inin web developer guide
DESCRIPTION
ININ_Web_Developer_GuideTRANSCRIPT

Interactive Intelligence, Inc. 7601 Interactive Way
Indianapolis, Indiana 46278 Telephone/Fax (317) 872-3000
www.ININ.com
Interaction Web Tools
Developer's Guide
Interactive Intelligence Customer Interaction Center® (IC™) Messaging Interaction Center™ (MIC™)
Version 4.0
Last updated March 18, 2014 (See Change Log for summary of changes made to this document since GA.)
Abstract This document describes how to customize the IC Web Tools user interface and its features.

Interaction Web Tools Developer's Guide ii
Copyright and Trademark Information Interactive Intelligence, Interactive Intelligence Customer Interaction Center, Interaction Administrator, Interaction Attendant, Interaction Client, Interaction Designer, Interaction Tracker, Interaction Recorder, ION, icNotify, Interaction Mobile Office, Interaction Optimizer, and the “Spirograph” logo design are registered trademarks of Interactive Intelligence, Inc. Interactive Intelligence Group, Inc., Interaction Center Platform, Interaction Monitor, Customer Interaction Center, EIC, Interaction Fax Viewer, Interaction Server, Interaction Voicemail Player, Interactive Update, Interaction Supervisor, Interaction Migrator, and Interaction Screen Recorder are trademarks of Interactive Intelligence, Inc. The foregoing products are ©1997-2014 Interactive Intelligence, Inc. All rights reserved. Interaction Dialer and Interaction Scripter are registered trademarks of Interactive Intelligence, Inc. The foregoing products are ©2000-2014 Interactive Intelligence, Inc. All rights reserved. Messaging Interaction Center and MIC are trademarks of Interactive Intelligence, Inc. The foregoing products are ©2001-2014 Interactive Intelligence, Inc. All rights reserved. e-FAQ and Interaction Director are registered trademarks of Interactive Intelligence, Inc. e-FAQ Knowledge Manager, Interaction FAQ, and Interaction Marquee are trademarks of Interactive Intelligence, Inc. The foregoing products are ©2002-2014 Interactive Intelligence, Inc. All rights reserved. Interaction Conference is a trademark of Interactive Intelligence, Inc. The foregoing products are ©2004-2014 Interactive Intelligence, Inc. All rights reserved. Interaction SIP Proxy and Interaction EasyScripter are trademarks of Interactive Intelligence, Inc. The foregoing products are ©2005-2014 Interactive Intelligence, Inc. All rights reserved. Interaction Gateway is a registered trademark of Interactive Intelligence, Inc. Interaction Media Server is a trademark of Interactive Intelligence, Inc. The foregoing products are ©2006-2014 Interactive Intelligence, Inc. All rights reserved. Interaction Desktop is a trademark of Interactive Intelligence, Inc. The foregoing products are ©2007-2014 Interactive Intelligence, Inc. All rights reserved. Interaction Process Automation is a trademark of Interactive Intelligence, Inc. Deliberately Innovative, Interaction Feedback, and Interaction SIP Station are registered trademarks of Interactive Intelligence, Inc. The foregoing products are ©2009-2014 Interactive Intelligence, Inc. All rights reserved. Interaction Web Portal, Interaction Analyzer, and IPA are trademarks of Interactive Intelligence, Inc. The foregoing products are ©2010-2014 Interactive Intelligence, Inc. All rights reserved. Spotability is a trademark of Interactive Intelligence, Inc. ©2011-2014. All rights reserved. Interaction Edge and Interaction Mobilizer are registered trademarks of Interactive Intelligence, Inc. Interaction SIP Bridge, Interactive Intelligence Marketplace℠, Interactive Intelligence Communications as a Service℠, CaaS Quick Spin™, and Interactive Intelligence CaaS℠ are trademarks of Interactive Intelligence, Inc. The foregoing products are ©2012-2014 Interactive Intelligence, Inc. All rights reserved. Bay Bridge Decisions, Interaction Script Builder, and Interaction Speech Recognition are trademarks of Interactive Intelligence, Inc. The foregoing products are ©2013-2014 Interactive Intelligence, Inc. All rights reserved. The veryPDF product is ©2000-2014 veryPDF, Inc. All rights reserved. This product includes software licensed under the Common Development and Distribution License (6/24/2009). We hereby agree to indemnify the Initial Developer and every Contributor of the software licensed under the Common Development and Distribution License (6/24/2009) for any liability incurred by the Initial Developer or such Contributor as a result of any such terms we offer. The source code for the included software may be found at http://wpflocalization.codeplex.com. A database is incorporated in this software which is derived from a database licensed from Hexasoft Development Sdn. Bhd. ("HDSB"). All software and technologies used by HDSB are the properties of HDSB or its software suppliers and are protected by Malaysian and international copyright laws. No warranty is provided that the Databases are free of defects, or fit for a particular purpose. HDSB shall not be liable for any damages suffered by the Licensee or any third party resulting from use of the Databases.
Other brand and/or product names referenced in this document are the trademarks or registered trademarks of their respective companies.
DISCLAIMER
INTERACTIVE INTELLIGENCE (INTERACTIVE) HAS NO RESPONSIBILITY UNDER WARRANTY, INDEMNIFICATION OR OTHERWISE, FOR MODIFICATION OR CUSTOMIZATION OF ANY INTERACTIVE SOFTWARE BY INTERACTIVE, CUSTOMER OR ANY THIRD PARTY EVEN IF SUCH CUSTOMIZATION AND/OR MODIFICATION IS DONE USING INTERACTIVE TOOLS, TRAINING OR METHODS DOCUMENTED BY INTERACTIVE.
Interactive Intelligence, Inc. 7601 Interactive Way Indianapolis, Indiana 46278 Telephone/Fax (317) 872-3000 www.ININ.com

Interaction Web Tools Developer's Guide iii
Interaction Center Platform® Statement This document may describe Interaction Center (IC) features that are not available or licensed in your IC product. Multiple products are based on the Interaction Center Platform, and some features are disabled or unavailable in some products.
Products based on the Interaction Center Platform include: Interactive Intelligence Customer Interaction Center® (IC) Messaging Interaction Center™ (MIC™)
Since these products share some common features, this document is intended for use with all IC products, unless specifically stated otherwise on the title page or in the context of the document.
How do I know if I have a documented feature? Here are some indications that the documented feature is not currently licensed or available in your version:
The menu, menu item, or button that accesses the feature appears grayed-out. One or more options or fields in a dialog box appear grayed-out or do not appear
at all. The feature is not selectable from a list of options.
If you have questions about feature availability, contact your vendor regarding the feature set and licenses available in your version of this product.
About the Files Described The JavaScript files and code described are proprietary to Interactive Intelligence and intended for use as-is. Do not modify them as part of a customer deployment because this creates an unsupported configuration. Updated JavaScript files from IC service updates must be installed manually, so users must take care not to overwrite any customizations that they previously made. However, customizations are welcome to include the JavaScript files to use the features that their API provides.

Interaction Web Tools Developer's Guide iv
Table of Contents Chapter 1: Introduction ................................................................. 1
General Information about Protocols ................................................................ 2
Chapter 2: Configuring the Agent Search Page ................................. 4 Designating which Agents Appear on the Agent Search Page............................... 4 Customizing the Images on the Agent Search Page ........................................... 4
Chapter 3: Making Minor Customizations ....................................... 5 Embedding Within Another Web Page............................................................... 7 Chats and Callbacks to Multiple Queues ............................................................ 9
Creating a Directory Page ............................................................................ 9 Adding Fields to the Chat Registration Form .................................................... 12 Creating a Post-chat Page ............................................................................ 15 Adding Custom Information to a Chat ............................................................ 16
Chapter 4: Writing a Custom Client ...............................................17 HTTP Header Information ............................................................................. 17 Message Type: Get Server Configuration ........................................................ 18 Query Queue .............................................................................................. 19 Party Information ........................................................................................ 20 Start a Chat ................................................................................................ 21 Reconnect .................................................................................................. 23 Poll for New Events ...................................................................................... 24 Retrieve a File Sent By Agent ........................................................................ 24 Send a Message .......................................................................................... 25 Update Typing Indicator ............................................................................... 25 Exit a Chat ................................................................................................. 25 Common Response Format ........................................................................... 26
Common Response Elements ..................................................................... 28 Create a Callback ........................................................................................ 30 Query Callback Properties ............................................................................. 32 Query Callback Status .................................................................................. 33 Disconnect.................................................................................................. 34 Modification ................................................................................................ 35
Chapter 5: Sending and Receiving Web Pages Using Handlers .......36 Capturing Visitor-entered Data from Your Web Site into Handlers ...................... 36
Concepts Introduced ................................................................................. 36 Overview ................................................................................................. 36 Example .................................................................................................. 37 Command-Line Data ................................................................................. 37 Configuring the HTML Event Initiator to Receive Command-Line Data.............. 39
Form Data .................................................................................................. 40 Syntax for Form Data ................................................................................ 40 Configuring the HTML Event Initiator to Receive Form Data............................ 41

Interaction Web Tools Developer's Guide v
Creating Handlers that Send Information to a Web Page .................................. 42 Concepts Introduced ................................................................................. 42 Overview ................................................................................................. 42 Example .................................................................................................. 42 Creating Templates ................................................................................... 43
Substitution Fields ....................................................................................... 44 Syntax for Substitution Fields ..................................................................... 44 Sample HTML substitution fields ................................................................. 44 Configuring the Generate HTML Tool (Binding Variables to Substitution Fields) . 45
Custom HTML Events ................................................................................... 46 Attributes ................................................................................................ 47
Web HTML Handler Parameter ....................................................................... 47
Appendix A: Sample Session ...........................................................48
Appendix B: How to Set and Use JavaScript Tracing ........................51
Change Log ....................................................................................52

Interaction Web Tools Developer's Guide 1
Chapter 1: Introduction Interaction Web Tools enables users to provide Web-based chat and callback interactions to their customers.
By default ("out of the box"), the feature displays a web page with three tabs: for starting a chat, for requesting a callback, and for registering an account.
By using the features of Interaction Web Tools, you can modify the page in various ways. For example:
Change color, background, or CSS styles Embed the page within another web page. Add controls to the page. Create a customized client interface, still sending and receiving messages in
Interactive Intelligence formats. Change the chat or callback window that appears to the user.
Customizing Interaction Web Tools features requires knowledge of JavaScript, JSON, and related technologies in order to use the API. This document assumes that readers have such knowledge, so it does not explain those issues.

Interaction Web Tools Developer's Guide 2
General Information about Protocols
Here are some general points:
All URIs start with "/WebSvcs" from the WebProcessorBridge’s perspective. However, from the Web server’s perspective, other URI components probably appear first and trigger the reverse proxy mechanism.
A GUID represents the notion of <chat, participant> or <callback, participant>. GUIDs are present at the end of most URIs. That does not include URIs for querying the server's capabilities, starting a new chat, and creating a callback, however. When these URIs are called, there is no <chat, participant> to specify.
All request/response pairs can be written in JSON. The language is controlled via an HTTP Accept header in the requests and the Content type in the responses. This is the same regardless of whether you are using a GET or a POST. The correct MIME type to use is: application/json
You can optionally use a semicolon and a character encoding, for example: text/json;charset=utf-8
Most JSON requests encountered during an active chat receive a response in the common JSON response format. See Common Response Format for details on this response formats.
The following types of requests do not get a common response:
A request for a server's configuration
A request to create a callback
A request for the status of a callback
A request to cancel a callback
A request to query the queue
A request for party information
The successful response to a request to retrieve a file sent by the agent is the contents of that file. However, the unsuccessful response is an HTTP 500 error.
The client uses the following URI components. The URI components are dynamically created, based on the following information:
Server name
URI components to trigger the reverse proxy
Path info, which is hard-coded into the client
GUID, which is received from the server
All URIs are case-insensitive.
Note: In this document, bold italicized text describes the type of data that belongs in the indicated position; do not insert it verbatim.

Interaction Web Tools Developer's Guide 3
With switchover, the Web server is essentially a single point of failure and there are two different reverse proxies, one for each IC server.
For example, suppose the Web server is chat.company.com and the IC servers are bert.company.com and ernie.company.com. The administrator sets up the reverse proxy so that http://chat.company.com/server1/path goes to:
http://bert.company.com:8114/path
Likewise, http://chat.company.com/server2/path goes to: http://ernie.company.com:8114/path
If a chat starts on …/server1/… and then a switchover occurs from bert to ernie, Interaction Web Tools tell them to start using …/server2/… URIs (which goes to ernie).

Interaction Web Tools Developer's Guide 4
Chapter 2: Configuring the Agent Search Page Interactive Intelligence provides an Agent Search page, which displays the list of agents who can receive chats, callbacks, or emails. When you implement the Agent Search page, you can designate which agents and images appear on it.
Note: To implement additional customizations, contact the Global Alliances group at Interactive Intelligence.
Designating which Agents Appear on the Agent Search Page
In order to include an agent on the Agent Search page, you must specify the agent’s display name.
Note: The Agent Search page shows only agents with display names.
To specify the agents who appear on the Agent Search page:
1. In Interactive Administrator, in the menu tree, expand People and then click Users.
2. In the table, click the user name of the agent you want to include in the Agent Search page. The User Configuration dialog box appears.
3. Click the Personal Info tab. 4. In the Display Name box, type the name that should appear for the agent in the
Agent Search page. 5. Click Apply and then click OK.
Customizing the Images on the Agent Search Page
You can customize the appearance of the Agent Search page by changing the images that appear on it. In the folder where the Web Development tools are installed, locate the images for the Agent Search page in the WebServices\img subfolder.
Tip: To simplify the customization process, keep the same file names.

Interaction Web Tools Developer's Guide 5
Chapter 3: Making Minor Customizations The API uses four Cascading Style Sheet (CSS) files:
• <web root>\I3Root\page.css This file is small and contains only CSS to modify the body element. For example, changing this file can make the page background blue.
• <web root>\I3Root\webchat.css This file contains CSS selectors that you can use to customize every other aspect of the Interactive Intelligence® Chat and Callback user interface. The default user interface has five sections.
• <web root>\I3Root\printableHistory.css This file formats the printable view that you can generate by clicking the Printable Chat History link (figure, item 2).
• <web root>\I3Root\WebServices\searchpage.css
This file contains CSS selectors to customize the agent search page.
Section 1: Identifies the caller and the agents. Section 2: Link to print the chat transcript. Section 3: Body of the chat. Section 4: Area to type chat comments. Section 5: Button to exit from chat.
Tip: To edit Webchat.css, use a tool such as Firebug (http://getfirebug.com) to see which selectors apply to which user interface elements.
With CSS and the JavaScript API, you can customize both the appearance and the arrangement of the chat user interface. The figure on the next page shows an example. You can use the same techniques to customize the user interface pages for creating callbacks and for creating new accounts.

Interaction Web Tools Developer's Guide 6
Section 1: Link to print the chat transcript. Section 2: Identifies the caller and the agent. Section 3: Body of the chat. Section 4: Area to type chat comments. Section 5: Button to exit from chat.
Note that this customization changes the color, the banner background, and the locations of the user interface elements. The following table shows how each change was made:
Change File to Edit How Accomplished
Background color
page.css Change background-color: from the default of #FBCA48 to #C6C6FF
Banner image
page.css Change background-image: from the default of url('img/WebChatHeader.png') to url('img/AcmeAirlinesBackground.png')
Note: You supply all custom images.
Page layout webchat.css Change color and/or background color in:
.iwc-web-chat .iwc-link .iwc-form-tabs .iwc-unselected-tab > a .iwc-form-tabs .iwc-selected-tab > a .iwc-form-panel .iwc-account-radio-button-label .iwc-form-panel .iwc-create-account-link .iwc-form-panel .iwc-label
Change width in:
.iwc-form-panel .iwc-textbox .iwc-received-messages-panel .iwc-participants-panel .iwc-participants-panel > ul > li .iwc-participant-img

Interaction Web Tools Developer's Guide 7
Change File to Edit How Accomplished
Change height in:
.iwc-participants-panel > ul > li, .iwc-participants-panel > ul > li table, .iwc-participants-panel > ul > li tbody, .iwc-participants-panel > ul > li tr, .iwc-participants-panel > ul > li td, .iwc-participants-panel > ul > li .iwc-participant-name .iwc-participants-panel > ul > li .iwc-participant-img
Add code lines in:
.iwc-login-container: Add height value .iwc-form-panel: Add margin-top and margin-left values .iwc-button: Add margin-top and margin-left values .iwc-exit-button: Add margin-top and margin-left values .iwc-received-messages-panel: Add float-left value .iwc-participants-panel: Add float-left value .iwc-compose-message-panel: Add clear:both
Change margin-top to 82px in
.iwc-web-chat > h1.iwc-page-header
Tip: You can find code examples in WebSvcsExamples.zip and the folder examples/… that it contains.
Embedding Within Another Web Page
You can also embed Interaction Web Tools in another web page.
Interaction Web Tools Developer's Guide 8
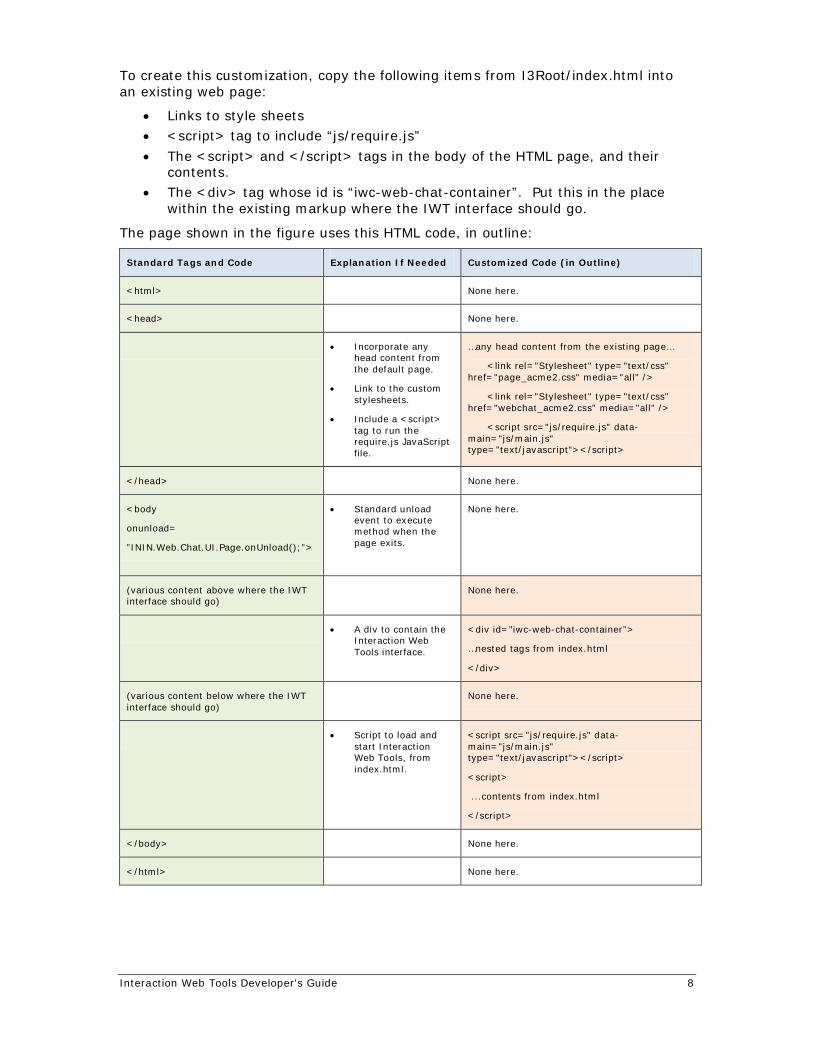
To create this customization, copy the following items from I3Root/index.html into an existing web page:
• Links to style sheets • <script> tag to include “js/require.js” • The <script> and </script> tags in the body of the HTML page, and their
contents. • The <div> tag whose id is “iwc-web-chat-container”. Put this in the place
within the existing markup where the IWT interface should go.
The page shown in the figure uses this HTML code, in outline:
Standard Tags and Code Explanation If Needed Customized Code (in Outline)
<html> None here.
<head> None here.
• Incorporate any head content from the default page.
• Link to the custom stylesheets.
• Include a <script> tag to run the require.js JavaScript file.
…any head content from the existing page…
<link rel="Stylesheet" type="text/css" href="page_acme2.css" media="all" />
<link rel="Stylesheet" type="text/css" href="webchat_acme2.css" media="all" />
<script src="js/require.js" data-main="js/main.js" type="text/javascript"></script>
</head> None here.
<body
onunload=
”ININ.Web.Chat.UI.Page.onUnload();”>
• Standard unload event to execute method when the page exits.
None here.
(various content above where the IWT interface should go)
None here.
• A div to contain the Interaction Web Tools interface.
<div id=”iwc-web-chat-container”>
…nested tags from index.html
</div>
(various content below where the IWT interface should go)
None here.
• Script to load and start Interaction Web Tools, from index.html.
<script src="js/require.js" data-main="js/main.js" type="text/javascript"></script>
<script>
...contents from index.html
</script>
</body> None here.
</html> None here.

Interaction Web Tools Developer's Guide 9
Chats and Callbacks to Multiple Queues
In the default installation:
• All chats are directed to a single user or workgroup queue (or perhaps chats are unavailable).
• All callbacks are directed to a single user or workgroup queue (or perhaps callbacks are unavailable).
• The chat queue and the callback queue needn’t be the same.
However, your organization can allow chats and callbacks to various queues. For example, suppose you want a directory page with links to chat to individual employees. In this case, the website can have pages about various products and the “callback” link on each page goes to a queue for that product.
Creating a Directory Page You can create a directory page, which lists users and groups:
Note: A simpler alternative is to use the standard Search page.
To create a directory page: On the directory page, add a list of users and groups. For each user and each group, add one link to start a chat and a second link to
request a callback. Point the chat links toward a helper page, such as chat.html. Point the callback links toward a helper page, such as callback.html. You can find a directory page code example in WebSvcsExamples.zip and the folder examples/Directory that it contains. The file includes other examples as well.
Note: To validate the queue names to ensure that chats/callbacks are not created against undesired or non-existent queues, use chat.html and callback.html. The following example shows how properly formatted text and links look:
The page shown in the figure uses this HTML code, in outline:
Standard Tags and Code Explanation If Needed Customized Code (in Outline)
<html> None here.
<head> <title>Contact Us</title>
</head> <body> <table>
None here.
<tr><td> • Label for links Marketing Group</td>

Interaction Web Tools Developer's Guide 10
Standard Tags and Code Explanation If Needed Customized Code (in Outline)
<td> • Link to chat page
• Passes query string parameters target and targetType values to JScript.
<a href="chat.html?
target=Marketing&
targetType=Workgroup"
>Chat</a></td>
<td> • Link to callback page
• Passes query string parameters target and targetType values to JScript.
<a href="callback.html?
target=Marketing&
targetType=Workgroup"
>Callback</a></td>
</tr><tr><td> • Label for links Jane Doe</td>
<td> • Link to chat page
• Passes query string parameters target and targetType values to JScript.
<a href="chat.html?
target=Jane+Doe&
targetType=User"
>Chat</a></td>
<td> • Link to callback page
• Passes query string parameters target and targetType values to JScript.
<a href="callback.html?
target=Jane+Doe&
targetType=User"
>Callback</a></td>
</tr><tr><td> • Label for links Jane Doe</td>
• Link to chat page
• Passes query string parameters target and targetType values to JScript.
<a href="chat.html?
target=John+Doe&
targetType=User"
>Chat</a></td>
• Link to callback page
• Passes query string parameters target and targetType values to JScript.
<a href="callback.html?
target=John+Doe&
targetType=User"
>Callback</a></td>
</tr></table> None here.
</body></html> None here.
Alter the default index.html page in the \\inetpub\wwwroot folder as indicated by the following table and rename it chat.html. You only change the callback function.
Standard Tags and Code
Explanation If Needed
Customized Code (in Outline)
<html><head> Default elements:
• <meta> tags
• Page title
• Links to stylesheets
• Script require.js
None here.
Interaction Web Tools Developer's Guide 11
Standard Tags and Code
Explanation If Needed
Customized Code (in Outline)
</head><body>
<div>
Div for noscript error message
None here.
</div><script type="text / javascript">
• Script heading
• Declare and initialize two variables with the query string parameters
var callback = function()
{
var chatTarget = ININ.Web.Chat.WebServices.Utilities.getQueryStringValue('target');
var chatTargetType = ININ.Web.Chat.WebServices.Utilities.getQueryStringValue('targetType');
• Load the page.
• Any line ending in "null" may be omitted.
var params = { "currentUriFragment" : ININ.Web.Chat.UI.ConfigConversions.convertICServerCountToCurrentUriFragment(ININ.Web.Chat.Config.ICServerCount), "uriFragments" : ININ.Web.Chat.UI.ConfigConversions.convertICServerCountToUriFragments(ININ.Web.Chat.Config.ICServerCount), "pageMode" : ININ.Web.Chat.UI.ConfigConversions.convertInteractionTypesToPageMode(ININ.Web.Chat.Config.InteractionTypes), "chatTarget" : ININ.Web.Chat.Config.ChatTarget, "chatTargetType" : ININ.Web.Chat.Config.ChatTargetType, "callbackTarget" : ININ.Web.Chat.Config.CallbackTarget, "callbackTargetType" : ININ.Web.Chat.Config.CallbackTargetType, "defaultLanguageCode" : ININ.Web.Chat.Config.DefaultLanguageCode, "useHttps" : ININ.Web.Chat.Config.UseEncryption, "customInfo" : null, "chatFollowupUrl" : null, "callbackAttributes" : null, "callbackRoutingContext" : null };
ININ.Web.Chat.UI.Page.load(params);
};
</script>
</body>
</html>
• Close the callback function
• Terminate script and HTML file
None here.
In Callback.html, you make similar changes in the callback function. Differences are:
The list of interaction types is [“Callback”]. chatTarget and chatTargetType get null values (non-null values are ignored). callbackTarget is the queue to which the Callback goes. callbackTargetType is the type of the queue.

Interaction Web Tools Developer's Guide 12
Adding Fields to the Chat Registration Form
On the webserver, the install created this file: C:\inetpub\wwwroot\i3root\js\ui.js
In the same folder, open the file Customizations.js. Find this line:
return new ININ.Web.Chat.UI._Internal._DefaultRegistrationFormPanel( args.chatManager, args.statusManager, args.registerFormContainer, args.registrationCallback, args.form);
Change the line to the following:
return new ININ.Web.Chat.Customizations.RegistrationFormPanel(args.chatManager, args.statusManager, args.registerFormContainer, args.registrationCallback);
The bold segment can be any name you choose, but it must match the name of the new class that you create next.
Create a class with the same name as you used earlier in this procedure. The following table (which spans three pages) demonstrates and explains the relevant code. In the first row, code changes are in bold type.
Explanation Code _DefaultRegistrationFormPanel must be a direct ancestor class (at some level) of the new class you create here.
/** * RegistrationFormPanel class * * Implement the methods in this class to change the appearance and behavior * of the Registration Form Panel. * */ ININ.Web.Chat.Customizations.RegistrationFormPanel = Class.create(ININ.Web.Chat.UI._Internal._DefaultRegistrationFormPanel, {
This example is standard code. You can add to this code, but don't delete any of it.
/** * Constructor * * @param chatManager An instance of a class derived from ChatManagerBase. * @param statusManager An implementation of the IStatusManager interface, such as FormContainerPanel. * @param registerFormContainer The Panel that contains this registration form. Must have a showRegisterForm() method. * @param registrationCallback The function to call once the registration attempt is complete (if it succeeds). May be null. */ initialize : function($super, chatManager, statusManager, registerFormContainer, registrationCallback) { $super(chatManager, statusManager, registerFormContainer, registrationCallback, null); },
Interaction Web Tools Developer's Guide 13
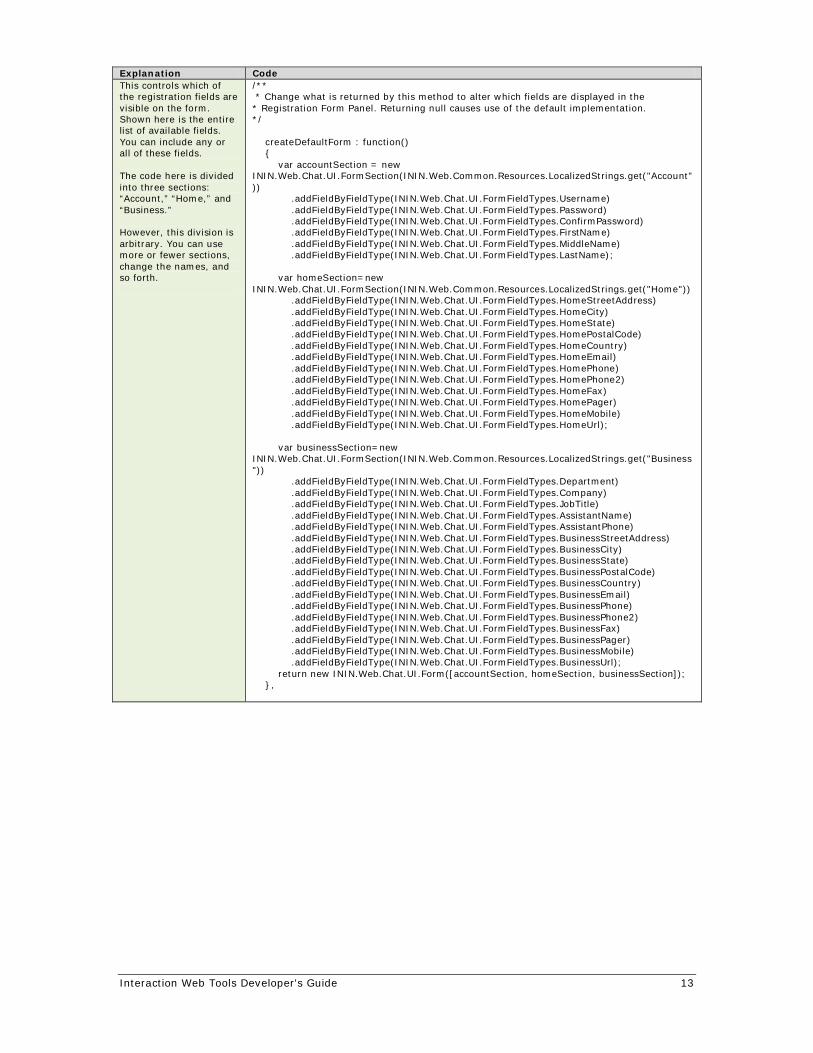
Explanation Code This controls which of the registration fields are visible on the form. Shown here is the entire list of available fields. You can include any or all of these fields. The code here is divided into three sections: “Account,” “Home,” and “Business.” However, this division is arbitrary. You can use more or fewer sections, change the names, and so forth.
/** * Change what is returned by this method to alter which fields are displayed in the * Registration Form Panel. Returning null causes use of the default implementation. */ createDefaultForm : function() { var accountSection = new ININ.Web.Chat.UI.FormSection(ININ.Web.Common.Resources.LocalizedStrings.get("Account")) .addFieldByFieldType(ININ.Web.Chat.UI.FormFieldTypes.Username) .addFieldByFieldType(ININ.Web.Chat.UI.FormFieldTypes.Password) .addFieldByFieldType(ININ.Web.Chat.UI.FormFieldTypes.ConfirmPassword) .addFieldByFieldType(ININ.Web.Chat.UI.FormFieldTypes.FirstName) .addFieldByFieldType(ININ.Web.Chat.UI.FormFieldTypes.MiddleName) .addFieldByFieldType(ININ.Web.Chat.UI.FormFieldTypes.LastName); var homeSection=new ININ.Web.Chat.UI.FormSection(ININ.Web.Common.Resources.LocalizedStrings.get("Home")) .addFieldByFieldType(ININ.Web.Chat.UI.FormFieldTypes.HomeStreetAddress) .addFieldByFieldType(ININ.Web.Chat.UI.FormFieldTypes.HomeCity) .addFieldByFieldType(ININ.Web.Chat.UI.FormFieldTypes.HomeState) .addFieldByFieldType(ININ.Web.Chat.UI.FormFieldTypes.HomePostalCode) .addFieldByFieldType(ININ.Web.Chat.UI.FormFieldTypes.HomeCountry) .addFieldByFieldType(ININ.Web.Chat.UI.FormFieldTypes.HomeEmail) .addFieldByFieldType(ININ.Web.Chat.UI.FormFieldTypes.HomePhone) .addFieldByFieldType(ININ.Web.Chat.UI.FormFieldTypes.HomePhone2) .addFieldByFieldType(ININ.Web.Chat.UI.FormFieldTypes.HomeFax) .addFieldByFieldType(ININ.Web.Chat.UI.FormFieldTypes.HomePager) .addFieldByFieldType(ININ.Web.Chat.UI.FormFieldTypes.HomeMobile) .addFieldByFieldType(ININ.Web.Chat.UI.FormFieldTypes.HomeUrl); var businessSection=new ININ.Web.Chat.UI.FormSection(ININ.Web.Common.Resources.LocalizedStrings.get("Business")) .addFieldByFieldType(ININ.Web.Chat.UI.FormFieldTypes.Department) .addFieldByFieldType(ININ.Web.Chat.UI.FormFieldTypes.Company) .addFieldByFieldType(ININ.Web.Chat.UI.FormFieldTypes.JobTitle) .addFieldByFieldType(ININ.Web.Chat.UI.FormFieldTypes.AssistantName) .addFieldByFieldType(ININ.Web.Chat.UI.FormFieldTypes.AssistantPhone) .addFieldByFieldType(ININ.Web.Chat.UI.FormFieldTypes.BusinessStreetAddress) .addFieldByFieldType(ININ.Web.Chat.UI.FormFieldTypes.BusinessCity) .addFieldByFieldType(ININ.Web.Chat.UI.FormFieldTypes.BusinessState) .addFieldByFieldType(ININ.Web.Chat.UI.FormFieldTypes.BusinessPostalCode) .addFieldByFieldType(ININ.Web.Chat.UI.FormFieldTypes.BusinessCountry) .addFieldByFieldType(ININ.Web.Chat.UI.FormFieldTypes.BusinessEmail) .addFieldByFieldType(ININ.Web.Chat.UI.FormFieldTypes.BusinessPhone) .addFieldByFieldType(ININ.Web.Chat.UI.FormFieldTypes.BusinessPhone2) .addFieldByFieldType(ININ.Web.Chat.UI.FormFieldTypes.BusinessFax) .addFieldByFieldType(ININ.Web.Chat.UI.FormFieldTypes.BusinessPager) .addFieldByFieldType(ININ.Web.Chat.UI.FormFieldTypes.BusinessMobile) .addFieldByFieldType(ININ.Web.Chat.UI.FormFieldTypes.BusinessUrl); return new ININ.Web.Chat.UI.Form([accountSection, homeSection, businessSection]); },

Interaction Web Tools Developer's Guide 14
Explanation Code This shows which fields the user must fill in. Those fields should be the same fields or a subset of fields in the previous row. For instance, if you want the form to contain fields for user name, password, password (again to confirm), and phone number, but you want phone number to be optional, then include .addFieldByFieldType (in the previous row of this table) for all 4, but in this row you only include Username, Password, and ConfirmPassword. The absence of HomePhone here is what makes it optional.
/** * Change what is returned by this method to alter which fields the user must * fill in when submitting the Registration Form Panel. Returning null results in * the default implementation being used. */ getRequiredFields : function() { return [ ININ.Web.Chat.UI.FormFieldTypes.Username, ININ.Web.Chat.UI.FormFieldTypes.Password, ININ.Web.Chat.UI.FormFieldTypes.ConfirmPassword, ININ.Web.Chat.UI.FormFieldTypes.FirstName, ININ.Web.Chat.UI.FormFieldTypes.MiddleName, ININ.Web.Chat.UI.FormFieldTypes.LastName, ININ.Web.Chat.UI.FormFieldTypes.HomeStreetAddress, ININ.Web.Chat.UI.FormFieldTypes.HomeCity, ININ.Web.Chat.UI.FormFieldTypes.HomeState, ININ.Web.Chat.UI.FormFieldTypes.HomePostalCode, ININ.Web.Chat.UI.FormFieldTypes.HomeCountry, ININ.Web.Chat.UI.FormFieldTypes.HomeEmail, ININ.Web.Chat.UI.FormFieldTypes.HomePhone, ININ.Web.Chat.UI.FormFieldTypes.HomePhone2, ININ.Web.Chat.UI.FormFieldTypes.HomeFax, ININ.Web.Chat.UI.FormFieldTypes.HomePager, ININ.Web.Chat.UI.FormFieldTypes.HomeMobile, ININ.Web.Chat.UI.FormFieldTypes.HomeUrl, ININ.Web.Chat.UI.FormFieldTypes.Department, ININ.Web.Chat.UI.FormFieldTypes.Company, ININ.Web.Chat.UI.FormFieldTypes.JobTitle, ININ.Web.Chat.UI.FormFieldTypes.AssistantName, ININ.Web.Chat.UI.FormFieldTypes.AssistantPhone, ININ.Web.Chat.UI.FormFieldTypes.BusinessStreetAddress, ININ.Web.Chat.UI.FormFieldTypes.BusinessCity, ININ.Web.Chat.UI.FormFieldTypes.BusinessState, ININ.Web.Chat.UI.FormFieldTypes.BusinessPostalCode, ININ.Web.Chat.UI.FormFieldTypes.BusinessCountry, ININ.Web.Chat.UI.FormFieldTypes.BusinessEmail, ININ.Web.Chat.UI.FormFieldTypes.BusinessPhone, ININ.Web.Chat.UI.FormFieldTypes.BusinessPhone2, ININ.Web.Chat.UI.FormFieldTypes.BusinessFax, ININ.Web.Chat.UI.FormFieldTypes.BusinessPager, ININ.Web.Chat.UI.FormFieldTypes.BusinessMobile, ININ.Web.Chat.UI.FormFieldTypes.BusinessUrl ]; } });

Interaction Web Tools Developer's Guide 15
Creating a Post-chat Page
You can display a web page after a chat, such as for a customer satisfaction survey. To do so, add the URL of the web page as an extra parameter to ININ.Web.Chat.UI.Page.load(). The highlighted line at the bottom of the page load row of the table gives an example.
Standard Tags and Code
Explanation If Needed
Customized Code (in Outline)
<html><head> Default elements:
• <meta> tags
• Page title
• Links to stylesheets
• Script require.js
</head><body>
<div>
Div for noscript error message
</div><script type="text / javascript">
• Script heading
•
• Load the page
• Close the callback function
• Any line ending in "null" may be omitted.
var myUrl = “http://www.somewhere.com/somepage.html”; var params = { "currentUriFragment" : ININ.Web.Chat.UI.ConfigConversions.convertICServerCountToCurrentUriFragment(ININ.Web.Chat.Config.ICServerCount), "uriFragments" : ININ.Web.Chat.UI.ConfigConversions.convertICServerCountToUriFragments(ININ.Web.Chat.Config.ICServerCount), "pageMode" : ININ.Web.Chat.UI.ConfigConversions.convertInteractionTypesToPageMode(ININ.Web.Chat.Config.InteractionTypes), "chatTarget" : ININ.Web.Chat.Config.ChatTarget, "chatTargetType" : ININ.Web.Chat.Config.ChatTargetType, "callbackTarget" : ININ.Web.Chat.Config.CallbackTarget, "callbackTargetType" : ININ.Web.Chat.Config.CallbackTargetType, "defaultLanguageCode" : ININ.Web.Chat.Config.DefaultLanguageCode, "useHttps" : ININ.Web.Chat.Config.UseEncryption, "customInfo" : null, "chatFollowupUrl" : myUrl, "callbackAttributes" : null, "callbackRoutingContext" : null };
ININ.Web.Chat.UI.Page.load(params);
</script>
</body>
</html>
• Terminate script and HTML file

Interaction Web Tools Developer's Guide 16
Adding Custom Information to a Chat
You can add custom information to a chat / callback by adding a customInfo variable to the index.htm page. The following table shows where to change the code, though the specific changes are unique to each situation.
Standard Tags and Code
Explanation If Needed
Customized Code (in Outline)
<html><head>
</head><body>
<div></div>
Default elements:
• <meta> tags
• Page title
• Links to stylesheets
• Script require.js
<script type="text / javascript">
• Script heading
• Load the page
• Assign a value to the customInfo variable. Usually, this is a program determined value such as in the example shown here.
• Close the callback function
• Any line ending in "null" may be omitted.
var myData = “some data”; var params = { "currentUriFragment" : ININ.Web.Chat.UI.ConfigConversions.convertICServerCountToCurrentUriFragment(ININ.Web.Chat.Config.ICServerCount), "uriFragments" : ININ.Web.Chat.UI.ConfigConversions.convertICServerCountToUriFragments(ININ.Web.Chat.Config.ICServerCount), "pageMode" : ININ.Web.Chat.UI.ConfigConversions.convertInteractionTypesToPageMode(ININ.Web.Chat.Config.InteractionTypes), "chatTarget" : ININ.Web.Chat.Config.ChatTarget, "chatTargetType" : ININ.Web.Chat.Config.ChatTargetType, "callbackTarget" : ININ.Web.Chat.Config.CallbackTarget, "callbackTargetType" : ININ.Web.Chat.Config.CallbackTargetType, "defaultLanguageCode" : ININ.Web.Chat.Config.DefaultLanguageCode, "useHttps" : ININ.Web.Chat.Config.UseEncryption, "customInfo" : myData, "chatFollowupUrl" : null, "callbackAttributes" : null, "callbackRoutingContext" : null }; ININ.Web.Chat.UI.Page.load(params);
</script></body></html>
• Terminate script and HTML file
Custom information appears in the Notes area. Only the agent sees it.

Interaction Web Tools Developer's Guide 17
Chapter 4: Writing a Custom Client A web client can send several types of messages to WebProcessorBridgeU.exe.
Typically, the client sends the messages to a web server in the customer’s DMZ (demilitarized zone). The DMZ then functions as a reverse proxy to the xIC server inside the firewall’s WebProcessorBridgeU.exe process.
These requests can be in XML or JSON format. XML requests receive responses in XML; JSON requests receive responses in JSON. Though XML is available, Interactive Intelligence recommends that you use JSON.
The following sections demonstrate the message types. Unless otherwise specified, responses are in the Common Response Format.
Note: All responses are formatted for clarity. Actual responses can contain more or fewer whitespace characters.
HTTP Header Information
When writing custom clients, use this HTTP header information:
Content_Range: Send the Content-Range entity-header with a partial entity-body to specify where to apply the partial body in the full entity-body. Web Tools do not support Partial entity-body. Do not include the Content_Range entity-header in any requests.
Accept: Use the Accept request-header field to specify media types that are acceptable for the response. If accept character set is present, acceptable media types are application/json, application/xml, text/plain, text/* or /. If accept is not present but the content-type header is present and its value matches a listed type, then WebTools uses that character set. Otherwise, WebTools uses the default content type application/json. WebTools uses UTF8 charset only. Accept-Charset should contain either UTF8 or *.
Accept-Charset: Use the Accept-Charset request-header field to indicate which character sets are acceptable for the response. If accept character set is present, acceptable media types are application/json, application/xml, text/plain, text/* or /. If accept is not present but the content-type header is present and its value matches a listed type, then WebTools uses that character set. Otherwise, WebTools uses the default content type application/json. WebTools uses UTF8 charset only. Accept-Charset should contain either UTF8 or *.
Content-type: Use the Content-Type entity-header field to indicate the media type of the entity-body sent to the recipient or, in the case of the HEAD method, the media type that would have been sent had the request been a GET. If accept character set is present, acceptable media types are application/json, application/xml, text/plain, text/* or /. If accept is not present but the content-type header is present and its value matches a listed type, then WebTools uses that character set. Otherwise, WebTools uses the default content type application/json. WebTools uses UTF8 charset only. Accept-Charset should contain either UTF8 or *.
WebTools uses only GET and POST methods.

Interaction Web Tools Developer's Guide 18
Message Type: Get Server Configuration
Use the “Get Server Configuration” message type to identify a server's capabilities.
Note: In the following code, “en-us,en;q=0.7,fr;q=0.3” is just an example. In actual use, the value will be whatever the browser sends to the Web server as the value of the "Accept-Language" HTTP header.
Message Code JSON Request GET /websvcs/serverConfiguration HTTP/1.1
Accept: application/json
JSON Response [ { "serverConfiguration": { "capabilities": { "chat": [ "start", "reconnect", "poll", "setTypingState", "sendMessage", "exit", "supportAuthenticationTracker", "supportAuthenticationAnonymous" ], "callback": [ "create", "reconnect", "status", "disconnect", "properties", "modify", "supportAuthenticationTracker", "supportAuthenticationAnonymous" ], "queueQuery": [ "supportAuthenticationTracker", "supportAuthenticationAnonymous" ], "common": [ "supportRegistrationTracker", "partyInfo" ] }, "failoverURIs": [ ] } }, { "browserAcceptLanguage": "ta,en-US;q=0.8,en;q=0.6" } ]

Interaction Web Tools Developer's Guide 19
Query Queue
Send the “Query Queue” message to find out the number of available agents in an ACD queue and the approximate wait time.
The "participant" block is required:
• For a non-anonymous but non-authenticated user, supply the name and specify the credentials as “null.”
• For an anonymous user, specify the name as "Anonymous User" and specify the credentials as “null.”
• For "queueType" always specify "Workgroup."
Message Code JSON Request POST /websvcs/queue/query
{ "queueName": "Marketing", "queueType": "Workgroup", "participant": { "name": "Wally Webuser", "credentials": "s3cr3t" } }
Successful JSON Response
{ "queue": { "agentsAvailable": 5, "estimatedWaitTime": 30, "custom" : { "attr1" : "value1", "attr2" : "value2" }, "status": { "type": "success" } } }
Failed JSON Response
{ "queue": { "status": { "type": "failure", "reason": "error.websvc.notACDQueue" } } }

Interaction Web Tools Developer's Guide 20
Party Information
Send the “partyInfo” message to get the picture of the agent. This message is available for both chats and callbacks.
The GUID in the URL is the value of "participantID" of the web visitor, which was obtained earlier in the Callback Create, Callback Reconnect, or Start Chat response.
The GUID in the POST data that is the value of the "participantID" key is the participantID of an agent whose name/picture the web user wants to see. This is obtained in the response to Callback Status Query or any chat response.
If no photo of the agent is available, the "photo" name/value pair is omitted.
Message Code JSON Request POST /WebSvcs/partyInfo/7cbd650b-e8f5-45be-b1cc-7277671537b1
{ "participantID": "1234abcd-0000-0000-aaaa-0123456789ab" }
Successful JSON Response
{ "partyInfo": { "name": "Alan Agent", "photo": "/websvcs/abc/xyz.png", "status": { "type": "success" } } }
Failed JSON Response
{ "partyInfo": { "status": { "type": "failure", "reason": "error.websvc.something" } } }

Interaction Web Tools Developer's Guide 21
Start a Chat
Send the “Start a Chat” message to begin a new chat. Currently, there is no concept of an external user joining an existing chat. You must get the server configuration before starting a chat.
The chat client gets the web user's name and passes it to the WebProcessor as part of the request.
The request format enables you to avoid exposing workgroups to the website.
The "participant" block is required: • For a non-anonymous but non-authenticated user, supply the name and
specify the credentials as “null.” • For an anonymous user, specify the name as "Anonymous User" and specify
the credentials as “null.”
The "attributes" block may have any number of children, but no grandchildren. The values of its children must be strings.
You can optionally supply routing contexts. For more information, see Chapter 8 of the Interaction Web Tools Technical Reference.
The contexts are available in the server handler for setting internal skills by looking up the category IP table.
In the handler, you can adopt any custom routing logic.
Message Code JSON Request Note: "text/plain" is the only content type supported.
POST /WebSvcs/chat/start { "supportedContentTypes": "text/plain", "participant": { "name": "Wally Webuser", "credentials": "s3cr3t" }, "target": "Marketing", "targettype": "Workgroup", "language": "en-us" "customInfo": "free-form text", "attributes" : { "some_name" : "some_string", "some_other_name" : "some_other_string" }, "routingContexts" : [ { "context" : "ICM", "category" : "Product" }, { "context" : "012789", "category" : "Accounts" } ] }

Interaction Web Tools Developer's Guide 22
Message Code Successful JSON Request
{ "chat": { "participantID": "6cbd650b-e8f5-45be-b1cc-7277671537b0", "chatID": "7cbd650b-e8f5-45be-b1cc-7277671537b9", "dateFormat": "M\/d\/yyyy", "timeFormat": "h:mm:ss tt", "status": { "type": "success" } } }
Failed JSON Response
{ "chat": { "status": { "type": "failure", "reason": "error.websvc.something" } }

Interaction Web Tools Developer's Guide 23
Reconnect
Send the “Reconnect” message to resume a chat on another IC server after a switchover occurs.
The "participant" block is required:
• For an anonymous user, specify the name as "Anonymous User" and specify the credentials as “null.”
• For a non-anonymous but non-authenticated user, use the non-authenticated version of the Reconnect message.
Message Code JSON Request (non-authenticated user)
POST /websvcs/chat/reconnect { "chatID": "6cbd650b-e8f5-45be-b1cc-7277671537b0" }
JSON Request (authenticated user)
POST /websvcs/chat/reconnect { "chatID": "6cbd650b-e8f5-45be-b1cc-7277671537b0", "participant": { "name": "Wally Webuser", "credentials": "s3cr3t" } }
Successful JSON Response
{ "chat": { "participantID": "6cbd650b-e8f5-45be-b1cc-7277671537b0", "events": [ { "type": "participantStateChanged", "participantID": "f9580ef2-1270-4182-a429-c3c0d957bf2a", "sequenceNumber": 0, "state": "active", "participantName": "John Doe" }, { "type": "participantStateChanged", "participantID": "e9580ef2-1270-4182-a429-c3c0d957bf2a", "sequenceNumber": 0, "state": "active", "participantName": "James" } ], "status": { "type": "success" } } }

Interaction Web Tools Developer's Guide 24
Message Code
Failed JSON Response
{ "chat": { "status": { "type": "failure", "reason": "error.websvc.something" } } }
Poll for New Events
Send the “Poll for New Events” message periodically to determine if anyone has joined/left the chat, if an agent has typed anything, if someone sent a file, and so forth.
This message can only be sent when a chat is active. Specifically, after a successful response to a “Start a Chat” message, and before an “Exit a Chat” message is sent for that chat session. The message must include a GUID in the URI. This GUID is the value of “participantID” returned by the call to “Start a Chat.” Message Code JSON Request GET /WebSvcs/chat/poll/c59f68d7-a1ff-416a-aa6e-09f978973a8a HTTP/1.0
Accept: application/json
Retrieve a File Sent By Agent
If the agent sends a file, it is placed in a “sandbox” on the server which runs WebProcessorBridgeU.exe. It can be retrieved via a typical HTTP request. The URI of the file is sent as part of the response to a poll, sent message, or the like. Message Code Request GET /WebSvcs/chat/getFile/c59f68d7-a1ff-416a-aa6e-
09f978973a8a/9b5d4caca0df42bbaab01e92f1126dbd/Sample0.txt HTTP/1.0
Response The contents of the requested file. If the file is not found, an HTTP 500 error is returned.

Interaction Web Tools Developer's Guide 25
Send a Message
Use the “Send a Message” message when the remote user types a message for the agent.
This message can only be sent when a chat is active. Specifically, after a successful response to a “Start a Chat” message, and before an “Exit a Chat” message is sent for that chat session. It must include a GUID in the URI. This GUID is the value of “participantID” returned by the call to “Start a Chat.” Message Code JSON Request POST /WebSvcs/chat/sendMessage/c59f68d7-a1ff-416a-aa6e-09f978973a8a HTTP/1.0
Accept: application/json { "message": "Can you please tell me my account balance?", "contentType": "text/plain" }
Update Typing Indicator
Use the “Update Typing Indicator” message to indicate to the agent that the remote user is typing, or has stopped typing.
This message can only be sent when a chat is active. Specifically, after a successful response to a “Start a Chat” message, and before an “Exit a Chat” message is sent for that chat session. It must include a GUID in the URI. This GUID is the value of “participantID” returned by the call to “Start a Chat.” Message Code JSON Request
POST /WebSvcs/chat/setTypingState/c59f68d7-a1ff-416a-aa6e-09f978973a8a HTTP/1.0 Accept: application/json { "typingIndicator": true }
Exit a Chat
Use the “Exit a Chat” message to stop the remote user’s participation in a chat.
This message can only be sent when a chat is active. Specifically, after a successful response to a “Start a Chat” message, and before an “Exit a Chat” message is sent for that chat session. It must include a GUID in the URI. This GUID is the value of “participantID” returned by the call to “Start a Chat.”
After this message is sent, no further messages are sent until or unless one of the following is sent:
• Get Server Configuration • Start a Chat • Create a Callback
Note that even though this is an HTTP POST request, no data is posted. Message Code JSON Request POST /WebSvcs/chat/exit/c59f68d7-a1ff-416a-aa6e-09f978973a8a HTTP/1.0
Accept: application/json

Interaction Web Tools Developer's Guide 26
Common Response Format
The common response format is for responses to requests to:
• Start a Chat • Poll for New Events • Send a Message • Update Typing Indicator • Exit a Chat
This format controls how the system displays these types of information:
• How many milliseconds (always the same) to wait before polling again • Events to indicate someone joined or left the conversation • Someone started or stopped typing • Someone sent a message, file, or URL • The participant ID of the web user joining the chat • The status of the response
Note: You can use Interaction Administrator to customize the wait time suggestion. Navigate to System Configuration, then to Web Services | Web Services Parameters. Add a parameter named MaxPollFrequency.
The listings illustrate all possible fields in this format. Not all fields are present in every response. Specifically:
• In responses to requests to start a chat, the WebProcessorBridge assigns a new participant ID to the web user (see the listings below, between the final event and the status). The WebProcessorBridge does not assign a new participant ID in any other response types.
• In responses to chat exit requests, a subset of the format is used. “status,” “pollWaitSuggestion” and descendants are present, but “participantID” and its descendents are not present. "events" is ignored.
• Responses can include zero or more events. • For events of type “participantStateChanged”:
”state”: "active" indicates that the specified participant has joined the conversation.
”state”: "disconnected" indicates that the specified participant has left the conversation.
Interaction Web Tools Developer's Guide 27
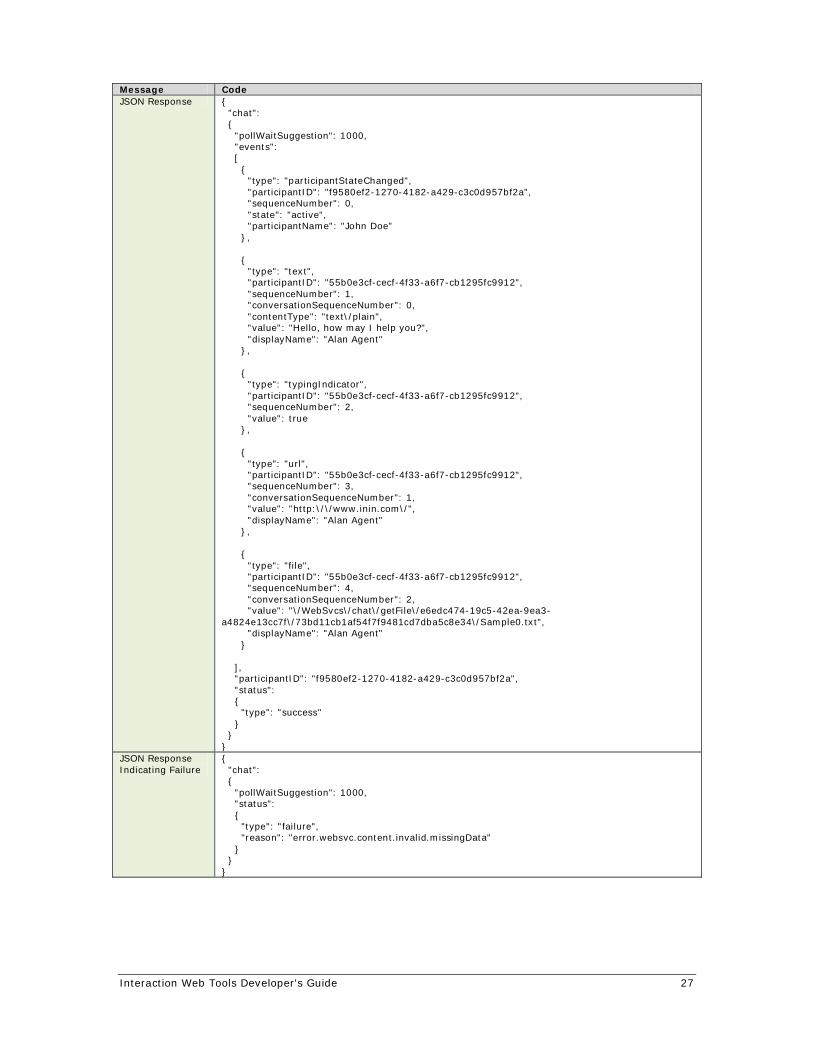
Message Code JSON Response {
"chat": { "pollWaitSuggestion": 1000, "events": [ { "type": "participantStateChanged", "participantID": "f9580ef2-1270-4182-a429-c3c0d957bf2a", "sequenceNumber": 0, "state": "active", "participantName": "John Doe" }, { "type": "text", "participantID": "55b0e3cf-cecf-4f33-a6f7-cb1295fc9912", "sequenceNumber": 1, "conversationSequenceNumber": 0, "contentType": "text\/plain", "value": "Hello, how may I help you?", "displayName": "Alan Agent" }, { "type": "typingIndicator", "participantID": "55b0e3cf-cecf-4f33-a6f7-cb1295fc9912", "sequenceNumber": 2, "value": true }, { "type": "url", "participantID": "55b0e3cf-cecf-4f33-a6f7-cb1295fc9912", "sequenceNumber": 3, "conversationSequenceNumber": 1, "value": "http:\/\/www.inin.com\/", "displayName": "Alan Agent" }, { "type": "file", "participantID": "55b0e3cf-cecf-4f33-a6f7-cb1295fc9912", "sequenceNumber": 4, "conversationSequenceNumber": 2, "value": "\/WebSvcs\/chat\/getFile\/e6edc474-19c5-42ea-9ea3-a4824e13cc7f\/73bd11cb1af54f7f9481cd7dba5c8e34\/Sample0.txt", "displayName": "Alan Agent" } ], "participantID": "f9580ef2-1270-4182-a429-c3c0d957bf2a", "status": { "type": "success" } } }
JSON Response Indicating Failure
{ "chat": { "pollWaitSuggestion": 1000, "status": { "type": "failure", "reason": "error.websvc.content.invalid.missingData" } } }

Interaction Web Tools Developer's Guide 28
Common Response Elements
status The "type" child of this element indicates whether the request succeeded or failed.
If type is "failure," then the "errorCode" element contains a hierarchical code specifying details of the failure. "pollWaitSuggestion" should be present. Other elements (events, pollWaitSuggestion) might be included, but it is unlikely.
If a response to a request to exit a chat, "status" is the only relevant child of "chat,"
events This array can contain zero or more children. Each child must have a "type" element, which can be any of the following:
participantStateChanged text file url typingIndicator
Each child must have a "participantID" element whose value is the GUID of the participant who generated the event. Each child must have a "sequenceNumber" element which indicates this event's position in the list of all events for this chat.
type="participantStateChanged": This type of event appears once each time a participant changes state. Examples are becoming active and disconnecting. This type is specified as the value of the "state" element, and the corresponding examples of possible values are "active" and "disconnected." This type of event can appear zero or more times in any response. The element can contain the display name of the participant who has changed state.
type="text": This type of event appears any time a chat participant has sent a textual message. It includes a "contentType" attribute to indicate to the server that the message being sent is plain text.
type="file": This type appears any time an agent has sent a file. The "value" attribute specifies the URI of the file to retrieve: it begins with "/WebSvcs" and the client can retrieve it via an HTTP GET request. If successful, the response is the contents of the file. If unsuccessful, the response is an HTTP 500 error.
type="url": This type appears any time a chat participant has sent a URL. The URL is specified via the "value" element.
type="typingIndicator": This type of event indicates that a participant has begun or stopped typing. If it does not appear for a specified participant, then:
If an event with type="participantStateChanged" element is present indicating that this participant has become active, then the user has not yet begun typing.
If an event with type="text" or type="url" exists for the same participant, then this participant is not typing (just finished typing a message)
If neither of these cases is true for a participant, then the user’s typing status has not changed since the last response.

Interaction Web Tools Developer's Guide 29
Sequence numbers are without regard to event type. For example, if event 1 indicates that a participant has changed state, and a URL follows it, then the URL is 2, not a separate 1. Sequence numbers are scoped to the chat: for example, they do not reset to 1 with each new poll response.
The GUI can use both sequence numbers and time stamps to display events in the proper order. It can use sequence numbers to determine if an event is missing.
The "participantID" attribute specifies who generated the event. In the case of an event with type="participantStateChanged" indicating that a new participant has joined the chat, the participantID attribute allows the GUI to create an association between participant's GUID and the participant’s name.
pollWaitSuggestion This response element is the number of milliseconds the WebProcessor suggests the client wait before the next poll. The client is not required to follow this suggestion. The WebProcessorBridge uses the default interval of 2 seconds. You can, however, use the parameter in Interaction Administrator to specify a different interval. For more information, see the Interaction Web Tools Technical Reference.
Interaction Web Tools Developer's Guide 30
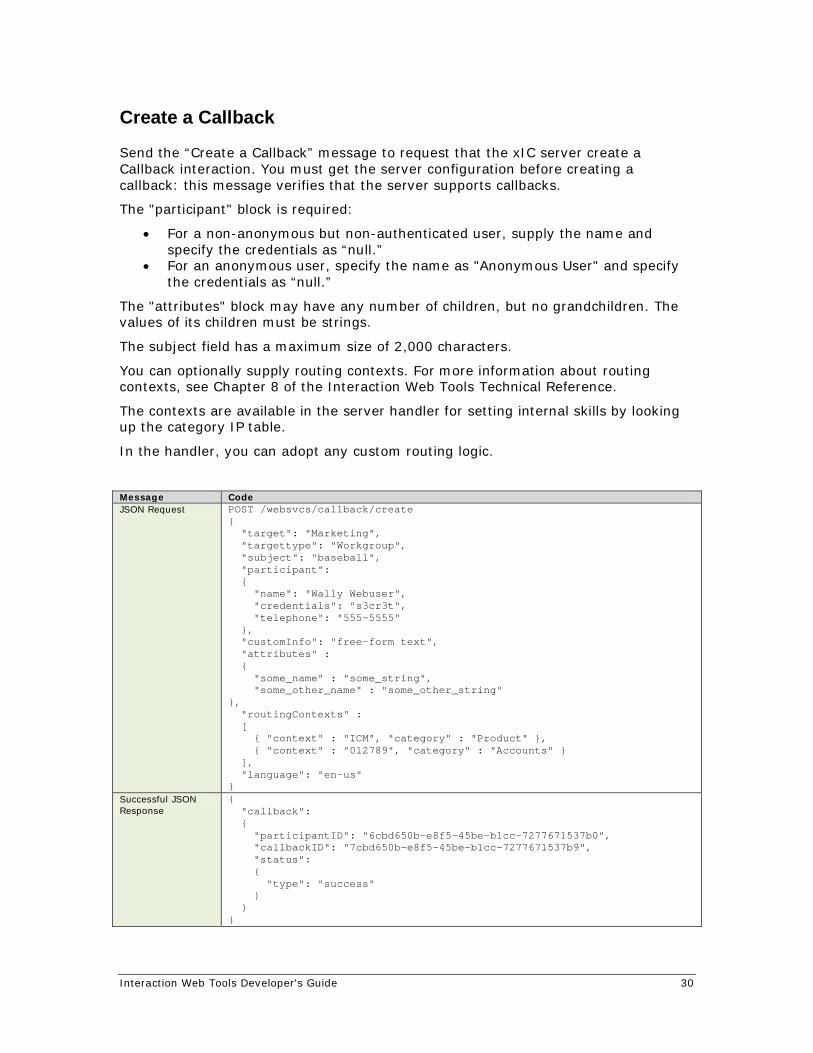
Create a Callback
Send the “Create a Callback” message to request that the xIC server create a Callback interaction. You must get the server configuration before creating a callback: this message verifies that the server supports callbacks.
The "participant" block is required:
• For a non-anonymous but non-authenticated user, supply the name and specify the credentials as “null.”
• For an anonymous user, specify the name as "Anonymous User" and specify the credentials as “null.”
The "attributes" block may have any number of children, but no grandchildren. The values of its children must be strings.
The subject field has a maximum size of 2,000 characters.
You can optionally supply routing contexts. For more information about routing contexts, see Chapter 8 of the Interaction Web Tools Technical Reference.
The contexts are available in the server handler for setting internal skills by looking up the category IP table.
In the handler, you can adopt any custom routing logic.
Message Code JSON Request POST /websvcs/callback/create
{ "target": "Marketing", "targettype": "Workgroup", "subject": "baseball", "participant": { "name": "Wally Webuser", "credentials": "s3cr3t", "telephone": "555-5555" }, "customInfo": "free-form text", "attributes" : { "some_name" : "some_string", "some_other_name" : "some_other_string" }, "routingContexts" : [ { "context" : "ICM", "category" : "Product" }, { "context" : "012789", "category" : "Accounts" } ], "language": "en-us" }
Successful JSON Response
{ "callback": { "participantID": "6cbd650b-e8f5-45be-b1cc-7277671537b0", "callbackID": "7cbd650b-e8f5-45be-b1cc-7277671537b9", "status": { "type": "success" } } }

Interaction Web Tools Developer's Guide 31
Message Code Failed JSON Response
{ "callback": { "status": { "type": "failure", "reason": "error.websvc.something" } } }

Interaction Web Tools Developer's Guide 32
Query Callback Properties
Send the “Query Callback Properties” message to retrieve a callback’s subject and telephone number (the data that is specified by the user). You can use the Query Callback Properties message to prepopulate the form for modifying a callback.
Note: Compare this message to Query Callback Status which queries data that is set by ACD.
Message Code JSON Request GET /websvcs/callback/properties/6cbd650b-e8f5-45be-b1cc-7277671537b0
Successful JSON Response
{ "callback" : { "subject": "baseball", "telephone": "555-5555", "status" : { "type" : "success" } } }
Failed JSON Response
{ "callback": { "status": { "type": "failure", "reason": "error.websvc.something" } } }

Interaction Web Tools Developer's Guide 33
Query Callback Status
Send the “Query Status” message to retrieve status information on the callback’s routing through IC.
Note: Compare this message to Query Callback Properties which queries data that is set by the user.
In the event of a successful JSON response (long-polling), the State value is Active.
When the scheduling callback feature is in place, State value is Active or Inactive.
Active means callback is active on the ACD queue. Inactive means the callback is waiting to be scheduled.
The AcdStatus block is omitted if the State is Inactive.
The GUID in the URL is the value of "participantID," which was obtained earlier.
The value of "queueWaitTime" is the number of seconds since the callback was created.
The value of "estimatedCallbackTime" is the number of seconds between now and the estimated time when an agent will call the creator back.
The value of "longestWaitTime" is in seconds.
If no agent has been assigned, the entire "assignedAgent" block will be omitted.
Message Code JSON Request GET /websvcs/callback/status/6cbd650b-e8f5-45be-b1cc-7277671537b0
Successful JSON Response (long-polling)
{ "callback": { "state" : "Active", "assignedAgent": { "name": "Alan Agent", "participantID": "7cbd650b-e8f5-45be-b1cc-7277671537b1" }, "acdStatus": { "queueWaitTime": 600, "interactionState": "ACD - Wait Agent", "estimatedCallbackTime": 3600, "queuePosition" : 1, "queueName" : "Sales", "longestWaitTime": 600, "callsWaitingCount": 4, "loggedInAgentsCount": 36, "availableAgentsCount" : 1 }, "status": { "type": "success" } } }

Interaction Web Tools Developer's Guide 34
Message Code Failed JSON Response
{ "callback": { "status": { "type": "failure", "reason": "error.websvc.something" } } }
Disconnect
Send the “Disconnect” message to disconnect the callback.
The GUID in the URL is the value of "participantID," which was obtained earlier.
The body of this POST request is empty.
Message Code JSON Request POST /websvcs/callback/disconnect/6cbd650b-e8f5-45be-b1cc-7277671537b0
Successful JSON Response
{ "callback": { "status": { "type": "success" } } }
Failed JSON Response
{ "callback": { "status": { "type": "failure", "reason": "error.websvc.something" } } }

Interaction Web Tools Developer's Guide 35
Modification
Send the “Modification” message to modify the callback.
Message Code JSON Request POST /websvcs/callback/modify/6cbd650b-e8f5-45be-b1cc-7277671537b0
{ "subject": "baseball", "telephone": "555-5555", "customInfo": "free-form text", "attributes": { "some_name" : "some_string", "some_other_name" : "some_other_string" } }
Successful JSON Response
{ "callback": { "status": { "type": "success" } } }
Failed JSON Response
{ "callback": { "status": { "type": "failure", "reason": "error.websvc.something" } } }

Interaction Web Tools Developer's Guide 36
Chapter 5: Sending and Receiving Web Pages Using Handlers
You can use handlers to:
Capture visitor-entered data from your Web site You can create handlers that accept visitor-entered information, such as name, IC password, and other types of information. The values entered are passed into handlers where they can be processed any way you like (for a form, hyperlink, etc.) Example: You could ask a visitor to enter the name or extension of an IC agent. Your Web server passes this information into a handler where you could generate a web page showing that IC agent’s current availability and expected time of return.
Send information from handlers into custom web pages Handlers processing the visitor-entered information can retrieve data from a database, IC Directory Services, a mail server, or any other data source accessible to handlers. You can then use handlers to format that data and return it to the visitor in a custom web page. Example: Using IC OCR capabilities, a visitor could e-mail an interaction fax document to the OCR Server. OCR converts the document to a text document. The handlers then send e-mail to that visitor with a hyperlink. When the visitor logs in to your Web site, they can click the hyperlink in their e-mail to view the converted document.
Capturing Visitor-entered Data from Your Web Site into Handlers
This section describes the process by which information passes from a web page to a handler.
Concepts Introduced HTML event HTML Initiator Web HTML plugin
Overview If you chose to install the Web event components, you can start handlers with events generated by web pages. For example, when a visitor clicks a Submit button on your web page, all the information that visitor entered on the page is collected and placed within an HTML event that starts a handler. (The event is unique for that button, starting specific handlers for specific actions.) The handler can extract that information from the event, place the information into string variables and process the information within a handler. The events a web page generates are HTML events. You may give each a unique name. The HTML initiator can start a unique handler for each unique HTML event your web pages generate.
A custom handler on your Web server provides this Web event functionality. Hyperlinks and buttons within your web pages can call this handler to generate a Web event. This handler also packages visitor data into the event and passes such information as the Web connection, the visitor's IP address and other useful

Interaction Web Tools Developer's Guide 37
information to the handler. The handler processes the information and sends a custom page back to the visitor over the same Web connection. This entire transaction occurs through a proxy on your Web server, so it works even if you are using a firewall to protect your network.
Example This example shows how to look up a name and password submitted in an HTML form using the Web event component.
Assume that you installed the Web event components and created a web page that allows visitors to submit names and passwords in an HTML form. Behind the Submit button on the form is a call to the Web HTML plugin that looks something like this example:
<HTML> <HEAD> <TITLE>Simple Example</TITLE> <script type="text/javascript" src="./js/external/jquery.min.js"></script> <script type="text/javascript" src="./js/WebSearch/switchover.js"></script> </script> </HEAD> <BODY> <form method="POST" > Enter your name and password:<br> <input name="Name" type="TEXT" cols=50 size="50" align=left> <input name="Password" type="TEXT" cols=50 size="50" align=left> <input name="SUBMIT" type="SUBMIT" value="OK" align=left onClick='ININ.Switchover.configureFormsForSwitchover("./WebServices/Server1/", "./WebServices/Server2/", "doHTMLRequest?&event=PasswordLookup");'> </form> </BODY> </HTML>
When the visitor clicks the Submit button, the Web HTML plugin generates an event called PasswordLookup that contains the Name and Password string values. The Notifier, an IC server subsystem that broadcasts events, receives the event, and broadcasts it to all of the other IC server subsystems. One of the subsystems notified is Interaction Processor. Interaction Processor starts any handlers HTML initiators registered to start when the PasswordLookup event occurs.
A handler named PasswordLookup.ihd starts. The PasswordLookup initiator retrieves the values of Name and Password from the event and writes those values to variables that the handler can use. Interaction Processor starts PasswordLookup, which retrieves the value of Name and Password, and then performs a database lookup based on the Name and Password values.
By calling the Web HTML plugin from a web page, you can start a handler and pass information to that handler. You can pass two types of information: command-line data and form data.
Command-Line Data Command-line data is static information you want to pass into a handler. You can embed a call to the Web HTML plugin, along with one or more command-line parameters, behind a hyperlink in a web page. When the visitor clicks that hyperlink, the Web HTML plugin generates an event that includes the command-line data. Any handler started by that event can extract the command-line data.

Interaction Web Tools Developer's Guide 38
Syntax for Command-Line Data with the Web HTML plugin
Passing command-line data with a call to Web HTML plugin requires the following statement behind a hyperlink.
The following shows a hyperlink that calls Web HTML plugin to generate the EventName event and pass command-line parameters of ARG1=French or ARG1=English.
<HTML> <HEAD> <TITLE>Simple Example</TITLE> <script type="text/javascript" src="./js/external/jquery.min.js"></script> <script type="text/javascript" src="./js/WebSearch/switchover.js"></script> </script> </HEAD> <BODY> <form method="POST" > <input type="SUBMIT" value="Search" id=submit1 name=submit1 onClick='ININ.Switchover.configureFormsForSwitchover("./WebServices/Server1/", "./WebServices/Server2/", "doHTMLRequest?event=EventName&ARG1=English");'> </form> </BODY> </HTML>
This example is a hyperlink that calls the Web HTML plugin to generate the EventTitle event and pass command-line parameters.
<HTML> <HEAD> <TITLE>Simple Example</TITLE> <script type="text/javascript" src="./js/external/jquery.min.js"></script> <script type="text/javascript" src="./js/WebSearch/switchover.js"></script> </script> </HEAD> <BODY> <form method="POST" > <input type="SUBMIT" value="Search" id=submit1 name=submit1 onClick='ININ.Switchover.configureFormsForSwitchover("./WebServices/Server1/", "./WebServices/Server2/", "doHTMLRequest?event=EventTitle&ARG1=French&ARG2=Document1");'> </form> </BODY> </HTML>
Now that you understand how to write web pages that collect information from remote browsers, you can learn how to configure handlers to extract this information from the HTML event.
Interaction Web Tools Developer's Guide 39
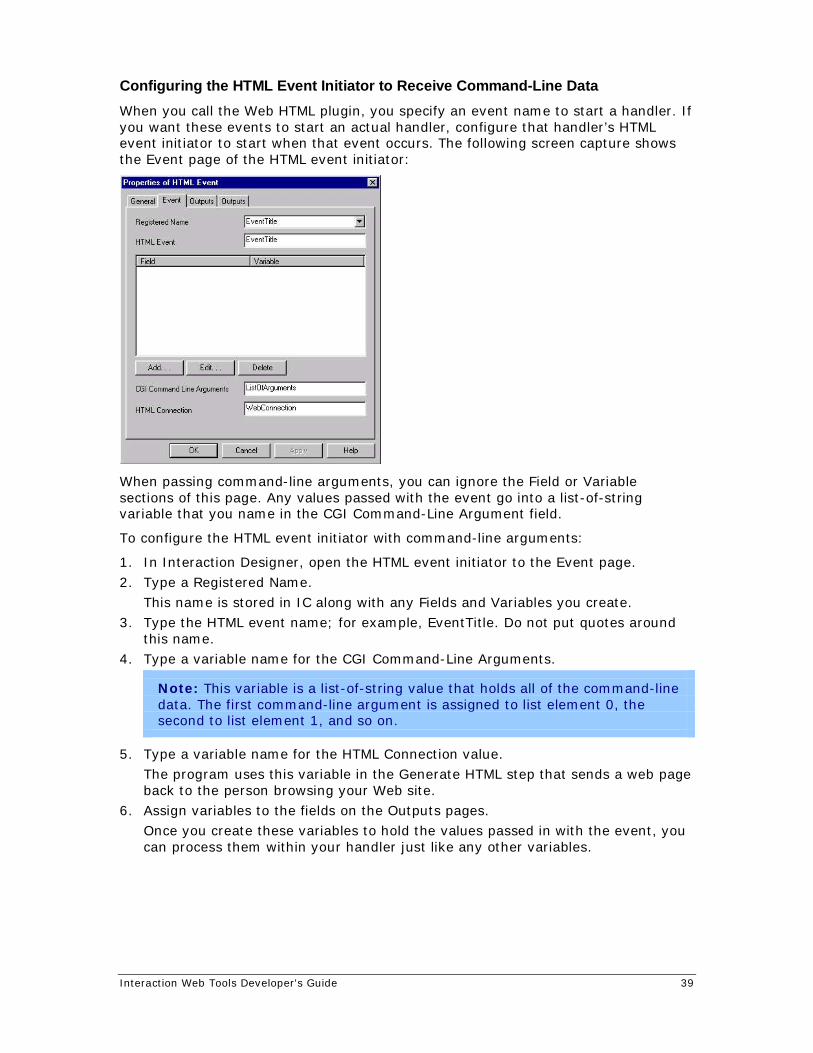
Configuring the HTML Event Initiator to Receive Command-Line Data When you call the Web HTML plugin, you specify an event name to start a handler. If you want these events to start an actual handler, configure that handler’s HTML event initiator to start when that event occurs. The following screen capture shows the Event page of the HTML event initiator:
When passing command-line arguments, you can ignore the Field or Variable sections of this page. Any values passed with the event go into a list-of-string variable that you name in the CGI Command-Line Argument field.
To configure the HTML event initiator with command-line arguments:
1. In Interaction Designer, open the HTML event initiator to the Event page. 2. Type a Registered Name.
This name is stored in IC along with any Fields and Variables you create. 3. Type the HTML event name; for example, EventTitle. Do not put quotes around
this name. 4. Type a variable name for the CGI Command-Line Arguments.
Note: This variable is a list-of-string value that holds all of the command-line data. The first command-line argument is assigned to list element 0, the second to list element 1, and so on.
5. Type a variable name for the HTML Connection value. The program uses this variable in the Generate HTML step that sends a web page back to the person browsing your Web site.
6. Assign variables to the fields on the Outputs pages. Once you create these variables to hold the values passed in with the event, you can process them within your handler just like any other variables.

Interaction Web Tools Developer's Guide 40
Form Data
Form data is information that a visitor types in an HTML form. When a website visitor enters data in an HTML form and submits it, the Web HTML plugin packages the submitted form data in the event. An HTML event initiator can then extract the data.
Syntax for Form Data The following is a simple form allowing a visitor to submit a name and password using the Web HTML plugin. It generates the PasswordLook event when a user clicks Submit:
<HTML> <HEAD> <TITLE>Simple Example</TITLE> <script type="text/javascript" src="./js/external/jquery.min.js"></script> <script type="text/javascript" src="./js/WebSearch/switchover.js"></script> </script> </HEAD> <BODY> <form method="POST" > Enter your name and password:<br> <input name="Name" type="TEXT" cols=50 size="50" align=left> <input name="Password" type="TEXT" cols=50 size="50" align=left> <input name="SUBMIT" type="SUBMIT" value="OK" align=left onClick='ININ.Switchover.configureFormsForSwitchover("./WebServices/Server1/", "./WebServices/Server2/", "doHTMLRequest?&event=PasswordLookup");'> </form> </BODY> </HTML>
As with command-line data in the previous HTML example screens, specify the name of the event in the call to the Web HTML plugin . Any input values are bundled in the event, and the HTML event initiator can bind the data to a variable, where a handler can use it.
Note: The variables that hold the visitor-entered values are list-of-string variables. Some form elements, like check boxes or combo boxes (selection boxes), can pass more than one value into the event.
For more information about creating forms, and the types of elements available in forms, see the HTML documentation for your HTML authoring software.
Interaction Web Tools Developer's Guide 41
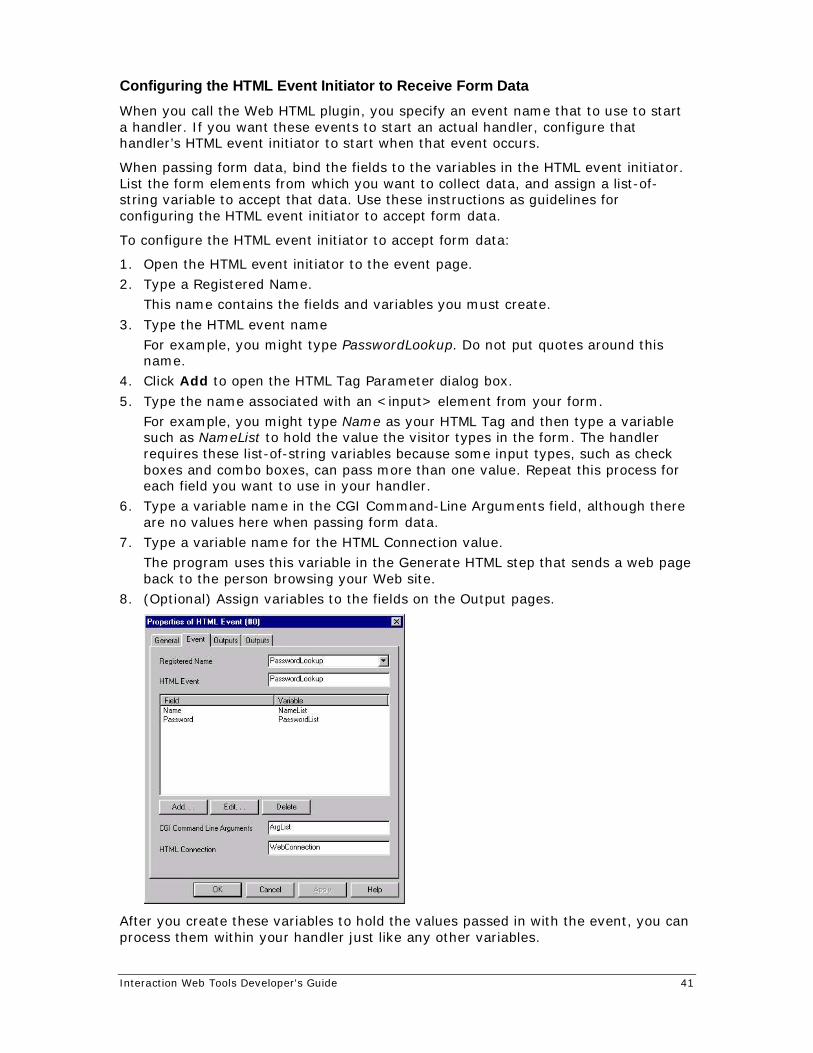
Configuring the HTML Event Initiator to Receive Form Data When you call the Web HTML plugin, you specify an event name that to use to start a handler. If you want these events to start an actual handler, configure that handler’s HTML event initiator to start when that event occurs.
When passing form data, bind the fields to the variables in the HTML event initiator. List the form elements from which you want to collect data, and assign a list-of-string variable to accept that data. Use these instructions as guidelines for configuring the HTML event initiator to accept form data.
To configure the HTML event initiator to accept form data:
1. Open the HTML event initiator to the event page. 2. Type a Registered Name.
This name contains the fields and variables you must create. 3. Type the HTML event name
For example, you might type PasswordLookup. Do not put quotes around this name.
4. Click Add to open the HTML Tag Parameter dialog box. 5. Type the name associated with an <input> element from your form.
For example, you might type Name as your HTML Tag and then type a variable such as NameList to hold the value the visitor types in the form. The handler requires these list-of-string variables because some input types, such as check boxes and combo boxes, can pass more than one value. Repeat this process for each field you want to use in your handler.
6. Type a variable name in the CGI Command-Line Arguments field, although there are no values here when passing form data.
7. Type a variable name for the HTML Connection value. The program uses this variable in the Generate HTML step that sends a web page back to the person browsing your Web site.
8. (Optional) Assign variables to the fields on the Output pages.
After you create these variables to hold the values passed in with the event, you can process them within your handler just like any other variables.

Interaction Web Tools Developer's Guide 42
Creating Handlers that Send Information to a Web Page
This section describes the process by which a handler sends a web page back to a visitor browsing your Web site.
Concepts Introduced • Generate HTML tool • Static web page • Custom web page • Substitution fields • HTML template • Binding • Web connection
Overview Just as you can pass information from a web page into a handler, you can also pass information from a handler into a web page. The Generate HTML tool can send a web page to a person browsing your Web site over the Web connection extracted by the HTML initiator.
The web page sent by the Generate HTML step could be static or custom. A static web page is a normal HTML document unmodified for any particular visitor. A custom web page is an HTML document containing information processed within a handler, like an account balance or an IC visitor's availability. Customized web pages use HTML templates containing substitution fields. Substitution fields are placeholders in a template whose purpose is to contain string values looked up within the handler. The Generate HTML step retrieves your configured template and binds values from the handler to substitution fields in the template. The Generate HTML step then sends the customized web page back over the Web connection.
Example This example shows how to return the status of an order in a custom web page.
In the previous example, a person browsing your Web site submitted a name and password for handler processing. In this example, a handler sends a custom web page back to that visitor containing the status of an order.
Using the name and password, WebPasswordLookup validates the visitor name and retrieves the status of the customer’s order from a database. WebPasswordLookup then assigns the value to a string variable named OrderStatus and calls a Generate HTML step. This step performs several tasks:
First, it uses the Web connection value retrieved by the HTML initiator and determines to whom to send the page.
Second, it specifies the template that to use to generate the web page for the visitor.
Third, it binds string variables from the handler to any substitution fields in the HTML template.
For our example, the OrderStatus is bound to a substitution field in the template. The template and substitution fields appear in the following sample:
<HTML> <HEAD>

Interaction Web Tools Developer's Guide 43
<TITLE>Simple Example</TITLE> <script type="text/javascript" src="./js/external/jquery.min.js"></script> <script type="text/javascript" src="./js/WebSearch/switchover.js"></script> </script> </HEAD> <BODY> <form method="POST" > Enter your name and password:<br> <input name="Name" type="TEXT" cols=50 size="50" align=left> <input name="Password" type="TEXT" cols=50 size="50" align=left> <input name="SUBMIT" type="SUBMIT" value="OK" align=left onClick='ININ.Switchover.configureFormsForSwitchover("./WebServices/Server1/", "./WebServices/Server2/", "doHTMLRequest?&event=PasswordLookup");'> </form> </BODY> </HTML>
When you specify this template in the Generate HTML step, OrderStatus appears in the Substitution Field list, where you can pass in (bind) values from the handler.
As the Generate HTML step executes, the Web server sends a page to the visitor, displaying the status of the order.
The key to creating handlers that send web pages back to visitors is the Generate HTML tool. This tool uses the web connection value gathered by the HTML event initiator to send a web page back the visitor over the same connection.
A Generate HTML step can send two types of web pages back to visitors: static or custom.
A static web page is simply an HTML document that you have defined as a template. For static pages, the Generate HTML step sends a copy of the template back to the person browsing your Web site.
A custom HTML document contains substitution fields to which you can bind variables from a handler. The Generate HTML step places values from the handler into placeholders, called substitution fields, defined in the template. Binding is the process by which values from handlers are associated with substitution fields in a template.
Note: Failure to send a web page back to a visitor generates a web page stating “Error Generating HTML" for that visitor."
Creating Templates Templates are HTML documents defined as templates by the Generate HTML tool. Any HTML document can be a template. Once you publish the handler containing the Generate HTML step, the program makes the text of the template part of the Java source code for that handler and writes it explicitly to the Java class file. No physical copy of the HTML template is required after that, unless you want to change the template.

Interaction Web Tools Developer's Guide 44
Substitution Fields
Substitution fields enable you to pass string values from a handler into an HTML document. For example, use this feature to send visitor-specific information, such as account balances or the status of an order, to a person browsing your Web site.
When you create substitution fields in an HTML document, and then define that document as an HTML template, the substitution fields appear in the Generate HTML step. There you can associate a string or list-of-string variable with a substitution field. The name for this process is binding.
Syntax for Substitution Fields Substitution fields are easy to add to any HTML document. Add ##I3_SubstitutionFieldName## to your document, and the Generate HTML tool parses the field when you define that document as a template.
<HTML> <HEAD> <TITLE>Simple Example</TITLE> </HEAD> <BODY> <H2>Today’s Lucky Lotto Number is: ##I3_LottoNumberToday##</H2> <H2>Yesterday’s Lucky Lotto Number was: ##I3_LottoNumberYesterday##</H2> </BODY> </HTML>
Sample HTML substitution fields This sample HTML code has two substitution fields, ##I3_LottoNumberToday## and ##I3_LottoNumberYesterday##. When the program saves code as an HTML document and selects it as a template, both LottoNumberToday and LottoNumberYesterday appear in the Substitution Field list in the Generate HTML tool.
You can also pass list-of-string values in to HTML lists. This table shows the different types of HTML lists that can contain substitution fields. Binding a list-of-string value to a substitution field in an HTML list produces a list item for every element in that list-of-string value. List Type Syntax
Ordered List <OL> <LI>##I3_SubList## </OL>
Bulleted (unordered) List <UL> <LI>##I3_SubList## </UL>
Definition List <DL> <LI>##I3_SubList## <DL>
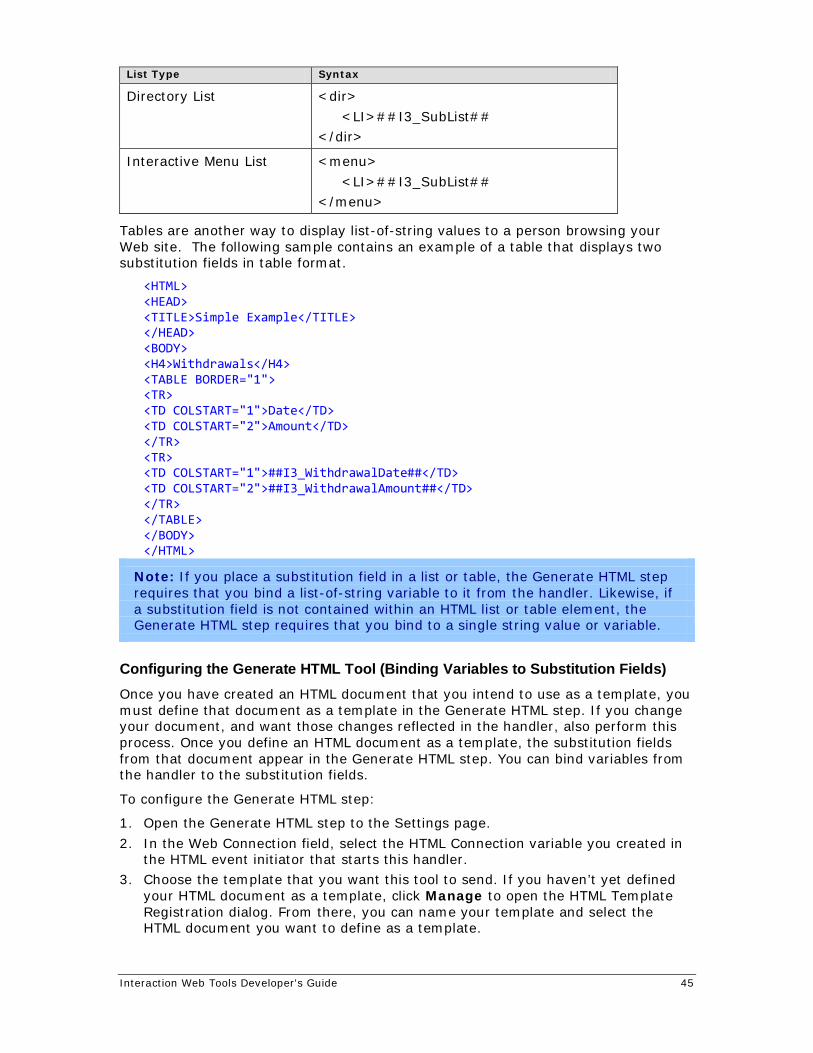
Interaction Web Tools Developer's Guide 45
List Type Syntax
Directory List <dir> <LI>##I3_SubList## </dir>
Interactive Menu List <menu> <LI>##I3_SubList## </menu>
Tables are another way to display list-of-string values to a person browsing your Web site. The following sample contains an example of a table that displays two substitution fields in table format.
<HTML> <HEAD> <TITLE>Simple Example</TITLE> </HEAD> <BODY> <H4>Withdrawals</H4> <TABLE BORDER="1"> <TR> <TD COLSTART="1">Date</TD> <TD COLSTART="2">Amount</TD> </TR> <TR> <TD COLSTART="1">##I3_WithdrawalDate##</TD> <TD COLSTART="2">##I3_WithdrawalAmount##</TD> </TR> </TABLE> </BODY> </HTML>
Note: If you place a substitution field in a list or table, the Generate HTML step requires that you bind a list-of-string variable to it from the handler. Likewise, if a substitution field is not contained within an HTML list or table element, the Generate HTML step requires that you bind to a single string value or variable.
Configuring the Generate HTML Tool (Binding Variables to Substitution Fields) Once you have created an HTML document that you intend to use as a template, you must define that document as a template in the Generate HTML step. If you change your document, and want those changes reflected in the handler, also perform this process. Once you define an HTML document as a template, the substitution fields from that document appear in the Generate HTML step. You can bind variables from the handler to the substitution fields.
To configure the Generate HTML step:
1. Open the Generate HTML step to the Settings page. 2. In the Web Connection field, select the HTML Connection variable you created in
the HTML event initiator that starts this handler. 3. Choose the template that you want this tool to send. If you haven’t yet defined
your HTML document as a template, click Manage to open the HTML Template Registration dialog. From there, you can name your template and select the HTML document you want to define as a template.
Interaction Web Tools Developer's Guide 46
4. If you change this document after you define it as a template, repeat this process to redefine it and recognize any new substitution fields or HTML commands.
5. When you have chosen a template, all the substitution fields contained in the template appear in the Substitution Field list.
6. Bind each substitution field to a variable from the handler, or to an expression. Click Bind Expression to open the Edit Expression dialog box. In this dialog, select a variable from the handler to bind to the substitution field or build an expression. For more information about building expressions, see the Interaction Designer help.
Note: If you place a substitution field in a list or table, the Generate HTML step requires that you bind to it a list-of-string variable from the handler. Likewise, if a substitution field is not contained within an HTML list or table element, the Generate HTML step requires that you bind to a single string value or variable.
7. When you have bound all the substitution fields to variables from your handler or expressions, click OK to close the Generate HTML step, then save and publish your handler.
When you manage an HTML template in the GenerateHTML step, it loads the HTML document into the Registry. You can view these forms under:
key_local_machine/software/Interactive Intelligence/EIC/Directory Services/Root/<SiteName>/Production/Configuration/Web Forms
Warning: Always use caution when viewing the Registry!
Once you complete these steps, you have configured the Generate HTML step to send a web page back to a visitor browsing your Web site.
Any reference to a file and its location in an HTML document that begins with a “/” starts from the WWWRoot directory. Otherwise, IC looks for this file in the current directory.
Custom HTML Events
These parameters are automatically sent to the handler for its use. In addition, any custom parameters issued with the request in the form &name=value are sent to the handler as name=value parameters which the handler can parse and use. Custom HTML Event Description
AUTH_TYPE HTTP request authorization type
CONTENT_LENGTH HTTP request content type
CONTENT_TYPE HTTP request content type
EVENT Name of handler to initiate
HTTP_ACCEPT HTTP Accept-Language header value
HTTP_COOKIE Any cookies sent with the HTTP request
HTTP_USER_AGENT HTTP header value for User-Agent
LOCALHOSTIP IP address of Webserver

Interaction Web Tools Developer's Guide 47
Custom HTML Event Description
LOCALHOSTNAME Name of Web server
PATH_INFO HTTP request path information
PATH_TRANSLATED HTTP request path translated
QUERY_STRING The request string separated from path to the program
REMOTE_ADDR IP address of machine sending the request
REMOTE_HOST Name of machine sending the request
REQUEST_METHOD Set to Post
SCRIPT_NAME Relative program path
SERVER_NAME Name of Webserver
SERVER_PORT Port used
SERVER_PROTOCOL The http (standard port 80) or https (secure port 443)
Attributes Optional Parameter Type Default
Value Description
CUSTOM_INFO String <none> Used to pre-populate the registration form with information that customer entered in a previous visit. Strings of name value pairs are delimited by '|'.
Web HTML Handler Parameter
This configuration parameter is used by the Web HTML handler.
Parameter Description Available
WebCGIRequestTimeout This time out (in seconds) determines the maximum time a handler can take to reply to the CGI request. Default: 300
4.0 GA to present

Interaction Web Tools Developer's Guide 48
Appendix A: Sample Session This appendix gives a complete network transcript of a sample chat. Request Response Description GET /websvcs/serverConfiguration HTTP/1.0 [ { "serverConfiguration": {
"cfgVer": 1 ,"capabilities": { "chat": [ "start" , "reconnect" , "poll" , "setTypingState" , "sendMessage" , "exit" , "supportAuthenticationTracker" , "supportAuthenticationAnonymous" ] ,"callback": [ "create" , "reconnect" , "status" , "disconnect" , "properties" , "modify" , "supportAuthenticationTracker" , "supportAuthenticationAnonymous" ] ,"queueQuery": [ "supportAuthenticationTracker" , "supportAuthenticationAnonymous" ] ,"common": [ "supportRegistrationTracker" , "partyInfo" , "problemReport" ] } ,"failoverURIs": [ ] ,"problemReportRegEx": "Chrome" } } , { "browserAcceptLanguage": "en-US,en;q=0.8" } ]
Client requests server configuration
POST /websvcs/chat/start HTTP/1.0 {"supportedContentTypes": "text/plain", "participant": {"name": "John Doe", "credentials": ""}, "target": "Marketing", "targetType": "Workgroup", "clientToken": "deprecated", “language”: “en-us” }
{ "chat": { "pollWaitSuggestion": 2000 , “cfgVer”: 1, "participantID": "94e8c3b0-aeee-40e1-ba5a-a593c8047fc5", “dateFormat”: “M\/d\/yyyy”, “timeFormat”: “h:mm:ss tt”, “chatID”: “73db8632-9ee8-459e-a193-4d25684499d0” ,"status": { "type": "success" } } }
Client starts a chat. Server provides participant ID and chat ID The participant ID is used when sending future messages in the chat. However, if a switchover occurs, the chat ID will be needed to create a new participant ID on the other IC server.
GET /websvcs/chat/poll/94e8c3b0-aeee-40e1-ba5a-a593c8047fc5 HTTP/1.0
{ "chat": { "pollWaitSuggestion": 2000 , “cfgVer”: 1,"events": [ { "type": "participantStateChanged" ,"participantID": "94e8c3b0-aeee-40e1-ba5a-a593c8047fc5" ,"sequenceNumber": 0 ,"state": "active" ,"participantName": "John Doe" } ] ,"status": { "type": "success" } } }
Client polls. Server indicates that the web user has joined the chat.
GET /websvcs/chat/poll/94e8c3b0-aeee-40e1-ba5a-a593c8047fc5 HTTP/1.0
{ "chat": { "pollWaitSuggestion": 2000 , “cfgVer”: 1,"events": [ { "type": "text" ,"participantID": "00000000-0000-0000-0000-000000000000" ,"sequenceNumber": 1 ,"conversationSequenceNumber": 0 ,"contentType": "text\/plain" ,"value": "Welcome to IC!" ,"displayName": "IC" } , { "type": "text" ,"participantID": "00000000-0000-0000-0000-000000000000" ,"sequenceNumber": 2 ,"conversationSequenceNumber": 0 ,"contentType": "text\/plain" ,"value": "Interaction transferred to Marketing." ,"displayName": "IC" } , { "type": "text" ,"participantID": "00000000-0000-0000-0000-000000000000" ,"sequenceNumber": 3 ,"conversationSequenceNumber": 0 ,"contentType": "text\/plain" ,"value": "Interaction
Client polls. Server sends some introductory text.

Interaction Web Tools Developer's Guide 49
Request Response Description alerting Alan Agent." ,"displayName": "IC" } ] ,"status": { "type": "success" } } }
GET /websvcs/chat/poll/94e8c3b0-aeee-40e1-ba5a-a593c8047fc5 HTTP/1.0
{ "chat": { "pollWaitSuggestion": 2000 , “cfgVer”: 1,"events": [{ "type": "participantStateChanged" ,"participantID": "3da146e0-0344-47a7-b9f5-d88fafe98108" ,"sequenceNumber": 4 ,"state": "active" ,"participantName": "Alan Agent" } , { "type": "text" ,"participantID": "00000000-0000-0000-0000-000000000000" ,"sequenceNumber": 5 ,"conversationSequenceNumber": 0 ,"contentType": "text\/plain" ,"value": "IC has joined the conversation." ,"displayName": "IC" } ] ,"status": { "type": "success" } } }
Client polls. Server indicates that agent has joined the chat.
GET /websvcs/chat/poll/94e8c3b0 HTTP/1.0 { "chat": { "pollWaitSuggestion": 2000 , “cfgVer”: 1,"events": [ ] ,"status": { "type": "success" } } }
Client polls. Server indicates that nothing has happened since the previous poll. Subsequent exchanges identical to this row are omitted from the remainder of this listing.
GET /websvcs/chat/poll/94e8c3b0 HTTP/1.0 { "chat": { "pollWaitSuggestion": 2000 , “cfgVer”: 1,"events": [ { "type": "typingIndicator" ,"participantID": "3da146e0-0344-47a7-b9f5-d88fafe98108" ,"sequenceNumber": 6 ,"value": true } ] ,"status": { "type": "success" } } }
Client polls. Server indicates that agent is typing.
GET /websvcs/chat/poll/94e8c3b0 HTTP/1.0 { "chat": { "pollWaitSuggestion": 2000 , “cfgVer”: 1,"events": [ { "type": "typingIndicator" ,"participantID": "3da146e0-0344-47a7-b9f5-d88fafe98108" ,"sequenceNumber": 7 ,"value": false } , { "type": "text" ,"participantID": "3da146e0-0344-47a7-b9f5-d88fafe98108" ,"sequenceNumber": 8 ,"conversationSequenceNumber": 0 ,"contentType": "text\/plain" ,"value": "Hello, how may I help you?" ,"displayName": "Alan Agent" } ] ,"status": { "type": "success" } } }
Client polls. Server sends agent’s message and indicates that agent has stopped typing.
POST /websvcs/chat/setTypingState/94e8c3b0-aeee-40e1-ba5a-a593c8047fc5 HTTP/1.0 { "typingIndicator": true}
{ "chat": { "pollWaitSuggestion": 2000 , “cfgVer”: 1, "events": [ ] ,"status": { "type": "success" } } }
Client sets typing indicator to show that web user is typing.
POST /websvcs/chat/sendMessage/94e8c3b0-aeee-40e1-ba5a-a593c8047fc5 HTTP/1.0 {"message": "Can you please tell me my account balance? My account number is 12345.\n", "contentType": "text/plain"}
{ "chat": { "pollWaitSuggestion": 2000 , “cfgVer”: 1, "status": { "type": "success" } ,"events": [ ] } }
Client sends message from web user.
GET /websvcs/chat/poll/94e8c3b0-aeee-40e1-ba5a-a593c8047fc5 HTTP/1.0
{ "chat": { "pollWaitSuggestion": 2000 , “cfgVer”: 1, "events": [ { "type": "text" ,"participantID": "94e8c3b0-aeee-40e1-ba5a-a593c8047fc5" ,"sequenceNumber": 9 ,"conversationSequenceNumber": 0 ,"contentType": "text\/plain" ,"value": "Can you please tell me my account balance? My account number is 12345." ,"displayName": "John Doe" } ] ,"status": { "type": "success" } } }
Client polls. Server echoes message back to client.
POST /websvcs/chat/setTypingState/94e8c3b0-aeee-40e1-ba5a-a593c8047fc5 HTTP/1.0 { "typingIndicator": false}
{ "chat": { "pollWaitSuggestion": 2000 , “cfgVer”: 1, "events": [ ] ,"status": { "type": "success" } } }
Client sets typing indicator to show that web user has finished typing.
GET /websvcs/chat/poll/94e8c3b0-aeee-40e1-ba5a-a593c8047fc5 HTTP/1.0
{ "chat": { "pollWaitSuggestion": 2000 , “cfgVer”: 1, "events": [ { "type": "typingIndicator" ,"participantID": "3da146e0-0344-47a7-b9f5-
Client polls. Server indicates that agent is
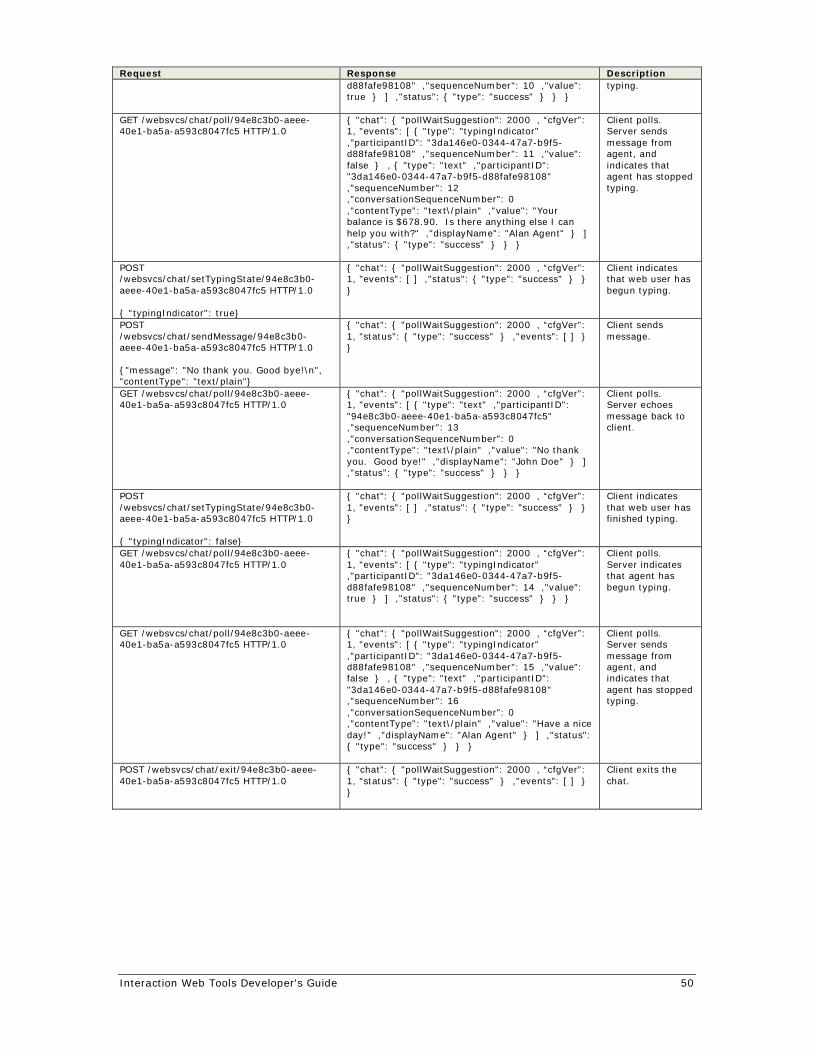
Interaction Web Tools Developer's Guide 50
Request Response Description d88fafe98108" ,"sequenceNumber": 10 ,"value": true } ] ,"status": { "type": "success" } } }
typing.
GET /websvcs/chat/poll/94e8c3b0-aeee-40e1-ba5a-a593c8047fc5 HTTP/1.0
{ "chat": { "pollWaitSuggestion": 2000 , “cfgVer”: 1, "events": [ { "type": "typingIndicator" ,"participantID": "3da146e0-0344-47a7-b9f5-d88fafe98108" ,"sequenceNumber": 11 ,"value": false } , { "type": "text" ,"participantID": "3da146e0-0344-47a7-b9f5-d88fafe98108" ,"sequenceNumber": 12 ,"conversationSequenceNumber": 0 ,"contentType": "text\/plain" ,"value": "Your balance is $678.90. Is there anything else I can help you with?" ,"displayName": "Alan Agent" } ] ,"status": { "type": "success" } } }
Client polls. Server sends message from agent, and indicates that agent has stopped typing.
POST /websvcs/chat/setTypingState/94e8c3b0-aeee-40e1-ba5a-a593c8047fc5 HTTP/1.0 { "typingIndicator": true}
{ "chat": { "pollWaitSuggestion": 2000 , “cfgVer”: 1, "events": [ ] ,"status": { "type": "success" } } }
Client indicates that web user has begun typing.
POST /websvcs/chat/sendMessage/94e8c3b0-aeee-40e1-ba5a-a593c8047fc5 HTTP/1.0 {"message": "No thank you. Good bye!\n", "contentType": "text/plain"}
{ "chat": { "pollWaitSuggestion": 2000 , “cfgVer”: 1, "status": { "type": "success" } ,"events": [ ] } }
Client sends message.
GET /websvcs/chat/poll/94e8c3b0-aeee-40e1-ba5a-a593c8047fc5 HTTP/1.0
{ "chat": { "pollWaitSuggestion": 2000 , “cfgVer”: 1, "events": [ { "type": "text" ,"participantID": "94e8c3b0-aeee-40e1-ba5a-a593c8047fc5" ,"sequenceNumber": 13 ,"conversationSequenceNumber": 0 ,"contentType": "text\/plain" ,"value": "No thank you. Good bye!" ,"displayName": "John Doe" } ] ,"status": { "type": "success" } } }
Client polls. Server echoes message back to client.
POST /websvcs/chat/setTypingState/94e8c3b0-aeee-40e1-ba5a-a593c8047fc5 HTTP/1.0 { "typingIndicator": false}
{ "chat": { "pollWaitSuggestion": 2000 , “cfgVer”: 1, "events": [ ] ,"status": { "type": "success" } } }
Client indicates that web user has finished typing.
GET /websvcs/chat/poll/94e8c3b0-aeee-40e1-ba5a-a593c8047fc5 HTTP/1.0
{ "chat": { "pollWaitSuggestion": 2000 , “cfgVer”: 1, "events": [ { "type": "typingIndicator" ,"participantID": "3da146e0-0344-47a7-b9f5-d88fafe98108" ,"sequenceNumber": 14 ,"value": true } ] ,"status": { "type": "success" } } }
Client polls. Server indicates that agent has begun typing.
GET /websvcs/chat/poll/94e8c3b0-aeee-40e1-ba5a-a593c8047fc5 HTTP/1.0
{ "chat": { "pollWaitSuggestion": 2000 , “cfgVer”: 1, "events": [ { "type": "typingIndicator" ,"participantID": "3da146e0-0344-47a7-b9f5-d88fafe98108" ,"sequenceNumber": 15 ,"value": false } , { "type": "text" ,"participantID": "3da146e0-0344-47a7-b9f5-d88fafe98108" ,"sequenceNumber": 16 ,"conversationSequenceNumber": 0 ,"contentType": "text\/plain" ,"value": "Have a nice day!" ,"displayName": "Alan Agent" } ] ,"status": { "type": "success" } } }
Client polls. Server sends message from agent, and indicates that agent has stopped typing.
POST /websvcs/chat/exit/94e8c3b0-aeee-40e1-ba5a-a593c8047fc5 HTTP/1.0
{ "chat": { "pollWaitSuggestion": 2000 , “cfgVer”: 1, "status": { "type": "success" } ,"events": [ ] } }
Client exits the chat.

Interaction Web Tools Developer's Guide 51
Appendix B: How to Set and Use JavaScript Tracing If you have a problem with the Interaction Web Tools API or client, you can turn up the tracing level to make the problem easier to diagnose. You can then use Firebug or another web debugging tool to view the trace log information.
To set trace levels and view trace logging:
1. Display the Web browser's Developer Console. 2. In a chat window, the agent or customer types one of the following instructions:
o set tracelevel all
o set tracelevel verbose
o set tracelevel note
o set tracelevel status
o set tracelevel warning
o set tracelevel error
o set tracelevel critical
3. View the trace logging in the Developer Console.

Interaction Web Tools Developer's Guide 52
Change Log Change Log Date Changed… 2011-10-21 Initial release version. 2012-01-10 Added section on adding fields to the chat registration form. Made a
few other minor tweaks. Updated copyrights and other standard text. 2012-01-25 Added section on adding custom information to chat/callback.
Corrected capitalization of Bootloader.js in several locations. 2013-07-30 Corrected a code line in the "Reconnect" section. Updated code in
Appendices A and B. Did other general cleanup. 2013-08-05 Updated code for JSON, discussed routing contexts, and made other
miscellaneous updates. 2013-08-22 Added 2,000-character subject field limit info to "Create a Callback." 2013-10-09 In Chapter 4, added a new section with HTTP header information. 2013-12-02 Added Chapter 5, "Sending and Receiving Web Pages Using Handlers."
The chapter had been in the Web Services Technical Reference. I modified it for inclusion in the current document.
2014-03-18 Updated "Embedding Within Another Web Page," "Chats And Callbacks to Multiple Queues," "Creating a Post-Chat Page," and "Adding Custom Information to a Chat" for some JavaScript code changes.