infrared mobile digital scouting camera user’smanual
TRANSCRIPT
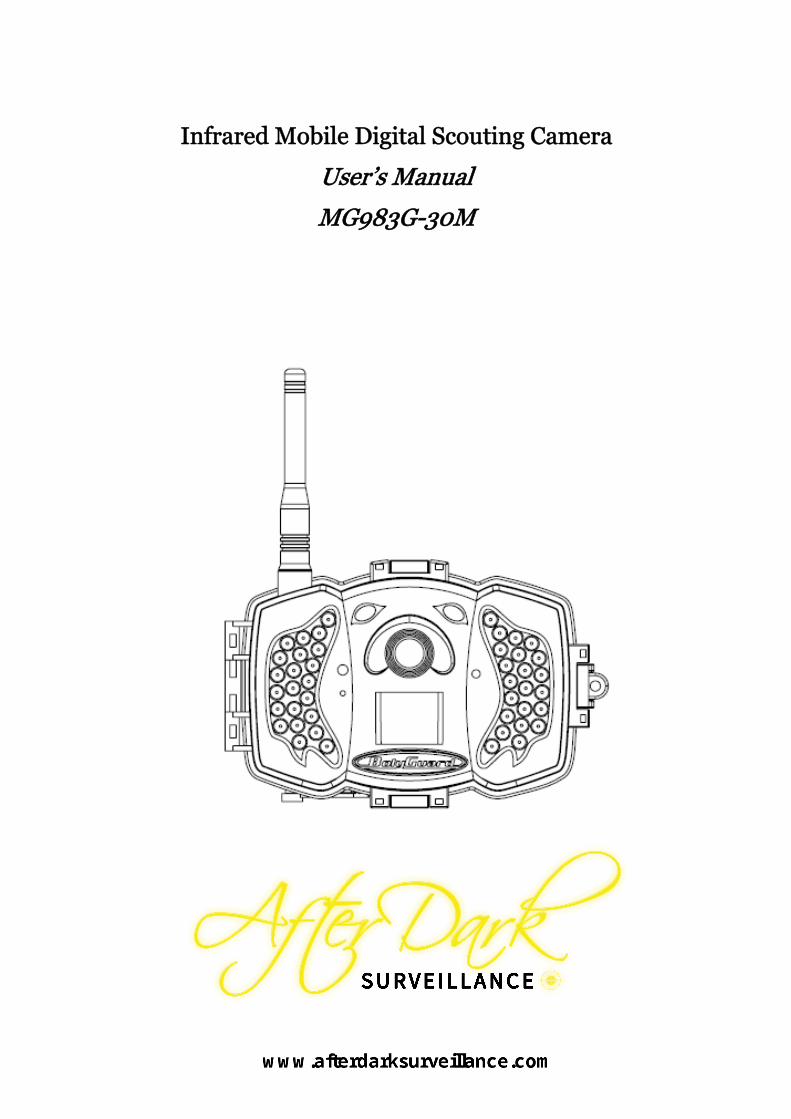
Infrared Mobile Digital Scouting Camera
User’s Manual
MG983G-30M

Content Instruction..................................................
.1 General Description...................................... .2 Application...............................................3 Camera Overview........................................ .4 Shooting Information Display...............................5 Two Way Communication.................................
Cautions.................................................... Quick Start Guide............................................
.1 Power Supply............................................ .2 Insert SD card and SIM card................................3 Do the Camera Settings................................... .4 Manually Send a MMS or GPRS Photo..................... .5 SMS Control............................................
Advanced Operations........................................ .1 Work Mode............................................. .2 Settings Menu.......................................... 4.2.1 Setting Items....................................... 4.2.2 Default Set.........................................
.3 Use the Remote Control.................................. .4 Load or Remove a Wireless Sensor........................ .5 Change the Settings via Android APP or SMS............... .6 User Level...............................................7 Use Android APP.........................................8 SMS Command List.....................................
Appendix I: PIR Detection Zone.................................Appendix II: Error Code....................................... Appendix Ⅲ: Technical Specifications........................... Appendix Ⅳ: Parts List........................................

MG983G-30M
1 Instruction
1.1 General Description
This camera, a digital scouting camera with 3Gcommunication function, is a digital infrared surveillancecamera, triggered by any movement of human or animalmonitored by a high sensitive Passive Infrared (PIR) motionsensor, and then automatically captures high quality pictures(up to 30M pixels) or records video clips (1080 FHD). It sendspicture instantly to your mobile device or video (less than 10M)to your e-mail via GPRS network. You’ll be alerted just whenthe camera is triggered or per custom settings.It takes color pictures or videos under sufficient daylight.
While at night, the built-in infrared LEDs can help to take clearpictures or videos (monochrome).There is a 3” color LCD display screen on the camera and a
sound recorder embedded in the camera. A laser pointer is usedto help target the photo area of the camera.It is resistant against water and snow. The camera can also
be used as a portable digital camera.
1.2 Application
This camera can be used as an automatic surveillancedevice for guarding and recording unexpected intrusion tohomes, shops, schools, depots, offices, taxis, work sites, etc. Itcan also be used as a trail camera for hunting or monitoringanimals by recording the traces of wild animals. It can be leftalone for weeks and months and it will save event recordsautomatically in digital format.

MG983G-30M
1.3 Camera Overview
Take a few moments to familiarize with the cameracontrols and displays. It is helpful to bookmark this section andrefer to it when reading through the rest of the manual.
Figure 1 Diagram of camera functional indicators

MG983G-30M
Figure 2 Inner panel view
Figure 3 Diagram of camera interfaces

MG983G-30M
1.4 Shooting Information Display
When the camera is turned on (the power switch is slid toSETUP position), the current settings will be displayed onscreen.
Figure 4 Shooting information display
is the correct SIM card status and the available spaceof SD card should be a none zero value.
1.5 Two Way Communication
You can set SMS control submenu as ON to open the twoway communication function. Under this setting, the cameracan receive and respond to your SMS command or the AndroidAPP command.This camera can send pictures instantly to your mobile
device via WCDMA/GSM(GSM not work in USA and Canada)network. You’ll be alerted just when a picture or video has beentaken. The camera sends MMS or Email message throughMMSC(MMS Service Center) or GPRS network, so before usingthis function, you need to open MMS and GPRS service from

MG983G-30M
your service provider. It supports following bands :GSM with850MHz, 900MHz, 1800MHz and 1900MHz;WCDMA with850MHz, 900MHz, 1900MHz and 2100MHz.

MG983G-30M
2 Cautions
The working voltage of the camera is 6V. The camera issupplied by the power adapter or 8 AA batteries.
Please install batteries according to shown polarity. Please insert the SD card before power on camera. Thecamera has no internal memory for saving images or videos.The camera will not work if there is no SD card.
Please unlock the write-protect switch before inserting theSD card.
Please do not insert or take out the SD card when the powerswitch is at ON position.
Please make sure that your SIM card supports the MMS andGPRS data business.
When going into the SETUP mode, allow approximately10-20 seconds for the camera to acquire a signal.
It is recommended to format the SD card by the camerawhen used for the first time. Many other SD cards formattedby other cameras have poor compatibility with differentbrands of cameras. So it is best to format the SD card withthis camera or on a computer.
In the SETUP mode, the camera will shut downautomatically after 3 minutes if no operation is done. Pleaseturn on the power again if you want to continue to work withthe control.

MG983G-30M
3 Quick Start Guide
3.1 Power Supply
Use 8 AA batteries. High-density and high-performancealkaline or lithium batteries are recommended.Also 6V external power supply and solar panel are
supported. The battery can be just a backup for emergency use(6V support).
3.2 Insert SD card and SIM card
Insert an unlocked SD card and an available MMS andGPRS enabled SIM card.
3.3 Do the Camera Settings
Down load the camera set-up software (BMC-config) fromour website. The specified website is written in the last page ofthe manual.
1) Open the software and select camera model:

MG983G-30M
2) Set the camera parameters
First, select your country and carriers (step1) according toyour SIM card and input your receiving phone number in“administrator number” and receiving e-mail address in“Receive Email 1” (step3). For first time use, we suggest youto use default settings (step2), any settings you want to change,please click “Change Setting”.
3) Do WAP/Internet settings

MG983G-30M
After finish above settings, click “Check WAP/InternetParameters” to check whether you have all parameters filled in.Then save the GSM folder to the root directory of your SD card(step4).
If your country or SIM card operator is not in the list, try tofind “Others”, then ask the SIM card operator for theparameters you need(MMS URL, MMS APN, Port, MMS IP,Account, Password, GPRS APN,GPRS account, GPRS password)
MG983G-30M
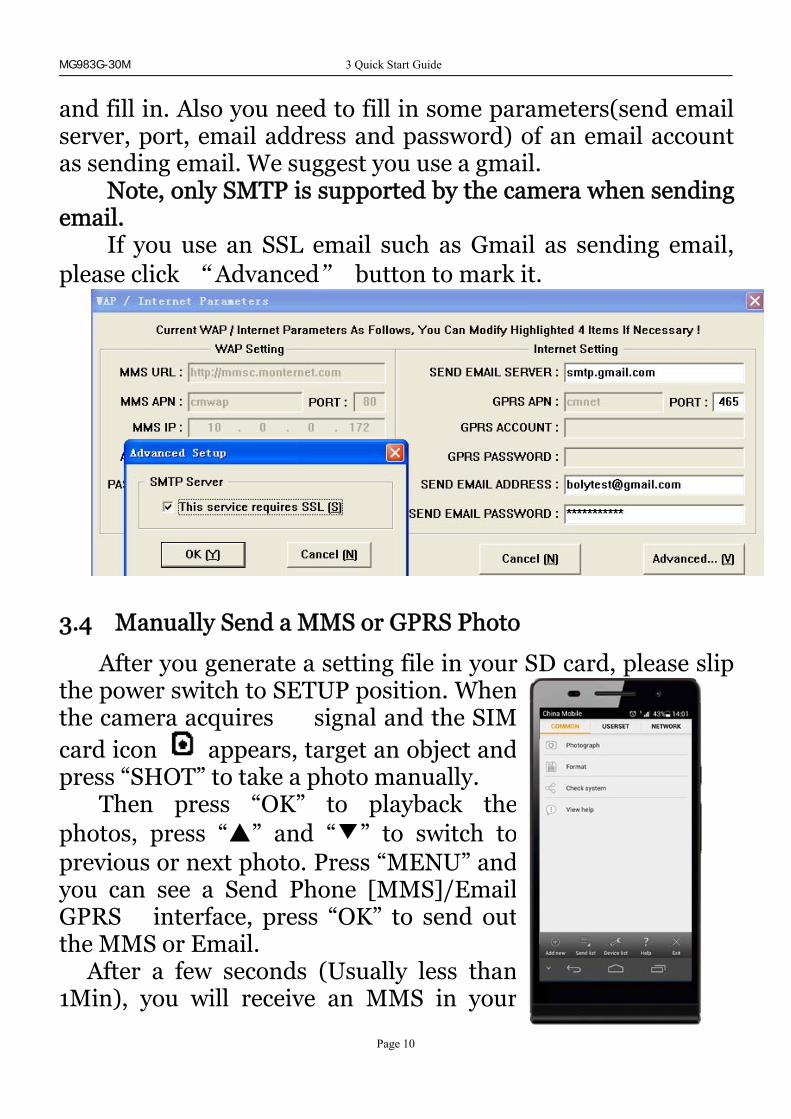
and fill in. Also you need to fill in some parameters(send emailserver, port, email address and password) of an email accountas sending email. We suggest you use a gmail.Note, only SMTP is supported by the camera when sending
email.If you use an SSL email such as Gmail as sending email,
please click “Advanced” button to mark it.
3.4 Manually Send a MMS or GPRS Photo
After you generate a setting file in your SD card, please slipthe power switch to SETUP position. Whenthe camera acquires signal and the SIMcard icon appears, target an object andpress “SHOT” to take a photo manually.Then press “OK” to playback the
photos, press “▲” and “▼” to switch toprevious or next photo. Press “MENU” andyou can see a Send Phone [MMS]/EmailGPRS interface, press “OK” to send outthe MMS or Email.After a few seconds (Usually less than
1Min), you will receive an MMS in your

MG983G-30M
phone or Email in your mailbox.
3.5 SMS Control
When the camera is working, you can send a text message“#T#” to your camera’s SIM card number to get an on spotimage or use our Android application tools. Note you need toset SMS control as ON when using SMS command.
Down load the Android control software from our website.The specified website is written in the last page of the manual.For iPhone, just download it from the App Store by
searching BGTools.

MG983G-30M
4 Advanced Operations
This chapter explains the advanced operations forcustomizing the camera settings.
4.1 Work Mode
Setup mode: to program camera or to playback thephotos or video clips.Hunting mode: when animal or
human intrudes into the monitoringregion, the camera will take pictures orvideos automatically according to theprevious programmed settings. Afterswitching the camera to ON position,the motion indication LED (red) willblink for about 10 seconds. This time interval is for you toposition the camera for automatic surveillance operation.
Security mode: similar tohunting mode, but needs morepower to supply. So it’s suitablefor indoor use and needs to usethe power adapter. Only insecurity mode you can use theremote control to easily arm ordisarm.If the power switch is in ON position and the Security
Mode is ON, the camera will work in Hunting Mode.
4.2 Settings Menu
Press MENU on the keyboard to enter into the menusetting. The settings menu will be shown on the LCD.
Use “▲” or “▼” key to select the menu item, use “►”

MG983G-30M
or “◄” to change different item pages or select the differentoptions. Press “OK” to save the settings.
4.2.1 Setting Items
SettingItems
Description
CameraMode
There are three camera modes: Photo,Video and Pic+Video. You can enter the mainmenu to set the camera mode. If you choosePic+Video mode, the camera takes a picturewith a video clip.
SecurityMode
To set if you will use security mode. Securitymode is suitable for indoor use. You need touse the power adapter to power supply. Thebattery can be just a backup for emergencyuse. Otherwise, the battery will be quicklyconsumed. The remote control is availableonly when Security Mode is ON.
Photo SizeChoose the image size: 14MP, 20MP or30MP.
Video SizeChoose the video size: 1920x1080,1280x720 or 640x480.
Photo BurstThis parameter affects the number ofpictures taken for each triggering in cameramode. It’s from “1 Photo” to “3 Photos”.
VideoLength
Choose duration of recording a video. It’sfrom 5 seconds to 180 seconds.
Set Clock
Set camera date and time.You can change the date and time by settingthis parameter when necessary, e.g., afterevery battery change. The date format can bechanged, the time format is hour: minute:second.

MG983G-30M
Time Lapse
Time lapse means the camera can captureimages or videos at a preset time intervalregardless of whether motions are detected.The default parameter is Off, which means thetime lapse function is disabled. Changing thisparameter to a non-zero value turns on theTime Lapse mode, and camera will takephotos at given time interval.Please note that if the PIR Trigger is set toOff, then Time Lapse can’t be set to Off.
PIR Trigger
Choose sensitivity of the PIR. The highersensitivity indicates that the camera is moreeasily triggered by motion and takes morepictures or records more videos. It isrecommended to use high sensitivity in roomor environment with little interference, and touse lower sensitivity for outdoor orenvironment with lots of interference like hotwind, smoke, near window, etc. For normaluse of the camera, the Normal mode isrecommended and is the default setting.
PIR Interval
This parameter indicates how long the PIR(Passive Infrared motion sensor) will bedisabled after each triggering in ON mode.During this time the PIR of the device will notreact to the motion of human (or animal).The minimum interval is 0 second. It meansthe PIR can work all the time.
Work DayChoose the days of the week to let thecamera work.This item is available only in Security Mode.
Work HourChoose a time period of a day to let thecamera work. The camera will awake at the

MG983G-30M
setting time duration in a day. In the rest ofthe time the camera is sleeping. Set WorkHour as off means the camera works all day.
Send to
There are 2 Send to modes:1 Phone MMS: send images to mobilephone.2 Email GPRS: send images to an e-mailaddress via GPRS use SMTP.You should set your receiving phonenumber and your receiving e-mail address inthe APP program to function it.
Send Mode
There are 4 Send modes: “Manual” works inSETUP mode,“Daily” and “Instant” work inON mode. “OFF” means to close thecommunication function.1. “Manual”:Choose “Manual” in SETUP mode. Pleaseensure a SIM card is inserted properly. Videoinformation can’t be sent in SETUP modewhen you choose Phone MMS; but you cansend photos or videos( less than 10M) whenyou choose Email GPRS.2. “Daily”:Daily means the camera will report thesummarized information at a preset time (ifthe preset time is, eg. 20:00 PM) on howmany pictures it had taken per day. So, youwill get a summarized text message until20:00 PM.If it is on Photo or Pic+Video mode, thecamera will send an MMS at the preset time.The MMS will show you the latest photo andthe total quantity of the pictures taken. If it is

MG983G-30M
on Video mode, the camera will send a SMS orvideo at the preset time. The SMS will showyou how many video clips the camera hastaken within 24 hours.If you choose “Daily”, you need to set thedaily report time: xxH, xxM.3. “Instant”:Instant, just works in ON mode, whichmeans the camera will send an MMS to yourphone instantly after it captures a photo or toyour email with a Video( less than 10M). Youcan choose the number of pictures you want itto send out per day.If it is on Photo mode and you choose theInstant mode, and set the MAX number as 10,the camera will send 10 MMS within 24 hours.It then continues to capture photos and savethem on the SD card. After 24 hours, thecamera will send MMS again when it capturesphotos. If it is on Video mode, the Camera willsend only SMS instead of MMS when send tois set as Phone MMS.If you choose “Instant”, you need to set howmany MMS you want to send for economicconsideration.4. “Off”: to disable communication function.
SMS Control
SMS Control can enable two waycommunication functions. It means if youchoose SMS Control as ON, this camera canreceive and respond to your SMS command.Also you can retrieve live pictures any time.But the power consumption will be a littlemore than normal hunting status.
Game Call It means this camera can play audio file at a

MG983G-30M
preset time clock for preset times.The audio file must be saved in the directoryof \DCIM\BMCIM\ with a name ofAUDIxxxx(from 0000 to 9999).WAV afterformat the SD card and setting the game callas on mode, or choose the audio file(format ofWAV, AVI,MP3) in Windows APP. Note thatGame Call will not function if the SD card isfull or there is a trigger when it is time toplayback the audio.
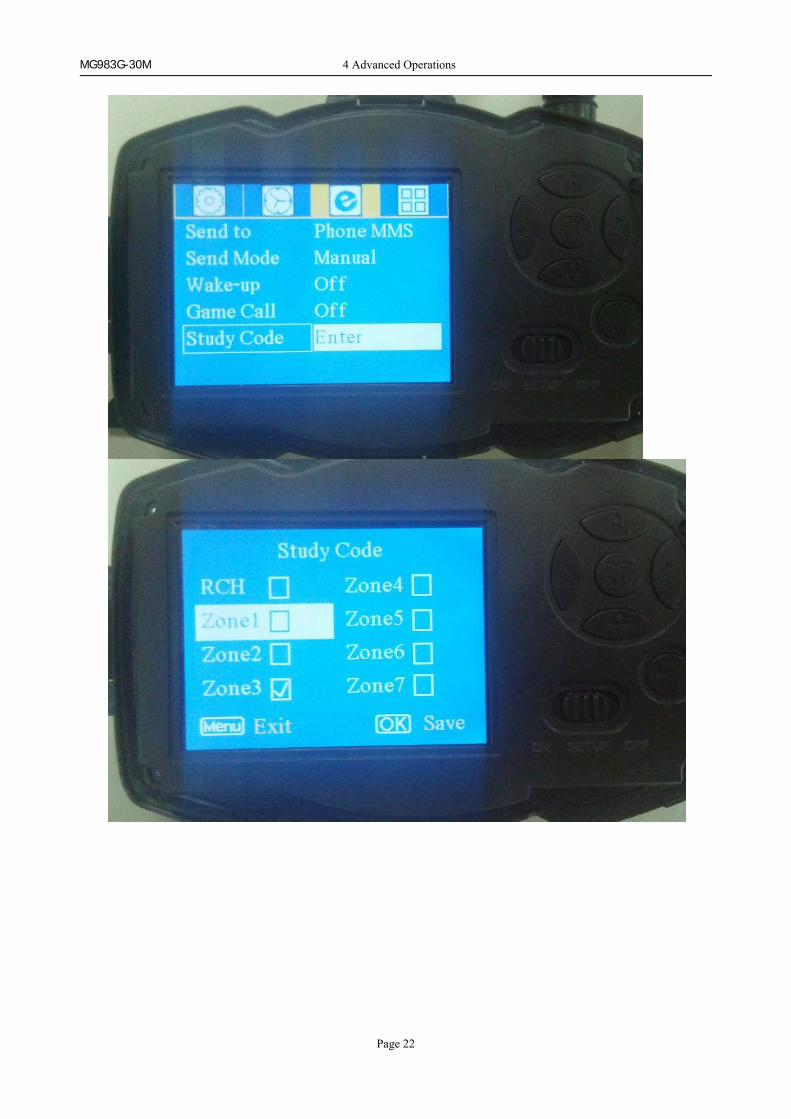
Study Code
It means to pair the camera with a specified433MHz wireless device, such as PIR sensor,wireless door magnet, wireless smokedetector, etc. The specified wireless sensor canbe set as part of the alarm system.All device should be paired with this camerafirst. Please see following chapters to find themethod to connect or remove a wirelesssensor.Please note this item is available only inSecurity Mode.
Language Choose the language you need.Beep Sound Enable or disable the beep sound.
CameraPosit
You can set A-Z position for your camera, sothat you can distinguish which photo is takenby which camera.
Format SDFormat the SD card. All images and videosin the SD card will be deleted.
Default SetRestore all customer settings to defaultvalues.
Version Version information

MG983G-30M
4.2.2 Default Set
Setting Items Default Options Description
Camera
Mode
Photo Video,
Pic+Video
Security
Mode
Off On
Photo Size 30MP 20MP
14MP
Video Size 1920x1080 1280x720
640x480
Photo Burst 1 Photo 2-3 Photos
Video Length 10 Sec. 5-180 Sec.
Set Clock Enter Adjust Clock
Time Lapse OFF 5Min-8H
PIR Trigger Normal High, Low,Off
PIR Interval 5 Sec 0-55 Sec,
1-60 Min
Work Day Enter
Work Hour Off 00:00-23:59
Send to Phone[MM
S]
Email[GPRS],
Send Mode Manual Daily,

MG983G-30M
Instant,
Off
SMS Control On Off Two way
communication
Game Call Off On Set the time and
frequency of
audio playback
Study Code Enter
Language English Suomi,
Deutsch,
Svenskt,
Dansk
Norsk,
čeština
Italiano,
Pусский
Beep Sound On Off
Camera Posit Off A to Z
Position
Format SD Enter Yes, No
Default Set Save
Version Enter

MG983G-30M
4.3 Use the Remote Control
When it’s in Security Mode, you can use the remotecontrol to easily arm (button A) or disarm (button D). Alsoyou can dial the emergency numbers via button C in case ofemergency. Press button B to open or close the laser (youcan easily mount the camera with the help of the laserpointer).Button A: Arm the cameraButton D: Disarm the cameraButton C: Emergency call buttonButton B: Laser pointer
Setup status Study Code Menu Study Code Menu
Method to add remote control(s) to the camera:Set Security Mode as On, Enter the Setup status, press
Menu and enter the Study Code submenu. Choose “RCH,”

MG983G-30M
press OK button, then press button A of the remote control .When it's successful, there will be a "√” before RCH.
Note, it has not entered Security mode even you setsecurity mode as on, you need to press the left key to entersecurity mode quickly or wait for about two minutes tillthere is an “A” instead of “S” on the display screen.
4.4 Load or Remove a Wireless SensorWe support three customized kinds of 433MHZ
sensors, infrared body sensor, wireless door magnet andwireless smoke detector that can be set as an alarm sensorof the camera.Method to load or remove a wireless sensor:1. Power on the wireless sensor.2. Enter the Setup status, press Menu and enter into
the Study Code submenu. Choose a zone, for exampleZone1, press OK button, then trigger the wireless sensor tocheck if the sensor is loaded successfully. When it'ssuccessful, there will be a "√” after the zone number.For example,to load a infrared body sensor :1. Choose a zone to start study code;2. Power on and trigger the wireless sensor;3. When you want to remove the wireless sensor,
please enter the study code menu, press “◄” or “►”
button to cancel the “√.”Please note that the wireless sensors just can be used
in Security Mode. In Hunting Mode, the wireless sensorswill not function.
MG983G-30M

MG983G-30M

MG983G-30M
4.5 Change the Settings via Android APP or SMSWhen you are far away from your house, you can get
spot photos or change camera settings via our androidapplication tools or SMS.
4.6 User LevelThere are two user levels: administrator and normal
users. Each user has a different authorization level:Functions User LevelSet administratorphone number
Onlyadministrator’s password
Set administrator’s password administratorSet camera parameters administrator

MG983G-30M
Set normal user administratorReceive emergency calling administrator, normal userSend SMS for on spot picture administratorReceive MMS when triggered administrator, normal userCheck camera status administrator, normal userGet help information administrator, normal user
4.7 Use Android APPIt’s easy to use the Android APP to communicate with
the camera, so you don’t need to edit the SMS. You justneed to click the button to finish the operation.
4.8 SMS Command ListIf you can’t use the Android APP for easy operation,
the list below shows all the SMS commands for you. Youcan control your camera via SMS.
A. Set Network Parameters

MG983G-30M
No Function SMS Command1 Set Normal
Users PhoneNumber
#n#13800138001#13800138002#13800138003#
2 Set MMSParameters
#m#http://mmsc.monternet.com#10.0.0.172#80#cmwap# name#password#(The example parameters are for thecarrier of China Mobile)
3 Set EmailParameters
#s#[email protected]#bmc123#25#cmnet#smtp.sina.com#name#password#SSL#
4 Set ReceiveE-mailAddress
#r#[email protected] #[email protected]#[email protected] #[email protected]#B. Normal Control
No Function SMS Command1 Get On Spot
Photo#T# (Send MMS to phone)#T#E#(Send to email by GPRS)
4 Check CameraSettings
#L#
5 Format SDCard
#F#
6 SetAdministrator’sPassword
#P#0000# (It’s suggested that theadministrators password be changed atthe beginning)
7 Help #H#C. Set Menu Parameter
No Function SMS Command1 Change
Camera Mode#e#cp# (photo mode) or #e#cv# (videomode) or #e#ct#(pic+video)
2 Change PhotoSize
#e#s5# (5mp) or #e#s10# (10mp)

MG983G-30M
3 Change PhotoBurst
#e#b1# (1~6 photos)
4 Change VideoSize
#e#fh#(720p) or #E#fl#(VGA)
5 Change VideoLength
#e#v5# or #E#v30# (the number after Vis seconds)
6 Change DateTime
#e#t# (adjustment the time)
7 Change TimeLapse
#e#l1h# (1 hour) or #e#l5m# (5 min)
8 Change PIRTrigger
#e#po# (Off) or #e#ph# (High) or#e#pn# (Normal) or #e#pl# (Low)
10 Change PIRInterval
#e#i30m# (30min) or #e#i30s# (30sec)
11 Change SendTo
#e#mp# (phone) or #e#me# (email) or#e#mc# (call) or #e#mg# (e-mail gprs)
12 Change SendMode
#e#ed# (daily) or #e#ei10# (to setinstant mode and the max number perday) or #e#eo# (off) or#e#em#(Manual)
13 Change GameCall
#e#gon18:00[5]# or #e#goff#
15 ChangeCameraPosition
#e#oa# (a~z) to set the camera positionfunction#e#ooff# to off the camera positionfunction
16 Change WorkHour
#e#hoff# or #e#hon10:00-18:00#

MG983G-30M Ⅰ:
Appendix I: PIR Detection Zone
Figure 5 shows Bolymedia’s 5 kinds of detection range atdifferent detection angles. This camera is super long range with60 degree.
Figure 5 PIR Detection Zone
The PIR detection angle (α) is just smaller than the field ofview (FOV) angle (β). The advantage of this design is to reduceempty picture rate and capture most, if not all, motions.
Figure 6 Detection angle vs. FOV angle
This camera has a new design of PIR and the new PIR is

MG983G-30M Ⅰ:
patented. The new patented PIR’s detection range can reach to100ft (in good environments). Figure 7 shows the compareddetection zone between normal PIR and the new patented PIR.
Figure 7 Comparison of Detection Zones of new and existingPIRs

MG983G-30M AppendixⅡ: Error Code
Appendix II: Error Code
Code Meaning Description
Non-existentaddress
Possible cause:1. The user forgets to input the receivingcellphone number.2. The user forgets to input the receivingE-mail address.Suggestion:1. Check the MMS settings, input all thenecessary parameters.
File not found
Possible cause:1. The file means the image file. Itshows that the system can’t find theimage file when sending the MMS.Just when the system is unstable, itwill happen (very small probability).Suggestion:1. When the GSM and GPRS signal areboth OK, please resend again.2. When the GSM and GPRS signal arepoor, please change a place to try again;3. If 1 and 2 do not work and the errorcode 3919 always appears, please sendthe camera back for repairs.
MMS busy;Sending MMSstopped;Sending MMSbusy
Possible cause:When start a new MMS sendingprocedure, the previous MMSsending is not finished, so it willshow these information. This is ainner use error, we have the correctprogrammer design, so it won’thappen in the consumer’s side.Suggestion:

MG983G-30M AppendixⅡ: Error Code
If it always shows 3926,3927 or 3928,maybe there is a hardware defect.Please send camera back for repair (verysmall probability).
Failed toopennetwork;Networknotdeactivated;Networkerror
Possible cause:1. The GSM network is not good or notwell covered with the GPRS network.2. The instability in signal transmissionleads to some MMS setting parametersmissing when the GSM base station dothe data analysis. If for the incorrecttransmission reason, the camera mayshow various error code.Suggestion:1. Contact the network provider if theGPRS network is well covered in thatarea.2. Change a place to try again. It’s betterto try in a public place, where there isalways good signal.3. If the provider said there is GPRSsignal covered but the signal is weak,you can try to use a enhanced antennathat is SMA type with antenna gain of10db.
Notenoughbalance inSIM card;MMS
Possible cause:1. The SIM card is not enough balance.2. Not correct settings.3.The GSM network is not good leading toa timeout problem (very smallprobability).Suggestion:

MG983G-30M AppendixⅡ: Error Code
setting error; 1.Please check to make sure your SIMcard has enough balance.2. Please check the MMS settings.
Other error code
Many codes in the list are used fordebugging in the product design phase.Most of them will not be shown toconsumers, so please ignore the othererror codes and contract us directly.Thanks.

MG983G-30M Appendix Ⅲ: Technical Specifications
Appendix Ⅲ: Technical Specifications
Image Sensor14MP Color CMOS,
20MP , 30MP Interpolation
Lens F/NO=2.2;FOV (Field of View)=60°
PIR Detection Range 30m/100ftDisplay Screen 3’’ LCDMemory Card From 8 MB to 32 GB
Picture Resolution30MP=6400×480020MP = 5184×388814MP = 4320×3240
Video Resolution1080FHD(1920×1080)720P HD (1280×720)VGA (640×480)
PIR SensitivityAdjustable (High / Normal /
Low/Off)Trigger Time 1 sec.Weight 0.30 kgOperation/StorageTemperature
-20 - +60°C / -30 - +70°C
PIR Interval 0 sec. – 60 min.Video Length 5–180 sec.Power Supply 8×AA or 4×AAStand-by Current < 0.25 mA (<6mAh / Day)
Power Consumption
400 videos(interval=5 min,video length=10 sec)
>500 MMS (use 8*AAbatteries)
Sound Recording AvailableMounting Rope / Belt / Python lockDimensions 147 x96 x79 mmOperation Humidity 5 % - 90 %

MG983G-30M Appendix Ⅲ: Technical Specifications
SecurityAuthentication
FCC, CE, RoHS
*without battery

MG983G-12M Appendix Ⅳ: Parts List
Appendix Ⅳ: Parts List
Part Name QuantityDigital Camera oneWireless Remote
Controltwo
USB Cable oneBelt one
User’s Manual oneAntenna one
Warranty Card one433MHz Wireless
Sensoroption