infotainment manual model year 2014.5 edition: … · 10 tp button activate or deactivate radio...
TRANSCRIPT

0 - 1Infotainment Manual Model Year 2014.5 Edition: January 2014 KTA-2723/5-VX-enVAUXHALL Zafira Tourer
Infotainment Manual Model Year 2014.5 Edition: January 2014 KTA-2723/5-VX-en

Navi 950/650 / CD 600 .................. 3CD 400plus/400/300 .................... 77
Contents


Introduction .................................... 4Basic operation ............................ 14Radio ........................................... 22CD Player .................................... 28External devices .......................... 30Navigation .................................... 37Speech recognition ...................... 55Phone .......................................... 59Frequently asked questions ......... 68Index ............................................ 72
Navi 950/650 / CD 600

4 Introduction
Introduction
General information ....................... 4Theft-deterrent feature ................... 5Control elements overview ............ 6Usage .......................................... 12
General informationThe Infotainment system providesyou with state-of-the-art in-carinfotainment.The radio can easily be used byregistering a large number of FM, AMand DAB (Digital Audio Broadcasting)radio stations with the 1...6 presetbuttons.You can connect external datastorage devices, e.g. iPod, USBdevices, or other auxiliary devices tothe Infotainment system as furtheraudio sources; either via cable or viaBluetooth.Using the controls and menus of theInfotainment system, you can operateapproved smartphone applications.In addition, the Infotainment system isequipped with a phone applicationthat allows for comfortable and safeuse of your mobile phone in thevehicle.
Optionally, the Infotainment systemcan be operated using the instrumentpanel controls, the controls on thesteering wheel or the speechrecognition function.The well-thought-out design of thecontrol elements and the cleardisplays enable you to control thesystem easily and intuitively.NoteThis manual describes all optionsand features available for thevarious Infotainment systems.Certain descriptions, including thosefor display and menu functions, maynot apply to your vehicle due tomodel variant, countryspecifications, special equipment oraccessories.
Important information onoperation and traffic safety
9 Warning
The Infotainment system must beused so that the vehicle can bedriven safely at all times. If in
Introduction 5
doubt, stop the vehicle andoperate the Infotainment systemwhile the vehicle is stationary.
9 Warning
The usage of the navigationsystem does not release the driverfrom the responsibility for acorrect, vigilant attitude in roadtraffic. The related trafficregulations must always befollowed.Only make entries (e.g.addresses) with the vehiclestationary.If a navigation instructioncontradicts traffic regulations, thetraffic regulations always apply.
9 Warning
Areas such as one-way streetsand pedestrian zones are notmarked on the navigation systemmap. In such areas, the system
may issue a warning that must beaccepted. Therefore, payparticular attention to one-waystreets and other roads andentrances that must not be driveninto.
Radio receptionRadio reception may be disrupted bystatic, noise, distortion or loss ofreception due to:■ changes in distance from the
transmitter,■ multi-path reception due to
reflection,■ shadowing.
Theft-deterrent featureThe Infotainment system is equippedwith an electronic security system forthe purpose of theft deterrence.The Infotainment system thereforefunctions only in your vehicle and isworthless to a thief.

6 Introduction
Control elements overviewNavi 950 / 650

Introduction 7
1 ; button
Access Home Page .............. 142 Station buttons 1...6
Short press: select station .. . . 24
Long press: save station ....... 243 DEST / NAV button
Open navigationdestination menu .................. 42
4 s button
Radio: search backwards ..... 22
CD/MP3/WMA: skip trackbackwards ............................. 29
External devices: skiptrack backwards .................... 32
5 m VOL knob
Press: switch on/offInfotainment system .............. 12
Turn: adjust volume .............. 126 u button
Radio: search forwards ......... 22
CD/MP3/WMA: skip trackforwards ................................ 29
External devices: skiptrack forwards ....................... 32
7 T button
CD/MP3/WMA: start/pause playback ..................... 29
External devices: start/pause playback ..................... 32
8 FAV 1-2-3 button
Open favourites list ............... 249 AS 1-2 button
Short press: openautostore list .......................... 23
Long press: saveautostore stationsautomatically ......................... 23
10 TP button
Activate or deactivateradio traffic service ................ 25
11 d button
Eject CD ................................ 29
12 CONFIG button
Open settings menu .............. 1913 INFO button
Radio: information oncurrent station
CD/MP3/WMA, externaldevices: information oncurrent track
Navigation: information,e.g. on current location
14 Multifunction knob
Turn: mark menu optionsor set alphanumeric values . . 14
Press (the outer ring):select/activate the markedoption; confirm set value;switch function on/off;open audio or navigationmenu ..................................... 14
15 Eight-way switch
Navigation: move displaywindow in map view .............. 38

8 Introduction
16 BACK button
Menu: one level back ............ 14
Input: delete last characteror entire entry ........................ 14
17 RPT / NAV button
Repeat last navigationmessage ............................... 50
18 CD slot .................................. 2919 O button
Take phone call oractivate/deactivate mute ....... 62
20 NAV button
Display map ......................... 3821 SRCE (Source) button
Press to toggle through thedifferent audio sources
CD/MP3 player ...................... 28
USB ....................................... 30
AUX ....................................... 30
Bluetooth ............................... 30
AM ......................................... 22
FM ......................................... 22
DAB ....................................... 22

Introduction 9
CD 600

10 Introduction
1 ; button
Access Home Page .............. 142 Station buttons 1...6
Long press: save station ....... 24
Short press: select station .. . . 243 s button
Radio: search backwards ..... 22
CD/MP3/WMA: skip trackbackwards ............................. 29
External devices: skiptrack backwards .................... 32
4 m VOL knob
Press: switch on/offInfotainment system .............. 12
Turn: adjust volume .............. 125 u button
Radio: search forwards ......... 22
CD/MP3/WMA: skip trackforwards ................................ 29
External devices: skiptrack forwards ....................... 32
6 FAV 1-2-3 button
Open favourites list ............... 247 AS 1-2 button
Short press: openautostore list .......................... 23
Long press: saveautostore stationsautomatically ......................... 23
8 TP button
Activate or deactivateradio traffic service ................ 25
9 d button
Eject CD ................................ 2910 CONFIG button
Open settings menu .............. 1911 INFO button
Radio: information oncurrent station
CD/MP3/WMA, externaldevices: information oncurrent track
12 Multifunction knob
Turn: mark menu optionsor set alphanumeric values . . 14
Press: select/activate themarked option; confirm setvalue; switch function on/off; open audio menu ............ 14
13 BACK button
Menu: one level back ............ 14
Input: delete last characteror entire entry ........................ 14
14 Tone button
Open tone settings ................ 1715 CD slot .................................. 2916 O button
Take phone call oractivate/deactivate mute ....... 62
17 T button
CD/MP3/WMA: start/pause playback ..................... 29
External devices: start/pause playback ..................... 32

Introduction 11
18 SRCE (Source) button
Press to toggle through thedifferent audio sources
CD/MP3 player ...................... 28
USB ....................................... 30
AUX ....................................... 30
Bluetooth ............................... 30
AM ......................................... 22
FM ......................................... 22
DAB ....................................... 22
Steering wheel audio controls
1 qw button
Short press: take phone call . 62
or dial number in call list ....... 62
or activate speechrecognition ............................ 55
Long press: show call list ...... 62
or activate voice pass-thru(if supported by phone) ......... 55
2 SRC (Source) button
Press: select audio source .... 22
If radio is active: turn up/down to select next/previous preset radiostation ................................... 22
If CD player is active: turnup/down to select next/previous CD/MP3/WMAtrack ...................................... 29
If external device is active:turn up/down to selectnext/previous track ................ 32
If phone is active: turn up/down to select next/previous entry in call list ........ 62
If phone is active and callswaiting: turn up/down toswitch between calls ............. 62
3 w button
Increase volume .................... 124 ─ button
Reduce volume ..................... 125 xn button
Short press: end/declinecall ......................................... 62

12 Introduction
or close call list ...................... 62
or activate/deactivate mute ... 12
or deactivate speechrecognition ............................ 55
UsageControl elementsThe Infotainment system is operatedvia function buttons, a multifunctionknob and menus that are shown onthe display.Inputs are made optionally via:■ the central control unit on the
instrument panel 3 6■ controls on the steering wheel 3 6■ the speech recognition system3 55.
NoteOnly the most direct ways for menuoperation are described in thesubsequent chapters. In somecases, there may be other options.
Switching the Infotainmentsystem on or offPress the X knob briefly. Afterswitching on, the last selectedInfotainment source becomes active.
Automatic switch-offIf the Infotainment system is switchedon using the X knob while the ignitionis switched off, it switches off againautomatically after 10 minutes.
Setting the volumeTurn the X knob. The current settingis shown in a pop-up at the bottom ofthe screen.When the Infotainment system isswitched on, the last selected volumeis set, provided that the volume islower than the maximum start-upvolume.The following volume settigs can beset separately:■ the maximum start-up volume3 18
■ the volume of the trafficannouncements 3 18
■ the volume of the navigationmessages 3 38.

Introduction 13
Auto volumeWhen auto volume is activated3 18, the volume is adaptedautomatically to compensate for theroad and wind noise as you drive.
MutePress the O button (if Phone portalis available: press for a few seconds)to mute the audio sources.To cancel mute again: turn the XVOL knob or press the O buttonagain (if Phone portal is available:press for a few seconds).
Volume limitation at hightemperaturesAt very high temperatures inside thevehicle, the Infotainment systemlimits the maximum adjustablevolume. If necessary, the volume isdecreased automatically.
Modes of operation
Audio playersRepeatedly press the SRCE button totoggle between the AM, FM, CD,USB, AUX, Bluetooth or DAB mainmenus.Find detailed descriptions of:■ CD/MP3 player 3 28■ USB port 3 30■ AUX input 3 30■ Bluetooth audio 3 30■ AM radio 3 22■ FM radio 3 22■ DAB radio 3 27.
NavigationPress the NAV button to display themap of the navigation application.Press the multifunction knob to opena submenu with options for the inputof destinations and the structuring ofa route.Find a detailed description of thenavigation functions 3 37.
PhonePress the O button to display thephone main menu with options for theinput or selection of numbers.Find a detailed description of themobile phone functions 3 59.NoteShort information on the audiosources and the current navigationsession may be displayed via theQuick Info application.

14 Basic operation
Basic operation
Basic operation ............................ 14Tone settings ............................... 17Volume settings ........................... 18System settings ........................... 19
Basic operation
Multifunction knobThe multifunction knob is the centralcontrol element for the menus.Turn the multifunction knob:■ To mark a menu option.■ To set an alphanumeric value.Press the multifunction knob(Navi 950 / Navi 650: press the outerring):■ To select or activate the marked
option.■ To confirm a set value.■ To switch a system function on/off.■ To open the audio or navigation
menu within the respectiveapplication.
; buttonPress the ; button to access theHome Page.
Using the multifunction knob, youmay then access the differentapplications.Turn the multifunction knob to selectthe More screen button at the bottomof the screen.

Basic operation 15
Press the multifunction knob(Navi 950 / Navi 650: press the outerring) to display the second HomePage with further applications.Using the multifunction knob, youmay then access the differentapplications.NoteMost of the applications orapplication menus may also bedirectly accessed via the buttons onthe instrument panel.
BACK buttonPress the BACK button to:■ Exit a menu or screen.■ Return from a submenu to the next
higher menu level.■ Delete the last character in a
character sequence.Press and hold the BACK button fora few seconds to delete the entireentry.
Examples of menu operation
Selecting a screen elementTurn the multifunction knob to movethe cursor (= coloured background) tothe desired option.Press the multifunction knob to selectthe marked icon, screen button ormenu item.NoteIn subsequent chapters theoperating steps for selecting andactivating a screen button or menuitem will be described as "...selectthe...screen button..." or "...selectthe...menu item...".
Scrolling lists
If there are more menu itemsavailable in a list than presentable onthe screen, a scroll bar is displayed.Turn the multifunction buttonclockwise to scroll downwards andanticlockwise to scroll upwards.NoteIn subsequent chapters theoperating steps for scrolling a list willbe described as "...scroll to...menuitem...".

16 Basic operation
Adjusting a setting
Turn the multifunction knob to changethe current value of the setting.Press the multifunction knob toconfirm the set value.NoteIn subsequent chapters theoperating steps for adjusting asetting will be described as "...adjustthe...setting...".
Activating a menu itemTurn the multifunction knob to movethe cursor (= coloured background) tothe desired option.
Press the multifunction knob toactivate the menu item. A checkmarkor a point appear within the box or ringbeside the respective menu item.
NoteIn subsequent chapters theoperating steps for activating amenu item will be described as"...activate the...menu item...".
Entering a character sequenceTurn the multifunction knob to selectthe desired character.Press the multifunction knob to enterthe respective character in the entryfield at the top of the screen.
The last character in the charactersequence can be deleted using theDel screen button or the BACKbutton. Pressing and holding theBACK button deletes the entire entry.Press the multifunction knob toconfirm the selected character.NoteIn subsequent chapters theoperating steps for enteringcharacters will be described as"...enter the desired characters...".
MessagesBefore a system function is executed,you are sometimes prompted with amessage. If requested, select one ofthe options.

Basic operation 17
The selection and activation of ascreen button in a message functionare the same as described forselecting an option in a menu.
Tone settingsPress the ; button and then selectthe More screen button at the bottomof the screen. On the second HomePage, select the Tone icon. The tonesettings menu is displayed.
BassUse this setting to enhance orattenuate the deep frequencies of theaudio sources.Adjust the setting as desired.
MidUse this setting to enhance orattenuate the midrange frequenciesof the audio source.Adjust the setting as desired.
TrebleUse this setting to enhance orattenuate the high frequencies of theaudio sources.
Adjust the setting as desired.
EQ mode(EQ: Equaliser)Use this setting to optimise the tonefor a specific style of music, e.g.Rock or Classical.Select the EQ menu item. A submenuwith predefined sound styles isdisplayed.Select the desired sound style.If one of the predefined sound stylesis selected, Bass, Mid and Treble arepreadjusted by the system.If you manually adjust one of thesettings described above, EQ is set toManual.
Fade and BalanceWhen Fade or Balance are selected,an illustration is displayed on the rightside of the screen.
18 Basic operation
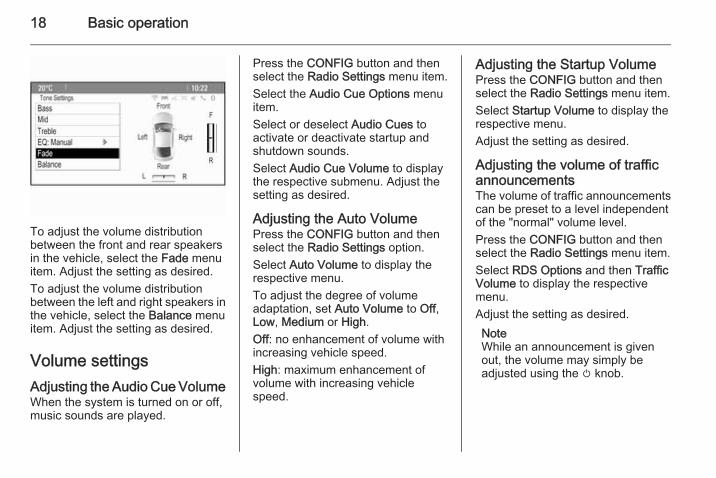
To adjust the volume distributionbetween the front and rear speakersin the vehicle, select the Fade menuitem. Adjust the setting as desired.To adjust the volume distributionbetween the left and right speakers inthe vehicle, select the Balance menuitem. Adjust the setting as desired.
Volume settingsAdjusting the Audio Cue VolumeWhen the system is turned on or off,music sounds are played.
Press the CONFIG button and thenselect the Radio Settings menu item.Select the Audio Cue Options menuitem.Select or deselect Audio Cues toactivate or deactivate startup andshutdown sounds.Select Audio Cue Volume to displaythe respective submenu. Adjust thesetting as desired.
Adjusting the Auto VolumePress the CONFIG button and thenselect the Radio Settings option.Select Auto Volume to display therespective menu.To adjust the degree of volumeadaptation, set Auto Volume to Off,Low, Medium or High.Off: no enhancement of volume withincreasing vehicle speed.High: maximum enhancement ofvolume with increasing vehiclespeed.
Adjusting the Startup VolumePress the CONFIG button and thenselect the Radio Settings menu item.Select Startup Volume to display therespective menu.Adjust the setting as desired.
Adjusting the volume of trafficannouncementsThe volume of traffic announcementscan be preset to a level independentof the "normal" volume level.Press the CONFIG button and thenselect the Radio Settings menu item.Select RDS Options and then TrafficVolume to display the respectivemenu.Adjust the setting as desired.NoteWhile an announcement is givenout, the volume may simply beadjusted using the m knob.

Basic operation 19
Adjusting the Chime VolumeWhen operating the controls in thevehicle, beeping sounds confirm youractions. The volume of the beepingsounds may be adjusted.Press the CONFIG button and thenselect the Vehicle Settings menuitem.Select Comfort and Convenience andthen Chime Volume to display therespective submenu. Select Normalor High.
Adjusting the NavigationVolumePress the CONFIG button and thenselect the Navigation Settings menuitem.Select the Navigation Volume menuitem. The respective submenu isdisplayed.To adjust the volume of theannouncements, selectAnnouncement and then adjust thesetting as desired.
To adjust the volume of the audiosource possibly playing in thebackground, select Background andthen adjust the setting as desired.Select Volume Test to get an audioexample of the settings.NoteWhile an announcement is givenout, the volume may simply beadjusted using the m knob.
System settingsVarious Infotainment system settingsmay be adjusted via the Configapplication.
Language settingsPress the CONFIG button and thenselect the Languages menu item. Alist of all languages available isdisplayed.Select the desired language.
Time and date settingsPress the CONFIG button and thenselect the Time and Date menu itemto display the respective submenu.
NoteIf RDS Auto Time Adjust is activated3 25, time and date areautomatically set by the system.

20 Basic operation
Set timeTo adjust the time settings, select theSet Time menu item. Adjust thesettings as desired.
Set dateTo adjust the date settings, select theSet Date menu item. Adjust thesettings as desired.
Time formatTo choose the desired time format,select the 12 hr / 24 hr Format menuitem. A submenu is displayed.Activate 12 Hour or 24 Hour.
Software informationPress the CONFIG button and thenselect the Radio Settings menu item.Scroll through the list and selectSoftware Versions Menu to displaythe respective submenu.
Software version informationTo display a list of all softwareversions installed, select SoftwareVersion Information.By default, all versions are activated.
Software updateTo update your system software,contact your Vauxhall AuthorisedRepairer.
Log fileTo generate a log file of your currentsoftware version, select the CreateLog File menu item.
Licensing informationTo display information on themanufacturer of the Infotainmentsystem, select Licensing Information.
Factory defaultsTo reset all Infotainment settings totheir factory defaults, select Clear andReset Radio.
Display settingsPress the CONFIG button and thenselect the Display Settings menu itemto display the respective submenu.
Home PageSelect Home Page Menu to displaythe home page settings menu.
To access the menu from the HomePage, select the Menu screen buttonat the bottom of the screen.The Home Page may be adjustedaccording to your personalpreferences.CustomiseThe application icons displayed onthe first home page may be chosen asdesired.Select the Customise menu item todisplay a list of all applicationsinstalled in the system. Activate themenu items of those applications youwish to be displayed on the first homepage.The other applications are thenarranged on the following pages.SortUp to eight application icons may bearranged on each home page.The positions of the icons can bechanged as desired.Select the Sort menu item to displaythe home pages in edit mode.Select the icon you wish to move.

Basic operation 21
Scroll to the position on the homepage where you wish the icon to belocated. Press the multifunction knobto confirm.The icon is moved to the new location.The icon that was located in thatposition before is now displayed in theposition of the moved icon.Home page defaultsTo reset the Home Page to its factorydefaults, select Restore Home PageDefaults.
Display OffTo turn the display off, select DisplayOff.To turn the display back on, press anybutton on the instrument panel(except the m VOL knob).

22 Radio
Radio
Usage .......................................... 22Station search .............................. 22Autostore lists .............................. 23Favourite lists ............................... 24Radio data system (RDS) ............ 25Digital audio broadcasting ........... 27
UsageActivating radioPress the ; button and then selectthe AM, FM or DAB icon.The station last selected is played.NoteWhen an audio source is alreadyactive, you may toggle between thedifferent audio sources byrepeatedly pressing the SRCEbutton.
Station searchAutomatic station searchBriefly press the t or v buttons toplay the next station in the stationmemory.
Manual station searchPress and hold the t or v buttons.Release the button when the requiredfrequency has almost been reachedon the frequency display.
Manual station tuningIn the FM and DAB waveband, pressthe multifunction knob to open therespective menu and then selectManual tuning. The frequencycurrently active is displayed at thebottom of the screen.Turn the multifunction knob to reachthe desired frequency.In the AM waveband, turn themultifunction knob to adjust thefrequency.
Station listsIn the FM and DAB waveband, turnthe multifunction knob to display thestation list.In the AM waveband, press themultifunction knob to display therespective waveband menu.Select AM Station List.A list of all receivable stations of therelevant waveband and in the currentreception area is displayed.

Radio 23
NoteIf no station list has been createdbeforehand, the Infotainmentsystem performs an automaticstation search.
Select the desired station.NoteThe currently received station ismarked by i.
Category listNumerous RDS 3 25 and DAB3 27 stations broadcast a PTYcode, which specifies the type ofprogramme transmitted (e.g. news).
Some stations also change the PTYcode depending on the content whichis currently transmitted.The Infotainment system stores thesestations in the correspondingcategory list sorted by programmetype.NoteThe category list submenu item isonly available for the FM and theDAB wavebands.
To search for a programme typedetermined by the stations, select thewaveband specific category listoption.A list of programme types currentlyavailable is displayed.Select the desired programme type. Alist of stations is displayedtransmitting a programme of theselected type.Select the desired station.NoteThe currently received station ismarked by i.
Updating the station listsIf the stations stored in the waveband-specific station list can no longer bereceived, the AM and the DAB stationlists must be updated.NoteThe FM station list is updatedautomatically.
Select the corresponding list item inthe waveband-specific menu toupdate a station list.A station search is started. Once thesearch is finished, the stationpreviously selected is played.To cancel the station search, pressthe multifunction knob.NoteIf a waveband specific station list isupdated the corresponding categorylist (if available) is also updated.
Autostore listsThe stations best received in awaveband can be stored in andselected from the autostore lists.

24 Radio
Each waveband has 2 autostore lists(AS 1, AS 2), in each of which6 stations can be stored.NoteThe currently received station ishighlighted.
Automatic station storingKeep the AS button pressed until anautostore message is displayed. The12 strongest stations in the currentwaveband are stored in the twoautostore lists.To cancel the autostore procedure,select the Cancel screen button.
Storing stations manuallyStations can also be stored manuallyin the autostore lists.Set the station to be stored.Press the AS button to open theautostore list or to switch to anotherautostore list.To store the station in a list position:press the corresponding stationbutton 1...6 until a confirmationmessage is displayed.NoteManually stored stations areoverwritten in an automatic stationstoring process.
Retrieving a stationIf required, press the AS button toopen an autostore list or to switch toanother autostore list.Press one of the station buttons 1...6to activate the station at thecorresponding list position.
Favourite listsStations of all wavebands can bestored manually in the favourite lists.
6 stations can be stored in eachfavourite list. The number of availablefavourite lists can be set (see below).NoteThe currently received station ishighlighted.
Storing a stationSet the station to be stored.Briefly press the FAV button to opena favourite list or to switch to anotherfavourite list.To store the station in a list position:press the corresponding stationbutton 1...6 until a confirmationmessage is displayed.

Radio 25
Retrieving a stationIf required, briefly press the FAVbutton to open a favourite list or toswitch to another favourite list. Pressone of the station buttons 1...6 toactivate the station stored in therespective location.
Defining the number of favouritelistsPress the CONFIG button and thenselect the Radio Settings menu item.Select Number of Favourite Pages todisplay the respective submenu.Select the number of favourite pagesyou wish to be displayed.
Radio data system (RDS)RDS is a service of FM stations thatconsiderably facilitates the finding ofthe desired station and its fault-freereception.
Advantages of RDS■ On the display the programme
name of the set station appearsinstead of its frequency.
■ During station search theInfotainment system tunes in toRDS stations only.
■ The Infotainment system alwaystunes in to the best receivablebroadcasting frequency of the setstation by means of AF (AlternativeFrequency).
■ Depending on the station that isreceived the Infotainment systemdisplays radio text that can contain,for example, information on thecurrent programme.
RDS Options menuTo open the menu for the RDSconfiguration, press the CONFIGbutton and then select the RadioSettings menu item.Select RDS Options to display therespective submenu.
Activating the RDS functionActivate the RDS menu item.NoteIf RDS is deactivated, not all menuitems of the RDS Options menu aredisplayed.
RegionalRDS stations sometimes broadcastregionally different programmes ondifferent frequencies.If Regional is activated, onlyalternative frequencies (AF) with thesame regional programmes areselected.

26 Radio
If Regional is deactivated, alternativefrequencies of the stations areselected without regard to regionalprogrammes.
Text Scroll FreezeSome RDS stations do not only showthe programme service name on thedisplay, but also additionalinformation on the currentprogramme. If additional informationis displayed, the programme name ishidden.To prevent additional informationfrom being displayed, activate theText Scroll Freeze menu item.
Radio TextIf RDS and the reception of an RDSstation are activated, information onthe radio programme currently activeor the music track currently playingare displayed below the programmename.To show or hide the information,activate or deactivate the Radio Textmenu item.
Radio traffic service(TP = Traffic Programme)Radio traffic service stations are RDSstations that broadcast traffic news.If the radio traffic service is switchedon, radio or media playback isinterrupted for the duration of thetraffic announcement.
Switching the radio traffic service onand offTo switch the traffic announcementstandby facility of the Infotainmentsystem on and off, press the TPbutton.■ If the radio traffic service is
switched on, [ ] is indicated on thedisplay.
■ If the current station is not a radiotraffic service station, a search isstarted automatically for the nextradio traffic service station.
■ If a radio traffic service station hasbeen found, [TP] is indicated on thedisplay.
Traffic VolumeTo adjust the volume of trafficannouncements, select the TrafficVolume menu item. The respectivesubmenu is displayed. Adjust thesetting as desired.
Listening to traffic announcementsonlySwitch on the radio traffic service andcompletely turn down the volume ofthe Infotainment system.
Blocking out traffic announcementsTo block out a traffic announcement,e.g. during CD/MP3 playback:Press the TP button or select theCancel screen button in the TPmessage.The traffic announcement iscancelled, but the radio traffic serviceremains switched on.
Auto Time AdjustThe system constantly receivesinformation on the current time anddate.

Radio 27
If you wish the time and date settingsto be updated automatically, activatethe RDS Auto Time Adjust menu item.If you wish to set time and datemanually, deactivate the RDS AutoTime Adjust menu item.
Digital audio broadcastingDigital audio broadcasting (DAB) isan innovative and universalbroadcast system.
General information■ DAB stations are indicated by the
programme name instead of thebroadcasting frequency.
■ With DAB, several radioprogrammes (services) can bebroadcasted on a single frequency(ensemble).
■ Besides high-quality digital audioservices, DAB is also able totransmit programme-associateddata and a multitude of other dataservices including travel and trafficinformation.
■ As long as a given DAB receivercan pick up the signal sent out by abroadcasting station (even if thesignal is very weak), soundreproduction is ensured.
■ There is no fading (weakening ofthe sound) that is typical of AM orFM reception. The DAB signal isreproduced at a constant volume.
■ Interference caused by stationsthat are on nearby frequencies (aphenomenon that is typical of AMand FM reception) does not occurwith DAB.If the DAB signal is too weak to bepicked up by the receiver, thesystem switches over to the sameprogramme on another DAB or FMstation.
■ If the DAB signal is reflected bynatural obstacles or buildings, thereception quality of DAB isimproved, whereas AM or FMreception is considerably impairedin such cases.
■ When DAB reception is enabled,the FM tuner of the Infotainmentsystem remains active in the
background and continuallysearches for the best receivable FMstations. If TP 3 25 is activated,traffic announcements of the FMstation which is currently bestreceived are issued. Deactivate TP,if DAB reception should not beinterrupted by FM trafficannouncements.
DAB announcementsBesides their music programmes, lotsof DAB stations also broadcastannouncements of variouscategories.While being in the DAB main menu,press the multifunction knob to openthe DAB menu and then selectAnnouncements.If you activate some or all categories,the currently received DAB service isinterrupted when an announcementof these categories is made.Activate the desired categories.

28 CD Player
CD Player
General information ..................... 28Usage .......................................... 29
General informationImportant information aboutaudio CDs and MP3/WMA CDsThe Infotainment system's CD playercan play audio CDs and MP3/WMACDs.
Caution
Under no circumstances placeDVDs, single-CDs with a diameterof 8 cm or shaped CDs in the audioplayer.You must not put any stickers onCDs. These discs can get jammedin the CD drive and ruin the drive.An expensive replacement of thedevice will then be necessary.
File formats
Audio CDsThe following CD formats can beused: CD-ROM Mode 1 and Mode 2;CD-ROM XA Mode 2, Form 1 andForm 2.
MP3 CDsThe following file formats can beused: ISO9660 Level 1, Level 2,(Romeo, Joliet).MP3 and WMA files written in anyformat other than listed above maynot play correctly, and their file namesand folder names may not bedisplayed correctly.The following restrictions apply for thedata stored on an MP3/WMA CD:Number of tracks: max. 999.Number of folders: max. 255.Folder structure depth:max. 64 levels (recommended:max. 8 levels).Number of playlists: max. 15.Number of songs per playlist:max. 255.Applicable playlistextensions: .m3u, .pls, .asx, .wpl.

CD Player 29
UsageStarting CD playbackPush the CD with the labelled sidefacing upwards into the CD slot untilit is pulled in.CD playback starts automatically andthe CD or MP3 CD main menu isdisplayed.If there is already a CD inserted, butthe CD or MP3 CD main menu is notactive, press the ; button and thenselect the CD icon.The CD or MP3 CD main menu isdisplayed and CD playback is started.
Depending on the data stored on theaudio CD or MP3 CD, more or lessdetailed information on the CD andthe current music track are shown onthe display.NoteWhen an audio source is alreadyactive, you may toggle between thedifferent audio sources byrepeatedly pressing the SRCEbutton.
Removing a CDPress d button.The CD is pushed out of the CD slot.If the CD is not removed afterejection, it will be drawn back in againautomatically after a few seconds.
Track ListTurn the multifunction knob to displaya list of all tracks on the CD.NoteThe currently playing track is markedby i.
Select the desired track.
Function buttons
Skipping to previous or next trackPress the t or v buttons once orseveral times to skip to the previousor next track.
Fast forwarding or rewindingPress and hold the t or v buttonsto fast forward or rewind the currenttrack.
Pausing playbackPress the T button to pauseplayback.
Audio menuPress the multifunction knob todisplay the CD or MP3 menu.NoteFind a description of the functions inthe MP3 menu 3 32.
Shuffle functionTo play the tracks on the CD inrandom order, activate the Shufflemenu item.To return to the normal playing order,deactivate the Shuffle menu item.
30 External devices
External devices
General information ..................... 30Playing audio ............................... 32Displaying pictures ....................... 33Using apps ................................... 34
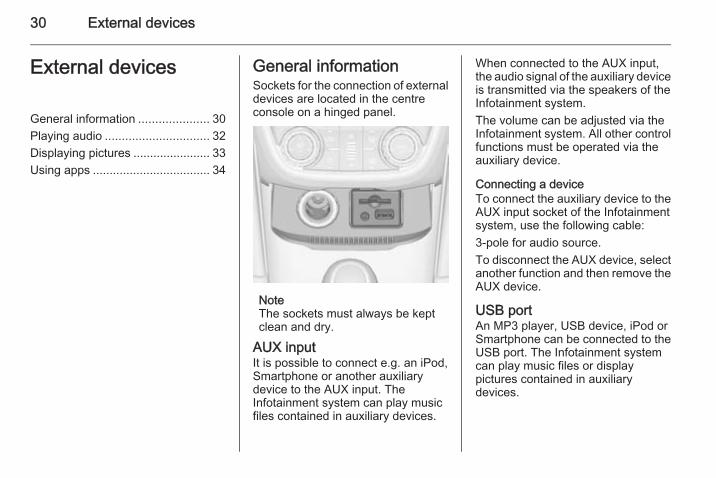
General informationSockets for the connection of externaldevices are located in the centreconsole on a hinged panel.
NoteThe sockets must always be keptclean and dry.
AUX inputIt is possible to connect e.g. an iPod,Smartphone or another auxiliarydevice to the AUX input. TheInfotainment system can play musicfiles contained in auxiliary devices.
When connected to the AUX input,the audio signal of the auxiliary deviceis transmitted via the speakers of theInfotainment system.The volume can be adjusted via theInfotainment system. All other controlfunctions must be operated via theauxiliary device.
Connecting a deviceTo connect the auxiliary device to theAUX input socket of the Infotainmentsystem, use the following cable:3-pole for audio source.To disconnect the AUX device, selectanother function and then remove theAUX device.
USB portAn MP3 player, USB device, iPod orSmartphone can be connected to theUSB port. The Infotainment systemcan play music files or displaypictures contained in auxiliarydevices.

External devices 31
When connected to the USB port, thedevices mentioned above can beoperated via the controls and menusof the Infotainment system.NoteNot all MP3 player, USB drive, iPodmodels or Smartphones aresupported by the Infotainmentsystem.
Connecting/disconnecting a deviceConnect the device to the USB port.For the iPod, use the appropriateconnection cable.NoteIf a non-readable USB device oriPod is connected, a correspondingerror message will appear and theInfotainment system willautomatically switch to the previousfunction.
To disconnect the USB device oriPod, select another function and thenremove the USB storage device.
Caution
Avoid disconnecting the deviceduring playback. This maydamage the device or theInfotainment system.
BluetoothBluetooth enabled audio sources(e.g. music mobile phones, MP3players featuring Bluetooth, etc.),which support the Bluetooth musicprofiles A2DP and AVRCP can beconnected wirelessly to theInfotainment system.The Infotainment system can playmusic files contained in Bluetoothdevices, e.g. iPod or Smartphone.
Connecting a deviceFind a detailed description on theBluetooth connection 3 60.
File formats
Audio filesOnly devices formatted in the FAT32,NTFS and HFS+ file systems aresupported.NoteSome files may not be playedproperly. This might be due to adifferent recording format or thecondition of the file.Files from online shops to whichDigital Rights Management (DRM)has been applied cannot be played.
The playable audio file formatsare .mp3, .wma, .aac and .m4a.When playing a file with ID3 taginformation, the Infotainment systemcan display information, e.g. on thetrack title and artist.
Picture filesThe displayable picture file formatsare .jpg, .jpeg, .bmp, .png and .gif.The files must have a maximum sizeof 2048 pixels in widths and2048 pixels in heights (4MP).

32 External devices
GracenoteThe Gracenote database containsinformation on media data currentlyavailable on the market.When connecting external devices,the tracks or files are recognised bythe Gracenote function.If the Gracenote normalisationfunction is activated, spellingmistakes in MP3 tag data areautomatically corrected. Due to this,media search results may beimproved.Press the CONFIG button and thenselect the Radio Settings menu item.Select Gracenote Options to displaythe respective submenu.Activate the Gracenote normalisationfunction.
Playing audioStarting playbackIf not connected, connect the device3 30.Press the ; button and then selectthe USB, AUX or Bluetooth icon.
Example: USB main menu
Function buttonsThe media files on the USB andBluetooth devices may be operatedusing the buttons on the instrumentpanel.
Skipping to previous or next trackPress the t or v buttons once orseveral times to skip to the previousor next track.
Fast forwarding or rewindingPress and hold the t or v buttonsto fast forward or rewind the currenttrack.
Pausing playbackPress the T button to pauseplayback.
Audio menusTo display the respective audiomenu, press the multifunction knob.NoteNot all menu items are available inall audio menus.
Shuffle functionPress the multifunction knob todisplay the USB or Bluetooth menu.

External devices 33
To play the tracks on the respectivedevice in random order, activate theShuffle menu item.To return to the normal playing order,deactivate the Shuffle menu item.
Browsing(only available in USB menus)To search for a track within thestructure, select one of the menuitems, e.g. Folders, Play Lists orAlbums.Browse through the structure untilyou find the desired track.Select the track to start playback.
Individual playlistsThe system allows new playlists to becreated via the Gracenote function.Similar tracks are put together on alist automatically generated by thesystem.Select the track around which youwish to create a new playlist.Select the Play More Like This...menu item in the respective audiomenu. A new playlist is created andstored in the Play Lists menu.
To delete a playlist generated by thesystem, select the Delete AutomaticPlaylist menu item. A list of allgenerated playlists is displayed.Select the playlist you wish to delete.The playlist is deleted.
Displaying picturesViewing picturesConnect a USB device 3 30.Press the ; button and then selectthe Pictures icon to open the PictureViewer USB menu.A list of all pictures and picture foldersfound on the USB device is displayed.Browse through the pictures andfolders until you find the desiredpicture and select it. The picture isdisplayed.
Function buttons
Info buttonSelect the Info screen button at thebottom of the screen to displayinformation on the picture stored onthe USB device, e.g. a name ornumber. The respective information isdisplayed above the picture.
Skipping to the previous or nextpictureSelect the < or > screen buttons atthe bottom of the screen to display theprevious or next picture.

34 External devices
Slide showTo start a slideshow of all picturesstored in the respective picture folder,select the 6 screen button at thebottom of the screen. The slideshowis started.When the slideshow is started, the 6screen button changes to Q.Select the Q screen button to pausethe slideshow.
Rotating the pictureSelect the R screen button at thebottom of the screen to rotate thepicture.
Picture menuTo display the picture menu, selectthe Menu screen button at the bottomof the screen.
Picture Viewer MainSelect the Picture Viewer Main menuitem to display a list of all picturefolders, see above.
Slideshow TimerTo adjust the time sequence in whichone picture is shown during a slideshow, select the Slideshow Timermenu item. The respective submenuis displayed. Select the desiredoption.
Shuffle ImagesTo display the pictures of a slide showin random order, activate the ShuffleImages screen button.
Using appsThe Infotainment system supports theoperation of apps via the controls onthe Infotainment system.Before an application can beoperated using the controls andmenus of the Infotainment system,the respective application has to beinstalled via a smartphone.
Activating the Tethering functionon the smartphoneActivate the Tethering and theBluetooth functions on thesmartphone (see user guide of thesmartphone).NoteTethering has to be set up correctlydepending on the network provider.
Connect the smartphone to theInfotainment system via Bluetooth3 60.
Creating a new accountPress the ; button and then selectthe Apps icon to display a welcomescreen.To setup a new account, select therespective screen button at thebottom of the screen. You are ledthrough various setup screens.First, a list of all phones paired to thesystem is displayed. Select the phonewith which you want to establish anInternet connection to the app store.

External devices 35
Then a keyboard for the entry of anemail address is displayed. Enteryour email address.In the menu displayed afterwards, aPIN code needs to be set. Select theNew PIN entry field. A keyboard isdisplayed. Select the desired digits.To confirm the PIN code, select theConfirm New PIN entry field. Thekeyboard is redisplayed. Enter thePIN code again. Confirm your input.A menu for country selection isdisplayed. Scroll through the list andselect the desired country.Last, the privacy policy of the appstore is displayed. Select the Agreescreen button to create the account.The apps main menu is displayed.
Installing new appsPress the ; button and then selectthe Apps icon to display the appsmain menu.Select the Apps screen button at thebottom of the screen to display theapps menu.
AllTo display a list of all apps available,select the All screen button at thebottom of the screen.Scroll through the list and select thedesired app. A submenu with detailedinformation on the respective app isdisplayed.To install the app on the Infotainmentsystem, select the Install screenbutton at the bottom of the screen.The app is installed.When the installation process isfinished, the Install screen buttonchanges to Launch.NoteApps installed on the Infotainmentsystem are displayed as icons on thehome pages.
o
To search for a specific app, selectthe o screen button. A keyboard isdisplayed.Enter the search name. A list of allapps found for the respective searchname is displayed.
Select the desired app. A submenuwith detailed information on therespective app is displayed.To install the app on the Infotainmentsystem, select the Install screenbutton at the bottom of the screen.The app is installed.When the installation process isfinished, the Install screen buttonchanges to Launch.NoteApps installed on the Infotainmentsystem are displayed as icons on thehome pages.
My AppsPress the ; button and then selectthe Apps icon to display the appsmain menu.Select the Apps screen button at thebottom of the screen to display theapps menu.To display a list of all apps installedon the Infotainment system, selectthe My Apps screen button at thebottom of the screen.Select the desired options for e.g.starting or deleting an app.

36 External devices
SettingsThe settings menu provides optionsfor the management of the accounts.Press the ; button and then selectthe Apps icon to display the appsmain menu.Select the Settings screen button atthe bottom of the screen to display therespective submenu.Adjust the settings as desired.

Navigation 37
Navigation
General information ..................... 37Usage .......................................... 38Destination input .......................... 42Guidance ..................................... 50
General informationThe navigation application will reliablyguide you to your destination withoutthe need to read maps.The current traffic situation is takeninto account in the route calculation.For this reason, the Infotainmentsystem receives trafficannouncements in the currentreception area via RDS-TMC.The navigation application cannot,however, take into account trafficincidents, traffic regulations changedat short notice and hazards orproblems that arise suddenly (e.g.road works).
Caution
The usage of the navigationsystem does not release the driverfrom the responsibility for acorrect, vigilant attitude in roadtraffic. The relevant trafficregulations must always be
followed. If a navigation instructioncontradicts traffic regulations, thetraffic regulations always apply.
Functioning of the navigationapplicationThe position and movement of thevehicle are detected by the navigationapplication using sensors. Thetravelled distance is determined bythe vehicle's speedometer signal andturning movements on bends by agyro sensor. The position isdetermined by the GPS satellites(Global Positioning System).By comparing the sensor signals withthe digital maps, it is possible todetermine the position with anaccuracy of approx. 10 metres.The system will also work with poorGPS reception, however, theaccuracy of the determination of theposition will be reduced.After the entry of the destinationaddress or point of interest (nearestpetrol station, hotel, etc.) the route iscalculated from the current location tothe destination selected.
38 Navigation
Route guidance is provided by voicecommands and a direction arrow, aswell as with the aid of a multi-colourmap display.
UsageInformation on the map displayTo display the map around the currentlocation, you may optionally:■ Press the NAV button.■ Press the ; button and then select
the Navigation icon.
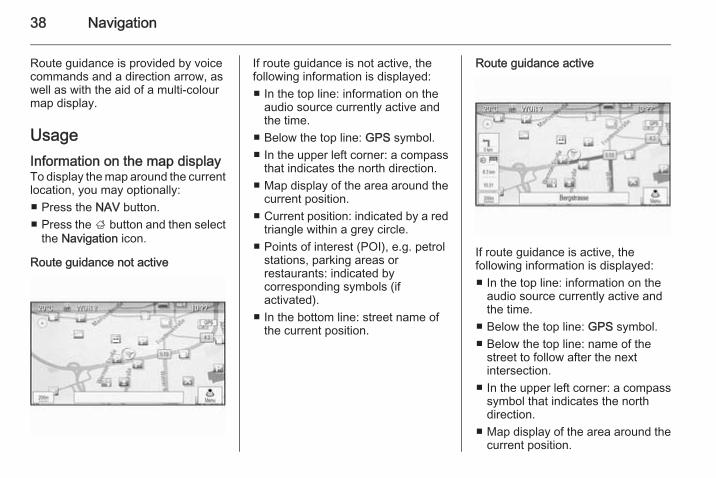
Route guidance not active
If route guidance is not active, thefollowing information is displayed:■ In the top line: information on the
audio source currently active andthe time.
■ Below the top line: GPS symbol.■ In the upper left corner: a compass
that indicates the north direction.■ Map display of the area around the
current position.■ Current position: indicated by a red
triangle within a grey circle.■ Points of interest (POI), e.g. petrol
stations, parking areas orrestaurants: indicated bycorresponding symbols (ifactivated).
■ In the bottom line: street name ofthe current position.
Route guidance active
If route guidance is active, thefollowing information is displayed:■ In the top line: information on the
audio source currently active andthe time.
■ Below the top line: GPS symbol.■ Below the top line: name of the
street to follow after the nextintersection.
■ In the upper left corner: a compasssymbol that indicates the northdirection.
■ Map display of the area around thecurrent position.

Navigation 39
■ Current position: indicated by a redtriangle within a grey circle.
■ Route: indicated by a blue line.■ Final destination: indicated by a
black chequered flag.■ Waypoint (intermediate
destination): indicated by a reddiamond.
■ Points of interest (POI), e.g. petrolstations, parking areas, orrestaurants: indicated bycorresponding symbols (ifactivated).
■ Traffic incidents, e.g. traffic jam:indicated by correspondingsymbols (if activated).
■ On the left side: direction arrow anddistance to the next manoeuvre.
■ On the left side: remaining distanceto the final destination or to the nextwaypoint.
■ On the left side: estimated arrivaltime or remaining travel time.
■ In the bottom line: street name ofthe current position.
Map manipulation
Moving the visible map sectionThe visible map section on the mapdisplay can be moved freely in alldirections using the Eight-way switch.The Eight-way switch in the middle ofthe multifunction knob may be tilted inall directions.Tilt the switch to one side. The visiblemap section moves in the respectivedirection.To redisplay the map around thecurrent location, press the BACKbutton.
Changing the map scaleWhen the map is displayed, turn themultifunction knob to display a scalebar at the bottom of the screen.Turn the multifunction knob again toadjust the scale as desired.
Changing the map modeThe map may be displayed in three(route guidance not active),respectively five (route guidanceactive) different modes, see "Mapsetup" below.Repeatedly press the NAV button totoggle between the different mapmodes.
Map setup
Heading indicatorPress the multifunction knob todisplay the Navigation Menu. Selectthe Heading Indicator menu item todisplay the respective submenu.The following options are available:■ 2D North Up: 2D view, north facing
upwards.■ 2D Heading Up: 2D view, driving
direction facing upwards.■ 3D Heading Up: 3D view, driving
direction facing upwards.Select the desired option.

40 Navigation
Map modesPress the multifunction knob todisplay the Navigation Menu. Selectthe Map Modes menu item to displaythe respective submenu.The following options are available:■ Full Map ("Normal" view described
above): Full screen map view, allfunction and indication screenbuttons displayed.
■ Full Glory: Full screen map view,most functions and indicationscreen buttons hidden.
■ Split with Turn List: Divided screenwith map on the left and turn list onthe right side.
■ Split with Turn Arrow: Dividedscreen with map on the left side andturn arrow for the next turningmanoeuvre on the right side.
■ Split with Media: Divided screenwith map on the left side and audiosource currently active on the rightside.
Select the desired option.
Map displayPress the multifunction knob todisplay the Navigation Menu. Selectthe Map Settings menu item and thenMap Display to display the respectivesubmenu.Depending on the external lightingconditions, activate the Day or Nightmenu item.For an automatic adaption by thesystem, activate Automatic.
Displaying POIsPress the multifunction knob todisplay the Navigation Menu.Select the Show POIs menu item todisplay the respective submenu.If you wish all POIs available in thesystem to be displayed on the map,activate Show all POIs.If you do not wish POIs to bedisplayed on the map, activate Hideall POIs.To only display specific POIs, activatethe User Defined menu item and thenactivate the POI categories you wishto be displayed.
Changing screen informationThe route information displayed onthe screen during active routeguidance may be customised.Press the multifunction knob todisplay the Navigation Menu. Scrollthrough the list and select the SwitchRoute Time/Destination menu item.Time informationIf you wish to change the timeinformation displayed, select SwitchArrival/Travel Time to display therespective submenu.Activate the information setting youwish to be displayed.Destination informationIf you are in a waypoint trip, you maywant to display the route informationfor a waypoint instead of those for thefinal destination.To change the setting, select SwitchWaypoint/Destination. A list of alldestinations in the waypoint tripcurrently active is displayed.Activate the information setting youwish to be displayed.

Navigation 41
Position information
Current positionPress the multifunction knob todisplay the Navigation Menu. Selectthe Current Position Info menu item.On the right side of the screen, thecurrent position is displayed on themap. On the left side, the GPScoordinates of the current position areshown.
Destination positionIf route guidance is active, you maydisplay information on the destinationentered.Press the multifunction knob todisplay the Navigation Menu. Selectthe Destination Position Info menuitem.On the right side of the screen, thedestination is displayed on the map.On the left side, the address and theGPS coordinates of the destinationare shown.
Saving a positionThe current position or a destinationposition may be saved in the addressbook.Select the Save screen button. Find adetailed description on savingaddresses in the address book3 42.
Route simulationThe Infotainment system features aroute simulation mode for testpurposes.To start the simulation mode, pressthe CONFIG button and then selectthe Navigation Settings menu item.Scroll through the list and selectRoute Simulation to display therespective submenu.
Starting positionSince the simulation mode does notdraw on the GPS signal providing thecurrent position of the vehicle, a startposition must be set manually.
Use Last Known PositionTo set the last position provided by aGPS signal as starting point, selectthe Use Last Known Position menuitem.Use Previous DestinationTo use one of the last destinationsentered as starting point, select theUse Previous Destination menu item.The previous destinations list isdisplayed.Select the desired address.Use Specified LocationTo use a specific location as startingpoint, select the Use SpecifiedLocation menu item.Enter an address. Find a detaileddescription 3 42.Simulation mode is started.
Cancelling simulation modeTo leave the simulation mode, pressthe CONFIG button and then selectthe Navigation Settings menu item.Scroll through the list and selectRoute Simulation to display therespective submenu.

42 Navigation
Select the Cancel Route Simulationmenu item.
Additional route simulation menuWhen route guidance is active in thesimulation mode, an additional menuis displayed in the Navigation Menu.Press the multifunction knob todisplay the Navigation Menu. Scrollthrough the list and select the RouteSimulation menu item to display therespective submenu.To stop the simulated route guidance,select the Stop Simulation menu item.The guidance process is stopped, theroute guidance mode remains active.To display the next simulated turningmanoeuvre on the map, select theNext Manoeuvre menu item.
Destination inputThe Destination application providesdifferent options to set a destinationfor route guidance.Press the DEST / NAV button (whenroute guidance is not active) todisplay the Destination Entry menu.
Manual address entry
Address Entry menuPress the DEST / NAV button todisplay the Destination Entry menuand then select the Address Entryicon to display a mask for addressentry.
Select the Country entry field. A list isdisplayed. Select the desired country.Select the City/Postal entry field todisplay a keyboard. Enter the desiredcity name or postal code (see below).Select the Street entry field toredisplay the keyboard. Enter thedesired street name (see below).You may then enter a house numberor junction.Select the House number or Junctionentry field. The keyboard isredisplayed. Enter the desirednumber or street name (see below).

Navigation 43
NoteIf a house number is not stored in thesystem database, the house numberclosest to the destination entered isused for route calculation.
If required, confirm your input.A confirmation menu is displayed.Select the Start Guidance menu itemto start route guidance.
KeyboardDepending on the function selected,the keyboards may be displayeddifferently.
To change the letter arrangement onthe letter keyboard, select the ABCscreen button on the left side of thekeyboard. The letters are nowarranged in alphabetical order.To enter a character sequence,successively select the desiredcharacters.NoteWhen entering an address, thekeyboard uses an intelligent spellingfunction which automatically blocksout characters that cannot occurnext in the respective charactersequence.
To enter special characters notavailable on the letter keyboard,select the ÄÖ screen button at theright side of the letter keyboard. Thespecial characters keyboard isdisplayed. Select the desiredcharacter.To enter numbers or symbols, selectthe Sym screen button at the rightside of the special characterskeyboard. The symbols keyboard isdisplayed. Select the desiredcharacter.
To redisplay the letter keyboard,select the ABC screen button at theright side of the symbol keyboard.This way you may toggle between thethree keyboards.To delete characters already entered,select the Delete screen button at theright side of the respective keyboardor press the BACK button.When entering an address, a list ofmatching entries is automaticallydisplayed as soon as the number ofmatching entries found in the addressmemory is equal to or less than six.To manually display a list of matchingentries for the current input, select therespective List screen button at thebottom of the keyboard.To display the last five entries made,select the Last 5 screen button at thebottom of the keyboard.Select the desired entry from the list.If required, select the confirmationbutton displayed at the bottom of thekeyboard.

44 Navigation
Points of InterestA point of interest is a specific locationthat might be of general interest, e.g.a petrol station, parking area orrestaurant.The data stored within theInfotainment system contain a greatnumber of predefined POIs which areindicated by symbols on the map.These POIs may be selected asdestinations for route guidance.
Search menuA POI may be selected using differentsearch masks.Press the DEST / NAV button todisplay the Destination Entry menuand then select the Points of Interesticon to display the POI List menu.Select Category:, Name: orTelephone number. The respectivesearch mask is displayed.
Fill out the entry fields in therespective search mask.Category search maskSelect the Location entry field todisplay a list. Select the desiredoption.Select the Category entry field todisplay a POI category list. Select thedesired category and then asubcategory from the list.Select the Sort Method entry field todisplay the respective submenu.Select By Distance or By Name.
Select the Search screen button atthe bottom of the screen. A list of POIsor POI categories is displayedcorresponding to the criteria entered.Select the desired menu item.Name search maskSelect the Country entry field todisplay a list of all available countries.Select the desired country.To specify the location, select theentry field for the city or postal code.A keyboard is displayed. Enter thedesired name or number.Select the Sort Method entry field todisplay the respective submenu.Select By Distance or By Name.Select the Search screen button atthe bottom of the screen. Thekeyboard is redisplayed.Enter the name of the desired POI.Telephone number search maskSelect the Country entry field todisplay a list of all available countries.Select the desired country.Select the Sort Method entry field todisplay the respective submenu.Select By Distance or By Name.

Navigation 45
Select the Number entry field todisplay a keypad. Enter the desirednumber.When the respective search mask isfilled out, a confirmation menu isdisplayed.Select the Start Guidance menu itemto start route guidance.
Category listsPress the NAV button and then themultifunction knob to display theNavigation Menu. Select NearbyPOIs or POIs Along Route. A POIcategory list is displayed.Select the desired category,subcategories and then POI.A confirmation menu is displayed.Select the Start Guidance menu itemto start route guidance.
Previous DestinationsThe last destinations selected orentered for route guidance are storedwithin the system.
Press the DEST / NAV button todisplay the Destination Entry menuand then select the PreviousDestinations icon.A list of the last destinations isdisplayed sorted in reversechronological order.Select the desired address from thelist.A confirmation menu is displayed.Select the Start Guidance menu itemto start route guidance.
Address BookThe Address Book provides localstorage space for addresses enteredin the navigation application.
Storing addresses in the addressbookTo store an address in the addressbook, press the DEST / NAV button todisplay the Destination Entry menu.Enter or select the desired address.The confirmation menu is displayed.
Select the Save screen button. TheAddress Book Entry mask isdisplayed.
46 Navigation
Depending on the informationavailable, the different entry fields arealready filled.To enter or modify the name of therespective location, select the Nameentry field. A keyboard is displayed.Enter the desired name and confirmyour input.To modify the address, select theAddress entry field. The addressentry mask is displayed. Make yourchanges and confirm your input.To enter or modify the phone number,select the Number entry field. Akeypad is displayed. Enter thedesired number.If activated 3 38, the address bookentries are indicated on the map byPOI icons. To change the iconindicating an address entry, select theIcon entry field. A list of all POI iconsavailable within the system isdisplayed.Scroll through the list and select thedesired icon.
Select the Done screen button at thebottom of the entry mask. Theaddress is stored.
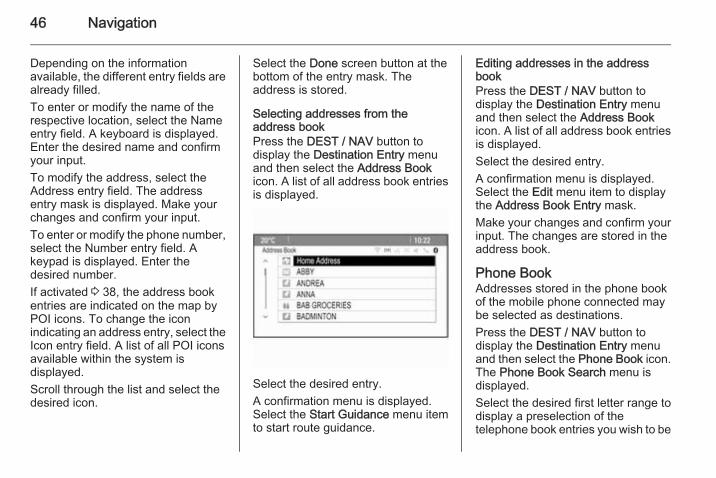
Selecting addresses from theaddress bookPress the DEST / NAV button todisplay the Destination Entry menuand then select the Address Bookicon. A list of all address book entriesis displayed.
Select the desired entry.A confirmation menu is displayed.Select the Start Guidance menu itemto start route guidance.
Editing addresses in the addressbookPress the DEST / NAV button todisplay the Destination Entry menuand then select the Address Bookicon. A list of all address book entriesis displayed.Select the desired entry.A confirmation menu is displayed.Select the Edit menu item to displaythe Address Book Entry mask.Make your changes and confirm yourinput. The changes are stored in theaddress book.
Phone BookAddresses stored in the phone bookof the mobile phone connected maybe selected as destinations.Press the DEST / NAV button todisplay the Destination Entry menuand then select the Phone Book icon.The Phone Book Search menu isdisplayed.Select the desired first letter range todisplay a preselection of thetelephone book entries you wish to be

Navigation 47
displayed. The phone book jumps tothe position of the letter rangeselected.
Select the desired entry in thetelephone book to display theaddress saved under this entry.Select the address.NoteWhen the Infotainment systemcannot find a valid address, you areprompted with a message.
A confirmation menu is displayed.Select the Start Guidance menu itemto start route guidance.
Destination selection from themapDestinations (addresses or POIs)may also be set via the map.Press the NAV button to display themap.Use the Eight-way switch to centrethe map around the desireddestination. A red v symbol isindicated on the map and thecorresponding address is displayedon a label.
Press the multifunction knob toactivate the Go screen button.
A confirmation menu is displayed.Select the Start Guidance menu itemto start route guidance.NoteIf there is more than one POI locatedat the map position selected, this isindicated on the label. Activating theGo screen button then opens a listfor selection.
My HomeYou can permanently store yourhome address in the system.
Storing the home addressPress the DEST / NAV button todisplay the Destination Entry menu.Enter your home address.A confirmation menu is displayed.Select the Save as Home menu item.You are prompted with a message.Confirm the message to save yourhome address.NoteThe home address is also stored inthe address book.
48 Navigation
Selecting the home addressPress the DEST / NAV button todisplay the Destination Entry menuand then select the My Home icon.Route guidance to the home addressis started immediately.
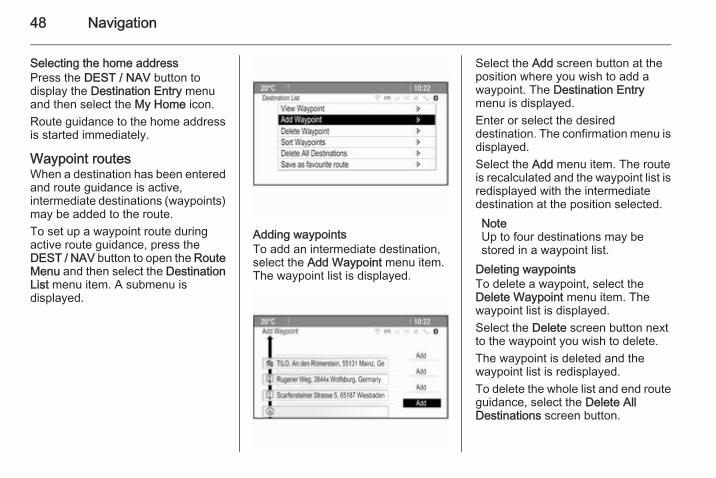
Waypoint routesWhen a destination has been enteredand route guidance is active,intermediate destinations (waypoints)may be added to the route.To set up a waypoint route duringactive route guidance, press theDEST / NAV button to open the RouteMenu and then select the DestinationList menu item. A submenu isdisplayed.
Adding waypointsTo add an intermediate destination,select the Add Waypoint menu item.The waypoint list is displayed.
Select the Add screen button at theposition where you wish to add awaypoint. The Destination Entrymenu is displayed.Enter or select the desireddestination. The confirmation menu isdisplayed.Select the Add menu item. The routeis recalculated and the waypoint list isredisplayed with the intermediatedestination at the position selected.NoteUp to four destinations may bestored in a waypoint list.
Deleting waypointsTo delete a waypoint, select theDelete Waypoint menu item. Thewaypoint list is displayed.Select the Delete screen button nextto the waypoint you wish to delete.The waypoint is deleted and thewaypoint list is redisplayed.To delete the whole list and end routeguidance, select the Delete AllDestinations screen button.

Navigation 49
Moving waypointsTo change the order of the waypointsin the route, select the SortWaypoints screen button.Select the Move screen button next tothe waypoint you wish to move. TheAdd Waypoint menu is displayed.Select the Add screen button at theposition where you wish to drop therespective waypoint.The route is recalculated and theorder of the waypoints in the waypointlist is changed.
Favourite Routes
Storing waypoint routesA waypoint route created (see above)may be saved as favourite route.During an active waypoint route,press the DEST / NAV button to openthe Route Menu and then select theDestination List menu item. Asubmenu is displayed.Select Save as favourite route. Akeyboard is displayed.Enter a name for the favourite routeand confirm your input.
The waypoint route is saved.
Creating new favourite routesPress the DEST / NAV button todisplay the Destination Entry menuand then select the FavouriteRoutes icon to display the FavouriteRoute menu.Select the New Favourite Routemenu item. A keyboard is displayed.
Enter a name for the favourite routeand confirm your input. The FavouriteRoute menu is redisplayed.Select the desired favourite route. Amenu is displayed.
Create a waypoint route (see above).To change the name of the respectivefavourite route, select the Edit Namemenu item. The keyboard for nameentry is displayed. Enter the desiredname and confirm your inputTo delete the respective favouriteroute, select the Delete Favouritemenu item. The favourite route isdeleted and the Favourite Routemenu is redisplayed.

50 Navigation
Selecting a favourite routePress the DEST / NAV button todisplay the Destination Entry menuand then select the FavouriteRoutes icon to display a list of thefavourite routes saved.Select the desired route from the list.The route confirmation menu isdisplayed.To start route guidance, select theStart Guidance menu item.
Latitude / LongitudeThe GPS coordinates of a desiredlocation may be used to set adestination.Press the DEST / NAV button todisplay the Destination Entry menuand then select the Latitude menuitem.Select the Latitude entry field todisplay the Geolocation Entry menu.
Repeatedly press the multifunctionknob to adjust the first setting asdesired.Turn the multifunction knob to moveto the next value to be set.Proceed like this to set all values.Select the BACK button to return tothe next higher menu level.Adjust the longitude values asdescribed above.When all GPS coordinates areentered, select the Search screenbutton at the bottom of the screen.A confirmation menu is displayed.
To start route guidance, select theStart Guidance menu item.
Deleting saved destinationsTo delete destinations stored in thesystem, press the CONFIG button,select the Navigation Settings menuitem and then Delete SavedDestinations. A submenu isdisplayed.Activate the menu items of thestorage location you wish to becleared.Select the Delete screen button. Theselected storage locations arecleared.
GuidanceStarting and cancelling routeguidance
Starting route guidanceEnter or select the desired address.A confirmation menu is displayed.Select the Start Guidance menu itemto start route guidance.

Navigation 51
Cancelling route guidanceWhen route guidance is active, pressthe DEST / NAV button to display theRoute Menu.Select the Cancel Route menu item tocancel the current navigation session.
Guidance instructionsRoute guidance is provided by voiceprompts and visual instructions on themap (if activated).
Voice promptsNavigation voice prompts announcewhich direction to follow, whenapproaching an intersection at whichyou need to turn.Press the CONFIG button and thenselect the Navigation Settings menuitem.Select the Voice Prompt menu item todisplay the respective submenu.If you wish the system to audiblyindicate the next turning manoeuvre,activate Navigation Voice Prompts.If you wish traffic alerts to be read out,activate Traffic Alert Prompts.To adjust the volume during voiceprompts, select the NavigationVolume menu item. The respectivesubmenu is displayed.To adjust the volume of voiceprompts, select Announcement andthen adjust the setting as desired.To adjust the volume of the audiosource possibly playing in thebackground, select Background andthen adjust the setting as desired.
Select Volume Test to get an audioexample of the settings.
Guidance alertsGuidance alerts show in a close-upview of the respective map sectionwhich direction to follow whenapproaching an intersection at whichyou need to turn.Press the CONFIG button and thenselect the Navigation Settings menuitem.Select the Guidance Alert menu itemto display the respective submenu.If you wish the display toautomatically show the map whenapproaching the next turningmanoeuvre, activate Guidance Alertin Primary.If you wish turning manoeuvres to bedisplayed in a close-up view, activateGuidance Alert in Map.

52 Navigation
Traffic incidentsThe TMC traffic information systemreceives all current traffic informationfrom TMC radio stations. Thisinformation is included in thecalculation of a route.
Traffic settingsPress the CONFIG button and thenselect the Navigation Settings menuitem.Select the Traffic Settings menu itemto display the respective submenu.To use the TMC traffic informationsystem, activate the Traffic Eventsmenu item.Recalculation of an active routeIf a traffic problem occurs duringactive route guidance, the route maybe changed.Select Alert if better route isavailable to display the respectivesubmenu.If you wish the route to be constantlyadapted to the current traffic situation,activate Route Based on TrafficConditions.
Choose between AutomaticRecalculation and Recalculation afterConfirmation of a correspondingmessage.Traffic incidents on the mapTraffic incidents may be indicated onthe map by corresponding symbols.Select Show Traffic Events on Map todisplay the respective submenu.
Select the desired option.If User Defined is activated, scrollthrough the list and activate the trafficincidents categories you wish to bedisplayed.
TMC stationsThe TMC stations broadcasting trafficinformation, may be set automaticallyor manually.Select the Traffic Stations menu itemto display a selection mask.Select the Mode entry field to displaythe respective submenu. Select thedesired option.If Manual Station Selection is chosen,a TMC station needs to be set.Select the Station entry field todisplay the Traffic Station List.Select the desired station.
Traffic incidents listsWhen route guidance is active, pressthe NAV button and then press themultifunction knob to display theNavigation Menu. Scroll through thelist and select the Traffic menu item.To display a list of all traffic eventsknown for the area around the currentvehicle location, select the All TrafficEvents menu item.

Navigation 53
To display a list of the traffic eventsconcerning the current route, selectthe Traffic Events on Route menuitem.The traffic incidents lists may besorted in different ways.Select the Traffic Settings menu itemin the Traffic menu and then SortMethod:. The respective submenu isdisplayed.Activate the desired option.
Route trackingThe bread crumbs function allowstracking of the roads already taken ina route.Press the CONFIG button and thenselect the Navigation Settings menuitem. Select the Bread Crumbs menuitem to display the respective menu.To start a tracking session, activatethe Record menu item. The routetaken is recorded and displayed asdotted line on the map.
To delete the bread crumbs alreadydropped in an active tracking session,select the Delete screen button. Youare prompted with a message.Confirm the message to delete allbread crumbs.To end the tracking session,deactivate the Record menu item. Akeyboard is displayed.Enter a name for the respectivetracking session and select theDone screen button. The session isstored in the Saved list.
To display a list of all trackingsessions, select the Saved screenbutton. Select the desired trackingsession to display the Bread CrumbDetails menu.To change the name of the respectivetracking session, select the EditName menu item. A keyboard isdisplayed. Enter the desired nameand select the Done screen button.Select the Load menu item to displaythe bread crumb main menu. If youwish the respective tracking sessionto be constantly displayed on themap, activate the Display menu item.To directly display the whole trackingsession in the respective mapsection, select the Show on Mapmenu item.To delete the respective trackingsession, select the Delete menu item.
RoutingWhen a route has been calculated,you may manually change certainparts or recalculate the whole route.

54 Navigation
Turn ListThe Turn List displays all streets andturning manoeuvres on the calculatedroute starting from the currentlocation.Press the DEST / NAV button andthen select the Turn List menu item.The turn list is displayed.
To exclude certain streets from theroute, select the Avoid screen buttonnext to the respective street.The route is recalculated and therespective street is excluded.
Avoid ListWhen streets have been excludedfrom the original route, they aredisplayed in the Avoid List.Press the DEST / NAV button andthen select the Avoid List menu itemto display the respective submenu.To display all streets avoided, selectthe View List menu item.To delete all avoidances and return tothe original route, select the Delete AllItems menu item.
DetourPress the DEST / NAV button andthen select the Detour menu item.To change the route for a certaindistance, select the Detour ByDistance menu item. A menu listingdifferent distances is displayed.Select the desired distance. Theroute is recalculated accordingly.To block the whole route, select theDetour Complete Route menu item.The original route is blocked and anew route to the desired destinationis calculated.
Exit listTo display a list of the next exits andmotorway stations while driving on amotorway, press the NAV button andthen press the multifunction knob todisplay the Navigation Menu.Scroll through the list and select theExit List menu item.
Route optionsWhen route guidance is active, pressthe DEST / NAV button and thenselect the Route Options menu item.A list of route calculation options androad types is displayed.To define by what criteria a route maybe calculated, activate one of theoptions: Fastest for the fastest route(in time), Shortest for the shortestroute (in distance) or Eco for the routewith the lowest fuel consumption.To define which road types may beincluded in the calculation of theroute, activate the desired options:highways, tollroads, ferries, etc.

Speech recognition 55
Speech recognition
General information ..................... 55Usage .......................................... 56
General informationEmbedded speech recognitionThe speech recognition of theInfotainment system enables you tooperate various functions of theInfotainment system via voice input. Itrecognises commands and numericsequences independently of therelevant speaker. The commandsand numeric sequences can bespoken without a pause between theindividual words.In the event of incorrect operation orcommands, the speech recognitiongives visual and/or acoustic feedbackand requests you to re-enter thedesired command. Apart from this,the speech recognitionacknowledges important commandsand will enquire if necessary.In general, there are different ways tospeak commands for completing thetasks. Most of them, exceptdestination entry and voice keypad,can be completed in a singlecommand.
If the action takes more than onecommand to be performed, proceedas follows:In the first command, you indicate thetype of action to be performed, e.g."Navigation destination entry". Thesystem replies with prompts that leadyou through a dialogue for enteringthe necessary information. Forexample, if a destination for routeguidance is needed, say "Navigation"or "Destination entry".NoteTo ensure that conversations insidethe vehicle do not lead tounintentional triggering of thesystem functions, the speechrecognition does not start until it hasbeen activated.
Language support■ Not all languages available for the
display of the Infotainment systemare also available for the speechrecognition.
■ If the currently selected displaylanguage is not supported by thespeech recognition, speechrecognition is not available.

56 Speech recognition
In such a case you need to selectanother language for the display ifyou want to control the Infotainmentsystem via voice input. Changingthe display language, see"Language" in chapter "Systemsettings" 3 19.
Address input for destinations inforeign countriesIn case you want to enter the addressof a destination located in a foreigncountry via voice input, you need tochange the language of theInfotainment display to the languageof the foreign country.E.g. if the display is currently set toEnglish and you want to enter thename of a city located in France, youneed to change the display languageto French.Exceptions: If you want to enteraddresses in Belgium, you mayoptionally change the displaylanguage to French or Dutch. Foraddresses in Switzerland you mayoptionally change the displaylanguage to French, German, orItalian.
For changing the display language,see "Language" in chapter "Systemsettings" 3 19.
Input order for destination addressesThe order in which the parts of anaddress need to be entered using thespeech recognition system isdependent on the country where thedestination is located.An example for the respective inputorder is given out by the system.
Voice pass-thru applicationThe voice pass-thru application of theInfotainment system allows access tothe speech recognition commands onyour smartphone. See yoursmartphone manufacturer's userguide to find out whether yoursmartphone supports this feature.
UsageEmbedded speech recognition
Activating speech recognitionNoteSpeech recognition is not availableduring an active phone call.
Press the w button on the right side ofthe steering wheel.The audio system mutes, the wsymbol on the display is highlighted,and a voice output message promptsyou to say a command.As soon as the speech recognition isready for voice input, a beep is heard.You can now say a voice command todirectly initiate a system function(e.g. playing a radio station), or tostart a dialogue sequence withseveral dialogue steps (e.g. enteringa destination address), see"Operation via speech commands"further below.

Speech recognition 57
After a dialogue sequence is finished,the speech recognition is deactivatedautomatically. To initiate anotherdialogue sequence, you must activatethe speech recognition again.
Adjusting the volume of voicepromptsPress the w or ─ buttons on the rightside of the steering wheel.
Interrupting a voice promptAs an experienced user, you caninterrupt a voice prompt by brieflypressing the w button on the steeringwheel.A beep is heard immediately, and acommand can be stated withouthaving to wait.
Cancelling a dialogue sequenceThere are several possibilities tocancel a dialogue sequence and todeactivate the speech recognition:■ Say "Cancel" or "Exit".■ Press the n button on the right
side of the steering wheel.
In the following situations a dialoguesequence is automatically cancelled:■ If you do not say any commands for
some time (by default you areprompted three times to say acommand).
■ If you say commands that are notrecognised by the system (bydefault you are prompted threetimes to say a correct command).
Operation via speech commandsThe speech recognition canunderstand commands that are eithernaturally stated in sentence form, ordirect commands stating theapplication and the task.For best results:■ Listen for the voice prompt and wait
for the beep before saying acommand or replying.
■ Say "Help" if you want to listenagain to the help prompt for thecurrent dialogue step.
■ The voice prompt can beinterrupted by pressing the w buttonagain. If you wish to directly speakyour command, press the w buttontwice.
■ Wait for the beep and then speakthe command naturally. In mostcases, recognition rates will behigher if pauses are kept to aminimum. Use short and directcommands.
Usually phone and audio commandscan be spoken in a single command.For example, "Call David Smith atwork", "Play" followed by the artist orsong name, or "Tune to" followed bythe radio frequency and thewaveband.Navigation destinations, however,are too complex for a singlecommand. First, state "Navigation"and then, e.g. "Address" or "Point ofInterest". The system responds withrequesting more details.After saying "Point of Interest", onlymajor chains may be selected byname. Chains are businesses with at

58 Speech recognition
least 20 locations. For other POIs,say the name of a category, e.g."Restaurants", "Shopping centres", or"Hospitals".Direct commands are easierunderstood by the system, e.g. "Call01234567".If you say "Phone", the systemunderstands that a phone call isrequested and responds withrespective questions until enoughdetails are gathered. If the phonenumber has been saved with a nameand a place, the direct commandshould include both, for example "CallDavid Smith at work"Selecting list itemsWhen a list is displayed, a voiceprompt asks to confirm or select anitem from that list. A list item may bemanually selected, or by speaking theline number of the item.The list on a speech recognitionscreen functions the same as a list onother screens. Manually scrolling thelist on a screen during a speechrecognition session suspends thecurrent speech recognition event and
plays a prompt like "Make yourselection from the list using themanual controls, or press the backbutton on the faceplate to try again".If no manual selection is made within15 seconds, the speech recognitionsession terminates, you are promptedwith a message, and the formerscreen is redisplayed.The "Back" commandTo return to the previous dialoguestep, alternatively: say "Back", orpress the BACK button on theinstrument panel.
The "Help" commandAfter saying "Help", the help promptfor the current dialogue step is readaloud.To interrupt the help prompt, pressthe w button again. A beep is heard.You may say a command.
Voice pass-thru application
Activating the voice pass-thru speechrecognitionPress and hold the w button on theright side of the steering wheel.Find further information on theoperation in the user guide of yoursmartphone.
Adjusting the volume of voicepromptsPress the w or ─ buttons on the rightside of the steering wheel.
Deactivating the voice pass-thruspeech recognitionPress the n button on the right sideof the steering wheel. The speechrecognition session is ended.

Phone 59
Phone
General information ..................... 59Bluetooth connection ................... 60Emergency call ............................ 61Operation ..................................... 62Text messages ............................ 65Mobile phones and CB radioequipment .................................... 67
General informationThe Phone portal provides you withthe possibility of having mobile phoneconversations via a vehiclemicrophone and the vehicleloudspeakers as well as operating themost important mobile phonefunctions via the Infotainment systemin the vehicle. To be able to use thePhone portal, the mobile phone mustbe connected with it via Bluetooth.The Phone portal can be operatedoptionally via the speech recognitionsystem.Not all Phone portal functions aresupported by every mobile phone.The possible phone functions dependon the relevant mobile phone andnetwork provider. You will find furtherinformation on this in the operatinginstructions for your mobile phone oryou can enquire about them with yournetwork provider.
Important information foroperation and traffic safety
9 Warning
Mobile phones have effects onyour environment. For this reasonsafety regulations and directionshave been prepared. You shouldbe familiar with the relateddirections before you use thetelephone function.
9 Warning
Use of the hands-free facility whiledriving can be dangerous becauseyour concentration is reducedwhen telephoning. Park yourvehicle before you use the hands-free facility. Follow the stipulationsof the country in which you findyourself at present.Do not forget to follow the specialregulations that apply in specificareas and always switch off themobile phone if the use of mobile

60 Phone
phones is prohibited, ifinterference is caused by themobile phone or if dangeroussituations can occur.
BluetoothThe Phone portal is certified by theBluetooth Special Interest Group(SIG).You will find further information aboutthe specification on the Internet athttp://www.bluetooth.com
Bluetooth connectionBluetooth is a radio standard for thewireless connection of e.g. mobilephones, iPod/iPhone models, or otherdevices.To be able to set up a Bluetoothconnection to the Infotainmentsystem, the Bluetooth function of theBluetooth device must be activated.For further information, pleaseconsult the user guide of theBluetooth device.
Via the Bluetooth menu, pairing (PINcode exchange between Bluetoothdevice and Infotainment system) andconnecting of the Bluetooth devicesto the Infotainment system are carriedout.
Important information■ Up to five devices can be paired to
the system.■ Only one paired device can be
connected to the Infotainmentsystem at a time.
■ Pairing normally only needs to becarried out once, unless the deviceis deleted from the list of paireddevices. If the device has beenconnected previously, theInfotainment system establishesthe connection automatically.
■ Bluetooth operation considerablydrains the device's battery.Therefore, connect the device tothe power outlet for charging.
Bluetooth menuTo open the Bluetooth menu, youmay optionally:■ Press the O button. Select the
Phone Settings menu item andthen Bluetooth.
■ Press the CONFIG button. Selectthe Phone Settings menu item andthen Bluetooth.
■ Press the ; button and select theConfig icon. Select the PhoneSettings menu item and thenBluetooth.
The menu items Device list and Pairdevice are displayed.
Pair deviceTo initiate the pairing process on theInfotainment system, select the Pairdevice menu item. A message with afour-digit Infotainment system code isdisplayed.Initiate the pairing process on theBluetooth device. If required, enterthe Infotainment system code on theBluetooth device.

Phone 61
A six-digit PIN code for the pairingprocess is displayed on theInfotainment system.To confirm the pairing process:■ If SSP (secure simple pairing) is
supported:Compare the PIN codes displayedon the Infotainment system and onthe Bluetooth device (if demanded)and confirm the message on theBluetooth device.
■ If SSP (secure simple pairing) is notsupported:Enter the PIN code on theBluetooth device and confirm yourinput.
The devices are paired and the phonemain menu is displayed.The phone book and call lists (ifavailable) are downloaded from theBluetooth device.If required, confirm the correspondingmessage on the Bluetooth device.
Device listThe device list contains all Bluetoothdevices paired to the Infotainmentsystem.
If a new device is paired, it isdisplayed in the device list.
Connecting a deviceSelect the device you wish toconnect. A submenu is displayed.Select the Select screen button.The device previously connected isdisconnected and this device isconnected.
Deleting a deviceSelect the device you wish to delete.A submenu is displayed.Select the Delete screen button.The device is deleted.
Emergency call
9 Warning
Connection setup cannot beguaranteed in all situations. Forthis reason you should not relyexclusively on a mobile phonewhen a vitally importantcommunication (e.g. a medicalemergency) is concerned.In some networks it may benecessary for a valid SIM card tobe properly inserted in the mobilephone.

62 Phone
9 Warning
Bear in mind that you can makeand receive calls with the mobilephone, if it is in a service area witha sufficiently strong signal. Undercertain circumstances emergencycalls cannot be made on all mobilephone networks; it is possible thatthey cannot be made when certainnetwork services and/or telephonefunctions are active. You canenquire about this with the localnetwork operators.The emergency call number candiffer depending on the region andcountry. Please enquirebeforehand about the correctemergency call number for therelevant region.
Making an emergency callDial the emergency call number (e.g.112).The telephone connection to theemergency call centre is set up.
Answer when the service personnelquestions you about the emergency.
9 Warning
Do not end the call until you arerequested to do so by theemergency call centre.
OperationAs soon as a connection viaBluetooth has been set up betweenyour mobile phone and theInfotainment system, you can alsooperate many functions of yourmobile phone via the Infotainmentsystem.After setting up a connection betweenthe mobile phone and theInfotainment system, the mobilephone data is transmitted to theInfotainment system. This can takesome time depending on the phonemodel. During this period, operationof the mobile phone is possible via theInfotainment system only to a limitedextent.
Not every telephone supports allfunctions of the phone application.Therefore, deviations from the rangeof functions described are possible.
Phone main menuTo display the phone main menu,press the O button. The followingscreen is displayed (if a mobile phoneis connected).
Initiating a phone call
Entering a numberPress the O button and then selectthe Enter number menu item. Akeypad is displayed.

Phone 63
Enter the desired number.Select the Del screen button or pressthe BACK button to delete the lastdigit entered.Select the l or k screen button tomove the cursor within the numberalready entered.To start dialling, select the OK screenbutton.NoteYou may access the phone bookfrom the keypad by pressing thePB button.
Phone bookPress the O button and then selectthe Phone Book menu item. ThePhone Book Search menu isdisplayed.
Select the desired first letter range todisplay a preselection of thetelephone book entries you wish to bedisplayed. The phone book jumps tothe position of the letter rangeselected.
Select the desired entry in thetelephone book to display thenumbers saved under this entry.Select the desired number to startdialling.Phone book sortingThe phone book may be sorted by lastname or by first name.To change the sorting order, selectthe O button and then the PhoneSettings menu item.Select Sort Order to display therespective submenu.Activate the desired option.

64 Phone
Call listsPress the O button and then selectthe Call Lists menu item. The CallLists menu is displayed.
Select the desired call list. Dependingon the list selected, the last incoming,outgoing or missed calls aredisplayed.Select the desired entry in the call listto start dialling.
Incoming callsWhen a call comes in, a message isdisplayed on the screen.
To take the call, select the Answerscreen button.To reject the call, select the Declinescreen button.
Functions during a phone callWhen a call is active, the in-call viewis displayed.
Ending a phone callTo end the call, select the Hang upscreen button.
Muting a callTo temporarily mute the microphone,activate the Mute call screen button.Deactivate the Mute call screenbutton to unmute the microphone.
Transferring to handsetSelect the Transfer to Handset menuitem to transfer the call to the mobilephone. The Private Call menu isdisplayed.

Phone 65
To transfer the call back to theInfotainment system, select theTransfer call menu item in the PrivateCall menu.
Second phone call
Initiating a second phone callWhile a call is active, select the Enternumber menu item in the in-call view.The keypad is displayed. You mayenter a number or select a numberfrom the phone book, see above.
Second incoming phone callWhen a second call comes in, amessage is displayed at the bottom ofthe screen.Select the desired option.If the call is taken, the first call is puton hold and the second call becomesactive.Both calls are displayed in the in-callview.
To switch between the calls, selectthe Switch calls menu item.
Conference callSelect the Merge calls screen buttonto activate both calls at the same time.The Merge calls screen buttonchanges to Detach call.To end a conference call, select theDetach call screen button.
Ending phone callsIn a conference call, select the Hangup screen button to end both phonecalls.
Text messagesAs soon as a connection viaBluetooth has been set up betweenyour mobile phone and theInfotainment system, you can operatethe messages inbox of your mobilephone via the Infotainment system.Not every phone supports the textmessages function of theInfotainment system.
Activating the messagesapplication on the mobile phoneThe transmission of text messagedata to the Infotainment system mustbe activated on the mobile phone.In the Bluetooth menu of your mobilephone, select the name of the pairedInfotainment system to display therespective submenu.To display the text messages in themessages application of theInfotainment system, activate therespective function in the submenuon the mobile phone.

66 Phone
The Messages icon in the Homemenu of the Infotainment system isthen selectable.
Incoming text messageWhen a new text message isreceived, you are prompted with amessage indicating the name ornumber of the sender.Select one of the options in themessage.
ListenIf you wish the system to read out themessage, select the Listen screenbutton.
ViewTo display the message on thescreen, select the respective screenbutton.NoteMessages are only displayed on thescreen when the vehicle is parked.
DismissTo dismiss the message, select therespective screen button.
ReplyTo directly answer the message,select the Reply screen button. A listof predefined messages is displayed.Select the desired message andconfirm your input.The message is sent.NoteNew predefined messages may becreated in the settings menu.
CallTo call the sender of the textmessage, select the Call screenbutton.
InboxPress the ; button and then selectthe Messages icon to display therespective menu.Select the Inbox menu item to displaya list of all inbox messages.
Select the desired message. Themessage is displayed on the screen.NoteMessages are only displayed on thescreen when the vehicle is parked.
If desired, select one of the options atthe bottom of the screen (see above).
SettingsPress the ; button and then selectthe Messages icon to display therespective menu.Select the Settings menu item todisplay the respective submenu.Adjust the settings as desired.

Phone 67
Mobile phones and CBradio equipmentInstallation instructions andoperating guidelinesThe vehicle specific installationinstructions and the operatingguidelines of the mobile phone andhandsfree manufacturer must beobserved when installing andoperating a mobile telephone. Failureto do so could invalidate the vehicletype approval (EU directive 95/54/EC).Recommendations for fault-freeoperation:■ Professionally installed exterior
antenna to obtain the maximumrange possible,
■ Maximum transmission power10 watts,
■ Installation of the phone in asuitable spot, consider relevantNote in the Owner's Manual,chapter Airbag system.
Seek advice on predeterminedinstallation points for the externalantenna or equipment holder andways of using devices with atransmission power exceeding10 watts.Use of a handsfree attachmentwithout external antenna with mobiletelephone standardsGSM 900/1800/1900 and UMTS isonly permitted if the maximumtransmission power of the mobiletelephone is 2 watts for GSM 900 or1 watt for the other types.For reasons of safety, do not use thephone while driving. Even use of ahandsfree set can be a distractionwhile driving.
9 Warning
Operation of radio equipment andmobile telephones which fail tomeet above mentioned mobiletelephone standards is onlypermitted using an antennalocated outside of the vehicle.
Caution
Mobile telephones and radioequipment may lead tomalfunctions in the vehicleelectronics when operated insidethe vehicle with no exteriorantenna, unless the abovementioned regulations areobserved.
68 Frequently asked questions
Frequently askedquestions
Frequently asked questions ......... 68
Frequently askedquestions
Speech recognition?The speech recognition function
does not work very well. How canI improve its performance?!Wait for the beep and then try to
speak the command naturally.Avoid long pauses, use littleaccentuation and speak at amoderate volume.Detailed description 3 56.
?The voice prompts given out by thespeech recognition system are toolong. How can I interrupt them todirectly speak a command?!To interrupt the voice prompt of the
speech recognition system, pressthe w button on the steering wheel.Wait for the beep and then speakyour command.Detailed description 3 56.
?I cannot select a phone contact viaspeech recognition. What am Idoing wrong?!The Infotainment system
accesses the phone book entriesas they are stored. If the sortingorder is set to "last name, firstname", the correct command forcalling John Smith is "Smith,John".Detailed description 3 55.
?I cannot enter an address locatedin another country via speechrecognition. What am I doingwrong?!Via speech recognition, you can
only enter addresses fordestinations located in the countrywhose language is selected assystem language, e.g. if thesystem is set to German, youcannot enter a destination locatedin France.Detailed description 3 55.

Frequently asked questions 69
Phone?How can I pair my phone with the
Infotainment system?! In order to pair a phone, press theO button, select the PhoneSettings menu item and thenBluetooth. Select Pair device andfollow the instrucation on theInfotainment system and yourmobile phone. Make sureBluetooth is enabled.Detailed description 3 60.
?How can I access my phone bookor recent calls list via theInfotainment system?!Depending on the phone, you have
to allow access to the respectivedata in the settings of your mobilephone. In general, the download ofthe phone book and recent calls listis not supported by all mobilephones.Detailed description 3 60.
?Although access to my phone bookhas been granted, not all contactsare available in the Infotainmentsystem. Why is that?!Depending on the phone, contacts
stored on the SIM card cannot beread by the Infotainment system.Detailed description 3 60.
Navigation?How can I toggle between total
driving time or remaining drivingtime and total distance or partialdistance?!When the navigation application is
active, press the multifunctionknob to display the NavigationMenu. Select Switch Route Time/Destination and adjust the settingsas desired.Detailed description 3 38.
?When pressing the DEST/NAVbutton, different menus aredisplayed sometimes. Why is that?! If route guidance is active, the
destination application isdisplayed for you to select adestination.Detailed description 3 42.If route guidance is not active, theRoute Menu is displayed.Detailed description 3 50.
Audio?When playing media files from a
device connected via Bluetooth,the track title and artist are notdisplayed in the Infotainmentsystem and the media browsefunction is not available. Why isthat?!When connecting a device via
Bluetooth, due to the Bluetoothprotocol supported only restrictedfunctions are available.Detailed description 3 32.

70 Frequently asked questions
?The Infotainment system does nothave a tone button on thefaceplate. How can I change thetone settings?!The tone settings menu is
accessible via the Home Page.Press the ; button and then selectthe More screen button to displaythe second Home Page. To accessthe tone settings menu, select theTone icon.Detailed description 3 17.

Frequently asked questions 71
72
Index AActivating AUX.............................. 32Activating Bluetooth music........... 32Activating CD player..................... 29Activating radio............................. 22Activating the Infotainment system 12Activating the navigation system. . 38Activating the phone portal........... 62Activating USB audio.................... 32Activating USB picture.................. 33Address book................................ 42Audio CUE volume....................... 18Audio files..................................... 30Autostore lists............................... 23
Retrieving stations..................... 23Storing stations......................... 23
Auto volume.................................. 18AUX.............................................. 30
BBACK button................................. 14Balance......................................... 17Basic operation............................. 14Bass.............................................. 17Bluetooth connection.................... 60Bluetooth music............................ 30Bread crumbs............................... 50
CCategory list.................................. 22CD player...................................... 28Chime volume............................... 18Control elements
Infotainment system.................... 6Steering wheel............................ 6
Control elements overview............. 6
DDAB.............................................. 27Date.............................................. 19Destination input .......................... 42Digital audio broadcasting............ 27Display.......................................... 19Displaying pictures....................... 33
EEmergency call............................. 61EQ................................................ 17Equaliser....................................... 17
FFactory defaults............................ 19Fader............................................ 17Favourite lists............................... 24
Retrieving stations..................... 24Storing stations......................... 24
File formats................................... 28

73
Audio files.................................. 30Picture files................................ 30
Frequently asked questions......... 68
GGeneral information 28, 30, 37, 55, 59
AUX........................................... 30Bluetooth music......................... 30CD............................................. 28Infotainment system.................... 4Navigation................................. 37Phone portal.............................. 59Radio......................................... 22USB........................................... 30
Guidance ..................................... 50
HHome address.............................. 42Home Page............................. 14, 19
IInfotainment control panel.............. 6
KKeyboard...................................... 42
LLanguage..................................... 19
MMaps............................................. 38Maximum startup volume............. 18Menu operation............................. 14Messages..................................... 14Midrange....................................... 17Mobile phones and CB radio
equipment ................................ 67Multifunction knob......................... 14Mute.............................................. 12
NNavigation
Address book............................ 42Bread crumbs............................ 50Coordinates............................... 42Current location......................... 38Destination input....................... 42Favourite routes........................ 42General settings........................ 38Guidance alerts......................... 50Home address........................... 42Keyboard................................... 42Map display............................... 38Map manipulation...................... 38POIs.......................................... 42Recent destinations.................. 42Route guidance......................... 50Route options............................ 50
Route simulation....................... 38Route tracking........................... 50TMC stations............................. 50Traffic incidents......................... 50Turn list..................................... 50Voice prompts........................... 50Waypoint trip............................. 42
Navigation system........................ 37Navigation volume........................ 18
OOperation...................................... 62
AUX........................................... 32Blueotooth music....................... 32CD............................................. 29Infotainment system.................. 12Menu......................................... 14Navigation system..................... 38Phone........................................ 62Radio......................................... 22USB..................................... 32, 33
PPairing.......................................... 60Phone
Bluetooth................................... 59Bluetooth connection................ 60Conference call......................... 62Emergency calls........................ 61Functions during a call.............. 62
74
Phone book............................... 62Recent calls............................... 62Text messages.......................... 65
Phone book............................ 42, 62Phone call
Initiating..................................... 62Taking....................................... 62
Picture files................................... 30Pictures......................................... 33Playing audio................................ 32POIs.............................................. 42
RRadio
Autostore lists............................ 23Category list.............................. 22DAB........................................... 27DAB announcements................ 27Digital Audio Broadcasting........ 27Favourite lists............................ 24Radio Data System................... 25RDS........................................... 25RDS Options menu................... 25Regional.................................... 25Retrieving stations.............. 23, 24Station list.................................. 22Station search........................... 22Storing stations................... 23, 24TP.............................................. 25
Traffic Programme.................... 25Waveband selection.................. 22
Radio data system (RDS) ............ 25Regionalisation............................. 25Route guidance............................ 50Route simulation........................... 38
SSoftware update........................... 19Speech recognition....................... 55Station list..................................... 22Station search............................... 22Switching the Infotainment
system on.................................. 12System settings............................ 19
Display...................................... 19Home Page............................... 19Language.................................. 19Software.................................... 19Time and Date........................... 19
TTA................................................. 25TA volume.................................... 18Text messages............................. 65Theft-deterrent feature ................... 5Time.............................................. 19Time format.................................. 19TMC.............................................. 50Tone settings................................ 17
TP................................................. 25Traffic incidents............................ 50Traffic programme........................ 25Treble........................................... 17Turn list......................................... 50
UUsage................... 12, 22, 29, 38, 56
AUX........................................... 32Bluetooth music......................... 32CD............................................. 29Infotainment system.................. 12Navigation system..................... 38Phone........................................ 62USB..................................... 32, 33
USB.............................................. 30Using apps.................................... 34
VVoice recognition.......................... 55Volume
Audio Cue volume..................... 18Auto volume.............................. 18Chime volume........................... 18Maximum startup volume.......... 18Mute function............................. 12Navigation volume..................... 18Volume of trafficannouncements........................ 18
Volume settings............................ 18

75
WWaveband selection..................... 22Waypoint trip................................. 42

76

Introduction .................................. 78Radio ........................................... 95CD Player .................................. 104AUX input ................................... 108USB port .................................... 109Speech recognition .................... 111Phone ........................................ 116Index .......................................... 128
CD 400plus/400/300

78 Introduction
Introduction
General information ..................... 78Theft-deterrent feature ................. 79Control elements overview .......... 80Usage .......................................... 86Basic operation ............................ 87Tone settings ............................... 91Volume settings ........................... 92Personalisation ............................ 93
General informationThe Infotainment system providesyou with state-of-the-art in-carinfotainment.For the AM, FM and DAB wavebandsthe radio is equipped with twelveautomatically assignable channelpresets. Furthermore, variouschannels can be allocated manually(waveband-independent).The integrated audio player willentertain you with audio CDs andMP3/WMA CDs.Furthermore, you can connectexternal data storage devices, e.g.iPod, MP3 player or USB stick, or aportable CD player to theInfotainment system as further audiosources.The digital sound processor providesyou with several preset equalizermodes for sound optimisation.Optionally, the Infotainment systemcan be operated using controls on thesteering wheel or via the speechrecognition system.
In addition the Infotainment systemcan be equipped with a mobile phoneportal.The well-thought-out design of thecontrol elements, the clear displaysand a large multifunction knob enableyou to control the system easily andintuitively.NoteThis manual describes all optionsand features available for thevarious Infotainment systems.Certain descriptions, including thosefor display and menu functions, maynot apply to your vehicle due tomodel variant, countryspecifications, special equipment oraccessories.
Important information onoperation and traffic safety
9 Warning
The Infotainment system must beused so that the vehicle can bedriven safely at all times. If in

Introduction 79
doubt, stop the vehicle andoperate the Infotainment systemwhile the vehicle is stationary.
Radio receptionRadio reception may be disrupted bystatic, noise, distortion or loss ofreception due to■ changes in distance from the
transmitter,■ multi-path reception due to
reflection,■ shadowing.
Theft-deterrent featureThe Infotainment system is equippedwith an electronic security system forthe purpose of theft-deterrence.The Infotainment system thereforefunctions only in your vehicle and isworthless to a thief.

80 Introduction
Control elements overviewCD 400 / CD 400plus

Introduction 81
1 RADIO (BAND) ..................... 95
Activate radio or changewaveband .............................. 95
2 CD ....................................... 104
Start CD/MP3/WMA replay . 1053 Search backward .................. 95
Radio: search backward ....... 95
CD/MP3/WMA: skip trackbackward ............................. 105
4 m (VOL) knob ........................ 86
Press: switch on/off .............. 86
Infotainment system ............. 86
Turn: adjust volume .............. 865 Search forward ...................... 95
Radio: search forward ........... 95
CD/MP3/WMA: skip trackforward ................................ 105
6 Radio station buttons 1...6 ... 96
Long press: save station ....... 96
Short press: select station .. . . 96
7 FAV (1/2/3) ............................ 96
Lists of favourites (presetradio stations) ....................... 96
8 AS (1/2) ................................. 96
Automatic memory levels(preset radio stations) ........... 96
Short press: selectautostore list .......................... 96
Long press: save stationsautomatically ......................... 96
9 TP ....................................... 100
Activate or deactivateradio traffic service .............. 100
If Infotainment system isswitched off: display timeand date .............................. 100
10 CD ejection ......................... 10511 CONFIG ................................ 92
Open settings menu .............. 92
12 INFO ..................................... 80
Radio: information on thecurrently played station ......... 95
CD/MP3/WMA:information on thecurrently inserted CD .......... 105
13 CD slot ................................ 10514 Multifunction knob ................. 87
Turn: mark menu optionsor set numeric values ........... 87
Press: select/activate themarked option; confirm setvalue; switch function on/off .. 87
15 BACK .................................... 87
Menu: one level back ............ 87
Input: delete last characteror entire entry ........................ 87
16 TONE .................................... 91
Tone settings ........................ 9117 v/G .................................... 116
Open telephone main menu 122
Activate/deactivate mute ....... 86

82 Introduction
18 AUX ..................................... 108
Change to external audiosource ................................. 108

Introduction 83
CD 300

84 Introduction
1 RADIO (BAND) ..................... 95
Activate radio or changewaveband .............................. 95
2 CD ....................................... 104
Start CD/MP3/WMA replay . 1053 Search backward .................. 95
Radio: search backward ....... 95
CD/MP3/WMA: skip trackbackward ............................. 105
4 MP3: folder level higher ...... 1055 m (VOL) knob ........................ 86
Press: switch on/off theInfotainment system .............. 86
Turn: adjust volume .............. 866 Search forward ...................... 95
Radio: search forward ........... 95
CD/MP3/WMA: skip trackforward ................................ 105
7 MP3: folder level lower ........ 105
8 Radio station buttons 1...6 ... 96
Long press: save station ....... 96
Short press: select station .. . . 969 FAV (1/2/3) ............................ 96
Lists of favourites (presetradio stations) ....................... 96
10 AS (1/2) ................................. 96
Automatic memory levels(preset radio stations) ........... 96
Short press: selectautostore list .......................... 96
Long press: save stationsautomatically ......................... 96
11 TP ....................................... 100
Activate or deactivateradio traffic service .............. 100
If Infotainment system isswitched off: display timeand date .............................. 100
12 CD ejection ......................... 10513 CONFIG ................................ 92
Open settings menu .............. 92
14 INFO ..................................... 80
Radio: information on thecurrently played station ......... 95
CD/MP3/WMA:information on thecurrently inserted CD .......... 105
15 CD slot ................................ 10516 Multifunction knob ................. 87
Turn: mark menu optionsor set numeric values ........... 87
Press: select/activate themarked option; confirm setvalue; switch function on/off .. 87
17 BACK .................................... 87
Menu: one level back ............ 87
Input: delete last characteror entire entry ........................ 87
18 TONE .................................... 91
Tone settings ........................ 9119 v/G .................................... 116
Open telephone main menu 122
Activate/deactivate mute ....... 86

Introduction 85
20 AUX ..................................... 108
Change to external audiosource ................................. 108
Steering wheel audio controls
1 Short press: take phone call 116
or dial number in call list ..... 122
or activate speechrecognition (if available) ...... 111
Long press: show call list .... 122
or deactivate speechrecognition (if available) ...... 111
2 SRC (Source) ........................ 86
Press: select audio source .... 86
If radio is active: turnupwards/downwards toselect next/previouspreset radio station ............... 95
If CD player is active: turnupwards/downwards toselect next/previous CD/MP3/WMA track .................. 105
If Phone portal is active:turn upwards/downwardsto select next/previousentry in call list .................... 122
If Phone portal is activeand calls waiting: turnupwards/downwards toswitch between calls ........... 122
3 Increase volume .................... 864 Reduce volume ..................... 865 Short press: end/decline
call ....................................... 122
or close call list .................... 122
or activate/deactivate mute ... 86
or deactivate speechrecognition (if available) ...... 111

86 Introduction
UsageControl elementsThe Infotainment system is operatedvia function buttons, multifunctionalknobs and menus that are shown onthe display.Inputs are made optionally via:■ the central control unit in the
instrument panel 3 80■ controls on the steering wheel3 80
■ the speech recognition system3 111
Switching the Infotainmentsystem on or offPress the X knob briefly. Afterswitching on, the last selectedInfotainment source is active.
Automatic switch-offIf the Infotainment system has beenswitched on using the X knob whenthe ignition was switched off, it willswitch off again automatically after30 minutes.
Setting the volumeTurn the X knob. The current settingis shown on the display.When the Infotainment system isswitched on, the last selected volumeis set, provided that volume is lowerthan the maximum start-up volume.The following can be set separately:■ the maximum start-up volume3 92
■ the volume of the trafficannouncements 3 92
Speed compensated volumeWhen speed compensated volume isactivated 3 92 the volume isadapted automatically to make up forthe road and wind noise as you drive.
MutePress the v/G button (if Phone portalis available: press for a few seconds)to mute the audio sources.To cancel mute again: turn the Xknob or press the v/G button again(if Phone portal is available: press fora few seconds).
Volume limitation at hightemperaturesAt very high temperatures inside thevehicle the Infotainment system limitsthe maximum adjustable volume. Ifnecessary the volume is decreasedautomatically.
Modes of operation
RadioPress the RADIO button to open theradio main menu or to changebetween the different wavebands.Press the multifunction knob to opena submenu with options for stationselection.Detailed description of the radiofunctions 3 95.
Audio playersPress the CD / AUX / CD/AUX buttonto open the CD, USB, iPod or AUXmenus or to switch between thesemenus.Press the multifunction knob to opena submenu with options for trackselection.

Introduction 87
Detailed description of:■ CD player functions 3 105■ AUX input functions 3 108■ USB port functions 3 109
PhonePress the v/G button to open thetelephone menu.Press the multifunction knob to opena submenu with options for the inputor selection of numbers.Detailed description of the mobilephone portal functions 3 116.
Basic operationMultifunction knobThe multifunction knob is the centralcontrol element for the menus.Turn the multifunction knob:■ CD 400 / CD 400plus: to mark a
menu option■ CD 300: to display a menu option■ to set a numeric value.
Press the multifunction knob:■ CD 400 / CD 400plus: to select or
activate the marked option■ CD 300: to select or activate the
option displayed■ to confirm a set value■ to switch a system function on/off.
BACK buttonPress the BACK button briefly to:■ exit a menu■ return from a submenu to the next
higher menu level■ delete the last character in a
character sequence.Press and hold the BACK button for afew seconds to delete the entire entry.
Examples of menu operation
CD 400 / CD 400plusSelecting an option
Turn the multifunction knob to movethe cursor (= coloured background) tothe desired option.Press the multifunction knob to selectthe marked option.SubmenusAn arrow on the right-hand edge ofthe menu indicates that afterselection of the option a submenuwith further options will be opened.

88 Introduction
Activating a setting
Turn the multifunction knob to markthe desired setting.Press the multifunction knob toactivate the setting.
Setting a value
Turn the multifunction knob to changethe current value of the setting.Press the multifunction knob toconfirm the set value.
Switching a function on or off
Turn the multifunction knob to markthe function to be switched on or off.Press the multifunction knob to switchbetween the settings On and Off.

Introduction 89
Entering a character sequence
For the input of character sequences,e.g. telephone numbers:Turn the multifunction knob to selectthe desired character.Press the multifunction knob toconfirm the selected character.Using the BACK button the lastcharacter in the character sequencecan be deleted.
CD 300Menu elements and symbols
The up and down arrows 1 indicate:the top menu level is active. Furtheroptions are available in the activemenu.Turn the multifunction knob to displaythe other options in the active menu.The angled arrow 2 indicates: asubmenu with further options isavailable.Press the multifunction knob to selectthe option displayed and to open thecorresponding submenu.
The arrow pointing to the right 3indicates: the first submenu level isactive (two arrows = second submenulevel active).The down arrow 4 indicates: furtheroptions are available in the activesubmenu.Activating a setting
Press the multifunction knob to openthe corresponding settings menu.Turn the multifunction knob to displaythe desired setting.Press the multifunction knob toactivate the setting.

90 Introduction
Setting a value
Press the multifunction knob to openthe corresponding settings menu.Turn the multifunction knob to changethe current value of the setting.Press the multifunction knob toconfirm the set value.
Switching a function on or off
Press the multifunction knob to openthe corresponding settings menu.Turn the multifunction knob to markthe setting On or Off.Press the multifunction knob toconfirm the marked setting.
Entering a character sequence
Press the multifunction knob to openthe relevant settings menu.Turn the multifunction knob to changethe character at the current cursorposition.Press the multifunction knob toconfirm the character displayed.Using the BACK button the lastcharacter in the character sequencecan be deleted.

Introduction 91
Tone settingsIn the tone settings menu the tonecharacteristics can be set for eachradio waveband and each audioplayer source.
Press the TONE button to open thetone menu.
Setting bass, middle and treble
Select Bass:, Midrange: or Treble:.Set the desired value for the selectedoption.
Setting the volume distributionbetween front - rear
Select Fader:.Set the desired value.

92 Introduction
Setting the volume distributionbetween right - left
Select Balance:.Set the desired value.
Setting an individual setting to“0”Select the desired option and pressand hold the multifunction knob for afew seconds.
Setting all settings to "0" or "Off"Press and hold the TONE button for afew seconds.
Optimizing the tone for the styleof music
Select EQ: (Equalizer).The displayed options offer optimizedbass, middle and treble presettingsfor the relevant style of music.Select the desired option.
Volume settingsMaximum startup volume
Press the CONFIG button to open thesystem settings menu.CD 400 / CD 400plus: select Radiosettings and then Maximum startupvolume.CD 300: select Audio settings andthen Start up volume.Set the desired value.

Introduction 93
Speed compensated volume
Press the CONFIG button to open thesystem settings menu.CD 400 / CD 400plus: select Radiosettings and then Auto volumecontrol.CD 300: select Audio settings andthen Auto volume control.Speed compensated volume can bedeactivated or the degree of volumeadaptation can be selected in themenu displayed.Select the desired option.
Volume of the trafficannouncements (TA)The volume of the trafficannouncements can be increased orreduced proportionate to the normalaudio volume.
Press the CONFIG button to open thesystem settings menu.CD 400 / CD 400plus: select Radiosettings, RDS options and TAvolume.CD 300: select Audio settings, RDSoptions and TA volume.Set the desired value for the volumeincrease or reduction.
Personalisation(only with CD 400plus)Various Infotainment system settingscan be separately memorised foreach vehicle key (driver) of the car.
Memorised settingsBy removing the vehicle key from theignition switch the following settingsare automatically saved for the keybeing used:■ last volume settings; one volume
level for all non-phone audiosources (radio, CD player, AUX,USB) and one for phone audio
■ all radio station presets■ all tone settings; each of these
settings are separately saved foreach of the following audiosources: AM, FM, DAB, CD player,AUX, USB
■ last active audio source■ last active radio station (separately
for each waveband)■ last active display mode

94 Introduction
■ last position in Audio/MP3 CDincluding track number and folder
■ state of shuffle songs setting(CD player)
■ state of TP (Traffic Programme)setting
■ cursor position for each menu onthe display
Activating/deactivatingpersonalizationPress the CONFIG button to open thesystem settings menu.Select Vehicle settings and thenComfort settings.Set Personalization by driver to On orOff.

Radio 95
Radio
Usage .......................................... 95Station search .............................. 95Autostore lists .............................. 96Favourite lists ............................... 96Waveband menus ........................ 97Radio data system (RDS) .......... 100Digital audio broadcasting ......... 102
UsageControl buttonsThe most important buttons forcontrol of the radio are as follows:■ RADIO: Activate radio■ s u: Station search■ AS: Autostore lists■ FAV: Favourite lists■ 1...6: Preset buttons■ TP: Radio traffic service 3 100
Activating the radioPress the RADIO button to open theradio main menu.The station last played will bereceived.
Selecting the wavebandPress the RADIO button once orseveral times to select the desiredwaveband.The station last played in thatwaveband will be received.
Station searchAutomatic station searchBriefly press button s or u toplay the next station in the stationmemory.
Manual station searchPress button s or u for a fewseconds to start a search for the nextreceivable station in the currentwaveband.When the required frequency hasbeen reached the station is playedautomatically.NoteManual station search: If the radiodoes not find a station, it switchesautomatically to a more sensitivesearch level. If it still does not find astation, the frequency that was lastactive is set again.NoteFM waveband: when the RDSfunction is activated, only RDSstations 3 100 are searched for, and

96 Radio
when the radio traffic service (TP) isactivated, only traffic servicestations 3 100 are searched for.
Manual station tuning
AM wavebandTurn the multifunction knob and setthe optimal reception frequency onthe pop-up frequency display.
DAB wavebandPress the multifunction knob to openthe DAB menu and select DABmanual tuning.Turn the multifunction knob and setthe required reception frequency onthe pop-up frequency display.
Autostore listsThe stations that can be received bestin a waveband can be searched forand stored automatically via theautostore function.
NoteThe currently received station ismarked by i.
Each waveband has 2 autostore lists(AS 1, AS 2), in each of which6 stations can be stored.
Automatic station storingPress and hold the AS button until anautostore message is displayed. The12 strongest stations in the currentwaveband will be stored in the2 autostore lists.To abort the autostore procedure,press the multifunction knob.
Storing stations manuallyStations can also be stored manuallyin the autostore lists.Set the station to be stored.Briefly press the AS button to open anautostore list or to switch to anotherautostore list.To store the station in a list position:press the corresponding stationbutton 1...6 until a confirmationmessage is displayed.NoteManually stored stations areoverwritten in an automatic stationstoring process.
Retrieving a stationBriefly press the AS button to open anautostore list or to switch to anotherautostore list.Briefly press one of the stationbuttons 1...6, to open the station atthe corresponding list position.
Favourite listsStations of all wavebands can bestored manually in the favourite lists.

Radio 97
6 stations can be stored in eachfavourite list.The number of available favouritelists is configurable (see below).NoteThe currently received station ismarked by i.
Storing a stationSet the station to be stored.Briefly press the FAV button to opena favourite list or to switch to anotherfavourite list.
To store the station in a list position:press the corresponding stationbutton 1...6 until a confirmationmessage is displayed.
Retrieving a stationBriefly press the FAV button to opena favourite list or to switch to anotherfavourite list.Briefly press one of the stationbuttons 1...6, to open the station atthe related list position.
Defining the number of availablefavourite lists
Press the CONFIG button.
Select Radio settings and then Radiofavourites.Select the desired number ofavailable favourite lists.
Waveband menusAlternative facilities for stationselection are available via waveband-specific menus.With the radio main menu active,press the multifunction knob to openthe relevant waveband menu.NoteThe following FM-specific displaysare shown as examples.

98 Radio
Favourites listSelect Favourites list. All stationssaved in the favourites lists aredisplayed.
Select the required station.NoteThe currently received station ismarked by i.
Stations lists
AM/FM wavebandSelect AM stations list or FM stationslist.
All receivable AM/FM stations in thecurrent reception area are displayed.
DAB wavebandTurn the multifunction knob.All receivable DAB stations 3 102 inthe current reception area aredisplayed.NoteIf no station list has been createdbeforehand, the Infotainmentsystem performs an automaticstation search.
Select the required station.
NoteThe currently received station ismarked by i.
Updating stations listsIf the stations stored in a waveband-specific station list can no longer bereceived:Select the corresponding commandto update a station list.CD 400plus: The dual tuner of theInfotainment system continuouslyupdates the FM stations list in thebackground. No manual update isrequired.A station search is started. Once thesearch is completed the station lastreceived will be played.To abort the station search, press themultifunction knob.NoteIf a waveband-specific station list isupdated, the correspondingcategory list is also updated.

Radio 99
Category listsNumerous RDS stations 3 100broadcast a PTY code, whichspecifies the type of programmetransmitted (e.g. news). Somestations also change the PTY codedepending on the content currentlybeing transmitted.The Infotainment system stores thesestations, sorted by programme type,in the corresponding category list.To search for a programme typedetermined by station: select thewaveband specific category listoption.
A list of programme types currentlyavailable is displayed.Select the desired programme type.CD 400 / CD 400plus: A list of stationsis displayed that transmit aprogramme of the selected type.
Select the desired station.CD 300: The next receivable stationof the selected type is searched forand is played.The category list is also updatedwhen the corresponding wavebandspecific station list is updated.
NoteThe currently received station ismarked by i.
DAB announcementsBesides their music programmesnumerous DAB stations 3 102broadcast various announcementcategories.The currently received DAB service(programme) is interrupted when anyannouncements of previouslyactivated categories are pending.
Activating announcement categoriesSelect DAB announcements in theDAB menu.

100 Radio
Activate the desired announcementcategories.Several announcement categoriescan be selected at the same time.NoteDAB announcements can only bereceived if the DAB waveband isactivated.
Radio data system (RDS)RDS is a service of FM stations thatconsiderably facilitates the finding ofthe desired station and its fault-freereception.
Advantages of RDS■ On the display the programme
name of the set station appearsinstead of its frequency.
■ During a station search theInfotainment system tunes in toRDS stations only.
■ The Infotainment system alwaystunes into the best receivablebroadcasting frequency of the setstation by means of AF (AlternativeFrequency).
■ Depending on the station that isreceived the Infotainment systemdisplays radio text that can contain,for example, information about thecurrent programme.
Configuring RDSTo open the menu for the RDSconfiguration:Press the CONFIG button.CD 400 / CD 400plus: Select Radiosettings and then RDS options.CD 300: Select Audio settings andthen RDS options.
TA volumeThe volume of the trafficannouncements (TA) can be preset3 92.Switching RDS on and offSet the option RDS to On or Off.NoteIf RDS is switched off, it will beautomatically switched on againwhen a radio station is changed (bysearch function or preset button).
Traffic announcement (TA)To switch the TA function on or offpermanently:
Radio 101
Set the option Traffic announcement(TA) to On or Off.
Switching regionalization on and off(RDS must be activated forregionalization.)At certain times some RDS stationsbroadcast regionally differentprogrammes on different frequencies.Set the option Regional (REG) to Onor Off.If regionalization is switched on, onlyalternative frequencies (AF) with thesame regional programmes areselected.If regionalization is switched off,alternative frequencies of the stationsare selected without regard toregional programmes.
RDS-scrolling textSome RDS stations hide theprogramme name in the display linein order to display additionalinformation.To prevent additional informationbeing displayed:Set RDS-Text scroll freeze to On.
Radio text:If RDS and reception of an RDSstation are activated, informationabout the programme that is currentlyreceivable and about the music trackcurrently playing are displayed belowthe programme name.To show or hide the information:Set the option Radio text: to On or Off.
Radio traffic service(TP = Traffic Programme)Radio traffic service stations are RDSstations that broadcast traffic news.
Switching the radio traffic service onand offTo switch the traffic announcementstandby facility of the Infotainmentsystem on and off:Press the TP button.■ If the radio traffic service is
switched on, [ ] is displayed in theradio main menu.
■ Only radio traffic service stationsare received.
■ If the current station is not a radiotraffic service station, a search isstarted automatically for the nextradio traffic service station.
■ If a radio traffic service station hasbeen found, [TP] is displayed in theradio main menu.
■ Traffic announcements are playedat the preset TA volume 3 92.
■ If the radio traffic service isswitched on, CD/MP3 replay isinterrupted for the duration of thetraffic announcement.
Listening to traffic announcementsonlySwitch on the radio traffic service andcompletely turn down the volume ofthe Infotainment system.
Blocking out traffic announcementsTo block out a traffic announcement,e.g. during CD/MP3 replay:Press TP button or the multifunctionknob to confirm the cancel messageon the display.

102 Radio
The traffic announcement is aborted,but the radio traffic service remainsswitched on.
EON (Enhanced Other Networks)With EON you can listen to radiotraffic announcements even if thestation you have set does notbroadcast its own radio traffic service.If such a station is set, it is displayedin black as for radio traffic servicestations TP.
Digital audio broadcastingDigital audio broadcasting (DAB) isan innovative and universalbroadcast system.DAB stations are indicated by theprogramme name instead of thebroadcasting frequency.
General information■ With DAB, several radio
programmes (services) can bebroadcast on a single frequency(ensemble).
■ Besides high-quality digital audioservices, DAB is also able totransmit programme-associateddata and a multitude of other dataservices including travel and trafficinformation.
■ As long as a given DAB receivercan pick up the signal sent out by abroadcasting station (even if thesignal is very weak), soundreproduction is ensured.
■ There is no fading (weakening ofthe sound) that is typical of AM orFM reception. The DAB signal isreproduced at a constant volume.
■ If the DAB signal is too weak to bepicked up by the receiver, receptionis interrupted completely. Thisincident can be avoided byactivating Auto ensemble linkingand/or Auto linking DAB-FM in theDAB settings menu.
■ Interference caused by stationsthat are on nearby frequencies (aphenomenon that is typical of AMand FM reception) does not occurin connection with DAB.
■ If the DAB signal is reflected bynatural obstacles or buildings, thereception quality of DAB isimproved, whereas AM or FMreception is considerably impairedin such cases.
■ When DAB reception is enabled,the FM tuner of the Infotainmentsystem remains active in thebackground and continuallysearches for the best receivable FMstations. If TP 3 100 is activated,

Radio 103
traffic announcements of the FMstation which is currently bestreceivable are issued. DeactivateTP, if you do not wish DABreception to be interrupted by FMtraffic announcements.
Configuring DAB
Press the CONFIG button.Select Radio settings and then DABsettings.
The following options are available inthe configuration menu:■ Auto ensemble linking: with this
function activated, the deviceswitches over to the same service(programme) on another DABensemble (frequency, if available)when the DAB signal is too weak tobe picked up by the receiver.
■ Auto linking DAB-FM: with thisfunction activated, the deviceswitches over to a correspondingFM station of the active DABservice (if available) when the DABsignal is too weak to be picked upby the receiver.
■ Dynamic audio adaption: with thisfunction activated, the dynamicrange of the DAB signal is reduced.That means the level of the loudsounds is reduced, but not the levelof the quiet sounds. Therefore thevolume of the Infotainment system
can be raised to a point where thequiet sounds are audible, withoutthe loud sounds being too loud.
■ Frequency band: after selection ofthis option it can be defined whichDAB wavebands are to be receivedby the Infotainment system.
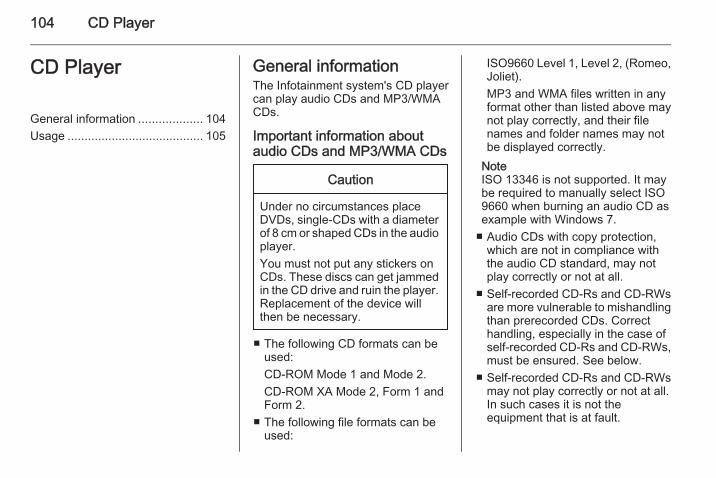
104 CD Player
CD Player
General information ................... 104Usage ........................................ 105
General informationThe Infotainment system's CD playercan play audio CDs and MP3/WMACDs.
Important information aboutaudio CDs and MP3/WMA CDs
Caution
Under no circumstances placeDVDs, single-CDs with a diameterof 8 cm or shaped CDs in the audioplayer.You must not put any stickers onCDs. These discs can get jammedin the CD drive and ruin the player.Replacement of the device willthen be necessary.
■ The following CD formats can beused:CD-ROM Mode 1 and Mode 2.CD-ROM XA Mode 2, Form 1 andForm 2.
■ The following file formats can beused:
ISO9660 Level 1, Level 2, (Romeo,Joliet).MP3 and WMA files written in anyformat other than listed above maynot play correctly, and their filenames and folder names may notbe displayed correctly.
NoteISO 13346 is not supported. It maybe required to manually select ISO9660 when burning an audio CD asexample with Windows 7.
■ Audio CDs with copy protection,which are not in compliance withthe audio CD standard, may notplay correctly or not at all.
■ Self-recorded CD-Rs and CD-RWsare more vulnerable to mishandlingthan prerecorded CDs. Correcthandling, especially in the case ofself-recorded CD-Rs and CD-RWs,must be ensured. See below.
■ Self-recorded CD-Rs and CD-RWsmay not play correctly or not at all.In such cases it is not theequipment that is at fault.

CD Player 105
■ On mixed mode CDs (audio tracksand compressed files, e.g. MP3,are stored), the audio tracks partand the compressed files part canbe played separately.
■ Avoid leaving fingerprints when youchange CDs.
■ Put CDs back in their sleevesimmediately after removing themfrom the CD player in order toprotect them from damage and dirt.
■ Dirt and liquids on CDs can smearthe lens of the CD player inside thedevice and cause faults.
■ Protect CDs from heat and directsunlight.
■ The following restrictions apply forthe data stored on an MP3/WMACD:Number of tracks: max. 999.Number of folders: max. 255.Folder structure depth: max.64 levels (recommended: max.8 levels).Number of playlists: max. 15.
Number of songs per playlist: max.255.Applicable playlistextensions: .m3u, .pls, .asx, .wpl.
■ This chapter deals only with playingMP3 files since the operation forMP3 and WMA files is identical.When a CD with WMA files isloaded MP3 related menus aredisplayed.
UsageStarting CD replay
Press the CD button to open the CDor MP3 menu.If there is a CD in the CD player, CDreplay is started.Depending on the data stored on theaudio CD or MP3 CD differinginformation about the CD and thecurrent music track will be shown onthe display.
Inserting a CDInsert a CD with the printed sidefacing up into the CD slot until it isdrawn in.NoteIf a CD is inserted, a CD symbol isshown in the top line of the display.
Changing the standard pageview(only with CD 300)During audio CD or MP3 replay: pressthe multifunction knob and then selectDefault CD page view or Default MP3page view.Select the desired option.

106 CD Player
Changing the folder levelPress button g or e to change to ahigher or lower folder level.
Skipping to the next track orprevious trackBriefly press button s or u.
Fast forward or rewindPress and hold button s or u tofast forward or rewind the currenttrack.
Selecting tracks using the audioCD or MP3 menu
During audio CD replay
Press the multifunction knob to openthe audio CD related menu.To play all tracks in random order: setShuffle songs to On.To select a track on the audio CD:select Tracks list and then select thedesired track.
During MP3 replay
Press the multifunction knob to openthe MP3 related menu.To play all tracks in random order: setShuffle songs to On.To select a track from a folder orplaylist: select Playlists/Folders.Select a folder or playlist and thenselect the desired track.NoteIf a CD contains both audio and MP3data, the audio data can be selectedfrom Playlists/Folders.

CD Player 107
To open a menu with additionaloptions for track search andselection: select Search. The optionsavailable depend on the data savedon the MP3 CD.The search process on the MP3 CDmay take several minutes. During thistime the station last played will bereceived.
Removing a CDPress the d button.The CD is pushed out of the CD slot.If the CD is not removed afterejection, it will be drawn back in againautomatically after a few seconds.
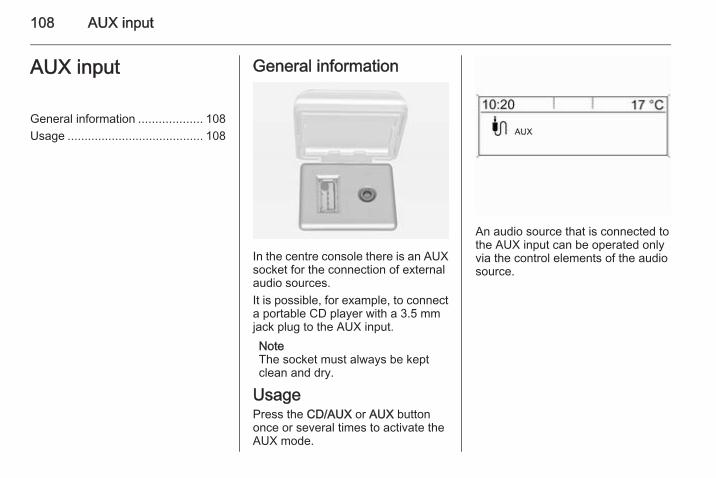
108 AUX input
AUX input
General information ................... 108Usage ........................................ 108
General information
In the centre console there is an AUXsocket for the connection of externalaudio sources.It is possible, for example, to connecta portable CD player with a 3.5 mmjack plug to the AUX input.NoteThe socket must always be keptclean and dry.
UsagePress the CD/AUX or AUX buttononce or several times to activate theAUX mode.
An audio source that is connected tothe AUX input can be operated onlyvia the control elements of the audiosource.

USB port 109
USB port
General information ................... 109Playing saved audio files ........... 109
General information
In the centre console there is a USBsocket for the connection of externalaudio data sources.Devices connected to the USB portare operated via the controls andmenus of the Infotainment system.NoteThe socket must always be keptclean and dry.
Important informationThe following devices can beconnected to the USB port:■ iPod■ Zune■ PlaysForSure device (PFD)■ USB driveNoteNot all iPod, Zune, PFD or USB drivemodels are supported by theInfotainment system.
Playing saved audio files

110 USB port
Press the AUX button once or severaltimes to activate the USB mode.Replay of the audio data stored on theUSB device is started.The operation of data sourcesconnected via USB is generally thesame as for an audio MP3 CD 3 105.On the following pages only theaspects of operation that aredifferent/additional are described.Operation and the screen displaysare described for USB drives only.Operation of other devices like iPodor Zune is generally the same.
Selecting tracks using the USBmenu
Press the multifunction knob to openthe USB related menu.To play all tracks in succession:select Play all.To display a menu with variousadditional options for track searchand selection: select Search.The search process on the USBdevice may take several minutes.During this time the station last playedwill be received.To play all tracks in random order: setShuffle songs (random) to On.
To repeat the currently played track:set Repeat to On.

Speech recognition 111
Speech recognition
General information ................... 111Phone control ............................ 112
General informationThe speech recognition of theInfotainment system enables you tooperate the phone portal via voiceinput. It recognises commands andnumeric sequences independently ofthe relevant speaker. The commandsand numeric sequences can bespoken without a voice pausebetween the individual words.You can save telephone numbersassigning a name of your choice(voice tag). Using these names, youcan later set up a telephoneconnection.In the event of incorrect operation orcommands the speech recognitiongives you visual and/or acousticfeedback and requests you to re-enter the desired command. Apartfrom this, the speech recognitionacknowledges important commandsand will enquire if necessary.To ensure that conversations insidethe vehicle do not lead tounintentional triggering of system
functions, the speech recognitiondoes not start until it has beenactivated.
Important notes on languagesupport■ Not all languages available for the
display of the Infotainment systemare also available for the speechrecognition.
■ If the currently selected languagefor the display is not supported bythe speech recognition, you need toenter the voice commands inEnglish.To be able to enter voicecommands in English, you firstneed to activate the phone mainmenu by pressing the v/G buttonon the Infotainment system, andthen activate the speechrecognition of the phone portal bypressing button w on the steeringwheel.

112 Speech recognition
Phone controlActivating speech recognitionTo activate the speech recognition ofthe Phone portal, press button w onthe steering wheel. For the duration ofthe dialogue any active audio sourceis muted and any traffic news fade-inis cancelled.
Adjusting the volume for voiceoutputTurn the volume knob on theInfotainment system, or press the + or― button on the steering wheel.
Cancelling a dialogueThere are various ways ofdeactivating the speech recognitionand cancelling the dialogue:■ Press button x on the steering
wheel.■ Say "Cancel".■ Do not enter (say) any commands
for some time.■ After the third unrecognised
command.
OperationWith the aid of the speech recognitionthe mobile phone can be operatedvery conveniently via voice input. It issufficient to activate the speechrecognition and to enter (say) thedesired command. After input of thecommand the Infotainment systemguides you through the dialogue withappropriate questions and feedbackto achieve the desired action.
Main commandsAfter activation of the speechrecognition a short tone signals thatthe speech recognition is expectinginput.Main commands available:■ "Dial"■ "Call"■ "Redialing"■ "Save"■ "Delete"■ "Directory"■ "Pair"
■ "Select device"■ "Voice feedback"
Commands that are frequentlyavailable■ "Help": the dialogue is terminated
and all commands available withinthe actual function are enumerated.
■ "Cancel": the speech recognition isdeactivated.
■ "Yes": a suitable action is triggereddepending on the context.
■ "No": a suitable action is triggereddepending on the context.
Entering a telephone numberAfter the command "Dial" the speechrecognition requests input of anumber.The telephone number must bespoken in your normal voice withoutany artificial pauses between theindividual numbers.Recognition works best if a pause ofat least half a second is made afterevery three to five digits. TheInfotainment system then repeats thenumbers recognised.

Speech recognition 113
You can then enter further numbersor the following commands:■ "Dial": the inputs are accepted.■ "Delete": the number last entered or
the block of numbers last entered isdeleted.
■ "Plus": a preceding "+" is enteredfor a call abroad.
■ "Verify": the inputs are repeated bythe voice output.
■ "Asterisk": An asterisk "*" isentered.
■ "Hash": A hash "#" is entered.■ "Help"■ "Cancel"The maximum length of the telephonenumber entered is 25 digits.To be able to make a call abroad youcan say the word "Plus" (+) at thebeginning of your number. The plusallows you to call from any countrywithout knowing the prefix for callsmade abroad in that country. Thensay the required country code.Example of a dialogueUser: "Dial"
Voice output: "Please, say thenumber to dial"User: "Plus Four Nine"Voice output: "Plus Four Nine"User: "Seven Three One"Voice output: "Seven Three One"User: "One One Nine Nine"Voice output: "One One Nine Nine"User: "Dial"Voice output: "The number is beingdialled"
Entering a nameUsing the "Call" command atelephone number is entered that hasbeen stored in the telephone bookunder a name (voice tag).Commands available:■ "Yes"■ "No"■ "Help"■ "Cancel"Example of a dialogueUser: "Call"
Voice output: "Please, say thenametag to call"User: <Name>Voice output: "Do you want to call<Michael>?"User: "Yes"Voice output: "The number is beingdialled"
Starting a second callA second call can be started during anactive telephone call. To do so, pressbutton w.Commands available:■ "Send": activate manual DTMF
(touch-tone dialling), e.g. for voicemail or telephone banking.
■ "Send nametag": activate DTMF(touch-tone dialling) by entering aname (voice tag).
■ "Dial"■ "Call"■ "Redialing"■ "Help"■ "Cancel"

114 Speech recognition
Example of a dialogueUser: <if a telephone call is active:press w button>User: "Send"Voice output: "Please, say thenumber to send."(for number input see the dialogueexample for Entering a telephonenumber)User: "Send"
RedialingThe number last dialled is redialledwith the command "Redialing".
SavingWith the command "Save" atelephone number is stored in thetelephone book under a name (voicetag).The name entered must be repeatedonce. The pitch and pronunciationmust be as identical as possible forboth name inputs, otherwise thespeech recognition will reject theinputs.A maximum of 50 voice tags can bestored in the telephone book.
Voice tags are speaker-dependent,i.e. only the person who recorded avoice tag can open it.To avoid the start of the recording ofa saved name from being cut-off, ashort pause should be left after aninput request.To be able to use the voice tagindependently of the location, i.e.including other countries, alltelephone numbers should beentered with a "plus" character and acountry code.Commands available:■ "Save": the inputs are accepted.■ "Verify": the last input is repeated.■ "Help"■ "Cancel"Example of a dialogueUser: "Save"Voice output: "Please, say thenumber to save"(for number input see the dialogueexample for Entering a telephonenumber)User: "Save"
Voice output: "Please, say thenametag to save"User: <Name>Voice output: "Please, repeat thenametag to confirm"User: <Name>Voice output: "Saving the nametag"
DeletingA previously saved voice tag isdeleted with the command "Delete".Commands available:■ "Yes"■ "No"■ "Help"■ "Cancel"
Listening to stored namesThe voice output of all stored names(voice tags) is started with thecommand "Directory".

Speech recognition 115
Commands available during voiceoutput of the voice tags:■ "Call": the telephone number of the
voice tag last read aloud isselected.
■ "Delete": the entry of the voice taglast read aloud is deleted.
Saving a mobile phone to or deletingit from the device listWith the command "Pair" a mobilephone can be saved to or deletedfrom the device list of the Phoneportal 3 117.Commands available:■ "Add"■ "Delete"■ "Help"■ "Cancel"Example of a dialogueUser: "Pair"Voice output: "Do you want to add ordelete a device?"User: "Add"
Voice output: "Using the pair functionin the external device, enter <1234>to pair."Voice output: "Do you want to pair thedevice?"User: "Yes"Voice output: "The device isconnected as the number<device_number>"
Selecting a mobile phone from thedevice listUsing the "Select device" command,a mobile phone can be selected in thedevice list for setting up a Bluetoothconnection.Example of a dialogueUser: "Select device"Voice output: "Please, say a devicenumber to select"User: <device_number>Voice output: "Do you want to selectthe device number <device_num‐ber>?"User: "Yes"Voice output: "Do you want to pair thedevice?"
User: "Yes"Voice output: "One moment. Thesystem searches for the selecteddevice"Voice output: "Device number<dev_num> is selected"
Voice feedbackEach voice input is answered orcommented on by the Infotainmentsystem by way of a voice output thatis adapted to the situation.To switch the voice output on or off,enter "Voice feedback" or pressbutton w.

116 Phone
Phone
General information ................... 116Bluetooth connection ................. 117Emergency call .......................... 121Operation ................................... 122Mobile phones and CB radioequipment .................................. 125
General informationThe Phone portal provides you withthe possibility of having mobile phoneconversations via a vehiclemicrophone and the vehicleloudspeakers as well as operating themost important mobile phonefunctions via the Infotainment systemin the vehicle. To be able to use thePhone portal, the mobile phone hasto be connected with it via Bluetooth.The Phone portal can be operatedoptionally via the speech recognitionsystem.Not all Phone portal functions aresupported by every mobile phone.The possible phone functions dependon the relevant mobile phone andnetwork provider. You will find furtherinformation on this in the operatinginstructions for your mobile phone oryou can enquire about them with yournetwork provider.
Important information foroperation and traffic safety
9 Warning
Mobile phones have effects onyour environment. For this reasonsafety regulations and directionshave been prepared. You shouldbe familiar with the relateddirections before you use thetelephone function.
9 Warning
Use of the hands-free facility whiledriving can be dangerous becauseyour concentration is reducedwhen telephoning. Park yourvehicle before you use the hands-free facility. Follow the stipulationsof the country in which you findyourself at present.Do not forget to follow the specialregulations that apply in specificareas and always switch off themobile phone if the use of mobile

Phone 117
phones is prohibited, ifinterference is caused by themobile phone or if dangeroussituations can occur.
BluetoothThe Phone portal is certified by theBluetooth Special Interest Group(SIG).You will find further information aboutthe specification on the Internet athttp://www.bluetooth.com
Operating the speechrecognitionDo not use the speech recognition inemergencies, because in stresssituations your voice can change somuch that it can no longer berecognised sufficiently to set up thedesired connection quickly enough.
Control elementsThe most important telephonespecific control elements are asfollows:v/G button: opens the telephonemain menu.
Controls on steering wheel:q, w: accept call, activate speechrecognition.n, x: end/reject call, deactivatespeech recognition.The Phone portal can be operatedoptionally via speech recognition3 111.
Bluetooth connectionBluetooth is a radio standard for thewireless connection of, for example, atelephone with other devices.Information such as a telephonebook, call lists, the network operator’sname and field strength can betransferred. The functionality can berestricted depending on thetelephone type.To be able to set up a Bluetoothconnection with the Phone portal, theBluetooth function of the mobilephone has to be activated and themobile phone has to be set to"visible". For further informationplease refer to the operatinginstructions for the mobile phone.
Bluetooth menu
Press the CONFIG button.Select Phone settings and thenBluetooth.Activating BluetoothIf the Bluetooth function of the Phoneportal is deactivated: set Activation toOn and confirm the subsequentmessage.Device listWhen a mobile phone is connected tothe Phone portal via Bluetooth for thefirst time, the mobile phone is storedin the device list.

118 Phone
A maximum of 5 mobile phones canbe stored in the device list.
Connecting a mobile phone forthe first timeThere are two options for connectinga mobile phone to the Phone portal:by adding it as a handsfree device orby using the SIM Access Profile(SAP).
Handsfree modeWhen the mobile phone is added asa handsfree device the user canmake or receive calls and use otherfunctions via the Phone portal. Therange of functions available depends
on the mobile phone. While it isconnected with the Phone portal themobile phone can be operated asusual. Note that the mobile phonebattery may discharge at a higherspeed than usual due to the Bluetoothconnection active along with normaloperation of the mobile phone.
SAP modeWhen using the SAP option, a widerrange of functions is available via thePhone portal such as various securityand messaging options. The actualrange of functions depends on thenetwork provider. Additionally, in theSAP mode the mobile phone is in thestandby mode. Only the Bluetoothconnection and the SIM card areactive, which leads to lower energyconsumption of the connected mobilephone.
Connecting a mobile phone as ahandsfree device
Select Add device (Handsfree). TheBluetooth code to be entered into themobile phone is displayed.The Phone portal can now bedetected by other Bluetooth devices.As soon as the mobile phone hasdetected the Phone portal theBluetooth code can be entered intothe mobile phone.

Phone 119
As soon as the Phone portal hasdetected the mobile phone, theconnection set-up can be confirmed.The mobile phone is adopted in thedevice list and can be operated viathe Phone portal.
Changing the Bluetooth code(only relevant for handsfree mode)The first time a Bluetooth connectionto the Phone portal is set up, a defaultcode is displayed. This default codecan be changed at any time. Forsecurity reasons a four-digit,randomly selected code must beused for pairing devices.
Select Change Bluetooth code. Onthe menu displayed, edit the actualBluetooth code and accept themodified code using OK.
Connecting a mobile phone via SIMAccess Profile (SAP)Select Add SIM access device.The Phone portal scans for availabledevices and displays a list of devicesfound.NoteThe mobile phone must haveBluetooth activated and be set tovisible.
Select the desired mobile phone fromthe list. The SAP passcode prompt isshown on the Infotainment displaycontaining a 16-digit code.

120 Phone
Enter the displayed SAP passcode inthe mobile phone (without spaces).The mobile phone PIN code is shownon the Infotainment display.If the PIN request function is active,the user will have to enter the PINcode of the SIM card in the mobilephone.
Enter the PIN code of the mobilephone SIM. The mobile phone ispaired with the Phone portal.Services of the mobile networkprovider can be used via the Phoneportal.
Connecting a mobile phonesaved in the device list
Select the desired mobile phone andthen select the option Select in themenu displayed.As soon as the Phone portal hasdetected the mobile phone, theconnection setup can be confirmed.The mobile phone can be operatedvia the Phone portal.
Removing mobile phone fromdevice listSelect the desired mobile phone fromthe device list. In the menu displayedselect Delete and confirm thesubsequent message.
Setting up a connected phoneVarious mobile phone settings can beconfigured in the Phone settingsmenu, if the phone is connected viaSAP.
Adjusting the ring toneTo change the ring tonecharacteristic:Press CONFIG button.Select Phone settings and then Ringtone.Select the desired option.To change the ring tone volume:While the phone rings turn the m knobof the Infotainment system or pressthe buttons + / - on the steering wheel.
Changing security settingsPress CONFIG button.

Phone 121
Select Phone settings and thenSecurity.The security dialogue is displayed.
Activating/Deactivating PIN requestSelect PIN request On or Off.Enter the PIN code of the mobilephone SIM card and confirm.NoteThis option depends on theindividual network provider.
Changing the PIN codeSelect Change PIN.Enter the current PIN code. Enter thenew PIN code. Repeat the new PINcode and confirm. The PIN has beenchanged.Configuring network servicesSelect Phone settings and thenNetwork services. The Networkservices dialogue is displayed.Depending on the network providerand mobile phone there are severaloptions available.
■ Network selection: choosebetween automatic or manualnetwork selection.
■ Call waiting: activate or deactivatecall waiting.
■ Call diverting: select divertingoptions depending on the situation.
■ Call barring: configure call barringoptions depending on the situation.
For details on network servicesconfiguration refer to the mobilephone manual or enquire with themobile network provider.
Configuring SMS centre numberThe SMS centre number is a phonenumber that acts as a gateway fortransferring SMS messages betweenmobile phones. This number isusually preset by the networkprovider.To configure the SMS centre numberselect Phone settings and then SMScentre number. If required, modify theSMS centre number.
Resetting the mobile phone to factorysettingsSelect Phone settings and thenRestore factory settings.
Emergency call
9 Warning
Connection setup cannot beguaranteed in all situations. Forthis reason you should not relyexclusively on a mobile phonewhen a vitally importantcommunication (e. g. a medicalemergency) is concerned.In some networks it may benecessary for a valid SIM card tobe properly inserted in the mobilephone.
9 Warning
Bear in mind that you can makeand receive calls with the mobilephone, if it is in a service area with

122 Phone
a sufficiently strong signal. Undercertain circumstances emergencycalls cannot be made on all mobilephone networks; it is possible thatthey cannot be made when certainnetwork services and/or telephonefunctions are active. You canenquire about this with the localnetwork operators.The emergency call number candiffer depending on the region andcountry. Please enquirebeforehand about the correctemergency call number for therelevant region.
Making an emergency callDial the emergency call number (e.g.112).The telephone connection to theemergency call centre is set up.Answer when the service personnelquestions you about the emergency.
9 Warning
Do not end the call until you arerequested to do so by theemergency call centre.
OperationIntroductionAs soon as a connection viaBluetooth has been set up betweenyour mobile phone and theInfotainment system, you can alsooperate many functions of yourmobile phone via the Infotainmentsystem.Via the Infotainment system, you can,e.g., set up a connection to thetelephone numbers stored in yourmobile phone or change thetelephone numbers.NoteIn the handsfree mode mobile phoneoperation continues to be possible,e. g. taking a call or adjusting thevolume.
After setup of a connection betweenthe mobile phone and theInfotainment system the mobilephone data is transmitted to theInfotainment system. This can takesome time depending on the phonemodel. During this period operation ofthe mobile phone is possible via theInfotainment system only to a limitedextent.Not every telephone supports allfunctions of the Phone portal.Therefore deviations from the rangeof functions described with thesespecific telephones are possible.
Setting the volume for hands-free facilityTurn the m knob on the Infotainmentsystem or press the buttons + / - onthe steering wheel.

Phone 123
Dialling a telephone number
With the telephone main menu active,press the multifunction knob to openthe phone operation menu.Several options for dialling telephonenumbers, for using the phone bookand call lists, for viewing and editingmessages are available.Using the Phone off command theconnected phone can be detachedfrom the Phone portal.
Entering a number manually
Select Enter number and then enterthe desired number sequence.Select Call to start the diallingprocess.You can switch to the telephone bookmenu by selecting PB.
Telephone bookAfter setting up the connection thetelephone book is compared with thetelephone book in the temporarymemory, provided that the same SIMcard or same telephone is connected.During this period any newly addedentries are not displayed.
If the SIM card or telephone aredifferent, the telephone book isreloaded. This process can take a fewminutes depending on the phonemodel.Selecting a telephone number fromthe telephone book
Select Phone book. In the displayedmenu select the desired first letterrange to start a preselection of thetelephone book entries that you wantto have displayed.

124 Phone
NoteTelephone book entries are carriedover as they are transferred from themobile phone. The presentation andorder of the telephone book entriesmay be different on the Infotainmentsystem's display and the mobilephone's display.
After having performed thepreselection: select the desired entryin the telephone book to display thenumbers saved under this entry.Select the desired number to start thedialling process.
Call lists
Via the menu Call lists the user canview incoming, outgoing and missedcalls and dial the relevant numbers.To start a dialling process: select thedesired call list, an entry in the call listand finally the desired telephonenumber.
Messaging functions
When the mobile phone is pairedusing the SAP mode, the user canview, compose and send messagesvia the Phone portal. The messagescan also be deleted in this menu.To view received messages: selectInbox.To view sent messages: selectOutbox.To compose a message: select Writenew message.NoteMessages are limited to70 characters.

Phone 125
Incoming callWhen there is an incoming call amenu is displayed to accept ordecline the telephone call.Select required option.
Functions during a telephonecallIf you currently have a telephone call,press the multifunction knob to opena submenu.Various options are availabledepending on the situation and rangeof functions of the mobile phone:■ Hang up: disconnect the telephone
connection.■ Call number: enter a telephone
number to make a secondtelephone call or perform DTMF(touch-tone dialling), e.g. for voicemail or telephone banking.
■ Detach call: detach the connectionto a conference participant in atelephone conference.
■ Merge calls: merge two calls whenthere are several active calls.
■ Switch calls: switch between calls,if there are several calls.
■ Mute call: mute a call.
Mobile phones and CBradio equipmentInstallation instructions andoperating guidelinesThe vehicle specific installationinstructions and the operatingguidelines of the mobile phone andhandsfree manufacturer must beobserved when installing andoperating a mobile telephone. Failureto do so could invalidate the vehicletype approval (EU directive 95/54/EC).
Recommendations for fault-freeoperation:■ Professionally installed exterior
antenna to obtain the maximumrange possible,
■ Maximum transmission power10 watts,
■ Installation of the phone in asuitable spot, consider relevantNote in the Owner's manual,chapter Airbag system.
Seek advice on predeterminedinstallation points for the externalantenna or equipment holder andways of using devices with atransmission power exceeding10 watts.Use of a handsfree attachmentwithout external antenna with mobiletelephone standards GSM900/1800/1900 and UMTS is onlypermitted if the maximumtransmission power of the mobiletelephone is 2 watts for GSM 900 or1 watt for the other types.

126 Phone
For reasons of safety, do not use thephone while driving. Even use of ahandsfree set can be a distractionwhile driving.
9 Warning
Operation of radio equipment andmobile telephones which fail tomeet above mentioned mobiletelephone standards is onlypermitted using an antennalocated outside of the vehicle.
Caution
Mobile telephones and radioequipment may lead tomalfunctions in the vehicleelectronics when operated insidethe vehicle with no exteriorantenna, unless the abovementioned regulations areobserved.

Phone 127

128
Index AActivating CD player................... 105Activating speech recognition..... 112Activating the radio....................... 95Autostore lists............................... 96
BBACK button................................. 87Basic operation............................. 87Bluetooth.................................... 116Bluetooth connection.................. 117
CCD player
activating................................. 105important information.............. 104usage...................................... 105
Configuring DAB......................... 102Configuring RDS......................... 100Control elements overview........... 80
DDAB............................................ 102Digital audio broadcasting.......... 102
EEmergency call........................... 121Enhanced Other Networks......... 100EON............................................ 100
FFavourite lists............................... 96
GGeneral information...................
.......... 78, 104, 108, 109, 111, 116
HHandsfree mode......................... 117
IInfotainment system
control elements........................ 80instrument panel........................ 80maximum startup volume.......... 92Multifunction unit....................... 80personalisation.......................... 93speed dependent volume.......... 92steering wheel audio controls. . . 80tone settings.............................. 91volume of the trafficannouncements........................ 92volume settings......................... 92
MMenu operation............................. 87Mobile phones and CB radio
equipment .............................. 125Multifunction knob......................... 87Mute.............................................. 86

129
OOperation.................................... 122
PPersonalisation............................. 93Phone
adjusting ring tones................. 117Bluetooth................................. 116Bluetooth connection.............. 117call lists.................................... 122control elements...................... 116dialling a number..................... 122emergency calls...................... 121functions during a call............. 122handsfree mode...................... 117important information.............. 116messaging functions............... 122recharging the battery............. 116setting the volume................... 122SIM Access Profile (SAP)....... 117telephone book....................... 122
Phone control............................. 112Playing saved audio files............ 109
RRadio
Radio data system (RDS)....... 100activating................................... 95autostore lists............................ 96
Digital audio broadcasting(DAB)...................................... 102favourite lists............................. 96selecting the waveband............ 95station lists................................ 97station search............................ 95usage........................................ 95waveband menus...................... 97
Radio data system (RDS) .......... 100RDS............................................ 100Recharging the phone battery.... 116Regionalization........................... 100Retrieving stations........................ 96
SSAP mode.................................. 117Selecting the waveband............... 95Setting the volume........................ 86SIM Access Profile (SAP)........... 117Speech recognition............. 111, 112
activating................................. 112phone control.......................... 112usage...................................... 112volume for voice output........... 112
Speed compensated volume........ 86Starting CD replay...................... 105Station search............................... 95Storing stations............................. 96
Switching the Infotainmentsystem on or off......................... 86
Switching the radio on.................. 95
TTheft-deterrent feature ................. 79Tone settings................................ 91Traffic announcements................. 92
UUpdating station lists.................... 97Usage..................... 86, 95, 105, 108Using the AUX input................... 108Using the CD player................... 105Using the Infotainment system..... 86Using the radio............................. 95Using the USB port..................... 109
VVoice recognition........................ 111Volume for voice output.............. 112Volume settings............................ 92
WWaveband menus......................... 97

130