infoconnect enterprise edition product guide
TRANSCRIPT

fkcl`çååÉÅí=båíÉêéêáëÉ=bÇáíáçå
mêçÇìÅí=dìáÇÉ
Created on April 24, 2013
INFOConnect Enterprise Edition Product Guide

© 2013 Attachmate Corporation. All Rights Reserved.
Patents
This Attachmate software is protected by U.S. patents 6252607 and 6803914.
Trademarks
Attachmate, the Attachmate logo, CryptoConnect, FileXpress, and PEPgate are either registered trademarks or trademarks of Attachmate Corporation in the USA. INFOConnect is a registered trademark of Unisys Corporation. FIPS 140-1 and/or FIPS 140-2 Validated are certification marks of NIST, which does not imply product endorsement by NIST, the U.S. or Canadian Governments. All other trademarks, trade names, or company names referenced in product materials are used for identification only and are the property of their respective owners.
Attachmate Software License Agreement
A copy of the Attachmate software license agreement governing this product can be found in a ‘license’ file in the root directory of the product.
Licensor
Attachmate Corporation 705 5th Avenue South, Suite 1100 Seattle, WA 98104 USA +1.206.217.7100 http://www.attachmate.com
Third-Party Notices
Third Party Terms and notices are provided in a ‘thirdpartynotices’ file in the root directory of the product.

iii
Contents
Introduction 7 About this Guide 7 New Features 8 Security Features 9 System Requirements 10 INFOConnect Products and Features 11
Major Components and Utilities 12 Unisys Transports and Options 13 Airline Transports and Options 14 INFOConnect Options Pack 14 FTP Client 15 APIs and Development Kits 16
Deploy and Distribute INFOConnect 19 Planning Your Deployment 20
Feature Options 21 Issues For Any Installation 21
Installing INFOConnect with the Attachmate Setup Program 25 Create an Administrative Installation Point 25 Customize Your Installation 27 Deploy an "Out-of-the-Box" Version using Factory Defaults 58 Deploy with Systems Management Server 60 Include Patch Files with the Initial Install 60 Publish an Installation with Active Directory 60
Installing From the Command Line 62 Set the Location of INFOConnect Features 62 Command-Line Properties for Transports and Options 63 INFOConnect MSI Properties 64
Updating, Repairing, or Removing INFOConnect 66 Distribute Software Updates 66 Upgrade or Remove INFOConnect 67 Upgrade Enablers 67
Deploying Sessions and Data with Reflection Security Gateway 69 Configure Sessions That Connect Using the Security Proxy and User Authorization Tokens 70 Configure Sessions to use ID Manager to Assign Terminal IDs 72 Deploy MSI Packages from Reflection Management Server 73

iv
Configuring Security Settings 75 Configuring FIPS 140-2 Validated Encryption 76 Configure Encryption for OTS Sessions 79 Encrypting EXTRA! for Accessory Manager Sessions 84 Reflection Secure FTP Client 84 Meeting DOD PKI Requirements 85 CryptoConnect 89 Port Numbers for Emulation Clients 89
Administrative Tasks and Tools 91 Administer Features using Group Policy 92 Enable Usage Metering 92 Connect to Sabre NOFEP 93 Disable Client Features with the Security Editor 94 Add Sessions to a Portal or Web Page 95
Launcher Control Code Sample 96 Using EXTRA! for Accessory Manager 97
Limitations of EXTRA! for Accessory Manager 97 EXTRA! Administrative Tools 97
Response Time Monitor Utility 101 Export/Import Utility 101 Using CnfEdit 101 Split Screen Transport 104 Set Up Trace Files 104
User Tasks 107 Start a Session 107 Start a Session from a Web Page 108 Prevent Sessions from Disconnecting During Standby Mode 108 Choose Productivity Pane Options 110 Reduce Keystrokes with Productivity Tools 111
Print and Transaction Router (PTR) 113 What is PTR? 113 Start or Quit PTR 114 PTR System Tray 114
PTR System Tray Headers 114 Show or Hide the Status Bar 117 Show or Hide Inactive Routes 117 Add, Remove, or Sort Headers 118 PTR System Tray Command Line Options 118
View and Modify the PTR Configuration 119

v
Add or Delete a Route 119 Controlling Routes Dynamically 120 Create a Host Path 121 Configure a Host Filter 122 Create a Printer Queue Path 123 Editing a Path 123
Using Character Translation 124 Adding Translation String Anchors 125 Using the PTR Control Menu 125 Using the Quick Status Function 125 PTR Keyboard Functions 126 Troubleshooting Print and Transaction Router 127
Glossary of Terms 129

7
Introduction
Attachmate INFOConnect Enterprise Edition delivers PC connectivity to mainframes through a suite of terminal emulators, transports, connection tools, print and router services, encryption modules, utilities, APIs, SDKs, and custom installers. Using INFOConnect, users can run host applications, transfer files, and integrate data into other Windows applications. The navigational, scripting, and scheduling tools simplify interaction with host applications and streamline user tasks.
About this Guide
This guide provides up-to-date information on INFOConnect Enterprise Edition.
General help and context sensitive help is available in the product and requires the WinHelp viewer (WinHlp32.exe). We are no longer updating this help system. Microsoft has discontinued support of WinHelp on Windows 8, Windows 7 and Vista operating systems because of security vulnerabilities.
For more information, see Attachmate Technical Note 2294 (http://support.attachmate.com/techdocs/2294.html) (http://support.attachmate.com/techdocs/2294.html).
C H A P T E R 1

INFOConnect Enterprise Edition Product Guide
8
New Features
This release of INFOConnect includes the following new features:
Windows 8 Compatible INFOConnect Enterprise Edition meets the requirements outlined in the Windows 8 Compatible logo specification, including (but not limited to) adherence of the Windows Security best practices and 64-bit operating system support.
SHA256 options for OpenSSH Servers Secure Shell connections now include SHA256 authentication values to support newer OpenSSH servers. You can configure the client to use SHA256 values for its authentication code and signature algorithm, or when sending HMAC values during the key exchange. You can find these settings on the Encryption tab of the Reflection Secure Shell Settings dialog box.
Integration with Reflection Security Gateway Reflection Security Gateway provides increased security to INFOConnect by leveraging the current enterprise authentication infrastructure. By using Reflection Security Gateway with INFOConnect, you have access to the following features:
Control access with User Authorization tokens. Manage access to your host connections by using the Reflection Security Proxy Server with user authorization tokens.
Administer secure sessions. Create sessions and make them available to client workstations from the Reflection Management Server. The Reflection Management Server authenticates users connecting to hosts via the Reflection Security Proxy Server.
Deploy configuration files. Deploy configuration settings and other data files directly to users from the Reflection Management Server. Use the Attachmate Customization Tool or other MSI builder to package configuration files into custom install packages. Packages can be uploaded and deployed to specific users and groups from the Administrative WebStation.
Product usage tracking. Use metering to track and report product usage from client workstations. Metering also allows you to limit the number of concurrent users that can access a host at a given time. Metering is a web-based management system provided by the Reflection Metering Server, included in Reflection Security Gateway. See Enable
Metering (page 92).
For more information, see Deploying Sessions and Data with Reflection Security Gateway (page 69).
Customizable Application Data Folder Location You can change the default location of INFOConnect application data using the Attachmate Installer Program (setup.exe). Application data includes configuration settings and other files that the application requires to run (such as, IC32.cfg, InsMgr32.cfg, Rootcas.cdb, Sabre.cnf, and Stdcfg.atm). For instructions, see Customized User and Application Data Folders (page 22).
Additional Payment Card Industry (PCI) protection in PTR When the PTR Route Printer Type is set to MSR/FOID, sensitive data is obfuscated in accordance with the IATA FOID rules. What this means is, credit card information that appears in the MSR tracks is partially or wholly concealed by X characters, depending on the data type. (Credit card numbers are partially concealed; CVV codes are wholly concealed.) This change impacts data going through the PTR OLE API, including the PTRSTray Device Data column.

Introduction
9
Security Features
INFOConnect includes the following security features:
SSL/TLS and SSH Security Components. Attachmate security components are validated against the stringent Federal Information Processing Standards (FIPS 140-2) federal security specification, which enables Attachmate products to adhere to the DoD PKI certification requirements. FIPS mode enforces the United States government Federal Information Processing Standard (FIPS) 140-2 for SSH and SSL/TLS connections. When FIPS mode is enabled, all available settings use security protocols and algorithms that meet this standard. For more information about using these security components to secure sessions, see Configure Security Settings (page 75).
SHA256 options for OpenSSH Servers. Secure Shell connections now include SHA256 authentication values to support newer OpenSSH servers. You can configure the client to use SHA256 values for its authentication code and signature algorithm, or when sending HMAC values during the key exchange. You can find these settings on the Encryption tab of the Reflection Secure Shell Settings dialog box.
Encryption for CASL and EXTRA! macros. To protect sensitive data in macros, EXTRA! and CASL macros (including source files) are automatically encrypted when they run or when they're saved in their authoring application. Encrypted macros will only run in INFOConnect 9.1 and later. For details, see Modify Application Settings (page 30).
Encryption option for Auto Complete dictionary. The Auto Complete dictionary, which maintains a list of recently typed words, can be encrypted. For details, see Technical Note 2538 http://support.attachmate.com/techdocs/2538.html.
Enhanced privacy filters. You can filter sensitive data in more areas of the application, including the Print Screen, Cut, Copy, and Paste commands and the Recent Typing productivity feature. Privacy filters can prevent screen data from being published to Microsoft Word and Outlook. Filters are defined on a per-user basis and apply to all sessions for the given user. For more information, see Configure Privacy Filters to Mask Sensitive Data.

INFOConnect Enterprise Edition Product Guide
10
System Requirements
A list of operating system requirements for the current release of INFOConnect Enterprise Edition and Airlines Gateway can be found in Technical Note 2662 http://support.attachmate.com/techdocs/2662.html.
For production environments, many users install the various INFOConnect components on separate computers. Specific requirements will vary based on which components are installed, and on other hardware and software components present.
Note: Attachmate cannot confirm the accuracy of performance, or any other claims related to non Attachmate products.

Introduction
11
INFOConnect Products and Features
Attachmate INFOConnect Enterprise Edition is available in these product configurations. The features listed are described in the following pages.
Product Configuration Included Features
Unisys Transports/ Options
Airline Transports/ Options
Options Pack FTP Client EXTRA! for Accessory Manager (page 97)
INFOConnect Enterprise Edition for Unisys
Unisys A-Series
Unisys 2200
X X X
INFOConnect Enterprise Edition for Airlines*
IBM TPF mainframes
Global Distribution Systems
Unisys A-Series
Unisys 2200
X X X X
INFOConnect Enterprise Edition for Unisys, IBM and Open Systems
Unisys A-Series
Unisys 2200
IBM mainframes
IBM AS/400s
UNIX/Open VMS
X
X X X
*Note: This product also includes a comprehensive set of components and tools developed for the airline/travel industry.
Additional Products
Product Description
INFOConnect Print and Transaction Router (PTR)
Manages printing and transaction routing by enabling input devices to cooperatively use and share several output devices (queues) through communication links called PTR routes. Three PTR products are available: standard PTR, PTR Plus (includes CUPPs support), and PTR Server. You can install a PTR product with INFOConnect Accessory Manager or as a stand-alone application.

INFOConnect Enterprise Edition Product Guide
12
INFOConnect Airlines Gateway Manages communication between networked PCs using Attachmate Airlines Client Emulation products and any host that supports Mapping of Airline Traffic over Internet Protocol (MATIP) or any major Global Distribution Systems (GDS) including Sabre, Worldspan, Amadeus, EDS Shares, or Apollo\Galileo. Supports up to 100 terminal addresses per host protocol. For more information, see the INFOConnect Airlines Gateway Product Guide.
Major Components and Utilities Depending on the terms of your INFOConnect license, your INFOConnect product may include some or all of the following components and utilities.
Component Description
Accessory Manager Frame Enables PCs using terminal emulators to communicate with hosts such as Unisys mainframes, IBM mainframes, UNIX hosts, or any major Global Distribution System (GDS).
Attachmate Installer Program Windows Vista Certified MSI Installers created with the Windows Installer XML (WIX) Toolkit and use the standard Attachmate UI component (setup.exe). Includes the Attachmate Customization Tool.
Attachmate Customization Tool Can be used to customize the installation package using MST files. The Attachmate Customization Tool is a complete replacement for the Custom Installation Wizard, which was used in previous INFOConnect releases to create customized installation images.
Reflection Security Components
Security components that use SSL/TLS or SSH protocols and meet FIPS 140-2 security standards.
DoD-PKI Encryption Module Provides public key infrastructure (PKI) authentication support certified by Joint Interoperability Test Command (JITC).
Emulators Provide communication between PCs and mainframes including Global Distribution Systems (GDSs). The INFOConnect terminal emulators include:
ALC (IBM TPF mainframes and GDSs)
T27 (Unisys A-Series mainframes)
UTS (Unisys 2200 mainframes)
3270, 5250, VT (IBM mainframes, AS/400s, VT hosts)
Split Screen Transports Enable PCs using Microsoft Windows and INFOConnect Connectivity Services (ICS) to share an INFOConnect path with multiple INFOConnect applications. When used with a Split Screen-enabled Accessory Manager frame, the frame provides additional functionality to the user.

Introduction
13
Transports Enable PCs using INFOConnect Connectivity Services to access hosts and mainframes. For more information, see the following section, Product Features.
EXTRA! for Accessory Manager Provides a suite of terminal emulators (3270, 5250, and VT) and connection tools that enable PCs to communicate with IBM mainframes, AS/400s, and UNIX\Open VMS hosts.
T27 Print Services and Configuration Utility
Provides a printer pass-through application for T27 connectivity. Controls the way T27 Print Services operates. For example, you can specify how Print Services communicates with the host or which printer is used.
Print and Transaction Router (PTR)
Manages printing and transaction routing by enabling several input devices (hosts) to cooperatively use and share several output devices (queues) through communication links called PTR routes. Three PTR products are available: standard PTR; PTR Plus (includes CUPPs support); and PTR Server. You can install a PTR product with Accessory Manager or as a stand-alone application.
Utilities Export/Import utility: exports data from an INFOConnect database (IC32.cfg) into an .ini or .csv file, as well as imports data from an .ini or .csv file into an INFOConnect database. For more information, open ExpImp32.hlp in the Infocnee\Enu folder.
Copy ICS Database utility: creates a copy of an INFOConnect database that is identical to the original database except for the location name of the executable files. For more information, open Copics32.hlp in the Infocnee\Enu folder.
Attachmate Version utility (Atmver.exe): creates a file that displays the version numbers of all INFOConnect products that are installed.
Getdid.exe: increases the number of sessions allowed by the transports.
Testgms.exe: for more information, contact Technical Support.
Unisys Transports and Options
This Feature Description
TCPA Provides access to hosts using the TCP/IP network protocol.
HLCN Provides NETBIOS connectivity to Unisys A-Series hosts.
INT1 Provides access to Unisys 1100/1200 hosts using the TCP/IP network protocol.
MATIP Provides access to Unisys hosts using the MATIP network protocol.

INFOConnect Enterprise Edition Product Guide
14
FileXpress-XST Client
Enables PCs to connect directly through the XST port and transfer files with a Unisys ClearPath NX/LX series or A-Series mainframe. Requires the host component.
Response Time Monitor Utility
Displays information about communication between one or more PCs running INFOConnect Accessory Manager and a host. You can use this information to identify problems with either your network performance or your host.
CryptoConnect Client ETS
Manages FIPS 140-1 certified encryption between 32-bit INFOConnect UTS or T27 emulators and the CryptoConnect gateway.
WinFTP Transfers files between your PC and any host such as a Unisys ClearPath IX, 2200 Series host, or a UNIX host running FTP server software. The PC must communicate with the host via a WinSock-compatible TCP/IP network.
CCF Provides CCF protocol over WinSock for migrating NX/View products.
Airline Transports and Options
Feature Description
INT1 Provides access to Unisys 110/1200 hosts using TCP/IP network protocol
MATIP for ALC Provides access to airline hosts using MATIP network protocol
MATIP for UTS Provides access to Unisys hosts using the MATIP network protocol
ATSTCP Provides access to the Galileo Apollo GDS
UPDFRAD Enables PCs to communicate with a SHARES host via UDP
Sabre Provides high-speed access to the Sabre GDS
CryptoConnect Client ETS Manages FIPS 140-1 certified encryption between INFOConnect UTS or T27 emulators and the CryptoConnect gateway.
INFOConnect Options Pack
Feature Description
GraphX32 Enables PCs using Microsoft Windows and INFOConnect Connectivity Services to emulate the graphics capability of the UTS60 terminal by interpreting the UTS60 graphics protocol commands as they are received across an INFOConnect path.

Introduction
15
INFOConnect Automation Development Kit
For development of Windows applications that interact with Attachmate terminal emulators. For more information, see the INFOConnect HLLAPI Programmer’s Reference.
INFOConnect DataXpress
Enables PCs to transfer files to and from Unisys ClearPath IX or 2200 Series mainframes.
INFOConnect Connectivity Services Development Kit (IDK)
Develop applications and components that use the INFOConnect Connectivity Service (ICS). For more information, see the INFOConnect Development Kit Basic Programming Reference Manual.
INFOConnect OLE Custom Control
Develop Windows applications that use INFOConnect paths. For more information, see the INFOConnect OCX Programmer’s Reference.
FTP Client
Feature Description
Utilities Reflection software utilities that provide reliable file transfers with any file server and secure options for users with those requirements.
Kerberos Manager Manages and configures the Reflection Kerberos client.
Key Agent Holds multiple private keys that can be used in a Secure Shell (SSH) connection for public key authentication. Also enables agent forwarding for a SSH connection.

INFOConnect Enterprise Edition Product Guide
16
APIs and Development Kits The APIs and development kits that are available for purchase with INFOConnect are documented in the online manuals that can be found in the pdf_docs_infoconnect directory and on the Attachmate Support website (http://www.attachmate.com/Support).
Online Guides and Manuals
Title Filename and Description
INFOConnect CASL Script Language Guide
Casl_lang_ref.pdf
Documents the Common Accessory Script Language (CASL), which is used to create macros that interact with hosts, users, and other macros.
INFOConnect Development Kit Basic Programming Reference Manual
Idk_basic_prog_ref.pdf
Provides detailed information about the INFOConnect Connectivity Services (ICS) programming interface, messages, and data types available for ICS Accessory development and for the development of additional data filters (Service Libraries) and connection types (External Interface Libraries).
INFOConnect Development Kit Basic Developer’s Guide
Idk_basic_dev_gd.pdf
Explains how to install and use the INFOConnect Development Kit.
INFOConnect HLLAPI Programmer’s Reference
Ihllapi_prog_ref.pdf
Explains how to use HLLAPI to write Windows applications that interact with Attachmate terminal emulators and therefore with host applications.
INFOConnect OCX Programmer’s Reference
Ocx_prog_ref.pdf
Explains how to use the OLE Custom Control to write Windows applications that use INFOConnect paths.
FileXpress XST–API Programmer’s Reference
Filexpress_api_prog_ref.pdf
Explains how to integrate FileXpress–XST functions into custom applications.
PTR User API Programmer’s Reference
Ptr_uapi_prog_ref.pdf
Provides details on creating applications to print vouchers and other specialized tickets from PCs by sending data directly to a printer.
PTR OLE API Programmer’s Reference
Ptr_oleapi_prog_ref.pdf
Provides details about creating an application that monitors PTR routes.

Introduction
17
PTR API Programmer’s Reference Ptr_api_prog_ref.pdf
Provides details about using the PTR Development Kit to design a custom host filter.


19
Deploy and Distribute INFOConnect
In this Chapter
Planning Your Deployment 20
Installing INFOConnect with the Attachmate Setup Program 25
Installing From the Command Line 62
Updating, Repairing, or Removing INFOConnect 66
Deploying Sessions and Data with Reflection Security Gateway 69
Configuring Security Settings 75
This chapter is designed to help administrators plan installations and deploy software to user workstations.
C H A P T E R 2

INFOConnect Enterprise Edition Product Guide
20
Planning Your Deployment
INFOConnect supports a variety of deployment options, from “out-of-the-box” installations to highly customized deployments. Use the following lists to find deployment solutions that work for you.
Installation Go to
Deploy an "out-of-the-box" version, using factory defaults Page 58
Deploy from a command line Page 62
Provide users with an installation from Active Directory Page 60
Provide users with an installation of selective features Page 29
Include custom configuration files with the installation Page 39
Review issues that pertain to all installations Page 21
Session configuration Go to
Configure FIPS 140-2 connections using a Group Policy Page 76
Deploy sessions that use the Reflection Security Proxy Page 70
Deploy macros, and other user data to user workstations Page 73

Deploy and Distribute INFOConnect
21
Feature Options The table below summarizes the features that are available when you install INFOConnect Enterprise Edition. For feature descriptions, see INFOConnect Products and Features (page 11).
INFOConnect for Airlines for Unisys for IBM and Open Systems
Airlines Gateway X
ATSTCP X
CryptoConnect Client ETS
X X X
EXTRA! Accessory Manager
X
X
FTP Client X X X
INFOConnect Options Pack
X X X
INT1 X X
MATIP for ALC X
MATIP for UTS X X
UPDFRAD X
Sabre X
TCPA X X
Issues For Any Installation
Single Users and Multiple Users
The installer correctly handles multiple users per machine and roaming profiles. It also follows Windows User Account Control (UAC) requirements when storing settings files.
In most customizations, you would choose the My Documents directory option for user data (macros, schemes, and sessions). That way, when each user logs on to Windows the first time after INFOConnect is installed, the system automatically creates a set of user data for that user in the specified location.
Choose All Users\Documents directory option if you want to create a single set of application data that all users share.

INFOConnect Enterprise Edition Product Guide
22
By default, all users have the same access to all configuration options for the emulators, file transfer products, and transports. However, you can load a different security file to limit access to functions within Accessory Manager, and you can add passwords to the Database Editor.
In this way, you can control how much access the users have to various functions. You can view detailed information about this in the Help after you install the products. For information about Accessory Manager security, click Administrative Help from the Accessory Manager Help menu. For information about Database Editor security, click Database Editor Help Topics from the Database Editor Help menu.
To change a PC from single-user to multiple-user or from multiple-user to single-user after you have installed any INFOConnect product, you must remove all of your current products, and then install new ones. You can back up the database using the Export/Import Utility and then import the data into the new database after you install the INFOConnect products. For information about this utility, go to Program Files\Attachmate\Infocnee\Enu and open ExpImp32.hlp.
Customized User and Application Data Folders
You can change the default location of user data and application data from the Attachmate Setup program (setup.exe). User data refers to files such as schemas, macros and sessions. Application data typically includes configuration files that the application requires to run. For example, IC32.cfg, InsMgr32.cfg, Rootcas.cdb, Sabre.cnf, and Stdcfg.atm.
To specify the user data and application data folders
1 Run the Attachmate Setup program (setup.exe):
If you Do this
Install from a download site
Click the download link and run the download program. Select a location for the installer files and click Next. This extracts the files to the specified location and starts the Setup wizard.
Install from an administrative install point
From the administrative installation point, double-click the setup.exe file.
2 After accepting the license agreement, click the Data Location tab.
3 Specify a new location for user data and/or application data.
Choose this option To do this
My Documents directory Allow users to only access their own user data or application data.
All Users\Documents directory Allow any users on this system to access all local user data or application data.
User defined directory Allow users to specify their own folder for user data or application data.

Deploy and Distribute INFOConnect
23
IPv6 Support
TCPWin32 detects the presence of and uses the Winsock2 functions which support IPv6. If these functions are not available, the old calls are used and IPv6 support won’t be available. DNS names, IPv6 addresses, or IPv4 addresses may all be specified in the configuration. This adds IPv6 support to all transports that use TCPWin32, which include INT-1, TCPA, ATSTCP, MATIP and SABREIP. IPv6 support is not available for CCF, SABRE2 or UDPFRAD.
Although the IPv6 specifications allow for much longer DNS names, INFOConnect continues to limit the length of names to 64 characters.
Installation Logging
To get details about the installation, enable the log file for the Attachmate Installer Program (setup.exe). This file is saved in the user’s temp directory (%tmp%) and has a generated name that begins with atm.
To create or disable an installation log file
1 Run the Attachmate Setup program (setup.exe):
If you Do this
Install from a download site
Click the download link and run the download program. Select a location for the installer files and click Next. This extracts the files to the specified location and starts the Setup wizard.
Install from an administrative install point
From the administrative installation point, double-click the setup.exe file.
2 On the Advanced tab, select or clear Create a log file for this installation.
3 Click Install Now.
To view the log file, launch the Start menu Run command and enter %tmp%.
PTR Installation Options
You can install a Print and Transaction Router (PTR) product (PTR, PTR Plus, or PTR Server) as an add-on for Accessory Manager or as a stand-alone product. If you require INFOConnect and PTR on the same PC, install PTR with Accessory Manager—stand-alone PTR cannot coexist with INFOConnect. To install the PTR as a stand-alone product, use the Attachmate Setup program (page 25).
For installation instructions, refer to the Read Me file included with your PTR product.
MATIP Service
After a network installation, a user with administrative rights must manually configure and then start the MATIP service.

INFOConnect Enterprise Edition Product Guide
24
To configure and start the MATIP service
1 From the Control Panel, open Administrative Tools, and then select Services.
2 Open MATIP Service in the Services list.
3 On the MATIP Service Properties (Local Computer) dialog box, click the Log On tab.
4 Enter the account information of the administrator or user with administrative rights and then click Apply.
5 Click the General tab.
6 Under Service Status, click Start.

Deploy and Distribute INFOConnect
25
Installing INFOConnect with the Attachmate Setup Program
The Attachmate Setup Program uses standard MSI-based deployment technologies for Windows systems. The Attachmate Setup Program provides a standard user interface and includes the Attachmate Customization Tool, which can be used to customize the installation package using transform (.mst) files.
The main advantage of this technology is the ability to create a customized installation for your users, which may include additional files and programs contained within companion install packages (.msi). To update software, additional installations must be made available to users.
To perform a customized deployment:
Create an administrative installation point. In this step, the Attachmate Setup Program will move (and decompress, if necessary) all of the INFOConnect installation files to prepare for deployment. INFOConnect cannot be run from this location.
Install INFOConnect to a workstation. From this location, you'll run INFOConnect and create configuration files and session files.
Note: To use token passing or SSL/TLS encrypted connections via the Reflection Security Proxy Server, you must create sessions in Reflection Security Gateway.
Run the Attachmate Customization Tool from the administrative installation point to customize your installation. The Attachmate Customization Tool is a special mode of the Attachmate Setup program (setup.exe) that lets you create transform files (.mst) to modify the primary install and companion install packages (.msi) to include files. For instructions, see Customize Your Installation (page 27).
Create an Administrative Installation Point To prepare your environment for deployment, you will need to create an administrative installation point. You do this by installing a source image of the application, similar to an image on a DVD on a network share (typically a file server). The administrative installation point includes all of the files required to install INFOConnect as well as the administrative tools used for customization.
Notes:
Attachmate recommends that you create an administrative installation point before you install INFOConnect on a workstation. That way, you can use the administrative installation point for the workstation installation.
If you prefer to use a command line instead of the Attachmate Installation Program graphical interface, you can create an administrative installation point from the command line as follows:
path_to_setup_file\Setup.exe /install /admin TARGETDIR=UNC_path_to_administrative_installation_point
INFOConnect Enterprise Edition Product Guide
26
If you prefer to install INFOConnect on your workstation first, you must create the administrative installation point from the command line as follows:
path_to_setup_file_on_your_workstation\Setup.exe /install /admin TARGETDIR=UNC_path_to_administrative_installation_point
To create an administrative install point
Caution: For this procedure, use only the Advanced and File Location tabs. Configurations made from other tabs will be ignored.
1 Create a network share on a network file server.
2 Click the download link, and then run the download program. Select a location for the installer files, and then click Next.
This extracts the files to the specified location and starts the Attachmate Installation Program. (If you have already downloaded the files, click the setup.exe file to start the installation program.)
3 Click Continue and accept the license.
4 From the Advanced tab, click Create an Administrative install point on a server.
5 Click Continue, and then browse to the network share you want to use for the administrative installation image.
Important! Make sure to specify the path to the network share as a UNC path. For example: \\share_name\administrative_install_point.
6 Click Install Now.

Deploy and Distribute INFOConnect
27
Customize Your Installation Customize INFOConnect to specify the way you want it to install, look, and act on the end user’s computer. Using the tools provided you can:
Create transforms to customize the installation
Because multiple transforms can be created for a given install package, you can create customized installations for separate departments or groups of users, each represented in a transform file.
Create companion install packages and install them
Companion packages show up as independent entries in the Windows list of installed applications, and can be installed and uninstalled independently of INFOConnect.
If you have Reflection Security Gateway, you can deploy companion install packages to user workstations from Reflection Management Server at any time. For more information, see Deploying Sessions and Data with Reflection Security Gateway (page 70).
Both transforms and companion install packages adhere to MSI standards; therefore, you can install them in conjunction with Active Directory, SMS, or any other Windows Installer-compatible deployment tool.
Set Up a Shortcut to the Attachmate Customization Tool
By default, the Attachmate Customization Tool can be opened only from a command line. To save yourself time starting this tool, you can optionally create a desktop shortcut and set the shortcut properties to open it.
To set up a desktop shortcut
1 On your administrative installation point, right-click on the setup.exe file and choose Create Shortcut.
2 Right-click on the shortcut and choose Properties.
3 In the Target field, add the /admin option to the end of the command line. For example:
\\myServer\adminInstallPoint\setup.exe /admin
CAUTION: Make sure that the path in the Target field is referenced with a Uniform Naming Convention (UNC) format. Do not use drive letters in the path name. Using drive letters can cause problems when you try to use the shortcut on other workstations.
4 Rename the shortcut and save it on the desktops of your workstation and on the server that you are using for your administrative installation point.
Open the Attachmate Customization Tool
The Attachmate Customization Tool is a special mode of the Setup wizard that supports custom modifications to the primary install and includes some limited deployment facilities.

INFOConnect Enterprise Edition Product Guide
28
Use the Attachmate Customization Tool to create transforms or companion install packages. Each customization has its own set of configuration panels based on your choice on the Select Customization panel.
To open the Attachmate Customization Tool and choose a customization type
1 Before you run the Attachmate Customization Tool, create an Administrative installation point (page 25).
2 If another instance of setup.exe is running, close it. You can run only one instance of the setup.exe program at a time.
3 Start the Attachmate Customization Tool:
• On a command line, change to the administrative installation point and enter:
path_to_setup\setup.exe /admin
Or
• If you have set up a shortcut to the Attachmate Customization tool, double-click it.
4 The Select Customization dialog box prompts you to choose which mode you want to open.
To Select this option
Create a new transform (.mst) Create a new Setup customization file for the following product
Create a new companion install package (.msi)
Create a new Companion installer
Open (and edit) an existing file of either type
Open an existing Setup customization file or Companion installer
Deploy and Distribute INFOConnect
29
Create a Transform that Specifies which Features to Install
You can specify which features are installed to your end users by using the Attachmate Customization Tool to create a transform file (MST) that modifies the installation. In addition, you can choose from three options for not installing an item; advertising it, not installing it, and permanently blocking it so that users can not install it later.
Transforms can be used with any installation that starts with setup.exe or with command-line installs (used by many deployment tools). The installer can only apply transforms during an installation.
To select features, components, and languages to install
1 Create an administrative install point.
2 Start the Attachmate Customization Tool:
• On a command line, change to the administrative installation point and enter:
path_to_setup\setup.exe /admin
Or
• If you have set up a shortcut to the Attachmate Customization tool, double-click it.
3 Select Create a new Setup customization file for the following product.
4 Under Features, choose Set Feature Installation States.
5 Use the feature tree to configure each feature's installation state as follows:
Choose To do this
Feature will be installed on local hard drive
Add a feature to the installation.
Feature will be installed when required
Advertise a feature.
Feature will be unavailable Leave a feature uninstalled. End users will still be able to select the item and install it from Windows Programs and Features or Add/Remove Programs.
Feature will be hidden from view
Leave a feature uninstalled and hidden. End users will not be able to install the item, and it will not be visible in the Windows Programs and Features or Add/Remove Programs.
6 Click File > Save As.
Your changes are saved to a transform (*.mst) file.
You will need to deploy the transform with the primary installation. Transforms can be used with any install started with setup.exe or with command-line installs (used by many deployment tools). The installer can only apply transforms during an installation. The following procedure describes how to add your transform file to installations started with the Attachmate Setup wizard (setup.exe).

INFOConnect Enterprise Edition Product Guide
30
To add the transform to an install started with setup.exe
1 Start the Attachmate Customization Tool.
2 Select Open an existing Setup customization file or Companion installer, and then click OK.
3 In the Open dialog box, browse to select your transform (.mst) file.
4 Click User interface and select Use this customization with interactive installs using setup.exe.
When you save your transform with this option selected, Attachmate Customization Tool automatically updates the setup.ini file to apply your transform to the INFOConnect installation by adding the following line to the [Setup] section:
CustomTransform=<your_transform.mst>
5 From the File menu, click Save. (If Save appears dimmed, click Exit and you will be prompted to save the file.)
The transform can now be deployed to end users via the setup.exe file. (Users can run setup.exe, the setup.exe file can be called from a script, or setup.exe can be initiated from a command line.)
To modify an existing installation transform
1 Start the Attachmate Customization Tool.
2 Select Open an existing Setup customization file or Companion installer, and then click OK.
3 In the Open dialog box, browse to the location you selected when you created your transform file, and select the [transform_name].mst file.
4 Select items from the list in the left panel to open configuration panels on the right, and then make your customizations.
5 From the File menu, choose Save As. It is recommended that you save the Transform file (.mst) in the same folder as the installer package file for INFOConnect.
Modify Application Settings
The Attachmate Customization Tool allows you to control which features of the application you want to deploy. For example, you can include data files and RUMBA schemes or remove productivity settings in the deployed application. The available features depend on the INFOConnect product you are installing.
To modify application settings
1 Install INFOConnect on your workstation.
2 Start the Attachmate Customization Tool:
• On a command line, change to the administrative installation point and enter:

Deploy and Distribute INFOConnect
31
path_to_setup\setup.exe /admin
Or
• If you have set up a shortcut to the Attachmate Customization tool, double-click it.
3 From the Select Customization dialog box, select Create a new Setup customization file for the following product (or edit an existing customization file).
4 From the navigation pane, click Modify application settings.
5 From the Application settings list, select INFOConnect CIW. The Modify button in the lower-right corner of the window becomes active.
Note: The INFOConnect CIW or Custom Application Wizard was available in earlier versions of INFOConnect as a standalone application. It performs the same functionality in this version but operates only within the context of the Attachmate Customization Tool.

INFOConnect Enterprise Edition Product Guide
32
6 Click Modify.
7 On the first panel of the Custom Application Settings wizard, enter a description and press Next.
8 Use the following tables to help you select the appropriate options and values for each panel.
General Global Preferences
Use the Modify Application Settings (page 30) page of the Attachmate Customization Tool to access these settings.

Deploy and Distribute INFOConnect
33
Option or value Description
Accessory Manager and EXTRA! settings
Show open session dialog at startup: When selected, displays the Open Session dialog box to the user at startup (and prevents the user from creating a new session or opening an existing layout on startup). When cleared, the user is presented with the Start By dialog box, from which a session type or layout may be selected. (Default: Cleared.)
Prompt for disconnection: When selected, prompts the user before each session or layout is disconnected. When cleared, the session or layout automatically disconnects when closed. (Default: Selected.)
Disable event logging: Select to turn off event logging. (Default: Cleared.)
Show Tip of the Day: Clear to prevent the Tip of the Day dialog box from appearing. (Default: Selected.)
Encrypt macros: Select to encrypt macros when they’re saved. EXTRA! macros are encrypted when saved in the EXTRA! Basic Editor. The source and output files associated with a CASL macro are encrypted when saved in the CASL Macro Editor. If the source file is newer than the compiled macro, the CASL compiler produces a new encrypted CASL macro file. You can unencrypt a macro by deselecting this option in the Global Preferences dialog box, and then saving the macro in its authoring application. (Default: Selected.)
Encrypt macros when run: Select to rewrite EXTRA! and CASL macros as encrypted files when they’re executed. Both the source and output files associated with a CASL macro are encrypted. (Default: Selected.)
Note: Encrypted macros will only run in INFOConnect version 9.1 and later.
Execute only encrypted macros: Select to run only encrypted EXTRA! and CASL macros and to compile only encrypted CASL source files. (Default: Cleared.)
Warning: If the source file associated with a CASL macro is newer than the compiled macro and is unencrypted, the automatic compile will fail and the macro will not be run.

INFOConnect Enterprise Edition Product Guide
34
Accessory Manager only settings
Show Accessory Manager startup dialog: When selected, displays the Accessory Manager Startup dialog box when Accessory Manager is opened. From this dialog box, the user can choose to create a new session, open an existing session, or open an existing layout. When cleared, Accessory Manager opens a blank workspace. (Default: Cleared.)
The Accessory Manager Startup dialog box will not appear when Accessory Manager is started using automation, a portal, or when a session is opened from a command line or by double-clicking it.
Automatically create bookmark files: When selected, creates a bookmark file (.bkm) automatically each time you bookmark a recorded host screen. When cleared, bookmark files must be created manually. To create a bookmark file manually, from the Tools menu, choose Page Settings. From the Bookmarks page, click a bookmark, and click Create Bookmark file. (Default: Cleared.)
Show Capture dialog when start capture: When selected, displays the Capture Printer Settings dialog box each time you select File > Capture. When cleared, the capture begins when you select Capture, and the data is handled according to the settings specified in the Capture Printer Settings dialog box. Select this option if you frequently switch the destination or other options for captured data. (Default: Selected.)
On close session Auto-save session settings: When selected, all sessions are automatically saved without user intervention. (Default: Cleared.)
Prompt for session saves: When selected, the user is prompted before sessions are saved. (Default: Selected.)
Do not Prompt for or Auto save sessions: When selected, the user is not prompted to save sessions, nor are sessions automatically saved. Sessions are saved only if a user initiates a save by selecting a toolbar or menu option. (Default: Cleared.)

Deploy and Distribute INFOConnect
35
EXTRA! only settings Expand Page Setting dialog box: From this dialog box, you can edit the navigational path and page identification information for recorded pages. (Default: Selected.)
Assign ENTER key to left mouse button double click: When selected, double-clicking the left mouse button will function as if the Enter key had been pressed. (Default: Cleared.)
Show Host Name on Taskbar icon when session is minimized: When selected, the name of the host is displayed on the task bar icon when the session is minimized. (Default: Cleared.)
Open multiple instances of the same session: When selected, multiple sessions of the same connection can be opened simultaneously. (Default: Cleared.)
Set Macro Password box: When selected, prevents macros from recording passwords. A dialog box appears asking the user for the password when the macro is run. (Default: Selected.)
Push update during upgrade install
Force update of existing current user (HKCU) settings to these General and Advanced Global Preferences settings: When selected, overwrites all existing HKCU settings in the registry, undoing any personal settings when upgrading. (Default: Cleared.)
Set scheme and macro search paths
Choose to set custom scheme and macro search paths prior to deployment from the Search Paths dialog box.
Macro search path: Use the default path or select Specify search path and Browse to specify the custom path.
Remote scheme path: Use the default path or select Specify scheme path and Browse to specify the custom path.
Advanced Global Preferences Dialog Box
Use the Modify Application Settings (page 30) page of the Attachmate Customization Tool to access these settings.
Option or value Description
HLLAPI Shortname association: Select Shared among all users (default) or Unique to each user
Transport type: Select Standard or Enhanced (default).

INFOConnect Enterprise Edition Product Guide
36
Associate Sessions to Shortnames
Opens the Add HLLAPI ShortNames screen where you can add HLLAPI short names and associate HLLAPI short names with sessions. If you type a full path, it will be included in the installed product in Global preferences. If no path is included, the previously specified path for user data files is used.
Product: Choose either Accessory Manager (default) or EXTRA!
Short name: The letter of the short name that your HLLAPI application will use to connect to this session. There are 26 choices, A through Z, for each product type.
Session name: Enter either an exact path to the session document or browse to the path.
Host type: Select the host type to which this session connects. The choices are IBM Mainframe (3270), IBM AS400 (5250), or VAX/VMS, UNIX. (Unavailable if Product setting is Accessory Manager.)
Sub type, Wyse: If you specify VAX/VMS, UNIX as a host type, you can also select Wyse as a sub type. (Unavailable if Product setting is Accessory Manager.)
Screen size: Based on the host type selected, specify the screen size this for this session. (Unavailable if Product setting is Accessory Manager.)
IBM Mainframe (3270): 24x80, 32x80, 43x80, or 27x132
IBM AS400 (5250): 24x80 or 27x132
VAX/VMS, UNIX: 24x80, 25x80,36x80, 48x80, 72x80, 144x80, 72x132 or 144x132
Shortname associations: This list displays the shortname and the session file assigned to it. You must assign a HLLAPI shortname before you connect to a session, or if you already have session connections, you must exit all sessions and restart the sessions before the HLLAPI shortname settings will take effect.
Keyboard type Select the type of keyboard to use.
Global Productivity Preferences
Use the Modify Application Settings (page 30) page of the Attachmate Customization Tool to access these settings.

Deploy and Distribute INFOConnect
37
Option or value Description
Productivity features Disable all Productivity features: Select to prevent users from accessing productivity features.
Enable Productivity pane: You must select this option to clear or select individual productivity features. The first group of productivity features require the Productivity pane to also be selected, in order to be available to users. If, after you select some of these features, you clear this box, your individual selections will be retained here, but the features and the Productivity pane will be unavailable to users. (Default: Selected.)
Users have the option to hide Productivity features which have been enabled from this dialog box, but cannot show them if they have not been enabled.
Show Productivity pane: Select to display the Productivity pane to users by default. This option can only be modified when Enable Productivity pane is selected. (Default: Selected.)
Enable Scratch Pad: (Default: Selected.)
Enable Macro Bar: (Default: Selected.)
Enable Recent Typing: (Default: Selected.)
Enable History: (Default: Selected.)
Enable Microsoft Office Tools: (Default: Selected.)
The remaining Productivity features can be selected independently of the Productivity pane.
Enable Spell Checking: (Default: Selected.)
Enable Auto Complete: (Default: Selected.)
Enable Auto Expand: (Default: Selected.)
Enable Keystroke Saving Calculator: Select to allow the Keystroke meter to calculate the number of keystrokes required for each task performed. The Keystroke Saving Calculator calculates the number of keystrokes required for each task, and then displays the actual number of keystrokes saved when those tasks are executed using features such as Auto Complete or Auto Expand. Available in Unisys, 3270, and 5250 sessions only. (Default: Selected.)
Spelling preferences Spell check provider: Wintertree Sentry is the default spell checker.
Main dictionary path: Click to select a different path.
Main dictionary list: Click to select a different list.
Default user dictionary: Click to select a different user dictionary.

INFOConnect Enterprise Edition Product Guide
38
Add Registry Data
By modifying registry values, you can change the way the application operates. (For example, for certain Attachmate applications, you can add a value that specifies to never save settings on exit.)
Caution: Adding or modifying registry data incorrectly can cause problems that may require you to reinstall the Windows operating system.
To add or modify registry data
1 Start the Attachmate Customization Tool:
• On a command line, change to the administrative installation point and enter:
path_to_setup\setup.exe /admin
Or
• If you have set up a shortcut to the Attachmate Customization tool, double-click it.
2 From the Select Customization dialog box, select the option that best describes the task you are performing.
3 From the navigation pane, click Add registry data.
4 Do one of the following:
• To add a new registry value, click Add.
• To modify a registry value in the table, select the value, and then click Modify.
5 Specify registry keys and values to add or modify during the installation process.
For this item Do this
Key Enter the complete registry path from the root.
Name Enter the registry value name. If the value name is Null, the data entered into the Value column are written to the default registry key.
Type Select the data type of the value. Types include strings, integers (DWORD), or binary values.
Value Enter the value.
Modify Setup Properties
You can modify existing INFOConnect setup properties, such as setting the default application folder, or add your own properties to the install. An example of an installer property is ARPHELPLINK, which sets the URL used by the support link in Windows Programs and Features. For a list of installer properties, see INFOConnect MSI Properties (page 64).

Deploy and Distribute INFOConnect
39
Caution: Do not overwrite existing properties unless you fully understand how the changes affect your install. Setting properties to improper values can break the install.
To modify installation properties
1 Start the Attachmate Customization Tool:
• On a command line, change to the administrative installation point and enter:
path_to_setup\setup.exe /admin
Or
• If you have set up a shortcut to the Attachmate Customization tool, double-click it.
2 From the Select Customization dialog box, select the option that best describes the task you are performing.
3 On the Attachmate Customization Tool navigation pane, select Modify setup properties.
4 Do one of the following:
To Do this
Add a property Click Add. From the drop-down list for Name, select a property or type it in the Name field and then enter the property attribute in the Value field.
Note: "Public" properties (those with UPPERCASE names) can be modified, but only those properties as documented in the Windows Installer documentation from Microsoft should be added or changed here. Public properties specific to Attachmate installers should not be changed since changes to these may affect the installation or future updates of those installers.
Modify an attribute for a property that is listed under Property name
Select a property name, and then click Modify. In the Add/Modify Property Value dialog box, change the attribute in the Value field and then click OK.
Remove a property that is listed under Property name
Select the property name, and then click Remove.
5 From the File menu, choose Save As.
Create an MSI Package to Install Configuration Files
INFOConnect uses a variety of files to store configuration information. To install these files to end user's computers, you can use the Attachmate Customization Tool to create a companion install package (MSI) that is installed when users run the Attachmate Setup wizard. Alternatively, you can use Reflection Security Gateway to deploy packages to user workstations any time users open sessions from the Reflection Management Server. For details, see Deploy Packages from Reflection Management Server (page 73). For help identifying the files that contain your customized settings, see INFOConnect Configuration Files (page 41).

INFOConnect Enterprise Edition Product Guide
40
Note: If you plan to regularly update your companion install packages, you may want to save them with version numbers. You can enable this feature by editing the setup.ini file in the administrative install image to include the following line under the [Setup] section:
UpgradeSupport=1
The next time you save your changes to a custom install package in the Attachmate Customization Tool, you'll be prompted to enter a version number.
To create a companion package that installs customized files
1 Create an administrative install point (page 25).
2 Install INFOConnect on your administrative workstation.
3 Make your customizations and locate the file or files that contain your customized settings.
4 Start the Attachmate Customization Tool:
• On a command line, change to the administrative installation point and enter:
path_to_setup\setup.exe /admin
Or
• If you have set up a shortcut to the Attachmate Customization tool, double-click it.
5 Select Create a new Companion Installer and click OK.
6 If you plan to deploy the companion install package from Reflection Management Server, select Specify install locations and under Installation type, select Installs only for the user who installs it (required).
7 Select Add files and specify which files you want to include in this package and where you want to install them on user workstations.
8 Click File > Save As to save your companion package.
You can deploy the package you just created in a number of ways. The next procedure is one example. It creates a transform file that you can use to include this package with the INFOConnect installation. To deploy packages from Reflection Management Server, see Upload and Deploy Companion Install Packages (page 73).
To install the companion package automatically when users run the Attachmate Setup wizard
1 Start the Attachmate Customization Tool (or, if it is still running click File > New) and select Create a new Setup customization file for the following product.
2 Click Add installation and run programs.
3 Click Add. For Target, specify the companion package you just created.
4 Click File > Save As to save your transform.

Deploy and Distribute INFOConnect
41
Note: When you save your transform, the Customization Tool automatically updates the setup.ini file, adding a [RunPrograms] section with instructions for installing your companion package.
5 Instruct users to install using the Attachmate Setup wizard (setup.exe).
Modify User Settings
Use the Modify User Settings pane to add user-specific settings to a companion package. Before you begin, note the following.
Modify User Settings is not available for all applications
This panel is available only if you are configuring a user-specific package
You may be able to install user-specific settings using the Add files pane
Users must be specified for companion packages deployed from the Reflection Management Server.
To install user settings
1 Start the Attachmate Customization Tool:
• On a command line, change to the administrative installation point and enter:
path_to_setup\setup.exe /admin
Or
• If you have set up a shortcut to the Attachmate Customization tool, double-click it.
2 From the navigation pane, click Specify install locations. Under Installation type, select Installs only for the user who installs it.
3 From the navigation pane, click Modify user settings.
4 Select the application whose settings you are configuring and click Define.
Note: The Define button is available only if the selected application is installed on your workstation.
INFOConnect Configuration Files
In addition to host session configuration files, there are many other configuration files that you may want to deploy to your users. These include macros, toolbars, QuickPads, hotspots, keyboard maps, and color schemes. INFOConnect installs a selection of configuration files that you can modify and include with your custom installation. For more information about creating these types of configuration files, open a session and select INFOConnect Help Topics from the Help menu. This help system requires the WinHelp viewer (WinHlp32.exe) to view it.

INFOConnect Enterprise Edition Product Guide
42
Following is a list of the type of files that can be added to an INFOConnect installation:
File Type Description
.adp INFOConnect session file
.app Print session file
.atb PTR Device initialization files
.atm T27 Print config file
.aww INFOConnect layout file
.bgr PTR device initialization file
.bkm Bookmark file
.btp PTR device initialization file
.cfg INFOConnect database file
.cmu Menu scheme file
.cnf ALC configuration file
.ctt Custom translation table file
.dic Custom dictionary file
.dll PTR direct link libraries
.e3c 3270 color scheme file
.e3e 3270 edit scheme file
.e5c 5250 color scheme file
.e5e 5250 edit scheme file
.e5t 5250 file transfer file
.eac Auto complete dictionary file
.ead Auto expand dictionary file
.ebd Dialog file
.ebh Macro header file
.ebm Macro file
.edc DEC color scheme file
.ede DEC edit scheme file
.edp EXTRA! display session file
.edt DEC transfer scheme file
.ehs HotSpot scheme file
.eil IND$file transfer list file, PTR external interface libraries

Deploy and Distribute INFOConnect
43
.eis IND$file scheme file
.ekm Keyboard map file
.elf EXTRA! layout file
.env Navigation action file
.epp EXTRA! printer session file
.eqp QuickPad file
.esf Security editor file
.etb Toolbar file
.etl Batch transfer list file
.exs EXS file
.flt Aomdemon filter file
.ftb AS400 batch file transfer list file
.hff PTR host file filter
.his VT history file
.hst History file
.inf INFOConnect setup file
.lsr PTR device initialization file
.msr PTR device initialization file
.mtr Session monitor file
.nap NiteApps file
.ocr PTR device initialization file
.qpr QuickApp file
.sdb Demo doc file
.set Profs print settings
.sl PTR service libraries
.tbl Translate table file
.tem Migrate wizard file
.tlx Wintertree spellchecker dictionary configuration file
.txt Text file
.xcp APPN node file
.xml Privacy file
.xwc CASL macro executable file
.xws CASL macro source file

INFOConnect Enterprise Edition Product Guide
44
privacy.xml Privacy filtering file
Attachmate Customization Tool Reference
Use the Attachmate Customization Tool to create setup customization files (also called transforms) or companion installer packages.
Setup customization file This is a customized installer for INFOConnect. The file is a standard MSI transform file (*.mst) that customizes the installer database. Deploying a customized installer enables you to pre-configured installation that meets the requirements of your users.
Companion package A companion package installs additional files. These are installed independently of the INFOConnect install. Use this to provide users with supporting files, such as settings and configuration files.
In this Section
Panels for Creating and Editing Transform Files 44
Panels for Creating and Editing Companion Installations 51
Add/Modify Program Entry Dialog Box 55
Add/Modify Property Value Dialog Box 55
Modify Shortcut Dialog Box 56
Add/Modify Registry Data 57
Panels for Creating and Editing Transform Files
Getting there
1 On a workstation on which you have installed INFOConnect, open the Attachmate Customization Tool from a desktop shortcut or from a command line as follows:
path_to_setup\setup.exe /admin
2 From the Select Customization dialog box, do one of the following:
• Select Create a new Setup customization file for the following product.
-or-
• Select Open an existing Setup customization file or Companion installer and then, from the Open dialog box, select an .MST file.
Using the Attachmate Customization Tool, you can create standard MSI transforms that modify the primary installer database. You can also open and edit existing .mst files that you have already created for this product using the Attachmate Customization Tool.

Deploy and Distribute INFOConnect
45
After you create the transform, you must include it in the install. Transforms can be used with any install started with setup.exe or with command-line installs (used by many deployment tools). The installer can only apply transforms during an installation.
The options are:
Install location and organization name (page 45) Specify the default installation folder on the user's computer.
Licensing and session metering (page 46) Accept license agreement and define session metering options for installation.
User interface (page 47) Choose User Interface options for installation.
Remove previous installations (page 48) Remove Previous Installations.
Add installations and run programs (page 48) Add, modify or remove additional product installations and run programs.
Modify setup properties (page 48) Set properties for Setup to apply during the installation.
Set feature installation states (page 49) For each feature, click to select the installation state.
Configure shortcuts (page 49) Modify shortcuts for this product.
Add registry data (page 50) Specify registry data to add to the user's computer during installation.
Modify application Settings (page 50) Make changes to application settings on the computer where the customization file is installed.
Install location and organization name
Select the option Create a new Setup customization file in the Attachmate Customization Tool to access these settings.
Specify the default installation folder on the user's computer
Specify the installation folder and the value for the MSI standard COMPANYNAME property.
This setting Does this
Default installation folder
Specifies where to install the product files. (Install location changes are disabled if the primary product installer does not support changing the install location.)
Notes:
List items that refer to folders (for example, [ProgramMenuFolder]) are pre-defined folder keywords (page 54). You can create customized directories by adding new folder names with typical directory syntax (such as, [ProgramFilesFolder]\My Folder). Alternatively, you can enter a fully qualified path (for example, C:\Program Files\My

INFOConnect Enterprise Edition Product Guide
46
Folder), as long as that location is known to exist on the target machine.
If you are modifying an installation that includes both 32-bit and 64-bit components, the location you specify for Default installation folder is used for the 32-bit components only. To specify a location for 64-bit components, use Modify setup properties (page 48). Add a property called INSTALLDIR64 and set the value to the location you want for the installation folder. This can be the same location as Default installation folder or a different location.
Organization name
Specifies the MSI standard COMPANYNAME value.
License and session metering
Select the option Create a new Setup customization file in the Attachmate Customization Tool to access these settings.
Accept license agreement and define session metering options for installation
Select the check box to accept the license agreement on behalf of users
To configure a transform, you must accept the product license on behalf of your users.
Volume Purchase Agreement
For some products you can enter a Volume Purchase Agreement (VPA) number.
Note: VPA numbers are issued by Attachmate, to allow customer support to expedite service requests.
Session Metering Enables metering at install time and sets the host URL for the metering software. This enables an administrator to monitor use and ensure licensing compliance.
To use metering, you will need a metering server, which is available as part of several Attachmate products, including Reflection Security Gateway. When the customized package is installed at the workstation, metering information is placed in the workstation registries, and the workstations are configured to report to the metering server.
Note: Metering options can also be configured with Group Policy installation. Group Policy settings take precedence over installed settings.
Meter As
Specifies the product to be metered. The options available (if any) depend on the product you are installing.
Metering URL
Specifies the URL of the Metering Server. The metering server URL will be in this form:

Deploy and Distribute INFOConnect
47
http://[host name]:[port number]/[metering server context name]/meter.do
If you used the default port, you can omit the port number. For example:
http://Myserver.com/rwebmeter/meter.do
Note: The default port for HTTP is 80. The default port for HTTPS is 443. Use HTTPS only if your metering server is set up to support secure HTTPS connections.
Require Metering
Requires INFOConnect to connect to the metering server before it runs. If it cannot connect, it doesn't run. If this option is cleared and INFOConnect is launched when the server is unavailable, INFOConnect runs, but the session is not metered and license limits are not enforced.
User interface
Select the option Create a new Setup customization file in the Attachmate Customization Tool to access these settings.
Choose User Interface options for installation
Use this customization for command-line installs or with deployment software
The transform is used only when you explicitly add this file to your installation.
Use this customization with interface installs using setup.exe
The transform is used when you perform the installation with setup.exe.
Note: The MSI command to run the transform is automatically inserted in the setup.ini file when you save your transform. This means that any changes you made, such as running a companion installer, will run automatically when users run the Attachmate Setup wizard (setup.exe).
Select user interface level If the transform is used along with setup.exe, you can specify the user interface level for the Attachmate Setup wizard interface during the install. These settings are available when Use this customization with interactive installs using setup.exe is selected.
None Displays no interface.
Basic Displays only a progress bar.
Full Displays the full Attachmate Setup wizard interface.
No cancel Sets up the install so that it cannot be canceled after it begins.

INFOConnect Enterprise Edition Product Guide
48
Remove previous installations
Select the option Create a new Setup customization file in the Attachmate Customization Tool to access these settings.
Specify earlier versions of this product to remove
Specify which previous versions to remove before the product is installed. Previous installations are upgraded (replaced) by the primary product. Installations that are not selected are not removed when you install the product.
Add installations and run programs
Select the option Create a new Setup customization file in the Attachmate Customization Tool to access these settings.
Add, modify or remove additional product installations and run programs
Specifies MSI packages to install and/or additional programs to run before or after the primary install. You can also specify a companion package generated by this tool.
This setting Does this
Add Opens the Add/Modify Program Entry dialog box from which you can add programs along with their command line arguments.
Modify Opens the Add/Modify Program Entry dialog box from which you can modify the selected item.
Remove Removes a selected program from the table. (Active only when a program is selected in the table.)
Move arrows Moves programs up or down in the action sequence.
Note: If you want the program you added to run automatically when users run the Setup program (setup.exe), go to the User Interface panel (page 47) and select Use this customization with interactive installs using setup.exe. When you select this option, ACT automatically adds a line to the setup.ini file to include your transform as a part of the Setup program.
Modify setup properties
Select the option Create a new Setup customization file in the Attachmate Customization Tool to access these settings.
Set properties for Setup to apply during the installation
Define public Windows Installer properties.
Add Opens the Add/Modify Property Value (page 55) dialog box from which you can define or redefine public properties. You can modify properties in the installer database or you can create your own.
Caution: Do not overwrite existing properties unless you fully understand how the changes affect your install. Setting properties to incorrect values
Deploy and Distribute INFOConnect
49
can break the install.
Modify Opens the Add/Modify Property Value (page 55) dialog box from which you can change the values for the selected property. (This option is active only when a property is selected in the table.)
Remove Removes a selected property from the table. (This option is active only when a property is selected in the table.)
Note: If you are configuring a companion package, the values for COMPANYNAME and Manufacturer are set automatically to the value you specify for Organization name on the Specify package information pane.
Set feature installation states
Select the option Create a new Setup customization file in the Attachmate Customization Tool to access these settings.
For each feature, click to select the installation state
You can select which features, components, and languages to install for your end users. In addition, you can choose from three levels of not installing an item: advertising it, not installing it, and permanently blocking it to prevent users from installing it later.
Click a feature to set its installation state, then select an installation option.
Choose To do this
Feature will be installed on local hard drive
Add a feature to the installation.
Feature will be installed when required
Advertise a feature.
Feature will be unavailable Leave a feature uninstalled. End users will still be able to select the item and install it from the Windows Uninstall or change a program list (or the Add/Remove Programs control panel in Windows XP).
Feature will be hidden from view Leave a feature uninstalled and hidden. End users will not be able to install the item and it will not be visible in the Windows Uninstall or change a program list.
Configure shortcuts
Select the option Create a new Setup customization file in the Attachmate Customization Tool to access these settings.
Modify shortcuts for this product
Specify the details for shortcuts associated pre-defined INFOConnect shortcuts (if you are creating a transform), or with added files (if you are creating a companion package).

INFOConnect Enterprise Edition Product Guide
50
Modify opens the Modify Shortcut dialog box, from which you can change the location, name, tooltips, arguments, and initial window size of the program for which the shortcut is configured.
Notes:
To create a shortcut to a file you add to a companion package, use the Add files (page 53) pane, and click Include shortcut before you browse to the file you want to add.
Clearing a Shortcut Name check box only blocks the installation of the shortcut. The shortcut remains in the installer database and can be selected at any time.
Add registry data
Select the option Create a new Setup customization file in the Attachmate Customization Tool to access these settings.
Specify registry data to add to the user's computer during installation
Specify registry keys and values to add or modify during the installation process. By modifying registry values, you can change the way the application operates (for example, for certain Attachmate applications, you can add a value that specifies to never save settings on exit).
Notes:
The Windows Registry Database stores a hierarchical set of keys that determine how your machine operates. These keys hold values that contain the data or binary code necessary to perform specific functions.
Caution! Do not modify registry keys unless you understand the implications of any changes you are making. Improper registry modification can cause serious problems on the user's workstation.
Add Opens the Add/Modify Registry Data (page 57) dialog box, from which you can add a registry key.
Modify Opens the Add/Modify Registry Data (page 57) dialog box, from which you can modify the registry data for the selected key.
Remove Deletes the selected key.
Modify Application Settings
Select the option Create a new Setup customization file in the Attachmate Customization Tool to access these settings.
Make changes to application settings on the computer where the customization file is installed
Use this pane to modify settings that affect the product you are installing.

Deploy and Distribute INFOConnect
51
Modifications you make here affect all users of the computer on which the product is installed.
Note: The features available on this pane (if any) depend on which product you are installing.
Panels for Creating and Editing Companion Installations
Getting there
1 On a workstation on which you have installed INFOConnect, open the Attachmate Customization Tool from a desktop shortcut or from a command line as follows:
path_to_setup\setup.exe /admin
2 From the Select Customization dialog box, do one of the following:
• Select Create a new Companion installer
-or-
• Select Open an existing Setup customization file or Companion installer and, in the Open dialog box, select an .MSI file.
Create a companion install package (also called a "companion database") to install any files that are not installed with INFOConnect. Because companion files are installed independently of INFOConnect, you can upgrade the product without removing these support files. You can also deploy additional support files without re-installing the product. If, for example, you are supporting several business units that require their own customized configuration files, you can create a companion install package for each business unit.
The options are:
Specify package information (page 52) Specify companion package Information.
Specify install locations (page 52) Specify the default installation folders on the user's computer.
Add files (page 53) Specify files to add to the user's computer during installation.
Configure shortcuts (page 49) Modify shortcuts for this product.
Modify setup properties (page 48) Set properties for Setup to apply during the installation.
Add registry data (page 50) Specify registry data to add to the user's computer during installation.
Modify user settings (page 53) Make changes to user settings on the computer where the customization file is installed.
Note: The Modify user settings option is active only when Installs only for the user who installs it is selected on the Specify the default installation folders on the user's computer panel.
INFOConnect Enterprise Edition Product Guide
52
Specify package information
Select the option Create a new Companion Installer in the Attachmate Customization Tool to access these settings.
Specify companion package Information
Add/Remove name Specifies the name shown in the Programs and Features control panel. (This is called Add/Remove in older Windows systems.)
Organization name The value you specify here sets the value of two MSI properties: COMPANYNAME, and Manufacturer (the value that will show up under Publisher in the Programs and Features control panel. Note: You can modify these properties independently on the Modify setup properties (page 48) pane.
Specify install locations
Select the option Create a new Companion Installer in the Attachmate Customization Tool to access these settings.U
Specify the default installation folders on the user's computer
Specifies the default locations ACT uses for files and shortcuts. See Pre-defined folder keywords (page 54) for information about keyword options in the folder drop-down lists.
Default installation folder
Specifies the default location for files you add using the Add files pane.
Default shortcut folder Specifies the default location for the shortcuts that you
create using Add files when Include shortcut is selected.
Installation type Specifies the access for files (after the installation).
Note: The value you specify for Installation type determines which folder locations are available in the folder drop-down lists on this pane, in the Add files pane, and in the Modify Shortcut dialog box.
Installs to all users of a machine Sets up the companion installation so that the files are available for every user who logs on to the machine.
Installs only for the user who installs it Sets up the companion installation so that the files are available only for the user who installs it.

Deploy and Distribute INFOConnect
53
Add files
Select the option Create a new Companion Installer in the Attachmate Customization Tool to access these settings.
Specify files to add to the user's computer during installation
Specifies the files to install, their location, and whether to associate shortcuts with the files. Multiple files of any type can be selected.
Add files to Specify a location for the installed files. You can enter a specific
path or use pre-defined Windows folder locations shown in brackets in the drop-down list (or combine the two).
Note: The drop-down options available in this list depend on the Installation type you select in the Specify install locations pane. For details see Pre-defined folder keywords (page 54).
Include Shortcut Specifies creation of a shortcut for the file selected in the table.
Add Opens the Add files to Package dialog box from which you can browse to the files you want to add.
Note: List items that refer to folders (for example, [ProgramMenuFolder]) are pre-defined folder keywords (page 54). You can create customized directories by adding new folder names with typical directory syntax (such as, [ProgramFilesFolder]\My Folder). Alternatively, you can enter a fully qualified path (for example, C:\Program Files\My Folder), as long as that location is known to exist on the target machine.
Update Sets selection of the install location or whether to add or remove a shortcut. (This allows you to change these selections after the file is added to the table.)
Remove Removes the file selected in the table.
Note: Files added as part of a companion installer will overwrite any existing files with the same name found in the specified locations on the target computer.
Modify user settings
Select the option Create a new Companion Installer in the Attachmate Customization Tool to access these settings.
Make changes to user settings on the computer where the customization file is installed
Use this panel to customize user settings for an application and include these settings with the companion installation. The list of features available depends on which Attachmate product you are customizing.
Notes:

INFOConnect Enterprise Edition Product Guide
54
The Modify user settings option is available only if the Installs only for the user who installs it option in the Specify install locations panel is selected.
Before you can modify settings from this panel you need to perform a workstation install of the application you want to customize.
Application - Settings
Shows a list of options that are available for customization with your product installation.
Define Opens a tool to customize settings for the selected feature.
Note: The Define button is available only if the selected application is installed on your workstation.
Defaults Resets the selected item to defaults.
Pre-defined folder keywords
The drop-down folder location options include different Windows locations depending on whether you are installing for an individual user or all users of a machine.
Note: The default Windows locations given here are typical defaults for Windows 7 and Windows 8.
Locations available for all user installations
Location name in ACT Default Windows location
[CommonAppDataFolder] C:\ProgramData
[CommonDocumentsFolder] C:\Users\Public\Documents
[CommonFilesFolder] C:\Program Files\Common Files
[ProgramFilesFolder] C:\Program Files
[RootDrive] C:\
[WindowsFolder] C:\Windows
Locations available for individual user installations
Location name in ACT Default Windows location (Windows 7)
[AppDataFolder] C:\Users\<user>\AppData\Roaming\
[LocalAppDataFolder] C:\Users\<user>\AppData\Local\
[PersonalFolder] C:\Users\<user>\Documents\
[RootDrive] C:\

Deploy and Distribute INFOConnect
55
Add/Modify Program Entry Dialog Box
Getting there
1 On a workstation on which you have installed INFOConnect, open the Attachmate Customization Tool from a desktop shortcut or from a command line as follows:
path_to_setup\setup.exe /admin
2 From the navigation pane, click Add installations and run programs.
3 To add a new program, click Add.
-or-
To modify settings for a program in the table, select the program, and then click Modify.
From this dialog box, you can specify how to run a program included in an installation.
Target Specify the folder in which the program resides.
Arguments Specify command-line arguments for the executable.
Run this program after the base product has been installed
Select to run the program executable after the base installation is complete.
Run this program before the base product has been installed
Select to run the program executable before the base installation starts.
Note: List items that refer to folders (for example, [ProgramMenuFolder]) are pre-defined folder keywords. You can create customized directories by adding new folder names with typical directory syntax (such as, [ProgramFilesFolder]\My Folder). Alternatively, you can enter a fully qualified path (for example, C:\Program Files\My Folder), as long as that location is known to exist on the target machine.
Add/Modify Property Value Dialog Box
Getting there
1 On a workstation on which you have installed INFOConnect, open the Attachmate Customization Tool from a desktop shortcut or from a command line as follows:
path_to_setup\setup.exe /admin
2 From the Select Customization dialog box, select the option that best describes the task you are performing.
3 From the navigation pane, click Modify setup properties.
4 To add a new property, click Add.

INFOConnect Enterprise Edition Product Guide
56
-or-
To modify a property in the table, select the property, and then click Modify.
Set the property names and values to create new properties or to modify properties in the installer database. For example, you can set a property that disables the Remove button on the Windows Add or Remove Programs panel.
Name Select or enter the property name. You can modify properties in the
installer database or you can create your own.
Note: Some Reflection applications support a Setup Property called WRQ_USERDIR. This property affects only those applications whose default user data directory is %personalfolder%\Attachmate\Reflection. If the application you are installing does not include an option on the installer File Location tab for changing the user data directory, you can use this property to specify a non-default user data directory.
Value Set the property value. (If you select a name from the Name list,
guidelines for the value are displayed under the Value field.)
Modify Shortcut Dialog Box
Getting there
1 On a workstation on which you have installed INFOConnect, open the Attachmate Customization Tool from a desktop shortcut or from a command line as follows:
path_to_setup\setup.exe /admin
2 From the Select Customization dialog box, select the option that best describes the task you are performing.
3 From the navigation pane, click Configure shortcuts.
4 Under Shortcut name, select a shortcut, and then click Modify.
Set the following values to configure a shortcut in a INFOConnect install.
Location Specify where you want the shortcut to reside.
Name Enter a name for the shortcut.
Tooltip Enter text that describes the shortcut.
Arguments Enter command-line arguments to pass to the program.
Run Specify an initial size for the application window.

Deploy and Distribute INFOConnect
57
Note: List items that refer to folders (for example, [ProgramMenuFolder]) are pre-defined folder keywords. You can create customized directories by adding new folder names with typical directory syntax (such as, [ProgramFilesFolder]\My Folder). Alternatively, you can enter a fully qualified path (for example, C:\Program Files\My Folder), as long as that location is known to exist on the target machine.
Add/Modify Registry Data
Getting there
1 On a workstation on which you have installed INFOConnect, open the Attachmate Customization Tool from a desktop shortcut or from a command line as follows:
path_to_setup\setup.exe /admin
2 From the Select Customization dialog box, select the option that best describes the task you are performing.
3 From the navigation pane, click Add registry data.
4 To add a new registry value, click Add.
-or-
To modify a registry value in the table, select the value, and then click Modify.
Specify registry keys and values to add or modify during the installation process. By modifying registry values, you can change the way the application operates (for example, for certain Attachmate applications, you can add a value that specifies to never save settings on exit).
In this field Enter or select
Key The complete Registry path from the root, for example:
HKEY_LOCAL_MACHINE\SOFTWARE\Reflection\Rwin\Reflection
Name The registry value name, for example:
SaveChanges
If the Name box is blank, the data entered into the Value box are written to the Default registry key.
Type The data type of the value. For example:
DWORD
Types include strings, integers (DWORD), or binary values.
Value The value. For example:
0x00000000 (0)

INFOConnect Enterprise Edition Product Guide
58
Create a Chain Installation to Run Additional Programs
Use this procedure to set up a chain install that automatically runs companion install packages (MSI) before or after the primary installation, or that launches other scripts or programs.
To chain installations and programs
1 Start the Attachmate Customization Tool:
• On a command line, change to the administrative installation point and enter:
path_to_setup\setup.exe /admin
Or
• If you have set up a shortcut to the Attachmate Customization tool, double-click it.
2 From the Attachmate Customization Tool navigation pane, choose Add installations and run programs.
3 Click Add.
The Add/Modify Program Entry dialog box opens.
4 In the Target list, enter or select the folder where the program .exe file or the .msi file resides, and then enter the executable to run; for example:
msiexec.exe
5 Under Arguments, enter the command-line arguments to execute; for example:
/i My_installation.msi
6 Choose one of the following options to specify when to run the program.
• Run this program after the base product has been installed.
• Run this program before the base product has been installed.
Note: For most cases, select Run this program after the base product has been installed. If you select this option before the base product has been installed and the program fails, INFOConnect is not installed.
7 Repeat these steps to add other programs or .msi files.
8 To change the execution sequence, use the arrows next to Move (at the bottom left area of the pane. To remove a program from the list, select it in the list and click Remove.
Deploy an "Out-of-the-Box" Version using Factory Defaults The Attachmate Setup program (setup.exe) is the recommended tool for installing and deploying INFOConnect. This tool is configured to install using the default language and also supports features provided by the Attachmate Customization Tool. You can also deploy using the Microsoft Installer file (*.msi) provided in the Administrative Install.

Deploy and Distribute INFOConnect
59
To install INFOConnect with the Attachmate Setup program (setup.exe)
1 Run the Setup.exe using one of the following approaches:
• Direct users to launch the installer by running setup.exe from the administrative installation point. With this option, users can modify the feature set.
-or-
• Configure a shortcut or script to run setup.exe from the administrative installation point. The command line options shown here install using the default feature set:
To do this Use this command line
Display a progress bar and a Cancel button. setup.exe /install
Display a progress bar with no Cancel button. setup.exe /install /passive
Perform silent install with no display. setup.exe /install /quiet
You can also run the installation using the Microsoft msiexec command. The basic syntax is:
msiexec –i path_to_administrative_installation_point\msi_filename.msi
Use the following command to view help about additional msiexec options:
msiexec -?

INFOConnect Enterprise Edition Product Guide
60
Deploy with Systems Management Server Use the Microsoft Systems Management Server (SMS) to deploy to computers running Microsoft Windows. Before you start, make sure that:
You are using SMS version 1.2 or later. SMS versions earlier than 1.2 are not supported.
Microsoft Windows Installer software version 2.0 or later is installed on your computer and on all of the computers on which you are installing the product.
To deploy with Systems Management Server
1 Create an administrative install point on your SMS site server.
2 Use the product Package Definition File (.sms) to create the product installation package.
3 Advertise the installation packages to your users.
Include Patch Files with the Initial Install After the Attachmate Installer Program installs the .msi file, it looks in an updates folder for any .msp files to install. You can include service packs and patches with an initial installation by copying the .msp files to an “updates” folder in the same location as setup.exe.
To include service packs and patches with the initial installation
1 Create an administrative installation point.
2 Navigate to the administrative installation point for setup.exe.
3 Create a folder named “updates”.
4 Copy any .msp files to the "updates" folder.
5 Any installation that uses setup.exe will apply the .msp files after installing INFOConnect.
Note: If you are not using setup.exe for deployment, any patches in the “updates” folder must applied with your deployment software.
Publish an Installation with Active Directory You can assign and publish your product installation using Microsoft Active Directory.
Note: Before you start, make sure that:
Windows Administrative Tools are installed on your workstation.
You are a member of Domain Admins and Group Policy Creators and Owners (required to publish software).

Deploy and Distribute INFOConnect
61
For more information, see "Active Directory groups" in the Microsoft Management Console help.
To install with Active Directory
1 From the Active Directory User and Computers Console, advertise your product installation to members of any organizational units in your Active Directory using appropriate transform modifications.
2 If multiple transforms are specified, make sure the listed order of the transforms is correct, and then click OK. (If you need to change the order for any reason after you click OK, you will have to start over again.)
Note: For more information about assigning and publishing, see "assigning applications" and "publishing applications" in the Microsoft Management Console help.

INFOConnect Enterprise Edition Product Guide
62
Installing From the Command Line
You can use the Attachmate Setup wizard command line to install INFOConnect from the distribution image, or from an administrative installation image. You can also include command-line options in a batch file to preset installation parameters, and limit user interaction while INFOConnect is installing. You can even suppress installation dialog boxes to provide an unattended installation.
In addition, you can use command-line options to prepare INFOConnect for installation by users. In general, any of the MSI command-line options can be used from the Attachmate Setup wizard command line.
To install from the command line
At the command prompt or Start menu Run command, change to the directory in which the setup.exe file resides, and do one of the following:
• To create an administrative installation point, type:
setup.exe /install /admin TARGETDIR=path
• To install to a workstation with typical settings, type:
setup.exe /install
• To specify a non-default location for program files use INSTALLDIR. For example:
setup.exe /install INSTALLDIR=C:\path
• When using the 64-bit installer for INFOConnect, use INSTALLDIR to specify the location for 32-bit components and INSTALLDIR64 to specify the location for 64-bit components. The two paths can be the same or different. For example:
setup.exe /install INSTALLDIR=C:\path INSTALLDIR64=C:\path
Note: To view a list of the command-line options for customizing installations, change to the directory in which the setup.exe file resides and enter:
setup.exe /?
To install directly with MSI
At the command prompt or Start menu Run command, change to the directory in which the .msi file resides and enter:
msiexec.exe /i Installation_file_name.msi
Set the Location of INFOConnect Features You can install all features onto the local drive or you can install all features as run-from-source to install all features from the network.
To set the location of INFOConnect features
From the command prompt, type one of the following:

Deploy and Distribute INFOConnect
63
For a complete install of all features onto the local drive, type:
msiexec /i path\Product.msi ADDLOCAL=ALL /qb
where path is the path to the directory that contains the appropriate .msi file, and Product.msi is the installation file.
For a complete install where the client installs all features from the network, type:
msiexec /i path\Product.msi ADDSOURCE=ALL /qb
If you share your INFOConnect products on a file server and the networked PCs do not have write privileges to the server, .gid files for the online Help will be created in the Windows\Help folder for each user. If you subsequently install an additional INFOConnect product on the file server, the user will not see the online Help for that product until he or she deletes the .gid files from his or her Windows\Help folder (these are hidden files).
In a shared network installation, the networked PCs will not have access to the online Help for the INFOConnect transports via the Accessory Manager online Help.
For more information on command-line options and parameters, see the Microsoft Windows Installer documentation.
Command-Line Properties for Transports and Options You can install transports or options from the command line if you haven’t customized your .msi file to install specific transports or options. This is most common for silent or group policy installations. If you do not specify any transports or options, the defaults are installed.
To install transports and options from a command line, type the feature names exactly as they appear in the following tables as values for Windows Installer properties such as ADDLOCAL or ADDSOURCE.
Use the MSI feature names with the standard MSI properties and arguments. The ADDLOCAL=comma_delimited_list property would install one or more transports or options locally. For example, to install the Sabre and MATIP for UTS transports locally, you would enter:
ADDLOCAL=ICW40_SABRE,MATIP_ AIRLINES
Other common properties to set on the command line (but not in a transform) include REMOVE=comma_delimited_list, which uninstalls the feature and ADDSOURCE=comma_delimited_list, which installs the files for that feature to run from a network location.
INFOConnect Unisys Transports and Options
Transport or option Feature name
TCPA - A Series TCP/IP Transport (default) ICW40_ATA
HLCN - Host LAN Connection Terminal Services ICW40_ALA
INT1 Transport (default) ICW40_OIA
MATIP for UTS Transport ICW40_MATIP
FileXpress-XST Client ICW40_XST
Response Time Monitor Utility ICW40_ARTMS

INFOConnect Enterprise Edition Product Guide
64
CryptoConnect Client ICW40_CRYPTO
WinFTP ICW40_FTP
CCF ICW40_CCF
INFOConnect Airlines Transports and Options
Transport or option Feature name
INT1 Transport (default) ICW40_OIA_AIRLINES
MATIP for UTS Transport ICW40_MATIP_AIRLINES
MATIP for ALC Transport (default) MATIP_ALC_AIRLINES
ATSTCP - Galileo Apollo Travel Services TCP/IP Transport
ICW40_ATS
UDP for TPF Transport ICW40_FRAD
Sabre IP Transport ICW40_SABRE
CryptoConnect Client ICW40_CRYPTO_AIRLINES
Airlines Gateway ICW40_AIRGATE
PTR Stand-alone Transport and Options
Transport or option Feature name
INT1 Transport ICW40_OIA_AIRLINES
MATIP for ALC Transport (default) MATIP_ALC_AIRLINES
MATIP for UTS Transport ICW40_MATIP_AIRLINES
ATSTCP - Galileo Apollo Travel Services TCP/IP Transport
ICW40_ATS
UDP for TPF Transport ICW40_FRAD
Sabre IP Transport ICW40_SABRE
Airlines Gateway (default) ICW40_AIRGATE
INFOConnect MSI Properties
The following table lists common properties in the INFOConnect .msi file, some of which are used to set default values for installation and global options. These properties can be specified on the command line or passed in by way of a transform file (see Modify Setup Properties (page 38)). If installation values are not specified and the installation dialog boxes are suppressed, the default values are used.
Property Description
COMPANYNAME=organization Sets the organization name.
Deploy and Distribute INFOConnect
65
INSTALLDIR=path Sets the installation path.
USERDATALOC_CUSTOM=Yes|No Default is No. This property only works when
USERDATALOCATIONMIN and
USERDATALOCATIONMINTWO are set to Custom.
If USERDATALOCATIONMIN or
USERDATALOCATIONMINTWO is set to Custom., set
this value to Yes. In all other cases, set it to No.
USERDATALOC_CUSTOM_PATH=path Only works if USERDATALOCATIONMIN and
USERDATALOCATIONMINTWO are set to Custom.
Specifies a custom location to store user data. If
you replace the user-specific portion of the path
with the string userid, when the product is run by
a user for the first time, the userid portion of the
path is replaced with the logged-in user’s ID.
USERDATALOCATIONMIN=value Sets the location for user data. When you specify
custom for the value, you must include the
following two properties:
USERDATALOC_CUSTOM=Yes
USERDATALOC_CUSTOM_PATH=pathname
This value Saves data to
MyDocs My Documents
AllUsersDocDataDir All Users\Documents
Custom User-defined directory
APPDATALOC_CUSTOM=Yes|No Default is No. This property only works if
APPDATALOCATION is set to Custom. In that case,
include this property and set the value to Yes.
APPDATALOC_CUSTOM_PATH=path This property only works if APPDATALOCATION is
set to Custom. In that case, include this property
and for path, specify a custom location.
APPDATALOCATION=value
Sets the location where application data is saved.
When you specify Custom for the value, you must
include the following two properties:
APPDATALOC_CUSTOM=Yes
APPDATALOC_CUSTOM_PATH=pathname
This value Saves data to
My Documents My Documents
AllUsersDocuments All Users\Documents
Custom User-defined directory

INFOConnect Enterprise Edition Product Guide
66
Updating, Repairing, or Removing INFOConnect
You can distribute software updates in a standard MSP file format, remove installations, or repair installations.
After a patch or service pack is installed, a Service Pack tab appears in the Attachmate Installer Program. The Service Pack tab lists the service packs and hot fixes that have been installed and provides an option to remove any of the installed updates.
Distribute Software Updates Software updates, including service packs and patches, are typically distributed as MSP files.
Use one of the following procedures to deploy an .msp file using an updates folder, or using the Attachmate Patch utility included with your distribution, or by using an updates folder.
To apply a patch using an “updates” folder
1 Create a folder named “updates” in the same location as Setup.exe.
2 Copy the MSP files to the “updates” folder.
3 Run Setup.exe to apply the patch.
The Windows Installer technology may require original media when applying a patch. Therefore, the original media should be available to users during this time. You can use command-line options to deploy patches when INFOConnect is deployed from a network location or via group policies.
To apply a patch to an installed administrative point
Do one of the following:
At the command prompt or the Start menu Run command, type:
msiexec /a [path]\Admin_install.msi /p [path]/Patch.msp
INFOConnect is deployed from a network location and the patch is installed to the administrative install point. Each user must repair his or her installation of INFOConnect using the Control Panel to apply the patch.
If INFOConnect is deployed via Group Policies, the group policy is deployed again. (To redeploy the group policy, select the policy, right-click it, and choose Re-Deploy. The installation will then be updated the next time the user logs in, or when the computer is rebooted, depending on the type of deployment that was done.)
To distribute updates with the Attachmate Patch utility
1 From the distribution image, open the Attachmate Patch utility by double-clicking the self-extracting executable update file.
2 Follow the instructions given by the utility.
For detailed instructions on upgrading INFOConnect, refer to the Attachmate Patch Utility Help.
Deploy and Distribute INFOConnect
67
Upgrade or Remove INFOConnect When you upgrade INFOConnect from a previous release, existing predefined keyboard maps (such as T27.ekm) are not overwritten. This ensures that any changes you or the user made to those keyboard maps are not lost. However, it also means that the user will not receive any new modifications added to them. For instructions on adding new keyboard map features, see the Accessory Manager online help.
INFOConnect follows Windows requirements when uninstalling a system that has been installed for multiple users. When INFOConnect is uninstalled, the product is removed completely from the machine. Registry keys are removed from HKEY_CURRENT_USER and HKEY_USER only for the user who is logged on when the uninstall process is invoked. Therefore, to uninstall INFOConnect from the other users on the same machine, the administrator must manually remove the registry entries and product shortcuts.
In a shared network installation, access to INFOConnect products can be removed at a networked PC. In this case, the products will no longer be accessible at that PC, but they remain installed on the file server and all other users will still be able to share them.
Note: You must log on with administrator privileges to remove the product. If you do not have the necessary access rights, request that your system administrator elevate your privileges.
To uninstall INFOConnect
Do one of the following:
From the Programs and Features or Add/Remove Programs control panel, select INFOConnect.
At the command prompt or the Start menu Run command, change to the directory in which the setup.exe file resides and enter:
msiexec /x ProductCodeGUID /qb
where ProductCodeGUID is the Globally Unique Identifier (GUID) that is the principal identifier for the product. To get the product code, use an MSI editing tool or contact Attachmate Technical Support at http://support.attachmate.com/contact.
Upgrade Enablers
If there is a folder named upgrade included with the product distribution, copy it to the administrative install location. The upgrade folder contains files required to perform a successful upgrade from an older product. These enabler patches are applied to your system prior to the upgrade.
Note: If you are not using setup.exe for deployment, the patches in the upgrade folder must be applied with your deployment software.


69
Deploying Sessions and Data with Reflection Security Gateway
In this Chapter
Configure Sessions That Connect Using the Security Proxy and User Authorization Tokens 70
Configure Sessions to use ID Manager to Assign Terminal IDs 72
Deploy MSI Packages from Reflection Management Server 73
This section provides instructions on deploying INFOConnect sessions using Attachmate Reflection Security Gateway. Reflection Security Gateway provides increased security to legacy host applications by leveraging the current enterprise authentication infrastructure.
The main advantage of Reflection Security Gateway is the ability to configure INFOConnect terminal sessions to make connections through the Reflection Security Proxy Server. The Security Proxy Server increases host security through user authentication tokens, which control host access, and SSL/TLS encryption. Because session configuration files are stored on the Reflection Management Server, you can administer updates as needed, effectively pushing changes out to client workstations.
Additionally, you can use Reflection Management Server to silently deploy user and configuration data to specified users in the form of companion install packages (MSI). Data such as macros, toolbars, keyboard maps, schemes, and other resources can be bundled in version-controlled companion install packages (MSI) and then stored on the Reflection Management Server to automatically deploy when a user accesses the server. For information about creating companion packages,Create an MSI Package to Install Configuration Files (page 39).
Requirements
On the Administrator's workstation, installation of Attachmate INFOConnect version 9.2 and a browser (with Java enabled).
Reflection Security Gateway components, which can be installed on one or more servers available over the network.
Reflection Security Gateway
This product includes the following components:
Administrative WebStation. A password-protected, centralized website hosted by the Reflection Management Server from which administrators can configure, secure, and deploy terminal sessions.
Reflection Security Proxy Server. A server that provides additional security to Windows-based sessions by applying SSL/TLS encryption and user authorization using security tokens.
Reflection Management Server. A server that stores sessions created in Administrative WebStation and makes them available to end users. It also optionally authenticates and authorizes users connecting to hosts via the Reflection Security Proxy Server.
C H A P T E R 3

INFOConnect Enterprise Edition Product Guide
70
Reflection Metering Server. A server that tracks and reports the usage of Windows-based Attachmate products. See Enable Metering (page 92).
For more information about these components, see the documentation included with Reflection Security Gateway.
Configure Sessions That Connect Using the Security Proxy and User Authorization Tokens Use this procedure to configure INFOConnect emulation sessions that connect to the Reflection Security Proxy Server, including sessions that require security tokens for user authorization (also referred to as "token passing").
This feature is supported in Telnet connected 3270, 5250 and VT sessions, in addition to UTS, T27 and ALC emulation sessions.
This procedure assumes installation of the Reflection Security Gateway. INFOConnect sessions created in Administrative WebStation are stored on the Reflection Management Server and made available to end users or groups from the Links List.
Note: INFOConnect also supports host connections made using a Reflection Security Proxy that is not configured to require user authorization (for example, a Security Proxy that uses the Pass Through proxy type). You can configure these sessions in INFOConnect by specifying the port on the Security Proxy Server that is defined for the destination host. Sessions created outside of Administrative WebStation are not available to users or groups from the Reflection Management Server Links List.
To configure a session to use security tokens
1 Start and log on to the Administrative WebStation.
2 From the left pane, select Session Manager and click Add.
3 From the Windows-Based list, select INFOConnect, type a descriptive session name. This name is sent to the emulator and is included in the session profile.
4 Click Continue.
5 Specify the directory on the end user's workstation where settings files will be stored and whether these files will overwrite existing user files.
6 Click Launch.
INFOConnect opens in Administrative WebStation (AWS) mode.
7 Follow the wizard's prompts to configure the host. Make sure to leave the default option Reflection Security Proxy selected as the type of connection.
8 On the Reflection Security tab, from the Proxy server address menu, specify a Reflection Security Proxy Server.
A description of the selected Reflection Security Proxy Server appears below the fields.
• If the Security Proxy requires user authorization, type the destination host's IP address or host name and port number in the fields provided.

Deploying Sessions and Data with Reflection Security Gateway
71
• If the Security Proxy does not require user authorization, the destination host will be preconfigured in the Host address and Host port. No action is required.
9 Click Next and continue through the wizard to complete the configuration. When you click Finish, the session opens in INFOConnect.
After the session successfully connects, you can further customize the session in INFOConnect.
10 Save and close the new session.
The session file is then saved to the Reflection Management Server.
To make the session available to users
Use Access Mapper in the Administrative WebStation to provide access to specific users or groups. If the Reflection Management Server has been configured to integrate with your enterprise directory using LDAP, the Access Mapper operates in a different mode. For more information, refer to the documentation included with Reflection Security Gateway.
After you make the session available to users, it appears on their Links List as a hyperlink (URL).
The first time the user clicks the URL, the session profile and associated files are downloaded to the end user's computer. An updated session profile is downloaded to the client only if the previous file was deleted or if the option Overwrite end user files was selected in the Session Manager. After the session makes the connection, the status icon shows a connection to the Reflection Security Proxy Server (versus the host, as in a direct connection).
If you have uploaded companion packages to the Reflection Management Server for deployment, these packages will download and the individual files will be copied to the user's workstation in the locations specified before the session opens.
To modify the session's settings
Use the following procedure to modify INFOConnect sessions created in the Administrative WebStation. If you modify these sessions outside of Administrative WebStation, many of the Reflection security settings will be unavailable.
1 Start and log in to Administrative WebStation.
2 Select Session Manager and then click the session name.
3 Click Launch.
4 After you make changes, save the file as prompted.
Your modified session file replaces the existing session file of the same name on the Reflection Management Server.

INFOConnect Enterprise Edition Product Guide
72
Configure Sessions to use ID Manager to Assign Terminal IDs
From INFOConnect, you can establish host connections using Attachmate ID Manager, provided by Reflection Security Gateway. ID Manager configures and monitors a pool of resource IDs that a user can use to establish a host session. Resource IDs work in place of the required address or identifier for a particular terminal type. This eliminates the need to configure a terminal ID (GPID or LU) for each and every client. You can use ID Manager with 3270, 5250, UTS, ALC and T27 terminal emulation sessions.
When a session is configured to use ID Manager, the user obtains an ID before the session connects and then holds on to the ID throughout the session. When the session disconnects, the ID is returned to its pool. A different ID may be used the next time the session connects.
Use the following procedure to enable ID Manager for individual sessions. This procedure assumes installation of Reflection Security Gateway. To enable ID Manager for the product, see Customizing Your Installation (page 27).
To configure a new session to use an ID
Note: To complete this procedure, you need the complete URL for the ID Manager server (for
example, http://servername/rwebidm, where rwebidm is typically case sensitive, but
servername is not) and the parameters that ID Manager server requires to allocate an ID.
1 From the INFOConnect Accessory Manager, select File > New Session and create a
session as required for the desired Unisys or Airlines host and transport type.
2 When the Use ID Management check box appears in the Path Wizard, select it and
continue.
3 On the following page, select Use Reflection ID Management Server and in the
Reflection ID Management Server URL box, type the URL for the web server. For
example, https://servername:port/rwebidm. If you use the default port for http (80) or
https (443), the colon and port number are not required.
4 Click Next to continue.
5 Under Obtain ID using, select only those options required by the server. (Options
that aren't supported by INFOConnect are unavailable.) If you select Pool name, enter
the name of the pool.
6 Click OK and complete the session creation.
To configure an existing session to use an ID
1 With the session open, from the Options menu, select Settings.
2 On the left, select Connection.
3 Under Path Description, click Edit.
4 On the Path tab, under Station ID, select Use ID Manager and then click Configure ID Manager.
5 Select Use Reflection ID Management Server and in the Reflection ID Management Server URL box, type the URL for the web server. For example,
https://servername:port/rwebidm. If you use the default port (80), the colon and port
number are not required.

Deploying Sessions and Data with Reflection Security Gateway
73
6 Click Next to continue.
7 Under Obtain ID using, select only those options required by the server. (Options
that aren't supported by INFOConnect are unavailable.) If you select Pool name, enter
the name of the pool.
8 Click OK.
9 Close the Database Editor and save your changes.
Deploy MSI Packages from Reflection Management Server
Use the Package Manager to upload companion install packages (.msi) to the Reflection Management Server for deployment to specified users. Companion install packages might include toolbars, macros, keyboard maps, and settings that support specific types of host emulation sessions. To create a companion install package, you can use any tool that creates .msi packages, including the Attachmate Customization Tool.
This procedure assumes installation Reflection Security Gateway.
To upload a package
1 Start the Administrative WebStation.
2 Click Package Manager on the left.
3 Click Add and then Browse to locate the .msi file you want to add or update. You can
optionally add a description about the package.
4 Click Save to upload the package to the Reflection Management Server.
To deploy a package to users
Use the Access Mapper to specify users to which the package will be deployed.
Use Access Mapper in the Administrative WebStation to provide access to specific
users or groups. If the Reflection Management Server has been configured to integrate with your enterprise directory using LDAP, the Access Mapper operates in a different mode. For more information, refer to the documentation included with Reflection Security Gateway.
After you make the package available to a user, the next time that user accesses the Links List, the package contents are copied to the user's computer to the locations specified in the MSI package. Files on the user's computer may be overwritten, depending on the options chosen when the MSI package was created.
To update or replace a package
To update an MSI package on the Reflection Management Server, you essentially replace it with an updated file of the same name.
1 Make your changes to the MSI package and save it using the same name.
2 From Package Manager, click the MSI file that you want to replace.
3 Click Browse, select the modified package, and then click Open.

INFOConnect Enterprise Edition Product Guide
74
4 In the Description field, enter a version number or some other indicator that the package
contents have changed, and then click Save.

75
Configuring Security Settings
In this Chapter
Configuring FIPS 140-2 Validated Encryption 76
Configure Encryption for OTS Sessions 79
Encrypting EXTRA! for Accessory Manager Sessions 84
Reflection Secure FTP Client 84
Meeting DOD PKI Requirements 85
CryptoConnect 89
Port Numbers for Emulation Clients 89
This section describes how to configure security and encryption features included with INFOConnect, such as FIPS 140-2 and the Reflection secure FTP Client, for your sessions.
To create secure connections using the Reflection Security Proxy Server, see Deploying Sessions and Data with Reflection Security Gateway (page 70).
C H A P T E R 4

INFOConnect Enterprise Edition Product Guide
76
Configuring FIPS 140-2 Validated Encryption Use the procedures in this section to specify FIPS 140-2 validation for existing and new connections.
Federal Information Processing Standard (FIPS) 140-2 is a standard that describes US Federal Government requirements that IT products should meet for Sensitive, but Unclassified (SBU) use. The standard was published by the National Institute of Standards and Technology (NIST). The standard defines the security requirements that must be satisfied by a cryptographic module used in a security system protecting unclassified information within IT systems.
Attachmate received FIPS 140-2 validation from NIST for the Reflection Security Components and Reflection Security Gateway.
Configure FIPS 140-2 Sessions using Group Policy
Use the following procedure to ensure that all host connections run in FIPS 140-2 mode.
To set FIPS 14-2 connections via group policy
1 Install the administrative template file. See Administer Features using Group Policy (page 92).
2 Run the Windows Group Policy editor (gpedit.msc).
3 Expand the User Configuration tree:
• In Windows Server 2012, Windows Server 2008, Windows 8, Windows 7, or Vista: User Configuration > Administrative Templates > Classic Administrative Templates (ADM) > Reflection Settings.
• In Windows Server 2003 or Windows XP: User Configuration > Administrative Templates > Reflection Settings.
4 From the list of Reflection Settings, select Allow non-FIPS mode, and then click Edit policy setting.
5 In the Configure Client Metering dialog box, check the Enabled radio button.
6 Click OK and exit the Group Policy Editor.
Configure FIPS 140-2 for Existing Sessions
Existing sessions will continue to use the previously configured connection path unless you deliberately edit the connection properties.
To configure FIPS 140-2 for existing connections
1 In the Accessory Manager, open a session, and choose Edit > Settings.
2 On the left, select Connection.
3 Do one of the following:

Configuring Security Settings
77
• For IBM AS/400 sessions, on the General tab, for Security type, choose Attachmate FIPS 140-2 and leave Encryption Strength set to Auto. The appropriate encryption strength will be negotiated for the connection.
• For IBM Mainframe sessions, on the General tab, click Add. In the Configure Connection dialog box, for Security type, choose Attachmate FIPS 140-2 and leave Encryption Strength set to Auto. The appropriate encryption strength will be negotiated for the connection.
• For Unisys sessions, on the Connection tab, click Advanced. In the Path Wizard, follow the prompts to add your settings. On the page that displays your IP address or host name and port, select the Attachmate TLS option. Complete the Path Wizard.
• For VMS/UNIX/Asynchronous sessions, on the General tab, click Advanced. In the Reflection Secure Shell Settings dialog box, click the Encryption tab and then select Run in FIPS mode.
4 To determine the active (negotiated) encryption strength for the session, hold the cursor over the lock icon until the tooltip appears.
Configure FIPS 140-2 for New TN3270 and TN5250 Sessions
FIPS 140-2 is supported in the EXTRA! TN3270 and TN5250 transports as an SSL/TLS connection via Reflection Security Gateway.
To configure a FIPS-validated connection
1 In the Accessory Manager, choose File > New to create a new session.
2 In the New Session Wizard, specify IBM AS/400 or IBM Mainframe for host type and click Next.
3 Follow the prompts in the New Session Wizard.
4 On the tabbed page, on the General tab, do one of the following:
• For IBM AS/400 sessions, from the Security type list, choose Attachmate FIPS 140-2. Leave Encryption Strength set to Auto and click OK. The appropriate encryption strength will be negotiated for the connection. Complete the New Session Wizard.
• For IBM Mainframe sessions, on the General tab, click the Add button. In the Configure Connection dialog box, for Security type, choose Attachmate FIPS 140-2, leave Encryption Strength set to Auto, and click OK. The appropriate encryption strength will be negotiated for the connection.
Configure FIPS 140-2 for New UTS, ALC and T27 Sessions
When you configure secure UTS and T27 SSL/TLS emulation sessions via Reflection Security Gateway, only connections using FIPS 140-2 permitted protocols are allowed.

INFOConnect Enterprise Edition Product Guide
78
To configure a FIPS-validated connection
1 In the Accessory Manager, choose File > New to create a new session.
2 In the New Session Wizard, specify Unisys 2200 or Unisys A Series for host type and click Next.
3 Follow the prompts in the Path Wizard.
4 On the page where you enter the IP Address or Host Domain Name and Host Port, select Attachmate TLS.
5 Complete the Path Wizard.
Configure FIPS 140-2 for New VAX/VMS/UNIX or Asynchronous Sessions
FIPS 140-2 is supported via SSH connections in VT Telnet connections. In these connections, FIPS 140-2 is provided by Reflection Security Components.
To configure a FIPS-validated connection
1 In the Accessory Manager, choose File > New to create a new session.
2 In the New Session Wizard, specify VAX/VMS/UNIX, or asynchronous hosts for host type and click Next.
3 Follow the prompts in the New Session Wizard.
4 On the General tab, do one of the following:
• For Telnet connections, enter the host name. Then, click the Security tab, and for Type of security, choose Attachmate FIPS 140-2.
• For SSH connections, for Host, enter the host name, and then click Advanced. In the Reflection Secure Shell Settings dialog box, click the Encryption tab and select Run in FIPS mode.

Configuring Security Settings
79
Configure Non-FIPS Encryption for Sessions
INFOConnect now includes encryption options for users who may not be required to comply with the FIPS 140 standard, but wish to meet PCI DSS or other security standards. Specifically, Attachmate TLS encryption allows you to use the entire range of supported protocols, including those associated with FIPS. TLS can provide encryption strength ranging from medium to strong—the actual encryption protocol that is used is negotiated between the client and server when the connection is initiated.
Use the following simplified procedure to change a session’s security settings to use a non-FIPS encryption option. If a FIPS group policy is set, no security changes can be made.
To configure non-FIPS encryption
1 In the Accessory Manager, open a session, and from the Options menu, choose Settings.
2 On the left, select Connection.
3 Do one of the following:
• For IBM AS/400 sessions, on the General tab, for Security type, choose AttachmateTLS v1.0 and leave Encryption Strength set to Auto. The appropriate encryption strength will be negotiated for the connection.
• For IBM Mainframe sessions, on the General tab, click the Add button. In the Configure Connection dialog box, for Security type, choose Attachmate TLS v1.0 and leave Encryption Strength set to Auto. The appropriate encryption strength will be negotiated for the connection.
• For Unisys sessions, click the Edit button. Next, on the Path tab, click the Advanced button. In the Path Wizard, follow the prompts to set SSL. On the page that displays your IP address or host name and port, select the Attachmate TLS option. Complete the Path Wizard.
• For VMS/UNIX/Asynchronous sessions, click the Security tab. For Type of security, choose Attachmate TLS v1.0.
4 To determine the active encryption strength for the session, hold the cursor over the lock icon until the tooltip appears.
Configure Encryption for OTS Sessions When you configure encryption for existing or new OTS sessions, all sessions must use encrypted channel and connection configurations. In addition, those configurations must specify the gateway IP address or domain name, instead of the host IP address or domain name.
You can use the INFOConnect Accessory Manager or Database Editor to enable or disable encryption for individual client connections. If you need to set encryption settings for several existing OTS sessions, see Configure Encryption for Multiple OTS Sessions (page 81).

INFOConnect Enterprise Edition Product Guide
80
Notes
UTS Users: Once you encrypt particular channel or connection configurations, all sessions that use those configurations are encrypted. Unencrypted sessions must use unencrypted channel and connection configurations. If you specify encryption for a host or gateway that does not support encryption, or if you fail to select encryption for a host or gateway that supports encryption, the session terminates with a Session path closed error.
T27 Users: If you specify encryption for a host or gateway that does not support encryption, the session terminates in an Encryption/negotiation failure error; if you fail to select encryption for a host or gateway that supports encryption, the session fails to respond.
To create new encrypted sessions
Use the session and path wizard screens in Accessory Manager.
To encrypt a single existing OTS session
1 In the Database Editor, go to the TCP/UDP Path Options dialog box.
2 Select Encrypted Connection.
3 Type the IP address or domain name of the CryptoConnect TCP/IP Gateway in the IP address or domain name text box.
4 Click Configure.
5 In the TCP path options dialog box, verify that the correct information is specified for the Remote port and value options as follows:
For this connection Specify these options Value
Any T27 connection Remote Port: TELNET 23
Any UTS connection with a DCP-Gateway mode connection type
Remote Port: TELCON 256
Any UTS connection with a DCP-IP Router mode or HLC connection type
Remote Port: TP0 102
6 (Optional) Type an alternate IP address or domain name in the Alternate IP address or domain name text box.
7 If you want the alternate IP address to be encrypted, you must type the name of an alternate CryptoConnect TCP/IP Gateway and select Encrypted connection.
8 Click OK on the TCP/UDP path options dialog box and any subsequent dialog boxes.
9 Click the Save icon on the toolbar.
When the new session connects to the CryptoConnect TCP/IP Gateway, a Padlock symbol appears on the status bar to indicate a secure connection. If you have multiple active sessions, the status bar shows the state of the session that has focus within Accessory Manager.

Configuring Security Settings
81
Remove Encryption from OTS Sessions
When you unencrypt a UTS session, all sessions associated with the connection name are then unencrypted.
To unencrypt an OTS session
1 Open the session.
2 In the TCP/UDP path options dialog box, make these changes:
• Replace the name of the CryptoConnect TCP/IP Gateway with the name of the host in the IP address or domain name box.
• Clear the Encrypted connection check box.
3 If you specified a CryptoConnect TCP/IP Gateway as the alternate IP address, make these changes in the TCP path options dialog box:
• Replace the name of the CryptoConnect TCP/IP Gateway with the name of the host in the IP address or domain name box.
• Clear the Encrypted connection check box.
Configure Encryption for Multiple OTS Sessions
The ICW40-TCP page allows you to configure several existing OTS sessions at one time. When you configure the ICW40-TCP package, the INFOConnect Manager reads the cryptocn.ini file to obtain the IP addresses of the host and gateway to encrypt all of the sessions connecting to each host IP specified. A sample cryptocn.ini is included in the Infocnee directory.
If you do not modify the cryptocn.ini, or if you have existing sessions that connect to an IP address that you do not specify in the cryptocn.ini file, the Convert existing paths to use encryption dialog box appears when you configure the ICW40-TCP package. Complete that dialog box to encrypt the remaining sessions, or, if you do not want to encrypt those sessions, indicate that no change is necessary.
To modify the cryptocn.ini file
1 In line 1, enter the IP address or DNS name of the host your clients access as follows. You must include the square brackets around the host IP or DNS name.
[123.456.78.901]
2 In line 2, do one of the following:
To Do this
Provide the IP address of the CryptoConnect TCP/IP Gateway that you direct the clients to for encryption
Enter Gateway=234.567.89.012
where 234.567.89.012 is the IP address

INFOConnect Enterprise Edition Product Guide
82
Not use a gateway for a particular host or to not encrypt communication with a particular host
Enter Gateway= Communication to that host will not be encrypted
3 To set the Fallback option do one of the following:
To Do this
Enable the client to access the host directly (without encryption) in the event of a problem accessing the gateway
Set Fallback to True: [123.456.78.901] Gateway=234.567.89.012 Fallback=TRUE
Enable the client to access the host without encryption
Set Fallback to False: [123.456.78.901] Gateway=234.567.89.012 Fallback=FALSE If you do not set the Fallback option, the default FALSE will be used.
4 Complete steps 1 - 3 for each host in your network that you want to connect to with encrypted sessions.
If the various client configurations sometimes reference the host by the DNS name and sometimes by the IP address, include an entry for each kind of configuration in the file.
5 Save the modified Cryptocn.ini file in the Windows directory on the client PC.
6 (Optional) If you have several clients that access the same hosts, you can copy this file to the Windows directory on additional client PCs.
To configure the ICW40-TCP package through the INFOConnect Manager
1 Start INFOConnect Manager 32-bit.
2 From the Configure menu, select Packages.
3 Select the ICW40-TCP line and click Quick Config.
4 If the Convert existing paths to use encryption dialog box appears, do one of the following each time you are prompted:
If you want Do this
To encrypt sessions connecting to that host
Complete the configuration as follows: a. In the Name or IP address box, enter the IP address of the CryptoConnect TCP/IP Gateway. b. Select Retain old address as unencrypted fallback to have the client access the host without encryption in the event of a problem accessing the gateway. c. Click OK to encrypt all sessions associated with that IP address.

Configuring Security Settings
83
To continue to encrypt sessions connecting to that host
Click No change.
5 Repeat step 4 until you are no longer prompted to complete the Convert existing paths to use encryption dialog box.
When this dialog box appears, your existing sessions are configured and ready to be used and you can exit INFOConnect Manager.
Configure Encryption for UTS Sessions
When you clear the encryption settings from a UTS session, all sessions associated with the connection name will make only unencrypted connections. If you need to run both encrypted and unencrypted UTS sessions from the same client, the terminal ID (TID), channel, environment, and connection configurations for each kind of session (encrypted or unencrypted) must be unique.
Because it is easy to inadvertently mix and match the named channel, environment, and connection configurations, it is recommended that you give similar descriptive names to all the named configurations that are related to one kind of session. For example, an encrypted channel to a DCP in a demand mode could use dcp_enc and dcp_dem_enc as the channel and environment configurations names.
Use the following procedure to create a UTS session that uses an encrypted channel/connection without affecting existing unencrypted sessions.
To encrypt the channel for a new UTS session
1 Create a new UTS session in Accessory Manager, completing the dialog boxes as prompted. Ensure that you do the following:
• Assign a unique TID to the session.
• Enter a new name for the channel. (If you do not enter a new channel name, you will not be able to use the original channel for an unencrypted session.)
• Enter a new environment name.
• Enter a new connection name.
• Enter the IP address or domain name of the CryptoConnect Gateway and select the Encrypted connection box.
2 Click Finish to establish the session.
When the new session connects to the CryptoConnect TCP/IP Gateway, a padlock icon appears on the status bar to indicate a secure connection.
When you configure additional encrypted sessions, you can use the same channel and environment names as long as you use a new TID and path name. You will not be prompted to enter a connection, check the encryption option, or enter the gateway IP address if you re-use the channel and environment. The new session gathers that information from the channel and environment configurations.

INFOConnect Enterprise Edition Product Guide
84
Encrypting EXTRA! for Accessory Manager Sessions
Use the Connection settings to add, modify, or remove encryption from new or existing EXTRA! for Accessory Manager sessions.
SSL v3.0 provides a secure TN3270 session that implements standard SSL support as provided directly by some IBM mainframes and products such as the Attachmate SNA Gateway. It allows the use of Smartcard and client certificate pass-through, but will not connect to the CryptoConnect Gateway.
To edit the connection settings
1 Create a new session or open an existing session.
2 From the Options menu, choose Settings.
3 From the Settings screen, click Connection and then click the Add or Edit button.
4 In the Configure Connection dialog box, on the General tab, specify the following:
To use Set this
Standard SSL v3.0 encryption with Smartcard and client certificate pass through features with TN3270 sessions
The host alias or IP address of the SSL-enabled host or TN3270 gateway SSL V3.0 as the level of encryption.
If you select Use Microsoft Security Implementation, you will need a Cryptographic Security Provider application provided by a third party, usually the Smartcard vendor or Microsoft.
The new settings take effect the next time you open the session. A padlock icon appears on the session status bar when you run a session that has a secure connection. If you have multiple active sessions, the status bar shows the state of the session that has focus within Accessory Manager.
If you specify encryption for a host or gateway that does not support encryption, or if you fail to select encryption for a host or gateway that supports encryption, the session terminates with an error.
5 To disable encryption in EXTRA! for Accessory Manager Sessions, select None for the encryption level and for FIPS-140 sessions and then replace the CryptoConnect Gateway IP address with the host IP address or host alias, host name, or DNS host name.
Reflection Secure FTP Client The Reflection Secure FTP client provides FIPS 140-2 compliant support for a wide variety of FTP servers, including Unix, NetWare, Unisys, HP 3000, IBM mainframe, AS/400 and OpenVMS. It allows you to encrypt file transfers using industry-standard SSL/TLS or SSH protocols, export and import settings in XML format, and perform site-to-site transfer between FTP servers.
The Reflection Secure FTP client is a feature in the INFOConnect Enterprise Edition installation along with the following utilities:
Kerberos Manager: Manages and configures the Reflection Kerberos client.

Configuring Security Settings
85
Key Agent: An application that holds multiple private keys that can be used in Secure Shell connections for public key authentication. It also enables agent forwarding for a Secure Shell connection.
Meeting DOD PKI Requirements Use this section to configure INFOConnect to meet the requirements for operating within the Department of Defense (DOD) Public Key Infrastructure (PKI) environment. To configure INFOConnect to use the required FIPS 140-2 validated SSL/TLS connections, you must complete the tasks outlined below, in INFOConnect and the Reflection Certificate Manager.
INFOConnect Tasks
Use the Path wizard to create a new INFOConnect path or configure an existing INFOConnect path to use the following options:
FIPS 140-2 encryption
CRL or OCSP certificate revocation checking
Verify host name against host certificate name
Reflection Certificate Manager Tasks
Use Reflection Certificate Manager to complete the following tasks and configurations:
Disable the use of the Windows certificate store for SSL connections.
Configure the appropriate server for certificate revocation checking.
Install the appropriate trust points (referred to as Trusted certification authorities or Certification authorities in Reflection Certificate Manager).
To enable FIPS 140-2 validated SSL/TLS for an existing configuration
1 Run the Database Editor.
2 From the Connection Type list box, do one of the following:
To Do this
Configure a TCPA connection type
a. Select TCPA. b. From the Paths and their descriptions list, click the name of the path that you want to modify. c. Click the Path tab. d. Click Advanced.
Configure an INT1 connection type
a. Select INT1. b. Click the Connection tab. c. Click Advanced.
3 In the Encryption group, select FIPS 140-2.
4 Type the IP address or domain name of the security proxy in the IP address or domain name box, and then click Configure PKI.

INFOConnect Enterprise Edition Product Guide
86
5 From the PKI Settings dialog box, select Verify host name against certificate name, select at least one of the options from the Certification revocation group box, and then click Reflection Certificate Manager.
6 Configure the Reflection Certificate Manager for use in your situation.
7 Close the Reflection Certificate Manager and then click OK on the PKI Settings dialog box.
8 In the Socket group, click Configure.
9 In the TCP Path Options dialog box, make sure the appropriate port on the proxy server is specified.
10 (Optional) Type an alternate IP address or domain name in the IP address or domain name box in the Alternate path group, and then select the appropriate encryption setting.
INFOConnect automatically reuses the PKI settings you configured for the security proxy.
11 Click OK in the TCP Path Options and any other dialog boxes and save the record.
When the new session connects to the security proxy, a Padlock symbol appears on the status bar to indicate a secure connection. If you have multiple active sessions, the status bar shows the state of the session that has focus within Accessory Manager.

Configuring Security Settings
87
Introduction to Public Key Infrastructure (PKI)
A Public Key Infrastructure (PKI) is a system that helps facilitate secure communications using digital certificates. INFOConnect supports the use of a PKI for host (server) and user (client) authentication during FIPS 140-2 validated SSL/TLS sessions.
Authentication
Authentication is the process of reliably determining the identity of a communicating party. Identity can be proven by something you know (such as a password), or something you have (such as a private key or token). In a typical session to a remote host, the client authenticates with a password, but the host is not authenticated. More secure protocols (including FIPS 140-2 validated SSL/TLS) require host authentication. Host authentication is accomplished using public key cryptography. In addition, SSL/TLS can also be configured to use public key cryptography for user authentication.
Public Key Cryptography
Public key cryptography uses a mathematical algorithm, or key, to scramble (encrypt) data, and a related key to unscramble (decrypt) it. One of the keys is a public key, which can be freely distributed to communicating parties, and the other is a private key, which should be kept securely by the owner of the key. Data encrypted with the private key can only be decrypted with the public key; and data encrypted with the public key can only be decrypted with the private key, allowing digital signatures to be verified.
When keys are used for authentication, the party being authenticated creates a digital signature using the private key of a public/private key pair. The recipient must use the corresponding public key to verify the authenticity of the digital signature. This means that the recipient must have a copy of the other party’s public key and trust in the authenticity of that key.
Digital Certificates
Digital certificates provide a secure way to distribute public keys. Certificates are provided by a trusted third party, called a certification authority (CA). Each certificate includes a public key and identifying information about the owner of that key. In addition, the certificate is digitally signed by the CA. Anyone with a copy of the CA’s public key can ensure that the contents of any certificate issued by that CA have not been altered. Because you trust the CA, you can be confident that the key owner is who or what he claims to be, and that the public key has not been tampered with.
All SSL/TLS sessions require certificates for host authentication; without the necessary certificate, you cannot make a host connection. Depending on the host configuration, you may also need to install certificates (configure a private key) for client authentication.
Digital Certificate Stores
Digital certificates are maintained on your computer in certificate stores. A certificate store contains the certificates you use to confirm the identity of remote parties, and may also contain personal certificates, which you use to identify yourself to remote parties. Personal certificates are associated with a private key on your computer.
The Reflection Certificate Manager can be configured to use digital certificates located in either or both of the following stores. However, for use with the DOD PKI, you must use the Reflection certificate store and disable the use of the Windows certificate store by the Reflection Certificate Manager.

INFOConnect Enterprise Edition Product Guide
88
Windows Certificate Store: This store can be used by a number of applications, including Web browsers and Email clients. Some certificates in this store are included when you install the Windows operating system. Others may be added when you connect to Internet sites and establish trust, when you install software, or when you receive an encrypted or digitally signed email. You can also import certificates manually into your Windows store. Manage the certificates in this store using the Windows Certificate Manager.
Reflection Certificate Store: This store is used only by Reflection applications, and this is the certificate you must use for DOD PKI purposes. To add certificates to this store, you must import them manually. You can import certificates from files and also use certificates on hardware tokens such as smart cards. Manage the certificates in this store using the Reflection Certificate Manager.
When you configure the Reflection Certificate Manager to use only the Reflection certificate store (when use of the Windows store is disabled), only those certificates you have imported into the Reflection store are used for host authentication.
Additional Private Key (Certificate) Information and Safeguards
Depending on the host configuration, you may also need to install personal certificates (configure a private key) for client authentication.

Configuring Security Settings
89
CryptoConnect The CryptoConnect Encrypted Transport System (ETS) consists of a gateway and one or more clients that fully encrypt communication between INFOConnect emulators and a host. The CryptoConnect TCP/IP Gateway runs on a Windows server and fully encrypts communication sent from the host to the client. The client (CryptoConnect ETS) resides on a separate PC from the gateway and encrypts and decrypts communication between the client and the gateway. CryptoConnect uses FIPS 140-1 encryption.
Port Numbers for Emulation Clients The following table lists the default port number emulation clients can use to access hosts.
Terminal Port
UTS Port 102
UTS secure Port 3782
T27 Port 23
UDPFRAD Port 3020
ATSTCP Port 2748
MATIP Port 350
SABRE Port 12001
SABRE2 Port 30031
TN3270 Port 23
TN5250 Port 23
Telnet Port 23


91
Administrative Tasks and Tools
In this Chapter
Administer Features using Group Policy 92
Enable Usage Metering 92
Connect to Sabre NOFEP 93
Disable Client Features with the Security Editor 94
Add Sessions to a Portal or Web Page 95
Using EXTRA! for Accessory Manager 97
Response Time Monitor Utility 101
Export/Import Utility 101
Using CnfEdit 101
Split Screen Transport 104
Set Up Trace Files 104
This chapter covers common Administrative tasks and the tools that are included with INFOConnect.
C H A P T E R 5

INFOConnect Enterprise Edition Product Guide
92
Administer Features using Group Policy
Using Windows Group Policy, Administrators can implement the following features to INFOConnect users:
FIPS 140-2 security
Metering and licensing of the product
These features are made available through the Reflection Policy template file. This file contains many other group policy settings that do not apply to INFOConnect.
To install the administrative template file
1 From the Attachmate Download Library, download the file ReflectionPolicy.zip.
2 Unzip the file and copy ReflectionPolicy.adm to the \%systemroot%\inf folder (for example, C:\Windows\inf\).
3 Add the file ReflectionPolicy.adm to your Windows Group Policy editor.
a) From a command line, run Gpedit.msc.
b) Expand the Computer Configuration tree, right-click Administrative Templates and select Add/Remove Templates.
c) Click Add, browse to select the ReflectionPolicy.adm file, and click Open.
d) Close the Add/Remove Templates dialog box.
See also
Configure FIPS 140-2 Sessions using Group Policy 76
Enable Usage Metering
The Reflection Metering Server allows administrators to track INFOConnect sessions and determine how many client workstations use the product. Metering can also be used to limit the number of concurrent users that can access a host at any given time.
Metering can be enabled one of two ways: During installation—by customizing the installation with the Attachmate Customization Tool; or after installation, by using a group policy. Group policy settings take precedence over installed settings. This feature requires installation of Reflection Security Gateway.
To enable metering via group policy
1 Install the administrative template file. See Administer Features using Group Policy (page 92).
2 Run the Windows Group Policy editor (gpedit.msc):
3 Expand the Computer Configuration tree:

Administrative Tasks and Tools
93
• In Windows Server 2012, Windows Server 2008, Windows 8, Windows 7, or Vista: Computer Configuration > Administrative Templates > Classic Administrative Templates (ADM) > Reflection Settings > Client Metering.
• In Windows Server 2003 or Windows XP: Computer Configuration > Administrative Templates > Reflection Settings > Client Metering.
4 Select Configure Client Metering and then click Edit policy setting.
5 In the Configure Client Metering dialog box, check the Enabled radio button.
6 In the Metering web server box, enter the URL of your metering server.
Syntax:
http://[host name]:[port number]/[metering server context name]/meter.do
For example:
http://Myserver.com:80/rwebmeter/meter.do
Note: If you used the default port, you can omit the colon and port number.
7 Select Require connection to metering server only if you want to prevent users from launching INFOConnect when the metering server is not available. (Enabling this setting can be useful when you are creating a trial installation and want to test to see if the metering server is running and available.)
8 Click OK and exit the Group Policy Editor.
Connect to Sabre NOFEP
Use the following instructions to connect INFOConnect with the Sabre No Open Front End Processor (NOFEP) system. Customers are required to license the Sabre API (CCSAPI) before connecting via INFOConnect.
Install the Sabre API (CCSAPI) before you install INFOConnect. For information on the API installation, refer to the Sabre documentation.
To verify access to Sabre, test the following connections:
Telnet to access.sabre.com port 30031 (TA access)
Telnet to access.sabre.com port 30032 (Agency Pooled TA access)
Telnet to access.sabre.com port 30051 (Printer access)
Telnet to hsspconfig.sabre.com 389 (LDAP services for NOFEP access)
To configure csapi.cfg
CCSAPI takes its configuration settings from the Csapi.cfg file, which must be placed in the Windows directory.
1 From the Windows directory, open Csapi.cfg in Notepad.
2 Locate the Route names section.
INFOConnect Enterprise Edition Product Guide
94
3 In the FIXEDTERMINALHSSP2 entry, (or your own route, if you have created one) replace PUT_YOUR_PROVIDED_VALUE_HERE with an address provided to you by Sabre (a six digit hex number).
4 Locate the {hssp2terminalfixed} section.
5 Modify SKIPLEADINGCHARS to equal 3.
6 Modify EBCDIC2ASCII to equal NO.
7 Save and close the file.
To define a new session in INFOConnect Accessory Manager
1 In Attachmate Accessory Manager, from the File menu, select New Session.
2 If asked to select a host type, select ALC Host and click Next.
3 If offered the chance to use an existing path, click Next to create a new path.
4 Select the SABRE2 connection type and click Next.
5 Enter FIXEDTERMINALHSSP2 or, if you have created one, the name of your own route. Then, click Next.
6 Enter a terminal address provided to you by Sabre (a six digit hex number) and click Next.
7 Enter the path name and description. The path name and description identify the configuration settings in the Accessory Manager database for the workstation. Click Next.
8 Click Finish to use the existing session name or enter another name and click Finish.
9 Test the new session. The first time you try to connect to the new terminal address (TA), a standard disconnect NOFEP message may appear. Disregard the message and try again.
Disable Client Features with the Security Editor
Using the Security Editor, you can remove commands from the menus, disable buttons on toolbars and QuickPads, and disable keys on keyboard maps. For example, if you want to prevent users from creating a new session, you can remove the New Session option from the File menu. All changes are kept in a Scheme file (.esf). This file can be password protected and then distributed to users on your network. You can configure users with read-only access to the Scheme file.
A default Scheme file (Default.esf), with all client features enabled, is automatically installed in the Schemes directory. You can either edit the default Scheme file or save it under a new name and then modify the new version.
To disable a client feature with the Security Editor
1 Open a session.
2 From the Options menu, select Security.

Administrative Tasks and Tools
95
3 In the Scheme field, make sure that the Scheme file you want to edit is displayed. If it isn’t, browse to the correct file.
4 Click the Options tab.
5 If the Scheme file is password protected, you are asked for the password. Enter the password in the Security Password dialog box, and click OK.
6 Select the category that contains the command(s) you want to set.
7 Clear the check mark from the command(s) you want secured.
8 Repeat steps 6 and 7 for each command that you want secured.
9 To save the scheme file, click the File tab, and click Save As.
10 Select the file or enter a new filename and click Save.
Add Sessions to a Portal or Web Page
You can integrate INFOConnect sessions with a portal or web page through an ActiveX control. Then computers that have INFOConnect installed can access the session in a web-based environment.
If you have an existing portal to which you would like to add a session, you can call this control from the HTML code in your portal. The control opens INFOConnect and displays it in the portal (or in a new browser window). You can define the basic behavior of this ActiveX control by setting its properties in JavaScript added to a web page.
Scripting Integrated INFOConnect Sessions
By using the Launcher control Session property and scripting, you can access the automation interfaces for INFOConnect. For example, if the Launcher control <OBJECT> name is “launcher,” the following JavaScript sets the session connected state to false (disconnects the session):
launcher.session.Connected(false); The following JavaScript sends text to the screen: scrn = launcher.session.Screen(); scrn.SendKeys(“Hello<Enter>”);
A full description of the Session object and all of its sub-objects is available in the Help installed with the INFOConnect client application at Infonee\Enu\Epc_ole.hlp. You must have EXTRA! for Accessory Manager installed to get this help file and the WinHelp32.exe Help viewer to view it.
Add a Session to any Web Page
You can add an INFOConnect session to any Web page by calling the INFOConnect Launcher control. The Launcher control has configurable properties that you can set.
To add an INFOConnect session to a Web page
1 In the head section of your target HTML file, use JavaScript to create a function.
2 In the code sample, this is called “mylaunchfunction.”

INFOConnect Enterprise Edition Product Guide
96
3 In the Body section of your target HTML file, use the onLoad attribute to call the function you created in step 1.
4 In the Body section of your target HTML file, create an object with attributes for id, classid, width, and height.
The classid must equal “clsid:DE8845A4-B737-4C12-A4DA-B0F0BEED1AC2”.
Launcher Control Code Sample This code sample shows how to call the INFOConnect Launcher control from an HTML page.
<HTML><HEAD><TITLE>Sample HTML Page</TITLE> <SCRIPT LANGUAGE="JavaScript”>function mylaunchfunction(){ launcher.launchfile="INT1_1.ADP”; launcher.embedded=true; launcher.onclose="close”; launcher.launch();}</SCRIPT></HEAD> <BODY onLoad="mylaunchfunction()”> <H1>INFOConnect Terminal</H1> <BR> <OBJECT ID="launcher” CLASSID="clsid:DE8845A4-B737-4C12-A4DA-B0F0BEED1AC2” HEIGHT="300” WIDTH="500”></OBJECT> </BODY></HTML>
Launcher Control Scripting Code Sample
This code sample shows how to call properties of the session object of the INFOConnect Launcher ActiveX control from an HTML page.
<HTML><HEAD><TITLE>Sample HTML Page</TITLE> <SCRIPT LANGUAGE="JavaScript”>function mylaunchfunction(){ launcher.launchfile="INT1_1.ADP”; launcher.embedded=true; launcher.onclose="close”; launcher.launch();}function connect(){ launcher.session.Connected(true);}function disconnect(){ launcher.session.Connected(false);}</SCRIPT></HEAD> <BODY ONLOAD="mylaunchfunction()”> <H1>INFOConnect Terminal</H1> <BR> <OBJECT ID="launcher” CLASSID="clsid:DE8845A4-B737-4C12-A4DA-B0F0BEED1AC2” HEIGHT="300” WIDTH="500”></OBJECT> <BR><BR> <BUTTON NAME="Test” ONCLICK="connect()”>Connect</BUTTON> <BUTTON NAME="Test” ONCLICK="disconnect()”>Disconnect</BUTTON> </BODY></HTML>
Administrative Tasks and Tools
97
Using EXTRA! for Accessory Manager
EXTRA! for Accessory Manager is a suite of terminal emulators (3270, 5250, and VT) and connection tools that let your PC communicate with an IBM mainframe, AS/400, or DEC host. EXTRA! for Accessory Manager is a stand-alone application that exists in a separate folder. You can run this application by itself, or you can create and open EXTRA! sessions within Accessory Manager.
To use EXTRA! sessions within Accessory Manager, you must keep both applications installed. When you open an EXTRA! session within Accessory Manager, the session still requires files from the Infocnee\Extra folder to run.
Limitations of EXTRA! for Accessory Manager Although you can create and open EXTRA! sessions within Accessory Manager and perform most of the functions that you can with any other emulator, there are some limitations:
Any keyboard maps, QuickPads, toolbars, or schemes located in the remote folder (as specified on the Global Preferences dialog box) are not copied. To use any of these files, you must copy them manually to the Infocnee\Accmgr32 folder or whatever folder is specified as the local or remote folder on the Global Preferences dialog box.
When you display the Open Session dialog box using Accessory Manager, only .adp files are displayed by default. To view all files in the Sessions folder, select All Files from the Files of Type list box. (Any 3270, 5250, or VT sessions that you create using Accessory Manager automatically use the .adp file extension, and will be immediately visible in the Open Session dialog box.)
Edit settings and File transfer settings do not appear in the Apply settings category on the Action dialog box, so you cannot apply edit schemes or file transfer schemes using keyboard maps, QuickPads, toolbars, or HotSpots. However, you can create these schemes and use them in your session using the Settings dialog box.
You cannot associate file transfer schemes with recorded host screens. File Transfer Schemes does not appear in the Available Settings list box on the Settings tab on the Page Settings dialog box.
Any data about the session that was typed on the Properties dialog box using EXTRA! for Accessory Manager is not available from the Accessory Manager application window.
Accessory Manager does not support EXTRA! layout files (.ewl).
Although context-sensitive Help is available for all dialog boxes, no other online Help for EXTRA! is accessible from within Accessory Manager. To access additional online Help for this product, you must run EXTRA! for Accessory Manager as a stand-alone application and click the desired item from its Help menu.
EXTRA! Administrative Tools In addition to the utilities included with INFOConnect, EXTRA! for Accessory Manager provides a few utilities that are installed into the same program group under Windows.

INFOConnect Enterprise Edition Product Guide
98
Schedule Events with NiteApps
NiteApps automatically starts an application or executes a batch command file on your personal computer at the time and day you specify. NiteApps operates whether or not EXTRA! is running. Consequently, you can use NiteApps to start PC applications independent of your work on the host.
For NiteApps to run a program or batch command file, the NiteApps application must be loaded and in Run mode. To ensure that your scheduled programs run daily, you can create a Windows shortcut to NiteApps and then place this shortcut in your Windows Startup directory. This will cause the NiteApps program to load in the Run mode each time you start your personal computer.
To load NiteApps
1 From the Start menu, choose INFOConnect Enterprise Edition and select NiteApps.
2 From the NiteApps File menu, choose Open.
3 From the Open dialog box, select the NiteApps configuration file (.nap) that contains the list of programs you want to execute and click Open.
The existing events are displayed in the Events dialog box.
4 Choose Run to start the NiteApps file.
5 The first time you start NiteApps, the Events dialog box is empty. You can begin scheduling events by choosing the Add button. If you have previously created a NiteApps file, NiteApps displays a list of scheduled events for the last NiteApp created. To create a new NiteApps file, select New from the File menu and click the Add button. The Schedule Event dialog box opens.
For detailed information on the Schedule Event dialog box, select the Help option on the NiteApps dialog box and then select the Help Topics option.
To schedule an event
1 On the NiteApps dialog box, click Edit to edit an existing NiteApps file or Add to create a new NiteApps file.
2 Enter the event name.
3 Enter the full path and filename of the program file or batch file you want NiteApps to start, or click Browse to select the filename. Include any necessary command parameters. If the parameter is a data filename, include its path as well as its filename.
4 If the event occurs on a continual basis, select Recurring Event. If you select Hourly, be sure to choose the proper timing.
5 When you are finished scheduling events, click OK.
6 To save the NiteApps file, select File > Save or File > Save As and assign a filename to the file.

Administrative Tasks and Tools
99
Editing Host Code Pages
With the Attachmate Host Code Page Editor, you can create custom code pages that change how a character is translated between the host and the PC. For example, if an asterisk (*) prints incorrectly on a laser printer, you can use the Host Code Page Editor to change the host value to print a dollar sign ($) instead. You can also create a new host page to make temporary printing changes to a host document.
The Host Code Page Editor makes it easy for you to determine which host value should display. For example, if you are having trouble with file transfer and would like to learn which value should display a copyright symbol (©), you can open Host Code Page Editor and identify the value.
To edit a host code page
1 Run the following file to open the Host Code Page Editor:
[install_directory]\Attachmate\Infocnee\AtmCpEdt.exe
2 From the File menu, choose New. The Select Base Host Code Page appears.
3 Select the host code page that you want to modify, and click OK. The selected Host Code Page is displayed in the Editor.
4 Double-click the value you want to modify, enter the new value, then press the Enter key to establish the new value.
5 Save the new custom code page with a unique name.
Send Commands to an AS/400 Host without a Display Session
Using the Remote Command utility, you can start and control non-interactive programs on an AS/400 host without opening an AS/400 display session. Commands can be sent individually or in combination, and can be saved as an ASCII file for resubmission. Return codes are received, but program data cannot be returned from the host.
The Remote Command utility provides:
An interface to automate sending one command or a batch of commands.
An API set for Remote Command and Distributed Program Call. This includes header files, an .lib file, and sample code.
The API set and sample code is installed to the following location:
install_directory\Attachmate\Infocnee\Samples\Rcsample.*
To send commands to an AS/400 host without a display session
Determine the non-interactive programs on the AS/400 host that you want to start and control from your personal computer. For example, to send an immediate message to one or more message queues, you would use the SNDMSG command.
1 From the display session, test the command to make sure that it is a legitimate command.
2 Write down or copy the command lines that you are entering from the display session.

INFOConnect Enterprise Edition Product Guide
100
3 Open the Remote Command utility.
4 From the File menu, choose Open.
5 Do one of the following:
• If you are creating a new command script (.RCS), choose New.
• If you are editing an existing command script, select the filename of the command script that you want to edit, and then choose Open.
6 Enter the command lines.
To send Do this
One command line Move the cursor to the command line to be sent, and click the Send Command button.
All commands listed in the box
Click the Send All Commands button.
7 When commands are sent, the actual messages that were sent are displayed in the Command Output Messages box.
8 Choose Save to save the command script (.rcs). You can also choose Save As to save an edited command script to be resubmitted, or Exit to close the Remote Command dialog box without saving your changes.
APPN End Node Support
The INFOConnect APPN End Node implementation makes it possible for workstations to participate in an APPN network. Information can be exchanged with any APPN Network Node, which results in improved performance and easier configuration in the network.
Many different APIs in the APPC/APPN environment are supported, including:
APPC
CPI-C
WOSA APPC
WOSA CPI-C
APPN Node supports Dependent LU Requester (DLUR/DLUS) conversations with your 3270 applications. This allows you to route full 3270 traffic across your APPN network. The Dynamic Definition of Dependent LU (DDDLU) feature enables simpler configuration of VTAM physical units (PU). You can assign pools of LUs on the host instead of listing each LU on a PU definition.
Using the APPN Node Manager application, users and administrators can monitor, activate and deactivate items in the APPN Node, and the INFOConnect Status App utility supports all types of APPC and CPI-C tracing.
These highlights are a subset of the features available in the INFOConnect APPN End Node implementation. Context-sensitive Help is available throughout the APPN Configurator and APPN Node Manager applications to provide more assistance.
The recommended configuration procedure is to use the New Session wizard to create new sessions and specify connectivity prior to using the APPN Configurator to add peer connectivity.

Administrative Tasks and Tools
101
Response Time Monitor Utility
The INFOConnect Response Time Monitor utility displays information about communication between one or more PCs running INFOConnect Accessory Manager and a host. Specifically, it displays information about transmissions from the PC and responses from the host, calculating both the size of the buffers being sent between the two and the amount of time between each transmission or response. You can use this information to identify problems with either your network performance or your host.
Run Response Time Monitor by choosing RTM Utility from the Attachmate INFOConnect Programs group. Response Time Monitor comes with its own Help.
Export/Import Utility
The INFOConnect Export/Import Utility lets you export data from any INFOConnect database into an .ini or .csv file, as well as import data from an .ini or .csv file into an INFOConnect database. You can also create a detail file that provides information about each field in the .ini or .csv file such as the maximum number of bytes allowed in each field or the type of data that each field can contain.
You can use this utility to perform a number of tasks:
Export path information from an earlier version INFOConnect database and then import it into the current database (IC32.cfg)
Create a backup copy of your INFOConnect database so that you can restore it if your original database is deleted or becomes corrupted
Create and edit INFOConnect paths in an .ini or .csv file that you can subsequently import into an INFOConnect database
Export path information from multiple INFOConnect databases and then import the data into a single master database
Modify the organization of groups and users in the tree in the shared version of the INFOConnect Database Editor
In previous versions of INFOConnect, 32-bit and 16-bit transport libraries were available. In the current release all transports and databases are 32-bit.
If you are copying your INFOConnect database for use on multiple servers, you might need to use the Copy ICS Database Utility, which lets you change certain directory names within the database. For more information, run Copics32.hlp in the Infocnee\Enu folder.
Export/Import Utility is accessed through the command line only and comes with its own help system. Access the help by running ExpImp32.hlp from the Infocnee\Enu folder.
Using CnfEdit
Some user applications may require a file with the extension .cnf to hold translation tables and other communications data. A .cnf file is in binary format and can only be edited using the CnfEdit program. Several different options can be modified using CnfEdit. Some are not used with current products, but are retained for compatibility with older Gateway products.

INFOConnect Enterprise Edition Product Guide
102
Take great care when changing .cnf values. Do not change a value unless you are sure that the new value is valid.
When you update a .cnf file, the changes do not take effect until the product using the file is restarted.
To use CnfEdit
1 From the command line, navigate to Infocnee/Cnf and locate the .cnf file you want to work with.
2 From the command line, type:
path/CnfEdit
where path is the path to CnfEdit.
3 Press the Enter key.
The File Selection screen is displayed.
4 Type the name of the .cnf file you want to edit, then press Enter.
The Configuration Categories menu appears. The column on the left provides a list of six categories. When you move the cursor over a category name, the column on the right provides a list of all the options in that category.
5 Move the cursor over the category that contains the options you want to edit and press Enter. A new screen for editing the options in that category is displayed.
CnfEdit Categories and Options
Category Option/Description
IA Level Data Entry Airline code The airline code will be set correctly when you receive the .cnf file. Do not change this code unless you are sure that the current code is not correct.
Interchange address Retained for compatibility with other gateway software. Do not set any values for this parameter.
Host Type The host type will be set correctly when you receive the .cnf file. Do not change the host type.

Administrative Tasks and Tools
103
Code Host
00 01 02 03 04 05 06 07 08 09 0A 0B 0C 0D 0E 0F 10 11 12 14 15 16
Any host type not listed here SABRE SABRE (FOS) British Airways (BABS) Continental CPARS JALCOM KLM (CORDA) QANTAS (QANTAM) Worldspan (PARS) Apollo Egypt Air El Al (Israel Airlines) Thai Airways Canadian Airlines Garuda Abacus Amadeus Apollo 2915 Shares System One/Amadeus (Unison ALC specification) Turkish
SITA message TA Retained for compatibility with other gateway software. Do not set any values for this parameter.
Response Interchange Address Retained for compatibility with other gateway software. Do not set any values for this parameter.
TA Tables Retained for compatibility with other gateway software. Do not set any values for this parameter.
Screen Translate Tables Because screen translation is a two-way process, two screen translate tables are supplied with the correct settings for your host. One is used to translate data going to the host; the other is used to translate data coming from the host. Do not change the setting unless you are certain that you are entering correct values.
Any value may be entered into the tables and very little validation is provided, therefore, you must ensure that the data input is correct.

INFOConnect Enterprise Edition Product Guide
104
Communications This screen displays all the items in the configuration file that are associated with communication between the gateway and the host. Care should be taken when changing these values as it is possible to select combinations of values that will prevent data transmission.
The Help screen at the bottom right of the screen will display further information about the item situated at the cursor, and also indicate the type of data expected as input.
Printer Translate Because printer translation is a one-way process from the host to the printer, only one table is required. Do not change the setting unless you are certain that you are entering correct values.
Most printer character translations will be the same as the display translation. However, some characters will be different. No more than 15 differences are allowed between the display and printer translation tables. If there are more than 15 differences, a warning message is displayed. At this point, it is possible to edit either table until only 15 differences between them are outstanding. The file cannot be saved if there are more than 15 differences.
Printer Escape These options are not used.
Split Screen Transport
The INFOConnect Split Screen transport enables PCs to communicate with an ALC, ClearPath IX, or 1100/2200 Series host. Using the Split Screen Path template enables you to open multiple terminal emulation sessions using the same path. Once you have the sessions open, you can enter a task or command in one session and direct your output and host responses to display in another open session.
The Split Screen Path template works by specifying a path within a path. From INFOConnect Manager, create a path that uses the Split Screen Path template and then configure the path template by specifying a different path that defines your host connection.
Installing any version of INFOConnect Enterprise Edition that supports ALC will automatically install the Split Screen transport. For more information about using Split Screen transport, see “About Split Screen Access” under “Overviews” in the Accessory Manager Help, or run Split32.hlp from the Infocnee\Enu folder.
Set Up Trace Files
Use the following procedure to specify the location, the size limit of trace files, and the number of files that are created when the size limit is reached.

Administrative Tasks and Tools
105
1 From the Start menu, choose Attachmate INFOConnect Enterprise Edition > Manager 32-bit.
2 From the Administer menu, choose Administrator Login.
3 Enter the Administrator password and click OK.
4 From the Administer menu, choose Trace.
5 Select Enable Trace Log.
6 For Custom Trace File Location (optional), specify the path where you want log files to be saved or use the default. If you specify a filename with no path, the file is saved to the appdata location. The default appdata location is Users\Public\Documents\Attachmate\INFOCNEE (Windows 7) and Documents and Settings\All Users\Documents\Attachmate\INFOCNEE (Windows XP).
Note: If you run INFOConnect as an escalated process on Windows 7, do not specify the Windows directory for trace files. In this case, a trace file can not be created in the Windows directory and no error will occur to warn you that it wasn't created.
7 For Maximum File Size, specify (in MB), the maximum file size before the trace file splits into a new file.
8 For Number of File Cycles, specify the maximum number of files the trace log creates at the Maximum File Size. When this number is met, the trace log creates an additional file; when that file reaches the Maximum File Size, it starts to overwrite the trace files, starting with the first one created.


107
User Tasks
In this Chapter
Start a Session 107
Start a Session from a Web Page 108
Prevent Sessions from Disconnecting During Standby Mode 108
Choose Productivity Pane Options 110
Reduce Keystrokes with Productivity Tools 111
This chapter covers basic tasks designed to help users get started with INFOConnect.
Start a Session
All of the terminal emulators and all but one of the file transfer products run within Accessory Manager. DataXpress–ST has its own application window.
The procedure used to start a session varies depending on which product you installed and how the product was installed. The following procedures explain how to start Accessory Manager and DataXpress–ST sessions.
To start Accessory Manager and open a session
1 From the Start menu, choose Attachmate INFOConnect Enterprise Edition > Accessory Manager 32-bit.
2 Do one of the following:
To Do this
Create a new session Select File > New Session. The New Session Wizard guides you through creating a session and, if appropriate, an INFOConnect path.
Open an existing session Select File > Open Session and double-click a session.
You can create a shortcut for any existing session and then open that session by double-clicking the shortcut.
To start DataXpress-ST and open a session
1 From the Start menu, choose Attachmate INFOConnect Enterprise Edition > DataXpress–ST.
2 Do one of the following:
C H A P T E R 6

INFOConnect Enterprise Edition Product Guide
108
To Do this
Create a new session, but not open it
Select Preferences > Session and respond to the subsequent prompts.
Create a session and open it automatically
Select Window > New Session and respond to the subsequent prompts.
Start a Session from a Web Page
Use this procedure to start INFOConnect emulation sessions that connect to hosts via the Reflection Security Proxy Server.
To start a session
1 Click the URL provided by your Administrator.
If specific information is required to authenticate to the Reflection Management Server, the Administer will provide that information.
2 From the Links List, select the session you want to open.
If the session is configured to use tokens for user authorization, the connection must occur before the specified expiration period. Within that expiration period, the session can disconnect and reconnect using the same token. After the token expires, INFOConnect must be restarted by clicking the session in the Links List to retrieve a new, valid token.
After the session makes the connection, the status icon shows a connection to the Reflection Security Proxy Server (versus the host, as in a direct connection).
Note: Saving a local copy of these sessions is generally not recommended. If the session is modified by your Administrator, the local copy will not include the modifications.
Prevent Sessions from Disconnecting During Standby Mode
By default, host sessions are disconnected when the computer enters a low-power state, such as Standby or Sleep. Even though the session reconnects when the computer "wakes," this process resets the connection and data may be lost as a result.
There are two ways you can prevent host sessions from disconnecting when this occurs. You can either prevent your computer from entering system standby mode or, you can configure the computer to keep the host connection alive whenever it enters standby mode. The latter method is more suitable for laptops and other battery-operated devices. Instructions for these two methods are provided as follows.

User Tasks
109
To prevent Standby or Sleep mode
Use the following procedure to prevent the system from entering system standby mode or causing the computer to shut down in a low-power situation. (For instructions on changing system power options, which can also cause the system to enter standby mode, see the Windows Help.)
1 In the Accessory Manager, choose Options > Global Preferences.
2 Click the General tab.
3 Click the Prevent System Sleep check box until a check mark appears and then click OK to close the General Preferences dialog box.
Note: On Windows 7 or Vista, if the check box is colored or cleared, the computer can enter standby mode. On Windows XP, if the check box is colored, the computer will notify the user before entering standby mode (the default); if the check box is cleared, the computer will enter standby mode without notifying the user.
To keep sessions connected during Standby or Sleep mode
Warning: On Windows 7, the effectiveness of this registry setting can vary, depending on the network interface controller (NIC) hardware and driver. Before you rely on this setting, thoroughly test the setting on the specific system that is intended for its use. In critical situations where connections must remain intact during periods of user inactivity, the global preference Prevent System Sleep is a more dependable option for this operating system.
1 In the Windows Registry Editor, locate the following registry key
[HKEY_CURRENT_USER\Software\Attachmate\Accessory Manager\WorkStationUser\Preferences]
2 From the Edit menu, choose New > String Value.
3 Name the string DisconnectWhenSleeping and in the Value Data box, type NO.
4 Close the Registry Editor.
5 In Windows, from the Start menu, open the Network and Internet control panel.
6 Right-click your network connection and choose Properties.
7 In the Local Area Connection Properties dialog box, click Configure.
8 In the <networkname> Network Connection Properties dialog box, click the Power Management tab.
9 Deselect the setting Allow the computer to turn off this device to save power and click OK.

INFOConnect Enterprise Edition Product Guide
110
Choose Productivity Pane Options
Productivity features accelerate data entry and host navigation by reducing keystrokes and mouse clicks. Features such as Spell-check, Auto Complete, Auto Expand, History, Scratch Pad, and Recent Typing enable users to save thousands of keystrokes throughout the day. The Office Tools feature allows you to use Microsoft Word and Outlook application features from your host application. You can create Word documents, send email, schedule appointments, add notes and tasks, and create new contacts.
You use the Productivity Settings pages to enable or disable productivity features and configure individual features. With a session open, choose Settings from the Options menu, then click the Productivity category. Use the following options to define your productivity features:
Productivity Pane Options
Option Description
General Select to show or hide each of the buttons in the Productivity pane on the left side of your host session display screen. Spelling: Set criteria for the spelling checker. With Spelling options, you can specify several ways to check spelling as you type, or correct spelling automatically. The Enable Spell Checking check box activates this feature in the host application.
Auto Complete Select from the settings so that complete words or dates are inserted anytime you type a few identifying characters. The Auto Complete feature remembers what you type and makes suggestions as it learns commands that are used repeatedly. The Enable Auto Complete check box activates this feature in the host application.
Auto Expand Add acronyms or shortcuts for long words, phrases, or complex repeat commands. The shortcut, when typed, will automatically expand to the full word or phrase. The Enable Auto Expand check box activates this feature in the host application.
History Set the number of screens to save. You can view, copy, and print information from previous screens, eliminating data entry redundancies. The Enable History check box activates this feature in the host application.
Recent Typing Set the number of fields to save. You can quickly view, select, and automatically populate fields with repeat words and commands. The Enable Recent Typing check box activates this feature in the host application.

User Tasks
111
Microsoft Office Tools Enable or disable each of the settings for the Microsoft Office Tools features. When the check box for Enable Microsoft Office Tools is selected, that feature is activated and ready to use in the host application. When each check box listed under Microsoft Office Tools is enabled, that feature is available for use in the Microsoft Office Tools panel in the Productivity pane on the left side of your host session display screen. From the host, you can quickly access Microsoft Word and Outlook Office features.
For more information about the Productivity pane, see "Changing Productivity Settings” under “Using Sessions” in the Accessory Manager Help.
Reduce Keystrokes with Productivity Tools
From the Productivity pane in Accessory Manager, features such as Auto Expand and Auto Complete reduce the number of keystrokes end users must type to complete tasks.
Keystroke savings are not counted for VT sessions.
The Auto Complete feature saves previous entries you’ve made when you entered text for Web addresses, forms, or passwords. Then, when you type information in one of these fields again, Auto Complete suggests possible matches.
With Auto Expand feature, you can pre-set acronyms or shortcuts for long words, phrases, and complex repeat commands, reducing the number of keystrokes required to execute tasks and enter host data. Once you have specified the settings for an entry, when you type the corresponding shortcut on the host screen, it automatically expands to the desired word or phrase.
If you prefix an acronym to automatically expand with one or more characters not typically in the first position in a word, such as an equal sign (=), an exclamation point (!), or a caret (^), the word is left “as is.”
For example, =ATM won’t automatically expand to Attachmate when your intention is to leave it as ATM because you are referring to automatic teller machines (ATMs).
With the Recent Typing feature, you can quickly view and select fields, and automatically populate them with repeat words and commands, eliminating the need to re-enter information manually.


113
Print and Transaction Router (PTR)
In this Chapter
What is PTR? 113
Start or Quit PTR 114
PTR System Tray 114
View and Modify the PTR Configuration 119
Using Character Translation 124
Adding Translation String Anchors 125
Using the PTR Control Menu 125
Using the Quick Status Function 125
PTR Keyboard Functions 126
Troubleshooting Print and Transaction Router 127
This chapter describes how to configure and use INFOConnect for Airlines Print and Transaction Router (PTR).
What is PTR?
Attachmate INFOConnect Enterprise Edition for Airlines Print and Transaction Router (PTR) is optional print delivery software designed for airlines multidevice networks. It can be installed as an optional add-on to Accessory Manager or as a standalone application.
PTR provides an interface between a host computer and devices (printers and readers) connected to a PC, locally and via a network. PTR supports not only shared printers and host devices, but also intelligent devices such as card readers, specialized printers used for ticket generation, and point of sale terminals used to print receipts. In addition, PTR prints from multiple hosts, independent of a terminal emulator.
PTR supports 64 routes (or 120 routes when used with PTRServer). For print queues, it can use COM ports 1–99 and LPT ports 1–4.
Using PTR's interface functions, a host computer can send automated data through a PC to an attached printer. PTR doesn't initiate or even control print jobs. It simply provides communication paths between the host, which can be on a mainframe or a PC, and a PC's attached printer.
C H A P T E R 7

INFOConnect Enterprise Edition Product Guide
114
Start or Quit PTR
By default, PTR is run as a Windows service, which uses the PTR System Tray as the graphical interface to communicate all PTR activity. If you configured PTR with the INFOConnect Manager 32-bit, PTR may start automatically.
PTR can run as a service or as an executable using the same configuration. The executable filename is PTR32.exe. For PTR Server, it's PTRSVR.exe.
To start or quit PTR
1 From the Start menu, choose Settings > Control Panel > (Security and System) > Administrative Tools > Services.
2 In the Services window, double-click Attachmate Print and Transaction Router (PTR), and then click the Start button. If the service doesn't start, the specified port may be in use.
3 To quit PTR, click the Stop button.
Before you can send print jobs through PTR, you must add a route for each device. See Add or Delete a Route (page 119).
PTR System Tray
The INFOConnect PTR System Tray displays information that the PTR application provides about the INFOConnect paths and routes configured in PTR. In addition to status information, the System Tray provides the following:
Specific information about the route configuration. For instance, you can view both the name and the location of the host filter being used.
The ability to view the status of many routes at one time.
The current lock state, the job count, or the time the job was submitted.
PTR System Tray Headers The PTR System Tray header bar consists of the following column headers:
The PTR System Tray headers provide information about routes configured in PTR. You can use these headers to sort the order in which the System Tray displays the routes. By default, the System Tray displays all of the headers, but you can customize the System Tray to display the headers you want.

Print and Transaction Router (PTR)
115
This header Indicates
Status Status displays the route status, which accounts for both the current INFOConnect host path and the INFOConnect printer queue path. Possible route status values are listed as follows:
Route Status Description
Active Both the host and printer
connections are working properly.
Disabled The route is disabled in the PTR
configuration.
Enabled The route is enabled in the PTR
configuration.
Failed The host connection failed to
initialize or encountered a fatal error while being executed. The value in the Host Status field provides more information about the status of the host connection.
Warning This status can indicate a lost host
connection or a particular event, such as a busy or offline printer. Values in the Host Status field provide more information about the status of the host connection and values in the Queue Status field provide more information about the status of the printer connection.
Route Name The name of the INFOConnect route specified in the Route Configuration dialog box.
Host Filter The filename and directory path of the host filter specified in the Route Configuration dialog box.
Host Path The name of the INFOConnect path that enables PTR to communicate with the host.
Host Status The status of the INFOConnect host path. Possible values are listed as follows:
Host Status Description
Broken The host path lost the active host
connection.
Closed The host connection is inactive.
Connected The host path is connected to a
destination. This usually indicates an active connection with the host.
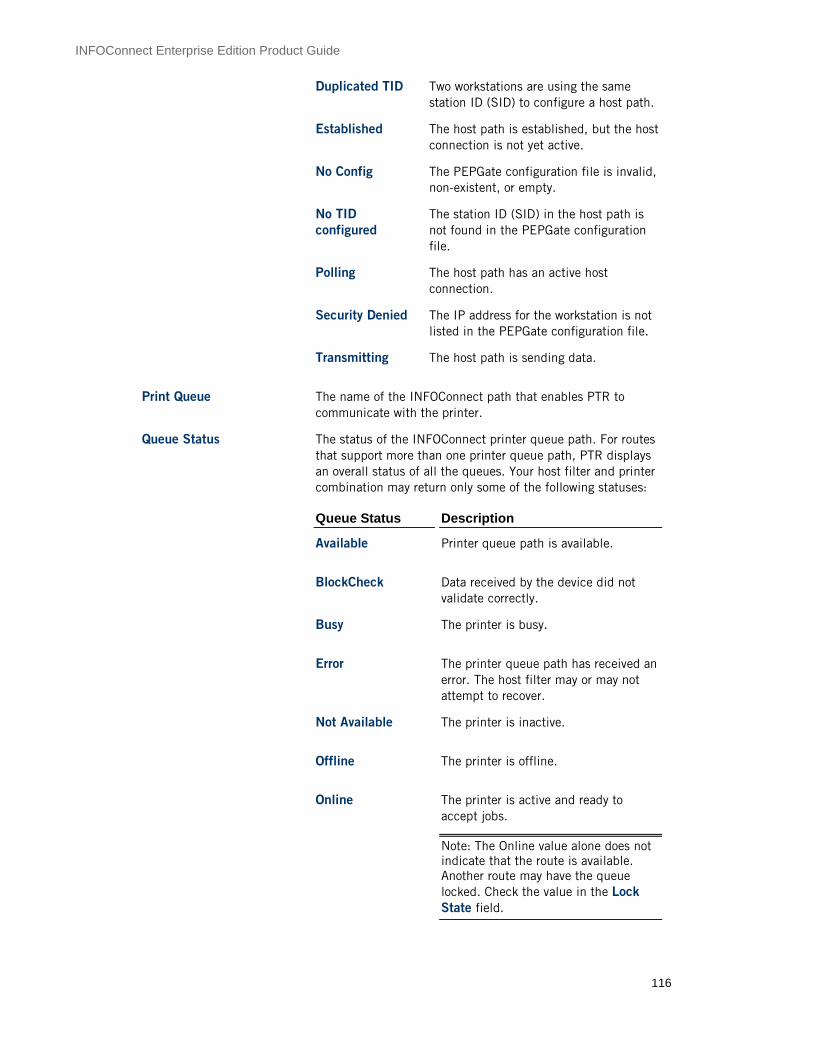
INFOConnect Enterprise Edition Product Guide
116
Duplicated TID Two workstations are using the same
station ID (SID) to configure a host path.
Established The host path is established, but the host
connection is not yet active.
No Config The PEPGate configuration file is invalid,
non-existent, or empty.
No TID configured
The station ID (SID) in the host path is not found in the PEPGate configuration file.
Polling The host path has an active host
connection.
Security Denied The IP address for the workstation is not
listed in the PEPGate configuration file.
Transmitting The host path is sending data.
Print Queue The name of the INFOConnect path that enables PTR to communicate with the printer.
Queue Status The status of the INFOConnect printer queue path. For routes that support more than one printer queue path, PTR displays an overall status of all the queues. Your host filter and printer combination may return only some of the following statuses:
Queue Status Description
Available Printer queue path is available.
BlockCheck Data received by the device did not
validate correctly.
Busy The printer is busy.
Error The printer queue path has received an
error. The host filter may or may not attempt to recover.
Not Available The printer is inactive.
Offline The printer is offline.
Online The printer is active and ready to
accept jobs.
Note: The Online value alone does not indicate that the route is available. Another route may have the queue locked. Check the value in the Lock State field.

Print and Transaction Router (PTR)
117
OutOfPaper The printer is out of paper.
PaperJam The printer has a paper jam.
PrinterLocked The printer queue is locked by another
host filter.
Printing The printer queue path is processing a
print job.
Lock State The current lock state of the INFOConnect printer queue path. Each printer queue path may be locked by only one route at any instance.
Lock State Description
Locked The printer queue path is locked by the
route.
Unlocked The printer queue path is available for
printing.
Waiting The route is waiting for the printer
queue path to become available.
Jobs The number of jobs in the printer queue.
Submitted The timestamp (Submit Time) of the current Start of the Document (SOD) message being processed by the printer queue.
Show or Hide the Status Bar
From the View menu, click Status Bar.
If the status bar is already displayed, clicking Status Bar will hide the status bar. If the status bar is not displayed, clicking the Status Bar displays the status bar.
A check mark appears next to this menu item when the Status Bar is displayed and disappears when it is hidden.
Show or Hide Inactive Routes
From the View menu, click Inactive Routes.
If inactive routes are already displayed, clicking Inactive Routes will hide the inactive routes. If inactive routes are not displayed, clicking Inactive Routes displays the inactive routes.
A check mark appears next to this menu item when inactive routes are displayed and disappears when they are hidden.

INFOConnect Enterprise Edition Product Guide
118
Add, Remove, or Sort Headers Use the following procedures to customize the headers in the PTR system tray.
To add or remove a header
1 From the Setting menu, select Set Tray Option and then click Setting.
2 Do one of the following:
To Do this
Add a header In the Headers region of the Setting dialog box, click the name of the header you want to add to the System Tray display, and click the right arrow button to move it to the Selected Headers region.
Remove a header In the Selected Headers region of the Setting dialog box, click the name of the header you want to remove from the System Tray display, and click the left arrow button to move it to the Headers region.
3 Repeat step 2 for each header you want to add or remove.
4 Click Save to save your changes.
To sort the headers
From the System Tray, click the header you want sort by.
The order in which route information is displayed on the System Tray will change according to the header you selected. For instance, if you sorted by host filter, the routes will be listed alphabetically by host filter.
PTR System Tray Command Line Options Use the following options to run the PTR System tray from a command line.
This option Does this
-L Sets the initial location on the screen. Enter the following:
'L(LEFT, TOP, RIGHT, BOTTOM)' where LEFT, TOP, RIGHT and BOTTOM are integer numbers.
-X Disables all exiting/closing options. Removes the Exit selection from the menu, removes the system menu, suppresses Alt-F4, and removes some options from the context menu (available by right-clicking the icon).
-C Disables some exiting/closing options. Removes the Exit selection from the menu and suppresses Alt-F4.
-N Disables the Help.
-M Starts PTR System Tray in a minimized state.

Print and Transaction Router (PTR)
119
-I Suppresses the PTR system tray icon in the Windows System Tray.
View and Modify the PTR Configuration
Use the INFOConnect Manager 32-bit to view and modify the PTR configuration for PTR, PTR Plus, and PTR Server. INFOConnect Manager 32-bit typically restarts PTR anytime the configuration is modified.
Add or Delete a Route Before you can send jobs through PTR, you must create a route for the printer or other device you want to use. When you add a route, you must define the following three key elements of that route:
The host path. This is an INFOConnect path that provides the communication link between PTR and the host or an API application.
The host filter. A DLL that initializes the host connection, the host filter manipulates the printer data for the selected input or output device, and sends the data to it.
The printer queue path. This is an INFOConnect path that provides the communication link between PTR and the input or output device, such as a printer or file.
Each INFOConnect path requires a path template. The path template defines the INFOConnect library or libraries and the open IDs to use for one or more paths. Numerous printer libraries are available for specific devices and protocols.
Note: You can also configure a route using the PTR Route Wizard. From the Windows Start menu, choose INFOConnect Enterprise Edition > PTR Route Wizard and follow the onscreen prompts.
To add a route
1 Make sure that the device is attached to one of the PC's COM ports or parallel ports or to a network printer available through Windows Print Manager.
2 From the Windows Start menu, choose Attachmate INFOConnect Enterprise Edition > Manager 32-bit.
3 In INFOConnect Manager, from the Administration menu, choose Administrator Login.
4 Enter the password. If you don't have an administrator password, ask your system administrator to create a path template for you.
5 Click Configure from the menu bar, and then click Packages.
6 Click Quick Config.
7 In the PTR Configuration dialog box, click Add.
8 In the Route Configuration dialog box, complete the Route Configuration dialog box.

INFOConnect Enterprise Edition Product Guide
120
To delete a route
1 Complete the following to delete a route from the PTR Configuration dialog box.
2 In the PTR Configuration dialog box, select the printer name you want to delete.
3 Click Delete. A message box appears, confirming that you want to delete the selected route name.
4 Click OK to delete the printer route.
Controlling Routes Dynamically PTR includes three command-line utilities that you can use to control routes in PTR when PTR is running. You can use these utilities to dynamically activate configuration changes that have been made in INFOConnect Manager 32-bit and to attempt to recover from certain errors.
You can also start, stop, and reset routes via the PTR OLE API. For more information, see the INFOConnect PTR OLE Programmer's Reference.
Reset a Route
Use this procedure to intervene when the expected print operation doesn't occur.
Resetting a route closes and reopens the printer queue and the host path. In the case of the printer queue, this can sometimes resolve an issue in a related component (for example, a USB device driver or a peripheral device manager). The results will depend on the printer library in use.
Closing and re-opening the host path sends a message to the host which may trigger a desired activity from the mainframe.
To reset a route
From a command line, run the PTRReset utility, using the PTR route name (case sensitive) as the parameter. For example:
ptrreset <routename>
where <routename> is the case-sensitive name of the route.
The host path and the printer queue path specified for the route are closed and then re-opened.
Start or Stop a Route
Use the PTRStart and PTRStop utilities to start and stop (respectively) a route in the existing PTR configuration.
To stop a route
From a command line, enter the following:

Print and Transaction Router (PTR)
121
PTRStop <routename>
where <routename> is the case-sensitive name of an existing route.
The route will stop and remain inactive until you run PTRStart for that route.
To start a route
From a command line, enter the following:
PTRStart <routename>
where <routename> is the case-sensitive name of an existing route.
Activate or Remove a Route
Use this procedure to dynamically activate or remove routes that have been recently configured in the INFOConnect Manager 32-bit. For instructions on configuring routes in INFOConnect Manager 32-bit, see Add or Delete a Route (page 119).
If you're adding multiple routes or are making extensive changes to the current PTR configuration, effect those changes by restarting the PTR service. See Start or Quit PTR (page 114).
To activate or remove a route
1 From a command line, do one of the following:
• To activate a route that you've recently added, run the PTRStart utility with the /Refresh parameter. For example,
ptrstart /Refresh
• To remove a route you've recently added, run the PTRStop utility with the /Refresh parameter. For example,
ptrstop /Refresh
2 Close and restart the PTR System Tray.
The PTR System Tray will reflect your changes. See PTR System Tray Headers (page 114).
Create a Host Path
Complete the following steps to create a host path from the Route Configuration dialog box.
To create a host path
1 In the Host Path route options area, click Create Path.
2 In the Add Path dialog box, type the appropriate information for your path in the following fields:
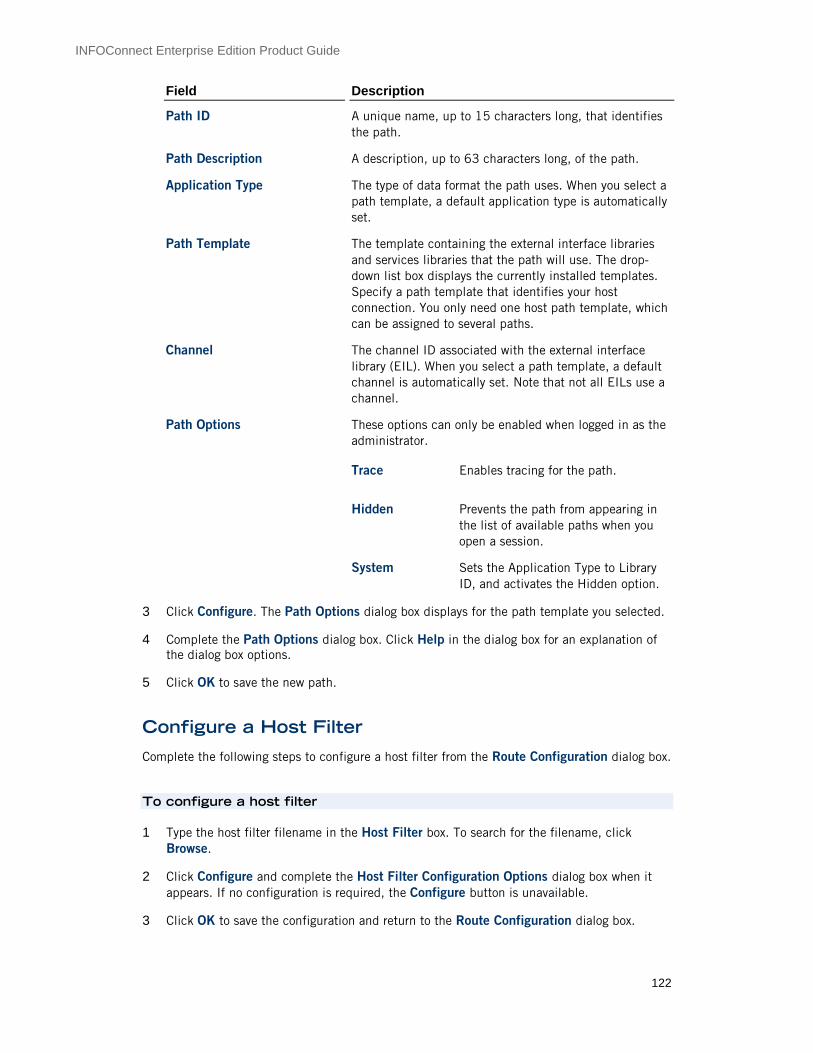
INFOConnect Enterprise Edition Product Guide
122
Field Description
Path ID A unique name, up to 15 characters long, that identifies the path.
Path Description A description, up to 63 characters long, of the path.
Application Type The type of data format the path uses. When you select a path template, a default application type is automatically set.
Path Template The template containing the external interface libraries and services libraries that the path will use. The drop-down list box displays the currently installed templates. Specify a path template that identifies your host connection. You only need one host path template, which can be assigned to several paths.
Channel The channel ID associated with the external interface library (EIL). When you select a path template, a default channel is automatically set. Note that not all EILs use a channel.
Path Options These options can only be enabled when logged in as the administrator.
Trace Enables tracing for the path.
Hidden Prevents the path from appearing in the list of available paths when you open a session.
System Sets the Application Type to Library
ID, and activates the Hidden option.
3 Click Configure. The Path Options dialog box displays for the path template you selected.
4 Complete the Path Options dialog box. Click Help in the dialog box for an explanation of the dialog box options.
5 Click OK to save the new path.
Configure a Host Filter
Complete the following steps to configure a host filter from the Route Configuration dialog box.
To configure a host filter
1 Type the host filter filename in the Host Filter box. To search for the filename, click Browse.
2 Click Configure and complete the Host Filter Configuration Options dialog box when it appears. If no configuration is required, the Configure button is unavailable.
3 Click OK to save the configuration and return to the Route Configuration dialog box.

Print and Transaction Router (PTR)
123
Create a Printer Queue Path
Complete the following steps to create a print queue path from the Route Configuration dialog box. This path designates the connection between your PC and an output device, such as a printer or file.
To create a printer queue path
1 In the Host Path route options area, click Create Path.
2 In the Add Path dialog box, type the appropriate information for your path in the following fields:
Field Description
Path ID A unique name, up to 15 characters long, that identifies the path. One printer path must be assigned to each printer
Path Description A description, up to 63 characters long, of the path.
Application Type The type of data format the path uses. When you select a path template, a default value is automatically set. PTR is set for all print queue paths. All paths using the PTR application type appear as selections in the Printer Queue Path list box.
Path Template The template containing the external interface libraries and services libraries that the path will use. The drop-down list box displays the currently installed templates. Specify a path template that uses the routing module for your device.
Channel The channel ID associated with the external interface library (EIL). When you select a path template, a default value is automatically set. Note that not all EILs use a channel.
Path Options These options can only be enabled when logged in as the administrator.
Trace Enables tracing for the path.
Hidden Prevents the path from appearing in the list
of available paths when you open a session.
System Sets the Application Type to Library ID, and
activates the Hidden option.
3 Click Configure. The Path Options dialog box appears for the path template you selected.
4 Complete the Path Options dialog box.
5 Click OK to save the new path.
Editing a Path Use the following procedure to modify a path in the INFOConnect Manager.

INFOConnect Enterprise Edition Product Guide
124
To modify a path
1 From the Windows Start menu, choose Attachmate INFOConnect Enterprise Edition > Manager 32-bit.
2 From INFOConnect Manager, from the Configure menu, choose Paths.
3 From the INFOConnect Paths window, select the path you want to change and click Modify.
4 From the Modify Path dialog box, change the fields and options in the dialog box. To change any path template options, click Configure.
5 When you have completed your changes, click OK to save the modified path configuration.
Using Character Translation
PTR uses translation strings (in a translation table file) to alter the data flowing to or from a peripheral device.
Use this procedure to configure character translation in PTR.
To configure translation
1 From the PTR Configuration dialog box, click Add.
2 In the Route Configuration dialog box, for Translation, type the filename of the translation table that PTR will use to convert characters sent from the printer to the host or from the host to the printer. PTR provides several sample translation tables that you can use:
Use this file To convert all
ANSICAPS.XLT Characters to their ANSI uppercase equivalent.
ANSILOWR.XLT Characters to their ANSI lowercase equivalent.
CRTOLF.XLT Carriage return characters to line feed characters.
MAKECR.XLT End of line sequences to carriage return characters.
MAKELF.XLT End of line sequences to line feed characters.
MAKECRLF.XLT End of line sequences to carriage return and line feed characters.
Print and Transaction Router (PTR)
125
Adding Translation String Anchors
You can limit translation to just the beginning or end of a buffer by adding anchoring characters to PTR translation strings. This is useful when you need to standardize response headers, or correct for device differences (such as Carriage Return and Line Feed differences) between printers by hiding them from the mainframe and PTRUAPI applications.
To add a translation string anchor
Do one of the following:
To translate the beginning of the buffer, at the beginning of a translation string, include a carat (^). This character serves as a front anchor.
To translate the end of the buffer, at the beginning of the translation string, include a dollar sign ($). This character serves as a back anchor.
Using the PTR Control Menu
From the PTR Control menu, you can select each of the major functions for Print and Transaction Router.
Note: The PTR Control menu is not available in Windows Vista or Windows 7.
Quick Status. This menu item enables you to determine the minimized program icon that displays for the Print and Transaction Router application. When the setting is selected, a check mark appears to the left of the setting and the quick status icon (page 125) appears as the minimized program icon. This icon shows basic status information for up to four active printers. When the setting is cleared, the check mark disappears, and the PTR icon appears as the minimized program icon.
View Configuration. Select this menu item to display the PTR Configuration dialog box for viewing only. You cannot make changes to any route configurations using View Configuration.
Reset. Select this menu item to display a cascading menu of the currently active PTR routes. The cascading menu displays up to 16 route names. Select a route from the cascading menu to reset the route, which reinitializes the connection to your host and the output device.
Using the Quick Status Function
The quick status function uses the Quick Status icon to display a simple go or no-go status for four active printers. When the Quick Status function is selected from the PTR Control menu, the Quick Status icon replaces the PTR icon. The icon disappears when you clear the option on the control menu.
Up to four printers are listed on the icon. If less than four printers have been designated as active, only the active printers show on the icon. The space for the other printers is left blank. For example, if only two printers are active, then only the numbers 1 and 2 for those printers appear on the icon.
The printer number corresponds to the order in which the active printers are defined in the PTR Configuration dialog box. For example, if the first active printer in the Printer Names list box is PTR_PRINTER4, then the number "1" on the icon represents the status for that printer.

INFOConnect Enterprise Edition Product Guide
126
The following table lists the statuses and their meanings as displayed on a color and on a black-and-white monitor.
This status Indicates Color monitor Monochrome monitor
1-4 The number of active printers as defined in the PTR Configuration dialog box. If only two printers are active, only "1" and "2" appear on the icon.
Black Black
Check mark At least one of the communication paths is working (the host path and/or the printer path).
Green if both the host path and the printer path are working.
Gray if only one of the paths is working.
Thick if both the host path and the printer path are working. Thin if only one of the two paths is working.
X The communications paths aren't working, or an error has occurred.
Red if the paths were previously working but aren't now or if an error has occurred.
Gray if the paths were never opened successfully during the present invocation of Print and Transaction Router.
Black if the paths were previously working but aren't now.
Gray if the paths were never opened successfully during the present invocation of Print and Transaction Router.
Right Arrow Data is being transmitted from the host to the printer.
Black Black
Left arrow Data is being transmitted from the printer to PTR.
Black Black
No arrow Data is not being transmitted.
Blank Blank
PTR Keyboard Functions
The following keystrokes enable you to use the PTR functions from the keyboard.
Function Keystroke(s)
Display cascading menu of selected item RIGHT ARROW or ENTER
Quit Print and Transaction Router ALT+F4
Move down in a list box DOWN ARROW or RIGHT ARROW
Move left in a text box LEFT ARROW or UP ARROW

Print and Transaction Router (PTR)
127
Move right in a text box RIGHT ARROW or DOWN ARROW
Move to next dialog box item TAB
Move to previous dialog box item SHIFT+TAB
Move up in a list box UP ARROW or LEFT ARROW
Remove a cascading menu from display LEFT ARROW or ESC
Click Cancel in a dialog box ESC or ALT+F4
Click OK in a dialog box ENTER or ALT+O
Troubleshooting Print and Transaction Router
Some problem conditions can occur for which error messages can't be generated. The following information lists problem conditions, explanations and possible solutions.
Communications can't be established with the printer.
Make sure the printer is plugged in and turned on.
Check the cable from the printer to the COM, USB, or parallel port.
Check the printer for error conditions.
The program doesn't launch when you enter the PTR32.EXE command.
Check that the print path and the host path are configured correctly.
Communications can't be established with the host.
Be sure that your IP address and your terminal ID configuration settings are correct.
Be sure you are using a communications cable appropriate for your environment.
Verify that the host is up and running.
Verify that you can communicate with the host by running a terminal emulator.
Printed output is garbled.
Check the escape sequences sent from the host. The sequences are probably invalid for the destination printer. Refer to the documentation supplied with the printer for the proper sequences.
Verify that the appropriate printer service library is being used. Some printers require special printer service libraries.
Verify that the appropriate translation tables are being used. Some sequences may need to be converted using the translation facility in the host filter.
Application error when using the “Net stop ptrservice” command.
Stop and restart the Attachmate PTR service. See Start or Quit PTR (page 114).

Glossary of Terms
A acquisition phase
Windows Installer phase of installation during which the installer determines procedure. Acquisition phase begins when an application or user instructs the Windows Installer to install an application or feature. The installer then queries the database for information as it generates the execution script for the installation. See also execution phase and Installation Mechanism.
advertising
Windows Installer capability to make the interfaces required for loading and to make an application available without installing the application. When a user or application activates an advertised interface, the installer then proceeds to install the necessary components.
See also assigning, publishing and install-on-demand.
AID keys
Keys that send commands to the host, such as ATTN, Enter, and SYS RQ. To make it possible for you to invoke these same host functions from a PC keyboard, the functions are assigned to PC keys or key combinations.
application server
A program that manages operations between an organization’s back-end systems and a user’s computer. Typically used for transaction-based applications.
assigning
During a Windows Installer installation, makes an application available, and makes it appear as if it has been installed to a user, without actually installing it. Assigning adds shortcuts and icons to the Start menu, associates appropriate files, and writes registry entries for the application. When a user tries to open an assigned application, then the installer installs the application. Assigning and publishing are two methods of advertising.
attribute
1. In the markup languages XML and HTML, a name-value pair within a tagged element that modifies certain features of that element. 2. In screen displays, an element of additional information that controls such characteristics as the background and foreground colors of the character, underlining, and blinking. 3. In a database record, the name or structure of a field. For example, the files Lastname, Firstname, and Phone would be attributes of each record in a Phonelist database. The size of a field or the type of information it contains would also be attributes of a database record.
See also element, property.

INFOConnect Enterprise Edition Product Guide
130
autofield
An automatically created user field.
B bean
Reusable piece of Java code, also called a Java bean. Beans can be generated from tasks and combined to create an application.
See also JavaBeans, task, task bean.
C cabinet file
In a Windows Installer installation, a single file, usually with a .cab extension, that stores compressed files in a file library. The cabinet format is an efficient way to package multiple files because compression is performed across file boundaries, significantly improving compression ratio.
cache
1. A special memory subsystem in which frequently used data values are duplicated for quick access. A disk cache refers to a portion of RAM that temporarily stores information read from disk. A memory cache stores the contents of frequently accessed RAM locations and the addresses where these data items are stored. 2. A reserved portion of a computer's RAM or hard disk set aside to temporarily hold information, for example, a Web browser cache. See also Java caching.
CASL macro
A series of instructions for performing specified tasks automatically. These instructions use a special script language called the Common Accessory Script Language (CASL).
CASL Macro Editor
An Accessory Manager program that you can use to create and edit CASL macros. The CASL Macro Editor is similar to a text editor, but also provides menu items for compiling and running CASL macros.
character attribute
Determines how characters in text fields are treated. Mainframe character attributes determine whether fields are protected or unprotected, alphanumeric or numeric-only, and modified or unmodified.
See also extended attribute bytes.

Glossary of Terms
131
child
1. A process initiated by another process (the parent). The parent process often sleeps (is suspended) until the child process stops executing. 2. In a tree structure, child refers to the relationship of a node to its immediate predecessor.
class
In the Java programming language, a type that defines the implementation of a particular kind of object.
class path
An environment variable that tells Java-based applications where to find Java class libraries.
client
(adj) Pertaining to a networked computer. For example, a client application is an application that either runs directly on a client or is downloaded from a server to a client.
(n) 1. On a local area network or the Internet, a computer that accesses shared network resources provided by another computer (called a server). 2. In object-oriented programming, a member of a class (group) that uses the services of another class to which it is not related. 3. A process, such as a program or task, that requests a service provided by another program — for example, a word processor that calls on a sort routine built into another program. The client process uses the requested service without having to "know" any working details about the other program or the service itself.
code page
A table of numeric codes used to represent language-specific characters. Code pages are a way of providing support for character sets and keyboard layouts used in different countries. To display characters correctly, you must select the code page used by your host.
COMMAREA
An area of memory on the host used to transfer inputs and outputs between COBOL programs. A particular COBOL program may use only some of the fields in the COMMAREA. There can be a single COMMAREA used for both inputs and outputs, or there can be separate COMMAREAs for each.
Common Accessory Script Language (CASL)
A special script language used in all CASL macros.
You can view or print a copy of the CASL Script Language Guide by installing the Adobe Acrobat Reader, running the Acrobat Reader, and opening the Casl_lag_ref.pdf file.

INFOConnect Enterprise Edition Product Guide
132
components and features
The Windows Installer organizes an installation around the concepts of components and features. A feature is a part of the application's total functionality that a user may decide to install independently. A component is a piece of the application or product to be installed. The installer always installs or removes a component from a user's computer as a coherent piece. Components are usually hidden from the user. When a user selects a feature for installation, the installer determines which components must be installed to provide that feature.
configuration
1. A set of parameters that define and control the behavior of sessions and applets, which may be for terminal emulation, host printer emulation, or file transfer. 2. A set of parameters for connecting to a UTS or T27 host.
connection
The communication link between a client and a host that allows users to interact with the host from the client computer's connection type.
The communication mechanism used by the client to establish a connection with a host.
context
Information that adds meaning to something else. For example, a task's context could be the host connection or session with which it is associated. If the task's context is maintained, or preserved, the session remains connected after the task has completed, and the session is available to run the next task.
See also stateful task.
copybook
A file containing COBOL data declarations that was included when the COBOL program on the host was compiled. A particular copybook may be included in more than one COBOL program; a program can include several copybooks.
A COBOL copybook declares the names and data types of variables that associated COBOL programs use to exchange information in the COMMAREA. Typically, programs that exchange data in this way are compiled with the same copybook file.
See also COMMAREA.
correlation ID
An identifier assigned to an individual transaction, used in end-to-end tracing to track the transaction across multiple components.
D

Glossary of Terms
133
daemon
A program that runs on a host to provide network services. A daemon in UNIX is similar to a TSR (Terminate and Stay Resident) program in DOS.
data source
A host, database, or other application or repository from which information is retrieved.
decision branch
An action that executes other actions depending on current conditions. A decision branch action consists of at least one rule and at least one condition test. If the condition test meets the rule, the branch evaluates to "true," and the event continues by executing the subsequent action.
dedicated session
A session that is associated with a specific logical unit (LU) or terminal or station ID. Using dedicated sessions ensure that specific sessions are assigned to specific clients at run-time.
deploy
1. To install software onto multiple computers, either one-at-a-time or across a network. 2. To make software available on a network so that multiple users can access or install it.
detail table
A table made up of detail screens, which present very long records in more than one level. The first level of the table displays only the first level of fields for each record. When a record is selected, more fields can be shown in a separate screen.
See also table.
directory service
A repository of information used to manage people and resources within an organization.
discovery
In peer-to-peer computing, a mechanism used by computers on a network to locate and interact with one another.
download
To transfer programs or data from a host or Web server to your local computer.
E

INFOConnect Enterprise Edition Product Guide
134
element
In an XML document, an element is made up of a start-tag, an end-tag, and data in between. The start- and end-tags describe the data within the tags, which is considered the value of the element. The element may contain text, comments, or other elements.
environment
A named set of configuration options used with Unisys ClearPath IX or 2200 Series hosts.
execution phase
When the Windows Installer executes a script of installer actions.
See also acquisition phase and installation mechanism.
export
To extract data and make it available in another file or format.
See also deploy.
extended attribute bytes (EABs)
Codes used by many mainframe applications to display highlighting, reverse image, blinking, and seven colors.
See also character attribute.
F failover
A backup operation in which the functions of a primary resource (such as a server) are automatically assumed by a secondary resource, should the primary resource fail or be shut down. Used to make systems more fault-tolerant, failover is typically an integral part of mission-critical systems that must be constantly available.
free ID
An ID that has been assigned to a name but that has not yet been allocated to any client.
G global screen
A screen sent by the host that is not the result of a user action, for example, a message sent by the host, but not a transient screen.

Glossary of Terms
135
H HLLAPI (High Level Language Application Programming Interface)
An IBM API that makes communication between a PC and a mainframe computer possible. The PC must run 3270 emulation software, and then define an interface between the PC application and the emulation software. This API type is also referred to as "screen-scraping," because the characters used would otherwise be displayed on a terminal screen.
host
A mainframe, mini-computer, or information hub with which the PC communicates.
host access ID
Connection data that is unique for an individual session with a host. The type of connection data and available properties for an ID depend on the host type with which it will be used.
host code page
See code page.
host field
A fixed region of the host screen with associated text and attributes.
host-initiated screen
See global screen.
HotGUI
A terminal applet that is just like the regular terminal session, except that it uses a GUI-style interface, as opposed to the traditional "green screen" interface.
I IConnectorAccess
The interface implemented in Verastream (formerly Synapta Services Builder) to pass data using XML.

INFOConnect Enterprise Edition Product Guide
136
installation mechanism
In a Windows installation, there are two phases to a successful installation process: acquisition and execution. If the installation is unsuccessful, a rollback phase may occur. At the beginning of the acquisition phase, an application or a user instructs the installer to install a feature or an application. The installer then progresses through the actions specified in the sequence tables of the installation database. These actions query the installation database and generate a script that gives a step-by-step procedure for performing the installation. During the execution phase, the installer passes the information to a process with elevated privileges and runs the script. If an installation is unsuccessful, the installer restores the original state of the computer. When the installer processes the installation script it simultaneously generates a rollback script. In addition to the rollback script, the installer saves a copy of every file it deletes during the installation. These files are kept in a hidden, system directory. Once the installation is complete, the rollback script and the saved files are deleted.
installation-on-demand
Windows Installer service that installs applications or features as requested by the user or another application. Advertising makes a feature or application available for install-on-demand installation.
instance document
An individual XML document that conforms to a particular schema.
See also XML Schema.
interface object
See task interface object.
ITask
The interface implemented in Verastream (formerly Synapta Services Builder) to pass data using task beans.
J Java caching
The process of installing Java applets or other software on a client so that the files can be run locally rather than from the server. Java caching is controlled by settings on the server rather than by the browser’s cache settings. Clearing the browser’s cache (either the memory cache or the disk cache) does not remove files installed via Java caching. The location of the files and the procedure for removing them varies, depending on the browser and the applet.
JavaBeans
A component architecture for the Java programming language developed initially by Sun Microsystems. JavaBeans components are called "beans."

Glossary of Terms
137
JavaBeans allows developers to create reusable software components that can then be assembled together using visual application builder tools. A builder tool can analyze how a bean works, developers can customize the appearance and behavior of a bean, and customized beans can be stored and reused.
See also bean.
Javadocs
API documentation in HTML format, generated from Java source code.
K keyboard map
A file that defines the function that each key on a computer keyboard performs to communicate with a host. For example, the Ctrl + e key combination might be mapped to perform the TRANSMIT function.
L layout
An arrangement of session windows, their positions on the desktop, and their host connections.
layout file
A file that defines an arrangement of session windows, including all windows in their specified sizes and positions. By opening the file, you can restart all the sessions in the layout at a later time.
legacy data
Proprietary host data, such as data on an IBM mainframe.
login task
A task that is used to log in to the host.
loop action
A decision branch action that, once completed, re-evalutes the condition and re-executes as long as the branch condition remains true.
See also decision branch.
M

INFOConnect Enterprise Edition Product Guide
138
macro
A series of instructions for performing specified tasks automatically. CASL macros are written using the CASL Script Language.
migrate
To convert existing files for use with a newer version of an existing product or competitive product.
MSI file
Windows Installer installation file (.msi) is a COM-structured storage file containing the instructions and data required to install an application. Every package contains at least one .msi file. The .msi file contains the installer database, a summary information stream, and possibly one or more transforms and internal source files. An .msi file can be either compressed or non-compressed. A compressed .msi file can hold files, but cannot be changed. An uncompressed .msi file is smaller and files can be added to it, but the additional files must be copied to the location of the .msi file. During a custom installation, if a new compressed .msi file is required (as the case would be when files are added) you will be prompted for a new .msi filename.
MSM file
Windows Installer merge modules (.msm files) provide a standard method by which developers deliver shared Windows Installer components and setup logic to their applications. Merge modules are used to deliver shared code, files, resources, registry entries, and setup logic to applications as a single compound file. Developers authoring new merge modules or using existing merge modules should follow the standard outlined in this section.
A merge module cannot be installed alone; it must be merged into an installation package using a merge tool. Developers wanting to use merge modules must obtain one of the freely distributed merge tools, such as Mergemod.dll, or purchase a merge tool from an independent software vendor. Developers can create new merge modules by using many of the same software tools used to create a Windows Installer installation package, such as the database table editor Orca provided with the Windows Installer SDK.
MSP file
A Windows Installer patch (.msp file) is a file used to deliver updates to Windows Installer applications. The patch is a self-contained package that generally contains all the information required to update the application. Patches contain at minimum two database transforms. One transform updates the information in the installation database of the application. The other transform adds information that the installer uses for patching files. The installer uses the information provided by the transforms to apply patch files that are stored in the cabinet file stream of the patch package. A patch package does not have a database like an installation package (.msi file).

Glossary of Terms
139
MST file
A Windows Installer transform (.mst) file adds or replaces elements in the original database. For example, a transform can add a feature or set of features for a specific set of users or a specific group of users. A common use for transforms is the customization of base installation packages for particular groups of users. Multiple transforms can be applied to a base package and then applied on-the-fly during installation. This extends the capabilities of the installer to create custom packages and provides a mechanism for efficiently assigning the most appropriate installations to different groups of users. Transforms can also be used to apply a minor fix to an application that does not warrant a major upgrade.
multiple users
An installation where the product files are installed on a single PC that multiple users share. Each user who wants to run the products runs a separate installation utility. Product configuration and management is normally handled by the PC administrator.
N NavMap
A file that contains the navigation information required to access screens within a host application. This information can include screens, fields, keystrokes, and paths between screens.
node
1. In tree structures, a location (set of information) on the tree that can have links to one or more nodes below it (child nodes). The topmost node is called the “root.” The root can have zero or more child nodes; the root is the parent node to its children. Each child node can in turn have zero or more children of its own. Every node in a tree has exactly one parent node (except for the root, which has none), and all nodes in the tree are descendants of the root node. 2. In an XML document that is modeled after a tree, each element in the tree is considered a node. An XML-based application can store data in all the different types of nodes and in all the fields of each node. XML states that there must be at least one element in each document: the root node. All nodes are one of four types: character, processing instruction (PI), comment, or element. Character, PI, and comment nodes have no children, so they are always leaf nodes in an XML document tree.
P package
1. An .msi file and any external source files that may be pointed to by this file. A package therefore contains all the information the Windows Installer needs to run the UI and to install or uninstall the application.
2. A group of related Java classes and interfaces that provides access protection and namespace management. Bundling groups of related Java classes and interfaces into a package builds in control access between classes (both inside and outside the package), and makes it possible to quickly determine the relationship between the classes and the interfaces. Also, by creating a new namespace, it prevents the names of classes from conflicting with those in other packages.

INFOConnect Enterprise Edition Product Guide
140
parent
1. The first of two or more connected objects in a hierarchical data structure system, a parent structure invokes its child structure, which inherits the parent’s attributes. 2. A process from which a child process is started.
parent/child
1. The relationship between processes in a multitasking environment in which the parent process calls the child process and most often suspends its own operation until the child process aborts or is completed. 2. The relationship between nodes in a tree data structure in which the parent is one step closer to the root (that is, one level higher) than the child.
See also child.
pinpoint customization
To provide custom logic for a targeted aspect of implementation.
See also scripted.
preference
A setting for an application or tool, typically set by users.
See also property.
primary server
Within each server cluster, there is one primary server and one or more secondary servers. All configuration changes take place through the cluster's primary server. Configuration data, event log files, and trace log files are dynamically replicated across all servers in the cluster, ensuring that all active servers have access to the latest data. Although you can access the console from another server in the cluster just as you do from the primary server, the console request is automatically redirected to the primary server. If the primary server ever goes off-line, the server with next highest priority in the cluster takes over primary server responsibilities.
product
A single, stand-alone application sold separately (such as EXTRA! X-treme) or a single, stand-alone set of closely related applications or a larger system of applications (EXTRA! Mainframe Server) that are sold and marketed together.
See also component.
property
1. A characteristic of an object. Depending on the object, the user might set its properties. 2. In Windows, a characteristic or parameter of an object or device. Properties of a file, for example, include type, size, and creation date and can be identified by accessing the file's property sheet.
Glossary of Terms
141
See also attribute, preference.
protected field
A field in which a user cannot enter, modify, or erase data.
publishing
Windows Installer method of advertising a feature or application. Publishing does not populate the UI. However, if another application attempts to open a published application, there is enough information present for the installer to assign the published application.
See also advertising.
Q QuickPad
An onscreen keypad that provides a convenient way to send commands to the host.
R recipient
A user or group of users on the system.
recognition
An element within the design-time task configuration for which the user can provide custom logic using script.
relative field
A user field for which the size varies, depending on the data contained in the field.
See also user field.
remotable object
An object that can be controlled from a different computer than the computer to which it has been deployed.
resource adapter
A system-level software driver used by an application server or client to connect to an enterprise system. A resource adapter is typically specific to an enterprise system. It is available as a library and is used within the address space of the server or client using it.

INFOConnect Enterprise Edition Product Guide
142
A resource adapter plays a central role in the integration and connectivity between your enterprise system and an application server. It is the point of contact between application components, application servers, and enterprise information systems. The Attachmate J2EE Connector is a resource adapter.
See also application server.
resource adapter module
A package of information needed to deploy and run your task file from an application server.
See also application server, resource adapter.
runtime service
A program that handles the transmission of information between a data source and a deployed application.
S scheme
A collection of configuration options.
For example, a color scheme might reflect certain colors for certain types of characters. A HotSpot scheme might include a specific combination of text and region HotSpots.
If you do not save a scheme as its own file, the configuration options become part of the session profile.
screen bindings
Associations between custom application forms and the data processed by your host application. For example, you could bind user input from a text field to specify where to send the data, or you could bind host output data to specify where to get the data to populate a control.
scripted
An element of the design-time task configuration that the user has overridden with script.
server
1. On a local area network (LAN), a computer running administrative software that controls access to the network and its resources, such as printers and disk drives, and provides resources to computers functioning as workstations on the network. 2. On the Internet or other network, a computer or program that responds to commands from a client. For example, a file server may contain an archive of data or program files; when a client submits a request for a file, the server transfers a copy of the file to the client.
See also client.

Glossary of Terms
143
service
A program, routine, or process that performs a specific function.
See also runtime service, Windows service.
service bean
A Java bean that includes multiple tasks in a single bean. Service beans have a method for each task. Task inputs and outputs are arguments to the method. Service beans can be used to create applications in any Java application development environment.
See also bean and Web service.
session
The GUI representation of a connection between a PC and a host that operates according to the configuration settings configured in the session profile.
session file
The file that contains the configuration information for a session.
session pool
A group of host sessions that share a common configuration and NavMap.
session profile
A file that contains all the configuration information associated with a session, including the INFOConnect path, terminal type, file transfer protocol, and other settings.
session template
In EXTRA! X-treme, a session configuration on which you can base a new session.
standalone installation
An installation mode in which the product files are installed in a location (usually a PC hard disk) that one or more users will access.
stateful task
A task that maintains context, keeping track of your configuration settings and what you were doing the last time you ran an application. A stateful task can start where a previous task ended.
Compare stateless task.

INFOConnect Enterprise Edition Product Guide
144
stateless task
A task that does not maintain context information about previous actions.
Compare stateful task.
T task
A sequence of transactions that perform a particular job. A task can be a simple data transfer, such as updating a database record, or it can be more complex, such as logging onto a host application, navigating to a particular screen, and sending and retrieving data. It could even be a combination of tasks that make up a business application. A task consists of one or more transactions.
transcoding
A process that reformats a single source of Web content to suit the needs of different display devices, such as both hand-held and desktop displays. Transcoding eliminates the need to rewrite content to meet the requirements of each device separately.
transform (.mst) file
A file that holds all customized changes made to the MSI's database, including additional file information. Existing .mst files can be overwritten, or the filename can be changed to retain an existing .mst file, thereby writing all changes to a new transform file.
transient step
One or more transitional screens sent by the host without the user sending an AID key to the host.
translation table
A file that modifies the data sent between the host and a client to ensure that the client can display characters that are not part of the U.S. English character set.
transport
The communication software that enables a PC to communicate with a host via a specific type of network. For example, the INFOConnect TCP/IP Transport enables communication via a TCP/IP network.

Glossary of Terms
145
tree
A data structure containing zero or more nodes that are linked together in a hierarchical fashion. The topmost node is called the root. The root can have zero or more child nodes, connected by edges (links); the root is the parent node to its children. Each child node can in turn have zero or more children of its own. Nodes sharing the same parent are called siblings. Every node in a tree has exactly one parent node (except for the root, which has none), and all nodes in the tree are descendants of the root node. These relationships ensure that there is always one — and only one — path from the root node to any other node in the tree.
U unattended installation
An installation performed without user interaction, in which installation dialog boxes are suppressed. Also known as a silent installation.
unexpected screen
A screen that does not match a destination screen for the current step in a task. An unexpected screen may be recorded in the NavMap but occurs out of the order expected.
unformatted screen
A screen that does not contain fields defined by the host application.
unrecorded screen
A screen that has not been recorded as part of the current task.
upload
To transfer programs or data from your local computer to a central host or Web server.
user field
An area of the host screen that you define as a field. A user field does not alter the actual host screen.
V viewer
An applet or control that loads within a Web browser to provide host access capability.
W

INFOConnect Enterprise Edition Product Guide
146
Web service
Software that dynamically interacts with other software using Internet protocols and formats such as HTML, XML, TCP/IP, and SOAP, and handles the transmission of information between a data source and a deployed application.
Web Services Description Language (WSDL)
The Web Services Description Language (WSDL) is an XML format published for describing Web services.
Windows Installer
Microsoft client-side installer service for managing the installation of applications. The application must be encapsulated in a package, consisting of an .msi file and optional external source files.
See also package, MSI file.
Windows service
A program, routine, or process that typically begins running as soon as the computer starts. Windows services are started, stopped, and configured from Services in the Windows control panel.
X XML Schema
A file that defines the structure, content, and semantics of XML documents. A single schema defines a class of XML documents. An individual XML document that conforms to a particular schema is called an instance document. The metadata files for Attachmate products are written using XML Schema format.