infinite flight airport editing guide · 2020-05-21 · infinite flight airport editing guide...
TRANSCRIPT

Beginner’s Guide
Version 10.1 – May 2020
2 INFINITE FLIGHT AIRPORT EDITING GUIDE 05/2020
TABLE OF CONTENTS Infinite Flight Airport Editing .................................................................................................................... 4
Getting Started .......................................................................................................................................... 5
Important Vocabulary ........................................................................................................................... 5
Useful Links ........................................................................................................................................... 6
Airport Editing Infos .......................................................................................................................... 6
Airport Information .......................................................................................................................... 6
Coordinate conversion ..................................................................................................................... 6
Signing Up .............................................................................................................................................. 7
Required Accounts ................................................................................................................................ 8
GitHub ................................................................................................................................................ 8
Slack ................................................................................................................................................... 8
Required Downloads .......................................................................................................................... 10
World Editor (WED) by Laminar Research .................................................................................... 10
Airport Repository........................................................................................................................... 10
SASPlanet ......................................................................................................................................... 10
GitHub Desktop (optional) ............................................................................................................. 10
Setup .................................................................................................................................................... 11
Organized Folder Structure ........................................................................................................... 11
WED .................................................................................................................................................. 11
SASPlanet ......................................................................................................................................... 12
The First Airport ...................................................................................................................................... 13
Preparations ........................................................................................................................................ 13
Check Satellite Images .................................................................................................................... 13
Check GitHub and Get Assigned ................................................................................................... 13
Import apt.dat or Create a New Airport ....................................................................................... 15
Download Satellite Images............................................................................................................. 16
Airport Editing ..................................................................................................................................... 18
Basic WED tools ............................................................................................................................... 18
Airport Settings and Equipment .................................................................................................... 21
Runways and Helipads, PAPIs and VASIs ...................................................................................... 23
Nodes ............................................................................................................................................... 27
Snapping .......................................................................................................................................... 30
Layering ........................................................................................................................................... 31
Taxiways ........................................................................................................................................... 32
Lines and Lights .............................................................................................................................. 34

3 INFINITE FLIGHT AIRPORT EDITING GUIDE 05/2020
Spawns ............................................................................................................................................. 38
Airport Export ...................................................................................................................................... 41
Troubleshooting .................................................................................................................................. 41
Transparent/Invisible Taxiways ..................................................................................................... 41
Wrongly Orientated Lines and Lights ........................................................................................... 42
Common Error Messages .............................................................................................................. 43
Reviewing Process............................................................................................................................... 43
#peer-review ................................................................................................................................... 43
Official Review ................................................................................................................................. 44
ILS Adjustments After Review ............................................................................................................ 45
Airport Editing Checklist ......................................................................................................................... 46
WED Shortcuts ......................................................................................................................................... 47
Menus .................................................................................................................................................. 47
File .................................................................................................................................................... 47
Edit .................................................................................................................................................... 47
View .................................................................................................................................................. 47
Select ................................................................................................................................................ 47
Airport .............................................................................................................................................. 47
Tools ..................................................................................................................................................... 47
Table of Figures ....................................................................................................................................... 48
Image Sources ..................................................................................................................................... 48
Disclaimer ................................................................................................................................................ 49
Acknowledgements ................................................................................................................................. 49
Team ......................................................................................................................................................... 49
Owner ................................................................................................................................................... 49
Managers ............................................................................................................................................. 49
Reviewers ............................................................................................................................................. 49

4 INFINITE FLIGHT AIRPORT EDITING GUIDE 05/2020
INFINITE FLIGHT AIRPORT EDITING Have you ever wondered why airports in Infinite Flight by Flying Development Studio look how they look? Who helped Laura and the others to add lines years ago? Who made the layouts of San Francisco, Saint Marten and Amsterdam change? Who extended the runway length at Birmingham? It’s the work of the editors in the Infinite Flight Airport Editing Team! Since the launch of global was announced back in 2016, the group is constantly growing – many users wanted to edit their favorite aiports or their home airport for global release scheduled for 2017. Many people stayed with the team after their wish list was done and continued with airports they had never heard of before to contribute to everyone’s experience in Infinite Flight of the future. You’ve probably already seen them on the Infinite Flight Community in the Infinite Flight Global Airport Tracking Thread.
Do you also have a local airport or a wish list of airports you want to see in Infinite Flight? You can join the Infinite Flight Airport Editing as well! If you don’t know what skills and what software you need, this is the document you need to read! It will cover the entire editing process from the moment you apply until your airports are present in Infinite Flight. If you already decided to join, we kindly ask you to carefully read through the entire guide before you start since it covers all important questions about Airport Editing. It might be a lot of information to start off with but it will help you to understand the
If you are not yet a part of our team and you are still sure you want to become an Infinite Flight Airport Editor after reading this detailed guide, apply by sending a direct message to @airportediting on the Infinite Flight community forums.

5 INFINITE FLIGHT AIRPORT EDITING GUIDE 05/2020
GETTING STARTED Once you join Infinite Flight Airport Editing, you will need to learn lots of new things to become a successful editor. It is totally normal that the first airport is not a masterpiece; however, the better you read this tutorial and check other sources listed in this script, the higher the quality of your first airports and the less disappointments will occur. Don’t forget that everyone involved in Airport Editing will happily support you if you have any questions. You will learn more on how to get support and answers later in this tutorial.
IMPORTANT VOCABULARY In this tutorial, you will come across lots of wordings you may not have heard before. To help you understand the explanations given more easily, you can find a list with frequently used “Editing Vocabulary” below.
Word Synonyms Meaning
Node Vertex (pl. vertices) Fix points used to form lines and polygons in WED
Overcurving “Cosmetic” issue with curved lines causing unrealistic shapes.
Spawn Ramp start Object in WED that is used to set the start location for aircraft in IF
Snap(ping) Practice to connect nodes of taxiways and lines to avoid gaps
Orthophoto Image with coordinate information to position it in WED for editing
Repository repo Location of all IF airport files on GitHub Issue Tracker GitHub page where the progress on airports
is documented and tracked Scenery Package Folder that can be created and opened in
WED to edit the airport in apt.dat Airport file File used to save the airport for Infinite Flight
once it’s completed ICAO code/identifier Airport code,
airport identifier Unique code used to identify all major airports in the world
AGL Height, “Above ground level”
Height or elevation above the ground, used e.g. for tower height
MSL Elevation, “Mean sea level”
Elevation of e.g. the airport above the sea level (=0 ft MSL)
Peer Review PR Airport check performed in the #peer-review channel prior to OR (see “Review Process”)
Official Review OR Official check of an airport prior to addition to the repository

6 INFINITE FLIGHT AIRPORT EDITING GUIDE 05/2020
USEFUL LINKS Apart from this main tutorial on Infinite Flight Airport Editing, the web offers loads of information on Airport Editing. You can find links to the main official sources below.
AIRPORT EDITING INFOS Find information on airport editing and additional tutorials at:
www.airportediting.com Our official website, offering all tutorials available
Visit our YouTube channel Helpful tutorial videos on several topics
Visit us on Instagram Follow our progress, new airports are posted regularly
AIRPORT INFORMATION To find information on airport facts and figures, we recommend these websites:
www.worldaerodata.com www.apxp.info
www.aircharts.org www.airnav.com (US and Canada only)
www.rocketroute.com www.gcmap.com
www.opennav.com www.flightplandatabase.com/tools
www.ead.eurocontrol.int (charts for European Airports)
www.faa.gov/air_traffic/flight_info/aeronav/Aero_Data/Airport_Data (charts for US Airports)
COORDINATE CONVERSION An important factor in airport and especially naviation editing are coordinates. Since they can be provided in a wide range of formats, www.earthpoint.us/convert.aspx can be helpful to convert them to the format you need for editing.
7 INFINITE FLIGHT AIRPORT EDITING GUIDE 05/2020
SIGNING UP Once you come to the conclusion that you want to volunteer as an Airport Editor, the first step you take is sending a direct message to @airportediting on the IF Community. It doesn’t need to be a detailed application you would submit for a job offer at Airbus, Boeing, Google or wherever you would like to work, but we would ask you to at least include the following:
• Subject, e.g. Join request, Infinite Flight Airport Editing • A short text stating that you want to become part of the team, don’t send empty mails, that
may get you a reply like “What do you want me to tell?” or, even worse, no reply at all (the people managing our inbox may be veteran editors but they can’t find out your intentions by looking at an empty screen)
• Your username on the Infinite Flight Community • Your GitHub username
This information will help us to make you a member with all abilities quicker and may also help us to find out who you are. It does not happen very frequently, but in very rare cases we may restrict access to the team if it turns out you are known for unruly behavior on the IFC.
By following the application link on our website, you will be forwarded to a predefined DM on the IFC you just have to fill out completely to apply. You can also find the DM at bit.ly/IFAEApply.
Some important things you may want to consider before joining:
Even though the Editing Team consists of numerous nationalities and individuals speaking a wide range of languages, a good command of English is recommended. You may get help by some editors that are fluent in your mother language, especially if you speak German or Spanish; however, you will always receive your review feedback after submitting an airport in English. Furthermore, the main language used in our conversations is English.
Once you have applied, it may take some days until you get a reply. Usually, we will process applications every one to two weeks (depending on the number of incoming applications) at once. If you do not receive a reply within a few days, you do not need to send another DM to us.
As soon as your reply is handled, you will get a reply including some information on tutorials and software as well as some setup instructions. Additionally, you will get an invitation link to our group chat and our GitHub team. You will need to accept both applications in order to join.
If you are a former member of our team, you will also need to reapply, however you won’t receive a new invitation to Slack but we will reactivate your account so you can log in with your old credential. A new invitation to GitHub will be sent, nevertheless.

8 INFINITE FLIGHT AIRPORT EDITING GUIDE 05/2020
REQUIRED ACCOUNTS In addition to our welcoming email, we will also invite you to join our Slack workspace and our GitHub team.
GITHUB Infinite Flight Airport Editing uses GitHub to organize and store airport files accessible for all members. Moreover, team members can create issues and are assigned to them to keep track of who is doing which airports. To create an account on GitHub visit github.com. If you already own an account, all you need to do is tell us your username in the application form. If you didn’t own an account before joining Airport Editing, create one and let us know your user name. Either way, you will get an invitation to our GitHub organization granting you read access. This is needed so supervisors can assign you to issues and so reviewers can tag you once they upload your airport to the repo. To accept the invitation, use the link in the invitation email sent by GitHub.
GENERAL RULES • Do not share the link to the GitHub repository. There were several occasions where outside
users messed up the issue tracker requiring a cleanup by supervisors afterwards. • Always search before creating an issue, we don’t want to have duplicates. All issues
regarding one airport will be discussed in one issue only. • Do not work on Airports with a closed issue nor create a new one to update the airport.
Always ask a supervisor to reopen an issue for an airport requiring updates and provide a good reason for additional work on the completed airport (e.g. new terminal was built, new runway was built, runway was extended/ closed etc.) Airports won’t be reviewed if the issue is closed or if no issue exists.
• You may only be assigned to three issues at a time. This will be enforced by supervisors. • Do not close issues. In case you want to give up on an issue, comment it in the issue and
our staff will take care of your request. Having the airport sent for review is also no reason to close an issue.
SLACK Slack is our way to communicate with each other. As soon as we welcome you, you will get an email inviting you to our Slack group chat. All members are asked to join the group. Slack is your place to go for questions regarding editing, feedback on your airports and much more. As a member, you will be able to join the public channels and to start private conversations with other members. Slack will also be the place where we manage the number of members in the team. We don’t require editors to edit one airport per week, but we ask for a certain level of activity. From time to time you will see announcements asking you to react in a limited period of time so we can remove inactive members. To make recognizing you easier it is recommended that your Slack username is similar to or the same as the GitHub one. You can still set a different display name.
You can use Slack in your browser, or you can download the app for PC, Mac OS and your Smartphone.
GENERAL RULES • Basic rules for conversations apply. When chatting, ask yourself if you would say the same
in real life. While the #off-topic channel does not restrict what you can talk about, that doesn’t mean you should transform it into the #nonsense channel. Continuous chit chat combined with poor editing performance might lead to removal from the team.
• Be active regularly to check the chat for news and announcements, also regarding editing rules. Activate push notifications for the announcement channel at least.
9 INFINITE FLIGHT AIRPORT EDITING GUIDE 05/2020
• Use the different channels (see next chapter) for the topics they are created for only. • When asking editing questions in discussions for the aiport you edit, include the ICAO code
of the airport so other editors can help you more quickly in case they have to check the real-world satellite images.
• Do not share internal conversations with non-editors. • Main language used in the team is English. All editors are asked to chat in English in public
channels. If you want to have a conversation in your mother language with other people, use direct messages or group chats.
• Please use the Deletron App at www.slackdeletron.com to clear storage regularly (at the latest when we ask you to do so in #announcements). We use a free plan and only have 5GB of storage available for our team.
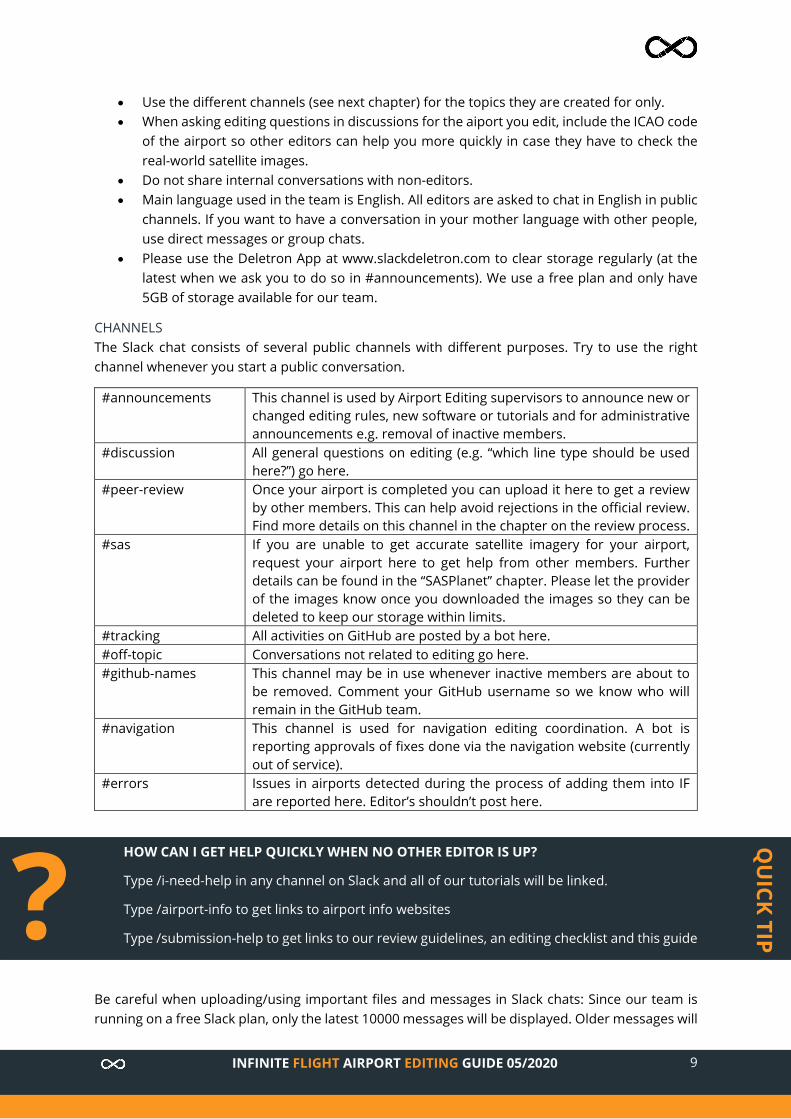
CHANNELS The Slack chat consists of several public channels with different purposes. Try to use the right channel whenever you start a public conversation.
#announcements This channel is used by Airport Editing supervisors to announce new or changed editing rules, new software or tutorials and for administrative announcements e.g. removal of inactive members.
#discussion All general questions on editing (e.g. “which line type should be used here?”) go here.
#peer-review Once your airport is completed you can upload it here to get a review by other members. This can help avoid rejections in the official review. Find more details on this channel in the chapter on the review process.
#sas If you are unable to get accurate satellite imagery for your airport, request your airport here to get help from other members. Further details can be found in the “SASPlanet” chapter. Please let the provider of the images know once you downloaded the images so they can be deleted to keep our storage within limits.
#tracking All activities on GitHub are posted by a bot here. #off-topic Conversations not related to editing go here. #github-names This channel may be in use whenever inactive members are about to
be removed. Comment your GitHub username so we know who will remain in the GitHub team.
#navigation This channel is used for navigation editing coordination. A bot is reporting approvals of fixes done via the navigation website (currently out of service).
#errors Issues in airports detected during the process of adding them into IF are reported here. Editor’s shouldn’t post here.
Be careful when uploading/using important files and messages in Slack chats: Since our team is running on a free Slack plan, only the latest 10000 messages will be displayed. Older messages will
HOW CAN I GET HELP QUICKLY WHEN NO OTHER EDITOR IS UP?
Type /i-need-help in any channel on Slack and all of our tutorials will be linked.
Type /airport-info to get links to airport info websites
Type /submission-help to get links to our review guidelines, an editing checklist and this guide
QU
ICK TIP ?

10 INFINITE FLIGHT AIRPORT EDITING GUIDE 05/2020
be archived automatically. These messages won’t be accessible for us so don’t use Slack as a kind of online storage but download crucial files when you get them, so they don’t get lost.
REQUIRED DOWNLOADS Apart from lots of time you also need some programs for airport editing. All programs we use are free and can be downloaded online.
WORLD EDITOR (WED) BY LAMINAR RESEARCH World Editor is the core software for our project. WED is the program you use to edit the airports with. The program is available for Windows, MacOS and Linux. The software is available at http://developer.x-plane.com/tools/worldeditor/ as a .zip download. Always download the latest stable version.
AIRPORT REPOSITORY The airport repository “the repo” is our airport database. The airports are saved as .dat files which can be opened with World Editor. Since we highly recommend importing the existing airport files for editing, you need to download a copy of the repository on Github or using GitHub Desktop. You may want to update your download every now and then to have the latest versions of airports on your hard drive. To download a .zip copy of the repo go to “code” page of the Airport Editing GitHub team and click on “Clone or Download” then select “Download ZIP”. Unzip the folder to you Airport Editing folder after the download is done. If you are using GitHub Desktop, select “Open in Desktop”.
SASPLANET You may already have wondered how editors are able to create accurate airports. The answer is simple: We use software that provides orthophotos for import into WED. Our preferred software is SASPlanet. This program is capable of exporting orthophotos from various sources like Google, Bing or Yandex Maps in selectable quality. SASPlanet is only available for Windows and Linux unfortunately. MacOS users can request SAS orthophotos in the #sas channel. To download SASPlanet, visit this page to download the latest version. To update the satellite images within SAS, you can also find information about the current map version on this page. The downloaded file will be zipped as a .7z file. To unpack it, you will need a program such as WinRAR or 7Zip(available at www.7-zip.org).
GITHUB DESKTOP (OPTIONAL) As mentioned in the repository download chapter, you can also get your copy of the airport repository using the GitHub desktop app. It’s available at www.desktop.github.com. The program is optional if you are a normal editor. It’s only mandatory for supervisors.
Picture 1: Downloading the repo through github.com

11 INFINITE FLIGHT AIRPORT EDITING GUIDE 05/2020
SETUP After downloading all necessary software, it’s time to set everything up for editing. Most of the programs you downloaded are stored in .zip or .7z files and only need to be unpacked. Several require a special setup nevertheless.
ORGANIZED FOLDER STRUCTURE A helpful tip to keep your Airport Editing files at one place is creating a folder for it on your desktop. Since we don’t ask you to download a demo version of X-Plane you even need a special folder structure required by WED.
We recommend to have an own folder dedicated to Airport Editing which contains the required software and the folder structure required to imitate an X-Plane installation. You have to download a folder with a ready to use folder structure from Dropbox at bit.ly/IFAEFolders. After downloading, just unzip the folder and continue with your setup as described below.
WED The setup of WED is easy. Once the download is completed, extract the .zip folder to your “Airport Editing” folder. Windows should be able to do that, otherwise you’ll need 7-zip or a similar program. For easy access, you can pull WED.exe out of the folder. The rest of the folder is not needed and can be deleted. To complete the setup of WED, open the program. You will be asked to “pick your X-System folder”. Click on “Select X-Plane Folder” in the lower right and navigate to your “Airport Editing” folder that contains the folder structure downloaded before. After that, WED is ready for use and you can create your first scenery package.
Picture 3: WED's appearance when opening it for the first time
Picture 2: Typical Airport Editing Folder Structure

12 INFINITE FLIGHT AIRPORT EDITING GUIDE 05/2020
SASPLANET The setup of SASPlanet is quite easy as well. However, you won’t be able to extract the .7z file you downloaded without 7-zip, WinRAR or similar programs. To extract the file, right click the .7z folder and select 7-zip – Extract files. You can then select a place, preferably your Airport Editing folder, where SAS should be extracted to. Once this is done you can open that folder and create a shortcut to the SASPlanet Application in your Airport Editing folder so that you can access it more easily. SAS is ready for use from that point, no further installations are necessary. To keep your satellite image supply up to date, check the current map version regularly. Once an image source like Google Earth/ Maps updates its images it doesn’t take too long until a new SAS version is available.
Picture 4: Extracting the SASPlanet .7z folder

13 INFINITE FLIGHT AIRPORT EDITING GUIDE 05/2020
THE FIRST AIRPORT Congratulations! You are ready to edit your first airport for Infinite Flight! The following chapter will tell you how to do so starting with the preparations necessary before the editing process itself, followed by the editing part and a troubleshooting chapter containing tips on the most frequent issues.
PREPARATIONS Before editing can start, there is still some work to do: satellite images need to be checked and downloaded, GitHub has to be checked and some more things. The following chapter explains the steps that are missing for a successful first airport.
CHECK SATELLITE IMAGES So, you selected the airport you want to start your editing career with? Ideally, you already know the ICAO or FAA identifier next to the airport name and maybe you already collected data like the airport elevation or the ATC frequencies. Perfect! However, there is one thing you should have a look at before you open an issue on GitHub – the satellite images available for the airport. Open SAS or WED-o-maker and navigate to your desired airport. If you are using SAS you can choose from various maps. Construction sites, outdated imagery and low image quality can make editing quite hard, especially for a new editor. If your desired airport has low quality imagery and/or significant construction sites impeding editing in SAS or WED-o-Maker, consider postponing the airport to a later date when more recent or higher quality imagery may be available to avoid frustration and/or unassigning.
CHECK GITHUB AND GET ASSIGNED Once you checked the available imagery, your next step is visiting GitHub. As stated in the very beginning of this tutorial, every editor must announce once he starts working on an airport. To avoid duplicate issues, always search before you create a new issue. Someone else may already have created a suggestion for your airport. To search all issues in our GitHub repository, navigate to the issue page of the “Airports” repository and use the search bar (only available in the desktop version of GitHub.com, there is no search bar in the mobile view). Type in the ICAO identifier and run the search. You will then see a list of all open issues with the ICAO code you entered. Also check the “Closed” section in the results. An airport will be listed there if it has been redone already. In case it is listed as “open”, check the labels attached to the issue.
Picture 5: The issue tracker - use the search bar indicated by the arrow to search for the identifier of your airport. Use the "Labels" button to only show airports with certain labels.

14 INFINITE FLIGHT AIRPORT EDITING GUIDE 05/2020
Labels are added to issues by supervisors. They show the progress and priorities of airports. You can also access airports with certain labels via the “Labels” button right next to the search bar on the issue tracker. If an airport is labeled as “Being Redone”, another editor is already working on the airport. If one label says “Suggestion”, no one is working on it and you can leave a comment in the issue stating that you want to work on the airport.
If your search for the airport code didn’t show any results, you can create a new issue for the airport by hitting the green “New Issue” button in the upper right. Enter the airport code as the issue title and use the issue templated that will show up to provide important airport data. You must add the following information (replace the placeholder texts in < >) to every issue you create:
• Airport Name State the complete Airport Name here.
• Country Name the country the airport is located in.
• Improvements that need to be made State what issues you will be fixing. Usually, you will redo the airport from scratch.
• Are you working on this airport? State, if you will be doing the airport yourself or if you created the airport as a suggestion. Since suggestions are usually not done in a adequate amount of time, we recommend to only create issues for airports you want to do yourself.
• Airport Priority? (10000ft+ Runway) To allow supervisors to add the correct labels and milestones to your issue, you have to state if any priorities are fulfilled. Right now, the following priorities exist:
o IF Event (GP1) This priority is only added to issues by supervisors on request by IF LLC and represents airports that will be used for a special event in the future. GP 1 airports will only be assigned to experienced editors and must be completed within one month.
o +10K (GP2) this priority is given to all airports that are equipped with at least one runway with a runway length of more than 10 000 ft (=3048m). If this applies to your airport please name the runway(s) that fulfill(s) the requirement.
MY AIRPORT DOESN’T HAVE AN IDENTIFIER. WHAT CAN I DO?
Unfortunately, our repository only features airports that have an ICAO code or a FAA code. Airports without an identifier are usually of a very low priority (tiny airstrips for private aviation and similar). They cannot be added to our airport repository and won’t be added to Infinite Flight consequently. Airports with a certain priority will have ICAO codes anyway. ?
QU
ICK TIP
Picture 6: Example of a filled issue template

15 INFINITE FLIGHT AIRPORT EDITING GUIDE 05/2020
o World Capitals (GP3) All airports serving capital cities of countries are given this priority label.
o US Capitals (GP4) In case your airport serves a US state capital it will be given the priority 4 label. Please state which state's capital is served by the airport.
A supervisor will assign you as soon as possible if you are within the limit for assignments at this time and will add the required labels.
IMPORT APT.DAT OR CREATE A NEW AIRPORT Once you are assigned you can proceed with launching WED. Hit the “New Scenery Package” button in the lower left. WED will add a new Scenery Package to the list. You can name it instantly by typing something without clicking on anything before. If the Scenery Pack is saved as “Untitled 1” initially, you can rename it by double-clicking/selecting and clicking on it. Enter a name that allows you to identify the airport, so use something like the identifier or the name. Once you have more than one scenery package, WED orders them alphabetically.
To open the scenery package and start with your airport select the scenery pack with a single left-click on the scenery pack in the list and hit “Open Scenery Package” at the bottom of the WED window. The program will then open the editing window. Go to “File”- “Import apt.dat” (Ctrl+Shift+i) and access your “Airports” folder you downloaded from GitHub and find your airport by its identifier. The search bar in the folder window is very helpful for this task. Enter the folder with the correct identifier and open the “apt.dat”-file.
At this point, there are three different scenarios that can apply to your airport:
1. You can import a basic airport from the repo 2. You can import an empty airport file with the airport coordinates from the repo. The folders
of these airports are marked with “[-]” 3. You have to create an entirely new airport
If the last scenario applies, you won’t get any results in the “Airports” folder. However, this is very rare and only applies to a small number of airports (mainly tiny GA airports and brand-new airports). To start your airport, go to “Airport”- “Create Airport” (Ctrl+Shift+i). A new, empty airport will be added, named “unnamed entity”. You will have to add all information needed (including the identifier and the airport name) manually later.
If one of the first scenarios applies, you will be able to import an airport file. A popup in the style of World Editor will open where the airport name is shown. Select the name and hit “Import”. The airport will either contain some generic taxiways (Scenario 1) or only a windsock called “Airfield Center” (Scenario 2). Usually, all airports are done from scratch when they have not been edited by another editor already, so you may want to delete all features apart from the runways (they contain some information we can use already) by selecting them or the groups they are in and hitting the “Del” key.

16 INFINITE FLIGHT AIRPORT EDITING GUIDE 05/2020
DOWNLOAD SATELLITE IMAGES With your airport file imported in WED, you can now download the satellite images you will use to create the airport with using SASPlanet or images provided via the #sas channel.
The download of satellite images via SASPlanet might be a bit more difficult than importing it with WED-o-Maker. While WED-o-Maker loads Bing images directly into WED, SASPlanet allows you to choose the area you want to load freely, offers various image sources but has to be imported manually into World Editor.
After opening SASPlanet, navigate to the airport you need images as you would do in a normal map program like Google Maps or Google Earth. Either enter the airport name in the search bar or navigate to it manually using your mouse. If you are using the search bar at the top of the SAS window, you can choose which search engine you want to use for finding your airport in the dropdown next to the search bar. Once you have found your airport, you need to check which image source provides the most recent images with the best image quality. You can choose from several sources at the dropdown menu in the toolbar. Google Earth, bing and Yandex usually offer images for most of the places around the world. Other images may be available at certain places.
Once you have found an appropriate image source, choose the selection tool and select the airport. You can either select the airport in a rectangular selection or in a polygonal selection. To reduce the image size, you should rather use the polygonal selection, where you can create a free shape around the airport by clicking around the airport. Change the selection type by clicking on the little arrow next to the selection tool.
When the selection is completed, click the green check mark in the appearing popup window and a new popup will appear after a few seconds.
The popup is called “Selection Manager”. The first step to take in this popup is starting the download of the images. Therefore, go to the “Download” tab (the tab should usually be the open tab when the popup appears) and select the zoom level you want to download in the list on the right. You should at least download images at zoom level 19, rather use 20 or 21 for very high image quality. Please note that a high image quality results in a high file size which might impact the speed and performance of World Editor during editing. To start the download, hit “Start” at the bottom of the window. A new popup that shows you the download progress will appear. The completed download will be announced by the text “The Task is completed!”. Return to the Selection Manager by clicking on the blue rectangle at the lower left of the progress window. This time, you want to use the “Stitch” tab to export the downloaded images as an image file you can use in WED.
Picture 7: (1) Search Bar, (2) Source Selection, (3) Selection Tool
1 2 3
Picture 8: Selection Manager, Download page

17 INFINITE FLIGHT AIRPORT EDITING GUIDE 05/2020
The ”Stitch” page offers several options to control image quality and size. At first, select GeoTIFF as the image format you want to use. To use GeoTIFF without alignment issues, make sure to select the “Geographic (Latitude/Longitude)/ WGS84 / EPSG:4326” Projection. In the field below the format selection, select the folder you want to save the images to (It’s helpful to create an image folder in your Airport Editing folder for that). In the “Zoom” dropdown, select the zoom level you downloaded before.
In the lower right, the “Stitch” page is furthermore equipped with a
menu to split the image. This might be necessary since World Editor can only handle a limited file size for a single image. This limit may differ depending on your computer’s specifications. If the image appears blank in World Editor, the file is too large and has to be split since WED will be able to handle the overall size of the image when it is split into smaller portions. The performance of WED might go down in both cases. To split the file, select how many pics should be cut in the “Split image” menu (Example: If you choose 3 in the “horizontally” window and 2 in the “vertically” window, SAS will produce 3x2=6 single images.) To export the image(s), click “Start” once all settings are correct. You can close SAS after exporting is completed.
The only thing left to do now is import the images into World Editor. Open the scenery package of your airport and go to “View”- “Pick overlay image” and select the image(s) you generated for the airport. The geoTIFF images will be aligned automatically. If this doesn’t work, it might be necessary to export the images in SASPlanet once again.
Picture 9: Selection Manager, Stitch page

18 INFINITE FLIGHT AIRPORT EDITING GUIDE 05/2020
AIRPORT EDITING With all downloads and installations completed, you are now ready for editing your first airport. Editing will happen in World Editor. You will use the software to draw taxiways, taxi lines and outlines as well as for editing airport numbers (elevation, runway lengths etc.) and spawn information.
BASIC WED TOOLS To create airports of a high quality it’s important to know the tool you use for that. World Editor offers various tools and options for all elements.
The editing window of World editor comes split into three columns. For Infinite Flight airports, you won’t need the left column (Libraries) so you can just minimize it by dragging the edge of the column to the left. You then have a large editing column and a smaller column with an object list including a search tool (top) and an option window (bottom). The width of the right column can be varied by dragging the edge around. Your basic WED setting will then look like this:
Picture 10: Basic World Editor Setting with left (Library) column removed
Object List
Option Window
Editing Window
SHORTCUTS AND KEY COMBINATIONS WHEN USING MAC OS
As you will notice, all key combinations given in the guide will be based on Windows as the operating systems. The same key combinations are also available on MacOS. Simply replace “Ctrl” with the Mac’s “Command” and “Alt” with “Option”. ?
QU
ICK TIP

19 INFINITE FLIGHT AIRPORT EDITING GUIDE 05/2020
Obviously, the different sections have different functions:
Editing Window
The editing window is the area where you draw and edit your airport. After selecting a tool, you can either move the airport, separate nodes, draw lines and taxiways. You can also select objects to edit them using the option window. Move around in the scenery by clicking with the right key of the mouse while dragging with the mouse and zoom in and out with the wheel of your mouse.
Object List
The object list shows all objects used in your airport. They are automatically named and don’t need any edits in the first place. Only spawns have to be named with suitable names or according to charts. You can use the search bar to find a certain object. Furthermore, grouping of objects is possible. The position in the list will impact how the airport is rendered in IF. If one line is above another line in the list, it will be rendered on top of the other one in both, WED and IF. Selecting an object in the list will also show the details in the option window. To get a clean list it’s highly recommended to create groups (e.g. one for taxiways, one for lines and one for ATC frequencies.) To group objects, select the desired items by clicking on them while holding shift and choose “Group” in the “Edit” menu or hit Ctrl+G. To avoid unintended object movements, the object list (and the object itself in the option window) offer an option to lock elements or entire groups. Just select the object/ group in the object list and click on the lock symbol. You can also make certain objects invisible by clicking on the eye symbol. ATTENTION: objects made invisible will not be exported when the airport is exported. Make all objects visible again before sending it for review!
Option Window
In the option window, you can change certain settings for the selected object. These can be runway markings, lightning and line types as well as spawn attributes. Find more on these topics in later chapters. The option window also allows to switch between different views where WED only shows certain objects (only pavement, only lines, also show plane shapes for the spawns etc.)
Tools
On the left side of the WED window you can see the tools available. You won’t need all of them for airports created for Infinite Flight. Each tool offers different options in the top line of the editing window. The taxiway and line tools will show options for lines and lights, the runway tools allow quick settings for new runways and the ramp start tool will allow you to set different spawn attributes before positioning the spawns. These settings can be altered in the option window later in the editing process. There are only two tools that can be used universally: The Vertex tool and the Marquee tool. While the other tools are used to create certain object, these two tools allow to
HOW DO I USE THE GROUPING FUNCTION BEST?
Ideally, you group all objects of a kind, so one group for all lines, one for all taxiways and so on. Additionally, you can create further groups for different types of lines. By creating separate groups for holds, road lines/ outlines, taxiway edge lines and centerlines, you can easily edit the rendering of the airport e.g. by moving holds on top of centerlines only by reordering the groups in the object list. ?
QU
ICK TIP

20 INFINITE FLIGHT AIRPORT EDITING GUIDE 05/2020
edit and move them afterwards. The vertex tool allows you to select and move single lines or line parts, nodes, or other objects. The marquee tool can be used to select several entire objects up to the entire airport and move them completely. The selected elements can be moved and scaled by dragging. When holding the Alt key, arrows will appear at the edges and you can rotate selected objects. The same rule applies to runways and helipads.
Below, you can find an overview of all tools available, the shortcuts for the tools are displayed in brackets:
Apart from these tools, the different columns at the very top (File, Edit, View, etc.) offer various tools to change things.
File
The File column offers options for the import and export of the airport files, to save changes and to revert the airport to the last saved changes. Orthophotos are also imported through this menu.
Edit
Use the Edit menu to undo and redo actions, to reorder objects and to duplicate them. The grouping option is also selectable here.
Vertex Tool (V)
Runway Tool (R)
Helipad Tool (H)
Taxilines Tool (L)
Light Fixture (F)
Beacon Tool (E)
Tower Viewpoint Tool (A)
Boundary Tool (B)
Object Tool (not used in IF)
Forests Tool (not used in IF)
Lines Tool (not used in IF)
Exclusions Tool (not used in IF)
Truck Parking Tool (not used in IF)
Marquee Tool (M)
Sealane Tool (not used in IF)
Taxiway Tool (T)
Hole Tool (K)
Signs Tool (not used in IF)
Windsock Tool (W)
Ramp Start Tool (O)
Taxiroutes Tool (not used in IF)
Facades Tool (not used in IF)
Strings Tool (not used in IF)
Polygon Tool (not used in IF)
Truck Destination Tool (not used in IF)

21 INFINITE FLIGHT AIRPORT EDITING GUIDE 05/2020
View
This column is for everything regarding rendering directly in World Editor. You can change the transparency level of the taxiways, select/deselect the low definition world map and the slightly better slippy maps, switch the rendering of nodes and lines on and off or change from meters to feet and vice versa.
Select
This menu won’t be used too much. Use it if you want to select several objects at once, also depending on their ordering. Most tasks here can be done using a key combination as well.
Airport
In the Airport menu, you can create new airports, add ATC frequencies and meta data.
Help
Help allows access to the WED guide by Laminar Research and some software information.
AIRPORT SETTINGS AND EQUIPMENT The first thing to edit at your airport are some facts and numbers. Every airport needs an identifier entered, the airport elevation assigned, and the correct ATC frequencies added. Apart from that, all airports for Infinite Flight need a tower viewpoint and a boundary. If the airport has one, a rotating beacon can be added as well.
AIRPORT NAME The naming of the airport should follow the charts. To make the search for the airport in the simulator easier, you may also add the name of the city the airport services in addition to the official name. Note that the first two words of the airport name will be read by Infinite Flight when calling ATC frequencies (e.g. when the airport name is “Paris Charles De Gaulle”, the ATC voice will read “Paris Charles [Frequency Name]”). To change the name of the airport, double click it in the object list or in the option window when the entire airport is selected.
AIRPORT IDENTIFIER The airport identifier can be altered in the same way. Select the airport and edit the entry “ICAO code” in the option window. In case your airport only has a FAA identifier you can enter this one as well.
AIRPORT ELEVATION The airport elevation is a very crucial piece of data for IF. If you enter an elevation that is too low, the airport may end up in a giant hole, if it’s too high you will generate an artificial cliff around the airport. The best sources are usually official charts, if you can’t find any, there are several web pages that offer information on airports (see chapter “useful links”). Always make sure to have the correct units selected in the “View” menu – there’s a significant difference between feet and meters. The airport elevation can be changed in the option window when the airport is selected in the object list.
ATC FREQUENCIES When it comes to ATC frequencies, there are several scenarios of what you can do. When the airport is selected, you can find the line “Has ATC” in the option window next to other options. If your airport has ATC services, you have to set a checkmark here. If a “X” is selected, click on it to change it to the check mark. The airport will be displayed with a blue airport icon in IF and

22 INFINITE FLIGHT AIRPORT EDITING GUIDE 05/2020
controllers will be able to operate at the airport. If your airport doesn’t have ATC services or only a Unicom frequency or something equal, set the ATC status to “X”. The airport will then get a violet icon. This will only work if you don’t add any other ATC frequency types than CTAF or AWOS! Airports usually come with a set of ATC frequencies in the .dat file. If you didn’t delete them when starting your work, you still have to check the frequencies for the correct numbers and frequency types. Select a frequency in the object list and have a look at the frequency information in the option window. Frequencies can be found in charts and on the internet.
Note that you can choose different frequency types:
AWOS – used for ATIS and AWOS frequencies CTAF – used for Unicom and CTAF frequencies Clearance Delivery – not yet supported in IF, can be added nevertheless Ground Control – used for ground and apron frequencies Tower Approach Departure
Make sure to add all available frequencies of your airport to allow ATC to work together and improve the service for the pilots. Center frequencies don’t have to be added. Furthermore, you can name the frequencies like they are called in real life instead of the generic “TWR” or “GND” names. Approach frequencies will have the name you assign to them in IF. For tower and ground, the names may not have an impact on IF now, but this might change in the future. In case you have none or less frequencies than needed for your airport in WED, you can easily create a new frequency. Select the airport in the object list and select “Add Frequency” in the “Airport” menu or hit Ctrl+F with the airport selected. The new frequency will be added at the bottom of the object list as “unnamed entity”. Rename it and enter the required data.
Apart from these data sets, our airports also need some “hardware” – at least a tower viewpoint and a boundary. In addition, the rotating beacon can be added to airports that are equipped with one.
TOWER VIEWPOINT To add a tower viewpoint, select the tower viewpoint tool. At the upper edge of the editing window, you can select the tower height (AGL not MSL; in the unit selected in “View”) before placing the tower viewpoint on the tower visible in the satellite images by clicking with the mouse. If you have a hard time finding the tower with the images in WED, an airport chart can help. In case you need to change the height later, you can do this in the option window upon selecting the tower viewpoint in the object list or in the editing window. Every airport needs a tower viewpoint!
CHARTS ARE A GREAT SOURCE! WHERE DO I GET THEM?
For many airports, airport charts can be found by searching with the ICAO on Google. Apart from that, some countries offer the official charts for free in there AIPs. For example, all charts for civilian airports within Europe can be accessed at Eurocontrol. This requires an account, but it is completely free of charge. Links to Eurocontrol and to the FAA are linked in the “useful links” section of this document. ?
QU
ICK TIP
23 INFINITE FLIGHT AIRPORT EDITING GUIDE 05/2020
AIRPORT BOUNDARY The airport boundary must be added to define the area that should be rendered at the airport elevation. For that reason, you have to redraw the airport fence with the boundary tool. You are required to follow the boundary as precisely as possible. Often, the boundary of the airport may also be defined by terminal buildings, hangars or other buildings. Include them in the airport and draw the boundary around them. You have to make sure that no object included in the airport is located outside of the boundary or touches the boundary, i.e. also don’t snap the boundary to taxiways or other objects. Also, curves must not be added to boundaries.
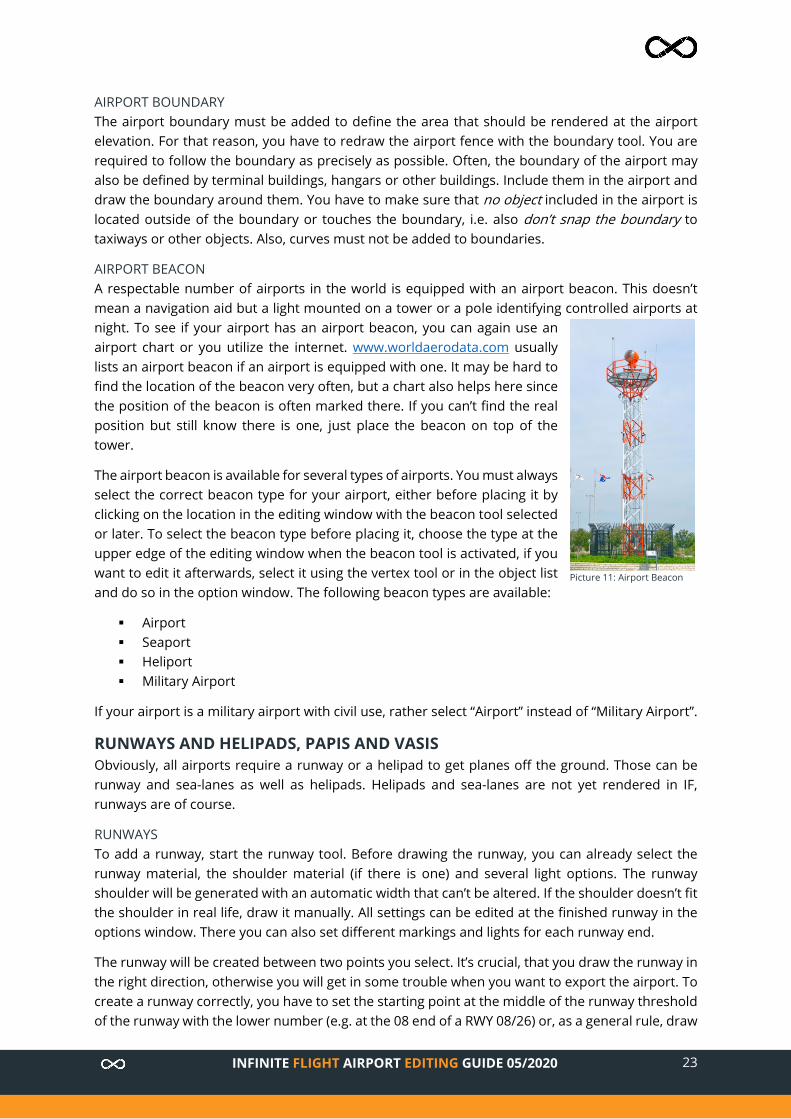
AIRPORT BEACON A respectable number of airports in the world is equipped with an airport beacon. This doesn’t mean a navigation aid but a light mounted on a tower or a pole identifying controlled airports at night. To see if your airport has an airport beacon, you can again use an airport chart or you utilize the internet. www.worldaerodata.com usually lists an airport beacon if an airport is equipped with one. It may be hard to find the location of the beacon very often, but a chart also helps here since the position of the beacon is often marked there. If you can’t find the real position but still know there is one, just place the beacon on top of the tower.
The airport beacon is available for several types of airports. You must always select the correct beacon type for your airport, either before placing it by clicking on the location in the editing window with the beacon tool selected or later. To select the beacon type before placing it, choose the type at the upper edge of the editing window when the beacon tool is activated, if you want to edit it afterwards, select it using the vertex tool or in the object list and do so in the option window. The following beacon types are available:
Airport Seaport Heliport Military Airport
If your airport is a military airport with civil use, rather select “Airport” instead of “Military Airport”.
RUNWAYS AND HELIPADS, PAPIS AND VASIS Obviously, all airports require a runway or a helipad to get planes off the ground. Those can be runway and sea-lanes as well as helipads. Helipads and sea-lanes are not yet rendered in IF, runways are of course.
RUNWAYS To add a runway, start the runway tool. Before drawing the runway, you can already select the runway material, the shoulder material (if there is one) and several light options. The runway shoulder will be generated with an automatic width that can’t be altered. If the shoulder doesn’t fit the shoulder in real life, draw it manually. All settings can be edited at the finished runway in the options window. There you can also set different markings and lights for each runway end.
The runway will be created between two points you select. It’s crucial, that you draw the runway in the right direction, otherwise you will get in some trouble when you want to export the airport. To create a runway correctly, you have to set the starting point at the middle of the runway threshold of the runway with the lower number (e.g. at the 08 end of a RWY 08/26) or, as a general rule, draw
Picture 11: Airport Beacon

24 INFINITE FLIGHT AIRPORT EDITING GUIDE 05/2020
from the south and west towards the north and east. Once you click on the spot on the runway, you will see a small green cross displayed. Move to the other runway end and click on the other threshold and the runway will be generated with numbers. You can change them manually as well.
Once the runway is generated, you can still alter the size. The length can be adjusted by pulling on the green boxes at the runway ends. The width can only be adjusted by changing the number in the width line in the option window. In that window, you can also change lighting, markings and the shoulders. Always make sure to add the correct attributes. The runway lighting is often listed in airport charts or has to be guessed by the shape of the approach lights. The runway markings can be easily checked visually using the orthophotos.
The following runway marking types exist:
The different markings are:
None No touch down zone markings, no centerline and threshold markings Visual No touch down zone markings, centerline and threshold markings present Non-Precision Single touch down zone markings, centerline and threshold markings
o UK Touch down marking chequered o US Touch down marking solid
Precision Multiple touch down zone markings, centerline and threshold markings o UK Main touch down marking chequered o US Main touch down marking solid
Picture 12: Runway Marking Types (Left to Right): None, Visual, Non-Precision (UK), Non-Precision (US), Precision (UK), Precision (US)

25 INFINITE FLIGHT AIRPORT EDITING GUIDE 05/2020
In case you have to find out the approach lights from the orthophoto, here’s a visualization:
Apart from the normal runways, you might also see runways with stopways and/or displaced thresholds. Don’t draw the arrows and markings manually, since the special runway parts can be rendered automatically. When the runway is selected you will see two arrows at the threshold, one facing towards the runway and one facing away. To draw a displaced threshold, align your runway end with the end of the displaced threshold (either the end of the paved runway or where it touches the stopway), then use the arrow facing towards the runway and align the white line with the displaced threshold line (beginning of the runway itself). The displaced threshold is part of the calculated runway length in WED. To add a stopway equipped with yellow chevrons, drag the arrow facing away from the runway until the yellow rectangle reaches the end of the pavement. If the stopway doesn’t have markings, don’t use the stopway feature of WED but draw the area with a taxiway manually!
See how a runway equipped with stopway and displaced threshold will look compared to the real-world example:
Stopway
Stopway
Displaced Threshold
Displaced Threshold
Picture 14: Runway in WED and the real-world runway in comparison
Picture 13: Approach Light Types

26 INFINITE FLIGHT AIRPORT EDITING GUIDE 05/2020
HELIPADS Helipads are not rendered in IF now. Nevertheless, it is not permissible to draw helipad markings manually. When you see a helipad in the airport, add it using the helipad tool. You can add helipad lights and select the material before and after creating it. If it’s a helipad that’s only drawn on the apron with markings, add it as “transparent”. To generate a helipad, click in the middle of the helipad. To set the orientation, hold the key on your mouse and drag away. A movable arrow will appear and can be moved so the arrow is rectangular to the taxiway edge. Release the mouse and the helipad will appear. Renaming of the helipad is only possible when you keep the format H[number] (H01, H02, H03 etc.). By changing the numbers in the option window you can adjust the helipad size as well as you can use the mouse by dragging the edges around with the green boxes with your mouse.
PAPI AND VASI LIGHTS Apart from instrument equipment like ILS, the majority of airports are equipped with visual guidance hardware, namely VASI (Visual approach slope indicator) and PAPI (Precision approach path indicator) lights. You can add these using the light fixture tool. You can choose between
PAPI (Left Side) PAPI (Right Side) PAPI (20 Degrees) VASI VASI (Tri-Color) Wig-Wags (These don’t have to be added to IF, they mark runway hold lines flashing yellow)
The left and right side attached to the taxiway refer to the position of the lights relative to the runway from the perspective of the plane approaching. Make sure to orientate the lights correctly, meaning that the (tiny) arrow and the wider side of the light is facing the plane that would approach the runway. Also make sure to enter the correct approach angle. Usually, 3° are in use, some airports have different angles though. Some airport charts show the angle of the PAPI lights. 20 degree PAPI lights are only used at aerospace facilities for their approaches. These PAPI lights are not located next to the runway but in front of it. PAPI lights are usually built in groups of four or two single lights somewhere around the touchdown zone. Ideally, position the light in the middle of the group in WED. How a PAPI light set looks like on satellite imagery can be seen on the right.
Picture 15: PAPI (left)

27 INFINITE FLIGHT AIRPORT EDITING GUIDE 05/2020
In contrast to PAPI lights, VASI lights are not ordered next to each other but in a line parallel to the runway. There are “normal” VASI lights and VASI (Tri-Color) lights. Which kind of VASI light the airport you are doing has, can be found in charts and/or online.
NODES For the next chapters, this word will be your best friend: node. So, what is a node?
Nodes are used for taxiways, lines and boundaries in World Editor when editing for Infinite Flight. When creating those, every click will create a node that will appear as a green dot once the object is created. A node is basically a fixed point of a so-called Bezier curve that can be straight as well as curved. The node is not only a fixed point though, but it is made a true control center for the lines that use it as an “anchor” through a lot of very helpful key combinations. You can curve the adjacent lines and you can control line features such as line types and lights. All in all, the node enables you to create every shape that can be found in any airport of the world. Since nodes define fix coordinates that will be saved in your airport file, one of the most important aim we have is reducing the number of nodes since it will directly influence Infinite Flight’s performance. This is achieved by reducing the number of separate taxiway parts and using the hole cutting tool and curving instead of recreating curves with lots of nodes.
Since we want a small airport file, you are asked to use as little nodes as possible and therefore you should create objects with as little points as possible initially. You can easily add additional nodes where they are needed by selecting the object and clicking on that point of the taxi line/taxiway edge where you want a new node to be while holding Alt.
Upon creating a taxiway or a line in WED, you can already curve the lines you create by selecting fix points/nodes. To do so, you hold the left mouse key when creating a node and move your mouse. This way of curving tends to be quite inaccurate though since you will most likely curve the next section of the line in a way you don’t want. Therefore, rather curve the lines once the taxiway/line is completed. You will have to use key combinations for curving.
Picture 17: A node (not selected)
Picture 16: VASI lights
28 INFINITE FLIGHT AIRPORT EDITING GUIDE 05/2020
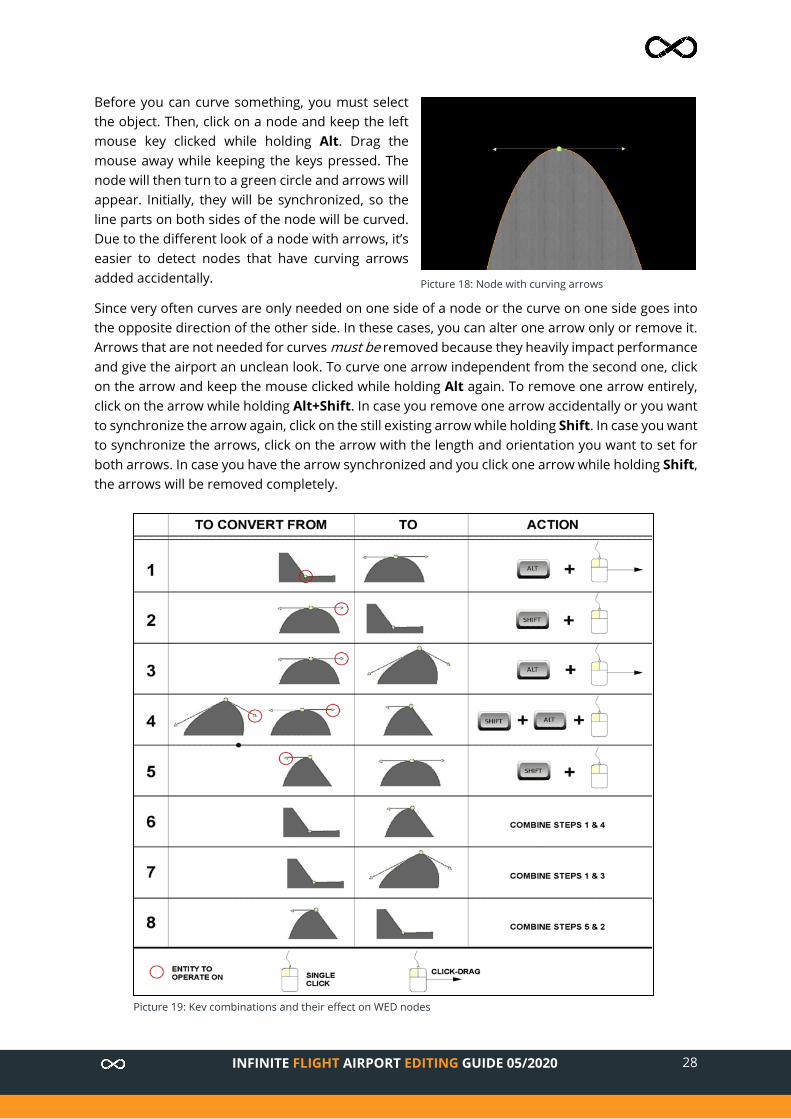
Before you can curve something, you must select the object. Then, click on a node and keep the left mouse key clicked while holding Alt. Drag the mouse away while keeping the keys pressed. The node will then turn to a green circle and arrows will appear. Initially, they will be synchronized, so the line parts on both sides of the node will be curved. Due to the different look of a node with arrows, it’s easier to detect nodes that have curving arrows added accidentally.
Since very often curves are only needed on one side of a node or the curve on one side goes into the opposite direction of the other side. In these cases, you can alter one arrow only or remove it. Arrows that are not needed for curves must be removed because they heavily impact performance and give the airport an unclean look. To curve one arrow independent from the second one, click on the arrow and keep the mouse clicked while holding Alt again. To remove one arrow entirely, click on the arrow while holding Alt+Shift. In case you remove one arrow accidentally or you want to synchronize the arrow again, click on the still existing arrow while holding Shift. In case you want to synchronize the arrows, click on the arrow with the length and orientation you want to set for both arrows. In case you have the arrow synchronized and you click one arrow while holding Shift, the arrows will be removed completely.
Picture 18: Node with curving arrows
Picture 19: Key combinations and their effect on WED nodes

29 INFINITE FLIGHT AIRPORT EDITING GUIDE 05/2020
With these key combinations, you will be able to create almost every curve you will find in airports without creating a new node in addition to the nodes at the two ends of the line part to be curved.
To create high quality airports and to avoid issues in later stages of airport editing, you are asked to remove every arrow that is not needed for a curve. If you have a straight taxiway leading to a curve, create the curve and remove the arrow that is not needed for the curve so it doesn’t impact the form of the straight part of the taxiway. This is crucial where two taxiways touch (see next chapter).
Another important thing is to avoid overcurving. In most of the cases, overcurving will only cause weird shapes. However, there might be cases where overcurving can cause taxiways to become invisible. You may ask yourself now “What is overcurving?”. It basically means that your curve arrow exceeds a certain length or angle. To avoid it, your arrows have to stay in a certain area. You want the ends of the arrows to remain in the area between the curve and the (imaginary) extension of the straight line adjacent to the curve. Yes, this sounds very complicated and you probably still don’t know where to put your arrow, so here’s a visual explanation.
If you don’t follow this curving guideline, you will cause curves which will look like in the following picture. The curve will not curve in one direction but will first follow a path in the opposite direction:
RIGHT WRONG
Picture 20: Correct and incorrect curving
Picture 21: Badly curved line

30 INFINITE FLIGHT AIRPORT EDITING GUIDE 05/2020
Nodes are not only used for curving but also for the most important quality factor in Infinite Flight Airport Editing: snapping.
SNAPPING When drawing taxiways and taxi lines you will come across points where two or more lines or taxiways meet each other. Obviously, we don’t want gaps between different taxiway materials. The same applies for taxi lines. That’s why snapping is mandatory at every airport. Whenever two lines merge and wherever two taxiways meet, they need to be snapped. Of course, also lines that touch taxiway edges must be snapped.
To allow snapping in World Editor, make sure the option “Snap to vertices” is selected () in the upper left corner of the editing window when the Vertex tool is activated. This will allow you to snap nodes together.
To snap nodes, simply drag one node towards the node of the other line it has to be snapped to until it “jumps” onto the other node. Alternatively, you can snap nodes that are very close to each other by double clicking on one of the nodes.
When you are snapping taxiways together which are curved, the arrows have to be snapped as well! Snapping arrows works exactly like normal snapping. Where straight taxiway edges are touching, make sure to remove superfluous arrows so you don’t need to snap unnecessarily.
Often, there are locations where two taxiways and a line meet at one point. In that case you must create a node to snap the line to at both taxiways and snap all three nodes together. This often happens where taxiway centerlines enter hangars or where holds need to be snapped to taxiways with a separate shoulder.
While snapping might be important at lots of places, there are also constellations where snapping is not necessary. An overview of where snapping is needed and where it isn’t can be found on the next page.

31 INFINITE FLIGHT AIRPORT EDITING GUIDE 05/2020
Snapping is mandatory for the following constellations:
Two lines merge
Line touches a taxiway edge
Spawn points on taxi lines (details in the “Spawns” chapter)
Line touches two bordering taxiways
Two taxiways touch each other
Snapping is not required here:
Two lines cross (Attention: if the line type of at least one of the lines changes at the crossing, snapping is mandatory (usually ILS critical centerlines crossing a hold)
Line crosses bordering taxiways
Holds cross the taxiway but don’t reach the taxiway edge (you may snap these lines where they cross the centerline)
LAYERING An important thing to look out for during editing is layering of taxiways and of lines. While lines will always render on top of taxiways, the layering of several different lines as well as of different taxiways is controlled by the editor. To layer one element (taxiway/line) on top of each other, the element must be higher up in the object list than the lower element. Correct layering is mandatory for
Hold lines over taxiway centerlines Taxiway patches over the main taxiway so that they are visible

32 INFINITE FLIGHT AIRPORT EDITING GUIDE 05/2020
TAXIWAYS Infinite Flight airports (at the moment) only support taxiways and lines, no buildings. However, the floor of hangars which are housing aircraft must be added. Taxiways are drawn using the taxiway tool. The taxiway tool offers several different taxiway materials:
Asphalt Concrete Grass Dirt Gravel Dry Lakebed Snow (Transparent)
All materials are usable while editing for Infinite Flights except for the “Transparent” taxiway type. Upon export, transparent taxiways will be excluded from the apt.dat file meaning that these taxiways will not be included in your airport.
When drawing taxiways, always use the real-life taxiway material. Note that it can happen quite often that asphalt is colored very bright, while dirty concrete may be very dirty from rubber. Don’t replicate the colors but the material. Concrete can often be identified by rectangular shapes in the taxiway since concrete taxiways are usually cut to remove water and reduce tensions in the material. Asphalt usually doesn’t have these. Charts can be helpful here as well as historic satellite images e.g. by Google Earth. When you add hangars, the floor should be added using concrete unless you can prove that the real life floor of the hangar is made from a different material.
To draw a taxiway, select the taxiway tool and a taxiway material. Create a path around the taxiway of one material until you reach your starting point and the taxiway is generated. You may simplify certain areas, e.g. when small asphalt patches are located inside of a concrete area. Use your best judgement to decide how much detail you add with different taxiway colors. Try to be as precise and exact as possible for the taxiways. Leave holes or gaps wherever buildings are placed in real life. However, don’t leave gaps for movable jet bridges and don’t add taxiway lines as building outlines. You also must not add land-side paved areas such as public roads or parking lots.
WHAT DO I NEED TO PAY ATTENTION TO WHEN DRAWING TAXIWAYS AND RUNWAYS?
Runways don’t have nodes and cannot be snapped as a result. Instead, you have to overlap taxiways with the runway to avoid gaps. You don’t have to follow the runway edge closely, but you can overlap it as much as you want. Just make sure to remove edge lines of the taxiway when you are overlapping a lot so the markings aren’t drawn on the taxiway too much.
When the runway shoulder in real life isn’t matched by the automatic shoulder generated by World Editor, add the shoulder manually. You don’t need to spare the runway or cut a hole for it. Simply draw a rectangle around the runway, it can also be included in another taxiway.
When drawing a grass runway, it will be rendered on top of any taxiway. It is recommended to remove any taxiway lines where the grass runway crosses.
?
QU
ICK TIP

33 INFINITE FLIGHT AIRPORT EDITING GUIDE 05/2020
To keep the quality of the airport up while reducing the number of nodes, try to use as little separate taxiways with as little nodes as possible. To achieve this, try to include as many areas of the same material as possible in one taxiway and use the hole cutting tool afterwards. To avoid unnecessary edges in Infinite Flight’s airport maps, it is not allowed to snap taxiways to themselves or snap two taxiways of the same material to each other. To cut a hole you have to make sure that the taxiway you want to add a hole to is selected before you activate the hole cutting tool. To cut a hole, just draw it by clicking around the edges of the holes. Whenever you have to add patches (e.g. a small concrete surface surrounded by asphalt) don’t cut a hole but simply layer the patch on top of the existing taxiway. Make sure to have the patches sorted above the base taxiway in the object list so the patches show on top. It is recommended to group taxiways, e.g. all patches in one group to make the ordering easier. Please note that when you layer taxiways, this must not cause intersecting taxiway edges. This means that it is not allowed that taxiways must not overlap partially like in the picture shown below (left half). In these cases, snap the taxiways to each other (right half) and don’t layer them or overlap the taxiways entirely (use the method that creates less nodes).
Picture 22: Correct and incorrect use of taxiway layering (left: incorrect, center and right: correct)
Before as well as after creating a taxiway, you can add taxiway edge lines and lights directly to the edges of the taxiway if the edge lines are drawn directly at the edge of the taxiway (Find all line types in the next chapter). This is recommended to reduce potential snapping issues of the taxiway and the line. If the taxiway has a taxiway shoulder of the same material as the main taxiway, you should add the edge lines/lights using the line tool. You can add/remove the edge lines in different ways. Firstly, you can select lines and lights for the entire taxiway by selecting the line and light types in the editing window prior to drawing the taxiway. Furthermore, you can select the taxiway after its creation and edit the line type for the entire taxiways. In these cases, you have to make sure that you remove the lines and lights wherever the taxiway touches a runway, a gap/hole left for a building or another taxiway. Also, you have to be precise and remove taxiway edge lines where there are none. To edit/add lines and lights at certain areas of a taxiway, select one of the nodes next to the area you want to edit. You can also select all nodes of a taxiway by pressing Ctrl+Shift+Down. Changes to the lines at the node in the option window will affect the line up to the next node. If the wrong edge section is edited, you have to edit the line attributes at the node on the other end of the section you want to edit. You may need to add additional nodes to create a precise line layout. When using holes you can also choose a separate line type for the entire edge of the hole without changing the line type for the entire taxiway by selecting the hole outline using the vertex tool.
Don’t forget to snap additional nodes to adjacent taxiway elements and be precise with lines!

34 INFINITE FLIGHT AIRPORT EDITING GUIDE 05/2020
LINES AND LIGHTS Lines can also be added manually. Use this for taxiway edge markings that are not directly at the outline of the taxiway. Also, the lines are used to add taxiway centerlines, roads and gate outlines.
You can choose line and light types before and after creating a line with the line tool. Taxi lights are not yet part of IF but we create them to prepare airports for an addition of these lights. There are no strict rules for taxiway lights because of that. Basically, use common sense. You are not required to add lights and are not required to leave them entirely either. If you know exactly which lights an airport has, it’s of course very appreciated if you add them during editing. When assigning taxiway edge lights, you must make sure that the lights are added on the outer side of the taxiway.
A list of taxiway lines and lights can be found below.
As a general rule, for lines, you are asked to draw everything you see. You even have to draw all taxiway edge lines, centerlines and hold lines. Roads and gate outlines are not mandatory as well as arrows (e.g. the arrows indicating where to turn into the parking position), but it’s highly recommended to add them. It may take more time but it will increase the overall realism of your airport. However, there are things you must not add.
Don’t add:
Letters and numbers Outlines to terminals Manually drawn runway numbers Arrows on displaced thresholds and stopways Xs marking closed taxiways Perpendicular lines attached to taxiway edge lines Any drawings and shapes drawn in a way that can’t be reproduced with the currently
supported line types. Hashed areas, i.e. don’t fill areas with lines (e.g. jetway movement areas) but only add the
outlines:
Again, make sure to snap all lines! Especially when you are new you don’t know all the markings, so on the upcoming pages you can find a list of all line types supported by Infinite Flight along with example pictures. Line types not included in the list must not be used for the time being.
Picture 23: Correct way to draw hashed areas (left) and what not to add (right)

35 INFINITE FLIGHT AIRPORT EDITING GUIDE 05/2020
Line Type Image Line Type Name Description and Use
Single Yellow
Yellow Line without gaps, usually used as a TWY
centerline
Single Yellow (Black) Yellow line with black
edge, usually used as a TWY centerline
Broken Yellow Short yellow lines with
small gaps, used as centerlines and holds
Broken Yellow (Black)
Short yellow lines with small gaps on black
ground, used as centerlines and holds
Other Hold
Solid Yellow line with a broken yellow line on top, used as intermediate hold
Other Hold (Black)
Solid Yellow line with a broken yellow line on top on black ground, used as
intermediate hold
Runway Hold
Two Solid Yellow Lines with two Broken Yellow lines, broken part of the hold is facing the runway
Runway Hold (Black)
Two Solid Yellow Lines with two Broken Yellow lines on black ground,
broken part of the hold is facing the runway
ILS Hold
Two parallel yellow lines connected by solid yellow line pairs, used as holds
ILS Hold Black
Two parallel yellow lines connected by solid yellow
line pairs on a black ground, used as holds
Wide Broken Single
Yellow
Solid yellow lines with wide gaps, used as centerline and for
alternate parking positions
Wide Broken Single
Yellow (Black)
Solid yellow lines with wide gaps on black
ground, used as centerline and for alternate parking
positions

36 INFINITE FLIGHT AIRPORT EDITING GUIDE 05/2020
Double Solid Yellow
Two solid yellow lines, used as taxiway edge line
Double Solid Yellow
(Black)
Two solid yellow lines with black edges, used as
taxiway edge line
Wide Broken Double
Solid Yellow
Pairs of yellow lines with wide gaps, used as taxiway edge line on some aprons
Wide Broken Double Solid Yellow (Black)
Pairs of yellow lines with wide gaps on black
ground, used as taxiway edge line on some aprons
ILS Critical Centerline
Solid yellow line with dashed lines on each side,
centerline marking near some runway holds
ILS Critical Centerline
(Black)
Solid yellow line with dashed lines on each side
on black ground, centerline marking near
some runway holds
Solid White (Roadway)
Solid white line, used for roads and gate outlines, replaces red lines in gate
areas
Chequered White (Roadway)
Mixed white-black line, marks roads where they
cross taxiways
Broken White (Roadway)
Broken white line, used for roads and some gate
outlines, replaces broken red lines

37 INFINITE FLIGHT AIRPORT EDITING GUIDE 05/2020
In addition to the lines, you have the following options for lights:
Light Image Light Name Description and Use
Taxiway Centerline Lights (Green)
Green lights built into the taxiway on
or next to the centerline to indicate the
taxiway; not all airports have these
Taxiway Edge Lights (Blue)
Blue lights mounted next to the taxiway or on
the shoulder, indicate the
taxiway edge; quite a lot of airports
have them
Hold Short Light (Amber)
Orange lights built into the taxiway to highlight holding points. Used for
intermediate holds and runway holds
(e.g. in Europe)
Hold Short Lights (Pulsing Amber)
Flashing orange lights marking
runway hold lines (e.g. in the US)
Hold Short Centerline Lights (Amber/Green)
Orange and Green lights built into the
centerline to highlight runway
areas, usually used from runway holds
to the end of the line on the runway

38 INFINITE FLIGHT AIRPORT EDITING GUIDE 05/2020
Boundary Edge Lights (Red)
Red lights, often used to mark
construction sites on the apron
SPAWNS Now that you have finished the drawing part of the airport, there’s one more thing to add: Spawns. By setting the spawns, you set the parking layout of the airport.
To add spawns, select the ramp start tool (O). You can set the spawn attributes at the top of the editing window. It’s recommended to set the attributes before adding the spawn since it will be much quicker to set the attributes for one set of spawns at once instead of changing them for every single spawn after adding them.
You have to set the following spawn attributes
Ramp Start Type
You can choose between
• Gate: Used for all kinds of airline parking and cargo positions • Tie-Down Especially used for GA spawns where aircraft are tied to the ground • Misc Used for all other parking outside of hangars (try to avoid this) • Hangar Used for spawns that are placed inside of a hangar
Equipment Type
You can add the equipment types Heavy Jets, Jets, Turboprops, Props, Fighters and Helicopters, choose with common sense, several attributes can be selected at once (e.g. Heavy Jets, Jets). The Heavy Jet attribute is only allowed for spawns with a size of class E and F!

39 INFINITE FLIGHT AIRPORT EDITING GUIDE 05/2020
Size
You can choose from six different spawn sizes. See the table below to check which airplane sizes represent the aircraft types in Infinite Flight. When selecting spawn sizes make sure to allow the aircraft types that use a gate in real life, even when the plane icons in ATC+Taxi view overlap in that case (e.g. if a gate can handle an A330, size E must be selected even when the shown 747 silhouette is bigger than the gate. Make sure to check the aircraft types serving an airport in real life to not restrict the usage of the airport for these types.
Aircraft Size IF Aircraft Types
A Cessna 172, Cirrus SR22, F-14, F-16, F/A 18, F-22, Spitfire, TBM, XCub
B A-10, Cessna 208, Cessna Citation X, Bombardier CRJ, P-38
C Airbus A318-100, Airbus A319-100, Airbus A320-200, Airbus A321-200, Boeing 717-200, Boeing 737-700, Boeing 737-800, Boeing 737-900, Bombardier Dash
8 Q400, Embraer E170, Embraer E175, Embraer E190, Embraer E195
D Boeing 757-200, Boeing 767-300, C-17 Globemaster III, C-130 Hercules,
MD11/DC10
E Airbus A330-200, Airbus A330-300, Airbus A340-600, Airbus A350-900,
Boeing 747-200, Boeing 747-400, Boeing 777-200, Boeing 777-200F, Boeing 777-300, Boeing 787-8, Boeing 787-9, Boeing 787-10
F Airbus A380-800, Boeing 747-8
Ramp Operation Type
Ramp operation types represent the use of the spawn. There are:
• General Aviation • Airline • Cargo • Military
Use common sense when adding the ramp operation types. You must not add ramp operation types to Misc and Hangar spawns!
Once you are done adding all of the spawns, continue by snapping the spawns to the centerlines of the parking positions. The spawn points you place is the location where the nose wheel of your aircraft will be positioned upon spawning. You don’t have to snap them at the very end of the lines, but you can increase realism by snapping them to an additional node on the line. The stop bars at the gates give a good impression where the spawns can be added. If you add a spawn to a parking position that includes a turn, there are two different types. Type one consists of a straight line followed by a curve, another short straight line and a second curve part leaving the position.
Picture 24: Type 1 curved parking
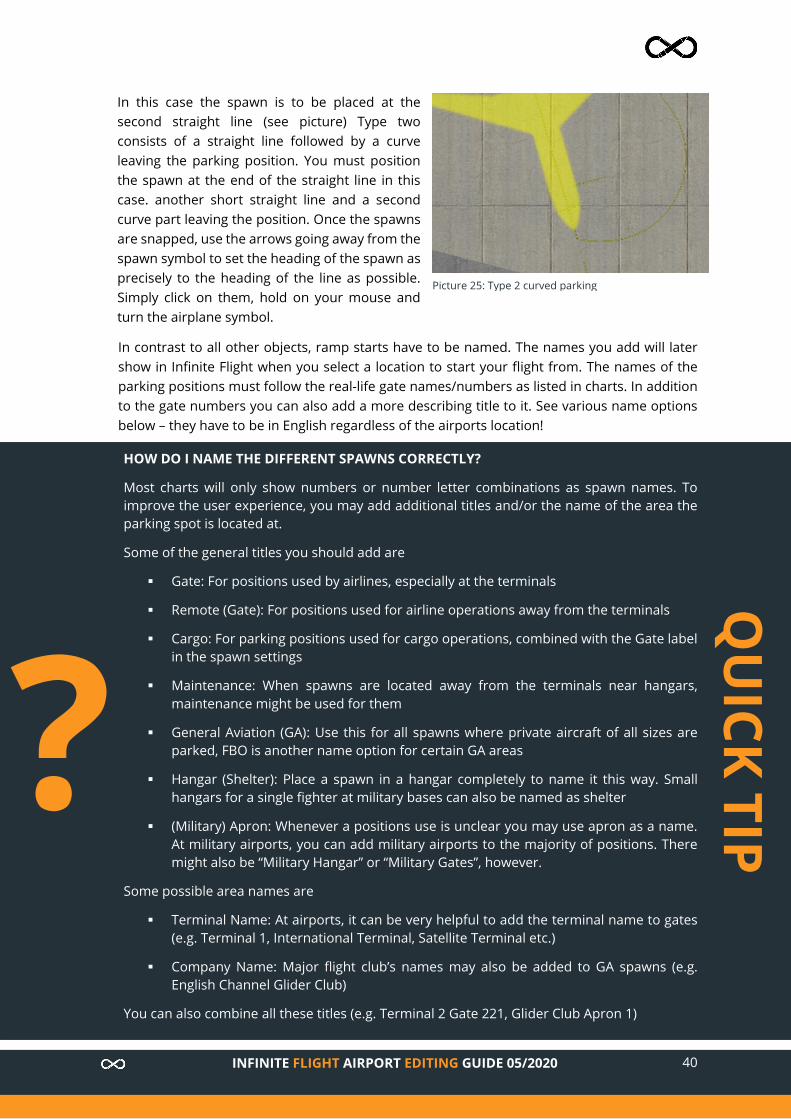
40 INFINITE FLIGHT AIRPORT EDITING GUIDE 05/2020
In this case the spawn is to be placed at the second straight line (see picture) Type two consists of a straight line followed by a curve leaving the parking position. You must position the spawn at the end of the straight line in this case. another short straight line and a second curve part leaving the position. Once the spawns are snapped, use the arrows going away from the spawn symbol to set the heading of the spawn as precisely to the heading of the line as possible. Simply click on them, hold on your mouse and turn the airplane symbol.
In contrast to all other objects, ramp starts have to be named. The names you add will later show in Infinite Flight when you select a location to start your flight from. The names of the parking positions must follow the real-life gate names/numbers as listed in charts. In addition to the gate numbers you can also add a more describing title to it. See various name options below – they have to be in English regardless of the airports location!
Picture 25: Type 2 curved parking
HOW DO I NAME THE DIFFERENT SPAWNS CORRECTLY?
Most charts will only show numbers or number letter combinations as spawn names. To improve the user experience, you may add additional titles and/or the name of the area the parking spot is located at.
Some of the general titles you should add are
Gate: For positions used by airlines, especially at the terminals
Remote (Gate): For positions used for airline operations away from the terminals
Cargo: For parking positions used for cargo operations, combined with the Gate label in the spawn settings
Maintenance: When spawns are located away from the terminals near hangars, maintenance might be used for them
General Aviation (GA): Use this for all spawns where private aircraft of all sizes are parked, FBO is another name option for certain GA areas
Hangar (Shelter): Place a spawn in a hangar completely to name it this way. Small hangars for a single fighter at military bases can also be named as shelter
(Military) Apron: Whenever a positions use is unclear you may use apron as a name. At military airports, you can add military airports to the majority of positions. There might also be “Military Hangar” or “Military Gates”, however.
Some possible area names are
Terminal Name: At airports, it can be very helpful to add the terminal name to gates (e.g. Terminal 1, International Terminal, Satellite Terminal etc.)
Company Name: Major flight club’s names may also be added to GA spawns (e.g. English Channel Glider Club)
You can also combine all these titles (e.g. Terminal 2 Gate 221, Glider Club Apron 1)
?
QU
ICK TIP

41 INFINITE FLIGHT AIRPORT EDITING GUIDE 05/2020
AIRPORT EXPORT Congratulations! You’ve just completed your first airport! There’s one more thing that’s left to do. Since we can’t work with scenery packs in Infinite Flight, you have to export the airport in an apt.dat file again. To do so, ensure that the export target (File menu) is set to X-Plane 10.50 and go to “File – Export apt.dat”. Save the file in the folder for the airport in your “Airports” folder. It might still be open in the export window opening from the import at the beginning of editing. If not, you can either navigate through the country folders manually or, if you don’t know in which country an airport is located, search for its identifier in the search bar of the export window. After that, overwrite the old apt.dat file in the folder. During export, WED will automatically check if there are any issues.
TROUBLESHOOTING Sometimes issues may occur during editing and you might ask yourself how to fix them. Here you can find some solutions for frequent issues.
TRANSPARENT/INVISIBLE TAXIWAYS Transparent taxiways can be caused by several things:
Check the pavement transparency setting Maybe you’ve just set the pavement transparency to “None”. Go check it in the View menu.
The satellite image can cover the taxiway If you have your SAS images ordered on top of the airport, one taxiway will always be covered by the image. Set the images to invisible and check if you can see the taxiway again.
It might be caused by a bug in World Editor Sometimes, WED doesn’t show taxiways at certain zoom levels when there are lots of holes cut into the taxiway. Try to zoom in and out and check if the taxiways appears at other zoom levels
A hole in the taxiway might be located outside of the taxiway/might overlap the taxiway outline Holes have to be positioned inside the taxiway entirely. Check if you have holes cut that are crossing the taxiway outline. If yes, edit the holes until they are inside the taxiway or snapped to the edges. If this doesn’t help, select the taxiway and zoom out. The taxiway will be highlighted orange. If you see anything outside the taxiway that is orange as well, it might be a hole that was supposed to be cut into another taxiway. Instead, you might have had the now transparent taxiway selected when using the hole cutting tool. Remove the hole outside of the taxiway and delete it. If the taxiway doesn’t appear again, check the next solutions.
The taxiway might be wound the wrong way around For whatever reason, your taxiway might be wound the wrong way around. To fix this, use the reverse option in the edit menu (Ctrl+Shift+R). If this doesn’t help, undo the reversing to have the taxiway wound correctly again.
Picture 26: Airport export window

42 INFINITE FLIGHT AIRPORT EDITING GUIDE 05/2020
The taxiway might overlap itself This can be caused by inaccurate drawing and snapping as well as by bad curving. Below you can see examples of how these issues may look in World Editor.
As a first step to restore the pavement you should try to find a spot where one of these issues is present. At first, check if there are any places like in image (3) where the taxiway is snapped with itself. If this is the case, check the snapping. To avoid this as a potential issue, try to design holes in the taxiways with the hole cutting tool! If this doesn’t help, try to find out if and, if yes, where an issue like in (1) and (2) is present in your taxiway. Therefore, save your current progress. After that, start deleting all curving arrows. If the taxiway becomes visible this way, go to File – Revert to Saved. Your saved progress will be restored. Delete the last node you’ve deleted before again. If the taxiway remains transparent, check all the arrows you’ve deleted before until the taxiway becomes visible. If you can delete all arrows without the taxiways becoming visible again, start to delete the nodes (select the node and hit the “Delete” key). Once the taxiway becomes visible you might have found the location with the fault. Restore the last saved version and try to fix any issues at that location. If this doesn’t help, there have to be other issues at nodes you have already deleted before, so check the nodes you have deleted before the taxiway became visible as well. Once you fixed all issues, the taxiway will be visible again. If you tried all steps and all that is left of the taxiway is a rectangle, you have to recreate the taxiway.
WRONGLY ORIENTATED LINES AND LIGHTS There are some issues with line orientation that can be fixed easily.
As already mentioned in the lines section of this guide, runway holds and other holds have to be oriented correctly. Wrongly oriented hold lines are subject to rejection in the review process.
Additionally, taxiway edge lights (blue) must be on the outside of the taxiway. If the edge lights are directly added to the taxiway, the lights will always be added on the outside. If this isn’t the case, you probably added the lights to the wrong taxiway (e.g. a taxiway shoulder or another taxiway touching it). Add the taxiway lights to the right nodes then. You can select all nodes of a taxiway when it is selected. This way you can access the nodes of the taxiway located lower in the ordering as well.
For hold lines and when edge lights are added on the wrong side, select the line and use the reverse tool in the edit menu (Ctrl+Shift+R).
Picture 27: Different causes of transparent taxiways. (1) Inaccurate drawing (2) accidental/wrong curving (3)

43 INFINITE FLIGHT AIRPORT EDITING GUIDE 05/2020
COMMON ERROR MESSAGES Sometimes, you may get an error message, e.g. when attempting to export your airport. Below you can find solutions for several
ORTHOIMAGE NAME/PATH NOT ACCEPTABLE – SPACES NOT ALLOWED AND LOCATION MUST BE INSIDE THE SCENERY DIRECTORY You probably used the “Import Orthophoto” option to import your images. Use the “Pick Overlay Image” function.
RAMP OPERATION TYPES ONLY ALLOWED AT REAL RAMP STARTS If you got this message, you have assigned ramp operation types to “Misc” or “Hangar” spawns during editing. This is not allowed. Remove all ramp operation types from spawns with ramp start type “Misc” or “Hangar” to fix this.
POLYGON/HOLE WOUND CLOCKWISE A taxiway (or a hole) is wound incorrectly. World Editor automatically selects the taxiway with the issue. If the taxiway (or hole) is visible, you have to redraw it. If it’s transparent (or still showing taxiway in case of holes), reverse it (Ctrl+Shift+R).
RUNWAY HAS ILLEGAL HIGH-END NUMBER Runways must be named with the lower number first, e.g. 09/27, 18/36 etc. Change the name of the runway to fix this issue.
RUNWAY NEEDS TO BE REVERSED TO MATCH ITS NAME Runways have to be drawn from the south/west to the north/east, so from the lower number side to the higher number. You have drawn it the opposite way. Reverse the taxiway to fix this issue.
THIS AIRPORT HAS GROUND/DELIVERY BUT NO TOWER Airports that are equipped with a clearance delivery and/or ground frequency must have a tower frequency as well. You probably forgot to add that one. Select the airport and create a new Tower frequency (Ctrl+F) with the correct frequency information to allow an export of the airport.
ATC FREQUENCY IS NOT A MULTIPLE OF 25KHZ […] In this case, you have to adjust the erroneous frequencies in a way, that the decimals have the format .X00, .X25, .X50 or .X75. (X represents an arbitrary number between 0 and 9)
REVIEWING PROCESS All issues are fixed and the airport is exported. All you need to do now is submitting the airport successfully. Before sending the airport for any review make sure that your airport is drawn accurately (e.g. no skewed lines or unnecessary amounts of nodes) since poorly designed airport may be rejected for poor quality.
#PEER-REVIEW To ensure that your airport doesn’t have any issues you didn’t notice, it’s highly recommended to use the peer-review channel on slack. Simply upload the apt.dat file of your airport and tell your fellow editors which airport this is. You can upload the file by clicking on the “+” next to the text bar. Search your directory for the file and upload it. You can also upload it using drag and drop. Other editors will have a quick look at the airport and give you feedback. They might not detect every single issue, but they help reducing the risk of a rejection in the official review.

44 INFINITE FLIGHT AIRPORT EDITING GUIDE 05/2020
Obviously, peer-review is a channel that only works if it is considered a “give and take” service. Once you are more experienced you are asked to have a look at the airports of other editors asking for help.
Please note: Peer-Review only makes sense if you use it before submitting the airport for official review!
OFFICIAL REVIEW When your airport has passed peer-review and any remaining issues have been fixed, you can send it for review. To do so, don’t use GitHub’s pull request feature (unless you’re instructed otherwise) but attach it to an email to [email protected]. Use the airport code as the subject of the email. If there are any special characteristics for the airport, please let us know in the email. Examples of these characteristics are:
Changed airport code Recently added features (longer runway, new apron, new terminal etc.) Data source you used in case you edited a very remote field without many information on
the web
Please comply with some basic guidelines when emailing airports for review:
Don’t send several mails for one airport or ask about the state of the review. Since the reviewers use their free time for checking airports it may take several days up to a week (in extreme cases even longer) until your airport can be reviewed.
If you only edited minor issues (e.g. runway markings) or if you fixed reported issues at an airport that has already been redone earlier, please list everything you changed in your mail to speed up the review!
If you detect issues with your airport after you’ve sent it in, you can still resubmit the changes. Do this by replying to/forwarding the original email you sent. This might sound strange but it has a reason: The emails are threaded in our inbox, meaning that all replies are listed with the original mail. This makes sure that we always review the latest version of the airport and that we can quickly see the issues that have led to a rejection before. Therefore, also send corrections after the airport was rejected as a reply to the rejection email.
Please don’t send the entire folder of your airport but only attach the apt.dat file. This speeds up review since reviewers don’t have to unzip any folders before review.
It’s not needed to rename the apt.dat file (e.g. with the airport code). Just send it as “apt.dat” Since Official Review should be considered a final official check and not a service to receive
feedback and get advice where errors have to be fixed, a resubmission of an airport will only be reviewed several days after the initial review. Sending (incremental) fixes only minutes after the rejection will not be reviewed immediately.
Once you have sent the mail, don’t close the issue for the airport on GitHub! You can comment that the airport has been sent for approval (not required), anything else will be handled by the reviewer and the supervisor team.
The airport won’t be added to Infinite Flight instantly, but it will be added with the next scenery update. These usually occur on a monthly basis.

45 INFINITE FLIGHT AIRPORT EDITING GUIDE 05/2020
ILS ADJUSTMENTS AFTER REVIEW Once the airport was accepted, it will be added to the repository. Once this happens, everyone can get the latest version of the airport from GitHub. In case you moved one or more runways equipped with ILS, or if you changed the airport elevation of an airport with an ILS-equipped runway, you must create an issue in the Navigation repository of our organization. A navigation editor will then update the runway data for the airport to ensure the functionality of the ILS. If this is not done, discrepancies can cause the Autoland feature in IF to land the plane at the wrong location and the ILS will not guide you to the runway precisely.
HOW TO CREATE GOOD AIRPORT SCREENSHOTS
You might have seen the screenshots our editors occasionally share on the IFC. If you want to show your work as well, here’s how to receive the best results:
- Lock the entire airport - Switch off “Show Vertices” in the “View” menu - Set Pavement Transparency to “Solid” - Switch your view to “Taxi and Flow” - Switch off the Slippy Map if you have it activated
?
QU
ICK TIP

46 INFINITE FLIGHT AIRPORT EDITING GUIDE 05/2020
AIRPORT EDITING CHECKLIST Before submitting your airport for review, use this checklist to make sure you edited everything required for an acceptance (this is what reviewers will check)
Airport Code is correct Airport Elevation is correct Airport Location is correct ATC frequency information is correct
Airport Boundary is added without curves Tower Viewpoint is added Tower Height is correct Airport Beacon is added (if present in real life) No objects are located outside of the boundary, touch or cut through the boundary
Runways are added Runway numbers are correct Runway length is correct Displaced thresholds and stopways are added (if present IRL) Runway markings are correct Runway lighting is correct PAPI/VASI lights are added correctly
All Taxiways are added and are drawn accurately Taxiway materials are correct No buildings apart from hangars are added Taxiways are overlapping runways All taxiways are snapped Taxiways and patches are layered and ordered correctly
All unnecessary curving arrows are removed
Taxiway markings are drawn accurately Marking types are correct Lines are snapped Hold lines are snapped Gate outlines are drawn No runway markings are drawn No hashed areas are present
Spawns are added Spawn attributes are complete and correct Spawns are named correctly Spawns are snapped to lines Spawns are oriented correctly
Export Target is set to X-Plane 10.50 Email includes the ICAO code and necessary information

47 INFINITE FLIGHT AIRPORT EDITING GUIDE 05/2020
WED SHORTCUTS World Editor is full of functions. Most have a shortcut key combination you can use to select it more quickly. All shortcuts are displayed as Windows key combinations. For Mac, use command instead of Ctrl.
MENUS FILE Close (the editing window) Ctrl+W
Save (the progress in your scenery pack) Ctrl+S
Validate Ctrl+Shift+V
Import apt.dat Ctrl+Shift+I
Export apt.dat Ctrl+Shift+B
EDIT Undo Ctrl+Z
Redo Ctrl+Shift+Z
Duplicate Ctrl+Shift+D
Group Ctrl+G
Ungroup Ctrl+Shift+G
Move First Ctrl+Shift+[
Move Up Ctrl+[
Move Down Ctrl+]
Move Last Ctrl+Shift+]
VIEW Zoom to Airport Ctrl+Alt+/
Zoom Selection Ctrl+/
SELECT Select All Ctrl+A
Select None Ctrl+D
Select Polygon (entire taxiway; only works when one node of the taxiway is selected) Ctrl+Shift+Up
Select Vertices (select all nodes separately; only works with taxiway selected) Ctrl+Shift+Down
AIRPORT Create Airport Ctrl+Shift+A
Create ATC Frequency Ctrl+F
TOOLS Vertex Tool V
Marquee Tool M
Runway Tool R
Sealane Tool S
Helipad Tool H
Taxiway Tool T
Taxilines Tool L
Hole Tool K
Light Fixture Tool F
Airport Beacon Tool E
Windsock Tool W
Tower Viewpoint Tool A
Ramp Start Tool O
Boundary Tool B

48 INFINITE FLIGHT AIRPORT EDITING GUIDE 05/2020
TABLE OF FIGURES Picture 1: Downloading the repo through github.com ....................................................................... 10 Picture 2: Typical Airport Editing Folder Structure .............................................................................. 11 Picture 3: WED's appearance when opening it for the first time ....................................................... 11 Picture 4: Extracting the SASPlanet .7z folder ...................................................................................... 12 Picture 5: The issue tracker - use the search bar indicated by the arrow to search for the identifier of your airport. Use the "Labels" button to only show airports with certain labels. ........................ 13 Picture 6: Example of a filled issue template ....................................................................................... 14 Picture 7: (1) Search Bar, (2) Source Selection, (3) Selection Tool ...................................................... 16 Picture 8: Selection Manager, Download page .................................................................................... 16 Picture 9: Selection Manager, Stitch page ............................................................................................ 17 Picture 10: Basic World Editor Setting with left (Library) column removed ...................................... 18 Picture 11: Airport Beacon ..................................................................................................................... 23 Picture 12: Runway Marking Types (Left to Right): None, Visual, Non-Precision (UK), Non-Precision (US), Precision (UK), Precision (US) ........................................................................................................ 24 Picture 13: Approach Light Types .......................................................................................................... 25 Picture 14: Runway in WED and the real-world runway in comparison ............................................ 25 Picture 15: PAPI (left) .............................................................................................................................. 26 Picture 16: VASI lights ............................................................................................................................. 27 Picture 17: A node (not selected) ........................................................................................................... 27 Picture 18: Node with curving arrows ................................................................................................... 28 Picture 19: Key combinations and their effect on WED nodes ........................................................... 28 Picture 20: Correct and incorrect curving ............................................................................................. 29 Picture 21: Badly curved line .................................................................................................................. 29 Picture 22: Example, where snapping must be used instead of layering.......................................... 33 Picture 23: Correct way to draw hashed areas (left) and what not to add (right) ............................ 34 Picture 24: Type 1 curved parking ......................................................................................................... 39 Picture 25: Type 2 curved parking ......................................................................................................... 40 Picture 26: Airport export window ........................................................................................................ 41 Picture 27: Different causes of transparent taxiways. (1) Inaccurate drawing (2) accidental/wrong curving (3) snapping issue ...................................................................................................................... 42
IMAGE SOURCES Satellite Images taken from Google Earth
Approach Light visualization:
http://www.fsdeveloper.com/forum/attachments/approach_lighting_2-jpg.5788/
Picture 13: https://airportlightinginc.com/contact-airport-lighting-systems/
Picture 20: http://developer.x-plane.com/manuals/wed/

49 INFINITE FLIGHT AIRPORT EDITING GUIDE 05/2020
DISCLAIMER Infinite Flight Airport Editing is not affiliated in any way with Infinite Flight (IF) or Flying Development Studio (FDS). Infinite Flight is copyright of Flying Development Studio, LLC, 2016. References made to Infinite Flight or other FDS products are done so with kind express permission from Flying Development Studio, LLC. Airport Editors don’t get paid but provide their work for use by FDS voluntarily according to the Contributor License Agreement. Speculations that Airport Editors get discounts on IF products, free Live+ subscriptions or access to alpha or beta testing are incorrect. Joining the team to get access to exclusive features or discounts won’t get you anywhere in fact.
ACKNOWLEDGEMENTS Thanks to the entire Airport Editing team for supporting this guide with their ideas and questions and obviously for all the hard work they do every day to improve the user experience in Infinite Flight. A special thank you to Adrien for handling our website including the management of the different iterations of the guide. Thanks also to Nick, who created the Infinite Flight Airport Editing logo.
TEAM Our team has been founded and is still (or to be precise again) managed from the IF side by Cameron. The most work regarding team management are carried out by our managers, who also support our reviewer team. If you have inquiries, please direct them to the @airportediting group on the IFC. Please be aware that we won’t take editing requests sent to us no matter what channel is used.
OWNER
@Cameron
MANAGERS
@Moritz
@Ryan_E
REVIEWERS
@IFBR-Mauricio
@Ohagi