infct and infct-xxxb
TRANSCRIPT

INFCT and INFCT-xxxB
INFINITY® C Programmable DigitalThermocouple Meter
Operator’s Manual
NEWPORT Electronics,Inc.http://www.newportUS.com/manuals

CountersFrequency Meters
PID ControllersClock/Timers
PrintersProcess Meters
On/OffControllersRecordersRelativeHumidity
TransmittersThermocouples
ThermistorsWire
Rate MetersTimers
TotalizersStrain Gauge
MetersVoltmetersMultimeters
Soldering IronTesterspH pens
pH ControllerspH Electrodes
RTDsThermowellsFlow Sensors
For Immediate AssistanceIn the U.S.A. and Canada: 1-800-NEWPORT®
In Mexico: (95) 800-NEWPORTSM
Or call your local NEWPORT Office.
It is the policy of NEWPORT to comply with all worldwide safety and EMC/EMI regulations that apply. NEWPORT is constantly pursuingcertification of its products to the European New Approach Directives. NEWPORT will add the CE mark to every appropriate device uponcertification.
The information contained in this document is believed to be correct but NEWPORT Electronics, Inc. accepts no liability for any errors itcontains, and reserves the right to alter specifications without notice.
WARNING: These products are not designed for use in, and should not be used for, patient connected applications.
TRADEMARK NOTICE: a®, , , newportUS.com, , , and the “Meter Case Bezel Design” are trademarks of NEWPORT Electronics, Inc.
PATENT NOTICE: This product is covered by one or more of the following patents: U.S. Pat. No. Des. 336,895; 5,274,577; 6,243,021 /Canada 2052599; 2052600 / Italy 1249456; 1250938 / France Brevet No. 91 12756 / Spain 2039150; 2048066 / UK Patent No. GB2 249837; GB2 248 954 / Germany DE 41 34398 C2. Other International Patents Pending.
NEWPORT®NEWPORT®
Internet [email protected]
Additional products from
NEWPORTnetSM On-Line Servicewww.newportUS.com
This device is marked with the international caution symbol. It is important to read the Setup Guide before installing or commissioningthis device as it contains important information relating to safety and EMC.
NEWPORT Electronics,Inc.

i
Table of Contents
Section Page
SEC 1 INTRODUCTION . . . . . . . . . . . . . . . . . . . . . . . . . . . . . . . . . .11.1 Description . . . . . . . . . . . . . . . . . . . . . . . . . . . . . . . . . . .11.2 Standard Features . . . . . . . . . . . . . . . . . . . . . . . . . . . . .11.3 Optional Features . . . . . . . . . . . . . . . . . . . . . . . . . . . . . .1
SEC 2 NOTES, WARNINGS and CAUTIONS . . . . . . . . . . . . . . . . .2
SEC 3 UNPACKING . . . . . . . . . . . . . . . . . . . . . . . . . . . . . . . . . . . . .2
SEC 4 SAFETY CONSIDERATIONS . . . . . . . . . . . . . . . . . . . . . . . .3
SEC 5 PARTS OF THE METER . . . . . . . . . . . . . . . . . . . . . . . . . . . .45.1 Front of the Meter . . . . . . . . . . . . . . . . . . . . . . . . . . . . . .45.2 Rear of the Meter . . . . . . . . . . . . . . . . . . . . . . . . . . . . . .7
SEC 6 SETUP . . . . . . . . . . . . . . . . . . . . . . . . . . . . . . . . . . . . . . . . .96.1 Conditions Requiring Disassembly . . . . . . . . . . . . . . . . .96.2 Disassembly . . . . . . . . . . . . . . . . . . . . . . . . . . . . . . . . . .96.3 Rating/Product Label . . . . . . . . . . . . . . . . . . . . . . . . . . . .96.4 Main Board Jumpers . . . . . . . . . . . . . . . . . . . . . . . . . . . .96.5 Panel Mounting . . . . . . . . . . . . . . . . . . . . . . . . . . . . . . .12
SEC 7 SENSOR INPUT & MAIN POWER CONNECTIONS . . . . . . . .137.1 Sensor Input Connections . . . . . . . . . . . . . . . . . . . . . . .137.2 Main Power Connections . . . . . . . . . . . . . . . . . . . . . . .137.3 Analog and Relay Output Connections . . . . . . . . . . . . .15
SEC 8 INPUT TYPE (INPT) . . . . . . . . . . . . . . . . . . . . . . . . . . . . . .17
SEC 9 DECIMAL POINT POSITION (DEC.P) . . . . . . . . . . . . . . . .18
SEC 10 READING CONFIGURATION ("RD.CF") . . . . . . . . . . . . . .19
SEC 11 COLOR CONFIGURATION ("COLR") . . . . . . . . . . . . . . . .20

ii
Table of Contents
Section Page
SEC 12 SETPOINT 1 CONFIGURATION (S1.CF) . . . . . . . . . . . . . 21
SEC 13 SETPOINT 2 CONFIGURATION (S2.CF) . . . . . . . . . . . . . 22
SEC 14 SETPOINT 1 DEADBAND (S1.DB) . . . . . . . . . . . . . . . . . . 23
SEC 15 SETPOINT 2 DEADBAND (S2.DB) . . . . . . . . . . . . . . . . . . 24
SEC 16 OUTPUT CONFIGURATION (OT.CF) . . . . . . . . . . . . . . . . 2516.1 To Enable or Disable the Analog Output . . . . . . . . . . . 2516.2 To Select Analog Output as Current or Voltage . . . . . . 2516.3 To Select Analog Output or Proportional Control . . . . . 26
SEC 17 PROPORTIONAL BAND (P.BND) . . . . . . . . . . . . . . . . . . . 27
SEC 18 MANUAL RESET (M.RST) . . . . . . . . . . . . . . . . . . . . . . . . . 29
SEC 19 OUTPUT SCALE AND OFFSET (OT.S.O) . . . . . . . . . . . . . 30
SEC 20 COLD JUNCTION OFFSET CALIBRATION (C.J.OF) . . . . . . 32
SEC 21 LOCK OUT CONFIGURATION (LK.CF) . . . . . . . . . . . . . . 3321.1 To Enable or Disable the Reset Button . . . . . . . . . . . . 3321.2 To Enable or Disable Setpoint Changes . . . . . . . . . . . .3321.3 To Enable Display’s program version . . . . . . . . . . . . . . 34
SEC 22 BRIGHTNESS CONFIGURATION . . . . . . . . . . . . . . . . . . . 35
SEC 23 TUNING PROPORTIONAL CONTROLLER . . . . . . . . . . . 36
SEC 24 DISPLAY MESSAGES . . . . . . . . . . . . . . . . . . . . . . . . . . . . 37
SEC 25 MENU CONFIGURATION . . . . . . . . . . . . . . . . . . . . . . . . . 38
SEC 26 SETPOINT CONFIGURATION DISPLAYS . . . . . . . . . . . . 42
SEC 27 SPECIFICATIONS . . . . . . . . . . . . . . . . . . . . . . . . . . . . . . . 43
SEC 28 FACTORY PRESET VALUES . . . . . . . . . . . . . . . . . . . . . . 47
CE APPROVAL SECTION . . . . . . . . . . . . . . . . . . . . . . . . . . . . . . . . .48
iii
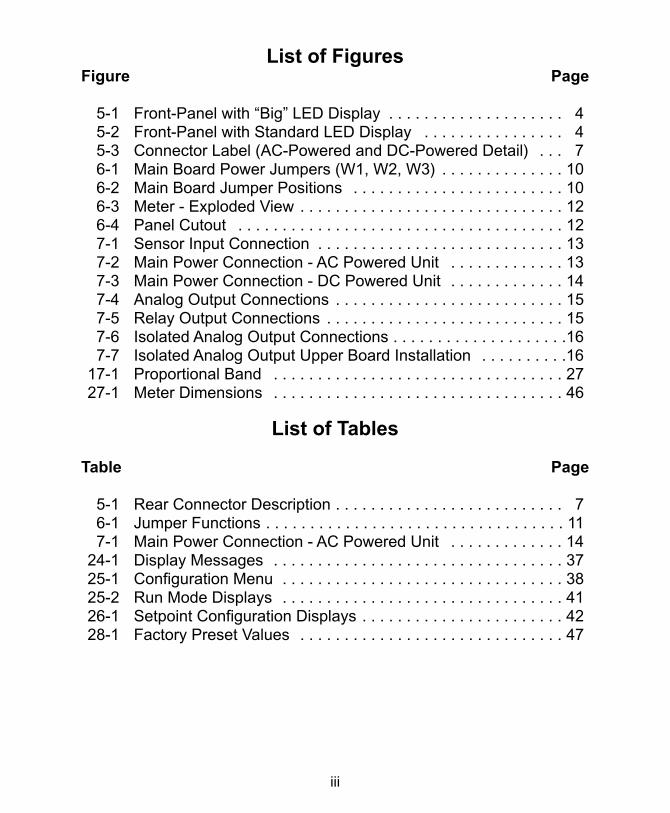
List of FiguresFigure Page
5-1 Front-Panel with “Big” LED Display . . . . . . . . . . . . . . . . . . . . 45-2 Front-Panel with Standard LED Display . . . . . . . . . . . . . . . . 45-3 Connector Label (AC-Powered and DC-Powered Detail) . . . 76-1 Main Board Power Jumpers (W1, W2, W3) . . . . . . . . . . . . . . 106-2 Main Board Jumper Positions . . . . . . . . . . . . . . . . . . . . . . . . 106-3 Meter - Exploded View . . . . . . . . . . . . . . . . . . . . . . . . . . . . . . 126-4 Panel Cutout . . . . . . . . . . . . . . . . . . . . . . . . . . . . . . . . . . . . . 127-1 Sensor Input Connection . . . . . . . . . . . . . . . . . . . . . . . . . . . . 137-2 Main Power Connection - AC Powered Unit . . . . . . . . . . . . . 137-3 Main Power Connection - DC Powered Unit . . . . . . . . . . . . . 147-4 Analog Output Connections . . . . . . . . . . . . . . . . . . . . . . . . . . 157-5 Relay Output Connections . . . . . . . . . . . . . . . . . . . . . . . . . . . 157-6 Isolated Analog Output Connections . . . . . . . . . . . . . . . . . . . .167-7 Isolated Analog Output Upper Board Installation . . . . . . . . . .16
17-1 Proportional Band . . . . . . . . . . . . . . . . . . . . . . . . . . . . . . . . . 2727-1 Meter Dimensions . . . . . . . . . . . . . . . . . . . . . . . . . . . . . . . . . 46
List of Tables
Table Page
5-1 Rear Connector Description . . . . . . . . . . . . . . . . . . . . . . . . . . 76-1 Jumper Functions . . . . . . . . . . . . . . . . . . . . . . . . . . . . . . . . . . 117-1 Main Power Connection - AC Powered Unit . . . . . . . . . . . . . 14
24-1 Display Messages . . . . . . . . . . . . . . . . . . . . . . . . . . . . . . . . . 3725-1 Configuration Menu . . . . . . . . . . . . . . . . . . . . . . . . . . . . . . . . 3825-2 Run Mode Displays . . . . . . . . . . . . . . . . . . . . . . . . . . . . . . . . 4126-1 Setpoint Configuration Displays . . . . . . . . . . . . . . . . . . . . . . . 4228-1 Factory Preset Values . . . . . . . . . . . . . . . . . . . . . . . . . . . . . . 47

iv
NOTES

SECTION 1. INTRODUCTION
1.1 DESCRIPTION
The Programmable Thermocouple Meter is a value packed indicator/ controller. Four fulldigits allow for an accurate display of your temperature. Your meter may be a basicindicator or it may include analog output or dual relay output. Analog output is fullyscalable and may be configured as a proportional controller, or to follow your display.Dual 5 amp, form C relays control critical processes. Front panel peak detection andmemory is also standard. A mechanical lockout has been included to guard againstunauthorized changes.
1.2 STANDARD FEATURES
The following is a list of features:
* 4-digit, three color programmable “Big” LED display or 4-digit, standard LED Display
* NEMA 4/Type 4 Front Bezel* ±0.5 °C accuracy* J, K, DIN J or TC thermocouple types* Peak detection* Non-volatile memory-no battery backup* 115 or 230 Vac 50/60 Hz power supply or
10-32 Vdc or 26-56 Vdc
1.3 OPTIONAL FEATURES
* Dual 5 amp, form C relay outputs* Scalable analog output * Proportional control* Front-panel deviation correction* Easy setup for proportional control
Features with are for the “B” version which has three-color programmable“Big” LED display - All segment characters shown are for the “B” version.
1
SECTION 2. NOTES, WARNINGS and CAUTIONS
Information that is especially important to note is identified by three labels:
• NOTE• WARNING• CAUTION• IMPORTANT
NOTE: provides you with information that is important to successfully setup anduse the Programmable Digital Meter.
CAUTION or WARNING: tells you about the risk of electric shock.
CAUTION, WARNING or IMPORTANT: tells you of circumstances or practicesthat can effect the meter's functionality and must refer to accompanyingdocuments.
SECTION 3. UNPACKING
Remove the Packing List and verify that all equipment has been received. If there are anyquestions about the shipment, use the phone numbers listed on the back cover to contactthe Customer Service Department nearest you.
Upon receipt of shipment, inspect the container and equipment for any signs of damage.Take particular note of any evidence of rough handling in transit. Immediately report anydamage to the shipping agent.
The carrier will not honor any claims unless all shipping material is saved fortheir examination. After examining and removing contents, save packingmaterial and carton in the event reshipment is necessary.
Verify that you receive the following items in the shipping box:
QTY DESCRIPTION1 Programmable indicator/controller with all applicable connectors attached.1 Owner's Manual1 Set Mounting brackets
If you ordered any of the available options (except the "BL" blank Lens option), they willbe shipped in a separate container to avoid any damage to your indicator/controller.
2

3
SECTION 4. SAFETY CONSIDERATIONS
This device is marked with the international caution symbol. It is important to
read this manual before installing or commissioning this device as it contains
important information relating to Safety and EMC (Electromagnetic Compatibility).
This instrument is a panel mount device protected in accordance with EN 61010-1:2001, electrical safety requirements for electrical equipment formeasurement, control and laboratory. Installation of this instrument should be done byqualified personnel. In order to ensure safe operation, the following instructions shouldbe followed.
This instrument has no power-on switch. An external switch or circuit-breaker shallbe included in the building installation as a disconnecting device. It shall be marked toindicate this function, and it shall be in close proximity to the equipment within easyreach of the operator. The switch or circuit-breaker shall not interrupt the ProtectiveConductor (Earth wire), and it shall meet the relevant requirements of IEC 947–1 andIEC 947-3 (International Electrotechnical Commission). The switch shall not beincorporated in the main supply cord.
Furthermore, to provide protection against excessive energy being drawn from themain supply in case of a fault in the equipment, an overcurrent protection device shallbe installed.
• Do not exceed voltage rating on the label located on the top of the instrumenthousing.
• Always disconnect power before changing signal and power connections.• Do not use this instrument on a work bench without its case for safety reasons.• Do not operate this instrument in flammable or explosive atmospheres.• Do not expose this instrument to rain or moisture.• Unit mounting should allow for adequate ventilation to ensure instrument does not
exceed operating temperature rating.• Use electrical wires with adequate size to handle mechanical strain and power
requirements. Install without exposing bare wire outside the connector to minimizeelectrical shock hazards.
EMC Considerations• Whenever EMC is an issue, always use shielded cables.• Never run signal and power wires in the same conduit.• Use signal wire connections with twisted-pair cables.• Install Ferrite Bead(s) on signal wires close to the instrument if EMC problems persist.
Failure to follow all instructions and warnings may result in injury!
Note

SECTION 5. PARTS OF THE METER
5.1 FRONT OF THE METER
Figure 5-1 shows each part of the front of the three-color programmable “Big”LED display meter (Version B).
Figure 5-1. Front-Panel with Big Display
Figure 5-2 shows each part of the front of the standard LED display meter.
Figure 5-2. Front-Panel wtih Standard Display
These meter display windows (both versions) light when appropriate:
1 - Setpoint 1 status2 - Setpoint 2 statusC - °C unit indicatorF - °F unit indicator
5 Pushbuttons for programming the meter.
/ /
••••1 2
RESETMENUDEVMAXSETPTS
C F
4
Digital LED Display:-1.9.9.9 or 9.9.9.9 4-digitthree color programmable,21 mm (0.83") high LEDdisplay with programmabledecimal point.
Digital LED Display:-1.9.9.9. or 9.9.9.9. 14 segment, 13.8 mm(0.54") high LED displaywith programmabledecimal point.
5.1 FRONT OF THE METER (Continued)
SETPTS BUTTON
This button functions only in the run mode. When the meter is in the run mode,press this button to sequentially recall the previous setpoint settings. After using the/MAX and /DEV buttons to alter these settings as desired, press the SETPTSbutton to store these new values.
Unless you press the SETPTS button within 20 seconds to store your input, themeter will scroll to setpoint 2 and retain the last value stored.
If the dual relay option is not installed or if the “L.3=1” on the “LK.CF” menu,pressing the SETPTS button will display the meter's firmware version.
/MAX BUTTON
During the run mode, press the /MAX button to recall the PEAK reading since thelast press of the RESET button. To return to the current readings without resettingthe PEAK reading, press the /MAX button. To reset the PEAK reading, press theRESET button.
During the configuration mode, use the /MAX button to change the values of theflashing digit shown on the display and/or toggle between menu choices, such as"R.1=F" or "R.1=C".
When configuring your setpoint values, press the /MAX button to increment theflashing digit from 0 to 9 by 1's.
5
6
5.1 FRONT OF THE METER (Continued)
/DEV BUTTON
During the run mode press the /DEV button to display the deviation from setpoint 1.
When configuring your setpoint values, press the /DEV button to scroll to the nextdigit.
MENU BUTTON
In the run mode, press the MENU button to terminate the current measuring processand enter you into the configuration mode.
Only if you have installed the lockout jumpers on the main board.
In the configuration mode, press the MENU button to store changes in the non-volatilememory and then advance you to the next menu item.
RESET BUTTON
If you hard reset (press the MENU button followed by the RESET button) or poweroff/on the meter, it shows "RST", followed by "t_C".
In the setpoint mode, press the RESET button to reset the setpoints. The meter shows"SP.RS" and returns to the run mode.
In the configuration mode, press the RESET button once to review the previous menu.Press the RESET button twice to perform a hard reset and return to the run mode.In the peak mode, press the RESET button to reset peak value. The meter shows"PK.RS" and return to the run mode.
When in setpoint or configuration mode, if the meter shows 9999 or -1999 withall flashing digits, the value has overflowed. Press the /MAX button to starta new value.

5.2 REAR OF THE METER
Figure 5-3 shows the connector label mounted at the top of the meter housing. Table 5-1gives a brief description of each connector at the rear of the meter.
Figure 5-3. Connector Label (AC-Powered and DC-Powered Detail)
Table 5-1 Rear Connector Description
CONNECTOR DESCRIPTION
TB1-1 Setpoint 1: Normally open (N.O.1) connection
TB1-2 Setpoint 1: Normally closed (N.C.1) connection
TB1-3 Setpoint 1: Common (COM1) connection
TB1-4 Setpoint 2: Normally open (N.O.2) connection
TB1-5 Setpoint 2: Normally closed (N.C.2) connection
TB1-6 Setpoint 2: Common (COM2) connection
TB1-7 ac line connection (no connections on dc-powered units)
TB1-8 ac neutral connection (+ Input on dc-powered units)
TB1-9 ac earth ground (dc-power return on dc-powered units)
TB1-10 Analog voltage output
TB1-11 Analog current output
TB1-12 Analog return
TB4-B +TC Input
TB4-C -TC Input
TB5-1 Isolated Analog Voltage Output
TB5-2 Isolated Analog Current Output
TB5-3 Isolated Analog Output Return
7

NOTES
8

9
SECTION 6. SETUP
6.1 CONDITIONS REQUIRING DISASSEMBLY
You may need to open up the meter for one of the following reasons:
• To check or change the 115 or 230 Vac power jumpers.
• To install or remove jumpers on the main board.
6.2 DISASSEMBLY
Disconnect the power supply before proceeding.
To remove and access the main board, follow these steps:
• Disconnect the main power from the meter.
• Remove the back case cover.
• Lift the back of the main board upwards and it slide out of the case.
Caution: The meter has no power-on switch, so it will be in operation as soonyou apply power.
If you power off/on the meter, or perform a hard reset (press the RESET button twice),the meter shows "RST", followed by "t_C".
6.3 RATING/PRODUCT LABEL
This label is located on top of the meter housing (refer to Figure 6-3).
6.4 MAIN BOARD JUMPERS (refer to Figure 6-1)
Important: If you want to change the Factory preset jumpers, do the followingsteps; otherwise go to section 6.5.
Warning: Disconnect the power from the unit before proceeding. This device must only be reconfigured by a specially trained electrician withcorresponding qualifications. Failure to follow all instructions and warnings mayresult in injury!
1. Remove the main board from the case. Refer to Section 6.2.
2. Locate the solder jumpers W1, W2, and W3 (located near the edge of the mainboard alongside the transformer).
3. If your power requirement is 115 Vac, solder jumpers W1 and W3 should bewired, but jumper W2 should not. If your power requirement is 230 Vac, solderjumper W2 should be wired, but jumpers W1 and W3 should not.
9

10
6.4 MAIN BOARD JUMPERS (Continued)
Figure 6-1 shows the W1 through W3 jumpers on the main board.
Figure 6-1. Main Board Power Jumpers (W1, W2, W3)
Figure 6-2 shows the main board jumpers.
Figure 6-2. Main Board Jumper Positions

11
6.4 MAIN BOARD JUMPERS (Continued)
S2 jumpers are used for sensor break indications (refer to Table 6-1).
S3 jumpers are used for the following (refer to Table 6-1):
* To enable or disable the front panel push-buttons* To allow for an extremely low resistance load for analog output * To disable the MENU button* To perform calibration procedure
Test pins TP1 - TP11 are for testing purposes. Do not use as reading errors may result.
Table 6-1. Jumper Functions
JUMPER DESCRIPTION
S2-A Install for negative sensor break (i.e., refrigeration).
S2-B Install for positive sensor break (i.e., heating).
S2-C Removed. Not used.
S2-D Removed. Not Used.
S3-A Install to enable front panel push-buttons. Remove todisable all front panel push-buttons
S3-B Removed. Install for factory calibration only.
S3-C Normally removed. Install for analog voltage outputwhen load has less than 1 KΩ impedance. Careshould be taken when installing this jumper.
S3-D Removed. Not used.
S3-E If installed without S3-B, the MENU button locks out.
S4-A Removed. Not used.
11

12
6.5 PANEL MOUNTING
Figure 6-3. Meter - Exploded View
1. Cut a hole in yourpanel, as shown inFigure 6-3. Forspecific dimensionsrefer to Figure 6-4.
2. Insert the meter intothe hole. Be sure the frontbezel gasket is flushto the panel.
3. Slide on mountingbracket to secure.
4. Proceed to Section 7to connect yoursensor input andmain power.
"NEW" STYLEMOUNTINGBRACKET
FRONT BEZEL
CASE
REAR COVER
(REMOVED)
PANELCUT-OUT
"OLDER" STYLEMOUNTING
BRACKET 2 PCSGASKET
PRODUCTLABEL
CONNECTORLABEL
Figure 6-4 Panel Cutout

13
SECTION 7. SENSOR INPUT/ MAIN POWER CONNECTIONS
7.1 SENSOR INPUT CONNECTIONS
Figure 7-1 describes how to connect your sensor.
. pu t Connection
Figure 7-1. Sensor Input Connection
7.2 MAIN POWER CONNECTIONS
Figure 7-2 shows the proper AC power main power connections. is not active.
Warning: Do not connect AC power to your device until you have completed allinput and output connections. This device must only be installed by a speciallytrained electrician with corresponding qualifications. Failure to follow allinstructions and warnings may result in injury!
Figure 7-2. Main Power Connections - AC
13

14
7.2 MAIN POWER CONNECTIONS (Continued)
Table 7-1 shows the wire color and respective terminal connections for both USA andEurope.
Table 7-1. Main Power Connection - AC Powered Unit
Figure 7-3. Main Power Connections - DC Powered Unit
WIRE COLORS
TB1 AC POWER EUROPE USA
7 ~ ac Line Brown Black
8 ~ ac Neutral Blue White
9 ~ ac Earth Green/Yellow Green

15
7.3 ANALOG AND RELAY OUTPUT CONNECTIONS
If you have purchased a meter with analog or dual relay output, refer to the followingdrawings for output connections.
Figure 7-4. Analog Output Connections
Figure 7-5. Relay Output Connections
15

16
7.3 ANALOG AND RELAY OUTPUT CONNECTING (Continued)
Figure 7-6. Isolated Analog Output Connections.
Figure 7-7. Isolated Analog Output Upper Board Installation
Attach cableto P1

17
SECTION 8. INPUT TYPE (INPT)
Refer to Table 25-1 for a summary list of menu configuration.
To select your appropriate input type signal follow these steps:
1. Press the MENU button until the meter shows "INPT" .
2. Press the /DEV button. The meter shows one of the following:
* J.TC - Iron vs. Constantan (NIST)* K.TC - Nickel-Chromium vs. Nickel-Aluminum (NIST)* DJ.TC - Iron vs. Copper (DIN)* T.TC - Copper vs. Copper-Nickel
3. Press the /MAX button to scroll through available choices.
4. Press the MENU button to store your choices. The meter momentarily shows"STRD", followed by "DEC.P" (Decimal point).
17

18
SECTION 9. DECIMAL POINT POSITION (DEC.P)
Refer to Table 25-1 for a summary list of menu configuration follow these steps:
To select a decimal point display position follow these steps:
1. Press the MENU button until the meter shows "DEC.P".
2. Press the /DEV button. The meter shows one of the following:* FFFF.* FFF.F
3. Press the /MAX button to scroll between choices.
4. Press the MENU button to store your choices. The meter momentarily shows"STRD", followed by "RD.CF" (Reading Configuration).
When you change the decimal position the meter adjusts setpoints, deadbands,proportional band, and manual reset values. These adjustments are madeaccording to the new decimal point. If one or more of these values overflow,the meter flashes "ER2" when you store a new decimal point position value.
AUTOMATIC DECIMAL POINT ADJUST
If you select 0.1 degree resolution the decimal point automatically adjusts itself to 1degree if the temperature reading is above 999.9 or below -199.9.
19
SECTION 10. READING CONFIGURATION ("RD.CF")
Refer to Table 25-1 for a summary list of menu configuration follow these steps:
To determine if your meter shows in °F (Fahrenheit) or °C (Celsius).
1. Press the MENU button until the meter shows "RD.CF" .
2. Press the /DEV button. The meter shows one of the following:
* "R.1=F" (°F)* "R.1=C" (°C)
3. Press the /MAX button to toggle between choices.
4. Press the MENU button to store your selection. The meter momentarily shows"STRD", followed by "S1.CF" (Setpoint 1 Configuration).
19
20
SECTION 11. COLOR CONFIGURATION (COLR)
Refer to Table 25-1 for a summary list of menu configuration.
Selecting Display Color is not active unless your meter is a Version “B”.
To select a display color, follow these steps:
1. Press the MENU button until the meter shows “COLR”.
2. Press the ∂DEV button. The meter shows one of the following:
• “GRN”
• “REd”
• “AMbR”
3. Press the ßMAX button to scroll between available choices.
4. Press the MENU button to store your choice. The meter momentarily shows“StRd”, followed by the next menu “S1.CF” (Setpoint 1 Configuration). Or youcan press the RESET button to abort and go back to the “Rd.CF” menu.
2121
SECTION 12. SETPOINT 1 CONFIGURATION (S1.CF)
Refer to Table 25-1 for a summary list of menu configuration.
Setpoint 1 is not active unless your meter has dual relay output capabilities. The LED'swill display whether the (S1.CF) is active or not. You may use Setpoint 1 Configuration(S1.CF) for the following:
* To set the setpoint's active band above or below your chosen value
* To select whether the setpoint operation is latched or unlatched
1. Press the MENU button until the meter shows "S1.CF".
2. Press the /DEV button. The meter shows one of the following:
* "S.1=A" (Active above the setpoint)* "S.1=B" (Active below the setpoint)
3. Press the /MAX button to toggle between choices.
4. Press the /DEV button again. The meter shows one of the following:
* "S.2=L" Setpoint 1 to be latched* "S.2=U" Setpoint 1 to be unlatched
5. Press the /MAX button to toggle between choices.
6. Press the MENU button to store your choices(s). The meter momentarily shows"STRD", followed by "S2.CF" (Setpoint 2 Configuration).

22
SECTION 13. SETPOINT 2 CONFIGURATION (S2.CF)
Refer to Table 25-1 for a summary list of menu configuration.
Setpoint 2 is not active unless your meter has dual relay output capabilities. The LED'swill display whether the (S2.CF) is active or not. You may use Setpoint 2 Configuration(S2.CF) for the following:
* To set the setpoint's active band above or below your chosen value* To select whether the setpoint operation is latched or unlatched
1. Press the MENU button until the meter shows "S2.CF" .
2. Press the /DEV button. The meter shows one of the following:* "S.1=A" (Active above the setpoint)* "S.1=B" (Active below the setpoint)
3. Press the /MAX button to toggle between choices.
4. Press the /DEV button again. The meter shows one of the following:* "S.2=L" Setpoint 1 to be latched* "S.2=U" Setpoint 1 to be unlatched
5. Press the /MAX button to toggle between choices.
6. Press the MENU button to store your choices(s). The meter momentarily shows"STRD", followed by "S1.DB" (Setpoint 1 Deadband).
22

2323
SECTION 14. SETPOINT 1 DEADBAND (S1.DB)
Refer to Table 25-1 for a summary list of menu configuration.
Setpoint 1 Deadband (S1.DB) is not active unless your meter has dual relay outputcapabilities. The LED's will display whether the (S1.DB) is active or not. To set thedeadband (hysteresis) of Setpoint 1, follow these steps:
1. Press the MENU button until the meter shows "S1.DB".
2. Press the /DEV button. The meter shows the last previously stored 4-digitnumber (0000 through 9999) with flashing 4th digit.
3. Press the /MAX button to change the value of the flashing digit. If you continueto press the /MAX button, the flashing digit's value continues to change.
4. Press the /DEV button to scroll to the next digit.
5. Press the MENU button to store value. The meter momentarily shows "STRD",followed by "S2.DB" (Setpoint 2 Deadband)

24
SECTION 15. SETPOINT 2 DEADBAND (S2.DB)
Refer to Table 25-1 for a summary list of menu configuration.
Setpoint 2 Deadband (S2.DB) is not active unless your meter has dual relayoutput capabilities. The LED's will display whether the (S2.DB) is active or not.To set the deadband (hysteresis) of Setpoint 2, follow these steps:
1. Press the MENU button until the meter shows "S2.DB".
2. Press the /DEV button. The meter shows the last previously stored 4-digitnumber (0000 through 9999) with flashing 4th digit.
3. Press the /MAX button to change the value of the f lashing digit.If you continue to press the /MAX button, the flashing digit's value continues tochange.
4. Press the /DEV button to scroll to the next digit.
5. Press the MENU button to store your selection. "STRD" momentarily displays,followed by cold junction offset if you have a standard meter (refer to Section 20)or "OT.CF" (Output Configuration) if you have analog output capabilities (refer toSection 16).
24

2525
SECTION 16. OUTPUT CONFIGURATION (OT.CF)
Refer to Table 25-1 for a summary list of menu configuration.
Output Configuration is not active unless your meter has analog output capabilities. Themenu will display whether analog output is present or not. Use Output Configuration(OT.CF) to select the following:
* To enable or disable the analog output * To determine if the analog output is current or voltage* To determine if the analog output is proportional to the display
or to the error (the difference between reading and setpoint value)
16.1 To Enable or Disable The Analog Output
1. Press the MENU button until the meter shows "OT.CF" .
2. Press the /DEV button. The meter shows one of the following:* "O.1=D" (Analog output disabled)* "O.1=E" (Analog output enabled)
3. Press the /MAX button to toggle between choices.
4. Press the /DEV button to select analog output as current/voltage or press theMENU button to store your choice. The meter momentarily shows "STRD" ,followed by "OT.S.O" (Output Scale and Offset - refer to Section 19).
16.2 To Select Analog Output as Current or Voltage
1. Press the /DEV button. The meter shows one of the following:* "O.2=V" (Analog output = voltage)* "O.2=C" (Analog output = current)
2. Press the /MAX button to toggle between choices.
3. Press the /DEV button to select analog output/proportional or press the MENUbutton to store your choice. The meter momentarily shows "STRD" , followed by"OT.S.O" (Output Scale and Offset - refer to Section 18) or "P.BND" (ProportionalBand - refer to Section 17).
26
16.3 To Select Analog Output or Proportional Control
To determine if the meter is to transmit an analog signal out (proportional to yourdisplay), or serve as a proportional controller (proportional to the error = display -setpoint 1).
1. Press the /DEV button. The meter shows one of the following:* "O.3=A" (Analog output is retransmission of temperature)* "O.3=P" (Analog output is proportional)
Only shows up if relay and analog output purchased.
2. Press the /MAX button to toggle between choices.
3a. If you select O.3 to equal A, press the MENU button to store your choice. Themeter momentarily shows "STRD", followed by "OT.S.O" (Output Scale andOffset- refer to Section 19).
3b. If you select O.3 to equal P, press the /DEV button. The meter shows one ofthe following:* "O.4=D" (Proportional analog output is DIRECT ACTING)* "O.4=R" (Proportional analog output is REVERSE ACTING).
4. Press the /MAX button to toggle between choices.
5. Press the MENU button to store your choice. The meter momentarily shows"STRD", followed by "P.BND" (Proportional Band).
Additionally, if you select O.2 to equal V (Analog output to be voltage), press the/DEV button. The meter shows one of the following:* "O.5=F" (Proportional 0-10 V analog output)* "O.5=H" (Proportional 0-5 V analog output)
6. Press the /MAX button to toggle between choices.
7. Press the MENU button to store your choice(s). The meter momentarily shows"STRD", followed by "P.BND" (Proportional Band).
26

2727
SECTION 17. PROPORTIONAL BAND (P.BND)
Refer to Table 25-1 for a summary list of menu configuration.
17.1 SELECTING PROPORTIONAL BAND (P.BND)
Proportional Band (P.BND) is not active unless your meter has analog output and relaycapabilities. The menu will display whether analog output is present or not.
• A proportional controller's output is linearly proportional to the change of the error signal,whenever the signal is within 2 prescribed values (Proportional Band).
• There are three (3) points of interest on the proportional controller transfer curve. • The first is the magnitude of the error signal that drives the controller to “full on” (e.g. 20 mA
out for 4-20 mA).
Figure 17-1. PROPORTIONAL BAND
• The second point of interest is the magnitude of the error signal that drives thecontroller output to “full off” (e.g. 4 mA out on 4-20 mA). These two (2) points need notbe equally spaced on either side of the zero error point.
• The third is the factor "Offset" and it is the output value of the controller which causeszero error.
The above example illustrates the parameters for the 4-20mA analog out, likewise,analog voltage output will have these (3) points of interest.
27

2828
SECTION 17. PROPORTIONAL BAND (P.BND) (Continued)
If A is the controller gain the,Proportional Band =Max. out - Min. out
ACONTROLLER OUT = A* ERROR + OFFSET
To select the proportional band for your proportional controller, follow these steps:
1. Press the MENU button until the meter shows "P.BND".
2. Press the /DEV button. The meter shows the last previously stored 4- digitnumber (0000 through 9999) with flashing 4th digit.
3. Press the /MAX button to change the value of the flashing digit.If you continue to press the /MAX button, the flashing digit's value continues tochange.
4. Press the /DEV button to scroll to the next digit.
5. Press the MENU button to store your selection. The meter momentarily shows"STRD", followed by "M.RST" (Manual Reset).
“P.BND” displays only if you select analog output as proportional.

2929
SECTION 18. MANUAL RESET (M.RST)
Refer to Table 25-1 for a summary list of menu configuration.
Manual Reset (M.RST) is not active unless your meter has analog output capabilities.The menu will display whether analog output is present or not. This feature allows youto offset the error that may occur within your setpoint. In order to determine the amountof error, you must compare your display value to the setpoint 1 value. The differencebetween these two values is the amount of error that you may want to enter into ManualReset (M.RST).
1. Press the MENU button until the meter shows "M.RST" .
2. Press the /DEV button. The meter shows last previously stored 4-digit number (-1999 through 9999) with flashing 4th digit.
3. Press the /MAX button to change the value of the flashing digit.If you continue to press the /MAX button, the flashing digit's value continues tochange.
4. Press the /DEV button to scroll to the next digit.
5. Press the MENU button to store your selection. The meter momentarily shows"STRD", followed also momentarily by "RST" (Reset). Then “CJ.OF” (Cold JunctionOffset) displays (refer to Section 20).
“M.RST” displays only if you select analog output as proportional.Always choose the value of "M.RST" less than "P.BND/2".Meter will not accept larger values and displays with flashing "ER 4".

30
SECTION 19. OUTPUT SCALE AND OFFSET (OT.S.O)
Refer to Table 25-1 for a summary list of menu configuration.
Output Scale and Offset (OT.S.O) is not active unless your meter has analog outputcapabilities. The menu will display whether analog output is present or not. OutputScale and Offset (OT.S.O) scales your analog output to be equal to the meter's displayand/or any engineering units you require. You may scale the output for direct (4-20 mA,0-10 V, etc) or reverse acting (20-4 mA, 10-0 V, etc).
"OT.S.O" only shows if you select analog output as a retransmissionof temperature.
1. Press the MENU button until the meter shows "OT.S.O" .
2. Press the /DEV button. The meter shows "RD 1" (Read 1) .
This is your first point of display reading.
3. Press the /DEV button again. The meter shows the last previously stored4-digit number (-1999 through 9999) with flashing 4th digit.
4. Press the /MAX button to change the value of Read 1.
5. Press the /DEV button to scroll to the next digit.
6. Press the MENU button to store your selection. The meter shows "OUT.1"(Output 1).
This starting analog signal corresponds to your Read 1 display.
7. Press the /DEV button. The meter shows selected output.
If you select "O.2=V" for voltage, the maximum signal you may select is 10.00for an 0-10 V dc signal output. If you select "O.2=C" for current, the maximumsignal you may select is 19.99 for a 0-20 or 4-20 mA dc signal output.
8. Press the /MAX button to enter the output 1 signal selection. If you continue topress the /MAX button, the flashing digit's value continues to change.
30

3131
SECTION 19. OUTPUT SCALE AND OFFSET (OT.S.O) (Continued)
9. Press the /DEV button to scroll to the next digit.
10. Press the MENU button to store your selection. The display shows "RD 2" (Read 2).
This is your second point of display reading.
11. Press the /DEV button. The last previously stored 4-digit number (-1999 through 9999) displays with flashing 4th digit.
12. Press the /MAX button to change the value of the flashing digit.If you continue to press the /MAX button, the flashing digit's value continues tochange.
13. Press the /DEV button to scroll to the next digit.
14. Press the MENU button to store your selection. "OUT.2" (Output 2) displays.
This analog signal should correspond to your Read 2 display.
15. Press the /DEV button. Selected output displays.
If you select "O.2=V" for voltage, the maximum signal you may select is10.00 for an 0-10 V dc signal output. If you select "O.2=C" for current, themaximum signal you may select is 19.99 for a 0-20 or 4-20 mA dc signaloutput.
16. Press the /MAX button to change the value of the flashing digit. If you continue to press the /MAX button, the flashing digit's value continues tochange.
17. Press the /DEV button to scroll to the next digit.
18. Press the MENU button to store your selection. The meter momentarily shows"STRD", followed also momentarily by "RST" (Hard Reset). "CJ.OF" (ColdJunction Offset) then displays.
WARNING: If the meter displays all flashing values on any item, the value hasoverflowed. Press the /MAX button to start new values.

32
SECTION 20. COLD JUNCTION OFFSET CALIBRATION(C.J.OF)
Refer to Table 25-1 for a summary list of menu configuration.
The cold junction offset equals the actual temperature minus the reading temperature.You may compensate for any error due to cold junction on the TC input. You mayperform this compensation in any temperature from 0°C to 40°C (or 32°F to 104°F),however we recommend you perform this compensation at 0°C (32°F) for best result. Todo this, immerse the thermocouple hot junctions into a mixture of ice and water. Checkthe Reading Configuration bit R.1 of the "RD.CF" menu setting for the propertemperature units.
TO PERFORM THIS COMPENSATION, FOLLOW THESE STEPS:
1. Connect the thermocouple wire to the +S and -S input.
2. Press the MENU button until meter displays "CJ.OF".
3. Press the /DEV button. the meter displays the previous offset value withflashing 4th digit.
4. Press the /DEV button again. The reading temperature will be displayed (withno digit flashing).
5A. If the value is okay, then press the MENU button. The display will show "STRD"and 0 value will be entered at the offset.
B. If the value is not okay, then enter the actual temperature using the /DEV and/MAX buttons. Once you enter the accurate temperature, press the MENUbutton. The meter displays "STRD" and stores the offset value.
1. Temperature unit is either celsius or fahrenheit and will always bedisplayed at 0.1 degree resolution. The meter f lashes corresponding LED.
2. MAX/MIN offset value will be ±25.0 °C or 45.0 °F. If offset the limit,the meter will flash "ER 3" and previous offset will not be changed.
32

3333
SECTION 21. LOCK OUT CONFIGURATION (LK.CF)
Refer to Table 25-1 for a summary list of menu configuration.
Use Lock Out Configuration (LK.CF) for the following:
* To enable or disable the RESET button in the run mode.
* To enable or disable setpoint changes
21.1 To Enable or Disable the RESET button in the Run Mode
1. Press the MENU button until the meter shows "LK.CF" after ("C.J.OF").
2. Press the /DEV button until the meter shows "RS.=E" (Default).
3. Press the /MAX button to toggle between:
"RS.=E" To enable the RESET button in the run mode (Default).
"RS.=D" To disable the RESET button in the run mode.
4. Once desired mode shows, press the MENU button to store the change. Themeter returns to the run mode.
21.2 To Enable or Disable Setpoint Changes
1. Press the MENU button until the meter shows "LK.CF" (after "C.J.OF" ).
2. Press the /DEV button until the meter shows "SP.=E"(Default).
3. Press the /MAX button to toggle between:
"SP.=E" To enable setpoint changes (Default).
"SP.=D" To disable setpoint changes
4. Once desired mode shows, press the MENU button to store the change.
33

3434
SECTION 21. LOCK OUT CONFIGURATION (LK.CF) (Continued)
21.3 To Enable Display’s Program Version:
1. Press the MENU button until the meter shows "LK.CF" (after "C.J.OF" ).
2. Press the /DEV button until the meter shows one of the following:
* "L.3=0" “SETPTS” button will display setpoint values.
* "L.3=1" "SETPTS" button will display the meter’s firmware version.
3. Press the /MAX button to toggle between the choices above.
4. Press the MENU button to store the changes.
If your meter does not have the relay option, setpoint menu items above will notbe available and SETPTS button will always display the meter's softwareversion. These units will have +OL (overload) or +OPEN memory indicated byAlarm 1 & 2 LED displays. LEDs can be reset by pressing MENU then RESETbutton or by power OFF then ON. These units can not use analog outputproportional to error from setpoint 1. under menu OT.CF, 0.3=P.
35
SECTION 22. BRIGHTNESS CONFIGURATION
Refer to Table 25-1 for a summary list of menu configuration.
Changing Display Brightness is not active unless meter is a Version “B”.
1. Press the MENU button until the meter shows “bRit” (after “LK.CF”).
2. Press the ∂DEV button from “bRit”. The meter shows one of the following:
• “M.brt” Medium Brightness
• “L.brt” Low Brightness
• “H.brt” High Brightness (Default)
3. Press the ßMAX button to toggle between available choices.
4. Press the MENU button to store your selection. The meter momentarily shows“StRd” followed by “StRd”, “RSt”, “t_C”, then measured value.

3636
SECTION 23. TUNING PROPORTIONALCONTROLLER
The Proportional Controller is not active unless your meter has analog outputand relay capabilities. The menu will display whether analog output is presentor not. This function allows you to tune your controller provided you haveanalog output capabilities. Select proportional on Output Configuration (referto Section 16-3) prior to tuning your controller. Include the meter in theprocess loop and turn on the meter. Allow enough time for the system tosettle, then do the following.
1. Press the /DEV button. The meter momentarily shows "DEV"followed by a blinking value. This value is the deviation (error)between Reading and Setpoint 1 values. If there is no error (error iszero), your controller is tuned. If a value other than zero shows,proceed with step 2.
2. Press RESET button. The meter shows "TUNE", tuning yourcontroller and canceling any error. Once tuned, the meter shows"RST" and returns to the run mode.
Allow enough time for process to settle before proceeding with "TUNE"procedure. If any error happens during this procedure, meter will flash"ER 4" and abort the tuning. You have to restart the procedure.
"TUNE" will be active if your meter has analog output capabilities.
3. Press the /DEV button. Verify that blinking value is zero. If blinkingvalue is not zero, repeat step 2.

373737
SECTION 24. DISPLAY MESSAGES
Table 24-1. Display Messages
MESSAGE DESCRIPTIONRST Hard (power on) Reset
INPT Input Type
DEC.P Decimal Point
RD.CF Reading Configuration
COLR Display Color
S1.CF Setpoint 1 Configuration
S2.CF Setpoint 2 Configuration
S1.DB Setpoint 1 Deadband
S2.DB Setpoint 2 Deadband
OT.CF Output Configuration
P.BND Proportional Band
M.RST Manual Reset
OT.S.O Output Scale and Offset
C.J.OF Cold Junction Offset
ER3 Cold Junction Offset Error
LK.CF Lock Out Configuration
bRit Display Brightness
+OL + Overload Signal
-OL - Overload Signal
TUNE Tuning Proportional Controller
ER4 Tuning Proportional Error
OPN Sensor Breaker or Temperature Outside the Range
+999 Value Overflow in Setpoint/Menu Peak Deviation Routine
-1999 Value Overflow in Setpoint/Menu Peak Deviation Routine
ER1 2 Coordinate Format Programming Error
PEAK Peak Value
PK.RS Peak Reset
SP.RS Reset Setpoints
SP1 Setpoint 1 Value
SP2 Setpoint 2 ValueER2 One or more the following items have overflowed because of decimal
point change: setpoint values, setpoint deadbands, proportionalbands or manual reset.
v.-88.88 Firmware version (where 8 is 0 ~ 9)

38
SECTION 25. MENU CONFIGURATION
Not all menu items display on standard meters.
Table 25-1. Configuration Menu
INPTInput Type
DEC.PDecimal Point
RD.CFReading
Configuration
COLR Display Color
Selection
S1.CFSetpoint 1
Configuration
S2.CFSetpoint 2
Configuration
S1.DBSetpoint 1 Deadband
S2.DBSetpoint 2 Deadband
Shows inputchoices:
Shows decimal point position
R.1
Shows inputchoices:
S.1
S.2
S.1
S.2
Press to scroll to thenext digit to the right
Press to scroll to thenext digit to the right
J.TC Iron vs. Constantan(NIST)
K.TC Chromel vs.Alumel (NIST)
DJ.TC Iron vs. Copper (DIN)T.TC Copper vs. Copper-
Nickel
FFFFFFF.F
C: Celsius F: Fahrenheit
GRN (Green)RED (Red) AMBR (Amber)
A: Active aboveB: Active belowU: UnlatchedL: Latched
A: Active aboveB: Active belowU: UnlatchedL: Latched
Press to change the value ofthe flashing digit
Press to change the value ofthe flashing digit
MENU /DEV /MAX
(Defaults in Bold and Italics)

393939
SECTION 25. MENU CONFIGURATION (Continued)
Table 25-1. Configuration Menu (Continued)
*If you select 0.2=V, you may select your analogoutput to be 0-10 V or 0-5V by accessing sub-menu0.5=F or 0.5=H
*If 0.3=P, you may select your proportional outputanalog to be direct 0.4=D (4-20 mA, 0-5 V, 0-10 v) or reverse acting 0.4=R (20-4 mA, 5-0 V, 10-0 V) .
OT.CFOutput Configuration
Analog Output
P.BNDProportional Bandshown if 0.3 = P
Shows prior valueentered. Scrolls to thenext digit to the right
Changes the value of the flashing digit
Changes the value of the flashing digit
Shows prior valueentered. Scrolls to thenext digit to the right
M.RSTManual Reset
shown if 0.3 = P
0.1
0.2
0.3
0.4
0.5
D: DisabledE: Enabled
V: Voltage analog outC: Current analog out
A: Retransmission oftemperature
P: Proportional to error
D: Proportional analog outputis direct readingR: Proportional analog outputis reverse acting
F: 0-10 V proportionalH: 0-5 V proportional
MENU /DEV /MAX
(Defaults in Bold and Italics)
4040
SECTION 25. MENU CONFIGURATION (Continued)
Table 25-1. Configuration Menu (Continued)
OT.S.OOutput Scale & Offset
Enter new value & show "OUT1"
Enter new value & show "RD 2"
Enter new value &show "OUT2"
Show"RD 1" & prior value
Scroll right one digit
Show prior value
Scroll right one digit
Show prior value
Scroll right one digit
Show prior value
Change flashing digit's value
Change flashing digit's value
Change flashing digit's value
Change flashing digit's value
C.J.OFCold Junction Offset
LK.CFLock Out
Configuration
bRItBrightness
Configuration
Show actual or prior value
RS=
SP=
L3=
Change flashing digit's value(°C only)
E (Enable RESET button inrun mode)
D (Disable RESET button inrun mode)
E (Enable setpoint changes)D (Disable setpoint changes)
0 (SETPTS button displaysetpoint values)
1 (SETPTS button displayfirmware version v.-8.8where 8 is 0~9)
M.brt (Medium Brightness)L.brt (Low Brightness)H.brt (High Brightness)
MENU /DEV /MAX
(Defaults in Bold and Italics)
414141
SECTION 25. MENU CONFIGURATION (Continued)
Table 25-2. Run Mode Displays
/DEVDISPLAY DESCRIPTION/MAX RESET
PEAKPeak
Reading
SP.RS
DEV Press toactivate
Tareproportionalcontroller orexit deviationmode
Shows deviation value.
LATCHED RESET
Press RESET button toreset your setpoints.
WARNING! This resets your tare ifyou are using thismode.
Displays thepeak readingand must be pressed againto return to the normaloperatingmode withoutresetting.
Reset thepeak readingwhen in thismode.
Peak Reading
Displays the highestreading since lastreset.

4242
SECTION 26. SETPOINT CONFIGURATION DISPLAYS
Table 26-1. Setpoint Configuration Displays
SP 1Setpoint 1
SETPOINT 1
Select from -1999through 9999
SETPOINT 2
Select from -1999through 9999
Press to scrollto the nextdigitto the right
Press to changethe value of theflashing digit
Press to changethe value of theflashing digit
Scroll rightone digit
SP 2Setpoint 2
/DEV DESCRIPTIONMENU /MAX

4343
SECTION 27. SPECIFICATIONS
SIGNAL INPUT
Thermocouple Types J - Iron vs. Constantan (NIST)
Temperature Ranges -210° through 760°C(-346° through 1400°F)
K - Chromel vs. Alumel (NIST)-270° through 1372°C(-454° through 2500°F)
DIN J - Iron vs. Constantan (DIN)-200° through 900°C(-328° through 1652°F)
T - Copper vs. Copper-Nickel-270° through 400°C(-454° through 752°F)
Isolation Dielectric strength to 2500V transient per 3mm spacing based on EN 61010 for 260Vrms or dc working voltageNMR- 60 dBCMR- 120 dB
“Big” Display: 4-digit, three color programmable 9-segmentLED 21 mm (0.83")
Symbol: (-1.9.9.9~ 9.9.9.9)
Standard Display: 4-digit, 14-segment LED, 13.8 mm (0.54”)Symbol: (-1.9.9.9. ~ 9.9.9.9.)
ANALOG TO DIGITAL
Technique Dual slope
Internal Resolution 15 bits
Read Rate 3/sec Polarity Automatic
43

4444
SECTION 27. SPECIFICATIONS (Continued)
±0.5°C
Temperature Stability 0.05°C/°C
Step Response Time 1-2 seconds
Warm Up to Rated Accuracy 30 min
ANALOG OUTPUT (if applicable)
Signal type Current or voltage
Signal Level Current 10 V max compliance at 20 mA output
Signal Level Voltage 20 mA max for 0-10 V output
Function May be assigned to a display range or proportional controloutput with setpoint #1 when used as a control output.
Linearity 0.2%
Step Response Time 2-3 seconds to 99% of the final value
ISOLATED ANALOG OUTPUT (if applicable)
Same as non-isolated analog output except isolated to 1000 Vdc.
Signal type Current or voltage
Signal Level
Current 10 V max compliance at 20 mA output
Voltage 20 mA max for 0-10 V output
Function May be assigned to a display range or proportional controloutput with setpoint #1 when used as a control output.
Linearity 0.2%
Step Response Time 2 - 3 seconds to 99% of the final value
Only one analog output is available on each unit and it must be factory installed.
ACCURACY AT 25°C

4545
SECTION 27. SPECIFICATIONS (Continued)
INPUT POWER INFORMATION
~ AC units 115/230 V~(AC) ±10%, 50/60 Hz7 W max, power consumption (Non-Isolated Analog Output)8 W max, power consumption (Isolated Analog Output)
DC units 10-32 Vdc or 26-56 Vdc6 W max, power consumption (Non-Isolated Analog Output)7 W max, power consumption (Isolated Analog Output)
External Fuse Required:
IEC 127-2/IIIPower Fuse115 V 125 mA @ 250 (T)230 V 63 mA @ 250 (T)
UL 248-14 (Listed Fuse)Power Fuse115 V 175 mA @ 250 V Slow-Blow230 V 80 mA @ 250 V Slow-Blow
ENVIRONMENT
Operating Temperature 0° to 50°C (32° to 122°F)Storage Temperature -40° to 85°C (-40° to 185°F)Relative Humidity 90% at 40°C (non-condensing)
MECHANICAL
Panel Cutout 1/8 DIN 3.62 x 1.77" (92 x 45mm)Weight 1.27 lb (574 g)Case Material Polycarbonate, 94 V-O UL rated Protection: NEMA 4/Type 4 Front Bezel
ALARM OUTPUTS (if applicable)
2 Form "C" on/off relays. Configurable for latched and unlatched by software.
Max Current 5 AMPS, Resistive Load
Max Voltage 250 V ac or 30 V dc
45

4646
SECTION 27. SPECIFICATIONS (Continued)
Figure 27-1 Meter Dimensions
SIDE VIEW TOP VIEW
CASE
REAR COVER
96,0 (3.78)48,0 (1.89)
20,3 (.80)
151,
4 (5
.96)
RETAINER
FRONT BEZEL

47
SECTION 28. FACTORY PRESET VALUES
Table 28-1. Factory Preset Values
MENU ITEM FACTORY PRESET VALUES
INPT Input Type: K.TC (Type K T/C)DEC.P Decimal Point Position: FFFF.RD.CF Reading Configuration:
R.1=F (Fahrenheit)COLR Normal Color Display:
REd or GRN (Note: Depending how it was ordered)S1.CF Setpoint 1 Configuration:
S.1=A (Setpoint is active above)S.2=U (Setpoint is unlatched)
S2.CF Setpoint 2 Configuration:S.1=A (Setpoint is active above)S.2=U (Setpoint is unlatched)
S1.DB Setpoint 1 Deadband: 0003S2.DB Setpoint 2 Deadband: 0003OT.CF Output Configuration:
O.1=E (Analog output is enabled)O.2=C (Analog output is current)O.3=A (Analog output follows the display value)
OT.S.O Output Scale and Offset:0-1000 = 4-20 mA dc
LK.CF Lock Out ConfigurationRS=E (Enable the RESET button in the run mode)SP=E (Enable setpoint changes)L3=0 (SETPTS button display setpoint values)
bRit H.brt (Brightness Level)SP1 Setpoint 1 Value: 0000SP2 Setpoint 2 Value: 0000

4848
CE APPROVALS INFORMATION
This product conforms to the EMC directive 89/336/EEC amended by93/68/EEC, and with the European Low Voltage Directive 72/23/EEC.
Electrical Safety EN61010-1:2001Safety requirements for electrical equipment for measurement, control andlaboratory.Double InsulationPollution Degree 2Dielectric withstand Test per 1 min
• Power to Input/Output: 2300 Vac (3250 Vdc)• Power to Input/Output: 500 Vac (720 Vdc)
(Low Voltage dc Power Option*)
• Power to Relays Output: 2300 Vac (3250 Vdc)• Relay 1 to Relay 2: 2300 Vac (3250 Vdc)• Isolated Analog to Inputs: 1000 Vac (1420 Vdc)• Analog to Inputs: No Isolation
Measurement Category ICategory I are measurements performed on circuits not directly connected to theMains Supply (power). Maximum Line-to-Neutral working voltage is 50 Vac/dc.This unit should not be used in Measurement Categories II, III, IV.
Transients Overvoltage Surge (1.2 / 50uS pulse)• Input Power: 2500 V• Input Power: 500 V
(Low Voltage dc Power Option*)
• Isolated Analog: 500 V• Input/Output Signals: 500 V
Note: *Units configured for external low power dc voltage, 10-32 Vdc (BasicInsulation)
EMC EN61326:1997 + and A1:1998 + A2:2001Immunity and Emissions requirements for electrical equipment for measurement,control and laboratory.
• EMC Emissions Table 4, Class B of EN61326• EMC Immunity** Table 1 of EN61326
Note: **I/O signal and control lines require shielded cables and these cables must be located on conductive cable trays or in conduits. Furthermore, the length of these cables should not exceed 30 meters
Refer to the EMC and Safety installation considerations (Guidelines) of this manualfor additional information.

Warranty/DisclaimerNEWPORT Electronics, Inc. warrants this unit to be free of defects in materials and workmanship for a period of one(1) year from the date of purchase. In addition to NEWPORT’s standard warranty period, NEWPORT Electronics willextend the warranty period for four (4) additional years if the warranty card enclosed with each instrument isreturned to NEWPORT.
If the unit should malfunction, it must be returned to the factory for evaluation. NEWPORT’s Customer ServiceDepartment will issue an Authorized Return (AR) number immediately upon phone or written request. Uponexamination by NEWPORT, if the unit is found to be defective it will be repaired or replaced at no charge.NEWPORT’s WARRANTY does not apply to defects resulting from any action of the purchaser, including but notlimited to mishandling, improper interfacing, operation outside of design limits, improper repair, or unauthorizedmodification. This WARRANTY is VOID if the unit shows evidence of having been tampered with or shows evidenceof being damaged as a result of excessive corrosion; or current, heat, moisture or vibration; improper specification;misapplication; misuse or other operating conditions outside of NEWPORT’s control. Components which wear are notwarranted, including but not limited to contact points, fuses, and triacs.
NEWPORT is pleased to offer suggestions on the use of its various products. However, NEWPORT neitherassumes responsibility for any omissions or errors nor assumes liability for any damages that result from theuse of its products in accordance with information provided by NEWPORT, either verbal or written. NEWPORTwarrants only that the parts manufactured by it will be as specified and free of defects. NEWPORT MAKES NOOTHER WARRANTIES OR REPRESENTATIONS OF ANY KIND WHATSOEVER, EXPRESSED OR IMPLIED,EXCEPT THAT OF TITLE, AND ALL IMPLIED WARRANTIES INCLUDING ANY WARRANTY OFMERCHANTABILITY AND FITNESS FOR A PARTICULAR PURPOSE ARE HEREBY DISCLAIMED. LIMITATIONOF LIABILITY: The remedies of purchaser set forth herein are exclusive and the total liability of NEWPORTwith respect to this order, whether based on contract, warranty, negligence, indemnification, strict liability orotherwise, shall not exceed the purchase price of the component upon which liability is based. In no eventshall NEWPORT be liable for consequential, incidental or special damages.
CONDITIONS: Equipment sold by NEWPORT is not intended to be used, nor shall it be used: (1) as a “BasicComponent” under 10 CFR 21 (NRC), used in or with any nuclear installation or activity; or (2) in medical applicationsor used on humans. Should any Product(s) be used in or with any nuclear installation or activity, medical application,or used on humans, or misused in any way, NEWPORT assumes no responsibility as set forth in our basicWARRANTY / DISCLAIMER language, and additionally purchaser will indemnify NEWPORT and hold NEWPORTharmless from any liability or damage whatsoever arising out of the use of the Product(s) in such a manner.
Direct all warranty and repair requests/inquiries to the NEWPORT Customer Service Department. BEFORERETURNING ANY PRODUCT(S) TO NEWPORT, PURCHASER MUST OBTAIN AN AUTHORIZED RETURN (AR)NUMBER FROM NEWPORT’S CUSTOMER SERVICE DEPARTMENT (IN ORDER TO AVOID PROCESSINGDELAYS). The assigned AR number should then be marked on the outside of the return package and on anycorrespondence.
The purchaser is responsible for shipping charges, freight, insurance and proper packaging to prevent breakage intransit.
FOR WARRANTY RETURNS, please have thefollowing information available BEFORE contacting NEWPORT:
1. P.O. number under which the product wasPURCHASED,
2. Model and serial number of the product underwarranty, and
3. Repair instructions and/or specific problemsrelative to the product.
FOR NON-WARRANTY REPAIRS, consult NEWPORT forcurrent repair charges. Have the following informationavailable BEFORE contacting NEWPORT:
1. P.O. number to cover the COST of the repair,
2. Model and serial number of product, and3. Repair instructions and/or specific problems relative to
the product.
NEWPORT’s policy is to make running changes, not model changes, whenever an improvement is possible. Thisaffords our customers the latest in technology and engineering.
NEWPORT is a registered trademark of NEWPORT Electronics, Inc.
© Copyright 2006 NEWPORT Electronics, Inc. All rights reserved. This document may not be copied,photocopied, reproduced, translated, or reduced to any electronic medium or machine-readable form, in whole or inpart, without prior written consent of NEWPORT Electronics, Inc.
Return Requests/Inquiries

For immediate technical or application assistance please call:
Newport Electronics, Inc.2229 South Yale Street • Santa Ana, CA • 92704 • U.S.A.
TEL: (714) 540-4914 • FAX: (203) 968-7311Toll Free: 1-800-639-7678 • www.newportUS.com • e-mail:[email protected]
ISO 9001 Certified
Newport Technologies, Inc.976 Bergar • Laval (Quebec) • H7L 5A1 • Canada
TEL: (514) 335-3183 • FAX: (514) 856-6886Toll Free: 1-800-639-7678 • www.newport.ca • e-mail:[email protected]
Newport Electronics, Ltd.One Omega Drive • River Bend Technology Centre
Northbank, Irlam • Manchester M44 5BD • United KingdomTel: +44 161 777 6611 • FAX: +44 161 777 6622
Toll Free: 0800 488 488 • www.newportuk.co.uk • e-mail:[email protected]
Newport Electronics spol s.r.o.Frystatska 184, 733 01 Karviná • Czech RepublicTEL: +420 59 6311899 • FAX: +420 59 6311114
Toll Free: 0800-1-66342 • www.newport.cz • e-mail: [email protected]
Newport Electronics GmbHDaimlerstrasse 26 • D-75392 Deckenpfronn • Germany
TEL: 49 7056 9398-0 • FAX: 49 7056 9398-29Toll Free: 0800 / 6397678 • www.newport.de • e-mail: [email protected]
Mexico and Latin AmericaFAX: 001 (203) 359-7807
En Español: 001 (203) 359-7803
M3732/N/0906