infant ecg/umbilical cannulation skin lf03710u instruction … · about the simulator the life/form...
TRANSCRIPT
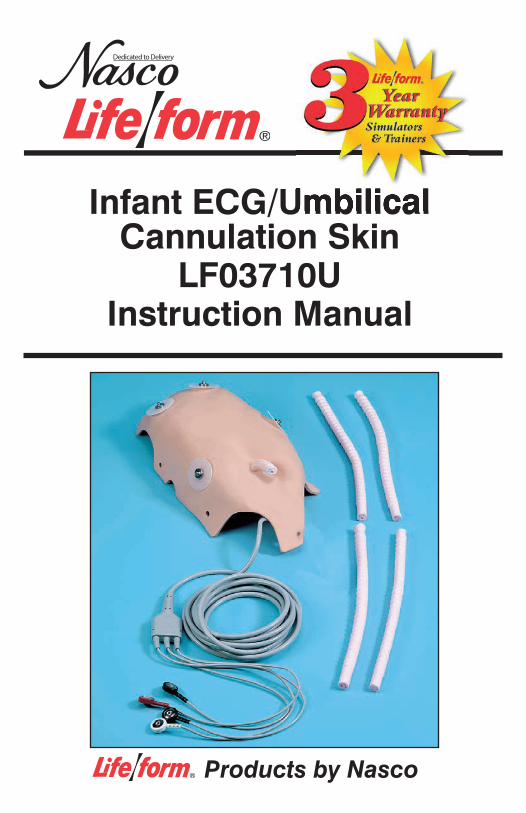
Infant ECG/Umbilical Cannulation Skin
LF03710UInstruction Manual
Products by Nasco
Infant ECG/Umbilical
About the Simulator
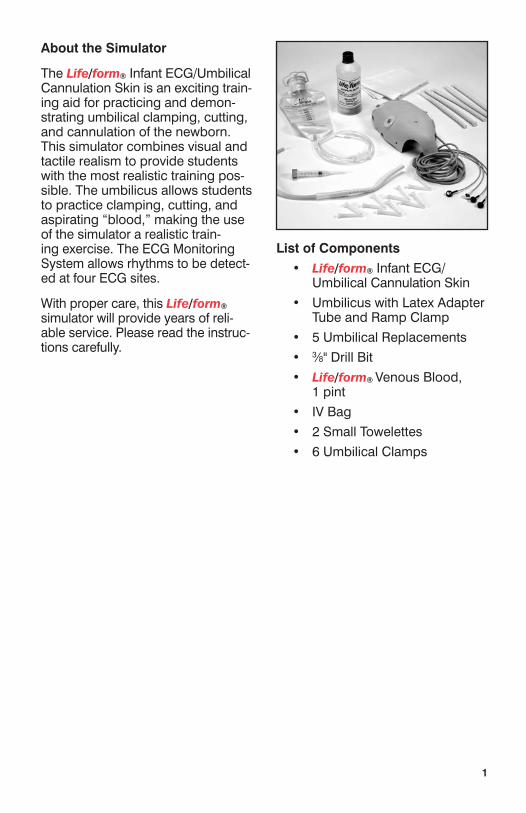
The Life/form® Infant ECG/Umbilical Cannulation Skin is an exciting train-ing aid for practicing and demon-strating umbilical clamping, cutting, and cannulation of the newborn. This simulator combines visual and tactile realism to provide students with the most realistic training pos-sible. The umbilicus allows students to practice clamping, cutting, and aspirating “blood,” making the use of the simulator a realistic train-ing exercise. The ECG Monitoring System allows rhythms to be detect-ed at four ECG sites.
With proper care, this Life/form® simulator will provide years of reli-able service. Please read the instruc-tions carefully.
List of Components • Life/form® Infant ECG/ Umbilical Cannulation Skin
• UmbilicuswithLatexAdapter Tube and Ramp Clamp
• 5UmbilicalReplacements
• 3⁄8" Drill Bit
• Life/form® Venous Blood, 1 pint
• IVBag
• 2SmallTowelettes
• 6UmbilicalClamps
1

2
SetupThe Life/form® Infant ECG/Umbilical Cannulation Skin has been designed to replace the standard outer chest skin on the Resusci® Baby* brand CPR Manikins.
Resusci® Baby* Installation Instructions
Removing the Regular Chest SkinIn order to install the Infant ECG/Umbilical Cannulation Skin, you must first remove the outer skin that is currently in place on your CPR Manikin.
Chest Plate Preparation
Liftoutthelungplateandchestplate assembly. (See figure 1.) Once you have removed the lung plate from your Resusci® Baby*, you must determine which style the lung plate is.
If you have a lung plate like the one inFigure2,youmayproceedto“Installing the Umbilicus” on page 4.
If you have a lung plate like the one in Figure 3, follow the steps below.
You will need to locate the 3⁄8" drill bit included with your Life/form® Simulator and a standard electric 3⁄8" household drill (not included).
Turning the lung plate over, you will find two circular depressions on the lower end of the lung plate. (See figure 4.)
*RESUSCI® BABY IS A TRADEMARK OF LAERDAL MEDICAL CORPORATION.
Figure 1
Figure 3
Figure 2

By measuring, find the center between the two circles and mark it with a pencil. (See figure 5.)
Carefully drill a 3⁄8" hole through the lung plate in the marked location. (See figure 6.) (Be sure to wear safety glasses during this step.)
Be sure the hole is nice and smooth and no burrs are present. You may remove any burrs with a file or by trimming carefully with a scalpel. (See figures 7A and 7B.)
3
Figure 4
Figure 5
Figure 6
Figure 7A
Figure 7B

Installing the Umbilicus
Figure 8
Once the lung plate and chest plate assembly have been removed, thread the umbilicus up through the lung plate assembly so about two inches are protruding. (See figure 8.)
Next, coil the extra umbilicus under the plate with the small latex tubing coming out of the right hand side of your Resusci® Baby*.
Figure 9
Now install your lung and chest plate assembly back into the body. (See figure 9.)
Figure 10
Finally, snap the top four connec-tions down on your new chest skin, thread the umbilicus through the hole in the chest skin, and finish attaching the skin. (See figure 10.) Push the umbilicus down so only about one inch is protruding.
General Instructions for Use
A. Preparing the Synthetic Blood Concentrated blood colorant is provided.Fillthe16-oz.con- tainer with tap water for the proper dilution. (See figure 11.)
4
*RESUSCI® BABY IS A TRADEMARK OF LAERDAL MEDICAL CORPORATION.
Figure 11

Figure 12
B. Hanging the IV Bag Hang the bag at an 18" height.
C. Filling the IV Supply Bag Pour the diluted Life/form® Blood into the IV bag. (See figure 12.) Distilled water can be used in place of synthetic blood, and is recommended. Be certain the clamp on the tubing is closed before filling.
D. Connecting the IV Bag to the Umbilicus
The umbilicus is supplied with a special connector that fits the umbilicus tubing and the IV tub-ing. Insert the connector from the IV tubing into the tubing coming from the umbilicus as shown. (See figure 13.)
E. Filling the Umbilicus System 1. Hold a towel or container near the open end of the umbilicus. 2.Carefullyopentheclampand allow the liquid to slowly flow through the system until a steady stream exits all three holes at the umbilicus end. Note: Careful adjustment of the ramp clamp is needed to supply a steady stream of “blood” during aspiration pro- cedures. (See figure 14.)
Procedures That Can Be Performed on This Simulator
A. “Blood” AspirationThe Life/form® Infant ECG/Umbilical Cannulation Skin is now ready for aspiration practice. The “blood” flow is controlled by careful adjustment of the ramp clamp.
B. Cutting the UmbilicusThe Life/form® Infant ECG/Umbilical Cannulation Skin Simulator allows the student to practice clamping and cutting the umbilicus. The umbilicus may be drawn out of the body to the desired length for trim-ming. Note: When the umbilici are used up, order the Umbilical Cannulation Replacement Cords (LF03642U) on page 7.
5
Figure 13
Figure 14

C. Clamping the UmbilicusThe Life/form® Infant ECG/Umbilical Cannulation Skin is perfect for practicing umbilicus clamping and umbilicus clamp removal.
Causes for Failure in FunctionIV infusion may not flow if the bag isn’t high enough, if the clamp isn’t open, or if the latex tubing is kinked or pinched.
A. During the Procedure of Drawing “Blood,” If the “Blood” Cannot Be Aspirated 1. The clamp on the IV tubing may not be open.
2.Aircouldbetrappedinthe umbilicus system. Simply flush the system slowly, draining some “blood” or distilled water, whichever you are using, until all the air bubbles are eliminated.
3. Check for possible kinks in the system.
Care of the SimulatorThis training simulator has been designed to provide the greatest possible durability and lowest maintenance while not compromis-ing the realism of use. The follow-ing are some suggestions for help-ing you yield the maximum life from this unique simulator.
A. Before Storing the Infant ECG/ Umbilical Cannulation Skin 1. Drain the umbilicus by raising the body over the height of the IV bag and then opening therampclamp.Allowthe “blood” to flow back past the bag clamp, then close the clamp.
2.DisconnecttheIVbagand pour the fluid back into the container.
3. If synthetic blood was used, flush out both the bag and umbilicus with clean water and allow them to dry.
B. Umbilicus Replacement
Afterthelengthofumbilicusisused up, it will need replacing. The simulator comes with five additional umbilici. To replace the used umbilicus with a new piece, do the following:
Figure 15
1. Make sure the clamp on the IV bag is closed.
2.Disconnecttheoldumbilicus from the latex tubing. (See figure 15.)
Figure 166

3.Attachthenewumbilicusby sliding it inside the tube. (See figure 16.)
4. Reinstall the umbilicus as described earlier.
Supplies/Replacement Parts for the Infant ECG/Umbilical Cannulation Skin
LF00845U Life/form® Venous Blood, 1 quart
LF00846U Life/form® Venous Blood, 1 gallon
LF01022U Fluid Supply Stand
LF01130U Fluid Supply Bag
LF03642U Umbilical Cannulation Replacement Cords (10pk)
LF09919U Nasco Cleaner
7

COPYRIGHT © NASCO 1995 PRINTED IN U.S.A. NP 32-00/RV 8-12
Other Available SimulatorsLF00698U Adult Injectable Arm (White)LF00855U Male CatheterizationLF00856U Female CatheterizationLF00901U Prostate ExaminationLF00906U Ostomy CareLF00929U Surgical BandagingLF00957U Enema AdministrationLF00958U Pediatric Injectable ArmLF00961U Intramuscular InjectionLF00984U Breast ExaminationLF00995U Arterial Puncture ArmLF00999U Pediatric Injectable HeadLF01005U First Aid Arm LF01008U Intradermal Injection ArmLF01012U Heart Catheterization (TPN)LF01019U Ear ExaminationLF01027U Peritoneal DialysisLF01028U Suture Practice ArmLF01034U Suture Practice LegLF01036U Spinal InjectionLF01037U Hemodialysis Practice ArmLF01038U Episiotomy Suturing SetLF01042U Suture KitLF01062U Pelvic, Normal & AbnormalLF01063U Stump Bandaging, UpperLF01064U Stump Bandaging, LowerLF01069U Cervical EffacementLF01070U Birthing StationLF01082U CricothyrotomyLF01083U Tracheostomy CareLF01084U Sigmoidoscopic ExaminationLF01087U Central Venous CannulationLF01095U Blood Pressure ArmLF01108U Infant Intraosseous InfusionLF01121U Advanced IV ArmLF01131U Venipuncture and Injection ArmLF01139U Advanced IV HandLF01142U Auscultation TrainerLF01143U Testicular ExamLF01152U Male & Female CatheterLF01155U Advanced CPR DogLF01162U Venatech IV TrainerLF01174U NG Tube & Trach Skills
LF01184U Venatech IM & Sub Q LF01193U Special Needs BabyLF03000U CPARLENE® SeriesLF03601U Adult Airway Management Trainer with StandLF03602U Adult Airway Management ManikinLF03609U Child Airway Management Trainer with StandLF03616U Child CRiSis™ ManikinLF03617U Deluxe Child CRiSis™ Manikin with Arrhythmia TutorLF03620U PALS Update KitLF03623U Infant Airway Management Trainer with StandLF03632U Child Intraosseous Infusion/ Femoral Access Leg on a StandLF03633U Child Airway Management Trainer TorsoLF03693U Basic Buddy® CPR ManikinLF03699U “Airway Larry” Airway Management TrainerLF03709U Infant CRiSis™ ManikinLF03720U Baby Buddy™ Infant CPR ManikinLF03750U Fat Old FredLF03760U Airway Management/Cricoid Pressure TrainerLF03770U Chest TubeLF03953U CRiSis™ Manikin, CompleteLF03955U Deluxe CRiSis™ ManikinLF03956U Deluxe “Plus” CRiSis™ ManikinLF03965U Adult CRiSis™ Auscultation ManikinLF03966U Adult CRiSis™ Auscultation Manikin with ECG SimulatorLF04000U GERi™/KERi™ Manikin SeriesLF04200U Adult Sternal Intraosseous InfusionLF06001U CPR Prompt® Adult/Child ManikinLF06012U CPR Prompt® Infant ManikinLF06200U CPR Prompt® Keychain Rescue AidLF06204U CPR Prompt® Rescue and Practice Aid
901 Janesville Avenue, P.O. Box 901Fort Atkinson, Wisconsin 53538-0901
1-800-558-9595eNasco.com • E-mail: [email protected]
Fort Atkinson