indoor lighting lcc-tool user guide
TRANSCRIPT

Indoor lighting LCC-Tool User Guide
Visual guide to using the life-cycle costing and CO2 assessment tool
for office indoor lighting projects
(LCC-CO2 tool)
L C C _ I n d o o r L i g h t i n g _ 2 0 2 1 0 5 - 2 3

2
INDOOR LIGHTING LCC-TOOL: A BESPOKE VERSION For indoor lighting projects Publisher:
Government of Flanders – Departement Omgeving, 2021 Publisher of the original LCC-CO2 TOOL – A Smart SPP project publication (www.smart-spp.eu):
The SMART SPP consortium, c/o ICLEI – Local Governments for Sustainability, 2011 Authors:
Els Verwimp (Government of Flanders), Co-author: CERAA npo Authors of the original LCC-CO2 TOOL: A Smart SPP project publication (www.smart-spp.eu):
Aure Adell (Ecoinstitut Barcelona), Dominik Seebach and Martin Möller (Öko-Institut) with contributions of Philipp Tepper (ICLEI)
Copyright:
The SMART SPP consortium, c/o ICLEI – Local Governments for Sustainability, 2011. Copyright for the 2021-adaptation lies with Flanders Government, 2021, All rights reserved. No part of this publication can be reproduced or copies in any form or by any means without written permission of ICLEI – Local Governments for Sustainability and the Government of Flanders. For any question please contact: [email protected] and [email protected].

3
Indoor lighting LCC-Tool User Guide
Visual guide to using the life-cycle costing and CO2 assessment tool
for office indoor lighting projects
(LCC-CO2 tool) Project partners SMART SPP:
Project partners BESPOKE VERSION FOR indoor lighting projects:
Indoor lighting LCC-Tool – User Guide
4
Index Index ...................................................................................................................................................... 4
Part I – Introduction ................................................................................................................................ 5
I.1 Supported operating system and software ..................................................................................... 5
I.2 Objective of the user guide ............................................................................................................. 5
I.3 What information does the tool provide? ........................................................................................ 5
I.4 Who should fill in the tool? ............................................................................................................. 7
Part II - Quickstart Guide ........................................................................................................................ 8
Part III – General features of the tool ...................................................................................................... 9
Part IV – User Guide – Acquisition ........................................................................................................ 10
Homepage ........................................................................................................................................ 10
Step 1: Log in and create a new project (contracting authority) ......................................................... 11
Step 2: General information input (contracting authority) ................................................................... 12
Step 3: Inputting building structure (contracting authority) ................................................................. 13
Step 4: Create an output for the bidder (contracting authority) .......................................................... 16
Step 5: Inputting lighting devices (bidder or contracting authority) ..................................................... 17
Step 6: Create a proposal for the contracting authority (bidder) ........................................................ 20
Step 7: Import the proposals (contracting authority) .......................................................................... 22
Step 8: Results for the proposals (contracting authority) ................................................................... 23
Step 9: Tender evaluation and awarding the contract (contracting authority) .................................... 26
Part V – User Guide – Lease ................................................................................................................ 29
Modifications for step 2: General information input (contracting authority) ......................................... 29
Modifications for step 6: Create a proposal for the contracting authority (bidder) .............................. 29
Modifications for step 8: Results for the proposals (contracting authority) ......................................... 30

Indoor lighting LCC-Tool – User Guide
5
Part I – Introduction I.1 Supported operating system and software The tool has been programmed for Microsoft Office 2016 for Windows. I.2 Objective of the user guide This user Guide accompanies the Office Indoor Lighting LCC-tool. The tool has been developed to help you calculate the total cost of ownership (TCO), the life cycle costs (LCC) and CO2 emissions of an indoor lighting project to assist in procurement decision making. The User Guide has been produced to help you understand: • What kind of information the tool can provide • How the tool should be completed, and by whom The Office Indoor Lighting LCC-Tool, which was commissioned by the Government of Flanders, is to be seen as a tool complementary to the ‘LCC-tool indoor lighting’ of the European Commission (EC). Both tools are based on the same principles and data (e.g. for CO2 information) and the development teams regularly coordinated their efforts to guarantee a common basis. Use the Office Indoor Lighting LCC-Tool (Government of Flanders) for more complex situations, to also consider the embedded emissions or to simulate lease situations. Broadly speaking, the Office Indoor Lighting LCC-Tool offers you the following additional options: • Input of a complex building structure with a large quantity of different lighting devices (LCC-tool indoor
lighting (EC): max. 5 types of lighting devices) • Both acquisition and lease contracts • The option to consider embedded emissions from the production and end-of life stage, if an
Environmental Product Declarations (EPD) is available for all lighting devices The user guide accompanying the LCC-tool indoor lighting (EC) contains a lot of useful information about the preparation stage for your procurement and how you can combine LCC with other criteria in your tender. This information is definitely also useful when using the more extended Office Indoor Lighting LCC-Tool (Government of Flanders). I.3 What information does the tool provide? The tool can be used: • To assess the total cost of ownership (TCO), life cycle costs (LCC), CO2 emissions and payback
period of your lighting project • To compare different scenarios or offers for purchasing or leasing contracts • To assess the current situation and thus determine potential financial impacts of innovative
alternative solutions Never use this tool as the only (award) criterium in a tendering process! The purpose of the tool is to assess costs related to the (re)lighting project on the long term. The tools has no criteria, nor does it evaluate, requirements regarding visual comfort (such as colour temperature, uniformity, glare,…) and other qualitative aspects of the lighting design. It’s important to describe which qualitative demands the lighting design should meet, and that the bidder proves that his design meets your expectations with a.o. plans, lighting studies, technical specifications of the lighting devices ….

Indoor lighting LCC-Tool – User Guide
6
You can use the tool: • For acquisition or lease contracts • With or without maintenance contract • With or without EPD (Environmental Product Declaration) information The tool will adapt accordingly after you’ve chosen your options at the ‘LCC input results’ sheet. Total cost of ownership (TCO) The total cost of ownership is the sum of all costs involved in the acquisition, operation and maintenance of a given asset during its lifetime: • Acquisition costs: The total acquisition costs include the purchase price of the luminaires including
all lighting elements (cable, control systems,…), taxes, installation and initial one-off costs for commissioning, training and communication.
• Operating costs: the expenses related to the operation of the lighting devices and elements, including taxes.
• Maintenance costs: the expenses related to the maintenance or replacement of the lighting devices and elements, including taxes.
• Other costs: fees, subsidies or other costs. • Remnant value / End-of life / disposal: After the end of its service life, the product enters the end-
of life phase, where it will be recycled and/or disposed. The remnant value as well as the waste treatment costs (if applicable) have to be considered.
Life-cycle costs (LCC) The assessment of all costs associated with the life cycle of a product that are directly covered by one or more actors in the product life cycle (supplier, manufacturer, user or consumer, and/or EoL actor), with the inclusion of externalities that are anticipated to be internalized in the decision-relevant future.1 • extraction of raw materials • design • production and environmental costs • packaging • distribution • operating costs • maintenance • dismantling, recycling, disposal and environmental costs • and transportation costs between the different stages CO2 emissions You can use the tool to calculate the CO2 emissions of a lighting project. The tool provides two options regarding the CO2 emissions: 1. A version of the tool without EPD (Environmental Product Declaration) information and thus
without embedded emissions. In this version, the tool will only calculate the CO2 emissions deriving from the operational phase. These are mainly caused by energy consumption during use. The tool calculates these CO2 emissions deriving from the operational phase based on the energy use forecasting, energy mix …
1 definition Hunkeler D. et al. (2008) - ‘Environmental Life Cycle Costing’, published by the Society for Environmental Toxicology and Chemistry (SETAC).
Indoor lighting LCC-Tool – User Guide
7
2. A version of the tool with EPD information and thus with both CO2 emissions deriving from the operational phase as embedded emissions. Embedded emissions are emissions caused during production (including raw material extraction), transportation, installation and disposal. In this case, if EPD’s are available for every lighting system in the project, the tool will use the LCA results from the EPD to calculate the CO2 emissions deriving from: • the production stage, comprising all processes for the manufacturing of the product, • the construction process stage and, • the end of life stage.
The costs of the CO2 emissions are calculated in order to monetise the environmental impact (externalities) by CO2 emissions. Payback period The payback period is the length of time required to recover the cost of an investment. The payback period of a given investment or project is an important determinant of whether to undertake the project or not, when comparing the future project with the existing situation. Tender evaluation The “Tender Evaluation” sheet will help you to compare the calculations of TCO, LCC and/or CO2 emissions of the different bidders. You’ll also be able to define other award criteria, add the weighting of each award criteria as defined in the tender specifications and add the points awarded per criterium and offer in order to get a full overview of the end result. IMPORTANT: You will need to choose between the TCO or LCC approach in your award criteria, because you can’t reward the same aspects twice. Both calculations have a common basis. I.4 Who should fill in the tool? Who within the contracting authority should be involved? Involve the right people within your organisation when preparing the tool, e.g.: • The division in charge for the energy contracts / climate goals. They can help you with the costs and
the expected cost evolution of your energy contract and the CO2 emissions mix linked to the contract. • The financial division. They can help you determine the appropriate discount rate, the right evaluation
period … Who has to fill in which information (bidder / contracting authority)? • Certain data must be provided by the contracting authority:
− Evaluation period − Discount rate and annual price increase of electricity − Building structure (levels, room type, …)
• The bidders will fill in their offer for the lighting project into the tool and send their proposal back to the contracting authority.
• Bidders must provide evidence to support the costing and the information on CO2 emissions that they submit. Clarify that in your tender documents.
• Fields in Italic contain data that the tool doesn’t use when calculating results. It isn’t mandatory to fill these in. The information however could be useful when transferring specific information to the bidder for their light studies.
Indoor lighting LCC-Tool – User Guide
8
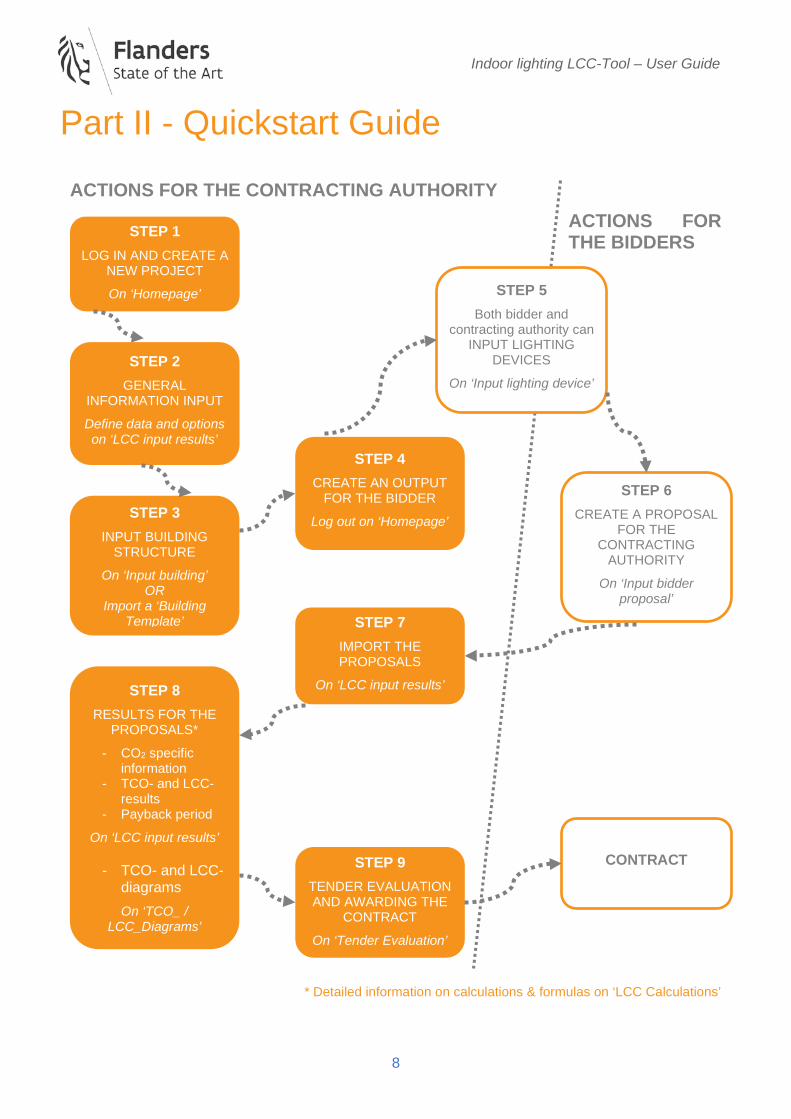
Part II - Quickstart Guide
STEP 1 LOG IN AND CREATE A
NEW PROJECT
On ‘Homepage’
ACTIONS FOR THE CONTRACTING AUTHORITY ACTIONS FOR THE BIDDERS
STEP 2 GENERAL
INFORMATION INPUT Define data and options on ‘LCC input results’
STEP 3 INPUT BUILDING
STRUCTURE On ‘Input building’
OR Import a ‘Building
Template’
STEP 8 RESULTS FOR THE
PROPOSALS* - CO2 specific
information - TCO- and LCC-
results - Payback period
On ‘LCC input results’
- TCO- and LCC-diagrams On ‘TCO_ /
LCC_Diagrams’
STEP 4 CREATE AN OUTPUT
FOR THE BIDDER Log out on ‘Homepage’
STEP 7 IMPORT THE PROPOSALS
On ‘LCC input results’
STEP 9 TENDER EVALUATION AND AWARDING THE
CONTRACT On ‘Tender Evaluation’
* Detailed information on calculations & formulas on ‘LCC Calculations’
STEP 5 Both bidder and
contracting authority can INPUT LIGHTING
DEVICES On ‘Input lighting device’
STEP 6 CREATE A PROPOSAL
FOR THE CONTRACTING
AUTHORITY On ‘Input bidder
proposal’
CONTRACT

Indoor lighting LCC-Tool – User Guide
9
Part III – General features of the tool Colour coding of worksheets The tool consists of several worksheets whose tabs have been colour coded:
The “Introduction” sheet contains an overview of the worksheets in the tool and their use. Colour coding of cells Additionally, cells are colour-coded to help identify how to use them:
Information on calculations and formulas You can find detailed information on calculations and formulas on each (visible) worksheet on the “LCC Calculations” sheet.
All sheet tabs in dark green contain text for your information
All sheet tabs in light green are to input data or compare results
All sheet tabs in dark grey are background sheets for calculations and provision of specific information
Green cells with the letter ‘c’ contain extra information – Hover over the field to see the information
White cells are those where you have to input data
Orange cells contain drop-down menus where you have to select an option
Grey cells contain automatic calculations

Indoor lighting LCC-Tool – User Guide
10
Part IV – User Guide – Acquisition Never ‘reuse’ the LCC-tool from a previous tender! Download an empty version of this tool for each new procedure. That way, you’re always sure that you’re using the latest version of the tool. The tool contains Excel VBA (Visual Basic for Applications) codes. That’s why you might have to confirm “Enable Content” on the button on the yellow bar on top of your screen. This will allow the tool to use the VBA codes on your computer.
Make sure that you’ve set the macro settings in the trust centre of Microsoft Office to “Disable all macros with notification”. De option “Enable all macros … ” will in some versions of Excel generate errors the first time that you enable the content:
Homepage You can access the different sheets of the tool by clicking on the titles in the orange boxes on the “HOME” sheet. The “HOME” sheet groups the actions for either the contracting authority or the bidder separately. You’ll find the version of the tool and the type of user in the top right corner of this sheet. You can also easily navigate through the tool by clicking on the floating Menu bar. You can close this floating menu, but you can always re-open it by clicking on the ‘Menu’ button which you’ll find on every sheet.

Indoor lighting LCC-Tool – User Guide
11
Step 1: Log in and create a new project (contracting authority) Log in as contracting authority The contracting authority will have to prepare the tool before publishing it (with other tender documents). In order to do this, you’ll need to log in on the “HOME” sheet as a contracting authority. This will give you access to more functionalities of the tool and allows you to define all relevant data for the tender. When first using the tool, use the following account name and password to log in:
Account: Contracting authority Password: LCC-Tool2019!
Use the box behind the password field to see the password you’re typing. You can change the password when logging out (see Step 4). Choose your language / Create new project You can use the tool in English or Dutch. Alter the language with the ‘Language’ button on the “HOME” sheet. When changing the language, you’ll automatically create a new project and erase all previously entered data. Therefore, it’s not possible to change the language after the project has started to avoid bugs in the tool. If you do not wish to change the language, you can click on “New project” in the orange box “Actions for the contracting authority” to start a new project. The tool will ask you if you want to erase all previously entered data from the tool. Click ‘Yes’.

Indoor lighting LCC-Tool – User Guide
12
Log out Log out after filling in the necessary data (see Step 4). Step 2: General information input (contracting authority) Input the general data in the General Information section at the top of the “LCC input results” sheet. This way you’ll ensure that all bidders use the same data. This is important to be able to compare the results of the proposals.
If you use the “Clear Fields” button, all the details of the worksheet will be erased and default-values will reappear. Estimating / calculating the existing annual operating costs The tool offers you the possibility to calculate the payback period for a relighting project. If you wish to do so, you’ll need to input the annual operating costs for lighting of the existing building (incl. VAT). The electrical consumption for lighting isn’t usually measured separately from the total electrical consumption of the building. You could estimate your consumption for lighting and multiply it with your electricity price per kWh to obtain the (estimated) annual operating costs for lighting. How to estimate the annual consumption for lighting?
• Option 1: calculate the estimated consumption for lighting Available tools: Lighting Energy Numeric Indicator (LENI): this is an indicator of the efficiency of an entire lighting installation, including lighting control systems and is expressed in terms of energy per square meter per year (kWh / m².year) and makes a link with the power density of the area (W / m²). This tool also gives the estimated total energy per year in kWh/year. https://www.wtcb.be/homepage/index.cfm?cat=tools&sub=calculator&pag=leni

Indoor lighting LCC-Tool – User Guide
13
• Option 2: monitor the actual consumption for lighting You can monitor the actual consumption for lighting during a representative period of time (for example during 3 months in mid-season) by placing a sub-meter on the lighting circuit in the electrical fuse box. This modification needs to be carried out by a certified electrician. The results on energy use can be extrapolated to an annual consumption.
Step 3: Inputting building structure (contracting authority) You have two options to input the building structure:
• Option 1: room per room input • Option 2: export / import building template
IMPORTANT: The tool allows the bidder to input a different number of lighting points than you have foreseen in the initial building structure (provided that the design meets the specifications on visual quality). If you don’t wish the bidder to alter the lighting points, e.g. for practical reasons such as cabling already present, you’ll have to specify that in your tender documents. Also make sure that the bidder finds enough information in your tender documents to calculate other costs, such as cabling (see Step 6). Option 1: room per room input Fill in the data for each room in the “Input Building” sheet. You need to fill in the details for each room separately.
Click on ‘save room details’ after inputting the data for the room. This will add the room to the building structure. When you click on ‘save room details’ the tool will ask the following question: “Erase all details in this form to add a new entry?” If you choose ‘Yes’, you’ll be able to input a new room starting from scratch. If you choose ‘No’, you can start with the data from the previously inputted room.

Indoor lighting LCC-Tool – User Guide
14
The tool will automatically create a list of rooms for each floor on the “Building Template” sheet. If needed be, you can modify the details of the rooms afterwards in the Building Template. Option 2: export / import building template Instead of inputting the building structure room by room, you can also fill in the “Building Template” sheet. All the rooms can be viewed in this Building Template. The “options” column enables you to:
• Make new rows to add rooms • Copy rooms • Delete rooms
In the Building Template, you can select information directly in the dropdown menus or click on the right mouse button to access the large text boxes of the building template.

Indoor lighting LCC-Tool – User Guide
15
Always click ‘Save Template’ after updating data in the template or importing a template. Using the ‘Save Template’ button will add or alter the room data in the “Tbl_Buildings” sheet and show this data in the “Input bidder proposal” sheet where the bidders should input their proposal. Only when the data is saved in the “Tbl_Buildings” sheet, it is really saved. When you press the ‘Refresh Template’ button, the last saved version of the building structure will replace your unsaved input. You can export a Building Template (filled in or empty) to complete it outside of the tool. This way, you can send the Building Template to your architect or engineer or other members of the design team for their information or with the request to fill in the template. Click on the ‘Export Building’ button to export the Building Template. This will automatically create a separate file and open this file. Make sure to save your project before you export the Building Template. Click on the ‘Import Building’ button and select the file you wish to import in order to import the (external) Building Template back into the tool after it was finalized. Press the ‘Save Template’ button after import to save the imported template.
The reduction factor When inputting the building structure, you’ll be asked for information on the (required) lighting control systems. These systems enable the provision of optimum lighting levels where and when it is needed. Lighting output in a room will be adapted based on daylight levels, occupancy levels, room features or a combination of factors. This allows to reduce the necessary energy for lighting. The tool will, according to the chosen control system, take a reduction factor into account for the energy use (according to norm EN12464 and the EPB legislation - annex VI). The reduction factor is calculated as a result of the following three choices:
• Daylight-entry detection
Yellow part of the room is dimmed according to daylight entry
(Source: EPB legislation - annex VI) • Size area • Switching detection

Indoor lighting LCC-Tool – User Guide
16
Switching according to daylight entry
No
syst
em in
day
light
zo
ne
No
syst
em in
arti
ficia
l lig
ht
zone
Man
ual s
yste
m in
day
light
zo
ne
Man
ual s
yste
m in
arti
ficia
l lig
ht z
one
Auto
mat
ic s
yste
m in
da
ylig
ht z
one
Auto
mat
ic s
yste
m in
ar
tific
ial l
ight
zon
e
Manual switching or presence detection 1,00 1,00 0,90 1,00 0,60 0,80 No system or all systems that are not listed below 1,00 1,00 1,00 0,90 1,00 0,60 0,80 Manual switching Controlled area smaller than 30m² or meeting room 0,90 0,90 0,90 0,81 0,90 0,54 0,72 Controlled area larger than 30m² 1,00 1,00 1,00 0,90 1,00 0,60 0,80 Presence detection with automatic switch-on and automatic switch-off or dimming position
Controlled area smaller than 30m² or meeting room Full shutdown in case of absence 0,80 0,80 0,80 0,72 0,80 0,48 0,64 Switch back to dimming position in absence 0,85 0,85 0,85 0,77 0,85 0,51 0,68 Controlled area larger than 30m² Full shutdown in case of absence 1,00 1,00 1,00 0,90 1,00 0,60 0,80 Switch back to dimming position in absence 1,00 1,00 1,00 0,90 1,00 0,60 0,80 Manual switch-on and automatic switch-off or dimming position Controlled area smaller than 30m² or meeting room
Full shutdown in case of absence 0,70 0,70 0,70 0,63 0,70 0,42 0,56 Switch back to dimming position in absence 0,80 0,80 0,80 0,72 0,80 0,48 0,64
Controlled area larger than 30m²
Full shutdown in case of absence 1,00 1,00 1,00 0,90 1,00 0,60 0,80 Switch back to dimming position in absence 1,00 1,00 1,00 0,90 1,00 0,60 0,80
Step 4: Create an output for the bidder (contracting authority)
Once you’ve added all general information and the complete building structure to the LCC-tool and have finalized the other tender documents (a.o. outlining the specifications on the quality of the lighting design), you can publish the tender documents or send them to a selected group of potential bidders. IMPORTANT: Log out before publishing the file or sending it to the bidders. Click on the ‘log out’ button on the “HOME” sheet! When you close the file, it normally logs out automatically. You can change the password by entering a new password in the ‘Log out’ textbox. Remember to use your new password on reopening the tool! If you don’t enter a new password when logging out, the password will remain unchanged.
Indoor lighting LCC-Tool – User Guide
17
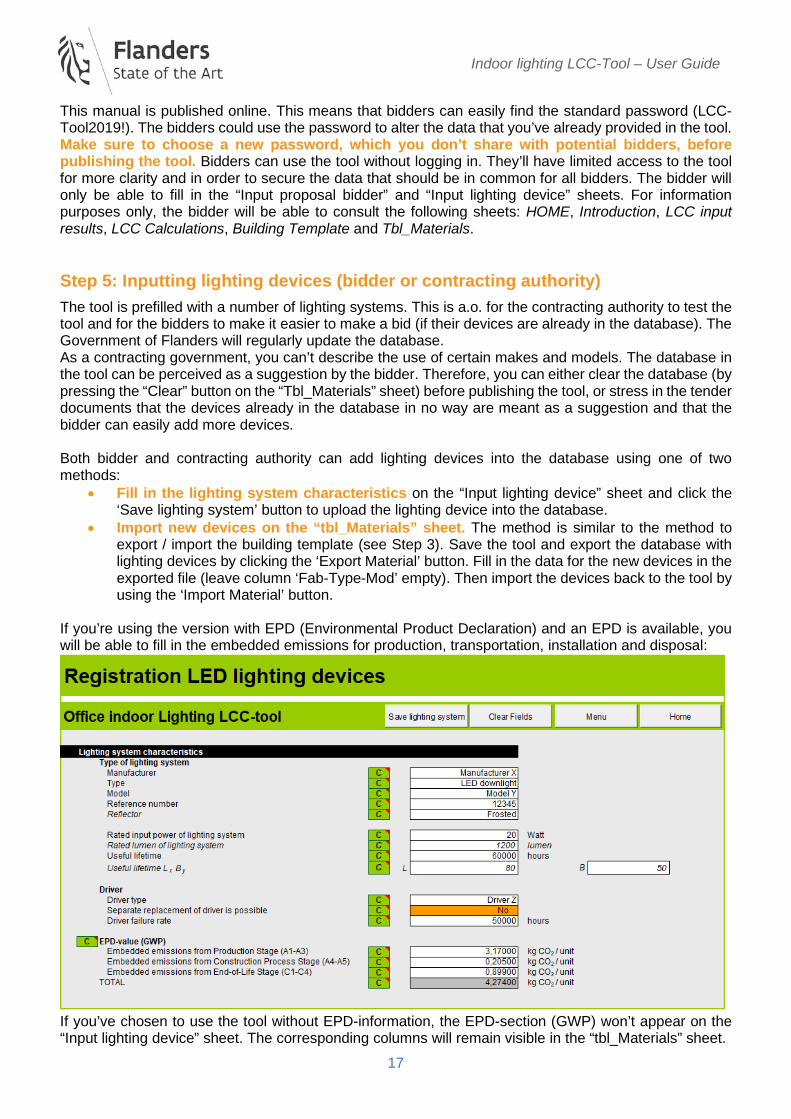
This manual is published online. This means that bidders can easily find the standard password (LCC-Tool2019!). The bidders could use the password to alter the data that you’ve already provided in the tool. Make sure to choose a new password, which you don’t share with potential bidders, before publishing the tool. Bidders can use the tool without logging in. They’ll have limited access to the tool for more clarity and in order to secure the data that should be in common for all bidders. The bidder will only be able to fill in the “Input proposal bidder” and “Input lighting device” sheets. For information purposes only, the bidder will be able to consult the following sheets: HOME, Introduction, LCC input results, LCC Calculations, Building Template and Tbl_Materials. Step 5: Inputting lighting devices (bidder or contracting authority) The tool is prefilled with a number of lighting systems. This is a.o. for the contracting authority to test the tool and for the bidders to make it easier to make a bid (if their devices are already in the database). The Government of Flanders will regularly update the database. As a contracting government, you can’t describe the use of certain makes and models. The database in the tool can be perceived as a suggestion by the bidder. Therefore, you can either clear the database (by pressing the “Clear” button on the “Tbl_Materials” sheet) before publishing the tool, or stress in the tender documents that the devices already in the database in no way are meant as a suggestion and that the bidder can easily add more devices. Both bidder and contracting authority can add lighting devices into the database using one of two methods:
• Fill in the lighting system characteristics on the “Input lighting device” sheet and click the ‘Save lighting system’ button to upload the lighting device into the database.
• Import new devices on the “tbl_Materials” sheet. The method is similar to the method to export / import the building template (see Step 3). Save the tool and export the database with lighting devices by clicking the ‘Export Material’ button. Fill in the data for the new devices in the exported file (leave column ‘Fab-Type-Mod’ empty). Then import the devices back to the tool by using the ‘Import Material’ button.
If you’re using the version with EPD (Environmental Product Declaration) and an EPD is available, you will be able to fill in the embedded emissions for production, transportation, installation and disposal:
If you’ve chosen to use the tool without EPD-information, the EPD-section (GWP) won’t appear on the “Input lighting device” sheet. The corresponding columns will remain visible in the “tbl_Materials” sheet.

Indoor lighting LCC-Tool – User Guide
18
When you, as a contracting authority, import the received offers (see Step 7), you’ll also import the lighting devices added by de bidders. Check the data inputted by the bidder prior to the import of the offer in your own version of the tool. You’ll easily find which devices were added by a bidder on the “Tbl_Materials” sheet (column S).
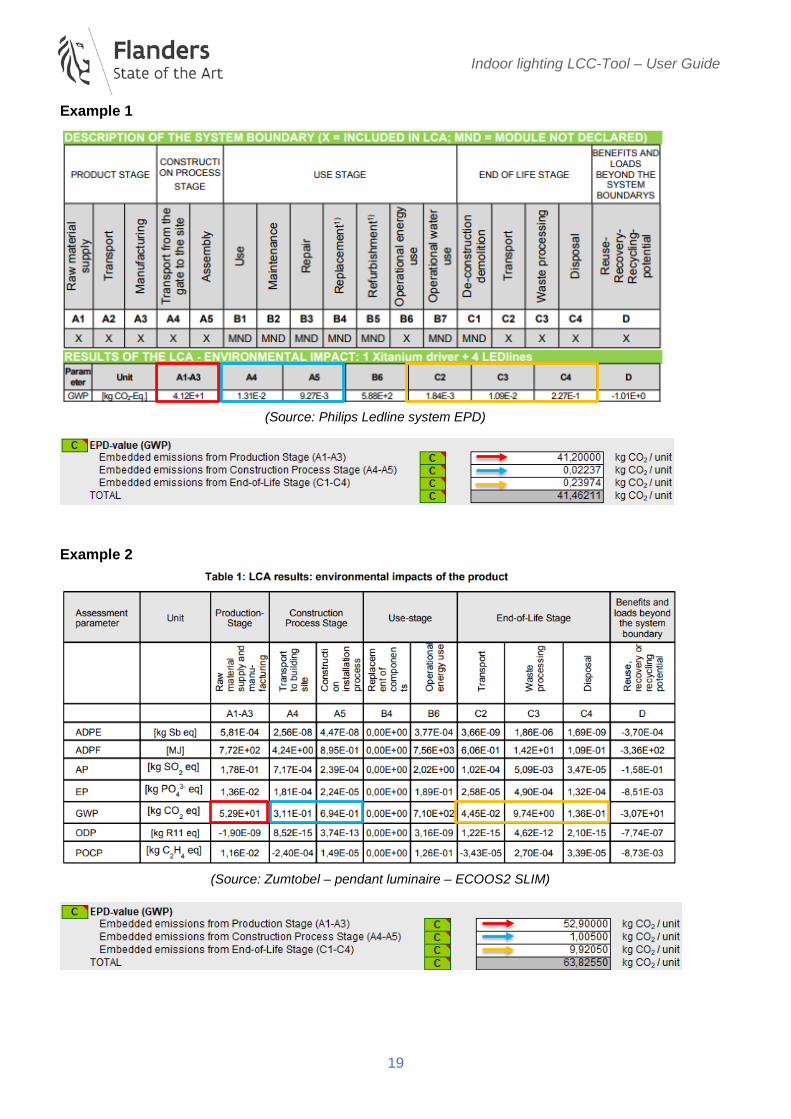
Useful lifetime LxBy The gradual light output degradation of a population of LED-based lighting products at a certain point in time is called useful life and is generally expressed as LxBy according to the IEC 62717:2014 standard. Use L80B50 values if possible: length of time during which 50% of a population of the LED-based lighting products have parametrically failed to provide at least 80% of the initial luminous flux. As the contracting authority, you can specify in the tender documents that the useful lifetime should be expressed as L80B50 to better compare the lighting devices between each other.2 EPD information To calculate the embedded emissions of a lighting device, the tool uses the values for Global Warming Potential (GWP) from the Environmental Product Declaration (EPD).
2 The Guidance Paper ‘Evaluating performance of LED based luminaires’ van Lighting Europe (2018) offers you a lot of useful background information that will help you to decide on the right L- and B-values for your project.
Indoor lighting LCC-Tool – User Guide
19
Example 1
Example 2
(Source: Philips Ledline system EPD)
(Source: Zumtobel – pendant luminaire – ECOOS2 SLIM)
Indoor lighting LCC-Tool – User Guide
20
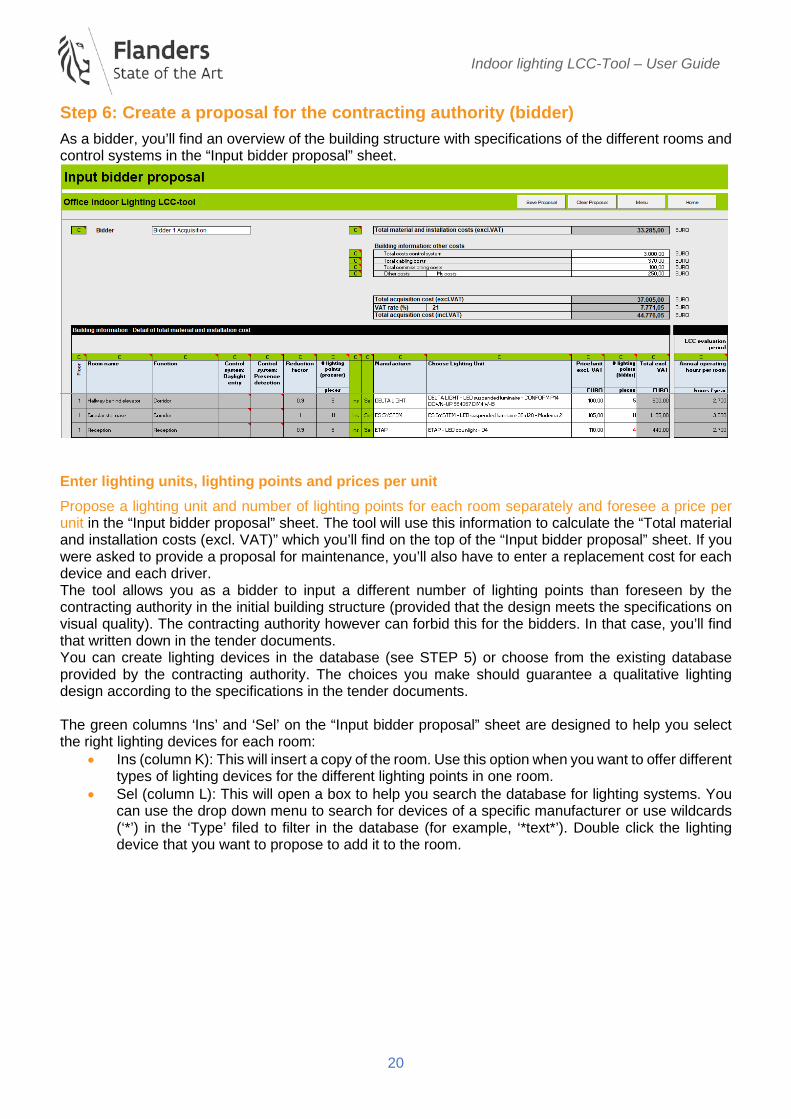
Step 6: Create a proposal for the contracting authority (bidder) As a bidder, you’ll find an overview of the building structure with specifications of the different rooms and control systems in the “Input bidder proposal” sheet.
Enter lighting units, lighting points and prices per unit Propose a lighting unit and number of lighting points for each room separately and foresee a price per unit in the “Input bidder proposal” sheet. The tool will use this information to calculate the “Total material and installation costs (excl. VAT)” which you’ll find on the top of the “Input bidder proposal” sheet. If you were asked to provide a proposal for maintenance, you’ll also have to enter a replacement cost for each device and each driver. The tool allows you as a bidder to input a different number of lighting points than foreseen by the contracting authority in the initial building structure (provided that the design meets the specifications on visual quality). The contracting authority however can forbid this for the bidders. In that case, you’ll find that written down in the tender documents. You can create lighting devices in the database (see STEP 5) or choose from the existing database provided by the contracting authority. The choices you make should guarantee a qualitative lighting design according to the specifications in the tender documents. The green columns ‘Ins’ and ‘Sel’ on the “Input bidder proposal” sheet are designed to help you select the right lighting devices for each room:
• Ins (column K): This will insert a copy of the room. Use this option when you want to offer different types of lighting devices for the different lighting points in one room.
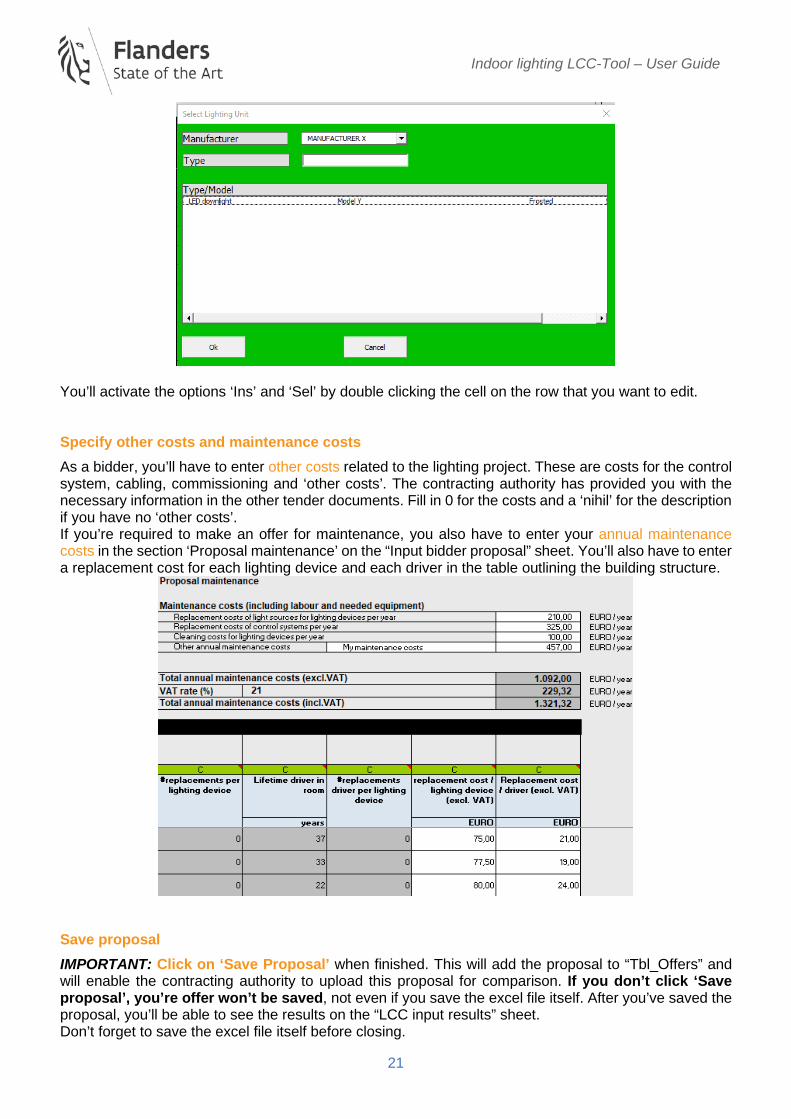
• Sel (column L): This will open a box to help you search the database for lighting systems. You can use the drop down menu to search for devices of a specific manufacturer or use wildcards (‘*’) in the ‘Type’ filed to filter in the database (for example, ‘*text*’). Double click the lighting device that you want to propose to add it to the room.
Indoor lighting LCC-Tool – User Guide
21
You’ll activate the options ‘Ins’ and ‘Sel’ by double clicking the cell on the row that you want to edit. Specify other costs and maintenance costs As a bidder, you’ll have to enter other costs related to the lighting project. These are costs for the control system, cabling, commissioning and ‘other costs’. The contracting authority has provided you with the necessary information in the other tender documents. Fill in 0 for the costs and a ‘nihil’ for the description if you have no ‘other costs’. If you’re required to make an offer for maintenance, you also have to enter your annual maintenance costs in the section ‘Proposal maintenance’ on the “Input bidder proposal” sheet. You’ll also have to enter a replacement cost for each lighting device and each driver in the table outlining the building structure.
Save proposal IMPORTANT: Click on ‘Save Proposal’ when finished. This will add the proposal to “Tbl_Offers” and will enable the contracting authority to upload this proposal for comparison. If you don’t click ‘Save proposal’, you’re offer won’t be saved, not even if you save the excel file itself. After you’ve saved the proposal, you’ll be able to see the results on the “LCC input results” sheet. Don’t forget to save the excel file itself before closing.

Indoor lighting LCC-Tool – User Guide
22
Step 7: Import the proposals (contracting authority) As soon you, as the contracting authority, receive the proposals from the different bidders, you’ll have to upload these proposals back into your initial version of the file (main file) for comparison:
• Close all the files of the bidders before importing them into the main file. • Open the main file and log in as the contracting authority (see Step 1). • Press the ‘Import Proposal’ button in the top right corner of the “LCC input results” sheet. • Select the offer you wish to import. • Repeat the previous two steps for each offer that you want to upload in your main file. • IMPORTANT: Input a unique reference for every single offer (‘Personal offer ID’). This short
description (max. 12 characters) will be shown in the sheets and diagrams for comparison.
If you use the “Clear Fields” button, all the details in the white boxes of the worksheet will be erased and default-values will reappear. After importing the different proposals, you can review a single offer in detail by filling in the exact bidder’s name in the E7 cell of the “Input bidder proposal” sheet and a double clicking on the name.

Indoor lighting LCC-Tool – User Guide
23
The “Comparison acquisition” sheet will provide details of each proposal and an overview of all the received offers.
Step 8: Results for the proposals (contracting authority) Go to the “LCC input results” sheet. The proposals of the different bidders are automatically filled in into the columns.

Indoor lighting LCC-Tool – User Guide
24
The Total cost of ownership (TCO) consists of acquisition costs, operating costs, maintenance costs, other costs and remnant value or end of life costs (see ‘I.3 What information does the tool provide?’ on p.5 for more information). Most of the cells in the overview will be filled in automatically with information that you’ve filled in as a contracting authority or that you’ve received from the bidders. As the contracting authority, you can at this point still add information on “Maintenance costs”, “Other costs” (fees / subsidies) and “Remnant value / End of Life costs”:
• Maintenance costs: If you didn’t ask the bidders for a proposal on maintenance costs, e.g. because you have your own maintenance staff, you can add an estimate of the costs to be incorporated in the TCO and LCC Results.
• Fees / subsidies or other costs: You can include the costs in annual fees and taxes and other costs as well as income from subsidies. All costs will be included in positive value. Subsidies should be included as a negative value, as they reduce the total costs.
• Remnant value or end-of-life costs: At the end of the planning horizon the lighting systems may either be: Out of service and require disposal in the correct manner, or Still be usable and have value In the first case, the product may have an extra cost for disposal, which should be added in the LCC-calculations. In the second case you could decide to sell, in which case it will provide you with some money (remnant value) which should be deducted to the LCC calculation. When estimating the end-of-life costs, also consider the lifespan of the devices and the planning horizon. If the planning horizon is twice as long as the lifespan, the disposal costs would occur twice.
Step 8.1: CO2 specific information Lower on the “LCC input results” sheet, you should find the CO2 specific information.
De tool will show you:
• The annual CO2 emissions for the use stage • The embedded emissions of the products (If you’ve chosen for the version including EPD-
information and if EPD’s are available for every lighting system in the project) You’ll find more information on the CO2 emissions in “I.3 What information does the tool provide? – CO2 emissions” on p. 6. Where you wish to include information on the embedded emissions of products, it needs to be ensured that any data submitted by suppliers is based on sound life-cycle assessment (LCA). In tendering it is important to very clearly specify whether such information shall be given or not, and if so, make a very clear reference to both the methodical conditions and the scope (system boundaries) of considered upstream and downstream effects which you want to have included. It is advised only to do this with the support of LCA experts. The complexity of a full LCA cannot be addressed with the LCC-CO2 tool provided, therefore this tool only allows for the inclusion of previously calculated aggregated data on embedded emissions.

Indoor lighting LCC-Tool – User Guide
25
Further information on LCA data can be found here: https://eplca.jrc.ec.europa.eu/ Step 8.2: TCO and LCC Results and payback period Once all proposals are uploaded and referenced you will be able to see the final results on the “LCC input results” sheet, and compare offers over the chosen evaluation period.

Indoor lighting LCC-Tool – User Guide
26
Step 8.3: Diagrams In order to see the TCO and LCC-results graphically, go to the “TCO_Diagrams” and “LCC_Diagrams” sheets.
Step 9: Tender evaluation and awarding the contract (contracting authority) Within the “Tender Evaluation” sheet this tool allows you to compare the different proposed solutions and to identify the economically most advantageous offer. This includes considering the Total cost of ownership (TCO) or the life cycle costs (LCC) and the CO2 emissions, all calculated in the “LCC input results” sheet. Tailored to the needs of your tender, you can also include additional award criteria, such as human centric lighting, quality of service, aesthetics and other environmental criteria. You will need to choose between the TCO or LCC approach in your award criteria, because you can’t reward the same aspects twice in your tender.
Please, note that all award criteria must be linked to the subject matter. It is recommended to make specific reference to TCO or LCC and CO2 emissions criteria in the subject matter of the tender, for example, by using key phrases such as “taking into account life-cycle costs” and “reduced CO2 emissions”. The inclusion of operational lifetime costs of energy consumption and CO2 emissions as award criteria in the procurement process is legally sound. The TCO and LCC approach take into account the acquisition or lease costs, energy use (and if asked, the costs for maintenance). Make sure not to award these aspects a second time when choosing your other award criteria.
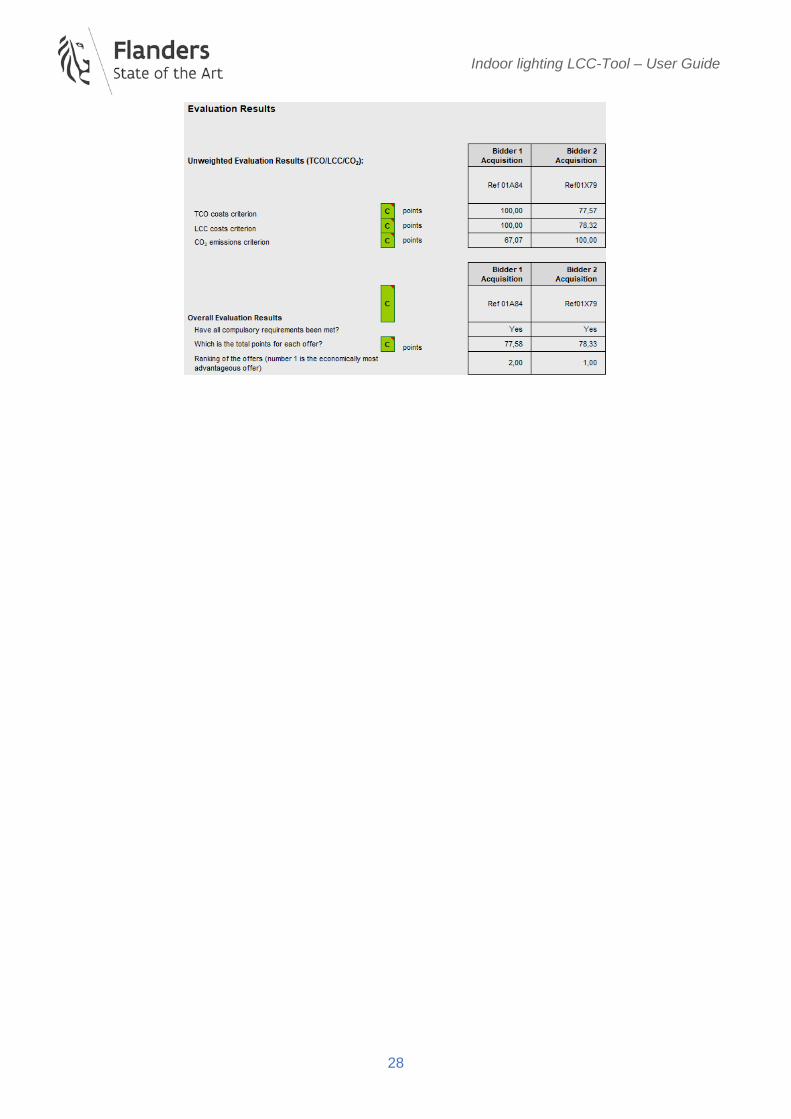
You’ll need to specify the following on the “Tender Evaluation” sheet:
• Have all compulsory technical specifications been met (“yes” or “no”)? All offers not meeting the compulsory specifications will be automatically excluded from the calculations of the points total for the award criteria.
• Which are the other award (sub-)criteria? Also fill in the maximum possible points for each (sub)criterium and the points that the different offers were awarded. The tool has an automatic formula which weighs the offer against the best result for the (sub)criterium. Don’t use the tool for the calculation of the point total for all award criteria if you’ve described a different method of calculation in your tender documents. Because of the weighting factors (as described in the tender documents) that you specify in the section “Weighting of award criteria”, the total will never be higher than 100%.

Indoor lighting LCC-Tool – User Guide
27
Use the + and – buttons to view more or less detail of the award categories.
Indoor lighting LCC-Tool – User Guide
28

Indoor lighting LCC-Tool – User Guide
29
Part V – User Guide – Lease If the contracting authority doesn’t wish to purchase the lighting systems but prefers to rent them for a specified period of time, a lease agreement can be considered. This part will only address the most important differences in the tool compared to the version for acquisition. You’ll find more information on the use of the tool in Part IV (p. 10). When leasing, you’ll look at the lease cost. The total lease cost per year is the amount you pay for renting a light solution for your project. The version of the tool for lease calculates a ‘Total Cost of Use’ instead of a Total Cost of Ownership. Modifications for step 2: General information input (contracting authority) On the “LCC input results”, choose the option lease for the type of contract. This choice for the type of contract will adapt the tool accordingly.
Modifications for step 6: Create a proposal for the contracting authority (bidder) Instead of a one-off price per unit for acquisition of lighting devices, as a bidder you will have to provide a price per unit per month. Based on these prices per device and the number of lighting points, the “Input bidder proposal” sheet will show the “Lease cost per month (excl. VAT)” at the top of the page. On the right side of the table outlining the building structure, you’ll see an estimate of the number of replacements needed over the evaluation period. These should be included in the lease cost. IMPORTANT: Click on ‘Save Proposal’ when finished.

Indoor lighting LCC-Tool – User Guide
30
Modifications for step 8: Results for the proposals (contracting authority) The results on the “LCC input results’ page will show you the Total Cost of Use (instead of the Total Cost of Ownership). The Total Cost of Use consists of lease costs and operation costs.
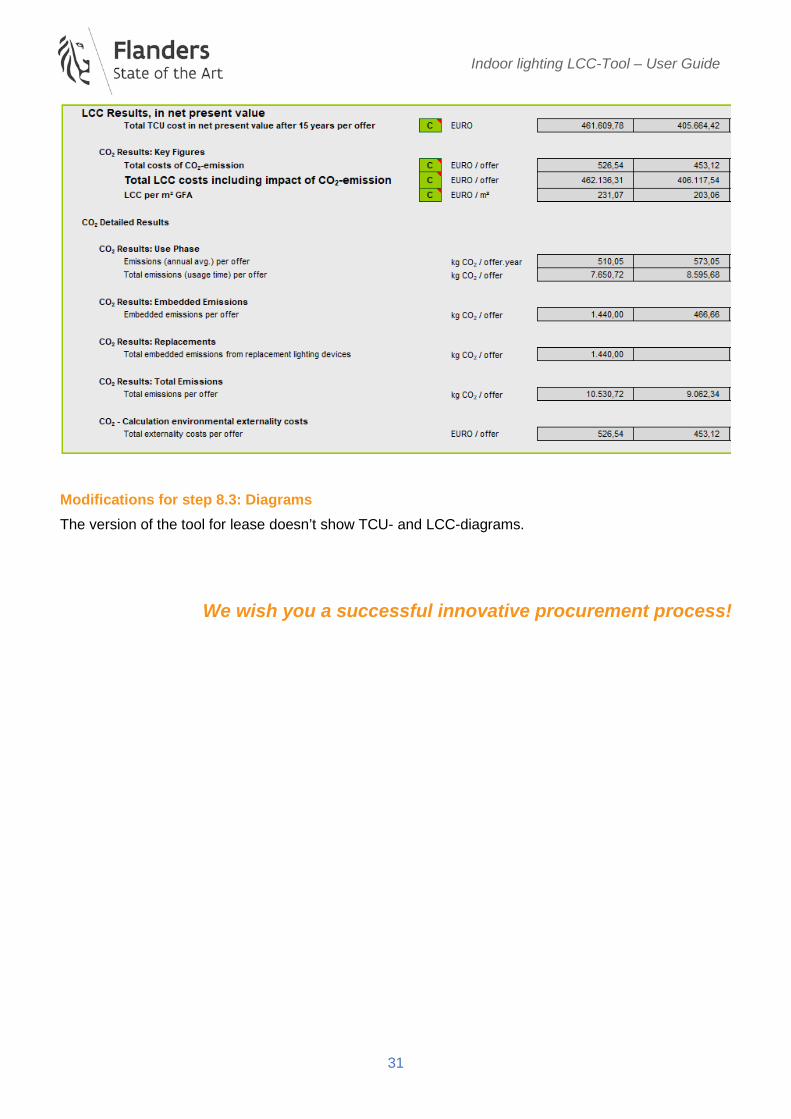
Lease costs include the annual costs for renting a light solution for your project. The lease cost includes the rental price of the luminaires including all lighting elements (cable, control systems,…), taxes, installation, commissioning costs and maintenance and dismantling costs. Operation costs include the annual expenses related to the operation of the lighting devices and elements, including taxes. The annual electricity consumption is translated in the annual costs for operation. Modifications for step 8.2: TCU and LCC Results The “LCC input results” sheet shows you the TCU Results instead of the TCO Results.
Indoor lighting LCC-Tool – User Guide
31
Modifications for step 8.3: Diagrams The version of the tool for lease doesn’t show TCU- and LCC-diagrams.
We wish you a successful innovative procurement process!