indexeddb and push notifications in progressive web apps
TRANSCRIPT
IndexedDB and Push Notifications in Progressive Web AppsAdegoke Obasa
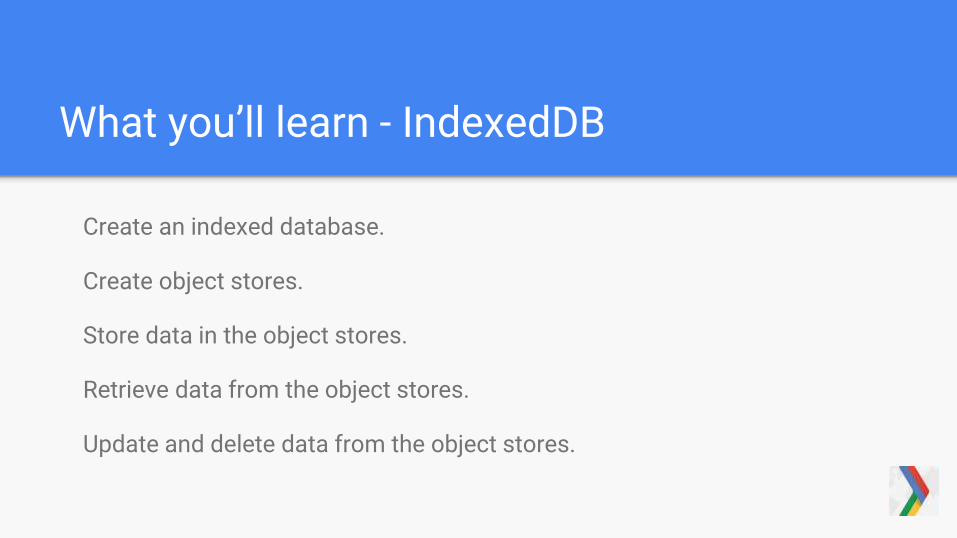
What you’ll learn - IndexedDB
Create an indexed database.
Create object stores.
Store data in the object stores.
Retrieve data from the object stores.
Update and delete data from the object stores.
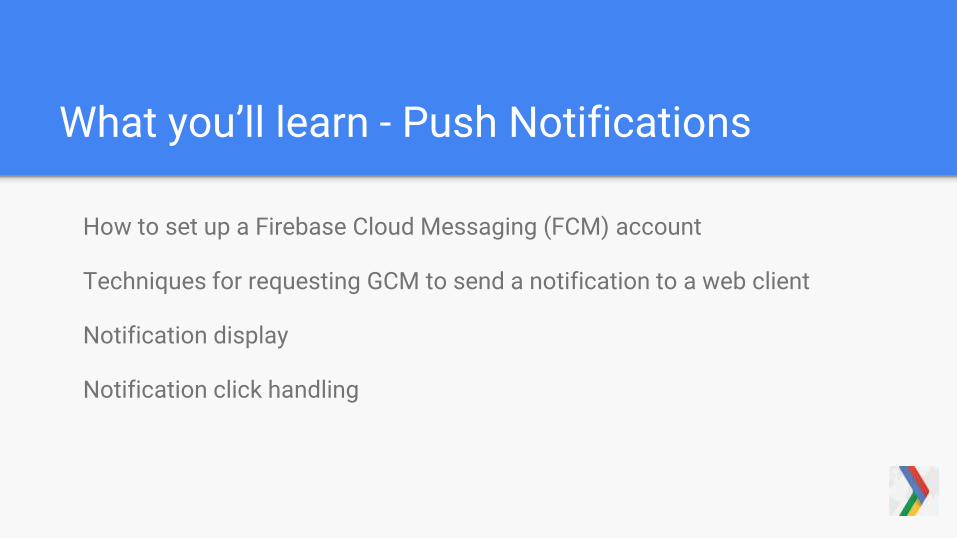
What you’ll learn - Push Notifications
How to set up a Firebase Cloud Messaging (FCM) account
Techniques for requesting GCM to send a notification to a web client
Notification display
Notification click handling
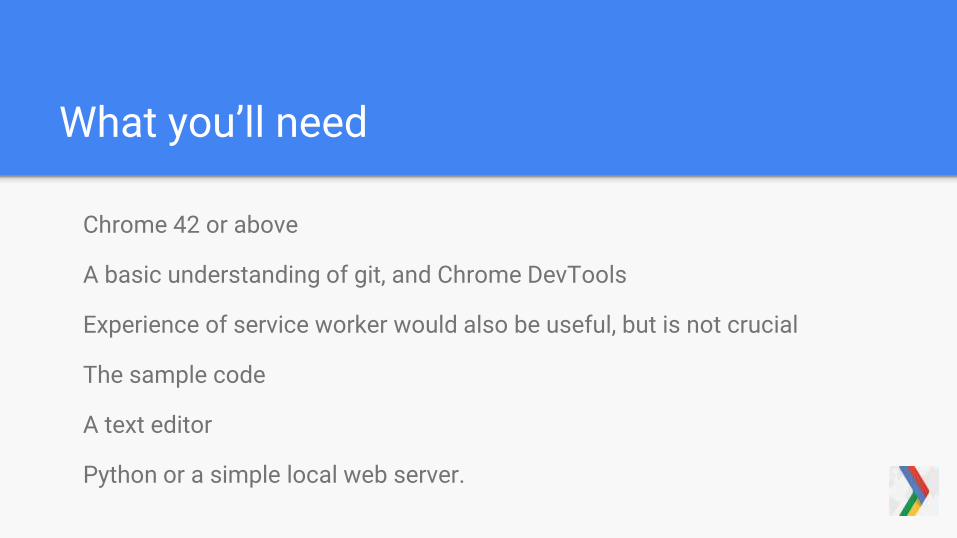
What you’ll need
Chrome 42 or above
A basic understanding of git, and Chrome DevTools
Experience of service worker would also be useful, but is not crucial
The sample code
A text editor
Python or a simple local web server.
IndexedDB
What is IndexedDB?
Why IndexedDB?
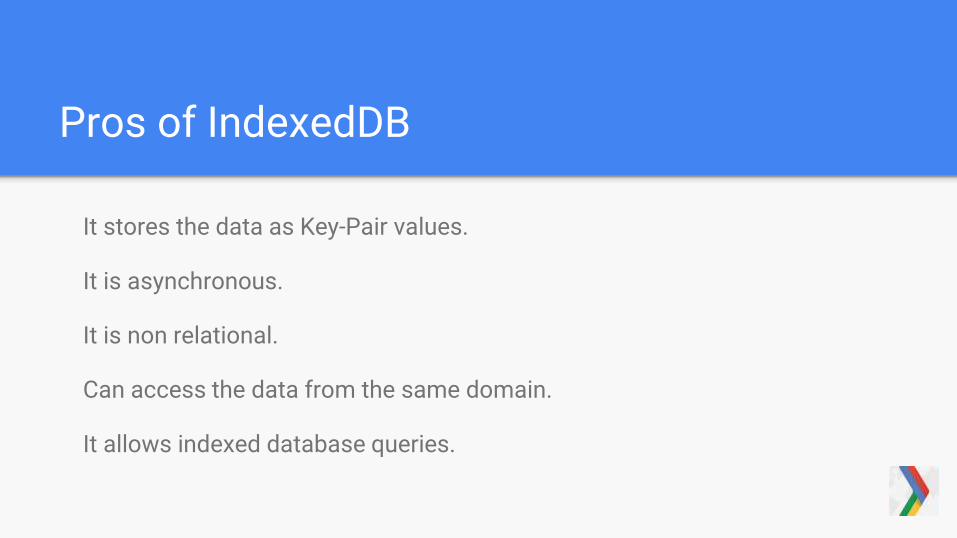
Pros of IndexedDB
It stores the data as Key-Pair values.
It is asynchronous.
It is non relational.
Can access the data from the same domain.
It allows indexed database queries.
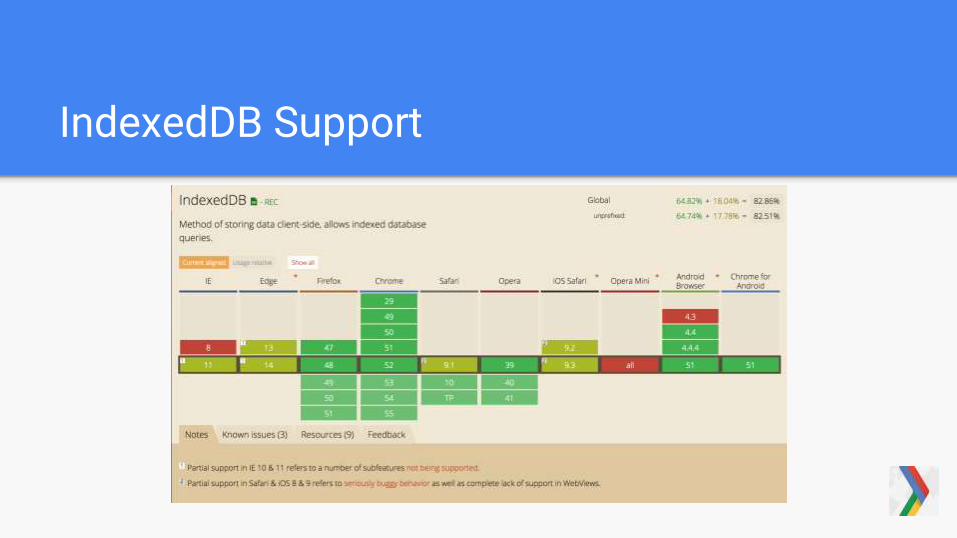
IndexedDB Support
“Talk is cheap, show me the code”
- Linus Torvalds
IndexedDB 101
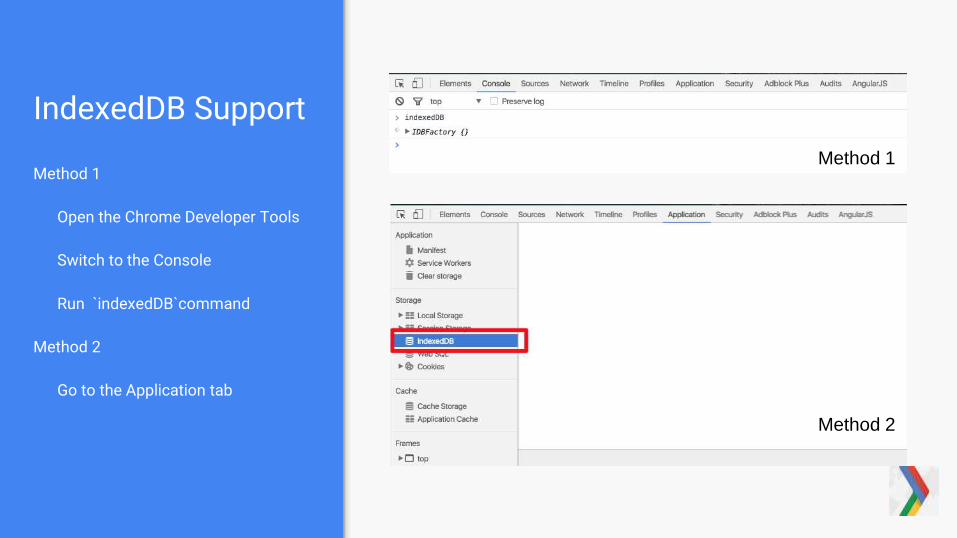
IndexedDB Support
Method 1
Open the Chrome Developer Tools
Switch to the Console
Run `indexedDB`command
Method 2
Go to the Application tab
Method 1
Method 2
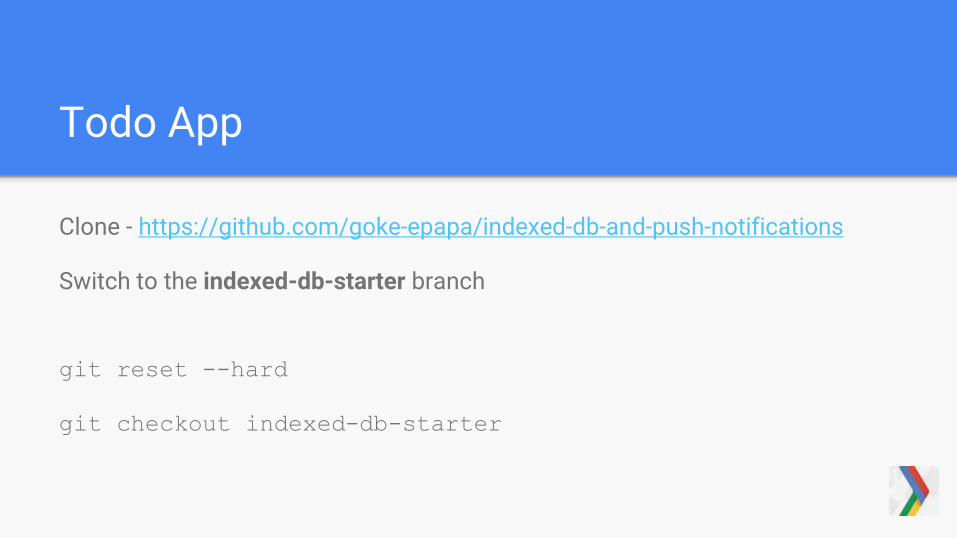
Todo App
Clone - https://github.com/goke-epapa/indexed-db-and-push-notifications
Switch to the indexed-db-starter branch
git reset --hard
git checkout indexed-db-starter
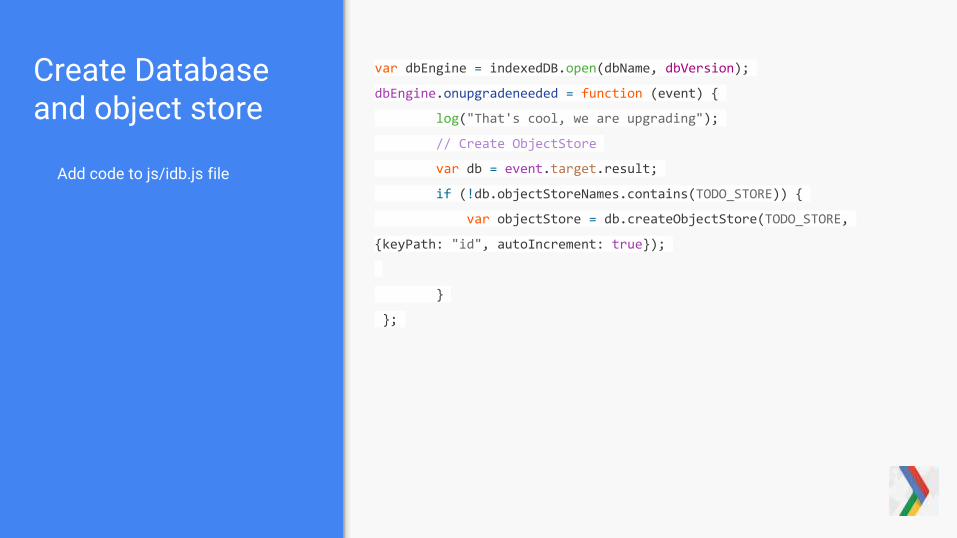
Create Database and object store
Add code to js/idb.js file
var dbEngine = indexedDB.open(dbName, dbVersion);
dbEngine.onupgradeneeded = function (event) {
log("That's cool, we are upgrading");
// Create ObjectStore
var db = event.target.result;
if (!db.objectStoreNames.contains(TODO_STORE)) {
var objectStore = db.createObjectStore(TODO_STORE,
{keyPath: "id", autoIncrement: true});
}
};
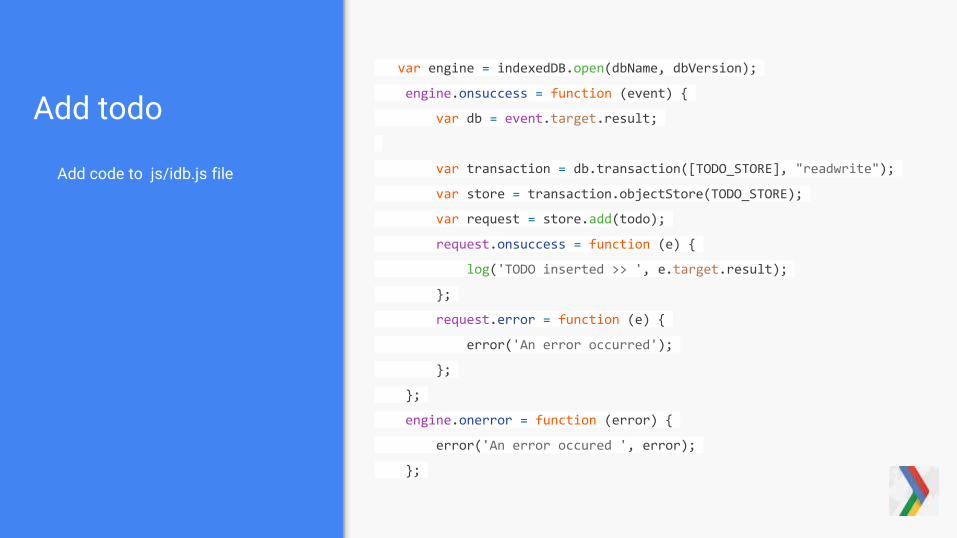
Add todo
Add code to js/idb.js file
var engine = indexedDB.open(dbName, dbVersion);
engine.onsuccess = function (event) {
var db = event.target.result;
var transaction = db.transaction([TODO_STORE], "readwrite");
var store = transaction.objectStore(TODO_STORE);
var request = store.add(todo);
request.onsuccess = function (e) {
log('TODO inserted >> ', e.target.result);
};
request.error = function (e) {
error('An error occurred');
};
};
engine.onerror = function (error) {
error('An error occured ', error);
};
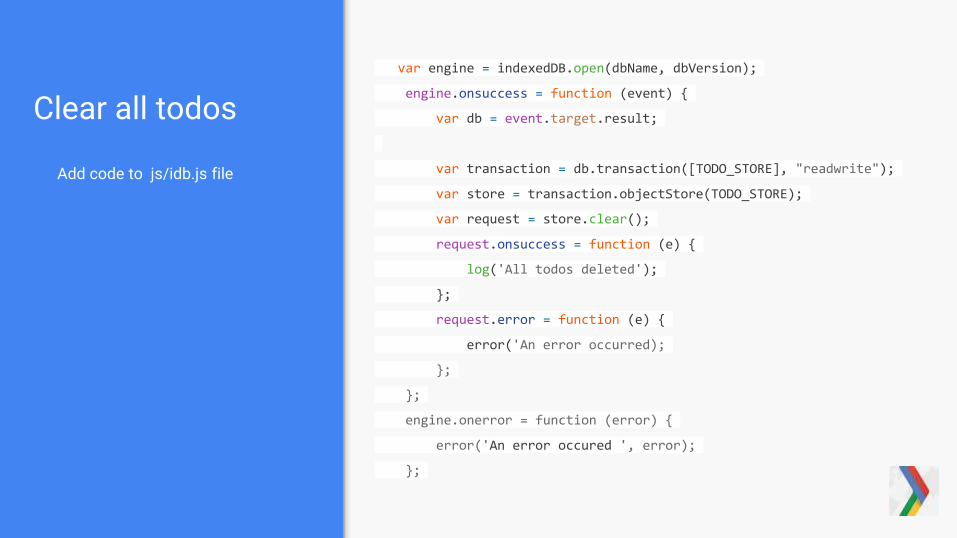
Clear all todos
Add code to js/idb.js file
var engine = indexedDB.open(dbName, dbVersion);
engine.onsuccess = function (event) {
var db = event.target.result;
var transaction = db.transaction([TODO_STORE], "readwrite");
var store = transaction.objectStore(TODO_STORE);
var request = store.clear();
request.onsuccess = function (e) {
log('All todos deleted');
};
request.error = function (e) {
error('An error occurred);
};
};
engine.onerror = function (error) {
error('An error occured ', error);
};
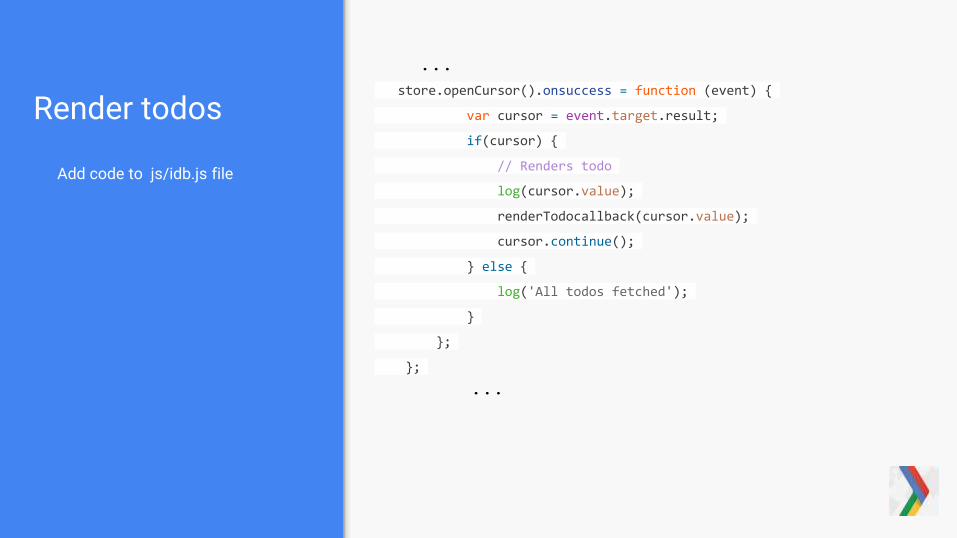
Render todos
Add code to js/idb.js file
...
store.openCursor().onsuccess = function (event) {
var cursor = event.target.result;
if(cursor) {
// Renders todo
log(cursor.value);
renderTodocallback(cursor.value);
cursor.continue();
} else {
log('All todos fetched');
}
};
};
...

Delete todo
Add code to js/idb.js file
...
var transaction = db.transaction([TODO_STORE], "readwrite");
var store = transaction.objectStore(TODO_STORE);
var request = store.delete(Number(id));
request.onsuccess = function (e) {
log('Todo ' + id + 'deleted');
if (typeof callback != 'undefined') {
callback();
}
};
request.error = function (e) {
error('An error occurred');
};
...
Push Notifications

Implementing Push Notifications in the Todo App
Switch to the push-notifications-starter branch
git reset --hard
git checkout push-notifications-starter

Create a Firebase Cloud Messaging (FCM ) project.
Navigate to the Google Developers
Console -
https://console.cloud.google.com

Enable FCM
From Use Google APIs, select
Enable and manage APIs
From the Google APIs list, select
Google Cloud Messaging
Click the Enable button

Get credentials
From the API Manager menu,
select Credentials
Click the Create credentials
dropdown button and select
API key:
Click the Go to Credentials button
For Where will you be calling the
API from? Select Web Browser
(Javascript)
Click the What Credentials do I
need button
Give the key a name (anything you
like!), leave the HTTP referrers
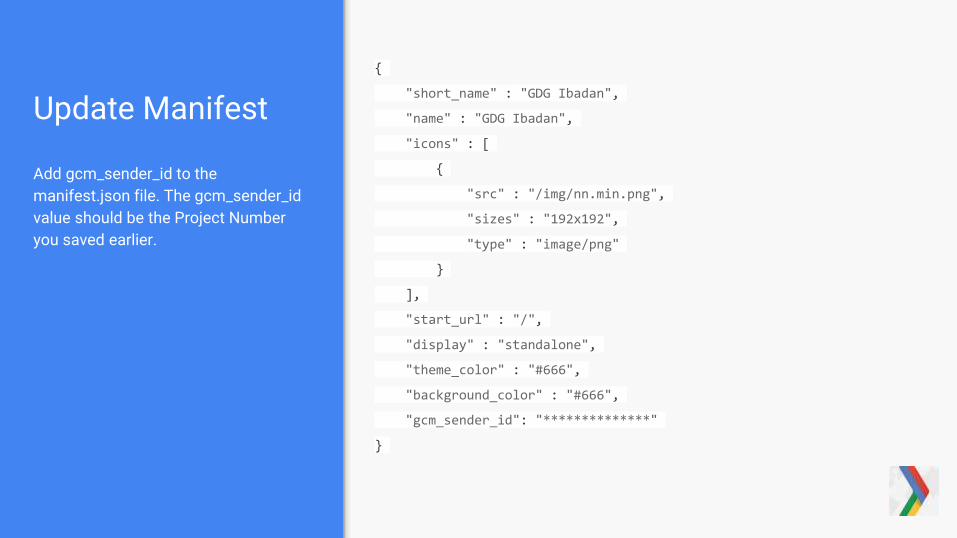
Update Manifest
Add gcm_sender_id to the
manifest.json file. The gcm_sender_id
value should be the Project Number
you saved earlier.
{
"short_name" : "GDG Ibadan",
"name" : "GDG Ibadan",
"icons" : [
{
"src" : "/img/nn.min.png",
"sizes" : "192x192",
"type" : "image/png"
}
],
"start_url" : "/",
"display" : "standalone",
"theme_color" : "#666",
"background_color" : "#666",
"gcm_sender_id": "**************"
}
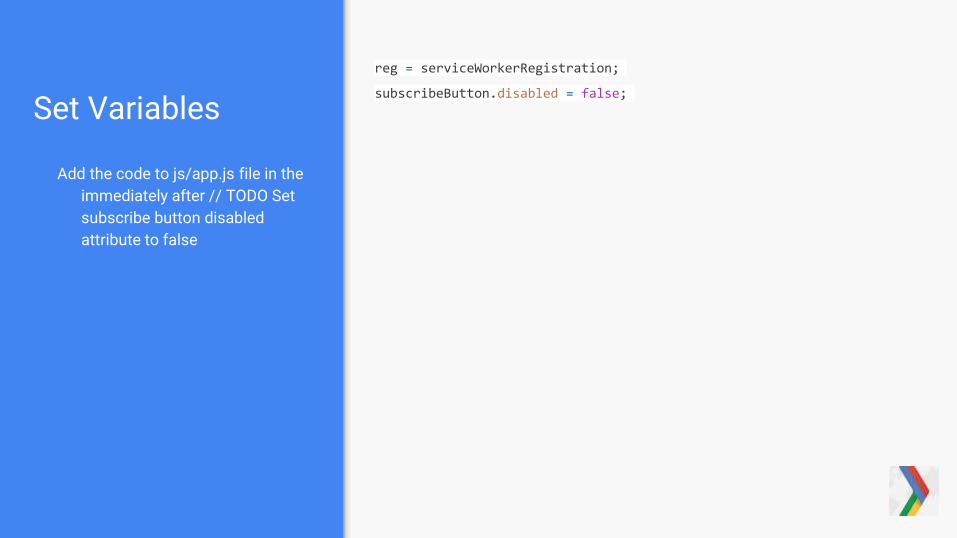
Set Variables
Add the code to js/app.js file in the
immediately after // TODO Set
subscribe button disabled
attribute to false
reg = serviceWorkerRegistration;
subscribeButton.disabled = false;
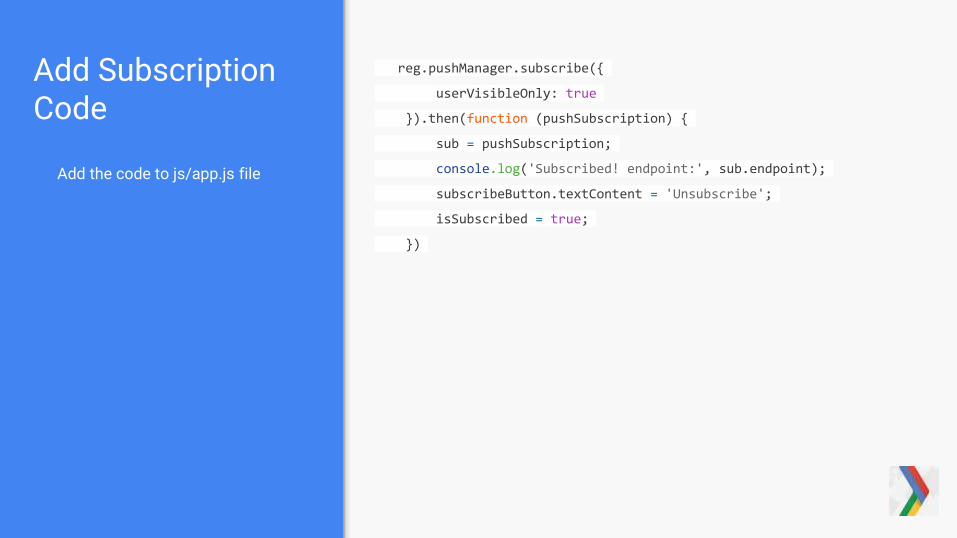
Add Subscription Code
Add the code to js/app.js file
reg.pushManager.subscribe({
userVisibleOnly: true
}).then(function (pushSubscription) {
sub = pushSubscription;
console.log('Subscribed! endpoint:', sub.endpoint);
subscribeButton.textContent = 'Unsubscribe';
isSubscribed = true;
})
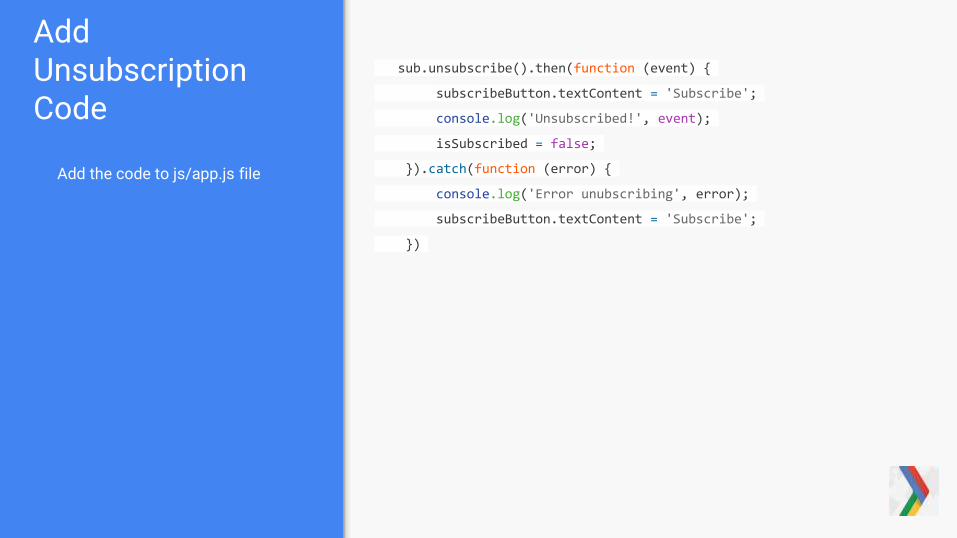
Add Unsubscription Code
Add the code to js/app.js file
sub.unsubscribe().then(function (event) {
subscribeButton.textContent = 'Subscribe';
console.log('Unsubscribed!', event);
isSubscribed = false;
}).catch(function (error) {
console.log('Error unubscribing', error);
subscribeButton.textContent = 'Subscribe';
})
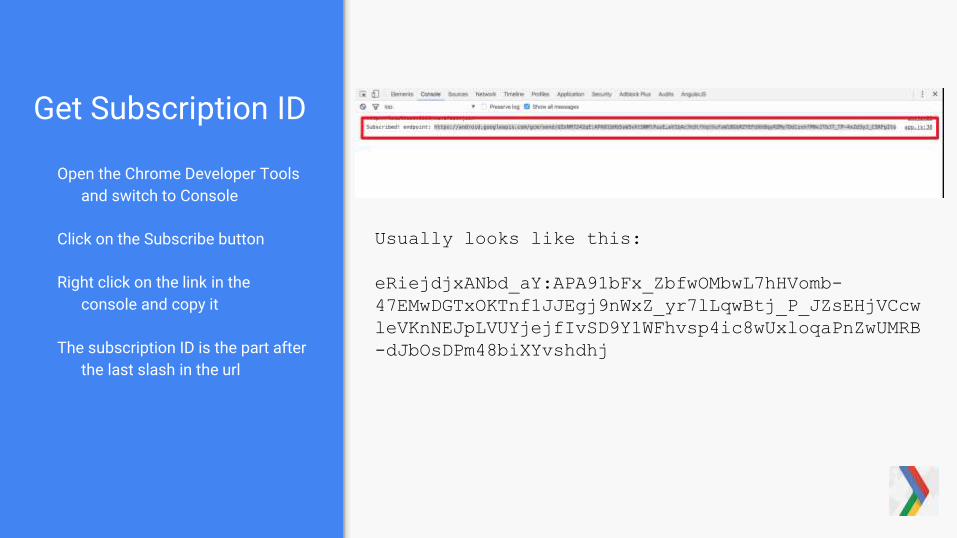
Get Subscription ID
Open the Chrome Developer Tools
and switch to Console
Click on the Subscribe button
Right click on the link in the
console and copy it
The subscription ID is the part after
the last slash in the url
Usually looks like this:
eRiejdjxANbd_aY:APA91bFx_ZbfwOMbwL7hHVomb-
47EMwDGTxOKTnf1JJEgj9nWxZ_yr7lLqwBtj_P_JZsEHjVCcw
leVKnNEJpLVUYjejfIvSD9Y1WFhvsp4ic8wUxloqaPnZwUMRB
-dJbOsDPm48biXYvshdhj
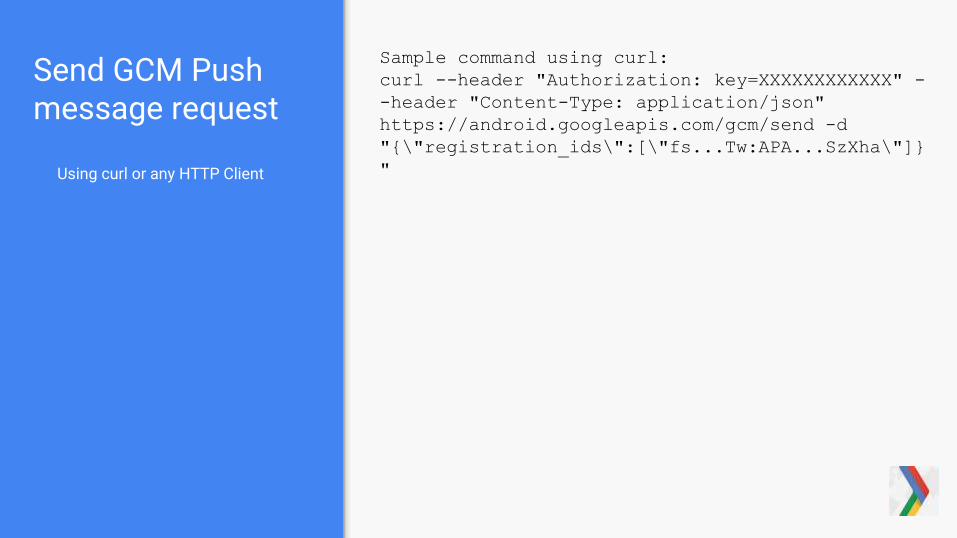
Send GCM Push message request
Using curl or any HTTP Client
Sample command using curl:
curl --header "Authorization: key=XXXXXXXXXXXX" -
-header "Content-Type: application/json"
https://android.googleapis.com/gcm/send -d
"{\"registration_ids\":[\"fs...Tw:APA...SzXha\"]}
"
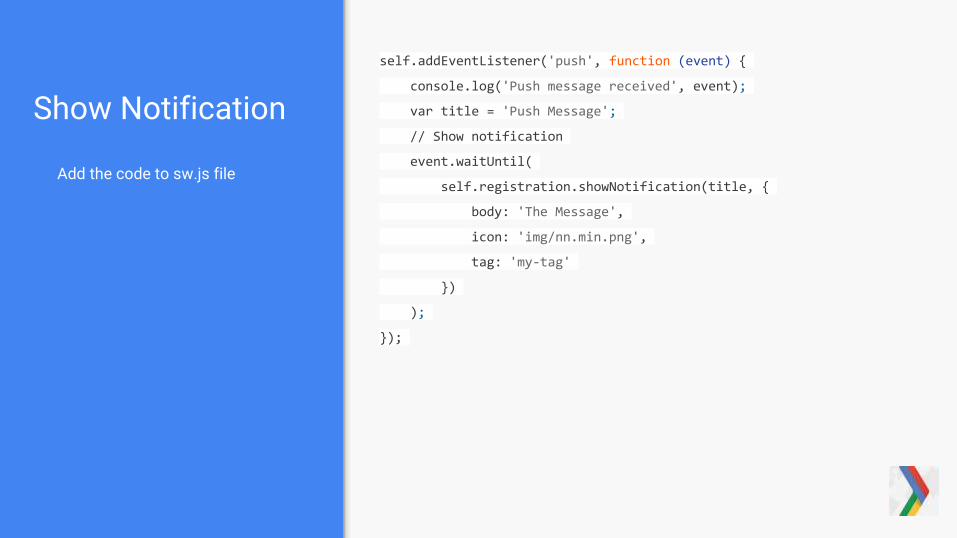
Show Notification
Add the code to sw.js file
self.addEventListener('push', function (event) {
console.log('Push message received', event);
var title = 'Push Message';
// Show notification
event.waitUntil(
self.registration.showNotification(title, {
body: 'The Message',
icon: 'img/nn.min.png',
tag: 'my-tag'
})
);
});
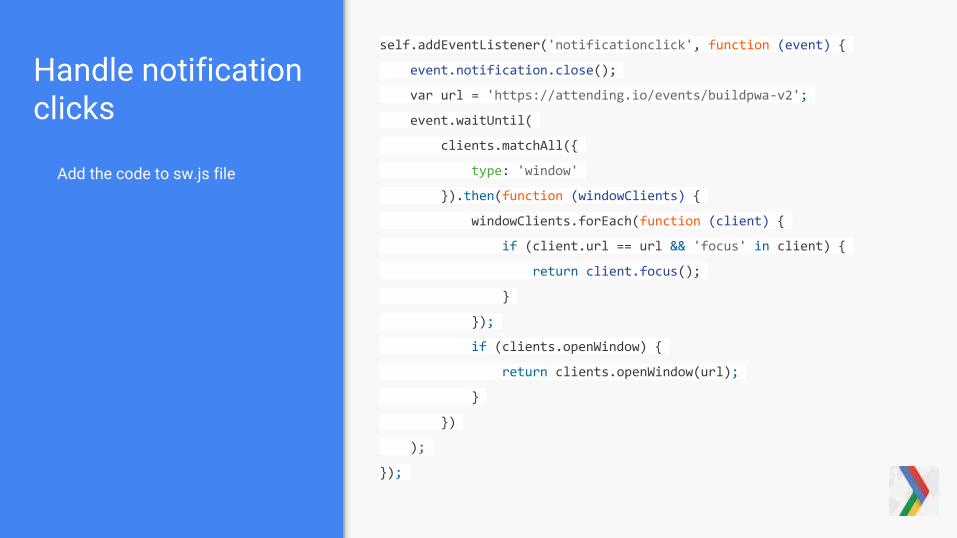
Handle notification clicks
Add the code to sw.js file
self.addEventListener('notificationclick', function (event) {
event.notification.close();
var url = 'https://attending.io/events/buildpwa-v2';
event.waitUntil(
clients.matchAll({
type: 'window'
}).then(function (windowClients) {
windowClients.forEach(function (client) {
if (client.url == url && 'focus' in client) {
return client.focus();
}
});
if (clients.openWindow) {
return clients.openWindow(url);
}
})
);
});
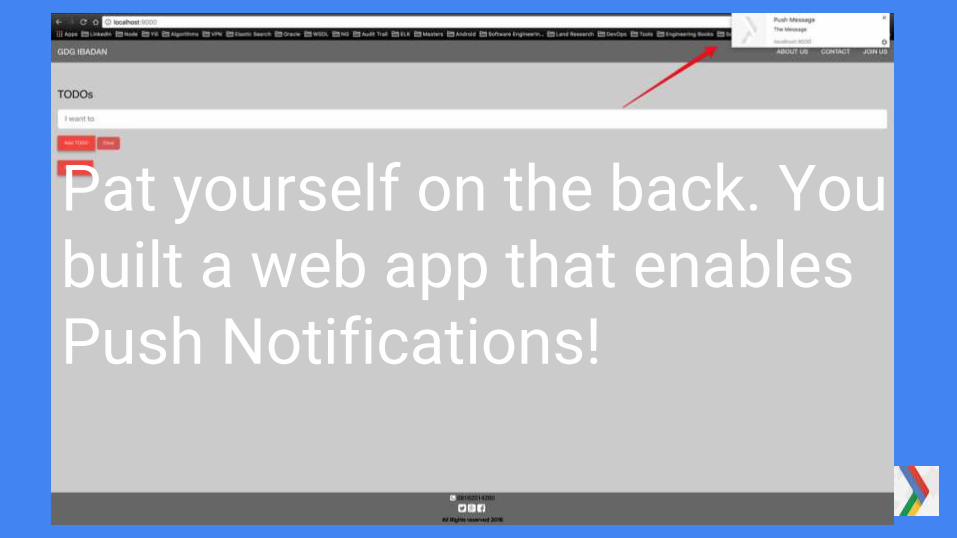
Pat yourself on the back. You built a web app that enables Push Notifications!
References
Google Developers - Your First Push Notifications Web App
Further Reading / Recommendations
Udacity Course - Offline Web Applications
Thanks!
Adegoke Obasa
Software Engineer
Cotta & Cush Limited | adKandi
@goke_epapa
www.adegokeobasa.me