indesign cc: visual quickstart guide -...
TRANSCRIPT

S A N D E E C O H E N
InDesign CC
LEARN THE QUICK AND EASY WAY!
VISUAL QUICKSTART GUIDE

V I S U A L Q U I C K S T A R T G U I D E
I n D e s i g n C C
F O R W I N D O W S A N D M A C I N T O S H
S A N D E E C O H E N
P e a c h p i t P r e s s

Visual QuickStart Guide InDesign CC
Peachpit Press www.peachpit.com. To report errors, please send a note to [email protected].
Peachpit Press is a division of Pearson Education.
Copyright © 2014 by Sandee Cohen
Editor: Becky Morgan Production Editor: Becky Winter Compositor & Interior Design: Sandee Cohen Cover Design: RHDG/Riezebos Holzbaur, Peachpit Press Logo Design: MINE (TM) www.minesf.com Proofreader: Patricia Pane Indexer: James Minkin
Notice of Rights All rights reserved. No part of this book may be reproduced or transmitted in any form or by any means, electronic, mechanical, photocopying, recording, or otherwise, without prior written permission of the publisher. For information on getting permission for reprints and excerpts, contact [email protected].
Cartoons for introduction © Laurie Wigham Some halftone images courtesy of Hemera Photo-Objects 50,000 Volumes I and II Some halftone images © copyright Photospin.com Some line art © copyright www.arttoday.com
Notice of Liability The information in this book is distributed on an “As is” basis, without warranty. Although every precaution has been taken in the preparation of this book, neither the author nor Peachpit Press shall have any liability to any person or entity with respect to any loss or damage caused or alleged to be caused directly or indirectly by the instructions contained in this book or by the computer software and hardware products described herein.
Trademarks Visual QuickStart Guide is a registered trademark of Peachpit Press, a division of Pearson Education.
All other trademarks are the property of their respective owners.
Many of the designations used by manufacturers and sellers to distinguish their products are claimed as trademarks. Where those designations appear in this book, and Peachpit Press was aware of a trademark claim, the designations appear as requested by the owner of the trademark. All other product names and services identified throughout this book are used in editorial fashion only and for the benefit of such companies. No such use, or the use of any trade name, is intended to convey endorsement or other affiliation with the book.
ISBN-10: 0-321-92957-8 ISBN-13: 978-0-321-92957-0
0 9 8 7 6 5 4 3 2 1
Printed and bound in the United States of America

InDesign CC Visual Quickstart Guide iii
IntroductionWelcome to the InDesign CC Visual
QuickStart Guide, my tenth ver-sion of the book. From its humble start, InDesign is now the primary application for desktop publishing and page layout. I feel very lucky to have been working with and teaching InDesign since its very first beta. In fact, this is the only third-party book that has had editions for all versions of InDesign.
Using This BookIf you have used any of the other Visual QuickStart Guides, you will find this book to be similar. Each chapter is divided into different sections that deal with a specific topic — usually a set of tools or similar com-mands. For instance, the chapter on text has sections on creating text frames, typing text, selecting text, and so on.Each of the sections contains numbered exer-cises that show you how to perform a specific technique. As you work through the steps, you gain an under standing of the technique or feature. The illustrations help you judge if you are following the steps correctly.However, unlike some other books, this book doesn’t provide you with files and images that you can use to follow along with the exercises. That’s because the exercises are very simple and you can use just about any text or image to practice on. I also feel that you’ll learn better with files that make sense to you, rather than working with mine.

iv Introduction
I’ve also sprinkled sidebars, printed in colored boxes, throughout the chapters. Some of these sidebars give you a bit of history or background for a specific feature. Other times, I’ve written out humorous stories about desktop publishing. These sidebars are the same little stories and anecdotes I tell my students in the classes I teach.Strictly speaking, you don’t have to work through the book in the same order as it is printed. If you want to learn more about imported images, you can skip right over to that chapter.However, the book is organized in the same order that I run my InDesign beginner classes. We start with the document setup, then move to basic text, color, and so on. It’s just as if you were sitting in one of my classes. The only thing you won’t see is a lunch break.
Mac or Windows?It really doesn’t matter if you’re working on a Macintosh or Windows computer. Adobe has been extra careful to make the program look, feel, and operate exactly the same on each platform.However, there are some times that they have had to make a change between the platforms. They haven’t done it just on a whim. The operating system has required it. For instance, the command for Preferences is under the InDesign menu on the Mac. But Windows doesn’t provide an application menu. So the Preferences command is under the Edit menu for that platform.Whenever there is a difference between the platforms, I’ll separate the instructions out with labels for each platform — Mac for Macintosh, Win for Windows.
InstructionsYou will find it easier to use this book once you understand the terms I am using. This is especially impor tant since some other com-puter books use terms differently. Therefore, here are the terms I use in the book and explanations of what they mean.Click refers to pressing down and releasing the mouse button on the Macintosh, or the left mouse button on Windows. You must release the mouse button or it is not a click. Don’t move the mouse during a click or you’ll wind up doing a press and drag (covered below).Press means to hold down the mouse button, or a keyboard key. Keep pressing down. Don’t let go until you finish doing whatever it is you’re in the middle of. For instance, you need to press (hold) the Shift key down as you drag the mouse to create a square frame. Then you let go of the mouse before you release the Shift key.Press and drag means to hold the mouse button down and then move the mouse. I also use the shorthand term drag.
Menu CommandsInDesign has menu commands that you follow to open dialog boxes, change artwork, and initiate actions. These menu commands are listed in bold type in the book. The typical direction to choose a menu command might be written as Object > Arrange > Bring to Front. This means that you should first choose the Object menu, then choose the Arrange submenu, and then choose the Bring to Front command.
Modifier KeysOne big difference between the platforms is the keys that you press on the keyboard. The Macintosh uses a key called the Command or Apple key. I shorten this to Cmd.

InDesign CC Visual Quickstart Guide v
Windows uses a key called the Control key. I shorten this to Ctrl. The Macintosh uses a key called the Option key while Windows uses a key called Alt.When I tell you what modifier keys to use, I always list the Macintosh key first, then a slash, and then the Windows key second. So the instruction “Hold the Cmd/Ctrl key” means hold the Cmd key on the Macintosh platform or the Ctrl key on the Windows platform. When the key is the same on both computers, such as the Shift key, only one key is listed.
b The light theme for the interface is used in this book
a The default setting for the InDesign interface is a dark background with white text and icons.
Keyboard ShortcutsYou’ll notice that I don’t usually provide the keyboard shortcut for commands. For instance, I’ll list the menu command for File > New, but not the keyboard shortcut Cmd/Ctrl-N.While keyboard shortcuts help you work faster, you really don’t have to start using them right away. In fact, you will most likely learn more about InDesign by using the menus. As you look for one command, you may see another feature that you would like to explore.So don’t worry about keyboard shortcuts as you start. Focus on the big picture.
Changing the Interface ThemeOne thing that will jump out at you is the difference between how my screen shots of the program look and the version on your computer.Your version most likely looks like figure a . I changed my interface to a lighter theme so that the screen shots in the book would be easier to print and read. So my interface looks like figure b .You may want to change the interface prefer-ence in you version of InDesign so that your panels match mine.
To change the interface theme:1. With InDesign running, but no
document open, choose InDesign > Preferences > Interface (Mac) or Edit > Preferences > Interface (Win). This opens the Interface settings preferences c .
2. Deselect the option to Match Pasteboard to Theme Color.
3. Click OK. The interface has now changed to the lighter colors.
c Choose Light from the Color Theme menu to match the screen shots in this book.
vi Introduction
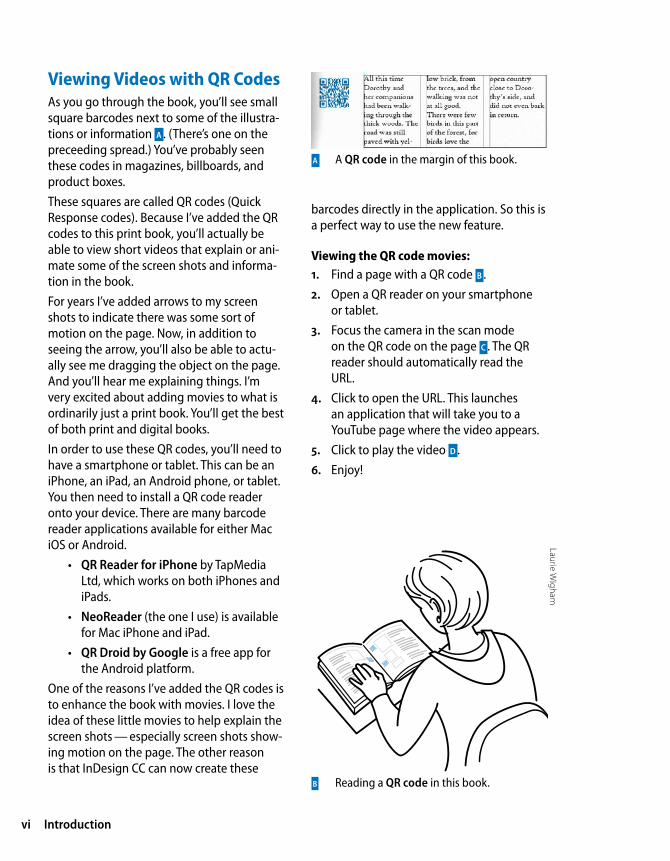
Viewing Videos with QR CodesAs you go through the book, you’ll see small square barcodes next to some of the illustra-tions or information a . (There’s one on the preceeding spread.) You’ve probably seen these codes in magazines, billboards, and product boxes.These squares are called QR codes (Quick Response codes). Because I’ve added the QR codes to this print book, you’ll actually be able to view short videos that explain or ani-mate some of the screen shots and informa-tion in the book.For years I’ve added arrows to my screen shots to indicate there was some sort of motion on the page. Now, in addition to seeing the arrow, you’ll also be able to actu-ally see me dragging the object on the page. And you’ll hear me explaining things. I’m very excited about adding movies to what is ordinarily just a print book. You’ll get the best of both print and digital books.In order to use these QR codes, you’ll need to have a smartphone or tablet. This can be an iPhone, an iPad, an Android phone, or tablet. You then need to install a QR code reader onto your device. There are many barcode reader applications available for either Mac iOS or Android.
• QR Reader for iPhone by TapMedia Ltd, which works on both iPhones and iPads.
• NeoReader (the one I use) is available for Mac iPhone and iPad.
• QR Droid by Google is a free app for the Android platform.
One of the reasons I’ve added the QR codes is to enhance the book with movies. I love the idea of these little movies to help explain the screen shots — especially screen shots show-ing motion on the page. The other reason is that InDesign CC can now create these
barcodes directly in the application. So this is a perfect way to use the new feature.
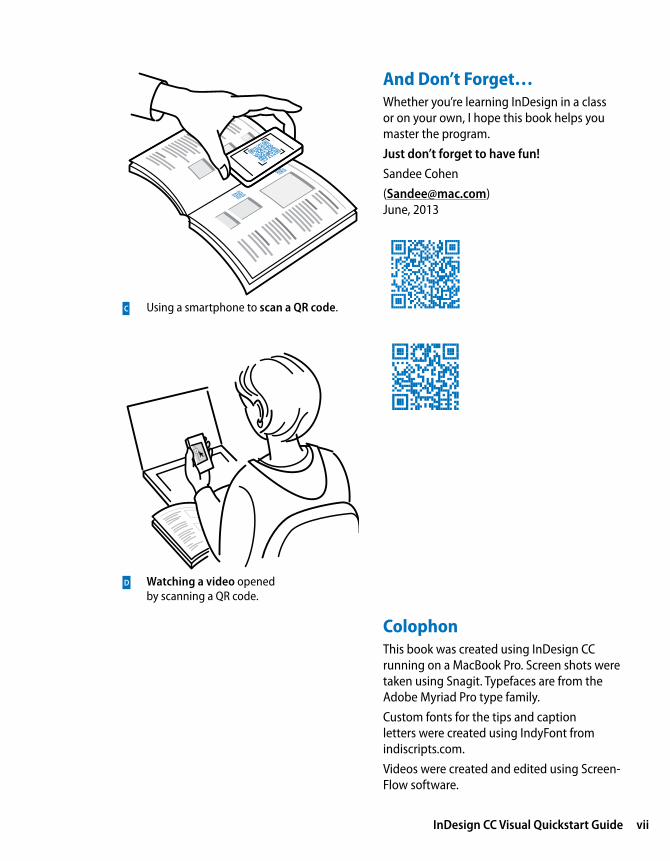
Viewing the QR code movies:1. Find a page with a QR code b .2. Open a QR reader on your smartphone
or tablet.3. Focus the camera in the scan mode
on the QR code on the page c . The QR reader should automatically read the URL.
4. Click to open the URL. This launches an application that will take you to a YouTube page where the video appears.
5. Click to play the video d .6. Enjoy!
a A QR code in the margin of this book .
b Reading a QR code in this book .
Laurie Wigham
InDesign CC Visual Quickstart Guide vii
c Using a smartphone to scan a QR code .
d Watching a video opened by scanning a QR code.
And Don’t Forget…Whether you’re learning InDesign in a class or on your own, I hope this book helps you master the program. Just don’t forget to have fun!Sandee Cohen([email protected]) June, 2013
ColophonThis book was created using InDesign CC running on a MacBook Pro. Screen shots were taken using Snagit. Typefaces are from the Adobe Myriad Pro type family.Custom fonts for the tips and caption letters were created using IndyFont from indiscripts.com.Videos were created and edited using Screen-Flow software.

viii Introduction
My Thanks to:
Nancy Ruenzel, publisher of Peachpit Press.
Becky Morgan, my editor at Peachpit Press. Thanks for being so patient with me.
Becky Winter, for testing the QR codes for printing.
Dave Awl, for taking all the screen shots of the new interface elements. As always, Dave is a meticulous worker who always comes through in a rush.
Patricia Pane, for proofing the pages.
James Minkin, for the index.
Laurie Wigham, for the cartoons in the Intro-duction. They are a neat instruction as to how to use QR codes.
Kris Coppieters of Rorohiko, who did the impossible and wrote a script that created hyperlinks from the QR codes. He saved me over a hundred hours of work. Rorohiko Workflow Resources is available for custom automation solutions.
The staff of Peachpit Press, all of whom make me proud to be a Peachpit author.
The InDesign team, who made InDesign my favorite program to use and to write about.
David Lerner of Tekserve, who has helped me keep my computers running in the middle of the book crunch. Tekserve is the best place in NYC to buy or service Macintosh computers and iPads.
Marc Autret of indiscripts.com, who gener-ously gave me a copy of IndyFont, originally created by Theunis de Jong, which creates custom fonts right in InDesign!

InDesign CC Visual Quickstart Guide ix
Table of ContentsIntroduction ii
Table of Contents ix
Chapter 1 Getting Started 1
Working with Panels . . . . . . . . . . . . . . . .2Using Workspaces . . . . . . . . . . . . . . . . . .4Using the Tools Panel . . . . . . . . . . . . . . . .6Using the Tool Hints Panel . . . . . . . . . . . . .7Using Contextual Menus . . . . . . . . . . . . . .8
Chapter 2 Document Setup 9
Setting Up Documents . . . . . . . . . . . . . . 10Setting the Layout Options . . . . . . . . . . . 13Changing Layout Options . . . . . . . . . . . . 16Using the Document Presets . . . . . . . . . . 17Using Document Rulers . . . . . . . . . . . . . 19Using the Page Tool . . . . . . . . . . . . . . . . 21Working with Guides . . . . . . . . . . . . . . . 23Using Smart Guides . . . . . . . . . . . . . . . . 27Viewing Transformation Values . . . . . . . . . 27Working with Document Grids . . . . . . . . . 28Changing the Magnification . . . . . . . . . . . 29View and Pasteboard Controls . . . . . . . . . 31Using the Zoom and Hand Tools . . . . . . . . 33Controlling Windows . . . . . . . . . . . . . . . 35Using the Application Bar . . . . . . . . . . . . 36File Maintenance . . . . . . . . . . . . . . . . . . 38
Chapter 3 Basic Text 41
Creating Text Frames . . . . . . . . . . . . . . . 42Typing Text . . . . . . . . . . . . . . . . . . . . . 45Selecting Text . . . . . . . . . . . . . . . . . . . . 46Moving and Deleting Text . . . . . . . . . . . . 48Using the Character Panel . . . . . . . . . . . . 50
Setting the Typeface and Point Size . . . . . . . . . . . . . . . . . . . . . . 53Styling Text . . . . . . . . . . . . . . . . . . . . . 54Setting Line and Character Spacing . . . . . . 56Applying Text Distortions . . . . . . . . . . . . 58Setting the Language . . . . . . . . . . . . . . . 59Applying Paragraph Formatting . . . . . . . . 60Setting Alignment and Indents . . . . . . . . . 61Bullets and Numbering . . . . . . . . . . . . . . 63Setting Paragraph Effects . . . . . . . . . . . . 66Working with Hidden Characters . . . . . . . . 68Using the Glyphs Panel . . . . . . . . . . . . . . 69Working with Text Flow. . . . . . . . . . . . . . 72Setting Text Frame General Controls. . . . . . 73Spanning and Splitting Columns . . . . . . . . 77Using the Control Panel for Text . . . . . . . . 78Using Special Text Characters . . . . . . . . . . 79
Chapter 4 Working with Objects 81
Types of Frames . . . . . . . . . . . . . . . . . . 82Creating Basic Shapes . . . . . . . . . . . . . . 83Selecting Objects . . . . . . . . . . . . . . . . . 85Moving Objects . . . . . . . . . . . . . . . . . . 86Replicating Objects . . . . . . . . . . . . . . . . 88Resizing Objects . . . . . . . . . . . . . . . . . . 90Using the Transform Tools . . . . . . . . . . . . 91Using the Transform Panel . . . . . . . . . . . . 96Using the Transform Commands . . . . . . . 100Using the Arrange Commands . . . . . . . . 102Aligning Objects . . . . . . . . . . . . . . . . . 103Smart Dimensions; Smart Spacing . . . . . . 106Using the Gap Tool . . . . . . . . . . . . . . . 107Grouping and Pasting Into Objects . . . . . 108Using the Measure Tool . . . . . . . . . . . . . 110Using the Info Panel with Objects . . . . . . 112Locking Objects . . . . . . . . . . . . . . . . . 113Selecting Frames . . . . . . . . . . . . . . . . . 114

x Table of Contents
Chapter 5 Working in Color 115
The Basics of Color . . . . . . . . . . . . . . . . 116Using the Color Panel . . . . . . . . . . . . . . 118Defining and Storing Swatches . . . . . . . . 122Using Swatch Libraries . . . . . . . . . . . . . 130Creating Tints . . . . . . . . . . . . . . . . . . . 131Using the Color Picker . . . . . . . . . . . . . 133Creating Gradient Swatches . . . . . . . . . . 134Using the Eyedropper . . . . . . . . . . . . . . 137Overprinting Colors . . . . . . . . . . . . . . . 138
Chapter 6 Fills, Strokes, and Effects 139
Applying Fills . . . . . . . . . . . . . . . . . . . 140Applying Stroke Effects . . . . . . . . . . . . . 144Creating Custom Stroke Styles . . . . . . . . 151Adding Arrows . . . . . . . . . . . . . . . . . . 156Corner Options . . . . . . . . . . . . . . . . . . 156Opacity and Blend Mode Effects . . . . . . . 158Working with Effects . . . . . . . . . . . . . . 160Shadow Effects . . . . . . . . . . . . . . . . . . 161Glow Effects . . . . . . . . . . . . . . . . . . . . 162Bevel and Emboss Effects . . . . . . . . . . . 163Satin Effect . . . . . . . . . . . . . . . . . . . . 163Feather Effects . . . . . . . . . . . . . . . . . . 164Setting the Global Light . . . . . . . . . . . . 165Using the Pathfinder Commands . . . . . . . 166Using the Eyedropper . . . . . . . . . . . . . . 169Setting Object Defaults . . . . . . . . . . . . . 171
Chapter 7 Points and Paths 173
Pen Points . . . . . . . . . . . . . . . . . . . . . 174Drawing Lines . . . . . . . . . . . . . . . . . . 175Drawing Curves . . . . . . . . . . . . . . . . . 176Changing Curves and Corner Points . . . . . 177Modifying Paths . . . . . . . . . . . . . . . . . 178Modifying Points . . . . . . . . . . . . . . . . . 180Using the Pencil Tool . . . . . . . . . . . . . . 182Using the Smooth Tool . . . . . . . . . . . . . 184
Using the Erase Tool . . . . . . . . . . . . . . . 185Adding or Deleting Points on Paths . . . . . 186
Chapter 8 Imported Graphics 187
Placing Artwork . . . . . . . . . . . . . . . . . 188Specialty Frames . . . . . . . . . . . . . . . . . 192Setting the Image Import Options . . . . . . 195Working with Images Inside Frames . . . . . 199Fitting Graphics in Frames . . . . . . . . . . . 201Linking Graphics . . . . . . . . . . . . . . . . . 204Setting Layer Visibility . . . . . . . . . . . . . 208Importing Transparent Images . . . . . . . . 209Viewing Images . . . . . . . . . . . . . . . . . 210
Chapter 9 Text Effects 213
Wrapping Text . . . . . . . . . . . . . . . . . . 214Text on a Path. . . . . . . . . . . . . . . . . . . 220Working with Paragraph Rules . . . . . . . . 223Inline and Anchored Objects . . . . . . . . . 227
Chapter 10 Pages and Books 231
Changing the Pages Panel . . . . . . . . . . . 232Adding Blank Pages . . . . . . . . . . . . . . . 234Navigating and Moving Pages . . . . . . . . 235Modifying Page Sizes . . . . . . . . . . . . . . 239Creating and Separating Spreads . . . . . . 241Importing Text . . . . . . . . . . . . . . . . . . 242Flowing Text . . . . . . . . . . . . . . . . . . . 246Creating Text Breaks . . . . . . . . . . . . . . . 248Working with Master Pages . . . . . . . . . . 249Rotating Spreads . . . . . . . . . . . . . . . . . 255Page Numbers and Text Variables . . . . . . 256Making Books . . . . . . . . . . . . . . . . . . 260Creating a Table of Contents . . . . . . . . . . 265
Chapter 11 Layers 271
Creating and Deleting Layers . . . . . . . . . 272Setting the Layer Options . . . . . . . . . . . 274

InDesign CC Visual Quickstart Guide xi
Working with Layers . . . . . . . . . . . . . . 277Layer Contents . . . . . . . . . . . . . . . . . . 279
Chapter 12 Libraries and Snippets 281
Storing Items in a Library . . . . . . . . . . . 282Applying Library Items to a Page . . . . . . . 284Setting the Library Display. . . . . . . . . . . 285Searching and Sorting Libraries . . . . . . . 286Creating and Using Snippets . . . . . . . . . 287
Chapter 13 Tabs and Tables 289
Inserting Tab Characters . . . . . . . . . . . . 290Setting Tab Stops . . . . . . . . . . . . . . . . 291Creating Tab Leaders . . . . . . . . . . . . . . 294Creating and Using Tables . . . . . . . . . . . 295Navigating Through Tables . . . . . . . . . . 300Selecting Tables . . . . . . . . . . . . . . . . . 301Working with Rows and Columns . . . . . . 303Adjusting Tables Within a Text Frame . . . . 309Working with Headers and Footers . . . . . 310Adding Images to Tables . . . . . . . . . . . . 312Customizing Cells . . . . . . . . . . . . . . . . 313Setting Borders, Strokes, and Fills . . . . . . . . . . . . . . . . . . . . . . 316Alternating Strokes and Fills . . . . . . . . . . 319Adding Diagonal Lines in Cells . . . . . . . . 322Using the Table or Control Panels . . . . . . 323
Chapter 14 Automating Your Work 325
Changing Case . . . . . . . . . . . . . . . . . . 326Checking Spelling . . . . . . . . . . . . . . . . 326Using Find/Change . . . . . . . . . . . . . . . 330Using the Text Find/Change . . . . . . . . . . 332Using the GREP Find/Change . . . . . . . . . 334Using the Glyph Find/Change . . . . . . . . . 335Using the Object Find/Change . . . . . . . . 336Saving Searches . . . . . . . . . . . . . . . . . 336Adding Captions to Images . . . . . . . . . . 337Using the Story Editor . . . . . . . . . . . . . 340
Tracking Text Changes . . . . . . . . . . . . . 341Conditional Text . . . . . . . . . . . . . . . . . 343Conditional Text Sets . . . . . . . . . . . . . . 346Footnotes . . . . . . . . . . . . . . . . . . . . . 347Using Find Font . . . . . . . . . . . . . . . . . 350Keeping Lines Together . . . . . . . . . . . . 351Using the Eyedropper on Text . . . . . . . . . 352Using Scripts . . . . . . . . . . . . . . . . . . . 354
Chapter 15 Styles 355
Working with Paragraph Styles . . . . . . . . 356Working with Character Styles . . . . . . . . 360Working with Styles . . . . . . . . . . . . . . . 361Creating Style Groups . . . . . . . . . . . . . . 363Loading and Importing Styles . . . . . . . . 364Importing Text Styles from Word . . . . . . . 366Applying Styles and Style Overrides . . . . . 368Clearing Style Overrides . . . . . . . . . . . . 369Redefining and Deleting Styles . . . . . . . . 371Automatic Drop Cap Styling . . . . . . . . . . 373Using Nested Styles . . . . . . . . . . . . . . . 374Creating Nested Line Styles . . . . . . . . . . 377Creating GREP Styles . . . . . . . . . . . . . . 378Defining Object Styles . . . . . . . . . . . . . 379Working with Object Styles . . . . . . . . . . 381Defining Table and Cell Styles . . . . . . . . . 382Using the Quick Apply Feature . . . . . . . . 384
Chapter 16 Typography 387
Optical Margin Alignment . . . . . . . . . . . 388Using Adobe Paragraph Composer . . . . . 389Applying Justification Controls . . . . . . . . 390Controlling Hyphenation . . . . . . . . . . . . 394Baseline Grid . . . . . . . . . . . . . . . . . . . 396Balancing Ragged Lines . . . . . . . . . . . . 399Using OpenType . . . . . . . . . . . . . . . . . 399OpenType Categories . . . . . . . . . . . . . . 401

xii Table of Contents
Chapter 17 Interactive and Multimedia 403
Types of Interactive Elements . . . . . . . . . 404Defining Hyperlinks . . . . . . . . . . . . . . . 405Creating Cross-References . . . . . . . . . . . 410Working with Bookmarks . . . . . . . . . . . 413Adding Sounds . . . . . . . . . . . . . . . . . . 416Movies and Animations . . . . . . . . . . . . 420Creating Buttons . . . . . . . . . . . . . . . . . 423Sample Buttons . . . . . . . . . . . . . . . . . 427Creating PDF Forms . . . . . . . . . . . . . . . 428Sample Forms . . . . . . . . . . . . . . . . . . 429Animating InDesign Objects . . . . . . . . . 430Timing . . . . . . . . . . . . . . . . . . . . . . . 433Setting Page Transitions . . . . . . . . . . . . 435Multi-State Objects . . . . . . . . . . . . . . . 437Working with the SWF Preview Controls . . 439Creating QR Codes . . . . . . . . . . . . . . . . 440
Chapter 18 Working with Layouts 441
Collecting and Placing Content . . . . . . . . 442Linking Items . . . . . . . . . . . . . . . . . . . 445Mapping Styles . . . . . . . . . . . . . . . . . . 447Creating Alternate Layouts . . . . . . . . . . 448Applying Liquid Layout Rules . . . . . . . . . 450Auto-Fit Commands . . . . . . . . . . . . . . . 454
Chapter 19 Printing 457
Printing a Document . . . . . . . . . . . . . . 458Setting the General Print Options . . . . . . 459Choosing the Setup Controls . . . . . . . . . 461Setting Marks and Bleed . . . . . . . . . . . . 462Working with Print Presets . . . . . . . . . . . 464Creating a Print Summary . . . . . . . . . . . 465Preflighting Documents . . . . . . . . . . . . 466Creating Preflight Profiles . . . . . . . . . . . 467Packaging a Document . . . . . . . . . . . . . 470
Chapter 20 Exporting 471
Setting the Export File Options . . . . . . . . 472Creating Print PDF Files . . . . . . . . . . . . . 474Setting the PDF General Controls . . . . . . 474Setting the PDF Compression Options . . . 477Exporting Interactive PDF Files . . . . . . . . 480Setting PDF Security Options . . . . . . . . . 482Using InDesign Markup Files . . . . . . . . . 484Exporting for InCopy . . . . . . . . . . . . . . 484Exporting EPUB Files . . . . . . . . . . . . . . 485Exporting HTML Files . . . . . . . . . . . . . . 486Exporting JPEG or PNG Files . . . . . . . . . . 488Exporting SWF or FLA Files . . . . . . . . . . 489Exporting Text . . . . . . . . . . . . . . . . . . 490
Chapter 21 Customizing 491
Modifying Keyboard Shortcuts . . . . . . . . 492Modifying the Menu Commands . . . . . . . 495Choosing the Preferences Categories . . . . 496General Preferences Controls . . . . . . . . . 496Interface Preferences . . . . . . . . . . . . . . 497Type Preferences . . . . . . . . . . . . . . . . . 498Advanced Type Preferences . . . . . . . . . . 498Composition Preferences . . . . . . . . . . . 499Units & Increments Preferences . . . . . . . . 499Grids Preferences . . . . . . . . . . . . . . . . 500Guides & Pasteboard Preferences . . . . . . 500Dictionary Preferences . . . . . . . . . . . . . 501Spelling Preferences . . . . . . . . . . . . . . 501Autocorrect Preferences . . . . . . . . . . . . 502Notes Preferences . . . . . . . . . . . . . . . . 502Track Changes Preferences . . . . . . . . . . 503Story Editor Display Preferences . . . . . . . 503Display Performance Preferences . . . . . . 504Appearance of Black Preferences . . . . . . . 504File Handling Preferences . . . . . . . . . . . 505Clipboard Handling . . . . . . . . . . . . . . . 505Trashing Preferences . . . . . . . . . . . . . . 506
Index . . . . . . . . . . . . . . . . . . . . . . . . 507

This page intentionally left blank

InDesign CC Visual Quickstart Guide 81
4Working with ObjectsBack in the old days of board
mechanicals, advertising agencies and design studios had a production area called the bullpen. It was the people in the bullpen — called bullpen artists — who actually created the mechanical. Most of them were kids just out of design school; the bullpen was usually their first step up the ladder in advertising or design.
The kids in the bullpen were amazing. Although not professional illustrators, they could create all sorts of artwork for the layout.
The same is true when working with InDesign. Although InDesign is not a full-fledged drawing program such as Adobe Illustrator, you can use InDesign’s tools to create a wide variety of effects by distorting, moving, resizing, dupli-cating, and aligning objects. It’s your electronic bullpen.
In This Chapter:Types of Frames 82Creating Basic Shapes 83Selecting Objects 85Moving Objects 86Replicating Objects 88Resizing Objects 90Using the Transform Tools 91Using the Transform Panel 96Using the Transform Commands 100Using the Arrange Commands 102Aligning Objects 103Smart Dimensions; Smart Spacing 106Using the Gap Tool 107Grouping and Pasting Into Objects 108Using the Measure Tool 110Using the Info Panel with Objects 112Locking Objects 113Selecting Frames 114

82 Chapter 4 Working with Objects
Types of FramesFrames are the containers in which you place graphics or text. Frames can also be used as graphic shapes. There are three types of frames you can create: unassigned, graphic, and text.
Unassigned framesUnassigned frames are created with the Rectangle, Ellipse, and Polygon tools a . These frames are useful for adding color to your layout or a stroke around an area without inserting a graphic or text.
Graphic framesGraphic frames are created with the Rectan-gle Frame, Ellipse Frame, and Polygon Frame tools. When you create a graphic frame, diagonal lines inside the frame indicate that you can insert a graphic inside the frame a .
tip Although most people insert images inside graphic frames, there is nothing to prevent you from flowing text inside a graphic frame.
Text framesText frames are created using the Text tool or by converting frames. When you create a text frame, two link boxes appear on the sides of the frame in addition to the bounding box handles. Text frames also display a blinking insertion point when they are selected a .
a The three different types of frames : unassigned, graphic, and text.
Unassigned frame
Graphic frame
Text frame
Diagonal Lines in Graphic Frames?
The diagonal lines inside a graphic frame come from a convention that was used in traditional pasteboard mechanicals.
When pasteboard artists drew the lines on mechanicals, they would often block off an area with diagonal lines to indicate that a picture or graphic was to go there.
Electronic page-layout programs such as Adobe InDesign and QuarkXPress use the same convention. The diagonal lines indicate where photos or graphics need to be inserted.
However, there is absolutely no rule that says you can only place images in graphic frames. You can place text in graphic frames or images in unassigned frames. The choice is yours.

InDesign CC Visual Quickstart Guide 83
Creating Basic ShapesYou use the rectangle, ellipse, and polygon frame tools to create graphic frames into which you place images.
tip If another tool is visible, press the corner triangle to reveal the toolset.
To create a rectangular graphic frame:1. Click the Rectangle Frame tool in the
Tools panel b .2. Drag across the page to create the
rectangle.
tip Hold the Opt/Alt key to draw the object from the center.
3. Release the mouse button when the rectangle is the correct size.
tip Hold the Shift key to constrain the rectangle into a square.
To create an elliptical graphic frame:1. Click the Ellipse Frame tool in the Tools
panel c .2. Drag across the page to create the ellipse.
tip Hold the Opt/Alt key to draw the object from the center.
3. Release the mouse button when the ellipse is the correct size.
tip Hold the Shift key to constrain the ellipse into a circle.
You can also create rectangles and ellipses by specifying their size numerically.
To create objects numerically:1. Click with either the Rectangle or Ellipse
Frame tools. A dialog box appears d .2. Enter the width and height amounts.3. Click OK. The frame appears where the
mouse was clicked.
Using the Transformation Values?
You may notice that a label appears when you drag or create objects that contains feedback as to the position, size, or angle of the object. This is the Transformation Values cursor.
Rather than clutter the illustrations in this chap-ter, I’ve turned off the Transformation Values.
But you should get in the habit of using those labels to work more precisely.
b The Rectangle Frame tool in the Tools panel creates rectangular graphic frames.
c The Ellipse Frame tool in the Tools panel creates elliptical graphic frames.
d The Ellipse and Rectangle dialog boxes let you create frames with precise width and height.

84 Chapter 4 Working with Objects
To create a polygon graphic frame:1. Choose the Polygon Frame tool in the
Tools panel a .2. Click on the page. This opens the Polygon
dialog box b .3. Enter a number in the field for the
Number of Sides to the polygon.4. To create a star, change the amount in
the Star Inset field from 0% to a higher number.
5. Click OK. The polygon is created.
tip Hold the Opt/Alt key to draw the object from the center.
tip Hold the Shift key to constrain the width and height of the object to the same amount.
tip You can also drag across the page to create the polygon or star.
The Line tool lets you draw a straight line.
To create straight lines:1. Click the Line tool in the Tools panel c .2. Position the cursor where you want the
line to start.
tip Hold the Opt/Alt key to draw the line from its centerpoint.
3. Drag to create a line.
tip Hold the Shift key to constrain the line to 45-degree angles.
c The Line tool in the Tools panel creates straight lines.
b The Polygon Settings dialog box creates either polygons or stars.
a Use the Polygon Frame tool to create polygon and star graphic frames.
Converting Shapes
So what if you’ve created a circle and later on realize you need a rectangle? What do you do?
Simple, you can use the Pathfinder Convert Shape commands to change an object from one shape to another. (See Chapter 7, “Points and Paths,” for more information on the Pathfinder commands.)

InDesign CC Visual Quickstart Guide 85
Selecting ObjectsOnce you’ve created objects, you can use dif-ferent techniques to select them.
To select by clicking:1. Choose the Selection tool (black arrow) in
the Tools panel d .2. Click the object you want to select.3. Hold the Shift key to select any additional
objects.
tip Hold the Shift key and click on a selected object to deselect that object.
tip To select objects behind others, hold the Cmd/Ctrl key as you click the mouse button.
tip Double-click on a graphic frame to toggle between the Selection and Direct Selection tools.
You can also select an object by dragging an area, or marquee, around the object.
To select by dragging a marquee:1. Choose the Selection tool.2. Drag along a diagonal angle to create a
marquee around the objects you want to select e .
tip You do not need to marquee the entire object to select it. Objects are selected if any portion is within the marquee.
tip Hold the Shift key and drag around another area to add to a selection.
You can also use a menu command to select all the objects on a page.
To select all the objects on a page:Choose Edit > Select All.
tip This command works only if you do not have an insertion point blinking inside a text frame.
What Are the Differences Between the Selection Tools?
Perhaps the most confusing part of InDesign is the difference between the Selection tool (black arrow) and the Direct Selection tool (white arrow) d .
The Selection tool will always select the object as a whole. Use this tool when you want to manipulate the entire object.
The Direct Selection tool will always select the points or segments that make up a frame. Use the Direct Selection tool to reshape a path.
Both tools can select placed images within a frame, as covered in Chapter 8, “Imported Graphics.”
If you’ve ever worked with Adobe Illustrator, you’ll instantly recognize the two selection tools as identical to their Illustrator cousins.
d The Selection tool in the Tools panel selects entire objects. The Direct Selection tool selects a point on an object.
Selection tool Direct Selection tool
e Drag to create a marquee to select objects.

86 Chapter 4 Working with Objects
Moving ObjectsThe simplest way to position an object on a page is to drag it to a new position, but you can also move objects by using menu and keyboard commands, or by typing specific numerical locations into a dialog box, as you’ll learn later in this chapter.
To move an object by dragging:1. Choose the Selection tool in the Tools
panel.2. Click the object you want to move. A
bounding box with eight handles appears around the object. This indicates the object is selected.
3. Position the Selection tool on the edges of the bounding box (but not on the handles of the bounding box).
tip If an object has a fill color, gradient, or image inside it, you can drag with the Selection tool directly inside the object. Otherwise, you must drag by the stroke or bounding box.
4. Drag to move the object. If you drag quickly, you will see only a bounding box preview of the object being moved a .orPress and pause for a moment before you drag the object. The pause gives InDesign enough time to let you see a preview of the object as you move it b .
a Quickly drag to see the bounding box of the object being moved.
b Pause before you drag to see a preview of the object being moved.
InDesign CC Visual Quickstart Guide 87
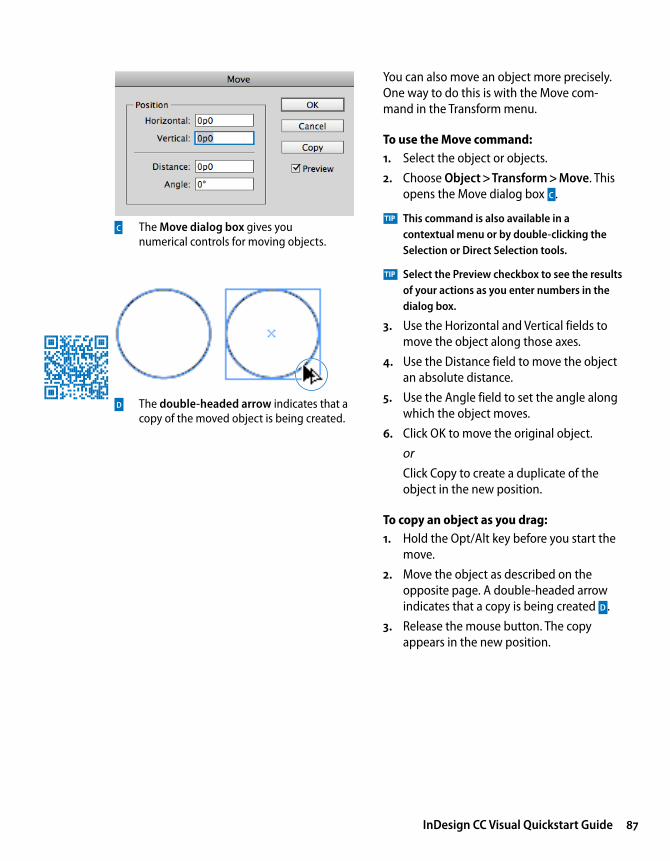
You can also move an object more precisely. One way to do this is with the Move com-mand in the Transform menu.
To use the Move command:1. Select the object or objects.2. Choose Object > Transform > Move. This
opens the Move dialog box c .
tip This command is also available in a contextual menu or by double-clicking the Selection or Direct Selection tools.
tip Select the Preview checkbox to see the results of your actions as you enter numbers in the dialog box.
3. Use the Horizontal and Vertical fields to move the object along those axes.
4. Use the Distance field to move the object an absolute distance.
5. Use the Angle field to set the angle along which the object moves.
6. Click OK to move the original object.orClick Copy to create a duplicate of the object in the new position.
To copy an object as you drag:1. Hold the Opt/Alt key before you start the
move.2. Move the object as described on the
opposite page. A double-headed arrow indicates that a copy is being created d .
3. Release the mouse button. The copy appears in the new position.
c The Move dialog box gives you numerical controls for moving objects.
d The double-headed arrow indicates that a copy of the moved object is being created.

88 Chapter 4 Working with Objects
Replicating ObjectsThere are several commands you can use to create duplicates of objects. Use the Copy command when you want to put the object on the clipboard so you can paste it some-where else.
To copy objects:1. Select an object to copy.2. Choose Edit > Copy.
Use the Cut command to remove the object from the page so it can be pasted elsewhere.
To cut objects:1. Select an object to cut.2. Choose Edit > Cut.
Use the Paste command to see the contents of the clipboard.
To paste objects:Choose Edit > Paste. The contents of the clipboard appear in the center of the window area a .orChoose Edit > Paste in Place. The contents of the clipboard appear in the same location on the page as when they were originally selected.
The Duplicate command makes a copy with-out changing the contents of the clipboard.
To duplicate objects:1. Choose the object to duplicate.2. Choose Edit > Duplicate. The selected
object appears on the page at the same distance that the last object was moved b .
b The Duplicate command places the object offset from the original.
Original object
Duplicated object
a The Paste command places the object in the center of the page.
Copied object
Pasted object
Using Paste in Place
I always wondered just how useful the Paste in Place command is. After all, if you already have a copy of an object in one place, why would you need a second copy right over it?
That’s not the point of Paste in Place. The power of the command is that you can paste an object in the same place on different pages. You can even paste in the same place in different documents. This is very helpful for creating documents that all look the same.

InDesign CC Visual Quickstart Guide 89
InDesign makes it easy to create a grid of an object as you drag to create it. This is known as the gridify feature.
To create a grid as you draw an object:1. Select one of the drawing tools and start
the drag to draw the object.2. Without releasing the mouse button,
press the up/down or left/right arrows. This creates rows and columns that duplicate the object as follows: • The up and down arrows increase and
decrease the number of rows. • The left and right arrows increase and
decrease the number of columns.
tip Add the Cmd/Ctrl key and use the arrow keys to change the spaces between the rows or columns.
3. Release the mouse button when you have as many objects you you need c :
The gridify feature doesn’t give you numerical control over the space between the rows and columns. That’s when you want to use the Step and Repeat command.
To duplicate multiple objects:1. With an object selected, choose Edit >
Step and Repeat. The Step and Repeat dialog box appears d .
2. In the Repeat Count field, enter the number of duplicates you want to create.
3. If desired, check Create as a grid. This changes the Repeat Count to Rows and Columns e .
4. In the Horizontal Offset field, enter a distance for the horizontal space between duplicates.
5. In the Vertical Offset field, enter a distance for the vertical space between duplicates.
6. Click OK.
d Use the Step and Repeat dialog box to make multiple copies of an object positioned at specific horizontal and vertical intervals.
e The Step and Repeat dialog box set to create a grid of repeated objects.
c Press the up/down or left/right arrows as you drag with a tool to create a grid of the objects.

90 Chapter 4 Working with Objects
Resizing ObjectsVery often things need to be made bigger or smaller. InDesign gives you several different ways to scale objects. You can also use the bounding box handles to change the dimen-sions of the object visually. This is the easiest way to quickly resize an object.
To resize using the bounding box handles:1. Choose the Selection tool.2. Choose which handle to drag based on
the following options a : • Drag the corner handles to change
both the width and height. • Drag the top or bottom handles to
change the height only. • Drag the left or right handles to change
the width only.3. Drag the handle. If you drag quickly, you
will see only the bounding box of the object b .orPress and hold for a moment and then drag the handle. This shows a preview of the object as you resize the bounding box c .
tip Hold down the Shift key as you drag a corner to keep the original proportions of the width and height.
tip Hold the Cmd/Ctrl key as you drag to scale the frame as well as any text and images inside the object.
4. Release the mouse button when the object is the correct size.
a Use the bounding box handles to resize an object.
b If you drag quickly , you only see a box as you resize an object.
c If you press and pause a moment , you see an actual preview as you resize an object.
Resizing or Scaling?
Although you and I might feel the words are the same, InDesign treats them differently. When you resize an object, you change its width or height. The amount of scaling stays the same in the Control panel or the Transform panel. You have to resize the object again to get it back to its original size.
When you scale an object, the width and height change, and the amount of scaling applied to the object is shown in the Scale fields in the Con-trol panel or Transform panel. You can convert the object back to its original size by setting the scaling to 100%.

InDesign CC Visual Quickstart Guide 91
Using the Transform ToolsThe transform tools resize and distort objects. You can transform the object itself (also called the container) or the object as well as any content. How you select objects changes the effect of the transform tools.
To control the effect of the transform tools:Select the object using the Selection tool. This type of selection causes the transform tools to affect both the container and any text or images inside it d .orHold the Opt/Alt key as you click the frame with the Group Selection tool (Direct Selection tool). This causes the transformation to affect only the container, not any text or images contained in the frame e .
tip The plus (+) sign next to the Direct Selection tool indicates that the tool is now the Group Selection tool.
All the transformations take place in relation to a reference point. Each object has a default reference point, but you can change it if necessary.
To control the reference point:1. Select the object to be transformed.2. Choose one of the transform tools. A
reference point appears inside the object.3. Move the cursor near the reference point.
A small icon appears next to the cursor that indicates you can move the reference point f .
4. Drag the reference point to a new position.orClick to position the reference point in a new position.
e Objects selected with the Group Selection tool have only the object transformed by the transform tools.
d Objects selected with the Selection tool have both the object and its content transformed by the transform tools.
f The indicator that the reference point can be moved to a new position.

92 Chapter 4 Working with Objects
The Scale tool lets you increase or decrease the size of objects.
To scale objects visually using the Scale tool:1. Select the object or objects.2. Choose the Scale tool in the Tools panel a .
The Scale tool is in the flyout menu under the Free Transform tool.
3. If necessary, change the position of the reference point.
4. Move the cursor away from the reference point, and drag to scale the object b .
tip Hold down the Shift key to constrain the tool to horizontal, vertical, or proportional scaling.
tip To see a preview of the image as you scale, press and hold the mouse button for a moment before you start to drag.
tip Hold down the Opt/Alt key to copy the object as you scale it.
If you prefer, you can resize objects numeri-cally using the Scale command.
To scale objects using the Scale command:1. Select the object or objects.2. Choose Object > Transform > Scale. This
opens the Scale dialog box c .3. Enter an amount for the Scale X
(horizontal) field.4. Enter an amount for the Scale Y (vertical)
field.
tip If the chain icon is selected, the X and Y fields scale the same amounts.
5. Select the Preview checkbox to see the effects of entering the amounts.
6. Click OK to scale the object or click Copy to create a scaled copy of the object.
a The Scale tool in the Tools panel is used to change the size of objects.
b The arrowhead appears while scaling an object.
c The Scale dialog box lets you scale objects using numerical values.
Making Copies as You Scale, Rotate, and Shear
As you use the Scale, Rotate, and Shear tools, you can duplicate the object as you transform it.
Drag, as usual, to start the transformation, but then add the Opt/Alt key after you start the drag. You will see the double-headed arrow that indicates you are duplicating the object.
Release the mouse button first, and then the Opt/Alt key to finish the transformation and duplication.
InDesign CC Visual Quickstart Guide 93
To scale objects numerically using the Scale tool:1. Select the object or objects.2. Choose the Scale tool in the Tools panel. 3. Hold the Opt/Alt key and click to desig-
nate the position of the reference point. This opens the Scale dialog box c .
4. Set the dialog box controls as described in the previous exercise.
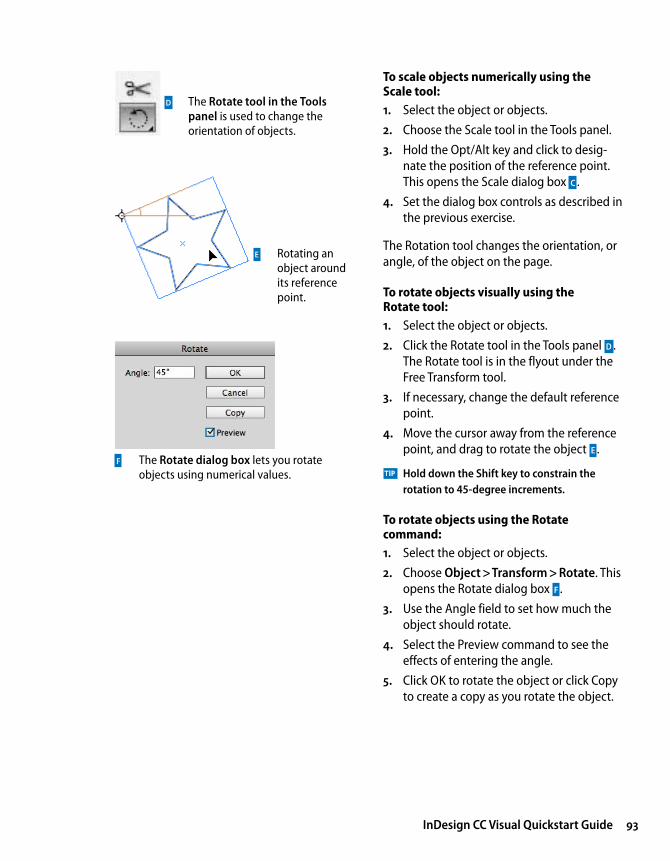
The Rotation tool changes the orientation, or angle, of the object on the page.
To rotate objects visually using the Rotate tool:1. Select the object or objects.2. Click the Rotate tool in the Tools panel d .
The Rotate tool is in the flyout under the Free Transform tool.
3. If necessary, change the default reference point.
4. Move the cursor away from the reference point, and drag to rotate the object e .
tip Hold down the Shift key to constrain the rotation to 45-degree increments.
To rotate objects using the Rotate command:1. Select the object or objects.2. Choose Object > Transform > Rotate. This
opens the Rotate dialog box f .3. Use the Angle field to set how much the
object should rotate.4. Select the Preview command to see the
effects of entering the angle.5. Click OK to rotate the object or click Copy
to create a copy as you rotate the object.
d The Rotate tool in the Tools panel is used to change the orientation of objects.
e Rotating an object around its reference point.
f The Rotate dialog box lets you rotate objects using numerical values.

94 Chapter 4 Working with Objects
To rotate objects numerically using the Rotate tool:1. Select the object or objects.2. Choose the Rotate tool in the Tools panel.3. Hold the Opt/Alt key and click to set the
position of the reference point. This opens the Rotate dialog box.
4. Set the dialog box controls as described in the previous exercise.
The Shear tool distorts the shape of objects.
To shear objects visually using the Shear tool:1. Select the object or objects.2. Click the Shear tool in the Tools panel a .
The Shear tool is in the flyout under the Free Transform tool.
3. If necessary, drag the reference point to a new position. The cursor indicates the reference point can be moved.
4. Move the cursor away from the reference point, and drag to shear the object b .
To shear objects using the Shear command:1. Select the object or objects.2. Choose Object > Transform > Shear. This
opens the Shear dialog box c .3. Use the Shear Angle field to set the
amount of distortion.4. Select one of the Axis options:
• Horizontal shears along the horizontal axis.
• Vertical shears along the vertical axis.5. Select the Preview command to see the
effects of entering the shear angle and choosing the axis.
6. Click OK to shear the object.orClick Copy to create a sheared copy of the object.
a Use the Shear tool in the Tools panel to distort objects.
b Shearing an object around the reference point.
c The Shear dialog box lets you distort objects using numerical values.

InDesign CC Visual Quickstart Guide 95
To shear objects numerically using the Shear tool:1. Select the object or objects.2. Choose the Shear tool in the Tools panel.3. Hold the Opt/Alt key and click to set the
position of the reference point. This opens the Shear dialog box c .
4. Set the dialog box controls as described in the previous exercise.
Rather than switching between the Scale, Rotate, and Shear tools, you can use the Free Transform tool to scale, rotate, or shear an object.
To use the Free Transform tool:1. Select the object or objects.2. Click the Free Transform tool in the Tools
panel d . A bounding box appears around the object.
3. To scale the object, place the cursor over one of the handles. The cursor changes to a straight double-headed arrow e .orTo rotate the object, place the cursor outside one of the handles of the bounding box. The cursor changes to a curved double-headed arrow f .orTo skew the object, drag one of the handles and then hold the Cmd/Ctrl key after you have started the drag. The cursor does not change appearance, but the object will be sheared.
4. Release the mouse button to apply the transformation.
tip You can also scale or rotate an object using the Selection tool and dragging a corner of the object.
d Choose the Free Trans form tool in the Tools panel to scale, rotate, and shear objects.
e The double-headed arrow indicates that the Free Transform tool is in the scale mode.
f The curved double-headed arrow indicates that the Free Transform tool is in the rotation mode.

96 Chapter 4 Working with Objects
Using the Transform PanelThe Transform panel allows you to move, scale, rotate, and shear objects precisely, using numerical values.
tip When you have objects selected, the Control panel displays many of the controls that are found in the Transform panel.
To open the Transform panel:Choose Window > Object & Layout > Transform to open the panel a .orIf the Transform panel is behind other panels, click the Transform panel tab.
As you work with the Transform panel, it is important to know its reference point on the object. This is the same as the reference point used with the transform tools.
To set the Transform panel reference point:1. Select the object or objects that you want
to transform.2. Click the reference point control on the
Transform panel to choose the point around which the object moves b .
a The Transform panel is a command center for positioning and transforming objects.
b The reference point controls where in the object the transformation occurs.
Bottom left
Top left
Left side
Top right
Right side
Bottom right
Top center
Bottom center
Center
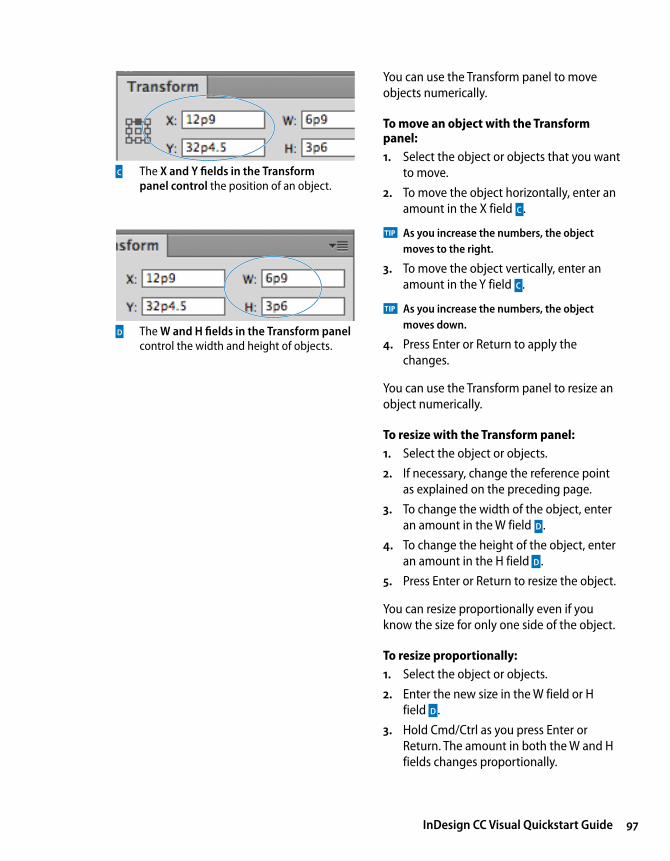
InDesign CC Visual Quickstart Guide 97
You can use the Transform panel to move objects numerically.
To move an object with the Transform panel:1. Select the object or objects that you want
to move.2. To move the object horizontally, enter an
amount in the X field c .
tip As you increase the numbers, the object moves to the right.
3. To move the object vertically, enter an amount in the Y field c .
tip As you increase the numbers, the object moves down.
4. Press Enter or Return to apply the changes.
You can use the Transform panel to resize an object numerically.
To resize with the Transform panel:1. Select the object or objects.2. If necessary, change the reference point
as explained on the preceding page.3. To change the width of the object, enter
an amount in the W field d .4. To change the height of the object, enter
an amount in the H field d .5. Press Enter or Return to resize the object.
You can resize proportionally even if you know the size for only one side of the object.
To resize proportionally:1. Select the object or objects.2. Enter the new size in the W field or H
field d .3. Hold Cmd/Ctrl as you press Enter or
Return. The amount in both the W and H fields changes proportionally.
c The X and Y fields in the Transform panel control the position of an object.
d The W and H fields in the Transform panel control the width and height of objects.

98 Chapter 4 Working with Objects
You can also scale using the Trans form panel.
To scale with the Transform panel:1. Select the object or objects.
tip Use the Selection tool to scale the object and its contents. Use the Direct Selection tool to scale only the object.
2. If necessary, change the reference point.3. To change the horizontal size, enter a
percentage in the Scale X field a .4. To change the height of the object, enter
a percentage in the Scale Y field a .
tip The Scale X and Y fields also have pop-up lists from which to choose the amount of scaling.
5. Press Enter or Return to apply the changes.
tip You can also scale text within a text frame by dragging on the edge of the frame while holding the Cmd/Ctrl key. Hold Cmd/Ctrl-Shift and drag by a corner point to scale proportionally. This also applies to text frames in groups.
To scale proportionally with the Transform panel:1. Select an object or objects.2. If the Link icon is in the open state, click to
close it b .3. Enter an amount in either the Scale X or
Scale Y fields. You do not have to enter an amount in both fields. The closed Link icon forces both fields to display the same amount.
4. Press Enter or Return to apply the changes.
tip Hold the Cmd/Ctrl key as you press the Enter or Return key to scale proportionally even if the Link icon is in the open state.
b The Link icon in the closed state forces both the Scale X and the Scale Y fields to the same amount. In the open state, you can enter different amounts for the Scale X and Scale Y fields.
Closed state Open state
Scale X Scale Y
a The Scale X and Y fields in the Transform panel let you apply percentage amounts to scale objects.

InDesign CC Visual Quickstart Guide 99
You can also rotate objects using the Transform panel.
To rotate with the Transform panel:1. Select the object or objects.
tip Use the Selection tool to rotate the object and its contents. Use the Direct Selection tool to rotate only the object.
2. If necessary, change the reference point.3. Enter the amount of rotation in the
Rotation field c .
tip The Rotation field also has a pop-up list from which to choose the amount of rotation.
4. Press Enter or Return to apply the changes d .
You can also shear objects using the Trans-form panel.
To shear with the Transform panel:1. Select the object or objects.
tip Use the Selection tool to shear the object and its contents. Use the Direct Selection tool to shear only the object.
2. If necessary, change the reference point.3. Enter the amount of distortion in the
Shear field e .
tip The Shear field also has a pop-up list from which to choose the amount of shearing.
4. Press Enter or Return to apply the changes f .
f The difference between shearing an object or shearing an object and its content.
Object sheared
Object and content sheared
c The Rotation field in the Transform panel lets you change the angle of objects.
e The Shear field in the Transform panel lets you distort the shape of objects.
d The difference between rotating an object or rotating an object and its content.
Object rotatedObject and content rotated

100 Chapter 4 Working with Objects
Using the Transform CommandsIn addition to the transform tools and transform fields, there are a whole bunch of transform commands you can use on objects. These commands make it easy to perform commonly used transformations, such as rotating and flipping objects.
To rotate with the transform commands:1. Select an object or objects.2. Click to open the Transformation
panel menu.orChoose Object > Transform.
3. Choose one of the rotation settings as follows a : • Rotate 90° CW (clockwise). • Rotate 90° CCW (counterclockwise). • Rotate 180°.
To flip objects using the transform commands:1. Select an object or objects.2. Click to open the Transform panel menu.
orChoose Object > Transform.
3. Choose one of the flip settings as follows b : • Flip Horizontal. • Flip Vertical.
The CycloneThe Cyclone
The Cyclone
The Cyclone b The effects of flipping objects using the Transform submenu.
Original
Flip Horizontal
Flip Vertical
The Cyclone
The Cyclone The Cyclone
The C
yclo
ne
a The effects of rotating objects using the Transform submenu.
Rotate 90° CW
Rotate 90° CCW
Rotate 180°
Original
The Cyclone
The Cyclone The Cyclone
The C
yclo
ne
The Cyclone
The Cyclone The Cyclone
The C
yclo
ne

InDesign CC Visual Quickstart Guide 101
When you perform a transformation on an object, that transformation is stored in InDesign’s memory. You can then perform the same transformation again on another object — even in another document! This is similar to Illustrator’s Transform Again command.
To repeat transformations:1. Use any of the transform commands on a
selection.2. Select a different object or objects.3. Choose one of the following from the
Object > Transform Again submenu. • Transform Again applies the last single
transform command to the selection as a whole c .
• Transform Again Individually applies the last single transform command to each object in the selection d .
• Transform Sequence Again applies the last set of transformation commands to the selection as a whole.
• Transform Sequence Again Individually applies the last set of transformation commands to each object in the selection.
tip InDesign remembers all the transformation commands until you select a different object or perform a different task.
tip InDesign can even remember an Opt/Alt-drag transformation that duplicated an object.
c The Transform Again command allows you to duplicate transformation commands applied to objects.
Circle moved to new position
Transform Again command applied to triangle
d The differences between the Transform Again command and the Transform Again Individually command when applied to multiple objects.
Rotation applied to single triangle
Transform Again applied to two triangles
Transform Again Individually applied to two triangles

102 Chapter 4 Working with Objects
Using the Arrange CommandsObjects in InDesign are layered on top of one another in the same order they were created. (This is sometimes called the stacking order.) The first object created is behind the second, the second behind the third, and so on. Though you may not see the layering when objects are side by side, it is apparent when they overlap a .
tip The layering of objects is not the same as the layers of a document. (See Chapter 11, “Layers,” for more information on working with layers.)
The Arrange commands allow you to move objects through the stacking order.
To move up or down one level in a stack:1. Select the object you want to move.2. Choose Object > Arrange > Bring
Forward to move the object in front of the next object in the stacking order b .orChoose Object > Arrange > Send Backward to move the object behind the next object in the stacking order c .
To move up or down the entire stack:1. Select an object you want to move.2. Choose Object > Arrange > Bring to
Front to move the object in front of all the others in its layer d .orChoose Object > Arrange > Send to Back to move the object behind all the others in its layer e .
a When two objects overlap, it is obvious which object is in front of the other.
b Effects of the Bring Forward command.
Bring Forward appliedStar in back
c Effects of the Send Backward command.
Send Backward appliedStar in front
d Effects of the Bring to Front command.
Bring to Front appliedStar in back
e Effects of the Send to Back command.
Send to Back appliedStar in front

InDesign CC Visual Quickstart Guide 103
Aligning ObjectsThe Align panel provides commands that align objects or distribute them evenly along a horizon tal or vertical axis.
To work with the Align panel:1. Choose Window > Object & Layout >
Align. This opens the Align panel f .2. Choose Show Options from the Align
panel menu to see all the com mands in the panel.
To align objects:1. Select two or more objects.2. Use the Alignment menu to choose to
what items the objects should align g . • Align to Selection uses the objects
themselves for alignment. • Align to Key Object lets you designate
a specific object to which the others align. (See the next exercise for how to designate the key object.)
• Align to Margins uses the margins for alignment.
• Align to Page uses the page trim for alignment.
• Align to Spread uses the size of the spread for alignment.
3. Click an alignment icon as follows: • Click a vertical alignment icon to move
the objects into left, centered, or right alignment h .
• Click a horizontal alignment icon to move the objects into top, centered, or bottom alignment i .
tip The align commands move objects based on the best representation of the controls. For instance, the Align Left command uses the leftmost object; Align Top uses the topmost object, and so on.
f Use the Align panel to arrange objects in an orderly fashion.
Original objects
Align Left
Align Centered
Align Right
h Effects of the vertical alignment icons .
Original objects Align Top
Align Centered Align Bottom
i Effects of the horizontal alignment icons.
g The Alignment menu lets you choose how the objects should be aligned.
104 Chapter 4 Working with Objects
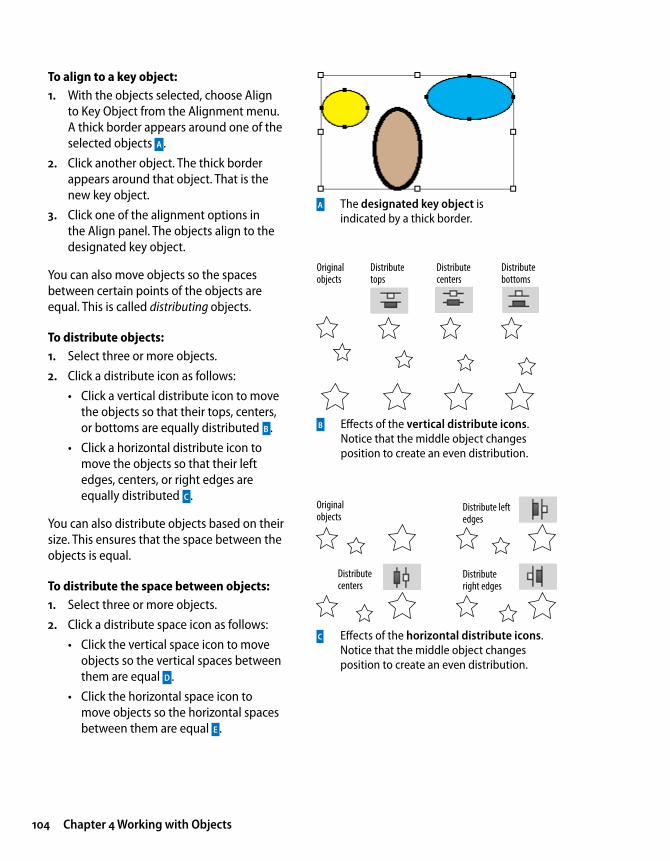
To align to a key object:1. With the objects selected, choose Align
to Key Object from the Alignment menu. A thick border appears around one of the selected objects a .
2. Click another object. The thick border appears around that object. That is the new key object.
3. Click one of the alignment options in the Align panel. The objects align to the designated key object.
You can also move objects so the spaces between certain points of the objects are equal. This is called distributing objects.
To distribute objects:1. Select three or more objects.2. Click a distribute icon as follows:
• Click a vertical distribute icon to move the objects so that their tops, centers, or bottoms are equally distributed b .
• Click a horizontal distribute icon to move the objects so that their left edges, centers, or right edges are equally distributed c .
You can also distribute objects based on their size. This ensures that the space between the objects is equal.
To distribute the space between objects:1. Select three or more objects.2. Click a distribute space icon as follows:
• Click the vertical space icon to move objects so the vertical spaces between them are equal d .
• Click the horizontal space icon to move objects so the horizontal spaces between them are equal e .
Original objects
Distribute tops
Distribute centers
Distribute bottoms
b Effects of the vertical distribute icons . Notice that the middle object changes position to create an even distribution.
Original objects
Distribute left edges
Distribute centers
Distribute right edges
c Effects of the horizontal distribute icons . Notice that the middle object changes position to create an even distribution.
a The designated key object is indicated by a thick border.

InDesign CC Visual Quickstart Guide 105
The Align panel also has controls to space objects numerically. You can apply a numeri-cal distance between the tops, centers, bot-toms, or sides of objects.
To use spacing to distribute objects:1. Select two or more objects.2. Select Use Spacing in the Distribute
Objects section of the Align panel f .3. Enter the numerical distance in the Use
Spacing field.4. Click one of the Distribute Objects icons.
Now the objects are separated by a specific space inserted between the tops, centers, bottoms, or sides of the objects.
tip If a positive number moves the objects in the wrong direction, use a negative number.
You can also set a specific numerical distance between the objects themselves. This is very useful when you want the same amount of space between objects, but the objects them-selves have different sizes.
To set the spacing between objects:1. Select two or more objects.2. Select Use Spacing in the Distribute
Spacing section of the Align panel g .3. Enter the numerical distance in the Use
Spacing field.4. Click one of the Distribute Spacing icons.
Now a specific amount of space is added between the objects horizontally or vertically.
tip If a positive number moves the objects in the wrong direction, use a negative number.
Original objects
Distribute vertical space
d Effect of the vertical distribute space icon.
Original objects
Distribute horizontal space
e The effect of the horizontal distribute space command .
f The Use Spacing option for Distribute Objects lets you set a specific distance between the tops, centers, bottoms, or sides of objects.
g The Use Spacing option for Distribute Spacing lets you set a specific distance between objects.

106 Chapter 4 Working with Objects
Smart Dimensions; Smart SpacingJust as Smart Guides can align to margins and objects, they also give you feedback that can help you create an object that is the same size as another object on the page.
To show or hide Smart Guides:Choose Window > Grids & Guides > Smart Guides. This turns the Smart Guides on or off.
One of the options for Smart Guides is the Smart Dimensions feature. This helps you create objects that have the same width or height.
To create objects with the same dimensions:1. Create one object that has a certain width
or height.2. Drag to create a new object. As you drag,
watch for a dimension arrow that appears next to the width or height a . This is the Smart Dimension indicator that says the two objects have the same dimension.
Another option for Smart Guides is the Smart Spacing feature. This makes it easy to evenly distribute objects so that the spaces between them are equal.
To position objects with the same spacing:1. Create two objects that have a certain
space between them.2. Position a third object on the page. As
you drag, watch for the Smart Spacing indicators that appear between the objects b . This indicates that the three objects are spaced evenly.
a The Smart Dimension indicators appear when an object is the same width or height as another.
b The Smart Spacing indicators appear when an object is the same distance away from one object as it is from another.

InDesign CC Visual Quickstart Guide 107
Using the Gap ToolGaps are the spaces between objects. There may be times when you want to change the size of two objects, but keep the same amount of space (gap) between them. The Gap tool makes it very easy to change the width or height of the objects without affect-ing the size of the gap between them.
tip The Gap tool can work on either horizontal or vertical gaps.
To use the Gap tool to resize objects:1. Select the Gap tool in the Tools panel c .2. Move the cursor inside the space between
two objects. A gray highlight and double-headed gap cursor appear. This indicates that the gap space has been selected.
3. Drag the cursor up and down for horizontal gaps or left and right for vertical gaps. The gap remains constant while the sizes of the objects change d .
4. Use the following modifiers to change how the Gap tool works: • Hold the Shift key to apply the effects
of the Gap tool to only the two objects closest to the cursor e .
• Hold the Cmd/Ctrl key to resize the gap instead of moving it.
• Hold the Opt/Alt key to move the objects and the gap without changing their sizes.
• Hold the Cmd+Opt/Ctrl+Alt keys to resize the gap and move the objects.
tip The Gap tool can be applied even if there is no space between two objects. The Gap tool then modifies the size of the objects without opening any space between them.
d As the Gap tool drags between two objects, the size of the objects changes while the size of the gap remains constant.
c The Gap tool in the Tools panel changes the size of objects without affecting the size of the space between the objects.
e When the Shift key is pressed, the Gap tool effect is applied only to the two objects closest to the cursor.
With Shift key
Without Shift key

108 Chapter 4 Working with Objects
Grouping and Pasting Into ObjectsYou can group objects so you can easily select and modify them as a unit.
To group objects:1. Select the objects you want to group.2. Choose Object > Group. A dotted-line
bounding box encloses all the objects a .
You can also create groups within groups. This is called nesting.
To nest groups:1. Select the grouped objects.2. Hold the Shift key and select another
object or group.3. Choose Object > Group.
Once you have grouped objects, you can select individual objects within the group.
To select groups or objects within groups:Click once on any item in the group. The group is selected as a whole.orDouble-click to select a specific item in the group b .
tip The first double-click may act like the Direct Selection tool and select just part of the object. If this happens, double-click again to select the entire item.
a When selected with the Selection tool, grouped items display a dashed line around the group .
Ungrouped items
Grouped items
b When selected with the Direct Selection tool, a single item in a group is displayed on its own .
Group selected
Single item selected

InDesign CC Visual Quickstart Guide 109
To use commands to select objects within groups:1. Use the Selection tool to select the group.2. Choose Object > Select > Content. This
selects the topmost object in the group.3. Choose Object > Select > Previous
Object. This selects the object that is layered below the selected object.orChoose Object > Select > Next Object. This selects the object that is directly above the selected object.
To ungroup objects:1. Select the group.2. Choose Object > Ungroup.3. If you have nested groups, continue to
ungroup the objects as necessary.
You can also paste an object into a frame. InDesign refers to the object that is pasted as the content. It refers to the frame that holds the object as the container.
To paste an object into another:1. Select the first object and position it over
the second object c .2. Choose Edit > Cut to place the first object
on the computer clipboard.3. Select the second object and choose
Edit > Paste Into. The content appears within the borders of the container d .
tip To paste multiple objects, group the objects together.
To remove pasted-in content:1. Use the Direct Selection tool to select the
pasted-in content.2. Choose Edit > Cut.
tip The pasted-in content can be placed back on the page by choosing Edit > Paste.
c An object to be pasted into another should be positioned over the other.
d The Paste Into command displays the content only within the borders of the container.

110 Chapter 4 Working with Objects
Using the Measure ToolThere are many places where you can find the numerical sizes of items. But what if you want to measure the distance to another item? That’s where the Measure tool is so helpful.
To measure distances using the Measure tool:1. Choose Window > Info to open the Info
panel.
tip All amounts measured by the Measure tool are displayed in the Info panel.
2. Click the Measure tool in the Tools panel a . The Measure tool is in the flyout menu under the Eyedropper tool.
3. Place the Measure tool on the start point and drag to the end point. A measuring line appears on the page b . The Info panel displays the following attributes c : • Horizontal position displays the X
coordinate of the first point in the line or whichever point is then moved.
• Vertical position displays the Y coordinate of the first point in the line or whichever point is then moved.
• Distance shows the length of the line. • Width shows the width of the
bounding box that would enclose the line.
• Height shows the height of the bounding box that would enclose the line.
• Angle shows the angle on which the line was drawn.
a The Measure tool in the Tools panel .
b Drag the Measure tool to measure the distance between two points.
c The measurements displayed in the Info panel for the measuring line drawn with the Measure tool.
Horizontal position
Vertical position
Distance
WidthHeightAngle
InDesign CC Visual Quickstart Guide 111
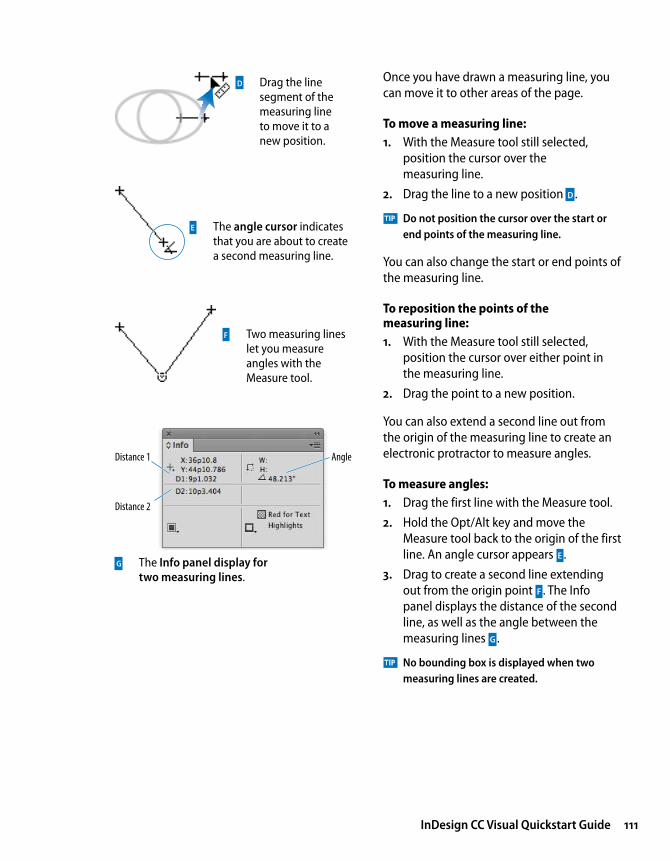
Once you have drawn a measuring line, you can move it to other areas of the page.
To move a measuring line:1. With the Measure tool still selected,
position the cursor over the measuring line.
2. Drag the line to a new position d .
tip Do not position the cursor over the start or end points of the measuring line.
You can also change the start or end points of the measuring line.
To reposition the points of the measuring line:1. With the Measure tool still selected,
position the cursor over either point in the measuring line.
2. Drag the point to a new position.
You can also extend a second line out from the origin of the measuring line to create an electronic protractor to measure angles.
To measure angles:1. Drag the first line with the Measure tool.2. Hold the Opt/Alt key and move the
Measure tool back to the origin of the first line. An angle cursor appears e .
3. Drag to create a second line extending out from the origin point f . The Info panel displays the distance of the second line, as well as the angle between the measuring lines g .
tip No bounding box is displayed when two measuring lines are created.
d Drag the line segment of the measuring line to move it to a new position.
f Two measuring lines let you measure angles with the Measure tool.
g The Info panel display for two measuring lines .
Distance 1
Distance 2
Angle
e The angle cursor indicates that you are about to create a second measuring line.

112 Chapter 4 Working with Objects
Using the Info Panel with ObjectsThe Info panel also gives you information about the document, text, and placed images.
To see the document information:Deselect any objects on the page. The Info panel displays the following a : • Location of the file on the computer. • Last Modification date and time. • Author as entered in the File Info
(File > File Info) dialog box. • File size.
To see the text information:Place your insertion point inside a text frame or highlight the text in the frame. The Info panel displays the following b : • Characters in the frame or selection. • Words in the frame or selection. • Lines in the frame or selection. • Paragraphs in the frame or selection.
tip If there is any overset text, it is displayed as a number with a plus sign.
To see the placed object information: Select a frame that contains a placed image, or the placed image itself. The Info panel displays the following c : • Type of placed image. • Actual ppi (points per inch) resolution
of the image. • Effective ppi resolution of the image if
you have scaled it in InDesign. • Color Space of the image. • ICC Profile (if applicable) may also be
shown.
a With no objects selected, the Info panel displays document information .
b With text selected, the Info panel displays text information .
c With a placed image selected, the Info panel displays placed image information .
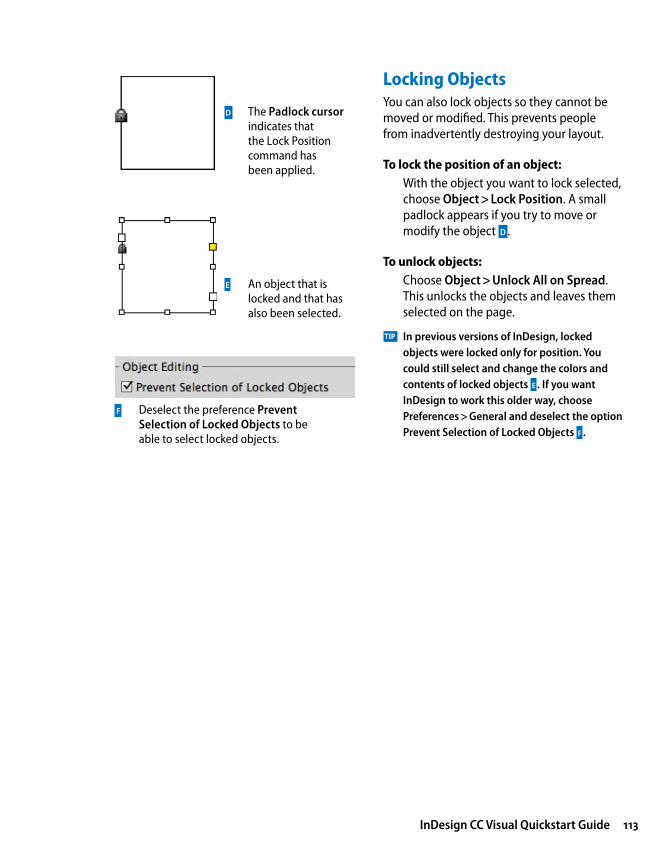
InDesign CC Visual Quickstart Guide 113
Locking ObjectsYou can also lock objects so they cannot be moved or modified. This prevents people from inadvertently destroying your layout.
To lock the position of an object:With the object you want to lock selected, choose Object > Lock Position. A small padlock appears if you try to move or modify the object d .
To unlock objects:Choose Object > Unlock All on Spread. This unlocks the objects and leaves them selected on the page.
tip In previous versions of InDesign, locked objects were locked only for position. You could still select and change the colors and contents of locked objects e . If you want InDesign to work this older way, choose Preferences > General and deselect the option Prevent Selection of Locked Objects f .
d The Padlock cursor indicates that the Lock Position command has been applied.
e An object that is locked and that has also been selected.
f Deselect the preference Prevent Selection of Locked Objects to be able to select locked objects.
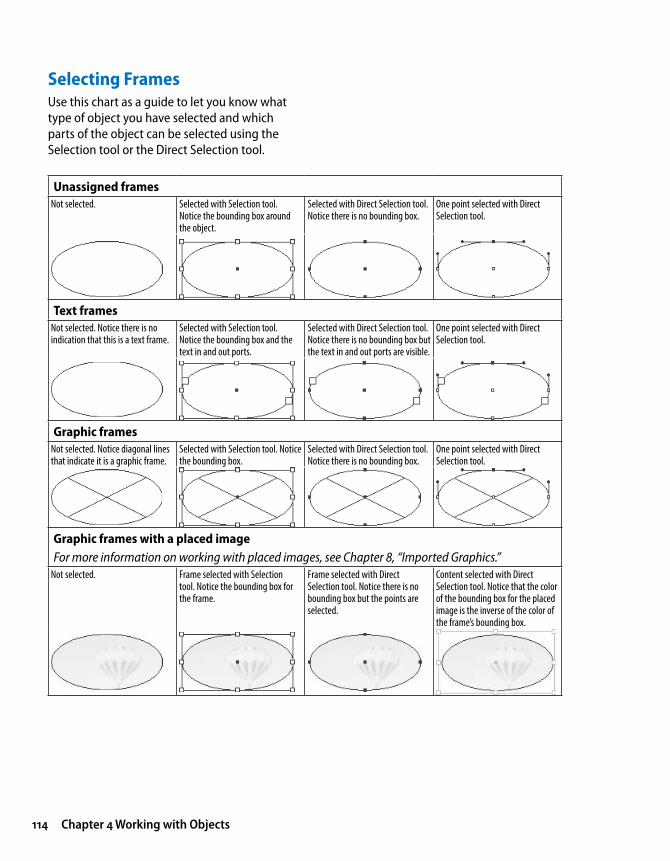
114 Chapter 4 Working with Objects
Selecting FramesUse this chart as a guide to let you know what type of object you have selected and which parts of the object can be selected using the Selection tool or the Direct Selection tool.
Unassigned framesNot selected. Selected with Selection tool.
Notice the bounding box around the object.
Selected with Direct Selection tool. Notice there is no bounding box.
One point selected with Direct Selection tool.
Text framesNot selected. Notice there is no indication that this is a text frame.
Selected with Selection tool.Notice the bounding box and the text in and out ports.
Selected with Direct Selection tool. Notice there is no bounding box but the text in and out ports are visible.
One point selected with Direct Selection tool.
Graphic framesNot selected. Notice diagonal lines that indicate it is a graphic frame.
Selected with Selection tool. Notice the bounding box.
Selected with Direct Selection tool. Notice there is no bounding box.
One point selected with Direct Selection tool.
Graphic frames with a placed imageFor more information on working with placed images, see Chapter 8, “Imported Graphics.”
Not selected. Frame selected with Selection tool. Notice the bounding box for the frame.
Frame selected with Direct Selection tool. Notice there is no bounding box but the points are selected.
Content selected with Direct Selection tool. Notice that the color of the bounding box for the placed image is the inverse of the color of the frame’s bounding box.

InDesign CC Visual Quickstart Guide 507
creating and setting up, 448–449Liquid Layout Rules for, 450–453
Alternating Pattern feature, 319–320anchor points, 174
adding to paths, 180, 186created with Pen tool, 174deleting from paths, 180, 185, 186drawing paths and, 175–177modifying on paths, 180–181repositioning on paths, 178See also paths
anchored objectscreating, 227positioning, 228, 229–230
angles, measuring, 111Animation panel, 430animations, 430–434
adding to objects, 430duration and speed settings, 431events for prompting, 431removing from objects, 432timing controls, 433–434uses for SWF, 431, 435See also videos
app creation with MSOs, 437Appearance of Black preferences, 504AppleScripts, 354Application bar, 36–37Arrange commands, 102arrowheads, 156artboard
different-sized pages on, 22moving pages on, 240
artwork, imported. See imported graphicsASCII text files, 242, 245attributes
cell, 382character, 50, 353drop cap, 67
Aabout this book, iii–ivAbove Line objects, 229Accept Change icons, 342actions
button event, 425PDF form, 428
Add Anchor Point tool, 180, 186Add command, Pathfinder, 166Adjust View Settings menu, 211–212Adobe Bridge, 36, 287, 339Adobe.com Web site, 37Adobe Flash (FLA) files, 472, 489Adobe Illustrator. See IllustratorAdobe PageMaker, 40Adobe Paragraph Composer, 389Adobe Photoshop. See PhotoshopAdobe Single-line Composer, 389Adobe World-Ready Composers, 389Advanced Type preferences, 498Alert icon, Book panel, 262Align panel, 103–105alignment
baseline grid, 397caption, 338cell text, 314–315object, 103–105optical margin, 388paragraph, 61path-based text, 222Smart Guides for, 27stroke, 148tab, 291–292text, 61, 76, 397
All Caps text style, 54, 401alphabetizing TOC entries, 269alternate characters, 69, 399–400alternate layouts
Index
508 Index
baseline shift, 57Basic Paragraph style, 356bevel effect, 145, 163Bezier curves, 174black color
appearance preferences, 504mixing in RGB vs. CMYK, 119protected as color swatch, 125
Black slider, 118blank pages
adding to books, 234, 263option for printing, 460
Bleed view mode, 31bleeds
definition of, 12guides and marks for, 23, 462setting area for, 463
blend modesapplying opacity and, 158–159removing effects of, 160
bold text, 53, 59Book panel, 260bookmarks, 404, 413–415
creating, 413, 414deleting, 414exported PDFs and, 476nesting/unnesting, 415PDF document, 269, 476renaming, 414repositioning, 415
Bookmarks panel, 413books, 260–269
adding documents to, 260chapter numbers in, 264creating files for, 260opening documents in, 261output options for, 264page numbers in, 260, 263, 264reasons for creating, 260removing documents from, 260reordering documents in, 261replacing files in, 262style source synchronization, 261–262
effects applied to, 159Find/Change searches for, 336master page, 250object, 169–170, 336paragraph, 60, 353sampling, 169–170table, 383text, 353
audio. See soundsAuto Leading percentage, 393Autocorrect feature
preferences for, 502working with, 329
auto-fit commands, 454–455autoflow cursor, 247automation features, 325–354
captioning images, 337–339changing text case, 326conditional text, 343–346drop cap styling, 373Eyedropper tool, 352–353Find Font, 350Find/Change, 330–336footnotes, 347–349Keep Options, 351page numbering, 256scripts, 354spelling checker, 326–329Story Editor, 340Track Changes, 341–342
Bbalancingragged lines, 399
text in columns, 75base color for tints, 131baseline
footnote, 349table cell, 315text, 57
baseline grid, 396–398aligning text to, 397creating for text frame, 398setting, 396

InDesign CC Visual Quickstart Guide 509
inserting text into, 300merging/unmerging, 313navigating between, 300placing tables into, 299preserving formatting of, 316preview area for, 317selecting text in, 301splitting, 313strokes around, 316–320styles for, 382text controls, 314–315
centeringgraphics in frames, 202Liquid Layout Rule for, 450, 451Smart Guides for, 27
chapters, numbering, 258, 264Character panel, 50–52character styles
applying, 368defining, 360deleting, 372
charactersalternate, 69, 399–400Control panel settings, 78hidden, 68OpenType, 399–400preference settings, 498sampling attributes of, 353special, 79styling, 360, 407tab, 290
Clear Overrides button, 369–370clipboard
explanation of using, 48Handling settings for, 505
Close Path command, 179, 186closing
documents, 39panels, 2paths, 168, 175, 176, 179
CMYK colors, 116, 119Color panel controls, 118Color Picker options, 133
collapsing panels, 2
table of contents for, 265–269updating files in, 262See also pages
borderskey object, 104table, 316, 318
bounding boxesflowing text around, 214, 215working with handles of, 90, 95
break characters, 248Bridge, Adobe, 36, 287, 339bullets, 63–64, 65buttons, 404, 423–427
animation control, 432appearance states for, 426–427converting to objects, 423creating and naming, 423events and actions for, 424–425library of sample, 427
Buttons and Forms panel, 423, 428
CCap settings for strokes, 147capitalized word hyphenation, 395captions, 337–339
metadata information, 337–338, 339position and style options, 338static vs. live, 339workflow for adding, 339
case, command for changing, 326case sensitivity
Find/Change search, 332PDF password, 482spelling checker, 327, 328text style name, 364
cells (table)copying/pasting, 306customizing, 313–315diagonal lines inside, 322fills inside, 318, 321first baseline for, 315graphics in, 312header and footer, 311
510 Index
libraries of, 130merging, 127modifying, 125repositioning, 128saving, 128tint, 131–132See also Swatches panel
columnsadding, 305adjusting in tables, 303–308alternating strokes for, 320break character for, 248changing margins and, 16deleting, 305distributing, 307fixed width, 74flexible width, 74guides for, 23, 24inserting, 304selecting, 301setting, 15spanning/splitting, 77text frame, 73–75width settings, 307See also rows
compositionparagraph vs. single-line, 389setting preferences for, 499
compound paths, 143compound shapes, 192compression, PDF file, 477–479conditional text, 343–346
applying, 344creating/modifying, 343grouping into sets, 346indicator settings, 344, 345showing/hiding, 345
conflicts, style, 365, 366Container icon, 140Content Collector, 442Content Conveyer, 442–444Content Placer, 443, 445contextual menus, 8continued to/from character, 259
color, 115–138basics of, 116–117CMYK, 116, 118–119compression options, 478default, 129fill, 121, 140–143gap, 149gradients, 134–136grid, 28hidden character, 68Lab, 116, 120layer, 274libraries of, 130mixing in Color panel, 118–120out-of-gamut, 120overprinting, 138preflight profiles for, 468process vs. spot, 125RGB, 116, 119ruler guide, 26sampling, 137stops for, 135stroke, 121, 144–145swatches, 122–129types of, 116–117unnamed, 122, 123, 129
color bars, 462Color list, 274Color panel, 118–121
Black slider, 118choosing options in, 118CMYK color controls, 118Lab colors in, 120out-of-gamut colors and, 120RGB colors in, 119–120tinting swatches in, 131
Color Picker, 133color swatches, 122–129
applying, 126, 130defining new, 124–125, 133deleting, 126–127, 128duplicating, 128gradient, 134–136importing, 129, 130

InDesign CC Visual Quickstart Guide 511
custom objects, 230custom workspaces, 4customizing, 491–506
Appearance of Black settings, 504Autocorrect preferences, 502Clipboard Handling settings, 505Composition preferences, 499Dictionary preferences, 501Display Performance settings, 504File Handling preferences, 505General preferences, 496Grids preferences, 500Guides & Pasteboard settings, 500individual cell strokes, 317Interface preferences, 497keyboard shortcuts, 492–494Link Info items, 207menu commands, 495Notes preferences, 502Quick Apply results, 385Spelling preferences, 501Story Editor Display settings, 503stroke styles, 151–155table cells, 313–315text wrap, 218Track Changes feature, 503Type preferences, 498Units & Increments settings, 499See also preferences
Cut command, 88
Ddashed strokes, 150, 151, 153defaults, 15
color, 129document, 15, 171object, 171object style, 379, 381preview, 210restoring all, 506text, 51
deletinganchor points, 180, 186bookmarks, 414
Contour Options Type menu, 216control handles, 174, 177, 178Control panel
for tables, 303, 323–324for text, 78
conversionsbutton-to-object, 423file, 40header and footer, 311master page, 251out-of-gamut color, 120shape, 84, 167text-to-frame, 193–194text-to-table, 296
copiessaving documents as, 39setting number to print, 459
copyinglayers, 273objects, 87, 88text, 48See also duplicating
corner curves, 176corner points, 175, 177corners, object, 156–157cropping
auto-fit commands and, 454frame fitting commands and, 203printer marks indicating, 462
cross references, 404, 410–412defining and setting, 410–411text and appearance options, 412See also hyperlinks
cursorsautoflow, 247Content Collector, 442link text, 72loaded, 190, 242, 247Padlock, 190preferences for, 497Sound Clip, 416
curvesdrawing, 176modifying, 177

512 Index
distributingcolumns/rows, 307–308objects, 104–105
document pages, 234converting to master pages, 251modifying master elements on, 252
documentsadding pages to, 234adding/removing from books, 260Application bar for, 36–37defaults for, 15, 171examining links in, 204file maintenance for, 38–40flowing text into, 246–248grids for, 28guides for, 23–27Hand tool for, 34information about, 112layout options for, 13–16magnifying, 29–30, 33, 36making a copy of, 39maximum number of pages in, 237moving pages in, 22, 238, 240opening in InDesign, 40packaging to print, 470pasteboard controls, 32placing artwork in, 188–191preflight profiles for, 469preflighting elements in, 466preparing for a TOC, 265presets for, 17–18rearranging pages in, 238recovering after crash, 40reverting to saved, 39rulers for, 19–20saving, 38–39setting up, 10–12sizing pages in, 21Smart Guides for, 27sounds added to, 416–419Transformation Values for, 27view modes for, 31, 37window controls for, 35Zoom tool for, 33
button actions, 425color swatches, 126–127, 128columns/rows, 305document presets, 17hyperlinks, 409items on layers, 280layers, 273, 278library items, 283pages, 237parts of paths, 185points on paths, 180, 185, 186preference files, 506print presets, 464ruler guides, 26shortcut sets, 494strokes, 155styles, 371–372workspaces, 4–5See also removing
destinations, hyperlink, 405–406, 408, 409dictionary
hyphenation controls, 396setting preferences for, 501spell checker options, 328–329
digital publications, 403, 404Digital Publishing with Adobe InDe-
sign (Cohen and Burns), 403Direct Selection tool, 85
modifying paths with, 178moving objects with, 87scaling objects with, 98selecting frames with, 114
directional feather effect, 164discretionary hyphens, 395Display Performance preferences, 504displaying
grids, 28images, 210–212library items, 285, 287See also showing/hiding
distances, measuring, 110distorting
objects, 94text, 58

InDesign CC Visual Quickstart Guide 513
feather, 164–165glow, 162page transition, 435–436path-based text, 221removing, 160satin, 163shadow, 161working with, 160See also text effects
electronic stylingapplying to text, 54myths and realities of, 59
Ellipse tool, 42, 83elliptical frames, 42, 44, 83em and en spaces, 79emboss effect, 163empty frames, 203End Nested Style Here character, 376end shapes, 156endnotes, 349EPS files, 195, 196, 472EPUB files, 472, 485–486Erase tool, 185, 186errors
preflight, 466, 468–469spelling, 327, 329, 501
eventsanimation, 431button action, 424PDF form, 428
Excel files, 244–245Exclude Overlap command, 166exporting, 471–490
compression for, 477–479document presets, 18EPUB files, 485–486file formats for, 472–473Flash (FLA) files, 489general options for, 474–476HTML files, 486–487InCopy format files, 484InDesign Markup files, 484interactive PDFs, 428–429, 476, 480–481
dotted stroke style, 151, 154downsampling images, 477, 478dragging
colors, 121, 123columns/rows, 305fills, 140objects, 86pages, 238snippets, 288strokes, 144text, 49See also moving
drawing, 173–177curves, 176lines, 175Pen tool for, 175–177Pencil tool for, 182–183programs used for, 174
drop caps, 66–67, 373drop shadows, 161duplicating
color swatches, 128layers, 272objects, 88, 89, 92pages, 237styles, 362text, 49See also copying
duration of animations, 431dynamic spelling checker, 329
Eediting
document presets, 18glyph sets, 71hyperlinks, 409linked items, 206, 445paths, 182QR codes, 440strokes, 154styles, 385text, 47
effects, 160–165bevel/emboss, 163

514 Index
gradient, 141–142None option, 143object, 140overprinting, 138swapping strokes and, 144table cell, 318text, 141See also strokes
Find Font feature, 350Find/Change feature, 330–336
control buttons, 331glyph searches, 335GREP searches, 334object attribute searches, 336saving searches in, 336search area settings, 330text string searches, 332–333Undo command and, 331See also searches
Fit Content Proportionally command, 201fixed width columns, 74Flash (FLA) files, 472, 489Flash Player (SWF) files, 472flattener preset, 463flexible width columns, 74flipping objects, 100flowing text
around objects, 214, 215into documents, 246–248
flush spaces, 79fonts
choosing, 50–51, 53favorite, 52finding/replacing, 350OpenType, 399–402recently used, 52searching for, 51–52size/styles, 53
footers, table, 310–311footnotes, 347–349
formatting, 347–348importing from Word, 349inserting into text, 347layout options for, 348–349
items as snippets, 287JPEG files, 488PNG files, 488print PDFs, 474, 476, 477print presets, 465security options for, 482–483setting up PDFs for, 474–476spelling dictionary entries, 329SWF files, 489text, 490
Eyedropper toolcolors and, 137object attributes and, 169–170setting options for, 352text attributes and, 353
Ffacing pages, 13false italic, 58favorites, fonts as, 52feather effects, 164–165figure spaces, 79file formats
export, 472–473graphic, 189import, 195sound, 416video, 416
File Handling preferences, 505files
book document, 260converting, 40finding linked, 207maintenance of, 38–40opening in InDesign, 40recovering, 40saving, 38–39See also documents
Fill icon, 140fills, 140–143
alternating repeating, 321colors applied to, 121default for, 171

InDesign CC Visual Quickstart Guide 515
glow effects, 162glyphs, 71
alternate, 400categories of, 400Find/Change for, 335OpenType, 399–400scaling, 392sets of, 70–71working with, 69–71
Glyphs panel, 69–71, 400Grabber tool, 34Gradient panel, 136gradients, 134–136
adjusting, 142color stops for, 135defining new, 134, 136feather effect for, 165fills applied as, 141–142modifying swatches of, 135process and spot colors in, 136storing unnamed, 136
graphic frames, 82, 83–84, 114graphics
centering, 202display settings for, 210–212file formats for, 189fitting in frames, 201–203import options for, 195–198linking/relinking, 204–207modifying frames and, 199–200placing in documents, 188–191sampling colors from, 137table cells containing, 312transparency in imported, 209working with missing, 205See also images; imported graphics
grayscale compression, 478GREP
Find/Change feature, 334style creation, 378
gridify feature, 89grids
baseline, 396–398creating from objects, 89
forced line break, 45formatting
applying local, 368, 371bullets/numbers, 63clearing local, 369–370, 381finding and changing, 333footnotes, 347–348paragraphs, 60–67preserving for cells, 316table of contents, 267
forms, 404, 428–429creating and naming, 428library of sample, 429setting options for, 429
frame breaks, 248frames
auto-fit options, 454–455converting text to, 193–194creating, 42–44, 83–84fitting graphics in, 201–203flowing text into, 246–247graphic, 82, 83–84importing paths as, 194linking text between, 72modifying images and, 199–200placeholder text in, 248placing graphics into, 188–191resizing, 200, 201–202selecting, 114, 199specialty, 192–194tips for drawing, 44types of, 82unassigned, 43, 44, 82, 114See also text frames
Free Transform tool, 95
GGap tool, 107gaps
object-related, 107stroke-related, 149, 150
General preferences, 496global defaults, 171Global Light setting, 165

516 Index
hyphenationcontrolling, 394–396discretionary hyphens, 395No Break command, 395turning on, 67, 394
Iicon view of panels, 3IDML files, 38, 473, 484Illustrator
drawing in, 174file format options, 195layer visibility in files from, 208paths imported from, 194transparency in files from, 209
imagesauto-fit options for, 454captions added to, 337–339display settings for, 210–212import options for, 195–198metadata information for, 337–338modifying frames and, 19–200preflight profiles for, 468table cells containing, 312transparency in imported, 209working with missing, 205See also graphics; placed images
imported graphics, 187–212fitting in frames, 201–203import options for, 195–198layer visibility for, 208linking, 204–207placing in documents, 188–191sampling colors from, 137transparency in, 209
importingartwork, 188color swatches, 129, 130document presets, 18footnotes from Word, 349master pages, 249paths as frames, 194printer presets, 465setting options for, 195–198
setting preferences for, 500working with, 28
Group Selection tool, 91groups
object, 108selecting, 108style, 363ungrouping, 109
Guide-based rule, 451, 453guides, 23–27
preferences for, 500showing/hiding, 24Smart Guides, 27types of, 23working with, 23–26
gutters, 15
Hhair space, 79Hand tool, 34hanging punctuation, 388headers, table, 310–311hidden characters, 68hiding. See showing/hidinghighlights, underlines as, 55horizontal distribution, 104–105horizontal scaling, 58HTML files, 472, 486–487hyperlinks, 404, 405–409
appearance settings, 407character styles, 407creating new, 405cross-references and, 410–412destinations for, 405–406, 408, 409editing and deleting, 409including in exported PDFs, 476preflight profiles for, 468source of, 405testing and fixing, 409tips for using, 408types of, 406
Hyperlinks panel, 405, 406

InDesign CC Visual Quickstart Guide 517
Invert command, 214invisible objects, 218island spreads, 241ISO standards, 474, 475italic text, 58, 59
JJavaScripts, 354Join command, 179, 186joins
path, 168, 179stroke, 147
JPEG filesexporting, 473, 488importing, 195
justification controls, 390–393Auto Leading percentage, 393consideration about, 391glyph scaling, 392letter spacing, 391single word justification, 393word spacing, 390
KKeep Options feature, 351kerning text, 56key objects, aligning to, 104keyboard shortcuts, v
assigning, 494changing, 492, 494creating new, 493customizing, 6, 492–494deleting sets of, 494Hand tool, 34magnification, 30making a list of, 493running scripts using, 354setting for styles, 362text selection, 47tips for drawing frames, 44viewing for tools, 6workspace, 5Zoom tool, 33, 34
spelling dictionary entries, 329styles from Word, 366–367tables, 297–299text, 242–245transparent images, 209
InCopy documents, 473, 484indents
margin, 62TOC, 269
InDesign filesexport options for, 472–473import options for, 195, 198
InDesign Markup (IDML) files, 38, 473, 484Info panel
Measure tool, 110, 111using with objects, 112
informationdocument, 112library item, 285link, 207metadata, 337–338
inline objectscreating, 227setting options for, 228
inner glow effect, 162inner shadow effect, 161Insert command, 234insertion point, 45inset spacing, 75Intent menu, 13interactive elements, 404
bookmarks, 404, 413–415buttons, 404, 423–427cross references, 404, 410–412exporting with PDFs, 476, 480–481forms, 404, 428–429hyperlinks, 404, 405–409previewing, 439workspaces for, 404See also multimedia
Interface preferences, 497interface themes, vIntersect command, 166

518 Index
libraries, 282–286adding items to, 282–283applying items from, 284creating new, 282deleting items from, 283displaying items in, 285, 287modifying item info in, 285Sample Buttons and Forms, 427, 429searching within, 286snippets compared to, 287sorting items in, 287strategies for using, 283updating items in, 284
Library panel, 282Ligatures command, 54line breaks, 399linear gradients, 134, 142, 145lines
creating straight, 84drawing, 175footnote rule, 349measuring, 110–111paragraph rule, 223–226selecting single, 46
link text cursor, 72linked content, 445–446linking
content in layouts, 445–446graphics in documents, 204–207objects, text, and images, 206text between frames, 72See also hyperlinks
Links panel, 204, 446Liquid Layout Rules, 450–453
Guide-based rule, 451, 453Object-based rule, 451, 452Re-center rule, 450, 451Scale rule, 450, 451testing, 453
live captions, 339Load Conveyer command, 444loaded cursors, 190, 242, 247local formatting
applying, 368, 371
LLab color, 116
Color panel controls, 120Color Picker options, 133
Landscape orientation, 14language settings, 59layering objects, 102layers, 271–280
creating, 272deleting, 273, 278duplicating, 272guide visibility for, 276hiding/showing, 275highlight color for, 274locking, 274merging, 278moving objects between, 277naming/renaming, 274pasting items with, 273preventing printing of, 275, 458reordering, 277selecting items on, 279setting options for, 274–276text wrap for hidden, 276viewing contents of, 279visibility of imported, 208, 278working with contents of, 279–280
Layers panel, 272Layout menu, 236layouts, 441–455
auto-fit commands for, 454–455changing options for, 16collecting content for, 442, 444creating alternate, 448–449linking content in, 445–446Liquid Layout Rules for, 450–453mapping styles in, 447Pages panel setup for, 233placing content in, 443, 444rearranging in Pages panel, 449setting options for, 13–15
leading, text, 56, 393letter spacing, 391

InDesign CC Visual Quickstart Guide 519
Measure tool, 110–111measurement units, 19–20, 499measuring lines, 110–111Media panel
sound options, 417–419video options, 420–422See also multimedia
menu commands, ivcustomizing, 495learning shortcuts for, 47
menuscontextual, 8panel, 3
mergingcells, 313layers, 278swatches, 127
metacharacters, 333metadata
adding to images, 337caption settings, 338
Microsoft Excelimporting data from, 244–245importing tables from, 297–298
Microsoft Wordimporting footnotes from, 349importing styles from, 366–367importing tables from, 297, 299importing text from, 243–244
minimizing panels, 2Minus Back command, 166missing images, 205Missing Link icon, 204miter limit for strokes, 147mixed inks, 117Modified Link icon, 204modifier keys, iv–vmonochrome images, 478–479mouse
keyboard shortcuts vs., 47selecting text with, 46terminology for using, iv
Move dialog box, 87
clearing, 369–370, 381local overrides, 234locking
guides, 26items on layers, 280layers, 274objects, 113
loopingnested styles, 376videos, 420
luminance, 120
MMacintosh computers, iv, 385magnification
Application Bar, 36document, 29–30ruler guide, 26Zoom tool, 33
mapping, style, 367, 447margins
changing, 16facing pages and, 14guides for indicating, 23indent controls for, 62optical alignment of, 388setting, 14
marquee, dragging, 85marquee zoom option, 33master pages, 234, 249–254
adding objects to, 249applying to pages, 251basing masters on other, 250, 252converting document pages to, 251creating new, 250determining number of, 253importing from documents, 249override options for, 252–253, 254page numbering using, 256separating items from, 253–254showing/hiding items on, 254stacking order of items on, 253text wrap applied to, 219, 253uses for, 249

520 Index
New Document dialog box, 10No Break command, 395None option for fills, 143Nonprinting option, 458, 476Normal View mode, 31Notes preferences, 502Number of Pages setting, 13numbers
chapter, 258, 264page, 256–257, 263, 264paragraph, 64–65, 266
numerical adjustmentsfor frames, 44for objects, 83, 93, 94, 95for rows/columns, 307
OObject States panel, 437object styles, 379–381
default, 379, 381defining, 379–380working with, 381
object-based controllers, 452Object-based rule, 451, 452objects, 81–114
aligning, 103–105animated, 430–434converting buttons to, 423copying, 87, 88corner options for, 156–157custom, 230default settings for, 171distributing, 104–105duplicating, 88, 89, 92fills applied to, 140Find/Change searches for, 336flipping, 100flowing text around, 214frames as, 82Gap tool for, 107grids created from, 89grouping, 108Info panel for, 112
movies. See videosmoving
bookmarks, 415column guides, 24control handles, 178hyperlinks, 409objects, 86–87, 97, 277pages, 22, 238, 240points on paths, 178ruler guides, 26styles into groups, 363text, 48–49See also dragging
multimediaanimations, 430–434sounds, 416–419videos, 420–422See also interactive elements
multi-state objects (MSOs), 437–438
Nnaming/renaming
alternate layouts, 448bookmarks, 414buttons, 423files, 38forms, 428items on layers, 280layers, 274multi-state objects, 438unnamed colors, 129
navigationpage, 235–236table, 300Track Changes, 342
navigation controls, 236nested styles, 374–377
explanation of, 374line styles as, 377working with, 374–376
nestingbookmarks, 415groups, 108panels, 3
InDesign CC Visual Quickstart Guide 521
Orientation controls, 14outer glow effect, 162out-of-gamut colors, 120output intent, 13output options
for books, 264for PDF files, 274–276See also exporting
overprinting colors, 138overrides
clearing, 369–370master page, 252paragraph style, 368
overset symbol, 45
Ppackaging documents, 470Padlock cursor, 113page breaks, 248page marks, 462page numbers
adding automatic, 256adjusting in books, 263, 264continued to/from character, 259document sections and, 256–257TOC style options for, 268
Page Size setting, 14, 448page spreads. See spreadsPage tool, 21–22Page Transitions panel, 435Page Turn/Curl effects, 435PageMaker, Adobe, 40pages
adding to documents, 234applying masters to, 251background color of, 122chapter numbers for, 258continued to/from character, 259deleting, 237duplicating, 237exporting, 475flowing text onto, 247glossary of terms for, 234
invisible, 218layers and, 277locking, 113master page, 249Measure tool for, 110–111moving, 86–87, 97multi-state, 437–438nesting groups of, 108Nonprinting option for, 458, 476numerical creation of, 83opacity effects for, 158–159pasting, 88, 109preflight profiles for, 468reference point for, 91resizing, 90, 97rotating, 93–94, 99, 100sampling, 169–170scaling, 90, 92–93, 98selecting, 85, 108–109shapes as, 83–84, 167shearing, 94–95, 99Smart Guides for, 106spacing between, 104–105, 107stacking order of, 102strokes applied to, 144styling, 379–381transforming, 91–101ungrouping, 109
offset controlsparagraph rule, 225text wrap, 214
One-Third Rule, 177opacity effects, 158–159, 160Open Path command, 179, 186opening
documents, 40, 261panels, 2paths, 168, 179tools, 6
OpenType fonts, 399–402categories for, 400–402working with, 399–400
optical margin alignment, 388

522 Index
Basic Paragraph style, 356cross-reference, 411deleting, 372GREP styles within, 378methods for defining, 357–358Next Style command, 358–359overriding, 368
paragraphsaligning, 61bulleting, 63–64, 65composition based on, 389Control panel settings, 78drop caps for, 66–67formatting, 60hyphenation for, 67keep options for, 351margin indents for, 62numbering, 64–65, 266rules applied to, 223–226sampling attributes of, 353selecting, 46space between, 66styling, 356–359
passwords, 482Paste in Place command, 88Paste Into command, 109Paste Remembers Layers command, 273pasteboard
placing items on, 10preferences for, 32, 500
pastinglayers, 273objects, 88, 109text, 48, 297
Pathfinder commands, 166–168paths
adding points to, 180, 186changing points on, 180–181, 186closing, 168, 175, 176, 179compound, 143deleting parts of, 181, 185drawing points and, 175–177elements of, 174importing as frames, 194
hyperlinks to, 408island spreads for, 241layout options for, 13–14maintaining spreads of, 241master, 249–254maximum number of, 237moving, 22, 238, 240navigating to, 235–236numbering, 256–257, 263, 264Pages panel setup, 232–233pasteboard surrounding, 10printed information about, 462rearranging in documents, 238rotating spreads of, 255section markers for, 257sizing/resizing, 21, 239targeting, 235thumbnail previews of, 233transition effects for, 435–436working on, 235See also books
Pages paneldisplay options, 232–233layout views, 233rearranging layouts in, 449transition effects, 436
Panel Options dialog box, 232panels
arranging into workspaces, 4–5overview of working with, 2–3See also specific panels
paper size/orientation, 461Paper swatch, 122Paragraph panel, 60paragraph rules, 223–226
applying, 223offset settings for, 225positioning within frames, 224reason for using, 223reversing text using, 226styling the appearance of, 224width settings for, 225
paragraph styles, 356–359applying, 368
InDesign CC Visual Quickstart Guide 523
of content in layouts, 443, 444of footnotes in text, 349of tables into cells, 299
PNG files, 473, 488point size, 53points
adding to paths, 180, 186created with Pen tool, 174deleting from paths, 180, 185, 186drawing paths and, 175–177modifying on paths, 180–181repositioning on paths, 178See also paths
polygon frames, 43, 84Polygon tool, 43, 84Portrait orientation, 14positioning
anchored objects, 228, 229–230bullets/numbers, 65captions, 338footnotes, 349paragraph rules, 224ruler guides, 26tab stops, 291–292text on a path, 220zero point, 20
posterssound, 419video, 421
power zoom, 34precision eyedropper, 170preferences, 496–506
Appearance of Black, 504Autocorrect, 502categories for, 496Clipboard Handling, 505Composition, 499deleting files with, 506Dictionary, 501Display Performance, 504File Handling, 505General, 496Grids, 28, 500Guides, 23, 500
joining, 179modifying, 168, 178–179, 182opening, 168, 179reversing, 179smoothing, 184splitting, 179text on, 220–222See also points
PDF filescompression options for, 477–479export options for, 472, 474–483general controls for, 474–476import options for, 195, 197Include settings for, 476interactive, 428–429, 476, 480–481marks and bleeds for, 479output resolution for, 481page view options, 480print, 474, 476, 477security options for, 482–483sound options for, 418tags included in, 481TOC bookmarks in, 269video options for, 422
Pen tool, 173–177drawing with, 175–177rules for using, 177
Pencil tool, 182–183permissions, 482–483Photoshop
adding image metadata in, 337layer visibility in files from, 208transparency in files from, 209working with layer comps from, 196
Place command, 188placed images
import options for, 195–198layer options for, 208sampling colors from, 137selecting frames with, 114viewing information for, 112
placeholder text, 248placement
of artwork in documents, 188–191

524 Index
preflight profiles for, 467–469preflighting documents for, 466presets used for, 464–465preventing layers from, 275, 458selecting page size for, 460Setup options used for, 461slug area option for, 463summary of settings for, 465suppressing for objects, 458
process colorsgradients and, 136spot colors vs., 125
profiles, preflight, 467–469proportional resizing, 97, 201proportional scaling, 98PSD files, 195, 196, 209punctuation, hanging, 388punctuation space, 79
QQR codes
creating and editing, 440script for hyperlinking, 354viewing videos with, vi–vii
QuarkXPress files, 40Quick Apply feature, 384–386
applying styles with, 384customizing results for, 385editing styles through, 385letter commands used with, 386Macintosh notebooks and, 385
Rradial gradients, 134, 142ragged line balancing, 399Raster Images slider, 211Re-center rule, 450, 451recovering files, 40Rectangle tool, 44, 83rectangular frames, 44, 83redefining styles, 371Redo command, 39
Interface, 497Notes, 502Pasteboard, 32, 500Pencil tool, 183restoring default, 506Smooth tool, 184Story Editor Display, 503Track Changes, 503Type, 498Units & Increments, 499See also customizing
preflight profiles, 467–469preflighting documents, 466Presentation mode, 31presets
document, 17–18flattener, 463print, 464–465
Preview mode, 31previewing
colors to overprint, 138default settings for, 210interactive elements, 439new document options, 11pages in Pages panel, 233table cells, 317
primary text frames, 246printer marks, 462printers
choosing from Printer list, 459exporting/importing presets for, 465
printing, 457–470bleed settings for, 463color types related to, 116–117different-sized pages, 240documents from InDesign, 458exporting PDF files for, 474, 477general options for, 459–460graphic formats for, 189out-of-gamut symbol for, 120overprinting colors/fills, 138packaging documents for, 470page mark options for, 462permission settings for, 483

InDesign CC Visual Quickstart Guide 525
height of, 306–307inserting, 304keep options for, 308selecting, 302See also columns
RTF files, 242, 244, 473, 490ruler guides, 23, 25, 26rulers, 19–20
removing tabs from, 293setting tab stops in, 291–292units of measurement for, 499
rulesfootnote, 349paragraph, 223–226See also lines
SSample Buttons and Forms library, 427, 429sampling
colors, 137object attributes, 169–170text attributes, 353
satin effect, 163Save commands, 39saving
color swatches, 128custom workspaces, 4document presets, 17files, 38–39print presets, 464searches, 336strokes, 155
Scale command, 92Scale rule, 450, 451Scale tool, 92, 93scaling
drop caps, 373glyphs, 392objects, 90, 92–93, 98proportional, 98resizing vs., 90text distortion by, 58See also sizing/resizing
reference pointcontrolling for objects, 91setting for Transform panel, 96
Registration color, 123registration marks, 462Reject Change icons, 342removing
animation from objects, 432button properties, 423documents from books, 260effects from objects, 160pasted-in content, 109tab stops, 293See also deleting
renaming. See naming/renamingreordering
book documents, 261layers, 277library entries, 287
Repeat Header/Footer menus, 310Repeat Tab command, 292repeating elements, 374replicating objects, 88–89resizing. See sizing/resizingrestoring default settings, 506reversed text effect, 226reverting to saved version, 39RGB colors, 116
Color panel controls, 119Color Picker options, 133
Rich Text Format. See RTF filesright indent tab, 290Rotate command, 93Rotate tool, 93, 94rotating
objects, 93–94, 99, 100spreads, 255
rowsadjusting in tables, 303–308alternating strokes for, 319deleting, 305distributing, 308guides for, 25

526 Index
Shear tool, 94, 95shearing objects, 94–95, 99shortcuts. See keyboard shortcutsshowing/hiding
conditional text, 345document rulers, 19grids, 28guides, 24hidden characters, 68items on layers, 280layers, 275master page items, 254Smart Guides, 27, 106
sizing/resizingframes, 200, 201–202Gap tool for, 107objects, 90, 97, 107pages, 21, 239proportional, 97, 201scaling vs., 90See also scaling
skewing text, 58Slug view mode, 31slugs
definition of, 12guides for indicating, 23setting area for, 463
Small Caps text style, 54, 401Smart Dimension indicators, 106Smart Guides, 23, 27, 106Smart Spacing indicators, 106smooth curves, 176Smooth tool, 184Snap to Document Grid command, 28Snap to Guides command, 24snippets, 287–288
creating, 287dragging onto a page, 288file format for, 473libraries vs., 287
soft return, 45sorting
library items, 287
Scissors tool, 179, 186Screen Mode menu, 37scripts, running, 354Scripts panel, 354searches
Application bar, 37Find Font, 350Find/Change, 330–336font name, 51–52glyph, 335GREP, 334library, 286object attribute, 336saving, 336spelling check, 327text string, 332–333See also Find/Change feature
section markers, 257security, PDF, 482–483segments, path, 174, 176, 181selecting
frames, 114, 199groups, 108images inside frames, 199items on layers, 279objects, 85, 108–109tables, 301–302text, 46–47, 301
Selection tool, 85moving objects with, 87placing artwork with, 189selecting objects with, 85, 109
setsconditional text, 346glyph, 70–71keyboard shortcut, 492–493
shadow effects, 161shapes
compound, 192converting, 84, 167creating, 83–84text wrap around, 214, 215, 216
Shear command, 94
InDesign CC Visual Quickstart Guide 527
columns, 77paths, 179
spot colors, 117gradients and, 136process colors vs., 125
spreads, 13island, 241keeping together, 241moving pages in, 22rotating, 255
spreadsheetsimporting data from, 298See also Microsoft Excel
stacking orderof master page items, 253of objects in documents, 102of table borders/strokes, 318
standards for PDFs, 474, 475star frames, 43Start Page setting, 13Startup Alert dialog box, 506states
button appearance, 426–427multi-state object, 438
static captions, 339Step and Repeat dialog box, 89Stop Color menu, 135storing
tint swatches, 132unnamed gradients, 136
Story Editordisplay preferences, 503working with, 340
straight lines, 84, 175strikethrough text, 54, 55stripe stroke style, 151, 152Stroke panel, 146strokes, 144–155
alignment options for, 148alternating repeating, 319–320caps and joins for, 147colors applied to, 121custom styles for, 151–155
styles, 362TOC entries, 269
Sound Clip cursor, 416sounds, 416–419
adding to documents, 416file formats for, 416PDF options for, 418playing in Media panel, 418posters for indicating, 419setting options for, 417
sourcehyperlink, 405, 408linked content, 445style, 261–262
space characters, 79spacing
footnote, 348inset, 75letter, 391line, 56object, 104–105, 107paragraph, 66special character, 79word, 390
spanning columns, 77special characters, 79, 256, 259special effects. See effectsspecialty frames, 192–194speed settings
for animations, 431for page transitions, 435
spelling checker, 326–329Autocorrect feature, 329dictionary options, 328–329error correction, 327limitations of, 327search criteria, 327setting preferences for, 501steps for using, 326
spine setting, 20Split Window controller, 35splitting
cells, 313

528 Index
overriding, 368paragraph, 356–359, 368, 372Quick Apply feature, 384–386redefining, 371sorting, 362stroke, 149, 151–155table, 383text, 54–55, 356–360TOC, 265, 268unlinking, 361, 370
subscript text, 54Subtract command, 166superscript text, 54swatch libraries, 130Swatches panel, 122–129
adding colors to, 121, 123dragging colors into, 123working with, 122–123See also color swatches
SWF animationsexporting, 472, 489uses for, 431, 435
SWF Preview panel, 439synchronizing book files, 261–262
Ttable of contents (TOC)
automatic vs. manual, 269bookmarks made from, 414creation process for, 265<n>269nonexisting items and, 266other uses for, 268
Table panel, 303, 323–324tables, 289, 295–324
adjusting in text frames, 309alternating patterns in, 319–321borders added around, 316cell customization, 313–315converting to text, 299copying/pasting in, 306creating new, 295deleting, 305diagonal lines in, 322
dashed, 150, 151, 153default for, 171deleting, 155dotted, 151, 154editing, 154gap color for, 149miter limit for, 147object, 144overprinting, 138saving, 155stacking order of, 318stripe, 151, 152styles applied to, 149swapping fills and, 144table cell, 316–320text, 145transferring, 155weight setting for, 146See also fills
style source, 261–262styles, 355–386
applying, 368, 384basing on other, 361caption, 338cell, 382character, 360, 368, 372, 407clearing overrides for, 369–370conflicts between, 365, 366deleting, 371–372drop cap, 373duplicating, 362editing, 385electronic, 54, 59footnote, 347GREP, 378grouping, 363guidelines for using, 362, 364importing from Word, 366–367keyboard shortcuts for, 362loading into documents, 364–365local formatting and, 368, 369–370, 371mapping, 367, 447nested, 374–377object, 379–381
InDesign CC Visual Quickstart Guide 529
exporting, 490fills applied to, 141Find/Change searches, 332–333flowing into documents, 246–248fonts for, 50–52, 53frames for, 42–44, 73–76glyphs used in, 69–71grid for aligning, 396–398hidden characters in, 68hyphenation controls, 394–396importing, 242–245information about, 112inserting into table cells, 300justification controls, 390–393kerning and tracking, 56–57language settings, 59line spacing for, 56linking between frames, 72margin indents for, 62moving by dragging, 49optical margin alignment of, 388paragraph composition for, 389paragraph formatting for, 60–67paragraph rules for, 223–226path-based, 220–222placeholder, 248point size for, 53preflight profiles for, 468–469sampling attributes of, 353scaling in a frame, 98selecting, 46–47, 301skewing, 58spanning/splitting columns, 77special characters, 79strokes applied to, 145styling, 54–55, 356–360tab characters, 290tracking changes to, 341–342Type preferences for, 498typing into documents, 45wrapping, 214–219See also typography
text anchors, 411text effects, 213–230
fills used in, 318, 321Go to Row option, 300graphics added to, 312headers/footers in, 310–311importing, 297–299navigating through, 300panel-based controls for, 323–324pasting text into, 297placing in table cells, 299row/column adjustments, 303–308selecting, 301–302setting spacing around, 309strokes used in, 316–320styles for, 383tab characters in, 300text converted to, 296using tabs vs., 294
tabs, 289, 290–294creating tab leaders, 294inserting tab characters, 290, 300setting tab stops, 291–293using tables vs., 294
Tabs panel, 291tagged text files, 472, 490targeting pages, 235testing
hyperlinks, 409Liquid Layout Rules, 453
text, 41–79aligning, 61, 314, 397balancing lines of, 399baseline shift for, 57breaks inserted into, 248bullets/numbering for, 63–64, 65case changes for, 326cell options for, 314–315conditional, 343–346Control panel for, 78converting to frames, 193–194converting to tables, 296copying/pasting, 48cross-reference, 412distorting, 58duplicating, 49

530 Index
Timing panel, 433–434tints, 117, 131–132titles, table of contents, 266Toggle Lock space, 274Tool Hints panel, 7Tool Tips, 6, 7Tools panel, 6Track Changes feature
preferences for, 503working with, 341–342
tracking, formatting text by, 57Transform Again options, 101transform commands, 100–101Transform panel, 96–99transform tools, 91–95Transformation Values, 27, 42, 83transforming objects, 91–101
commands for, 100–101duplicating and, 92repeating transformations, 101tools used for, 91–95Transform panel for, 96–99
transition effects, 435–436transparency
display settings for, 212importing images with, 209opacity effects and, 158Pages panel option for, 233
two-headed arrow, 24Type preferences, 498Type tool
creating text frames with, 42typing text with, 45
typeface. See fontstyping text, 45typography, 387–402
balancing ragged lines, 399baseline grid options, 396–398hyphenation controls, 394–396justification controls, 390–393OpenType fonts for, 399–402optical margin alignment, 388paragraph composition, 389
anchored objects, 227, 228, 229–230inline objects, 227, 228paragraph rules, 223–226running text on a path, 220–222wrapping text, 214–219
text files, 242, 473, 490text frames
auto-fit options, 455columns in, 73–75controls for, 73–76creating, 42–44, 82custom grid for, 398fills applied in, 141flowing text into, 246–247guide to selecting, 114inset spacing for, 75linking text between, 72paragraph spacing limit for, 76placeholder text in, 248strokes applied in, 145tables in, 295, 309tips for drawing, 44unassigned, 43, 44vertical alignment of, 76
text styles, 54–55character styles, 360, 368, 372paragraph styles, 356–359
text threads, 72text variables, 258text wrap, 214–219
applying, 214contour options, 216creating a custom, 218general options, 214, 215hidden layers and, 276ignoring, 219invisible objects and, 218master pages and, 219, 253Wrap To options, 217
thin spaces, 79thumbnail previews, 233TIFF files, 195tiling documents, 37

InDesign CC Visual Quickstart Guide 531
visibilitybutton state, 427layer, 208, 278
VisualBasic scripts, 354
Wwebsites, hyperlinks to, 408weights
rule, 224stroke, 146
window controls, 35window page menu, 236Windows computers, ivWord program. See Microsoft Wordwords
hyphenation of, 394–396justifying single, 393selecting single, 46spacing between, 390
workspacesinteractive, 404overview of using, 4–5selecting in Application bar, 37
Wrap To menu options, 217wrapping text. See text wrap
XXML file format, 473
Zzero point, 20Zoom tool, 33zooming in/out
magnification settings for, 30marquee zoom for, 33power zoom for, 34View commands for, 29Zoom tool for, 33
Uunassigned frames, 43, 44, 82, 114underlined text, 54, 55Undo command, 39, 331ungrouping objects, 109Units & Increments preferences, 499units of measurement, 19–20, 499unlocking
guides, 24objects, 113
unnamed colorsgradients and, 136naming, 129problems with, 122, 123, 129
updatingbook files, 262linked content, 445–446numbering in books, 264
URLs, hyperlinks, to, 408
VVector Graphics slider, 211vertical alignment
of cell text, 314–315of text frames, 76of text on a path, 222
vertical distribution, 104–105vertical scaling, 58videos, 420–422
adding to documents, 420file formats for, 416PDF options for, 422playing in Media panel, 422posters for indicating, 421setting options for, 420viewing with QR codes, vi–viiSee also animations
View commands, 29, 30View Options menu, 36View Threshold option, 26views
Display Performance, 504document, 31, 35, 36–37