increasing manufacturing competency with a 'dirt · pdf filedir t-cheap sand casting lab...
TRANSCRIPT

Session 2263
Proceedings of the 2002 American Society for Engineering Education Annual Conference & Exposition Copyright © 2002, American Society for Engineering Education
Increasing Manufacturing Competency with a ‘Dirt-Cheap’ Sand Casting Lab
Charlene A. Yauch, Ajay J. Athale
Oklahoma State University Abstract The Society of Manufacturing Engineers Education Foundation has identified competency gaps in a number of critical areas including manufacturing processes, materials, and teamwork. To address these problem areas and provide students with a hands-on manufacturing experience, an economical sand casting lab was developed and implemented in an industrial processes course at Oklahoma State University. The lab exercise familiarizes students with the sand casting process using inexpensive and readily available materials and equipment. A key variation is that wax is substituted for metal as the casting medium. This change greatly increases process safety while significantly decreasing the cost. The final product, a votive candle, can be retained by the students as a reminder of their experience. More importantly, while conducting the lab in teams of three, students are confronted with issues related to materials and manufacturability, process improvements, teamwork, and following procedures. Although this lab is currently being utilized with college juniors and seniors, it could also be an appropriate activity for high-school students to learn more about manufacturing processes and related issues. The paper also suggests ways in which the sand casting lab could be expanded to address additional competency gaps such as manufacturing systems principles, ergonomics, and quality. Introduction This paper describes a hands-on sand casting lab designed to address several of the competency gaps identified by the Society of Manufacturing Engineers (SME) Education Foundation1. The lab enables students to experience the sand casting process with significantly reduced costs and increased safety compared to a traditional sand casting lab. This has been accomplished by substituting molten wax as the casting medium, replacing commonly used metals such as aluminum or cast iron. Since wax has a very low melting temperature (about 130 degrees F.), it greatly increases process safety, while significantly decreasing cost. Although learning about the sand casting process in a foundry environment using molten metal would be the most preferable way to teach the process, the lab described below provides a reasonable alternative when access to a foundry is not possible. The lab has been conducted in an introductory industrial processes course within the School of Industrial Engineering and Management (IEM) at Oklahoma State University (OSU). Students in the course are at the junior or senior level. They work in groups of two or three, and the lab takes approximately three to four hours to complete.
Page 7.659.1

Session 2263
Proceedings of the 2002 American Society for Engineering Education Annual Conference & Exposition Copyright © 2002, American Society for Engineering Education
The next two sections of the paper explain the materials and procedures for the sand casting lab. Our goal is to provide enough information to enable other educators to utilize and benefit from this experience. Following the description of materials and procedures, the costs associated with implementing the lab are presented. Then, the lab’s impact on manufacturing competency gaps is assessed, and finally, the paper concludes with a discussion of how the lab could be expanded to address additional competency gaps. Materials The materials and equipment needed for the sand casting lab are divided into two categories: those used to prepare for the lab (see Table 1) and those used during the lab itself (see Table 2). Some of the materials and equipment needed during the lab are provided to each lab team on a dedicated basis, while other items are shared between teams. The quantities listed are based on eight teams performing the lab simultaneously and sufficient materials for the lab to be performed twice. The only customized items are the sand casting flasks, each consisting of a cope, drag, pattern plate, and sprue. The flasks were designed by John Nazemetz and Charlene Yauch of the IEM department and built by one of the OSU carpentry shops. Each pattern plate was designed to create three votive candles. A CAD drawing of the flasks can be provided upon request.
Table 1: Materials and Equipment Needed to Prepare for Lab Quantity Description
1 Large sieve 1 Coffee grinder or blender 16 Garbage bags (heavy duty 3 mil)
2 rolls Electrical tape (optional)
Table 2: Materials and Equipment Needed During Lab Dedicated Items Shared Items
Quantity (per team)
Description Quantity (total)
Description
1 Flask (cope, drag, pattern plate, & sprue) 1 Hot plate (2 burners) 1 Large tamper (wood, 2 in. x 2 in. x 2 ft.) 2 Large pots 1 Small tamper (wood, 3/4 in. x 3/4 in. x 1 ft.) 2 Melting pots
22 lbs. Sand 2 Thermometers 1 Mixing bucket 4 Plastic liquid measuring cups 1 Trowel 4 Plastic/rubber mallets 1 Small paint brush 2 Spray bottles 2 Bottom boards (wood, 12 in. x 12 in. x 1 in.) 42 lbs. Clay (ground kitty litter) 1 Potato peeler 1 1/3 dry measuring cup 10 lbs. Wax (1 slab or block)
1 Talcum powder (small container) 2 Small sieves 2 rolls Masking tape 2 Very small paintbrushes 1 1/8-inch drill bit 48 Pre-tabbed wicks P
age 7.659.2

Session 2263
Proceedings of the 2002 American Society for Engineering Education Annual Conference & Exposition Copyright © 2002, American Society for Engineering Education
Procedures The sand casting process is broadly classified into six major steps – preparation, melting, mold making, pouring, removing, and finishing. The melting and mold making procedures are performed simultaneously. 1) Preparation: The lab procedures are greatly simplified if the clay, sand, and flasks are prepared for use prior to the lab. To prepare the clay, three 14 lb. containers of unscented, scoopable kitty litter (100% sodium bentonite clay) were purchased and then ground into fine particles. The grinding can be done using either a coffee grinder or a blender (we suggest that you use one you no longer plan to use in the kitchen or purchase one solely for this function). The sand we used was not foundry sand. Instead, dirt was scooped from a sandy field on the ranch owned by our department head. If you do not have access to an area with sandy dirt, foundry sand or sand with very fine particles should be used instead. For each flask, the cope, drag, and pattern plate should be numbered. The numbers indicate which pieces go together and can also be used to show the proper alignment to use when assembling them. An additional optional improvement is to cover the surface of both sides of the pattern plate with electrical tape. The smooth surface of the tape helps to prevent the sand from sticking to the pattern. 2) Melting: The wax is melted over a hot plate using a double boiler technique (see Figure 1). A thermometer is clipped to each of the melting pots. Wax melts at approximately 130 degrees Fahrenheit. The burner temperature is adjusted in order to maintain a wax temperature between 140 and 200 degrees F. An assistant should be used to continuously monitor the wax and ensure that it does not reach its flash point (approximately 400 degrees Fahrenheit).
Figure 1. Wax Melting Setup
Page 7.659.3

Session 2263
Proceedings of the 2002 American Society for Engineering Education Annual Conference & Exposition Copyright © 2002, American Society for Engineering Education
3) Mold Making: First, the flask handles are masked to prevent sand from getting around the alignment pins. Then, the flask is assembled and turned upside down for the drag side to be packed first. The mixing process is the most important part of the mold making procedure (see Figure 2). Accurate amounts of water, clay, and sand must be used to get good results. Excess water will cause the mixture to be too wet and stick to the pattern plate. If the mixture is too dry, the mold will not hold together. A good proportion of sand, clay and water is 3 cups of sand (about 70% by volume), 2/3 cup of clay (about 12.5%) and 6 ounces of water (about 17.5%) per batch. The dry sand and clay are mixed first, then water is added 2 ounces at a time. It will seem difficult at first to get the water thoroughly mixed into the sand/clay, but it is essential that there be no dry spots. About 5 batches are needed to pack the entire flask (cope and drag sides). Mixing larger batches should be avoided as it becomes much more difficult to get a thorough mix.
Figure 2. Mixing
Before starting to pack the sand, a thin layer of talcum powder mixed with sand is applied to the pattern plate using a small sieve. This helps to prevent sticking to the pattern plate. The sand mixture is then scooped into the drag and packed using the large tamper (see Figure 3). The team should continue mixing and packing until the drag is completely filled. The drag side should then be leveled using a tamper, and a bottom board should be placed on top.
Figure 3. Packing the Drag
Page 7.659.4

Session 2263
Proceedings of the 2002 American Society for Engineering Education Annual Conference & Exposition Copyright © 2002, American Society for Engineering Education
The entire flask assembly is then flipped over and rested on the bottom board. The cope side is removed and the pattern plate is “tapped” with a plastic or rubber mallet to loosen the sand on the opposite side (see Figure 4). For areas that are hard to reach, the small tamper is laid between the pattern features and tapped on with the hammer.
Figure 4. Tapping the Pattern Plate
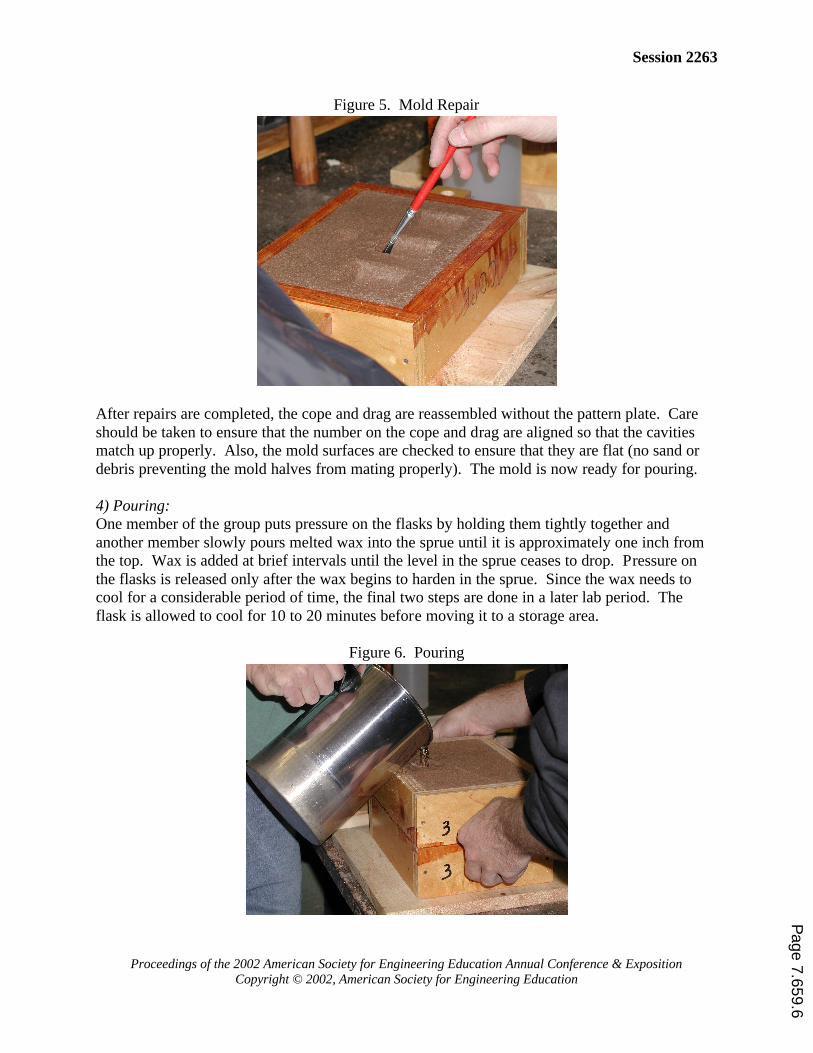
The cope is then reassembled onto the flask, and a mixture of talcum powder and sand is now applied. The sprue is placed in position, and then the sand mixture is packed in the cope in a similar fashion to that used for the drag. One precaution is that a partial batch of leftover sand mixture should not be packed down on the cope side. If this is done, the mold tends to fail at this point. To avoid problems, a sufficiently large amount of sand (at least a full batch) must be packed next to the pattern plate. During packing of the cope, the sprue should be periodically rotated to loosen it and facilitate its removal. When the cope is filled and leveled, the sprue should be removed, flask handles unmasked, and excess sand brushed off. The cope and pattern plate are then simultaneously lifted straight up and carefully separated from the drag. A bottom board is placed on top of the cope, so it can be flipped over and set down. The pattern plate is then tapped, especially around the runners, to release it from the cope side of the mold. The pattern plate is then carefully lifted away from the cope. Both sides of the mold are inspected. Minor repairs, if any, can be made to the mold without having to repack it. A very small paintbrush is used to brush sand away from unintended areas (see Figure 5). Also, the sand can be wetted in selective areas using a spray bottle and repaired with fingers or paintbrush. If damage to the mold is more extensive (e.g. large clumps have stuck to the pattern plate), the pattern plate can be replaced on the mold and the area opposite to the damage tapped again. If this releases the sand in the cavity, a wet paintbrush is used to stick it to the mold at the appropriate place. The last resort is to break the mold and completely repack one or both sides. P
age 7.659.5
Session 2263
Proceedings of the 2002 American Society for Engineering Education Annual Conference & Exposition Copyright © 2002, American Society for Engineering Education
Figure 5. Mold Repair
After repairs are completed, the cope and drag are reassembled without the pattern plate. Care should be taken to ensure that the number on the cope and drag are aligned so that the cavities match up properly. Also, the mold surfaces are checked to ensure that they are flat (no sand or debris preventing the mold halves from mating properly). The mold is now ready for pouring. 4) Pouring: One member of the group puts pressure on the flasks by holding them tightly together and another member slowly pours melted wax into the sprue until it is approximately one inch from the top. Wax is added at brief intervals until the level in the sprue ceases to drop. Pressure on the flasks is released only after the wax begins to harden in the sprue. Since the wax needs to cool for a considerable period of time, the final two steps are done in a later lab period. The flask is allowed to cool for 10 to 20 minutes before moving it to a storage area.
Figure 6. Pouring
Page 7.659.6

Session 2463
Proceedings of the 2002 American Society for Engineering Education Annual Conference & Exposition Copyright © 2002, American Society for Engineering Education
5) Removing: After the wax has completely cooled, the molds can be broken and the candles removed (see Figure 7). The sand mixture can be saved and reused by drying it and regrinding it into fine particles (sand and clay premixed). The sprue and runners should be broken off of the three candles.
Figure 7. Removing the Candles
6) Finishing: The candles are completed by cleaning them and adding a wick. The flash and runner remnants can be removed using a potato peeler. The students “peel” their candles until satisfied with their shape and looks. A 1/8-inch drill bit is used to drill a hole, and a pre-tabbed wick is inserted to finish the candle. The final product, a votive candle, can be retained by the students as a reminder of their experience. Costs of Materials & Equipment The total cost for equipment and reusable materials for eight teams to perform the lab simultaneously was $1039.03. The cost of non-reusable materials for the lab to be performed twice (sixteen teams total) was $29.43. Table 3 itemizes costs for all materials and equipment.
Page 7.659.7

Session 2263
Proceedings of the 2002 American Society for Engineering Education Annual Conference & Exposition Copyright © 2002, American Society for Engineering Education
Table 3: Costs of Materials & Equipment Equipment & Reusable Materials
Description Quantity Unit Cost ($) Total Cost ($) Large sieve 1 3.46 3.46 Coffee grinder or blender 1 19.96 19.96 Sand casting flasks & sprues 8 82.18 657.43 Large tampers 8 0.33 1.99 Small tampers 8 0.16 0.97 Sand 352 lbs. * * Mixing buckets 8 0.98 7.84 Trowels 8 4.97 39.76 Small paint brushes 8 1.49 11.92 Bottom boards 16 2.31 36.96 Hot plate 1 153.00 153.00 Large pots 2 * * Melting pots 2 11.99 23.98 Thermometers 2 8.25 16.50 Plastic liquid measuring cups 4 1.44 5.76 Plastic/rubber mallets 4 3.98 15.92 Spray bottles 2 1.58 3.16 Clay (ground kitty litter) 42 lbs. 6.50/14 lbs. 19.50 Dry measuring cup set 1 1.94 1.94 Small sieves 2 2.97 5.94 Very small paint brushes 4 1.97 7.88 1/8-inch drill bits 2 2.58 5.16 Tarp (optional) 1 * * TOTAL $1039.03
Non-Reusable Materials Description Quantity Unit Cost ($) Total Cost ($)
Garbage bags (heavy duty 3 mil) 16 bags 0.75 12.00 Electrical tape (optional) 2 rolls 1.97 3.94 Wax 10 lbs. (1 slab) 5.78 5.78 Talcum powder 1 container 2.47 2.47 Masking tape 2 rolls 1.18 2.36 Pre-tabbed wicks 48 0.06 2.88 TOTAL $29.43
* No cost is shown because these items were donated. Impact on Competency Gaps The SME Education Foundation identified 14 critical competency gaps related to manufacturing and engineering education in 19971. The sand casting lab described above is designed to address several of these gaps by confronting students with issues related to materials, manufacturability, process improvements, teamwork, and following procedures. In the areas of materials and manufacturability, students get to see first-hand how common materials (sand and clay) can be used to create a functional mold. Many of our students have been amazed that the molds actually work. They also learn the importance of mixing accurate P
age 7.659.8

Session 2263
Proceedings of the 2002 American Society for Engineering Education Annual Conference & Exposition Copyright © 2002, American Society for Engineering Education
quantities of materials together since the mold will not function properly if the mixture is too wet or too dry. The lab also provides students with an opportunity to address process improvements. This is because the design of the flask (including pattern plate) is such that the candles generally end up with shrinkage cavities. At the end of the lab, students are asked to consider what changes can be made to the flask or the procedures to eliminate shrinkage cavities and/or any other noticeable quality problems. With respect to teamwork, the lab requires students to interact in a situation that is very different from their normal routines (even compared to other labs). Students work together in teams of three (generally selected by the instructor). Successfully building a mold within a limited amount of time forces them to work together and cooperate. The students also tend to put additional stress on themselves by endeavoring to produce high quality candles. Although candle quality is not considered as part of their lab grade, it is not uncommon for the students to engage in some friendly competition to see which team can produce the best candles. Finally, the lab is also aimed at giving students experience with following procedures. The lab instructions are very detailed and must be followed closely for a successful mold to be created. Although following procedures is not explicitly included as one of the SME competency gaps, it is important that future industrial and manufacturing engineers appreciate and understand the need for detailed and accurate work instructions. Expansion of the Lab Although this lab is currently being utilized with college juniors and seniors, it could also be an appropriate activity for high-school students to learn more about manufacturing processes and related issues. The lab could also be expanded or modified to address additional competency gaps such as manufacturing systems principles, ergonomics, and design of experiments. Manufacturing systems principles, such as lean manufacturing, theory of constraints, or material control, could be addressed in conjunction with this lab by dividing the eight teams into two groups of four. One group would perform the lab as described above with each team performing the entire mixing and mold-making process. The second group would be set up as a processing line: one team for mixing the sand, one for packing the drag, one for packing the cope, and one for removing the pattern plate and pouring the wax. Performance data could be collected and compared during the lab. Then the students could analyze the situation for increased production quantities and evaluate how the system could be improved using lean principles or the theory of constraints, for example. A second expansion of the lab could address the ergonomics competency gap. This would be accomplished by asking the students to redesign the lab equipment (flasks, tampers, etc.), workstations, and procedures in order to improve ergonomics and safety. The final expansion or modification to the lab relates to design of experiments. The current lab is conducted such that the procedures and parameters are the same for all of the teams. For
Page 7.659.9

Session 2263
Proceedings of the 2002 American Society for Engineering Education Annual Conference & Exposition Copyright © 2002, American Society for Engineering Education
example, every team uses flasks with the same dimensions and pours wax at the same temperature. As previously mentioned, the resulting candles generally have shrinkage cavities. In an effort to solve this quality problem, a designed experiment could be conducted by identifying and varying those input variables that significantly affect the output. These variables could be any or all of the following – flask design, width and location of runners, type of sand, ingredient proportions in the sand mixture, pouring temperature, pouring time, etc. One or more input variables would be selected, with each group conducting a run for the experiment. For example, assuming that runner width is the only variable to be studied, each group would work with a pattern plate with varying runner width keeping everything else constant. The data collected from these runs could then be input to statistical software such as DOE (Design Of Experiments) – KISS2 to perform analysis and provide the best combination of factor settings. If time permits, confirmatory runs could be performed to check the results. Conclusion The hands-on sand casting lab described in this paper is a low-cost alternative that addresses several of the competency gaps identified by SME. In addition, the lab could be expanded or modified to address several others. Although this lab is currently being utilized with college juniors and seniors as part of an industrial processes course, it could also be used as an appropriate activity for high-school students to learn more about manufacturing processes and related issues. Bibliography 1. SME. (1997). Manufacturing Education Plan: Phase I Report. Dearborn, MI: Society of Manufacturing
Engineers. 2. http://www.sigmazone.com/doekiss.htm (Accessed January 8, 2002). CHARLENE A. YAUCH Charlene A. Yauch is an assistant professor at Oklahoma State University. She received her M.S. (Sociology, Mfg. Systems Engineering) and Ph.D. (Industrial Engineering) degrees from the University of Wisconsin-Madison and a B.S.I.E. from Purdue University. She is a licensed professional engineer with over 6 years of industry experience. In addition to research on implementing new manufacturing systems, she currently teaches a graduate course on management of cellular manufacturing systems and an undergraduate courses on manufacturing processes. AJAY J. ATHALE Ajay J. Athale is a graduate student in Industrial Engineering & Management at Oklahoma State University. He has a bachelor’s degree in Mechanical Engineering from Pune University, India. His major areas of interest are data modeling, supply chain management, production control, and inventory management.
Page 7.659.10