in ansys workbenchexpertfea.com/samples/sample black belt vol2.pdf · 2018-04-11 · become a black...
TRANSCRIPT

1 Become a Black Belt in ANSYS Workbench, Volume 2
©expertfea .c om , March 20 17
Become a Black Belt
in
ANSYS Workbench b y Cl aud i u D an i l a
Vo lume 2 : GREEN and BLUE be l t
-20 fa st t uto r i a l s f o r a dVanced use rs -

3 Become a Black Belt in ANSYS Workbench, Volume 2
ᵠ ᵠ

5 Become a Black Belt in ANSYS Workbench, Volume 2
Foreword
Hi all!
My name is Claudiu and I am in the FEA domain since the year 2000. It is my pleasure to share with you, in the form
of short tutorials, 20 of the simulations that are present on the Solved FEA pages of expertfea.com and GrabFEA.com
In this 2nd volume, the rhythm is a little more alert, this meaning that you have done before, in ANSYS Workbench,
at least the fixed cantilever beam FEA everyone does in the beginning :))
I hope you will find the spaced out, aerated perspective on the problems agreeable, because I didn't want the
information to be crowded in any way and miss some important points!
Check the YouTube results movies for the tutorials contained in this book, then take the decision of whether to buy
this book or not.
With the risk of repeating myself, if you like this domain, start working NOW! Maybe some voices said that it is hard,
maybe others said that there are no workplaces in this domain and try to discourage you - do not listen to anyone
pulling you aside from this path and begin the work ASAP!
My luck was that 17 years ago, there was no one to discourage me, because this domain was in its beginnings. But I
had to spend countless nights doing FEA, searching for software demos, for 3D models and so on - while my friends
were partying in the clubs or becoming Quake and Half Life champions... In order to obtain something, you need to
give something; in this case, you need to give time, effort and dedication. Not much, if you start TODAY; the
important thing is to work constantly!
The water drops carve the hardest rock, not using their force, but by repetition - do the same, with small but
constant effort and you'll carve your place in the FEA world, sooner than you think!
Also, prepare yourself for the 3rd volume, which will be the most advanced, but with the least details; you need to
do things very fast and by yourself, because in the next volume no one will hold your hands, it's a promise!
Have faith in yourself and in your awesome future!
Claudiu, 26th of March 2017
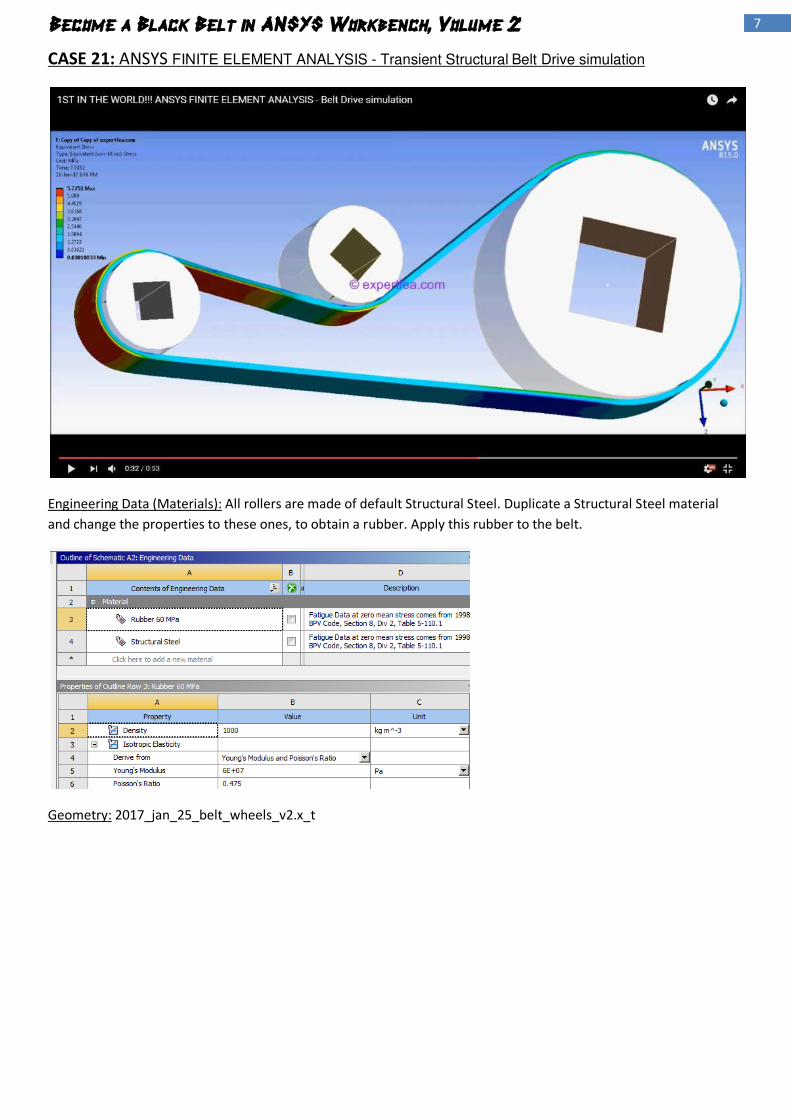
7 Become a Black Belt in ANSYS Workbench, Volume 2
CASE 21: ANSYS FINITE ELEMENT ANALYSIS - Transient Structural Belt Drive simulation
Engineering Data (Materials): All rollers are made of default Structural Steel. Duplicate a Structural Steel material
and change the properties to these ones, to obtain a rubber. Apply this rubber to the belt.
Geometry: 2017_jan_25_belt_wheels_v2.x_t
9 Become a Black Belt in ANSYS Workbench, Volume 2
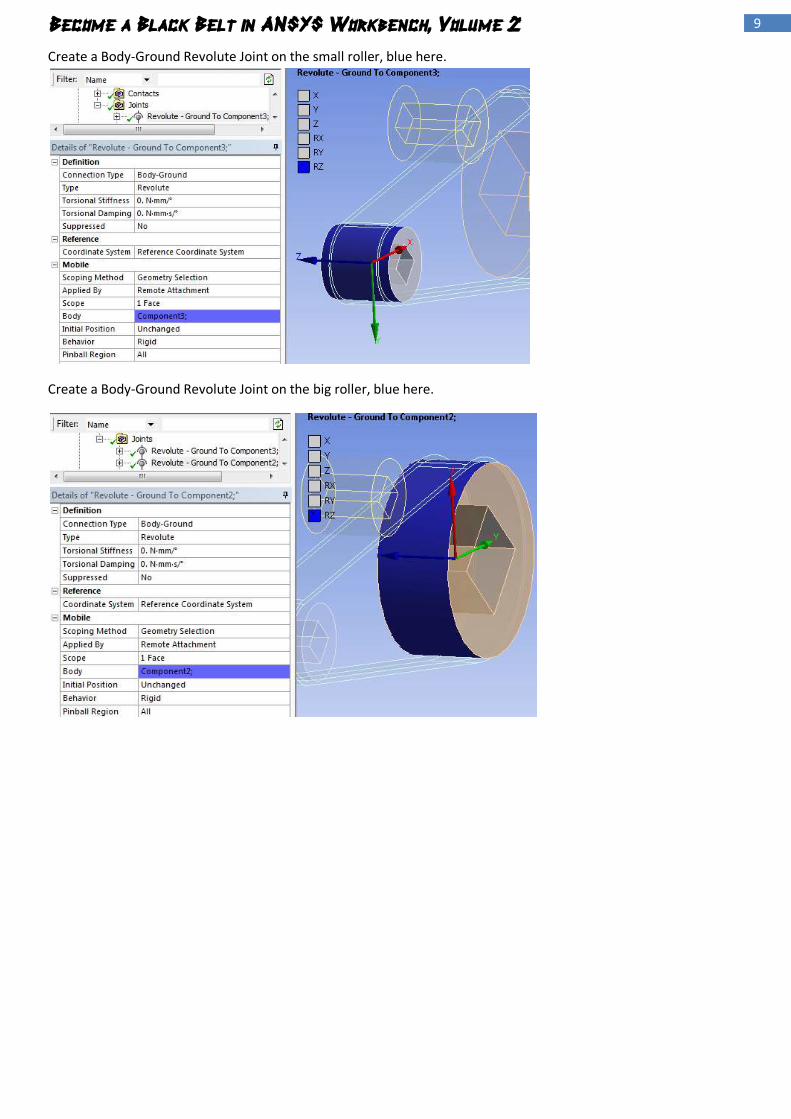
Create a Body-Ground Revolute Joint on the small roller, blue here.
Create a Body-Ground Revolute Joint on the big roller, blue here.
10 Become a Black Belt in ANSYS Workbench, Volume 2
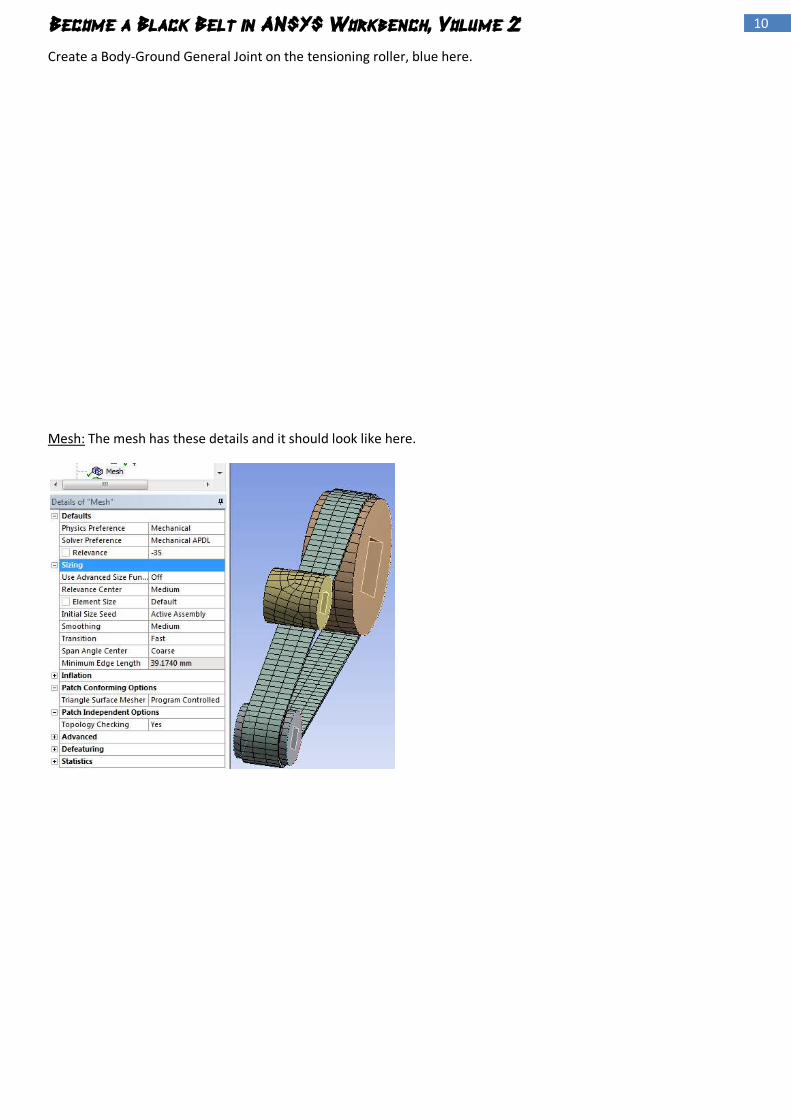
Create a Body-Ground General Joint on the tensioning roller, blue here.
Mesh: The mesh has these details and it should look like here.

13 Become a Black Belt in ANSYS Workbench, Volume 2
Solution: Insert these default items, for all parts.
Insert a Joint Probe for the small roller.
After the solving is done, click Solution, then Worksheet button to access these extra results for Angle, Angular
Velocity and Angular Acceleration.
Further homework:
- increase the mesh Relevance to 50, solve, draw the conclusions
- apply Frictional contacts of µ=0.1, solve, draw the conclusions
- change the Young Modulus of the rubber to half its original value, solve, draw the conclusions
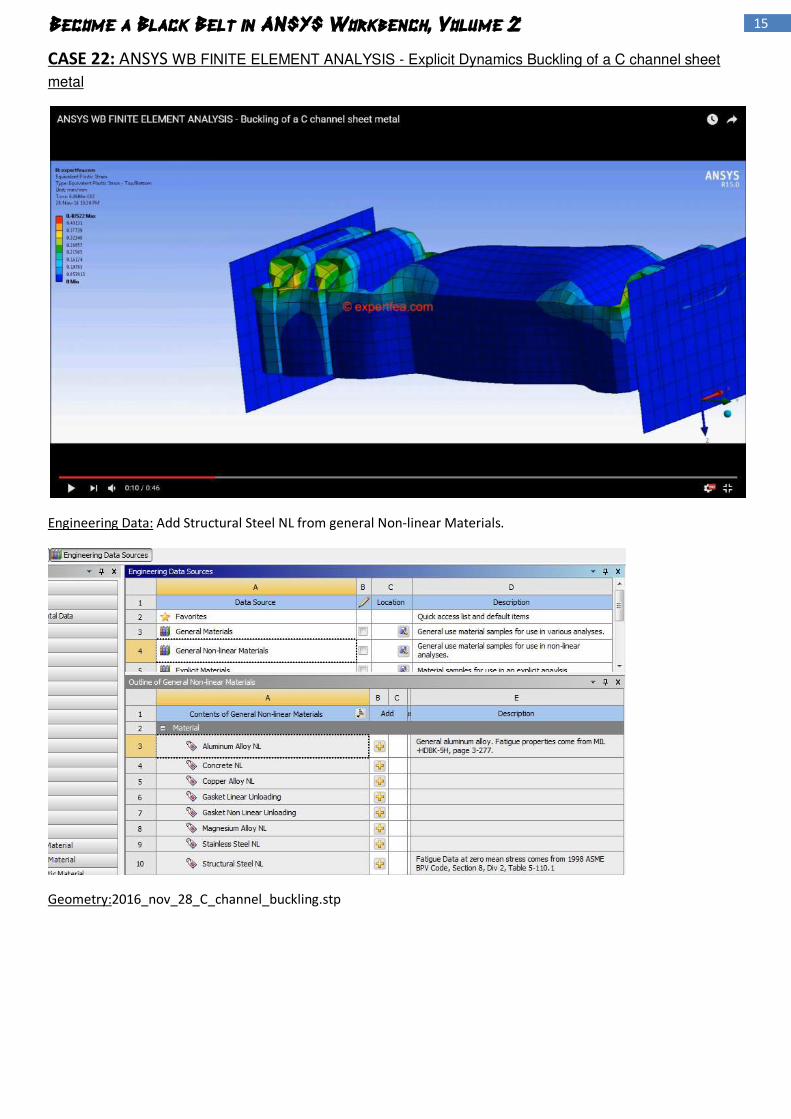
15 Become a Black Belt in ANSYS Workbench, Volume 2
CASE 22: ANSYS WB FINITE ELEMENT ANALYSIS - Explicit Dynamics Buckling of a C channel sheet
metal
Engineering Data: Add Structural Steel NL from general Non-linear Materials.
Geometry:2016_nov_28_C_channel_buckling.stp

16 Become a Black Belt in ANSYS Workbench, Volume 2
Apply Structural Steel NL to the part seen green here and make its Thickness = 1 mm.
Apply Structural Steel NL to the parts seen green here and make their Thickness = 20 mm.
Connections: Delete any existing Contacts.
17 Become a Black Belt in ANSYS Workbench, Volume 2
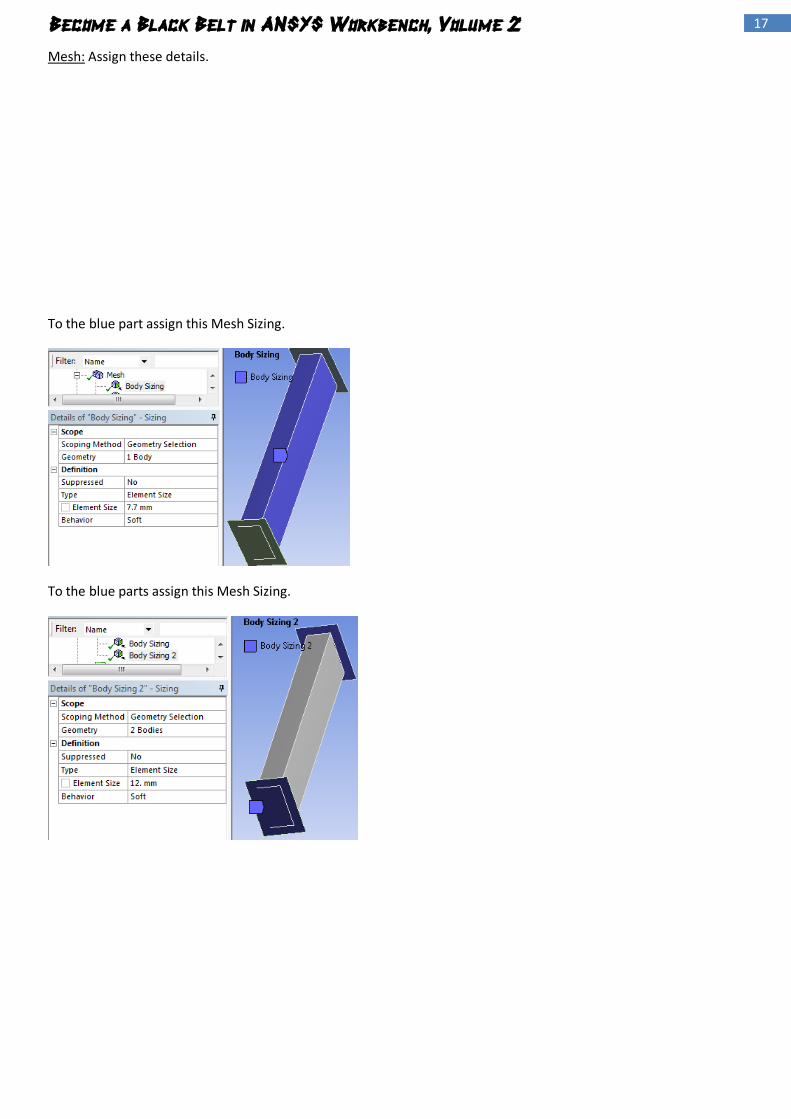
Mesh: Assign these details.
To the blue part assign this Mesh Sizing.
To the blue parts assign this Mesh Sizing.
18 Become a Black Belt in ANSYS Workbench, Volume 2
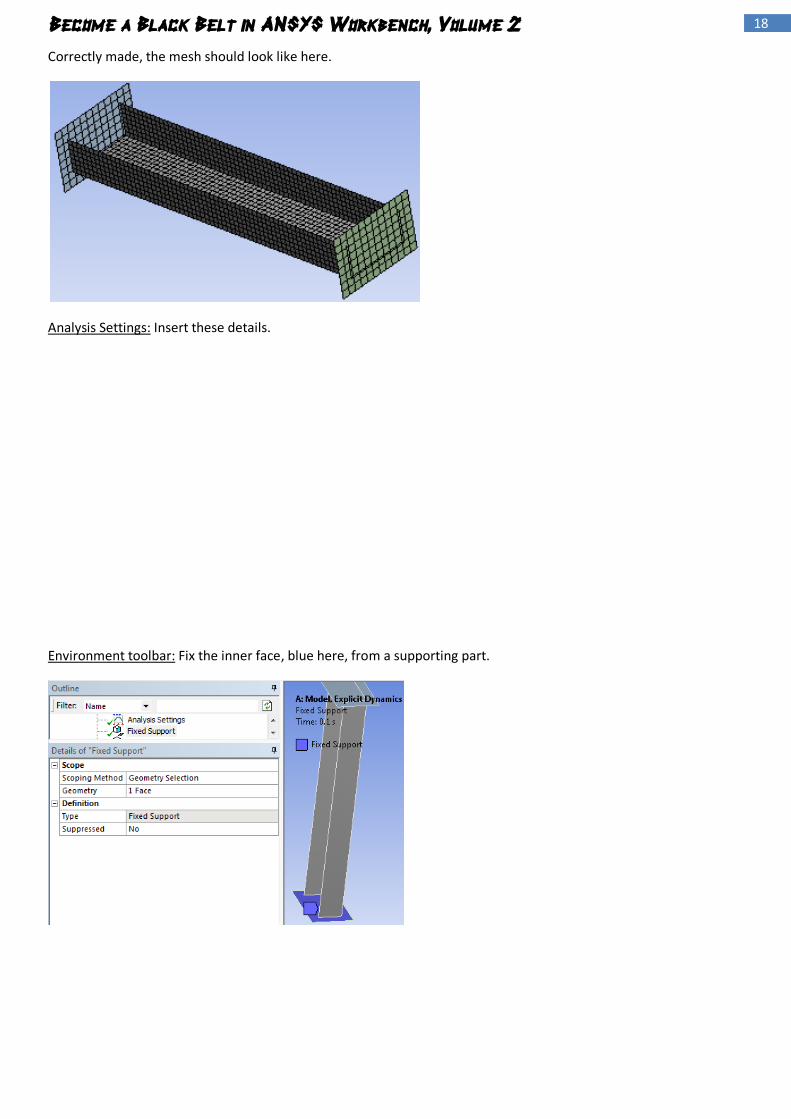
Correctly made, the mesh should look like here.
Analysis Settings: Insert these details.
Environment toolbar: Fix the inner face, blue here, from a supporting part.
19 Become a Black Belt in ANSYS Workbench, Volume 2
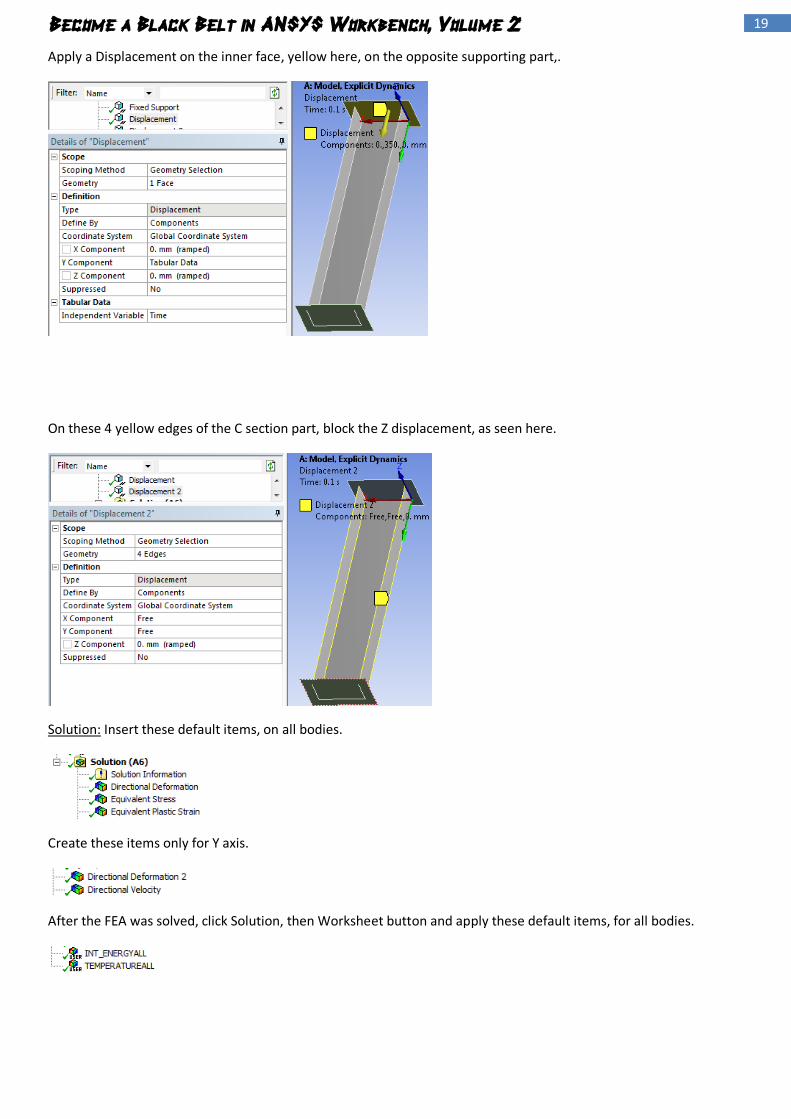
Apply a Displacement on the inner face, yellow here, on the opposite supporting part,.
On these 4 yellow edges of the C section part, block the Z displacement, as seen here.
Solution: Insert these default items, on all bodies.
Create these items only for Y axis.
After the FEA was solved, click Solution, then Worksheet button and apply these default items, for all bodies.

20 Become a Black Belt in ANSYS Workbench, Volume 2
Further homework:
- decrease the mesh sizings in half, solve, draw the conclusions
- apply Bonded contacts between C section part and the supporting plates, solve, draw the conclusions
- delete the Z displacement of the C section edges and let them move freely, solve, draw the conclusions

21 Become a Black Belt in ANSYS Workbench, Volume 2
CASE 23: ANSYS WB FINITE ELEMENT ANALYSIS - Explicit Dynamics Detonation of a grenade into a
metallic box
Engineering Data: From Explicit Materials, add COMP B and STEEL 4340.

22 Become a Black Belt in ANSYS Workbench, Volume 2
Geometry:2016_jun_17_grenade_v2.x_t
Hide the bodies to see the inner explosive part, green here and assign COMP B to it. Make Reference Frame =
Eulerian (Virtual), which applies to gaseous and liquid bodies. Remember the Eulerian frame when doing future
similar FEA!
To the grenade body, green here, assign STEEEL 4340.

23 Become a Black Belt in ANSYS Workbench, Volume 2
To the outer shell bodies, green here, apply STEEL 4340 and Thickness = 1 mm.
Connections: Suppress the Contacts.
Mesh: Assign these details.
24 Become a Black Belt in ANSYS Workbench, Volume 2
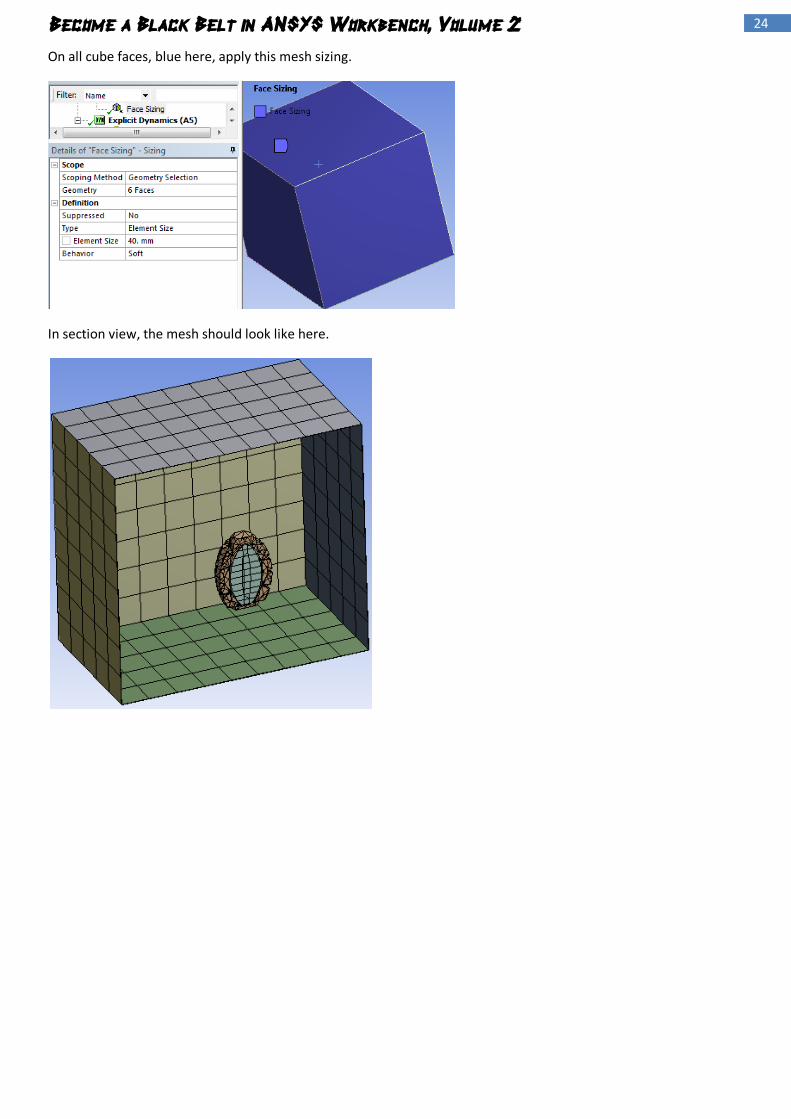
On all cube faces, blue here, apply this mesh sizing.
In section view, the mesh should look like here.

25 Become a Black Belt in ANSYS Workbench, Volume 2
Analysis settings: Carefully apply these details. The Euler Domain Controls dictates the meshing of the virtual body
(e.g.: surrounding air); tune these values in connection with how powerful is your workstation.
Fix these 4 edges, seen green here.
26 Become a Black Belt in ANSYS Workbench, Volume 2
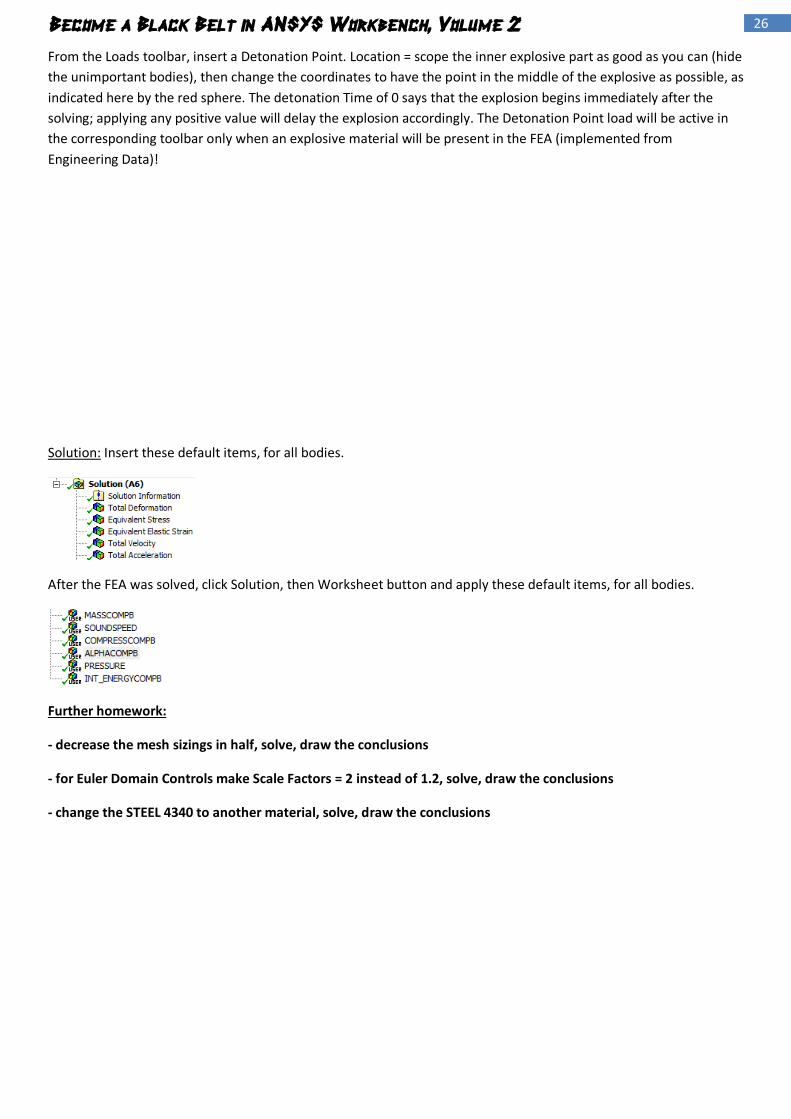
From the Loads toolbar, insert a Detonation Point. Location = scope the inner explosive part as good as you can (hide
the unimportant bodies), then change the coordinates to have the point in the middle of the explosive as possible, as
indicated here by the red sphere. The detonation Time of 0 says that the explosion begins immediately after the
solving; applying any positive value will delay the explosion accordingly. The Detonation Point load will be active in
the corresponding toolbar only when an explosive material will be present in the FEA (implemented from
Engineering Data)!
Solution: Insert these default items, for all bodies.
After the FEA was solved, click Solution, then Worksheet button and apply these default items, for all bodies.
Further homework:
- decrease the mesh sizings in half, solve, draw the conclusions
- for Euler Domain Controls make Scale Factors = 2 instead of 1.2, solve, draw the conclusions
- change the STEEL 4340 to another material, solve, draw the conclusions

27 Become a Black Belt in ANSYS Workbench, Volume 2
CASE 24: ANSYS WB FINITE ELEMENT ANALYSIS - Explicit Dynamics Drop Test of a vintage cell phone
falling from 2.5 meters height
Geometry:2016_may_6_cellphone_v1.x_t
Assign POLYCARB material to the parts selected here with blue.
28 Become a Black Belt in ANSYS Workbench, Volume 2
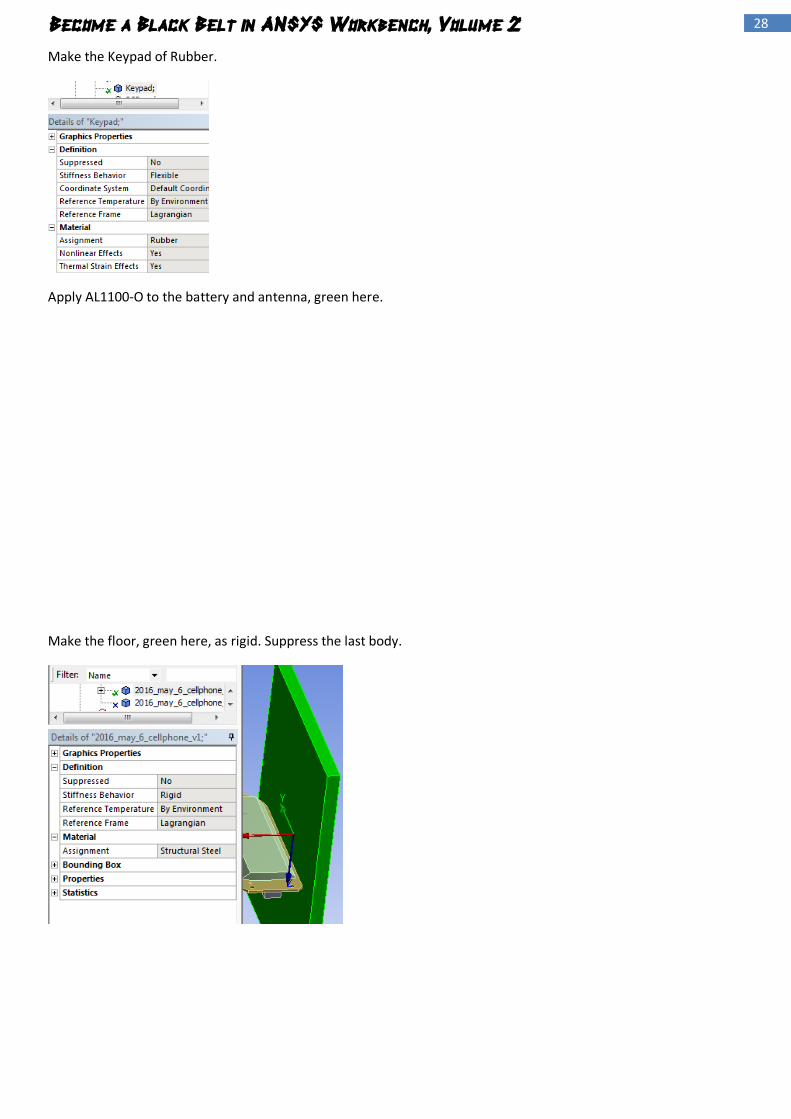
Make the Keypad of Rubber.
Apply AL1100-O to the battery and antenna, green here.
Make the floor, green here, as rigid. Suppress the last body.

29 Become a Black Belt in ANSYS Workbench, Volume 2
While on the Model branch, insert a Virtual Topology with High Behavior and obtain similar count values.
Connections: Suppress the Contacts.
Mesh: Assign these details.
For these 2 housing parts, seen here in blue, apply this sizing.
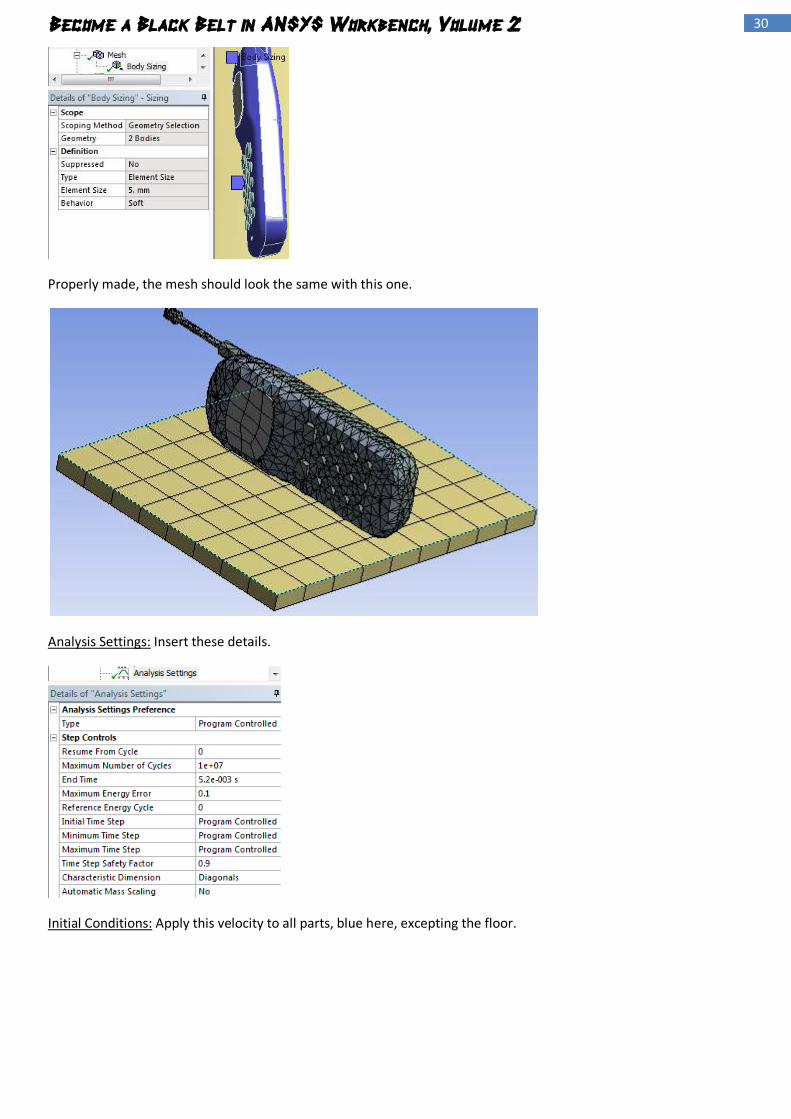
30 Become a Black Belt in ANSYS Workbench, Volume 2
Properly made, the mesh should look the same with this one.
Analysis Settings: Insert these details.
Initial Conditions: Apply this velocity to all parts, blue here, excepting the floor.
31 Become a Black Belt in ANSYS Workbench, Volume 2
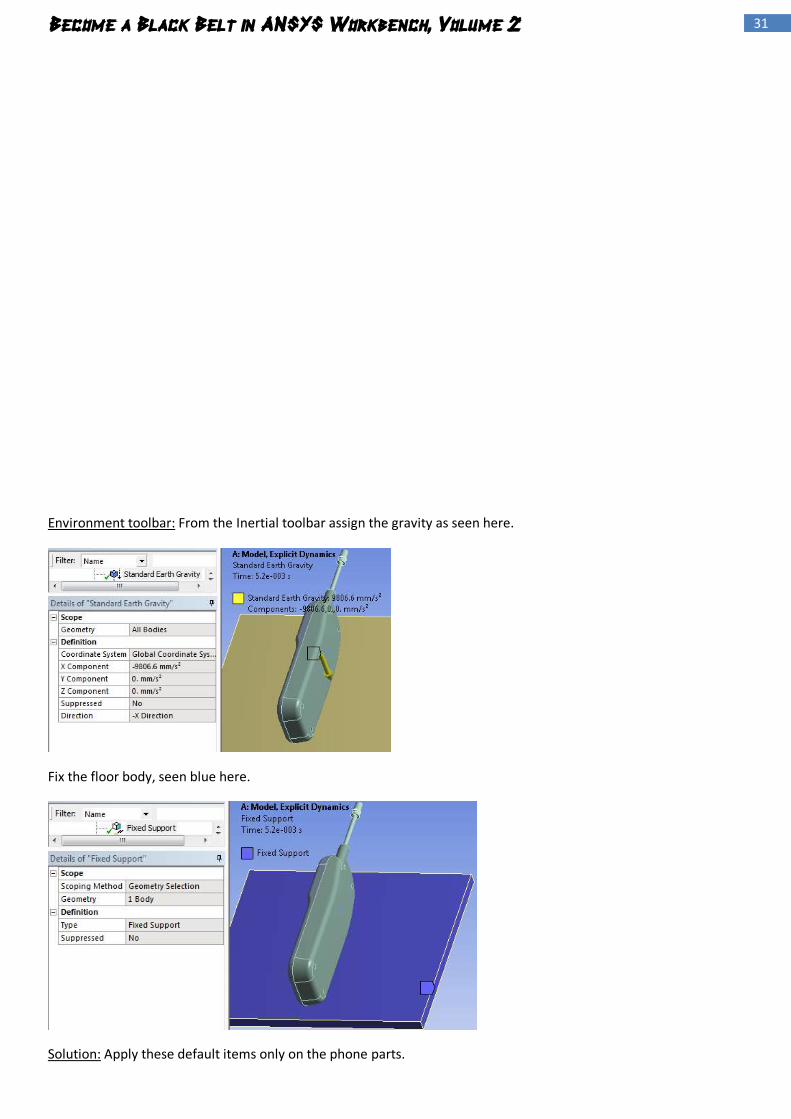
Environment toolbar: From the Inertial toolbar assign the gravity as seen here.
Fix the floor body, seen blue here.
Solution: Apply these default items only on the phone parts.

32 Become a Black Belt in ANSYS Workbench, Volume 2
Insert these default items on all the bodies.
Further homework:
- delete the Virtual Topology, solve, draw the conclusions
- decrease the falling velocity to 7 m/s, solve, draw the conclusions
- change the POLYCARB material to any other material, solve, draw the conclusions
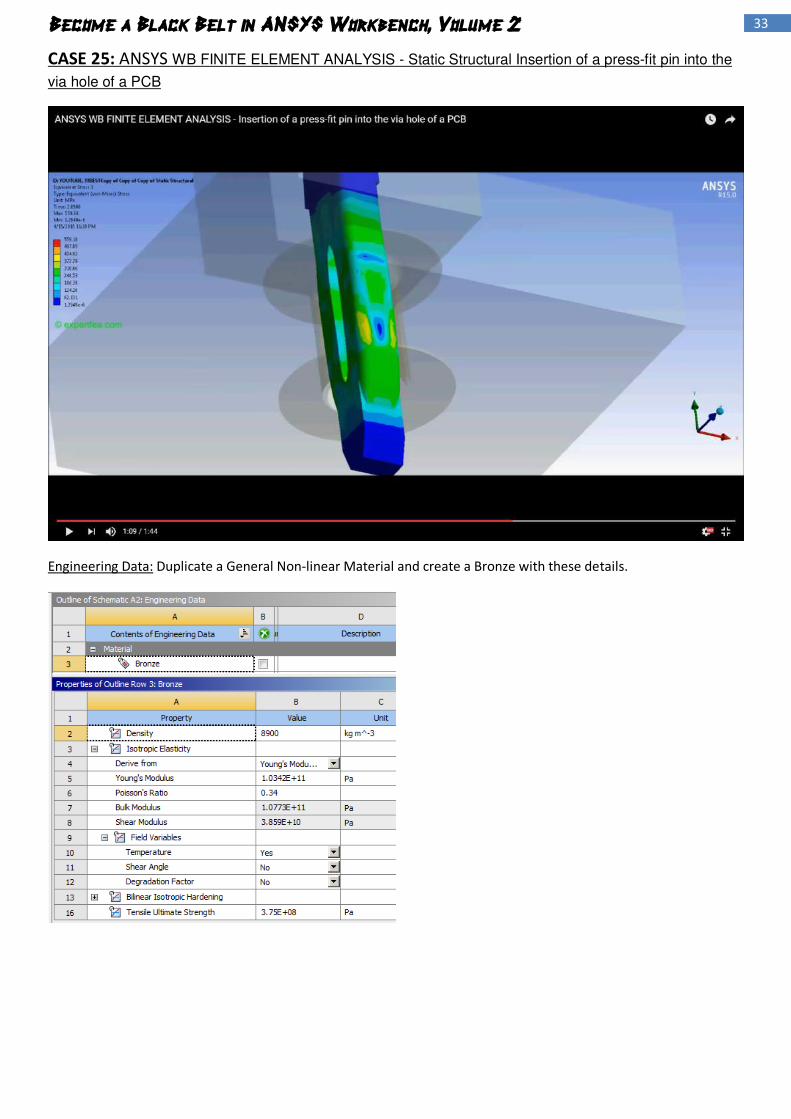
33 Become a Black Belt in ANSYS Workbench, Volume 2
CASE 25: ANSYS WB FINITE ELEMENT ANALYSIS - Static Structural Insertion of a press-fit pin into the
via hole of a PCB
Engineering Data: Duplicate a General Non-linear Material and create a Bronze with these details.
34 Become a Black Belt in ANSYS Workbench, Volume 2
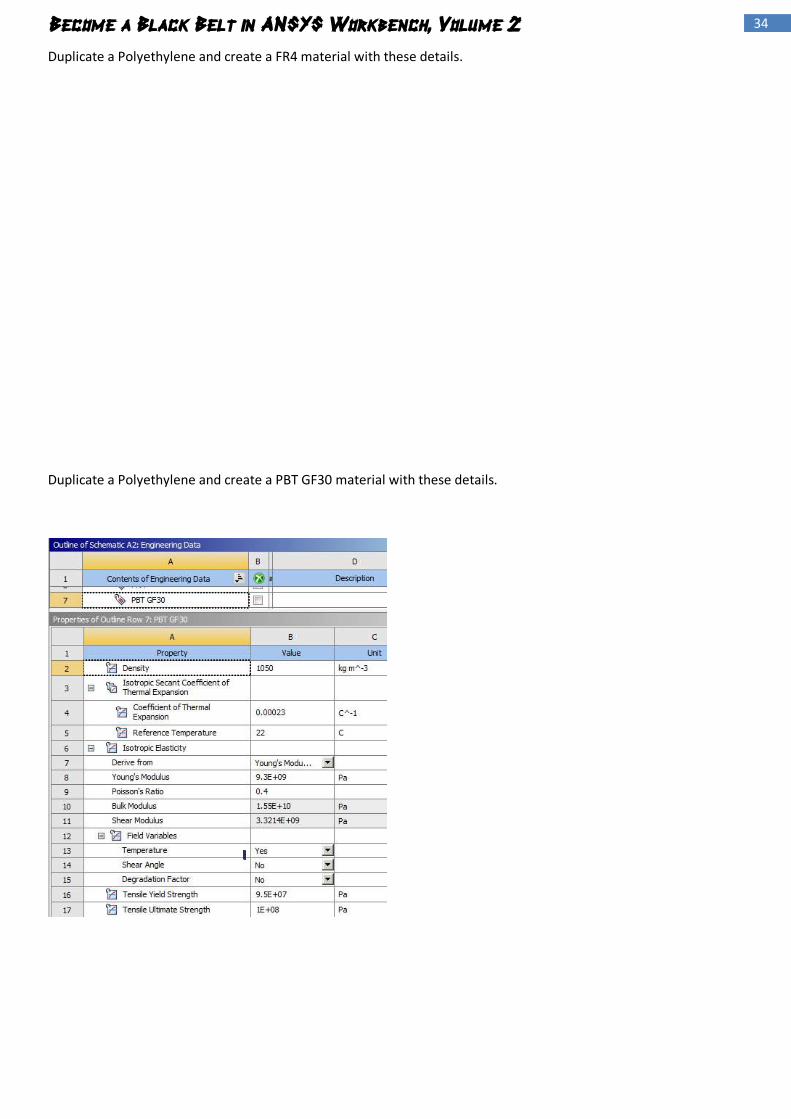
Duplicate a Polyethylene and create a FR4 material with these details.
Duplicate a Polyethylene and create a PBT GF30 material with these details.

35 Become a Black Belt in ANSYS Workbench, Volume 2
Geometry: Assign FR4 material on the PCB part, green here.
Assign Bronze material on the via and pin, green here.
Assign PBT GF30 material on the via and pin, green here.
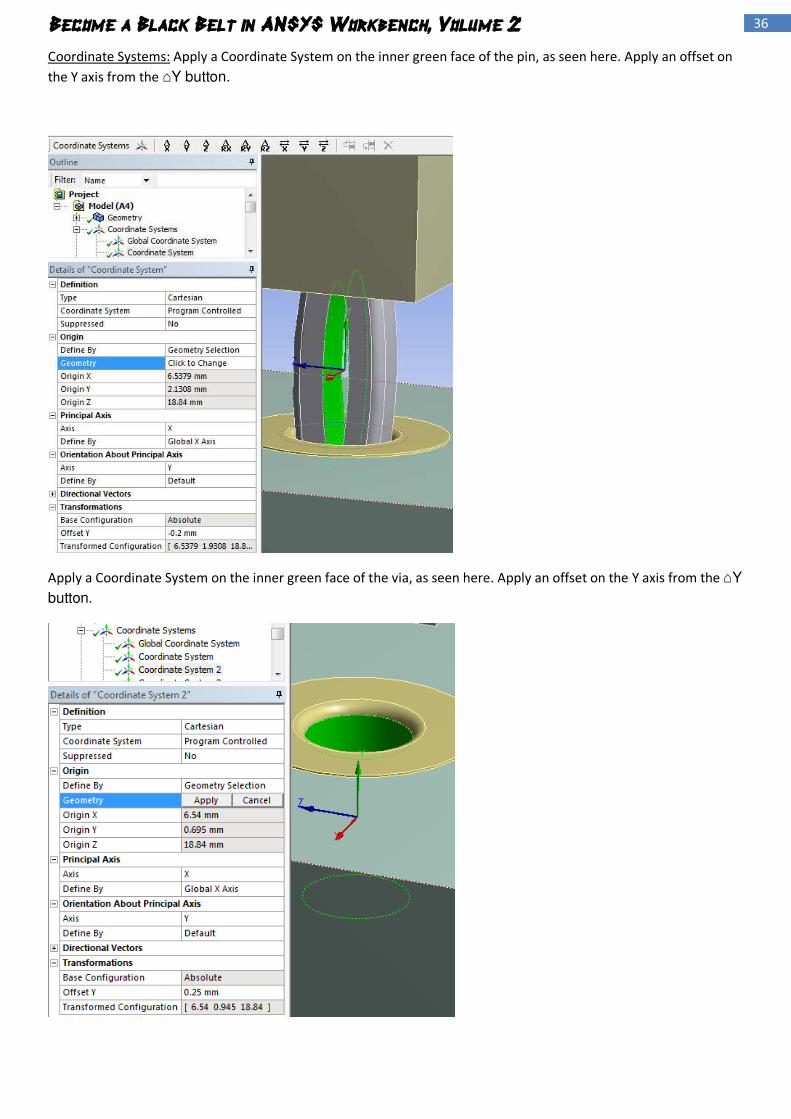
36 Become a Black Belt in ANSYS Workbench, Volume 2
Coordinate Systems: Apply a Coordinate System on the inner green face of the pin, as seen here. Apply an offset on
the Y axis from the ⌂Y button.
Apply a Coordinate System on the inner green face of the via, as seen here. Apply an offset on the Y axis from the ⌂Y
button.

37 Become a Black Belt in ANSYS Workbench, Volume 2
Apply a Coordinate System on the inner green face of the via hole in PCB, as seen here. No offset on the Y axis.
Connections, Contacts: Create a bonded contact between the via body and its hole in the PCB.

38 Become a Black Belt in ANSYS Workbench, Volume 2
Create a Frictionless contact between pin and via, with these details. Carefully select these faces, differently colored
in red and blue, for the Contact and Target side.
Create a bonded contact between the pin and the surrounding plastic.
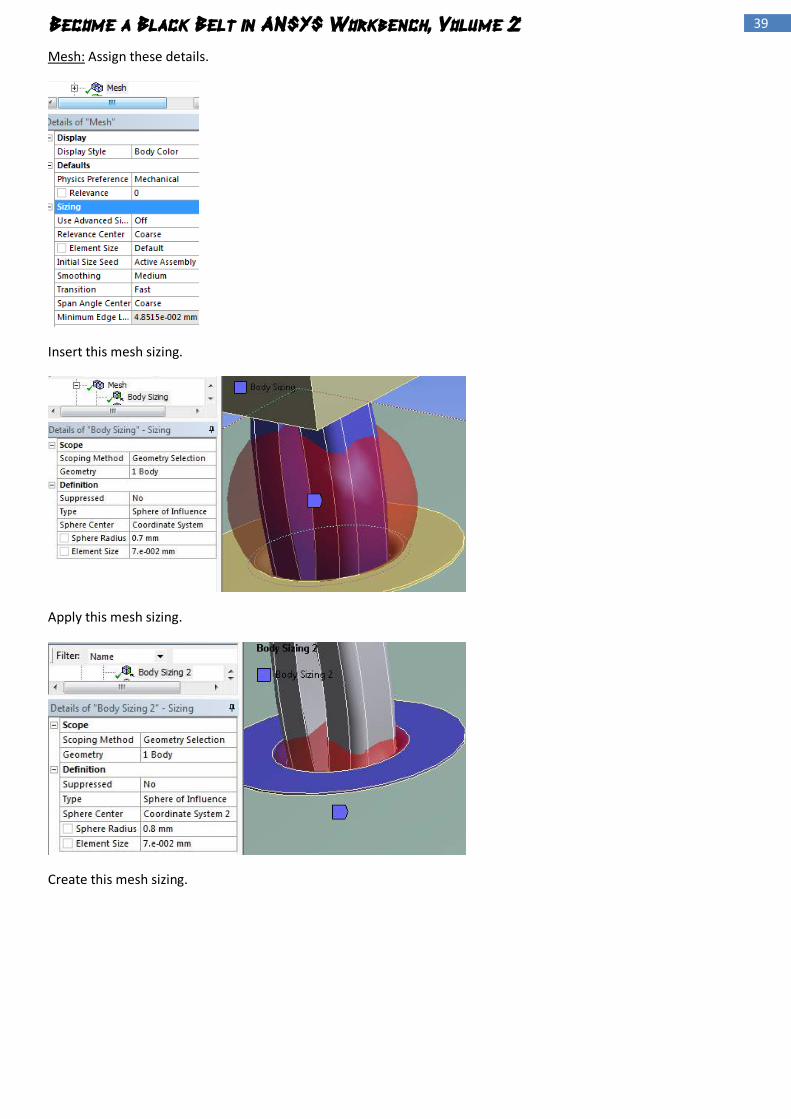
39 Become a Black Belt in ANSYS Workbench, Volume 2
Mesh: Assign these details.
Insert this mesh sizing.
Apply this mesh sizing.
Create this mesh sizing.
40 Become a Black Belt in ANSYS Workbench, Volume 2
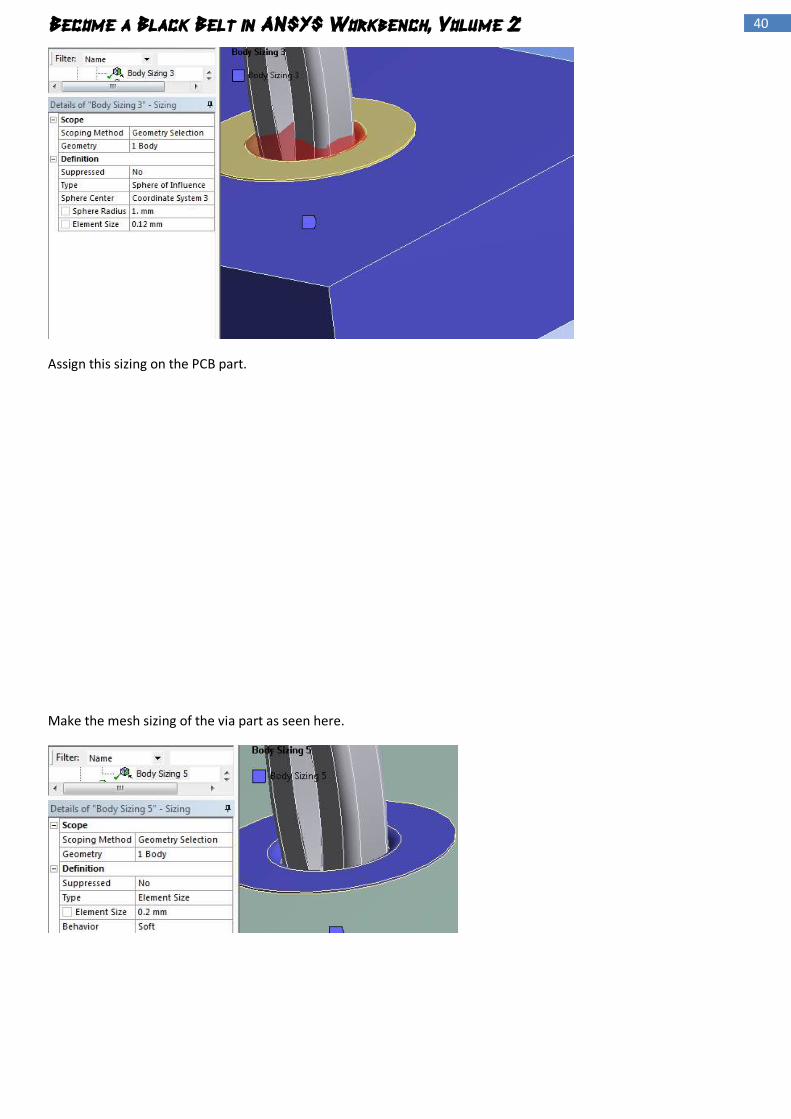
Assign this sizing on the PCB part.
Make the mesh sizing of the via part as seen here.

41 Become a Black Belt in ANSYS Workbench, Volume 2
Correctly made, the mesh should look similar to this one.
Analysis Settings: Assign these details to the 1st
step.
42 Become a Black Belt in ANSYS Workbench, Volume 2
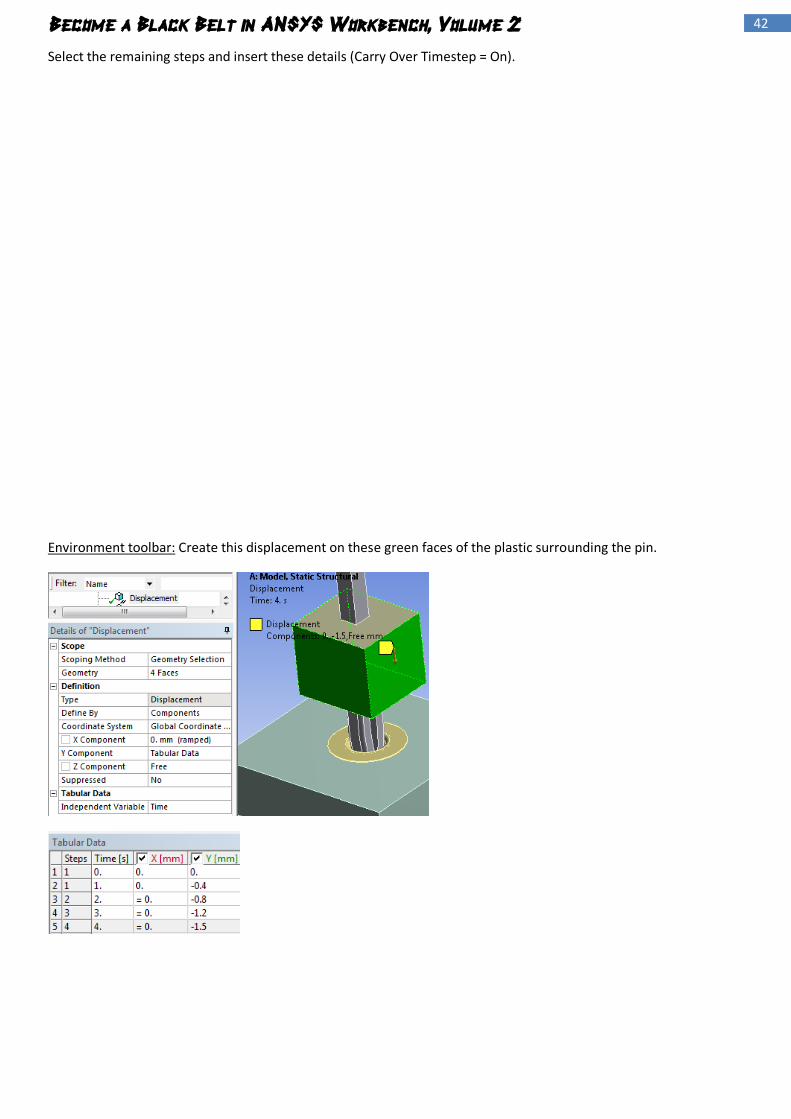
Select the remaining steps and insert these details (Carry Over Timestep = On).
Environment toolbar: Create this displacement on these green faces of the plastic surrounding the pin.

43 Become a Black Belt in ANSYS Workbench, Volume 2
Fix these blue faces on the PCB part.
Apply a support on this blue face on the bottom of the via.
Solution: Insert Total Deformation, Equivalent Stress and Strain Energy as default, for all bodies.
Apply Equivalent Stress separately for via, pin and PCB.
Create these items for via and PCB on X axis.
44 Become a Black Belt in ANSYS Workbench, Volume 2
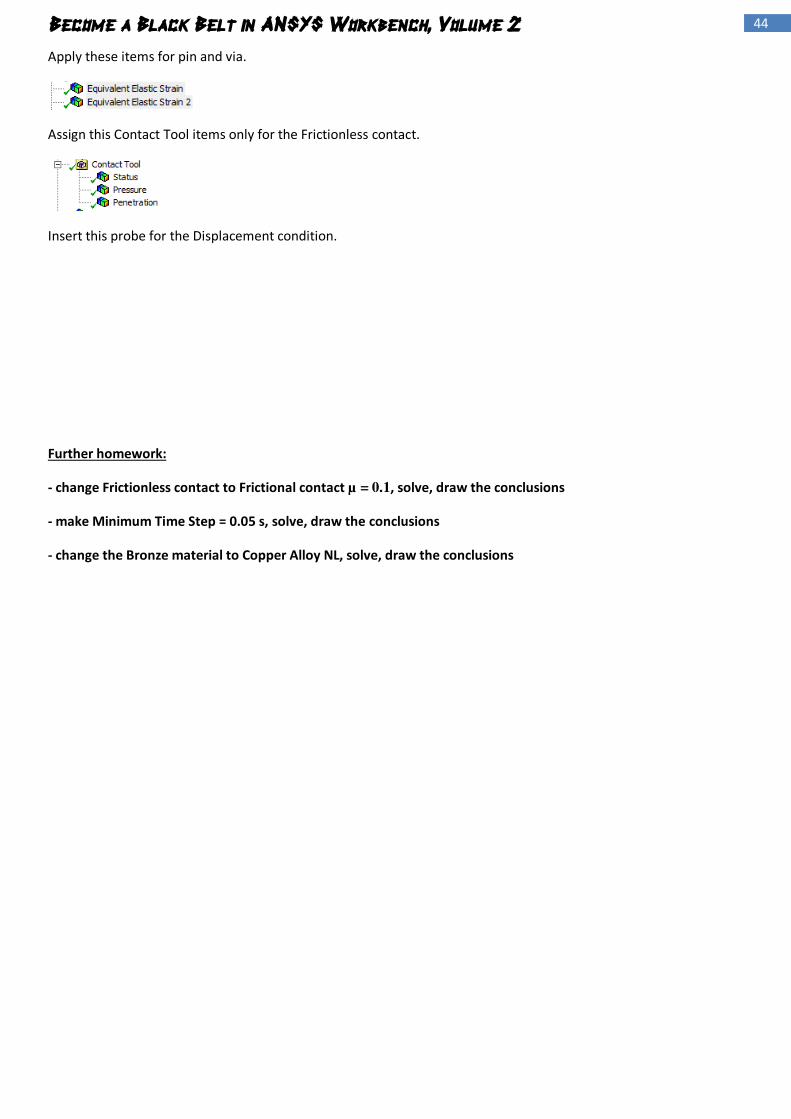
Apply these items for pin and via.
Assign this Contact Tool items only for the Frictionless contact.
Insert this probe for the Displacement condition.
Further homework:
- change Frictionless contact to Frictional contact µ = 0.1, solve, draw the conclusions
- make Minimum Time Step = 0.05 s, solve, draw the conclusions
- change the Bronze material to Copper Alloy NL, solve, draw the conclusions
45 Become a Black Belt in ANSYS Workbench, Volume 2
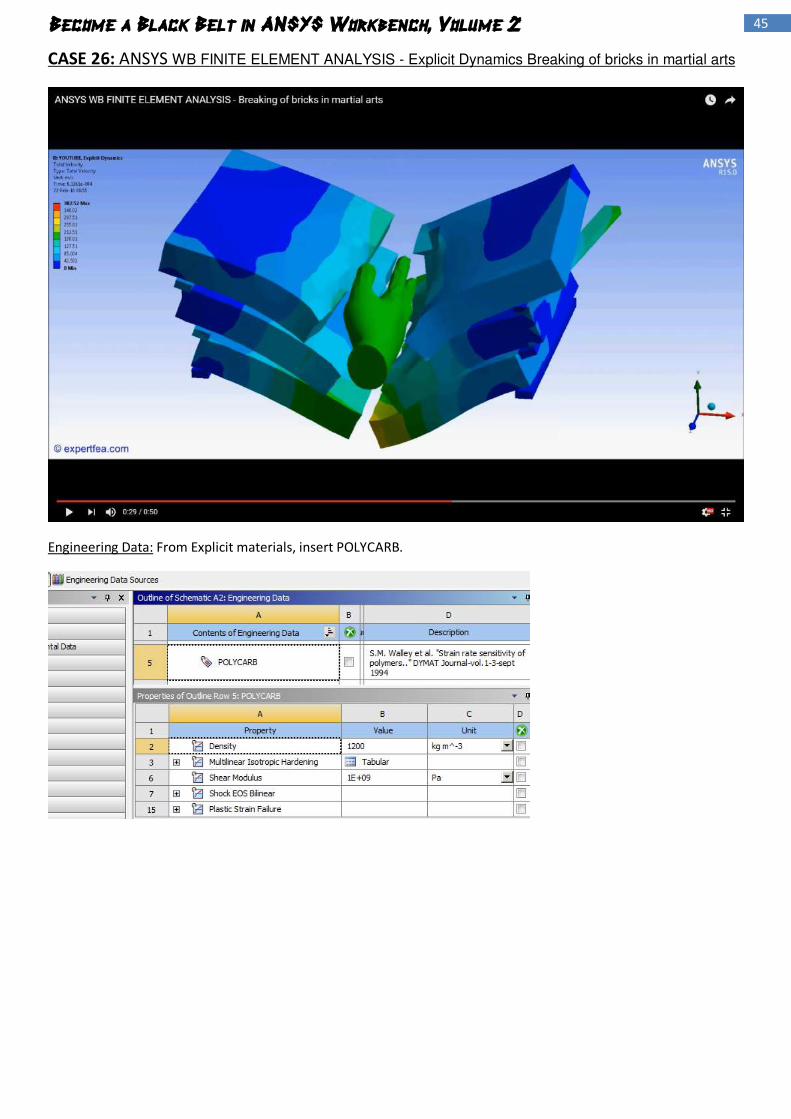
CASE 26: ANSYS WB FINITE ELEMENT ANALYSIS - Explicit Dynamics Breaking of bricks in martial arts
Engineering Data: From Explicit materials, insert POLYCARB.

46 Become a Black Belt in ANSYS Workbench, Volume 2
Geometry:2016_feb_14_hand_bricks1.x_t
Make all bricks of POLYCARB and leave them with Stiffness Behavior = Flexible.
Make all the other parts as Rigid, including the hand. Their material is unimportant, because of the infinite stiffness.

47 Become a Black Belt in ANSYS Workbench, Volume 2
Create a Virtual Topology similar to the one seen on this hand.
Connections: Assign these details to all the contacts.
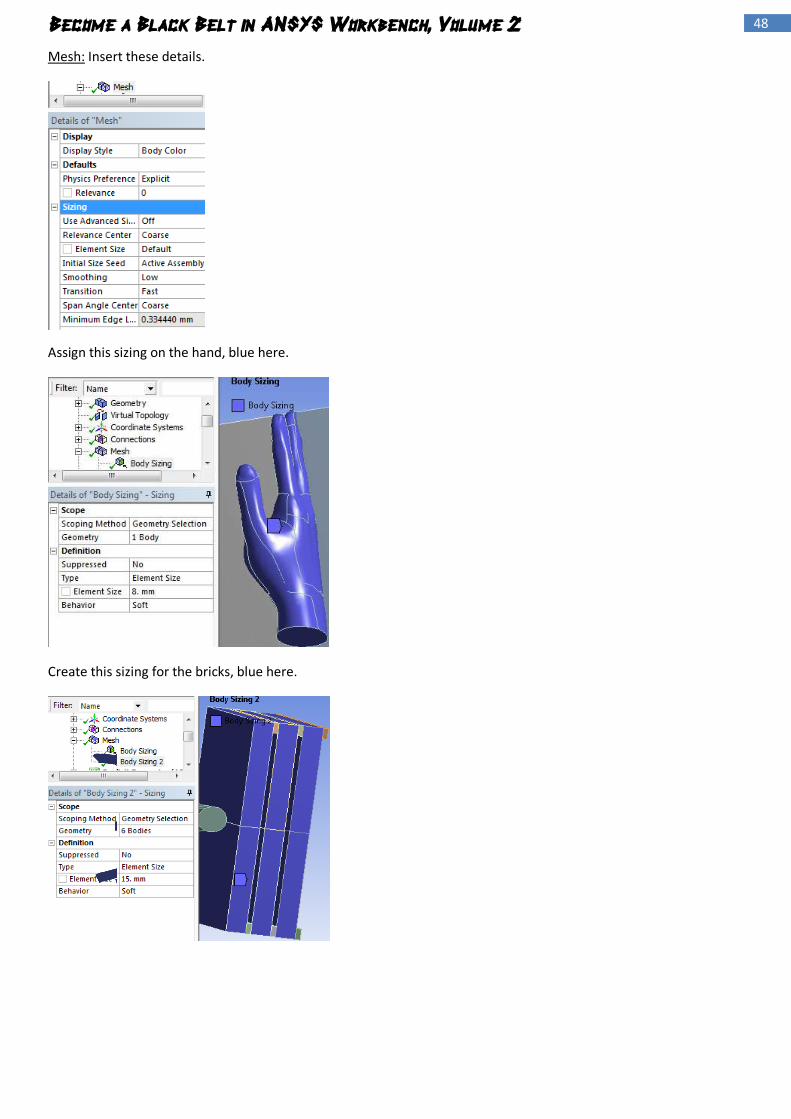
48 Become a Black Belt in ANSYS Workbench, Volume 2
Mesh: Insert these details.
Assign this sizing on the hand, blue here.
Create this sizing for the bricks, blue here.
49 Become a Black Belt in ANSYS Workbench, Volume 2
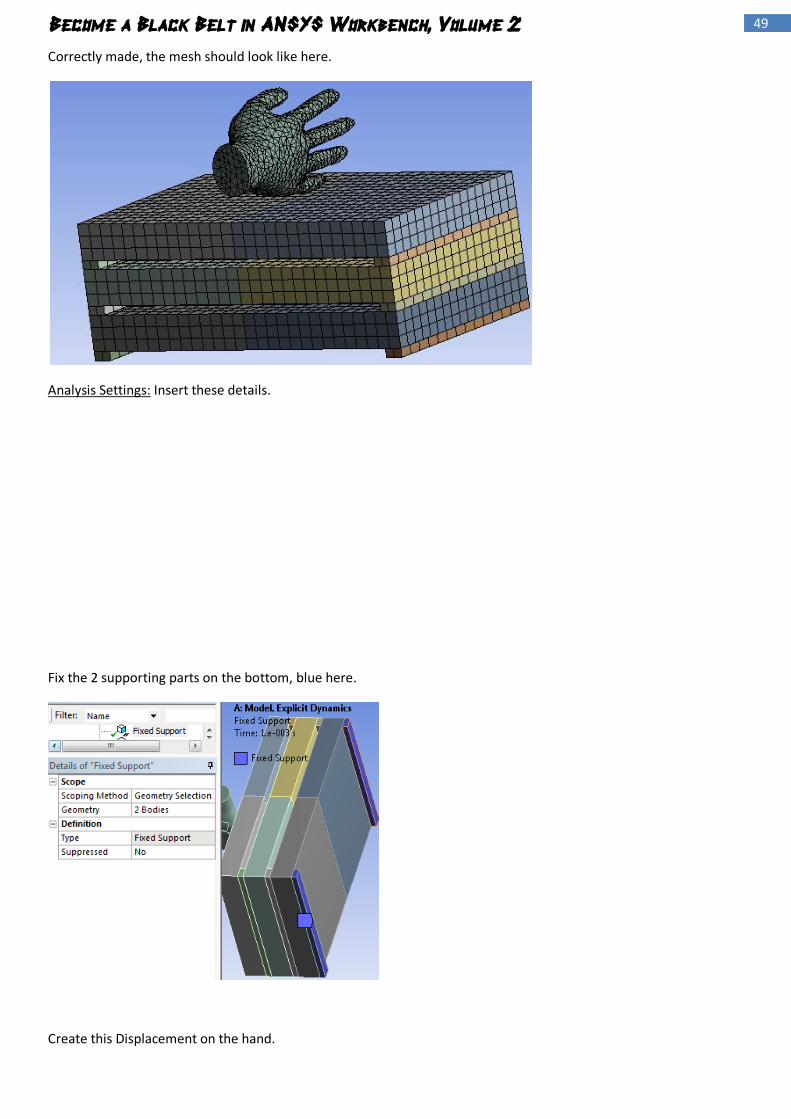
Correctly made, the mesh should look like here.
Analysis Settings: Insert these details.
Fix the 2 supporting parts on the bottom, blue here.
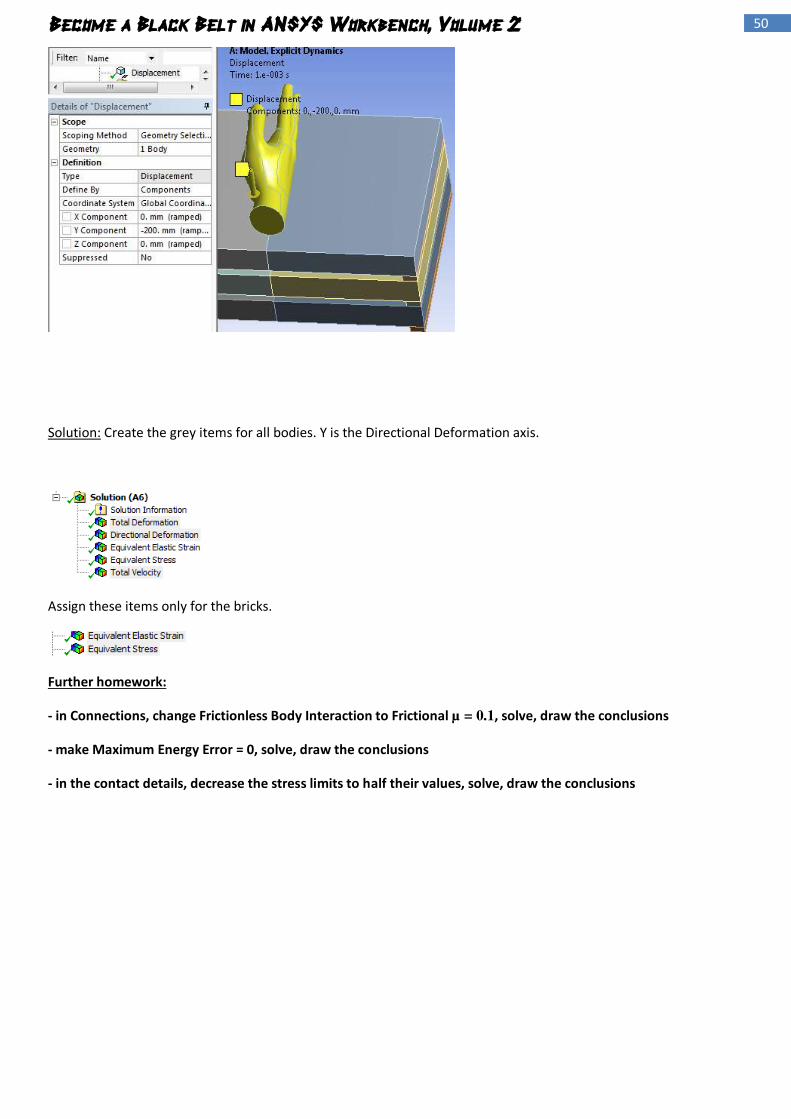
Create this Displacement on the hand.
50 Become a Black Belt in ANSYS Workbench, Volume 2
Solution: Create the grey items for all bodies. Y is the Directional Deformation axis.
Assign these items only for the bricks.
Further homework:
- in Connections, change Frictionless Body Interaction to Frictional µ = 0.1, solve, draw the conclusions
- make Maximum Energy Error = 0, solve, draw the conclusions
- in the contact details, decrease the stress limits to half their values, solve, draw the conclusions
57 Become a Black Belt in ANSYS Workbench, Volume 2
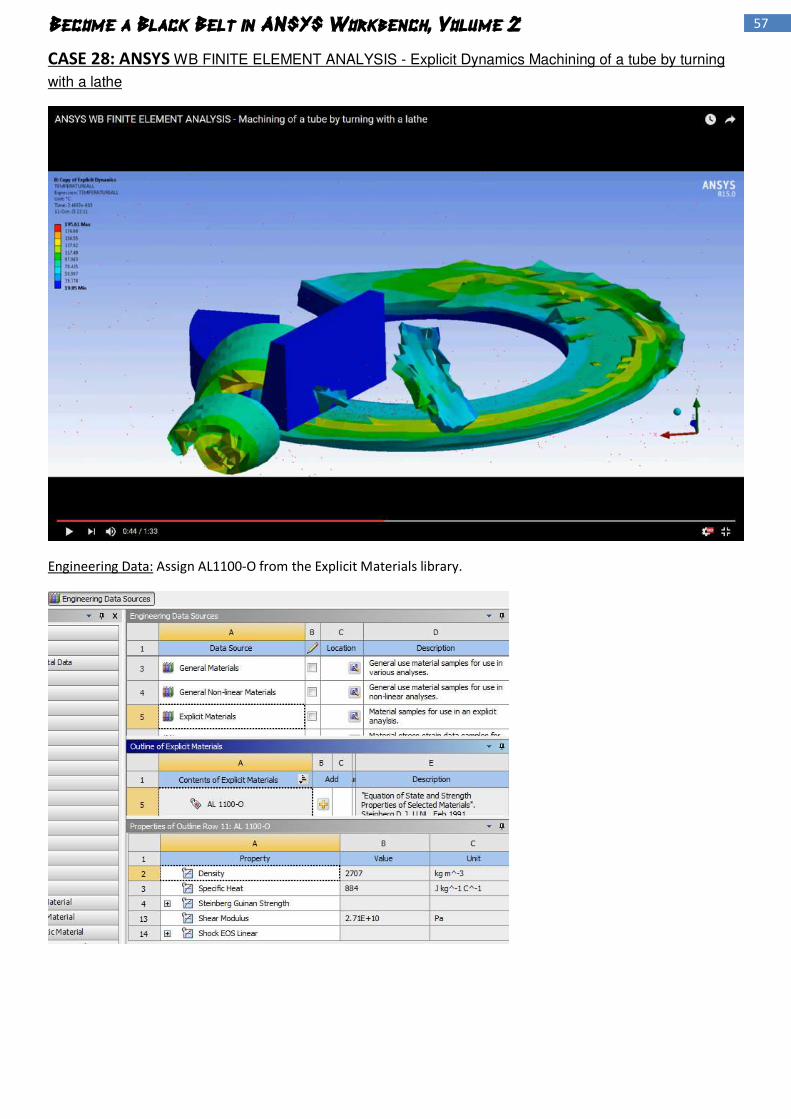
CASE 28: ANSYS WB FINITE ELEMENT ANALYSIS - Explicit Dynamics Machining of a tube by turning
with a lathe
Engineering Data: Assign AL1100-O from the Explicit Materials library.

58 Become a Black Belt in ANSYS Workbench, Volume 2
Geometry: 2015_oct_11_machining_318deg_tube.x_t
Assign the AL1100-O material to the workpiece, green here. Make the tool’s Stiffness Behavior = Rigid.
Coordinate Systems: Click the inside of the workpiece, green here, and assign these details (Type = Cylindrical). Make
sure that the circular axis (green here) is the one that makes the tool rotate.
Mesh: Assign these details.

59 Become a Black Belt in ANSYS Workbench, Volume 2
Insert this body sizing on both parts.
Analysis Settings: Insert these details.
Environment toolbar: Create this displacement on the bottom face of the workpiece, yellow here.

60 Become a Black Belt in ANSYS Workbench, Volume 2
Fix the tool, blue here.
Solution: Create these items, as default, for all bodies.
After the FEA is solved, click Solution, then the worksheet button and select these items as default, for all parts.
Further homework:
- in Connections, change Frictionless Body Interaction to Frictional µ = 0.01, solve, draw the conclusions
- change the material of the sheet-metal part to Aluminum Alloy, solve, draw the conclusions
- change Stiffness Behavior of the tool part to Flexible, solve, draw the conclusions
- increase the mesh sizing to double their values, solve, draw the conclusions
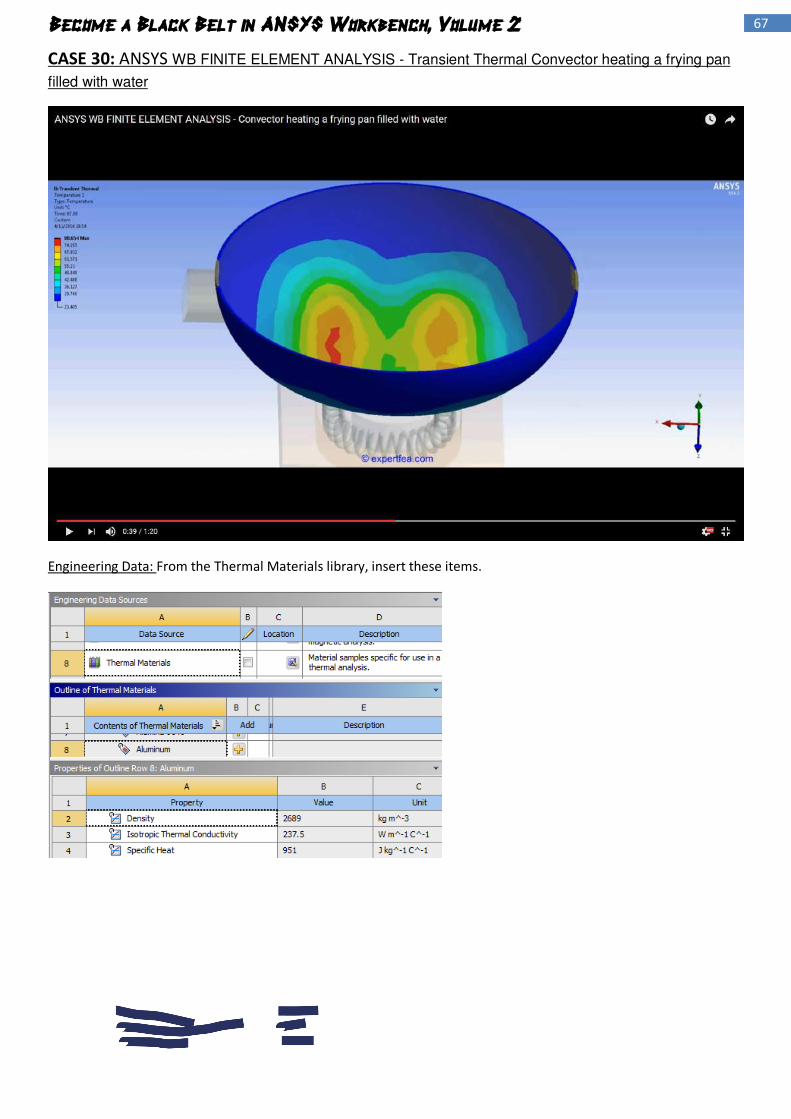
67 Become a Black Belt in ANSYS Workbench, Volume 2
CASE 30: ANSYS WB FINITE ELEMENT ANALYSIS - Transient Thermal Convector heating a frying pan
filled with water
Engineering Data: From the Thermal Materials library, insert these items.

68 Become a Black Belt in ANSYS Workbench, Volume 2
Duplicate one of the above materials and create this one.
Geometry:2014_apr_09_convector3.x_t
The materials names seen underneath might differ from the ones in the Thermal Library, assigned above. This is a
neglect able matter.
For the brick body, green here, assign Concrete.
69 Become a Black Belt in ANSYS Workbench, Volume 2
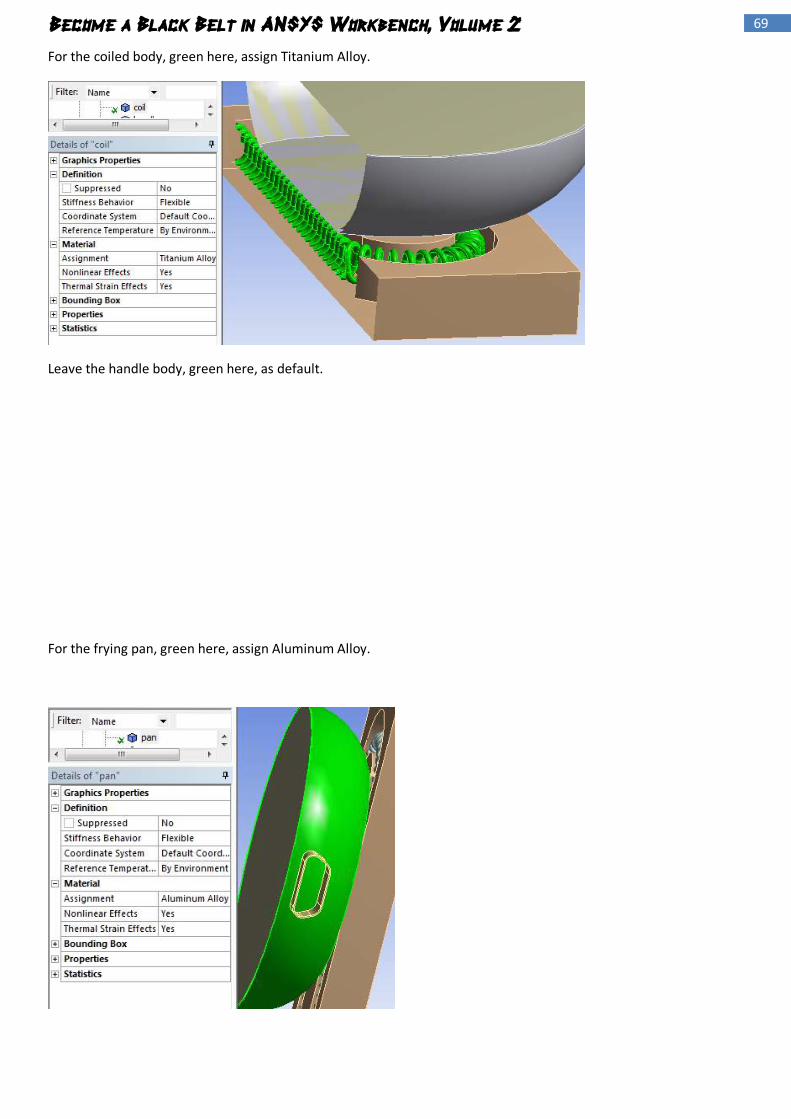
For the coiled body, green here, assign Titanium Alloy.
Leave the handle body, green here, as default.
For the frying pan, green here, assign Aluminum Alloy.

70 Become a Black Belt in ANSYS Workbench, Volume 2
For the water body, green here, assign Water.
Connections: Leave all contacts as default.
Mesh: Assign these details.

71 Become a Black Belt in ANSYS Workbench, Volume 2
Create a Tet method for the coil, green here.
The mesh should look like here.
Analysis Settings: Apply these details.

72 Become a Black Belt in ANSYS Workbench, Volume 2
Environment toolbar: Insert this default temperature on the bottom face of the brick, red here.
Apply a convection load on all faces of the assembly, as seen here in yellow.
Create this heat flow load on the coil only, blue here.
73 Become a Black Belt in ANSYS Workbench, Volume 2
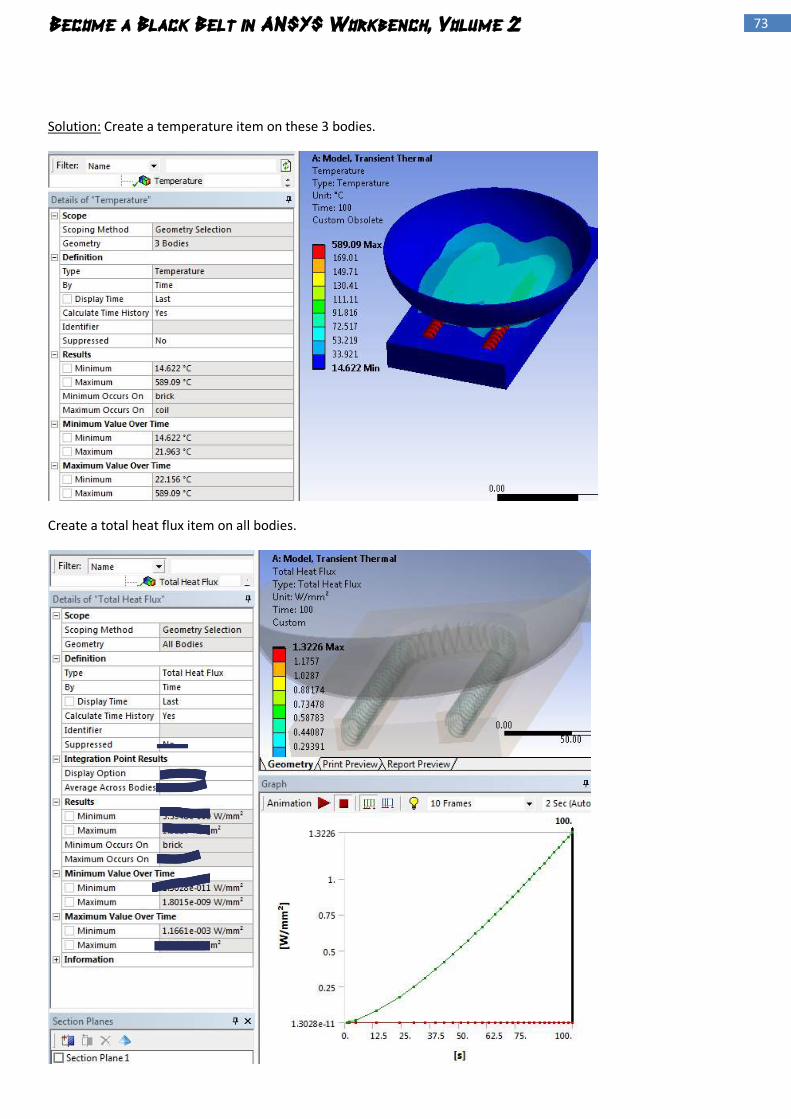
Solution: Create a temperature item on these 3 bodies.
Create a total heat flux item on all bodies.

74 Become a Black Belt in ANSYS Workbench, Volume 2
Scope for the temperature items separately, on each part.
After the FEA is solved, click Solution, then Worksheet and scope for this item.
Further homework:
- in Connections, change Frictionless Body Interaction to Frictional µ = 0.05, solve, draw the conclusions
- change Stiffness Behavior of the shell parts to Flexible, solve, draw the conclusions
- increase the mesh sizing to double their values, solve, draw the conclusions
75 Become a Black Belt in ANSYS Workbench, Volume 2
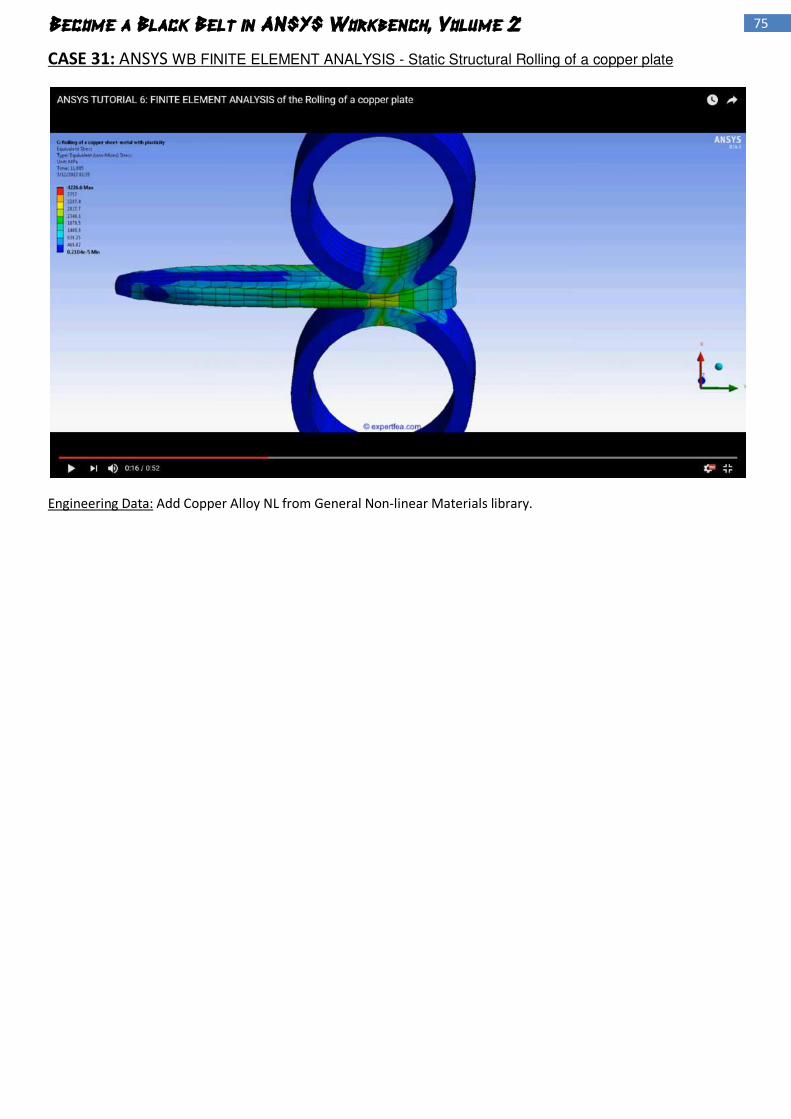
CASE 31: ANSYS WB FINITE ELEMENT ANALYSIS - Static Structural Rolling of a copper plate
Engineering Data: Add Copper Alloy NL from General Non-linear Materials library.
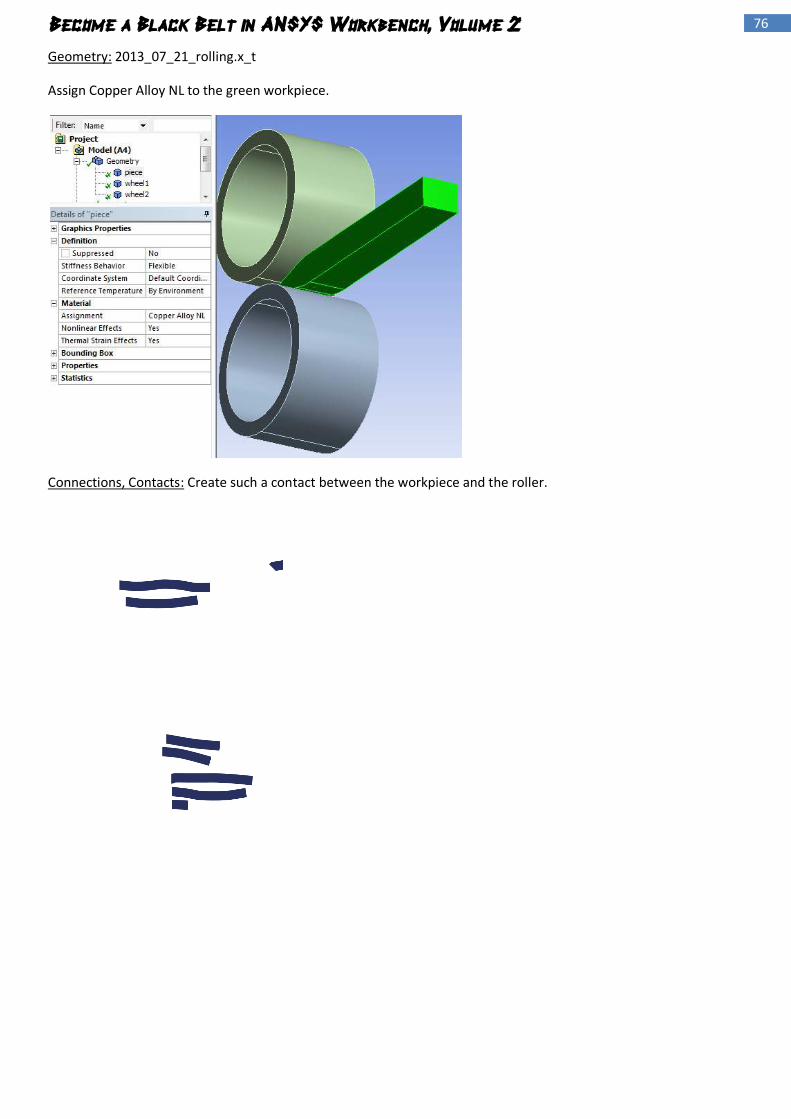
76 Become a Black Belt in ANSYS Workbench, Volume 2
Geometry: 2013_07_21_rolling.x_t
Assign Copper Alloy NL to the green workpiece.
Connections, Contacts: Create such a contact between the workpiece and the roller.

77 Become a Black Belt in ANSYS Workbench, Volume 2
Make a similar contact for the other roller.
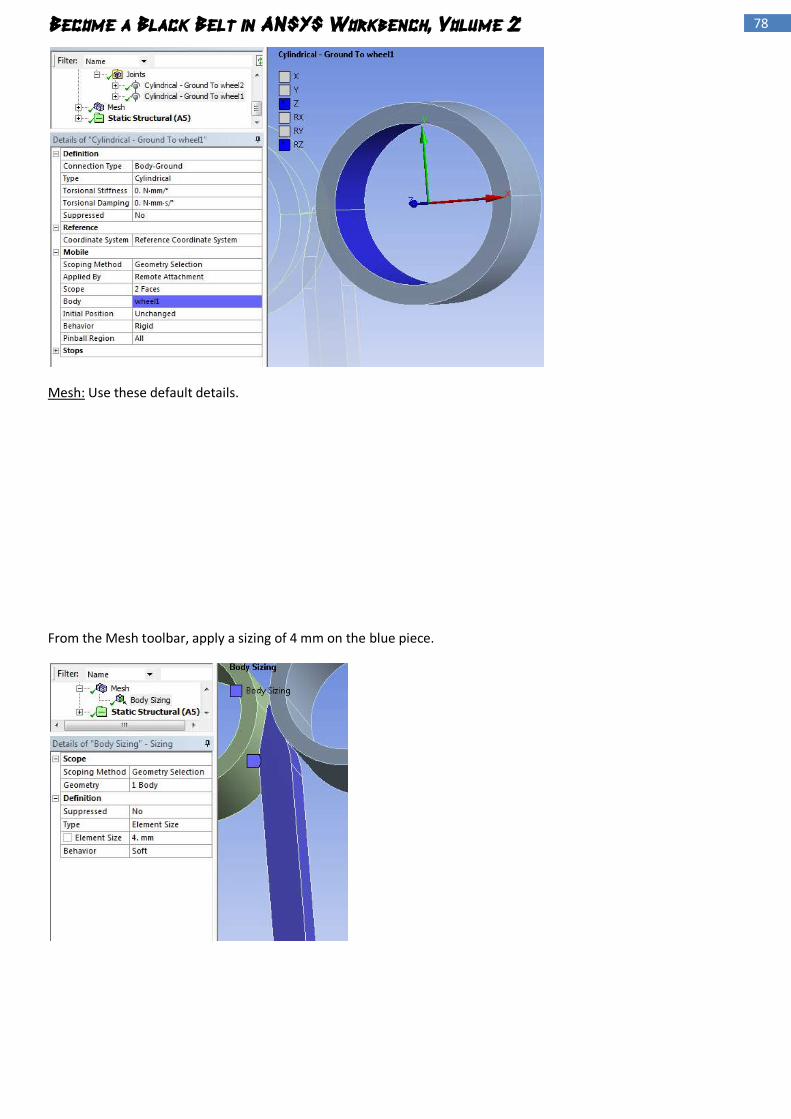
From the Connections toolbar, create a Body-Ground, Revolute Joint on each roller.
78 Become a Black Belt in ANSYS Workbench, Volume 2
Mesh: Use these default details.
From the Mesh toolbar, apply a sizing of 4 mm on the blue piece.
79 Become a Black Belt in ANSYS Workbench, Volume 2
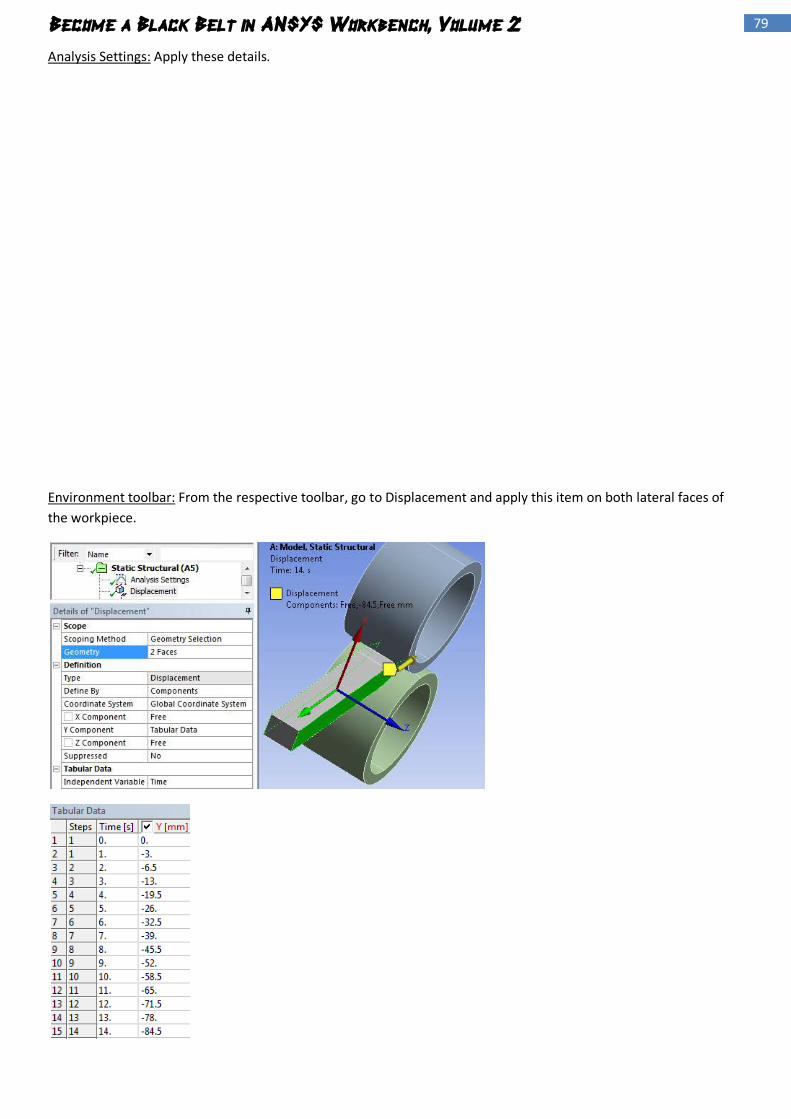
Analysis Settings: Apply these details.
Environment toolbar: From the respective toolbar, go to Displacement and apply this item on both lateral faces of
the workpiece.
80 Become a Black Belt in ANSYS Workbench, Volume 2
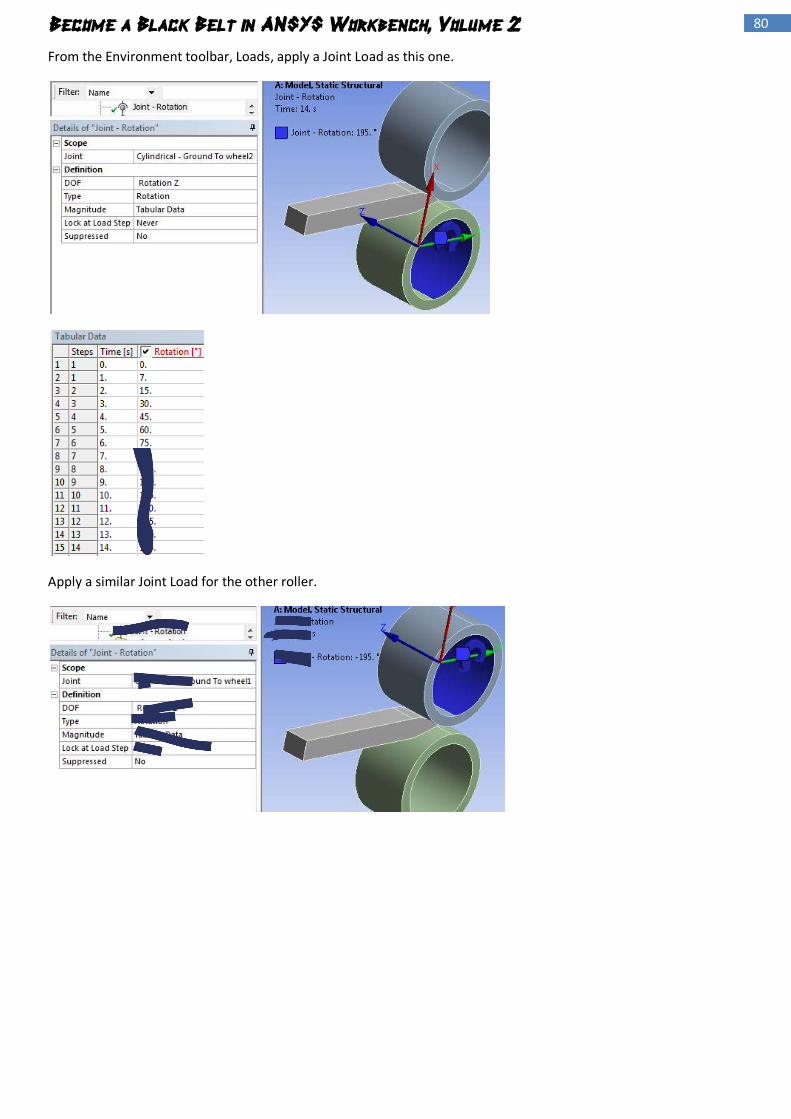
From the Environment toolbar, Loads, apply a Joint Load as this one.
Apply a similar Joint Load for the other roller.
81 Become a Black Belt in ANSYS Workbench, Volume 2
Solution: From the Solution toolbar insert the following items.
A Directional Deformation for the faces on the tip of the workpiece.
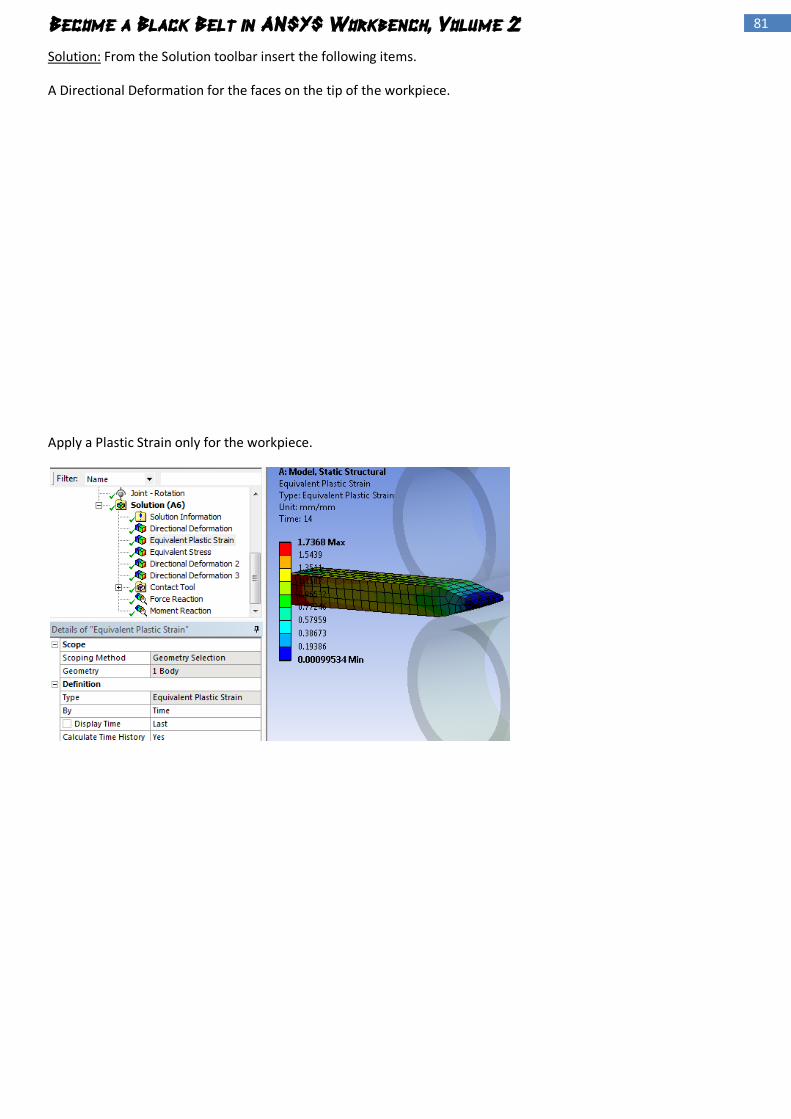
Apply a Plastic Strain only for the workpiece.
82 Become a Black Belt in ANSYS Workbench, Volume 2
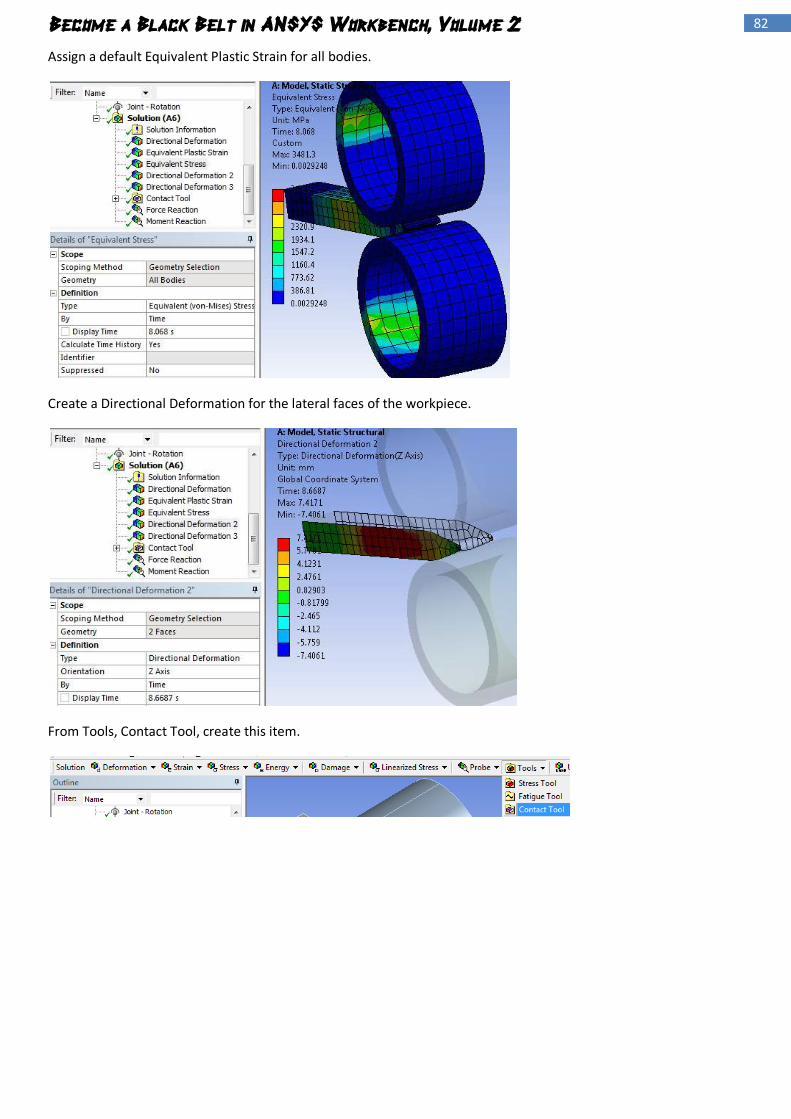
Assign a default Equivalent Plastic Strain for all bodies.
Create a Directional Deformation for the lateral faces of the workpiece.
From Tools, Contact Tool, create this item.
83 Become a Black Belt in ANSYS Workbench, Volume 2
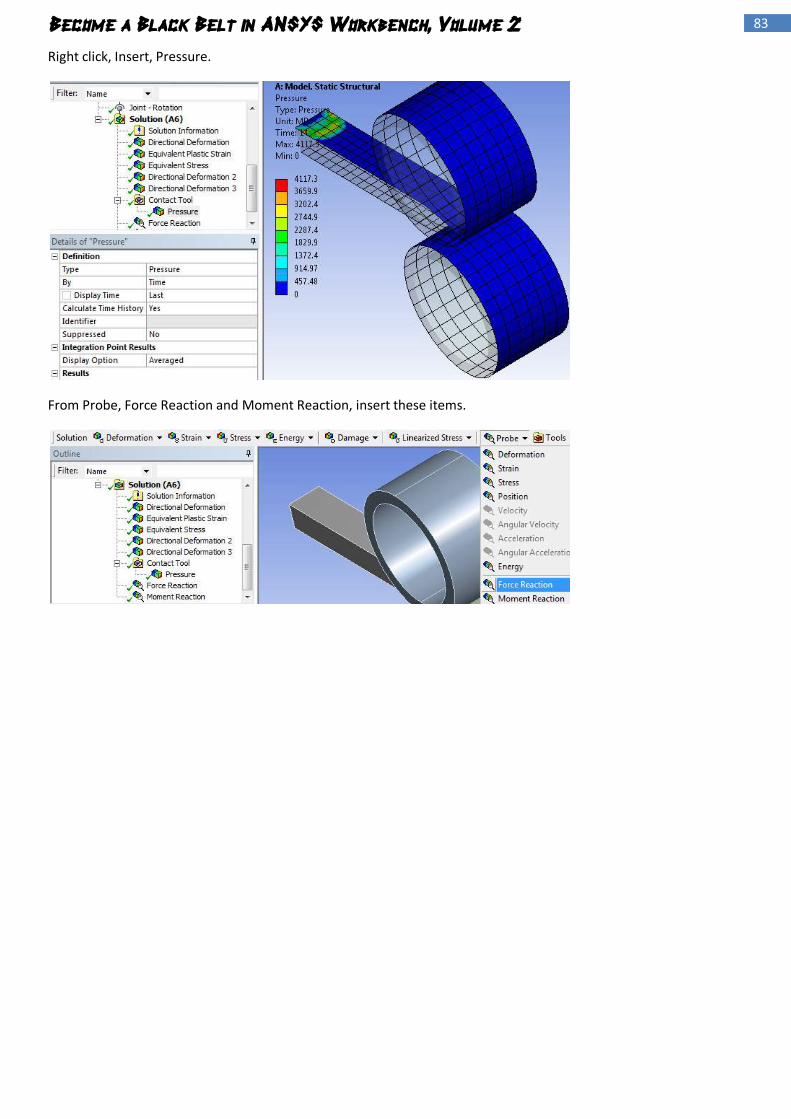
Right click, Insert, Pressure.
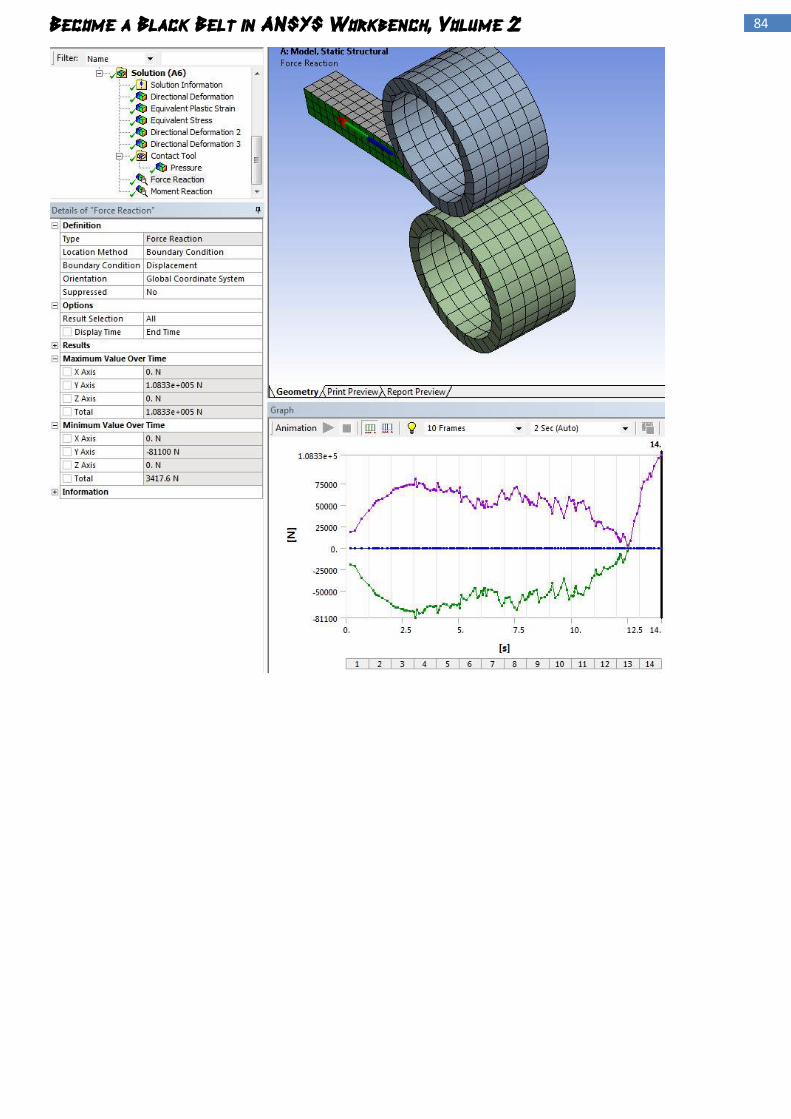
From Probe, Force Reaction and Moment Reaction, insert these items.
84 Become a Black Belt in ANSYS Workbench, Volume 2
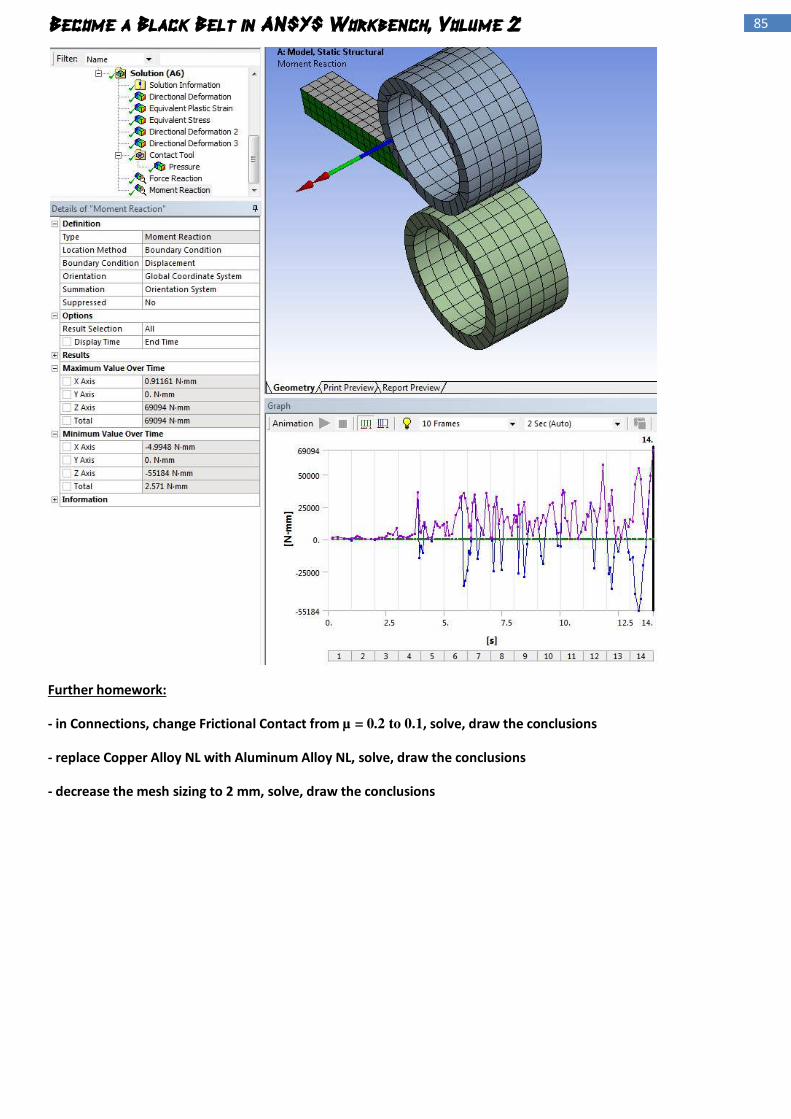
85 Become a Black Belt in ANSYS Workbench, Volume 2
Further homework:
- in Connections, change Frictional Contact from µ = 0.2 to 0.1, solve, draw the conclusions
- replace Copper Alloy NL with Aluminum Alloy NL, solve, draw the conclusions
- decrease the mesh sizing to 2 mm, solve, draw the conclusions

95 Become a Black Belt in ANSYS Workbench, Volume 2
CASE 33: ANSYS WB FINITE ELEMENT ANALYSIS - Static Structural Full ball bearing under load
Engineering Data: No change, use the default material.
Geometry: 2013_09_16_ball-bearing-3.x_t
97 Become a Black Belt in ANSYS Workbench, Volume 2
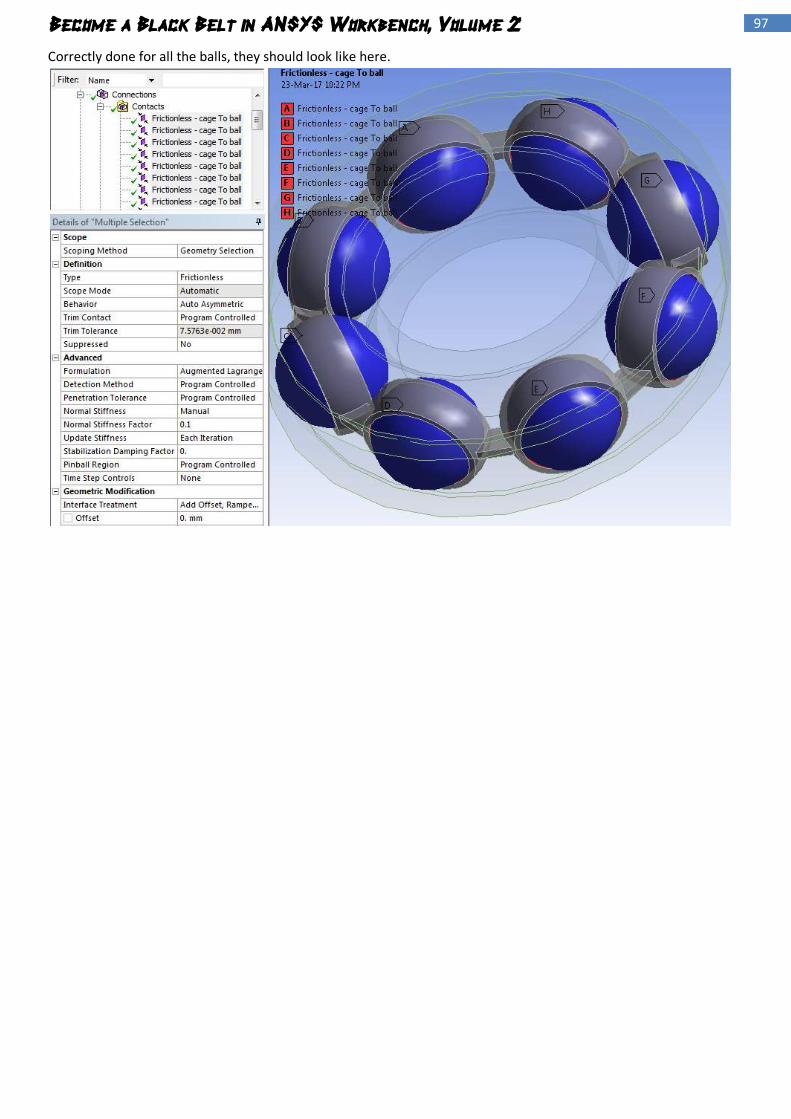
Correctly done for all the balls, they should look like here.
99 Become a Black Belt in ANSYS Workbench, Volume 2
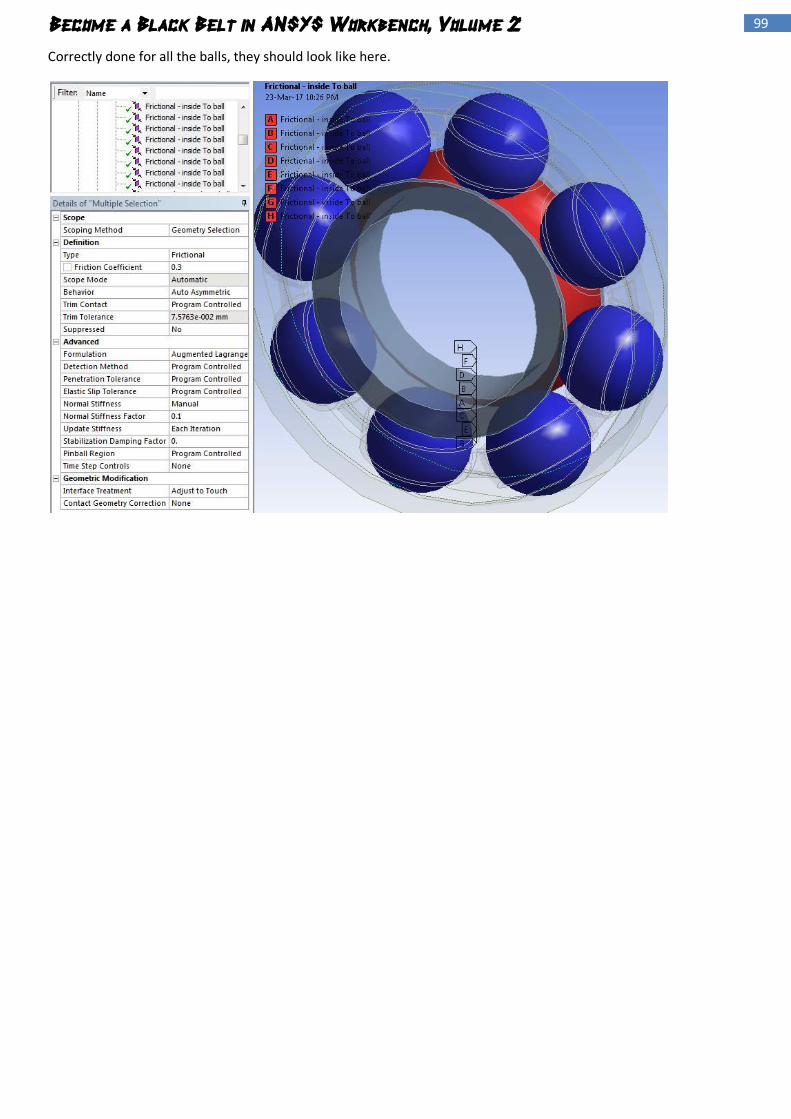
Correctly done for all the balls, they should look like here.
101 Become a Black Belt in ANSYS Workbench, Volume 2
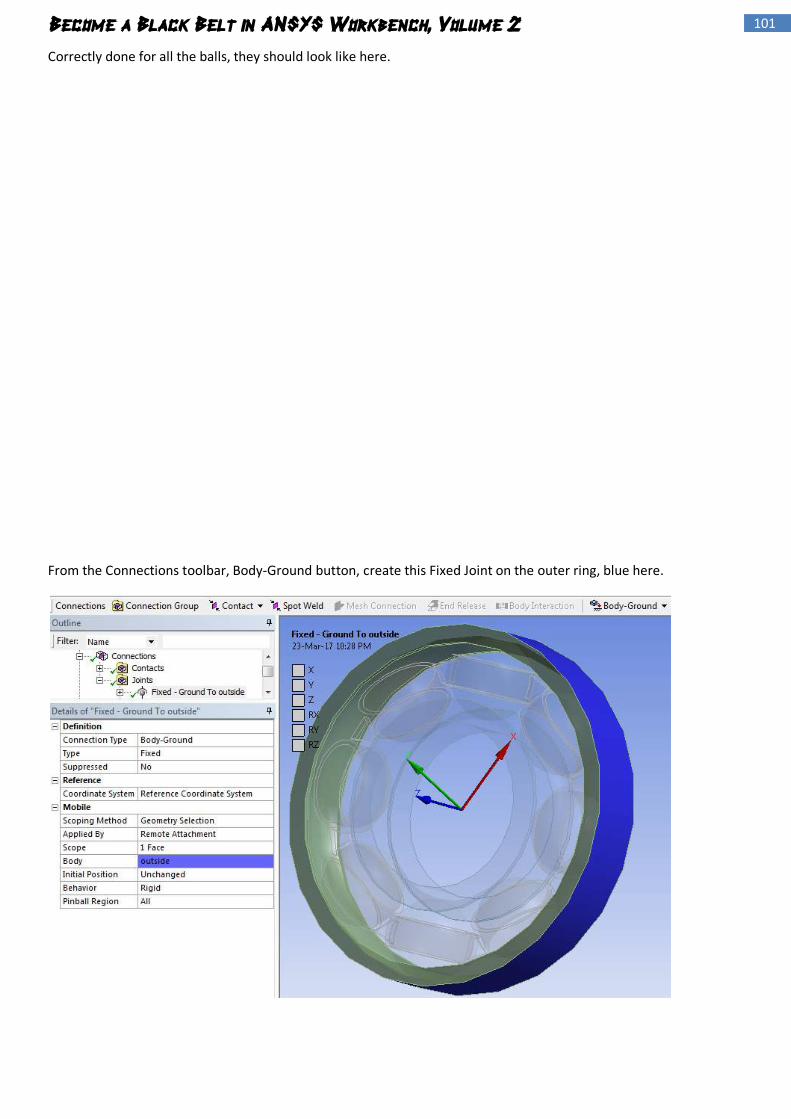
Correctly done for all the balls, they should look like here.
From the Connections toolbar, Body-Ground button, create this Fixed Joint on the outer ring, blue here.

102 Become a Black Belt in ANSYS Workbench, Volume 2
In a similar manner, create this Revolute Joint on the inner ring, blue here.
Mesh: Assign these details.

103 Become a Black Belt in ANSYS Workbench, Volume 2
From the Mesh toolbar, Mesh Control, apply this Method = Tetrahedrons.
From the same toolbar and button create a Sizing on all the green faces, except the inner spherical faces of the
cages, where the balls are held on.

104 Become a Black Belt in ANSYS Workbench, Volume 2
Insert a similar sizing as this one on the aforementioned internal spherical faces of the cage, seen blue here.
Analysis Settings: Apply these details, as seen here for the 1st timestep.

105 Become a Black Belt in ANSYS Workbench, Volume 2
Select the other steps from the Graph tab and make for each of them Carry Over Timestep = On, keeping the same
details as above.
Environment toolbar: From the respective toolbar, Loads button, create a Bearing Load on the inner ring, seen red
here.

106 Become a Black Belt in ANSYS Workbench, Volume 2
From the same location, apply a Joint Load similar to this one.
Solution: Apply a default Total Deformation on all bodies.

107 Become a Black Belt in ANSYS Workbench, Volume 2
Create a default Equivalent Stress on all bodies.
Make a default Directional Deformation on Y axis for all bodies.
Insert an Equivalent Stress only for the cage.

108 Become a Black Belt in ANSYS Workbench, Volume 2
Define a Contact tool only for these contacts. Right click, Insert, Pressure.
Define another Contact tool only for these contacts. Right click, Insert, Pressure.

109 Become a Black Belt in ANSYS Workbench, Volume 2
Further homework:
- in Connections, change Frictionless contacts to Frictional µ = 0.01, solve, draw the conclusions
- change Stiffness Behavior of the inner and outer ring to Rigid, solve, draw the conclusions (if question marks
appear on the existing contacts, right click on them, Flip Contact/Target)
- increase the mesh sizing to 1 mm, solve, draw the conclusions

200 Become a Black Belt in ANSYS Workbench, Volume 2