implementing microsoft-dynamics-nav-2009-sample-chapter-6-modifying-the-system
DESCRIPTION
TRANSCRIPT

Implementing Microsoft Dynamics NAV 2009
David Roys Vjekoslav Babić
Chapter No. 6 "Modifying the System"

For More Information: www.packtpub.com/implementing-microsoft-dynamics-nav-2009/book
In this package, you will find: A Biography of the authors of the book
A preview chapter from the book, Chapter NO.6 "Modifying the System"
A synopsis of the book’s content
Information on where to buy this book
About the Authors David Roys is a Microsoft Most Valuable Professional (MVP) for the Microsoft Dynamics NAV product. He has worked in the computer industry since 1992 and currently works in New Zealand for Intergen Ltd., a leading Microsoft Gold Partner and Dynamics Presidents Club member.
Since getting his honors degree in Computing Science from Staffordshire University, England, he has worked with a variety of custom-written and packaged financial solutions in a variety of roles. His first programming job provided experience of financial systems using CICS, COBOL, and JCL on an IBM 3090 series mainframe. From being a very junior developer in a large organization, he went on to be a one-man IT department at a small food manufacturing company in a role that allowed him to learn and develop solutions for a Danish ERP package called 'Concorde XAL'.
David moved into the world of consulting and ERP reselling in 1996 where he enjoyed working with some truly brilliant people at Columbus IT Partner and was able to work on international projects in South Africa, Hungary, Poland, and Ireland.
With many years of experience in XAL and Axapta he moved to New Zealand in 2002 to work as a consultant for Ernst & Young in their IT Consulting practice delivering financial solutions in Navision Attain. He now works in his dream job as a Dynamics NAV consultant and developer for Intergen Ltd., a bunch of fun-loving, incredibly smart people. David firmly believes that ERP systems are boring and is committed to bringing some entertainment to this dull and listless world.

For More Information: www.packtpub.com/implementing-microsoft-dynamics-nav-2009/book
This book could not have happened were it not for the significant sacrifice from three special people in my life: Nikki my wife, and Katie and Annabelle, my daughters. This book is dedicated to you as a small token for the family time lost and the extra work endured.
My thanks go to the Naylor family for feeding and entertaining my family for many Sunday lunches and afternoons.
Thank you to all Intergenites that have helped with this book: to Tony Stewart and Tim Mole for your encouragement and support, to Olmec for your creative brilliance, and to those that helped with technical reviewing and provided feedback (Scruff, Matt, Jolann, Stefnie, Ian, and Michael).
Special thanks to Eric 'Waldo' Wauters, who was an absolute star technical reviewer for my chapters. Eric, your knowledge, insight and humor has helped me enormously. Some fantastic last-minute contributions from Lars Hammer are much appreciated; thank you Lars!
Thanks to Dad; he knows why.
Thanks to David Studabaker. If it weren't for your book Programming Microsoft Dynamics NAV, this book would not exist.
Finally, a big warm thank-you to Vjeko, my co-author and friend, who was crazy enough to take on this project when he had no time to spare. I look forward to meeting with you and sharing that glass of wine one day. You have been an inspiration to me, and have taught me many things.
For More Information: www.packtpub.com/implementing-microsoft-dynamics-nav-2009/book
Vjekoslav Babić is a Microsoft Dynamics NAV expert, consultant, and architect with ten years experience in the IT industry and six years experience delivering project success on large-scale, high-risk, and international implementations of Microsoft Dynamics solutions. He has project experience in various industries, including telecommunications, insurance, pharmaceuticals, industrial gasses, chemicals, food and beverage, manufacturing, printing, distribution, and retail.
He is a Project Management Institute certified Project Management Professional, an accomplished Microsoft Certified Trainer with a track record of successful trainings and presentations, a Microsoft Certified Business Management Solutions Professional with several Microsoft Dynamics NAV and Microsoft Dynamics CRM specializations, and holds a number of Microsoft technical certifications.
Vjekoslav has published more than forty articles on business solutions, software development, database design, and internet technologies; he is the author of the NAV Insights column and an Editorial Advisory Board member with MSDynamicsWorld.com. An active blogger, he frequently writes about Microsoft Dynamics implementation methodologies, Sure Step, and Project Management topics on his blog NavigateIntoSuccess.com.
Based in Zagreb, Croatia, he is employed as a consultant at Microsoft.
If there were only one person whom I should thank, then I would be in lots of trouble. Because there are two: my wife Selma, and my daughter Dora. Countless evenings and weekends that I spent writing these pages, my wife spent acting as a single parent, watching our daughter master her first steps and words. This was their time. And this is their book.
A big thank-you goes to Frank Fugl, a product manager in Microsoft Dynamics NAV team; Chandru Shankar, a member of Sure Step team; Vincent Bellefroid, partner at Plataan, a professional trainer, and an avid Microsoft Dynamics NAV evangelist; and Eric Wauters, a Microsoft Dynamics NAV MVP and development coordinator at iFacto, who all took time to review the early drafts and point out inaccuracies, inconsistencies, or points missed, or otherwise helped this project, and whose insight was priceless.
Finally, special thanks to Dave, my co-author and friend, who initiated the book idea, made me believe in it, and kept motivating me with his enthusiasm throughout this project.

For More Information: www.packtpub.com/implementing-microsoft-dynamics-nav-2009/book
Implementing Microsoft Dynamics NAV 2009 Microsoft Dynamics NAV 2009 is the latest release of the NAV application (formerly known as Navision) from the Microsoft Dynamics family of products that brings a three-tiered architecture, Web services enablement, and many more exciting features, to the well established Enterprise Resource Planning (ERP) solution.
Although Dynamics NAV is carefully designed for ease-of-use, attaining measurable business gains requires an understanding of business, finance, analysis and design techniques, programming skills, and the ability to manage complex projects coupled with an expert knowledge of the product itself.
This book distils hard-won experience into an easy to follow guide to implementing the full power of Dynamics NAV in your business. It won't just tell you how to do it; it will show you how to do it. It will help you to become a better consultant or developer by providing practical examples and expert advice.
From an introduction to the new RoleTailored user interface to a series of practical Web services programming tutorials, you will gain a deep understanding of what NAV 2009 has to offer compared to previous versions. With a strong emphasis on practical examples, we take you through the implementation process and provide guidance on configuring the Chart of Accounts and Dimensions for financial analysis, how to use the Rapid Implementation Toolkit (RIM) to reduce implementation effort, and an overview of the Sure Step implementation methodology. You will learn how to take a business problem through to a working solution using industry-standard techniques such as use-case modeling and object-role modeling. We will teach you how to design and develop NAV objects including the new Page object and the Client Reporting Services report layouts.

For More Information: www.packtpub.com/implementing-microsoft-dynamics-nav-2009/book
What This Book Covers Chapter 1: The purpose of this chapter is a teaser introduction to get you excited about the product, what's in it in general, and what's in it as compared to previous versions, to give you a little taste of what's coming up in the book, and explain what the fuss about this new release is all about.
Chapter 2: The RoleTailored client is the new user interface for users of Microsoft Dynamics NAV 2009, and it is completely different to the pervious versions. We'll take you through the different components of the interface, introduce the terminology, explore the navigation components and page types, and teach you how to personalize the application to meet your own requirements using the extensive personalization features.
Chapter 3: Microsoft Dynamics NAV 2009 introduces a new paradigm to ERP. Instead of the system being focused on the forms that capture and present data and the functions the user can perform, the system is based around the individuals within an organization, their roles, and the tasks they perform. We cover how Microsoft researched the roles and explore the departments, roles, and tasks that have been identified in the Microsoft Dynamics Customer Model. We also show the reader how to assign the standard roles to users, how to create new roles, and how to allow departmental super users to configure the application for their role so that the change is applied to all users with the same profile.
Chapter 4: Microsoft Dynamics NAV is not a product with a Next-Next-Finish type of installation, and it takes a lengthy project to deploy it successfully. We focus on the six phases of the implementation process, and explain each phase with detailed dos and don'ts for a typical implementation. Based on the Dynamics Sure Step implementation methodology with advice liberally sprinkled throughout, special attention is given to new features of Microsoft Dynamics NAV 2009, and where the new capabilities must be taken into account to make most out of the implementation project.
Chapter 5: Every implementation of Microsoft Dynamics NAV 2009 will require the system to be configured to meet the needs of the business. This chapter tells the implementation consultant how to do this from a core financials perspective and provides valuable information that will allow developers to understand more about the application they are changing. We cover basic accounting for programmers, dimensions, and posting groups, and how to use the Rapid Implementation Methodology (RIM) Toolkit to speed things along.

For More Information: www.packtpub.com/implementing-microsoft-dynamics-nav-2009/book
Chapter 6: Hardly any standard system can fit the needs of a business out of the box. Either the customer must shape their processes to match the system, or the consultant must shape the system to match the processes, and usually the latter prevails. This chapter explains the process of modifying the system, how to design a viable data model, and how to design and develop a functional user interface for both RoleTailored and Classic clients, without writing any code.
Chapter 7: The three-tiered architecture of Microsoft Dynamics NAV 2009 and native Web Services Enablement open up a whole new world of possibilities for NAV implementations. We cover some of the many possibilities for extending the application, allowing the consultant and developer to understand the technologies that are available and their respective design considerations. Our practical examples introduce the NAV programmer to the world of .NET and show how you can use the information available on the internet to develop your own killer .NET add-ons.
Chapter 8: There's much more to development than programming. It starts with understanding what customer really needs, and usually extends way beyond the system being deployed to a test environment. This chapter focuses on the development phase, and what it takes to get from a concept to a live and working solution.
Chapter 9: After the system goes live, or as it grows, there are periods when new problems may arise, and often their source is far from obvious. This chapter explores the tools and techniques available for detecting problems, pinpointing the source, and helping to remove them from the system quickly and painlessly. It explains how to debug the Service Tier, how to troubleshoot performance issues, what can be done to avoid problems, and how proper planning before design can help to get it right the first time.
Chapter 10: Our sample application focuses on requirements gathering, functional specification creation, solution design, and the eventual build of a prototype. We look at how a business problem can be explored using techniques such as interviewing, use-case modeling, and object-role modeling to create a solution design that can be molded into a working prototype.

For More Information: www.packtpub.com/implementing-microsoft-dynamics-nav-2009/book
Modifying the System"The best investment is in the tools of one's own trade." Benjamin Franklin
Hardly any standard business management application can fi t the needs of a business out of the box. Either the customer must shape their processes to match the system, or the consultant must shape the system to match the processes. Usually, the latter prevails. This chapter will explain the process of modifying the system without programming and describe the tools we have at our disposal to do it.
In this chapter you will learn:
How a non-programmer can develop killer applicationsHow to customize data model, user interface, and reporting componentsWhat kind of changes can be made without breaking the whole thingAnd a few tricks from old dogs that got new bones ahead of everybody else
Understanding the tools Have you ever held a chainsaw in your hands? Go try it, hear it roar. Quite a beast, eh? Now, what can you do with it? Was felling timber the fi rst image that popped up?
We had something else in mind. Have you ever seen any of those ice sculptures? Did you know that sculptors often use chainsaws to carve them out? Carving them slowly over days with fi ne tools is often not an option—the ice can start melting in a matter of minutes. To be able to fi nish in time before physics takes over, power tools must be used, and specially equipped chainsaws have been selected as a tool of choice of many ice carvers.
Modifying a big system, one like Microsoft Dynamics NAV 2009, requires a lot of skill, knowledge, and experience. While skill and experience can't be learned from a book, knowledge for the better part of it can. There are two kinds of knowledge: the knowledge of the tools, and the knowledge of the product.
••••

For More Information: www.packtpub.com/implementing-microsoft-dynamics-nav-2009/book
Modifying the System
[ 248 ]
If you only know the tools, and don't know the object you will work on with these tools, you can easily mess up. If you only know the product, but don't know the tools, you are missing many opportunities. When you know the tools, and what they can do, and how the product will behave when it has been touched, you are on the right path.
If you are an application consultant, and you know the product and how it works, but haven't ever dared to open it up in Object Designer and shape it to your liking, this chapter is for you. You already have the knowledge of the product, what it is and how it works; you only need the knowledge of the tools to become a true artist.
A chainsaw artist, if you wish. The tools you are about to master are quite powerful: they can craft beautifully architectured state-of-the-art solutions, or they can leave a complete mess.
Let's become artists.
Modifications for non-programmers In Microsoft Dynamics NAV 2009, it is possible to create a fully functioning modifi cation without really writing a single line of code. As a matter of fact, it happens quite often. Often, customers will demand changes that are simple in nature: adding a fi eld to a report, or rearranging the screen elements. You don't need to be a programmer to be able to accomplish that mission.
Microsoft Dynamics NAV comes with a comprehensive set of tools aimed at modifying the solution and every aspect of it, from the data model, via business logic, all the way to the user interface. Many steps along this way can be done without any programming knowledge.
Let's take a look at what can be done without writing code:
Extending the data model: Application data is stored in tables, which are specifi cally designed to store exactly that information which is required by the application, no more, no less. When your customer presents you with new requirements, these will often spawn many changes to the underlying data model, to accommodate all those types of information that weren't originally supposed to be stored, because nobody knew they existed. You can do all of these data model modifi cations using special data design tools, without writing any code. True, some business logic is usually associated with data, so called business rules, but these should be written much later, after the model has been completed.
•

For More Information: www.packtpub.com/implementing-microsoft-dynamics-nav-2009/book
Chapter 6
[ 249 ]
Modifying the user interface: To put a functional user interface together requires a good understanding of the underlying data model, and of various user interface controls that can be put on screen, what they can do, and what they can't. You can compose hundreds of fully functional data-enabled pages or forms, and establish complex navigation rules between them, without ever coming anywhere close to the C/AL code editor.Reporting: Again, to compose reports mainly requires good knowledge of the underlying data, and the knowledge of tools. While some complex reports may require extensive coding, the vast majority of reports will be prepared by simply laying out fi elds in the report designer.Data import and export: When data needs to go in and out of the system, you can reach for built-in development tools that can create data migration objects in a matter of minutes.
One of those times when knowing how to shape the system matters, while coding doesn't at all, is prototyping. Imagine how quickly you could get the requirements straight with a customer if you were able to quickly compose a usable user interface prototype!
Object Designer basics All of the development in Microsoft Dynamics NAV is done through the Object Designer feature of the Classic client.
To invoke the Object Designer from anywhere within the application, simply press Shift+F12, or go to main menu, click Tools, then Object Designer. It looks like the following screenshot:
•
•
•
For More Information: www.packtpub.com/implementing-microsoft-dynamics-nav-2009/book
Modifying the System
[ 250 ]
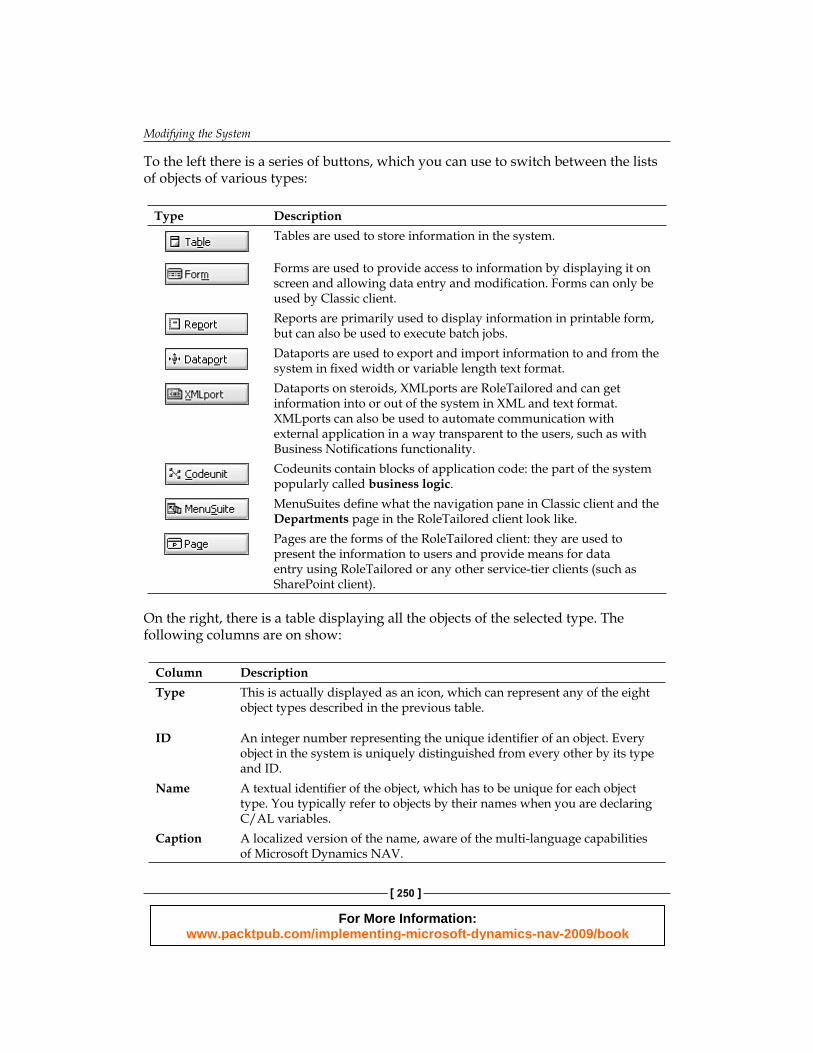
To the left there is a series of buttons, which you can use to switch between the lists of objects of various types:
Type D esc riptionTables are used to store information in the system.
Forms are used to provide access to information by displaying it on screen and allowing data entry and modifi cation. Forms can only be used by Classic client.Reports are primarily used to display information in printable form, but can also be used to execute batch jobs.Dataports are used to export and import information to and from the system in fi xed width or variable length text format.Dataports on steroids, XMLports are RoleTailored and can get information into or out of the system in XML and text format. XMLports can also be used to automate communication with external application in a way transparent to the users, such as with Business Notifi cations functionality.Codeunits contain blocks of application code: the part of the system popularly called business logic.MenuSuites defi ne what the navigation pane in Classic client and the Departments page in the RoleTailored client look like.Pages are the forms of the RoleTailored client: they are used to present the information to users and provide means for data entry using RoleTailored or any other service-tier clients (such as SharePoint client).
On the right, there is a table displaying all the objects of the selected type. The following columns are on show:
Column DescriptionType This is actually displayed as an icon, which can represent any of the eight
object types described in the previous table.
ID An integer number representing the unique identifi er of an object. Every object in the system is uniquely distinguished from every other by its type and ID.
Name A textual identifi er of the object, which has to be unique for each object type. You typically refer to objects by their names when you are declaring C/AL variables.
Caption A localized version of the name, aware of the multi-language capabilities of Microsoft Dynamics NAV.

For More Information: www.packtpub.com/implementing-microsoft-dynamics-nav-2009/book
Chapter 6
[ 251 ]
Column DescriptionModifi ed Tells if the object was modifi ed. Upon saving, every object will
automatically get a checkmark in this fi eld.Version List A textual list of version tags, explaining which product releases, add-ons,
or customizations have changed the object.Date Date of the last save operation in Object Designer.Time Time of the last save operation in Object Designer.BLOB Size Size of BLOB representation of the object in the database. The defi nition,
and for all compiled objects an executable version of it, are saved in the database. This makes for a very portable solution, where the database is, so are the application objects.
Compiled Flag that tells if the object was compiled, either during the last save operation, or manually by calling the Compile command. Only compiled objects can be executed.
On the bottom right, you have a few basic command buttons: New to create a new object of the selected type, Design to open an existing one, Run to execute the selected object, and Help to answer any questions that we might come across in the process of modifying the system.
Extending the data model At the heart of every application functionality in Microsoft Dynamics NAV lies the data. Customer or vendor master records, open documents, posted documents, application setup or ledger entries, all these, and many more, exist as data stored in tables.
Every table represents a category of information, such as customers, or items. A row in a table represents a specifi c instance of such information, such as the customer Spotsmeyer's Furnishings, or the item TOKYO Guest Chair, blue. A row consists of a set of fi elds, which are attributes that describe every piece of data. Bits of information, such as customer number, or item unit cost, or invoice due date, are stored as fi elds.
Tables aren't isolated, and usually refer to each other using relationships. For example, the table Sales Header relates to the table Customer through fi elds Sell-to Customer No. and Bill-to Customer No.. Another table, Sales Line, relates back to table Sales Header through Document Type and Document No. fi elds. These relationships represent real-life properties: sales lines belong to a sales header, making a sales document, such as an invoice. An invoice is then issued to a customer.
Tables and their relationships make the data model, and the role of the data model is to encapsulate the real-life properties of entities, as well as their natural relationships.

For More Information: www.packtpub.com/implementing-microsoft-dynamics-nav-2009/book
Modifying the System
[ 252 ]
Creating tables To create a new table, click New in Object Designer, while the Table button is selected. This will bring up the Table Designer.
Creating new objects is almost uniform throughout the application. While the New button is specifi c to Object Designer, there are other ways you can use to create something new, like pressing F3, or calling New from the Edit menu.
Whenever you create a new object, you'll soon want to save it. To save an object, click Ctrl+S or choose Save or Save As... from the File menu. This will bring up the Save As dialog window:
En ter the ID and the Name—both are mandatory—and click OK. ID is the object number in Object Designer, and Name is its name—make sure that both values are unique.
For More Information: www.packtpub.com/implementing-microsoft-dynamics-nav-2009/book
Chapter 6
[ 253 ]
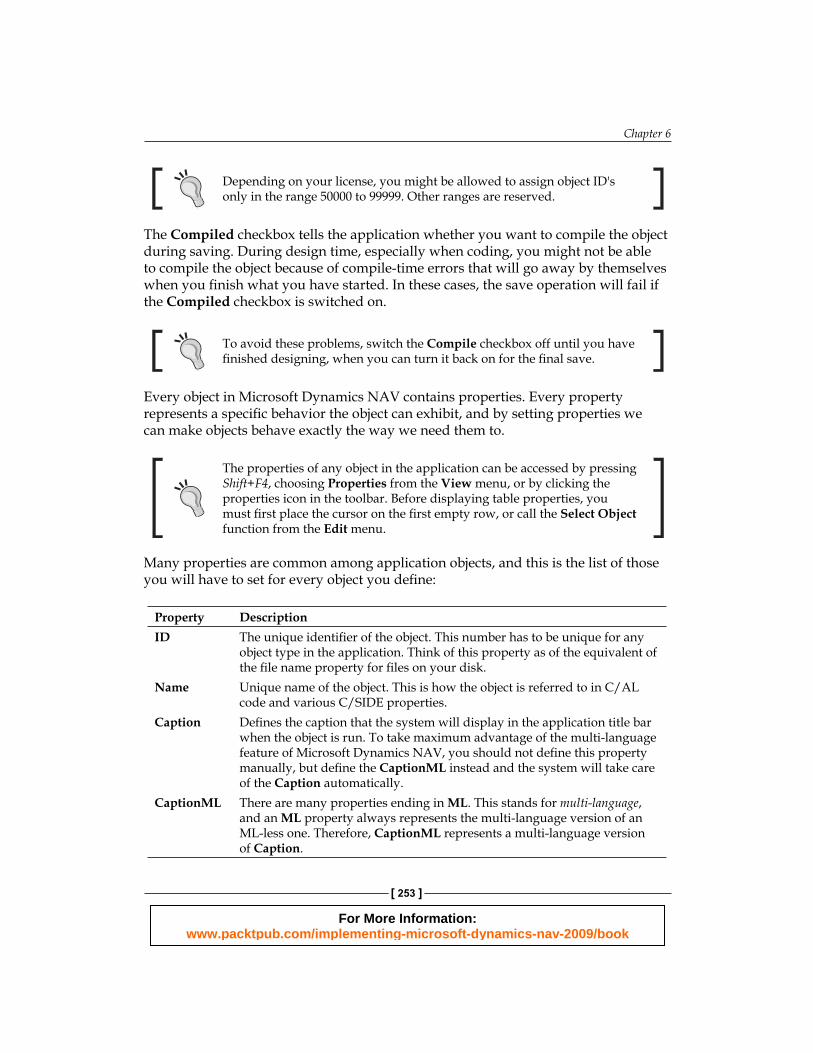
Depending on your license, you might be allowed to assign object ID's only in the range 50000 to 99999. Other ranges are reserved.
The Compiled checkbox tells the application whether you want to compile the object during saving. During design time, especially when coding, you might not be able to compile the object because of compile-time errors that will go away by themselves when you fi nish what you have started. In these cases, the save operation will fail if the Compiled checkbox is switched on.
To avoid these problems, switch the Compile checkbox off until you have fi nished designing, when you can turn it back on for the fi nal save.
Every object in Microsoft Dynamics NAV contains properties. Every property represents a specifi c behavior the object can exhibit, and by setting properties we can make objects behave exactly the way we need them to.
The properties of any object in the application can be accessed by pressing Shift+F4, choosing Properties from the View menu, or by clicking the properties icon in the toolbar. Before displaying table properties, you must fi rst place the cursor on the fi rst empty row, or call the Select Object function from the Edit menu.
Many properties are common among application objects, and this is the list of those you will have to set for every object you defi ne:
Property DescriptionID The unique identifi er of the object. This number has to be unique for any
object type in the application. Think of this property as of the equivalent of the fi le name property for fi les on your disk.
Name Unique name of the object. This is how the object is referred to in C/AL code and various C/SIDE properties.
Caption Defi nes the caption that the system will display in the application title bar when the object is run. To take maximum advantage of the multi-language feature of Microsoft Dynamics NAV, you should not defi ne this property manually, but defi ne the CaptionML instead and the system will take care of the Caption automatically.
CaptionML There are many properties ending in ML. This stands for multi-language, and an ML property always represents the multi-language version of an ML-less one. Therefore, CaptionML represents a multi-language version of Caption.

For More Information: www.packtpub.com/implementing-microsoft-dynamics-nav-2009/book
Modifying the System
[ 254 ]
When editing properties, you'll notice that some of them have < and > around the value, such as <Normal>, <Yes>, or <Undefi ned>. These indicate the default states of these properties. When you set a property value explicitly, it loses the < and > signs to indicate that the property value has been explicitly assigned. To return back to the default state, select the property value and press Del.
Adding fields Tables consist of fi elds, and you need at least one of these. To add fi elds to a table, while in Table Designer, position the cursor on the fi rst empty line, and type in the name.
For each fi eld you need to defi ne these properties:
Property DescriptionField No. The fi eld's unique identifi er within the table, by which the fi eld is known
to the system. Every fi eld must have a Field No. assigned.Name The fi eld's unique name within the table, by which the fi eld is known to
developers. The Name is how the fi eld is referred to by C/AL code or C/SIDE properties.
Data Type Determines the type of data stored in this fi eld. When data is entered, the system automatically validates it against the data type, preventing any incompatible data entry (such as typing Twenty into an Integer fi eld).
DataLength Specifi es the length of text that can be entered in this fi eld. The application will automatically prevent the entry of any information longer than the specifi ed length, both for manual and programmatic entry. This property is available for Text and Code data types.
Get familiar with the fi eld data types and the various properties you can set on them by calling C/SIDE Reference Guide from Help menu.
Table relationships Tables can relate to each other to represent natural, logical, or real-life relationships. You can express relationships in a technical way, using entity-relationship terms: invoice is of customer; item is of inventory posting group; sales line is of sales header. Or you can do it naturally, using human terms: invoice is issued to customer; item uses inventory posting group, sales line belongs to sales header.

For More Information: www.packtpub.com/implementing-microsoft-dynamics-nav-2009/book
Chapter 6
[ 255 ]
A table is always related to another table through a fi eld. In these examples, invoice is related to customer through the Sell-to Customer No. and Bill-to Customer No. fi elds; item is related to inventory posting group through the Inventory Posting Group fi eld; sales line is related to sales header through the Document Type and Document No. fi elds.
In Microsoft Dynamics NAV, relationships are established through the TableRelation fi eld property. To defi ne a relationship, select the TableRelation property and click the Assist button to open the Table Relation editor. This is what it looks like for the Sell-to Customer No. fi eld of table 36 Sales Header:
This is a simple relationship between the Sell-to Customer No. fi eld and the primary key fi eld of the Customer table. Relationships can be more complex: you can defi ne conditional relationships, or explicitly declare fi elds you want to relate to, and you can even specify table fi lters to be applied during lookups.
We don't defi ne relationships just for the heck of it—they have three important purposes:
They enable lookup functionality: When TableRelation is set for a fi eld, whenever you are editing a value for that fi eld, the system will let you pick up one of the possible values by bringing up the lookup form. You can defi ne which form is used as a lookup form for a table by setting its LookupFormID property.They establish data integrity: If you defi ne a TableRelation, then you won't be able to just type any value in that fi eld, because the relationship terms would be broken. You can only enter a value that exists in the related fi eld in the related-to table. The system always takes care that only valid values are written in fi elds belonging to a relation. You may, however, switch off this mechanism by setting the ValidateTableRelation property to No.They maintain data integrity: If you change a value of a key fi eld in a table, the change will be propagated to all the related tables. For example, if you change the No. for a customer, it will be automatically changed in all tables that are related to the Customer table.
•
•
•
For More Information: www.packtpub.com/implementing-microsoft-dynamics-nav-2009/book
Modifying the System
[ 256 ]
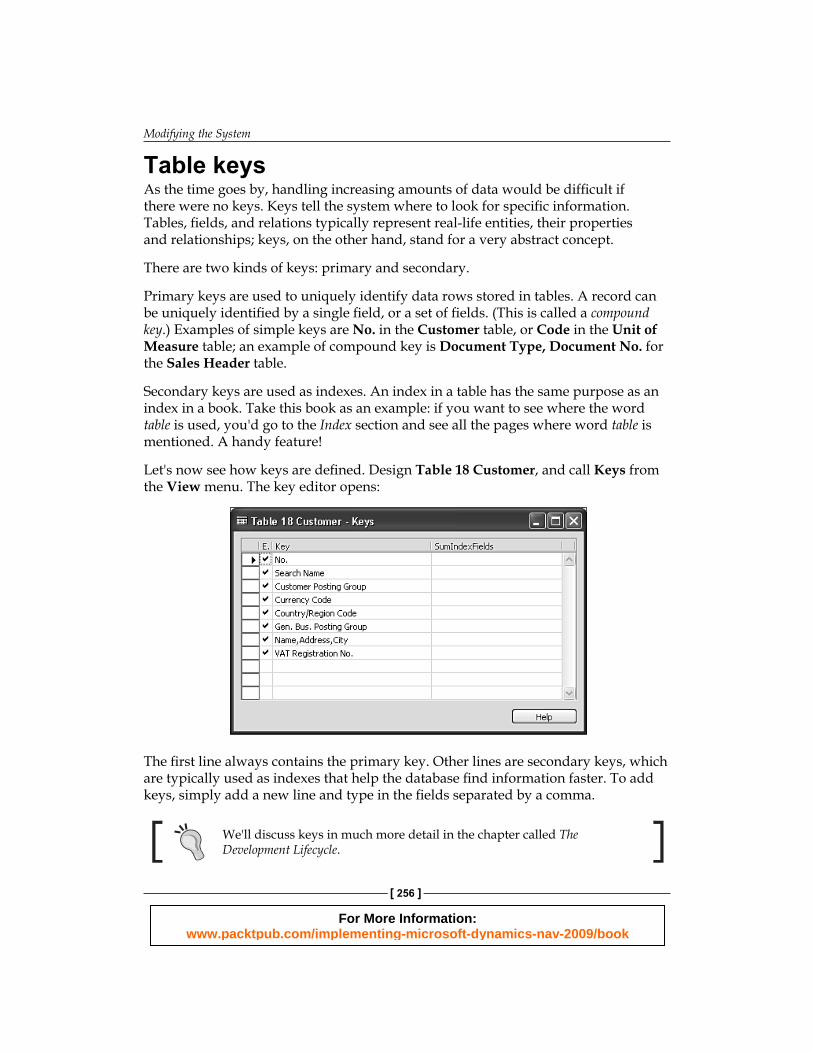
Table keysA s the time goes by, handling increasing amounts of data would be diffi cult if there were no keys. Keys tell the system where to look for specifi c information. Tables, fi elds, and relations typically represent real-life entities, their properties and relationships; keys, on the other hand, stand for a very abstract concept.
There are two kinds of keys: primary and secondary.
Primary keys are used to uniquely identify data rows stored in tables. A record can be uniquely identifi ed by a single fi eld, or a set of fi elds. (This is called a compound key.) Examples of simple keys are No. in the Customer table, or Code in the Unit of Measure table; an example of compound key is Document Type, Document No. for the Sales Header table.
Secondary keys are used as indexes. An index in a table has the same purpose as an index in a book. Take this book as an example: if you want to see where the word table is used, you'd go to the Index section and see all the pages where word table is mentioned. A handy feature!
Let's now see how keys are defi ned. Design Table 18 Customer, and call Keys from the View menu. The key editor opens:
The fi rst line always contains the primary key. Other lines are secondary keys, which are typically used as indexes that help the database fi nd information faster. To add keys, simply add a new line and type in the fi elds separated by a comma.
We'll discuss keys in much more detail in the chapter called The Development Lifecycle.
For More Information: www.packtpub.com/implementing-microsoft-dynamics-nav-2009/book
Chapter 6
[ 257 ]
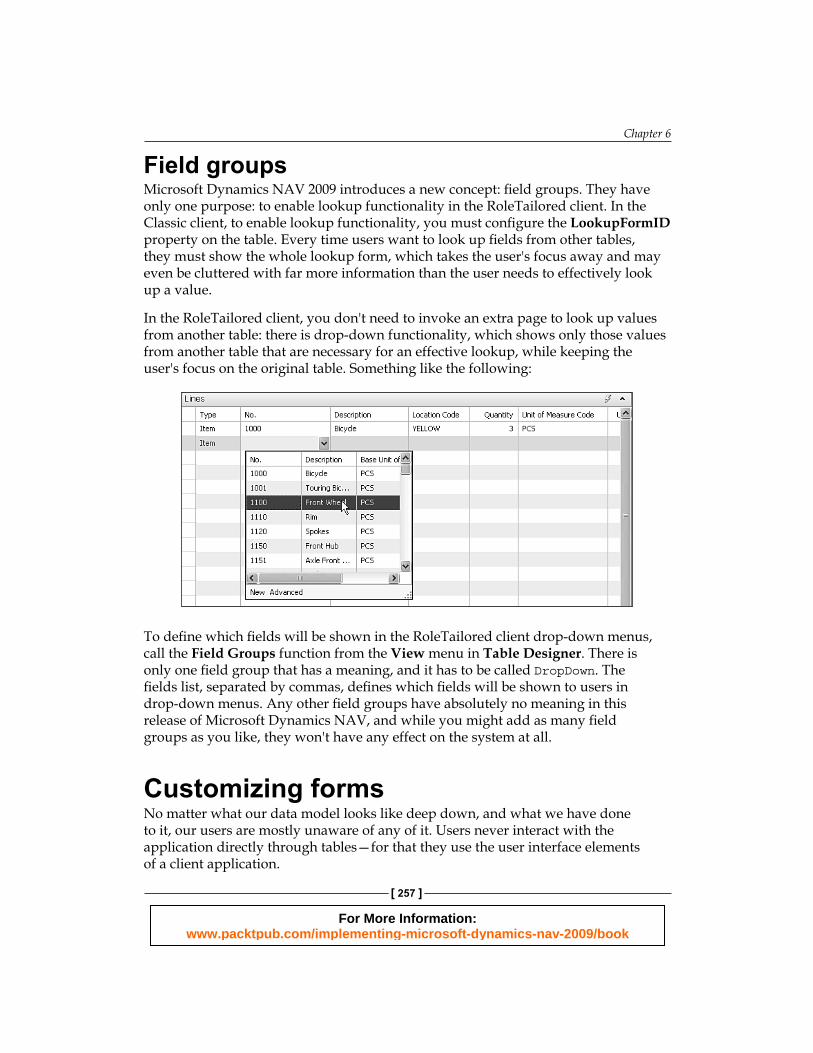
Field groupsMi crosoft Dynamics NAV 2009 introduces a new concept: fi eld groups. They have only one purpose: to enable lookup functionality in the RoleTailored client. In the Classic client, to enable lookup functionality, you must confi gure the LookupFormID property on the table. Every time users want to look up fi elds from other tables, they must show the whole lookup form, which takes the user's focus away and may even be cluttered with far more information than the user needs to effectively look up a value.
In the RoleTailored client, you don't need to invoke an extra page to look up values from another table: there is drop-down functionality, which shows only those values from another table that are necessary for an effective lookup, while keeping the user's focus on the original table. Something like the following:
To defi ne which fi elds will be shown in the RoleTailored client drop-down menus, call the Field Groups function from the View menu in Table Designer. There is only one fi eld group that has a meaning, and it has to be called DropDown. The fi elds list, separated by commas, defi nes which fi elds will be shown to users in drop-down menus. Any other fi eld groups have absolutely no meaning in this release of Microsoft Dynamics NAV, and while you might add as many fi eld groups as you like, they won't have any effect on the system at all.
Customizing formsNo matter what our data model looks like deep down, and what we have done to it, our users are mostly unaware of any of it. Users never interact with the application directly through tables—for that they use the user interface elements of a client application.

For More Information: www.packtpub.com/implementing-microsoft-dynamics-nav-2009/book
Modifying the System
[ 258 ]
Microsoft Dynamics NAV 2009 comes with two clients: the new one called RoleTailored, which you have already had chance to meet and play with, and the old one called Classic.
When defi ning the user interface, you must address both of them. Unfortunately, defi ning user interfaces is a double work: you must defi ne them separately. Forms, the building blocks of the Classic client can't be used in the RoleTailored one, while pages, the building blocks of the RoleTailored interface can't be used in the Classic one.
Creating formsLuc ky for you, creating forms is mostly a trouble-free task: the New Form wizard, a fairly straightforward gadget, which requires very little technical skills, is there to help you kick start. To create a form, click the Forms button in Object Designer, then click the New button, or simply press F3. The wizard is there:
The majority of forms are data bound, which means they display information from a table. A form can only be bound to a single table, and you can choose which one by fi lling out the Table fi eld in the New Form dialog. You can choose to continue with a blank form, or to use one of the two wizards: the Card-Type Form Wizard or the List-Type Form Wizard.
The New Form wizard helps you create forms of the two most common types: cards and lists. The wizard will help you choose which fi elds to display on the form, and choose their arrangement and layout.

For More Information: www.packtpub.com/implementing-microsoft-dynamics-nav-2009/book
Chapter 6
[ 259 ]
After the wizard completes its job, your newly designed form is displayed in the Form Designer, where most of the design work for forms is done. A typical result of a Card-Type Form wizard is as follows:
Form propertiesIt's a good time to inspect and get to know the most useful form properties. Most of them have been set by the wizard, but sometimes you'll just get to set them manually:
Property DescriptionWidth and Height Defi ne how wide and tall the form will be when displayed in
non-maximized state.Editable Specifi es whether controls in the form can be edited. When set to
No, none of the controls in the form can be edited.InsertAllowed, ModifyAllowed, and DeleteAllowed
By default, all data-bound forms allow all types of operations. If you want to prevent users from inserting, modifying, or deleting records in this form, set these properties to their desired state. Set these properties only when absolutely necessary, such as for setup forms that must allow modifi cations but not insertions or deletions.
LookupMode A form in lookup mode displays OK and Cancel buttons, and closes when users press either of these; while in non-lookup mode these buttons are automatically hidden. Lookup mode is normally controlled by the application, and a form automatically enters the lookup mode whenever users open the form by looking up a fi eld from another table by pressing F6 or clicking the lookup button.By setting this property to Yes you can put a form explicitly into the lookup mode.

For More Information: www.packtpub.com/implementing-microsoft-dynamics-nav-2009/book
Modifying the System
[ 260 ]
Property DescriptionSourceTable Specifi es the underlying table upon which fi eld controls in the form
will be based.SourceTableView Specifi es the default sorting and fi lter state of the form. Here you
can explicitly declare a fi lter that can't be overridden by users, for example if you only want to see active customers, or documents of a certain type.
There are many more properties, but they aren't so frequently used and you'll learn them gradually as you continue to work with the application.
Adding controls A jolly bunch of controls was added to the form when you completed the wizard, but you can add many more as you go. To add more controls to the form, you have two choices: adding fi elds or adding controls.
When you add a fi eld, it is automatically converted to either a Text Box or a Check Box, depending on the fi eld's data type, and it is automatically bound to the fi eld. On the other hand, controls may, or may not be bound, and there is a broader choice of controls to choose from.
To add fi elds, select Field Menu from the View menu. The Field Menu is opened, and you can select the fi elds you want added to the form. When you are ready to add those fi elds, simply move your mouse pointer above the desired position in the form, and when the mouse pointer changes to a rectangle with a small cross at the upper left, double-click on the form. This will add the fi elds and their captions, and set their properties, all in one go. This is how it works:

For More Information: www.packtpub.com/implementing-microsoft-dynamics-nav-2009/book
Chapter 6
[ 261 ]
If you want to do this manually, or you want to add other controls such as buttons, progress bars, or subforms, display the Toolbox window by choosing Toolbox from the View menu. A small fl oating window will open with different icons representing different types of controls you can add.
A dding controls is as simple as adding fi elds; you simply select the desired control, position your mouse pointer above the desired target position, and click. These are the types of controls you can add:
Control DescriptionLabel—displays a static, multi-language enabled text defi ned by its Caption and CaptionML properties.Text box—this must be bound to a source using the SourceExpr property. It can be bound to any of the following sources: a fi eld in a table, a variable, a constant value, a Text Constant, or a valid C/AL expression. If the source is a variable or an editable fi eld in a table, the control is editable; in any other case it is read-only.Check box—a small square box, which can be in two states: checked or unchecked. Similar to a text box, it must be bound to a source using the SourceExpr property, with one condition: the source must be of or evaluate to Boolean data type.Option button—a small round button, which can be in two states: checked or unchecked. It must be bound to a source using the SourceExpr property. The source of the Option button must be of or evaluate to Boolean or Option data type. You will typically have more than one Option button linked to the same source, and set their OptionValue properties to different values, representing different options users can select from.Command button—a plain button, which displays a static, multi-language enabled text defi ned by its Caption and CaptionML properties.Menu button—a button that displays a static, multi-language enabled text defi ned by its Caption and CaptionML properties and opens a menu when clicked.Frame—a control which is used as a container of other controls: and any controls placed inside a frame are moved together with the frame. A frame can display a caption in its top-left cornerImage—displays a static image, defi ned by its Bitmap property. This property can be set to a numeric value (a variety of documented and undocumented numeric values can display any of the built-in application icons), or to a fi le path. If you specify a path, it must point to a BMP fi le, and the image is embedded into the form at compile time.

For More Information: www.packtpub.com/implementing-microsoft-dynamics-nav-2009/book
Modifying the System
[ 262 ]
Control DescriptionPicture box—displays a bitmap from a table fi eld of type BLOB. The fi eld is specifi ed using the SourceExpr property.Shape—displays a static shape of type defi ned using the ShapeStyle property.Indicator—displays a progress bar, with the SourceExpr property bound to any kind of C/AL expression evaluating to a numeric value in the 0 to 10,000 range (10,000 represents 100%).Tab control—a container control with several tabs, or pages, defi ned using PageNames and PageNamesML properties.Subform—used to display a form, typically a list, within another form, typically a card form. Table box—contains other controls typically of type text box, arranged in a tabular list. Every list form contains a table box control.Matrix box—a complex control, similar to a table box in the way that it displays a set of columns. However, the columns are determined at run time from a list of values from another table. Making use of this control requires a fair amount of programming.
Let's take a look at some commonly used non-basic controls.
Subforms Imagine a form within a form. What is it good for? Well, hardly anything if you imagined a card form within another card form. But if you imagined a list form within a card form, uses are plenty: sales invoices or production orders with their lines, bills of materials with their components, sales statistics with breakdown per territory; you name it. This is achieved using the Subform control. Run form 42 Sales Order to get a gist of what a card form with a Subform looks like.
To confi gure a subform control to display another form, you need to set some properties:
Property DescriptionSubFormID Specifi es the ID of the form that will be displayed as subform.SubFormLink Specifi es how the subform is linked to the main form. Subforms are
used to represent parent-child or master-detail relationships between data in two tables, with a header displaying master information, and lines displaying details. This property is used to specify the master-detail relationship.
For More Information: www.packtpub.com/implementing-microsoft-dynamics-nav-2009/book
Chapter 6
[ 263 ]
Menus and buttons Other types of controls that you will usually want to include on your forms are menus and buttons. They are used to invoke other features, such as posting procedures, reports, or other forms.
Two controls are particularly useful for this: Button and MenuButton. A button can execute a single action, something like the Make Order button on the Sales Quote form. A menu button isn't linked to an action directly, but when clicked, it displays a menu of actions that we can then execute by clicking on them. For a feel of a typical menu button, take a look at Functions, also on the Sales Quote form.
Now that we've mastered the rocket science behind, let's see which properties we need to set to defi ne actions:
Property DescriptionPushAction Type of action that can happen when users push the button. <0>
indicates that no action will be taken; OK, Cancel, LookupOK, LookupCancel, Yes, No, Close, and Stop will all close the form with proper status returned to the caller; FormHelp will launch the online help for the form; RunObject will execute an object; RunSystem will execute an external application; and LookupTable will launch the default lookup form for the underlying source table.
RunObject Specifi es the type and ID of the object that will be executed when the button is pushed. PushAction must be RunObject.
RunFormView Specifi es any sort order or fi lters applied to the executed form. PushAction must be RunObject and RunObject must specify a form.
RunFormLink Specifi es the link established between the caller form and the executed form. When two forms are linked using this property, the called form can update its contents when record selection is changed in the caller from. You can think of this as showing a subform in an external window.
RunFormLinkType Specifi es whether the link specifi ed in RunFormLink is an active one, or a one-time link. An active link, specifi ed by the OnUpdate value, will cause the called form to update its content based on the link every time the record is changed in the caller form. A one-time link, specifi ed by OnOpen, will simply display the called form, with the link in place, but will not update the called form when the record in the caller form changes.

For More Information: www.packtpub.com/implementing-microsoft-dynamics-nav-2009/book
Modifying the System
[ 264 ]
For menu buttons, you must fi rst defi ne menu items. To do so, right-click the menu button and choose Menu Items, or choose the same command from the View menu. For each menu item you must at least defi ne its Caption, and you can use other properties to defi ne specifi c actions that will execute when a menu item is selected from the menu.
Menu items share the majority of their properties with command buttons, and all of the properties discussed in the table above apply to menu items of menu buttons as much as they do to command buttons.
Customizing pages Pages are the RoleTailored client's equivalent of forms, and are the building blocks of the RoleTailored user interface. They are used primarily to display information from the database and to allow data entry, but we can use them simply to put anything we wish on screen for the user to interact with.
To create a page, in Object Designer select Pages, then click the New button. The New Page form will assist you through the creation process:
For More Information: www.packtpub.com/implementing-microsoft-dynamics-nav-2009/book
Chapter 6
[ 265 ]
Page propertiesU nlike the New Form dialog, here you can only choose the source table and the type of page; but as soon as you make your choice, a blank Page Designer is shown, with only two properties fi lled out: SourceTable and PageType. Most page properties are called exactly the same and exhibit the same behavior as form properties, but there are four additional ones:
Property DescriptionPageType Specifi es the type of the page. Types affect the behavior of
pages, and we will discuss page types in more detail later on.InstructionalTextML Declares the multi-language text label that will be displayed
on the page before any other user interface element. It only has effect on Confi rmationDialog type forms.
CardFormID Defi nes the card form that is used to display, edit, or create records of the type that is displayed in a list. For example, in Customer List, this property defi nes that Customer Card is invoked every time a user calls the Edit, View, or New action. This property affects only list type forms.
LinksAllowed Specifi es whether links functionality will be available for this page or not.
Page types The most important of these properties is PageType, because it defi nes the behavior of the form when displayed in the RoleTailored client. There are exactly ten types of pages: Card, List, RoleCenter, CardPart, ListPart, Document, Worksheet, ListPlus, Confi rmationDialog and NavigatePage.
Let's take a closer look at their purpose, functionality, and anatomy.
Card Similar to the card form, this type of page displays information about one record of a single table, such as one customer, one vendor, or one item. Typical examples of a card page are 21 Customer Card, or 30 Item Card.

For More Information: www.packtpub.com/implementing-microsoft-dynamics-nav-2009/book
Modifying the System
[ 266 ]
The following is what a typical page looks like:
At the top of the page there are actions. Actions can be grouped into menus, or into toolbars. We'll learn all about them later.
The majority of the screen is used for information display and entry. The left part of the screen is occupied with a ContentArea, which consists of groups of fi elds called FastTabs. Values of fi elds in FastTabs are typically taken from a single record of a table.
The right part of the screen is occupied by the FactBoxArea, which contains several FactBoxes.
ListS imilar to the list form, List pages display multiple records from the same table at once, such as a list of customers, list of vendors, or list of items. Typical examples are 22 Customer List, or 27 Vendor List.

For More Information: www.packtpub.com/implementing-microsoft-dynamics-nav-2009/book
Chapter 6
[ 267 ]
This is what a List page looks like:
It has exactly the same elements as a card page, except its ContentArea is consumed by a single repeater group, which lists all information in a table.
RoleCenterPa ges of this type are used as home screens for different roles. They consist of different parts, and are used to provide quick access to the functionality most used by a user role, as well as the most relevant information, all at a glance. Examples of RoleCenter pages are 9005 Sales Manager Role Center and 9010 Production Planner Role Center.

For More Information: www.packtpub.com/implementing-microsoft-dynamics-nav-2009/book
Modifying the System
[ 268 ]
The following is what a RoleCenter looks like:
It consists of groups displayed as vertical columns. In each group it is possible to have several page parts, such as Activities, My Items, and many more.
CardPartCar dPart pages are card pages that aren't used standalone, but come as parts on other pages, such as Card, List, or RoleCenter pages. Various FactBoxes, such as 9082 Customer Statistics or 9092 Approval Factbox, are typical examples of CardPart pages. Most elements of a RoleCenter, as well as most FactBoxes are actually CardPart (or ListPart) pages. Here is an example of a CardPart:

For More Information: www.packtpub.com/implementing-microsoft-dynamics-nav-2009/book
Chapter 6
[ 269 ]
Card Part pages typically consist of several groups, which are rendered in various ways, depending on the type of elements displayed. The CardPart shown consists of three CueGroups.
ListPartList Part pages are list pages intended for inclusion as parts of other types of pages. Pages such as 47 Sales Invoice Subform or 9150 My Customers are examples of ListPart pages. Most of the list part pages are simply sub-pages of other pages, but often ListParts fi nd their way into RoleCenter pages or FactBox areas as well.

For More Information: www.packtpub.com/implementing-microsoft-dynamics-nav-2009/book
Modifying the System
[ 270 ]
Here goes a ListPart:
As obvious as it is, all list parts consist of columns of fi elds.
DocumentDocum ent pages are combinations of card and list types, and contain several groups of header information and typically one ListPart page with lines information. Information contained in header and lines of a Document page represents an indivisible entity (for example an invoice consists of both header and lines). Take a look at page 43 Sales Invoice or 99000831 Released Production Order to get a feel for document pages.
The following is a document page:

For More Information: www.packtpub.com/implementing-microsoft-dynamics-nav-2009/book
Chapter 6
[ 271 ]
If at fi rst it doesn't look much different from a typical card page, take a closer look. One of its FastTabs is actually a ListPart page.
WorksheetWorksh eet forms are used for various journals, such as 39 General Journal or 40 Item Journal, and they typically comprise a fi lter, lines, and a summary footer.
This is what a good Worksheet page looks like:
The elements of a Worksheet page are a single fi lter fi eld used to choose batches (groups of lines of a worksheet that will be processed as a single transaction), lines, and a footer, which typically gives summary information about the worksheet lines.
ListPlusThis is a hybrid of list and card types, but different from document type. It contains header information and lines information; however, the lines don't belong to the header, they are only related to it. Good examples of ListPlus pages are 397 Sales Invoice Statistics or 5091 Segment.

For More Information: www.packtpub.com/implementing-microsoft-dynamics-nav-2009/book
Modifying the System
[ 272 ]
The following is a ListPlus:
If it re minds you of a Document, it is so because it is similar. It contains exactly the same types of elements, and is rendered similarly, and the difference is purely technical. A document represents a single entity while a ListPlus contains information collected from various entities.

For More Information: www.packtpub.com/implementing-microsoft-dynamics-nav-2009/book
Chapter 6
[ 273 ]
ConfirmationDialogPages of this type are used for important interruptions of user actions, when the application needs an extra confi rmation from the user before the action can be completed. These pages usually contain information that will aid the user in deciding the course of action. Typical examples of Confi rmationDialog pages are pages 342 Check Availability or 343 Check Credit Limit.
This is a typical Confi rmationDialog:
Notice the text above the FastTab: it comes from the InformationalTextML property, which can be defi ned on any type of page, but only has effect on pages of type Confi rmationDialog.
For More Information: www.packtpub.com/implementing-microsoft-dynamics-nav-2009/book
Modifying the System
[ 274 ]
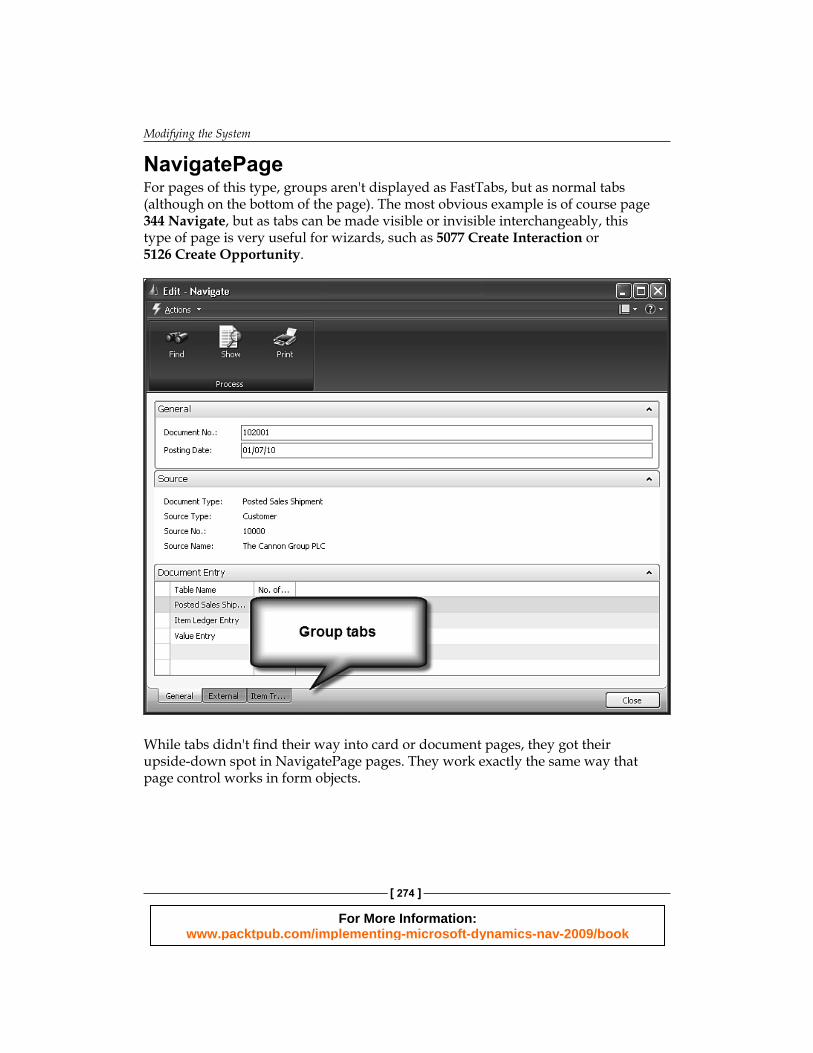
NavigatePageFor pages of this type, groups aren't displayed as FastTabs, but as normal tabs (although on the bottom of the page). The most obvious example is of course page 344 Navigate, but as tabs can be made visible or invisible interchangeably, this type of page is very useful for wizards, such as 5077 Create Interaction or 5126 Create Opportunity.
While tabs didn't fi nd their way into card or document pages, they got their upside-down spot in NavigatePage pages. They work exactly the same way that page control works in form objects.

For More Information: www.packtpub.com/implementing-microsoft-dynamics-nav-2009/book
Chapter 6
[ 275 ]
Page DesignerTo get a f eeling of how a simple page is designed, in Object Designer locate the page 5714 Responsibility Center Card and click the Design button:
Unlike Form Designer, which we saw earlier, here we can declare user interface elements (controls), but can't specify exactly how or where they will be positioned on screen.
To create a new control, select the fi rst empty line and simply start typing something into the Name or Caption column. These two properties have exactly the same meaning as anywhere else in the system. Important properties you must set for page controls are Type, SubType, and SourceExpr.
Property DescriptionType Defi nes the general behavior of the control. Each control belongs to one
of the four types: Container, Group, Field, or Part.SubType For each type, there are several subtypes, which further modify the
control and its behavior.SourceExpr For controls of type Field, this property defi nes the source from which
the control's value is taken.
Let's take a closer look at types and their respective subtypes.

For More Information: www.packtpub.com/implementing-microsoft-dynamics-nav-2009/book
Modifying the System
[ 276 ]
Containers At the base of every page there is a container, and every page must have a container defi ned as its topmost element. The container is used to defi ne the general behavior of the page.
There are three subtypes of containers:
ContentArea: most common container subtype, used for most page types. If a page is not a FactBox or a RoleCenter page, then its topmost container must be of type ContentArea.FactBoxArea: containers of this type contain page parts of FactBox type, and place them in the FactBox pane of the page.RoleCenterArea: used by pages of type RoleCenter, these containers group page parts into vertical columns.
Don't defi ne two containers of the same type per page. A page must contain exactly one ContentArea or RoleCenter area, and up to one FactBoxArea. Any other containers beyond these will be ignored and won't be rendered.
Groups Groups are used to group other controls together in several different ways. Group subtype determines how exactly the group is rendered in the RoleTailored client.
There are four group subtypes:
Group: groups fi elds into FastTabs, for easier navigation and to reduce clutter on screen. This subtype is typically used on card type pages.Repeater: groups fi elds into tabular lists, typically on list or ListPart pages.CueGroup: displays fi elds as visual cues, instead of as normal fi eld controls.FixedLayout: displays fi eld values as non-editable labels, without their fi eld captions. Typically used with worksheet type pages.
Group subtype affects several other aspects of the RoleTailored client renderer. For example, it determines the type of icon that RoleCenter will display in the upper-left corner of a page part. If a part page contains a CueGroup, the icon will display a pile of papers, while for other group subtypes it will display a single document.
•
•
•
•
•
•
•
For More Information: www.packtpub.com/implementing-microsoft-dynamics-nav-2009/book
Chapter 6
[ 277 ]
For other page types groups also have specifi c behavior. For example, in pages of type NavigatePage, groups are rendered as tabs, instead of as FastTabs. For PageCards, groups are displayed as labels printed in bold, while ListCard pages will ignore any groups other than Repeaters.
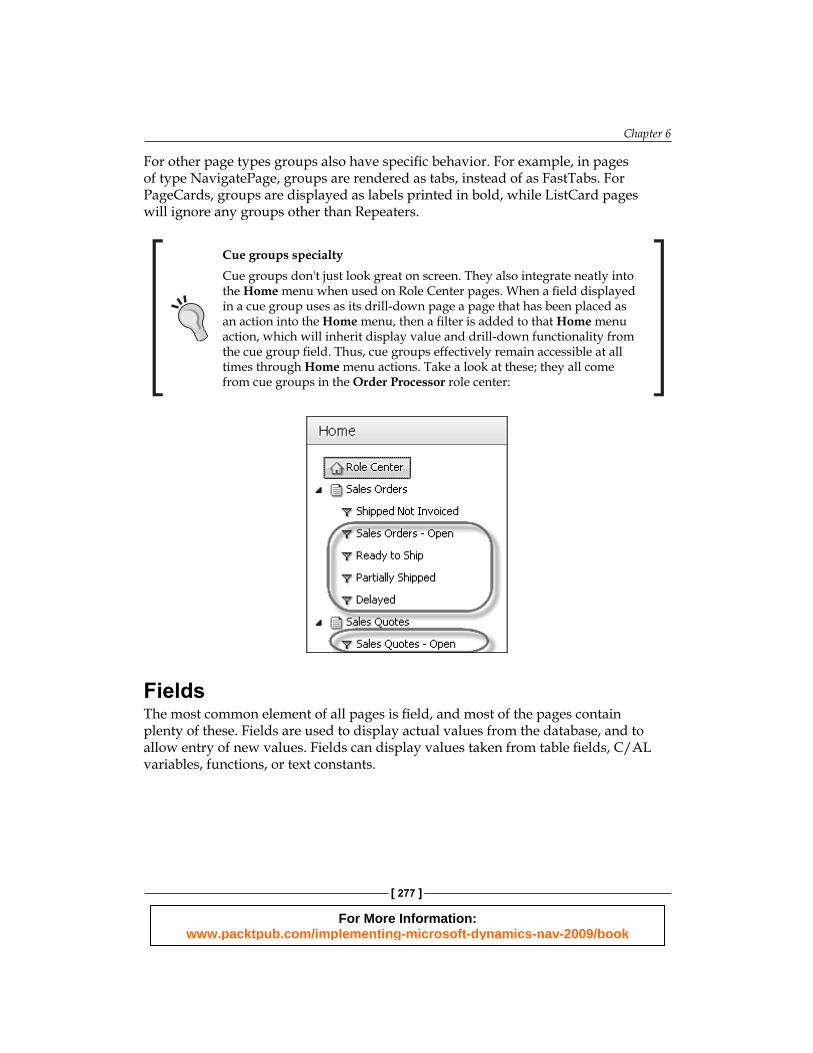
Cue groups specialtyCue groups don't just look great on screen. They also integrate neatly into the Home menu when used on Role Center pages. When a fi eld displayed in a cue group uses as its drill-down page a page that has been placed as an action into the Home menu, then a fi lter is added to that Home menu action, which will inherit display value and drill-down functionality from the cue group fi eld. Thus, cue groups effectively remain accessible at all times through Home menu actions. Take a look at these; they all come from cue groups in the Order Processor role center:
FieldsThe m ost common element of all pages is fi eld, and most of the pages contain plenty of these. Fields are used to display actual values from the database, and to allow entry of new values. Fields can display values taken from table fi elds, C/AL variables, functions, or text constants.
For More Information: www.packtpub.com/implementing-microsoft-dynamics-nav-2009/book
Modifying the System
[ 278 ]
How exactly the fi eld will be displayed is determined by:
Data type of the value associated with the fi eld: Every data type will render a particular user interface control. Code, text, and numeric fi elds are rendered as text boxes, options are rendered as combo boxes, boolean values display checkboxes, and date values come with the date picker control.TableRelation property: If a fi eld is related to another table as a lookup fi eld, it will display a drop-down menu similar to a combo box, which allows looking up values from another table. If a fi eld is a SIFT fi eld, it will be displayed as a hyperlink, which will allow drilling down to actual values used for calculation of the value displayed in the SIFT fi eld.Group subtype: Fields in Group subtypes will be rendered with their captions to the left of the fi eld control; fi elds in CueGroup are rendered as visual cues (stacks of documents); fi elds in Repeaters will be rendered as columns of tables; and fi elds belonging to FixedLayout groups will be displayed as read-only labels without caption.ExtendedDatatype property: If defi ned on a fi eld, this property determines additional functionality of the fi eld. Values of Phone No., URL, and E-Mail will display an icon button, which will launch a phone caller application, a web browser, or an e-mail client respectively, while Ratio fi elds will be displayed as progress bars.
PartsThe R oleTailored client allows you to embed pages and other objects, such as charts, as parts of other pages. This can be achieved through controls of type Part. It is only possible to embed pages of type CardPart and ListPart.
Parts don't have subtypes, but their behavior is controlled by an important property: PartType. It can have one of the following values: Page, System, or Chart.
Page partsThe default value of the PartType property is Page, and it's for reason: the most common type of parts is other pages. It is possible to embed CardPart or ListPart pages only, but you have a lot of fl exibility with them to defi ne whatever functionality you want to see embedded.
When you specify Page as PartType, you must also defi ne the PagePartID property, which must contain the ID of the page object you want to embed.
•
•
•
•
For More Information: www.packtpub.com/implementing-microsoft-dynamics-nav-2009/book
Chapter 6
[ 279 ]
System partsO ther than user-defi ned parts, there are system provided parts, which give access to useful functionality and information.
For system parts it is necessary to specify, SystemPartID property, which is really a drop-down list of the following parts:
Outlook: displays the Outlook integration part, which provides information about pending items, such as e-mail messages, calendar entries, or tasks.Notes: displays the notes linked to the currently selected entity.MyNotes: displays notifi cations other users sent to the user using Notes functionality.RecordLinks: displays the links related to the currently selected entity.
Chart partsA particularly eye-candy feature of Microsoft Dynamics NAV 2009 is charts, a special type of parts, which can be included on any RoleCenter page without any declaration, or on other types of pages by declaring them through a Part property of type Chart.
There is a smorgasbord of system-provided charts, which cover most application areas from accounting to manufacturing. If you are unhappy with these, you can create and import your own. Chart defi nitions are stored in the system table 2000000078 Chart, where they can be imported or exported as XML defi nitions using the Charts form or page. You can fi nd Charts in the Departments page (or navigation pane if you are using the Classic client) under Administration | Application Setup | RoleTailored Client.
P s
•
•
•
•

For More Information: www.packtpub.com/implementing-microsoft-dynamics-nav-2009/book
Where to buy this book You can buy Implementing Microsoft Dynamics NAV 2009 from the Packt Publishing website: http://www.packtpub.com/implementing-microsoft-dynamics-nav-2009/book
Free shipping to the US, UK, Europe and selected Asian countries. For more information, please read our shipping policy.
Alternatively, you can buy the book from Amazon, BN.com, Computer Manuals and most internet book retailers.
www.PacktPub.com