implementation of management information system (mis ... · before the pi can continue with the...
TRANSCRIPT

Projects MIS – User Manual Version 20.0
Oracle Projects MIS – User Manual
Implementation of Management Information System (MIS)
Including Financial Management System (FMS)
ICAR
Version No.: 20.0
INDIAN AGRICULTURAL STATISTICS RESEARCH INSTITUTE
(INDIAN COUNCIL OF AGRICULTURAL RESEARCH)
LIBRARY AVENUE, PUSA, NEW DELHI – 110 012
www.iasri.res.in
2013

Projects MIS – User Manual Version 20.0
2 of 298
Project Team
Mission Leader Dr. N.S. Rathor, DDG (Engg.)
IASRI, New Delhi (Lead Institute)
Dr. A.K. Choubey, HoD, CA
Dr. Alka Arora, Sr. Scientist
Dr. Sudeep Marwaha, Sr. Scientist
Smt. Shashi Dahiya, Scientist
Sh. S. N. Islam, Scientist
Smt. Angshu Bhardwaj, Scientist
Sh. Soumen Pal, Scientist (till 30th September, 2012)
Sh. A.P. Sharma, F&AO
Sh. K.P.S. Gautam, SAO
IBM Team
Sh. Amit Bothra
Sh. Madhur Keswani
Sh. Sameer Sachdeva
Sh. Anil Sharma
Sh. Ravi Kant Singh
Sh. Navroz Singh Dhillon
Sh. Alok Saraogi
Sh. Pushpendu Roy
Sh. Sapthagiri Srirangam
Smt. Sneha Yadav
Sh. Sourabh Kumar
Sh. Nitin Batta
Smt. Lakshmi Sowmya
List of Resource Personnel
ICAR
Sh. Devendra Kumar, Dir (F)
Sh. Sanjay Gupta, Dir (A) (till July, 2012)
Sh. J. Ravi, Dir (P)
Dr AK Vasisht, ADG(PIM/ESM)
Ms. Namrta Sharma, DS (P)
Sh. Rupesh Sharma, SO (GA)
Sh. Harpal, SO (Cash-I)
Sh. Dilip Roy, CASH DISBURSEMENT
Sh. SK Behera, DS (GAC)
Sh. Rajiv Mangotra, DS (P)
Smt. Rashmi Rao, Deputy Director Finance
Sh. GP Sharma, DDF
Sh. S K Pathak, SF&AO
Sh. S K Sharma, F&AO
Smt. Sunita Arya, SF&AO
Smt. Rajashree Sunil, US (Tech & WS)
Sh. Naresh Kumar Arora, F&AO (Edn)
Sh. Kanhaiya Lal Chowdhary, DS (Edn)
NDRI, Karnal
Sh. J.K. Kewalramani, JD (Admn) & Registrar
Sh. Vishal Acharya, AF&AO
Sh. Brahm Parkash, AAO
Sh. S George, CF&AO

Projects MIS – User Manual Version 20.0
3 of 298
CIFE, MUMBAI
Sh. Suresh Chandra, CF&AO
Sh. Suresh Kumar, CAO
Dr. S. Jahageerdar, Officer In-Charge, IT
NAARM, Hyderabad
Sh. Sanjay Kant, JD (Admn) & Registrar
Sh. Jakir Hussain Khilji, F &AO
CMFRI
Sh. Rakesh Kumar, CAO
Sh. AV Joseph, SF&AO
CRIJAF
Sh. K.P. Nath, F&AO
Sh. M.K. Pachauri, SAO
Dr. D. Barman, Scientist
NBPGR
Sh. B K Bansal, F&AO
Sh. S K Sinha, SAO
IARI
Sh. Radhey Shyam, CF&AO
Sh. P.K. Jain, CAO
DKMA
Sh. Himanshu, Scientist, DIPA, ICAR
Sh. Naresh Kumar Arora, F&AO(Edn)
NAIP
Sh. S Bilgrami, CF&AO
Sh. Kumar Rajesh, US
IVRI
Sh. Pankaj Kumar, Joint Secretary
ICAR-REC
Sh. Pushapanayak, CAO

Projects MIS – User Manual Version 20.0
4 of 298
DOCUMENT RELEASE NOTICE
ORACLE PROJECTS – User Training Manual
Version no: 20.0
Release no:
Date of Release : 20th
August, 2013
Client : Indian Council of Agricultural Research
Project : MIS & FMS Implementation
Author : Sh. Navroz Singh Dhillon
Reviewer : Sh. Anil Sharma Date: 25th August, 2013

Projects MIS – User Manual Version 20.0
5 of 298
REVISION HISTORY
Document No.:
Document Title: Oracle Projects MIS – User Training Manual
Version No. Issue Date Change Details Owner Authorized by Remarks
1.0 20th
August, 2013 No Previous Document
10.0 25th
November, 2014 Version No. 1.0 Navroz Dhillon
20.0 24th
May, 2015 Updated Report details, Page No.276
Creation of Project Receipts, Page
No. 278
Enter Budget for Externally Funded
Project, Page No. 286
Ravi Kant Singh

Projects MIS – User Manual Version 20.0
6 of 298
Table of Contents
1 LOGGING INTO ORACLE APPLICATIONS ................................................................................................................................................................................... 8
2 DOCUMENT NUMBERS .................................................................................................................................................................................................................... 14
3 STATUS REPORT ................................................................................................................................................................................................................................ 16
3.1 STATUS REPORT CREATION ................................................................................................................................................................................................................ 17 3.2 STATUS REPORT COMPLETION ........................................................................................................................................................................................................... 23 3.3 STATUS REPORT APPROVAL ................................................................................................................................................................................................................ 34 3.4 SR RELATED REPORTS ....................................................................................................................................................................................................................... 39
4 RPPI (SINGLE INSTITUTE) .............................................................................................................................................................................................................. 48
4.1 RPPI CREATION ................................................................................................................................................................................................................................ 49 4.2 RPPI COMPLETION ........................................................................................................................................................................................................................... 56 4.3 RPPI – OBJECTIVE AND ACTIVITY INFORMATION ................................................................................................................................................................................ 64 4.4 RPPI - ENTER BUDGETARY INFORMATION INCLUDING ITEM DETAILS .................................................................................................................................................. 83 4.5 RPPI – CAPTURING RPPI CHECKLIST ............................................................................................................................................................................................... 94 4.6 RPPI APPROVAL (INCLUDING PME CELL APPRAISAL) ...................................................................................................................................................................... 105 4.7 RPPI RELATED REPORTS ................................................................................................................................................................................................................. 124
5 RPPII .................................................................................................................................................................................................................................................... 125
5.1 RPPII CREATION............................................................................................................................................................................................................................. 126 5.2 RPPII COMPLETION ........................................................................................................................................................................................................................ 132 5.3 RPPII APPROVAL INCLUDING RATINGS ............................................................................................................................................................................................ 155 5.4 RPPII RELATED REPORTS ................................................................................................................................................................................................................ 171
6 RPPIII................................................................................................................................................................................................................................................... 172
6.1 RPPIII CREATION ........................................................................................................................................................................................................................... 173 6.2 RPPIII COMPLETION ...................................................................................................................................................................................................................... 179 6.3 RPPIII CHECKLIST .......................................................................................................................................................................................................................... 194 6.4 RPPIII APPROVAL (INCLUDING RATINGS) ........................................................................................................................................................................................ 205 6.5 RPPIII RELATED REPORTS ............................................................................................................................................................................................................... 218
7 RPPIV ................................................................................................................................................................................................................................................... 220
7.1 RPPIV CREATION AND COMPLETION ............................................................................................................................................................................................... 221 7.2 RPPIV RELATED REPORTS ............................................................................................................................................................................................................... 233

Projects MIS – User Manual Version 20.0
7 of 298
8 RPPI AMENDMENT .......................................................................................................................................................................................................................... 234
9 PROJECT ABEYANCE/TERMINATION ....................................................................................................................................................................................... 244
10 INTER-INSTITUTIONAL PROJECT.......................................................................................................................................................................................... 255
11 FIND/OPEN A DOCUMENT ......................................................................................................................................................................................................... 266
12 RUN/VIEW A REPORT ................................................................................................................................................................................................................. 269
13 REPORTS ........................................................................................................................................................................................................................................ 276
14 CREATION OF PROJECT RECEIPTS ....................................................................................................................................................................................... 278
15 ENTER BUDGET FOR EXTERNALLY FUNDED PROJECT................................................................................................................................................. 286

Projects MIS – User Manual Version 20.0
8 of 298
1 Logging into Oracle Applications
Navigation
Open the link for the Oracle Instance
http://fms.iasri.res.in:8005/ (for User Training Instance)

Projects MIS – User Manual Version 20.0
9 of 298
Logging into
Oracle Apps Enter the Username and Password as provided (individual user name/password to be used). Password need to be changed
on first time login.
On logging into the application, a new page consisting of the responsibilities assigned to the user and the active
notifications for the user will open up.
User Name
Password

Projects MIS – User Manual Version 20.0
10 of 298
Click on Project Details function.
This is the Projects MIS
responsibility for the user
These are the
notifications for
the user
These are the various
functions available in the
particular responsibility

Projects MIS – User Manual Version 20.0
11 of 298
Menu Bar and
Shortcuts A new form in Oracle opens up. The menu bar icons and various keyboard shortcuts have been displayed below:
New Find Save Clear Record Delete Record
Attachment

Projects MIS – User Manual Version 20.0
12 of 298
1. New: Use this icon to create a new invoice. Alternative navigation: File->New
2. Find: Use this icon to invoke find (query) screen. The keyboard short cut is F11 key.
3. Save: Use this icon to save the record. Alternative navigation: File->Save or press CTRL + S
4. Clear Record: Use this icon to clear the current (selected) record. This however does not delete a record that has
already been saved. Alternative navigation: Edit->Clear->Record
5. Delete Record: Use this icon to delete the current (selected) record. Alternative navigation: Edit->Delete
6. Attachment: Use this icon to attach text files or other files if required.

Projects MIS – User Manual Version 20.0
13 of 298
Keyboard
Shortcuts
Important Keyboard shortcut
Function/Purpose Keyboard Shortcut
Enter into query mode F11
Query with partial information Prefix or suffix with %
Execute query CTRL + F11
Close/Exit screen F4
Invoke List of Values CTRL + L
Insert duplicate field SHIFT +F5
Insert duplicate record SHIFT +F6
To query the form:
1. For query, first press F11.
2. Give partial information on screen like partial employee name, and prefix or suffix with %.
3. Execute the query by pressing CTRL and F11.
List of Value (LOV)
LOV facilitates the completion of a text entry field when there are numerous values that may be assigned. LOVs are a useful
alternative to drop-down lists, particularly in cases where displaying a long list of selections in a drop-down list would require
excessive scrolling.
Search within LOV list
1. Click on the LOV icon.
2. The list of LOV is displayed.
3. If short list then scroll and select the required value. Press OK.
4. If the LOV list is long, then enter any partial/full value and suffix with the ‘%’ in the Find field. The ‘%’ as prefix and
suffix is also used where the subsequent word(s) of the total value is used for query.
5. Then click Find button.
6. This displays a shortened list of values that will match the query submitted.
Select the value desired and click OK. The original text entry screen is populated.

Projects MIS – User Manual Version 20.0
14 of 298
2 Document Numbers
Document
Numbering Logic The document numbering will be automatic and numeric; and will be generated from the system.
Example 1: If the Document Number is 55200130017:
The first three digits represent the institute. Here 552 is for IASRI.
The fourth and fifth digits represent the document type.
00 is for SR
10 is for RPPI
11 is for RPPI Amendment
13 is for Externally Funded Projects
14 is for Consultancy/Contract Research Projects
20 is for RPPII
30 is for RPPIII
40 is for RPPIV
The sixth and seventh digit represent the year in which the document was created. So 13 means it was created during
the period April 2012-March 2013.
The last four digits are a running sequence and start with the number 0001. So here this is the 17th
Status Report
created in the period April 2012-March 2013 in IASRI.
Example 2: If the Document Number is 15611140012:
Projects MIS – User Manual Version 20.0
15 of 298
The first three digits represent the institute. Here 156 is for IASRI.
The fourth and fifth digits represent the document type. 11 is for RPPI Amendment
The sixth and seventh digit represent the year in which the document was created. So 14 means it was created during
the period April 2013-March 2014.
The last four digits are a running sequence and start with the number 0001. So here this is the 12th
RPPI Amendment
created in the period April 2013-March 2014 in IARI.

Projects MIS – User Manual Version 20.0
16 of 298
3 Status Report
Process Map

Projects MIS – User Manual Version 20.0
17 of 298
3.1 Status Report Creation
Process
Overview
Descriptio
n
According to the latest guidelines issued by ICAR, the first stage for initiation of a research project is the creation of a status report
for proposal of a new project. So it is the first Performa which a scientist has to prepare, before the initiation of his/her project. It
helps to objectively assess the need of the project.
It covers the basic project information like project title, employee information, genesis and rationale of the project,
knowledge/technology gaps and justification for taking up the present project, Critical review of present status of the technology at
national and international levels, details on propriety/patent perspective and expected output and clientele etc. It has to be approved
before the PI can continue with the creation of RPP-I for his project.
Document
Numberin
g
The document numbering will be automatic and numeric; and will be generated from the system.
For example, if the Document Number is 55200130017:
The first three digits represent the institute. Here ‘552’ is for IASRI.
The fourth and fifth digits represent the document type. 00 is for SR
The sixth and seventh digit represent the year in which the document was created. So '13' means it was created during the period April
2013-March 2014.
The last four digits are a running sequence and start with the number 0001. So here this is the 17th
Status Report created in the period
April 2012-March 2013 in IASRI.
Navigation Responsibility: IASRI Projects
Navigation->Project Details

Projects MIS – User Manual Version 20.0
18 of 298
Oracle
Process –
Status
Report
Creation
Double Click on Project Details; or Click on Project Details and Click on Open.
Click here

Projects MIS – User Manual Version 20.0
19 of 298
Creating a
new Status
Report
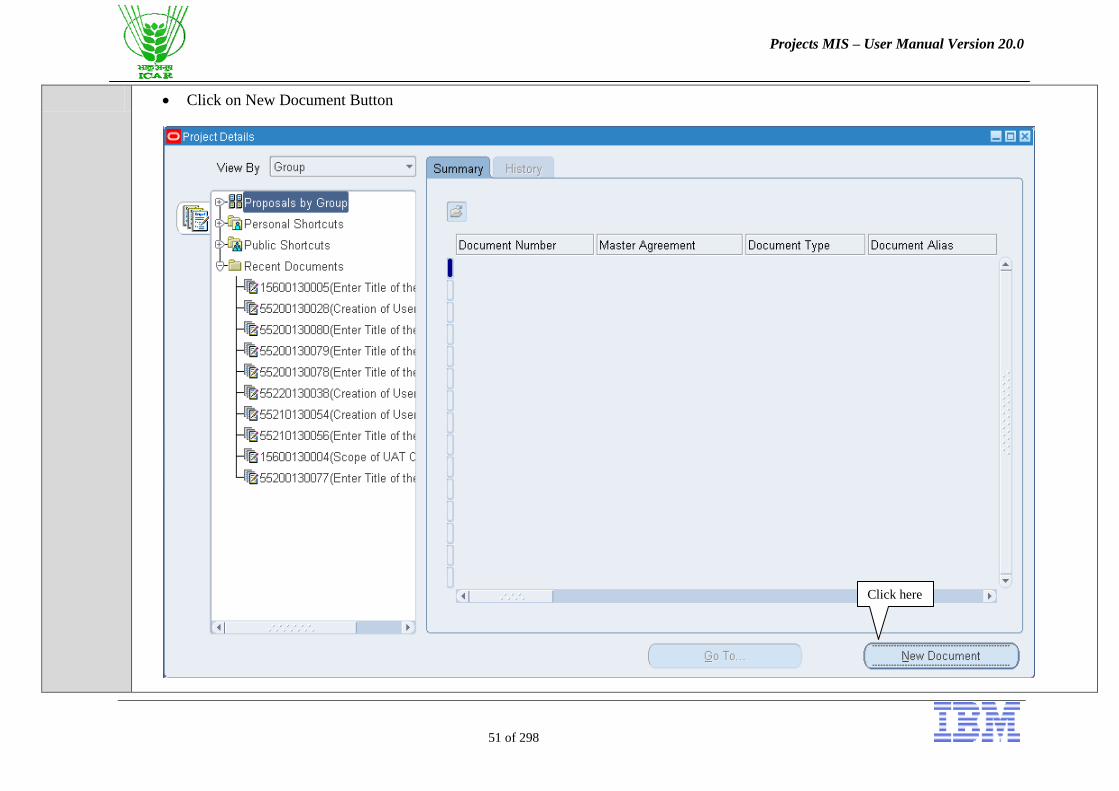
New Screen opens up as shown in the figure below. This screen is used to create a new document or open an existing document. Click on
“New Document” button to create a new Status Report.
For new Status Report
Creation, click here

Projects MIS – User Manual Version 20.0
20 of 298
Creating a
new Status
Report
A new form opens up. Select the second option “Create new Status Report from Status Report Template” and click on the “Next” Button.

Projects MIS – User Manual Version 20.0
21 of 298
Creating a
new Status
Report
Again click on “Next” Button. A note will appear. Click on OK.

Projects MIS – User Manual Version 20.0
22 of 298
Creating a
new Status
Report
Click on Finish.
After clicking on Finish Button, a note will appear. Click on OK. A new Status Report is created.
Click here to
finish Status
Report creation

Projects MIS – User Manual Version 20.0
23 of 298
3.2 Status Report Completion
Completin
g a new
Status
Report –
Project
Header
Details
This is the Project Header Tab. Here enter details such as “Type of Project”, “Lead Division” and “Project Title”.
Type of Project
Lead Division
Project Title

Projects MIS – User Manual Version 20.0
24 of 298
Completin
g a new
Status
Report –
Project
Header
Details
For example, to enter the “Type of Project”, click on the LOV Button in the field and select the desired value from the new form which
opens up.

Projects MIS – User Manual Version 20.0
25 of 298
Enter
Team
Member
Informatio
n
Click on “Project Team Info/Doc Approval” Tab. This tab is used to store member information and to send the document for approval. Enter
team member information (team member name and role).
Employee name Employee Role

Projects MIS – User Manual Version 20.0
26 of 298
Enter
Project
Item
Details
Click on the “Project Items” Tab. This tab is used to enter project item details. Click on the “Standard” Checkbox. A note will appear.
Click on OK. Then a new window opens up. Click on “Status Report” and then Click on “Copy”.
1. Click on Standard
Check Box
2. Select Status Report
3. Click on
Copy Button

Projects MIS – User Manual Version 20.0
27 of 298
Enter
Project
Item
Details
Status Report Project Items get copied. Click on a Project Item and enter the relevant data for that project item in the text field below.
Click on Project Item
Enter the relevant
text field

Projects MIS – User Manual Version 20.0
28 of 298
Enter
External
Member
Informatio
n
If there are any external members in the project (optional), click on “External Members” Tab. This tab is used to enter external team
member information (and team ratings etc. in other documents).
In “Team Information” LOV, select External Team Member 1. Enter External Member Name and Institute. Then in the DFF enter other
details such as member role, start date etc. Repeat the above step for other external team members as well.
s
1. Choose option
External Team Member
1
2. Capture External
Team Member Name
3. Capture External
Team Member Institute
4. Click here to
open this window

Projects MIS – User Manual Version 20.0
29 of 298
Team
Member
Concurren
ce
Now all the information related to Status Report has been entered. The next step is to submit this report for approval.
To get team member approval, click on Go To Button and select the “Communications” option.
Click here

Projects MIS – User Manual Version 20.0
30 of 298
Team
Member
Concurren
ce
Click on New Button. A new window will open up.
Click on “Action” field.
Then Select the team member from which you wish to take approval.
In text field, enter the communication subject that you wish to send to the team member.
Then save the communication.
Note: Save the communication only after you have entered all the necessary details, especially the person from which approval is
needed.

Projects MIS – User Manual Version 20.0
31 of 298
1. Click here
2. Enter Team Member
whose approval is needed
3. Enter Text 4. SAVE the Record

Projects MIS – User Manual Version 20.0
32 of 298
Team
Member
Concurren
ce – Co-PI
Login
Open the link for the Oracle Instance
http://fms.iasri.res.in:8005/ (For User Training Instance)
Team
Member
Concurren
ce – Co-PI
Login
Team Member will enter his/her Username and Password as provided (individual user name/password to be used). Password need to be
changed on first time login.
On logging into the application, a new page consisting of the responsibilities assigned to the user and the active notifications for the user will
open up.

Projects MIS – User Manual Version 20.0
33 of 298
Team
Member
Concurren
ce – Co-PI
Login
The Team Member will see a notification regarding the approval in his/her login; and will click on the notification for approval.
Team
Member
Concurren
ce – Co-PI
Login
Clicking on the notification, the team member will be able to see notification details. On verifying that all the information entered is valid
and correct, he will give his concurrence by clicking on “OK” button.
Concurrence will not be achieved until user clicks on OK button, and only then will the Team Member Signature be captured in the
report output.
Notification for approval
OK Button

Projects MIS – User Manual Version 20.0
34 of 298
3.3 Status Report Approval
Submit
Status
Report for
Approval
PI will open the Status Report (refer to Process 10).
Go To “Project Team Info/Doc Approval” Tab. Click on “Forward” Button. The approval process is initiated.
Click here to start
approval process

Projects MIS – User Manual Version 20.0
35 of 298
Status
Report
Approval
– HoD
Login
HoD will open the link for the Oracle Instance
Open this URL: http://fms.iasri.res.in:8005/ in your browser.
On logging into the application, a new page consisting of the responsibilities assigned to the user and the active notifications for the user will
open up.

Projects MIS – User Manual Version 20.0
36 of 298
Status
Report
Approval
– HoD
Login
The notification will include basic details like document type, document number, project title, team member information etc.
The HoD can enter his overall comments and approve/reject the document by clicking on approve/reject button.
HoD can click on “View Project Form” link to open the
Project Details Form for that particular document.
Overall Comments
Approve Reject

Projects MIS – User Manual Version 20.0
37 of 298
Status
Report
Approval
– HoD
Login
Optionally the HoD can open the document by clicking on “View Project Form”. The below form opens up.
HoD can check all the details of the Status Report here.

Projects MIS – User Manual Version 20.0
38 of 298
Status
Report
Approved
After approval, the status of the document is changed to “Document Approved” as shown below:
Document Approved

Projects MIS – User Manual Version 20.0
39 of 298
3.4 SR Related Reports
Run/View
a Report From the toolbar menu at the top, select View Requests

Projects MIS – User Manual Version 20.0
40 of 298
Run a
Report Click on "Submit a new Request" to run a report.
Click here to run a
report

Projects MIS – User Manual Version 20.0
41 of 298
Select "Single Request” and click "OK"
Run a
Report Enter Report Name as ‘ICAR Status Report’
Enter Parameters and click on OK.

Projects MIS – User Manual Version 20.0
42 of 298
1. Enter Report Name
2. Enter Parameter 1
Institute Name
3. Enter Parameter 2
Status Report

Projects MIS – User Manual Version 20.0
43 of 298
Run a
Report Click on Submit Button.
A note will come. Click on No.

Projects MIS – User Manual Version 20.0
44 of 298
Report
Output Given below is a sample Status Report output:

Projects MIS – User Manual Version 20.0
45 of 298

Projects MIS – User Manual Version 20.0
46 of 298

Projects MIS – User Manual Version 20.0
47 of 298
Run/View
Report User can run the following reports:
Report Name Report Parameters Report Functionality
ICAR Status Report Institute Name
Status Report Number
It provides the Status Report
output.

Projects MIS – User Manual Version 20.0
48 of 298
4 RPPI (Single Institute)
Process Map

Projects MIS – User Manual Version 20.0
49 of 298
4.1 RPPI Creation
Process
Overview
Descriptio
n
This Performa provides details on the project, project team, institutions involved, objectives, activities and output details, technical
programme, financial implications, expected output, expected benefits in economic terms and risk analysis and finally observation
of PME Cell. The Performa essentially identifies activities against which the future research output evaluation will be carried out
including team assessment.
Navigation Responsibility: IASRI Projects
Navigation->Project Details
Oracle
Process –
RPPI
Creation -
Screenshot
and Steps
Double Click on Project Details; or Click on Project Details and Click on Open.

Projects MIS – User Manual Version 20.0
50 of 298
Click here
Projects MIS – User Manual Version 20.0
51 of 298
Click on New Document Button
Click here

Projects MIS – User Manual Version 20.0
52 of 298
Select the Option “Copy From Existing Document” and click on Next.
Choose this option for creating
RPPI, RPPII, RPPIII and RPPIV

Projects MIS – User Manual Version 20.0
53 of 298
In the next window, mention the details of the Status Report from which you wish to create the RPPI Document. Then click on “Next”.
Enter Status Report details

Projects MIS – User Manual Version 20.0
54 of 298
Then enter details of the new document which you wish to create. In this case, choose RPPI document type. A note will appear; click on
“OK” button. Then enter Project Start Date as the Start Date and click on “Finish”.
A note will appear. Click on “OK”. RPPI Document is created.
Choose RPPI type
Capture Project Start Date
Click here

Projects MIS – User Manual Version 20.0
55 of 298
Note: Here in document type, 4 RPPI Document Types exist (for each institute):
o IASRI-RPPI: This is for Institute Funded Project
o IASRI-RPPI (Amendment): This is for creating an RPPI Amendment (covered as a separate process later)
o IASRI-RPPI (Consultancy/Contract): This is for Consultancy/Contract Research Projects
o IASRI-RPPI (Externally Funded): This is for externally funded projects
Note: In this example, we have taken an Externally Funded Project. However, the same process is valid for Institute funded and
Consultancy/Contract research projects as well.

Projects MIS – User Manual Version 20.0
56 of 298
4.2 RPPI Completion
Capture
Project
Details
Form
Project Header form opens.
Enter Priority Area and End Date.
Note: The RPPI number is copied in the Project Code. The actual PME code is generated automatically but only after the RPPI is approved.
Till then, the RPPI number serves as a temporary project code.
End date Priority Area

Projects MIS – User Manual Version 20.0
57 of 298
Enter
Project
Items
Details
Click on Project Item Tab. Here enter Project Item Details for RPPI as shown (similar to Status Report).
1. Click here
2. Choose RPPI
3. Click here

Projects MIS – User Manual Version 20.0
58 of 298
Enter
Project
Items
Details
Click on first section “1. Key Words” and capture details in the free text field “Project Item Detail”.
Capture Key Words Detail
here
Click on item
“1. Key Words”

Projects MIS – User Manual Version 20.0
59 of 298
Click on second section “2. If Project not already in the Priority Area, give Justification” and capture details in the free text field “Project
Item Detail”.
Similarly, capture details for all sections one by one.
Click on this item
Capture Details
here in text format

Projects MIS – User Manual Version 20.0
60 of 298
Enter
Team
Member
Contributi
on
Click on External Members/Member Contribution Tab. In Team Information field, choose the value “Individual Contribution by Team
Members”.
In the bottom portion of the form, enter serial number. A message will pop up saying that the member information needs to be entered in the
flex field. Click on OK.
Press “Tab” button twice; or press “Ctrl+L”. A new window will open up. Enter details for one team member.
Repeat the above two steps for all team members.

Projects MIS – User Manual Version 20.0
61 of 298
1. Choose “Individual Contribution
by Team Members”
2. Choose Serial Number
beginning with ‘101’
3. Capture Individual
Contribution Details

Projects MIS – User Manual Version 20.0
62 of 298
Creation
of Project The next step is to create a project. In a project, the budgetary and objective/activity information is stored.
Go to Project Headers Tab. Click on Project Code field. A note will pop up asking you to validate that you have entered all the
information correctly. Once you click on OK, a project is created successfully.
Note: each project is identified with a unique project number and a unique project code.
1. Click here
2. This Note will pop
up. Click on OK.

Projects MIS – User Manual Version 20.0
63 of 298
Associatio
n of
Project to
Document
You have to associate the project to the document. For that, click on the project field. Your project number will automatically be
captured in the field.
Click here

Projects MIS – User Manual Version 20.0
64 of 298
4.3 RPPI – Objective and Activity Information
Enter
Workplan
Informatio
n
Double Click on Project List; or Select Project List and click on Open. A web page will open.

Projects MIS – User Manual Version 20.0
65 of 298
Enter
Workplan
Informatio
n
Project List page shows all the ongoing projects in which you are a team member.
Click on your RPPI Number or your Project Number. A new window will open.
Enter
Workplan
Informatio
n
This page contains details regarding your objective, activities and monitorable target details. Click on the workplan tab.
Click here
Click here

Projects MIS – User Manual Version 20.0
66 of 298
Creating
Objectives
and
Activities
Workplan Tab opens up. The next step is to define your objective and activities. For this click on the Create Objectives and Activities
Button.
Creating
Objectives
and
Activities
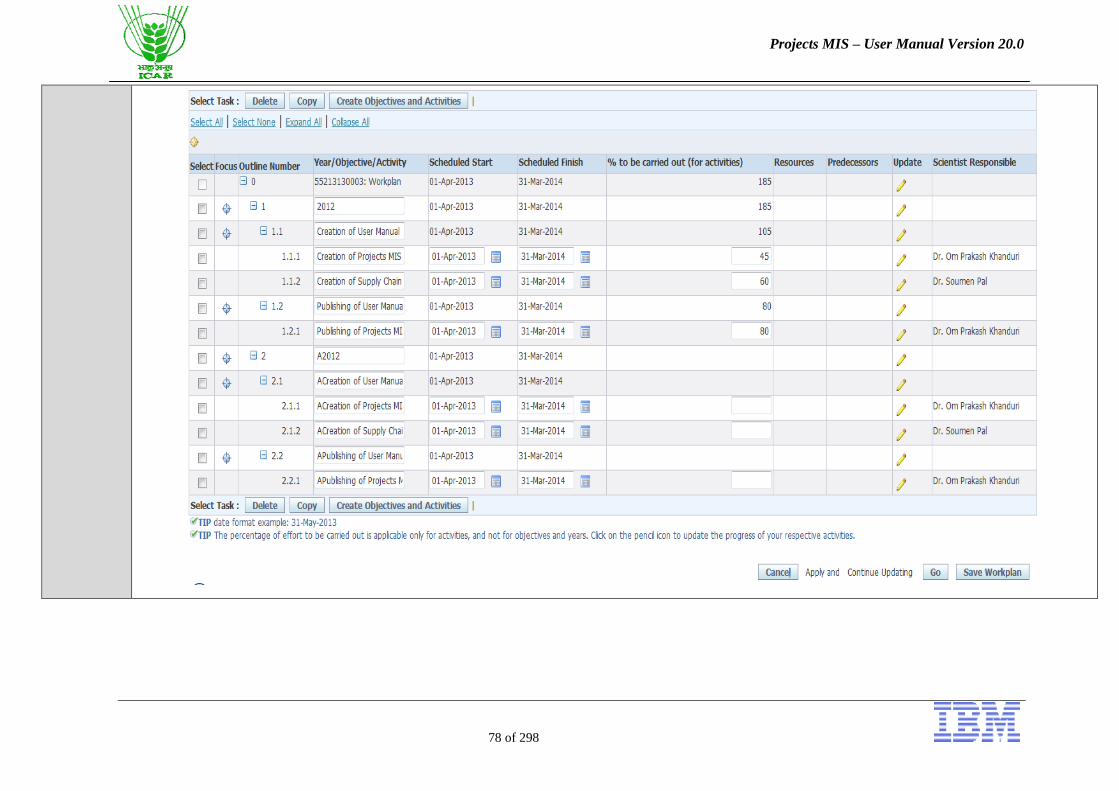
A new page opens up. To enter objective and activities, select the outline level according to the type.
o Outline level '1' is for defining a year; '2' is for objective and '3' is for activity.
o In serial number, please enter running sequence number 1, 2, 3 irrespective of type.
o In the next column, enter the year, objective or activity as the case may be.
o For activity, enter the activity start date, finish date, % to be carried out and scientist responsible as well.
Click here

Projects MIS – User Manual Version 20.0
67 of 298
o Note: For each activity, please specify the percentage to be carried out for the year that you have entered. For example, in the
screenshot below, for activity with serial number 3, it means that 45% of the activity will be completed in year 2012 (January-
December 2012). Similarly, for activity with serial number 4, 60% of the activity will be completed in the period January-December
2012.

Projects MIS – User Manual Version 20.0
68 of 298

Projects MIS – User Manual Version 20.0
69 of 298
Create objectives and activities only for one year and click on apply button.
Note: for future years, the same data will be copied in a later step. So you have to define objectives and activities only for one year.

Projects MIS – User Manual Version 20.0
70 of 298
Creating
Output
Monitorab
le Targets
After clicking on apply button, you will come back to the previous page.
Now to create output monitorable targets, click on the output monitorable target tab under workplan tab.
Click here to create targets

Projects MIS – User Manual Version 20.0
71 of 298
Defining
Output
Monitorab
le Targets
To create a new monitorable target, click on Go button as indicated below.
Defining
Output
Monitorab
le Targets
On this page, enter the target name and short description for the first output monitorable target.
To create another Output Monitorable Target, click on “Add Another” button. Then enter same details for other monitorable targets as
well. Like this, define all your targets in one go.
After you define your all output monitorable targets, click on “Apply”.
Click here

Projects MIS – User Manual Version 20.0
72 of 298
Associate
Activities
and
Output
Monitorab
le Targets
Now you can view all the targets which you have defined. The next step is to associate these output monitorable targets with activities.
To accomplish this, for the first target, click on the update button.
Output Monitorable Target (which
will be printed in the report output)
Click here for the first target

Projects MIS – User Manual Version 20.0
73 of 298
Associate
Activities
and
Output
Monitorab
le Targets
Click on the Associate Activities Tab; and then click on “Associate Output Monitorable Targets and Activities” button.
Associate
Activities Click on Expand All. Then select the “activity/activities” with which you want to associate that particular target and click on “Apply”
button
Click here

Projects MIS – User Manual Version 20.0
74 of 298
and
Output
Monitorab
le Targets
You reach the previous page. Again click on “Apply” Button.
Repeat these steps for all monitorable targets.
3. Click on Apply 1. Click on Expand All
2. Select the Activity

Projects MIS – User Manual Version 20.0
75 of 298
Copying
informatio
n for
future
years
Go to Objective and Activity Details Tab and click on Expand All. Then select the year, and click on Copy Button.
`
1. Click here

Projects MIS – User Manual Version 20.0
76 of 298
Copying
informatio
n for
future
years
A new window opens up. In Prefix, add any character. For example, initially add A. This value is for internal maintenance of the system
and has no impact on your work.
Note: Please ensure that you use different Prefix every time you copy the objective and activity details for other years.
Click on Expand All and Select the year. Then click on Apply.
Enter Prefix as A
Click on Expand All

Projects MIS – User Manual Version 20.0
77 of 298
Copying
informatio
n for
future
years
You will come back to the objective and activity details tab. Click on Expand All.
1. Choose the year
2. Click here
Projects MIS – User Manual Version 20.0
78 of 298
Projects MIS – User Manual Version 20.0
79 of 298
Copying
informatio
n for
future
years
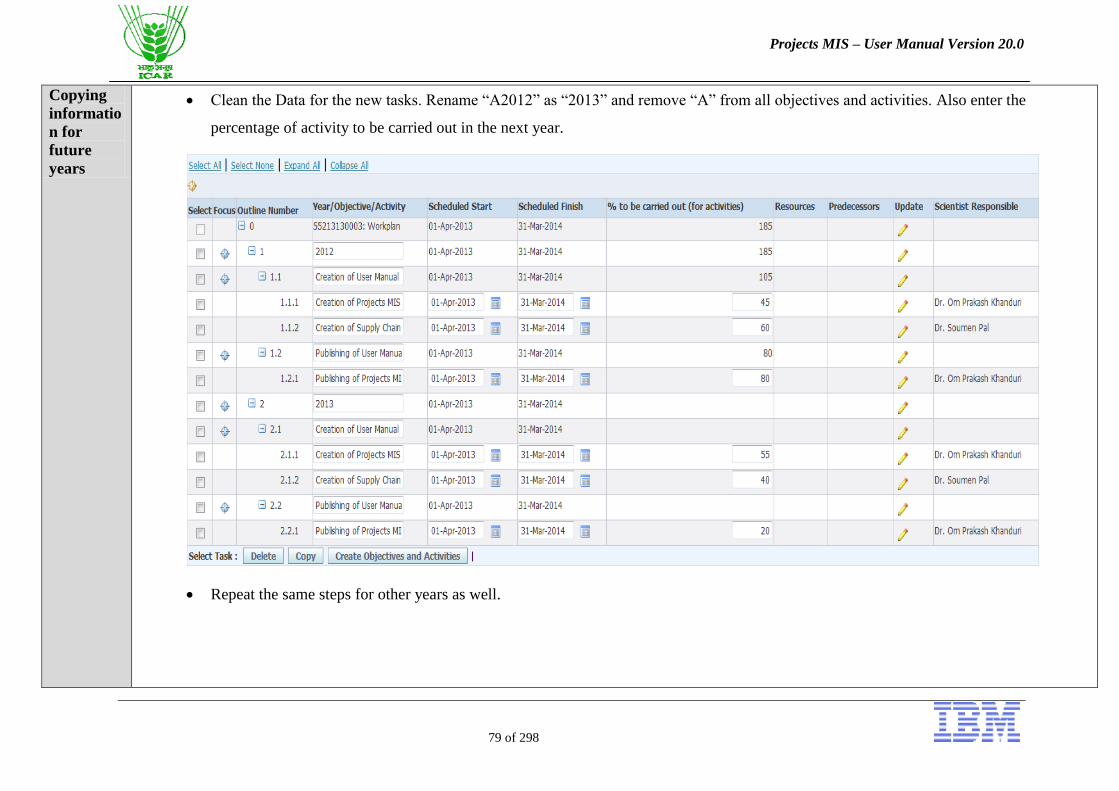
Clean the Data for the new tasks. Rename “A2012” as “2013” and remove “A” from all objectives and activities. Also enter the
percentage of activity to be carried out in the next year.
Repeat the same steps for other years as well.

Projects MIS – User Manual Version 20.0
80 of 298
Saving the
Workplan To Save Workplan, click on “Save Workplan” Button.

Projects MIS – User Manual Version 20.0
81 of 298
Then click on “Finally Save Workplan” Button.

Projects MIS – User Manual Version 20.0
82 of 298
With this the Objective and Activity Details are saved.

Projects MIS – User Manual Version 20.0
83 of 298
4.4 RPPI - Enter Budgetary Information including Item Details
Enter
Budget Click on “Enter Budget”

Projects MIS – User Manual Version 20.0
84 of 298
Enter
Budget Enter the Project Number. Choose Expenditure Budget as the Budget Type
Note: There are two Budget Types: Expenditure Budget and Comprehensive Proposal Budget. For single institute project, we define
only the expenditure budget. It contains budget defined for that institute and expenditure transactions can be made against it.
1. Enter the project number
2. Choose Expenditure Budget
3. “DFF Field”. Click here to enter
source of fund and fund type.

Projects MIS – User Manual Version 20.0
85 of 298
Enter
Budget Click on the DFF Field. A new window will open
Enter fund type, scheme name and division. As this is an externally funded project, user will enter funding agency name and country as
well.
After entering all the desired information, click on OK button.

Projects MIS – User Manual Version 20.0
86 of 298
Enter
Budget Click on “Details” Button. A new form will open.

Projects MIS – User Manual Version 20.0
87 of 298
Enter
Budget Select Major Expenditure Head (e.g. Grants – Capital) and click on “Budget Lines” Button. A new form will open. A note will open.
Click on OK.
Note: The Budget that you enter for a particular month is valid for that entire financial year. For example, if you enter the budget for
June 2013, it will be valid for the period April 2013 to March 2014.
User will enter Minor Expenditure Head and Amount Type as shown and enter budget for all years.
1. Choose the minor
expenditure head
2. Capture the amount

Projects MIS – User Manual Version 20.0
88 of 298
Similarly enter budget for all other major and minor expenditure heads. Save your work.
Click on Submit Button.
Click here

Projects MIS – User Manual Version 20.0
89 of 298
Click on Baseline Button.
Note: After clicking on Baseline button, the budget becomes available for financial transactions.
Click here

Projects MIS – User Manual Version 20.0
90 of 298
With this the budget gets saved.
Enter Item
Details Click on “Project Item Details Form”

Projects MIS – User Manual Version 20.0
91 of 298
Enter Item
Details Click on “New” Button

Projects MIS – User Manual Version 20.0
92 of 298
Enter Item
Details Enter year, institute name, item name, project code, major and minor category as shown.
Projects MIS – User Manual Version 20.0
93 of 298
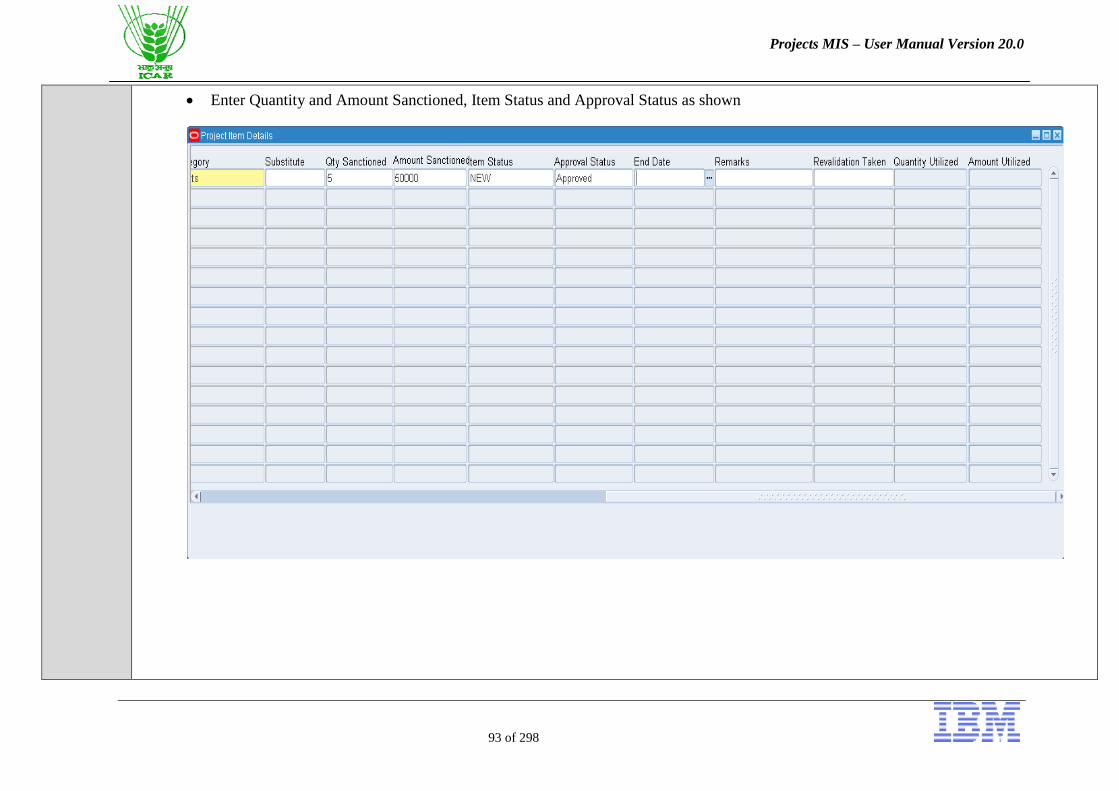
Enter Quantity and Amount Sanctioned, Item Status and Approval Status as shown

Projects MIS – User Manual Version 20.0
94 of 298
4.5 RPPI – Capturing RPPI Checklist
RPPI
Checklist Click on Project Details

Projects MIS – User Manual Version 20.0
95 of 298
RPPI
Checklist Open the RPPI Document (Select your RPPI document and click on “Go To” Button. Choose the “Authoring Workbench” option)

Projects MIS – User Manual Version 20.0
96 of 298
RPPI
Checklist Select the Ratings/Checklists Tab
Click on Ratings and Checklist LOV
Choose this tab
Click here

Projects MIS – User Manual Version 20.0
97 of 298
RPPI
Checklist A new window opens up. Click on the LOV. Then choose RPPI Checklist and click on OK.
1. Click here
2. Choose RPPI
Checklist

Projects MIS – User Manual Version 20.0
98 of 298
RPPI
Checklist Enter data for RPPI Checklist as shown below
Click on OK Button.

Projects MIS – User Manual Version 20.0
99 of 298
Team
Member
Concurren
ce
For team member concurrence, click on Go To Button and select the “Communications” option.
1. Click here
2. Click here

Projects MIS – User Manual Version 20.0
100 of 298
Team
Member
Concurren
ce
Click on New Button. A new window will open up.
Click on “Action” field.
Then Select the team member from which you wish to take approval.
In text field, enter the communication subject that you wish to send to the team member.
Then save the communication.
Note: Save the communication only after you have entered all the necessary details, especially the person from which approval is
needed.

Projects MIS – User Manual Version 20.0
101 of 298
1. Click here
2. Enter Team Member
whose approval is needed
3. Enter Text 4. SAVE the Record

Projects MIS – User Manual Version 20.0
102 of 298
Team
Member
Concurren
ce – Co-PI
Login
Open the link for the Oracle Instance
http://fms.iasri.res.in:8005/ (For User Training Instance)
Team
Member
Concurren
ce – Co-PI
Login
Team Member will enter his/her Username and Password as provided (individual user name/password to be used). Password need to be
changed on first time login.
On logging into the application, a new page consisting of the responsibilities assigned to the user and the active notifications for the user will
open up.
Projects MIS – User Manual Version 20.0
103 of 298
Team
Member
Concurren
ce – Co-PI
Login
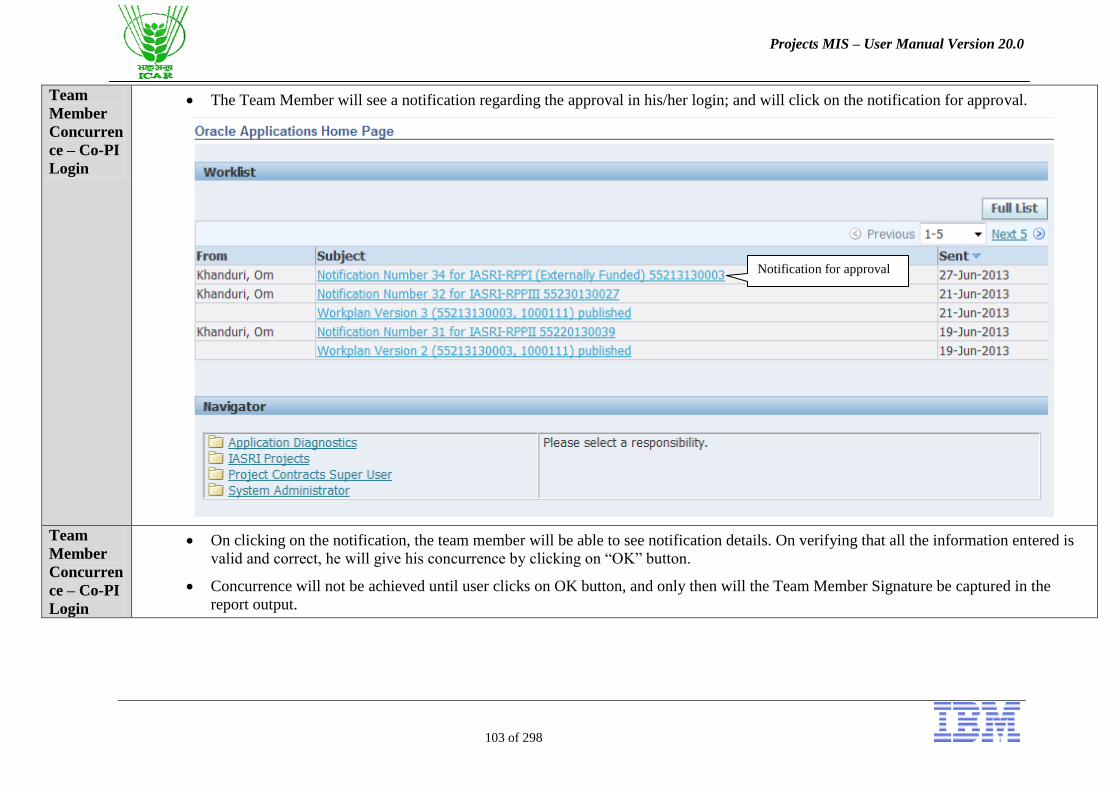
The Team Member will see a notification regarding the approval in his/her login; and will click on the notification for approval.
Team
Member
Concurren
ce – Co-PI
Login
On clicking on the notification, the team member will be able to see notification details. On verifying that all the information entered is
valid and correct, he will give his concurrence by clicking on “OK” button.
Concurrence will not be achieved until user clicks on OK button, and only then will the Team Member Signature be captured in the
report output.
Notification for approval

Projects MIS – User Manual Version 20.0
104 of 298
OK Button

Projects MIS – User Manual Version 20.0
105 of 298
4.6 RPPI Approval (including PME Cell Appraisal)
RPPI
Approval To initiate RPPI Approval, click on “Forward” Button. With this, the approval process gets initiated.

Projects MIS – User Manual Version 20.0
106 of 298
RPPI
Approval
– HoD
Login
HoD will login into the system (refer to process 1). He will click on the relevant notification.
RPPI
Approval
– HoD
Login
HoD will check all the details provided in the notification
Click here

Projects MIS – User Manual Version 20.0
107 of 298

Projects MIS – User Manual Version 20.0
108 of 298
Additionally, the HoD can click on “View Project Form” link to check more details. The HoD can also give his comments, reject the
document, reassign it to or request information from another user
After HoD approves the document, it goes to the PME Cell Incharge for approval
Click here to open the document details

Projects MIS – User Manual Version 20.0
109 of 298
RPPI
Approval
– PME
Incharge
Login
PME Cell Incharge will check all the details provided in the notification (similar to HoD) (refer to process 1).

Projects MIS – User Manual Version 20.0
110 of 298
PME Cell
Appraisal
and
Approval
PME Cell will click on view project form in the notification. A new window with the Project Header Tab will open.
Click here to capture PME Appraisal

Projects MIS – User Manual Version 20.0
111 of 298

Projects MIS – User Manual Version 20.0
112 of 298
Click on Project Team Info/Doc Approval Tab.
Note: Before any approving authority does the evaluation or rating of a project, it needs to temporarily “stop” the approval process by
clicking on the stop button as shown below.
Click here to halt the process so
that appraisal can be done

Projects MIS – User Manual Version 20.0
113 of 298
A note saying “Workflow process stopped successfully” will pop up. Click on OK.
Next, click on Ratings/Checklists Tab.

Projects MIS – User Manual Version 20.0
114 of 298

Projects MIS – User Manual Version 20.0
115 of 298
Select PME Cell Appraisal Report (process similar to RPPI Checklist).
Note: Appraisal by the PME Cell will be based on important parameters to recommend to IRC whether the project is worth execution.

Projects MIS – User Manual Version 20.0
116 of 298

Projects MIS – User Manual Version 20.0
117 of 298
The PME Cell will fill up all the information shown above (except for Total Score (out of 100) – it will be automatically calculated).
After filling all the information, it will click on OK.

Projects MIS – User Manual Version 20.0
118 of 298

Projects MIS – User Manual Version 20.0
119 of 298
Now the PME Cell will reinitiate the Approval Process by clicking on “Project Team Info/Doc Approval” Tab and clicking on
“Forward” button.
Click here to
reinitiate approval

Projects MIS – User Manual Version 20.0
120 of 298
With this the PME Cell Appraisal and Approval is complete. The document will go to the next approving authority (Director/JD (R)) for
approval.
RPPI
Approval
– Director
Login
The Director will login into the application (refer to process 1) and click on the notification.
User will approve or reject the document as he deems fit.

Projects MIS – User Manual Version 20.0
121 of 298
RPPI
Approved With this the RPPI gets approved.

Projects MIS – User Manual Version 20.0
122 of 298
Update
PME Code When the PI opens the RPPI document the next time (refer to process find/open a document), a note saying that the PME Code has been
updated will pop up. Click on OK.
The Project Code has been automatically updated with the PME Code.

Projects MIS – User Manual Version 20.0
123 of 298
Project Code automatically updated with the
PME Code after the RPPI gets approved.

Projects MIS – User Manual Version 20.0
124 of 298
4.7 RPPI Related Reports
Run/View
a Report To run a report, refer to process 12
User can run the following reports:
Report Name Report Parameters Report Type Report Functionality
ICAR RPP-I Report Institute Name
RPPI Number
Adobe pdf It provides the RPPI output.
ICAR RPP-I Checklist Report Institute Name
RPPI Number
Adobe pdf It provides the RPPI Checklist
Report output
ICAR RPPI Checklist Summary
Report
Institute Name
Division
From Date
To Date
MS Excel It provides the RPPI Checklist
details for a list of projects for a
particular institute (or division)
for a particular period (signified
by the start date and end date)
ICAR PME Cell Appraisal
Report
Institute Name
RPPI Number
Adobe pdf It provides the PME Cell
Appraisal Report output
ICAR Proposal Vs Expenditure
Budget Report
Institute Name
RPPI Number
MS Excel It provides the comprehensive
proposal budget (if applicable)
and expenditure budget details
for a particular project

Projects MIS – User Manual Version 20.0
125 of 298
5 RPPII
Process Map

Projects MIS – User Manual Version 20.0
126 of 298
5.1 RPPII Creation
Process
Overview
Descriptio
n
RPPII provides annual progress of the project covering activities and outputs and achievements earmarked for the year for each of
the team member.
Navigation Responsibility: IASRI Projects
Navigation->Project Details
RPPII
Creation User will create a new RPPII Document from the related RPPI Document. The process is similar to creating RPPI from Status
Report.
Click on Project Details. A new window opens

Projects MIS – User Manual Version 20.0
127 of 298
RPPII
Creation Click on “New Document” Button.

Projects MIS – User Manual Version 20.0
128 of 298
Click here

Projects MIS – User Manual Version 20.0
129 of 298
RPPII
Creation Select the “copy from existing document” option so that the relevant information is copied from RPPI Document. Click on Next.

Projects MIS – User Manual Version 20.0
130 of 298
RPPII
Creation In the next screen, select the document type and RPPI Number as shown below. Then click on Next.

Projects MIS – User Manual Version 20.0
131 of 298
RPPII
Creation In the next screen, select type as RPPII. In start date field, enter the start of RPPII reporting period. Then click on finish.
With this the RPPII document with a unique RPPII number is successfully created.
Enter RPPII
Reporting Period
Enter RPPII Type

Projects MIS – User Manual Version 20.0
132 of 298
5.2 RPPII Completion
RPPII
Completio
n
All the relevant information is copied from RPPI to RPPII Document.
In the Project Header Tab, enter the reporting period end date as the end date.
Reporting Period
End Date

Projects MIS – User Manual Version 20.0
133 of 298
RPPII
Project
Items
Click on Project Items Tab. Enter Project Section details (similar to RPPI and Status Report)
Click on “Standard” Checkbox
A note will appear asking you to select the relevant sections. Click on OK.

Projects MIS – User Manual Version 20.0
134 of 298
RPPII
Project
Items
Click on “RPPII” and click on Next Button.
1. Click here
2. Choose RPPII
3. Click on Next

Projects MIS – User Manual Version 20.0
135 of 298
RPPII
Project
Items
The RPPII sections will get copied into the document. Click on each item and enter the relevant text.
Capture the details

Projects MIS – User Manual Version 20.0
136 of 298
Updating
Activity
Progress
Click on Project List. A new page will open in browser.

Projects MIS – User Manual Version 20.0
137 of 298
Updating
Activity
Progress
Click on the Project Code/Project Number which you want to update.
Updating
Activity
Progress
Project Tab will open. Click on Workplan Tab.
Click on Project Number

Projects MIS – User Manual Version 20.0
138 of 298
Updating
Activity
Progress
User will come on the Objective and Activity Details SubTab. Click on Expand All.
Updating
Activity
Details
Now, each team member (PI, Co-PI etc.) will update his/her respective activities from his/her login.
To achieve that, click on update progress button (pencil link)

Projects MIS – User Manual Version 20.0
139 of 298
Updating
Activity
Details
In the summary screen, user can see the % to be completed as envisaged in RPPI. Against that, user will enter the % achieved as
targeted.
Note: for example as shown below, 45% of the activity is envisaged to be completed in this particular year. If the user has
completed the entire work (i.e. 45% of the total activity has been successfully completed, he/she will enter 100% as % achieved as
targeted).
Click here

Projects MIS – User Manual Version 20.0
140 of 298
Updating
Activity
Details
Optionally in the Progress Report SubTab, user may enter the activity status (completed, not started, in progress, on hold), progress
status (at risk, on track, in trouble), and the progress comments for that particular activity.
1. Enter % achieved as targeted
2. Click here

Projects MIS – User Manual Version 20.0
141 of 298
Updating
Activity
Details
After updating the progress, user will click on submit. Then click on Yes on the next page.

Projects MIS – User Manual Version 20.0
142 of 298
Saving
Workplan User will come back to the Objective and Activity Details SubTab.
Note: Similarly, each user will update all the activities for which he/she is responsible using his login credentials.
Finally, the PI will save the workplan. Choose “Update Current Working Version” as shown and click on “Go”.

Projects MIS – User Manual Version 20.0
143 of 298
Saving
Workplan On the next page, click on “Save Workplan” button.
On the next page, click on “Finally Save Workplan” Button.

Projects MIS – User Manual Version 20.0
144 of 298

Projects MIS – User Manual Version 20.0
145 of 298
Saving
Workplan With this the workplan is successfully saved.

Projects MIS – User Manual Version 20.0
146 of 298
RPPII
Team
Rating
Click on Project Details

Projects MIS – User Manual Version 20.0
147 of 298
RPPII
Team
Rating
To open the document, user will select the RPPII Document and click on Go To Button; then select Authoring Workbench and click
on OK (refer to process Find/Open a Document).

Projects MIS – User Manual Version 20.0
148 of 298
RPPII
Team
Rating
Click on Team Rating Tab.
In Team Information, choose the “Team Rating by PI – RPPII” option.
Note: The process of team rating is similar to the process of entering the individual contribution of team members in RPPI.
Choose “Team Rating
by PI – RPPII”

Projects MIS – User Manual Version 20.0
149 of 298
RPPII
Team
Rating
In Sr. No., choose 1.
A note will open asking user to enter member rating. Click on OK.

Projects MIS – User Manual Version 20.0
150 of 298
RPPII
Team
Rating
Next, press “Tab” twice or press “Ctrl+L”
A new window will open. Here enter the member name and member rating. Then click on OK.
Note: Similarly, the PI will enter ratings for each of his team members (including him).

Projects MIS – User Manual Version 20.0
151 of 298

Projects MIS – User Manual Version 20.0
152 of 298
Project
Rating by
PI
User will open the document and click on Ratings/Checklists Tab
Similar to RPPI Checklist and PME Cell Appraisal, user will select the “Project Rating by PI” option.
1. Click here
2. Click here
3. Choose “Project Rating by PI”

Projects MIS – User Manual Version 20.0
153 of 298
Project
Rating by
PI
PI will enter the rating awarded to the project along with the period of rating. Then click on OK.

Projects MIS – User Manual Version 20.0
154 of 298
Team
Member
Concurren
ce
The process to take Team Member Concurrence will be the same as in Status Report and RPPI.

Projects MIS – User Manual Version 20.0
155 of 298
5.3 RPPII Approval including Ratings
RPPII
Approval The RPPII Approval process is same as that of Status Report and RPPI.
The PI will open the RPPII Document and go on Project Team Info/Doc Approval Tab.
User will click on Forward button. With this the approval process is initiated.
Click here to initiate
approval

Projects MIS – User Manual Version 20.0
156 of 298
RPPII
Approval
– HoD
Login
HoD will login into the application and open the notification.
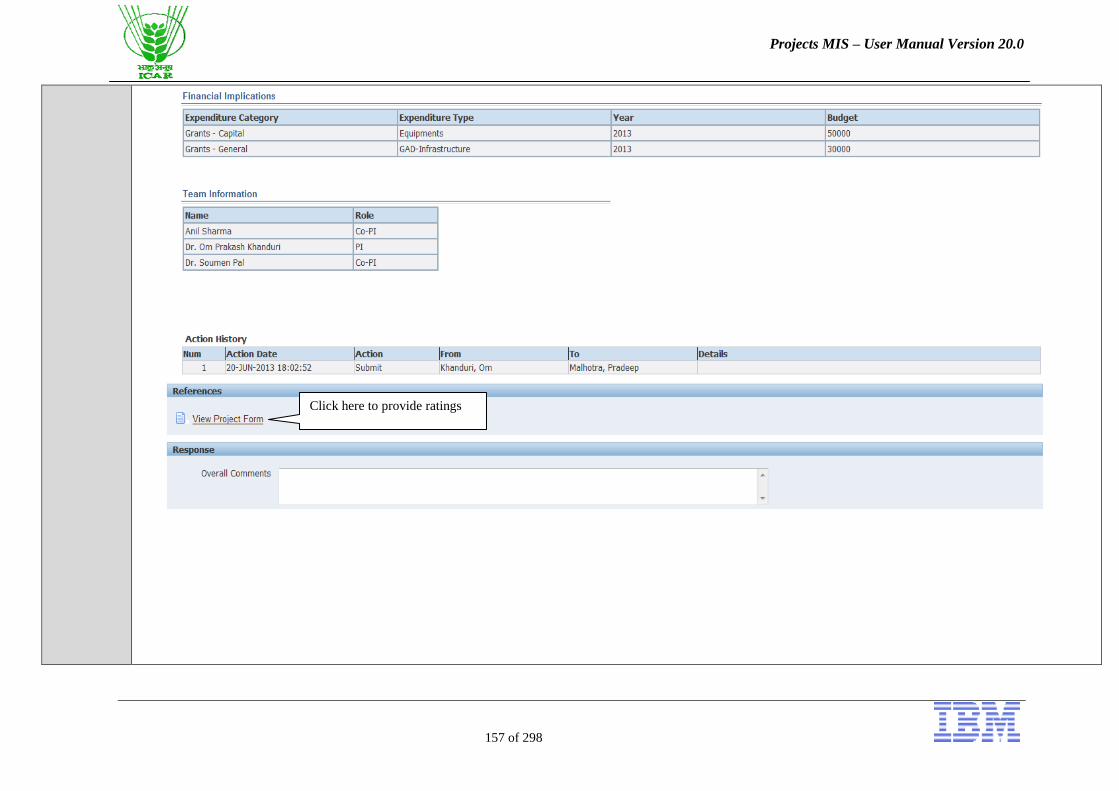
User will check the notification details.
To give the project rating, user will click on “View Project Form”. The document will get opened.
Projects MIS – User Manual Version 20.0
157 of 298
Click here to provide ratings

Projects MIS – User Manual Version 20.0
158 of 298
RPPII
Rating HoD will go to Project Team Info/Doc Approval Tab and click on Stop button so that the approval process gets temporarily halted
and he/she can provide his/her rating.

Projects MIS – User Manual Version 20.0
159 of 298
User will go to Ratings/Checklists Tab and select “Project Rating by HoD” option.

Projects MIS – User Manual Version 20.0
160 of 298
HoD will provide his rating and overall comments; and click on OK.
RPPII
Approval
– HoD
Login
HoD will go back to the Project Team Info/Doc Approval Tab and click on Forward button so that the document gets forwarded to
the next authority.

Projects MIS – User Manual Version 20.0
161 of 298
Click here to
reinitiate approval

Projects MIS – User Manual Version 20.0
162 of 298
RPPII
Approval
– PME
Incharge
Login
PME Incharge will login into the application.
User will check the notification details.

Projects MIS – User Manual Version 20.0
163 of 298
To record the IRC Comments, user will click on “View Project Form”. The document will get opened.
Click here to Capture IRC Comments

Projects MIS – User Manual Version 20.0
164 of 298
Comments
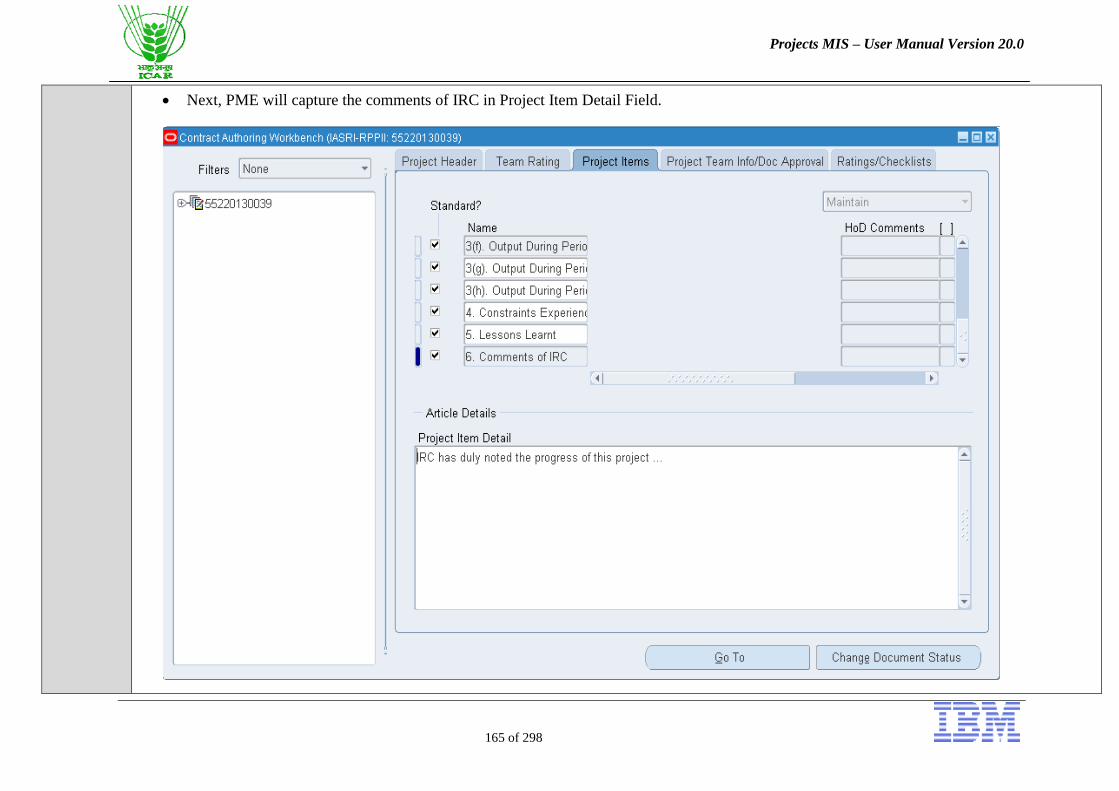
of IRC User will go to the Project Team Info/.Doc Approval Tab and click on Stop button to temporarily halt the approval process
User will go to the Project Items Tab and select the “Comments of IRC” section.
Projects MIS – User Manual Version 20.0
165 of 298
Next, PME will capture the comments of IRC in Project Item Detail Field.

Projects MIS – User Manual Version 20.0
166 of 298
User will then reinitiate the approval process by going to Project Item Detail/Doc Approval Tab and forwarding the document to the
next approver.
RPPII
Approval
– Director
/JD (R)
Login
Director/JD (R) will login into the application.
User will check the notification details.

Projects MIS – User Manual Version 20.0
167 of 298
To give ratings, user will click on “View Project Form” link and the document will get opened.
Click here to give ratings

Projects MIS – User Manual Version 20.0
168 of 298
Director/
JD (R)
Rating
User will temporarily halt the approval process by going to Project Team Info/Doc Approval Tab and clicking on Stop button.
Next, user will go to Ratings/Checklists Tab and select the “Project Rating by Director” option.

Projects MIS – User Manual Version 20.0
169 of 298
Director/
JD (R)
Rating
User will capture his/her rating and comments.
User will go to Project Team Info/Doc Approval Tab and click on Forward button. As in this case, the Director/ JD (R) is the last
approving authority, RPPII will get approved.

Projects MIS – User Manual Version 20.0
170 of 298
RPPII
Approved With this the RPPII gets approved and the status becomes “Document Approved”.
RPPII is now approved

Projects MIS – User Manual Version 20.0
171 of 298
5.4 RPPII related reports
Run/View
a Report To run a report, refer to process 12
User can run the following reports:
Report Name Report Parameters Report Type Report Functionality
ICAR RPP-II Report Institute Name
RPPII Number
Adobe pdf It provides the RPPII report
output.
ICAR Statement of Expenditure
Report
Institute Name
Project Number
From Date
To Date
Microsoft Excel It provides the Statement of
Expenditure for a particular
project.
You can optionally give the
period for which the expenditure
report is required.
ICAR Project Rating Report Institute Name
Division
Document Type
Document Number
From Date
To Date
Microsoft Excel It Provides Rating given to a
range of projects undertaken in a
particular period by HoD,
Director etc.
It is valid for both RPPII and
RPPIII document types.
ICAR Project Publication Detail
Report
Institute Name
Division Name
Report Type
From Date
To Date
Microsoft Excel It provides the output/cumulative
output for a range of documents
(RPPII/RPPIII) created in a
particular period.

Projects MIS – User Manual Version 20.0
172 of 298
6 RPPIII
Process Map

Projects MIS – User Manual Version 20.0
173 of 298
6.1 RPPIII Creation
Process
Overview
Descriptio
n
RPPIII is a final project report that covers details on the project basic information, objectives, materials and methods used, results
and discussion, objective wise achievements and conclusions. It also has information on financial aspects and cumulative outputs.
The most significant information is on the extent of achievement of objectives/activities and outputs earmarked as per RPP-I. It also
gives details the efforts made for commercialization/ technology transfer, proposed utilization of outputs, its significance in
knowledge creation, expected benefits and economic impact, future line of research work/other identifiable problems and a
certificate on handing of research data generated out of the project deposited to PME Cell for future use.
Navigation Responsibility: IASRI Projects
Navigation->Project Details
RPPIII
Creation User will create a new RPPIII Document from the related RPPI Document. The process is similar to creating RPPI from Status
Report; or RPPII from RPPI
Click on Project Details. A new window opens

Projects MIS – User Manual Version 20.0
174 of 298

Projects MIS – User Manual Version 20.0
175 of 298
RPPIII
Creation Click on “New Document” Button.

Projects MIS – User Manual Version 20.0
176 of 298
RPPIII
Creation Select the “copy from existing document” option so that the relevant information is copied from RPPI Document. Click on Next.

Projects MIS – User Manual Version 20.0
177 of 298
RPPIII
Creation In the next screen, select the document type and RPPI Number as shown below. Then click on Next.

Projects MIS – User Manual Version 20.0
178 of 298
RPPIII
Creation In the next screen, select type as RPPIII. In start date field, enter the project start date. Then click on finish.
With this the RPPIII document with a unique RPPIII number is successfully created.

Projects MIS – User Manual Version 20.0
179 of 298
6.2 RPPIII Completion
RPPIII
Completio
n
All the relevant information is copied from RPPI to RPPIII Document.
In the Project Header Tab, enter the actual completion date of the project as the end date.
Actual date of completion

Projects MIS – User Manual Version 20.0
180 of 298
RPPIII
Project
Items
Click on Project Items Tab. Enter Project Section details (similar to RPPII, RPPI and Status Report)
Click on “Standard” Checkbox
A note will appear asking you to select the relevant sections. Click on OK.

Projects MIS – User Manual Version 20.0
181 of 298
RPPIII
Project
Items
Click on “RPPIII” and click on Next Button.

Projects MIS – User Manual Version 20.0
182 of 298
RPPIII
Project
Items
The RPPIII sections will get copied into the document. Click on each item and enter the relevant text.

Projects MIS – User Manual Version 20.0
183 of 298
Updating
Activity
Progress
Click on Project List. A new page will open in browser.

Projects MIS – User Manual Version 20.0
184 of 298
Updating
Activity
Progress
Click on the Project Code/Project Number which you want to update.
Updating
Activity
Progress
Project Tab will open. Click on Workplan Tab.

Projects MIS – User Manual Version 20.0
185 of 298
Updating
Activity
Progress
User will come on the Objective and Activity Details SubTab. Click on Expand All.

Projects MIS – User Manual Version 20.0
186 of 298
Updating
Activity
Details
Now, each team member (PI, Co-PI etc.) will update his/her respective activities.
To achieve that, click on update progress button (pencil link)
Note: The process is same as explained for RPPII

Projects MIS – User Manual Version 20.0
187 of 298
Updating
Activity
Details
In the summary screen, user can see the % to be completed as envisaged in RPPI. Against that, user will enter the % achieved as
targeted.
Note: for example as shown below, 45% of the activity is envisaged to be completed in this particular year. If the user has
completed the entire work (i.e. 45% of the total activity has been successfully completed, he/she will enter 100% as % achieved as
targeted).

Projects MIS – User Manual Version 20.0
188 of 298
Updating
Output
Monitorab
le Targets
Click on Output Monitorable Targets Tab.
Click on Update Progress Link.
Optionally, user can enter the Percent Complete and Completion Date here.
Updating
Output
Monitorab
le Targets
User will enter the “Actual Output Achieved” and click on Submit button.
1. Click here
2. Click here
Enter Actual Output Achieved

Projects MIS – User Manual Version 20.0
189 of 298
Updating
Activity
Details
Click on Yes on the next page.
Updating
Activity
Details
User will come back to the previous screen. Again click on Submit, and then on Yes,
1. Click here

Projects MIS – User Manual Version 20.0
190 of 298
Saving
Workplan User will come back to the Objective and Activity Details SubTab.
Note: Similarly, each user will update all the activities and output monitorable targets for which he/she is responsible using his login
credentials.
Finally, the PI will save the workplan. Choose “Update Current Working Version” as shown and click on “Go”.
2. Click here

Projects MIS – User Manual Version 20.0
191 of 298
Saving
Workplan On the next page, click on “Save Workplan” button.
On the next page, click on “Finally Save Workplan” Button.

Projects MIS – User Manual Version 20.0
192 of 298

Projects MIS – User Manual Version 20.0
193 of 298
Saving
Workplan With this the workplan is successfully saved.

Projects MIS – User Manual Version 20.0
194 of 298
6.3 RPPIII Checklist
RPPIII
Checklist Click on Project Details

Projects MIS – User Manual Version 20.0
195 of 298
RPPIII
Checklist To open the document, user will select the RPPIII Document and click on Go To Button; then select Authoring Workbench and
click on OK.

Projects MIS – User Manual Version 20.0
196 of 298
RPPIII
Checklist User will open the document and click on Ratings/Checklists Tab
Similar to RPPI Checklist and PME Cell Appraisal, user will select the “RPPIII Checklist” option.

Projects MIS – User Manual Version 20.0
197 of 298
RPPIII
Checklist Fill all the details of RPPIII Checklist and click on OK.

Projects MIS – User Manual Version 20.0
198 of 298
Final
Project
Evaluation
by PI
Similar to RPPIII Checklist (as shown above), select “Final Project Evaluation by PI” option as shown below:

Projects MIS – User Manual Version 20.0
199 of 298
Final
Project
Evaluation
by PI
Fill in all the details

Projects MIS – User Manual Version 20.0
200 of 298
Team
Rating by
PI
Click on Team Rating Tab.
In Team Information, choose the option “Team Rating by PI – RPPIII” option.
Note: The process is same as filling “Individual Contribution by Team Members” and “Team Rating by PI – RPPII”,

Projects MIS – User Manual Version 20.0
201 of 298
1. Click here
2. Choose this option.
3. Click here

Projects MIS – User Manual Version 20.0
202 of 298
Team
Rating by
PI
In Sr. No. field, select the first value i.e.1.
A not will pop up. Click on OK.
Press Tab button twice, or press “Ctrl+L”. A new form will open up.
Fill in all the details. You need not fill the total score (out of 10) as it will be calculated automatically.

Projects MIS – User Manual Version 20.0
203 of 298
With this the RPPIII preparation is complete.

Projects MIS – User Manual Version 20.0
204 of 298
RPPIII
Team
Member
Concurren
ce
The process to take RPPIII Team Member Concurrence is similar to that for SR, RPPI and RPPII.

Projects MIS – User Manual Version 20.0
205 of 298
6.4 RPPIII Approval (Including Ratings)
RPPIII
Approval The RPPIII Approval process is same as that of Status Report and RPPI.
RPPIII
Approval The PI will open the RPPIII Document and go on Project Team Info/Doc Approval Tab.
User will click on Forward button. With this the approval process is initiated.
Click here

Projects MIS – User Manual Version 20.0
206 of 298
RPPIII
Approval
– HoD
Login
HoD will login into the application and open the notification.
User will check the notification details. Optionally he can check other details by clicking on “View Project Form”. The document
will get opened.
User will approve the document and it will get forwarded to the next approver.

Projects MIS – User Manual Version 20.0
207 of 298
RPPIII
Approval
– PME
Incharge
Login
PME Incharge will login into the application and open the notification.

Projects MIS – User Manual Version 20.0
208 of 298
User will check the notification details. User will click on “View Project Form” to capture “Final Project Evaluation by Evaluation
Committee”. The document will get opened.
Click here to provide final project evaluation
by Evaluation Committee

Projects MIS – User Manual Version 20.0
209 of 298
RPPIII
Approval
– PME
Login
Rating
PME Incharge will go to Project Team Info/Doc Approval Tab and click on Stop button so that the approval process gets
temporarily halted and final project evaluation by evaluation committee can be captured.

Projects MIS – User Manual Version 20.0
210 of 298
User will go to Ratings/Checklists Tab and select “Final Project Evaluation by Evaluation Committee” option.
1. Click here
2. Open List of Values
3. Choose option
4. Click on OK

Projects MIS – User Manual Version 20.0
211 of 298
User will capture the evaluation done by the evaluation committee. Along with this, user will also capture whether or not RPPIV for
this document will be created; and if yes, then by what date.
Relevant to
RPPIV

Projects MIS – User Manual Version 20.0
212 of 298
User will go to Project Item Tab to capture the Observations of PME Cell based on Evaluation of Research Project after
Completion.

Projects MIS – User Manual Version 20.0
213 of 298
User will then reinitiate the approval process by going to Project Item Detail/Doc Approval Tab and forwarding the document to the
next approver.
RPPII
Approval
– Director
/JD (R)
Login
Director/JD (R) will login into the application.
User will check the notification details.

Projects MIS – User Manual Version 20.0
214 of 298
To give rating and comments, user will click on “View Project Form” link and the document will get opened.
Director/
JD (R)
Rating
User will temporarily halt the approval process by going to Project Team Info/Doc Approval Tab and clicking on Stop button.
Next, user will go to Ratings/Checklists Tab and select the “Project Rating by Director” option.
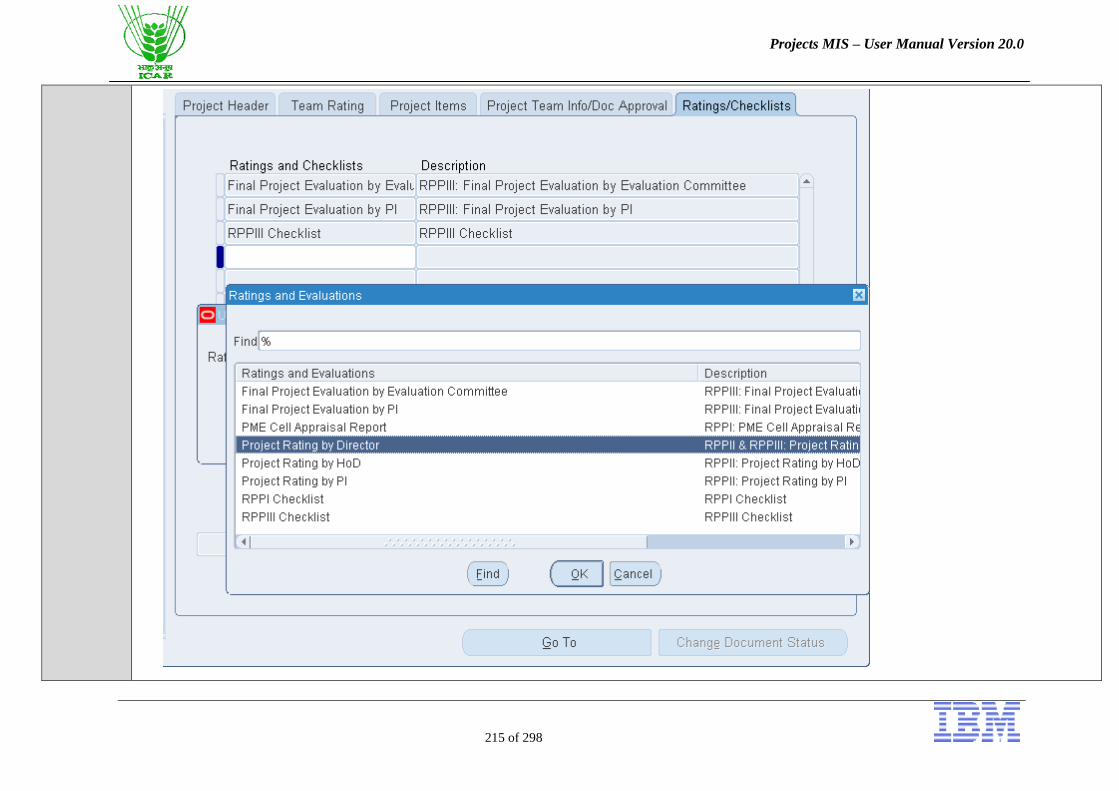
Projects MIS – User Manual Version 20.0
215 of 298

Projects MIS – User Manual Version 20.0
216 of 298
Director/
JD (R)
Rating
User will capture his/her rating and comments.
User will go to Project Team Info/Doc Approval Tab and click on Forward button. As in this case, the Director/ JD (R) is the last
approving authority, RPPII will get approved.

Projects MIS – User Manual Version 20.0
217 of 298
RPPIII
Approved With this the RPPIII gets approved and the status becomes “Document Approved”.
Document Approved

Projects MIS – User Manual Version 20.0
218 of 298
6.5 RPPIII related reports
Run/View
a Report To run a report, refer to process 12
User can run the following reports:
Report Name Report Parameters Report Type Report Functionality
ICAR RPP-III Report Institute Name
RPPIII Number
Adobe pdf It provides the RPPIII report
output
ICAR RPP-III Checklist Report Institute Name
RPPIII Number
Adobe pdf It provides the RPPIII Checklist
Report output
ICAR RPPIII Checklist
Summary Report
Institute Name
Division Name
From Date
To Date
Microsoft Excel It provides the RPPIII Checklist
details for a list of projects for a
particular institute (or division)
for a particular period (signified
by the start date and end date
ICAR Final Project Evaluation
Report by PI
Institute Name
RPPIII Number
Adobe pdf It provides the Final Project
Evaluation Report by PI output
ICAR Final Project Evaluation
Report By Evaluation Committee
Institute Name
RPPIII Number
Adobe pdf It provides the Final Project
Evaluation Report by Evaluation
Committee output
ICAR Project Publication Detail
Report
Institute Name
Division Name
Report Type
From Date
To Date
Microsoft Excel It provides the output/cumulative
output for a range of documents
(RPPII/RPPIII) created in a
particular period.
ICAR Project Status Report for
IRC
Institute Name Microsoft Excel It provides the Project Status for
IRC. This report is relevant for

Projects MIS – User Manual Version 20.0
219 of 298
Division
From Date
To Date
the PME Cell.
ICAR Project Funding Report Institute Name
Division
From Date
To Date
Microsoft Excel This report provides details of the
project funding.
ICAR Project Rating Report Institute Name
Division
Document Type
Document Number
From Date
To Date
Microsoft Excel It Provides Rating given to a
range of projects undertaken in a
particular period by HoD,
Director etc.
It is valid for both RPPII and
RPPIII document types.

Projects MIS – User Manual Version 20.0
220 of 298
7 RPPIV
Process Map

Projects MIS – User Manual Version 20.0
221 of 298
7.1 RPPIV Creation and Completion
Process
Overview
Descriptio
n
As per the latest guidelines, for certain projects another document (RPP-IV) will also be created to capture the upscale of research
outcome to the end user.
Navigation Responsibility: IASRI Projects
Navigation->Project Details
RPPIV
Creation User will create a new RPPIV Document from the related RPPI Document. The process is similar to creating RPPI from Status
Report; or RPPII/RPPIII from RPPI
Click on Project Details. A new window opens

Projects MIS – User Manual Version 20.0
222 of 298

Projects MIS – User Manual Version 20.0
223 of 298
RPPIV
Creation Click on “New Document” Button.
New Document

Projects MIS – User Manual Version 20.0
224 of 298
RPPIV
Creation Select the “Copy from Existing Document” option so that the relevant information is copied from RPPI Document. Click on Next.
Choose this option

Projects MIS – User Manual Version 20.0
225 of 298
RPPIV
Creation In the next screen, select the document type and RPPI Number as shown below. Then click on Next.

Projects MIS – User Manual Version 20.0
226 of 298
RPPIV
Creation In the next screen, select type as RPPIV. Then click on finish.
With this the RPPIV document with a unique RPPIV number is successfully created.
1. Choose RPPIV Document
2. Click here

Projects MIS – User Manual Version 20.0
227 of 298
RPPIV
Completio
n
All the relevant information is copied from RPPI to RPPIV Document.

Projects MIS – User Manual Version 20.0
228 of 298
RPPIV
Project
Items
Click on Project Items Tab. Enter Project Section details (similar to RPPIII, RPPII, RPPI and Status Report)
Click on “Standard” Checkbox

Projects MIS – User Manual Version 20.0
229 of 298
A note will appear asking you to select the relevant sections. Click on OK.
RPPIV
Project
Items
Click on “RPPIV” and click on Next Button.
1. Click here 2. Choose RPPIV
3. Click on Next

Projects MIS – User Manual Version 20.0
230 of 298
RPPIV
Project
Items
The RPPIV sections will get copied into the document. Click on each item and enter the relevant text.
1. Choose Section
2. Capture Information

Projects MIS – User Manual Version 20.0
231 of 298
RPPIV
Completio
n –
Capturing
Efforts
Made
Click on Efforts Made (RPPIV) Tab.
Enter serial number, expected end users, details of research output etc. as shown below:
1. Enter Sr. No. 2. Choose End User
from a List of Values
3. Enter Details of
Research Output
4. Enter Efforts Made

Projects MIS – User Manual Version 20.0
232 of 298
5. Click here
6. Enter Outcomes
Projects MIS – User Manual Version 20.0
233 of 298
RPPIV
Team
Member
Concurren
ce
The process of RPPIV Team Member Concurrence is similar to all other documents.
RPPIV
Approval The process of RPPIV Approval is similar to all other documents.
7.2 RPPIV related reports
Run/View
a Report To run a report, refer to process 12
User can run the following reports:
Report Name Report Parameters Report Type Report Functionality
ICAR RPP-IV Report Institute Name
RPPIV Number
Adobe pdf It provides the RPPIV report
output

Projects MIS – User Manual Version 20.0
234 of 298
8 RPPI Amendment
Process Map
Process
Overview
Descriptio
n
Once the RPPI Document is approved, user can make no modifications in it. To modify end date, project items, objective,
activities etc. user has to create a new RPPI Amendment document.
This document will again go to the appropriate channels for approval.
Navigation Responsibility: IASRI Projects

Projects MIS – User Manual Version 20.0
235 of 298
Navigation->Project Details
RPPI
Amendme
nt
Creation
User will create a new RPPI Amendment Document from the related RPPI Document. The process is similar to creating other
documents.
Click on Project Details. A new window opens

Projects MIS – User Manual Version 20.0
236 of 298

Projects MIS – User Manual Version 20.0
237 of 298
RPPI
Amendme
nt
Creation
Click on “New Document” Button.

Projects MIS – User Manual Version 20.0
238 of 298
RPPI
Amendme
nt
Creation
Select the “copy from existing document” option so that the relevant information is copied from RPPI Document. Click on
Next.

Projects MIS – User Manual Version 20.0
239 of 298
RPPI
Amendme
nt
Creation
In the next screen, select the document type and RPPI Number as shown below. Then click on Next.

Projects MIS – User Manual Version 20.0
240 of 298
RPPI
Amendme
nt
Creation
In the next screen, select type as RPPI Amendment. Then click on finish.
With this the RPPI Amendment document with a unique RPPI Amendment number is successfully created.
Choose RPPI
Amendment here

Projects MIS – User Manual Version 20.0
241 of 298
RPPI
Amendme
nt
Completio
n
All the relevant information is copied from RPPI to RPPIV Document.

Projects MIS – User Manual Version 20.0
242 of 298
RPPI
update For example, the user wants to update the key words. User will go to the Project Items Tab and update the key words text.
User will make the
required modifications

Projects MIS – User Manual Version 20.0
243 of 298
RPPI
Amendme
nt
Approval
RPPI Approval process is same as that for other documents.

Projects MIS – User Manual Version 20.0
244 of 298
9 Project Abeyance/Termination
Process
Overview
Description
A Project can be terminated or put into abeyance only by the PME Cell. If a project is put into Abeyance, it is temporarily closed.
No financial transactions can occur against the project till it is in abeyance. Further, no workplan activities can be updated.
Hence, to complete ongoing/pending financial transactions, if any, the PME would have access to take the Project out of abeyance.
If a project is terminated, it is closed forever and can never be opened again.
Navigation Responsibility: IASRI Projects
Navigation->Project Details
Project
Abeyance Click on “Change Document Status” Button.

Projects MIS – User Manual Version 20.0
245 of 298
Click on Change Document
Status Button (only PME Cell
Incharge will have access to it)

Projects MIS – User Manual Version 20.0
246 of 298
Project
Abeyance A new window will open. Select “Change Contract Status” and click on OK.
1. Choose this option
2. Click on OK

Projects MIS – User Manual Version 20.0
247 of 298
Project
Abeyance User will enter New Status (Abeyance or Termination) and the reason for status change.
Optionally, user can enter Date of Abeyance and Comments.
1. Choose new
status as Abeyance
2. Choose reason
3. Provide Date &
Comments

Projects MIS – User Manual Version 20.0
248 of 298
Click on OK Button.
Project
Abeyance The Status is changed to “Abeyance”.

Projects MIS – User Manual Version 20.0
249 of 298
Note: The process to take a project out of abeyance and to terminate a project is exactly similar.
Note: Once a project is in abeyance, user cannot update the workplan or make financial transactions against it.
Project out
of
Abeyance
Click on “Change Document Status” Button.

Projects MIS – User Manual Version 20.0
250 of 298
Click on Change Document
Status Button (only PME Cell
Incharge will have access to it)

Projects MIS – User Manual Version 20.0
251 of 298
Project out
of
Abeyance
A new window will open. Select “Change Contract Status” and click on OK.

Projects MIS – User Manual Version 20.0
252 of 298
Project out
of
Abeyance
User will enter New Status (Abeyance or Termination) and the reason for status change.
Optionally, user can enter Date of Abeyance and Comments.
1. Choose new
status
2. Choose reason
3. Provide Date &
Comments

Projects MIS – User Manual Version 20.0
253 of 298
Click on OK Button.
Project out
of
Abeyance
The Status is changed back to “Document Approved”.

Projects MIS – User Manual Version 20.0
254 of 298

Projects MIS – User Manual Version 20.0
255 of 298
10 Inter-Institutional Project
Process Map

Projects MIS – User Manual Version 20.0
256 of 298
Process
Overview
Descriptio
n
Even if a Project is Inter-Institutional, the process of documentation and evaluation remains the same.
However, there is a difference in budget creation.
Assume that a project has been undertaken in 1 Lead Institute and ‘n’ Collaborating Institutes. In this case, n+2 budgets will be
created:
One expenditure budget in every collaborating institute in which the budget allotted to that particular institute is captured.
One expenditure budget in the lead institute in which the budget allotted to the lead institute is captured.
One comprehensive proposal budget in the lead institute in which the entire Project Budget is captured.
For example, let us say that a project has IASRI as the lead institute and IARI as the collaborating institute. The total project budget
is Rs. 10 crore out of which IARI has been allotted Rs. 4 crore and IASRI Rs. 6 crore.
PI will create an expenditure budget in IASRI for Rs. 6 crore
PI will create an expenditure budget in IARI for Rs. 4 crore
PI will create a comprehensive proposal budget in IASRI for Rs. 10 crore
Note: Financial Transactions are done only against expenditure budget. The comprehensive proposal budget is only for reference.
Navigation Responsibility: IASRI Projects
Navigation->Project Details

Projects MIS – User Manual Version 20.0
257 of 298
Multiple
Institute
Project
Click on “Enter Budget” option.

Projects MIS – User Manual Version 20.0
258 of 298
Multiple
Institute
Project
First the PI will enter Comprehensive Proposal Budget.
Select the Project Number. In Budget Type field, select “Comprehensive Proposal Budget”.
1. Choose Comprehensive
Proposal Budget
2. Click on DFF
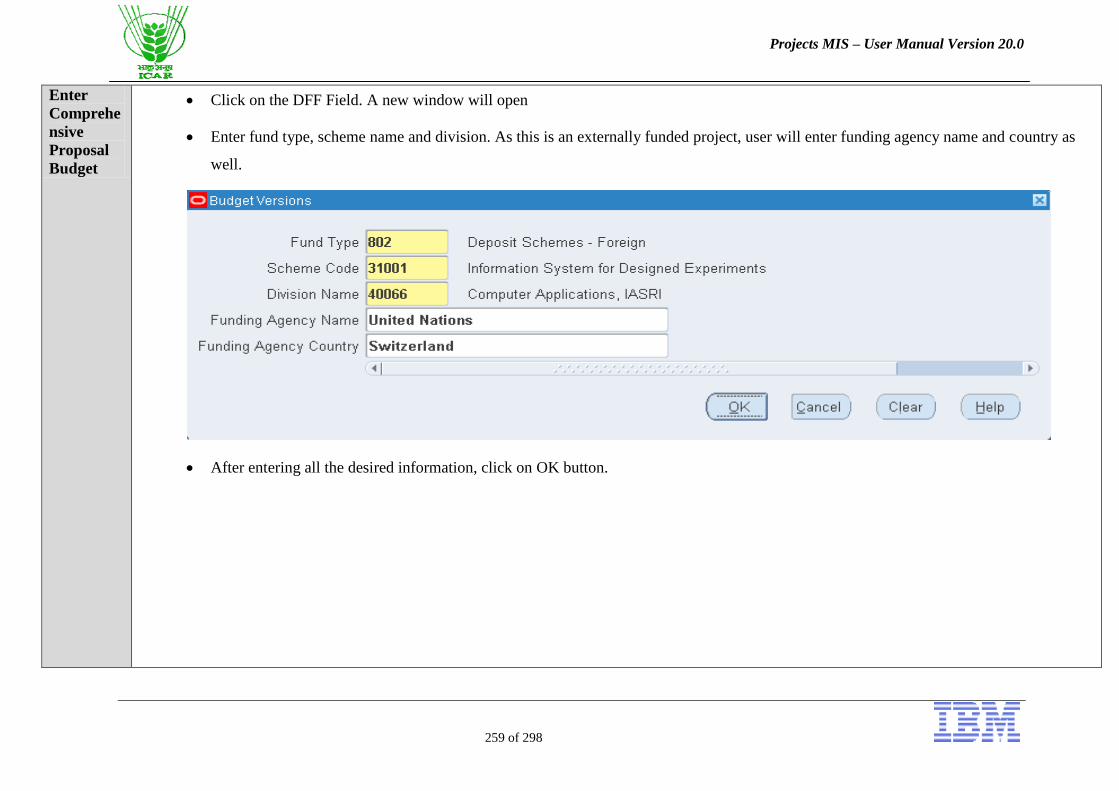
Projects MIS – User Manual Version 20.0
259 of 298
Enter
Comprehe
nsive
Proposal
Budget
Click on the DFF Field. A new window will open
Enter fund type, scheme name and division. As this is an externally funded project, user will enter funding agency name and country as
well.
After entering all the desired information, click on OK button.

Projects MIS – User Manual Version 20.0
260 of 298
Enter
Comprehe
nsive
Proposal
Budget
Click on “Details” Button. A new form will open.
Enter
Comprehe
nsive
Select Major Expenditure Head (e.g. Grants – Capital) and click on “Budget Lines” Button. A new form will open. A note will open.
Click on OK.
1. Choose the Major
Expenditure Head
2. Click here

Projects MIS – User Manual Version 20.0
261 of 298
Proposal
Budget Note: The Budget that you enter for a particular month is valid for that entire financial year. For example, if you enter the budget for June
2013, it will be valid for the period April 2013 to March 2014.
User will enter Minor Expenditure Head and Amount Type as shown and enter budget for all years.
1. Choose minor
expenditure head 1. Choose Raw Cost 3. Enter amounts for
the year

Projects MIS – User Manual Version 20.0
262 of 298
Similarly enter budget for all other major and minor expenditure heads. Save your work.
Click on Submit Button.
Click here

Projects MIS – User Manual Version 20.0
263 of 298
Click on Baseline Button. With this the budget gets saved.
Note: After clicking on Baseline button, the budget becomes available for financial transactions.
Click here to
Baseline Budget

Projects MIS – User Manual Version 20.0
264 of 298
Enter
Expenditu
re Budget
for Lead
Institute
Enter Expenditure Budget for Lead Institute (refer to process 4.4)
Enter
Expenditu
re Budget
for
Collaborat
ing
Institute
Note: For collaborating institute, a separate project with a unique project number is created in that institute. In this project, you can only
enter budget for that particular project i.e. you cannot enter workplan details, just expenditure budget for the collaborating institute.
Note: The Project Code for this Project will be the PME Code prefixed by the three digit institute code (same code used to represent
institute in document numbering) to mark a distinction with the lead institute project. So if the PME Code is
AGEDIASRICIL201332115347 for a project number 1000111 running in IASRI with IARI as the collaborating institute, for IARI the
budget created will be in project number 1000112 and project code 156-AGEDIASRICIL201332115347 as 156 is the institute code for
IARI.

Projects MIS – User Manual Version 20.0
265 of 298
Enter Expenditure Budget for collaborating institute (refer to process 4.4)

Projects MIS – User Manual Version 20.0
266 of 298
11 Find/Open a Document
Find/Open
a
Document
In Recent Documents, only the ten documents which the user has most recently accessed are displayed as shown below:
To find a document (which may not be displayed in the list of recent documents), click on Find Button.
Click on Torch (It is
the Find Icon)

Projects MIS – User Manual Version 20.0
267 of 298
Find a
Document As shown below, enter the Document Number and click on Find
1. Choose Institute
2. Enter Document
Number
3. Click on Find

Projects MIS – User Manual Version 20.0
268 of 298
Find a
Document Click on Go To Button and select Authoring Workbench Option. With this the Document is opened successfully.
1. Click here
2. Choose this option
3. Click on OK

Projects MIS – User Manual Version 20.0
269 of 298
12 Run/View a Report
Run/View
a Report From the toolbar menu at the top, select View Requests

Projects MIS – User Manual Version 20.0
270 of 298
Run a
Report Click on "Submit a new Request" to run a report (or “Find” to view a report).
Select "Single Request” and click "OK"
Click here to run a report Click here to view a
report

Projects MIS – User Manual Version 20.0
271 of 298
Run a
Report Enter Report Name
Enter Parameters and click on OK.

Projects MIS – User Manual Version 20.0
272 of 298
1. Enter Report Name
2. Enter Parameter 1
Institute Name
3. Enter Parameter 2
Status Report

Projects MIS – User Manual Version 20.0
273 of 298
Run a
Report Click on Submit Button.
A note will come. Click on No.

Projects MIS – User Manual Version 20.0
274 of 298
View a
Report Click on "Find" Button to view a report
Click here to view a
report

Projects MIS – User Manual Version 20.0
275 of 298
View a
Report User will choose the report and click on “View Output” Button.
Click on View Output

Projects MIS – User Manual Version 20.0
276 of 298
13 Reports
Reports Output for the following reports can be obtained from the system:
Report Name Report Description
ICAR Status Report It provides the Status Report output.
ICAR RPP-I Report It provides the RPPI output.
ICAR RPP-I Checklist Report It provides the RPPI Checklist Report output
ICAR RPP-I Checklist Summary Report It provides the RPPI Checklist details for a list of projects for a particular institute (or
division) for a particular period (signified by the start date and end date)
ICAR PME Cell Appraisal Report It provides the PME Cell Appraisal Report output
ICAR Proposal vs. Expenditure Budget Report It provides the comprehensive proposal budget (if applicable) and expenditure budget details
for a particular project
ICAR RPP-II Report It provides the RPPII report output.
ICAR Project Rating Report It Provides Rating given to a range of projects undertaken in a particular period by HoD,
Director etc.
It is valid for both RPPII and RPPIII document types.
ICAR RPP-III Report It provides the RPPIII report output
ICAR RPP-III Checklist Report It provides the RPPIII Checklist Report output
ICAR RPP-III Checklist Summary Report It provides the RPPIII Checklist details for a list of projects for a particular institute (or
division) for a particular period (signified by the start date and end date
ICAR Statement of Expenditure Report It provides the Statement of Expenditure for a particular project.
You can optionally give the period for which the expenditure report is required.
ICAR Final Project Evaluation Report by PI It provides the Final Project Evaluation Report by PI output
ICAR Final Project Evaluation Report by It provides the Final Project Evaluation Report by Evaluation Committee output

Projects MIS – User Manual Version 20.0
277 of 298
Evaluation Committee
ICAR Project Publication Detail Report It provides the output/cumulative output for a range of documents (RPPII/RPPIII) created in
a particular period.
ICAR Project Status Report for IRC It provides the Project Status for IRC. This report is relevant for the PME Cell.
ICAR Project Funding Report This report provides details of the project funding.
ICAR RPP-IV Report It provides the RPPIV report output

Projects MIS – User Manual Version 20.0
278 of 298
14 Creation of Project Receipts
Reports 1. Create Receipt in system (follow normal steps)

Projects MIS – User Manual Version 20.0
279 of 298

Projects MIS – User Manual Version 20.0
280 of 298
2. Additionally, to enter Project related information, click on DFF as shown below:
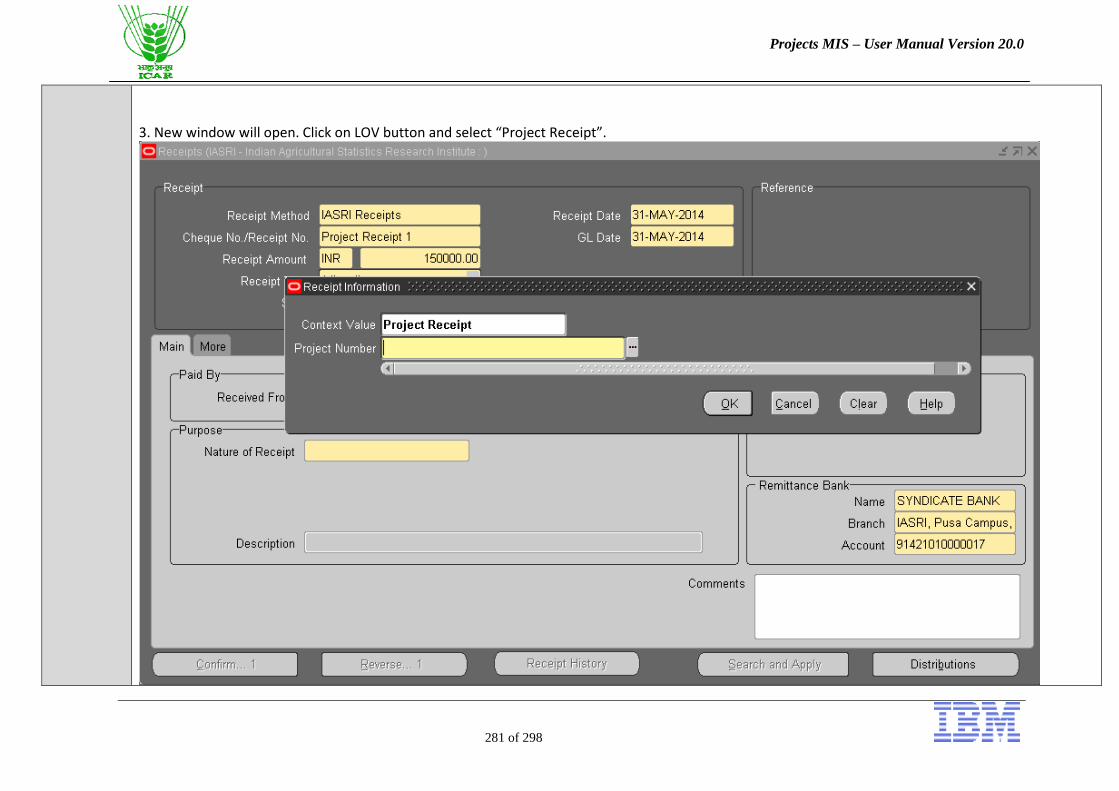
Projects MIS – User Manual Version 20.0
281 of 298
3. New window will open. Click on LOV button and select “Project Receipt”.

Projects MIS – User Manual Version 20.0
282 of 298
4. Select the correct project number (search via project number/PIMS Code/Project Title)

Projects MIS – User Manual Version 20.0
283 of 298
5. Continue with the normal process – enter received from, nature of receipt etc.

Projects MIS – User Manual Version 20.0
284 of 298
6. Continue with the normal process – click on distribution button and enter fund type, scheme etc.

Projects MIS – User Manual Version 20.0
285 of 298
7. Continue with the normal process – save the receipt.

Projects MIS – User Manual Version 20.0
286 of 298
15 Enter Budget for Externally Funded Project
Reports 1. Login into the ERP Application and click on the Projects folder
2. Click on “Enter Budget” link. The following window will open up.

Projects MIS – User Manual Version 20.0
287 of 298
3. In the “Project Number” field: a. either enter your 7 digit system generated project number or
b. click on the dropdown (LOV) button.
i. A new window will open up
ii. In the find field, enter “%” symbol and click on Find button.
iii. Enter your project number or your PIMS/PME Code between “%” symbols and click on find button. E.g. if the PIMS code is IXX00125, enter
%IXX00125% and click on find button.

Projects MIS – User Manual Version 20.0
288 of 298
4. The next field to be filled is Budget Type. If you are entering budget in which you will enter funds available for your institute to carry out the project,
select “Expenditure Budget” and click on OK.

Projects MIS – User Manual Version 20.0
289 of 298
5. A new window will open up. Here let us enter the following values:
a. Fund Type: Enter the fund type of your project. For Example, institute funded project come under Plan. Externally Funded Projects come under Deposit
Schemes. If the Funding Agency for the externally funded project is Domestic, select Deposit Schemes – Domestic. If the Funding Agency for the
externally funded project is Foreign, select Deposit Schemes – Foreign. In this example, let us assume project is funded from domestic funding agency
(DBT).
b. Scheme Code: Select the name of the scheme under which your project is running.

Projects MIS – User Manual Version 20.0
290 of 298
c. Division Name: Select the name of the division under which this project is running.
d. Funding Agency Name: Enter the name of the funding agency (mandatory and only for externally funded projects).
e. Funding Agency Country: Enter the country of the funding agency (mandatory and only for externally funded projects).
f. Click on OK.
6. Now user needs to allocate budget in the project. To accomplish this, click on “Details” button. A new window will open.

Projects MIS – User Manual Version 20.0
291 of 298
7. Here user can see the 3 major expenditure heads. There are separate minor heads under each major head. Process to enter budget in any minor head will
remain the same. In this example, let us allocate under equipments. Equipments will come under Grants – Capital. So select Grants – Capital from the
window above and click on Budget Lines Button. A note will appear which says:
“Please note that Budget Amount that you enter for a particular month would be Applicable for that financial year.”

Projects MIS – User Manual Version 20.0
292 of 298
Click on OK. A new window will open.

Projects MIS – User Manual Version 20.0
293 of 298
8. Here we will enter the following information:
a. Minor Expenditure Head: Click on the drop-down button and you can see the minor heads under that particular major head (in this example, Grants –
Capital).

Projects MIS – User Manual Version 20.0
294 of 298
Select the appropriate minor head and click on OK.
b. Amount Type: Click on the dropdown button. Value “Raw Cost” will come automatically.

Projects MIS – User Manual Version 20.0
295 of 298
In the next 4 columns, user can see four months. Remember the note which says “Please note that Budget Amount that you enter for a particular month
would be Applicable for that financial year.” Therefore:
i. User may enter the budget in any month; he will be able to use that amount for the entire financial year. For example, if user enters amount in November
2012, he/she will be able to use that budget for April 2012-March 2013.
ii. All the reports related to Projects MIS give financial year wise fund availability and not month wise fund availability (even though amount is entered

Projects MIS – User Manual Version 20.0
296 of 298
month wise).
iii. To enter budget in some other month, user can navigate using the arrow buttons on the window.
c. Saving the row: As soon as you save your work, two more lines will be generated with amount type “Currency” and “NA”.
These rows are generated automatically by the system and are used for integration with other areas. User needs to enter only the “raw cost”. Note: Do not
enter the same “minor expenditure head” twice. A minor head can be entered only once on a budget; to enter values for multiple years use the arrow
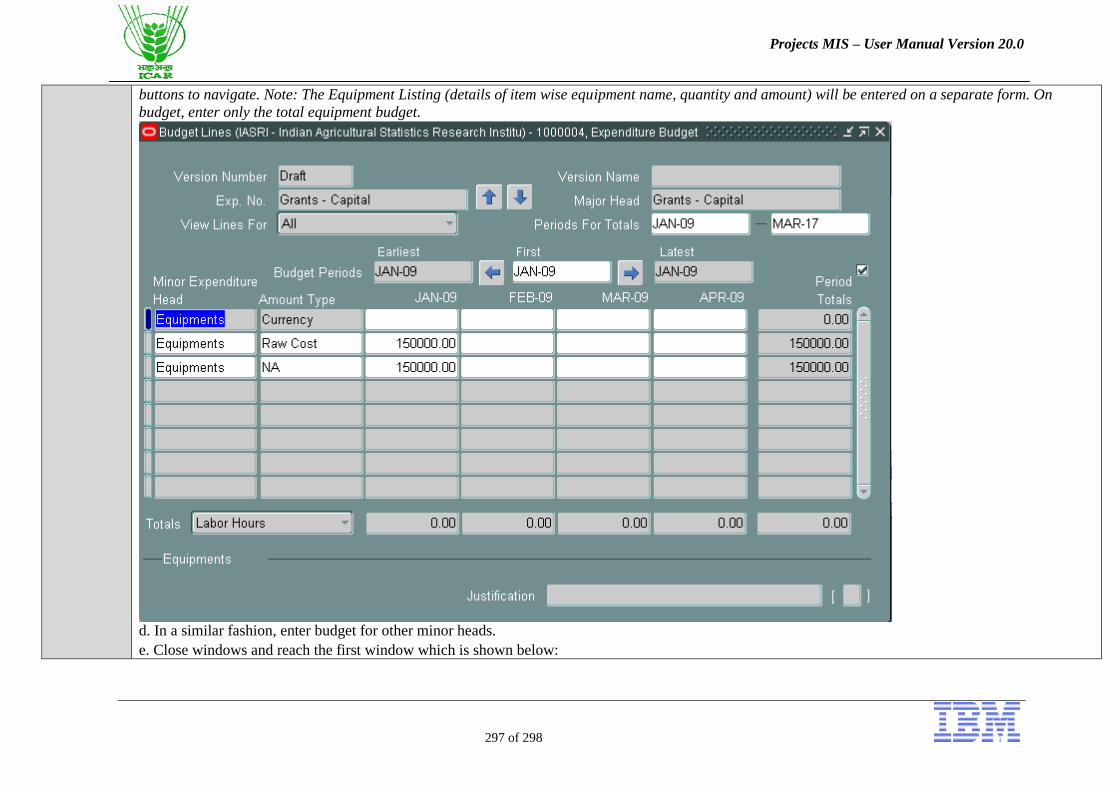
Projects MIS – User Manual Version 20.0
297 of 298
buttons to navigate. Note: The Equipment Listing (details of item wise equipment name, quantity and amount) will be entered on a separate form. On
budget, enter only the total equipment budget.
d. In a similar fashion, enter budget for other minor heads.
e. Close windows and reach the first window which is shown below:

Projects MIS – User Manual Version 20.0
298 of 298
f. Submit and Baseline: All the information that user enters will get saved in the draft status only. To change the status from draft to final, click on the
“submit” button once. The name of button will change to “baseline”. Then click on “baseline” button. And the status is changed to final.
Note: Until user submits and baselines the budget, he/she will not be able to create an indent against that project budget.