immunology mic 451fac.ksu.edu.sa/sites/default/files/laboratory_guidance_mic_451... · immunology...
TRANSCRIPT
Laboratory Guidance
Immunology MIC 451
Prepared by:
Dr. Nagwa M. Aref
Dr. Faheema Khan
Dian Rachma W. MSc.
King Saud University
Department Botany and Microbiology
Kingdom of Saudi Arabia 2011
1. PHAGOCYTOSIS
Background Information
Inflammation is one of the ways our body reacts to an infectious agents or injury. During the
inflammatory response, white blood cells with multilobed nucleus, PMNs (Polymorphonuclear
neutrophils) migrate out of capillaries and into the infected tissue. PMN attracted to the site of infection
through a process known as chemotaxis. In Chemotaxis, phagocyctic cells move migrate towards the
infected cite where phagocytosis begin. The phagocytic cells are PMNs, monocytes, and macrophages.
Monocytes are white blood cells with one large nucleus. Monocytes circulate in our pheripheral blood for
only about 1 day. They may eventually move into tissue where they mature into a cell called a
macrophages. Macrophage may life for several month. PMNs and macrophage are the major phagocytic
cells of the immune system.
Phagocytosis is the process when phagocytes ingest, kill, and digest infectious organisms and
unwanted cellular debris such as old cells or particulate matter. The particulate susceptible to the
phagocytosis can be intracellular, such as Mycobacterium tuberculosis, or extracellular such as
Streptococcus pneumonia. The intracellular pathogen are ingested by macrophage when they are released
from a dying cell. The process begin after the phagocytes are attracted to the sie of injury and begin to
attach to the microorganism(s). Attachment is accomplished because phagocytes have certain receptors
(non-speciffic) on their cell surface to which microorganism can be attached.
In this exercise you will see PMNs engulfe yeast cells. Try to observe the entire sequence of
events which includes chemotaxis, adherence, engulfment and phagosome formation. You will also stain
your cells after phagocytosis has occurred using a common blood cell stain (Wright’s stain) and observed
ingested yeast cells within the PMNs.
Objectives
To observe phagocytosis by microscopically examining the PMNs and monocytes as they ingest
the yeast cells
To understand the mechanims of phagocytosis.
Materials
Lancet
Disposable gloves
Heparanized capillary tubes
Microcentrifuge
Coverslips
RPMI 1640 cell culture medium with 25mM Hepes buffer
Tooth picks
Wright-Giemma stain
Staining racks
Proper discard containers for the lancet, capillary tubes, gauze, slides, etc.
Alcohol swabs
Gauze
Suspension of yeast cells (108/ml)
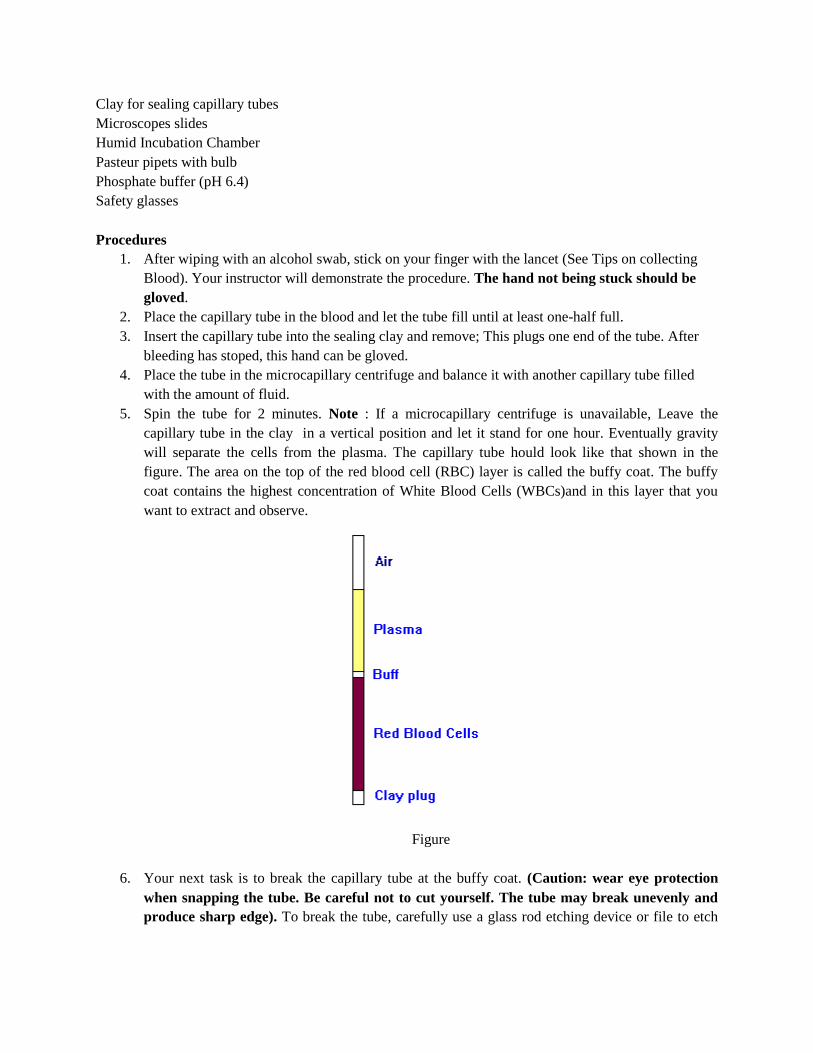
Clay for sealing capillary tubes
Microscopes slides
Humid Incubation Chamber
Pasteur pipets with bulb
Phosphate buffer (pH 6.4)
Safety glasses
Procedures
1. After wiping with an alcohol swab, stick on your finger with the lancet (See Tips on collecting
Blood). Your instructor will demonstrate the procedure. The hand not being stuck should be
gloved.
2. Place the capillary tube in the blood and let the tube fill until at least one-half full.
3. Insert the capillary tube into the sealing clay and remove; This plugs one end of the tube. After
bleeding has stoped, this hand can be gloved.
4. Place the tube in the microcapillary centrifuge and balance it with another capillary tube filled
with the amount of fluid.
5. Spin the tube for 2 minutes. Note : If a microcapillary centrifuge is unavailable, Leave the
capillary tube in the clay in a vertical position and let it stand for one hour. Eventually gravity
will separate the cells from the plasma. The capillary tube hould look like that shown in the
figure. The area on the top of the red blood cell (RBC) layer is called the buffy coat. The buffy
coat contains the highest concentration of White Blood Cells (WBCs)and in this layer that you
want to extract and observe.
Figure
6. Your next task is to break the capillary tube at the buffy coat. (Caution: wear eye protection
when snapping the tube. Be careful not to cut yourself. The tube may break unevenly and
produce sharp edge). To break the tube, carefully use a glass rod etching device or file to etch

the capillary tube between two hands. Position your forefingers and thumbs at the etched point
and snap the tube at the interface.
7. Carefully tap the portion with the fluid (plasma) and cells onto a coverslip. The coverslip is
placed on a glass slide for easier handling. Also place a drop at the end of another glass side
(figure 1).
(1) (2)
Figure 1.(1). Coverslip on a slide with the fluid (2). Slide with the fluid. (a:Buffy coat and plasma )
8. Dispense 1 drop of RPMI 1640 cell culture medium with Hepes buffer next to the fluid. The
medium ensures that the PMNs do not die while they are phagocytizing the yeast.
9. Dispense 1 drop of suspended yeast cell (Saccharomyces cerevisiae) next to the fluid.
10. Mix the three suspensions together with a toothpick.
11. Place both the slide with coverslip and the second slide in a humid incubation chamber and
incubate for 5 to 10 minutes at 37°C. It is important the mixture on the slide does not dry during
incubation. Keep the lid closed on the chamber and make sure the paper is thoroughly moistened
during incubation.
12. After 5-10 minutes, remove the slide with the coverslip and carefully invert the coverslip onto the
slide. Let the fluid on the coverslip settle for one minute before observing. (You have made a wet
mount of phagocyte and yeast cells).
13. Continue to incubate the other slide for an additional 45minutes in the humid chamber.
14. Observe the slide with the coversliip under 40xpower. The suspension is best observed using
phase microscopy.
15. Watch the PMNs send out pseudopodia and begin to engulf the yeast cells. Record your
observations in the RESULTS sheet.
16. After the slide has incubated about 1 hour, remove it from the chamber and spread the fluid over
entire slide. This can be done by using another slide or a toothpick. Allow the slide to air dry.
17. Stain the slide according to the following Wright’s stain procedure:
a. Place the slide on a staining rack and cover it with filtered Wright’s stain.
b. Allow the stain to remain on the smear for at least 5 minutes.
c. Slowly add buffer to the stain until the buffer begins overflow the stain. A metallic luster
appearance will show up. (Some stain already contain the buffer, so this step is unnecessary).
d. After mixing the buffer and stain by gently blowing on the smear, let the slide sit for another
5 minutes.
e. Gently wash the stain and buffer off the slide with distilled water.
f. Air-dry the smear or carefully blot the slide between two sheets of bilbulous paper.
18. Examine the smear microscopically. Use 40X or oil immersion (100X) to see the ingested yeast.
In a properly stained slide, the red blood cells will appear as small pink- to red-colored cells,
whereas the white blood cells will appear blue to dark purple with a dark purple nucleus. If the
slide is poor stain, the white blood cells will be faintly stained.
a
a
a

19. Draw your observation in the RESULTS section.
Reference
Hudson BK. Sherwood LK. 1997. Exploration in Microbiology a discovery based approach.
Prentice hall: USA.

Lab RESULT 1. PHAGOCYTOSIS
Student name : __________________
ID Number : __________________
Date : __________________
1. Draw and or/describe the events you saw during the microscopic examination of PMNs engulfing
yeast cells
2. Draw and or/describe the events you saw during the microscopic examination of PMNs engulfing
yeast cells with your stained slide
Reflections
1. The sample placed on the slide contained plasma, not serum (fluid portion of the blood). What is the
difference between serum and plasma?
2. Does plasma contain the IgG and C3 necessary for opsonization?
3. How long did it take your PMNs to engulf the yeast cells?
4. What happened during the phagocytosis ?
2. PRECITPITIN: Ring Test
Background Information
The ring test is one of the oldest methods for detecting soluble antigen and antibody. It is
simple, quick, and reasonably sensitive for the detection of trace quantities of antigen, as used
forensically to detect adulteration of food meats with our meat proteins. It is less sensitive for the
detection of antibody. A good antiserum usually gives a ring test visible in minutes at a dilution
factor 1:5.
The ring test is based on the propensity of antibodies to form complexes with their
corresponding antigens. When antibodies attach to antigen molecules in solution, the molecules
become part of an insoluble antibody-antigen complex, and a visible precipitate forms.
Objectives
To understand how to perform the ring test for detecting antigen and antibody
Materials
Precipitin Tubes (3x50mm)
Saline Solution (0.9%)
Bovine Serum Albumin (BSA) 1 %
Antiserum
Normal rabbit serum
Procedure
1. Obtain 0.5 ml clear antiserum.
2. Prepare a 1:5 dillution of the antiserum by adding 0.1 ml to 0.4 ml saline and mixing, and
a 1:10 dilution by adding 0.2 ml of the 1:5 dilution to 0.2 ml of saline.
3. Into 3 precipitin tubes, clearly identified , add 0.2-0.3 antiserum and the dilutions,
respectively (Place the serum into the bottom of the tub without creating bubbles )
4. To a fourth tube, add normal rabbit serum.
5. With the precipitin tube held at angel of 45-60 °, carefully allow 2 drops of a 1:20
dilution of the bovine albumin to flow down the side of the tube and over the antiserum.
A sharp line will be produced at the interface of the liquids.
6. Observe the precipitin reaction in each tube at minute interval for 5minutes and then at 5-
minute interval for 30 minutes. Record it on RESULT sheet.
Reference
Montasser MS. 1999. Experimental Protocols in Virology and Immunology. Academic
publication committee. Kuwait University.

Lab RESULT 2. PRECIPITIN: Ring Test
Student name : __________________
ID Number : __________________
Date : __________________
1. Examine all test tubes for the development of a ring of precipitation at the interface. Indicate
the presence or absence of a ring.
2. Determine and indicate the antigen dilution that produce the greatest degree of precipitation
that is indicative of the optimal antibody:antigen ratio
Table Ring Test Precipitation on every minutes in the first five minutes
Presence of
interfacial
ring (+) or (-)
Antigen dilutions Time
1:5 1:10 Serum
control
Saline
control
1 min
2 min
3 min
4 min
5 min
Table Ring Test Precipitation on every minutes in the first five minutes
Presence of
interfacial
ring (+) or (-)
Antigen dilutions Time
1:5 1:10 Serum
control
Saline
control
5 min
10 min
15 min
20 min
25 min
30 min

3. MICROPRECIPITIN TEST
Background Information
The viral protein coat has multiple epitopes susceptible to antibodies. Antibodies have
two antigen-binding sites. When brought together in optimal proportions, antibodies can link
virus particles and for large aggregates. In droplets, such aggregates are visible as whitish
precipitate. If either the number of antibodies or virus particles are limiting, no visible precipitate
is formed. This is the basis for testing the quality of an antiserum in the microprecipitin test.
Drops of a series twofold antiserum dilutions are mixed with drops of a similar series of virus
dilutions in a grid titration. The greatest dilution giving a visible precipitate can be determined
for both antiserum and virus. For the antiserum, this highest dilution factor signifies the titre of
the serum.
By using the test for screening serum from successive bleedings, the titre of the antiserum
can be monitored during the immunisation process. If carried out properly, the test requires only
properly, the test requires only a small volume of antiserum.
Objectives
Two learn how to performs : Immunoelectrohphoresis
Materials
Plastic Petri dish, 14 cm diameter
Filter petri dish, 14 cm diameter
Microcentrifuge tube (0.5-1.0 ml)
Rack for microcentrifuge tubes
Micropipettes (200,100 and 20 µl)
Incubator at 37 °C
Stereomicroscope with Iluminator
Glossy black paper sheet, black glass plate, or other black material (11x11 cm)
Tris-NaCl buffer ; Tris-HCL (0.01 M);NaCl (0.85%). Adjust to pH 7.0
Antiserum, in a microfuge tube, undiluted, volume at least 60 µl
virus materials
Plant virus suspension in a microcentrifuge tube, concentration 1 mg/ml, volume at least 240 µl

Procedure
Preparing dilution series
1. Place eight microcentrifuge tubes in a rack, with the first one containing undiluted virus
suspension. Mark the tubes with the virusdilution factors:1,2,4,8,16,32,64,&128.
2. Pipette 120 µl of Tris-Nacl buffer into each of the tubes 2-128.
3. Transfer 120 µl of virus suspension from tube 1 to tube 2 and mix thoroughly by sucking
and expelling the liquid a few times. Avoid the formation of air bubbles or foam as much
as possible.
4. With a clean pipette tip transfer 120 µl from tube 2 to tube 4 and mix again.
5. Repeat this until all tubes contain successive virus dilutions.
6. Place seven microfuge tubes in the rack and marks the tubes with the serum dilutions
factors 16,32,64,128,256,512, & 1024.
7. Pipette 225 µl of Tris-NaCl buffer into tube 16, and 120 µl in the other six tubes.
8. Transfer 15 µl of undiluted serum into tube 16 and mix.
9. Continue dilution by successively transferring 120 µl to the other tubes.
Grid Titration
1. Draw on the sheet of paper lacctice of 9x8 squares of 1 cm 3 Lable the column as shown in the
figure .
1 2 4 8 16 32 64 128 B
16
32
64
128
256
512
1024
B
2. Using a 20 µl micropipette, place 12 µl droplets of Tris-NaCl buffer in the center of the
squares of the column labelled B. As the droplets are small they may have to be dabbed
off.
3. Equally, place 12 µl droplets of virus dilutions in all squares of correspondingly labeled
columns
4. Repeat step 2 and 3 with buffer and antiserum dilutions in appropriate rows, placing the
droplets on top of the ones with antigen. Start with antiserum dilution 1024 after the
application of buffer. If necessary, dab off the droplets on top of the first ones but make
the contact of the pipette tip with the two combined droplets as superficial as possible.
5. Place the dish cover after lining it with moist filter paper and incubate at 37 °C for 2 hour
6. Place the dish, without cover, on a glossy black background with oblique to light.
Examine the drops with a stereomicroscope for the presence of a whitish precipitate at 16
X or 25 X magnification.
7. Evaluate the amount of precipitate according to the following scale :
++++ very heavy precipitate
+++ heavy precipitate
++ slight precipitate
+ slight precipitate
± barely visible
0 no precipitate
8. Keep the dish overnight in a refrigerator for a second evaluation.
Reference
Djikstra J. Pdee Jager P. 1998. Practical Plant Virolog,protocols and exercise. Springer:
Heidelberg.

Lab RESULT 3. MICROPRECIPITIN TEST
Student name : __________________
ID Number : __________________
Date : __________________
1. Observe the plate and evaluate the amount of precipitate. Complete the figure below
2. Which dilution having a very heavy precipitate ?
3. In the Buffer control, is there any precipitate ?
1 2 4 8 16 32 64 128 B
16
32
64
128
256
512
1024
B

4. IMMUNODIFFUSION : Radial Immunodifussion
Background Information
In Immunodiffusion tests, antibodies and or soluble antigens are loaded into separate
wells of a gel and are allowed to difuse, each reagent moving radially into the gell. An immobile
precipitate, visible as a band (precipitin line) in the gel, develops if specific antibody- antigen
binding takes place, and if antibody-antigen components are present at optimal proportions.
In radial immunodifussion, the antibodies are equally distribute, loaded into a well,
diffuses. When antigens molecules move through the gel, they bind to and carry antibodies, until
the ratio of antibodies are optimal for complex formation.
Objectives
To understand Immunodiffusion technique
Materials
Human IgG, IgA, and IgM “NL” “Bindarit TM
Radial immnodiffusion kit
Human serum
Micropipettte
Procedure
1. Obtain 5 µl of human serum, and pipette it into a designated wells of the RID assay gel.
2. Resserve the three weels for standard concentrations. A high standars, low standard, and a serum
control (Provided in the radial immunodiffusion kit)
3. Place the gel into moist box, and incubate for 24 hours at room temperature to allow difussinon
and banding (The gel can be stored in refrigerator for several weeks, if the boxis keep moist)
4. Read the result of your assay: Measure the diameter of the circle of precipitate (in centimeters)
for the sample you loaded and for the three standard samples. Record this in the
Reference
Prescott, LM. 2005. Study Guide for Use With Microbiology. McGraw-Hill: Montana State
University.

Lab RESULT 4. IMMUNODIFFUSION : Radial Immunodifussion
Student name : __________________
ID Number : __________________
Date : __________________
Record the three standars immunoglobulin (Ig) Concentrations and the diameter of each resulting
precipitin ring. Also record the diameter of the precipitin circle for the sample you loaded.
Ig Standard Concntration Diameter of precipitate circle
Sample precipitin ring diameter :_____________________________________

5. IMMUNOELECTROPHORESIS
Background Information
Immunoelectrophoresis involves combination of two techniques of immunodiffusion and
electrophoresis. Antigen are first loaded into wells an agarose gel and are separated by charge in
an electrophoresis chamber. Then, antibodies are used yo detect the separated antigens after
being loaded into a trough that runs the length of the gel, they diffuse towards and complex with
the antigens, and form visible lines of precipitate.
Objectives
To perform one of the immunodiffusion technique : Immunoelectrophoresis
Materials
Hight resolution electrophoresis buffer, pH 8.8
1% Agarose in high resolutionbuffer, pH 8.8
Antigens: bovine serum; bovine albumin 10 mg/ml
Antibodies: anti-bovine albumin; anti-bovine serum
Horizontal gel electrophoresis box
Power supply
160 mm diameter petri dish
Tape
2 glass slides
Glass or plastic dropper
Micropipette/tips (10-100 µl)
Grade no.1 whatman paper or 3MM paper
Procedure
1. Prepare 40 ml of 1% agarose: Add 0.4 g of agarose to 40 ml of high-resolution buffer,
PH 8.8 in a 125 ml flask. Microwave the mixture for about 30 seconds, check to make
sure it does not boil over. Using a hot glove, gently swirl the flask and return it to the
microwave. Heat for 15 seconds, repeating this until no flecks of agarose are visible in
the flask. Let the molten agarose cool until the flask is comfortable to handle, but still
warm
2. While the agarose cools, prepare a horizontal gel electrophoresis box by putting the dams
securely in place. Also prepare a trough-forming apparatus: obtain a 60 mm petri dish
with lid, and tape a slide to each side.

3. Once the agarose has cooled so that the flask is comfortable to hold, pour the agarose into
the unit until it completely covers the platform. Place the trough-forming apparatus at the
center of the platform. Allow the agarose to solidify, about 10 minutes.
4. When the gell is solid, gently remove the dams and trough-forming apparatus. Using the
the large end of a plastic or glass dropper (a diameter of about 0.5 cm), cut wells into
each gel as shown in the following template
5. Pour high-resolution buffer, pH 8.8, into the electrophoresis box or either side of the gel,
being careful not to pour onto the gel itself. 1 or 2 inches deep. Cut two pieces of
whatman chromatography paper wicks, and place them into the apparatus. Be sure that
the paper is in contact with the gel and the buffer at both ends of the gel.
6. Load the antigens: Changing micropipette tips between samples, load 20 µlof bovine
serum into wells A and C, and 20 µl of bovine albumin into well B. Do not load the
troughs.
7. Electrophoresis samples at 70 volts for 1.5 hours
8. Load the antibodies: After electrophoresis is complete, load 50 µ of anti-bovine albumin
into trough 1 and 50 µl of anti-bovine serum into trough 2. Again, change tips between
samples.
9. Leave the gell in the electrophoresis apparatus, and wrap a moist paper towel and plastic
wrap around it to create a moist container. Incubate for 24 to 48 hours at room
temperature to allow diffusion and banding.
Reference
Prescott, LM. 2005. Study Guide for Use With Microbiology. McGraw-Hill: Montana State
University.
A
B
C

Lab RESULT 5. IMMUNOELECTROPHORESIS
Student name : __________________
ID Number : __________________
Date : __________________
Diagram the result of the IEP Assay

6. THIN LAYER IMMUNOASSAY
Background In formation
Many antigens adsorbs firmly to the hydrophobic surface of polystyrene. The exposed
antigenic determinants on the monomolecular film are fully reactive with antibody. Antibody
bound to the antigen may be detected by fluorescence in ultraviolet light after reaction with
fluorescein labeled anti-immunoglobulin.
Thin-layer immunoassay (TIA) is a technically simple and accurate method for the assay
of antigen-antibody reaction. The technique basically use the principle that macromolecules may
be absorbed as a thin layer to a polystyrene surface. These macromolecules most often preserve
their serological reactivity and hence capable of binding antibodies. The presence of antibodies
on the antigen surface is visualized as a distinct hydrophilic condensation pattern when surface is
exposed to water vapor. TIA has been used for the determination of antibodies against purified
proteins, polysaccharides, and lipopolisaccharides also proved suitable for screening of serum
samples.
Objectives
To know the Thin-layer Immunoassay technique
\
Materials
Petri plates, 100 mm polystyrene
Ethanol (70%)
Microtiter plates
Microtiter diluters (25 µl)
Capillary tubes (20 µl)
Bovine Serum Albumin (BSA), 1%
NaHCO3 (0.05 M)
NaCl (0.15M)
Water bath, 60°C
Procedure
1. Rinse a polystyrene Petri plate with 70% ethanol. Blow the plate dry with a jet of air.
2. Using a 0.05M NaHCO3 as diluents, prepare 20 ml of a BSA solution containing 10
µg/ml. Pour the solution into the dry petri plate. Incubate the plate for 30-60 minutes at
37°C. (Plates with antigen may be stored at 4°C until ready for use).
3. Pour off the antigen solution; wash plates thoroughly with distilled water. Blow dry.
4. With marker pen, draw a grid on the underside of the plate to provide 20-40 squares.
5. Prepare 10-2 serial dilutions of antiserum in NaCl (0.15M) using the microdillution
equiptment. Starting with the highest dilution and using a capillary tube, spot 5µl of

antiserum onto a square. Proceed with the remaining dilutions of antiserum. Repeat with
a control normal serum.
6. Place the petri plate with dilutions in a humid chamber 37°C for one hour.
7. Invert the plate with the serum drops still in place over a beaker filled with water at 60°C
for one minute/ Rinse the plate thoroughly with distilled water blow dry, and again invert
the plate over the beaker filled with water at 60°C.
8. Observe the condensation patterns in the squares. Record as positive those dilution of
serum that give water droplets obviously larger than droplets appearing over the
background.
Reference
Montasser MS. 1999. Experimental Protocols in Virology and Immunology. Academic
publication committee. Kuwait University.
Jeansson S. Elwing H. Nilsson L. 1978. Thin-Layer Immunoassay for Determination of
Antibodies to Herpes Simplex Virus. Journal of Clin Microbiol.

Lab RESULT 6. THIN LAYER IMMUNOASSAY
Student name : __________________
ID Number : __________________
Date : __________________
Diagram your Thin-Layer Immunoassay result, and give explanation on the picture

7. POLYCLONAL ANTIBODIES
Background Information
The Immunization of laboratory animals to induce a humoral and or/cellular immune
reponse has been a routine procedure performed worldwide. Several animal species are used for
the production of antibodies, rabbits and mice are the most frequently used species for the
production polyclonal antibodies (pAbs).
The mammals immune system are believed to be comprised of approximately 1000
clolnal populations of limphocytes as characterized by their antigen-receptor specificity. The
diversity allows immune response to a broad range of iimunogens, for example: foreign proteins,
carbohydrates, peptides, bacterial, and viral components.Apolyclonal humoral response, making
use of the entire range of antibodies result in high avidity (defined as the product of the affinity
constants of all binding antibodies) and gives the ability to the organims to defend themselves
against pathogen.
Objectives
To understand the protocols of polyclonal antibody production in laboratory animal
Materials
Young rabbits (2.5-3.0 Kg; 10-16 weeks of age), 2 animals per antigen
Complete Freund’s adjuvant
Bovine serum albumin (BSA) 2%
Alumunium Chloride, 2%
Vaccine vials
Pipettes
Sterile small test tube
Syringe, 3ml; 10 ml
Cotton
Alcohol
Test tube
Animal clippers
Procedure
Preparation of antigen with adjuvant
1. To 4 ml Freund’s adjuvant, add 1 ml 2% BSA. Vortex in a sterilized small (5 ml) test
tube for about15 min. The emulsion should not separate on standing.
2. To 3 ml 2% BSA , add 1 ml AlCl3 (2%). Add sufficient 0.5 N NaOH to produce
maximum flocculation. Label and store in refrigerator.
Immunization
1. Procure a normal rabbit and collect 2-3 ml blood and preserve the serum.
2. Inject 0,2 ml antigen-Complete Freund’s Adjuvant (CFA), subcutaneous (SQ) and
Intramuscular (IM).
3. One week after injection test bleed the rabbit (see no.1).
4. After two weeks give 0,2 ml antigen-Freund’s Incomplete Adjuvant (IFA)
5. One week after injection test bleed the rabbit (see no.1).
6. Collect the blood from the rabbit (follow the instructor).
7. Write your Lab RESULT in the form of a ‘ Laboratory report’.
Immunization Schedule
Day 0 Pre-immune bleed, First immunization
Day 7 Test Bleed
Day 14 Second immunization
Day 21 Test Bleed
Day 25 Blood collection
Reference
Montasser MS. 1999. Experimental Protocols in Virology and Immunology. Academic
publication committee. Kuwait University.
Florida State University. 2007. Polyclonal Antibody Production Protocol-Rabbit. Florida State
University.
8. Two Step DAS-ELISA
ELISA (enzyme-linked immunosorbent assay) or ELA (enzyme immunosorbent assay) is
the most widely used immunoassay labs today. Immunoassays are based on detectable
interactions between antigens and antibodies such as precipitation, agglutination, or complement
fixation.To increase sensitivity in detecting antigens, antibodies can be labeled with substance
such as radioactive chemicals (E.g., Iodine-125), fluorescent compounds, magnetic beds, or
enzymes.
The ELISA take advantage of the strong and specific attachment that occurs between an
antibody and antigen (thus the term is imumunosorbent) An enzyme covalently attached to the
tail portion of the antibody. The enzyme linked to the antibody is one that catalyzes the
conversion of a colorless substrate into a colored product.
In this exercise we will perform the direct-double antibody sandwich (DAS)-ELISA. In
this procedure, test sample and conjugate are incubated simultaneously in the wells, so that one
washing step is omitted. This technique has advantage than the standard DAS-ELISA. It is less
time consuming and, in general, more sensitive, with less background reaction. However it is less
sensitive when the virus concentration are higher than 50 ng. Hence, this technique is
recommended for the detection of small amounts of virus.
Objectives
To practice modified ELISA technique
To understand how ELISA test can be use clinically to detect antibodies or antigen
Materials
General
Polystyrene mictotitre plates (96 wells)
Glass vials
Medium-speed centrifuge with tubes
Microtiter and pestle or small bags of thick plastic
Cheesecloth
Micropipettes (200 µl; 300 µl) with tips
Dialysis tubing prepared by boiling for 10 minnutes in 0.01 EDTA
Incubator at 30-37°C
Virus and plant materials Virus-free and virus containing materials, for instance, leaves of noninfected and infected plants,
respectively.
Purified virus suspension
Chemicals, solutions and suspensions
Purified immunoglobulins to the virus
PBS (see appendix)
Tween-20
PBS with 0.05% (v/v) Tween-20 (PBS-Tween)

Sodium carbonate coating buffer: 0.05M, pH 9.6 (see appendix)
Diethanolamne
Diethanolamine susbtrate buffer: 10%(v/v), pH 9.8(see appendix)
p-Nitrophenyl phosphate (Substrate)
Sodium azide (NaN3)
Glutaraldehyde (Electronmicroscope grade)
Alkaline phosphate
Bovine Serum Albumin
Glycerol: 50% (v/v)
PVP (Mr 44,0000)
Ovalbumin crystallized
NaOH: 3M
Na-DIECA : 0.012 M
Na2-EDTA : 0.012 M
Preparations virus and control samples
Grind noninfected, and infected, leaf material separately in PBS-Tween (0.2-1.0 g fresh
weight per 10 ml buffer) in a mortar with pestle. Some plants, especially woody ones, contain
substances, such as tannins, which may interfere with reactions in ELISA. In that case, it is
advised to add 20g PVP and 0.2 ovalbumin to 11 of the PBS-Tween. PVP is a synthetic polymer
which binds tannins and other phenolic substances.
When the concentration of virus in the leaf samples is expected to be low and the leaves
do not contain much fibrous materials, they may be crushed with some PBS-Tween in a small
plastic bag, by placing the latter on the bench and rubbing over it with a test tube or a similar
cylinder. Usually dilution series of leaf extracts obtained are made in PBS-Tween.
Immunoglobulins
For purification of immunoglobulins (see appendix). Purified immunoglobulins to be
used for conjugation should not contain sodium azide. Glycerol in stored immunoglobulins does
not interfere with adsorption to the polystyrene plates provided its concentration does exceed
1%. Hence, glycerol-perserved immunoglobulins can be used for coating after appropriate
dilution
1. Dissolve 5 mg alkaline phosphatase in 2 ml purified immunoglobulin suspension of 1
mg/ml.
2. Dialyse 3 h at 4 °C against 1Lof PBS (three changes)
3. Add 50 µl of freshly prepared 2.5% (w/v) glutaraldehyde.
4. Incubate the mixture at 22 °C for 4 h.
5. Remove the glutaraldehyde by dialysing at least three times against 1L of PBS.
6. Remove any precipitate formed by low-speed centrifugation
7. Store the conjugate thus obtained wih approx. 1% BSA (w/v) (final concentration) at
4°C; for storage up to 6 months, add NaN3 to a final concentration of 0.02% (w/v).
8. Dilute the conjugate with PBS-Tween before use.

Substrate
Dissolve P-nitrophenyl phosphate powder in freshly prepared diethanolamine substrate
buffer to a concentration of 0.67 mg/ml. (Note: Glassware used for substrate solutions should be
very clean!)
Optimum concentration of coating and enzyme-labelled antibodies
Before starting the actual experiment, the optimum dilutions of coating immunoglobulin
and conjugate are tested with sap from virus-free (control) and infected (test) leaf material.
Filling of wells and washing of plates are done as described below for DAS-ELISA. The
combination which gives maximum distinction between the control samples and the least
infected test sample is chosen for the actual; experiment
Procedure
1. Coating: fill all wells of the microtiter plate (except those the top and bottom rows and the
row on the extreme right, which may give nonspecific reaction) with 200 µl aliquots of
immunoglobulin diluted in coating buffer. Cover the plate and incubate at 30-37°C for 2-4
hour or at 4-6°C over night.
2. Washing: Remove the immunoglobulin suspension by vigorously shaking out the plate over
the wash basin. Fill the wells with PBS-Tween, empty the plate and fill it again with PBS-
Tween. Remove the PBS-Tween after 3 min. Repeat this washing and soaking in PBS-tween
twice and finally beat the plate dry on paper towels spread on the bench.
3. Test sample fill all coated wells (except those of the extreme left row) with 100 µl aliquots
of test samples, diluted in PBS-Tween (addition of chelating agents such as Na-DIECA or
Na2-EDTA) to a concentration of 0.012 M may further improve the sensitivity of the assay.
4. Conjugate: fill each well with 200 µl aliquots of enzyme labeled immunoglobulin, diluted in
PBS-Tween. Cover the plate at 4-6°C overnight.
5. Washing: see step 2
6. Substrate : Fill each well with 200 µl aliquots of substrate. Add 200 µl PBS-Tween to the
wells of rows on the top. Bottom and extreme right, for uniformity.
7. Incubate at room temperature unit a yellow colour is clearly visible in the positive controls
(usually between 30-90 min). If desired, the reaction can be stopped by adding 50 µl of 3M
NaOH to each well (mix the component by agitating the plate carefuly).
8. Asses result by either visual observation or by measurement of absorbance of the hydrolysed
substrate (p-nitrophenol) at 405 nm wavelength in a microtitre plate reader. Record your
result.

9. Write your Lab RESULT in the form of a ‘ Laboratory report’.
Reference
Djikstra J. Pdee Jager P. 1998. Practical Plant Virolog,protocols and exercise. Springer:
Heidelberg.

9. Amplified ELISA
Background Information
This is a very sensitive ELISA, developed by Stanley in 1985. It may amplify signals up to
500-fold, thus enabling detection of very small amounts of virus, for instance in individual vector
insects or seeds.
In this procedure, the alkaline-phosphatase-labelled antibody dephosphorylates nicotinamide
adenine dinucleotide phosphatase monosodium salt (NADP) to nicotinamide adenine
dinucleotide (NAD) which catalyses a redox cycle: alcohol dehydrogenase converting ethanol
into acetaldehyde leading to reduction of NAD by ethanol. In the presence of diaphorase, the
reduced NAD (NADH) thus formed in turn reduces a violet coloured tetrazolium salt (P-
iodonitro-tetrazolium violet) to a red product (formazan). Limitation of the technique is the
highcost of the chemicals in the amplification mixture.
Objectives
To practice modified ELISA technique
To understand how ELISA test can be use clinically to detect antibodies or antigen
Materials
The same ingredients as the two step DAS-ELISA escept for the substrate.
- β-Nicotinamide adenine dinucelotide phosphate monosodium salt (NADP): 0.2mM
- Diethanolamine buffer: 0.05 M, pH9.5 The Buffer is prepared by adding 5,28 ml
diethanolamine to 1L of deionized water.
- Phosphate buffer: 0.025 M, pH 7.0
- Amplification mixture (see appendix)
- Nitrophenyl o-phosphate disodium-salt: 0.5M
Procedure
1. Coating: fill all wells of the microtiter plate (except those the top and bottom rows and the
row on the extreme right, which may give nonspecific reaction) with 200 µl aliquots of
immunoglobulin diluted in coating buffer. Cover the plate and incubate at 30-37°C for 2-4
hour or at 4-6°C over night.
2. Washing: Remove the immunoglobulin suspension by vigorously shaking out the plate over
the wash basin. Fill the wells with PBS-Tween, empty the plate and fill it again with PBS-
Tween. Remove the PBS-Tween after 3 min. Repeat this washing and soaking in PBS-tween
twice and finally beat the plate dry on paper towels spread on the bench.
3. Test sample fill all coated wells (except those of the extreme left row) with 200 µl aliquots
of test samples (each samples in duplicate or triplicate). Fill each of the wells on the extreme
left with 200 µl PBS-Tween (They serve as a blanks in the ELISA reader).

4. Washing: see step 2
5. Conjugate: fill each well with 200 µl aliquots of enzyme labeled immunoglobulin, diluted in
PBS-Tween. Cover the plate and incubate for 2-4 hour at 30-37°, or at 4-6°C overnight.
6. Washing: see step 2.
7. Fill the well with 100 µl aliquots of 0.2 M NaDP in 0.05 M diethanolamine buffer pH 9.5.
8. Incubate at 20 °C for 30 minutes
9. Terminate the enzyme-substrate reaction by adding 15 µl of 0.5 Nitrophenyl o-phosphate
disodium salt.
10. Add 150 µl of the amplification mixture to the coated wells; add 250 µl PBS-Tween to the
wells of rows on the top, bottom and on the extreme right.
11. Measure clour development at 492 nm wavelength. Record the result.
12. Write your Lab RESULT in the form of a ‘ Laboratory report’.
Reference
Djikstra J. Pdee Jager P. 1998. Practical Plant Virolog,protocols and exercise. Springer:
Heidelberg.

10. LATEX AGGLUTINATION SLIDE TEST FOR Staphylococcus aureus
Background Information
Agglutination reactions involve visible aggregation of particles because of the specific
antigen-antibody combination. Antibodies that produce such reaction are known as agglutinins.
Agglutination is a two-step process, involving sensitization or initial binding followed by lattice
formation, or formation of large aggregates. Latex agglutination test are very popular in clinical
laboratories. The tests have been applied to the detection of over 100 infectious diseases, and
many other applications are currently available. The test was first performed by Singer and Plotz
in 1956. Afterwards, the tests have been developed to diagnose microbial and viral infection,
autoimmune diseases, hormones, drugs, and serum proteins.
In latex agglutinations test, an antibody (or antigen) coates the surface of latex particles
(sensitized latex). When a sample contains the specific antigen (or antibody) is mixed with the
milky-appearing sensitized latex. Many of the latex agglutination tests developed are performed
manually and the agglutination is detected by visual observation. In spite of, its usefulness and
less costly this manual assays suffer from lack of consistency in endpoint readouts.
Objectives
To know how to perform the latex agglutination
Understand principle of the technique
Materials
Latex agglutination kit
Pipettes of 10,20,35, and 50 µl
Gloves
Loop inoculation
Bunsen burner
Timer
Staphylococcus aureus
Staphylococcus epidermidis
Procedure
1. Allow reagents, controls, and specimens to reach room temperature.
2. Mix the latex reagent by shaking; expel any latex from the dropper for complete mixing.
3. Dispense 1 drop of Test Latex onto one of the circles on the reaction card and add 1 drop
to another circle.

4. Using a microbiological loop pick up and smear 5 suspect colonies onto the Test Latex-
containing circle and mix this into the Test Latex reagent. Spread to cover the circle.
5. Repeat step 3 for the Control Latex.
6. Pick up and hand rock the card for up to 20 sec and observe for agglutination under
normal lighting conditions. Read macroscopically; do not use a magnifying glass.
7. Dispose of the reaction card in an appropriate biohazard container.
8. Re-cap the bottles and return to the refrigerator.
Interpretation of the test result
Positive result
A positive result is obtained if agglutination of the blue latex particles occurs within 20 sec in the
test circle, with no agglutination in the control circle. The result is positive when there is
noticeable clearingof the blue background in the test latex. This indicates the present of S. aureus
Negative result
A negative result is obtained if no agglutination occurs and a smooth suspension remains at 20
sec in the test circle. The result is negative when there is no noticeable clearing of the blue
background in the test latex.
Uninterpretable Result
The test is uninterpretable if the control reagent shows agglutination or autoagglutination.
Reference
Laboratory Procedure BBLTM StaphyloslideTM Latex Test for Staphylococcus aureus.
http://www.bd.com/ds/technicalCenter/clsi/clsi-staphyloslide.pdf
Stevens CD.2010. Clinical Immunology and Serology A Laboratory Prespective: Third Edition.
F.A.Davis Company: Philadelphia.
Lab RESULT 10.LATEX AGGLUTINATION SLIDE TEST
FOR Staphylococcus aureus
Student name : __________________
ID Number : __________________
Date : __________________
1. What is the result of the test ? (positive and negativve)
2. What s the conclusion of the result ?

11. ROCKETIMMUNOELECTROPHORESIS
Background Information
Rocket immunoelectrophoresis also known as single crosses immunoelectrophoresis,
spike immnoelectrophoresis, (the Laurell technique) or electroimmnuoassay. This is a
quantitative method for the estimation of antibody titre and concentration of antigens. It is a
relatively quick method and can be adopted to determine antibody titer since the area enclosed
by the precipitation line is lineary related to the amount of antigen and inversely to antibody
content in the gel.
Objectives
Practice Rocket Immunoelectrophoresis Technique
Materials
Rocket Immunoelectrophoresis kit
Electrophoresis unit
Agarose
Barbitone buffer 0.1 M
Calcium lactate 0.2 mM
Antiserum
Coomassie brilliant blue
Methanol acetic acid buffer
Procedure
1. Prepare 1% (w/v) agarose gels containing 2% polyethylene glycol 6000 to stabilize and
enhance the immune precipitate, in 0.1 M barbitone buffer 2mM Calcium lactate, pH 8.6
and containing 0.7-3.0 % antiserum.
2. Pour the above agarose gels on a glass plates (10x10cm) to give a gel 1.5 mm thick.
3. Punch 3 mm diameter hole at about 8-10 mm centres in a line 2 cm from side edges.
4. By using different antigen or diluting the Original antigen , place 10 µl of each sample in
a hole.
5. Carry the electrophoresis at a high voltage, 10 V/cm for 2-4 hours, using the same buffer
in the gels.
6. Press the gels onto the glass plates under 0.5 cm of filter paper and soak in 0.1mM NaCl
twice for 20 minutes each and then in running water once for 15 minutes.
7. At the end of this time, press again the gels onto a glass plate and dry with a portable hair
dryer.
8. Stain the plates with 0.25 % Coomassie brilliant blue for 15 minutes and destain in
methanol-acetic-acid-water (25:7.5: 67.5, vol/vol/vol).
9. Measure peak heights on a dry surface of the glass plate. The antigen concentration are
proportional to the peak heights.
Reference
Montasser MS. 1999. Experimental Protocols in Virology and Immunology. Academic
publication committee. Kuwait University.
12. ELECTROBLOT IMMUNOASSAY
Background Information
Immunoblotting assays generally make use of the strong protein-binding capacity of
nitrocellulose or nylon membrane. The protein under investigation may be either electroblotted
onto the membrane from a gel through which they have been separated by electrophoresis
(electroblot immunoassay, western blotting) or applied directly to the membrane (dot-blot and
tissue blot immunoassays).
Electroblot immune assay (EBIA;western blotting) is a technique based on
electrophoresis and serology and thus combine the protein-separating capacity of the former with
the specificity of the latter. Therefore, very small quantities of protein can be detected. In EBIA,
protein samples are electrophoresed on an SDS polyacrylamide gel; then the separated protein
are covalently bound to a nitrocellulose or nylon membrane by electrotransfer to make them
more accessible for reaction with subsequently added antibodies.
Materials
Preparation of crude protein extract
The following cultures and reagent are available in the identification of Bacterial Protein Profiles
Kit.
Bacterial strain grown as lawns on LB agar plates
E.coli B, Serratia marcescens, Micrococcus luteus, Bacillus subtillis,
Reagents
Tris-EDTA-glucose (TEG) solution (25mM Tris-Cl, pH 8.0, 50 mM glucose, 10 mM EDTA)
TEG containing lysozyme 5 mg/ml, prepared the day of lab and stored cold.
Sample loading buffer

APPENDIX
1. Phosphate Buffer Saline
NaCl 137mM
KH2PO4 1.5 mM
Na2HPO4 8.0 mM
KCL 2.7 mM
NaN3 3.0 mM
Check the pH of the final solution. It may be convenient to preparte a stock solution at 10X the
desired concentration. In that case, no preservative such as NaN3,has to be added. The pH of
concentrate will be lower than that of the working solution. Note: NaN3 is highly toxic and it
bind to metals, forming explosive compounds when kept dry. Wear gloves to dispense.
2. Ampification mixture
Prepare 15 ml of 0.025 M phosphate buffer, pH 7.0, containing: 700 U alcohol dehydrogenase;
100 U diaphorase; 3% (v/v) ethanol; 1 mM p-iodonitrotetrazolium violet.
3. Purification of Immunoglobulin
In some cases it may be necessary to purify the immunoglobulin (the predominantly IgG) from
the serum, e.g. for raising the titre of the antiserum, for eliminating other interfering proteins or
for working with known quantities or concentrations of antibodies. Several methods exist for
purification of immunoglobulins. The simplest methods involving precipitation by ammonium
sulphate, is given below.
Materials
General
Medium speed centrifuge with fixed-angel rotor and tubes
Spectophotometer
Deep-freeze at -20°C
Dialysis tubing
Chemicals, solution and suspensions
Antiserum
Half-Strenght PBS (1/2xPBS); see appendix for PBS
Saturated ammonium sulphate: 75 g in 100 ml deionised water
Sodium azide (NaN3)
Na2-EDTA

Preparations
Before use, the dialysis tubing should be boiled for 5 minutes in deionised water to remove
glycerin. Add to the water Na2-EDTA to 0.01 M to neutralize polyvalent cations. After boiling,
rinse the tubing thoroughly with deionised water.
Procedure
1, To 1 ml of antiserum add 9 ml of half-strength (1/2X) PBS.
2. Add 10 mol of saturated ammonium sulphate, dropwise with constant stirring.
3. Leave mixture for 1 hour at room temperature.
4. Collect the precipitate by centrifugation at 8000 g for 15 min
5. Resuspend the pellet in 2 ml of 1/2XPBS
6. Dialyse three times against 500 ml of ½ PBS
7. Determine the immunoglobulin concentration spectrophotometrically, using a specific
absorbance of 1.4 for 1 mg/ml at 280 nm wavelength.
8. Add NaN3 to a concentration of 0.01% (w/v)
9. Divide the immunoglobulin preparation in small portions (to avoid repeated freezing and
thawing) and stored at -20°C. Immunoglobulins can be stored for longer periods with 50% (v/v)
glycerol.
Caution : do not add the Immunoglobulins will be used for conjugation.