imagemagick tricks web image effects from the … · imagemagick tricks web image effects from the...
TRANSCRIPT

ImageMagick Tricks Web Image Effects from the Command Line and PHP
Unleash the power of ImageMagick with this fast, friendly tutorial and tips guide
Sohail Salehi
Chapter 3 "Convert and Mogrify"

For More Information: www.packtpub.com/imagemagick/book
In this package, you will find: A Biography of the author of the book
A preview chapter from the book, Chapter 3 "Convert and Mogrify"
A synopsis of the book’s content
Information on where to buy this book
About the Author Sohail Salehi was born in Mashad, Iran, on March 18, 1975. He graduated in Software Engineering from Mashad University in 2000. In recent years, Sohail has contributed to over 20 books, mainly in programming and computer graphics. He has written frequent articles for "0 & 1 Magazine", an IT magazine from Ferdowsi University. You can find a complete list of his work at www.sohail2d.com. In the past he has worked as a Chairman in the IT department of various universities including Mashad, Ferdowsi, and the Industrial Management University. Currently he is working on the IT training standards for the Iranian "Work and Science Organisation" 2005-2006 period.
Many thanks to my lovely wife Ghazal for being so kind to me during writing this book.
Many, many thanks to every one at Packt who helped me create such a great book.
Thanks to my very dear friend David Barnes for starting things off from the beginning, helping me nail down the concept, and accompanying me during various parts of this book.

For More Information: www.packtpub.com/imagemagick/book
Convert and MogrifyWe learned from Chapter 1 that any image processing activity in ImageMagick can be done using its utilities. The convert utility is one that contains many parameters for implementing more than seventy percent of ImageMagick features. We can see that mogrify is similar to convert in some situations. These utilities will be studied in depth in this chapter and we will get familiar with their image processing and other capabilities.
We will concentrate on parameters and their practical usage. These are very important because we will see them being repeated for other ImageMagick utilities during the next chapters. As a matter of fact all of ImageMagick's functionality comes from about 200 options that may be used in several utilities. The question is, if the result is the same then what is the point of repeating the same options for different utilities?
Good question. In order to find out the answer we have to analyze the ImageMagick utilities' anatomy. So let's start our trip with this one: convert.
Convert Syntax and OptionsFor running convert use the following scheme:
convert [ options ...] file [ options ...] file
As you can see there are some options in front of file names. These options execute our requests on files that have been specified.
Based on what option we choose tasks like format conversion, image transformation or filter application will be done. Maybe the simplest usage of this utility is something like this:
convert mylogo.bmp mylogo.jpg

For More Information: www.packtpub.com/imagemagick/book
Convert and Mogrify
[ 30 ]
In this example, the format of the specified file is converted from .bmp to .jpg. There are many options and parameters that we can use with convert so that with the help of them some complicated image processing can be done in a multi‑line convert call.
In the next section, we start with a simple image and while working on it to achieve professional art work, introduce you to some great features of the convert utility.
How to Draw Basic Shapes with ConvertConvert can be used to draw curves, lines, circles, ellipses, rectangles, polygons, texts, and even to mix two images. Although we will introduce the -draw parameters during this book, the complete list is provided in Appendix B.
This is the overall syntax of the -draw option.
-draw '<our shape> coordinates'
In this scheme instead of <our shape> we can place our desired shape keyword (that is, circle or rectangle). For example the following command will draw a black line from (10,10) to (70,90) on a white page with 80x100 dimensions and then save the result in a bitmap file:
convert –size 80x100 xc:white –draw 'line 10,10 70,90' line.bmp
As you can see with this convert command four options are used. The part of this command which draws the line is:
-draw 'line 10,10 70,90'
In which 10,10 indicates the coordinates of the start point and 70,90 indicates the end point of the line. At the beginning of this command there is a –size option, which tells ImageMagick to create a file eighty pixels wide and hundred pixels high. Next, we set the background color of our file to white with the xc:white option. There are several ways of defining colors in ImageMagick, which we shall discuss later. For now just use this option to set the white color as the background.
If we leave the xc: parameter without any color, then the file will use white as the background. By default, the background color is white and the drawing color is black.
The last step is to save our work as a graphic file. In order to do this, simply specify a file name and a graphic format extension at the end of this command. Use the display command as shown below to view the graphic file in ImageMagick:
display line.bmp

For More Information: www.packtpub.com/imagemagick/book
Chapter 3
[ 31 ]
Fig 3-1: The Output of the display line.bmp Command
If you are a Windows user, you may encounter the following error while executing the above example:
Non-conforming drawing primitive definition 'rectangle' In Windows you have to use "instead of" for commands. So that the example has to be changed as follows in Windows:
convert –size 80x100 xc:white –draw "line 10,10
70,90" line.bmp In addition, the name of the program used to display images in Windows is imdisplay.exe. Hence, for showing the result in Windows we can use this command:
Imdisplay line.bmp
Workshop I: Creating a Simple LogoLet's work on something practical. Do you believe we can design logos with just the –draw option? We are going to design the Packt Publishing logo in this workshop. Take a look at the Packt logo on the cover of this book and try to guess what primitives can be used to implement it.
1. Create an empty file with a white background and name it packt_logo.gif.convert –size 300x150 xc: packt_logo.gif
The file packt_logo.gif is three hundred pixels wide and one fifty pixels high and the background color is white. Note that the xc: parameter is empty.
2. Draw two black vertical rectangles on the left and right sides of the image.convert packt_logo.gif –draw 'rectangle 0,0 40,140' –draw 'rectangle 260,0 300,140' packt_logo.gif
Let's examine this command. In this command, we open the previous created file, packt_logo.gif, draw two vertical rectangles and save the result by specifying the name at the end of the command.

For More Information: www.packtpub.com/imagemagick/book
Convert and Mogrify
[ 32 ]
Fig 3-2: Drawing Black Rectangles on Both Sides of the Image
3. Draw a white rectangle in the middle of the image as follows.convert packt_logo.gif –fill white –draw 'rectangle 15,8 285,132' packt_logo.gif
By default the drawing color is black. So in this command we use the –fill option to change the color to white.
Fig 3-3: Our Work after Drawing the White Rectangle
4. Now it is time to insert some text. convert packt_logo.gif -fill orange –pointsize 80 –draw "text
20,95 'PACKT'" -fill black -pointsize 27 –draw "text 68,147 'PUBLISHING'" Packt_logo.gif
5. For writing the word PACKT we have to change the color into orange. We can do this by calling the –fill option. Text size can be set by –pointsize and finally by calling:-draw "text <x,y –coordinates on which text will be displayed> 'Our text' "
the desired text will be displayed. Note the second fill command. We set the color to black otherwise the word PUBLISHING would be displayed in orange. Here is the completed logo:
Fig 3-4: The Final Logo

For More Information: www.packtpub.com/imagemagick/book
Chapter 3
[ 33 ]
There are some differences between this logo and the original one. The word PACKT has to be taller and PUBLISHING must fill the space between the two brackets. Transformation options for this will be introduced later.
You may notice that for specifying colors we use names like red, yellow, or darkblue. The question is, if we don't like to use numbers for representing colors (as in the command‑line applications) then what color names can we use in our commands? In other words what are the valid names for colors in ImageMagick? Use the following command to see the complete list: identify –list color
In this workshop we design the logo in four steps but keep in mind that in ImageMagick we can write complex commands and execute multiple tasks using just one single command. For example, we can implement the above logo using a single command as follows:
convert –size 300x150 xc: –draw 'rectangle 0,0 40,140' –draw 'rectangle 260,0 140,300' –fill white –draw 'rectangle 15,8 285,132' -fill orange –pointsize 80 –draw "text 20,95 'PACKT'" -fill black -pointsize 27 –draw "text 68,147 'PUBLISHING'" Packt_logo.gif
Painting MethodsOne of the important roles of the –draw option is filling an area with a specified color. There are many parameters for doing this. In fact all of them use point as the basic parameter. In the next workshop we will study them in detail.
Workshop II: Color Filling with –draw1. Make a 400x100 .png file and draw the following items on it:
Fig 3-5: Creating an Image with the Draw Option

For More Information: www.packtpub.com/imagemagick/book
Convert and Mogrify
[ 34 ]
You know how to do this from the previous workshop, don’t you? There is just one new tip. For defining and using a stoke around the text add the following code to your convert command call:
convert <required codes for page setting,color definitions & rectangle drawings> ... -stroke white strokewidth:2 –font Tahoma -pointsize 48 –fill black draw "text 3,70 'COLOR BOUNDARY'" color_test.png
The –stroke parameter sets the color of the stroke and –strokewidth defines its thickness. Use the –font parameter to specify a font for our text.
2. Let's start our experiments by drawing a single white pixel on our image:convert color_test.png –fill white –draw 'color 7,50 point' color_test_point.png
The color parameter in the –draw option indicates that we are going to paint the specified location with the color that we have set in the –fill parameter. We will see there are several methods for painting. In this example using the point parameter at the end of the –draw option we just put a single pixel on the image.
Fig 3-6: Draw a White Pixel on the Specified Coordinate (7,50)
3. –draw has an ability to replace the current color with whichever color we specify:convert color_test.png –fill orange –draw 'color 7,50 replace' color_test_replace.png
Fig 3-7: All Occurrences of Black have been Replaced
with Orange using the Replace Parameter
As you can see the black color is replaced with orange wherever it is found.

For More Information: www.packtpub.com/imagemagick/book
Chapter 3
[ 35 ]
4. In the letter shapes that are curved there are some unchanged colors. We can specify a larger threshold for replacing color with the help of the –fuzz parameter:convert color_test.png –fill darkred –fuzz 5% –draw 'color 7,50 replace' color_test_replace_with_fuzz.png
Fig 3-8: Using –fuzz we can Obtain a smoother Result
5. Be careful while using the -fuzz parameter because specifying large values may overpaint more adjacent colors and fill greater boundaries. In the following command although we put a green pixel on the first vertical rectangle (on the left) setting a bigger value for –fuzz paints a larger area:convert color_test.png –fill green –fuzz 40% –draw 'color 5,5 replace' color_test_replace_with_higher_fuzz.png
Fig 3-9: A 40% Fuzz Causes Many Colors to be Replaced –
Probably too Many in Most Cases
6. In the previous steps we painted discrete areas. The command to be used for filling just a bounded area is shown below:convert color_test.png –fill yellow –bordercolor "RGB(0,0,153)" –draw 'color 395,95 filltoborder' color_test_fill_to_border.png
Fig 3-10: At the Southwest Corner the Area Surrounded by
Blue Color RGB(0,0,153) Turns to Yellow
In this command, the –bordercolor parameter is used for defining the boundary color of the area that should be painted with yellow. There are several ways to define color in ImageMagick. In this example we used the RGB (R, G, B) method in which each color is represented by a maximum three digit decimal number. Here is the complete method of representing colors in ImageMagick:

For More Information: www.packtpub.com/imagemagick/book
Convert and Mogrify
[ 36 ]
Color notation DescriptionUse color name itself see the names by: identify –list #RGB R, G, and B are 4‑bit hex numbers#RRGGBB R, G, and B are 8‑bit hex numbers#RRRGGGBBB R, G, and B are 12‑bit hex numbers#RRRRGGGGBBBB R, G, and B are 16‑bit hex numbers
#RRGGBBAA R, G, and B are 8‑bit hex numbers and A is used for transparency
#RRRGGGBBBAAA R, G, and B are 12‑bit hex numbers and A is used for transparency
#RRRRGGGGBBBB R, G, and B are 16‑bit hex numbers and A is used for transparency
rgb(r,g,b) r, g, and b are decimal numbersrgb(r,g,b,a) r, g, b, and a are decimal numbers
7. We use the same –fuzz rules for the -bordercolor parameter:convert color_test.png –fill yellow –bordercolor "RGB(0,0,153)" –fuzz 15% –draw 'color 395,95 filltoborder' color_test_fill_to_fuzzborder.png
Fig 3-11: A 15% Fuzz Causes the Border Area to be Limited
8. Finally, do you want to fill the whole image with a desired color? Then use the reset parameter in the –draw option:convert color_test.png –fill lime –draw 'color 395,95 reset' color_test_reset.png
Fig 3-12: Filling an Image using the Reset Parameter

For More Information: www.packtpub.com/imagemagick/book
Chapter 3
[ 37 ]
DeformationsBesides drawing and painting abilities there are some parameters that can be used for image deformations. For example with the –implode option we can suck or blow the pixels of an image. Here is its usage:
convert {input image} –implode value {output image}
Positive values suck the pixels and negative ones blow the pixels of the image. The option works on drawings too. See the following example:
convert –size 200x70 xc:darkred -fill white –draw 'roundrectangle 5,5 195,65 5,5' -fill black -pointsize 35 –draw "text 12,45 'i m p l o d e'" -implode 0.5 implode.gif
This command first creates text on a white background with a red border (Fig 3-13a) and then implodes it by 0.5 (Fig 3‑13b).
Fig 3-13: Implode Option
There is a little tip about this white background. It has rounded corners. We can draw it using the roundrectangle parameter:
-draw 'roundrectangle x0,y0 x1,y1 wc,hc'
Here, x and y are used for drawing coordinates and wc and hc are used for defining the horizontal and vertical radius of rounded corners. In the –implode option we can set the blowing status using negative values. Here is an example:
convert –size 200x70 xc:darkred -fill white –draw 'roundrectangle 5,5 195,65 5,5' -fill black -pointsize 35 –draw "text 14,45 'e x p l o d e'" -implode -3 implode.gif
Fig 3-14: Making an Exploding Effect by using Negative Values (-3) in the -implode Option
Another deformation in ImageMagick parameters is –swirl. As its name shows we can use it to create spiral effects in the middle of the current image. It has only one parameter, which is used for degrees of spiral. Use positive values for counter clockwise and negative values for clockwise rotation.

For More Information: www.packtpub.com/imagemagick/book
Convert and Mogrify
[ 38 ]
The -wave option is another deformation option. It has two parameters—amplitude and wavelength. The amplitude sets the height of the wave and wavelength defines the distance between two waves.
Let's see examples for these two deformations. In these examples just the last part of the command makes the requested deformation and previous lines are used to draw two parallel rectangles:
convert –size 200x70 xc:darkred -fill white –draw 'roundrectangle 5,5 195,65 5,5' -fill black –draw 'rectangle 5,25 195,31' -fill red –draw 'rectangle 5,39 195,45' -swirl -360 swirl.gif
Fig 3-15: Make Spiral Effect Clockwise
convert –size 200x70 xc:darkred -fill white –draw 'roundrectangle 5,5 195,65 5,5' -fill black –draw 'rectangle 5,25 195,31' -fill red –draw 'rectangle 5,39 195,45' -wave 5x20 wave.gif
Fig 3-16: Making Waves with +/-5 Pixels
Height and 20 Pixels Length
Be careful while using the -wave option because every value you set for amplitude will affect the original height of the result image. For example in the previous sample although we defined a 100x70 dimension for the image after using this effect the height of the image became 80: 5x(amplitude) x 2 = 10 10 + 70x(image height) = 80
As we can see the effect of all these filters originally starts at the center of the image.
You may ask if there is any solution to affect a specific location of the image with these filters. The answer is the –region option. With this option we cannot only define the exact location where the filter is applied but we can also define an area limitation (width and height) for it. The –region format is as shown next:
-region widthxheight{+-}x{+-} y

For More Information: www.packtpub.com/imagemagick/book
Chapter 3
[ 39 ]
Now let's see the –region option in action:
convert –size 600x70 xc:darkred -fill white –draw 'roundrectangle 5,5 595,65 5,5' -fill black –draw 'rectangle 5,25 595,31' -fill red –draw 'rectangle 5,39 595,45' Simple_lines.jpg
convert simple_lines.jpg -region 90x70+10+0 -swirl 500 -region 90x70+95+0 -swirl 500 -region 90x70+190+0 -swirl -500 -region 120x70+280+0 -implode 1.5 -region 100x70+380+0 -implode -7 -region 100x70+490-10 -wave 10x50 complex.jpg
Who will believe that the simple output from the first piece of code (Fig 3-17a ) can be converted to something like Fig 3‑17b?
Fig 3-17: In the Second Image each Effect Corresponds to one
–region Parameter in the Second Piece of Code
One of the uses of the deformation filter is to change the appearance of portrait photos as demonstrated in the next workshop.
Workshop III: Image DistortionI have a portrait image and I'm going to make some changes to it with the following command. Please keep in mind you can do this on your own images but with some considerations about the coordinates that you define for the –region option.
Let's see the code and its result:
convert image.jpg -region 70x110+270+140 –swirl 250 -region 70x120+83+129 –swirl -250 -region 170x170+115+350 –swirl 400 –region 90x50+165+195 –implode -1 Output.jpg

For More Information: www.packtpub.com/imagemagick/book
Convert and Mogrify
[ 40 ]
Fig 3-18: Making Some Deformations on a Portrait
Basic TransformationsAnother important part of ImageMagick options is transformation commands. In this section we will see their syntax and usage. With these transformations we can rotate, resize, crop, change canvas, skew, flip vertically and horizontally, and roll our artworks. Let's see these commands in action.
How to Rotate Drawings in ImageMagickWith the help of the rotate option we can make our desired rotation in the convert command. Here it is the option format:
-rotate deg {<}{>}
Use positive and negative degrees for rotating clockwise and counter-clockwise respectively.
If you set the > operator in front of this option the rotation will be performed only if the image width exceeds the height. Use < for situations where you want the rotation to be performed on an image where its height is more than its width.
Workshop IV: Rotating Text1. Write some white text on any background of your choice as shown:
convert back.jpg –fill white –font computerfont –pointsize 25 –stroke blue –strokewidth 2 -draw "text 20,130 'Fantastic Rotation !!!'" straight.jpg

For More Information: www.packtpub.com/imagemagick/book
Chapter 3
[ 41 ]
Fig 3-19: Writing Simple Formatted Text on a Background
2. Now we spin the text counter‑clockwise by thirty degrees. This step is a little tricky. As you can see, if we use the following code then the text will stay still and the background image will be rotated as shown in Fig 3‑20a. convert back.jpg –fill white –rotate 30–font computerfont –pointsize 25 –stroke blue –strokewidth 2 -draw "text 20,130 'Fantastic Rotation !!!'" r1.jpg
3. The solution is to use the rotate parameter in the text -draw option (Fig 3‑20b):convert back.jpg –fill white –font computerfont –pointsize 25 –stroke blue –strokewidth 2 -draw "rotate 30 text 20,130 'Fantastic Rotation !!!'" r2.jpg
Fig 3-20: Using the -rotate Option Outside (as shown in (a)) and Inside
(as shown in (b)) the –draw Option
When we rotate an entire scene there are always some extra triangles that will be produced to keep the image rectangular. In the command that corresponds to Fig 3‑20a, if you set the background color to something other than white you will see that the triangles at the corners will be painted that color.

For More Information: www.packtpub.com/imagemagick/book
Convert and Mogrify
[ 42 ]
4. The drawback of this solution is that we have to define new coordinates for the text so that it aligns correctly in the middle of background:convert back.jpg –fill white –font computerfont –pointsize 25 –stroke blue –strokewidth 2 -draw "rotate 30 text 75,35 'Fantastic Rotation !!!'" r2.jpg
Fig 3-21: Setting the Correct Rotation Coordinates
It seems that dealing with the rotation coordinates in this manner is a little complicated. Moreover, we have adjusted the text experimentally and it may not end up correctly placed, right at the center of the background. So it is better to use the –gravity option to do it precisely. Here is the format:-gravity location
5. The gravity option uses nine locations for adjusting drawing art works on a background. You can see the names and positions of these regions in the following image.
Fig 3-22: Partitioning an Image with Gravity Values
Based on this information it is better to use following command to achieve exact aligning:convert back.jpg –gravity center –fill white –font computerfont –pointsize 25 –stroke blue –strokewidth 2 -draw "rotate 30 text 0,0 'Fantastic Rotation !!!'" precise_rotate.jpg
6. Now let's do it again and this time add some blur effect to the text. First we create some white text and apply the radial blur effect to it.convert –size 300x240 xc:transparent –gravity center –fill lightblue –font computerfont –pointsize 25 -draw "rotate 15 text 0,0 'Fantastic Rotation !!!'" –radial-blur 20 blur_rotate.png

For More Information: www.packtpub.com/imagemagick/book
Chapter 3
[ 43 ]
Fig 3-23: Make a 20 degree Radial Blur on the 15 degree Rotated Text
In this command we use the –radial-blur option to make our effect. This option has a single parameter as the blur rotation degree.
There are plans for a consolidation of some of the specialized blurs. As such –radial-blur may change to a different name and syntax.
7. Now we mix it with the background:convert back.jpg –gravity center –draw 'image over 0,0 0,0 blur_rotate.png' Final_background.jpg
Fig 3-24: The Radial Blurred Rotated Text is Mixed with the Background
As you can see we use the image parameter in the –draw option for mixing two images. There are some compositing methods too. We will study them in depth soon. For now we use the over method.
Warning: ImageMagick developers are planning to revise the commands and syntax for specialized blurs. As such, -radial-blur may change its name or usage. So if this example stops working, please check the ImageMagick documentation.
For More Information: www.packtpub.com/imagemagick/book
Convert and Mogrify
[ 44 ]
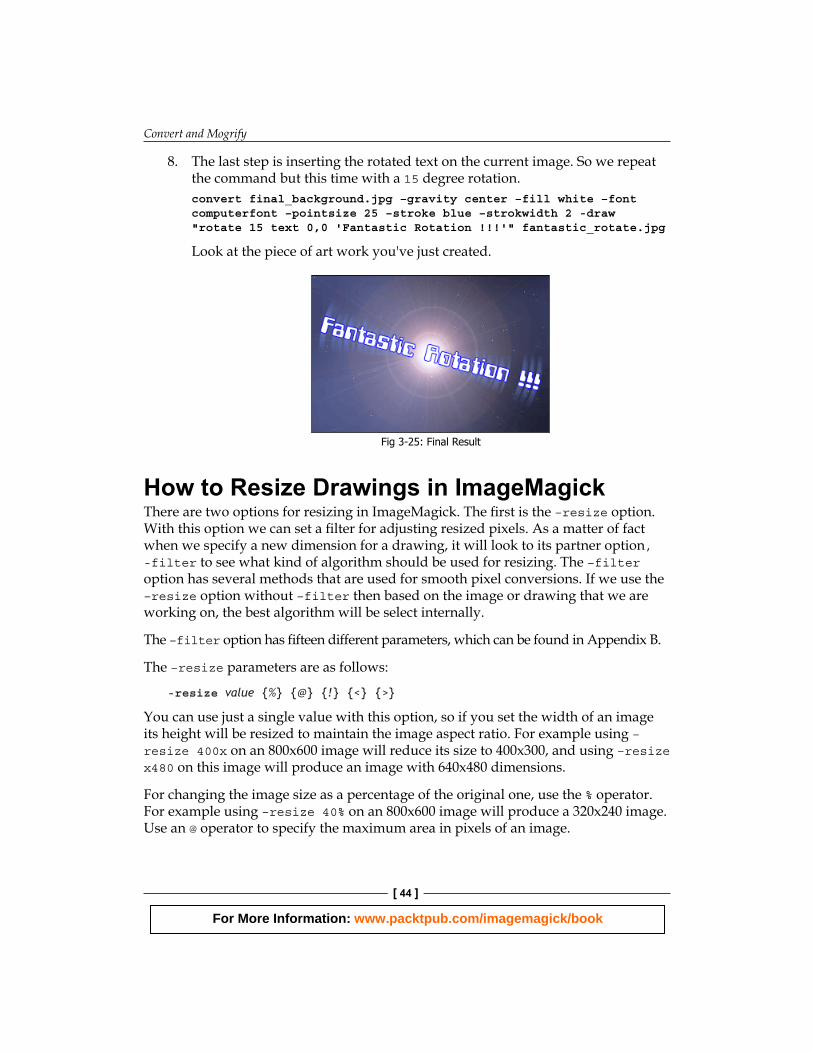
8. The last step is inserting the rotated text on the current image. So we repeat the command but this time with a 15 degree rotation.convert final_background.jpg –gravity center –fill white –font computerfont –pointsize 25 –stroke blue –strokwidth 2 -draw "rotate 15 text 0,0 'Fantastic Rotation !!!'" fantastic_rotate.jpg
Look at the piece of art work you've just created.
Fig 3-25: Final Result
How to Resize Drawings in ImageMagickThere are two options for resizing in ImageMagick. The first is the –resize option. With this option we can set a filter for adjusting resized pixels. As a matter of fact when we specify a new dimension for a drawing, it will look to its partner option, -filter to see what kind of algorithm should be used for resizing. The –filter option has several methods that are used for smooth pixel conversions. If we use the –resize option without –filter then based on the image or drawing that we are working on, the best algorithm will be select internally.
The –filter option has fifteen different parameters, which can be found in Appendix B.
The –resize parameters are as follows:
-resize value {%} {@} {!} {<} {>}
You can use just a single value with this option, so if you set the width of an image its height will be resized to maintain the image aspect ratio. For example using –resize 400x on an 800x600 image will reduce its size to 400x300, and using –resize x480 on this image will produce an image with 640x480 dimensions.
For changing the image size as a percentage of the original one, use the % operator. For example using –resize 40% on an 800x600 image will produce a 320x240 image. Use an @ operator to specify the maximum area in pixels of an image.

For More Information: www.packtpub.com/imagemagick/book
Chapter 3
[ 45 ]
Use < to change the dimensions of the image only if its width or height exceeds the size that you have specified and use > to change dimensions if both of its dimensions are less than the specification.
Keep in mind, the output of a resized image with the –resize option usually is a smoothed image. But what can we do if we were looking for a pixilated resize operation?
Another alternative to the resize task in ImageMagick is the –sample option. Here is the usage:
-sample widthxheight{+-}x{+-}y
The width and height specify image dimension. In the next example we will see the usage of these two resizing options.
First we draw four adjacent colored rectangles (Fig 3‑26a) as follows:
convert –size 30x20 xc: white -fill red -draw 'rectangle 0,0 15,10' -fill blue -draw 'rectangle 15,0 30,10' -fill green -draw 'rectangle 0,10 15,20' -fill yellow -draw 'rectangle 15,10 30,20' Rectangles.jpg
It will create a little image (30x20) so let's enlarge it using the options that we are already familiar with.
convert rectangles.jpg –resize 900% rect_resized.jpg
In this example using 900% as the parameter of –resize will enlarge it to nine times its original size (Fig 3-26b). Now let's do it again with the –sample option and this time let's specify a value as the new image height (Fig 3‑26c).
convert rectangles.jpg –sample x180 rect_resampled.jpg
Fig 3-26: (a) Original image, (b) Enlarged with –resize, (c) Enlarged with –sample

For More Information: www.packtpub.com/imagemagick/book
Convert and Mogrify
[ 46 ]
How to Crop Images Using ImageMagickImageMagick has several methods for cropping. Sometimes we want the remainder of a cropped image to be extracted and saved as a new image and sometimes we want to add a slice to the current image. In this section we will see how to handle different cropping methods.
This ‑crop option includes the same parameters as –sample.
-crop widthxheight{+-}x{+-}y{%}
Again width and height are used for size of cutting area and x and y are used for defining the cutting offset. It is possible to specify a percentage of original images as the cutting area with the % operator.
In the following code we cut and save a 110x70 pixels area of the specified image starting at the 60x50 coordinate:
convert sample.png –crop 110x70+60+50 cropped.jpg
Fig 3-27: Image Cropping
Be careful when you use the -crop option with .png or .gif formats. In these formats you can save image canvases and offsets too and it will produce unwanted results during cropping. So we need to remove the page info in these files by using the +repage option after –crop or using ! at the end of the crop argument as follows:
convert sample.png –crop 110x70+60+50 +repage cropped.png
Suppose that we are going to cut the center of an image with specified width and height. One way to do it is to specify the exact area and offset for the cutting process. A better solution is to do it with help of the –gravity option. In the next example a 140x60 area will be cut from the center of an image.
convert temple.tif –gravity center –crop 140x60+0+0 cropped_center.jpg

For More Information: www.packtpub.com/imagemagick/book
Chapter 3
[ 47 ]
Fig 3-28: Crop from Center
The –shave OptionIn the previous example we eliminated the borders from an image and saved the result as a new image. A better method to perform this kind of image cutting is –shave. This option has following format:
-shave widthxheight{%}
It will cut borders with the values specified in the width and height parameters. In the previous example the dimension of the image 292x200 and with the following summarized command we can achieve the same result as earlier:
convert temple.tif –shave 76x70 shaved.jpg
Inserting and Deleting Rows and Columns in ImagesThere is a pair of options that can be used for inserting or deleting vertical or horizontal areas on the image. The first one, –splice is used for inserting:
-splice widthxheight{+-}x{+-}y{%}
The description of x and y in this option is as before. But the width and height parameters are used for specifying the column and row size that should be inserted in the image. Here are some examples of this option's usage. Imagine the following image:
Fig 3-29: The Sample Image that we
are going to Work On
For More Information: www.packtpub.com/imagemagick/book
Convert and Mogrify
[ 48 ]
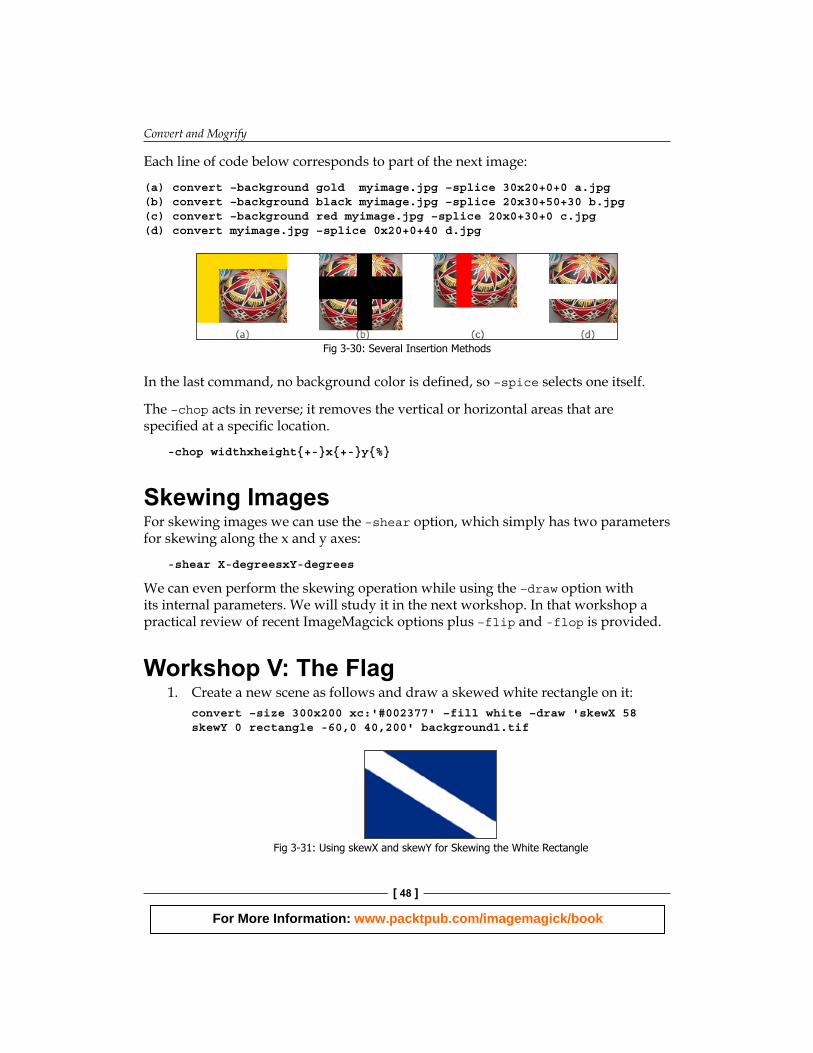
Each line of code below corresponds to part of the next image:
(a) convert –background gold myimage.jpg –splice 30x20+0+0 a.jpg(b) convert –background black myimage.jpg –splice 20x30+50+30 b.jpg(c) convert –background red myimage.jpg –splice 20x0+30+0 c.jpg(d) convert myimage.jpg –splice 0x20+0+40 d.jpg
Fig 3-30: Several Insertion Methods
In the last command, no background color is defined, so –spice selects one itself.
The –chop acts in reverse; it removes the vertical or horizontal areas that are specified at a specific location.
-chop widthxheight{+-}x{+-}y{%}
Skewing ImagesFor skewing images we can use the –shear option, which simply has two parameters for skewing along the x and y axes:
-shear X-degreesxY-degrees
We can even perform the skewing operation while using the –draw option with its internal parameters. We will study it in the next workshop. In that workshop a practical review of recent ImageMagcick options plus –flip and -flop is provided.
Workshop V: The Flag1. Create a new scene as follows and draw a skewed white rectangle on it:
convert –size 300x200 xc:'#002377' –fill white –draw 'skewX 58 skewY 0 rectangle -60,0 40,200' background1.tif
Fig 3-31: Using skewX and skewY for Skewing the White Rectangle
For More Information: www.packtpub.com/imagemagick/book
Chapter 3
[ 49 ]
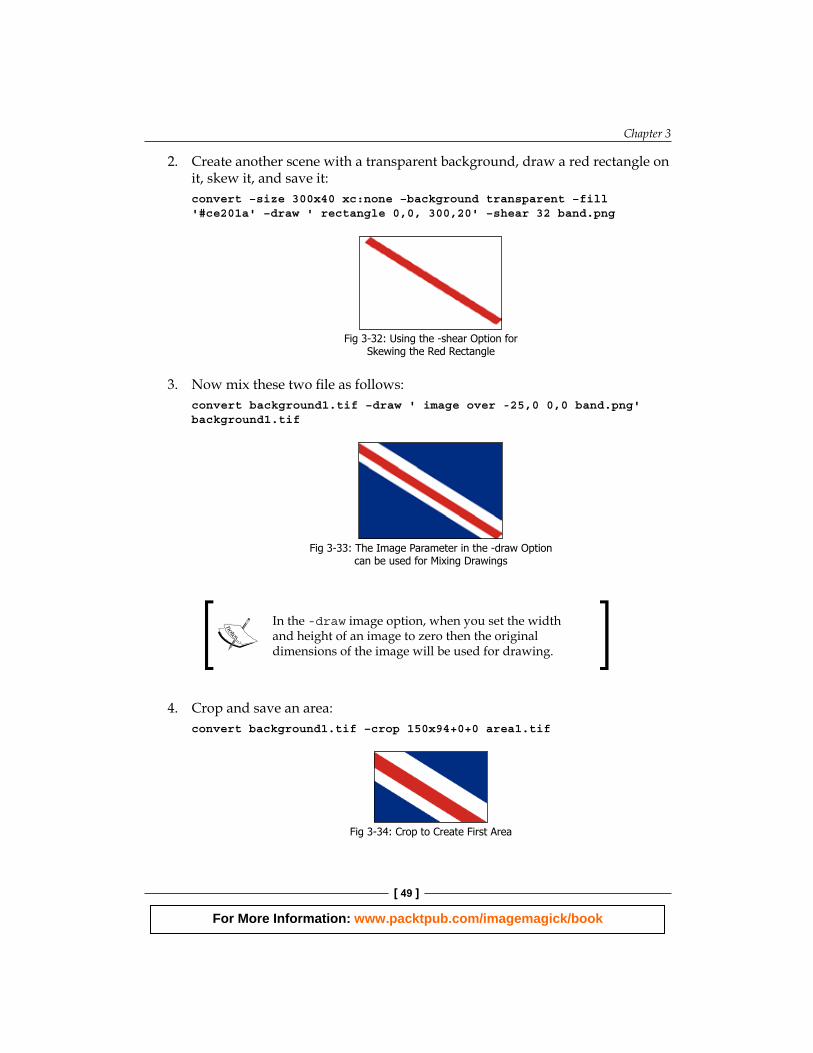
2. Create another scene with a transparent background, draw a red rectangle on it, skew it, and save it:convert –size 300x40 xc:none –background transparent –fill '#ce201a' –draw ' rectangle 0,0, 300,20' –shear 32 band.png
Fig 3-32: Using the -shear Option for
Skewing the Red Rectangle
3. Now mix these two file as follows:convert background1.tif –draw ' image over -25,0 0,0 band.png' background1.tif
Fig 3-33: The Image Parameter in the -draw Option
can be used for Mixing Drawings
In the -draw image option, when you set the width and height of an image to zero then the original dimensions of the image will be used for drawing.
4. Crop and save an area:convert background1.tif –crop 150x94+0+0 area1.tif
Fig 3-34: Crop to Create First Area
For More Information: www.packtpub.com/imagemagick/book
Convert and Mogrify
[ 50 ]
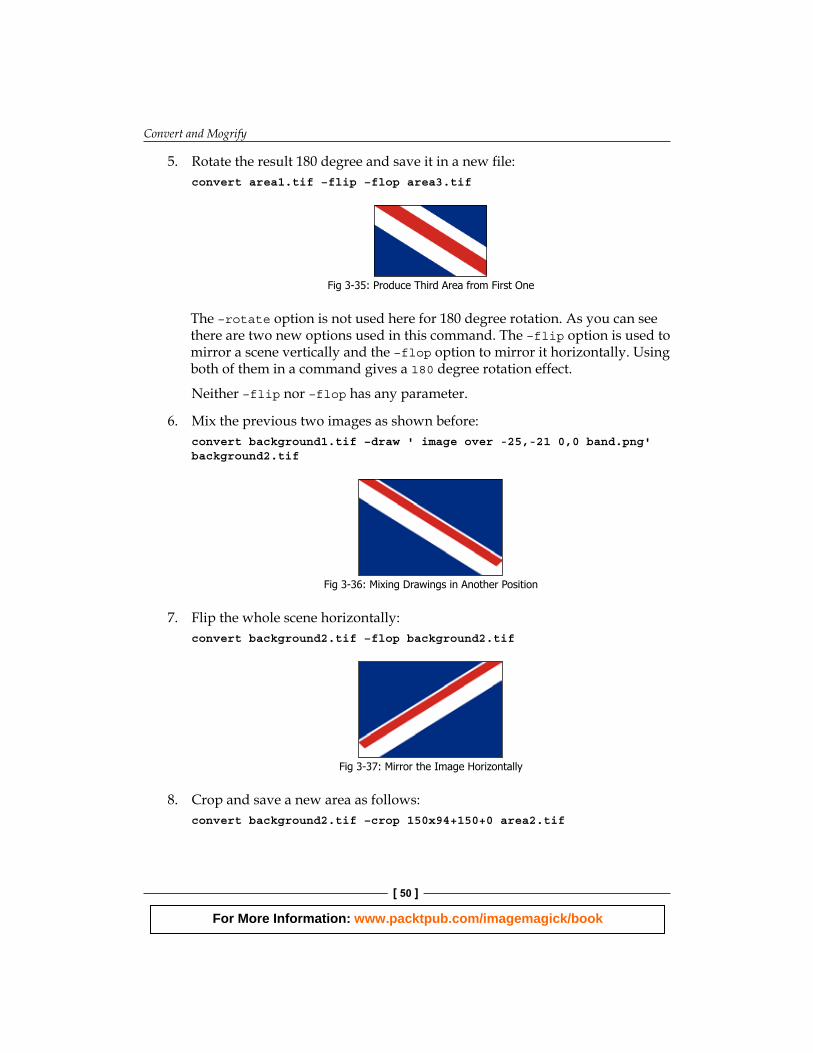
5. Rotate the result 180 degree and save it in a new file:convert area1.tif –flip –flop area3.tif
Fig 3-35: Produce Third Area from First One
The –rotate option is not used here for 180 degree rotation. As you can see there are two new options used in this command. The –flip option is used to mirror a scene vertically and the –flop option to mirror it horizontally. Using both of them in a command gives a 180 degree rotation effect.
Neither –flip nor –flop has any parameter.
6. Mix the previous two images as shown before:convert background1.tif –draw ' image over -25,-21 0,0 band.png' background2.tif
Fig 3-36: Mixing Drawings in Another Position
7. Flip the whole scene horizontally:convert background2.tif –flop background2.tif
Fig 3-37: Mirror the Image Horizontally
8. Crop and save a new area as follows:convert background2.tif –crop 150x94+150+0 area2.tif

For More Information: www.packtpub.com/imagemagick/book
Chapter 3
[ 51 ]
Fig 3-38: Crop to Create Second Area
9. Again rotate it with a –flip and –flop option:convert area2.tif –flip –flop area4.tif
Fig 3-39: Produce Fourth Area from the Second One
10. Now its time to arrange these four areas to achieve a new mixed scene:convert –size 300x188 xc:none –draw ' image over 0,0 0,0 area1.tif' –draw ' image over 150,0 0,0 area2.tif' –draw ' image over 0,94 0,0 area4.tif' –draw ' image over 150,94 0,0 area3.tif' Mixed.tif
Fig 3-40: Mixing All Four Areas
11. For adding white and red crosses use the -splice option two times:convert mixed.tif –background white –gravity center –splice 20x20 -background '#ce201a' –splice 40x40 flag.tif
Fig 3-41: The Final Flag

For More Information: www.packtpub.com/imagemagick/book
Convert and Mogrify
[ 52 ]
Artistic OptionsFor readers who are interested in the artistic capabilities of ImageMagick, this section will be wonderful. The artistic options mainly work on pixels and colors of an image so that it looks different. Most of them act on groups of pixels that are specified within a parametric radius or a specific color level.
Some of these options are discussed in the following table and the remainder will be studied during the next chapters.
Option Parameters DescriptionCharcoal value Converts the image to a charcoal drawing. Bigger
amounts for value will produces thicker lines.
Edge radius Detect edges in an image by finding harmonic adjacent colors in the specified radius.
Emboss radius Simply emboss an image with provided radius.Paint radius The most frequent color is identified and then the others
are replaced by that and an oil paint effect produced.
Posterize levels Reduce the image colors to a limited number of color levels.
Shade azimuthxheight Convert the image to gray scale shades. The azimuth is used for setting the light source degree and height will sets the distance of light source from horizon.
Solarize threshold Will produce a negative film effect by negating all pixels above the threshold level. Setting threshold to 100 equals to using –negate option.
Spread value The value that is specified for this option acts as a radius, which is used to select a random pixel in that limit to swap with the current pixel. This effect will produce a distorted glass view.
Due to this table the artistic options usage seems fair. Let's see them in a practical example.
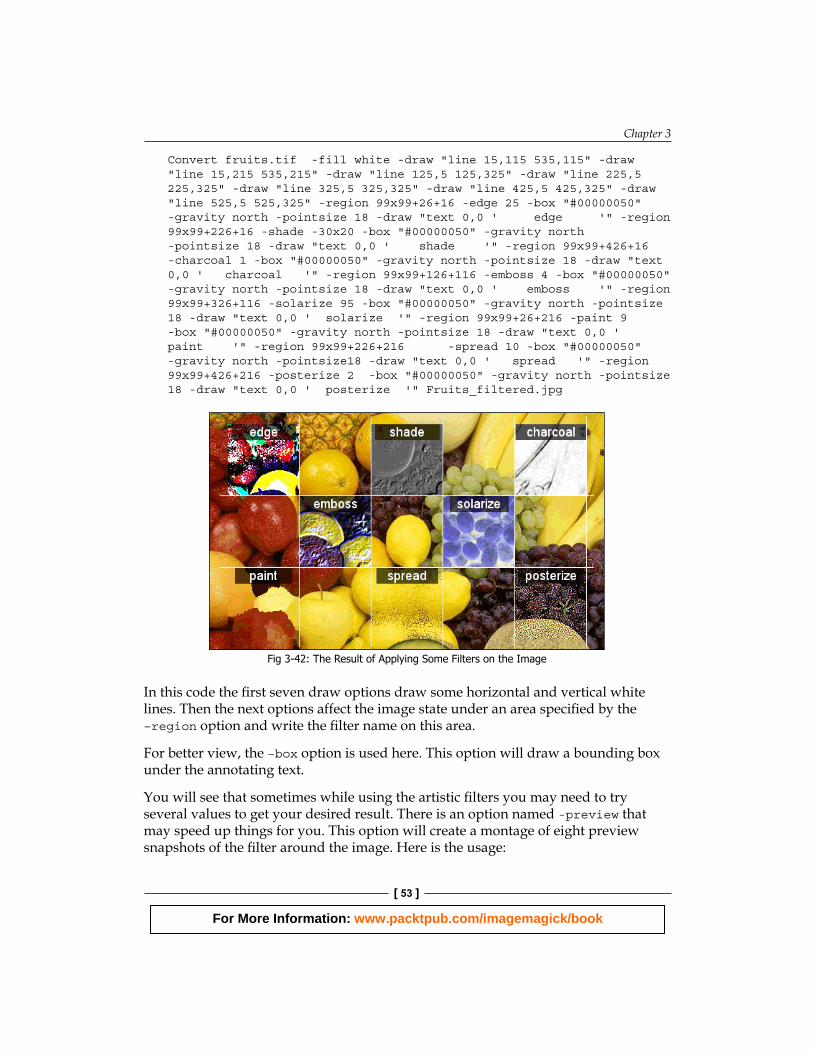
Workshop VI: Applying Various Filters on an ImageI wrote the following command for an image with 550x330 dimensions. Try it on your favorite image and see the result:
For More Information: www.packtpub.com/imagemagick/book
Chapter 3
[ 53 ]
Convert fruits.tif -fill white -draw "line 15,115 535,115" -draw "line 15,215 535,215" -draw "line 125,5 125,325" -draw "line 225,5 225,325" -draw "line 325,5 325,325" -draw "line 425,5 425,325" -draw "line 525,5 525,325" -region 99x99+26+16 -edge 25 -box "#00000050" -gravity north -pointsize 18 -draw "text 0,0 ' edge '" -region 99x99+226+16 -shade -30x20 -box "#00000050" -gravity north -pointsize 18 -draw "text 0,0 ' shade '" -region 99x99+426+16 -charcoal 1 -box "#00000050" -gravity north -pointsize 18 -draw "text 0,0 ' charcoal '" -region 99x99+126+116 -emboss 4 -box "#00000050" -gravity north -pointsize 18 -draw "text 0,0 ' emboss '" -region 99x99+326+116 -solarize 95 -box "#00000050" -gravity north -pointsize 18 -draw "text 0,0 ' solarize '" -region 99x99+26+216 -paint 9 -box "#00000050" -gravity north -pointsize 18 -draw "text 0,0 ' paint '" -region 99x99+226+216 -spread 10 -box "#00000050" -gravity north -pointsize18 -draw "text 0,0 ' spread '" -region 99x99+426+216 -posterize 2 -box "#00000050" -gravity north -pointsize 18 -draw "text 0,0 ' posterize '" Fruits_filtered.jpg
Fig 3-42: The Result of Applying Some Filters on the Image
In this code the first seven draw options draw some horizontal and vertical white lines. Then the next options affect the image state under an area specified by the –region option and write the filter name on this area.
For better view, the –box option is used here. This option will draw a bounding box under the annotating text.
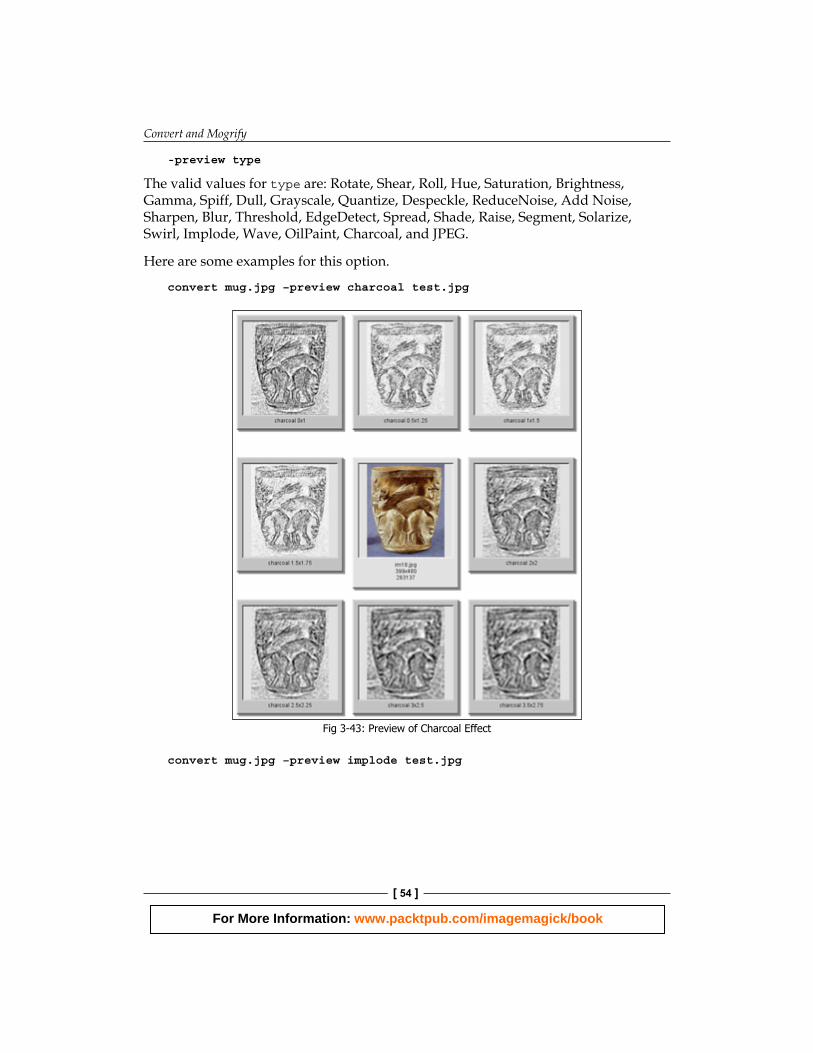
You will see that sometimes while using the artistic filters you may need to try several values to get your desired result. There is an option named -preview that may speed up things for you. This option will create a montage of eight preview snapshots of the filter around the image. Here is the usage:
For More Information: www.packtpub.com/imagemagick/book
Convert and Mogrify
[ 54 ]
-preview type
The valid values for type are: Rotate, Shear, Roll, Hue, Saturation, Brightness, Gamma, Spiff, Dull, Grayscale, Quantize, Despeckle, ReduceNoise, Add Noise, Sharpen, Blur, Threshold, EdgeDetect, Spread, Shade, Raise, Segment, Solarize, Swirl, Implode, Wave, OilPaint, Charcoal, and JPEG.
Here are some examples for this option.
convert mug.jpg –preview charcoal test.jpg
Fig 3-43: Preview of Charcoal Effect
convert mug.jpg –preview implode test.jpg

For More Information: www.packtpub.com/imagemagick/book
Chapter 3
[ 55 ]
Fig 3-44: Preview of Implode Effect
The options that we have learned in this chapter are just a small part of the whole ImageMagick options. There is still much to say about the convert utility as you will see in later chapters.
Mogrify Syntax and OptionsMogrify uses almost the same options and the same syntax that the Convert utility but the main difference between these two utilities is:
Convert can save the image processing tasks in a new file but Mogrify overwrites them on the file that it is working on. Here is the syntax:
mogrify [ options ...] file
Another difference between these two utilities is that we can make some graphic with convert, define a canvas for it and save the result in a file whose name and format we specify but mogrify only works on existing files. It is unable to create a new file. For example if do not already have a file named line.bmp then the following command will produce an error:
mogrify –size 80x100 xc:white –draw 'line 10,10 70,90' line.bmp

For More Information: www.packtpub.com/imagemagick/book
Convert and Mogrify
[ 56 ]
The error message will say:
mogrify: unable to open image `line.bmp': No such file or directory.
But using the same parameters with convert as shown below will produce a file named line.bmp and draw a line on it:
convert –size 80x100 xc:white –draw 'line 10,10 70,90' line.bmp
So, it seems that the best uses of mogrify are processing tasks that needs no extra file production.
There is an exception for mogrify. This utility will produce new files when it is used with the -format parameter. For example when we use the following command to produce some .bmp files the original .jpg files that already exist in the directory will remain unchanged:
mogrify –format bmp *.jpg
Let’s see mogrify in action and use some parameters with it in the next workshop.
Workshop VII: The CardIn this workshop we will work on a portrait image to make an artwork similar to those found on playing cards. I choose an image with 202x196 pixels dimensions. You can choose your desired one but keep in mind it is better to select an image that when you rotate it 180 degree matches with the original one.
1. Make a copy of your image, rotate it by 180 degrees, and name it rotated.bmp:Convert hafez.jpg –rotate 180 rotated.bmp
In the above command we use convert to rotate the image because we need the original image and if mogrify is used instead then we lose the next steps.
Another subject to notice is that we used the .bmp format to prevent loss in image quality. JPEG is a lossy format and saving the rotated image as JPEG image will affect the quality a little.

For More Information: www.packtpub.com/imagemagick/book
Chapter 3
[ 57 ]
Fig 3-45: (a) The Original Image and (b) The Rotated Image
2. Next, we expand the canvas of the original image from bottom and sides:Convert –background white Hafez.jpg –splice 40x0+0+0 –splice 40x0+242+0 –splice 0x196+0+196 -fill none –stroke black –strokewidth 1 -draw ‘rectangle 0,0 281,391 Hafez_card.bmp
Fig 3-46: The Expanded Canvas with the Original Image
3. In the first part of the previous code we set the background color to white. There are three splice parameters. The first one adds an empty area 40 pixels wide at the left side of current image. The second splice parameter adds the same area at the right side of the current area and the last one will add an area with a height of 196 pixels at the bottom of the image.

For More Information: www.packtpub.com/imagemagick/book
Convert and Mogrify
[ 58 ]
We need to add a border to our work so it can be recognized from the white background of the current book page. So we set the border color to black in the –stroke option and define the border width in the –strokewidth option. Now we can draw a rectangle on our image that simulates the border for it and the rectangle will not fill the scene because we set the fill color to none in the -fill option.This is not the optimum manner of implementing this step but I have introduced it just for showing the several methods available for performing a task in ImageMagick.The better solution is to use the –border and –bordercolor options. The first one defines the border thickness and the second one will set the color for it.convert hafez.jpg –splice 39x0+0+0 –splice 39x0+241+0 –splice 0x196+0+194 –bordercolor black –border1 hafez_card.bmp
If you observe the image carefully you will notice that the result is the same. The syntax of the -border command is as follows:-border width x height
In this option we can set the width and height of the image border with the related parameters.
4. Now place the mirrored image in the current scene using:convert hafez.jpg –rotate 180 rotated.bmp convert hafez_card.bmp –draw “image over 40,196 0,0 ‘rotated.bmp’” hafez_card.bmp
Fig 3-47: Our Work after Placing the Rotated Part below the Original

For More Information: www.packtpub.com/imagemagick/book
Chapter 3
[ 59 ]
5. Next, we have to design a name on this card:convert –background white –fill black -font blackchancery -pointsize 30 label:”H\nA\nF\nE\nZ”\ card_label.jpg
Fig 3-48: Card Label
6. Let’s talk about the -label option in the previous command. With this option we can place a text label on the current image. Its syntax is as follows:-label: name
Since we used new line characters, it will place each letter in the next line automatically.
7. Finally, we add the name at both sides of our art work:
mogrify –draw “image over 240,0 0,0 ‘card_label.jpg’ –draw “rotate 180 image over -40,-391 0,0 ‘card_label.jpg’ hafez_card.bmp
Fig 3-49: Inserting the Labels on the Card

For More Information: www.packtpub.com/imagemagick/book
Convert and Mogrify
[ 60 ]
At the end we used the mogrify command in this step. In this command we place two labels on the image simultaneously.
We used mogrify because there is no need to create any extra image as the product of a new task. We used the original file that the image insertion operation has been done on as the output file.
In the first option we draw the label image at the 240,0 location of the card. The second draw option is a little tricky. Because we rotate the label 180 degrees we have to use a coordinate pair that places the label exactly on the lower left corner of our image.
The negative values for location will solve this problem. The -40 value for x position means that we want our image aligned to this location from the left (and not from the right as usual) and the -391 value for y position will align the image from the bottom (not from the top as usual).
SummaryIn this chapter we learned about several aspects and usages of ImageMagick options in the Convert utility. We covered drawing primitive commands, defining color and painting methods, defining text characteristics and annotating images, various deformations and translations, and finally some artistic effects. We also covered the Mogrify command. These commands have been studied during several workshops. Although we cannot cover every single option in this book, you should now have plenty of ideas for your own experiments!
In the next chapter, another two powerful ImageMagick utilities, Composite and Montage will be studied and we will see how to use them with Convert to create complex graphics.

For More Information: www.packtpub.com/imagemagick/book
ImageMagick Tricks: Web Image Effects from the Command Line and PHP ImageMagick ™ was introduced in 1999 by ImageMagick Studio LLC for the first time. It is a graphical application used for performing image processing tasks. It is a powerful collection of tools and libraries to read, write, and manipulate images in about 100 formats.
In this book, I'll show how to use the various ImageMagick utilities to create amazing artwork from the command line. You may find doing some image processing tasks with this program is more convenient than using other solutions, like Adobe Photoshop.
Let me give you an example. How do you resize about 3000 photos of different sizes and formats and place a watermark on them? This question led me to examine ImageMagick for the first time and after a while I found it to be a powerful and easy-to-learn application.
You may not believe how easily ImageMagick can do it for you. With a single command you can resize, watermark, add effects, frame, arrange, convert, format, and do many more tasks on a single image or a bunch of various images.
To cut a long story short, I think it is the best command-line image processing application that I’ve ever seen. It is more than a command-line application. If you are a programmer using compilers like C, Delphi, Python, Perl, and so on or even server-side languages like PHP, then you can find your favourite ImageMagick API for your compiler.
Due to space limitaion, this book concentrates just on command-line utilities. Maybe in the future we will publish titles on other ImageMagick APIs.
What This Book Covers Chapter 1 is an introduction, which provides you with a brief history about Imagemagick and its capabilities.
Chapter 2 contains useful steps for installing and configuring ImageMagick. There are some good resources for downloading the application—based on your OS—too.
Chapter 3 covers the convert and mogrify utilities. You can find practical workshops in this chapter.
Chapter 4 covers the composite and montage utilities and their role in combining and presenting images.
Chapter 5 mainly focuses on input (import utility) and output (display utility) in ImageMagick. There are some descriptions about obtaining useful information from images using identify.
Chapter 6 teaches you how to create animations using ImageMagick.

For More Information: www.packtpub.com/imagemagick/book
Chapter 7 contains brief information about the ImageMagick command line programming language—conjure. Moreover in this chapter the compare utility, which compares the differences between two images of the same size, visually and mathematically will be studied too.
Chapters 8, 9, and 10 cover some practical web projects including building a confirmation-code box, online customized e-cards, and online customized templates (for a book cover).
Appendix A will show you how to install and use new fonts. There are some free resources for fonts and images too.
Appendix B covers the compression and quality trade-off in ImageMagick.
Where to buy this book You can buy ImageMagick Tricks from the Packt Publishing website: http://www.packtpub.com/imagemagick/book.
Free shipping to the US, UK, Europe, Australia, New Zealand and India.
Alternatively, you can buy the book from Amazon, BN.com, Computer Manuals and most internet book retailers.
www.PacktPub.com