image viewer application for tweten’s photography...
TRANSCRIPT
IMAGE VIEWER APPLICATION FOR TWETEN’S PHOTOGRAPHY
by
Vinod Khanna Saini Ganesh Bachelor of Technology, Jawaharlal Nehru Technological University,
2003
A Project
Submitted to the Graduate Faculty
of the
University of North Dakota
in the partial fulfillment of the requirements
for the degree of
Master of Science
Grand Forks, North Dakota December 2005


Copyright 2005 Vinod Saini Ganesh
ii
iii
iv
TABLE OF CONTENTS
PERMISSION.................................................................................................................... iv
LIST OF FIGURES ........................................................................................................... vi
ACKNOWLEDGEMENTS.............................................................................................. vii ABSTRACT..................................................................................................................... viii
CHAPTER I INTRODUCTION.......................................................................................................1
1.1 PROBLEM STATEMENT..................................................................................1 1.2 STRUCTURE OF THIS PROJECT ....................................................................2
II REQUIREMENTS AND SPECIFICATION..............................................................3 III SOFTWARE DESIGN ...............................................................................................7 IV IMPLEMENTATION................................................................................................17 V SOFTWARE VERIFICATION AND VALIDATION.............................................27 VI CONCLUSIONS ......................................................................................................35 REFERENCES ..................................................................................................................36 APPENDIX A....................................................................................................................37 APPENDIX B ....................................................................................................................46
v
LIST OF FIGURES
1. Class Diagram..................................................................................................................8
2. Object Diagram................................................................................................................9
3. Use Case Diagram..........................................................................................................10
4. State Diagram.................................................................................................................11
5. Sequence Diagram .........................................................................................................12
6. Collaboration Diagram...................................................................................................13
7. Activity Diagram ...........................................................................................................15
8. Deployment Diagram.....................................................................................................16
9. Flow Chart of run Method .............................................................................................29
10. Main Interface..............................................................................................................39
11. Interface after Game Selection.....................................................................................40
12. Vertical Slide Show Display Interface.........................................................................41
13. Horizontal Slide Show Interface..................................................................................42
14. Small Thumbnails display Interface ............................................................................43
15. Medium Thumbnails display Interface ........................................................................44
16. Photo Zoom/Rotate Interface.......................................................................................45
17. Background Color Pop-up Window.............................................................................46
vi

ACKNOWLEDGEMENTS
This project would not have been possible without generous support of the following
people:
Associate Professor, Dr.Ronald Marsh, who is my advisor, for suggesting the project.
The meetings organized by him, helped me a lot to discuss the problems. It was
wonderful working with him. My client, Rock Tweten, for giving me support and
suggestions. My Parents, siblings and sister-in-law for showing love as well as care and
giving suggestions through out my project. Graduate students, for providing valuable tips
to solve technical problems.
I would like to thank one and all who helped me indirectly in making this project a big
success.
vii
ABSTRACT
The objective of this project is to build an Image Viewer Application exploiting
the features of Object Oriented concepts with Java’s swing library [1] for Tweten’s
Photography [2] located in the city of Grafton, North Dakota. The Image Viewer
Application allows the user to access the application in a user friendly manner. Tweten’s
Photography is primarily known for photographing children’s ice hockey events.
Currently Tweten’s Photography uses Tripism Event and Portrait Software (TEPS)
designed by imageTech Marketing Company [3] which is available for viewing games,
event slide shows, and thumbnails. The user unfriendliness is the primary reason for
Tweten’s Photography to look for the alternative software. In keeping with the objectives
of this project, the Image Viewer has an easy- to- use Graphical User Interface to view
slide shows and thumbnails. Tweten’s Photography plans to install the Image Viewer
Application in its lab, which is comprised of six computers. A customer (normally a
parent) who walks into the studio can log on to one of these computers and choose a
particular event/game from the available list in the application to view slide shows or
thumbnails.
viii
CHAPTER I
INTRODUCTION
Tweten’s Photography is an all digital photography and design studio located in
Grafton, ND. Since 1979 it has been using the latest technology to deliver Fine Portraits,
Memory Mates, and children’s ice hockey Action Photos. Tweten’s Photography is also
responsible for photographing the University of North Dakota Graduation Ceremony.
Tweten’s Photography contacted Dr.Marsh, who is my advisor, to develop new
software with a more user-friendly Graphical User Interface (GUI). This project, the
Image Viewer Application, was designed to avoid all the difficulties Tweten’s
photography is facing with the Tripism Event and Portrait Software (TEPS) software.
The goal of this application mainly concentrates on saving time and reducing labor,
which in turn helps to increase profit for Tweten’s photography.
1.1 PROBLEM STATEMENT
To display photographs to their customers, Tweten’s photography is presently
using TEPS. TEPS is designed for professional photographers who use digital technology
and Apple computers to speed the process of delivering their products and services to
their customers. Professional photographers currently use TEPS for shooting weddings,
portraits, school, sports, and corporate events. Photographers can add graphics or even
1
replace backgrounds with the use of the TEPS green screen technology. Extensive
preference options and customization tools add value to standard prints. All of these
things can be accomplished without photographers having to become computer experts.
This package is designed for photographers who use multiple computers on a network
and who primarily use a film based output device.
However, TEPS software has several disadvantages. The primary disadvantage is
the user unfriendliness of the software. Since there are many customers who want to use
this software to view the photographs for each event/game, it is very difficult for
photographers in Tweten’s photography to explain to each and every customer how to
use the software. The second disadvantage is that this software is too costly. The third
disadvantage of TEPS is that Tweten photographers are finding it a time consuming and
tedious process to drag and drop the many image folders into this software in order for
the users to view slide shows and thumbnails for each event/game.
1.2 STRUCTURE OF THIS PROJECT
The next chapter describes the Requirements and Specifications of this
application. Chapter 3 describes Design of the software with Rational Rose. Chapter 4
focuses on the Implementation. Chapter 5 implements Verification and Validation.
Chapter 6 contains the Conclusion.
2
CHAPTER II
REQUIREMENTS AND SPECIFICATION
Software requirements express the needs and constraints that are placed upon a
software product to the satisfaction of some real world application. A requirement
specification is an agreement between the client and the software developer. The project
requirements were provided to Dr. Marsh by Mr. Rock Tweten, the managing director of
Tweten’s Photography.
2.1 REQUIREMENTS
Tweten’s Photography is famous for covering children’s ice hockey tournaments.
The users or customers of this project are mainly the parents of the participating children.
Since TEPS software is somewhat complicated to use, Tweten’s Photography gathered all
the requirements by carefully observing parents using the TEPS software and decided to
build an end product which will allow parents to more easily access the photographs.
The basic purpose of developing the Image Viewer Application is to provide
customers the ability to navigate through the menu to find the photographs of an
event/game of their interest. Once the customer locates the event/game folder he/she
wishes to view, he/she should be able to view a slide show or browse quickly through the
3
thumbnails. The developed application runs on Mac and Windows operating systems and
was coded in Java language.
Basic requirements:
• The number of photos for a particular event/game is at least 500 and not more
than 2000.
• The photo size used is minimum of 800 Kilobytes (kb) and maximum of 12
Megabytes (mb).
• The photos retain the same resolution after they are displayed.
• The format of the photos is Joint Photographic Experts Group (JPEG) [4].
• Display thumbnails and slide shows.
• The event/game name and photo names are displayed under the slide show
display and under each thumbnail.
While the user is viewing the slide show, the display rate interval ranges between
1 and 10 seconds, showing two photos on the screen at a given time. The other features
added are stop, pause, rewind, forward, and restart the slide show. Each thumbnail
interface displays 30 pictures at a time. When a user clicks on a thumbnail of a picture,
he/she is taken to the interface where he/she can enlarge or rotate the selected picture. A
user is also given an option of selecting the size of the thumbnails, music, help topics,
and background color.
Assuming that the pictures are of ice hockey games and are located in a folder
named games. When a user clicks on the SelectAnEvent menu, the application will
provide a list of sub-folders of the games from which the user can click on the game of
his/her interest to start a slide show or view the thumbnails.
4
The application displays the image number across the top of the photo in black
letters or in a user specified color. A user is also provided with a choice of selecting the
different sizes and different fonts for the text and image numbers.
The Image Viewer Application also supports keyboard shortcuts to ease the
navigation. The down arrow key is used to pause the slide show. To resume, the user
must click the Play button or click on the Slideshow button. The left and right arrow keys
can be used for navigating the previous and next picture respectively. The control key
can stop the slide show, while the escape key exits the slide show.
2.2 SPECIFICATIONS
As per the requirements, a Graphical User Interface has been developed with the
following Menus and Buttons that can be easily understood by the parents:
• SELECTANEVENT MENU: Used to select a event/game from the specified
folder.
• EDIT BUTTON: Used to set the font size, color and style of the text.
• SLIDESHOW BUTTON: Used to view the slide show after selecting a game
from the SelectAnEvent menu. In turn, the slide show interface has other buttons
such as STOP, PAUSE, REVERSE, FORWARD, and PLAY. All these buttons
are self explanatory.
• THUMBNAIL BUTTON: Used to view the thumbnails after selecting a game
from the SelectAnEvent menu. After the thumbnails are displayed, a user may
5
select a photo. Then, he/she will be taken to an interface where he/she has the
option of enlarging and rotating the photo.
• MUSIC BUTTONS: Used to play, stop, and pause the music.
• BACKGROUND: Used to change the Background.
• EXIT: Used to exit the application.
• HELP: Used to show help topics
• ABOUT: Used to give some information about Tweten’s photography.
As I progressed through the project more requirements emerged, which are
satisfied with the following additions.
• TWO PHOTOS: Initially this application displayed only one photo at a time while
viewing the slide show. However, changes were made to display two photos at a
time.
• SLIDEFLIP: The photos are sometimes vertical and sometimes horizontal.
Initially, the requirement was only for horizontal photos. According to the new
requirement, I have included a SLIDEFLIP button/option in which photos can be
viewed both in horizontal as well as vertical position.
• SPEED: Changes the 2 second slide show display rate to anything in between 1
and 10 seconds.
• JAVA LAUNCHER: To make the project user friendly, changes have been made
so that users can run the software with a single click on an executable file icon
instead of running it using command line arguments.
6
7
CHAPTER III
SOFTWARE DESIGN
After the requirements section, I developed the software design in the Unified
Modeling Language (UML) [5] using the Rational Rose software [6]. Rational Rose is a
visual modeling tool to draw UML diagrams. The UML is one of the most exciting tools
in the world of system design and development. The design of the software with UML
enables system programmers to create blueprints that capture their visions in a standard,
easy-to-understand way and communicate them to others. The UML contains a number
of graphical elements that combine to form diagrams. The main use of the diagrams is to
present multiple views of a system. Each and every step in the design helps programmers
understand the entire system structure, before they start working on the code.
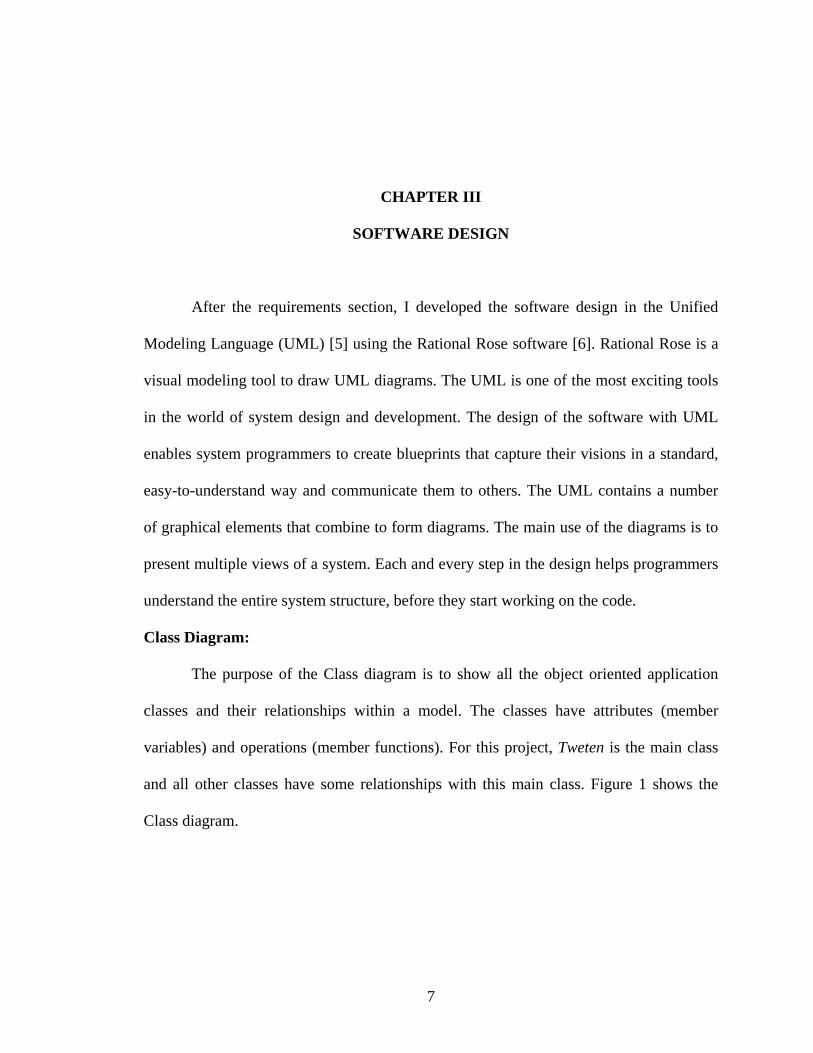
Class Diagram:
The purpose of the Class diagram is to show all the object oriented application
classes and their relationships within a model. The classes have attributes (member
variables) and operations (member functions). For this project, Tweten is the main class
and all other classes have some relationships with this main class. Figure 1 shows the
Class diagram.
Twetensvalue : int = 0label : JLabelbutton : JButtonname2 : type = initvalsleepvalue : JSliderlayout : FlowLayoutframe : JFrameslidepause : boolean = false<<final>> panel : JPanelname3 : type = initval
Tweten()ThumbDis1: void()ThumbDis2 : void()deleteDirector()run()update1()main()
JFrame
frameInit()update()
ActionListner
actionPerformed()
<<Interface>>
Runnable
run()
<<Interface>>
MouseAdapter
mousePressed()
Thumbnail1MediaTracker : MediaTrackerthumbWidth : int = 0thumbHeight : int = 0BufferedImage : thumbImageBufferedOutputStream : out
Thumbnail1()
Thumbnail2MediaTracker : MediaTrackerthumbWidth : int = 0thumbHeight : int = 0BufferedImage : thumbImageBufferedOutputStream : out
Thumbnail2()
Thumbnail3MediaTracker : MediaTrackerthumbWidth : int = 0;thumbHeight : int = 0BufferedImage : thumbImageBufferedOutputStream : out
Thumbnail3()
ButtonHandler
actionPerformed()
ItemHandler
actionPerformed()
StyleHandler
itemStateChanged()
ImagePointersriimage : String = " "
ImagePointer()mousePressed()
1..n 11..n 1
1..n 11..n 1
1..n
1
1..n
1
0..n1
0..n1
0..n1 0..n1
0..n1
0..n1
1..n
1
1..n
1ItemListner
itemStateChanged()
<<Interface>>
8
Figure 1: Class Diagram
Object Diagram:
An object is an instance of a class. That means it has specific values of attributes
and behavior. Figure 2 shows how the UML represents an object. It shows the name of
the object on the left side and name of the class on the right side.
TwetenObject: Tweten
Figure 2: Object Diagram
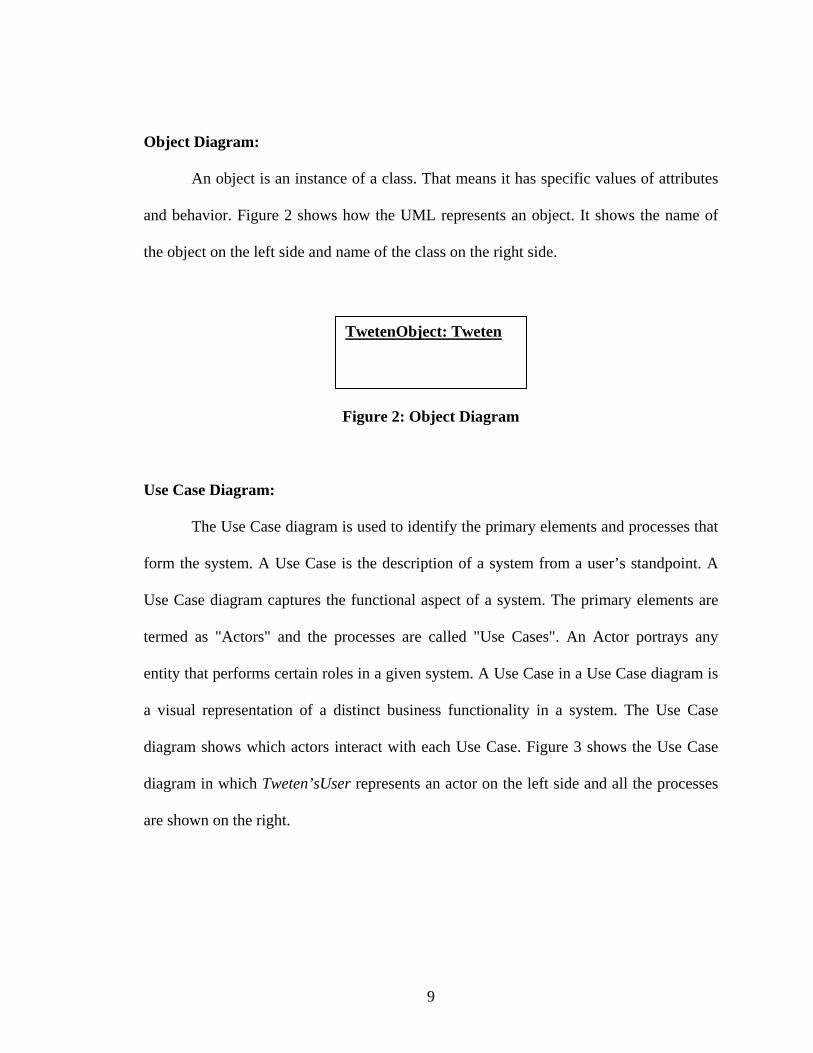
Use Case Diagram:
The Use Case diagram is used to identify the primary elements and processes that
form the system. A Use Case is the description of a system from a user’s standpoint. A
Use Case diagram captures the functional aspect of a system. The primary elements are
termed as "Actors" and the processes are called "Use Cases". An Actor portrays any
entity that performs certain roles in a given system. A Use Case in a Use Case diagram is
a visual representation of a distinct business functionality in a system. The Use Case
diagram shows which actors interact with each Use Case. Figure 3 shows the Use Case
diagram in which Tweten’sUser represents an actor on the left side and all the processes
are shown on the right.
9
StopPlay
Pause
Reverse
ForwardSlideFlip
SmallSize
MediumSize
FontColor
FontSize
FontStyle
Thumbnails
<<extends>>ThumbnailSize
Music
Edit
<<extends>>
<<extends>>
<<extends>>
Help
Exit
GameSelection
<<includes>>
Slideshow
<<includes>>
<<extends>><<extends>>
<<extends>>
<<extends>>
<<extends>>
<<extends>>
Background
Tweten'sUser
<<extends>>
Figure 3: Use Case Diagram
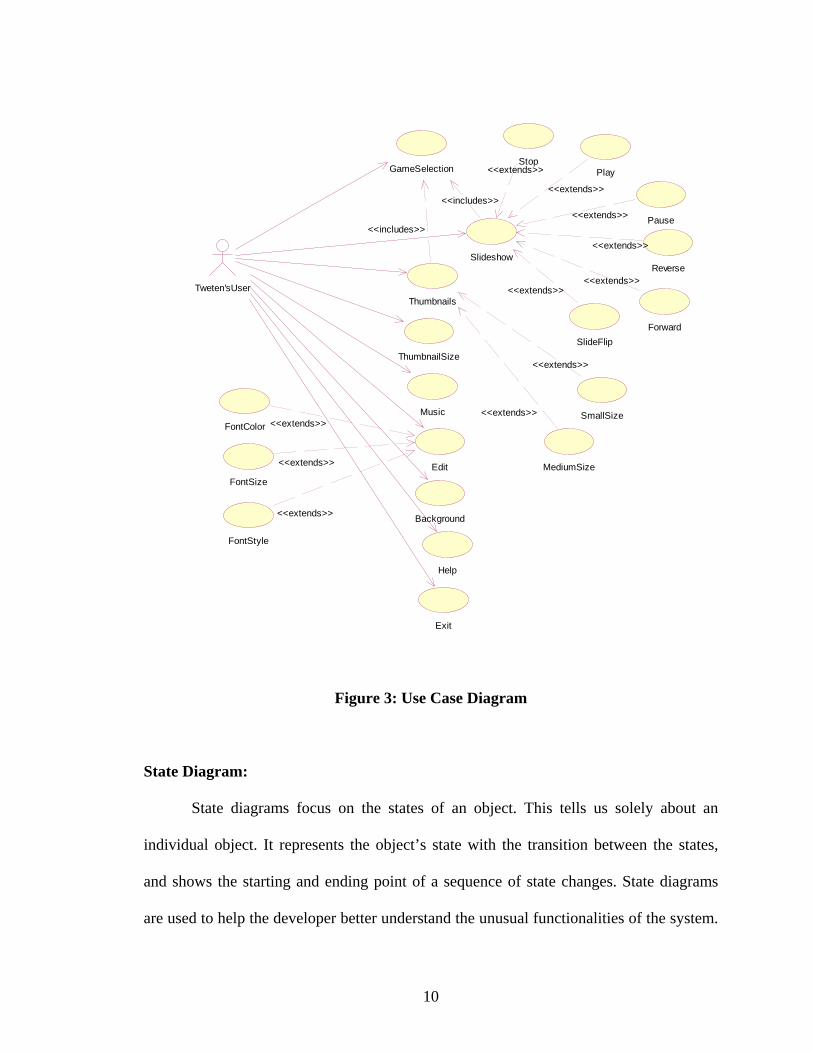
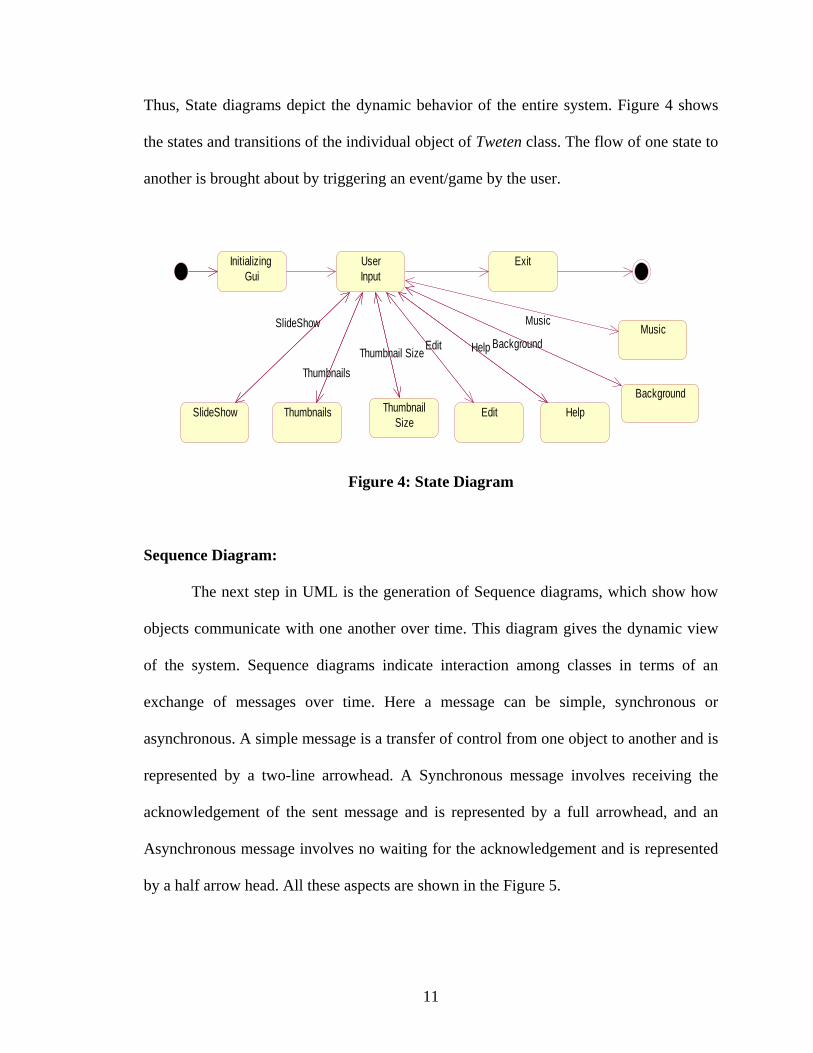
State Diagram:
State diagrams focus on the states of an object. This tells us solely about an
individual object. It represents the object’s state with the transition between the states,
and shows the starting and ending point of a sequence of state changes. State diagrams
are used to help the developer better understand the unusual functionalities of the system.
10
11
The next step in UML is the generation of Sequence diagrams, which show how
objects communicate with one another over time. This diagram gives the dynamic view
of the system. Sequence diagrams indicate interaction among classes in terms of an
exchange of messages over time. Here a message can be simple, synchronous or
asynchronous. A simple message is a transfer of control from one object to another and is
represented by a two-line arrowhead. A Synchronous message involves receiving the
acknowledgement of the sent message and is represented by a full arrowhead, and an
Asynchronous message involves no waiting for the acknowledgement and is represented
by a half arrow head. All these aspects are shown in the Figure 5.
Sequence Diagram:
Thus, State diagrams depict the dynamic behavior of the entire system. Figure 4 shows
the states and transitions of the individual object of Tweten class. The flow of one state to
another is brought about by triggering an event/game by the user.
Initializing Gui
Exit User Input
SlideShow Thumbnails ThumbnailSize
HelpBackground
Edit
SlideShow
ThumbnailsThumbnail SizeEdit
Figure 4: State Diagram
Help Background
MusicMusic

: Tweten : Thumbnail2 : Thumbnail3 : ButtonHandler : ImagePointer : ItemHandler : StyleHandler : Thumbnail1
SlideshowOptions
SlideFilp
FontColor/FontSize
FontStyle
Music
Rotate/Scale
Background
GameSelection
Slideshow
Thumbnails ImageClick
Figure 5: Sequence Diagram
12
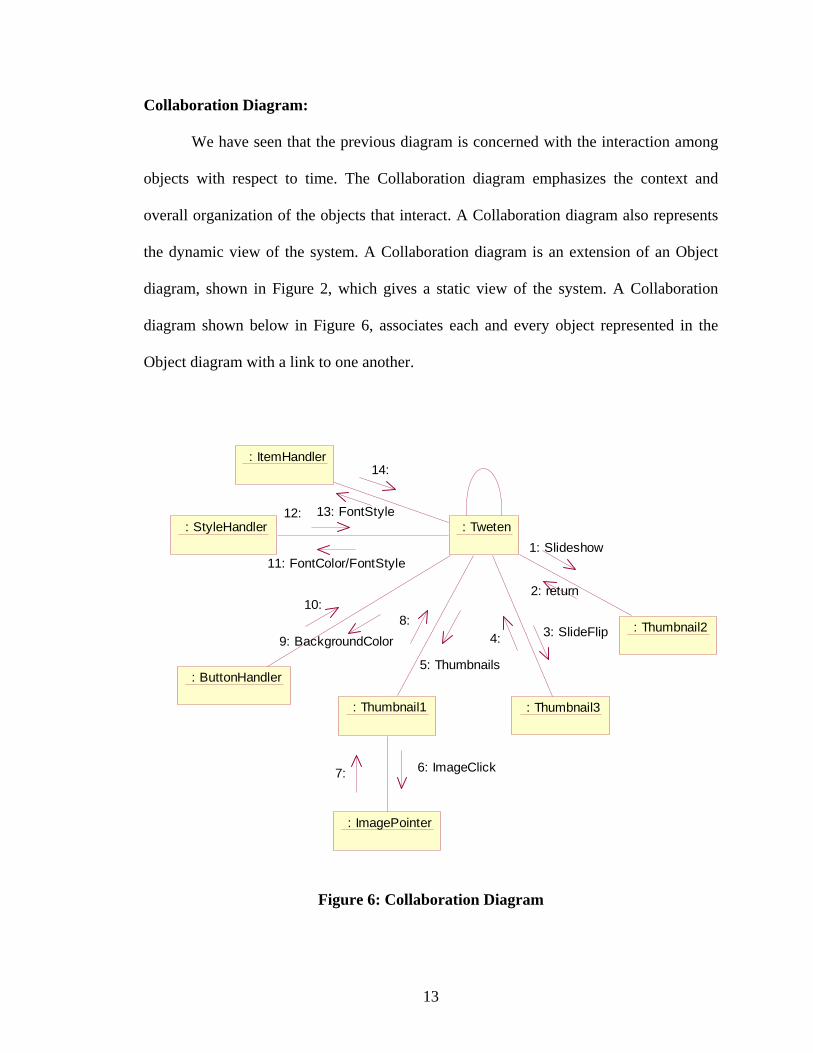
Collaboration Diagram:
We have seen that the previous diagram is concerned with the interaction among
objects with respect to time. The Collaboration diagram emphasizes the context and
overall organization of the objects that interact. A Collaboration diagram also represents
the dynamic view of the system. A Collaboration diagram is an extension of an Object
diagram, shown in Figure 2, which gives a static view of the system. A Collaboration
diagram shown below in Figure 6, associates each and every object represented in the
Object diagram with a link to one another.
: Tweten
: Thumbnail2
: Thumbnail3 : Thumbnail1
: ButtonHandler
: ItemHandler
: StyleHandler
: ImagePointer
1: Slideshow
2: return
3: SlideFlip4:
5: Thumbnails
8: 9: BackgroundColor
10:
13: FontStyle
14:
11: FontColor/FontStyle
12:
6: ImageClick7:
Figure 6: Collaboration Diagram
13
14
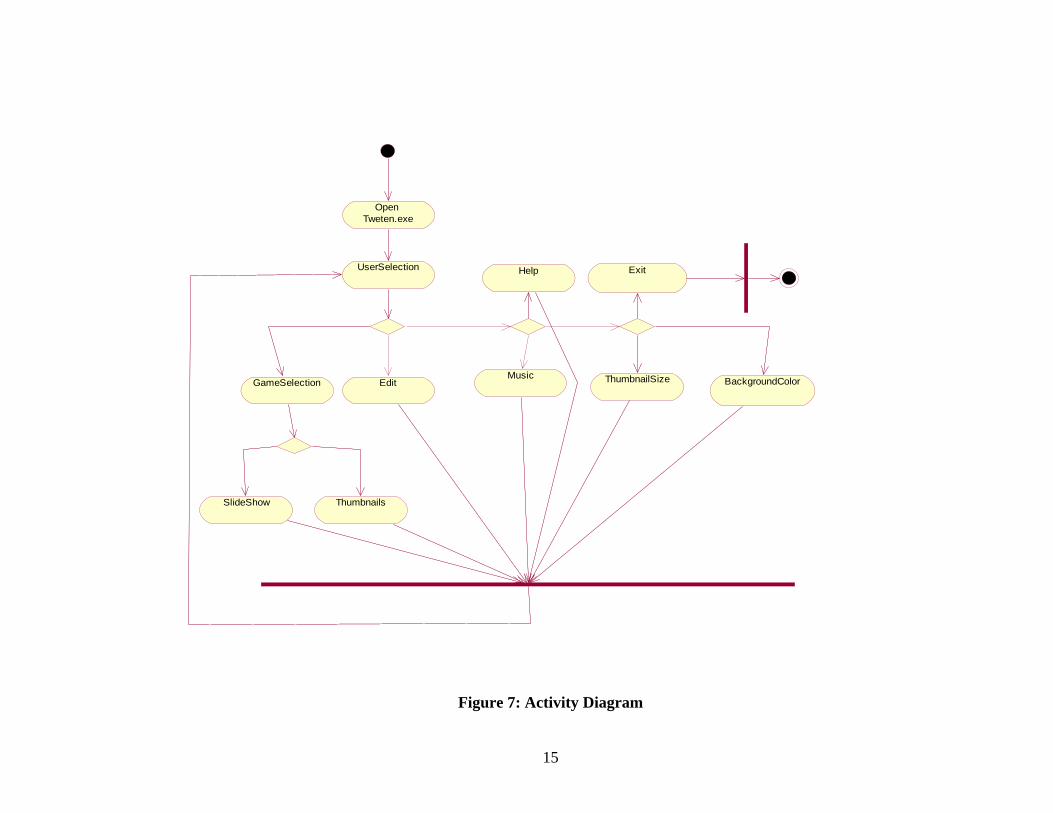
Activity Diagram:
Activity diagrams describe the workflow behavior of a system. Activity diagrams
are similar to State diagrams, because activities are the state of doing something. The
diagrams describe the state of activities by showing the sequence of activities performed.
Activity diagrams can show activities that are conditional or parallel. Activity diagrams
are also useful for analyzing a Use Case by describing what actions need to take place
and when they should occur by modeling applications with parallel processes. Activity
diagrams show the flow of activities through the system. Diagrams are read from top to
bottom and have branches and forks to describe conditions and parallel activities. A fork
is used when multiple activities are occurring at the same time. The branch describes
what activities will take place based on a set of conditions. Figure 7 below shows the
Activity diagram.
Deployment Diagram:
A UML Deployment diagram depicts a static view of the run-time configuration
of processing nodes and the components that run on those nodes. In other words,
Deployment diagrams show the hardware for your system, the software that is installed
on that hardware, and the middleware used to connect the disparate machines to one
another. Figure 8 below shows different hardware systems used in this project and their
relationship with each other.
Open Tweten.exe
GameSelection
UserSelection Exit
SlideShow Thumbnails
Help
EditMusic ThumbnailSize BackgroundColor
Figure 7: Activity Diagram
15
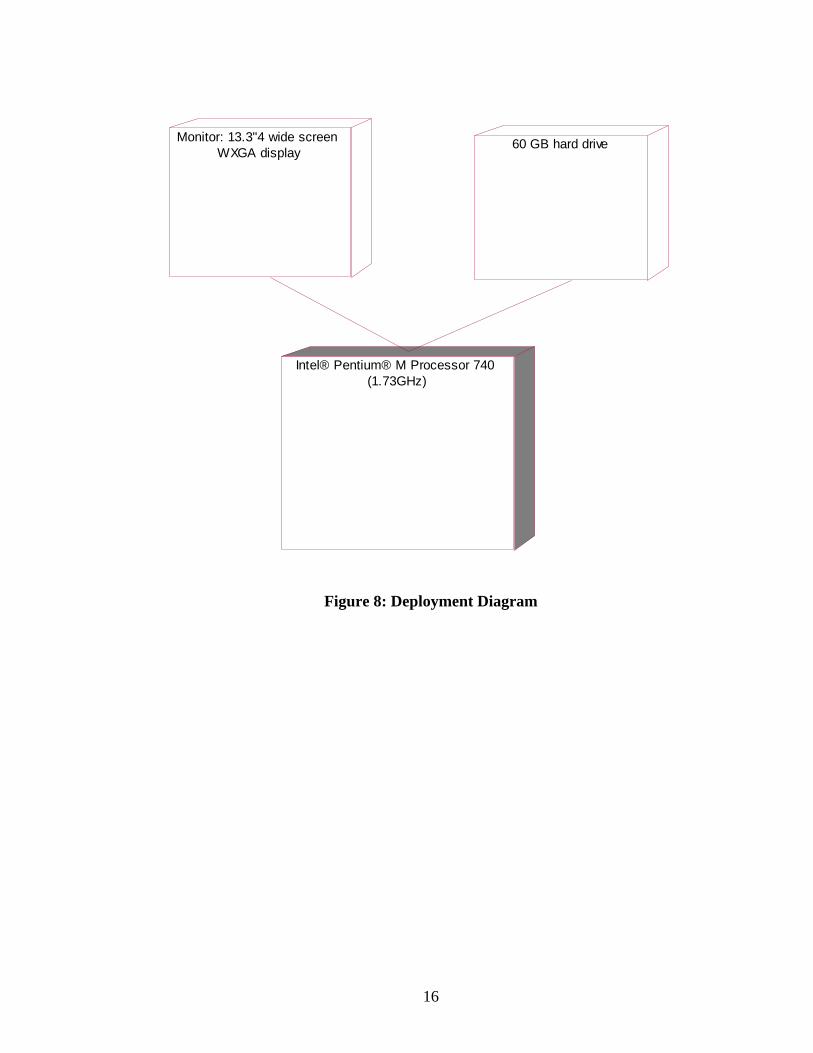
Intel® Pentium® M Processor 740 (1.73GHz)
60 GB hard driveMonitor: 13.3"4 wide screen WXGA display
Figure 8: Deployment Diagram
16
CHAPTER IV
IMPLEMENTATION
After completing the design section using the UML tools, the functional modules
are implemented using Java’s Swing Library. The complete source code is in appendix A.
In this chapter I present the pseudo code for the modules as well as some code examples.
The various important modules discussed here are
1. Interface Layout
2. Read files from a Folder
3. Delete files from a Folder
4. Show Thumbnails
5. Show Slideshow
6. Edit Font
7. Rotate/Scale
8. Background
9. Play Music
1. Interface Layout:
The interface consists of 5 components including one frame and three panels.
a. Frame Layout:
JFrame frame=new JFrame ("IMAGE VIEWER APPLICATION"); frame.setSize (1280, 800); frame.setVisible (true);
17
This shows that total length of the frame is 1280x 800. The frame window is set
to be in visible mode.
b. Panel Layout:
jp1.setPreferredSize (new Dimension (800,110)); jp1.setBackground (Color. RED);
On the frame there are three panels that contain different items. The above code
details the layout of the panel 1. Panel 1 is of the length 800x110 and its color is red.
panel 2 is of the length 800x30. Panel 3 is the area where all the graphics are
displayed, so the height of the panel is greater than the other two panels. The size of
the panel 3 is 800x1700.
c. Buttons Layout:
There are buttons on the first two panels described above. After panels are placed
on the frame, I added buttons on panel 1 and panel 2. Here is the sample code to
create the button 1 object and add it to panel 2.
JButton button1=new JButton ("Thumbnails"); jp2.add (button1, BorderLayout.SOUTH);
d. Menu Layout:
In this application there are two menu items that are used for selecting an
event/game and editing the font. The following code adds the Edit menu to panel 1:
JMenu edit= new JMenu ("Edit"); JMenu fontcolor=new JMenu ("FontColor"); edit. add (fontcolor); jp1.add (edit);
18
e. Combo box Layout:
Panel 1 and Panel 2 each have one Combo box for choosing the music and
thumbnail size respectively. The Thumbnail combo box is shown in the following
code:
String [] wh = {"Thumbnails Size”,” Small", "Medium",}; JComboBox wh1 = new JComboBox (wh); wh1.setSelectedIndex (0);
2. Read files from a Folder:
Once a user selects a game from SelectAnEvent menu, the code below is invoked.
It extracts all the folders from the folder named games in the SelectAnEvent menu. A
User can select an event/game folder for viewing slide shows or thumbnails.
File dir = new File (". /games/"); If (dir.isDirectory ()) { String s [] = dir.list (); for (int i=0; i<s.length; i++) { File dir2=new File (". /games/", s[i]); if (! dir2.isFile()){ final JMenuItem item=new JMenuItem(s[i]); event. add (item); item.addActionListener (new ActionListener ( ) { public void actionPerformed (Action Event event1) {………………
3. Delete files from a Folder:
After a user is done seeing photos of a particular event/game, there will be photos
saved in some folders of the application. To save disk space, the application should delete
all photos from those folders. The following code shows how to delete subfolders and
files from a given folder:
File [] files = path.listFiles (); for (int i=0; i<files. length; i++) {
if (files[i].isDirectory ()) { DeleteDirector (files[i]) ;} else {
19
Files[i].delete (); Files[i] =null ;} }
4. Show Thumbnails:
The thumbnails module in this application is considered to be an important
module. Once a user selects games, he/she can view thumbnails. The User has an option
of selecting the image size of small or medium from the combo box, provided in panel 2.
As reducing the image size from 12 mb (maximum) to 24kb/44kb takes a considerable
amount of time, the number of images displayed on panel 3 has been limited to between
20 and 30, depending on the required processing time and availability of images ready to
be displayed. Usually, Tweten’s photographers take at least 500 and at most 2000 photos
for each event/game. Reducing these images is done using a thread, even when a user is
watching the slide show. The following code to create thumbnails runs as a thread until
all the thumbnails are created:
Thumbnail tb= new Thumbnail (“./games/”+arg+”/”+s1 [thinc] +””, "./Thumbnails2/"+s1 [thinc] +"","300","300","77"); Thumbnail tb= new Thumbnail (“./games/”+arg+”/”+s1 [thinc] +””, "./Thumbnails2/"+s1 [thinc] +"","400","400","77");
This code creates an object of class Thumbnail. It would invoke the Thumbnail
constructor which takes the parameters such as path of source image, path of destination
image, width and height of thumbnail size and the resolution parameter.
The next/prev buttons can be used to view the next or previous set of thumbnails.
A scrolling option is also provided so that a user can scroll the panel up and down to view
the images. If the thumbnails are not readily available the application waits until they are
ready and then displays the thumbnails that are ready and written in the specified folder.
These photos are displayed according to the way (vertically or horizontally) they are
20
photographed. If a user wants to scale/zoom or rotate the image, he/she may click on
whichever thumbnail image they prefer. The following code is used to display thumbnails
when the Thumbnail button is clicked:
button1.addActionListener (new ActionListener () { public void actionPerformed (ActionEvent event2){ Slidedisplay=false; f( arg.equals(" ")){ JOptionPane.showMessageDialog (null," Please select an Event","
GameSelection", JOptionPane.WARNING_MESSAGE);} else {jp3.removeAll (); frame. repaint (); frame. validate (); smallsize=21; medsize=21; prev1.setEnabled(false); prev2.setEnabled (false); next1.setEnabled (true); next2.setEnabled (true); try {if (thinc<21){ Thread. sleep (8000); smallsize=thinc; medsize=thinc ;}} catch (InterruptedException x ) { Thread.currentThread ().interrupt (); } if (smallsize>21 || medsize>21) { smallsize=21; medsize=21; } progbar1.removeAll (); frame. repaint (); label4 =new JLabel (); label4.setText (arg); label4.setHorizontalTextPosition (SwingConstants.CENTER); label4.setVerticalTextPosition (SwingConstants.BOTTOM); label4.setFont (new Font (“serif", java.awt.Font.BOLD, 20)); progbar1.add (label4, BorderLayout.CENTER); jp3.add (progbar1); jp3.add (thumbnail1); if (widthheight.equals ("Small")) { jp3.setPreferredSize (new Dimension (980, 1500)); for (thdis1=0; thdis1<smallsize; thdis1++){ Mydisplay1 (); System.gc ();} } if(widthheight.equals ("Medium")) { jp3.setPreferredSize (new Dimension (980, 2800)); for (thdis1=0; thdis1<medsize; thdis1++){ Mydisplay2 (); System.gc (); } } jp3.add (thumbnail2); frame. repaint (); Frame. Validate (); ………………………..
21

5. Show Slideshow:
The slide show is the most interesting part of the application to Tweten’s
Photography customers. After the completion of an event/game, the interested customers
can gather by the computers and start viewing the slide show. If a parent likes a picture in
which his/her child is present, they can write down the picture number. Once the slide
show is done, parents can queue up to obtain the prints of the photos they have noted the
numbers for. Thus the slide show module can result in high profitability for Tweten’s
photography given its ease of use for the end user. Once a user selects a game, he/she has
an option of viewing the slide show. Clicking the Slideshow button will take one to the
interface of panel 3.
Since there are between 500 and 2000 photos in each event/game, I was asked to
display two photos at a time in order to reduce the time required to view/scan the photos.
In this interface a user has an option to play, pause, stop, forward, and reverse the slide
show. When a user clicks the Play button, the slide show count is assigned to the starting
value of the photos. When a user selects the Pause button, the flag has been set to pause
the thread which displays the slide show. Again when he/she selects the Play button, the
slide show will resume from where it is paused. When he/she selects the Stop button, the
slide show will stop and upon pressing the Play button the slide show will resume from
the start. When a user selects the Forward button, the slide show will skip 2 photos and
display the next 2 photos. When a user selects the Backward button, the slide show will
skip 2 photos back words. A user also has an option of controlling the speed of the slide
show in the interface. Since photos are taken both horizontally and vertically, a user has
an option of flipping the slides using the Slideflip button giving them the choice to
22
display the photos either way they wish. Thus, the Slideflip button acts a toggle button
which will affect all the images in the show.
The following are displayed at the bottom of the slide show:
- the name of the event/game,
- the number of photos,
- name of the photos,
- and count of the photos the user is watching
The above description can be achieved by the following code: …count=count+1; if(count<s2.length) { label3 =new JLabel(); tok =new StringTokenizer(s2[count],"."); token=tok.nextToken(); label3.setText(token); label3.setIcon(photo2[count]); label3.setHorizontalTextPosition(SwingConstants.CENTER); label3.setVerticalTextPosition(SwingConstants.BOTTOM); label3.setForeground( colortext ); label3.setFont(new Font( fontselection,java.awt.Font.BOLD,35) ); jp3.add(label3,BorderLayout.CENTER); } else { cbht2=" "; } label4 =new JLabel(); label4.setText(arg +" : Showing " +cbht1+", "+cbht2+" of "+total); label4.setHorizontalTextPosition(SwingConstants.CENTER); label4.setVerticalTextPosition(SwingConstants.BOTTOM); label4.setFont(new Font( "serif", java.awt.Font.BOLD,25) ); progbar.add(label4,BorderLayout.CENTER); label2=null; label3=null; label4=null;
23
photo2[count]=null; token=null; //System.gc(); jp3.add(progbar); frame.repaint();
frame.validate(); …………..
7. Rotate/Scale:
A user who is in the thumbnail Interface can click any of the thumbnail images
and be taken to the Interface where one can scale or rotate the image. In this interface one
also has the option of going back to the thumbnail interface. When a user clicks on an
image, the mouse pressed event is invoked and it uses the thumbnail object to rotate and
place each image in a specified folder. When a user clicks the Scale button the image is
read from the specified folder. Now the user has an option of rotating the image. Each
time the image is rotated 90 degrees and is read from a specified folder.
The code for mouse pressed event, rotate and scale events are given below:
public void mousePressed(MouseEvent e) { rotate.setEnabled(false); srimage1=this.srimage;
Thumbnail tb1=new Thumbnail0 ("./games/"+arg+"/"+srimage1+" ", "./files/Scale/ "+srimage1+"","600","600","99");
tb1=null; Thumbnail1 tbr4=new Thumbnail1 ( "./games/ "+arg+ "/"+srimage1+" ","./files/Rotate4/"+srimage1+"","600","600","99");
tbr4=null; Thumbnail180 tbr5=new Thumbnail180 ("./games /"+arg+"/"+srimage1+ "" ,"./files/Rotate5/ " + srimage1+"","600","600","99"); tbr5=null; Thumbnail270 tbr6=new Thumbnail270 ("./games/"+arg+" / "+srimage1 + "" ," ./files/Rotate6 /"+srimage1+"","600","600","99"); tbr6=null; }
24
8. Background:
Background color is also one of the features the user might be interested in
manipulating. Whenever a user clicks the BackgroundColor button the following code is
invoked which pops up the color chooser:
if ( event.getSource() == colorchange ){ color=JColorChooser.showDialog(Tweten.this,"Choose a color",color);
if(color==null) color=Color.LIGHT_GRAY; jp3.setBackground(color); ……………
A user can select a color and then can hit Ok button to see the change in the
background color.
9. Play Music:
Music is not an important aspect of this application. However, it is implemented
as part of the requirements. A user can select the music of his/her choice and then hit the
Play button to play a song only once. If a user wants to hear the song repeatedly, he/she
needs to hit the Loop button. A user can stop the music with the Stop button. The code to
implement this functionality is shown below:
String choices[] = { "Welcome", "Holly" }; chooseSound = new JComboBox( choices ); chooseSound.addItemListener( new ItemListener() { // stop sound and change to sound to user's selection public void itemStateChanged( ItemEvent e ) { currentSound.stop(); currentSound = chooseSound.getSelectedIndex() == 0 ? sound1 : sound2; // System.out.println("vond"+currentSound); } } // end anonymous inner class
if ( event.getSource() == playSound ) {
25
currentSound.play(); }
As previously stated, the above functional modules are implemented using Java’s
swing library under Windows platform. The compiled code can be run on any operating
system provided it has the Java Runtime Environment [7] installed.
26
CHAPTER V
SOFTWARE VERIFICATION AND VALIDATION
Software verification refers to the set of activities that ensure that software
correctly implements a specific function. Validation refers to a different set of activities
that ensure that the software that has been built is traceable to customer requirements.
Software testing is an important phase of software quality assurance and represents the
ultimate review of specification, design and code generation. After generating the source
code, it is mandatory to test software to uncover and correct as many errors as possible
before the delivery to customers. During the course of this software coding, Rock Tweten
and I tested the software at some Ice Hockey events held at Grand Forks and uncovered
some errors, which were corrected.
Validation Testing
I started off developing this software with the initial requirements given by
Tweten’s Photography. I created a prototype and then presented it to Tweten’s
photography. Several iterations of prototype generation was required, before the
requirements were solidified. At the end, the project was successful which, according to
the customer point of view, satisfied all the requirements. I visited all of the events
covered by Tweten’s Photography in Grand Forks and ran the software. Rock Tweten and
I wrote down all the problems users were facing and used this information to refine the
requirements. The end product is designed according to convenience of the user. Real
27
time testing is very hard and millions of errors emerge up which we would not realize
while coding.
Verification Testing
At testing time, we must design tests that have the highest likelihood of finding
the most errors with minimum amount of time and effort. There are methods (white box
and black box testing) that provide a mechanism to help to ensure the completeness of
tests and provide the highest likelihood for uncovering errors in software. I used white
box and black box testing.
White box testing, sometimes called glass-box testing, focuses specifically on
using internal knowledge of the software to guide the selection of test data. The intention
in white box testing is to ensure that all possible feasible flow of control paths through a
subprogram are traversed while the software is under test. As this project mainly focuses
on thumbnails and slide shows, I have taken a subprogram named run which does these
activities and implemented the white box testing. The flow diagram from Figure 9 gives
the various paths that can be achieved in the run subprogram. Thus, once we know the
internal working of the run method, tests can be conducted to ensure that all internal
operations in the run method are performed according to the specifications. With testing
we can confirm the following results
a. All the independent paths within a module have been exercised at least once.
b. All the logical conditions with the true or false values are verified
c. All the loops are executed correctly.
d. The internal data structures are valid
28
2
1
4 9
6 8
7
11
13
17
18
14
16
3
5
10
12 15
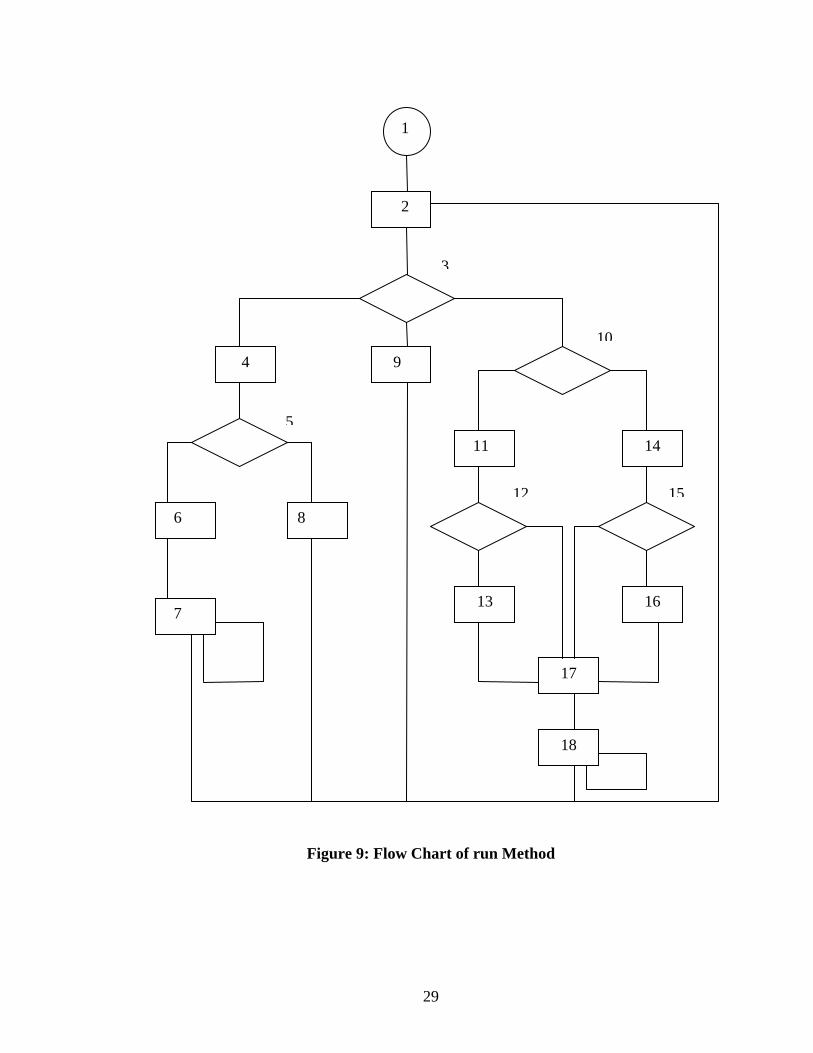
Figure 9: Flow Chart of run Method
29
Path Testing:
Path testing is a white-box testing technique. This can be used to achieve the
above four objectives. The following steps can be used in path testing to test the run
subprogram.
a. Using the code, I have drawn the Flow Chart shown in the above Figure 9.
b. Determined the basis set of linearly independent paths. Following are the paths
that can be derived from the above Figure 9.
Path 1: 1-2-3-4-5-6-7-….-2
Path 2: 1-2-3-4-5-8-2
Path 3: 1-2-3-9-2
Path 4: 1-2-3-10-11-12-13-17-18-….-2
Path 5: 1-2-3-10-11-12-17-18-…-2
Path 6: 1-2-3-10-14-15-16-17-18-….-2
Path 7: 1-2-3-10-14-15-17-18-…-2
c. Then, I prepared the test cases and worked on each and every path.
Path 1 test case:
NoStopRequested=true, arg=null character, thumbfinish=false, change=false
Expected Results:
a. Sets variables change=true and thinc=0. Read the files from the selected
event/game folder (to create thumbnails of the selected event/game).
b. Deletes previous thumbnails folders.
c. Creates thumbnails.
30
Path 2 test case:
NoStopRequested=true, arg=null character, thumbfinish=false, change=false, thinc=total
number of photos.
Expected Results:
a. Once test case 1 is finished, this test case is used to assign thumbfinish=true that
would not allow the path 1 test case to be entered again.
b. Also assigns fint=true which would be used in test case 3.
Path 3 test case:
NoStopRequested=true, thumbfinish=true, fint=true.
Expected Results:
a. Puts thread to sleep for a specified time.
Path 4 test case:
Slidedisplay=true && slideinc<s2.length, flipflag=0.
Expected Results:
a. Uses the Thumbnail constructor with arguments path of source file, path of
destination file, width, height and quality to prepare photos to be displayed in the
horizontal position for the slide show.
Path 5 test case:
Slidedisplay==true && slideinc<s2.length, flipflag=0, slideinc<s2.length.
Expected Results:
a. Same as test case 4, but this test case will not be executed if slideinc variable is
equal to the length of array in which photos are read.
31
Path 6 test case:
Slidedisplay=true && slideinc<s2.length, flipflag=1.
Expected Results:
a. Uses the Thumbnail constructor with arguments path of source file, path of
destination file, width, height and quality to prepare photos to be displayed in the
vertical position for the slide show.
Path 7 test case:
Slidedisplay==true && slideinc<s2.length, flipflag=1, slideinc<s2.length.
Expected Results:
a. Same as test case 6, but this test case will not be executed if slideinc variable is
equal to the length of array in which photos are read.
Black Box Testing:
Black-box test design is usually described as focusing on testing functional
requirements. Black box analysis refers to analyzing a running program by probing it
with various inputs. This kind of testing requires only a running program and does not
make use of source code analysis of any kind. The main input requirements for this
project are only the JPEG image files of size 12mb each or less. Rock Tweten and I tested
the project with JPEG Images of size 12mb each or less. My code had some problems
when the 12mb files were used. I found out that the problem is related to the Java Virtual
Machine. I rectified it by setting the runtime parameter which increases the memory or
heap size in the Java Virtual Machine. I fixed the problem and now it works properly.
The various test cases given below are the possible inputs to test the project. If user
inputs photos of more than 12mb, the software my run slow or it may crash.
32
a. Total number of Photos =2000 or less, Photo type= jpeg, Photo Size= 12mb or
less
b. Total number of Photos =2000 or less, Photo type= gif, Photo Size= 12mb or less
c. Total number of Photos =2000 or less, Photo type= png, Photo Size= 12mb or
less.
d. Total number of Photos =2000 or less, Photo type= combination of Jpeg, gif, png,
Photo Size= 12mb or less.
All the above test cases worked properly. Thus Black Box testing is verified.
Unit Testing:
Unit testing is based on testing each and every module described in the
implementation section. Rock Tweten tested each and every button, menus and combo
box. I also asked some other people to test the application. They carefully tested the
project concentrating on each and every unit or module of the software.
Integration Testing:
There are some connections between some units. So after the completion of the
software I tested whether the integrated modules were working correctly or not. Rock
Tweten has also asked for the Use Case diagram for the software and then tested the
software. All the connections worked properly.
Security Testing:
There is no need to implement security testing because, there is no database
connectivity. The input is just the image files already there in the folder, so there is no
security threat associated with this software.
33
Stress Testing:
A lot of errors emerged when I ran the software. The majority of these were found
during the stress testing. The main errors we found in this software are the run time
errors. As this software deals with many images, there is a possibility that the Java
Virtual Machine may be filled with objects. There is only one way we can overcome this
error, i.e. by setting the Java Virtual Machine parameter during the run time of the
software. So run time parameters are set to increase the Java Virtual Machine heap size.
Other run time errors may be overflow of an array. I initialized the size of the array that
holds the photos to 2000. If a user inputs more than 2000 photos, an array overflow
runtime error will occur and software crashes.
34

CHAPTER VI
CONCLUSION
This software was accepted by Rock Tweten and the university gave me the copy
rights to sell the software. Rock Tweten plans to present this software at the Sports and
Events Photographers Conference (SEPCON) at Austin, Texas [8] on January 22, 2006,
where photographers from all over the world attend.
The meetings organized by Dr.Marsh every week allowed me to discuss the
issues, which helped to accomplish this software. I have gotten the chance to interact with
a real client (Rock Tweten) and many end users, who discussed the pros and cons about
the prototype with me and Rock. I observed one of the users getting frustrated when he
used the first prototype presented at a Children’s Ice Hockey tournament in Grand Forks.
Some other customers commented that project was running at the constant speed which
gave them no options to set the speed with which they wished to view the slide show.
Some other customers could not launch the application by typing the command line
arguments. At the start of the project, I didn’t realize that photos would be taken
horizontally. Thus, one of the users brought up the issue of flipping the pictures. One end
user gave me the idea of displaying few thumbnails at a time instead of displaying all at a
time. Thus, the end users and the client gave me suggestions which have been very
helpful to me in deriving the final product.
35

The comments given by the end users and the client resulted in a change in the
design of the project. Firstly, as I mentioned earlier, is displaying two photos at a time
while users are viewing the slide show. Secondly, displaying 20 to 30 thumbnails at a
time instead of displaying all the thumbnails which consumes time and memory. Thirdly,
playing music was also an issue. Some users liked to hear music while others were
against it. But as it is a trivial issue, I customized the music buttons according to
convenience of the users. Fourthly, launching the application using the executable file
icon, which I did not do until the end of the project also has been new addition to the
software. A Java launcher is created with set of parameters which are useful during the
software runtime. Fifthly, showing the progress of the slide show display using a
progress bar component was no longer important, so it was removed from the software.
It was very difficult to incorporate in the software all the issues presented by the users.
But ultimately, it was a good learning experience and gave me an idea of how to be
patient with client’s changing requirements with respect to the end users.
Before the start of the project, I was unsure about which programming language I
needed to use in order to accomplish the project. As Tweten’s Photography is using
Apple computers and VB.NET is not compatible with Apple computers, I used Java
which is operating system independent.
36
REFERENCES
[1] Harvey M.Dietel, Paul J.Dietel, Java How to Program, fifth edition, Prentice Hall, 2002. [2] Tweten’s Photography, http://www.twetensphotography.com/ Retrieved on 10/25/2004
[3] Image Tech Marketing, http://www.imagetech.us/index.html Retrieved on 10/25/2004 [4] Joint Photographic Expert Group, http://www.jpeg.org/ Retrieved on 10/25/2005 [5] Sinan Si Alhir, Learning UML, first edition, O'Reilly Media, Inc.; 2003
[6] Teri Quatrani, Visual Modeling with Rational Rose 2002 and UML, third edition, Addison-Wesley, 2002 [7] Sun Developer Network, http://java.sun.com/j2se/1.3/download.html Retrieved on 10/02/2004 [8] Imaging USA, http://www.imagingusa.org/ Retrieved on 09/15/2005
37
APPENDIX I
USER MANUAL
Image Viewer Application for Tweten’s photography is a Graphical User
Interface which is platform independent. The zip file of the software is in the enclosed
CD. When a user unzips the file, he/she finds an exe file named Tweten and folders
named files and games. A user should place some folders containing photos in the games
folder before starting the application. The application can be launched by clicking the exe
file icon. If the application does not launch, then his/her system probably does not have
the Java Runtime Environment (JRE) installed. A user can use the Sun Micro System’s
website [7] and install JRE. Once the JRE is successfully installed, Image application
should launch without any problem.
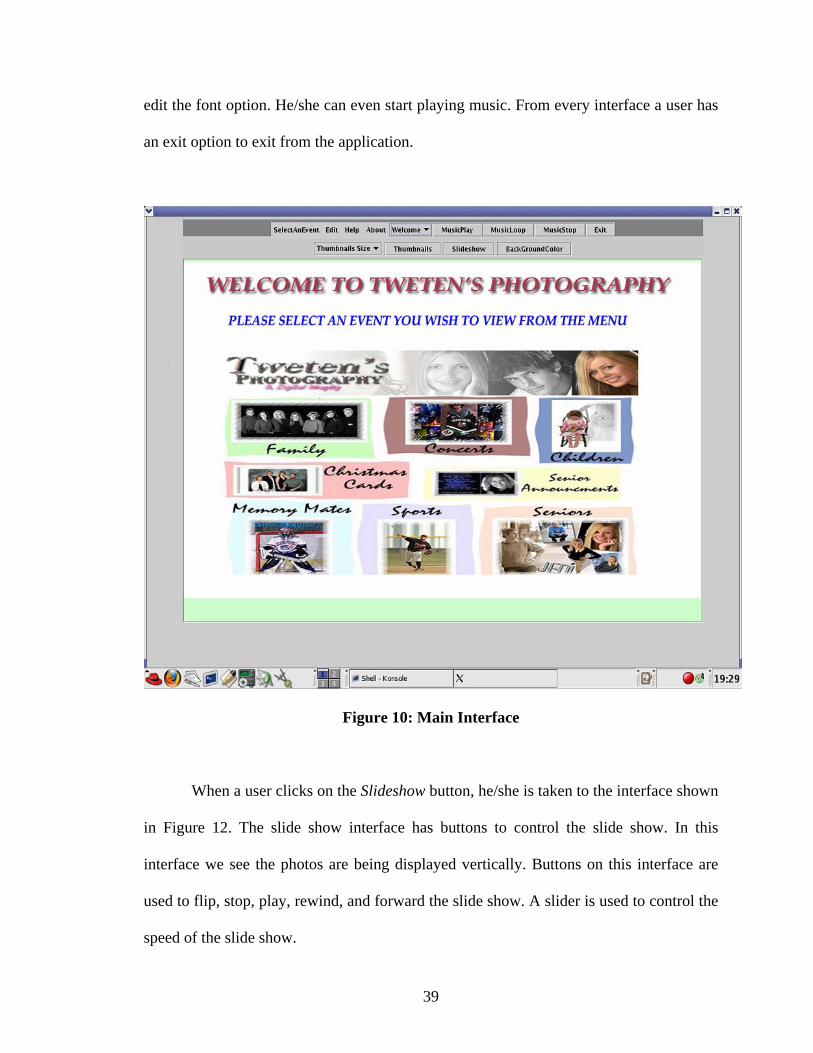
The following interfaces explained below give users a complete idea of the Image
Viewer Application. The main Interface includes three panels as shown in the Figure 10.
Panel 1 and panel 2 contain menus and buttons to trigger an event/game. Panel 3 is used
to display thumbnails, slide shows or help topics.
Once a user selects a event/game form SelectAnEvent menu, he/she is taken to the
following interface shown in Figure 11. This interface displays the name of the
event/game a user selected and help topics to help navigate further through the
application. Now a user may select either thumbnails, slide show, change background, or
38
edit the font option. He/she can even start playing music. From every interface a user has
an exit option to exit from the application.
Figure 10: Main Interface
When a user clicks on the Slideshow button, he/she is taken to the interface shown
in Figure 12. The slide show interface has buttons to control the slide show. In this
interface we see the photos are being displayed vertically. Buttons on this interface are
used to flip, stop, play, rewind, and forward the slide show. A slider is used to control the
speed of the slide show.
39
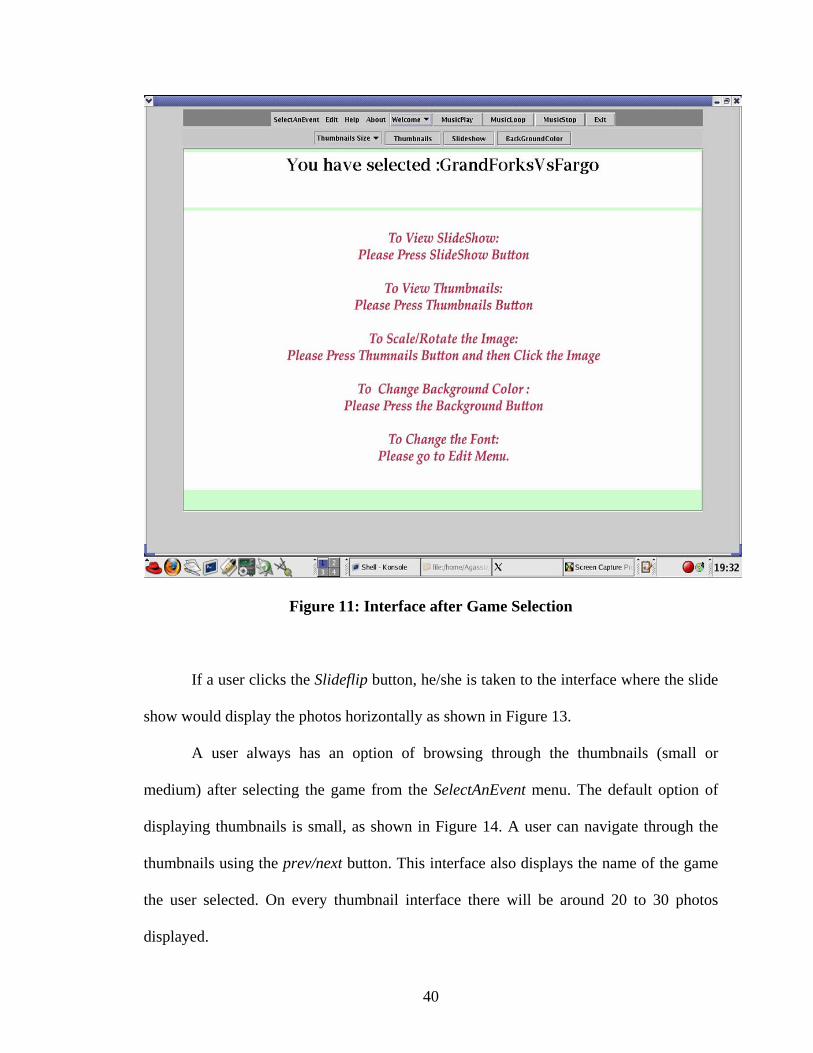
Figure 11: Interface after Game Selection
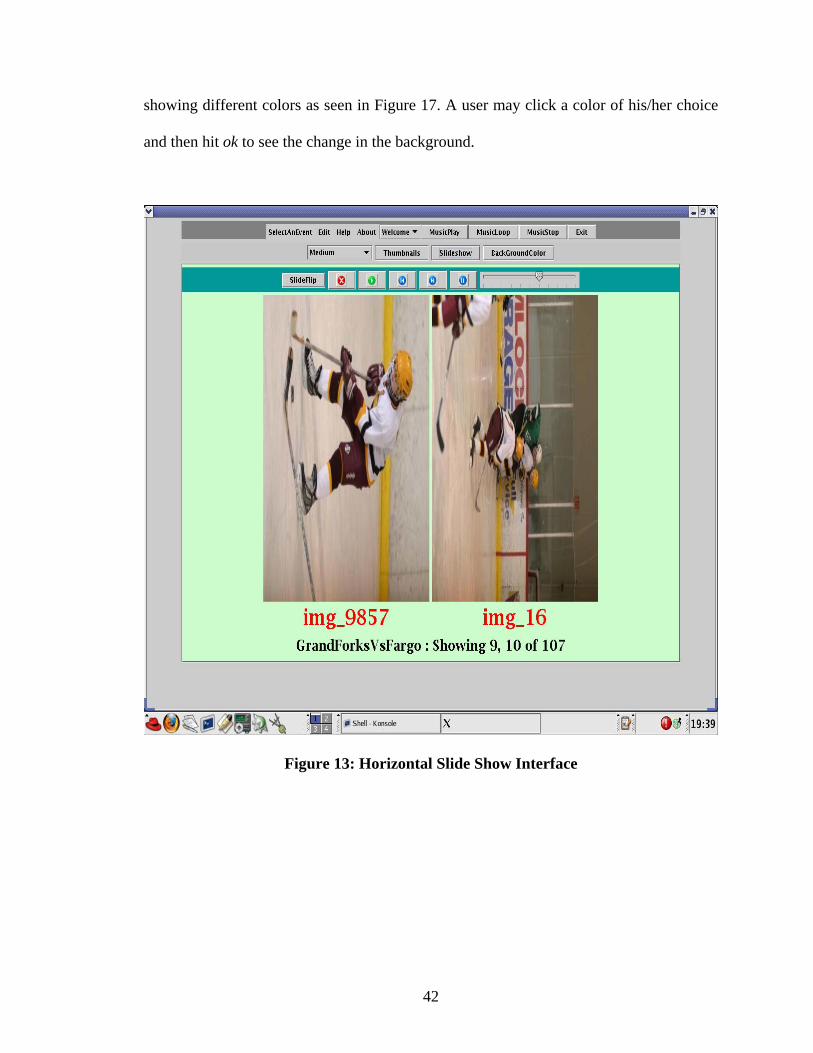
If a user clicks the Slideflip button, he/she is taken to the interface where the slide
show would display the photos horizontally as shown in Figure 13.
A user always has an option of browsing through the thumbnails (small or
medium) after selecting the game from the SelectAnEvent menu. The default option of
displaying thumbnails is small, as shown in Figure 14. A user can navigate through the
thumbnails using the prev/next button. This interface also displays the name of the game
the user selected. On every thumbnail interface there will be around 20 to 30 photos
displayed.
40
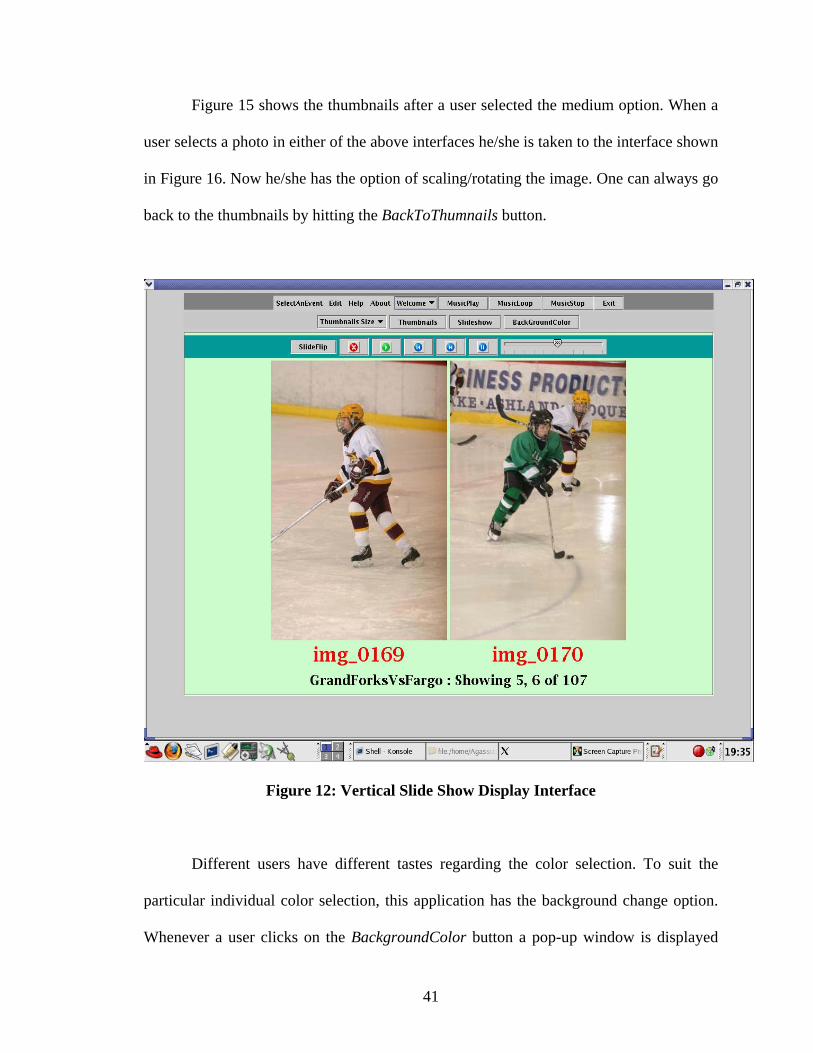
Figure 15 shows the thumbnails after a user selected the medium option. When a
user selects a photo in either of the above interfaces he/she is taken to the interface shown
in Figure 16. Now he/she has the option of scaling/rotating the image. One can always go
back to the thumbnails by hitting the BackToThumnails button.
Figure 12: Vertical Slide Show Display Interface
Different users have different tastes regarding the color selection. To suit the
particular individual color selection, this application has the background change option.
Whenever a user clicks on the BackgroundColor button a pop-up window is displayed
41
showing different colors as seen in Figure 17. A user may click a color of his/her choice
and then hit ok to see the change in the background.
Figure 13: Horizontal Slide Show Interface
42

Figure 14: Small Thumbnails display Interface
43
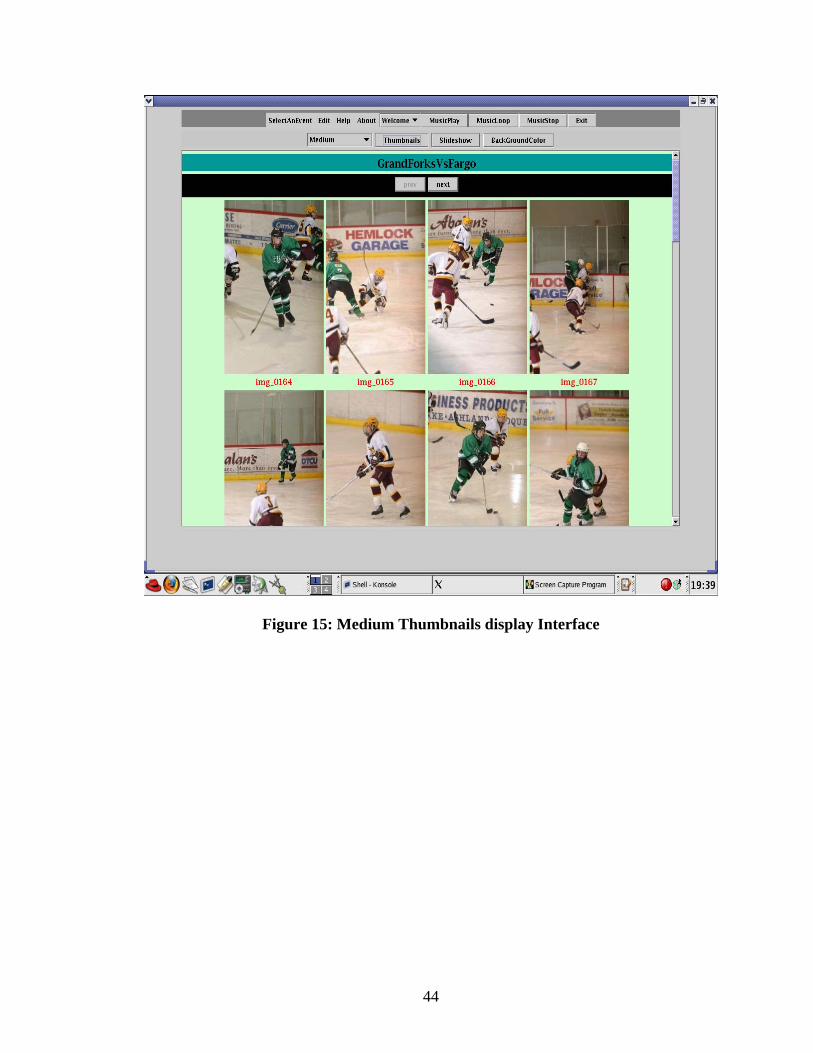
Figure 15: Medium Thumbnails display Interface
44
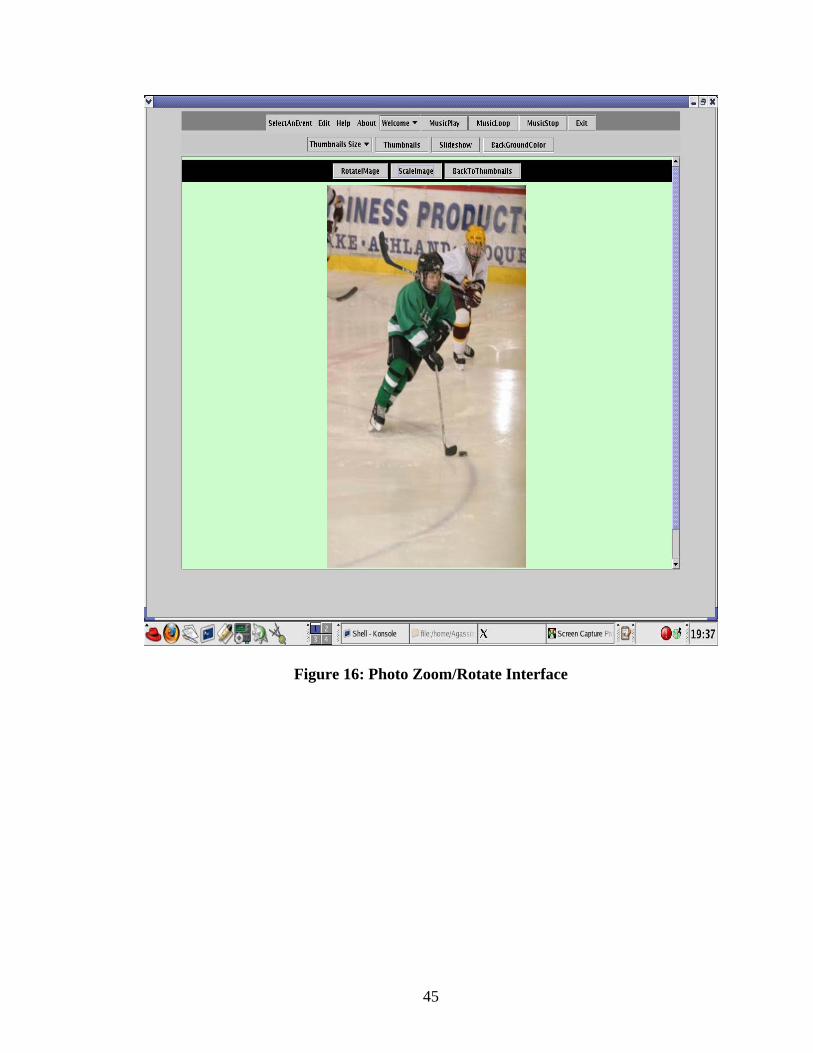
Figure 16: Photo Zoom/Rotate Interface
45
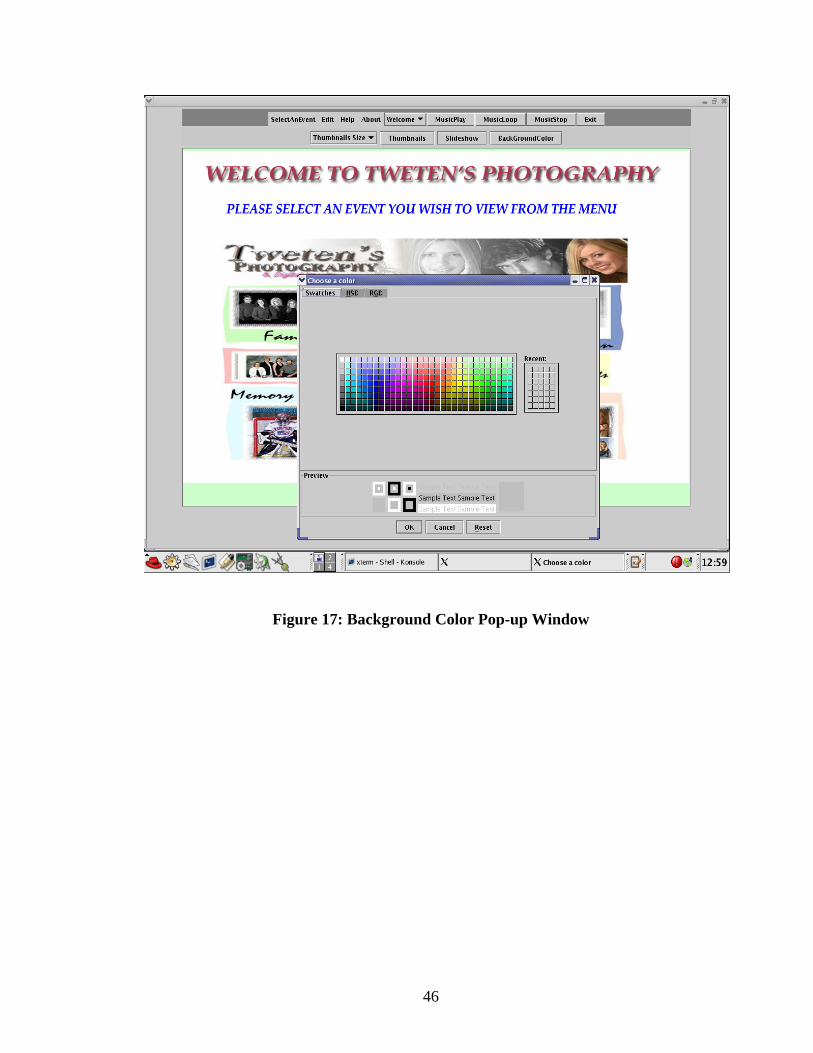
Figure 17: Background Color Pop-up Window
46
APPENDIX B: SOURCE CODE
Please find the attached compact disk labeled as “Image Viewer for Tweten’s
Photography” with this project report.
47