im-9500 print “n” mail paitec usa pressure sealer user manual this manual provides detailed...
TRANSCRIPT

IM-9500
Print “n” Mail
Paitec USA Pressure sealer
User Manual
This manual provides detailed information on how to operate and maintain your IM- 9500 Print “n” Mail”.
Please read this manual before operating the machine in order to prevent any damage caused by improper handling

- 2 -
Introduction
Thank you for purchasing a IM-9500 Print “n” Mail product.
This manual is prepared to provide you with guidelines on how to properly operate and maintain the IM-9500.
Copyright
Any of the contents should not be copied, re-printed or translated by other languages without Paitec USA approval.
- 3 -
IM-9500 INDEX
1. Installation1) Accessories2) IM-9500 Installation Process3) Printer Installation4) Ready for Operation
2. Operation
3. Problem Handling
4. Engineering Mode
5. Cleaning the contamination
6. Software Installation and Upgrade

- 4 -
• IM-9500 offers the most heavy duty print “n” mail pressure sealer and comes with various security solutions. It provides excellent sealing quality with the 2 pairs of pressure rollers and is capable of processing of 200,000 forms per month.
IM -9500 (Inline Pressure Sealer)
• Form Size : A4 / Letter / Legal size• Speed : Up to 3,600 sheets per hour based on a 60 ppm printer• Fold Setting : Manual• Paper weight : 60-120gsm• Fold type : Z, C, V & Double• Double Detect : By pass tray and sensor • Stacker : Auto slide conveyor (*600 sheets)• Printer Compatibility : HP LJ4515 laser printer series(duplex available)• Duty cycle : 200,000 sheets per month(without printer)• Height Adjustable : 0- 80mm• *Based on 90gsm paper weight
IM-9500 Spec.
• HP Laserjet 4010, 4015, 4110, 4515, 4515x 4550 • Height adjustable table can be also compatibility with other printers. • Recommended Printer for PAITEC PRESSURE SEALERS IS HP LJ4515 laser printer
series.• Please note extra paper trays will be required in order for the system to function
properly
IM-9500 Compatibility
HP LJ 4515 PRINTER
IM9500 Spec.
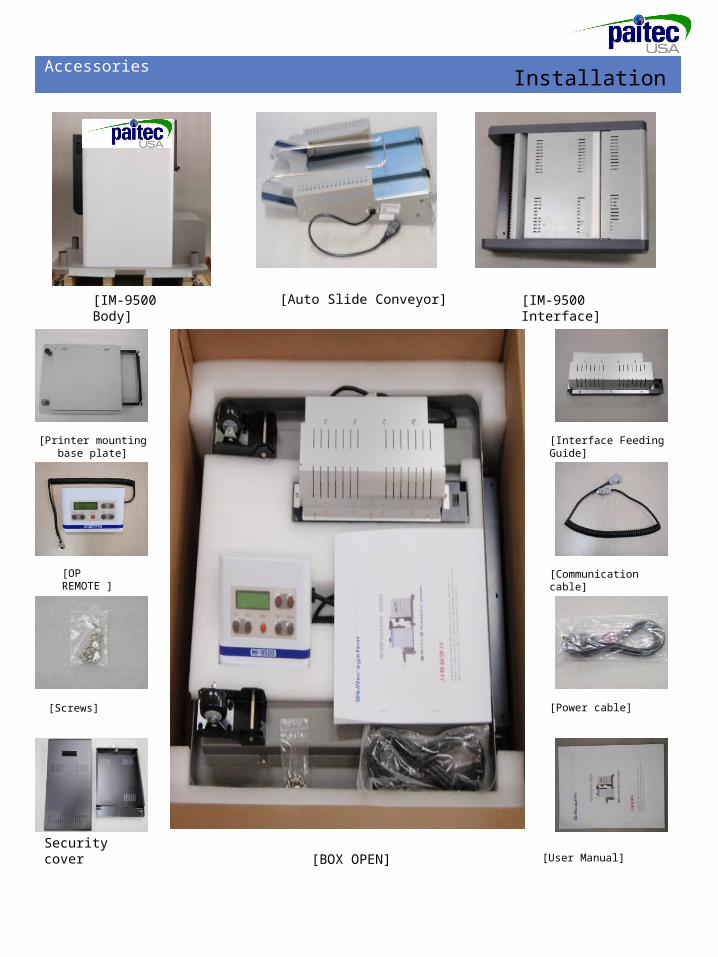
Accessories
[IM-9500 Body]
[IM-9500 Interface]
[Auto Slide Conveyor]
[OP REMOTE ]
Security cover
[Printer mounting base plate]
[BOX OPEN]
[Screws]
[Interface Feeding Guide]
[Communication cable]
[Power cable]
[User Manual]
Installation

- 6 -
IM-9500 Installation Process Installation
Connect IM-9500 body with printer base plate and screw
Picture showing printer base plate connected
• Adjustable Screw
•Fixed hole for printer
① Installation for printer base plate and load the printer.• Unscrew the IM-9500 body from the packing pallet and screw the printer base plate to connect the printer.
Load the printer onto the printer base plate and adjust the height using the 2 height adjustment bolts. Please note you will require an adjustable spanner for this task
Unscrew the IM-9500 Body that is assembled on the packing pallet.

IM-9500 INDEX
1. Installation
2. Operation1) Checklist before operation2) Folding list and setting3) Standard Operation4) Demonstration5) Other operation
3. Problem Handling• Printer Error• Double Detect• Paper Jam Removal• Jam removal Sealing rollers
4. Engineering Mode
5. Cleaning the contamination
6. Software Installation and Upgrade

- 8 -
IM-9500 Installation Process Installation
Screw the interface to the main body (Back) Screw the interface. (Front)
② OP panel & Interface
Assemble the interface to IM-9500. The interface will slide right to left to engage properly
Connect the OP panel cable to IM-9500 as shown
• Picture shows the complete installation of the op panel and interface
- 9 -
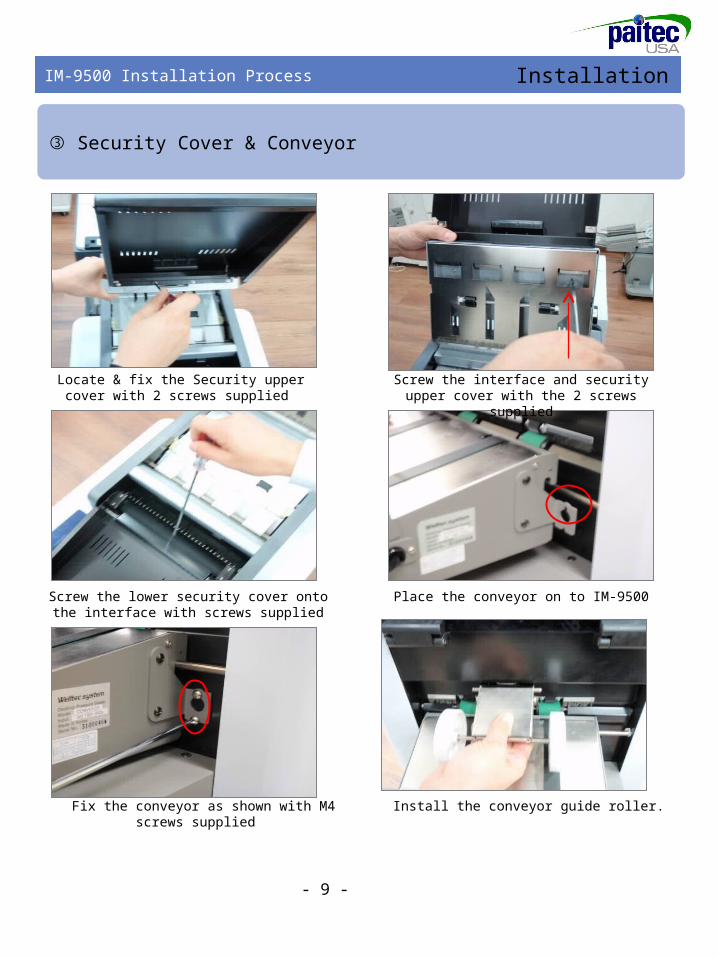
IM-9500 Installation Process Installation
③ Security Cover & Conveyor
Locate & fix the Security upper cover with 2 screws supplied
Screw the interface and security upper cover with the 2 screws supplied
Screw the lower security cover onto the interface with screws supplied
Place the conveyor on to IM-9500
Fix the conveyor as shown with M4 screws supplied
Install the conveyor guide roller.
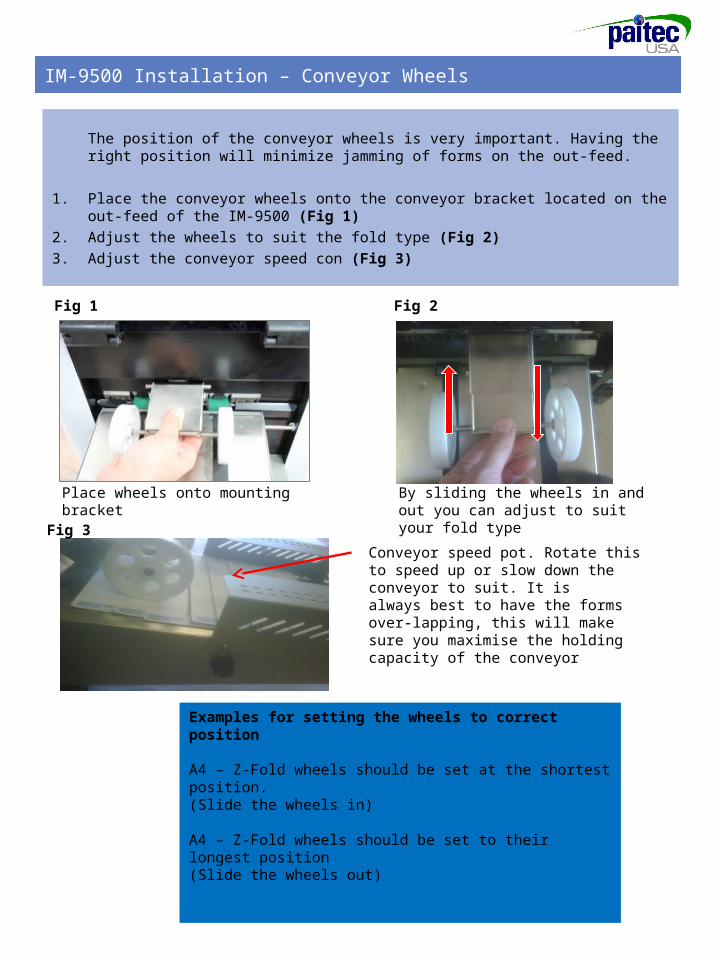
IM-9500 Installation – Conveyor Wheels
- 10 -
The position of the conveyor wheels is very important. Having the right position will minimize jamming of forms on the out-feed.
1. Place the conveyor wheels onto the conveyor bracket located on the out-feed of the IM-9500 (Fig 1)
2. Adjust the wheels to suit the fold type (Fig 2)3. Adjust the conveyor speed con (Fig 3)
Place wheels onto mounting bracket
By sliding the wheels in and out you can adjust to suit your fold type
Examples for setting the wheels to correct position
A4 – Z-Fold wheels should be set at the shortest position. (Slide the wheels in)
A4 – Z-Fold wheels should be set to their longest position(Slide the wheels out)
Conveyor speed pot. Rotate this to speed up or slow down the conveyor to suit. It is always best to have the forms over-lapping, this will make sure you maximise the holding capacity of the conveyor
Fig 1 Fig 2
Fig 3

- 11 -
Printer Installation – installing the Firmware USB
Firmware Kit USB Interface Guide Unit
③ HP Printer
Remove this cover from the printer to access the communication part
of printer
Remove the front communication cover as shown
Unscrew the two points as shown and remove the communication housing bay
Installation

- 12 -
Remove the upper cover of printer. Remove the left and right screws
Insert the cooling fan cable from the interface guide as shown
Install the interface guide unit onto the printer as shown using the screw sent with the guide
Printer Installation Installing the Firmware USB
③ HP Printer set up – interface Guide
Installation

- 13 -
Printer Installation installing the firmware USB
Reassemble the control board
Cable route for Fan Harness.
Replace the 2 M3 Screws as shown in picture
Remove the 2 x M3 Screws and take the metal plate off
Install the D-Sub Ass’y as shown
③ HP Printer set up
installation

- 14 -
Printer Installation Installing the Firmware USB
Connect the Fan Harness & Fan cover Harness connectors
Re-install HP Inner Cover.
③ HP Printer set up.
Replace 2 x M3 Screws Connect the Firmware USB tool into the Hub. Please take care on this part of the installation
installation

- 15 -
Ready for Operation
IM9500 / Printer Alignment
•Please Check the gap between the MF9500 body & printer. The interface guide should be pushed into the mouth on the interface by no more than 25cm See [fig. 1].
•If required use a spirit level to make sure the surface the machines are located on is level.
! Once you have achieved this power up the machine and Press the “Reset” Button on the OP panel. This will indicate that the interface guide is located correctly.
see fig.2• Also Connect the power for Printer and auto slide conveyor.
{Fig. 1}
{fig. 2}
installation

MF9500 INDEX
1. Installation
2. Operation1) Checklist before operation2) Folding list and setting3) Standard Operation4) Demonstration5) Other operation
3. Problem Handling• Printer Error• Double Detect• Paper Jam Removal• Jam removal Sealing rollers
4. Engineering Mode
5. Cleaning the contamination
6. Software Installation and Upgrade

- 17 -
Checklist before Operation - Cables Operation
① IM9500 & Printer communication cable
• Check On/OFF power
② IM9500, Auto slide conveyor & Printer Power on

- 18 -
Fold Settings
1.Unlock the green release lever to set the correct fold position.
2. Slide the red arrow, by moving the red knob to the fold position required according to the fold assist label on the fold drum.
3. Slide the blue arrow (second fold) according to the fold assist label on the fold drum.
4. Once the required fold position is set, lock back the green release lever.
(Remember the Red knob is for the first fold setting, Blue slider is for the second fold setting.
Ex 1) “Z” fold with A4Red arrow “198”(First fold 198mm), blue arrow “99”(Second fold 99mm) Ex 2) “C” fold with LetterRed arrow “92”(First fold 92mm), blue arrow “94”(Second fold 94mm) Ex 3) “V” fold A4Red arrow “148”(First fold 148mm), blue arrow “0”(Fully down, No Second fold) Note: Please note that although we suggest that you follow the fold setting according to the manual, however the scale on the drum is NOT 100% accurate and is provided as a guide only
2nd fold setting lever
(Blue)
1st fold setting lever(Red)
Fold Position lock lever
Operation

14” fold drum Settings
- 19 -
By looking at the Customer’s Form, determine the Size of Paper and Type of Fold. The blue slider on the front of your drum is your first fold position marker (There are basic instructions on the drum to help you.) Remember unlock the first fold locking lever (Green plastic ball on shaft) first before moving the blue slider
First Fold slider
Fold Position locking lever
Fold Drum locking lever release this to access the second fold plate.
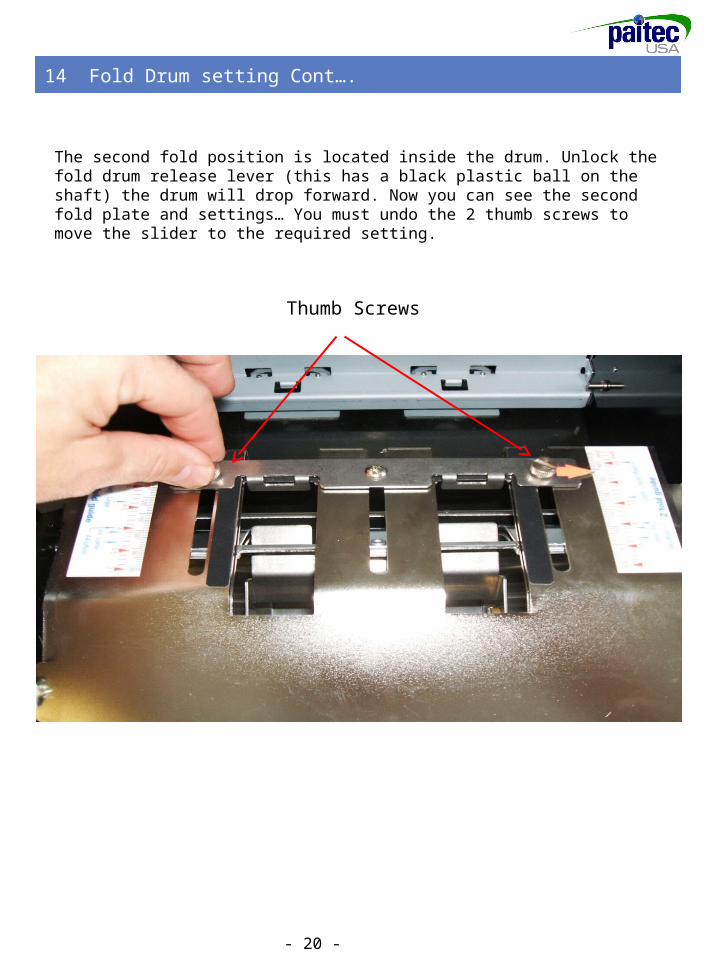
14” Fold Drum setting Cont….
- 20 -
The second fold position is located inside the drum. Unlock the fold drum release lever (this has a black plastic ball on the shaft) the drum will drop forward. Now you can see the second fold plate and settings… You must undo the 2 thumb screws to move the slider to the required setting.
Thumb Screws
- 21 -
Standard Operation
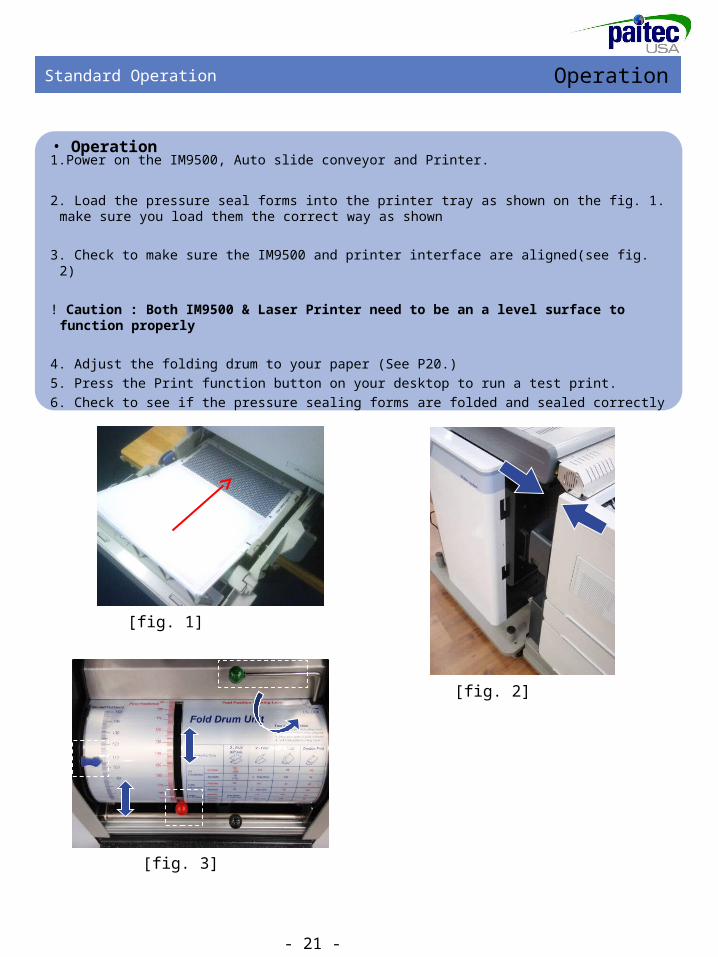
1.Power on the IM9500, Auto slide conveyor and Printer.
2. Load the pressure seal forms into the printer tray as shown on the fig. 1. make sure you load them the correct way as shown
3. Check to make sure the IM9500 and printer interface are aligned(see fig. 2)
! Caution : Both IM9500 & Laser Printer need to be an a level surface to function properly
4. Adjust the folding drum to your paper (See P20.) 5. Press the Print function button on your desktop to run a test print.6. Check to see if the pressure sealing forms are folded and sealed correctly
• Operation
[fig. 1]
[fig. 2]
[fig. 3]
Operation

- 22 -
Demonstration
1. Check OP panel(see fig.1)2. Load the pressure seal forms into the printer tray (see fig.2)3. Find the “Start Feeding” on the menu and press the start for operation.(you can see
IM9500 on the printer menu)4. Check if the pressure seal forms are well sealed or not.
• Feeding Mode (Allows you to fold and seal documents that have already been printed )
[fig. 2- loading the paper]
[fig. 1- Ready]
[Menu – IMF9500 ] [Copies ]
[Copies Q’ty] [Start Feeding ][fig 3 – Printer Menu]
Operation

- 23 -
Other Operation
1.Change the “Divert” on OP panel . (see fig. 1)
2. Open security cover this is where the printed forms end up (see fig. 2)
• Printing only operation (Allows you to print your documents only without folding and sealing)
1. Press “Set Button” 2 times
Mode : WorkingPrinter [Prompted]
2. Presss Button
Mode : WorkingDivert [Prompted]
3. Press “Set Button” once (warning sound)
Mode : WorkingDivert [Prompted]
4. Press “Mode Button” 2 timesThis is the save option
Mode: DivertReady 10 0
[fig. 1 - Menu]
[fig. 2 – security cover open]
Operation

IM9500 INDEX
1. Installation
2. Operation
3. Paper Jam Removal
• Printer Error• Double Detect• Paper Jam Removal• Jam removal Sealing rollers
4. Engineering Mode
5. Cleaning the contamination
6. Software Installation and Upgrade

- 25 -
Paper Jam Removal
Top Unit (Printer Set Error code)
1. Check the gap between IM9500 & Printer guide is set correctly2. After adjusting the gap, please press “Reset” button on the control panel3. Check IM9500 & printer communication cable is connected well. 4. Check for paper jams inside the laser printer and IM9500 interface unit
Caution : Both IM9500 & Laser Printer need to be an a level surface to function properly
Folding is not accurate.
1. Check the folding lever locations are set to your stationery. (See P20)2. Check to see if the paper is loaded correctly (security panel as your leading edge)
Problem Handling

- 26 -
Paper Jam Removal Problem Handling
Double Detect By -Pass Tray
1. The IM9500 has a function to detect double forms. ( A double form is where 2 separate pieces of paper have stuck together) If a double form is passed from the printer to the MF9500, it will be detected at the entrance to the interface and be diverted to the by-pass tray.
2.If you are experiencing double feeding, please make sure you fan the paper properly before loading the printer tray.
! Caution : Please confirm the OP panel menu is displaying “Divert” mode.
Mode:DivertReadey 10 0
[OP mode]
Fan the pressure seal forms to separate and to eliminate any static that may have been
caused by either storage or by the laser printer. (This can also be achieved using a paper jogger Please call us for more information about this..)
The paper should fanned before you load the printer tray
By-Pass Tray

- 27 -
Paper Jam Removal
The folding direction is incorrect
1. Make sure that the your stationery is loaded properly in the printer tray
2. Also check whether the fold setting are correct.
3. The security panel is your leading edge
Audible Warning Sound
1.Please check IM9500 and interface gap. 2.Press “Reset” Button3. If the machine is still emitting a warning sound, please check for the any other paper jams
in interface, folding area and sealing roller area. Make sure you open the back door and check this area
Problem Handling

Paper Jam Removal
Paper Jam Removal
1. Paper jam in the folding unit. : Open the security cover and pull and slide out the folding unit. Remove any jammed paper. If there is a frequent paper jam within this unit, check the fold setting again. (pic.1)
2. Paper jam in the interface : Please open the top door to clear any paper jams in the interface unit.
(pic.2)3. Paper jam in the sealing rollers : Open the body cover and use the jam tools to
remove the jam.(pic.3)4. Others : separate the printer from the machine and open the cover( pic. 4) and remove
the jam.
Problem Handling
- 28 -
Pic.1
Pic. 2
Pic.3 Pic.4

Jam Removal – Back Door
- 29 -
In order to clear a paper jam from the rear of the machine you will need to do the following.
1.Slide the printer away from the IM9500. this can be achieved by standing in front of
the printer, holding the printer on the left and right side and pulling towards you.
1.Open the Black rear door.
2.Remove any forms that are jammed within the paper path.
3.Close the rear door and slide the printer back into place.
4.Check to make sure the system in aligned before commencing operations.
5.Press the reset button on the console
Slide the printer away from the MF9500
Open the Rear Door
Clear away any jammed forms
Slide the printer back into place

Jam Removal – Sealing rollers
- 30 -
In order to clear a paper jam from the sealing rollers you will need to do the following.
1.Turn off the power to the IM9500 unit
2.Remove the op panel and place on top of the interface.
3.Remove the left side cover from the machine by pushing up and pulling it away. As shown in Fig 1
4.Attach the wrench (Supplied) to the sealing roller shaft as shown in fig 2
5.Rotate this anti clockwise to release the paper jam. Open the rear door and remove the jammed form.
6.Replace the side cover and turn the power back on.
Fig 1 Fig 2
Jan removal tool (Supplied) rotate anti-clockwise
Lift cover up and pull away as shown

IM9500 INDEX
1. Installation
2. Operation
3. Problem HandlingPrinter ErrorDouble DetectPaper Jam RemovalJam removal Sealing rollers
4. Engineering Mode
5. Cleaning the contamination from the sealing / fold rollers
6. Software Installation and Upgrade
- 32 -
Engineering Mode Engineering Mode

MF9500 INDEX
1. Installation
2. Operation
3. Problem Handling• Printer Error• Double Detect• Paper Jam Removal• Jam removal Sealing rollers
4. Engineering Mode
5. Cleaning the contamination from the sealing / fold rollers
7. Software Installation and Upgrade

- 34 -
Cleaning the Press roller and Fold roller Cleaning
How to clean the 4 Sealing Rollers
1.Open THE PERSPEX security cover. Slide out the folding unit. You will see the sealing rollers once you pull and slide out the folding unit.
2.Please clean the surface of the roller with an alcohol based cleaning solution3.Contaminated sealing rollers may ruin the stationery, create noise, and cause frequent
paper jam in the sealing rollers.4.Do not use any sharp edged tools to remove the contamination from the sealing
rollers this will damage them and invalidate your warranty.
1st set of sealing rollers
2nd set of sealing rollers (May require engineers assistance)
Remove the rear plate.
1) Release the screws and Open the cover.
2) Remove the screws. (both Side)
3) Separate the hook and shaft. (Both Side)
4) Remove the shaft 5) Clean the sealing rollers.
Clean the sealing rollers.

- 35 -
Cleaning the Press roller and Fold roller Cleaning
How to clean the folding roller
1.You will see the folding roller when you release the bottom lever of the folding unit. 2.Please clean the surface of the folding unit.3.Only use either alcohol or water when cleaning the surface of the folding roller. Thinners or
any other types of solutions may damage the surface of the roller.

MF9500 INDEX
1. Installation
2. Operation
3. Problem HandlingPrinter ErrorDouble DetectPaper Jam RemovalJam removal Sealing rollers
4. Engineering Mode
5. Cleaning the contamination from the sealing / fold rollers
6. Software Installation and Upgrade

- 37 -
Upgrade the HP4515 Firmware Software Installation
Initialize the Firmware in the USB
1. Turn off the printer and click the ‘menu’ button when the memory is checked. (Until three LED is lightened)2. Click the 1)‘previous’ button after the 2)three LED is lightened. (Insert the USB)3. Click the ‘OK’ button when ‘Initialize Disk’ is shown in LCD Panel.4. A loading screen is shown on the display
1.Click the ‘start’ button in the windows and click the ‘run’ in the start menu.2.Type ‘cmd’.3.Type ‘FTP : (IP address of your printer is linked)’4.You can see the little progress. (Press ‘Enter’ twice please.)5.Type ‘Bin’ when ‘ftp>’ is shown. Please run the installation by assignment the destination of the installation file. If you assign wrong destination you will do all process from first step again. Ex) The destination of installation file is in C:\.. ‘ put c: “duoseal_1.0.2.0.pjl”6. If the installation complete printer is rebooted.
Firmware Installation
Detailed figures are shown in next page.
Previous Button
3 LED Lights

- 38 -
Upgrade the HP4515 Firmware Software Installation
1. Connect the printer by network.
2. Press ‘Enter’ Key.
- 39 -
Upgrade the HP4515 Firmware Software Installation
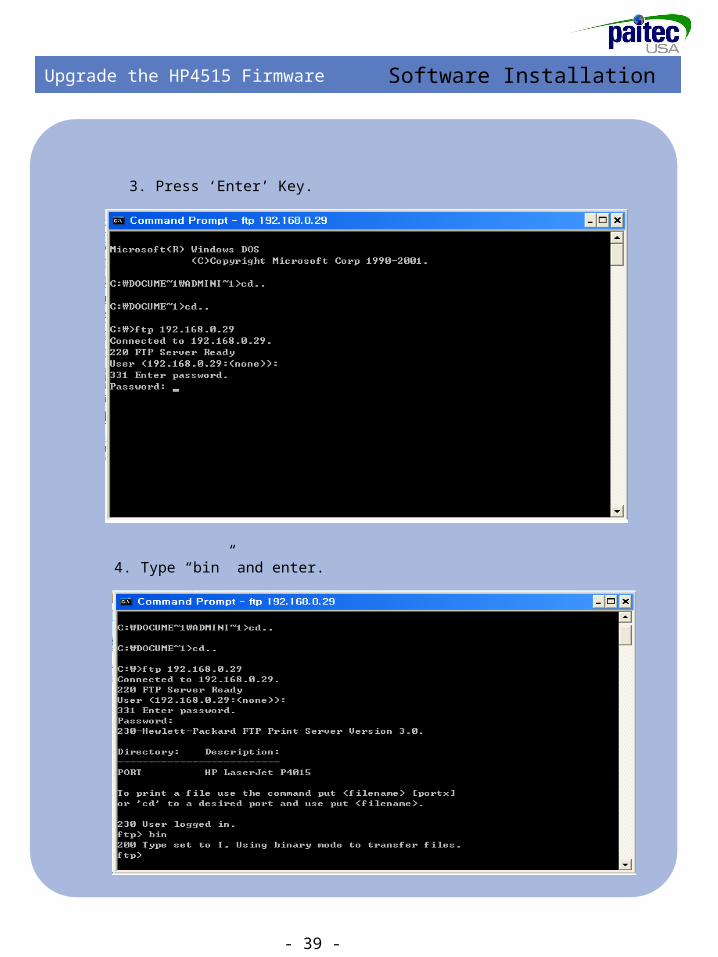
3. Press ‘Enter’ Key.
4. Type “bin” and enter.

- 40 -
Upgrade the HP4515 Firmware Software Installation
5. Run the installation file.