identity-based networking services: cisco integrated local web
TRANSCRIPT

Application Note
© 2010 Cisco Systems, Inc. All rights reserved. This document is Cisco Public Information. Page 1 of 36
Identity-Based Networking Services: Cisco Integrated Local Web Authentication Deployment and Configuration Guide
Table of Contents
Table of Contents ........................................................................................................................................................1
Introduction..................................................................................................................................................................2 Prerequisites .............................................................................................................................................................2 Solution Scope..........................................................................................................................................................2
About Integrated Local Web Authentication .............................................................................................................3 Benefits .....................................................................................................................................................................3 Functional Overview .................................................................................................................................................5
Functional Differences Between Wired and Wireless Web Authentication .........................................................6 HTTPS Certificate Considerations .......................................................................................................................8
Configuring Web Authentication................................................................................................................................8 Configure Cisco Secure ACS...............................................................................................................................8 Configure the NAC Guest Server .......................................................................................................................23 Configure the Switch ..........................................................................................................................................31 Configure the WLC ............................................................................................................................................34
Conclusion .................................................................................................................................................................35
Appendix A: References ...........................................................................................................................................36 Cisco Product Documentation ................................................................................................................................36

Application Note
© 2010 Cisco Systems, Inc. All rights reserved. This document is Cisco Public Information. Page 2 of 36
Introduction
In today’s diverse workplaces, partners, consultants, contractors and even guests require access to
network resources over the same LAN connections as regular employees. While IEEE 802.1X secures
the internal network by requiring employees to present valid credentials before accessing the network,
some provision must be made for users without IEEE 802.1X supplicants or without valid IEEE 802.1X
credentials. Web authentication (WebAuth) provides supplemental authentication while maintaining the
primary benefits of an IEEE 802.1X–protected network.1
WebAuth authenticates the user at the access edge by providing a web-based login page on which the user can
enter his or her credentials. After the user is identified, the user’s identity can be used by mapping identities to
policies that grant or deny granular network access.
An effective and scalable WebAuth solution should possess the following characteristics:
● Fully customizable login pages and acceptable use policies
● Parity for wired and wireless
● Support for sponsored guest access
● Support for employee access
● Compatibility with IEEE 802.1X
● Centralized webpage management
● Centralized policy definition and accounting
All these things can be achieved with the integrated local WebAuth feature: an end-to-end solution for wired and
wireless web authentication.
This document describes the network design considerations for integrated local WebAuth and outlines a framework
that allows the network administrator to implement integrated local WebAuth.
Prerequisites
This document focuses on enhancing the manageability, applicability, and integration of wired and wireless
WebAuth. This document assumes that the reader is familiar with basic WebAuth.
Solution Scope
The following hardware platforms and software releases are the minimum versions required to configure all the
features discussed in this guide.
● Cisco Catalyst® 2960 with Cisco IOS® Software Release 12.2(52)SE
● Cisco Catalyst 3560 with Cisco IOS Software Release 12.2(52)SE
● Cisco Catalyst 3750 with Cisco IOS Software Release 12.2(52)SE
● Cisco Catalyst 4500 with Cisco IOS Software Release 12.2(50)SG
● Cisco Catalyst 6500 with Cisco IOS Software Release 12.2(33)SXI
1 IEEE 802.1X is a secure, standards-based, Layer 2 authentication mechanism. IEEE 802.1X–enabled features include secure, standards-based authentication, dynamic VLAN assignment, Microsoft Windows machine authentication, and user authentication that is transparent to the user.

Application Note
© 2010 Cisco Systems, Inc. All rights reserved. This document is Cisco Public Information. Page 3 of 36
● Cisco Wireless LAN Controllers Version 4.1
● Cisco Network Admission Control (NAC) Guest Server (NGS) Version 2.0.2
● Cisco Secure Access Control Server (ACS) Version 5.12
Although other platforms were not tested as part of this solution, other Cisco Catalyst switches are expected to
perform similarly with equivalent releases of software.
About Integrated Local Web Authentication
Benefits
Integrated local WebAuth provides a convenient method for authenticating end users. The benefits of a Cisco
solution are illustrated in Figure 1.
Figure 1. Cisco integrated local WebAuth Solution
● Centralized webpage management: Integrated local WebAuth enables network administrators to use
webpages that are centrally managed and hosted on the Cisco NGS. Centralized management greatly
reduces the operating expenses associated with maintaining a WebAuth solution, since webpage updates
and changes can be made in a single place.
● Fully customizable login pages and acceptable use policies: Because webpages are centrally defined
and hosted on the Cisco NGS, they can be fully customized, enabling administrators to give these pages the
look and feel of their organizations.
● Parity for wired and wireless: Cisco Catalyst switches and Cisco Wireless LAN Controllers both support
the functions needed for integrated local WebAuth. Wired and wireless users will be subject to the same
authentication process and will experience the same interface.
● Support for sponsored guest access: With integrated local WebAuth, guests can authenticate using
temporary, sponsored credentials in the form of a username and password. The Cisco NGS allows authorized
sponsors to create these credentials for guest users. When guests enter these credentials at the web login
page, the credentials are forwarded to Cisco NGS for validation.
2 Cisco Secure ACS 4.2 also supports the required functions with the appropriate configuration. Cisco ACS 5.0 does not.

Application Note
© 2010 Cisco Systems, Inc. All rights reserved. This document is Cisco Public Information. Page 4 of 36
● Support for employee access: With integrated local WebAuth, employees can authenticate using
usernames and passwords that are already defined in existing identity stores such as Microsoft Active
Directory. When employees enter their existing credentials on the web login page, the credentials are
forwarded to Active Directory for validation.
● Compatibility with IEEE 802.1X: Integrated local WebAuth integrates with other forms of authentication
such as IEEE 802.1X and MAC authentication bypass (MAB). Wired switches support flexible authentication
(FlexAuth), a feature set that enables administrators to configure WebAuth to be triggered after an IEEE
802.1X timeout, an IEEE 802.1X failure, or a MAB failure. Cisco Wireless LAN Controllers can be configured
to provide separate wireless LANs (WLANs) for IEEE 802.1X authentication and WebAuth.
● Centralized policy definition: Integrated local WebAuth uses Cisco Secure ACS 5.1 as a policy engine
for all types of authentication: IEEE 802.1X, MAB, WebAuth, wired and wireless, and employee and guest.
Centralized policy management reduces operating expenses by allowing network administrators to configure
network access for all users in a single place.
● Centralized accounting: With integrated local WebAuth, all authentication activity flows through Cisco
Secure ACS. As the central repository for RADIUS accounting and authentication records, Cisco Secure ACS
5.1 provides a comprehensive view of the network. All users and devices connecting to the network—weather
wired or wireless, using guest or employee credentials, or authenticating through IEEE 802.1X, MAB, or
WebAuth—will be accounted for in Cisco Secure ACS.

Application Note
© 2010 Cisco Systems, Inc. All rights reserved. This document is Cisco Public Information. Page 5 of 36
Functional Overview
This section describes the functions of integrated local WebAuth. Successful WebAuth is the result of several steps.
While most of these operations are invisible to the end user, a clear understanding of these steps is essential to
deployment and maintenance of WebAuth.
The high-level functional sequence for integrated local WebAuth is illustrated in Figure 2.
Figure 2. High-Level WebAuth Sequence
1. WebAuth begins: In wireless networks, users manually select a service set ID (SSID) that provides a WebAuth
service. In wired networks, WebAuth begins after IEEE 802.1X has timed out or failed or MAB has failed.
2. Network access device (NAD) limits access: The NAD can be either a Cisco Catalyst switch or a Cisco
Wireless LAN Controller. When WebAuth begins, the NAD permits the traffic types (such as Dynamic Host
Configuration Protocol [DHCP] and Domain Name System [DNS]) required for WebAuth.
3. Host acquires IP address: The host requests and receives an IP address.
4. Host acquires login page: The host opens a browser. The NAD intercepts the host’s HTTP traffic and redirects
the user’s browser to the Cisco NGS. The Cisco NGS returns the login page.
5. User submits credentials: When the user enters his or her username and password, the browser sends the
credentials to the NAD. The NAD sends these credentials to Cisco Secure ACS.

Application Note
© 2010 Cisco Systems, Inc. All rights reserved. This document is Cisco Public Information. Page 6 of 36
6. Credentials are validated: Cisco Secure ACS sends the credentials to the Cisco NGS or the employee
directory for validation. The identity store that contains the credentials validates the credentials.
7. Cisco Secure ACS returns policy: If the credentials are valid, Cisco Secure ACS sends the NAD an Accept
message with specific policy instructions (if required).
8. NAD applies policy: The NAD applies the policy sent by Cisco Secure ACS, and the browser is redirected to
the original destination.
For a detailed analysis of each of these steps and an in-depth discussion of WebAuth with other security features,
see the Web Authentication Deployment and Configuration Guide at
http://www.cisco.com/en/US/products/ps6638/prod_white_papers_list.html.
Functional Differences Between Wired and Wireless Web Authentication
While the basic architecture and end-user experience are essentially the same for all WebAuth sessions, there are
some important functional differences between authentication in wired and wireless systems. Understanding these
differences is crucial to correct implementation of integrated local WebAuth. The most important differences are
described in the following sections.
Start of Web Authentication
When wireless users connect to a network, they typically select a specific WLAN, which is identified by an SSID.
To begin WebAuth, a wireless user must first select an SSID that the network administrator has previously enabled
for WebAuth.
Today, there is no wired equivalent of the wireless concept of SSIDs. In other words, wired networks do not provide
the capability for end users to select a particular service prior to authentication. Therefore, a wired port attempts to
authenticate users using a sequence of methods, typically starting with the most secure method (IEEE 802.1X).
If IEEE 802.1X authentication fails or times out, the port can fall back to MAB. If MAB fails (or was not configured),
the port can be configured to fall back to WebAuth. This sequential ordering of methods is enabled by a set of
features known as FlexAuth. To help ensure that WebAuth is triggered at the appropriate time, network
administrators must configure FlexAuth.
Access Limitation Prior to Authentication
All traffic from wireless hosts passes through the wireless LAN controller (WLC). When WebAuth is configured,
the WLC automatically restricts the traffic on the WLAN, allowing only enough access for the end host to acquire
an IP address and be redirected to the Cisco NGS.
On a wired port, network access is restricted by a preauthentication port access control list (ACL). This ACL must be
configured and applied to the WebAuth fallback profile. This profile, and, consequently, the per-authentication ACL,
is applied to the port when WebAuth begins (that is, after IEEE 802.1X authentication times out or fails or MAB fails).
The contents of the preauthentication ACL are arbitrary and can be defined to allow or limit as much access as the
network security policy allows. At a minimum, however, the ACL should allow access for DHCP and DNS, so that a
host can acquire an IP address and resolve hostnames in URLs. In addition, the preauthentication ACL should allow
redirected traffic to the Cisco NGS as described in the Traffic Redirection to Cisco NGS section below.

Application Note
© 2010 Cisco Systems, Inc. All rights reserved. This document is Cisco Public Information. Page 7 of 36
Traffic Redirection to Cisco NGS
The WLC can be configured to redirect traffic to the Cisco NGS by specifying the appropriate URL in the external
server configuration section of the WLC GUI. When an external URL is specified, the WLC automatically allows
traffic from the host to the URL.
Wired switches do not have a specific command-line interface (CLI) for redirection. Instead, redirection is
accomplished by creating a customized login page on the switch. The customized page contains instructions about
how to perform redirection (using JavaScript, HTML metatags, or a manual redirect command) that a browser can
interpret. The switch serves this customized page when the user begins WebAuth, and the browser will automatically
be redirected to the Cisco NGS. An example of this customized page is included later in this document.
There are two important deployment considerations for the wired implementation of redirection. First, because the
switch automatically consumes all traffic to ports 80 and 443 during WebAuth processing, the redirection should
point to a different port on the Cisco NGS (for example, port 8443). Second, because the preauthentication ACL
controls the port prior to authentication, the preauthentication ACL must allow traffic to Cisco NGS on port 8443.
Note: Why Redirect to Port 8443 on Cisco NGS?
Starting in Version 2.0.2, Cisco NGS listens for web traffic on port 8443 in addition to the standard ports 80 and 443.
Therefore, no additional configuration is required on the Cisco NGS to support traffic redirected to port 8443.
Service Type Attribute in RADIUS Request
During WebAuth processing, switches and WLCs submit a RADIUS request to the Cisco Secure ACS for Password
Authentication Protocol (PAP) authentication of the user’s name and password. While these RADIUS requests are
generally quite similar, a request from a switch will have a different RADIUS attribute 6 (Service-Type) than a request
from a WLC .
● The WLC will send a RADIUS request to Cisco Secure ACS with Service-Type =1 [Login].
● A Cisco Catalyst switch will send a RADIUS request to Cisco Secure ACS with Service-Type = 5 [Outbound].
By using the Service-Type attribute in the policy definition on Cisco Secure ACS, it is possible to distinguish
WebAuth requests from other authentication requests (such as IEEE 802.1X and MAB) and to assign different
policies to switches and WLCs.
Authorization Policy Applied After Authentication
By default, the WLC will remove all restrictions after the user has successfully authenticated using WebAuth.
No special configuration or dynamic authorization is required.3
By default, a wired switch does not remove any restrictions after a successful authentication. In other words, the
preauthentication ACL remains active on the port. Therefore, it is necessary to dynamically authorize the port by
applying a new ACL on top of the preauthentication ACL after successful authentication. Although there are several
different types of dynamic ACLs, Cisco recommends using downloadable ACLs (dACLs) to achieve consistency
with IEEE 802.1X and MAB across all Cisco Catalyst switch platforms.
3 Optionally, an ACL can be dynamically downloaded from ACS using the Airespace-ACL VSA

Application Note
© 2010 Cisco Systems, Inc. All rights reserved. This document is Cisco Public Information. Page 8 of 36
Summary of Main Differences Between Wired and Wireless Web Authentication
Table 1 summarizes the main difference between wired and wireless WebAuth.
Table 1. Main Differences Between Wired and Wireless WebAuth
Difference Wireless Behavior Wired Behavior
Start of WebAuth Manual; starts after user selects WebAuth SSID Sequential; starts after IEEE 802.1X timeout or failure or MAB failure (controlled by FlexAuth configuration)
Preauthentication access Automatically restricted to DHCP and redirected traffic Uses manually configured preauthentication ACL to allow DHCP and redirected traffic
Redirection Uses configuration option in GUI Uses customized login page with embedded redirection
Cisco Secure ACS RADIUS Request
Service-Type = 1 Service-Type = 5
Authorization policy Not required (WLAN is open after authentication) Requires dACL to open preauthentication ACL
The differences between wired and wireless authentication do not affect the overall architecture or the end-user
experience, but they do need to be addressed during the implementation phase. These implementation details are
described in the Configuring Web Authentication section below.
HTTPS Certificate Considerations
Integrated local WebAuth uses HTTPS to secure transactions between the end user, the switch, and the Cisco NGS.
During the authentication process, end users may be presented with up to two certificates: one from the Cisco NGS
during redirection and one from the switch when the credentials are submitted.
By default, both the Cisco NGS certificate and the switch certificate are self-signed. Most browsers will view these
certificates as invalid and display a warning. Some newer browsers make it difficult to accept an invalid certificate,
forcing the end user through multiple steps to add an exception for each certificate.
The simplest solution is to do nothing. End users will simply have to accept the “invalid” self-signed certificates to get
access. Although inconvenient for end users, this option has no administrative costs associated with it.
Configuring Web Authentication
This section describes how to configure a system based on Cisco IOS Software for IEEE 802.1X authentication with
WebAuth fallback.
Configure Cisco Secure ACS
In this section, Cisco Secure ACS is configured for WebAuth.
Configure AAA Clients (Switch and Wireless LAN Controller)
In this section, the switch and WLC that will be performing WebAuth are added as AAA clients in Cisco Secure ACS.
1. Open the Cisco Secure ACS Management interface.
2. In the left navigation column, expand Network Resources and select Network Devices and AAA Clients.
3. Click Create. The following window will appear:

Application Note
© 2010 Cisco Systems, Inc. All rights reserved. This document is Cisco Public Information. Page 9 of 36
4. Specify the name, IP address, and RADIUS shared secret for this switch. Optionally, add Description, Location,
and Device Type information.
Note: The RADIUS shared secret must match the key configured on the switch. The IP address must match the
IP address of the RADIUS source interface that the switch uses to source RADIUS packets for Cisco Secure ACS.
See the Verify Basic Web Authentication Configuration section for more information about how to configure the key
and the RADIUS source interface on the switch.
5. Click Submit.
6. Repeat this process to add the WLC as an authentication, authorization, and accounting (AAA) client in
Cisco Secure ACS, using the WLC’s name, IP address, and RADIUS shared secret.
Note: The RADIUS shared secret configured in Cisco Secure ACS must match the shared secret configured
on the WLC. The IP address must match the IP address of the management interface that the WLC uses to source
RADIUS packets to Cisco Secure ACS. See the Configure the WLC to Authenticate Against Cisco Secure ACS
section for more information about how to configure the shared secret on the WLC.
Configure Cisco Secure ACS to Validate Employee Credentials with Active Directory
In this section, Cisco Secure ACS is configured to join the Microsoft Active Directory domain to validate employee
usernames and passwords.
1. Open the Cisco Secure ACS Management interface.
2. In the left navigation column, expand Users and Identity Stores. Under Users and Identity Stores, expand
External Identity Stores and select Active Directory. The following window will appear:

Application Note
© 2010 Cisco Systems, Inc. All rights reserved. This document is Cisco Public Information. Page 10 of 36
3. Specify the Active Directory domain name
4. Specify the username and password of an Active Directory user who has permission to create computer objects
in the domain.
5. Click Save Changes.
6. Verify that the connectivity status is CONNECTED.

Application Note
© 2010 Cisco Systems, Inc. All rights reserved. This document is Cisco Public Information. Page 11 of 36
Configure Cisco Secure ACS to Validate Sponsored Guest Credentials with Cisco NGS
In this section, Cisco Secure ACS is configured to use Cisco NGS as a RADIUS proxy for validating sponsored-
guest credentials.
1. Open the Cisco Secure ACS Management interface.
2. In the left navigation column, expand Users and Identity Stores. Under Users and Identity Stores,
expand External Identity Stores and select RADIUS Identity Servers.
3. Click Create. The following window will appear:
4. Enter the Cisco NGS name, hostname, and shared secret. Optionally, add a description.
Note: The RADIUS shared secret configured in Cisco Secure ACS must match the shared secret configured on
the Cisco NGS. The IP address must match the IP address that the Cisco NGS uses to source RADIUS packets for
Cisco Secure ACS. See the Validating Guest Credentials from Cisco Secure ACS section for more information about
how to configure the shared secret on the Cisco NGS.
5. Click Submit.

Application Note
© 2010 Cisco Systems, Inc. All rights reserved. This document is Cisco Public Information. Page 12 of 36
Create an Identity Store Sequence with Active Directory and Cisco NGS
In this section, an identity store sequence will be configured on Cisco Secure ACS. The store sequence allows
Cisco Secure ACS to query multiple identity stores sequentially until a match is found.
1. Open the Cisco Secure ACS Management interface.
2. In the left navigation column, expand Users and Identity Stores. Under Users and Identity Stores,
expand External Identity Stores and select Identity Store Sequences.
3. Click Create. The following window will appear:
4. Enter a name for the sequence and, optionally, a description.
5. Under Authentication Method List, select Password Based.
6. Under Authentication and Attribute Retrieval Search List, select AD1 and NGS from the list in the Available
column. Click > to move AD1 and NGS to the Selected column on the right.
Note: The order of the identity stores is important. Cisco Secure ACS processes this list sequentially. By default,
Cisco Secure ACS treats a RADIUS Reject message from RADIUS identity servers as an authentication failure
(for example, as if the user submitted a bad password). Cisco Secure ACS will not try the next identity store in a
sequence if authentication fails, which may defeat the purpose of the identity store sequence. There are two ways
to handle this situation. First, when creating a store sequence that contains a RADIUS identity server, make sure
that the RADIUS identity server (Cisco NGS) comes last. This option is used in this configuration guide. The second
alternative is to use the Advanced tab in the RADIUS identity server configuration to change the default handling of
RADIUS Reject messages.
7. Click Submit.

Application Note
© 2010 Cisco Systems, Inc. All rights reserved. This document is Cisco Public Information. Page 13 of 36
Create a Downloadable ACL in Cisco Secure ACS
In this section, a downloadable ACL is created in Cisco Secure ACS. This ACL will be used in the authorization
policy in a subsequent step.
1. Open the Cisco Secure ACS Management interface.
2. In the left navigation column, under Policy Elements, expand Authorization and Permissions. Then expand
Named Permission Objects and select Downloadable ACLs.
3. Click Create. The following window will appear:
4. Enter a name for this dACL and specify the ACL elements. A very simple example (granting full network access)
is shown. The syntax for the ACL must conform to the requirements for extended Layer 3 ACLs in Cisco IOS
Software with the additional requirement that the source of the ACL must be “any.”
Tip: Type carefully. Cisco Secure ACS does not perform any syntax checking, but the switch will fail authorization
if the ACL is not properly specified. To the end user, this failure will appear as a failed authentication.
Note: The switch will replace the source “any” in each ACL element with the IP address of the end host when it
applies the dACL to the port.
5. Click Submit.

Application Note
© 2010 Cisco Systems, Inc. All rights reserved. This document is Cisco Public Information. Page 14 of 36
Create a Wired Authorization Profile in Cisco Secure ACS
In this section, a wired authorization profile is created in Cisco Secure ACS. This profile will be used in the
authorization policy in a subsequent step. The authorization profile has three parts: the profile name, a dACL,
and a manually entered RADIUS attribute that enables the switch to apply the dACL.
1. Open the Cisco Secure ACS Management interface.
2. In the left navigation column, under Policy Elements, expand Authorization and Permissions. Then expand
Network Access and select Authorization Profiles.
3. Click Create. The following window will appear:
4. On the General tab, specify a name for this profile.

Application Note
© 2010 Cisco Systems, Inc. All rights reserved. This document is Cisco Public Information. Page 15 of 36
5. Click the Common Tasks tab. Under ACLs, navigate to Downloadable ACL Name and choose Static
and then the name of the dACL configured in the previous step (PERMIT-ANY in this example).

Application Note
© 2010 Cisco Systems, Inc. All rights reserved. This document is Cisco Public Information. Page 16 of 36
6. Click the RADIUS Attributes tab. For Dictionary Type, choose RADIUS-Cisco. For RADIUS Attribute,
select cisco-av-pair. For Attribute Value, choose Static and type priv-lvl=15 in the text box. Click Add.
Note: The cisco-av-pair “priv-lvl=15” is a special attribute that is required to enable the switch to applied the dACL.
Without this attribute, the switch will fail the authorization and the WebAuth user will not get access to the network.
7. Click Submit.
Create a Web Authentication Access Service
In this section, a WebAuth access service is created in Cisco Secure ACS. This access service will be used in the
service selection rules in a subsequent step. The access service profile has four parts: the service name, the
allowed protocol filter, the identity policy, and the authorization policy.

Application Note
© 2010 Cisco Systems, Inc. All rights reserved. This document is Cisco Public Information. Page 17 of 36
Configure the Protocol Filter
In this section, the access service is created with the appropriate protocol filter. Since WebAuth uses PAP to
authenticate usernames and passwords, PAP is the only permitted protocol.
1. Open the Cisco Secure ACS Management interface.
2. In the left navigation column, under Access Policies, click Access Services. The list of existing access
services will appear.
3. At the bottom of the right pane, click Create. The following window will appear:

Application Note
© 2010 Cisco Systems, Inc. All rights reserved. This document is Cisco Public Information. Page 18 of 36
4. In Step 1 — General, specify a name for this service. Under Access Service Policy Structure, select User
Selected Service Type. For User Selected Service Type, choose Network Access. Under User Selected
Service Type, select Identity and Authorization. Click Next. The following window appears:
5. In Step 2 — Allowed Protocols, deselect Process Host Lookup. Select Allow PAP/ASCII. Click Finish.
You will be prompted to modify the service selection policy. Click No.

Application Note
© 2010 Cisco Systems, Inc. All rights reserved. This document is Cisco Public Information. Page 19 of 36
Define the Identity Policy
In this section, the identity policy of the access service is defined. The identity policy will be set to check the
username and password against the identity store sequence created in a previous step.
1. In the left navigation column, expand Access Policies to list the access service that was just created.
Expand Web Auth Access Service and click Identity. The following window will appear:
2. In the WebAuth Identity policy window, select Single result selection. For Identity Source, select the
identity store sequence you created in the Create an Identity Store Sequence with Active Directory and Cisco
NGS section (AD + NGS). Click Save Changes.

Application Note
© 2010 Cisco Systems, Inc. All rights reserved. This document is Cisco Public Information. Page 20 of 36
Define the Authorization Policy
In this section, the authorization policy of the access service is defined. Since wired WebAuth requires a dACL,
a special rule will be created for wired WebAuth. Wireless users will be subject to the default authorization rule,
which enables all access on the WLAN by sending a RADIUS Access-Accept message with no special attributes.
1. In the left navigation column, expand Access Policies to list the access service that was just created.
Expand Web Auth Access Service and click Authorization. Click Create. The following window will appear.
2. Specify the name of the rule for wired WebAuth.

Application Note
© 2010 Cisco Systems, Inc. All rights reserved. This document is Cisco Public Information. Page 21 of 36
3. Select Compound Condition. Under Condition, choose RADIUS-IETF for Dictionary and Service-Type for
Attribute. For Value, select Outbound and click Add to add the condition to the Current Condition Set table.
4. Scroll down to the Results section and click Select. An Authorization Profiles dialog box appears:
5. Select the wired WebAuth profile that was created in the Create a Wired Authorization Profile in Cisco Secure
ACS section. Click OK.
6. The dialog box will disappear, returning you to the rule definition window. Click OK.
7. The main Authorization Policy window will reappear:
8. Click Save Changes.
Note: You do not need to create a special authorization rule for wireless WebAuth. Wireless WebAuth users
will match the default rule in the authorization policy, which will permit full access.

Application Note
© 2010 Cisco Systems, Inc. All rights reserved. This document is Cisco Public Information. Page 22 of 36
Create a Web Authentication Service Selection Rule
This section describes how to create a service selection rule for WebAuth in Cisco Secure ACS. This service
selection rule will help ensure that the policies defined in the WebAuth access service are applied to WebAuth
requests.
1. Open the Cisco Secure ACS Management interface.
2. In the left navigation column, under Access Policies, click Service Selection. The list of existing service
selection rules will appear.
3. At the bottom of the right pane, click Create. The Service Selection Rule dialog box will appear and should be
filled out as described in the following steps:
4. Specify a name for the rule (Web Auth Service Select is used here).
5. Under Conditions, select Compound Condition.
6. Under Dictionary, choose RADIUS-IETF.

Application Note
© 2010 Cisco Systems, Inc. All rights reserved. This document is Cisco Public Information. Page 23 of 36
7. Under Attribute, select Service-Type.
8. Under Operator, choose match.
9. Under Value, select Outbound.
10. Under Current Condition Set, click Add.
Note: The condition just added (Service-Type = Outbound) will match all inbound requests for wired WebAuth.
11. Under Current Condition Set, click Or > Insert.
12. Under Conditions, select Compound Condition.
13. Under Dictionary, choose RADIUS-IETF.
14. Under Attribute, select Service-Type.
15. Under Operator, choose match.
16. Under Value, select Login.
17. Under Current Condition Set, click Add.
Note: The condition just added (Service-Type = Login) will match all inbound requests for Wireless WebAuth.
18. Under Results, select the access service that was created in the Create a Web Authentication Access Service
section.
19. Click OK. The Service Selection Rules summary will appear with the new rule:
20. Click Save Changes.
Configure the NAC Guest Server
In this section, the Cisco NGS is configured for guest credentials validation and centralized login pages for wired and
wireless authentication.
This section does not cover sponsored account creation or guest policy. For information about those topics, see the
Cisco NGS configuration guide at
http://www.cisco.com/en/US/products/ps10160/products_installation_and_configuration_guides_list.html.

Application Note
© 2010 Cisco Systems, Inc. All rights reserved. This document is Cisco Public Information. Page 24 of 36
Validating Guest Credentials from Cisco Secure ACS
In this section, the Cisco NGS is configured to accept RADIUS requests from a Cisco Secure ACS that has been
proxied on behalf of the WLC and the wired switch.
1. Open the Cisco NGS Administrative interface.
2. In the left navigation column, expand Devices and click RADIUS Clients. The list of existing RADIUS clients
will appear. Click Add RADIUS Client. The following window appears:
3. Enter the name, IP address, and shared secret belonging to Cisco Secure ACS. The shared secret must match
what was previously configured in Configure Cisco Secure ACS to Validate Sponsored Guest Credentials with
Cisco NGS section. Click Add RADIUS Client. The RADIUS Clients summary window reappears.

Application Note
© 2010 Cisco Systems, Inc. All rights reserved. This document is Cisco Public Information. Page 25 of 36
4. In the main RADIUS Clients summary window, click Add RADIUS Client. The following window appears:
5. Enter the name and IP address associated with the wired switch. The Secret fields cannot be empty, but the
value does not need to match what is configured on the switch or Cisco Secure ACS. Uncheck the Device
sends Calling Station IP box. Click Add RADIUS Client. The RADIUS Clients summary window reappears.

Application Note
© 2010 Cisco Systems, Inc. All rights reserved. This document is Cisco Public Information. Page 26 of 36
6. In the main RADIUS Clients summary window, click Add RADIUS Client. The following window appears:
7. Enter the name and IP address associated with WLC. The Secret fields cannot be empty, but the value does
not need to match what is configured on the WLC or in Cisco Secure ACS. Uncheck the Device sends Calling
Station IP box. Click Add RADIUS Client. The RADIUS Clients summary window reappears:
8. Click Restart.

Application Note
© 2010 Cisco Systems, Inc. All rights reserved. This document is Cisco Public Information. Page 27 of 36
Creating Wired Login Pages
This section documents the steps required to create a centralized login page for wired WebAuth.
1. Open the Cisco NGS Administrative interface.
2. In the left navigation column, expand Hotspot and select Sites. Click Add Site. The following window
will appear:
3. Enter a name and description for this site. Click Create Site.

Application Note
© 2010 Cisco Systems, Inc. All rights reserved. This document is Cisco Public Information. Page 28 of 36
4. The Settings tab for the newly created site will appear. Verify that Operation mode is set to Authentication
as shown here:
5. Click the Files tab for the site. The following window will appear:

Application Note
© 2010 Cisco Systems, Inc. All rights reserved. This document is Cisco Public Information. Page 29 of 36
The Files tab contains instructions about where to store the files for the customized webpage on the Cisco NGS.
When a hotspot is created, a home directory is created on Cisco NGS in /guest/www/html/sites/<name of hotspot>.
Since the name of the hotspot created in this example is LWA, the files are stored on the Cisco NGS in the directory
/guest/www/html/sites/LWA.
6. Connect to the Cisco NGS using the console port or SSH.
7. Move to the directory specified on the Files tab in step 5.
8. Copy the following sample files to the wired hotspot directory: /guest/sites/samples/switch_login.html and
/guests/sites/samples/wlc_aup.html. The sample files are shown here:
9. The switch_login.html file will be the wired login page. It includes the widget code required for switch-based
WebAuth. Customize this file as required for your site.
10. The wlc_aup.html file will be the acceptable-use page presented to users authenticating with sponsored-guest
credentials. Customize this file as required for your site.
11. Use secure FTP (SFTP) or Secure Copy Protocol (SCP) to transfer any image files or other secondary files
referenced in the switch_login.html and wlc_autp.html files to this directory.
Creating Wireless Login Pages
This section documents the steps required to create a centralized login page for wireless WebAuth.
1. Open the Cisco NGS Administrative interface.
2. In the left navigation column, expand Hotspot and select Sites. Click Add Site. The following window
will appear:
3. Enter a name and description for this site. Click Create Site.

Application Note
© 2010 Cisco Systems, Inc. All rights reserved. This document is Cisco Public Information. Page 30 of 36
4. The Settings tab for the newly created site will appear. Verify that Operation mode is set to Authentication as
shown here:
5. Click the Files tab for the site. The following window will appear:
The Files tab contains instructions about where to store the files for the customized webpage on the Cisco NGS.
When a hotspot is created, a home directory is created on Cisco NGS in /guest/www/html/sites/<name of hotspot>.
Since the name of the hotspot created in this example is WLCWebAuth, the files are stored on the Cisco NGS in the
directory /guest/www/html/sites/WLCWebAuth.

Application Note
© 2010 Cisco Systems, Inc. All rights reserved. This document is Cisco Public Information. Page 31 of 36
6. Connect to the Cisco NGS using the console port or SSH.
7. Change to the directory specified in the Files tab in step 5.
8. Copy the following sample files to the wireless hotspot directory: /guest/sites/samples/wlc_login.html and
/guests/sites/samples/wlc_aup.html. The sample files are shown here:
9. The wlc_login.html file will be the wireless login page. It includes the widget code required for WLC-based
WebAuth. Customize this file as required for your site. Other than the widget, the content of this page can be
the same as that for the wired WebAuth page.
10. The wlc_aup.html file will be the acceptable-use page presented to users authenticating with sponsored-guest
credentials. Customize this file as required for your site. The content of this page can be the same as that for the
wired WebAuth aup file.
11. Use SFTP or SCP to transfer any image files or other secondary files referenced in the wlc_login.html and
wlc_autp.html files to this directory.
Configure the Switch
In this section, the Cisco IOS Software switch is configured for integrated local WebAuth. This section assumes that
the switch has previously been configured for basic WebAuth as described in the Web Authentication Deployment
and Configuration Guide at http://www.cisco.com/en/US/products/ps6638/prod_white_papers_list.html.
Verify Basic Web Authentication Configuration
The following example shows all the required elements of a configuration for IEEE 802.1X with WebAuth fallback in
the order it would appear in the CLI. This configuration should be deployed and validated before continuing with the
advanced features required for integrated local WebAuth.
Most of this configuration can be reused in its current form. However, the lines in red must be adapted to
your environment.
aaa new-model
!
aaa authentication dot1x default group radius
aaa authentication login default group radius
aaa authorization network default group radius
aaa authorization auth-proxy default group radius
aaa accounting dot1x default start-stop group radius
aaa accounting auth-proxy default start-stop group radius
!
ip device tracking
ip admission name IP_ADMIN_RULE proxy http
!
fallback profile WEB_AUTH_PROFILE
ip access-group PRE_WEBAUTH_POLICY in
ip admission IP_ADMIN_RULE
!

Application Note
© 2010 Cisco Systems, Inc. All rights reserved. This document is Cisco Public Information. Page 32 of 36
dot1x system-auth-control
!
interface Gigabit 1/0/5 !Change to your interface name
switchport mode access
switchport access vlan 30 !Change to your access VLAN
authentication port-control auto
authentication fallback WEB_AUTH_PROFILE
dot1x pae-authenticator
dot1x tx-period 5
!
ip http server
ip http secure-server
!
ip access-list extended PRE_WEBAUTH_POLICY
permit udp any any eq bootps
permit udp any any eq domain
!
radius-server host 10.200.10.152 key cisco123 !Change to the IP address and shared secret !of your Cisco Secure ACS server
radius-server vsa send authentication
Create Customized Webpages for URL Redirect
In this section, the switch is configured with the webpages that are required for integrated local WebAuth.
Note: Sample versions of the special login pages required on the switch can be found on the Cisco NGS.
These files must be modified and downloaded to the switch as described here.
1. Use SFTP or SCP to go to the Cisco NGS and retrieve the following sample files:
● /guest/sites/samples/switch_includes/login.html
● /guest/sites/samples/switch_includes/expired.html
● /guest/sites/samples/switch_includes/failed.html
● /guest/sites/samples/switch_includes/success.html
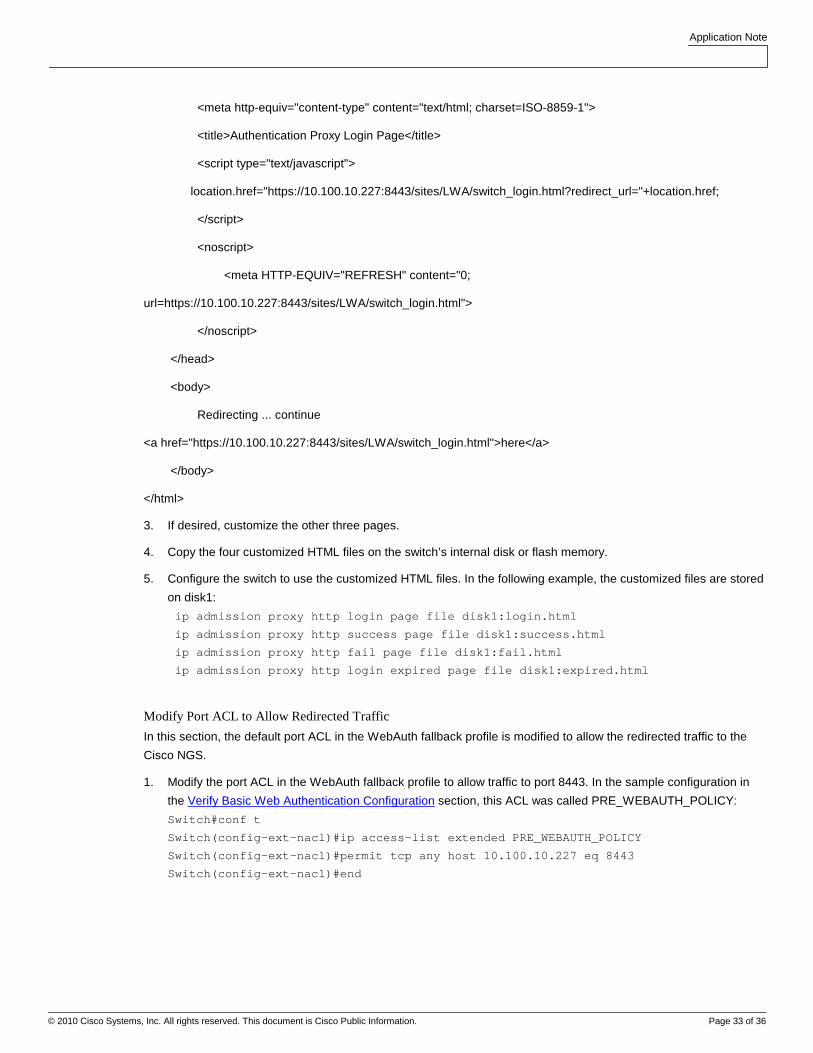
2. Edit the sample login.html file, modifying all the URLs to match the IP address of your Cisco NGS and the
hotspot site name for wired WebAuth. In this example, the Cisco NGS has an IP address of 10.100.10.227,
and the hotspot site name for wired WebAuth is LWA. The login.html file should look like this (modified lines
are highlighted in red):
<html>
<head>
<meta Http-Equiv="Cache-Control" Content="no-cache">
<meta Http-Equiv="Pragma" Content="no-cache">
<meta Http-Equiv="Expires" Content="0">
<meta HTTP-EQUIV="REFRESH" content="2;
url=https://10.100.10.227:8443/sites/LWA/switch_login.html">
Application Note
© 2010 Cisco Systems, Inc. All rights reserved. This document is Cisco Public Information. Page 33 of 36
<meta http-equiv="content-type" content="text/html; charset=ISO-8859-1">
<title>Authentication Proxy Login Page</title>
<script type="text/javascript">
location.href="https://10.100.10.227:8443/sites/LWA/switch_login.html?redirect_url="+location.href;
</script>
<noscript>
<meta HTTP-EQUIV="REFRESH" content="0;
url=https://10.100.10.227:8443/sites/LWA/switch_login.html">
</noscript>
</head>
<body>
Redirecting ... continue
<a href="https://10.100.10.227:8443/sites/LWA/switch_login.html">here</a>
</body>
</html>
3. If desired, customize the other three pages.
4. Copy the four customized HTML files on the switch’s internal disk or flash memory.
5. Configure the switch to use the customized HTML files. In the following example, the customized files are stored
on disk1:
ip admission proxy http login page file disk1:login.html
ip admission proxy http success page file disk1:success.html
ip admission proxy http fail page file disk1:fail.html
ip admission proxy http login expired page file disk1:expired.html
Modify Port ACL to Allow Redirected Traffic
In this section, the default port ACL in the WebAuth fallback profile is modified to allow the redirected traffic to the
Cisco NGS.
1. Modify the port ACL in the WebAuth fallback profile to allow traffic to port 8443. In the sample configuration in
the Verify Basic Web Authentication Configuration section, this ACL was called PRE_WEBAUTH_POLICY:
Switch#conf t
Switch(config-ext-nacl)#ip access-list extended PRE_WEBAUTH_POLICY
Switch(config-ext-nacl)#permit tcp any host 10.100.10.227 eq 8443
Switch(config-ext-nacl)#end

Application Note
© 2010 Cisco Systems, Inc. All rights reserved. This document is Cisco Public Information. Page 34 of 36
Configure the WLC
In this section, the WLC switch is configured for integrated local WebAuth.
Configure the WLC to Redirect to Cisco NGS
1. Open the WLC management interface. Select the top-level WLAN tab and select the profile name of the WLAN
that has been created for WebAuth. Click the Security tab and then click the Layer 3 tab. The following window
will appear:
2. For Web Auth type, choose External(Re-direct to external server).
3. For URL, specify the wireless login page created on the Cisco NGS. In this example, the Cisco NGS’s IP
address is 10.100.10.227, the hotspot name is WLCWebAuth, and the login page is wlc_login.html, so the
URL is https://10.100.10.227/sites/WLCWebAuth/wlc_login.html.
4. Click Apply.

Application Note
© 2010 Cisco Systems, Inc. All rights reserved. This document is Cisco Public Information. Page 35 of 36
Configure the WLC to Authenticate Against Cisco Secure ACS
1. Open the WLC management interface and click the top-level Security tab. In the left navigation pane,
expand RADIUS and click Authentication. Click New. The following window will appear:
2. Enter the IP address and shared secret of the Cisco Secure ACS. Click Apply.
3. Click the top-level WLAN tab and select the profile name of WLAN that has been created for WebAuth.
Click the Security tab and then click the AAA Servers tab. The following window will appear:
4. For Server 1, choose the Cisco Secure ACS. Click Apply.
Conclusion
The Cisco integrated local WebAuth feature provides a consistent and scalable WebAuth solution that can be
used for employees and guests regardless of how they access the campus network. Centralized policy management
reduces operating expenditures (OpEx), and centralized accounting increases network visibility. When combined
with other security elements such as infrastructure protection, threat identification and mitigation, and secure
connectivity, integrated local WebAuth increases the ability of the network to defend itself.

Application Note
© 2010 Cisco Systems, Inc. All rights reserved. This document is Cisco Public Information. Page 36 of 36
Appendix A: References
This section provides a list of references.
Cisco Product Documentation
● Basic WebAuth Deployment and Configuration Guide:
http://www.cisco.com/en/US/products/ps6638/prod_white_papers_list.html
● Configuring WebAuth on Cisco Catalyst 3750 Series Switches:
http://www.cisco.com/en/US/partner/docs/switches/lan/catalyst3750/software/release/12.2_50_se/configuratio
n/guide/sw8021x.html
● Configuring WebAuth on Cisco Catalyst 4500 Series Switches:
http://www.cisco.com/en/US/partner/docs/switches/lan/catalyst4500/12.2/53SG/configuration/webauth.html
● Configuring WebAuth on Cisco Catalyst 6500 Series Switches:
http://www.cisco.com/en/US/partner/docs/switches/lan/catalyst6500/ios/12.2SX/configuration/guide/webauth.
html
● WebAuth with Cisco Wireless LAN Controllers:
http://www.cisco.com/en/US/partner/tech/tk722/tk809/technologies_configuration_example09186a008076f97
4.shtml#external-process
● Cisco NGS configuration guide:
(http://www.cisco.com/en/US/products/ps10160/products_installation_and_configuration_guides_list.html)
● Scenario-based IEEE 802.1X design guide:
http://www.cisco.com/en/US/prod/collateral/iosswrel/ps6537/ps6586/ps6638/whitepaper_C11-530469.html
● Scenario-based IEEE 802.1X configuration guide:
http://www.cisco.com/en/US/prod/collateral/iosswrel/ps6537/ps6586/ps6638/Whitepaper_c11-532065.html
● Cisco IOS Firewall authentication proxy:
http://www.cisco.com/en/US/products/sw/secursw/ps1018/products_tech_note09186a0080094eb0.shtml
Printed in USA C27-577490-02 06/10