icw 1000 global user’ s manu al - allstar...
TRANSCRIPT

U
ICW‐
ser’
‐1000
s M
IN
www
0 Glob
anu
NCOM Co.
w.incominc
bal
al
, Ltd.
c.com

1
Copyright Notice INCOM is registered trademarks of INCOM Co., Ltd. Other referenced trademarks are
trademarks (registered or otherwise) of the respective trademark owners.
This document is confidential and proprietary to INCOM Co., Ltd. No part of this document
may be reproduced, stored, or transmitted in any form by any means without the prior
written permission of INCOM Co., Ltd.
Information furnished herein by INCOM Co., Ltd., is believed to be accurate and reliable. The
authors have used their best efforts in preparing this material. These efforts include the
development, research, and testing of the theories and programs to determine their
effectiveness.
However, INCOM assumes no liability for errors that may appear in this document, or for
liability otherwise arising from the application or use of any such information or for any
infringement of patents or other intellectual property rights owned by third parties which
may result from such application or use. The products, their specifications, and the
information appearing in this document are subject to change without notice.
INCOM Co., Ltd.
© 2014 by INCOM Co., Ltd. All rights reserved.

2
Manual Introduction This user's manual contains items that you should follow in order to prevent any harm to
yourself and others, or damage to equipment, and to enable you to use this product
safely. An explanation of the markings and symbols used in this manual is provided below.
Please understand these symbols before reading the rest of this document.
Every care has been taken in the writing of this manual, but if you find any points of
concern with this manual, please notify us through one of our contact points.
Please understand that this company cannot assume any responsibility for any damage or
other pure economic loss resulting from lost communications opportunities due to a
breakdown of this product, its incorrect operation, power failure or other external factors.
After sales service
■ We request that you write down in a memo or otherwise store any information that
you yourself have registered in this product.
■ This company has no obligation concerning changes to or loss of, any information and
bears no responsibility for this whatsoever.
■ During repairs for a breakdown, data created by the customer or loaded in from
outside may change or be lost.
■ This company takes no responsibility for this. In case that this product is used for abnormal purpose, the guarantee will expire
regardless of a time of purchase.
Any reproduction or copying of its content without prior permission is strictly forbidden. The contents of this manual may be revised at any time without prior notice. For support information about added functions, changes, etc., we recommend that you periodically visit the home page below for updated information.
Our company's home page http://www.incominc.com/ ■ Compliance Statement for FCC THIS DEVICE COMPLIES WITH PART 15 OF THE FCC RULES.
Operation is subject to the following two conditions; (1) this device may not cause harmful
interference, and (2) this device must accept any interference received, including interference
that may cause undesired operation.
3
CAUTION: Changes or modifications not expressly approved by the party responsible for
compliance could void the user’s authority to operate the equipment.
NOTE: This equipment has been tested and found to comply with the limits for a Class B digital
device, pursuant to part 15 of the FCC Rules. These limits are designed to provide reasonable
protection against harmful interference in a residential installation. This equipment generates
uses and can radiate radio frequency energy and, if not installed and used in accordance with
the instructions, may cause harmful interference to radio communications. However, there is
no guarantee that interference will not occur in a particular installation. If this equipment does
cause harmful interference to radio or television reception, which can be determined by
turning the equipment off and on, the user is encouraged to try to correct the interference by
one or more of the following measures:
‐ Reorient or relocate the receiving antenna. ‐ Increase the separation between the equipment and receiver.
‐ Connect the equipment into an outlet on a circuit different from that to which the receiver
is connected.
‐ Consult the dealer or an experienced radio/TV technician for help For body worn operation, this phone has been tested and meets FCC RF exposure guidelines
when used with an accessory that contains no metal and that positions the handset a
minimum of 1.5cm from the body. Use of other accessories may not ensure compliance with
FCC RF exposure guidelines.

4
■ Caution concerning interference with 2.4GHz/5GHz wireless LAN When communicating with a 2.4GHz/5GHz LAN, be careful about the following.
Microwave ovens and other industrial, scientific, and medical equipment, as well as indoor
wireless stations (wireless stations requiring permits) and special low‐power wireless stations
(wireless stations not requiring permits) used for identifying mobile units used in plant
manufacturing line etc., as well as amateur wireless stations (wireless stations requiring
permits) operate in the frequency band used by this product.
Before using this product, double check that no indoor wireless stations, special low‐power
wireless stations for mobile unit identification, or amateur wireless stations are in operation in
the vicinity.
If this product should cause harmful electromagnetic interference in an indoor wireless
station for identifying a mobile unit, quickly change the frequency used or stop emitting
the electromagnetic signal, then notify the store of purchase and consult with them about
measures for avoiding interference (for example, installing a partition wall).
Besides that, if this product should cause harmful electromagnetic interference in a
special low‐power wireless station used for identifying a mobile unit, or in an amateur
wireless station, or some other problem occurs, please inquire at the store from which
you made your purchase.
■ Built‐in 2.4GHz/5GHz band (IEEE802.11a / IEEE802.11b / IEEE802.11g / IEE802.11n) wireless
LAN functions
Usage frequency band: Wireless equipment using the 2.4GHz/ 5GHz
Band Transmission method: DSSS OFDM
Modulation: DQPSK DBPSK CCK BPSK QPSK 16‐QAM 64‐QAM Assumed interference distance: 40m max.
Frequency modulation advantages: The entire bandwidth can be used to avoid the
frequency bands of indoor wireless stations and special low‐power wireless stations used for
identifying mobile units, as well as amateur wireless stations.
Because the 2.4GHz band frequency used in this product overlaps with medical equipment,
microwave ovens and other industrial and scientific equipment, as well as indoor wireless
stations and special low‐power wireless stations for identifying mobile units used in plant
manufacturing line etc., electromagnetic interference is possible. Before starting to use this
product, please double check that no indoor wireless stations or special low‐power wireless
stations are operating within the interference range of this product.

5
Safety Precautions Since this is provided to make safe and right use of ICW‐1000G to prevent any accidents or
risks, be sure to carefully read it, follow instructions, and keep it where it is easily noticed.
Warning This mark is intended to warn users of the risk of a serious injury or death when they violate
instructions.
Do not put ICW‐1000G in heating appliances such as heaters and microwave ovens to
dry them if they are wet. It can cause explosions, deformation, or troubles. In this case, free
services shall not be provided.
Do not use ICW‐1000G in places that are too hot or too wet (keep them indoors
between 0 ℃ and + 50 ℃). If they get wet with rain, have drinks spilled, or are used in
extremely hot/wet places such as public sauna bathroom, it can cause battery explosions.
Put ICW‐1000G and chargers in places out of reach of children or pets. If one puts
batteries his or her mouth, or uses broken batteries, it can hurt his or her body, or cause
electric shocks.
Do not disassemble ICW‐1000G, or apply shocks to them as you please. If they get
damaged while you disassemble them, or inflict shocks on them, you cannot have free
services.
You should stop charging the phone and separate it from battery if the phone is
overheating during charging the phone. Doing so may get burned.
Be aware of much ESD (Electrostatic Discharge simulator) environment. The product may
have the abnormal condition

6
Be sure to use designated batteries and accessories only for ICW‐1000G provided by our
company. If you use unauthorized batteries or accessories, it can reduce the life of ICW‐
1000G, cause explosions, or damage them. In this case, you cannot have free services.
Be careful for conductors such as necklaces, keys, and coins not to contact battery
terminals (metal section). Since short circuits can cause explosions, be careful for such events
never to take place.
Neither throws batteries, which can inflict shocks on them, nor put them near to heating
appliances such as heaters and microwave ovens. It can cause the leak of battery contents, or
explosions.
Use standard chargers that obtained INCOM authentication for batteries. Otherwise,
batteries will have their life reduced, face explosions, or damage ICW‐1000G. In this case, free
services shall not be provided.
Refrain from the use of ICW‐1000G, and leave the power cord of chargers unplugged
when thunders and lightening are severe. Thunderbolts can cause severe physical injuries, or
fires.
Do not hold ICW‐1000G to your ears to turn on the power. It can cause hearing
impairments, or physical injuries. Do not look at the infrared window in a direct way when
using remote control. It can cause visual impairments.
Do not use chemical detergents such as benzene, thinner, and alcohol to clean ICW‐
1000G. It can cause fires.
Never push the power button when ICW‐1000G are wet, nor touch ICW‐1000G chargers,
or power cords with wet hands. It can cause fires or electric shocks.
Precautions
This mark is intended to caution users against violating instructions since it can cause a slight
physical injury or product damage.

7
Correctly install ICW‐1000G in compliance with instructions. Otherwise, it can cause an
abnormal operation of ICW‐1000G, or reduce their life.
Be aware of radio interference. Since this radio equipment can have radio interference,
services related to life safety are not provided.
Do not install ICW‐1000G in places exposed to direct sunlight, and on carpets or cushions.
It can cause fires or troubles.
Do not install ICW‐1000G in narrow places with poor ventilation, or near heat sources. It
can cause fires or troubles.
Do not install ICW‐1000G in places with much dust. It can cause operational problems,
or reduce phone life.
Install ICW‐1000G on flat places, not on shelves or slopes. Otherwise, it can hurt you, or
cause troubles when they drop.
Since emergency calls are available only within call coverage, check in advance whether
or not calls are available.
Do not use ICW‐1000G covered wrap or vinyl. Coating can be removed.
Record and keep the information contained in ICW‐1000G separately.
Since the important information stored in ICW‐1000G can be removed due to unavoidable
circumstances such as users’ carelessness, maintenance, and product upgrade, please keep a
record of important information. Take note that manufacturer will not take responsibility for
any damage from the loss of information. If batteries are not used for a long time, keep them
at room temperature after charging.
If you want to use again after leaving them for a long time, it is recommended to use them
after fully charging.

8
Keep in mind that ICW‐1000G can produce much heat while using for a long time. Do not install ICW‐1000G in heavily shaking places. It can cause performance degradation, or
reduce the life of products.
After using ICW‐1000G for a long time, they can produce a weak sound due to their liquid
crystal protective vinyl covering the speaker.
If ICW‐1000G is separated from AP or chargers for a long time, they cannot work due to
battery discharge.
9
Contents
Chapter 1
BASICS………………………………………………………………..……………….………………………………………….12
ICW‐1000G at a glance………………………………………………………………………………………………………….12
KEY Function……………………………………………………………………………………..…………………….…………..13
Display indicators…………………………………………………………………………………….……………………………14
Basic Components………………………………………………………………………………………………………………..15
Battery Replacement……………………………………………………………………………………………………………15
Battery Charging Signal…………………………………………………………………………………………………………16
Chapter 2
BASIC Function……………………………………………………………………………………………………………..17
How to Turn On / Off…………………………………………………………………………………………………………17
How to Enter Characters……………………………………………………………………………………………………17
How to Enter Special Text………………………………………………………………………………………………….18
Making a Call……………………………………………………………………………………………………………………..18
Making a Call the Received Number………………………………………………………………………………….19
Making Calls Using Speed Dial……………………………………………………………………………………………19
Incoming Call………………………………………………………………………………………………………….…….……19
Missed Call……………………………………………………………………………………………………………….……….19
Chapter 3
Function on the Call……………………………………………………………………………………………………..20
How to Mute……………………………………………………………………………………………………………………..20
Saving Phone Number on Calling……………………………………………………………………………………….20
Memo………………………………………………………………………………………………………………………………..21
Volume Control………………………………………………………………………………………………………………….21

10
Chapter 4
Phone Book………………………………………………………………………………………………………………….22
Search………………………………………………………………………………………………….…………………………….22
Adding Phone Book……………………………………………………………………….…………………………………..23
Saving New Number…………………………………………………………………………………………………………..24
Speed Dial………………………………………………………………………………………………………………………….24
Group settings……………………………………………………………………………………………………………………25
Call History…………………………………………………………………………………………………………………………25
Web Phone book……………………………………………………………………………………………………………….26
Call Time……………………………………………………………………………………………………………………………28
Chapter 5
Message……………………………………………………………………………………………………………………….29
Writing Text Message………………………………………………………………………………………………………..29
Inbox………………………………………………………………………………………………………………………………….30
Outbox………………………………………………………………………………………………………………………………30
Draft………………………………………………………………………………………………………………………………….30
Stored Message Box…………………………………………………………………………………………………………..31
Spam Message…………………………………………………………………………………………………………………..31
Spam Message Box…………………………………………………………………………………………………………….31
Spam Number……………………………………………………………………………………………………………………31
Spam Strings……………………………………………………………………………………………………………………...31
Spam Setting……………………………………………………………………………………………………………………..32
Message Settings……………………………………………………………………………………………………………….32
Chapter 6
Facility…………………………………………………………………………………………………………………………..33
Alarm/Wake‐up Call……………………………………………………………………………………………………..……33
Display of Selected Menu Screen………………………………………….……………………………………………34
Schedule…………………………………………………………………………………………………………………………….35

11
Calculator…………………………………………………………………………………………………………………………..35
World Time………………………………………………………………………………..………………………………………36
Chapter 7
Screen and Sound…………………………………………………………………………………………………………37
Banner………………………………………………………………………………………………………………………………37
Set lighting………………………………………………………………………………………………………………………..37
Ring ton/Vibrate………………………………………………………………………………………………………………….38
Ringers……………………………………………………………………………………………………………………………….39
Sound Effects…………………………………………………………………………………………………………………….39
System Alerts………………………………………………………………………………………………………………………40
Volumes……………………………………………………………………………………………………………………………..41
Chapter 8
Phone Setting………………………………………………………………………………………………………………….42
Language …………………………………………………………………………………………………………………………..42
Other Functions…………………………………………………………………………………………………………………..42
Lock PC Sync……………………………………………………………………………………………………………………….42
Lock Phone………………………………………………………………………………………………………………………….43
Emergency Numbers………………………………………………………………………………………………………….43
Feature……………………………………………………………………………………………………………………………….44
Call block mode………………………………………………………………………………………………………………….44
Call forwarding…………………………………………………………………………………………………………………….45
Do NOT Disturb ………………………………………………………………………………………………………………….45
Time……………………………………………………………………………………………………………………………………..46
WLAN Search………………………………………………………………………………………………………………………48
Connect to new Temporary Profile WLAN Search…………………………………………………………………49
Result to Default…………………………………………………………………………………………………………………50
My Phone Information………………………………………………………………………………………………………….51

12
Basics 1
ICW‐1000G at a Glance

13
Basic Key Function
Key Name Icon Basic functions
Navigation key Navigation Key – In the idle state, this button opens each
function. Within a menu or a list, you can use this as
direction keys.
Left selection key
Right selection key L R
Left selection key – Search WLAN key / Scroll up in the menu
list.
Right selection key – Search grouped phone book.
Send key
Equivalent to “Answer” on a standard phone and
“hold” during a call.
End key
Equivalent to “hang up” on a standard phone. Return to idle
state. Pressing and holding the key in the idle
state turns the handset On/Off.
OK key
Confirmation(OK), Select, View, Connect on each
display screen
Search phonebook key Search phonebook, trace call history and storage phonebook/ Scroll up in the menu list
Alarm key
Setting up alarm and wakeup call / Move to
left in the menu and editor.
Setting Key Quick access to personal shortcuts / Scroll down in the menu list
Message key Using message function
Speaker key Using speaker function
Mute key
Mute key is used when calling on the phone.
Pressing the key during a call turns “Mute” mode.
Vibration key
Pressing and holding the key in the idle state:
Switch the ringer (buzzer) On/Off
Clear key
CLR Key is used to return to previous menu list. Cancel
(ESC) and removing characters.
Lock key
The pound is for entering the pound sign.
Pressing and holding the key in the idle state: Switches on the key lock.
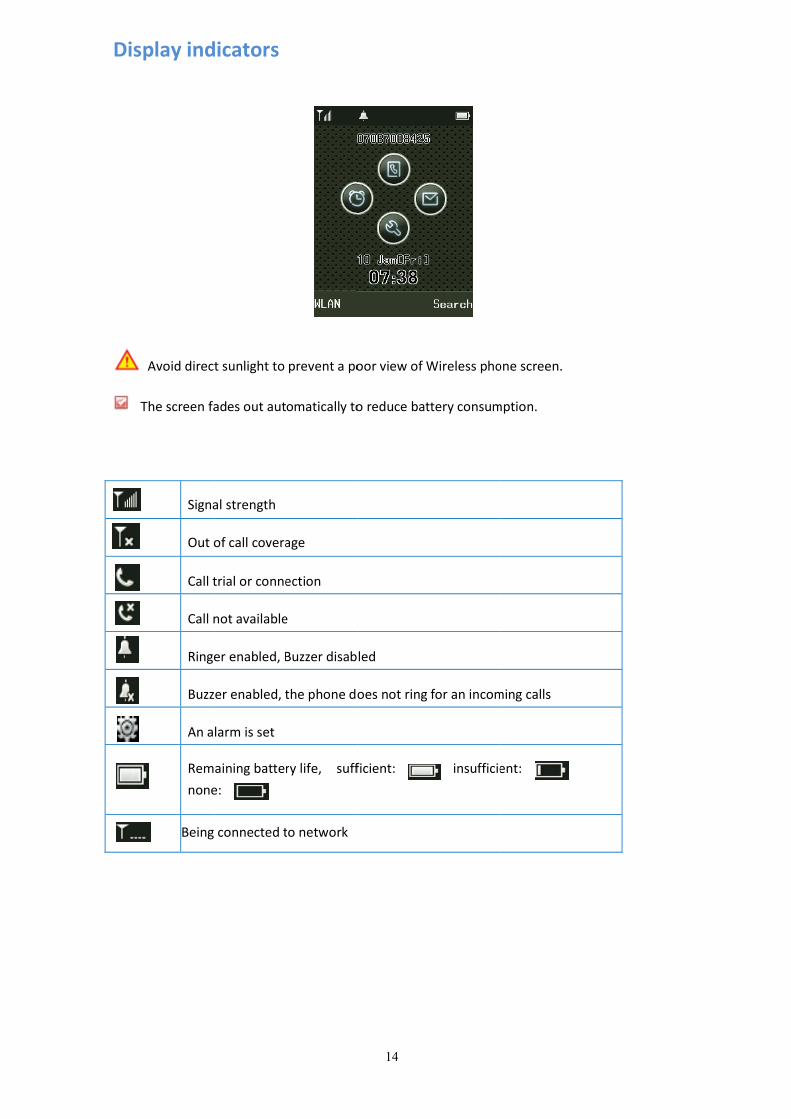
Dis
T
play ind
Avoid direct
The screen fa
Signa
Out o
Call t
Call n
Ringe
Buzz
An a
Rem
none
Being
dicators
t sunlight to
ades out aut
al strength
of call covera
trial or conne
not available
er enabled, B
er enabled, t
larm is set
aining batte
e:
connected t
prevent a po
omatically to
age
ection
e
Buzzer disab
the phone do
ry life, suff
to network
14
oor view of W
o reduce bat
led
oes not ring
ficient:
Wireless pho
ttery consum
for an incom
insufficie
one screen.
mption.
ming calls
ent:

15
Basic Components Please check whether the package includes all these items as shown down below in the picture
after purchasing the phone set. If there is missing anything that you found, please contact your
dealer immediately.
For safety in use, please purchase authentic products. If you want to purchase additional
batteries or chargers, contact your dealer.
Battery Replacement
Always use original INCOM batteries for your safety when you replace batteries, following the
figure below.
Battery insertion Battery removal
ICW-1000G
h
Battery Cradle
Power Cord (CE/US/UK)AC Adapter

16
Please turn off the power before removing battery from the phone (a sudden power off
can cause troubles). If battery is inserted upside down, the phone will not work.
Time Taking to Charge
Classification Standard model (1,100mAh)
Time Approximately 300 minutes
Battery Life
Successive Talk Time Approximately 14 hours
Successive Standby Time Approximately 150 hours
Successive Talk Time and Standby Time of batteries are the estimates of the company’s
laboratory, which can be different from the figures in manual depending on the patterns they
are used.
Battery Charging Signal If batteries need charging, they display, producing ringing sound. If the sound is
ringing, start charging immediately.

17
2Basic Function
How to Turn On / Off
If you want to turn on the power, keep pressing for about 3 seconds or until turn on the display.
If you want to turn off the power, keep pressing for about 3 seconds or until turn off the display
If abnormal works take place, or the power button does not work while using Wireless
phone, start the phone after removing and inserting the battery. Turn on the power after
waiting for 5 seconds or more when you restart the phone.
How to Enter Text Entering English Alphabets
Ex) If you want to enter “UNI”: press two times press two times press
three times.

How
If you
Ma
Press
press
delet
I
book
1.
You c
butto
w to Ent
u want to cre
king a C
s after
s . A
tes all numbe
f you select
.
. Send a M
can send mes
on (L ‐Lef
ter Spec
eate message
Call
r entering ar
short press
ers entered.
t Save after
essage
ssages to the
ft Selection k
ial Text
es, press Me
rea code and
s of
To finish cal
entering ph
e phone num
key) – press
18
enu 1 to se
d phone num
deletes one
ling, press
hone numbe
mber entered
button
elect sign en
mber. If you
e number, w
.
r, it will imm
d. Entering p
n – writing m
tering mode
selected
while a long
mediately be
hone numbe
massage – Pre
e.
wrong num
g press of
e stored in p
er – press M
ess Send but
mbers,
phone
enu
tton

Ma
Pressagain
Ma
You c
press
long
the S
S
Inco
To re
Mis
If you
To se
king a C
s buttn. A maximum
king Cal
can create s
s of the Spee
press of the
peed Dial.
Since if the d
oming C
ceive incom
ssed Cal
u have misse
ee calls arrive
Call the R
on, select yom of 100 pho
lls using
hortcuts by
ed Dial desir
e last one o
distance from
Call
ing, press
l
ed call, press,
ed in your ab
Received
our desiredone numbers
Speed D
assigning ph
red to call. H
of the abbre
m AP become
. To finis
, and
bsence from t
19
d Numbe
phone nums incoming a
Dial
hone numbe
However, if t
eviated numb
es longer, no
sh calls, pres
the last one
the call list,
er
ber using nd outgoing
ers to the nu
the Speed Di
bers. You ca
oise can be m
ss .
of those cal
press
, and can be store
umber key 1
ial is 2 digits
an press
made, call ne
ls will be ans
.
press ed in the call
1‐99. Make a
s or more, m
after en
ear to it.
swered.
l list.
a long
make a
tering

Fu
How You c
Selec
work
If you
T
too m
can h
Sav
You c
Menu
Y
unction
w to Mu
can make mu
ction Key
s.
want to canc
This is desig
much, or you
hear the othe
ving Pho
can store new
u (Left Select
You can find
n on th
ute
ute of transm
L) during
cel, press 1.
ned to prev
u want the s
er party.
ne Num
w numbers in
tion Key
the phone n
e call
mission voice
calls. The scr
Mute off aft
ent the othe
situation aro
mber on C
n the phoneb
L) during
numbers stor
20
e by selectin
reen shows
ter pressing M
er party fro
ound you not
Calling
book by sele
calls.
red by select
g 1. Mute o
icon
Menu (Left S
m hearing w
t to expose
ecting 2. Sav
ting Contact
n after press
if the functio
Selection Key
when the no
to the other
e Number af
s during calls
3
sing Menu (L
on of Mute o
y L) aga
oise around y
r party, whil
fter pressing
s.
3
Left
on
ain.
you is
le you
g

21
Memo
You can note something during call (Numbers Only). Press the buttons that you want to note
and you can store the memos by pressing . The memos stored can be found in the
call list.
F F F
Volume Control You can adjust receiver volume by side bar key during calls.
Some of the bell sounds downloaded can be harshly heard since they do not match
the sound source in Wireless phones. This does not come from any troubles in phones, and
you can select and use other sounds.

Ph
Sea
You
in sta
detai
press
Integ
phon(1 cha
Press
T
W
hone B
arch
can search
andby mode
ls, select yo
sing Menu (L
grated Search
e number taracter or m
s afte
Take note th
The company
Wireless pho
Book
for phone n
e. If you wan
ur desired n
Left Selection
h: Select Me
o search usimore). Total D
r selecting Ye
hat if you se
y provides 0
ones.
numbers jus
nt to call at
numbers by
n Key
enu (Left Se
ing Deletion: Sele
es/No using
lect Delete a
0000 as the d
22
st by pressi
t the phone
pressing
L).
election Key
after enteriect Menu an
.
all, all phone
default user
ng Search (
number sel
. You ca
L) an
ng some ofnd 2. (Delete
numbers sto
password w
Right Select
ected, press
an select se
d 1. (All) in
name/phone all), and the
ored will be
hen custome
4
tion Key
s . T
earch metho
turn. Go t
ne number/een enter pas
removed.
ers purchase
4
R)
To see
ods by
to the
e‐mail sword.
e

Add A ma
Selec
Y
or mo
You c
• A m
enter
• Pre
A ma
press
• You
ding Pho
aximum of 5
ction Key
You can sele
ore, a repres
can save pho
: Enter name
maximum of
red.
: Designat
: Enter pho
ss phone nu
: Mobile
aximum of 5
sing Short.
: Enter e‐ma
: Enter mess
: Designate
: Enter mem
u can enter a
one Boo
00 phone n
)Con
ct the types
sentative num
one numbers
es
f 8 character
te groups.
one numbers
mber types t
: Home
phone num
ail informatio
senger inform
bell sounds.
os.
a maximum o
k
umbers can
tacts2 .N
of phone nu
mber should
in the phon
rs a maximu
s
to classify.
e : Offi
mbers can be
on
mation
of 80 charact
23
be stored in
New Contact
umbers for e
be designat
e book by pr
um of 16 cha
ice : O
e entered. Yo
ters for the E
n the phone
ach, and if th
ted. Save Pho
ressing Save.
aracters for
Other phones
ou can desig
English Alpha
e book. Ente
he numbers
one Numbers
.
the English
s
gnate Speed
abet.
er the Menu
to be stored
s.
Alphabet ca
‐Dial numbe
(Left
d are 2
an be
ers by

24
Saving New Number
You can store phone numbers in the Contacts by pressing Save (Right Selection Key R) after entering them in standby mode.
FF
Speed Dial This is a function that enters the most frequently used ones of those phone numbers stored in
Contacts in Speed dials, and easily get them later when users want to call at those phone
numbers (numbers from 1 to 99 are provided).
You may set it after selecting your desired speed dial using .
If speed dial have been designated, you can remove them by pressing Menu (Left Selection Key
L→ Clear, or change them using .

Gro
You c
Name
You c
• Gro
• Me
Y
both
Cal You c
turn.
oup setti
can add or ed
e: Enter nam
can enter a m
oup Ringers:
ssage Ringer
ou can set ri
group bell a
l History
can check th
You can eas
ings
dit groups to
mes of groups
maximum of
Set Ringers b
rs: Set messa
inging bell an
nd personal
y
he latest call
sily get Call h
o store phone
s.
24 character
by group.
age alarms by
nd message
bell, the bel
s. Select Me
istory by pre
25
e numbers. P
rs for the Eng
y group.
bell by grou
l will be ring
enu (Press
essing
Press
glish Alphabe
ps. However
ing the perso
) → Con
in standby
→ 4. Group
et.
r, if the phon
onal bell.
ntacts → 5 .
mode.
settings in t
ne numbers s
Call history
urn.
set to
in

26
: Display outgoing calls
: Display incoming calls
: Display missed calls
: Display memos during calls
: Display refused calls
: Display call forwarding numbers
For more details, select in relevant Call history. You can send messages, set incoming call interception, and delete all phone numbers in the list
by pressing Menu.
Web Phone Book With ICW‐1000G’s PC Sync, You can organize Phone book in PC as well as ICW‐1000G.
Press on navigation press “2. Preference” or moving blue bar with navigation to “2.
Preference” press “6. Lock PC Sync” or moving blue bar with navigation to “6. Lock PC
Sync” Enable Enter Password (initial password is 000000: PC Sync Login password)
Confirm Password

27
You can see the Web GUI phone book
Type your Phone IP address on the internet browser with 8080 port (for instance, if your
phone’s IP address is 192.168.0.100, type IP address on web browser like
http://192.168.0.100:8080)
If you want to know your phone IP address, please select the Menu Settings 6. My
phone info Network Info
Make sure that the PC and Phone must be on the same subnet. Otherwise, it will not be
connected. To log‐in, you should enter password on the web.
Enter Password and click on Login button
In order to bring file, click “Receiving” button and select CSV file in your PC.
The form of CSV file should be included these titles as below:
N
Key
Ca You
→ 3
1.
2.
3.
You
Name
Number Nu
ll Time
can check c
3. Call durati
All calls: Dis
Dialed calls
SMS sent: D
Call time do
can
and in t
Group
umber Type
If the Wi‐Fi
all time and
on.
splay total ca
s: Display cal
Display the n
oes not corre
n use this fun
urn in stand
Number
phone is pow
the number
all time of ca
l time of call
number of m
espond to ac
nction by pre
by mode.
28
Number1
Email1
wer off durin
r of message
alls received
s transmitte
essages sent
ctual charges
essing Menu
Number
Messenge
ng the file tra
s sent. Selec
and transmit
d.
t.
s.
button and
2 Numbe
er Conten
ansfer, data c
t “1. Status”
tted.
selecting Me
er3
Num
nts
could be lost
” at Phone S
essage or pre
mber4
t.
ettings
essing

29
5
Message
Writing Text Message
Press on navigation, short cut for Message Menu1 → Write Msg in turn.
You can get the latest phone numbers by entering phone number yourself or pressing Menu.
Otherwise, you can enter phone numbers, pressing Search and finding the numbers stored in
Contacts.
To enter various expressions, you can select 1. Symbol, ^.^, or My phrase, pressing Menu.
You can select whether or not to store after entering expressions.
You can send messages to a maximum of 10 persons at a time, but the charges will
be imposed in proportion to the number of added phone numbers.

30
Inbox
If new messages have arrived, Wireless phones let you know their arrival on new message
notification screen, and you can check those messages, pressing . You can store a maximum of 100 messages received. If the received messages are over 100 in number, they
are deleted one by one starting with the oldest ones.
Press → 2. Inbox in turn.
Press button after selecting your desired messages using .
When you get the voice message, you can see pictures as below.
Outbox
Messages sent can be stored up to 100 ones, and only successfully transmitted ones are
stored.
Press → 3. Outbox in turn. Press button after selecting your desired messages
using . Draft
This is a function that messages in creation are automatically stored temporarily if calls arrive
while entering messages, or if you press Finish button. Messages in creation are stored up to 5
ones.
Press → 4. Draft in turn.
Select your desired messages using .
If you want to edit messages in creation, press button, modify expressions, and
send messages, pressing button again, after selecting whether or not to store.

31
Stored Message Box
This is a function that separately preserves the messages received.
A maximum of 100 messages can be stored, and if the messages in store reach 100 in number,
you should delete the existing messages to store new ones.
Press → 5. Stored Msg. box in turn. Spam Message
This is a function that intercepts unwanted messages. Press on navigation, short cut for
Press → 6. Spam Msg. in turn. Select your desired item using .
Spam Message Box
It gives you the messages classified as spam. It can store a maximum of 10 messages. If the
messages received are over 10, they are automatically deleted one by one starting with the
oldest.
Spam Number Those messages coming from designated phone numbers are classified as spam. A maximum
of 10 messages can be stored.
Spam Strings Those messages containing designated character strings are classified as spam. You can enter a
maximum of 32 ones for the English Alphabet.

32
Spam Setting You can set or cancel spam interception using this function.
Message Settings
. Press on navigation, short cut for Message Menu7 → Settings in turn Select your
desired item using .
My Phrase
You can enter your own expressions. A maximum of 10 expressions can be stored. Display Type
This is a function that sets message reception indication. It displays only the reception of
messages. You can set the details of received messages to be shown on the screen in a right
way using this function. Alert type
You can set the interval of message reception notifications, and select one of Clear, Once, and
Every 2 minutes using .
Message Alerts
You can set message reception sound, and select bell types using .
Save Outbox
You can set the storage of transmitted messages. If you select Yes/No, the transmitted messages
will automatically/will not be stored in the out box.
Reset Msg Box
You can initialize message box. Enter password, select Message Box, using , and press button.

33
Facility 6
Alarm/Wake‐up Call
Press key on navigation, short cut for Facility menu → 1. Alarm/Wakeup Call in turn.
Select Add for setting Alarm/Wakeup Call.
: Display the current time. : Set alarm/wake‐up calls. You can select one of Set Time, Every 10 min, Every 20 min,
Every 30 min, Every 1 hour, and Clear using .
: Display set alarm/wake‐up call time. If you select Set Time, users can enter their
desired time themselves. Select hour/minute using , and enter time using figure
buttons. You can select Morning ( ) and Afternoon ( ).
: Set alarm/wake‐up call setting period. You can select one of Once, Every day, Mon‐Fri,
and Mon‐Sat using .
: Set alarm/wake‐up call Ringers.
: Set the number of alarm/wake‐up call rings. You can select one of No repeat, 1
time, 3 times, 5 times, and 10 times using .
: Set alarm/wake‐up call ring interval with the number of rings. You can select one of
every 1 min, Every 3 min, Every 5 min, Every 10 min, and Every 15 min using.

the Ko
A
Dis
Menu
If you
bell r
the sc
Press
stops
If the
selectrings
: Enter info
orean Alphab
A maximum
play of S
Display the c
Display canc
u includes Ad
u set alarm/
rings, and th
creen.
s or
s automatica
e number o
t Cancel or again.
ormation on
bet, and a ma
of 10 alarm/
Selected
current setti
cels status.
dd, Delete, a
/wake‐up ca
he expression
and th
lly.
of alarm/wak
Postpone Al
n alarm/wake
aximum of 40
/wake‐up cal
d Menu S
ng status.
and Delete al
lls, appe
n, message a
e bell sound
ke‐up call r
arm using
34
e‐up calls. It
0 characters
lls can be set
Screen
ll of Alarm/W
ars on stand
and current
d will stop. O
ings was se
. If th
t allows a ma
for the Engl
t.
Wakeup Calls
dby screen.
time of Ala
Otherwise, i
et, you can
he newly sel
aximum of 2
ish Alphabet
.
If the set ti
rm/wake‐up
f 1 minute
press
ected time c
20 character
t.
ime comes,
p Calls appea
passes, the
or
comes, alarm
rs for
alarm
ars on
alarm
, and
m bell

35
Schedule
You can select your desired date to see holiday/day and lunar date. It provides a solar calendar
between January 1970 and December 2020.
Press key on navigation, short cut for Facility menu → 2. Schedule.
If you select Today, the calendar will lead you to today’s date.
Calculator
You can do simple figures using this function.
Press key on navigation, short cut for Facility menu → 3. Calculator.
Press button after entering figures, arithmetic signs, and figures.
• You can enter figures up to 15 digits. • Four fundamental rules of arithmetic can be applied in a consecutive way up to 10 times.
• Press button as R , and you can enter figures from the start.
• Decimal points are represented by (a maximum of 5 digits after decimal point can
be entered.)
• For negative numbers, use .

36
World Time
You can read date and time around the world using this function.
Press key on navigation, short cut for Facility menu → 4. World Time.
You can set a country and a city using or List, and Set/Clear DST with Menu. If you set DST, is displayed on the cities, and set at 1 hour faster than standard time.

37
Screen & Sound 7
Banner
Select the expressions to be displayed on standby screen. You can set users’ own expressions or
Wireless phone number to be displayed, or cancel them.
Press key for Phone Settings → 2. Preference → 1. Banner
• Set: You can select Number, Clear, or Input text. • Content: Enter expressions to be displayed. • Align: You can set the location of expressions to left, center, or right. • Font color: You can set the color of expressions to black, red, orange, yellow, green, blue,
indigo, or purple.
• Background color: You can set the background color of expressions to none, black, white,
red, orange, yellow, green, blue, indigo, or purple.
You can select View to see the current setting in advance, and change the location of expressions
using .
Set lighting
You can set the lighting of screen.
Press key for Phone Settings → 2. Preference → 2. Set Lighting

38
• LCD backlight LCD lighting is on for the time set, and then goes out. You can select one of 5 seconds, 10
seconds, 20 seconds, 30 seconds, 1 minute, and 3 minutes, and Always.
• LCD brightness
You can set LCD screen brightness to 40 %, 60 %, 80 %, or 100 %, and it has been basically set to
80 %.
• Button lighting
Button lighting is on for the time set, and then goes out. You can select one of 5 seconds, 10
seconds, and 20 seconds, and it has been basically set to 5 seconds.
For power saving, the screen turns off automatically if there are no outside inputs. To turn it
on again, press a random key.
Ringtone/Vibrate
You can set notification methods (bell sound or mute) for incoming calls.
Press key for Phone Settings → 4. Sounds → 1. Ringtone/Vibrate
1. Ringers: Produce Ringers.
2. Vibration: Change to Vibration mode from Ring mode 3. Mute: Reception screen is displayed without Ringers or Vibration.

39
Ringers
This is a function that sets bell sound types and volume. Press key → 4. Sound
→ 2. Ringers
• Types: Press and Select ringer type.
• Level: Press and adjust volume.
Sound Effects
You can set various Sound effects using this function.
Press key for Phone Settings → 4. Sound → 3. Sound effects
Key tone sound
Set Sound effects that are
produced when users press
buttons
Press
or Type to select Key tone sound
Key tone volume
Set Key tone volume. Press or Level to set Key tone volume

40
System Alerts This is a function that sets or cancels battery warning sound, alarm sound, and call area change
alarm sounds
Press key for Phone Settings → 4. Sound → 4. System alerts
Low battery sound This is a function that produces warning sounds when battery life is exhausted.
Press or Type to set/clear sounds
Low battery volume
Set battery warning sound volume. Press or Level to set battery
warning sound volume
Warning sound This is a function of notifying that systems were set or operated. Press
or
Warning volume Set alarm sound volume. Press or Level to set alarm sound volume
Service area sound This is a function of notifying that wireless LAN service areas have changed.
Press or Type to set/clear sounds
Volume of Call
Area Change Alarm
Set the volume of call area change alarm sounds. Press or Level to
set the volume of call area change alarm sounds.
Power off Sound
Set Sound effects that are
produced when turning
off the
Press
or Type to select Key tone sound
Power off volume
Set power‐off sound volume Press or Level to set Key tone volume

41
Volumes
You can set the volume of sounds heard during calls, and control the volume of receivers
using this function. Press key → 4. Sound → 5. Volumes. Or volume can be
controlled by side bar key. Below references are volume is controlled at Phone Settings.
Press or Level to set volumes.

42
8
Phone Setting
Language You can set Language
Press key for Phone Settings → 2. Preference → 3. Language
Multi‐language Support: There are seven (7) languages you can choose to set: English, French,
Italian, German, Dutch, Spanish, and Portuguese.
Other Functions
Lock PC Sync
If you set to Main Lock, all information of Lock PC Sync is locked. Main Cancel is available
only in Menu.
In order to use PC Sync, change this menu from “Disable” to “Enable”.

43
Lock phone
If you set to Main Lock, all information of Wireless phone is locked. Main Cancel is available
only in Menu.
Emergency Numbers
You can register emergency phone numbers at which you can call during main lock.
The upper pictures of below are registration of emergency number as Press
key for Phone Settings → 2. Preference→ Input emergency. The lower pictures of
below are the method of using emergency call on standby screen.
If you select Unlock, password field appears. A correct entry of your password gives you
temporary cancel mode. If the screen turns off, or you turn off and on the power, the phone
enters main lock mode again.

If you
I
Fea
Press
Call If you
want
T
u select SOS,
If you press #
ature
s key f
Block M
u select Call
to intercept
The intercep
you can get
# button on
for Phone Se
ode
block mode
t. You can en
ted phone n
phone num
standby scre
ettings → 3. F
e, password
nter a maxim
umbers are
44
bers at whic
een, the pho
Feature
entry field
mum of 3 pho
shown in Ca
h you can ca
ne enters ma
appears. En
one numbers
ll history.
all on emerge
ain lock mod
ter phone n
.
ency.
de.
numbers that you

45
Call Forwarding Wireless phones provide a function of forwarding calls from the phone numbers hoped to
be connected in users’ absence or during calls.
• No answer: Incoming calls are forwarded to the preset number when there has been no
answer during your set time.
• Busy: Incoming calls are forwarded to the preset number when you are on another phone. • Disable: All incoming calls are forwarded to the preset number.
Since this is Wireless phone’ internal function, the use of this function requires that its
power is on.
Do Not Disturb
Removal of function as ringing by calling, alarm, messaging during set time

46
Time You can set the date and time automatically and manually.
Press key for Phone Settings → 5. Time
Start timer server and if you want to set current time manually select time server Stop.
To set Time server, select 2. Time server and input the NTP Server IP address.
To define your time zone select 3. Time Zone and select your location of GMT. Finally
the phone will be rebooted.

47
To change the Time format, select 4. Time format then you can change type of date and
time.
To define the Daylight Saving Time, select 5. DST and choose Disable or Enable. After set
Start time, the End time should be settled by time which is applied DST time. After set DST
time will be displayed on the screen.

48
WLAN Search
Search wireless LAN services around Wireless phones.
Press key for Phone Settings → 6. WLAN Search → 2. Set Lighting and in standby mode.
Have no encryption set in Wireless network
Have encryption set in Wireless network
Verify and add WLAN Profile.
Press key for Phone Settings → 1. Status → 2. WLAN Profile
For adding or deleting the profile, please press pressing Menu (Left Selection Key L).

1
2
3
Con
It is
disap
reboo
Press the
Access Po
Select a▲▼on na
Enter secu
access po
nnect to
only for th
ppeared if yo
oting the pho
AP search ke
oints in Stand
an access avigation and
urity and au
int. Please re
new Te
he tempora
ou select ano
one.
ey to se
dby mode
point usid press
thentication
efer to Secur
emporary
rily connect
other tempor
49
earch availa
ing the dkey
n type of Wi
rity and TCP/
y profile
ted profile.
rary profile. T
ble Wireless
direction k
reless
/IP
e
The existin
The profile w
ey
ng temporar
will not be re
ry profile w
emained if yo
will be
ou are

50
Reset to Default
Press key for Phone Settings → 7. Reset to default → Enter Password → For Resetting, press “Yes”
If default is selected, password entry field appears.
Be careful since all user information including phone numbers and call information can be deleted.
Deleted information is NOT possible to be restoration.

51
My Phone Information You can see the setting information of Wireless phones.
Press key for Phone Settings → 1. Status → 1. My phone info..
You can enjoy various information using .
•Phone info.
You can get phone numbers, software versions, and product MAC address.
• Network info.
You can get information such as Wireless phone’s IP address, subnet mask, basic gateways, and DNS address.
• WLAN Info.
You can get information on AP connected to Wireless phones, or wire/wireless sharers.

52
41
n stable VoIP solution technology. Incom which has the
advantage of optimal customization for various customers’
demands is to enjoy the better convenience of c
Incom Co., Ltd offers Wi‐ Fi phone and application based on
stable VoIP solution technology. Incom which has the
advantage of optimal customization for various customers’
demands is to enjoy the better convenience of
communication technology in both enterprise and home by
the field‐proven quality with a history for 14 years. We will
be active partner of yours to enjoy the most advanced
wireless communication technology and to create the higher
productivity and value. For more information on Incom and
its Wi‐Fi solutions, visit www.incominc.com
Address: #405, 4th floor, Ace Techno Tower Ⅲ, 197‐48 Guro3‐Dong, Guro‐Ku, Seoul, Republic of Korea
Tel: +82 – 2 – 839 – 7773 (General) / +82 – 70 – 4009 – 4215 (Overseas Sales & Marketing Team)