ict tools in school – a practical guide · ict tools in school – a practical guide ict tools...
TRANSCRIPT
ICT Tools in School – a Practical Guide
ICT Tools for Inquiry Based Science Education -
Practical Ideas for Tools and Implementation
Lorenz Kampschulte and Karsten Eilert
May 2016
IPN – Leibniz Institute for Science and Mathematics Education at the University of Kiel
www.ipn.uni-kiel.de – Olshausenstr. 62, 24118 Kiel, Germany
Contact: [email protected]
IRRESISTIBLE is a project on teacher training, combining formal and informal learning focused on Responsible Research and Innovation. This project has received funding from the European Union’s Seventh Framework Programme for research, technological development and demonstration under grant agreement no 612367.

ICT Tools in School – a Practical Guide
2
Content
1. Introduction ...................................................................................................................................................... 3
2. ICT at School ..................................................................................................................................................... 5
Smartphone Market Share and Penetration......................................................................................................... 5
Challenges When Using ICT at School ................................................................................................................... 9
Factors Determining a Rewarding Use of an ICT Tool in Teaching ..................................................................... 11
3. App Catalogue ................................................................................................................................................ 13
4. Example of an E-Learning Platform ................................................................................................................ 40
Short Introduction to the E-Learning Platform Mahara ..................................................................................... 40
HowTo’s .............................................................................................................................................................. 41
5. Examples of Using ICT in a Learning Unit ....................................................................................................... 50
Introduction ........................................................................................................................................................ 50
Unit on Plastics: Introduction to Plastics using Mahara ..................................................................................... 51
Unit on Solar Energy: Defining the Best Position for a Solar Cell using different ICT Tools ................................ 53
Unit on CO2 Footprints: Calculating and Comparing CO2 Footprints for Food and Travel .................................. 58
6. Collection of Best Practice Examples .............................................................................................................. 61
Edmodo (1): Online Platform for Teacher and Student Collaboration................................................................ 62
Skype: Teleconferences with Experts Far Away from the School’s Region ......................................................... 65
Popplet: A Tool for Building Concept Maps ........................................................................................................ 67
Apple iMovie: Make Videos about Climate Change to Show at a Museum ....................................................... 69
Audio and Video Tools for Collecting Data and Knowledge to be Presented in the Exhibition .......................... 70
Scratch: an Online Application Used to Develop a Digital Game ....................................................................... 72
Glogster and Scratch: Designing Interactive Digital Posters .............................................................................. 74
Conclusion ........................................................................................................................................................... 76
Thanks
Sincere thanks are given to all partners within the IRRESISTIBLE project who contributed to this ICT guide. Without
the extensive input and fruitful discussions especially on the implementation of ICT tools, writing a guidebook like
this would not have been possible. Special thanks also to Maria Weisermann and Stefanie Herzog for their
valuable support in proofreading this document.
www.irresistible-project.eu
3
1. Introduction
ICT tools like apps, programs and web2.0 applications are part of our modern society. Schools all over Europe are
adopting this essential trend, but in many countries this adoption is happening at a rather slow pace. This has
many reasons, from missing infrastructure to security concerns to teachers not being familiar enough with using
ICT in regular classes. To encourage teachers to think about an increased use of ICT tools in teaching, and to
inspire them on where and how to use these tools is the main idea of this ICT Guide. We need well-educated
students with profound ICT skills – in terms of operation as well as media literacy – to become active members of
our knowledge society which is built on the foundation of ICT in most areas these days.
The aim of this guide is to practically support teachers in using ICT tools in class. A special focus is laid on
integrating various tools in inquiry-based science education (IBSE): on the one hand, this type of teaching allows
for a multitude of different opportunities for integrating ICT, on the other hand, it is one of the foci of the EU
project IRRESISTIBLE in which this guide was developed.
This guide is an updated and considerably improved version of the Web2.0 / App Guide published in an early
phase of the IRRESISTIBLE project (March 2014). While the first guide mainly focused on listing selected tools that
could be integrated in IBSE teaching, this guide goes a step further by analyzing the application of tools in the
IRRESISTIBLE teaching modules and offering many examples of practical integration of ICT tools in teaching.
The guide itself is divided in three main sections:
The first section (chapter 2) offers an overview on the spread of mobile devices, including numbers on the
smartphone penetration in the relevant age group (students), the distribution of different operating systems, and
the apps available for the different systems. Further the section includes a discussion of the challenges when
using ICT in the classroom, mainly based on the experiences with implementation of ICT-supported teaching
modules within the IRRESISTIBLE project. As a result of the experience gained in analyzing examples and
discussions in two workshops, a list of factors determining a decent use of an ICT tool in teaching was extracted.
This list was then used as a base for the revision of section two and the development of section three.
Section two (chapters 3 and 4) focuses on the ICT tools itself: Although in many schools traditional personal
computers are the tool of choice when working with ICT in class, there’s an increasing number of so-called ‘tablet-
classes’, and with more and more students carrying a smartphone anyway, the opportunity to work with these
devices in class gains momentum.
In total, there are almost four million apps available, plus an uncounted number of programs for traditional
computers - so the problem is not that the app / program you are searching for is not out there, the challenge is
to find it. Everybody using a smartphone will know that apps have very different qualities and prices. Our goal for
this guide was to find useful apps and programs for different tasks in IBSE, e.g. task like organizing a project,
measuring or simulating data, collaborative work, or presenting information. A full list of tasks and tools can be
found on page 14.
For each task, helpful tools were searched that satisfied a set of criteria we had defined beforehand:
- The tool should work
- The tool should be available on both major operating systems (or at least a similar app should be
available)1, so a mixed set of handhelds could be used in the classroom. Another option would be a web-
1 Some apps with the same name, even from the same author, have greatly varying functionality in the version for different operating systems. Teachers should consider this when setting up the tasks for their students.
ICT Tools in School – a Practical Guide
4
based tool, being accessible with any device’s web browser, so either on computers in the classroom or
computer room, on a classroom set of tablets or on students’ own smartphones.
- The tool should be free (although apps usually are not really expensive, we feared that having to pay for
an app to be used on students’ smartphones would discourage some teachers, students or even parents)
- The tool should not be cluttered with annoying or even inappropriate advertisements. Although we
understand that programmers need some revenue to live on, it should not interfere with using the app.
Thus there are several apps showing ads in our list, but they do so in a decent way.
E-learning platforms are gaining a huge momentum right now all over Europe. Taking this into account as well as
their ideal usability when teaching IBSE, we did not only list several examples in the App Catalogue, but also
included a step-by-step instruction on how to use them (using the example of the open source platform Mahara).
The third section of this ICT Guide (chapters 5 and 6) is dedicated to presenting examples of the integration of ICT
tools in teaching. Chapter 5 lists examples of teaching units which contain one or several ICT tools that students
need to use in order to fulfill different learning tasks. Chapter 6 is a collection of best practice examples drawn
from the IRRESISTIBLE project – ICT tools that worked exceptionally well when used in a given IBSE setting.
Since the pace of the ICT market is incredibly fast, especially in the area of smartphone apps, this guide is only to
be seen as a snap-shot from mid-2016. Some tools will stay on the market for quite some time while others might
disappear in a few months. And new, better ones will show up. But in general, as this guide points out that there
is a certain tool for a particular purpose, it might then be easier in the future to find a suitable replacement.
www.irresistible-project.eu
5
2. ICT at School
Smartphone Market Share and Penetration
Due to the growing number of ‘tablet classes’ at schools and with an increasing number of students owning a
smartphone even in lower grades, the relevance of smartphone and tablet apps to be used in teaching increases.
To give a brief overview of this trend, the following section lists some facts and figures on mobile devices and the
use and distribution in the relevant age group.
Smartphone sales
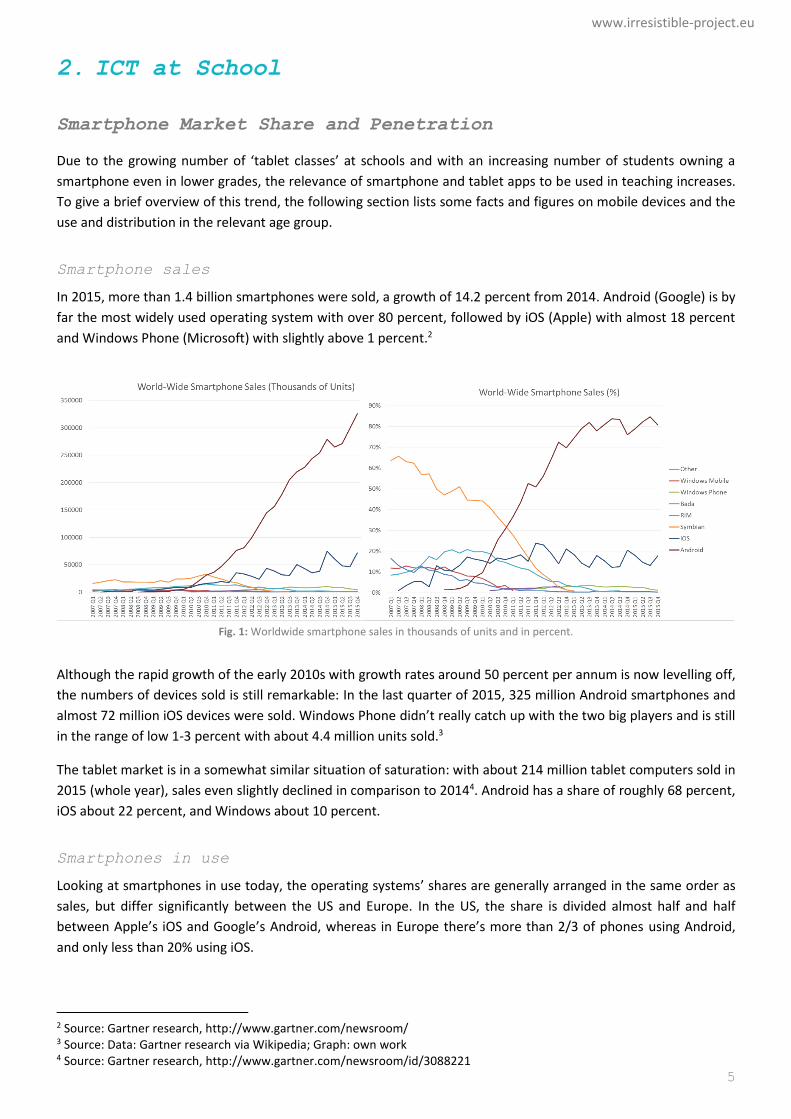
In 2015, more than 1.4 billion smartphones were sold, a growth of 14.2 percent from 2014. Android (Google) is by
far the most widely used operating system with over 80 percent, followed by iOS (Apple) with almost 18 percent
and Windows Phone (Microsoft) with slightly above 1 percent.2
Fig. 1: Worldwide smartphone sales in thousands of units and in percent.
Although the rapid growth of the early 2010s with growth rates around 50 percent per annum is now levelling off,
the numbers of devices sold is still remarkable: In the last quarter of 2015, 325 million Android smartphones and
almost 72 million iOS devices were sold. Windows Phone didn’t really catch up with the two big players and is still
in the range of low 1-3 percent with about 4.4 million units sold.3
The tablet market is in a somewhat similar situation of saturation: with about 214 million tablet computers sold in
2015 (whole year), sales even slightly declined in comparison to 20144. Android has a share of roughly 68 percent,
iOS about 22 percent, and Windows about 10 percent.
Smartphones in use
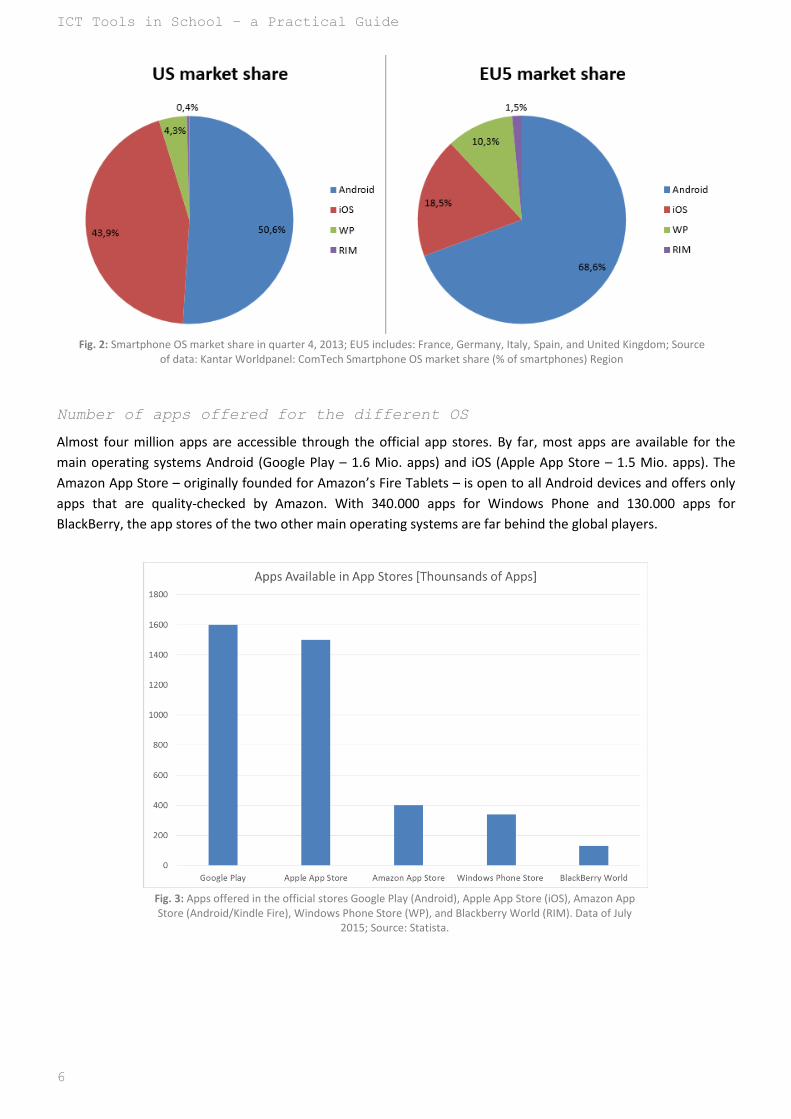
Looking at smartphones in use today, the operating systems’ shares are generally arranged in the same order as
sales, but differ significantly between the US and Europe. In the US, the share is divided almost half and half
between Apple’s iOS and Google’s Android, whereas in Europe there’s more than 2/3 of phones using Android,
and only less than 20% using iOS.
2 Source: Gartner research, http://www.gartner.com/newsroom/ 3 Source: Data: Gartner research via Wikipedia; Graph: own work 4 Source: Gartner research, http://www.gartner.com/newsroom/id/3088221
ICT Tools in School – a Practical Guide
6
Fig. 2: Smartphone OS market share in quarter 4, 2013; EU5 includes: France, Germany, Italy, Spain, and United Kingdom; Source
of data: Kantar Worldpanel: ComTech Smartphone OS market share (% of smartphones) Region
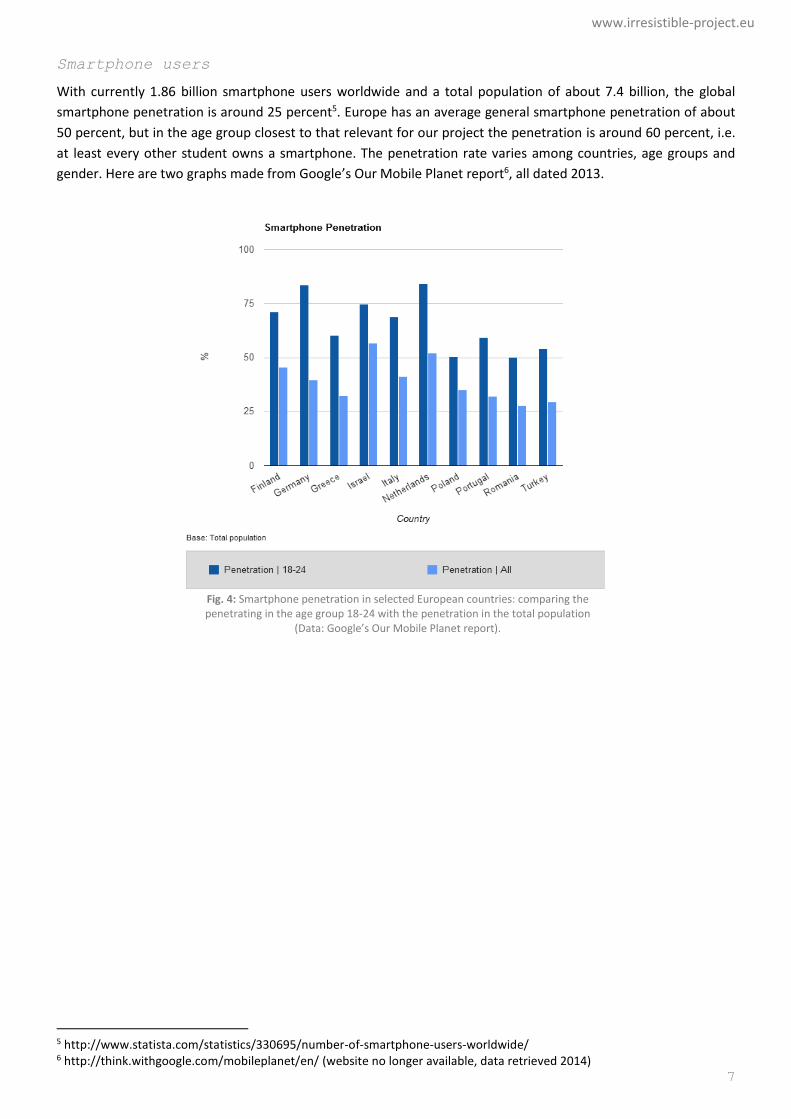
Number of apps offered for the different OS
Almost four million apps are accessible through the official app stores. By far, most apps are available for the
main operating systems Android (Google Play – 1.6 Mio. apps) and iOS (Apple App Store – 1.5 Mio. apps). The
Amazon App Store – originally founded for Amazon’s Fire Tablets – is open to all Android devices and offers only
apps that are quality-checked by Amazon. With 340.000 apps for Windows Phone and 130.000 apps for
BlackBerry, the app stores of the two other main operating systems are far behind the global players.
Fig. 3: Apps offered in the official stores Google Play (Android), Apple App Store (iOS), Amazon App Store (Android/Kindle Fire), Windows Phone Store (WP), and Blackberry World (RIM). Data of July
2015; Source: Statista.
www.irresistible-project.eu
7
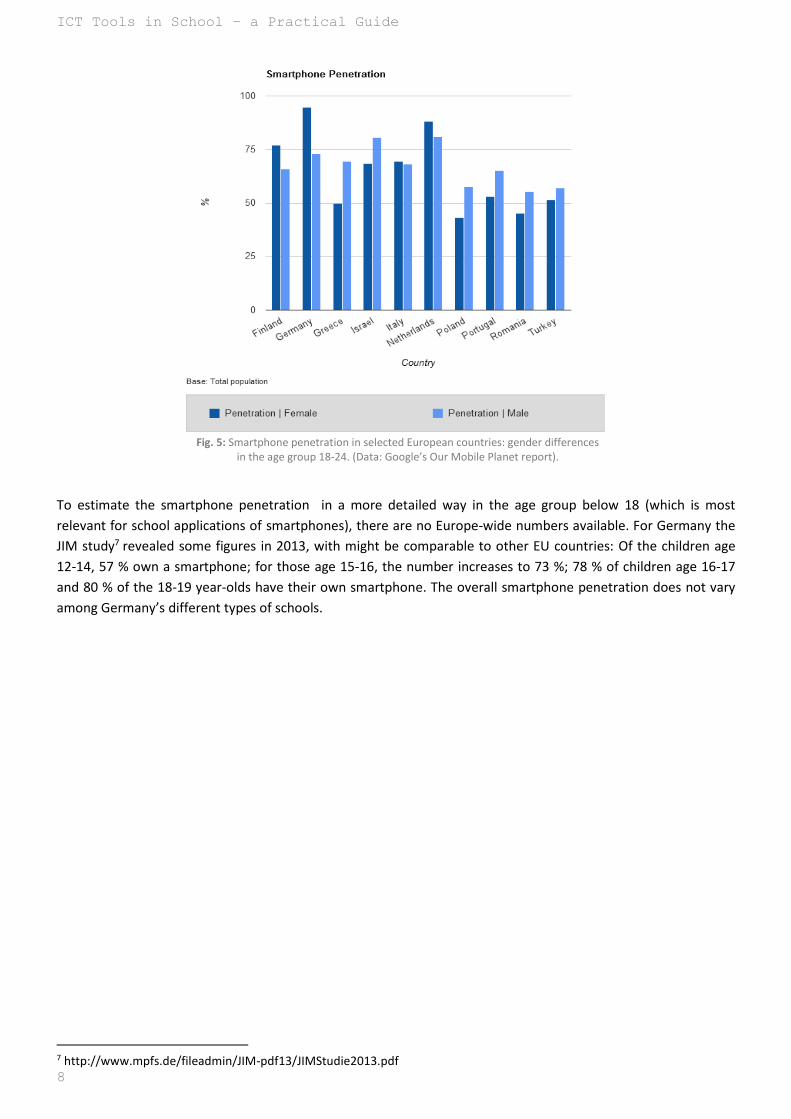
Smartphone users
With currently 1.86 billion smartphone users worldwide and a total population of about 7.4 billion, the global
smartphone penetration is around 25 percent5. Europe has an average general smartphone penetration of about
50 percent, but in the age group closest to that relevant for our project the penetration is around 60 percent, i.e.
at least every other student owns a smartphone. The penetration rate varies among countries, age groups and
gender. Here are two graphs made from Google’s Our Mobile Planet report6, all dated 2013.
Fig. 4: Smartphone penetration in selected European countries: comparing the penetrating in the age group 18-24 with the penetration in the total population
(Data: Google’s Our Mobile Planet report).
5 http://www.statista.com/statistics/330695/number-of-smartphone-users-worldwide/ 6 http://think.withgoogle.com/mobileplanet/en/ (website no longer available, data retrieved 2014)
ICT Tools in School – a Practical Guide
8
Fig. 5: Smartphone penetration in selected European countries: gender differences
in the age group 18-24. (Data: Google’s Our Mobile Planet report).
To estimate the smartphone penetration in a more detailed way in the age group below 18 (which is most
relevant for school applications of smartphones), there are no Europe-wide numbers available. For Germany the
JIM study7 revealed some figures in 2013, with might be comparable to other EU countries: Of the children age
12-14, 57 % own a smartphone; for those age 15-16, the number increases to 73 %; 78 % of children age 16-17
and 80 % of the 18-19 year-olds have their own smartphone. The overall smartphone penetration does not vary
among Germany’s different types of schools.
7 http://www.mpfs.de/fileadmin/JIM-pdf13/JIMStudie2013.pdf
www.irresistible-project.eu
9
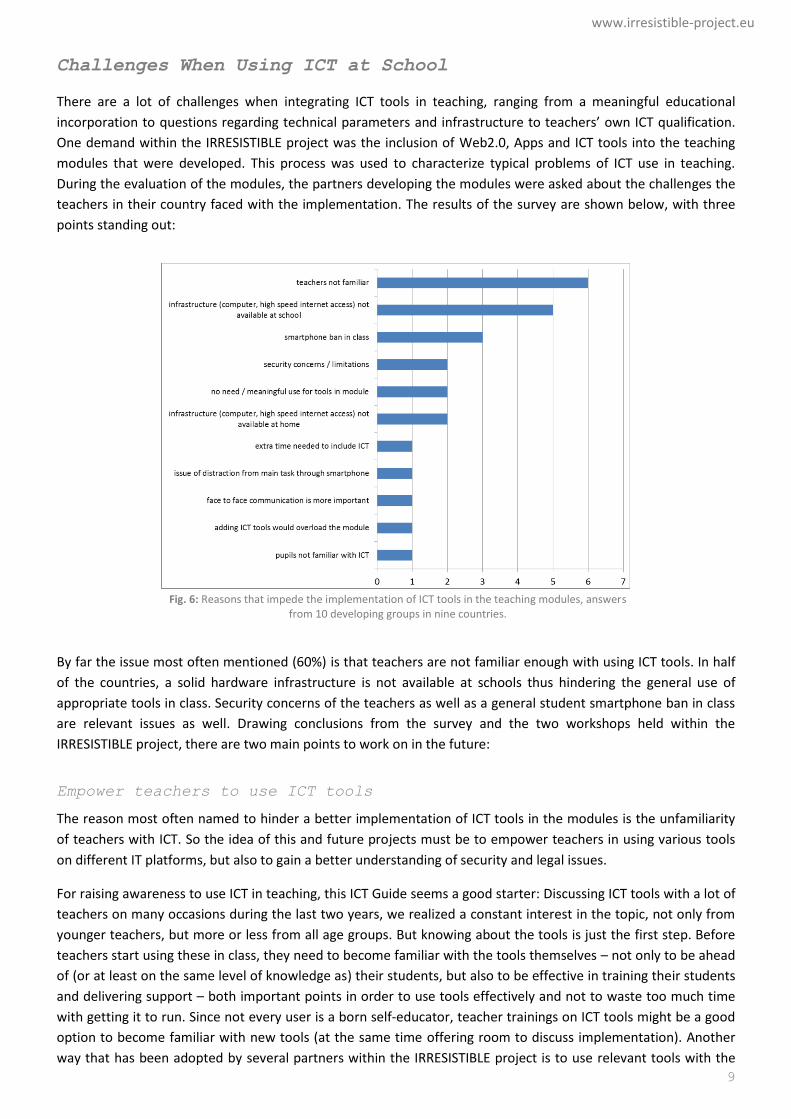
Challenges When Using ICT at School
There are a lot of challenges when integrating ICT tools in teaching, ranging from a meaningful educational
incorporation to questions regarding technical parameters and infrastructure to teachers’ own ICT qualification.
One demand within the IRRESISTIBLE project was the inclusion of Web2.0, Apps and ICT tools into the teaching
modules that were developed. This process was used to characterize typical problems of ICT use in teaching.
During the evaluation of the modules, the partners developing the modules were asked about the challenges the
teachers in their country faced with the implementation. The results of the survey are shown below, with three
points standing out:
Fig. 6: Reasons that impede the implementation of ICT tools in the teaching modules, answers
from 10 developing groups in nine countries.
By far the issue most often mentioned (60%) is that teachers are not familiar enough with using ICT tools. In half
of the countries, a solid hardware infrastructure is not available at schools thus hindering the general use of
appropriate tools in class. Security concerns of the teachers as well as a general student smartphone ban in class
are relevant issues as well. Drawing conclusions from the survey and the two workshops held within the
IRRESISTIBLE project, there are two main points to work on in the future:
Empower teachers to use ICT tools
The reason most often named to hinder a better implementation of ICT tools in the modules is the unfamiliarity
of teachers with ICT. So the idea of this and future projects must be to empower teachers in using various tools
on different IT platforms, but also to gain a better understanding of security and legal issues.
For raising awareness to use ICT in teaching, this ICT Guide seems a good starter: Discussing ICT tools with a lot of
teachers on many occasions during the last two years, we realized a constant interest in the topic, not only from
younger teachers, but more or less from all age groups. But knowing about the tools is just the first step. Before
teachers start using these in class, they need to become familiar with the tools themselves – not only to be ahead
of (or at least on the same level of knowledge as) their students, but also to be effective in training their students
and delivering support – both important points in order to use tools effectively and not to waste too much time
with getting it to run. Since not every user is a born self-educator, teacher trainings on ICT tools might be a good
option to become familiar with new tools (at the same time offering room to discuss implementation). Another
way that has been adopted by several partners within the IRRESISTIBLE project is to use relevant tools with the
ICT Tools in School – a Practical Guide
10
teachers during the development of the teaching modules, giving them the opportunity to learn by productively
using it themselves.
The next step towards using ICT in class is a meaningful implementation into teaching. Knowing about the
possibilities (and limitations) of a tool and connecting it to relevant tasks in teaching is key to creating benefits for
learning. The chapters Examples of Using ICT in a Learning Unit (page 50) and the Collection of Best Practice
Examples (page 61) included in this guide might offer additional ideas for implementation.
Another reason that prevents teachers from using ICT tools is the uncertainty about security and legal issues.
Since regulations in different countries vary greatly, it is very difficult to give general advice. Within the
IRRESISTIBLE project the range of regulations differed between countries in which using Facebook for teaching
and sharing tasks for homework is common and those countries in which all tools that store or send data outside
the own country are not allowed at school (which excludes a huge amount of tools, including all major cloud
storage providers), just to name the extreme positions.
Sure enough, the easiest way to solve these issues would be to not use ICT tools and ban smartphones from class.
But this would withhold a huge learning opportunity from students and counteract any improvement regarding
their media literacy. Providing teachers with the necessary background knowledge and giving them time in class
to address these problems seems to be a much better way. Banning smartphones is the quick solution to reduce
distraction – engaging students to make use of the technology at their hands and simultaneously training them to
use it in a decent way and prioritize tasks would be much more helpful for their future. Security concerns are a
broad field of challenges, from copyright issues to secure data storage in cloud space. Again, not using tools like
student-developed (public) websites and cloud space is the simple solution – making students adhere to copyright
regulations and finding ways to work with open content on their website or to discuss security issues when saving
data on cloud space, such as finding solutions to encrypt these data as well as working with anonymous/fake
accounts prepares students much better for their future. But this calls for teachers being highly qualified in using
ICT, staying up-to-date during their teaching life, as well as investing some extra time in their lessons to address
and discuss these challenges.
Improvement of Infrastructure
Many of the tools need a decent internet connection for working properly which seems to be problematic in
many schools. Using stationary personal computers in a computer room or in the classroom is quite common,
whereas using student smartphones with a Wireless LAN connection at school is definitely not the standard yet.
The studies mentioned above as well as various discussions on the workshops and with teachers reveal that many
schools in the participating countries have a weak IT infrastructure. For a seamless integration of ICT tools in
teaching, e.g. in form of an e-learning platform, permanent access to the tools is necessary. If teachers – as it is
common practice in many countries today – have to move with their class to a separate computer room (which
probably is not even available for all lessons) it is hard to realize a continuous, ICT accompanied project flow. This
is much easier put into practice by either using computers in the classroom, or students’ own smartphones – with
the latter giving the chance to propagate the project across the boundaries of classroom and school. Especially
the approach using students’ smartphones requires a more comprehensive IT infrastructure than is available in
many schools today.
Being aware that creating a sound infrastructure at school is a long term project, we want to mention just two
approaches realized within the IRRESISTIBLE project to temporarily get around this challenge: As intermediate
approach, it might be an option to install a temporary WLAN access point (cost < 100 EUR) in the class allowing
the use of students’ smartphones and thus working with ICT tools. Another possible approach is the use of ICT
infrastructure and support offered by a third party such as a science center or student lab, as presented in the
best practice example using Scratch (Greece 3, page 72).
www.irresistible-project.eu
11
Factors Determining a Rewarding Use of an ICT Tool in
Teaching
Several factors that determine a good integration of an ICT tool in the teaching process were revealed through an
analysis of the integration of ICT tools in the different teaching modules, through the analysis of the best practice
examples (pages 61 - 75) as well as though discussion of the topic with education experts and teachers in the
second workshop. These factors can be grouped in three larger areas: The tool itself, the integration into
teaching, and the environment that influences the use.
Tool
- Easy to use for teachers and students: the tool should be easy to install/access and have clear user interface
so the main functionality is directly approachable.
- Suitable for the purpose: the tool should match the task it is intended for in teaching.
- Free: using paid apps on student devices is not feasible (complicated payment processes, most often credit
card needed).
- Problem with different operating systems: When using smartphones most likely different operating systems
are present in class. In this App Guide, we usually name different options for both major operating systems.
If working in groups, it might be helpful to make sure each group has at least one student working with the
app the teacher is familiar with.
Integration
- Analyze points in teaching phases where ICT integration is helpful: When planning a teaching unit, find the
spots where ICT tools support the progress and where enough time is available.
- Adding extra value: if the task can be fulfilled in the same manner with standard (e.g. paper-pencil) tools,
there’s little use in complicating it with using ICT. Gathering data from different teams or collecting
information to share and work with creates extra value.
- Collaboration is pro: collaborative tools can support the group dynamic of a project and extend it over the
lessons itself.
- Experience tool in class: when introducing ICT tools, a tutorial is not enough. Testing it and starting to work
with it are key issues for ongoing use by students.
- Problems with battery life: the main purpose of students’ own smartphone is their personal communication.
Students might stop using the smartphone in class to safe battery for their afternoon chat. To avoid this,
Students should be told in advance that there will be a 20 minute smartphone session in class, so that they
could charge their phones or deliberately ration their battery time.
Environment
- Teacher ICT skills: the teacher needs to feel comfortable with using the ICT tool for a proper integration.
Before starting the teaching sequence in class, the teacher should have spent some time trying out each
tool.
- Combine science and ICT classes: the combination of the classes could strengthen the relevance and
understanding for the students (e.g. learning the basics of the tools in ICT class and their use in science
class).
- Students would prefer smart devices: students would prefer smartphones and tablets, although the
integration into a teaching unit is more demanding than for standard (e.g. PC-based) tools
- Awareness of using devices in classroom: creating awareness of using ICT tools in class might animate
colleagues to follow and thus gain a general ICT implementation at school.
ICT Tools in School – a Practical Guide
12
Taking these factors into account when planning the use of ICT tools in teaching might help to keep the focus on
the main task (teaching) and not to create too much distraction. The following section of this guide aims to
support the teacher in selecting the appropriate tools for each teaching tasks, the sections Examples of using ICT
(page 50ff) and Collection of Best Practice Examples (page 61ff) should help with the integration into the actual
teaching process.
www.irresistible-project.eu
13
3. App Catalogue
Based on the experience with ICT tools that were used in the teaching modules developed within the
IRRESISTIBLE project, the following section offers a wide selection of ICT tools fitting very different purposes. For
each selected tool some core facts are listed: The title, the operating system, price, author, a brief description of
what the tool’s key feature is, and a screenshot to give an idea what the tool looks like. Where applicable, an
alternative solution is named, sometimes with a different operating system, sometimes a different tool with a
similar functionality. When looking for further options, visit the site of the tool in the relevant app store and have
a look at the section of comparable tools that is proposed by the store.
A little hint for Android users: When searching the Google Play Store using your Android device, it’ll only show the
apps working on your device. If you search for tools in general, use a browser to get the full program.

ICT Tools in School – a Practical Guide
14
Table 1: Overview of the tools presented in the app catalogue and indication of operating systems they could be used on.
Category Program / App Android iOS Browser Program install.
page
Project Tools
Mindomo X X X - 15
Popplet - X X - 15
Groupboard X X X - 16
Trello X X X - 16
Evernote X X X X 17
Squid X (X) - - 17
Board Cam Pro - X - - 18
Image and Video Work
Lapse It X X - - 18
1 Second Everyday X X - - 19
Pics Art X X X - 19
iMovie (X) X (X) - 20
Measuring
Photo Ruler ABC (X) X - - 20
OSMTracker X (X) - - 21
iMetalBox (X) X - - 21
Accelerometer Analyzer X (X) - - 22
Oscilloscope X (X) - - 22
Signal Generator X (X) - - 23
Light meter X (X) - - 23
Changers CO2 Fit X X (X) - 24
Simulation
Scratch (X) (X) X - 24
Algodoo (X) X - X 25
Geogebra X X X - 25
Sun Surveyor lite X X - - 26
Sun Position and Sunrise X X - - 26
Veggietizer X - - - 27
Eat Low Carb - - X - 27
Mobile Office
Prezi (Viewer) X X X - 28
Google Docs, Sheets & Slides X X X X 28
CamScanner X X - - 29
Collaborative Work
Skype X X - X 29
Mind42 X (X) X - 30
Google Docs X X X X 30
e-Learning System
Mahara ePortfolio X X X 31
Edmodo X X X - 31
GoConqr X X X - 32
Knowledge
Wikipedia Mobile X X X - 32
Merck PTE X X - - 33
Formulas Free X X - - 33
Physics Formulas Free X X - - 34
Khan Academy X X X - 34
Sky Map X X - - 35
Tools
Quick Graph (X) X - - 35
Universal Converter free X X - - 36
i-nigma X X - - 36
Exhibitions
QR Code Generator (X) (X) X - 37
Glogster X X X - 37
Open Exhibits PLAYER - X X X 38
Open Exhibits SDK - X X X 38
Add-on SPARKvue - X - - 39
www.irresistible-project.eu
15
Mindomo Mind mapping
Project Tools
Operating system(s): Android, iOS Language: English Price: free; Author: Expert Software Applications Srl Alternative solutions: NeuronalMind42 (Browser, Android) / Simple Mind + (iOS)
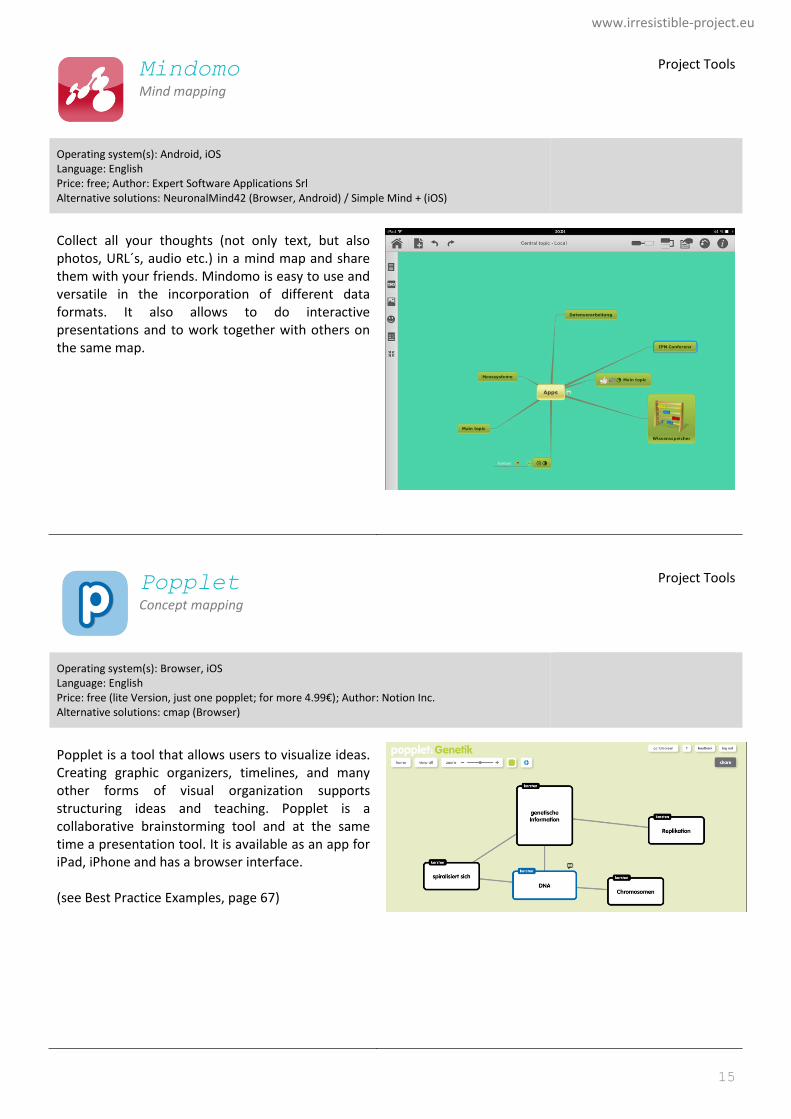
Collect all your thoughts (not only text, but also photos, URL´s, audio etc.) in a mind map and share them with your friends. Mindomo is easy to use and versatile in the incorporation of different data formats. It also allows to do interactive presentations and to work together with others on the same map.
Popplet Concept mapping
Project Tools
Operating system(s): Browser, iOS Language: English Price: free (lite Version, just one popplet; for more 4.99€); Author: Notion Inc. Alternative solutions: cmap (Browser)
Popplet is a tool that allows users to visualize ideas. Creating graphic organizers, timelines, and many other forms of visual organization supports structuring ideas and teaching. Popplet is a collaborative brainstorming tool and at the same time a presentation tool. It is available as an app for iPad, iPhone and has a browser interface. (see Best Practice Examples, page 67)
ICT Tools in School – a Practical Guide
16
Groupboard Interactive and collaborative whiteboard
Project Tools
Operating system(s): Android, iOS, Browser Language: English Price: free; Author: Yuansheng Chen Alternative solutions: Twiddla (Browser)
Groupboard is a tool for creating and sharing whiteboard content. You can create whiteboards containing sketches, text, and photos. Sharing them with other Groupboard users (up to 5) is easily done by creating an own (or guest) account. The chat-function is really helpful while collaboratively creating and discussing the content.
Trello Organize a project, keep track of progress, work on tasks collaboratively
Project Tools
Operating system(s): Android, iOS, Browser Language: English Price: free; Author: Fog Creek Software Alternative solutions: Edmodo
Trello helps you to create the organizational structure of your project. Create lists, e.g. ‘ToDo’, ‘Doing’, ‘Done’, ‘Things-to-remember’ etc. Create single tasks (called cards), add photos, checklists, mark them with different colors, schedule them etc. Structure the cards in the lists, according to project progress. Invite coworkers to participate in the board, to create their own tasks, to comment tasks and mark project progress in the tasks.
www.irresistible-project.eu
17
Evernote Remember everything: collect data, store it, and organize it.
Project Tools
Operating system(s): Android, iOS, Browser; Program install Language: English Price: free; Author: Edmodo inc. Alternative solutions: Google Keep
Evernote is one of the top 10 note-taking apps. Allows you to collect ideas and data, create lists, photos, audio recordings. Organize Data in several notebooks, tag them as needed. Full integration in the operating system makes collecting content easy, e.g. save whole websites, save pictures from the web via the share button, or directly import them from the camera and share them with friends. This app allows for collaborative work. Email notes directly from any email account into your Evernote notebook. Full synchronization with all your devices, e.g. on smartphone, tablet, computer at work, computer at home etc. Evernote is a pretty complex tool for organizing things, sometimes a little ‘overloaded’. If you look for something simple to ‘just keep some notes’ try Google Keep.
Squid Sketchbook style note app with easy export
Project Tools
Operating system(s): Android Language: English Price: free; Author: Steadfast Innovation, LLC Alternative solutions: Smart Note (iOS)
Squid is an easy to use App for sketching and creating simple collages, include photos (+ cut, rotate etc.). Create different sketchbooks with several pages. Very acute finger / pen pressure recognicion allows elegant sketching (depends also on the touchscreen of your device). Export single pages or the whole sketchbook in .pdf, .png or .jpg format.
ICT Tools in School – a Practical Guide
18
Board Cam Pro Live notes as virtual 2nd layer on a running experiment
Project Tools
Operating system(s): iOS Language: English Price: 1.99€; Author: Juan Luis Herrera Cortijo Alternative solutions: -
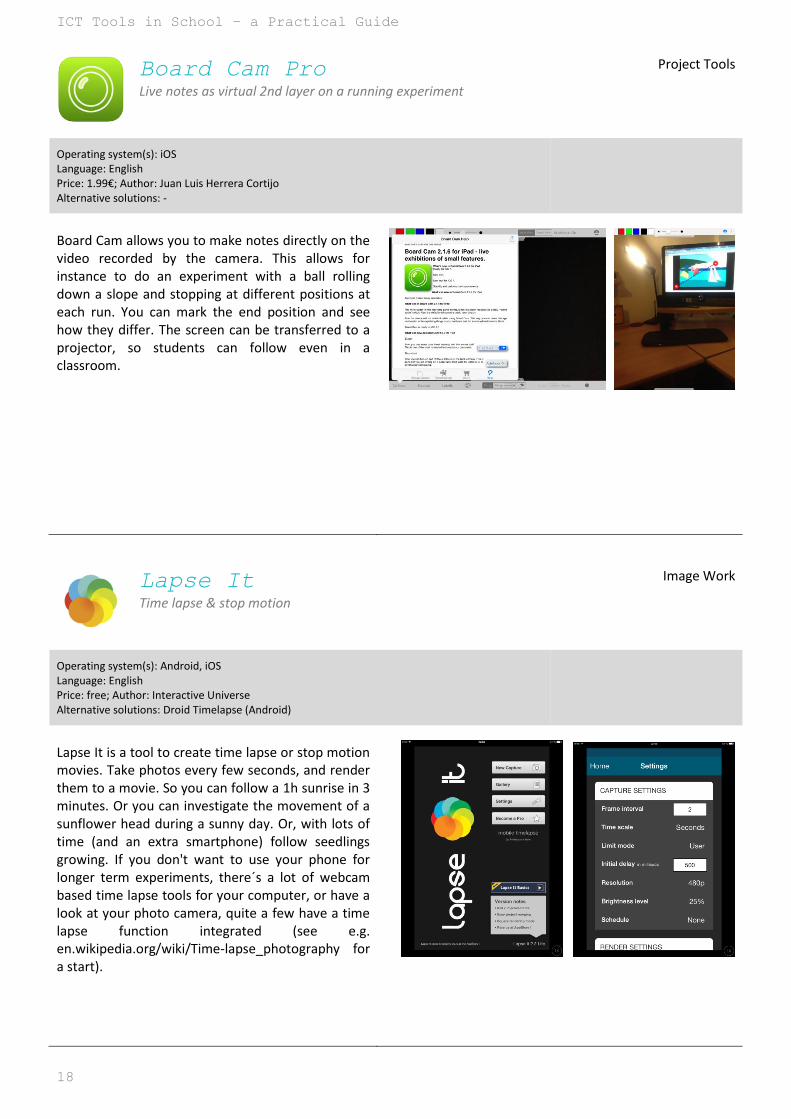
Board Cam allows you to make notes directly on the video recorded by the camera. This allows for instance to do an experiment with a ball rolling down a slope and stopping at different positions at each run. You can mark the end position and see how they differ. The screen can be transferred to a projector, so students can follow even in a classroom.
Lapse It Time lapse & stop motion
Image Work
Operating system(s): Android, iOS Language: English Price: free; Author: Interactive Universe Alternative solutions: Droid Timelapse (Android)
Lapse It is a tool to create time lapse or stop motion movies. Take photos every few seconds, and render them to a movie. So you can follow a 1h sunrise in 3 minutes. Or you can investigate the movement of a sunflower head during a sunny day. Or, with lots of time (and an extra smartphone) follow seedlings growing. If you don't want to use your phone for longer term experiments, there´s a lot of webcam based time lapse tools for your computer, or have a look at your photo camera, quite a few have a time lapse function integrated (see e.g. en.wikipedia.org/wiki/Time-lapse_photography for a start).

www.irresistible-project.eu
19
1 Second Everyday Imagine a movie that includes every day of the rest of your life
Image Work
Operating system(s): Android, iOS Language: English Price: free (for 1 Month, then 0.89€); Author: Cesar Kuriyama Alternative solutions: 1 Second Daily Cam (iOS)
Track processes over a longer period of time: Trees getting green in spring, or track the view out of your window over a full season. This App allows you to create multiple timelines in a Video that you can share and save via Google Drive.
PicsArt All in one image processing app
Image Work
Operating system(s): Android, iOS Language: various Price: free; Author: PicsArt Alternative solutions: Pixlr Express (Android/iOS)
PicsArt is one of the best photo-editing programs for smartphones and tablets, offering a large number of features. Create sketches from scratch, use a photo and rework it, include it in a collage. Share your work in various ways, inside the community or via Twitter and Facebook etc. The camera module included allows to record an interval series of photos, e.g. for tracking a chemical reaction on minute scale and comparing the different states.
ICT Tools in School – a Practical Guide
20
iMovie Intuitive tool for creating and playing movies
Video Work
Operating system(s): iOS Language: various Price: 4.99€; Author: Apple Inc. Alternative solutions: VideoShow Free (Android, free)
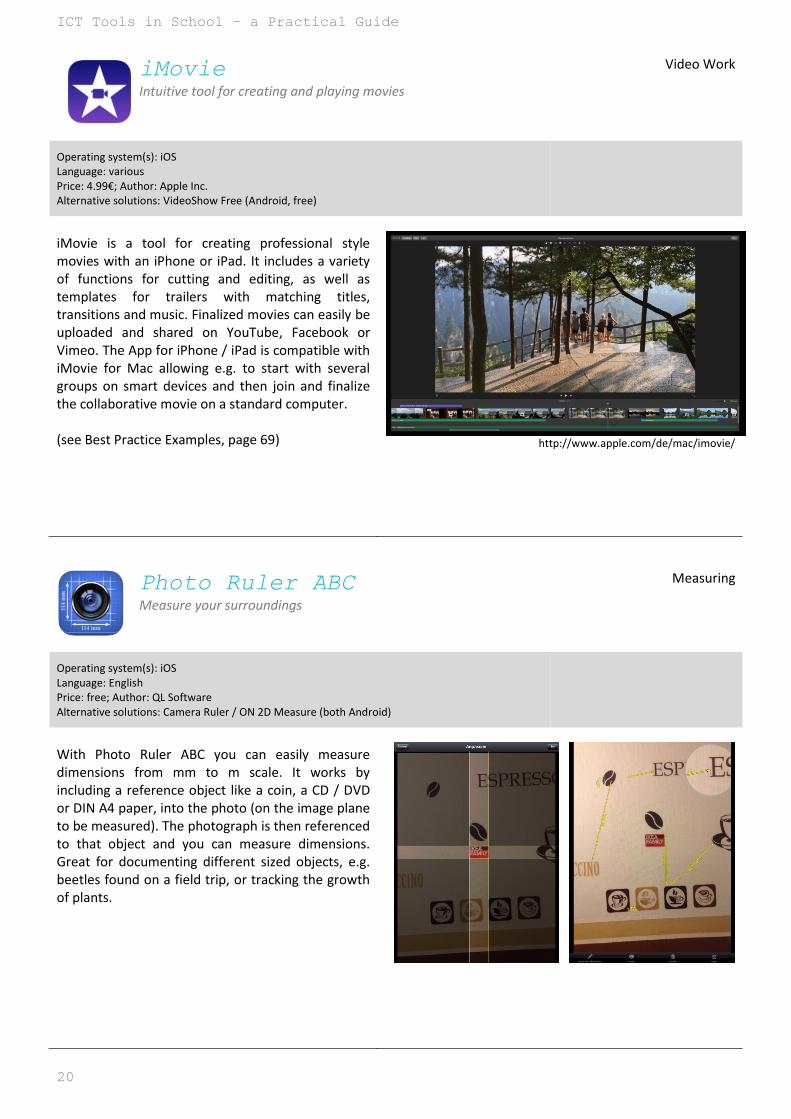
iMovie is a tool for creating professional style movies with an iPhone or iPad. It includes a variety of functions for cutting and editing, as well as templates for trailers with matching titles, transitions and music. Finalized movies can easily be uploaded and shared on YouTube, Facebook or Vimeo. The App for iPhone / iPad is compatible with iMovie for Mac allowing e.g. to start with several groups on smart devices and then join and finalize the collaborative movie on a standard computer. (see Best Practice Examples, page 69)
http://www.apple.com/de/mac/imovie/
Photo Ruler ABC Measure your surroundings
Measuring
Operating system(s): iOS Language: English Price: free; Author: QL Software Alternative solutions: Camera Ruler / ON 2D Measure (both Android)
With Photo Ruler ABC you can easily measure dimensions from mm to m scale. It works by including a reference object like a coin, a CD / DVD or DIN A4 paper, into the photo (on the image plane to be measured). The photograph is then referenced to that object and you can measure dimensions. Great for documenting different sized objects, e.g. beetles found on a field trip, or tracking the growth of plants.

www.irresistible-project.eu
21
OSMTracker Track your way
Measuring
Operating system(s): Android Language: English Price: free; Author: Nicolaus Guillaumin Alternative solutions: My Tracks / GPS-Tracks (both Android/iOS)
With OSMTracker you can log a route you have taken with GPS, e.g. while hiking, cycling, or on a scientific field trip. OSM tracker allows you to add points of interest (PoI) alongside the track, e.g. text messages, markers, photos, audio recordings etc. The recorded tracks can be shown in the app, or exported in .gpx format, allowing the further work on them with a multitude of programs (e.g. Google Maps, Google Earth, and many add-ons that build on them).
iMetalBox Measurement tool box
Measuring
Operating system(s): iOS Language: English Price: free; Author: Tue Nguyen Minh Alternative solutions: Smart Tools (Android)
iMetalBox is a tool box including different measuring devices build on the sensors of your smartphone. iMetalBox includes a Flashlight, Stoppwatch, Spirit Level, Ruler, Protractor, and a Compass. Smart Tools for Android is a comparable collection (the full collection is a pay app, but you can download all tools as stand alone measures for free). Be aware that the measuring results are highly influenced by the type of smartphone you use (i.e.the sensors and electronics therein).
ICT Tools in School – a Practical Guide
22
Accelerometer Analyzer Use the internal acceleration sensors of your smart device
Measuring
Operating system(s): Android, Language: English Price: free; Author: Sora Takayama Alternative solutions: Sensor Kinetics / Sparkvue (both Android/iOS)
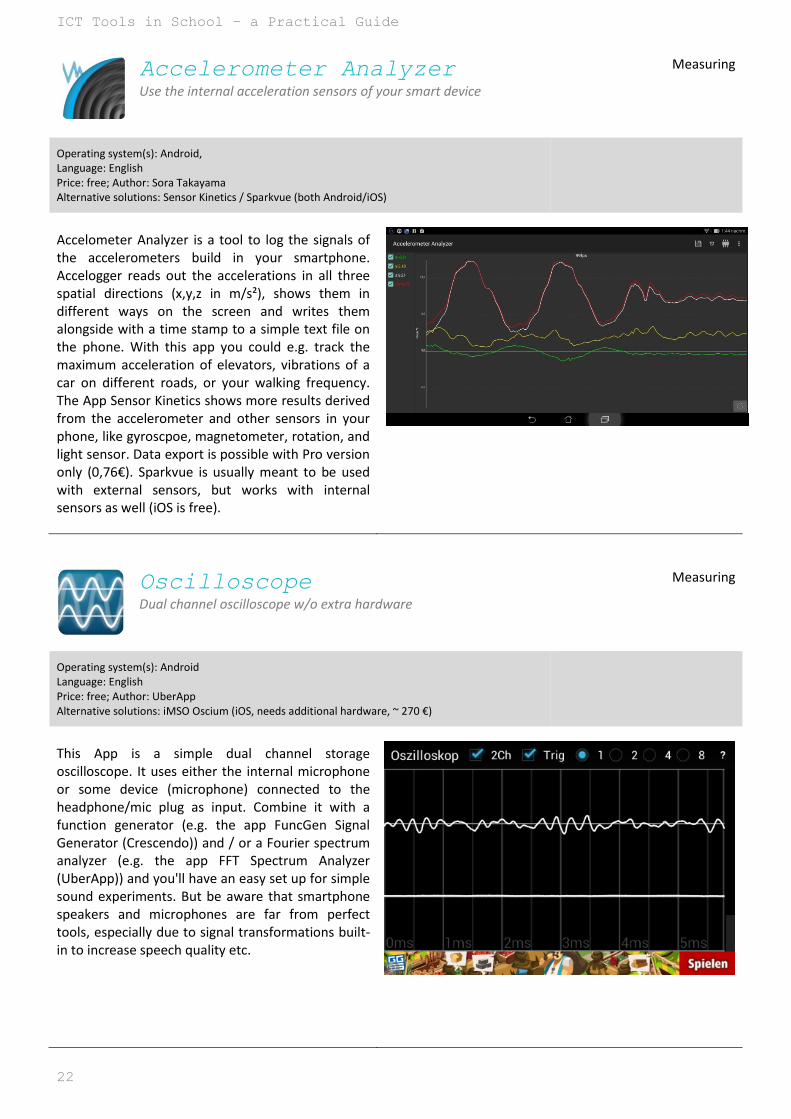
Accelometer Analyzer is a tool to log the signals of the accelerometers build in your smartphone. Accelogger reads out the accelerations in all three spatial directions (x,y,z in m/s²), shows them in different ways on the screen and writes them alongside with a time stamp to a simple text file on the phone. With this app you could e.g. track the maximum acceleration of elevators, vibrations of a car on different roads, or your walking frequency. The App Sensor Kinetics shows more results derived from the accelerometer and other sensors in your phone, like gyroscpoe, magnetometer, rotation, and light sensor. Data export is possible with Pro version only (0,76€). Sparkvue is usually meant to be used with external sensors, but works with internal sensors as well (iOS is free).
Oscilloscope Dual channel oscilloscope w/o extra hardware
Measuring
Operating system(s): Android Language: English Price: free; Author: UberApp Alternative solutions: iMSO Oscium (iOS, needs additional hardware, ~ 270 €)
This App is a simple dual channel storage oscilloscope. It uses either the internal microphone or some device (microphone) connected to the headphone/mic plug as input. Combine it with a function generator (e.g. the app FuncGen Signal Generator (Crescendo)) and / or a Fourier spectrum analyzer (e.g. the app FFT Spectrum Analyzer (UberApp)) and you'll have an easy set up for simple sound experiments. But be aware that smartphone speakers and microphones are far from perfect tools, especially due to signal transformations built-in to increase speech quality etc.
www.irresistible-project.eu
23
Signal-Generator Signal Generator to create reference tones for sound frequency experiments
Measuring
Operating system(s): Android Language: English Price: free; Author: XYZ-Apps Alternative solutions: Signal Generator (iOS)
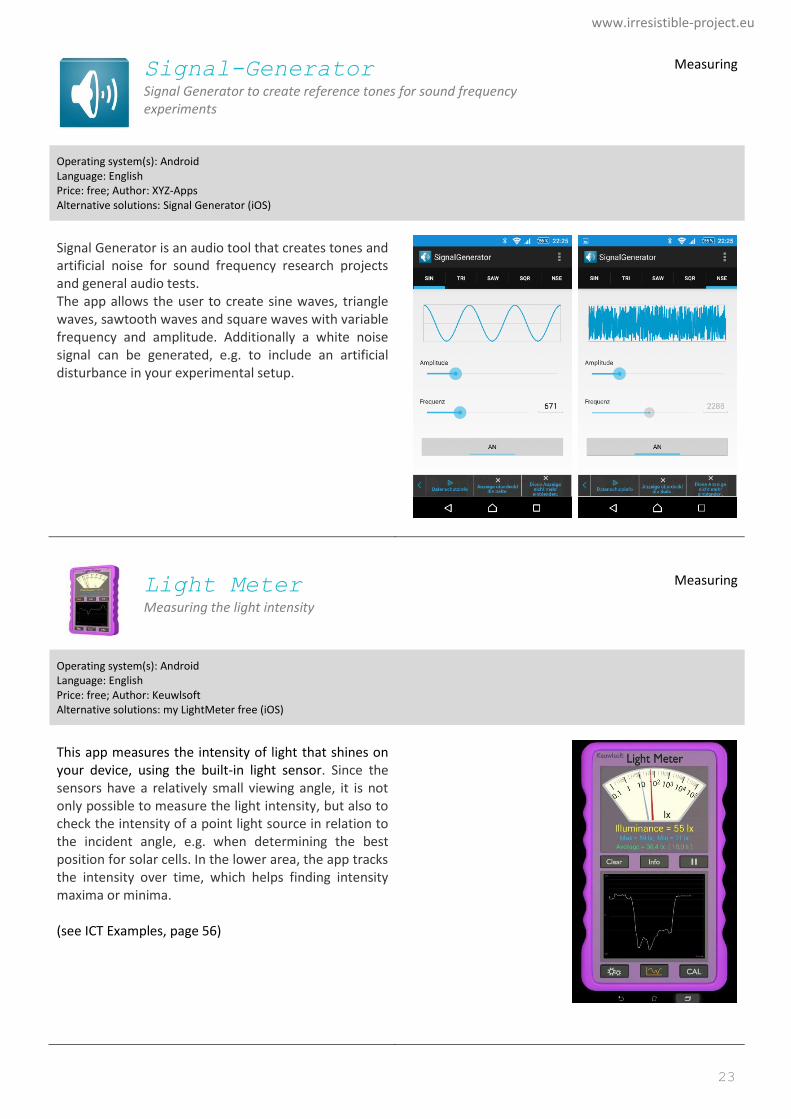
Signal Generator is an audio tool that creates tones and artificial noise for sound frequency research projects and general audio tests. The app allows the user to create sine waves, triangle waves, sawtooth waves and square waves with variable frequency and amplitude. Additionally a white noise signal can be generated, e.g. to include an artificial disturbance in your experimental setup.
Light Meter Measuring the light intensity
Measuring
Operating system(s): Android Language: English Price: free; Author: Keuwlsoft Alternative solutions: my LightMeter free (iOS)
This app measures the intensity of light that shines on your device, using the built-in light sensor. Since the sensors have a relatively small viewing angle, it is not only possible to measure the light intensity, but also to check the intensity of a point light source in relation to the incident angle, e.g. when determining the best position for solar cells. In the lower area, the app tracks the intensity over time, which helps finding intensity maxima or minima. (see ICT Examples, page 56)
ICT Tools in School – a Practical Guide
24
Changers CO2 Fit Track how much CO2 you can reduce and collect ReCoins.
Measuring
Operating system(s): Android, iOS Language: various Price: free; Author: Blacksquared Alternative solutions: -
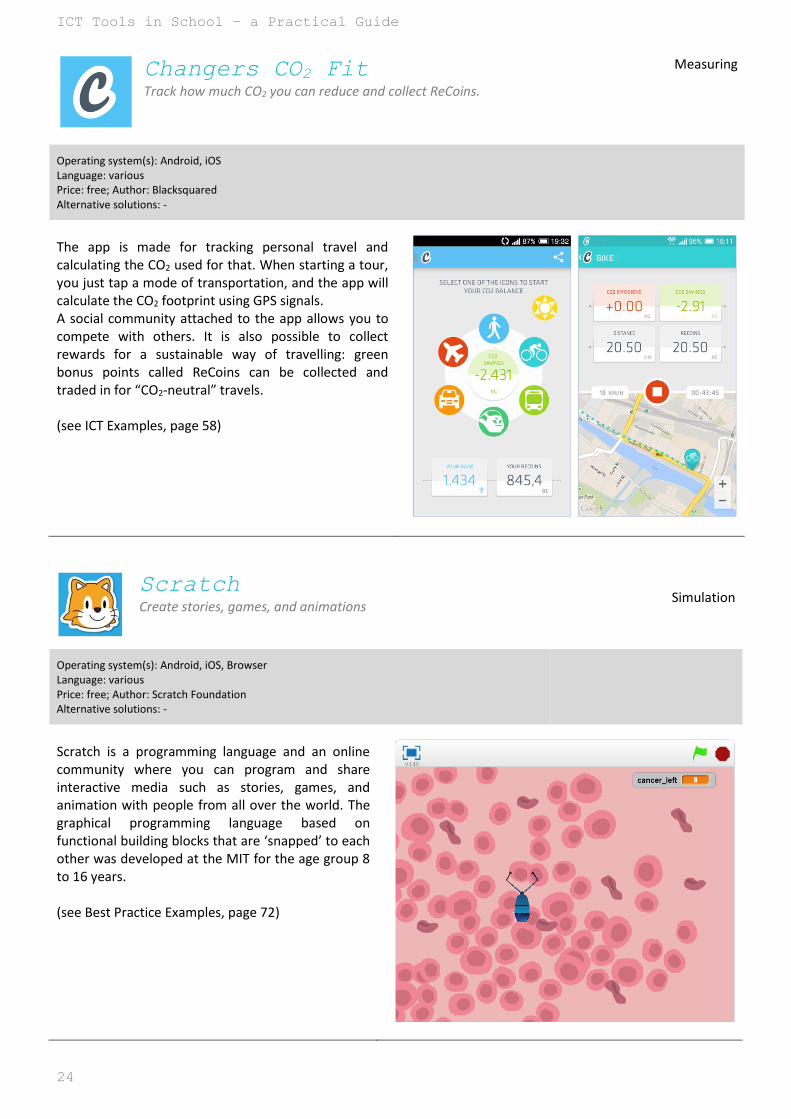
The app is made for tracking personal travel and calculating the CO2 used for that. When starting a tour, you just tap a mode of transportation, and the app will calculate the CO2 footprint using GPS signals. A social community attached to the app allows you to compete with others. It is also possible to collect rewards for a sustainable way of travelling: green bonus points called ReCoins can be collected and traded in for “CO2-neutral” travels. (see ICT Examples, page 58)
Scratch Create stories, games, and animations
Simulation
Operating system(s): Android, iOS, Browser Language: various Price: free; Author: Scratch Foundation Alternative solutions: -
Scratch is a programming language and an online community where you can program and share interactive media such as stories, games, and animation with people from all over the world. The graphical programming language based on functional building blocks that are ‘snapped’ to each other was developed at the MIT for the age group 8 to 16 years. (see Best Practice Examples, page 72)
www.irresistible-project.eu
25
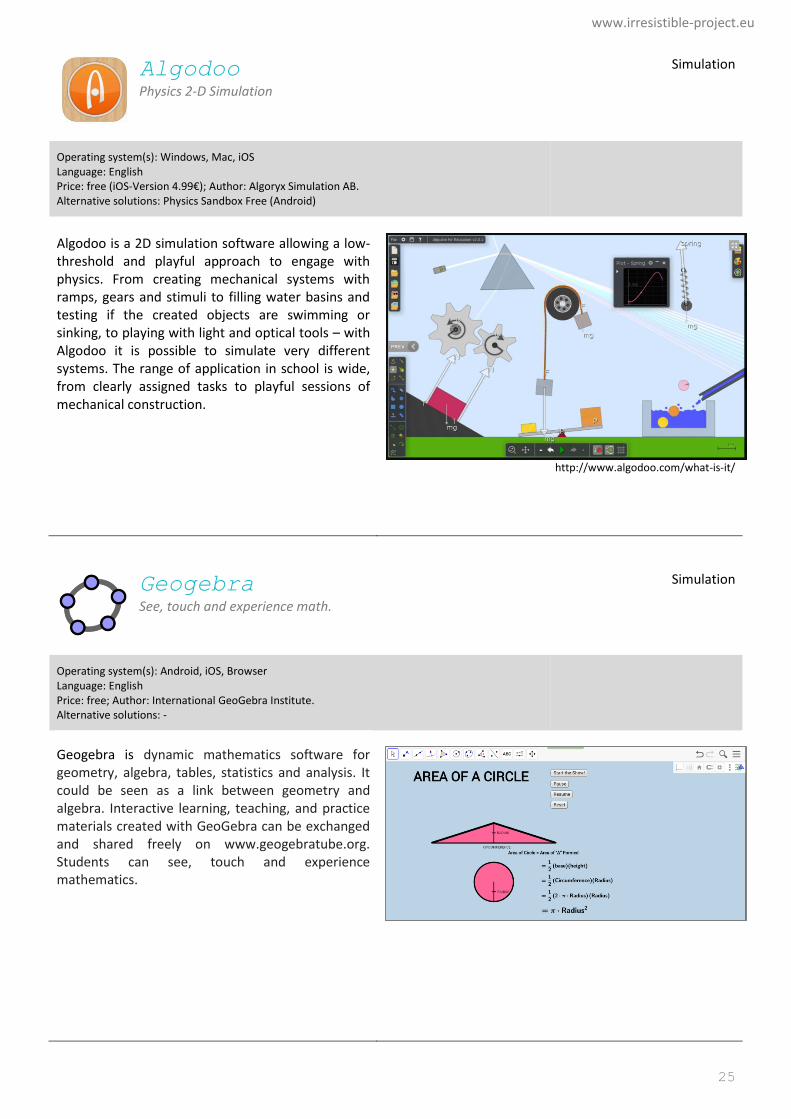
Algodoo Physics 2-D Simulation
Simulation
Operating system(s): Windows, Mac, iOS Language: English Price: free (iOS-Version 4.99€); Author: Algoryx Simulation AB. Alternative solutions: Physics Sandbox Free (Android)
Algodoo is a 2D simulation software allowing a low-threshold and playful approach to engage with physics. From creating mechanical systems with ramps, gears and stimuli to filling water basins and testing if the created objects are swimming or sinking, to playing with light and optical tools – with Algodoo it is possible to simulate very different systems. The range of application in school is wide, from clearly assigned tasks to playful sessions of mechanical construction.
http://www.algodoo.com/what-is-it/
Geogebra See, touch and experience math.
Simulation
Operating system(s): Android, iOS, Browser Language: English Price: free; Author: International GeoGebra Institute. Alternative solutions: -
Geogebra is dynamic mathematics software for geometry, algebra, tables, statistics and analysis. It could be seen as a link between geometry and algebra. Interactive learning, teaching, and practice materials created with GeoGebra can be exchanged and shared freely on www.geogebratube.org. Students can see, touch and experience mathematics.
ICT Tools in School – a Practical Guide
26
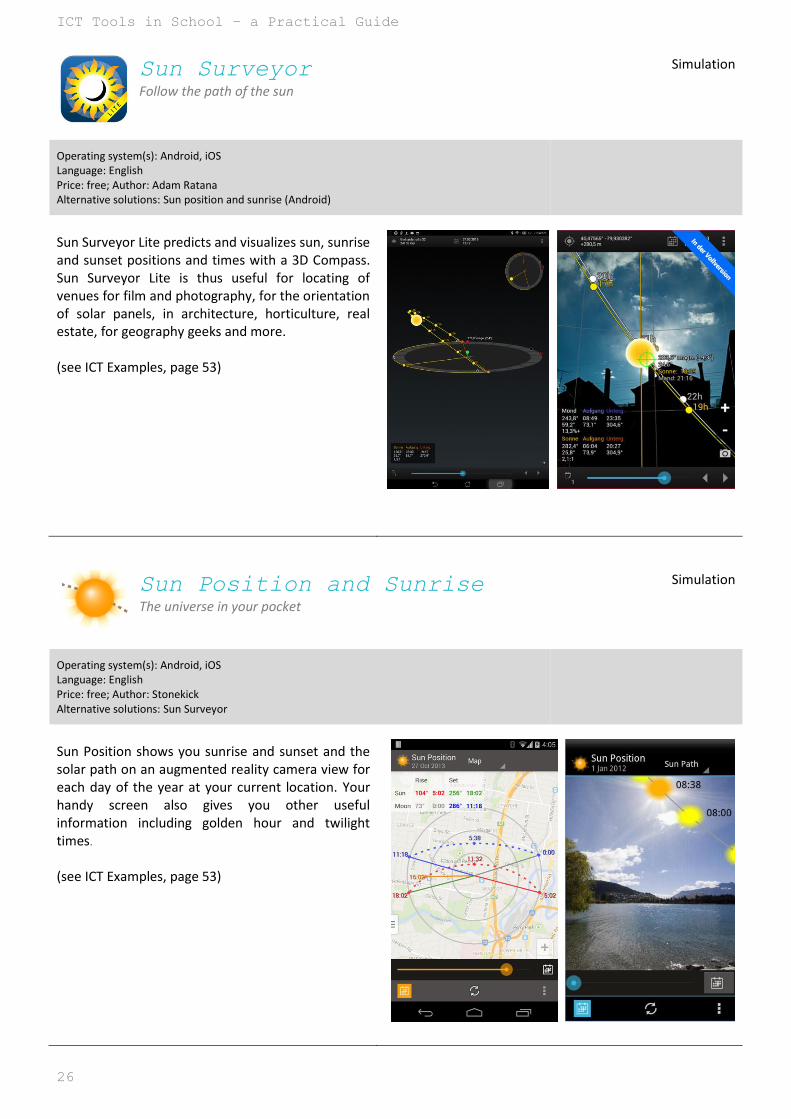
Sun Surveyor Follow the path of the sun
Simulation
Operating system(s): Android, iOS Language: English Price: free; Author: Adam Ratana Alternative solutions: Sun position and sunrise (Android)
Sun Surveyor Lite predicts and visualizes sun, sunrise and sunset positions and times with a 3D Compass. Sun Surveyor Lite is thus useful for locating of venues for film and photography, for the orientation of solar panels, in architecture, horticulture, real estate, for geography geeks and more. (see ICT Examples, page 53)
Sun Position and Sunrise The universe in your pocket
Simulation
Operating system(s): Android, iOS Language: English Price: free; Author: Stonekick Alternative solutions: Sun Surveyor
Sun Position shows you sunrise and sunset and the solar path on an augmented reality camera view for each day of the year at your current location. Your handy screen also gives you other useful information including golden hour and twilight times.
(see ICT Examples, page 53)
www.irresistible-project.eu
27
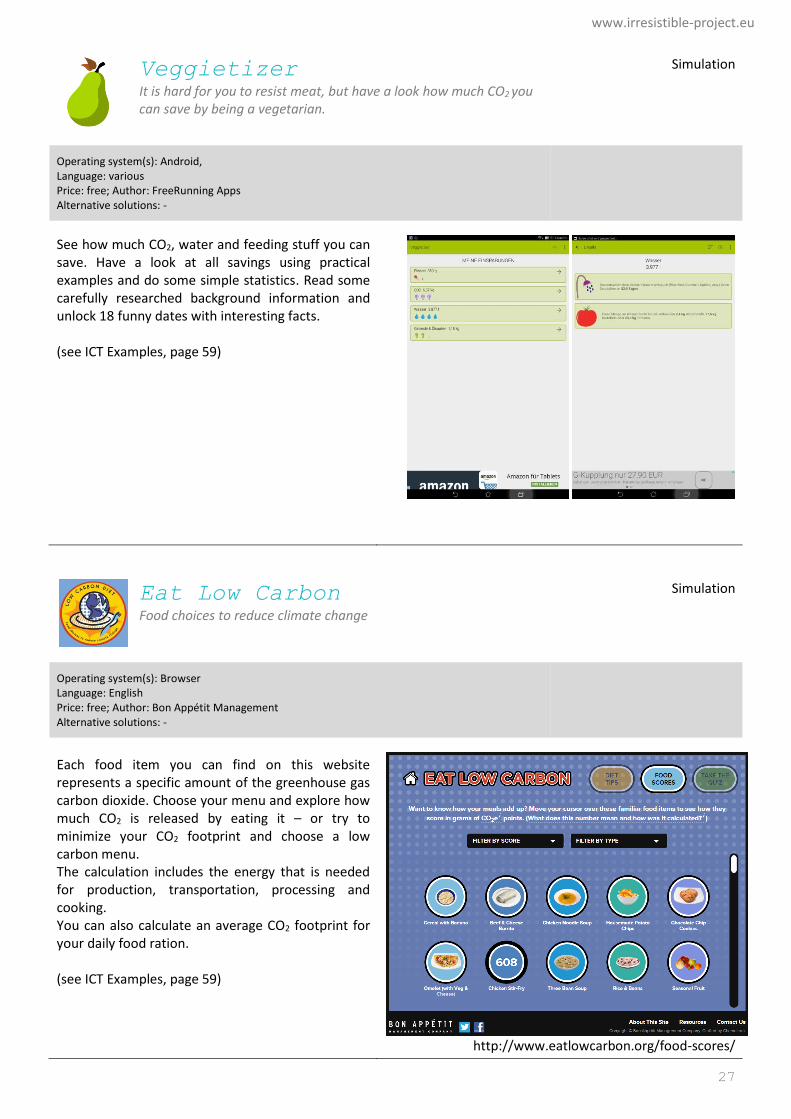
Veggietizer It is hard for you to resist meat, but have a look how much CO2 you can save by being a vegetarian.
Simulation
Operating system(s): Android, Language: various Price: free; Author: FreeRunning Apps Alternative solutions: -
See how much CO2, water and feeding stuff you can save. Have a look at all savings using practical examples and do some simple statistics. Read some carefully researched background information and unlock 18 funny dates with interesting facts. (see ICT Examples, page 59)
Eat Low Carbon Food choices to reduce climate change
Simulation
Operating system(s): Browser Language: English Price: free; Author: Bon Appétit Management Alternative solutions: -
Each food item you can find on this website represents a specific amount of the greenhouse gas carbon dioxide. Choose your menu and explore how much CO2 is released by eating it – or try to minimize your CO2 footprint and choose a low carbon menu. The calculation includes the energy that is needed for production, transportation, processing and cooking. You can also calculate an average CO2 footprint for your daily food ration. (see ICT Examples, page 59)
http://www.eatlowcarbon.org/food-scores/
ICT Tools in School – a Practical Guide
28
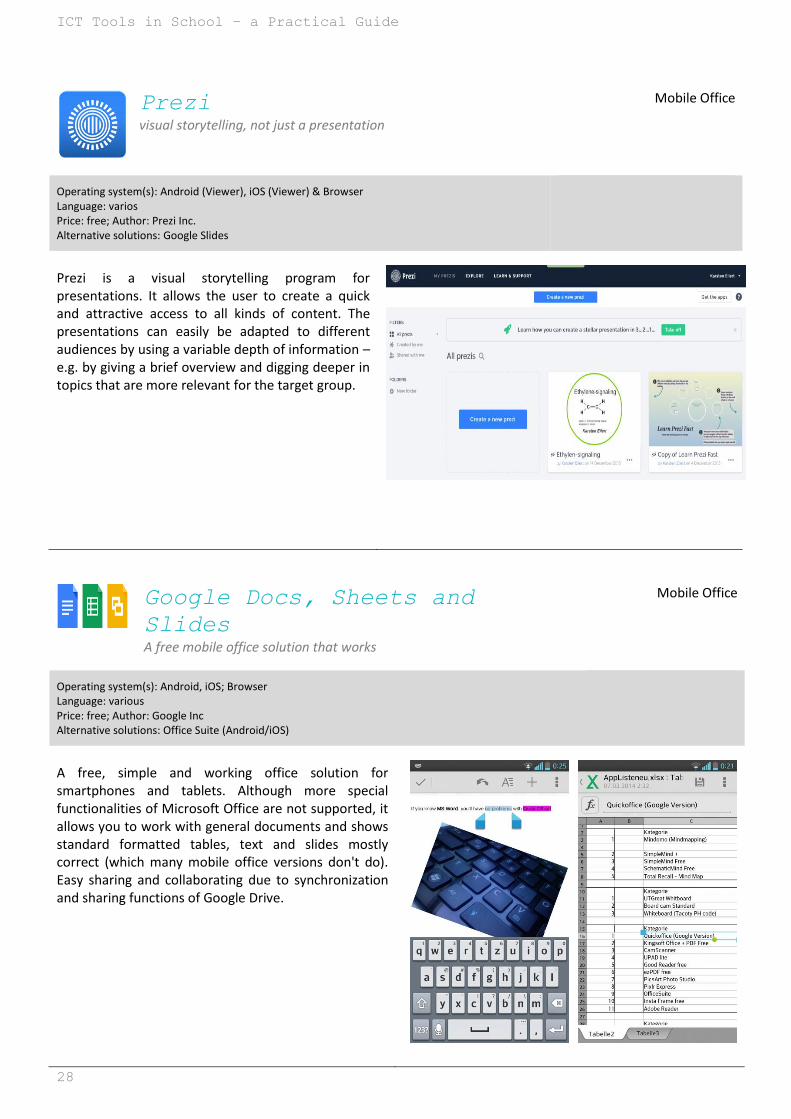
Prezi visual storytelling, not just a presentation
Mobile Office
Operating system(s): Android (Viewer), iOS (Viewer) & Browser Language: varios Price: free; Author: Prezi Inc. Alternative solutions: Google Slides
Prezi is a visual storytelling program for presentations. It allows the user to create a quick and attractive access to all kinds of content. The presentations can easily be adapted to different audiences by using a variable depth of information – e.g. by giving a brief overview and digging deeper in topics that are more relevant for the target group.
Google Docs, Sheets and
Slides A free mobile office solution that works
Mobile Office
Operating system(s): Android, iOS; Browser Language: various Price: free; Author: Google Inc Alternative solutions: Office Suite (Android/iOS)
A free, simple and working office solution for smartphones and tablets. Although more special functionalities of Microsoft Office are not supported, it allows you to work with general documents and shows standard formatted tables, text and slides mostly correct (which many mobile office versions don't do). Easy sharing and collaborating due to synchronization and sharing functions of Google Drive.
www.irresistible-project.eu
29
CamScanner - Phone PDF Creator Smart and intelligent document administrator
Mobile Office
Operating system(s): Android, iOS Language: various Price: free (pro version 4,49 € per month); Author: IntSig Information Co.,Ltd Alternative solutions: Foxit PDF Camera + Foxit MobilePDF (Android)
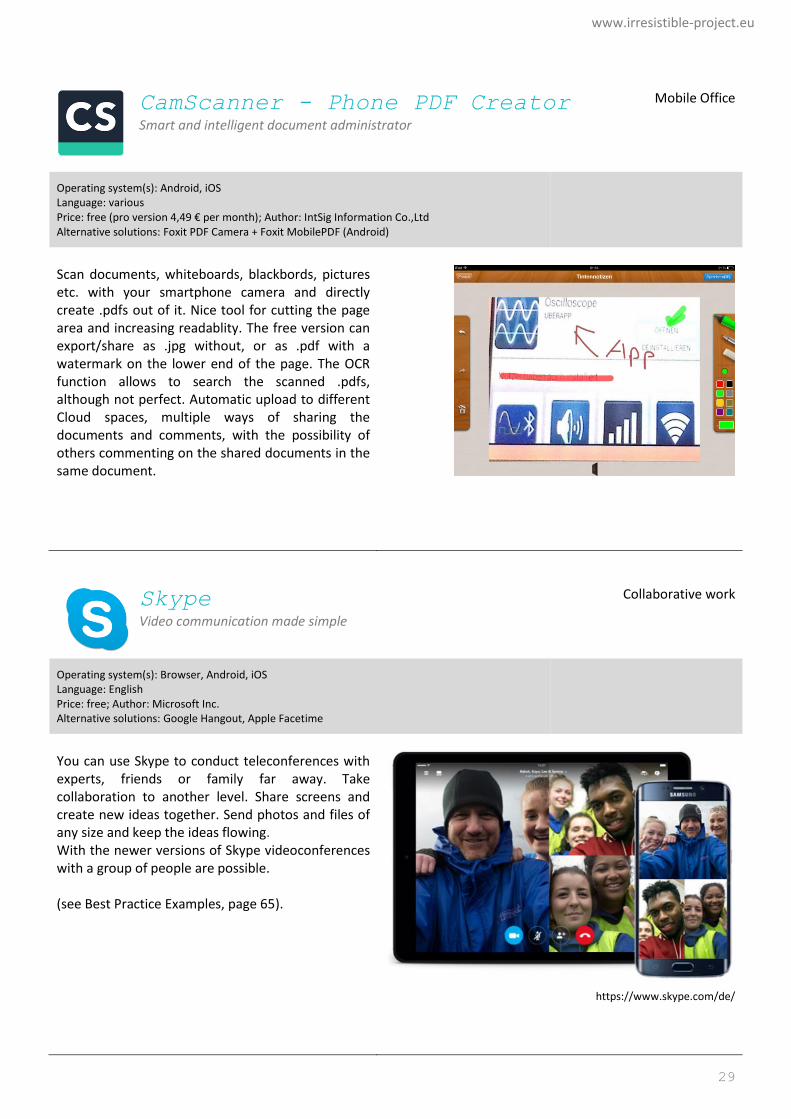
Scan documents, whiteboards, blackbords, pictures etc. with your smartphone camera and directly create .pdfs out of it. Nice tool for cutting the page area and increasing readablity. The free version can export/share as .jpg without, or as .pdf with a watermark on the lower end of the page. The OCR function allows to search the scanned .pdfs, although not perfect. Automatic upload to different Cloud spaces, multiple ways of sharing the documents and comments, with the possibility of others commenting on the shared documents in the same document.
Skype Video communication made simple
Collaborative work
Operating system(s): Browser, Android, iOS Language: English Price: free; Author: Microsoft Inc. Alternative solutions: Google Hangout, Apple Facetime
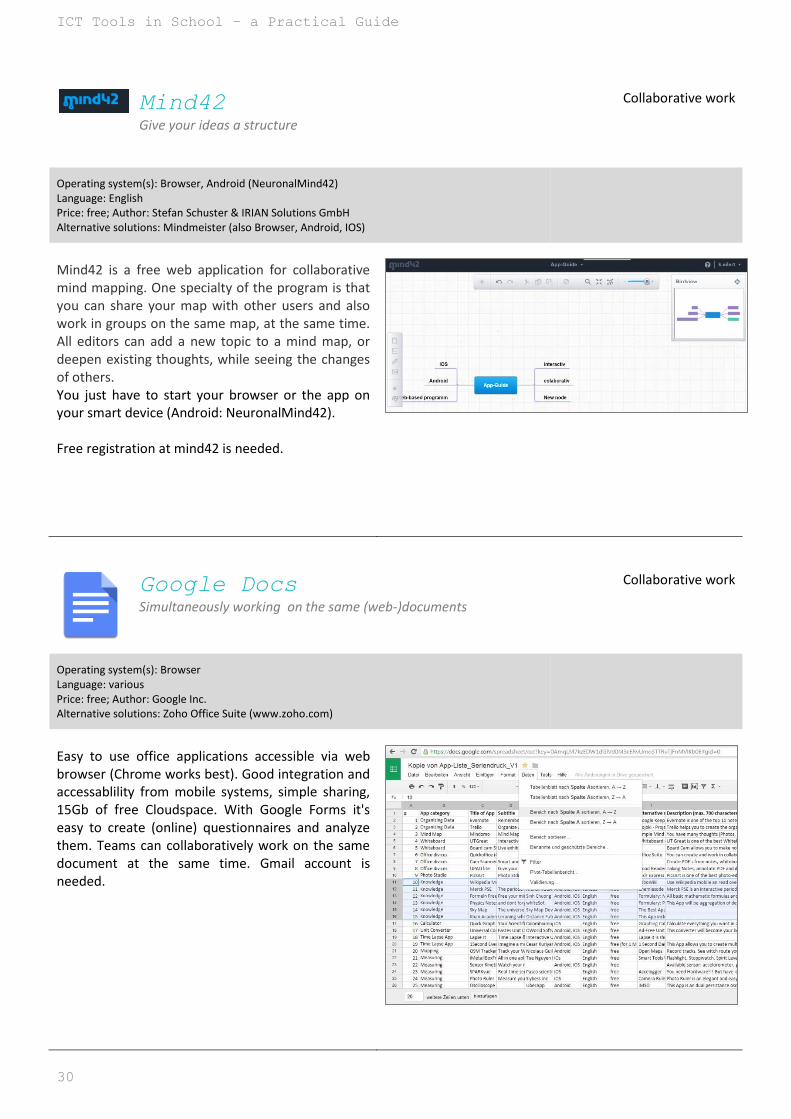
You can use Skype to conduct teleconferences with experts, friends or family far away. Take collaboration to another level. Share screens and create new ideas together. Send photos and files of any size and keep the ideas flowing. With the newer versions of Skype videoconferences with a group of people are possible. (see Best Practice Examples, page 65).
https://www.skype.com/de/
ICT Tools in School – a Practical Guide
30
Mind42 Give your ideas a structure
Collaborative work
Operating system(s): Browser, Android (NeuronalMind42) Language: English Price: free; Author: Stefan Schuster & IRIAN Solutions GmbH Alternative solutions: Mindmeister (also Browser, Android, IOS)
Mind42 is a free web application for collaborative mind mapping. One specialty of the program is that you can share your map with other users and also work in groups on the same map, at the same time. All editors can add a new topic to a mind map, or deepen existing thoughts, while seeing the changes of others. You just have to start your browser or the app on your smart device (Android: NeuronalMind42). Free registration at mind42 is needed.
Google Docs Simultaneously working on the same (web-)documents
Collaborative work
Operating system(s): Browser Language: various Price: free; Author: Google Inc. Alternative solutions: Zoho Office Suite (www.zoho.com)
Easy to use office applications accessible via web browser (Chrome works best). Good integration and accessablility from mobile systems, simple sharing, 15Gb of free Cloudspace. With Google Forms it's easy to create (online) questionnaires and analyze them. Teams can collaboratively work on the same document at the same time. Gmail account is needed.
www.irresistible-project.eu
31
Mahara ePortfolio Web2.0 in a nutshell: ePortfolio system plus safe social network
e-learning Systems
Operating system(s): Browser, Upload tools for Android (MaharaDroid) and iOS (PortfolioUP!) Language: various Price: free; Author: Mahara Open Source Community Alternative solutions: Edmodo, Google Classroom
Mahara is an ePortfolio system that is explicitly developed as a learner centered system to form a Personal Learning Environment (in contrast to Learning Management System (LMS) like Moodle). It offers a dazzling array of functions, with the core being an ePortfolio system and a shielded social network with tools such as journals (private / internal), a blogging tool, easy to program (drag-and-drop) web pages (privat / internal / external), collaborative work pages, a resume builder etc. Mahara can be used as stand-alone system or be integrated in a larger network, e.g. with it's 'sister' application Moodle. It usually needs a Linux Server (Ubuntu, Debian), but can also be run on most shared webhosting and Windows systems.
Edmodo Create secure groups that take learning beyond the classroom
e-learning Systems
Operating system(s): Android, iOS, Browser Language: English Price: free; Author: Edmodo inc. Alternative solutions: Mahara, Google Classroom
Edmodo is a social learning network that takes learning beyond the classroom by providing a safe place for teachers and students to connect and collaborate – anytime, anywhere. You can create a group for your students, where they find worksheets, presentations or homework. It is also possible to assign tasks with a due date and to create short quizzes. Your students will find everything they need for the next exam, homework or group work. (see Best Practice Examples, page 62ff)
ICT Tools in School – a Practical Guide
32
GoConqr Interactive and collaborative whiteboard
e-learning Systems
Operating system(s): Android, iOS, Browser Language: English Price: free; Author: ExamTime Alternative solutions: Edmodo, Mahara, Google Classroom
GoCondr is a platform that turns learning into an active and entertaining process. Teachers can create a connected and digital classroom for learning including resources, tests, homework and quizzes. Students can organize their learning in mind maps, flashcards, slide sets and notes and share it with classmates or friends. They can track their learning progress, create a study-planer and start discussions for a collaborative learning progress.
Wikipedia Mobile Wikipedia easily accessible in your pocket
Knowledge
Operating system(s): Android, iOS Language: various Price: free; Author: Wikimedia Foundation Alternative solutions: LoboWiki (Android)
Use Wikipedia mobile and read over 20 million articels. Save articles to read later offline, search related articles. Share articles (links) in various ways. On aged phones, the app is much faster than using a browser.
www.irresistible-project.eu
33
Merck PTE The periodic table, presented in a nice way
Knowledge
Operating system(s): Android, iOS Language: various Price: free; Author: Merck KGaA Alternative solutions: Chemisode (iOS)
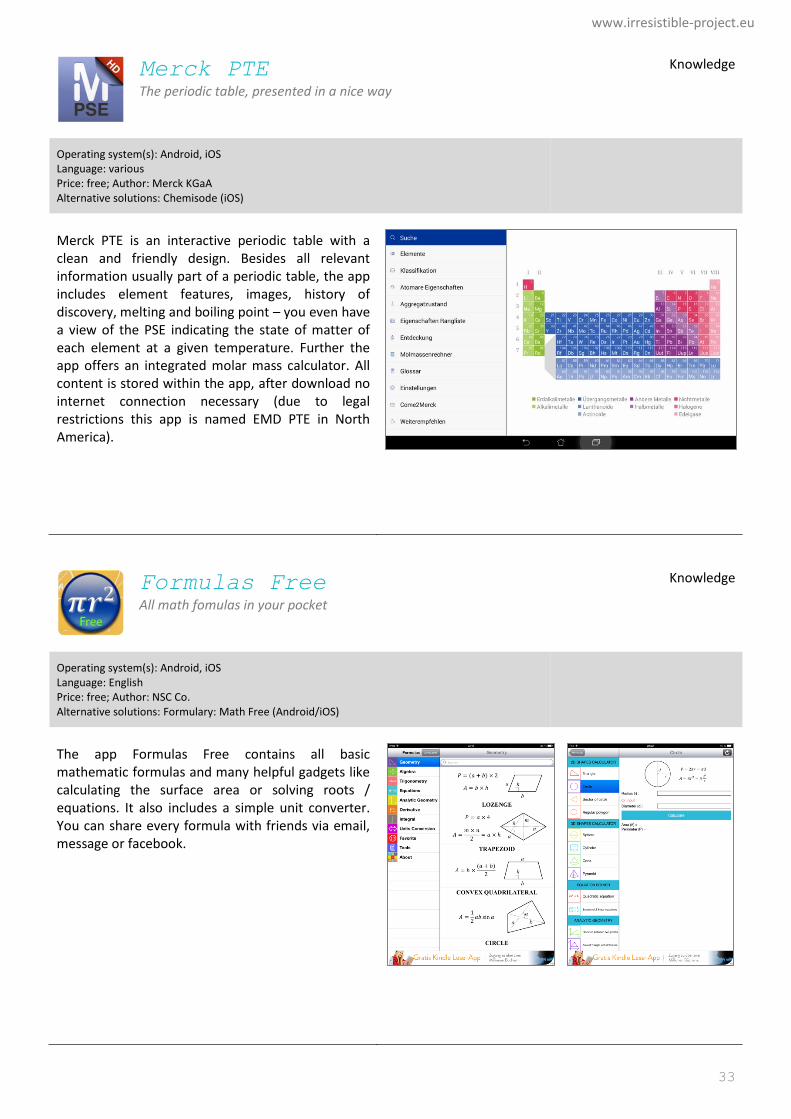
Merck PTE is an interactive periodic table with a clean and friendly design. Besides all relevant information usually part of a periodic table, the app includes element features, images, history of discovery, melting and boiling point – you even have a view of the PSE indicating the state of matter of each element at a given temperature. Further the app offers an integrated molar mass calculator. All content is stored within the app, after download no internet connection necessary (due to legal restrictions this app is named EMD PTE in North America).
Formulas Free All math fomulas in your pocket
Knowledge
Operating system(s): Android, iOS Language: English Price: free; Author: NSC Co. Alternative solutions: Formulary: Math Free (Android/iOS)
The app Formulas Free contains all basic mathematic formulas and many helpful gadgets like calculating the surface area or solving roots / equations. It also includes a simple unit converter. You can share every formula with friends via email, message or facebook.
ICT Tools in School – a Practical Guide
34
Physics Formulas Free Physics formulary
Knowledge
Operating system(s): Android, iOS Language: English Price: free; Author: NSC Co. Alternative solutions: Formulary: Physics Free (iOS)
This app is an aggregation of definitions and formulas in basic physics knowledge, somewhere between fomulary and text book. It contains e.g. electricity, magnetism, electromagnetic waves, ray optics etc.
Khan Academy Learning while watching
Knowledge
Operating system(s): Android, iOS Language: English Price: free; Author: Distance Future Alternative solutions: -
This app offers a huge collection of video lectures. Topics are e.g. mathematics, science, economics, humanities etc. Most lectures include experiments, notes, and pictures.
www.irresistible-project.eu
35
Sky Map The universe in your pocket
Knowledge
Operating system(s): Android, iOS Language: English Price: free; Author: Android: Sky Map Devs, iOS: Mobius Entertainment Alternative solutions: -
The app offers you navigation through the night sky. It works in two modes: Point your phone to any star or constellation, and it will offer you the solution on the screen. Or search for a star or constellation in the menu, and let it guide you to the object of desire.
Quick Graph Capable scientific graphing calculator
Tools
Operating system(s): iOS Language: English Price: free; Author: Colombiamug Alternative solutions: Graphing Calculator (Android)
This scientific graphing calculator offers 2D and 3D equation plotting with wireframe and solid visualization. Supports cartesian, polar, cylindrical and spherical coordinate systems. Includes a library for commonly used equations.
ICT Tools in School – a Practical Guide
36
Universal Converter free Easy-to-use unit converter
Tools
Operating system(s): Android, iOS Language: English Price: free; Author: OWorld Software Alternative solutions: Ad-Free Unit-Converter (iOS)
Universal Converter free is a clearly designed and easy to use app for converting various units. The free app includes e.g. mass, speed, volume, distance, time, temperature.
i-nigma The most widely used mobile barcode reader in the world
Tools
Operating system(s): Android, iOS Language: English Price: free; Author: 3GVision Alternative solutions: Barcode Scanner (Android)
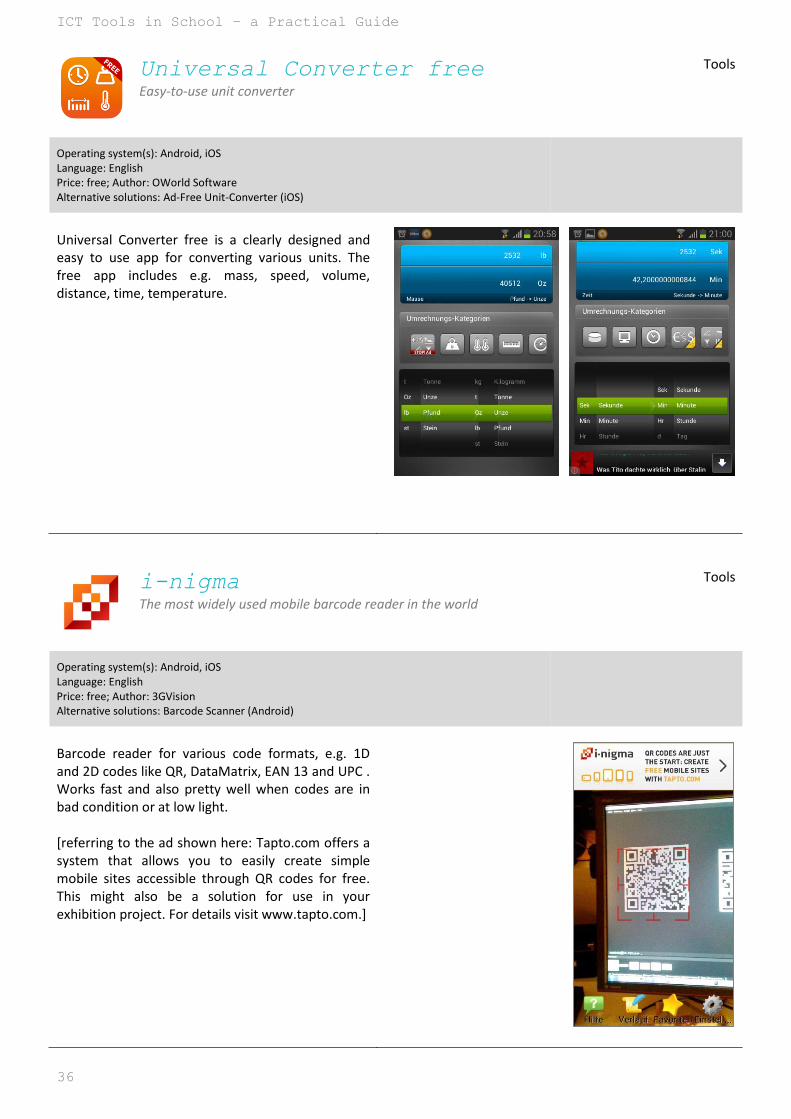
Barcode reader for various code formats, e.g. 1D and 2D codes like QR, DataMatrix, EAN 13 and UPC . Works fast and also pretty well when codes are in bad condition or at low light. [referring to the ad shown here: Tapto.com offers a system that allows you to easily create simple mobile sites accessible through QR codes for free. This might also be a solution for use in your exhibition project. For details visit www.tapto.com.]
www.irresistible-project.eu
37
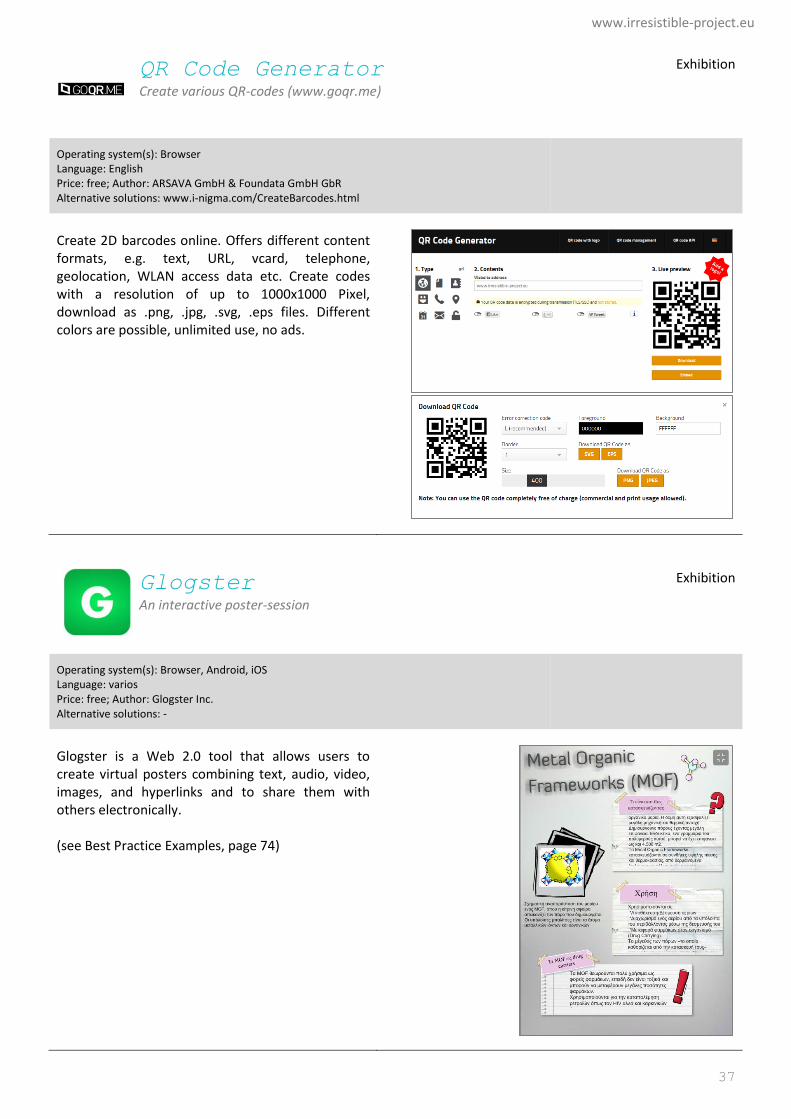
QR Code Generator Create various QR-codes (www.goqr.me)
Exhibition
Operating system(s): Browser Language: English Price: free; Author: ARSAVA GmbH & Foundata GmbH GbR Alternative solutions: www.i-nigma.com/CreateBarcodes.html
Create 2D barcodes online. Offers different content formats, e.g. text, URL, vcard, telephone, geolocation, WLAN access data etc. Create codes with a resolution of up to 1000x1000 Pixel, download as .png, .jpg, .svg, .eps files. Different colors are possible, unlimited use, no ads.
Glogster An interactive poster-session
Exhibition
Operating system(s): Browser, Android, iOS Language: varios Price: free; Author: Glogster Inc. Alternative solutions: -
Glogster is a Web 2.0 tool that allows users to create virtual posters combining text, audio, video, images, and hyperlinks and to share them with others electronically. (see Best Practice Examples, page 74)
ICT Tools in School – a Practical Guide
38
Open Exhibits PLAYER Author/Edit multitouch, multi-user exhibits in CML, GML and CSS (www.openexhibits.org)
Exhibition
Operating system(s): Windows, Mac OS Language: English Price: free; Author: Ideum Alternative solutions: -
Edit and adapt a multitouch surface without deeper programming skills. The OE Player works comparable to a web browser interpreting XML-based mark-up language and cascading style sheets (CSS). By changing the XML files you can adapt the content, by adjusting the CSS files you can change the look. (OE Player requires Adobe AIR and Windows OS)
Open Exhibits SDK Develop multitouch, multi-user exhibits and components (www.openexhibits.org)
Exhibition
Operating system(s): Windows, Mac OS Language: English Price: free; Author: Ideum Alternative solutions: -
The OpenExhibits Software Development Kit (SDK) allows you to easily program your own multitouch application. The Kit is written in ActionScript. Adobe Flash and Adobe AIR are supported. The OE SDK allows you to develop in the IDE of your choice, but Open Exhibits officially supports the following IDEs: Flash Professional CS5+, FlashDevelop, Flash Builder.
www.irresistible-project.eu
39
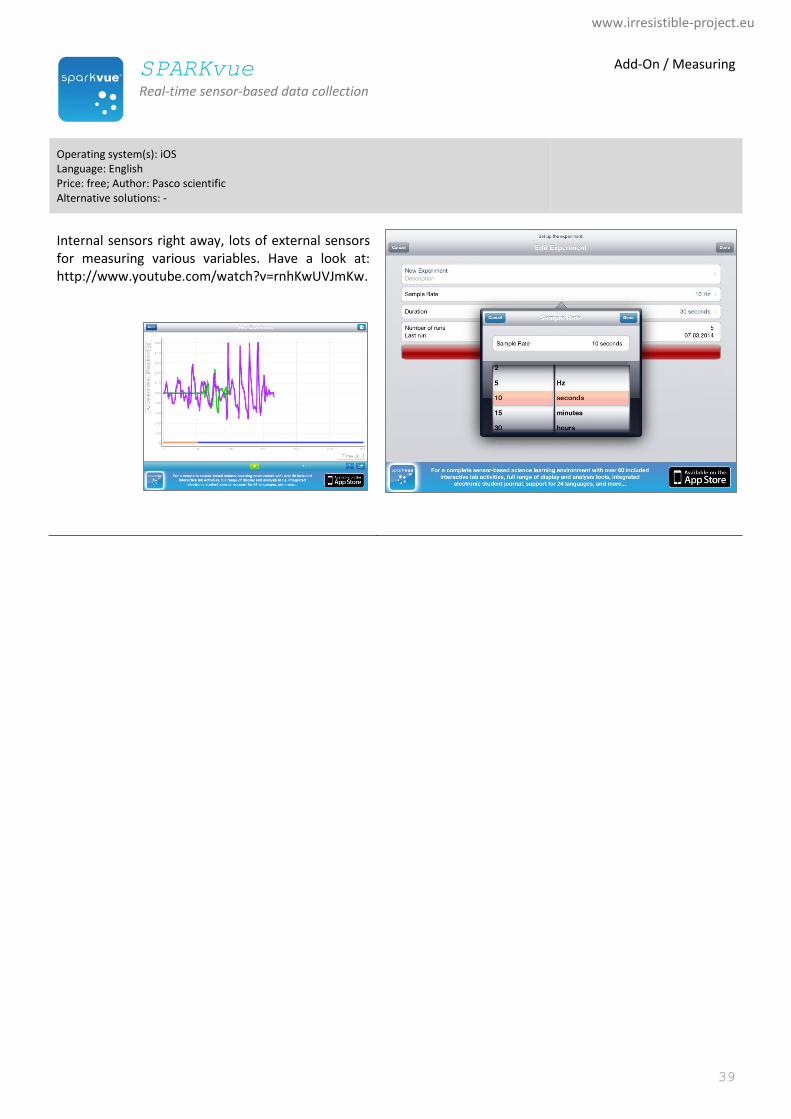
SPARKvue Real-time sensor-based data collection
Add-On / Measuring
Operating system(s): iOS Language: English Price: free; Author: Pasco scientific Alternative solutions: -
Internal sensors right away, lots of external sensors for measuring various variables. Have a look at: http://www.youtube.com/watch?v=rnhKwUVJmKw.
ICT Tools in School – a Practical Guide
40
4. Example of an E-Learning Platform
Learner centered e-learning platforms are increasingly becoming an integral part of teaching. Although the idea is
not new, in recent years quite a few new platforms have showed up and are competing for the favor of schools
and teachers, e.g. Mahara, Edmodo, GoCondr and Google Classroom to name just a few. The following short
introduction to the open source platform Mahara will give an overview what an e-learning platform is capable of
and how it can be used in teaching.
Short Introduction to the E-Learning Platform Mahara
This really should just be a very brief introduction to give a rough idea of the basic use and capabilities. All
information you need you’ll find on www.mahara.org. Also, there are many national groups supporting the
system and offering tutorials in your language. And you can find a lot of detailed video tutorials on YouTube.
What is Mahara?
Mahara is an ePortfolio system that is explicitly developed as a learner centered system to form a Personal
Learning Environment (in contrast to Learning Management System (LMS) like Moodle). It offers a dazzling array
of functions: The core components are an ePortfolio system to present, share and exchange information,
including a full file repository with upload possibilities from mobile devices. The second large part is a shielded
social network with tools such as journals (private/internal), blogs, forums, easy to build web pages (private /
internal / external), collaborative work pages, a resume builder, and many more. All the content is easily placed
on the pages by drag-and-drop, combining internal (Mahara portfolio) and external (web) content on the same
pages. Even external blogs can be embedded on internal pages using RSS feeds. Mahara scales nicely on different
systems, so you can work on the web interface from your personal computer, laptop, tablet, and smartphone.
Mahara can be used as stand-alone system or be integrated in a larger network, e.g. with its 'sister' application
Moodle. It nicely integrates in Moodle, you can e.g. use the same login accounts and manage them in Moodle,
and you can directly link from Moodle pages to Mahara pages.
The System Requirements are not immense, but have in mind that traffic and thus machines load scales with the
numbers of users. The Mahara standard setup is to run it on an Apache web server installed on a Linux system
(e.g. Ubuntu, Debian), it also needs a database (Postgres or MySQL) installed for managing user data and content.
Running it on a separate machine will give you the best performance. But it also works on shared webhosting, and
on Windows and MAC operating systems. There are also several hosting companies offering a serviced platform
ready to start. See Mahara.org for details. The design of the user interface can be widely customized.
Names and Definitions
Artefacts all data created and/or uploaded to Mahara are called artefacts
View a view is a collection of artefacts, e.g. a journal, a page, a blog entry etc.
Collection a collection is a set of pages that are linked to one another and have the same access permissions
Sharing sharing of views and artefacts is possible on several levels: no sharing, sharing with one other member (e.g. sending it to your friend, or submitting it to a tutor), sharing with all your friends, sharing with groups, sharing with all members of the Mahara setup, sharing public (i.e. the web)
Groups can be created by an admin, or autonomously by users (depends on the admin settings what is allowed). Groups can create own (group) pages, repositories etc.
Forums can be created by an admin, or autonomously by users, can have public discussion or only restricted to defined members (depends on the admin settings what is allowed)
www.irresistible-project.eu
41
HowTo’s
These HowTo’s should allow you to get started with Mahara. Mahara Version 1.8 is the base for this manual.
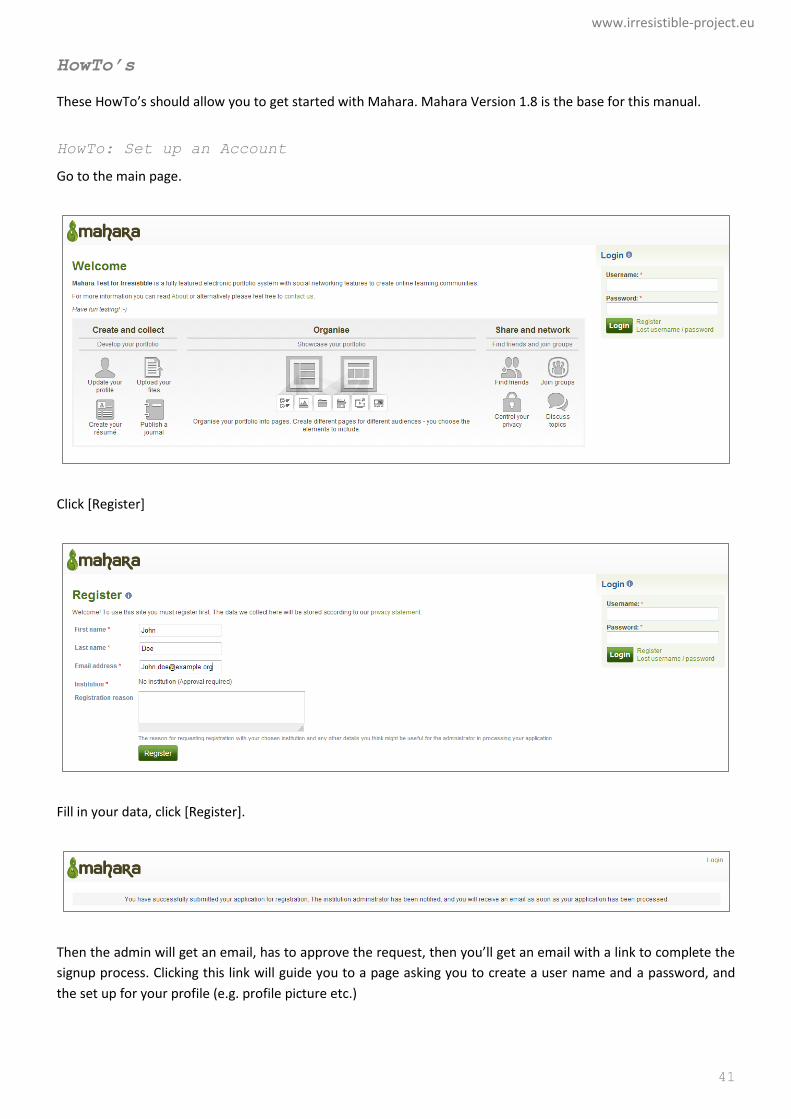
HowTo: Set up an Account
Go to the main page.
Click [Register]
Fill in your data, click [Register].
Then the admin will get an email, has to approve the request, then you’ll get an email with a link to complete the
signup process. Clicking this link will guide you to a page asking you to create a user name and a password, and
the set up for your profile (e.g. profile picture etc.)
ICT Tools in School – a Practical Guide
42
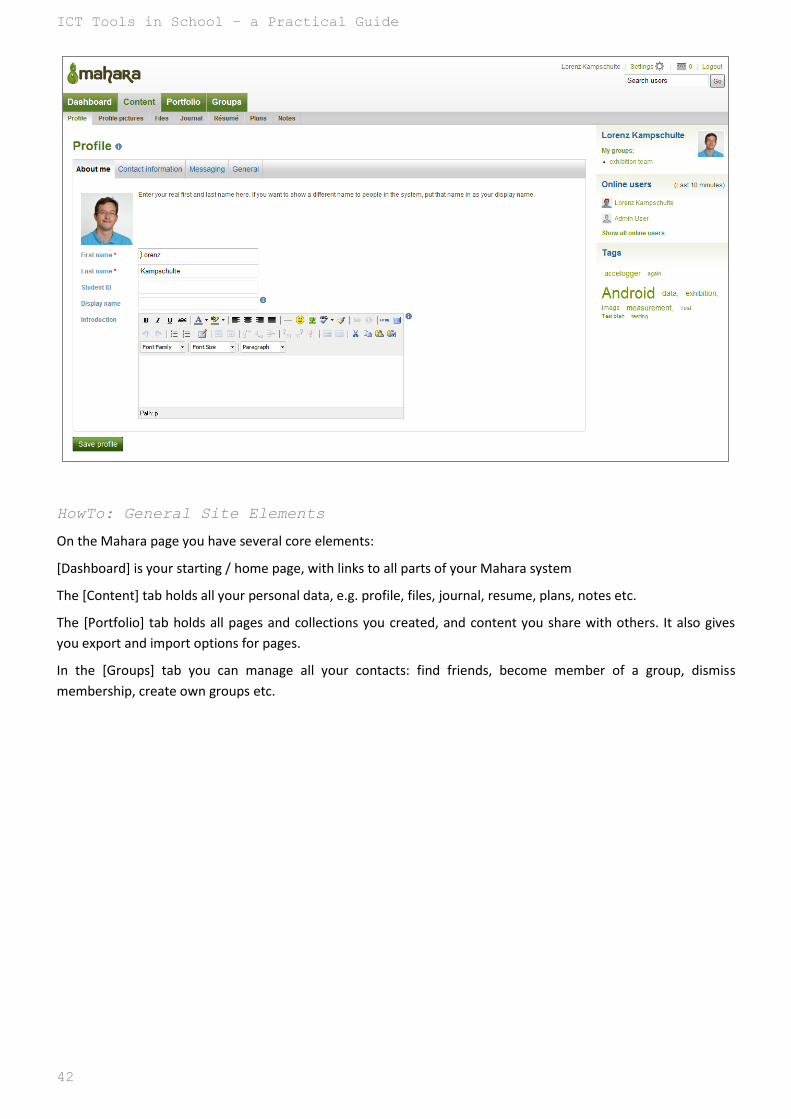
HowTo: General Site Elements
On the Mahara page you have several core elements:
[Dashboard] is your starting / home page, with links to all parts of your Mahara system
The [Content] tab holds all your personal data, e.g. profile, files, journal, resume, plans, notes etc.
The [Portfolio] tab holds all pages and collections you created, and content you share with others. It also gives
you export and import options for pages.
In the [Groups] tab you can manage all your contacts: find friends, become member of a group, dismiss
membership, create own groups etc.

www.irresistible-project.eu
43
HowTo: Upload a File
Uploading files is really simple: Go to [Content] [Files]
Just drag-and-drop the file on the [Drop files here to upload] field, or use the [Add file] button. In the lower part
of the screen you have a list of all your files, can create folders and sort them. Hit the [Edit] button (pen symbol)
to add a description and tags for your file.
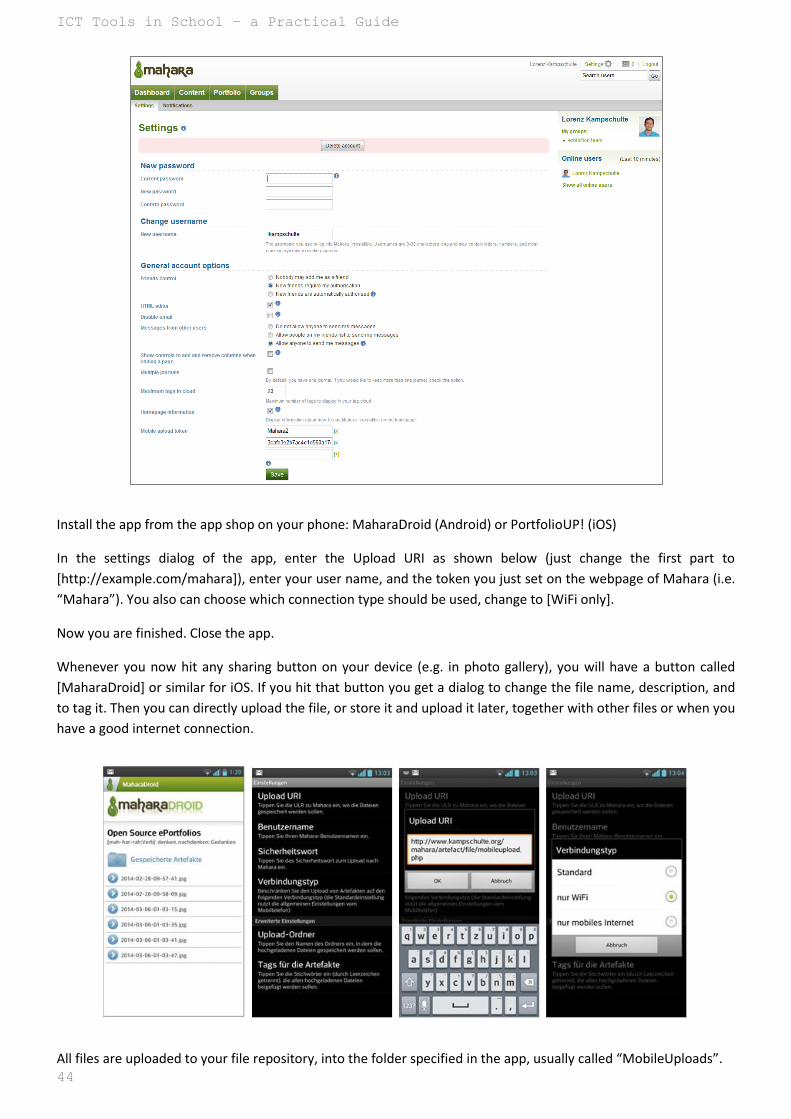
HowTo: Upload a File with a Smartphone App
You can upload files directly by opening Mahara in your mobile browser. But for Android OS as well as iOS there is
an app making uploading even easier. A big advantage is that you can store files in the app, and can upload it later
when you are back to a free WLAN connection (so save your data plan).
On your Mahara page go to [Settings] (upper right corner), and at the end of the page enter a [Mobile upload
token]. This could be a very simple ID like “Mahara” or your name for the first connection; every time you now
upload new artefacts, the system will change the token and then use more secure codes (like the one shown here
in 2nd line). Hit [Save].
ICT Tools in School – a Practical Guide
44
Install the app from the app shop on your phone: MaharaDroid (Android) or PortfolioUP! (iOS)
In the settings dialog of the app, enter the Upload URI as shown below (just change the first part to
[http://example.com/mahara]), enter your user name, and the token you just set on the webpage of Mahara (i.e.
“Mahara”). You also can choose which connection type should be used, change to [WiFi only].
Now you are finished. Close the app.
Whenever you now hit any sharing button on your device (e.g. in photo gallery), you will have a button called
[MaharaDroid] or similar for iOS. If you hit that button you get a dialog to change the file name, description, and
to tag it. Then you can directly upload the file, or store it and upload it later, together with other files or when you
have a good internet connection.
All files are uploaded to your file repository, into the folder specified in the app, usually called “MobileUploads”.
www.irresistible-project.eu
45
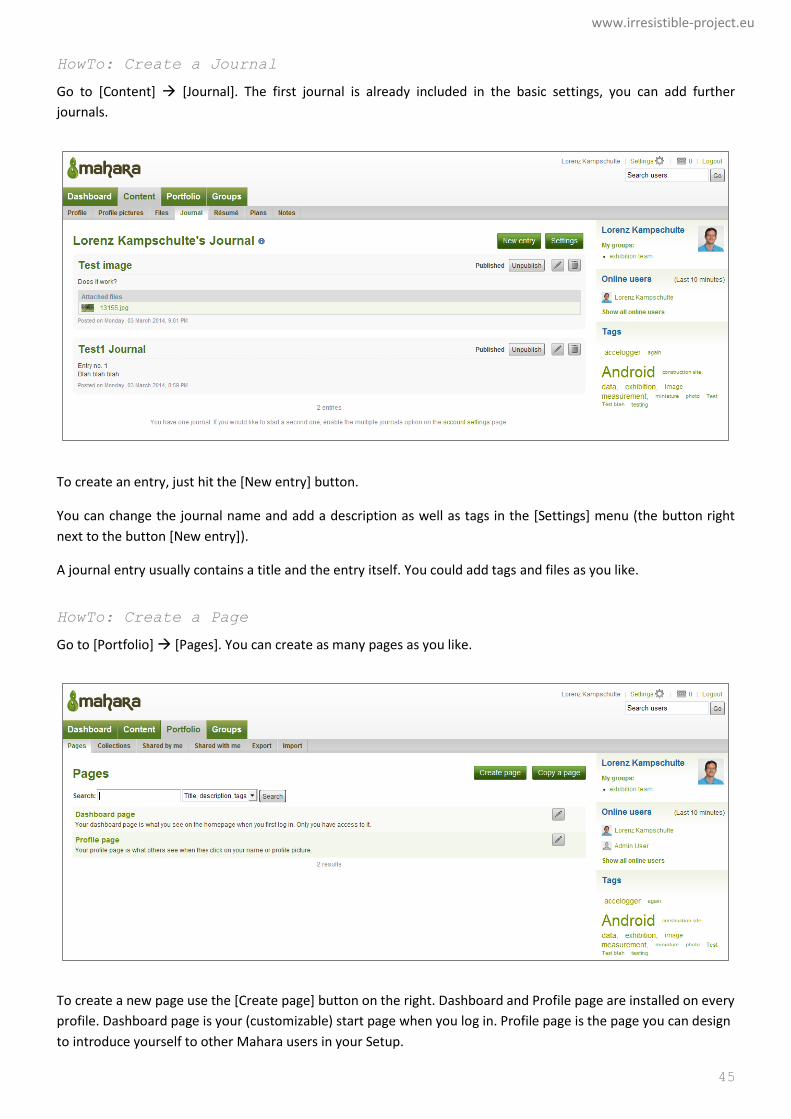
HowTo: Create a Journal
Go to [Content] [Journal]. The first journal is already included in the basic settings, you can add further
journals.
To create an entry, just hit the [New entry] button.
You can change the journal name and add a description as well as tags in the [Settings] menu (the button right
next to the button [New entry]).
A journal entry usually contains a title and the entry itself. You could add tags and files as you like.
HowTo: Create a Page
Go to [Portfolio] [Pages]. You can create as many pages as you like.
To create a new page use the [Create page] button on the right. Dashboard and Profile page are installed on every
profile. Dashboard page is your (customizable) start page when you log in. Profile page is the page you can design
to introduce yourself to other Mahara users in your Setup.
ICT Tools in School – a Practical Guide
46
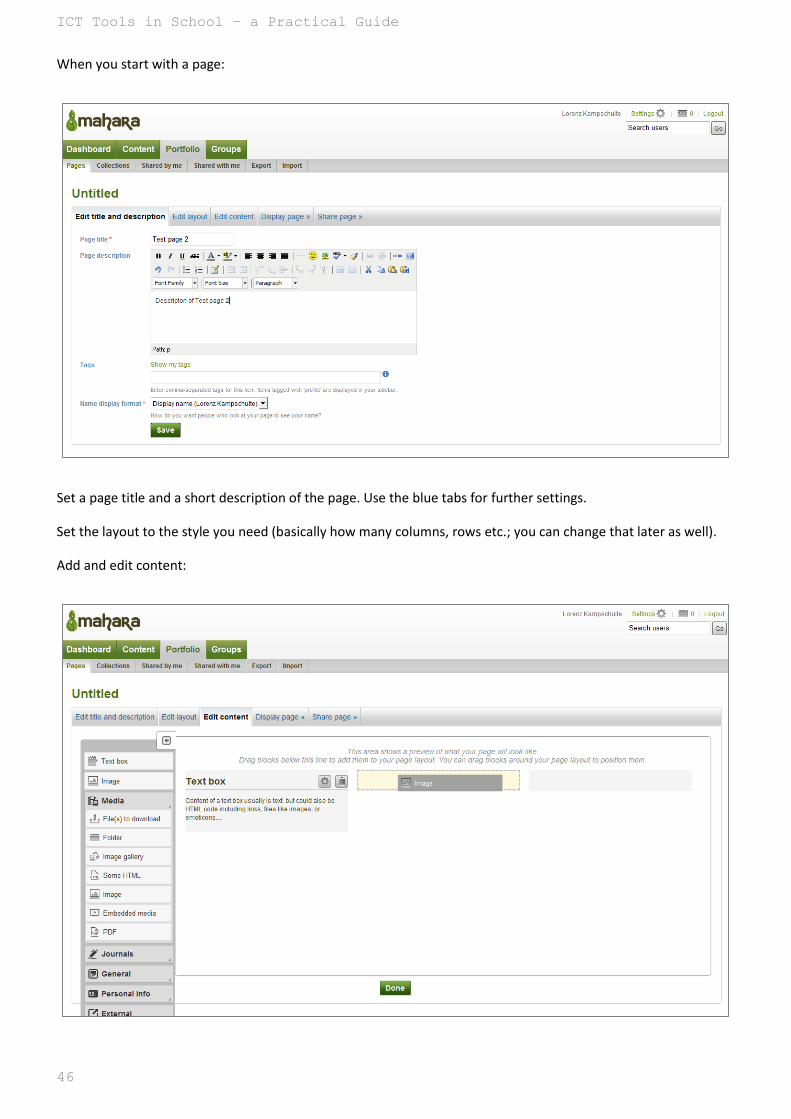
When you start with a page:
Set a page title and a short description of the page. Use the blue tabs for further settings.
Set the layout to the style you need (basically how many columns, rows etc.; you can change that later as well).
Add and edit content:

www.irresistible-project.eu
47
Just drag-and-drop the content placeholders from the menu on the left to your page on the right. If you have
specified the position, an options menu opens where you can add and edit the content, e.g. set a title, text,
image, video, pdf etc. (whatever you like). You can combine internal content (e.g. images, movie clips etc.)
uploaded to your Mahara repository, and external content like YouTube clips, which then will be embedded in
your page. If you add a PDF box and specify a file to it, you’ll see a simple PDF reader embedded in your page
showing the document. Finish the dialog with the [Save] button, and it will be included in your page.
The tab [Display page] gives you a preview of your page.
In the tab [Share page] you can specify who can see your page. Besides others, you can allow users to only view
your page, or to copy it and work on it. So as a teacher, you can create framework pages, share them with your
students who fill in the content, and then share them back to you for review.
For all sharing, you can set a start and end date to define the time when it is accessible. When you share the page
with the public, it might be wise to create a SecretURL. A standard Mahara page URL is something like
http://example.com/mahara/view/view.php?id=17, a Secret URL would be
http://example.com/mahara/view/view.php?t=KWRv0QElLYVXcIdTpFAG thus masking the page ID.
You can export your page in HTML code, so it is usable standalone without Mahara.
Collection:
A collection is a set of pages that are linked to one another and have the same access permissions. You can create
as many collections as you like, but a page cannot appear in more than one collection.
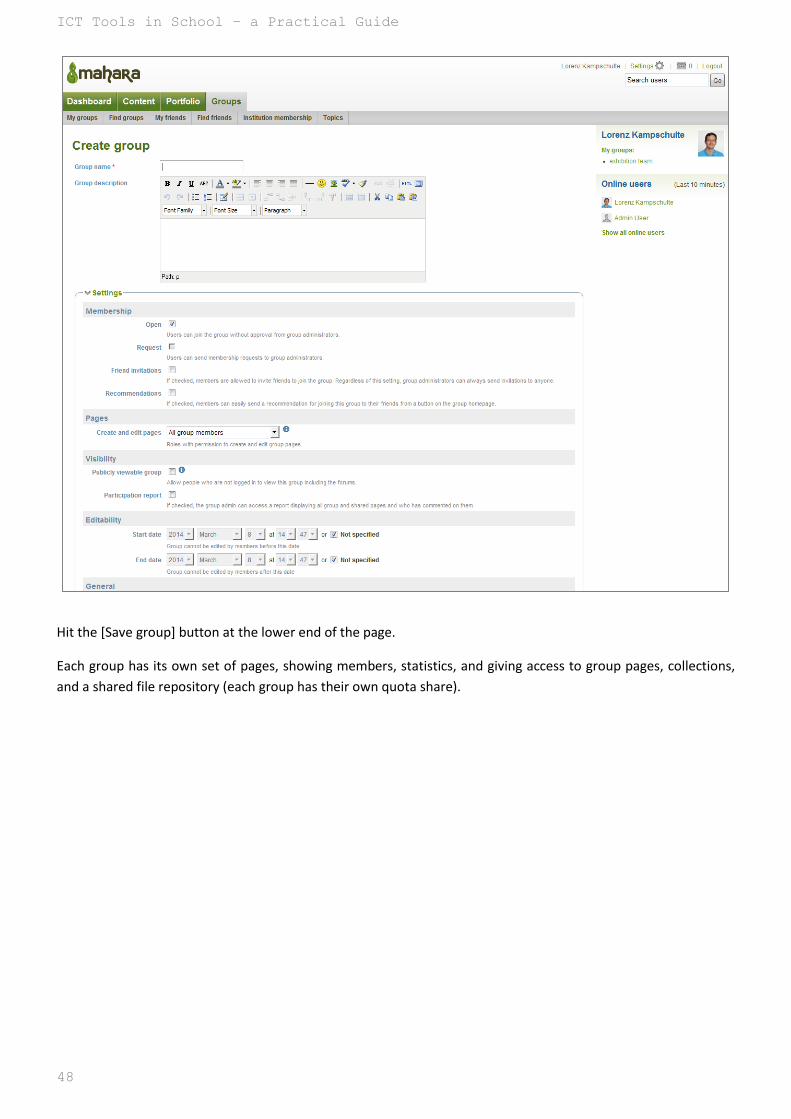
HowTo: Create a Group
There are two ways to becoming a member of a group: Either search for groups and join them (could be free
access or needed to ask permission to join from the group administrator), or found a group yourself.
Go to [Groups] [My Groups] [Create a new group]
In the dialog for creating a new group you can specify the member permissions, e.g. how to enter the group, who
is allowed to edit the group pages etc.
ICT Tools in School – a Practical Guide
48
Hit the [Save group] button at the lower end of the page.
Each group has its own set of pages, showing members, statistics, and giving access to group pages, collections,
and a shared file repository (each group has their own quota share).
www.irresistible-project.eu
49
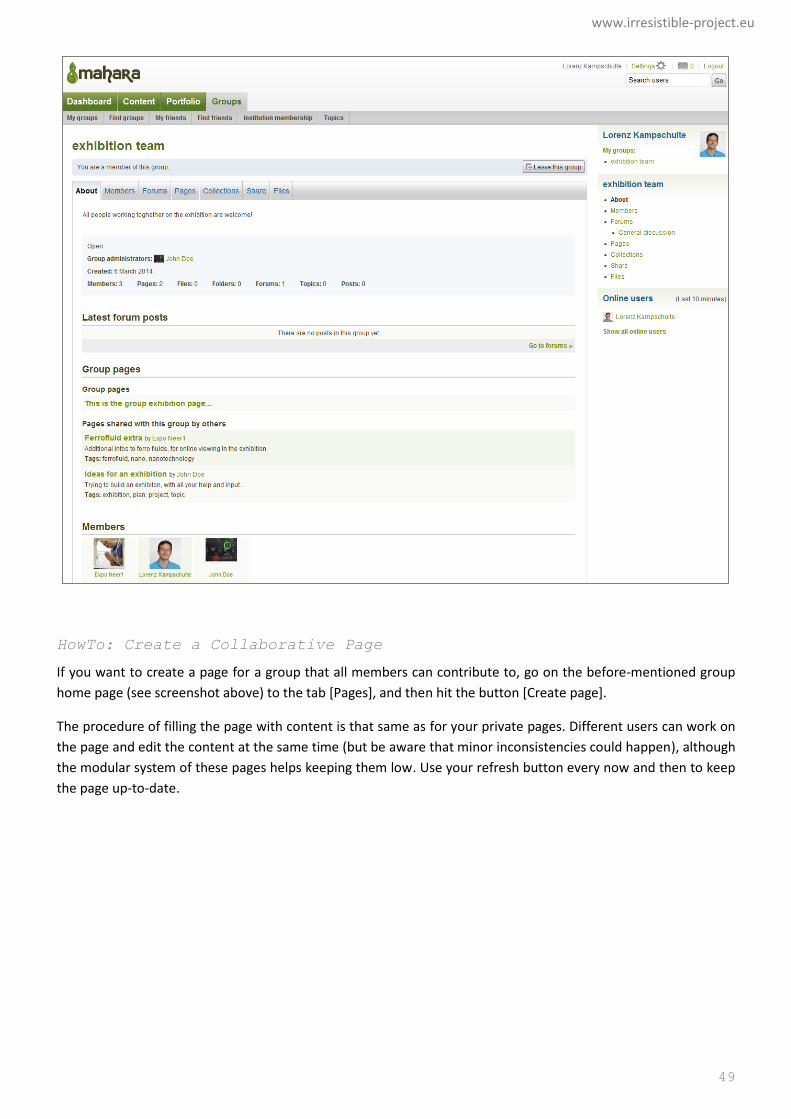
HowTo: Create a Collaborative Page
If you want to create a page for a group that all members can contribute to, go on the before-mentioned group
home page (see screenshot above) to the tab [Pages], and then hit the button [Create page].
The procedure of filling the page with content is that same as for your private pages. Different users can work on
the page and edit the content at the same time (but be aware that minor inconsistencies could happen), although
the modular system of these pages helps keeping them low. Use your refresh button every now and then to keep
the page up-to-date.
ICT Tools in School – a Practical Guide
50
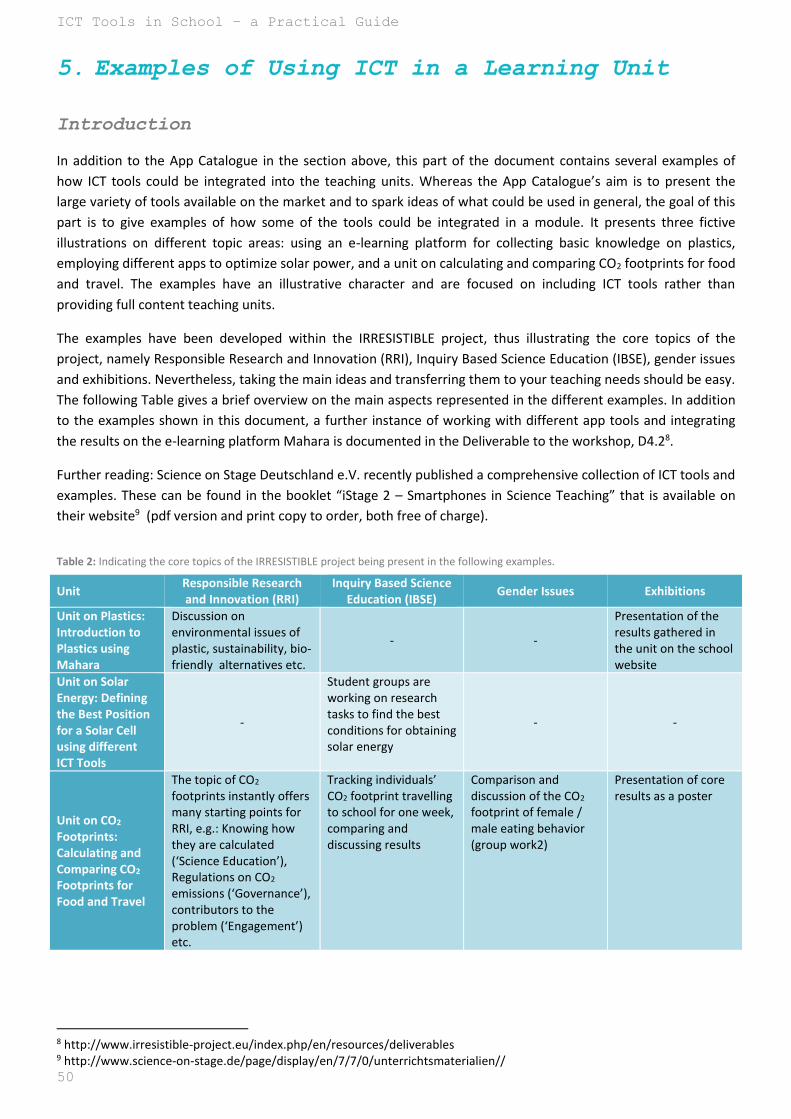
5. Examples of Using ICT in a Learning Unit
Introduction
In addition to the App Catalogue in the section above, this part of the document contains several examples of
how ICT tools could be integrated into the teaching units. Whereas the App Catalogue’s aim is to present the
large variety of tools available on the market and to spark ideas of what could be used in general, the goal of this
part is to give examples of how some of the tools could be integrated in a module. It presents three fictive
illustrations on different topic areas: using an e-learning platform for collecting basic knowledge on plastics,
employing different apps to optimize solar power, and a unit on calculating and comparing CO2 footprints for food
and travel. The examples have an illustrative character and are focused on including ICT tools rather than
providing full content teaching units.
The examples have been developed within the IRRESISTIBLE project, thus illustrating the core topics of the
project, namely Responsible Research and Innovation (RRI), Inquiry Based Science Education (IBSE), gender issues
and exhibitions. Nevertheless, taking the main ideas and transferring them to your teaching needs should be easy.
The following Table gives a brief overview on the main aspects represented in the different examples. In addition
to the examples shown in this document, a further instance of working with different app tools and integrating
the results on the e-learning platform Mahara is documented in the Deliverable to the workshop, D4.28.
Further reading: Science on Stage Deutschland e.V. recently published a comprehensive collection of ICT tools and
examples. These can be found in the booklet “iStage 2 – Smartphones in Science Teaching” that is available on
their website9 (pdf version and print copy to order, both free of charge).
Table 2: Indicating the core topics of the IRRESISTIBLE project being present in the following examples.
Unit Responsible Research and Innovation (RRI)
Inquiry Based Science Education (IBSE)
Gender Issues Exhibitions
Unit on Plastics: Introduction to Plastics using Mahara
Discussion on environmental issues of plastic, sustainability, bio-friendly alternatives etc.
- -
Presentation of the results gathered in the unit on the school website
Unit on Solar Energy: Defining the Best Position for a Solar Cell using different ICT Tools
-
Student groups are working on research tasks to find the best conditions for obtaining solar energy
- -
Unit on CO2 Footprints: Calculating and Comparing CO2 Footprints for Food and Travel
The topic of CO2 footprints instantly offers many starting points for RRI, e.g.: Knowing how they are calculated (‘Science Education’), Regulations on CO2 emissions (‘Governance’), contributors to the problem (‘Engagement’) etc.
Tracking individuals’ CO2 footprint travelling to school for one week, comparing and discussing results
Comparison and discussion of the CO2 footprint of female / male eating behavior (group work2)
Presentation of core results as a poster
8 http://www.irresistible-project.eu/index.php/en/resources/deliverables 9 http://www.science-on-stage.de/page/display/en/7/7/0/unterrichtsmaterialien//
www.irresistible-project.eu
51
Unit on Plastics: Introduction to Plastics using Mahara
This example illustrates a teaching sequence on plastics. It starts with a reference to plastic as part of our daily
environment and then introduces the basics about the production and use of plastic materials. Towards the end,
it raises questions about substituting plastics and other ways to reduce the immense problems they create today.
During the whole unit, students work and document their results on the e-learning platform Mahara. At the end,
the results collected during the teaching unit are presented on the school website. Mahara is just an exemplary
tool to be used here, there are comparable tools around that could be used in a similar way (e.g. Edmondo, page
62ff).
Activity sequence
1. Introduction to Mahara
Introduction of the students into the e-learning system Mahara, creating user accounts for the learners. A brief
introduction to the e-learning platform Mahara is included in this guide on pages 40 to 49.
2. Entry task: everyday reference
The students get the task to photograph three different objects made of plastic in their home. The objects should
be as different as possible. Afterwards these images should be uploaded to the content section of their individual
Mahara account (in Mahara jargon they are then called artifacts). This can be either done by using their own
smartphones and the Mahara app, or done in a classical way by using a digital camera and upload the images via
the browser interface.
In the following lesson, a joint Mahara group for the project is established and the images are collected in a
common portfolio. The pupils are asked to find categories for sorting the plastic pictures (this could be e.g. color,
hard / soft, applications etc.). If pupils come up with several classifications schemes, multiple portfolios can be
created and filled. Afterwards, the different sorting criteria are discussed by the learners, either face-to-face in
class or digitally within a Mahara forum.
3. Topic plastics
In the following lesson(s) the students are introduced to the topic of plastic. The introductory unit to plastics
could incorporate e.g. structure, fabrication (polyreactions), properties, labelling etc. From this knowledge, new
criteria arise to sort plastic into different categories.
When the new categories are developed, a new Mahara portfolio is created. As an introduction to each category
the nature, structure and main properties are briefly described. The students try to find out which plastic the
photographed objects are made of and sort the images into the new categories.
4. Topic recycling
This section starts with a short teaching unit on plastic: “Problems with Production and Recycling”. Different
plastics are analyzed and compared with respect to their sustainability, considering not only the current use but
their impact over the entire life span. The findings from the unit are collected in a new plastic portfolio.
Subsequently, the task to research bio-friendly alternatives to the plastics shown in the portfolio is given to the
students. The alternatives should have similar characteristics and thus should be able to serve as a direct
substitute for the original plastics. If appropriate, other groups with secondary tasks are formed, for example:
how can recycling be further improved or how can the construction of products be optimized to reduce the use of
plastic and to ease recycling (reduced quantity of conventional plastic, composite materials, recycling friendly

ICT Tools in School – a Practical Guide
52
construction etc.). The research results of the groups are collected on further Mahara portfolios, the (digital)
discussion can be dealt with in topic-related Mahara forums.
5. Presentation
Each group prepares a final portfolio page or a small series of blog entries within Mahara, which summarize the
main findings of their group work in a multimedia format. These contents are first presented to the class, then
released as a public Mahara portfolio and in the end embedded in the school website.
Fig. 7: Example of a Mahara portfolio during the sorting process: students’ photographs are
grouped in four categories: thermoplast, duroplast, elastomer, unsettled.
www.irresistible-project.eu
53
Unit on Solar Energy: Defining the Best Position for a Solar
Cell using different ICT Tools
In this example, a teaching unit on solar energy is presented, especially looking at the influence of the solar panel
position on the highest possible power generation. The class is divided in three groups looking at different
aspects: the local position (e.g. influenced by houses, trees etc.), the regional position (e.g. influenced by
topography, sunshine duration etc.), as well as the technical position (e.g. orientation, tilting angle etc.). During
the units, the groups work with different ICT tools to fulfill their tasks, the tools are either smartphone or
computer based. The tools are just examples that could be used, several other tools are available that could be
used in a similar way.
Activity sequence
1. Introduction
Solar energy is a fundamental part of all scenarios to ensure the global energy supply in the future. Until the
vision of a ‘solar paint’ that can be applied to almost all surfaces turning them into effective peripheral power
generators comes true, we have quite a way to go. Today’s state of the art technology is photovoltaic solar panels
being based on polysilicon or thin films. These have two main drawbacks: they still are moderately expensive (so
it’s not possible to ‘just cover’ all available surfaces), and their efficiency is highly dependent on their orientation
towards the light. The latter effect should be investigated within this unit.
2. Group 1 – school yard
Task: Find the best spot to place a 2 m² photovoltaic solar panel on your school yard. Take factors as sun position
during a day, seasonal sun position, obstacles (houses, trees) into account. Use the App Sun Position10 or Sun
Surveyor11 to work out the best place.
As a result, take (or draw) a map of your school yard and indicate your 1st and 2nd choice position. Draw a table
and list the relevant factors for both positions.
Fig. 8: Screenshots of the apps Sun Position (left) and Sun Surveyor (middle and right) to determine the best position for
a solar panel (screenshots: 10, 11).
10 https://play.google.com/store/apps/details?id=com.andymstone.sunpositiondemo&hl=de 11 https://play.google.com/store/apps/details?id=com.ratana.sunsurveyor&hl=de
ICT Tools in School – a Practical Guide
54
3. Group 2 – regional position
Task: Find the best spot for a small communal solar power plant (200 m² base area, photovoltaic) within a radius
of 50 km from your school location. Take factors as local sunshine duration, topography, sites (buildings,
grassland, large roofs etc.) into account. Use Tools like Google Earth12 (topography, site options), sunshine
duration maps13, or tools to analyze the course of the sun for a specific place.14
As a result, take a map of the area under investigation and indicate your 1st and 2nd choice position. Draw a table
and list the relevant factors for both positions.
Fig. 9: Course of the sun simulated on sonnenverlauf.de14 (left), map of global radiation for southern Bavaria13 (right).
12 https://earth.google.com/ 13 http://geoportal.bayern.de/energieatlas-karten (similar maps should exist for most regions) 14 http://www.sonnenverlauf.de/#/48.2184,11.6294,15/2015.11.04/07:24/1
www.irresistible-project.eu
55
Fig. 10: Two possible positions for a small PV solar power plant, visualized in Google Earth12: (1) on the roof of a football
stadium, (2) on the top of a small hill close by.
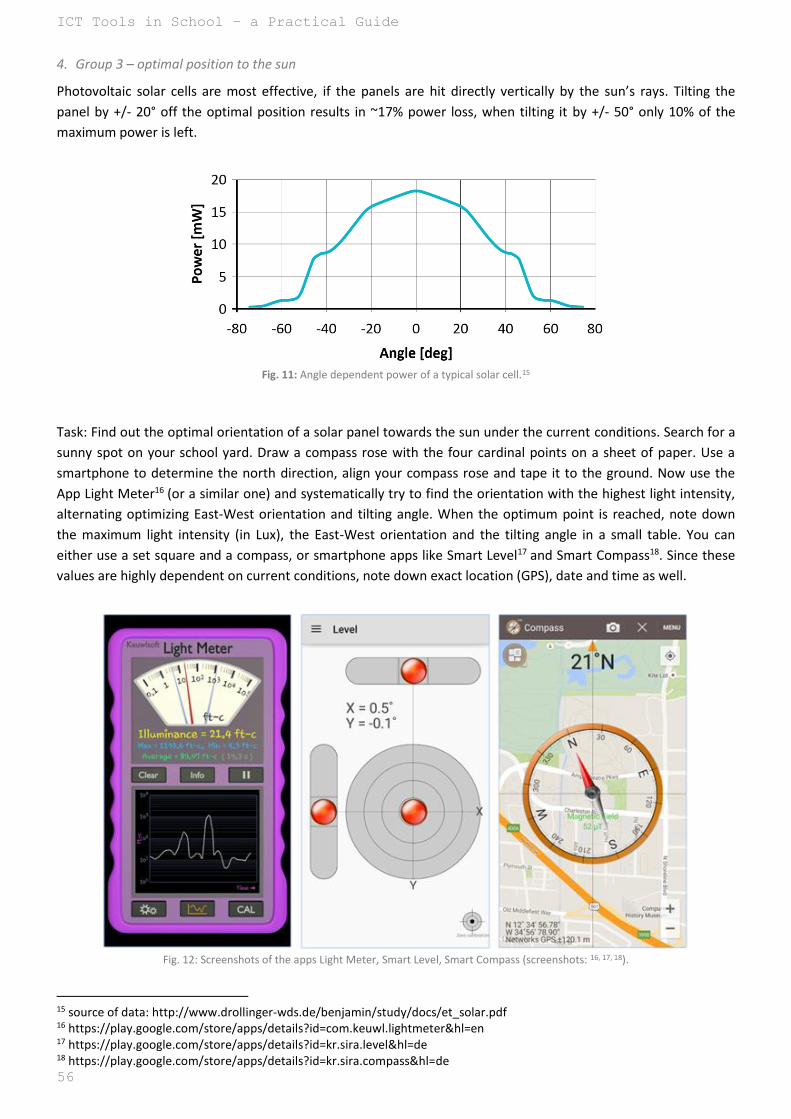
ICT Tools in School – a Practical Guide
56
4. Group 3 – optimal position to the sun
Photovoltaic solar cells are most effective, if the panels are hit directly vertically by the sun’s rays. Tilting the
panel by +/- 20° off the optimal position results in ~17% power loss, when tilting it by +/- 50° only 10% of the
maximum power is left.
Fig. 11: Angle dependent power of a typical solar cell.15
Task: Find out the optimal orientation of a solar panel towards the sun under the current conditions. Search for a
sunny spot on your school yard. Draw a compass rose with the four cardinal points on a sheet of paper. Use a
smartphone to determine the north direction, align your compass rose and tape it to the ground. Now use the
App Light Meter16 (or a similar one) and systematically try to find the orientation with the highest light intensity,
alternating optimizing East-West orientation and tilting angle. When the optimum point is reached, note down
the maximum light intensity (in Lux), the East-West orientation and the tilting angle in a small table. You can
either use a set square and a compass, or smartphone apps like Smart Level17 and Smart Compass18. Since these
values are highly dependent on current conditions, note down exact location (GPS), date and time as well.
Fig. 12: Screenshots of the apps Light Meter, Smart Level, Smart Compass (screenshots: 16, 17, 18).
15 source of data: http://www.drollinger-wds.de/benjamin/study/docs/et_solar.pdf 16 https://play.google.com/store/apps/details?id=com.keuwl.lightmeter&hl=en 17 https://play.google.com/store/apps/details?id=kr.sira.level&hl=de 18 https://play.google.com/store/apps/details?id=kr.sira.compass&hl=de
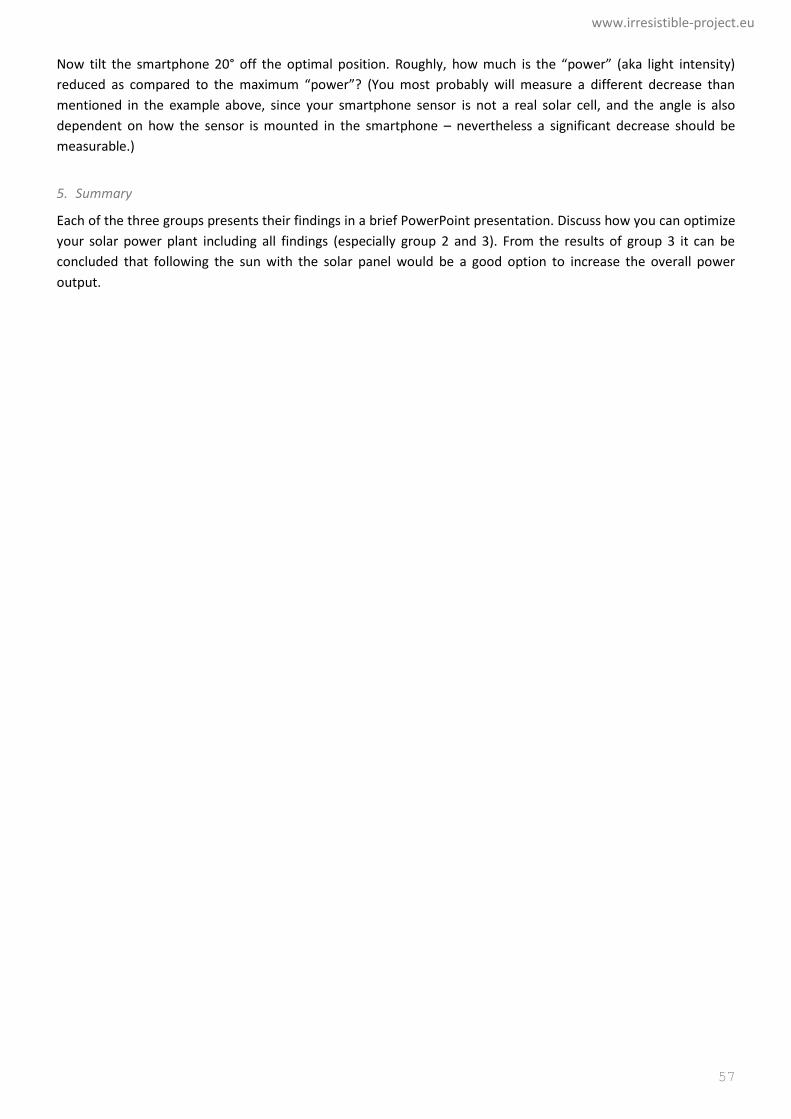
www.irresistible-project.eu
57
Now tilt the smartphone 20° off the optimal position. Roughly, how much is the “power” (aka light intensity)
reduced as compared to the maximum “power”? (You most probably will measure a different decrease than
mentioned in the example above, since your smartphone sensor is not a real solar cell, and the angle is also
dependent on how the sensor is mounted in the smartphone – nevertheless a significant decrease should be
measurable.)
5. Summary
Each of the three groups presents their findings in a brief PowerPoint presentation. Discuss how you can optimize
your solar power plant including all findings (especially group 2 and 3). From the results of group 3 it can be
concluded that following the sun with the solar panel would be a good option to increase the overall power
output.
ICT Tools in School – a Practical Guide
58
Unit on CO2 Footprints: Calculating and Comparing CO2
Footprints for Food and Travel
This example illustrates a teaching unit on carbon footprints. Carbon footprints are “a measure of the total
amount of carbon dioxide (CO2) and methane (CH4) emissions of a defined population, system or activity,
considering all relevant sources, sinks and storage within the spatial and temporal boundary of the population,
system or activity of interest. Calculated as carbon dioxide equivalent (CO2e) using the relevant 100-year global
warming potential (GWP100).”19 Working with and reflecting these measures, students should get an idea on the
dimension of CO2 emissions and how the individual can influence climate change by controlling his/her own
behavior. In the teaching unit, several apps and websites are used to explore, compare and track the individual
carbon footprint.
The teaching module on Climate Change developed by the Finnish partners within the IRRESISTIBLE project
includes several aspects on CO2 and Carbon footprints20.
Activity sequence
1. Introduction
The introduction to the topic starts with a more general approach to climate change and the role of CO2 and other
greenhouse gases. Following, the concept of carbon footprints is introduced, illustrating their idea of not only
taking direct emission (e.g. transportation) into account, but also considering indirect emission (e.g. food, textiles
etc.). For the latter it is especially interesting to have a look on product lifecycle analysis.
2. Determining the CO2 emission of getting to school for one week
Introduce students to using the app Changers CO2 fit21. The app allows the user to track all travelling, it calculates
the CO2 saved and rewards the user with green bonus points called ReCoins.
Let the students track their way to school (or all travelling) for one week, collect, compare and discuss the results.
Fig. 13: Screenshots of the app Changers CO2 Fit: start screen, travel screen, list of travel activities
(screenshots 21).
19 Wright, L.; Kemp, S.; Williams, I. (2011). "'Carbon footprinting': towards a universally accepted definition". Carbon Management 2 (1): 61–72. doi:10.4155/CMT.10.39. 20 http://www.irresistible-project.eu/index.php/en/topics 21 https://play.google.com/store/apps/details?id=com.blacksquared.changers&hl=de
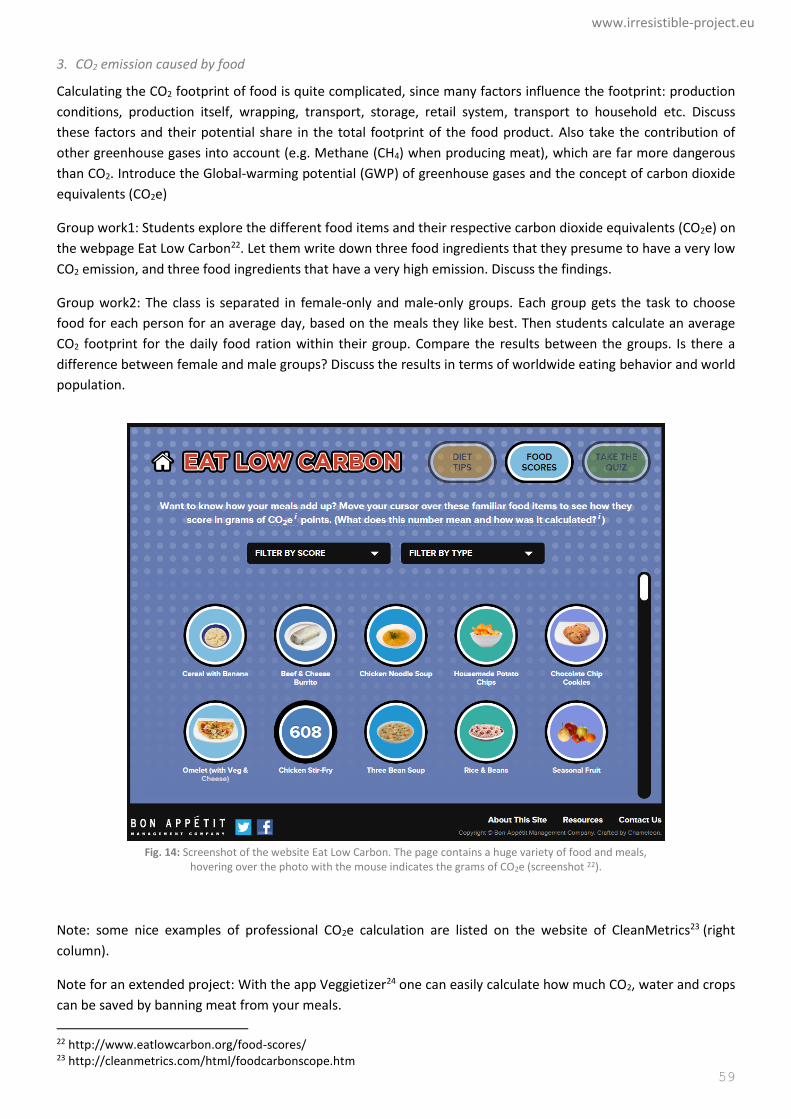
www.irresistible-project.eu
59
3. CO2 emission caused by food
Calculating the CO2 footprint of food is quite complicated, since many factors influence the footprint: production
conditions, production itself, wrapping, transport, storage, retail system, transport to household etc. Discuss
these factors and their potential share in the total footprint of the food product. Also take the contribution of
other greenhouse gases into account (e.g. Methane (CH4) when producing meat), which are far more dangerous
than CO2. Introduce the Global-warming potential (GWP) of greenhouse gases and the concept of carbon dioxide
equivalents (CO2e)
Group work1: Students explore the different food items and their respective carbon dioxide equivalents (CO2e) on
the webpage Eat Low Carbon22. Let them write down three food ingredients that they presume to have a very low
CO2 emission, and three food ingredients that have a very high emission. Discuss the findings.
Group work2: The class is separated in female-only and male-only groups. Each group gets the task to choose
food for each person for an average day, based on the meals they like best. Then students calculate an average
CO2 footprint for the daily food ration within their group. Compare the results between the groups. Is there a
difference between female and male groups? Discuss the results in terms of worldwide eating behavior and world
population.
Fig. 14: Screenshot of the website Eat Low Carbon. The page contains a huge variety of food and meals,
hovering over the photo with the mouse indicates the grams of CO2e (screenshot 22).
Note: some nice examples of professional CO2e calculation are listed on the website of CleanMetrics23 (right
column).
Note for an extended project: With the app Veggietizer24 one can easily calculate how much CO2, water and crops
can be saved by banning meat from your meals.
22 http://www.eatlowcarbon.org/food-scores/ 23 http://cleanmetrics.com/html/foodcarbonscope.htm
ICT Tools in School – a Practical Guide
60
4. Summary
Discuss the findings on CO2 emissions from food and travel. For consolidating the results of the unit, let the
students make a joint poster which could have three parts:
- Introduction, explaining CO2 problem and concept of carbon footprints and carbon dioxide equivalents
(CO2e)
- Catchy examples to present: compare travelling a specified distance by plane, by train, by bus, by car and
by bicycle and / or compare meat: beef from Argentina, local beef, local poultry
- Students research the CO2e for ten different kinds of food (e.g. 100g of pasta, 100g soy milk, 100g beef
etc.) and calculate how far you could travel with a car producing the same CO2 emission (for a graphic
inspiration look at the illustration of the CO2e of different products published by the meateater’s-guide25).
Hang up the poster in a frequented spot in the school building to spark discussion between students.
24 https://play.google.com/store/apps/details?id=freerunningapps.veggietizer&hl=en (currently only a German version available) 25 http://static.ewg.org/reports/2011/meateaters/images/eatsmart_twenty.gif
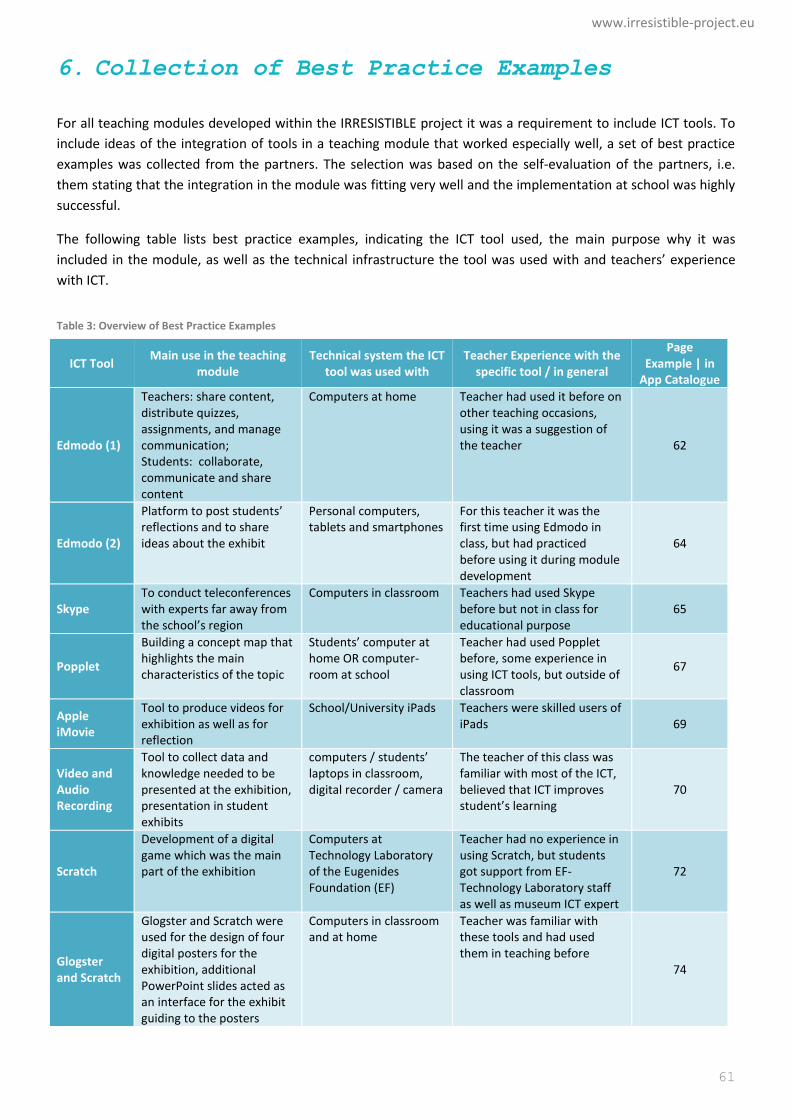
www.irresistible-project.eu
61
6. Collection of Best Practice Examples
For all teaching modules developed within the IRRESISTIBLE project it was a requirement to include ICT tools. To
include ideas of the integration of tools in a teaching module that worked especially well, a set of best practice
examples was collected from the partners. The selection was based on the self-evaluation of the partners, i.e.
them stating that the integration in the module was fitting very well and the implementation at school was highly
successful.
The following table lists best practice examples, indicating the ICT tool used, the main purpose why it was
included in the module, as well as the technical infrastructure the tool was used with and teachers’ experience
with ICT.
Table 3: Overview of Best Practice Examples
ICT Tool Main use in the teaching
module Technical system the ICT
tool was used with Teacher Experience with the
specific tool / in general
Page Example | in
App Catalogue
Edmodo (1)
Teachers: share content, distribute quizzes, assignments, and manage communication; Students: collaborate, communicate and share content
Computers at home Teacher had used it before on other teaching occasions, using it was a suggestion of the teacher 62
Edmodo (2)
Platform to post students’ reflections and to share ideas about the exhibit
Personal computers, tablets and smartphones
For this teacher it was the first time using Edmodo in class, but had practiced before using it during module development
64
Skype To conduct teleconferences with experts far away from the school’s region
Computers in classroom Teachers had used Skype before but not in class for educational purpose
65
Popplet
Building a concept map that highlights the main characteristics of the topic
Students’ computer at home OR computer-room at school
Teacher had used Popplet before, some experience in using ICT tools, but outside of classroom
67
Apple iMovie
Tool to produce videos for exhibition as well as for reflection
School/University iPads Teachers were skilled users of iPads 69
Video and Audio Recording
Tool to collect data and knowledge needed to be presented at the exhibition, presentation in student exhibits
computers / students’ laptops in classroom, digital recorder / camera
The teacher of this class was familiar with most of the ICT, believed that ICT improves student’s learning
70
Scratch
Development of a digital game which was the main part of the exhibition
Computers at Technology Laboratory of the Eugenides Foundation (EF)
Teacher had no experience in using Scratch, but students got support from EF-Technology Laboratory staff as well as museum ICT expert
72
Glogster and Scratch
Glogster and Scratch were used for the design of four digital posters for the exhibition, additional PowerPoint slides acted as an interface for the exhibit guiding to the posters
Computers in classroom and at home
Teacher was familiar with these tools and had used them in teaching before
74
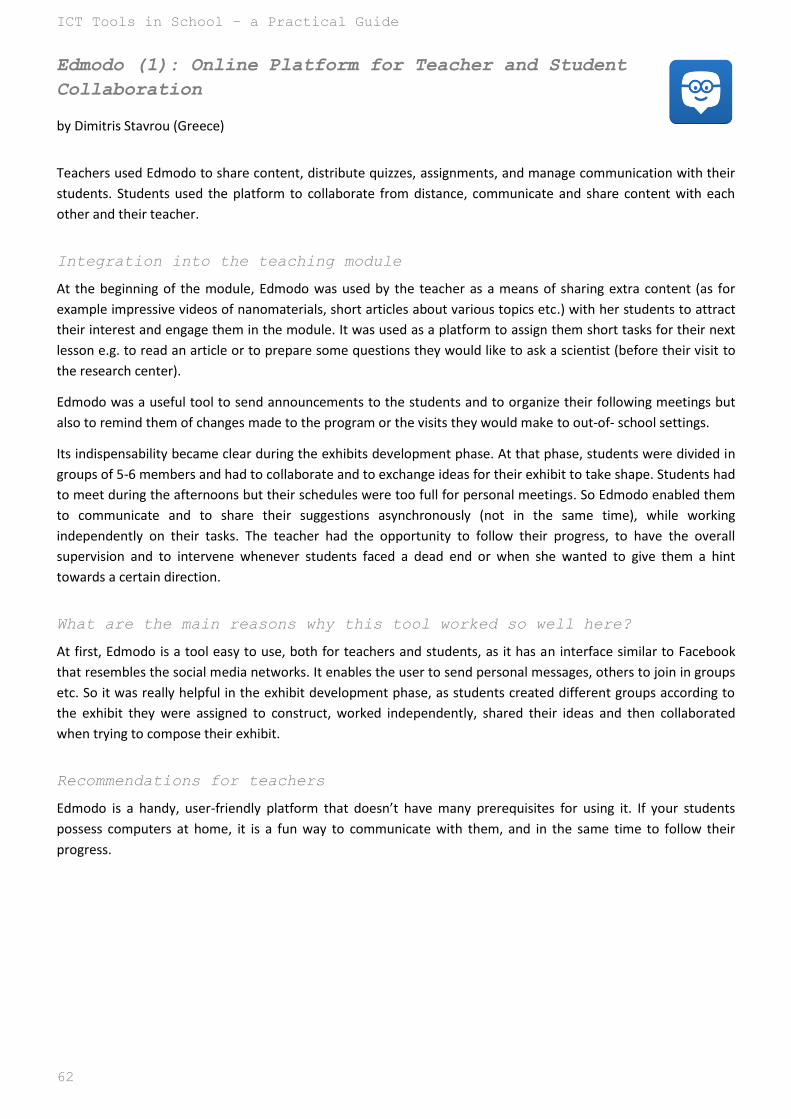
ICT Tools in School – a Practical Guide
62
Edmodo (1): Online Platform for Teacher and Student
Collaboration
by Dimitris Stavrou (Greece)
Teachers used Edmodo to share content, distribute quizzes, assignments, and manage communication with their
students. Students used the platform to collaborate from distance, communicate and share content with each
other and their teacher.
Integration into the teaching module
At the beginning of the module, Edmodo was used by the teacher as a means of sharing extra content (as for
example impressive videos of nanomaterials, short articles about various topics etc.) with her students to attract
their interest and engage them in the module. It was used as a platform to assign them short tasks for their next
lesson e.g. to read an article or to prepare some questions they would like to ask a scientist (before their visit to
the research center).
Edmodo was a useful tool to send announcements to the students and to organize their following meetings but
also to remind them of changes made to the program or the visits they would make to out-of- school settings.
Its indispensability became clear during the exhibits development phase. At that phase, students were divided in
groups of 5-6 members and had to collaborate and to exchange ideas for their exhibit to take shape. Students had
to meet during the afternoons but their schedules were too full for personal meetings. So Edmodo enabled them
to communicate and to share their suggestions asynchronously (not in the same time), while working
independently on their tasks. The teacher had the opportunity to follow their progress, to have the overall
supervision and to intervene whenever students faced a dead end or when she wanted to give them a hint
towards a certain direction.
What are the main reasons why this tool worked so well here?
At first, Edmodo is a tool easy to use, both for teachers and students, as it has an interface similar to Facebook
that resembles the social media networks. It enables the user to send personal messages, others to join in groups
etc. So it was really helpful in the exhibit development phase, as students created different groups according to
the exhibit they were assigned to construct, worked independently, shared their ideas and then collaborated
when trying to compose their exhibit.
Recommendations for teachers
Edmodo is a handy, user-friendly platform that doesn’t have many prerequisites for using it. If your students
possess computers at home, it is a fun way to communicate with them, and in the same time to follow their
progress.
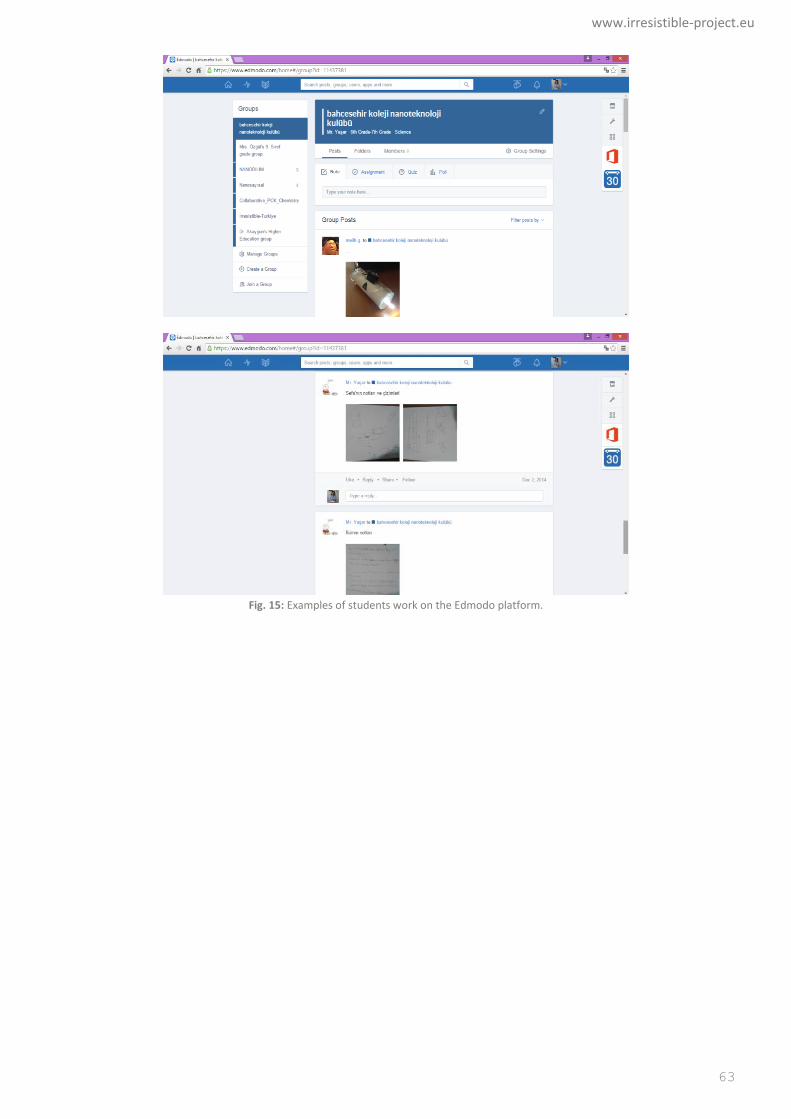
www.irresistible-project.eu
63
Fig. 15: Examples of students work on the Edmodo platform.
ICT Tools in School – a Practical Guide
64
Edmodo (2): A Simple Platform for Teachers and
Students to Share and Communicate
by Sevil Akaygün (Turkey)
Edmodo is a simple platform that is used as a Learning Management System (LMS) through which teacher and
students share their ideas, announcements, and materials. They also post comments and express their feeling
such as ‘Like’.
Integration into the teaching module
The Nanosilver module is composed of 8 lessons, each of which is 80 minutes long. In every lesson, the teacher
created a page where students could upload their reflections or assignments of that lesson. Then they conducted
online discussions about the past lesson. So, both the teacher and the students actively used Edmodo throughout
the module.
What are the main reasons why this tool worked so well here?
1. Edmodo is a good tool that allows interaction among the students and the teacher, so it was very appropriate
for our module in which students work in groups, yet individually reflect on the tasks. Edmodo allows both group
and individual work.
2. The interface of Edmodo looks like Facebook so it was very attractive and easy to use for students.
Recommendations for teachers
We have an Edmodo page for the teachers developing the module, so they practiced and got used to it. I think it
might be recommended to have an Edmodo page / group for a bigger group where they can join as participants
before being a teacher.
www.irresistible-project.eu
65
Skype: Teleconferences with Experts Far Away from the
School’s Region
by Dimitris Stavrou (Greece)
Skype was used to conduct teleconferences with experts (science centers or science museums) far away from the
school’s region.
Integration into the teaching module
We used Skype to conduct teleconferences on several occasions. In our module one of the main objectives was
for students to come in direct contact with experts and to exchange ideas with them as these experts had
contributed in the module development: researchers from the FORTH (in Crete) and museum experts from EF (in
Athens). As a result, students whose schools were far away from the aforementioned institutions had to
overcome the obstacle of the distance. Skype helped us eliminate the distance, enabling the conduction of tele-
meetings with the experts.
So in the engagement phase, when (according to our module) students should visit the Interactive Exhibition of
Science and Technology of EF in Athens and be toured around the exhibits, students of Rethymnon made a Skype
connection with the expert there, who – holding his tablet – was guiding them through the various exhibits
discussing their designing advantages and disadvantages. Likewise, in the exhibits development phase, the
museum expert showed the exhibits via Skype in a particular tele-meeting and gave his advices from a distance
instead of visiting the class in person in order to advise them on the exhibits they had started developing (as he
did with the schools in Athens).
Respectively, in the elaboration phase, when students were supposed to personally discuss the nanotechnology
applications developed and RRI issues involved with the FORTH scientists in Crete, instead those students from
Athens had the opportunity to pose their questions and talk to them via Skype.
In this way every student, no matter where his/her school was, had the same stimuli and the same experiences as
other students in different locations.
What are the main reasons why this tool worked so well here?
Firstly, students were excited about conducting a teleconference especially with experts from the science center
and the science museum, as it was their first time, and somehow they felt like this procedure was adding prestige
to their effort.
Secondly, as was said before, our module development group and the institutions that were collaborating in
developing the module were located in three different cities (Athens, Heraklio, Rethymno). If students would
have had to limit their visits to the sites which they could have physically traveled to, they certainly would have
missed important experiences that were indispensable to fulfill the module.
Recommendations for teachers
Skype is a useful tool that enables the minimization of all distances. We would recommend it whenever for some
reason you cannot accomplish students’ physical presence in a certain place, as it is really easy to use.
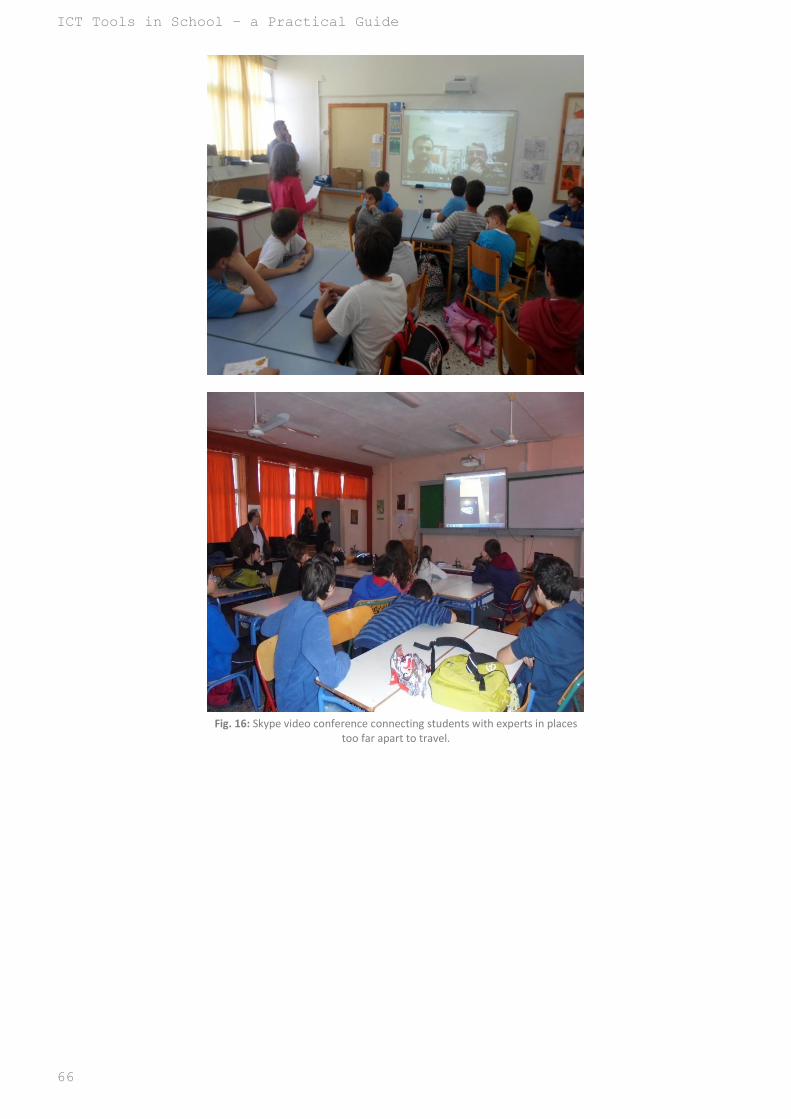
ICT Tools in School – a Practical Guide
66
Fig. 16: Skype video conference connecting students with experts in places
too far apart to travel.
www.irresistible-project.eu
67
Popplet: A Tool for Building Concept Maps
by Rita Marques (Portugal)
The tool is used for building a concept map that highlights the main characteristics of the Polar Regions after
students have done some research on the topic.
Integration into the teaching module
After doing some research on the Polar Regions (climate, biology, geology, geography), students had to organize
their knowledge and represent it through a set of concepts and their relationships (indicated by a connection line
between two concepts). The relationships between concepts in different domains of the concept map helped us
to see how some domains of knowledge represented on the map were related to each other. A final feature that
may be added to concept maps is listing specific examples of events or objects that help to clarify the meaning of
a given concept. Concerning the tool, students need to create an account (or they can try it out) and choose the
free version, although limited in the number of concept maps it allows. After building their maps, they then share
them (i.e. share their hyperlink or embed them, via blog or other platform) for evaluation regarding the
evaluation criteria. Students were aware of these criteria since the onset of the task.
What are the main reasons why this tool worked so well here?
a) It allows teachers to identify both valid and invalid ideas held by students.
b) It allows the incorporation of images or videos (from YouTube, Vimeo) as representation of concepts, not
only text.
c) In order to establish relationships between concepts, students have the opportunity to structure their
knowledge about the topic, becoming more aware of what they know or don't know yet.
d) The concept maps can be easily built and shared.
Recommendations for teachers
First of all, students don't usually know what concept maps are – for them, they're a list of words, structured in a
linear fashion. If there is no time available in class for teachers to show, as an example, how to build a concept
map using Popplet, it is very important to share a tutorial with students (although the tool is very easy to use and
very intuitive).
As a tool for building concept maps, Popplet has a downside: it does not allow the user to write (in a quick way) a
word on the connecting line, and this word is very important since it specifies the relationship between the two
concepts. But students can place it, nevertheless, inside a box: then they will have two concepts connected
through a line with a box, inside of which is the linking word. It's an alternative way of making the map more
complete.
Another important issue is the assessment criteria: they should be delivered to students on the onset of the task.
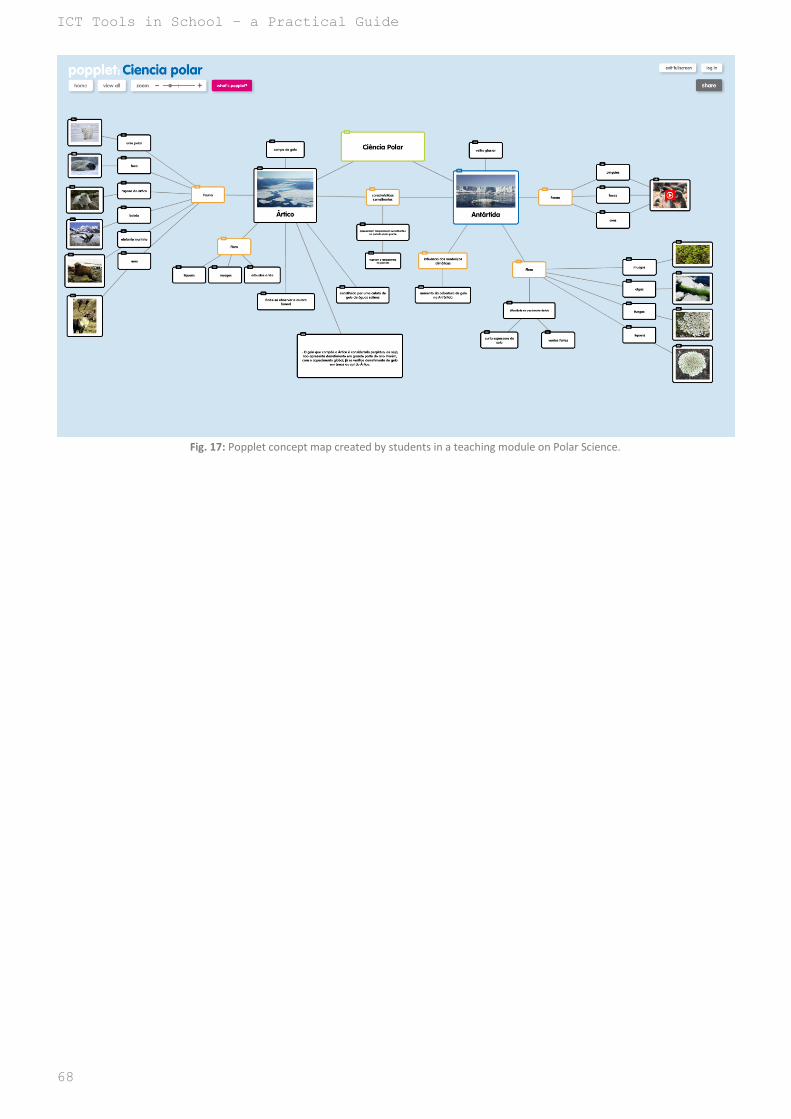
ICT Tools in School – a Practical Guide
68
Fig. 17: Popplet concept map created by students in a teaching module on Polar Science.
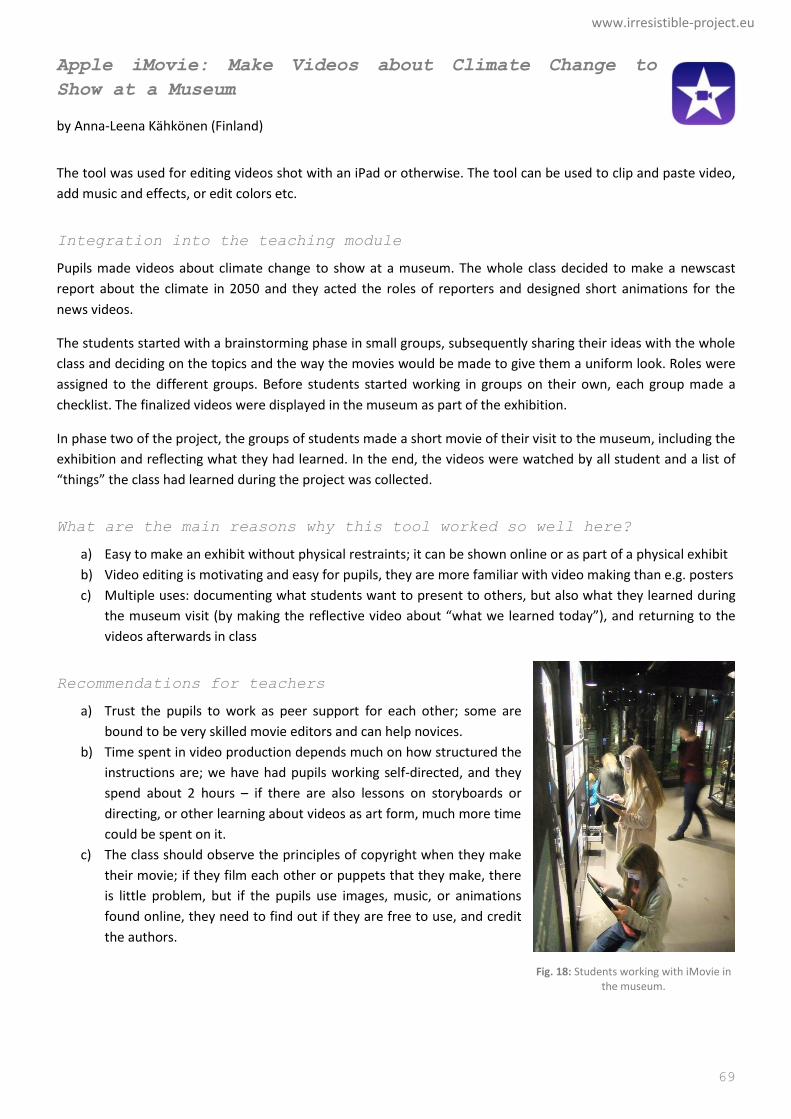
www.irresistible-project.eu
69
Apple iMovie: Make Videos about Climate Change to
Show at a Museum
by Anna-Leena Kähkönen (Finland)
The tool was used for editing videos shot with an iPad or otherwise. The tool can be used to clip and paste video,
add music and effects, or edit colors etc.
Integration into the teaching module
Pupils made videos about climate change to show at a museum. The whole class decided to make a newscast
report about the climate in 2050 and they acted the roles of reporters and designed short animations for the
news videos.
The students started with a brainstorming phase in small groups, subsequently sharing their ideas with the whole
class and deciding on the topics and the way the movies would be made to give them a uniform look. Roles were
assigned to the different groups. Before students started working in groups on their own, each group made a
checklist. The finalized videos were displayed in the museum as part of the exhibition.
In phase two of the project, the groups of students made a short movie of their visit to the museum, including the
exhibition and reflecting what they had learned. In the end, the videos were watched by all student and a list of
“things” the class had learned during the project was collected.
What are the main reasons why this tool worked so well here?
a) Easy to make an exhibit without physical restraints; it can be shown online or as part of a physical exhibit
b) Video editing is motivating and easy for pupils, they are more familiar with video making than e.g. posters
c) Multiple uses: documenting what students want to present to others, but also what they learned during
the museum visit (by making the reflective video about “what we learned today”), and returning to the
videos afterwards in class
Recommendations for teachers
a) Trust the pupils to work as peer support for each other; some are
bound to be very skilled movie editors and can help novices.
b) Time spent in video production depends much on how structured the
instructions are; we have had pupils working self-directed, and they
spend about 2 hours – if there are also lessons on storyboards or
directing, or other learning about videos as art form, much more time
could be spent on it.
c) The class should observe the principles of copyright when they make
their movie; if they film each other or puppets that they make, there
is little problem, but if the pupils use images, music, or animations
found online, they need to find out if they are free to use, and credit
the authors.
Fig. 18: Students working with iMovie in the museum.
ICT Tools in School – a Practical Guide
70
Audio and Video Tools for Collecting Data and Knowledge to
be Presented in the Exhibition
by Ron Blonder (Israel)
Next to standard audio and video recording equipment, several digital animation tools were used to develop
content for the exhibitions. (Voki: www.voki.com, PowToon: www.powtoon.com, Go Animate:
goanimate.com/videomaker).
Integration into the teaching module
The module on solar cells was developed using the 6E-model, the tools were used in the following phases:
1. Engage: presenting a high-quality "special news broadcast" as a tool for raising interest, engaging and
challenging students to provide relevant information to their guiding question.
2. Explore: Student exploration of the subject is promoted by providing students with experiences (e.g.
digital and live experiment on photovoltaic cells, RRI presentations).
3. Explain: Students collect data and knowledge to answer the questions by engaging in the science museum
visit, in addition to using their computers as a tool for collecting the data and knowledge needed to be
presented at the exhibition, later on.
4. Elaborate: Students are encouraged to elaborate on their findings during the exhibit-design phase of the
module. The students connect the scientific content to RRI by using computers, animated videos, digital
animations for (a) designing the RRI-related parts of their exhibits and (b) applying RRI to the research
topics of the Weizmann Institute graduate students, in discussions with these students.
5. Exchange: Students are encouraged to communicate their findings and conclusions with the wider
audience of their fellow students (who did not participate in the module), by presenting their exhibits to
them, using different tools such as the digital camera recorded experiment of photovoltaic solar cell.
6. Evaluate: Students' learning of the main goal of the module (i.e., to foster positive attitudes towards RRI)
is also measured by using online pre/post RRI questionnaire, what is also considered an ICT educational
tool.
What are the main reasons why this tool worked so well here?
For example, using the You tube animated film or storytelling of Dr. Peterson and his attitudes regarding using
lead, exposed the students indirectly to several 6E RRI dimensions, which were naturally integrated into the story
as a part of the story consequence. The students raised few of the dimensions as a result of watching the film.
They were exposed to ethical issues, the governance role and effect on scientific research, open access issues and
who should be responsible.
Recommendations for teachers
Students’ exposure to educational ICT has a significant and positive impact on students’ attendance and
concentration. ICT enables teachers to easily explain complex instruction, ensures students' comprehension,
creates interactive classes and makes the lessons more enjoyable.
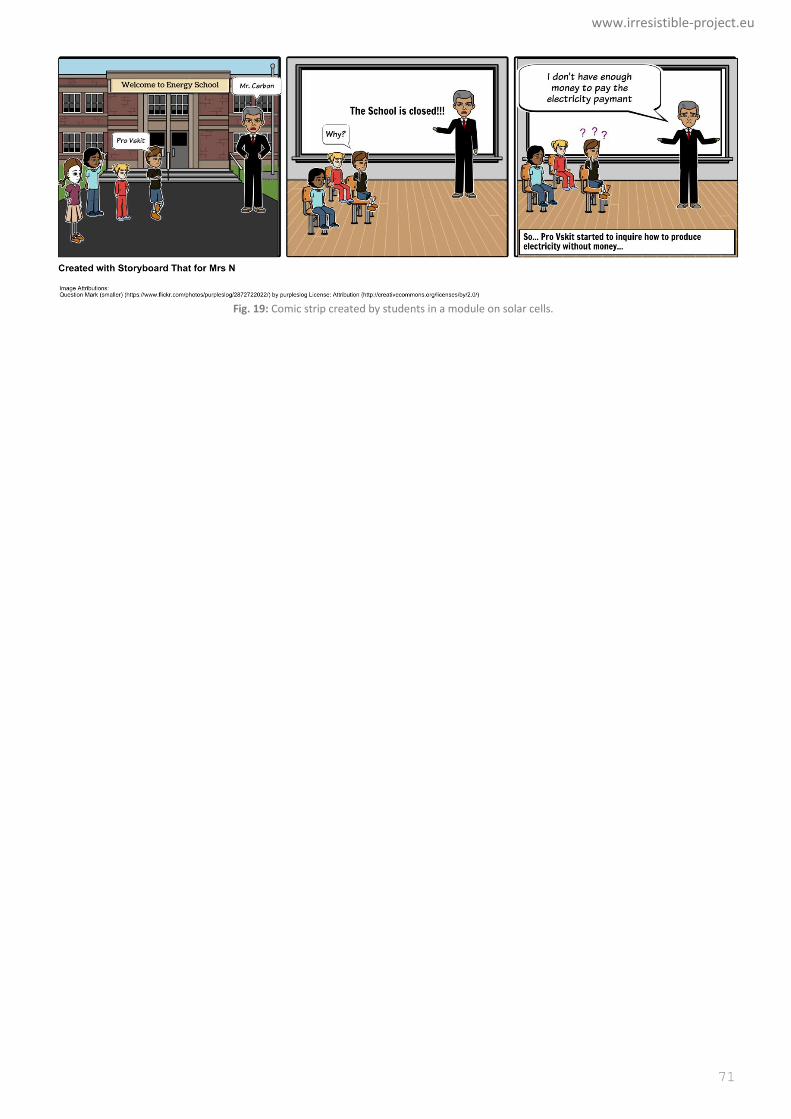
www.irresistible-project.eu
71
Fig. 19: Comic strip created by students in a module on solar cells.
ICT Tools in School – a Practical Guide
72
Scratch: an Online Application Used to Develop a
Digital Game
by Christina Troumpetari (Greece)
Scratch was used for the development of a digital game which was the main part of the exhibit entitled “From the
Nanotechnology to the Prodigy”. As children create with Scratch, they learn to think creatively, work
collaboratively, and reason systematically. The scratch application was developed at the Technology Laboratory of
the Eugenides Foundation with the participation of the experts of the Lab such as graphic designers and ICT
experts. Furthermore there was the use of tools for processing photos at the stage of the development.
Integration into the teaching module
The main idea was to create a digital game for visitors learning about the subjects of breast cancer or HIV. The
scenario is that in the future, a presumed patient will have been diagnosed with breast cancer or HIV. The doctor
recommends as a remedy to "attack" the cancer cells or the virus from an appropriate Nano-robot, which will be
introduced in the patient's body or blood for this purpose.
The presentation method of the exhibit as organized by the students is the following:
This game consists of a PowerPoint presentation in combination with a Scratch application. Visitors – through the
presentation – opt to learn about subjects of breast cancer or HIV by selecting gender and disease. After that,
they play a digital game where they control a Nano-robot which attacks the cancer cells or HIV, trying to destroy
them. When the game is finished, the exhibit tries to put forward a query to the visitors on what would happen in
case the robot attacks a healthy cell by mistake.
Since the idea of creating the game and integrating it in a museum style exhibit seemed highly promising but
technically ambitions, the Technology Laboratory of the Eugenides Foundation supported the students in
different ways: The selected images were modified and improved by the graphic designers of the Lab under the
guidance of the students. At the same time, students developed the environment and the instructions of the
game as Scratch application with the assistance of the museum ICT expert, at the Utech Lab.
What are the main reasons why this tool worked so well here?
Scratch is a useful tool to create animations that help visualize difficult concepts such as nanotechnology. To this
end, Scratch was selected to be used for the visualization of the students’ storyline for their exhibit. Moreover,
Scratch is a web-based environment and can be accessed as a free desktop version by students, teachers, parents
and other communities of users in various settings: schools, museums, libraries etc. across Europe.
Recommendations for teachers
If there’s no professional support (as in this case) it is important that teachers (or students) are familiar with the
Scratch program.
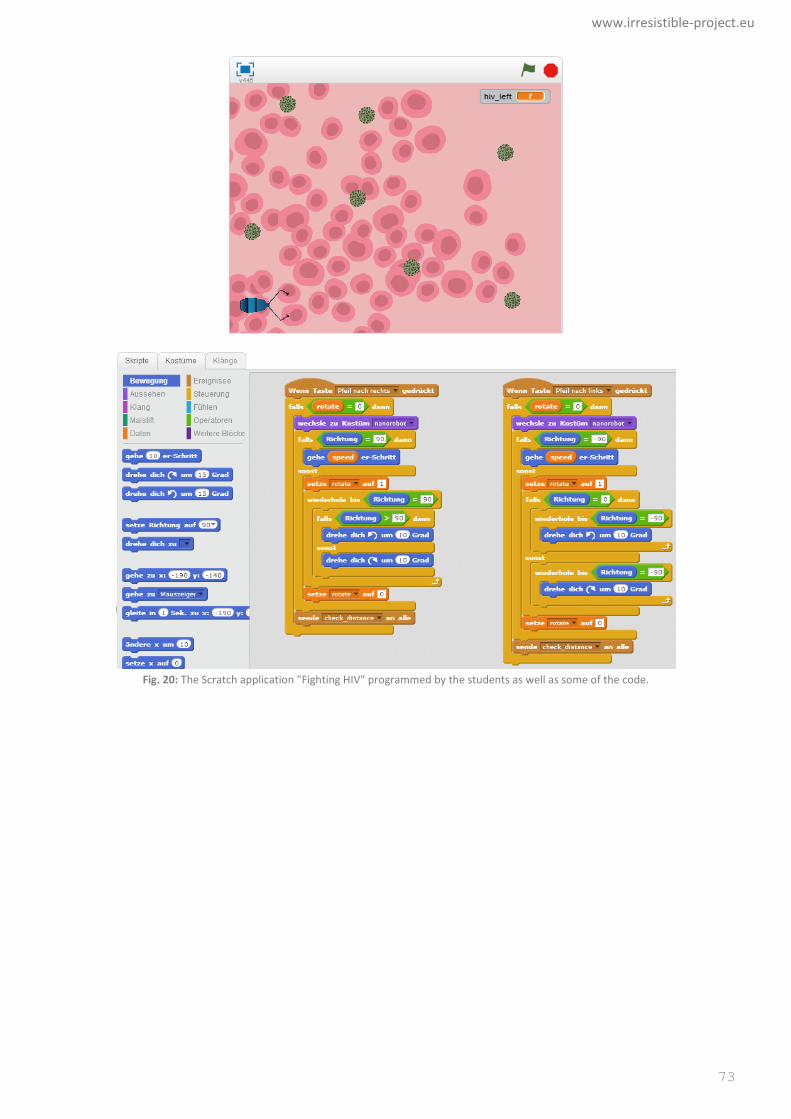
www.irresistible-project.eu
73
Fig. 20: The Scratch application "Fighting HIV" programmed by the students as well as some of the code.
ICT Tools in School – a Practical Guide
74
Glogster and Scratch: Designing Interactive Digital
Posters
by Christina Troumpetari (Greece)
Glogster is a Web 2.0 tool that allows users to create virtual posters combining text, audio, video, images, and
hyperlinks and to share them with others electronically. Students used the ICT tools of Glogster and Scratch for
the design of four digital posters entitled “Nanotechnology in the service of Medicine” and additional material. All
material was included in a PowerPoint presentation.
Integration into the teaching module
The 4 digital Glogster posters and the Scratch presentation were developed mainly by the students in the
classroom and at home with an intervention of the teacher regarding the editing of various elements (text, layout
etc.).
Visitors of the exhibition interacted with PowerPoint slides which acted as an interface and guided them to four
different interactive Glogster posters concerning Nanotechnology in the service of Medicine. In addition, a
Scratch application was available in order to introduce visitors to the RRI aspects and to be the trigger on RRI
issues. At the end of this application, visitors were asked to give their opinion which was recorded for the next
visitor in order to see it.
Students presented their scenarios during the visit of museum staff to their class. The idea was discussed and
suggestions were made to the students concerning the design of the posters and the exhibit interface.
What are the main reasons why this tool worked so well here?
Glogster and Scratch were the most appropriate ICT tools to support the storyline of the students. Students using
Glogster had at their disposal a great variety of different elements such as text, images, podcasts, music,
hyperlinks for web pages, videos and furthermore other objects in order to create an interactive digital poster.
Moreover, since Glogster is a web based platform, students had the opportunity to meet and work as a team
from their homes and not exclusively in the limited time of school hours and also the result of their work could be
shared online via Glogster community with many others students and educators.
Recommendations for teachers
The option of Glogster is a very creative process and it is a user-friendly application for teachers.
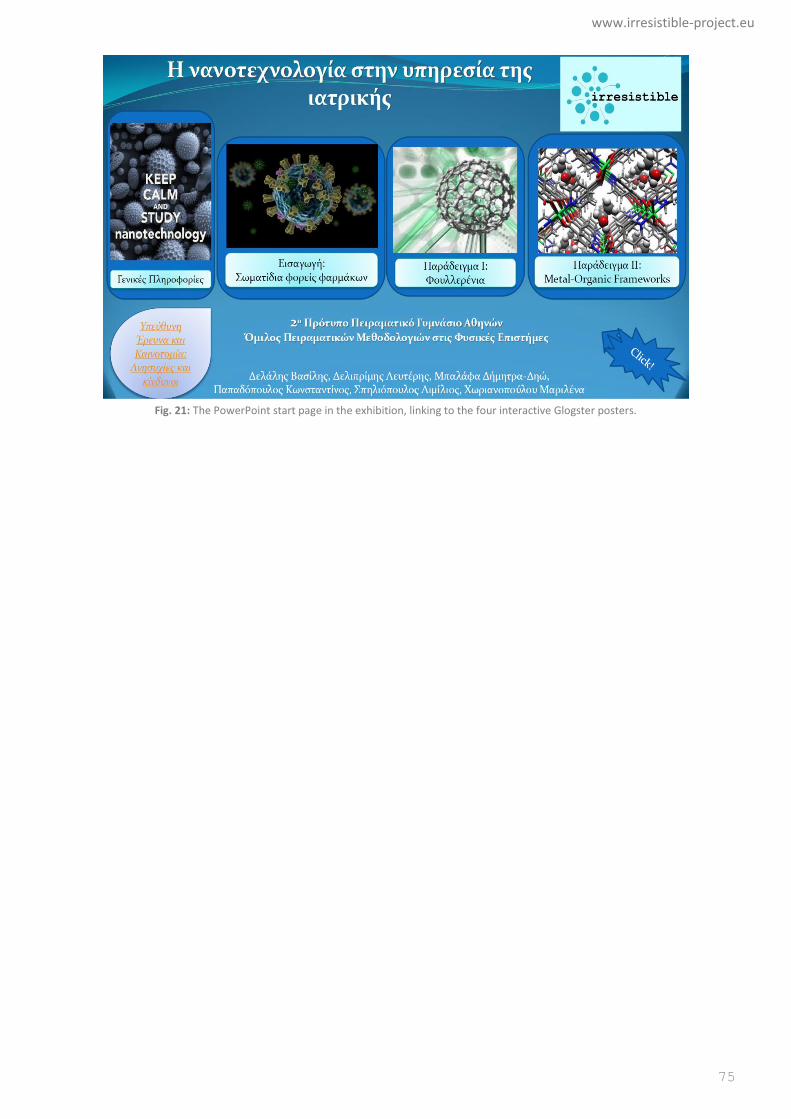
www.irresistible-project.eu
75
Fig. 21: The PowerPoint start page in the exhibition, linking to the four interactive Glogster posters.
ICT Tools in School – a Practical Guide
76
Conclusion
The best practice examples were analyzed with a special focus on the two main challenges when using ICT at
school as detailed in section 5. When looking at the ICT skills of the teachers in these examples, it is not surprising
that all except one teacher being responsible for the implementation were skilled ICT users. The one exception
was a teacher that was trained to use the tool during the module development, thus highlighting a proper way to
engage teachers. When analyzing the infrastructure challenges, there was no uniform picture: From computers in
classroom to students’ computers at home to school tablets and students’ smartphones – all kinds of
infrastructure were present. This indicates that even with a less powerful infrastructure best practice ICT use is
possible (see for instance the example Greece (3), where computers and the support team of the science center
were utilized to develop a digital game).
When looking for similarities within the best practice examples, there are a few factors that stand out: six out of
the eight examples indicate that the tool is easy to use, making this one of the most important prerequisites for
proper integration. In five examples, the tools or the content that was developed with the tools were used as
special (interactive) elements in the exhibition. This shows that if the tool is integrated in a way properly
supporting the task in the project, an extra value (in this case interactive exhibition elements) could be created. In
three cases, the tools were also used to share the results even beyond the student exhibitions, i.e. via the internet
to a larger community.
Offering a base for collaborative work seems to also be an important feature for a tool being considered for a best
practice example – this could either be realized with a learning management system (as demonstrated with the
two Edmodo-examples in the list) or on a smaller scale with Glogster – a tool for collaboratively creating posters.
Summing up the analysis of the best practice examples, the success of ICT tool integration is defined by four main
factors:
- the right tool (easy to use, fitting the task etc.)
- a proper integration (adding extra value, collaborative etc.)
- the necessary infrastructure (important although not the only factor etc.)
- proper ICT skills of the teachers (very important!)
With this ICT Guide we hope to support you in advancing on all four levels: discovering the right tools, finding
ways of target-oriented integration, coping with (and getting around) infrastructural challenges and – last but not
least – improving your own ICT skills by simply trying out these tools in your classroom. Get started!