icse registration module v 2 - council for the...
TRANSCRIPT

1
ICSE REGISTRATION MODULE V 2.0
User Guide for Schools

2
TABLE OF CONTENTS
INTRODUCTION 3
LOGIN 3
REGISTERING CANDIDATES FOR ICSE 4
INITIATING THE REGISTRATION PROCESS 4
RE-REGISTERING A DETAINED CANDIDATE 5
REGISTERING A NEW CANDIDATE 6
RE-REGISTERING A CANDIDATE USING THE SEARCH FUNCTIONALITY 8
CANDIDATE REVIEW 9
PRINCIPAL REVIEW 12
MAKING PAYMENT FOR REGISTRATION. 13

3
Introduction
Welcome to e-Registration Version 2.0 of the Registration Module of the CAREERS System. Several
changes have been introduced in this version of the Registration Module, which has made it more
user friendly. Clear instructions have been provided on each screen to guide the user every step of the
way. This User Guide is an added tool that will help users accomplish various tasks quickly and
correctly.
Login
To login to the CAREERS System, carry out the following steps:
1. Enter the following URL in the address bar of your browser: http://careers.cisce.org. This opens
the Login screen (Fig. 1).
Fig. 1: Login Screen
2. Enter your User Name and Password in the space provided, and click on the Login button. This will
open the CAREERS Home page.
Fig. 2: CAREERS Home Page

4
3. In the CAREERS Home page, click on the e-Registration tile to open the Registration landing page (Fig. 3).
Fig. 3: Registration Landing Page
Registering Candidates for ICSE
You can register the following categories of candidates for ICSE Examinations:
� Class IX detained candidates from your school - to be re-registered
� Candidates who have passed Class VIII - to be registered newly
� Withdrawn candidates from any CISCE affiliated school - to be re-registered
Initiating the Registration Process
To initiate the registration process, carry out the following steps:
1. In the Registration landing page, from the dropdown menu options under ICSE, click on the
Registration menu (highlighted in red in Fig. 3 above). This takes you to the ICSE Registration
Activation screen (Fig, 4).
Fig. 4: ICSE Registration Activation Screen
2. At the bottom of the ICSE Registration Activation screen, there are two radio buttons against the
question Are you presenting candidaes for ICSE 2016?. Select the Yes radio button, and click on
the Finish button at the bottom right of the screen. This opens the Registration Instructions page
(Fig. 5).

5
Fig. 5: ICSE Registration Instruction Screen
3. After going through the instructions, click the checkbox against I have read and understood the
above instructions. The Proceed button will now be activated. Click on the Proceed button.
Re-registering a Detained Candidate
1. Clicking on Proceed button in Instructions page opens the Update Class IX Status screen (Fig. 6).
Fig. 6: Screen with Promoted to Class X selected

6
The purpose of this screen is to segregate candidates who have completed Class IX into three
categories: those who passed and are promoted to Class X, those who failed and are to be
detained and re-registered, and those who are to be withdrawn. By default, the Promoted to Class
X radio button will be selected for all candidates.
2. Select the appropriate radio button against each candidate, and click on the Finish button. The
system will now have a list of detained candidates who are to be re-registered.
Registering a New Candidate
Students who have completed Class VIII and have been promoted to Class IX need to be registered to
be able to appear for the ICSE 2016 Examination. Clicking the Finish button in the Update Class IX
Status screen opens a new screen (Fig. 7). At the top of this screen there are two bands. The upper
band is used to search for detained candidates from your school, as well as withdrawn candidates
from any CISCE affiliated school. The lower band is used to add new candidates. By default the lower
band with the blank Candidate Details Form will be open.
Fig. 7: The Candidate Details Screen

7
To register a new student, carry out the following steps:
1. In the blank Candidate Details screen (Fig. 7 above), enter the required details.
2. Upload a passport size coloured photograph of the candidate in school uniform against a white
background. Also please note that 75% of the photograph should be of the face of the candidate.
3. Capture / Scan and upload the signature of the candidate.
4. Enter comments if any in the Comments to Principal text box.
5. To the bottom right of the screen there are three buttons: Save, Save & Continue, and Submit to
Principal. After entering all the details and uploading all the required documents, if you click on
the Save button, the data will be saved in the system, and a confirmation message will appear
briefly on top of the screen. The screen will now be ready for Candidate Review. You can however
make further changes to the data later if required.
6. After entering all the details and uploading all the required documents, if you click on the Save &
Continue button, the data will be saved in the system, and the screen will be ready for candidate
review. A confirmation message will appear briefly on top of the screen, with a blank Candidate
Details screen below it, enabling you to add the next candidate. You can make further changes to
the Candidate Details from the Candidate Review screen.
7. You can also enter all the details, upload all the required documents, and click on the Submit to
Principal button. The data will now be saved in the system, and the screen will now be ready for
Principal Review. The Staff User will not be able to make any further changes to the data after
submitting the form to the Principal. A blank Candidate Details screen will open, enabling you to
add the next candidate.
NOTES:
a. All fields with an asterisk (*) are mandatory fields.
b. Candidates permitted Second Language Exemption must upload scanned copies of the
supporting documents prescribed in the form.
c. Scanned copies of supporting documents must be uploaded if a Guardian's name is proposed.
d. In Group I, Subjects 01 and 50 are compulsory Subjects, and will be selected by default.
e. Minimum 1 and maximum 2 Subjects to be selected from Group I apart from the default
Subjects.
f. Minimum 2 and maximum 3 Subjects to be selected from Group II.
g. Only 1 Subject to be selected from Group III.
h. If Art is selected as the Subject in Group III, an additional box will open with 4 papers, out of
which two must be selected.
i. Students permitted Second Language Exemption need to study only the two default subjects
from Group I. Other subjects in Group I will be disabled.

8
Fig. 8: Sample Candidate Details Screen with all fields added newly
Re-registering a Candidate Using the Search Function
The Search function allows you to search for Class IX detained candidates from your own school, as
well as withdrawn candidates from any CISCE affiliated school, using either the candidate’s Unique ID
or Registration Number as the search criterion. To search and add a candidate to the list of candidates
for registration, carry out the following steps:
1. Click on the Search & Add button to the top right of the Candidate Details screen (Fig. 9 highlighted
in red).
Fig. 9: The Search & Add Button
2. Click on the down arrow at the extreme right of the top band. This displays the search criteria
options available, namely Unique ID and Registration Number (Fig. 10).

9
Fig. 10: The Search & Add Screen
3. Enter either the Unique ID or Registration Number of the candidate in the field provided, and click
on the Search button. The basic details of the candidate will be displayed below (Fig. 11).
Fig. 11: Search result showing basic details of the candidate searched for
4. Click on the Proceed button to the bottom right of the screen. This will display all the details of
the candidate. Since the data displayed in the screen belongs to a candidate who had already been
registered previously and is being re-registered, most of the data in the fields will not be editable.
The only area where editing is possible is choice of Subjects. Photograph and signature can be
added if this was not uploaded at the time of the original registration.
5. Make the requisite changes and click on the Save button. The modifications made will be saved in
the system, and the screen will now be ready for Candidate Review. You can re-visit the page later
and make further changes if required.
6. After making the requisite changes, click on the Submit to Principal button. The modifications
made will be saved in the system, and the screen will now be ready for Principal Review. The Staff
User will not be able to make any further changes to the data after submitting the form to the
Principal.
Candidate Review
The candidate review is done prior to submission of the registration request to the Principal. The
Purpose of the Candidate Review screen is to allow candidates to view the details that have been
entered, and to correct errors if any. To do a Candidate Review, carry out the following steps:
1. Click on the Registration Summary button next to the Search & Add button (Fig 12 highlighted in
red).

10
Fig. 12: The Registration Summary Button
This opens the Registration Summary screen (Fig. 13). The screen has different rows showing
various tasks to be carried out. The first row shows the number of candidates whose details have
been saved and whose Candidate Review is pending. There are two buttons in this row: View All
and Start Review.
Fig. 12: ICSE Registration Summary screen showing number of Candidate Reviews pending
2. Click on the View All button. This will display the names of the candidates whose Candidate Review
is pending (Fig. 13).
Fig. 13: Screen showing list of candidates whose Candidate Reviews is pending
3. Click on the name of a candidate in the list, and the Candidate Details page pertaining to that
candidate will be displayed.
4. Click on the Start Review button. This will directly open the Candidate Details page of the first
candidate in the list.
5. Review the candidate details to make sure all the details are entered correctly, and that all the
necessary supporting documents as well as the candidate's photograph and signature are
uploaded.
6. Click on the Registration Summary button at the top to take you back to the ICSE Registration
Summary screen.
7. Click on the Print Candidate Details button at the top if you want to print and file a hard copy of
the candidate details.
8. Click on the Delete Candidate button if you want to delete the candidate from the current
registration. This option will be available only if you log in as the Principal.

11
9. If you are satisfied that everything is in order, click the checkbox at the bottom of the page. This
will enable two buttons to the bottom right of the page: Save & Proceed and Submit to Principal
& Proceed (Fig. 14)
Fig. 14: Candidate Review Screen with Save & Proceed and Submit to Principal & Proceed buttons enabled
10. Click on the Save & Proceed button if you want to save the details entered and move on to the
next task, but would like to return to the page later to make further changes. The status of the
registration request will now change to Submission to Principal Pending, and the candidate’s name
will be added to the list of Submission to Principal Pending candidates on the ICSE Registration
Summary scree (Fig. 15). You can click on the View All button and click on the name of the
candidate in the list that is displayed to open the Candidate Details page of that candidate and do
any further modification that may be required.
Fig. 15: Registration Summary screen showing number of Candidates pending submission to Principal
11. Click on the Submit to Principal & Proceed button if you are satisfied that no further modifications
will be required, and want to move on to the next task. The status of the registration request will
now change to Principal Review Pending, and the candidate’s name will be added to the list of
Principal Review Pending candidates on the ICSE Registration Summary screen (Fig. 16).
Fig. 16: Registration Summary screen showing number of Candidates pending Principal Review
12
Principal Review
Only the Principal of a school can submit a request for registration to the Council. Before submitting
a registration request to the Council, the Principal can review the request to ensure everything is in
order. To do this, carry out the following steps:
1. Log into the CAREERS System using the Principal's login credentials, click on the Registration tile,
go to the ICSE menu, and click on Registration in the dropdown menu. This opens the ICSE
Registration Summary screen.
2. In the ICSE Registration Summary screen, go to the Principal Review Pending row. There are two
buttons against the task: View All and Start Review (Fig. 16 above).
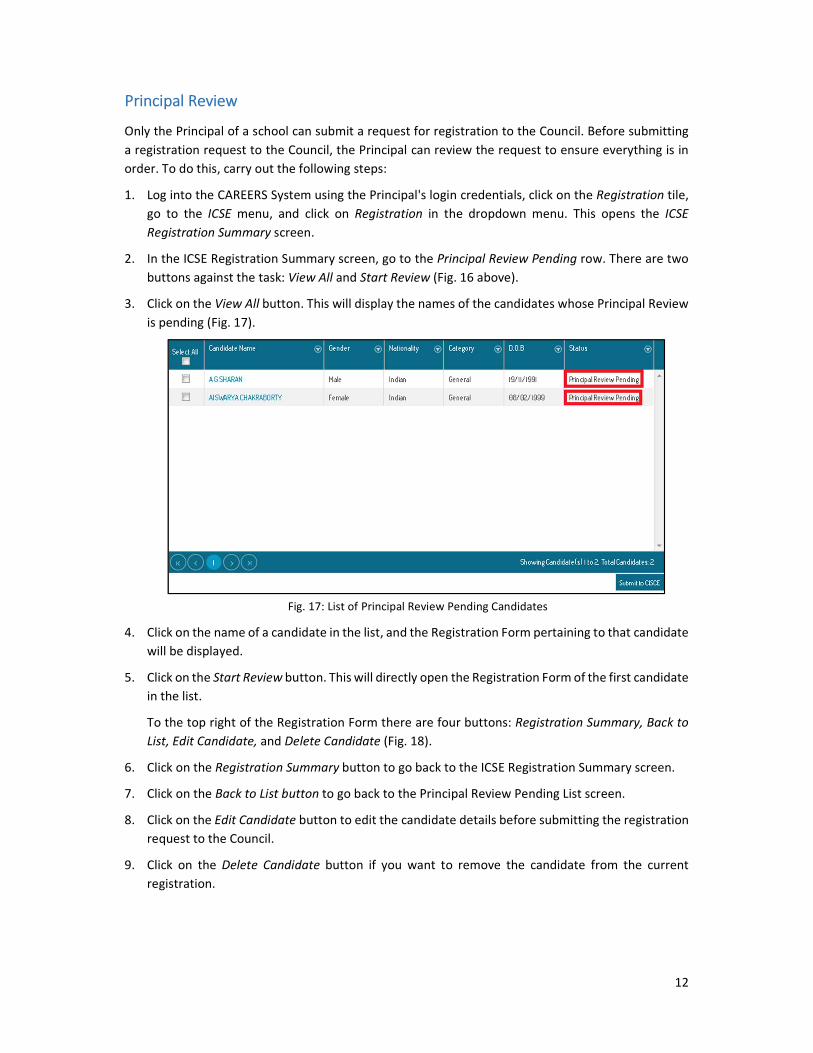
3. Click on the View All button. This will display the names of the candidates whose Principal Review
is pending (Fig. 17).
Fig. 17: List of Principal Review Pending Candidates
4. Click on the name of a candidate in the list, and the Registration Form pertaining to that candidate
will be displayed.
5. Click on the Start Review button. This will directly open the Registration Form of the first candidate
in the list.
To the top right of the Registration Form there are four buttons: Registration Summary, Back to
List, Edit Candidate, and Delete Candidate (Fig. 18).
6. Click on the Registration Summary button to go back to the ICSE Registration Summary screen.
7. Click on the Back to List button to go back to the Principal Review Pending List screen.
8. Click on the Edit Candidate button to edit the candidate details before submitting the registration
request to the Council.
9. Click on the Delete Candidate button if you want to remove the candidate from the current
registration.

13
Fig. 18: Registration Form - Principal Review
Towards the bottom of the Registration Form - Principal Review screen, two options are available
for the Principal (Fig 19).
Fig. 19: Registration Form - Principal Review Options
10. Select the first option if you require more clarification from the staff user. A task will now be
created for the staff user, requiring him/her to respond to your request for more clarification.
11. Select the second option if you want to submit the request to the Council for approval.
12. Add any comments that you may want to, in the Comments to CISCE text box.
13. Click on the Submit to CISCE button to the bottom right of the screen. The candidate’s status will
now change to Payment Pending.
NOTE: The principal can also submit the registration request directly from the list of Principal Review
Pending candidates without going through the review process simply by clicking the checkbox against
the candidate and clicking on the Submit to CISCE button.
Making Payment for registration.
Registration charges have to be paid to CISCE for all candidates, except Detained and Withdrawn
candidates. The payment has to be made online using the CAREERS System. Payment options available
are through Net Banking, and through use of Credit Cards and Debit Cards. To make payment, carry
out the following steps:

14
1. Go to the Payment Due row on the ICSE Registration Summary screen (Fig. 20).
Fig. 20: Registration Summary screen showing number of Payment Due Candidates
2. Click on the View All button if you want to view the list of candidates and make payment for
selected candidates from the list.
3. Click on the Pay All button if you want to directly make the payment from this screen. The CAREERS
System is integrated with a secure payment gateway. Clicking the Payment button will navigate
you to the payment gateway. Follow the usual procedure for making online payments. On
completion of the transaction, you will be navigated back to the CAREERS System, where an
acknowledgement will be provided with the full transaction details.
After the registration request is submitted to the Council for approval, the Council may get back to
the school seeking more clarifications. This usually happens in the case of candidates with Guardian
Exemption and Second Language Exemption. A task will then be created automatically, requiring the
Principal to respond to the request for more clarification. The task will be visible to the Principal
immediately on logging in.