iboardtouch iwbpro - cloudinary
TRANSCRIPT

iBoardTouch IWBPro User Manual
iBoardTouch Limited Page 1
iBoardTouch
IWBPro
User Manual
October 2015
IWBPro Version 1.5.01
www.iboardtouch.co.uk
iBoardTouch IWBPro User Manual
iBoardTouch Limited Page 2
1 Introduction ......................................................................................................................................... 7
1.1 About IWBPro ............................................................................................................................... 7
1.2 Classic & Modern Modes .............................................................................................................. 7
2 Installation & Registration ................................................................................................................... 9
2.1 Download ...................................................................................................................................... 9
2.2 System Requirements ................................................................................................................... 9
2.3 Installation .................................................................................................................................... 9
2.3.1 Admin Privileges ..................................................................................................................... 9
2.3.2 Start The Installation .............................................................................................................. 9
2.3.3 Silent Installs ........................................................................................................................ 10
2.4 Registration ................................................................................................................................. 10
2.4.1 Serial Key .............................................................................................................................. 10
2.4.2 Registration Screen .............................................................................................................. 10
2.5 Un-Installing IWBPro ................................................................................................................... 11
2.5.1 Running uninstall.exe Directly ............................................................................................. 12
2.5.2 Uninstall From Program Group ............................................................................................ 13
2.5.3 Un-install Using Control Panel ............................................................................................. 14
3 Operation (Classic Mode) ................................................................................................................... 15
3.1 Interface ...................................................................................................................................... 15
3.1.1 Toolbars ............................................................................................................................... 15
3.1.2 File Menu Item ..................................................................................................................... 17
3.1.3 Pens Menu Item ................................................................................................................... 18
3.1.3.1 Pen Properties ............................................................................................................... 18
3.1.4 Lines Menu Item .................................................................................................................. 19
3.1.4.1 Line Properties .............................................................................................................. 20
3.1.5 Erasers Menu Item ............................................................................................................... 20
3.1.6 One Touch Common Items Floating Toolbar ....................................................................... 21
3.1.7 Zoom Menu Item ................................................................................................................. 23
3.1.7.1 Magnifier Zoom Tool ..................................................................................................... 23
3.1.8 2D Shapes Menu Item .......................................................................................................... 24
3.1.8.1 Shape Properties ........................................................................................................... 25
3.1.9 3D Shapes Menu Item .......................................................................................................... 26
3.1.9.1 Shape Properties ........................................................................................................... 27
3.1.10 Inserts Menu Item .............................................................................................................. 27

iBoardTouch IWBPro User Manual
iBoardTouch Limited Page 3
3.1.11 Resource Bank Drag and Drop ........................................................................................... 28
3.1.12 Text Menu Item .................................................................................................................. 29
3.1.13 Scratch Pad Menu Item ...................................................................................................... 30
3.1.14 Fill & Border Colour Menu Items ....................................................................................... 31
3.1.15 Maths Tool Menu Item ...................................................................................................... 32
3.1.16 Others Menu Item .............................................................................................................. 33
3.1.17 Custom Tools Menu Item ................................................................................................... 34
3.1.18 Desktop Menu Item & Floating Toolbar ............................................................................ 35
3.1.19 iBT Menu Item .................................................................................................................... 37
4 Document Management Functions ................................................................................................... 38
4.1 Create New Document ................................................................................................................ 38
4.2 Save Document ........................................................................................................................... 39
4.2.1 Save As PDF / Image / Powerpoint ...................................................................................... 39
4.2.2 File Formats .......................................................................................................................... 40
4.3 Open Document .......................................................................................................................... 40
4.4 Password Protecting Documents ................................................................................................ 40
4.5 Import ......................................................................................................................................... 41
4.6 Printing ........................................................................................................................................ 43
4.7 Exit IWBPro ................................................................................................................................. 43
4.8 Page Control ................................................................................................................................ 43
5 Maths Tool Functions ......................................................................................................................... 45
5.1 Ruler ............................................................................................................................................ 45
5.2 Triangle 30º & 45º Set Square .................................................................................................... 45
5.3 Protractor .................................................................................................................................... 47
5.4 Compass ...................................................................................................................................... 48
5.5 Function Graph ........................................................................................................................... 50
5.6 Maths Formula ............................................................................................................................ 54
5.7 Co-Ordinates Axis ........................................................................................................................ 56
5.8 Calculator .................................................................................................................................... 57
6 Other Tools ......................................................................................................................................... 58
6.1 Shade Tool ................................................................................................................................... 58
6.2 Black Screen Tool ........................................................................................................................ 59
6.3 Full Screen View Tool .................................................................................................................. 59
6.4 Screen Capture Tool .................................................................................................................... 60

iBoardTouch IWBPro User Manual
iBoardTouch Limited Page 4
6.5 Screen Recorder Tool .................................................................................................................. 61
6.6 Spotlight Tool .............................................................................................................................. 63
6.7 Visualiser Tool ............................................................................................................................. 64
6.8 Visualiser Advanced Settings ...................................................................................................... 65
6.9 Screen Wrap (Curtain) Tool ......................................................................................................... 66
6.10 Clock Tool .................................................................................................................................. 66
6.11 Calendar Tool ............................................................................................................................ 67
6.12 Timer Tool ................................................................................................................................. 68
6.13 Page Replay Tool ....................................................................................................................... 70
6.14 Pull Down Board (Board-in-Board) Tool ................................................................................... 71
7 Inserting Objects ................................................................................................................................ 72
7.1 Insert Office Documents ............................................................................................................. 72
7.2 Insert Image ................................................................................................................................ 72
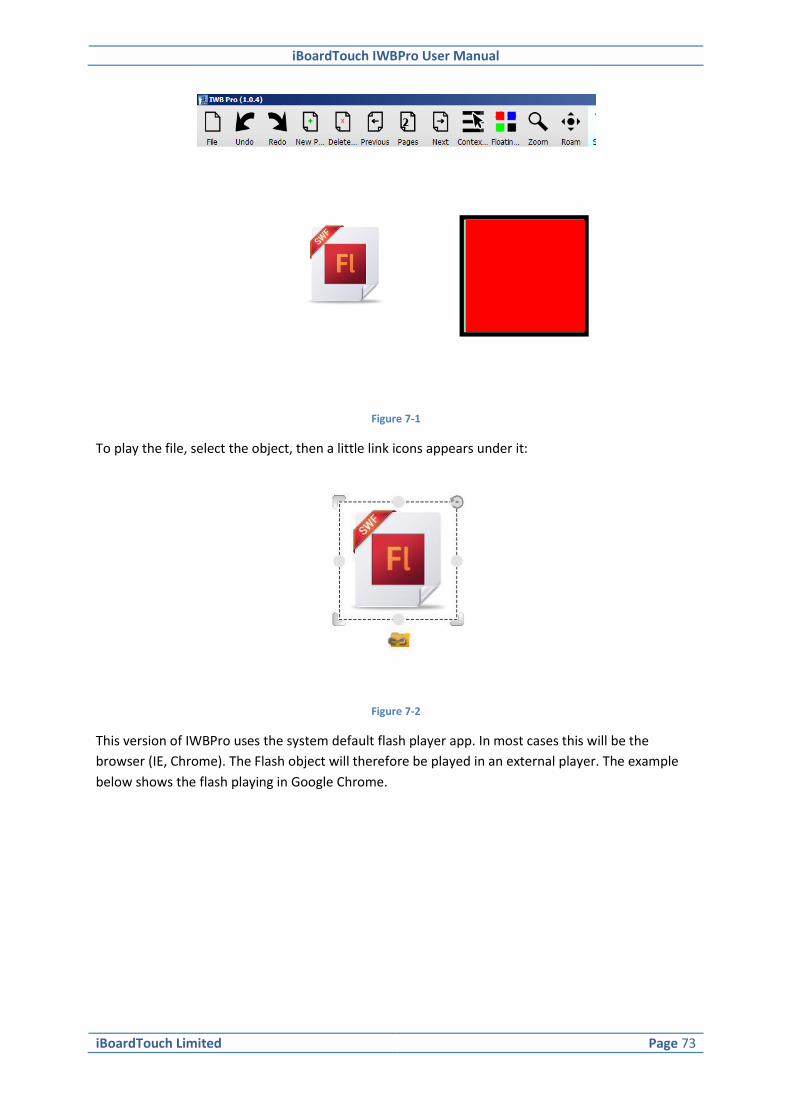
7.3 Insert Flash .................................................................................................................................. 72
7.4 Insert Video ................................................................................................................................. 74
7.5 Insert Chart ................................................................................................................................. 74
7.6 Insert Table ................................................................................................................................. 76
7.7 Background Colour ...................................................................................................................... 79
7.8 Insert Background Image ............................................................................................................ 80
7.9 Clear Background ........................................................................................................................ 82
8 Context Menus ................................................................................................................................... 83
8.1 Cut/Copy/Paste ........................................................................................................................... 83
8.2 Delete .......................................................................................................................................... 84
8.3 Clone ........................................................................................................................................... 84
8.4 Pen Width/Pen Color/Fill Color ................................................................................................... 84
8.5 Group/unGroup .......................................................................................................................... 84
8.6 Order ........................................................................................................................................... 84
8.7 Align ............................................................................................................................................ 84
8.8 Edit Hyperlink .............................................................................................................................. 84
8.9 Replay .......................................................................................................................................... 86
8.10 Lock ........................................................................................................................................... 86
8.11 Export ........................................................................................................................................ 86
8.12 Set As Background .................................................................................................................... 86
8.13 Flip ............................................................................................................................................. 86
iBoardTouch IWBPro User Manual
iBoardTouch Limited Page 5
8.14 Mirror ........................................................................................................................................ 87
8.15 Animation .................................................................................................................................. 87
8.16 Inscribed Circle .......................................................................................................................... 88
8.17 Radius ........................................................................................................................................ 89
8.18 Centre ........................................................................................................................................ 89
8.19 Edit Text .................................................................................................................................... 89
8.20 Read Aloud ................................................................................................................................ 89
8.21 Recognise handwriting .............................................................................................................. 90
9 Text Handling ..................................................................................................................................... 91
9.1 Text Input Tool ............................................................................................................................ 91
9.2 Handwriting Recognition ............................................................................................................ 91
9.3 Speech recognition ..................................................................................................................... 92
10 iBT Menu .......................................................................................................................................... 92
10.1 Help / About .............................................................................................................................. 93
10.2 Register ..................................................................................................................................... 93
10.3 Custom Tool List ........................................................................................................................ 93
10.4 Custom ...................................................................................................................................... 94
10.5 System Settings ......................................................................................................................... 94
10.5.1 Settings Tab ........................................................................................................................ 94
10.5.2 Update Tab ......................................................................................................................... 95
10.5.3 Register Tab ....................................................................................................................... 96
10.5.4 Theme Tab ......................................................................................................................... 97
10.5.5 Library Tab ......................................................................................................................... 97
11 Modern Mode .................................................................................................................................. 98
11.1 Main Modern Toolbar ............................................................................................................... 99
11.2 File/Navigator Menu ............................................................................................................... 100
11.2.1 Desktop Mode .................................................................................................................. 101
11.2.2 Common Items Toolbar ................................................................................................... 103
11.2.3 Select Tool ........................................................................................................................ 103
11.2.4 Roam Tool ........................................................................................................................ 103
11.2.5 Pen Tool ........................................................................................................................... 104
11.2.6 Line Tool ........................................................................................................................... 105
11.2.7 2D Shape Tool .................................................................................................................. 106
11.2.8 3D Shape Tool .................................................................................................................. 106

iBoardTouch IWBPro User Manual
iBoardTouch Limited Page 6
11.2.9 Fill Tool ............................................................................................................................. 107
11.2.10 Scratch Card Tool ........................................................................................................... 108
11.2.11 Eraser Tool ..................................................................................................................... 108
11.2.12 Lesson Tools ................................................................................................................... 108
11.2.12.1 Backgrounds ............................................................................................................ 109
11.2.12.2 Subjects ................................................................................................................... 110
11.2.12.2.1 Mathematics .................................................................................................... 110
11.2.12.2.2 Geometry ......................................................................................................... 111
11.2.12.3 Presentation Tools .................................................................................................. 111
11.2.12.4 Custom Tools........................................................................................................... 113
11.3 Modern Context Menus .......................................................................................................... 113

iBoardTouch IWBPro User Manual
iBoardTouch Limited Page 7
1 Introduction
1.1 About IWBPro
iBoardTouch IWBPro is a teaching and presentational software package for use in classrooms, meeting rooms. IWBPro replaces the old IWB application. IWBPro offers the following enhancements over IWB:
Open SMART Notebook (including Gallery Items and Collections) files with all features intact (not just an image of a page)
Promethean support will also be added
Updated Modern UI, but with the option to use the Classic mode UI (similar to old IWB).
Import greater range of media files
Import Word/Excel/Powerpoint/PDF documents without requiring MS Office to be installed
Text to Speech and Speech to Text IWBPro is a multimedia interactive teaching system and also can be used to make courseware and lesson plans. Although IWBPro is sold with the iBoardTouch manufactured touch screens, the software will work on any PC, laptop (Windows 7), and is also available on Mac. When IWBPro is used on a computer with touch screen capabilities the combination of technologies makes for a powerful, natural way to write, draw, present, etc. On PCs without touch capabilities IWBPro can be operated with a mouse instead. IWBPro has built-in features for graphs, stencils, backgrounds, images and templates. This guide covers the features with instructions on how to use them and get the best out of the application.
1.2 Classic & Modern Modes
The application can be run in one of two modes - Classic or Modern. The underlying functions are largely the same, but to enable users of the old IWB to migrate to the new IWBPro without requiring re-training the Classic Mode was added. Classic Mode is enabled by default. The table below shows the two modes side-by-side:

iBoardTouch IWBPro User Manual
iBoardTouch Limited Page 8
Classic Mode Modern Mode
Figure 1-1
Figure 1-2
This user guide covers both modes but does so separately, with a section for Classic Mode, and one for the Modern mode.
iBoardTouch IWBPro User Manual
iBoardTouch Limited Page 9
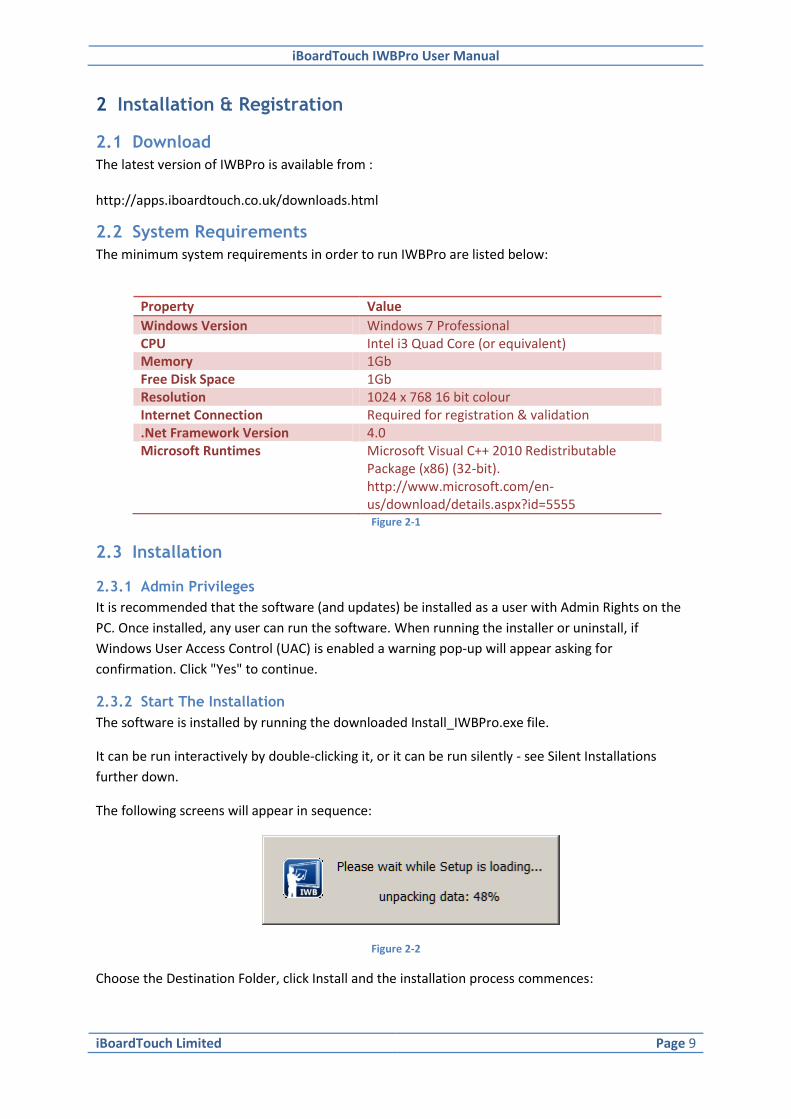
2 Installation & Registration
2.1 Download
The latest version of IWBPro is available from : http://apps.iboardtouch.co.uk/downloads.html
2.2 System Requirements
The minimum system requirements in order to run IWBPro are listed below:
Property Value
Windows Version Windows 7 Professional CPU Intel i3 Quad Core (or equivalent) Memory 1Gb Free Disk Space 1Gb Resolution 1024 x 768 16 bit colour Internet Connection Required for registration & validation .Net Framework Version 4.0 Microsoft Runtimes Microsoft Visual C++ 2010 Redistributable
Package (x86) (32-bit). http://www.microsoft.com/en-us/download/details.aspx?id=5555 Figure 2-1
2.3 Installation
2.3.1 Admin Privileges
It is recommended that the software (and updates) be installed as a user with Admin Rights on the
PC. Once installed, any user can run the software. When running the installer or uninstall, if
Windows User Access Control (UAC) is enabled a warning pop-up will appear asking for
confirmation. Click "Yes" to continue.
2.3.2 Start The Installation
The software is installed by running the downloaded Install_IWBPro.exe file.
It can be run interactively by double-clicking it, or it can be run silently - see Silent Installations
further down.
The following screens will appear in sequence:
Figure 2-2
Choose the Destination Folder, click Install and the installation process commences:

iBoardTouch IWBPro User Manual
iBoardTouch Limited Page 10
Figure 2-3 Figure 2-4
Installation takes no more than a 1-2 minutes. On completion the following screen appears. Click
Finish.
Figure 2-5
2.3.3 Silent Installs
IWBPro has a silent install option, which means it can be run non-interactively, to make it easier to
deploy to multiple PCs. The command to run a silent install is as follows:
Install_IWBPro.exe /S /D="C:\Program Files (x86)\iBoardTouch IWBPro"
2.4 Registration
By default the software allows up to 30 usage attempts before it forces registration.
2.4.1 Serial Key
Registration requires a serial key. This key is obtained by raising a ticket at :
http://apps.iboardtouch.co.uk/ibtticket
2.4.2 Registration Screen
Registration can also be manually initiated by selecting the "iBT" menu item and then "System
Settings". If the "iBT" is not visible, but there is a folder icon with the label "More..." click that to
reveal additional options:

iBoardTouch IWBPro User Manual
iBoardTouch Limited Page 11
Classic Mode Modern Mode
Figure 2-6
Figure 2-7
The Settings dialogue appears, then click the "Register" button:
Figure 2-8
Figure 2-9
Enter the details then click the "Register" button to submit the details.
2.5 Un-Installing IWBPro
There are 3 methods for removing/un-installing IWBPro:
iBoardTouch IWBPro User Manual
iBoardTouch Limited Page 12
Run the uninst.exe program directly from "C:\Program Files (x86)\iBoardTouch
IWBPro\uninstall.exe".
Run the uninst.exe program via the "Uninstall" start menu item under "iBoardTouch IWB"
program group
Use the "Program & Features" option in "Control Panel"
All these options should be performed user Admin privileges.
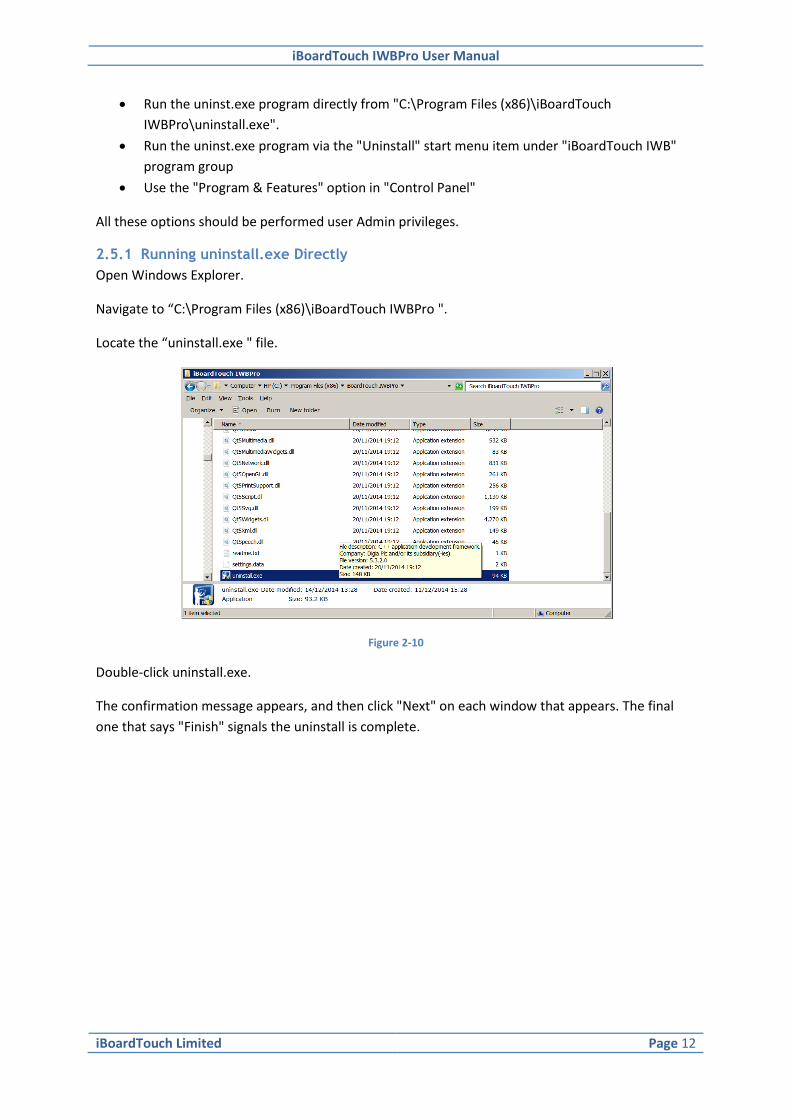
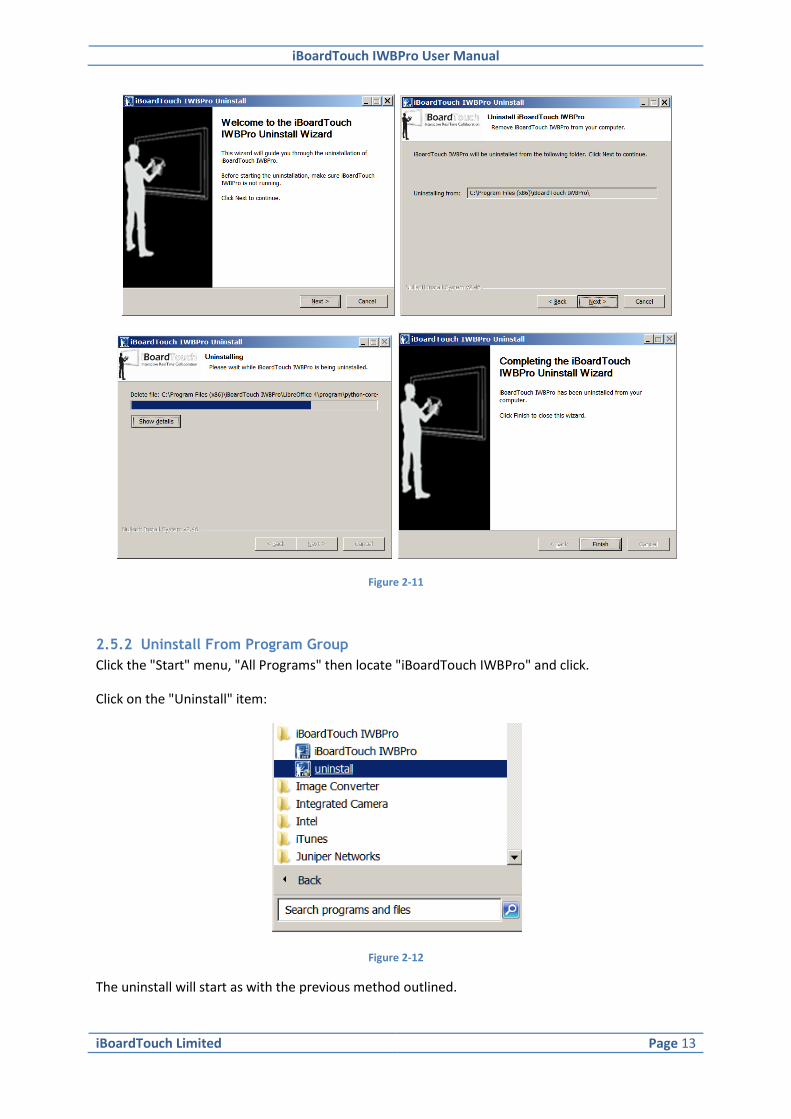
2.5.1 Running uninstall.exe Directly
Open Windows Explorer.
Navigate to “C:\Program Files (x86)\iBoardTouch IWBPro ".
Locate the “uninstall.exe " file.
Figure 2-10
Double-click uninstall.exe.
The confirmation message appears, and then click "Next" on each window that appears. The final
one that says "Finish" signals the uninstall is complete.
iBoardTouch IWBPro User Manual
iBoardTouch Limited Page 13
Figure 2-11
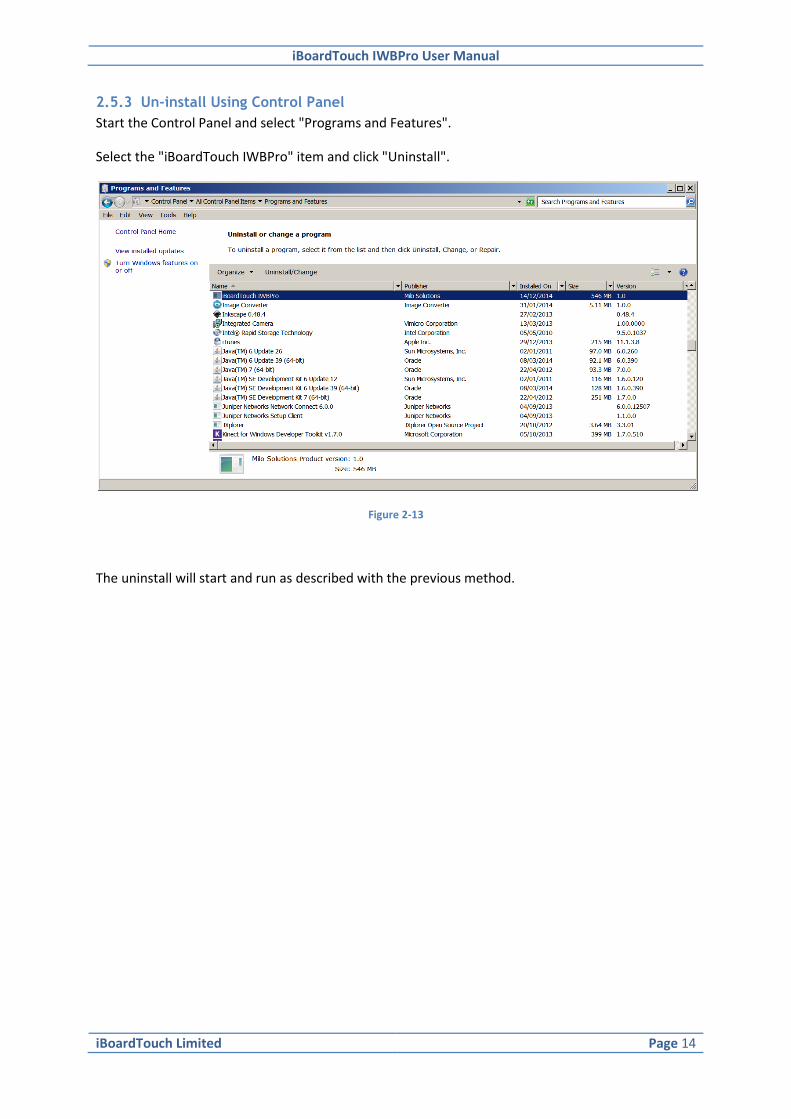
2.5.2 Uninstall From Program Group
Click the "Start" menu, "All Programs" then locate "iBoardTouch IWBPro" and click.
Click on the "Uninstall" item:
Figure 2-12
The uninstall will start as with the previous method outlined.
iBoardTouch IWBPro User Manual
iBoardTouch Limited Page 14
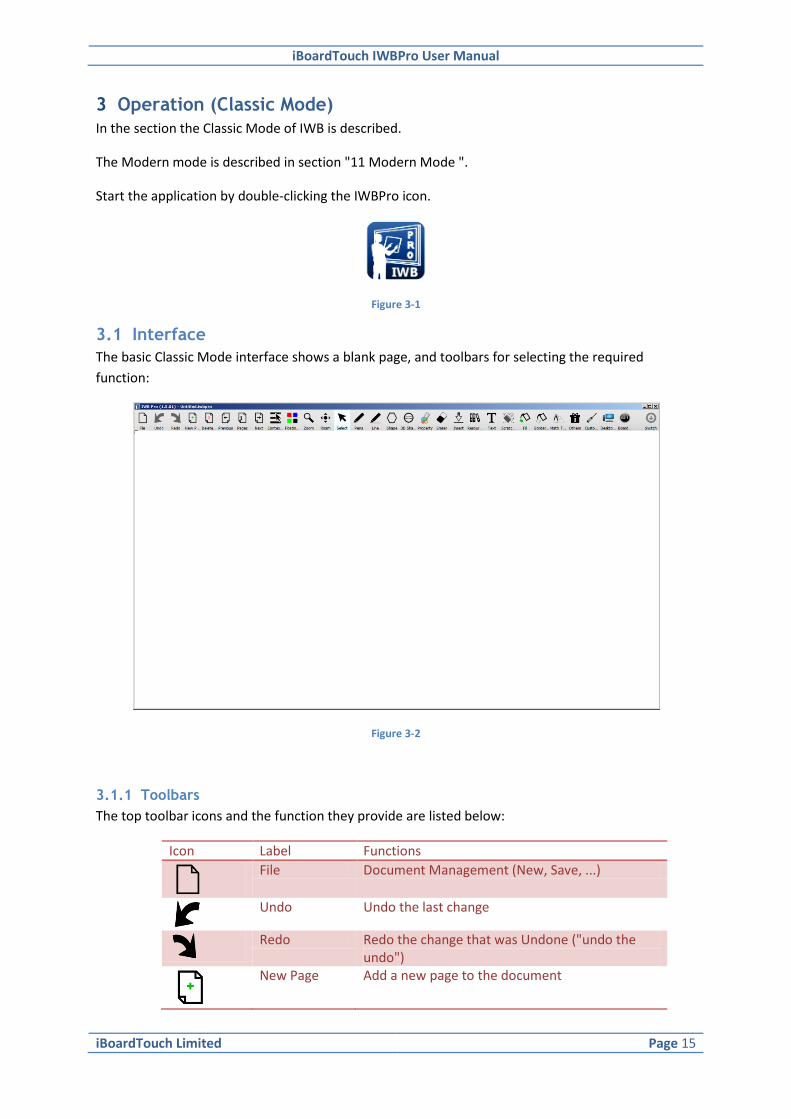
2.5.3 Un-install Using Control Panel
Start the Control Panel and select "Programs and Features".
Select the "iBoardTouch IWBPro" item and click "Uninstall".
Figure 2-13
The uninstall will start and run as described with the previous method.
iBoardTouch IWBPro User Manual
iBoardTouch Limited Page 15
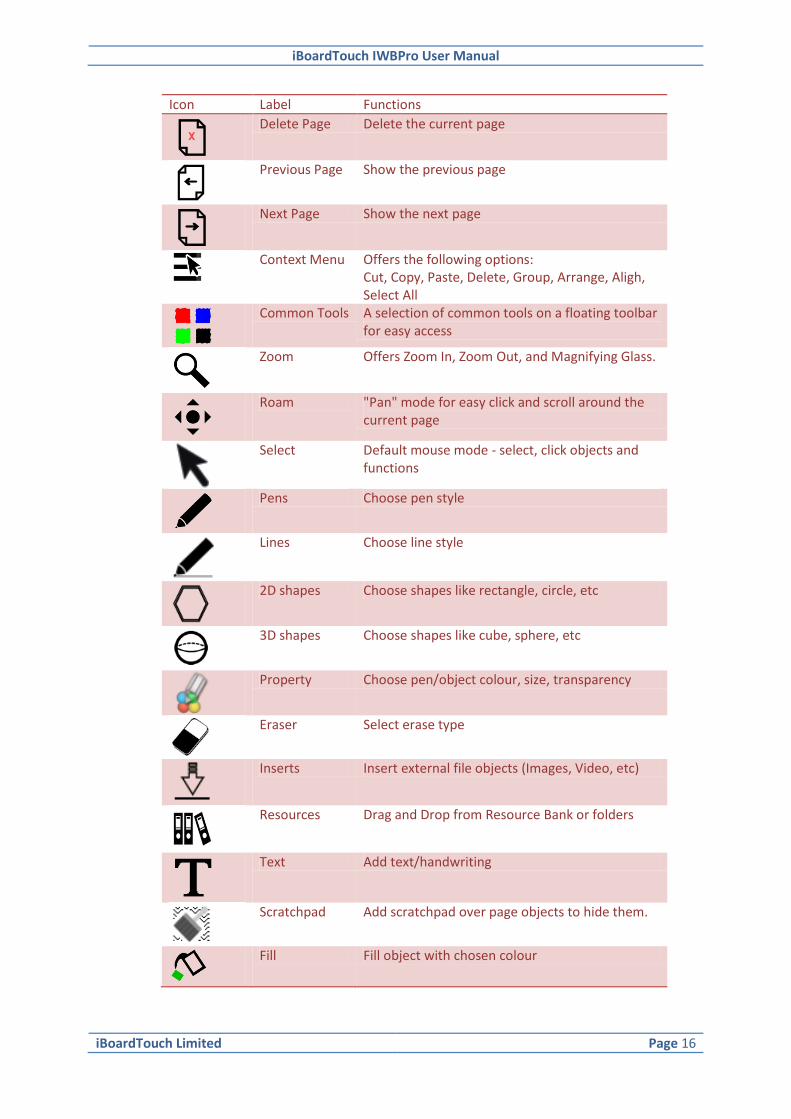
3 Operation (Classic Mode)
In the section the Classic Mode of IWB is described.
The Modern mode is described in section "11 Modern Mode ".
Start the application by double-clicking the IWBPro icon.
Figure 3-1
3.1 Interface
The basic Classic Mode interface shows a blank page, and toolbars for selecting the required
function:
Figure 3-2
3.1.1 Toolbars
The top toolbar icons and the function they provide are listed below:
Icon Label Functions
File Document Management (New, Save, ...)
Undo Undo the last change
Redo Redo the change that was Undone ("undo the
undo")
New Page Add a new page to the document
iBoardTouch IWBPro User Manual
iBoardTouch Limited Page 16
Icon Label Functions
Delete Page Delete the current page
Previous Page Show the previous page
Next Page Show the next page
Context Menu Offers the following options: Cut, Copy, Paste, Delete, Group, Arrange, Aligh, Select All
Common Tools A selection of common tools on a floating toolbar for easy access
Zoom Offers Zoom In, Zoom Out, and Magnifying Glass.
Roam "Pan" mode for easy click and scroll around the current page
Select Default mouse mode - select, click objects and functions
Pens Choose pen style
Lines Choose line style
2D shapes Choose shapes like rectangle, circle, etc
3D shapes Choose shapes like cube, sphere, etc
Property Choose pen/object colour, size, transparency
Eraser Select erase type
Inserts Insert external file objects (Images, Video, etc)
Resources Drag and Drop from Resource Bank or folders
Text Add text/handwriting
Scratchpad Add scratchpad over page objects to hide them.
Fill Fill object with chosen colour

iBoardTouch IWBPro User Manual
iBoardTouch Limited Page 17
Icon Label Functions
Border Change object border colour
Maths Tool Choose compass, protractor, set squares, etc
Others Choose presentation tools e.g. Curtain, Screenshot, Visualiser, etc
Custom Tools Choose from a list of Custom added external applications
Desktop Mode Switch to Desktop Mode
iBoardTouch Access Help, About, Settings, Custom Tools options
More When the screen resolution is smaller than normal and there is not enough space to fit all the items on the toolbar, the right most icons are grouped under this icon.
Top/Bottom Switch Toolbar Position
Figure 3-3
3.1.2 File Menu Item
The list below shows the File Menu options. See the "4 Document Management Functions" section
for details.
Icon Label Functions
New Create a new document
Open File Open another document
Export Export current page as an image
Import Import Office (Word, Excel, Powerpoint) or PDF document
Save File Save current document

iBoardTouch IWBPro User Manual
iBoardTouch Limited Page 18
Icon Label Functions
Save As Save current document as a different file
Save PDF Saves the document in PDF format
Save Image Saves the document in a variety of image formats
Save as PPTX Saves the document in a MS Powerpoint format
Print Current Print current page
Print Print whole document
Figure 3-4
3.1.3 Pens Menu Item
Icon Label Functions
Pencil Freehand uniform style, thinkness pencil
Magic Pen Converts an approximate freehand drawn shape to a neat straight line polygon or circle/ellipse.
Point to Point Draw joined with straight lines between points
Highlighter Highlighter (transparent marker)
Soft Brush Brush like pen - varying angular thickness
Calligraphy Calligraphic style strokes
Figure 3-5
3.1.3.1 Pen Properties
After selecting a pen, the properties of the pen can be set by clicking the "Property" icon:

iBoardTouch IWBPro User Manual
iBoardTouch Limited Page 19
Figure 3-6
The sub-toolbar allows the colour, transparency and size of the pen stroke to be set..
Click on the Coloured square next to the "Color" label to show the Colour Pallete and choose the pen
stroke colour:
Figure 3-7
Click "OK" to set the chosen colour.
The "Fill" property applies to 2D and 3D objects, not to pens and lines.
The "Transparency" slider is used to set the transparency of the pen stroke; the further it is the to
the right the more opaque it is, the further to left the more transparent.
3.1.4 Lines Menu Item
Selecting the Line tool from the toolbar open the following line selection:

iBoardTouch IWBPro User Manual
iBoardTouch Limited Page 20
Figure 3-8
The following line types are available:
Icon Functions
Solid line
Dashed line
Dotted line
Dash-dot line
Dash dot-dot line
Figure 3-9
3.1.4.1 Line Properties
The properties of the chosen line can be set using the "Property" toolbar item (as with Pens).
The example below shows a dashed line and how the properties of "Color", "Transparency" and
"Size" influence the appearance when it is drawn:
Figure 3-10
3.1.5 Erasers Menu Item
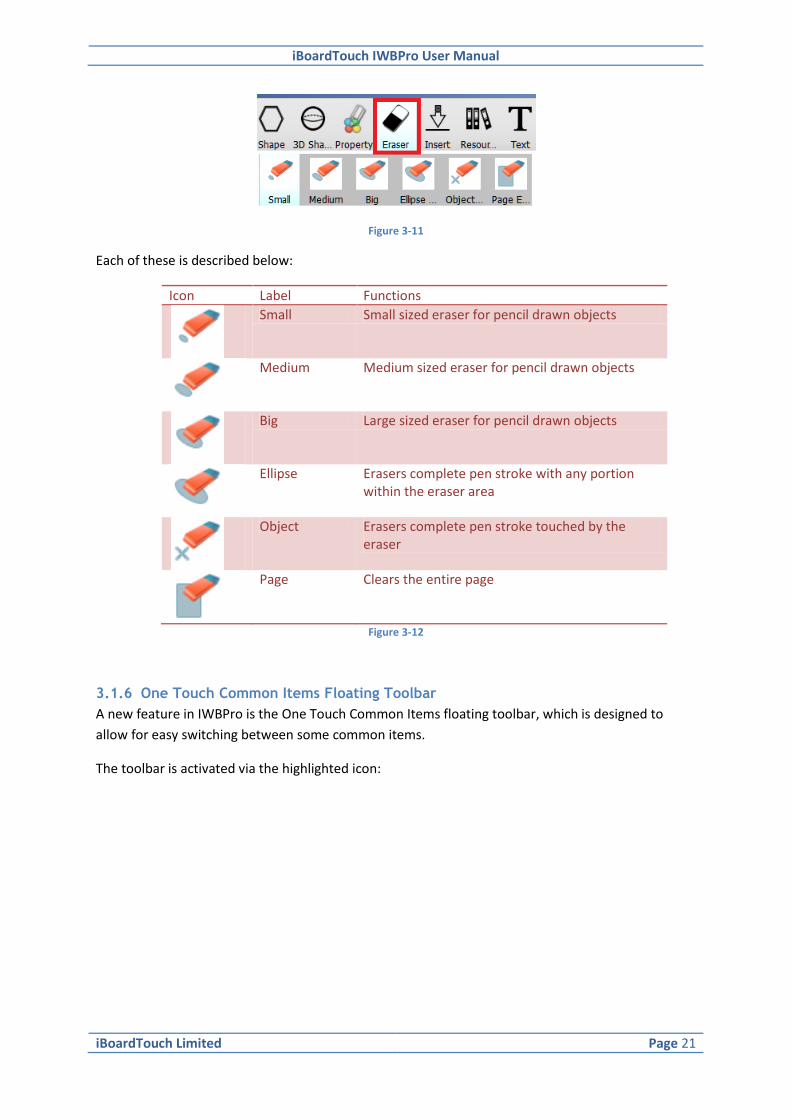
Selecting the Eraser tool from the toolbar open the following eraser toolset:
iBoardTouch IWBPro User Manual
iBoardTouch Limited Page 21
Figure 3-11
Each of these is described below:
Icon Label Functions
Small Small sized eraser for pencil drawn objects
Medium Medium sized eraser for pencil drawn objects
Big Large sized eraser for pencil drawn objects
Ellipse Erasers complete pen stroke with any portion within the eraser area
Object Erasers complete pen stroke touched by the eraser
Page Clears the entire page
Figure 3-12
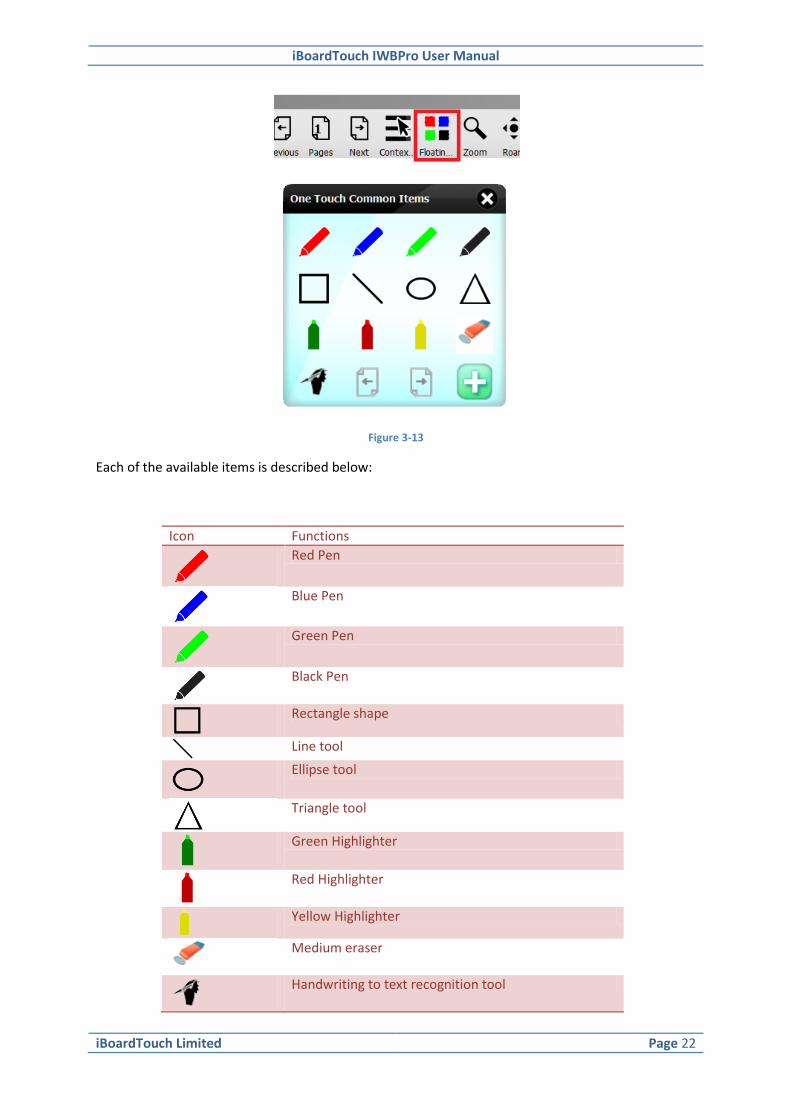
3.1.6 One Touch Common Items Floating Toolbar
A new feature in IWBPro is the One Touch Common Items floating toolbar, which is designed to
allow for easy switching between some common items.
The toolbar is activated via the highlighted icon:
iBoardTouch IWBPro User Manual
iBoardTouch Limited Page 22
Figure 3-13
Each of the available items is described below:
Icon Functions
Red Pen
Blue Pen
Green Pen
Black Pen
Rectangle shape
Line tool
Ellipse tool
Triangle tool
Green Highlighter
Red Highlighter
Yellow Highlighter
Medium eraser
Handwriting to text recognition tool
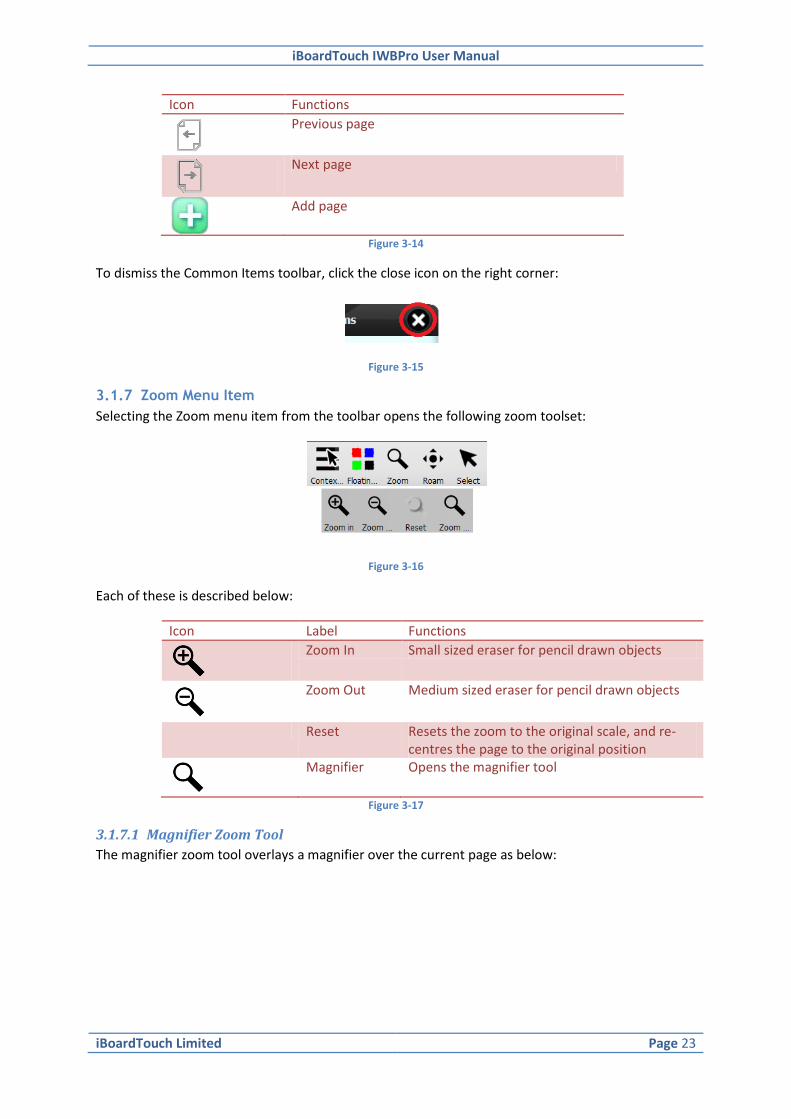
iBoardTouch IWBPro User Manual
iBoardTouch Limited Page 23
Icon Functions
Previous page
Next page
Add page
Figure 3-14
To dismiss the Common Items toolbar, click the close icon on the right corner:
Figure 3-15
3.1.7 Zoom Menu Item
Selecting the Zoom menu item from the toolbar opens the following zoom toolset:
Figure 3-16
Each of these is described below:
Icon Label Functions
Zoom In Small sized eraser for pencil drawn objects
Zoom Out Medium sized eraser for pencil drawn objects
Reset Resets the zoom to the original scale, and re-centres the page to the original position
Magnifier Opens the magnifier tool
Figure 3-17
3.1.7.1 Magnifier Zoom Tool
The magnifier zoom tool overlays a magnifier over the current page as below:

iBoardTouch IWBPro User Manual
iBoardTouch Limited Page 24
Figure 3-18
The highlighted circular area can be moved (mouse or touch) to other areas of the page.
To adjust the zoom level click the settings icon to reveal the slider control:
Figure 3-19
Close this tool by clicking the icon.
3.1.8 2D Shapes Menu Item
In IWBPro access to shapes such as rectangles etc has been simplified by making these available on
the main toolbar.
Figure 3-20

iBoardTouch IWBPro User Manual
iBoardTouch Limited Page 25
The available icons and associated shapes are listed below.
Icon Functions
Draw rectangle/squares
Draw circle
Draw ellipse
Draw parallelogram
Draw trapezoidal
Draw right-angled triangle
Draw isosceles triangle
Draw 5 pointed star
Draw pentagon
Draw hexagon
Draw using freehand recognition
Figure 3-21
3.1.8.1 Shape Properties
The properties of the chosen shape can be set using the "Property" toolbar item (as with
Pens). Select the shape (if necessary click the select icon and then click the required object).
The example below shows a rectangle and how the properties influence the shape appearance when
it is drawn:
iBoardTouch IWBPro User Manual
iBoardTouch Limited Page 26
Figure 3-22
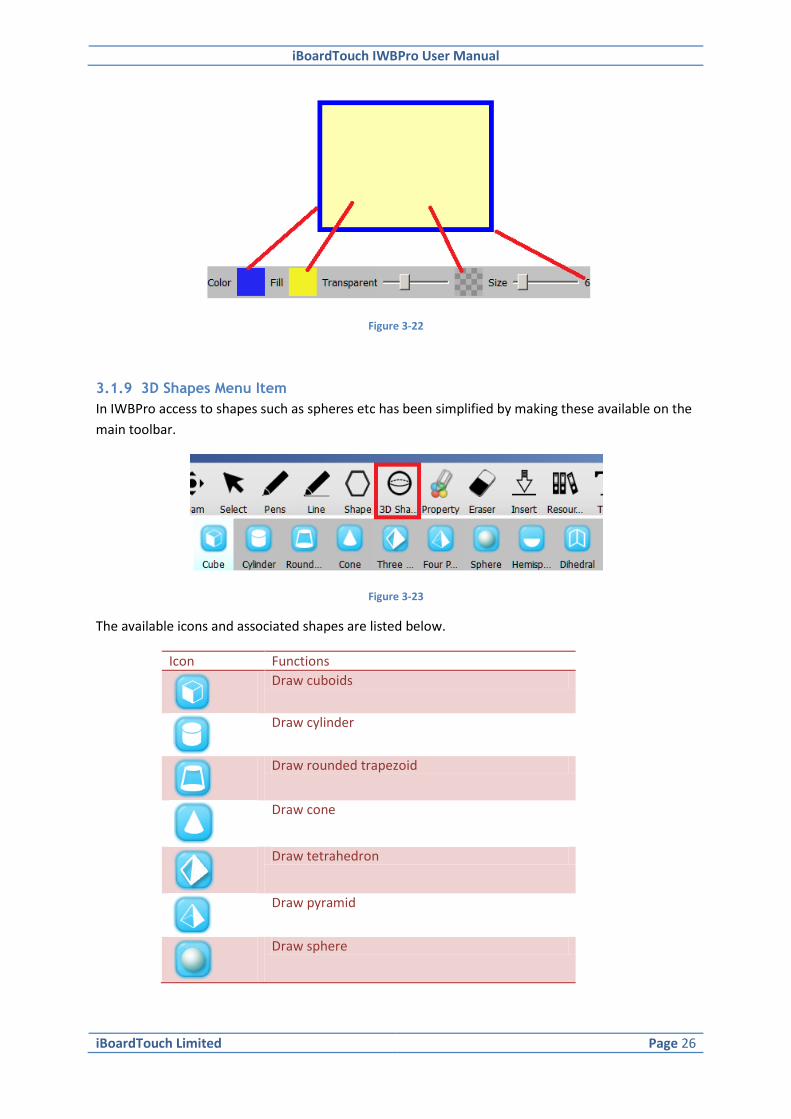
3.1.9 3D Shapes Menu Item
In IWBPro access to shapes such as spheres etc has been simplified by making these available on the
main toolbar.
Figure 3-23
The available icons and associated shapes are listed below.
Icon Functions
Draw cuboids
Draw cylinder
Draw rounded trapezoid
Draw cone
Draw tetrahedron
Draw pyramid
Draw sphere
iBoardTouch IWBPro User Manual
iBoardTouch Limited Page 27
Icon Functions
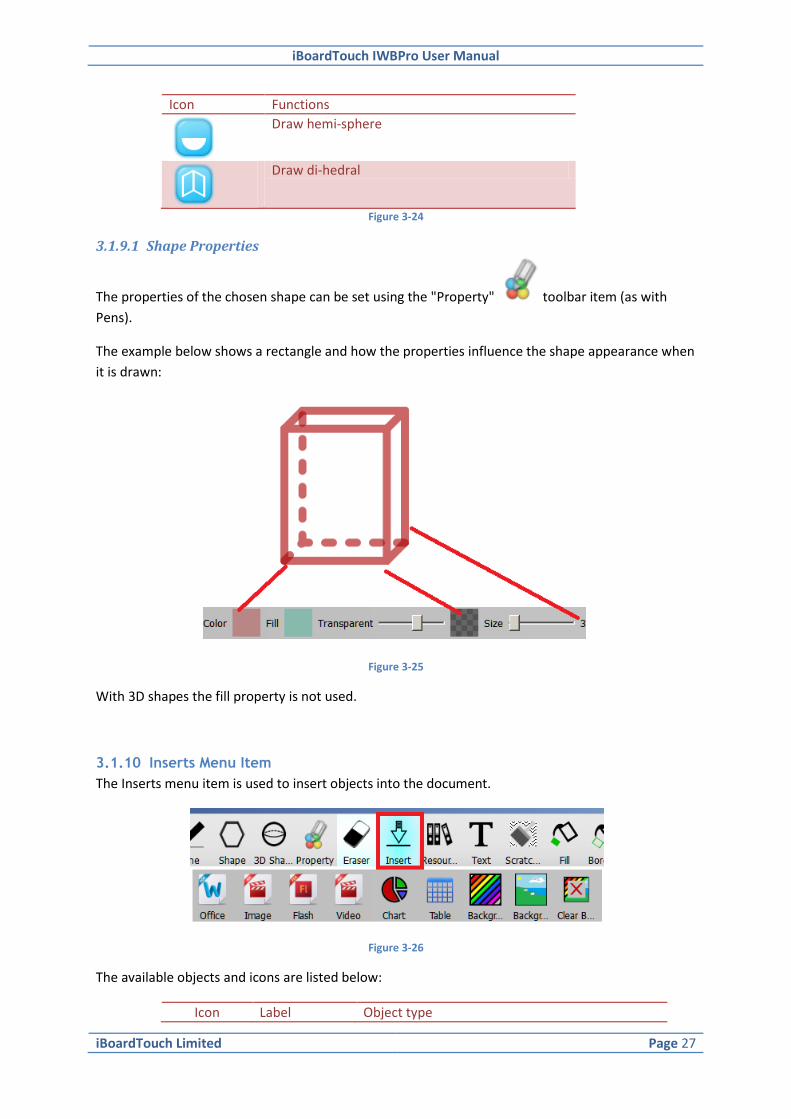
Draw hemi-sphere
Draw di-hedral
Figure 3-24
3.1.9.1 Shape Properties
The properties of the chosen shape can be set using the "Property" toolbar item (as with
Pens).
The example below shows a rectangle and how the properties influence the shape appearance when
it is drawn:
Figure 3-25
With 3D shapes the fill property is not used.
3.1.10 Inserts Menu Item
The Inserts menu item is used to insert objects into the document.
Figure 3-26
The available objects and icons are listed below:
Icon Label Object type

iBoardTouch IWBPro User Manual
iBoardTouch Limited Page 28
Icon Label Object type
Office Insert MS Office/PDF documents from file system
Image Insert image from file system. Supported formats are bmp, dds, icns, ico, jp2, jpeg, jpg, pbm, png, ppm, tif, tiff, wbmp, webp, xbm, xpm.
Flash Insert a Flash SWF format file. Adobe Flash player must be installed. Default SWF file player must be defined (.e.g Google Chrome)
Video Insert video from file system. Supported formats are avi, mp4, mpeg, mpg, flv, mkv, ogm, ogg, webm, mov, wmv, f4v, swf.
Chart Insert a Pie, Line, Bar, Bubble, or Area type chart onto current page (after specifying the data).
Table Insert a table on the page, specifying the number of rows and columns
Background Colour
Change the current page background colour
Background Image
Choose from a selection of preset backgrounds, or browse the file systems for an image.
Clear Background
Clear the background colour/image insert via the above 2 functions
Figure 3-27
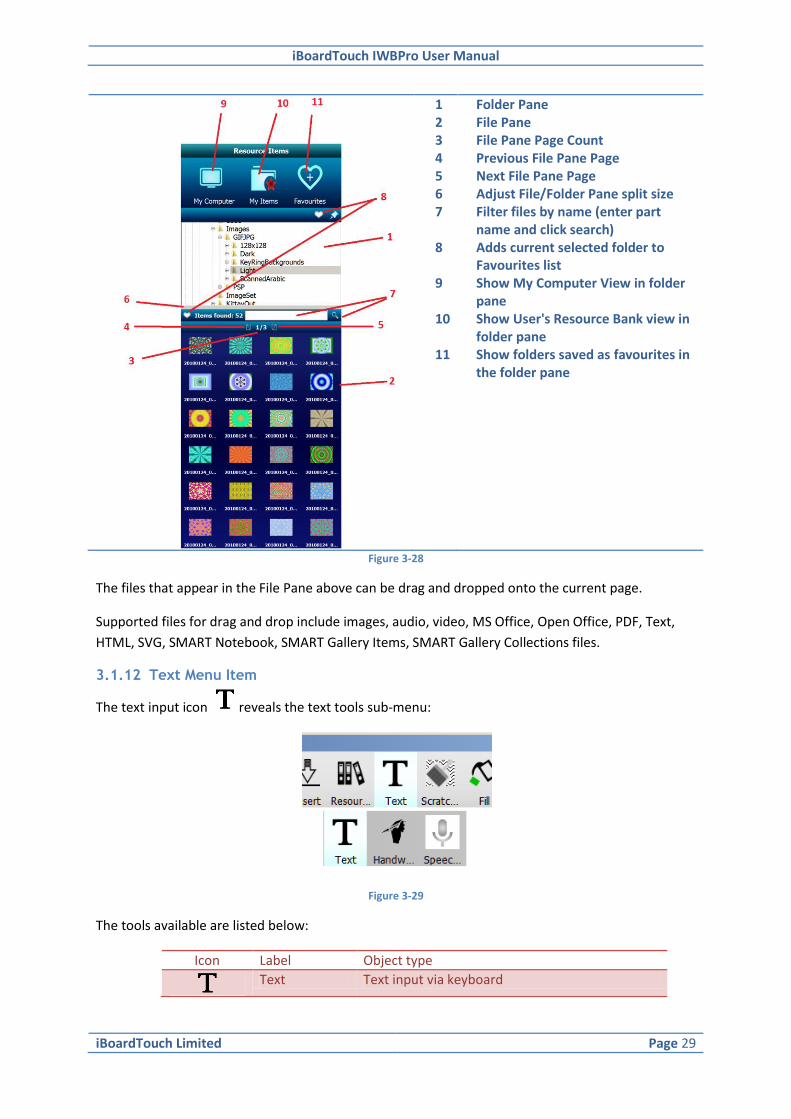
3.1.11 Resource Bank Drag and Drop
Another new feature in IWBPro is the Resource Bank which allows supported objects to be drag and
dropped directly onto the page. It supports the folder tree browser from the "My Computer" top-
level and also maps to each user's personal resource folder. This feature is taken from the IWBPro
modern mode.
The Resource Bank appears on the left hand side:
iBoardTouch IWBPro User Manual
iBoardTouch Limited Page 29
1 2 3 4 5 6 7 8 9 10 11
Folder Pane File Pane File Pane Page Count Previous File Pane Page Next File Pane Page Adjust File/Folder Pane split size Filter files by name (enter part name and click search) Adds current selected folder to Favourites list Show My Computer View in folder pane Show User's Resource Bank view in folder pane Show folders saved as favourites in the folder pane
Figure 3-28
The files that appear in the File Pane above can be drag and dropped onto the current page.
Supported files for drag and drop include images, audio, video, MS Office, Open Office, PDF, Text,
HTML, SVG, SMART Notebook, SMART Gallery Items, SMART Gallery Collections files.
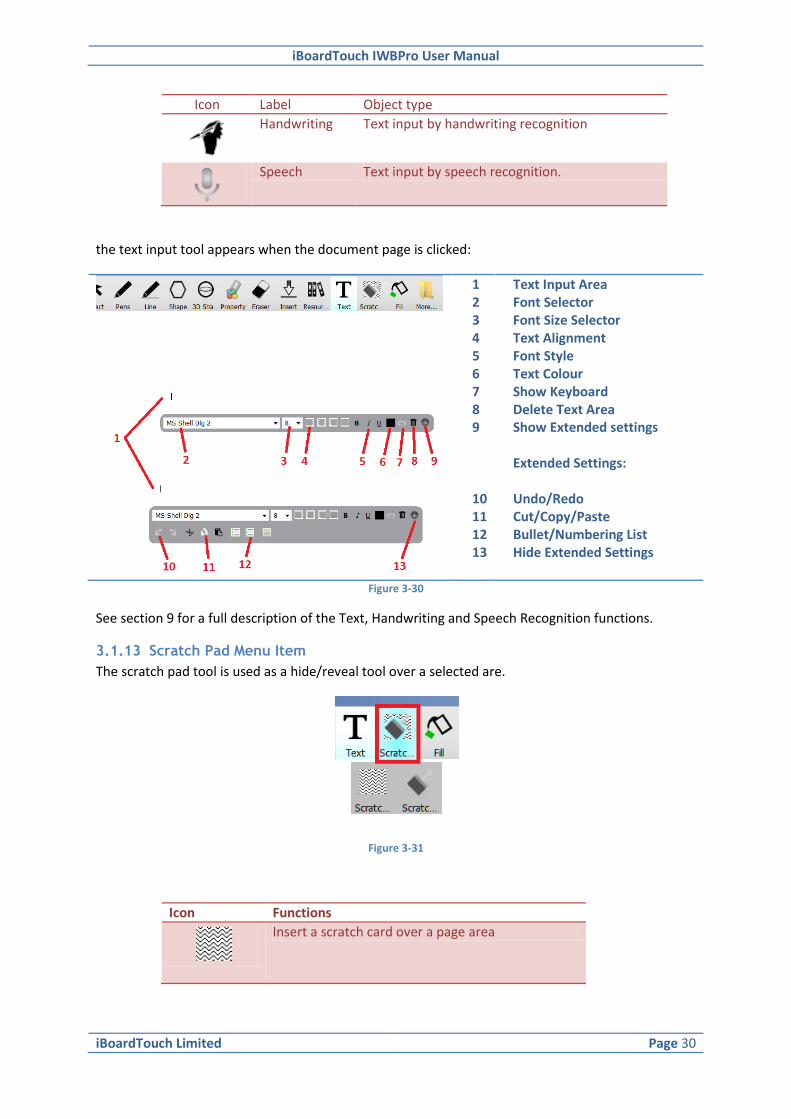
3.1.12 Text Menu Item
The text input icon reveals the text tools sub-menu:
Figure 3-29
The tools available are listed below:
Icon Label Object type
Text Text input via keyboard
iBoardTouch IWBPro User Manual
iBoardTouch Limited Page 30
Icon Label Object type
Handwriting Text input by handwriting recognition
Speech Text input by speech recognition.
the text input tool appears when the document page is clicked:
1 2 3 4 5 6 7 8 9 10 11 12 13
Text Input Area Font Selector Font Size Selector Text Alignment Font Style Text Colour Show Keyboard Delete Text Area Show Extended settings Extended Settings: Undo/Redo Cut/Copy/Paste Bullet/Numbering List Hide Extended Settings
Figure 3-30
See section 9 for a full description of the Text, Handwriting and Speech Recognition functions.
3.1.13 Scratch Pad Menu Item
The scratch pad tool is used as a hide/reveal tool over a selected are.
Figure 3-31
Icon Functions
Insert a scratch card over a page area

iBoardTouch IWBPro User Manual
iBoardTouch Limited Page 31
Scraper for the scratch card to reveal what's behind
Figure 3-32
3.1.14 Fill & Border Colour Menu Items
The Fill and Border Colour items are used to set or change the fill/border colours of objects drawn
with the pen, line, and shape tools.
In the example below, a circle is drawn using the shape tool:
Figure 3-33
To change the fill colour, select the Fill tool icon, then click the Property icon to display
the property selector.
Figure 3-34
Click the "Fill" property colour, select the colour and click OK.
Now, click inside the shade to apply the new colour:

iBoardTouch IWBPro User Manual
iBoardTouch Limited Page 32
Figure 3-35
The Border tool is used in a similar way. To change the colour of the border of the above shape
select the Border tool icon, then click the Property icon to display the property selector.
Figure 3-36
Click the "Colour" property colour, select the colour and click OK.
Now, click inside the shape to apply the new border colour:
Figure 3-37
3.1.15 Maths Tool Menu Item
The maths tool offers a variety of tools that are shown when the Math Tool icon is clicked:

iBoardTouch IWBPro User Manual
iBoardTouch Limited Page 33
Figure 3-38
The tools are described below:
Icon Label Functions
Ruler Draw straight lines of required size Measure distance between 2 points on the page
Triangle Set square (30 or 45 degree) with ruler scales.
Triangle Set square (30 or 45 degree) with ruler scales.
Protractor Protractor for measure angles and drawing arcs
Compass Compass for drawing circles
Function Insert a graphic based on a function. Types of formulas supported are Linear, Quadratic, Cubic, Trigonometric & Reciprocal
Mathematical Formula
Insert free format Math functions
Coordinates
Calculator
Figure 3-39
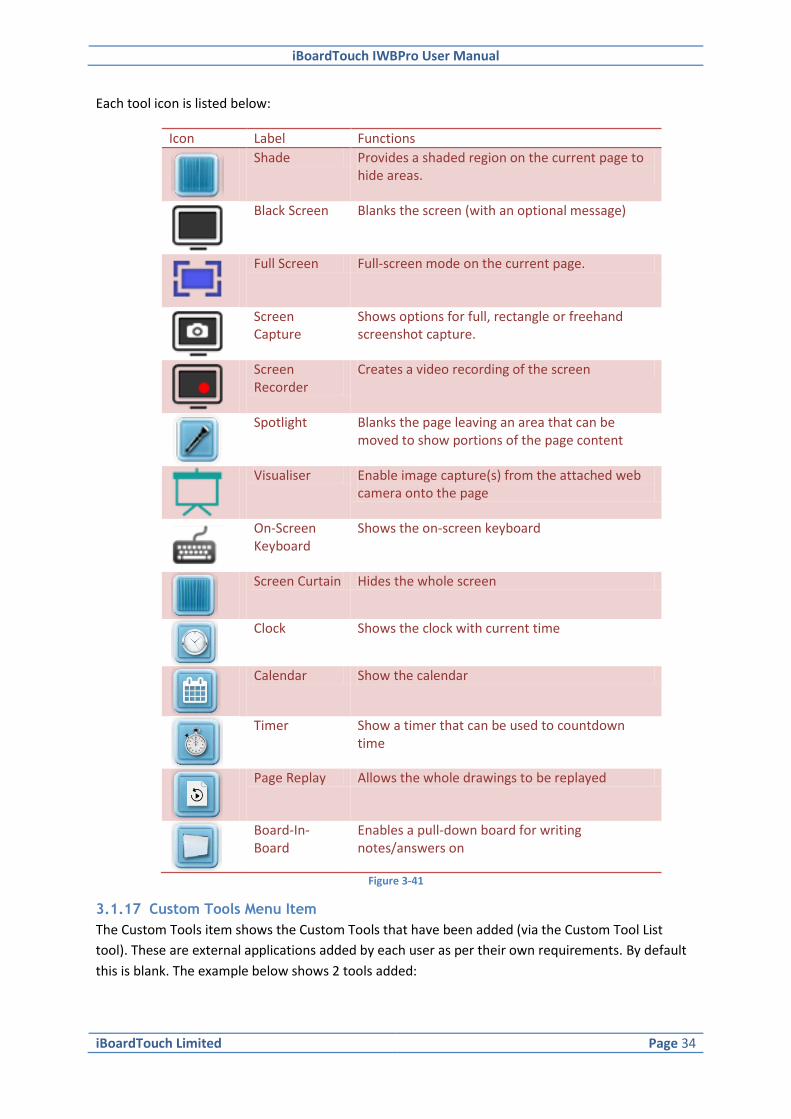
3.1.16 Others Menu Item
The Other Tools item houses a miscellaneous collection of mainly presentational tools, some of
which have been added from the Modern Mode:
Figure 3-40
iBoardTouch IWBPro User Manual
iBoardTouch Limited Page 34
Each tool icon is listed below:
Icon Label Functions
Shade Provides a shaded region on the current page to hide areas.
Black Screen Blanks the screen (with an optional message)
Full Screen Full-screen mode on the current page.
Screen Capture
Shows options for full, rectangle or freehand screenshot capture.
Screen Recorder
Creates a video recording of the screen
Spotlight Blanks the page leaving an area that can be moved to show portions of the page content
Visualiser Enable image capture(s) from the attached web camera onto the page
On-Screen Keyboard
Shows the on-screen keyboard
Screen Curtain Hides the whole screen
Clock Shows the clock with current time
Calendar Show the calendar
Timer Show a timer that can be used to countdown time
Page Replay Allows the whole drawings to be replayed
Board-In-Board
Enables a pull-down board for writing notes/answers on
Figure 3-41
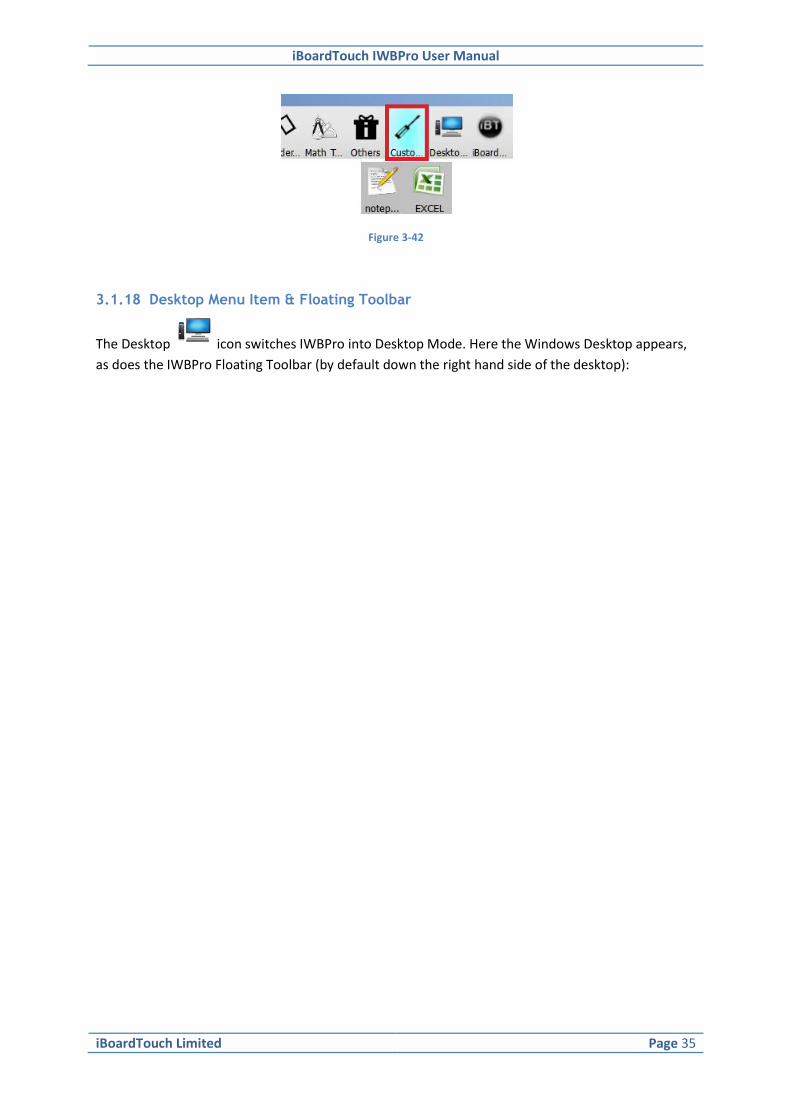
3.1.17 Custom Tools Menu Item
The Custom Tools item shows the Custom Tools that have been added (via the Custom Tool List
tool). These are external applications added by each user as per their own requirements. By default
this is blank. The example below shows 2 tools added:
iBoardTouch IWBPro User Manual
iBoardTouch Limited Page 35
Figure 3-42
3.1.18 Desktop Menu Item & Floating Toolbar
The Desktop icon switches IWBPro into Desktop Mode. Here the Windows Desktop appears,
as does the IWBPro Floating Toolbar (by default down the right hand side of the desktop):

iBoardTouch IWBPro User Manual
iBoardTouch Limited Page 36
Figure 3-43
The floating toolbar appears initially down the right side of the screen.
If the screen resolution is too small, the folder icon is shown at the bottom to indicate additional icons. Clicking the folder icon will reveal those additional icons. The Floating Toolbar can be switched to the left or rightmost part of
the screen using the buttons. In Desktop Mode the main IWB window is hidden and the Windows Desktop become active, but allowing the IWB functions be used on the desktop. The icons and functions available match those on the normal toolbar in the Classic Mode. This enables the user to draw directly on the desktop. For example, a teacher may wish to show web pages via a browser and highlight certain parts. By switching to desktop mode this can be achieved. The following shows how in the Desktop Mode a web page can be viewed and marked with the pen:
Figure 3-44
Switching back to iBT Application mode is done by clicking the "iBT" icon.

iBoardTouch IWBPro User Manual
iBoardTouch Limited Page 37
3.1.19 iBT Menu Item
The "iBT" menu item reveals the settings and about menus. Each of these will be described in the
later chapter "10 iBT Menu".
Figure 3-45

iBoardTouch IWBPro User Manual
iBoardTouch Limited Page 38
4 Document Management Functions
The IWBPro application saves the pages in a file with the default "iwbpro" extension. The files are
referred to as IWBPro documents. Files can also be saved as PDF, SMART Notebook, or Image
formats.
In this section the functions for managing the documents are explained. These are accessed via the
"File" toolbar icon:
Figure 4-1
4.1 Create New Document
When the IWB application starts it opens with a blank one page document which can be drawn on. If after drawing, a new document is required, select the "File" and "New" icon from the common toolbar:
File
+ New
If the current document has unsaved changes, the application will prompt to save the current document:
Figure 4-2
Clicking "Discard" cause the current changes to be lost, and a new blank document is opened. Clicking "Cancel" cancels the "File>New" operation and leaves the current document in place with any unsaved changes. Clicking "Save" opens the standard Microsoft Windows "Save As" dialogue box where the user can specify the name and location of the saved document. The default location for files is the user's "Documents\IWBPro" folder.
iBoardTouch IWBPro User Manual
iBoardTouch Limited Page 39
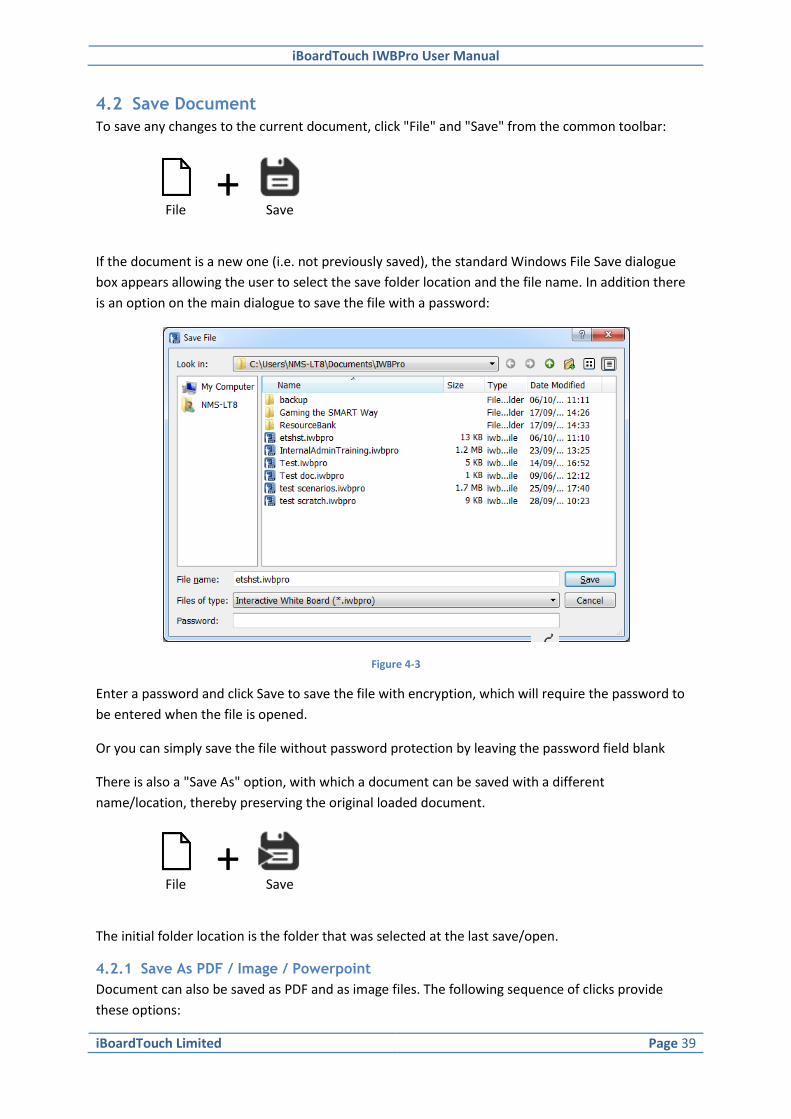
4.2 Save Document
To save any changes to the current document, click "File" and "Save" from the common toolbar:
File
+ Save
If the document is a new one (i.e. not previously saved), the standard Windows File Save dialogue
box appears allowing the user to select the save folder location and the file name. In addition there
is an option on the main dialogue to save the file with a password:
Figure 4-3
Enter a password and click Save to save the file with encryption, which will require the password to
be entered when the file is opened.
Or you can simply save the file without password protection by leaving the password field blank
There is also a "Save As" option, with which a document can be saved with a different
name/location, thereby preserving the original loaded document.
File
+ Save
The initial folder location is the folder that was selected at the last save/open.
4.2.1 Save As PDF / Image / Powerpoint
Document can also be saved as PDF and as image files. The following sequence of clicks provide
these options:

iBoardTouch IWBPro User Manual
iBoardTouch Limited Page 40
File
+ Save PDF
File
+ Save
Image
File
+ Save
Image
4.2.2 File Formats
IWB supports the following document formats:
Format Name File Name Extension
IWBPro *.iwbpro Native format of IWBPro documents with full feature support
SMART Notebook *.notebook Files created using SMART Notebook.
IWB *.iwb Files from the old IWB application
PPTx *.pptx Files created in PowerPoint Presentation format
Figure 4-4
Other format documents can be inserted/drag and dropped via the "Insert" or "Resources" icons.
4.3 Open Document
IWB documents that have been previously saved can be opened. Select the "File" and "Open" icon from the common toolbar:
File
+ Open
As with the Create New Document function, if the current document has unsaved changes the save
prompt will appear first.
4.4 Password Protecting Documents
To protect a document from being opened by students (for example test results), there is an option
when saving the document as IWBPRO format to password protect ("encrypt") the document, which
results in the file requiring a password to view it in IWBPro.

iBoardTouch IWBPro User Manual
iBoardTouch Limited Page 41
The "Password?" box appears on the main dialogue known as simplifying save, the password should
be entered text field, and then "Save" button should be pressed:
Figure 4-5
To ignore this, i.e. not add password protection, simply click the "Save" button with leaving the
“Password” text field blank.
4.5 Import
The Import functions allows certain types of document to be imported as an image into the current
IWBPro document.
File
+ Import
The standard File Open dialogue box opens.
The supported files for import are files known by the extensions: ODT, OTT, SXW, STW, DOCX,
DOTX, DOC, DOT, XML, RTF, ODF, ODS, SLC, XLSX, XLSM, XLST, XLS, XLW, XLC, XLT, ODP, OTP, SXC,
PPTX, PPSX, PPMS, POTX, POMX, PPT, PPS, PPM, POT, POM, HTML, HTM, PDF, POM.
Once the file is selected, the following dialogue appears:

iBoardTouch IWBPro User Manual
iBoardTouch Limited Page 42
Figure 4-6
If a Office document is selected the "Import" button will be disabled whilst the document is
internally inspected, then the option to import will be enabled. The import dialogue allows page
range, resolution to be set for the import.
When import is clicked the import processing starts:
Figure 4-7
The document is rendered as an image and set as background, page by page.
The import renders the source document as an image, so consequently some of the formatting,
position, size of various elements may vary from the original document.

iBoardTouch IWBPro User Manual
iBoardTouch Limited Page 43
4.6 Printing
There are two modes for printing - Print Document:
File
+ Print All
and Print Current Page:
File
+
Print Page
The standard Windows Print File dialogue box opens for printer selection.
4.7 Exit IWBPro
The IWBPro application is exited using the Windows [X] button, or the upper-leftmost "File" title bar
icon:
Figure 4-8
If the current document has any unsaved changes the save document prompt will appear.
4.8 Page Control
The page control icon opens the page list panel on the right side of the desktop.
Figure 4-9
iBoardTouch IWBPro User Manual
iBoardTouch Limited Page 44
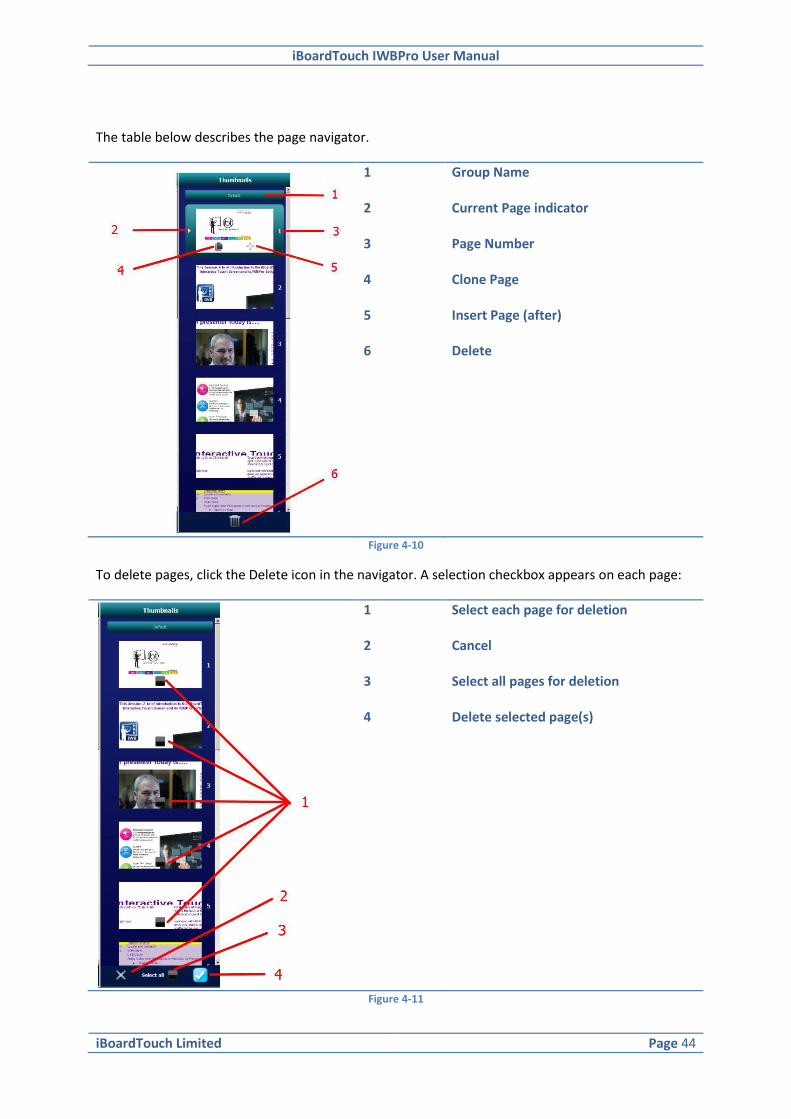
The table below describes the page navigator.
1 2 3 4 5 6
Group Name Current Page indicator Page Number Clone Page Insert Page (after) Delete
Figure 4-10
To delete pages, click the Delete icon in the navigator. A selection checkbox appears on each page:
1 2 3 4
Select each page for deletion Cancel Select all pages for deletion Delete selected page(s)
Figure 4-11

iBoardTouch IWBPro User Manual
iBoardTouch Limited Page 45
5 Maths Tool Functions
5.1 Ruler
To display the Ruler Tool, click the following icons:
+
The ruler appears:
Figure 5-1
The ruler can positioned to use the scale to measure distance
Ruler length and rotation is controlled via the buttons listed below:
Button Icon Function
Close the ruler
Rotate
Change length
Figure 5-2
To draw a line of a required length, place the cursor over the ruler graduations and drag to the
required length. a line will be drawn as the cursor is dragged, and the measurement will be shown
on the ruler as the pen moves.
Figure 5-3
The style, colour, thickness on the line drawn is in accordance with the current line settings.
5.2 Triangle 30º & 45º Set Square
To display the 30º Set Square Tool, click the following icons:
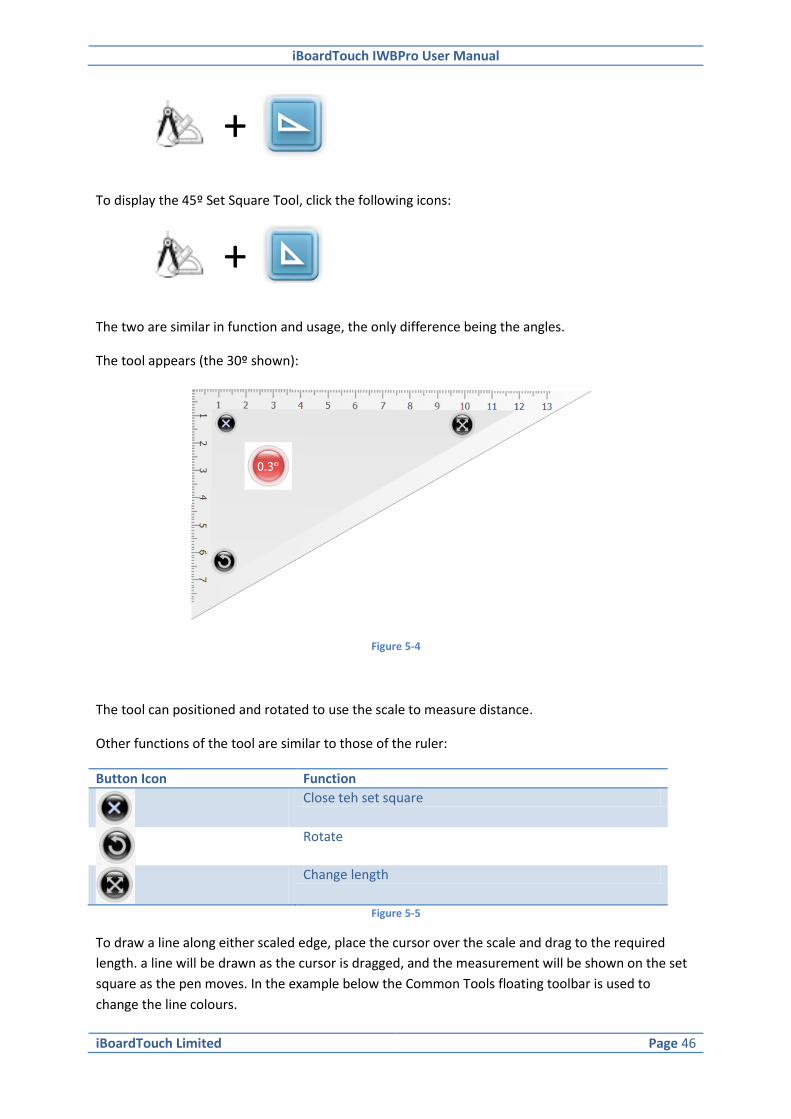
iBoardTouch IWBPro User Manual
iBoardTouch Limited Page 46
+
To display the 45º Set Square Tool, click the following icons:
+
The two are similar in function and usage, the only difference being the angles.
The tool appears (the 30º shown):
Figure 5-4
The tool can positioned and rotated to use the scale to measure distance.
Other functions of the tool are similar to those of the ruler:
Button Icon Function
Close teh set square
Rotate
Change length
Figure 5-5
To draw a line along either scaled edge, place the cursor over the scale and drag to the required
length. a line will be drawn as the cursor is dragged, and the measurement will be shown on the set
square as the pen moves. In the example below the Common Tools floating toolbar is used to
change the line colours.

iBoardTouch IWBPro User Manual
iBoardTouch Limited Page 47
Figure 5-6
5.3 Protractor
To display the Protractor Tool, click the following icons:
+
The tool appears:
Figure 5-7
The tool can positioned and rotated to use the scale to measure angles.
Angles are measured by clicking on the peg and dragging. The angle is indicate at the centre of the
compass.

iBoardTouch IWBPro User Manual
iBoardTouch Limited Page 48
Other functions of the tool are similar to those of the ruler:
Other functions of the tool are similar to those of the ruler:
Button Icon Function
Close the set tool
Rotate
Draw angled lines at the set angle
Pegs used to drag the pointer to the required angle
Figure 5-8
To draw an angle, click and drag the peg to the required angle then click the "tick" icon. The result is
drawn under the protractor:
Figure 5-9
5.4 Compass
The compass tool is used to draw arcs and circles.
To display the compass tool press the following icons:
+
The tool appears:

iBoardTouch IWBPro User Manual
iBoardTouch Limited Page 49
1
2
3
4
5
6
Pin leg - click and drag to position the pin point as required Radius - click and drag to the required radius Pen - click and drag anywhere along the pen to draw the arc Pen Positioner - move the pen point at the set radius without drawing the arc Arc/Sector toggle - click to specify that a sector should be drawn, unclick to draw an arc Close tool
Figure 5-10
Arc Sector
Figure 5-11
Figure 5-12
Figure 5-13
To change the colour, click on the pen part of the compass, then select "Property" icon from the
toolbar:
Figure 5-14
The "Color" property sets the colour of the pen, the fill colour of the sector (or segment if arc mode
is selected). The size sets the size of the stroke.
The following is drawn when the mode is set to sector, fill colour is red, and pen is green:

iBoardTouch IWBPro User Manual
iBoardTouch Limited Page 50
Figure 5-15
The same settings but with arc mode creates a segment as follows:
Figure 5-16
5.5 Function Graph
This tool draws a graph of a mathematic function with the option to embed the resulting graph as an
image onto the current document page.
This tool is displayed by clicking the following:
+
The following screen appears:

iBoardTouch IWBPro User Manual
iBoardTouch Limited Page 51
Figure 5-17
The numbered control components are described below:
1 Zoom level slider
2 Switch to pan/roam mode 3 Pen tool 4 Highlighter 5 Eraser 6 Clear graph 7 Function editor 8 Add graph to document as an image 9 Exit Function plotter
Figure 5-18
The function editor is shown below:

iBoardTouch IWBPro User Manual
iBoardTouch Limited Page 52
Figure 5-19
Using the buttons the equation is created. Click the green tick button to plot the graph:
Figure 5-20
Clicking the mode slider from 1 to 0 reveals a set of preset functions:
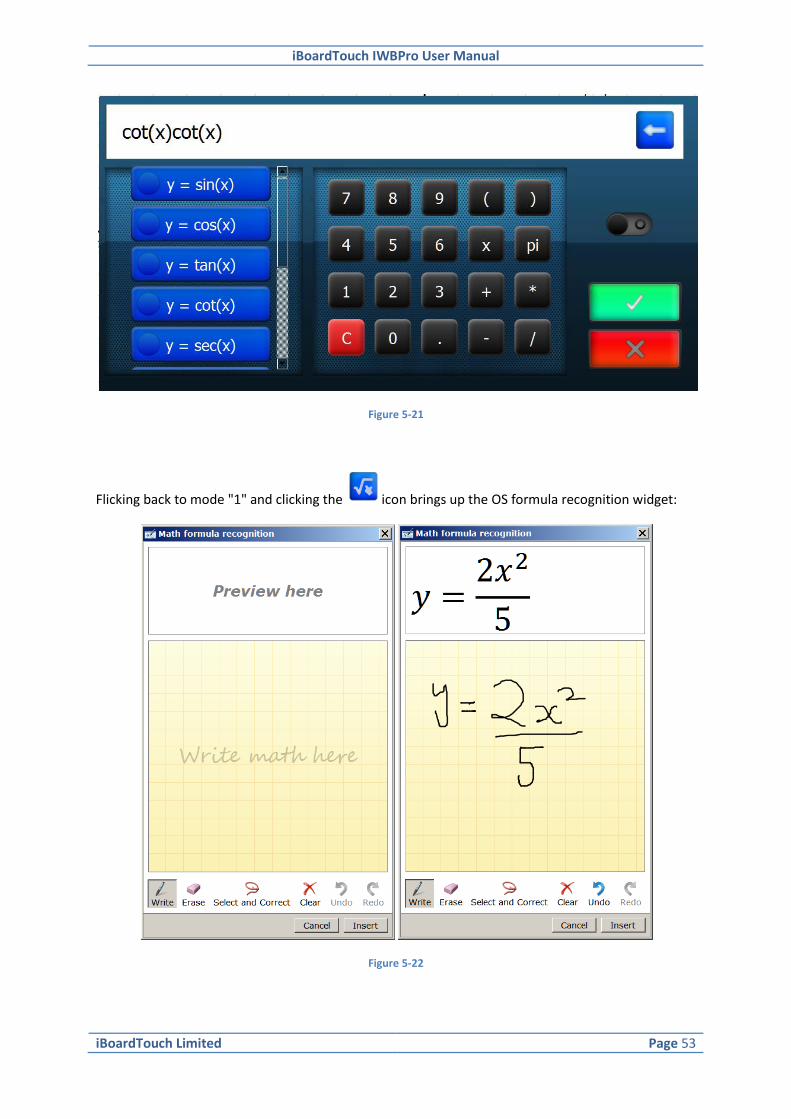
iBoardTouch IWBPro User Manual
iBoardTouch Limited Page 53
Figure 5-21
Flicking back to mode "1" and clicking the icon brings up the OS formula recognition widget:
Figure 5-22

iBoardTouch IWBPro User Manual
iBoardTouch Limited Page 54
Click "Insert" to insert the recognised equation and to plot the graph.
Clicking snapshot icon adds the graph to the document as an image:
Figure 5-23
The resulting object can be manipulated as any other image object.
Show and hide the annotation by clicking the orange text icon again.
5.6 Maths Formula
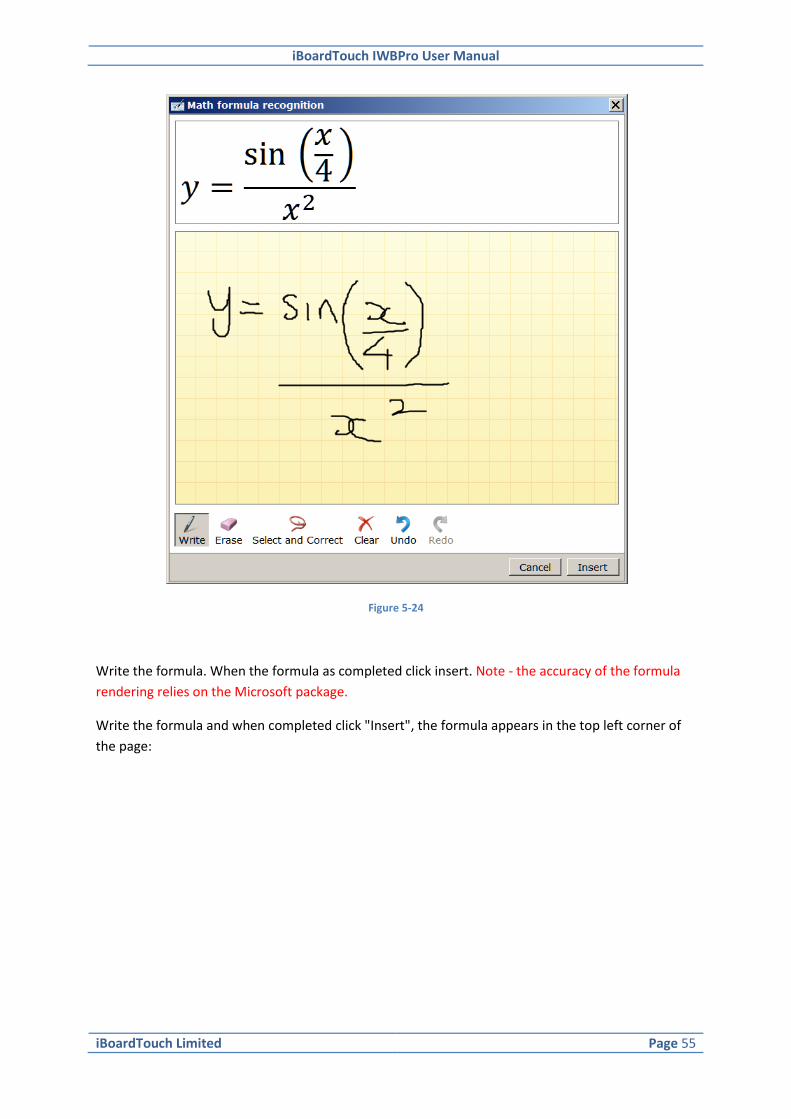
This feature relies on the Microsoft Windows 7 "Math Input Panel" being installed.
Click the following to display the input panel:
+
The panel appears:
iBoardTouch IWBPro User Manual
iBoardTouch Limited Page 55
Figure 5-24
Write the formula. When the formula as completed click insert. Note - the accuracy of the formula
rendering relies on the Microsoft package.
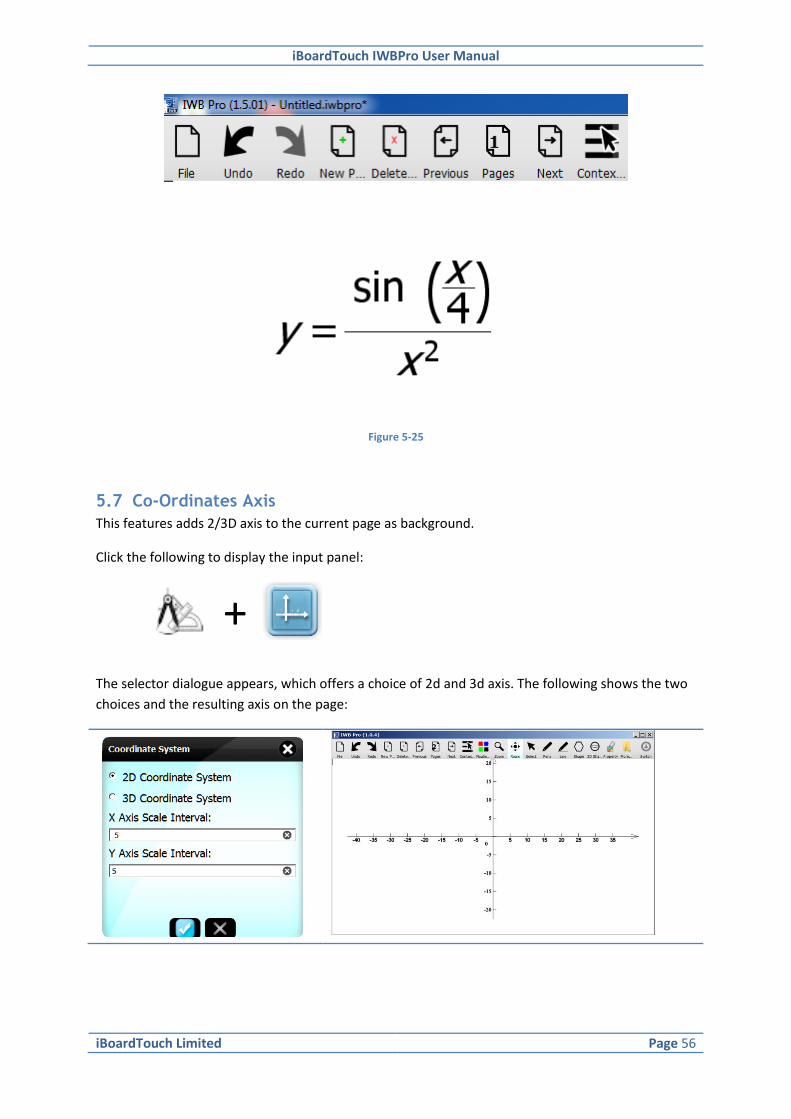
Write the formula and when completed click "Insert", the formula appears in the top left corner of
the page:
iBoardTouch IWBPro User Manual
iBoardTouch Limited Page 56
Figure 5-25
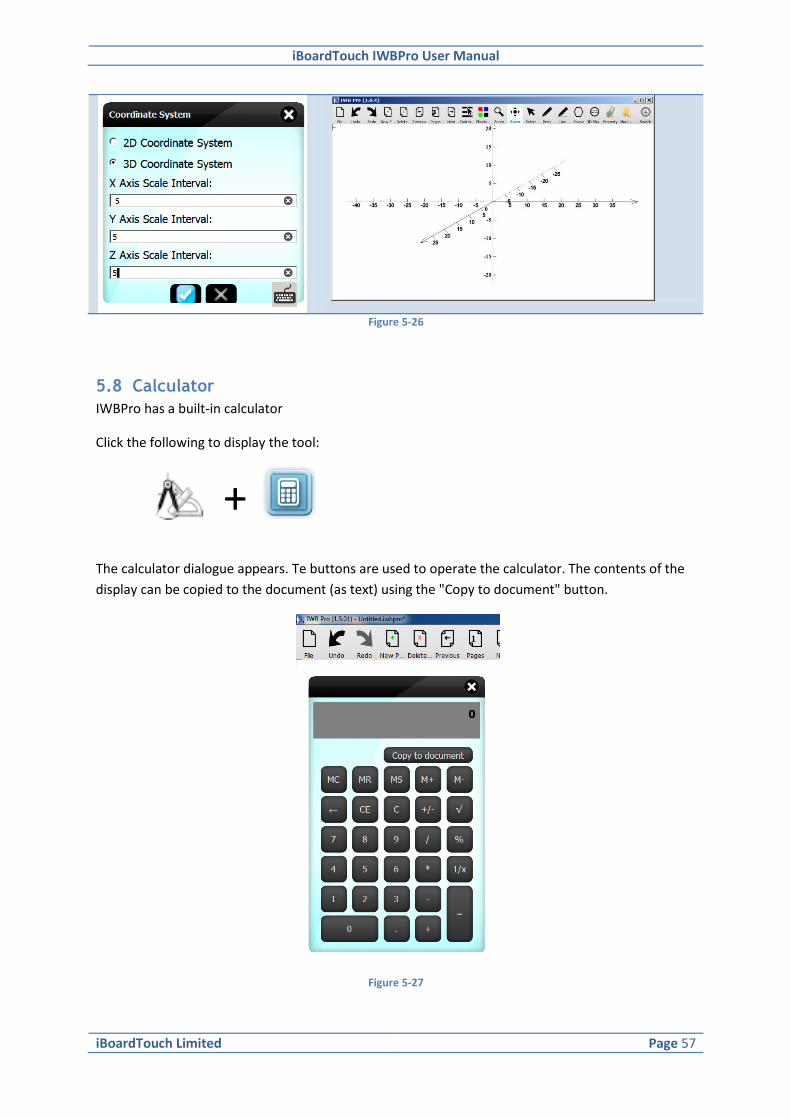
5.7 Co-Ordinates Axis
This features adds 2/3D axis to the current page as background.
Click the following to display the input panel:
+
The selector dialogue appears, which offers a choice of 2d and 3d axis. The following shows the two
choices and the resulting axis on the page:
iBoardTouch IWBPro User Manual
iBoardTouch Limited Page 57
Figure 5-26
5.8 Calculator
IWBPro has a built-in calculator
Click the following to display the tool:
+
The calculator dialogue appears. Te buttons are used to operate the calculator. The contents of the
display can be copied to the document (as text) using the "Copy to document" button.
Figure 5-27
iBoardTouch IWBPro User Manual
iBoardTouch Limited Page 58
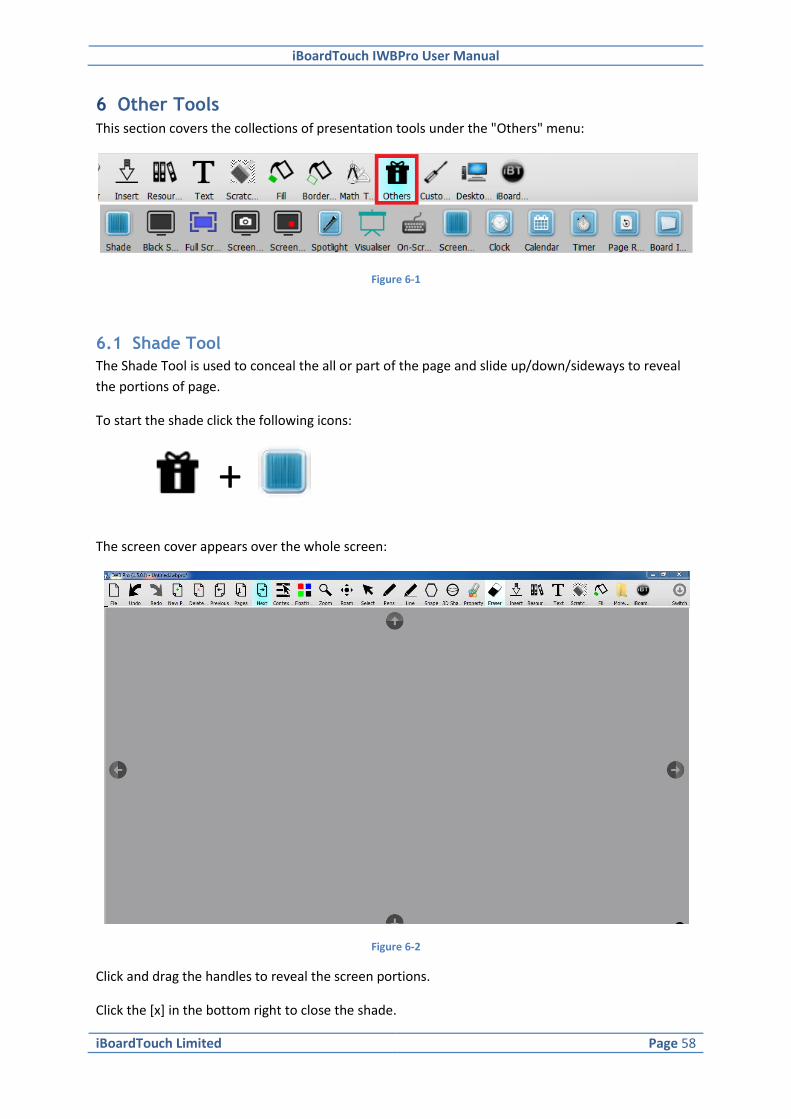
6 Other Tools
This section covers the collections of presentation tools under the "Others" menu:
Figure 6-1
6.1 Shade Tool
The Shade Tool is used to conceal the all or part of the page and slide up/down/sideways to reveal
the portions of page.
To start the shade click the following icons:
+
The screen cover appears over the whole screen:
Figure 6-2
Click and drag the handles to reveal the screen portions.
Click the [x] in the bottom right to close the shade.

iBoardTouch IWBPro User Manual
iBoardTouch Limited Page 59
6.2 Black Screen Tool
The Black Screen Tool is used to cover the screen with a banner message.
To start the tool click the following icons:
+
A dialogue appears allowing the banner message to be entered:
Figure 6-3
The message is then displayed as a red on black banner covering the whole screen:
Figure 6-4
Press any key or click to close the banner.
6.3 Full Screen View Tool
The Full Screen View Tool maximises the page drawing area of the screen, hiding all the toolbars.

iBoardTouch IWBPro User Manual
iBoardTouch Limited Page 60
To start the tool click the following icons:
+
Figure 6-5
Four buttons at the bottom edge of the screen appear that allow page selection, and the red [x]
button reverts the screen back to normal mode.
6.4 Screen Capture Tool
The Screen Capture Tool enables the whole or a portion of the screen/desktop to be captured, and
pastes the result onto the current IWB page as an image.
To start the tool click the following icons:
+
The screen capture panel appears:
Figure 6-6

iBoardTouch IWBPro User Manual
iBoardTouch Limited Page 61
The icons and their functions on this panel are described below:
Button Icon Function
Captures the whole screen, pastes the captured image onto the current page
Captures a rectangle area specified by click and drag. The rectangle is marked as it is dragged. When the tick is clicked the selected region is pasted into the document, when the red cross is ticked the selection is cancelled.
Freehand selection - draw around the required region, when the cursor is released the region is pasted onto the current page.
Closes the screen capture panel.
Figure 6-7
6.5 Screen Recorder Tool
The Screen recorder Tool is used to record the desktop interaction as a video, with audio. This can
be used to record lessons.
To start the tool click the following icons:
+
The IWB screen recorder application windows appears:
Figure 6-8
The buttons from left to right are Play, Pause, Stop.
Button Icon Function

iBoardTouch IWBPro User Manual
iBoardTouch Limited Page 62
Start/Stop recording. When recording this is red.
Plays the recorded video.
Options. This opens up the following options:
These options allow the region that is record to be set manually, as well as the video format and frame rate. The screen grab icon can be used to us click and drag to set the recording region. The region defaults to the full screen (including extend desktops). Clicking Advance reveals some more video settings:
Closes the screen recorder panel.
Figure 6-9
To start recording press record button, and the file save dialogue appears.
The sets the name that the recoding will be saved. When setting the name, ensure the extension
matches the Profile setting i9n the video capture panel, e.g. WMV, MP4:
Figure 6-10
Click "Save" and the recording starts. The timers start counting too.

iBoardTouch IWBPro User Manual
iBoardTouch Limited Page 63
Figure 6-11
Press the red button to stop the recording.
Click the play button to play the recorded video.
Click the [x] button on the recorder to exit.
6.6 Spotlight Tool
The Spotlight Tool is used to show a small part often page, with the rest covered in black.
To start the tool click the following icons:
+
The whole screen is covered bar a circular area:
Figure 6-12
The blue gear cog icon is used to adjust size of the visible area.

iBoardTouch IWBPro User Manual
iBoardTouch Limited Page 64
Click and drag on any of the black area to move the view port around. The square icon changes the
shape of the view port to square.
Click the[X] to close this tool.
6.7 Visualiser Tool
The Visualiser Tool (in old IWB called the Exhibition Tool) interfaces with the camera (if attached) to
take pictures and allow them to be embedded within the IWBPro document.
To start the tool click the following icons:
+
The camera capture page opens:
Figure 6-13
The "Camera" drop-down list shows all the available cameras.
The "Resolution" drop-down list specifies the camera capture size.
The "Audio" drop-down list lists all available audio devices.

iBoardTouch IWBPro User Manual
iBoardTouch Limited Page 65
The icon buttons along the bottom control this tool as follows:
Button Icon Function
Locks the size and position of the camera feed.
Refreshes the available camera/audio device lists.
Take snapshot.
Close tool and return back to IWBPro document.
Record camera feed
This will bring up the Visualiser Advanced Settings menu. See the "Visualiser Advanced Settings" section below.
Figure 6-14
6.8 Visualiser Advanced Settings
Figure 6-15
The values are explained in the table below in detail. The first two values in the table can be changed
to your preference but the rest of them should be left along in default format:
Values Function
Profiles This lists all available video formats you can record your camera with.
FPS (Frame Per Second) This is how fast the video feed will be recording and playing back, so to make the video playback smoother you would have to increase the FPS.

iBoardTouch IWBPro User Manual
iBoardTouch Limited Page 66
6.9 Screen Wrap (Curtain) Tool
The Shade Tool is used to conceal the all screen.
To start the shade click the following icons:
+
The screen cover appears over the whole screen:
Figure 0-1
The image that is displayed can be changed (e.g. School logo) by clicking the blue gear cog button
and selecting an image file.
The selection icon allows or region to be specified where the curtain should cover.
Click the [x] in the bottom right to close the tool.
6.10 Clock Tool
The Clock Tool displays a clock with the current time.
To start the tool click the following icons:
+
The clock appears:

iBoardTouch IWBPro User Manual
iBoardTouch Limited Page 67
Figure 0-2
Use the Move Arrows icon to drag the clock to different positions.
Click the [x] in the bottom right to close the tool.
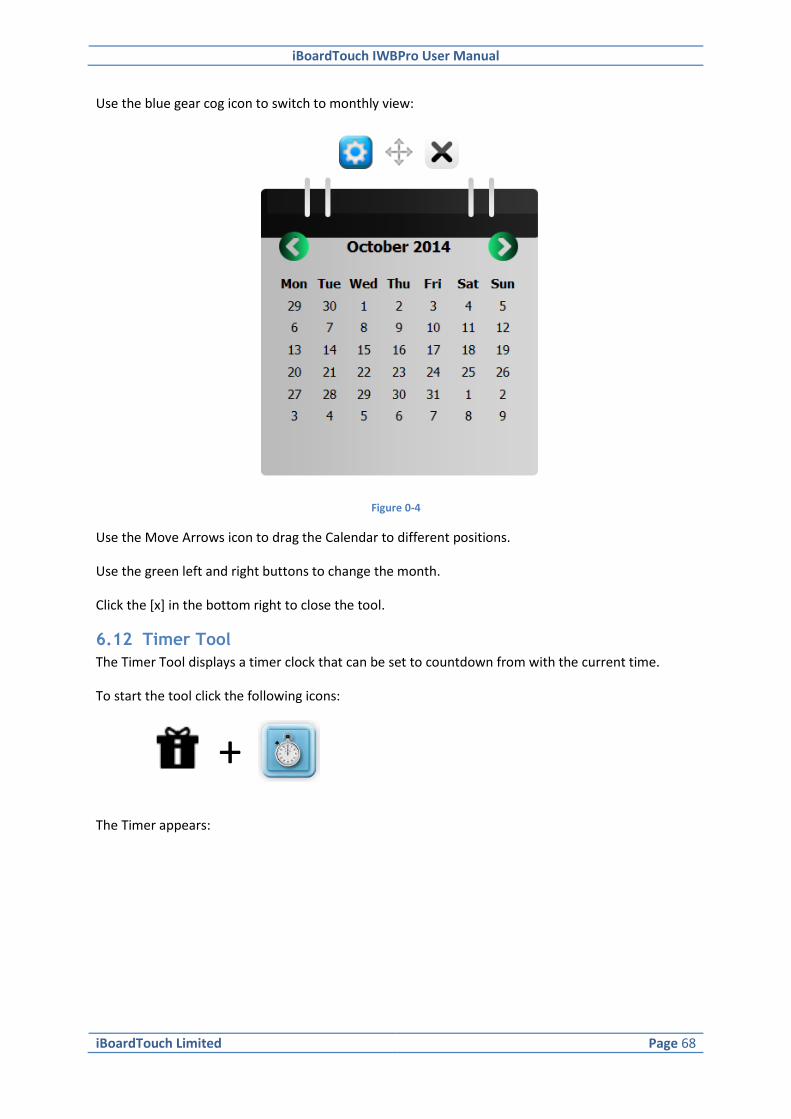
6.11 Calendar Tool
The Clock Tool displays a clock with the current time.
To start the tool click the following icons:
+
The Calendar appears:
Figure 0-3
iBoardTouch IWBPro User Manual
iBoardTouch Limited Page 68
Use the blue gear cog icon to switch to monthly view:
Figure 0-4
Use the Move Arrows icon to drag the Calendar to different positions.
Use the green left and right buttons to change the month.
Click the [x] in the bottom right to close the tool.
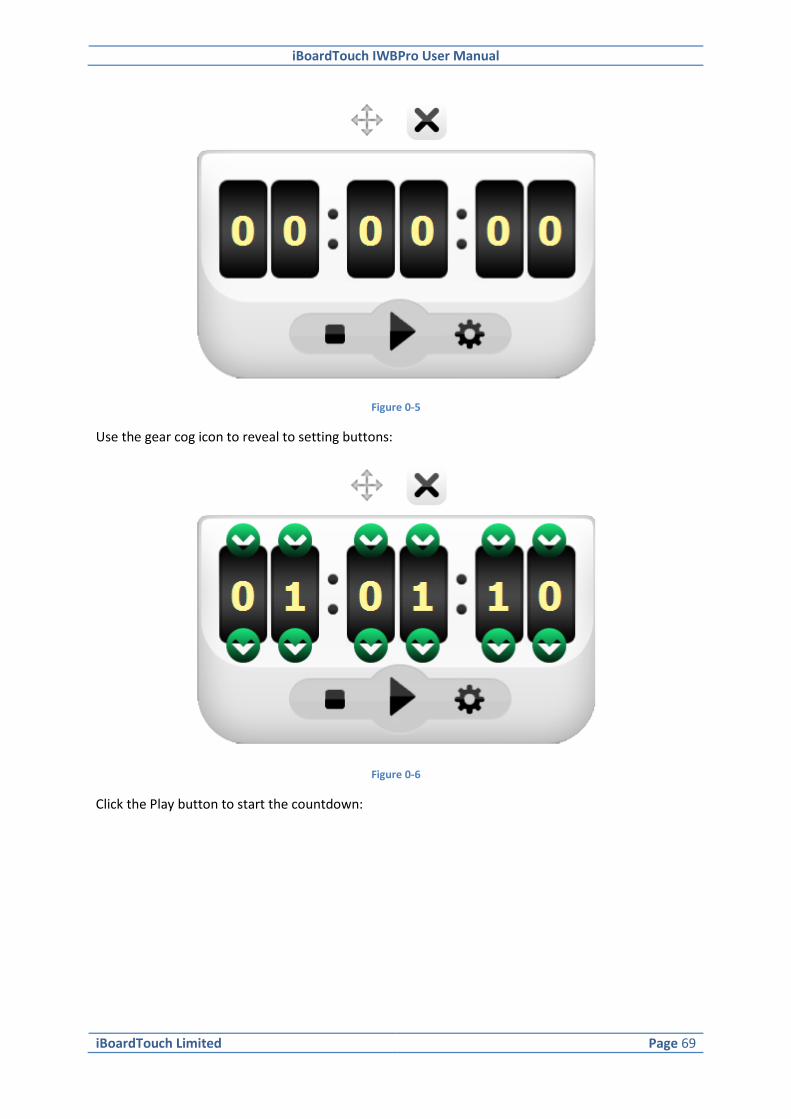
6.12 Timer Tool
The Timer Tool displays a timer clock that can be set to countdown from with the current time.
To start the tool click the following icons:
+
The Timer appears:
iBoardTouch IWBPro User Manual
iBoardTouch Limited Page 69
Figure 0-5
Use the gear cog icon to reveal to setting buttons:
Figure 0-6
Click the Play button to start the countdown:

iBoardTouch IWBPro User Manual
iBoardTouch Limited Page 70
Figure 0-7
Pause and Stop buttons are also on the timer.
Use the Move Arrows icon to drag the Calendar to different positions.
Click the [x] in the bottom right to close the tool.
6.13 Page Replay Tool
The Page Replay Tool is new in IWBPro. It is used to replay the page creation from start.
To start the tool click the following icons:
+
When click the following controls appear:
Figure 0-8
These buttons are close, play, stop, adjust speed (x1, x2, x3, x4) and replay.
Click Play to start the replay.
Click the [x] in the bottom right to close the tool.
iBoardTouch IWBPro User Manual
iBoardTouch Limited Page 71
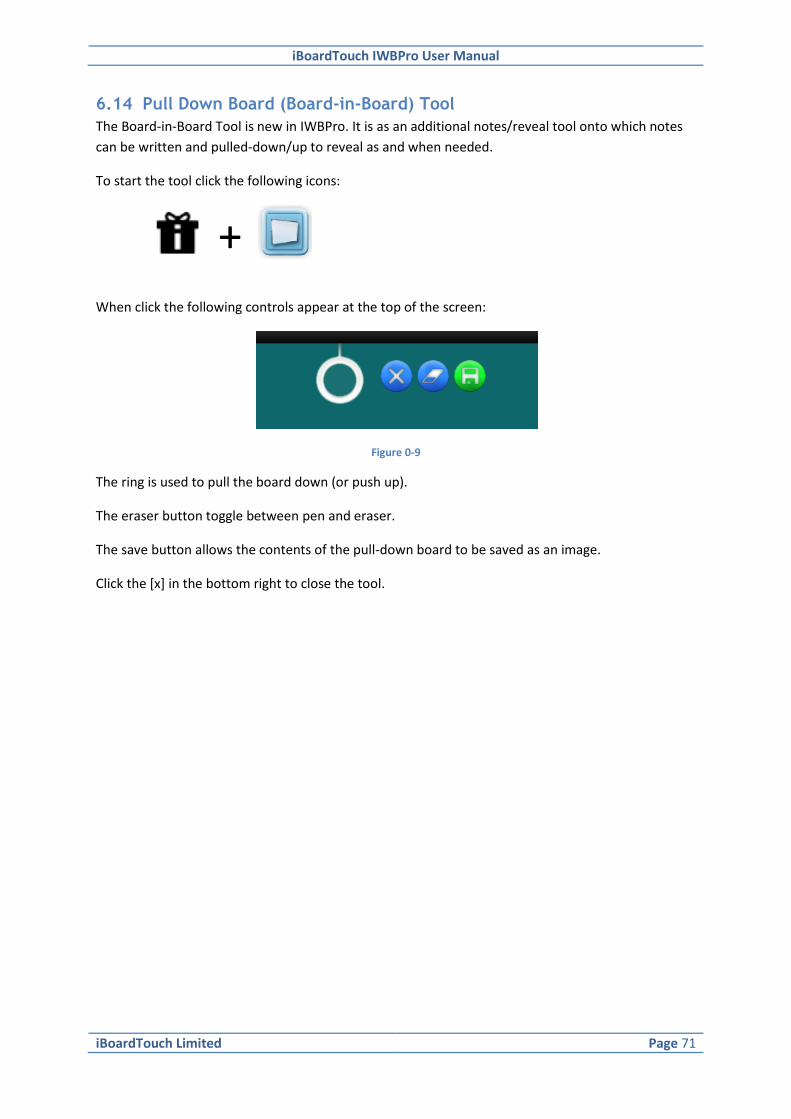
6.14 Pull Down Board (Board-in-Board) Tool
The Board-in-Board Tool is new in IWBPro. It is as an additional notes/reveal tool onto which notes
can be written and pulled-down/up to reveal as and when needed.
To start the tool click the following icons:
+
When click the following controls appear at the top of the screen:
Figure 0-9
The ring is used to pull the board down (or push up).
The eraser button toggle between pen and eraser.
The save button allows the contents of the pull-down board to be saved as an image.
Click the [x] in the bottom right to close the tool.

iBoardTouch IWBPro User Manual
iBoardTouch Limited Page 72
7 Inserting Objects
The Inserts menu is used to embed various types of external objects and documents into the current
document.
7.1 Insert Office Documents
IWBPro can import MS Office, OpenOffice, LibreOffice and PDF documents without requiring MS
Office to be installed. The topic of importing these type of files has been covered in the document
management section.
7.2 Insert Image
Images saved in files can be inserted onto the current page.
Click the following icons to insert an image:
+
The standard Windows select file dialogue box appears.
IWBPro support a much wider range of image formats than the old IWB.
Select the image file. The images is inserted on the current page.
The image can be rotated, moved, resized.
7.3 Insert Flash
Flash Shockwave files can be inserted onto the current page.
Click the following icons to insert a flash file:
+
The standard Windows select file dialogue box appears.
The type of file that can be inserted is SWF.
Select the file. The Flash icon is inserted on the current page.
iBoardTouch IWBPro User Manual
iBoardTouch Limited Page 73
Figure 7-1
To play the file, select the object, then a little link icons appears under it:
Figure 7-2
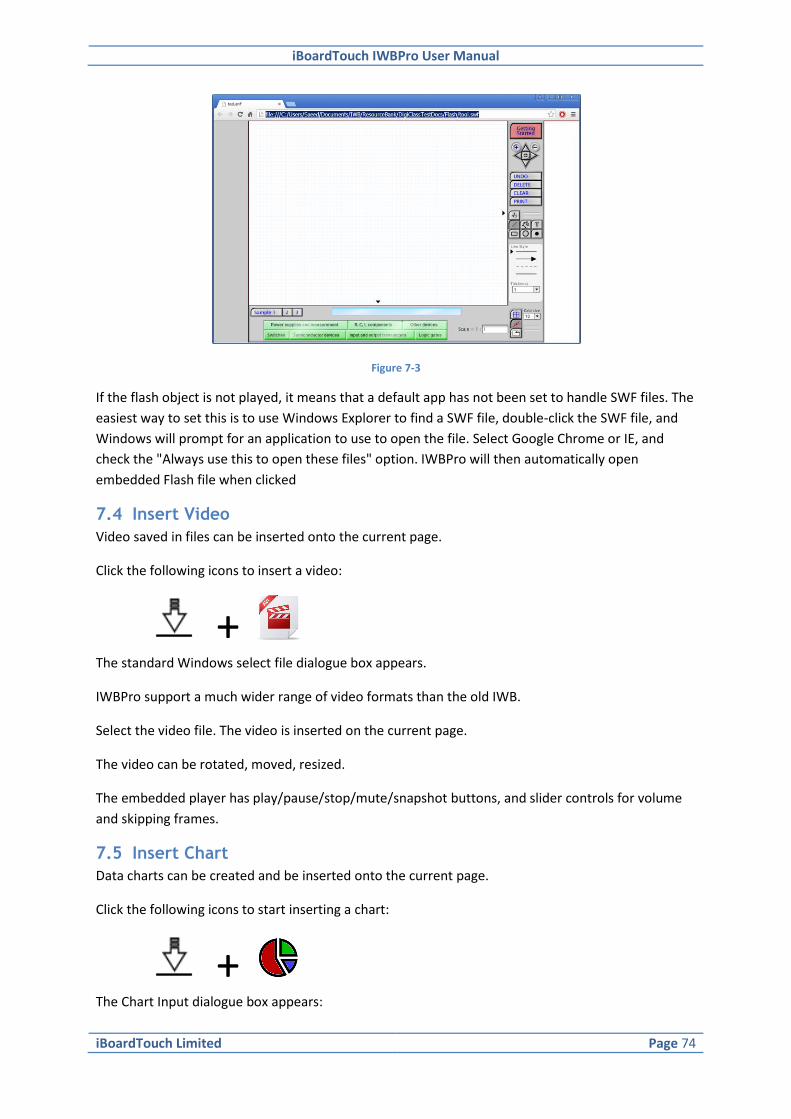
This version of IWBPro uses the system default flash player app. In most cases this will be the
browser (IE, Chrome). The Flash object will therefore be played in an external player. The example
below shows the flash playing in Google Chrome.
iBoardTouch IWBPro User Manual
iBoardTouch Limited Page 74
Figure 7-3
If the flash object is not played, it means that a default app has not been set to handle SWF files. The
easiest way to set this is to use Windows Explorer to find a SWF file, double-click the SWF file, and
Windows will prompt for an application to use to open the file. Select Google Chrome or IE, and
check the "Always use this to open these files" option. IWBPro will then automatically open
embedded Flash file when clicked
7.4 Insert Video
Video saved in files can be inserted onto the current page.
Click the following icons to insert a video:
+
The standard Windows select file dialogue box appears.
IWBPro support a much wider range of video formats than the old IWB.
Select the video file. The video is inserted on the current page.
The video can be rotated, moved, resized.
The embedded player has play/pause/stop/mute/snapshot buttons, and slider controls for volume
and skipping frames.
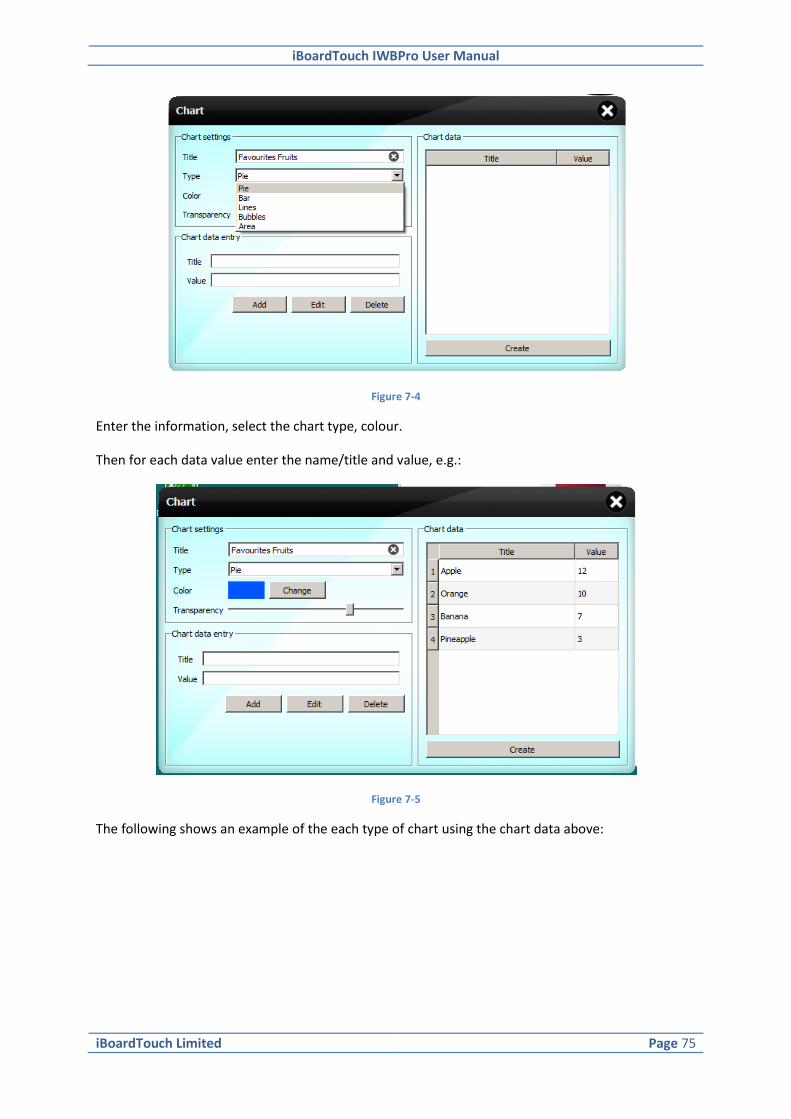
7.5 Insert Chart
Data charts can be created and be inserted onto the current page.
Click the following icons to start inserting a chart:
+
The Chart Input dialogue box appears:
iBoardTouch IWBPro User Manual
iBoardTouch Limited Page 75
Figure 7-4
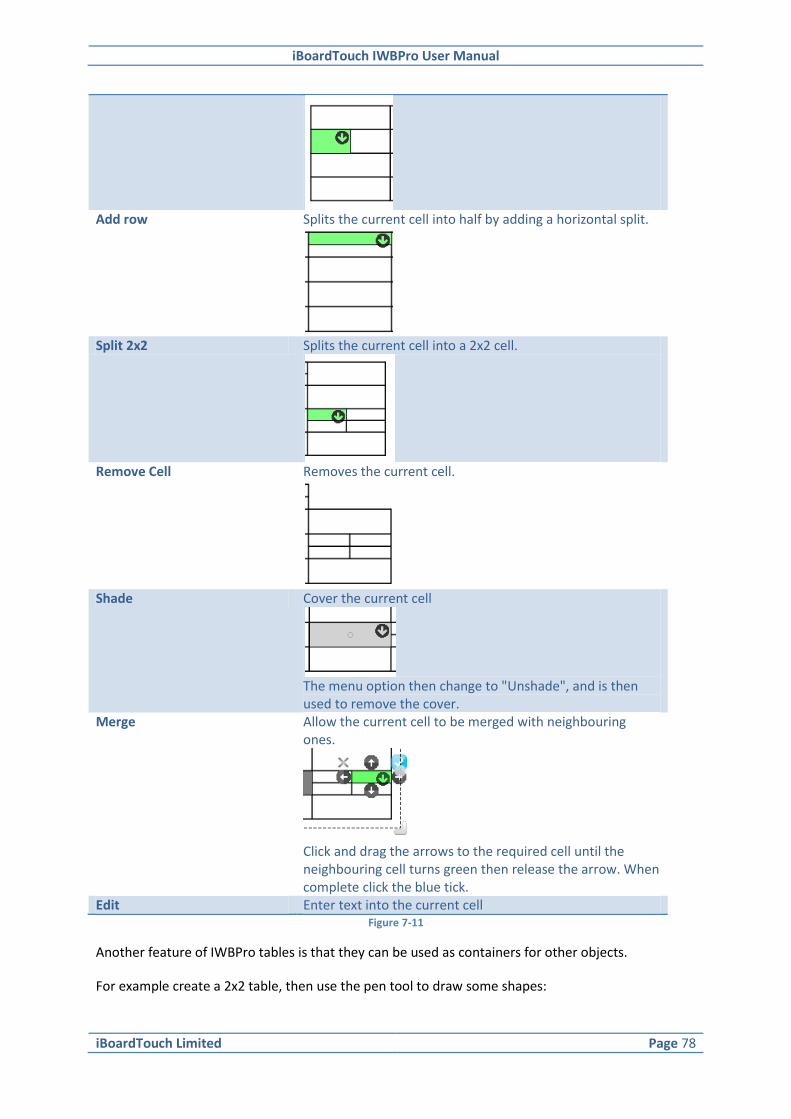
Enter the information, select the chart type, colour.
Then for each data value enter the name/title and value, e.g.:
Figure 7-5
The following shows an example of the each type of chart using the chart data above:

iBoardTouch IWBPro User Manual
iBoardTouch Limited Page 76
Figure 7-6
Once added, the chart can be handled just like any other image.
7.6 Insert Table
Click the following icons to insert a table:
+
The Custom Table dialogue box appears.
Figure 7-7
Specify the required grid size and click Create.
The new table is inserted on the current page.

iBoardTouch IWBPro User Manual
iBoardTouch Limited Page 77
Figure 7-8
The table can be rotated, moved, resized.
Tables have their own properties which are used to amend the table. Right-click on a cell, or click
within a cell and select the green down arrow to open the menu:
Figure 7-9
Figure 7-10
The menu reveals the following options that can be performed on the cell:
Menu Item Function
Add Column Splits the current cell into half by adding a vertical split.
iBoardTouch IWBPro User Manual
iBoardTouch Limited Page 78
Add row Splits the current cell into half by adding a horizontal split.
Split 2x2 Splits the current cell into a 2x2 cell.
Remove Cell Removes the current cell.
Shade Cover the current cell
The menu option then change to "Unshade", and is then used to remove the cover.
Merge Allow the current cell to be merged with neighbouring ones.
Click and drag the arrows to the required cell until the neighbouring cell turns green then release the arrow. When complete click the blue tick.
Edit Enter text into the current cell Figure 7-11
Another feature of IWBPro tables is that they can be used as containers for other objects.
For example create a 2x2 table, then use the pen tool to draw some shapes:

iBoardTouch IWBPro User Manual
iBoardTouch Limited Page 79
Figure 7-12
Now drag and drop each shape into a table cell, taking care to drop when the destination cell turns
green:
Figure 7-13
The objects become contained within the table.
7.7 Background Colour
Click the following icons to change the background colour:
+
The colour pallet dialogue box appears.
iBoardTouch IWBPro User Manual
iBoardTouch Limited Page 80
Figure 7-14
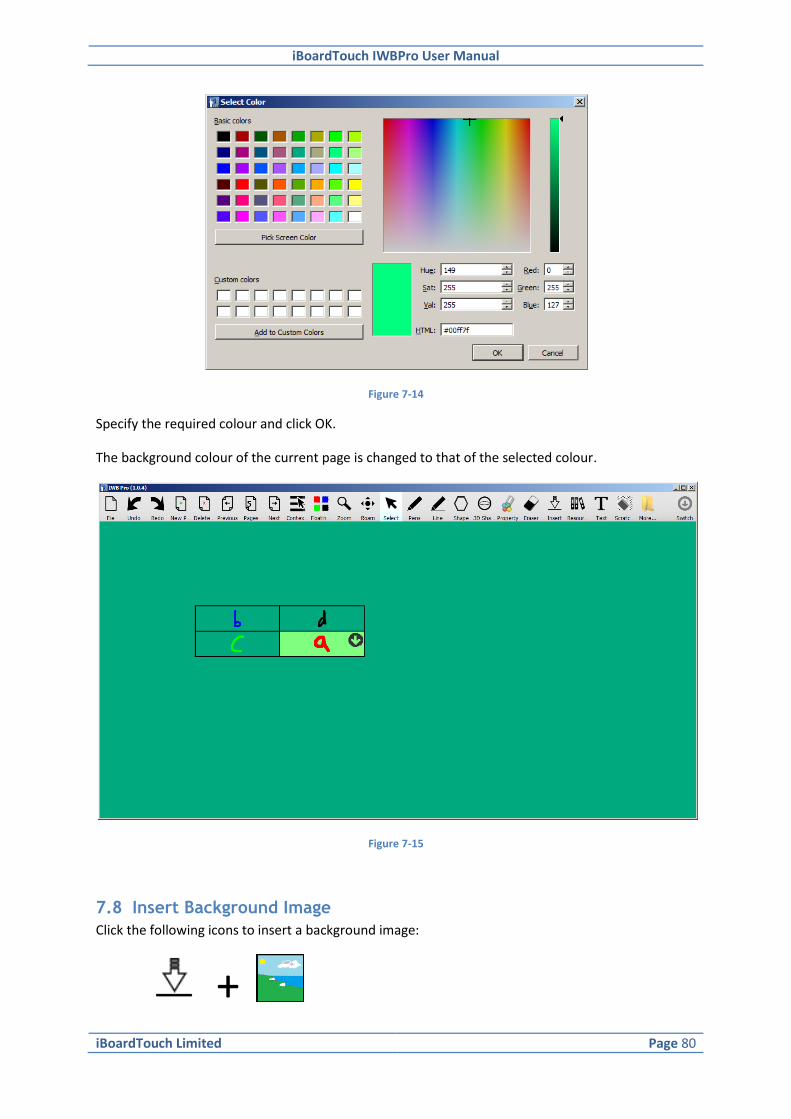
Specify the required colour and click OK.
The background colour of the current page is changed to that of the selected colour.
Figure 7-15
7.8 Insert Background Image
Click the following icons to insert a background image:
+
iBoardTouch IWBPro User Manual
iBoardTouch Limited Page 81
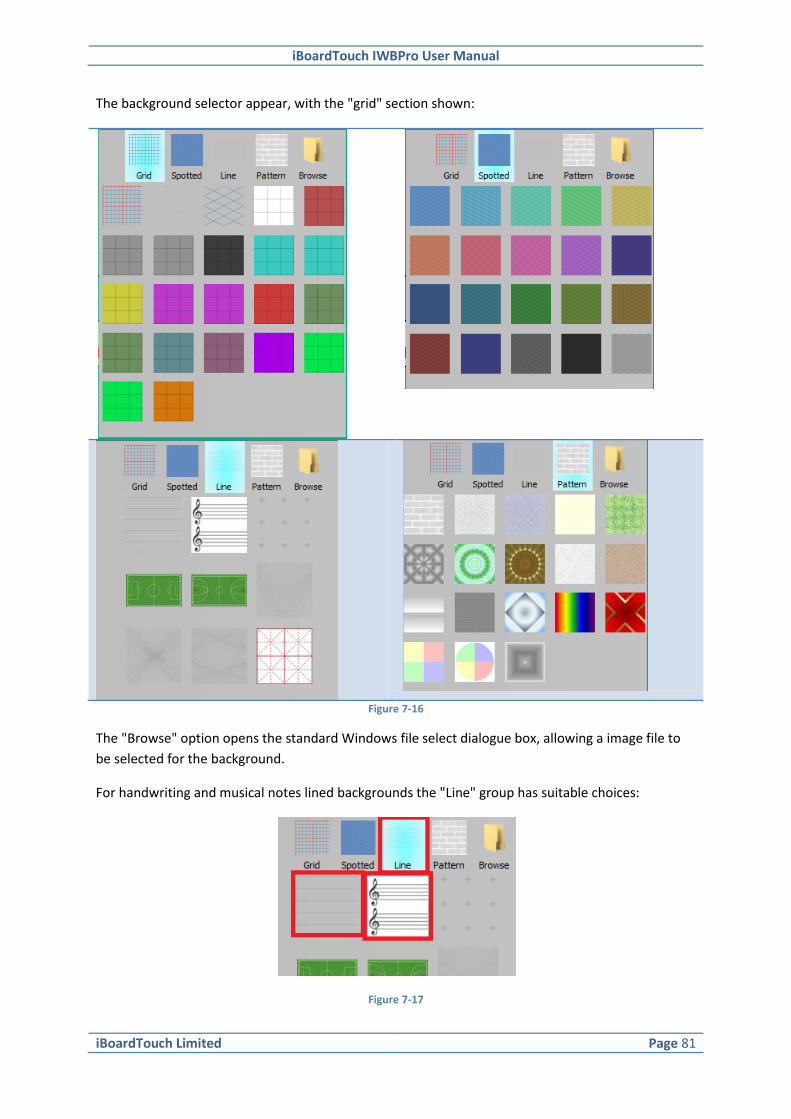
The background selector appear, with the "grid" section shown:
Figure 7-16
The "Browse" option opens the standard Windows file select dialogue box, allowing a image file to
be selected for the background.
For handwriting and musical notes lined backgrounds the "Line" group has suitable choices:
Figure 7-17

iBoardTouch IWBPro User Manual
iBoardTouch Limited Page 82
Select the required image and click OK.
Whether an image or one of the predefined backgrounds is selected, the effect is for the selection to
be inserted as the background of the current page:
Figure 7-18
7.9 Clear Background
The background colour and image changes can be cancelled via the Clear Background icon as
follows:
+
iBoardTouch IWBPro User Manual
iBoardTouch Limited Page 83
8 Context Menus
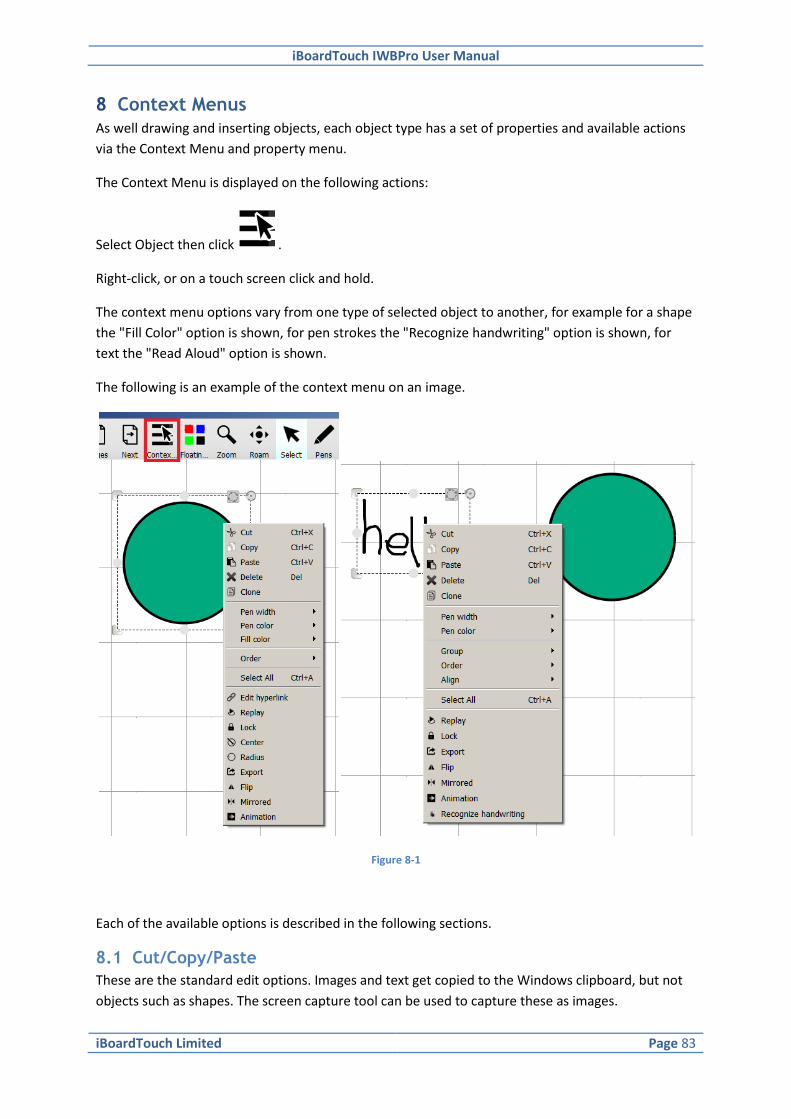
As well drawing and inserting objects, each object type has a set of properties and available actions
via the Context Menu and property menu.
The Context Menu is displayed on the following actions:
Select Object then click .
Right-click, or on a touch screen click and hold.
The context menu options vary from one type of selected object to another, for example for a shape
the "Fill Color" option is shown, for pen strokes the "Recognize handwriting" option is shown, for
text the "Read Aloud" option is shown.
The following is an example of the context menu on an image.
Figure 8-1
Each of the available options is described in the following sections.
8.1 Cut/Copy/Paste
These are the standard edit options. Images and text get copied to the Windows clipboard, but not
objects such as shapes. The screen capture tool can be used to capture these as images.

iBoardTouch IWBPro User Manual
iBoardTouch Limited Page 84
8.2 Delete
Deletes the select object(s).
8.3 Clone
Shortcut copy and paste - creates a copy of the selected object.
8.4 Pen Width/Pen Color/Fill Color
Amend the pen stroke, colour and fill properties of the selected item.
8.5 Group/unGroup
Used to combine separately drawn object into 1. Ungroup separates them again.
8.6 Order
Defines the layering order of objects. Standard options are Bring Item to Top, Front, Back, Bottom.
8.7 Align
Allows the selected objects to be aligned relative to each other:
Figure 8-2
8.8 Edit Hyperlink
Hyperlinks combine external links and annotations from old IWB.
Click Edit Hyperlink to reveal to options:

iBoardTouch IWBPro User Manual
iBoardTouch Limited Page 85
Figure 8-3
Each icon represents a particular type of link, as described below:
Icon Function
Select a file as the link. When the link is clicked the file is opened using the standard installed application for that file type. Use the search button to browse for the file.
Specify on website URL/address as the link. When the link is clicked, the default browser opens to the link.
This replaces the old IWB text annotation. Enter the text notes here and when the link is clicked the notes appear.
Add a link to a page. When the link is clicked, IWBPro navigates to the target page.
Audio file link. When the link is clicked the specified audio file is played.
Figure 8-4
When an object is clicked that has any of these links attached, a small link icon appears below the
object, e.g.:
Figure 8-5

iBoardTouch IWBPro User Manual
iBoardTouch Limited Page 86
8.9 Replay
Similar to the Page replay tool, but this applies to the individual object. Selecting Replay reveals the
following panel of buttons:
Figure 8-6
These work the same as with Page Replay described earlier.
8.10 Lock
When lock is clicked on an object the object cannot be moved or resized/rotated/deleted.
A lock icon appears on the object to denote it being locked:
Figure 8-7
To unlock, click the lock icon.
8.11 Export
Selecting Export allows the object to be saved as an image file. The standard Windows save file
dialogue opens.
When entering the filename for the exported file, the extension must be entered - this is how the
format is derived.
8.12 Set As Background
Available for images only. Allows the selected image to be used as the current page background.
8.13 Flip
This options allows the object to be horizontally or vertically flipped:
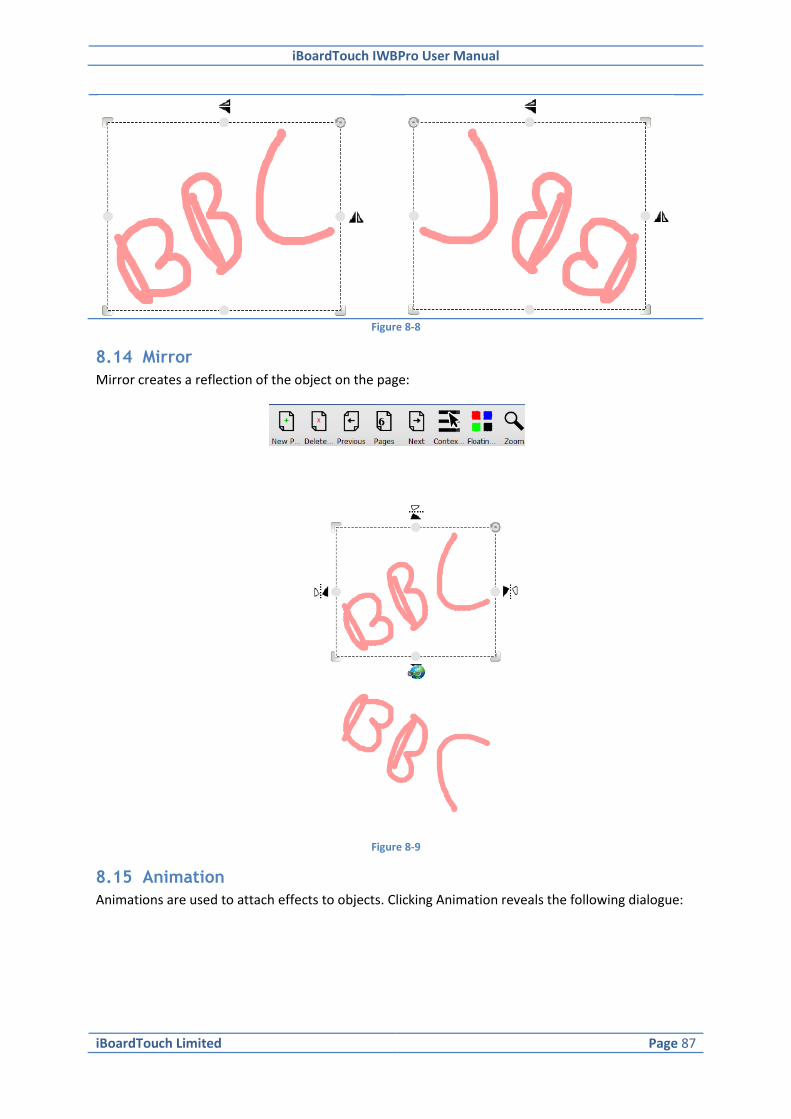
iBoardTouch IWBPro User Manual
iBoardTouch Limited Page 87
Figure 8-8
8.14 Mirror
Mirror creates a reflection of the object on the page:
Figure 8-9
8.15 Animation
Animations are used to attach effects to objects. Clicking Animation reveals the following dialogue:
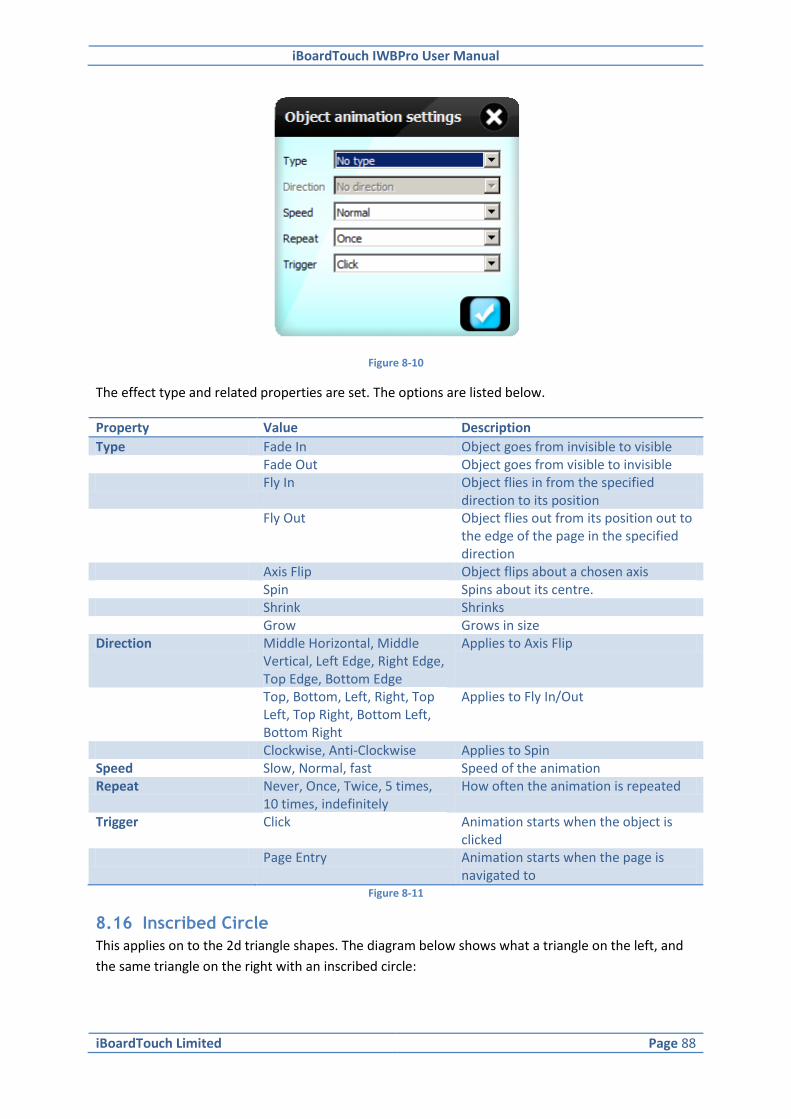
iBoardTouch IWBPro User Manual
iBoardTouch Limited Page 88
Figure 8-10
The effect type and related properties are set. The options are listed below.
Property Value Description
Type Fade In Object goes from invisible to visible Fade Out Object goes from visible to invisible Fly In Object flies in from the specified
direction to its position Fly Out Object flies out from its position out to
the edge of the page in the specified direction
Axis Flip Object flips about a chosen axis Spin Spins about its centre. Shrink Shrinks Grow Grows in size Direction Middle Horizontal, Middle
Vertical, Left Edge, Right Edge, Top Edge, Bottom Edge
Applies to Axis Flip
Top, Bottom, Left, Right, Top Left, Top Right, Bottom Left, Bottom Right
Applies to Fly In/Out
Clockwise, Anti-Clockwise Applies to Spin Speed Slow, Normal, fast Speed of the animation Repeat Never, Once, Twice, 5 times,
10 times, indefinitely How often the animation is repeated
Trigger Click Animation starts when the object is clicked
Page Entry Animation starts when the page is navigated to
Figure 8-11
8.16 Inscribed Circle
This applies on to the 2d triangle shapes. The diagram below shows what a triangle on the left, and
the same triangle on the right with an inscribed circle:

iBoardTouch IWBPro User Manual
iBoardTouch Limited Page 89
Figure 8-12
8.17 Radius
This applies only to the circle shape. The diagram below shows a plain circle on the left, and a circle
with the "Radius" marked:
Figure 8-13
8.18 Centre
This applies only to the circle shape. The diagram below shows a plain circle on the left, and a circle
with the "Centre" marked:
Figure 8-14
8.19 Edit Text
This applies to text object, and is used when the text needs to be amended.
8.20 Read Aloud
This also applies only to text. It reads out the text using the speech properties in the System Settings.

iBoardTouch IWBPro User Manual
iBoardTouch Limited Page 90
8.21 Recognise handwriting
Allows pen strokes to be selected and converted to handwriting.

iBoardTouch IWBPro User Manual
iBoardTouch Limited Page 91
9 Text Handling
9.1 Text Input Tool
Text can be input via the keyboard.
Click the Text icon:
The text box (dashed border) and font format dialogue box appears:
Figure 9-1
Type the required text in the box.
The font controls allows the font, style, size, colour, alignment of the text to be changed.
Click the down arrow to reveal additional formatting options:
Figure 9-2
9.2 Handwriting Recognition
Click the Text tool + icon, and write on the page the text to be recognised:

iBoardTouch IWBPro User Manual
iBoardTouch Limited Page 92
Figure 9-3
After a short pause the strokes are replaced with the text object:
Figure 9-4
The text font, size and colour are set from the default text settings.
9.3 Speech recognition
The Speech Recognition is an experimental feature which will be refined in later versions. A more
detailed description will be added when the feature is completed.
Click the Text tool + icon, to start the Speech Recognition.
Text input by Speech Recognition reads input from the microphone, and converts the capture audio
to text.
10 iBT Menu
The iBT icon reveals a menu of miscellaneous configuration items:
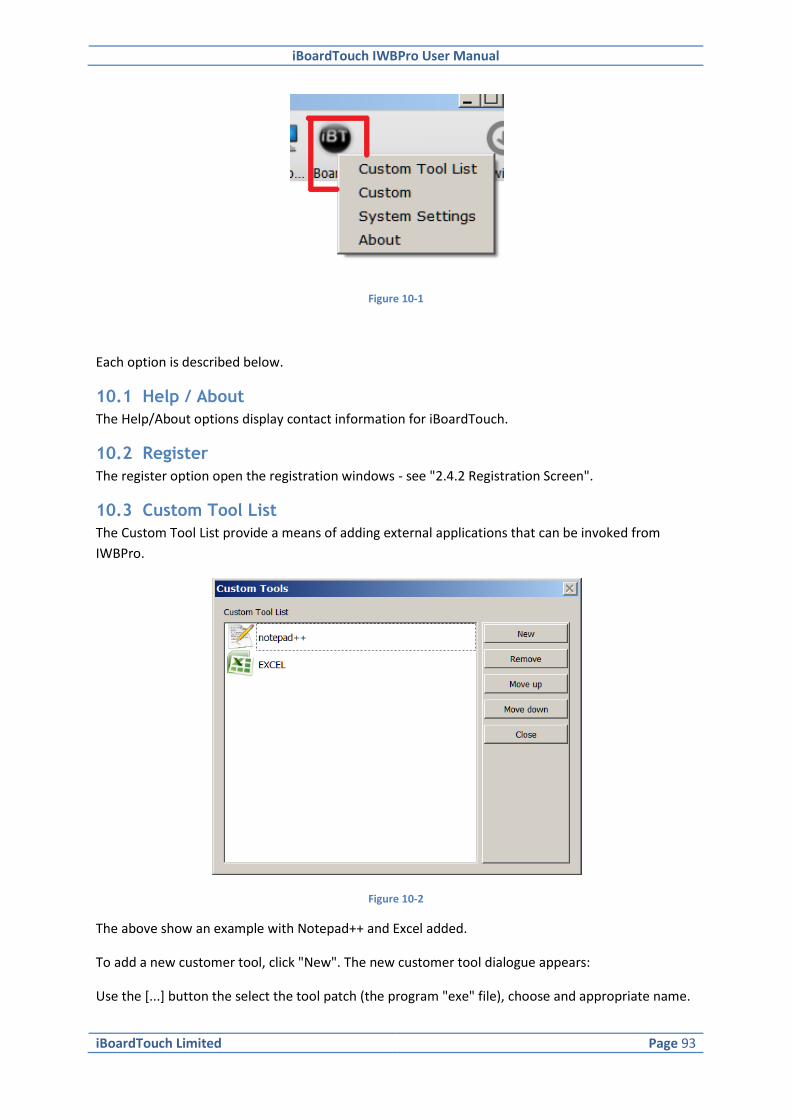
iBoardTouch IWBPro User Manual
iBoardTouch Limited Page 93
Figure 10-1
Each option is described below.
10.1 Help / About
The Help/About options display contact information for iBoardTouch.
10.2 Register
The register option open the registration windows - see "2.4.2 Registration Screen".
10.3 Custom Tool List
The Custom Tool List provide a means of adding external applications that can be invoked from
IWBPro.
Figure 10-2
The above show an example with Notepad++ and Excel added.
To add a new customer tool, click "New". The new customer tool dialogue appears:
Use the [...] button the select the tool patch (the program "exe" file), choose and appropriate name.

iBoardTouch IWBPro User Manual
iBoardTouch Limited Page 94
Parameter and Work Path depend on the tool being selected as to the value. In most cases these are
left blank. Remark is used for the "bubble-text" when the mouse hovers over the icon for the tool.
Figure 10-3
Once added, the tool can be run via the Custom Tools icon:
Figure 10-4
10.4 Custom
This option is reserved for future use.
10.5 System Settings
The System Settings dialogue contains user preference settings, and also has tabs for managing
updates, registration and theme selection. Each of these has its own tab.
10.5.1 Settings Tab
The Settings tab is shown below.
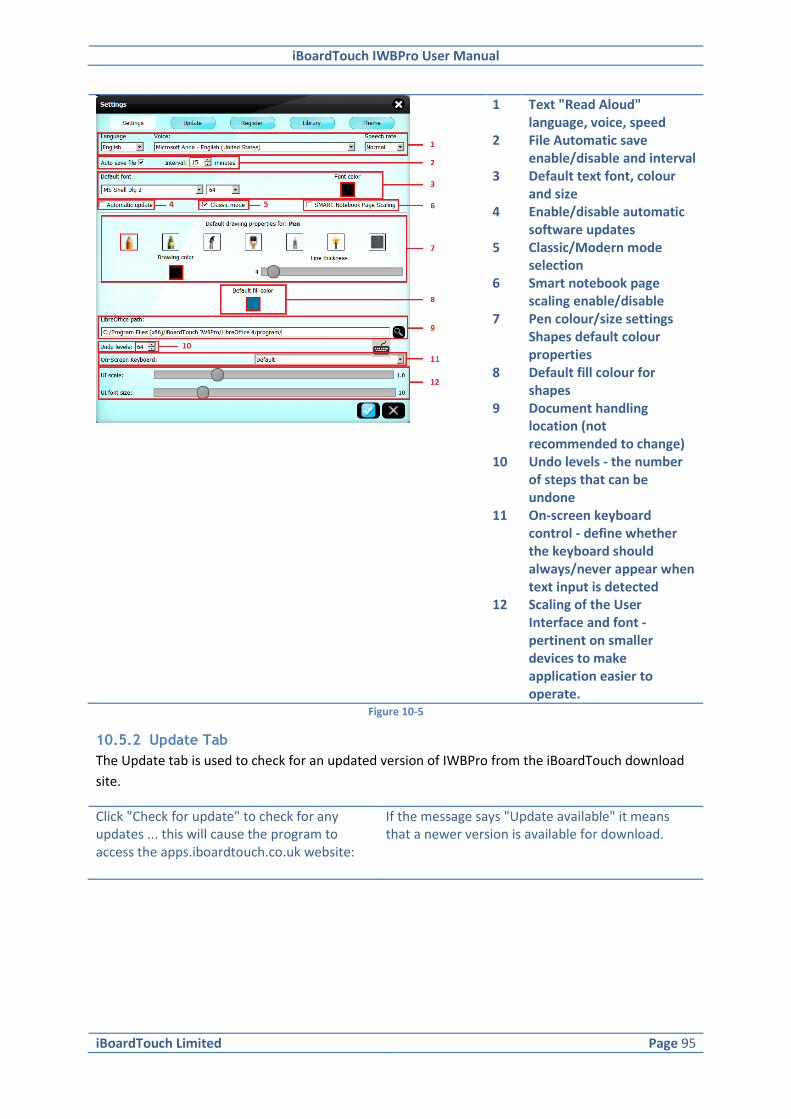
iBoardTouch IWBPro User Manual
iBoardTouch Limited Page 95
1 2 3 4 5 6 7 8 9 10 11 12
Text "Read Aloud" language, voice, speed File Automatic save enable/disable and interval Default text font, colour and size Enable/disable automatic software updates Classic/Modern mode selection Smart notebook page scaling enable/disable Pen colour/size settings Shapes default colour properties Default fill colour for shapes Document handling location (not recommended to change) Undo levels - the number of steps that can be undone On-screen keyboard control - define whether the keyboard should always/never appear when text input is detected Scaling of the User Interface and font - pertinent on smaller devices to make application easier to operate.
Figure 10-5
10.5.2 Update Tab
The Update tab is used to check for an updated version of IWBPro from the iBoardTouch download
site.
Click "Check for update" to check for any updates ... this will cause the program to access the apps.iboardtouch.co.uk website:
If the message says "Update available" it means that a newer version is available for download.
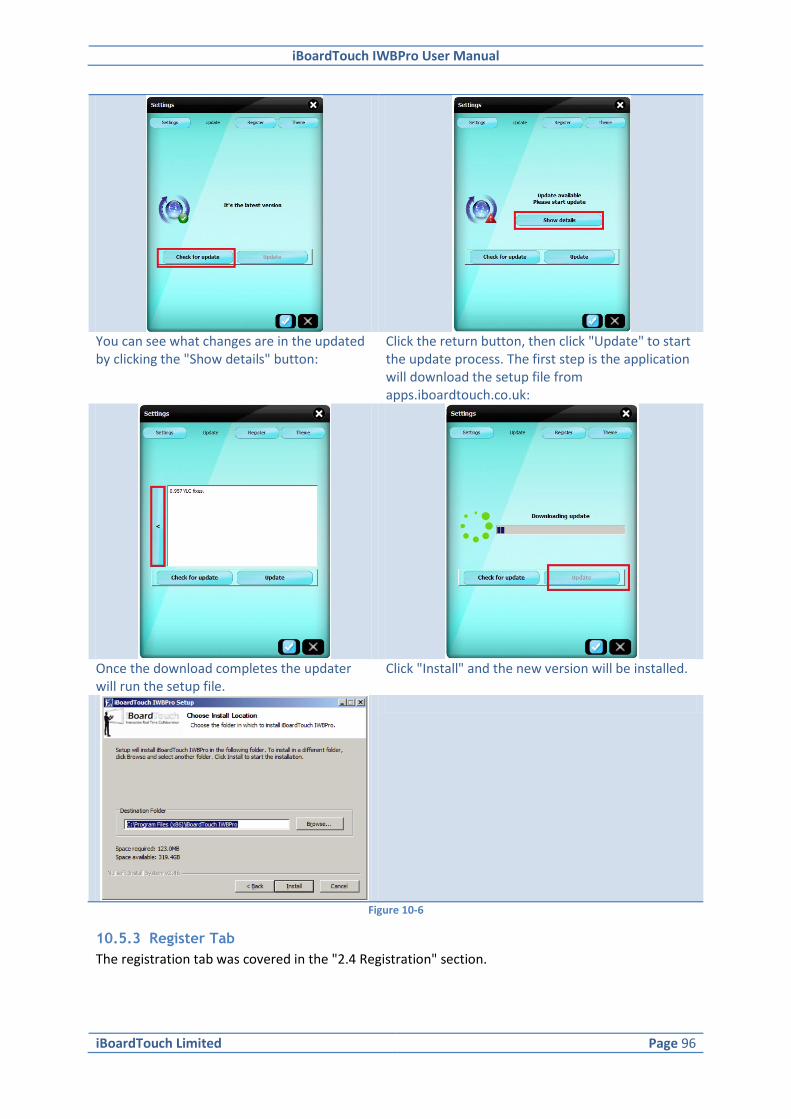
iBoardTouch IWBPro User Manual
iBoardTouch Limited Page 96
You can see what changes are in the updated by clicking the "Show details" button:
Click the return button, then click "Update" to start the update process. The first step is the application will download the setup file from apps.iboardtouch.co.uk:
Once the download completes the updater will run the setup file.
Click "Install" and the new version will be installed.
Figure 10-6
10.5.3 Register Tab
The registration tab was covered in the "2.4 Registration" section.
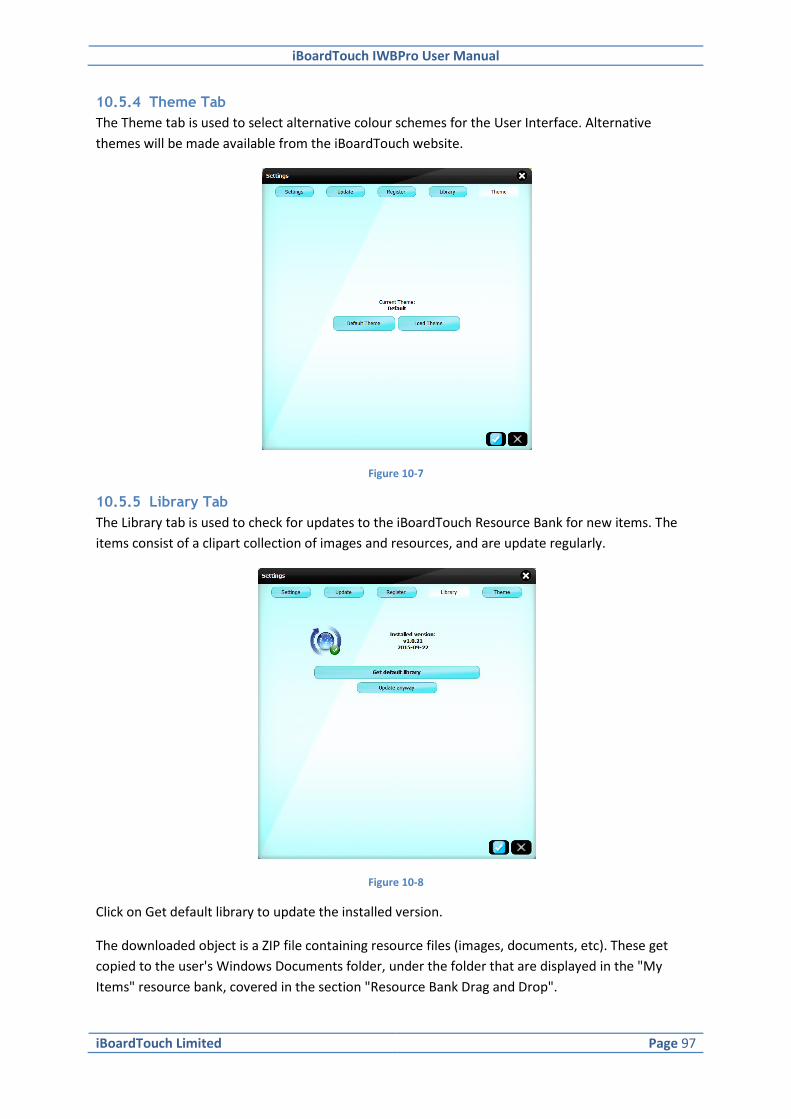
iBoardTouch IWBPro User Manual
iBoardTouch Limited Page 97
10.5.4 Theme Tab
The Theme tab is used to select alternative colour schemes for the User Interface. Alternative
themes will be made available from the iBoardTouch website.
Figure 10-7
10.5.5 Library Tab
The Library tab is used to check for updates to the iBoardTouch Resource Bank for new items. The
items consist of a clipart collection of images and resources, and are update regularly.
Figure 10-8
Click on Get default library to update the installed version.
The downloaded object is a ZIP file containing resource files (images, documents, etc). These get
copied to the user's Windows Documents folder, under the folder that are displayed in the "My
Items" resource bank, covered in the section "Resource Bank Drag and Drop".

iBoardTouch IWBPro User Manual
iBoardTouch Limited Page 98
11 Modern Mode
In this section the IWBPro Modern Mode is described.
The main difference between the Classic and Modern is in the User Interface, and the toolbars.
The tools themselves are similar if not the same between the two modes, i.e. the Maths, Others
tools for example look and operate the same. In such cases the relevant section will be referenced
rather than repeating the notes again in this section.
In Modern mode the toolbar is as follows:
Figure 11-1
An example of how the Modern Mode looks is below:
Figure 11-2

iBoardTouch IWBPro User Manual
iBoardTouch Limited Page 99
11.1 Main Modern Toolbar
The Modern Mode toolbar icons and what function they provide are listed below:
Icon Functions
Displays the Navigation Menu - File, Save, Open, Exit, Settings:
Switch to Desktop Mode
A selection of common tools on a floating toolbar for easy access
Default mouse mode - select, click objects and functions
"Pan" mode for easy click and scroll around the current page
Choose pen style
Choose line style
Choose shapes like rectangle, circle, etc
Choose shapes like cube, sphere, etc
Add text/handwriting
Fill object with chosen colour
Add scratchpad over page objects to hide them.
Select erase type
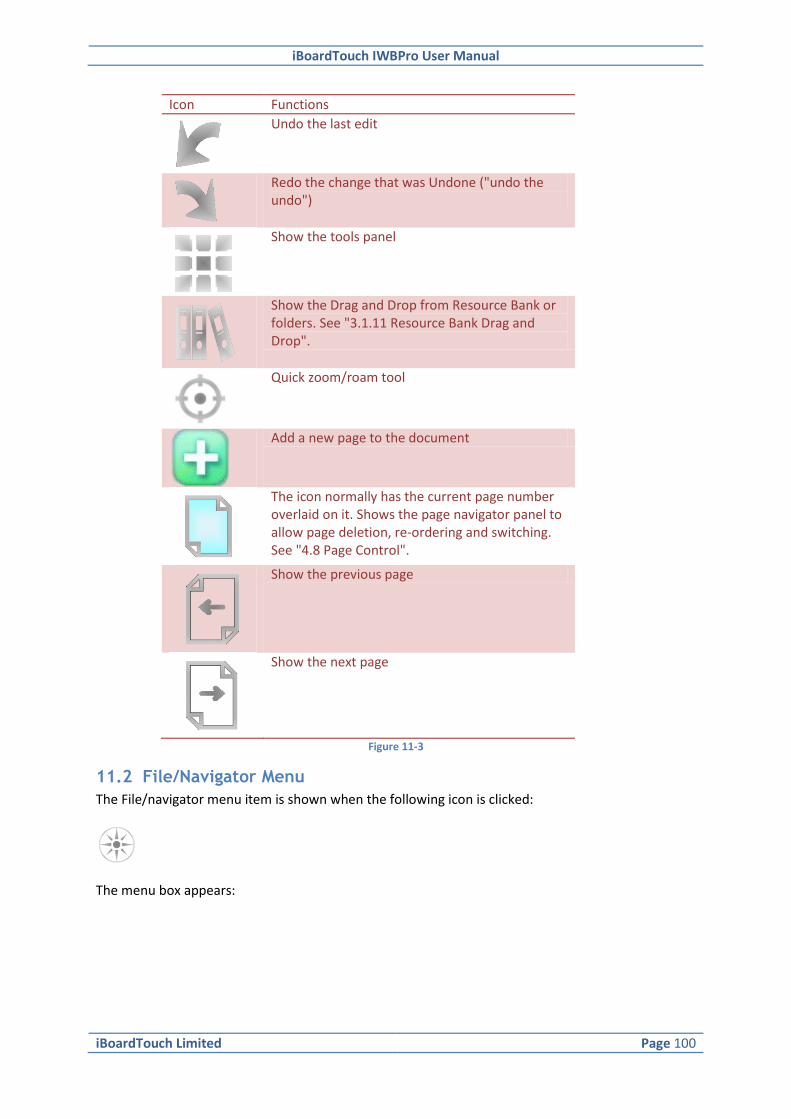
iBoardTouch IWBPro User Manual
iBoardTouch Limited Page 100
Icon Functions
Undo the last edit
Redo the change that was Undone ("undo the undo")
Show the tools panel
Show the Drag and Drop from Resource Bank or folders. See "3.1.11 Resource Bank Drag and Drop".
Quick zoom/roam tool
Add a new page to the document
The icon normally has the current page number overlaid on it. Shows the page navigator panel to allow page deletion, re-ordering and switching. See "4.8 Page Control".
Show the previous page
Show the next page
Figure 11-3
11.2 File/Navigator Menu
The File/navigator menu item is shown when the following icon is clicked:
The menu box appears:
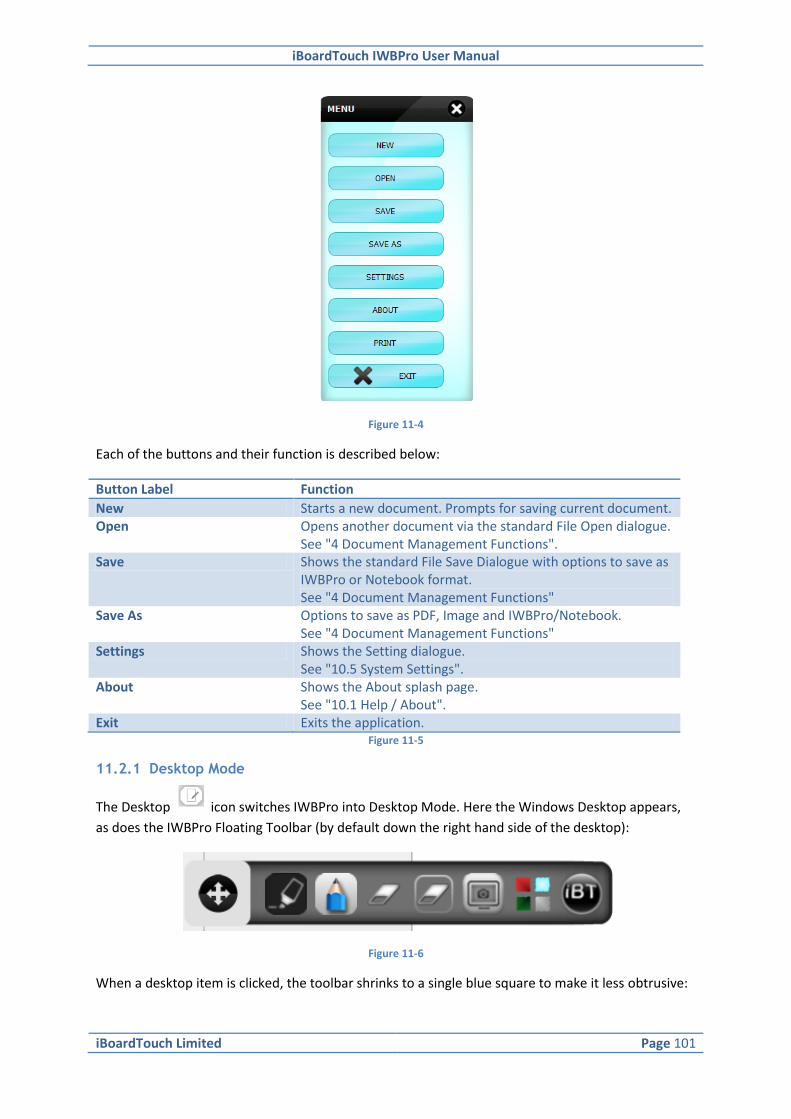
iBoardTouch IWBPro User Manual
iBoardTouch Limited Page 101
Figure 11-4
Each of the buttons and their function is described below:
Button Label Function
New Starts a new document. Prompts for saving current document. Open Opens another document via the standard File Open dialogue.
See "4 Document Management Functions". Save Shows the standard File Save Dialogue with options to save as
IWBPro or Notebook format. See "4 Document Management Functions"
Save As Options to save as PDF, Image and IWBPro/Notebook. See "4 Document Management Functions"
Settings Shows the Setting dialogue. See "10.5 System Settings".
About Shows the About splash page. See "10.1 Help / About".
Exit Exits the application. Figure 11-5
11.2.1 Desktop Mode
The Desktop icon switches IWBPro into Desktop Mode. Here the Windows Desktop appears,
as does the IWBPro Floating Toolbar (by default down the right hand side of the desktop):
Figure 11-6
When a desktop item is clicked, the toolbar shrinks to a single blue square to make it less obtrusive:

iBoardTouch IWBPro User Manual
iBoardTouch Limited Page 102
Figure 11-7
Clicking on the blue square reverts the toolbar back.
At the right and left most edges of the desktop (including extended desktops), the following will
appear:
Figure 11-8
The toolbar icons and their functions are described below:
Icon Function
Click and drag the toolbar
Toggle between highlighter and mouse. Highlighter mode allows for annotations on the desktop (as an overlay). Toggling to mouse enables the desktop to be controlled and operated as normal.
Toggle between pen and mouse. Pen mode allows for annotations on the desktop (as an overlay). Toggling to mouse enables the desktop to be controlled and operated as normal.
Toggle between eraser and mouse. Eraser mode allows for highlighter/pen annotations on the desktop to be erased). Toggling to mouse enables the desktop to be controlled and operated as normal.
The screen grab button brings up the screen grab panel.
This panel has already been covered in the "6.4 Screen Capture Tool" section.

iBoardTouch IWBPro User Manual
iBoardTouch Limited Page 103
Switch back to IWBPro.
Page eraser deletes all objects on scene
This is the one touch common item menu you can access through desktop
Figure 11-9
11.2.2 Common Items Toolbar
This tool is shown when the icon is clicked.
This tool was described in section "3.1.6 One Touch Common Items Floating Toolbar".
11.2.3 Select Tool
The select tool icon is:
When selected it operates in two modes. The first is object mode in which when clicked on an object
it selected that object. The second is "sweep" mode where multiple objects can be selected by either
encircling them, or tracing over them. The following shows the alternates ways that 2 objects can be
selected (the box and the pen mark):
Figure 11-10
11.2.4 Roam Tool
The Roam tool icon is:
When clicked, the zoom icons appears on the toolbar:
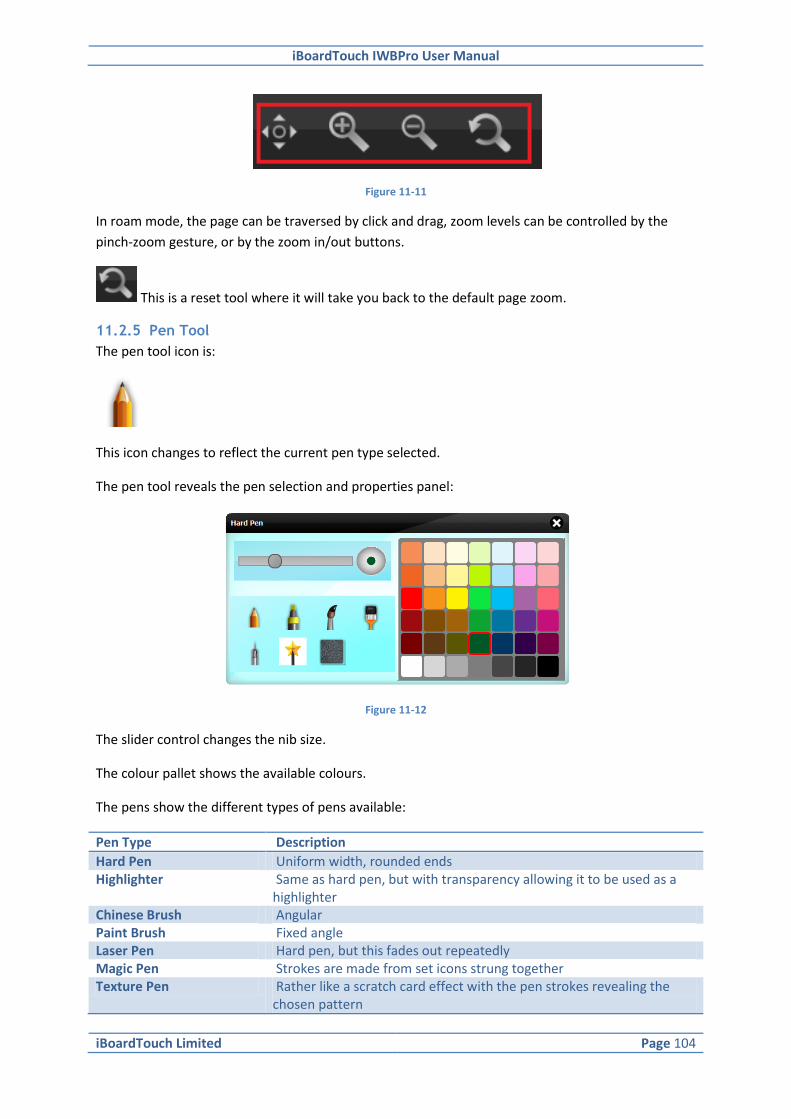
iBoardTouch IWBPro User Manual
iBoardTouch Limited Page 104
Figure 11-11
In roam mode, the page can be traversed by click and drag, zoom levels can be controlled by the
pinch-zoom gesture, or by the zoom in/out buttons.
This is a reset tool where it will take you back to the default page zoom.
11.2.5 Pen Tool
The pen tool icon is:
This icon changes to reflect the current pen type selected.
The pen tool reveals the pen selection and properties panel:
Figure 11-12
The slider control changes the nib size.
The colour pallet shows the available colours.
The pens show the different types of pens available:
Pen Type Description
Hard Pen Uniform width, rounded ends Highlighter Same as hard pen, but with transparency allowing it to be used as a
highlighter Chinese Brush Angular Paint Brush Fixed angle Laser Pen Hard pen, but this fades out repeatedly Magic Pen Strokes are made from set icons strung together Texture Pen Rather like a scratch card effect with the pen strokes revealing the
chosen pattern

iBoardTouch IWBPro User Manual
iBoardTouch Limited Page 105
Figure 11-13
The magic and texture pens do not have a colour pallet, but instead different properties that can be
selected:
Figure 11-14
The following shows how the pen types differ:
Figure 11-15
11.2.6 Line Tool
The line tool icon is:
This icon changes to reflect the current line type selected.
The line tool reveals the line selection and properties panel:
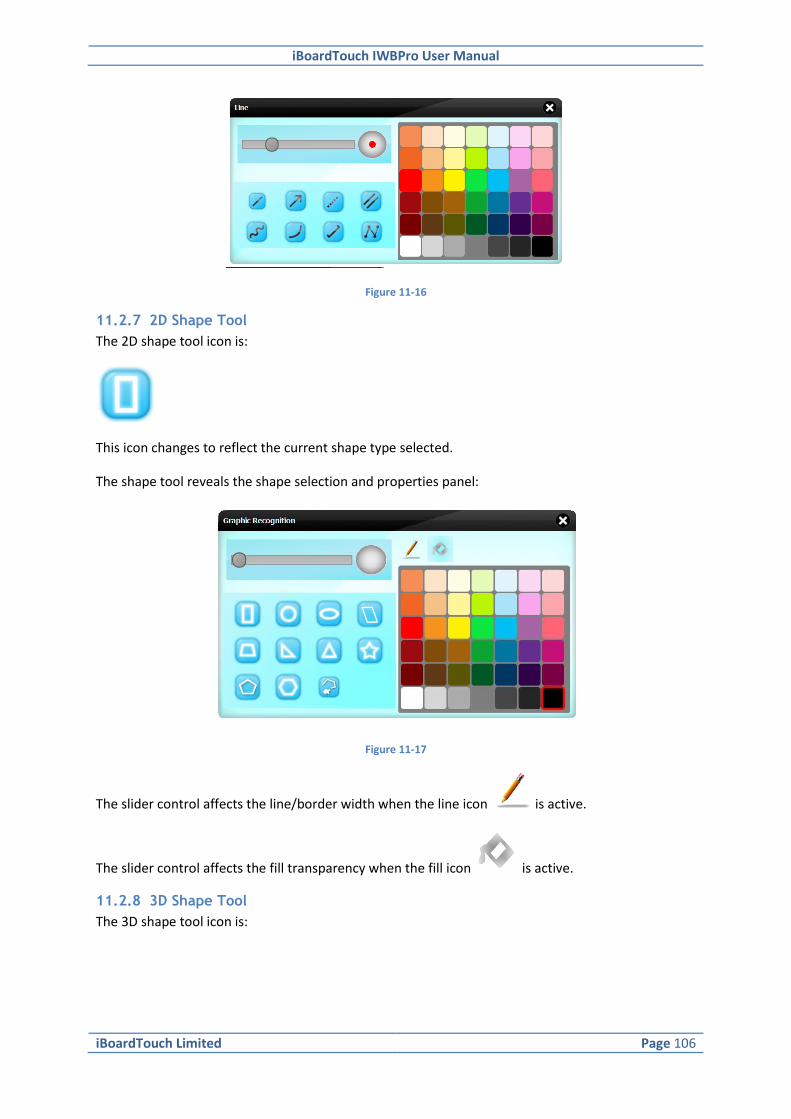
iBoardTouch IWBPro User Manual
iBoardTouch Limited Page 106
Figure 11-16
11.2.7 2D Shape Tool
The 2D shape tool icon is:
This icon changes to reflect the current shape type selected.
The shape tool reveals the shape selection and properties panel:
Figure 11-17
The slider control affects the line/border width when the line icon is active.
The slider control affects the fill transparency when the fill icon is active.
11.2.8 3D Shape Tool
The 3D shape tool icon is:
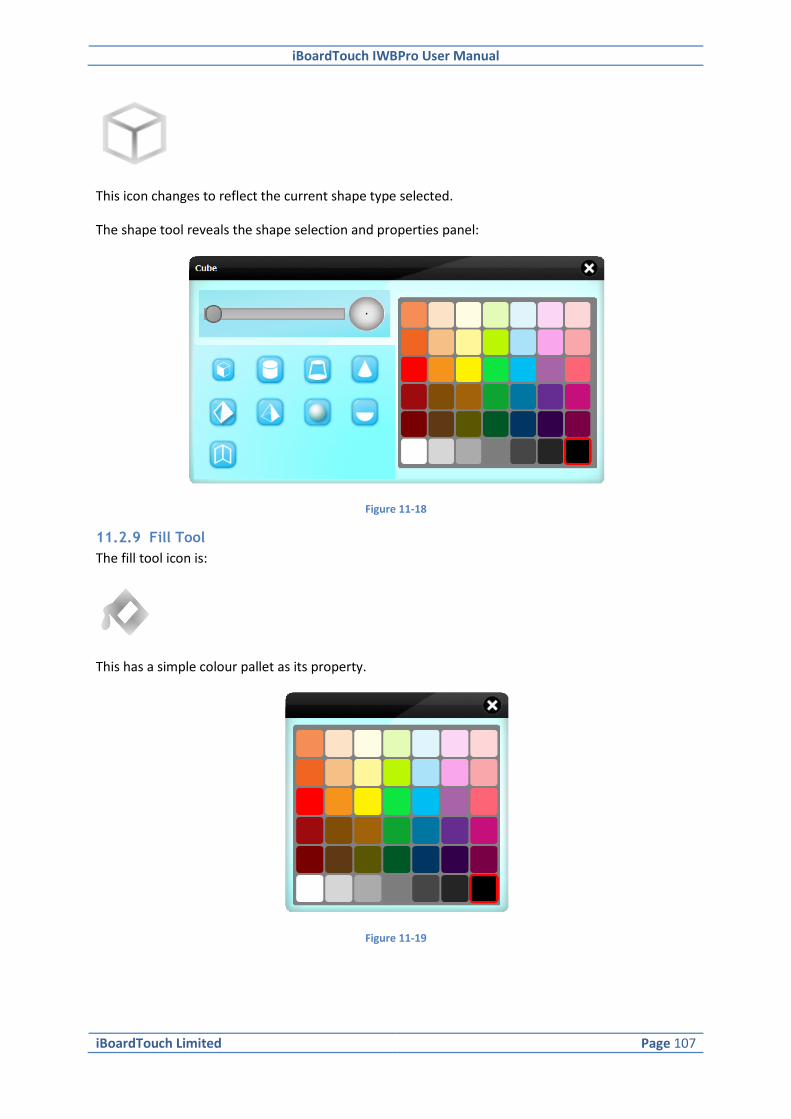
iBoardTouch IWBPro User Manual
iBoardTouch Limited Page 107
This icon changes to reflect the current shape type selected.
The shape tool reveals the shape selection and properties panel:
Figure 11-18
11.2.9 Fill Tool
The fill tool icon is:
This has a simple colour pallet as its property.
Figure 11-19
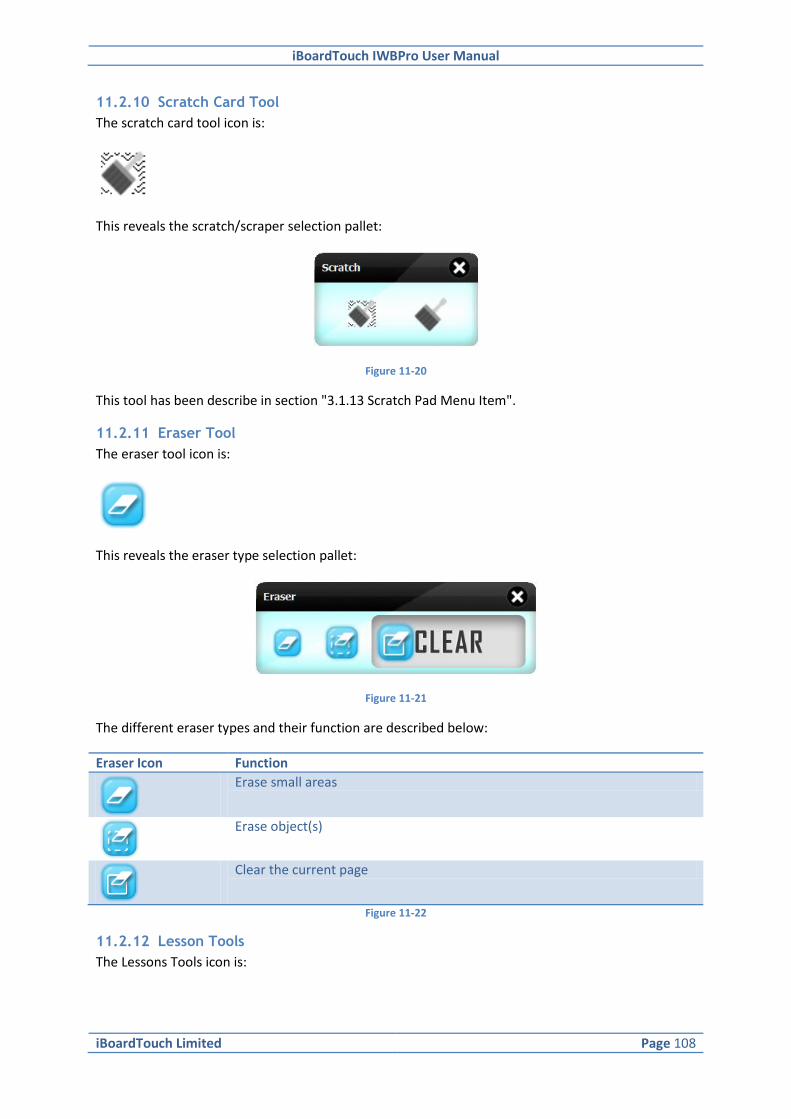
iBoardTouch IWBPro User Manual
iBoardTouch Limited Page 108
11.2.10 Scratch Card Tool
The scratch card tool icon is:
This reveals the scratch/scraper selection pallet:
Figure 11-20
This tool has been describe in section "3.1.13 Scratch Pad Menu Item".
11.2.11 Eraser Tool
The eraser tool icon is:
This reveals the eraser type selection pallet:
Figure 11-21
The different eraser types and their function are described below:
Eraser Icon Function
Erase small areas
Erase object(s)
Clear the current page
Figure 11-22
11.2.12 Lesson Tools
The Lessons Tools icon is:
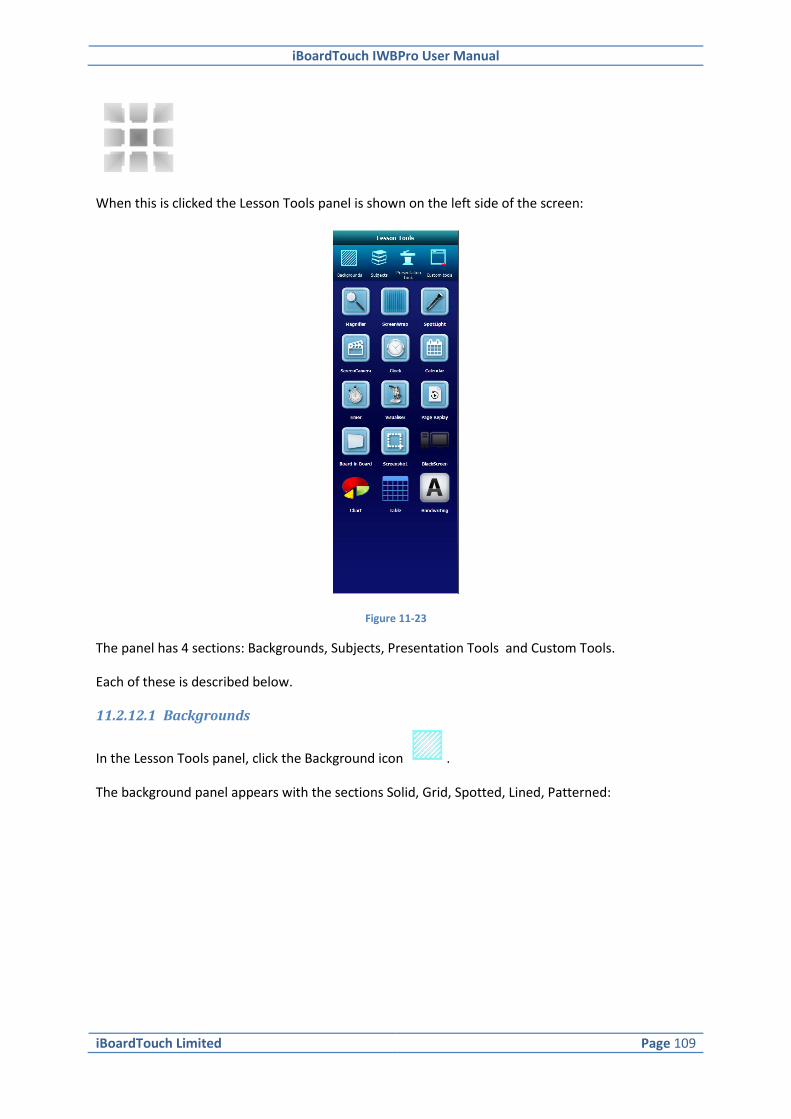
iBoardTouch IWBPro User Manual
iBoardTouch Limited Page 109
When this is clicked the Lesson Tools panel is shown on the left side of the screen:
Figure 11-23
The panel has 4 sections: Backgrounds, Subjects, Presentation Tools and Custom Tools.
Each of these is described below.
11.2.12.1 Backgrounds
In the Lesson Tools panel, click the Background icon .
The background panel appears with the sections Solid, Grid, Spotted, Lined, Patterned:

iBoardTouch IWBPro User Manual
iBoardTouch Limited Page 110
Figure 11-24
Clicking on any of the background icons causes the current page background to be changed
accordingly. The backgrounds are "tiled" with the selected icon, apart from the "Lined" backgrounds,
which are placed at the origin of the page.
11.2.12.2 Subjects
The Subjects panel is shown by clicking the icon.
Currently the Subjects panel has two sections - Mathematics and Geometry - with tools for each
subject.
11.2.12.2.1 Mathematics
The Mathematics subjects section tools are shown below:
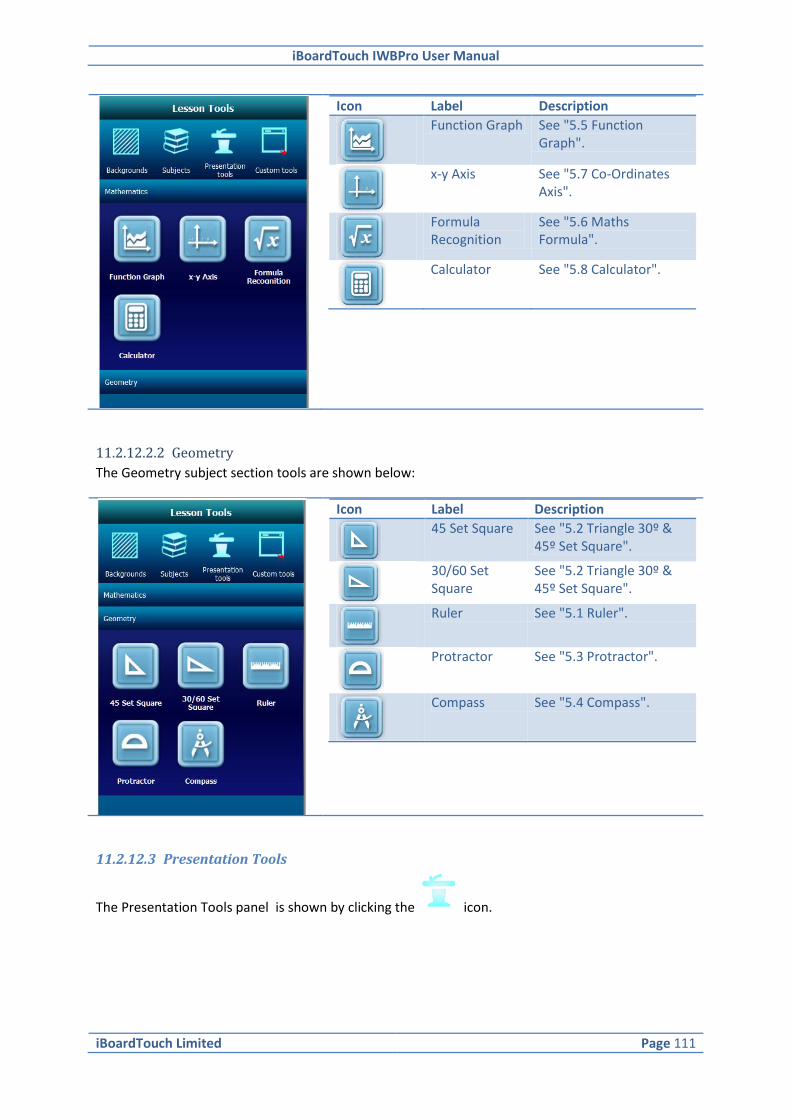
iBoardTouch IWBPro User Manual
iBoardTouch Limited Page 111
Icon Label Description
Function Graph See "5.5 Function Graph".
x-y Axis See "5.7 Co-Ordinates Axis".
Formula Recognition
See "5.6 Maths Formula".
Calculator See "5.8 Calculator".
11.2.12.2.2 Geometry
The Geometry subject section tools are shown below:
Icon Label Description
45 Set Square See "5.2 Triangle 30º & 45º Set Square".
30/60 Set Square
See "5.2 Triangle 30º & 45º Set Square".
Ruler See "5.1 Ruler".
Protractor See "5.3 Protractor".
Compass See "5.4 Compass".
11.2.12.3 Presentation Tools
The Presentation Tools panel is shown by clicking the icon.
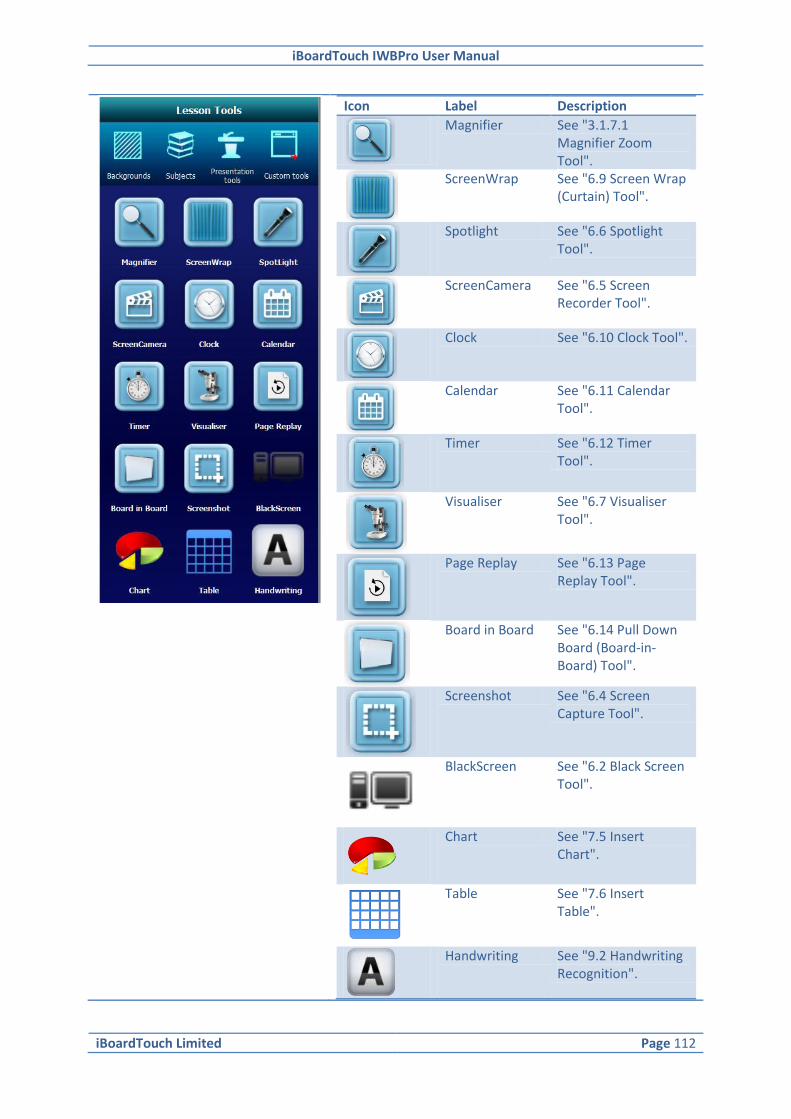
iBoardTouch IWBPro User Manual
iBoardTouch Limited Page 112
Icon Label Description
Magnifier See "3.1.7.1 Magnifier Zoom Tool".
ScreenWrap See "6.9 Screen Wrap (Curtain) Tool".
Spotlight See "6.6 Spotlight Tool".
ScreenCamera See "6.5 Screen Recorder Tool".
Clock See "6.10 Clock Tool".
Calendar See "6.11 Calendar Tool".
Timer See "6.12 Timer Tool".
Visualiser See "6.7 Visualiser Tool".
Page Replay See "6.13 Page Replay Tool".
Board in Board See "6.14 Pull Down Board (Board-in-Board) Tool".
Screenshot See "6.4 Screen Capture Tool".
BlackScreen See "6.2 Black Screen Tool".
Chart See "7.5 Insert Chart".
Table See "7.6 Insert Table".
Handwriting See "9.2 Handwriting Recognition".
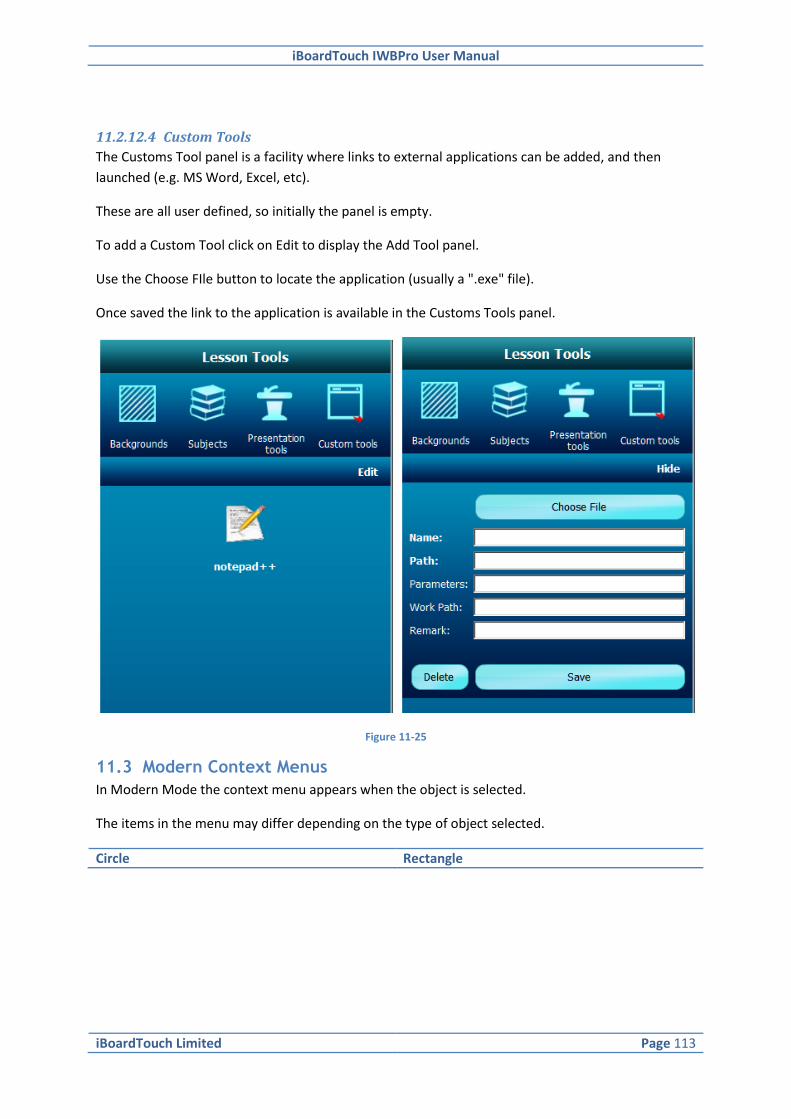
iBoardTouch IWBPro User Manual
iBoardTouch Limited Page 113
11.2.12.4 Custom Tools
The Customs Tool panel is a facility where links to external applications can be added, and then
launched (e.g. MS Word, Excel, etc).
These are all user defined, so initially the panel is empty.
To add a Custom Tool click on Edit to display the Add Tool panel.
Use the Choose FIle button to locate the application (usually a ".exe" file).
Once saved the link to the application is available in the Customs Tools panel.
Figure 11-25
11.3 Modern Context Menus
In Modern Mode the context menu appears when the object is selected.
The items in the menu may differ depending on the type of object selected.
Circle Rectangle
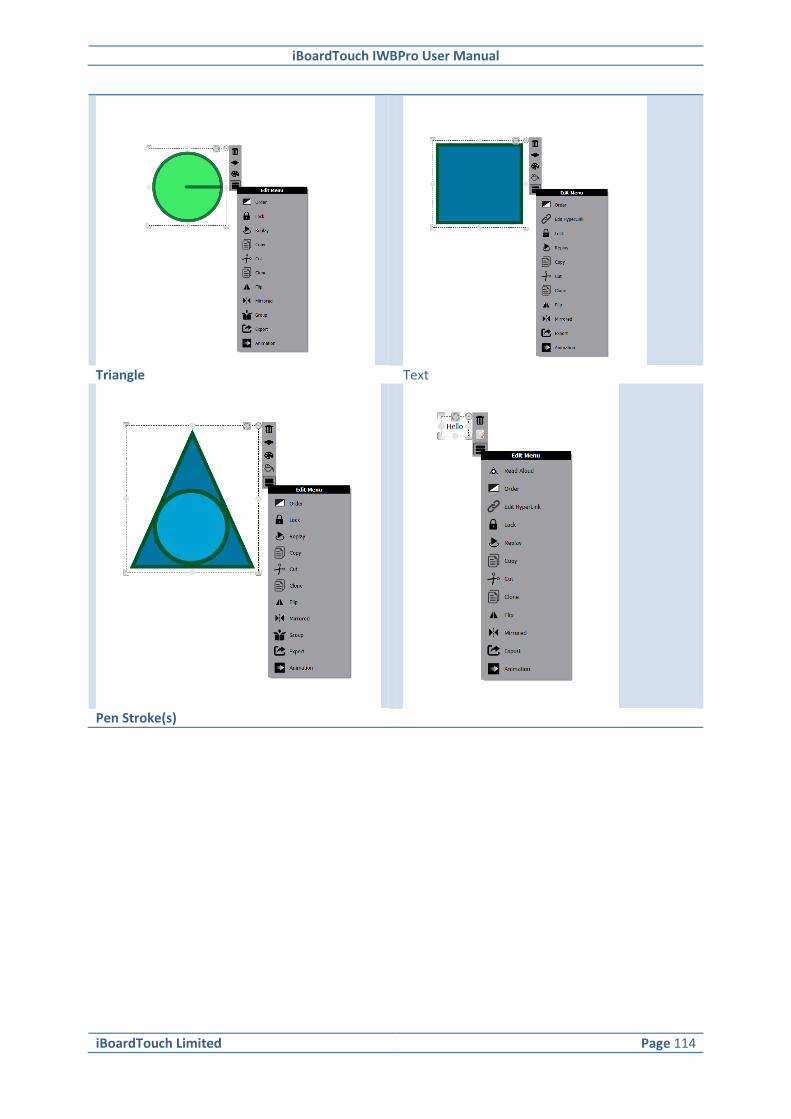
iBoardTouch IWBPro User Manual
iBoardTouch Limited Page 114
Triangle Text
Pen Stroke(s)
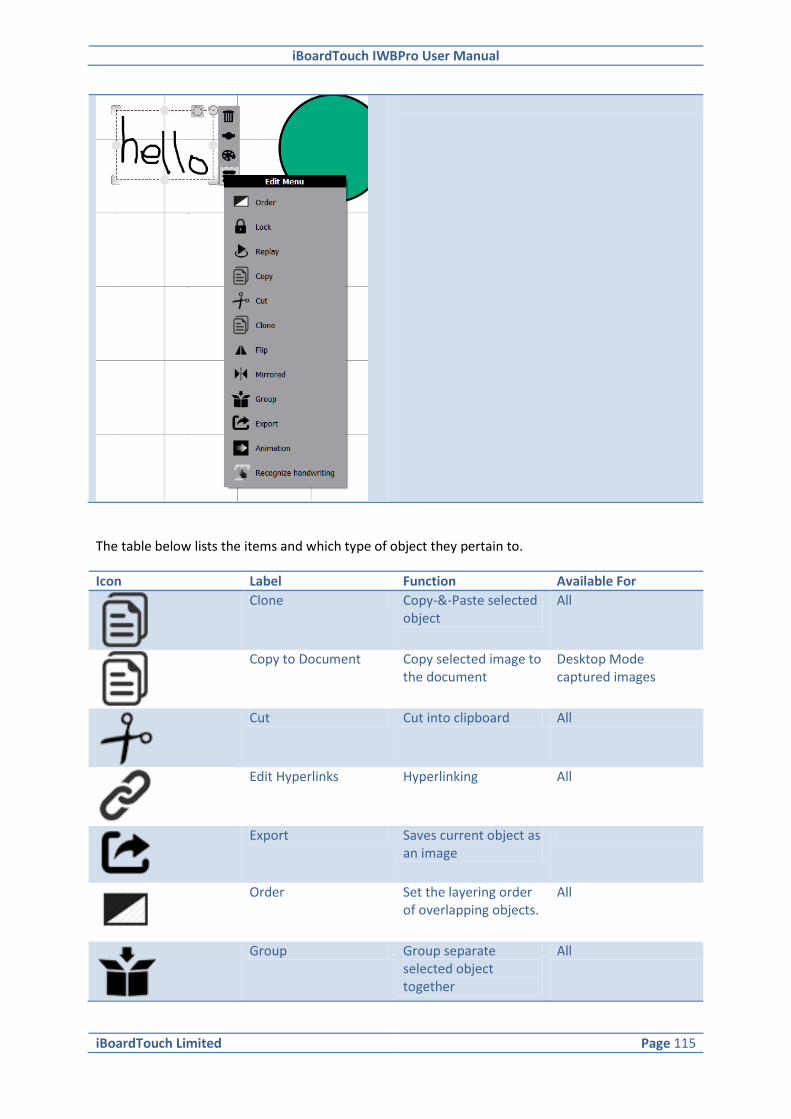
iBoardTouch IWBPro User Manual
iBoardTouch Limited Page 115
The table below lists the items and which type of object they pertain to.
Icon Label Function Available For
Clone Copy-&-Paste selected object
All
Copy to Document Copy selected image to the document
Desktop Mode captured images
Cut Cut into clipboard All
Edit Hyperlinks Hyperlinking All
Export Saves current object as an image
Order Set the layering order of overlapping objects.
All
Group Group separate selected object together
All

iBoardTouch IWBPro User Manual
iBoardTouch Limited Page 116
Icon Label Function Available For
Inscribed Circle Adds an inscribed circle to the triangle
Triangle
Lock Locks the object All
Context menu All
Mirrored Create mirrored copies of the object
All
Fill Colour Shapes, lines, pen strokes
Line Colour Shapes, lines, pen strokes
Radius Craws a line from the centre of the circle to the edge to mark the radius
Circle
Replay Replays the actions performed on an object.
All
Flip Flip an object horizontally/vertically
All
Set as Background Sets the selected image as the background, with a choice between tiled and padded.
Image
Edit Text Text
Animation Set animation effects on an object
All
Delete the selected object
All
Ungroup Ungroups items that were grouped previously
Grouped Items

iBoardTouch IWBPro User Manual
iBoardTouch Limited Page 117
Icon Label Function Available For
Line Thickness Pen strokes, line, shapes
Recognize handwriting Sends the selected pen strokes to the handwriting recognition and if recognised adds the text to the document
Pen strokes