ibm watson solutions business and academic partners - ibm cloud … · 2020-03-30 · watson...
TRANSCRIPT

Watson Solutions 1
IBM Watson Solutions
Business and Academic Partners
Build a Face Recognition App
Using Visual Recognition API and Node-RED
Prepared by Armen Pischdotchian
Modified by Ronan Bourlier, C. Lalevée
Watson Solutions 2
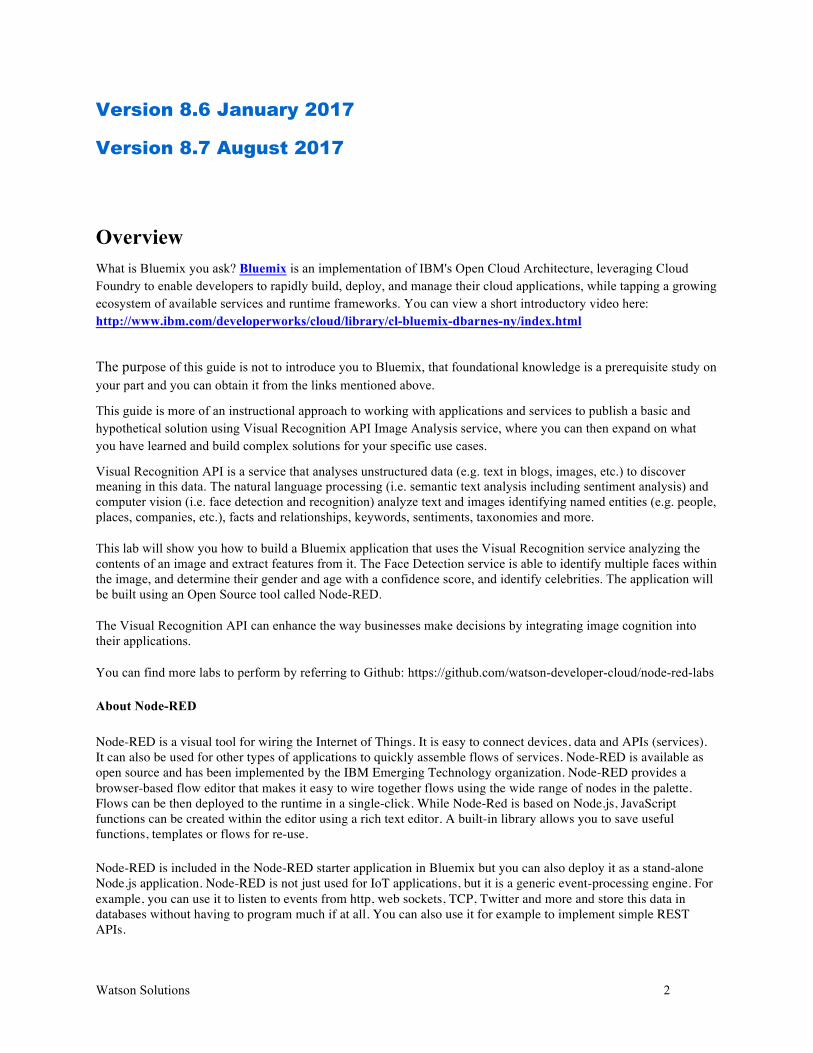
Version 8.6 January 2017
Version 8.7 August 2017
Overview What is Bluemix you ask? Bluemix is an implementation of IBM's Open Cloud Architecture, leveraging Cloud Foundry to enable developers to rapidly build, deploy, and manage their cloud applications, while tapping a growing ecosystem of available services and runtime frameworks. You can view a short introductory video here: http://www.ibm.com/developerworks/cloud/library/cl-bluemix-dbarnes-ny/index.html
The purpose of this guide is not to introduce you to Bluemix, that foundational knowledge is a prerequisite study on your part and you can obtain it from the links mentioned above.
This guide is more of an instructional approach to working with applications and services to publish a basic and hypothetical solution using Visual Recognition API Image Analysis service, where you can then expand on what you have learned and build complex solutions for your specific use cases.
Visual Recognition API is a service that analyses unstructured data (e.g. text in blogs, images, etc.) to discover meaning in this data. The natural language processing (i.e. semantic text analysis including sentiment analysis) and computer vision (i.e. face detection and recognition) analyze text and images identifying named entities (e.g. people, places, companies, etc.), facts and relationships, keywords, sentiments, taxonomies and more.
This lab will show you how to build a Bluemix application that uses the Visual Recognition service analyzing the contents of an image and extract features from it. The Face Detection service is able to identify multiple faces within the image, and determine their gender and age with a confidence score, and identify celebrities. The application will be built using an Open Source tool called Node-RED.
The Visual Recognition API can enhance the way businesses make decisions by integrating image cognition into their applications.
You can find more labs to perform by referring to Github: https://github.com/watson-developer-cloud/node-red-labs
About Node-RED
Node-RED is a visual tool for wiring the Internet of Things. It is easy to connect devices, data and APIs (services). It can also be used for other types of applications to quickly assemble flows of services. Node-RED is available as open source and has been implemented by the IBM Emerging Technology organization. Node-RED provides a browser-based flow editor that makes it easy to wire together flows using the wide range of nodes in the palette. Flows can be then deployed to the runtime in a single-click. While Node-Red is based on Node.js, JavaScript functions can be created within the editor using a rich text editor. A built-in library allows you to save useful functions, templates or flows for re-use.
Node-RED is included in the Node-RED starter application in Bluemix but you can also deploy it as a stand-alone Node.js application. Node-RED is not just used for IoT applications, but it is a generic event-processing engine. For example, you can use it to listen to events from http, web sockets, TCP, Twitter and more and store this data in databases without having to program much if at all. You can also use it for example to implement simple REST APIs.

Watson Solutions 3
The following table explains some of the more common nodes that you will use in this lab.
Node name Description
The http in node provides an input node for http requests, allowing the creation of simple web services. The resulting message has the following properties: msg.req : http request msg.res : http response
For POST/PUT requests, the body is available under msg.req.body
This uses the Express bodyParser middleware to parse the content to a JSON object. By default, this expects the body of the request to be URL encoded: foo=bar&this=that
To send JSON encoded data to the node, the content-type header of the request must be set to application/json. Note: This node does not send any response to the http request use a subsequent HTTP Response node.
The http response node can send responses back to http requests received from an HTTP Input node. The response can be customized using the following message properties: payload
is sent as the body of the response StatusCode
if set, is used as the response status code (default: 200) headers
if set, should be an object containing field/value pairs to be added as response headers.
With the change node you can set, change or delete properties of a message. The node can specify multiple rules that will be applied to the message in turn. The available operations are: Set
Sets a property. The to property can either be a string value, or reference another message property by name, for example: msg.topic. Change
search & replace parts of the property. If regular expressions are enabled, the replace with property can include capture groups, for example $1 Delete
deletes a property.
Watson Solutions 4
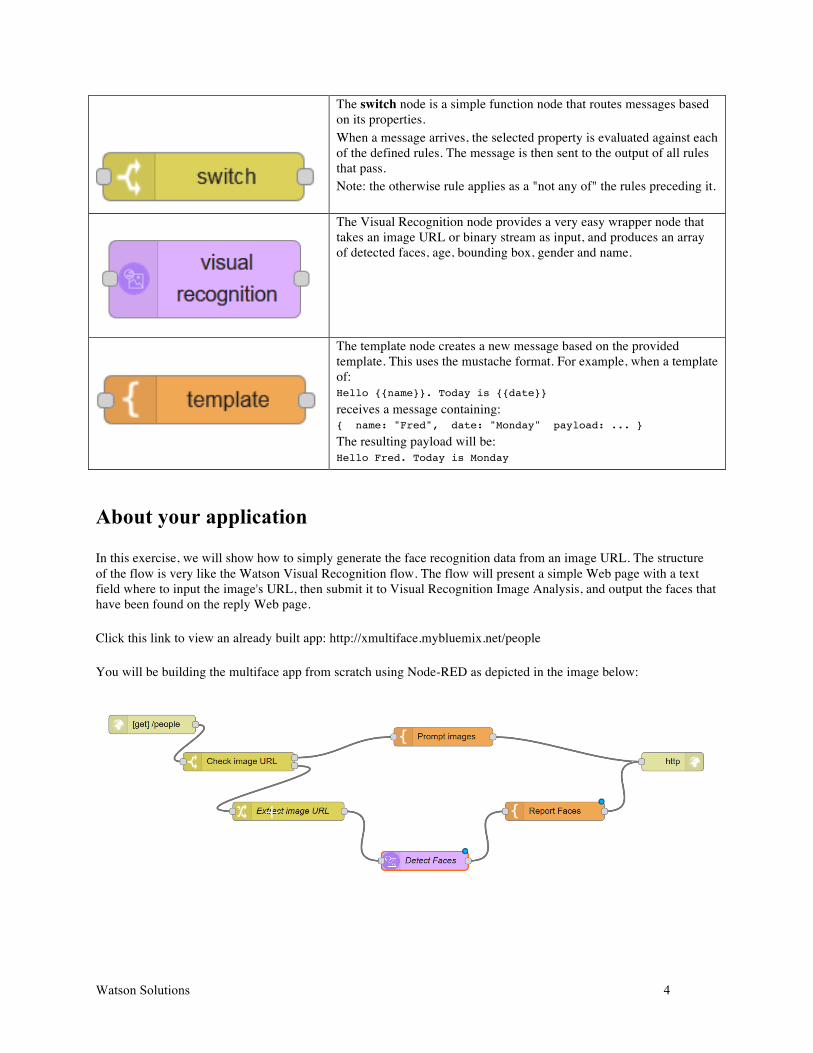
The switch node is a simple function node that routes messages based on its properties. When a message arrives, the selected property is evaluated against each of the defined rules. The message is then sent to the output of all rules that pass. Note: the otherwise rule applies as a "not any of" the rules preceding it.
The Visual Recognition node provides a very easy wrapper node that takes an image URL or binary stream as input, and produces an array of detected faces, age, bounding box, gender and name.
The template node creates a new message based on the provided template. This uses the mustache format. For example, when a template of: Hello {{name}}. Today is {{date}}
receives a message containing: { name: "Fred", date: "Monday" payload: ... }
The resulting payload will be: Hello Fred. Today is Monday
About your application
In this exercise, we will show how to simply generate the face recognition data from an image URL. The structure of the flow is very like the Watson Visual Recognition flow. The flow will present a simple Web page with a text field where to input the image's URL, then submit it to Visual Recognition Image Analysis, and output the faces that have been found on the reply Web page.
Click this link to view an already built app: http://xmultiface.mybluemix.net/people
You will be building the multiface app from scratch using Node-RED as depicted in the image below:

Watson Solutions 5
Build a Node-RED Starter Boilerplate Let’s begin with the first step, by creating a boilerplate app in Bluemix. This lab assumes that you have a Bluemix account and that you can sign in. You can register for Bluemix by clicking the SIGN UP button in the upper right corner of the page at console.ng.bluemix.net. After registering, you will receive an email message that requires you to confirm your registration. If you have a promo code, apply it at this time.
1. Sign into Bluemix: console.ng.bluemix.net
2. From the Bluemix console, access the Catalog tab and search for Node-RED Starter.
3. Specify a unique name for your app (in this example, multiface) and click Create. Allow enough time for the app to stage and start. This may take a few minutes.
4. Click Visit App. URL
5. In the ensuing page, configure Node-RED authentication (wizard) then click Go to your Node-RED editor. This opens the canvas where you begin to drag and drop the nodes and enter code as instructed.
Watson Solutions 6
Populate the Node-RED canvas
The remaining steps that pertain to building your node-RED canvas are outlined in the table below.
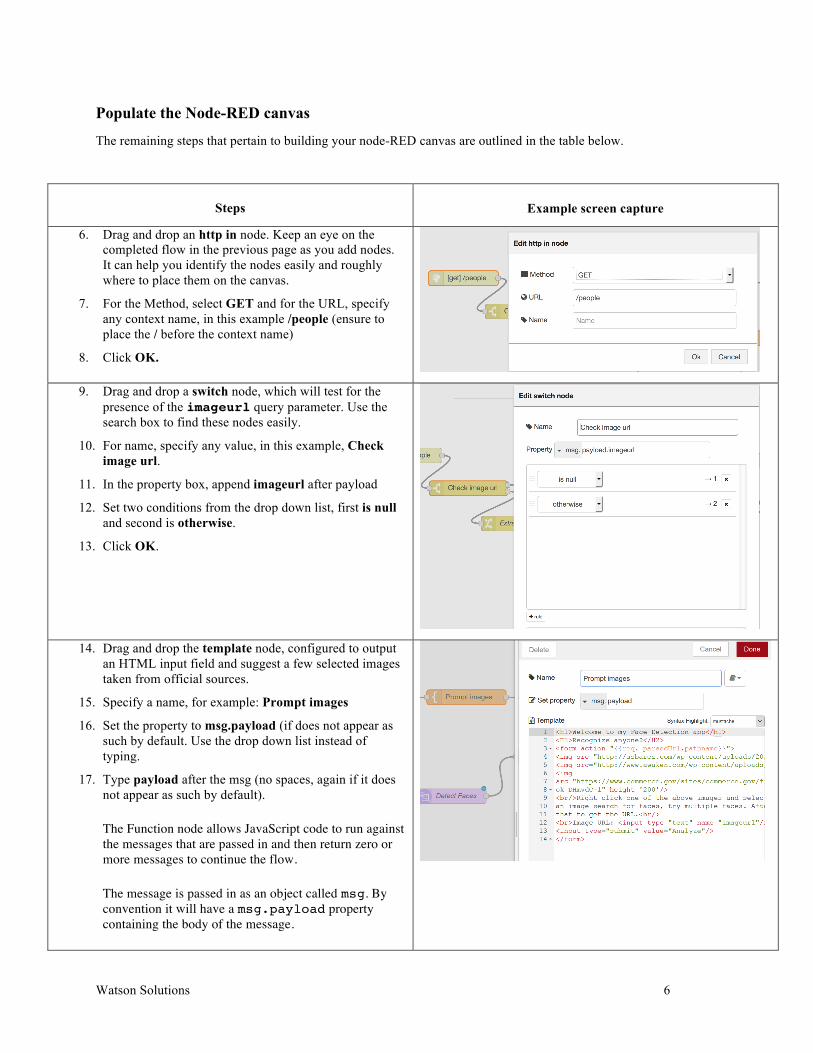
Steps Example screen capture
6. Drag and drop an http in node. Keep an eye on the completed flow in the previous page as you add nodes. It can help you identify the nodes easily and roughly where to place them on the canvas.
7. For the Method, select GET and for the URL, specify any context name, in this example /people (ensure to place the / before the context name)
8. Click OK.
9. Drag and drop a switch node, which will test for the presence of the imageurl query parameter. Use the search box to find these nodes easily.
10. For name, specify any value, in this example, Check image url.
11. In the property box, append imageurl after payload
12. Set two conditions from the drop down list, first is null and second is otherwise.
13. Click OK.
14. Drag and drop the template node, configured to output an HTML input field and suggest a few selected images taken from official sources.
15. Specify a name, for example: Prompt images
16. Set the property to msg.payload (if does not appear as such by default. Use the drop down list instead of typing.
17. Type payload after the msg (no spaces, again if it does not appear as such by default).
The Function node allows JavaScript code to run against the messages that are passed in and then return zero or more messages to continue the flow.
The message is passed in as an object called msg. By convention it will have a msg.payload property containing the body of the message.

Watson Solutions 7
18. Copy/paste this code in the body of the template overriding the existing template line of code:
<h1>Welcome to my Face Detection app</h1>
<H2>Recognize anyone?</H2>
<form action="{{req._parsedUrl.pathname}}">
<img src="http://asbarez.com/wp-content/uploads/2016/02/ibmwatson.jpg" height='200'/>
<img src="http://www.awaken.com/wp-content/uploads/2015/05/forbes.jpg" height='200'/>
<img
src="https://www.commerce.gov/sites/commerce.gov/files/styles/scale_250w/public/media/images/profile/elizabethholmes.jpg?it
ok=DHmvdC-1" height='200'/>
<br/>Right-click one of the above images and select Copy image location and paste the URL in the box below.<br>Do
an image search for faces, try multiple faces. After you click on an image, to the right it usually says "View image" click
that to get the URL.<br/>
<br>Image URL: <input type="text" name="imageurl"/>
<input type="submit" value="Analyze"/>
</form>
19. Drag and Drop a change node to extract the imageurl query parameter from the web request and assign it to the payload to be provided as input to the Visual Recognition Image Analysis node.
20. Specify a name.
21. Select Set for rule; the first rule is msg.payload, and the second rule is msg.payload.imageurl (use the drop down list to select the msg part and type the rest).
22. Drag and drop a Visual Recognition node.
23. Go to Bluemix, search for the Visual Recognition service.
24. Give the service a unique name after the dash. For example, Visual Recognition-<unique_name>
25. Click Create. Allow enough time.
26. On the left side of the Bluemix screen, click on service credentials and then on “view credential” to copy the API_key.
27. Back to the Node-RED canvas, for Detect annotators, select “Detect Faces”.
28. Paste the API keys
29. Click OK.

Watson Solutions 8
30. Drag and drop a template node with the following content, which will format the output returned from the Image Analysis node into an HTML table for easier reading. Override the existing line of code.
31. Copy/paste this code inside the template frame. <h1>Visual Recognition v3 Image Analysis</h1>
<p>Analyzed image: {{result.images.0.resolved_url}}<br/><img id="image" src="{{result.images.0.resolved_url}}" height="200"/></p>
{{^result}}
<P>No Face detected</P>
{{/result}}
<p>Images Processed: {{result.images_processed}}</p>
<table border='1'>
<thead><tr><th>Age Range</th><th>Confidence</th><th>Gender</th><th>Confidence</th><th>Name</th></tr></thead>
{{#result.images.0.faces}}<tr>
<td><b>{{age.min}} - {{age.max}}</b></td><td><i>{{age.score}}</i></td>
<td>{{gender.gender}}</td><td>{{gender.score}}</td>
<td>{{identity.name}} ({{identity.score}})</td>
</tr>{{/result.images.0.faces}}
</table>
<form action="{{req._parsedUrl.pathname}}">
<br><input type="submit" value="Try again or go back to the home page"/>
</form>
32. End the flow with the http response node and connect the nodes as you see depicted on page 4.
Watson Solutions 9
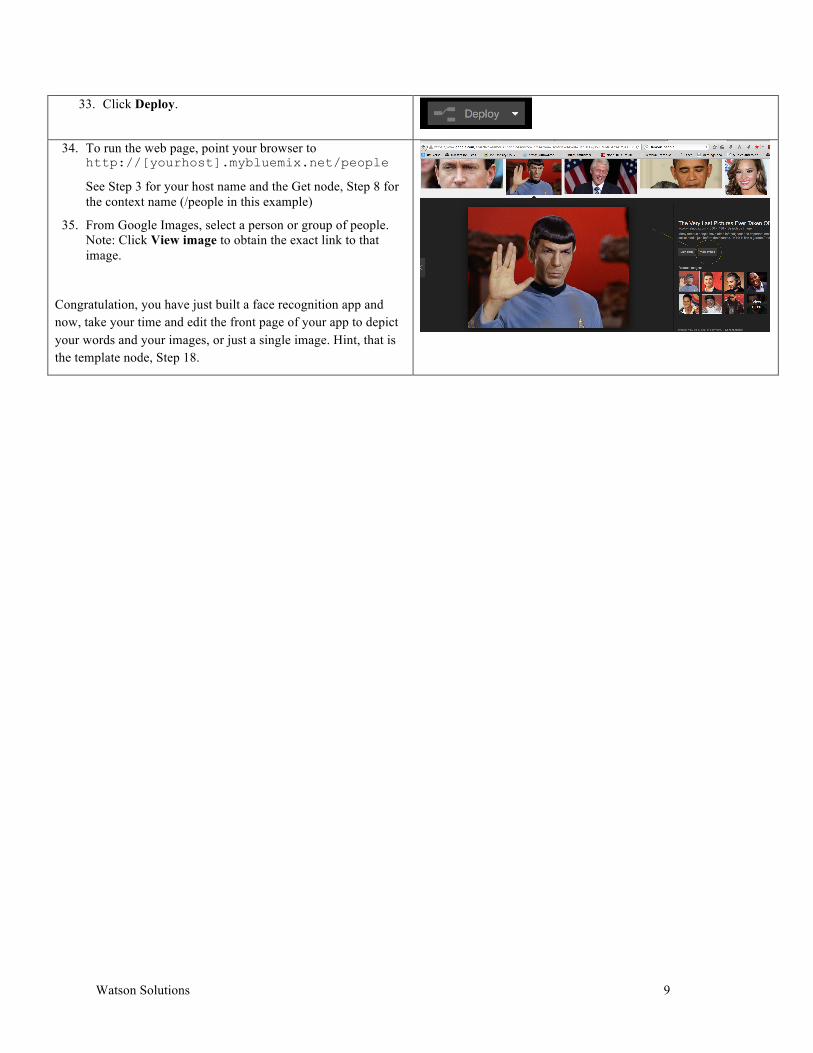
33. Click Deploy.
34. To run the web page, point your browser to http://[yourhost].mybluemix.net/people
See Step 3 for your host name and the Get node, Step 8 for the context name (/people in this example)
35. From Google Images, select a person or group of people. Note: Click View image to obtain the exact link to that image.
Congratulation, you have just built a face recognition app and now, take your time and edit the front page of your app to depict your words and your images, or just a single image. Hint, that is the template node, Step 18.