ibm cloud solutions on system x - lenovopress.com · part 2. ibm cloudburst on system x ......
TRANSCRIPT
ibm.com/redbooks
IBM CloudBurston System x
Armando LemosRafael Moleiro
Paolo OttavianoFerenc Rada
Maciej WidomskiByron Braswell
Cloud computing overview
CloudBurst hardware and software
CloudBurst administration and upgrade scenarios
Front cover

IBM CloudBurst on System x
April 2012
International Technical Support Organization
SG24-7981-00

© Copyright International Business Machines Corporation 2012. All rights reserved.Note to U.S. Government Users Restricted Rights -- Use, duplication or disclosure restricted by GSA ADPSchedule Contract with IBM Corp.
First Edition (April 2012)
This edition applies to Version 2.1 and 2.1.1 of IBM CloudBurst on System x.
Note: Before using this information and the product it supports, read the information in “Notices” on page vii.
Contents
Notices . . . . . . . . . . . . . . . . . . . . . . . . . . . . . . . . . . . . . . . . . . . . . . . . . . . . . . viiTrademarks . . . . . . . . . . . . . . . . . . . . . . . . . . . . . . . . . . . . . . . . . . . . . . . . . . . viii
Preface . . . . . . . . . . . . . . . . . . . . . . . . . . . . . . . . . . . . . . . . . . . . . . . . . . . . . . . ixThe team who wrote this book . . . . . . . . . . . . . . . . . . . . . . . . . . . . . . . . . . . . . . ixNow you can become a published author, too! . . . . . . . . . . . . . . . . . . . . . . . . . xiComments welcome. . . . . . . . . . . . . . . . . . . . . . . . . . . . . . . . . . . . . . . . . . . . . . xiStay connected to IBM Redbooks . . . . . . . . . . . . . . . . . . . . . . . . . . . . . . . . . . xii
Part 1. Cloud overview . . . . . . . . . . . . . . . . . . . . . . . . . . . . . . . . . . . . . . . . . . . . . . . . . . . . . . . 1
Chapter 1. Introduction to cloud computing. . . . . . . . . . . . . . . . . . . . . . . . . 31.1 What is cloud computing . . . . . . . . . . . . . . . . . . . . . . . . . . . . . . . . . . . . . . . 41.2 Deployment options for cloud . . . . . . . . . . . . . . . . . . . . . . . . . . . . . . . . . . 141.3 Delivery models for cloud . . . . . . . . . . . . . . . . . . . . . . . . . . . . . . . . . . . . . 161.4 Cloud methodology process . . . . . . . . . . . . . . . . . . . . . . . . . . . . . . . . . . . 19
1.4.1 Create an IT roadmap . . . . . . . . . . . . . . . . . . . . . . . . . . . . . . . . . . . . 201.4.2 Define and prioritize the workload. . . . . . . . . . . . . . . . . . . . . . . . . . . 211.4.3 Define your delivery models . . . . . . . . . . . . . . . . . . . . . . . . . . . . . . . 271.4.4 Understand the business value. . . . . . . . . . . . . . . . . . . . . . . . . . . . . 281.4.5 Define your cloud architecture and scope. . . . . . . . . . . . . . . . . . . . . 291.4.6 Implement the cloud . . . . . . . . . . . . . . . . . . . . . . . . . . . . . . . . . . . . . 34
Part 2. IBM CloudBurst on System x. . . . . . . . . . . . . . . . . . . . . . . . . . . . . . . . . . . . . . . . . . . 35
Chapter 2. CloudBurst hardware . . . . . . . . . . . . . . . . . . . . . . . . . . . . . . . . . 372.1 Introduction . . . . . . . . . . . . . . . . . . . . . . . . . . . . . . . . . . . . . . . . . . . . . . . . 382.2 CloudBurst hardware overview . . . . . . . . . . . . . . . . . . . . . . . . . . . . . . . . . 38
2.2.1 Basic hardware configuration . . . . . . . . . . . . . . . . . . . . . . . . . . . . . . 392.2.2 IBM HS22V Blade Servers . . . . . . . . . . . . . . . . . . . . . . . . . . . . . . . . 392.2.3 IBM System x3550 M3 Management Server . . . . . . . . . . . . . . . . . . 40
2.3 CloudBurst configuration models . . . . . . . . . . . . . . . . . . . . . . . . . . . . . . . 412.3.1 Small CloudBurst configuration—4 blades . . . . . . . . . . . . . . . . . . . . 412.3.2 Medium CloudBurst configuration—5-14 blades. . . . . . . . . . . . . . . . 432.3.3 Large CloudBurst configuration—15-28 blades . . . . . . . . . . . . . . . . 442.3.4 Extra-large CloudBurst configuration—29-56 blades . . . . . . . . . . . . 462.3.5 CloudBurst configuration model differences . . . . . . . . . . . . . . . . . . . 482.3.6 CloudBurst configuration options . . . . . . . . . . . . . . . . . . . . . . . . . . . 49
2.4 CloudBurst storage options . . . . . . . . . . . . . . . . . . . . . . . . . . . . . . . . . . . . 51
© Copyright IBM Corp. 2012. All rights reserved. iii
2.5 CloudBurst networks . . . . . . . . . . . . . . . . . . . . . . . . . . . . . . . . . . . . . . . . . 522.5.1 1 Gb Ethernet Management Network . . . . . . . . . . . . . . . . . . . . . . . . 532.5.2 10 Gb Ethernet networks . . . . . . . . . . . . . . . . . . . . . . . . . . . . . . . . . 53
Chapter 3. CloudBurst software. . . . . . . . . . . . . . . . . . . . . . . . . . . . . . . . . . 573.1 IBM CloudBurst for System x software overview . . . . . . . . . . . . . . . . . . . 583.2 IBM CloudBurst for System x software . . . . . . . . . . . . . . . . . . . . . . . . . . . 61
3.2.1 IBM Tivoli Service Automation Manager . . . . . . . . . . . . . . . . . . . . . . 623.2.2 IBM Tivoli Service Request Manager . . . . . . . . . . . . . . . . . . . . . . . . 663.2.3 IBM Tivoli Process Automation Engine . . . . . . . . . . . . . . . . . . . . . . . 663.2.4 IBM Tivoli Provisioning Manager. . . . . . . . . . . . . . . . . . . . . . . . . . . . 673.2.5 IBM Tivoli Usage and Account Manager. . . . . . . . . . . . . . . . . . . . . . 683.2.6 IBM Tivoli Monitoring. . . . . . . . . . . . . . . . . . . . . . . . . . . . . . . . . . . . . 703.2.7 IBM Tivoli Systems Automation for Multiplatforms . . . . . . . . . . . . . . 73
3.3 IBM CloudBurst software stack architecture . . . . . . . . . . . . . . . . . . . . . . . 753.3.1 Service automation image—icb-tivsam. . . . . . . . . . . . . . . . . . . . . . . 773.3.2 Monitoring image—icb-itm . . . . . . . . . . . . . . . . . . . . . . . . . . . . . . . . 773.3.3 Usage and Accounting image—cb-tuam. . . . . . . . . . . . . . . . . . . . . . 783.3.4 File repository, mail server, and URL redirection image—icb-nfs . . . 783.3.5 Dual node high availability . . . . . . . . . . . . . . . . . . . . . . . . . . . . . . . . 79
3.4 IBM CloudBurst for System x management software . . . . . . . . . . . . . . . . 793.4.1 IBM Systems Director . . . . . . . . . . . . . . . . . . . . . . . . . . . . . . . . . . . . 81
Chapter 4. Initial setup . . . . . . . . . . . . . . . . . . . . . . . . . . . . . . . . . . . . . . . . . 874.1 Creating operating system templates . . . . . . . . . . . . . . . . . . . . . . . . . . . . 88
4.1.1 Creating Microsoft Windows-based templates . . . . . . . . . . . . . . . . . 894.1.2 Creating Linux-based templates . . . . . . . . . . . . . . . . . . . . . . . . . . . . 944.1.3 Creating templates with VMware vCenter Converter . . . . . . . . . . . . 974.1.4 Preparing the OS image template for CloudBurst . . . . . . . . . . . . . . . 99
4.2 Installable software . . . . . . . . . . . . . . . . . . . . . . . . . . . . . . . . . . . . . . . . . 1034.2.1 Simple software distribution . . . . . . . . . . . . . . . . . . . . . . . . . . . . . . 1034.2.2 Installing software using Self-Service UI . . . . . . . . . . . . . . . . . . . . . 123
4.3 Reporting. . . . . . . . . . . . . . . . . . . . . . . . . . . . . . . . . . . . . . . . . . . . . . . . . 1244.3.1 Tivoli Usage and Accounting Manager and Tivoli Service Automation
Manager integration . . . . . . . . . . . . . . . . . . . . . . . . . . . . . . . . . . . . 1254.3.2 Working with Tivoli Usage and Accounting Manager reports . . . . . 131
4.4 Self-service UI customization and REST API usage. . . . . . . . . . . . . . . . 1394.4.1 Self-service UI customization . . . . . . . . . . . . . . . . . . . . . . . . . . . . . 1394.4.2 REST API usage . . . . . . . . . . . . . . . . . . . . . . . . . . . . . . . . . . . . . . . 146
4.5 Modifying for branding. . . . . . . . . . . . . . . . . . . . . . . . . . . . . . . . . . . . . . . 1514.5.1 Setting up the development environment . . . . . . . . . . . . . . . . . . . . 1524.5.2 Writing custom extensions . . . . . . . . . . . . . . . . . . . . . . . . . . . . . . . 1584.5.3 Globalization . . . . . . . . . . . . . . . . . . . . . . . . . . . . . . . . . . . . . . . . . . 163
iv IBM CloudBurst on System x
4.6 Customizing email notification templates . . . . . . . . . . . . . . . . . . . . . . . . 1664.6.1 Modifying a communication template . . . . . . . . . . . . . . . . . . . . . . . 167
4.7 Lifecycle of provisioning a project . . . . . . . . . . . . . . . . . . . . . . . . . . . . . . 1704.7.1 Tivoli Service Automation Manager interface . . . . . . . . . . . . . . . . . 170
4.8 Creating a customer . . . . . . . . . . . . . . . . . . . . . . . . . . . . . . . . . . . . . . . . 1744.9 Creating a new team and user . . . . . . . . . . . . . . . . . . . . . . . . . . . . . . . . 1754.10 Creating a sample project, Hello Cloud. . . . . . . . . . . . . . . . . . . . . . . . . 179
4.10.1 Creating a new project . . . . . . . . . . . . . . . . . . . . . . . . . . . . . . . . . 1794.10.2 Managing your project. . . . . . . . . . . . . . . . . . . . . . . . . . . . . . . . . . 187
Chapter 5. Administrator scenarios . . . . . . . . . . . . . . . . . . . . . . . . . . . . . 1955.1 Managing a shut down and restart of the system . . . . . . . . . . . . . . . . . . 195
5.1.1 Shutting down the software stack . . . . . . . . . . . . . . . . . . . . . . . . . . 1955.1.2 Shutting down the hardware . . . . . . . . . . . . . . . . . . . . . . . . . . . . . . 1985.1.3 Restarting the hardware . . . . . . . . . . . . . . . . . . . . . . . . . . . . . . . . . 1995.1.4 Restarting the software stack . . . . . . . . . . . . . . . . . . . . . . . . . . . . . 199
5.2 IBM CloudBurst backup and restore . . . . . . . . . . . . . . . . . . . . . . . . . . . . 2005.2.1 Backup procedure . . . . . . . . . . . . . . . . . . . . . . . . . . . . . . . . . . . . . . 201
5.3 Managing stacked projects . . . . . . . . . . . . . . . . . . . . . . . . . . . . . . . . . . . 2075.3.1 Example . . . . . . . . . . . . . . . . . . . . . . . . . . . . . . . . . . . . . . . . . . . . . 208
5.4 Managing passwords . . . . . . . . . . . . . . . . . . . . . . . . . . . . . . . . . . . . . . . 2115.4.1 Default system passwords . . . . . . . . . . . . . . . . . . . . . . . . . . . . . . . 2115.4.2 Changing hardware-related passwords . . . . . . . . . . . . . . . . . . . . . 2185.4.3 Changing CloudBurst passwords . . . . . . . . . . . . . . . . . . . . . . . . . . 221
Chapter 6. IBM Service Delivery Manager 7.2.2 . . . . . . . . . . . . . . . . . . . . 2376.1 Upgrading to CloudBurst 2.1.1 with IBM Service Delivery Manager 7.2.2238
6.1.1 Editing your servers settings . . . . . . . . . . . . . . . . . . . . . . . . . . . . . . 2426.1.2 Pre-upgrade steps. . . . . . . . . . . . . . . . . . . . . . . . . . . . . . . . . . . . . . 2436.1.3 Using the maintenance tool. . . . . . . . . . . . . . . . . . . . . . . . . . . . . . . 2446.1.4 Upgrading the software products . . . . . . . . . . . . . . . . . . . . . . . . . . 2486.1.5 Post-upgrade steps . . . . . . . . . . . . . . . . . . . . . . . . . . . . . . . . . . . . . 285
Abbreviations and acronyms . . . . . . . . . . . . . . . . . . . . . . . . . . . . . . . . . . . 295
Related publications . . . . . . . . . . . . . . . . . . . . . . . . . . . . . . . . . . . . . . . . . . 297IBM Redbooks . . . . . . . . . . . . . . . . . . . . . . . . . . . . . . . . . . . . . . . . . . . . . . . . 297Other publications . . . . . . . . . . . . . . . . . . . . . . . . . . . . . . . . . . . . . . . . . . . . . 297Online resources . . . . . . . . . . . . . . . . . . . . . . . . . . . . . . . . . . . . . . . . . . . . . . 298Help from IBM . . . . . . . . . . . . . . . . . . . . . . . . . . . . . . . . . . . . . . . . . . . . . . . . 298
Index . . . . . . . . . . . . . . . . . . . . . . . . . . . . . . . . . . . . . . . . . . . . . . . . . . . . . . . 299
Contents v

vi IBM CloudBurst on System x
Notices
This information was developed for products and services offered in the U.S.A.
IBM may not offer the products, services, or features discussed in this document in other countries. Consult your local IBM representative for information on the products and services currently available in your area. Any reference to an IBM product, program, or service is not intended to state or imply that only that IBM product, program, or service may be used. Any functionally equivalent product, program, or service that does not infringe any IBM intellectual property right may be used instead. However, it is the user's responsibility to evaluate and verify the operation of any non-IBM product, program, or service.
IBM may have patents or pending patent applications covering subject matter described in this document. The furnishing of this document does not give you any license to these patents. You can send license inquiries, in writing, to: IBM Director of Licensing, IBM Corporation, North Castle Drive, Armonk, NY 10504-1785 U.S.A.
The following paragraph does not apply to the United Kingdom or any other country where such provisions are inconsistent with local law: INTERNATIONAL BUSINESS MACHINES CORPORATION PROVIDES THIS PUBLICATION "AS IS" WITHOUT WARRANTY OF ANY KIND, EITHER EXPRESS OR IMPLIED, INCLUDING, BUT NOT LIMITED TO, THE IMPLIED WARRANTIES OF NON-INFRINGEMENT, MERCHANTABILITY OR FITNESS FOR A PARTICULAR PURPOSE. Some states do not allow disclaimer of express or implied warranties in certain transactions, therefore, this statement may not apply to you.
This information could include technical inaccuracies or typographical errors. Changes are periodically made to the information herein; these changes will be incorporated in new editions of the publication. IBM may make improvements and/or changes in the product(s) and/or the program(s) described in this publication at any time without notice.
Any references in this information to non-IBM websites are provided for convenience only and do not in any manner serve as an endorsement of those websites. The materials at those websites are not part of the materials for this IBM product and use of those websites is at your own risk.
IBM may use or distribute any of the information you supply in any way it believes appropriate without incurring any obligation to you.
Information concerning non-IBM products was obtained from the suppliers of those products, their published announcements or other publicly available sources. IBM has not tested those products and cannot confirm the accuracy of performance, compatibility or any other claims related to non-IBM products. Questions on the capabilities of non-IBM products should be addressed to the suppliers of those products.
This information contains examples of data and reports used in daily business operations. To illustrate them as completely as possible, the examples include the names of individuals, companies, brands, and products. All of these names are fictitious and any similarity to the names and addresses used by an actual business enterprise is entirely coincidental.
COPYRIGHT LICENSE:
This information contains sample application programs in source language, which illustrate programming techniques on various operating platforms. You may copy, modify, and distribute these sample programs in any form without payment to IBM, for the purposes of developing, using, marketing or distributing application programs conforming to the application programming interface for the operating platform for which the sample programs are written. These examples have not been thoroughly tested under all conditions. IBM, therefore, cannot guarantee or imply reliability, serviceability, or function of these programs.
© Copyright IBM Corp. 2012. All rights reserved. vii
Trademarks
IBM, the IBM logo, and ibm.com are trademarks or registered trademarks of International Business Machines Corporation in the United States, other countries, or both. These and other IBM trademarked terms are marked on their first occurrence in this information with the appropriate symbol (® or ™), indicating US registered or common law trademarks owned by IBM at the time this information was published. Such trademarks may also be registered or common law trademarks in other countries. A current list of IBM trademarks is available on the Web at http://www.ibm.com/legal/copytrade.shtml
The following terms are trademarks of the International Business Machines Corporation in the United States, other countries, or both:
AIX®BladeCenter®BNT®CloudBurst®Cognos®DB2 Universal Database™DB2®IBM Systems Director Active
Energy Manager™IBM®
Maximo®Netcool®Passport Advantage®Power Systems™PowerVM®Power®POWER®Redbooks®Redbooks (logo) ®Service Request Manager®
System p®System Storage DS®System Storage®System x®System z®Tivoli®WebSphere®z/VM®
The following terms are trademarks of other companies:
Intel Xeon, Intel, Intel logo, Intel Inside logo, and Intel Centrino logo are trademarks or registered trademarks of Intel Corporation or its subsidiaries in the United States and other countries.
ITIL is a registered trademark, and a registered community trademark of the Office of Government Commerce, and is registered in the U.S. Patent and Trademark Office.
Microsoft, Windows, and the Windows logo are trademarks of Microsoft Corporation in the United States, other countries, or both.
Java, and all Java-based trademarks and logos are trademarks or registered trademarks of Oracle and/or its affiliates.
UNIX is a registered trademark of The Open Group in the United States and other countries.
Intel, Intel logo, Intel Inside, Intel Inside logo, Intel Centrino, Intel Centrino logo, Celeron, Intel Xeon, Intel SpeedStep, Itanium, and Pentium are trademarks or registered trademarks of Intel Corporation or its subsidiaries in the United States and other countries.
Linux is a trademark of Linus Torvalds in the United States, other countries, or both.
Other company, product, or service names may be trademarks or service marks of others.
viii IBM CloudBurst on System x
Preface
This IBM® Redbooks® publication gives an overview of Cloud solutions, followed by detailed information and usage scenarios for IBM CloudBurst® in a System x® environment. Cloud computing can be defined as a style of computing in which dynamically scalable resources, such as CPU, storage, or bandwidth, are provided as a service over the Internet. Cloud computing represents a massively scalable, self-service delivery model where processing, storage, networking, and applications can be accessed as services over the Internet. Enterprises can adopt cloud models to improve employee productivity, deploy new products and services faster and reduce operating costs—starting with workloads, such as development and test, virtual desktop, collaboration, and analytics. IBM provides a scalable variety of cloud solutions to meet these needs.
This IBM Redbooks publication helps you to tailor an IBM CloudBurst installation on System x to meet virtualized computing requirements in a private cloud environment. This book is intended for IT support personnel who are responsible for customizing IBM CloudBurst to meet business cloud computing objectives.
The team who wrote this book
This book was produced by a team of specialists from around the world working at the International Technical Support Organization, Raleigh Center.
Armando Lemos is an Infrastructure Architect at Banco Itaú. He is a Certified Information Systems Security Professional (CISSP) with 20 years of experience in the data processing field, including IBM Mainframe and Midrange systems. He has a degree in Computer Science from Pontifícia Universidade Católica in São Paulo. His areas of expertise include hypertext technology, computer security, operating systems, and disaster recovery.
Rafael Moleiro is a graduate in Computer Science in Sao Paulo. He has 12 years of experience in Tivoli® products, including Storage Manager, Tivoli Monitoring, Tivoli Security, and Event Management. He joined IBM in 2006 in the GR Enterprise Automation team. Since 2009, he focused on Cloud solutions dedicated to private cloud and has in-depth skills in ISDM products, including Tivoli Service Automation Manager, Tivoli Provisioning Manager, IBM Tivoli Monitoring and Tivoli Usage, and Accounting Manager.
© Copyright IBM Corp. 2012. All rights reserved. ix
Paolo Ottaviano works in Italy as Advisory Engineer at the IBM SWG Rome Tivoli Lab. He has 16 years of experience in the Information Technology (IT) field and has several professionalcertifications. His areas of expertise are IBM CloudBurst on Systme X, IBM Service Delivery Manager, IBM Smart Cloud Provisioning and Identity security technologies, and IBM Tivoli Identity Manager.
Ferenc Rada is an IBM Innovation Center leader and IDR Technology Manager in Hungary. He has 12 years of experience in different IT areas. He has a degree in Technician Informatics Engineering from Hungary. His areas of expertise include BladeCenter® and storage and virtualization technologies.
Maciej Widomski is a Certified IT Specialist, currently working at Techline organization as a Cloud Solution Architect. He joined IBM in 2006 as a software developer. Through the years he gained experience in software and hardware, including virtualization technologies. His current area of expertise is IBM Cloud Solutions dedicated for private clouds. He is an IBM Certified Solution Advisor for Cloud Computing Architecture with in-depth hands-on skills in ISDM Cloud Management Software Stack.
Byron Braswell is a Networking Professional at the ITSO, Raleigh Center. He writes extensively in the areas of networking, application integration middleware, and personal computer software. Before joining the ITSO, Byron worked in IBM Learning Services Development in networking education development. He received a bachelor’s degree in Physics and a master’s degree in Computer Sciences from Texas A&M University.
Thanks to the following people for their contributions to this project:
Tamikia BarrowLinda RobinsonShari DeianaDavid WattsKaren LawrenceKaTrina LoveDebbie WilmschenInternational Technical Support Organization, Raleigh Center
Lakesia DickensGeorge GillenwaterMarkesha FarmerKeith T. AdamsRoss MickensRoss HamiltonDavid DeanEric KernIBM RTP
x IBM CloudBurst on System x
Paweł WnękSzymon CzachorIBM Poland
Aldo DuranIBM Austin
ITSO wants to thank Mr. Fernando Padia Júnior from Banco Itaú for his support in making Mr. Armando Lemos available to participate in this residency.
Now you can become a published author, too!
Here’s an opportunity to spotlight your skills, grow your career, and become a published author—all at the same time! Join an ITSO residency project and help write a book in your area of expertise, while honing your experience using leading-edge technologies. Your efforts will help to increase product acceptance and customer satisfaction, as you expand your network of technical contacts and relationships. Residencies run from two to six weeks in length, and you can participate either in person or as a remote resident working from your home base.
Find out more about the residency program, browse the residency index, and apply online at:
ibm.com/redbooks/residencies.html
Preface xi
Comments welcome
Your comments are important to us!
We want our books to be as helpful as possible. Send us your comments about this book or other IBM Redbooks publications in one of the following ways:
� Use the online Contact us review Redbooks form found at:
ibm.com/redbooks
� Send your comments in an email to:
� Mail your comments to:
IBM Corporation, International Technical Support OrganizationDept. HYTD Mail Station P0992455 South RoadPoughkeepsie, NY 12601-5400
Stay connected to IBM Redbooks
� Find us on Facebook:
http://www.facebook.com/IBMRedbooks
� Follow us on Twitter:
http://twitter.com/ibmredbooks
� Look for us on LinkedIn:
http://www.linkedin.com/groups?home=&gid=2130806
� Explore new Redbooks publications, residencies, and workshops with the IBM Redbooks weekly newsletter:
https://www.redbooks.ibm.com/Redbooks.nsf/subscribe?OpenForm
� Stay current on recent Redbooks publications with RSS Feeds:
http://www.redbooks.ibm.com/rss.html
xii IBM CloudBurst on System x
Part 1 Cloud overview
In this part we introduce cloud concepts and planning considerations to implement Cloud computing in a customer environment.
Part 1
© Copyright IBM Corp. 2012. All rights reserved. 1

2 IBM CloudBurst on System x
Chapter 1. Introduction to cloud computing
This chapter provides an overview of the cloud computing environment from the perspective of organizations that are considering the move to this technology.
First, we discuss the cloud environment as a technology:
� “What is cloud computing” on page 4� “Deployment options for cloud” on page 14� “Delivery models for cloud” on page 16� “Cloud methodology process” on page 19
Second, we discuss the process of transforming from a traditional computing model to a cloud computing model, beginning on Page 19.
1
© Copyright IBM Corp. 2012. All rights reserved. 3
1.1 What is cloud computing
Cloud computing is a category of solutions in which a technology or service lets users access computing resources on demand, as needed, whether the resources are physical or virtual, dedicated or shared, and no matter how they are accessed (direct connection, LAN, WAN, or the internet). The cloud is often characterized by self-service interfaces that let customers acquire resources when needed, as long as needed. Cloud is also the concept behind an approach to building information technology (IT) services that takes advantage of the growing power of servers and virtualization technologies. To accomplish this, IT staff uses new tools to define and manage existing resources, create services, and charge for system consumption.
Although the term “cloud” is a relatively new term in IT, it is not a new fundamental concept, in the sense that organizations have touched upon cloud technology by using virtualization, process automation, and by adopting a cloud-computing mind set. There are situations where cloud computing makes more sense than other technologies, especially when there is a standard or a pattern of requests. The benefits of cloud acceptance relate to both IT and business, which is why cloud computing is so powerful. Figure 1-1 on page 5 illustrates several of the core IT benefits that cloud computing delivers to an organization.
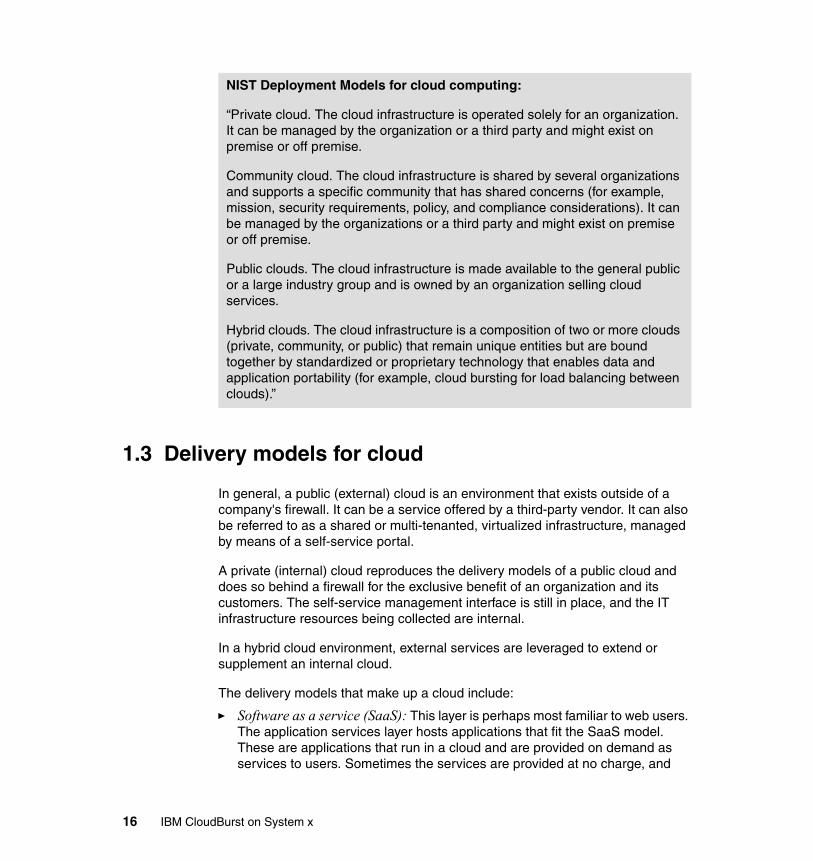
National Institute of Standards and Technology (NIST) definition for cloud computing:
“Cloud computing is a model for enabling convenient, on-demand network access to a shared pool of configurable computing resources (for example, networks, servers, storage, applications, and services) that can be rapidly provisioned and released with minimal management effort or service provider interaction.”
4 IBM CloudBurst on System x
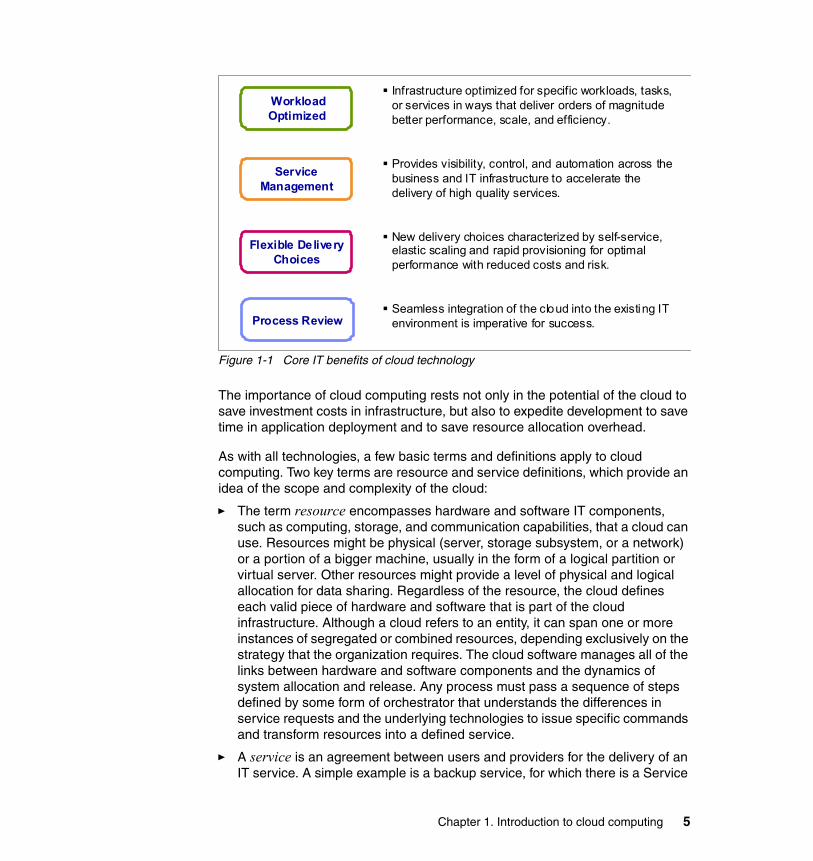
Figure 1-1 Core IT benefits of cloud technology
The importance of cloud computing rests not only in the potential of the cloud to save investment costs in infrastructure, but also to expedite development to save time in application deployment and to save resource allocation overhead.
As with all technologies, a few basic terms and definitions apply to cloud computing. Two key terms are resource and service definitions, which provide an idea of the scope and complexity of the cloud:
� The term resource encompasses hardware and software IT components, such as computing, storage, and communication capabilities, that a cloud can use. Resources might be physical (server, storage subsystem, or a network) or a portion of a bigger machine, usually in the form of a logical partition or virtual server. Other resources might provide a level of physical and logical allocation for data sharing. Regardless of the resource, the cloud defines each valid piece of hardware and software that is part of the cloud infrastructure. Although a cloud refers to an entity, it can span one or more instances of segregated or combined resources, depending exclusively on the strategy that the organization requires. The cloud software manages all of the links between hardware and software components and the dynamics of system allocation and release. Any process must pass a sequence of steps defined by some form of orchestrator that understands the differences in service requests and the underlying technologies to issue specific commands and transform resources into a defined service.
� A service is an agreement between users and providers for the delivery of an IT service. A simple example is a backup service, for which there is a Service
Workload Optimized
Service Management
Flexible Delivery Choices
Infrastructure optimized for specific workloads, tasks, or services in ways that deliver orders of magnitude better performance, scale, and efficiency.
Provides visibility, control, and automation across the business and IT infrastructure to accelerate the delivery of high quality services.
New delivery choices characterized by self-service, elastic scaling and rapid provisioning for optimal performance with reduced costs and risk.
Seamless integration of the cloud into the existing IT environment is imperative for success.Process Review
Chapter 1. Introduction to cloud computing 5
Level Agreement (SLA) that combines the service requirements with solutions to meet that specific need. There is usually a process involved to execute and report on the quality of the provided service, and this can relate to billing and to service improvement. A service can range from a simple virtual machine, a test environment, or a full-fledged system integration, facilitating multiple locations and with multiple system components running on a virtual and physical infrastructure. SLA metrics vary depending on the criticality of service, for example, a server might be considered working as designed if there is no downtime. Others might require that a server is up and performing at less than 90% processor and memory capacity to qualify as performing under normal conditions. Each user defines the metrics needed, but usually the combination of those metrics provides the value that represents the score of the service (good or bad). Cloud software can also evaluate the quality of running services and either promote or demote several of them to fit performance goals.
Organizations might consider a cloud as either a new project or a new investment. What is and is not part of the cloud is sometimes blurred when trying to scope its usage. Usually the analogy that the cloud suggests is something intangible, sometimes abstract and sometimes far from immediate needs. Other companies view a cloud as tangible with the actual pieces working together in the IT ecosystem and generating business value and even profit. Regardless of the maturity or needs, cloud computing is a technical solution for better service delivery.
Questions, such as “Is a cloud ready for use?”, “How many clouds are required?” or “What is the benefit of using a cloud, if my business is running without it?” reveal an opportunity to optimize IT. There are some characteristics that cloud computing explores, which are:
� Self-servicing: Self-servicing gives users the ability to request resources as needed, without having to consider capacity or system allocation details. This feature is the most tangible and appealing for end-users because they can request resources at any time, for any purpose, and only pay for the exact amount used. From an IT perspective, self-servicing requirements must be properly configured and set up. This includes using one or more provisioning tools to allocate and manage discrete resources, such as processor, memory, disk space, and network connections, and defining pools of resources to users. The self-servicing portal is one way to present a catalog from which users can select the needed options. Another way is to integrate with internal workflow systems to orchestrate the necessary system allocation steps as a batch operation.
� Elasticity to grow system resources quickly and transparently for customers: Capacity on demand is usually a similar concept for providing system capabilities in flight for the application so that new user requests can always
6 IBM CloudBurst on System x
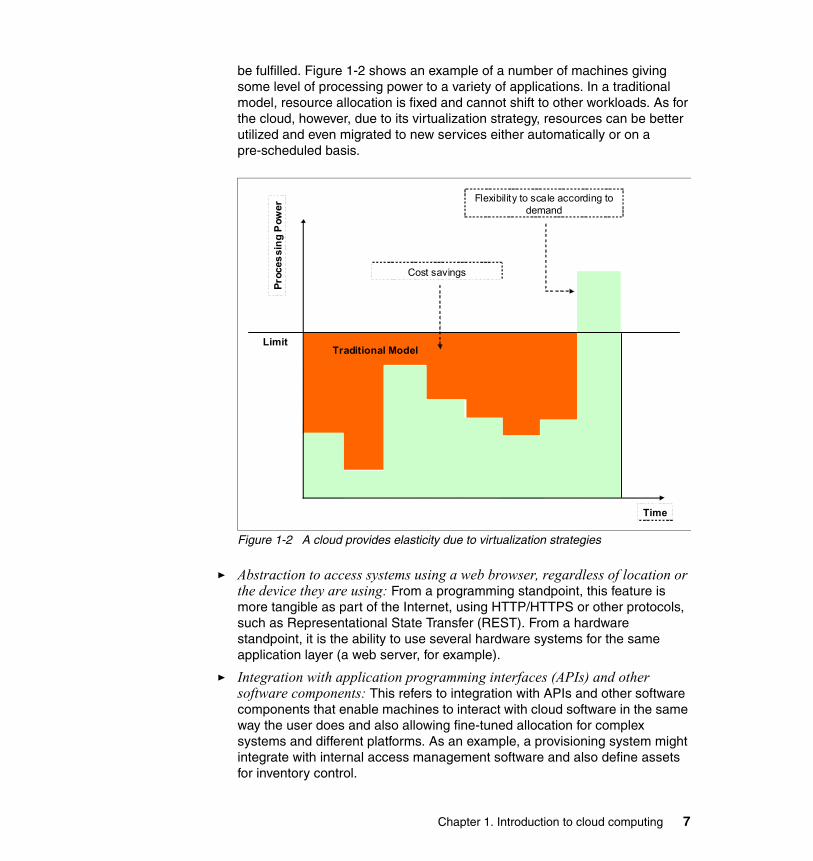
be fulfilled. Figure 1-2 shows an example of a number of machines giving some level of processing power to a variety of applications. In a traditional model, resource allocation is fixed and cannot shift to other workloads. As for the cloud, however, due to its virtualization strategy, resources can be better utilized and even migrated to new services either automatically or on a pre-scheduled basis.
Figure 1-2 A cloud provides elasticity due to virtualization strategies
� Abstraction to access systems using a web browser, regardless of location or the device they are using: From a programming standpoint, this feature is more tangible as part of the Internet, using HTTP/HTTPS or other protocols, such as Representational State Transfer (REST). From a hardware standpoint, it is the ability to use several hardware systems for the same application layer (a web server, for example).
� Integration with application programming interfaces (APIs) and other software components: This refers to integration with APIs and other software components that enable machines to interact with cloud software in the same way the user does and also allowing fine-tuned allocation for complex systems and different platforms. As an example, a provisioning system might integrate with internal access management software and also define assets for inventory control.
Flexibility to scale according to demand
Pro
ces
sin
g P
ower
Time
LimitTraditional Model
Cost savings
Chapter 1. Introduction to cloud computing 7
� Multi-tenancy: Multi-tenancy enables sharing of resources and costs across a large pool of users, thus allowing better optimization of system resources that are not fully allocated and absorbing peak-capacity in one system and balancing with other less-demanding systems. This process also allows for better overall utilization and cost reduction given that multiple systems can share common hardware and avoid multiple servers with low activity.
� Improved availability: Availability is improved when multiple redundant sites are used because this makes well designed cloud computing suitable for business continuity and disaster recovery. This is accomplished by using virtualization, automation, and data protection.
� Centralized management of system resources and better controls: Centralized management of system resources and better controls assists in allocating and distributing user requests over multiple servers with differing service level agreements and cost criteria. This is both a system management and service management approach, which is an improvement over past IT models. The concept is to define responsibilities for a cloud manager to evaluate and propose the best configurations and system resources and to evaluate the service level needs and system performance for continuous operations.
� Charge back: This idea is to measure the service quality (SLA), all available and allocated resources and charge for such system allocation. Certain companies might not charge actual dollars, but they might define an alternate process called show back to demonstrate how much system resources are being consumed by any given department. Depending on the case, it might be sufficient to present this simulation. Other companies actually charge so that users are more aware that cloud computing does require management and does have its own costs.
8 IBM CloudBurst on System x
Looking at mainframe-oriented organizations, it is clear that computing was centralized and consolidated with a variety of service requirements sharing and competing for processor and memory allocations to provide timely output to meet service levels. As part of the technology realm, users access protected areas of the mainframe environment to perform tasks, such as querying databases, adding new customer information and generating lists of goods and managing system activities, such as providing more capacity to new users, upgrading system components, and even charging for some (if not all) resource usage as billed time of the system. All of these examples relate to a secure, complex, and robust infrastructure that can span more than a single machine, perhaps dozens of system components, and still provide performance and system elasticity to accommodate a variety of workloads.
NIST essential characteristics for cloud computing:
“On-demand self-service. A consumer can unilaterally provision computing capabilities, such as server time and network storage, as needed automatically without requiring human interaction with each service's provider.
Broad network access. Capabilities are available over the network and accessed through standard mechanisms that promote use by heterogeneous thin or thick client platforms (mobile phones, computers, and PDAs).
Resource pooling. The provider's computing resources are pooled to serve multiple consumers using a multi-tenant model with different physical and virtual resources dynamically assigned and reassigned according to consumer demand. There is a sense of location independence in that the customer generally has no control or knowledge over the exact location of the provided resources but might be able to specify location at a higher level of abstraction (country, state, or datacenter). Examples of resources include storage, processing, memory, network bandwidth, and virtual machines.
Rapid elasticity. Capabilities can be rapidly and elastically provisioned, in some cases automatically, to quickly scale out and rapidly released to quickly scale in. To the consumer, the capabilities available for provisioning often appear to be unlimited and can be purchased in any quantity at any time.
Measured Service. Cloud systems automatically control and optimize resource use by leveraging a metering capability1 at some level of abstraction appropriate to the type of service (storage, processing, bandwidth, and active user accounts). Resource usage can be monitored, controlled, and reported, providing transparency for both the provider and consumer of the utilized service.”
Chapter 1. Introduction to cloud computing 9
Another non-IT use case worth mentioning is the power grid that connects multiple houses, companies, and public areas in every location of the globe. Unless if you work at the power company or manage a datacenter, you might not need to think about how electricity reaches the kitchen or the living room, how many power lines are available from South Dakota or far away in Brazil, or even if they connect to each other. All that matters is that consumers have electricity, as much as needed, during any season of the year. You might not like the bill, but you use it because it is the standard way of turning on the coffee machine at 6:00 am. All of these common daily processes share the same abstraction, elasticity, and pervasiveness of a cloud infrastructure that IT uses to create, manage, and deliver computer resource to customers.
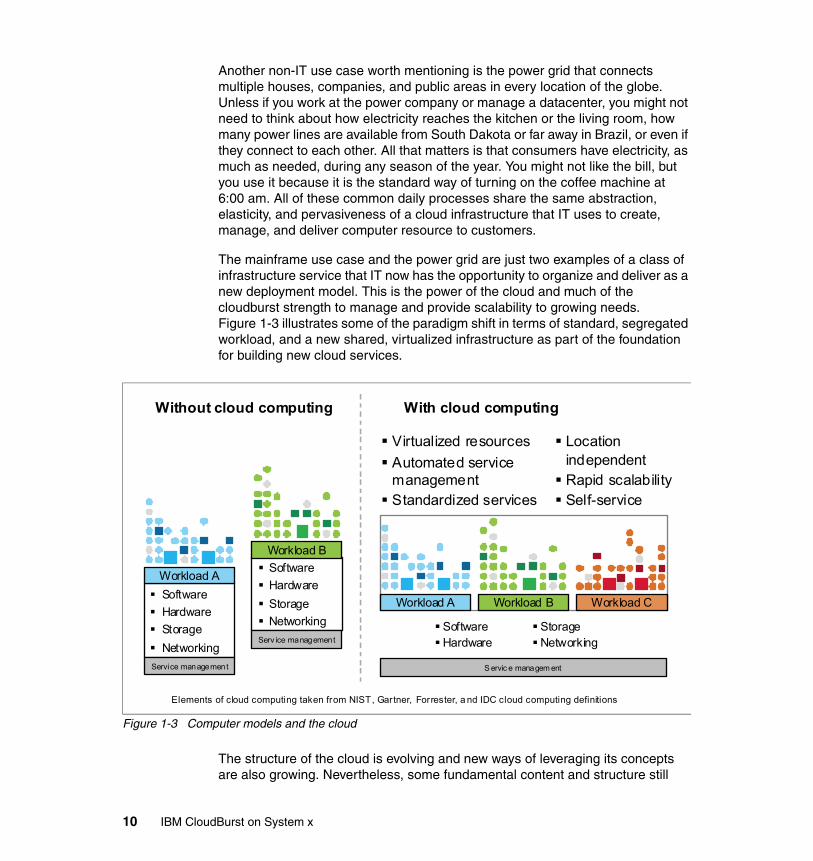
The mainframe use case and the power grid are just two examples of a class of infrastructure service that IT now has the opportunity to organize and deliver as a new deployment model. This is the power of the cloud and much of the cloudburst strength to manage and provide scalability to growing needs. Figure 1-3 illustrates some of the paradigm shift in terms of standard, segregated workload, and a new shared, virtualized infrastructure as part of the foundation for building new cloud services.
Figure 1-3 Computer models and the cloud
The structure of the cloud is evolving and new ways of leveraging its concepts are also growing. Nevertheless, some fundamental content and structure still
With cloud computingWithout cloud computing
Virtualized resources
Automated service management Standardized services
Location independent Rapid scalability Self-service
SoftwareHardware
StorageNetworking
Elements of cloud computing taken from NIST, Gartner, Forrester, a nd IDC cloud computing definitions
Software
Hardware
Storage
Networking
Workload A
Service management
Software
Hardware
Storage
Networking
Workload B
Serv ice management
Workload A Workload B Workload C
S ervic e managem ent
10 IBM CloudBurst on System x
applies, so that the world's behavior can be explained in cloud terms. Although the cloud is changing, some of the principles that are valid include a classic combination of layers that relate to technology, process, and people:
� The technology layer: The technology layer is much of the tangible aspects, such as the hardware resources that a cloud might have (yes, the cloud is physical in the technology sense of the word). There is no need for brand-new or 100% hardware similarity for cloud computing. New hardware is usually desirable, and organizations can certainly benefit from it, but you can always combine and optimize your environment for a variety of workload needs to exploit the full potential of previous investments. The technology realm also encompasses the software components that provide the actual intelligence for the cloud, which includes virtualization engines, orchestration, and capacity management products, working together and paying attention to system optimization and better delivery opportunities. The infrastructure is key to creating a robust cloud. Sometimes organizations tend to simplify the infrastructure step by simply using existing resources without properly understanding the scope and the potential scalability time frame. Sooner or later cloud users start to realize that there is a finite limit to this expansion. This might not be the case for all organizations, but careful attention to planning is a good practice, and walk-through exercises with clients’ internal and external users about the services and the flexibility they need is a good start to capture relevant requirements for cloud success.
� The process layer: The process layer deals with the usage complexity of the technology and presents it in a friendly way to service requestors. This is usually referred as portals and system catalogs that users can order and pick new services as needed. Some catalogs show static and small components or large and big deployment patterns. This strategy also requires careful thinking about the number of users that the cloud can support and the different service levels that IT can offer. There is usually a resource orchestrator that plays an important role during execution of resource allocation and management through the lifecycle of a given resource. Sometimes there is workflow software that implements a sequence of management approvals before the system starts any resource allocations. (This makes sense for organizations that charge for the whole process, and customers must agree on service ratings or SLAs beforehand.) Regardless of the number of management and orchestration complexities, cloud computing forces organizations to think about service processes and not simply IT tasks. This is one of the critical success factors for cloud computing. Without the clear understanding that a service is made up of multiple resources that span multiple IT departments, there is a risk for cloud deployment.
� The people layer: The people layer is the link between technology and processes. As with any complex project, there is a sequence of inception, planning, execution, and completion that requires planning and other
Chapter 1. Introduction to cloud computing 11
considerations. The role of the cloud system administrator is part of this sequence, in which the administrator understands and manipulates business and technical requirements in an orderly and prompt fashion. Some companies prefer to segregate the cloud staff as an independent service group, combining process-oriented human capital and technicians to manage and monitor cloud services. Although there is no one size fits all solution, some level of staff segregation for virtualization and service management makes a lot of sense in practical terms.
A cloud environment requires that administrators and service staff provide the necessary levels of availability and flexibility to end users. Nevertheless, the new deployment model poses new challenges in terms of organizational reporting, system administration, and staffing. In the past, organizations segregated key disciplines, such as operating system, database, networking, and storage, as independent teams, focusing on each separate process. The cloud is a major change in that perspective and thus, it affects the way people think about services as the big picture. Cloud computing proposes that users consume resources and do not have to consider whether there is a hardware limit or software restriction. The idea is to use the available resources. Therefore, what is important is not the process or the network, but, rather, the service.
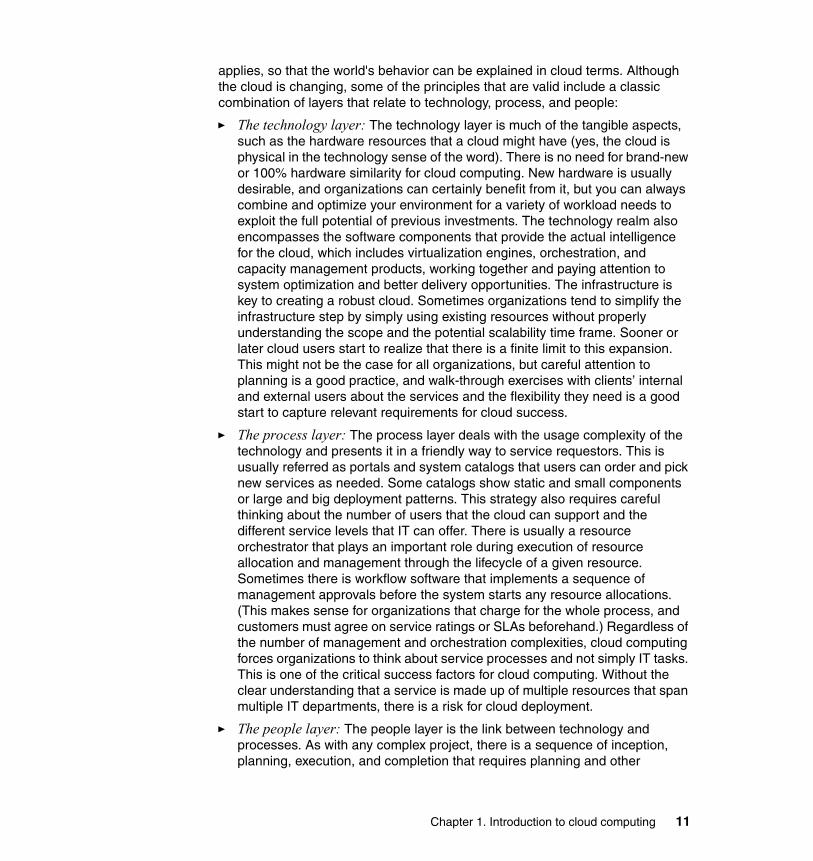
There are lots of workload candidates that can run in a cloud, but that does not mean everything can run in a cloud. Figure 1-4 illustrates these types of workloads and how they fit into the classification of cloud computing.
Figure 1-4 Workloads and cloud eligibility
SensitiveData Highly
customized
Not yet virtualizedThird party SW
Complexprocesses andtransactions
Regulationsensitive
Batchprocessing
Pre-production
systems
Matureworkloads
Isolatedworkloads
InformationIntensive
AnalyticsInfrastructure Storage
Some IndustryApplications
Collaboration
Workplace, Desktopand Devices
Some BusinessProcesses
Developmentand Test
InfrastructureCompute
Collaborative Care
Medical Imaging
Engineering Analytics
Financial Risk Analysis
Energy Management
Readyfor Cloud
May not yet beready
for Cloud ...
12 IBM CloudBurst on System x

A cloud environment is suggested for applications that involve IT management, business, or productivity, development and deployment, capacity (server or storage), and collaboration. There are many reasons why more and more companies are shifting toward IT solutions that include cloud computing:
� First, cloud computing can cut costs associated with delivering IT services. You can reduce both capital and operating costs by obtaining resources only when you need them and by paying only for what you use.
� Second, by offloading some of the burden associated with managing various resources across the enterprise, your key personnel can focus more on producing value and innovation for the business.
� Third, cloud computing models provide for business agility. Given that the entire IT infrastructure can scale up or down to meet demand, businesses can more easily meet the needs of rapidly changing markets to ensure they are always on the leading edge for their consumers.
Moving forward in the use of the cloud, there are new features to make life easier for end users. The term portal usually refers to a central web interface from which authorized users (if not public) can request new services. The service request is what usually determines which user community to expose the cloud to. Even though there is a lot of work behind the scenes, the portals and integration features for servicing is a hot topic for development and cloud acceptance.
Cloud computing is about efficiency to a higher and broader level that organizations had not considered viable because to its natural complexity. To give an example, consider the regular process of installing a server, which involves procurement, physical installation, networking cabling, operating system installation, networking configuration, storage configuration, infrastructure configuration, core packages, and application installation. Taking out the procurement component, the average set up time is hours or even days, depending on the number of packages, operating system interoperability with other products, application set up, and so on. This provisioning exercise suggests that some steps are unnecessarily long and that automation and simplification is key to better service response. Therefore, provisioning is one of the foundational principles for proper, efficient cloud delivery, such that groups of users can request IT services.
Information security plays an important and vital role in cloud computing. Traditional compute resources usually rely on physical network segregation (a separate switch from others, for example), in the form of a logical network (a virtual local area network (VLAN) in the same switch). Several additional variations, such as virtual IO system (VIOS), offer another layer of abstraction, which also opens the discussion about true resource segregation and information security exposure. A list of security requirements usually
Chapter 1. Introduction to cloud computing 13
incorporates proper access control enforcement, integrity, privacy, confidentiality, and availability, all of which govern users and system administrators.
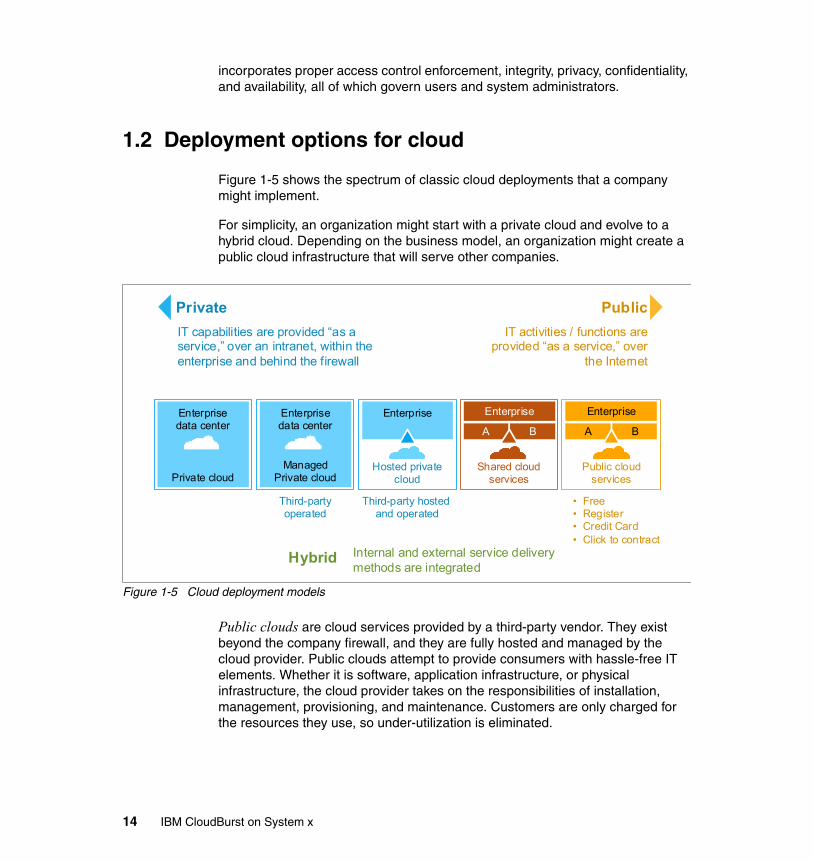
1.2 Deployment options for cloud
Figure 1-5 shows the spectrum of classic cloud deployments that a company might implement.
For simplicity, an organization might start with a private cloud and evolve to a hybrid cloud. Depending on the business model, an organization might create a public cloud infrastructure that will serve other companies.
Figure 1-5 Cloud deployment models
Public clouds are cloud services provided by a third-party vendor. They exist beyond the company firewall, and they are fully hosted and managed by the cloud provider. Public clouds attempt to provide consumers with hassle-free IT elements. Whether it is software, application infrastructure, or physical infrastructure, the cloud provider takes on the responsibilities of installation, management, provisioning, and maintenance. Customers are only charged for the resources they use, so under-utilization is eliminated.
Private
Hybrid
IT capabilities are provided “as a service,” over an intranet, within theenterprise and behind the firewall
Internal and external service delivery methods are integrated
Third-partyoperated
Third-party hosted and operated
Enterprisedata center
Private cloud
Enterprise
Shared cloudservices
Public
IT activities / functions areprovided “as a service,” over
the Internet
• Free• Register• Credit Card• Click to contract
Hosted privatecloud
Enterprisedata center
ManagedPrivate cloud
Enterprise
A B
Public cloudservices
Enterprise
A B
14 IBM CloudBurst on System x
These services are usually delivered with the idea of accommodating the most common use cases. Configuration options are usually a smaller subset of what they can be if the resource were controlled directly by the consumer.
Private clouds are cloud services provided within an enterprise. These clouds exist within the company firewall, and they are managed by the enterprise. Private clouds offer many of the same benefits that public clouds do, with one major difference: the enterprise is in charge of setting up and maintaining the cloud. The difficulty and cost of establishing an internal cloud can sometimes be prohibitive, and the cost of continual operation of the cloud might exceed the cost of using a public cloud.
Private clouds do offer advantages over the public variety. Finer-grained control over the various resources making up the cloud gives a company all available configuration options. In addition, private clouds are ideal when the type of work being done is not practical for a public cloud because of security and regulatory concerns.
Hybrid clouds are a combination of public and private clouds. These clouds are typically created by the enterprise, and management responsibilities can be split between the enterprise and public cloud provider. The hybrid cloud leverages services that are in both the public and private space.
Hybrid clouds are the answer when a company needs to employ the services of both a public and private cloud. In this sense, a company can outline the goals and needs of services, and obtain them from the public or private cloud, as appropriate. A well-constructed hybrid cloud can service secure, mission-critical processes, such as receiving customer payments, as well as those that are secondary to the business, such as employee payroll processing. The major drawback to this cloud is the difficulty in effectively creating and governing such a solution. Services from a variety of sources must be obtained and provisioned as though they originated from a single location, and interactions between private and public components can make the implementation even more complicated.
Chapter 1. Introduction to cloud computing 15
1.3 Delivery models for cloud
In general, a public (external) cloud is an environment that exists outside of a company's firewall. It can be a service offered by a third-party vendor. It can also be referred to as a shared or multi-tenanted, virtualized infrastructure, managed by means of a self-service portal.
A private (internal) cloud reproduces the delivery models of a public cloud and does so behind a firewall for the exclusive benefit of an organization and its customers. The self-service management interface is still in place, and the IT infrastructure resources being collected are internal.
In a hybrid cloud environment, external services are leveraged to extend or supplement an internal cloud.
The delivery models that make up a cloud include:
� Software as a service (SaaS): This layer is perhaps most familiar to web users. The application services layer hosts applications that fit the SaaS model. These are applications that run in a cloud and are provided on demand as services to users. Sometimes the services are provided at no charge, and
NIST Deployment Models for cloud computing:
“Private cloud. The cloud infrastructure is operated solely for an organization. It can be managed by the organization or a third party and might exist on premise or off premise.
Community cloud. The cloud infrastructure is shared by several organizations and supports a specific community that has shared concerns (for example, mission, security requirements, policy, and compliance considerations). It can be managed by the organizations or a third party and might exist on premise or off premise.
Public clouds. The cloud infrastructure is made available to the general public or a large industry group and is owned by an organization selling cloud services.
Hybrid clouds. The cloud infrastructure is a composition of two or more clouds (private, community, or public) that remain unique entities but are bound together by standardized or proprietary technology that enables data and application portability (for example, cloud bursting for load balancing between clouds).”
16 IBM CloudBurst on System x
providers generate revenue from, for example, web ads, and sometimes the application providers generate revenue directly from the use of the service.
Perhaps not quite as apparent to the public is that there are many applications in the application services layer that are directed to the enterprise community. There are hosted software offerings that handle payroll processing, human resource management, collaboration, customer relationship management, IBM Business Partner relationship management, and more.
Applications delivered using the SaaS model benefit consumers by relieving them from installing and maintaining the software, and the applications can be used through licensing models that support pay-for-use concepts.
� Platform as a service (PaaS): This is the layer in which we see application infrastructure emerge as a set of services. This includes, but is not limited to, middleware as a service, messaging as a service, integration as a service, information as a service, connectivity as a service, and so on. The services here are intended to support applications. These applications might be running in the cloud or in a more traditional enterprise data center. To achieve the scalability required within a cloud, the variety of services offered here are often virtualized, for example, by application server virtual images. Platform services enable consumers to ensure that their applications are equipped to meet users’ needs by providing application infrastructure based on demand.
� Infrastructure as a service (IaaS): The bottom layer of the cloud is the infrastructure services layer. Here, we see a set of physical assets, such as servers, network devices, and storage disks that are offered as provisioned services to consumers. The services here support application infrastructure, regardless of whether that infrastructure is being provided using the cloud, and many more consumers. As with platform services, virtualization is a frequently used method for providing the on-demand rationing of the resources.
Infrastructure services address the problem of properly equipping data centers by assuring computing power when needed. In addition, due to the fact that virtualization techniques are commonly employed in this layer, cost savings, brought about by more efficient resource utilization, can be realized.
Chapter 1. Introduction to cloud computing 17
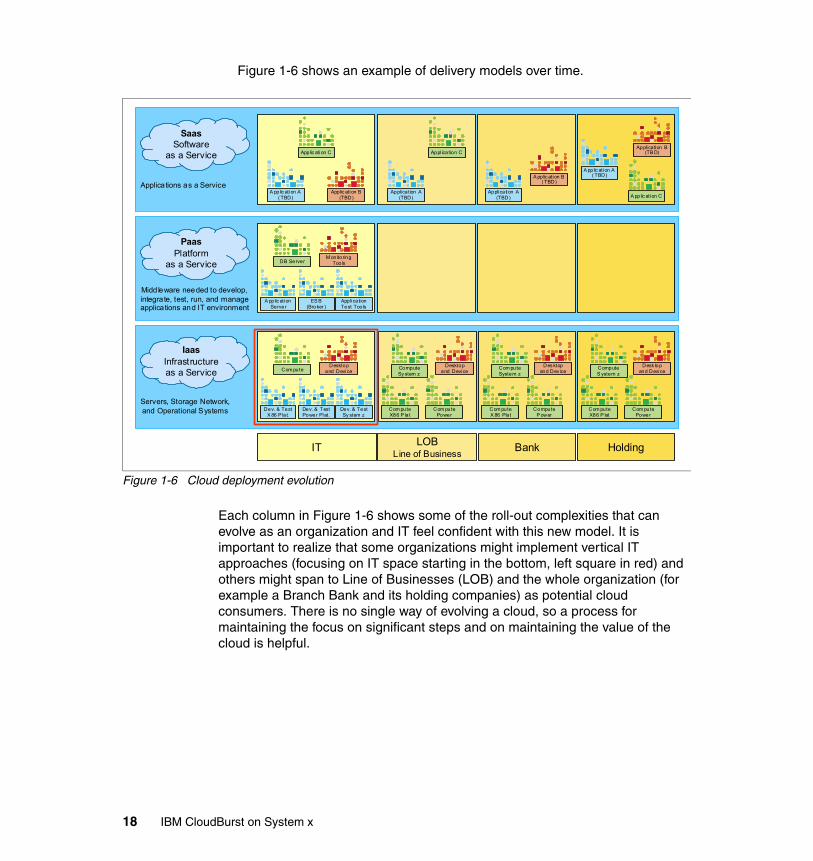
Figure 1-6 shows an example of delivery models over time.
Figure 1-6 Cloud deployment evolution
Each column in Figure 1-6 shows some of the roll-out complexities that can evolve as an organization and IT feel confident with this new model. It is important to realize that some organizations might implement vertical IT approaches (focusing on IT space starting in the bottom, left square in red) and others might span to Line of Businesses (LOB) and the whole organization (for example a Branch Bank and its holding companies) as potential cloud consumers. There is no single way of evolving a cloud, so a process for maintaining the focus on significant steps and on maintaining the value of the cloud is helpful.
Servers, Storage Network,and Operational Systems
Desktopand DeviceCom pute
Dev. & TestX 86 P lat.
Dev. & TestPower Plat.
Dev. & TestSy stem z
Desktopand Device
ComputeSy stem z
Com puteX86 P lat
ComputeP ower
Des ktopand Dev ice
Com puteSystem z
Com puteX 86 Plat
Com putePower
Desk topand Device
ComputeS ystem z
Com puteX86 P lat
IaasInfrastructureas a Service
Com putePower
M onitoringToolsDB Server
A pplic ationServer
ES B(Broker )
ApplicationTest Tools
Midd leware needed to develop,integrate, test, run, and manageapplications and IT environment
PaasPlatform
as a Service
SaasSoftware
as a Service
Applications as a Service
Applic ation C
Applic ation B(TBD)
A pplic ation A( TBD)
Application A(TBD)
Appl ication C
Application A(TBD)
A pplic ation B( TBD)
A pplic ation A( TBD)
A pplic ation C
Application B(TB D)
IT LOBLine of Business
Bank Holding
18 IBM CloudBurst on System x
1.4 Cloud methodology process
Because of the vast complexity within organizations, a process for understanding the core requirements and expediting cloud delivery plays an important role. The CloudBurst technology and processes, combined, make a perfect match for any organization that wishes to invest the right amount of effort in a cloud infrastructure.
A clear plan is necessary for any major project. Cloud computing is no different. Organizations are wise to declare the scope and depth of the cloud initiative early on in the planning phase, so that the expectations are properly outlined. It is also important to identify a process that can drive the project from start to finish. Figure 1-7 on page 20 illustrates a process that can assist in the cloud journey for an organization of any size.
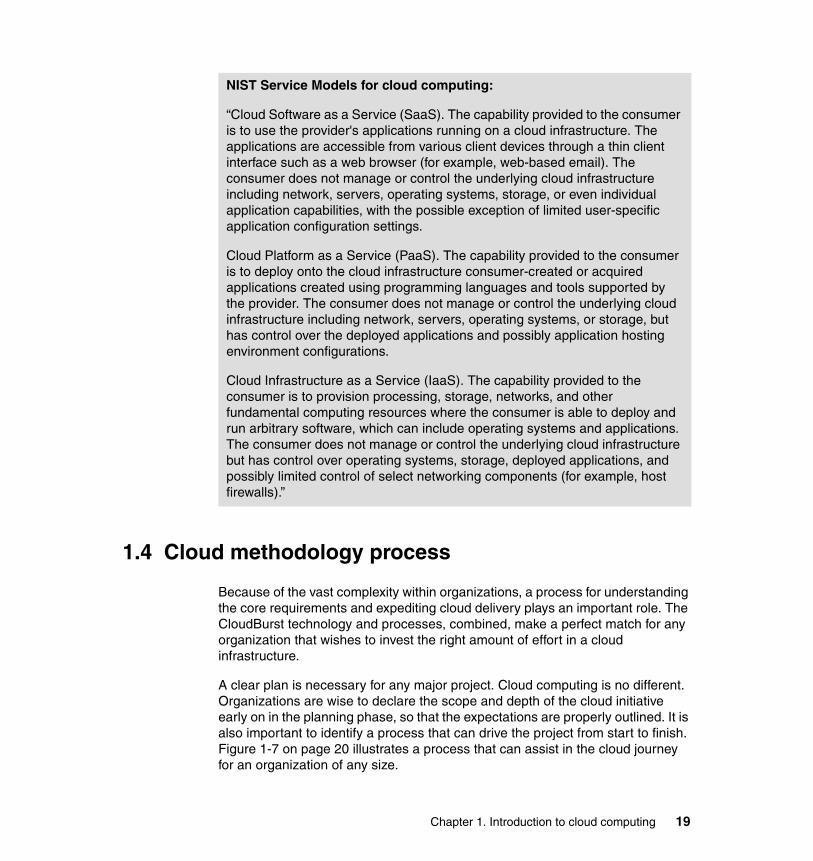
NIST Service Models for cloud computing:
“Cloud Software as a Service (SaaS). The capability provided to the consumer is to use the provider's applications running on a cloud infrastructure. The applications are accessible from various client devices through a thin client interface such as a web browser (for example, web-based email). The consumer does not manage or control the underlying cloud infrastructure including network, servers, operating systems, storage, or even individual application capabilities, with the possible exception of limited user-specific application configuration settings.
Cloud Platform as a Service (PaaS). The capability provided to the consumer is to deploy onto the cloud infrastructure consumer-created or acquired applications created using programming languages and tools supported by the provider. The consumer does not manage or control the underlying cloud infrastructure including network, servers, operating systems, or storage, but has control over the deployed applications and possibly application hosting environment configurations.
Cloud Infrastructure as a Service (IaaS). The capability provided to the consumer is to provision processing, storage, networks, and other fundamental computing resources where the consumer is able to deploy and run arbitrary software, which can include operating systems and applications. The consumer does not manage or control the underlying cloud infrastructure but has control over operating systems, storage, deployed applications, and possibly limited control of select networking components (for example, host firewalls).”
Chapter 1. Introduction to cloud computing 19
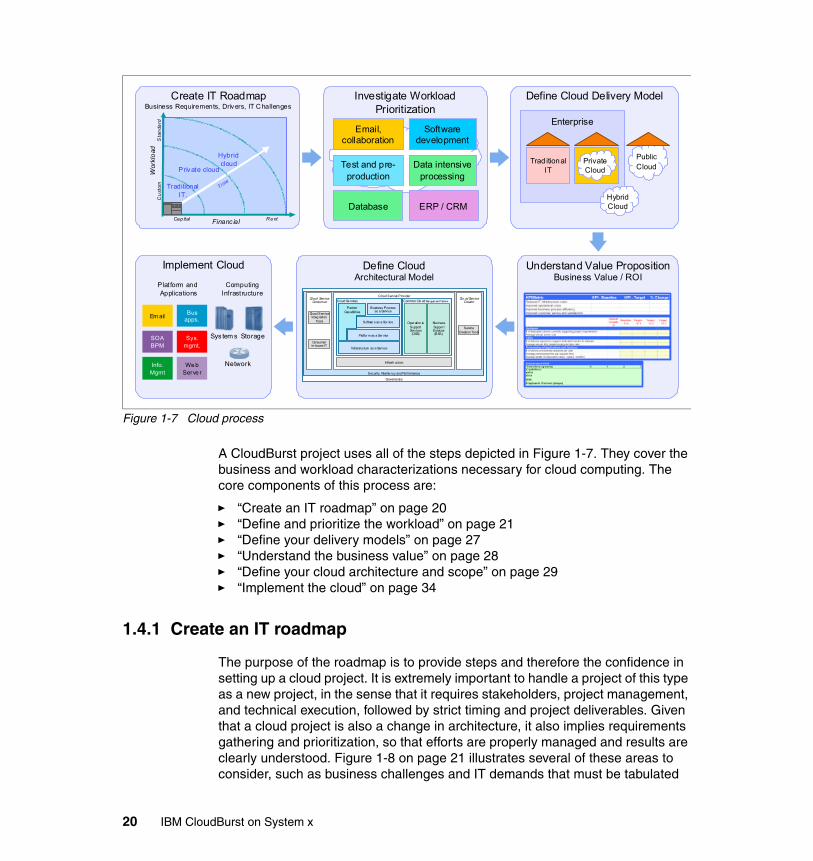
Figure 1-7 Cloud process
A CloudBurst project uses all of the steps depicted in Figure 1-7. They cover the business and workload characterizations necessary for cloud computing. The core components of this process are:
� “Create an IT roadmap” on page 20� “Define and prioritize the workload” on page 21� “Define your delivery models” on page 27� “Understand the business value” on page 28� “Define your cloud architecture and scope” on page 29� “Implement the cloud” on page 34
1.4.1 Create an IT roadmap
The purpose of the roadmap is to provide steps and therefore the confidence in setting up a cloud project. It is extremely important to handle a project of this type as a new project, in the sense that it requires stakeholders, project management, and technical execution, followed by strict timing and project deliverables. Given that a cloud project is also a change in architecture, it also implies requirements gathering and prioritization, so that efforts are properly managed and results are clearly understood. Figure 1-8 on page 21 illustrates several of these areas to consider, such as business challenges and IT demands that must be tabulated
Implement Cloud
Create IT RoadmapBusiness Requirements, Drivers, IT C hallenges
Cap ital
Private cloud
Hybrid cloud
Time
Traditional IT.
RentFinanc ial
Wor
klo
adC
ust
omS
tan
dard
Investigate WorkloadPrioritization
Database ERP / CRM
Email,collaboration
Softwaredevelopment
Test and pre-production
Data intensiveprocessing
Define Cloud Delivery Model
Enterprise
TraditionalIT
PrivateCloud
PublicCloud
HybridCloud
Understand Value PropositionBusiness Value / ROI
Define CloudArchitectural Model
Governa nce
Security, Resilie ncy and Per formance
Cloud ServiceConsum er
Clo ud ServiceCreator
Cloud Service Provider
Common Clo ud Managem en t PlatformCloud Se rvices
Business Processas a Service
Softwar e as a Ser vice
Platfor m as a Ser vice
Infrastructure as a Service
PartnerCap abilities
Oper ation alSupportServices(OSS)
BusinessSuppor tServices(BSS)
Infrastr ucture
ServiceCreation Too ls
ConsumerIn-house IT
Cloud ServiceInteg ration
Tools
ComputingInfrastructure
Plat form and Applications
Em ailBus
apps.
SOABPM
Sys.mgmt.
Info. Mgmt
We b Serve r
Sys tem s Storage
Network
20 IBM CloudBurst on System x

according to multiple workloads, while still combining key IT strategies such as virtualization, consolidation, and automation to implement a successful cloud infrastructure. The business challenges create a sequence of simpler to more complex needs, and the IT demands might expand into multiple requirements, forming a large project scope, encompassing principles and decisions in terms of the cloud deployment model and complexity.
Figure 1-8 Understanding business requirements
What can define a cloud project as more complex is not only the technical challenges and roadmap, but the change in mindset of the persons working with cloud computing. For example, a new process for self-servicing cloud machines might need organizational development, the creation of new roles for proper infrastructure management, or existing departments to cooperate with each other to structure a cloud service offering. This can suggest that new roles and functions might need new processes. Communication is also important to avoid failures and unnecessary delays. As mentioned briefly in 1.1, “What is cloud computing” on page 4, cloud computing is a shift in organizational maturity and in the way we think about architecture.
1.4.2 Define and prioritize the workload
One of the building blocks for cloud computing is understanding the workload (the consumers and the resources) that the infrastructure might need. There are
Storage
Dev/test Desktop
Analytic
CollaborationCompute
...
Cloud Ready
WorkloadsDeployment
OptionsPublic Private
Hybrid
Service Delivery &Management
• Consolidated• Virtualized• Standardized• Automated
G ove rn an ce
Se cu rit y, Re si lien cy a nd Pe rfo rma nc e
Cl ou d S er vi ce
C o ns ume r
C lo ud S erv ic e
Cr ea tor
C lo u d S er vic e Pr ov ide r
C om mon C lo ud Ma na ge men t P la tfor mC lou d Se rv ice s
B u sin es s Pro ce s sas a Se rv ice
S o ftw ar e a s a S er vic e
P la tfo rm a s a S er vic e
In fr as tru ctu re a s a S erv ic e
P ar tn erC a pa bil itie s
O pe ra tio na lSu p por t
S e rv ice s(O S S)
B us in es sS u pp or tS er vi ce s
(B SS )
Inf ras tr uc tur e
Se rv ice
C re ati on To o ls
C on su merIn -h ou se IT
C lo ud S er vic eI nte gr at ion
T oo ls
It Demands
BusinessChallenges
Security/privacy Service quality Funding/Cost Change
• Do more with less• Simplify and Optimize
IT Infrastructure
• Improve service• Improve availability
• Manage risk• Compliance
• Breakthrough agility • Future IT EnterpriseArchitecture
• IT & Bus Alignment
Reduce Time to Market• Innovation• Operations, Competition
• Data, information• Integration / Fusion
• Data center costs
• Customer Integrated View
Chapter 1. Introduction to cloud computing 21
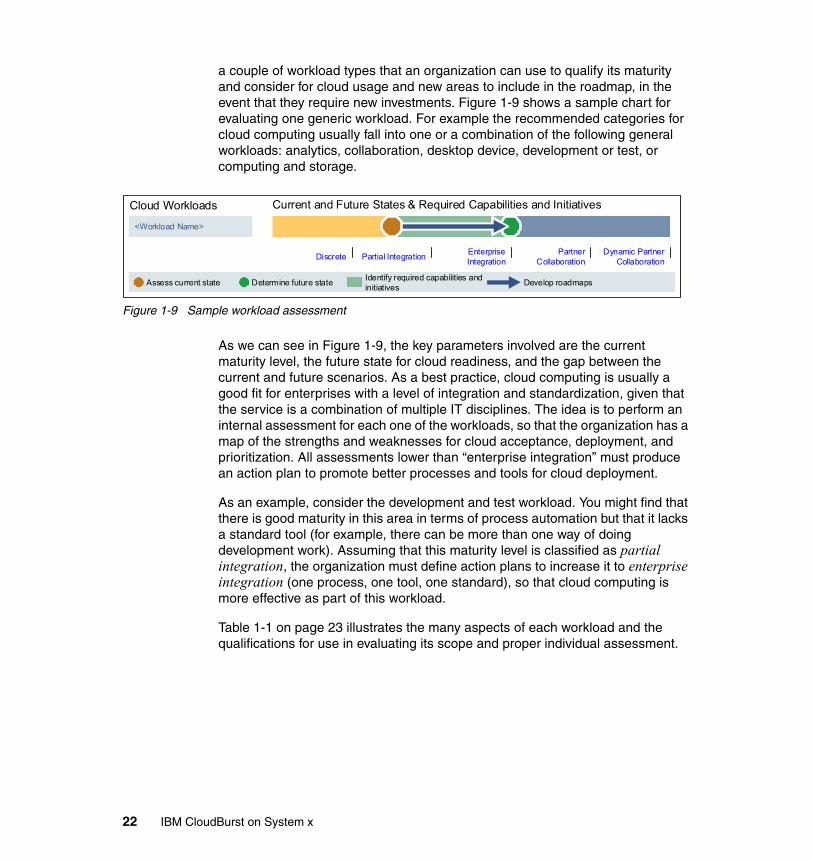
a couple of workload types that an organization can use to qualify its maturity and consider for cloud usage and new areas to include in the roadmap, in the event that they require new investments. Figure 1-9 shows a sample chart for evaluating one generic workload. For example the recommended categories for cloud computing usually fall into one or a combination of the following general workloads: analytics, collaboration, desktop device, development or test, or computing and storage.
Figure 1-9 Sample workload assessment
As we can see in Figure 1-9, the key parameters involved are the current maturity level, the future state for cloud readiness, and the gap between the current and future scenarios. As a best practice, cloud computing is usually a good fit for enterprises with a level of integration and standardization, given that the service is a combination of multiple IT disciplines. The idea is to perform an internal assessment for each one of the workloads, so that the organization has a map of the strengths and weaknesses for cloud acceptance, deployment, and prioritization. All assessments lower than “enterprise integration” must produce an action plan to promote better processes and tools for cloud deployment.
As an example, consider the development and test workload. You might find that there is good maturity in this area in terms of process automation but that it lacks a standard tool (for example, there can be more than one way of doing development work). Assuming that this maturity level is classified as partial integration, the organization must define action plans to increase it to enterprise integration (one process, one tool, one standard), so that cloud computing is more effective as part of this workload.
Table 1-1 on page 23 illustrates the many aspects of each workload and the qualifications for use in evaluating its scope and proper individual assessment.
<Workload Name>
Discrete Partial IntegrationEnterprise Integration
Partner Collaboration
Dynamic Partner Collaboration
Assess current state Determine future stateIdentify required capabilities and initiatives
Develop roadmaps
Cloud Workloads Current and Future States & Required Capabilities and Initiatives
22 IBM CloudBurst on System x
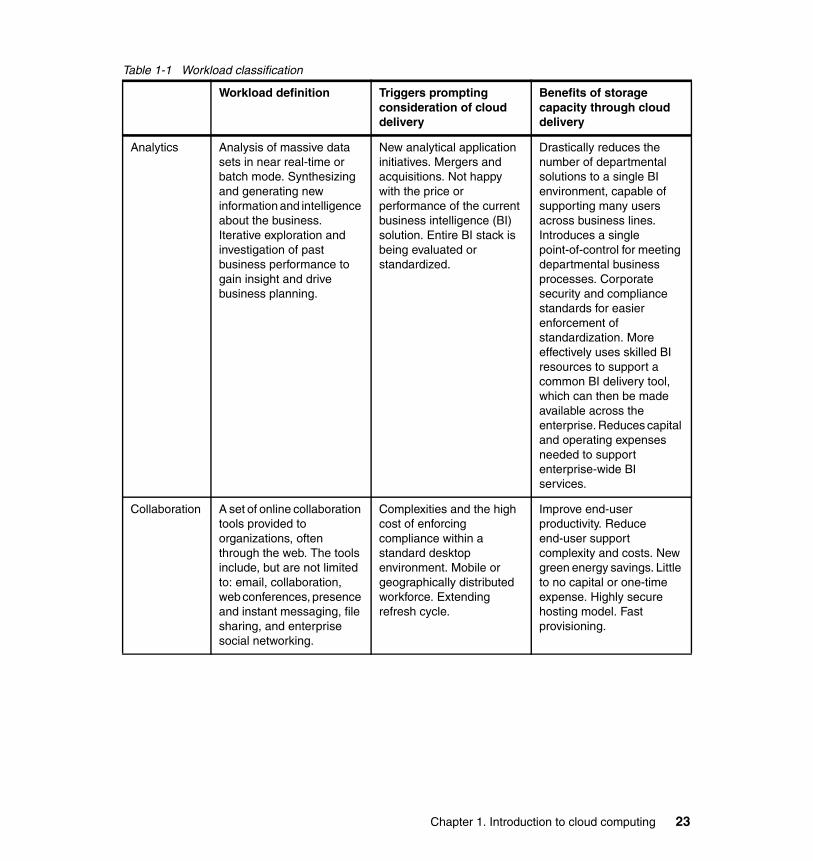
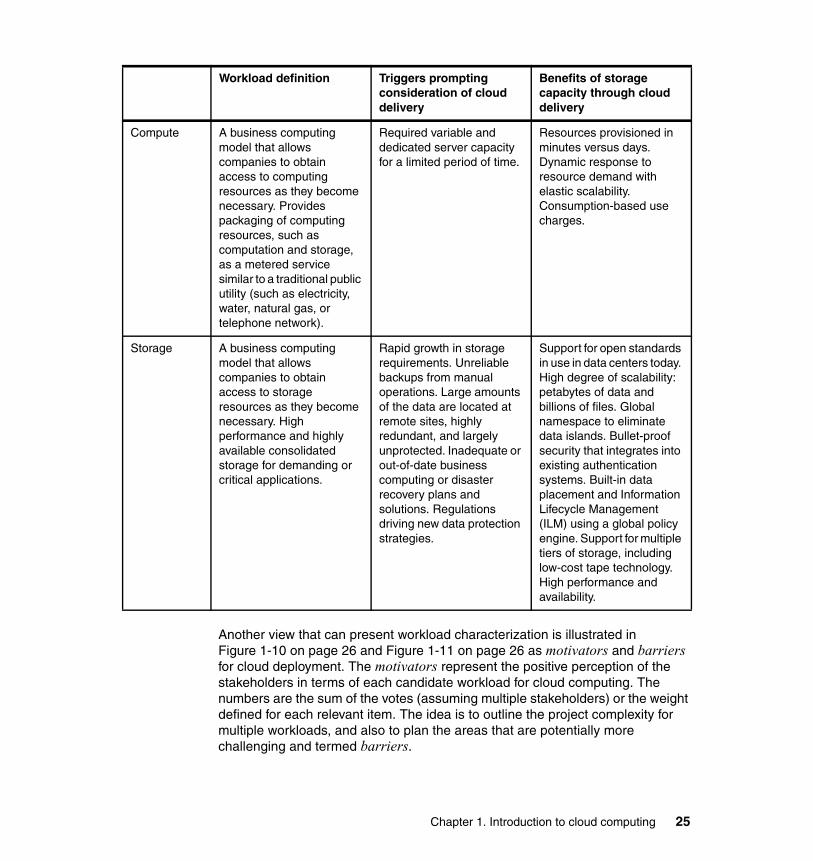
Table 1-1 Workload classification
Workload definition Triggers prompting consideration of cloud delivery
Benefits of storage capacity through cloud delivery
Analytics Analysis of massive data sets in near real-time or batch mode. Synthesizing and generating new information and intelligence about the business. Iterative exploration and investigation of past business performance to gain insight and drive business planning.
New analytical application initiatives. Mergers and acquisitions. Not happy with the price or performance of the current business intelligence (BI) solution. Entire BI stack is being evaluated or standardized.
Drastically reduces the number of departmental solutions to a single BI environment, capable of supporting many users across business lines. Introduces a single point-of-control for meeting departmental business processes. Corporate security and compliance standards for easier enforcement of standardization. More effectively uses skilled BI resources to support a common BI delivery tool, which can then be made available across the enterprise. Reduces capital and operating expenses needed to support enterprise-wide BI services.
Collaboration A set of online collaboration tools provided to organizations, often through the web. The tools include, but are not limited to: email, collaboration, web conferences, presence and instant messaging, file sharing, and enterprise social networking.
Complexities and the high cost of enforcing compliance within a standard desktop environment. Mobile or geographically distributed workforce. Extending refresh cycle.
Improve end-user productivity. Reduce end-user support complexity and costs. New green energy savings. Little to no capital or one-time expense. Highly secure hosting model. Fast provisioning.
Chapter 1. Introduction to cloud computing 23
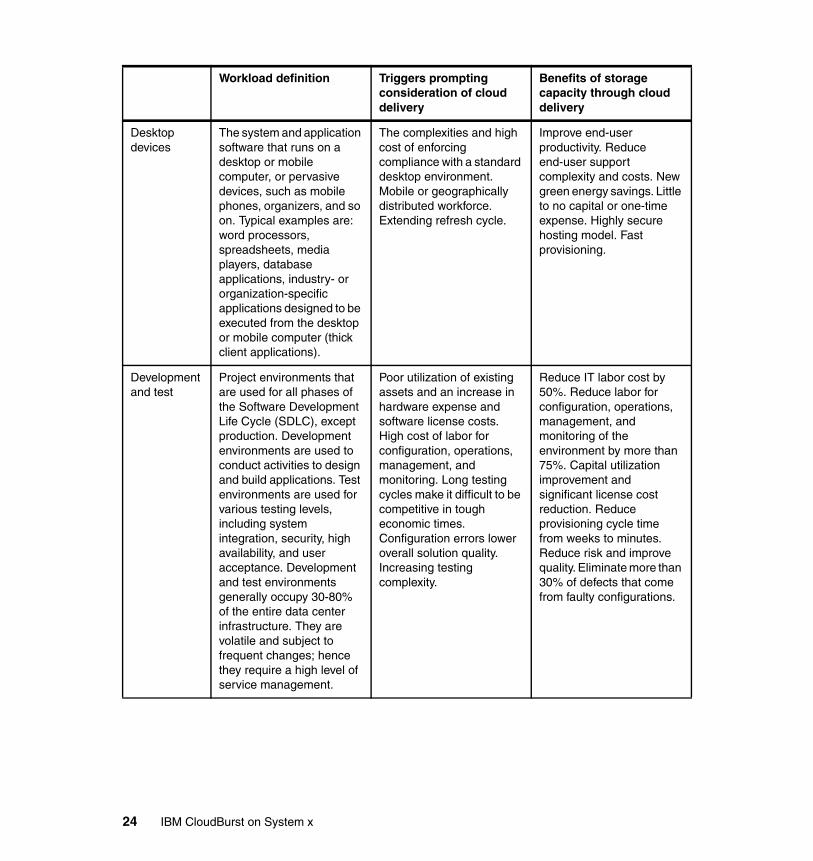
Desktop devices
The system and application software that runs on a desktop or mobile computer, or pervasive devices, such as mobile phones, organizers, and so on. Typical examples are:word processors, spreadsheets, media players, database applications, industry- or organization-specific applications designed to be executed from the desktop or mobile computer (thick client applications).
The complexities and high cost of enforcing compliance with a standard desktop environment. Mobile or geographically distributed workforce. Extending refresh cycle.
Improve end-user productivity. Reduce end-user support complexity and costs. New green energy savings. Little to no capital or one-time expense. Highly secure hosting model. Fast provisioning.
Development and test
Project environments that are used for all phases of the Software Development Life Cycle (SDLC), except production. Development environments are used to conduct activities to design and build applications. Test environments are used for various testing levels, including system integration, security, high availability, and user acceptance. Development and test environments generally occupy 30-80% of the entire data center infrastructure. They are volatile and subject to frequent changes; hence they require a high level of service management.
Poor utilization of existing assets and an increase in hardware expense and software license costs. High cost of labor for configuration, operations, management, and monitoring. Long testing cycles make it difficult to be competitive in tough economic times. Configuration errors lower overall solution quality. Increasing testing complexity.
Reduce IT labor cost by 50%. Reduce labor for configuration, operations, management, and monitoring of the environment by more than 75%. Capital utilization improvement and significant license cost reduction. Reduce provisioning cycle time from weeks to minutes. Reduce risk and improve quality. Eliminate more than 30% of defects that come from faulty configurations.
Workload definition Triggers prompting consideration of cloud delivery
Benefits of storage capacity through cloud delivery
24 IBM CloudBurst on System x
Another view that can present workload characterization is illustrated in Figure 1-10 on page 26 and Figure 1-11 on page 26 as motivators and barriers for cloud deployment. The motivators represent the positive perception of the stakeholders in terms of each candidate workload for cloud computing. The numbers are the sum of the votes (assuming multiple stakeholders) or the weight defined for each relevant item. The idea is to outline the project complexity for multiple workloads, and also to plan the areas that are potentially more challenging and termed barriers.
Compute A business computing model that allows companies to obtain access to computing resources as they become necessary. Provides packaging of computing resources, such as computation and storage, as a metered service similar to a traditional public utility (such as electricity, water, natural gas, or telephone network).
Required variable and dedicated server capacity for a limited period of time.
Resources provisioned in minutes versus days. Dynamic response to resource demand with elastic scalability. Consumption-based use charges.
Storage A business computing model that allows companies to obtain access to storage resources as they become necessary. High performance and highly available consolidated storage for demanding or critical applications.
Rapid growth in storage requirements. Unreliable backups from manual operations. Large amounts of the data are located at remote sites, highly redundant, and largely unprotected. Inadequate or out-of-date business computing or disaster recovery plans and solutions. Regulations driving new data protection strategies.
Support for open standards in use in data centers today. High degree of scalability: petabytes of data and billions of files. Global namespace to eliminate data islands. Bullet-proof security that integrates into existing authentication systems. Built-in data placement and Information Lifecycle Management (ILM) using a global policy engine. Support for multiple tiers of storage, including low-cost tape technology. High performance and availability.
Workload definition Triggers prompting consideration of cloud delivery
Benefits of storage capacity through cloud delivery
Chapter 1. Introduction to cloud computing 25
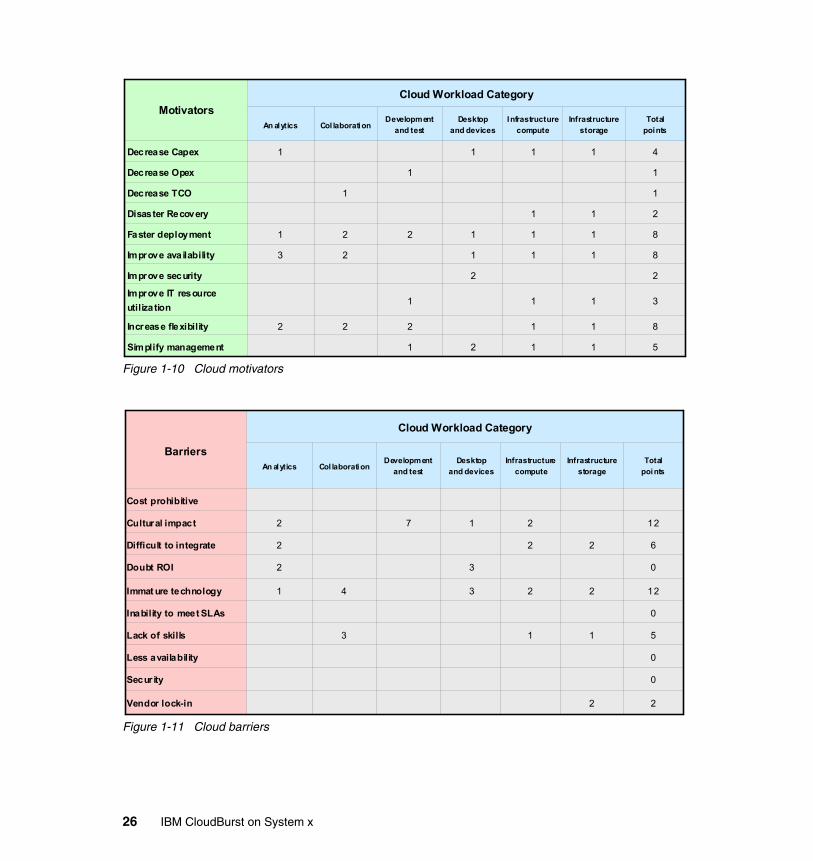
Figure 1-10 Cloud motivators
Figure 1-11 Cloud barriers
Motivators
Cloud Workload Category
An alytics Col laborationDevelopment
and test
Desktop
and devices
Infrastructure
compute
Infrastructure
storage
Total
points
Decrease Capex 1 1 1 1 4
Decrease Opex 1 1
Decrease TCO 1 1
Disaster Recovery 1 1 2
Faster deployment 1 2 2 1 1 1 8
Improve availability 3 2 1 1 1 8
Improve security 2 2
Improve IT resource
utilization1 1 1 3
Increase flexibility 2 2 2 1 1 8
Simplify management 1 2 1 1 5
Barriers
Cloud Workload Category
An alytics Col laborationDevelopment
and test
Desktop
and devices
Infrastructure
compute
Infrastructure
storage
Total
points
Cost prohibitive
Cultural impact 2 7 1 2 12
Difficult to integrate 2 2 2 6
Doubt ROI 2 3 0
Immat ure technology 1 4 3 2 2 12
Inability to meet SLAs 0
Lack of skills 3 1 1 5
Less availability 0
Security 0
Vendor lock-in 2 2
26 IBM CloudBurst on System x

This consolidated table gives the cloud project manager the ability to identify key areas in the project that require preparation. For example, the motivators show that cultural impact and immature technology are two high risks with a total of 12 points in this cloud assessment and, therefore, they are to be carefully anticipated as part of the communication effort in the project. As for the motivators, this example suggests that the business is willing to improve multiple service areas with flexibility and availability, mapped as ratings or 2 or higher in this matrix.
1.4.3 Define your delivery models
The next step in the process is to correlate and plot cloud deployment models with multiple workload types. Each intersection can be represented by three values:
� To be defined: This classification is for areas that do not immediately relate to phased cloud deployment. This does not mean that there will be no cloud evolution, but, rather, that there are higher priority and business needs requiring more focus at the moment.
� Medium priority: This classification is for areas that are important, but are of lower priority for cloud deployment. They are considered in the plan, and occasionally they relate to existing high priority items as dependencies.
� High priority: This classification defines the most critical and relevant areas for cloud computing as per the assessment. Any high-rated cloud workload must clearly define its scope, stakeholders, and product deliverables.
Figure 1-12 on page 28 is an example of an organization that selected a private cloud strategy and the overall priorities for a phase 1 project, by identifying the priority areas for each workload type. Here, the development and test workload is rated higher because of its relative simplicity and deliverable time frame. Some organizations might use one or more deployment models and one of more workload priorities together as part of their project plan.
Chapter 1. Introduction to cloud computing 27
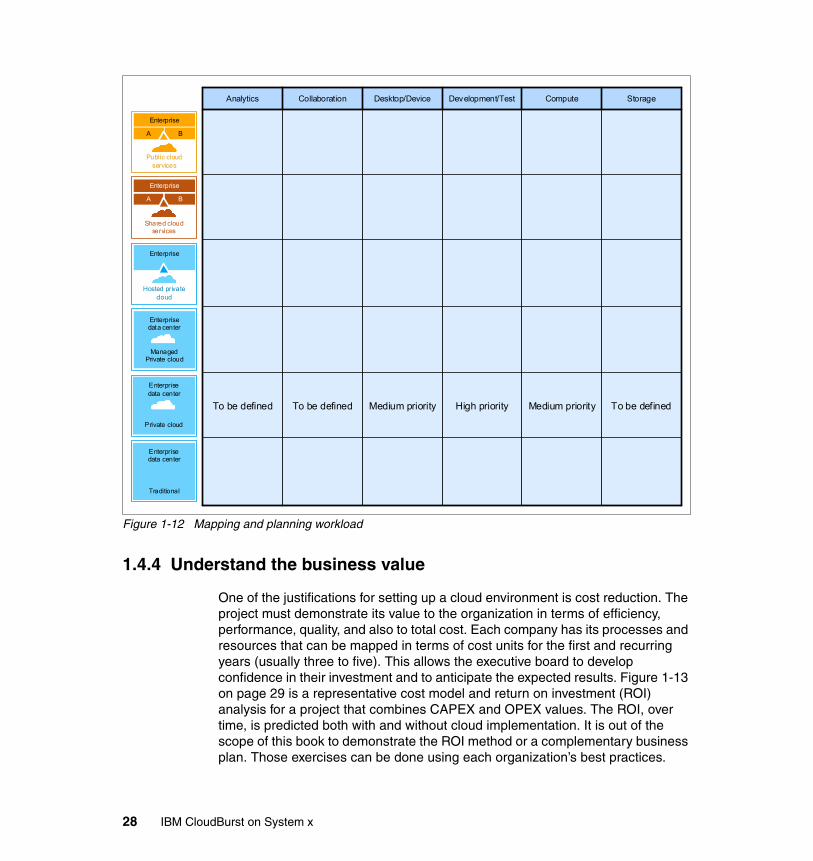
Figure 1-12 Mapping and planning workload
1.4.4 Understand the business value
One of the justifications for setting up a cloud environment is cost reduction. The project must demonstrate its value to the organization in terms of efficiency, performance, quality, and also to total cost. Each company has its processes and resources that can be mapped in terms of cost units for the first and recurring years (usually three to five). This allows the executive board to develop confidence in their investment and to anticipate the expected results. Figure 1-13 on page 29 is a representative cost model and return on investment (ROI) analysis for a project that combines CAPEX and OPEX values. The ROI, over time, is predicted both with and without cloud implementation. It is out of the scope of this book to demonstrate the ROI method or a complementary business plan. Those exercises can be done using each organization’s best practices.
To be definedMedium priorityHigh priorityMedium priorityTo be definedTo be defined
StorageComputeDevelopment/TestDesktop/DeviceCollaborationAnalytics
Enterprisedata center
Private cloud
Enterprisedata center
ManagedPrivate cloud
Enterprise
Hosted privatecloud
Shared cloudservices
Enterprise
A B
Public cloudservices
Enterprise
A B
Enterprisedata center
Traditional
28 IBM CloudBurst on System x

Figure 1-13 Sample cost model for cloud
1.4.5 Define your cloud architecture and scope
Architecting the cloud is also a challenge that requires a framework for consolidating the aspects of multiple disciplines, users, stakeholders, and tools. The principles for good IT governance rely on sound architecture planning and modeling. The cloud reference architecture allows a standards-based approach to cloud modeling, which is suitable for complex organizations. Nevertheless, it is a good practice to exercise cloud requirements and priorities accordingly, even for small deployments. As an example, the architecture scope typically includes a list of the following key concepts:
� Principles: These are the fundamental architecture ideas that the project is to honor. It can include statements for availability, data protection, and both internal and external regulatory compliance. These statements are intended
Year 1 Saving by Category
Sys. Admin. Cost42%Provisioning
Cost22%
Testing Productivity
25%
Hardware 10%
Software 1%
6.82 $302,958.33$935,880.13
308.91%102.97%
Payback Period (months)
Net Present Value (NPV) Total Initial Investment for Test Cloud
Estimated ROI over 3 yearsEstimated avg. annual ROI
ROI analysis example - Banking (medium # of servers)
= Service Management driven savings
Cumulative Cost Comparison -- With and without Cloud
$0.00
$500,000.00
$1,000,000.00
$1,500,000.00
$2,000,000.00
$2,500,000.00
$3,000,000.00
$3,500,000.00
$4,000,000.00
$4,500,000.00
$5,000,000.00
TransformationPoint
Year-1 Year-2 Year-3
Cum
ulat
ive
Expe
nses
Current IT Model Accumulated Costs Test Cloud Model Accumulated Costs
ROI projections from IBM Research Study 2009
12.18 $294,583.33$669,678.84
227.33%75.78%
Estimated ROI over 3 years
Estimated avg. annual ROI
Payback Period (months)
Net Present Value (NPV)
Total Initial Investment for Test Cloud
Year 1 Saving by Category
Testing Productivity
34%
Sys. Admin. 32%
Software -1%
Hardware 29%
Provisioning 4%
ROI analysis example - Manufacturing (SO account - small)
= Service Management driven savings
ROI projections from IBM Research Study 2009
Cumulative Cost Comparison -- With and without Cloud
$0.00
$200,000.00
$400,000.00
$600,000.00
$800,000.00
$1,000,000.00
$1,200,000.00
$1,400,000.00
$1,600,000.00
$1,800,000.00
$2,000,000.00
Transformation
Point
Year-1 Year-2 Year-3
Cum
ulat
ive
Expe
nses
Current IT Model Accumulated Costs Test Cloud Model Accumulated Costs
Year 1 Savings by Category
Provisioning Cost38%
Sys. Admin. Cost40%
Software -3%
Testing Productivity
4%Hardware
15%
4.85 $1,313,958.33$6,172,325.64
469.75%156.58%
Estimated ROI over 3 yearsEstimated avg. annual ROI
Payback Period (months)
Net Present Value (NPV) Total Initial Investment for Test Cloud
ROI analysis example- Banking (large # of servers)
= Service Management driven savings
Cumulative Cost Comparison -- With and without Cloud
$0.00
$5,000,000.00
$10,000,000.00
$15,000,000.00
$20,000,000.00
$25,000,000.00
$30,000,000.00
Transformation
Point
Year-1 Year-2 Year-3
Cum
ulat
ive
Expe
nses
Current IT Model Accumulated Costs Test Cloud Model Accumulated Costs
ROI projections from IBM Research Study 2009
Chapter 1. Introduction to cloud computing 29

to have a defined scope, and occasionally an out-of-scope declaration, to confirm that the project will adhere to the right principles.
� Requirements: What makes good requirements is usually a combination of specific stakeholders’ needs, properly captured in an orderly fashion, with conflicting ideas between them and achievable time frames estimated. The role of the architect is to address these concerns, by identifying and refining the stakeholders’ requirements, developing views of the architecture that show how the concerns and the requirements are going to be addressed, and by showing the trade-offs that are going to be made in reconciling the potentially conflicting concerns among the stakeholders.
IBM CloudBurst is a key technology that implements many of the IT functions illustrated in Figure 1-14 on page 31, which are part of the cloud architecture model. There are three major roles: consumer, provider, and creator:
� Consumer: The Cloud Service Consumer represents the users, groups, and communities that want a service with a form of automation and transparency. The consumers can be actual users or system administrators that act on behalf of users to define and create services.
� Provider: The Cloud Service Provider is any organization that wants to implement such a model. There are a lot of details that include services, management platform, infrastructure, security, and governance inside the model, with additional specifications, tools, and processes, such as the Information Technology Infrastructure Library (ITIL). A service provider is a business organization with a cloud infrastructure or a third-party entity that manages and charges for this type of service. Regardless of the business model, there must be one or more system providers to manage the cloud and ensure that it keeps running as a traditional application. In case there are problems with the cloud infrastructure, the resiliency and high availability controls of the cloud can take over and ensure that there is no service interruption. Fully-staffed, 24x7 provider coverage might be necessary to manage and meet SLA requirements for cloud services if there are mission-critical applications running. It is also important to test and validate
What is an architecture framework?
The Open Group Architecture Framework (TOGAF): “An architecture framework is a foundational structure, or set of structures, which can be used for developing a broad range of different architectures. It should describe a method for designing a target state of the enterprise in terms of a set of building blocks, and for showing how the building blocks fit together. It should contain a set of tools and provide a common vocabulary. It should also include a list of recommended standards and compliant products that can be used to implement the building blocks.”
30 IBM CloudBurst on System x

disaster recovery processes and business continuity, in case anything goes awry with the cloud provider.
� Creator: The Cloud Service Creator consolidates multiple cloud services and promotes the service, selling, and structure. This is a new role in which the service is defined and sold to multiple consumers, even if it is internal for one organization. The benefit of this approach is that the quality of service and its survival depends solely upon the ability of the cloud model to provide a business value, either by a justified ROI or strategic business market share. Part of such value needs communication, selling, and acceptance by internal users, who might not be aware of the solutions at their disposal.
Figure 1-14 Sample framework for cloud
The deeper the framework is planned and discussed, the more confident and structured the cloud infrastructure and services will work. Figure 1-15 on page 32, Figure 1-16 on page 33 and Figure 1-17 on page 34 present some of the details that each layer might have to support a robust cloud infrastructure.
The cloud management roles show multiple ITIL disciplines segregated as Operational Support Services (OSS) and Business Support Services (BSS). Refer to Figure 1-15 on page 32. Their purpose is to define the relationship for cloud and standard frameworks that many organizations already have in place, but sometimes lack the cloud awareness. Therefore, it is not the purpose of this framework to replace existing ITIL processes, but to complement its ability with
Governance
Security, Resiliency and Performance
Cloud ServiceConsumer
Cloud ServiceCreator
Cloud Service Provider
Common Cloud Management PlatformCloud Services
Business Processas a Service
Software as a Service
Platform as a Service
Infrastructure as a Service
PartnerCapabilities
OperationalSupportServices(OSS)
BusinessSupportServices(BSS)
Infrastructure
ConsumerIn-house IT
Cloud ServiceIntegration
Tools
ServiceCreation
Tools
ITIL V3 ITIL V3
Servers Storage Virtualization Storage
vmware Windows
Cloud ComputingSelected Workloadsand Service Catalog
Basic TechnologyComponents for Cloud IT Infrastructure Foundation Security Standards
Cloud Services Management
based on ITIL V3best practices
Chapter 1. Introduction to cloud computing 31
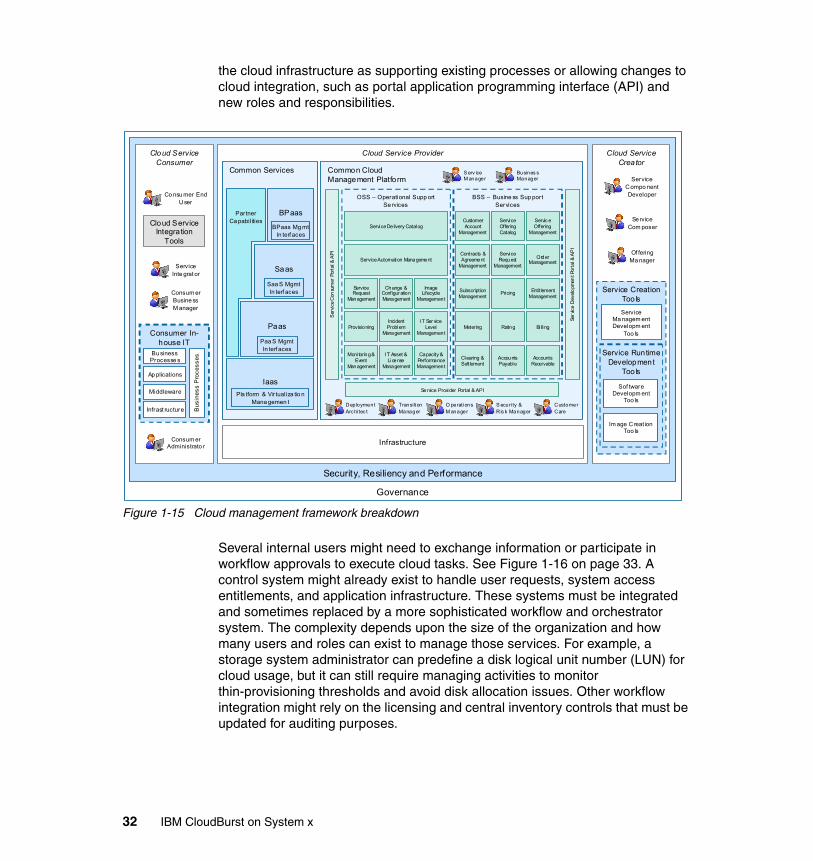
the cloud infrastructure as supporting existing processes or allowing changes to cloud integration, such as portal application programming interface (API) and new roles and responsibilities.
Figure 1-15 Cloud management framework breakdown
Several internal users might need to exchange information or participate in workflow approvals to execute cloud tasks. See Figure 1-16 on page 33. A control system might already exist to handle user requests, system access entitlements, and application infrastructure. These systems must be integrated and sometimes replaced by a more sophisticated workflow and orchestrator system. The complexity depends upon the size of the organization and how many users and roles can exist to manage those services. For example, a storage system administrator can predefine a disk logical unit number (LUN) for cloud usage, but it can still require managing activities to monitor thin-provisioning thresholds and avoid disk allocation issues. Other workflow integration might rely on the licensing and central inventory controls that must be updated for auditing purposes.
Governance
Security, Resiliency and Performance
Cloud ServiceCreator
ServiceCompo nentDeveloper
Se rviceCom poser
Of feringMa nager
Cloud Service Provider
Common CloudManagement Platform
Common Services
BPaas
Saas
Paas
Iaas
BPaas Mg mtIn terf aces
Saa S MgmtIn terf aces
Paa S MgmtIn terf aces
Pla tform & Virtualiza tio nMana gemen t
PartnerCa pabilities
Ser
vice
Con
sum
er P
orta
l & A
PI
Serv
ice
Dev
elo
pmen
t Por
tal &
AP
I
Service Provider Portal & API
S erv iceM anager
Busines sManager
DeploymentArc hi tec t
Transi tionManager
O perationsM anager
S ecuri ty &Ris k Manager
CustomerCare
ServiceRequest
Management
Change &Configur ationManagement
ImageLifecycle
Management
ProvisioningIncidentProblem
Management
IT Ser viceLevel
Management
Moni toring &Event
Management
IT Asset &License
Management
Capacity &PerformanceManagement
Service Automation Management
Service Delivery Catalog
OSS – Operational Supp ortSe rvices
Clearing &Settlement
AccountsPayable
AccountsReceivable
Metering Rating Bi lling
SubscriptionManagement
Pricing EntitlementManagement
Contracts &Agreement
Management
ServiceRequest
Management
OrderManagement
CustomerAccount
Management
ServiceOfferingCatalog
Servic eOffering
Management
BSS – Busine ss Sup portServices
Service CreationTools
ServiceMa nagem entDevelopm ent
Too ls
Service RuntimeDevelopment
Tools
Sof twareDevelopm ent
Too ls
Im age Creat ionToo ls
Infrastructure
Cloud ServiceConsumer
Cloud ServiceIntegration
Tools
Co nsu mer EndUser
ServiceInte grat or
Consum erBusine ssM anager
Consumer In-house IT
Infrast ructure
Middleware
Ap plications
Bu sinessProcesse s
Bu
sin
es
s P
roc
es
se
s
Consum erAdministrato r
32 IBM CloudBurst on System x
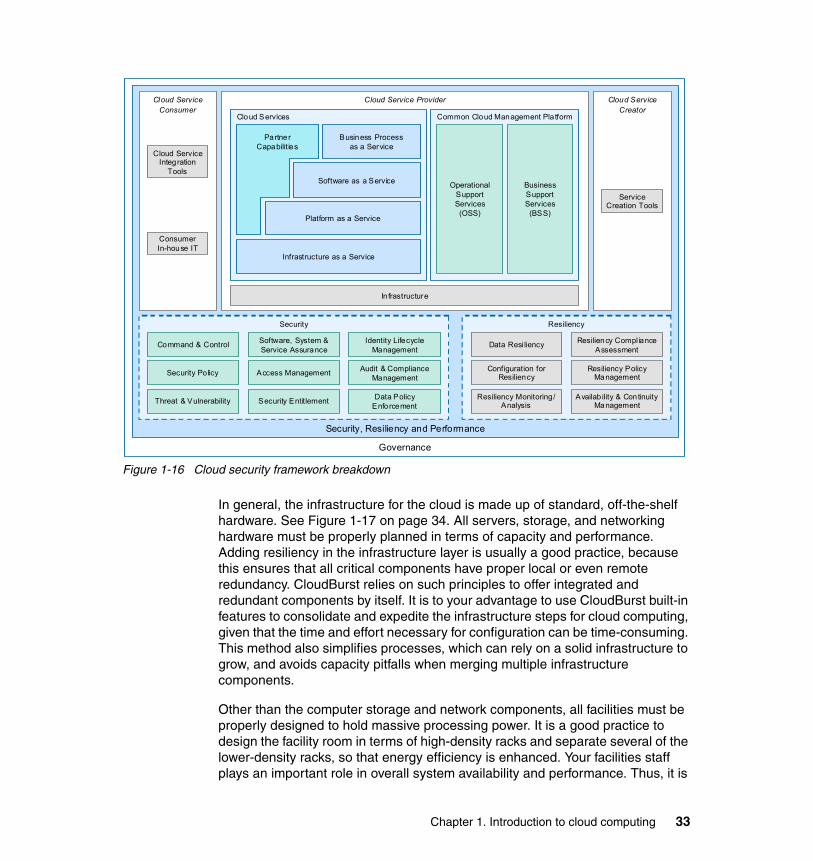
Figure 1-16 Cloud security framework breakdown
In general, the infrastructure for the cloud is made up of standard, off-the-shelf hardware. See Figure 1-17 on page 34. All servers, storage, and networking hardware must be properly planned in terms of capacity and performance. Adding resiliency in the infrastructure layer is usually a good practice, because this ensures that all critical components have proper local or even remote redundancy. CloudBurst relies on such principles to offer integrated and redundant components by itself. It is to your advantage to use CloudBurst built-in features to consolidate and expedite the infrastructure steps for cloud computing, given that the time and effort necessary for configuration can be time-consuming. This method also simplifies processes, which can rely on a solid infrastructure to grow, and avoids capacity pitfalls when merging multiple infrastructure components.
Other than the computer storage and network components, all facilities must be properly designed to hold massive processing power. It is a good practice to design the facility room in terms of high-density racks and separate several of the lower-density racks, so that energy efficiency is enhanced. Your facilities staff plays an important role in overall system availability and performance. Thus, it is
Governance
Security, Resiliency and Performance
ResiliencySecurity
Cloud ServiceConsumer
Cloud ServiceCreator
Cloud Service Provider
Common Cloud Management PlatformCloud Services
Business Processas a Service
Software as a Service
Platform as a Service
Infrastructure as a Service
PartnerCapabilities
OperationalSupportServices(OSS)
BusinessSupportServices
(BSS)
Infrastructure
ServiceCreation Tools
ConsumerIn-house IT
Cloud ServiceIntegration
Tools
Data Resi liency
Configuration forResiliency
Resiliency Monitoring/Analysis
Resiliency Compl ianceAssessment
Resiliency PolicyManagement
Availab ility & ContinuityManagement
Identity LifecycleManagement
Audit & ComplianceManagement
Data PolicyEnforcement
Software, System &Service Assurance
Access Management
Security Entitlement
Command & Control
Security Policy
Threat & Vulnerability
Chapter 1. Introduction to cloud computing 33
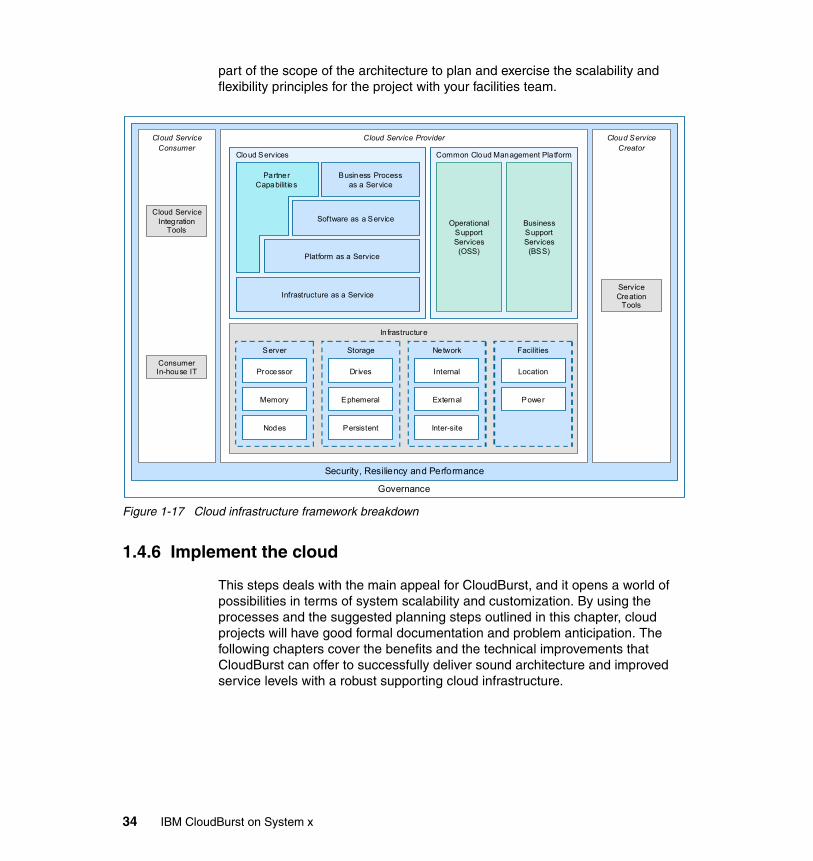
part of the scope of the architecture to plan and exercise the scalability and flexibility principles for the project with your facilities team.
Figure 1-17 Cloud infrastructure framework breakdown
1.4.6 Implement the cloud
This steps deals with the main appeal for CloudBurst, and it opens a world of possibilities in terms of system scalability and customization. By using the processes and the suggested planning steps outlined in this chapter, cloud projects will have good formal documentation and problem anticipation. The following chapters cover the benefits and the technical improvements that CloudBurst can offer to successfully deliver sound architecture and improved service levels with a robust supporting cloud infrastructure.
Governance
Security, Resiliency and Performance
Cloud ServiceConsumer
Cloud ServiceCreator
Cloud Service Provider
Common Cloud Management PlatformCloud Services
Business Processas a Service
Software as a Service
Platform as a Service
Infrastructure as a Service
PartnerCapabilities
OperationalSupportServices(OSS)
BusinessSupportServices
(BSS)
Infrastructure
ConsumerIn-house IT
Cloud ServiceIntegration
Tools
ServiceCreation
Tools
Server
Processor
Memory
Nodes
Storage Network Facilities
Dr ives
Ephemeral
Persistent
Internal
External
Inter-site
Location
Power
34 IBM CloudBurst on System x
Part 2 IBM CloudBurst on System x
In this part, we describe IBM CloudBurst on System x hardware and software components. We then describe some of the tasks that can be performed after the CloudBurst on System x solution is installed in the customer environment. We conclude with a detailed migration scenario that covers migrating IBM Service Delivery Manager V7.2.1 (a component of IBM CloudBurst V2.1 for System x to IBM Service Delivery Manager V7.2.2.
Part 2
© Copyright IBM Corp. 2012. All rights reserved. 35

36 IBM CloudBurst on System x
Chapter 2. CloudBurst hardware
This chapter presents a brief overview of the IBM CloudBurst on System x hardware and describes the small, medium, large, and extra large configuration options that are available with a CloudBurst solution. We discuss:
� 2.2, “CloudBurst hardware overview” on page 38 � 2.3, “CloudBurst configuration models” on page 41 � 2.4, “CloudBurst storage options” on page 51 � 2.5, “CloudBurst networks” on page 52
2
© Copyright IBM Corp. 2012. All rights reserved. 37
2.1 Introduction
IBM CloudBurst is a prepackaged and self-contained service delivery platform that can be easily and quickly implemented in a data center environment. It combines the necessary hardware, software, and services components to rapidly implement cloud computing. IBM CloudBurst on System x is built on an IBM BladeCenter platform. It provides preinstalled capabilities essential to a cloud model including:
� Fully integrated hardware and software platform with networking and storage for fast rollout
� A self-service portal interface for reservation of computing, storage, and networking resources, including virtualized resources
� Automated provisioning and de-provisioning of resources
� Prepackaged automation templates and workflows for most common resource types, such as VMware virtual machines
� Service management for cloud computing
� Real time monitoring
� Backup and recovery
� Integrated usage and accounting chargeback to track and optimize system usage
� Facility administrators with energy monitoring and management to optimize energy consumption for higher efficiency
� Supports ability to manager other heterogeneous resources outside the IBM CloudBurst environment
IBM CloudBurst on System x includes Global Technology Services (GTS) implementation services which can help ensure that a complete package of hardware and software is operational right away in your environment.
2.2 CloudBurst hardware overview
The basic hardware components and models that make up an IBM CloudBurst for System x 2.1 configuration are described in this section.
38 IBM CloudBurst on System x
2.2.1 Basic hardware configuration
These components are part of each CloudBurst 2.1 configuration. The quantities vary between configurations:
� One 42U rack
� One System x BladeCenter chassis
� One HS22V Management Blade for IBM CloudBurst Tivoli software stack VMs
� Three managed HS22V Virtualization Blades for provisioned virtual machines
� Redundant 8 Gb Fibre Channel (FC) network - Brocade switch modules
� Redundant 10 Gb Ethernet network - BNT® switch modules
� Redundant 1 Gb Ethernet management network - SMC 8126L2
� One system storage DS3524 dual controller
� Twenty four 300 GB SAS drives
� 1 x3550 M3 Management Server
2.2.2 IBM HS22V Blade Servers
In a CloudBurst 2.1 installation, one Management Blade Server running VMware ESXi 4.1 runs the following Tivoli Provisioning software:
� Tivoli Service Automation Manager (TSAM)� Network File System (NFS)� IBM Tivoli Monitoring (ITM)� Tivoli Usage and Accounting Manager (TUAM)
In a high availability (HA) environment, a second Blade Server is dedicated for backup and recovery.
There are two to 55 additional HS22V Blade Servers (depending on CloudBurst configuration size) that run the provisioned virtual machines.
Each Blade Server includes two 6 Core 2.8 Ghz processors, 72 GB RAM, a two-port 10 Gb Ethernet daughter card, and a two-port 8 Gbps Fibre Channel daughter card. The system runs from an embedded VMware hypervisor and requires no hard disk drives:
� Dual 6 Core Intel Xeon 2.8 GHz, 12 MB L2 cache, 95W� 72 GB memory - 18x 4 GB DDR3 1066 MHz� Hard disk drive - diskless� VMware ESXi Hypervisor on embedded USB key
Chapter 2. CloudBurst hardware 39
� Integrated 2-port Broadcom 5790S 1 GbE controller� CCFh - 2-port Broadcom Gen2 2-Port 10 Gb Ethernet� CIOv - 2-port Qlogic 8 Gb Fibre Channel
2.2.3 IBM System x3550 M3 Management Server
There is one x3550 M3 Management Server per CloudBurst 2.1 installation. The Management Server runs IBM Director for hardware discovery and provides hardware management for the CloudBurst installation.
The Management Server includes two quad core 2.4 Ghz processors, 24 GB of RAM, a ServeRAID M5015 RAID Controller with four 300 GB hard drives configured as two RAID 1 configurations. There are four 1 GbE ports and two 8 Gbps Fibre Channel ports. The system runs Windows Server 2008 Standard Edition R2 64 bit:
� Dual Quad Core Intel Xeon 2.26 GHz, 8 MB L2 cache, 80W� 24 GB memory - 6x 4 GB DDR3 1066 MHz� 4x 300 GB SAS 10K RPM (2 RAID 1 arrays)� ServeRAID M5015 SAS/SATA Controller� Integrated 2-port Broadcom 5709S 1 GbE Controller� Daughter card - 2-port Broadcom 5709S 1 GbE Controller� PCIe3 Card - 2-port Qlogic 8 Gb Fibre Channel� Windows Server 2008 Standard Edition R2 64 bit� IBM Systems Director Active Energy Manager™ V4.3� Network Control V1.2� IBM DB2® 9.5 ESE FP1+
Figure 2-1 on page 41 displays a conceptual view of the components that make a CloudBurst installation.
40 IBM CloudBurst on System x
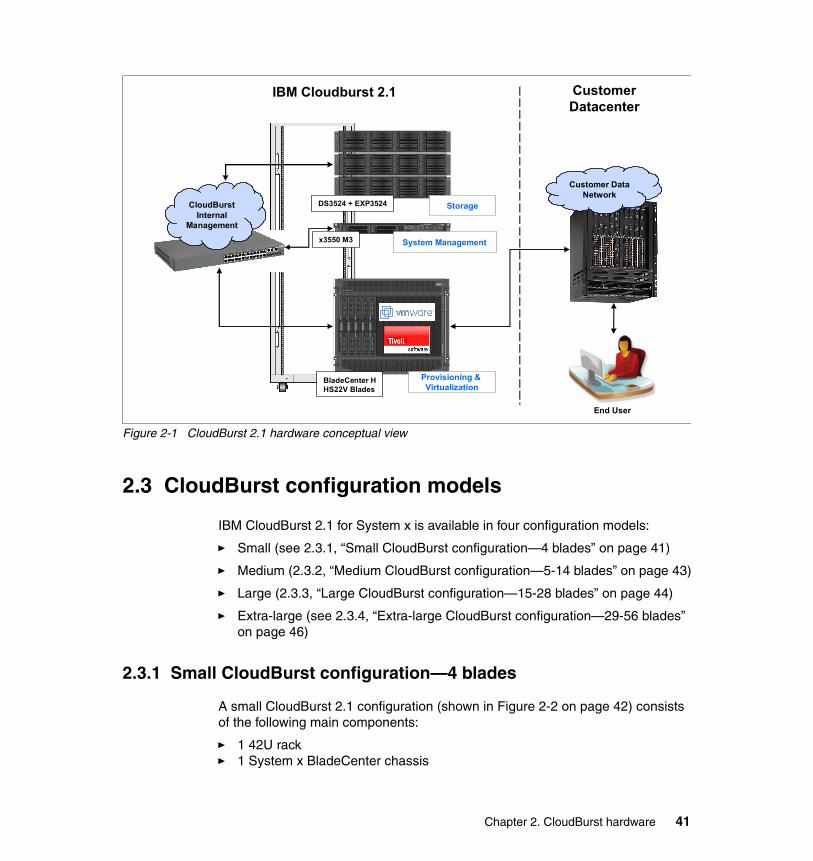
Figure 2-1 CloudBurst 2.1 hardware conceptual view
2.3 CloudBurst configuration models
IBM CloudBurst 2.1 for System x is available in four configuration models:
� Small (see 2.3.1, “Small CloudBurst configuration—4 blades” on page 41)
� Medium (2.3.2, “Medium CloudBurst configuration—5-14 blades” on page 43)
� Large (2.3.3, “Large CloudBurst configuration—15-28 blades” on page 44)
� Extra-large (see 2.3.4, “Extra-large CloudBurst configuration—29-56 blades” on page 46)
2.3.1 Small CloudBurst configuration—4 blades
A small CloudBurst 2.1 configuration (shown in Figure 2-2 on page 42) consists of the following main components:
� 1 42U rack� 1 System x BladeCenter chassis
Customer DataNetwork
S y s te m S to r a g e
41
85
1 29
DS3400
S y s te m S to r a g e
41
85
1 29
EXP3000
S y s te m S to r a g e
41
85
1 29
EXP3000
Sys t em x3350
1 2 3 4 5 6 7 8 9 10 11 12 13 14
1 2 3 4 5 6 7 8 9 10 11 12 13 14
Bl ad eCent er H
Storage
System Management
Provisioning & Virtualization
IBM Cloudburst 2.1
DS3524 + EXP3524
x3550 M3
BladeCenter HHS22V Blades
CustomerDatacenter
End User
CloudBurst Internal
Management
Chapter 2. CloudBurst hardware 41
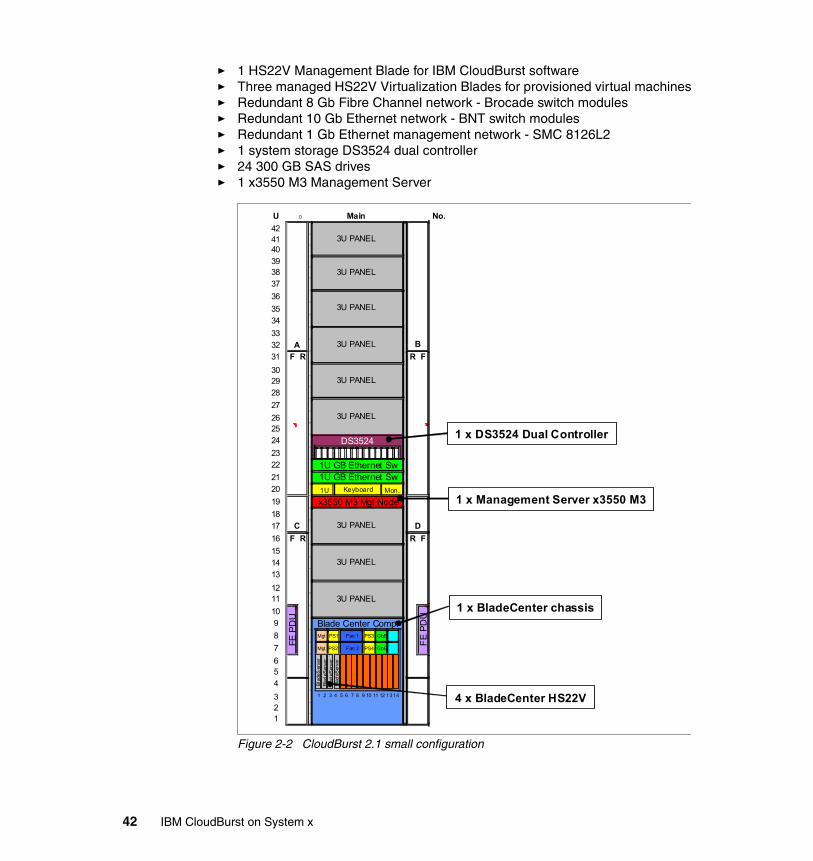
� 1 HS22V Management Blade for IBM CloudBurst software� Three managed HS22V Virtualization Blades for provisioned virtual machines� Redundant 8 Gb Fibre Channel network - Brocade switch modules� Redundant 10 Gb Ethernet network - BNT switch modules� Redundant 1 Gb Ethernet management network - SMC 8126L2� 1 system storage DS3524 dual controller� 24 300 GB SAS drives� 1 x3550 M3 Management Server
Figure 2-2 CloudBurst 2.1 small configuration
U 0 No.
424140
3938
37
36
35
34
33
32
31 F R R F
3029
28
27
2625
24
23
22
21
20
19
18
17
16 F R R F
15
14
13
1211
10
9
8
7
65
4
321
PS4 GbE
Main
Mgt PS1 Fan 1 GbE
Blade Center Comp.PS3
C
B
D
A
1U Keyboard Mon.
1U GB Ethernet Sw1U GB Ethernet Sw
1 2 3 4 5 6 7 8 9 10 11 12 13 14
3U PANEL
3U PANEL
3U PANEL
x3550 M3 Mgt Node
PS2 Fan 2Mgt
3U PANEL
3U PANEL
3U PANEL
3U PANEL
DS3524
3U PANEL
3U PANEL
Bla
deS
erve
rB
lad
eSer
ver
Bla
deS
erve
rB
lad
eSer
ver
FE
PD
U
FE P
DU
1 x DS3524 Dual Controller
1 x Management Server x3550 M3
1 x BladeCenter chassis
4 x BladeCenter HS22V
42 IBM CloudBurst on System x
2.3.2 Medium CloudBurst configuration—5-14 blades
A medium CloudBurst 2.1 configuration (shown in Figure 2-3 on page 44) consists of the following main components:
� 1 42U rack
� 1 System x BladeCenter chassis
� 1 HS22V Management Blade for IBM CloudBurst software
� 4-13 managed HS22V Virtualization Blades for provisioned virtual machines (12 with HA)
� Redundant 8 Gb Fibre Channel (FC) network - Brocade switch modules
� Redundant 10 Gb Ethernet network - BNT switch modules
� Redundant 1 Gb Ethernet management network - SMC 8126L2
� 1 system storage DS3524 dual controller
� 1-3 EXP3524 expansion units
� 48-96 300 GB SAS HDD
� 1 x3550 M3 Management Server
Chapter 2. CloudBurst hardware 43
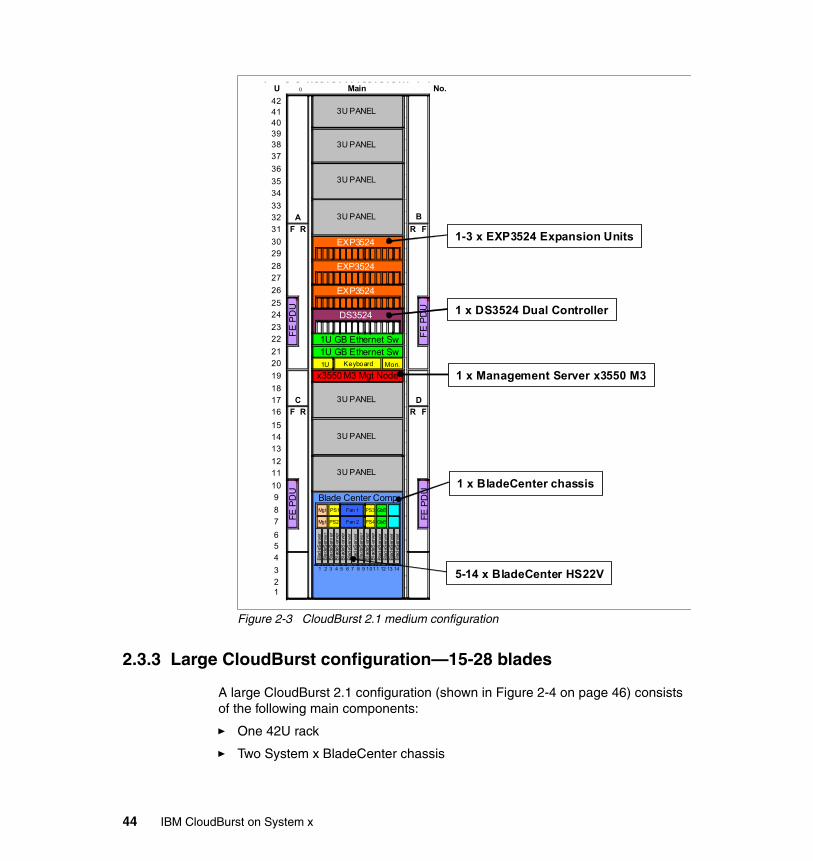
Figure 2-3 CloudBurst 2.1 medium configuration
2.3.3 Large CloudBurst configuration—15-28 blades
A large CloudBurst 2.1 configuration (shown in Figure 2-4 on page 46) consists of the following main components:
� One 42U rack
� Two System x BladeCenter chassis
U 0 No.
4241403938
37
36
35
34
33
32
31 F R R F
30
29
28
27
26
25
24
23
22
21
20
19
18
17
16 F R R F
15
14
13
12
11
10
9
8
7
65
4
3
21
PS4 GbE
Main
Mgt PS1 Fan 1 GbE
Blade Center Comp.PS3
C
B
D
A
1U Keyboard Mon.
1U GB Ethernet Sw1U GB Ethernet Sw
3U PANEL
3U PANEL
3U PANEL
x3550 M3 Mgt Node
PS2 Fan 2Mgt
3U PANEL
3U PANEL
3U PANEL
EXP3524
3U PANEL
EXP3524
DS3524
EXP3524
FE P
DU
FE P
DU
Bla
deS
erve
rB
lade
Ser
ver
Bla
deS
erv
erB
lade
Ser
ver
Bla
deS
erve
rB
lad
eSer
ver
Bla
deS
erve
rB
lade
Ser
ver
Bla
deS
erve
rB
lade
Ser
ver
Bla
deS
erve
rB
lad
eSer
ver
Bla
deS
erve
rB
lad
eSer
ver
1 2 3 4 5 6 7 8 9 10 11 12 13 14
FE
PD
U
FE
PD
U 1 x DS3524 Dual Controller
1 x Management Server x3550 M3
1 x BladeCenter chassis
5-14 x BladeCenter HS22V
1-3 x EXP3524 Expansion Units
44 IBM CloudBurst on System x
� One HS22V Management Blade for IBM CloudBurst software
� 14-27 managed HS22V Virtualization Blades for provisioned virtual machines (26 with HA)
� Redundant 8 Gb Fibre Channel (FC) network - Brocade switch modules
� Redundant 10 Gb Ethernet network - BNT switch modules
� Redundant 1 Gb Ethernet management network - SMC 8126L2
� Redundant SAN24B SAN switches
� Two system storage DS3524 dual controllers
� 4-6 EXP3524 expansion units
� 120-192 300 GB SAS HDD
� 1 x3550 M3 Management Server
Chapter 2. CloudBurst hardware 45
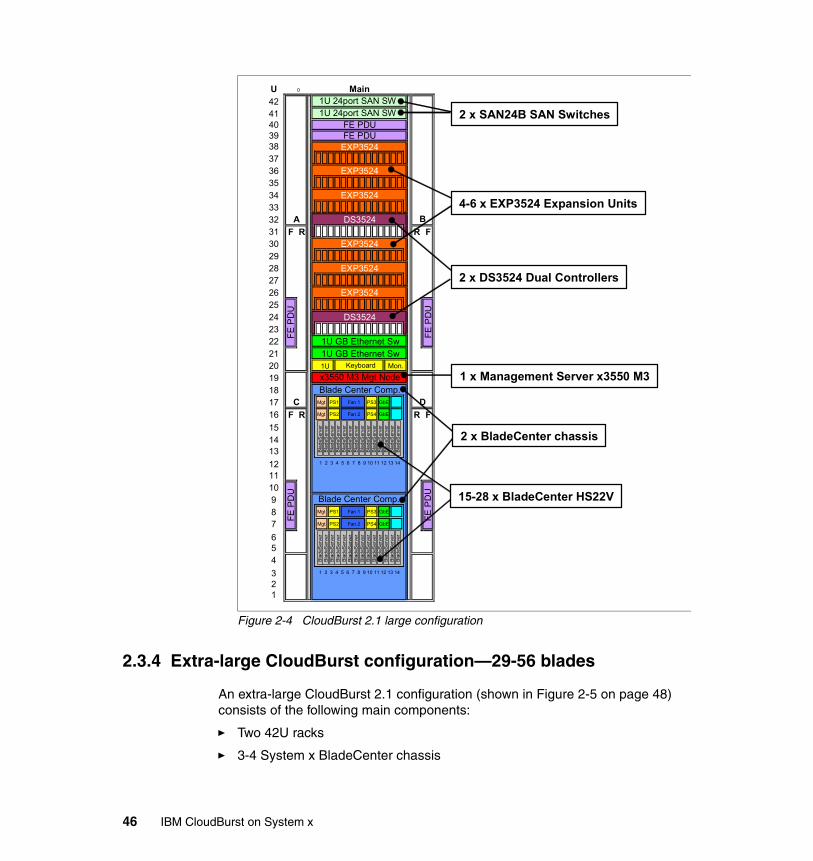
Figure 2-4 CloudBurst 2.1 large configuration
2.3.4 Extra-large CloudBurst configuration—29-56 blades
An extra-large CloudBurst 2.1 configuration (shown in Figure 2-5 on page 48) consists of the following main components:
� Two 42U racks
� 3-4 System x BladeCenter chassis
U 0
424140393837363534333231 F R R F302928272625242322212019181716 F R R F
151413
121110987
654
321
EXP3524
EXP3524
EXP3524
DS3524
EXP3524
DS3524
Mgt PS2 Fan 2
EXP3524
EXP3524
FE PDU
1U 24port SAN SW 1U 24port SAN SW
FE PDU
FE
PD
U
FE
PD
U
FE
PD
U
FE
PD
U
x3550 M3 Mgt Node
Blade Center Comp.
PS2 Fan 2
C
B
D
A
1U Keyboard Mon.
1U GB Ethernet Sw
Mgt PS1
Main
Mgt PS1 Fan 1
Mgt
Blade Center Comp.
1U GB Ethernet Sw
PS4 GbE
Fan 1
PS3 GbE
PS3 GbE
PS4 GbE
Bla
deS
erve
rB
lad
eSer
ver
Bla
deS
erve
rB
lad
eSer
ver
Bla
deS
erve
rB
lad
eSer
ver
Bla
deS
erve
rB
lad
eSer
ver
Bla
deS
erve
rB
lad
eSer
ver
Bla
deS
erve
rB
lad
eSer
ver
Bla
deS
erve
rB
lad
eSer
ver
1 2 3 4 5 6 7 8 9 10 11 12 13 14
Bla
deS
erve
rB
lad
eSer
ver
Bla
deS
erve
rB
lad
eSer
ver
Bla
deS
erve
rB
lad
eSer
ver
Bla
deS
erve
rB
lad
eSer
ver
Bla
deS
erve
rB
lad
eSer
ver
Bla
deS
erve
rB
lad
eSer
ver
Bla
deS
erve
rB
lad
eSer
ver
1 2 3 4 5 6 7 8 9 10 11 12 13 14
2 x DS3524 Dual Controllers
1 x Management Server x3550 M3
2 x BladeCenter chassis
15-28 x BladeCenter HS22V
4-6 x EXP3524 Expansion Units
2 x SAN24B SAN Switches
46 IBM CloudBurst on System x
� One HS22V Management Blade for IBM CloudBurst software
� 28-55 managed HS22V Virtualization Blades for provisioned virtual machines (54 with HA)
� Redundant 8 Gb Fibre Channel (FC) network - Brocade switch modules
� Redundant 10 Gb Ethernet network - BNT switch modules
� Redundant 1 Gb Ethernet management network - SMC 8126L2
� Redundant SAN24B SAN switches
� Redundant 10 GbE rack switches - BNT G8124R
� 3-4 system storage DS3524 dual controllers
� 6-12 EXP3524 expansion units
� 216-384 300 GB SAS HDD
� 1 x3550 M3 Management Server
Chapter 2. CloudBurst hardware 47
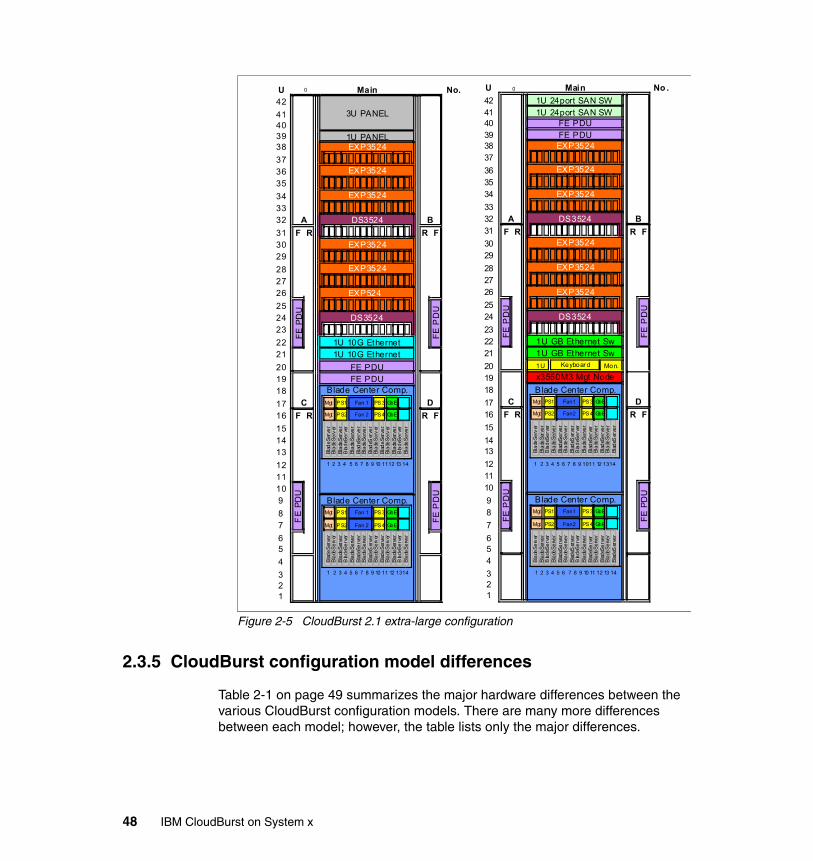
Figure 2-5 CloudBurst 2.1 extra-large configuration
2.3.5 CloudBurst configuration model differences
Table 2-1 on page 49 summarizes the major hardware differences between the various CloudBurst configuration models. There are many more differences between each model; however, the table lists only the major differences.
U 0 No.42
41403938
373635
343332
31 F R R F3029
282726
252423
2221
201918
1716 F R R F
151413
1211109
87
65
4
321
FE PDU
EXP524
DS3524
EXP3524
1U PANEL
B
EXP3524
EXP3524
EXP3524
DS3524
FE
PD
U
FE
PD
U
FE
PD
U
FE PDUBlade Center Comp.
PS2 Fan 2
C
A
1U 10G Ethernet
Mgt PS1
Mgt PS2 Fan 2
FE
PD
U
Main
Mgt PS1 Fan 1
Mgt
Blade Center Comp.
1U 10G Ethernet
PS4 GbE
Fan 1
PS3 GbE
PS3 GbE
PS4 GbE
D
3U PANEL
EXP3524
Bla
de
Ser
ver
Bla
deS
erv
erB
lade
Ser
ver
Bla
deS
erv
erB
lade
Se
rve
rB
lad
eSe
rve
rB
lade
Se
rve
rB
lad
eSer
ver
Bla
deS
erv
erB
lad
eS
erve
rB
lade
Se
rver
Bla
deS
erve
rB
lad
eSe
rver
Bla
deS
erv
er
Bla
de
Ser
ver
Bla
deS
erv
erB
lade
Ser
ver
Bla
deS
erv
erB
lade
Se
rve
rB
lad
eSe
rve
rB
lade
Se
rve
rB
lad
eSer
ver
Bla
deS
erv
erB
lad
eS
erve
rB
lade
Se
rver
Bla
deS
erve
rB
lad
eSe
rver
Bla
deS
erv
er
1 2 3 4 5 6 7 8 9 10 11 12 13 14
1 2 3 4 5 6 7 8 9 10 11 12 13 14
U 0 No .
424140393837
363534
333231 F R R F3029
282726
2524
232221
201918
1716 F R R F
15
1413
121110
98
7
654
321
FE
PD
U
B lade Center Comp.Mgt PS1 Fan 1 PS3 GbE
FE
PD
U
Mgt PS2 Fan 2 PS4 GbE
DMgt PS2 Fan 2 PS4 GbE
x3550M3 Mgt Node
Blade Center Comp.C Mgt PS1 Fan 1 PS3 GbE
1U GB Ethernet Sw1U Keyboar d Mon.
B
EXP3524
EXP3524
FE
PD
U
DS3524
1U GB Ethernet Sw
EXP3524
EXP3524
A DS3524
Main
FE PDUEXP3524
EXP3524
1U 24port SAN SW 1U 24port SAN SW
FE PDU
FE
PD
U
Bla
deS
erv
erB
lade
Ser
ver
Bla
deS
erv
erB
lade
Se
rve
rB
lad
eSe
rve
rB
lade
Se
rve
rB
lad
eSer
ver
Bla
deS
erv
erB
lade
Se
rve
rB
lad
eSe
rver
Bla
deS
erv
er
Bla
deS
erv
er
Bla
deS
erv
er
Bla
deS
erve
r
Bla
deS
erv
erB
lade
Ser
ver
Bla
deS
erv
erB
lade
Se
rve
rB
lad
eSe
rve
rB
lade
Se
rve
rB
lad
eSer
ver
Bla
deS
erv
erB
lade
Se
rve
rB
lad
eSe
rver
Bla
deS
erv
er
Bla
deS
erv
er
Bla
deS
erv
er
Bla
deS
erve
r
1 2 3 4 5 6 7 8 9 10 11 12 13 14
1 2 3 4 5 6 7 8 9 10 11 12 13 14
48 IBM CloudBurst on System x
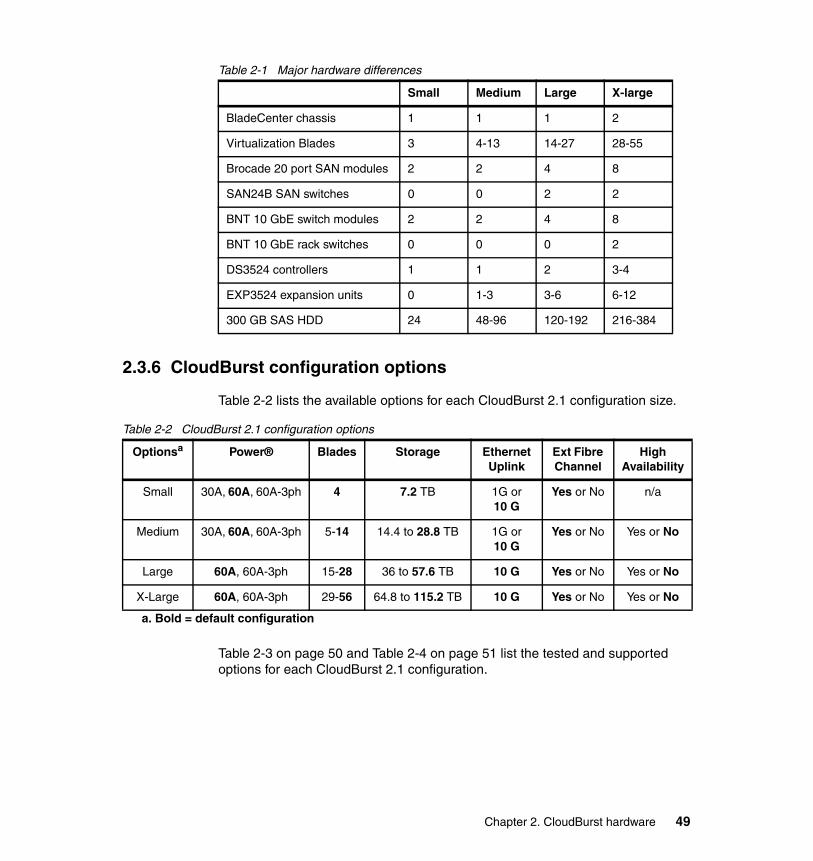
Table 2-1 Major hardware differences
2.3.6 CloudBurst configuration options
Table 2-2 lists the available options for each CloudBurst 2.1 configuration size.
Table 2-2 CloudBurst 2.1 configuration options
Table 2-3 on page 50 and Table 2-4 on page 51 list the tested and supported options for each CloudBurst 2.1 configuration.
Small Medium Large X-large
BladeCenter chassis 1 1 1 2
Virtualization Blades 3 4-13 14-27 28-55
Brocade 20 port SAN modules 2 2 4 8
SAN24B SAN switches 0 0 2 2
BNT 10 GbE switch modules 2 2 4 8
BNT 10 GbE rack switches 0 0 0 2
DS3524 controllers 1 1 2 3-4
EXP3524 expansion units 0 1-3 3-6 6-12
300 GB SAS HDD 24 48-96 120-192 216-384
Optionsa
a. Bold = default configuration
Power® Blades Storage Ethernet Uplink
Ext Fibre Channel
High Availability
Small 30A, 60A, 60A-3ph 4 7.2 TB 1G or 10 G
Yes or No n/a
Medium 30A, 60A, 60A-3ph 5-14 14.4 to 28.8 TB 1G or 10 G
Yes or No Yes or No
Large 60A, 60A-3ph 15-28 36 to 57.6 TB 10 G Yes or No Yes or No
X-Large 60A, 60A-3ph 29-56 64.8 to 115.2 TB 10 G Yes or No Yes or No
Chapter 2. CloudBurst hardware 49
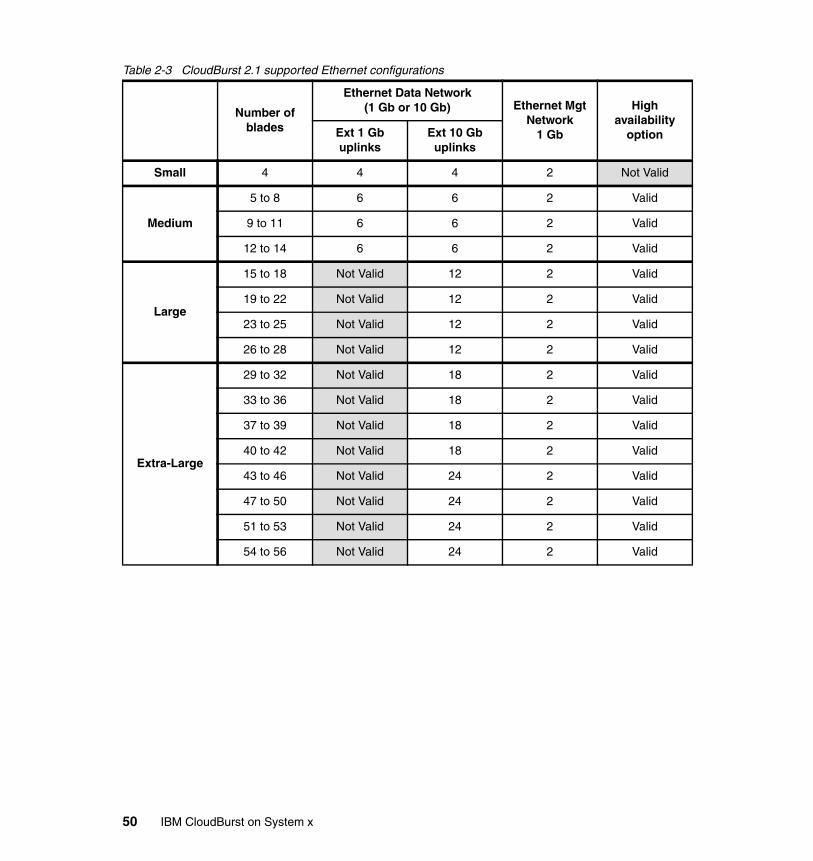
Table 2-3 CloudBurst 2.1 supported Ethernet configurations
Number of blades
Ethernet Data Network(1 Gb or 10 Gb) Ethernet Mgt
Network1 Gb
Highavailability
optionExt 1 Gb uplinks
Ext 10 Gb uplinks
Small 4 4 4 2 Not Valid
Medium
5 to 8 6 6 2 Valid
9 to 11 6 6 2 Valid
12 to 14 6 6 2 Valid
Large
15 to 18 Not Valid 12 2 Valid
19 to 22 Not Valid 12 2 Valid
23 to 25 Not Valid 12 2 Valid
26 to 28 Not Valid 12 2 Valid
Extra-Large
29 to 32 Not Valid 18 2 Valid
33 to 36 Not Valid 18 2 Valid
37 to 39 Not Valid 18 2 Valid
40 to 42 Not Valid 18 2 Valid
43 to 46 Not Valid 24 2 Valid
47 to 50 Not Valid 24 2 Valid
51 to 53 Not Valid 24 2 Valid
54 to 56 Not Valid 24 2 Valid
50 IBM CloudBurst on System x
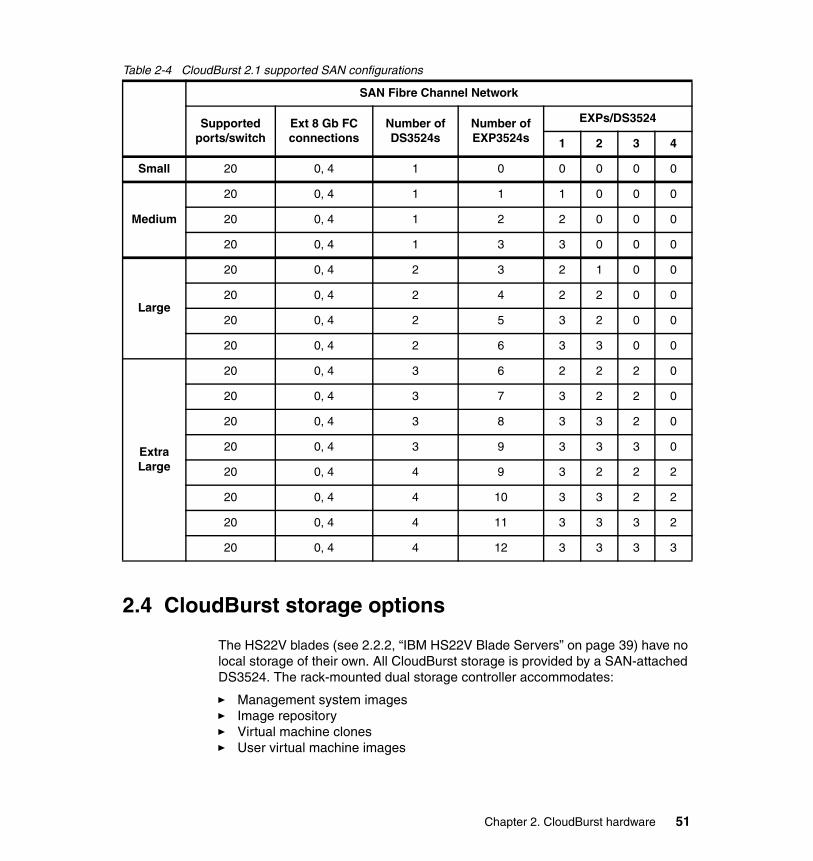
Table 2-4 CloudBurst 2.1 supported SAN configurations
2.4 CloudBurst storage options
The HS22V blades (see 2.2.2, “IBM HS22V Blade Servers” on page 39) have no local storage of their own. All CloudBurst storage is provided by a SAN-attached DS3524. The rack-mounted dual storage controller accommodates:
� Management system images� Image repository� Virtual machine clones� User virtual machine images
SAN Fibre Channel Network
Supported ports/switch
Ext 8 Gb FC connections
Number of DS3524s
Number of EXP3524s
EXPs/DS3524
1 2 3 4
Small 20 0, 4 1 0 0 0 0 0
Medium
20 0, 4 1 1 1 0 0 0
20 0, 4 1 2 2 0 0 0
20 0, 4 1 3 3 0 0 0
Large
20 0, 4 2 3 2 1 0 0
20 0, 4 2 4 2 2 0 0
20 0, 4 2 5 3 2 0 0
20 0, 4 2 6 3 3 0 0
ExtraLarge
20 0, 4 3 6 2 2 2 0
20 0, 4 3 7 3 2 2 0
20 0, 4 3 8 3 3 2 0
20 0, 4 3 9 3 3 3 0
20 0, 4 4 9 3 2 2 2
20 0, 4 4 10 3 3 2 2
20 0, 4 4 11 3 3 3 2
20 0, 4 4 12 3 3 3 3
Chapter 2. CloudBurst hardware 51
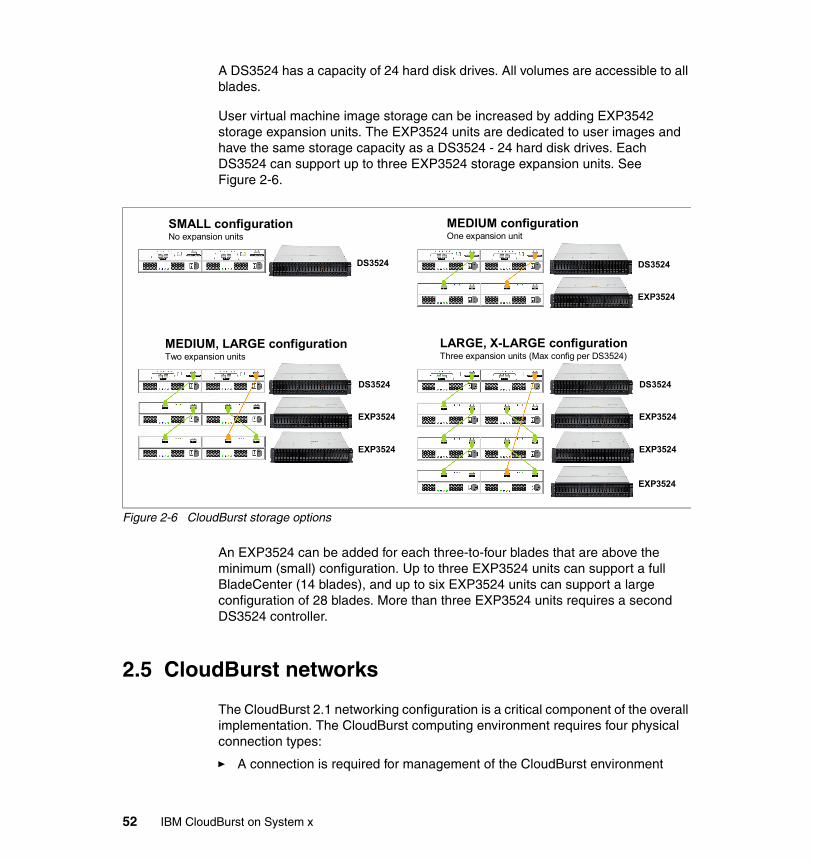
A DS3524 has a capacity of 24 hard disk drives. All volumes are accessible to all blades.
User virtual machine image storage can be increased by adding EXP3542 storage expansion units. The EXP3524 units are dedicated to user images and have the same storage capacity as a DS3524 - 24 hard disk drives. Each DS3524 can support up to three EXP3524 storage expansion units. See Figure 2-6.
Figure 2-6 CloudBurst storage options
An EXP3524 can be added for each three-to-four blades that are above the minimum (small) configuration. Up to three EXP3524 units can support a full BladeCenter (14 blades), and up to six EXP3524 units can support a large configuration of 28 blades. More than three EXP3524 units requires a second DS3524 controller.
2.5 CloudBurst networks
The CloudBurst 2.1 networking configuration is a critical component of the overall implementation. The CloudBurst computing environment requires four physical connection types:
� A connection is required for management of the CloudBurst environment
DS3524
EXP3524
EXP3524
DS3524
SMALL configurationNo expansion units
MEDIUM configurationOne expansion unit
MEDIUM, LARGE configurationTwo expansion units
LARGE, X-LARGE configurationThree expansion units (Max config per DS3524)
DS3524
EXP3524
DS3524
EXP3524
EXP3524
EXP3524
52 IBM CloudBurst on System x
� A connection is required for the virtual machine interconnections within the BladeCenter
� A connection is required to connect to the existing datacenter network
� A connection is required to the Fibre Channel SAN storage
A 1 Gb Ethernet network, 10 Gb Ethernet network, and an 8 Gb Fibre Channel storage network are all contained within a CloudBurst installation.
2.5.1 1 Gb Ethernet Management Network
Redundant 1 GbE SMC 8126L2 rack switches are used to connect all management components within the CloudBurst environment:
� x3550 M3 Management Server� Power Distribution Units� DS3524 SAN storage controllers� 10 GbE BNT G8124R rack switches� SAN24B Fibre Channel SAN switches� Advance Management Modules (AMM)
Each component in the 1 GbE Management Network is redundantly connected to the SMC switches. The Management Network is used to manage and monitor the following functions:
� Energy management� Switch configuration� Out of band disk system management� Hardware system events� Remote video
2.5.2 10 Gb Ethernet networks
The 10 GbE network serves multiple purposes.
10 Gb Ethernet Management NetworkThis Management Network is used for hypervisor host management. The CloudBurst components on this network are:
� x3550 M3 Management Server� 10 GbE BNT switch modules� HS22V blades� 10 GbE BNT G8124R rack switches
Chapter 2. CloudBurst hardware 53
10 Gb VM Network (Tivoli)The Tivoli management virtual machine (running on the HS22V Management Blade - see 2.2.1, “Basic hardware configuration” on page 39) and the provisioned virtual machines (running on the HS22V Virtualization Blades - see 2.2.1, “Basic hardware configuration” on page 39) have access to a private management network that is accessible over VLAN 90 (management VM communication) and VLANs 100-129 (agent monitoring). This VM Network is a separate and private logical network that is used for inter-communication between the VMs of the Tivoli software stack (see 3.3, “IBM CloudBurst software stack architecture” on page 75) and to provide monitoring function for the provisioned VMs.
The VM Network VLANs are not exposed/available to the customer data network. See “10 Gb Ethernet Customer Network” on page 54.
The CloudBurst components on this network are:
� 10 GbE BNT switch modules� HS22V blades� 10 GbE BNT G8124R rack switches
10 Gb Ethernet VMotion NetworkVMotion is the VMware feature enabling host-to-host virtual machine migration. Each HS22V ESXi host contains a VMware VMKernel configured for VMotion. The VMotion kernel is configured to be on VLAN 80. The VMotion Network is a logical segment of the CloudBurst 10 Gb Ethernet network that is used by the VMware infrastructure for migration of VMs between the hosts in a given cluster.
The VMotion Network is not exposed/available to the customer data network. See “10 Gb Ethernet Customer Network” on page 54.
The CloudBurst components on this network are:
� 10 GbE BNT switch modules� HS22V blades� 10 GbE BNT G8124R rack switches
10 Gb Ethernet Customer NetworkThe 10 Gb Ethernet Customer Network is the CloudBurst network accessible to the customer’s data network. The 10 GbE switch module in each Blade has 2-3 ports (4-6 ports per BladeCenter chassis) pre-configured to access the customer network. This network is segmented into 30 separate VLANs (130-159), each designating a unique Customer Group.
54 IBM CloudBurst on System x
Provisioned virtual machines created in one Customer Group cannot communicate with all other Customer Groups. This feature enables the CloudBurst infrastructure to be shared with multiple tenants.
In “10 Gb VM Network (Tivoli)” on page 54, we noted that there are 30 VLANs for the VM Network. This enables each Customer Group to have a unique private VM Network, further enforcing the customer group security.
The CloudBurst components in this network are:
� x3550 M3 Management Server� 10 GbE BNT switch modules� HS22V blades� 10 GbE BNT G8124R rack switches
Chapter 2. CloudBurst hardware 55

56 IBM CloudBurst on System x
Chapter 3. CloudBurst software
In this chapter, we provide an overview of the software that is installed as part of IBM CloudBurst 2.1 for System x.
In addition, this overview describes the software products that are part of IBM Service Delivery Manager (ISDM). We discuss:
� 3.1, “IBM CloudBurst for System x software overview” on page 58� 3.2, “IBM CloudBurst for System x software” on page 61� 3.3, “IBM CloudBurst software stack architecture” on page 75� 3.4, “IBM CloudBurst for System x management software” on page 79
3
© Copyright IBM Corp. 2012. All rights reserved. 57
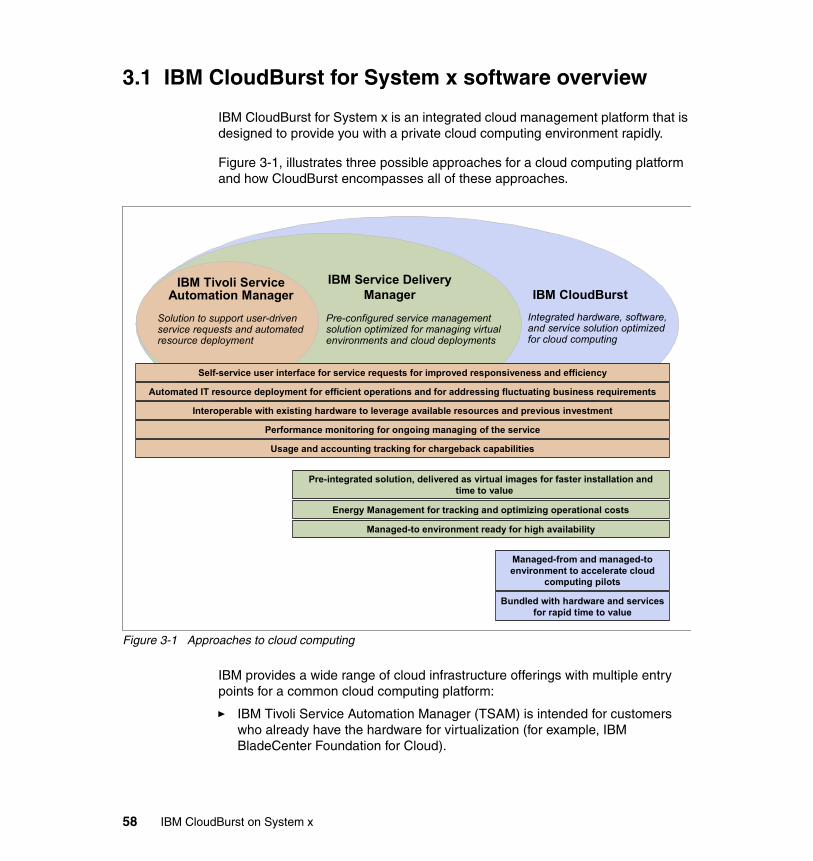
3.1 IBM CloudBurst for System x software overview
IBM CloudBurst for System x is an integrated cloud management platform that is designed to provide you with a private cloud computing environment rapidly.
Figure 3-1, illustrates three possible approaches for a cloud computing platform and how CloudBurst encompasses all of these approaches.
Figure 3-1 Approaches to cloud computing
IBM provides a wide range of cloud infrastructure offerings with multiple entry points for a common cloud computing platform:
� IBM Tivoli Service Automation Manager (TSAM) is intended for customers who already have the hardware for virtualization (for example, IBM BladeCenter Foundation for Cloud).
IBM CloudBurstIBM Tivoli Service
Automation Manager
Solution to support user-driven service requests and automated resource deployment
IBM Service Delivery Manager
Integrated hardware, software, and service solution optimized for cloud computing
Interoperable with existing hardware to leverage available resources and previous investment
Pre-configured service management solution optimized for managing virtual environments and cloud deployments
Self-service user interface for service requests for improved responsiveness and efficiency
Automated IT resource deployment for efficient operations and for addressing fluctuating business requirements
Pre-integrated solution, delivered as virtual images for faster installation and time to value
Performance monitoring for ongoing managing of the service
Energy Management for tracking and optimizing operational costs
Usage and accounting tracking for chargeback capabilities
Managed-to environment ready for high availability
Managed-from and managed-to environment to accelerate cloud
computing pilots
Bundled with hardware and services for rapid time to value
58 IBM CloudBurst on System x
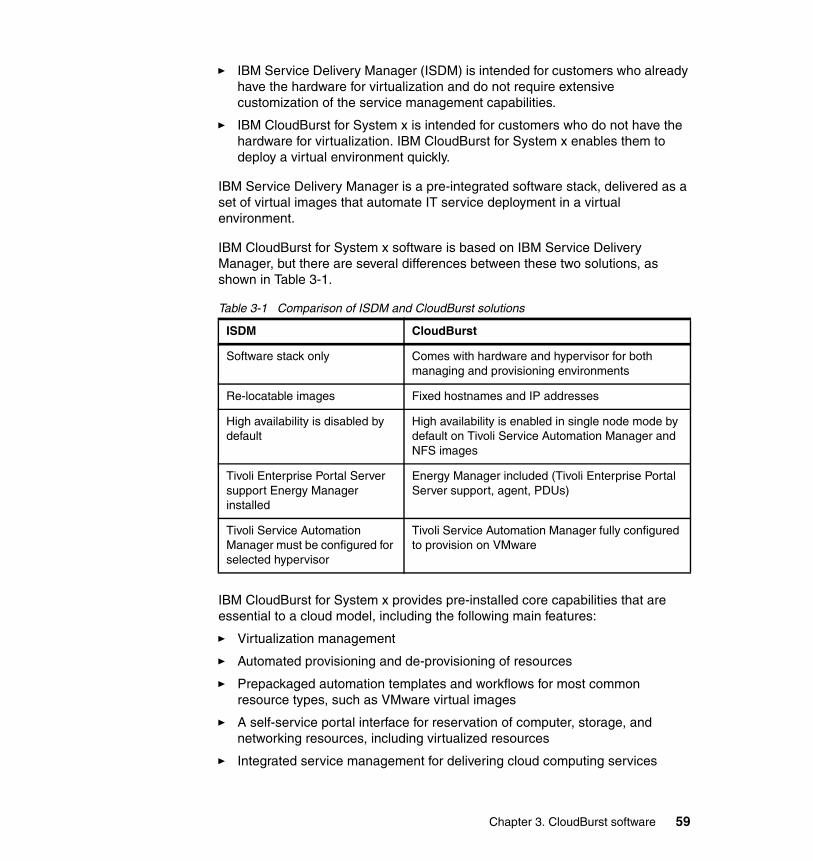
� IBM Service Delivery Manager (ISDM) is intended for customers who already have the hardware for virtualization and do not require extensive customization of the service management capabilities.
� IBM CloudBurst for System x is intended for customers who do not have the hardware for virtualization. IBM CloudBurst for System x enables them to deploy a virtual environment quickly.
IBM Service Delivery Manager is a pre-integrated software stack, delivered as a set of virtual images that automate IT service deployment in a virtual environment.
IBM CloudBurst for System x software is based on IBM Service Delivery Manager, but there are several differences between these two solutions, as shown in Table 3-1.
Table 3-1 Comparison of ISDM and CloudBurst solutions
IBM CloudBurst for System x provides pre-installed core capabilities that are essential to a cloud model, including the following main features:
� Virtualization management
� Automated provisioning and de-provisioning of resources
� Prepackaged automation templates and workflows for most common resource types, such as VMware virtual images
� A self-service portal interface for reservation of computer, storage, and networking resources, including virtualized resources
� Integrated service management for delivering cloud computing services
ISDM CloudBurst
Software stack only Comes with hardware and hypervisor for both managing and provisioning environments
Re-locatable images Fixed hostnames and IP addresses
High availability is disabled by default
High availability is enabled in single node mode by default on Tivoli Service Automation Manager and NFS images
Tivoli Enterprise Portal Server support Energy Manager installed
Energy Manager included (Tivoli Enterprise Portal Server support, agent, PDUs)
Tivoli Service Automation Manager must be configured for selected hypervisor
Tivoli Service Automation Manager fully configured to provision on VMware
Chapter 3. CloudBurst software 59
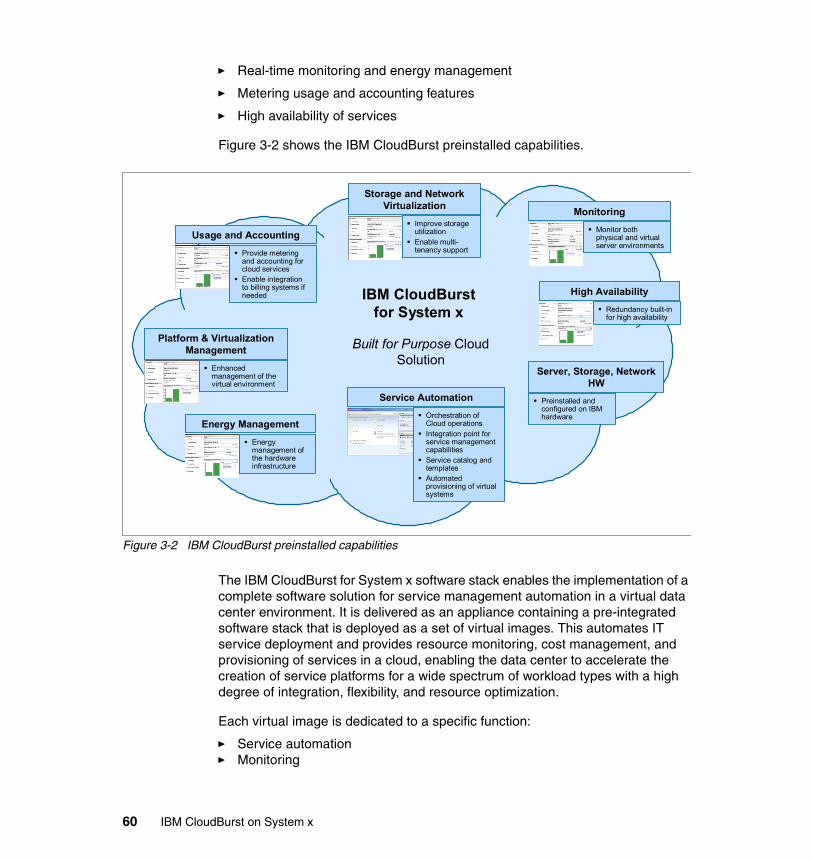
� Real-time monitoring and energy management
� Metering usage and accounting features
� High availability of services
Figure 3-2 shows the IBM CloudBurst preinstalled capabilities.
Figure 3-2 IBM CloudBurst preinstalled capabilities
The IBM CloudBurst for System x software stack enables the implementation of a complete software solution for service management automation in a virtual data center environment. It is delivered as an appliance containing a pre-integrated software stack that is deployed as a set of virtual images. This automates IT service deployment and provides resource monitoring, cost management, and provisioning of services in a cloud, enabling the data center to accelerate the creation of service platforms for a wide spectrum of workload types with a high degree of integration, flexibility, and resource optimization.
Each virtual image is dedicated to a specific function:
� Service automation � Monitoring
IBM CloudBurstfor System x
Monitor both physical and virtual server environments
Monitoring
Redundancy built-infor high availability
High Availability
Provide metering and accounting for cloud services
Enable integration to billing systems if needed
Usage and Accounting
Enhanced management of the virtual environment
Platform & Virtualization Management
Energy management of the hardware infrastructure
Energy Management
Built for Purpose Cloud Solution
Preinstalled and configured on IBM hardware
Server, Storage, Network HW
Improve storage utilization
Enable multi-tenancy support
Storage and Network Virtualization
Service Automation
Orchestration of Cloud operations
Integration point for service managementcapabilities
Service catalog and templates
Automated provisioning of virtual systems
60 IBM CloudBurst on System x
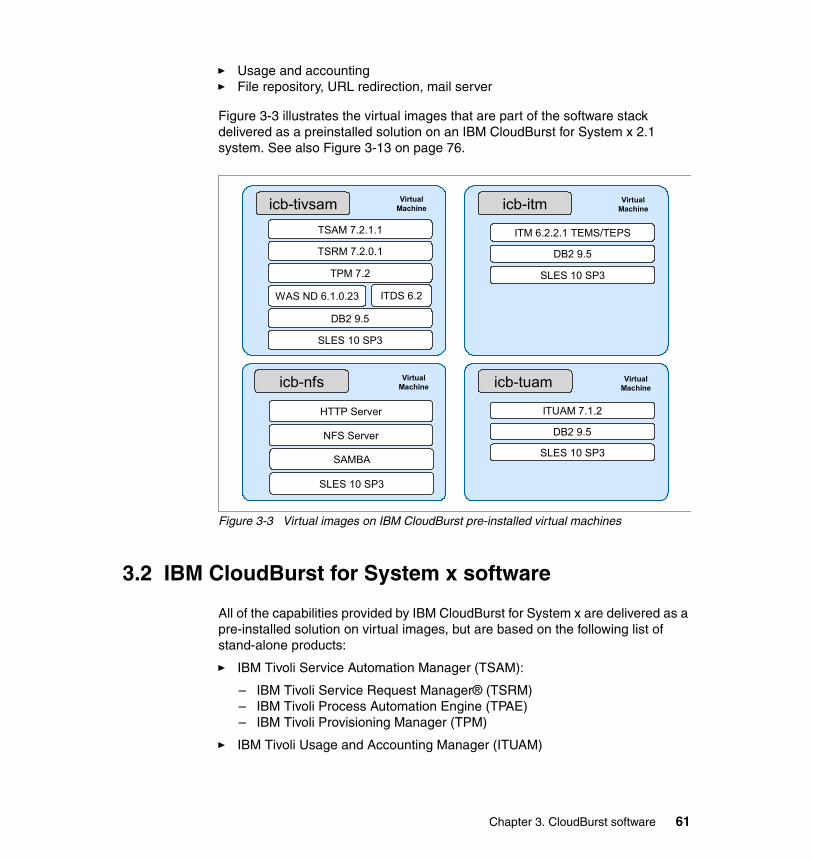
� Usage and accounting � File repository, URL redirection, mail server
Figure 3-3 illustrates the virtual images that are part of the software stack delivered as a preinstalled solution on an IBM CloudBurst for System x 2.1 system. See also Figure 3-13 on page 76.
Figure 3-3 Virtual images on IBM CloudBurst pre-installed virtual machines
3.2 IBM CloudBurst for System x software
All of the capabilities provided by IBM CloudBurst for System x are delivered as a pre-installed solution on virtual images, but are based on the following list of stand-alone products:
� IBM Tivoli Service Automation Manager (TSAM):
– IBM Tivoli Service Request Manager® (TSRM)– IBM Tivoli Process Automation Engine (TPAE)– IBM Tivoli Provisioning Manager (TPM)
� IBM Tivoli Usage and Accounting Manager (ITUAM)
SLES 10 SP3
icb-itm
DB2 9.5
ITM 6.2.2.1 TEMS/TEPS
HTTP Server
NFS Server
SLES 10 SP3
icb-nfs
SAMBA
SLES 10 SP3
icb-tivsam
DB2 9.5
WAS ND 6.1.0.23 ITDS 6.2
TPM 7.2
TSAM 7.2.1.1
TSRM 7.2.0.1
SLES 10 SP3
icb-tuam
DB2 9.5
ITUAM 7.1.2
VirtualMachine
VirtualMachine
VirtualMachine
VirtualMachine
Chapter 3. CloudBurst software 61
� IBM Tivoli Monitoring (ITM)
� IBM Tivoli System Automation for Multiplatforms (TSA)
3.2.1 IBM Tivoli Service Automation Manager
IBM Tivoli Service Automation Manager (TSAM) enables the automated design, deployment, and management of services, such as middleware, applications, hardware, and networks. It provides the ability to automate the manual tasks involved in making services available across infrastructure components. It facilitates making these services available through a cloud delivery model. IBM Tivoli Service Automation Manager provides capabilities to request, fulfil, and manage complete software stacks. This comprises the definition, offering, request, and automated provisioning of the stack, including integrated management of the environment.
Tivoli Service Automation Manager is responsible for automated provisioning of cloud offerings.
Tivoli Service Automation Manager is built on the IBM Service Management Platform of Tivoli process automation engine interacting with a federated data subsystem. The Tivoli process automation engine supports workflows, work and job management, role-based access, service-oriented architecture (SOA) services, notification, escalation, governance, and integration. The federated data subsystem provides services, assets, and configuration items.
The IBM Service Management Platform interacts with operational management technology, consisting of the following services over a virtualized IT structure (IBM servers and storage):
� Platform management services� Security services� Provisioning services from Tivoli Provisioning Manager� Usage and accounting services (Tivoli Usage and Accounting Manager)� IBM Tivoli Monitoring services� Energy management services
Figure 3-4 on page 63, illustrates the high-level software architecture of Tivoli Service Automation Manager.
62 IBM CloudBurst on System x
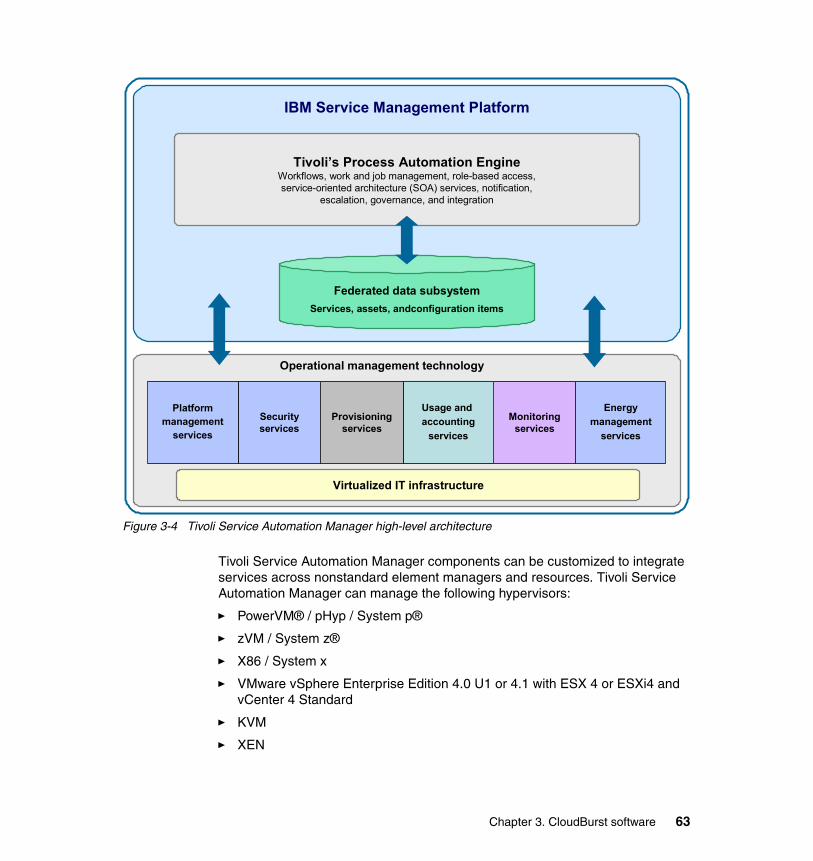
Figure 3-4 Tivoli Service Automation Manager high-level architecture
Tivoli Service Automation Manager components can be customized to integrate services across nonstandard element managers and resources. Tivoli Service Automation Manager can manage the following hypervisors:
� PowerVM® / pHyp / System p®
� zVM / System z®
� X86 / System x
� VMware vSphere Enterprise Edition 4.0 U1 or 4.1 with ESX 4 or ESXi4 and vCenter 4 Standard
� KVM
� XEN
IBM Service Management Platform
Usage and
accounting
services
Monitoringservices
Securityservices
Energy
management
services
Operational management technology
Platformmanagement
services
Virtualized IT infrastructure
Tivoli’s Process Automation EngineWorkflows, work and job management, role-based access,service-oriented architecture (SOA) services, notification,
escalation, governance, and integration
Federated data subsystem
Services, assets, andconfiguration items
Provisioningservices
Chapter 3. CloudBurst software 63
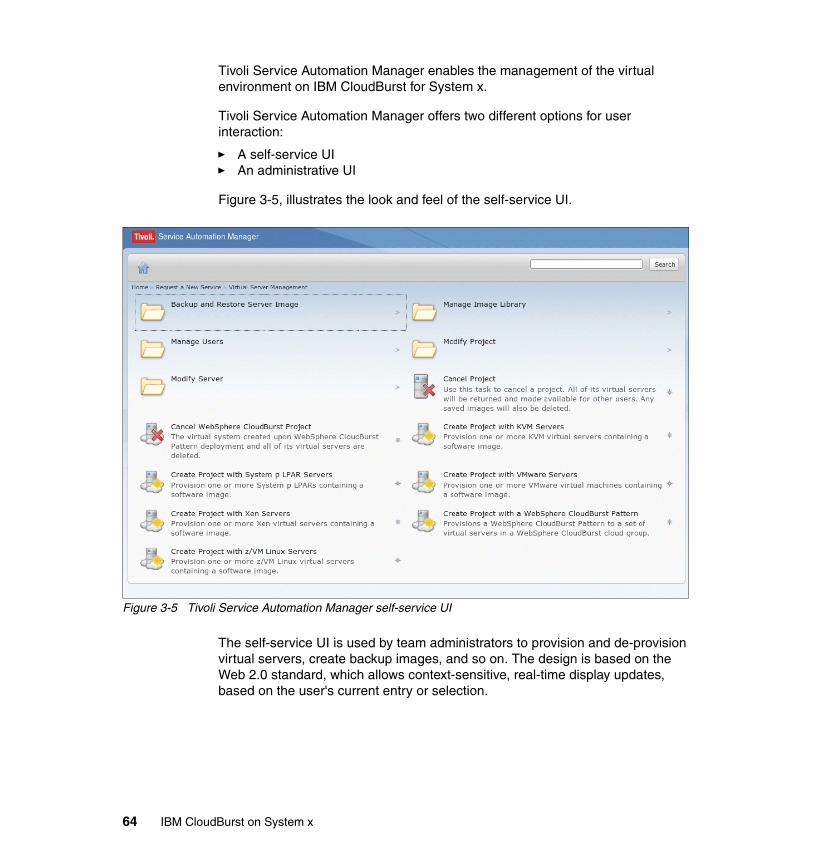
Tivoli Service Automation Manager enables the management of the virtual environment on IBM CloudBurst for System x.
Tivoli Service Automation Manager offers two different options for user interaction:
� A self-service UI � An administrative UI
Figure 3-5, illustrates the look and feel of the self-service UI.
Figure 3-5 Tivoli Service Automation Manager self-service UI
The self-service UI is used by team administrators to provision and de-provision virtual servers, create backup images, and so on. The design is based on the Web 2.0 standard, which allows context-sensitive, real-time display updates, based on the user's current entry or selection.
64 IBM CloudBurst on System x
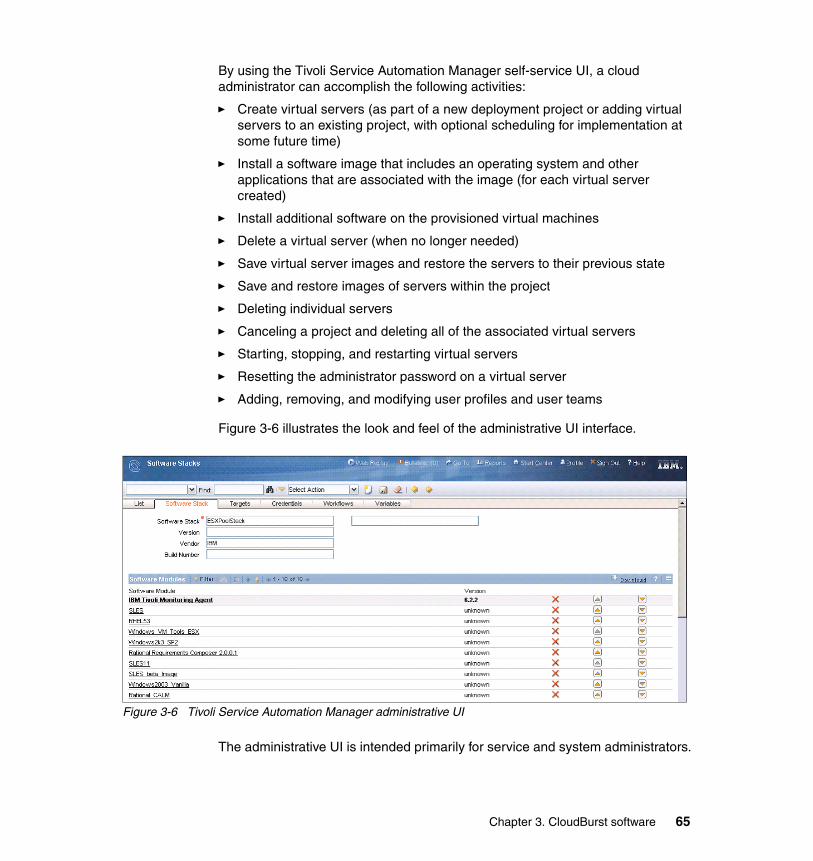
By using the Tivoli Service Automation Manager self-service UI, a cloud administrator can accomplish the following activities:
� Create virtual servers (as part of a new deployment project or adding virtual servers to an existing project, with optional scheduling for implementation at some future time)
� Install a software image that includes an operating system and other applications that are associated with the image (for each virtual server created)
� Install additional software on the provisioned virtual machines
� Delete a virtual server (when no longer needed)
� Save virtual server images and restore the servers to their previous state
� Save and restore images of servers within the project
� Deleting individual servers
� Canceling a project and deleting all of the associated virtual servers
� Starting, stopping, and restarting virtual servers
� Resetting the administrator password on a virtual server
� Adding, removing, and modifying user profiles and user teams
Figure 3-6 illustrates the look and feel of the administrative UI interface.
Figure 3-6 Tivoli Service Automation Manager administrative UI
The administrative UI is intended primarily for service and system administrators.
Chapter 3. CloudBurst software 65

3.2.2 IBM Tivoli Service Request Manager
IBM Tivoli Service Request Manager (TSRM) provides advanced processes for creating, managing, and monitoring service fulfilment activities, such as notifications, escalations, and a key performance indicator dashboard.
In the Tivoli Service Automation Manager context, Tivoli Service Request Manager provides the Cloud-based offerings through a Service Catalog UI. This enables users to obtain IT services through published service offerings.
Tivoli Service Request Manager combines the capabilities of a Service Desk for day-to-day management of existing IT services and a Service Catalog from which users can obtain new IT services through published service offerings.
In the context of the IBM CloudBurst software stack, Tivoli Service Request Manager provides the interface for daily activities such as:
� Request, edit, approve, and cancel projects� Manage users and groups� Manage the images service catalog � Back up and restore images
3.2.3 IBM Tivoli Process Automation Engine
The IBM Tivoli Process Automation Engine (TPAE) is not a product, but an integration platform that supports other process management products (PMPs). Tivoli Process Automation Engine:
� Serves as a base to build upon� Provides an integration framework for products� Supplies common data model to share between products� Delivers a common UI for multiple products� Provides role-based security and authentication for applications
Tivoli Process Automation Engine provides the workflow automation engine capabilities to assist with following process flows within organizations. It represents a common layer with all the base services and applications contained in the Maximo® package. Maximo Asset Management is an integrated productivity tool and database that helps manage all asset types on a single software platform.
Tivoli Process Automation Engine provides an interface that is customizable to suit different needs. Tivoli Process Automation Engine provides:
� Default application layouts for various user roles through Start Centers� Menu driven system for quick application switching
66 IBM CloudBurst on System x
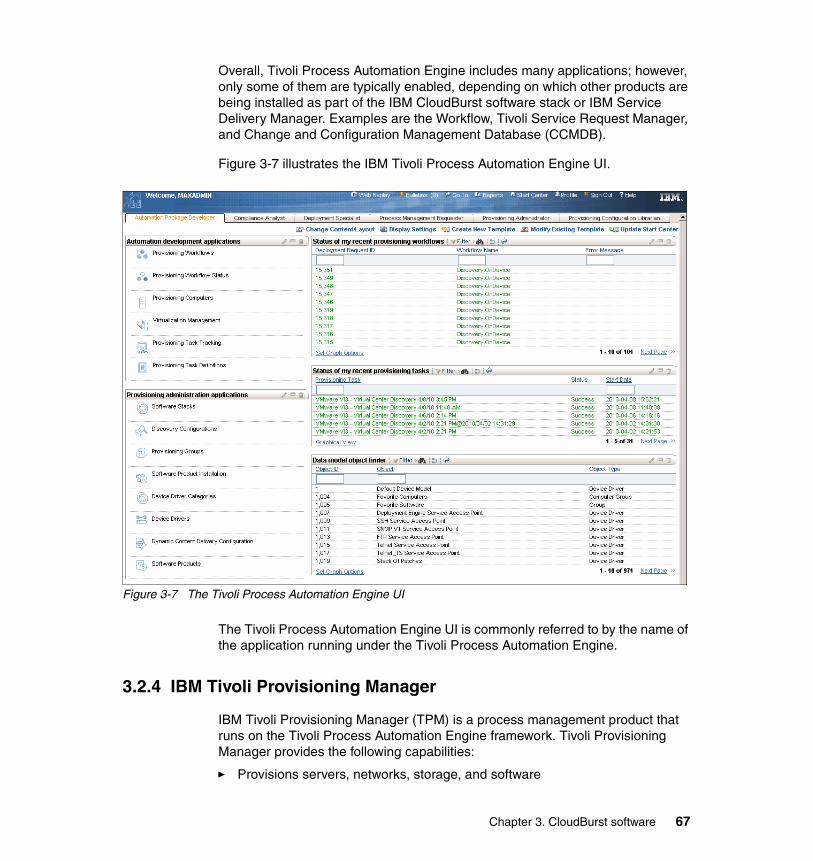
Overall, Tivoli Process Automation Engine includes many applications; however, only some of them are typically enabled, depending on which other products are being installed as part of the IBM CloudBurst software stack or IBM Service Delivery Manager. Examples are the Workflow, Tivoli Service Request Manager, and Change and Configuration Management Database (CCMDB).
Figure 3-7 illustrates the IBM Tivoli Process Automation Engine UI.
Figure 3-7 The Tivoli Process Automation Engine UI
The Tivoli Process Automation Engine UI is commonly referred to by the name of the application running under the Tivoli Process Automation Engine.
3.2.4 IBM Tivoli Provisioning Manager
IBM Tivoli Provisioning Manager (TPM) is a process management product that runs on the Tivoli Process Automation Engine framework. Tivoli Provisioning Manager provides the following capabilities:
� Provisions servers, networks, storage, and software
Chapter 3. CloudBurst software 67
� Automates best practices of common data center activities� Discovers and tracks data center resources� Distributes software and manages patches� Enforces enterprise software compliance policy� Interacts with various virtualization technologies to automate the provisioning
of virtualized environments
Tivoli Provisioning Manager is used to automate best practices for the provisioning of cloud-based service offerings. Provisioning activities can be connected and supported by change and release management processes, thereby optimizing efficiency, accuracy, and service delivery.
Tivoli Provisioning Manager can also be used to discover and track data center resources to enable highly accurate server provisioning and software deployments.
The main role of Tivoli Provisioning Manager, when used in the IBM CloudBurst context, is to provide the following functions:
� Discover VMware templates from VirtualCenter� Trigger cloning of virtual machines� Identify appropriate templates� Specify virtual machine hardware properties� Perform post-cloning configuration of deployed virtual machines� Assign host names and IP addresses� Configure networking� Change passwords� Configure authentication for interaction with virtual machines� Install the IBM Tivoli Monitoring (ITM) agent� Trigger the removal of virtual machines
3.2.5 IBM Tivoli Usage and Account Manager
As part of IBM Service Delivery Manager, IBM Tivoli Usage & Accounting Manager (ITUAM) provides the ability to allocate costs or chargeback based on service request metrics collected by IBM Tivoli Service Automation Manager. Predefined reports are provided to track these costs by user, business unit and so on:
� Provide usage and accounting functionality� Process information about provisioned and de-provisioned virtual images� Prepare data for invoice reporting
68 IBM CloudBurst on System x
The main role of Tivoli Usage & Accounting Manager, when used in the IBM CloudBurst context, is to provide the following functions to improve IT financial management:
� Keep track of sources of cost by enabling accurate billing for cloud services consumed
� Allocate, track, and invoice based on real usage
� Maintain multiple criteria for charging based on department, user, or project
� Interface with IBM Tivoli Service Automation Manger to collect project resource usage information of service instances over time, about virtual machine, processor and memory
When Tivoli Usage & Accounting Manage is used in the CloudBurst context to access usage and accounting reports, you can use the Tivoli Service Automation Manager administrative UI. See Figure 3-8.
Figure 3-8 Tivoli Usage and Account Manager UI viewed with Tivoli Service Automation Manager
The following default reports are available:
� Configuration Report (RCFGX001.rptdesign)
Contains information about report configuration
� Client Report (RCLTX001.rptdesign)
Lists all clients registered in the Tivoli Usage and Accounting Manager database
Chapter 3. CloudBurst software 69
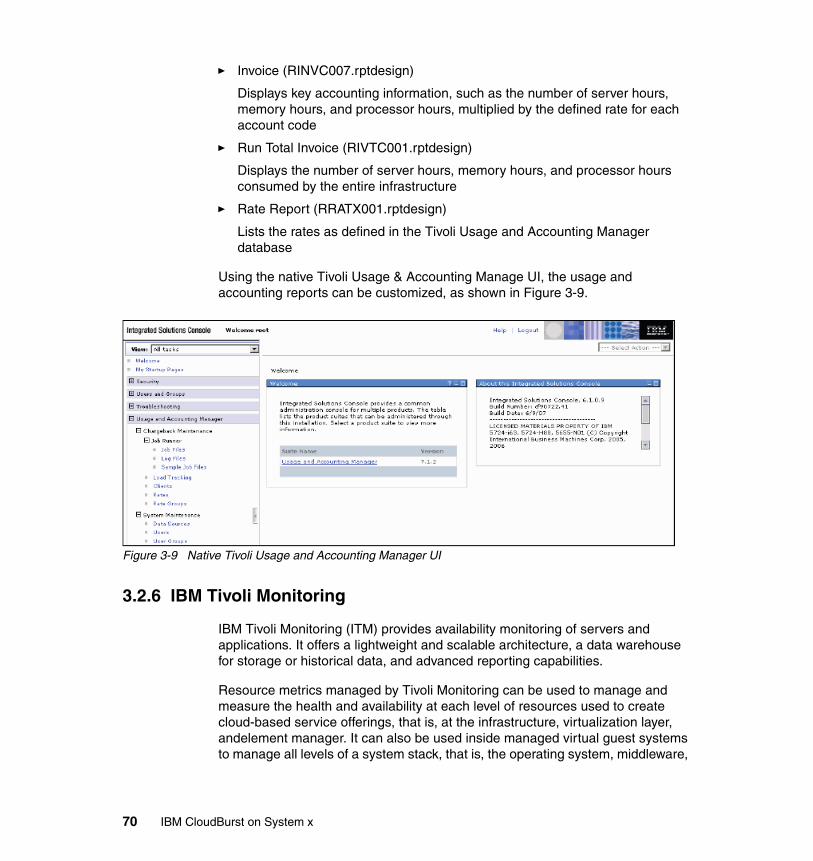
� Invoice (RINVC007.rptdesign)
Displays key accounting information, such as the number of server hours, memory hours, and processor hours, multiplied by the defined rate for each account code
� Run Total Invoice (RIVTC001.rptdesign)
Displays the number of server hours, memory hours, and processor hours consumed by the entire infrastructure
� Rate Report (RRATX001.rptdesign)
Lists the rates as defined in the Tivoli Usage and Accounting Manager database
Using the native Tivoli Usage & Accounting Manage UI, the usage and accounting reports can be customized, as shown in Figure 3-9.
Figure 3-9 Native Tivoli Usage and Accounting Manager UI
3.2.6 IBM Tivoli Monitoring
IBM Tivoli Monitoring (ITM) provides availability monitoring of servers and applications. It offers a lightweight and scalable architecture, a data warehouse for storage or historical data, and advanced reporting capabilities.
Resource metrics managed by Tivoli Monitoring can be used to manage and measure the health and availability at each level of resources used to create cloud-based service offerings, that is, at the infrastructure, virtualization layer, andelement manager. It can also be used inside managed virtual guest systems to manage all levels of a system stack, that is, the operating system, middleware,
70 IBM CloudBurst on System x
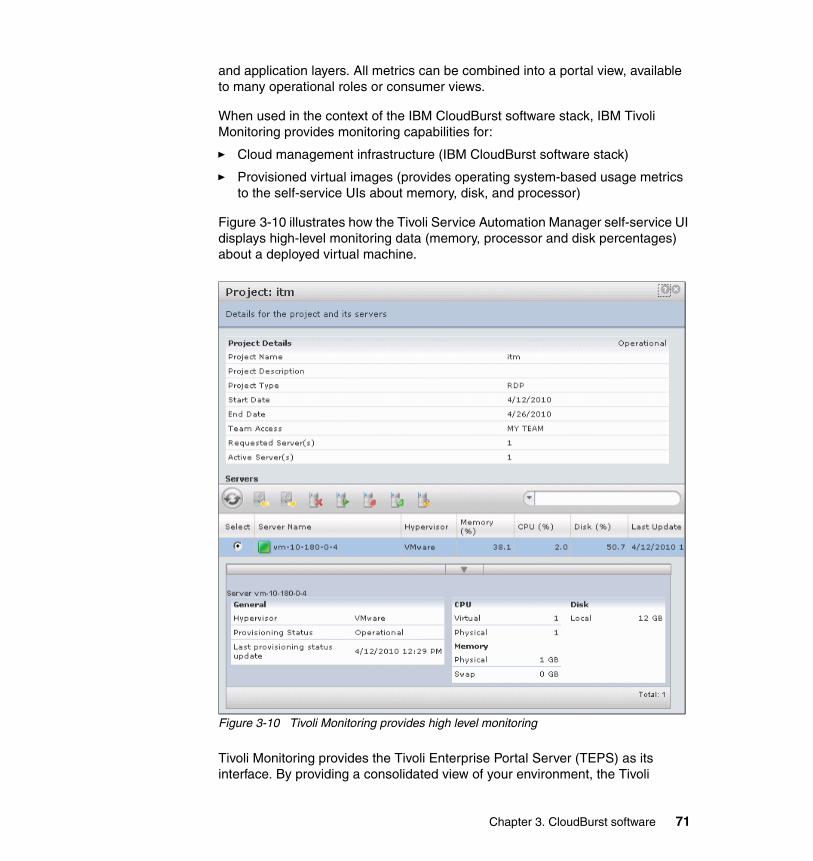
and application layers. All metrics can be combined into a portal view, available to many operational roles or consumer views.
When used in the context of the IBM CloudBurst software stack, IBM Tivoli Monitoring provides monitoring capabilities for:
� Cloud management infrastructure (IBM CloudBurst software stack)
� Provisioned virtual images (provides operating system-based usage metrics to the self-service UIs about memory, disk, and processor)
Figure 3-10 illustrates how the Tivoli Service Automation Manager self-service UI displays high-level monitoring data (memory, processor and disk percentages) about a deployed virtual machine.
Figure 3-10 Tivoli Monitoring provides high level monitoring
Tivoli Monitoring provides the Tivoli Enterprise Portal Server (TEPS) as its interface. By providing a consolidated view of your environment, the Tivoli
Chapter 3. CloudBurst software 71
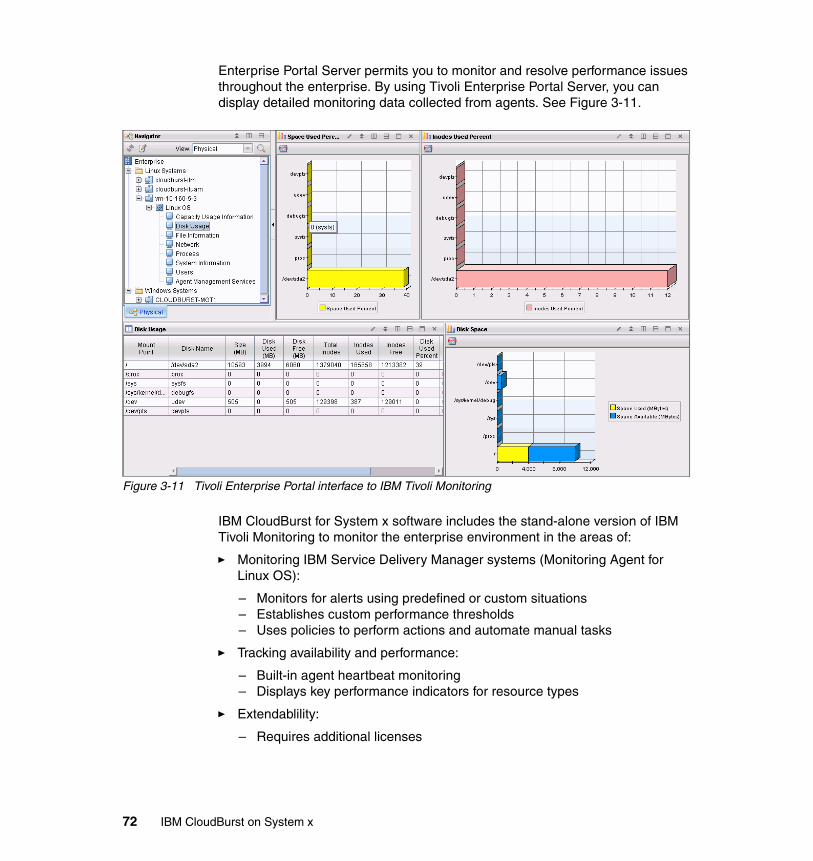
Enterprise Portal Server permits you to monitor and resolve performance issues throughout the enterprise. By using Tivoli Enterprise Portal Server, you can display detailed monitoring data collected from agents. See Figure 3-11.
Figure 3-11 Tivoli Enterprise Portal interface to IBM Tivoli Monitoring
IBM CloudBurst for System x software includes the stand-alone version of IBM Tivoli Monitoring to monitor the enterprise environment in the areas of:
� Monitoring IBM Service Delivery Manager systems (Monitoring Agent for Linux OS):
– Monitors for alerts using predefined or custom situations– Establishes custom performance thresholds– Uses policies to perform actions and automate manual tasks
� Tracking availability and performance:
– Built-in agent heartbeat monitoring– Displays key performance indicators for resource types
� Extendablility:
– Requires additional licenses
72 IBM CloudBurst on System x
3.2.7 IBM Tivoli Systems Automation for Multiplatforms
The IBM Tivoli Systems Automation for Multiplatforms (TSA) component ensures high availability and policy-based automation for applications and services across heterogeneous environments by applying advanced clustering technologies.
IBM Tivoli Systems Automation for Multiplatforms delivers advanced policy-based automation to ease operational management of complex IT infrastructures. By applying these policies, Tivoli System Automation for Multiplatforms can initiate, execute, and coordinate the automated starting, stopping, restarting and failing over of individual application components or entire composite applications. Thus it will help reduce the frequency and duration of incidents that impact IT availability.
Tivoli Systems Automation for Multiplatforms provides a standard toolset that supports multiple failover scenarios involving both physical and virtual environments.
The IBM Cloudburst high-availability architecture relies on functions provided by Tivoli Systems Automation for Multiplatforms and on the high-availability features offered by the VMware vCenter. The high availability provided by VMware relies on VMotion and DRS technologies.
IBM CloudBurst for System x using Tivoli Systems Automation for Multiplatforms can be configured in single or dual node high availability mode:
� Single node high availability
In a single node configuration, Tivoli Systems Automation for Multiplatforms is used to start and stop Tivoli Service Automation Manager, NFS, and HTTP services, but does not provide failover capabilities.
In the single node configuration, a separate IP address is used as the base address of the Tivoli Service Automation Manager server, and a Tivoli Systems Automation for Multiplatforms service address is used as the primary address of the server. All access to the system is done through the Tivoli Systems Automation for Multiplatforms service address.
The base address is only used if the Tivoli Systems Automation for Multiplatforms services are not working and for system maintenance.
� Dual node high availability
In a dual node high availability configuration, two additional servers are added to the reference configuration.
Figure 3-12 on page 74 illustrates the architecture of the dual node high-availability configuration.
Chapter 3. CloudBurst software 73
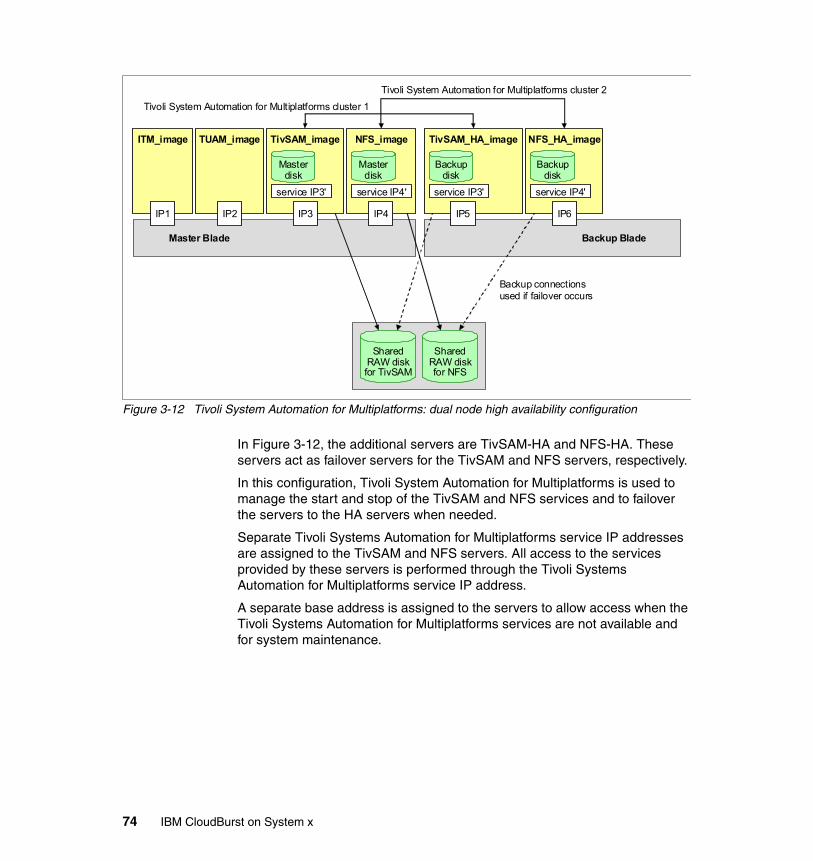
Figure 3-12 Tivoli System Automation for Multiplatforms: dual node high availability configuration
In Figure 3-12, the additional servers are TivSAM-HA and NFS-HA. These servers act as failover servers for the TivSAM and NFS servers, respectively.
In this configuration, Tivoli System Automation for Multiplatforms is used to manage the start and stop of the TivSAM and NFS services and to failover the servers to the HA servers when needed.
Separate Tivoli Systems Automation for Multiplatforms service IP addresses are assigned to the TivSAM and NFS servers. All access to the services provided by these servers is performed through the Tivoli Systems Automation for Multiplatforms service IP address.
A separate base address is assigned to the servers to allow access when the Tivoli Systems Automation for Multiplatforms services are not available and for system maintenance.
Master Blade
ITM_image
IP1
TUAM_image
IP2
Backup Blade
Tivoli System Automation for Multiplatforms cluster 1
Backup connectionsused if failover occurs
Tivoli System Automation for Multiplatforms cluster 2
SharedRAW diskfor TivSAM
SharedRAW diskfor NFS
TivSAM_image
Masterdisk
service IP3'
IP3
NFS_image
Masterdisk
service IP4'
IP4
TivSAM_HA_image
Backupdisk
service IP3'
IP5
NFS_HA_image
Backupdisk
service IP4'
IP6
74 IBM CloudBurst on System x

When dual node high availability is used in IBM CloudBurst, it provides significant improvements with respect to leveraging the high availability provided by the hypervisor:
� Software component failures
Tivoli Systems Automation for Multiplatforms can detect and recover from failures of software components by restarting or failing over the software components
The hypervisor does not detect failures of software components and cannot recover from software
� Hardware component failures
Tivoli Systems Automation for Multiplatforms can detect blade failures, network failures, disk failures, and recover from these failures
The hypervisor detects only the outage of a complete server; other hardware error situations such as network failures or disk failure are not detected or recovered
� System automation provides faster recovery
The VMware solution requires a cold backup
� Tivoli Systems Automation for Multiplatforms provides application start and stop automation
Restarting the operating system does not guarantee that the service is back up and running
3.3 IBM CloudBurst software stack architecture
IBM CloudBurst for System x is an appliance that is preinstalled with virtual images containing cloud management software.
Figure 3-13 on page 76 illustrates the products that are part of the software stack deployed in IBM CloudBurst. Four virtual machine images (icb-nfs, icb-tuam, icb-tivsam, and icb-itm) are deployed on the Management Blade. See 2.2.2, “IBM HS22V Blade Servers” on page 39 for more information about the Management Blade.
Note: Since Tivoli System Automation for Multiplatforms leverages a shared disk, due to a VMware limitation, it is not possible to take snapshots of a virtual machine.
Chapter 3. CloudBurst software 75
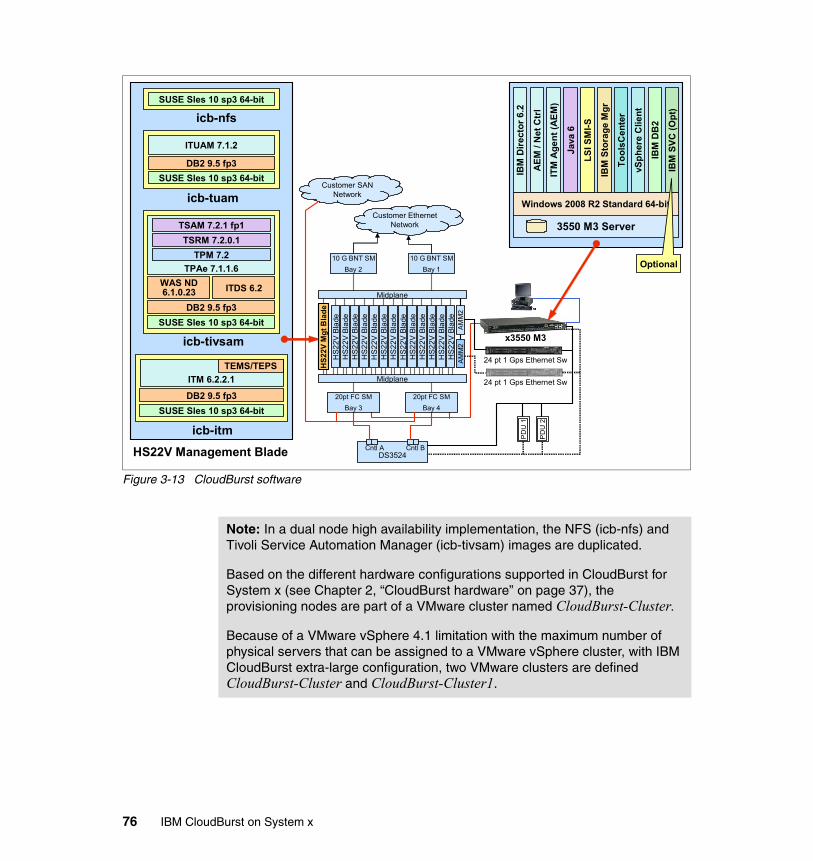
Figure 3-13 CloudBurst software
ITM 6.2.2.1
DB2 9.5 fp3
SUSE Sles 10 sp3 64-bit
TEMS/TEPS
SUSE Sles 10 sp3 64-bit
ITUAM 7.1.2
DB2 9.5 fp3
SUSE Sles 10 sp3 64-bit
TPAe 7.1.1.6
TSAM 7.2.1 fp1
TSRM 7.2.0.1
TPM 7.2
WAS ND6.1.0.23 ITDS 6.2
DB2 9.5 fp3
SUSE Sles 10 sp3 64-bit
icb-nfs
icb-tuam
icb-tivsam
icb-itm
3550 M3 Server
Windows 2008 R2 Standard 64-bit
IBM
Dir
ect
or
6.2
AE
M /
Net
Ctr
l
ITM
Ag
en
t (A
EM
)
Java
6
LS
I SM
I-S
IBM
Sto
rag
e M
gr
To
ols
Cen
ter
vSp
her
eC
lien
t
IBM
DB
2
IBM
SV
C (
Op
t)
Optional
HS
22
V B
lade
HS
22
V B
lade
HS
22
V B
lade
HS
22
V B
lade
HS
22
V B
lade
HS
22
V B
lade
HS
22
V B
lade
HS
22
V B
lade
HS
22
V B
lade
HS
22
V B
lade
HS
22
V B
lade
HS
22
V B
lade
HS
22
V B
lade
AM
M2
DS3524
Midplane
Cntl A Cntl B
Midplane
x3550 M3
24 pt 1 Gps Ethernet Sw
24 pt 1 Gps Ethernet Sw
AM
M2
20pt FC SM
Bay 3
10 G BNT SM
Bay 2
10 G BNT SM
Bay 1
20pt FC SM
Bay 4
PD
U 1
PD
U 2
Customer EthernetNetwork
Customer SANNetwork
HS
22
V M
gt
Bla
de
HS22V Management Blade
Note: In a dual node high availability implementation, the NFS (icb-nfs) and Tivoli Service Automation Manager (icb-tivsam) images are duplicated.
Based on the different hardware configurations supported in CloudBurst for System x (see Chapter 2, “CloudBurst hardware” on page 37), the provisioning nodes are part of a VMware cluster named CloudBurst-Cluster.
Because of a VMware vSphere 4.1 limitation with the maximum number of physical servers that can be assigned to a VMware vSphere cluster, with IBM CloudBurst extra-large configuration, two VMware clusters are defined CloudBurst-Cluster and CloudBurst-Cluster1.
76 IBM CloudBurst on System x
3.3.1 Service automation image—icb-tivsam
This virtual machine is the core component of the IBM CloudBurst System x software stack solution. It runs the software to create, destroy, modify, and manage the virtual machines in the cloud.
The software installed on this virtual machine includes:
� Tivoli Service Automation Manager 7.2.1 Fix Pack 1� Tivoli Service Request Manager 7.2.0.1� Tivoli Provisioning Manager version 7.2� DB2 ESE 9.5 Fix Pack 3� WebSphere® Network Deployment 6.1.0.23� Tivoli Directory Server 6.2� IBM HTTP Server 6.1.0.23� Tivoli System Automation for Multiplatforms 3.1.0.6
3.3.2 Monitoring image—icb-itm
This virtual machine is the monitoring engine of the solution. The software installed on it monitors the cloud management infrastructure and the provisioned virtual machines. These monitoring capabilities include:
� Disk usage� File information� Network information� Processes
The software installed on this virtual image includes:
� Tivoli Enterprise Monitoring Server 6.2.2 Fix Pack 1� Tivoli Enterprise Portal Server 6.2.2 Fix Pack 1� IBM DB2 ESE 9.5 Fix Pack 3
One or more IBM Tivoli Monitoring agents are installed on each IBM CloudBurst for System x virtual image.
icb-itmThe virtual machine has the following components:
� lz: Monitoring Agent for Linux OS� sy: Summarization and Pruning Agent � hd: Warehouse Proxy � ud: Monitoring Agent for DB2
Chapter 3. CloudBurst software 77
icb-nfsThe virtual machine has the following components:
� lz: Monitoring Agent for Linux OS
icb-tuamThe virtual machine has the following components:
� lz: Monitoring Agent for Linux OS� ud: Monitoring Agent for DB2
icb-tivsamThe virtual machine has the following components:
� lz: Monitoring Agent for Linux OS� ud: Monitoring Agent for DB2� pe: Monitoring Agent for Tivoli Provisioning Manager
3.3.3 Usage and Accounting image—cb-tuam
This virtual machine is the usage and accounting engine for the solution. The software installed here is in charge of processing the information about provisioned and de-provisioned virtual machines and preparing the data for invoice reporting. The software installed on this virtual machine consists of:
� Tivoli Usage and Accounting Manager 7.1.2� DB2 ESE 9.5 Fix Pack 3
3.3.4 File repository, mail server, and URL redirection image—icb-nfs
The purpose of this machine is to provide the following functions:
� File repository: The virtual image stores the binary files used by Tivoli Service Automation Manager to deploy the Tivoli Monitoring agents on a provisioned virtual machine.
� Mail server: Supports the Tivoli Service Automation Manager notification system.
� URL redirection: This virtual machine is the single access point to IBM Tivoli Usage and Accounting Manager, IBM Tivoli Service Automation Manager,
Note: Both agents sy and hd are used to exploit the IBM Tivoli Monitoring Warehouse integration (Data Warehouse solution is already present in the customer environment) gathering historical information.
78 IBM CloudBurst on System x
and IBM Tivoli Provisioning Manager UIs. You can use its IP address and host name in a web browser to access all three UIs, rather than using individual IP addresses and host names for each.
The software installed on this machine consists of:
� IBM HTTP Server 7.0 with WebSphere 7.0 Plug-in� Tivoli System Automation for Multiplatforms 3.1.0.6
To exploit the file repository role, a network file system server and a SAMBA server are also running on this virtual machine.
3.3.5 Dual node high availability
Optionally, if your solution has the high availability feature implemented, there are two additional virtual images added to the CloudBurst architecture. The high availability function is supported only for the Tivoli Service Automation Manager and NFS virtual images.
icb-nfs-haThis virtual machine can be optionally installed if you want to exploit high availability for icb-nfs and its services. Its software stack is identical to icb-nfs. Tivoli System Automation for Multiplatforms is responsible for managing high availability.
icb-tivsam-haThis virtual machine can be optionally installed if you want to exploit high availability for icb-tivsam and its services. Its software stack is identical to icb-tivsam. Tivoli System Automation for Multiplatforms is responsible for managing the high availability.
These virtual machines are running SUSE Linux Enterprise Server 10 Service Pack 3 64 bit.
3.4 IBM CloudBurst for System x management software
IBM CloudBurst for System x is preinstalled with the software necessary to manage the hardware and virtual resources. This software is preinstalled on the System x3550 M3 Management Server. For more information about the Management Server, see 2.2.3, “IBM System x3550 M3 Management Server” on page 40.
Chapter 3. CloudBurst software 79
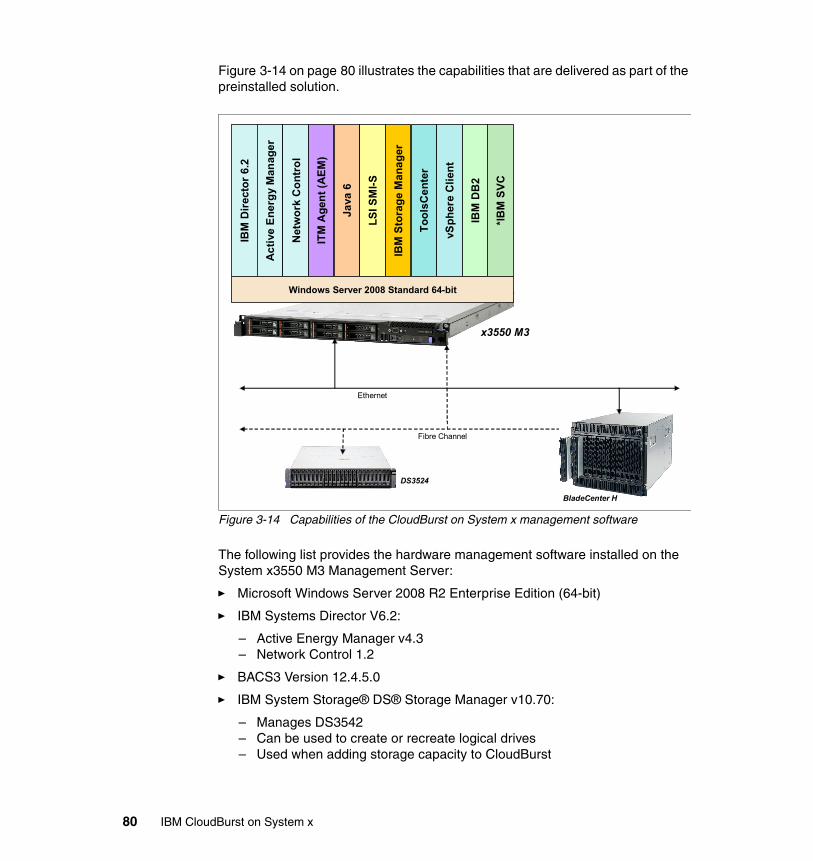
Figure 3-14 on page 80 illustrates the capabilities that are delivered as part of the preinstalled solution.
Figure 3-14 Capabilities of the CloudBurst on System x management software
The following list provides the hardware management software installed on the System x3550 M3 Management Server:
� Microsoft Windows Server 2008 R2 Enterprise Edition (64-bit)
� IBM Systems Director V6.2:
– Active Energy Manager v4.3– Network Control 1.2
� BACS3 Version 12.4.5.0
� IBM System Storage® DS® Storage Manager v10.70:
– Manages DS3542– Can be used to create or recreate logical drives– Used when adding storage capacity to CloudBurst
IBM
Dir
ecto
r 6.
2
Ac
tive
En
erg
y M
anag
er
Net
wo
rk C
on
tro
l
ITM
Ag
ent
(AE
M)
Java
6
LS
I SM
I-S
IBM
Sto
rag
e M
ana
ger
To
ols
Ce
nte
r
vSp
her
eC
lien
t
IBM
DB
2
*IB
M S
VC
x3550 M3
Ethernet
Fibre Channel
BladeCenter H
DS3524
Windows Server 2008 Standard 64-bit
80 IBM CloudBurst on System x
� Tools Center:
– Bootable Media Creator 2.0– Advanced Setup Utility 3.5– Dynamic Systems Analysis 3.0– UpdateXpress System Pack Installer 4.0
� IBM DB2 Enterprise Server Edition V9.5 FP5
� LSI Eagle2 SMI-S provider:
– Integrates IBM Systems Director with DS3542
� VMware vSphere Client 4.1
3.4.1 IBM Systems Director
IBM Systems Director is a platform management foundation that streamlines the way physical and virtual systems are managed across a multi-system environment. Leveraging industry standards, Systems Director supports multiple operating systems and virtualization technologies across IBM and non-IBM platforms. IBM Systems Director is an easy-to-use, point-and-click, simplified management solution. Through a single browser-based UI, Systems Director provides consistent views for visualizing managed systems and determining how these systems relate to one another while identifying the individual status of each.
IBM Systems Director is a platform management solution that utilizes a modular and extensible platform services foundation, which provides a way to add advanced platform management capabilities to the base offering. Advanced platform management functions can be added using plug-ins as they are required.
IBM Systems Director unifies the management of IBM systems, delivering a consistent look and feel for common management tasks, and integrates the IBM best-of-breed virtualization capabilities to provide new and radically improved ways to simplify the management of physical and virtual platform resources.
Systems Director provides multi-system support for IBM Power Systems™, Systems x, BladeCenter, System z, and Storage Systems, enabling seamless integration of IBM systems with the total infrastructure. Systems Director also manages non-IBM x86-based systems through a dedicated agent.
IBM Systems Director itself can be divided into two areas: Base Systems Director Managers and Hardware Platform Managers. Provided with IBM Systems Director, these managers deliver core capabilities for managing the full lifecycle of IBM server, storage, network, and virtualization systems.
Chapter 3. CloudBurst software 81
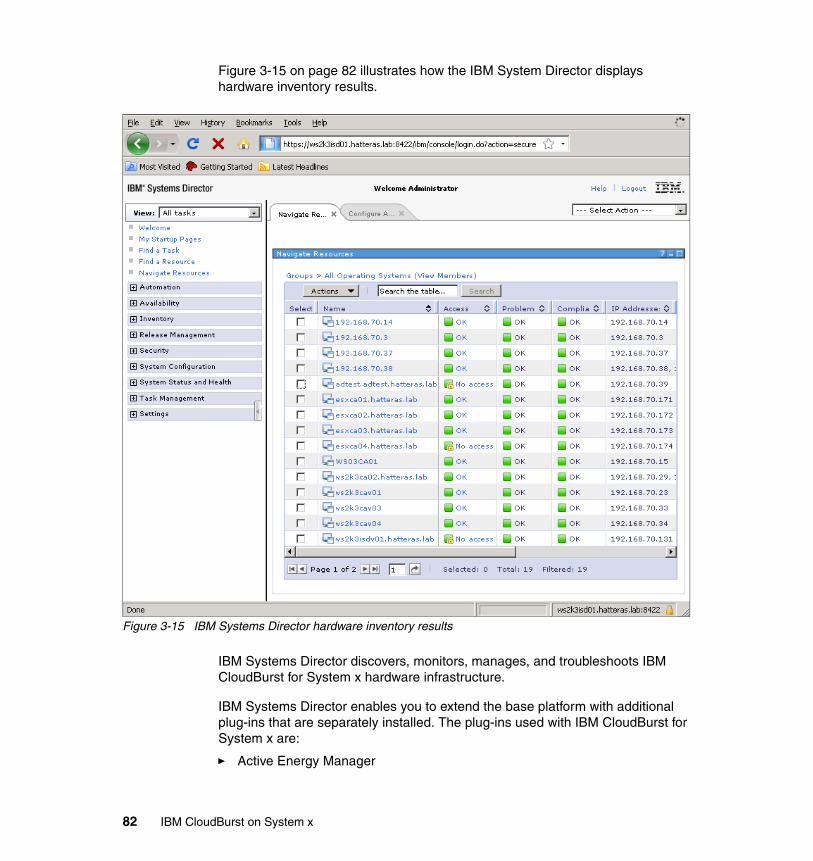
Figure 3-15 on page 82 illustrates how the IBM System Director displays hardware inventory results.
Figure 3-15 IBM Systems Director hardware inventory results
IBM Systems Director discovers, monitors, manages, and troubleshoots IBM CloudBurst for System x hardware infrastructure.
IBM Systems Director enables you to extend the base platform with additional plug-ins that are separately installed. The plug-ins used with IBM CloudBurst for System x are:
� Active Energy Manager
82 IBM CloudBurst on System x
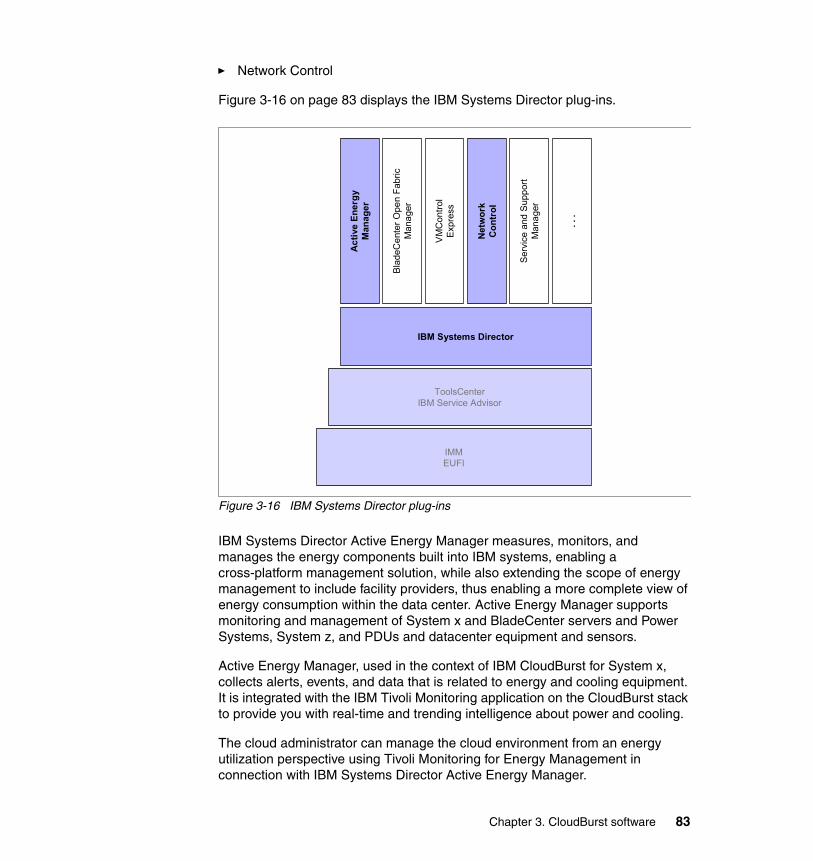
� Network Control
Figure 3-16 on page 83 displays the IBM Systems Director plug-ins.
Figure 3-16 IBM Systems Director plug-ins
IBM Systems Director Active Energy Manager measures, monitors, and manages the energy components built into IBM systems, enabling a cross-platform management solution, while also extending the scope of energy management to include facility providers, thus enabling a more complete view of energy consumption within the data center. Active Energy Manager supports monitoring and management of System x and BladeCenter servers and Power Systems, System z, and PDUs and datacenter equipment and sensors.
Active Energy Manager, used in the context of IBM CloudBurst for System x, collects alerts, events, and data that is related to energy and cooling equipment. It is integrated with the IBM Tivoli Monitoring application on the CloudBurst stack to provide you with real-time and trending intelligence about power and cooling.
The cloud administrator can manage the cloud environment from an energy utilization perspective using Tivoli Monitoring for Energy Management in connection with IBM Systems Director Active Energy Manager.
IBM Systems Director
ToolsCenterIBM Service Advisor
IMMEUFI
Ac
tive
En
erg
yM
anag
er
Bla
deC
ent
erO
pen
Fab
ricM
ana
ger
VM
Con
trol
Exp
ress
Net
wo
rkC
on
tro
l
Ser
vice
and
Sup
por
tM
ana
ger
. . .
Chapter 3. CloudBurst software 83
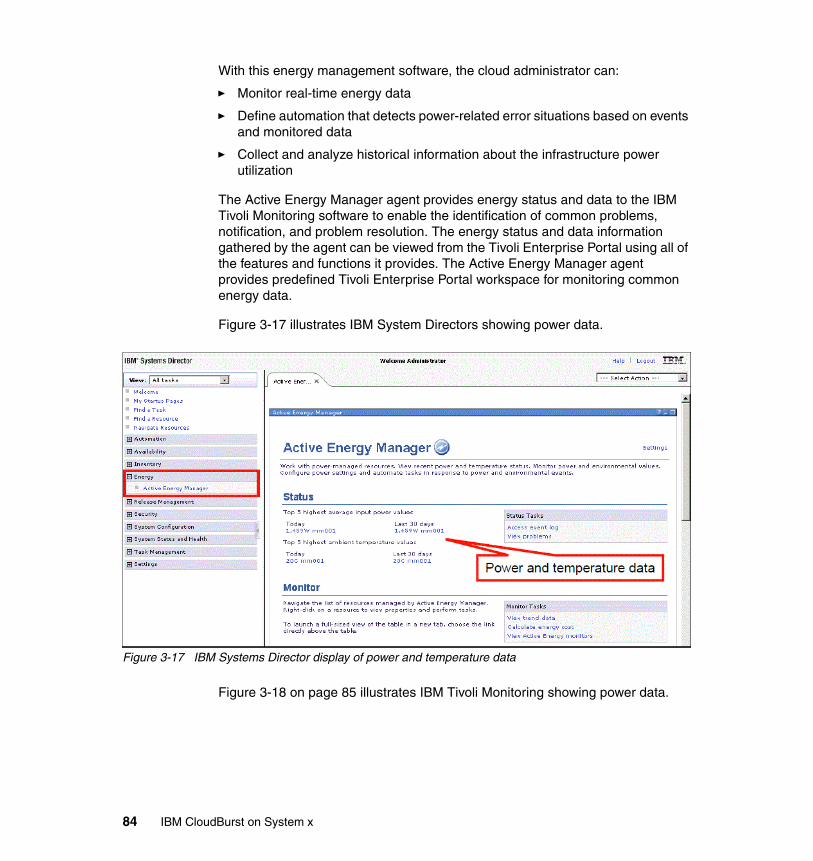
With this energy management software, the cloud administrator can:
� Monitor real-time energy data
� Define automation that detects power-related error situations based on events and monitored data
� Collect and analyze historical information about the infrastructure power utilization
The Active Energy Manager agent provides energy status and data to the IBM Tivoli Monitoring software to enable the identification of common problems, notification, and problem resolution. The energy status and data information gathered by the agent can be viewed from the Tivoli Enterprise Portal using all of the features and functions it provides. The Active Energy Manager agent provides predefined Tivoli Enterprise Portal workspace for monitoring common energy data.
Figure 3-17 illustrates IBM System Directors showing power data.
Figure 3-17 IBM Systems Director display of power and temperature data
Figure 3-18 on page 85 illustrates IBM Tivoli Monitoring showing power data.
84 IBM CloudBurst on System x
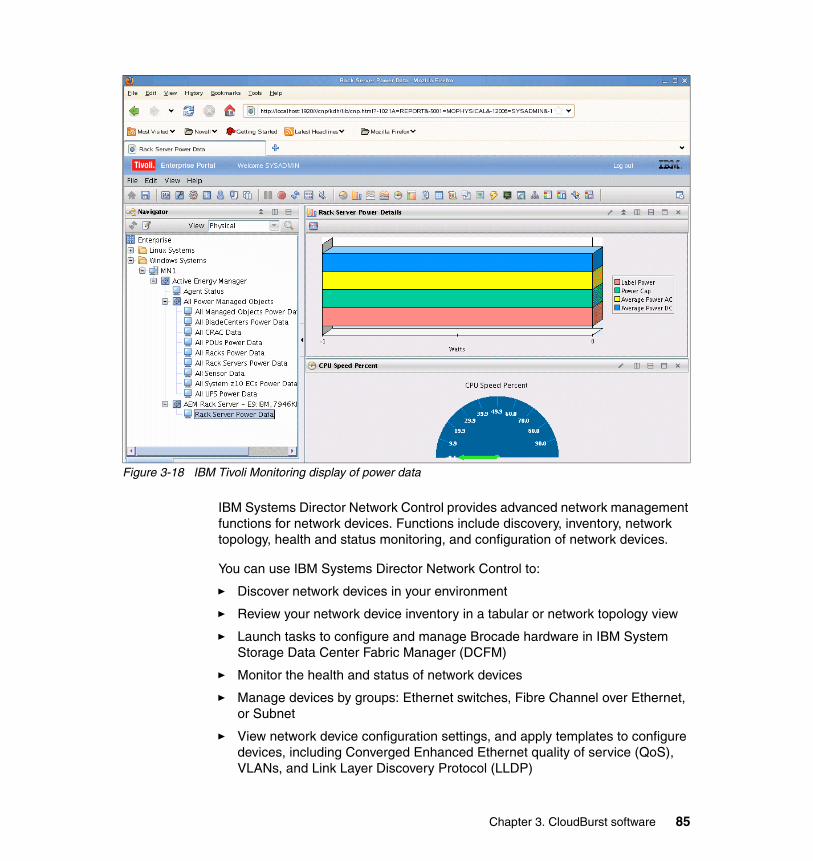
Figure 3-18 IBM Tivoli Monitoring display of power data
IBM Systems Director Network Control provides advanced network management functions for network devices. Functions include discovery, inventory, network topology, health and status monitoring, and configuration of network devices.
You can use IBM Systems Director Network Control to:
� Discover network devices in your environment
� Review your network device inventory in a tabular or network topology view
� Launch tasks to configure and manage Brocade hardware in IBM System Storage Data Center Fabric Manager (DCFM)
� Monitor the health and status of network devices
� Manage devices by groups: Ethernet switches, Fibre Channel over Ethernet, or Subnet
� View network device configuration settings, and apply templates to configure devices, including Converged Enhanced Ethernet quality of service (QoS), VLANs, and Link Layer Discovery Protocol (LLDP)
Chapter 3. CloudBurst software 85
� View systems according to VLAN and subnet
� Run network diagnostic tools, for example, ping and traceroute
For more information about IBM Systems Director, see IBM Director V6.2.x at
http://publib.boulder.ibm.com/infocenter/director/v6r2x/index.jsp?topic=%2Fcom.ibm.director.main.helps.doc%2Ffqm0_main.html
86 IBM CloudBurst on System x
Chapter 4. Initial setup
This chapter describes a selection of initial set up tasks that might be performed when a Cloudburst for System x environment is installed. We discuss:
� 4.1, “Creating operating system templates” on page 88� 4.2, “Installable software” on page 103� 4.3, “Reporting” on page 124� 4.4, “Self-service UI customization and REST API usage” on page 139� 4.5, “Modifying for branding” on page 151� 4.6, “Customizing email notification templates” on page 166� 4.7, “Lifecycle of provisioning a project” on page 170
4
© Copyright IBM Corp. 2012. All rights reserved. 87
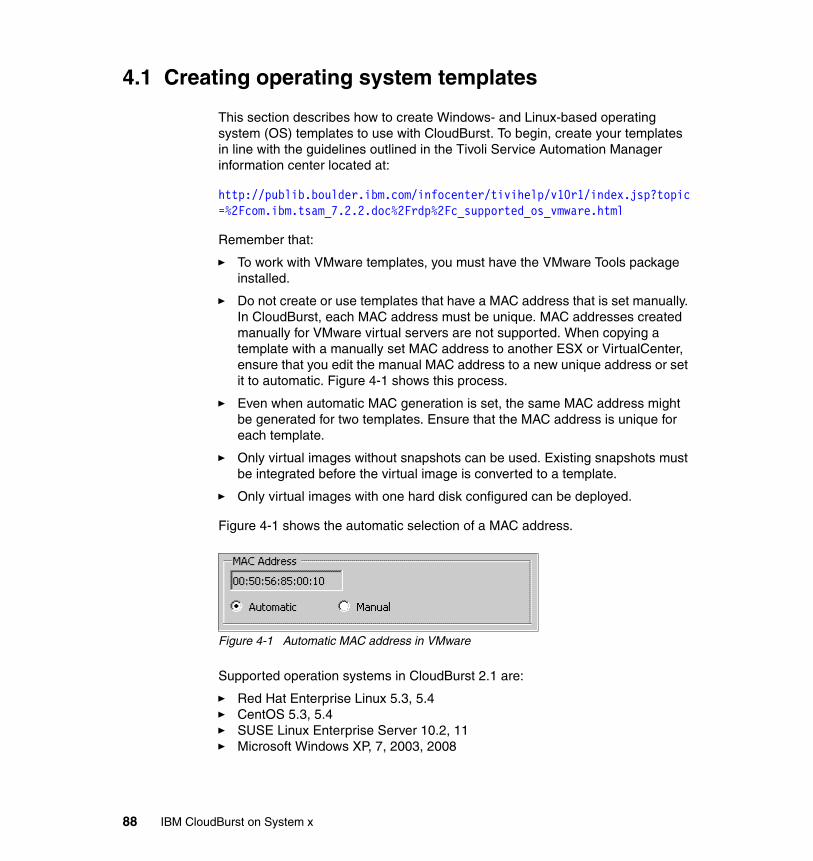
4.1 Creating operating system templates
This section describes how to create Windows- and Linux-based operating system (OS) templates to use with CloudBurst. To begin, create your templates in line with the guidelines outlined in the Tivoli Service Automation Manager information center located at:
http://publib.boulder.ibm.com/infocenter/tivihelp/v10r1/index.jsp?topic=%2Fcom.ibm.tsam_7.2.2.doc%2Frdp%2Fc_supported_os_vmware.html
Remember that:
� To work with VMware templates, you must have the VMware Tools package installed.
� Do not create or use templates that have a MAC address that is set manually. In CloudBurst, each MAC address must be unique. MAC addresses created manually for VMware virtual servers are not supported. When copying a template with a manually set MAC address to another ESX or VirtualCenter, ensure that you edit the manual MAC address to a new unique address or set it to automatic. Figure 4-1 shows this process.
� Even when automatic MAC generation is set, the same MAC address might be generated for two templates. Ensure that the MAC address is unique for each template.
� Only virtual images without snapshots can be used. Existing snapshots must be integrated before the virtual image is converted to a template.
� Only virtual images with one hard disk configured can be deployed.
Figure 4-1 shows the automatic selection of a MAC address.
Figure 4-1 Automatic MAC address in VMware
Supported operation systems in CloudBurst 2.1 are:
� Red Hat Enterprise Linux 5.3, 5.4� CentOS 5.3, 5.4� SUSE Linux Enterprise Server 10.2, 11� Microsoft Windows XP, 7, 2003, 2008
88 IBM CloudBurst on System x
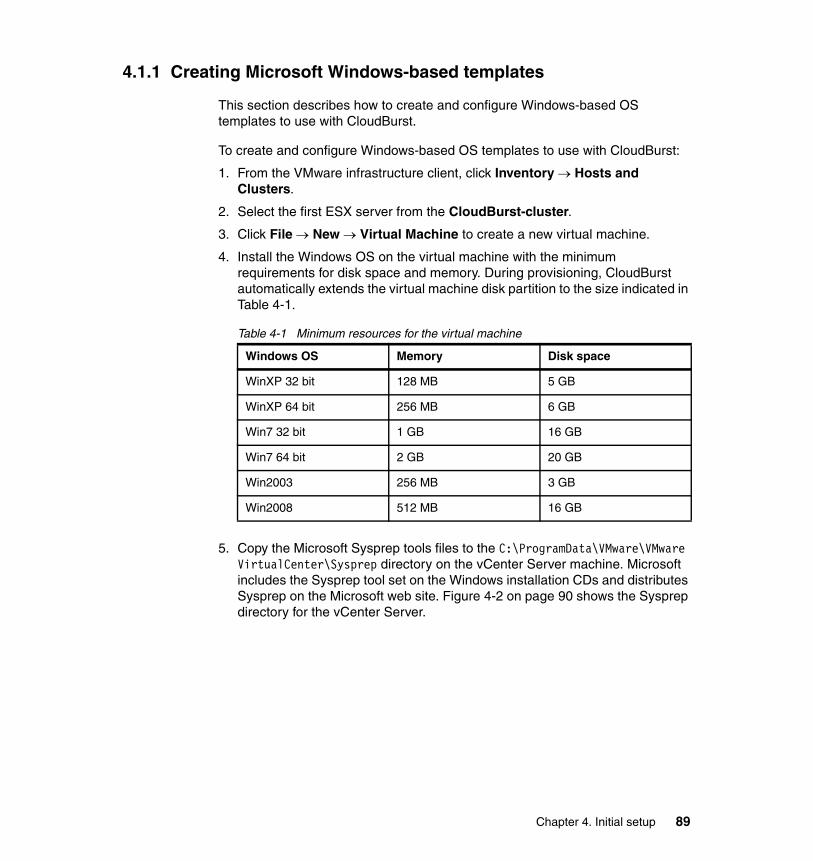
4.1.1 Creating Microsoft Windows-based templates
This section describes how to create and configure Windows-based OS templates to use with CloudBurst.
To create and configure Windows-based OS templates to use with CloudBurst:
1. From the VMware infrastructure client, click Inventory Hosts and Clusters.
2. Select the first ESX server from the CloudBurst-cluster.
3. Click File New Virtual Machine to create a new virtual machine.
4. Install the Windows OS on the virtual machine with the minimum requirements for disk space and memory. During provisioning, CloudBurst automatically extends the virtual machine disk partition to the size indicated in Table 4-1.
Table 4-1 Minimum resources for the virtual machine
5. Copy the Microsoft Sysprep tools files to the C:\ProgramData\VMware\VMware VirtualCenter\Sysprep directory on the vCenter Server machine. Microsoft includes the Sysprep tool set on the Windows installation CDs and distributes Sysprep on the Microsoft web site. Figure 4-2 on page 90 shows the Sysprep directory for the vCenter Server.
Windows OS Memory Disk space
WinXP 32 bit 128 MB 5 GB
WinXP 64 bit 256 MB 6 GB
Win7 32 bit 1 GB 16 GB
Win7 64 bit 2 GB 20 GB
Win2003 256 MB 3 GB
Win2008 512 MB 16 GB
Chapter 4. Initial setup 89
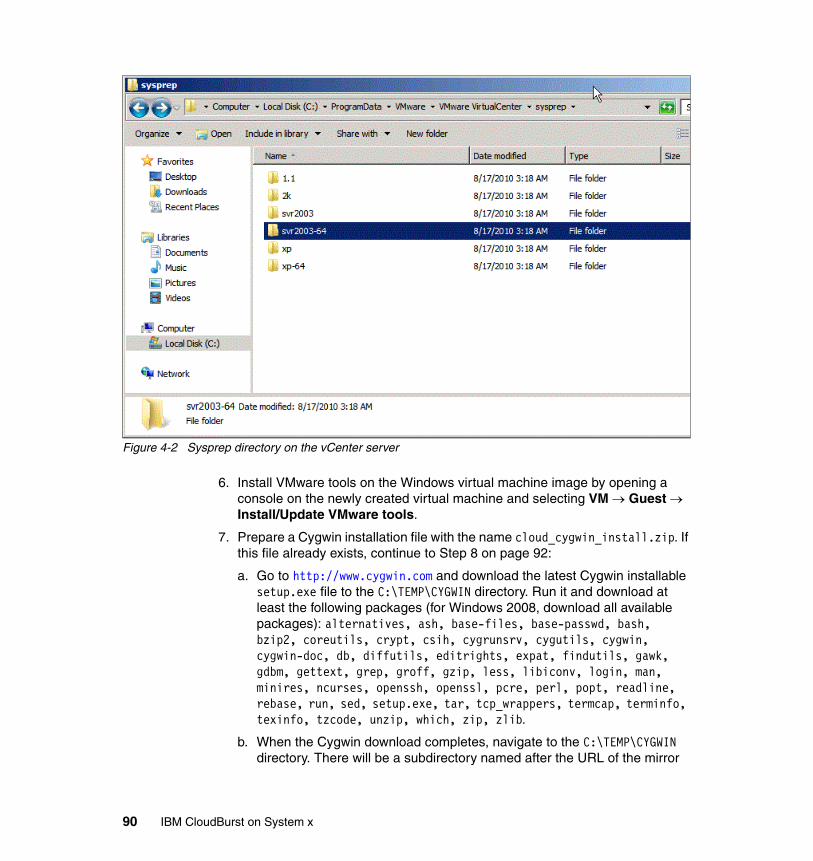
Figure 4-2 Sysprep directory on the vCenter server
6. Install VMware tools on the Windows virtual machine image by opening a console on the newly created virtual machine and selecting VM Guest Install/Update VMware tools.
7. Prepare a Cygwin installation file with the name cloud_cygwin_install.zip. If this file already exists, continue to Step 8 on page 92:
a. Go to http://www.cygwin.com and download the latest Cygwin installable setup.exe file to the C:\TEMP\CYGWIN directory. Run it and download at least the following packages (for Windows 2008, download all available packages): alternatives, ash, base-files, base-passwd, bash, bzip2, coreutils, crypt, csih, cygrunsrv, cygutils, cygwin, cygwin-doc, db, diffutils, editrights, expat, findutils, gawk, gdbm, gettext, grep, groff, gzip, less, libiconv, login, man, minires, ncurses, openssh, openssl, pcre, perl, popt, readline, rebase, run, sed, setup.exe, tar, tcp_wrappers, termcap, terminfo, texinfo, tzcode, unzip, which, zip, zlib.
b. When the Cygwin download completes, navigate to the C:\TEMP\CYGWIN directory. There will be a subdirectory named after the URL of the mirror
90 IBM CloudBurst on System x
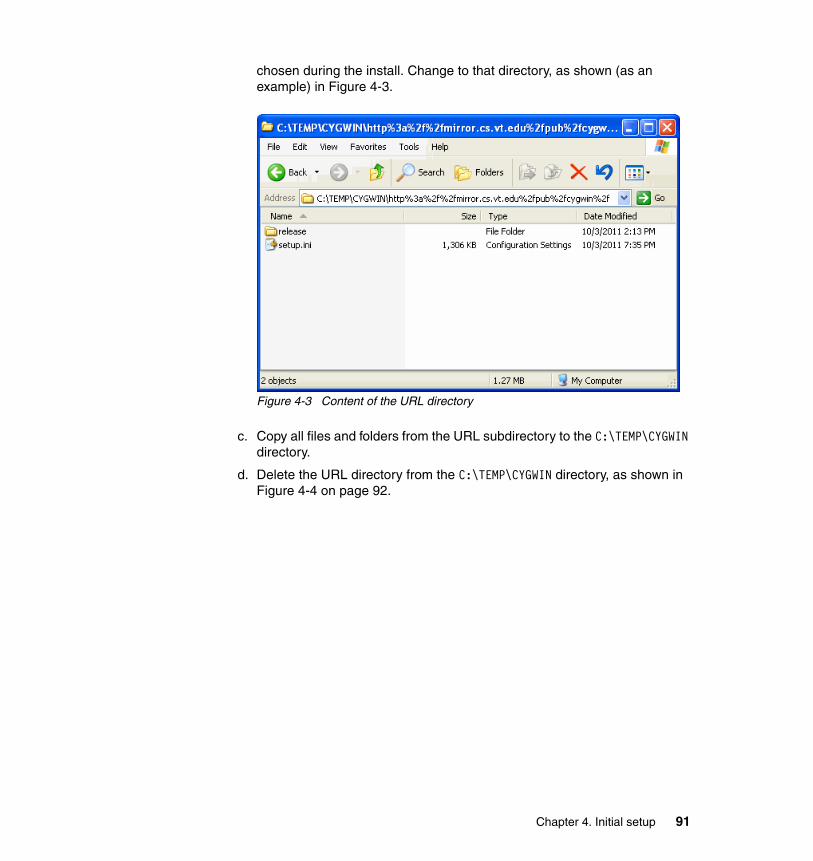
chosen during the install. Change to that directory, as shown (as an example) in Figure 4-3.
Figure 4-3 Content of the URL directory
c. Copy all files and folders from the URL subdirectory to the C:\TEMP\CYGWIN directory.
d. Delete the URL directory from the C:\TEMP\CYGWIN directory, as shown in Figure 4-4 on page 92.
Chapter 4. Initial setup 91
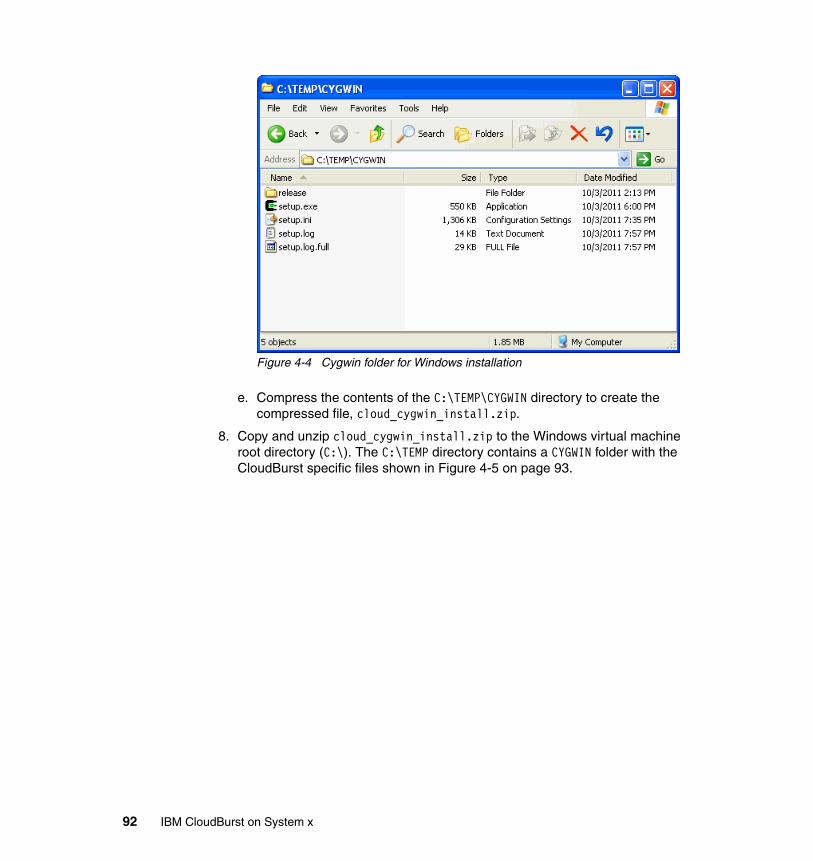
Figure 4-4 Cygwin folder for Windows installation
e. Compress the contents of the C:\TEMP\CYGWIN directory to create the compressed file, cloud_cygwin_install.zip.
8. Copy and unzip cloud_cygwin_install.zip to the Windows virtual machine root directory (C:\). The C:\TEMP directory contains a CYGWIN folder with the CloudBurst specific files shown in Figure 4-5 on page 93.
92 IBM CloudBurst on System x
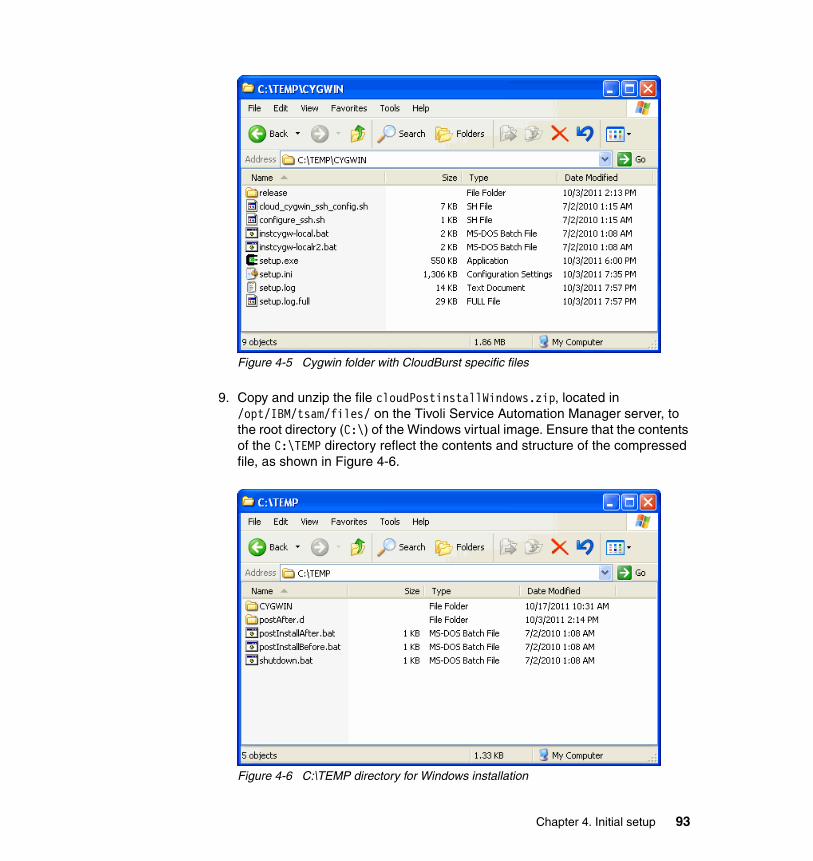
Figure 4-5 Cygwin folder with CloudBurst specific files
9. Copy and unzip the file cloudPostinstallWindows.zip, located in /opt/IBM/tsam/files/ on the Tivoli Service Automation Manager server, to the root directory (C:\) of the Windows virtual image. Ensure that the contents of the C:\TEMP directory reflect the contents and structure of the compressed file, as shown in Figure 4-6.
Figure 4-6 C:\TEMP directory for Windows installation
Chapter 4. Initial setup 93
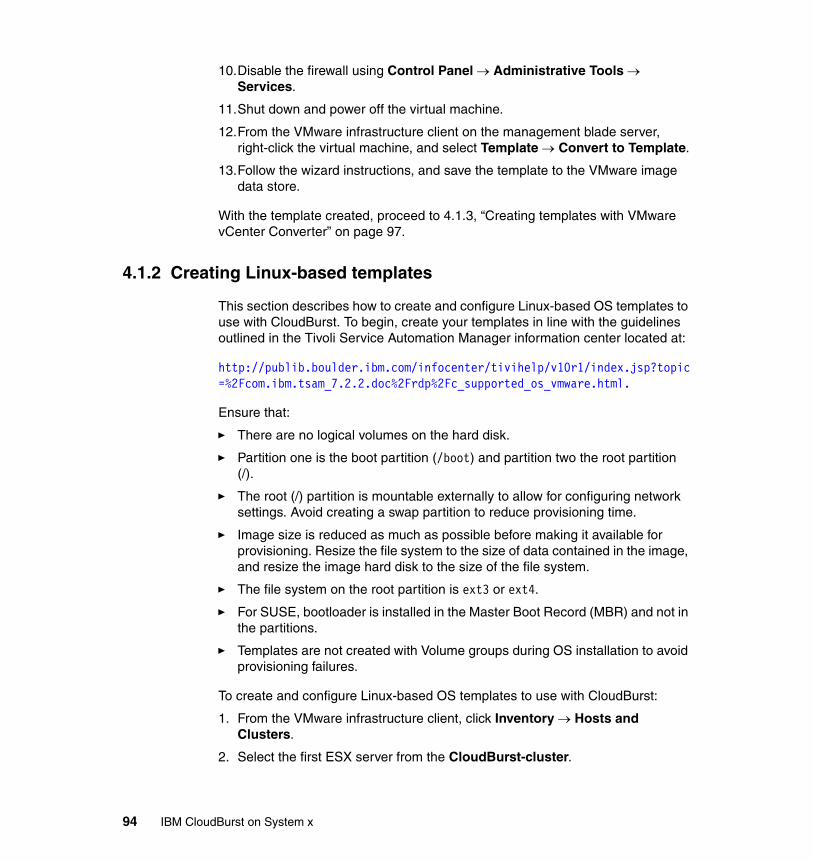
10.Disable the firewall using Control Panel Administrative Tools Services.
11.Shut down and power off the virtual machine.
12.From the VMware infrastructure client on the management blade server, right-click the virtual machine, and select Template Convert to Template.
13.Follow the wizard instructions, and save the template to the VMware image data store.
With the template created, proceed to 4.1.3, “Creating templates with VMware vCenter Converter” on page 97.
4.1.2 Creating Linux-based templates
This section describes how to create and configure Linux-based OS templates to use with CloudBurst. To begin, create your templates in line with the guidelines outlined in the Tivoli Service Automation Manager information center located at:
http://publib.boulder.ibm.com/infocenter/tivihelp/v10r1/index.jsp?topic=%2Fcom.ibm.tsam_7.2.2.doc%2Frdp%2Fc_supported_os_vmware.html.
Ensure that:
� There are no logical volumes on the hard disk.
� Partition one is the boot partition (/boot) and partition two the root partition (/).
� The root (/) partition is mountable externally to allow for configuring network settings. Avoid creating a swap partition to reduce provisioning time.
� Image size is reduced as much as possible before making it available for provisioning. Resize the file system to the size of data contained in the image, and resize the image hard disk to the size of the file system.
� The file system on the root partition is ext3 or ext4.
� For SUSE, bootloader is installed in the Master Boot Record (MBR) and not in the partitions.
� Templates are not created with Volume groups during OS installation to avoid provisioning failures.
To create and configure Linux-based OS templates to use with CloudBurst:
1. From the VMware infrastructure client, click Inventory Hosts and Clusters.
2. Select the first ESX server from the CloudBurst-cluster.
94 IBM CloudBurst on System x
3. Create a new virtual machine.
4. Select the Linux OS.
5. Install the Linux OS on the virtual machine with the minimum requirements. During provisioning, CloudBurst automatically extends the virtual machine disk and file systems to the requested size.
6. Remove the SWAP partition, if any.
7. Carry out the OS-specific steps described in “Creating templates on Red Hat and CentOS Linux” on page 96 or in “Creating templates on SuSE” on page 96, as applicable.
8. Remove all Secure Shell (SSH) keys in the /root directory, if any.
9. Remove the SSH host keys, if any, using cd /etc/ssh; rm ssh_host*.
10.Install VMware tools:
a. Open a console in the VMware client and navigate to the newly created virtual machine.
b. From the virtual machine console, select VM Guest Install/Update VMware tools.
c. Open a terminal and access the VMware tools by typing the commands shown in Example 4-1 as root.
Example 4-1 Installing VMware tools on a Linux-based system
mkdir -p /media/cdrommount /dev/cdrom /media/cdromls -l /media/cdromcd /rootmkdir temp_vmwtoolscd temp_vmwtoolscp /media/cdrom/vmware-tools-distrib.tar.gz ./gunzip vmware-tools-distrib.tar.gztar -xvf vmware-tools-distrib.tarcd /vmware-tools-distrib./vmware-install.pl
Your filename for VMware tools can be different than that shown in Example 4-1; however, it will be used again when you execute the third (ls -l) command.
d. Select all of the default options, including the option to configure VMware tools. Wait for the installation to complete.
e. Again, select VM Guest End Install VMware tools.
f. Clean up the temporary directory using rm -rf /root/temp_vmwtools.
Chapter 4. Initial setup 95
g. Close the terminal.
11.Shut down the guest OS, and power off the virtual machine.
12.From the VMware infrastructure client, right-click the virtual machine, and select Template Convert to Template.
13.Follow the wizard instructions and save the template to the VMware image data store.
Creating templates on Red Hat and CentOS LinuxTo create templates on the Red Hat and CentOS systems:
1. Stop the local firewall and set it to a manual start:
a. As root, run the commands shown in Example 4-2.
Example 4-2 Disable firewall on RHEL
service iptables saveservice iptables stopchconfig iptables off
b. Set SELINUX=disabled in the /etc/selinux/config file to disable Security Enhanced (SE) Linux.
2. Remove persistent network interfaces by removing all files matching the token ifcfg-eth* in /etc/sysconfig/network-scripts directory.
3. For Red Hat Enterprise Linux 5.4 and CentOS 5.4 templates, add the service network restart line to the end of the /etc/rc.local file.
Creating templates on SuSETo create templates in a SuSE-specific environment:
1. Stop the local firewall and set it to manual start:
a. Select YaST Security and Users Firewall.
b. In the Service Start section, set the firewall startup to manual and stop the firewall.
2. Ensure that bootloader is installed in the MBR:
a. Select YaST System Boot Loader.
b. Click the Boot Loader Installation tab, and go to the Boot Loader Location section.
c. Clear the Boot from Boot Partition option.
d. Select the Boot from Master Boot Record option.
96 IBM CloudBurst on System x
3. Remove persistent network interfaces by editing the 30-net_persistent_names.rules file (for SUSE Linux Enterprise Server 11, edit 70-persistent-net.rules) in the /etc/udev/rules.d directory, and remove all the network entries, leaving only comments.
4. For SUSE Linux Enterprise Server 11, verify that the red prompt is disabled on the terminal. To do so, open the terminal, and if the prompt appears in red, edit /etc/bash.bashrc and comment out the PS1="\[$_bred\]$PS1\[$_sgr0\]" line.
With the template created, proceed to 4.1.3, “Creating templates with VMware vCenter Converter” on page 97.
4.1.3 Creating templates with VMware vCenter Converter
With VMware vCenter Converter, you can create templates for CloudBurst from Windows- and Linux-based physical machines. This tool is also capable of converting an existing VMware Workstation or other third party images, for example, Microsoft Hyper-V, Microsoft Virtual Server, Microsoft Virtual PC, Parallels Desktop, Symantec Backup Exec System Recovery, Norton Ghost, Acronis, StorageCraft.
To convert a Windows XP physical machine:
1. Download and install a Local installation of the latest version of the Converter from:
http://www.vmware.com/products/converter/
2. Copy the Microsoft Sysprep tool based on the convertible OS to the %ALLUSERSPROFILE%\Application Data\VMware\VMware vCenter Converter Standalone\sysprep folder on the converter machine.
3. Run the tool from the Windows Start menu.
4. Click Convert machine.
5. Populate the IP address or name, User name, and Password fields, and choose the correct OS family in the Source System step.
6. Click Next.
7. Click Yes for Automatically uninstall the files when import succeeds.
Tip: Install the tool on a machine from which you can reach both the convertible OS and the CloudBurst management infrastructure, for example, the mn1.private.ibm.com management server.
Chapter 4. Initial setup 97
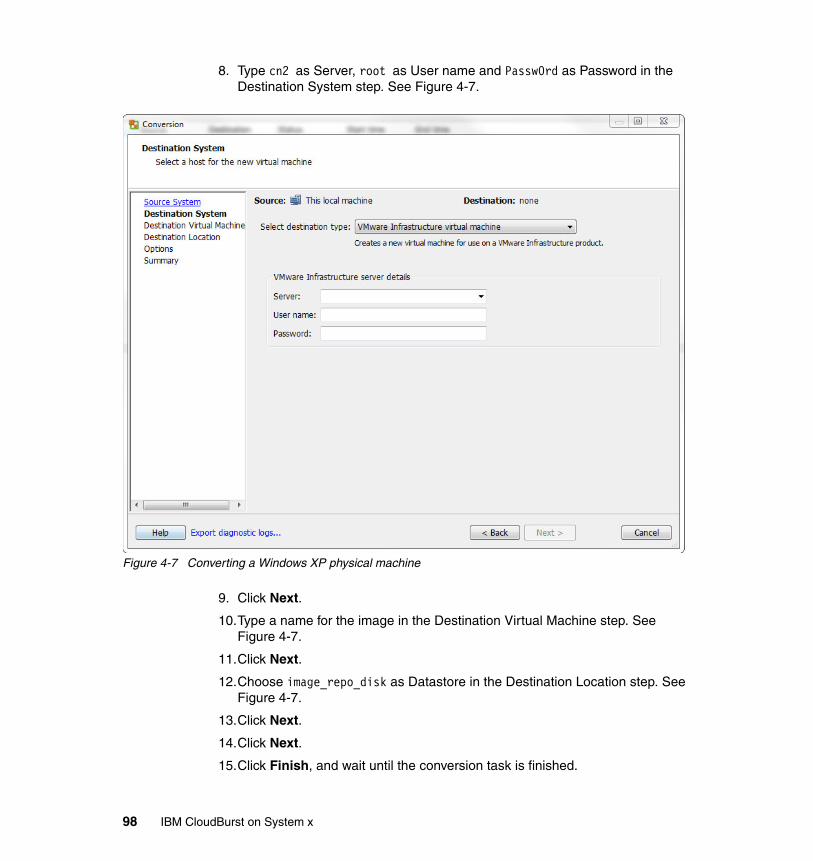
8. Type cn2 as Server, root as User name and Passw0rd as Password in the Destination System step. See Figure 4-7.
Figure 4-7 Converting a Windows XP physical machine
9. Click Next.
10.Type a name for the image in the Destination Virtual Machine step. See Figure 4-7.
11.Click Next.
12.Choose image_repo_disk as Datastore in the Destination Location step. See Figure 4-7.
13.Click Next.
14.Click Next.
15.Click Finish, and wait until the conversion task is finished.
98 IBM CloudBurst on System x
16.Prepare the guest OS as described in 4.1.1, “Creating Microsoft Windows-based templates” on page 89, and register the image as described in 4.1.4, “Preparing the OS image template for CloudBurst” on page 99.
For other conversions, review the VMware Converter documentation at http://www.vmware.com/support/pubs/converter_pubs.html.
4.1.4 Preparing the OS image template for CloudBurst
After you successfully create the OS template, add it to the CloudBurst stack to be able to use it during provisioning. The steps that follow apply to all operating systems.
Running a Tivoli Provisioning Manager discoveryTo discover the created OS templates from the hypervisor environment and add them to the data center model:
1. Log into the Tivoli Service Automation Manager administrative user interface.2. Click Go To Service Automation Cloud Pool Administration.3. Press Enter to display a list of all available Cloud Pools.4. Click VMware System x.5. Select the Cloud Pool Details tab.6. Scroll down to the Image Template Discovery section.7. Click Image Discovery to discover new images that were added.
Registering the image with the image libraryIn this section, we describe how to register the VMware image with the image library.
To register a VMware image:
1. Log in as PMRCDPAUSR to the Tivoli Service Automation Manager Self Service user interface at:
http://192.168.88.4/SimpleSRM
2. In the Home panel, select Request a new service Virtual Server Management Manage Image Library Register VMware Image to display the screen in Figure 4-8 on page 100.
Chapter 4. Initial setup 99
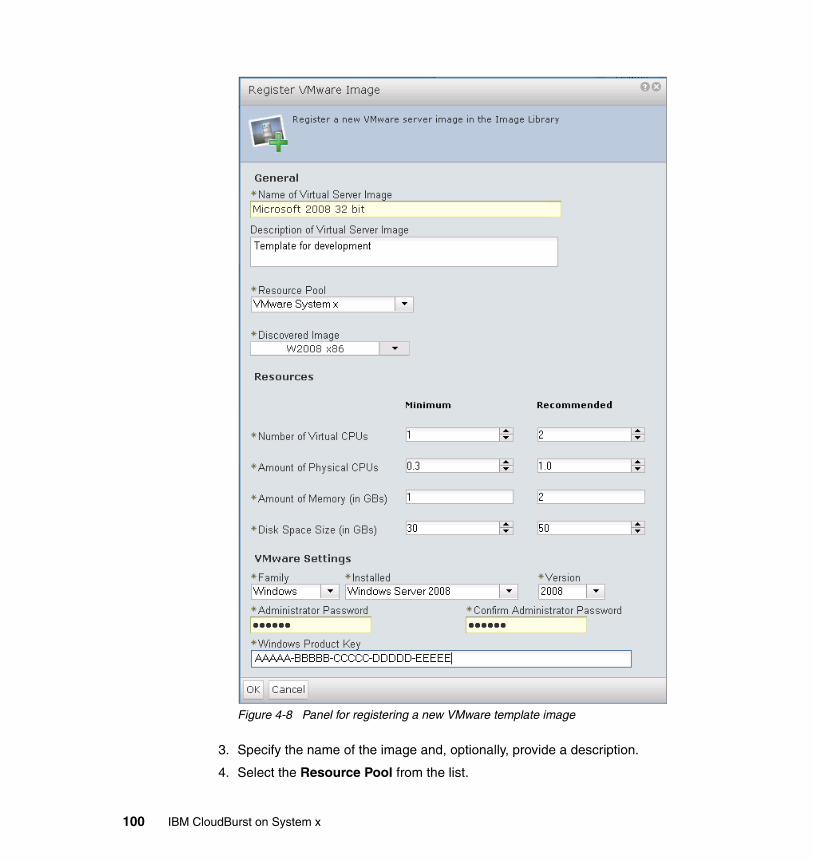
Figure 4-8 Panel for registering a new VMware template image
3. Specify the name of the image and, optionally, provide a description.
4. Select the Resource Pool from the list.
100 IBM CloudBurst on System x
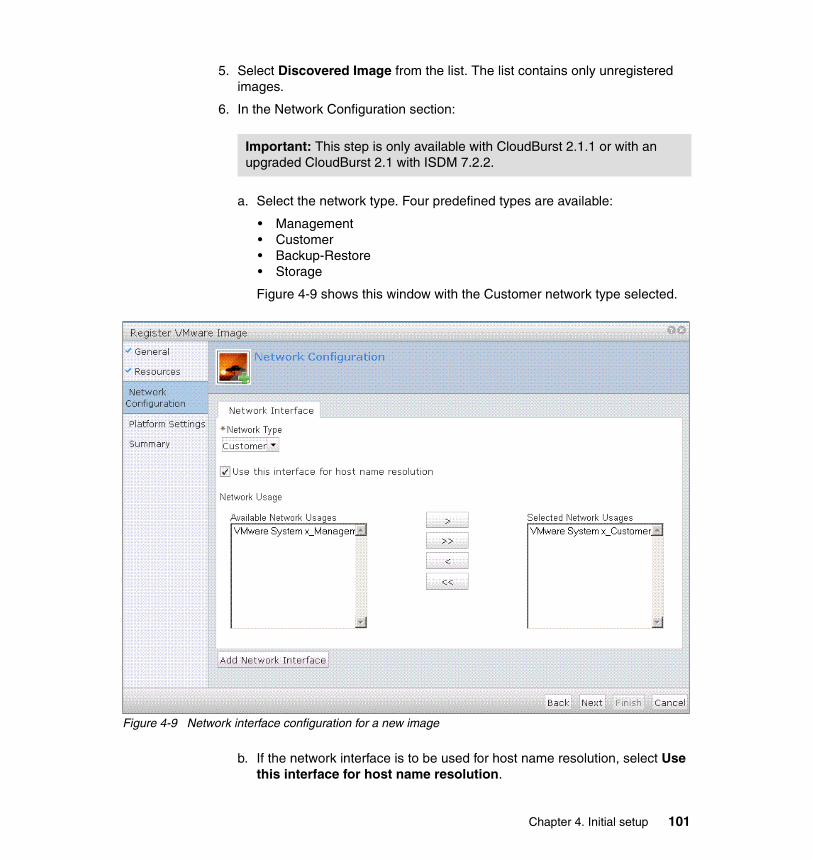
5. Select Discovered Image from the list. The list contains only unregistered images.
6. In the Network Configuration section:
a. Select the network type. Four predefined types are available:
• Management• Customer• Backup-Restore• Storage
Figure 4-9 shows this window with the Customer network type selected.
Figure 4-9 Network interface configuration for a new image
b. If the network interface is to be used for host name resolution, select Use this interface for host name resolution.
Important: This step is only available with CloudBurst 2.1.1 or with an upgraded CloudBurst 2.1 with ISDM 7.2.2.
Chapter 4. Initial setup 101
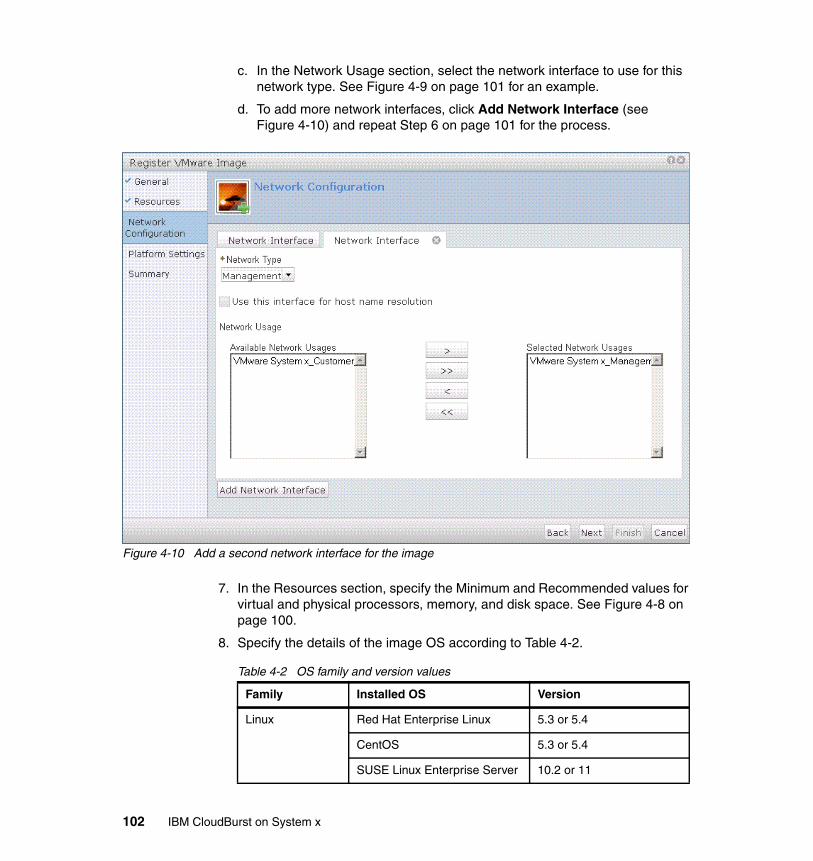
c. In the Network Usage section, select the network interface to use for this network type. See Figure 4-9 on page 101 for an example.
d. To add more network interfaces, click Add Network Interface (see Figure 4-10) and repeat Step 6 on page 101 for the process.
Figure 4-10 Add a second network interface for the image
7. In the Resources section, specify the Minimum and Recommended values for virtual and physical processors, memory, and disk space. See Figure 4-8 on page 100.
8. Specify the details of the image OS according to Table 4-2.
Table 4-2 OS family and version values
Family Installed OS Version
Linux Red Hat Enterprise Linux 5.3 or 5.4
CentOS 5.3 or 5.4
SUSE Linux Enterprise Server 10.2 or 11
102 IBM CloudBurst on System x
9. Depending on the OS, specify the Administrator Password or Root Password that matches the password set on the image from which the virtual machines will be created.
10.Microsoft Windows users only: Enter the Windows Product Key. See Figure 4-8 on page 100.
11.Click OK to submit the request.
If a VMware template is already registered in CloudBurst and needs to be modified, do not clone the virtual machine. If you do, you will not be able to use the modified VMware template. Instead, do the following:
1. Use VirtualCenter to convert the template into a virtual machine.2. Start the VM and modify it as required. 3. Convert the VM back into a template.
4.2 Installable software
IBM Tivoli Service Automation Manager 7.2.2 and its older versions can provision software using Tivoli Provisioning Manager, which is bundled into the Tivoli Service Automation Manager core product.
Tivoli Provisioning Manager uses the scalable distribution infrastructure for software distribution and installation, discovery, and compliance management. In this section, we discuss software distribution and installation only.
4.2.1 Simple software distribution
Tivoli Service Automation Manager provides a number of methods to distribute and install software on one or more managed target virtual servers, during or after provisioning. In this section, we discuss only Simple Software Distribution capability being a part of Tivoli Provisioning Manager functionality. This method is recommended for scenarios for which you do not need to perform extensive
Windows Windows XP Not required
Windows 2003 2003
Windows 2008 2008
Windows 2008 R2 2008
Windows 7 7
Family Installed OS Version
Chapter 4. Initial setup 103
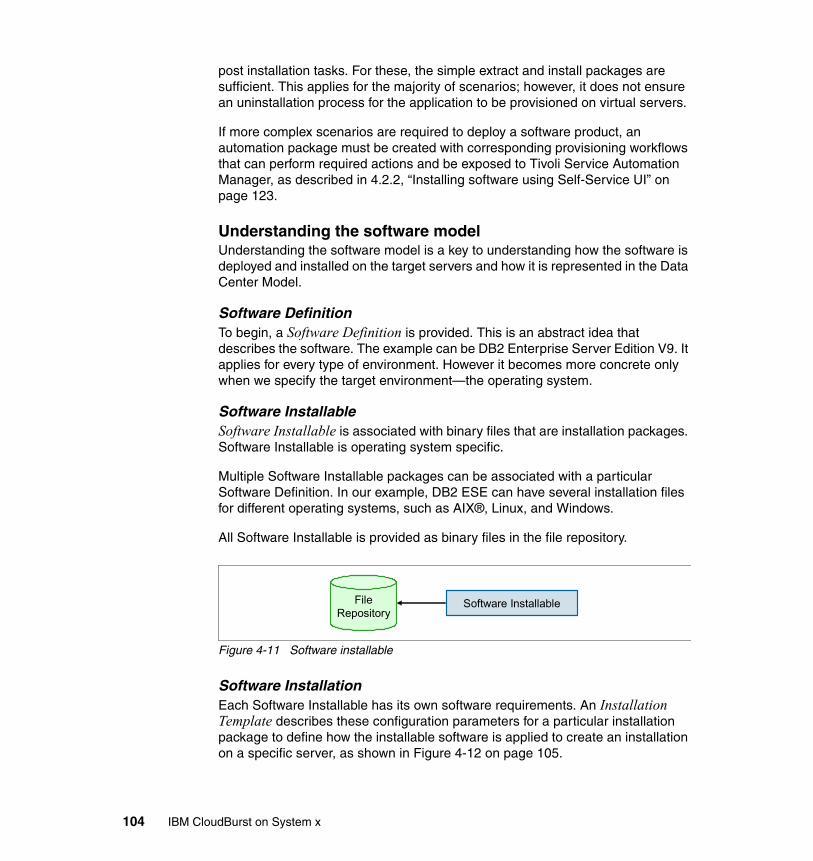
post installation tasks. For these, the simple extract and install packages are sufficient. This applies for the majority of scenarios; however, it does not ensure an uninstallation process for the application to be provisioned on virtual servers.
If more complex scenarios are required to deploy a software product, an automation package must be created with corresponding provisioning workflows that can perform required actions and be exposed to Tivoli Service Automation Manager, as described in 4.2.2, “Installing software using Self-Service UI” on page 123.
Understanding the software modelUnderstanding the software model is a key to understanding how the software is deployed and installed on the target servers and how it is represented in the Data Center Model.
Software DefinitionTo begin, a Software Definition is provided. This is an abstract idea that describes the software. The example can be DB2 Enterprise Server Edition V9. It applies for every type of environment. However it becomes more concrete only when we specify the target environment—the operating system.
Software InstallableSoftware Installable is associated with binary files that are installation packages. Software Installable is operating system specific.
Multiple Software Installable packages can be associated with a particular Software Definition. In our example, DB2 ESE can have several installation files for different operating systems, such as AIX®, Linux, and Windows.
All Software Installable is provided as binary files in the file repository.
Figure 4-11 Software installable
Software InstallationEach Software Installable has its own software requirements. An Installation Template describes these configuration parameters for a particular installation package to define how the installable software is applied to create an installation on a specific server, as shown in Figure 4-12 on page 105.
Software InstallableFileRepository
104 IBM CloudBurst on System x
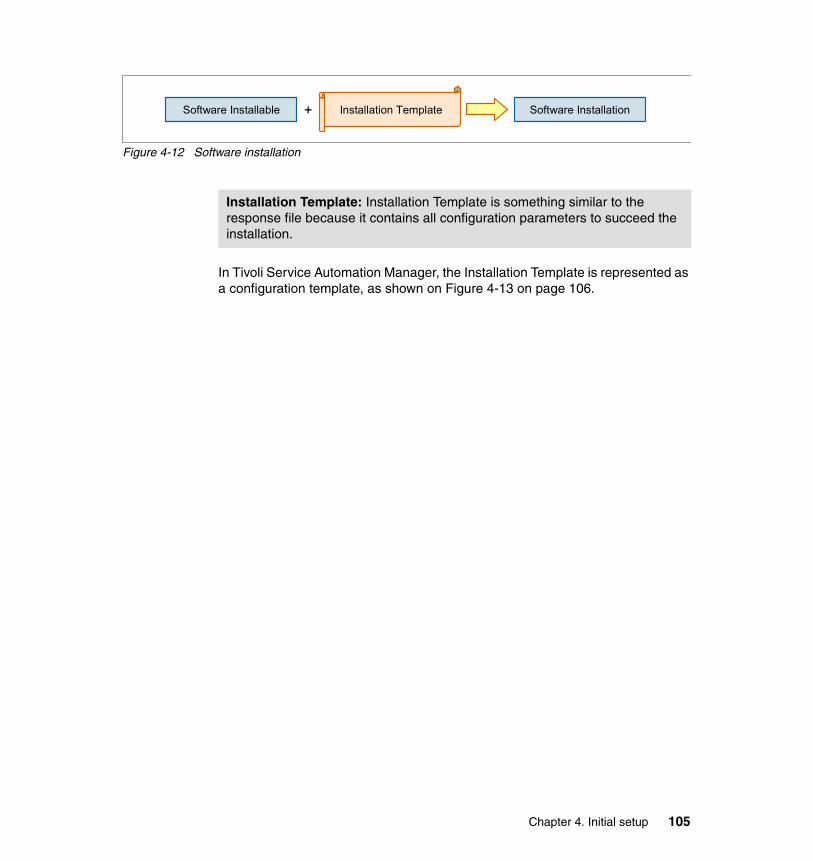
Figure 4-12 Software installation
In Tivoli Service Automation Manager, the Installation Template is represented as a configuration template, as shown on Figure 4-13 on page 106.
Software Installable + Installation Template Software Installation
Installation Template: Installation Template is something similar to the response file because it contains all configuration parameters to succeed the installation.
Chapter 4. Initial setup 105

Figure 4-13 Tivoli Service Automation Manager configuration template
Software InstanceThe nature of databases and web application servers is that they can have multiply instances created on a particular target server. This is the reason the Instance Template is introduced.
The Instance Template describes the detailed configuration of a particular instance of the software to be run on a target server. In other words, it defines how the installation software is applied to create an instance on a specific server.
106 IBM CloudBurst on System x
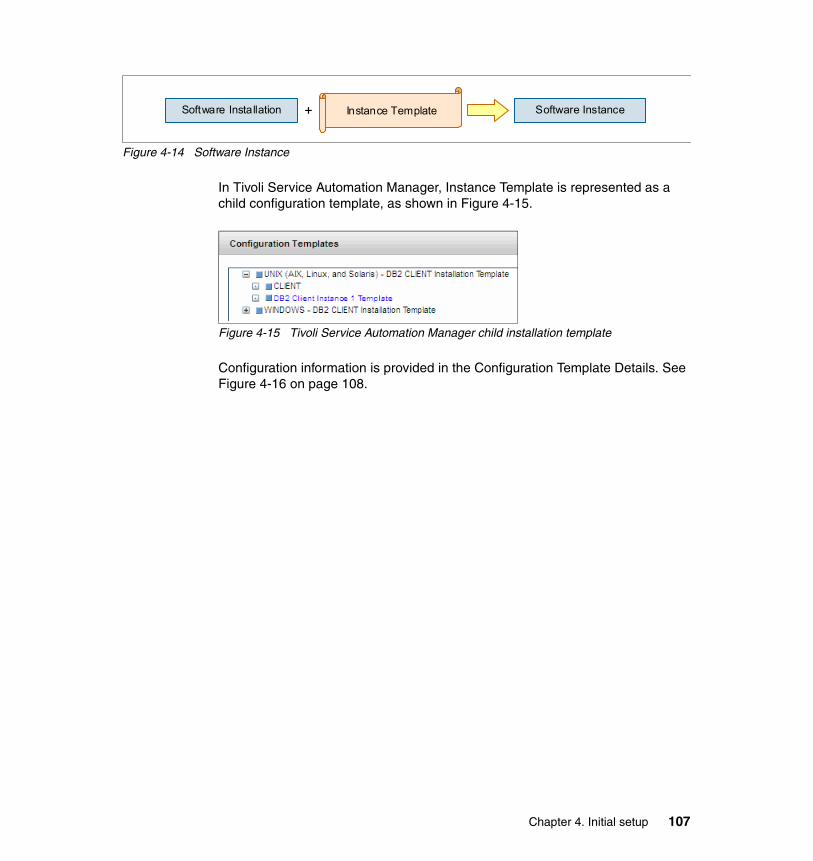
Figure 4-14 Software Instance
In Tivoli Service Automation Manager, Instance Template is represented as a child configuration template, as shown in Figure 4-15.
Figure 4-15 Tivoli Service Automation Manager child installation template
Configuration information is provided in the Configuration Template Details. See Figure 4-16 on page 108.
Software Installation + Instance Template Software Instance
Chapter 4. Initial setup 107
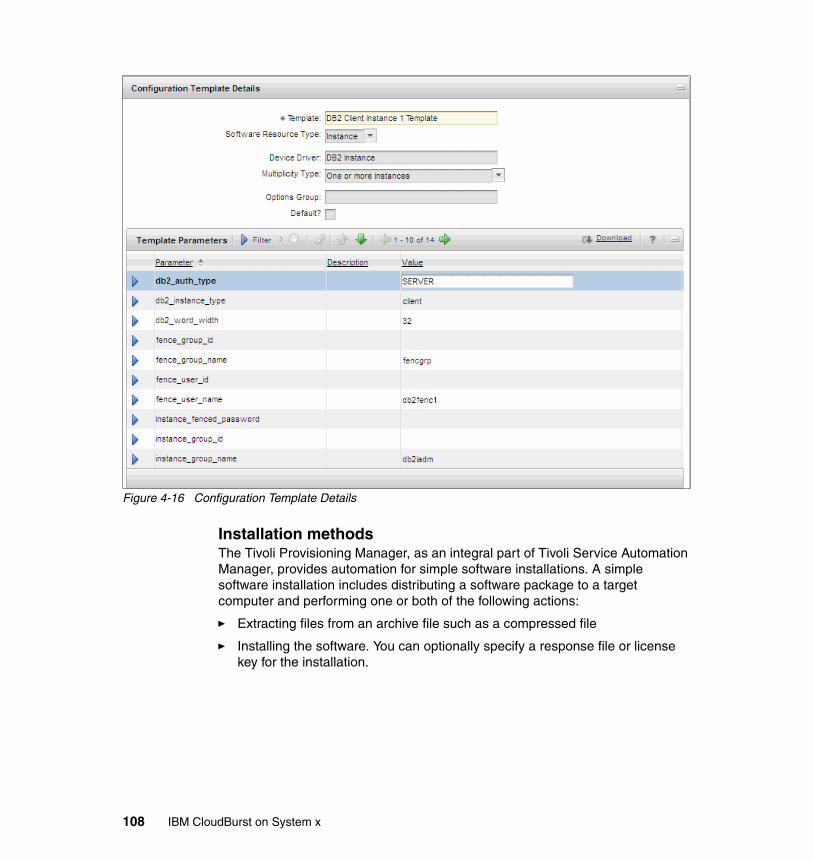
Figure 4-16 Configuration Template Details
Installation methodsThe Tivoli Provisioning Manager, as an integral part of Tivoli Service Automation Manager, provides automation for simple software installations. A simple software installation includes distributing a software package to a target computer and performing one or both of the following actions:
� Extracting files from an archive file such as a compressed file
� Installing the software. You can optionally specify a response file or license key for the installation.
108 IBM CloudBurst on System x
Simple software product distribution supports deployment to Windows, Linux, AIX, HP-UX, and Solaris Operating Environment computers. Any installation process that uses the SoftwareInstallable.Install logical management operation can take advantage of these installation methods. If the software product does not have a specific provisioning workflow associated with the SoftwareInstallable.Install logical management operation, the HostingEnvironment.Host logical management operation is automatically called to perform simple software product distribution.
Table 4-3 describes the available methods for installing simple software without writing provisioning workflows. For all of the methods, template definitions are provided.
Table 4-3 Installation methods
Note: Ensure that there are silent commands available for performing file extraction and the software installation. Any actions required during the installation process must:
� Be available from the command line� Require no user interaction
The ability to fully automate an installation depends on the silent installation support provided by the vendor of the software product. Not all software installations can be automated for deployment with simple software product distribution.
Method OS Formats
Unzip only: Copy a compressed file to a target computer and extract the contents to a specified location. A tool is copied to the target computer to extract the contents of the compressed file.
Use this option to automatically extract the contents of a compressed file.
Windows Archive files in a compressed format only.
Typical: .zip file
Chapter 4. Initial setup 109
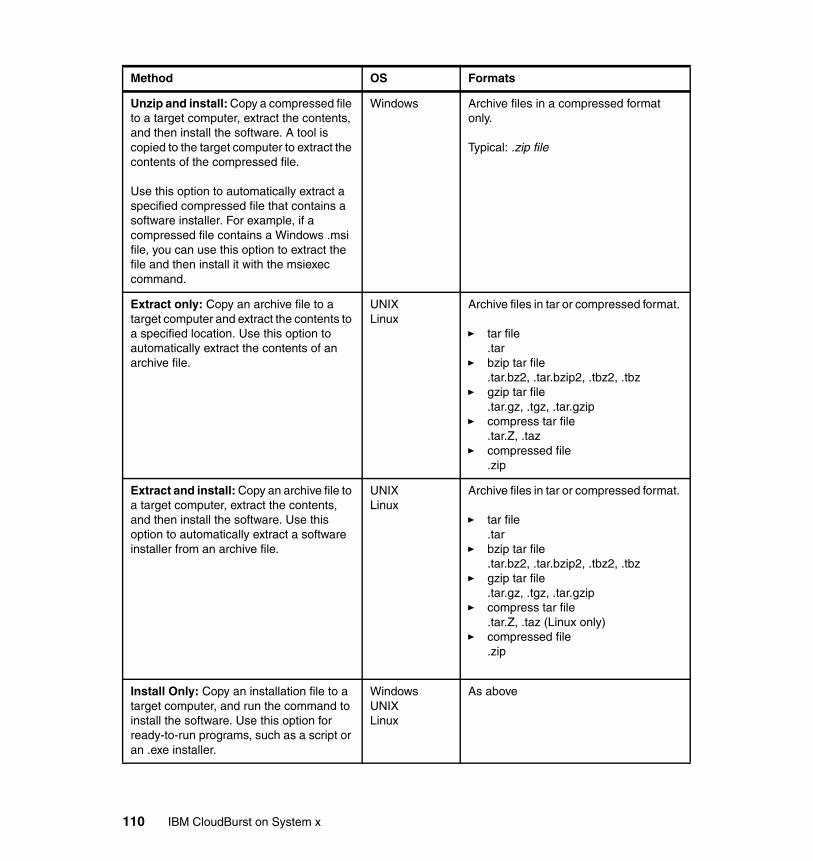
Unzip and install: Copy a compressed file to a target computer, extract the contents, and then install the software. A tool is copied to the target computer to extract the contents of the compressed file.
Use this option to automatically extract a specified compressed file that contains a software installer. For example, if a compressed file contains a Windows .msi file, you can use this option to extract the file and then install it with the msiexec command.
Windows Archive files in a compressed format only.
Typical: .zip file
Extract only: Copy an archive file to a target computer and extract the contents to a specified location. Use this option to automatically extract the contents of an archive file.
UNIXLinux
Archive files in tar or compressed format.
� tar file.tar
� bzip tar file.tar.bz2, .tar.bzip2, .tbz2, .tbz
� gzip tar file.tar.gz, .tgz, .tar.gzip
� compress tar file.tar.Z, .taz
� compressed file.zip
Extract and install: Copy an archive file to a target computer, extract the contents, and then install the software. Use this option to automatically extract a software installer from an archive file.
UNIXLinux
Archive files in tar or compressed format.
� tar file.tar
� bzip tar file.tar.bz2, .tar.bzip2, .tbz2, .tbz
� gzip tar file.tar.gz, .tgz, .tar.gzip
� compress tar file.tar.Z, .taz (Linux only)
� compressed file.zip
Install Only: Copy an installation file to a target computer, and run the command to install the software. Use this option for ready-to-run programs, such as a script or an .exe installer.
WindowsUNIXLinux
As above
Method OS Formats
110 IBM CloudBurst on System x
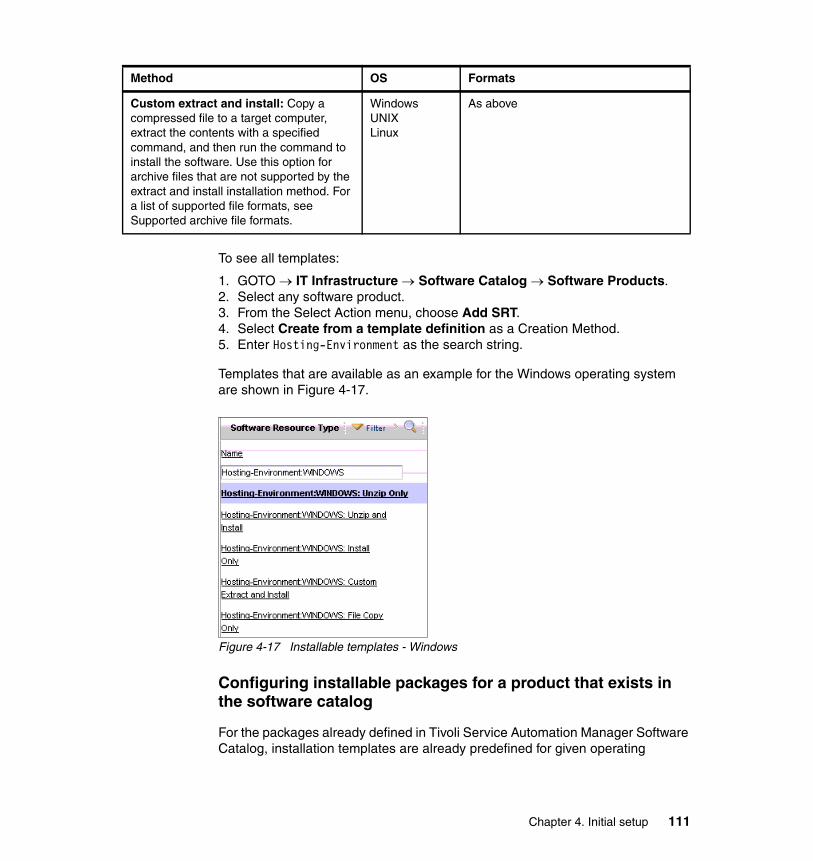
To see all templates:
1. GOTO IT Infrastructure Software Catalog Software Products.2. Select any software product.3. From the Select Action menu, choose Add SRT.4. Select Create from a template definition as a Creation Method.5. Enter Hosting-Environment as the search string.
Templates that are available as an example for the Windows operating system are shown in Figure 4-17.
Figure 4-17 Installable templates - Windows
Configuring installable packages for a product that exists in the software catalog
For the packages already defined in Tivoli Service Automation Manager Software Catalog, installation templates are already predefined for given operating
Custom extract and install: Copy a compressed file to a target computer, extract the contents with a specified command, and then run the command to install the software. Use this option for archive files that are not supported by the extract and install installation method. For a list of supported file formats, see Supported archive file formats.
WindowsUNIXLinux
As above
Method OS Formats
Chapter 4. Initial setup 111
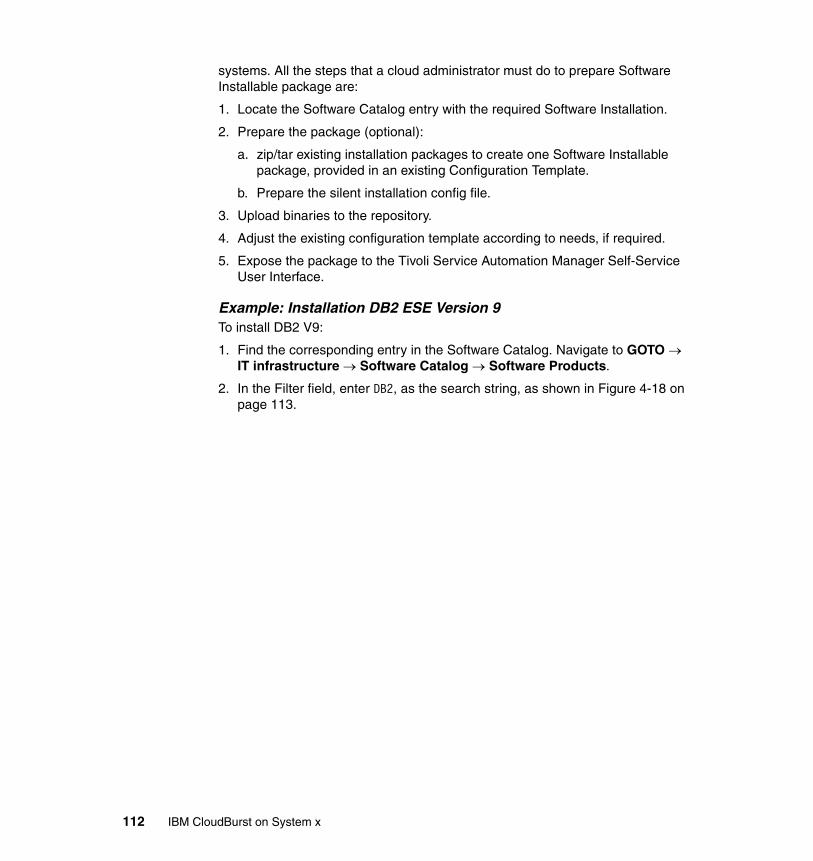
systems. All the steps that a cloud administrator must do to prepare Software Installable package are:
1. Locate the Software Catalog entry with the required Software Installation.
2. Prepare the package (optional):
a. zip/tar existing installation packages to create one Software Installable package, provided in an existing Configuration Template.
b. Prepare the silent installation config file.
3. Upload binaries to the repository.
4. Adjust the existing configuration template according to needs, if required.
5. Expose the package to the Tivoli Service Automation Manager Self-Service User Interface.
Example: Installation DB2 ESE Version 9 To install DB2 V9:
1. Find the corresponding entry in the Software Catalog. Navigate to GOTO IT infrastructure Software Catalog Software Products.
2. In the Filter field, enter DB2, as the search string, as shown in Figure 4-18 on page 113.
112 IBM CloudBurst on System x
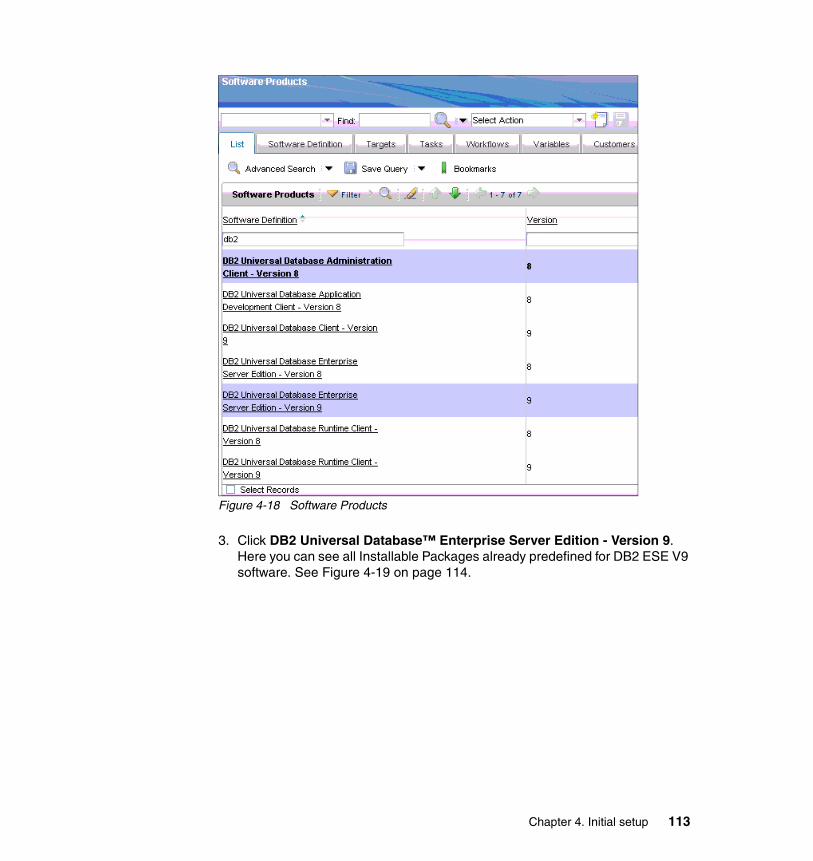
Figure 4-18 Software Products
3. Click DB2 Universal Database™ Enterprise Server Edition - Version 9. Here you can see all Installable Packages already predefined for DB2 ESE V9 software. See Figure 4-19 on page 114.
Chapter 4. Initial setup 113
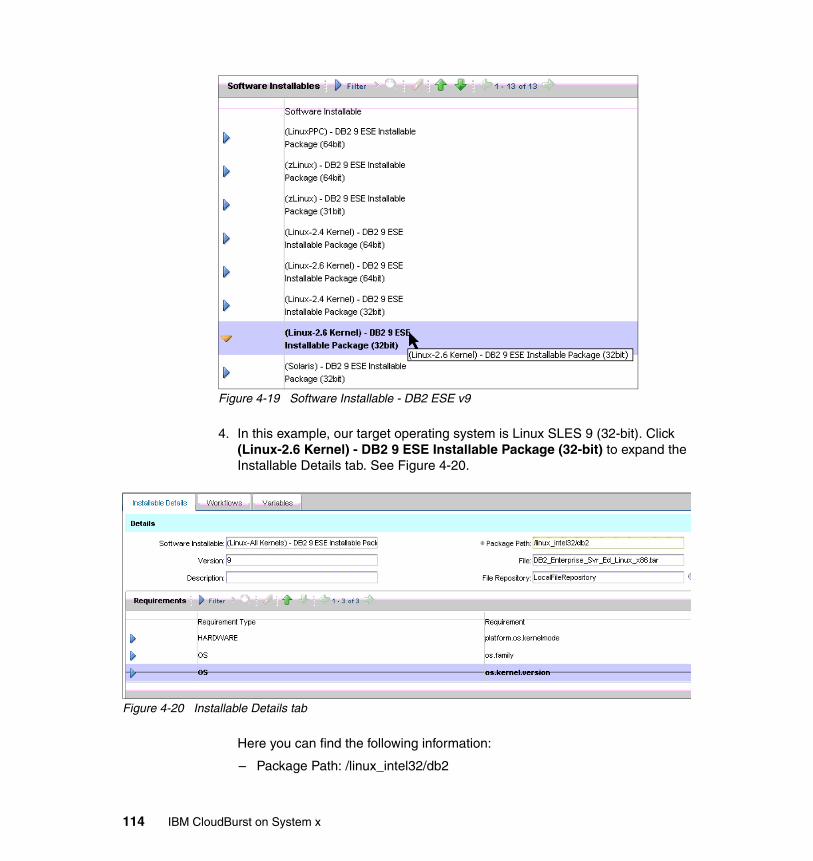
Figure 4-19 Software Installable - DB2 ESE v9
4. In this example, our target operating system is Linux SLES 9 (32-bit). Click (Linux-2.6 Kernel) - DB2 9 ESE Installable Package (32-bit) to expand the Installable Details tab. See Figure 4-20.
Figure 4-20 Installable Details tab
Here you can find the following information:
– Package Path: /linux_intel32/db2
114 IBM CloudBurst on System x
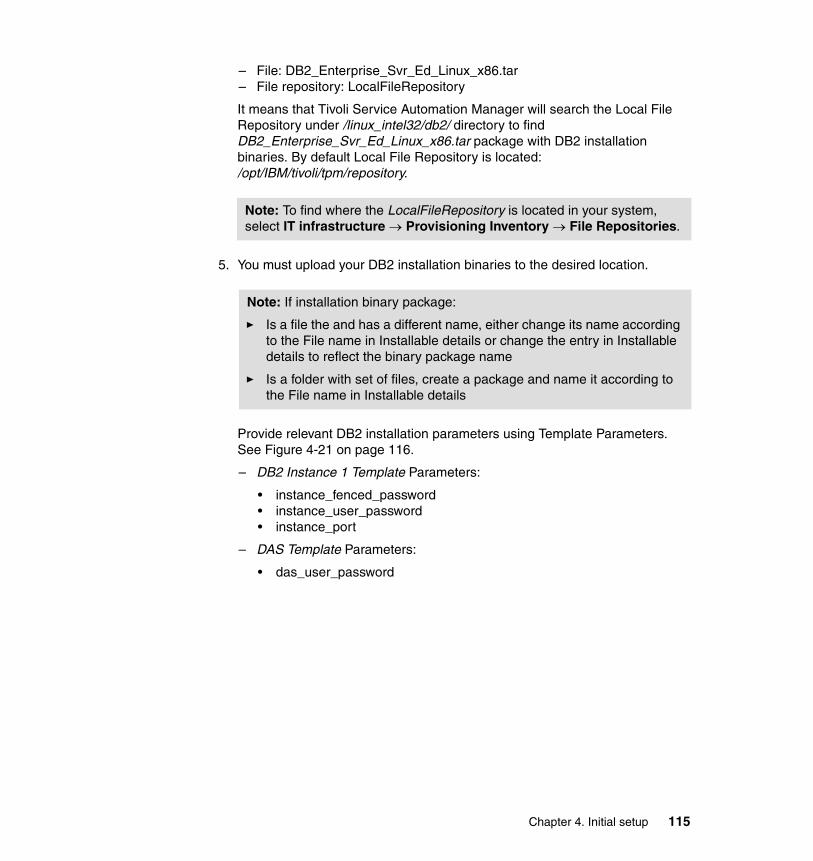
– File: DB2_Enterprise_Svr_Ed_Linux_x86.tar– File repository: LocalFileRepository
It means that Tivoli Service Automation Manager will search the Local File Repository under /linux_intel32/db2/ directory to find DB2_Enterprise_Svr_Ed_Linux_x86.tar package with DB2 installation binaries. By default Local File Repository is located: /opt/IBM/tivoli/tpm/repository.
5. You must upload your DB2 installation binaries to the desired location.
Provide relevant DB2 installation parameters using Template Parameters. See Figure 4-21 on page 116.
– DB2 Instance 1 Template Parameters:
• instance_fenced_password• instance_user_password• instance_port
– DAS Template Parameters:
• das_user_password
Note: To find where the LocalFileRepository is located in your system, select IT infrastructure Provisioning Inventory File Repositories.
Note: If installation binary package:
� Is a file the and has a different name, either change its name according to the File name in Installable details or change the entry in Installable details to reflect the binary package name
� Is a folder with set of files, create a package and name it according to the File name in Installable details
Chapter 4. Initial setup 115
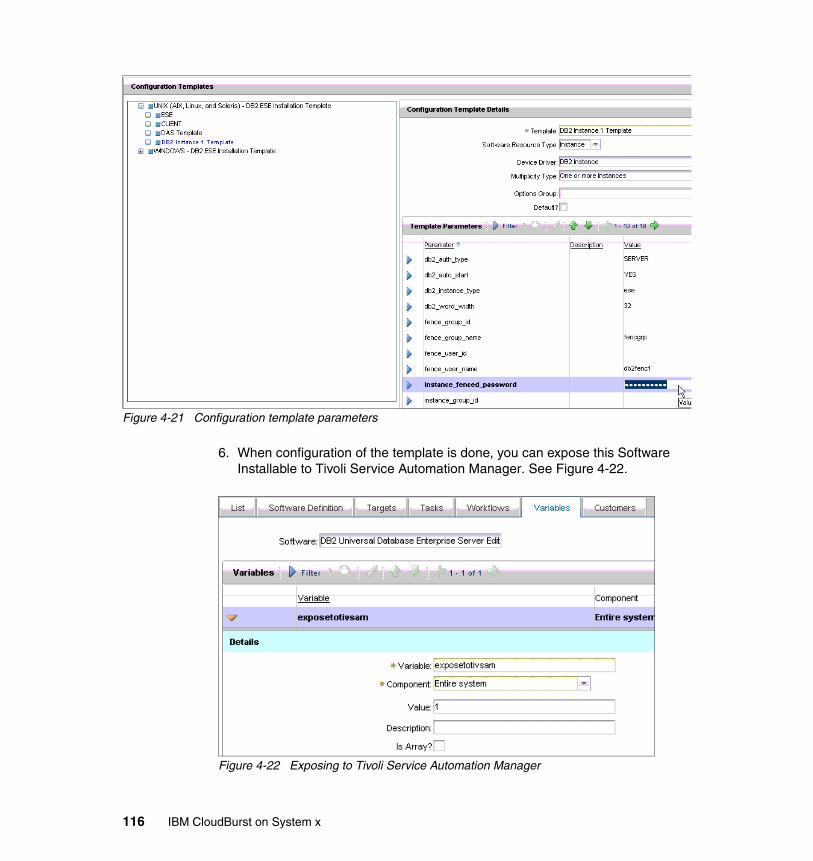
Figure 4-21 Configuration template parameters
6. When configuration of the template is done, you can expose this Software Installable to Tivoli Service Automation Manager. See Figure 4-22.
Figure 4-22 Exposing to Tivoli Service Automation Manager
116 IBM CloudBurst on System x
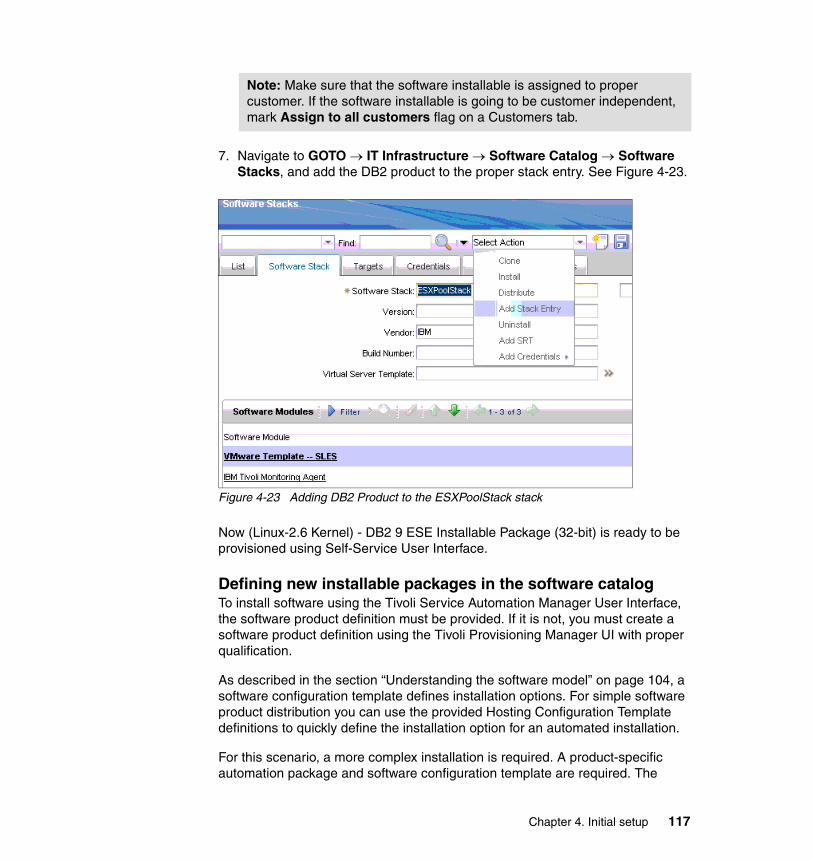
7. Navigate to GOTO IT Infrastructure Software Catalog Software Stacks, and add the DB2 product to the proper stack entry. See Figure 4-23.
Figure 4-23 Adding DB2 Product to the ESXPoolStack stack
Now (Linux-2.6 Kernel) - DB2 9 ESE Installable Package (32-bit) is ready to be provisioned using Self-Service User Interface.
Defining new installable packages in the software catalogTo install software using the Tivoli Service Automation Manager User Interface, the software product definition must be provided. If it is not, you must create a software product definition using the Tivoli Provisioning Manager UI with proper qualification.
As described in the section “Understanding the software model” on page 104, a software configuration template defines installation options. For simple software product distribution you can use the provided Hosting Configuration Template definitions to quickly define the installation option for an automated installation.
For this scenario, a more complex installation is required. A product-specific automation package and software configuration template are required. The
Note: Make sure that the software installable is assigned to proper customer. If the software installable is going to be customer independent, mark Assign to all customers flag on a Customers tab.
Chapter 4. Initial setup 117
automation package developer must predefine the software definition and software configuration template for the software in the automation package.
To define a new software product for simple distribution:
1. Click Go To IT Infrastructure Software Catalog Software Products.
2. Click New.
3. Specify the software product information, including the name, description, vendor, and build number.
4. Click New Installable.
5. In the Software Installable field, type the name of the software package.
6. In the Version field, type the software package version.
7. In the File Repository field, select LocalFileRepository or another file repository that you created.
8. In the Installable Path field, specify the software package location. The path is relative to the default local file repository path. It can also be some other custom file repository, for example, if the repository path is configured as TIO_HOME/repository/, and the software package is stored in TIO_HOME/repository/package, type /package as the parameter value.
9. In the File field, type the file name of the software package.
10.Click Submit.
11.Specify the installation options in the software configuration template:
a. Click Select Action Add SRT.
b. Select Create from template definition.
c. Click Select Value.
d. Use the filter to search for template names with the text Hosting-Environment.
e. Select the software configuration template that you want to use.
f. In the Configuration Templates section, specify the appropriate parameter values (detailed descriptions are in the Table 4-4 on page 119).
g. Click Save.
The software product is now defined in the software catalog and ready to be exposed to Tivoli Service Automation Manager for further installation purposes.
118 IBM CloudBurst on System x
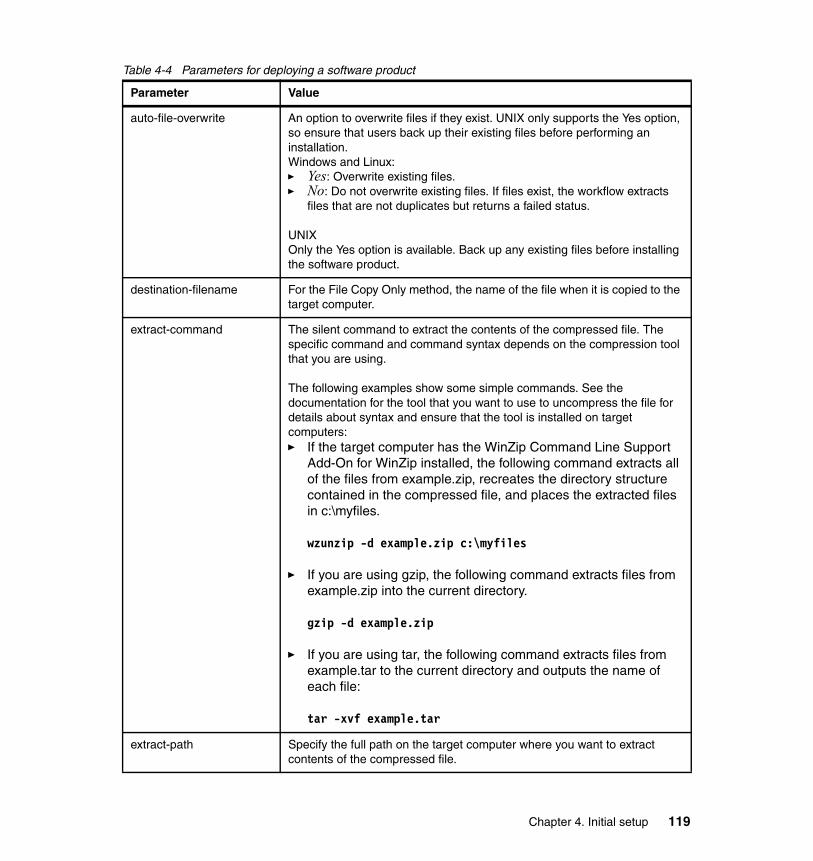
Table 4-4 Parameters for deploying a software product
Parameter Value
auto-file-overwrite An option to overwrite files if they exist. UNIX only supports the Yes option, so ensure that users back up their existing files before performing an installation.Windows and Linux:� Yes: Overwrite existing files.� No: Do not overwrite existing files. If files exist, the workflow extracts
files that are not duplicates but returns a failed status.
UNIXOnly the Yes option is available. Back up any existing files before installing the software product.
destination-filename For the File Copy Only method, the name of the file when it is copied to the target computer.
extract-command The silent command to extract the contents of the compressed file. The specific command and command syntax depends on the compression tool that you are using.
The following examples show some simple commands. See the documentation for the tool that you want to use to uncompress the file for details about syntax and ensure that the tool is installed on target computers:� If the target computer has the WinZip Command Line Support
Add-On for WinZip installed, the following command extracts all of the files from example.zip, recreates the directory structure contained in the compressed file, and places the extracted files in c:\myfiles.
wzunzip -d example.zip c:\myfiles
� If you are using gzip, the following command extracts files from example.zip into the current directory.
gzip -d example.zip
� If you are using tar, the following command extracts files from example.tar to the current directory and outputs the name of each file:
tar -xvf example.tar
extract-path Specify the full path on the target computer where you want to extract contents of the compressed file.
Chapter 4. Initial setup 119
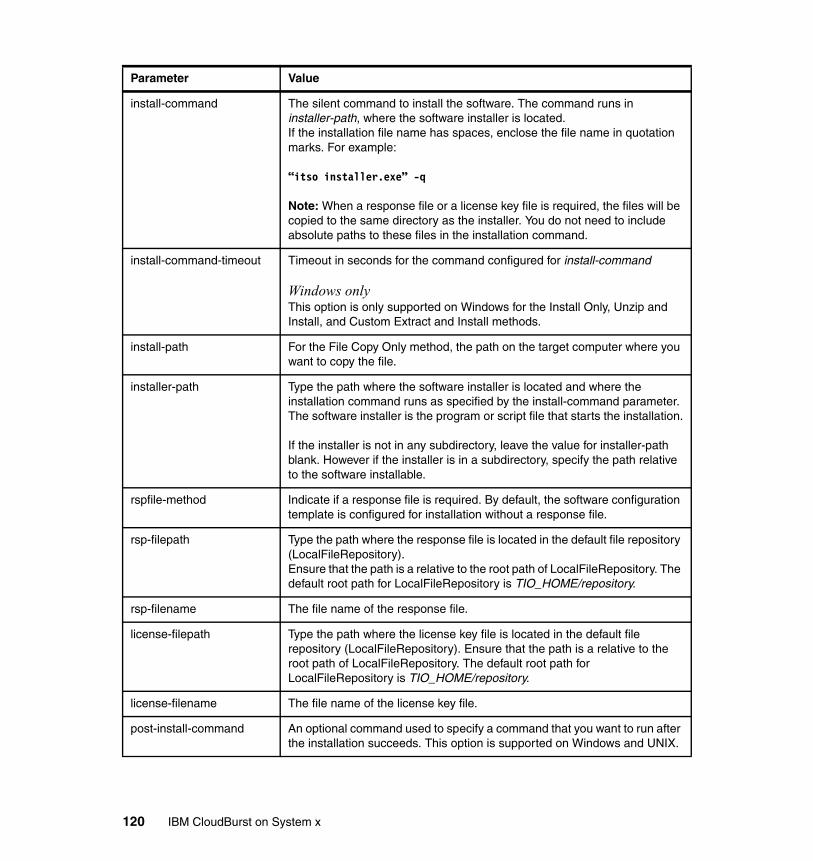
install-command The silent command to install the software. The command runs in installer-path, where the software installer is located.If the installation file name has spaces, enclose the file name in quotation marks. For example:
“itso installer.exe” -q
Note: When a response file or a license key file is required, the files will be copied to the same directory as the installer. You do not need to include absolute paths to these files in the installation command.
install-command-timeout Timeout in seconds for the command configured for install-command
Windows onlyThis option is only supported on Windows for the Install Only, Unzip and Install, and Custom Extract and Install methods.
install-path For the File Copy Only method, the path on the target computer where you want to copy the file.
installer-path Type the path where the software installer is located and where the installation command runs as specified by the install-command parameter. The software installer is the program or script file that starts the installation.
If the installer is not in any subdirectory, leave the value for installer-path blank. However if the installer is in a subdirectory, specify the path relative to the software installable.
rspfile-method Indicate if a response file is required. By default, the software configuration template is configured for installation without a response file.
rsp-filepath Type the path where the response file is located in the default file repository (LocalFileRepository). Ensure that the path is a relative to the root path of LocalFileRepository. The default root path for LocalFileRepository is TIO_HOME/repository.
rsp-filename The file name of the response file.
license-filepath Type the path where the license key file is located in the default file repository (LocalFileRepository). Ensure that the path is a relative to the root path of LocalFileRepository. The default root path for LocalFileRepository is TIO_HOME/repository.
license-filename The file name of the license key file.
post-install-command An optional command used to specify a command that you want to run after the installation succeeds. This option is supported on Windows and UNIX.
Parameter Value
120 IBM CloudBurst on System x
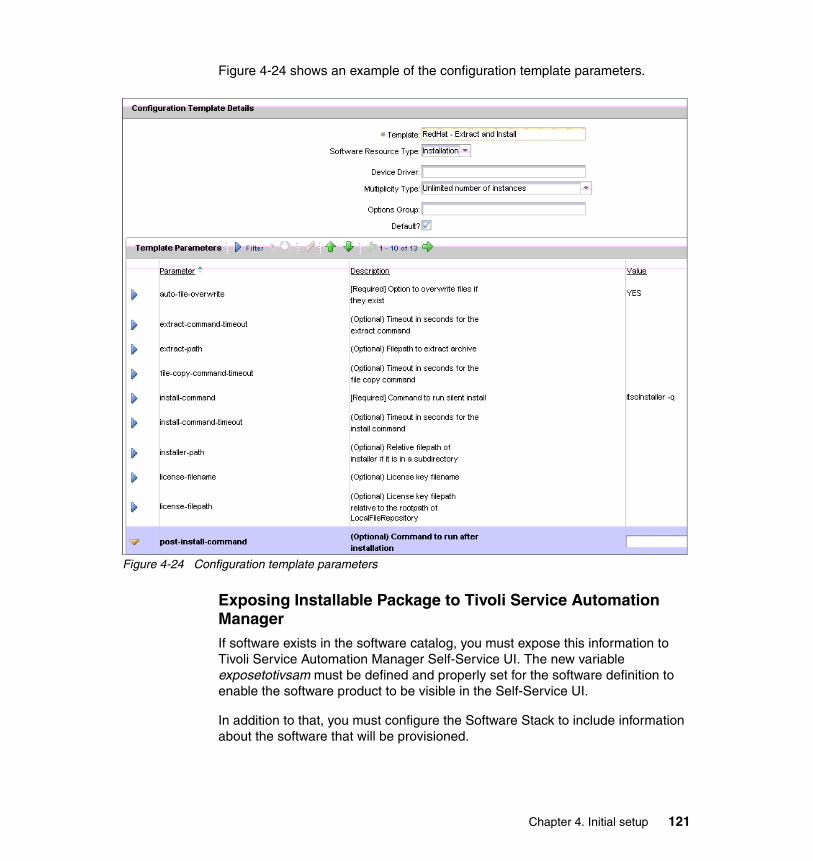
Figure 4-24 shows an example of the configuration template parameters.
Figure 4-24 Configuration template parameters
Exposing Installable Package to Tivoli Service Automation ManagerIf software exists in the software catalog, you must expose this information to Tivoli Service Automation Manager Self-Service UI. The new variable exposetotivsam must be defined and properly set for the software definition to enable the software product to be visible in the Self-Service UI.
In addition to that, you must configure the Software Stack to include information about the software that will be provisioned.
Chapter 4. Initial setup 121
Tivoli Service Automation Manager 7.2.2 introduces new Customers feature. The software must be assigned to particular customer (or exposed to all customers available in the system) to be visible in Self-Service User Interface.
Exposing software to Tivoli Service Automation ManagerTo expose software to Tivoli Service Automation Manager:
1. Log into the Tivoli Service Automation Manager Administration GUI.
2. Click Goto IT Infrastructure Software Catalog Software Products.
3. Select the software product you want to be visible in Self-Service UI.
4. For the selected software definition, click the Variables tab.
5. Click New Row for a new variable definition. Enter the variable name and its value:
– Variable: exposetotivsam– Value: 1
6. Click the Customers tab, and assign this software to the customers you want. If this is to be assigned to all customers, select the Assigned to all customers? option.
7. Click Save.
Adding information regarding the software product to Cloud Pool’s Software Stack
To add information regarding the software product to Cloud Pool’s Software Stack:
1. Click Go To IT Infrastructure Software Catalog Software Stacks, and search for the software stack you want to add information to.
2. From the Action Menu, select Add Stack Entry to add the software installable for software product you want.
3. Click Submit
4. Save your changes to the Cloud Pool Software Stack.
Assigning OS dependent software to the customerIf you are planning to install OS dependent software modules, you must assign the target OS template to the customer as well:
1. Select Goto Service Automation Configuration Cloud Customer Administration, and then select the customer.
2. In the Associated Resources section, on the IL Master Images tab, click Detailed Menu Go To Master Images.
122 IBM CloudBurst on System x
3. At the Software Stack, click Detailed Menu Go To Software Stack. On the Variables tab, enter the following variables:
– Variable: swType Value: OS– Variable: exposetotivsam Value: 1
4. Save the changes, and return to the Cloud Customer Administration application.
5. In the Associated Resources section, on the Software Modules tab, click Assign Software Product to select the OS template. See Figure 4-25.
6. Save the changes.
Figure 4-25 Resources associated with the customer
4.2.2 Installing software using Self-Service UI
To install new software using the Self-Service User Interface:
1. In the Tivoli Service Automation Manager Self-Service User Interface, navigate to Home Request a New Service Virtual Server Management Modify Server, and select Install Software. See Figure 4-26 on page 124.
2. Select a server to install a software onto.
3. Select the software to be installed.
4. Optionally, you can click Configure Software to perform configuration activities.
Chapter 4. Initial setup 123
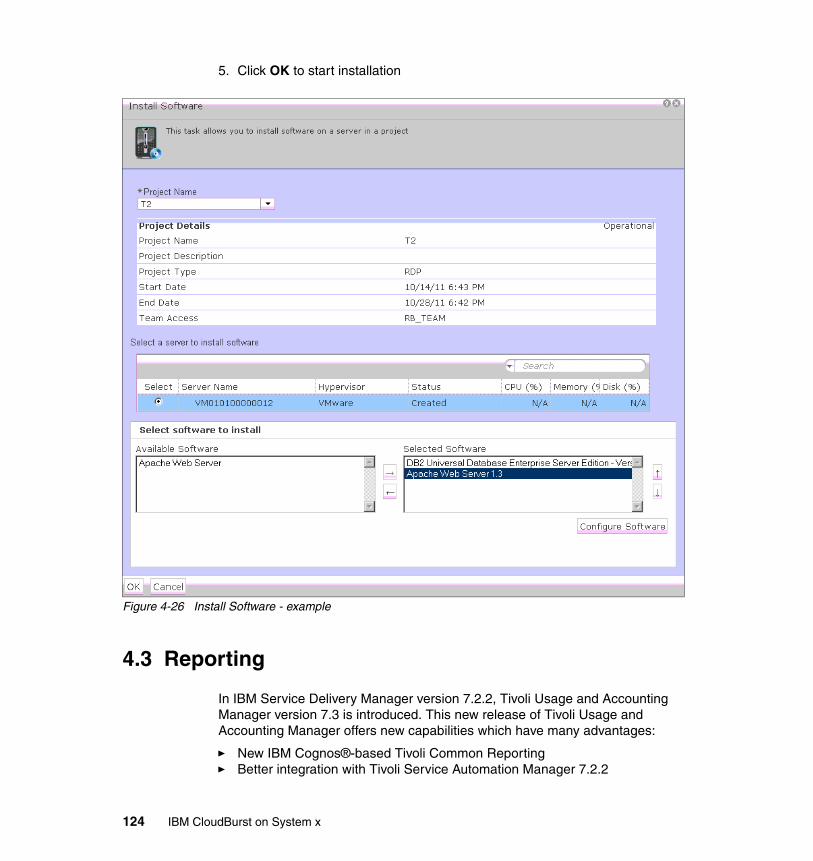
5. Click OK to start installation
Figure 4-26 Install Software - example
4.3 Reporting
In IBM Service Delivery Manager version 7.2.2, Tivoli Usage and Accounting Manager version 7.3 is introduced. This new release of Tivoli Usage and Accounting Manager offers new capabilities which have many advantages:
� New IBM Cognos®-based Tivoli Common Reporting� Better integration with Tivoli Service Automation Manager 7.2.2
124 IBM CloudBurst on System x
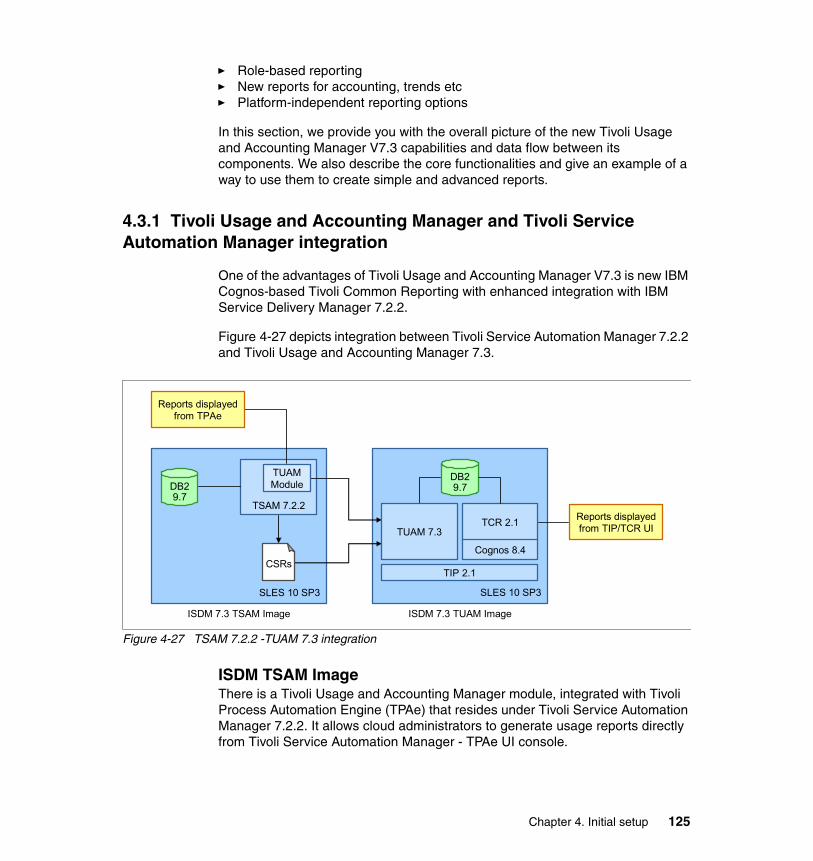
� Role-based reporting� New reports for accounting, trends etc� Platform-independent reporting options
In this section, we provide you with the overall picture of the new Tivoli Usage and Accounting Manager V7.3 capabilities and data flow between its components. We also describe the core functionalities and give an example of a way to use them to create simple and advanced reports.
4.3.1 Tivoli Usage and Accounting Manager and Tivoli Service Automation Manager integration
One of the advantages of Tivoli Usage and Accounting Manager V7.3 is new IBM Cognos-based Tivoli Common Reporting with enhanced integration with IBM Service Delivery Manager 7.2.2.
Figure 4-27 depicts integration between Tivoli Service Automation Manager 7.2.2 and Tivoli Usage and Accounting Manager 7.3.
Figure 4-27 TSAM 7.2.2 -TUAM 7.3 integration
ISDM TSAM ImageThere is a Tivoli Usage and Accounting Manager module, integrated with Tivoli Process Automation Engine (TPAe) that resides under Tivoli Service Automation Manager 7.2.2. It allows cloud administrators to generate usage reports directly from Tivoli Service Automation Manager - TPAe UI console.
SLES 10 SP3
DB29.7
TSAM 7.2.2
SLES 10 SP3
DB29.7
TCR 2.1
Cognos 8.4
TIP 2.1
TUAMModule
CSRs
TUAM 7.3
ISDM 7.3 TSAM Image ISDM 7.3 TUAM Image
Reports displayedfrom TIP/TCR UI
Reports displayedfrom TPAe
Chapter 4. Initial setup 125
Service Usage Data collection remains the same. Tivoli Service Automation Manager 7.2.2 provides Tivoli Usage and Accounting Manager 7.3 compliant information in a form of CSR (Common Source Record) files that are being consumed by Tivoli Usage and Accounting Manager itself.
ISDM TUAM ImageIn Tivoli Usage and Accounting Manager 7.3, a few products have been bundled.
Tivoli Common Reporting 2.1Provides an integrated reporting solution for the products in the Tivoli portfolio It provides a single sign-on service based on the WebSphere security module and Lightweight Third-Party Authentication (LTPA).
Cognos-based Tivoli Common Reporting engineIBM Cognos 8 Business Intelligence Reporting version 8.4.1, Fix Pack 3 resides below Tivoli Common Reporting product. The following Cognos components are available with Tivoli Common Reporting:
Framework Manager A modeling tool that allows you to create data models.
Query Studio A reporting tool for creating simple queries and reports
Report Studio A web-based tool for creating sophisticated reports against multiple databases
Cognos Connection An application where you can see all your report and manage them
Cognos gatewayA portal enabling communication between Tivoli Common Reporting Server and the Cognos-based Tivoli Common Reporting engine.
Cognos Content StoreA database that contains data that IBM Cognos 8 needs to operate, such as report specifications, published models, and the packages that contain them; connection information for data sources; information about the external namespace, and the Cognos namespace itself; and information about scheduling and bursting reports.
Note: To ensure integration between Tivoli Usage and Accounting Manager and Tivoli Service Automation Manager, proper system properties must be set accordingly. Refer to “Setting up system properties” on page 131 for more details.
126 IBM CloudBurst on System x
Tivoli Integrated Portal web user interfaceBased on Tivoli Integrated Portal, the following web user interface is available for the reporting solution:
� Common Reporting: A web portal for IBM Cognos 8 and a component which interacts with the Cognos Content Store. It is a front end to publish, find, manage, organize, and view organization's reports.
Tivoli Usage and Accounting Manager web interfacesTivoli Integrated Portal serverIn a web browser, enter the URL of the Tivoli Integrated Portal Server: http://host.domain:16310/ibm/console; or https://host.domain:16311/ibm/console if it is configured for secure access:
� host.domain is the fully qualified host name or IP address of the Tivoli Integrated Portal Server (such as MyServer.MySubdomain.MyDomain.com or 9.51.111.121, or localhost if you are running the Tivoli Integrated Portal Server locally).
� 16310 is the default non-secure port number for the administrative console and 16311 is the default secure port number. If your environment was configured with a port number other than the default, enter that number instead. If you are not sure of the port number, read the application server profile to get the correct number.
� ibm/console is the default path to the Tivoli Integrated Portal Server, however this path is configurable and might differ from the default in your environment.
After successful login, the logon window is displayed, as shown in Figure 4-28 on page 128.
Chapter 4. Initial setup 127
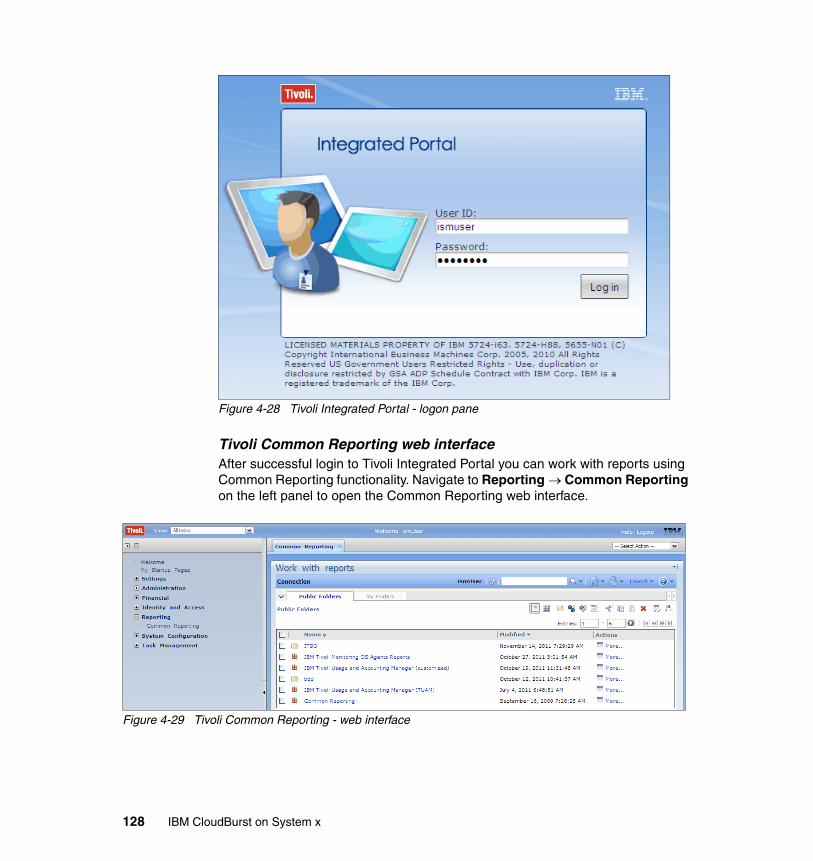
Figure 4-28 Tivoli Integrated Portal - logon pane
Tivoli Common Reporting web interfaceAfter successful login to Tivoli Integrated Portal you can work with reports using Common Reporting functionality. Navigate to Reporting Common Reporting on the left panel to open the Common Reporting web interface.
Figure 4-29 Tivoli Common Reporting - web interface
128 IBM CloudBurst on System x

Query Studio / Report StudioTo work with reports using either Query Studio or Report Studio and to perform some Cognos administration tasks, click Launch on the header of Common Reporting tab. See Figure 4-30.
Figure 4-30 Tivoli Common Reporting - Launch drop-down
You can also select a desired report and perform one of the actions, as shown in the figure Figure 4-31.
Figure 4-31 Tivoli Common Reporting - set of actions available for a report
The actions are:
� Setting the properties of the report� Running report with options� Working with Report Studio� Creating a report view of the report� Scheduling the report generation� Moving/Copying/Creating a shortcut/Deleting the report
Note: If you experience some difficulties in maximizing the Common Reporting frame, place the cursor on the Common Reporting tab and press F5.
Chapter 4. Initial setup 129
Data flow between Tivoli Service Automation Manager and Tivoli Usage and Accounting Manager
The cloud administrator enables Common Server Resource (CSR) file transfer between Tivoli Service Automation Manager and Tivoli Usage and Accounting Manager to exchange Service Usage information. All accounting information together with allocation/de-allocation of the resources is stored in the IBM Tivoli Change and Configuration Management Database (CCMDB), being periodically extracted and transformed into a CSR file. This data contains information about virtual machines and corresponding resources:
The identifiers are:
� Host name� Server type� Service type� Deployment instance� Deployment owner� Chargeback owner
The resources are:
� Server hours � CPU hours� Memory hours� Storage hours (new in Tivoli Usage and Accounting Manager 7.3)
Tivoli Usage and Accounting Manager uses the Job Runner application to run Data Collectors as a batch job on a defined schedule to convert usage metering data, created by the system into CSR files.
After the files are created, the data, being stored in the files is processed and the output is loaded into the Tivoli Usage and Accounting Manager database using the Usage and Accounting Engine Processing Engine.
Based on the accounting information in Tivoli Usage and Accounting Manager database Usage and Accounting Reports can be generated.
Note: A Tivoli Usage and Accounting Manager Data Collector is a program, script or a utility that reads resource usage and accounting records from CCMDB database and produces a CSR file, that is appropriate for Tivoli Usage and Accounting Manager Process Engine.
130 IBM CloudBurst on System x
4.3.2 Working with Tivoli Usage and Accounting Manager reports
In this section, we discuss Tivoli Usage and Accounting Manager reports.
Setting up system propertiesThe following system properties must be set in Maximo, which resides under Tivoli Service Automation Manager product, to ensure integration of Maximo itself with Cognos reporting engine. It is also required for publishing Data Models to Cognos.
mxe.report.cognos.db.schemaNameMaximo database schema name that is used by Cognos from which the metadata is being extracted.
mxe.report.cognos.db.sql.nameCatalog name that is associated with Maximo database. Required for SQL server installations.
mxe.report.cognos.db.typeMaximo database schema type being used by Cognos. Proper values are:
� "DB2" for DB2� "OR" for ORACLE� "SS" for SQL-Server
mxe.report.cognos.serverURLThis property provides Cognos Dispatcher/Gateway URI to introduce Cognos reports under Maximo. This should be complete path to the Cognos gateway.
mxe.report.cognos.namespaceCognos namespace that stores information regarding users and their rights,
Note: For more information, refer to the Tivoli Usage and Accounting Manager: Administering data processing information center at:
http://publib.boulder.ibm.com/infocenter/tivihelp/v3r1/topic/com.ibm.ituam.doc_7.3/admin_processing/c_data_process_intro.html
Note: If Cognos package publishing fails (for example, due to wrong system properties settings), check WebSphere systemout.log file, located at <WebSphere Install Directory>/WebSphere/AppServer/profiles/AppSrv01/logs/server1
Chapter 4. Initial setup 131
Service Usage Data processingConfiguration of service usage data is split into two parts: Tivoli Service Automation Manager (to ensure proper generation of CSR files) and configuration of Tivoli Usage and Accounting Manager server (to ensure proper way of consuming and processing gathered data)
Enabling metering and accounting in Tivoli Service Automation Manager
Enabling auditing for service instancesAuditing must be enabled to track capacity changes. If it is not done, the following steps must be performed:
1. In the Tivoli Service Automation Manager administration console click System Configuration Platform Configuration Database Configuration, and find the object: PMZHBWTN.
2. For this object, select the option Audit enabled .
3. Select the Attributes Tab, and for every attribute, open its property, and select the Audit Enabled option that is located on the Advanced sub-tab.
4. Save changes.
5. Find the object PMZHBWTNSPEC.
6. For this object, select the option Audit Enabled.
7. Select the Attributes Tab, and for every attribute, open its property, and select the Audit Enabled option.
8. Save changes.
Tip: For more details about how to integrate Maximo being present under Tivoli Service Automation Manager with Cognos Reporting engine, which resides under Tivoli Usage and Accounting Manager, refer to the Tivoli Service Automation Manager - Extension for Usage and Accounting Manager, Configuring report access information center at:
http://publib.boulder.ibm.com/infocenter/tivihelp/v55r1/topic/com.ibm.tuam.ext.doc_1.0/config/c_configuring_report_access.html
Note: PMZHBWTN and PMZHBWTNSPEC objects store information about Topology Nodes and their specification. Auditing allows tracking the changes that are being made to Topology Node instances.
132 IBM CloudBurst on System x
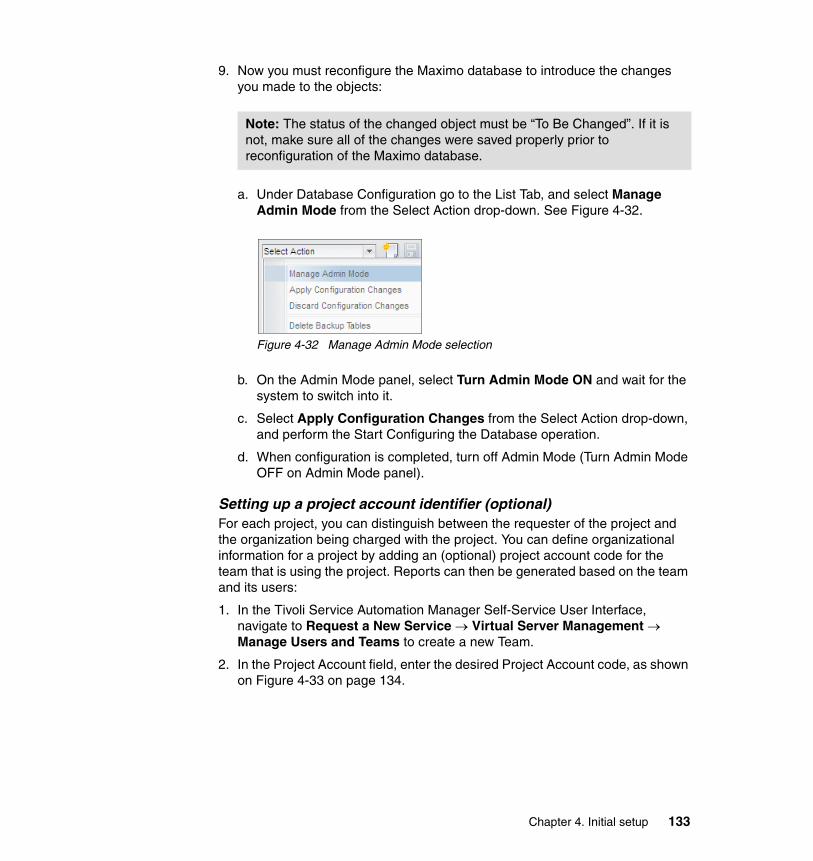
9. Now you must reconfigure the Maximo database to introduce the changes you made to the objects:
a. Under Database Configuration go to the List Tab, and select Manage Admin Mode from the Select Action drop-down. See Figure 4-32.
Figure 4-32 Manage Admin Mode selection
b. On the Admin Mode panel, select Turn Admin Mode ON and wait for the system to switch into it.
c. Select Apply Configuration Changes from the Select Action drop-down, and perform the Start Configuring the Database operation.
d. When configuration is completed, turn off Admin Mode (Turn Admin Mode OFF on Admin Mode panel).
Setting up a project account identifier (optional)For each project, you can distinguish between the requester of the project and the organization being charged with the project. You can define organizational information for a project by adding an (optional) project account code for the team that is using the project. Reports can then be generated based on the team and its users:
1. In the Tivoli Service Automation Manager Self-Service User Interface, navigate to Request a New Service Virtual Server Management Manage Users and Teams to create a new Team.
2. In the Project Account field, enter the desired Project Account code, as shown on Figure 4-33 on page 134.
Note: The status of the changed object must be “To Be Changed”. If it is not, make sure all of the changes were saved properly prior to reconfiguration of the Maximo database.
Chapter 4. Initial setup 133
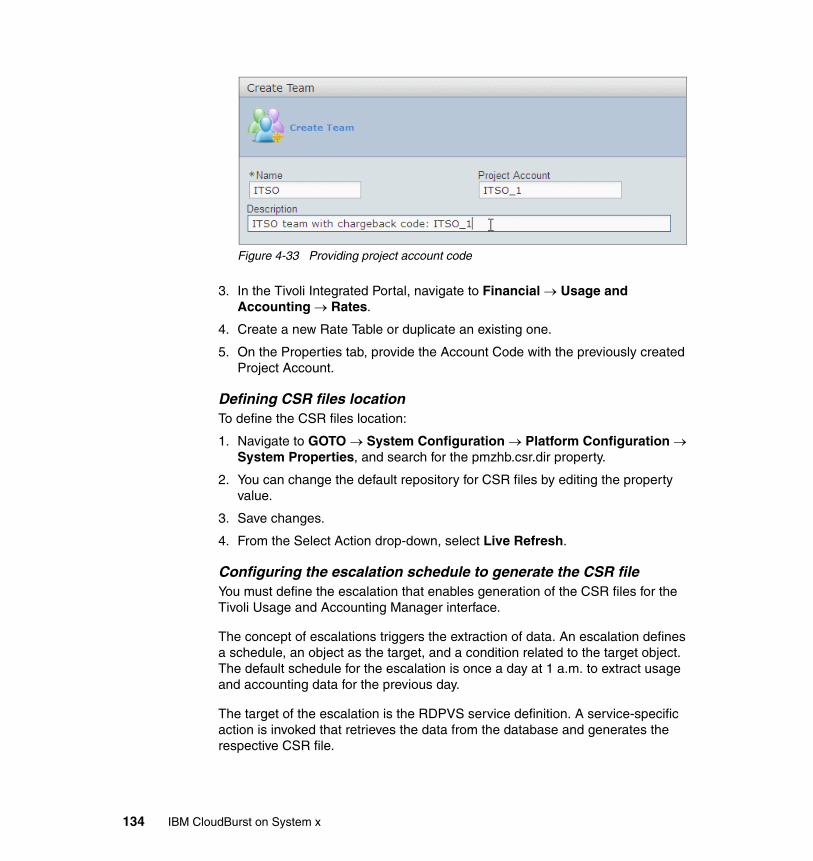
Figure 4-33 Providing project account code
3. In the Tivoli Integrated Portal, navigate to Financial Usage and Accounting Rates.
4. Create a new Rate Table or duplicate an existing one.
5. On the Properties tab, provide the Account Code with the previously created Project Account.
Defining CSR files locationTo define the CSR files location:
1. Navigate to GOTO System Configuration Platform Configuration System Properties, and search for the pmzhb.csr.dir property.
2. You can change the default repository for CSR files by editing the property value.
3. Save changes.
4. From the Select Action drop-down, select Live Refresh.
Configuring the escalation schedule to generate the CSR fileYou must define the escalation that enables generation of the CSR files for the Tivoli Usage and Accounting Manager interface.
The concept of escalations triggers the extraction of data. An escalation defines a schedule, an object as the target, and a condition related to the target object. The default schedule for the escalation is once a day at 1 a.m. to extract usage and accounting data for the previous day.
The target of the escalation is the RDPVS service definition. A service-specific action is invoked that retrieves the data from the database and generates the respective CSR file.
134 IBM CloudBurst on System x
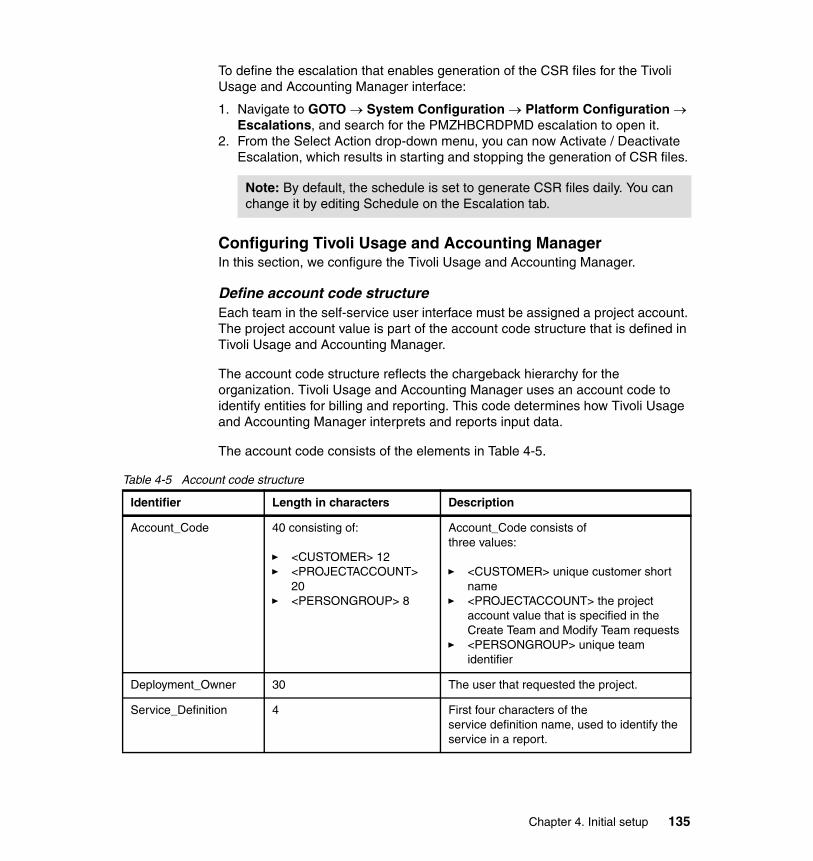
To define the escalation that enables generation of the CSR files for the Tivoli Usage and Accounting Manager interface:
1. Navigate to GOTO System Configuration Platform Configuration Escalations, and search for the PMZHBCRDPMD escalation to open it.
2. From the Select Action drop-down menu, you can now Activate / Deactivate Escalation, which results in starting and stopping the generation of CSR files.
Configuring Tivoli Usage and Accounting ManagerIn this section, we configure the Tivoli Usage and Accounting Manager.
Define account code structureEach team in the self-service user interface must be assigned a project account. The project account value is part of the account code structure that is defined in Tivoli Usage and Accounting Manager.
The account code structure reflects the chargeback hierarchy for the organization. Tivoli Usage and Accounting Manager uses an account code to identify entities for billing and reporting. This code determines how Tivoli Usage and Accounting Manager interprets and reports input data.
The account code consists of the elements in Table 4-5.
Table 4-5 Account code structure
Note: By default, the schedule is set to generate CSR files daily. You can change it by editing Schedule on the Escalation tab.
Identifier Length in characters Description
Account_Code 40 consisting of:
� <CUSTOMER> 12� <PROJECTACCOUNT>
20� <PERSONGROUP> 8
Account_Code consists ofthree values:
� <CUSTOMER> unique customer short name
� <PROJECTACCOUNT> the project account value that is specified in the Create Team and Modify Team requests
� <PERSONGROUP> unique team identifier
Deployment_Owner 30 The user that requested the project.
Service_Definition 4 First four characters of theservice definition name, used to identify the service in a report.
Chapter 4. Initial setup 135
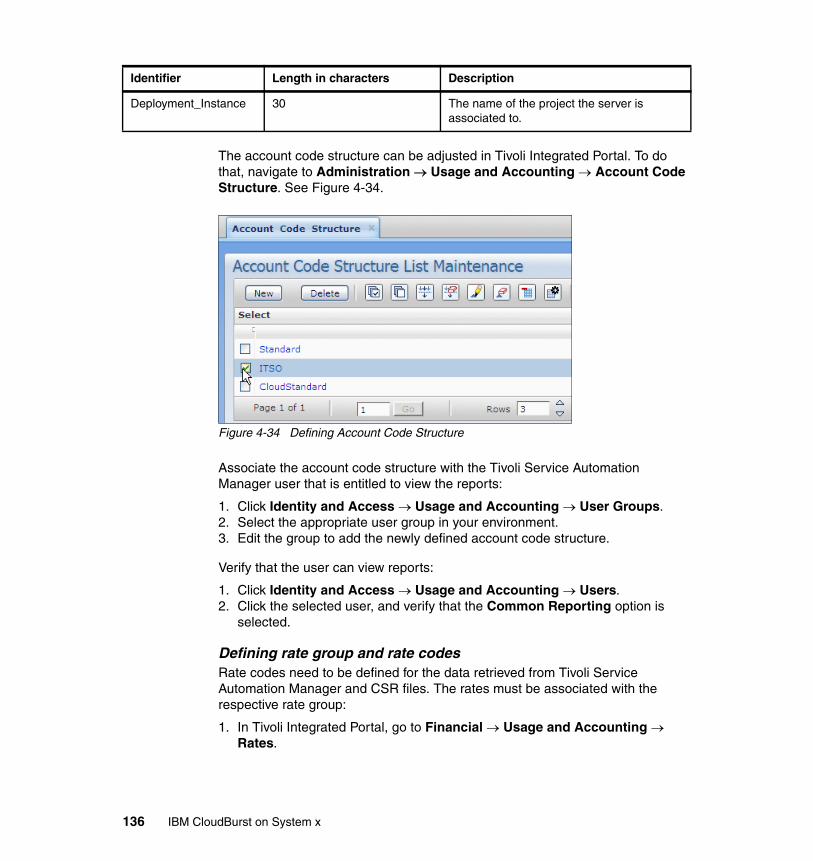
The account code structure can be adjusted in Tivoli Integrated Portal. To do that, navigate to Administration Usage and Accounting Account Code Structure. See Figure 4-34.
Figure 4-34 Defining Account Code Structure
Associate the account code structure with the Tivoli Service Automation Manager user that is entitled to view the reports:
1. Click Identity and Access Usage and Accounting User Groups.2. Select the appropriate user group in your environment. 3. Edit the group to add the newly defined account code structure.
Verify that the user can view reports:
1. Click Identity and Access Usage and Accounting Users.2. Click the selected user, and verify that the Common Reporting option is
selected.
Defining rate group and rate codesRate codes need to be defined for the data retrieved from Tivoli Service Automation Manager and CSR files. The rates must be associated with the respective rate group:
1. In Tivoli Integrated Portal, go to Financial Usage and Accounting Rates.
Deployment_Instance 30 The name of the project the server is associated to.
Identifier Length in characters Description
136 IBM CloudBurst on System x
2. Define rates and rate codes for the provided resources: SERVHRS, MEMMBHRS and CPUHRS. The descriptions specified are the descriptions that you will see in the reports.
3. Create a rate group called TivSAM, and associate the new rates with this group.
Customized processing of CSR file (Transfer and Process)After you enable metering in Tivoli Service Automation Manager, configure Tivoli Usage and Accounting Manager server to retrieve and process the CSR file.
See the following information center items for more detailed information:
� Configuring the Tivoli Usage and Accounting Manager job file to retrieve CSR files from Tivoli Service Automation Manager
http://publib.boulder.ibm.com/infocenter/tivihelp/v10r1/index.jsp?topic=%2Fcom.ibm.tsam_7.2.2.doc%2Ft_tuam_retrievecsr_jobfile.html
� Configuring the Tivoli Usage and Accounting Manager job file to process CSR files from Tivoli Service Automation Manager
http://publib.boulder.ibm.com/infocenter/tivihelp/v10r1/topic/com.ibm.tsam_7.2.2.doc/t_tuam_processcsr_jobfile.html
Working with reportsAs mentioned in “ISDM TUAM Image” on page 126, Tivoli Usage and Accounting Manager encapsulates Tivoli Common Reporting with Cognos reporting engine. For detailed information about the reporting functionality in Tivoli Usage and Accounting Manager, refer to the Tivoli Common Reporting information center at:
http://publib.boulder.ibm.com/infocenter/tivihelp/v3r1/topic/com.ibm.tivoli.tcr.doc_211/ctcr_intro.html
The information center for Common Reporting contains the following information:
� Running the sample overview report
After you install Tivoli Common Reporting 2.1.1, you can run a check on the reporting functionality by running your first sample report. The report can also be run for an overall reporting overview.
� Exporting Cognos report packages
Export your report package to be able to use it, for example, on a different Tivoli Common Reporting instance.
Note: You must have Tivoli Usage and Accounting Manager Administrator privileges to perform this task.
Chapter 4. Initial setup 137
� Copying report images to the Tivoli Common Reporting server
Cognos report packages do not contain images, so after you import a Cognos-based report package, you must copy the static images to a folder on your computer for the images to display.
� Emailing reports
Email your reports to share them with the group of people who do not have access to the reporting portal.
� Scheduling reports
A report schedule is a schedule for running a report at some time in the future. You can create a schedule to run a report one time or repeatedly.
� Performing ad-hoc reporting
Create reports ad hoc by using simple queries and formatting.
� Web-based report authoring
Create reports in a web-based tool that professional report authors use to build sophisticated, multiple-page, multiple-query reports against multiple databases. You can create any reports that your company requires, such as invoices, statements, and weekly sales and inventory reports.
� Using parameterized URLs to perform tasks outside Tivoli Common Reporting
Build a parameterized URL to perform a variety of tasks from a web application without opening Tivoli Common Reporting. You can place a customized URL in your web application to create a shortcut to a specific task. Authentication with Tivoli Integrated Portal user name and password is required.
� Search path
A search path is a basic expression in IBM Cognos that allows you to find objects. It is one of the parameters that you need for performing operations on reports using commands.
Tivoli Usage and Accounting Manager v1.0 extensionA very interesting option is Tivoli Service Automation Manager extension for Tivoli Usage and Accounting Manager that provides a link between Tivoli Usage and Accounting Manager and Tivoli Service Automation Manager to enable cloud financial management services between the two products. The extension is compatible with Tivoli Service Automation Manager version 7.2.2.
The Usage and Accounting v1.0 extension provides the following features:
� Report access functionality enables users to access and view Usage and Accounting Manager Cognos reports from Tivoli Process Automation Engine.
138 IBM CloudBurst on System x
Single sign on is configured between the two systems for report access. Cognos and Tivoli Process Automation Engine report security both work from the same set of Tivoli Process Automation Engine security users and groups.
� Role based security refers to the data synchronization of Tivoli Service Automation Manager entities, such as customers, teams, security groups and users, to Tivoli Usage and Accounting Manager entities, such as clients, users, and user groups. During the synchronization process account code security is applied to the reports that Tivoli Service Automation Manager users access. Account code security is used for customer and team reporting data segregation based on cloud roles in Tivoli Service Automation Manager.
4.4 Self-service UI customization and REST API usage
In this section, we describe how to customize the Tivoli Service Automation Manager interface and how to use the REST API to integrate external products within your environment.
4.4.1 Self-service UI customization
The reasons for customizing the ready-for-use Tivoli Service Automation Manager user interface vary among users. In this example, we cover how to hide icons, that are normally used by administrators, from non-administrators. We demonstrate how to hide the Manage Users and Teams icon. See Figure 4-35 on page 140.
In Tivoli Service Automation Manager, the actions a user can perform in the UI are called offerings. Offerings can be customized, added, and removed according to your requirements.
Logging into the administrator console To begin customization, log into the administrator console. The ready-for-use admin user name is maxadmin. See Example 4-3.
Example 4-3 URL for the Tivoli Service Automation Manager administrator console
https://ibmtsam.ral.ibm.com:9443/maximo/
Note: Detailed information about configuring and administering the Tivoli Usage and Accounting Manager v1.0 extension is in the information center at: http://publib.boulder.ibm.com/infocenter/tivihelp/v55r1/topic/com.ibm.tuam.ext.doc_1.0/welcome.htm
Chapter 4. Initial setup 139
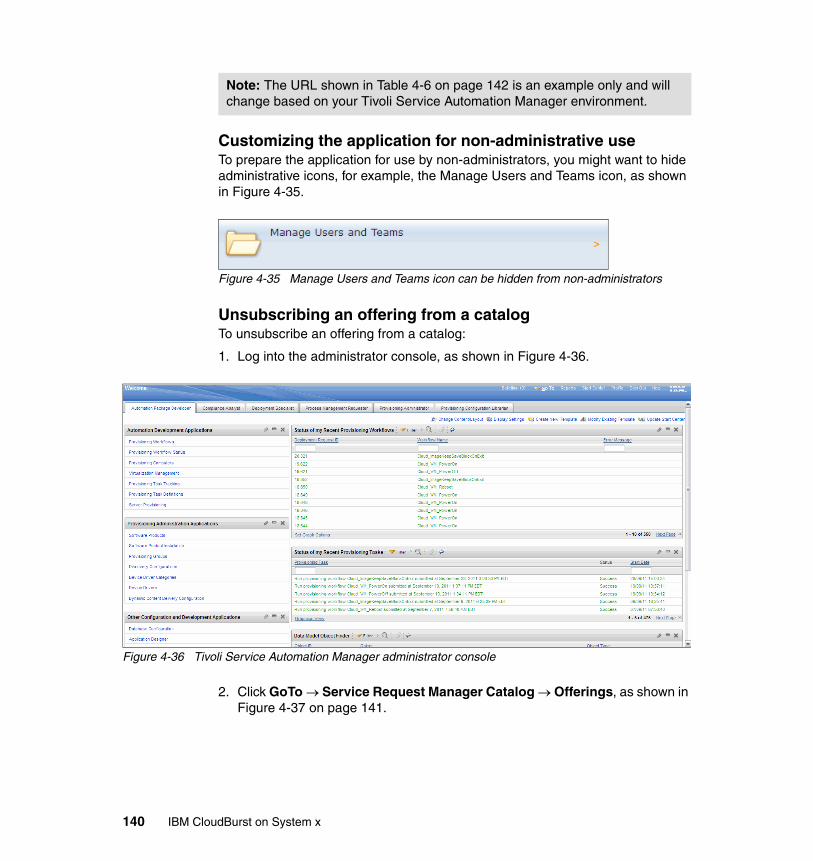
Customizing the application for non-administrative useTo prepare the application for use by non-administrators, you might want to hide administrative icons, for example, the Manage Users and Teams icon, as shown in Figure 4-35.
Figure 4-35 Manage Users and Teams icon can be hidden from non-administrators
Unsubscribing an offering from a catalogTo unsubscribe an offering from a catalog:
1. Log into the administrator console, as shown in Figure 4-36.
Figure 4-36 Tivoli Service Automation Manager administrator console
2. Click GoTo Service Request Manager Catalog Offerings, as shown in Figure 4-37 on page 141.
Note: The URL shown in Table 4-6 on page 142 is an example only and will change based on your Tivoli Service Automation Manager environment.
140 IBM CloudBurst on System x

Figure 4-37 Offerings console
3. Click in the Offerings drop-down menu, and select All Records to display a list of all available offerings displays. See Figure 4-38.
Figure 4-38 Drop-down list showing all offerings
Chapter 4. Initial setup 141
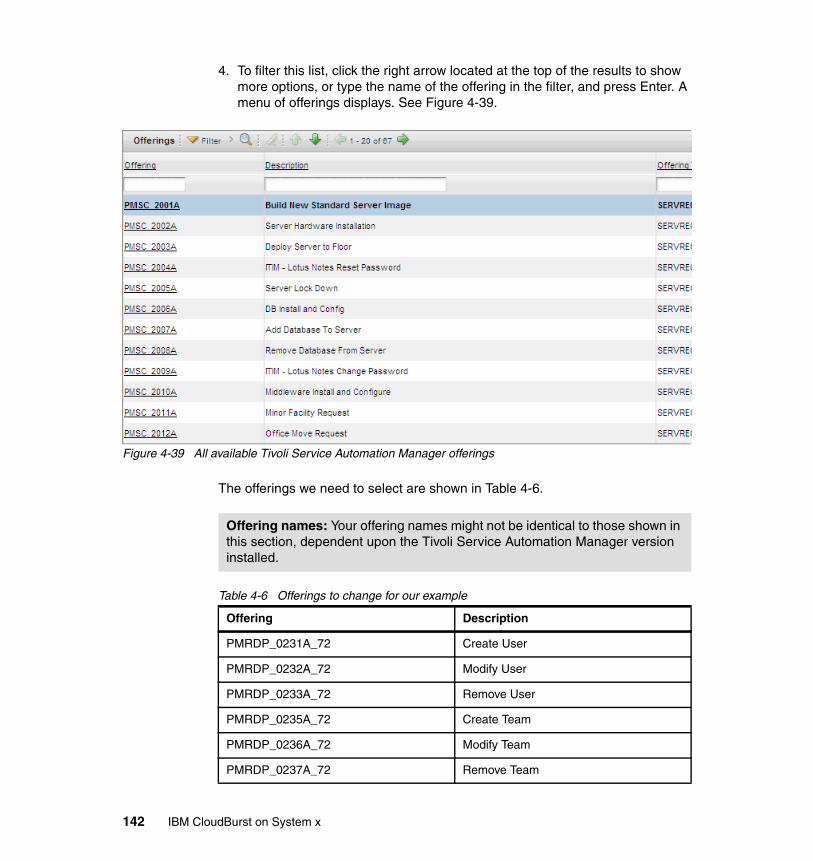
4. To filter this list, click the right arrow located at the top of the results to show more options, or type the name of the offering in the filter, and press Enter. A menu of offerings displays. See Figure 4-39.
Figure 4-39 All available Tivoli Service Automation Manager offerings
The offerings we need to select are shown in Table 4-6.
Table 4-6 Offerings to change for our example
Offering names: Your offering names might not be identical to those shown in this section, dependent upon the Tivoli Service Automation Manager version installed.
Offering Description
PMRDP_0231A_72 Create User
PMRDP_0232A_72 Modify User
PMRDP_0233A_72 Remove User
PMRDP_0235A_72 Create Team
PMRDP_0236A_72 Modify Team
PMRDP_0237A_72 Remove Team
142 IBM CloudBurst on System x
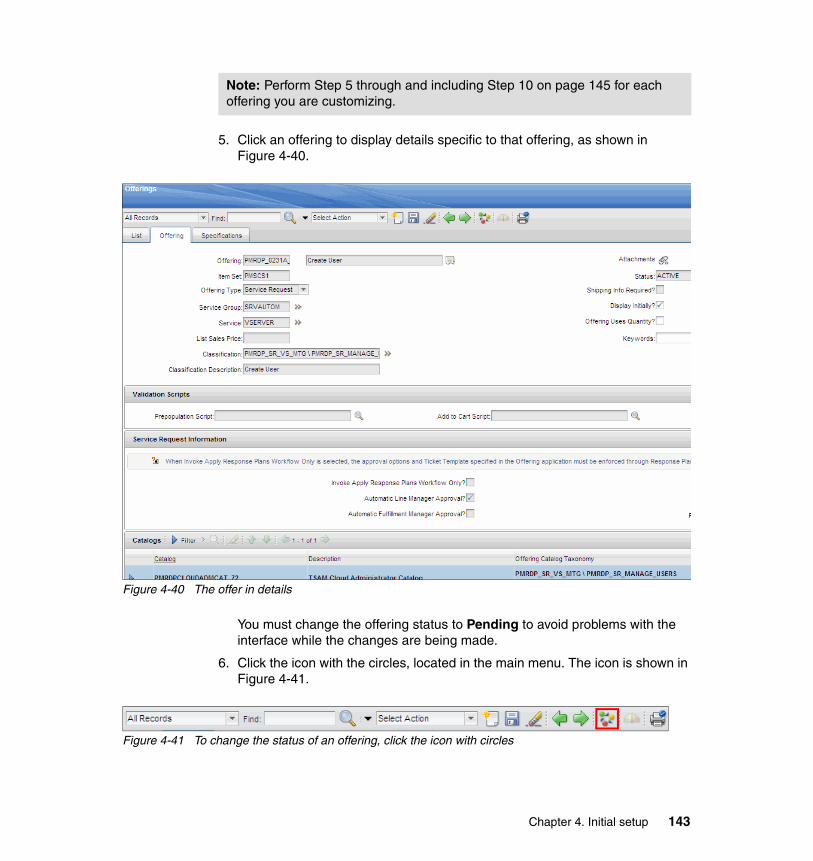
5. Click an offering to display details specific to that offering, as shown in Figure 4-40.
Figure 4-40 The offer in details
You must change the offering status to Pending to avoid problems with the interface while the changes are being made.
6. Click the icon with the circles, located in the main menu. The icon is shown in Figure 4-41.
Figure 4-41 To change the status of an offering, click the icon with circles
Note: Perform Step 5 through and including Step 10 on page 145 for each offering you are customizing.
Chapter 4. Initial setup 143
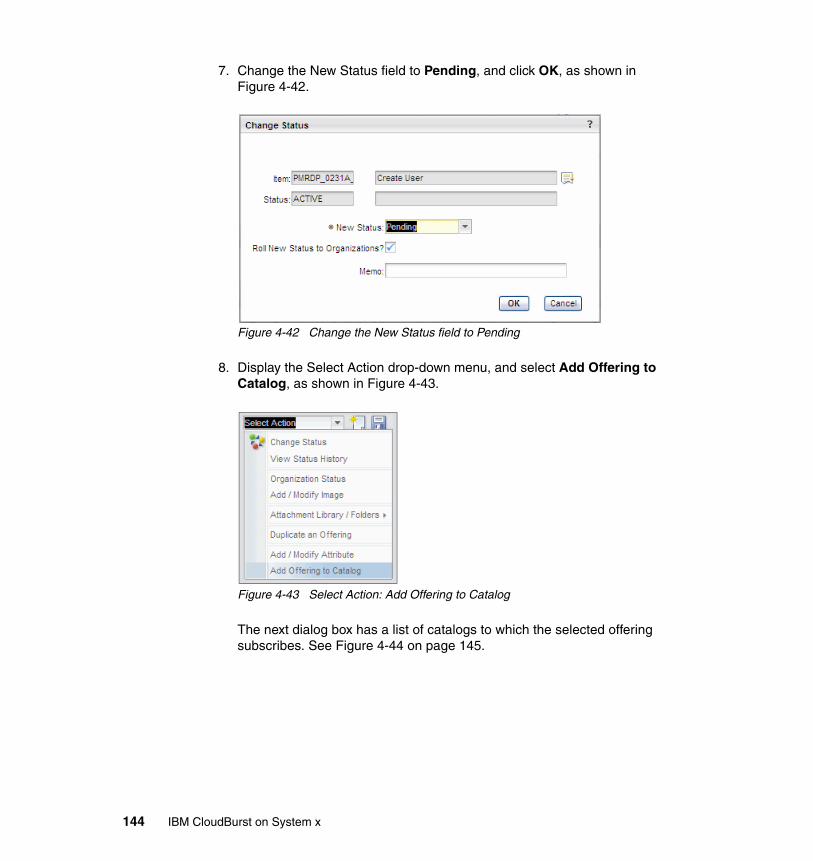
7. Change the New Status field to Pending, and click OK, as shown in Figure 4-42.
Figure 4-42 Change the New Status field to Pending
8. Display the Select Action drop-down menu, and select Add Offering to Catalog, as shown in Figure 4-43.
Figure 4-43 Select Action: Add Offering to Catalog
The next dialog box has a list of catalogs to which the selected offering subscribes. See Figure 4-44 on page 145.
144 IBM CloudBurst on System x
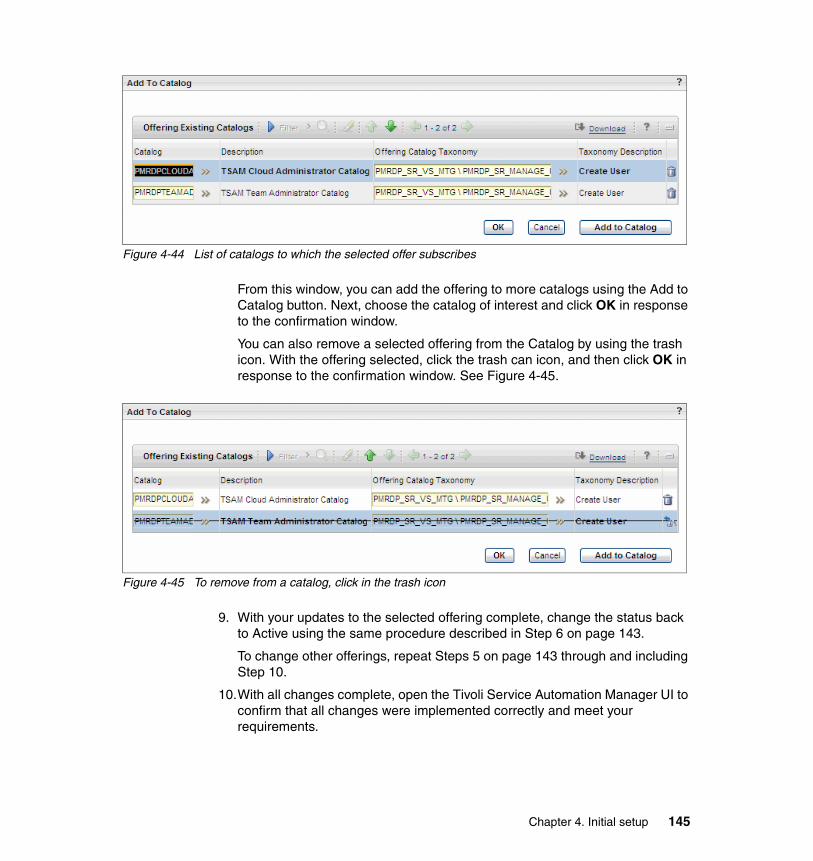
Figure 4-44 List of catalogs to which the selected offer subscribes
From this window, you can add the offering to more catalogs using the Add to Catalog button. Next, choose the catalog of interest and click OK in response to the confirmation window.
You can also remove a selected offering from the Catalog by using the trash icon. With the offering selected, click the trash can icon, and then click OK in response to the confirmation window. See Figure 4-45.
Figure 4-45 To remove from a catalog, click in the trash icon
9. With your updates to the selected offering complete, change the status back to Active using the same procedure described in Step 6 on page 143.
To change other offerings, repeat Steps 5 on page 143 through and including Step 10.
10.With all changes complete, open the Tivoli Service Automation Manager UI to confirm that all changes were implemented correctly and meet your requirements.
Chapter 4. Initial setup 145
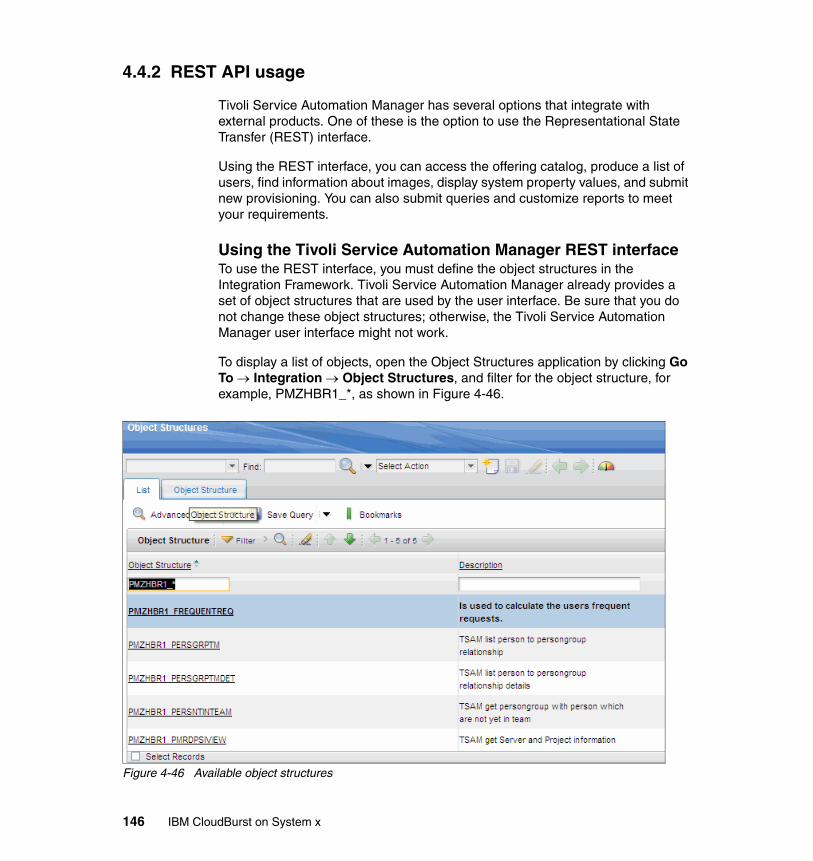
4.4.2 REST API usage
Tivoli Service Automation Manager has several options that integrate with external products. One of these is the option to use the Representational State Transfer (REST) interface.
Using the REST interface, you can access the offering catalog, produce a list of users, find information about images, display system property values, and submit new provisioning. You can also submit queries and customize reports to meet your requirements.
Using the Tivoli Service Automation Manager REST interfaceTo use the REST interface, you must define the object structures in the Integration Framework. Tivoli Service Automation Manager already provides a set of object structures that are used by the user interface. Be sure that you do not change these object structures; otherwise, the Tivoli Service Automation Manager user interface might not work.
To display a list of objects, open the Object Structures application by clicking Go To Integration Object Structures, and filter for the object structure, for example, PMZHBR1_*, as shown in Figure 4-46.
Figure 4-46 Available object structures
146 IBM CloudBurst on System x
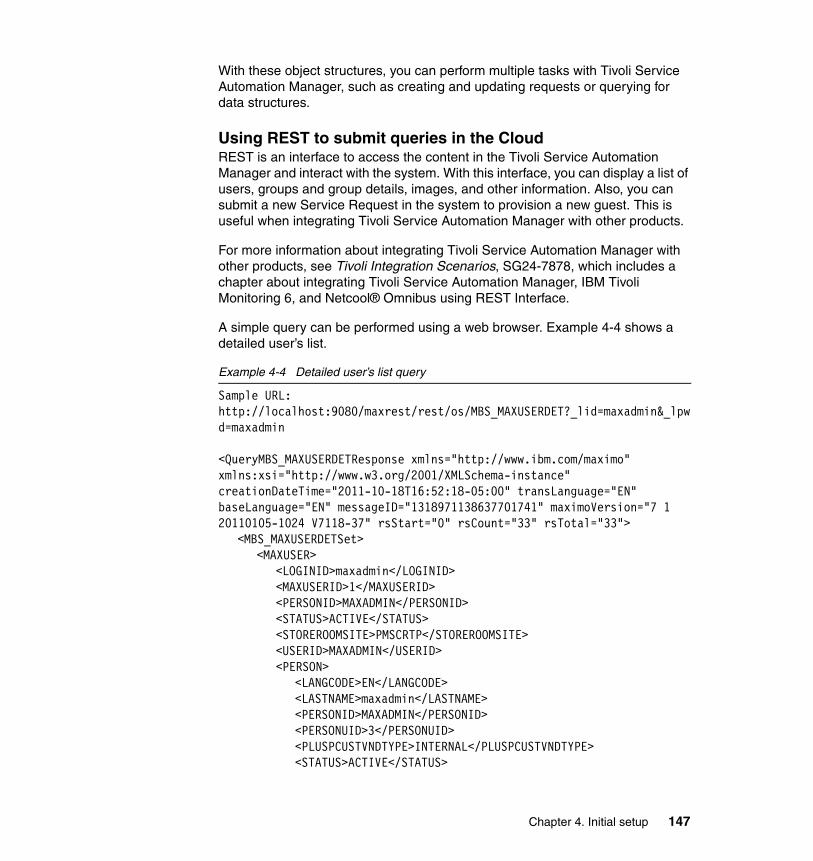
With these object structures, you can perform multiple tasks with Tivoli Service Automation Manager, such as creating and updating requests or querying for data structures.
Using REST to submit queries in the CloudREST is an interface to access the content in the Tivoli Service Automation Manager and interact with the system. With this interface, you can display a list of users, groups and group details, images, and other information. Also, you can submit a new Service Request in the system to provision a new guest. This is useful when integrating Tivoli Service Automation Manager with other products.
For more information about integrating Tivoli Service Automation Manager with other products, see Tivoli Integration Scenarios, SG24-7878, which includes a chapter about integrating Tivoli Service Automation Manager, IBM Tivoli Monitoring 6, and Netcool® Omnibus using REST Interface.
A simple query can be performed using a web browser. Example 4-4 shows a detailed user’s list.
Example 4-4 Detailed user’s list query
Sample URL: http://localhost:9080/maxrest/rest/os/MBS_MAXUSERDET?_lid=maxadmin&_lpwd=maxadmin
<QueryMBS_MAXUSERDETResponse xmlns="http://www.ibm.com/maximo" xmlns:xsi="http://www.w3.org/2001/XMLSchema-instance" creationDateTime="2011-10-18T16:52:18-05:00" transLanguage="EN" baseLanguage="EN" messageID="1318971138637701741" maximoVersion="7 1 20110105-1024 V7118-37" rsStart="0" rsCount="33" rsTotal="33">
<MBS_MAXUSERDETSet><MAXUSER>
<LOGINID>maxadmin</LOGINID> <MAXUSERID>1</MAXUSERID> <PERSONID>MAXADMIN</PERSONID> <STATUS>ACTIVE</STATUS> <STOREROOMSITE>PMSCRTP</STOREROOMSITE> <USERID>MAXADMIN</USERID> <PERSON>
<LANGCODE>EN</LANGCODE> <LASTNAME>maxadmin</LASTNAME> <PERSONID>MAXADMIN</PERSONID> <PERSONUID>3</PERSONUID> <PLUSPCUSTVNDTYPE>INTERNAL</PLUSPCUSTVNDTYPE> <STATUS>ACTIVE</STATUS>
Chapter 4. Initial setup 147
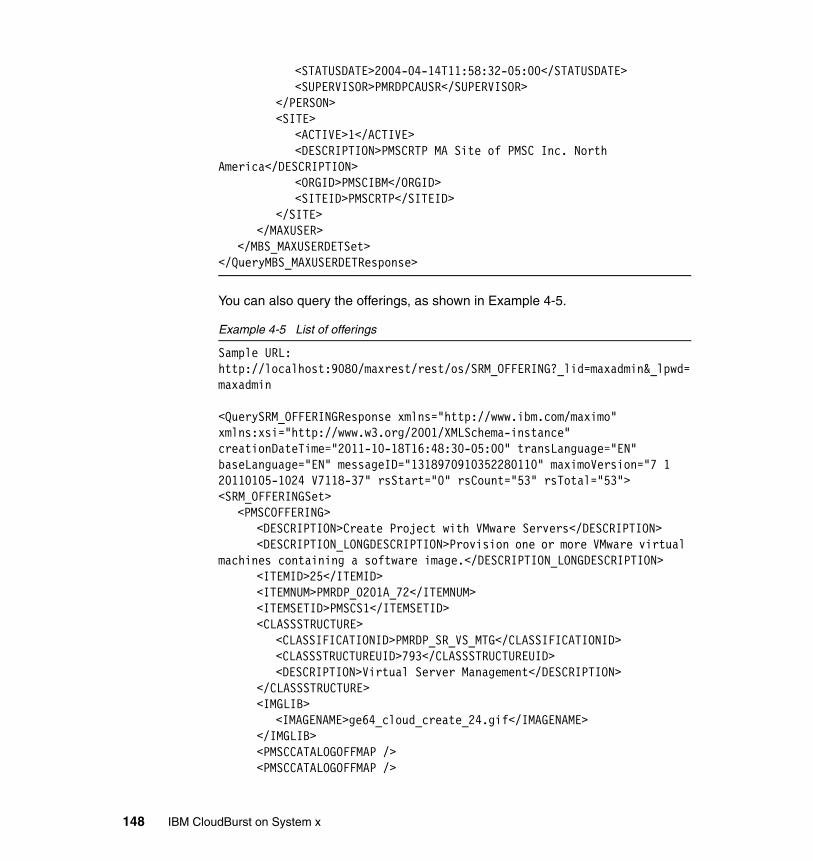
<STATUSDATE>2004-04-14T11:58:32-05:00</STATUSDATE> <SUPERVISOR>PMRDPCAUSR</SUPERVISOR>
</PERSON><SITE>
<ACTIVE>1</ACTIVE> <DESCRIPTION>PMSCRTP MA Site of PMSC Inc. North
America</DESCRIPTION> <ORGID>PMSCIBM</ORGID> <SITEID>PMSCRTP</SITEID>
</SITE></MAXUSER>
</MBS_MAXUSERDETSet></QueryMBS_MAXUSERDETResponse>
You can also query the offerings, as shown in Example 4-5.
Example 4-5 List of offerings
Sample URL: http://localhost:9080/maxrest/rest/os/SRM_OFFERING?_lid=maxadmin&_lpwd=maxadmin
<QuerySRM_OFFERINGResponse xmlns="http://www.ibm.com/maximo" xmlns:xsi="http://www.w3.org/2001/XMLSchema-instance" creationDateTime="2011-10-18T16:48:30-05:00" transLanguage="EN" baseLanguage="EN" messageID="1318970910352280110" maximoVersion="7 1 20110105-1024 V7118-37" rsStart="0" rsCount="53" rsTotal="53"><SRM_OFFERINGSet>
<PMSCOFFERING><DESCRIPTION>Create Project with VMware Servers</DESCRIPTION> <DESCRIPTION_LONGDESCRIPTION>Provision one or more VMware virtual
machines containing a software image.</DESCRIPTION_LONGDESCRIPTION> <ITEMID>25</ITEMID> <ITEMNUM>PMRDP_0201A_72</ITEMNUM> <ITEMSETID>PMSCS1</ITEMSETID> <CLASSSTRUCTURE>
<CLASSIFICATIONID>PMRDP_SR_VS_MTG</CLASSIFICATIONID> <CLASSSTRUCTUREUID>793</CLASSSTRUCTUREUID> <DESCRIPTION>Virtual Server Management</DESCRIPTION>
</CLASSSTRUCTURE><IMGLIB>
<IMAGENAME>ge64_cloud_create_24.gif</IMAGENAME> </IMGLIB><PMSCCATALOGOFFMAP /> <PMSCCATALOGOFFMAP />
148 IBM CloudBurst on System x
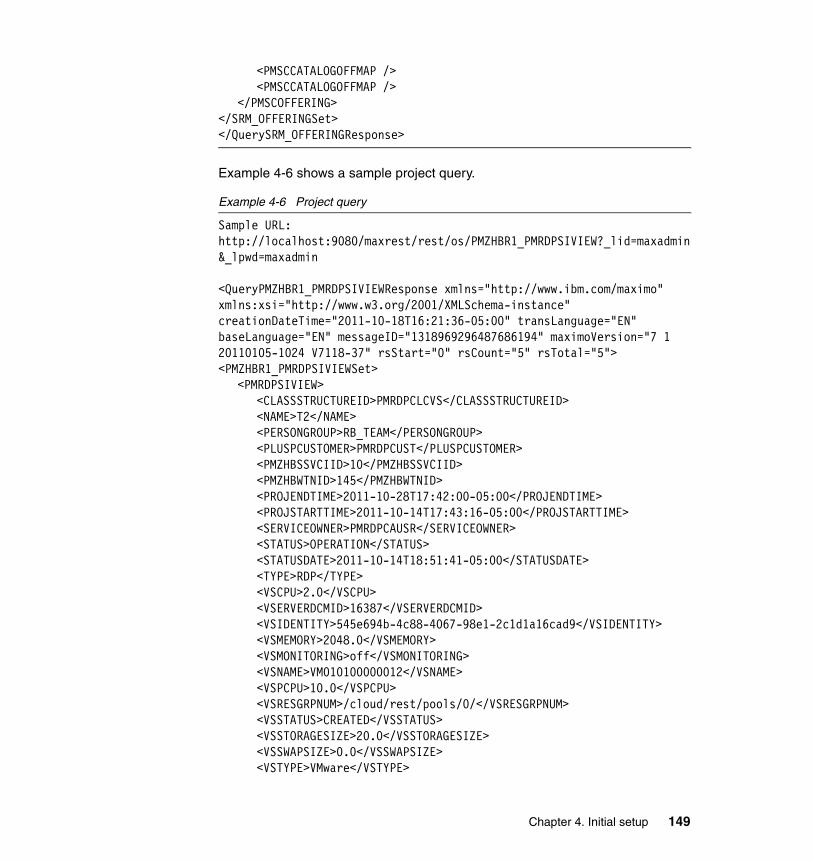
<PMSCCATALOGOFFMAP /> <PMSCCATALOGOFFMAP />
</PMSCOFFERING></SRM_OFFERINGSet></QuerySRM_OFFERINGResponse>
Example 4-6 shows a sample project query.
Example 4-6 Project query
Sample URL: http://localhost:9080/maxrest/rest/os/PMZHBR1_PMRDPSIVIEW?_lid=maxadmin&_lpwd=maxadmin
<QueryPMZHBR1_PMRDPSIVIEWResponse xmlns="http://www.ibm.com/maximo" xmlns:xsi="http://www.w3.org/2001/XMLSchema-instance" creationDateTime="2011-10-18T16:21:36-05:00" transLanguage="EN" baseLanguage="EN" messageID="1318969296487686194" maximoVersion="7 1 20110105-1024 V7118-37" rsStart="0" rsCount="5" rsTotal="5"><PMZHBR1_PMRDPSIVIEWSet>
<PMRDPSIVIEW><CLASSSTRUCTUREID>PMRDPCLCVS</CLASSSTRUCTUREID> <NAME>T2</NAME> <PERSONGROUP>RB_TEAM</PERSONGROUP> <PLUSPCUSTOMER>PMRDPCUST</PLUSPCUSTOMER> <PMZHBSSVCIID>10</PMZHBSSVCIID> <PMZHBWTNID>145</PMZHBWTNID> <PROJENDTIME>2011-10-28T17:42:00-05:00</PROJENDTIME> <PROJSTARTTIME>2011-10-14T17:43:16-05:00</PROJSTARTTIME> <SERVICEOWNER>PMRDPCAUSR</SERVICEOWNER> <STATUS>OPERATION</STATUS> <STATUSDATE>2011-10-14T18:51:41-05:00</STATUSDATE> <TYPE>RDP</TYPE> <VSCPU>2.0</VSCPU> <VSERVERDCMID>16387</VSERVERDCMID> <VSIDENTITY>545e694b-4c88-4067-98e1-2c1d1a16cad9</VSIDENTITY> <VSMEMORY>2048.0</VSMEMORY> <VSMONITORING>off</VSMONITORING> <VSNAME>VM010100000012</VSNAME> <VSPCPU>10.0</VSPCPU> <VSRESGRPNUM>/cloud/rest/pools/0/</VSRESGRPNUM> <VSSTATUS>CREATED</VSSTATUS> <VSSTORAGESIZE>20.0</VSSTORAGESIZE> <VSSWAPSIZE>0.0</VSSWAPSIZE> <VSTYPE>VMware</VSTYPE>
Chapter 4. Initial setup 149
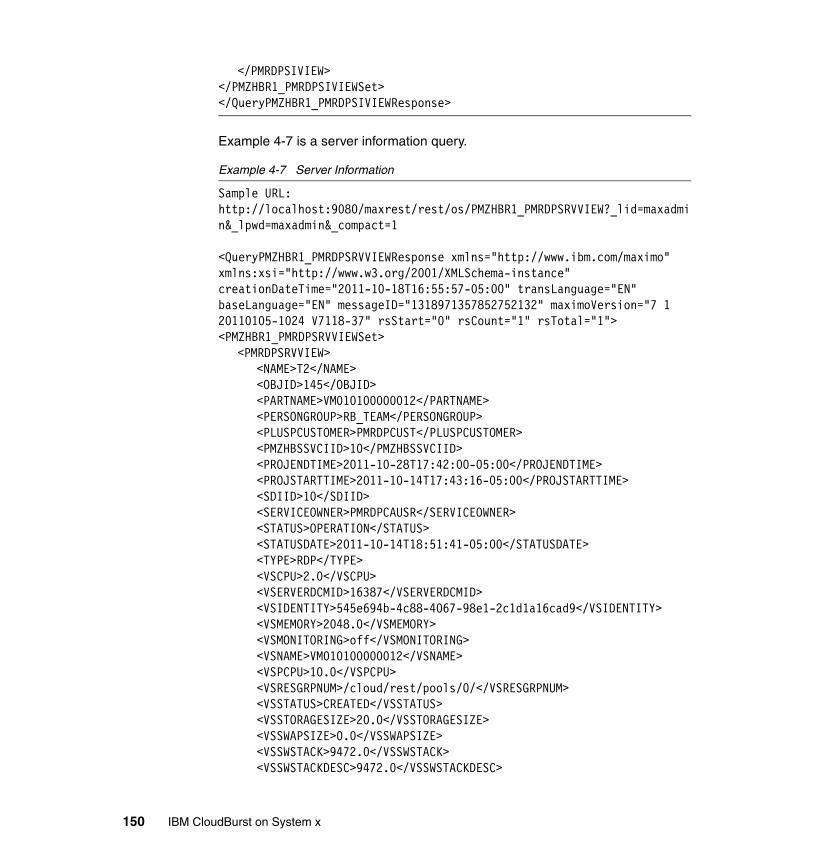
</PMRDPSIVIEW></PMZHBR1_PMRDPSIVIEWSet></QueryPMZHBR1_PMRDPSIVIEWResponse>
Example 4-7 is a server information query.
Example 4-7 Server Information
Sample URL:http://localhost:9080/maxrest/rest/os/PMZHBR1_PMRDPSRVVIEW?_lid=maxadmin&_lpwd=maxadmin&_compact=1
<QueryPMZHBR1_PMRDPSRVVIEWResponse xmlns="http://www.ibm.com/maximo" xmlns:xsi="http://www.w3.org/2001/XMLSchema-instance" creationDateTime="2011-10-18T16:55:57-05:00" transLanguage="EN" baseLanguage="EN" messageID="1318971357852752132" maximoVersion="7 1 20110105-1024 V7118-37" rsStart="0" rsCount="1" rsTotal="1"><PMZHBR1_PMRDPSRVVIEWSet>
<PMRDPSRVVIEW><NAME>T2</NAME> <OBJID>145</OBJID> <PARTNAME>VM010100000012</PARTNAME> <PERSONGROUP>RB_TEAM</PERSONGROUP> <PLUSPCUSTOMER>PMRDPCUST</PLUSPCUSTOMER> <PMZHBSSVCIID>10</PMZHBSSVCIID> <PROJENDTIME>2011-10-28T17:42:00-05:00</PROJENDTIME> <PROJSTARTTIME>2011-10-14T17:43:16-05:00</PROJSTARTTIME> <SDIID>10</SDIID> <SERVICEOWNER>PMRDPCAUSR</SERVICEOWNER> <STATUS>OPERATION</STATUS> <STATUSDATE>2011-10-14T18:51:41-05:00</STATUSDATE> <TYPE>RDP</TYPE> <VSCPU>2.0</VSCPU> <VSERVERDCMID>16387</VSERVERDCMID> <VSIDENTITY>545e694b-4c88-4067-98e1-2c1d1a16cad9</VSIDENTITY> <VSMEMORY>2048.0</VSMEMORY> <VSMONITORING>off</VSMONITORING> <VSNAME>VM010100000012</VSNAME> <VSPCPU>10.0</VSPCPU> <VSRESGRPNUM>/cloud/rest/pools/0/</VSRESGRPNUM> <VSSTATUS>CREATED</VSSTATUS> <VSSTORAGESIZE>20.0</VSSTORAGESIZE> <VSSWAPSIZE>0.0</VSSWAPSIZE> <VSSWSTACK>9472.0</VSSWSTACK> <VSSWSTACKDESC>9472.0</VSSWSTACKDESC>
150 IBM CloudBurst on System x
<VSTYPE>VMware</VSTYPE> </PMRDPSRVVIEW>
</PMZHBR1_PMRDPSRVVIEWSet></QueryPMZHBR1_PMRDPSRVVIEWResponse>
Using the REST API, you can create reports, develop a customized UI, or integrate Tivoli Service Automation Manager with another product. The list of REST interfaces is in the “Tivoli Service Automation Manager REST API Reference”, located at:
http://publib.boulder.ibm.com/infocenter/tivihelp/v10r1/topic/com.ibm.tsam_7.2.1.1.doc/t_tsamrestapireference.html
4.5 Modifying for branding
Tivoli Service Automation Manager 7.2.2 introduced a new method to extend the existing Self-Service User Interface look and functionality. In this section, we focus on the modifications regarding branding, specifically, how to change custom logos, messages, headings, and so on.
The Self-Service User Interface is built using Dojo combined with Java Script and HTML templates, leveraging Maximo REST API capabilities. It consists of a few WAR and JAR files, being stored in the MAXIMO.ear file in the following directory:
/opt/IBM/WebSphere/AppServer/profiles/ctgAppSrv01/installedApps/ctgCell01
The files of use for customization are:
� SimpleSRM.war
This is the main UI client code. It provides the code of all panels, used in UI.
� custom_web.war
In this file all customizations are incorporated. Tivoli Service Automation Manager checks if any customizations are available for particular panels and, if this extension is present, it is loaded into particular Dojo skeleton, on top of the Tivoli Service Automation Manager functionality.
Do not modify the WAR file: It is not recommended to modify this WAR file because with a new release of Tivoli Service Automation Manager this file is replaced and all of the customizations are overwritten.
Chapter 4. Initial setup 151
� SRMCommons.jar
It contains Self-Service User Interface configuration files and server Java code. Do not change the properties: config.properties, secure_config.properties, unless required explicitly.
In this section, all extensions are built using the custom_web.war file and its capabilities. This WAR file must be imported from the installation medium. For Tivoli Service Automation Manager 7.2.2, it is at:
TSAMBASE7220\samples\UI\custom_web.zip
The custom_web.zip file contains two projects:
� custom_web - project, which has the actual extensions
� custom_web_build, which is a tool project that contains build scripts for test and deployment
To activate extensions, custom_web.war must be built locally and deployed into Tivoli Service Automation Manager to finally become incorporated into the Maximo.ear.
4.5.1 Setting up the development environment
To build and deploy custom extensions, the Eclipse environment dedicated for development and build activities must be created:
1. Download and run Eclipse for Java EE Developers from http://www.eclipse.org/downloads. The supported releases are:
– Ganymede– Galileo– Helios
2. Using Eclipse IDE, create a workspace.
3. Import custom_web.zip archive to your Eclipse environment:
a. Select File Import General Existing Projects into Workspace.b. Click Select archive file, and browse for custom_web.zip.c. Click Finish to import the projects.
Note: It is highly recommended to use this WAR file for extensions because with each new Tivoli Service Automation Manager release this data remains intact. It is officially supported. The API interfaces were thoroughly tested and documented for the exact purpose of writing customer extensions.
152 IBM CloudBurst on System x
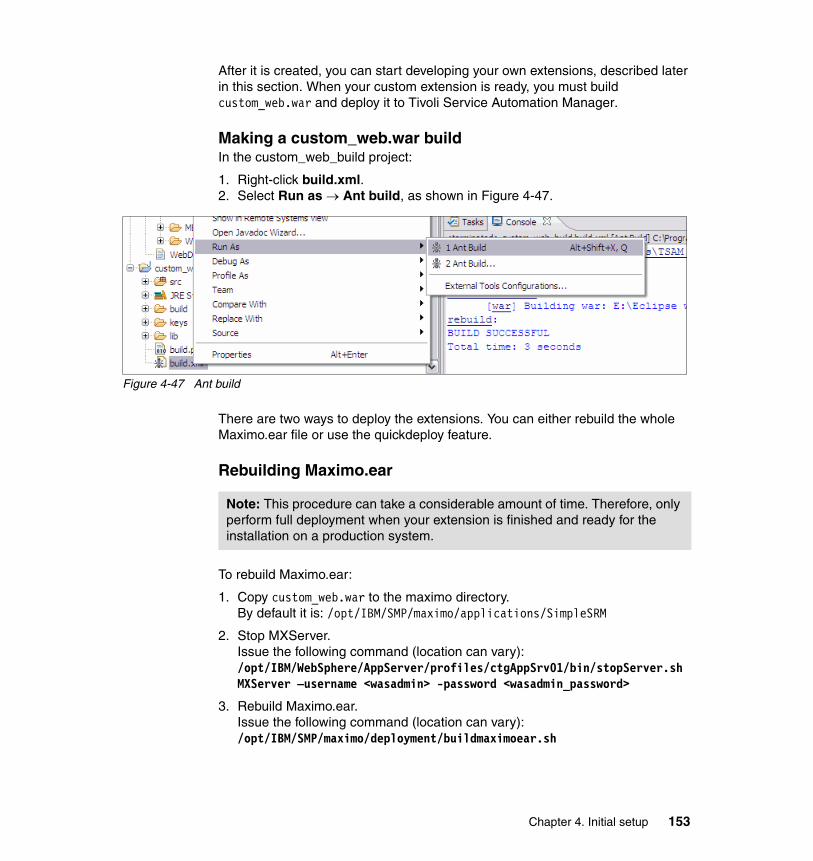
After it is created, you can start developing your own extensions, described later in this section. When your custom extension is ready, you must build custom_web.war and deploy it to Tivoli Service Automation Manager.
Making a custom_web.war buildIn the custom_web_build project:
1. Right-click build.xml.2. Select Run as Ant build, as shown in Figure 4-47.
Figure 4-47 Ant build
There are two ways to deploy the extensions. You can either rebuild the whole Maximo.ear file or use the quickdeploy feature.
Rebuilding Maximo.ear
To rebuild Maximo.ear:
1. Copy custom_web.war to the maximo directory.By default it is: /opt/IBM/SMP/maximo/applications/SimpleSRM
2. Stop MXServer. Issue the following command (location can vary):/opt/IBM/WebSphere/AppServer/profiles/ctgAppSrv01/bin/stopServer.sh MXServer –username <wasadmin> -password <wasadmin_password>
3. Rebuild Maximo.ear.Issue the following command (location can vary):/opt/IBM/SMP/maximo/deployment/buildmaximoear.sh
Note: This procedure can take a considerable amount of time. Therefore, only perform full deployment when your extension is finished and ready for the installation on a production system.
Chapter 4. Initial setup 153
4. Deploy Maximo.ear file.Issue the following command (location can vary):/opt/IBM/SMP/jacl/solutions/DeployApplication.sh <wasadmin> <wasadmin_password> MAXIMO ctgNode01 MXServer /opt/IBM/SMP/maximo/deployment/default/maximo.ear maximo_host webserver1
5. Start MXServer. Issue the following command (location can vary):/opt/IBM/WebSphere/AppServer/profiles/ctgAppSrv01/bin/startServer.sh MXServer –username <wasadmin> -password <wasadmin_password>
Performing quickdeploy
To perform quickdeploy, Eclipse must have a particular Ant build defined. Refer to “Configuring quickdeploy” on page 155 for more details.
After the Ant task is established, you can perform quickdeploy.
1. Right-click build.xml.2. Select Run as Ant build.3. In Ant Configuration Selection, select quickdeploy, and click Run, as
shown in Figure 4-48 on page 155.
Note: Use this to test immediately the small changes to the code. quickdeploy assumes, that the actual custom_web.war file is already deployed on a target server and its contents (javascript, html, css) can be replaced.
154 IBM CloudBurst on System x
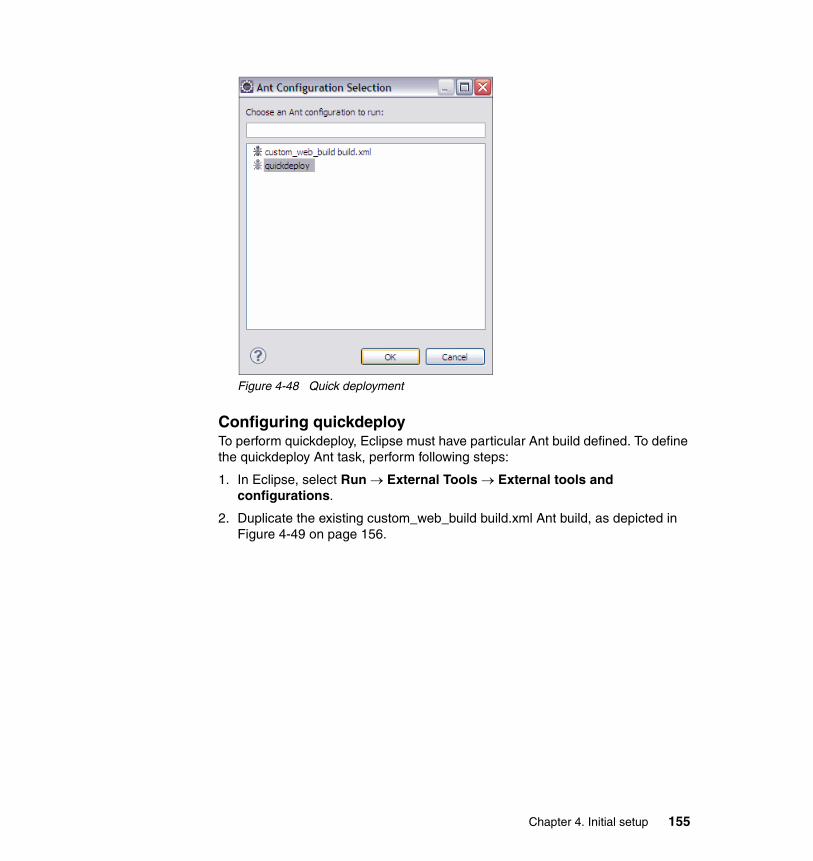
Figure 4-48 Quick deployment
Configuring quickdeployTo perform quickdeploy, Eclipse must have particular Ant build defined. To define the quickdeploy Ant task, perform following steps:
1. In Eclipse, select Run External Tools External tools and configurations.
2. Duplicate the existing custom_web_build build.xml Ant build, as depicted in Figure 4-49 on page 156.
Chapter 4. Initial setup 155
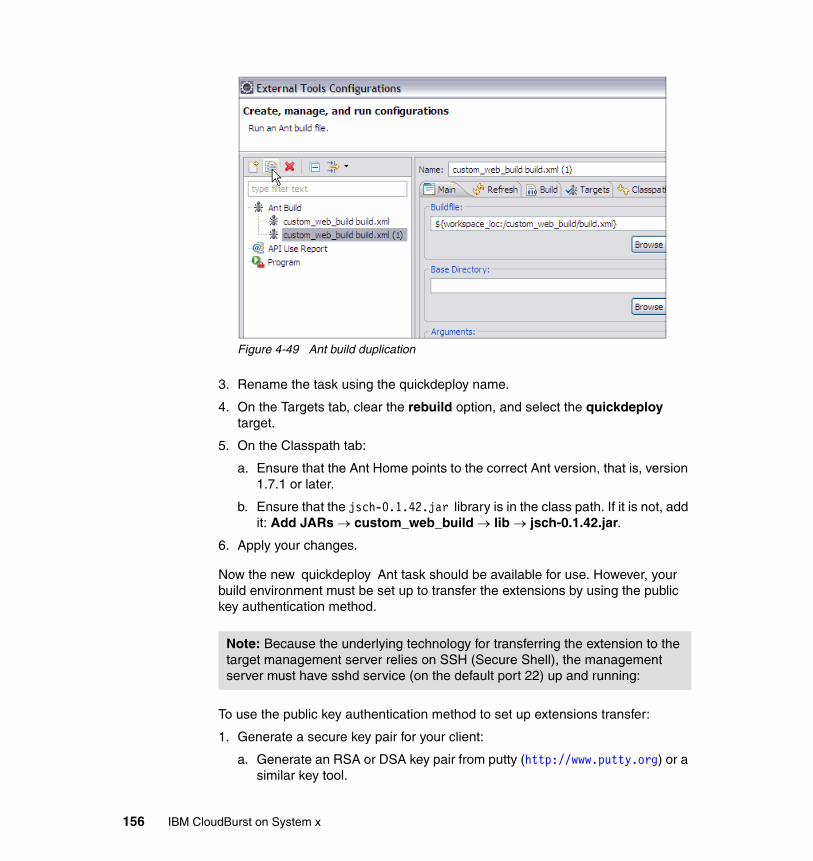
Figure 4-49 Ant build duplication
3. Rename the task using the quickdeploy name.
4. On the Targets tab, clear the rebuild option, and select the quickdeploy target.
5. On the Classpath tab:
a. Ensure that the Ant Home points to the correct Ant version, that is, version 1.7.1 or later.
b. Ensure that the jsch-0.1.42.jar library is in the class path. If it is not, add it: Add JARs custom_web_build lib jsch-0.1.42.jar.
6. Apply your changes.
Now the new quickdeploy Ant task should be available for use. However, your build environment must be set up to transfer the extensions by using the public key authentication method.
To use the public key authentication method to set up extensions transfer:
1. Generate a secure key pair for your client:
a. Generate an RSA or DSA key pair from putty (http://www.putty.org) or a similar key tool.
Note: Because the underlying technology for transferring the extension to the target management server relies on SSH (Secure Shell), the management server must have sshd service (on the default port 22) up and running:
156 IBM CloudBurst on System x
b. When using putty, use puttygen, a key generator program included in the putty installation. Select either SSH-2-RSA, or SSH-2-DSA with a number of bits between 64 - 2048 (1024 by default).
c. Ensure that the public key is in an OpenSSH-compatible format. When you use puttygen, copy the key from the text field to an id_dsa.pub or id_rsa.pub file, depending on the cryptographic method selected.
d. Save the private key to a file called id_dsa or id_rsa (depending on the cryptographic method selected) without the extension.
e. Place both the private and the public key into the keys folder of the custom_web_build project in Eclipse.
The keys folder in your custom_web_build project now contains the following files:
• id_<dsa|rsa> - the private key • id_<dsa|rsa>.pub - the public key
2. Establish a trusted connection to the management server:
a. Copy the public key file to the target management server.
b. On the target management server, add the contents of the public key to the authorized_keys file in your home directory:
• cd ~/.ssh
• cat /path/to/public/key/id_<dsa|rsa>.pub >> authorized_keys
3. Edit the build.properties file in the custom_web_build project in the following way:
– sshUser: Set to your user name on the target management server.
Note: Ensure that you are storing the key in an OpenSSH-compatible format. Do not click Save public key to ensure that you are not using putty proprietary format. Instead, copy and paste the public key from the text field to a new file and name this file id_dsa.pub or id_rsa.pub.
Note: Ensure that you are storing the key in OpenSSH-compatible format. Do not click Save public key to ensure that you are not using putty proprietary format. Instead, in the Conversions menu, select Export OpenSSH key.
Important: This user must have write access to the WebSphere installation directory.
Chapter 4. Initial setup 157
– sshUsePwd: Comment this line out. (Do not set it to no).
– sshUseKey: Set to yes.
– sshKeyFile: Set to keys/id_<dsa|rsa>.
– sshKeyPassphrase: Set the passphrase for your key (only if you have set one during key creation).
– targetHost: Set to the host name of the target management server.
If you have not installed Tivoli Service Automation Manager with default settings for WebSphere, you might need to change the following properties:
– WAS_HOME: Set to the installation directory of WebSphere.
– SERVER_NAME: Set to the name of the application server that runs Maximo.
– CELL_NAME: Set to the WebSphere cell that hosts your application server.
4. To test your setup, run the quickdeploy ant task from the build.xml.
4.5.2 Writing custom extensions
This section describes the process to customize a logo screen.
Predefined Dojo methods in Tivoli Service Automation Manager
To introduce the changes, you can use one of the Dojo functions being already predefined in Tivoli Service Automation Manager:
� tsamCustomInit
This function initializes custom extensions. It is called before the panel shows in the Self-Service User Interface. Perform branding customizations here, using, for example, the following methods:
– tsamLoadCSS
This method loads a new stylesheet to customize the look of your dialog.
Note: Detailed information about building the development environment and deploying custom extensions to Tivoli Service Automation Manager are in Tivoli Service Automation Manager 7.2.2 Extension Guide in the chapter Extensibility - Setting up your development environment at:
http://publib.boulder.ibm.com/infocenter/tivihelp/v10r1/index.jsp?topic=%2Fcom.ibm.tsam_7.2.2.doc%2Fext%2Ft_ext_ui_setup_env.html
158 IBM CloudBurst on System x
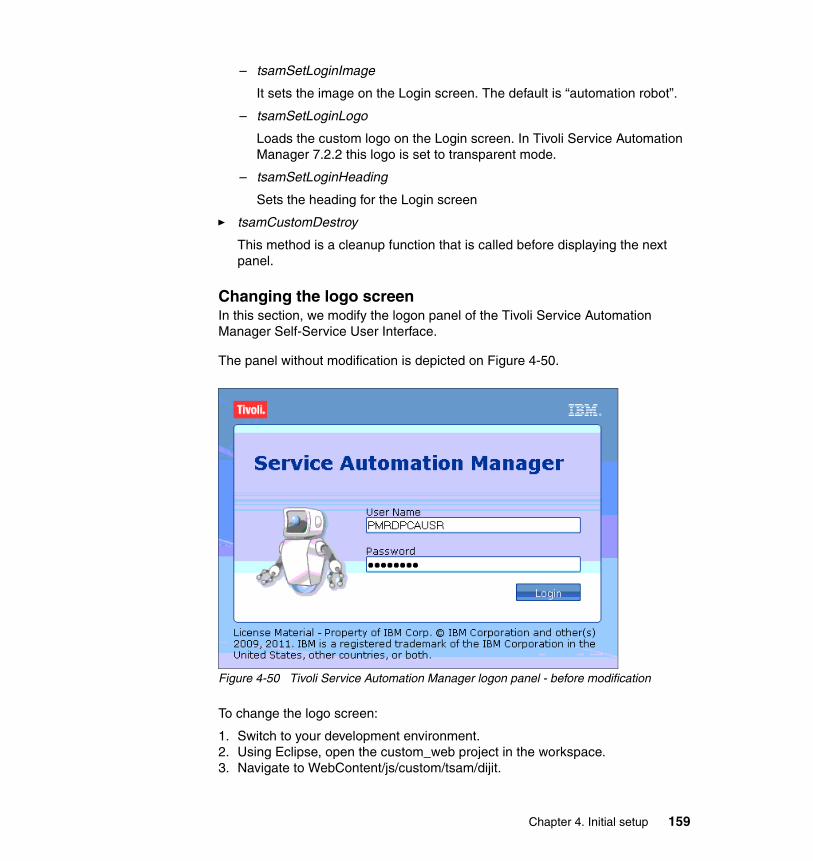
– tsamSetLoginImage
It sets the image on the Login screen. The default is “automation robot”.
– tsamSetLoginLogo
Loads the custom logo on the Login screen. In Tivoli Service Automation Manager 7.2.2 this logo is set to transparent mode.
– tsamSetLoginHeading
Sets the heading for the Login screen
� tsamCustomDestroy
This method is a cleanup function that is called before displaying the next panel.
Changing the logo screenIn this section, we modify the logon panel of the Tivoli Service Automation Manager Self-Service User Interface.
The panel without modification is depicted on Figure 4-50.
Figure 4-50 Tivoli Service Automation Manager logon panel - before modification
To change the logo screen:
1. Switch to your development environment.2. Using Eclipse, open the custom_web project in the workspace.3. Navigate to WebContent/js/custom/tsam/dijit.
Chapter 4. Initial setup 159
4. Open the Login.js file.
In Login.js file, depending on your needs, perform the actions in the following sections.
Loading a customized CSS sheet for the logon screentsamLoadCSS is designed to support the style change.
Syntax: tsamLoadCSS(Arg1)
Where:
Arg1 is a path to your *.css style sheet file below the custom_web/WebContent/js root directory (replaced with /custom/js in the syntax).
Example:
For the myNewStyle.css style sheet file, located under custom_web/WebContent/js/custom/tsam/dijit/themes/customstyles, the method should look as follows:
this.tsamLoadCSS("/custom/js/custom/tsam/dijit/themes/customstyles/myNewStyle.css");
Loading a customized logon screen imagetsamSetLoginImage is designed to change the logon image.
Syntax: tsamSetLoginImage(Arg1, Arg2, Arg3, Arg4)
Where:
� Arg1 - width (pixels)� Arg2 - height (pixels)� Arg3 - (optional) alternative text (displayed when image cannot be loaded)� Arg4 - path to your image file.
Note: In case your Login.js file is not available in the custom_web project, you might want to copy and rename the existing Login_sample.js file, present in WebContent/js/custom/tsam/dijit/ sample folder.
Note: The image is best displayed with 60 pixels in width and 120 pixels in height.
160 IBM CloudBurst on System x
Example:
For the Redbooks-logo.png image file, located under
custom_web/WebContent/js/custom/tsam/dijit/themes/images
with a width and height of 120 pixels, the method should look as follows:
this.tsamSetLoginImage(120,120, "", "/custom/js/custom/tsam/dijit/themes/images/Redbooks-logo.png");
Setting your own company logotsamSetLoginLogo method is designed to set the logo.
Syntax: tsamSetLoginLogo(Arg1, Arg2, Arg3, Arg4)
Where:
� Arg1 - width (pixels)� Arg2 - height (pixels)� Arg3 - (optional) alternative text (displayed when logo cannot be loaded)� Arg4 - path to your logo file
Example:
For the LoginLogo_ITSO.png logo file, located under custom_web/WebContent/js/custom/tsam/dijit/themes/images,
with a width of 42 pixels and a height of 22 pixels, the method should look as follows:
this.tsamSetLoginLogo(42, 22, "", "/custom/js/custom/tsam/dijit/themes/images/LoginLogo_ITSO.png");
Example 4-8 on page 162 shows the Login.js file introducing all of the changes for the logon screen described in this section.
Note: In Figure 4-50 on page 159, the customized logon image is depicted as an “automation robot”
Note: In Figure 4-50 on page 159, the company logo is depicted as a Tivoli brand logo.
Chapter 4. Initial setup 161
Example 4-8 Login.js - customization logon panel
dojo.provide("custom.tsam.dijit.Login");dojo.require("ibm.tivoli.simplesrm.srm.dijit.Login");dojo.declare("custom.tsam.dijit.Login",
[ibm.tivoli.simplesrm.srm.dijit.Login], {
tsamCustomInit: function() {//load new style
this.tsamLoadCSS("/custom/js/custom/tsam/dijit/themes/customstyles/myNewStyle.css");
//load new logon imagethis.tsamSetLoginImage(120,120, "",
"/custom/js/custom/tsam/dijit/themes/images/Redbook-logo.png");
//load new company logothis.tsamSetLoginLogo(42, 22, "",
"/custom/js/custom/tsam/dijit/themes/images/LoginLogo_ITSO.png");
},dummy_:null
});
The modified Logon screen is shown in Figure 4-51 on page 163.
Important: If you do not see any changes, clear your web browser’s cache and re-open the UI console.
162 IBM CloudBurst on System x
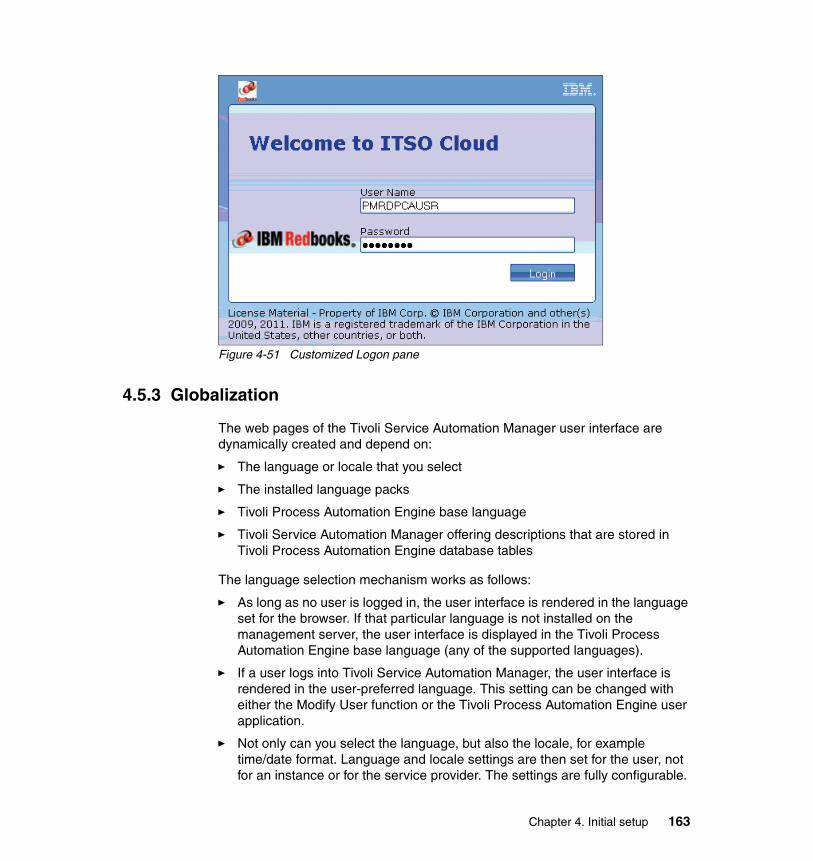
Figure 4-51 Customized Logon pane
4.5.3 Globalization
The web pages of the Tivoli Service Automation Manager user interface are dynamically created and depend on:
� The language or locale that you select
� The installed language packs
� Tivoli Process Automation Engine base language
� Tivoli Service Automation Manager offering descriptions that are stored in Tivoli Process Automation Engine database tables
The language selection mechanism works as follows:
� As long as no user is logged in, the user interface is rendered in the language set for the browser. If that particular language is not installed on the management server, the user interface is displayed in the Tivoli Process Automation Engine base language (any of the supported languages).
� If a user logs into Tivoli Service Automation Manager, the user interface is rendered in the user-preferred language. This setting can be changed with either the Modify User function or the Tivoli Process Automation Engine user application.
� Not only can you select the language, but also the locale, for example time/date format. Language and locale settings are then set for the user, not for an instance or for the service provider. The settings are fully configurable.
Chapter 4. Initial setup 163
Developing Globalization extensionBefore starting, make sure that Tivoli Service Automation Manager language pack has been installed properly in the system. For additional information about how to install language packs, see Tivoli Service Automation Manager information center at:
http://publib.boulder.ibm.com/infocenter/tivihelp/v10r1/index.jsp?topic=%2Fcom.ibm.tsam.doc_7.2%2Ft_install_base.html
Globalization dojo feature descriptionTivoli Service Automation Manager Self-Service User Interface can be extended in the form of JavaScript Dojo classes. Therefore for UI globalization purposes, Dojo features must be used.
If a language pack was installed properly to the system, the following additional files are present in the system (in custom_web.war project):
� js/custom/tsam/dijit/nls/uiStringTable.js (default, English)� js/custom/tsam/dijit/nls/de/uiStringTable.js (German)� js/custom/tsam/dijit/nls/es/uiStringTable.js (Spanish)� js/custom/tsam/dijit/nls/fr/uiStringTable.js (French)� js/custom/tsam/dijit/nls/it/uiStringTable.js (Italian)� js/custom/tsam/dijit/nls/ja/uiStringTable.js (Japanese)� js/custom/tsam/dijit/nls/ko/uiStringTable.js (Korean)� js/custom/tsam/dijit/nls/pt-br/uiStringTable.js (Portuguese / Brazilian)� js/custom/tsam/dijit/nls/ru/uiStringTable.js (Russian)� js/custom/tsam/dijit/nls/zh/uiStringTable.js (Chinese)� js/custom/tsam/dijit/nls/zh-tw/uiStringTable.js (Traditional Chinese)
These files represent the translation tables for a given language. Which table is used for translation is determined by the locale that is set in the web browser used to connect to Self-Service User Interface.
When dojo.requireLocalization (custom.tsam.dijit, uiStringTable) method is called, Dojo searches the nls folder in the custom.tsam.dijit package for the uiStringTable table corresponding to the locale.
Note: For additional information regarding user management, refer to Tivoli Service Automation Manager information center at: http://publib.boulder.ibm.com/infocenter/tivihelp/v10r1/topic/com.ibm.tsam_7.2.2.doc/rdp/t_rdp_managingusers.html
164 IBM CloudBurst on System x
Example:
When locale in the web browser is set to German (de), the dojo.requireLocalization (custom.tsam.dijit, uiStringTable) method will perform the search of the uiStringTable on ../nls/de/.. source. What eventually returns is:
js/custom/tsam/dijit/nls/de/uiStringTable.js (Translation table for German)
The structure of the uiStringTable table is a simple JavaScript array - mapping key: value, as depicted in Example 4-9.
Example 4-9 uiStringTable example
{Key1: "value1"Key2: "value2"...
}
Associating variables with a resource bundleHaving uiStringTable defined in the system, you can use keys, declared in the array, to load associated values into dojo string variables.
As an example, to change the this.myPanelLabel string, store the string value in the array, as shown in Example 4-10.
Example 4-10 Store the string value
{panelCustomLabel: "My Panel"...
}
Perform the next steps to set this.myPanelLabel variable in the code:
1. Load resource bundle into an array using the getLocalization() method
this.globalizationTable = dojo.i18n.getLocalization("custom.tsam.dijit", "uiStringTable");
Note: In case the required locale table is not supported, the cloud administrator can prepare the globalization uiStringTable table by copying the existing uiStringTable.js file to the location determined by language and translate the values for all keys accordingly. After this is done and uiStringTable is in a proper folder structure, globalization will be active.
Chapter 4. Initial setup 165
2. Use the this.globalizationTable array variable to replace the existing this.myPanelLabel string.
this.myPanelLabel(this.globalizationTable.panelCustomLabel);
This can be also done at once using the following syntax:
this.myPanelLabel = dojo.i18n.getLocalization("custom.tsam.dijit", "uiStringTable").panelCustomLabel;
4.6 Customizing email notification templates
IBM CloudBurst uses email notifications to inform users when:
� A Service Request approval is rejected, required, or approved
� A project is created, cancelled, pending removal due to an expired reservation, or a reservation time is modified
� A server is started, stopped, added, modified, removed, pending removal due to an expired reservation, or an operation was performed
� A virtual server image is created, saved, restored, or deleted
A subset of the built-in communication templates is included in the self-service virtual server provisioning service defined in CloudBurst. See Table 4-7.
Table 4-7 Suggested important communication templates
Important: Tivoli Service Automation Manager will overwrite all variables that are identical with the existing ones. They usually start with this._ Therefore it is recommended to use different writing conventions and names.
Template Event that triggers notification
PMRDPAFREJA A service request approval was rejected, and the submitting user is notified.
PMRDPNOTAS A server was added, and the user is notified.
PMRDPNOTCP A deployment was created, and he user is notified.
PMRDPNOTMS A server was modified, and the user is notified.
PMRDPRBREJ A service request approval was rejected, and the submitting user is notified.
PMRDPSRAF A service request approval is required, and the affected user is notified.
166 IBM CloudBurst on System x
To view additional templates, go to the Tivoli Service Automation Manager information center at:
http://publib.boulder.ibm.com/infocenter/tivihelp/v10r1/index.jsp?topic=%2Fcom.ibm.tsam_7.2.2.doc%2Frdp%2Fc_rdp_commtemplates.html
4.6.1 Modifying a communication template
If necessary, to modify a communication template:
1. Click Go To Administration Communication Templates.
2. Filter for the template that you want to modify, as described in Table 4-7 on page 166, or press Enter in an empty field to list all available templates. See Figure 4-52 on page 168.
PMRDPSROK A service request was automatically approved, and the submitting user is notified.
PMRDPSRRB A service request approval is required, and the user who reported the request is notified.
PMRDPNOTPEND Removal of a server is pending due to an expired reservation.
PMRDPNOTPENDPR
Removal of a project is pending due to an expired reservation.
PMRDPNOTAPP Approval is required.
PMRDPAPRREQ Informs Cloud Administrator of a required approval.
Template Event that triggers notification
Chapter 4. Initial setup 167
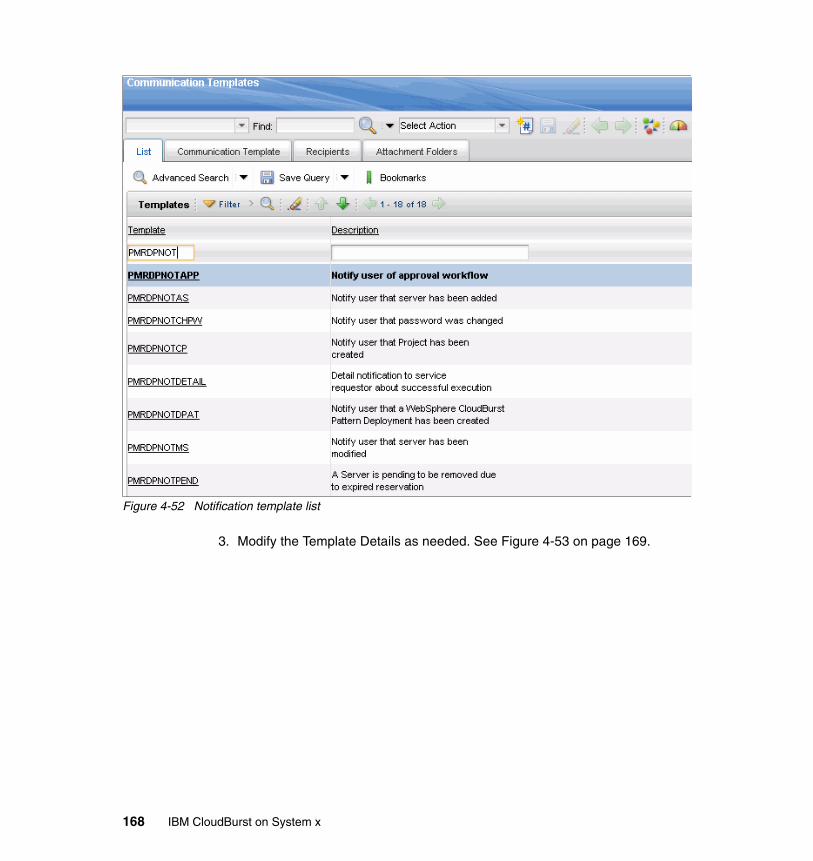
Figure 4-52 Notification template list
3. Modify the Template Details as needed. See Figure 4-53 on page 169.
168 IBM CloudBurst on System x
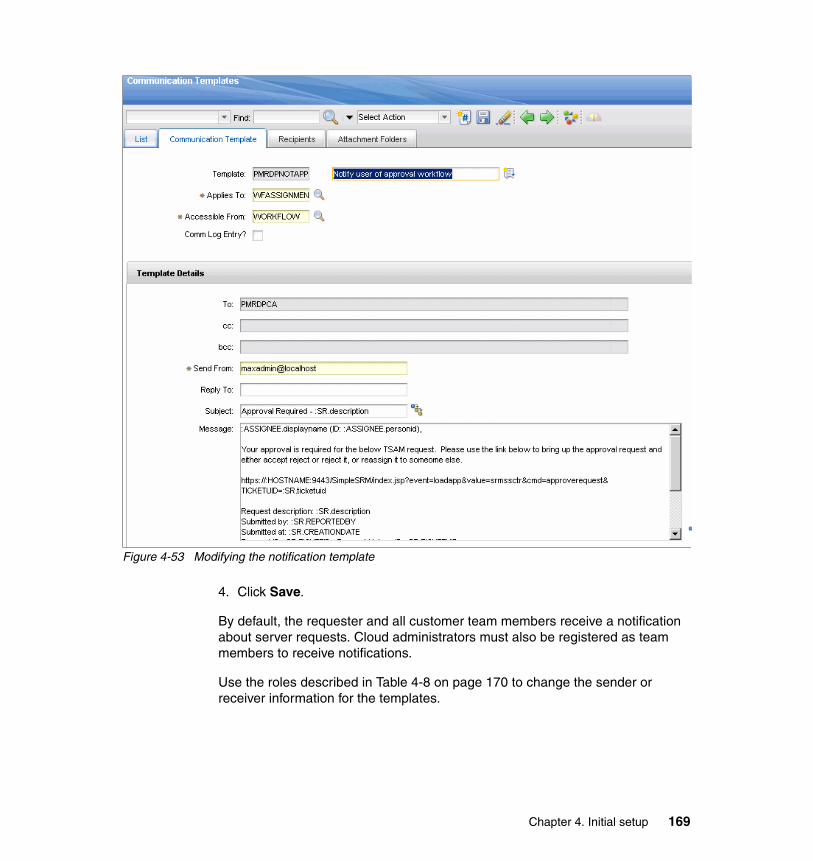
Figure 4-53 Modifying the notification template
4. Click Save.
By default, the requester and all customer team members receive a notification about server requests. Cloud administrators must also be registered as team members to receive notifications.
Use the roles described in Table 4-8 on page 170 to change the sender or receiver information for the templates.
Chapter 4. Initial setup 169
Table 4-8 Roles for email notification
For more information about notification templates, visit the Tivoli Service Automation Manager information center at: http://publib.boulder.ibm.com/infocenter/tivihelp/v10r1/index.jsp?topic=%2Fcom.ibm.tsam_7.2.2.doc%2Frdp%2Fc_rdp_commtemplates.html
4.7 Lifecycle of provisioning a project
The following sections guide you through creating a project in CloudBurst on System x. They include a sample project that incorporates several tasks that typically are required during any project lifecycle, beginning with your first login to the Tivoli Service Automation Manager user interface. The scenarios covered are:
� 4.8, “Creating a customer” on page 174� 4.9, “Creating a new team and user” on page 175� 4.10, “Creating a sample project, Hello Cloud” on page 179
In the sample project, the following management tasks are covered:
� “Stopping, starting, and restarting servers” on page 188� “Resetting a server password” on page 189� “Modifying server resources” on page 190� “Cancelling a project” on page 191
4.7.1 Tivoli Service Automation Manager interface
The Tivoli Service Automation Manager interface is used to perform the tasks we will cover. For more information about using the Tivoli Service Automation Manager, see:
http://publib.boulder.ibm.com/infocenter/tivihelp/v10r1/index.jsp
Role Definition
PMRDPNOTRQ User that issued a provisioning request.
PMRDPNOTSO Owner of the project, that is, a user who created the project.
PMRDPNOTUG Team of the user who issued a provisioning request. On CC list.
170 IBM CloudBurst on System x
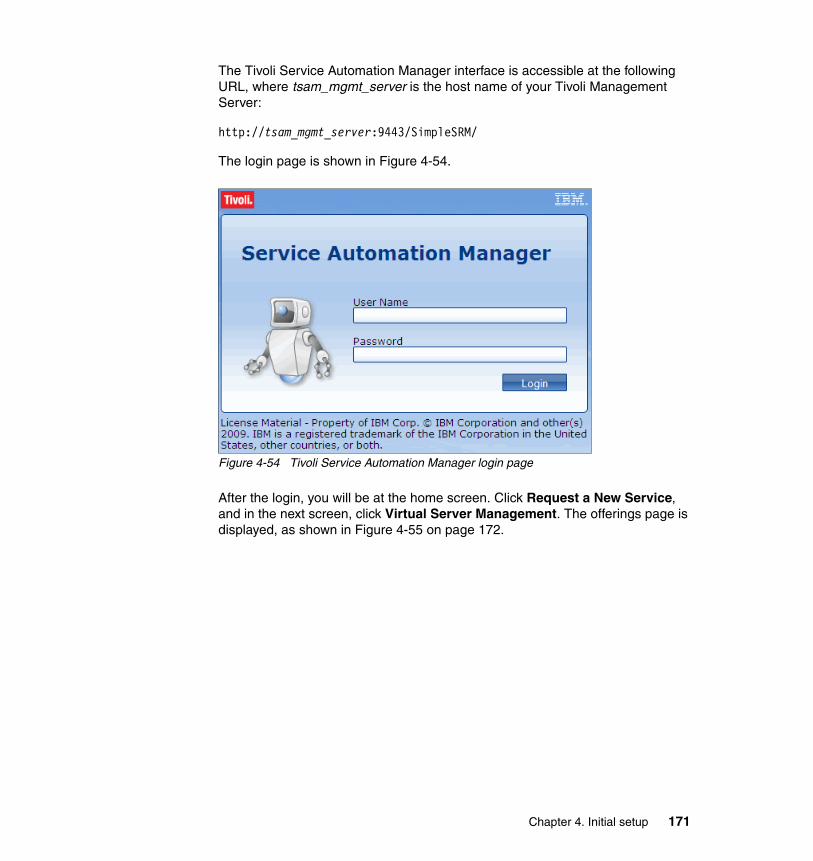
The Tivoli Service Automation Manager interface is accessible at the following URL, where tsam_mgmt_server is the host name of your Tivoli Management Server:
http://tsam_mgmt_server:9443/SimpleSRM/
The login page is shown in Figure 4-54.
Figure 4-54 Tivoli Service Automation Manager login page
After the login, you will be at the home screen. Click Request a New Service, and in the next screen, click Virtual Server Management. The offerings page is displayed, as shown in Figure 4-55 on page 172.
Chapter 4. Initial setup 171
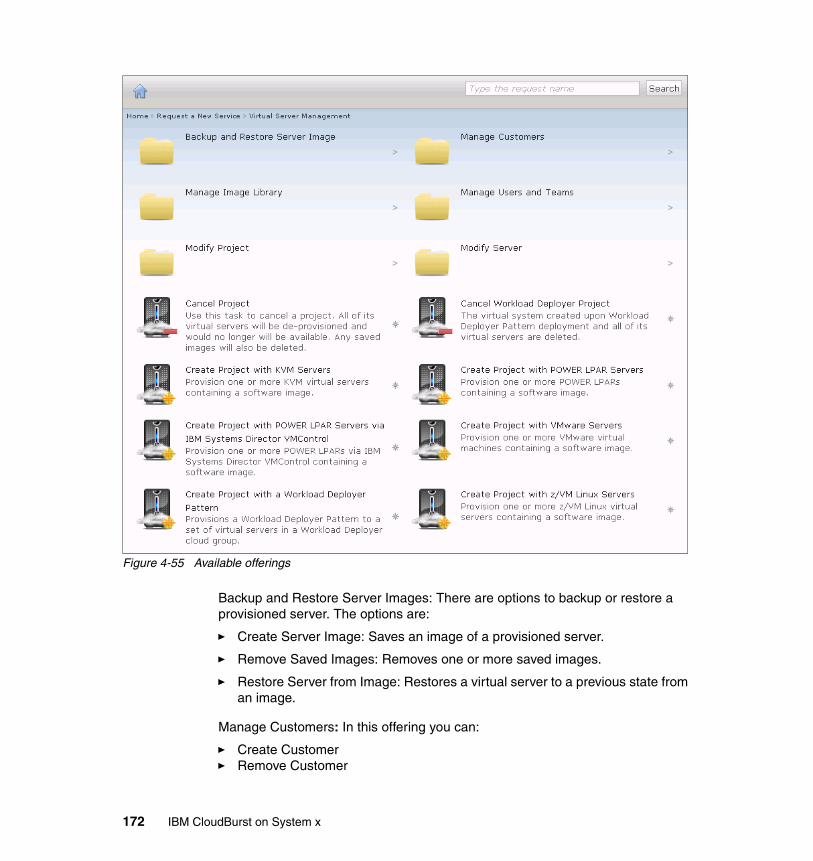
Figure 4-55 Available offerings
Backup and Restore Server Images: There are options to backup or restore a provisioned server. The options are:
� Create Server Image: Saves an image of a provisioned server.
� Remove Saved Images: Removes one or more saved images.
� Restore Server from Image: Restores a virtual server to a previous state from an image.
Manage Customers: In this offering you can:
� Create Customer� Remove Customer
172 IBM CloudBurst on System x
Manage Image Library: To add and remove images for a template. The options are:
� Register VMware Image� Register POWER® LPAR Image� Register KVM Image� Register Xen Image� Register Xen Image� Register z/VM® Image� Register VM Image using IBM System Director VMControl� Unregister Image
Manage Users and Teams: To add, remove, or edit users and teams:
� Create Team� Modify Team� Delete Team� Create User� Modify User� Delete User
Modify Project: Used to modify a project, such as add new servers, change the reservation, and remove servers from a project. The options are:
� Add Server type� Add POWER LPAR Servers using IBM System Director VMControl� Add Server from Saved Image� Modify Reservation� Remove Server
Modify Server: Actions in a specific provisioned server. The actions are:
� Reset Server Password� Restart Server� Stop Server� Start Server� Modify Resources: The resources can be Memory, CPU or Disk� Install Software: Install an additional software
Cancel Project: This offering cancels the project. All servers provisioned in the project are deleted, and the resources become available for new provisioning.
Create project with Server type: Where Server type is the list of available hypervisors in your Cloud. This is the first step to provision a server.
To provision a server for the first time, you need to have access to the Tivoli Service Automation Manager console and be member of a team. See the following sections for more detail.
Chapter 4. Initial setup 173
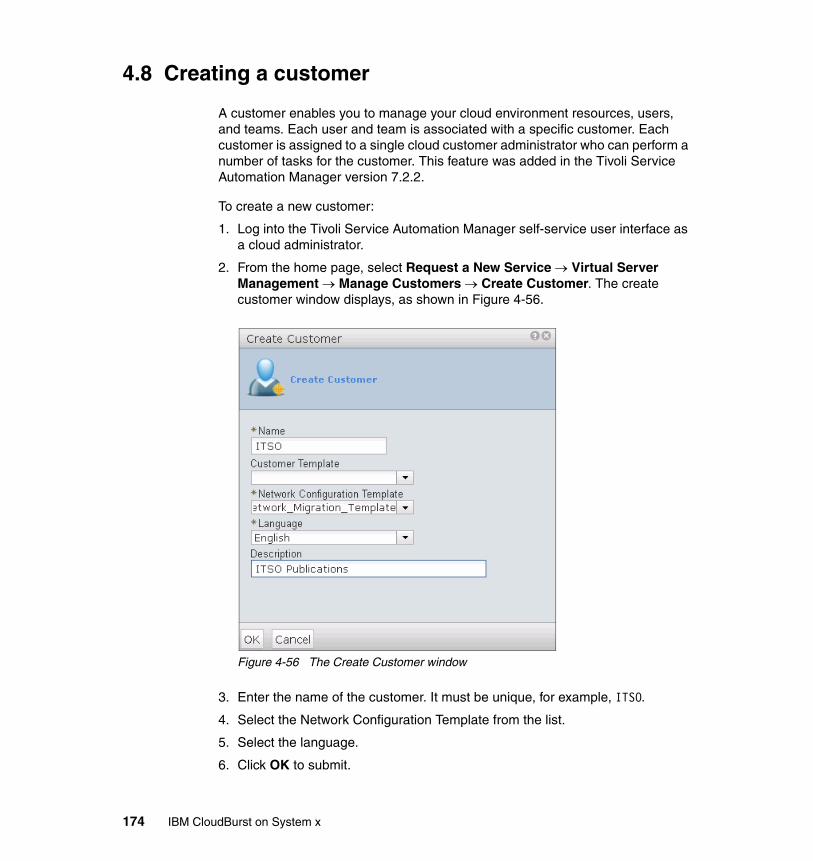
4.8 Creating a customer
A customer enables you to manage your cloud environment resources, users, and teams. Each user and team is associated with a specific customer. Each customer is assigned to a single cloud customer administrator who can perform a number of tasks for the customer. This feature was added in the Tivoli Service Automation Manager version 7.2.2.
To create a new customer:
1. Log into the Tivoli Service Automation Manager self-service user interface as a cloud administrator.
2. From the home page, select Request a New Service Virtual Server Management Manage Customers Create Customer. The create customer window displays, as shown in Figure 4-56.
Figure 4-56 The Create Customer window
3. Enter the name of the customer. It must be unique, for example, ITSO.
4. Select the Network Configuration Template from the list.
5. Select the language.
6. Click OK to submit.
174 IBM CloudBurst on System x
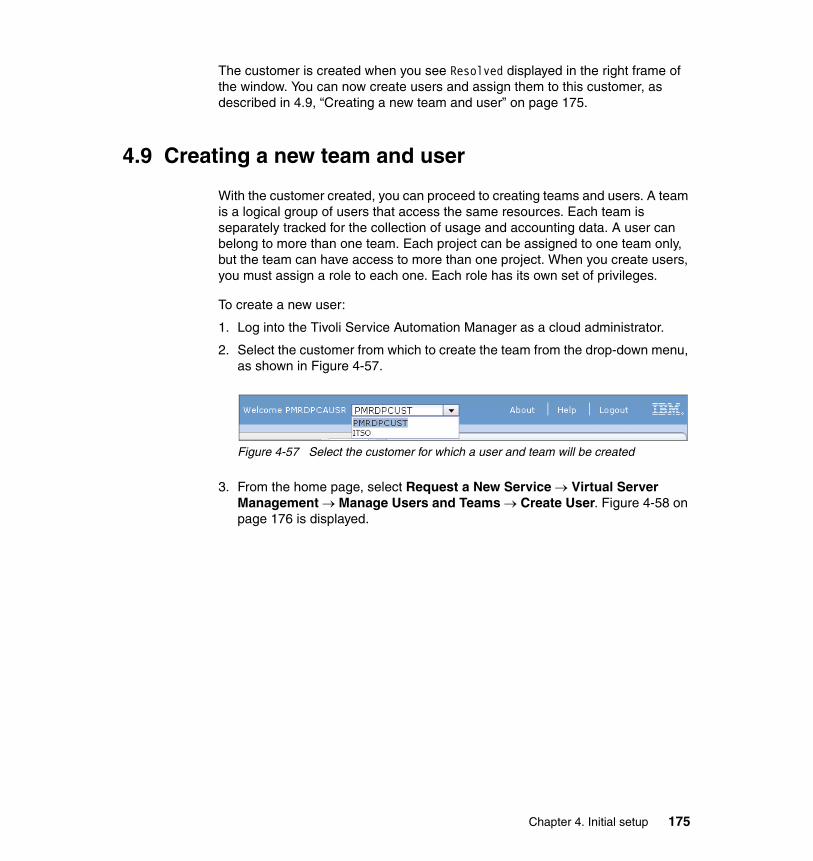
The customer is created when you see Resolved displayed in the right frame of the window. You can now create users and assign them to this customer, as described in 4.9, “Creating a new team and user” on page 175.
4.9 Creating a new team and user
With the customer created, you can proceed to creating teams and users. A team is a logical group of users that access the same resources. Each team is separately tracked for the collection of usage and accounting data. A user can belong to more than one team. Each project can be assigned to one team only, but the team can have access to more than one project. When you create users, you must assign a role to each one. Each role has its own set of privileges.
To create a new user:
1. Log into the Tivoli Service Automation Manager as a cloud administrator.
2. Select the customer from which to create the team from the drop-down menu, as shown in Figure 4-57.
Figure 4-57 Select the customer for which a user and team will be created
3. From the home page, select Request a New Service Virtual Server Management Manage Users and Teams Create User. Figure 4-58 on page 176 is displayed.
Chapter 4. Initial setup 175
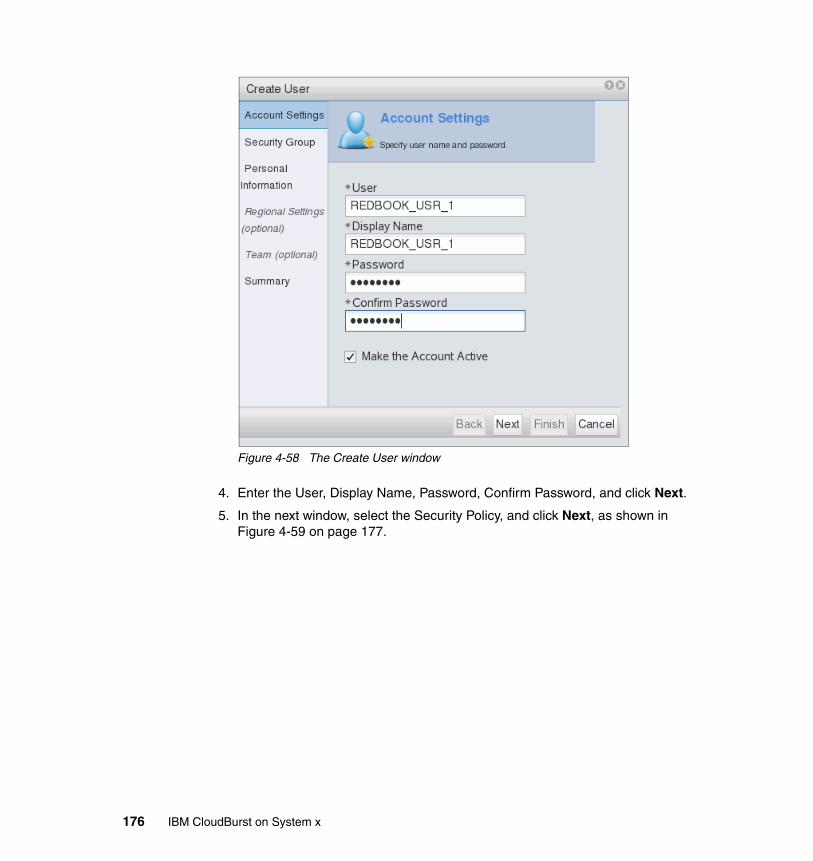
Figure 4-58 The Create User window
4. Enter the User, Display Name, Password, Confirm Password, and click Next.
5. In the next window, select the Security Policy, and click Next, as shown in Figure 4-59 on page 177.
176 IBM CloudBurst on System x
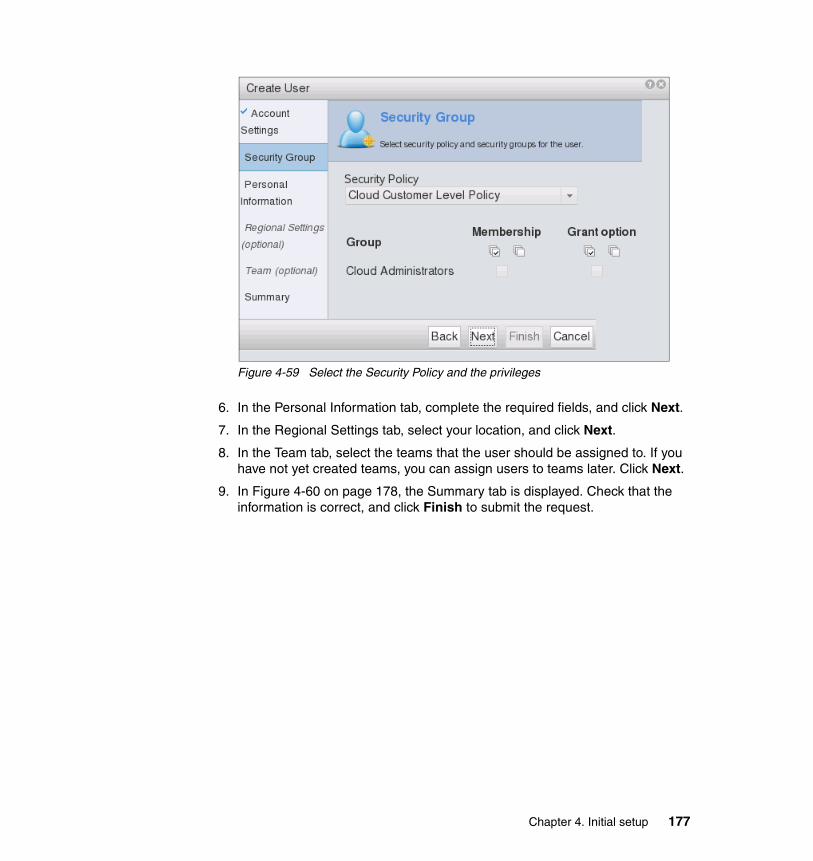
Figure 4-59 Select the Security Policy and the privileges
6. In the Personal Information tab, complete the required fields, and click Next.
7. In the Regional Settings tab, select your location, and click Next.
8. In the Team tab, select the teams that the user should be assigned to. If you have not yet created teams, you can assign users to teams later. Click Next.
9. In Figure 4-60 on page 178, the Summary tab is displayed. Check that the information is correct, and click Finish to submit the request.
Chapter 4. Initial setup 177
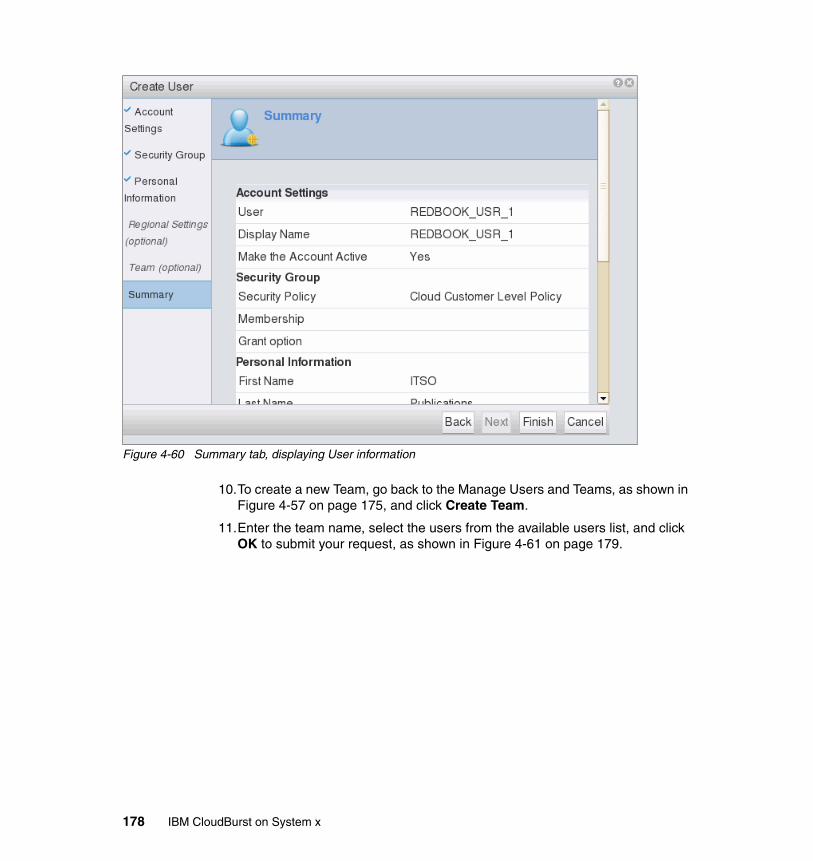
Figure 4-60 Summary tab, displaying User information
10.To create a new Team, go back to the Manage Users and Teams, as shown in Figure 4-57 on page 175, and click Create Team.
11.Enter the team name, select the users from the available users list, and click OK to submit your request, as shown in Figure 4-61 on page 179.
178 IBM CloudBurst on System x
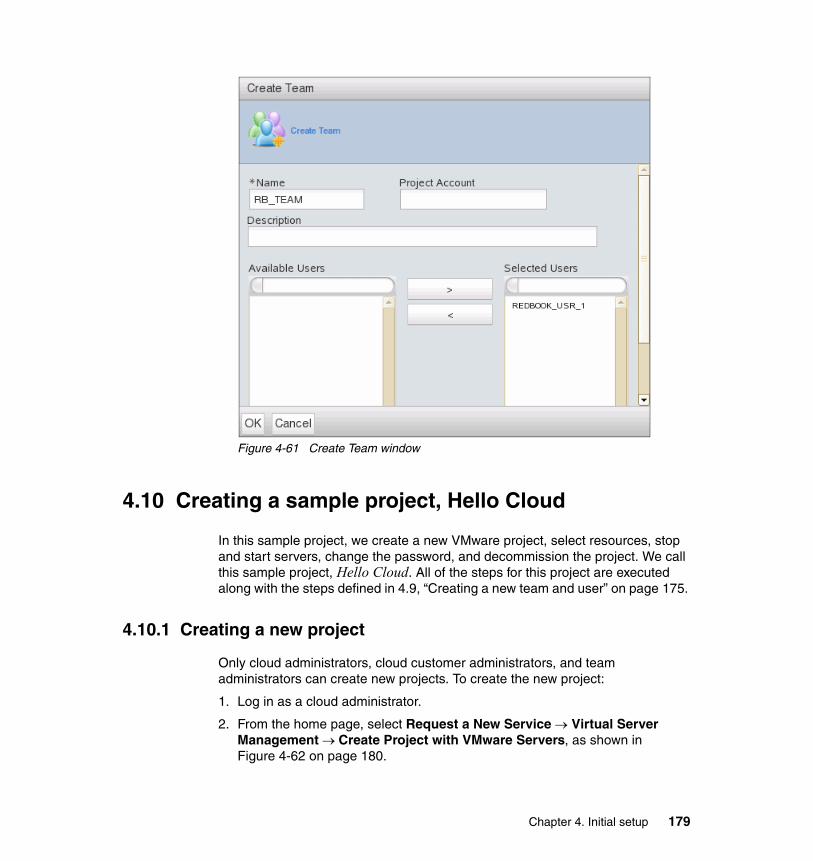
Figure 4-61 Create Team window
4.10 Creating a sample project, Hello Cloud
In this sample project, we create a new VMware project, select resources, stop and start servers, change the password, and decommission the project. We call this sample project, Hello Cloud. All of the steps for this project are executed along with the steps defined in 4.9, “Creating a new team and user” on page 175.
4.10.1 Creating a new project
Only cloud administrators, cloud customer administrators, and team administrators can create new projects. To create the new project:
1. Log in as a cloud administrator.
2. From the home page, select Request a New Service Virtual Server Management Create Project with VMware Servers, as shown in Figure 4-62 on page 180.
Chapter 4. Initial setup 179
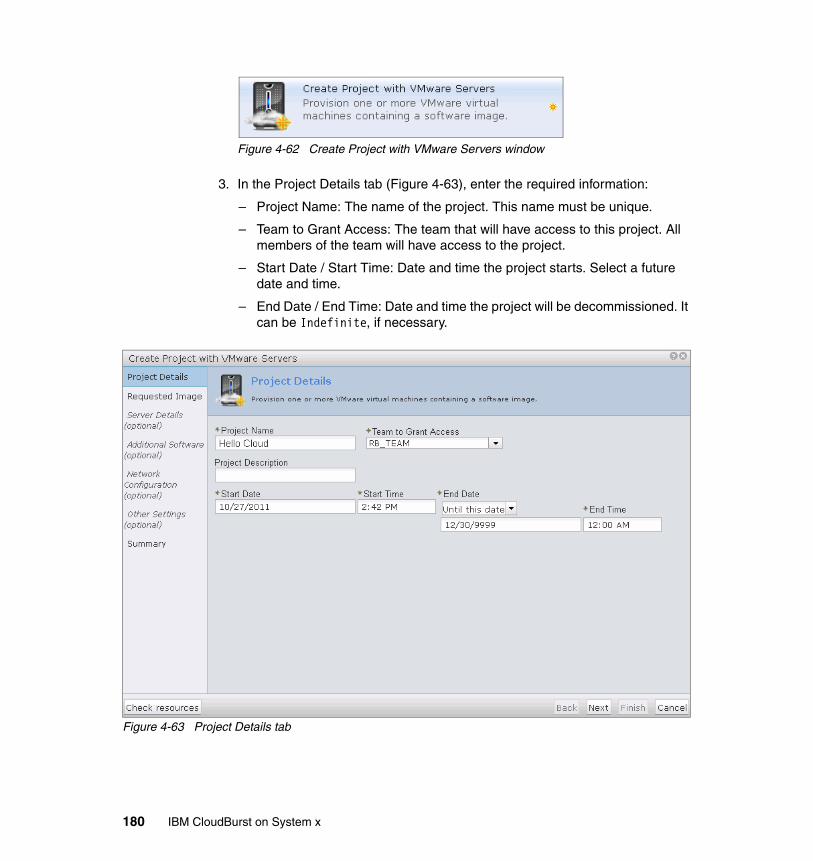
Figure 4-62 Create Project with VMware Servers window
3. In the Project Details tab (Figure 4-63), enter the required information:
– Project Name: The name of the project. This name must be unique.
– Team to Grant Access: The team that will have access to this project. All members of the team will have access to the project.
– Start Date / Start Time: Date and time the project starts. Select a future date and time.
– End Date / End Time: Date and time the project will be decommissioned. It can be Indefinite, if necessary.
Figure 4-63 Project Details tab
180 IBM CloudBurst on System x
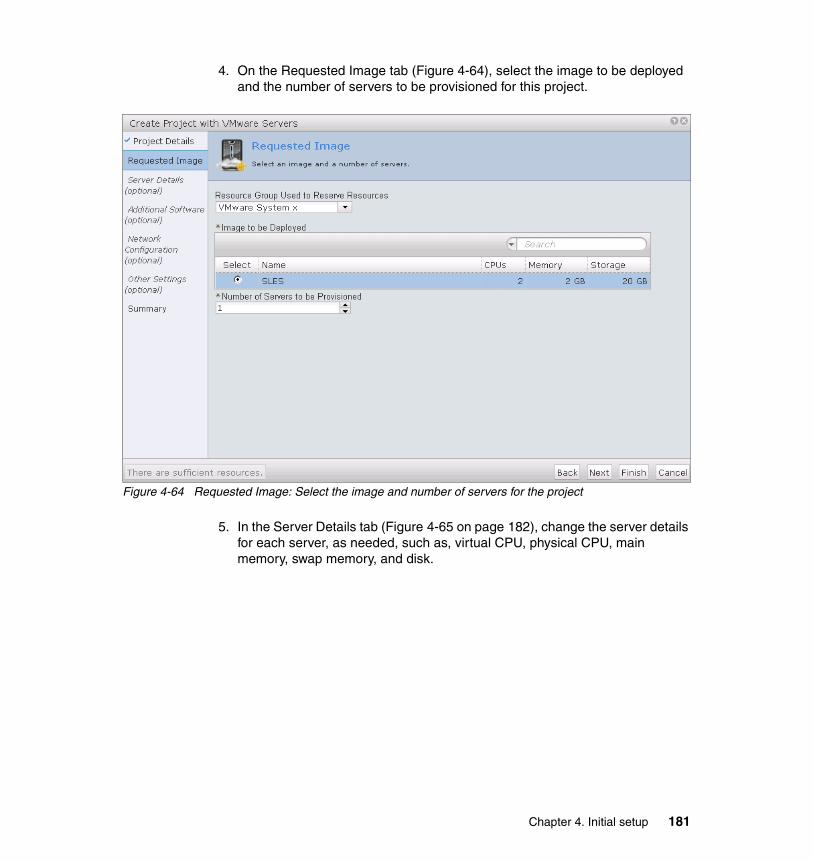
4. On the Requested Image tab (Figure 4-64), select the image to be deployed and the number of servers to be provisioned for this project.
Figure 4-64 Requested Image: Select the image and number of servers for the project
5. In the Server Details tab (Figure 4-65 on page 182), change the server details for each server, as needed, such as, virtual CPU, physical CPU, main memory, swap memory, and disk.
Chapter 4. Initial setup 181
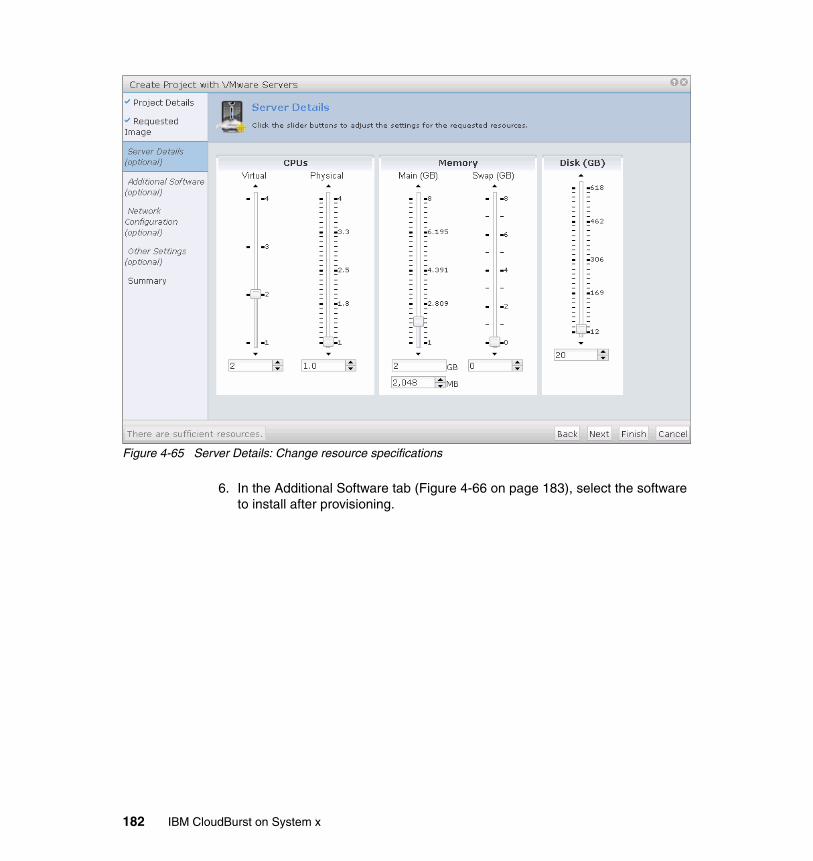
Figure 4-65 Server Details: Change resource specifications
6. In the Additional Software tab (Figure 4-66 on page 183), select the software to install after provisioning.
182 IBM CloudBurst on System x
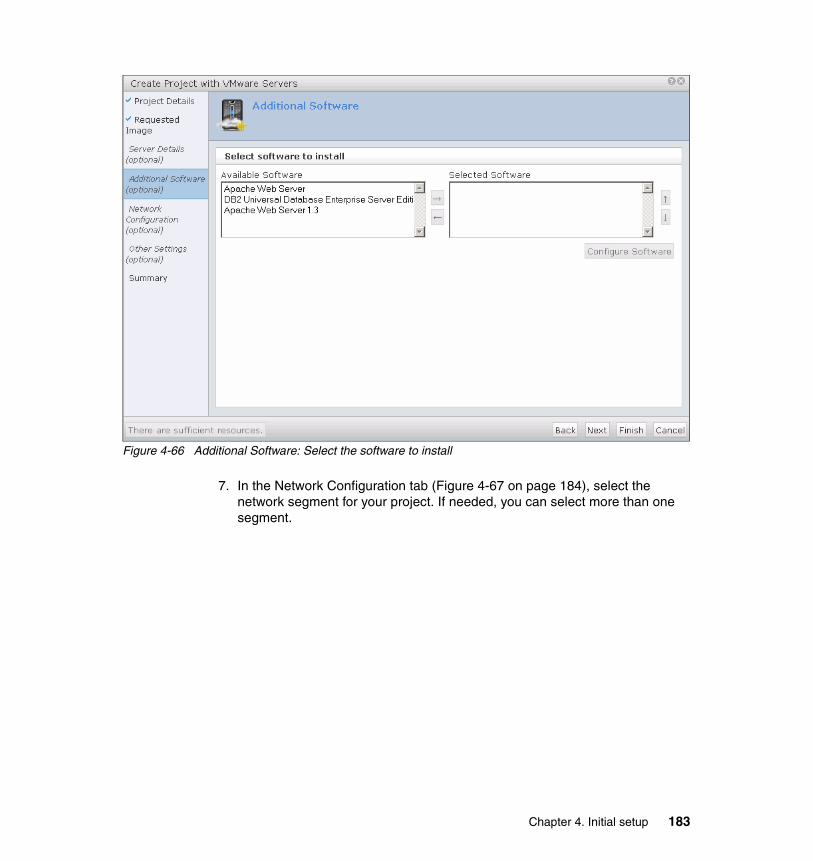
Figure 4-66 Additional Software: Select the software to install
7. In the Network Configuration tab (Figure 4-67 on page 184), select the network segment for your project. If needed, you can select more than one segment.
Chapter 4. Initial setup 183
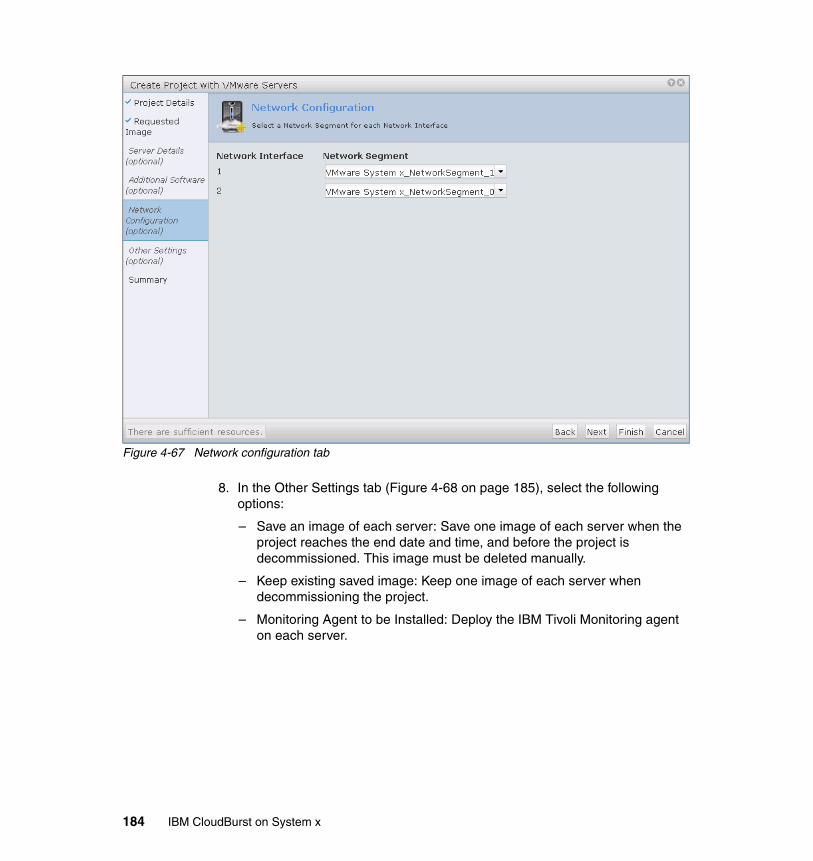
Figure 4-67 Network configuration tab
8. In the Other Settings tab (Figure 4-68 on page 185), select the following options:
– Save an image of each server: Save one image of each server when the project reaches the end date and time, and before the project is decommissioned. This image must be deleted manually.
– Keep existing saved image: Keep one image of each server when decommissioning the project.
– Monitoring Agent to be Installed: Deploy the IBM Tivoli Monitoring agent on each server.
184 IBM CloudBurst on System x
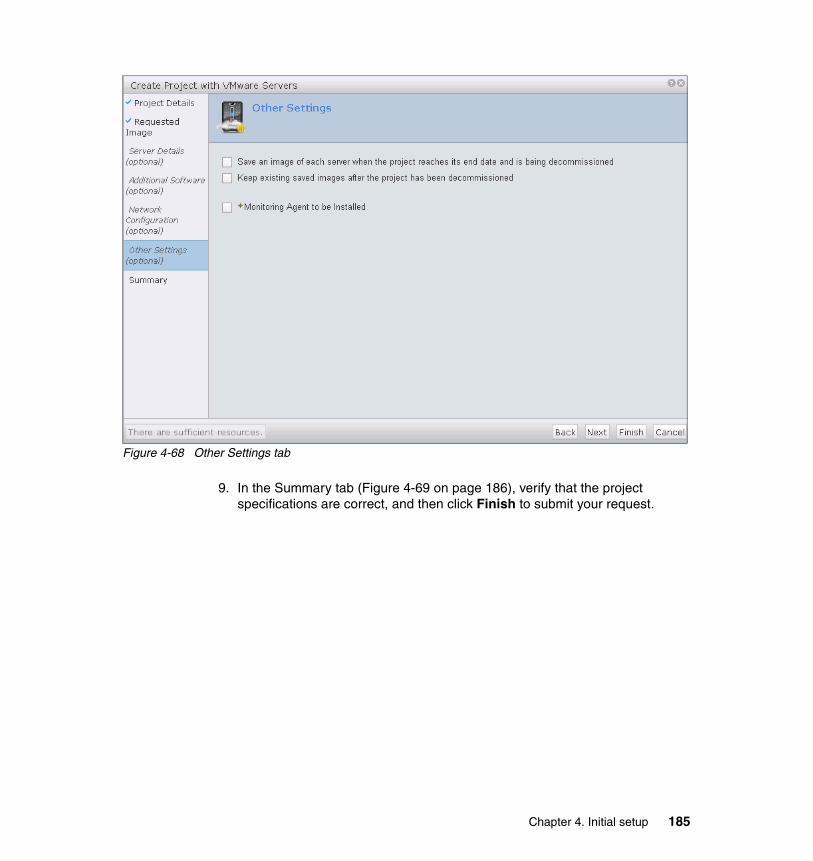
Figure 4-68 Other Settings tab
9. In the Summary tab (Figure 4-69 on page 186), verify that the project specifications are correct, and then click Finish to submit your request.
Chapter 4. Initial setup 185
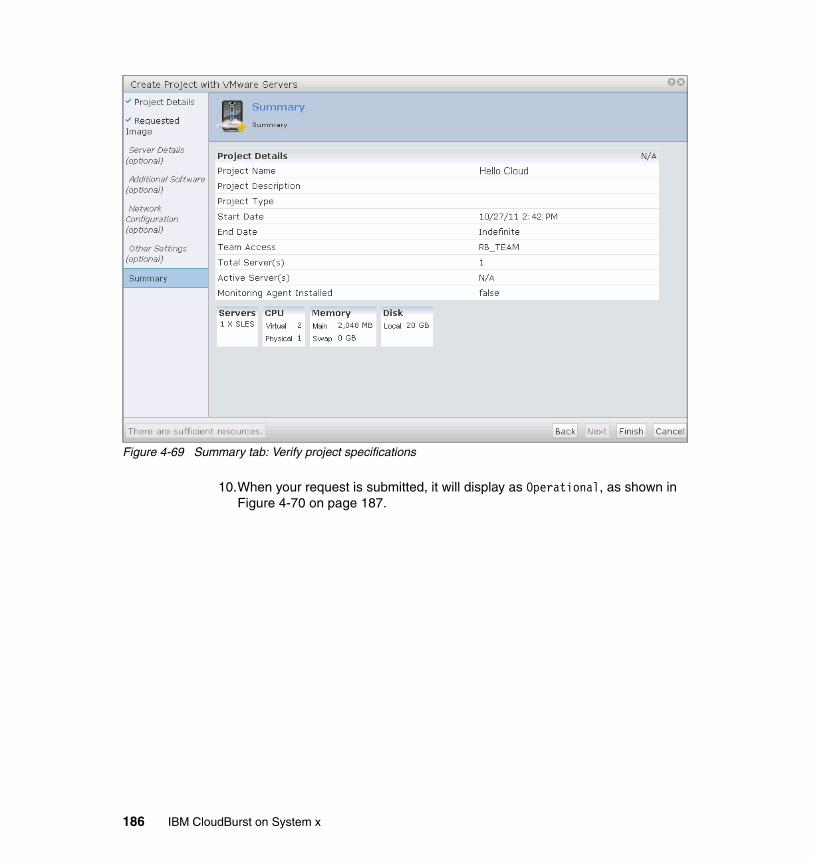
Figure 4-69 Summary tab: Verify project specifications
10.When your request is submitted, it will display as Operational, as shown in Figure 4-70 on page 187.
186 IBM CloudBurst on System x
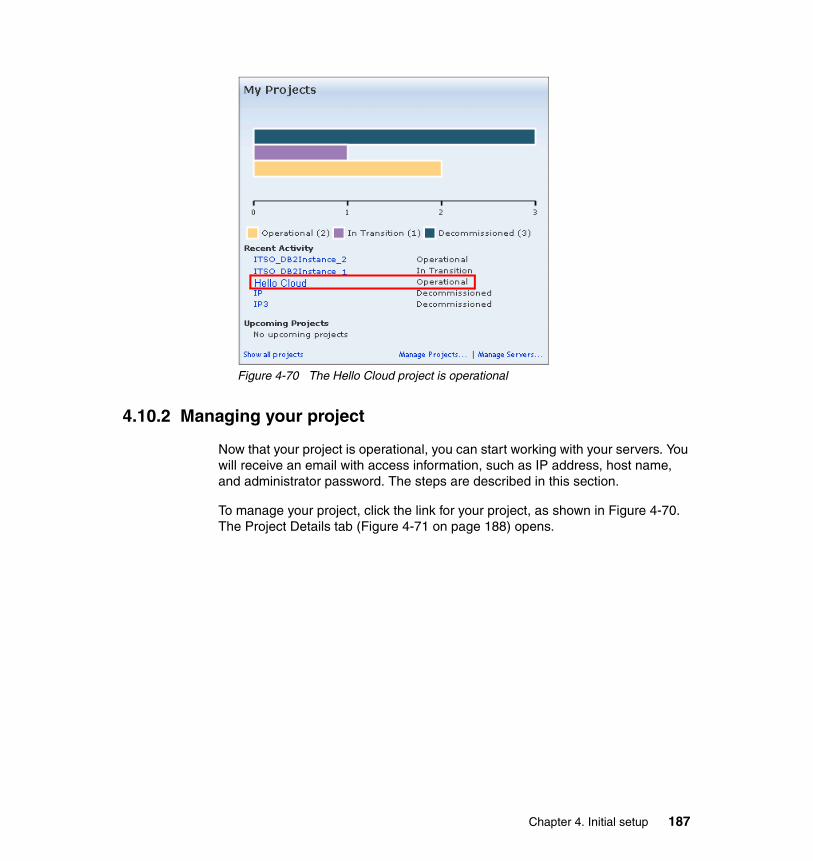
Figure 4-70 The Hello Cloud project is operational
4.10.2 Managing your project
Now that your project is operational, you can start working with your servers. You will receive an email with access information, such as IP address, host name, and administrator password. The steps are described in this section.
To manage your project, click the link for your project, as shown in Figure 4-70. The Project Details tab (Figure 4-71 on page 188) opens.
Chapter 4. Initial setup 187
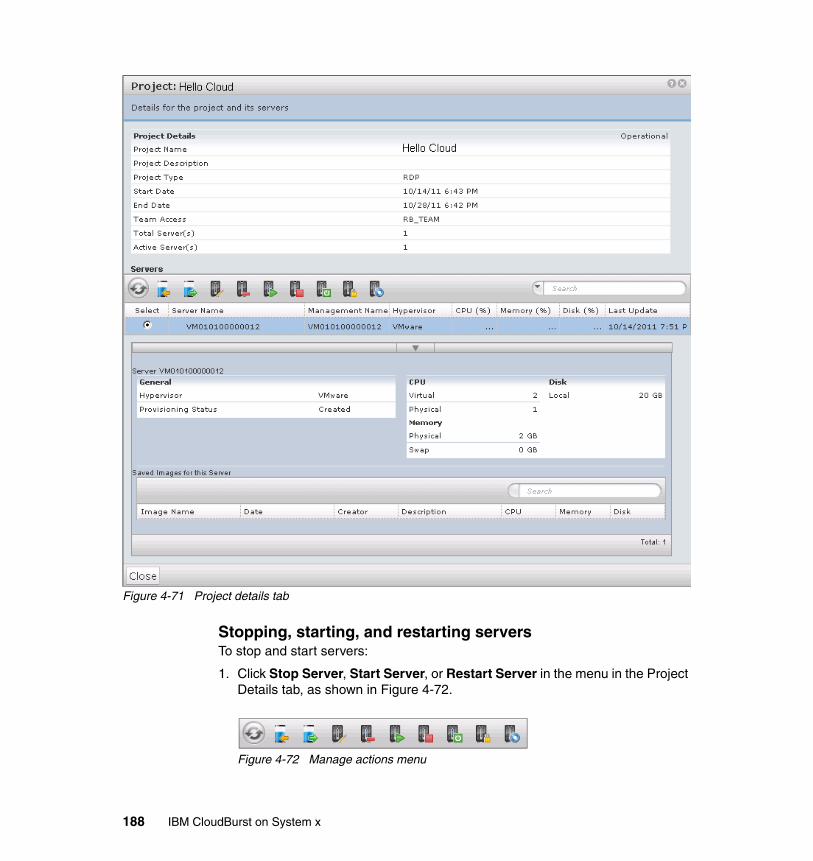
Figure 4-71 Project details tab
Stopping, starting, and restarting serversTo stop and start servers:
1. Click Stop Server, Start Server, or Restart Server in the menu in the Project Details tab, as shown in Figure 4-72.
Figure 4-72 Manage actions menu
188 IBM CloudBurst on System x
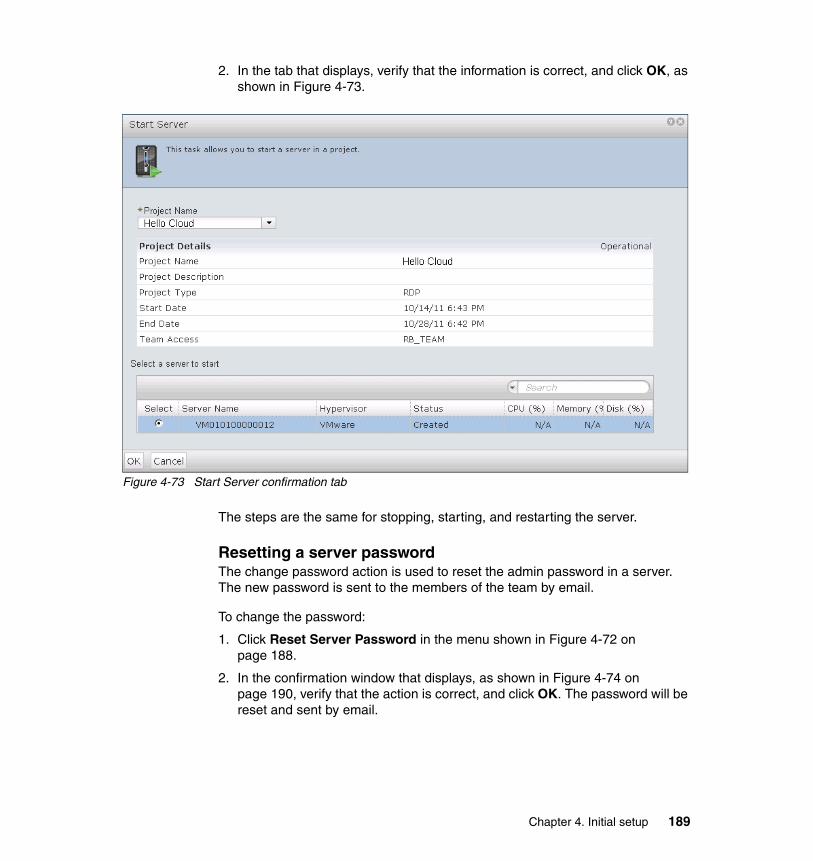
2. In the tab that displays, verify that the information is correct, and click OK, as shown in Figure 4-73.
Figure 4-73 Start Server confirmation tab
The steps are the same for stopping, starting, and restarting the server.
Resetting a server passwordThe change password action is used to reset the admin password in a server. The new password is sent to the members of the team by email.
To change the password:
1. Click Reset Server Password in the menu shown in Figure 4-72 on page 188.
2. In the confirmation window that displays, as shown in Figure 4-74 on page 190, verify that the action is correct, and click OK. The password will be reset and sent by email.
Chapter 4. Initial setup 189
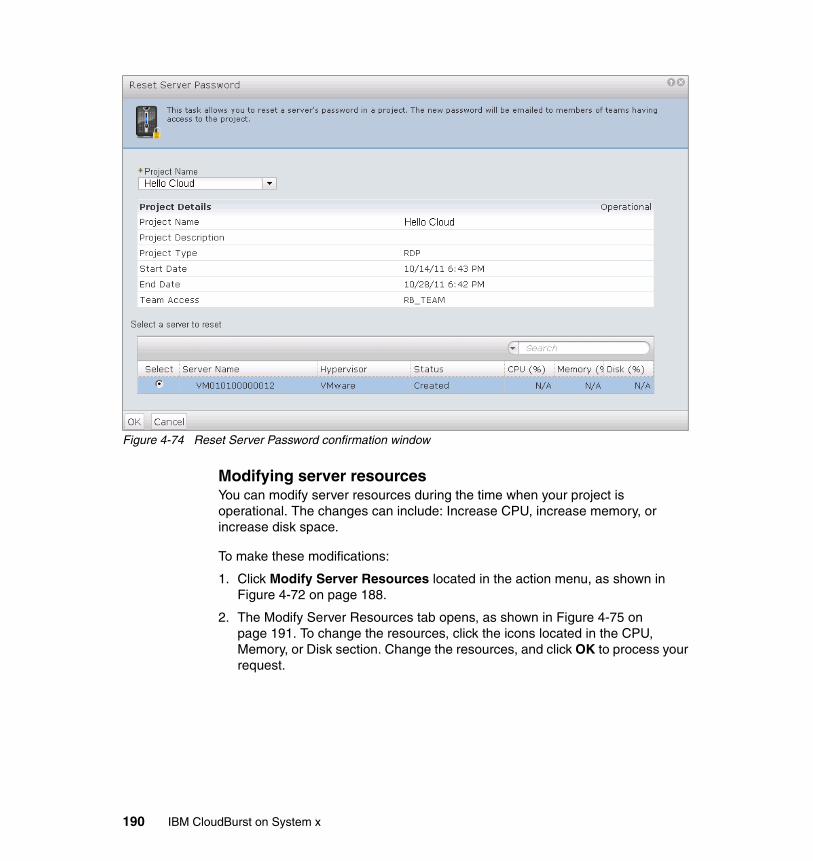
Figure 4-74 Reset Server Password confirmation window
Modifying server resourcesYou can modify server resources during the time when your project is operational. The changes can include: Increase CPU, increase memory, or increase disk space.
To make these modifications:
1. Click Modify Server Resources located in the action menu, as shown in Figure 4-72 on page 188.
2. The Modify Server Resources tab opens, as shown in Figure 4-75 on page 191. To change the resources, click the icons located in the CPU, Memory, or Disk section. Change the resources, and click OK to process your request.
190 IBM CloudBurst on System x
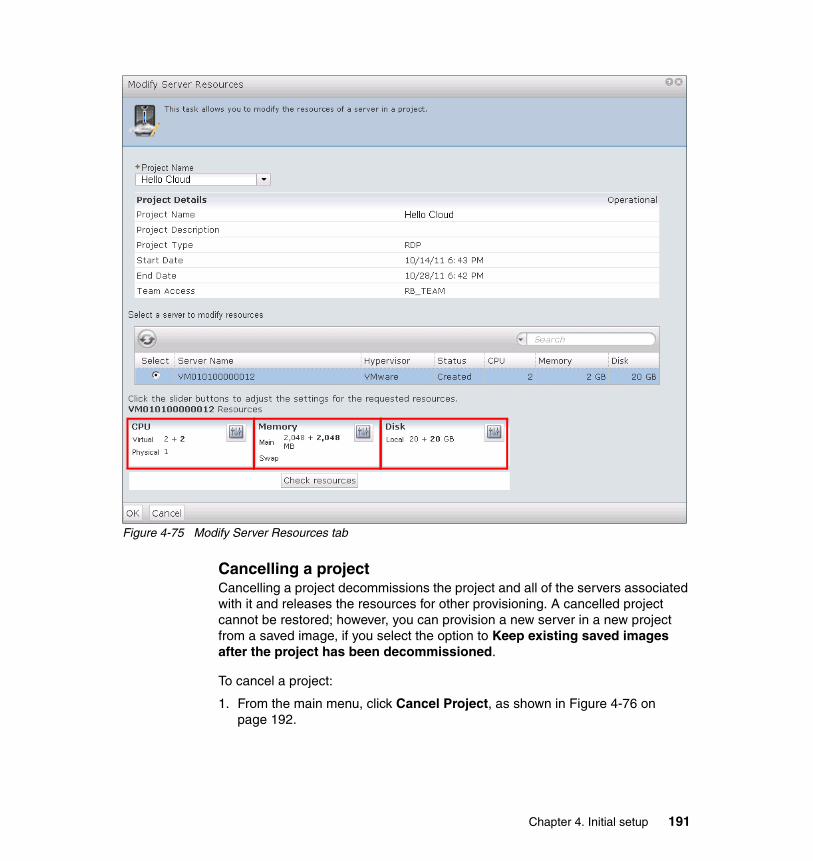
Figure 4-75 Modify Server Resources tab
Cancelling a projectCancelling a project decommissions the project and all of the servers associated with it and releases the resources for other provisioning. A cancelled project cannot be restored; however, you can provision a new server in a new project from a saved image, if you select the option to Keep existing saved images after the project has been decommissioned.
To cancel a project:
1. From the main menu, click Cancel Project, as shown in Figure 4-76 on page 192.
Chapter 4. Initial setup 191
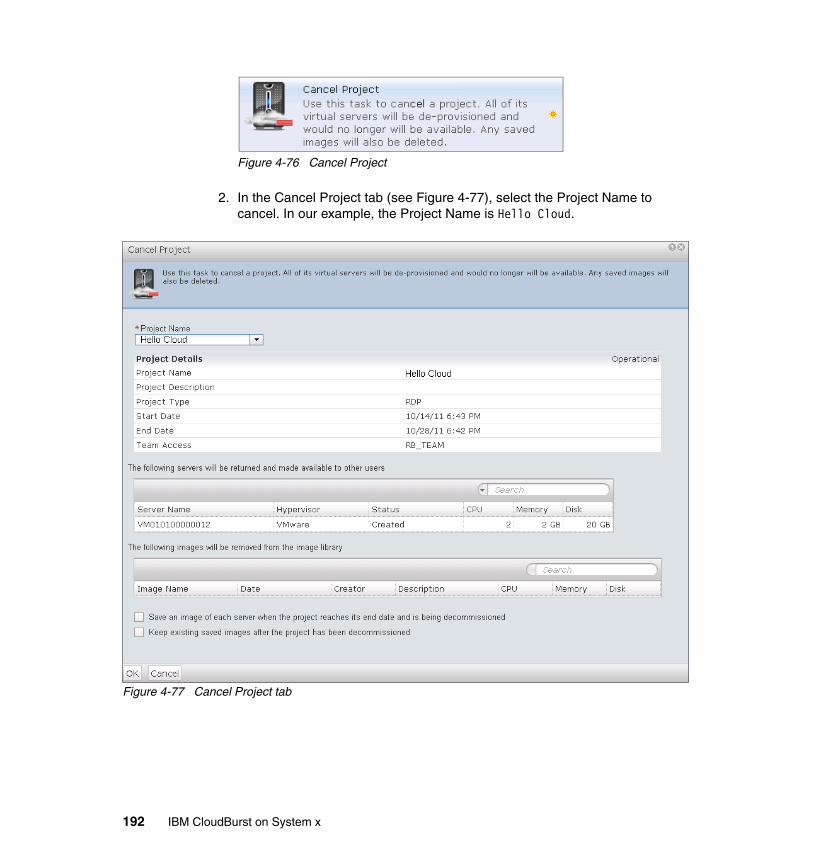
Figure 4-76 Cancel Project
2. In the Cancel Project tab (see Figure 4-77), select the Project Name to cancel. In our example, the Project Name is Hello Cloud.
Figure 4-77 Cancel Project tab
192 IBM CloudBurst on System x
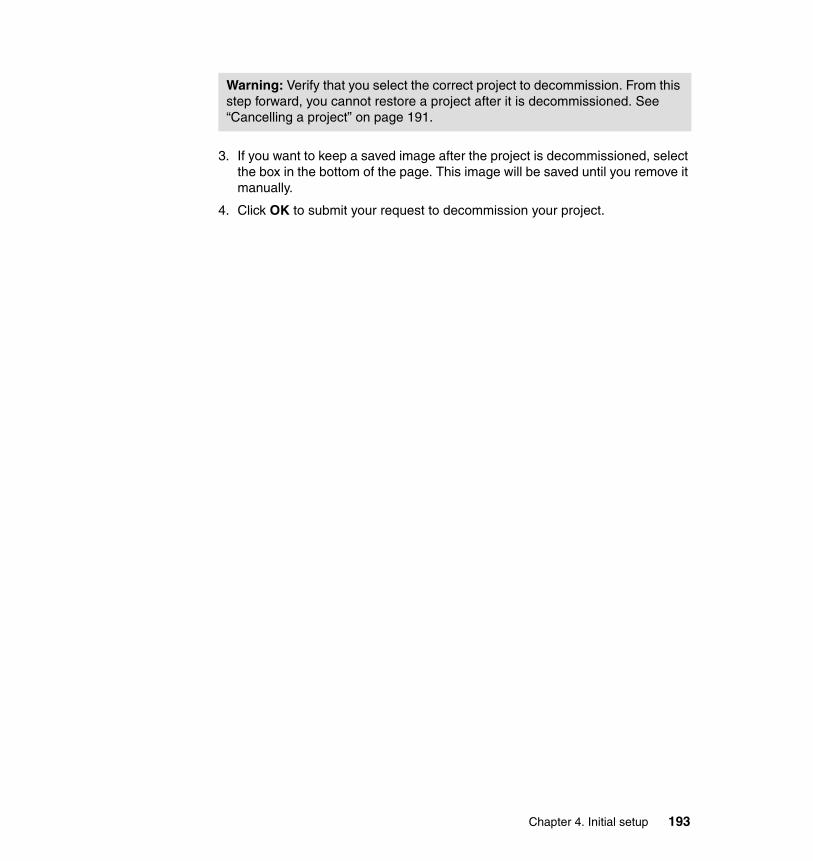
3. If you want to keep a saved image after the project is decommissioned, select the box in the bottom of the page. This image will be saved until you remove it manually.
4. Click OK to submit your request to decommission your project.
Warning: Verify that you select the correct project to decommission. From this step forward, you cannot restore a project after it is decommissioned. See “Cancelling a project” on page 191.
Chapter 4. Initial setup 193

194 IBM CloudBurst on System x
Chapter 5. Administrator scenarios
In this chapter, we introduce several functions carried out by the CloudBurst system administrator, including how to:
� 5.1, “Managing a shut down and restart of the system” on page 195, when a shutdown and restart of the system and the software stack are required
� 5.2, “IBM CloudBurst backup and restore” on page 200
� 5.3, “Managing stacked projects” on page 207
� 5.4, “Managing passwords” on page 211, such as default system passwords, changing hardware-related passwords, and changing Cloudburst passwords
5.1 Managing a shut down and restart of the system
The IBM CloudBurst software stack is configured to start automatically at image startup. For maintenance operations, you might need to stop and restart the components.
5.1.1 Shutting down the software stack
The following sections describe how to stop the CloudBurst software stack if required.
5
© Copyright IBM Corp. 2012. All rights reserved. 195
Stopping the running project serversBefore you shut down the CloudBurst middleware, it is recommended that every provisioned server be stopped first.
To stop provisioned servers:
1. Log into the Tivoli Service Automation Manager Self Service Interface as PMRDPCAUSR user at: https://192.168.88.4/SimpleSRM
2. Click Request a New Service Virtual Server Management Modify Server Stop Server.
3. In the Project Name field, choose the first project.
4. In the server selection section, choose the first server.
5. Click OK.
6. Repeat this for all of your servers and projects.
Stopping the icb-itmLog into the icb-itm as root, and execute the steps shown in Example 5-1.
Example 5-1 Shut down icb-itm
su - virtusercd /opt/IBM/ITM/bin/./itmcmd agent stop sy ./itmcmd agent stop hd./itmcmd agent stop lz./itmcmd agent stop cq./itmcmd agent stop kf ./itmcmd server stop TEMSexitsu - db2inst1db2stopexithalt -p
Stopping icb-tivsamTo stop icb-tivsam:
1. Log in to icb-tivsam as root, and execute the steps shown in Example 5-2
Example 5-2 Shut down icb-tivsam middleware
rgreq -o stop tsam-rglssam -V
196 IBM CloudBurst on System x
2. Wait until all resources are offline. You can verify the process if you re-execute the lssam -v command.
3. If all resources are offline, you can shut down the server, as shown in Example 5-3.
Example 5-3 Shut down the icb-tivsam server
halt -p
Stopping the icb-tuamTo stop icb-tuam:
1. Log into icb-tuam as root, and execute the commands shown in Example 5-4.
Example 5-4 Shut down icb-tivsam middleware
/opt/IBM/tuam/ewas/bin/stopServer.sh server1su - db2inst1db2stophalt -p
2. Specify virtuser as the userID and password to stop the WebSphere Application Server.
Stopping the icb-nfsTo stop icb-nfs:
1. Log in to the icb-nfs as root, and execute the commands in Example 5-5.
Example 5-5 Shutting down icb-nfs middleware
rgreq -o stop top-rglssam -V
2. Wait until all resources are offline. You can verify the process if you re-execute the lssam -v command.
3. If all resources are offline, you can shut down the server using the command shown in Example 5-6.
Example 5-6 Shut down icb-nfs server
halt -p
Chapter 5. Administrator scenarios 197

Stopping the icb-vctrIt is not recommended to stop the vCenter server as part of a software-only shutdown process. It can be shutdown as part of a full software and hardware shutdown process, as described in 5.1.2, “Shutting down the hardware” on page 198.
5.1.2 Shutting down the hardware
To properly shut down the CloudBurst hardware environment:
1. Log into the vCenter client as Administrator and connect to the icb-vctr server.
2. Click Home Inventory Hosts and Clusters.
3. Check that every virtual server is stopped except for icb-vctr (if anything else is running, refer to “Shutting down the software stack” on page 195).
4. Right-click the first provisioned server under CloudBurst-cluster (cn2.private.cloud.com), and click Shut Down.
5. Click Yes.
6. Click OK.
7. Repeat this process for every provisioned server in CloudBurst-cluster:
a. If you are using HA with Mgmt-cluster, note which ESX servers are in this VMware cluster.
b. Connect to each of these ESX servers as root, and shut down each one as described here.
If you are not using HA, connect and shut down the cn1.private.cloud.com server (Management Blade Server) only.
8. Open a remote desktop connection to the mn1.private.cloud.com Management Server.
9. Click Start Windows Security.
10.On the right-lower corner, click Shutdown, and wait until it stops.
11.Disconnect the power cables from all BladeCenter chassis to power off.
12.Power off all storage controllers.
13.Power off all storage expansion boxes (if any).
Important: If you see that icb-vctr vCenter server is running on cn1.private.cloud.com, or on any other server, you must first shut it down properly by right clicking icb-vctr, clicking Power Shut Down Guest, and waiting until it stops.
198 IBM CloudBurst on System x
14.Power off all external Ethernet and fibre switches (if any).
5.1.3 Restarting the hardware
After a complete shutdown, you can restart the CloudBurst using the following steps:
1. Power on all external Ethernet and fibre switches (if any).
2. Power on all storage expansion boxes (if any).
3. Power on all storage controllers after a few minutes.
4. Connect the power cables from all BladeCenter chassis to power on.
5. Power on the x3550 M3 Management Server and wait until it starts.
6. Power on all BladeCenter servers:
a. From a browser, connect to the first BladeCenter advanced management module at http://bc1-mm1.private.cloud.com as USERID user.
b. Click Blade Tasks Power/Restart on the left side of the window.
c. Select all installed blade servers, select Power On Blade, and click Perform action.
d. If you have more BladeCenter chassis, repeat these steps for each chassis.
5.1.4 Restarting the software stack
You must manually start the CloudBurst middleware if you manually stopped it for any reason, but did not power down the hardware (for example, when making a full backup of the software stack images). CloudBurst is configured to start every server and middleware automatically if the hardware is powered down, then powered on again.
Starting the icb-itm middlewareLog into the icb-itm as root, and execute the steps shown in Example 5-7.
Example 5-7 Starting the icb-itm middleware
su - db2inst1db2startexitsu - virtusercd /opt/IBM/ITM/bin/./itmcmd server start TEMS./itmcmd agent start cq
Chapter 5. Administrator scenarios 199
./itmcmd agent start lz
./itmcmd agent start hd
./itmcmd agent start syexit
Starting the icb-tivsam middleware1. Log into icb-tivsam as root, and execute the commands in Example 5-8.
Example 5-8 Start icb-tivsam middleware
chrg -o online tsam-rglssam -V
2. Wait until all resources are online. You can verify the process if you re-execute the lssam -v command.
Starting the icb-tuam middlewareLog into icb-tuam as root, and execute the steps shown in Example 5-9.
Example 5-9 Start icb-tuam middleware
/opt/IBM/tuam/ewas/bin/startServer.sh server1su - db2inst1db2start
Starting the icb-nfs middleware1. Log into icb-nfs as root, and execute the steps shown in Example 1.
Example 5-10 Starting the icb-nfs middleware
chrg -o online top-rglssam -V
2. Wait until all resources are online. You can verify the process if you re-execute the lssam -v command.
5.2 IBM CloudBurst backup and restore
In this section, we describe how to perform a backup and restore of the IBM CloudBurst on System x. We focus only on the CloudBurst software stack images and not on the backup and restore of server images because they (server
200 IBM CloudBurst on System x
images) can be backed up using the GUI with the process documented in the Tivoli Service Automation Manager user’s guide.
http://publib.boulder.ibm.com/infocenter/tivihelp/v10r1/topic/com.ibm.tsam_7.2.2.doc/rdp/t_rdp_serverimages.html
5.2.1 Backup procedure
In IBM CloudBurst for System x, there are two ways to back up the software stack:
� Backup the software stack images using the Virtual Center� Make periodic backups using a DB2 solution
The Virtual Center solution is useful before or after any change in your environment, such as applying a fix pack, adding new software, changing configuration, or upgrading a software stack. This solution is an easy way to save your system from its current state (snapshot) and can be easily restored.
Although the Virtual Center solution is useful, it is not the best approach for periodic backups because, using this solution, only full backups can be made (no incremental backups). To make incremental or periodic backups, we follow the procedure developed using DB2 solution.
Virtual Center solution for backing up a software stack IBM CloudBurst software stack includes the following software images. For your system to restore properly, all of these images must be saved in any temporary directory:
� icb-tivsam� icb-tuam� icb-itm� icb-nfs
Creating a backup To create a backup:
1. On the management server, log in to the Virtual Center.
2. Select Inventory Datastores.
Note: All of the steps described in this section are considered as recommendations and can be modified according to the customer’s requirements.
Chapter 5. Administrator scenarios 201
3. On the CloudDC cluster located in the left panel, right-click mgmt_disk storage, and select Browser Datastore.
4. In the left panel, select the root folder, “/”, and select the icb-tivsam folder in the right panel.
5. Click the Download a file icon in the toolbar.
6. Browse to the location where you want to save the backup, and click OK.
7. Repeat Steps Step 4. and Step 5. for the other images you want to back up.
Restoring the software stack images using the Virtual CenterYou can restore your backup to restore your system to a previous state:
1. On the management server, log in to the Virtual Center.
2. Select Inventory Datastores.
3. On the CloudDC cluster located in the left panel, right-click mgmt_disk storage, and select Browser Datastore.
4. In the left panel, select the root folder, “/”, and select the icb-tivsam folder in the right panel.
5. Click the Upload folder icon in the toolbar.
6. Browse to the location where you want to save your backup. Select the image icb-tivsam, and click OK.
7. You will receive a message warning that the file will be replaced. Click OK to begin the restore.
8. Repeat Steps Step 4. through Step 7. for other images you want to restore.
Synchronizing with the current statusAfter a backup is restored, you must synchronize with the current status of your environment. This is required because you might have new servers that were provisioned in your environment after the system was backed up.
Using the Provisioning Computers console, compare the computers in your system with those in the Virtual Center following these steps:
1. Open the Start Center as maxadmin.
Note: If you select tivoli_recovery as the target of your backup, you might notice that there is already a backup on the disk. This previous backup was created after IBM CloudBurst was initially set up, configured, and validated. If you want to store your backup on the same disk, remove the old backup to make space available.
202 IBM CloudBurst on System x
2. Click Go To IT Infrastructure Provisioning Inventory Provisioning Computers.
3. In the Provisioning Computers console, compare the list of servers with those in your Virtual Center. Delete any computer listed in the provisioning console that is not in the Virtual Center:
a. Click the Delete icon (the red X icon) located in the right column, as shown in Figure 5-1.
Figure 5-1 Click in the X red icon to delete a computer
4. After deleting the computers from the Maximo console, run the Virtual Center Discovery task by clicking Go To Service Automation Cloud Pool Administration.
5. In the drop-down menu, select All Records, as shown in Figure 5-2 on page 204.
6. Click in the Cloud Pool Name that represents your system, as shown in Figure 5-2 on page 204.
Chapter 5. Administrator scenarios 203
Figure 5-2 Select All Records for the Pool name that represents your system
7. In the configuration console, click Virtual Center Discovery, as shown in Figure 5-3.
Figure 5-3 Using Virtual Center Discovery to synchronize the system
204 IBM CloudBurst on System x
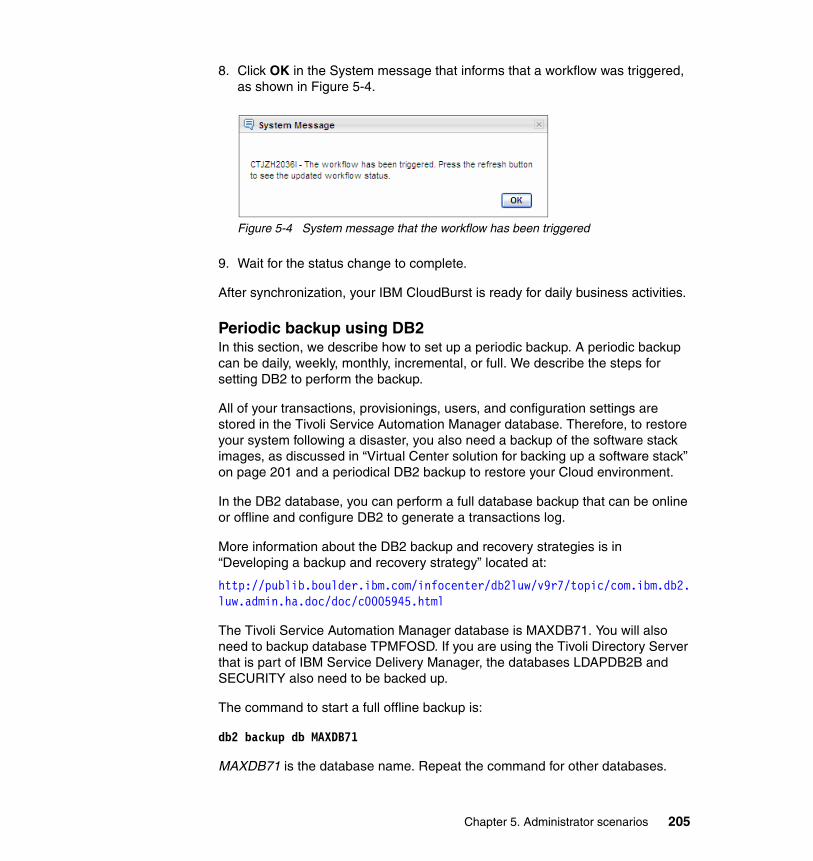
8. Click OK in the System message that informs that a workflow was triggered, as shown in Figure 5-4.
Figure 5-4 System message that the workflow has been triggered
9. Wait for the status change to complete.
After synchronization, your IBM CloudBurst is ready for daily business activities.
Periodic backup using DB2In this section, we describe how to set up a periodic backup. A periodic backup can be daily, weekly, monthly, incremental, or full. We describe the steps for setting DB2 to perform the backup.
All of your transactions, provisionings, users, and configuration settings are stored in the Tivoli Service Automation Manager database. Therefore, to restore your system following a disaster, you also need a backup of the software stack images, as discussed in “Virtual Center solution for backing up a software stack” on page 201 and a periodical DB2 backup to restore your Cloud environment.
In the DB2 database, you can perform a full database backup that can be online or offline and configure DB2 to generate a transactions log.
More information about the DB2 backup and recovery strategies is in “Developing a backup and recovery strategy” located at:
http://publib.boulder.ibm.com/infocenter/db2luw/v9r7/topic/com.ibm.db2.luw.admin.ha.doc/doc/c0005945.html
The Tivoli Service Automation Manager database is MAXDB71. You will also need to backup database TPMFOSD. If you are using the Tivoli Directory Server that is part of IBM Service Delivery Manager, the databases LDAPDB2B and SECURITY also need to be backed up.
The command to start a full offline backup is:
db2 backup db MAXDB71
MAXDB71 is the database name. Repeat the command for other databases.
Chapter 5. Administrator scenarios 205
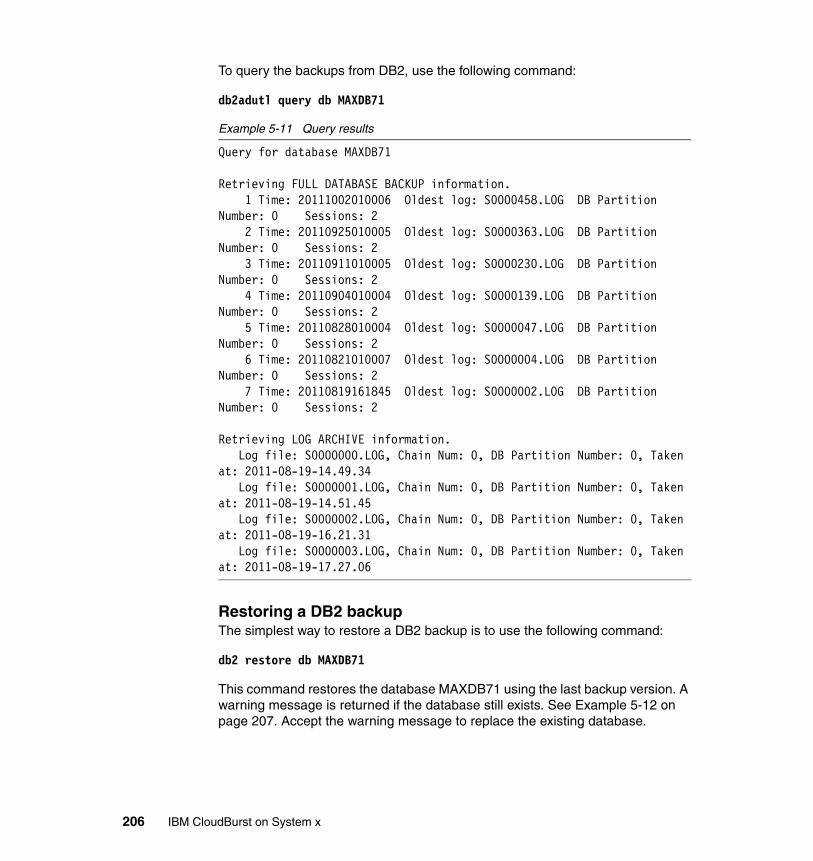
To query the backups from DB2, use the following command:
db2adutl query db MAXDB71
Example 5-11 Query results
Query for database MAXDB71
Retrieving FULL DATABASE BACKUP information. 1 Time: 20111002010006 Oldest log: S0000458.LOG DB Partition Number: 0 Sessions: 2 2 Time: 20110925010005 Oldest log: S0000363.LOG DB Partition Number: 0 Sessions: 2 3 Time: 20110911010005 Oldest log: S0000230.LOG DB Partition Number: 0 Sessions: 2 4 Time: 20110904010004 Oldest log: S0000139.LOG DB Partition Number: 0 Sessions: 2 5 Time: 20110828010004 Oldest log: S0000047.LOG DB Partition Number: 0 Sessions: 2 6 Time: 20110821010007 Oldest log: S0000004.LOG DB Partition Number: 0 Sessions: 2 7 Time: 20110819161845 Oldest log: S0000002.LOG DB Partition Number: 0 Sessions: 2
Retrieving LOG ARCHIVE information. Log file: S0000000.LOG, Chain Num: 0, DB Partition Number: 0, Taken at: 2011-08-19-14.49.34 Log file: S0000001.LOG, Chain Num: 0, DB Partition Number: 0, Taken at: 2011-08-19-14.51.45 Log file: S0000002.LOG, Chain Num: 0, DB Partition Number: 0, Taken at: 2011-08-19-16.21.31 Log file: S0000003.LOG, Chain Num: 0, DB Partition Number: 0, Taken at: 2011-08-19-17.27.06
Restoring a DB2 backupThe simplest way to restore a DB2 backup is to use the following command:
db2 restore db MAXDB71
This command restores the database MAXDB71 using the last backup version. A warning message is returned if the database still exists. See Example 5-12 on page 207. Accept the warning message to replace the existing database.
206 IBM CloudBurst on System x
Example 5-12 Accept the warning message to replace the database
SQL2539W Warning! Restoring to an existing database that is the same asthe backup image database. The database files will be deleted.Do you want to continue ? (y/n)
Repeat the same process for other databases.
After restoring the database, synchronization is mandatory to synchronize the images in the Virtual Center with those in the Tivoli Service Automation Manager. Synchronization steps are described in “Synchronizing with the current status” on page 202.
Recovery scenarioOur experience tells us that the best approach to recover a system following a disaster is the sum of the two solutions described: “Virtual Center solution for backing up a software stack” on page 201 and “Periodic backup using DB2” on page 205.
Take an image backup after an important change in your environment, such as after applying a FixPack, after changing hardware or any other upgrade in the cloud. This will prevent you from having to return to the previous state in case of a disaster.
Configure your system to take a daily database backup of your cloud. You can configure DB2 to take daily backup and set DB2 to save the transactions log.
In case of a disaster, follow these steps to restore your cloud:
1. “Restoring the software stack images using the Virtual Center” on page 2022. “Restoring a DB2 backup” on page 2063. “Synchronizing with the current status” on page 202
5.3 Managing stacked projects
The problem of stacked projects concerns wrong entries in a data model. It can be resolved using new functions in the Reliability, Availability and Serviceability (RAS) feature introduced in Tivoli Service Automation Manager 7.2.2.
Chapter 5. Administrator scenarios 207

When you encounter the situation that your project is In transition mode, and you cannot execute any actions on it, the forceCleanup function must be performed. The cleanup function was introduced in Tivoli Service Automation Manager 7.2.2 as the following REST API call, where:
� host name: The IP address or the name of the computer on which Tivoli Service Automation Manager is installed.
� port: A numeric value for the port, based on the value indicated during the Tivoli Service Automation Manager installation. The default port value is 9443.
� sdi_id: A numeric value for the service deployment instance ID in Tivoli Service Automation Manager.
https://[hostname]:[port]/maxrest/rest/forceCleanup/[sdi_id]
Possible HTTP error codes are listed in Table 5-1.
Table 5-1 RAS REST API - HTTP error codes
5.3.1 Example
In this example, we create a project named MW_ITSO. Due to unknown problems, the project creation process hangs up in the In Transition mode, as depicted in Figure 5-5 on page 209.
Important: When forceCleanup is called, ensure that no service requests are running because all of the associated service requests are also removed from the data model.
Error code Description
200 Successful invocation with XML response:
<result><successful>true</successful>
</result>
400 system#invalidParameter: Invalid or missing parameter
401 access#forceCleanup: User has not been granted the correct privilege to call the function
404 system#unknownobject: Given service deployment instance ID does not exist
500 Internal system errors
208 IBM CloudBurst on System x
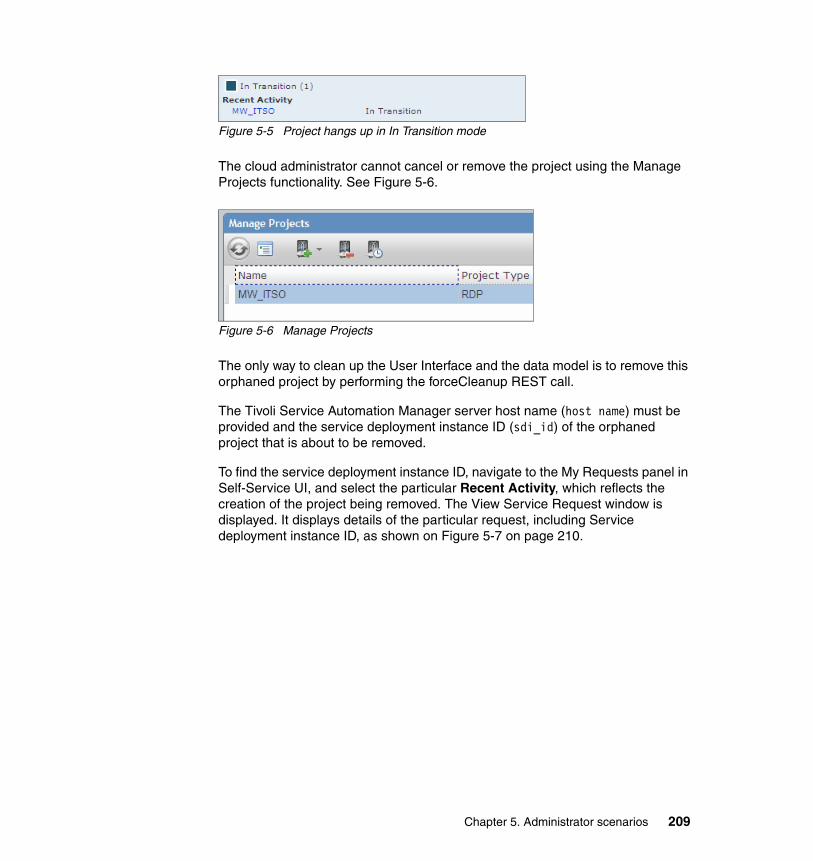
Figure 5-5 Project hangs up in In Transition mode
The cloud administrator cannot cancel or remove the project using the Manage Projects functionality. See Figure 5-6.
Figure 5-6 Manage Projects
The only way to clean up the User Interface and the data model is to remove this orphaned project by performing the forceCleanup REST call.
The Tivoli Service Automation Manager server host name (host name) must be provided and the service deployment instance ID (sdi_id) of the orphaned project that is about to be removed.
To find the service deployment instance ID, navigate to the My Requests panel in Self-Service UI, and select the particular Recent Activity, which reflects the creation of the project being removed. The View Service Request window is displayed. It displays details of the particular request, including Service deployment instance ID, as shown on Figure 5-7 on page 210.
Chapter 5. Administrator scenarios 209
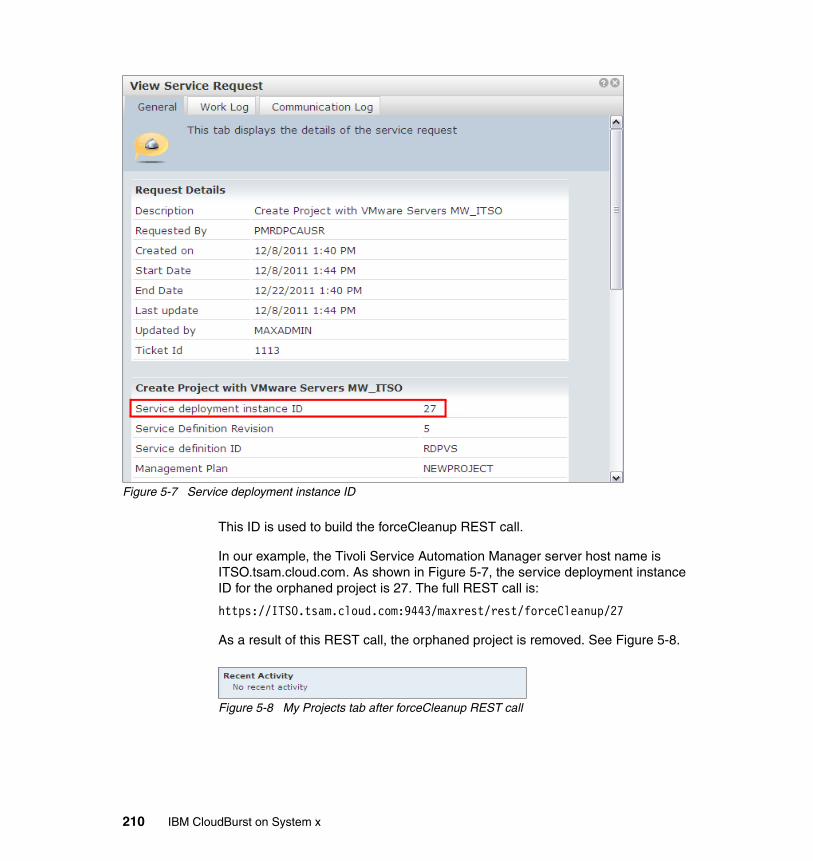
Figure 5-7 Service deployment instance ID
This ID is used to build the forceCleanup REST call.
In our example, the Tivoli Service Automation Manager server host name is ITSO.tsam.cloud.com. As shown in Figure 5-7, the service deployment instance ID for the orphaned project is 27. The full REST call is:
https://ITSO.tsam.cloud.com:9443/maxrest/rest/forceCleanup/27
As a result of this REST call, the orphaned project is removed. See Figure 5-8.
Figure 5-8 My Projects tab after forceCleanup REST call
210 IBM CloudBurst on System x
For more information, see the IBM IT Service Management documentation information center at:
http://publib.boulder.ibm.com/infocenter/tivihelp/v10r1/index.jsp
5.4 Managing passwords
This section describes the default credentials for the various CloudBurst hardware and software elements, and provides guidance about changing these when necessary. For more information, see the CloudBurst 2.1 information center at:
http://publib.boulder.ibm.com/infocenter/tivihelp/v10r1/index.jsp?topic=%2Fcom.ibm.cb.doc_2.1%2Fr_cb_security.html
5.4.1 Default system passwords
In CloudBurst, there is a dedicated Management Network from which you can access all of the hardware and software elements that make up the CloudBurst solution.
The default Management Network setup is:
� IP: 192.168.x.x� Subnet 255.255.0.0� VLAN: 70� Default gateway: 192.168.4.17
Hardware-related credentialsThis section describes small, medium, and large configurations related to hardware credentials. For information about an extra large configuration, visit the IBM Cloudburst Information Center at:
http://publib.boulder.ibm.com/infocenter/tivihelp/v10r1/index.jsp?topic=%2Fcom.ibm.cb.doc_2.1%2Fr_cb_credentials_hw.html
Table 5-2 on page 212 describes BladeCenter configuration details for small and medium configurations. BladeCenter details for a large configuration are in
Note: The IP address of the power distribution unit (PDU) as described in the information center documentation is 192.168.20.x.
Chapter 5. Administrator scenarios 211
Table 5-5 on page 213. Note that “PASSW0RD” contains the number “0” and not the letter “O”.
Table 5-2 Management Network on BladeCenter: Small and medium configurations
Table 5-3 lists Management Server information. Note that “Passw0rd” contains the number “0” and not the letter “o”.
Table 5-3 Management network on Management Server
Table 5-4 lists the credentials for external switches, storage, and PDUs.
Table 5-4 Management Network in other hardware environments
Chassis / Bay Component IP address Host name Username / Password
1 AMM 192.168.4.17 bc1-mm1 USERID / PASSW0RD
1 / 3 FC Switch 192.168.8.19 bc1-iom3 USERID / PASSW0RD
1 / 4 FC Switch 192.168.8.20 bc1-iom4 USERID / PASSW0RD
1 / 7 10G HSSMa
a. Depending on whether you use Cisco, BNT, or other HSSM, the password will differ. For Cisco 10 GbE HSSM, the default login is admin, but it does not have a password. You must set this password to Passw0rd as described at: http://publib.boulder.ibm.com/infocenter/bladectr/documentation/topic/com.ibm.bladecenter.common.nav.doc/io_esm_welcome_page.html.
192.168.8.23 bc1-iom7 admin / admin
1 / 9 10G HSSMa 192.168.8.25 bc1-iom9 admin / admin
Component IP address Host name Username / Password
x3550M3 192.168.0.1 mn1 Administrator / Passw0rd
x3550M3 Customer access
Customer defined Customer defined Administrator / Passw0rd
x3550M3 IMM Customer defined Customer defined USERID / PASSW0RD
Component IP address Host name Username / Password
SMC #1 192.168.16.1 sw1 admin / admin
212 IBM CloudBurst on System x
BladeCenter details for a large configuration are described in Table 5-5.
Table 5-5 Management Network on BladeCenter: Large configuration
SMC #2 192.168.16.2 sw2 admin / admin
DS3524 #1 A 192.168.24.20 san1-sc1 shellUsr / wy3oo&w4 OR infiniti OR P@ssw0rd
DS3524 #1 B 192.168.24.24 san1-sc2 shellUsr / wy3oo&w4 OR infiniti OR P@ssw0rd
PDU #1 192.168.20.1 pdu1 ADMIN / 1001
PDU #2 192.168.20.2 pdu2 ADMIN / 1001
PDU #3 192.168.20.3 pdu3 ADMIN / 1001
Chassis / Bay Component IP address Host name Username / Password
2 AMM 192.168.4.33 bc2-mm1 USERID / PASSW0RD
2 / 3 FC Switch 192.168.8.35 bc2-iom3 USERID / PASSW0RD
2 / 4 FC Switch 192.168.8.36 bc2-iom4 USERID / PASSW0RD
2 / 7 10G HSSMa 192.168.8.39 bc2-iom7 admin / admin
2 / 9 10G HSSMa 192.168.8.41 bc2-iom9 admin / admin
n/a SAN24B FC Switch
192.168.28.1 fcsw1 admin / password
n/a SAN24B FC Switch
192.168.28.1 fcsw2 admin / password
n/a DS3400 #2 A 192.168.24.36 san1-sc1 shellUsr / wy3oo&w4 OR infiniti
Component IP address Host name Username / Password
Chapter 5. Administrator scenarios 213
Server-related credentialsAll managed BladeCenter servers have an IP address, such as 192.168.72.x, where x is the sequential number of the server. Default credentials are root / Passw0rd.
Table 5-6 contains virtualization management-related information.
Table 5-6 IBM CloudBurst Management Server credentials
n/a DS3400 #2 B 192.168.24.40 san1-sc2 shellUsr / wy3oo&w4 OR infiniti
n/a PDU #5 192.168.20.5 pdu5 ADMIN / 1001
n/a PDU #6 192.168.20.6 pdu6 ADMIN / 1001
a. Depending on whether you use Cisco, BNT or other HSSM, the password will differ. For Cisco 10 GbE HSSM, the default login is admin, but it does not have a password. You must set to Passw0rd as described at: http://publib.boulder.ibm.com/infocenter/bladectr/documentation/topic/com.ibm.bladecenter.common.nav.doc/io_esm_welcome_page.html.
Module IP Address / Subnet / DNS or URL
Username / Password
vCenter 192.168.88.9 /255.255.0.0 / 192.168.0.1
Administrator/ Passw0rd
vMotion 192.168.8.x
IBM System Director https://mn1.private.cloud.com:8422/ibm/console/logon.jsp
Administrator/ Passw0rd
IBM DB2 db2admin / Passw0rd
Chassis / Bay Component IP address Host name Username / Password
214 IBM CloudBurst on System x
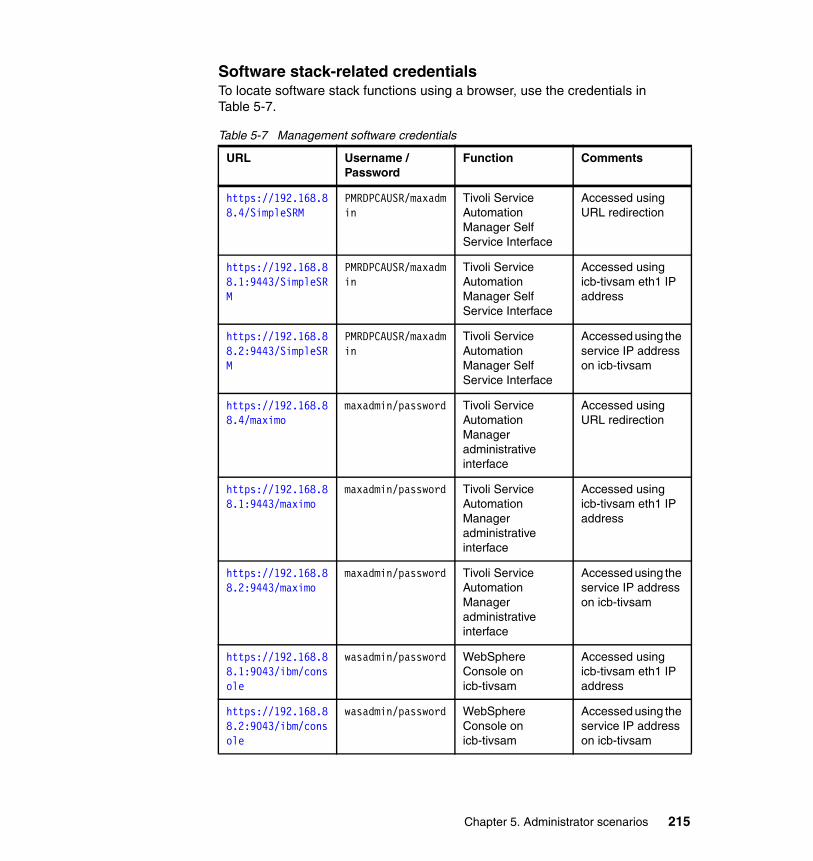
Software stack-related credentialsTo locate software stack functions using a browser, use the credentials in Table 5-7.
Table 5-7 Management software credentials
URL Username / Password
Function Comments
https://192.168.88.4/SimpleSRM
PMRDPCAUSR/maxadmin
Tivoli Service Automation Manager Self Service Interface
Accessed using URL redirection
https://192.168.88.1:9443/SimpleSRM
PMRDPCAUSR/maxadmin
Tivoli Service Automation Manager Self Service Interface
Accessed using icb-tivsam eth1 IP address
https://192.168.88.2:9443/SimpleSRM
PMRDPCAUSR/maxadmin
Tivoli Service Automation Manager Self Service Interface
Accessed using the service IP address on icb-tivsam
https://192.168.88.4/maximo
maxadmin/password Tivoli Service Automation Manager administrative interface
Accessed using URL redirection
https://192.168.88.1:9443/maximo
maxadmin/password Tivoli Service Automation Manager administrative interface
Accessed using icb-tivsam eth1 IP address
https://192.168.88.2:9443/maximo
maxadmin/password Tivoli Service Automation Manager administrative interface
Accessed using the service IP address on icb-tivsam
https://192.168.88.1:9043/ibm/console
wasadmin/password WebSphere Console on icb-tivsam
Accessed using icb-tivsam eth1 IP address
https://192.168.88.2:9043/ibm/console
wasadmin/password WebSphere Console on icb-tivsam
Accessed using the service IP address on icb-tivsam
Chapter 5. Administrator scenarios 215
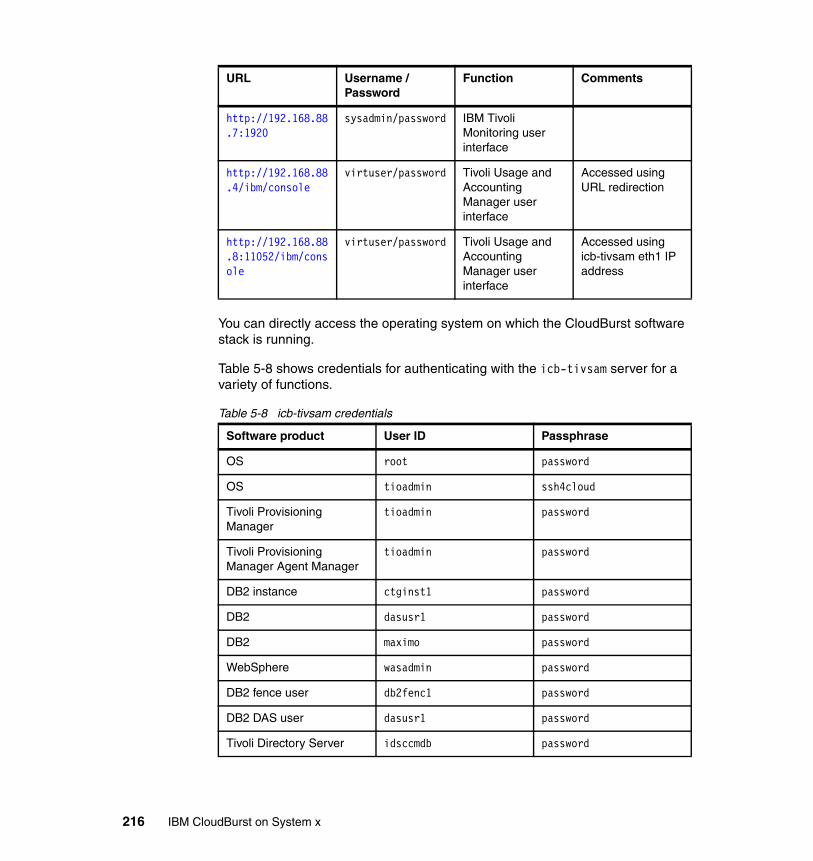
You can directly access the operating system on which the CloudBurst software stack is running.
Table 5-8 shows credentials for authenticating with the icb-tivsam server for a variety of functions.
Table 5-8 icb-tivsam credentials
http://192.168.88.7:1920
sysadmin/password IBM Tivoli Monitoring user interface
http://192.168.88.4/ibm/console
virtuser/password Tivoli Usage and Accounting Manager user interface
Accessed using URL redirection
http://192.168.88.8:11052/ibm/console
virtuser/password Tivoli Usage and Accounting Manager user interface
Accessed using icb-tivsam eth1 IP address
Software product User ID Passphrase
OS root password
OS tioadmin ssh4cloud
Tivoli Provisioning Manager
tioadmin password
Tivoli Provisioning Manager Agent Manager
tioadmin password
DB2 instance ctginst1 password
DB2 dasusr1 password
DB2 maximo password
WebSphere wasadmin password
DB2 fence user db2fenc1 password
DB2 DAS user dasusr1 password
Tivoli Directory Server idsccmdb password
URL Username / Password
Function Comments
216 IBM CloudBurst on System x
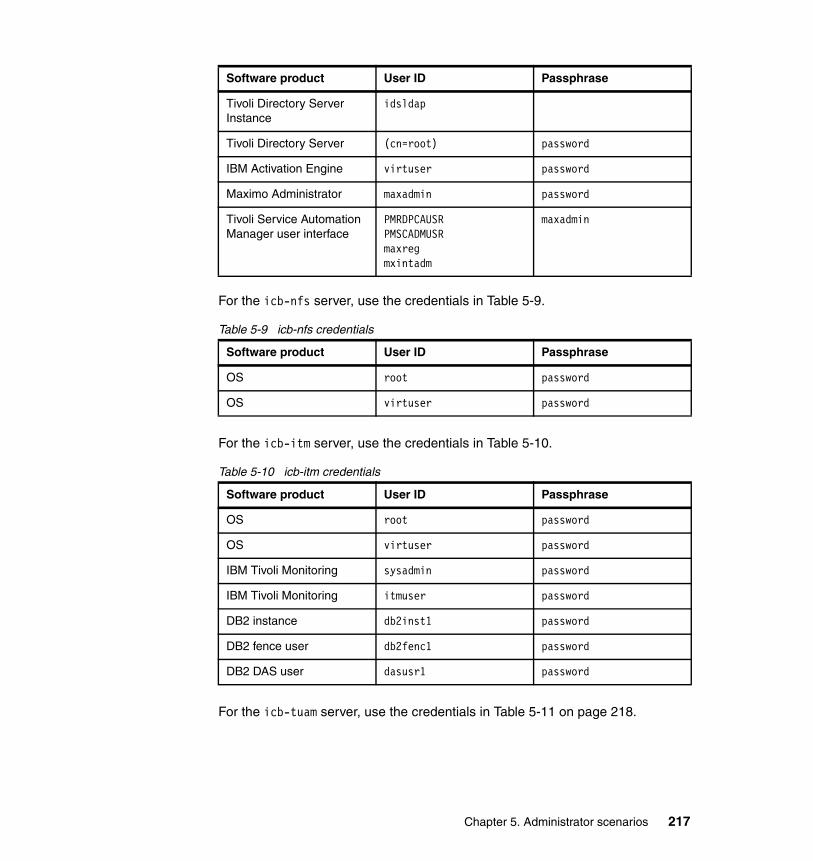
For the icb-nfs server, use the credentials in Table 5-9.
Table 5-9 icb-nfs credentials
For the icb-itm server, use the credentials in Table 5-10.
Table 5-10 icb-itm credentials
For the icb-tuam server, use the credentials in Table 5-11 on page 218.
Tivoli Directory Server Instance
idsldap
Tivoli Directory Server (cn=root) password
IBM Activation Engine virtuser password
Maximo Administrator maxadmin password
Tivoli Service Automation Manager user interface
PMRDPCAUSRPMSCADMUSRmaxregmxintadm
maxadmin
Software product User ID Passphrase
OS root password
OS virtuser password
Software product User ID Passphrase
OS root password
OS virtuser password
IBM Tivoli Monitoring sysadmin password
IBM Tivoli Monitoring itmuser password
DB2 instance db2inst1 password
DB2 fence user db2fenc1 password
DB2 DAS user dasusr1 password
Software product User ID Passphrase
Chapter 5. Administrator scenarios 217
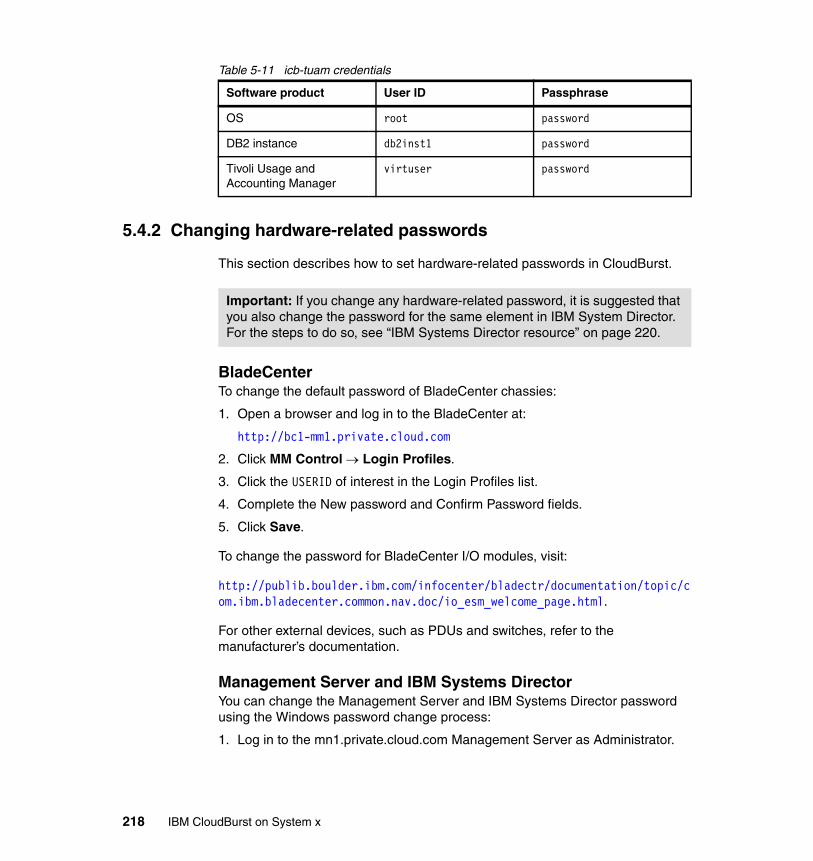
Table 5-11 icb-tuam credentials
5.4.2 Changing hardware-related passwords
This section describes how to set hardware-related passwords in CloudBurst.
BladeCenterTo change the default password of BladeCenter chassies:
1. Open a browser and log in to the BladeCenter at:
http://bc1-mm1.private.cloud.com
2. Click MM Control Login Profiles.
3. Click the USERID of interest in the Login Profiles list.
4. Complete the New password and Confirm Password fields.
5. Click Save.
To change the password for BladeCenter I/O modules, visit:
http://publib.boulder.ibm.com/infocenter/bladectr/documentation/topic/com.ibm.bladecenter.common.nav.doc/io_esm_welcome_page.html.
For other external devices, such as PDUs and switches, refer to the manufacturer’s documentation.
Management Server and IBM Systems DirectorYou can change the Management Server and IBM Systems Director password using the Windows password change process:
1. Log in to the mn1.private.cloud.com Management Server as Administrator.
Software product User ID Passphrase
OS root password
DB2 instance db2inst1 password
Tivoli Usage and Accounting Manager
virtuser password
Important: If you change any hardware-related password, it is suggested that you also change the password for the same element in IBM System Director. For the steps to do so, see “IBM Systems Director resource” on page 220.
218 IBM CloudBurst on System x
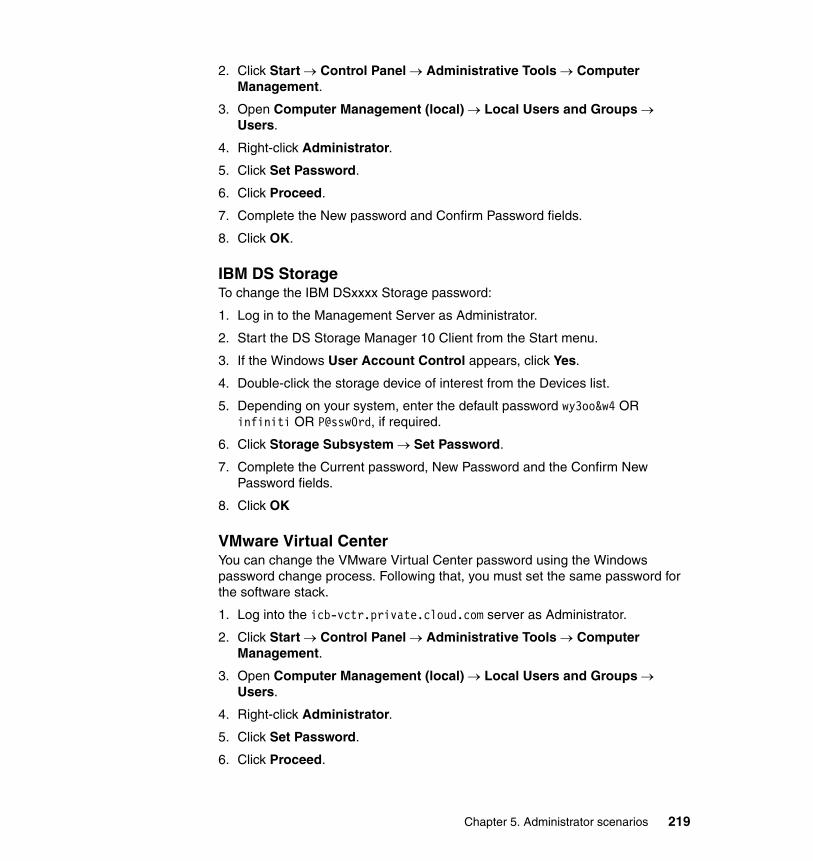
2. Click Start Control Panel Administrative Tools Computer Management.
3. Open Computer Management (local) Local Users and Groups Users.
4. Right-click Administrator.
5. Click Set Password.
6. Click Proceed.
7. Complete the New password and Confirm Password fields.
8. Click OK.
IBM DS StorageTo change the IBM DSxxxx Storage password:
1. Log in to the Management Server as Administrator.
2. Start the DS Storage Manager 10 Client from the Start menu.
3. If the Windows User Account Control appears, click Yes.
4. Double-click the storage device of interest from the Devices list.
5. Depending on your system, enter the default password wy3oo&w4 OR infiniti OR P@ssw0rd, if required.
6. Click Storage Subsystem Set Password.
7. Complete the Current password, New Password and the Confirm New Password fields.
8. Click OK
VMware Virtual CenterYou can change the VMware Virtual Center password using the Windows password change process. Following that, you must set the same password for the software stack.
1. Log into the icb-vctr.private.cloud.com server as Administrator.
2. Click Start Control Panel Administrative Tools Computer Management.
3. Open Computer Management (local) Local Users and Groups Users.
4. Right-click Administrator.
5. Click Set Password.
6. Click Proceed.
Chapter 5. Administrator scenarios 219
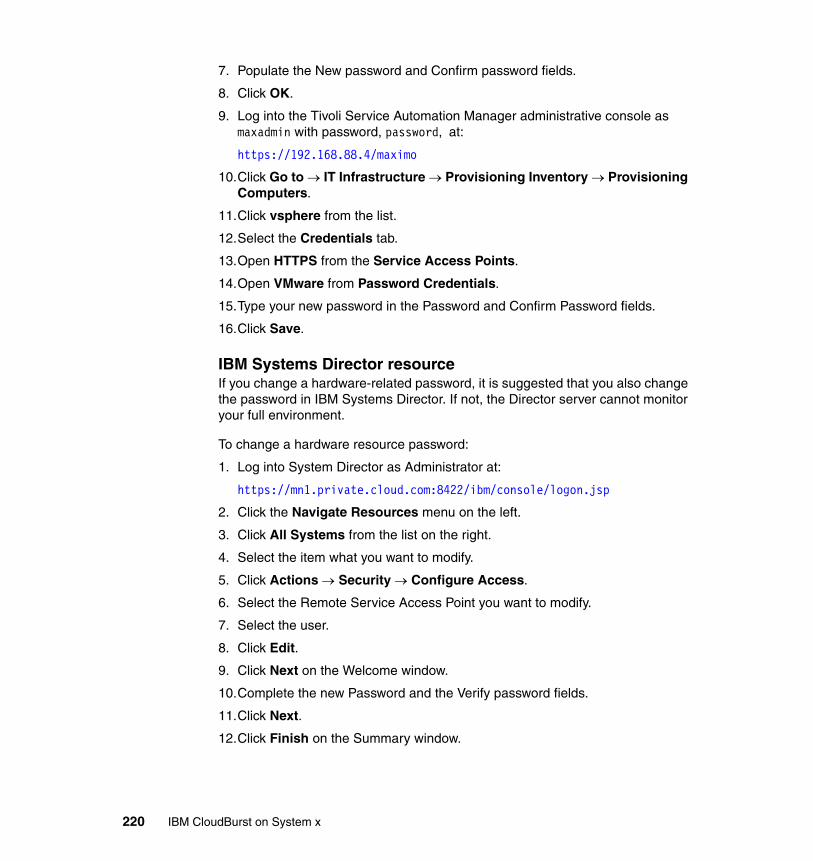
7. Populate the New password and Confirm password fields.
8. Click OK.
9. Log into the Tivoli Service Automation Manager administrative console as maxadmin with password, password, at:
https://192.168.88.4/maximo
10.Click Go to IT Infrastructure Provisioning Inventory Provisioning Computers.
11.Click vsphere from the list.
12.Select the Credentials tab.
13.Open HTTPS from the Service Access Points.
14.Open VMware from Password Credentials.
15.Type your new password in the Password and Confirm Password fields.
16.Click Save.
IBM Systems Director resourceIf you change a hardware-related password, it is suggested that you also change the password in IBM Systems Director. If not, the Director server cannot monitor your full environment.
To change a hardware resource password:
1. Log into System Director as Administrator at:
https://mn1.private.cloud.com:8422/ibm/console/logon.jsp
2. Click the Navigate Resources menu on the left.
3. Click All Systems from the list on the right.
4. Select the item what you want to modify.
5. Click Actions Security Configure Access.
6. Select the Remote Service Access Point you want to modify.
7. Select the user.
8. Click Edit.
9. Click Next on the Welcome window.
10.Complete the new Password and the Verify password fields.
11.Click Next.
12.Click Finish on the Summary window.
220 IBM CloudBurst on System x
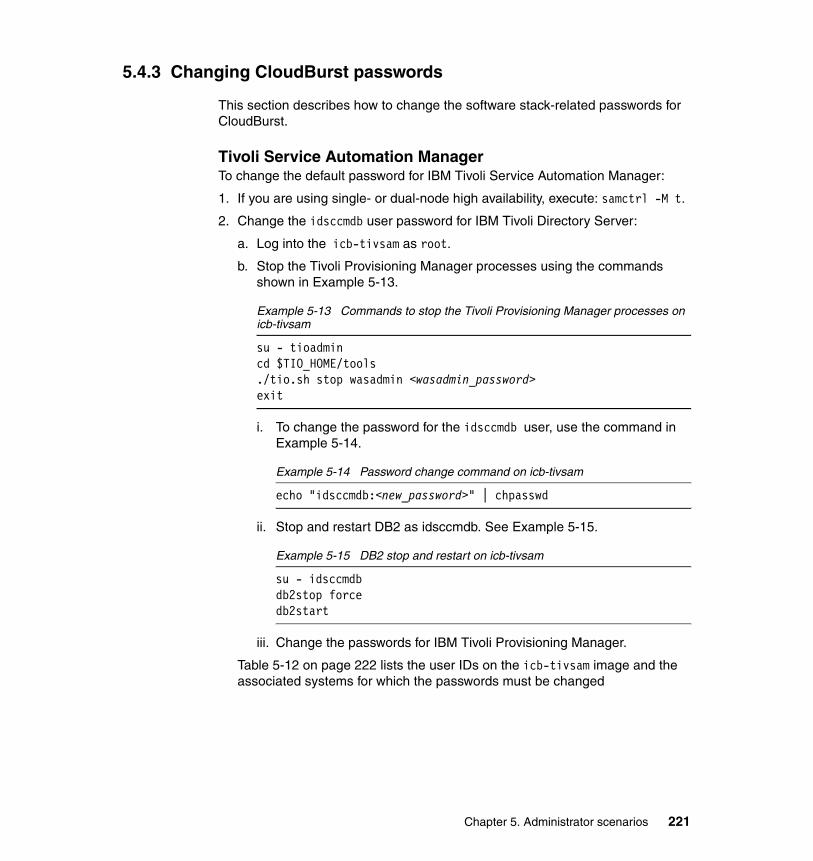
5.4.3 Changing CloudBurst passwords
This section describes how to change the software stack-related passwords for CloudBurst.
Tivoli Service Automation ManagerTo change the default password for IBM Tivoli Service Automation Manager:
1. If you are using single- or dual-node high availability, execute: samctrl -M t.
2. Change the idsccmdb user password for IBM Tivoli Directory Server:
a. Log into the icb-tivsam as root.
b. Stop the Tivoli Provisioning Manager processes using the commands shown in Example 5-13.
Example 5-13 Commands to stop the Tivoli Provisioning Manager processes on icb-tivsam
su - tioadmincd $TIO_HOME/tools./tio.sh stop wasadmin <wasadmin_password>exit
i. To change the password for the idsccmdb user, use the command in Example 5-14.
Example 5-14 Password change command on icb-tivsam
echo "idsccmdb:<new_password>" | chpasswd
ii. Stop and restart DB2 as idsccmdb. See Example 5-15.
Example 5-15 DB2 stop and restart on icb-tivsam
su - idsccmdbdb2stop forcedb2start
iii. Change the passwords for IBM Tivoli Provisioning Manager.
Table 5-12 on page 222 lists the user IDs on the icb-tivsam image and the associated systems for which the passwords must be changed
Chapter 5. Administrator scenarios 221
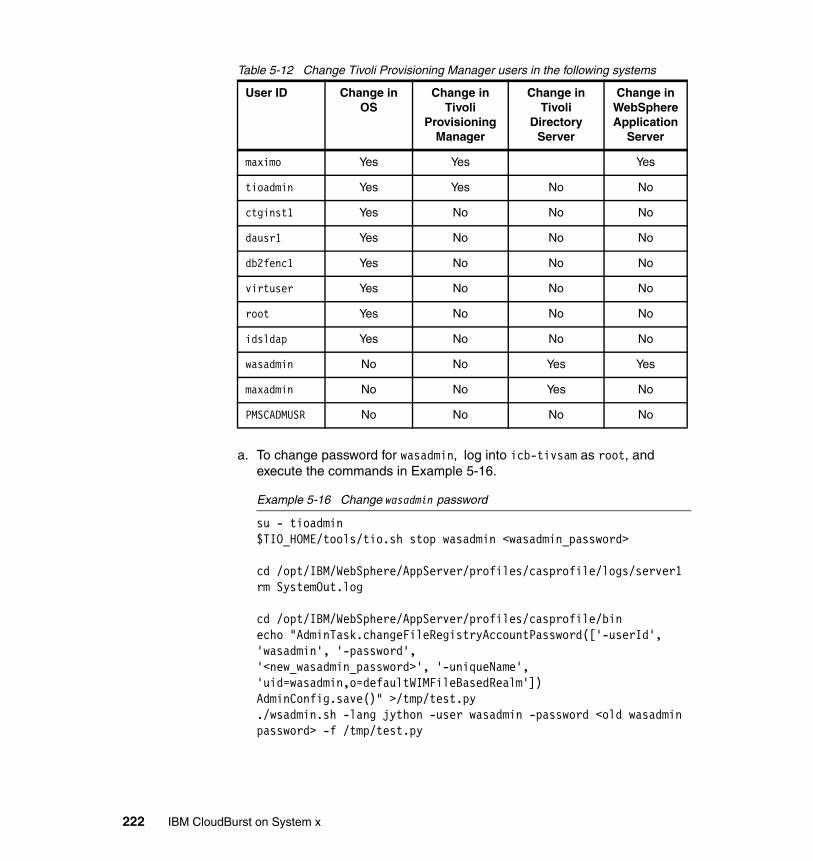
Table 5-12 Change Tivoli Provisioning Manager users in the following systems
a. To change password for wasadmin, log into icb-tivsam as root, and execute the commands in Example 5-16.
Example 5-16 Change wasadmin password
su - tioadmin$TIO_HOME/tools/tio.sh stop wasadmin <wasadmin_password>
cd /opt/IBM/WebSphere/AppServer/profiles/casprofile/logs/server1rm SystemOut.log
cd /opt/IBM/WebSphere/AppServer/profiles/casprofile/binecho "AdminTask.changeFileRegistryAccountPassword(['-userId', 'wasadmin', '-password', '<new_wasadmin_password>', '-uniqueName', 'uid=wasadmin,o=defaultWIMFileBasedRealm'])AdminConfig.save()" >/tmp/test.py./wsadmin.sh -lang jython -user wasadmin -password <old wasadmin password> -f /tmp/test.py
User ID Change in OS
Change in Tivoli
Provisioning Manager
Change in Tivoli
Directory Server
Change in WebSphere Application
Server
maximo Yes Yes Yes
tioadmin Yes Yes No No
ctginst1 Yes No No No
dausr1 Yes No No No
db2fenc1 Yes No No No
virtuser Yes No No No
root Yes No No No
idsldap Yes No No No
wasadmin No No Yes Yes
maxadmin No No Yes No
PMSCADMUSR No No No No
222 IBM CloudBurst on System x
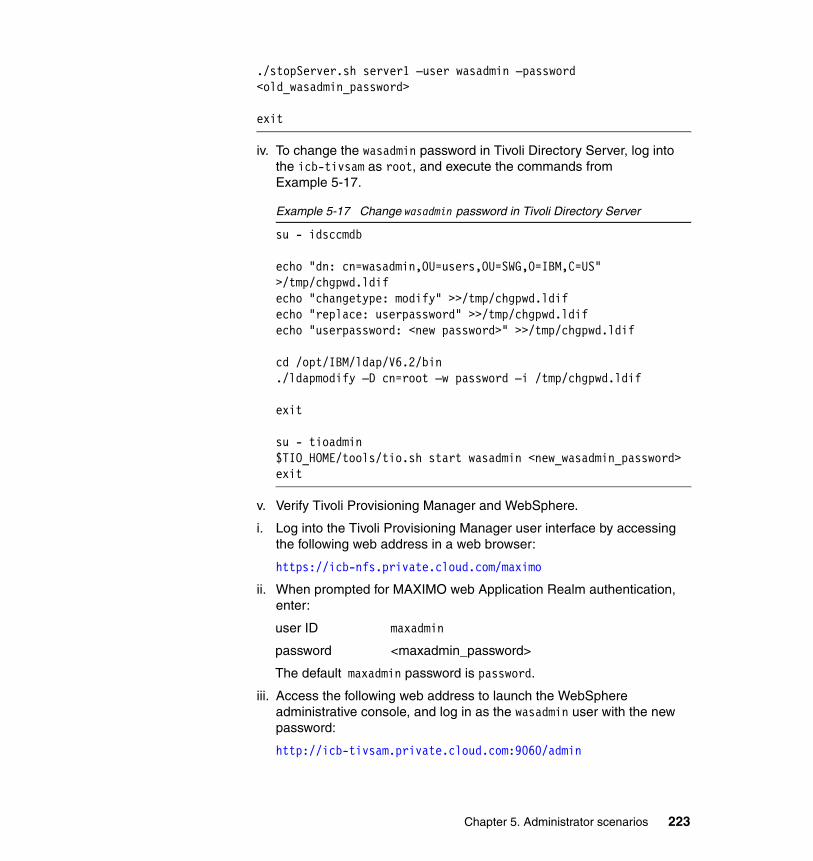
./stopServer.sh server1 –user wasadmin –password <old_wasadmin_password>
exit
iv. To change the wasadmin password in Tivoli Directory Server, log into the icb-tivsam as root, and execute the commands from Example 5-17.
Example 5-17 Change wasadmin password in Tivoli Directory Server
su - idsccmdb
echo "dn: cn=wasadmin,OU=users,OU=SWG,O=IBM,C=US" >/tmp/chgpwd.ldifecho "changetype: modify" >>/tmp/chgpwd.ldifecho "replace: userpassword" >>/tmp/chgpwd.ldifecho "userpassword: <new password>" >>/tmp/chgpwd.ldif
cd /opt/IBM/ldap/V6.2/bin./ldapmodify –D cn=root –w password –i /tmp/chgpwd.ldif
exit
su - tioadmin$TIO_HOME/tools/tio.sh start wasadmin <new_wasadmin_password>exit
v. Verify Tivoli Provisioning Manager and WebSphere.
i. Log into the Tivoli Provisioning Manager user interface by accessing the following web address in a web browser:
https://icb-nfs.private.cloud.com/maximo
ii. When prompted for MAXIMO web Application Realm authentication, enter:
user ID maxadmin
password <maxadmin_password>
The default maxadmin password is password.
iii. Access the following web address to launch the WebSphere administrative console, and log in as the wasadmin user with the new password:
http://icb-tivsam.private.cloud.com:9060/admin
Chapter 5. Administrator scenarios 223
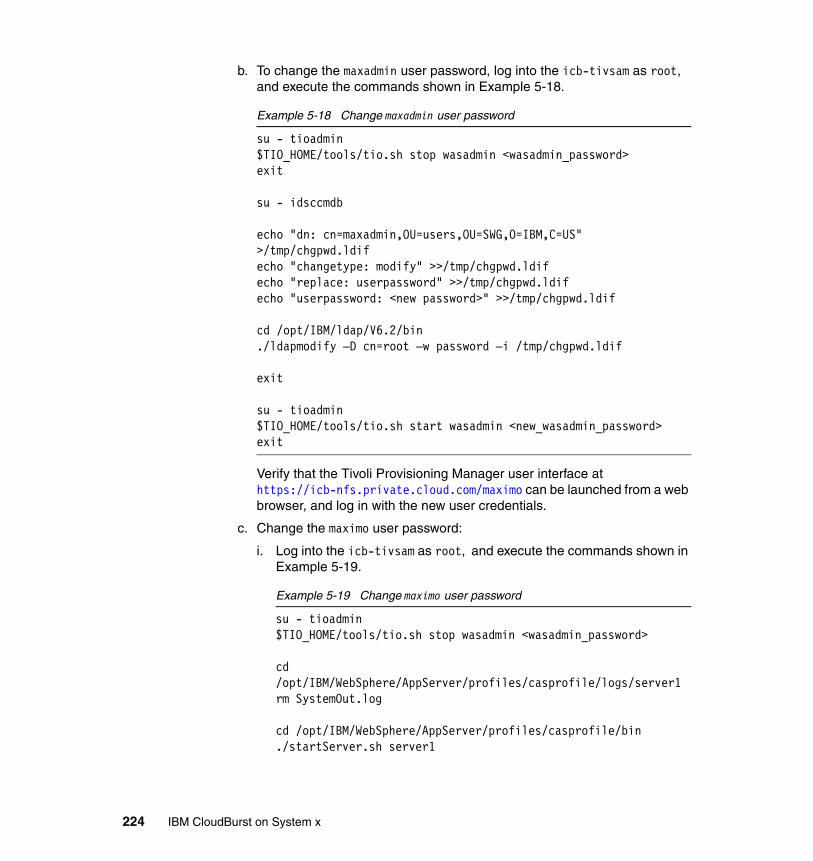
b. To change the maxadmin user password, log into the icb-tivsam as root, and execute the commands shown in Example 5-18.
Example 5-18 Change maxadmin user password
su - tioadmin$TIO_HOME/tools/tio.sh stop wasadmin <wasadmin_password>exit
su - idsccmdb
echo "dn: cn=maxadmin,OU=users,OU=SWG,O=IBM,C=US" >/tmp/chgpwd.ldifecho "changetype: modify" >>/tmp/chgpwd.ldifecho "replace: userpassword" >>/tmp/chgpwd.ldifecho "userpassword: <new password>" >>/tmp/chgpwd.ldif
cd /opt/IBM/ldap/V6.2/bin./ldapmodify –D cn=root –w password –i /tmp/chgpwd.ldif
exit
su - tioadmin$TIO_HOME/tools/tio.sh start wasadmin <new_wasadmin_password>exit
Verify that the Tivoli Provisioning Manager user interface at https://icb-nfs.private.cloud.com/maximo can be launched from a web browser, and log in with the new user credentials.
c. Change the maximo user password:
i. Log into the icb-tivsam as root, and execute the commands shown in Example 5-19.
Example 5-19 Change maximo user password
su - tioadmin$TIO_HOME/tools/tio.sh stop wasadmin <wasadmin_password>
cd /opt/IBM/WebSphere/AppServer/profiles/casprofile/logs/server1rm SystemOut.log
cd /opt/IBM/WebSphere/AppServer/profiles/casprofile/bin./startServer.sh server1
224 IBM CloudBurst on System x
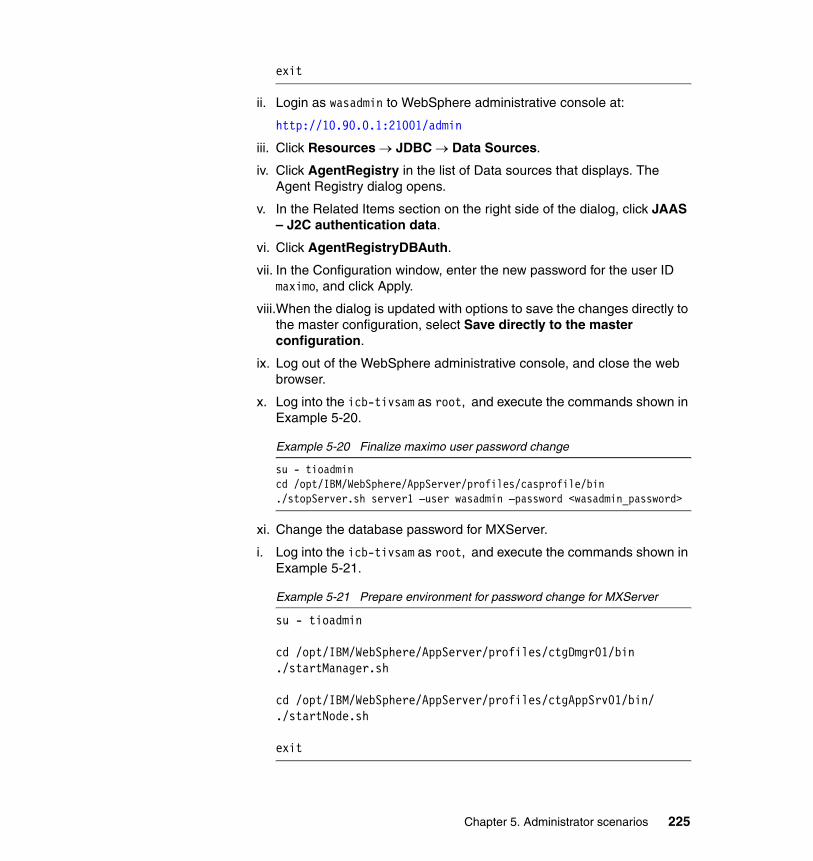
exit
ii. Login as wasadmin to WebSphere administrative console at:
http://10.90.0.1:21001/admin
iii. Click Resources JDBC Data Sources.
iv. Click AgentRegistry in the list of Data sources that displays. The Agent Registry dialog opens.
v. In the Related Items section on the right side of the dialog, click JAAS – J2C authentication data.
vi. Click AgentRegistryDBAuth.
vii. In the Configuration window, enter the new password for the user ID maximo, and click Apply.
viii.When the dialog is updated with options to save the changes directly to the master configuration, select Save directly to the master configuration.
ix. Log out of the WebSphere administrative console, and close the web browser.
x. Log into the icb-tivsam as root, and execute the commands shown in Example 5-20.
Example 5-20 Finalize maximo user password change
su - tioadmincd /opt/IBM/WebSphere/AppServer/profiles/casprofile/bin./stopServer.sh server1 –user wasadmin –password <wasadmin_password>
xi. Change the database password for MXServer.
i. Log into the icb-tivsam as root, and execute the commands shown in Example 5-21.
Example 5-21 Prepare environment for password change for MXServer
su - tioadmin
cd /opt/IBM/WebSphere/AppServer/profiles/ctgDmgr01/bin./startManager.sh
cd /opt/IBM/WebSphere/AppServer/profiles/ctgAppSrv01/bin/./startNode.sh
exit
Chapter 5. Administrator scenarios 225
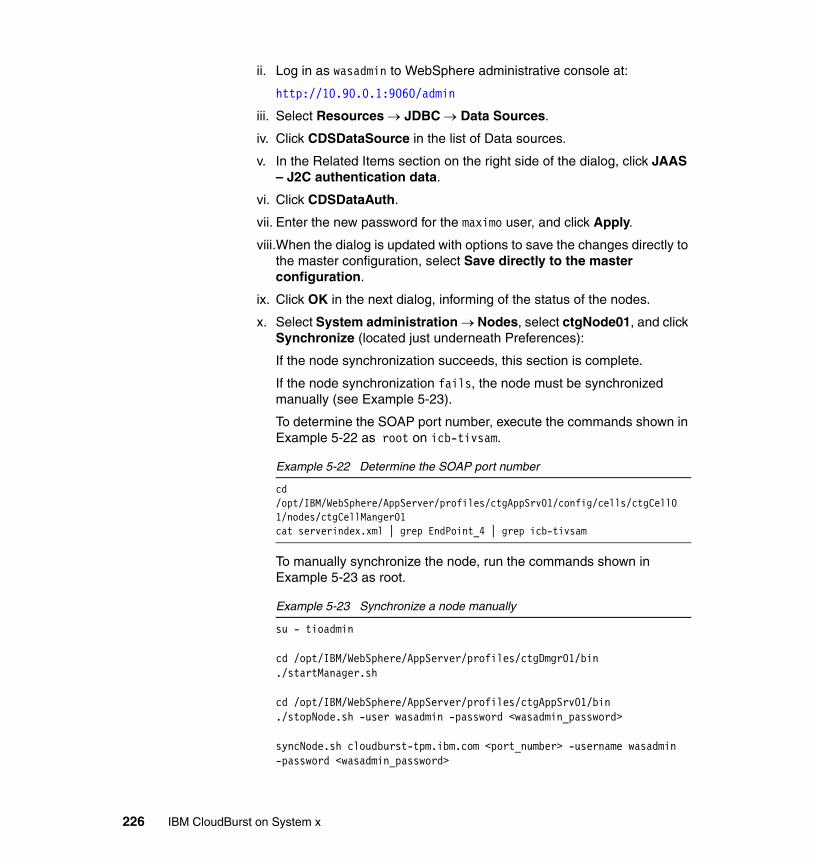
ii. Log in as wasadmin to WebSphere administrative console at:
http://10.90.0.1:9060/admin
iii. Select Resources JDBC Data Sources.
iv. Click CDSDataSource in the list of Data sources.
v. In the Related Items section on the right side of the dialog, click JAAS – J2C authentication data.
vi. Click CDSDataAuth.
vii. Enter the new password for the maximo user, and click Apply.
viii.When the dialog is updated with options to save the changes directly to the master configuration, select Save directly to the master configuration.
ix. Click OK in the next dialog, informing of the status of the nodes.
x. Select System administration Nodes, select ctgNode01, and click Synchronize (located just underneath Preferences):
If the node synchronization succeeds, this section is complete.
If the node synchronization fails, the node must be synchronized manually (see Example 5-23).
To determine the SOAP port number, execute the commands shown in Example 5-22 as root on icb-tivsam.
Example 5-22 Determine the SOAP port number
cd /opt/IBM/WebSphere/AppServer/profiles/ctgAppSrv01/config/cells/ctgCell0 1/nodes/ctgCellManger01cat serverindex.xml | grep EndPoint_4 | grep icb-tivsam
To manually synchronize the node, run the commands shown in Example 5-23 as root.
Example 5-23 Synchronize a node manually
su - tioadmin
cd /opt/IBM/WebSphere/AppServer/profiles/ctgDmgr01/bin./startManager.sh
cd /opt/IBM/WebSphere/AppServer/profiles/ctgAppSrv01/bin./stopNode.sh -user wasadmin -password <wasadmin_password>
syncNode.sh cloudburst-tpm.ibm.com <port_number> -username wasadmin -password <wasadmin_password>
226 IBM CloudBurst on System x
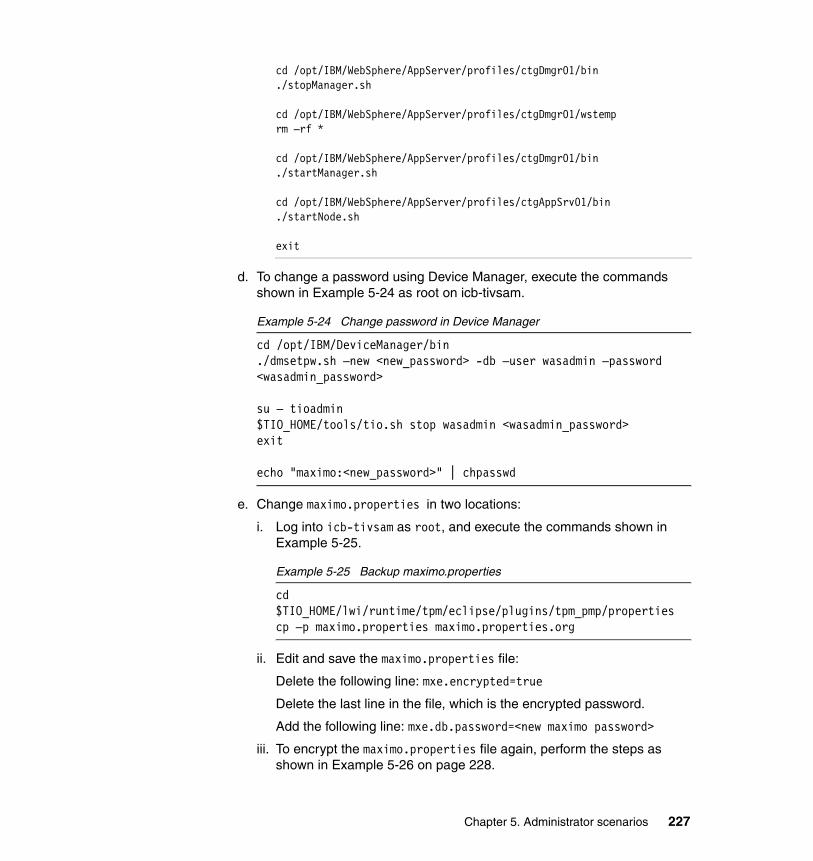
cd /opt/IBM/WebSphere/AppServer/profiles/ctgDmgr01/bin./stopManager.sh
cd /opt/IBM/WebSphere/AppServer/profiles/ctgDmgr01/wstemprm –rf *
cd /opt/IBM/WebSphere/AppServer/profiles/ctgDmgr01/bin./startManager.sh
cd /opt/IBM/WebSphere/AppServer/profiles/ctgAppSrv01/bin./startNode.sh
exit
d. To change a password using Device Manager, execute the commands shown in Example 5-24 as root on icb-tivsam.
Example 5-24 Change password in Device Manager
cd /opt/IBM/DeviceManager/bin./dmsetpw.sh –new <new_password> -db –user wasadmin –password <wasadmin_password>
su – tioadmin$TIO_HOME/tools/tio.sh stop wasadmin <wasadmin_password>exit
echo "maximo:<new_password>" | chpasswd
e. Change maximo.properties in two locations:
i. Log into icb-tivsam as root, and execute the commands shown in Example 5-25.
Example 5-25 Backup maximo.properties
cd $TIO_HOME/lwi/runtime/tpm/eclipse/plugins/tpm_pmp/propertiescp –p maximo.properties maximo.properties.org
ii. Edit and save the maximo.properties file:
Delete the following line: mxe.encrypted=true
Delete the last line in the file, which is the encrypted password.
Add the following line: mxe.db.password=<new maximo password>
iii. To encrypt the maximo.properties file again, perform the steps as shown in Example 5-26 on page 228.
Chapter 5. Administrator scenarios 227

Example 5-26 Encrypt maximo.properties
cd /opt/IBM/SMP/maximo/applications/maximo/propertiescp -p maximo.properties maximo.properties.origcp -p /opt/IBM/tivoli/tpm/lwi/runtime/tpm/eclipse/plugins/tpm_pmp/properties/maximo.properties .cd /opt/IBM/SMP/maximo/tools/maximoencryptproperties.shcp -p /opt/IBM/SMP/maximo/applications/maximo/properties/maximo.properties /opt/IBM/tivoli/tpm/lwi/runtime/tpm/eclipse/plugins/tpm_pmp/properties/maximo.propertiescp -p /opt/IBM/SMP/maximo/applications/maximo/properties/maximo.properties.orig /opt/IBM/SMP/maximo/applications/maximo/properties/maximo.properties
iv. Back up the second maximo.properties file, as shown in Example 5-27.
Example 5-27 Backup second maximo.properties
cd $TIO_HOME/eclipse/plugins/tpm_pmp/propertiescp –p maximo.properties maximo.properties.org
v. Edit and save the maximo.properties file:
Delete the following line: mxe.encrypted=true
Delete the last line in the file, which is the encrypted password.
Add the following line: mxe.db.password=<new maximo password>
vi. To encrypt the maximo.properties file again, perform the steps shown in Example 5-28.
Example 5-28 Encrypt maximo.properties
cd /opt/IBM/SMP/maximo/applications/maximo/propertiescp -p maximo.properties maximo.properties.origcp -p /opt/IBM/tivoli/tpm/eclipse/plugins/tpm_pmp/properties/maximo.properties .cd /opt/IBM/SMP/maximo/tools/maximoencryptproperties.shcp -p /opt/IBM/SMP/maximo/applications/maximo/properties/maximo.properties /opt/IBM/tivoli/tpm/eclipse/plugins/tpm_pmp/properties/maximo.propertiescp -p /opt/IBM/SMP/maximo/applications/maximo/properties/maximo.properties.orig /opt/IBM/SMP/maximo/applications/maximo/properties/maximo.properties
f. To update properties.jar, login as root to icb-tivsam, and execute the commands shown in Example 5-29.
Example 5-29 Update properties.jar
cd /opt/IBM/WebSphere/AppServer/profiles/ctgAppSrv01/installedApps/ctgCell01/MAXIMO.ear
228 IBM CloudBurst on System x
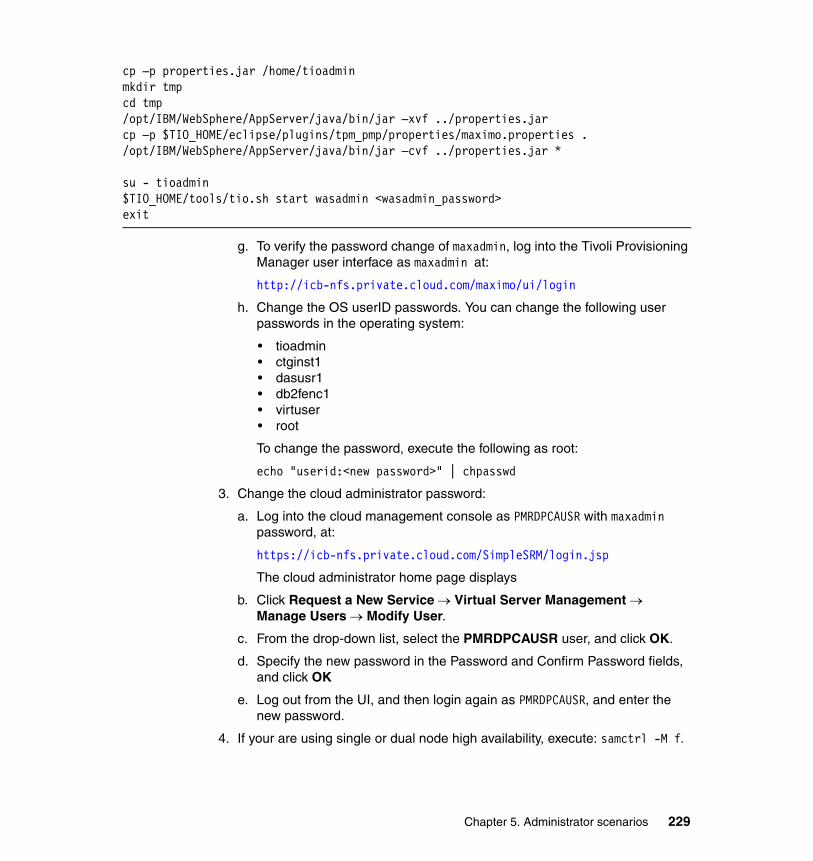
cp –p properties.jar /home/tioadminmkdir tmpcd tmp/opt/IBM/WebSphere/AppServer/java/bin/jar –xvf ../properties.jarcp –p $TIO_HOME/eclipse/plugins/tpm_pmp/properties/maximo.properties ./opt/IBM/WebSphere/AppServer/java/bin/jar –cvf ../properties.jar *
su - tioadmin$TIO_HOME/tools/tio.sh start wasadmin <wasadmin_password>exit
g. To verify the password change of maxadmin, log into the Tivoli Provisioning Manager user interface as maxadmin at:
http://icb-nfs.private.cloud.com/maximo/ui/login
h. Change the OS userID passwords. You can change the following user passwords in the operating system:
• tioadmin• ctginst1• dasusr1• db2fenc1• virtuser• root
To change the password, execute the following as root:
echo "userid:<new password>" | chpasswd
3. Change the cloud administrator password:
a. Log into the cloud management console as PMRDPCAUSR with maxadmin password, at:
https://icb-nfs.private.cloud.com/SimpleSRM/login.jsp
The cloud administrator home page displays
b. Click Request a New Service Virtual Server Management Manage Users Modify User.
c. From the drop-down list, select the PMRDPCAUSR user, and click OK.
d. Specify the new password in the Password and Confirm Password fields, and click OK
e. Log out from the UI, and then login again as PMRDPCAUSR, and enter the new password.
4. If your are using single or dual node high availability, execute: samctrl -M f.
Chapter 5. Administrator scenarios 229
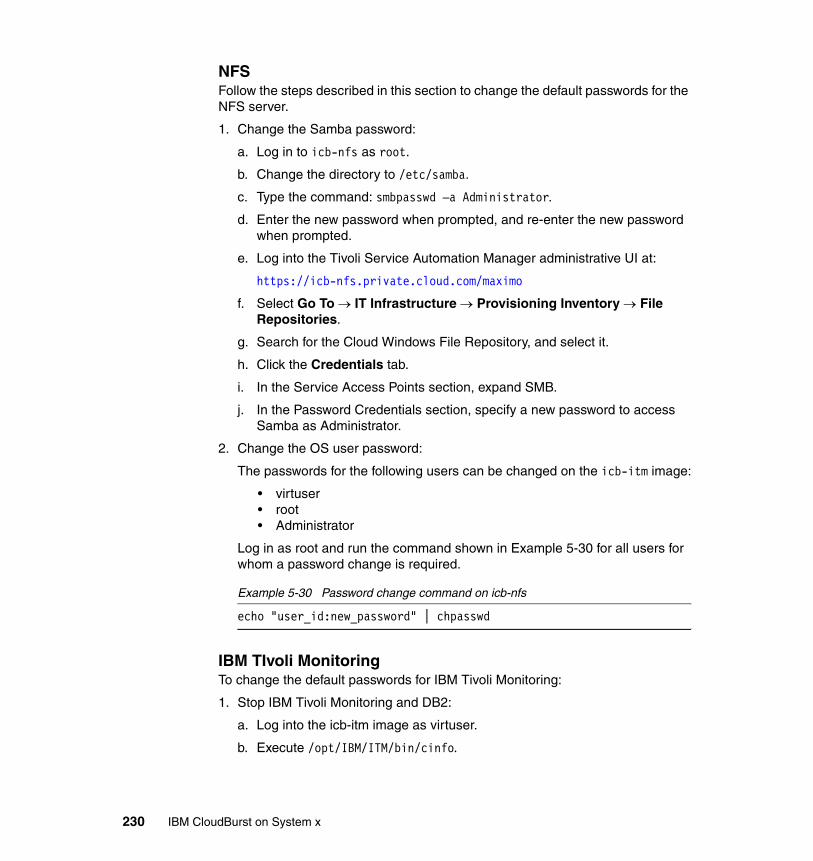
NFSFollow the steps described in this section to change the default passwords for the NFS server.
1. Change the Samba password:
a. Log in to icb-nfs as root.
b. Change the directory to /etc/samba.
c. Type the command: smbpasswd –a Administrator.
d. Enter the new password when prompted, and re-enter the new password when prompted.
e. Log into the Tivoli Service Automation Manager administrative UI at:
https://icb-nfs.private.cloud.com/maximo
f. Select Go To IT Infrastructure Provisioning Inventory File Repositories.
g. Search for the Cloud Windows File Repository, and select it.
h. Click the Credentials tab.
i. In the Service Access Points section, expand SMB.
j. In the Password Credentials section, specify a new password to access Samba as Administrator.
2. Change the OS user password:
The passwords for the following users can be changed on the icb-itm image:
• virtuser• root• Administrator
Log in as root and run the command shown in Example 5-30 for all users for whom a password change is required.
Example 5-30 Password change command on icb-nfs
echo "user_id:new_password" | chpasswd
IBM TIvoli MonitoringTo change the default passwords for IBM Tivoli Monitoring:
1. Stop IBM Tivoli Monitoring and DB2:
a. Log into the icb-itm image as virtuser.
b. Execute /opt/IBM/ITM/bin/cinfo.
230 IBM CloudBurst on System x
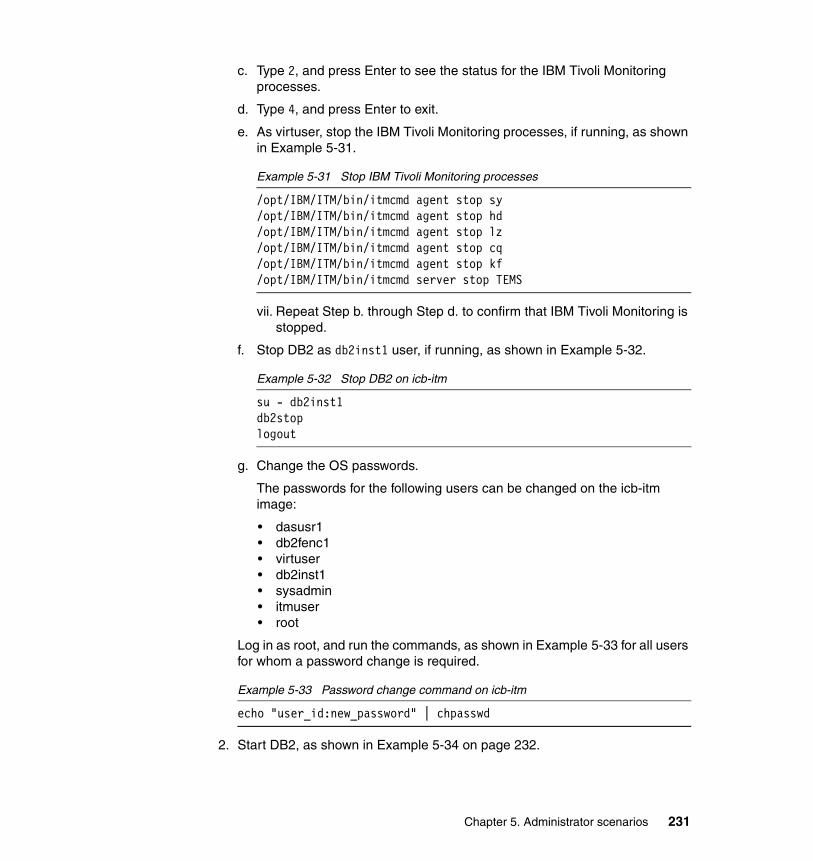
c. Type 2, and press Enter to see the status for the IBM Tivoli Monitoring processes.
d. Type 4, and press Enter to exit.
e. As virtuser, stop the IBM Tivoli Monitoring processes, if running, as shown in Example 5-31.
Example 5-31 Stop IBM Tivoli Monitoring processes
/opt/IBM/ITM/bin/itmcmd agent stop sy/opt/IBM/ITM/bin/itmcmd agent stop hd/opt/IBM/ITM/bin/itmcmd agent stop lz/opt/IBM/ITM/bin/itmcmd agent stop cq/opt/IBM/ITM/bin/itmcmd agent stop kf/opt/IBM/ITM/bin/itmcmd server stop TEMS
vii. Repeat Step b. through Step d. to confirm that IBM Tivoli Monitoring is stopped.
f. Stop DB2 as db2inst1 user, if running, as shown in Example 5-32.
Example 5-32 Stop DB2 on icb-itm
su - db2inst1db2stoplogout
g. Change the OS passwords.
The passwords for the following users can be changed on the icb-itm image:
• dasusr1• db2fenc1• virtuser• db2inst1• sysadmin• itmuser• root
Log in as root, and run the commands, as shown in Example 5-33 for all users for whom a password change is required.
Example 5-33 Password change command on icb-itm
echo "user_id:new_password" | chpasswd
2. Start DB2, as shown in Example 5-34 on page 232.
Chapter 5. Administrator scenarios 231
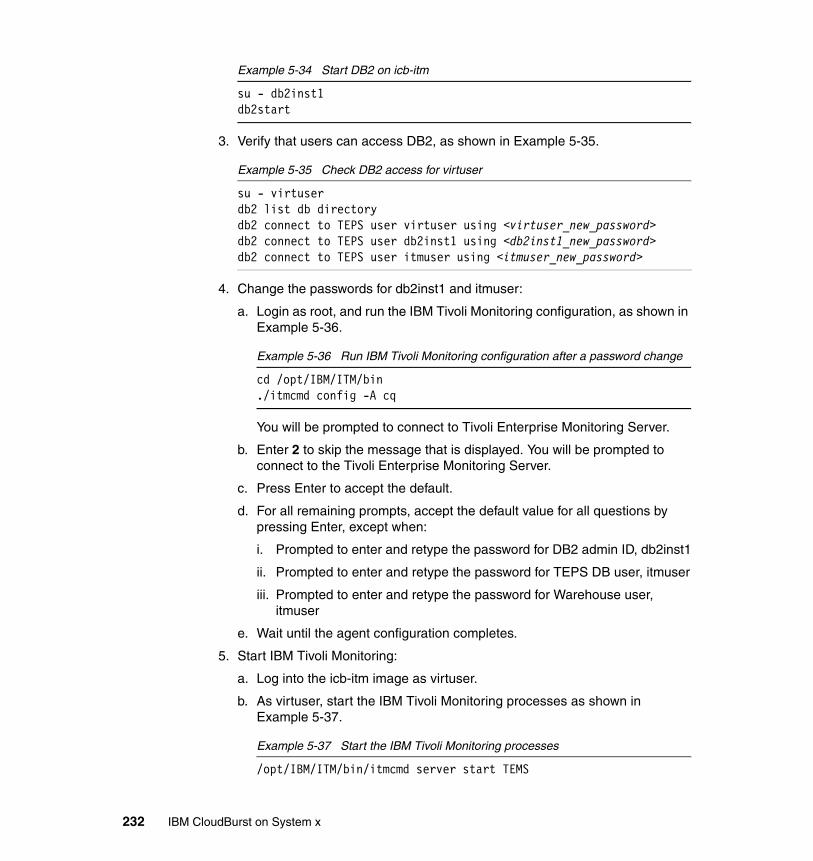
Example 5-34 Start DB2 on icb-itm
su - db2inst1db2start
3. Verify that users can access DB2, as shown in Example 5-35.
Example 5-35 Check DB2 access for virtuser
su - virtuserdb2 list db directorydb2 connect to TEPS user virtuser using <virtuser_new_password>db2 connect to TEPS user db2inst1 using <db2inst1_new_password>db2 connect to TEPS user itmuser using <itmuser_new_password>
4. Change the passwords for db2inst1 and itmuser:
a. Login as root, and run the IBM Tivoli Monitoring configuration, as shown in Example 5-36.
Example 5-36 Run IBM Tivoli Monitoring configuration after a password change
cd /opt/IBM/ITM/bin./itmcmd config -A cq
You will be prompted to connect to Tivoli Enterprise Monitoring Server.
b. Enter 2 to skip the message that is displayed. You will be prompted to connect to the Tivoli Enterprise Monitoring Server.
c. Press Enter to accept the default.
d. For all remaining prompts, accept the default value for all questions by pressing Enter, except when:
i. Prompted to enter and retype the password for DB2 admin ID, db2inst1
ii. Prompted to enter and retype the password for TEPS DB user, itmuser
iii. Prompted to enter and retype the password for Warehouse user, itmuser
e. Wait until the agent configuration completes.
5. Start IBM Tivoli Monitoring:
a. Log into the icb-itm image as virtuser.
b. As virtuser, start the IBM Tivoli Monitoring processes as shown in Example 5-37.
Example 5-37 Start the IBM Tivoli Monitoring processes
/opt/IBM/ITM/bin/itmcmd server start TEMS
232 IBM CloudBurst on System x
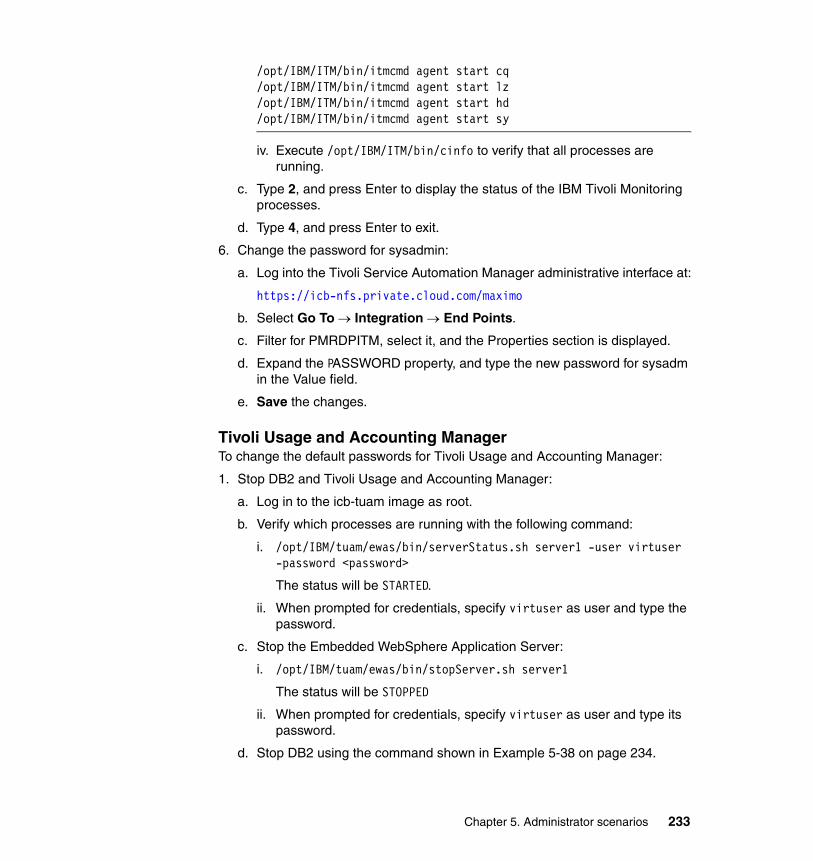
/opt/IBM/ITM/bin/itmcmd agent start cq/opt/IBM/ITM/bin/itmcmd agent start lz/opt/IBM/ITM/bin/itmcmd agent start hd/opt/IBM/ITM/bin/itmcmd agent start sy
iv. Execute /opt/IBM/ITM/bin/cinfo to verify that all processes are running.
c. Type 2, and press Enter to display the status of the IBM Tivoli Monitoring processes.
d. Type 4, and press Enter to exit.
6. Change the password for sysadmin:
a. Log into the Tivoli Service Automation Manager administrative interface at:
https://icb-nfs.private.cloud.com/maximo
b. Select Go To Integration End Points.
c. Filter for PMRDPITM, select it, and the Properties section is displayed.
d. Expand the PASSWORD property, and type the new password for sysadm in the Value field.
e. Save the changes.
Tivoli Usage and Accounting ManagerTo change the default passwords for Tivoli Usage and Accounting Manager:
1. Stop DB2 and Tivoli Usage and Accounting Manager:
a. Log in to the icb-tuam image as root.
b. Verify which processes are running with the following command:
i. /opt/IBM/tuam/ewas/bin/serverStatus.sh server1 -user virtuser -password <password>
The status will be STARTED.
ii. When prompted for credentials, specify virtuser as user and type the password.
c. Stop the Embedded WebSphere Application Server:
i. /opt/IBM/tuam/ewas/bin/stopServer.sh server1
The status will be STOPPED
ii. When prompted for credentials, specify virtuser as user and type its password.
d. Stop DB2 using the command shown in Example 5-38 on page 234.
Chapter 5. Administrator scenarios 233
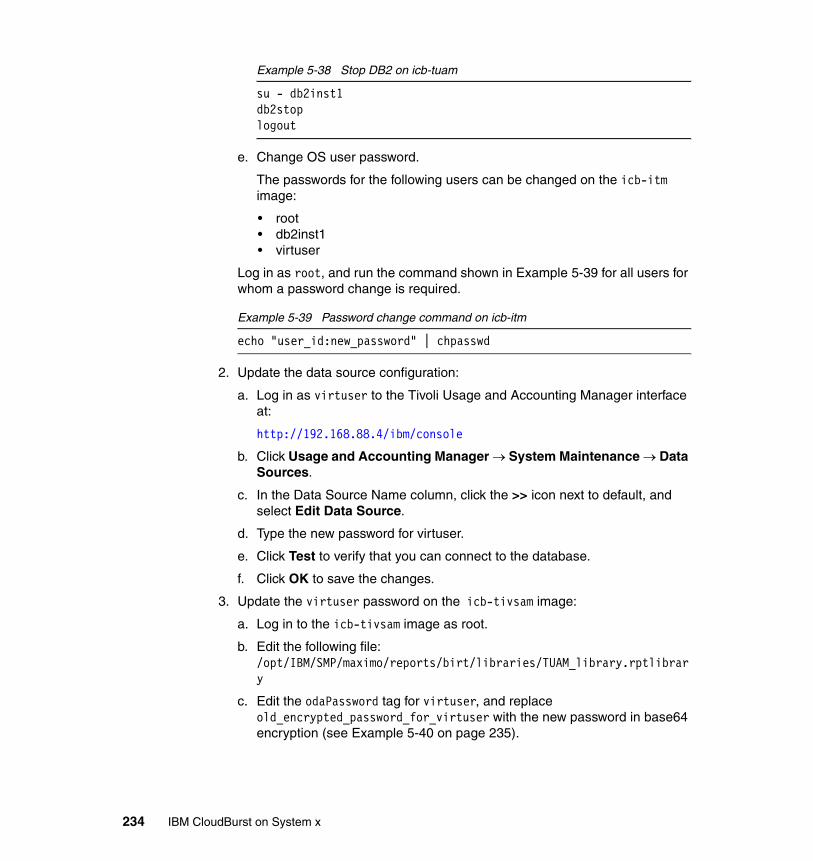
Example 5-38 Stop DB2 on icb-tuam
su - db2inst1db2stoplogout
e. Change OS user password.
The passwords for the following users can be changed on the icb-itm image:
• root• db2inst1• virtuser
Log in as root, and run the command shown in Example 5-39 for all users for whom a password change is required.
Example 5-39 Password change command on icb-itm
echo "user_id:new_password" | chpasswd
2. Update the data source configuration:
a. Log in as virtuser to the Tivoli Usage and Accounting Manager interface at:
http://192.168.88.4/ibm/console
b. Click Usage and Accounting Manager System Maintenance Data Sources.
c. In the Data Source Name column, click the >> icon next to default, and select Edit Data Source.
d. Type the new password for virtuser.
e. Click Test to verify that you can connect to the database.
f. Click OK to save the changes.
3. Update the virtuser password on the icb-tivsam image:
a. Log in to the icb-tivsam image as root.
b. Edit the following file: /opt/IBM/SMP/maximo/reports/birt/libraries/TUAM_library.rptlibrary
c. Edit the odaPassword tag for virtuser, and replace old_encrypted_password_for_virtuser with the new password in base64 encryption (see Example 5-40 on page 235).
234 IBM CloudBurst on System x
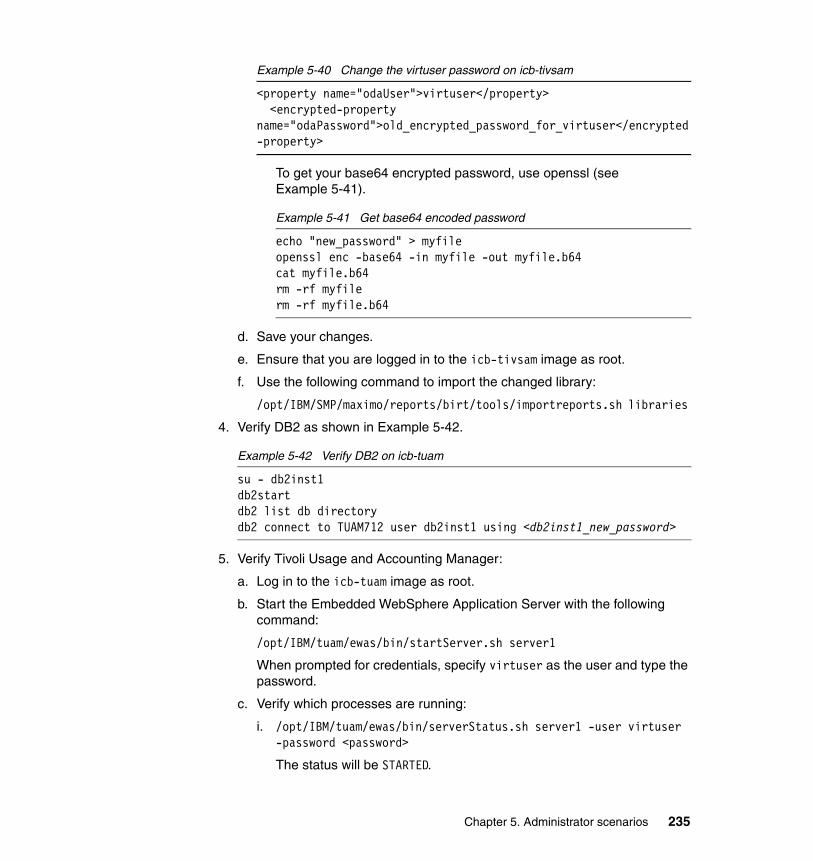
Example 5-40 Change the virtuser password on icb-tivsam
<property name="odaUser">virtuser</property> <encrypted-property name="odaPassword">old_encrypted_password_for_virtuser</encrypted-property>
To get your base64 encrypted password, use openssl (see Example 5-41).
Example 5-41 Get base64 encoded password
echo "new_password" > myfileopenssl enc -base64 -in myfile -out myfile.b64cat myfile.b64rm -rf myfilerm -rf myfile.b64
d. Save your changes.
e. Ensure that you are logged in to the icb-tivsam image as root.
f. Use the following command to import the changed library:
/opt/IBM/SMP/maximo/reports/birt/tools/importreports.sh libraries
4. Verify DB2 as shown in Example 5-42.
Example 5-42 Verify DB2 on icb-tuam
su - db2inst1db2startdb2 list db directorydb2 connect to TUAM712 user db2inst1 using <db2inst1_new_password>
5. Verify Tivoli Usage and Accounting Manager:
a. Log in to the icb-tuam image as root.
b. Start the Embedded WebSphere Application Server with the following command:
/opt/IBM/tuam/ewas/bin/startServer.sh server1
When prompted for credentials, specify virtuser as the user and type the password.
c. Verify which processes are running:
i. /opt/IBM/tuam/ewas/bin/serverStatus.sh server1 -user virtuser -password <password>
The status will be STARTED.
Chapter 5. Administrator scenarios 235

ii. When prompted for credentials, specify virtuser as user, and type the password.
d. Login as virtuser to the Tivoli Usage and Accounting Manager user interface at:
http://192.168.88.4/ibm/console
e. Navigate to Usage and Accounting Manager Chargeback Maintenance Clients. Verify that this displays with no errors (DB2 is working after changing the virtuser password).
236 IBM CloudBurst on System x
Chapter 6. IBM Service Delivery Manager 7.2.2
This chapter describes how to upgrade to CloudBurst 2.1.1 with IBM Service Delivery Manager 7.2.2. The release of IBM Service Delivery Manager 7.2.2 introduces a number of new functionalities. This chapter describes the upgrade process that makes these functionalities available to CloudBurst 2.1 users.
We describe the upgrade process for each of the following virtual images:
� icb-tivsam (for IBM Tivoli Service Automation Manager)� icb-tuam (for IBM Tivoli Usage and Accounting Manager)� icb-itm (for IBM Tivoli Monitoring)� icb-nfs (for IBM Tivoli Monitoring)
We also describe the specifics about how to:
� “Editing your servers settings” on page 242� “Pre-upgrade steps” on page 243� “Using the maintenance tool” on page 244� “Upgrading the software products” on page 248� “Post-upgrade steps” on page 285
6
© Copyright IBM Corp. 2012. All rights reserved. 237
6.1 Upgrading to CloudBurst 2.1.1 with IBM Service Delivery Manager 7.2.2
With the release of IBM Service Delivery Manager 7.2.2, new functionalities have been introduced. By upgrading the CloudBurst software stack from IBM Service Delivery Manager 7.2.1, you can take advantage of these features.
The following list contains new product features and enhancements that were added to IBM Service Delivery Manager 7.2.2:
� Maintenance tool
� Ability to collect and display historical monitoring reports
� URL redirection
� Integration with external IBM Tivoli Monitoring and Tivoli Usage and Accounting Manager
� Improved Tivoli Usage and Accounting Manager reports
� Service provider support
� Monitoring of the infrastructure
� Exploiting the configuration tools provided with Tivoli Service Automation Manager V7.2.2
� Automatic synchronization of Tivoli Service Automation Manager customer data structure with Tivoli Usage and Accounting Manager
The maintenance tool helps you to understand the difference between a version upgrade, a maintenance level upgrade of the Software stack installed in CloudBurst for System x, and those provided with a specific IBM Service Delivery Manager fix pack or version.
The maintenance tool determines the steps that are necessary to upgrade your existing implementation, and it points you to URLs from which you can run the required upgrades.
The data collected by IBM Tivoli Monitoring agents can be stored in an external data warehouse (connected to the CloudBurst) and used to generate reports with information about the availability and performance of your environment for a specific time frame. It also possible to generate trend analysis, including information related to the hypervisor. Historical reports are processed and displayed by Tivoli Common Reporting.
The URL redirection functionality has been extended to cover IBM Tivoli Monitoring user interfaces. Using a single host name or IP address, you can now
238 IBM CloudBurst on System x
access all of the user interfaces provided with IBM CloudBurst for System x software stack:
� Tivoli Service Automation Manager self-service user interface� Tivoli Service Automation Manager administrative user interface� Tivoli Usage and Accounting Manager user interface� Tivoli Enterprise Portal user interface� Tivoli Common Reporting user interface
There are a number of URLs for previous versions of the software stack (IBM Service Delivery Manager 7.2.1):
� Tivoli Service Automation Manager:
https://NFS_image/tivsam/admin Administrative UIhttps://NFS_image/tivsam/wasadmin WAS admin consolehttps://NFS_image/tivsam/SimpleSRM Self Service UI
� IBM Tivoli Monitoring:
https://NFS_image/itm/teps TEPS UIhttps://NFS_image/itm/tcr Tivoli Common Reporting UI
� Tivoli Usage and Accounting Manager:
https://NFS_image/tuam/wasadmin WAS admin consolehttps://NFS_image/tuam/tip Tivoli Integrated Portal
It is now possible to automatically configure (using the Service Connection Engine) the CloudBurst Software stack to integrate with IBM Tivoli Monitoring and Tivoli Usage and Accounting Manager instances that are already in your environment.
A wider set of usage and accounting reports is provided, including, for example, resource trends, invoice by rate groups, and account summary. Moreover, the reports can be viewed with Tivoli Common Reporting. You no longer need to access the Tivoli Service Automation Manager administrator UI to generate and display reports. A sample report in shown in Figure 6-1 on page 240.
Chapter 6. IBM Service Delivery Manager 7.2.2 239
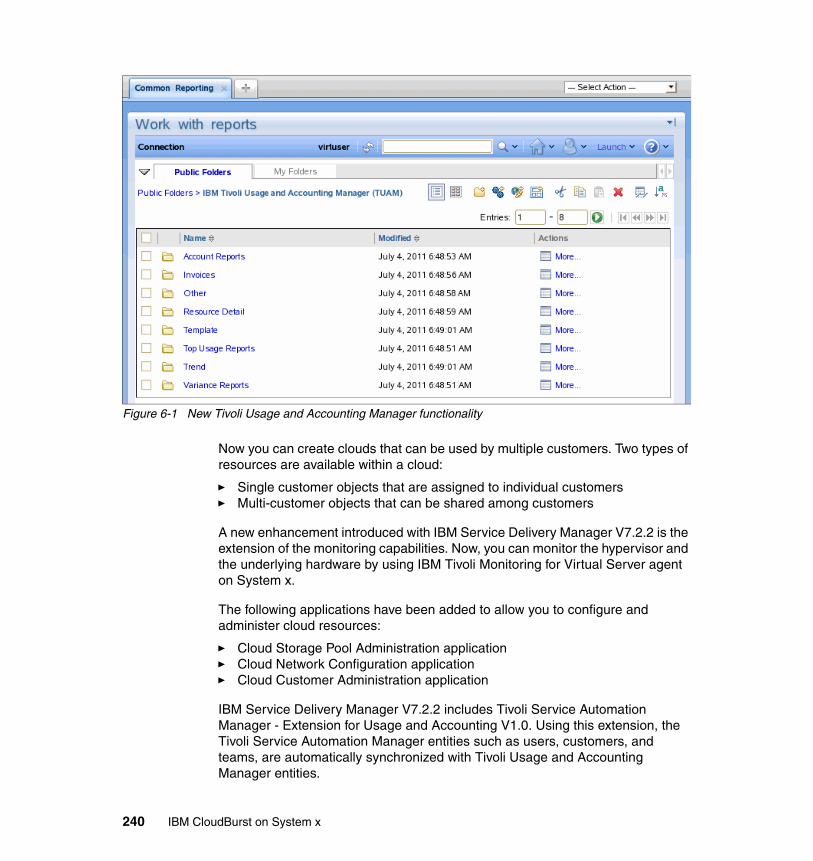
Figure 6-1 New Tivoli Usage and Accounting Manager functionality
Now you can create clouds that can be used by multiple customers. Two types of resources are available within a cloud:
� Single customer objects that are assigned to individual customers� Multi-customer objects that can be shared among customers
A new enhancement introduced with IBM Service Delivery Manager V7.2.2 is the extension of the monitoring capabilities. Now, you can monitor the hypervisor and the underlying hardware by using IBM Tivoli Monitoring for Virtual Server agent on System x.
The following applications have been added to allow you to configure and administer cloud resources:
� Cloud Storage Pool Administration application� Cloud Network Configuration application� Cloud Customer Administration application
IBM Service Delivery Manager V7.2.2 includes Tivoli Service Automation Manager - Extension for Usage and Accounting V1.0. Using this extension, the Tivoli Service Automation Manager entities such as users, customers, and teams, are automatically synchronized with Tivoli Usage and Accounting Manager entities.
240 IBM CloudBurst on System x
The following section describes how can you upgrade CloudBurst 2.1 software stack to the new version with IBM Service Delivery Manager 7.2.2 in a single node environment. If you are using dual-node, high availability, visit the following URL: http://publib.boulder.ibm.com/infocenter/tivihelp/v10r1/topic/com.ibm.isdm_7.2.2.doc/c_upgrading_dualHA.html#c_upgrading_dualHA
The full IBM Service Delivery Manager upgrade process contains both product maintenance upgrades, and some product version upgrades. IBM Service Delivery Manager provides you with a maintenance tool that guides you through both types of upgrade: a version upgrade and a maintenance level upgrade.
Upgrade the virtual images in the following order:
� icb-tivsam� icb-tuam� icb-itm� icb-nfs
The upgrade procedure for each virtual image is divided into three steps:
1. Pre-upgrade to increase the disk space and configure the software stack to prepare for the upgrade procedure
Information:
Currently, no official upgrade path or upgrade documentation is available for IBM CloudBurst for System x. The upgrade steps documented here were based on IBM Service Delivery Manager 7.2.1. The processes described in this chapter are based on the IBM Service Delivery Manager upgrade procedure located at http://publib.boulder.ibm.com/infocenter/tivihelp/v10r1/topic/com.ibm.isdm_7.2.2.doc/c_maintenance_tools.html
In order for the processes in this chapter to run successfully, it is expected that you are using the:
� default IP � default host name settings� default user credentials for the middleware
Also ensure that there are:
� No projects running � No projects scheduled� No modification to the UI
Chapter 6. IBM Service Delivery Manager 7.2.2 241
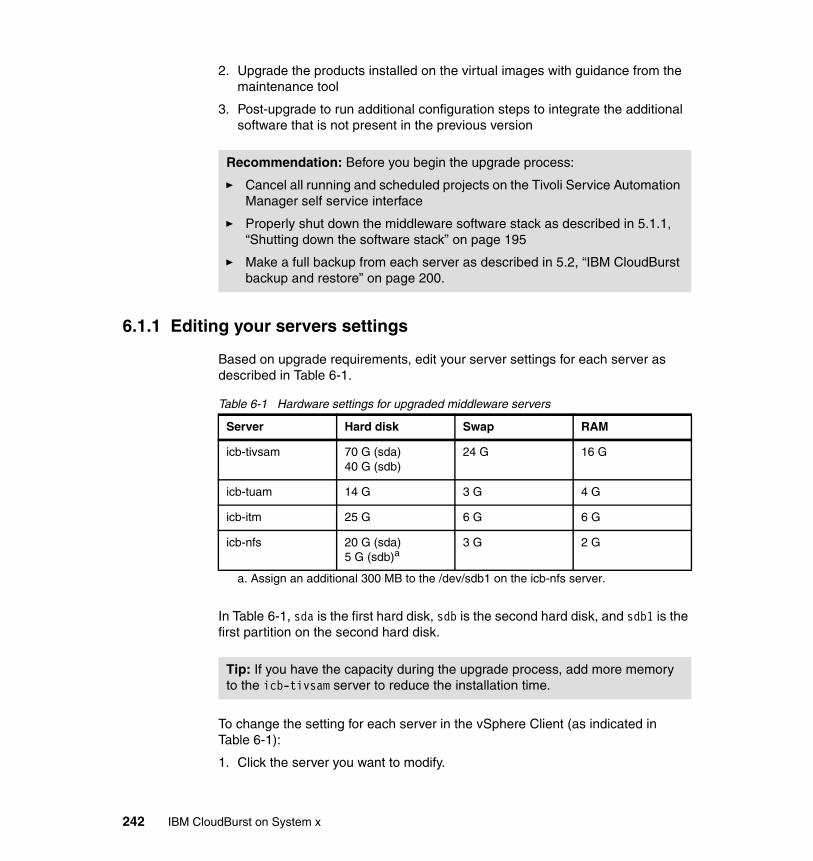
2. Upgrade the products installed on the virtual images with guidance from the maintenance tool
3. Post-upgrade to run additional configuration steps to integrate the additional software that is not present in the previous version
6.1.1 Editing your servers settings
Based on upgrade requirements, edit your server settings for each server as described in Table 6-1.
Table 6-1 Hardware settings for upgraded middleware servers
In Table 6-1, sda is the first hard disk, sdb is the second hard disk, and sdb1 is the first partition on the second hard disk.
To change the setting for each server in the vSphere Client (as indicated in Table 6-1):
1. Click the server you want to modify.
Recommendation: Before you begin the upgrade process:
� Cancel all running and scheduled projects on the Tivoli Service Automation Manager self service interface
� Properly shut down the middleware software stack as described in 5.1.1, “Shutting down the software stack” on page 195
� Make a full backup from each server as described in 5.2, “IBM CloudBurst backup and restore” on page 200.
Server Hard disk Swap RAM
icb-tivsam 70 G (sda)40 G (sdb)
24 G 16 G
icb-tuam 14 G 3 G 4 G
icb-itm 25 G 6 G 6 G
icb-nfs 20 G (sda)5 G (sdb)a
a. Assign an additional 300 MB to the /dev/sdb1 on the icb-nfs server.
3 G 2 G
Tip: If you have the capacity during the upgrade process, add more memory to the icb-tivsam server to reduce the installation time.
242 IBM CloudBurst on System x
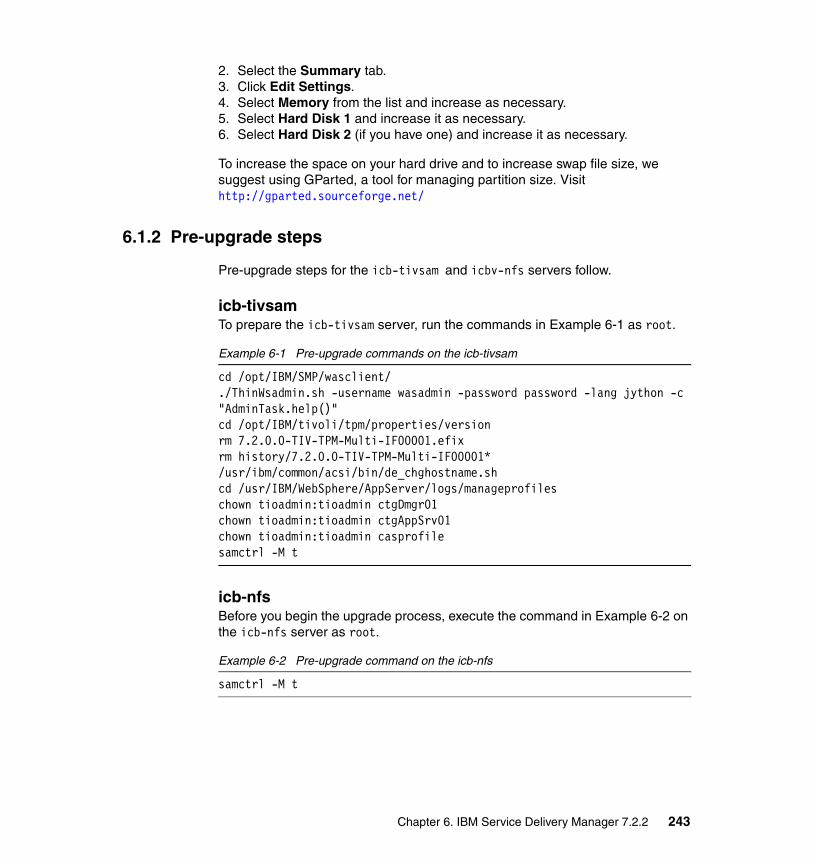
2. Select the Summary tab.3. Click Edit Settings.4. Select Memory from the list and increase as necessary. 5. Select Hard Disk 1 and increase it as necessary.6. Select Hard Disk 2 (if you have one) and increase it as necessary.
To increase the space on your hard drive and to increase swap file size, we suggest using GParted, a tool for managing partition size. Visit http://gparted.sourceforge.net/
6.1.2 Pre-upgrade steps
Pre-upgrade steps for the icb-tivsam and icbv-nfs servers follow.
icb-tivsamTo prepare the icb-tivsam server, run the commands in Example 6-1 as root.
Example 6-1 Pre-upgrade commands on the icb-tivsam
cd /opt/IBM/SMP/wasclient/./ThinWsadmin.sh -username wasadmin -password password -lang jython -c "AdminTask.help()"cd /opt/IBM/tivoli/tpm/properties/versionrm 7.2.0.0-TIV-TPM-Multi-IF00001.efixrm history/7.2.0.0-TIV-TPM-Multi-IF00001*/usr/ibm/common/acsi/bin/de_chghostname.shcd /usr/IBM/WebSphere/AppServer/logs/manageprofileschown tioadmin:tioadmin ctgDmgr01chown tioadmin:tioadmin ctgAppSrv01chown tioadmin:tioadmin casprofilesamctrl -M t
icb-nfsBefore you begin the upgrade process, execute the command in Example 6-2 on the icb-nfs server as root.
Example 6-2 Pre-upgrade command on the icb-nfs
samctrl -M t
Chapter 6. IBM Service Delivery Manager 7.2.2 243
6.1.3 Using the maintenance tool
As stated in 6.1, “Upgrading to CloudBurst 2.1.1 with IBM Service Delivery Manager 7.2.2” on page 238, the maintenance tool helps you to understand the difference between a version upgrade, a maintenance level upgrade of the Software stack installed in CloudBurst for System x, and those provided with a specific IBM Service Delivery Manager fix pack or version.
In the procedure that follows, the maintenance tool is used to define the readiness for upgrade for all software on an image. Run this procedure on each image:
1. Uncompress the ISDM_for_x86_2of15_V722.tar file to any directory.
2. Navigate to maintenanceTool.tar file, and uncompress it.
3. Change directory to launchpad\disk1.
4. Start the maintenance tool:
– On Microsoft Windows: launchpad.exe\– On Linux: ./launchpad.sh
5. Click Next on the Welcome window.
6. Choose the isdm/isdm722_VMware_upgrade.ovf file on the Choose update descriptor.
7. Click Next.
8. The Update Information window displays a list of the products and versions contained in the IBM Service Delivery Manager V7.2.2.
9. Click Next.
10.Specify the host name and access credentials for all of the virtual servers as you see. See Figure 6-2 on page 245.
Note: An executable version of the maintenance tool can be downloaded from the following website:
https://www-304.ibm.com/support/docview.wss?uid=swg21566630
244 IBM CloudBurst on System x
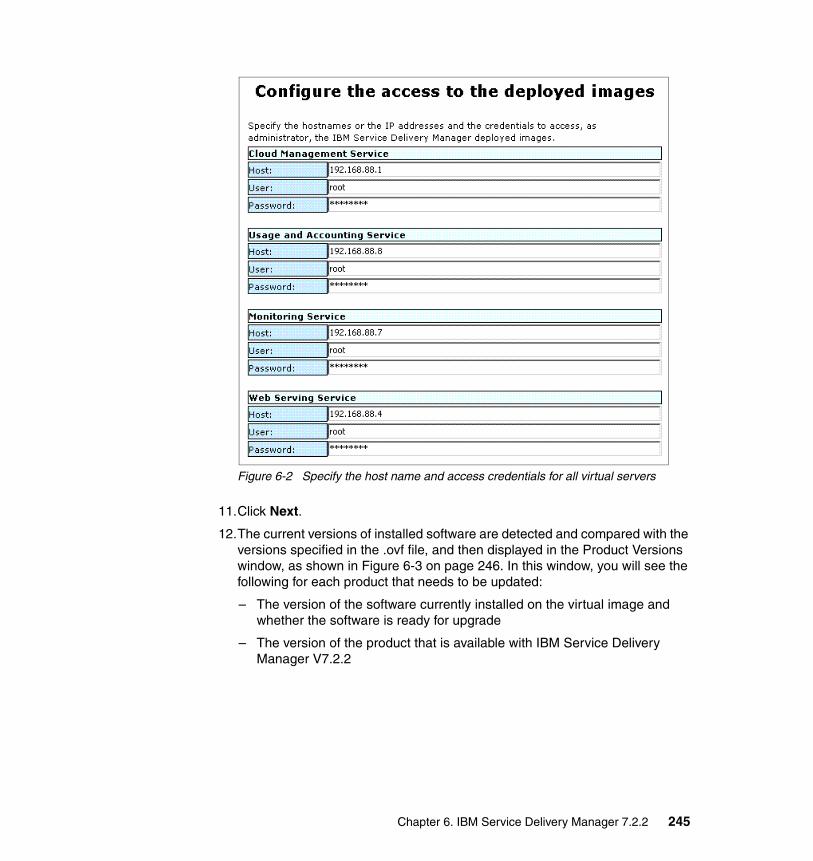
Figure 6-2 Specify the host name and access credentials for all virtual servers
11.Click Next.
12.The current versions of installed software are detected and compared with the versions specified in the .ovf file, and then displayed in the Product Versions window, as shown in Figure 6-3 on page 246. In this window, you will see the following for each product that needs to be updated:
– The version of the software currently installed on the virtual image and whether the software is ready for upgrade
– The version of the product that is available with IBM Service Delivery Manager V7.2.2
Chapter 6. IBM Service Delivery Manager 7.2.2 245
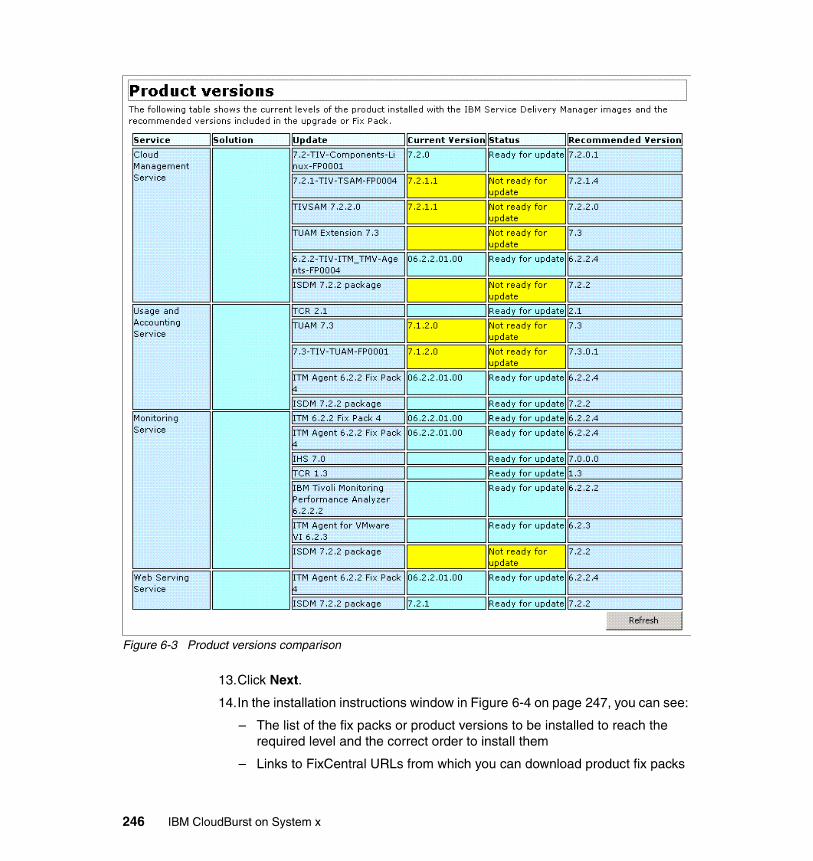
Figure 6-3 Product versions comparison
13.Click Next.
14.In the installation instructions window in Figure 6-4 on page 247, you can see:
– The list of the fix packs or product versions to be installed to reach the required level and the correct order to install them
– Links to FixCentral URLs from which you can download product fix packs
246 IBM CloudBurst on System x
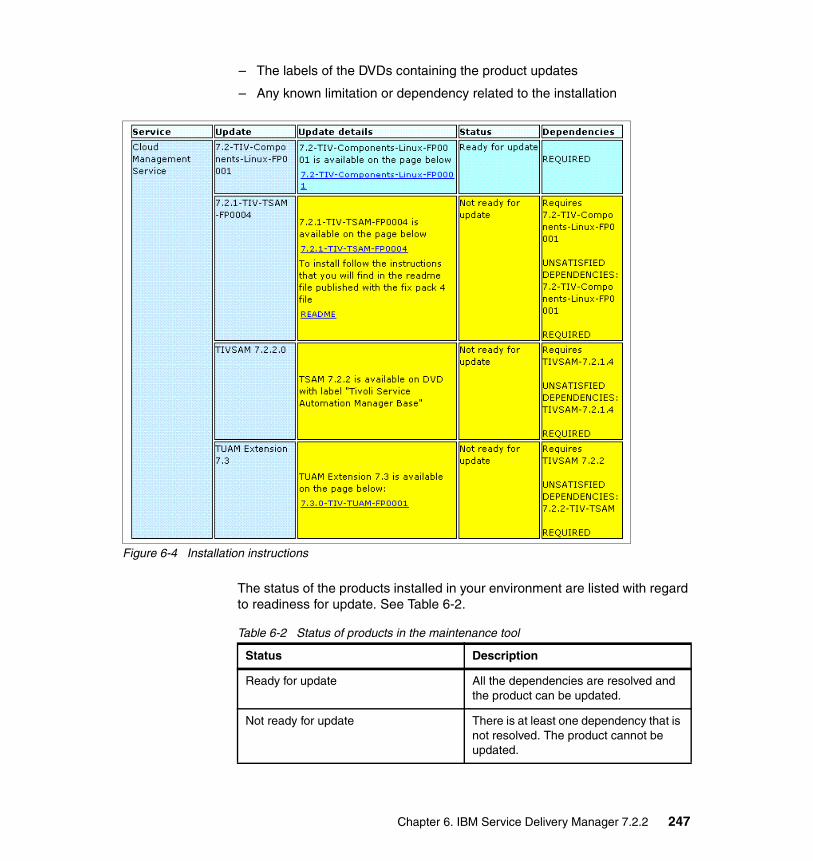
– The labels of the DVDs containing the product updates
– Any known limitation or dependency related to the installation
Figure 6-4 Installation instructions
The status of the products installed in your environment are listed with regard to readiness for update. See Table 6-2.
Table 6-2 Status of products in the maintenance tool
Status Description
Ready for update All the dependencies are resolved and the product can be updated.
Not ready for update There is at least one dependency that is not resolved. The product cannot be updated.
Chapter 6. IBM Service Delivery Manager 7.2.2 247
15.Click Back and Refresh to update the status of the installed products. If you run these steps successfully, the status of all product will be green and read Already updated.
16.Repeat this process steps for each image. Follow the instructions provided by the tool and refer to 6.1.4, “Upgrading the software products” on page 248.
17.Click Exit to close the tool.
6.1.4 Upgrading the software products
New and updated versions of supported products (at the time this IBM Redbooks Publication was written) are as follows. See also Figure 6-5 on page 249.
� Tivoli Service Automation Manager:
– Tivoli Service Automation Manager 7.2.2 + HF0001
– IBM Tivoli Service Automation Manager - Extension for Usage and Accounting v1.0
– Tivoli Service Request Manager 7.2.0
– Tivoli Provisioning Manager v7.2 FP2
– DB2 ESE 9.7 FP3 (a DB2 upgrade is not required to upgrade ISDM)
– WebSphere Network Deployment 6.1.0.29
– Tivoli Directory Server 6.2
– IBM HTTP Server 6.1.0.23
– Tivoli System Automation for Multiplatforms 3.1.0.6
� IBM Tivoli Monitoring:
– Tivoli Enterprise Monitoring 6.2.2 FP4– Tivoli Enterprise Portal Server 6.2.2 FP4– Tivoli Data Warehouse database V6.2.2 FP4– IBM Tivoli Monitoring for Virtual Servers 6.2.3– Tivoli Common Reporting 1.3– IBM HTTP Server 7.0
Already updated The product is already at the level required in the specified OVF file. No update is required.
Not checked The level of the product has not been compared to the level required in the OVF file.
Status Description
248 IBM CloudBurst on System x
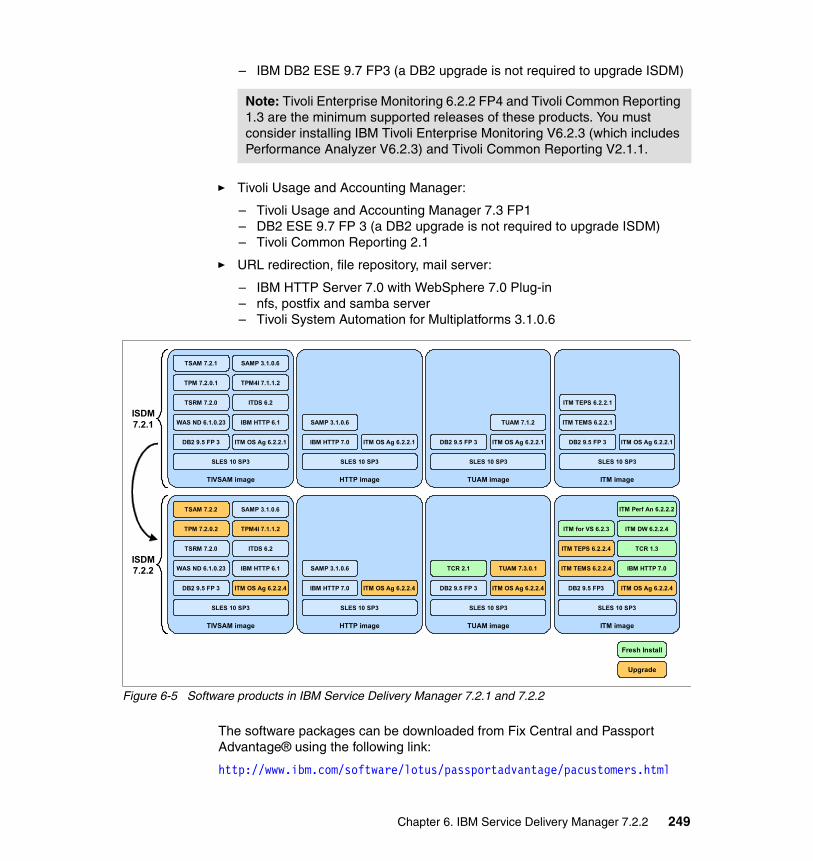
– IBM DB2 ESE 9.7 FP3 (a DB2 upgrade is not required to upgrade ISDM)
� Tivoli Usage and Accounting Manager:
– Tivoli Usage and Accounting Manager 7.3 FP1– DB2 ESE 9.7 FP 3 (a DB2 upgrade is not required to upgrade ISDM)– Tivoli Common Reporting 2.1
� URL redirection, file repository, mail server:
– IBM HTTP Server 7.0 with WebSphere 7.0 Plug-in– nfs, postfix and samba server– Tivoli System Automation for Multiplatforms 3.1.0.6
Figure 6-5 Software products in IBM Service Delivery Manager 7.2.1 and 7.2.2
The software packages can be downloaded from Fix Central and Passport Advantage® using the following link:
http://www.ibm.com/software/lotus/passportadvantage/pacustomers.html
Note: Tivoli Enterprise Monitoring 6.2.2 FP4 and Tivoli Common Reporting 1.3 are the minimum supported releases of these products. You must consider installing IBM Tivoli Enterprise Monitoring V6.2.3 (which includes Performance Analyzer V6.2.3) and Tivoli Common Reporting V2.1.1.
TIVSAM image
TSAM 7.2.1
TPM 7.2.0.1
TSRM 7.2.0
WAS ND 6.1.0.23
DB2 9.5 FP 3
SLES 10 SP3
SAMP 3.1.0.6
TPM4I 7.1.1.2
ITDS 6.2
IBM HTTP 6.1
ITM OS Ag 6.2.2.1
HTTP image
SAMP 3.1.0.6
IBM HTTP 7.0
SLES 10 SP3
ITM OS Ag 6.2.2.1
TUAM image
DB2 9.5 FP 3
SLES 10 SP3
TUAM 7.1.2
ITM OS Ag 6.2.2.1
ITM image
ITM TEPS 6.2.2.1
ITM TEMS 6.2.2.1
DB2 9.5 FP 3
SLES 10 SP3
ITM OS Ag 6.2.2.1
TIVSAM image
TSAM 7.2.2
TPM 7.2.0.2
TSRM 7.2.0
WAS ND 6.1.0.23
DB2 9.5 FP 3
SLES 10 SP3
SAMP 3.1.0.6
TPM4I 7.1.1.2
ITDS 6.2
IBM HTTP 6.1
ITM OS Ag 6.2.2.4
HTTP image
SAMP 3.1.0.6
IBM HTTP 7.0
SLES 10 SP3
ITM OS Ag 6.2.2.4
TUAM image
DB2 9.5 FP 3
SLES 10 SP3
TUAM 7.3.0.1
ITM OS Ag 6.2.2.4
ITM image
ITM for VS 6.2.3
ITM TEPS 6.2.2.4
ITM TEMS 6.2.2.4
SLES 10 SP3
ITM OS Ag 6.2.2.4
TCR 2.1
DB2 9.5 FP3
ITM Perf An 6.2.2.2
ITM DW 6.2.2.4
TCR 1.3
IBM HTTP 7.0
Fresh Install
Upgrade
ISDM7.2.1
ISDM7.2.2
Chapter 6. IBM Service Delivery Manager 7.2.2 249
– CZPD2ML: IBM Tivoli Service Request Mgr for Service Providers V7.2.0
– CI03BML: Tivoli Service Automation Manager Base V7.2.2
– CI01JML: Tivoli Common Reporting 2.1.1 Linux 64 Bit
– CZXZ4ML: IBM Tivoli Usage and Accounting Manager Enterprise Edition V7.3.0 for Linux IA32
– IBM Tivoli Monitoring 6.2.3 (Recommended, includes Tivoli Performance Analyzer)
• CZZ3DEN: IBM Tivoli Monitoring V6.2.3 Base Linux• CZZ3HEN: IBM Tivoli Monitoring V6.2.3 Agent
� Tivoli Provisioning Manager Fix Pack 7.2.0.1 Core and Web Components (7.2.0-TIV-TPM-FP0001)
http://www.ibm.com/support/docview.wss?uid=swg24028660
� Tivoli Provisioning Manager Fix Pack 7.2.0.2 Core and Web Components (7.2.0-TIV-TPM-FP0002)
http://www.ibm.com/support/docview.wss?uid=swg24029847
� Tivoli Provisioning Manager, Interim Fix 7.2.0.2-TIV-TPM-IF00001
http://www.ibm.com/support/docview.wss?uid=swg24030385
� Tivoli Service Automation Manager 7.2.2 Hot Fix 1 (7.2.2.0-TIV-TSAM-HF0001)
http://www.ibm.com/support/docview.wss?uid=swg24030642
� Tivoli Service Automation Manager Fix Pack 4 7.2.1-TIV-TSAM-FP0004
http://www.ibm.com/support/docview.wss?uid=swg24029547
� Tivoli Service Request Manager Fix Pack 7.2.0.1 (7.2.0.1-TIV-SRM-FP)
https://www.ibm.com/support/docview.wss?uid=swg24028142
� IBM Tivoli Monitoring 6.2.2 FP06 (Latest 6.2.2 Fix Pack)IBM Tivoli Monitoring 6.2.2 Fix Pack 6 (6.2.2-TIV-ITM-FP0006)
http://www.ibm.com/support/docview.wss?uid=swg24030135
� IBM Tivoli Monitoring 6.2.2 FP04 (Minimum version to use for TivSAM/ISDM 7.2.2)IBM Tivoli Monitoring 6.2.2 Fix Pack 4 (6.2.2-TIV-ITM-FP0004)
http://www.ibm.com/support/docview.wss?uid=swg24027751
� IBM Tivoli Usage and Accounting Manager 7.3, Fix Pack 1, 7.3.0-TIV-TUAM-FP0001
http://www.ibm.com/support/docview.wss?uid=swg24030313
250 IBM CloudBurst on System x
� IBM Tivoli Usage and Accounting Manager 7.3, Fix Pack 2, 7.3.0-TIV-TUAM-FP0002
http://www.ibm.com/support/docview.wss?uid=swg24031117
Software on the following servers will be upgraded:
� “Upgrading the icb-tivsam server” on page 251� “Upgrading the icb-tuam server” on page 278� “Upgrading icb-itm server” on page 281� “Upgrading the icb-nfs server” on page 285
Upgrading the icb-tivsam serverTo upgrade the icb-tivsam server, you need to install the packages listed in the following sections:
� “Installing IBM Tivoli Provisioning Manager 7.2.0 Fix Pack 1” on page 251
� “Installing IBM Tivoli Service Automation Manager 7.2.1 Fix Pack 4” on page 253
� “Installing IBM Tivoli Service Automation Manager 7.2.2” on page 254
� “Installing IBM Tivoli Usage and Accounting Manager 7.3.0 Extension” on page 277
� “Installing IBM Tivoli Monitoring Agent 6.2.2 Fix Pack 4” on page 277
� “Installing IBM Tivoli Common Reporting 2.1” on page 278
Installing IBM Tivoli Provisioning Manager 7.2.0 Fix Pack 1To install IBM Tivoli Provisioning Manager 7.2.0 Fix Pack 1:
1. Log in as root to the server.
2. Upload and uncompress the following files to the /root/upgrade directory:
– 7.2-TIV-Components-Linux-FP0001.tar– 7.2-TIV-TPM-Linux-FP0001.tar– 7.2-TIV-WebComp-UNIX-FP0001.tar
3. Execute the commands shown in Example 6-3.
Example 6-3 Prepare Tivoli Provisioning Manager fix pack 1 installation
su - tioadmincd $TIO_HOME/tools./tio.sh stop tpm/opt/IBM/AgentManager/bin/startServer.shexit
su - ctginst1
Chapter 6. IBM Service Delivery Manager 7.2.2 251
db2 connect to MAXDB71 user ctginst1db2 update db cfg for MAXDB71 using LOGPRIMARY 30db2 update db cfg for MAXDB71 using LOGSECOND 20db2 update db cfg using dbheap automaticdb2 update db cfg using stat_heap_sz automaticdb2 terminatecd /home/ctginst1/sqllib./db2profiledb2 connect to MAXDB71 user ctginst1db2 connect resetexit
4. Install the Tivoli Provisioning Manager Component Upgrade by executing:/root/upgrade/unixCoreCompUpgrade.sh -WASadmin wasadmin -WASadminPWD password -DBAdmin ctginst1 -DBAdminPWD password -AMPWD password
5. Start the WebSphere Application Server as tioadmin:$TIO_HOME/tools/tio.sh start wasadmin password
6. Verify that the deployment engine is working properly by running the following command as root:/usr/ibm/common/acsi/bin/listIU.shIf you have output from this command, then the engine is working properly.
7. Make sure there are no new certificates to be accepted, and if there are let us accept them now by running the following command:/opt/IBM/SMP/wasclient/ThinWsadmin.sh -username wasadmin -password password -lang jython -c "AdminTask.help()"Accept the option to add the requested certificate by entering “y.” (This option might not display in all environments.)
8. Run the web components installer GUI:/opt/IBM/SMP/bin/solutionInstallerGUI.sh
9. Select your language of choice, and click OK.
10.Select Next in the Introduction window.
11.Choose the /root/upgrade/repository/delta_tpm_pmp_7.2.0.1.zip file.
12.Click Next.
13.Click Next in the Package Validation Results window.
14.Enter the WebSphere Admin, WebSphere Remote, and Maximo DB passwords as password.
15.Click Next in the Package Options window.
16.Click Next in the Pre-Install Summary window.
17.Click Next in the Package Successfully Deployed window.
252 IBM CloudBurst on System x
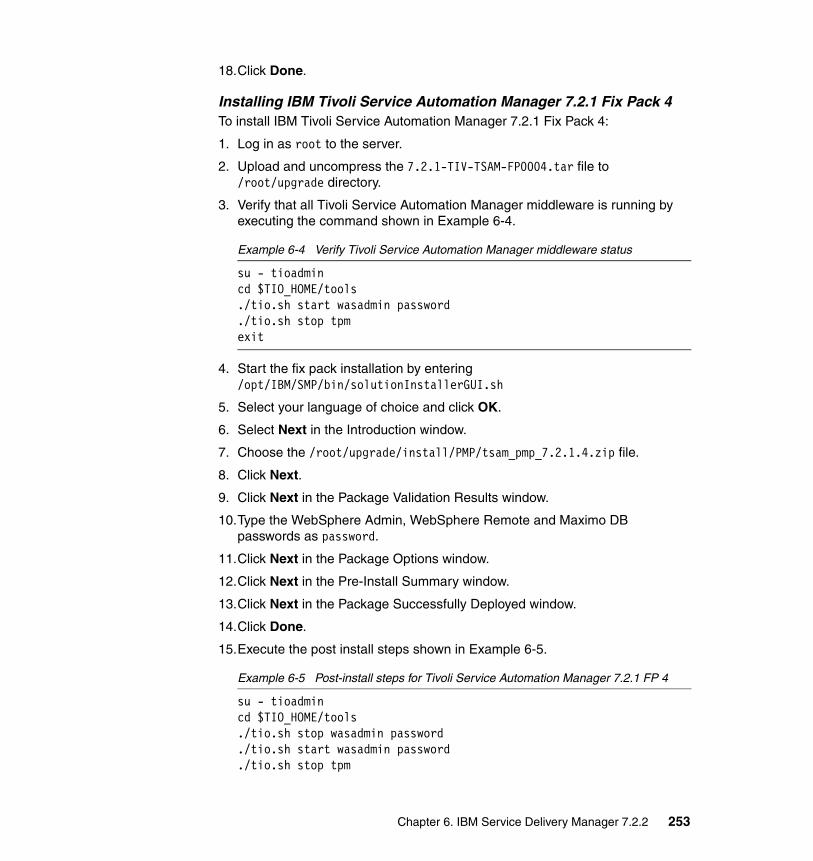
18.Click Done.
Installing IBM Tivoli Service Automation Manager 7.2.1 Fix Pack 4To install IBM Tivoli Service Automation Manager 7.2.1 Fix Pack 4:
1. Log in as root to the server.
2. Upload and uncompress the 7.2.1-TIV-TSAM-FP0004.tar file to /root/upgrade directory.
3. Verify that all Tivoli Service Automation Manager middleware is running by executing the command shown in Example 6-4.
Example 6-4 Verify Tivoli Service Automation Manager middleware status
su - tioadmincd $TIO_HOME/tools./tio.sh start wasadmin password./tio.sh stop tpmexit
4. Start the fix pack installation by entering/opt/IBM/SMP/bin/solutionInstallerGUI.sh
5. Select your language of choice and click OK.
6. Select Next in the Introduction window.
7. Choose the /root/upgrade/install/PMP/tsam_pmp_7.2.1.4.zip file.
8. Click Next.
9. Click Next in the Package Validation Results window.
10.Type the WebSphere Admin, WebSphere Remote and Maximo DB passwords as password.
11.Click Next in the Package Options window.
12.Click Next in the Pre-Install Summary window.
13.Click Next in the Package Successfully Deployed window.
14.Click Done.
15.Execute the post install steps shown in Example 6-5.
Example 6-5 Post-install steps for Tivoli Service Automation Manager 7.2.1 FP 4
su - tioadmincd $TIO_HOME/tools./tio.sh stop wasadmin password./tio.sh start wasadmin password./tio.sh stop tpm
Chapter 6. IBM Service Delivery Manager 7.2.2 253
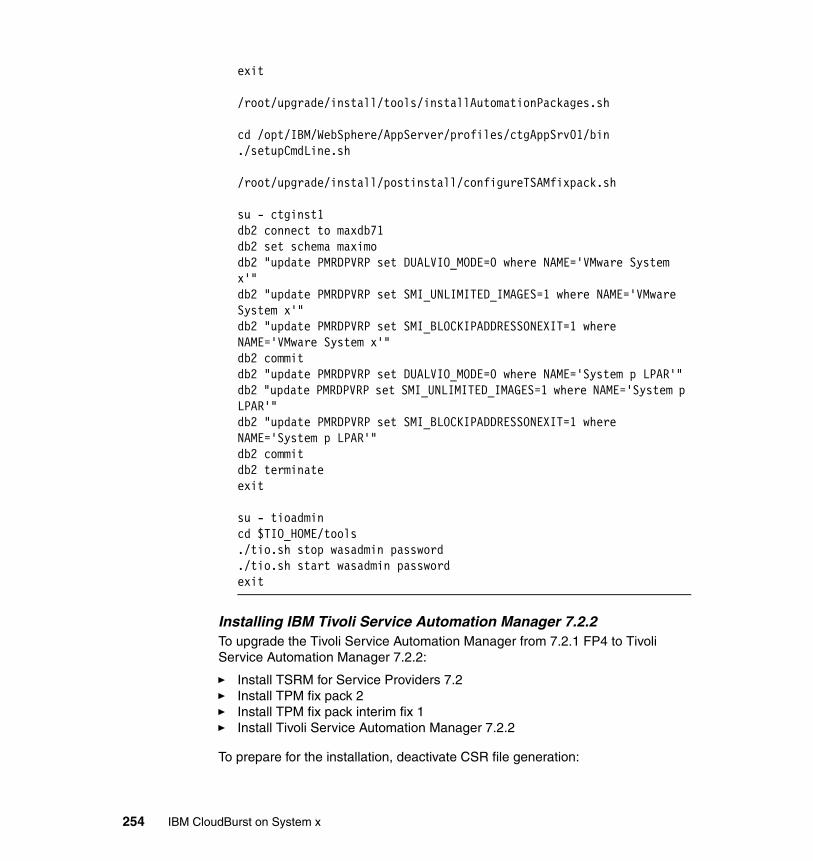
exit
/root/upgrade/install/tools/installAutomationPackages.sh
cd /opt/IBM/WebSphere/AppServer/profiles/ctgAppSrv01/bin./setupCmdLine.sh
/root/upgrade/install/postinstall/configureTSAMfixpack.sh
su - ctginst1db2 connect to maxdb71db2 set schema maximodb2 "update PMRDPVRP set DUALVIO_MODE=0 where NAME='VMware System x'"db2 "update PMRDPVRP set SMI_UNLIMITED_IMAGES=1 where NAME='VMware System x'"db2 "update PMRDPVRP set SMI_BLOCKIPADDRESSONEXIT=1 where NAME='VMware System x'"db2 commitdb2 "update PMRDPVRP set DUALVIO_MODE=0 where NAME='System p LPAR'"db2 "update PMRDPVRP set SMI_UNLIMITED_IMAGES=1 where NAME='System p LPAR'"db2 "update PMRDPVRP set SMI_BLOCKIPADDRESSONEXIT=1 where NAME='System p LPAR'"db2 commitdb2 terminateexit
su - tioadmincd $TIO_HOME/tools./tio.sh stop wasadmin password./tio.sh start wasadmin passwordexit
Installing IBM Tivoli Service Automation Manager 7.2.2To upgrade the Tivoli Service Automation Manager from 7.2.1 FP4 to Tivoli Service Automation Manager 7.2.2:
� Install TSRM for Service Providers 7.2� Install TPM fix pack 2� Install TPM fix pack interim fix 1� Install Tivoli Service Automation Manager 7.2.2
To prepare for the installation, deactivate CSR file generation:
254 IBM CloudBurst on System x
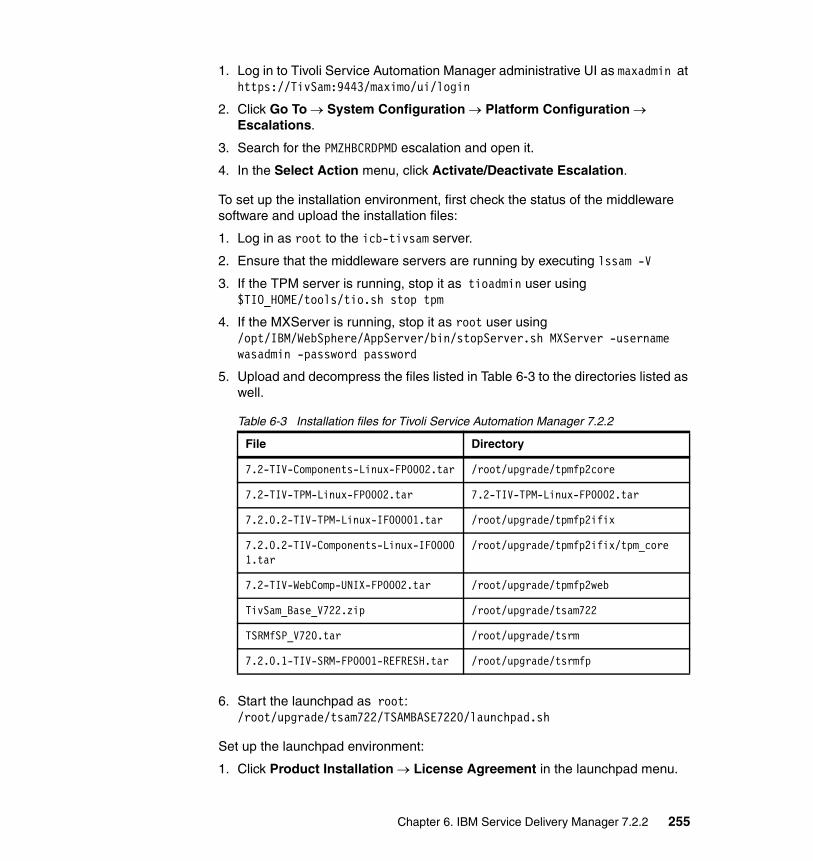
1. Log in to Tivoli Service Automation Manager administrative UI as maxadmin at https://TivSam:9443/maximo/ui/login
2. Click Go To System Configuration Platform Configuration Escalations.
3. Search for the PMZHBCRDPMD escalation and open it.
4. In the Select Action menu, click Activate/Deactivate Escalation.
To set up the installation environment, first check the status of the middleware software and upload the installation files:
1. Log in as root to the icb-tivsam server.
2. Ensure that the middleware servers are running by executing lssam -V
3. If the TPM server is running, stop it as tioadmin user using$TIO_HOME/tools/tio.sh stop tpm
4. If the MXServer is running, stop it as root user using/opt/IBM/WebSphere/AppServer/bin/stopServer.sh MXServer -username wasadmin -password password
5. Upload and decompress the files listed in Table 6-3 to the directories listed as well.
Table 6-3 Installation files for Tivoli Service Automation Manager 7.2.2
6. Start the launchpad as root:/root/upgrade/tsam722/TSAMBASE7220/launchpad.sh
Set up the launchpad environment:
1. Click Product Installation License Agreement in the launchpad menu.
File Directory
7.2-TIV-Components-Linux-FP0002.tar /root/upgrade/tpmfp2core
7.2-TIV-TPM-Linux-FP0002.tar 7.2-TIV-TPM-Linux-FP0002.tar
7.2.0.2-TIV-TPM-Linux-IF00001.tar /root/upgrade/tpmfp2ifix
7.2.0.2-TIV-Components-Linux-IF00001.tar
/root/upgrade/tpmfp2ifix/tpm_core
7.2-TIV-WebComp-UNIX-FP0002.tar /root/upgrade/tpmfp2web
TivSam_Base_V722.zip /root/upgrade/tsam722
TSRMfSP_V720.tar /root/upgrade/tsrm
7.2.0.1-TIV-SRM-FP0001-REFRESH.tar /root/upgrade/tsrmfp
Chapter 6. IBM Service Delivery Manager 7.2.2 255
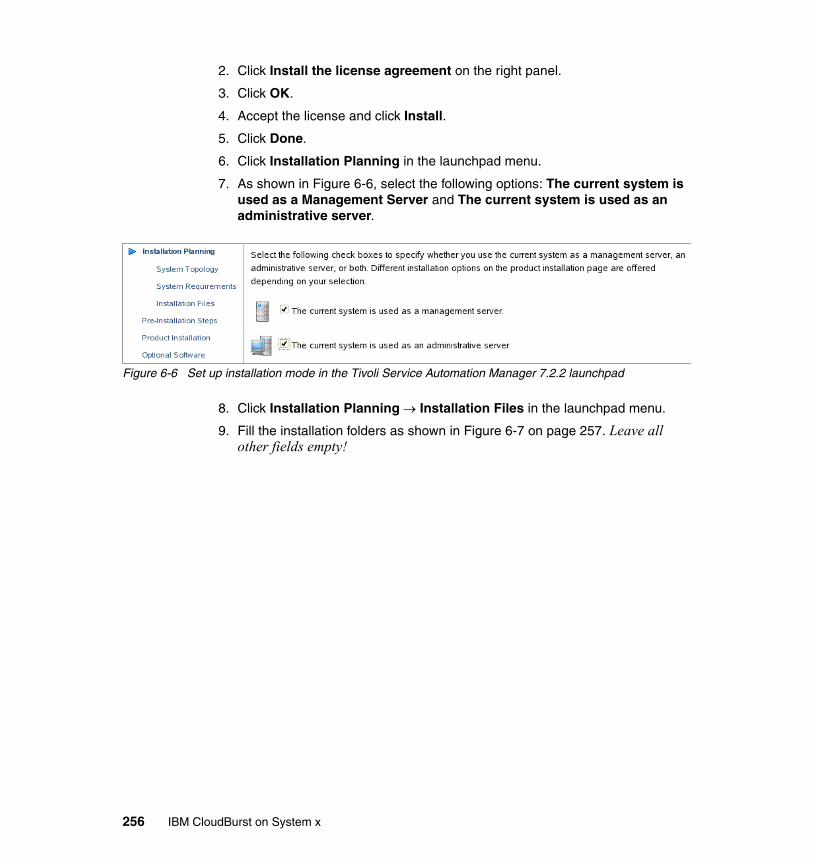
2. Click Install the license agreement on the right panel.
3. Click OK.
4. Accept the license and click Install.
5. Click Done.
6. Click Installation Planning in the launchpad menu.
7. As shown in Figure 6-6, select the following options: The current system is used as a Management Server and The current system is used as an administrative server.
Figure 6-6 Set up installation mode in the Tivoli Service Automation Manager 7.2.2 launchpad
8. Click Installation Planning Installation Files in the launchpad menu.
9. Fill the installation folders as shown in Figure 6-7 on page 257. Leave all other fields empty!
256 IBM CloudBurst on System x
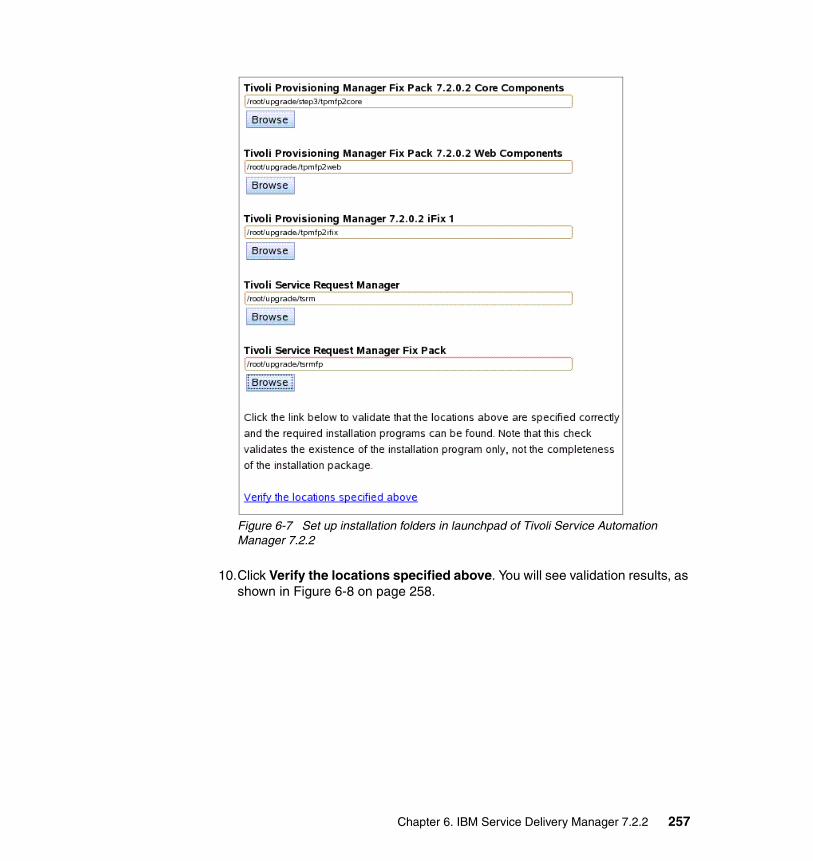
Figure 6-7 Set up installation folders in launchpad of Tivoli Service Automation Manager 7.2.2
10.Click Verify the locations specified above. You will see validation results, as shown in Figure 6-8 on page 258.
Chapter 6. IBM Service Delivery Manager 7.2.2 257
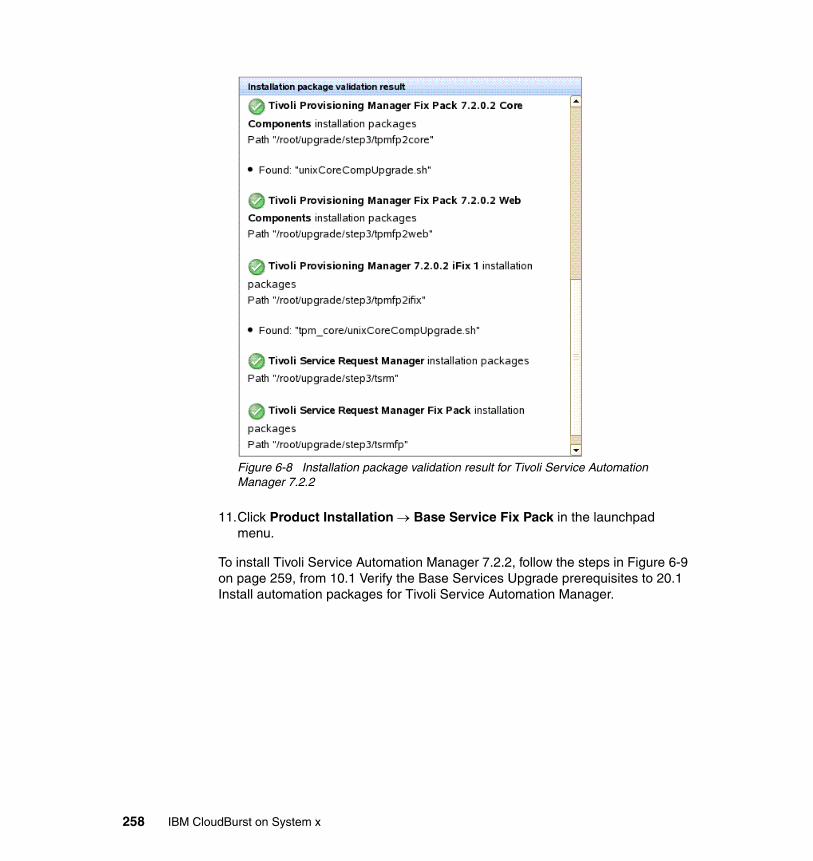
Figure 6-8 Installation package validation result for Tivoli Service Automation Manager 7.2.2
11.Click Product Installation Base Service Fix Pack in the launchpad menu.
To install Tivoli Service Automation Manager 7.2.2, follow the steps in Figure 6-9 on page 259, from 10.1 Verify the Base Services Upgrade prerequisites to 20.1 Install automation packages for Tivoli Service Automation Manager.
258 IBM CloudBurst on System x
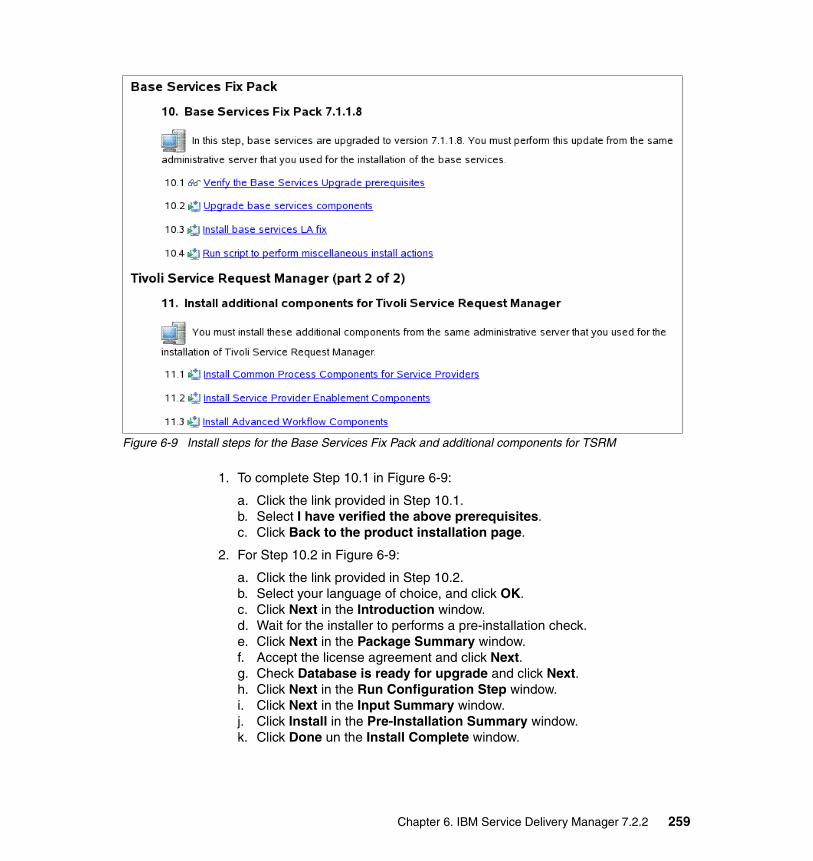
Figure 6-9 Install steps for the Base Services Fix Pack and additional components for TSRM
1. To complete Step 10.1 in Figure 6-9:
a. Click the link provided in Step 10.1. b. Select I have verified the above prerequisites.c. Click Back to the product installation page.
2. For Step 10.2 in Figure 6-9:
a. Click the link provided in Step 10.2.b. Select your language of choice, and click OK. c. Click Next in the Introduction window.d. Wait for the installer to performs a pre-installation check.e. Click Next in the Package Summary window.f. Accept the license agreement and click Next.g. Check Database is ready for upgrade and click Next.h. Click Next in the Run Configuration Step window.i. Click Next in the Input Summary window.j. Click Install in the Pre-Installation Summary window.k. Click Done un the Install Complete window.
Chapter 6. IBM Service Delivery Manager 7.2.2 259
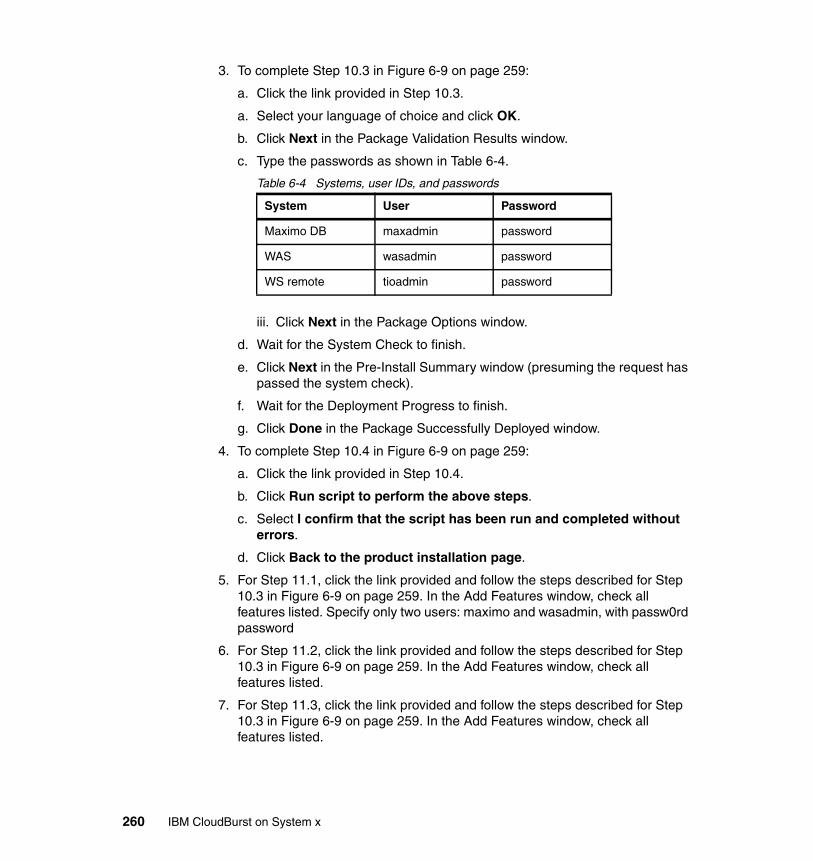
3. To complete Step 10.3 in Figure 6-9 on page 259:
a. Click the link provided in Step 10.3.
a. Select your language of choice and click OK.
b. Click Next in the Package Validation Results window.
c. Type the passwords as shown in Table 6-4.
Table 6-4 Systems, user IDs, and passwords
iii. Click Next in the Package Options window.
d. Wait for the System Check to finish.
e. Click Next in the Pre-Install Summary window (presuming the request has passed the system check).
f. Wait for the Deployment Progress to finish.
g. Click Done in the Package Successfully Deployed window.
4. To complete Step 10.4 in Figure 6-9 on page 259:
a. Click the link provided in Step 10.4.
b. Click Run script to perform the above steps.
c. Select I confirm that the script has been run and completed without errors.
d. Click Back to the product installation page.
5. For Step 11.1, click the link provided and follow the steps described for Step 10.3 in Figure 6-9 on page 259. In the Add Features window, check all features listed. Specify only two users: maximo and wasadmin, with passw0rd password
6. For Step 11.2, click the link provided and follow the steps described for Step 10.3 in Figure 6-9 on page 259. In the Add Features window, check all features listed.
7. For Step 11.3, click the link provided and follow the steps described for Step 10.3 in Figure 6-9 on page 259. In the Add Features window, check all features listed.
System User Password
Maximo DB maxadmin password
WAS wasadmin password
WS remote tioadmin password
260 IBM CloudBurst on System x
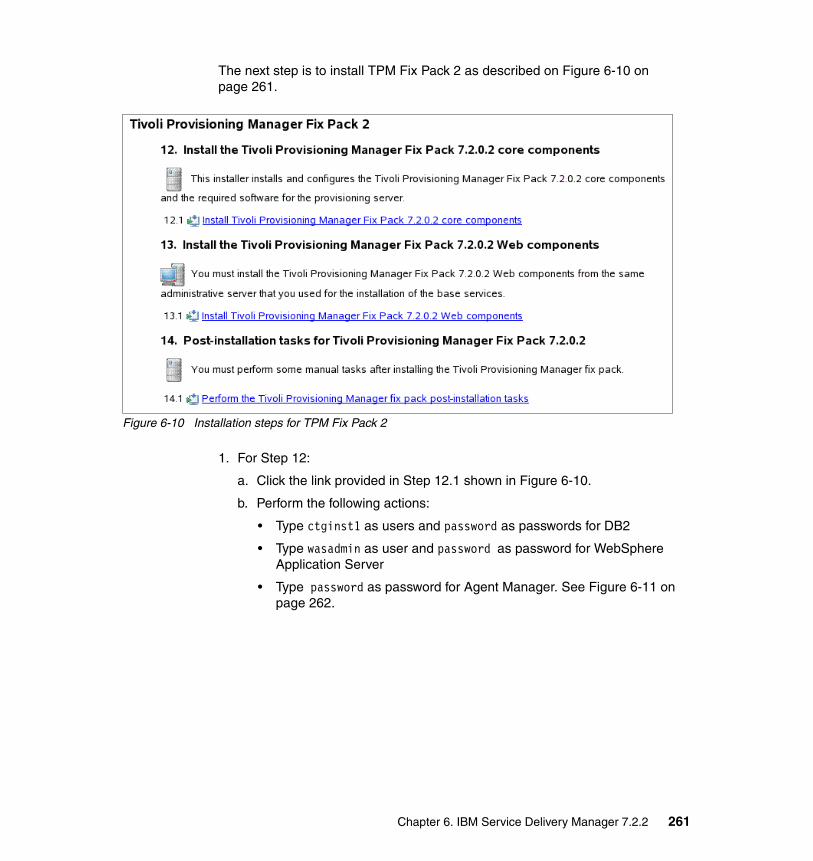
The next step is to install TPM Fix Pack 2 as described on Figure 6-10 on page 261.
Figure 6-10 Installation steps for TPM Fix Pack 2
1. For Step 12:
a. Click the link provided in Step 12.1 shown in Figure 6-10.
b. Perform the following actions:
• Type ctginst1 as users and password as passwords for DB2
• Type wasadmin as user and password as password for WebSphere Application Server
• Type password as password for Agent Manager. See Figure 6-11 on page 262.
Chapter 6. IBM Service Delivery Manager 7.2.2 261
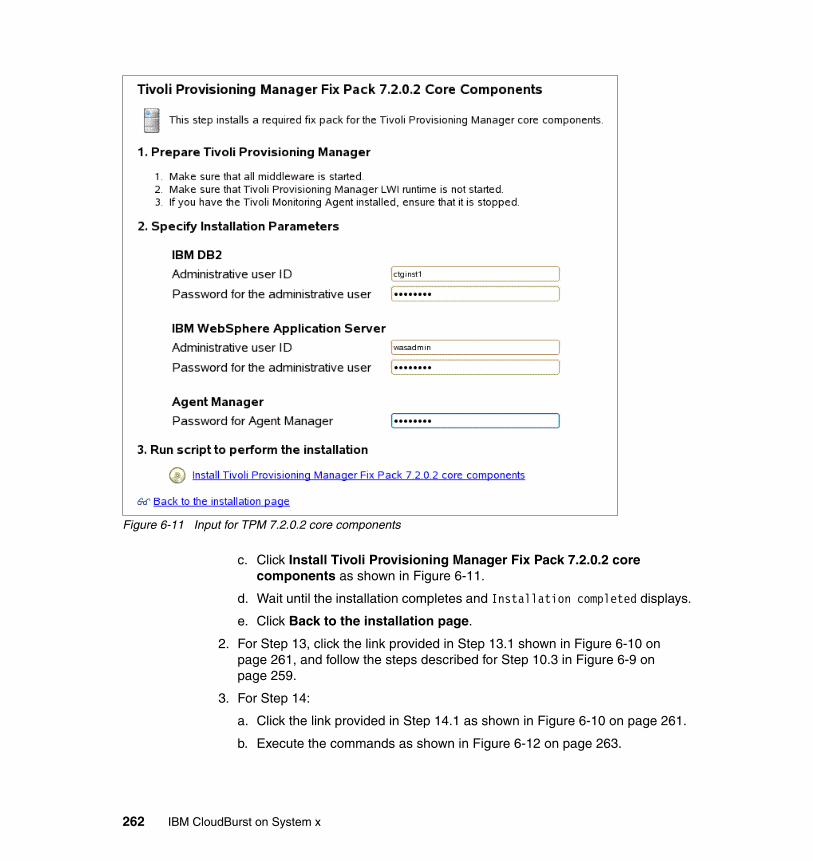
Figure 6-11 Input for TPM 7.2.0.2 core components
c. Click Install Tivoli Provisioning Manager Fix Pack 7.2.0.2 core components as shown in Figure 6-11.
d. Wait until the installation completes and Installation completed displays.
e. Click Back to the installation page.
2. For Step 13, click the link provided in Step 13.1 shown in Figure 6-10 on page 261, and follow the steps described for Step 10.3 in Figure 6-9 on page 259.
3. For Step 14:
a. Click the link provided in Step 14.1 as shown in Figure 6-10 on page 261.
b. Execute the commands as shown in Figure 6-12 on page 263.
262 IBM CloudBurst on System x
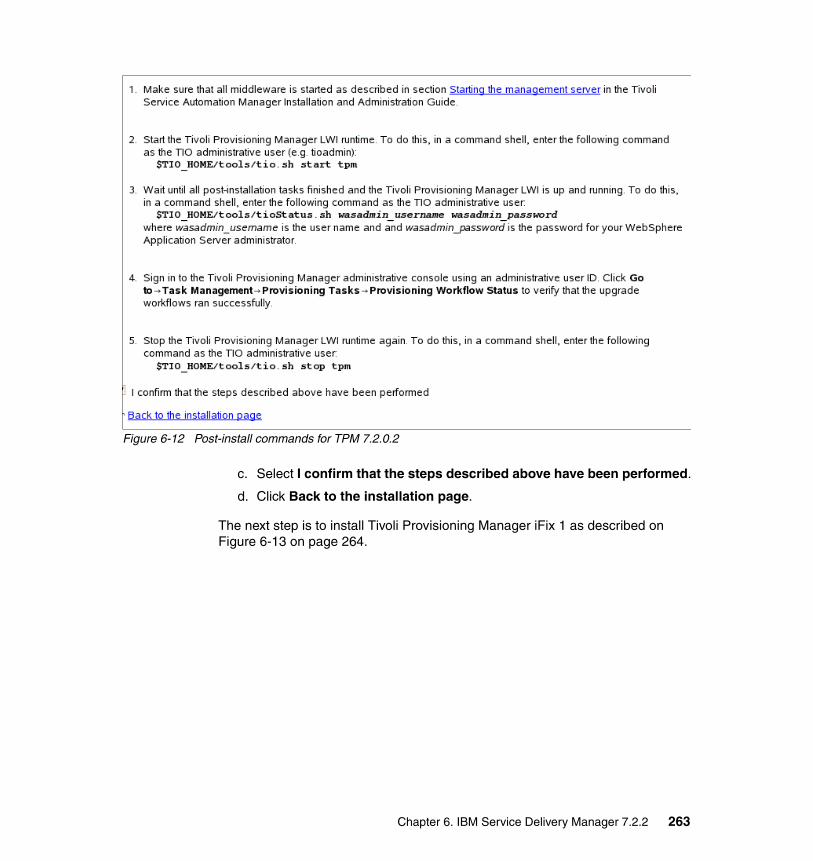
Figure 6-12 Post-install commands for TPM 7.2.0.2
c. Select I confirm that the steps described above have been performed.
d. Click Back to the installation page.
The next step is to install Tivoli Provisioning Manager iFix 1 as described on Figure 6-13 on page 264.
Chapter 6. IBM Service Delivery Manager 7.2.2 263
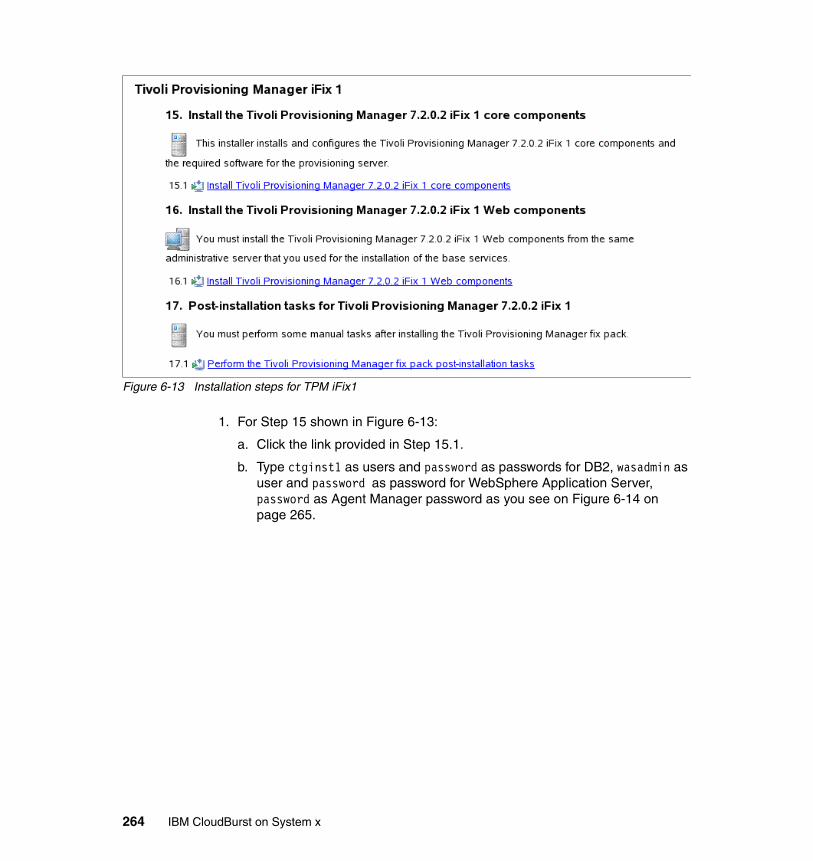
Figure 6-13 Installation steps for TPM iFix1
1. For Step 15 shown in Figure 6-13:
a. Click the link provided in Step 15.1.
b. Type ctginst1 as users and password as passwords for DB2, wasadmin as user and password as password for WebSphere Application Server, password as Agent Manager password as you see on Figure 6-14 on page 265.
264 IBM CloudBurst on System x
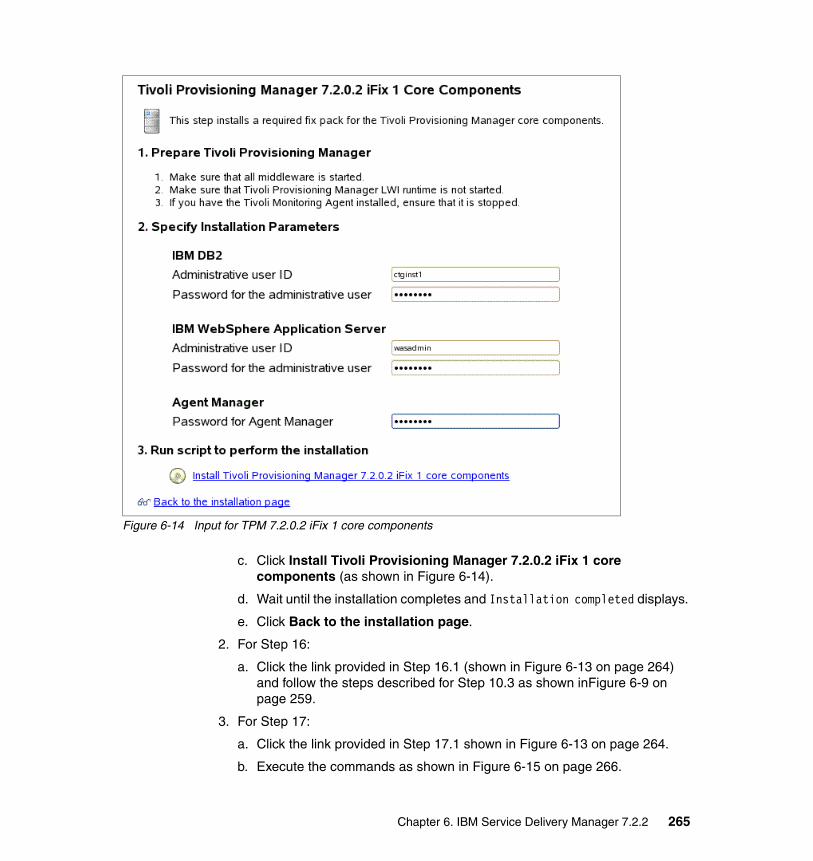
Figure 6-14 Input for TPM 7.2.0.2 iFix 1 core components
c. Click Install Tivoli Provisioning Manager 7.2.0.2 iFix 1 core components (as shown in Figure 6-14).
d. Wait until the installation completes and Installation completed displays.
e. Click Back to the installation page.
2. For Step 16:
a. Click the link provided in Step 16.1 (shown in Figure 6-13 on page 264) and follow the steps described for Step 10.3 as shown inFigure 6-9 on page 259.
3. For Step 17:
a. Click the link provided in Step 17.1 shown in Figure 6-13 on page 264.
b. Execute the commands as shown in Figure 6-15 on page 266.
Chapter 6. IBM Service Delivery Manager 7.2.2 265
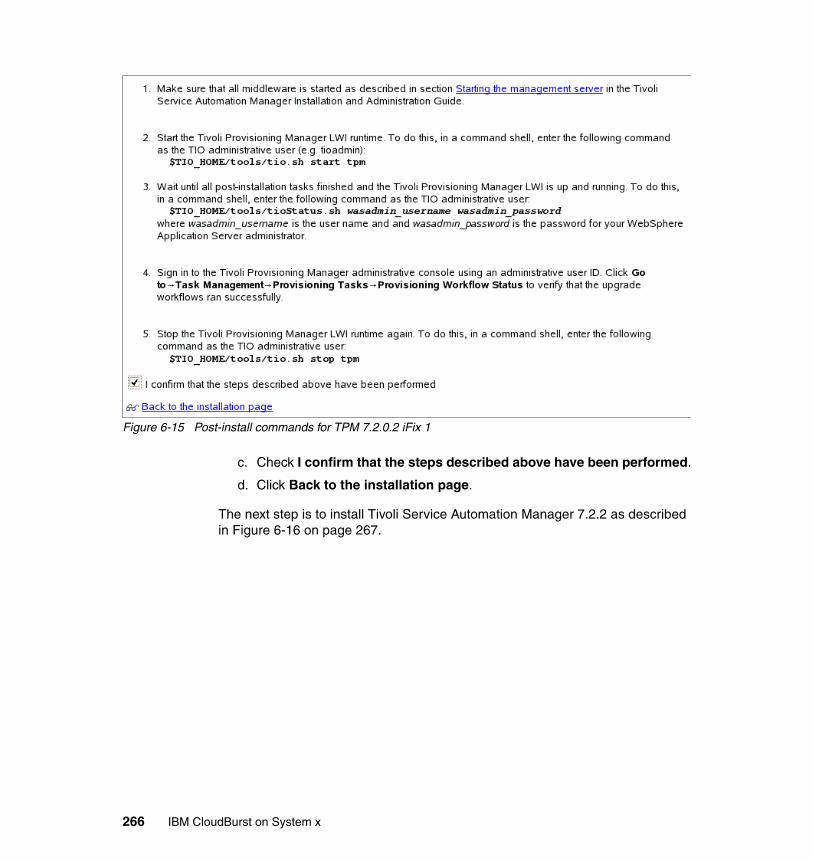
Figure 6-15 Post-install commands for TPM 7.2.0.2 iFix 1
c. Check I confirm that the steps described above have been performed.
d. Click Back to the installation page.
The next step is to install Tivoli Service Automation Manager 7.2.2 as described in Figure 6-16 on page 267.
266 IBM CloudBurst on System x

Figure 6-16 Installation steps for Tivoli Service Automation Manager 7.2.2
1. For Step 18.1:
a. Click the link provided in Step 18.1.
b. Check I have verified the Tivoli Service Automation Manager installation prerequisites.
c. Click Back to the product installation page.
2. For Step 18.2:
a. Click the link provided in Step 18.2.
b. Navigate to the directory, /opt/IBM/SMP/maximo/applications/maximo/maxrestweb/webmodule/WEB-INF
c. Back up the file web.xml, saving it with the file name web.xml.old
d. Open the file web.xml in an editor.
Chapter 6. IBM Service Delivery Manager 7.2.2 267
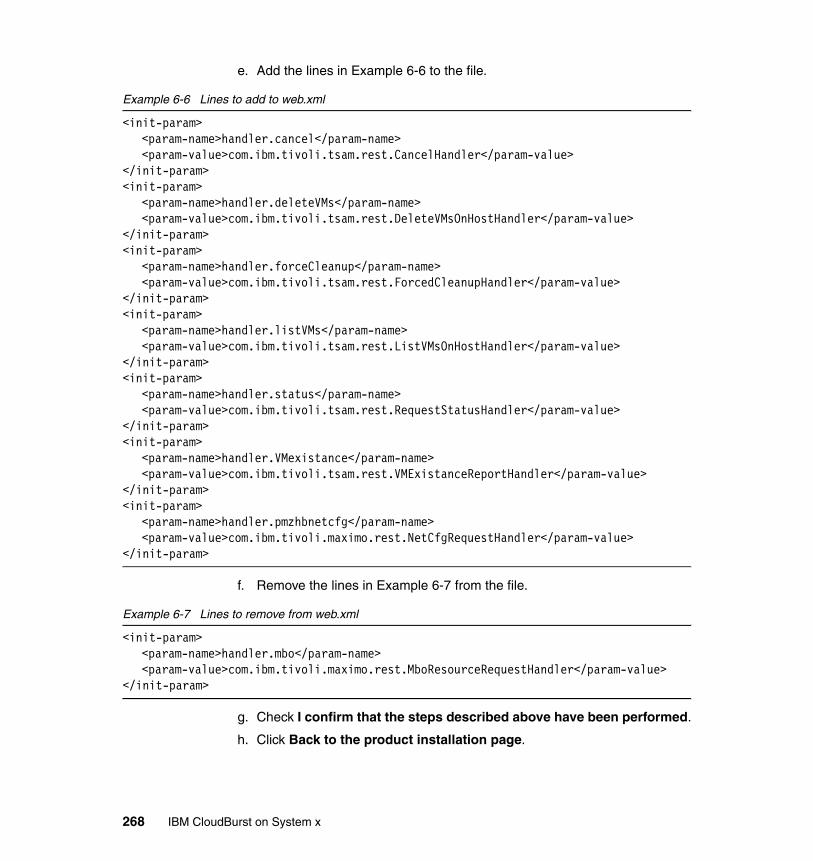
e. Add the lines in Example 6-6 to the file.
Example 6-6 Lines to add to web.xml
<init-param><param-name>handler.cancel</param-name><param-value>com.ibm.tivoli.tsam.rest.CancelHandler</param-value>
</init-param><init-param>
<param-name>handler.deleteVMs</param-name><param-value>com.ibm.tivoli.tsam.rest.DeleteVMsOnHostHandler</param-value>
</init-param><init-param>
<param-name>handler.forceCleanup</param-name><param-value>com.ibm.tivoli.tsam.rest.ForcedCleanupHandler</param-value>
</init-param><init-param>
<param-name>handler.listVMs</param-name><param-value>com.ibm.tivoli.tsam.rest.ListVMsOnHostHandler</param-value>
</init-param><init-param>
<param-name>handler.status</param-name><param-value>com.ibm.tivoli.tsam.rest.RequestStatusHandler</param-value>
</init-param><init-param>
<param-name>handler.VMexistance</param-name><param-value>com.ibm.tivoli.tsam.rest.VMExistanceReportHandler</param-value>
</init-param><init-param>
<param-name>handler.pmzhbnetcfg</param-name><param-value>com.ibm.tivoli.maximo.rest.NetCfgRequestHandler</param-value>
</init-param>
f. Remove the lines in Example 6-7 from the file.
Example 6-7 Lines to remove from web.xml
<init-param><param-name>handler.mbo</param-name><param-value>com.ibm.tivoli.maximo.rest.MboResourceRequestHandler</param-value>
</init-param>
g. Check I confirm that the steps described above have been performed.
h. Click Back to the product installation page.
268 IBM CloudBurst on System x

3. For Step 18.3, click the link provided, and follow the steps described for Step 10.3 as shown inFigure 6-9 on page 259.
4. For Step 18.4, click the link provided and follow the steps described for Step 10.3 as shown inFigure 6-9 on page 259.
5. For Step 19:
a. Click the link provided in Step 19.1.
b. Type tioadmin as the Tivoli Provisioning Manager administrative user ID.
c. Type ctgCell01 as the IBM WebSphere Application Server Cell name.
d. Click Run installation script.
e. Wait until the installation completes.
f. Click Back to the installation page.
6. For Step 20:
a. Click the link provided in Step 20.1.
b. Type tioadmin as the Tivoli Provisioning Manager administrative user ID.
c. Click Run installation script.
d. Wait until the installation completes.
e. Click Back to the installation page.
Several post-install steps for Tivoli Service Automation Manager 7.2.2 are required. These are:
1. Execute the commands in Example 6-8 as root on the icb-tivsam server to set up the middleware stack status.
Example 6-8 Middleware base services status set up
su - tioadmincd $TIO_HOME/tools./tio.sh start wasadmin password./tio.sh stop tpm
2. Finalize Tivoli Service Automation Manager 7.2.2 installation:
a. Execute the command /root/upgrade/tsam722/TSAMBASE7220/install/postinstall/configureTSAMupgrade.sh
b. Type wasadmin as the WebSphere Application Server administrative user name.
Chapter 6. IBM Service Delivery Manager 7.2.2 269
c. Type password as the WebSphere Application Server administrative user password.
d. Type 9443 as the WebSphere Application Server secure port.
e. Press Enter to quit when installation is finished.
3. Upgrade the existing service definitions:
a. Connect to https://192.168.88.4/maximo and log in as maxadmin in the Tivoli Service Automation Manager administrative UI.
b. Click Go To Service Automation Service Update Packages.
c. Select RDPVS Revision 5 on the List tab.
d. Click the Service Definition Deployments tab.
e. Click Deploy on Service Definitions.
f. In the Deploy Service Update Package on Service Definitions box, select the service definitions you want to upgrade.
g. Click Deploy on Service Definitions to start the deployment for the selected service definitions.
h. Click Refresh in the Status History section to update the status of the deployment process.
i. Verify that the status is Applied for each Service Package deployment to ensure the upgrading process succeeded.
4. Upgrading service deployment instances:
a. Click the Service Instance Deployments tab.
b. Click Deploy on Service Deployment Instances. The Deploy Service Update Package on Service Deployment Instances window is displayed.
c. Select the service deployment instances that you want to upgrade.
d. Click Deploy on Service Deployment Instances to start the deployment for the selected service deployment instances.
e. Click Yes when prompted about the execution of the management plan after deploying the update package.
f. Click Refresh in the toolbar menu.
g. Verify that the status is Applied for each Service Update Package deployment to ensure the upgrading process succeeded.
5. Enter Admin Mode:
a. Click Go To System Configuration Platform Configuration Database Configuration.
b. In the Select Action menu, click Manage Admin Mode.
270 IBM CloudBurst on System x
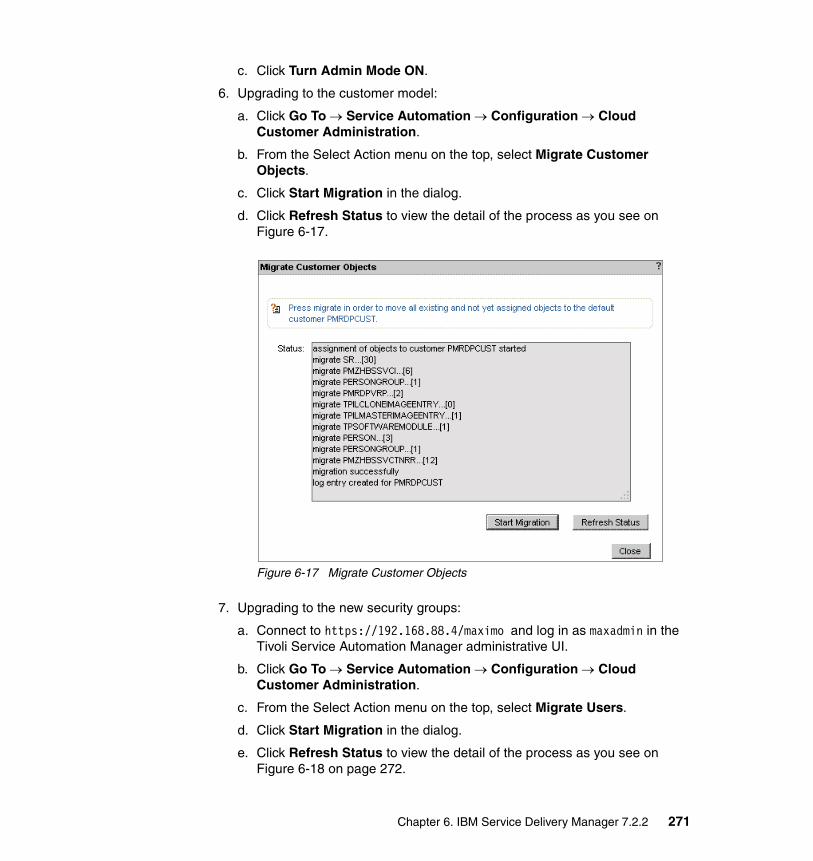
c. Click Turn Admin Mode ON.
6. Upgrading to the customer model:
a. Click Go To Service Automation Configuration Cloud Customer Administration.
b. From the Select Action menu on the top, select Migrate Customer Objects.
c. Click Start Migration in the dialog.
d. Click Refresh Status to view the detail of the process as you see on Figure 6-17.
Figure 6-17 Migrate Customer Objects
7. Upgrading to the new security groups:
a. Connect to https://192.168.88.4/maximo and log in as maxadmin in the Tivoli Service Automation Manager administrative UI.
b. Click Go To Service Automation Configuration Cloud Customer Administration.
c. From the Select Action menu on the top, select Migrate Users.
d. Click Start Migration in the dialog.
e. Click Refresh Status to view the detail of the process as you see on Figure 6-18 on page 272.
Chapter 6. IBM Service Delivery Manager 7.2.2 271
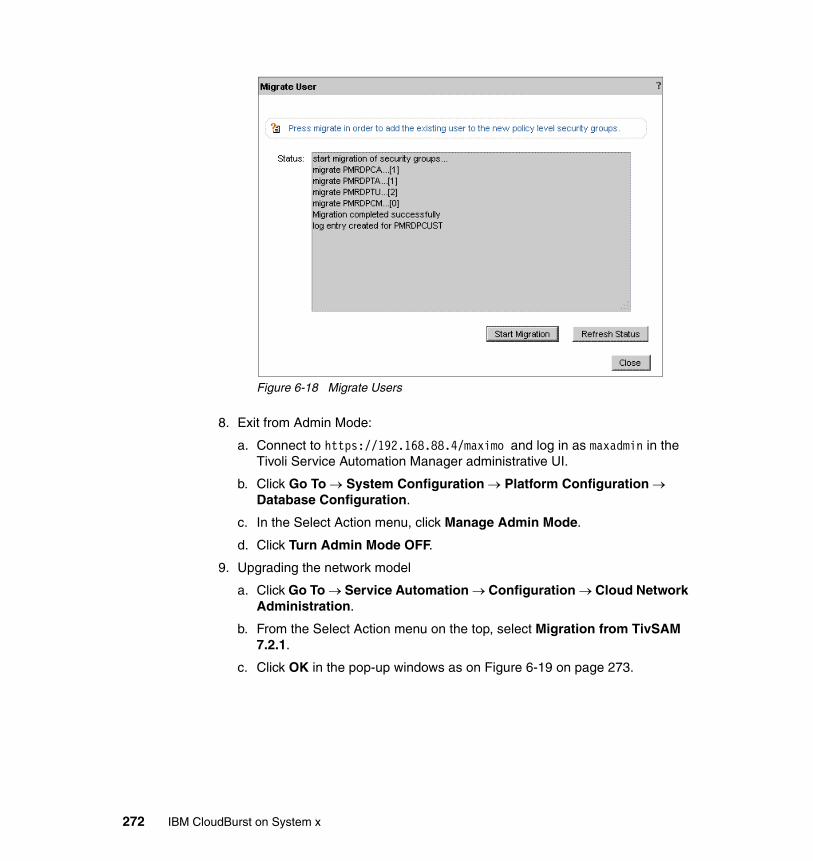
Figure 6-18 Migrate Users
8. Exit from Admin Mode:
a. Connect to https://192.168.88.4/maximo and log in as maxadmin in the Tivoli Service Automation Manager administrative UI.
b. Click Go To System Configuration Platform Configuration Database Configuration.
c. In the Select Action menu, click Manage Admin Mode.
d. Click Turn Admin Mode OFF.
9. Upgrading the network model
a. Click Go To Service Automation Configuration Cloud Network Administration.
b. From the Select Action menu on the top, select Migration from TivSAM 7.2.1.
c. Click OK in the pop-up windows as on Figure 6-19 on page 273.
272 IBM CloudBurst on System x
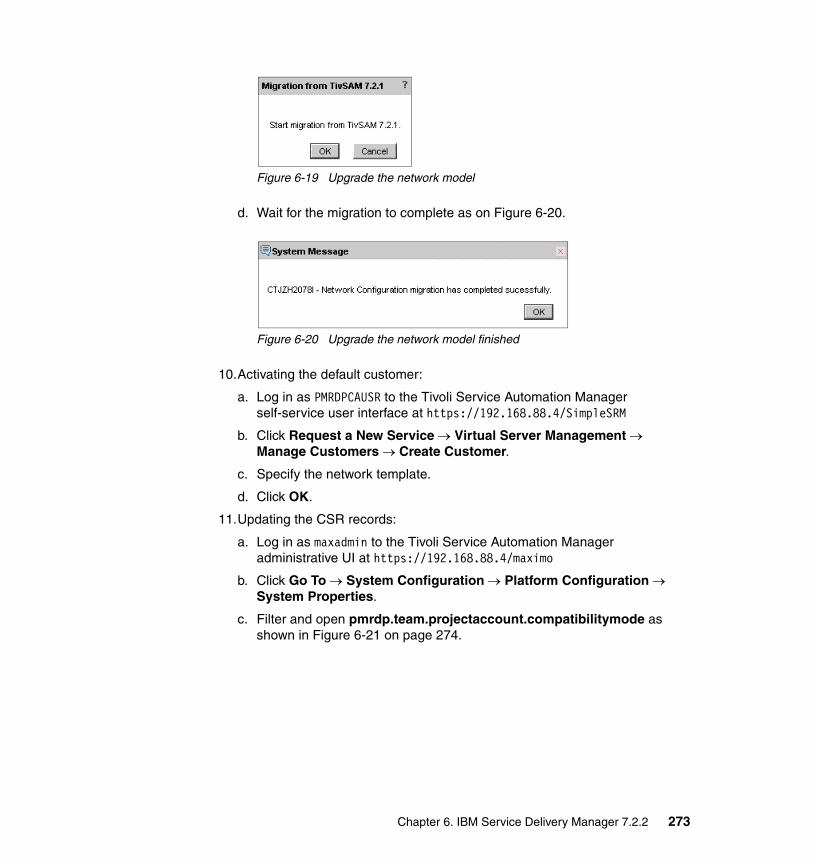
Figure 6-19 Upgrade the network model
d. Wait for the migration to complete as on Figure 6-20.
Figure 6-20 Upgrade the network model finished
10.Activating the default customer:
a. Log in as PMRDPCAUSR to the Tivoli Service Automation Manager self-service user interface at https://192.168.88.4/SimpleSRM
b. Click Request a New Service Virtual Server Management Manage Customers Create Customer.
c. Specify the network template.
d. Click OK.
11.Updating the CSR records:
a. Log in as maxadmin to the Tivoli Service Automation Manager administrative UI at https://192.168.88.4/maximo
b. Click Go To System Configuration Platform Configuration System Properties.
c. Filter and open pmrdp.team.projectaccount.compatibilitymode as shown in Figure 6-21 on page 274.
Chapter 6. IBM Service Delivery Manager 7.2.2 273
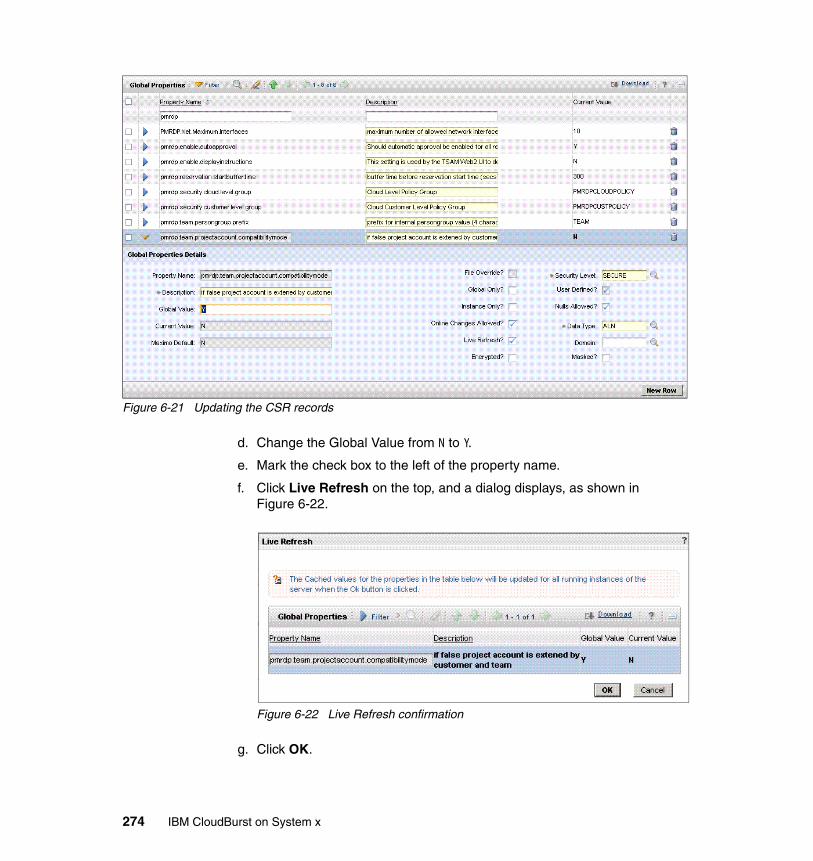
Figure 6-21 Updating the CSR records
d. Change the Global Value from N to Y.
e. Mark the check box to the left of the property name.
f. Click Live Refresh on the top, and a dialog displays, as shown in Figure 6-22.
Figure 6-22 Live Refresh confirmation
g. Click OK.
274 IBM CloudBurst on System x
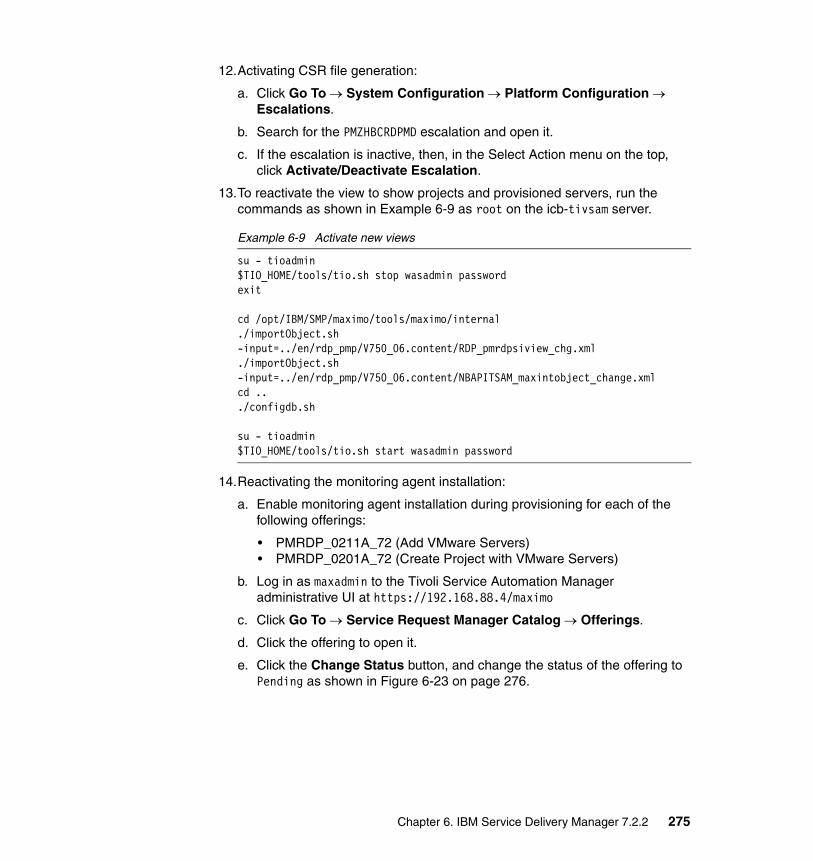
12.Activating CSR file generation:
a. Click Go To System Configuration Platform Configuration Escalations.
b. Search for the PMZHBCRDPMD escalation and open it.
c. If the escalation is inactive, then, in the Select Action menu on the top, click Activate/Deactivate Escalation.
13.To reactivate the view to show projects and provisioned servers, run the commands as shown in Example 6-9 as root on the icb-tivsam server.
Example 6-9 Activate new views
su - tioadmin$TIO_HOME/tools/tio.sh stop wasadmin passwordexit
cd /opt/IBM/SMP/maximo/tools/maximo/internal./importObject.sh -input=../en/rdp_pmp/V750_06.content/RDP_pmrdpsiview_chg.xml./importObject.sh -input=../en/rdp_pmp/V750_06.content/NBAPITSAM_maxintobject_change.xmlcd .../configdb.sh
su - tioadmin$TIO_HOME/tools/tio.sh start wasadmin password
14.Reactivating the monitoring agent installation:
a. Enable monitoring agent installation during provisioning for each of the following offerings:
• PMRDP_0211A_72 (Add VMware Servers)• PMRDP_0201A_72 (Create Project with VMware Servers)
b. Log in as maxadmin to the Tivoli Service Automation Manager administrative UI at https://192.168.88.4/maximo
c. Click Go To Service Request Manager Catalog Offerings.
d. Click the offering to open it.
e. Click the Change Status button, and change the status of the offering to Pending as shown in Figure 6-23 on page 276.
Chapter 6. IBM Service Delivery Manager 7.2.2 275

Figure 6-23 Change status
f. Click the Specifications tab.
g. In the Presentation section, select the Mandatory option, and deselect the Hidden option. These correspond to the offering attribute PMRDPCLSWS_MONITORING as shown in Figure 6-24.
Figure 6-24 Change the monitoring deployment
h. Change the status of this offering to Active.
276 IBM CloudBurst on System x
i. Save your changes.
Installing IBM Tivoli Usage and Accounting Manager 7.3.0 ExtensionTo install the Tivoli Usage and Accounting Manager extension:
1. Log in as root to the icb-tivsam server.
2. Upload and uncompress the 7.3.0-TIV-TUAM-FP0001.zip file to the /root/upgrade directory.
3. Change to the 6.2.2-TIV-ITM_TMV-Agents-FP0004 directory created in the previous step.
4. Execute the following command: /opt/IBM/SMP/bin/solutionInstaller.sh -action install -pkgpath /root/upgrade/cloudlet/cl_ua_pmp_psi.zip -license accept -dbuser ctginst1 -dbpwd password -wasuser wasadmin -waspwd password -wasrxauser tioadmin -wasrxapwd password
Installing IBM Tivoli Monitoring Agent 6.2.2 Fix Pack 4To install a new IBM Tivoli Monitoring Agent to a server:
1. Log in as root to the icb-tivsam server.
2. Upload and uncompress the 6.2.2-TIV-ITM_TMV-Agents-FP0004.tar file to the /root/upgrade directory.
3. Change to the 6.2.2-TIV-ITM_TMV-Agents-FP0004 directory.
4. Execute ./install.sh.
5. Press Enter to accept the default /opt/IBM/ITM home directory.
6. Type 1 and press Enter to continue the installation.
7. Type 1 and press Enter to install the product to the local host.
8. Type 1 and press Enter to accept the agreement.
9. Type 1 and press Enter to install the prerequisites.
10.Type 6 and press Enter to install the Monitoring Agent for Linux OS V06.22.04.00
11.Type 1 and press Enter to confirm your selection.
12.Type 2 and press Enter to skip additional products.
13.Start running the agent
/opt/IBM/ITM/bin/itmcmd agent start lz
Chapter 6. IBM Service Delivery Manager 7.2.2 277
Upgrading the icb-tuam serverTo upgrade the icb-tuam server, you need to install the packages listed in the following sections. Install them in the order listed.
� “Installing IBM Tivoli Common Reporting 2.1” on page 278.
� “Installing IBM Tivoli Usage and Accounting Manager 7.3.0” on page 280.
� “Installing IBM Tivoli Usage and Accounting Manager 7.3.0 Fix pack 1” on page 280
� “Installing IBM Tivoli Monitoring Agent 6.2.2 Fix Pack 4” on page 281
Installing IBM Tivoli Common Reporting 2.1Make sure the old Tivoli Usage and Accounting Manager 7.1.x is not running by issuing the following command:
/opt/ibm/tuam/ewas/bin/stopServer.sh server1 -username virtuser -password Passw0rd
To install IBM Tivoli Common Reporting:
1. Log in as root to the icb-tuam server.
2. Upload and uncompress the CZQ80ML.tar.gz file to the /root/upgrade directory.
3. Execute ./launchpad.sh
4. Click Install IBM Tivoli Common Reporting 2.1.
5. Select your language of choice and click OK.
6. Click Next in the Welcome window.
7. Accept the license agreement and click Next.
8. Choose Install a new instance of Tivoli Common Reporting in the Installation Mode window.
9. Click Next.
10.Select Single-computer installation in the Installation Scenario Selection window.
11.Click Next in the Installation Directory Selection window.
12.Click Next in the Advanced Configuration Selection window.
13.Type virtuser as the UserID.
14.Type password in the Password and Confirm Password fields.
15.Type 17310 as the Port Number.
16.Click Next.
278 IBM CloudBurst on System x
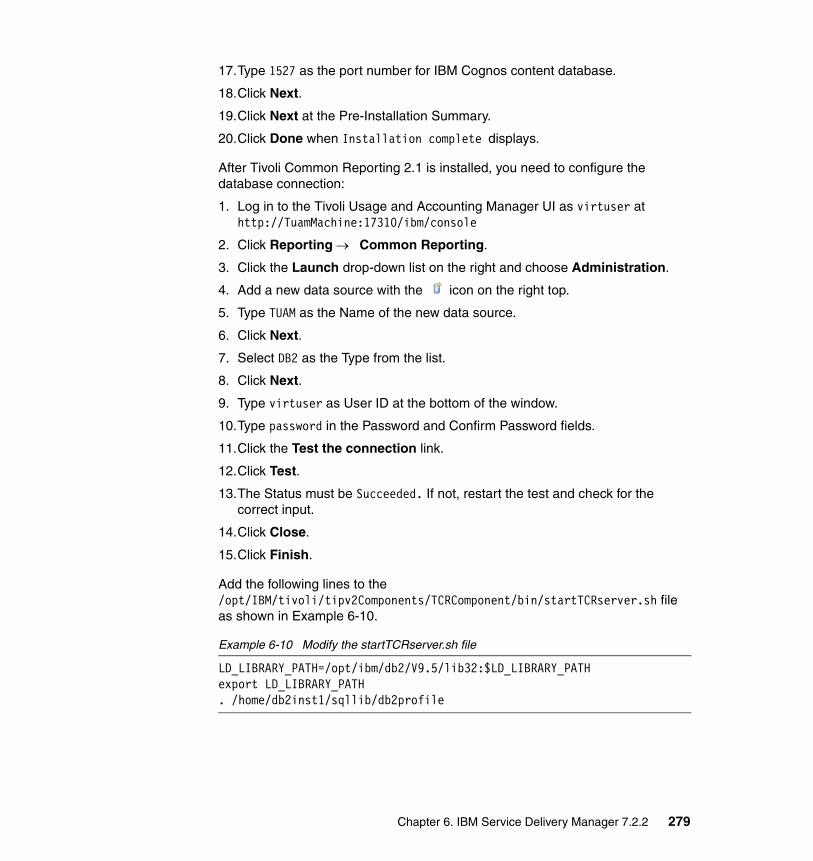
17.Type 1527 as the port number for IBM Cognos content database.
18.Click Next.
19.Click Next at the Pre-Installation Summary.
20.Click Done when Installation complete displays.
After Tivoli Common Reporting 2.1 is installed, you need to configure the database connection:
1. Log in to the Tivoli Usage and Accounting Manager UI as virtuser at http://TuamMachine:17310/ibm/console
2. Click Reporting Common Reporting.
3. Click the Launch drop-down list on the right and choose Administration.
4. Add a new data source with the icon on the right top.
5. Type TUAM as the Name of the new data source.
6. Click Next.
7. Select DB2 as the Type from the list.
8. Click Next.
9. Type virtuser as User ID at the bottom of the window.
10.Type password in the Password and Confirm Password fields.
11.Click the Test the connection link.
12.Click Test.
13.The Status must be Succeeded. If not, restart the test and check for the correct input.
14.Click Close.
15.Click Finish.
Add the following lines to the /opt/IBM/tivoli/tipv2Components/TCRComponent/bin/startTCRserver.sh file as shown in Example 6-10.
Example 6-10 Modify the startTCRserver.sh file
LD_LIBRARY_PATH=/opt/ibm/db2/V9.5/lib32:$LD_LIBRARY_PATHexport LD_LIBRARY_PATH. /home/db2inst1/sqllib/db2profile
Chapter 6. IBM Service Delivery Manager 7.2.2 279
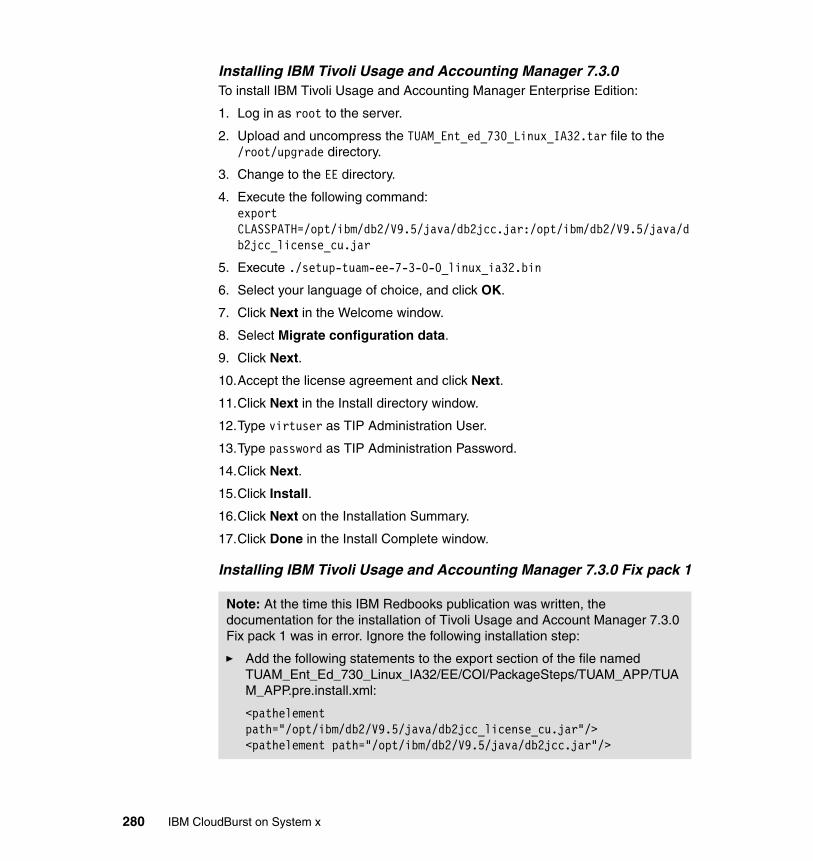
Installing IBM Tivoli Usage and Accounting Manager 7.3.0To install IBM Tivoli Usage and Accounting Manager Enterprise Edition:
1. Log in as root to the server.
2. Upload and uncompress the TUAM_Ent_ed_730_Linux_IA32.tar file to the /root/upgrade directory.
3. Change to the EE directory.
4. Execute the following command: export CLASSPATH=/opt/ibm/db2/V9.5/java/db2jcc.jar:/opt/ibm/db2/V9.5/java/db2jcc_license_cu.jar
5. Execute ./setup-tuam-ee-7-3-0-0_linux_ia32.bin
6. Select your language of choice, and click OK.
7. Click Next in the Welcome window.
8. Select Migrate configuration data.
9. Click Next.
10.Accept the license agreement and click Next.
11.Click Next in the Install directory window.
12.Type virtuser as TIP Administration User.
13.Type password as TIP Administration Password.
14.Click Next.
15.Click Install.
16.Click Next on the Installation Summary.
17.Click Done in the Install Complete window.
Installing IBM Tivoli Usage and Accounting Manager 7.3.0 Fix pack 1
Note: At the time this IBM Redbooks publication was written, the documentation for the installation of Tivoli Usage and Account Manager 7.3.0 Fix pack 1 was in error. Ignore the following installation step:
� Add the following statements to the export section of the file named TUAM_Ent_Ed_730_Linux_IA32/EE/COI/PackageSteps/TUAM_APP/TUAM_APP.pre.install.xml:
<pathelement path="/opt/ibm/db2/V9.5/java/db2jcc_license_cu.jar"/><pathelement path="/opt/ibm/db2/V9.5/java/db2jcc.jar"/>
280 IBM CloudBurst on System x
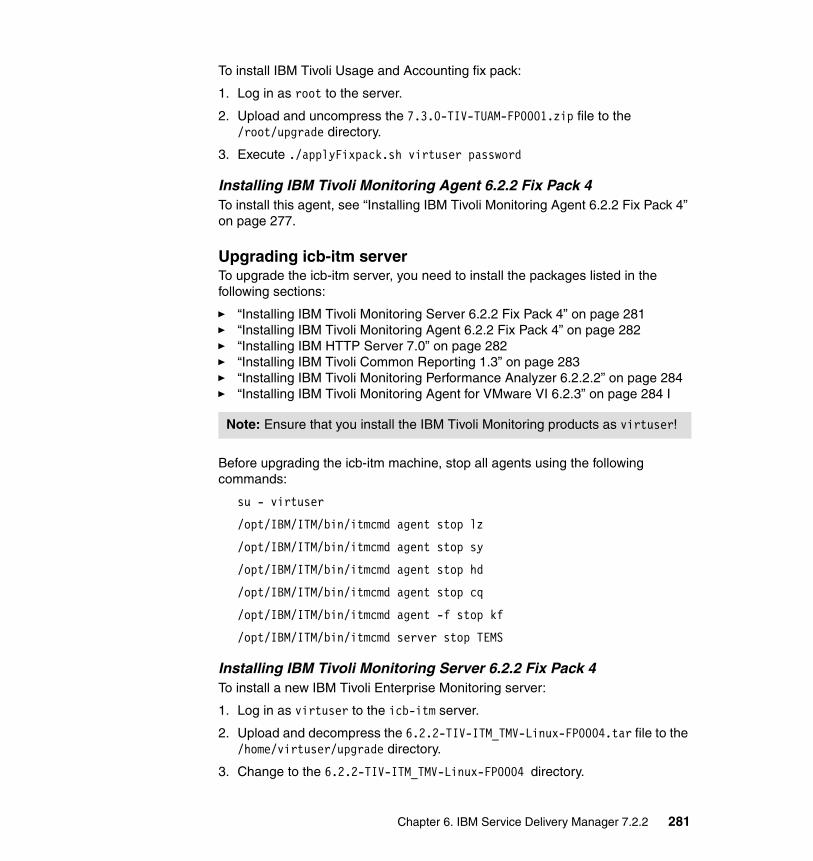
To install IBM Tivoli Usage and Accounting fix pack:
1. Log in as root to the server.
2. Upload and uncompress the 7.3.0-TIV-TUAM-FP0001.zip file to the /root/upgrade directory.
3. Execute ./applyFixpack.sh virtuser password
Installing IBM Tivoli Monitoring Agent 6.2.2 Fix Pack 4To install this agent, see “Installing IBM Tivoli Monitoring Agent 6.2.2 Fix Pack 4” on page 277.
Upgrading icb-itm serverTo upgrade the icb-itm server, you need to install the packages listed in the following sections:
� “Installing IBM Tivoli Monitoring Server 6.2.2 Fix Pack 4” on page 281 � “Installing IBM Tivoli Monitoring Agent 6.2.2 Fix Pack 4” on page 282 � “Installing IBM HTTP Server 7.0” on page 282 � “Installing IBM Tivoli Common Reporting 1.3” on page 283 � “Installing IBM Tivoli Monitoring Performance Analyzer 6.2.2.2” on page 284 � “Installing IBM Tivoli Monitoring Agent for VMware VI 6.2.3” on page 284 I
Before upgrading the icb-itm machine, stop all agents using the following commands:
su - virtuser
/opt/IBM/ITM/bin/itmcmd agent stop lz
/opt/IBM/ITM/bin/itmcmd agent stop sy
/opt/IBM/ITM/bin/itmcmd agent stop hd
/opt/IBM/ITM/bin/itmcmd agent stop cq
/opt/IBM/ITM/bin/itmcmd agent -f stop kf
/opt/IBM/ITM/bin/itmcmd server stop TEMS
Installing IBM Tivoli Monitoring Server 6.2.2 Fix Pack 4To install a new IBM Tivoli Enterprise Monitoring server:
1. Log in as virtuser to the icb-itm server.
2. Upload and decompress the 6.2.2-TIV-ITM_TMV-Linux-FP0004.tar file to the /home/virtuser/upgrade directory.
3. Change to the 6.2.2-TIV-ITM_TMV-Linux-FP0004 directory.
Note: Ensure that you install the IBM Tivoli Monitoring products as virtuser!
Chapter 6. IBM Service Delivery Manager 7.2.2 281
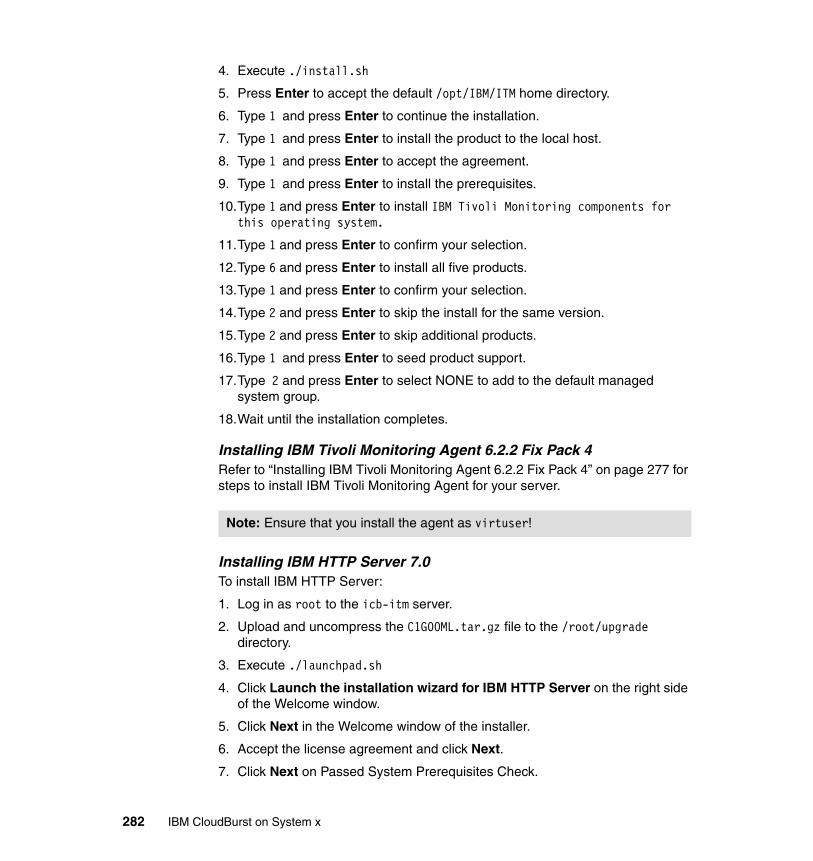
4. Execute ./install.sh
5. Press Enter to accept the default /opt/IBM/ITM home directory.
6. Type 1 and press Enter to continue the installation.
7. Type 1 and press Enter to install the product to the local host.
8. Type 1 and press Enter to accept the agreement.
9. Type 1 and press Enter to install the prerequisites.
10.Type 1 and press Enter to install IBM Tivoli Monitoring components for this operating system.
11.Type 1 and press Enter to confirm your selection.
12.Type 6 and press Enter to install all five products.
13.Type 1 and press Enter to confirm your selection.
14.Type 2 and press Enter to skip the install for the same version.
15.Type 2 and press Enter to skip additional products.
16.Type 1 and press Enter to seed product support.
17.Type 2 and press Enter to select NONE to add to the default managed system group.
18.Wait until the installation completes.
Installing IBM Tivoli Monitoring Agent 6.2.2 Fix Pack 4Refer to “Installing IBM Tivoli Monitoring Agent 6.2.2 Fix Pack 4” on page 277 for steps to install IBM Tivoli Monitoring Agent for your server.
Installing IBM HTTP Server 7.0To install IBM HTTP Server:
1. Log in as root to the icb-itm server.
2. Upload and uncompress the C1G00ML.tar.gz file to the /root/upgrade directory.
3. Execute ./launchpad.sh
4. Click Launch the installation wizard for IBM HTTP Server on the right side of the Welcome window.
5. Click Next in the Welcome window of the installer.
6. Accept the license agreement and click Next.
7. Click Next on Passed System Prerequisites Check.
Note: Ensure that you install the agent as virtuser!
282 IBM CloudBurst on System x
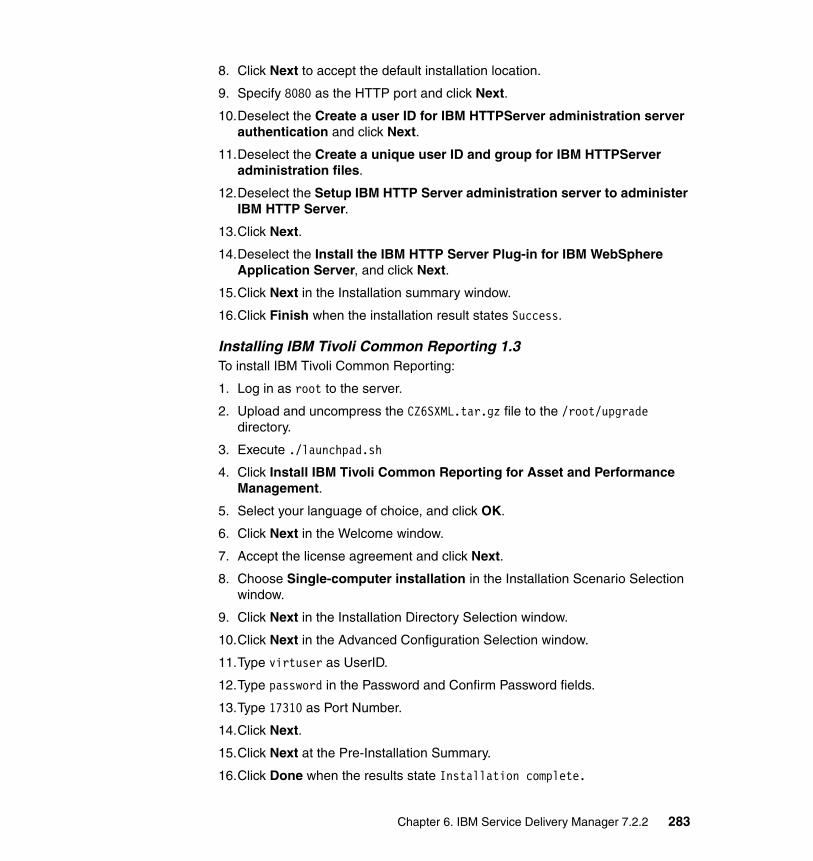
8. Click Next to accept the default installation location.
9. Specify 8080 as the HTTP port and click Next.
10.Deselect the Create a user ID for IBM HTTPServer administration server authentication and click Next.
11.Deselect the Create a unique user ID and group for IBM HTTPServer administration files.
12.Deselect the Setup IBM HTTP Server administration server to administer IBM HTTP Server.
13.Click Next.
14.Deselect the Install the IBM HTTP Server Plug-in for IBM WebSphere Application Server, and click Next.
15.Click Next in the Installation summary window.
16.Click Finish when the installation result states Success.
Installing IBM Tivoli Common Reporting 1.3To install IBM Tivoli Common Reporting:
1. Log in as root to the server.
2. Upload and uncompress the CZ6SXML.tar.gz file to the /root/upgrade directory.
3. Execute ./launchpad.sh
4. Click Install IBM Tivoli Common Reporting for Asset and Performance Management.
5. Select your language of choice, and click OK.
6. Click Next in the Welcome window.
7. Accept the license agreement and click Next.
8. Choose Single-computer installation in the Installation Scenario Selection window.
9. Click Next in the Installation Directory Selection window.
10.Click Next in the Advanced Configuration Selection window.
11.Type virtuser as UserID.
12.Type password in the Password and Confirm Password fields.
13.Type 17310 as Port Number.
14.Click Next.
15.Click Next at the Pre-Installation Summary.
16.Click Done when the results state Installation complete.
Chapter 6. IBM Service Delivery Manager 7.2.2 283
Installing IBM Tivoli Monitoring Performance Analyzer 6.2.2.2To install IBM Tivoli Monitoring Performance Analyzer:
1. Log in as virtuser to the server.
2. Upload and decompress the CZF7XEN.tar file to the /home/virtuser/upgrade directory.
3. Execute ./install.sh
4. Press Enter to accept the default /opt/IBM/ITM home directory.
5. Type 1 and press Enter to continue the installation.
6. Type 1 and press Enter to install the product to the local host.
7. Type 1 and press Enter to accept the agreement.
8. Type 1 and press Enter to install IBM Tivoli Monitoring components for this operating system.
9. Type 1 and press Enter to confirm your selection.
10.Type 1 and press Enter to install Performance Analytics for TEP V06.22.02.00.
11.Type 2 and press Enter to skip additional products.
Installing IBM Tivoli Monitoring Agent for VMware VI 6.2.3To install IBM Tivoli Monitoring Agent for VMware VI:
1. Log in as virtuser to the server.
2. Upload and decompress the CZ5QEN.tar file to he /home/virtuser/upgrade directory.
3. Execute ./install.sh
4. Press Enter to accept the default /opt/IBM/ITM home directory.
5. Type 1 and press Enter to continue the installation.
6. Type 1 and press Enter to install the product to the local host.
7. Type 1 and press Enter to accept the agreement.
8. Press Enter to continue the installation when the warning message shown in Example 6-11 is displayed.
Example 6-11 Warning message
KCIIN2463W Warning: This installation media does not contain any components which can be run on the current system platform architecture. To install components which can run on this system, please locate the installation media containing files similiar to *lx82*.jar.
284 IBM CloudBurst on System x
NOTE: IF YOU ARE INSTALLING APPLICATION SUPPORT, CONTINUE WITH THE INSTALLATION TO SEE A LIST OF SUPPORT FILES.
9. Type 4 and press Enter to install Tivoli Enterprise Monitoring Server support.
10.Type 1 and press Enter to confirm your selection is correct.
11.Type 4 and press Enter to install all available Monitoring Agents.
12.Type 2 and press Enter to skip additional products.
13.Type 1 and press Enter to seed product support.
14.Type 2 and press Enter to select ALL to add to the default managed system group.
15.Wait until the installation completes.
Start all the processes including the new agent using the following commands:
su - virtuser
/opt/IBM/ITM/bin/itmcmd server start TEMS
/opt/IBM/ITM/bin/itmcmd agent start cq
/opt/IBM/ITM/bin/itmcmd agent start hd
/opt/IBM/ITM/bin/itmcmd agent start sy
/opt/IBM/ITM/bin/itmcmd agent start lz
/opt/IBM/ITM/bin/itmcmd agent -o isdm722 start vm
To view the installed products, you can run the following command:
/opt/IBM/ITM/bin/cinfo -t
Upgrading the icb-nfs serverTo upgrade the icb-itm server, you need to install only the fix pack for the IBM Tivoli Monitoring agent.
Installing IBM Tivoli Monitoring Agent 6.2.2 Fix Pack 4Refer to “Installing IBM Tivoli Monitoring Agent 6.2.2 Fix Pack 4” on page 277 for installing the IBM Tivoli Monitoring Agent.
6.1.5 Post-upgrade steps
To finalize the installation, install IBM Service Delivery Manager 7.2.2 for the servers, then do configuration steps.
Chapter 6. IBM Service Delivery Manager 7.2.2 285
Installing IBM Service Delivery Manager 7.2.2 supportTo finish the installation and install IBM Service Delivery Manager 7.2.2 support for your environment:
1. Uncompress the ISDM_for_x86_2of15_V722.tar file to the directory of choice.
2. The following files will be listed:
– ITM_SLES_upgrade.tar– maintenanceTool.tar– NFS_SLES_upgrade.tar– TIVSAM_SLES_upgrade.tar– TUAM_SLES_upgrade.tar
3. Upload and uncompress the TIVSAM_SLES_upgrade.tar file to the /root/upgrade directory on icb-tivsam server.
4. Log in as root to the icb-tivsam server.
5. Execute /root/upgrade/upgradeTSAMMachine.sh
6. Run the commands shown in Example 6-12:
Example 6-12 Fix the upgrade
cd /opt/IBM/WebSphere/AppServer/java/jre/securitymv cacerts cacerts-oldln -s /shared/`pwd`/cacerts cacerts
7. Upload and uncompress the TUAM_SLES_upgrade.tar file to the /root/upgrade directory on icb-tuam server.
Note: At the time this IBM Redbooks publication was written, Step 5 above caused a problem with a file. We were required to run the commands shown in Step 6 to correct the problem. See APAR IV11003 for more information.
Note: Another way to fix the problem caused by running the script in Step 5 above is to replace the following line in the upgradeTSAMMachine.sh script:
Replace
ln -sf /shared${DIR} ${FILE}
with
ln -sf /shared${FILE} ${FILE}
Run the upgradeTSAMMachine.sh script.
286 IBM CloudBurst on System x

8. Log in as root to the icb-tuam server.
9. Execute /root/upgrade/upgradeTUAMMachine.sh icb-tivsam.private.cloud.com icb-nfs.private.cloud.com password
10.Upload and uncompress the ITM_SLES_upgrade.tar file to the /root/upgrade directory on icb-itm server.
11.Log in as root to the icb-itm server.
12.Execute /root/upgrade/upgradeITMMachine.sh
13.Upload and decompress the NFS_SLES_upgrade.tar file to the /root/upgrade directory on the icb-nfs server.
14.Log in as root to the icb-nfs server.
15.Execute /root/upgrade/upgradeNFSMachine.sh icb-itm.private.cloud.com icb-tuam.private.cloud.com icb-tivsam.private.cloud.com
Running post-upgrade steps on icb-tivsamRun samctrl -M f to put Tivoli System Automation for Multiplatforms into automatic mode.
Running post-upgrade steps on the icb-tuam serverTo complete the upgrade process on Tivoli Usage and Accounting Manager:
1. Add virtuser to the Tivoli Usage and Accounting Manager administration group:
a. Log in to Tivoli Usage and Accounting Manager as virtuser at http://TuamMachine:17310/ibm/console
b. Click Identity and Access Usage and Accounting Users.
c. Click New and select virtuser from the list of Search Central User Registry as shown in Figure 6-25 on page 288.
Note: After we performed the previous steps in our test environment, the icb-tivsam and icb-nfs software server stacks would not start after a reboot. When we checked with the command lssam -V, there appeared to be a problem with the eth0 vlan 100 interface. This might have been due to our particular configuration.
We fixed this with the following commands:
� modprobe 8201q� vconfig add eth0 100� ifconfig eth0.100 up
After a few seconds, the software stacks then started automatically.
Chapter 6. IBM Service Delivery Manager 7.2.2 287
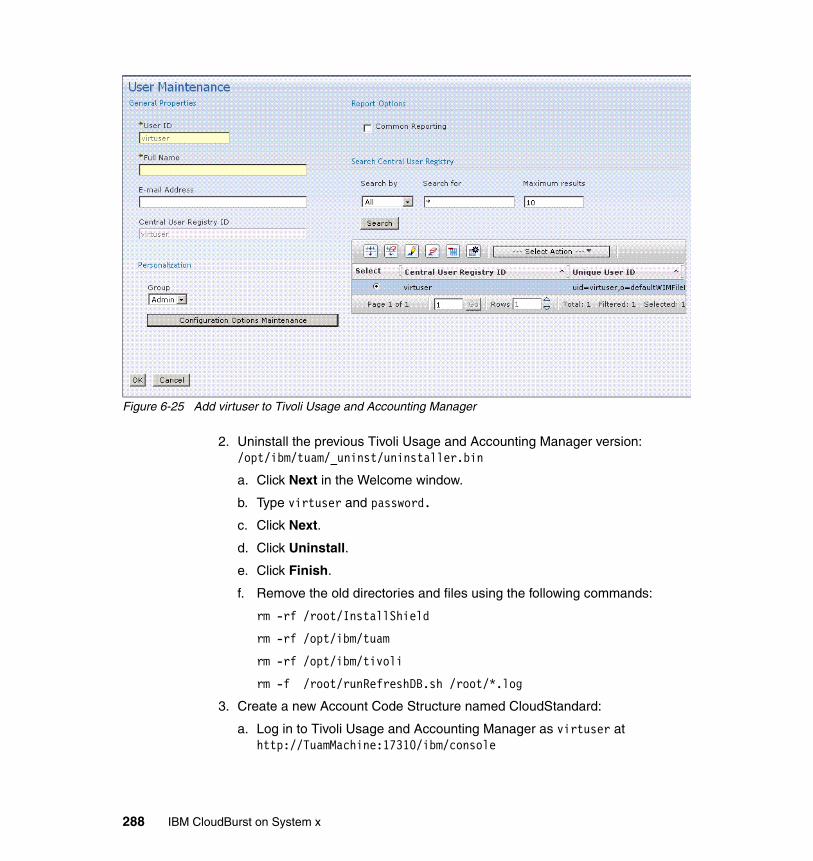
Figure 6-25 Add virtuser to Tivoli Usage and Accounting Manager
2. Uninstall the previous Tivoli Usage and Accounting Manager version: /opt/ibm/tuam/_uninst/uninstaller.bin
a. Click Next in the Welcome window.
b. Type virtuser and password.
c. Click Next.
d. Click Uninstall.
e. Click Finish.
f. Remove the old directories and files using the following commands:
rm -rf /root/InstallShield
rm -rf /opt/ibm/tuam
rm -rf /opt/ibm/tivoli
rm -f /root/runRefreshDB.sh /root/*.log
3. Create a new Account Code Structure named CloudStandard:
a. Log in to Tivoli Usage and Accounting Manager as virtuser at http://TuamMachine:17310/ibm/console
288 IBM CloudBurst on System x

b. Click Administration Usage and Accounting Account code Structure.
c. Click New.
d. Complete the form as shown in Figure 6-26
Figure 6-26 CloudStandard Account Code Structure
4. Link the CloudStandard to the Tivoli Usage and Accounting Manager Administration User Group:
a. Click Identity and Access Usage and Accounting User Groups.
b. Edit the user group Administrators.
c. Add the CloudStandard Account Code Structure as shown in Figure 6-27 on page 290.
Chapter 6. IBM Service Delivery Manager 7.2.2 289
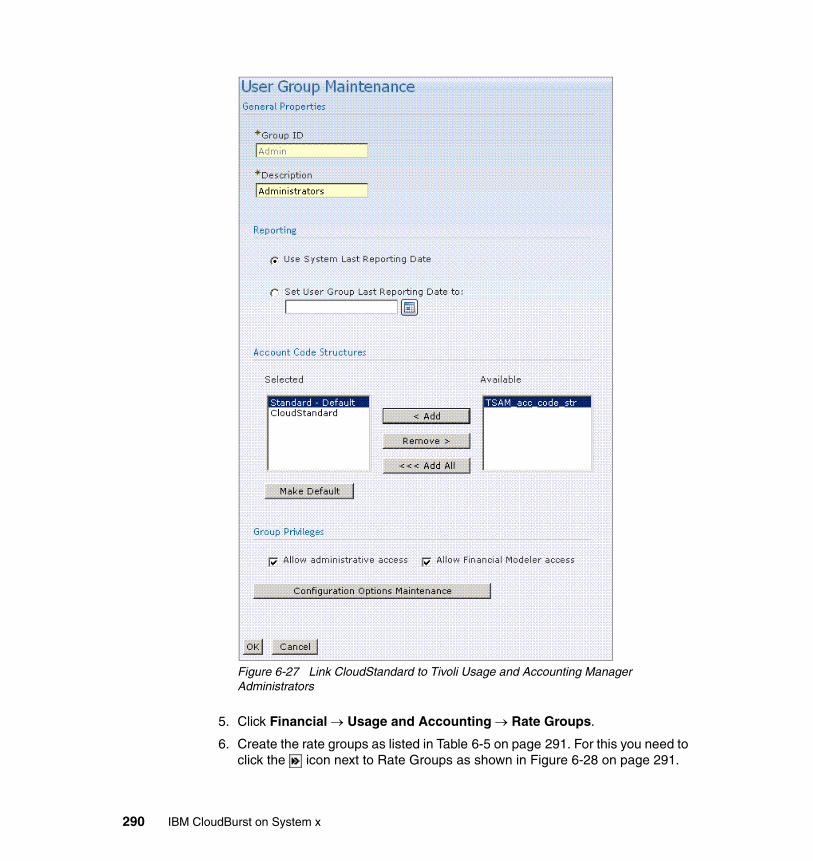
Figure 6-27 Link CloudStandard to Tivoli Usage and Accounting Manager Administrators
5. Click Financial Usage and Accounting Rate Groups.
6. Create the rate groups as listed in Table 6-5 on page 291. For this you need to click the icon next to Rate Groups as shown in Figure 6-28 on page 291.
290 IBM CloudBurst on System x
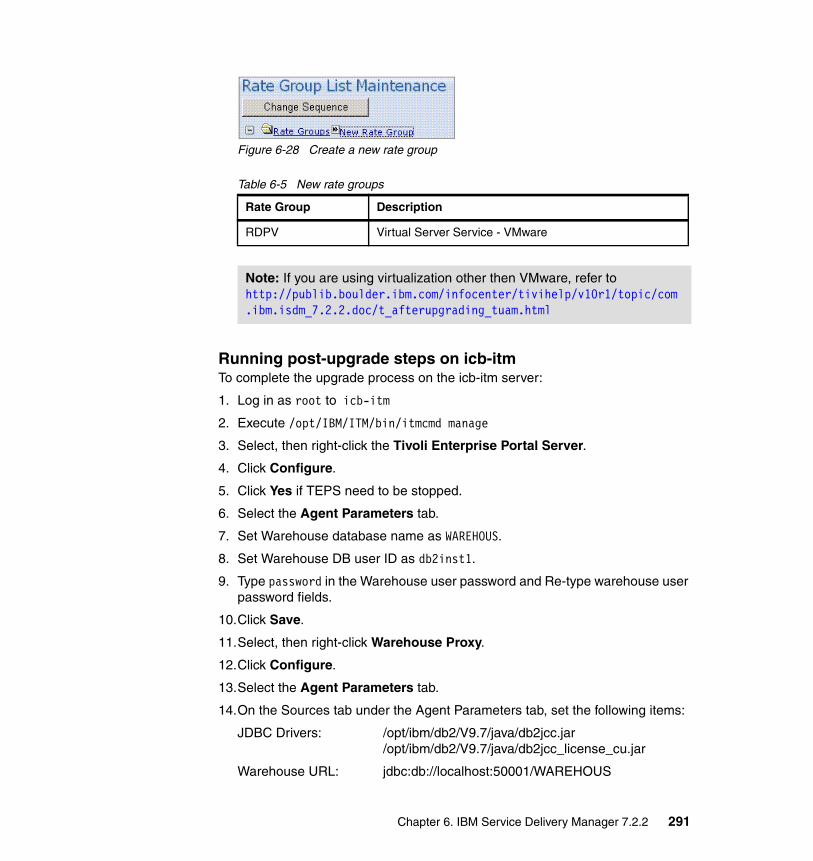
Figure 6-28 Create a new rate group
Table 6-5 New rate groups
Running post-upgrade steps on icb-itmTo complete the upgrade process on the icb-itm server:
1. Log in as root to icb-itm
2. Execute /opt/IBM/ITM/bin/itmcmd manage
3. Select, then right-click the Tivoli Enterprise Portal Server.
4. Click Configure.
5. Click Yes if TEPS need to be stopped.
6. Select the Agent Parameters tab.
7. Set Warehouse database name as WAREHOUS.
8. Set Warehouse DB user ID as db2inst1.
9. Type password in the Warehouse user password and Re-type warehouse user password fields.
10.Click Save.
11.Select, then right-click Warehouse Proxy.
12.Click Configure.
13.Select the Agent Parameters tab.
14.On the Sources tab under the Agent Parameters tab, set the following items:
JDBC Drivers: /opt/ibm/db2/V9.7/java/db2jcc.jar/opt/ibm/db2/V9.7/java/db2jcc_license_cu.jar
Warehouse URL: jdbc:db://localhost:50001/WAREHOUS
Rate Group Description
RDPV Virtual Server Service - VMware
Note: If you are using virtualization other then VMware, refer to http://publib.boulder.ibm.com/infocenter/tivihelp/v10r1/topic/com.ibm.isdm_7.2.2.doc/t_afterupgrading_tuam.html
Chapter 6. IBM Service Delivery Manager 7.2.2 291
Warehouse Driver: com.ibm.db2.jcc.DB2Driver
Warehouse User: db2inst1
Warehouse Password: password
TEP Server Host: localhost
TEP Server Port 1920
15.On the Scheduling tab, select Fixed and set the schedule to run every day at 02:00AM.
16.Click Save.
17.Click Action Exit.
18.Configure the monitoring agent for VMware VI:
a. Set the values from Table 6-6 in the file /opt/IBM/ISDM/templates/VIconfig.txt
Table 6-6 Configure the monitoring agent
Name of the parameter Value
<INSTANCE> ManageForm
<VALIDATE_SLL> Yes
<MAX_LOG_FILE_COUNT> 10
<MAX_LOG_FILE_SIZE> 5190
<MAX_LOG_LEVEL> INFO
<DIRECTOR_AUTHENTICATION> No
<DIRECTOR_HOST_ADDRESS> Leave this field empty.
<DIRECTOR_PORT_NUMBER> Leave this field empty.
<STORAGE_AGENT_MSN> Leave this field empty.
<DATASOURCE_ID> ManageForm
<DATASOURCE_HOST_ADDRESS> 192.168.88.9
<DATASOURCE_USERNAME> Administrator
<DATASOURCE_PASSWORD> Passw0rd
<DATASOURCE_USES_SSL> Yes
292 IBM CloudBurst on System x
iv. Run the following command:
/opt/IBM/ISDM/bin/create_ITM_VI_instance.sh -instance ManageFrom -cert /opt/IBM/SC/certs/rui.crt -password ITMVMWAREVI -option /opt/IBM/ISDM/templates/VIconfig.txt
b. Check the configuration file
/opt/IBM/ITM/config/icb-itm_vm_ManageFrom.cfg
The entry must have an instance name. If not, edit it and add the instance. Here is an excerpt of what you might see:
INSTANCE= [ SECTION=DATA_PROVIDER [ { KVM_LOG_FILE_MAX_COUNT=10 } ...
It must have the following syntax:
INSTANCE=ManageFrom [ SECTION=DATA_PROVIDER [ { KVM_LOG_FILE_MAX_COUNT=10 } ...
Then you can start this agent with the following command:
/opt/IBM/ITM/bin/itmcmd agent -o ManageFrom start vm
Running post-upgrade steps on icb-nfsRun samctrl -M f to set Tivoli System Automation for Multiplatforms into automatic mode.
Note: ITMVMWAREVI is the default password for the $CANDLE_HOME/lx8266/vm/etc/kvm.truststore. For more information, see the following information center page:
http://publib.boulder.ibm.com/infocenter/tivihelp/v24r1/topic/com.ibm.tivoli.itmvs.doc_6.2.2/vmware622_user19.htm?path=2_9_4_3_2_2#localinstall
Chapter 6. IBM Service Delivery Manager 7.2.2 293

294 IBM CloudBurst on System x
acronyms
AMM Advanced Managmemt Module
API application programming interface
BCH BladeCenter H
BI business intelligence
BOFM BladeCenter Open Fabric Manager
BSS Business Support Services
CCMDB IBM Tivoli Change and Configuration Management Database
CEE Converged Enhanced Ethernet
CISSP Certified Information Systems Security Professional
CSR Common Server Resource
DCFM Data Center Fabric Manager
FC Fibre Channel
FCoE Fibre Channel over Ethernet
GTS Global Technology Services
HA high availability
HSSM high speed switch module
HTTP hypertext transfer protocol
IaaS Infrastructure as a Service
IBM International Business Machines Corporation
ILM Information Lifecycle Management
ISAAC IBM Service Agility Accelerator for Cloud
ISDM IBM Service Delivery Manager
ITIL Information Technology Infrastructure Library
ITM IBM Tivoli Monitoring
ITSO International Technical Support Organization
ITUAM IBM Tivoli Usage and Accounting Manager
LLDP Link Layer Discovery Protocol
Abbreviations and
© Copyright IBM Corp. 2012. All rights reserved.
LOB Line of Businesses
LTPA Lightweight Third-Party Authentication
LUN logical unit number
MBR Master Boot Record
NFS Network File System
NIC network interface connection
OSS Operational Support Services
PaaS Platform as a Service
PDU power distribution unit
PMPs process management products
QoS quality of service
RAS Reliability, Availability and Serviceability
REST Representational State Transfer
ROI return on investment
SaaS Software as a Service
SAN storage area network
sdi_id service deployment instance ID
SDLC Software Development Life Cycle
SE Security Enhanced
SLA Service Level Agreement
SOA service-oriented architecture
SSH Secure Shell
SVC SAN Volume Controller
TCR Tivoli Common Reporting
TDS Tivoli Directory Server
TEM Tivoli Enterprise Monitoring
TEMA Tivoli Enterprise Monitoring Agent
TEMS Tivoli Enterprise Monitoring Server
TEP Tivoli Enterprise Portal
TEPS Tivoli Enterprise Portal Server
TivSAM Tivoli Service Automation Manager
295
TOGAF The Open Group Architecture Framework
TPAE Tivoli Process Automation Engine
TPAe Tivoli Process Automation Engine
TPM Tivoli Provisioning Manager
TSA Tivoli System Automation
TSAM Tivoli Service Automation Manager
TSRM Tivoli Service Request Manager
TUAM Tivoli Usage and Accounting Manager
UEFI Unified Extensible Firmware Interface
VIOS virtual IO system
VLAN virtual LAN
296 IBM CloudBurst on System x
Related publications
The publications listed in this section are considered particularly suitable for a more detailed discussion of the topics covered in this book.
IBM Redbooks
The following IBM Redbooks publications provide additional information about the topic in this document. Note that some publications referenced in this list might be available in softcopy only:
� Configuring ISDM in a Power Systems Cloud, SG24-7983� Tivoli Integration Scenarios, SG24-7878� IBM BladeCenter Foundation for Cloud: Integration Guide, REDP-4773� Implementing IBM Systems Director 6.1, SG24-7694
You can search for, view, download or order these documents and other Redbooks, Redpapers, Web Docs, draft and additional materials, at the following website:
ibm.com/redbooks
Other publications
These publications are also relevant as further information sources:
� Learning Technologies Client Technical Specialist - System x and BladeCenter Lecture
IBM Cloudburst 2.1 Overview (xtw110: Aug 2010 - 19 mins.), Ross Hamilton
� White Paper
IBM Tivoli Service Automation Manager v7.2 and Microsoft Active Directory Configuration Guide, Edson Manoel, Franco Potepan
� IBM Service Delivery Manager Version 7.2.2, SC34-2622-00
© Copyright IBM Corp. 2012. All rights reserved. 297
Online resources
These websites are also relevant as further information sources:
� IBM CloudBurst information center
http://publib.boulder.ibm.com/infocenter/tivihelp/v10r1/index.jsp?topic=%2Fcom.ibm.cb.doc_2.1%2Fcloudburst_welcome.html
� IBM Tivoli Service Automation Manager
http://publib.boulder.ibm.com/infocenter/tivihelp/v10r1/index.jsp?topic=%2Fcom.ibm.tsam_7.2.1.1.doc%2Ftsam_welcome.html
� IBM Tivoli Provisioning Manager information center
http://publib.boulder.ibm.com/infocenter/tivihelp/v28r1/index.jsp
� IBM IT Service Management documentation
http://publib.boulder.ibm.com/infocenter/tivihelp/v10r1/index.jsp
� Simple software product distribution
http://publib.boulder.ibm.com/infocenter/tivihelp/v28r1/index.jsp?topic=%2Fcom.ibm.tivoli.tpm.scenario.doc%2Fsoftware%2Fcsfd_proddistovw.html
Help from IBM
IBM Support and downloads
ibm.com/support
IBM Global Services
ibm.com/services
298 IBM CloudBurst on System x
Index
Numerics10Gb Ethernet Customer Network 5410Gb Ethernet Management Network 5310Gb Ethernet networks 5310Gb Ethernet VMotion Network 5410Gb VM Network (Tivoli) 541Gb Ethernet Management Network 5342U rack 39, 41, 43–44, 46
Aabstraction 7account code structure 136Account_Code 135Active Energy Manager 82–84administrative UI 64Advance Management Modules 53Already updated 248application services 16, 19application services layer 16–17architecture framework 30auto-file-overwrite 119availability 8
Bbackup 201
CloudBurst 200incremental 201periodic 205using DB2 205using Virtual Center 201
BladeCenterpassword 218
BladeCenter chassis 39, 41, 43–44, 46BNT switch modules 39, 42–43, 45, 47, 53–55Brocade switch modules 39, 42–43, 45, 47Business Intelligence Reporting 126Business Support Services 31
CCCFh 40CentOS 88
templates 96
© Copyright IBM Corp. 2012. All rights reserved.
central management 8Change and Configuration Management Database 67, 130charge back 8child configuration template 107CIOv 40cloud
definitions 5resource 5service 5
people layer 11process layer 11technology layer 11
cloud characteristics 9abstraction 7availability 8central management 8charge back 8elasticity 6integration 7multi-tenancy 8self-servicing 6
cloud computing 4community cloud 16definition 4deployment models 16hybrid clouds 15–16private clouds 15–16public clouds 14, 16workload candidates 12
Cloud Customer Administration 240cloud environment 12cloud management roles 31Cloud Network Configuration 240cloud ooptions
Tivoli Service Automation Manager 58cloud options
IBM CloudBurst for System x 59IBM Service Delivery Manager 59
Cloud Service Consumer 30Cloud Service Creator 31Cloud Service Provider 30Cloud Storage Pool Administration 240CloudBurst
299
dual node high availability 75IBM Tivoli Monitoring usage 71password 221Tivoli Provisioning Manager usage 68Tivoli Systems Automation for Multiplatforms us-age 73Tivoli Usage & Accounting Manager usage 69
CloudBurst configurationextra-large 46large 44medium 43small 41
CloudBurst configuration models 41CloudBurst hardware overview 38CloudBurst networks 52CloudBurst storage options 51Cognos 126, 131Cognos Connection 126Cognos Content Store 126Common Reporting 127Common Server Resource 130communication template 167communication templates 166community cloud 16configuration models 41Configuration Template Details 107connectivity as a service 17create new customer 174create new project 179create new user 175credentials
hardware 211manage 211
custom extensions 158customer
create 174Customer Network 54Cygwin 90
Ddata warehouse 238delivery models
application services 16, 19infrastructure services 17, 19platform services 17, 19
deployment model 10deployment models 16, 27Deployment_Instance 136
Deployment_Owner 135destination-filename 119DS3524 39, 42–43, 45, 47, 49, 51–53dual node high availability 73, 75–76, 79
Eelasticity 6email notification 166enterprise integration 22escalation 134–135ESXi 39, 54EXP3524 43, 45, 47, 49, 52EXP3542 52exposetotivsam 121exposing software 121extract-command 119extract-path 119extra-large CloudBurst configuration 46, 49–51
Ffile repository 61file repository, mail server, and URL redirection im-age
overview 78forceCleanup 208, 210Framework Manager 126
GG8124R 47, 53–55globalization 163GParted 243
Hhardware
password 218hardware overview 38hd 77HS22V 39, 42–43, 45, 47, 53–55hybrid cloud 14hybrid clouds 15–16
IIaaS 17, 19IBM CloudBurst for System x
core capabilities 59IBM Cognos 126IBM DS Storage
300 IBM CloudBurst on System x
password 219IBM HTTP Server 7.0
install 282IBM Service Delivery Manager 68IBM Service Delivery Manager 7.2.2 support
install 286IBM Service Management Platform 62IBM Systems Director 81–82, 220
Active Energy Manager 83Network Control 85overview 81password 218
IBM TIvoli Monitoringpassword 230
IBM Tivoli Monitoring 39overview 70usage in CloudBurst 71
IBM Tivoli Monitoring Agent 6.2.2 Fix Pack 4install 277
IBM Tivoli Provisioning Manager 7.2.0 Fix Pack 1install 251
icb-itm 75, 77post-upgrade 291start 199stop 196upgrade 281
icb-nfs 75–76, 78post-upgrade 293pre-upgrade steps 243start 200stop 197upgrade 285
icb-nfs-haoverview 79
icb-tivsam 75–76, 78post-upgrade 287pre-upgrade steps 243start 200stop 196upgrade 251
icb-tivsam-haoverview 79
icb-tuam 75, 78post-upgrade 287start 200stop 197upgrade 278
icb-vctr 198stop 198
in transition 208information as a service 17infrastructure as a service 17, 19infrastructure services 17, 19infrastructure services layer 17Installation Template 104install-command 120install-command-timeout 120installer-path 120install-path 120Instance Template 106integration 7integration as a service 17ISDM
maintenance tool 238post-upgrade steps 285product maintenance upgrades 241product version upgrades 241
ISDM upgrade order 241IT roadmap 20
Llarge CloudBurst configuration 44, 49–51license-filename 120license-filepath 120Link Layer Discovery Protocol 85Linux
templates 94Local File Repository 115logical partition 5logical volumes 94lz 77
Mmail server 61maintenance level upgrade 244maintenance tool 238, 242, 244Management Blade 39, 42–43, 45, 47, 75Management Blade Server 39Management Network 53Management Server 39–40, 42–43, 45, 47, 53, 55, 79
installed software 80password 218
Master Boot Record 94medium CloudBurst configuration 43, 49, 51mediuml CloudBurst configuration 50messaging as a service 17
Index 301
Microsoft Windows 88templates 89
middleware as a service 17monitoring 60Monitoring Agent for DB2 77Monitoring Agent for Linux OS 77Monitoring Agent for Tivoli Provisioning Manager 78monitoring image
overview 77multi-customer objects 240multi-tenancy 8
NNetwork Control 83, 85NFS 74
password 230NFS-HA 74Not ready for update 247
Oofferings 139Open Group Architecture Framework 30operating system templates 88Operational Support Services 31OS family 102
PPaaS 17, 19partial integration 22password
BladeCenter 218CloudBurst 221hardware 218IBM DS Storage 219IBM Systems Director 218IBM Tivoli Monitoring 230manage 211Management Server 218NFS 230reset 189Tiovoli Usage and Accounting Manager 233Tivoli Service Automation Manager 221VMware Virtual Center 219
pe 78people layer 11periodic backup 205
platform as a service 17, 19platform services 17, 19PMZHBWTN 132PMZHBWTNSPEC 132portal 11, 13post-install-command 120private cloud 14private clouds 15–16process automation 4process layer 11product maintenance upgrades 241product version upgrades 241project
create 179provisioned virtual machines 39provisioning 13Provisioning Computers 202provisioning tools 6public cloud 14public clouds 14, 16
QQuery Studio 126, 129quickdeploy 154–155
Rrate code 136rate group 136Ready for update 247Red Hat
templates 96Red Hat Enterprise Linux 88Redbooks website 297
Contact us xiregister VMware image 99Report Studio 126, 129reporting 124reports
working with 137Representational State Transfer 7, 146resource allocation 11resource orchestrator 11REST API 146restart
hardware 199software stack 199
restore 202CloudBurst 200
302 IBM CloudBurst on System x
using DB2 206rspfile-method 120rsp-filename 120rsp-filepath 120
SSaaS 16, 19SAN24B 45, 47, 49, 53sdi_id 208segregated workload 10self-service interfaces 4self-service UI 64
activities 65self-service UI customization 139Self-Service User Interface 123self-servicing 6server password 189service automation 60service automation image
overview 77Service Catalog 66Service Catalog UI 66Service Connection Engine 239service deployment instance ID 208Service Desk 66Service Level Agreement 5service processes 11service usage data 132Service_Definition 135show back 8shut down
hardware 198software stack 195
single customer objects 240single node high availability 73small CloudBurst configuration 41, 49–51SMC 8126L2 39, 42–43, 45, 53software as a service 16, 19Software Definition 104software distribution 103Software Installable 104, 116Software Instance 106stacked projects 207stop provisioned servers 196storage options 51Summarization and Pruning Agent 77SuSE
templates 96
SUSE Linux Enterprise Server 88sy 77synchronize
current status 202Sysprep tools 89, 97system catalog 11System x3550 M3 80
Ttechnology layer 11Template Parameters 115templates
CentOS 96Linux 94Microsoft Windows 89operating system 88Red Hat 96SuSE 96VMware vCenter Converter 97
Tivoli Change and Configuration Management Data-base 130Tivoli Common Reporting 124, 126, 128Tivoli Common Reporting 1.3
install 283Tivoli Common Reporting 2.1
install 278Tivoli Enterprise Portal Server 71Tivoli Integrated Portal 127Tivoli Monitoring Agent 6.2.2 Fix Pack 4
install 281–282, 285Tivoli Monitoring Agent for VMware VI 6.2.3
install 284Tivoli Monitoring for Energy Management 83Tivoli Monitoring Server 6.2.2 Fix Pack 4
install 281Tivoli Process Automation Engine 125
overview 66Tivoli Provisioning Manager 103
overview 67usage in CloudBurst 68
Tivoli Service Automation Manager 39, 103administrative UI 64architecture 63overview 62password 221self-service UI 64Service Catalog 66Service Catalog UI 66
Index 303

Service Desk 66Tivoli Service Automation Manager 7.2.1 Fix Pack 4
install 253Tivoli Service Automation Manager 7.2.2
install 254Tivoli Service Request Manager
activites 66overview 66
Tivoli Systems Automation for Multiplatformsdual node high availability 73overview 73single node high availability 73usage in CloudBurst 73
Tivoli Usage & Accounting Managerusage in CloudBurst 69
Tivoli Usage and Account Manageroverview 68
Tivoli Usage and Accounting Manager 39password 233
Tivoli Usage and Accounting Manager 7.3.0install 280
Tivoli Usage and Accounting Manager 7.3.0 Exten-sion
install 277Tivoli Usage and Accounting Manager 7.3.0 Fix pack 1
install 280TivSAM 74TivSAM-HA 74Topology Nodes 132trend analysis 238
Uud 77URL redirection 61, 238, 249usage and accounting 61usage and accounting image
overview 78Usage and Accounting Reports 130usage reports 125user
create 175
Vversion upgrade 244Virtual 201Virtual Center
backup 201
virtual imagefile repository, URL redirection, mail server 61monitoring 60service automation 60usage and accounting 61
virtual local area network 13virtual server 5Virtualization Blades 39, 42–43, 45, 47, 49virtualization technologies 4virtualized infrastructure 10VM Network (Tivoli) 54VMotion Network 54VMware ESXi 39VMware templates 88VMware tools 90, 95VMware Tools package 88VMware vCenter Converter
templates 97VMware Virtual Center
password 219
WWarehouse Proxy 77workload candidates 12workload classification 23
analytics 23barriers 25collaboration 23compute 25desktop devices 24development and test 24motivators 25storage 25
Xx3550 M3 39–40, 42–43, 45, 47, 53, 55
304 IBM CloudBurst on System x

(0.5” spine)0.475”<
->0.875”
250 <->
459 pages
IBM CloudBurst on System
x


®
SG24-7981-00 ISBN 0738436526
INTERNATIONAL TECHNICALSUPPORTORGANIZATION
BUILDING TECHNICALINFORMATION BASED ONPRACTICAL EXPERIENCE
IBM Redbooks are developed by the IBM International Technical Support Organization. Experts from IBM, Customers and Partners from around the world create timely technical information based on realistic scenarios. Specific recommendations are provided to help you implement IT solutions more effectively in your environment.
For more information:ibm.com/redbooks
®
IBM CloudBurston System xCloud computing overview
CloudBurst hardware and software
CloudBurst administration and upgrade scenarios
This IBM Redbooks publication gives an overview of Cloud solutions, followed by detailed information and usage scenarios for IBM CloudBurst in a System x environment. Cloud computing can be defined as a style of computing in which dynamically scalable resources, such as CPU, storage, or bandwidth, are provided as a service over the Internet. Cloud computing represents a massively scalable, self-service delivery model where processing, storage, networking, and applications can be accessed as services over the Internet. Enterprises can adopt cloud models to improve employee productivity, deploy new products and services faster and reduce operating costs—starting with workloads, such as development and test, virtual desktop, collaboration, and analytics. IBM provides a scalable variety of cloud solutions to meet these needs.
This IBM Redbooks publication helps you to tailor an IBM CloudBurst installation on System x to meet virtualized computing requirements in a private cloud environment. This book is intended for IT support personnel who are responsible for customizing IBM CloudBurst to meet business cloud computing objectives.
Back cover