ias web development using dreamweaver cs4 · php ‐ hypertext preprocessor files have a .php...
TRANSCRIPT

IAS Web Development using Dreamweaver CS4
Information Technology Group Institute for Advanced Study Einstein Drive Princeton, NJ 08540 609‐734‐8044 * [email protected]

Information Technology Group [2] Institute for Advanced Study

Table of Contents
General Terminology ................................................................................................................ 4 Help and Resources .................................................................................................................. 4 Introduction .............................................................................................................................. 6 Working with Your Web Space ................................................................................................. 6 Getting Started with Dreamweaver CS4................................................................................... 7 Welcome Screen ................................................................................................................... 7 Dreamweaver File Types....................................................................................................... 9 Create a Webpage .............................................................................................................. 10 Creating Different types of Documents.............................................................................. 11 Saving a Webpage............................................................................................................... 11 Site Definition ..................................................................................................................... 12
Dreamweaver Environment.................................................................................................... 14 Document Views ................................................................................................................. 15 Application Bar.................................................................................................................... 15 Document Toolbar .............................................................................................................. 16 Panels .................................................................................................................................. 17 Files Panel ....................................................................................................................... 17 Insert panel overview ..................................................................................................... 18
The Property Inspector ....................................................................................................... 20 Using Status Bar .................................................................................................................. 20 Customizing Workspace...................................................................................................... 21
Formatting Webpage .............................................................................................................. 22 Modifying the page title ..................................................................................................... 22 Text Properties.................................................................................................................... 23
Adding Design Elements ......................................................................................................... 23 Inserting Text ...................................................................................................................... 23 Inserting Images.................................................................................................................. 23 Inserting Tables................................................................................................................... 24
Creating and Formatting Lists ................................................................................................. 24 Create Ordered List............................................................................................................. 25 Create Unordered List......................................................................................................... 25
Working with Links.................................................................................................................. 25 Hyperlinks ........................................................................................................................... 26 Anchor Links........................................................................................................................ 27 Email Links........................................................................................................................... 28
To Preview in a Browser ......................................................................................................... 28 Create Navigation Bar ............................................................................................................. 29 Create Image Hotspot ............................................................................................................. 30
Information Technology Group [3] Institute for Advanced Study

General Terminology
Website: A website is a collection of web pages displayed on the Internet. Typically, it consists of a home page that is linked to other pages through text or images. Each website is identified by a unique Uniform Resource Locator (URL). Home page: The home page is the entry point of a website, providing access to other pages on the site. By default, the home page is named index.html so that the web server identifies it as the entry point of the site when it is accessed using the URL of the site. If the home page of the website is referred to by any other name, such as “home.html” then it can be accessed only by typing the URL of the site followed by “home.html”.
Help and Resources
In‐product Help is available through the Help menu. Dreamweaver CS4 has a web based Help Library with detailed explanations on how to use all the Dreamweaver functions. To use the Help Library, press F1 or click Help in the menu bar, then select Dreamweaver Help. The Dreamweaver Help contains complete documentation ‐ more information than the actual printed user guide. You may browse the Help Library by general topic or search for a specific topic.
Information Technology Group [4] Institute for Advanced Study

The best resource for all of the Adobe products is www.adobe.com. There are a wide range of tutorials and help files available for Dreamweaver.
Information Technology Group [5] Institute for Advanced Study
Introduction
With Adobe Dreamweaver CS4, you can easily add content to an existing website, including viewing, editing, creating, and publishing pages. This training manual will cover topics such as managing the site, formatting text, inserting tables and images, working with links, and customizing your Dreamweaver work environment.
Working with Your Web Space
All clients supported by the Information Technology group have a web space available for academic use.
Please note: Your web space is to be used for scholarly and administrative purposes only. It may not be used for commercial purposes or for financial gain. Please read the Institute's Computer use Policy for details.
Your web space contains a file called index.html, which is placed there to serve as a default page. You may edit, or replace, this page. If you are interested in using the logo, it can be found at the following URL.
http://people.ias.edu/fuld_icon.jpg
All web spaces are reached by visiting http://people.ias.edu/~username with username being replaced with your individual username. For example, if your username is jdoe, then your web space would be reached at http://people.ias.edu/~jdoe.
Note: If you are staff or faculty, your web space will not be located in your I‐drive. You will have your own directory located at \\itgfs\users\. You will need to map your computer to this location in order access your web space. If you need assistance with this, please contact the Help Desk.
Windows The web space for members is located directly within the I:\ drive, which is mapped to \\itgfs\users\username. In this case, the personal web space can be accessed by following these instructions.
These instructions assume that you are using an Institute provided office computer.
1. Double‐click on My Computer 2. Double‐click on the I:\ drive 3. Double‐click the public_html folder
Information Technology Group [6] Institute for Advanced Study

Inside this folder is a sample webpage that you can edit, or replace, called index.html. This index page contains the current ITG template. You can edit this page using any webpage editing program currently installed on your computer. You could also open your web page editor, and open the index.html page from within the program. The path to the page is I:\public_html\index.html
If you would like to access your personal web space from your personal computer you will need to follow these steps:
1. Connect to Institute for Advanced Study VPN, further information can obtained from the
following link: http://www.itg.ias.edu/net/vpn 2. You will need to map to your computer to the appropriate network drive. For
instructions on how to map a network drive please visit: http://www.itg.ias.edu/networkresources/accessingfiles/accessingfiles
If you are Staff then you will need to map your computer to the following network drive: \\itgfs\users\
If you are a Member you will need to map your computer to your home drive which is your I drive \\itgfs\users\username
Getting Started with Dreamweaver CS4
1. Begin by opening Adobe Dreamweaver CS4 2. In Windows, click on the Start button ‐> All Programs ‐> Adobe Design Premium CS4 ‐>
Adobe Dreamweaver CS4.
Welcome Screen
Once you launch the application Dreamweaver CS4 you will see the Welcome screen. The Welcome screen has several sections to it
Open a Recent Item – Contains a list of the nine most recently opened items in Dreamweaver
Create New – To create a new page or site.
Top Features(videos) ‐ The link directs to video training for Dreamweaver
Getting Started ‐ Gives you a quick tour of Dreamweaver’s functionality
New Features ‐ This opens the online new features documentation.
Resource – Provides links for further resources on adobe’s site for Dreamweaver.
Information Technology Group [7] Institute for Advanced Study

If you do not like the Welcome screen to appear when launching the application it can be easily disabled. You can disable it by selecting the “Don’t show again” option in the lower left of the window. If you need to re‐enable the Welcome screen you can do so by going to Edit ‐> Preferences ‐> General Category.
Information Technology Group [8] Institute for Advanced Study

Dreamweaver File Types
You can work with a variety of file types in Dreamweaver. The primary kind of file you will work with is the HTML file. HTML files—or Hypertext Markup Language files—contain the tag‐based language responsible for displaying a web page in a browser. You can save HTML files with either the .html or .htm extension. Dreamweaver saves files using the .html extension by default. Following are some of the other common file types you might use when working in Dreamweaver: CSS ‐ Cascading Style Sheet files have a .css extension. They are used to format HTML content and control the positioning of various page elements. GIF ‐ Graphics Interchange Format files have a .gif extension. GIF format is a popular web graphic format for cartoons, logos, graphics with transparent areas, and animations. GIFs contain a maximum of 256 colors. JPEG ‐ Joint Photographic Experts Group files (named after the organization that created the format) have a .jpg extension, and are usually photographs or high‐color images. The JPEG format is best for digital or scanned photographs, images using textures, images with gradient color transitions, and any images that require more than 256 colors. XML ‐ Extensible Markup Language files have an .xml extension. They contain data in a raw form that can be formatted using XSL (Extensible Style sheet Language). XSL ‐ Extensible Style sheet Language files have an .xsl or .xslt extension. They are used to style XML data that you want to display on a web page. CFML ‐ ColdFusion Markup Language files have a .cfm extension. They are used to process dynamic pages. PHP ‐ Hypertext Preprocessor files have a .php extension and are used to process dynamic pages.
Information Technology Group [9] Institute for Advanced Study

Create a Webpage
To create a new blank HTML web page, do the following:
1. Select File ‐> New.
2. Select the Blank Page category.
3. Select HTML from the Page Type column
4. Select the Layout you want
5. Click the DocType popup and select the option you want ( We will be using the default XHTML 1.0 Transitional)
6. Click on Create.
Information Technology Group [10] Institute for Advanced Study
Creating Different types of Documents
You can create different types of documents such as: Blank Page ‐ Blank web pages of various types, such as HTML, JavaScript, and ColdFusion. It also allows you to select predefined CSS layouts for the pages. Blank Template ‐ Templates of various types with predefined CSS layouts Page from Template ‐ Web pages based on existing templates. Page from Sample ‐ Web pages based on sample pages that contain predefined elements such as CSS style sheets, framesets, and themes. Other ‐ Various types of pages, such as ActionScript, C#, Java, and VB Script pages.
Saving a Webpage
To save a webpage ‐> click the File menu, and then select from the following options:
Save ‐ If the file is new, you will be prompted to enter a proper file name and location for the new page. If the file has been previously saved, Dreamweaver saves the file, using the original file name and location (without prompting).
Save As ‐ Use this option to make a copy of a file; you will be prompted to give the file a new name and location.
Save All ‐ Use this option if you have more than one file open, and you want to save all of them at the same time. If any of the files are new, you will be prompted to enter a file name and location.
Save To ‐ Remote Server. Use this option if you’ve set up your remote server, and you want to save the file directly to the server.
Save As Template ‐ Use this option to save the open document as a template. A template is a reusable document that contains editable regions.
Information Technology Group [11] Institute for Advanced Study

Site Definition
Whenever you build a new Web site or want to edit an existing one you’ve created elsewhere, you have to begin by introducing Dreamweaver to it—a process called defining a site. At its most basic, defining a site lets Dreamweaver know where you store your Web pages on your computer, and makes sure Dreamweaver correctly inserts images and adds links to the pages of your site To define a site, follow these steps:
1. Select Site from the menu.
2. Click on New Site.
3. Make sure the Basic tab is selected.
4. Type the name of your site in the first field. The name you type here is solely for your own reference, to help you identify the site in Dreamweaver’s Files panel. It won’t appear on the Web. Dreamweaver also asks for your site’s Web address.
5. Enter in the URL (Uniform Resource Locator) for your site.
6. Click on Next.
7. Click the No option in response to the next screen’s question: Do you want to work with a server technology such as ColdFusion, ASP, NET, JSP, or PHP.
8. Click on Next.
9. Click the Edit Local Copies on My Machine, then Upload to Server When Ready option.
10. Enter the location of your local root folder, or click the folder icon, located to the right of the input box, and then select the folder from the Find window.
11. Click on Next and Select None.
12. Click on Next and then Done.
Information Technology Group [12] Institute for Advanced Study

Information Technology Group [13] Institute for Advanced Study
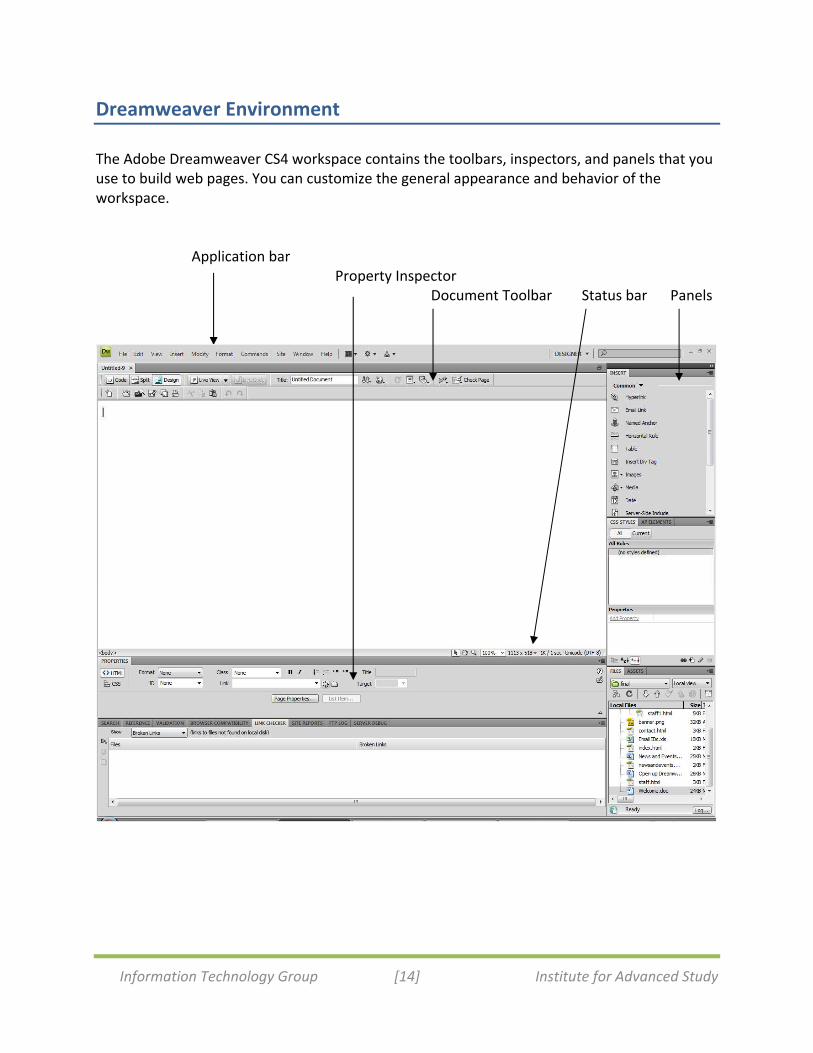
Dreamweaver Environment
The Adobe Dreamweaver CS4 workspace contains the toolbars, inspectors, and panels that you use to build web pages. You can customize the general appearance and behavior of the workspace. Application bar Property Inspector Document Toolbar Status bar Panels
Information Technology Group [14] Institute for Advanced Study

Document Views
The Document window shows the current document. You can select any of the following views: Design view A design environment for visual page layout, visual editing, and rapid application development. In this view, Dreamweaver displays a fully editable, visual representation of the document, similar to what you would see when viewing the page in a browser. Code view A hand‐coding environment for writing and editing HTML, JavaScript, server‐language code—such PHP or ColdFusion Markup Language (CFML)—and any other kind of code. Split Code view A split version of Code view that lets you scroll to work on different sections of the document at the same time. Code and Design view Lets you see both Code view and Design view for the same document in a single window. Live view Similar to Design view, Live view displays a more realistic representation of what your document will look like in a browser, and lets you interact with the document exactly as you would in a browser. Live view is not editable. However, you can edit in Code view and refresh Live view to see your changes. Live Code view Only available when viewing a document in Live view. Live Code view displays the actual code that a browser uses to execute the page, and can dynamically change as you interact with the page in live view. Live Code view is not editable.
Application Bar
The application bar contains menus, workspace switcher, and other application controls for changing the document window layout, managing Dreamweaver extensions, and creating and managing websites.
Information Technology Group [15] Institute for Advanced Study
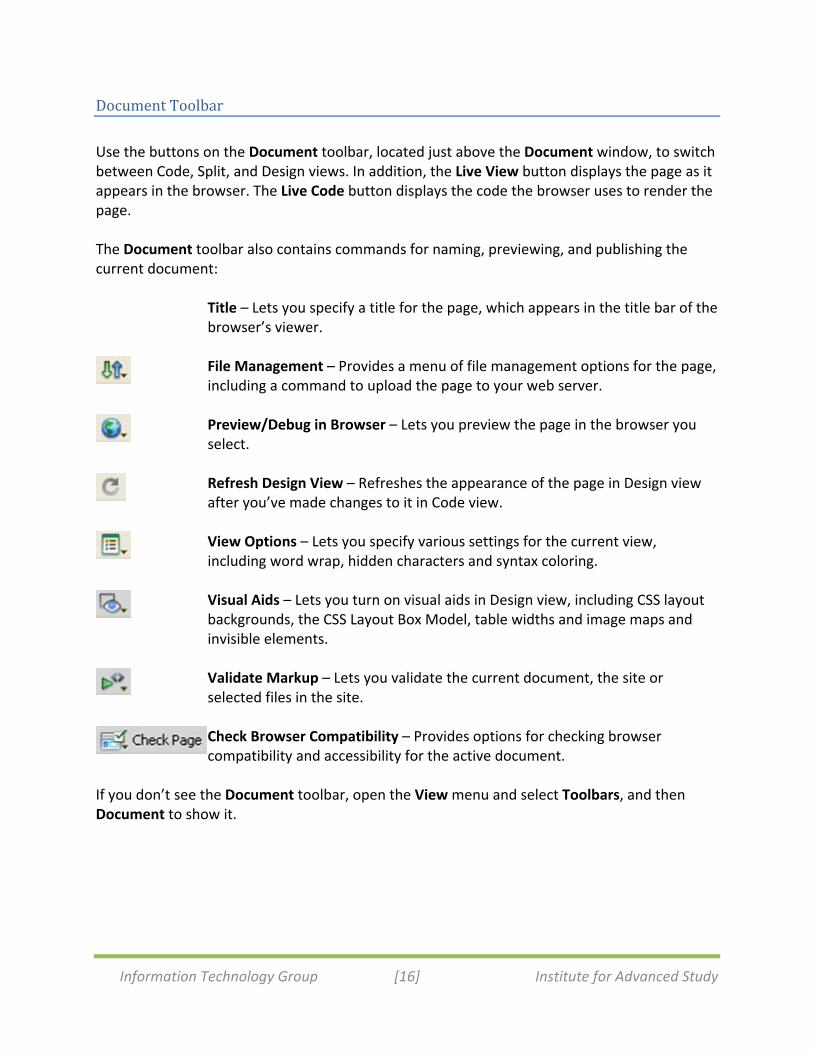
Document Toolbar
Use the buttons on the Document toolbar, located just above the Document window, to switch between Code, Split, and Design views. In addition, the Live View button displays the page as it appears in the browser. The Live Code button displays the code the browser uses to render the page. The Document toolbar also contains commands for naming, previewing, and publishing the current document:
Title – Lets you specify a title for the page, which appears in the title bar of the browser’s viewer.
File Management – Provides a menu of file management options for the page, including a command to upload the page to your web server.
Preview/Debug in Browser – Lets you preview the page in the browser you select.
Refresh Design View – Refreshes the appearance of the page in Design view after you’ve made changes to it in Code view.
View Options – Lets you specify various settings for the current view, including word wrap, hidden characters and syntax coloring.
Visual Aids – Lets you turn on visual aids in Design view, including CSS layout backgrounds, the CSS Layout Box Model, table widths and image maps and invisible elements.
Validate Markup – Lets you validate the current document, the site or selected files in the site.
Check Browser Compatibility – Provides options for checking browser compatibility and accessibility for the active document.
If you don’t see the Document toolbar, open the View menu and select Toolbars, and then Document to show it.
Information Technology Group [16] Institute for Advanced Study

Panels
Panels are windows that allow you to view, organize, and change elements and related options in a document. In Flash, you work with several panel windows at one time. Instead of continually moving, resizing, or opening and closing windows, you can collapse or expand individual panels within a window with a single click to save space.
Files Panel
The files panel is another panel that is used frequently. It lists all the web files such as web pages, graphic, flash and so on files. It is a quick way to open Web pages that you will need to work on. Work with files in the Files panel You can open or rename files; add, move, or delete files; or refresh the Files panel after you make changes. For Dreamweaver sites, you can also determine which files (on either the local or remote site) have been updated since the last time they were transferred.
C
reate a file or folder
Dreamweaver will create the new file or folder inside he currently selected folder, or in the same folder as he currently selected file. tt
1. In the Files panel Select Window > Files, select a file or folder.
2. Right‐click and select New File or New Folder. 3. Enter a name for the new file or folder. 4. Press Enter.
Delete a file or folder
1. In the Files panel, Select Window > Files, select the file or folder you want to delete. 2. Right‐click, then select Edit > Delete.
Information Technology Group [17] Institute for Advanced Study

Rename a file or folder
1. In the Files panel, Select Window > Files, select the file or folder you want to rename. 2. Do one of the following to activate the name of the file or folder:
Click in the filename, pause, and then click again.
Right‐click the file’s icon, then select Edit > Rename. 3. Type the new name over the existing name. 4. Press Enter.
Move a file or folder
1. In the Files panel, select Window > Files, select the file or folder you want to move. 2. Do one of the following:
Copy the file or folder, and then paste it in a new location.
Drag the file or folder to a new location. 3. Refresh the Files panel to see the file or folder in its new location.
Refresh the Files panel Do one of the following:
Right‐click any file or folder, then select Refresh.
Dreamweaver sites only ‐ Click the Refresh button in the Files panel toolbar (this option refreshes both panes).
Insert panel overview
The Insert panel contains buttons for creating and inserting objects such as tables, images, and links. The buttons are organized into several categories, which you can switch by selecting the desired category from the Category pop‐up menu.
The Insert panel is organized in the following categories: The Common category Lets you create and insert the most commonly used objects, such as images and tables. The Layout category Lets you insert tables, table elements, div tags, frames, and Spry widgets. You can also choose two views for tables: Standard (default) and Expanded Tables.
Information Technology Group [18] Institute for Advanced Study

The Forms category Contains buttons for creating forms and inserting form elements, including Spry validation widgets. The Data category Lets you insert Spry data objects as well as other dynamic elements like recordsets, repeated regions, and record insertion and update forms. The Spry category Contains buttons for building Spry pages, including Spry data objects and widgets. The InContext Editing category Contains buttons for building InContext editing pages, including buttons for Editable Regions, Repeating Regions, and managing CSS classes. The Text category Lets you insert a variety of text‐ and list‐formatting tags, such as b, em, p, h1, and ul. The Favorites category Lets you group and organize the Insert panel buttons you use the most in one common place. Server‐code categories Available only for pages that use a particular server language, including ASP, CFML Basic, CFML Flow, CFML Advanced, and PHP. Each of these categories provides server‐code objects that you can insert in Code view. Unlike other panels in Dreamweaver, you can drag the Insert panel out of its default dock position and drop it into a horizontal position at the top of the Document window. When you o so, it changes from a panel to a toolbar (though you cannot hide and display it in the same ay as other toolbars).
dw
Information Technology Group [19] Institute for Advanced Study
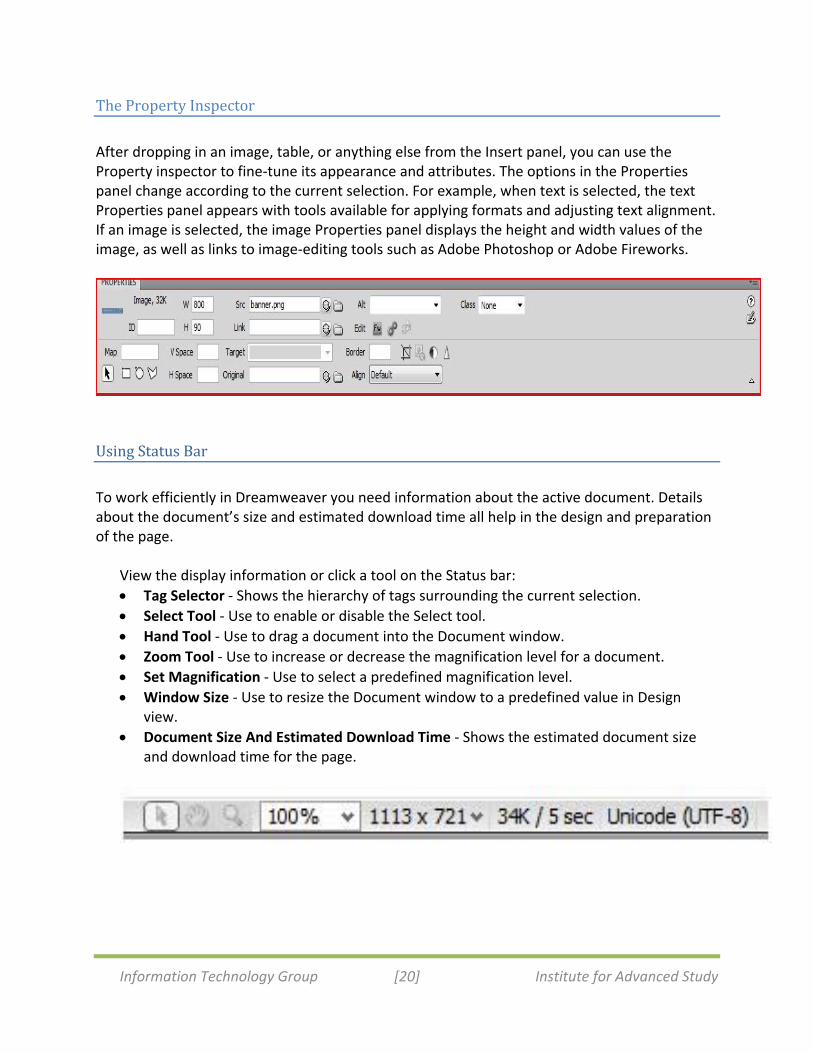
The Property Inspector
After dropping in an image, table, or anything else from the Insert panel, you can use the Property inspector to fine‐tune its appearance and attributes. The options in the Properties panel change according to the current selection. For example, when text is selected, the text Properties panel appears with tools available for applying formats and adjusting text alignment. If an image is selected, the image Properties panel displays the height and width values of the image, as well as links to image‐editing tools such as Adobe Photoshop or Adobe Fireworks.
Using Status Bar
To work efficiently in Dreamweaver you need information about the active document. Details about the document’s size and estimated download time all help in the design and preparation of the page.
View the display information or click a tool on the Status bar:
Tag Selector ‐ Shows the hierarchy of tags surrounding the current selection.
Select Tool ‐ Use to enable or disable the Select tool.
Hand Tool ‐ Use to drag a document into the Document window.
Zoom Tool ‐ Use to increase or decrease the magnification level for a document.
Set Magnification ‐ Use to select a predefined magnification level.
Window Size ‐ Use to resize the Document window to a predefined value in Design view.
Document Size And Estimated Download Time ‐ Shows the estimated document size and download time for the page.
Information Technology Group [20] Institute for Advanced Study

Customizing Workspace
You can think of workspace as creating your own personal view of Dreamweaver. When using workspaces, you can use the built‐in workspaces or create your own based upon your needs and preferences. To create your own workspace, manipulate the panels and toolbars to your liking. Panel Customization You can float the various panels by dragging them onto the page. In the Panels Group you can collapse all the panels to icons by clicking the two arrows to the right at the top of the panel group.
Classic ‘Dreamweaver CS3’ Workspace If you really like the look of Dreamweaver CS3, you can choose the CS3 (classic) workspace that is automatically installed with Dreamweaver CS4. To choose that workspace you go to Window > Workspace Layout > Classic.
Saving a Workspace To save your custom workspace, go to Window > Workspace Layout > New Workspace. By saving your workspace you will be able to easily access it at the top of the workspace list for quick reference at a later time.
Reset a Workspace In case of a accidental or unwanted changes to a workspace, you can reset the workspace by going to Window > Workspace Layout > Reset ‘Workspaces Name.’
Managing Workspaces To rename or delete the custom workspaces you have created, go to Window > Workspace Layout > Manage Workspaces.
Changing Workspaces If at any time you would like to change workspaces, you can easily do so by clicking the drop down next to the search in the upper right hand corner and choosing your desired workspace environment. Alternatively you could go to Window > Workspace Layout. To better utilize the Dreamweaver workspaces, examine how you use Dreamweaver and what panels you continually open and close. This will help you develop a Dreamweaver workspace that suits your needs so that you can perform tasks more effectively.
Information Technology Group [21] Institute for Advanced Study

Formatting Webpage
To change the background color of your pages or other overall properties of your website: Go to Modify > Page Properties. Here, in the Page Properties window, you can set the default font, text size, text color, and background for all of your pages
Modifying the page title
The title of a web page is displayed in the browser’s title bar. Page titles are one of the key elements used by search engines to index websites. It’s important to always change Dreamweaver’s default page title of “Untitled Document” to a phrase that describes your specific web page.
1. In the Title field of the Document toolbar, select the placeholder text, Untitled
Document.
2. Type the desired title and press Enter.
Information Technology Group [22] Institute for Advanced Study

Text Properties
The appearance of text on the web page is controlled by the properties of the text such as its font type, size, color, paragraph format, alignment, style, and indenting. To change these settings, you will want to highlight the text you want to edit and then go to the Property Inspector window.
Adding Design Elements
Inserting Text
To add text to a page:
1. On the new page, click to set a blinking insertion point. You can press Enter
2. Type your text.
Inserting Images
T o i ens rt an image on a page:
the desired location to place the picture. 1. Click in
2. Choose Insert > Image.
You can also find this in the Insert panel on the Common tab by clicking the Images button and selecting Image.
You can also have your cursor where you want the picture to appear. In the Assets Panel, locate and click the picture and then click insert at the bottom of the Assets panel.
t3. Naviga , and click OK.
4. In the Image Tag Accessibility Attributes dialog box, in the Alternate Text text
e to the desired folder, select the file
box, type an alternate name describing the image and click OK.
5. You can then specify the image properties by utilizing the Property Inspector.
Information Technology Group [23] Institute for Advanced Study

Inserting Tables
To insert tables
1. Click to place the insertion point for the new table.
2. Click the Insert menu, and then click Table.
3. Create a table using the following options:
Rows ‐ Enter a value for the number of rows in the table.
Columns ‐ Enter a value for the number of columns in the table.
Table Width ‐ Enter a value (pixels or percent), for the initial width of the table.
Border Thickness ‐ Enter a value for the border width of the table.
Cell Padding ‐ Enter a value for the number of pixels between a cell’s content and the cell boundaries.
Cell Spacing ‐ Enter a value for the number of pixels between adjacent table cells.
Header. Select a position for a header area in the table: None, Left, Top, Both.
Caption ‐ Enter a table caption (displays outside of the table).
Align Caption ‐ Click to align where the table caption appears in relation to the table: default, top, bottom, left, right.
Summary ‐ Enter a table description. Screen readers read the summary text, but the text does not appear in the user’s browser.
4. Click Ok.
Creating and Formatting Lists
Lists organize the everyday information of our lives: to‐do lists, grocery lists, least favorite celebrity lists, and so on. On Web pages, lists are indispensable for presenting groups of items such as links, company services, or a series of instructions. HTML offers formatting options for three basic categories of lists. The two most common types of lists are bulleted (called Unordered lists) and numbered (called Ordered in HTML). The third and lesser‐known list type, a definition list, comes in handy for creating glossaries or dictionary‐like entries.
Information Technology Group [24] Institute for Advanced Study

Create Ordered List
1. Click within the document where you want to insert the Ordered list, or select a group
of text that you want to convert into a list.
2. Click the Window menu, and then click Properties to display the Properties panel.
3. Click HTML to format HTML tags.
4. Click the Ordered List button in the Properties panel.
5. To add items to the list, type an item, and then press Enter.
Note: You can create a nested or indented list. A nested list is a list that contains another list. Select the items you want to nest, click the Indent button in the Properties panel, or click the Format menu, and then click Indent.
Create Unordered List
1. Click within the document where you want to insert the Unordered list, or select a
group of text that you want to convert into a list.
2. Click the Window menu, and then click Properties to display the Properties panel.
3. Click the Unordered List button in the Properties panel. Dreamweaver inserts a default
round bullet into the document.
4. To add items to the list, type an item, and then press Enter.
Working with Links
You can have hyperlinks, email links and anchor links on your page. A hyperlink is a reference (an address) to a resource on the web. Hyperlinks can point to any resource on the web: an HTML page, an image, a sound file, a movie, etc. An email link is a link that will open up the individuals default email client and fill in the email address field. An anchor is a term used to define a hyperlink destination inside a page. Using these various links can make your website user‐friendly.
Information Technology Group [25] Institute for Advanced Study

Hyperlinks
Hyperlinks are links that reference another web page on the same website or a different website. By default, the text that contains a hyperlink is shown in blue and is underlined. When you click a hyperlink, the target web page, by default, opens in the same window. It can also be opened in a new window. Hyperlinks can also be created on text or images. To create hyperlinks:
1. Select the desired text or image.
2. Choose Insert > Hyperlink.
a. You can also find this in the Insert panel on the Common tab and clicking the
Hyperlink button.
3. You can now either edit the properties in the Property Inspector by clicking OK or you
can fill the information in the dialog box.
Options
Text ‐ Allows you to specify the text to which you want to create a link.
Link ‐ Allows you to specify the web page to which you want to link.
Target ‐ Defines where the linked document will be opened.
Title ‐ Allows you to type a description of the page that you are linking.
Access Key ‐ Allows you to specify a shortcut key to select the link.
Tab Index ‐ Allows you to specify the tab order.
Information Technology Group [26] Institute for Advanced Study

Anchor Links
Named anchors let you set markers in a document, which are often placed at a specific topic or at the top of a document. You can then create links to these named anchors, which quickly take your visitor to the specified position.
Creating a link to a named anchor is a two‐step process. First, you create a named anchor; then you create a link to the named anchor.
1. In the Document window’s Design view, place the insertion point where you want the
named anchor.
2. Do one of the following:
•Select Insert > Named Anchor.
•In the Common category of the Insert panel, click the Named Anchor button.
3. In the Anchor Name box, type a name for the anchor, and click OK. (The anchor name
can’t contain spaces).
4. The anchor marker appears at the insertion point.
Note: If you do not see the anchor marker, select View > Visual Aids > Invisible Elements
L
ink to a named anchor
There are three ways to create a link to the named anchor:
1. In the Property Inspector, in the Link text box, click and type # followed by the anchor name to create a link to the named anchor (ex. #name).
2. Or, in the Property Inspector, to the right of the Link text box, click the Point to File button and drag it to the anchor marker on the web page.
3. Or, create a link using the Hyperlink dialog box.
In the Link text box, click and type # followed by the anchor name (ex. #name).
Or, from the Link drop‐down list, select the desired anchor.
Information Technology Group [27] Institute for Advanced Study
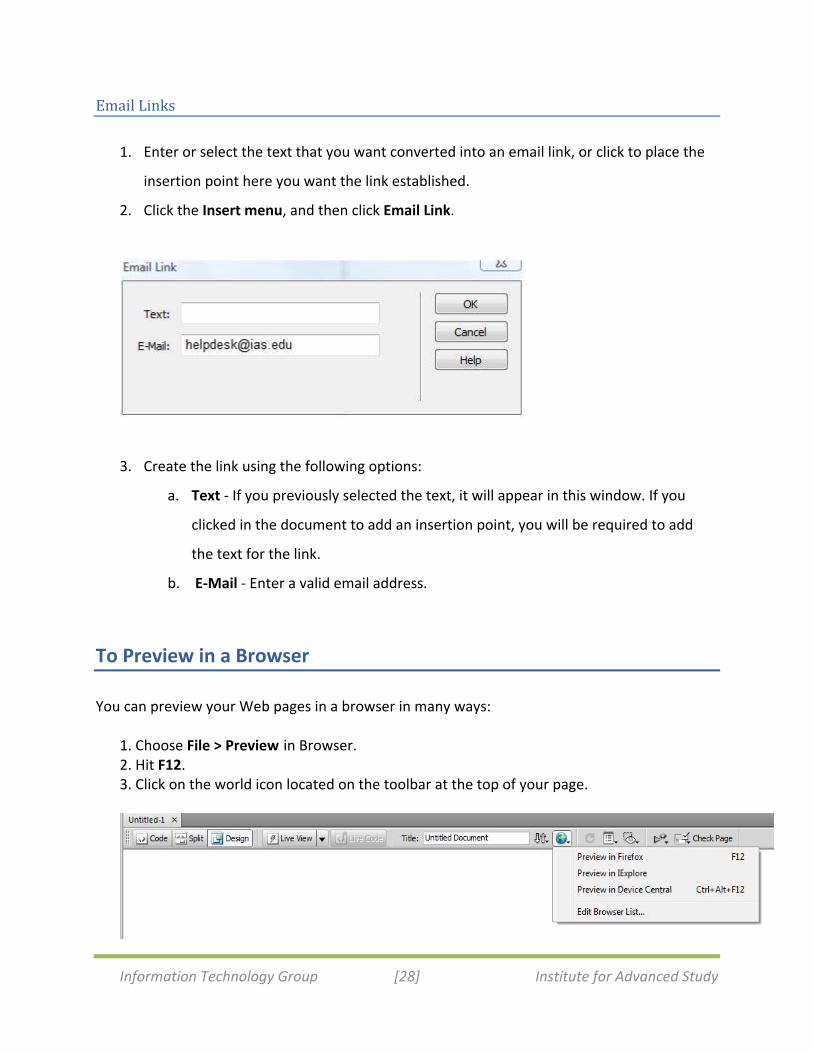
Email Links
1. Enter or select the text that you want converted into an email link, or click to place the
insertion point here you want the link established.
2. Click the Insert menu, and then click Email Link.
3. Create the link using the following options:
a. Text ‐ If you previously selected the text, it will appear in this window. If you
clicked in the document to add an insertion point, you will be required to add
the text for the link.
b. E‐Mail ‐ Enter a valid email address.
To Preview in a Browser
You can preview your Web pages in a browser in many ways:
1. Choose File > Preview in Browser. 2. Hit F12. 3. Click on the world icon located on the toolbar at the top of your page.
Information Technology Group [28] Institute for Advanced Study

Create Navigation Bar
A navigation bar provides an easy navigation interface for visitors to a website. You can create horizontal or vertical navigation bar. You can only create one navigation bar for a page. To create a navigation bar:
1. Select Insert > Image Objects > Navigation Bar.
2. In the Element name text box, type a name for a navigation bar element—for example, Home. Each element corresponds to a button with a set of up to four image states.
3. Four image states are: Up, Over, Down, and Over While Down. Browse to select images for these four states. Only the Up image is required; other image states are optional.
4. In the Alternate Text text box, Alternate text appears in place of images in text‐only browsers or in browsers that download images manually. Screen readers read
Information Technology Group [29] Institute for Advanced Study

alternate text, and some browsers display alternate text when the user moves the pointer over the navigation bar element.
5. In the When Clicked, Go To URL text box, type the URL of the web page that needs to be displayed when the user clicks the link.
6. Check the Preload image check box. Select this option to download images as the page is downloaded. This option prevents delays when the user moves the pointer over rollover images.
7. If required the check Show “Down Image” initially. Select this option for elements that you want to display initially in the Down state rather than the default Up state.
8. From the Insert down box, select the desired option vertically or horizontally.
9. If necessary, uncheck the Use Tables check box to display the elements on the page instead of placing them within the structure of a table.
10. If necessary, click the Add item button and add more elements to the Nav bar elements list box and specify the appropriate options for them.
11. Click OK to insert the navigation bar.
Create Image Hotspot
A hotspot is an area on an image that can be clicked to open a linked web page. Hotspots can be in different shapes such as rectangular, oval, or polygonal. To create an image:
1. Select an image ( example: the banner)
2. In the Property Inspector, in the Map section, select the desired hotspot (rectangular hotspot, oval hotspot, or polygonal hotspot).
3. On the image drag to create a hotspot.
4. On the Dreamweaver message box that appears, click on OK.
Information Technology Group [30] Institute for Advanced Study
Information Technology Group [31] Institute for Advanced Study
5. In the Hotspot Property Inspector for the Map text box, type a unique name for the image map.
6. In the Alt text box, type alternate text for the hotspot.
7. In the Link text box, type the desired webpage link