i n s t r u c t io n id: 8 4 2 4 6 3 4 0 ) f r o n t g r
TRANSCRIPT
2/4/2020 Document ID: 5336919
https://gsi.ext.gm.com/gsi/showDoc.do?pubCellSyskey=14411746&from=sm&cellId=319528&docSyskey=5336919&laborOpCode=&pubObjSyskey=14411748 1/11
2020 GMC Truck Sierra 1500 - 2WD | Sierra 1500 Accessory Installation Manual | Accessories | Exterior Trim Accessories | Accessories | Document ID: 5336919
Front Grille Emblem Package Installation (Illuminated Grille EmblemInstruction ID: 84246340)
Installation Instructions Part Number
84246340
Kit Contents
Qty Description
1 Emblem Assembly GMC – Front Grille Illuminated
1 Harness
5 Tie Strap
5 Tie Strap Clips
1 Emblem Assembly GMC – Endgate
1 Alcohol Wipe
1 Installation Instructions
ProcedureFront GMC Emblem Replacement
1. Read all instructions before performing procedure. 2. Inspect kit to verify all parts are included.
3. Turn off the vehicle.
© 2020 General Motors. All rights reserved.
2/4/2020 Document ID: 5336919
https://gsi.ext.gm.com/gsi/showDoc.do?pubCellSyskey=14411746&from=sm&cellId=319528&docSyskey=5336919&laborOpCode=&pubObjSyskey=14411748 2/11
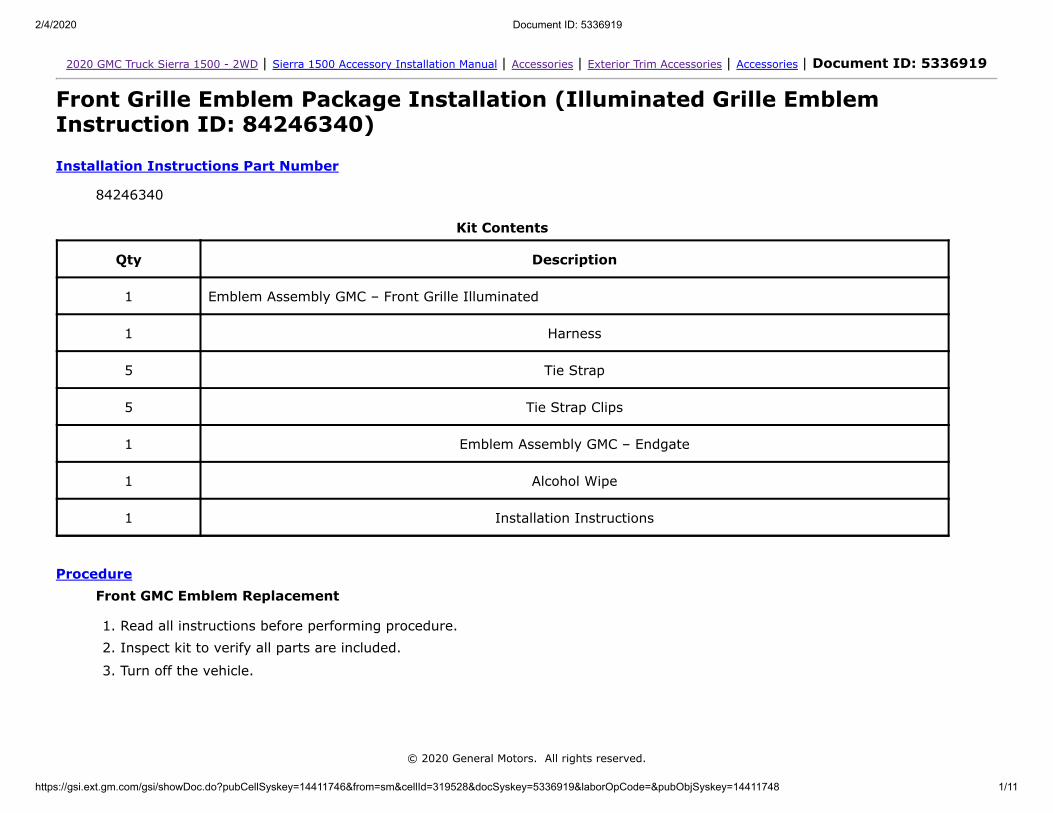
Note: Red emblems will be damaged and not suitable for re-use. 4. Using a suitable flat-bladed tool (2), carefully remove the red emblem insert (1) from each letter.
© 2020 General Motors. All rights reserved.
2/4/2020 Document ID: 5336919
https://gsi.ext.gm.com/gsi/showDoc.do?pubCellSyskey=14411746&from=sm&cellId=319528&docSyskey=5336919&laborOpCode=&pubObjSyskey=14411748 3/11
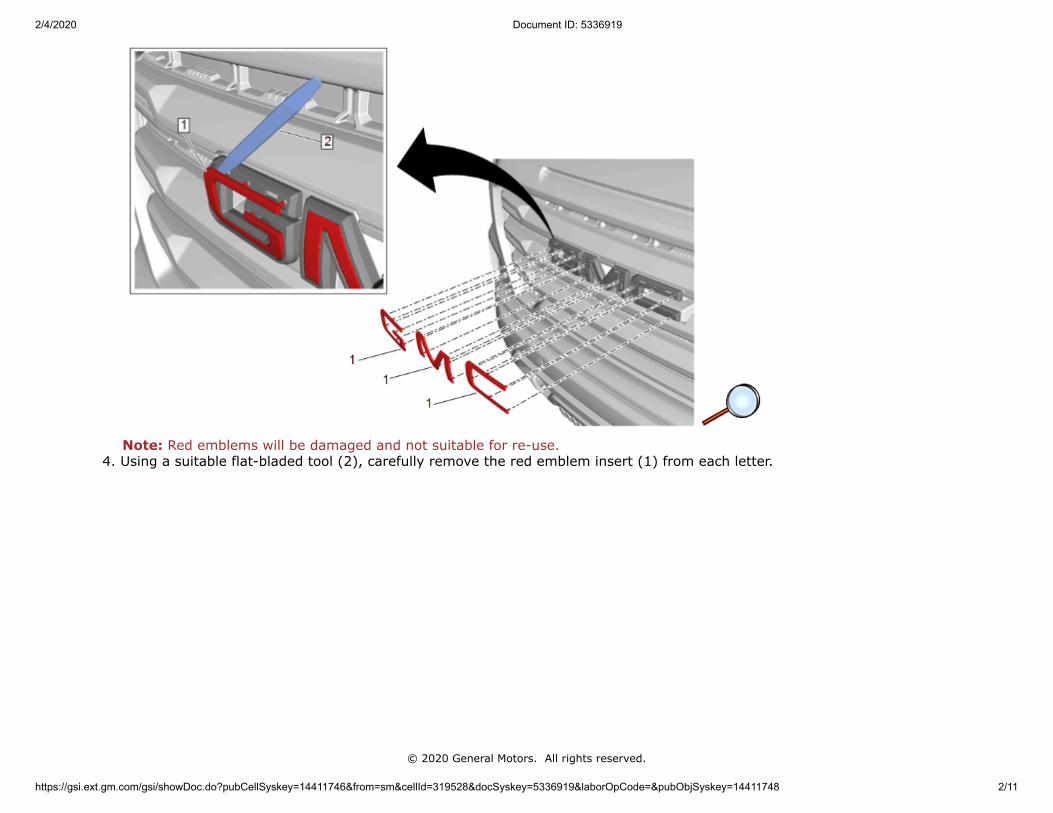
5. Using a suitable flat bladed tool (3), carefully release the retention clips (4) and remove each letter (1) from grille (2). Be carefulto avoid damage to the retaining tabs in the grille (2), as this may result in loose fit of the new emblems.
© 2020 General Motors. All rights reserved.
2/4/2020 Document ID: 5336919
https://gsi.ext.gm.com/gsi/showDoc.do?pubCellSyskey=14411746&from=sm&cellId=319528&docSyskey=5336919&laborOpCode=&pubObjSyskey=14411748 4/11
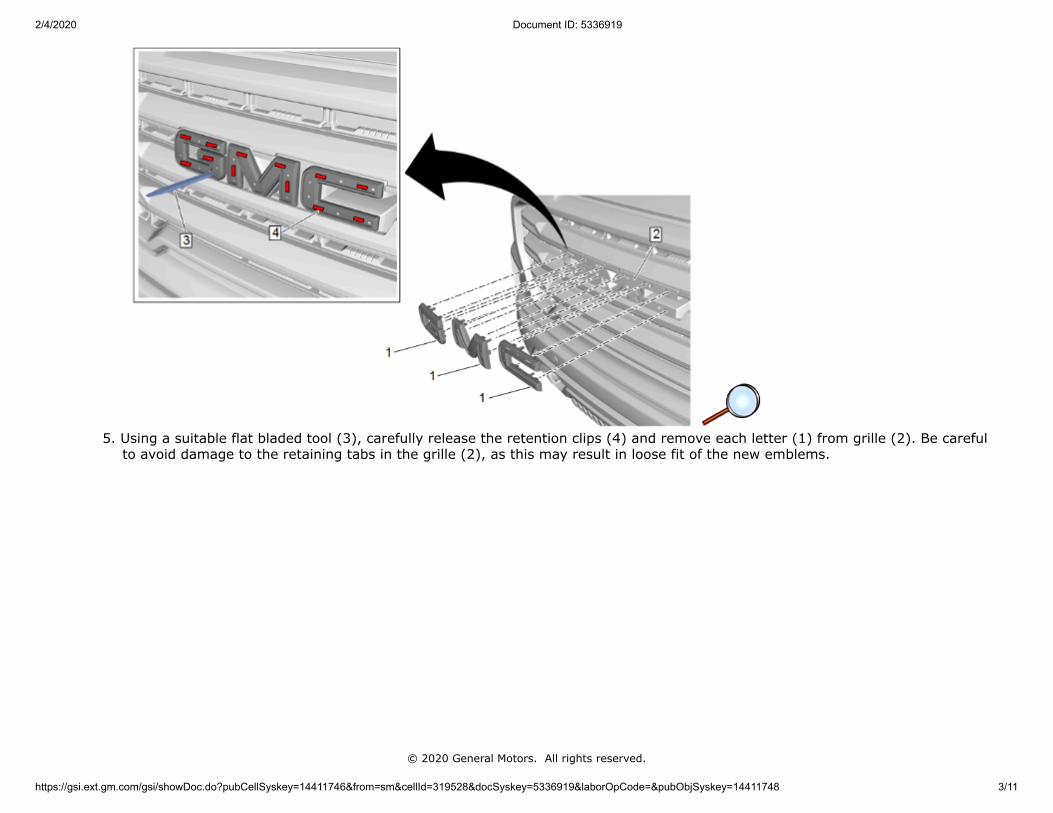
6. Accurately position the illuminated emblem from kit (1) to grille (2) using the locating pins.
7. Install the new emblem, applying enough evenly distributed pressure to engage the locking/retention tabs.
© 2020 General Motors. All rights reserved.

2/4/2020 Document ID: 5336919
https://gsi.ext.gm.com/gsi/showDoc.do?pubCellSyskey=14411746&from=sm&cellId=319528&docSyskey=5336919&laborOpCode=&pubObjSyskey=14411748 5/11
8. Verify that the emblem is fully seated and securely attached to the grille.
9. Remove the front grille and necessary components. Refer to Front Grille Replacement in Vehicle Service Manual.10. Remove the driver side headlamp assembly. Refer to Front Headlamp Replacement in Vehicle Service Manual.
© 2020 General Motors. All rights reserved.
2/4/2020 Document ID: 5336919
https://gsi.ext.gm.com/gsi/showDoc.do?pubCellSyskey=14411746&from=sm&cellId=319528&docSyskey=5336919&laborOpCode=&pubObjSyskey=14411748 6/11
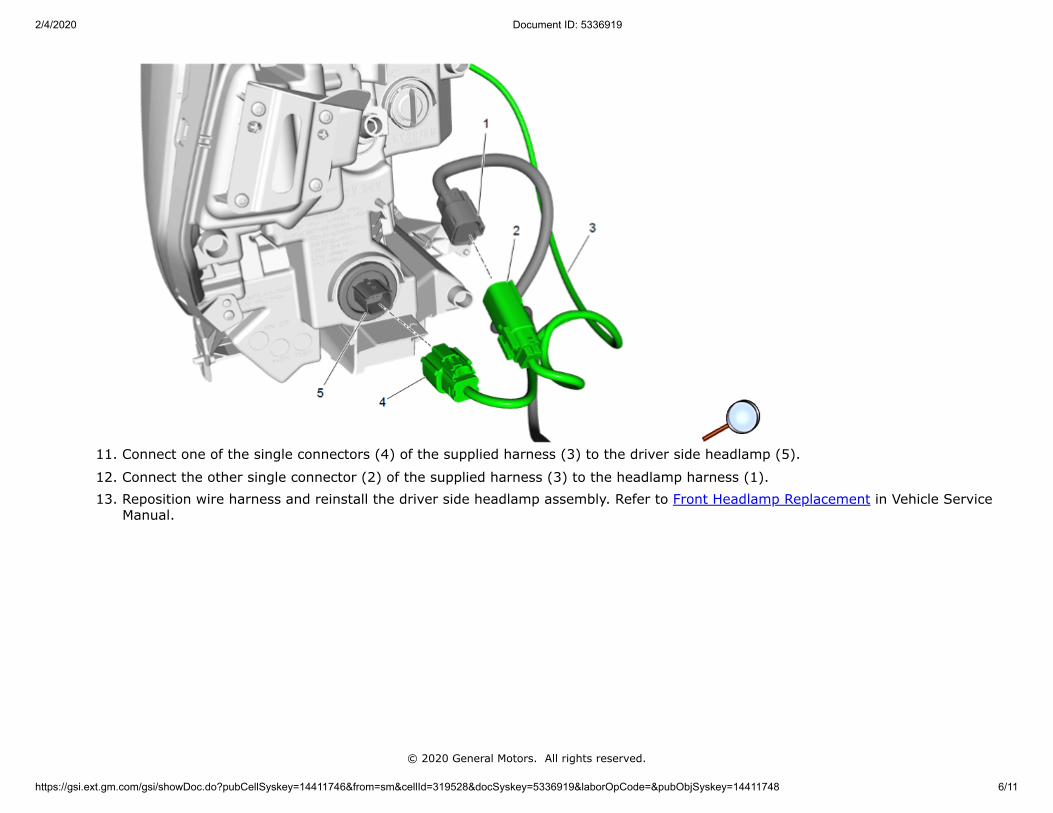
11. Connect one of the single connectors (4) of the supplied harness (3) to the driver side headlamp (5).
12. Connect the other single connector (2) of the supplied harness (3) to the headlamp harness (1).13. Reposition wire harness and reinstall the driver side headlamp assembly. Refer to Front Headlamp Replacement in Vehicle Service
Manual.
© 2020 General Motors. All rights reserved.
2/4/2020 Document ID: 5336919
https://gsi.ext.gm.com/gsi/showDoc.do?pubCellSyskey=14411746&from=sm&cellId=319528&docSyskey=5336919&laborOpCode=&pubObjSyskey=14411748 7/11
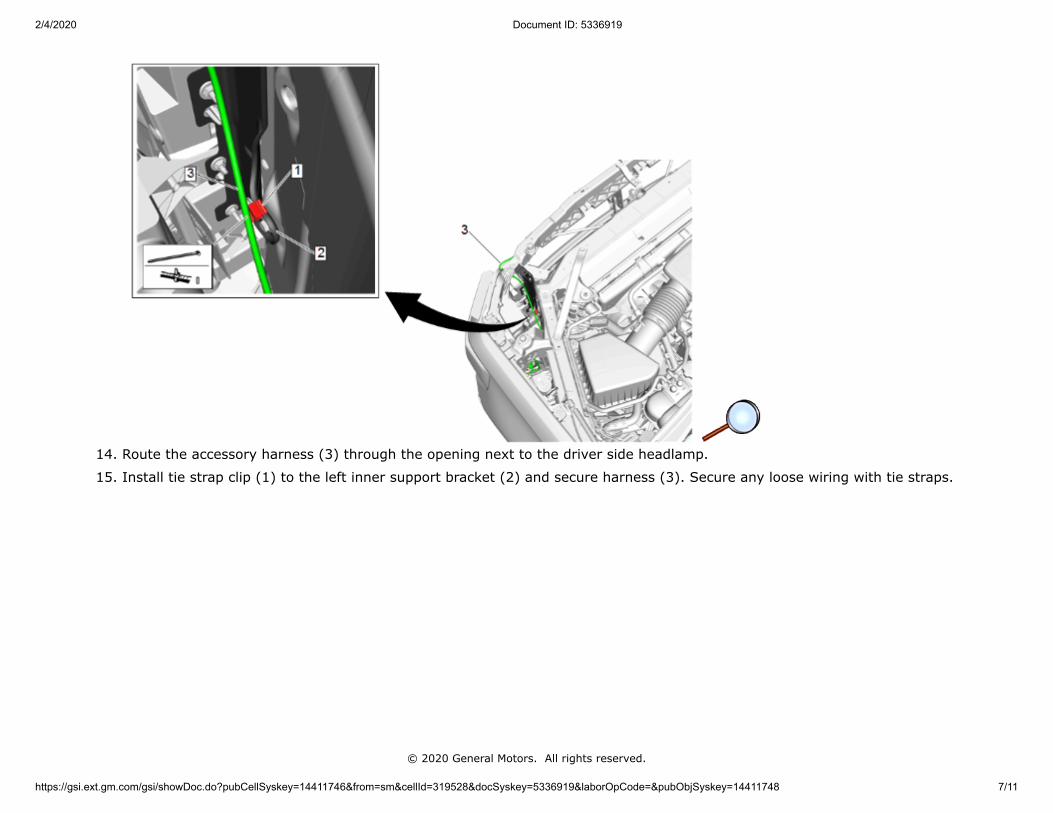
14. Route the accessory harness (3) through the opening next to the driver side headlamp.
15. Install tie strap clip (1) to the left inner support bracket (2) and secure harness (3). Secure any loose wiring with tie straps.
© 2020 General Motors. All rights reserved.

2/4/2020 Document ID: 5336919
https://gsi.ext.gm.com/gsi/showDoc.do?pubCellSyskey=14411746&from=sm&cellId=319528&docSyskey=5336919&laborOpCode=&pubObjSyskey=14411748 8/11
16. Install the tie strap clips (1) to the upper support (2), route accessory harness (3) towards center support and secure accessoryharness (3) to the upper support (2) with tie straps.
© 2020 General Motors. All rights reserved.
2/4/2020 Document ID: 5336919
https://gsi.ext.gm.com/gsi/showDoc.do?pubCellSyskey=14411746&from=sm&cellId=319528&docSyskey=5336919&laborOpCode=&pubObjSyskey=14411748 9/11
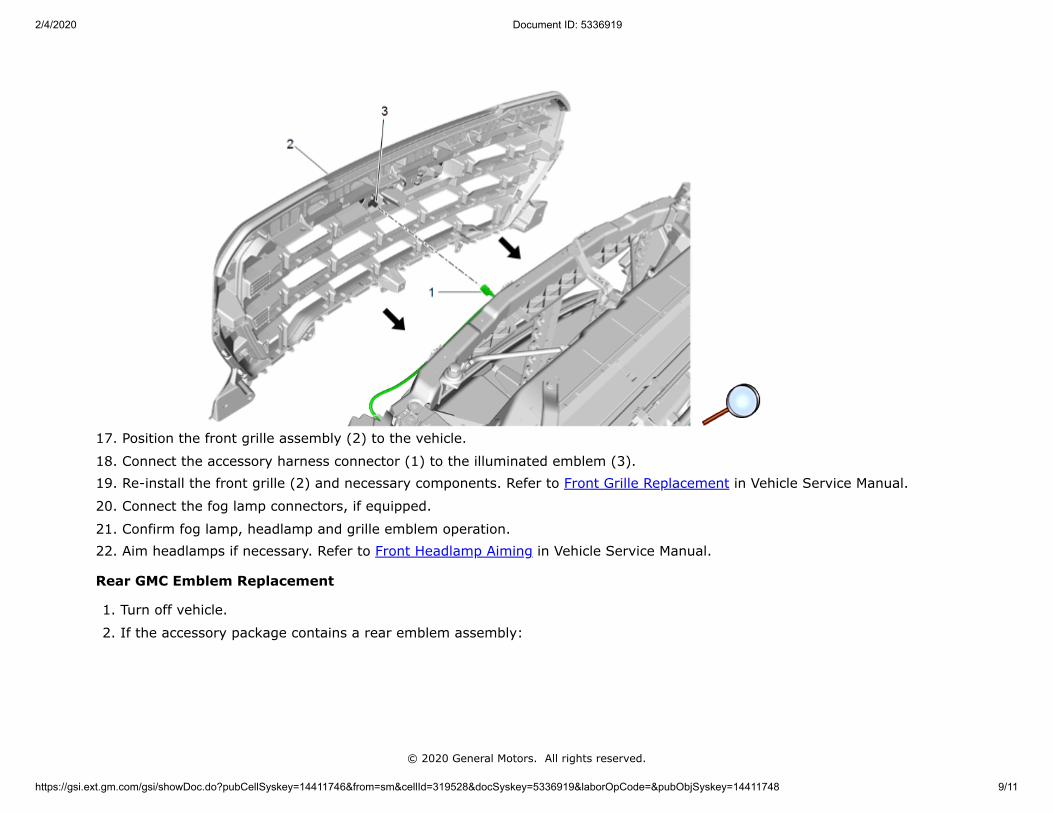
17. Position the front grille assembly (2) to the vehicle.
18. Connect the accessory harness connector (1) to the illuminated emblem (3).19. Re-install the front grille (2) and necessary components. Refer to Front Grille Replacement in Vehicle Service Manual.
20. Connect the fog lamp connectors, if equipped.
21. Confirm fog lamp, headlamp and grille emblem operation.22. Aim headlamps if necessary. Refer to Front Headlamp Aiming in Vehicle Service Manual.
Rear GMC Emblem Replacement
1. Turn off vehicle.
2. If the accessory package contains a rear emblem assembly:
© 2020 General Motors. All rights reserved.
2/4/2020 Document ID: 5336919
https://gsi.ext.gm.com/gsi/showDoc.do?pubCellSyskey=14411746&from=sm&cellId=319528&docSyskey=5336919&laborOpCode=&pubObjSyskey=14411748 10/11
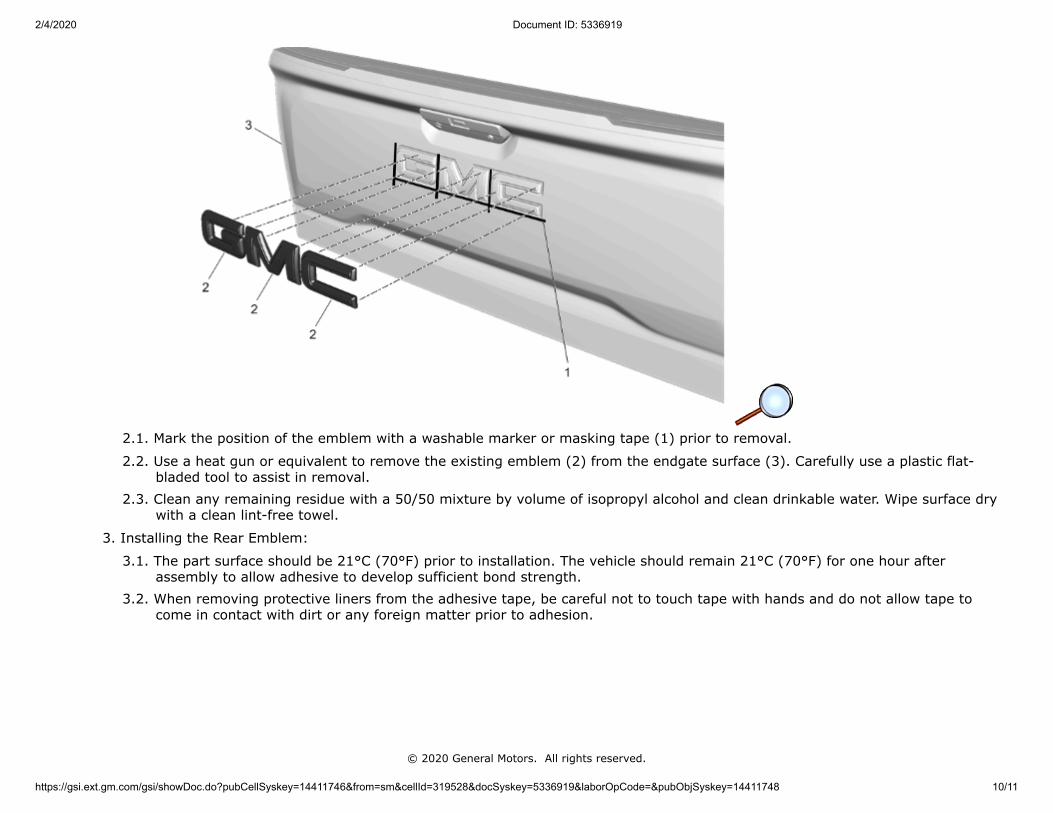
2.1. Mark the position of the emblem with a washable marker or masking tape (1) prior to removal.
2.2. Use a heat gun or equivalent to remove the existing emblem (2) from the endgate surface (3). Carefully use a plastic flat-bladed tool to assist in removal.
2.3. Clean any remaining residue with a 50/50 mixture by volume of isopropyl alcohol and clean drinkable water. Wipe surface drywith a clean lint-free towel.
3. Installing the Rear Emblem:
3.1. The part surface should be 21°C (70°F) prior to installation. The vehicle should remain 21°C (70°F) for one hour afterassembly to allow adhesive to develop sufficient bond strength.
3.2. When removing protective liners from the adhesive tape, be careful not to touch tape with hands and do not allow tape tocome in contact with dirt or any foreign matter prior to adhesion.
© 2020 General Motors. All rights reserved.
2/4/2020 Document ID: 5336919
https://gsi.ext.gm.com/gsi/showDoc.do?pubCellSyskey=14411746&from=sm&cellId=319528&docSyskey=5336919&laborOpCode=&pubObjSyskey=14411748 11/11
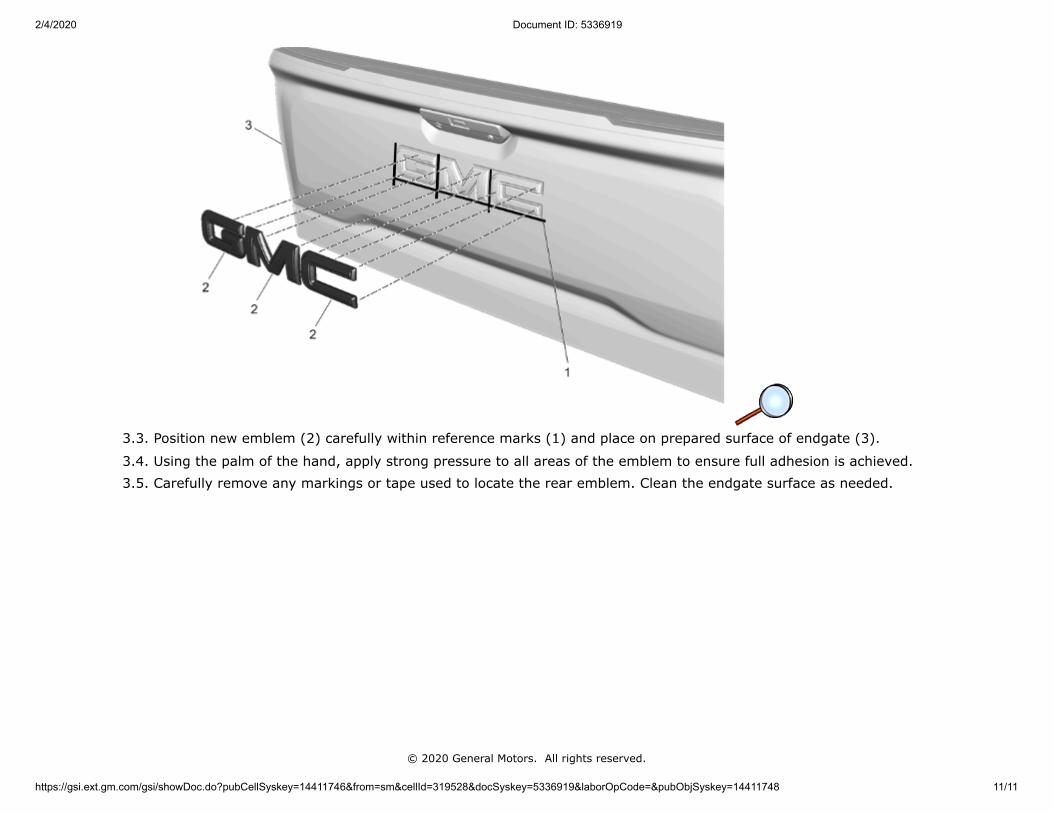
3.3. Position new emblem (2) carefully within reference marks (1) and place on prepared surface of endgate (3).
3.4. Using the palm of the hand, apply strong pressure to all areas of the emblem to ensure full adhesion is achieved.3.5. Carefully remove any markings or tape used to locate the rear emblem. Clean the endgate surface as needed.
© 2020 General Motors. All rights reserved.