i-digits - touch bionics: leading upper limb prosthetics ... clinician... · socket interface...
TRANSCRIPT

i-digits™
Clinician Manual

This document provides instruction for prosthetists in the fitting and servicing of i-digits™ and should be read in full prior to fitting. It is highly recommended that the use of this manual is made in conjunction with instruction from a clinician experienced in upper limb and myoelectric prostheses.
Refer to www.touchbionics.com/downloads/document-library to ensure you have the latest copy of this document.
Refer to the i-digits™ component assembly guide (MA01349) for assembly instructions and fabrication.
i-digits™ clinician manual
This symbol signifies important information and is used throughout the manual.
3 of 18
1.0 i-digits™ 4
1.1 Product Description 4
1.2 Intended Use 4
1.3 User Selection 5
1.4 Prosthesis Overview: Control Options 5
2.0 Componentry 6
2.1 Wristband componentry 7
2.2 Input options and muscle control sites 7
2.3 Battery Charging 8
3.0 Covers 9
3.1 Cover Options 9
4.0 Grip Review 10
4.1 Grip Options 10
5.0 Support Information 12
5.1 Storage and Maintenance 12
5.2 Troubleshooting 13
5.3 General Safety, Warnings and Precautions 14
6.0 User Information 15
6.1 User Details 15
7.0 Appendix 16
7.1 Technical Information 16
7.2 Environmental Conditions 16
7.3 Component Compatibility 16
7.4 Warranty 16

4 of 18
1.0 i-digits™
1.1 Product Description
design. dexterity. intelligent motion.
i-digits™ is a fully customized partial hand prosthesis with individually powered fingers. i-digits™ fingers work in con-junction with any remaining fingers to help significantly increase functional capabilities for users of the device. Based on the industry-leading design of our i-limb® prod-uct range, i-digits™ combines unsurpassed functionality with style.
i-digits™ quantum incorporates gesture control via the pat-ented and ground-breaking i-mo™ technology and is the first partial hand prosthesis that can change grips with a simple gesture.
Key features include:
• Smarter* - gesture control powered by i-mo™ technology uses simple gestures to change grips
- proximity control made available via grip chip tech-nology
• Faster* - adjustable speed boost increases speed up to 30%
• Stronger* - up to 30% more power when needed
- improved component design for easier and more reliable fabrication
- 50% longer battery life
• Smaller - form fitting design decreases device size in every dimension
- smaller digits now available
1.2 Intended Use
i-digits™ is intended to be used by patients with partial hand loss or deficiency. Devices are suited to patients with any 3, 4 or 5 digit loss, while patients with 1 or 2 digit loss are also indicated typically when the digits of loss are either the thumb or the main digits of opposition, namely the in-dex and middle fingers.
* not available on i-digits™ access
i-digits™ offers compliant grip through individually pow-ered digits with stall out ability. A manually rotating thumb in conjunction with a pulsing, enhanced grip (vari-grip), an anti-drop safety feature (auto-grasp) and the wide range of automated grip patterns lead to broad functionality.
Users can choose from a wide selection of automated grips and gestures to help complete daily tasks. Grips can then be customized further for precise control.

5 of 18
1.3 User Selection
i-digits™ is appropriate for users with partial hand loss or deficiency; where the level of loss or deficiency is:
• Distal to the wrist
• Proximal of the metacarpo-phalangeal joint
i-digits™ is not indicated for users with:
• cognitive impairment, such that the device is unable to be controlled
• where skin integrity is insufficient to support a pros-thetic device
1.4 Prosthesis Overview: Control Options
i-digits™ can access automated grips using a range of con-trol options.
gesture control (i-digits™ quantum only):
By enabling i-mo™ technology, gesture control allows an automated grip to be accessed through a smooth and nat-ural motion of the prosthesis in 1 of 4 directions.
To access gesture control:
• Device must be in full open hand mode
• Hold arm parallel to ground (elbow bent to 90°)
• Maintain an open signal until finger twitches
• Move the hand (within maximum 1 second) in direc-tion assigned to desired grip
• i-digits™ quantum will adopt the grip
Note: gesture control can also be accessed using co-con-traction. Depending on how your clinician has set up your prosthesis for you.
app control:
i-digits™ can access a grip at the touch of an icon on the my i-limb™ app and biosim™ app, enabling all automated grips to be available. These are called quick grips™.
i-digits™ will exit automated grip when icon is tapped again, or by selecting another grip icon.
Speed boost (not available on i-digits™ access) is also available on the app using a simple slider bar. This in-creased speed can provide benefits of a more responsive action, more natural appearance of motion and increased grip force.
triggersmuscle control
gr i p c h i p
i-mo™ intelligent motiongesture control
quick grips™
app controlgrip chips™
proximity control
muscle control:
Triggers are specific muscle signals that you can use to in-struct i-digits™ to activate an automated grip. There are 4 potential triggers: hold open, double impulse, triple im-pulse and co-contraction.
proximity control (not available on i-digits™ access):
grip chips™ are small Bluetooth chips which can change the programming of the i-digits™ when you position it near to the chip. The grip chips™ can be positioned around the user’s environment in practical locations to allow access to the optimum grip for particular daily tasks. Individual grip chips can be programmed using the biosim™ or my i-limb™ app.

6 of 18
This illustration above (fig.1) depicts an i-digits™ for users with sound thumb and 4 i-digits.
Fig. 1: Prosthesis overview
2.0 Componentry
Motorized Digit
Wristband and batteries
Palmer view Dorsal view
Knuckle

7 of 18
Fig. 2: Input options
LP Remote ElectrodeLP Compact ElectrodeFSR
When using LP Remote Electrodes or compact elec-trodes, the three muscle groups within the hand are:
1. Thenar compartment
2. Hypothenar compartment
3. Dorsum of the hand
2.1 Wristband componentry
The wristband houses the microprocessor and the batter-ies unit. It is buckle fastened, designed to fit loosely around the distal forearm. The flexible covering (bellows) allows access to wiring during prosthesis assembly. To switch the device on, press the button and the LED light will illumi-nate. To switch it off, press the button again and the LED will light momentarily.
2.2 Input options and muscle control sites
i-digitsTM devices can be controlled using Low Profile (LP) Remote Electrodes, compact electrodes or Force Sensing Resistors (FSRs) which are all specifically designed for use in i-digitsTM devices.
LP Remote Electrodes and compact electrodes both pick up muscle activity from the remaining muscles within the residual hand to control the movements of the digits. LP Remote Electrodes have dome contacts which can improve comfort to the user.
FSRs rely on physical movements of the residual hand to press against the FSR to control the digit movements. FSRs are ideally used in situations where there is a remnant fin-ger present on the affected hand which can flex and extend.
Do not rely on previous myo-electrical test-ing.
Use anatomical sites where the electrode will maintain constant, even contact with the skin. Avoid placing electrodes near socket interface trimlines, bony areas, skin grafts or fatty tissue.
Fig. 3: Electrode sites
Dorsal viewPalmer view
Fig. 4: Wristband
On/Off button LED display
Batteries
321
3

8 of 18
2.3 Battery Charging
Four batteries are provided, two for the wristband and two spares. Each battery is equipped with a LED display alert-ing you when the battery is low on charge. If the battery is low on charge the LED will illuminate RED. The LED will remain illuminated until the battery is adequately charged.
Charging time from full discharge is approximately 2 hours.
i-limb® Power Pack batteries for i-digits™ should only be charged using the battery charger (fig.6) supplied. Place the batteries in the charger as illustrated. Insert the char-ger lead from the mains charger into the charger base unit. Insert the mains charger into the power outlet (fig.5).
On the base plate (fig.7) of the charger you will see the vari-ous light sequences:
• Middle light on: Charger is plugged in
• 2nd and 5th lights blinking Green: Batteries are charging
• 2nd and 5th lights solid Green: Batteries are charged
• 1st and 4th Red lights on: Battery fault, unplug and try again. If lights continue to illuminate, contact Customer Support.
Fig. 5: Charger
Fig. 6: Charger base unit
Fig. 7: Base plate
UK
Europe
USA and Japan
Only use the plug to disconnect the charger, never pull the cable to remove the lead.
9 of 18
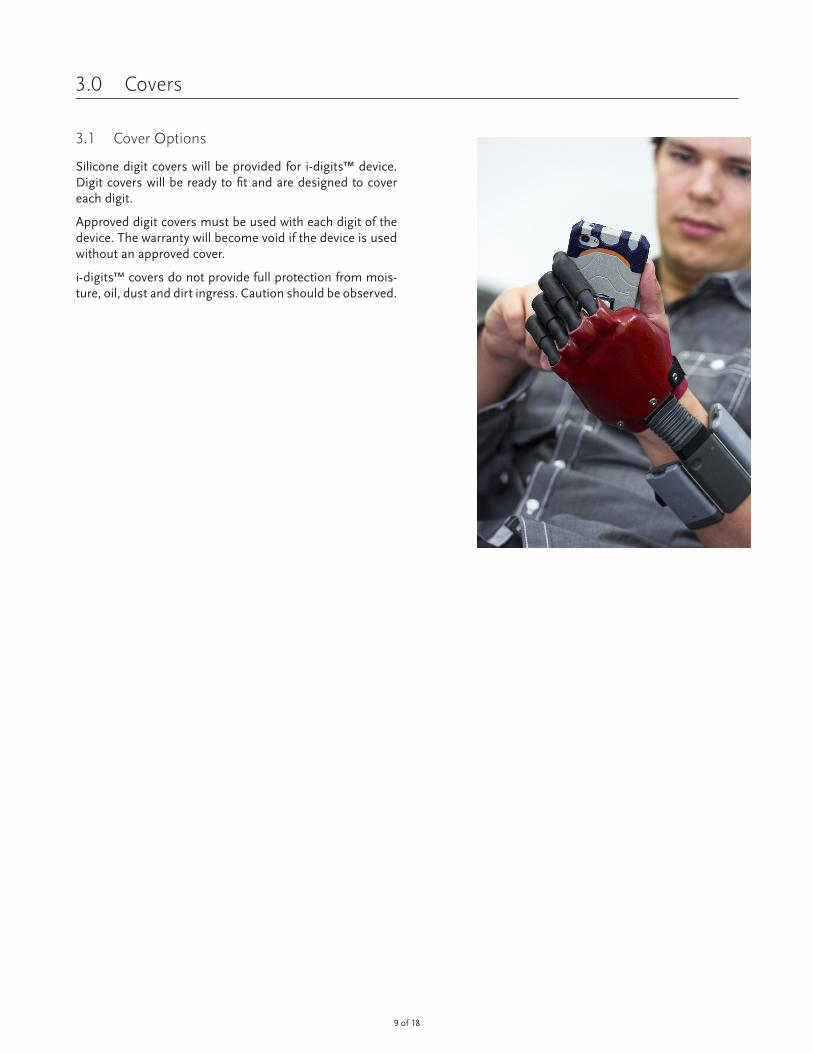
3.0 Covers
3.1 Cover Options
Silicone digit covers will be provided for i-digits™ device. Digit covers will be ready to fit and are designed to cover each digit.
Approved digit covers must be used with each digit of the device. The warranty will become void if the device is used without an approved cover.
i-digits™ covers do not provide full protection from mois-ture, oil, dust and dirt ingress. Caution should be observed.

10 of 18
4.0 Grip Review
i-digits™ quantum has 20 different grip options available and 12 customizable my grips™ (not shown). i-digits™ access has 12 different gip options available.
These grips can be accessed and programmed through the biosim™ app and the my i-limb™ app. The available grips are displayed on the quick grips page of the app.
The following features catalog reviews the various available grips and provide a functional description of each.The range of grips available is dependent on the i-digits™ device configurations and the level of amputation. The range of grips are represented below as per a 5 digit device.
4.1 Grip Options
PRECISION PINCH GRIP OPTIONS
TRIPOD GRIP OPTIONS
Standard Precision Pinch Opened middle, ring and little finger remain fully opened and switch off. Index finger and thumb provide grip.
Standard 3 Jaw Chuck (Tripod) Openedring and little finger remain fully opened and switch off. Thumb, index and middle fingers move to provide grip.
Thumb Precision Pinch Openedmiddle, ring and little finger remain fully opened and switch off. Thumb automati-cally moves to a partially closed position. Index finger will move to provide grip against a fixed thumb.
Thumb 3 Jaw Chuck (Tripod) Openedring and little finger remain fully opened and switch off. Thumb automatically moves to a partially closed position. In-dex and middle fingers move to provide grip against a fixed thumb.
Standard Precision Pinch Closedmiddle, ring and little finger automatical-ly close and switch off. Index finger and thumb provide grip.
Standard 3 Jaw Chuck (Tripod) Closedring and little finger move to terminal close. Thumb, index and middle fingers move to provide grip.
Thumb Precision Pinch Closedmiddle, ring and little finger automatical-ly close and switch off. Thumb automati-cally moves to a partially closed position. Index finger will move to provide grip against a fixed thumb.
Thumb 3 Jaw Chuck (Tripod) Closedring and little finger move to terminal close. Thumb automatically moves to a partially closed position. Index and mid-dle fingers move to provide grip against a fixed thumb.

11 of 18
ADDITIONAL GRIP AND GESTURE OPTIONS
Thumb Park Continuousall four fingers remain open and switch off, only the thumb will move.
Lateral Gripall four fingers fully close and switch off. Only thumb will move.
Custom Gestureall fingers automatically move to a user defined fully opened or fully closed posi-tion and switch off.
Thumb Park Quickall four fingers remain open and switch off, for 1.5 seconds the thumb will close and then automatically return to an open position.
Index Pointthumb, little, ring and middle fingers close and switch off. Only the index fin-ger will move.
Custom Gripall fingers automatically move to a user defined position. The user can choose to keep certain digits active and switch oth-ers off.
Graspfingers adopt a pre flexed position. All fingers function in squeeze mode, for rapid grasp and release of objects.
Handshakehand forms a shape appropriate for shak-ing another persons hand, and functions in squeeze mode.
Mousehand forms shape appropriate for using a computer mouse. Index finger functions in squeeze mode, for clicking the mouse.
Trigger Two Fingerhand forms a shape appropriate for using a spray bottle with the index and middle finger active. Index and middle fingers function in squeeze mode.
Thumb Triggerhand forms shape appropriate for using an aerosol spray can with thumb active in squeeze mode.
One Finger Triggerhand forms a shape appropriate for us-ing a spray bottle with the index finger active in squeeze mode.

12 of 18
5.0 Support Information
5.1 Storage and Maintenance
Always turn off the i-digits™ device when not in use.
Aim to charge the battery each day after use.
Replace the batteries every 12 months.
Ensure i-digits™ device is serviced every 12 months.

13 of 18
5.2 Troubleshooting
Problem Action
Prosthesis does not operate Ensure the prosthesis is switched onEnsure the battery is connectedEnsure the battery is charged Check the electrodes have good contact
One digit does not operate Check if the digit operates correctly using the Health Check in biosim™
Device stops halfway during an action
Electrode settings may need to be adjustedCheck the electrode cable is not damagedCheck that the digit screws are not looseEnsure that electrodes have good contact
User complains that the pros-thesis is difficult to operate
Electrode settings may be too lowEnsure the battery has good chargeEnsure the electrodes are well groundedCheck electrode placement and wiring
Battery charge does not last as long as expected
Fully charge the battery overnight. Check the battery connectionEnsure electrodes are not set above 5.5 Check user is not holding a sustained signal to the handby reviewing on real time graph, or excessive signal counts in usage statisticsReplace with a spare battery
Battery is not working Check the battery is connected Check the battery is chargedCheck the wiring for signs of damage Check the device using one of the spare batteries
At any time, contact customer support for further troubleshooting or questions.

14 of 18
5.3 General Safety, Warnings and Precautions
i-digits™
Do not use without an approved cover.
Do not use under water.
Do not use to operate heavy / industrial machinery.
Do not use with machinery with moving parts that may cause personal injury or damage.
Users must comply with local regulations on the operation of automobiles, aircraft, sailing vessels of any kind and any other motorized vehicle or device.
Do not use for extreme activities that may cause injury to a natural hand.
Do not expose to excessive moisture, liquid, dust, vibra-tion or shock.
Do not expose to high temperatures.
Do not expose to flames.
Do not use or expose to explosive atmospheres.
Do not disassemble componentry or modify in any way.
Maintenance, repairs and upgrades may only be per-formed by qualified Touch Bionics technicians and techni-cal partners.
Do not use with a damaged cover.
Damaged covers must be replaced or repaired by a quali-fied Touch Bionics technician or technical partner.
Only approved Touch Bionics accessories and tooling may be used with i-digits™.
Do not use an i-digits™ device to operate your mobile device whilst it is connected to a mains outlet, as this can affect EMG signal.
Failure to comply with the above guidelines will invalidate the warranty.
Batteries
Do not bend or exert excessive pressure on the battery.
Do not pierce the battery.
Do not disassemble.
Do not expose to high temperatures.
Do not incinerate batteries.
Do not short circuit the battery.
Do not store batteries inside a vehicle.
Dispose of batteries in accordance with US, European or local regulations.
Only use the appropriate Touch Bionics charger to charge Touch Bionics batteries.
If the battery has visibly ballooned or swelled:
• discontinue the charging process immediately
• disconnect the battery
• remove to a safe area
• leave and observe for 15 minutes
• replace with new battery
• do not re-use
• dispose of any leaking batteries in an appropriate manner
Failure to comply with the above guidelines will invalidate the warranty.
If you experience technical problems with the i-digits™ device contact Customer Support

15 of 18
It is recommended that the above information is also included in the user notes.
User Name: ...........................................................................................................................................................
Fitting Date: ...........................................................................................................................................................
Device Purchase Date: ..........................................................................................................................................
Device Serial Number: ..........................................................................................................................................
Prosthetist Name & Contact Information: ...........................................................................................................
Therapist Name & Contact Information: .............................................................................................................
6.0 User Information
6.1 User Details
Provision of the following information will enable easy identification of your patient’s device, should it be returned to cus-tomer service. Please forward to Touch Bionics as per the contact information on the back page of this manual.

16 of 18
i-digits™
Voltage 7.4 V (nominal)
Max. Current 5 A
Battery Capacity Rechargeable lithium polymer 7.4 V (nominal); 800 mAh capacity
Max device load 20kg
Finger Carry Load (static limit) 5kg
Time from full open to full close 0.8 seconds
7.0 Appendix
Hazardous Area Classification
i-digits™ device is not intended for use outside the boundaries of the environments listed below. The user of i-digits™ device should assure that it is not used in such environments.
Condition Level
Maximum temperature +70 c̊
Minimum temperature -40 c̊
Hazardous Area Classification Non Hazardous
7.1 Technical Information
7.2 Environmental Conditions
7.3 Component Compatibility
Please refer to www.touchbionics.com/downloads/document-library for Electro Magnetic Compatibility (EMC) and Elec-trical Information for i-digits™ products.
7.4 Warranty
Refer to www.touchbionics.com/downloads/document-library to review warranty information.

17 of 18
Consult instructions for use
Class II equipment – provides double Isolation to protect against electric shock
IP40
Degree of protection – IP40
Protection against penetration by solid particles with diameters larger than 1 mm. No special protection against penetration by water
Serial Number
For i-digits™ devices:
The unique serial number for i-digits™ devices is 2 letters followed by 4 digits, alpha / numeric number.
WEEE Compliance
Catalog number
Manufacturer
European Conformity

WWW.TOUCHBIONICS.COM ©Copyright Össur 2017 MA 01420, issue 1, June 2017
North AmericaTouch Bionics Inc.35 Hampden RoadMansfield MA 02048USA+1 855 MY iLIMB (694 5462)
Össur Americas27051 Towne Centre DriveFoothill Ranch, CA 92610, USATel: +1 (949) 382 3883Tel: +1 800 233 6263Fax: +1 800 831 [email protected]
Össur Canada2150 – 6900 Graybar RoadRichmond, BCV6W OA5 , CanadaTel: +1 604 241 8152Fax: +1 866 441 3880
Össur Europe BVDe Schakel 705651 GH EindhovenThe NetherlandsTel: +800 3539 3668Tel: +31 499 462840Fax: +31 499 [email protected]
Össur Deutschland GmbHAugustinusstrasse 11A50226 FrechenDeutschlandTel: +49 (0) 2234 6039 102Fax. +49 (0) 2234 6039 [email protected]
Össur NordicP.O. Box 67751 03 Uppsala, SwedenTel: +46 1818 2200Fax: +46 1818 [email protected]
Össur Iberia S.L.UCalle Caléndula, 93 -Miniparc IIIEdificio E, Despacho M1828109 El Soto de la Moraleja,AlcobendasMadrid – EspañaTel: 00 800 3539 3668Fax: 00 800 3539 [email protected]@ossur.com
Össur UK LtdUnit No 1S:ParkHamilton RoadStockport SK1 2AE, UKTel: +44 (0) 8450 065 065Fax: +44 (0)161 475 [email protected]
Össur Europe BV – ItalyVia Baroaldi, 2940054 Budrio, ItalyTel: +39 05169 20852Fax: +39 05169 [email protected]
Össur APAC2F, W16 BNo. 1801 Hongmei Road200233, Shanghai, ChinaTel: +86 21 6127 1707Fax: +86 21 6127 [email protected]
Össur Australia26 Ross Street,North ParramattaNSW 2151 AustraliaTel: +61 2 88382800Fax: +61 2 [email protected]
EuropeTouch Bionics GmbHLanger Anger 369115 HeidelbergGermany+49 6221 357 9060
InternationalTouch Bionics Ltd.Unit 3, Ashwood CourtOakbank Park WayLivingston EH53 0THUK+44 1506 438 [email protected]
Touch Bionics by Össur
Touch Bionics Ltd.Unit 3, Ashwood CourtOakbank Park WayLivingston EH53 0THUK+44 1506 438 [email protected]