hyperion retrieve
TRANSCRIPT

H Y P E R I O N ® E N T E R P R I S E ®
R E L E A S E 6 . 5 . 1
U S E R ’ S G U I D E

Hyperion Enterprise User’s Guide, 6.5.1
Copyright © 1991, 2009, Oracle and/or its affiliates. All rights reserved.
Authors: Enterprise Information Development Team
This software and related documentation are provided under a license agreement containing restrictions on use anddisclosure and are protected by intellectual property laws. Except as expressly permitted in your license agreement orallowed by law, you may not use, copy, reproduce, translate, broadcast, modify, license, transmit, distribute, exhibit,perform, publish, or display any part, in any form, or by any means. Reverse engineering, disassembly, or decompilationof this software, unless required by law for interoperability, is prohibited. The information contained herein is subject tochange without notice and is not warranted to be error-free. If you find any errors, please report them to us in writing.
If this software or related documentation is delivered to the U.S. Government or anyone licensing it on behalf of the U.S.Government, the following notice is applicable:
U.S. GOVERNMENT RIGHTS Programs, software, databases, and related documentation and technical data delivered toU.S. Government customers are "commercial computer software" or "commercial technical data" pursuant to theapplicable Federal Acquisition Regulation and agency-specific supplemental regulations. As such, the use, duplication,disclosure, modification, and adaptation shall be subject to the restrictions and license terms set forth in the applicableGovernment contract, and, to the extent applicable by the terms of the Government contract, the additional rights setforth in FAR 52.227-19, Commercial Computer Software License (December 2007). Oracle USA, Inc., 500 Oracle Parkway,Redwood City, CA 94065.
This software is developed for general use in a variety of information management applications. It is not developed orintended for use in any inherently dangerous applications, including applications which may create a risk of personalinjury. If you use this software in dangerous applications, then you shall be responsible to take all appropriate fail-safe,backup, redundancy, and other measures to ensure the safe use of this software. Oracle Corporation and its affiliatesdisclaim any liability for any damages caused by use of this software in dangerous applications.
Oracle is a registered trademark of Oracle Corporation and/or its affiliates. Other names may be trademarks of theirrespective owners.
This software and documentation may provide access to or information on content, products, and services from thirdparties. Oracle Corporation and its affiliates are not responsible for and expressly disclaim all warranties of any kind withrespect to third-party content, products, and services. Oracle Corporation and its affiliates will not be responsible for anyloss, costs, or damages incurred due to your access to or use of third-party content, products, or services.

Contents
Chapter 1. Entering Data in Schedules . . . . . . . . . . . . . . . . . . . . . . . . . . . . . . . . . . . . . . . . . . . . . . . . . . . 13
Schedules Overview . . . . . . . . . . . . . . . . . . . . . . . . . . . . . . . . . . . . . . . . . . . . . . . . . . . 13
Data Entry Window . . . . . . . . . . . . . . . . . . . . . . . . . . . . . . . . . . . . . . . . . . . . . . . . . . . 13
Setting Schedule Options . . . . . . . . . . . . . . . . . . . . . . . . . . . . . . . . . . . . . . . . . . . . . 15
Data Display . . . . . . . . . . . . . . . . . . . . . . . . . . . . . . . . . . . . . . . . . . . . . . . . . . . . . . 16
Schedule Point of View . . . . . . . . . . . . . . . . . . . . . . . . . . . . . . . . . . . . . . . . . . . . . . 16
Finding Accounts or Periods . . . . . . . . . . . . . . . . . . . . . . . . . . . . . . . . . . . . . . . . . . 17
Viewing Consolidation Detail . . . . . . . . . . . . . . . . . . . . . . . . . . . . . . . . . . . . . . . . . 17
Schedule Setup . . . . . . . . . . . . . . . . . . . . . . . . . . . . . . . . . . . . . . . . . . . . . . . . . . . . . . . 17
Defining Schedules . . . . . . . . . . . . . . . . . . . . . . . . . . . . . . . . . . . . . . . . . . . . . . . . . 18
Adding Validated Subaccounts . . . . . . . . . . . . . . . . . . . . . . . . . . . . . . . . . . . . . . . . 18
Entering or Editing Data . . . . . . . . . . . . . . . . . . . . . . . . . . . . . . . . . . . . . . . . . . . . . 19
Data Entry Operator Keys . . . . . . . . . . . . . . . . . . . . . . . . . . . . . . . . . . . . . . . . . . . . 19
Schedule Maintenance . . . . . . . . . . . . . . . . . . . . . . . . . . . . . . . . . . . . . . . . . . . . . . . . . 21
Highlighting Data Blocks . . . . . . . . . . . . . . . . . . . . . . . . . . . . . . . . . . . . . . . . . . . . . 21
Moving Data . . . . . . . . . . . . . . . . . . . . . . . . . . . . . . . . . . . . . . . . . . . . . . . . . . . . . 21
Copying Data . . . . . . . . . . . . . . . . . . . . . . . . . . . . . . . . . . . . . . . . . . . . . . . . . . . . . 22
Removing Data . . . . . . . . . . . . . . . . . . . . . . . . . . . . . . . . . . . . . . . . . . . . . . . . . . . . 22
Calculating Formulas in Schedules . . . . . . . . . . . . . . . . . . . . . . . . . . . . . . . . . . . . . . . . . 22
Setting Accounts Without Data to Zero . . . . . . . . . . . . . . . . . . . . . . . . . . . . . . . . . . . . . 23
Decimal Places Option . . . . . . . . . . . . . . . . . . . . . . . . . . . . . . . . . . . . . . . . . . . . . . . . . 24
Chapter 2. Loading and Extracting Data . . . . . . . . . . . . . . . . . . . . . . . . . . . . . . . . . . . . . . . . . . . . . . . . . . 25
Database Management Overview . . . . . . . . . . . . . . . . . . . . . . . . . . . . . . . . . . . . . . . . . . 25
Database Window . . . . . . . . . . . . . . . . . . . . . . . . . . . . . . . . . . . . . . . . . . . . . . . . . . . . . 26
Data Status . . . . . . . . . . . . . . . . . . . . . . . . . . . . . . . . . . . . . . . . . . . . . . . . . . . . . . . 27
Setting Database Options . . . . . . . . . . . . . . . . . . . . . . . . . . . . . . . . . . . . . . . . . . . . 28
Database Point of View . . . . . . . . . . . . . . . . . . . . . . . . . . . . . . . . . . . . . . . . . . . . . . 29
Viewing Entity Lists . . . . . . . . . . . . . . . . . . . . . . . . . . . . . . . . . . . . . . . . . . . . . . . . 29
Viewing Account Groups . . . . . . . . . . . . . . . . . . . . . . . . . . . . . . . . . . . . . . . . . . . . 30
Viewing Account Lists . . . . . . . . . . . . . . . . . . . . . . . . . . . . . . . . . . . . . . . . . . . . . . . 30
Viewing Consolidation Detail . . . . . . . . . . . . . . . . . . . . . . . . . . . . . . . . . . . . . . . . . 31
Contents iii

Finding Accounts in the Database . . . . . . . . . . . . . . . . . . . . . . . . . . . . . . . . . . . . . . 31
Finding Account Groups or Periods in the Database . . . . . . . . . . . . . . . . . . . . . . . . . 31
Database Maintenance . . . . . . . . . . . . . . . . . . . . . . . . . . . . . . . . . . . . . . . . . . . . . . . . . 32
Highlighting Data Blocks . . . . . . . . . . . . . . . . . . . . . . . . . . . . . . . . . . . . . . . . . . . . . 32
Moving Data . . . . . . . . . . . . . . . . . . . . . . . . . . . . . . . . . . . . . . . . . . . . . . . . . . . . . 33
Copying Data . . . . . . . . . . . . . . . . . . . . . . . . . . . . . . . . . . . . . . . . . . . . . . . . . . . . . 33
Pasting Data . . . . . . . . . . . . . . . . . . . . . . . . . . . . . . . . . . . . . . . . . . . . . . . . . . . . . . 34
Clearing Data Blocks . . . . . . . . . . . . . . . . . . . . . . . . . . . . . . . . . . . . . . . . . . . . . . . . 35
Filling the Database . . . . . . . . . . . . . . . . . . . . . . . . . . . . . . . . . . . . . . . . . . . . . . . . . 35
Erasing Data . . . . . . . . . . . . . . . . . . . . . . . . . . . . . . . . . . . . . . . . . . . . . . . . . . . . . . 35
Working with Data Drill-Back to FDM . . . . . . . . . . . . . . . . . . . . . . . . . . . . . . . . . . . 36
Managing Visual Cue for FDM Data . . . . . . . . . . . . . . . . . . . . . . . . . . . . . . . . . . . . 36
Locking or Unlocking Periods in the Database . . . . . . . . . . . . . . . . . . . . . . . . . . . . . 37
Journal Posting Lock and Unlock . . . . . . . . . . . . . . . . . . . . . . . . . . . . . . . . . . . . . . . 37
Calculating Formulas in the Database . . . . . . . . . . . . . . . . . . . . . . . . . . . . . . . . . . . . . . . 39
Setting Accounts Without Data to Zero . . . . . . . . . . . . . . . . . . . . . . . . . . . . . . . . . . . . . 39
Running Dependent Consolidation Detail Reports . . . . . . . . . . . . . . . . . . . . . . . . . . . . . 40
Clearing Invalid Consolidation Detail . . . . . . . . . . . . . . . . . . . . . . . . . . . . . . . . . . . . . . . 41
Data Formats . . . . . . . . . . . . . . . . . . . . . . . . . . . . . . . . . . . . . . . . . . . . . . . . . . . . . . . . 42
Accumulate . . . . . . . . . . . . . . . . . . . . . . . . . . . . . . . . . . . . . . . . . . . . . . . . . . . . . . 42
Replace . . . . . . . . . . . . . . . . . . . . . . . . . . . . . . . . . . . . . . . . . . . . . . . . . . . . . . . . . 43
Merge . . . . . . . . . . . . . . . . . . . . . . . . . . . . . . . . . . . . . . . . . . . . . . . . . . . . . . . . . . 44
Calculate Formulas . . . . . . . . . . . . . . . . . . . . . . . . . . . . . . . . . . . . . . . . . . . . . . . . . 44
Report Calculated Accounts . . . . . . . . . . . . . . . . . . . . . . . . . . . . . . . . . . . . . . . . . . . 45
Zero No Data . . . . . . . . . . . . . . . . . . . . . . . . . . . . . . . . . . . . . . . . . . . . . . . . . . . . . 45
Load Error File . . . . . . . . . . . . . . . . . . . . . . . . . . . . . . . . . . . . . . . . . . . . . . . . . . . . 45
Defining Data Formats . . . . . . . . . . . . . . . . . . . . . . . . . . . . . . . . . . . . . . . . . . . . . . 46
Loading Data . . . . . . . . . . . . . . . . . . . . . . . . . . . . . . . . . . . . . . . . . . . . . . . . . . . . . 46
Extracting Data . . . . . . . . . . . . . . . . . . . . . . . . . . . . . . . . . . . . . . . . . . . . . . . . . . . . 48
Extracting Consolidation Detail . . . . . . . . . . . . . . . . . . . . . . . . . . . . . . . . . . . . . . . . . . . 49
Validation of Records in Data Load and Extract . . . . . . . . . . . . . . . . . . . . . . . . . . . . . . . 51
Running Entity Detail Report . . . . . . . . . . . . . . . . . . . . . . . . . . . . . . . . . . . . . . . . . . . . 51
Decimal Places Option . . . . . . . . . . . . . . . . . . . . . . . . . . . . . . . . . . . . . . . . . . . . . . . . . 56
Chapter 3. Hyperion Retrieve . . . . . . . . . . . . . . . . . . . . . . . . . . . . . . . . . . . . . . . . . . . . . . . . . . . . . . . . . . 57
What Hyperion Retrieve Does . . . . . . . . . . . . . . . . . . . . . . . . . . . . . . . . . . . . . . . . . . . . 57
Hyperion Retrieve Setup . . . . . . . . . . . . . . . . . . . . . . . . . . . . . . . . . . . . . . . . . . . . . . . . 57
HPAPP.DAT File Format . . . . . . . . . . . . . . . . . . . . . . . . . . . . . . . . . . . . . . . . . . . . 58
Setting Up the HPAPP.DAT Environment Variable . . . . . . . . . . . . . . . . . . . . . . . . . . 58
iv Contents

Hyperion Retrieve Add-in File Locations . . . . . . . . . . . . . . . . . . . . . . . . . . . . . . . . . 59
Setting Up Hyperion Retrieve for Microsoft Excel . . . . . . . . . . . . . . . . . . . . . . . . . . . . . . 59
Starting Hyperion Retrieve for Excel . . . . . . . . . . . . . . . . . . . . . . . . . . . . . . . . . . . . . . . 59
Displaying No Data as Zero Option . . . . . . . . . . . . . . . . . . . . . . . . . . . . . . . . . . . . . 60
Hyperion Retrieve Formulas . . . . . . . . . . . . . . . . . . . . . . . . . . . . . . . . . . . . . . . . . . . . . 60
Hyperion Retrieve Arguments . . . . . . . . . . . . . . . . . . . . . . . . . . . . . . . . . . . . . . . . . 61
Hyperion Retrieve Functions . . . . . . . . . . . . . . . . . . . . . . . . . . . . . . . . . . . . . . . . . . 61
Pasting Functions in Excel . . . . . . . . . . . . . . . . . . . . . . . . . . . . . . . . . . . . . . . . . . . . 63
Hyperion Retrieve Worksheets . . . . . . . . . . . . . . . . . . . . . . . . . . . . . . . . . . . . . . . . . . . . 64
Selecting IDs in Hyperion Retrieve . . . . . . . . . . . . . . . . . . . . . . . . . . . . . . . . . . . . . . 66
Refreshing Worksheets . . . . . . . . . . . . . . . . . . . . . . . . . . . . . . . . . . . . . . . . . . . . . . 67
Changing the Default Application . . . . . . . . . . . . . . . . . . . . . . . . . . . . . . . . . . . . . . 67
VBA Hyperion Retrieve . . . . . . . . . . . . . . . . . . . . . . . . . . . . . . . . . . . . . . . . . . . . . . . . . 67
Setting Up VBA Hyperion Retrieve . . . . . . . . . . . . . . . . . . . . . . . . . . . . . . . . . . . . . 68
Starting VBA Hyperion Retrieve . . . . . . . . . . . . . . . . . . . . . . . . . . . . . . . . . . . . . . . 69
Refreshing All Linked Cells . . . . . . . . . . . . . . . . . . . . . . . . . . . . . . . . . . . . . . . . . . . 69
Converting Workbook . . . . . . . . . . . . . . . . . . . . . . . . . . . . . . . . . . . . . . . . . . . . . . 69
Chapter 4. Consolidating Data . . . . . . . . . . . . . . . . . . . . . . . . . . . . . . . . . . . . . . . . . . . . . . . . . . . . . . . . . 71
Consolidation Overview . . . . . . . . . . . . . . . . . . . . . . . . . . . . . . . . . . . . . . . . . . . . . . . . 71
Consolidation Detail . . . . . . . . . . . . . . . . . . . . . . . . . . . . . . . . . . . . . . . . . . . . . . . . 74
Consolidation Statuses . . . . . . . . . . . . . . . . . . . . . . . . . . . . . . . . . . . . . . . . . . . . . . 74
Statutory Consolidation Engine . . . . . . . . . . . . . . . . . . . . . . . . . . . . . . . . . . . . . . . . 75
Consolidation Window . . . . . . . . . . . . . . . . . . . . . . . . . . . . . . . . . . . . . . . . . . . . . . . . . 76
Finding Entities . . . . . . . . . . . . . . . . . . . . . . . . . . . . . . . . . . . . . . . . . . . . . . . . . . . 76
Finding Periods . . . . . . . . . . . . . . . . . . . . . . . . . . . . . . . . . . . . . . . . . . . . . . . . . . . 77
Consolidation Tasks . . . . . . . . . . . . . . . . . . . . . . . . . . . . . . . . . . . . . . . . . . . . . . . . . . . 77
Selecting Entities and Periods to Consolidate . . . . . . . . . . . . . . . . . . . . . . . . . . . . . . 78
Consolidating Data . . . . . . . . . . . . . . . . . . . . . . . . . . . . . . . . . . . . . . . . . . . . . . . . . 78
Consolidating Dynamic Organizations . . . . . . . . . . . . . . . . . . . . . . . . . . . . . . . . . . . 80
Running Consolidation Detail Reports . . . . . . . . . . . . . . . . . . . . . . . . . . . . . . . . . . . 81
Intercompany Matching Reports . . . . . . . . . . . . . . . . . . . . . . . . . . . . . . . . . . . . . . . . . . 83
Intercompany Group Selection . . . . . . . . . . . . . . . . . . . . . . . . . . . . . . . . . . . . . . . . 83
Partner Selection . . . . . . . . . . . . . . . . . . . . . . . . . . . . . . . . . . . . . . . . . . . . . . . . . . . 83
Entity Code Option . . . . . . . . . . . . . . . . . . . . . . . . . . . . . . . . . . . . . . . . . . . . . . . . . 86
Currency Option Selection . . . . . . . . . . . . . . . . . . . . . . . . . . . . . . . . . . . . . . . . . . . 86
Currency Translation . . . . . . . . . . . . . . . . . . . . . . . . . . . . . . . . . . . . . . . . . . . . . . . 86
Parent Currency . . . . . . . . . . . . . . . . . . . . . . . . . . . . . . . . . . . . . . . . . . . . . . . . . . . 86
Report Information to Include . . . . . . . . . . . . . . . . . . . . . . . . . . . . . . . . . . . . . . . . . 87
Contents v
Report Information to Suppress . . . . . . . . . . . . . . . . . . . . . . . . . . . . . . . . . . . . . . . . 87
Report Format . . . . . . . . . . . . . . . . . . . . . . . . . . . . . . . . . . . . . . . . . . . . . . . . . . . . 88
Running Intercompany Matching Reports . . . . . . . . . . . . . . . . . . . . . . . . . . . . . . . . 88
Intercompany Matching Report Case Studies . . . . . . . . . . . . . . . . . . . . . . . . . . . . . . 89
Intercompany Matching Report Sample Report . . . . . . . . . . . . . . . . . . . . . . . . . . . . 90
Chapter 5. Entering Journals . . . . . . . . . . . . . . . . . . . . . . . . . . . . . . . . . . . . . . . . . . . . . . . . . . . . . . . . . . 93
Journals Overview . . . . . . . . . . . . . . . . . . . . . . . . . . . . . . . . . . . . . . . . . . . . . . . . . . . . . 93
Journal Types . . . . . . . . . . . . . . . . . . . . . . . . . . . . . . . . . . . . . . . . . . . . . . . . . . . . . . . . 94
Regular Journals . . . . . . . . . . . . . . . . . . . . . . . . . . . . . . . . . . . . . . . . . . . . . . . . . . . 94
Auto-reversing Journals . . . . . . . . . . . . . . . . . . . . . . . . . . . . . . . . . . . . . . . . . . . . . 94
Parent Journals . . . . . . . . . . . . . . . . . . . . . . . . . . . . . . . . . . . . . . . . . . . . . . . . . . . . 95
Journal Templates . . . . . . . . . . . . . . . . . . . . . . . . . . . . . . . . . . . . . . . . . . . . . . . . . . . . . 95
Standard Templates . . . . . . . . . . . . . . . . . . . . . . . . . . . . . . . . . . . . . . . . . . . . . . . . 95
Recurring Templates . . . . . . . . . . . . . . . . . . . . . . . . . . . . . . . . . . . . . . . . . . . . . . . . 96
Balanced and Unbalanced Adjustments . . . . . . . . . . . . . . . . . . . . . . . . . . . . . . . . . . . . . 96
Journal Information . . . . . . . . . . . . . . . . . . . . . . . . . . . . . . . . . . . . . . . . . . . . . . . . . . . 97
Journal Status . . . . . . . . . . . . . . . . . . . . . . . . . . . . . . . . . . . . . . . . . . . . . . . . . . . . . 97
Journal Number . . . . . . . . . . . . . . . . . . . . . . . . . . . . . . . . . . . . . . . . . . . . . . . . . . . 98
Journal ID . . . . . . . . . . . . . . . . . . . . . . . . . . . . . . . . . . . . . . . . . . . . . . . . . . . . . . . 98
Code . . . . . . . . . . . . . . . . . . . . . . . . . . . . . . . . . . . . . . . . . . . . . . . . . . . . . . . . . . . 99
Viewing Journal Information . . . . . . . . . . . . . . . . . . . . . . . . . . . . . . . . . . . . . . . . . 100
Decimal Places Option . . . . . . . . . . . . . . . . . . . . . . . . . . . . . . . . . . . . . . . . . . . . . 100
Journal Adjustments . . . . . . . . . . . . . . . . . . . . . . . . . . . . . . . . . . . . . . . . . . . . . . . . . . 101
Data View and Journals . . . . . . . . . . . . . . . . . . . . . . . . . . . . . . . . . . . . . . . . . . . . . 101
Adjustments to Missing Data Values . . . . . . . . . . . . . . . . . . . . . . . . . . . . . . . . . . . 102
Journals Window . . . . . . . . . . . . . . . . . . . . . . . . . . . . . . . . . . . . . . . . . . . . . . . . . . . . 104
Journal and Template Creation . . . . . . . . . . . . . . . . . . . . . . . . . . . . . . . . . . . . . . . . . . 105
Opening Periods . . . . . . . . . . . . . . . . . . . . . . . . . . . . . . . . . . . . . . . . . . . . . . . . . . 105
Creating Journal Templates . . . . . . . . . . . . . . . . . . . . . . . . . . . . . . . . . . . . . . . . . . 106
Creating Journals . . . . . . . . . . . . . . . . . . . . . . . . . . . . . . . . . . . . . . . . . . . . . . . . . 106
Entering Adjustment Information . . . . . . . . . . . . . . . . . . . . . . . . . . . . . . . . . . . . . 107
Creating Journals Using Recurring Templates . . . . . . . . . . . . . . . . . . . . . . . . . . . . . 108
Saving Journals as New Journals . . . . . . . . . . . . . . . . . . . . . . . . . . . . . . . . . . . . . . 108
Reviewing Journals . . . . . . . . . . . . . . . . . . . . . . . . . . . . . . . . . . . . . . . . . . . . . . . . . . . 109
Reviewing Individual Journals . . . . . . . . . . . . . . . . . . . . . . . . . . . . . . . . . . . . . . . . 109
Reviewing Multiple Journals . . . . . . . . . . . . . . . . . . . . . . . . . . . . . . . . . . . . . . . . . 109
Journal Lock . . . . . . . . . . . . . . . . . . . . . . . . . . . . . . . . . . . . . . . . . . . . . . . . . . . . . . . . 110
Posting Journals . . . . . . . . . . . . . . . . . . . . . . . . . . . . . . . . . . . . . . . . . . . . . . . . . . . . . 110
vi Contents
Posting Individual Journals . . . . . . . . . . . . . . . . . . . . . . . . . . . . . . . . . . . . . . . . . . 111
Posting Multiple Journals . . . . . . . . . . . . . . . . . . . . . . . . . . . . . . . . . . . . . . . . . . . 111
Unposting Journals . . . . . . . . . . . . . . . . . . . . . . . . . . . . . . . . . . . . . . . . . . . . . . . . 112
Editing Templates or Journals . . . . . . . . . . . . . . . . . . . . . . . . . . . . . . . . . . . . . . . . 113
Reversing Journals . . . . . . . . . . . . . . . . . . . . . . . . . . . . . . . . . . . . . . . . . . . . . . . . 113
Extracting Journals . . . . . . . . . . . . . . . . . . . . . . . . . . . . . . . . . . . . . . . . . . . . . . . . . . . 114
Loading Journals . . . . . . . . . . . . . . . . . . . . . . . . . . . . . . . . . . . . . . . . . . . . . . . . . . . . . 115
Journal Load and Extract File Format . . . . . . . . . . . . . . . . . . . . . . . . . . . . . . . . . . . . . . 116
Journal Production Reports . . . . . . . . . . . . . . . . . . . . . . . . . . . . . . . . . . . . . . . . . . . . . 117
Running Journals or History Reports . . . . . . . . . . . . . . . . . . . . . . . . . . . . . . . . . . . 117
Running Trial Balance Reports . . . . . . . . . . . . . . . . . . . . . . . . . . . . . . . . . . . . . . . 118
Chapter 6. Using Hyperion Enterprise Web . . . . . . . . . . . . . . . . . . . . . . . . . . . . . . . . . . . . . . . . . . . . . . . 121
What Hyperion Enterprise Web Does . . . . . . . . . . . . . . . . . . . . . . . . . . . . . . . . . . . . . . 121
Selecting the Point of View . . . . . . . . . . . . . . . . . . . . . . . . . . . . . . . . . . . . . . . . . . . . . 122
Loading Data . . . . . . . . . . . . . . . . . . . . . . . . . . . . . . . . . . . . . . . . . . . . . . . . . . . . . . . 122
Viewing Consolidation Status . . . . . . . . . . . . . . . . . . . . . . . . . . . . . . . . . . . . . . . . . . . 125
Finding an Entity or Account . . . . . . . . . . . . . . . . . . . . . . . . . . . . . . . . . . . . . . . . . 125
Consolidating Data . . . . . . . . . . . . . . . . . . . . . . . . . . . . . . . . . . . . . . . . . . . . . . . . . . . 126
Viewing Task Status . . . . . . . . . . . . . . . . . . . . . . . . . . . . . . . . . . . . . . . . . . . . . . . . . . 127
Viewing Data . . . . . . . . . . . . . . . . . . . . . . . . . . . . . . . . . . . . . . . . . . . . . . . . . . . . . . . 128
Setting Schedule Options . . . . . . . . . . . . . . . . . . . . . . . . . . . . . . . . . . . . . . . . . . . . 129
Entering and Editing Data . . . . . . . . . . . . . . . . . . . . . . . . . . . . . . . . . . . . . . . . . . . 130
Locking and Unlocking Data . . . . . . . . . . . . . . . . . . . . . . . . . . . . . . . . . . . . . . . . . 131
How Data is Displayed in Hyperion Enterprise Web . . . . . . . . . . . . . . . . . . . . . . . . 131
Working with Data Drill-Back to FDM . . . . . . . . . . . . . . . . . . . . . . . . . . . . . . . . . . . . . 132
Viewing the Application Error Log . . . . . . . . . . . . . . . . . . . . . . . . . . . . . . . . . . . . . . . . 133
Customizing Web Links . . . . . . . . . . . . . . . . . . . . . . . . . . . . . . . . . . . . . . . . . . . . . . . 133
Entering Journals in Web . . . . . . . . . . . . . . . . . . . . . . . . . . . . . . . . . . . . . . . . . . . . . . 134
Journals Module . . . . . . . . . . . . . . . . . . . . . . . . . . . . . . . . . . . . . . . . . . . . . . . . . . . . . 134
Viewing Journals and Templates. . . . . . . . . . . . . . . . . . . . . . . . . . . . . . . . . . . . . . . 134
Journals and Templates . . . . . . . . . . . . . . . . . . . . . . . . . . . . . . . . . . . . . . . . . . . . . . . . 134
Journals and Template Creation . . . . . . . . . . . . . . . . . . . . . . . . . . . . . . . . . . . . . . . . . . 135
Opening Periods . . . . . . . . . . . . . . . . . . . . . . . . . . . . . . . . . . . . . . . . . . . . . . . . . . 135
Creating Journal Templates . . . . . . . . . . . . . . . . . . . . . . . . . . . . . . . . . . . . . . . . . . 135
Creating Journals . . . . . . . . . . . . . . . . . . . . . . . . . . . . . . . . . . . . . . . . . . . . . . . . . 136
Entering Adjustment Information . . . . . . . . . . . . . . . . . . . . . . . . . . . . . . . . . . . . . 137
Reviewing Journals . . . . . . . . . . . . . . . . . . . . . . . . . . . . . . . . . . . . . . . . . . . . . . . . . . . 137
Reviewing Individual Journals . . . . . . . . . . . . . . . . . . . . . . . . . . . . . . . . . . . . . . . . 137
Contents vii

Reviewing Multiple journals . . . . . . . . . . . . . . . . . . . . . . . . . . . . . . . . . . . . . . . . . 138
Posting Journals . . . . . . . . . . . . . . . . . . . . . . . . . . . . . . . . . . . . . . . . . . . . . . . . . . . . . 138
Posting individual journals . . . . . . . . . . . . . . . . . . . . . . . . . . . . . . . . . . . . . . . . . . 138
Posting Multiple journals . . . . . . . . . . . . . . . . . . . . . . . . . . . . . . . . . . . . . . . . . . . 139
Unposting journals . . . . . . . . . . . . . . . . . . . . . . . . . . . . . . . . . . . . . . . . . . . . . . . . 139
Loading Journals . . . . . . . . . . . . . . . . . . . . . . . . . . . . . . . . . . . . . . . . . . . . . . . . . . . . . 139
User Preferences . . . . . . . . . . . . . . . . . . . . . . . . . . . . . . . . . . . . . . . . . . . . . . . . . . . . . 140
Messaging Client . . . . . . . . . . . . . . . . . . . . . . . . . . . . . . . . . . . . . . . . . . . . . . . . . . . . 140
Chapter 7. Hyperion Allocations . . . . . . . . . . . . . . . . . . . . . . . . . . . . . . . . . . . . . . . . . . . . . . . . . . . . . . . 141
What Hyperion Allocations Does . . . . . . . . . . . . . . . . . . . . . . . . . . . . . . . . . . . . . . . . . 141
Allocation Types and Methods . . . . . . . . . . . . . . . . . . . . . . . . . . . . . . . . . . . . . . . . . . . 142
Name Allocation Type . . . . . . . . . . . . . . . . . . . . . . . . . . . . . . . . . . . . . . . . . . . . . . 142
Account Allocation Type . . . . . . . . . . . . . . . . . . . . . . . . . . . . . . . . . . . . . . . . . . . . 143
Time Allocation Type . . . . . . . . . . . . . . . . . . . . . . . . . . . . . . . . . . . . . . . . . . . . . . 143
Percent Method . . . . . . . . . . . . . . . . . . . . . . . . . . . . . . . . . . . . . . . . . . . . . . . . . . 143
Value Method . . . . . . . . . . . . . . . . . . . . . . . . . . . . . . . . . . . . . . . . . . . . . . . . . . . . 143
Factor Method . . . . . . . . . . . . . . . . . . . . . . . . . . . . . . . . . . . . . . . . . . . . . . . . . . . 143
Total Method . . . . . . . . . . . . . . . . . . . . . . . . . . . . . . . . . . . . . . . . . . . . . . . . . . . . 144
Hyperion Allocations Desktop . . . . . . . . . . . . . . . . . . . . . . . . . . . . . . . . . . . . . . . . . . . 144
Starting Hyperion Allocations . . . . . . . . . . . . . . . . . . . . . . . . . . . . . . . . . . . . . . . . . . . 145
Setting Hyperion Allocations Preferences . . . . . . . . . . . . . . . . . . . . . . . . . . . . . . . . . . . 146
Selecting Desktop Color . . . . . . . . . . . . . . . . . . . . . . . . . . . . . . . . . . . . . . . . . . . . . . . 146
Changing the Hyperion Enterprise Application . . . . . . . . . . . . . . . . . . . . . . . . . . . . . . . 147
Allocations Setup . . . . . . . . . . . . . . . . . . . . . . . . . . . . . . . . . . . . . . . . . . . . . . . . . . . . 147
Defining Allocations . . . . . . . . . . . . . . . . . . . . . . . . . . . . . . . . . . . . . . . . . . . . . . . 147
Previewing Allocation Results . . . . . . . . . . . . . . . . . . . . . . . . . . . . . . . . . . . . . . . . 149
Deleting Allocations . . . . . . . . . . . . . . . . . . . . . . . . . . . . . . . . . . . . . . . . . . . . . . . 149
Allocation Sets Setup . . . . . . . . . . . . . . . . . . . . . . . . . . . . . . . . . . . . . . . . . . . . . . . . . . 150
Defining Allocation Sets . . . . . . . . . . . . . . . . . . . . . . . . . . . . . . . . . . . . . . . . . . . . 150
Deleting Allocation Sets . . . . . . . . . . . . . . . . . . . . . . . . . . . . . . . . . . . . . . . . . . . . . 151
Running Allocation Sets . . . . . . . . . . . . . . . . . . . . . . . . . . . . . . . . . . . . . . . . . . . . . . . 151
Posting Allocation Sets . . . . . . . . . . . . . . . . . . . . . . . . . . . . . . . . . . . . . . . . . . . . . . . . 152
Deleting Run Information . . . . . . . . . . . . . . . . . . . . . . . . . . . . . . . . . . . . . . . . . . . . . . 152
Extracting Allocation or Set Information . . . . . . . . . . . . . . . . . . . . . . . . . . . . . . . . . . . 153
Loading Allocation or Set Information . . . . . . . . . . . . . . . . . . . . . . . . . . . . . . . . . . . . . 153
Printing or Previewing Allocation Reports . . . . . . . . . . . . . . . . . . . . . . . . . . . . . . . . . . 154
Chapter 8. LedgerLink . . . . . . . . . . . . . . . . . . . . . . . . . . . . . . . . . . . . . . . . . . . . . . . . . . . . . . . . . . . . . 157
LedgerLink Overview . . . . . . . . . . . . . . . . . . . . . . . . . . . . . . . . . . . . . . . . . . . . . . . . . 157
viii Contents
LedgerLink Desktop . . . . . . . . . . . . . . . . . . . . . . . . . . . . . . . . . . . . . . . . . . . . . . . . . . 158
LedgerLink Sample Files . . . . . . . . . . . . . . . . . . . . . . . . . . . . . . . . . . . . . . . . . . . . . . . 159
Defining Templates . . . . . . . . . . . . . . . . . . . . . . . . . . . . . . . . . . . . . . . . . . . . . . . . . . . 160
Selecting a Source Sample File . . . . . . . . . . . . . . . . . . . . . . . . . . . . . . . . . . . . . . . . 161
Translate Data . . . . . . . . . . . . . . . . . . . . . . . . . . . . . . . . . . . . . . . . . . . . . . . . . . . . . . 162
Translation File Types . . . . . . . . . . . . . . . . . . . . . . . . . . . . . . . . . . . . . . . . . . . . . . 162
External Lists . . . . . . . . . . . . . . . . . . . . . . . . . . . . . . . . . . . . . . . . . . . . . . . . . . . . 162
Translation Builder Window . . . . . . . . . . . . . . . . . . . . . . . . . . . . . . . . . . . . . . . . . . . . 163
Translation Rules . . . . . . . . . . . . . . . . . . . . . . . . . . . . . . . . . . . . . . . . . . . . . . . . . 165
Imported Translation File Rules . . . . . . . . . . . . . . . . . . . . . . . . . . . . . . . . . . . . . . . 167
Results View Window . . . . . . . . . . . . . . . . . . . . . . . . . . . . . . . . . . . . . . . . . . . . . . . . . 169
Toolbar . . . . . . . . . . . . . . . . . . . . . . . . . . . . . . . . . . . . . . . . . . . . . . . . . . . . . . . . 170
Status Bar . . . . . . . . . . . . . . . . . . . . . . . . . . . . . . . . . . . . . . . . . . . . . . . . . . . . . . . 171
Setting Translate and Load Options . . . . . . . . . . . . . . . . . . . . . . . . . . . . . . . . . . . . . . . 171
Translate / Load Profiles List Box . . . . . . . . . . . . . . . . . . . . . . . . . . . . . . . . . . . . . . 171
Translate / Load Profile Dialog Box . . . . . . . . . . . . . . . . . . . . . . . . . . . . . . . . . . . . 172
Loading Data into Hyperion Enterprise . . . . . . . . . . . . . . . . . . . . . . . . . . . . . . . . . . . . 175
Starting LedgerLink . . . . . . . . . . . . . . . . . . . . . . . . . . . . . . . . . . . . . . . . . . . . . . . . . . . 175
Changing the Hyperion Enterprise Application . . . . . . . . . . . . . . . . . . . . . . . . . . . . 176
Selecting a Sample Record . . . . . . . . . . . . . . . . . . . . . . . . . . . . . . . . . . . . . . . . . . . 176
Verifying the Field Format . . . . . . . . . . . . . . . . . . . . . . . . . . . . . . . . . . . . . . . . . . . 177
Configuring the Template . . . . . . . . . . . . . . . . . . . . . . . . . . . . . . . . . . . . . . . . . . . 177
Specifying the Report Format . . . . . . . . . . . . . . . . . . . . . . . . . . . . . . . . . . . . . . . . 178
Defining External Lists . . . . . . . . . . . . . . . . . . . . . . . . . . . . . . . . . . . . . . . . . . . . . 179
Setting Up Translation Rules . . . . . . . . . . . . . . . . . . . . . . . . . . . . . . . . . . . . . . . . . . . . 179
Viewing Translation Results . . . . . . . . . . . . . . . . . . . . . . . . . . . . . . . . . . . . . . . . . . . . 180
Importing Translation Files . . . . . . . . . . . . . . . . . . . . . . . . . . . . . . . . . . . . . . . . . . . . . 181
Defining Translation Profiles . . . . . . . . . . . . . . . . . . . . . . . . . . . . . . . . . . . . . . . . . . . . 181
Defining Load Profiles . . . . . . . . . . . . . . . . . . . . . . . . . . . . . . . . . . . . . . . . . . . . . . . . . 182
Loading Data into Hyperion Enterprise . . . . . . . . . . . . . . . . . . . . . . . . . . . . . . . . . . . . 183
Chapter 9. Hyperion Retrieve Functions . . . . . . . . . . . . . . . . . . . . . . . . . . . . . . . . . . . . . . . . . . . . . . . . . 185
Function Syntax and Examples . . . . . . . . . . . . . . . . . . . . . . . . . . . . . . . . . . . . . . . . . . 185
HPACC - Account ID Function . . . . . . . . . . . . . . . . . . . . . . . . . . . . . . . . . . . . . . . 185
HPAMJ - Major Account ID Function . . . . . . . . . . . . . . . . . . . . . . . . . . . . . . . . . . 185
HPAS1 - First-level Subaccount ID Function . . . . . . . . . . . . . . . . . . . . . . . . . . . . . 186
HPAS2 - Second-level Subaccount ID Function . . . . . . . . . . . . . . . . . . . . . . . . . . . 186
HPBET - Difference Function . . . . . . . . . . . . . . . . . . . . . . . . . . . . . . . . . . . . . . . . 187
HPCAL - Calculated Account Function . . . . . . . . . . . . . . . . . . . . . . . . . . . . . . . . . 187
Contents ix

HPCDE - Category Description Function . . . . . . . . . . . . . . . . . . . . . . . . . . . . . . . . 188
HPCONTRIB - Contribution Data Function . . . . . . . . . . . . . . . . . . . . . . . . . . . . . 188
HPCUR - Currency Function . . . . . . . . . . . . . . . . . . . . . . . . . . . . . . . . . . . . . . . . 189
HPDCTRL - Direct Control Function . . . . . . . . . . . . . . . . . . . . . . . . . . . . . . . . . . 189
HPDOWN - Direct Ownership Function . . . . . . . . . . . . . . . . . . . . . . . . . . . . . . . . 190
HPDRV - Derived Sum Function . . . . . . . . . . . . . . . . . . . . . . . . . . . . . . . . . . . . . . 190
HPECODE - Entity Code Function . . . . . . . . . . . . . . . . . . . . . . . . . . . . . . . . . . . . 191
HPELIM - Elimination Data Function . . . . . . . . . . . . . . . . . . . . . . . . . . . . . . . . . . 191
HPFLW - Flow Function . . . . . . . . . . . . . . . . . . . . . . . . . . . . . . . . . . . . . . . . . . . . 192
HPFNA - First Entity Description Function . . . . . . . . . . . . . . . . . . . . . . . . . . . . . . 192
HPFRE - Default Frequency Function . . . . . . . . . . . . . . . . . . . . . . . . . . . . . . . . . . 192
HPFSN - Subentity Description Function . . . . . . . . . . . . . . . . . . . . . . . . . . . . . . . . 193
HPFUL - Entity Description Function . . . . . . . . . . . . . . . . . . . . . . . . . . . . . . . . . . 193
HPHEA - Account Description Function . . . . . . . . . . . . . . . . . . . . . . . . . . . . . . . . 193
HPHMJ - Major Account Description Function . . . . . . . . . . . . . . . . . . . . . . . . . . . 194
HPHS1 - First-level Subaccount Description Function . . . . . . . . . . . . . . . . . . . . . . 194
HPHS2 - Second-level Subaccount Description Function . . . . . . . . . . . . . . . . . . . . 195
HPINC - Income Account Function . . . . . . . . . . . . . . . . . . . . . . . . . . . . . . . . . . . . 195
HPINP - Input Account Function . . . . . . . . . . . . . . . . . . . . . . . . . . . . . . . . . . . . . 195
HPJAC - Journal Account Function . . . . . . . . . . . . . . . . . . . . . . . . . . . . . . . . . . . . 196
HPJCR - Journal Credit Value Function . . . . . . . . . . . . . . . . . . . . . . . . . . . . . . . . . 196
HPJDB - Journal Debit Value Function . . . . . . . . . . . . . . . . . . . . . . . . . . . . . . . . . 197
HPJDS - Journal Description Function . . . . . . . . . . . . . . . . . . . . . . . . . . . . . . . . . . 197
HPJEN - Journal Entity Function . . . . . . . . . . . . . . . . . . . . . . . . . . . . . . . . . . . . . . 198
HPJNO - Journal Number Function . . . . . . . . . . . . . . . . . . . . . . . . . . . . . . . . . . . . 198
HPJST - Journal Status Function . . . . . . . . . . . . . . . . . . . . . . . . . . . . . . . . . . . . . . 199
HPKEY - Default ID Function . . . . . . . . . . . . . . . . . . . . . . . . . . . . . . . . . . . . . . . . 199
HPLNK - Link Data Value Function . . . . . . . . . . . . . . . . . . . . . . . . . . . . . . . . . . . . 200
HPNAM - Entity Function . . . . . . . . . . . . . . . . . . . . . . . . . . . . . . . . . . . . . . . . . . 200
HPNNA - First Entity ID Function . . . . . . . . . . . . . . . . . . . . . . . . . . . . . . . . . . . . . 201
HPNSN - Subentity ID Function . . . . . . . . . . . . . . . . . . . . . . . . . . . . . . . . . . . . . . 201
HPPARADJ - Parent Adjustment Data Function . . . . . . . . . . . . . . . . . . . . . . . . . . . 202
HPPBE - Percentage Difference Function . . . . . . . . . . . . . . . . . . . . . . . . . . . . . . . . 202
HPPCH - Percentage Change Function . . . . . . . . . . . . . . . . . . . . . . . . . . . . . . . . . 203
HPPCONS - Ultimate Percent Consolidated Function . . . . . . . . . . . . . . . . . . . . . . 203
HPPCTRL - Ultimate Percent Control Function . . . . . . . . . . . . . . . . . . . . . . . . . . . 204
HPPOWN - Ultimate Percent Ownership Function . . . . . . . . . . . . . . . . . . . . . . . . 204
HPPROP - Proportion Data Function . . . . . . . . . . . . . . . . . . . . . . . . . . . . . . . . . . 205
HPSCA - Scale Function . . . . . . . . . . . . . . . . . . . . . . . . . . . . . . . . . . . . . . . . . . . . 205
x Contents
HPSHAROS - Shares Outstanding Function . . . . . . . . . . . . . . . . . . . . . . . . . . . . . . 206
HPSHAROW - Shares Owned by Other Entities Function . . . . . . . . . . . . . . . . . . . . 206
HPTRAN - Translation Data Function . . . . . . . . . . . . . . . . . . . . . . . . . . . . . . . . . . 207
HPVAL - Data Value Function . . . . . . . . . . . . . . . . . . . . . . . . . . . . . . . . . . . . . . . 207
HPVSHAROS - Voting Shares Outstanding Function . . . . . . . . . . . . . . . . . . . . . . . 208
HPVSHAROW - Voting Shares Owned by Other Entities Function . . . . . . . . . . . . . 209
Period Values in Hyperion Retrieve Functions . . . . . . . . . . . . . . . . . . . . . . . . . . . . . . . 209
Period ID . . . . . . . . . . . . . . . . . . . . . . . . . . . . . . . . . . . . . . . . . . . . . . . . . . . . . . . 209
Period Number . . . . . . . . . . . . . . . . . . . . . . . . . . . . . . . . . . . . . . . . . . . . . . . . . . . 209
Chapter 10. Product Documentation at Oracle’s Technology Network Site . . . . . . . . . . . . . . . . . . . . . . . . . . 211
Hyperion Enterprise Documentation . . . . . . . . . . . . . . . . . . . . . . . . . . . . . . . . . . . . . . 211
Index . . . . . . . . . . . . . . . . . . . . . . . . . . . . . . . . . . . . . . . . . . . . . . . . . . . . . . . . . . . . . 213
Contents xi

xii Contents
1Entering Data in Schedules
In This Chapter
Schedules Overview ... . . . . . . . . . . . . . . . . . . . . . . . . . . . . . . . . . . . . . . . . . . . . . . . . . . . . . . . . . . . . . . . . . . . . . . . . . . . . . . . . . . . . . . . . . . . . . . . . . . . . . . . . . . . .13
Data Entry Window... . . . . . . . . . . . . . . . . . . . . . . . . . . . . . . . . . . . . . . . . . . . . . . . . . . . . . . . . . . . . . . . . . . . . . . . . . . . . . . . . . . . . . . . . . . . . . . . . . . . . . . . . . . . . . .13
Schedule Setup ... . . . . . . . . . . . . . . . . . . . . . . . . . . . . . . . . . . . . . . . . . . . . . . . . . . . . . . . . . . . . . . . . . . . . . . . . . . . . . . . . . . . . . . . . . . . . . . . . . . . . . . . . . . . . . . . . .17
Schedule Maintenance ... . . . . . . . . . . . . . . . . . . . . . . . . . . . . . . . . . . . . . . . . . . . . . . . . . . . . . . . . . . . . . . . . . . . . . . . . . . . . . . . . . . . . . . . . . . . . . . . . . . . . . . . . .21
Calculating Formulas in Schedules... . . . . . . . . . . . . . . . . . . . . . . . . . . . . . . . . . . . . . . . . . . . . . . . . . . . . . . . . . . . . . . . . . . . . . . . . . . . . . . . . . . . . . . . . . . . .22
Setting Accounts Without Data to Zero ... . . . . . . . . . . . . . . . . . . . . . . . . . . . . . . . . . . . . . . . . . . . . . . . . . . . . . . . . . . . . . . . . . . . . . . . . . . . . . . . . . . . . . . .23
Decimal Places Option ... . . . . . . . . . . . . . . . . . . . . . . . . . . . . . . . . . . . . . . . . . . . . . . . . . . . . . . . . . . . . . . . . . . . . . . . . . . . . . . . . . . . . . . . . . . . . . . . . . . . . . . . . .24
In Oracle's Hyperion® Enterprise®, you can enter data using schedules. You can use Oracle'sHyperion® Enterprise® Reporting to generate reports.
This chapter provides information and procedures that you need to enter data in schedules.
Schedules OverviewA schedule is a form you use to enter, view, or edit data in specific accounts. You set up schedulesby giving them IDs and descriptions, specifying the account lists to include, and setting optionsto format and calculate the data.
Each schedule contains data for a specific entity and category, listed by account and period. Aschedule can include one or two account lists. This allows you to work with only the accountsthat you need instead of the entire chart of accounts. For example, you might have a schedulefor Actual data for the Plant 1 entity with a top list of input accounts for Sales Data and a bottomlist of calculated accounts for Total Sales. This schedule would allow you to enter data into inputaccounts and view the results of the data entry on the calculated accounts.
Data Entry WindowYou use the Data Entry window to set up and work with schedules. You perform the followingtasks in the Data Entry window:
l Create schedules and edit existing schedules
l Copy and delete schedules
l Enter and edit the schedule data
Schedules Overview 13

l Calculate formulas
l Add validated subaccounts
You can open one or more schedules from the Data Entry window to view or change the datain accounts. When you open the Data Entry window, the default schedule appears. You can editthe default schedule or open one or more new schedules. You can also preview and print scheduledata. For more information on schedules and how to use them, see Hyperion Enterprise GettingStarted.
Hyperion Enterprise generates an error message if you try to perform a task for a schedule pointof view, when another user has the same point of view already in use, for example in the DataEntry module. This error message is written to the error log. For more information on the errorlog, see Hyperion Enterprise Getting Started Guide.
Figure 1 Data Entry Window
1. You can select the expand/collapse box to display all accounts and subaccounts in theschedule. For more information, see Hyperion Enterprise Getting Started.
2. A plus sign ( + ) to the left of an account ID indicates that the account is a major accountwith hidden subaccounts, or a subaccount with second-level subaccounts. You can selectthe plus sign to display the subaccounts, or the minus sign ( - ) to hide the subaccounts.
3. Either one or two account lists, referred to as the top and bottom account lists, can appearin a schedule with a row for each account and a column for each period in the currentcategory.
4. The formulas area shows existing formula statements for the selected account.
14 Entering Data in Schedules
5. The information area shows the current frequency, view, scale, and decimal attribute of theselected account. For more information on selecting the point of view, see HyperionEnterprise Getting Started.
6. The account area displays the account type, the account description, and the stored valuefor the selected period.
Major accounts with subaccounts, as well as subaccounts with second-level subaccounts, arecalculated accounts, and you cannot enter data into them. Accounts that are unavailable forinput appear in different colors. You can change the following default system colors.
l White cells — Input accounts, available for data entry.
l Green cells — Calculated accounts.
l Yellow cells — Consolidated accounts.
For more information on changing system colors, see Hyperion Enterprise Getting Started. Formore information on account attributes, see the Hyperion Enterprise Administrator's Guide.
Setting Schedule OptionsThe following options determine the appearance of a schedule and how it calculates data:
l Showing account labels or descriptions or account labels and descriptions in the accountcolumn
l Showing data for all periods or the current period only
l Automatically or manually recalculating data
l Showing or hiding formulas
l Suppressing rows for accounts with no data
l Changing account and data column widths
l Specifying the font
If several Data Entry windows are open at once, the options you change affect only the activewindow.
ä To set schedule options:
1 From Data Entry, select Task > Set Schedule Options.
2 Specify whether to display the account label or description or account label and description, column widths,periods shown, font, or any other options.
Note: The default setting is to display the account label.
3 Click OK.
Data Entry Window 15

Data DisplayThe number of digits that you can see in a period for data values is determined by the columnwidth and font size, which are selected as schedule options. If the number of digits exceeds thecolumn width, the number is rounded and truncated, and a data display character is attachedto the number. Table 1 describes the data display characters.
Table 1 Data Display Characters
Character Description
K Thousands
M Millions
B Billions
T Trillions
Q Quadrillions
* The data value is too large to display
Although the system might display a rounded number, the system stores the full value. Whenyou select an account, the stored value appears in the information area.
Table 2 shows how the system displays the value 123456789012 using varying column widths.In the examples, the scale is set to 0 (zero) and the font is set to 8 points.
Table 2 Displaying Large Data Values
Column Width Displayed As
10 characters 123.45678B
8 characters 123.457B
6 characters 123.4B
Schedule Point of ViewThe schedule point of view determines which data is displayed in the Data Entry window. Whenyou access the Data Entry module, the Data Entry window contains data for the default schedule.You can change the schedule point of view by changing the category, organization, or entity.
The scale, frequency, and data view options default to the attributes of the current category. Bychanging any of these options, you can change the view of the data that shows in the currentschedule.
Note: Changing the scale, frequency, and data view within the Data Entry window affects thecurrent session only.
16 Entering Data in Schedules
You can change the scale, frequency, or data view in the Point of View dialog box. For moreinformation, see Hyperion Enterprise Getting Started.
Finding Accounts or PeriodsA schedule with many accounts or periods might extend beyond your screen. You can findaccounts or periods without scrolling through the schedule by typing all or part of its ID. Youcan also filter the list to include input accounts, calculated accounts, subaccounts, or dynamicview accounts.
ä To find an account or period:
1 From the Data Entry window, take one of the following actions:
l To find an account, select Edit > Find > Account and use the check boxes to filter the listof accounts.
l To find a period, select Edit > Find > Period.
2 Type an account or period ID or select one from the list.
3 Click OK.
Viewing Consolidation DetailIf you selected the option to store consolidation detail when you created the application, youcan view consolidation detail for an entity and its dependents. You can view translationinformation, proportion detail, elimination detail, parent-level adjustments, and contributionvalues using the point of view bar.
ä To view consolidation detail:
1 From the Desktop or a window that uses the point of view, select Edit > Point of View.
2 Select the Consolidation Detail tab, select the consolidation detail that you want to display, and click OK.
Schedule SetupSchedule setup involves defining the schedules you use to enter data into Hyperion Enterprise.You set up schedules by specifying IDs, descriptions, security classes, account lists, and scheduleoptions. You can create as many schedules as you want, and you can edit the definition of anyexisting schedule. You can also delete schedules that you no longer use.
Before you set up a schedule, your system administrator must define one or more account lists.If this is the first time the Data Entry window has been accessed in an application, you also needto create or select the default schedule. For information on account lists, see the HyperionEnterprise Administrator's Guide. For more information on the default schedule, see HyperionEnterprise Getting Started.
Schedule Setup 17
You can delete a schedule if you no longer need it. Deleting a schedule does not delete the datafor the entities and categories. You cannot delete a schedule if it is the default schedule.
Defining SchedulesYou define a schedule or edit an existing schedule when you want to set up a data entry formthat consists of one or two account lists. You can edit the attributes of a schedule to change itsID, description, security class, to select new top or bottom account lists, or to change displayoptions, such as the column width, periods shown, and font.
Note: Preferences set for schedule attributes by selecting Task > Set Schedule Options or fromthe Hyperion Enterprise Web will not be available after you close the application.
Note: The bottom account list is optional.
ä To define a schedule:
1 From the Data Entry window, perform an action:
l To create a schedule, select File > New Schedule.
l To edit a schedule, open the schedule and select File > Schedule Attributes. For instructionson opening a schedule, see Hyperion Enterprise Getting Started.
2 Specify the ID, description, security class, and top and bottom account lists.
3 Select Options, set preferences, and click OK to change how the data appears in the schedule. Forinstructions, see “Setting Schedule Options” on page 15.
Adding Validated SubaccountsValidated subaccounts appear in schedules only when data exists for the subaccount. Before youcan enter data in these subaccounts, you must manually add them to schedules.
For example, suppose a validated subaccount table contains 50 subaccounts under a majoraccount called Golf Sales. You might need to enter data for only three of these subaccounts.Instead of viewing all 50 subaccounts, you can add the three subaccounts you need under themajor account Golf Sales when you enter data.
The validated subaccounts are in the subaccount table assigned to the account or subaccount.The system adds validated subaccounts to the schedule in the order in which they appear in thesubaccount table. For information on setting up subaccount tables, see the Hyperion EnterpriseAdministrator’s Guide.
ä To add validated subaccounts:
1 From the Data Entry window, select a major account or subaccount that has validated subaccounts.
18 Entering Data in Schedules

2 Select Edit > Insert Subaccounts or double-click the on selected account ID or description in the Accountcolumn.
3 Enter or select the subaccount ID.
4 Click OK.
Entering or Editing Data You enter data into input accounts for base entities. Calculated and consolidated accounts donot accept data entry, because the values they contain come from other sources. For example,if a company called USA East has three dependents, East GF, East TN, and East FB, you entervalues into the dependent entities. After you consolidate, the value in USA East is the total ofthe values in its three dependents.
After you make changes to a schedule, the system prompts you to save the changes when youclose the Data Entry window or change the entity or category in the point of view bar in the DataEntry window.
You use the point of view bar to temporarily change the data view to see either periodic or year-to-date data for a category. You can enter data in any data view. For example, if you are enteringperiodic actual data for June, you can enter year-to-date actual data accumulated from Januaryto June by changing the view to year-to-date. Changing the data view in a schedule does notchange the Data View category attribute. For more information on point of view, see HyperionEnterprise Getting Started.
ä To enter or edit data in a schedule:
1 From the Data Entry window, select the cell in which you want to enter or change data. For instructions, see“Highlighting Data Blocks” on page 21.
2 Type a value and press Enter.
Tip: You can define the function of the Enter key on your workstation. For instructions, see theHyperion Enterprise Desktop chapter in Hyperion Enterprise Getting Started.
Data Entry Operator KeysOperator keys perform special functions that make data entry faster and easier. You can use theoperator keys to enter data in several cells at once, to perform calculations on data already inthe schedule, or to fill parts of a schedule with randomly generated test data. Table 3 describesthe operator keys.
Table 3 Operator Keys
Key Operation Example
+ Adds the number you type to thenumber already in the cell.
30+
Schedule Setup 19

Key Operation Example
- Subtracts the number you type fromthe number already in the cell.
30-
% + or % - Increases or decreases the value inthe cell by the percentage you type.
50%+
+ P or -P Increases or decreases the value inthe cell over the previous period bythe amount or percentage you type.
30%+P
/ Divides the current cell value by thenumber you type.
10/
* Multiplies the current cell value by thenumber you type.
5*
A Allocates the value you type equallyamong all highlighted cells.
150A
? Multiplies the value you type by arandom positive number.
30?
-? Multiplies the value you type by arandom negative number.
-30?
Figure 2 shows an example of how you can use the operator keys to edit data. The operator keysare used to increase the values in the Apparel account by 10 percent across all periods.
Figure 2 Using Operator Keys
1. Select the data that you want to change.
2. Enter a value followed by an operator key.
20 Entering Data in Schedules

The result is displayed in the schedule.
Schedule MaintenanceOnce you create schedules, you can maintain them by moving, copying, or removing data. Youuse a schedule to enter or edit data in input accounts for an entity and category. You performthese tasks to maintain data:
l Highlight Data Blocks
l Move Data
l Copy Data
l Remove Data
Highlighting Data BlocksYou can highlight blocks of accounts and periods in a schedule, then modify or enter data in allthe highlighted cells at once. You can highlight a row of data, a column of data, a block of cells,or the entire schedule.
ä To highlight blocks of data, take one of the following actions:
l To highlight an entire row, select an account ID or description in the left column of a row.
l To highlight an entire column, select a period ID at the top of a column.
l To highlight a block of cells, select a specific cell, then drag the cursor until all desired cellsare selected.
l To highlight the entire schedule, select the Account column heading.
Moving DataYou can move data from one cell to another or from a block of cells to another block of cellsthat is the same size. A gray zero appears in the cleared cells, indicating no data. If the Set NoData to Zero option is selected for the schedule, the no data state is converted to a true zerovalue, which appears in the same font as other values in the schedule. For more information, see“Setting Accounts Without Data to Zero” on page 23.
You cannot move data to or from locked periods, calculated accounts, or consolidated accounts.Locked periods have a Locked icon in the column heading. Calculated and consolidated accountsare color-coded. You can change the default colors of these account cells. For more information,see Hyperion Enterprise Getting Started.
ä To move data:
1 From the Data Entry window, select the cell or block of cells that contains the data you want to move.
2 Select Edit > Cut.
Schedule Maintenance 21

3 Select the cell or block of cells into which you want to paste the data. For instructions, see “HighlightingData Blocks” on page 21.
4 Select Edit > Paste.
Copying DataYou can copy data from one cell to another or from a block of cells to another block of cells thatis the same size. You can copy data from locked periods, calculated accounts, and consolidatedaccounts. You cannot paste data to locked periods, calculated accounts, or consolidatedaccounts. Locked periods have a Locked icon in the column heading. Calculated andconsolidated accounts are color-coded. You can change the default colors of these account cells.For more information, see Hyperion Enterprise Getting Started.
ä To copy data:
1 From the Data Entry window, select the cell or block of cells that contains the data you want to copy.
2 Select Edit > Copy.
3 Select the cell or block of cells into which you want to paste the data. For instructions, see “HighlightingData Blocks” on page 21.
4 Select Edit > Paste.
Removing DataYou can remove data from one cell or a block of cells. When you remove data, the data is deletedfrom both the schedule and the data table. A gray zero appears in the cleared cells, indicating nodata. If the Set No Data to Zero option is selected for the schedule, the no data state is convertedto a true zero value, which appears in the same font as other values in the schedule. For moreinformation, see “Setting Accounts Without Data to Zero” on page 23.
You cannot remove data from locked periods, calculated accounts, or consolidated accounts.Locked periods have a Locked icon in the column heading. Calculated and consolidated accountsare color-coded. You can change the default colors of account cells. For more information, seeHyperion Enterprise Getting Started.
ä To remove data:
1 From the Data Entry window, select the cell or block of cells that contains the data you want to remove. Forinstructions, see “Highlighting Data Blocks” on page 21.
2 Select Edit > Remove.
Calculating Formulas in SchedulesYou calculate formulas in a schedule to see the results of your data entry. If the Auto Recalculateoption is selected in the Schedule Options dialog box, data recalculates each time you enter a
22 Entering Data in Schedules
value. For faster data entry, deselect the Auto Recalculate option and then input your data. Whenyou save the schedule, the calculated accounts do not contain the new values, but you canrecalculate data manually for an entire schedule or for a specific account or period.
Note: All periods impacted by a change in data have a status of IMPACTED for consolidationafter you enter new data. The period set in the point of view does not impact the periodsthat the system impacts.
For example, suppose you enter values for the four subaccounts of the major account Sales, andyou want to view the new value for the major account. You can recalculate the data to check thenew total of the subaccounts. When you save the schedule with Auto Recalculate deselected,formulas are run, and the status of the file is saved. When you later retrieve the file, a formulastatus icon appears above the period ID to indicate that you need to calculate formulas.
When you work with several schedules at once, you can recalculate the data for the schedule inthe active window only. To recalculate the data for another open schedule, you must switch tothat schedule's window.
ä To calculate formulas:
1 From the Data Entry window, select the periods and accounts that contain the data to calculate.
2 Select Task > Calculate Formulas.
Setting Accounts Without Data to ZeroThe Set No Data to Zero option converts missing data to zeros. If the Set No Data to Zero optionis deselected, missing data appears as zeros. If the Set No Data to Zero is selected, zeros appearin normal text.
A period is missing data when it does not have a data value or a zero but there is data in the priorperiod. When the system processes data, missing data is always considered zero. The MissingData as Zero category attribute determines whether zero displays as a periodic or year-to-datevalue in a particular category. This allows derived data based on the zero values to remain thesame in different data views. This setting applies only to flow, income, and expense accounts.Balance, asset, and liability accounts are not affected.
Values for periods missing data appear differently depending on the data view. Zero periodicdisplays a value of zero for the period missing data. Zero year-to-date displays a year-to-datevalue of zero for the period missing the data. For example, suppose your default data view isperiodic and you select Missing Data as Zero and change your data view to year-to-date. If thevalue for January is 100 and data is missing for February, the system automatically enters aperiodic value of -100 for February to give February a year-to-date value of zero.
ä To convert missing data to zeros:
1 From the Data Entry window, select the period column heading for the period in which you want to convertno data zeros to true zeros.
Setting Accounts Without Data to Zero 23

Tip: To highlight the entire schedule, select the Account column heading.
2 Select Edit > Set No Data to Zero.
Decimal Places OptionWhen you create an account in the Accounts module, you specify a default number of decimalplaces for that account. Whenever you view values for that account, the default number ofdecimal places appears. For example, if you set the Decimals attribute of an account to 0 (zero),the system shows the account's values as whole numbers. If you set the Decimals attribute of anaccount to 2, the system shows the account's values with two decimal places, such as 6.75. Formore information, see the Hyperion Enterprise Administrator’s Guide.
In the Data Entry module, you can use the Decimal Places option to override the account’sdefault number of decimal places that appear. The number of decimal places you specify appearsfor each data value, even if you exit and re-enter the module. A check mark appears next to thenumber of decimal places you select on the menu. Selecting Default allows you to view thedecimal settings originally specified for the account in the Accounts module.
To override the default number of decimal places:
l From the Data Entry window, select View > Decimal Places.
Select the number of decimal places you want to appear, or select Default to use the number ofdecimal settings specified in the Accounts module.
24 Entering Data in Schedules

2Loading and Extracting Data
In This Chapter
Database Management Overview ... . . . . . . . . . . . . . . . . . . . . . . . . . . . . . . . . . . . . . . . . . . . . . . . . . . . . . . . . . . . . . . . . . . . . . . . . . . . . . . . . . . . . . . . . . . . . .25
Database Window... . . . . . . . . . . . . . . . . . . . . . . . . . . . . . . . . . . . . . . . . . . . . . . . . . . . . . . . . . . . . . . . . . . . . . . . . . . . . . . . . . . . . . . . . . . . . . . . . . . . . . . . . . . . . . . .26
Database Maintenance... . . . . . . . . . . . . . . . . . . . . . . . . . . . . . . . . . . . . . . . . . . . . . . . . . . . . . . . . . . . . . . . . . . . . . . . . . . . . . . . . . . . . . . . . . . . . . . . . . . . . . . . . .32
Calculating Formulas in the Database ... . . . . . . . . . . . . . . . . . . . . . . . . . . . . . . . . . . . . . . . . . . . . . . . . . . . . . . . . . . . . . . . . . . . . . . . . . . . . . . . . . . . . . . . .39
Setting Accounts Without Data to Zero ... . . . . . . . . . . . . . . . . . . . . . . . . . . . . . . . . . . . . . . . . . . . . . . . . . . . . . . . . . . . . . . . . . . . . . . . . . . . . . . . . . . . . . . .39
Running Dependent Consolidation Detail Reports.. . . . . . . . . . . . . . . . . . . . . . . . . . . . . . . . . . . . . . . . . . . . . . . . . . . . . . . . . . . . . . . . . . . . . . . . . . . . .40
Clearing Invalid Consolidation Detail. . . . . . . . . . . . . . . . . . . . . . . . . . . . . . . . . . . . . . . . . . . . . . . . . . . . . . . . . . . . . . . . . . . . . . . . . . . . . . . . . . . . . . . . . . . . .41
Data Formats ... . . . . . . . . . . . . . . . . . . . . . . . . . . . . . . . . . . . . . . . . . . . . . . . . . . . . . . . . . . . . . . . . . . . . . . . . . . . . . . . . . . . . . . . . . . . . . . . . . . . . . . . . . . . . . . . . . . . .42
Extracting Consolidation Detail . . . . . . . . . . . . . . . . . . . . . . . . . . . . . . . . . . . . . . . . . . . . . . . . . . . . . . . . . . . . . . . . . . . . . . . . . . . . . . . . . . . . . . . . . . . . . . . . . . .49
Validation of Records in Data Load and Extract .. . . . . . . . . . . . . . . . . . . . . . . . . . . . . . . . . . . . . . . . . . . . . . . . . . . . . . . . . . . . . . . . . . . . . . . . . . . . . . .51
Running Entity Detail Report . . . . . . . . . . . . . . . . . . . . . . . . . . . . . . . . . . . . . . . . . . . . . . . . . . . . . . . . . . . . . . . . . . . . . . . . . . . . . . . . . . . . . . . . . . . . . . . . . . . . . .51
Decimal Places Option ... . . . . . . . . . . . . . . . . . . . . . . . . . . . . . . . . . . . . . . . . . . . . . . . . . . . . . . . . . . . . . . . . . . . . . . . . . . . . . . . . . . . . . . . . . . . . . . . . . . . . . . . . .56
Hyperion Enterprise supports drill-back option to Oracle Hyperion Financial Data QualityManagement, Fusion Edition data.
This chapter provides information and procedures that you need to load and extract data inHyperion Enterprise applications.
Database Management OverviewDatabase management is the process of managing data for different entities, categories, accounts,and periods. For example, you can copy and move data between periods. Data load and extractis the process of loading data from or extracting data to external ASCII files.
You can use the Database module to transfer Hyperion Enterprise data between differentlocations or applications and between Hyperion Enterprise and other systems. For example, youcan extract data from various sites and load it into the application at headquarters, or you canload data into Hyperion Enterprise from a general ledger.
When you load or extract data, you use data formats to indicate how Hyperion Enterprise shouldinterpret data from external systems. For example, a data format can specify entity and accountconversion tables that match Hyperion Enterprise entities and accounts with entities andaccounts in external systems.
Database Management Overview 25
You can calculate formulas in the Database window to enter values in calculated accounts. Youcan also change accounts that have no data to zero values. The lock and unlock features of theDatabase window allow you to control the ability to change data. You can lock periods to freezevalues, and you can unlock them later if you want to change the values or allow users to changethem.
Database WindowThe Database window shows all accounts in the chart of accounts for the selected entity andcategory. When you first access the Database module, the Database window lists all accountgroups and indicates whether accounts in the group contain data.
You can select the plus sign ( + ) to the left of an account group to display its accounts andsubaccounts and view their data values. You can also see the status of each period of data in theDatabase window.
You can perform these tasks in the Database window:
l Load data from or extract data to ASCII text files
l Calculate formulas
l View accounts in an account list or group
l View data for entities in an entity list
l View translation, proportion, elimination, parent adjustments, or contribution values forthe current entity
l Find specific accounts, account groups, or periods in the database
l Print or preview specific accounts and periods or all accounts and periods
l Copy, move, or enter data
l Prevent users from editing data in specific periods by locking them
l Erase entire data files
For more information on printing, see Hyperion Enterprise Getting Started.
Hyperion Enterprise generates an error message if you try to perform tasks for a schedule pointof view in the Database window when another user has it open for the same schedule point ofview. This error message is written to the error log. For more information on the error log, seeHyperion Enterprise Getting Started Guide.
Figure 3 shows the Database window.
26 Loading and Extracting Data

Figure 3 Database Window
1. The Entity List drop-down list contains the entity list for which you are currently viewingdata and status information. It is not available until you use the View > Entity list menucommand to select an entity list.
2. The Periods columns show periods for the current category as column headings.
3. The Period status area shows whether the data for the period is locked, locked for journals,or must be recalculated.
4. The Accounts column shows account groups that you can expand to show account andsubaccount detail.
5. Each cell contains a value for an account or subaccount, or the data status for an accountgroup.
6. The Formulas area shows any formula that is defined for the account highlighted in theDatabase window.
7. The Information area shows the current frequency, view, scale, decimal places, parent entity,and display type, such as translation detail.
8. The account area displays the account type, account description, and stored value for theselected period.
For more information on working with tables, see Hyperion Enterprise Getting Started.
Data StatusThe Database window shows the data status for individual account groups in each period.Account groups have a data status of DATA or NO DATA.
Database Window 27

A status of DATA indicates that data exists for some or all of the accounts in a group for theperiod. If you expand the group, the system displays the actual account values. A status of NODATA indicates that no data exists for any account in a group for the period.
The Database window also shows the status for the entire period in the period status area.Table 4 shows the data status icons.
Table 4 Data Status Icons
The Locked icon indicates that this period was locked using the Lock option. You can view the account datain the locked period, but you cannot modify it.
The Journal Locked icon indicates that either a journal was posted for the current entity in this period or aJournal Lock was manually placed on the current entity in this period. Once you post a journal for an entity,you can modify the entity’s data only by posting additional journals.
The Journal Posting Lock icon indicates that the current entity and period combination has been locked toavoid the posting of journals. Data can be entered manually or loaded, but no journals can be posted to thisentity and period combination.
The Calculate Formulas icon indicates that data has changed in the period and you must calculate formulasto recalculate account values. Data can change due to manual data entry in schedules, data fills in Database,or data loads. For more information, see “Calculating Formulas in the Database” on page 39.
The Impacted icon indicates that the data is impacted. This status applies to either translation, proportion,elimination, or contribution values for an entity or parent data. Data can be impacted due to changes in entitydata, such as entering data, modifying data, clearing data, or erasing data.
Setting Database OptionsYou can set options in the Database window to affect how values show in the window for thecurrent session. You set the following database options in the Set Database Options dialog box:
l Whether the system shows account labels or descriptions and account labels and descriptionsin the Account column
l The column widths of the Account column and period columns, and how many columnsshow in the table
l Whether the system calculates formulas for all displayed accounts each time you enter oredit data
l Whether the system shows the formula for a selected account at the bottom of the Databasewindow
l The size and style of the font in the Database window, which determine how many charactersshow in each column
Note: If multiple instances of the Database window are open, the preferences you specifyaffect the active window only.
ä To set database options:
1 From Database, select Task > Set Database Options.
28 Loading and Extracting Data

2 Specify whether to display the account label or description or account label and description, whether tocalculate formulas, whether to show formulas in the window, and column widths.
Note: The default setting is to display the account label. The preferences you specify in SetDatabase options are saved when you exit the application.
3 Select Change Font to specify the font, style, and size for the characters in the Database window, then clickOK.
4 Click OK.
Database Point of ViewThe point of view determines the data you work with in the Database window. When you accessthe Database module, the Database window contains data for the current category, organization,and entity. You can change the database point of view by changing any of these elements.
The scale, frequency, and data view options default to the attributes of the current category. Youcan change the view of the data that shows in the Database by changing any of these elements.
Note: Changing the scale, frequency, and data view within the Database window affects thecurrent session only.
You can change the scale, frequency, or data view in the Point of View dialog box. Forinformation about the Point of View dialog box, see Hyperion Enterprise Getting Started.
Viewing Entity ListsYou use an entity list in the Database module to manage data for all entities in the list at once.You can move or copy data, lock and unlock periods, or extract data into a text file for all entitiesin the list.
For example, suppose you want to copy the Budget sales account figures for all North Americansubsidiaries from March to April. You can select an entity list called NAmerica that contains theNorth American companies and copy the sales figures from March to April for all entities in thelist in one operation.
The Database window shows data for only one entity at a time, but any operation you performwhen an entity list is selected affects all entities in the entity list. When you select an entity list,the data for the first entity in the list appears in the window. You can view the data for a differententity in the list by selecting the entity from the Entity List drop-down list.
For more information on copying lists, see “Copying Data” on page 33. For more informationon locking and unlocking the database, see “Locking or Unlocking Periods in the Database” onpage 37.
Database Window 29

ä To view an entity list:
1 From the Database window, select View > Entity List.
2 Select an entity list.
3 Click OK.
Tip: The drop-down list at the top of the Database window shows the first entity in the entitylist. To display data for another entity, select one from the drop-down list.
Viewing Account GroupsYou can view the accounts in an account group when you want to work with accounts in aspecific group only. For example, if you want to view only asset accounts, you can select thegroup that contains those accounts.
ä To view an account group:
1 From the Database window, select View > Account Group.
2 Enter an account group ID or select one from the list.
3 Click OK.
Tip: To return to the chart of accounts view, select View > Chart of Accounts.
Viewing Account ListsAccount lists are sets of accounts that allow you to use specific accounts together. Account listsusually consist of closely related accounts. You can select an account list to display the data forthe accounts in that list only.
For example, if you want to view the data for all intercompany accounts, you can select theInterco account list, which includes only intercompany accounts. When you select an accountlist, the system does not display rows for account groups.
ä To view an account list:
1 From the Database window, select View > Account List.
2 Type an account list ID or select one from the list.
3 Optional: Select one or more of the following options: Dynamic Lists, Fixed Lists, Fixed Lists with DynamicSubaccounts, See All Validated.
Note: If you select the See All Validated option, validated accounts that do not contain datadisplay in your account list. This enables you to include these accounts in your data extracttask. You can perform multiple data extracts with the account list that includes validatedaccounts without data, but once you close the account list the See All Validated option isno longer selected.
30 Loading and Extracting Data

4 Click OK.
Tip: To return to the chart of accounts view, select View > Chart of Accounts.
Viewing Consolidation DetailIf you selected the option to store consolidation detail when you created the application, youcan view consolidation detail for an entity and its dependents. You can view translationinformation, proportion detail, elimination detail, parent-level adjustments, and contributionvalues using the point of view bar.
ä To view consolidation detail:
1 From the Desktop or a window that uses the point of view, select Edit > Point of View.
2 Select the Consolidation Detail tab, then select the consolidation detail that you want to display, and clickOK.
Finding Accounts in the DatabaseYou can find a specific account in the Database window. This might be faster than using thescroll bars or the arrow keys to scroll through the database. If the selected account is in an accountgroup or account list that is collapsed, the system expands the group or list and highlights theaccount.
If you are viewing accounts from only one account group or account list, you can find accountsonly in the currently selected group or list. To find accounts that are not included in the currentgroup or list, you must return to the full chart of accounts view. For information on viewingaccount groups or account lists, see “Viewing Account Groups” on page 30 and “ViewingAccount Lists” on page 30.
ä To find an account in the database:
1 From the Database window, select Edit > Find > Account.
2 Use the check boxes to filter the list of accounts.
3 Type an account ID or select one from the list.
4 Click OK.
Finding Account Groups or Periods in the Database You can locate a specific account group or period in the Database window. Finding an accountgroup in the Database window might be faster than scrolling through the chart of accounts tosearch for an account group, especially if account detail is shown. Finding a period in theDatabase window is useful if the period columns extend beyond the Database window and mightbe faster than using the scroll bars or arrow keys to locate a specific period.
Database Window 31
ä To find an account group or period in the database:
1 From the Database window, take one of the following actions:
l Select Edit > Find > Account Group and enter an account group ID or select one from thelist.
l Select Edit > Find > Period and enter a period ID or select one from the list.
2 Click OK.
Database MaintenanceYou can move, copy, or clear blocks of data in the Database window. You can also fill individualcells or a range of cells with one value or with random values. These editing options allow youto manipulate data across entities, categories, and periods. For example, you can copy data fromthe Actual category to the Budget category. You can also update multiple accounts, periods, andentities. When you perform database operations, you can specify whether you want toautomatically calculate formulas for the values you change.
When you select an entity list in the database, any changes to data affect all entities in the list.For example, suppose you select the Base1 entity list, which contains base entities, and you clearthe data from the January period for accounts in the Income account group. The system clearsthe January values for all Income group accounts for all entities in the Base1 entity list.
Note: Any changes that you make to data in the Database window affect consolidation status,which you can view in the Consolidation window. You might need to calculate formulasor reconsolidate your data. For more information on consolidation statuses, see theHyperion Enterprise Administrator's Guide.
Highlighting Data BlocksBefore you can edit data, you must first highlight a block of cells. A data block can include cellsin one or more adjacent columns or rows. Once you highlight a block, you can perform thesetasks:
l Copy or move the values in the data block to another location
l Fill a selected area with the same value or with random numbers
l Clear all values from the block
l Calculate formulas on a highlighted period only
When you select an entity list in the Database, any change to data affects all entities in the list.For example, suppose you select the entity list BaseA, which contains base entities, and you movethe data from the February period for accounts in the Income group. The system moves theFebruary values for all Income group accounts for all entities in the BaseA entity list.
ä To highlight a data block, from the Database window, take one of the following actions:
l To highlight one cell, select only that cell.
32 Loading and Extracting Data
l To highlight an entire period, select the period ID.
l To highlight a single account across all periods, select the account ID.
l To highlight the entire database, select the Account column heading.
l To highlight a block of data, select any corner of the data, then drag the pointer to theopposite corner.
Moving DataYou can move data from one data block to another. For example, suppose you want to movethe first-quarter Marketing Expense account values to the third quarter. You can highlight thefirst-quarter values and cut them from that column, then paste the values in the third-quartercolumn. This is faster than entering the values in the third-quarter column and then clearingthem from the first-quarter column.
When you cut a block, the system copies the block to the Windows clipboard. You can thenpaste the block to a different location within the database. Consolidation status might beimpacted for the data blocks you move. You can view consolidation status in the Consolidationwindow. You might also need to calculate formulas. For more information on calculatingformulas, see “Calculating Formulas in the Database” on page 39.
Note: You cannot move data to calculated accounts or locked periods.
ä To move data:
1 From the Database window, select the cell or block of cells that contains the data you want to move. Forinstructions, see “Highlighting Data Blocks” on page 32.
2 Select Edit > Cut.
3 To move the data to a different category, select Edit > Point of View, then select Category and a categoryfrom the combo box.
4 Select the cell or block to which you want to move the data. The size of the block you are moving from mustmatch the size of the block you are pasting to.
5 Select Edit > Paste.
Copying DataYou can copy data from one data block to another. For example, suppose the tax account valuesyou want to enter for the third quarter are the same as the first-quarter values for those accounts.Instead of entering the same values, you can copy them from the first-quarter column to thethird-quarter column.
When you copy a block, the system copies the block to the Windows clipboard. You can thenpaste the block to a different location within the Database window. Consolidation status mightbe impacted for the data blocks you copy. You can view consolidation status in the Consolidation
Database Maintenance 33
window. You might also need to calculate formulas. For more information on calculatingformulas, see “Calculating Formulas in the Database” on page 39.
Note: You cannot copy data to calculated accounts or locked periods.
When organizations vary by category and period in an application, if you copy data from oneperiod to another while viewing an entity list, the system might copy data from one entity to adifferent entity. This occurs because the entities and their position in the list can change fromone period to another.
ä To copy data:
1 From the Database window, select the cell or block of cells that contains the data you want to copy. Forinstructions, see “Highlighting Data Blocks” on page 32.
2 Select Edit > Copy.
3 To copy the data to a different category, select Edit > Point of View, then select Category and a categoryfrom the combo box.
4 Select the cell or block to which you want to copy the data. The size of the block you are copying from mustmatch the size of the block to which you are pasting.
5 Select Edit > Paste.
Pasting DataYou can specify a mode, mathematical operation, or value for pasting values from the Windowsclipboard to a specific account or range of accounts. For example, you can cut or copy valuesfrom any open window and use the Paste Special option to multiply the values in the Windowsclipboard by 100 before they are pasted into the database. You could also specify whether toaccumulate or replace the values in the data block to which you are pasting values.
Consolidation status might be impacted for the data blocks to which you paste data. You canview consolidation status in the Consolidation window. You might also need to calculateformulas. For more information on calculating formulas, see “Calculating Formulas in theDatabase” on page 39.
ä To paste data:
1 From any open window, select Edit > Cut or Edit > Copy.
2 From the Database window, select the cell or block of cells that contains the data you want to cut or copy.For instructions, see “Highlighting Data Blocks” on page 32.
3 Select Edit > Paste Special.
4 Specify the mode, operators, and value for pasting values.
5 Click OK.
34 Loading and Extracting Data

Clearing Data BlocksYou can clear a block of cells and reset their values to NO DATA. This is faster than replacingthe existing values with one zero at a time. Consolidation status might be impacted for the datablocks you clear. You can view consolidation status in the Consolidation window. You mightalso need to calculate formulas. For more information on calculating formulas, see “CalculatingFormulas in the Database” on page 39.
Note: You cannot clear data from calculated accounts or from locked periods.
ä To clear a data block:
1 From the Database window, select the cell or block of cells that contains the data you want to remove. Forinstructions, see “Highlighting Data Blocks” on page 32.
2 Select Edit > Remove.
Filling the DatabaseYou can fill accounts, periods, or a block of accounts and periods with a specific value or randomvalues. Filling the database with a specific value saves time when you want to enter the samevalue in all periods of an account, all accounts for a period, or all of the accounts and periods ina data block. For example, you can fill all periods for the FedTax account with the same value.
You can fill the database with random values to test reports. For example, suppose you are writinga report that includes accounts where no value has been entered. You might want to preview thereport to see whether its format needs adjustment. The preview will be more realistic if it includesvalues for the specified accounts. When you finish writing the report, you can edit the databaseto clear the random values from the accounts.
Note: You cannot fill calculated accounts or locked periods with data.
ä To fill the database:
1 From the Database window, select the cell or block of cells that you want to fill. For instructions, see“Highlighting Data Blocks” on page 32.
2 Select Edit > Fill and take one of the following actions:
l To fill with a fixed value, type a value in the With text box.
l To fill with random values, leave the With text box blank.
3 Click OK.
Erasing DataYou can erase data from the database. When you erase data, all data for the current category andentity is removed from all periods and all data is removed from a data file regardless of the
Database Maintenance 35
currently selected account and entity lists. Erasing data is useful if you no longer need to maintaindata for a category and entity. Erasing data can free up disk space.
For example, suppose you have been maintaining historical data for the US west entity in theHistory category. If you no longer need to maintain the historical data, you can erase it.
In the Database module, remove data does not set values for parent level entities to zero. As aworkaround, use Erase Data to clear parent level values.
ä To erase data:
1 From the Database window, select Task > Erase Data.
2 When the system displays a confirmation message, take one of the following actions:
l To erase all data for the current category and entity, select Yes.
l To cancel the erase and return to the Database window, select No.
Working with Data Drill-Back to FDMTo work with data drill-back to FDM, enable visual cue, see “Managing Visual Cue for FDMData”. Set the required POV to view dimensions that contain FDM data.
ä To drill-back to FDM data
1 In the Hyperion Enterprise Database module, right-click the database cell and select Audit Intersection.
The FDM data drill-back page opens.
2 You can gather the required information on the data.
For more information on the drill-back options, see the FDM documentation.
Managing Visual Cue for FDM DataA user preference option is provided to set visual cues for demarcating FDM data in HyperionEnterprise applications. Based on your requirement, you can disable this option. You can setthis option from Hyperion Enterprise Desktop or Hyperion Enterprise Database module.However, you cannot manage this option from Hyperion Enterprise Web.
ä To disable the visual cue for FDM data from the Hyperion Enterprise Database module:
1 In the Hyperion Enterprise Database module, (If visual cue is enabled) right-click on the data cell and selectUser.
The User Preferences screen opens.
2 Select or clear Enable visual cue based on your requirement.
36 Loading and Extracting Data

Locking or Unlocking Periods in the DatabaseYou can lock and unlock periods to restrict or permit data changes. You cannot change data ina locked period, but you can consolidate data in a locked period. You can lock periods to freezevalues, and you can unlock them later if you want to allow changes to the values. For example,once all data for the January period is entered, you can lock the period until you are ready torun reports to ensure that the data is not changed accidentally.
When you lock a period, the locked status appears in the period status area for that period. Forexample, if you lock the January period, the locked status appears in the period status area belowJanuary. For more information on period status, see “Database Window” on page 26.
You cannot lock or unlock periods for an elimination company. The system locks or unlocksthe elimination company when you lock or unlock its parent. For more information onelimination companies, see the Hyperion Enterprise Administrator's Guide.
You can lock data for a period only if the following conditions are true:
l The calculate formulas status does not appear in the period status area for the selected period.If it does, you must calculate formulas before locking the period.
l All previous periods are locked.
l For a parent entity, all dependents of the entity are also locked. If a parent has dependentsthat are not locked, the Lock menu item is disabled, and you cannot lock any periods.
l The value in the locking account equals zero, if the current application uses a lockingaccount. For more information, see the Hyperion Enterprise Administrator's Guide.
You can unlock data for a period only if these conditions are true:
l All subsequent periods are unlocked.
l For a dependent entity, all parents of the entity are also unlocked. If a dependent has parentsthat are locked, the Unlock item is disabled, and you cannot unlock any periods.
If organization structures in your application vary by category and period, you may not be ableto successfully lock a period. This occurs when the period you are trying to lock contains entitiesthat are inactive for one or more prior periods. You must first manually lock the inactive entitiesin the prior periods, then lock the current period.
ä To lock or unlock a period in the database:
1 From the Database window, select the period ID for the period you want to lock or unlock.
2 Take one of the following actions:
l If the period is not locked, select Task > Lock Data.
l If the period is locked, select Task > Unlock Data.
Journal Posting Lock and UnlockYou can disable posting of journals to any entity and period by placing a journal posting lockon a data file.
Database Maintenance 37

When you apply this lock to a data file, data can only be entered manually or through a dataload. Changes cannot be made to the data file by posting journal adjustments for the entity andperiod combination, but unposted journals can be created for the data file as long as they arenot posted. The locked status displays in the period status area in the Database window for thatperiod. For example, if you lock the February period, the locked status appears in the periodstatus area below February.
You can place a journal posting lock only if the following conditions are true:
l No journals have been posted to the entity and period combination.
l The entity has the journal flag on.
l The entity and period combination does not have a data lock or journal lock already placedon it.
l You have security rights to do this.
Locking ImpactTable 5 illustrates the available Journal, Journal Posting, and Data locks, and how placing a lockimpacts the availability of the other locks.
Available - The menu item is available.
Not Available - The menu item is greyed out and you cannot select it.
X - Action taken by user.
Explicit - Journal lock is placed manually by a user without posting a journal.
Implicit - Journal lock is placed by the system when the journal is posted.
Table 5 Locking Impact Table
Journal Lock
Action Explicit Implicit Data Lock Journal PostingLock
Post a Journal Not Available X Available Not Available
Place manualJournal lock
X Available Available Not Available
Place a JournalPosting lock
Not Available Not Available Available X
Place a Data lock Not Available Not Available X Not Available
Placing a Journal Posting Lock
ä To place a journal posting lock:
1 From the Database window, select the period that you want to lock.
38 Loading and Extracting Data

2 Select Task > Journal Posting Lock.
Removing a Journal Posting Lock
ä To remove a journal posting lock:
1 From the Database window, select the period that you want to unlock.
2 Select Task > Journal Posting Unlock.
Calculating Formulas in the DatabaseYou can calculate values for all accounts in a specific period or for all accounts and periods inthe Database window. The Auto Recalculate option determines whether the system calculatesformulas in the Database window when you modify data. When the Auto Recalculate option isselected, the system calculates formulas when data is changed. When the Auto Recalculate optionis deselected, the calculate formulas status appears in the period status area for the affectedperiods. You must then calculate formulas using the Calculate Formulas option.
For example, suppose you clear data values from accounts in the January period in the Databasewindow. The calculate formulas flag appears in the period status area of the January period, andyou can use the Calculate Formulas option to recalculate values for the January period. Forinformation on period status indicators, see “Data Status” on page 27. For more informationon the Auto Recalculate option, see “Setting Database Options” on page 28.
If you do not calculate formulas before closing the Database window, the calculate formulasstatus appears the next time you access the Database window and view the same category andentity.
ä To calculate formulas in the database:
1 From the Database window, take one of the following actions:
l To select all periods, select the Account column heading, and ensure that no periods areselected.
l To select a specific period, select the Period ID column heading.
2 Select Task > Calculate Formulas.
Setting Accounts Without Data to ZeroYou can convert missing data to zero in individual periods. You can also select the Zero No Datacheck box in the Load dialog box to convert missing data in the load file to zero values inHyperion Enterprise.
Note: Selecting the Zero No Data check box can significantly increase the size of the datacategories. This may impact performance.
Calculating Formulas in the Database 39
ä To set accounts without data to zero:
1 From the Database window, take one of the following actions:
l To change values in an individual period, highlight the Period column heading.
l To change values in the entire database, highlight the Account column heading.
2 Select Edit > Set No Data to Zero.
Running Dependent Consolidation Detail ReportsThe dependent consolidation detail report lists all immediate dependents and theirconsolidation detail components for one account value. Consolidation detail componentsinclude contribution, proportion, elimination, translation, and parent adjustment detail. Thisreport allows you to track the consolidated data for the cell you select. For example, suppose theconsolidated value is 100, and the entity stores consolidation detail. The report might showvalues of 30, 30, and 40 from the three immediate dependents along with any availableconsolidation detail for each dependent. If your application has multiple levels, you can run thereport for one level at a time. For more information on storing consolidation detail, see theHyperion Enterprise Administrator’s Guide.
Note: The dependent consolidation report does not attach formulas to accounts duringprocessing, so if the account you select is a dynamic view account, no values appear.
You define the data to include on the report using the point of view bar and the Database window:
l Your point of view setting determines the category and the entity.
l Your selection in the Database window determines the account and period as well as thefrequency, view, scale, and decimal information for the data cell you select.
The report includes one account, one period, and one category. Its rows list all immediatedependents of the entity you select using the point of view. Its columns list all the consolidationdetail components you select.
Note: The system saves the options you select in the Dependent Consolidation dialog box anddisplays them the next time you run the dependent consolidation detail report.
You can also customize your report fonts, colors, and page layout. For more information oncustomizing the report, see Hyperion Enterprise Getting Started.
ä To run dependent consolidation detail reports:
1 Set the desired point of view. For instructions, see Hyperion Enterprise Getting Started.
2 From the Database window, select the desired account and period.
3 Select Task > Run Dependent Consolidation Detail Report.
4 Select the desired consolidation detail options to include.
40 Loading and Extracting Data

5 Select whether to suppress rows that contain no data or zeros.
6 Take one of the following actions:
l To print the report, select Print.
l To preview the report, select Preview.
Clearing Invalid Consolidation DetailYou can clear any invalid consolidation detail for an application in the Database window. Thedata to be cleared applies to all accounts and entities in all organizations for the category andperiods selected. You can view the date and time that the process starts and ends, the categoriesand periods being processed, and the detail being cleared in the Hyperion Enterprise error log.If the system is unable to clear the consolidation detail, this information is also recorded in theerror log.
You can clear consolidation detail if the following conditions are met:
l The application is set to store translation, proportion, elimination, or contribution valuesfor an entity.
l You have security access to the category selected.
l You select at least one period in the Database window.
When the status of data changes to Impacted, it does not mean that consolidation detail is invalid.You can clear consolidation detail only when the data is invalid.
The following are some of the reasons that consolidation detail can be invalid.
l Changes in the category setting: If the Allow Proportion and Elimination Detail check boxin the Categories window is deselected, the proportion and elimination detail that waspreviously generated for the category is no longer valid and must be cleared.
l Changes in the entity setting: If the Store Contribution Detail check box in the AdvancedOption tab in the Entities window is deselected, the consolidation detail that was previouslygenerated is no longer valid and must be cleared.
l Changes in the organizational structure: If the entity is removed from the organizationalstructure, the generated consolidation detail is no longer valid and must be cleared.
l Changes in the currency: If the currencies of the parent and base entity have changed so thatthey are now the same, the previously generated consolidation detail is no longer valid andmust be cleared.
Note: If the Translation Detail option was selected when the application was created, thetranslation detail is generated regardless of the currency setting for the parent andchild combination. This data should not be cleared.
l Changes in parent adjustment detail: The system does not clear the parent adjustment detailbecause journal entries may be associated with the parent. You must unpost the journals toclear parent adjustment data. If parent adjustment detail is no longer valid due to changes
Clearing Invalid Consolidation Detail 41

in the organizational structure and no journals are attached, the system clears this parentadjustment detail. A status of journal lock indicates that there are journals attached.
ä To clear invalid consolidation detail:
1 From the Database window, select Task > Clear Invalid Consolidation Detail.
2 Specify the category and periods for which you want consolidation detail to be cleared, then click OK.
Data FormatsYou can use data formats when you load data into Hyperion Enterprise from other systems orextract Hyperion Enterprise data for use with other systems. Data formats indicate how HyperionEnterprise should process the data in these files.
For example, your general ledger might contain data similar to Hyperion Enterprise but in adifferent format. You can use a load format for the general ledger to specify entity and accountconversion tables that match general ledger accounts and entities with Hyperion Enterpriseaccounts and entities during data load. Here are the data format options you can specify:
l Characters, including the delimiter to use and the character to indicate negative values
l Conversion tables for converting external entities and accounts to Hyperion Enterpriseentities and accounts
l Expression for load or extract, including the mathematical operation to perform, and thevalue by which to multiply or divide values in the text file
l Suppress zero options
l Number of decimal places for extracting data
l File extension
l Scale
l Data view
l Whether to use the load file name or the user ID of the user performing the data load as thename of the error log file
l Whether to extract derived values
l Whether to validate the records in the load file against the records loaded into HyperionEnterprise
For information on opening, copying, or deleting data formats, see Hyperion Enterprise GettingStarted.
AccumulateThe Accumulate option adds the values in a load file to the values that are already in theapplication. For example, suppose the database contains values in the Actual category for theUSdiv entity's payroll accounts for periods 1 through 3, as shown in Table 6.
42 Loading and Extracting Data

Table 6 Payroll Accounts in the Database
PAYROLL1 10 10 10
PAYROLL2 10 10 10
PAYROLL3 10 10 10
If you use the Accumulate option to load data for the same category, entity, account, and periods,the system adds the load value for each period to the existing value for that period. The followingload file specifies the values to be accumulated to each payroll account:
ACTUAL 1 3 USDIV,PAYROLL1,5,0,5USDIV,PAYROLL2,25,0,25 USDIV,PAYROLL3,5,0,5
Table 7 shows the result of the data load using the Accumulate option.
Table 7 Data Load Using the Accumulate Option
PAYROLL1 15 10 15
PAYROLL2 35 10 35
PAYROLL3 15 10 15
ReplaceThe Replace option clears the existing values from all accounts for the periods specified in thedata load file and then loads the values from the data load file. If an account is not specified inthe load file, its values for the specified periods are cleared during the load. If an account isspecified and its value for any period is left blank in the load file, the result of the data load forthat account and period is NO DATA. For example, suppose that the database contains thepayroll account values for entity USDIV shown in Table 8.
Table 8 Payroll Accounts in the Database
PAYROLL1 10 10 10
PAYROLL2 10 10 10
PAYROLL3 10 10 10
If you select the Replace option to load data for the same category, entity, account, and periods,the system uses the load value for each period to replace the existing value for that period. Thefollowing load file specifies the values to be loaded and replaced for each payroll account:
ACTUAL 1 3
Data Formats 43

USDIV,PAYROLL2,25,0,25 USDIV,PAYROLL3,5,,5
Table 9 shows the result of the data load using the Replace option.
Table 9 Data Load Using the Replace Option
PAYROLL1 NO DATA NO DATA NO DATA
PAYROLL2 25 0 25
PAYROLL3 5 NO DATA 5
MergeThe Merge option clears existing values only from the accounts specified in the data load fileand then replaces them with the values in the file. Unlike the Replace option, the Merge optionclears only the values from the accounts specified in the load file. For example, suppose thedatabase contains the payroll account values for entity USDIV shown in Table 10.
Table 10 Payroll Accounts in the Database
PAYROLL1 10 10 10
PAYROLL2 10 10 10
PAYROLL3 10 10 10
The following load file specifies the accounts and values to be merged during data load:
ACTUAL 1 3 USDIV, PAYROLL2,25,0,25 USDIV, PAYROLL3,5,0,5
Table 11 shows the result of the data load using the Merge option:
Table 11 Data Load Using the Merge Option
PAYROLL1 10 10 10
PAYROLL2 25 0 25
PAYROLL3 5 0 5
Calculate FormulasYou can select the Calculate Formulas check box to run chart methods when you load data. Thesystem then calculates formulas during the data load, so you do not have to manually calculateformulas after the load. If the Calculate Formulas check box is deselected when you load the datafile, you must use the Calculate Formulas option to calculate formulas after you load the file.For more information, see “Calculating Formulas in the Database” on page 39.
44 Loading and Extracting Data

Report Calculated AccountsYou use the Report Calculated Accounts option if you want the system to track attempts to loaddata into calculated accounts, which normally derive their values from other accounts. Forexample, the value in the Net Sales account might be the result of subtracting the value in theCost of Sales account from the value in the Gross Sales account. If the Report Calculated Accountsoption is selected and you attempt to load data into a calculated account, a message appears inthe Hyperion Enterprise error log.
Zero No DataYou can select the Zero No Data check box to convert missing data in load files to zero valuesin Hyperion Enterprise accounts. Hyperion Enterprise converts no data values to zero valuesonly if you load a no data value into an account that has data in a previous period. For example,suppose the Income account has a value of 25 for January. If a load file has missing data for theIncome account in February, and the Zero No Data check box is selected, the system assigns azero for the Income account for February.
Whether zero values are treated as zero periodic or zero category-to-date depends on the loadcategory's Missing Data as Zero option. If you do not want to convert missing data to zero forthe entire load file, you can load the file with the Zero No Data option deselected and then usethe Set No Data to Zero option to manually convert missing data to zero in individual periods.For more information on converting missing data to zero in individual periods, see “SettingAccounts Without Data to Zero” on page 39.
Load Error FileIf the database cannot accept data you attempt to load, the system writes to two files: an .ERRfile that stores data that did not load, and an ERROR.LOG file that describes the errors thatoccurred during data load. The system stores the ERROR.LOG file in the application directory.
Setting data load and extract defaults in the Format dialog box allows you to specify the file nameof your data load .ERR reports. The report name can be either the user ID of the personperforming the data load or the name of the original load file, with an .ERR file name extension.For example, if you select the Use load file name (*.ERR) check box and the name of the loadfile is ACTUAL03.DAT, the name for its .ERR file is ACTUAL03.ERR. If you log on to HyperionEnterprise with the user ID Admin and you do not select this check box, the name for the .ERRfile is ADMIN.ERR. You can specify any file name for the .ERR error file in the Load Error Fileedit box in the Load dialog box.
The system stores the .ERR file by default in the directory from which you loaded the data. Youcan view an .ERR file with any text editor, such as the Windows Notepad. After you correct theerrors, you can load the rejected data from the load error file without reloading all the data inthe original load file. For information on loading data, see “Loading Data” on page 46.
You can view the contents of the ERROR.LOG file in the Hyperion Enterprise Error Log dialogbox. For information on the error log, see Hyperion Enterprise Getting Started.
Data Formats 45

Defining Data FormatsYou can define data formats for loading or extracting data. For example, if you need to scale thedata you load for the HQ site, you can set up a format that scales the data during data load. Whenyou create a data format, you indicate whether it is for loading only, extracting only, or for bothloading and extracting.
ä To define a data format:
1 From the Database window, take one of the following actions:
l To create a format, select File > New Format.
l To edit a format, select File > Open Format, then select a format from the list.
2 Specify the ID, description, security class, and format type, then click OK.
Loading DataYou can load data into a Hyperion Enterprise database from an ASCII file. Many externalsystems, such as general ledgers and spreadsheets, can create ASCII files that you can load intoHyperion Enterprise. If necessary, you can edit an ASCII file with a text editor before loading it.
You load data to transfer Hyperion Enterprise data between different locations, applications, orsoftware packages. For example, you can load data that has been extracted from other sites intoan application at headquarters, or you can load data into Hyperion Enterprise from a generalledger.
A load file must specify a category, the first and last periods that receive the data, the entities andaccounts that receive the data, and the account values. A load file can contain data for manyentities and accounts but only one category. A file can contain data for a range of periods, butthe periods must be consecutive.
Note: If an entity and account combination appears more than once in a load file, those valuesare added together before they are loaded into the database.
Here is the order of the information that must appear in a load file:
l Category
l First period
l Last period
l Entities, followed by account IDs and data values for a range of periods
Load files affect data only in the periods they specify. For example, if a load file specifies periods1 through 4 for the Actual category, which contains 12 monthly periods, periods 5 through 12are not affected by the data load.
Here is a sample ASCII load file that specifies entities and accounts in the Actual category forperiods 1 through 4:
46 Loading and Extracting Data

ACTUAL 1 4 USCORP,SALES1,100,200,300,400 USCORP,SALES2,1001,2001,3001,4001 USCORP,SALES3,1501,2501,3501,4501 USREG1,SALES1,20100,501,0,0 USREG1,SALES2,20100,521,1021,1521 USREG1,SALES3,20100,501,1031,1531
The first line of the sample file specifies the Actual category.
The second line specifies the category's first period as the first period into which the data will beloaded.
The third line specifies the category's fourth period as the last period into which data will beloaded.
The fourth through ninth lines of the sample file each contain entities followed by account IDsand values for each specified period. For example, the fourth line specifies that the values 100,200, 300, and 400 are to be loaded into the Sales1 account for the entity UScorp. A comma ( , )is the delimiter that separates the data elements on each line of this sample load file.
You can use a load format while loading data. Load formats determine how data is loaded intothe application. For example, a load format might contain information about the type ofdelimiter in your load file or which conversion tables to use during data load. You can use thedefault load format, or you can select any existing load format. You can use the data load formatas it is, or you can edit it for the current load session only.
If you are using server-based processing to load data, a window appears that shows the loadingprogress. This window is a separate program, so you can perform other tasks in HyperionEnterprise or exit Hyperion Enterprise while the server is processing. The window closes whenthe server finishes processing or an error message appears if there is a problem.
ä To load data:
1 From the Database window, select Task > Load Data.
2 Select Add to add the data files that you want to load.
3 In the Load Error File text box, enter a name for the error log file.
4 Select a format for the load file, or select Default to use the system default.
5 To edit the selected load format for this load session only, select Edit, make your changes, then click OK.
6 Specify the mode to load data and select load options.
7 Click OK.
The Server Options dialog box is displayed.
8 Select Server if the application is server enabled and you want to execute on the server or select Local ifselectable and you want to execute on the local workstation.
Data Formats 47

Extracting DataYou can copy data from the Hyperion Enterprise database into an ASCII file that you can usewith another application or at another location. For example, you can extract data from severalcompany sites and then load the extracted files into the application at the company'sheadquarters.
You can also extract data to back up your application's data. An extract file specifies the datacategory, the first and last periods from which the system extracts the data, the entities andaccounts that contain the data, and the account values. An extract file can contain data frommany entities and accounts but only one category. It can contain data from a range of periods,but the periods must be consecutive. You can extract data from calculated accounts and globalaccounts. For a sample extract file, see the Hyperion Enterprise Administrator's Guide.
Here is the order of the information that appears in an extract file:
l Category
l First period
l Last period
l Entities, followed by account IDs and data values for a range of periods
You must specify a data extract format to tell the system how to format the data it extracts. Youcan use the default extract format, or you can select any existing extract format. You can use thedata extract format as it is, or you can edit it for the current extract session only.
You can also extract locked data only. To grant the ability to extract locked data, assign the accessright LIMITED, VIEW, or MODIFY to the security class assigned to the Extract Locked DataOnly task and assign NONE to the security class assigned to the Extract Data task. In the Databasewindow, the Task > Extract command is enabled only if the selected periods are locked. Anydata that is not locked is written to the error log. If you assign both tasks the access rightLIMITED, VIEW, or MODIFY, all data is extracted whether it is locked or unlocked. For moreinformation on assigning access rights, see the Hyperion Enterprise Administrator's Guide.
If you are using server-based processing to extract data, a window appears that shows theextracting progress. This window is a separate program, so you can perform other tasks inHyperion Enterprise or exit Hyperion Enterprise while the server is processing. The windowcloses when the server finishes processing or an error message appears if there is a problem.
ä To extract data:
1 From the Database window, highlight the data that you want to extract.
2 Select Task > Extract Data.
3 Type the file name for the extracted data, or click Browse to find the file.
4 From the Format drop-down list, select a format for the extract file or select Default to use the default format.
5 To edit the selected extract format for this extract session only, click Edit, make your changes, then clickOK.
6 Select whether to extract calculated, global, or dynamic view accounts.
7 Click OK.
48 Loading and Extracting Data

The Server Options dialog box is displayed.
8 Select Server if the application is server enabled and you want to execute on the server or select Local ifselectable and you want to execute on the local workstation.
Extracting Consolidation DetailYou can extract consolidation detail for one or more branches within a branch. The parentselection of the branch is based on the default entity set in the point of view. The account andperiod selections are based on the accounts and periods highlighted in the Database window.The category of data to extract is based on the default category set in the point of view.
You can select the following consolidation detail to extract: translation, proportion, elimination,parent adjustment, and contribution. The system extracts all the consolidation detail for eachparent and child combination. For example, if you extract translation and proportion detail, thesystem extracts this detail for the current parent and child, then extracts the detail for the nextchild of the same parent. After the system extracts consolidation detail for all children for thecurrent parent, the system extracts consolidation detail for the next parent and childcombination.
The system extracts consolidation detail based on the scale of the parent. If the currency for theparent and the child is the same, the system does not extract translation even if you select toextract it.
After you select the detail that you want to extract, you can specify whether to format your outputfor an external application or for Hyperion Enterprise. You select the Format for externalapplication option when you want to extract data to be used with another application such asMicrosoft Access server. You select the Format for Hyperion Enterprise option when you wantto extract data to be used with Hyperion Enterprise. To create a format that is valid for HyperionEnterprise, the system concatenates the parent, entity, and consolidation detail into one entityID.
For example, suppose you want to create a file for the organization structure shown inFigure 4.
Extracting Consolidation Detail 49
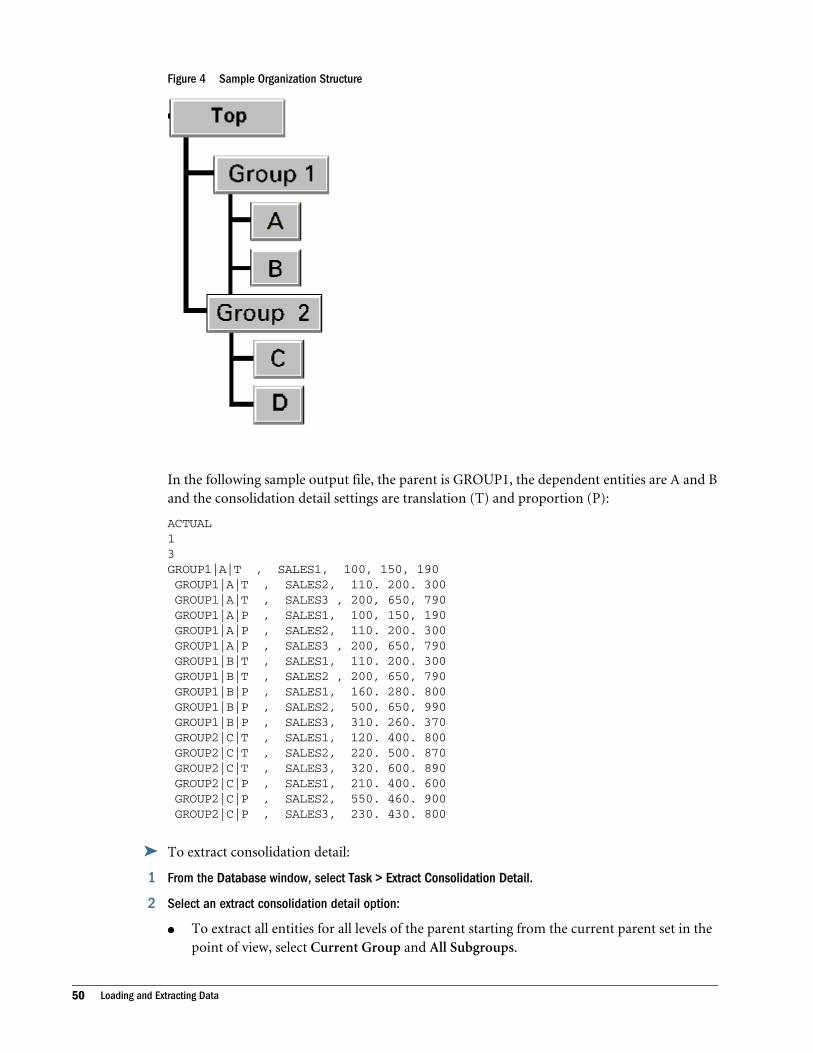
Figure 4 Sample Organization Structure
In the following sample output file, the parent is GROUP1, the dependent entities are A and Band the consolidation detail settings are translation (T) and proportion (P):
ACTUAL 1 3 GROUP1|A|T , SALES1, 100, 150, 190 GROUP1|A|T , SALES2, 110. 200. 300 GROUP1|A|T , SALES3 , 200, 650, 790 GROUP1|A|P , SALES1, 100, 150, 190 GROUP1|A|P , SALES2, 110. 200. 300 GROUP1|A|P , SALES3 , 200, 650, 790 GROUP1|B|T , SALES1, 110. 200. 300 GROUP1|B|T , SALES2 , 200, 650, 790 GROUP1|B|P , SALES1, 160. 280. 800 GROUP1|B|P , SALES2, 500, 650, 990 GROUP1|B|P , SALES3, 310. 260. 370 GROUP2|C|T , SALES1, 120. 400. 800 GROUP2|C|T , SALES2, 220. 500. 870 GROUP2|C|T , SALES3, 320. 600. 890 GROUP2|C|P , SALES1, 210. 400. 600 GROUP2|C|P , SALES2, 550. 460. 900 GROUP2|C|P , SALES3, 230. 430. 800
ä To extract consolidation detail:
1 From the Database window, select Task > Extract Consolidation Detail.
2 Select an extract consolidation detail option:
l To extract all entities for all levels of the parent starting from the current parent set in thepoint of view, select Current Group and All Subgroups.
50 Loading and Extracting Data
l To extract individual entities, select Current Group Only and select individual entities fromthe list box.
l To extract all the entities for the group for the immediate level only, select Current GroupOnly and select Select All.
3 Select the consolidation detail options you want to extract.
4 Select whether to format for an external application or for Hyperion Enterprise.
5 If you selected to format for Hyperion Enterprise, specify the concatenation character in the EntityConcatenation Character text box.
Note: You must not use the same character for concatenation as for the format delimiter.
Validation of Records in Data Load and ExtractYou can validate the records in a load file against the records loaded into Hyperion Enterprise.When you validate records, the system assigns an internal number to each record contained inthe load file, then calculates a control total that is entered at the beginning of the file. Duringdata load, the system again calculates the control total for the records in the file, then validatesthis number against the number originally calculated. If the numbers match, the data loadprocesses.
The internal control number for a record in the load file changes if you manually change therecord. Therefore, the original control total does not equal the control total recalculated on dataload. When the totals do not match, you receive an error message in the error log to warn youthat one or more records has changed since being extracted, and the data does not load.
If you select the Require Checksum option but the load file does not contain the control number,you receive an error in the error log and the load does not process. You must deselect the RequireChecksum option to process the data load. If you do not select the Require Checksum optionand the load file contains a control total, the system validates this number and warns you if thecontrol numbers do not match.
Running Entity Detail ReportYou can run a report of entity detail information for a specific entity. The entity detail is basedon the entity selected in the point of view. This detail can include immediate dependents or alldependents of the entity, account balances and related subaccount information for the singleaccount from a single period highlighted on the Database window, related journal entry detail,and consolidation detail information.
If an application that uses Statutory Consolidation Engine (SCE) processing is set up to storeconsolidation transaction detail, you can view such information on the Entity Detail report. Theinformation you see is described in this topic. For information on setting up an application tostore consolidation transaction detail, see the Hyperion Enterprise Statutory Consolidation Engine(SCE) Guide.
Validation of Records in Data Load and Extract 51

After you select the type of detail that you want to view in the report, you can select whether tosuppress rows that contain zero or no data and specify a report scale. When you select the defaultscale, all consolidation detail components use the Parent scale. When you select a specific scale,the report displays each amount in the scale factor selected.
You define the data to include on the report using the point of view bar, Database window, andEntity Detail Report dialog box:
l The category and entity that the system uses is based on the point of view bar settings.
l The account and period that the system uses is based on the account that you highlight inthe Database window.
l The report scale value is based on the point of view bar setting. For example, suppose thescale value from the Database module is set to 3. When you access the Entity Detail Reportdialog box, the default report scale is 3. You can, however, use the Report Scale drop-downlist box to change the scale value.
Note: The system saves the options you select in the Entity Detail Report dialog box to yourhypent.ini file and uses these settings the next time you access the dialog box orlog on to the system. The system does not, however, save the Report Scale or Parentoptions you select.
You can customize your report fonts, colors, and page layout. For more information oncustomizing the report, see Hyperion Enterprise Getting Started.
Figure 5 show a sample organization and sample entity detail reports.
52 Loading and Extracting Data

Figure 5 Entity Detail Report Structure
Selected options for Sample Report 1, shown in Figure 6:
l Point-of-view entity is Group1
l Account is SALES
l Show only immediate dependents
l Do not expand columns
l Allow rows with zero or no data to appear
l Do not show consolidation detail
Running Entity Detail Report 53
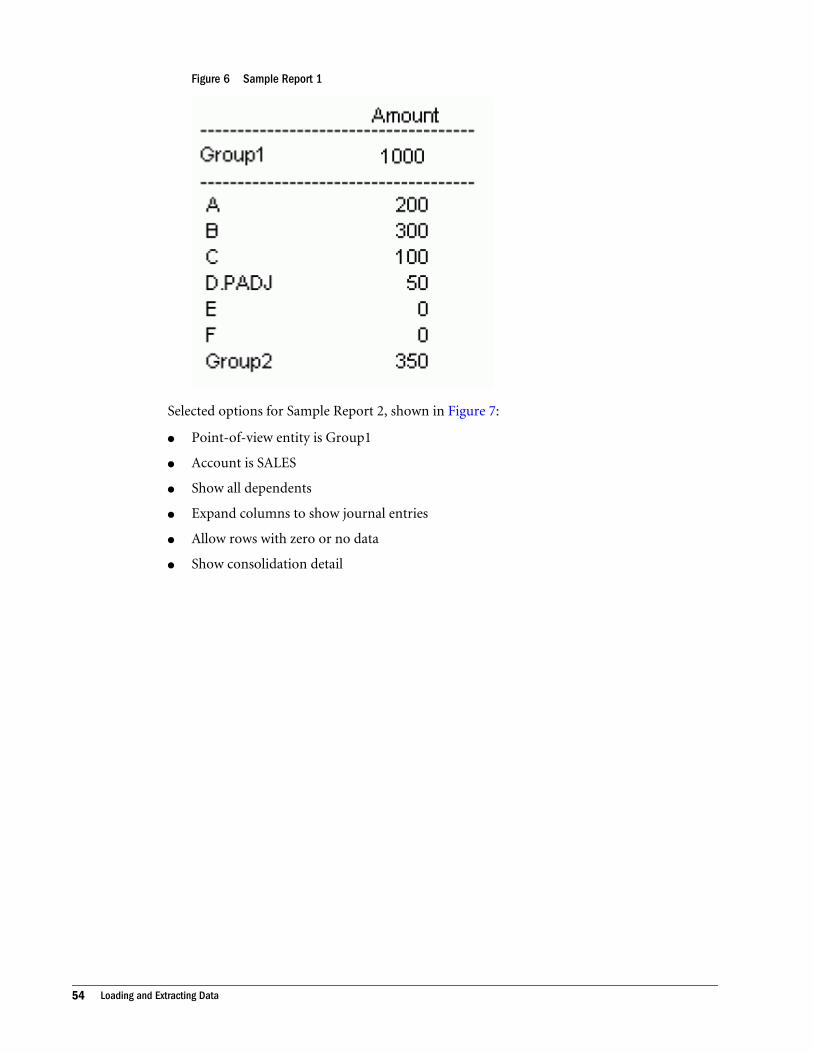
Figure 6 Sample Report 1
Selected options for Sample Report 2, shown in Figure 7:
l Point-of-view entity is Group1
l Account is SALES
l Show all dependents
l Expand columns to show journal entries
l Allow rows with zero or no data
l Show consolidation detail
54 Loading and Extracting Data

Figure 7 Sample Report 2
ä To run an entity detail report:
1 Set the point of view for the category and entity. For instructions, see Hyperion Enterprise Getting Started.
2 From the Database window, select one account from one period.
3 Select Task > Run Entity Detail Report.
4 Select whether to include immediate dependents only or all dependents.
5 Select the column expansion options you want to include.
6 Select a report scale from the Report Scale drop-down list or use the default report scale.
7 Select whether to suppress rows if a row does not contain data or contains only zero values.
8 Select whether to show consolidation details for a parent entity.
9 Select the immediate parent for the entity from the Select Parent drop-down list.
10 Take one of the following actions:
l To print the report, select Print.
l To preview the report, select Preview.
Running Entity Detail Report 55

Decimal Places OptionWhen you create an account in the Accounts module, you specify a default number of decimalplaces for that account. Whenever you view values for that account, the default number ofdecimal places appears. For example, if you set the Decimals attribute of an account to 0 (zero),the system shows the account's values as whole numbers. If you set the Decimals attribute of anaccount to 2, the system shows the account's values with two decimal places, such as 6.75. Formore information, see the Hyperion Enterprise Administrator's Guide.
In the Database module, you can use the Decimal Places option to override the account’s defaultnumber of decimal places that appear. The number of decimal places that you specify remainsin effect until you change it. A check mark appears next to the number of decimal places youselect on the menu. Selecting Default allows you to view the decimal settings originally specifiedfor the account in the Accounts module.
ä To override the default number of decimal places:
1 From the Database window, select View > Decimal Places.
2 Take one of the following actions:
l Select the number of decimal places to be displayed.
l Select Default to use the number of decimal settings specified in the Accounts module.
56 Loading and Extracting Data
3Hyperion Retrieve
In This Chapter
What Hyperion Retrieve Does ... . . . . . . . . . . . . . . . . . . . . . . . . . . . . . . . . . . . . . . . . . . . . . . . . . . . . . . . . . . . . . . . . . . . . . . . . . . . . . . . . . . . . . . . . . . . . . . . . . .57
Hyperion Retrieve Setup... . . . . . . . . . . . . . . . . . . . . . . . . . . . . . . . . . . . . . . . . . . . . . . . . . . . . . . . . . . . . . . . . . . . . . . . . . . . . . . . . . . . . . . . . . . . . . . . . . . . . . . . .57
Setting Up Hyperion Retrieve for Microsoft Excel .. . . . . . . . . . . . . . . . . . . . . . . . . . . . . . . . . . . . . . . . . . . . . . . . . . . . . . . . . . . . . . . . . . . . . . . . . . . . . .59
Starting Hyperion Retrieve for Excel .. . . . . . . . . . . . . . . . . . . . . . . . . . . . . . . . . . . . . . . . . . . . . . . . . . . . . . . . . . . . . . . . . . . . . . . . . . . . . . . . . . . . . . . . . . . . .59
Hyperion Retrieve Formulas ... . . . . . . . . . . . . . . . . . . . . . . . . . . . . . . . . . . . . . . . . . . . . . . . . . . . . . . . . . . . . . . . . . . . . . . . . . . . . . . . . . . . . . . . . . . . . . . . . . . . .60
Hyperion Retrieve Worksheets .. . . . . . . . . . . . . . . . . . . . . . . . . . . . . . . . . . . . . . . . . . . . . . . . . . . . . . . . . . . . . . . . . . . . . . . . . . . . . . . . . . . . . . . . . . . . . . . . . . .64
VBA Hyperion Retrieve... . . . . . . . . . . . . . . . . . . . . . . . . . . . . . . . . . . . . . . . . . . . . . . . . . . . . . . . . . . . . . . . . . . . . . . . . . . . . . . . . . . . . . . . . . . . . . . . . . . . . . . . . . .67
This chapter contains information and procedures that you need to use Hyperion Retrieve.
What Hyperion Retrieve DoesHyperion Retrieve provides the analysis, graphics, and presentation capabilities of spreadsheetsoftware to Hyperion Enterprise. With Hyperion Retrieve, you can access Hyperion Enterprisedata from Microsoft Excel worksheets. You can then use the spreadsheet software to analyze andmanipulate the data and produce reports and graphs.
Note: In addition to the standard Hyperion Retrieve for Microsoft Excel, you can use HyperionRetrieve for Microsoft Excel written with Visual Basic for Applications (VBA). For moreinformation, see “VBA Hyperion Retrieve” on page 67.
You can use Hyperion Retrieve with multiple Hyperion Enterprise applications. For example,you can retrieve data from both the Products application and the Tax application for use in thesame worksheet.
Hyperion Retrieve SetupBefore you use Hyperion Retrieve with a spreadsheet program, you must perform the followingtasks:
What Hyperion Retrieve Does 57

l Create an hpapp.dat file. The HPAPP.DAT file contains information about each HyperionEnterprise application you want to access with Hyperion Retrieve. For more information,see “HPAPP.DAT File Format” on page 58.
l Set up the HPAPP.DAT environment variable. For more information, see “Setting Up theHPAPP.DAT Environment Variable” on page 58.
l Place the Hyperion Retrieve add-in file in the correct subdirectory. For more information,see “Hyperion Retrieve Add-in File Locations” on page 59.
HPAPP.DAT File FormatBefore you can run Hyperion Retrieve, you must create a file called HPAPP.DAT. TheHPAPP.DAT file contains the application ID and an optional user ID for each application thatyou want to access with Hyperion Retrieve and may be stored in any directory.
Note: HPAPP.DAT must be in all capital letters in system variables.
You can create or edit an HPAPP.DAT file with a text editor. Use this format:
Application1,User1 .. .. .. .. .. .. .. .. .. Applicationn,Usern
Variable Description
Application1 The ID of the first application you want to access with Hyperion Retrieve.
User1 Your user ID for the first application you want to access with Hyperion Retrieve (optional).
Applicationn The ID of the last application you want to access with Hyperion Retrieve.
Usern Your user ID for the last application you want to access with Hyperion Retrieve (optional).
For example, suppose you want to use Hyperion Retrieve to access data from the Products andTax applications. If your user ID for both applications is ABC, the HPAPP.DAT. file in your 1-2-3or Excel program directory would look like this:
PRODUCTS,ABC TAX,ABC
Hyperion Retrieve will prompt for the user ID if it is not specified in the HPAPP.DAT. file. Hereis an HPAPP.DAT. file without user IDs:
PRODUCTSTAX
Setting Up the HPAPP.DAT Environment VariableHPAPP.DAT. files contain the applications to which a user has access when using HyperionRetrieve with Excel. You can set up HPAPP.DAT. as an environment variable in theautoexec.bat file and use the same HPAPP.DAT. file for Excel. You do not need to name thisfile HPAPP.DAT. For example, you can create several unique files that contain different Hyperion
58 Hyperion Retrieve
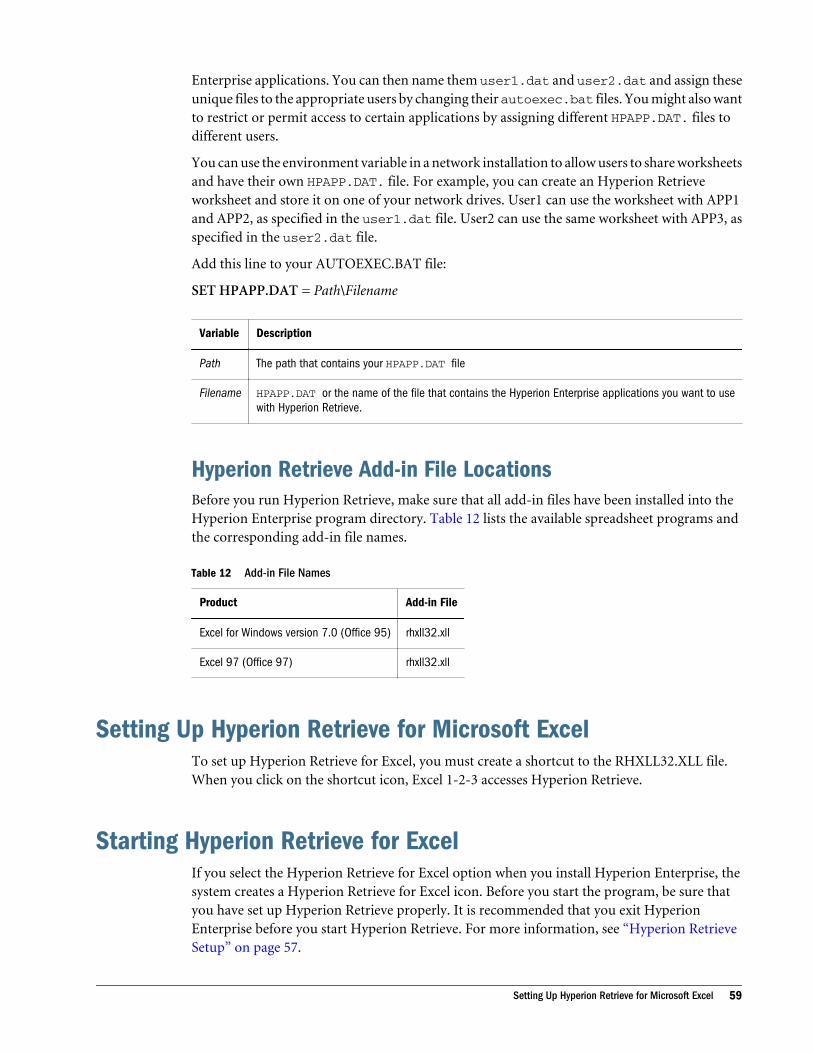
Enterprise applications. You can then name them user1.dat and user2.dat and assign theseunique files to the appropriate users by changing their autoexec.bat files. You might also wantto restrict or permit access to certain applications by assigning different HPAPP.DAT. files todifferent users.
You can use the environment variable in a network installation to allow users to share worksheetsand have their own HPAPP.DAT. file. For example, you can create an Hyperion Retrieveworksheet and store it on one of your network drives. User1 can use the worksheet with APP1and APP2, as specified in the user1.dat file. User2 can use the same worksheet with APP3, asspecified in the user2.dat file.
Add this line to your AUTOEXEC.BAT file:
SET HPAPP.DAT = Path\Filename
Variable Description
Path The path that contains your HPAPP.DAT file
Filename HPAPP.DAT or the name of the file that contains the Hyperion Enterprise applications you want to usewith Hyperion Retrieve.
Hyperion Retrieve Add-in File LocationsBefore you run Hyperion Retrieve, make sure that all add-in files have been installed into theHyperion Enterprise program directory. Table 12 lists the available spreadsheet programs andthe corresponding add-in file names.
Table 12 Add-in File Names
Product Add-in File
Excel for Windows version 7.0 (Office 95) rhxll32.xll
Excel 97 (Office 97) rhxll32.xll
Setting Up Hyperion Retrieve for Microsoft ExcelTo set up Hyperion Retrieve for Excel, you must create a shortcut to the RHXLL32.XLL file.When you click on the shortcut icon, Excel 1-2-3 accesses Hyperion Retrieve.
Starting Hyperion Retrieve for ExcelIf you select the Hyperion Retrieve for Excel option when you install Hyperion Enterprise, thesystem creates a Hyperion Retrieve for Excel icon. Before you start the program, be sure thatyou have set up Hyperion Retrieve properly. It is recommended that you exit HyperionEnterprise before you start Hyperion Retrieve. For more information, see “Hyperion RetrieveSetup” on page 57.
Setting Up Hyperion Retrieve for Microsoft Excel 59

The system prompts you for all applications listed in your HPAPP.DAT file. When you haveaccessed or canceled all the applications listed in your HPAPP.DAT file, the RHXL menu appearson the Excel menu bar.
ä To start Hyperion Retrieve for Excel, start Excel by clicking on the shortcut icon that you createdduring Hyperion Retrieve setup. The system prompts you for the user ID and password for eachapplication listed in the HPAPP.DAT file. If your user ID is specified in the HPAPP.DAT file,the system prompts you only for the password.
Displaying No Data as Zero OptionThe default setting for displaying no data in Hyperion Retrieve is #NA. You can change thissetting to display no data as zero by changing the user preferences in Hyperion Enterprise.
ä To display no data as zero:
1 From an Hyperion Enterprise application, select File > Preferences > User.
2 Select Display No Data as Zero.
3 Click OK.
Hyperion Retrieve FormulasWhen you use Hyperion Retrieve with either Microsoft Excel, you can create formulas forretrieving and manipulating various types of Hyperion Enterprise data. Formulas consist offunctions, which specify what types of data you want to retrieve, and arguments, which containdata or identify the data you want to retrieve.
Hyperion Retrieve formulas are like Microsoft Excel formulas except for the followingdifferences:
l Formulas use Hyperion Retrieve functions rather than standard Excel functions.
l Arguments relate specifically to Hyperion Enterprise application elements.
This example shows a formula with the HPVAL function followed by several arguments:
HPVAL("USOPS","ACTUAL","SALES","MAR 02","QYTD","TAX")
In the previous formula, the function HPVAL tells the system to retrieve a value for the USOperations entity, the Actual category, the Sales account, and the March 2002 period with thequarterly year-to-date view, from the Tax application.
Note: If you delete an entity in Hyperion Enterprise, the information for that entity is stillretrieved until you purge the entity.
60 Hyperion Retrieve

Hyperion Retrieve ArgumentsHyperion Retrieve formulas include arguments that identify Hyperion Enterprise applicationsand application elements, such as entities and categories. Arguments, which follow functions ina formula, are separated by commas and enclosed in parentheses. An argument can consist oftext, such as an account ID, or cell references. You must enclose text in double quotation marks(" ").
Using cell references is usually faster and easier than typing all the information for the argument.For example, suppose a function requires an argument to specify a category, and the ID of thecategory you want to specify appears in cell D5. You can type either the category ID or the cellreference, D5, as the argument. When you use cell references, you do not enclose them inquotation marks.
Tip: In an Excel worksheet, you do not need to specify an application in an argument to retrievedata from the default application.
Hyperion Retrieve FunctionsEvery Hyperion Retrieve formula includes a Hyperion Retrieve function followed by anargument, which identifies the data you want to retrieve and the application that contains it.Some functions retrieve the IDs or descriptions of application elements, such as entities andcategories. Others retrieve specific values or make calculations based on specific values.
In an Excel worksheet, an equal sign ( = ) must precede each function. Table 13 describes eachHyperion Retrieve function and its purpose. For detailed information and examples of HyperionRetrieve functions, see the Hyperion Retrieve Functions chapter.
Table 13 Hyperion Retrieve Functions
Function Purpose
HPACC Retrieves the ID for a specified account.
HPAMJ Retrieves the major account ID for a specified account.
HPAS1 Retrieves the first-level subaccount ID for a specified account.
HPAS2 Retrieves the second-level subaccount ID for a specified account.
HPBET Calculates the difference between two account values and shows the difference as a positive ornegative number.
HPCAL Returns a 1 if a specified account is a calculated account, or a -1 if it is not.
HPCDE Retrieves the description for a specified category.
HPCONTRIB Retrieves contribution data.
HPCUR Retrieves the currency ID for a specified entity.
Hyperion Retrieve Formulas 61
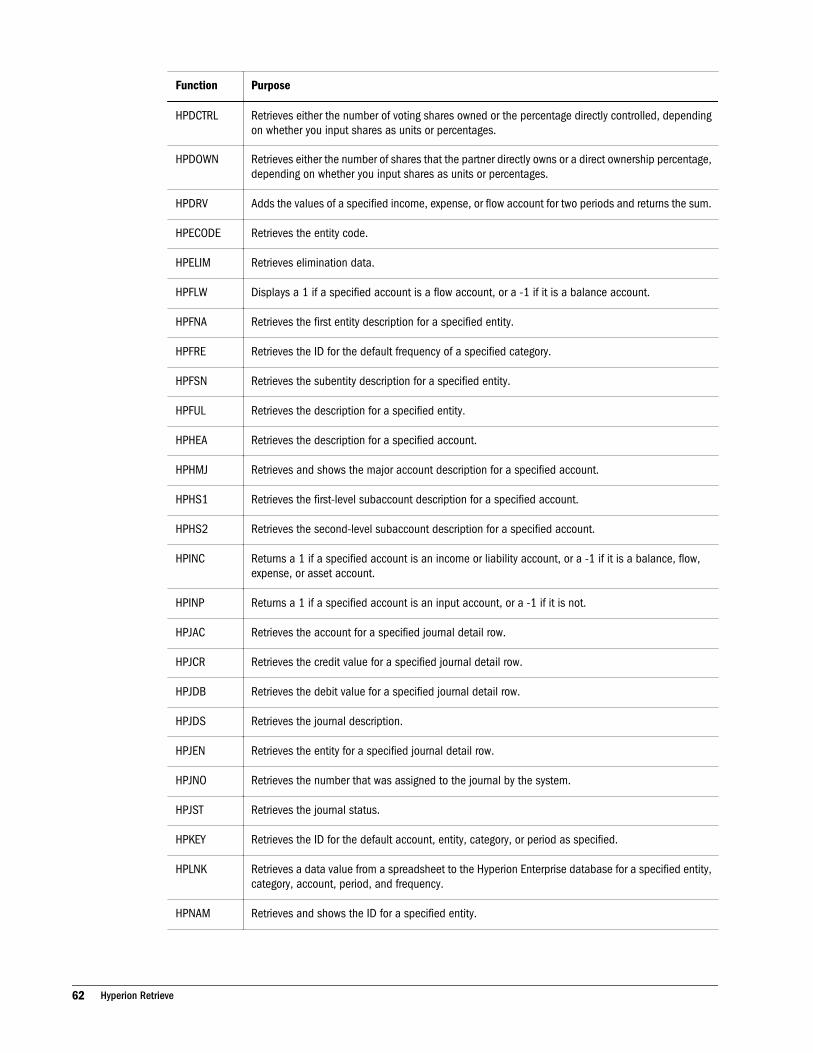
Function Purpose
HPDCTRL Retrieves either the number of voting shares owned or the percentage directly controlled, dependingon whether you input shares as units or percentages.
HPDOWN Retrieves either the number of shares that the partner directly owns or a direct ownership percentage,depending on whether you input shares as units or percentages.
HPDRV Adds the values of a specified income, expense, or flow account for two periods and returns the sum.
HPECODE Retrieves the entity code.
HPELIM Retrieves elimination data.
HPFLW Displays a 1 if a specified account is a flow account, or a -1 if it is a balance account.
HPFNA Retrieves the first entity description for a specified entity.
HPFRE Retrieves the ID for the default frequency of a specified category.
HPFSN Retrieves the subentity description for a specified entity.
HPFUL Retrieves the description for a specified entity.
HPHEA Retrieves the description for a specified account.
HPHMJ Retrieves and shows the major account description for a specified account.
HPHS1 Retrieves the first-level subaccount description for a specified account.
HPHS2 Retrieves the second-level subaccount description for a specified account.
HPINC Returns a 1 if a specified account is an income or liability account, or a -1 if it is a balance, flow,expense, or asset account.
HPINP Returns a 1 if a specified account is an input account, or a -1 if it is not.
HPJAC Retrieves the account for a specified journal detail row.
HPJCR Retrieves the credit value for a specified journal detail row.
HPJDB Retrieves the debit value for a specified journal detail row.
HPJDS Retrieves the journal description.
HPJEN Retrieves the entity for a specified journal detail row.
HPJNO Retrieves the number that was assigned to the journal by the system.
HPJST Retrieves the journal status.
HPKEY Retrieves the ID for the default account, entity, category, or period as specified.
HPLNK Retrieves a data value from a spreadsheet to the Hyperion Enterprise database for a specified entity,category, account, period, and frequency.
HPNAM Retrieves and shows the ID for a specified entity.
62 Hyperion Retrieve

Function Purpose
HPNNA Retrieves the first entity ID for a specified entity.
HPNSN Retrieves the subentity ID for a specified entity.
HPPARADJ Retrieves parent adjustment data.
HPPBE Calculates the percentage difference between two account values and shows the difference as apositive or negative number.
HPPCH Returns the percentage change between two values without evaluating whether the change is positiveor negative.
HPPCONS Retrieves the ultimate percent consolidated.
HPPOWN Retrieves the ultimate percent ownership.
HPPROP Retrieves proportional data.
HPSCA Retrieves the scaling factor for a specified entity, category, and account.
HPSHAROS Returns the total shares issued.
HPSHAROW Returns the total shares owned by other entities.
HPTRAN Retrieves translation data.
HPVAL Retrieves and shows a data value for a specified entity, category, account, period, frequency, andapplication.
HPVSHAROS Returns the total voting shares issued.
HPVSHAROW Returns the total voting shares owned by other entities.
Pasting Functions in ExcelExcel includes a Paste Function option that you can use to select Hyperion Retrieve functionsand paste them in formulas. When you use this option to paste a function in an Excel worksheet,you can also paste placeholders for the arguments that must follow the function. For moreinformation on the Paste Function option, see the Microsoft Excel User's Guide.
Figure 8 shows an Excel worksheet with a formula that uses the HPVAL function andplaceholders for the arguments that it requires.
Hyperion Retrieve Formulas 63

Figure 8 Hyperion Retrieve Formula with Placeholders
ä To paste a function in Excel:
1 From the Excel worksheet cell where you want to paste a function, select Edit > Paste Special.
2 Select Formula, then select Hyperion Retrieve.
3 Select a formula, then click Paste.
Hyperion Retrieve WorksheetsYou build Hyperion Retrieve worksheets the same way you build Excel worksheets, except thatyou can use Hyperion Retrieve formulas in addition to Excel formulas. You can also use theRHXL menu in Excel in addition to the Excel menus.
When you use Hyperion Retrieve, you have access to all the functions and features of Excel. Youcan build templates to create many different worksheets. For example, you can build a templatefor worksheets that contain periodic account values for a given entity and category.
Figure 9 show Hyperion Retrieve templates created in Excel.
64 Hyperion Retrieve

Figure 9 Hyperion Retrieve Template Created in Excel
You can open a template, add account IDs, and specify arguments for the formulas it contains.After you add account IDs and arguments to the template, you can save it under a different nameto create a worksheet without changing the template.
Figure 10 shows an Excel worksheet, based on the template in the previous figure, that containsaccount values for the Actual category and the Spain entity.
Hyperion Retrieve Worksheets 65

Figure 10 Sample Excel Worksheet
When you create a worksheet from a template, you must save the worksheet under a file namethat is different from the file name of the template. This leaves the template intact so that youcan use it to create other worksheets. For more information on working with templates in Excel,see the Microsoft Excel User's Guide.
Selecting IDs in Hyperion RetrieveYou can use the RHXL menu in Excel to select IDs of entities, categories, accounts, periods, andfrequencies to use as column or row headings or in formulas. For example, if you want to createa worksheet using Actual data for Israel, you can use the RHP or RHXL menu to select the Israelentity and the Actual category for the worksheet's title, column headings, or row headings. Youcan then use references to those cells as arguments in formulas.
ä To select an ID:
1 From a cell where you want to insert or replace a heading, select the RHP or RHXL menu option for the typeof ID that you want to show:
l To show an entity ID, select Change Entity.
l To show a category ID, select Change Category.
l To show an account ID, select Change Account.
l To show a period ID, select Change Period, then select the category that contains the periodyou want to show.
l To show a frequency ID, select Change Frequency.
66 Hyperion Retrieve
l To show a journal ID, select Change Journal.
l To show a journal detail ID, select Change Journal Detail.
2 Select the ID that you want to show.
Refreshing WorksheetsYou can refresh a worksheet to ensure that it contains the latest values from Hyperion Enterprise.For example, suppose that after you retrieve values from the application for a worksheet, youchange some of those values in Hyperion Enterprise. You can refresh the worksheet to retrievethe current values and update the worksheet. You can refresh an entire worksheet at one time,or you can refresh the data in selected rows or columns only.
ä To refresh a worksheet, take one of the following actions:
l To refresh selected values, select the rows or columns that you want to refresh, then selectRHXL > Refresh in Excel.
l To refresh an entire worksheet, select RHXL > Refresh in Excel.
Changing the Default ApplicationWhen you start Hyperion Retrieve, the default application is the first one that you open fromthe Hyperion Enterprise Login dialog box. You can change the default application to any otherapplication that you have opened.
ä To change the default application:
1 From the worksheet, select the Change Application option.
2 To change the default application from Excel, select RHXL > Change Application.
3 From the Application list box, select the application that you want to use as the default application, thenclick OK.
VBA Hyperion RetrieveIn addition to the standard Hyperion Retrieve for Microsoft Excel, you can use the VBA versionof Hyperion Retrieve for Microsoft Excel written with Visual Basic for Applications (VBA). Thisversion supports applications developed using double-byte systems. The original version ofHyperion Retrieve does not support double-byte systems, such as Japanese or Korean, becauseMicrosoft no longer supports the double-byte extensions of several legacy functions thatHyperion Retrieve uses.
The VBA version of Hyperion Retrieve also gives you all the features and functionality of thetraditional Hyperion Retrieve, as well as two new functions:
l Refresh All Linked Cells. For more information, see “Refreshing All Linked Cells” on page69.
VBA Hyperion Retrieve 67
l Convert Workbook. For more information, see “Converting Workbook” on page 69.
The following features or functions behave slightly differently in the VBA version of HyperionRetrieve.
l The argument Application in Hyperion Retrieve functions is now App, and the argumentvalue in the HPLNK function is now Value1.
l In the Function Wizard, optional arguments are displayed in a different font than requiredarguments.
l When you select the XLAutoRefresh option in the VBA version of Hyperion Retrieve,Microsoft Excel recalculates the HPVAL function whenever anything on the spreadsheet isrecalculated. The XLAutoRefresh option is off by default. To set the option, add the followingline to the [Default] section of the HypEnt.ini. file:
XLAutoRefresh=1
l Messages written to the error log at the beginning and completion of a Refresh no longerinclude the current point of view settings. Instead, the messages indicate theworkbook:worksheet[:range] that was refreshed. These messages are also written to the errorlog when beginning and completing the Refresh All Linked Cells and Convert Workbooktasks.
l The Change Journal Detail... menu item is enabled only when you have used ChangeJournal... to select a journal for the current application. The Change Journal Detail... menuitem is disabled if you have not selected a journal for the current application or if you canceledthe Change Journal... dialog box.
Note: Clicking Cancel on the Change Journal Detail... dialog box does not change thecontents of the active cell (whereas the RHXLL32.XLL add-in puts -1 in the activecell when this is done).
l If you have Microsoft Excel’s calculation option set for automatic calculation, MicrosoftExcel automatically recalculates the whole workbook whenever you open the workbook. Ifyou have Microsoft Excel’s calculator option set for manual calculation, Microsoft Exceldisplays FALSE in each refreshed cell when you refresh. To avoid this, press F9 to recalculatethe spreadsheet.
The following files are installed and used with the VBA version of Hyperion Retrieve
l HERETREV.XLA
l HEEXCEL.DLL
l the appropriate language HERES.DLL
Setting Up VBA Hyperion RetrieveBefore running the VBA version of Hyperion Retrieve, you must perform the same setupprocedures as you do when setting up the traditional version of Hyperion Retrieve. Forinstructions for setting up the traditional version of Hyperion Retrieve for Microsoft Excel, see“Hyperion Retrieve Setup” on page 57.
68 Hyperion Retrieve

Starting VBA Hyperion RetrieveAfter completing the Hyperion Retrieve Setup, create a desktop shortcut to HERETREV.XLA fileto run the VBA version of Hyperion Retrieve. Do not start the traditional version of HyperionRetrieve RHXLL32.XLL file if you want to work with the VBA version of Hyperion Retrieve.
Note: Microsoft Excel displays a message when you start the VBA version of Hyperion Retrieveinforming you that the spreadsheet contains macros (unless you have suppressed thisMicrosoft Excel option). You must select Enable Macros to use Hyperion Retrieve.
ä To start the VBA version of Hyperion Retrieve:
1 Start Excel by clicking on the shortcut icon that you created during Hyperion Retrieve setup.
2 Respond to the system prompts for a user ID and password for each application listed in theHPAPP.DAT file.
Note: If your user ID is specified in the HPAPP.DAT file, the system prompts only for thepassword.
Refreshing All Linked CellsMicrosoft Excel attaches the path of the Hyperion Retrieve program directory at the beginningof any add-in function within a worksheet. If you open a worksheet using a computer that hadHyperion Retrieve stored in a different program directory than the computer last used to savethe worksheet, Microsoft Excel prompts you to update the links. When prompted, you mustselect No and use the Refresh All Linked Cells option to refresh the links. When you select No,#NAME? is displayed in all cells that use Hyperion Retrieve functions and prepends the previouscomputer’s Hyperion Retrieve program directory in the formula itself. When you use the RefreshAll Linked Cells feature, Microsoft Excel finds the current program directory and removes theprevious path from the worksheet.
For example, user A has Hyperion Retrieve installed in C:\HYPERION SOLUTIONS and savesa Hyperion Retrieve spreadsheet. User B later opens the same spreadsheet on a differentcomputer, which has Hyperion Retrieve installed in D:\PROGRAM FILES\HYSOL. User B sees#NAME? in a cell of the spreadsheet, with =’C:\HYPERION SOLUTIONS\HERetrev.xla’!HPVAL($B$2,$B$3,$A5,B$4,$c$3,$B$1) as the contents of the cell. User B must select theRefresh All Linked Cells option, which refreshes the path to the program directory of HyperionRetrieve currently being used.
ä To refresh all linked cells, select RHXL > Refresh All Linked Cells.
Converting WorkbookWhen you open a workbook that was created using the traditional Hyperion Enterprise Retrieve,you must refresh the path to the VBA version of Hyperion Retrieve so that the functions can be
VBA Hyperion Retrieve 69

found. The Convert Workbook option helps Microsoft Excel find the Hyperion Retrievefunctions in the new add-in.
ä To convert a workbook, select RHXL > Convert Workbook.
70 Hyperion Retrieve

4Consolidating Data
In This Chapter
Consolidation Overview... . . . . . . . . . . . . . . . . . . . . . . . . . . . . . . . . . . . . . . . . . . . . . . . . . . . . . . . . . . . . . . . . . . . . . . . . . . . . . . . . . . . . . . . . . . . . . . . . . . . . . . . . .71
Consolidation Window... . . . . . . . . . . . . . . . . . . . . . . . . . . . . . . . . . . . . . . . . . . . . . . . . . . . . . . . . . . . . . . . . . . . . . . . . . . . . . . . . . . . . . . . . . . . . . . . . . . . . . . . . . .76
Consolidation Tasks ... . . . . . . . . . . . . . . . . . . . . . . . . . . . . . . . . . . . . . . . . . . . . . . . . . . . . . . . . . . . . . . . . . . . . . . . . . . . . . . . . . . . . . . . . . . . . . . . . . . . . . . . . . . . .77
Intercompany Matching Reports.. . . . . . . . . . . . . . . . . . . . . . . . . . . . . . . . . . . . . . . . . . . . . . . . . . . . . . . . . . . . . . . . . . . . . . . . . . . . . . . . . . . . . . . . . . . . . . . . .83
This chapter provides information and procedures for consolidation, which is the process ofgathering data from dependants and rolling it up to parents.
Consolidation OverviewConsolidation is the process of gathering data from dependent entities and rolling it up into aparent entity. During consolidation, the account values for dependent accounts roll up to theparent accounts. Financial data of each parent consists of the values consolidated from itsdependents. If you change data of a dependent, data of the parent changes when you consolidate.
As data consolidates, standard and custom methods perform calculations on the data. The systemcan perform the following operations:
l Intercompany eliminations, which eliminate intercompany transactions between twocompanies
l Currency conversions, which translate a dependent's local currency values into the parent'scurrency
l Tax rate calculations and other calculations your system administrator sets up inconsolidation methods
When you set up an application, you decide whether you need to store additional detail that canbe used to audit consolidated results. You can store the translated, proportion, elimination, andparent adjustment values. The system derives these values as it consolidates data from baseentities to parents. For information on consolidation detail, see “Consolidation Detail” on page74. For information on viewing translation detail in the point of view, see Hyperion EnterpriseGetting Started.
Figure 11 shows the consolidation hierarchy of an international corporation with two majordivisions: America and Europe. The consolidation hierarchy includes a currency conversion.
Consolidation Overview 71
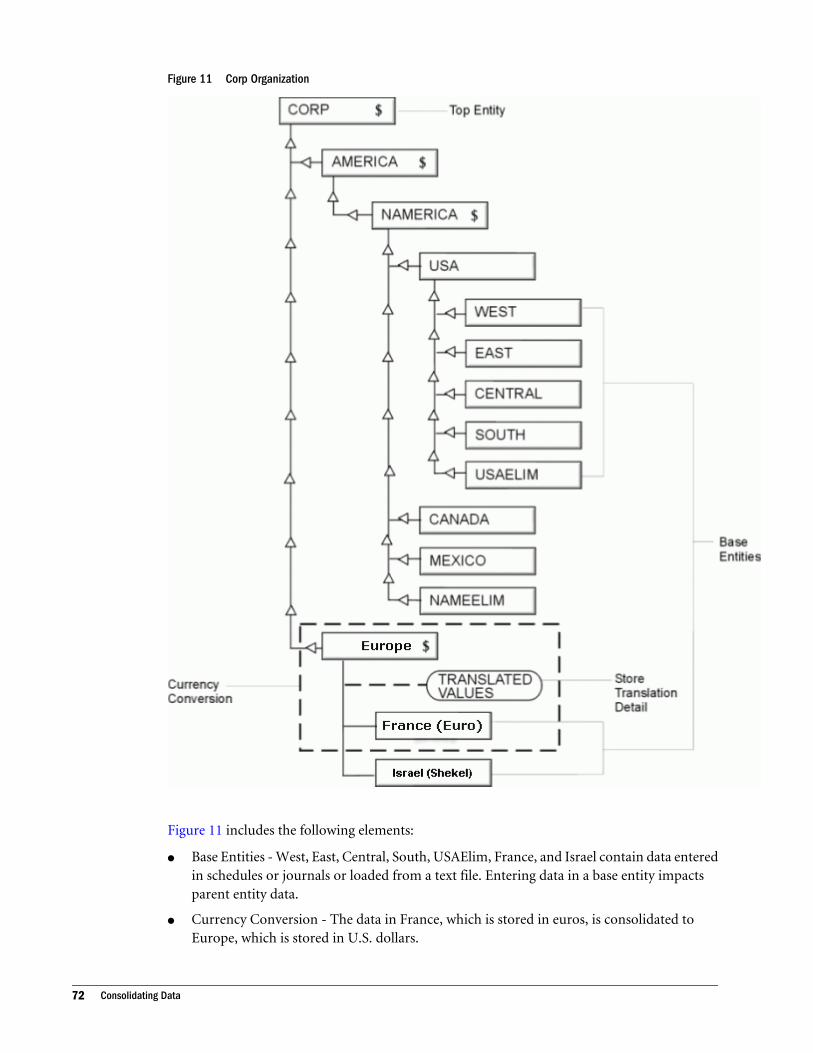
Figure 11 Corp Organization
Figure 11 includes the following elements:
l Base Entities - West, East, Central, South, USAElim, France, and Israel contain data enteredin schedules or journals or loaded from a text file. Entering data in a base entity impactsparent entity data.
l Currency Conversion - The data in France, which is stored in euros, is consolidated toEurope, which is stored in U.S. dollars.
72 Consolidating Data

l Store Translation Values - The data in France, which is stored as euros, is translated intoU.S. dollars and stored in a translation detail table. You can view these values in the Databaseor Data Entry module.
l Top Entity - Corp receives consolidated U.S. dollar data from its two divisions, America andEurope.
The system consolidates only one category and one organization at a time. You can consolidateall entities and periods for the current organization and category, or you can consolidate specificentities and specific periods only. This is called a partial consolidation.
For example, suppose that you need to produce a report on a specific entity in an organization.You can run a partial consolidation for that entity only. Figure 12 shows a partial consolidationin the Corp organization.
Figure 12 Partial Consolidation
In the previous figure, data has been loaded into accounts for the entity France. If you want tosee the consolidated results for Europe only, you can consolidate only Europe.
Consolidation Overview 73

Note: Hyperion Enterprise uses the percent consolidation value for consolidation, instead ofthe percent ownership value that Hyperion Enterprise SE uses.
Consolidation DetailYou can store details about translation values, ownership percentages, parent adjustments, andparent calculations that are performed during the consolidation process. You have severaloptions for storing consolidation detail, including several application and entity settings and acategory setting. You can store values in elimination, proportion, and adjustment tables for anentity and its dependents. You can also specify whether to store this detail for each parent entityand category in your application. For more information, see the Creating Applications chapterin the Hyperion Enterprise Administrator's Guide.
If you store consolidation detail, you can use the View > Consolidation Detail menu commandin the Database module to view the values in the parent adjustment, proportion, elimination,or translation tables for a parent entity. For more information, see “Viewing ConsolidationDetail” on page 31.
You can also create reports to view and print consolidation detail, as well as provide an additionalaudit trail of the consolidation process. Hyperion Retrieve provides another way to accessconsolidation detail. For more information on reports, see Hyperion Reporting User’s Guide.
Consolidation StatusesThe Consolidation window displays a status for each entity for each period in the currentcategory. The consolidation status indicates which entities and periods have been affected bydata or method changes and need to be consolidated. It also indicates which entities contain nodata in specific periods. Table 14 shows the different consolidation statuses and what they mean.
Table 14 Consolidation Status Indicators
Status Meaning
CALC Formulas must be calculated for the entity. Either data was entered for the entity and Formulas were notcalculated or a method was edited. When you perform a consolidation, formulas are calculatedautomatically. You can also calculate formulas manually using the Calculate Formulas option.
CHANGED Data has changed for the entity in the specified period. This can be the result of manual data entry inthe Data Entry or Database window, a journal entry, or a data load.
IMPACTED A data or method change has occurred below this parent entity in the consolidation path. This changeimpacts the value in the parent entity when you perform a consolidation.
OK The entity has already been consolidated and data has not changed. You do not need to consolidatethis period, but you can force consolidation.
DATA This entity has data. Entities with this status will be consolidated if you select Consolidate All with Data.
NO DATA This entity contains no data for the specified period. Entities with this status will not be consolidated ifyou select Consolidate All with Data. However, the system consolidates entities with no data if there isdata in prior periods for that entity.
74 Consolidating Data
Status Meaning
LOCKED This entity contains data that is locked for the specified period. Entities with this status are notconsolidated.
INACTIVE This entity does not exist for the current period. This status appears only in applications that vary bycategory and period.
Here are some of the tasks that can result in an IMPACTED, DATA, or CALC status:
l Changing an organization structure
l Modifying entity attributes
l Adding or deleting accounts
l Modifying account attributes
l Entering data in a schedule or the database
l Loading data
l Modifying methods
l Posting and unposting journals
These actions can cause different status changes for base and parent entities. For moreinformation, see the Hyperion Enterprise Administrator's Guide.
Statutory Consolidation EngineThe Statutory Consolidation Engine (ACE) is an add-on product that works with HyperionEnterprise to improve consolidation performance and functionality when the application has asparse data population and one or more of the following conditions apply:
l The size of the chart of accounts is inflated by an extensive use of intercompany details.
l Conditional rules must be defined for intercompany transactions.
l Complex consolidation methods must be defined to calculate items, such as goodwill orminority interests and consolidation reserves, and to generate a detailed audit trail of theconsolidation process.
ACE overrides the Hyperion Enterprise process of writing into the Translation, Proportion, andElimination data tables of consolidated entities. ACE enhances the performance level of theHyperion Enterprise translation and consolidation processes in two ways:
l ACE defines logic formulas by source account rather than by destination account.
l ACE performs impacted consolidations by dependent rather than by parent.
ACE consists of the translation and consolidation engine, which is invoked by HyperionEnterprise, and the Administration module, which the system administrator uses to define thecontent of ACE methods and to set parameters used by ACE. For more information, see theHyperion Enterprise Statutory Consolidation Engine Guide.
Consolidation Overview 75
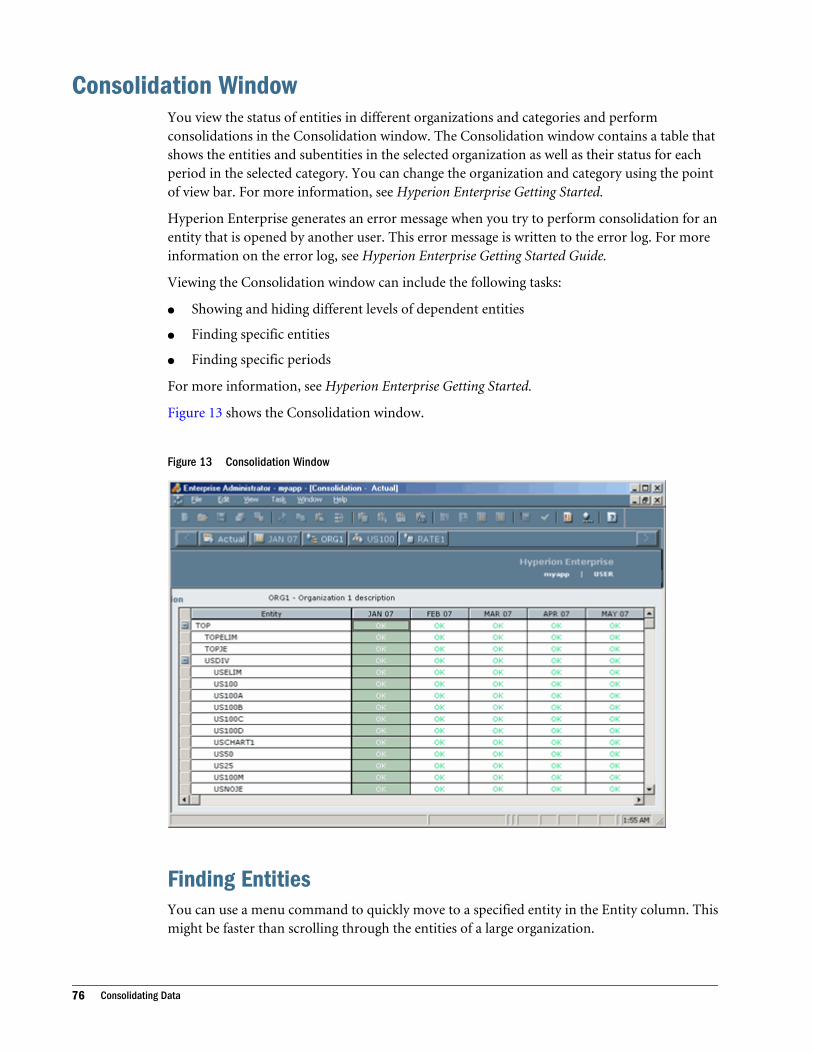
Consolidation WindowYou view the status of entities in different organizations and categories and performconsolidations in the Consolidation window. The Consolidation window contains a table thatshows the entities and subentities in the selected organization as well as their status for eachperiod in the selected category. You can change the organization and category using the pointof view bar. For more information, see Hyperion Enterprise Getting Started.
Hyperion Enterprise generates an error message when you try to perform consolidation for anentity that is opened by another user. This error message is written to the error log. For moreinformation on the error log, see Hyperion Enterprise Getting Started Guide.
Viewing the Consolidation window can include the following tasks:
l Showing and hiding different levels of dependent entities
l Finding specific entities
l Finding specific periods
For more information, see Hyperion Enterprise Getting Started.
Figure 13 shows the Consolidation window.
Figure 13 Consolidation Window
Finding EntitiesYou can use a menu command to quickly move to a specified entity in the Entity column. Thismight be faster than scrolling through the entities of a large organization.
76 Consolidating Data
For example, if you want to consolidate data for Europe only, you can use the Find > Entitycommand to select Europe. If the entity you want to find is part of a branch that is collapsed,the system expands the branch and highlights the entity.
ä To find an entity:
1 From the Consolidation window, select Edit > Find > Entity.
2 Use the check boxes to filter the list of entities.
3 Enter an entity ID or select one from the list.
4 Click OK.
Finding PeriodsYou can use the Find Period option to locate a period in the Consolidation window. This isuseful if you are working with a category that has period columns extending beyond theConsolidation window. Using the Find Period option might be faster than using the scroll barsor arrow keys to locate a period.
ä To find a period:
1 From Consolidation window, select Edit > Find > Period.
2 Enter a period ID or select one from the list.
3 Click OK.
Consolidation TasksConsolidation tasks include selecting the entities and periods you want to consolidate, selectinga consolidation option, and running the consolidation. You can select the entities and the periodsof data you want to consolidate. You can select one or more entities and periods. You chooseone of three options to consolidate data:
l Consolidate impacted entities only
l Consolidate entities with data only
l Consolidate all entities
The way the system consolidates data in dynamic organizations differs from the way itconsolidates data in organizations that do not vary by category and period. For moreinformation, see “Consolidating Dynamic Organizations” on page 80. For information onconsolidating using the Statutory Consolidation Engine, see the Hyperion EnterpriseStatutoryConsolidation Engine Guide.
Consolidation Tasks 77
Selecting Entities and Periods to ConsolidateWhen you perform consolidations, you can consolidate data for the current category for allentities in an organization or for a specific branch of the organization. Consolidating a specificbranch, which is also called a partial consolidation, is useful if you need to report on an entityother than the top entity in an organization. For example, suppose you need to run a report onthe Europe entity, which is a dependent entity in the Corp organization. You can consolidatedata for Europe only, then run the report on Europe's consolidated data.
Here are some guidelines:
l When you select a parent entity for a partial consolidation, all dependents of the parententity are selected even if they do not currently appear in the Consolidation window, andall periods are selected.
l You can consolidate data for all periods and entities, specific periods and all entities, orspecific periods and specific entities. Consolidating specific periods is useful if only certainperiods are affected by a data or method change. For example, suppose you load data forthe Actual category and the January period only. You can select the January period forconsolidation.
l When you select a period to consolidate, all previous periods with a consolidation status ofCALC, DATA, or IMPACTED are selected. This preserves the integrity of data in periodsthat depend on values from previous periods.
l You cannot select a base entity for consolidation because base entities do not havedependents. You also cannot select entities that have a status of NO DATA for all periods.
ä To select entities and periods for consolidation, from the Consolidation window, take one ofthe following actions:
l To consolidate all periods and all entities, select the first entity in the Entity column.
l To consolidate all entities in one period, select the period column heading.
l To consolidate all entities in multiple periods, select the status cell for the top entity in thefirst period you want to consolidate, then drag to the right until all the periods you want toconsolidate are highlighted.
l To consolidate one parent entity in one period, select the status cell for a parent entity in aspecific period.
l To consolidate one parent entity in multiple periods, select the status cell for the parententity in the first period you want to consolidate, then drag to the right until all the periodsyou want to consolidate are highlighted.
Consolidating DataAfter you select the entities and periods you want to consolidate, you select one of threeconsolidation options:
l Consolidate All Impacted
l Consolidate All
78 Consolidating Data
l Consolidate All with Data
If you select Consolidate All Impacted, the system consolidates only entities that have beenaffected by data or method changes. However, the system consolidates entities with no data ifthere is data in prior periods for that entity.
If you select Consolidate All with Data, the system consolidates only entities with data. Thisallows you to consolidate entities with data even if the data has not been changed.
If you select Consolidate All, you can force consolidation for all selected entities, even entitieswith a status of OK. This is useful if you have made changes that are not reflected by theconsolidation status indicators. For example, if you change currency translation rates, thestatuses do not change but you can force consolidation for all entities to reflect the change.Selecting Consolidate All also calculates formulas for accounts that previously had no data.
When you perform a consolidation, Hyperion Enterprise eliminates values in the translatedcurrency, which is the parent's currency. The system ignores the currency assigned to theelimination company.
If you are on a network and a user is working with an entity you are trying to consolidate, thedata for that entity is locked, and the system cannot consolidate it. All consolidations that arenot affected by the locked entity are performed.
For example, if you try to consolidate data for the entire Corp organization, and another user isworking with the dependent Europe, consolidation is blocked for Europe and the entities aboveit in the consolidation path. After the consolidation is complete, an error message appears,informing you that the entity Europe could not be accessed. The entity Europe and its parentshave the IMPACTED consolidation status, while those entities that successfully consolidatedhave the OK status.
A message box appears, showing the progress of consolidation for each entity and period. Whenthe consolidation is complete, the status of each successfully consolidated entity and periodchanges to OK.
If you are using server-based processing to consolidate data, a window appears that shows theprogress of the consolidation. This window is a separate program, so you can perform othertasks in Hyperion Enterprise or exit Hyperion Enterprise while consolidating. The window closeswhen the server finishes consolidating or an error message appears if there is a problem.
ä To consolidate data:
1 From the Consolidation window, select the entities and periods that you want to consolidate.
2 Take one of the following actions:
l To consolidate all selected entities and periods, regardless of whether they have data, selectTask > Consolidate All.
l To consolidate data for entities with a DATA, CALC, or IMPACTED status only, select Task> Consolidate All Impacted.
l To consolidate all selected entities that have data, select Task > Consolidate All with Data.
If the application is a server-based application, you receive a server prompt.
Consolidation Tasks 79

3 If you receive a prompt, select Server to consolidate on the server, or select Local to consolidate locally onthe client workstation.
Note: Select Cancel to stop the consolidation process.
Consolidating Dynamic OrganizationsYou use dynamic organizations to track changes to a business organization over time. Theorganization can vary by category and period. The organization column in the consolidationtable shows a composite view of the organization. Each entity appears in the organization inevery location that it has ever appeared. The status for each entity appears for those periods inwhich the entity existed in the organization. For periods where the entity or organization doesnot exist, the status INACTIVE appears.
You can create dynamic organizations if you select the Vary Organization by Period and Categoryapplication setting. For information on setting up applications, see the Hyperion EnterpriseAdministrator's Guide. For information on organizations that vary by period and category, seethe Hyperion Enterprise Administrator's Guide.
Figure 14 shows how a dynamic organization appears in the consolidation table.
Figure 14 Dynamic Organization in the Consolidation Table
In the previous figure, Denmark appears under both Eurwest and Nordic in the Entity column.The status of INACTIVE in the period columns indicates that Denmark was owned by Eurwestin January, and was moved to Nordic in February.
80 Consolidating Data
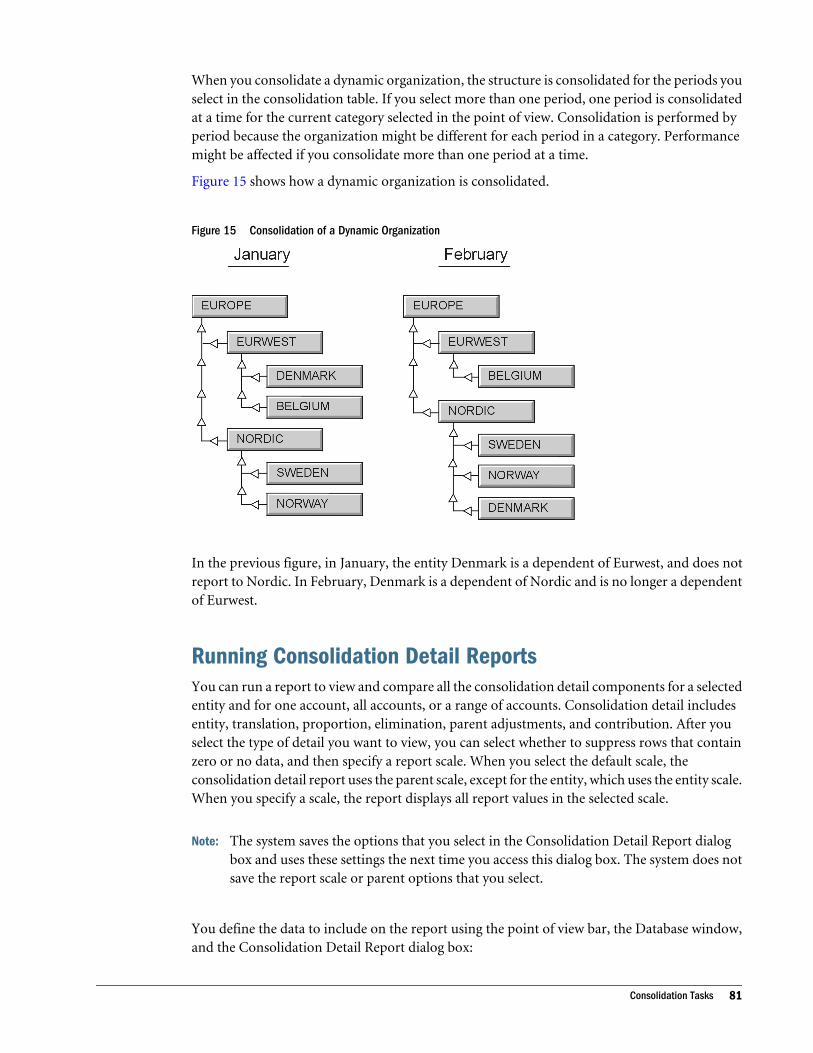
When you consolidate a dynamic organization, the structure is consolidated for the periods youselect in the consolidation table. If you select more than one period, one period is consolidatedat a time for the current category selected in the point of view. Consolidation is performed byperiod because the organization might be different for each period in a category. Performancemight be affected if you consolidate more than one period at a time.
Figure 15 shows how a dynamic organization is consolidated.
Figure 15 Consolidation of a Dynamic Organization
In the previous figure, in January, the entity Denmark is a dependent of Eurwest, and does notreport to Nordic. In February, Denmark is a dependent of Nordic and is no longer a dependentof Eurwest.
Running Consolidation Detail ReportsYou can run a report to view and compare all the consolidation detail components for a selectedentity and for one account, all accounts, or a range of accounts. Consolidation detail includesentity, translation, proportion, elimination, parent adjustments, and contribution. After youselect the type of detail you want to view, you can select whether to suppress rows that containzero or no data, and then specify a report scale. When you select the default scale, theconsolidation detail report uses the parent scale, except for the entity, which uses the entity scale.When you specify a scale, the report displays all report values in the selected scale.
Note: The system saves the options that you select in the Consolidation Detail Report dialogbox and uses these settings the next time you access this dialog box. The system does notsave the report scale or parent options that you select.
You define the data to include on the report using the point of view bar, the Database window,and the Consolidation Detail Report dialog box:
Consolidation Tasks 81

l The category and entity the system use are based on your point of view settings.
l The range of accounts for one period is from the highlighted accounts on the Databasewindow.
l The parent for the entity is selected in the Consolidation Detail Report dialog box.
l The default report scale value that the system uses is based on your selection from the pointof view bar. For example, suppose the scale value in the Database module is set to Scale 3(thousands). When you access the Consolidation Detail Report dialog box, the default reportscale is 3. You can change the scale value.
Suppose you want to produce a report with the following specifications:
l View entity, translation, and proportion detail for Account1 through Account7.
l Suppress all rows that contain zero or no data.
l Use a report scale value of 3.
Figure 16 shows the resulting report.
Figure 16 Sample Report
You can also customize your report fonts, colors, and page layout. For more information oncustomizing the report, see Hyperion Enterprise Getting Started.
ä To run a consolidation detail report:
1 From the Database window, highlight one account, all accounts, or a range of accounts for an entity.
2 Select Task > Run Consolidation Detail Report.
3 From the drop-down list box, select the parent entity that you want to view.
4 Select the consolidation detail that you want to include.
5 Select whether to suppress rows that contain no data or zeros.
6 From the Report Scale drop-down list, select the report scale that you want to use for the report.
7 Take one of the following actions
l To print the report, select Print.
l To preview the report, select Preview.
82 Consolidating Data

Intercompany Matching ReportsIntercompany matching reports list the intercompany transactions that are to be eliminatedduring consolidation for one period. These reports help you to track intercompany transactionsfor analysis and auditing in the currency that you specify.
You perform the following tasks to produce intercompany matching reports:
l Define intercompany account matching groups.
l Define the partners for which you want to report transactions.
l Specify the currency options.
l Specify the report information to include.
l Specify the report information to suppress.
l Customize your report.
Note: You must consolidate before you run intercompany matching reports.
To review an intercompany matching report sample, see “Intercompany Matching Report CaseStudies” on page 89 or the “Intercompany Matching Report Sample Report” on page 90.
Intercompany Group SelectionThe system produces reports based on the intercompany account matching groups that youdefine in the Accounts module. You select the entity or entities for which you are processing thereport in the Consolidation window, either by single entity or branch, then you select one ormore partner entities.
Note: If you select more than one period for processing, the system processes only the periodthat contains the cursor. A parent entity at the top of a branch is usually not anintercompany entity and is excluded from the entities that the system processes.
Partner SelectionAfter you select the entity or entities for which you are processing the report, you define thepartners for which you want to report transactions. You can define partners using the followingoptions:
l Specified partners means either a specific partner entity or all the intercompany entitieswithin a branch
l Within the group means all transactions between entities in the currently selected branch
l Outside the group within the organization means to report all transactions except those thattake place between entities in the currently selected branch
You can specify whether to display data in the following ways:
Intercompany Matching Reports 83
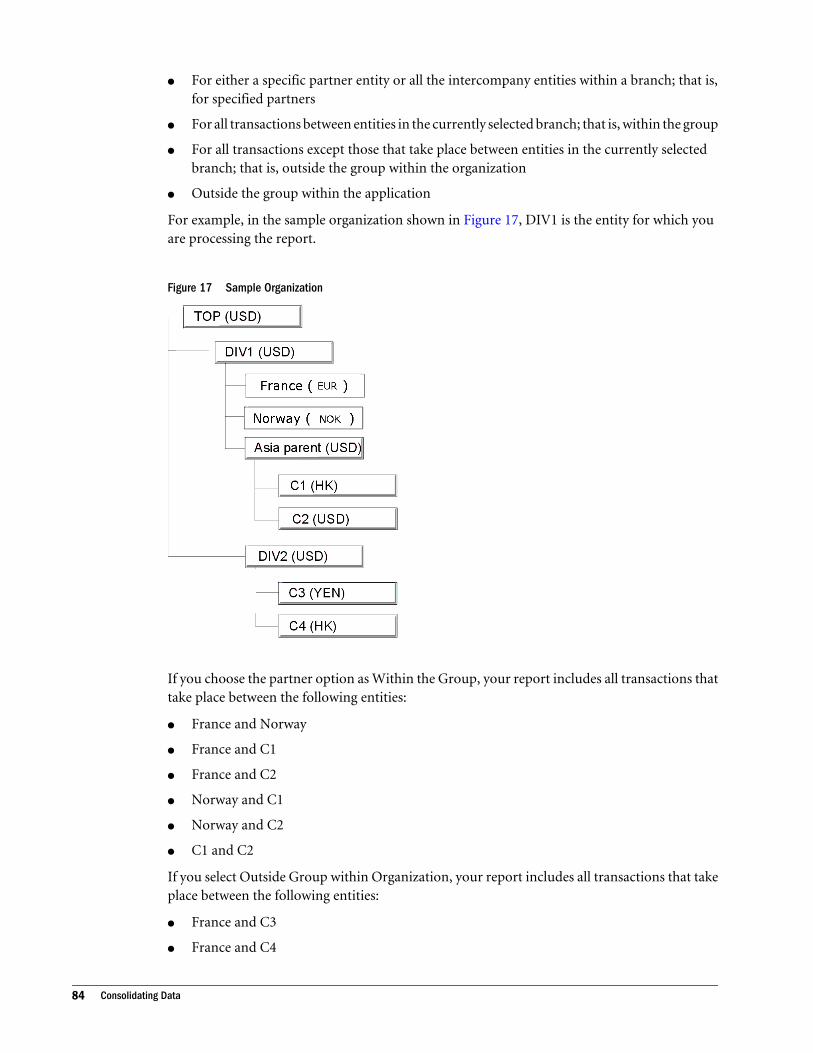
l For either a specific partner entity or all the intercompany entities within a branch; that is,for specified partners
l For all transactions between entities in the currently selected branch; that is, within the group
l For all transactions except those that take place between entities in the currently selectedbranch; that is, outside the group within the organization
l Outside the group within the application
For example, in the sample organization shown in Figure 17, DIV1 is the entity for which youare processing the report.
Figure 17 Sample Organization
If you choose the partner option as Within the Group, your report includes all transactions thattake place between the following entities:
l France and Norway
l France and C1
l France and C2
l Norway and C1
l Norway and C2
l C1 and C2
If you select Outside Group within Organization, your report includes all transactions that takeplace between the following entities:
l France and C3
l France and C4
84 Consolidating Data

l Norway and C3
l Norway and C4
l C1 and C3
l C1 and C4
l C2 and C3
l C2 and C4
If you choose Outside Group within Application, assume that you have the additionalorganization shown in Figure 18.
Figure 18 Additional Organization
Your report then includes all transactions that take place between the following entities:
l France and C3
l France and C4
l France and C5
l France and C6
l Norway and C3
l Norway and C4
l Norway and C5
l Norway and C6
l C1 and C3
l C1 and C4
l C1 and C5
l C1 and C6
l C2 and C3
l C2 and C4
l C2 and C5
l C2 and C6
If you choose the partner option as Specified Partner and select the partner as DIV2, your reportincludes all transactions that take place between the following entities:
l France and C3
Intercompany Matching Reports 85

l France and C4
l Norway and C3
l Norway and C4
l C1 and C3
l C1 and C4
l C2 and C3
l C2 and C4
Entity Code OptionYou can specify an entity code to filter the list of entities and the list of the matching partnersfor which you are processing the report. You can select multiple entity codes for a filter.
Currency Option SelectionAfter you specify the partner transactions to include in your intercompany matching report, youspecify one or more types of currency on the report:
l The currency of the entity for which you are processing the report
l The currency of the partner
l The currency of the parent
l Another currency that you select
For each currency you select, the system generates a Difference column. An optional Statuscolumn appears on the report.
Currency TranslationCurrency translation is performed using the rate specified in the application module fortranslating balance or flow accounts. You can also specify to translate flow accounts using balanceaccount rates for an intercompany set.
The system does not translate accounts if you specify to use child rates in your application. Ifyour application stores the rate account data in an account group other than GLOBAL, thesystem uses the rate data of the parent entity.
Parent CurrencyIn the Consolidation window, if you select only one entity for processing and apply the parentcurrency, the system uses the currency of the selected entity. If you select a branch or group forprocessing and apply parent currency, the system translates each dependent using the currencyof the parent, which is the top node of the branch.
86 Consolidating Data

Report Information to IncludeThe intercompany matching report includes columns for the entity for which you are processingthe report, the partner entity, accounts, entity and matching entity values, the difference betweenaccounts, and the status of the matching transaction.
You use the matching currency as a conversion factor in defining the matching tolerance for thereport. The matching currency for the report is the parent currency by default, which is thecurrency of the top node of the branch selected for processing. You can specify another matchingcurrency.
You use the matching tolerance to specify the range of values for which to report status. Thematching tolerance for the report is based on the matching currency you select. The report scalethat you select also is the scale for the Matching Tolerance amount.
You can specify whether to display the entity description for entities in the intercompanymatching set, whether to display account detail, account totals, and accounts in rows instead ofcolumns. You can select to generate a one report for each entity for which you are processingthe report. You can also select the report scale, and the number of decimal places to display onthe report.
The system processes and stores values based on account types. When you calculate thedifference, the system applies the signs to accounts as shown in Table 15.
Table 15 Account Signs
Account Attribute Sign
Income Minus
Expense Plus
Asset Plus
Liability Minus
Balance Plus
Flow Minus
When calculating the Total column, the system considers the sign for the account attribute, thenapplies the sign of the first account in each column to the result. Therefore, the sign of the totalmay change, depending upon the sign of the first account that is specified in each column.
Report Information to SuppressYou can suppress the following report information:
l Status, which provides status information based on the matching tolerance that applies tothe entire report.
Intercompany Matching Reports 87

l Currency, which provides information on the current and partner entity currencies for eachcurrency you select. For example, if you have different currencies assigned to each partnerentity, the currency for each partner is different on each row.
l Subtotals, which the system generates after processing each entity for which you areprocessing the report, and a grand total for the entire report. You might want to suppresstotaling and subtotaling if they are not meaningful because of currency differences. Forexample, if you have a report that shows both current entity and partner currencies, eachsubtotal might appear in a different currency. In this case, you might want to suppress thegrand total.
l Matching values, which are transactions that fall within the range of values you specify formatching tolerance.
Report FormatYou can customize your report fonts, colors, and page layout. For more information onformatting the report, see Hyperion Enterprise Getting Started.
Running Intercompany Matching ReportsAfter you define intercompany matching groups, you can use intercompany matching reportsto list the intercompany transactions that are eliminated during consolidation and to identifyunmatched intercompany transactions. These reports document an organization's transactionsso you can analyze or audit the data in the currency that you specify. The system saves the checkbox options that you select and displays them the next time you run intercompany matchingreports.
You can use Hyperion Reporting to design your own custom intercompany matching reports.For more information on designing custom intercompany matching reports, see the HyperionReporting User’s Guide. For more information on running standard intercompany matchingreports, see “Running Intercompany Matching Reports” on page 88. For more informationabout intercompany matching, see the Hyperion Enterprise Administrator's Guide.
ä To run intercompany matching reports:
1 From the Consolidation window, select the entity or entities and period for which you want to run the report.
2 Select Task > Run Intercompany Matching Reports.
3 On the Intercompany Group tab, select the intercompany group for which you want to run intercompanymatching reports.
4 On the Matching Options tab, select the partner transactions, currency options, and filter options that youwant to use.
5 On the Reporting Options tab, select a report and suppression options to include, then take one of thefollowing actions:
l To print the report, select Print.
l To preview the report, select Preview.
88 Consolidating Data

Intercompany Matching Report Case StudiesEvergreen Paper organization has two divisions for which you want to identify unmatchedintercompany transactions: DIV1 and DIV2. Figure 19 shows the divisions.
Figure 19 Divisions of Evergreen Paper Organization
Suppose the system administrator at Evergreen Paper wants to produce a report with thefollowing specifications:
l The entity for which you are processing the report is DIV1, which includes France, Norway,C1, and C2.
l The partner entity is DIV2, which includes C3 and C4.
l The currency option is Current Entity Currency.
Table 16 shows the results using the Current Entity Currency option.
Table 16 Results Using Current Entity Currency Option
Entity Matching Entity Receivables Payables
France C3 France, REC.C3 (euros) C3, PAY.France (yen,converted to euros)
C4 France, REC.C4 (euros) C4, PAY.France (HK,converted to euros)
Norway C3 Norway, REC.C3 (kroner) C3, PAY.Norway (yen,converted to kroner)
C4 Norway, REC.C4 (kroner) C4, PAY.Norway (HK,converted to kroner)
Intercompany Matching Reports 89

Entity Matching Entity Receivables Payables
C1 C3 C1, REC.C3 (HK) C3, PAY.C1 (yen,converted to HK)
C4 C1, REC.C4 (HK) C4, PAY.C1 (HK, noconversion)
C2 C3 C2, REC.C3 (USD) C3, PAY.C2 (yen,converted to USD)
C4 C2, REC.C4 (USD) C4, PAY.C2 (HK, convertedto USD)
Suppose the system administrator at Evergreen Paper Organization wants to produce a reportwith the following specifications:
l The entity for which you are processing the report is DIV1, which includes France, Norway,C1 and C2.
l The partner entity is DIV2, which includes C3 and C4.
l The currency option is Partner Currency.
Table 17 shows the results using the Partner Currency option.
Table 17 Results Using Partner Currency Option
Entity Matching Entity RECEIVABLES PAYABLES
France C3 France, REC.C3 (euros,converted to yen)
C3, PAY.France (yen)
C4 France, REC.C4 (euros,converted to HK)
C4, PAY.France (HK)
Norway C3 Norway, REC.C3 (kroner,converted to yen)
C3, PAY.Norway (yen)
C4 Norway, REC.C4 (kroner,converted to HK)
C4, PAY.Norway (HK)
C1 C3 C1, REC.C3 (HK, convertedto yen)
C3, PAY.C1 (yen)
C4 C1, REC.C4 (HK, noconversion)
C4, PAY.C1 (HK)
C2 C3 C2, REC.C3 (USD,converted to yen)
C3, PAY.C2 (yen)
C4 C2, REC.C4 (USD,converted to HK)
C4, PAY.C2 (HK)
Intercompany Matching Report Sample ReportFigure 20 shows a sample intercompany matching report with the following specifications:
90 Consolidating Data
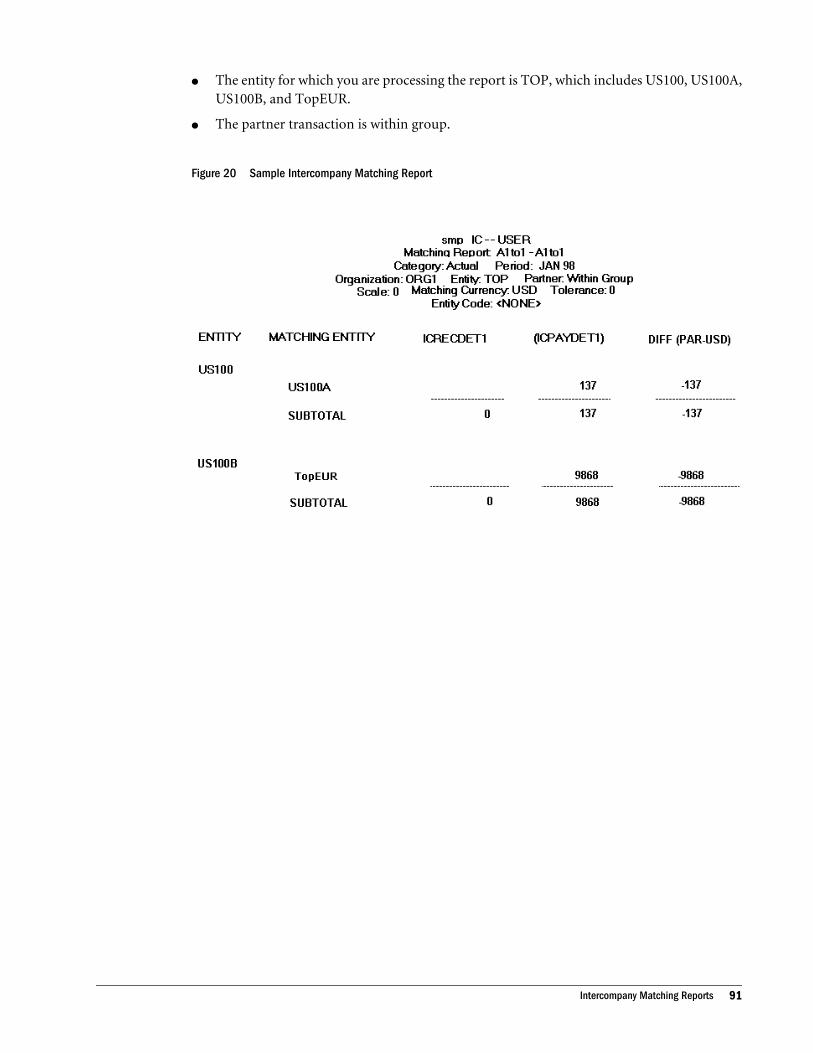
l The entity for which you are processing the report is TOP, which includes US100, US100A,US100B, and TopEUR.
l The partner transaction is within group.
Figure 20 Sample Intercompany Matching Report
Intercompany Matching Reports 91

92 Consolidating Data

5Entering Journals
In This Chapter
Journals Overview ... . . . . . . . . . . . . . . . . . . . . . . . . . . . . . . . . . . . . . . . . . . . . . . . . . . . . . . . . . . . . . . . . . . . . . . . . . . . . . . . . . . . . . . . . . . . . . . . . . . . . . . . . . . . . . . .93
Journal Types ... . . . . . . . . . . . . . . . . . . . . . . . . . . . . . . . . . . . . . . . . . . . . . . . . . . . . . . . . . . . . . . . . . . . . . . . . . . . . . . . . . . . . . . . . . . . . . . . . . . . . . . . . . . . . . . . . . . . .94
Journal Templates... . . . . . . . . . . . . . . . . . . . . . . . . . . . . . . . . . . . . . . . . . . . . . . . . . . . . . . . . . . . . . . . . . . . . . . . . . . . . . . . . . . . . . . . . . . . . . . . . . . . . . . . . . . . . . . .95
Balanced and Unbalanced Adjustments... . . . . . . . . . . . . . . . . . . . . . . . . . . . . . . . . . . . . . . . . . . . . . . . . . . . . . . . . . . . . . . . . . . . . . . . . . . . . . . . . . . . . . .96
Journal Information ... . . . . . . . . . . . . . . . . . . . . . . . . . . . . . . . . . . . . . . . . . . . . . . . . . . . . . . . . . . . . . . . . . . . . . . . . . . . . . . . . . . . . . . . . . . . . . . . . . . . . . . . . . . . . .97
Journal Adjustments ... . . . . . . . . . . . . . . . . . . . . . . . . . . . . . . . . . . . . . . . . . . . . . . . . . . . . . . . . . . . . . . . . . . . . . . . . . . . . . . . . . . . . . . . . . . . . . . . . . . . . . . . . . . 101
Journals Window ... . . . . . . . . . . . . . . . . . . . . . . . . . . . . . . . . . . . . . . . . . . . . . . . . . . . . . . . . . . . . . . . . . . . . . . . . . . . . . . . . . . . . . . . . . . . . . . . . . . . . . . . . . . . . . . 104
Journal and Template Creation ... . . . . . . . . . . . . . . . . . . . . . . . . . . . . . . . . . . . . . . . . . . . . . . . . . . . . . . . . . . . . . . . . . . . . . . . . . . . . . . . . . . . . . . . . . . . . . . 105
Reviewing Journals.. . . . . . . . . . . . . . . . . . . . . . . . . . . . . . . . . . . . . . . . . . . . . . . . . . . . . . . . . . . . . . . . . . . . . . . . . . . . . . . . . . . . . . . . . . . . . . . . . . . . . . . . . . . . . . 109
Journal Lock ... . . . . . . . . . . . . . . . . . . . . . . . . . . . . . . . . . . . . . . . . . . . . . . . . . . . . . . . . . . . . . . . . . . . . . . . . . . . . . . . . . . . . . . . . . . . . . . . . . . . . . . . . . . . . . . . . . . . 110
Posting Journals.. . . . . . . . . . . . . . . . . . . . . . . . . . . . . . . . . . . . . . . . . . . . . . . . . . . . . . . . . . . . . . . . . . . . . . . . . . . . . . . . . . . . . . . . . . . . . . . . . . . . . . . . . . . . . . . . . 110
Extracting Journals .. . . . . . . . . . . . . . . . . . . . . . . . . . . . . . . . . . . . . . . . . . . . . . . . . . . . . . . . . . . . . . . . . . . . . . . . . . . . . . . . . . . . . . . . . . . . . . . . . . . . . . . . . . . . . . 114
Loading Journals .. . . . . . . . . . . . . . . . . . . . . . . . . . . . . . . . . . . . . . . . . . . . . . . . . . . . . . . . . . . . . . . . . . . . . . . . . . . . . . . . . . . . . . . . . . . . . . . . . . . . . . . . . . . . . . . . 115
Journal Load and Extract File Format .. . . . . . . . . . . . . . . . . . . . . . . . . . . . . . . . . . . . . . . . . . . . . . . . . . . . . . . . . . . . . . . . . . . . . . . . . . . . . . . . . . . . . . . . . 116
Journal Production Reports .. . . . . . . . . . . . . . . . . . . . . . . . . . . . . . . . . . . . . . . . . . . . . . . . . . . . . . . . . . . . . . . . . . . . . . . . . . . . . . . . . . . . . . . . . . . . . . . . . . . . 117
This chapter provides information and procedures that you need for entering journals.
Journals OverviewA journal is a set of adjustments to account balances for one category and period. You use journalsto record changes in account values and maintain an audit trail of those changes. You can usejournal templates for common adjustments that you make on a regular basis, to create journalsautomatically for each period, or as a basis for creating new journals.
You create, edit, and post journals in the Journals module. When you post a journal, the systemrecalculates the account balances so that the database reflects the adjustments. You can refer toposted journals as records of adjustments, or run reports to check the trail of changes to accountvalues.
Journals Overview 93

Journal TypesYou can create three types of journals:
l Regular journals, which adjust values in a single period
l Auto-reversing journals, which adjust values in one period and automatically reverse themin the next period
l Parent journals, which adjust the contribution of an entity to its parent
Regular JournalsYou use regular journals to enter one-time adjustments for one period only. Regular journalscan be balanced, balanced by entity, or unbalanced. You determine that a journal or templateis regular when you create it. For example, suppose you want to enter one-time adjustments todata in the January period of the Actual category for the Cables, Monitors, and Keyboardsaccounts. You can enter these adjustments in a regular journal, then post the adjustments todifferent entities or all to the same entity. For information on balanced and unbalanced journals,see “Balanced and Unbalanced Adjustments” on page 96. For information on creating journalsand templates, see “Journal and Template Creation” on page 105.
Auto-reversing JournalsYou use auto-reversing journals to enter adjustments that you want to reverse in the next period.Auto-reversing journals affect two periods of data. You post an auto-reversing journal to adjustvalues in one period. When you open the next period, the system automatically creates and postsa journal that reverses those adjustments.
When you open the following period, the journal that the system creates is a regular journal witha status of Auto-reversed. The status of the original journal changes to Locked. When the systemcreates and posts the auto-reversed journal, it locks the newly-opened period in the database forall entities to which adjustments were posted in the auto-reversed journal.
Note: You cannot edit the data for the entities in the newly-opened period. You also cannotedit, unpost, or delete the auto-reversing journal or the auto-reversed journal.
For example, you can create and post an auto-reversing journal in January called JE1, whichadjusts the Cash and Sales accounts for France. When you open the February period, the systemcreates and posts a second journal called JE1, which reverses the JE1 adjustments made inJanuary. The journal you created in January is an auto-reversing journal with the status Locked.The journal automatically created in February is a regular journal with the status Auto-reversed.For information on creating journals, see “Journal and Template Creation” on page 105. Forinformation on journal statuses, see “Journal Status” on page 97.
When you post auto-reversing adjustments to an entity, you cannot remove that entity until youopen the next period in journals. You can delete an entity to which auto-reversing journaladjustments are posted, but you cannot purge it from the application.
94 Entering Journals

Note: You cannot create an auto-reversing template or create an auto-reversing parent journal.
Parent JournalsYou can create a parent journal to adjust the value that a dependent contributes to its parentduring consolidation. Parent journals adjust the value of the parent only.
For example, suppose your organization contains an entity called France that reports to EuropeConsolidated. You can create a parent journal that adjusts the contribution of France to EuropeConsolidated. Europe Consolidated is the entity in the Parent drop-down list box, and Franceis in the rows of the journal. There is no change to France's values. A parent journal can containadjustments to many entities for the same parent.
You can create a parent journal only if two settings are selected. You must select the Allow ParentAdjustments application setting. You also must select the Allow Parent Adjustments check boxin the Entities module for the parent entity. When you first create a journal or template, youdetermine whether it is a parent journal. For more information on creating journals andtemplates, see “Journal and Template Creation” on page 105. For more information on theAllow Parent Adjustments parent setting, see the Hyperion Enterprise Administrator's Guide.
Journal TemplatesYou can use journal templates to save time when you work with journals. You can create twotypes of journal templates:
l Standard templates, which contain account IDs, entity IDs, or values for similar adjustmentsthat you enter frequently. You can use a standard template as a starting point for creatingmany journals.
l Recurring templates, which contain complete adjustments that the system createsautomatically when you open a new period.
Standard TemplatesYou use standard templates when you need to post adjustments that have common adjustmentinformation for each period. Instead of creating a new regular journal every month, you cancreate a standard template that contains the common account IDs, entity IDs, or amounts. Youcan use the template as the basis for many regular journals that contain similar adjustmentinformation.
For example, if an entity is in a country with high inflation, you might need to post adjustmentsto several accounts every month to record changes in the entity's inventory values. Theadjustment amounts can change from month to month. You can create a template that containsthe account ID and entity, with a line for each adjustment. Each month, you can use the templateto create a regular journal that already contains the account and entity IDs for the adjustments,so that you only need to enter the amounts.
Journal Templates 95

You can also use a standard template to make similar adjustments to the amounts that an entitycontributes to multiple parents. You enter the adjustment information in the template, and thenchange the parent each time you create a journal with that template. A standard template cancontain balanced or unbalanced adjustments, and can be a regular or parent template. Forinformation on balanced and unbalanced adjustments, see “Balanced and UnbalancedAdjustments” on page 96. For information on regular and parent journals, see “Journal Types”on page 94.
Recurring TemplatesYou can use recurring templates to save time when you need to make identical adjustments inevery period. Instead of creating a regular journal for each period to post these adjustments, youcan create a recurring template that contains the adjustments. When you open a period, thesystem creates a regular journal from the template. You can post the journal immediately, oryou can edit it before posting it. For information on regular journals, see “Regular Journals” onpage 94.
Recurring templates are especially useful for working with a category that has a year-to-date dataview. Suppose you are working with the Actual category, which has a year-to-date view. TheOther Income account has a value of zero for January through March, but in April, you enter avalue of 2,000 because your company sells a truck for $2,000 more than its' cost. Because thecategory's data view is year-to-date, the 2,000 accumulated value appears as part of each month'scumulative value, so you might want to post an adjustment each month to offset that amount.
Each journal the system creates from a recurring journal template has the same ID anddescription as the template. For example, if you create a recurring template with the IDCABLEADJ, each journal the system creates from this template also has the ID of CABLEADJ.
A recurring template can contain balanced or unbalanced adjustments. You can create regularrecurring templates, but not auto-reversing or parent recurring templates. For information onbalanced and unbalanced adjustments, see “Balanced and Unbalanced Adjustments” on page96.
Balanced and Unbalanced AdjustmentsEach journal or template that you create is balanced, balanced by entity, or unbalanced. Youselect the balance attribute when you create or edit the journal or template.
A balanced journal or template is one in which the total debits are equal to the total credits. Youmust enter equal debits and credits within a balanced journal before you can post the journal.For example, if the total of credits in a journal is 50, the total of debits must also be 50 beforeyou can post the journal.
A journal or template that is balanced by entity is one in which the total debits to each entity areequal to the total credits to that entity. The debits and credits for each entity within a balancedjournal must balance before you can post the journal. For example, if the total of credits to anentity in a journal is 50, the total of debits to that entity must also be 50 before you can post thejournal.
96 Entering Journals
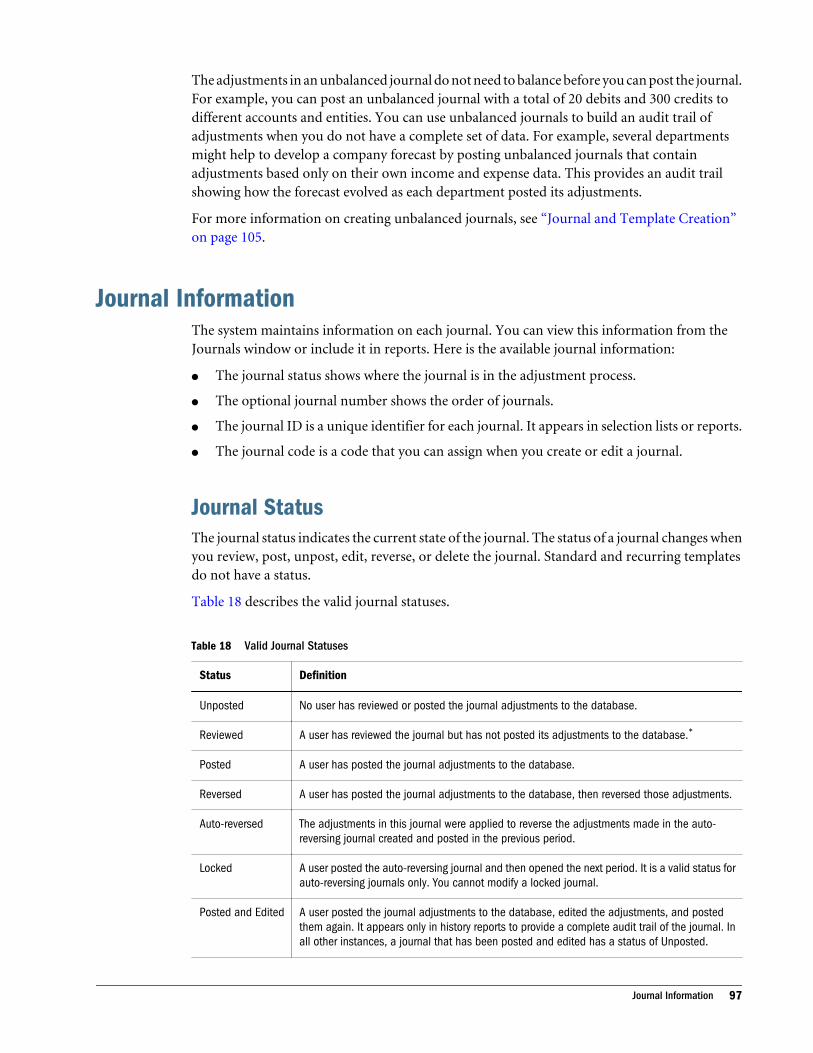
The adjustments in an unbalanced journal do not need to balance before you can post the journal.For example, you can post an unbalanced journal with a total of 20 debits and 300 credits todifferent accounts and entities. You can use unbalanced journals to build an audit trail ofadjustments when you do not have a complete set of data. For example, several departmentsmight help to develop a company forecast by posting unbalanced journals that containadjustments based only on their own income and expense data. This provides an audit trailshowing how the forecast evolved as each department posted its adjustments.
For more information on creating unbalanced journals, see “Journal and Template Creation”on page 105.
Journal InformationThe system maintains information on each journal. You can view this information from theJournals window or include it in reports. Here is the available journal information:
l The journal status shows where the journal is in the adjustment process.
l The optional journal number shows the order of journals.
l The journal ID is a unique identifier for each journal. It appears in selection lists or reports.
l The journal code is a code that you can assign when you create or edit a journal.
Journal StatusThe journal status indicates the current state of the journal. The status of a journal changes whenyou review, post, unpost, edit, reverse, or delete the journal. Standard and recurring templatesdo not have a status.
Table 18 describes the valid journal statuses.
Table 18 Valid Journal Statuses
Status Definition
Unposted No user has reviewed or posted the journal adjustments to the database.
Reviewed A user has reviewed the journal but has not posted its adjustments to the database.*
Posted A user has posted the journal adjustments to the database.
Reversed A user has posted the journal adjustments to the database, then reversed those adjustments.
Auto-reversed The adjustments in this journal were applied to reverse the adjustments made in the auto-reversing journal created and posted in the previous period.
Locked A user posted the auto-reversing journal and then opened the next period. It is a valid status forauto-reversing journals only. You cannot modify a locked journal.
Posted and Edited A user posted the journal adjustments to the database, edited the adjustments, and postedthem again. It appears only in history reports to provide a complete audit trail of the journal. Inall other instances, a journal that has been posted and edited has a status of Unposted.
Journal Information 97

Status Definition
Deleted A user deleted the journal from the application. You can review deleted journals when you runthe Journals Production report using enhanced filter capabilities.
** - This status is valid only if the Use Reviewed Status option is selected for the application. For more information, see the Hyperion EnterpriseAdministrator's Guide.
Journal NumberYou can use the journal number as an additional identifier for journals. In an application withjournal numbering, the system assigns a sequential number to each journal when you save orload it. The journal number appears above the journal ID in the Journals window.
You can use the journal number as a filter when selecting journals to include in reports. If youdelete a journal, the number for that journal remains in the application, and you can includethe deleted journal in a report. This ensures a complete audit trail of journals. For example, ifyou delete the journal with the number 235, and then run a history report on journals numberedbetween 230 and 240, the ID and description of the journal numbered 235 appear in the report.For information on including journals in reports, see “Journal Production Reports” on page117.
Note: The system does not assign numbers to journal templates. A journal number must bebetween 1 and 999999.
You specify whether to use journal numbering in the Application window. You set up journalnumbering in the Categories window. For information on selecting journal numbering for anapplication, or on setting up journal numbering, see the Hyperion Enterprise Administrator'sGuide.
Journal IDEach journal that you create has a journal ID assigned to it. The journal ID is a reference thatyou can use when selecting journals to edit, review, post, unpost, delete, or include in reports.For example, you select the journal ID to view information about a journal in a list box or in areport. The journal ID is the journal ID plus a combination of characters that provide thefollowing information about the journal:
l The first part of the ID identifies journals, standard templates, and recurring templates.
l The journal type indicates whether the journal or template is regular, auto-reversing, orparent.
l The journal status indicates the current state of the journal. For more information on journalstatuses, see “Journal Status” on page 97.
Table 19 shows the identifiers that combine to create the journal ID.
98 Entering Journals
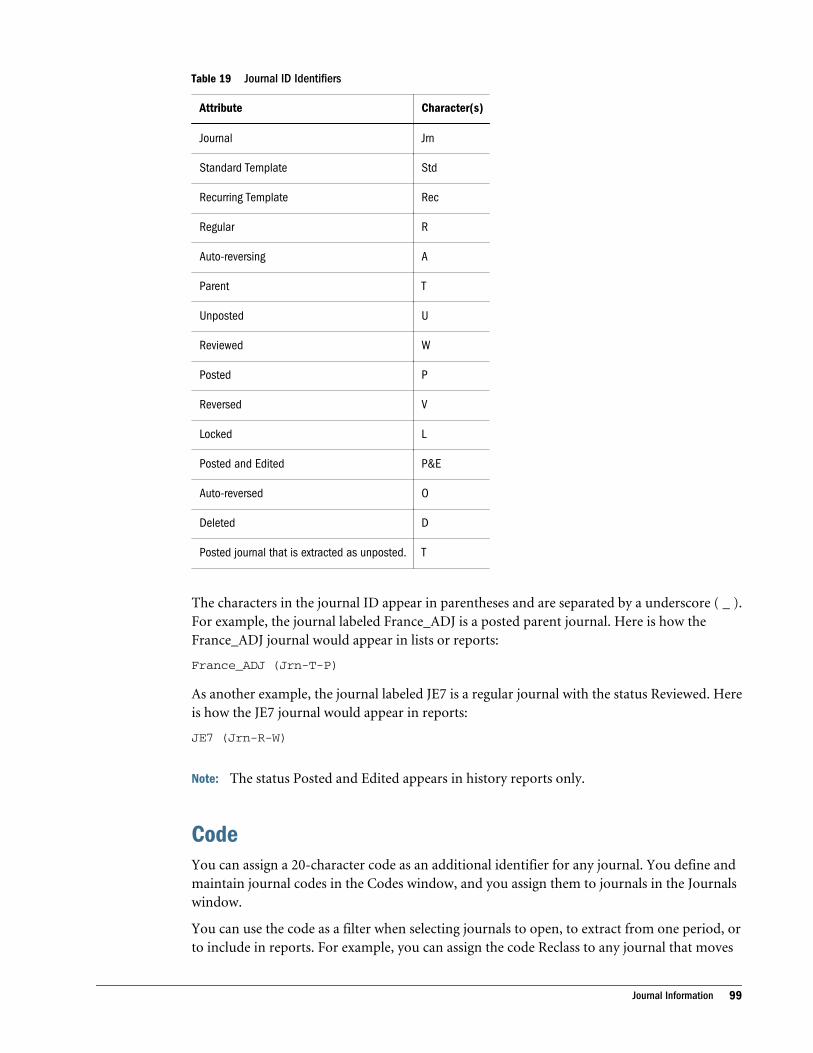
Table 19 Journal ID Identifiers
Attribute Character(s)
Journal Jrn
Standard Template Std
Recurring Template Rec
Regular R
Auto-reversing A
Parent T
Unposted U
Reviewed W
Posted P
Reversed V
Locked L
Posted and Edited P&E
Auto-reversed O
Deleted D
Posted journal that is extracted as unposted. T
The characters in the journal ID appear in parentheses and are separated by a underscore ( _ ).For example, the journal labeled France_ADJ is a posted parent journal. Here is how theFrance_ADJ journal would appear in lists or reports:
France_ADJ (Jrn-T-P)
As another example, the journal labeled JE7 is a regular journal with the status Reviewed. Hereis how the JE7 journal would appear in reports:
JE7 (Jrn-R-W)
Note: The status Posted and Edited appears in history reports only.
CodeYou can assign a 20-character code as an additional identifier for any journal. You define andmaintain journal codes in the Codes window, and you assign them to journals in the Journalswindow.
You can use the code as a filter when selecting journals to open, to extract from one period, orto include in reports. For example, you can assign the code Reclass to any journal that moves
Journal Information 99
balances from one account to another. You can then run a reclass journal report by includingonly the posted journals with the code Reclass.
For information on opening journals, see Hyperion Enterprise Getting Started. For informationon extracting journals, see “Extracting Journals” on page 114. For information on runningreports on journals, see “Journal Production Reports” on page 117. For more information oncodes, see the Hyperion Enterprise Administrator's Guide.
Viewing Journal InformationYou can quickly view detailed information about the current journal in the window. The JournalInformation message box shows the following details about the journal:
l Number
l Status
l Type
l User who created the journal
l Date and time created
l Date and time posted
ä To view journal information:
1 From the Journals window, click Info to open the message box.
2 View the information, then click Close.
Decimal Places OptionWhen you create an account in the Accounts module, you specify a default number of decimalplaces for that account. Whenever you view values for that account, the default number ofdecimal places appears. For example, if you set the Decimals attribute of an account to 0 (zero),the system shows the account's values as whole numbers. If you set the Decimals attribute of anaccount to 2, the system shows the account's values with two decimal places, such as 6.75.
In the Journals module, you can use the Decimal Places option to override the account's defaultnumber of decimal places that appear. The number of decimal places that you specify remainsin effect until you change it. A check mark appears next to the number of decimal places youselect on the menu.
Selecting Default for the Decimal Places option allows you to view the decimal settings originallyspecified for the account in the Accounts module. The Decimal Places option does not affect thedisplay of data in the Totals, Variance, and Value text boxes. However, the Decimal Places optionaffects the data display in Journal Production Reports.
Note: When you use the Decimal Places option, the system rounds the numbers that displaybut not the numbers that the system stores.
100 Entering Journals

ä To override the default number of decimal places:
1 From the Journals window, select View > Decimal Places.
2 Select the number of decimal places you want to display, or select Default to display the number of decimalplaces specified in the Accounts module.
Journal AdjustmentsJournal adjustments directly affect the values in the database. You must consider thisinformation when preparing to adjust data using journals:
l The data view that you select for the journal determines how the values in the databaseappear.
l The Missing Data as Zero setting for the category affects journal adjustments to missingdata.
Data View and JournalsWhen you create a journal, you use the Affects Future Periods setting to determine how thesystem recalculates future period data if a journal is posted to a period that has data in that futureperiod. When you create a journal, the system sets the default Affect Future Period option aseither Periodic or Category-to-Date, based on the setting in the Categories window. If you setMissing Data as Zero for Journal Entities to Category-to-Date, the default setting in Journals forAffects Future Periods is Periodic. Conversely, if you set Missing Data as Zero for Journal Entitiesto Periodic, the default setting in journals for Affects Future Periods is Category-to-Date. Formore information about data view, see the Hyperion Enterprise Administrator's Guide.
Table 20 shows the periodic and category-to-date (CTD) values for the Equipment account inthe periods January, February, and March before adjustments.
Table 20 Values before Adjustments
Data View JAN FEB MAR
Periodic 100 100 100
Category-To-Date 100 200 300
Suppose JE5 is a regular journal that contains one credit adjustment of 100 to the Equipmentaccount. If you post JE5 in February with the Affects Future Periods category-to-date optionselected, then the values for Equipment appear as shown in Table 21.
Table 21 Values for March Category-to-date
Data View JAN FEB MAR
Periodic 100 200 100
Category-To-Date 100 300 400
Journal Adjustments 101

The previous table shows that value in March is affected in the category-to-date view, but notin the periodic view. If you post JE5 in February with the Affects Future Periods Periodic optionselected, then the values for Equipment appear as shown in Table 22.
Table 22 Values for March Periodic
Data View JAN FEB MAR
Periodic 100 200 0
Category-To-Date 100 300 300
The previous table shows that value in March is affected in the periodic view, but not in thecategory-to-date view. The default for the Affects Future Periods setting is periodic for thecategory. The default for the Missing Data as Zero setting is category-to-date.
Note: Journal adjustments to balance accounts always affect future periods in the category-to-date view.
To change the Affect Future Periods settings, you must have access rights to that task.
Verify that the Affect Future Periods setting is correct if any of the following situations occur:
l If you change the Missing Data a Zero for Journal Entity setting after journals are created,any new journals created have a different default setting for Affect Future Period.
l If you load the journal entries from an ASCII file, the system loads the affect future periodsetting from the ASCII file. This setting may not be based on the default setting for thecategory.
Adjustments to Missing Data ValuesWhen you post journal adjustments to missing values in the database, the adjustments followthe Missing Data as Zero setting for the category. Table 23 shows how the category-to-date andperiodic values for the income account Interest Income appear when you select Missing Data asZero Category-to-date for the category. For more information about missing data, see theHyperion Enterprise Administrator's Guide.
Table 23 Missing Data as Zero Category-to-Date
Data View JAN FEB MAR
Periodic 100 -100 300
Category-To-Date 100 0 300
Table 24 shows how the category-to-date and periodic values for the Interest Income accountappear when you select Missing Data as Zero Periodic for the category.
102 Entering Journals

Table 24 Missing Data as Zero Periodic
Data View JAN FEB MAR
Periodic 100 0 200
Category-To-Date 100 100 300
If you post a credit adjustment of 50 to Interest Income in the February period, the adjustmentdepends on the Missing Data setting. Table 25 shows the adjustments to the same account, entity,and periods with the Missing Data as Zero Category-to-date selected for the category and withAffects Future Periods Category-to-date selected for the journal.
Table 25 Missing Data as Zero Category-To-Date, Affects Future Periods Category-To-Date
Data View JAN FEB MAR
Periodic 100 -50 300
Category-To-Date 100 50 350
In the previous table, the category-to-date value for March is affected by the adjustment.
Table 26 shows the adjustments to the same account, entity, and periods with the Missing Dataas Zero Category-to-date selected for the category and Affects Future Periods Periodic selectedfor the journal.
Table 26 Missing Data as Zero Category-To-Date, Affects Future Periods Periodic
Data View JAN FEB MAR
Periodic 100 -50 250
Category-To-Date 100 50 300
In the previous table, the periodic value for March is affected by the adjustment. Table 27 showsthe adjustments to the same account, entity, and periods with Missing Data as Zero Periodicselected for the category and Affects Future Periods Periodic selected for the journal.
Table 27 Missing Data as Zero Periodic, Affects Future Periods Periodic
Data View JAN FEB MAR
Periodic 100 50 150
Category-To-Date 100 150 300
In the previous table, the periodic value for March is affected by the adjustment. Table 28 showsthe adjustments to the same account, entity, and periods with Missing Data as Zero Periodicselected for the category and Affects Future Periods Category-to-date selected for the journal.
Journal Adjustments 103
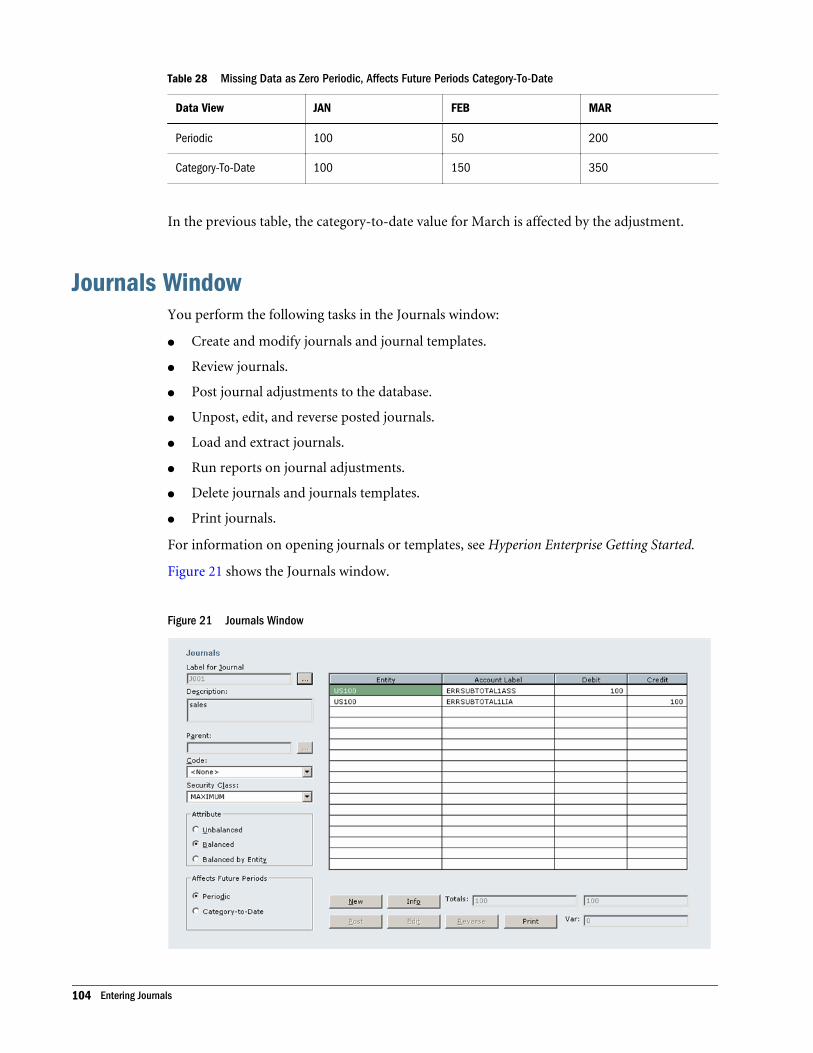
Table 28 Missing Data as Zero Periodic, Affects Future Periods Category-To-Date
Data View JAN FEB MAR
Periodic 100 50 200
Category-To-Date 100 150 350
In the previous table, the category-to-date value for March is affected by the adjustment.
Journals WindowYou perform the following tasks in the Journals window:
l Create and modify journals and journal templates.
l Review journals.
l Post journal adjustments to the database.
l Unpost, edit, and reverse posted journals.
l Load and extract journals.
l Run reports on journal adjustments.
l Delete journals and journals templates.
l Print journals.
For information on opening journals or templates, see Hyperion Enterprise Getting Started.
Figure 21 shows the Journals window.
Figure 21 Journals Window
104 Entering Journals

The Journals window shows the detail of the current journal, such as the ID, description, andattribute. The buttons at the bottom of the window allow you to quickly perform tasks such asposting or reversing the current journal.
Journal and Template CreationYou create journals to make adjustments to the database. You create journal templates to makethe journal adjustment process more efficient.
Journal and template creation involves the following tasks:
l Opening periods
l Creating journal templates
l Creating journals
l Entering adjustment information
You can delete unposted journals or journal templates that you no longer need. You can deleteunposted or reversed journals from the current category and period.
You can delete a standard or recurring journal template for all periods for the current category.For example, suppose the current category is Actual, and you have a standard journal templatefor adjustments to Actual data for several accounts for an entity. If your organization divestsitself of that entity, you can remove the template from the Actual category.
Opening PeriodsYou make journal adjustments for one category and one period. Before you can enter and postadjustments to the data for a period, the period must be open for journal entry. For example, ifyou want to post adjustments to the first quarter, you must open the first-quarter period.
You can open a period only if the previous period is open. For example, you can open the second-quarter period only if the first-quarter period is open.
When you open a period, the system uses any recurring journal templates for the current categoryto create the recurring entries for that period. The system also searches for any posted or unpostedauto-reversing journals from the previous period. If any unposted auto-reversing journals exist,you cannot open the period. If any posted auto-reversing journals exist, the system creates andposts a journal that reverses the entries in the posted auto-reversing journal.
You cannot unpost or edit an auto-reversing journal after you open the following period, andyou cannot edit or reverse the auto-reversed journal that the system creates. You have the optionof canceling and not opening the period. If you do open the period, the data is locked for allentities that are adjusted in the auto-reversed journal. For more information on auto-reversingjournals, see “Auto-reversing Journals” on page 94.
ä To open a period:
1 From the Journals window, select Task > Open Period.
Journal and Template Creation 105
2 Select Yes to open the next unopened period. If there are posted auto-reversing journals in the previousperiod, a message appears, warning that the journals will be reversed.
3 Select Yes to open the period, or select No to cancel the operation.
Creating Journal TemplatesYou can create two kinds of journal templates: standard and recurring. Standard templatescontain information for similar adjustments that you enter frequently. When you create astandard template, that template is available for all periods in the application.
Recurring templates contain information for identical adjustments that the system makesautomatically when you open a new period. After you create a recurring template, you can createjournals based on that template in your choice of the periods that are already open. For moreinformation on journal templates, see “Journal Information” on page 97. For information oncreating journals from recurring templates, see “Creating Journals Using Recurring Templates”on page 108.
ä To create a journal template:
1 From the Journals window, select File > New Journal.
2 Select Standard or Recurring, select the type of journal, then click OK.
3 Take one of the following actions:
l If you are creating a recurring template, enter complete adjustment information. Forinstructions, see “Entering Adjustment Information” on page 107.
l If you are creating a standard template, select which adjustment detail to include in astandard template. The only required information is the ID.
4 Select File > Save to save the template.
Creating JournalsEach journal that you create has a ID that is unique within the period. You can create a journallabeled CABLEADJ for each period in the Actual category, and you can create journals with thatID for different categories. You can also create journals and templates with the same ID in thesame category. However, you cannot create two journals labeled CABLEADJ in one period forany category. If you have the Autonumbering option selected, you cannot create a journal withthe same ID as one that has been previously deleted.
Each template that you create has a ID that is unique within the application. For informationon journal templates, see “Journal Information” on page 97.
Before you create a journal, check the point of view to be sure that the current category andperiod are the ones you want to adjust. You can create journals for the current category andperiod only. You cannot create auto-reversing journals if the current period is the last period ofa category, or if the next period is already open. For information on the point of view, seeHyperion Enterprise Getting Started.
106 Entering Journals

Note: You can create a journal entry with accounts for which you only have view rights.
ä To create a journal:
1 From the Journals window, select File > New Journal.
2 Select Journal and select the type of journal to create.
3 To use a standard template as a basis for a journal, select Use Standard Template and select a templatefrom the list.
4 Click OK.
5 Enter an ID and press Enter.
6 Type a description for the journal or template, and enter the adjustment information. For instructions, see“Entering Adjustment Information” on page 107.
Note: You can enter up to 254 characters in the Journals description field.
7 Select File > Save to save the journal.
Entering Adjustment InformationThe adjustment information that you enter in journals and templates includes account IDs,entity IDs, and adjustment amounts. A journal can contain adjustments to one account ormultiple accounts. Adjustments cannot be negative numbers, but you can enter a zero for a debitor credit. You can post the adjustments in any journal to one entity or multiple entities. In non-parent journals, you can enter the IDs of only those accounts that accept input, and only thoseentities that allow journal entries.
You enter adjustment information in the adjustment table in the Journals window. When youenter an account ID in the Account column of a journal, the system enters a default entity in theEntity column in the same row. If you pasted an entity in the current journals session, the systemuses the most recent entity you pasted as the default entity. If you have not pasted an entity, thesystem uses the current entity from the point of view as the default entity.
ä To enter adjustment information:
1 From the Journals window, create or open the journal or template to which you want to add adjustments.For instructions on creating journals or templates, see “Creating Journal Templates” on page 106. Forinstructions on opening journals or templates, see Hyperion Enterprise Getting Started.
2 Select the code, security class, and data view for the journal or template.
3 If you are entering adjustments for a parent journal, select the parent whose contribution values you wantto adjust.
4 Take one or more of the following actions:
l To add an adjustment on a blank row, type the ID of the account you want to adjust in theAccount column, or select Edit > Paste Account and select an account from the PasteAccount dialog box.
Journal and Template Creation 107

l To change the entity to which an adjustment will be posted, highlight the existing entity andtype the new entity ID, or select Edit > Paste Entity and select an entity from the Paste Entitydialog box.
l To enter an adjustment amount, type an amount in the Debit or Credit column in the rowfor the adjustment and press Enter.
l To add a blank row before an existing adjustment, highlight the account ID for the existingadjustment and select Edit > Insert Row.
Creating Journals Using Recurring TemplatesYou can use a recurring template to create journals in previously opened periods. You select thefirst period in which to create the journal. The system then creates journals in all periods fromthe start period to the last opened period in the category. For example, if you create a recurringtemplate in the April 03 period, you can create journals based on that template in the January,February, or March periods. The system creates but does not post the journals. You can post thejournals in the appropriate periods. For more information, see “Posting Individual Journals”on page 111.
ä To create a journal using a recurring template:
1 From the Journals window, open the recurring template from which you want to create journals. Forinstructions, see Hyperion Enterprise Getting Started.
2 Select Task > Apply Recurring Template.
3 Select the start period for the range of periods in which to create the journals.
4 Click OK.
Saving Journals as New JournalsYou can save an entire journal or template to a different label. The new journal will be in thesame category and period and will be the same type of journal.
The status of the existing journal will not be used for the newly saved journal. The status of thenewly saved journal will be Unposted.
ä To save a journal or template as a new journal:
1 From the Journals window, select File > Save As.
Note: You cannot use the Save As command for journals that are locked, manually reversed, orauto-reversed.
2 In the Label text box, enter a unique label for the new journal.
3 Take one of the following actions:
l To save and close the new journal, click OK.
l To cancel the changes, click Cancel.
108 Entering Journals

l To save and display the new journal, click Open.
Reviewing JournalsYou set a status of a journal to Reviewed to indicate that it is ready for posting. You can definesecurity access to specify that only certain users can review journals. For example, if you wantto ensure that all journals are reviewed by a manager before any user can post them, you can setsecurity so that only managers can review journals. For information on setting security forjournals, see the Hyperion Enterprise Administrator's Guide.
When you create a journal, the journal status is Unposted. In an application that does not usethe Reviewed status, you can post the unposted journal. In an application that uses the Reviewedstatus, you must set the journal's status to Reviewed before posting it. You can review journalsindividually or select several journals at once and change their status to Reviewed. Forinformation on the Use Reviewed Status option, see the Hyperion Enterprise Administrator'sGuide.
The following requirements must be met before you can review a journal:
l The status of the journal must be Unposted.
l All adjustment information must be complete.
l If the journal is a balanced journal, then the total debits must equal the total credits.
l If the journal is balanced by entity, then the total debits must equal the total credits for eachentity.
l You must have security rights to review journals.
l You must have sufficient security rights to all accounts and entities in the journal detail.
Reviewing Individual JournalsYou can change the status of an individual journal to Reviewed in the Journals window. Youreview a journal to verify that it is correct and indicate that it is ready for posting.
ä To review an individual journal:
1 Open the journal in the Journals window. For instructions, see Hyperion Enterprise Getting Started.
2 Click Review.
Reviewing Multiple JournalsYou can change the status of multiple journals simultaneously without opening each one in theJournals window. This is faster than reviewing them individually.
ä To review multiple journals:
1 From the Journals window, select Task > Review Journals.
Reviewing Journals 109

2 To filter the list of available journals, select any of the filter check boxes.
3 To further filter the list of journals, select Criteria, specify the filter criteria, then click OK.
4 Take one or more of the following actions:
l To review all of the available journals, click Add All.
l To review selected journals only, select the journals you want to review from the Unpostedjournals list box, then click Add.
l To select multiple adjacent journals, select the first journal and either drag to select theremaining journals in the range or hold down Shift and select the last journal in the range.
l To select multiple nonadjacent journals, hold down Ctrl while selecting journals.
l To deselect any journals that you specified, select the ones that you do not want to reviewfrom the Journals to Review list box, then click Remove.
5 Click OK.
Journal LockWhen you post adjustments to an entity in a period, the system locks data for that entity andperiod in the database. You cannot enter or change data in Schedules or load or change datadirectly in the database for that entity and period. This ensures a complete audit trail of datavalues.
To unlock data and allow changes from sources other than journals, you must unpost or edit alljournals that contain adjustments to that entity and period. When you edit a posted journal, thesystem unposts the journal. For more information on unposting and editing journals, see“Reversing Journals” on page 113.
You can apply a journal lock in the database without posting a journal. You can use this optionto ensure that users provide an audit trail when they modify data. For more information onlocking data without posting journals, see Chapter 2, “Loading and Extracting Data.”
Note: Accounts, subaccounts, entities, and subentities to which you have posted journaladjustments are restricted by the system. You cannot delete these elements withoutunposting or editing all journals that adjust their values.
Posting JournalsYou post a journal to apply the adjustments to the database. Until you post a journal, theadjustments exist in the journal only and do not affect the database, consolidations, or formulacalculation results.
You can edit a posted journal if you need to correct an adjustment, and you can reverse a postedjournal to back out its value. If you need to make extensive corrections in the database for aperiod after you have posted journals for that period, you can unpost the journals for that period,make the corrections, and then post the journals again. You can open and close a journal asmany times as necessary to enter or change adjustments before you post it.
110 Entering Journals
You can post a journal from the Journals window, or you can select multiple journals to post atonce. If the Calculate Formulas option is selected for the application, the system automaticallyadjusts the balances in the chart of accounts after you post a journal.
The following factors are required before you can post a journal:
l If the Use Reviewed Status option is selected for the application, then a journal must havethe status Reviewed before you can post it. For information on reviewing journals, see“Reviewing Journals” on page 109. For information on the Use Reviewed Status andCalculate Formulas options, see the Hyperion Enterprise Administrator's Guide.
l If the Use Reviewed Status option is deselected for the application, then a journal must havethe status of Unposted.
l All entry detail must be complete.
l If the journal is a balanced journal, then the total debits must equal the total credits.
l If the journal is balanced by entity, then the total debits must equal the total credits for eachentity.
l You must have security rights to post journals.
l You must have sufficient security rights to all accounts and entities in the journal detail.
Note: You cannot post a journal to an entity if a schedule or the database is open for thesame entity in another window. Hyperion Enterprise generates an error message ifyou try to post a journal to an entity that is opened by another user. This error messageis written to the error log. For more information on the error log, see HyperionEnterprise Getting Started Guide.
Posting Individual JournalsYou can post an individual journal in the Journals window. This allows you to check the journaladjustments before you post them.
ä To post an individual journal:
1 Open the journal that you want to post in the Journals window. For instructions, see Hyperion EnterpriseGetting Started.
2 Click Post.
Posting Multiple JournalsYou can post several journals simultaneously without opening them individually in the Journalswindow. For example, you might want to post several journals after reviewing the adjustmentsthat other users have entered in them. This is faster than posting the journals individually.
If the system encounters an invalid journal while posting multiple journals, the system continuesprocessing the remaining journals. An error message is written to the ERROR.LOG file detailingthe problem journal or journals.
Posting Journals 111

ä To post multiple journals:
1 From the Journals window, select Task > Post Journals.
2 To filter the list of available journals, select any of the filter check boxes.
3 To further filter the list of journals, select Criteria, specify the filter criteria, then click OK.
4 Take one or more of the following actions:
l To post all of the unposted journals, click Add All.
l To post selected journals only, select the journals you want to post from the AvailableJournals list box, then click Add.
l To select multiple adjacent journals, select the first journal and either drag to select theremaining journals in the range or hold down Shift and select the last journal in the range.
l To select multiple nonadjacent journals, hold down Ctrl while selecting journals.
l To deselect any journals that you specified, select the ones you do not want to post from theJournals to Post list box, then click Remove.
5 Click OK.
Unposting JournalsYou can unpost journals for a period if you need to make extensive changes to the database forthat period. When you unpost journals for a period, the system unlocks the data for that periodand the entities to which adjustments were posted. If the Calculate Formulas option is selectedfor the application, the system automatically adjusts the balances in the chart of accounts afteryou unpost a journal. For information on the Calculate Formulas option, see the HyperionEnterprise Administrator's Guide.
If you need to correct adjustments you have reviewed or posted, you can edit the journal. Forexample, suppose you have posted several journals with adjustments to the Israel entity and youreceive new data for Israel. You can unpost the journals, load the new data, and then post thejournals again. For information on editing a reviewed or posted journal, see “Editing Templatesor Journals” on page 113.
Note: You cannot unpost an auto-reversing journal if you have opened the next period, andyou cannot unpost an auto-reversed or reversed journal.
ä To unpost journals:
1 From the Journals window, select Task > Unpost Journals.
2 To filter the list of available journals, select any of the filter check boxes.
3 To further filter the list of Journals, select Criteria, specify the filter criteria, then click OK.
4 Take one or more of the following actions:
l To unpost all of the available journals, click Add All.
112 Entering Journals

l To unpost selected journals only, select the journals you want to review from the AvailableJournals list box, then click Add.
l To select multiple adjacent journals, select the first journal and either drag to select theremaining journals in the range or hold down Shift and select the last journal in the range.
l To select multiple nonadjacent journals, hold down Ctrl while selecting journals.
l To deselect any journals you specified, select the ones you do not want to unpost from theJournals to Unpost list box, then click Remove.
5 Click OK.
Note: If the system encounters an invalid journal while posting multiple journals, the systemwill continue processing the remaining journals. An error message will be written to theerror.log file detailing the problem journal or journals.
Hyperion Enterprise generates an error message when you try to unpost a journal to an entitythat is opened by another user. This error message is written to the error log. For moreinformation on the error log, see Hyperion Enterprise Getting Started Guide.
Editing Templates or JournalsYou can modify any template or journal. For example, you can insert blank rows in a journal toadd adjustments, or you can delete adjustments. You can also change the description of anunposted journal or template. You cannot change the ID of a journal or template.
You can modify journals even after you review or post them. The system automatically unpoststhe journal before you make the corrections. When you finish editing, you must review or postthe journal again to apply the corrected adjustments to the database. For information onreviewing journals, see “Reviewing Journals” on page 109. For information on posting journals,see “Posting Journals” on page 110.
After you edit a journal, you can review or post the journal, depending on the application settingsfor the Reviewed Status option. You cannot edit a posted auto-reversing journal after you openthe following period. You cannot edit an auto-reversed or reversed journal.
ä To edit a template or unposted journal:
1 From the Journals window, open the journal that you want to edit. For instructions, see Hyperion EnterpriseGetting Started.
2 To edit a reviewed or posted journal, click Edit.
3 Change the description and adjustment information as needed.
4 Select File > Save to save the changes to the journal.
Reversing JournalsYou can back out the values of a posted journal by reversing it. When you reverse a journal, thesystem creates and posts a copy in which the debits and credits are reversed. The adjustments in
Posting Journals 113

the reversed journal cancel the adjustments in the original journal. The original posted journaland the reversed copy both remain in the application. This provides a complete audit trail.
If the Calculate Formulas option is selected, the system adjusts the balances in the chart ofaccounts after you reverse a journal. For information on the Calculate Formulas option, see theHyperion Enterprise Administrator's Guide.
When you reverse a journal for a period, its ID becomes unavailable for that period. For example,if you reverse a journal for the first quarter, you cannot create another journal with the same IDfor the first quarter, but you can create one with that ID for the second quarter.
Note: You cannot edit or unpost reversed journals.
ä To reverse a journal:
1 Open the journal that you want to reverse in the Journals window. For instructions, see Hyperion EnterpriseGetting Started.
2 Click Reverse.
Extracting JournalsYou can extract journals and journal templates for the current category to a text file. For example,you might want to extract journals from one application and load them into another application.Here are the options that you can use to extract journals:
l You can use the Extract All Periods option to extract journals that meet specified criteriafrom all periods in the current category. For example, you can extract all unposted journals.
l You can use the Extract Single Period option to extract only journals that you select in thecurrent period.
You can also extract journals with Posted status as unposted. For example, suppose a site locationenters and posts journals in an application and needs to send the same information as unposteddata to Headquarters. You would select the Extract Posted Journals as Unposted option on theExtract Journals dialog box. The posted journals have a status of unposted. In the ASCII filethese posted journals have a status of T for transfer of shares and are treated the same as unpostedjournals when the system loads the journal ASCII file. For more information on posting journals,see “Posting Journals” on page 110.
If you are using server-based processing to extract journals, a window appears that shows theextracting progress. This window is a separate program, so you can perform other tasks inHyperion Enterprise or exit Hyperion Enterprise while the server is processing. The windowcloses when the server finishes processing or an error message appears if there is a problem.
ä To extract journals:
1 From the Journals window, take one of the following actions:
l To extract journals from all periods, select Task > Extract Journals > All Periods.
114 Entering Journals

l To extract journals from the current period, select Task > Extract Journals > SinglePeriod, then open the journal that you want to extract.
2 Type a file name to store the extract journals, or click Browse to find a file.
3 To use a character other than an exclamation point ( ! ) to separate the data items in the extracted journals,type the character in the Delimiter edit box.
4 Select whether to extract posted journals as unposted.
5 Filter the list of journals.
6 Click OK.
The Server Options dialog box is displayed.
7 Select Server if the application is server enabled and you want to execute on the server or select Local ifselectable and you want to execute on the local workstation.
Loading JournalsYou can load posted or unposted journals and journal templates for the current category fromtext files. For example, you can load standard journal templates extracted from one applicationinto another application. You can also load journals created or modified with a text editor.
When you load journals from a text file, you specify the types of journals you want to load. Forexample, if a text file contains recurring journal templates, you can load the templates, the postedjournals, or both. For information on the journal load and extract file format, see “Journal Loadand Extract File Format” on page 116.
When loading a journal from an ASCII file, you have the option to overwrite an existing unpostedjournal with the same label. This information is posted to the error log, and a warning messageappears at the end of the load informing you to view the error log. The system loads all journalsof the selected types for the current category. If you load a journal for a period that is not openfor journals, the system opens the period. If you load posted journals, the system locks the entitiesto which the adjustments in the journals have been posted, and the data and status are notaffected. This prevents double-counting of adjustment amounts.
Note: To load posted journals, you must have Modify security rights to the Load Posted Journalssecurable task.
In an application that uses automatic journal numbering, the system assigns a five-digit numberto each journal when you load it. The system follows the sequence of the load file when loadingjournals. For more information, see “Journal Number” on page 98.
A journals load file must follow a specific format. You can use the 1.8 Format option to loadjournals from a file that uses the format from Hyperion Enterprise SE. The system stores anyerrors that occur while loading journals in the error log. For information on the error log, seeHyperion Enterprise Getting Started.
Loading Journals 115
Note: When you load journals from an ASCII text file, the system does not change any data inthe database. For example, if you load a posted journal, the system assumes that the effectof the journal on the data has been written to the database. Therefore, you should loadjournals only after you perform a database load when you rebuild an application usingASCII text files.
If you are using server-based processing to load journals, a window appears that shows theloading progress. This window is a separate program, so you can perform other tasks in HyperionEnterprise or exit Hyperion Enterprise while the server is processing. The window closes whenthe server finishes processing or when an error occurs.
ä To load journals:
1 From the Journals window, select Task > Load Journals.
2 Type the file name from which to load journals, or click Browse to find the file.
3 If the file you are loading does not use an exclamation point ( ! ) as the delimiter, type the correct characterin the Delimiter text box.
4 Use the check boxes to filter the journals that you want to load.
5 Click OK.
The Server Options dialog box is displayed.
6 Select Server if the application is server enabled and you want to execute on the server or select Local ifselectable and you want to execute on the local workstation.
Journal Load and Extract File FormatWhen you load journals into Hyperion Enterprise from a text file, the text file must follow thisformat:
[JOURNAL=ID, Attribute, Template, Type, Status, Category, Period, Class, Parent, Code,Future] DESC=Description <Entity1>, <Account1>, <Debit1>, <Credit1> .. .. .. <Entityn>,<Accountn>, <Debitn>, <Creditn>
Variable Description
ID The ID of the journal.
Attribute U for unbalanced adjustments, B for balanced adjustments, or E for adjustments that are balanced byentity.
Template J for a journal, R for a recurring template, or S for a standard template.
Type R for regular adjustments, A for auto-reversing adjustments, or T for parent adjustments.
Status U for an unposted journal, P for a posted journal, W for a reviewed journal, O for an auto-reversedjournal, V for a reversed journal, T for a posted journal extracted as unposted, or L for a locked journal.
Category The ID of the category to adjust.
116 Entering Journals
Variable Description
Period The ID of the period to adjust.
Class The ID of the security class assigned to the journal or template.
Parent The parent for the journal.
Code The code for the journal.
Future C for adjustments that affect future periods in the category-to-date view, or P for adjustments that affectfuture periods in the periodic view.
Description The description for the journal or template.
Entity1 The entity in the first row of the adjustment table.
Account1 The account in the first row of the adjustment table.
Debit1 The debit in the first row of the adjustment table.
Credit1 The credit in the first row of the adjustment table.
Entityn The entity in the last row of the adjustment table.
Accountn The account in the last row of the adjustment table.
Debitn The debit in the last row of the adjustment table.
Creditn The credit in the last row of the adjustment table.
Journal Production ReportsJournal production reports provide information about the journal adjustments made to thedatabase. Here are the types of journal production reports you can run on selected journals oraccounts:
l Journals reports
l History reports
l Trial balance reports
You select the content and format of journal production reports, and then preview or print thereports. You can determine the headers, footers, IDs, columns, rows, and data of the journalproduction reports that you run.
Running Journals or History ReportsJournals reports and history reports provide summary information about selected journals.When you create a journals report or a history report, you select the journals to include in thereport and then determine the content and format of the report.
Journal Production Reports 117

A journals report provides information about the status of journals at the time you run thereport. You run a journals report to check the current status of one or more journals.
A history report provides a complete audit trail of selected journals. For example, a history reportmight show that a journal has been posted and reversed and the amounts of its adjustments.History reports provide the most detailed information about the history of a journal. If you posta journal and then edit it, the journal status is Unposted. The history report, however, indicatesthat the journal has been posted and edited by adding P&E to the journal ID.
You can include deleted journals in a journals report if the autonumbering option has beenselected during application setup. The journals report includes a list of deleted journals withoutany detail. For more information on autonumbering, see the Hyperion Enterprise Administrator'sGuide.
ä To run a journals or history report:
1 From the Journals window, take one of the following actions:
l To run a journals report, select Task > Journal Production Reports > Journals Report.
l To run a history report, select Task> Journal Production Reports > History Report.
2 Filter the list of journals.
3 To further filter the list of Journals, select Criteria, specify the filter criteria, then click OK.
4 Select one or more journals to include in the report and click OK.
5 Select the columns and attributes for the report.
6 Take one or more of the following actions:
l To print the report, click Print. For instructions on printing and previewing in HyperionEnterprise, see Hyperion Enterprise Getting Started.
l To preview the report, click Preview.
l To save the current settings as defaults, click Set Defaults.
l To return to the Journals window, click Close.
Running Trial Balance ReportsYou can run a trial balance report to verify the balance of a selected account. Trial balance reportsprovide information about any account to which journal adjustments have been made.
When you run a trial balance report, you first select the entity in the point of view and the accountto include in the trial balance and then specify the format of the report.
ä To run a trial balance report:
1 From the Journals window, select Task > Journal Production Reports > Trial Balance Report.
2 Select an account and click OK.
3 Optional: Change the width in the Width text boxes for any of the columns.
4 Take one or more of the following actions:
118 Entering Journals

l To print the report, click Print.
l To preview the report, click Preview.
l To save the current settings as defaults, click Set Defaults.
l To close the dialog box without printing, previewing, or setting defaults, click Close.
Journal Production Reports 119

120 Entering Journals

6Using Hyperion Enterprise Web
In This Chapter
What Hyperion Enterprise Web Does... . . . . . . . . . . . . . . . . . . . . . . . . . . . . . . . . . . . . . . . . . . . . . . . . . . . . . . . . . . . . . . . . . . . . . . . . . . . . . . . . . . . . . . . . 121
Selecting the Point of View... . . . . . . . . . . . . . . . . . . . . . . . . . . . . . . . . . . . . . . . . . . . . . . . . . . . . . . . . . . . . . . . . . . . . . . . . . . . . . . . . . . . . . . . . . . . . . . . . . . . 122
Loading Data ... . . . . . . . . . . . . . . . . . . . . . . . . . . . . . . . . . . . . . . . . . . . . . . . . . . . . . . . . . . . . . . . . . . . . . . . . . . . . . . . . . . . . . . . . . . . . . . . . . . . . . . . . . . . . . . . . . . 122
Viewing Consolidation Status ... . . . . . . . . . . . . . . . . . . . . . . . . . . . . . . . . . . . . . . . . . . . . . . . . . . . . . . . . . . . . . . . . . . . . . . . . . . . . . . . . . . . . . . . . . . . . . . . . 125
Consolidating Data ... . . . . . . . . . . . . . . . . . . . . . . . . . . . . . . . . . . . . . . . . . . . . . . . . . . . . . . . . . . . . . . . . . . . . . . . . . . . . . . . . . . . . . . . . . . . . . . . . . . . . . . . . . . . 126
Viewing Task Status... . . . . . . . . . . . . . . . . . . . . . . . . . . . . . . . . . . . . . . . . . . . . . . . . . . . . . . . . . . . . . . . . . . . . . . . . . . . . . . . . . . . . . . . . . . . . . . . . . . . . . . . . . . . 127
Viewing Data ... . . . . . . . . . . . . . . . . . . . . . . . . . . . . . . . . . . . . . . . . . . . . . . . . . . . . . . . . . . . . . . . . . . . . . . . . . . . . . . . . . . . . . . . . . . . . . . . . . . . . . . . . . . . . . . . . . . 128
Working with Data Drill-Back to FDM .... . . . . . . . . . . . . . . . . . . . . . . . . . . . . . . . . . . . . . . . . . . . . . . . . . . . . . . . . . . . . . . . . . . . . . . . . . . . . . . . . . . . . . . 132
Viewing the Application Error Log... . . . . . . . . . . . . . . . . . . . . . . . . . . . . . . . . . . . . . . . . . . . . . . . . . . . . . . . . . . . . . . . . . . . . . . . . . . . . . . . . . . . . . . . . . . . . 133
Customizing Web Links ... . . . . . . . . . . . . . . . . . . . . . . . . . . . . . . . . . . . . . . . . . . . . . . . . . . . . . . . . . . . . . . . . . . . . . . . . . . . . . . . . . . . . . . . . . . . . . . . . . . . . . . . 133
Entering Journals in Web ... . . . . . . . . . . . . . . . . . . . . . . . . . . . . . . . . . . . . . . . . . . . . . . . . . . . . . . . . . . . . . . . . . . . . . . . . . . . . . . . . . . . . . . . . . . . . . . . . . . . . . 134
Journals Module... . . . . . . . . . . . . . . . . . . . . . . . . . . . . . . . . . . . . . . . . . . . . . . . . . . . . . . . . . . . . . . . . . . . . . . . . . . . . . . . . . . . . . . . . . . . . . . . . . . . . . . . . . . . . . . . 134
Journals and Templates ... . . . . . . . . . . . . . . . . . . . . . . . . . . . . . . . . . . . . . . . . . . . . . . . . . . . . . . . . . . . . . . . . . . . . . . . . . . . . . . . . . . . . . . . . . . . . . . . . . . . . . . 134
Journals and Template Creation ... . . . . . . . . . . . . . . . . . . . . . . . . . . . . . . . . . . . . . . . . . . . . . . . . . . . . . . . . . . . . . . . . . . . . . . . . . . . . . . . . . . . . . . . . . . . . . 135
Reviewing Journals.. . . . . . . . . . . . . . . . . . . . . . . . . . . . . . . . . . . . . . . . . . . . . . . . . . . . . . . . . . . . . . . . . . . . . . . . . . . . . . . . . . . . . . . . . . . . . . . . . . . . . . . . . . . . . . 137
Posting Journals.. . . . . . . . . . . . . . . . . . . . . . . . . . . . . . . . . . . . . . . . . . . . . . . . . . . . . . . . . . . . . . . . . . . . . . . . . . . . . . . . . . . . . . . . . . . . . . . . . . . . . . . . . . . . . . . . . 138
Loading Journals .. . . . . . . . . . . . . . . . . . . . . . . . . . . . . . . . . . . . . . . . . . . . . . . . . . . . . . . . . . . . . . . . . . . . . . . . . . . . . . . . . . . . . . . . . . . . . . . . . . . . . . . . . . . . . . . . 139
User Preferences ... . . . . . . . . . . . . . . . . . . . . . . . . . . . . . . . . . . . . . . . . . . . . . . . . . . . . . . . . . . . . . . . . . . . . . . . . . . . . . . . . . . . . . . . . . . . . . . . . . . . . . . . . . . . . . . 140
Messaging Client . . . . . . . . . . . . . . . . . . . . . . . . . . . . . . . . . . . . . . . . . . . . . . . . . . . . . . . . . . . . . . . . . . . . . . . . . . . . . . . . . . . . . . . . . . . . . . . . . . . . . . . . . . . . . . . . 140
What Hyperion Enterprise Web DoesHyperion Enterprise Web enables you to perform Web-based application setup, view data,journals, templates, consolidation status, event log, active Web users, and task status, load data,journals, open periods, and perform Web-based consolidations over the Internet or an intranet.Using Hyperion Enterprise Web you can perform consolidations and data loads from any remotelocation at which you have an Internet or intranet connection. Your security rights to HyperionEnterprise Web functionality is set by your system administrator in Hyperion Enterprise. Formore information, see your system administrator.
What Hyperion Enterprise Web Does 121
Selecting the Point of ViewThe point of view (POV) is a set of elements that you define to specify which data HyperionEnterprise Web accesses when you start an application. The POV bar is made up of links and islocated below the navigation menu bar. Each link represents an element in the POV: category,reporting period, organization, entity, and parent. You can also view consolidation detail if thisoption was selected when the application was created. Items in POV elements sort alphabetically.Therefore, numbers sort numerically by digit. For example, periods may sort 1, 2, 10, 11, 12, 13,20, 21 and so on. For more information, see Hyperion Enterprise Getting Started.
Note: When you clear or modify a parent element in the POV, the children elements areautomatically adjusted. For example, if you set category to None, the reporting period isset to None, as well.
ä To select the POV:
1 From the Hyperion Enterprise Web Desktop, click a POV element link.
The Select Element page is displayed.
2 Click a POV element in the scrollable list, then click Select Dimension.
Tip: You can search for a POV element by entering at least the first characters of its name in theFind text box and then click Select Dimension. The list scrolls to the first POV element thatmatches what you entered.
Use to view more records, select Next and Previous button .
3 To select an additional POV element, click the link for that element near the top of the Select Element page,then repeat step 2.
4 Click Set POV to set the POV to the selected elements.
Loading DataYou load data to transfer Hyperion Enterprise data between different locations, applications, orsoftware packages. For example, you can load data that has been extracted from other sites intoan application at headquarters, or you can load data into Hyperion Enterprise from a generalledger.
You can load data into a Hyperion Enterprise database from an ASCII file. Many externalsystems, such as general ledgers and spreadsheets, can create ASCII files that you can load intoHyperion Enterprise. If necessary, you can edit an ASCII file with a text editor before loading it.
ä To load a data file:
1 From the Hyperion Enterprise Web Desktop, in the global selection frame, select Data.
The tasks you can perform in the Data module are displayed in the local selection frame.
122 Using Hyperion Enterprise Web

2 In the local selection frame, click Load Data.
The Load Data page is displayed. This page includes the Load Data box, as shown in Figure 22.
Figure 22 Load Data Box
3 In the File Properties text boxes, enter the names of the files that you want to upload, or click Browse tonavigate to the file names.
4 Optional: To load the specified data files without uploading them to the server, clear the Upload check box.If the Upload check box is selected, the files are uploaded to the Web.
Note: If you are uploading the data, make sure that the data files are fully accessible to the WebServer.
5 Select one of the following Mode options:
l Merge - Clears existing values only from the accounts specified in the data load file and thenreplaces them with the values in the file. Unlike the Replace option, the Merge option clearsonly the values from the accounts specified in the load file.
Loading Data 123

l Replace - Clears the existing values from all accounts for the periods specified in the dataload file and then loads the values from the data load file. If an account is not specified inthe load file, its values for the specified periods are cleared during the load.
l Accumulate - Adds the values in a load file to the values that are already in the application.
6 From the Format drop-down list, select a format for the data file, or select Default to use the system default.
7 Optional: To use a different account or entity conversion table than the one that is specified in the formatyou selected, select the Override Format Conversion Tables check box in the Conversion Tables area.
8 Optional: In the Conversion Tables area, select an account conversion table from the Account drop-downlist, an entity conversion table from the Entity drop-down list, or both.
Note: You can select an account or entity conversion table only if you selected the OverrideFormat Conversion Tables check box.
9 In the Data Options area, select one or more of the check boxes to specify how you want Hyperion EnterpriseWeb to process the data that you are loading:
l Calculate Formulas - Calculates formulas during the data load, so you do not have tomanually calculate formulas after the load.
l Report Calc Accounts - Tracks attempts to load data into calculated accounts, whichnormally derive their values from other accounts.
l Zero No Data - Converts missing data in load files to zero values in Hyperion Enterpriseaccounts. Hyperion Enterprise Web converts no-data values to zero values only if you loada no-data value into an account that has data in a previous period.
10 Click Submit.
If you selected the Upload check box, the Upload Progress window is displayed.
Caution! Do not perform any other action in the Web browser that is performing the uploaduntil the upload is complete, or the file upload will be cancelled. You can performonly the following actions from the Uploading page while an upload is in progress:Close the Upload Progress window and display it again by clicking DisplayProgress, or cancel the upload by clicking Cancel Upload.
When the data load is complete, regardless of whether you uploaded it to the server, the TaskSubmission Status page is displayed. This page uses one of the following codes to indicate whetherthe data load was successful:
l 0 - The data load was successful.
l 2 - The data load was unsuccessful.
l 3 - The data load was unsuccessful.
If a code of 2 or 3 is displayed, check the Application error log. For instructions, see “Viewingthe Application Error Log” on page 133.
124 Using Hyperion Enterprise Web

Viewing Consolidation StatusThe Consolidation Status page displays a status for each entity and period in the current category.The consolidation status indicates which entities and periods have been impacted by data ormethod changes and need to be consolidated. It also indicates which entities contain no data forspecific periods.
Tip: You can easily navigate within the Consolidation Status page. You can click on an entityname in the Current Path field to navigate within your current path structure or you canclick on the down arrow located in the left column of your Consolidation Status page todrill down on a specified entity. If there are more than fifty entities displayed, you can PageUp and Page Down.
ä To view the consolidation status:
1 From the Hyperion Enterprise Web Desktop, select the POV for which you want to view consolidation status.
2 In the global selection frame, select Consolidation.
The tasks you can perform in the Consolidation module are displayed in the local selectionframe.
3 Select View Consolidation Status.
The Consolidation Status frame is displayed.
4 Click Refresh Grid.
Note: Other users may be changing or consolidating data, so use the Refresh Grid option at anytime to retrieve the most current data.
Finding an Entity or AccountThe Find option enables you to search for an entity within your current organization or for anaccount within your current grid type. The Find option is available only on the ConsolidationStatus and View Data pages.
ä To find an entity:
1 From the View Consolidation Status frame, click Find.
2 In the Find text box, enter the full or partial path name separated by pipes ( | ), or enter an entity name.
3 Select Within Current Path to search only within the current path.
4 Click Find Next to start your search.
ä To find an account:
1 From the View Data frame, click Find.
2 In the Find text box, enter an account name and then click Find.
Viewing Consolidation Status 125

The grid scrolls to the specified account
Consolidating DataConsolidation is the process of gathering data from dependent entities and rolling it up into aparent entity. During consolidation, the account values for dependent accounts roll up to theparent accounts. Financial data of each parent consists of the values consolidated from itsdependents. If you change the data of a dependent, the data of the parent changes when youconsolidate.
When you perform consolidations, you can consolidate data for the current category for allentities in an organization or for a specific branch of the organization. Consolidating a specificbranch, which is also called a partial consolidation, is useful if you need to report on an entityother than the top entity in an organization. For example, suppose you need to run a report onthe Europe entity, which is a dependent entity in the Corp organization. You can consolidatedata for Europe only, then run the report on Europe's consolidated data. For more information,see Chapter 4, “Consolidating Data.”
ä To consolidate data:
1 From the Hyperion Enterprise Web Desktop, in the global selection frame, select Consolidation.
The tasks you can perform in the Consolidation module are displayed in the local selectionframe.
2 In the local selection frame, select Consolidate.
The Consolidate Data frame is displayed.
3 In the Consolidate Data frame, take one of the following actions:
l To consolidate only entities with IMPACTED status, select Impacted.
l To consolidate all selected entities that have data, select All with Data.
l To consolidate all selected entities and periods regardless of whether they have data, selectAll.
4 Select a Start Period, an End Period, and a Parent.
5 Click Submit to start consolidating.
Note: When consolidation begins, the process is off-loaded to the predefined Task Server.
The Task Submission Status page is displayed.
6 Verify that your consolidation task has been added to the queue successfully.
7 Click Return to the Desktop.
126 Using Hyperion Enterprise Web

Viewing Task StatusThe Task Status page displays the tasks submitted to the task server for Data Loads andConsolidations. The tasks can be filtered by task state, task date, and task time. You can use thetask status to see if a data load or consolidation is complete.
ä To view task status:
1 From the Hyperion Enterprise Web Desktop, in the global selection frame, select Logging.
The tasks you can perform in the Logging module are displayed in the local selection frame.
2 In the local selection frame, select View Task Status.
The Task Status frame is displayed. It includes a Display Tasks box (shown in Figure 23) and thecolumn headings for the Task List. You use the Display Tasks box to specify which tasks toinclude in the Task List.
Figure 23 Display Tasks Box
3 From the Task State drop-down list, select a task state.
4 Optional: In the Start Date text box, enter a date in MM/DD/YYYY format, or click the calendar icon to selecta date. If you do not specify a start date, all tasks before the specified end date are listed.
5 From the Start Time drop-down list, select the starting time for the task list. If you do not specify a start time,all tasks before the specified end time are listed.
6 In the End Date text box, enter a date in the MM/DD/YYYY format, or click the calendar icon and select adate. If you do not specify an end date, all tasks after the specified start date are listed.
7 From the End Time drop-down list, select the ending time for the task list. If you do not specify an endingtime, all tasks after the specified start time are listed.
8 Click Submit.
The Task List displays the statuses of tasks that meet the specified criteria.
9 Optional: Take one or more of the following actions:
l To stop a task while it is in progress, click Cancel and then click Cancel Tasks.
l To check whether any errors occurred during a task, click the icon in the Log column forthat task.
Viewing Task Status 127

Viewing DataYou can view data in a grid of any of the following types:
l Chart of Accounts
l Dynamic Account List
l Fixed Account List
l Fixed Account List with Dynamic Subaccounts
l Schedule
When you first access View Data, the system lists all account groups in the chart of accounts andindicates whether the accounts in each group contain data.
You can click a plus sign ( + ) to the left of a group name in the Account column to view anaccount in that group. If more than 50 groups or accounts are listed, you can use the Page Upand Page Down buttons to view additional group or account names. You can also click Find andenter the name of a group or an account to find it in the list that is displayed.
ä To view data:
1 From the Hyperion Enterprise Web Desktop, in the global selection frame, select Data.
The tasks you can perform in the Data module are displayed in the local selection frame.
2 In the local selection frame, select View Data.
If the Warning - Security page is displayed, as shown in Figure 24. You can install an application'sdigital signature the Warning - Security applet from this page.
Figure 24 Warning - Security Page
3 Do the following to complete the installation:
128 Using Hyperion Enterprise Web
l Click Run to install an application's digital signature the Warning - Security applet.
l If you do not want to install and run an application's digital signature the Warning - Securityapplet, click Cancel to end the installation process
Note: If you do not install an application's digital signature the Warning - Security applet,you cannot manually enter or edit data directly in the View Data grid.
When you select an option for installing and running an application's digital signature, theView Data page is displayed, showing the entire chart of accounts.
l From the License Agreement window dialog box, then select the Typical setup option andthen click Accept.
l From the Java Runtime SE Environment window dialog box, then select Next to continuethe installation process.
l Click Finish to exit from the wizard.
4 Optional: Change the data view by clicking the current selection.
The data view options are Periodic and CTD (Category to Date). Clicking CTD changes the viewto Periodic, and clicking Periodic changes the view to CTD.
5 Optional: To view an account list or schedule instead of the entire chart of accounts, from the Grid Type drop-down list select an account list type or select Schedule, then click Select.
The Select Element Web Page Dialog box is displayed.
6 If you selected an account list type or schedule in the preceding step, in the Select Element Web Page Dialogbox, click the account list or schedule name and then click Select Dimension.
Tip: You can search for an account list or schedule in the list by entering all or part of the accountlist or schedule name in the Find text box and then clicking Go. The list scrolls to the firstaccount list or schedule name that matches what you entered.
7 Click Refresh Grid.
The data grid is updated to show data for the selected account list or schedule. For informationon searching for a specific account on the View Data page, see “Finding an Entity or Account”on page 125.
Note: Other users may be changing or consolidating data, so use the refresh grid option at anytime to get the most current data.
Setting Schedule OptionsThe following options determine the appearance of a schedule and how it calculates data.
l Showing account labels or descriptions or account labels and descriptions in the accountcolumn
l Showing data for all periods or the current period
Viewing Data 129

l Showing or hiding formulas
l Suppressing rows for accounts with no data
If several View Data pages are open at once, the options that you select affect the active page.
ä To set schedule options:
1 From the View Data page, open a schedule. See “Viewing Data” on page 128.
2 From the View Data page, select (Schedule Options).
3 Specify whether to display the account label or description or account label and description, periods shown,and formulas.
4 Specify whether to suppress rows for accounts with no data.
5 Click OK.
Entering and Editing DataIf the Hyperion Solutions applet is installed, you can enter or edit data directly in the View Datagrid.
ä To enter data:
1 Click within the cell where you want to enter or edit data.
2 Enter the new data in the highlighted cell.
3 Click Save To File to save your data to a specified file and directory.
Caution! If you do not save your data to a file, your changes are lost and cannot be uploadedto Hyperion Enterprise.
4 Select one or more of the following options to indicate how you want to save your file:
l Extract all Input Accounts - Extracts all input accounts that are displayed on the page. Ifyou do not select this option, only updated cells are extracted.
l Extract Locked Periods - Extracts locked periods.
l Append to Existing File - Appends the data to an existing data file.
l Upload Data File - Uploads the file to the server and loads the data into Hyperion Enterprise.
If you select the Upload Data File check box, the Mode and Format drop-down list boxesare displayed.
Note: If you do not select the Upload Data File option, a data file is created, but you mustlater upload the file manually using the Data Load feature.
5 If you selected the Upload Data File check box, select an upload mode from the Mode drop-down list anda format for the uploaded data from the Format drop-down list.
6 Click Save File.
130 Using Hyperion Enterprise Web
Locking and Unlocking DataYou can lock and unlock periods to restrict or permit data changes. You cannot change data orconsolidate in a locked period. You can lock periods to freeze values, and you can unlock themlater if you want to allow changes to the values. For example, once all data for the January periodis entered, you can lock the period until you are ready to run reports to ensure that the data isnot changed accidentally. For more information, see Chapter 2, “Loading and Extracting Data.”
ä To lock or unlock data:
1 From the View Data frame, click Lock/Unlock Data.
The Lock/Unlock Data page is displayed.
2 Take one of the following actions:
l If the period is not locked, click Lock.
l If the period is locked, click Unlock.
3 Select an entity list to lock or unlock.
4 Specify a period for which you want to lock or unlock data.
5 Click Submit.
The Task Submission Status page is displayed, indicating whether or not your task was addedto the queue successfully. For more information on viewing the status on the task, see “ViewingTask Status” on page 127.
How Data is Displayed in Hyperion Enterprise WebYou can view or enter data in Hyperion Enterprise Web using a scaled number format. Scalingoptions determine how the system displays and interprets data. They save you time by enablingyou to enter data to the precision required. For example, if you set the scale for the U.S. Regionentity to thousands (3), and you enter a value of 6 in the Sales account for the U.S. Region, thesystem displays the number as 6 but stores the number as 6,000. If you do not scale the Salesaccount, and you enter a value of 6, the system displays and stores the number as 6.
Note: Before you can use scaling, the scale option must be checked for an account. Scaling is seton the category or on the entity. If a category does not have a scale set, then the systemuses the scale of the entity selected in the Point of View.
If you specify number formatting in Hyperion Enterprise, the thousands separator is used as thethousands, millions and billions separator in Hyperion Enterprise Web. If you use the SystemSettings, the number formatting is determined by the client operating system settings.
The Decimals detail displays the number of decimal places for an account value in the View Datapage. For example, if you set the Decimals attribute of an account to 0 (zero), the system displaysvalues for that account as whole numbers. If you set the Decimals attribute of an account to 2,the system displays values for that account with two decimal places, such as 8.25.
Viewing Data 131
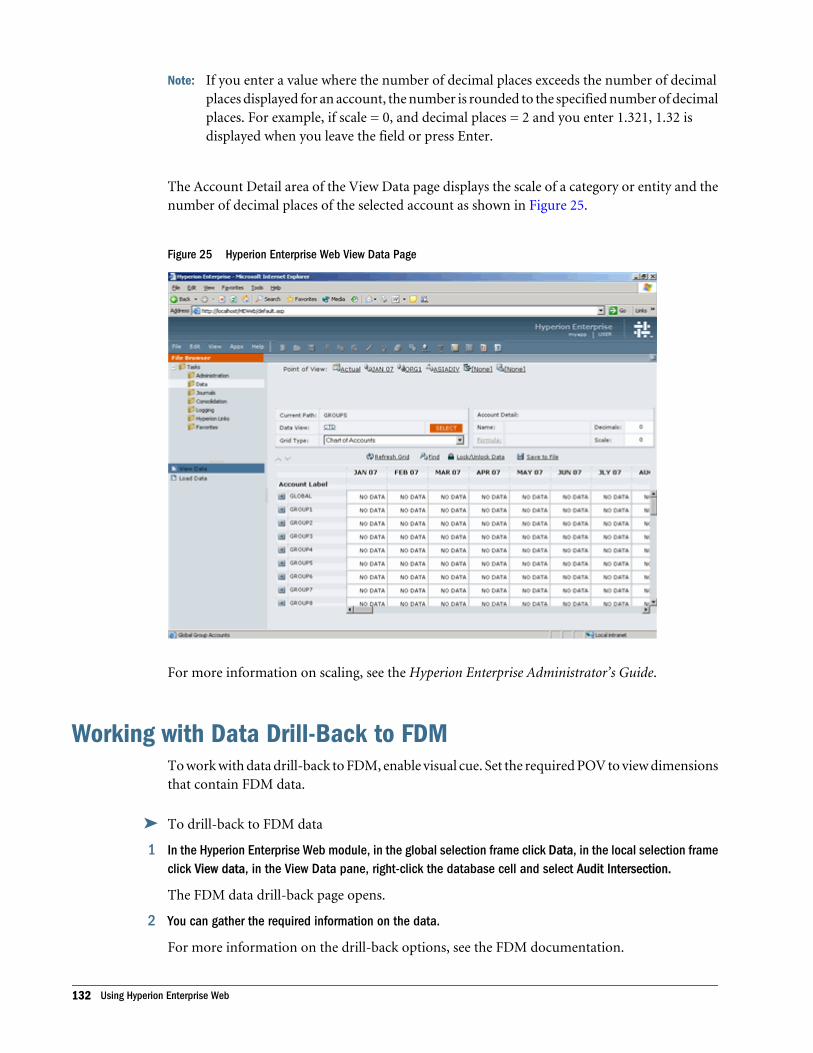
Note: If you enter a value where the number of decimal places exceeds the number of decimalplaces displayed for an account, the number is rounded to the specified number of decimalplaces. For example, if scale = 0, and decimal places = 2 and you enter 1.321, 1.32 isdisplayed when you leave the field or press Enter.
The Account Detail area of the View Data page displays the scale of a category or entity and thenumber of decimal places of the selected account as shown in Figure 25.
Figure 25 Hyperion Enterprise Web View Data Page
For more information on scaling, see the Hyperion Enterprise Administrator’s Guide.
Working with Data Drill-Back to FDMTo work with data drill-back to FDM, enable visual cue. Set the required POV to view dimensionsthat contain FDM data.
ä To drill-back to FDM data
1 In the Hyperion Enterprise Web module, in the global selection frame click Data, in the local selection frameclick View data, in the View Data pane, right-click the database cell and select Audit Intersection.
The FDM data drill-back page opens.
2 You can gather the required information on the data.
For more information on the drill-back options, see the FDM documentation.
132 Using Hyperion Enterprise Web

Viewing the Application Error LogThe Application Log is the error log for the Hyperion Enterprise application. Many differenttypes of messages can be written to the Application Log: data load errors, consolidation errors,Hyperion Enterprise system errors, and entity locking errors. You can open the Application Logand view any error or message you encounter while using Hyperion Enterprise Web.
To display the application log, from the Hyperion Enterprise Web Desktop, click ViewApplication Log
Customizing Web LinksUsing the CustomLinks.js file you can create links to four Web pages of your choice from theTools module. The CustomLinks.js file contains the following information:
var Customlink1_Text = “Oracle”;var CustomLink1_URL = “http://www.oracle.com”var Customlink2_Text = “”;var CustomLink2_URL = “”;var Customlink3_Text = “”;var CustomLink3_URL = “”;var Customlink4_Text = “”;var CustomLink4_URL = “”;
CustomLink1_Text is the text that is displayed for the first link and CustomLink1_URL is thepage that displays when the first link is selected by a user. CustomLink2_Text andCutomLink2_URL are settings for the second link displayed, and so on, up to four links.
Note: The link to the Oracle home page is the default setting for CustomLink1. If you want, youcan edit the link text and change the link settings for CustomLink1. For each link, modifyonly text between the quotation marks.
If either the Text or URL for a link is blank, no text between the quotation marks, the link is notdisplayed on the Hyperion Enterprise Web Desktop.
Once you create your links, you can edit a link or the text displayed for a link at any time. Alllinks are displayed on the Hyperion Enterprise Web Desktop in the Tools module.
ä To customize Web links:
1 Open the CustomLinks.js file, which is located where your Web Server is installed.
2 Enter text between the quotation marks (“ “) in the CustomLink2_Text line of the CustomLinks.js file.
3 Enter the URL of the Web page between the quotation marks (“ “) in the CustomLink2_URL line of theCustomLnks.js file.
4 Repeat steps 2 and 3 for each link that you want to create.
5 Save the CustomLinks.js file.
Viewing the Application Error Log 133

Entering Journals in WebA journal is a set of adjustments to account balances for one category and period. You use journalsto record changes in account values and maintain an audit trail of those changes. You can usejournal templates for common adjustments that you make on a regular basis, to create journalsautomatically for each period, or as a basis for creating new journals.
You create, edit, and post journals in the Journals module. When you post a journal, the systemrecalculates the account balances so that the database reflects the adjustments. You can refer toposted journals as records of adjustments, or run reports to check the trail of changes to accountvalues.
For more information on Journals, see Chapter 5, “Entering Journals”.
Journals ModuleWith Journals module in Hyperion Enterprise Web you can view the journals and templatescreated in the application, create and modify journals and journal templates, review, post,unpost, and load journals, and open periods.
To work on journals:
1. From the Hyperion Enterprise Web page, in the global selection frame select Tasks > Journals
Links to Journals module are displayed in the local selection frame.
Viewing Journals and Templates.You can view journals and templates created in the Hyperion Enterprise application on the Web.
ä To view journals and templates:
1 In the global selection frame, select Journals.
The tasks you can perform in the Journals module are displayed in the local selection frame.
2 In the local selection frame, select Journals and Templates.
The Journals and Templates frame is displayed.
Journals and TemplatesYou can perform the following tasks in the Journals window:
l Create and modify journals and journals templates.
l Review Journals
l Post Journals
l Load Journals
134 Using Hyperion Enterprise Web

Journals and Template CreationJournals and template creation involves the following tasks:
l Opening periods
l Creating journals templates
l Creating journals
l Entering adjustment information
Opening PeriodsYou make journal adjustments for one category and one period. Before you can enter and postadjustments to the data for a period, the period must be open for journal entry.
For more information on opening periods, see “Opening Periods” on page 105.
ä To open a period:
1 In the global selection frame, select Journals.
The tasks you can perform in the Journals module are displayed in the local selection frame.
2 In the local selection frame, select Open Periods.
The Open Periods frame is displayed.
3 Select the next unopened period. If there are posted auto-reversing journals in the previous period, a messageappears, warning that the journals will be reversed.
4 Click Refresh to refresh content area.
Creating Journal TemplatesYou can create two kinds of journal templates: standard and recurring. Standard templatescontain information for similar adjustments that you enter frequently. When you create astandard template, that template is available for all periods in the application.
For more information, see “Creating Journal Templates” on page 106.
ä To create a journal template:
1 In the global selection frame, select Journals.
The tasks you can perform in the Journals module are displayed in the local selection frame.
2 In the local selection frame, select Journals and Templates.
The Journals and Templates frame is displayed.
3 In the Journals and Templates frame, select New.
The New Journals/Templates frame is displayed.
Journals and Template Creation 135
4 In the New Journals/Templates frame, select Standard or Recurring, select the type of journal, then clickOK.
5 Take one of the following actions:
l If you are creating a recurring template, enter complete adjustment information. Forinstructions, see “Entering Adjustment Information” on page 137.
l If you are creating a standard template, select which adjustment detail to include in astandard template. The only required information is the ID.
6 Click Save.
Creating JournalsEach journal that you create has a ID that is unique within the period. You can create a journallabeled CABLEADJ for each period in the Actual category, and you can create journals with thatID for different categories. You can also create journals and templates with the same ID in thesame category. However, you cannot create two journals labeled CABLEADJ in one period forany category. If you have the Autonumbering option selected, you cannot create a journal withthe same ID as one that has been previously deleted.
For more information on creating journals, see “Creating Journals” on page 106.
ä To create a journal:
1 In the global selection frame, select Journals.
The tasks you can perform in the Journals module are displayed in the local selection frame.
2 In the local selection frame, select Journals and Templates.
The Journals and Templates frame is displayed.
3 In the Journals and Templates frame, select New.
The New Journals/Templates frame is displayed.
4 Select Journal and select the type of journal to create.
5 To use a standard template as a basis for a journal, select Use Standard Template and select a templatefrom the list.
6 Click OK.
7 Enter an ID and press Enter.
8 Type a description for the journal or template, and enter the adjustment information. For instructions, see“Entering Adjustment Information” on page 137.
Note: You can enter up to 254 characters in the journals description field.
9 Click Save.
136 Using Hyperion Enterprise Web
Entering Adjustment InformationThe adjustment information that you enter in journals and templates includes account IDs,entity IDs, and adjustment amounts.
For more information on entering adjustment information see, “Entering AdjustmentInformation” on page 107.
ä To enter adjustment information:
1 From the Journals and Templates frame, create or open the journal or template to which you want to addadjustments. For instructions on creating journals or templates, see “Creating Journal Templates” on page114. For instructions on opening journals or templates, see Hyperion Enterprise Getting Started.
2 Select the code, security class, and data view for the journal or template.
3 If you are entering adjustments for a parent journal, select the parent whose contribution values you wantto adjust.
4 Take one or more of the following actions:
l To add an adjustment on a blank row, type the ID of the account you want to adjust in theAccount column, or within the Web data grid double-click in the Account column and selectan account from the Select Element - Web Page Dialog box.
l To change the entity to which an adjustment will be posted, highlight the existing entity andtype the new entity ID, or within the Web data grid double-click in the Entity column andselect an entity from the Select Element - Web Page Dialog box.
l To enter an adjustment amount, type an amount in the Debit or Credit column in the rowfor the adjustment.
Note: If an entity or an account label is too long to view then hover the mouse over the labelto view it in it’s entirety.
5 Click Save.
Reviewing JournalsYou set a status of a journal to Reviewed to indicate that it is ready for posting. You can definesecurity access to specify that only certain users can review journals.
For more information, see “Reviewing Journals” on page 109.
Reviewing Individual JournalsYou can change the status of an individual journal to Reviewed in the Journals and Templatesframe. You review a journal to verify that it is correct and indicate that it is ready for posting.
ä To review an individual journal:
1 From the Journal and Template frame, select the journal you want to review, then click Review.
Reviewing Journals 137

Note: If Review is not selectable, in your application.ini file set the APP_JOUR_REVIEW valueto 1.
The Task Submission Status frame is displayed.
2 To return to the Journals and Templates frame, Click Return to Journals List Page.
Note: You cannot review a journal template.
Reviewing Multiple journalsYou can change the status of multiple journals simultaneously without opening each one in theJournals and Templates frame. This is faster than reviewing them individually.
ä To review multiple journals:
1 In the Journals and Template frame, select the journals you want to review, then click Review.
Note: If Review is not selectable, in your application.ini file set the APP_JOUR_REVIEW valueto 1.
The Task Submission Status frame is displayed.
2 To return to the Journals and Templates frame, Click Return to Journals List Page.
Posting JournalsYou post a journal to apply the adjustments to the database. Until you post a journal, theadjustments exist in the journal only and do not affect the database, consolidations, or formulacalculation results.
For more information on posting journals, see “Posting Journals” on page 110.
Posting individual journalsYou can post an individual journal in the Journals and Templates frame. This allows you tocheck the journal adjustments before you post them.
ä To post an individual journal:
1 In the Journals and Templates frame, select the journal you want to post, then click Post.
The Task Submission Status frame is displayed.
2 To return to the Journals and Templates frame, Click Return to Journals List Page.
138 Using Hyperion Enterprise Web

Note: You cannot post a journal template.
Posting Multiple journalsYou can post several journals simultaneously without opening them individually in the Journalswindow.
For more information on posting multiple journals, see “Posting Multiple Journals” on page111.
ä To post multiple journals:
1 In the Journals and Templates frame, select the journals you want to post, then click Post.
The Task Submission Status frame is displayed.
2 To return to the Journals and Templates frame, Click Return to Journals List Page.
Note: You cannot post journal templates.
Unposting journalsYou can unpost journals for a period if you need to make extensive changes to the database forthat period.
For more information on unposting journals, see “Unposting Journals” on page 112.
ä To unpost journals:
1 In the Journals and Templates frame, select the journals you want to unpost, then select Unpost.
The Task Submission Status frame is displayed.
2 To return to the Journals and Templates frame, Click Return to Journals List Page.
Note: You cannot unpost a journal template.
Loading JournalsYou can load posted or unposted journals and journal templates for the current category fromtext files. For example, you can load standard journal templates extracted from one applicationinto another application. You can also load journals created or modified with a text editor.
For more information on loading journals, see “Loading Journals” on page 115.
ä To load journals:
1 With links to journal tasks displayed in the local selection frame, select Load Journals.
The Load Journals frame is displayed.
Loading Journals 139

2 In the Load Journals frame, type the file name from which to load journals, or click Browse to find the file.
3 If the file you are loading does not use an exclamation point (!) as the delimiter, select the correct characterin the Default Delimeter Character drop-down list.
4 Use the check boxes to filter the journals that you want to load.
5 Click Submit.
User PreferencesSelect Enable Visual Cue preferences for demarcating the FDM data in the Hyperion Enterpriseapplications.
Messaging ClientYou can choose to enable messaging option to Hyperion Enterprise Web users.
140 Using Hyperion Enterprise Web
7Hyperion Allocations
In This Chapter
What Hyperion Allocations Does ... . . . . . . . . . . . . . . . . . . . . . . . . . . . . . . . . . . . . . . . . . . . . . . . . . . . . . . . . . . . . . . . . . . . . . . . . . . . . . . . . . . . . . . . . . . . . 141
Allocation Types and Methods... . . . . . . . . . . . . . . . . . . . . . . . . . . . . . . . . . . . . . . . . . . . . . . . . . . . . . . . . . . . . . . . . . . . . . . . . . . . . . . . . . . . . . . . . . . . . . . . 142
Hyperion Allocations Desktop... . . . . . . . . . . . . . . . . . . . . . . . . . . . . . . . . . . . . . . . . . . . . . . . . . . . . . . . . . . . . . . . . . . . . . . . . . . . . . . . . . . . . . . . . . . . . . . . . 144
Starting Hyperion Allocations ... . . . . . . . . . . . . . . . . . . . . . . . . . . . . . . . . . . . . . . . . . . . . . . . . . . . . . . . . . . . . . . . . . . . . . . . . . . . . . . . . . . . . . . . . . . . . . . . . 145
Setting Hyperion Allocations Preferences... . . . . . . . . . . . . . . . . . . . . . . . . . . . . . . . . . . . . . . . . . . . . . . . . . . . . . . . . . . . . . . . . . . . . . . . . . . . . . . . . . . . 146
Selecting Desktop Color .. . . . . . . . . . . . . . . . . . . . . . . . . . . . . . . . . . . . . . . . . . . . . . . . . . . . . . . . . . . . . . . . . . . . . . . . . . . . . . . . . . . . . . . . . . . . . . . . . . . . . . . . 146
Changing the Hyperion Enterprise Application ... . . . . . . . . . . . . . . . . . . . . . . . . . . . . . . . . . . . . . . . . . . . . . . . . . . . . . . . . . . . . . . . . . . . . . . . . . . . . . 147
Allocations Setup ... . . . . . . . . . . . . . . . . . . . . . . . . . . . . . . . . . . . . . . . . . . . . . . . . . . . . . . . . . . . . . . . . . . . . . . . . . . . . . . . . . . . . . . . . . . . . . . . . . . . . . . . . . . . . . 147
Allocation Sets Setup... . . . . . . . . . . . . . . . . . . . . . . . . . . . . . . . . . . . . . . . . . . . . . . . . . . . . . . . . . . . . . . . . . . . . . . . . . . . . . . . . . . . . . . . . . . . . . . . . . . . . . . . . . 150
Running Allocation Sets .. . . . . . . . . . . . . . . . . . . . . . . . . . . . . . . . . . . . . . . . . . . . . . . . . . . . . . . . . . . . . . . . . . . . . . . . . . . . . . . . . . . . . . . . . . . . . . . . . . . . . . . . 151
Posting Allocation Sets .. . . . . . . . . . . . . . . . . . . . . . . . . . . . . . . . . . . . . . . . . . . . . . . . . . . . . . . . . . . . . . . . . . . . . . . . . . . . . . . . . . . . . . . . . . . . . . . . . . . . . . . . . 152
Deleting Run Information... . . . . . . . . . . . . . . . . . . . . . . . . . . . . . . . . . . . . . . . . . . . . . . . . . . . . . . . . . . . . . . . . . . . . . . . . . . . . . . . . . . . . . . . . . . . . . . . . . . . . . 152
Extracting Allocation or Set Information ... . . . . . . . . . . . . . . . . . . . . . . . . . . . . . . . . . . . . . . . . . . . . . . . . . . . . . . . . . . . . . . . . . . . . . . . . . . . . . . . . . . . . 153
Loading Allocation or Set Information ... . . . . . . . . . . . . . . . . . . . . . . . . . . . . . . . . . . . . . . . . . . . . . . . . . . . . . . . . . . . . . . . . . . . . . . . . . . . . . . . . . . . . . . 153
Printing or Previewing Allocation Reports .. . . . . . . . . . . . . . . . . . . . . . . . . . . . . . . . . . . . . . . . . . . . . . . . . . . . . . . . . . . . . . . . . . . . . . . . . . . . . . . . . . . . . 154
This chapter presents information and procedures that you need for performing allocationsacross entities, accounts, and time periods.
What Hyperion Allocations DoesHyperion Allocations enables you to take Hyperion Enterprise data and perform allocationsacross entities, accounts, or time periods. You can run one or multiple allocations at a time bybuilding allocation sets and placing the allocations in the set.
Hyperion Allocations contains four modules: Allocations, Sets, Allocate, and Reports. You usethese modules to perform the following tasks in the order presented in Table 29.
Table 29 Allocation Modules
Module Tasks
Allocations Define allocations by selecting their types and methods.
Sets Assign allocations to a set so they can be run and posted.
What Hyperion Allocations Does 141
Module Tasks
Allocate Run and post the allocation sets.
Reports View and print information about allocations and allocation sets.
When you define an allocation, you specify the category, period, name, and account within theallocation or use variables to specify these elements. If you use variables to define the point ofview for an allocation, the system uses the point of view defined for the allocation set that containsthe allocation.
For example, if you use a variable for the allocation's category, Hyperion Allocations uses thecategory specified in the set's point of view when the allocation is run. You can combine specificand variable points of view to specify an allocation's performance based on the set in which yourun and post it.
You can customize Hyperion Allocations as follows:
l Select a screen font for text in the windows and dialog boxes.
l Select the language in which on-screen information is displayed.
l Select a color for the Hyperion Allocations desktop.
When you finish working with the allocations for one application, you can switch to a differentapplication without exiting Hyperion Allocations.
Note: You can only post 260 periods in an Allocations.
Allocation Types and MethodsHyperion Allocations provides three allocation types - Name, Account, and Time - and fourallocation methods - Percent, Value, Factor, and Total. When you define an allocation, you selectone allocation type and one allocation method. Your selections determine the options in theformula the system uses to define the allocation. The allocation types specify where the data isdistributed. The allocation methods specify how the data is distributed.
Regardless of the type and method you select, all values referenced in the allocation must be inthe Hyperion Enterprise database before you can run the allocation. If you allocate less than 100percent, the unallocated balance only appears when you preview the allocation.
Name Allocation TypeName allocations allow you to distribute a value from one entity, typically a parent entity, toother entities in an entity list. The list you use in the allocations is the same list you use in theHyperion Enterprise application. You can select either a specific list or use the name expansionvariable @NAM. If you use the @NAM variable, the allocation uses the name point of viewdefined for the allocation set.
142 Hyperion Allocations

Note: A name list in Hyperion Allocations is equivalent to an entity list in Hyperion Enterprise.
Account Allocation TypeAccount allocations allow you to distribute a value from a major account to its subaccounts.The subaccount tables are the same tables used in the current Hyperion Enterprise application.You can select either a specific subaccount, or use the account expansion variables @ACC and@SUB. If you use a variable, the allocation uses the account point of view defined for theallocation set.
Time Allocation TypeTime allocations allow you to distribute a value from a single source time period to many timeperiods within a range. The source contains one time period. The percentage, value, weight, anddestination contain a range based on start and end periods.
Percent Method The percent method distributes a value from the source entity, account, or period into eachdestination entity, account, or period using specific percentage amounts. The source value ismultiplied by the result of a percentage value stored in specific entities, subaccounts, or periods,and then divided by 100. In the formula, the numerator is the percentage value and thedenominator is 100. If you want the value to be fully allocated, the combined destinationpercentage values for the allocation must equal 100.
You must specify all values for this method. Here is the formula for the percent method:
Destination = (Source x Percent) / 100
Value MethodThe value method distributes the value in the source entity, account, or period by multiplyingthe source value by a ratio. The ratio is the value from a specific destination divided by a valuerepresenting all the destinations, or a weight.
You must specify all values for this method. Here is the formula for the value method:
Destination = (Source x Value) / Weight
Factor MethodThe factor method distributes the value in the source entity, account, or period by multiplyingit by a specific number for each destination. If you want the value to be fully allocated, thecombined destination values must equal 1.00.
You must specify all values for this method. Here is the formula for the factor method:
Allocation Types and Methods 143

Destination = Source x Factor
Total MethodThe total method distributes the entire value in the source entity, account, or period bymultiplying the source value by a ratio. The ratio is the value from a specific destination dividedby a value representing all the destinations, which Hyperion Allocations calculates.
You can select the total method for the following types of allocations:
l Name allocation
l Account allocation
l Time allocation
In a name allocation, the system totals across all entities in the specified entity list, avoiding theneed to consolidate in advance. In an account allocation, the system totals across all subaccountsin the specified subaccount table, avoiding the need to calculate formulas in advance. In a timeallocation, the system totals across the time period range specified, which prevents the need tostore special total values in advance.
This is the formula for the total method:
Destination = (Source x Value) / Total(Value)
Hyperion Allocations DesktopThe Hyperion Allocations Desktop is the starting point for all operations within the system. Itappears after you enter your user ID and password in the Login dialog box and start the system.You return to the Desktop when you close a module window.
Figure 26 shows the Hyperion Allocations Desktop.
144 Hyperion Allocations

Figure 26 Hyperion Allocations Desktop
The Hyperion Allocations Desktop includes the following elements:
l Title Bar - Identifies the product Allocations and software version number.
l Menu Bar - Presents the following menus that you select to perform tasks:
m File - Enables you to access the modules, view an activity log of Hyperion Enterpriseapplications, and exit Hyperion Allocations.
m Options - Enables you to switch applications, set preferences, select the desktop color,and extract or load allocation and set information.
m Help - Enables you to view database tables for allocations or sets, view systeminformation, and view version number, free memory, user ID, and application.
l Icons - Represent the following Allocation functions: View Log, Change Application,Change Language/Font, About Allocations.
l Status Bar - Displays the name of the current Hyperion Enterprise application and thecurrent process, if applicable. When the status bar displays the message Ready, the systemis ready to process data.
Starting Hyperion AllocationsThe first time you access a Hyperion Enterprise application using Hyperion Allocations, thesystem creates a directory called ALLOC under the application directory and creates the fileALLOCATE.MDB in the ALLOC directory. For example, if you access an application in the C:
Starting Hyperion Allocations 145
\HYPENT\WWCONSOL directory, the system creates the C:\HYPENT\WWCONSOL\ALLOCdirectory and creates a ALLOCATE.MDB file in that directory. The ALLOCATE.MDB file storesthe allocation sets defined for the application.
Note: Hyperion Allocations uses Hyperion Enterprise security to determine the access rightsyou have in an application.
ä To start Hyperion Allocations:
1 Exit Hyperion Enterprise.
2 From the Start menu, select Programs > Hyperion Solutions > Hyperion Enterprise > Allocations.
3 Select the Hyperion Enterprise application from the Application Name list box.
4 Enter your user ID and password.
5 Click OK.
Setting Hyperion Allocations PreferencesYou can select the language in which Hyperion Allocations runs and the screen font for thedialog boxes and windows. These preferences affect all the applications that your workstationaccesses in Hyperion Allocations.
ä To set Hyperion Allocations preferences:
1 From the Allocations desktop, select Options > Language or select Change Language/Font.
2 Make the appropriate changes:
l To change the language in which Hyperion Allocations is running, select a language fromthe Language list box
l Optional: Select B for bold or I for italic.
l To change the screen font, select a font from the Font drop-down list.
3 Click OK.
Selecting Desktop ColorYou can select the color for your Hyperion Allocations Desktop.
ä To select the Hyperion Allocations Desktop color:
1 From the Hyperion Allocations Desktop, select Options > Color.
2 Select a color from the Color palette.
3 Click OK.
146 Hyperion Allocations

Changing the Hyperion Enterprise ApplicationYou can change the Hyperion Enterprise application for which you are creating allocationswithout exiting Hyperion Allocations. Hyperion Allocations uses Hyperion Enterprise securityto determine the access rights you have for an application. Therefore, to access an applicationfrom within Allocations you use the same user ID and password that you use to access a HyperionEnterprise application.
ä To change the Hyperion Enterprise application:
1 From the Allocations Desktop, select Options > Application or select Change Application.
2 Select the Hyperion Enterprise application from the Application Name list box.
3 Type your user ID and password.
4 Click OK.
Allocations SetupYou set up allocations by defining the allocation and building the allocation formula. You canthen preview the results of the allocation. When you no longer need the allocation, you candelete it.
Defining AllocationsHere is the process to define an allocation:
l Select an allocation type and method.
l Assign a name and description to the allocation.
l Specify information for the selected allocation method.
l Build the allocation formula by specifying the point of view elements, including source anda destination category, and the allocation’s name, period, and account.
Note: When you specify point of view elements, you can select the category, period, name,and account or use the point of view element defined for the allocation set.
If you change the allocation method or type, the system clears all information from the allocationformula. For more information on allocation set point of view, see “Defining Allocation Sets”on page 150.
Table 30 shows the point of view icons.
Table 30 Allocation Formula Point of View Icons
Selection Description
Specify a category.
Changing the Hyperion Enterprise Application 147
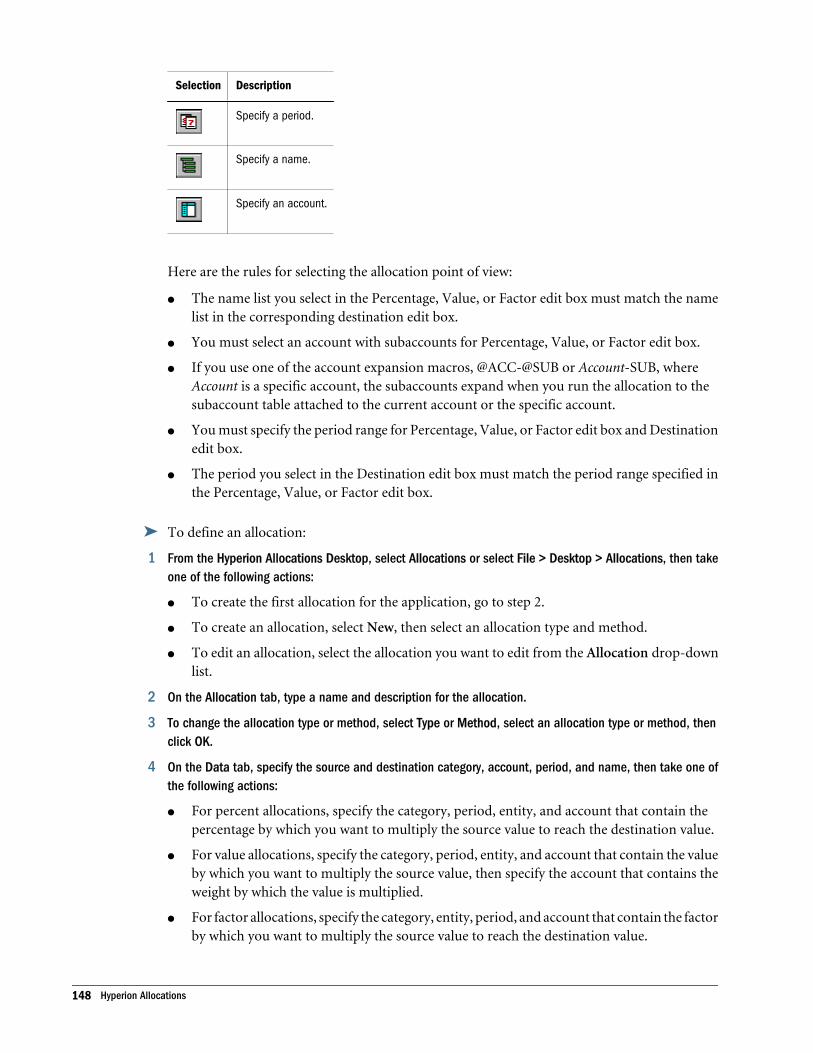
Selection Description
Specify a period.
Specify a name.
Specify an account.
Here are the rules for selecting the allocation point of view:
l The name list you select in the Percentage, Value, or Factor edit box must match the namelist in the corresponding destination edit box.
l You must select an account with subaccounts for Percentage, Value, or Factor edit box.
l If you use one of the account expansion macros, @ACC-@SUB or Account-SUB, whereAccount is a specific account, the subaccounts expand when you run the allocation to thesubaccount table attached to the current account or the specific account.
l You must specify the period range for Percentage, Value, or Factor edit box and Destinationedit box.
l The period you select in the Destination edit box must match the period range specified inthe Percentage, Value, or Factor edit box.
ä To define an allocation:
1 From the Hyperion Allocations Desktop, select Allocations or select File > Desktop > Allocations, then takeone of the following actions:
l To create the first allocation for the application, go to step 2.
l To create an allocation, select New, then select an allocation type and method.
l To edit an allocation, select the allocation you want to edit from the Allocation drop-downlist.
2 On the Allocation tab, type a name and description for the allocation.
3 To change the allocation type or method, select Type or Method, select an allocation type or method, thenclick OK.
4 On the Data tab, specify the source and destination category, account, period, and name, then take one ofthe following actions:
l For percent allocations, specify the category, period, entity, and account that contain thepercentage by which you want to multiply the source value to reach the destination value.
l For value allocations, specify the category, period, entity, and account that contain the valueby which you want to multiply the source value, then specify the account that contains theweight by which the value is multiplied.
l For factor allocations, specify the category, entity, period, and account that contain the factorby which you want to multiply the source value to reach the destination value.
148 Hyperion Allocations

l For total allocations, specify the category, account, period, and entity that contain the valueby which you want to multiply the source value, which the system divides by the total forall destinations.
5 To verify that the allocation does not contain errors, click Check.
6 Click Save, then click Close.
Previewing Allocation ResultsTo view the results of an allocation, you place the allocation in a set, then run and post theallocation. If necessary, you can then change the data in the Hyperion Enterprise application.As an alternative, you can preview the results of an allocation. Previewing allows you to makechanges before you run and post the allocation.
Note: If you allocate less than 100 percent, the unallocated balance appears only when youpreview the allocation.
ä To preview allocation results:
1 From the Hyperion Allocations Desktop, select Allocations or select File > Desktop > Allocations.
2 From the Allocation drop-down list box, select the allocation that you want to preview.
3 Click Preview.
4 If the allocation has one or more variables for the point of view elements, follow the prompts to select thepoint of view elements.
5 Verify the allocation results in the Preview window, then select Close twice.
Deleting AllocationsIf you no longer need an allocation, you can delete it.
Note: You can delete an allocation that is in a allocation set. When the allocation is deleted, itwill no longer be included in the allocation set.
ä To delete an allocation:
1 From the Hyperion Allocations Desktop, select Allocations or select File > Desktop > Allocations.
2 From the Allocation drop-down list box, select the allocation that you want to delete.
3 Click Delete.
4 Click OK, then click Close.
Allocations Setup 149
Allocation Sets SetupBefore you can run and post an allocation, you must place the allocation in an allocation set. Anallocation set is one or more allocations that you run and post at the same time.
When you set up an allocation set, you define it, add allocations to it, and run and post it. If youno longer need an allocation set, you can delete the set without deleting the allocations withinit.
Defining Allocation SetsWhen you define an allocation set, you give it an ID and description, decide whether formulasare calculated when you run the set, define its point of view, and select the allocations in the setthat you want to run and post at the same time. An allocation set cannot contain more than 1000allocations.
The point of view for the set provides the organization, category, entity or entity list, account orsubaccount table, or period for the allocation. These point of view selections are used only whenyou define an allocation with one or more point of view variables such as @CAT.
Here are the rules for selecting the allocation set point of view:
l You must first select the organization, and then the name. If you change the organizationto one that does not contain the selected entity, you must select a entity in the currentorganization.
l When you specify an entity list for the point of view and select the Name List check box, thesystem uses all the entities in this entity list to replace the @NAM variables in the set.
l Specify either an account or an account list in the allocation set point of view, not both.
l You must first select the category, and then the start and end periods.
l The end period must be either the same as or later than the start period.
l When you run the allocation set, the allocations are run in the order that they appear in theSelected Allocations list box in the Allocation Sets dialog box.
Note: It is important to define the point of view for the allocation set correctly to ensuredata is sent to the proper location in Hyperion Enterprise.
ä To define an allocation set:
1 From the Hyperion Allocations Desktop, select Sets or select File > Desktop > Edit Sets.
2 Create or edit an allocation set:
l To create the first allocation set for the application, go to step 3.
l To create an allocation set, select New.
l To edit an existing allocation set, select the allocation set you want to edit from the Set drop-down list.
3 On the Set tab, type an ID and description for the allocation set.
150 Hyperion Allocations

4 To have Hyperion Enterprise calculate formulas after posting the values in the allocation set, select ExecuteLogic.
5 On the Point of View tab, specify the point of view elements for any point of view variable.
6 Select the data view for the allocation set: View Year-To-Date or View Periodic.
7 On the Allocations tab, select the allocations to add to or remove from the set:
l To add allocations to the set, highlight one or more allocations in the AvailableAllocations list box and click Add.
l To remove allocations from the set, highlight an allocation in the Selected Allocations listbox and click Remove.
8 To change an allocation’s definition, select the allocation in the Available Allocations or SelectedAllocations list box, then click Edit.
9 To change the order of the allocations in the set, select the allocation that you want to move in the SelectedAllocations list box and drag it to its new position.
10 Click Save, then click Close.
Deleting Allocation SetsIf you no longer need an allocation set, you can delete it. If you delete an allocation set, theallocations in the set are not affected.
ä To delete an allocation set:
1 From the Hyperion Allocations Desktop, select Sets or select File > Desktop > Edit Sets.
2 From the Set drop-down list, select the allocation set that you want to delete.
3 Click Delete.
4 Click OK, then click Close.
Running Allocation SetsYou can run one or more allocation sets at a time. After you run an allocation set, you post it.When you run an allocation set, Hyperion Allocations creates a run ID, which identifies the datayou post to the Hyperion Enterprise application data. Each time you run the allocation set, thesystem overwrites the data held under this run ID. When you post the allocation run ID, datain the Hyperion Enterprise application is affected. For more information on post allocation sets,see “Posting Allocation Sets” on page 152.
Note: You can delete temporary allocation files created after running allocation sets.
ä To run an allocation set:
1 From the Hyperion Allocations Desktop, select Allocate or select File > Desktop > Allocate.
Running Allocation Sets 151

2 Select the allocation set or sets to run in the Sets list box, then click Run.
3 If the system displays a status of Allocation Error or Set Error, perform one of these steps:
l Click View Log to view the error, then click OK to close the error log.
l Click Clear Log to clear and exit the error log. Resolve any errors, then run the allocationagain.
4 Repeat steps 2 and 3 until you have run and verified all sets.
5 Click Close.
Posting Allocation SetsYou post allocation sets to apply the changes in the allocation set. To post an allocation set, youmust first run it. For more information on run allocation sets, see “Running Allocation Sets” onpage 151.
ä To post an allocation set:
1 From the Hyperion Allocations Desktop, select Allocate or select File > Desktop > Allocate.
2 Select the allocation set or sets to post in the Sets list box.
3 Select one or more run IDs to post in the Run ID list box, then click Post.
4 If the system displays a status of Post Error, perform one of these steps:
l Click View Log to view the error, then click OK to close the error log.
l Click Clear Log to clear and exit the error log. Resolve any errors, then post the allocationagain.
5 Repeat steps 2 through 4 until you have posted and verified all sets.
6 Select Close.
Deleting Run InformationAfter you post an allocation set to the Hyperion Enterprise application, you can delete the runID for the allocation set. If you decide not to post the allocation, you can delete the run ID foran allocation set before you post it.
ä To delete the run information:
1 From the Allocations desktop, select Allocate or select File > Desktop > Allocate.
2 In the Sets list box, select the allocation set or sets for which you want to delete run IDs.
3 Select one or multiple run IDs to delete in the Run ID list box, then click Delete.
The system changes the status of the run ID to Deleted.
4 To remove a run ID from the system, select it in the Run ID list box, then click Delete.
5 Repeat steps 2 through 4 until you have deleted all run IDs.
152 Hyperion Allocations
6 Click Close.
Extracting Allocation or Set InformationYou can extract or copy information defining allocations. and information defining sets to anASCII file.
You can use this process to edit your allocation and set information in a text file, then load theinformation back into the allocations database. For more information on loading, see “LoadingAllocation or Set Information” on page 153.
Note: When you extract set information, the corresponding allocation information is not copiedto the ASCII file.
ä To extract allocation or set information:
1 Take one of the following actions from the Hyperion Allocations Desktop:
l To extract allocations, select Options > Extract > Allocations.
l To extract allocation sets, select Options > Extract > Sets.
2 Select the allocations or sets to extract:
3 Click Extract to open the Enter Name of Extraction File dialog box.
4 Accept the default directory, which is the Outbox of the open application, or select a different directory.
5 In the File name edit box, type the name and name extension of the ASCII file to which you are copying theallocation or set information.
6 Click Save.
7 To extract additional allocation or set information, repeat steps 2 through 5.
8 When you finish extracting information, click Close.
Loading Allocation or Set InformationYou can load information defining allocations or information defining sets from an ASCII textfile to your allocations database.
You might do this if you want to edit your allocation and set information in a text file, then loadit back into the allocations database. For more information on extracting, see “ExtractingAllocation or Set Information” on page 153.
ä To load allocation or set information:
1 Take one of the following actions from the Hyperion Allocations Desktop:
l To load allocations, select Options > Load> Allocations.
l To load allocation set, select Options > Load > Sets.
Extracting Allocation or Set Information 153
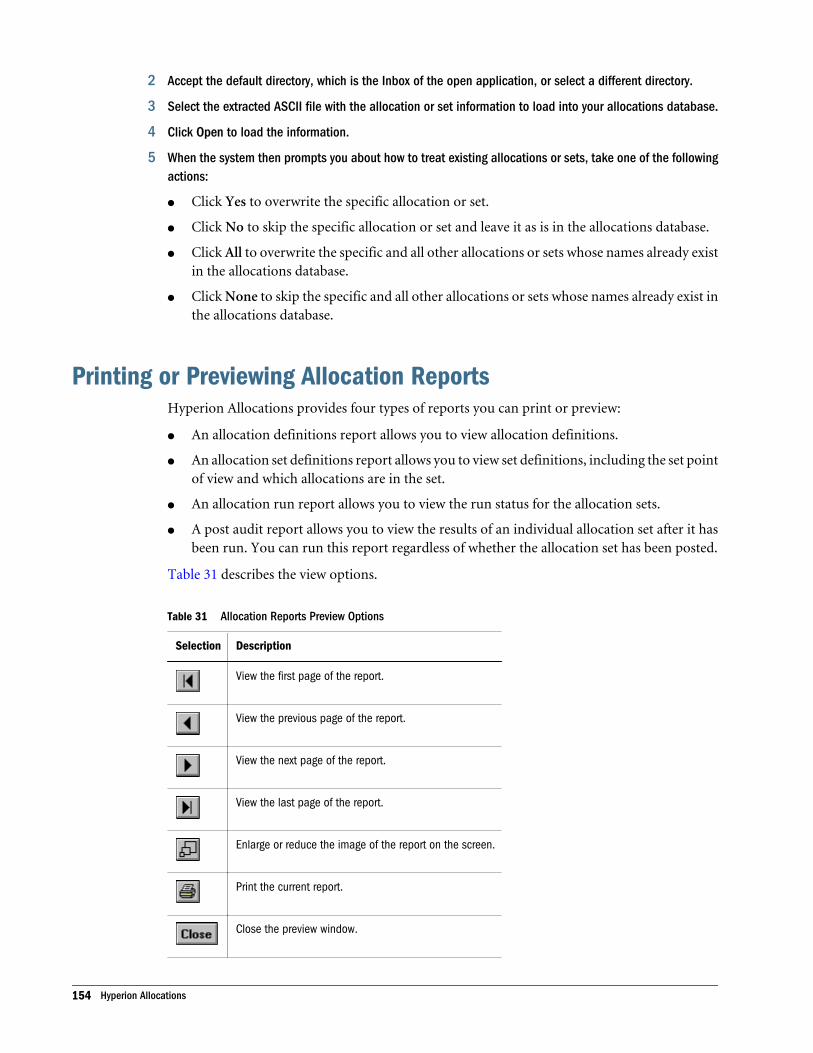
2 Accept the default directory, which is the Inbox of the open application, or select a different directory.
3 Select the extracted ASCII file with the allocation or set information to load into your allocations database.
4 Click Open to load the information.
5 When the system then prompts you about how to treat existing allocations or sets, take one of the followingactions:
l Click Yes to overwrite the specific allocation or set.
l Click No to skip the specific allocation or set and leave it as is in the allocations database.
l Click All to overwrite the specific and all other allocations or sets whose names already existin the allocations database.
l Click None to skip the specific and all other allocations or sets whose names already exist inthe allocations database.
Printing or Previewing Allocation ReportsHyperion Allocations provides four types of reports you can print or preview:
l An allocation definitions report allows you to view allocation definitions.
l An allocation set definitions report allows you to view set definitions, including the set pointof view and which allocations are in the set.
l An allocation run report allows you to view the run status for the allocation sets.
l A post audit report allows you to view the results of an individual allocation set after it hasbeen run. You can run this report regardless of whether the allocation set has been posted.
Table 31 describes the view options.
Table 31 Allocation Reports Preview Options
Selection Description
View the first page of the report.
View the previous page of the report.
View the next page of the report.
View the last page of the report.
Enlarge or reduce the image of the report on the screen.
Print the current report.
Close the preview window.
154 Hyperion Allocations
ä To print or preview an allocation report:
1 From the Hyperion Allocations Desktop, click Reports or select File > Desktop > Reports.
2 To print or preview an allocation definition report, on the Allocation Definition tab, select one or moreallocations, or click Select All to print or preview all the allocations.
3 To print or preview an allocations set definition report, on the Set Definition tab, select one or more allocationsets, or click Select All to print or preview all the allocation sets.
4 To print or preview an allocation run report, on the Run tab:
a. select one or more allocation sets, or click Select All to print or preview all the allocationsets.
b. Select the sort option: Run ID, Status, or Set Name.
5 To print or preview a post audit report, on the Post Audit tab:
a. Select the allocation set from the Select Sets list box.
b. Select one or more run IDs to print or preview from the Select Run ID list box.
6 Preview or print the report:
l To preview the information, click Preview. When you are finished previewing theinformation, select Print to print the information, or Close to close the preview window.
l To print the information, select Print.
7 Click Close.
Printing or Previewing Allocation Reports 155

156 Hyperion Allocations
8LedgerLink
In This Chapter
LedgerLink Overview ... . . . . . . . . . . . . . . . . . . . . . . . . . . . . . . . . . . . . . . . . . . . . . . . . . . . . . . . . . . . . . . . . . . . . . . . . . . . . . . . . . . . . . . . . . . . . . . . . . . . . . . . . . . 157
LedgerLink Desktop ... . . . . . . . . . . . . . . . . . . . . . . . . . . . . . . . . . . . . . . . . . . . . . . . . . . . . . . . . . . . . . . . . . . . . . . . . . . . . . . . . . . . . . . . . . . . . . . . . . . . . . . . . . . . 158
LedgerLink Sample Files .. . . . . . . . . . . . . . . . . . . . . . . . . . . . . . . . . . . . . . . . . . . . . . . . . . . . . . . . . . . . . . . . . . . . . . . . . . . . . . . . . . . . . . . . . . . . . . . . . . . . . . . 159
Defining Templates ... . . . . . . . . . . . . . . . . . . . . . . . . . . . . . . . . . . . . . . . . . . . . . . . . . . . . . . . . . . . . . . . . . . . . . . . . . . . . . . . . . . . . . . . . . . . . . . . . . . . . . . . . . . . 160
Translate Data... . . . . . . . . . . . . . . . . . . . . . . . . . . . . . . . . . . . . . . . . . . . . . . . . . . . . . . . . . . . . . . . . . . . . . . . . . . . . . . . . . . . . . . . . . . . . . . . . . . . . . . . . . . . . . . . . . 162
Translation Builder Window ... . . . . . . . . . . . . . . . . . . . . . . . . . . . . . . . . . . . . . . . . . . . . . . . . . . . . . . . . . . . . . . . . . . . . . . . . . . . . . . . . . . . . . . . . . . . . . . . . . . 163
Results View Window ... . . . . . . . . . . . . . . . . . . . . . . . . . . . . . . . . . . . . . . . . . . . . . . . . . . . . . . . . . . . . . . . . . . . . . . . . . . . . . . . . . . . . . . . . . . . . . . . . . . . . . . . . . 169
Setting Translate and Load Options ... . . . . . . . . . . . . . . . . . . . . . . . . . . . . . . . . . . . . . . . . . . . . . . . . . . . . . . . . . . . . . . . . . . . . . . . . . . . . . . . . . . . . . . . . . 171
Loading Data into Hyperion Enterprise... . . . . . . . . . . . . . . . . . . . . . . . . . . . . . . . . . . . . . . . . . . . . . . . . . . . . . . . . . . . . . . . . . . . . . . . . . . . . . . . . . . . . . . 175
Starting LedgerLink ... . . . . . . . . . . . . . . . . . . . . . . . . . . . . . . . . . . . . . . . . . . . . . . . . . . . . . . . . . . . . . . . . . . . . . . . . . . . . . . . . . . . . . . . . . . . . . . . . . . . . . . . . . . . 175
Setting Up Translation Rules ... . . . . . . . . . . . . . . . . . . . . . . . . . . . . . . . . . . . . . . . . . . . . . . . . . . . . . . . . . . . . . . . . . . . . . . . . . . . . . . . . . . . . . . . . . . . . . . . . . 179
Viewing Translation Results .. . . . . . . . . . . . . . . . . . . . . . . . . . . . . . . . . . . . . . . . . . . . . . . . . . . . . . . . . . . . . . . . . . . . . . . . . . . . . . . . . . . . . . . . . . . . . . . . . . . . 180
Importing Translation Files .. . . . . . . . . . . . . . . . . . . . . . . . . . . . . . . . . . . . . . . . . . . . . . . . . . . . . . . . . . . . . . . . . . . . . . . . . . . . . . . . . . . . . . . . . . . . . . . . . . . . . 181
Defining Translation Profiles .. . . . . . . . . . . . . . . . . . . . . . . . . . . . . . . . . . . . . . . . . . . . . . . . . . . . . . . . . . . . . . . . . . . . . . . . . . . . . . . . . . . . . . . . . . . . . . . . . . . 181
Defining Load Profiles .. . . . . . . . . . . . . . . . . . . . . . . . . . . . . . . . . . . . . . . . . . . . . . . . . . . . . . . . . . . . . . . . . . . . . . . . . . . . . . . . . . . . . . . . . . . . . . . . . . . . . . . . . . 182
Loading Data into Hyperion Enterprise... . . . . . . . . . . . . . . . . . . . . . . . . . . . . . . . . . . . . . . . . . . . . . . . . . . . . . . . . . . . . . . . . . . . . . . . . . . . . . . . . . . . . . . 183
This chapter provides information and procedures that you need to use LedgerLink forautomating data translations and imports:
LedgerLink OverviewLedgerLink automates the process of translating and importing data into Hyperion Enterprise.LedgerLink integrates third-party general ledger and additional feeder system data by usingtemplates applicable to specific vendor applications.
Using LedgerLink, you set up customized templates for each external application from whichyou want to import data. You can target templates to specific software applications such as OracleGeneral Ledger. You can then bring in data from different ledger and feeder systems withoutmodifying the files that contain the data.
Note: If the external entities are same but the internal entities are different in the LNT file,running the translation files consecutively may output an unexpected result. As a result,
LedgerLink Overview 157

run the files non-consecutively. For example: Loading two profiles consecutively whichuse Entity translation files where the external name is the same but the internal Enterpriseentity is different will result in the wrong LNT file being used for the last profile to run.Load them non-consecutively or close and re-open Ledgerlink between loads for thecorrect Entity Translation file to be selected.
LedgerLink includes the following modules, which you use to customize and define the data thatyou want to load:
Set the following access privileges to manage tasks in LedgerLink: You must have modify accessrights to the Format Administration task, under the Database tasks in the security module togain access to create general ledger templates, translation files, and load profiles. Having Limitedor View access rights to the Format Administration task is same as having None access rights.You do not require modify access rights to the FormatAdministration task to launch existingtranslate or load profiles.
Note: File path to load translation file cannot exceed 117 byte in length
Note: In Ledgerlink, adding accounts to a mapping table that would exceed 32,000 lines willresult in a runtime error.
l G/L Template Wizard - Creates templates to describe the format of the general ledger filesyou load into Hyperion Enterprise.
l Translation Builder - Creates translation mapping tables to match external general ledgernames and accounts with Hyperion Enterprise entities and accounts. You write translationlists that LedgerLink uses to map data from your general ledger to entities and accounts inHyperion Enterprise.
l Translate & Load Profiles - D settings for translation and load procedures. You select atemplate created in G/L Template Wizard, then specify where and how to load the generalledger data into Hyperion Enterprise.
l Load to Hyperion Enterprise - Loads general ledger data into Hyperion Enterprise.
LedgerLink DesktopThe LedgerLink Desktop is the starting point for all operations within the system. The Desktopappears after you enter your user ID and password in the Login dialog box and start the system.You return to the desktop when you close a module window.
Figure 27 shows the LedgerLink Desktop.
158 LedgerLink

Figure 27 LedgerLink Desktop
The LedgerLink Desktop includes the following elements:
Title Bar - Identifies the product LedgerLink and the release number.
l Menu Bar - Presents the following menus:
m File - Enables you to access the modules, print reports of the contents of saved G/LTemplates and Load Profiles, and exit LedgerLink.
m Options - Enables you to switch applications and select a language.
m Help - Gives you access to online help and information about LedgerLink.
l Icons -Represent the system modules. You select an icon to access the module it represents.
l Status Bar - When the system is not processing data, the status bar displays the ID of thecurrent Hyperion Enterprise application. Otherwise, it displays the current process.
LedgerLink Sample FilesTo learn to use LedgerLink, you can use sample files to write sample templates, tables, andprofiles. The sample files show you how LedgerLink integrates with SAP, Oracle Financials andHyperion's accounting solutions - general ledger, Pillar FYPLAN - budgeting, and HyperionEnterprise - consolidation. If you loaded sample files during installation, they are in the directorywhere you installed LedgerLink.
LedgerLink Sample Files 159

Note: Do not load the sample files into Hyperion Enterprise.
Following are descriptions of the sample files:
l Hyperion Accounting Solutions Sample File - The Hyperion accounting solutions samplefile demonstrates the use of account translation tables in loading data to HyperionEnterprise. They include examples of Exception, Range, and Global rules in mapping tables.
l Hyperion Pillar FYPLAN Sample File - The Hyperion Pillar FYPLAN sample file shows areport consisting of comma delimited fields, a header line, and 12 months of data. The nameand account translation tables use a single asterisk ( * ) wildcard opposite one account andthe same opposite one name. In the Translate & Load Profiles module, LedgerLink createsa load file without header options in the general ledger source file.
l Hyperion Enterprise Sample File - The Hyperion Enterprise sample file demonstrates howto use LedgerLink to feed data from detailed Hyperion Enterprise applications into summaryHyperion Enterprise applications. Because this sample does not use translation files, itbypasses the need to use the Translation Builder module.
l SAP Sample File - The SAP sample file shows the error log and reject file, which containsrecords that were not translated because the accounts in the file are not defined in thetranslations. This template prompts for a source general ledger output file when loading toHyperion Enterprise.
l Oracle Sample File - The Oracle sample file demonstrates use of the IGNORE feature intranslation mapping to disregard the Account / Name, which is not loaded into HyperionEnterprise and does not generate a report record. The file is a report with fixed-length fields,formatted data, conditional code blocks, and page header lines.
Defining TemplatesYou define templates to describe how data is formatted in external general ledgers. The templatedescribes an output file from a source general ledger system, such as Oracle General Ledger.LedgerLink uses these templates to interpret the data while loading it into Hyperion Enterprise.You use the G/L Template Wizard to define templates.
When you define a template, you select a sample from the list of available general ledger templatesand then modify the template. Each new template you create is added to the system.
Note: When using the G/L Template Wizard, do not use a field delimiter of more than onecharacter.
Defining a template consists of the following basic tasks:
l Select a sample of a general ledger output file, also called a source sample file.
l Select a sample record from the output file.
l Specify a record format.
160 LedgerLink
l Configure the template by identifying the separate fields in the record as names, accounts,or data values.
l If your general ledger output file is in the form of a report, indicate report format options,you specify the number of lines in the sample file used by the file header, page header, pagebody, and page footer.
You can also define a template by copying and editing an existing one.
Note: Templates are internal LedgerLink files contained in the HPLLINK.MDB file. They donot have file extensions and can be accessed only in G/L Template Wizard.
Selecting a Source Sample File
Note: The sample file is used for formatting only. You do not need to load this file into HyperionEnterprise. The file that you load must have the same format as the sample file.
The source system file can be either a table extract or a report. A table extract is an ASCII filewith individual data fields designated by delimiters or fixed-length formatting. A table extractfile does not have page headers, page footers, or page formatting.
A report can contain file headers, page headers, a report body, and page footers. The headers,footers, and body must be the same size on all pages of the output file. The report's data fieldsmust be designated by delimiters or fixed-length formatting.
For both types of source sample files, record delimiters are detected automatically. These can becarriage return line feeds or line feeds. If your file does not use delimiters or fixed-lengthformatting, the system applies fixed-length formatting. Do not use a field delimiter of more thanone character.
ä To select a source sample file:
1 From the LedgerLink Desktop, select G/L Template Wizard.
2 In the G/L Templates list box, create or edit a template:
l To a new template, click New.
l To edit an existing template, highlight the template and click Edit.
3 Select file type Table Extract or Report, based on the form of the general ledger file that you are loading.
4 If the sample file path and name do not appear next to the Select Sample File button or if you want to changethe sample file, select Select Sample File. Select the correct path and file, then click OK.
5 Click Next.
6 Select a sample record. For instructions, see “Selecting a Sample Record” on page 176.
Defining Templates 161

Translate DataAfter you define your template, you translate your external data into their Hyperion Enterpriseequivalents using name translation tables and account translation tables. The translation tablesmatch entities or accounts in other systems to entities or accounts in Hyperion Enterprise.
You use the Translation Builder module to create the translation tables from the external datasource and the template you set up in the G/L Template Wizard. You can also import and useaccount and name translation mapping tables that you have previously defined.
Note: If all your codes in an external data source match the entities and accounts in HyperionEnterprise, you do not need to translate your data.
Translation File TypesThe Translation Builder module produces translation files, which you then use to transfer datato Hyperion Enterprise. The type of translation file you create depends on the type of data withwhich you are working and the method you want to use to import or export data. The translationtypes are as follows:
l External Entity Lists (*.nli) - Describe either external entities in an ASCII file, or lists createdby LedgerLink using a General Ledger output file and template. Do not use single or doublequotation marks.
l External Account Lists (*.ali) - Contain either a list of external account data from a generalledger, or lists created by LedgerLink using a General Ledger output file and template.
l Import Account Translation (*.tra) - The import account translation files are ASCII accounttranslation files you create in a text editor. These files must be in the following format:External Account 1, External Account 2, Internal Account.
l Import Entity Translation (*.trn) - The import entity translation files are ASCII entitytranslation files you create in LedgerLink. These files are compiled and cannot be usedoutside LedgerLink.
l LedgerLink Entity Translation (*.lnt) - The LedgerLink entity translation files are internalentity translation files, which cannot be maintained outside LedgerLink.
l LedgerLink Account Translation (*.lat) - LedgerLink account translation files are internalaccount translation files, which cannot be maintained outside LedgerLink.
External ListsYou can use an external list within LedgerLink to create the translation file. This file consists ofthe valid external names or accounts you use within the translation. You can create or edit thelist within a text editor or within LedgerLink. In either case, the file name extension is .nli forname lists and .ali for account lists.
Note: You can create entity and account lists using the Hyperion Enterprise Entities and Accountmodules, but LedgerLink external lists display IDs without their descriptions.
162 LedgerLink
Entity External ListThe entity list has the following format:
ENTITY, where ENTITY is the entity ID.
Note: Additional data can be included after the comma, but will be ignored. Only the entity isvisible in the External List box.
SOURCE.NLILEGAL,MKTG,ADMIN,
In the previous example, only the LEGAL entity would be visible in the External List box.
Account External ListThe Account list has the following format:
ACCOUNT, where ACCOUNT is the account ID.
Note: Additional data can be included after the comma, but will be ignored. Only the accountis visible in the External List box.
SOURCE.ALA001P601,A002P601,A011P602,
In the previous example, only the A001P601 account will be visible in the External list box.
Translation Builder WindowYou use the Translation Builder Window to create or edit a LedgerLink translation file. You canview both external and Hyperion Enterprise names or accounts. You set up translation rulesusing the Translation Rules Mapping tabs in the lower portion of the window. You performtasks in the Translation Builder window by selecting menu commands or toolbar icons.
Figure 28 shows the Translation Builder window.
Translation Builder Window 163

Figure 28 Translation Builder Window
The Translation Builder window has the following elements:
l Title Bar - Identifies the product, release number, window name, and file name.
l Menu Bar - Lists the following menus that you can select to perform different tasks:
m File - The commands on the File menu allow you to perform the tasks shown inTable 32.
Table 32 Translation Builder File Menu
Command Task
New Create a translation file.
Open Open a translation file.
Save Save the current translation file.
Save As Provide a new entity for the translation file.
Open External List Open an external entity or account list.
Make External List Create or update an external entity or account list.
Import Translation File Import an ASCII file version of the Exception, Range, and Global rules.
ExportTranslation File Export a version of the Exception, Range, and Global rules as a .TRA file.
Edit - Enables you to perform the tasks shown in Table 33.
164 LedgerLink
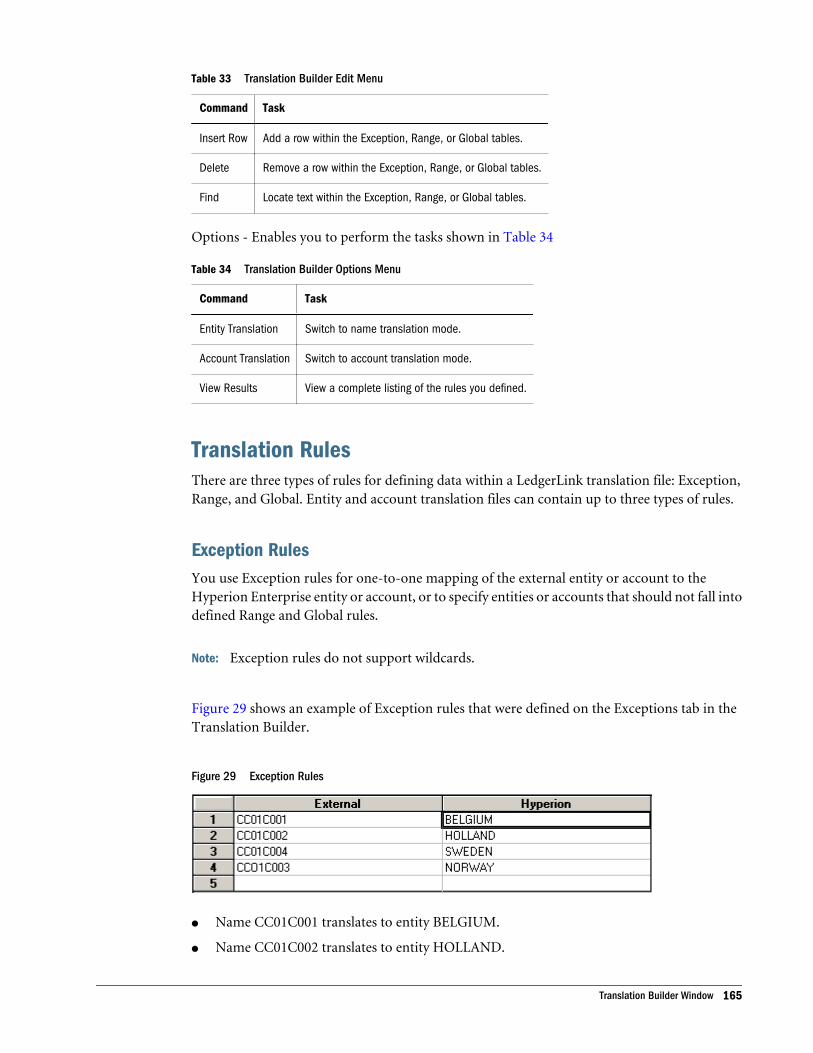
Table 33 Translation Builder Edit Menu
Command Task
Insert Row Add a row within the Exception, Range, or Global tables.
Delete Remove a row within the Exception, Range, or Global tables.
Find Locate text within the Exception, Range, or Global tables.
Options - Enables you to perform the tasks shown in Table 34
Table 34 Translation Builder Options Menu
Command Task
Entity Translation Switch to name translation mode.
Account Translation Switch to account translation mode.
View Results View a complete listing of the rules you defined.
Translation RulesThere are three types of rules for defining data within a LedgerLink translation file: Exception,Range, and Global. Entity and account translation files can contain up to three types of rules.
Exception RulesYou use Exception rules for one-to-one mapping of the external entity or account to theHyperion Enterprise entity or account, or to specify entities or accounts that should not fall intodefined Range and Global rules.
Note: Exception rules do not support wildcards.
Figure 29 shows an example of Exception rules that were defined on the Exceptions tab in theTranslation Builder.
Figure 29 Exception Rules
l Name CC01C001 translates to entity BELGIUM.
l Name CC01C002 translates to entity HOLLAND.
Translation Builder Window 165
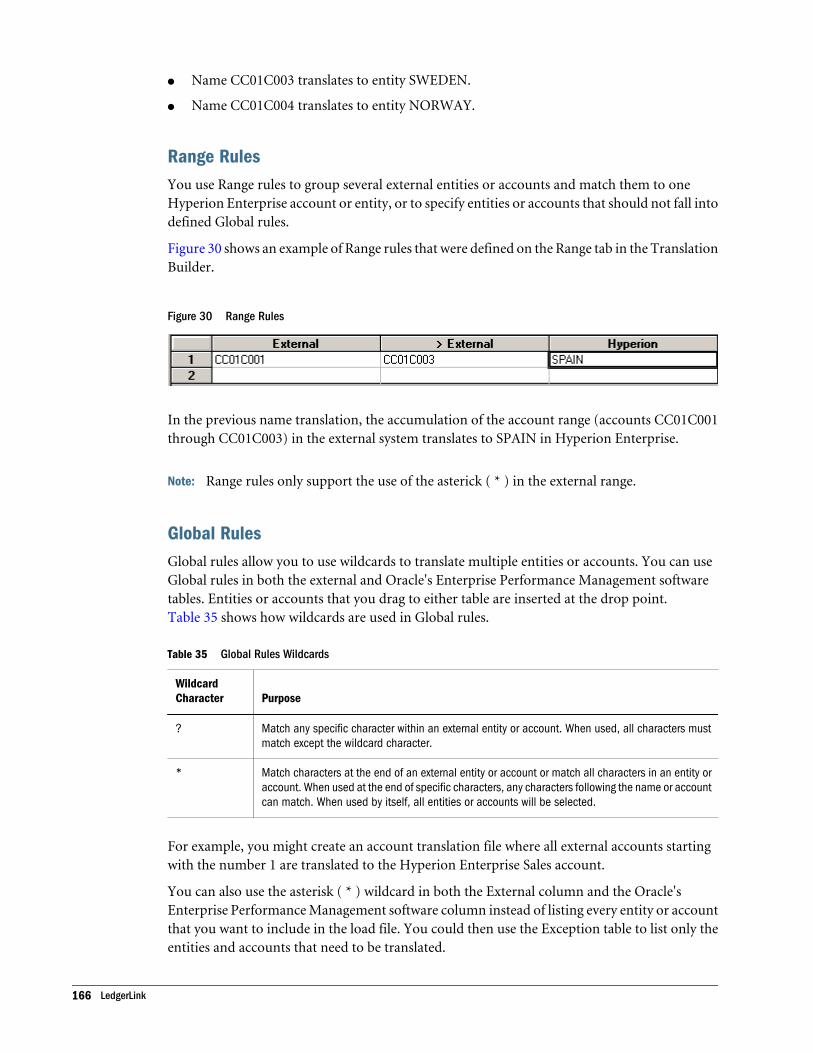
l Name CC01C003 translates to entity SWEDEN.
l Name CC01C004 translates to entity NORWAY.
Range RulesYou use Range rules to group several external entities or accounts and match them to oneHyperion Enterprise account or entity, or to specify entities or accounts that should not fall intodefined Global rules.
Figure 30 shows an example of Range rules that were defined on the Range tab in the TranslationBuilder.
Figure 30 Range Rules
In the previous name translation, the accumulation of the account range (accounts CC01C001through CC01C003) in the external system translates to SPAIN in Hyperion Enterprise.
Note: Range rules only support the use of the asterick ( * ) in the external range.
Global RulesGlobal rules allow you to use wildcards to translate multiple entities or accounts. You can useGlobal rules in both the external and Oracle's Enterprise Performance Management softwaretables. Entities or accounts that you drag to either table are inserted at the drop point.Table 35 shows how wildcards are used in Global rules.
Table 35 Global Rules Wildcards
WildcardCharacter Purpose
? Match any specific character within an external entity or account. When used, all characters mustmatch except the wildcard character.
* Match characters at the end of an external entity or account or match all characters in an entity oraccount. When used at the end of specific characters, any characters following the name or accountcan match. When used by itself, all entities or accounts will be selected.
For example, you might create an account translation file where all external accounts startingwith the number 1 are translated to the Hyperion Enterprise Sales account.
You can also use the asterisk ( * ) wildcard in both the External column and the Oracle'sEnterprise Performance Management software column instead of listing every entity or accountthat you want to include in the load file. You could then use the Exception table to list only theentities and accounts that need to be translated.
166 LedgerLink
Note: Using the Global rule might cause a sorted .GLO file to be unsorted after translation. Toavoid this, save it under a different name.
For account translation files only, you use the additional column that appears in each table toindicate whether to add the data to or subtract the data from the result. The default setting addsthe data.
Evaluation OrderDuring translation, LedgerLink evaluates rules in the following order:
l Exception
l Range
l Global
If an account is referenced by more than one type of rule, the first occurrence defines thetranslation. For example, suppose the following rules are defined:
Global: *,ACC1Range: 1000>2000,ACC2Exception: 1010,ACC3 1020,ACC4
Here are the results:
1010=ACC31020=ACC41000.2000 (excluding 1010 and 1020)=ACC21999 and 2001>3000 =ACC1
Ignore FeatureYou can ignore entities or accounts in a Hyperion Enterprise load profile to avoid having themappear as errors in the error log. For example, suppose you want to ignore the summary orvalidation accounts extracted from the ledger in a .GLO file. You can instruct LedgerLink toignore these accounts and not load them into Hyperion Enterprise by typing [IGNORE] in theOracle's Performance Management software table next to the entity or account. You can usewildcards with the Ignore feature to ignore a range of entities or accounts in the load file.
Note: You can use the Ignore feature in the Exception, Range, and Global mapping tables.
Imported Translation File RulesYou can import and export name and account translation files created in Hyperion Enterprise.These .TRA files are ASCII file versions of the Exception, Range, and Global tables. The formatfor creating a translation ASCII file differs for Exception, Range, and Global rules.
Translation Builder Window 167

Exception Rules for ASCII FilesYou use the Exception rule to match entities and accounts on a one-to-one basis. Exceptions areusually entities or accounts that do not come under Range or Global rules. For example, youmight want to translate entity 101L in your general ledger to TEXAS.INP in Hyperion Enterprise.
Note: Wildcards are not supported in the Exception rule.
For the each line in the Exception rule, use this format:
External, Internal
Variable Description
External The external entities and accounts
Hyperion Hyperion Enterprise entities and accounts
For example:
ACCT10, PEXP.SOCCER.SHOESACCT20, PEXP.SOCCER.BALLSACCT30, PEXP.SOCCER.EQUIPACCT40, PEXP.SOCCER.APPAR
In the previous example, the following rules are defined:
l Account ACCT10 translates to PEXP.SOCCER.SHOES.
l Account ACCT20 translates to PEXP.SOCCER.BALLS.
l Account ACCT30 translates to PEXP.SOCCER.EQUIP.
l Account ACCT40 translates to PEXP.SOCCER.APPAR.
Range Rules for ASCII FilesYou use Range rules to group several external entities or accounts and match them to oneHyperion Enterprise entity or account. For example, you might want to translate theaccumulation of accounts 20100 through 20500 in your general ledger to OTHERINC inHyperion Enterprise.
Note: Range rules support only the asterisk ( * ) wildcard, which you can use in the Oracle'sPerformance Management software table but not the external table. The asterisk cannotbe combined with any other characters. Using the wildcard maintains the same externalname or account as the internal Hyperion entity or account.
For Range rules, use this format:
External1 > Externaln, Hyperion
168 LedgerLink

Variable Description
External The first entity or account in a series in an external data source
Externaln The last entity or account in a series in an external data source
Hyperion The Hyperion Enterprise entity or account under which you want to group the accounts.
In the following example, the accumulation of accounts ACCT50 through ACCT70 translatesto PEXP.SOCCER.NOVELTIES:
ACCT50, > ACCT70, PEXP.SOCCER.NOVELTIES
Global Rules for ASCII FilesYou use Global rules to translate multiple names or accounts using wildcards.
For Global rules, use this format:
External, Hyperion
Variable Description
External The external entity or account to which you want to assign a Global rule
Hyperion The Hyperion Enterprise account to which you want the rule to apply
In the following example, the external accounts that start with the number 2 translate toSOCCER.OTHER:
2*,SOCCER.OTHER
You can also use the asterisk ( * ) wildcard in both the External column and the Oracle'sPerformance Management software column instead of listing every name or account that youwant to include in the load file. You could then use the Exception table to list only the entitiesand accounts that need to be translated.
Results View WindowYou access the Results View Window by selecting Options > View Results from the TranslationBuilder Window. Table 36 describes the icons that you can use in the Results View window.
Table 36 Results View Window Icons
Icon Purpose
Return to the main Translation Builder window.
Toggle between the Results View window and the LedgerLink desktop.
Results View Window 169

Icon Purpose
(White)
Recalculate the results of the translation. The table remains blank or contains the results of theprevious translation.
(Red)
Show only untranslated items.
Change your view from translated to untranslated results.
Find text in the Results table.
Print your results.
ToolbarWhen you move the cursor over a toolbar button, its description is displayed in the status barat the bottom of the window.
Table 37 shows the toolbar buttons and their purposes.
Table 37 Translation Builder Window Toolbar
Button Purpose
Return to the LedgerLink desktop.
Create a translation file.
Open a translation file.
Save the current translation file.
Open an external entity or account list.
Create or update an external entity or account list.
Switch to name translation mode.
Switch to account translation mode.
View the results or a complete listing of the rules you defined.
170 LedgerLink
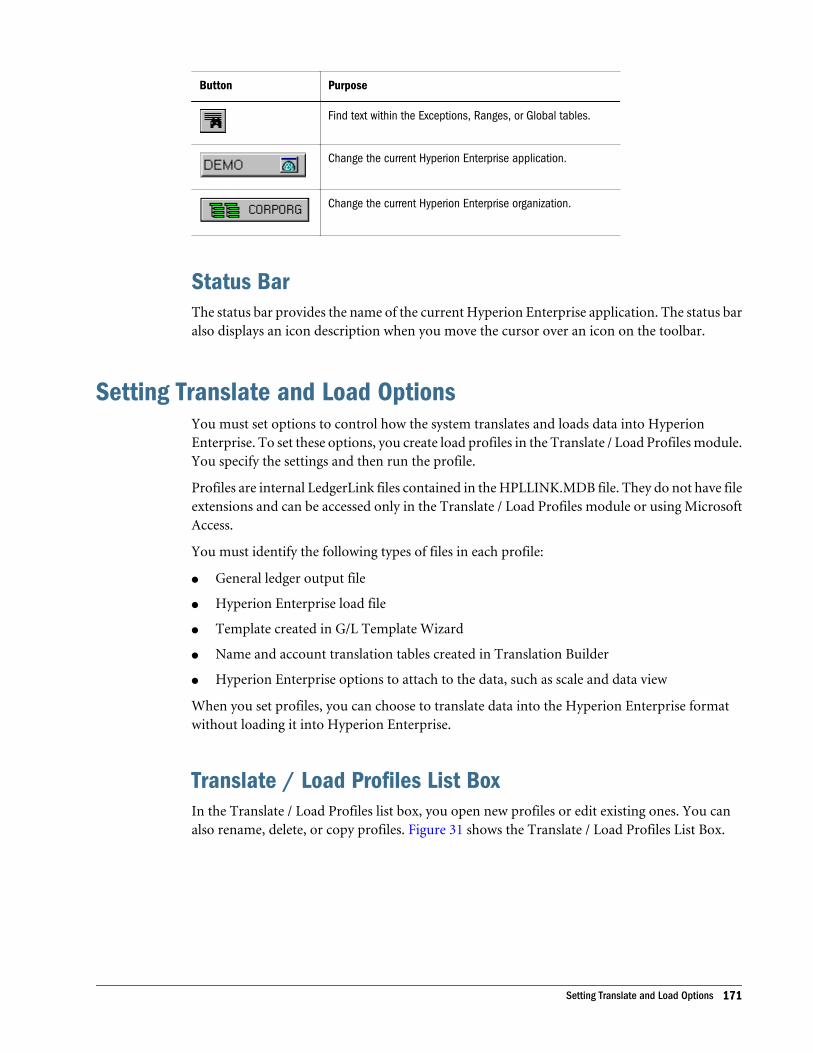
Button Purpose
Find text within the Exceptions, Ranges, or Global tables.
Change the current Hyperion Enterprise application.
Change the current Hyperion Enterprise organization.
Status BarThe status bar provides the name of the current Hyperion Enterprise application. The status baralso displays an icon description when you move the cursor over an icon on the toolbar.
Setting Translate and Load OptionsYou must set options to control how the system translates and loads data into HyperionEnterprise. To set these options, you create load profiles in the Translate / Load Profiles module.You specify the settings and then run the profile.
Profiles are internal LedgerLink files contained in the HPLLINK.MDB file. They do not have fileextensions and can be accessed only in the Translate / Load Profiles module or using MicrosoftAccess.
You must identify the following types of files in each profile:
l General ledger output file
l Hyperion Enterprise load file
l Template created in G/L Template Wizard
l Name and account translation tables created in Translation Builder
l Hyperion Enterprise options to attach to the data, such as scale and data view
When you set profiles, you can choose to translate data into the Hyperion Enterprise formatwithout loading it into Hyperion Enterprise.
Translate / Load Profiles List BoxIn the Translate / Load Profiles list box, you open new profiles or edit existing ones. You canalso rename, delete, or copy profiles. Figure 31 shows the Translate / Load Profiles List Box.
Setting Translate and Load Options 171

Figure 31 Translate / Load Profiles List Box
Table 38 describes the dialog box that contains existing profiles and six buttons.
Table 38 Translate / Load Profile Options
Button Purpose
Rename Rename the selected profile, overwriting the former name.
Delete Delete the selected profile.
Copy Create a copy of the selected profile that you can save under a new name.
New Create a new profile.
Edit Open the selected profile for revisions.
Close Close the list box.
Translate / Load Profile Dialog BoxIn the Translate / Load Profile dialog box, you set the attributes of load profiles. You specifywhich files and which Hyperion Enterprise options make up the profile. The Translate / LoadProfile dialog box has two tabs. In the Translate tab, you choose the files needed for the dataload. In the Load tab, you choose the Hyperion Enterprise options for the load profile, such asscale or start period.
Translate TabFigure 32 shows the Translation tab.
172 LedgerLink

Figure 32 Translation Tab
Table 39 describes the Translate tab options.
Table 39 Translate Tab Options
Option Purpose
Prompt at Time of Load Designate the general ledger source file during the load to Hyperion Enterprise.
Source G/L Output File Provide the drive, path, and file name of the general ledger output file.
Hyperion Enterprise LoadFile
Provide the drive, path, and file name of the optional Hyperion Enterprise load file.
G/L Template Provide the file name of the G/L Template file.
Entity Translation File Provide the drive, path, and file name of the Entity Translation file.
Account Translation File Provide the drive, path, and file name of the Account Translation file.
Load Translated G/L fileto Hyperion EnterpriseOnly
Load only a Hyperion Enterprise load file when performing Hyperion-to-Hyperion transfers.Selecting this box removes all other edit boxes from the Translate tab.
Browse Select a file from a dialog box. The Browse button appears next to one of four edit boxes,depending on which is the currently or most recently active: Source G/L Output File,Hyperion Load File, Name Translation File, or Account Translation File.
Edit Open a file in a text editor. The Edit button appears next to one of two edit boxes,depending on which is the currently or most recently active: Source G/L Output File editbox or Hyperion Load File edit box.
Load TabFigure 33 shows the Load tab.
Setting Translate and Load Options 173

Figure 33 Load Tab
Table 40 describes the Load tab options.
Table 40 Load Profile Options
Option Purpose
Use Header Options inG/L Source File
Tell LedgerLink to use the headers contained in the general ledger source file. Selectingthis box removes the Category, Start Period and End Period edit boxes from the Load tab.
Category Specify the category for the data being loaded.
Start and End Periods Specify the starting and ending periods for the data being loaded.
Scale Specify the scale of the data.
Mode Specify whether to accumulate, replace, or merge when loading the data.
Data View Specify whether data view is periodic, year-to-date, or by category.
Options Specifies whether to have the system perform any of these tasks during the data load:calculate formulas, report a data load to a calculated account as an error, or displayaccounts with no data as zero.
Load Translated G/L Fileto Hyperion EnterpriseOnly
Loads only a Hyperion Enterprise load file, for use in Hyperion-to-Hyperion transfers.Selecting this box removes the Use Header Options in the G/L Source File check box andthe Category, Start Period and End Period edit boxes from the Load tab.
174 LedgerLink

Loading Data into Hyperion EnterpriseThe Load to Hyperion Enterprise window displays all available load profiles in the Load Profileslist box. On the right, the window displays the characteristics of the current profile. At the bottomof the window, a status bar lists the current application and organization.
You use the menu commands and toolbar icons to load General Ledger data into HyperionEnterprise, edit profiles, view logs, and change applications. Table 41 describes the menu items.
Table 41 Load to Hyperion Enterprise Menu Items Commands
Command Purpose
Load the selected profile into Hyperion Enterprise.
Exit the Load to Hyperion Enterprise module and return to the desktop.
Change the attributes of the current profile.
(Red)Display the ERROR.LOG file, which contains any errors encountered during the load to HyperionEnterprise.
(Gray)Display the ADMIN.ERR file, which contains any data from the load file that could not be loaded intoHyperion Enterprise because of errors.
Select a new Hyperion Enterprise application to which you can load data.
Select a new Hyperion Enterprise organization to which you can load data.
Select a new Hyperion Enterprise category to which you can load data.
Select a new Hyperion Enterprise period to which you can load data.
Starting LedgerLinkDuring initial installation, you select a directory for the HPLL32.EXE file. It should be the samedirectory that contains HYPENT.EXE. The first time you access a Hyperion Enterpriseapplication using LedgerLink, the system creates a directory called LLINK under the applicationdirectory and creates the file HPLLINK.MDB in the LLINK directory. For example, if you accessan application in the C:\HYPENT\WWCONSOL directory, the system creates the C:\HYPENT\WWCONSOL\LLINK directory and creates a HPLLINK.MDB file in that directory. The LLINKdirectory contains any LedgerLink files not specific to a Hyperion Enterprise application. LLINKdirectories are specified in the HPADDONS.INI file, which resides in your windows directory.The HPLLINK.MDB file stores the templates and load profile defined for the application.
Note: LedgerLink uses Hyperion Enterprise security to determine the access rights you have.
Loading Data into Hyperion Enterprise 175

ä To start LedgerLink:
1 Exit Hyperion Enterprise.
2 From the Start menu, select Programs > Hyperion Solutions > Hyperion Enterprise > LedgerLink.
3 Select the Hyperion Enterprise application from the Application Name list box.
4 Enter your user ID and password.
5 Click OK.
Changing the Hyperion Enterprise ApplicationYou can change the Hyperion Enterprise application to which you are loading data withoutexiting LedgerLink. LedgerLink uses Hyperion Enterprise security to determine the access rightsyou have for an application. Therefore, to access an application from within LedgerLink, youuse the same user ID and password that you use to access a Hyperion Enterprise application.
ä To change the Hyperion Enterprise application:
1 From the LedgerLink Desktop, select Options > Application.
2 Select the Hyperion Enterprise application from the Application Name list box.
3 Enter your user ID and password.
4 Click OK.
Selecting a Sample RecordAfter you specify a source sample file and its type, you select the sample record that mostaccurately represents how the external general ledger assigns and delimits record fields. Thesource sample file's records are displayed. You can scroll through the file to find the record thatbest represents the records in your file. You identify the fields in the record that represent thename, account, and data. You also identify the symbol or format that separates fields in therecord.
ä To select a sample record:
1 Select a source sample file. For instructions, see “Selecting a Source Sample File” on page 161.
2 Select a record from the view box.
If you select a record that is nondelimited and does not use fixed-length formatting, the FixedRecord Length text box appears.
3 If the Fixed Record Length text box is displayed, place the record's fields in fixed-length columns. To alignthe fields in columns, either type the field length or click the arrows until the fields are aligned.
4 Click Next.
5 Verify field formats. For instructions, see “Verifying the Field Format” on page 177.
176 LedgerLink

Verifying the Field FormatThe source general ledger field format can be fixed length, delimited, or formatted. LedgerLinkselects the field format based on the sample record you selected. You then verify the format thatLedgerLink selects.
Here are the possible formats of your data file:
l Fixed-length fields - Aligned in columns and do not use characters as separators. Thecolumns must be consistent throughout the file.
l Delimited fields - Use characters such as commas ( , ) or semicolons ( ; ) to separate dataitems.
l Formatted data - Data fields that use currency symbols, commas, or parentheses. Forexample, the data item $123,000 contains currency symbols and commas.
LedgerLink uses the currency format you specify in Windows to determine the thousand anddecimal separators. If you want to change options, you can select either a comma or a space asa field delimiter, or enter a different one.
Note: When LedgerLink loads data to Hyperion Enterprise, it converts the data format to thestandard format for Hyperion Enterprise. For example, if parentheses designate negativenumbers in your output file, the parentheses will change to a minus sign ( - ) in HyperionEnterprise.
ä To verify the field format:
1 Select a sample record. For instructions, see “Selecting a Sample Record” on page 176.
2 Select Fixed Length or Delimited, depending on how your general ledger data is formatted.
3 If your data contains currency symbols, commas, or parentheses, select Formatted Data.
4 If your record is delimited and you want to change the field delimiter, select Delimited. Type the delimiterthat your external general ledger system uses, or select Space.
5 Click Next.
6 Configure the templates. For instructions, see “Configuring the Template” on page 177.
Configuring the TemplateYou configure the template to store information from the source record in Hyperion Enterprisename, account, and data fields. You can drag and drop a field or group of fields from the samplerecord into one of three categories: name, account, or data.
Once you place a field in a category, you can check its position on the record. For example, ifthe Account field is the second field on the record, it is identified as Field 2.
Note: Depending on the task, the cursor has different shapes. It is a four-arrow icon after youselect fields, an arrow-with-lines icon while you drag, and a hand-with-lines icon whenit is positioned over the edit box.
Starting LedgerLink 177
ä To configure the template:
1 Verify the field format. For instructions, see “Verifying the Field Format” on page 177.
2 Highlight the field or fields that identify names:
l For delimited data, click anywhere in the field.
l For fixed-length data, select the entire field. If your sample file has blank spaces precedingthe data, select those spaces to ensure enough column width for varying data lengths.
3 Drag the highlighted field or fields to the Name text box.
4 Repeat steps 2 and 3 for the Account and Data text boxes.
5 From the Name, Account, and Data text boxes, take one of the following actions:
l To remove a single field or adjacent fields, select the field or fields and drag them to the trashcan icon in the lower right.
l To remove all fields from all three edit boxes, click Clear All Fields.
6 To place additional text or a period in your Name or Account text box, take one or more of the followingactions:
l To add a period, drag the Period button to the text box.
l To add text, drag the Text button to the text box. Type the text in the dialog box, then clickOK.
7 For fixed-length fields, type the data column width in the Data Column Width text box.
Tip: You can highlight the data in the sample record and drag it to the edit box.
8 To display the location of the name, account, and data elements in the sample record, select ShowPositions.
9 To complete the configuration:
l If the sample file is in a report format, click Next, then specify report formats. Forinstructions, see “Specifying the Report Format” on page 178.
l If the sample file is a table extract, click Finish. Type a name for the template and clickOK.
Specifying the Report FormatIf your sample file is in the form of a report, you must specify how many File Header, PageHeader, Page Body, and Page Footer lines are in your report.
Note: Depending on the task, the cursor takes on different shapes. It is an arrow-with-lines iconwhile you drag and a hand-with-lines icon when it is over the edit box.
ä To specify the report format:
1 Configure the template. For instructions, see “Configuring the Template” on page 177.
178 LedgerLink

2 Type the number of lines for each of the following in its corresponding text boxes: File Header, PageHeader, Page Body, and Page Footer.
3 Select Finish.
4 Enter a name for the template, then click OK.
Defining External ListsYou create external lists based on a general ledger output (.glo) file and a LedgerLink template.After the external list is created and integrated into a translation file, you can update the listdirectly in LedgerLink if necessary.
You can also display a previously created name or account translation file in the Make ExternalAccount List dialog box. You can then define the relationship between external entities oraccounts and Hyperion entities or accounts.
ä To define an external list or to display a previously created account translation file:
1 From the LedgerLink Desktop, click Translation Builder.
2 To specify whether you want to create or update an external account or entity list, or to open a previouslyexisting one, select Options > Account Translation or Options > Name Translation.
Tip: You can select the name or account translation icon on the toolbar.
3 Take one of the following actions:
l To create a list, select File > Make External List or select the Make External List icon on thetoolbar.
l To open a list, select File > Open External List or select the appropriate icon on the toolbar.
4 Type the file names.
5 If you opened a previously existing list, select a template from the G/L Template drop-down list.
6 Create or update the list:
l To create a list, select Create New External List.
l To update the selected list, select Update External List.
7 Click OK.
Setting Up Translation RulesTo create a translation file, you must know the entities and accounts in both the external systemand the Hyperion Enterprise application. As you create the translation file, you define the rulesfor translating data.
You can define three types of rules: Exception, Range, or Global. Table 42 provides a briefdescription of translation rules. For more information on translation rules, see “TranslationRules” on page 165.
Setting Up Translation Rules 179

Table 42 Translation Rules
Rule Type Purpose
Exception Match external entities or accounts with Hyperion Enterprise entities or accounts in a one-to-onerelationship.
Range Group several external entities or accounts with one Hyperion Enterprise entities or account.
Global Use a wildcard such as asterisk ( * ) or question mark ( ? ) to translate multiple names or accounts.
ä To set up translation rules:
1 From the LedgerLink Desktop, click Translation Builder.
2 Take one of the following actions:
l To create a new translation file, select File > New or click the New button in the toolbar.
l To open an already existing translation file, select File > Open or click the Open toolbarbutton, select the file name, then click OK.
3 Select Options > Name Translation or Options > Account Translation.
Tip: To change the Hyperion Enterprise application or organization, select either theApplication toolbar icon or the Organization toolbar icon.
4 Define the rules for entities or accounts by selecting the tab for the type of rule you want to create:Exception, Range, or Global.
5 Enter the entities in the appropriate table.
Viewing Translation ResultsAfter you define the translation mapping rules, you can view a complete list of the rules in theResults View window. You can also switch between translated and untranslated data views. TheResults View window displays a table listing the external entities or accounts, the rule number,the rule, and the result. You can display all the results or only those that are not translated. Youcan also print the listing.
Note: Accounts that did not translate to Hyperion Enterprise appear in red.
ä To view translation results:
1 From the LedgerLink Desktop, click Translation Builder.
2 To change the data view between names and accounts, select Options > Name Translation or Options >Account Translation.
3 Select Options > View Results.
4 Optional: To refresh the data values, click the Calculate button.
5 To view more specific results criteria:
180 LedgerLink
l to display the results of the translation, click the Calculate Data button on the toolbar.
l To display the untranslated results, click the Show Untranslated button on the toolbar.
Tip: You can view the Hyperion Enterprise entities and accounts separately from theexternal source entities and accounts by selecting the Show Only Untranslated buttonon the toolbar.
6 Select File > Close to return to the LedgerLink Desktop.
Importing Translation FilesYou can import and export both entity and account translation files instead of creating them.These .TRA files are ASCII file versions of the Exception, Range, and Global tables. The importmethod allows you to build translations quickly without using the LedgerLink to specify rules.You use a different format for each type of translation rule. For more information on Exception,Range, and Global Rules for ASCII Files, see “Imported Translation File Rules” on page 167.
Note: You must save each file as a translation file (.LNT or .LAT) in LedgerLink after importingit, or you will be able to access the file through the import process only.
ä To import a translation file:
1 From the LedgerLink Desktop, click Translation Builder.
2 Select File >New.
3 To select entity or account external translation files, select Options > Account Translation or Options > NameTranslation.
4 Select File > Import Translation File.
5 Select the translation file that you want to import.
6 Click OK.
7 To save the file, select File > Save As.
8 Enter the path and file name in the Filename list box.
Tip: You must save the file as a translation file (.LAT or .LNT) in LedgerLink, or you will be ableto access the file through the import process only.
9 Click OK.
Defining Translation ProfilesTranslation profiles specify the data, template, and translation files you use to load data intoHyperion Enterprise.
Importing Translation Files 181

ä To define a translation profile:
1 From the LedgerLink Desktop, select Translate > Load Profiles.
2 In the Translate / Load Profiles list box, create or edit a profile:
l To create a profile, click New.
l To edit a profile, select the profile, then click Edit.
3 In the Source G/L Output File text box, type the drive, path, and file name of your general ledger output filethat you want to import into Hyperion Enterprise.
Tip: To select the general ledger output file during the load to Hyperion Enterprise, selectPrompt at Time of Load.
4 To edit your general ledger output file, click Edit. If you have not defined a file association, a messageappears, prompting you to do so.
5 To select or create a Hyperion Enterprise load file:
l In the Hyperion Enterprise Load File edit box, enter the drive, path, and file name of aHyperion Enterprise load file.
l To create a Hyperion Enterprise load file, select Create Hyperion Load File.
6 Select a template from the G/L Template drop-down list.
7 Enter the drive, path, and file name of the entity or account translation file in the Name Translation File textbox or the Account Translation File text box.
8 To load only a Hyperion Enterprise load file, select Load Translated G/L File to Enterprise Only.
9 Save your changes or load a file:
l To save your changes and close the dialog box, select OK. If you are creating a profile, theEnter Load Name dialog box appears. Enter an ID of up to 40 characters, and then clickOK.
Tip: You can also save the changes from the Load tab.
l To load a file, select the Load tab. For instructions on setting load options, see “DefiningLoad Profiles” on page 182.
Defining Load ProfilesLoad profiles specify the Hyperion Enterprise options for the data when it is loaded intoHyperion Enterprise.
ä To define load profiles:
1 From the LedgerLink Desktop, select Translate > Load Profiles.
2 In the Translate / Load Profile dialog box, select the Load tab.
3 To use the headers in your general ledger source file, select Use Header Options in G/L Source File.
182 LedgerLink

4 If you have not selected Use Header Options in G/L Source File, select a data category from the Categorytext box, enter a starting period in the Start Period edit box, and enter an ending period in the End Periodedit box.
5 Select a scale, or select Default to use the default scale for the selected category.
6 Select one of the following modes in the Mode text box:
l Select Accumulate to add the data values in your general ledger output file to the data valuesthat already exist in Hyperion Enterprise.
l Select Replace to delete values in all accounts in Hyperion Enterprise and to insert the valuesfrom your general ledger output file.
l Select Merge to clear values in Hyperion Enterprise only for accounts for which you areinserting new values from your general ledger output file.
7 In the Data View text box, select the data view that corresponds to your Hyperion Enterprise application.
8 Specify tasks for the system to perform during data load:
l To calculate formulas automatically, select Execute Logic.
l To report an error if you try to load data into a calculated account, select Report CalcAccts.
l To display accounts with no data as zero, select Zero No Data.
9 Click OK to save the changes.
10 If you are creating a new profile, enter an ID of up to 40 characters and click OK.
Loading Data into Hyperion EnterpriseYou can load source system data to the Hyperion Enterprise database using the templates,translations, and profiles defined in LedgerLink. Load profiles specify the files and settingsneeded to translate and load data into Hyperion Enterprise. For more information, see “SettingTranslate and Load Options” on page 171.
ä To load data into Hyperion Enterprise:
1 From the LedgerLink Desktop, select Load to Hyperion Enterprise.
2 In the Load to Hyperion Enterprise window, select a load profile from the Load Profile list box.
3 To change the profile's attributes, select Options > Edit Profile or click the Edit Profile button. For instructions,see “Defining Translation Profiles” on page 181 and the “Defining Load Profiles” on page 182.
4 Select File > Load.
If the load profile was set up to prompt you for a general ledger output file during the loadprocedure, the Select G/L Output File dialog box is displayed.
5 If the Select G/L Output File dialog box is displayed, select an output file, then click OK.
6 If an error message appears that states that data could not be loaded into Hyperion Enterprise, select Options> View Error Log.
Loading Data into Hyperion Enterprise 183

7 If other error messages appear during the load to Hyperion Enterprise, select Options > View Load Log.
184 LedgerLink

9Hyperion Retrieve Functions
In This Chapter
Function Syntax and Examples ... . . . . . . . . . . . . . . . . . . . . . . . . . . . . . . . . . . . . . . . . . . . . . . . . . . . . . . . . . . . . . . . . . . . . . . . . . . . . . . . . . . . . . . . . . . . . . . 185
Period Values in Hyperion Retrieve Functions ... . . . . . . . . . . . . . . . . . . . . . . . . . . . . . . . . . . . . . . . . . . . . . . . . . . . . . . . . . . . . . . . . . . . . . . . . . . . . . . 209
This appendix provides the syntax for Hyperion Retrieve functions and examples of their use.
Function Syntax and ExamplesThe following sections provide the syntax and examples for specific Hyperion Retrieve functions.
HPACC - Account ID FunctionYou use the HPACC function to retrieve and show the ID of a specified account. Use this format:
HPACC("Account","Application")
Variable Description
Account The ID for the account
Application The ID for the application that contains the account
For example, if the Tax application contains the Cost of Goods Sold account and its ID appearsin cell A7, you can use this formula for cell A23 to show the Cost of Goods Sold account ID incell A23:
HPACC(A7,"TAX")
HPAMJ - Major Account ID FunctionYou use the HPAMJ function to retrieve and show the major account ID for a specified account.Use this format:
HPAMJ("Account","Application")
Function Syntax and Examples 185
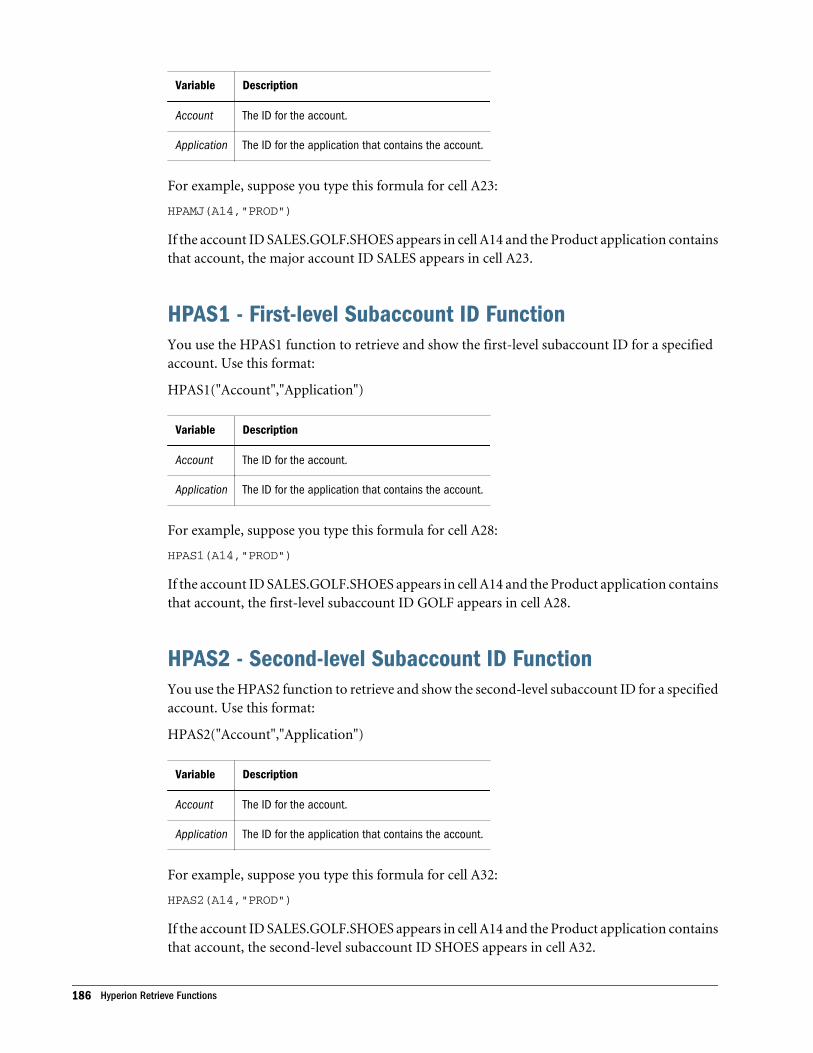
Variable Description
Account The ID for the account.
Application The ID for the application that contains the account.
For example, suppose you type this formula for cell A23:
HPAMJ(A14,"PROD")
If the account ID SALES.GOLF.SHOES appears in cell A14 and the Product application containsthat account, the major account ID SALES appears in cell A23.
HPAS1 - First-level Subaccount ID FunctionYou use the HPAS1 function to retrieve and show the first-level subaccount ID for a specifiedaccount. Use this format:
HPAS1("Account","Application")
Variable Description
Account The ID for the account.
Application The ID for the application that contains the account.
For example, suppose you type this formula for cell A28:
HPAS1(A14,"PROD")
If the account ID SALES.GOLF.SHOES appears in cell A14 and the Product application containsthat account, the first-level subaccount ID GOLF appears in cell A28.
HPAS2 - Second-level Subaccount ID FunctionYou use the HPAS2 function to retrieve and show the second-level subaccount ID for a specifiedaccount. Use this format:
HPAS2("Account","Application")
Variable Description
Account The ID for the account.
Application The ID for the application that contains the account.
For example, suppose you type this formula for cell A32:
HPAS2(A14,"PROD")
If the account ID SALES.GOLF.SHOES appears in cell A14 and the Product application containsthat account, the second-level subaccount ID SHOES appears in cell A32.
186 Hyperion Retrieve Functions

HPBET - Difference FunctionYou use the HPBET function to calculate and return the difference between two data values fora specified account. The difference appears with a minus sign ( - ) if it is negative. Use this format:
HPBET("Account","Value1","Value2","Application")
Table 43 HPAB-Variables
Variable Description
Account The account ID.
Value1 A formula, number, or cell reference for the first value.
Value2 A formula, number, or cell reference for the second value.
Application The application ID.
For example, suppose you want to return the difference between the October 2002 andNovember 2002 values of the Cost of Goods Sold account for the current entity and category inthe Tax application. If the account ID appears in cell A5 of the worksheet, the November 2002value appears in cell D5, and the October 2002 value appears in cell C5, you could use thisformula to return the difference between the two values:
HPBET(A5,D5,C5,"TAX")
You can also use the HPBET function to return the difference between an account's values fortwo different categories in the same period. For example, you might want to show the differencebetween the Cash account's February values in the Actual and Last Year categories, or thedifference between its values for the Israel and France entities.
Note: The system evaluates the difference between the values based on the account type. If youspecify an income or a liability account and the second value is greater than the first, theresult is negative. If you specify an expense or an asset account and the second value isgreater than the first, the result is positive.
HPCAL - Calculated Account FunctionYou use the HPCAL function to return and show a 1 if a specified account is a calculated account,or a -1 if it is not. Use this format:
HPCAL("Entity","Category","Account","Application")
Variable Description
Entity The entity ID.
Category The category ID.
Account The account ID.
Function Syntax and Examples 187

Variable Description
Application The ID of the application that contains the account.
For example, this formula returns a 1 because for the entity USWEST in the Product application,the Total Sales account is a calculated account:
HPCAL("USWEST","ACTUAL","TOTSALES","PROD")
HPCDE - Category Description FunctionYou use the HPCDE function to retrieve and show the description for a specified category. Usethis format:
HPCDE("Category","Application")
Variable Description
Category The category ID.
Application The application ID.
For example, this formula returns the description for the Forecast category in the Taxapplication:
HPCDE("FORCST","TAX")
HPCONTRIB - Contribution Data FunctionYou use the HPCONTRIB function to retrieve contribution data. Use this format:
HPCONTRIB("Entity", "Category", "Account", "Period", "Frequency", "Parent", "Application")
Variable Description
Entity The entity ID.
Category The category ID.
Account The account ID.
Period The period ID.
Frequency The frequency ID.
Parent The parent entity ID.
Application The ID for the application that contains the contribution data.
For example, the following formula returns the Actual category’s contribution data for the Israelentity in the Cables account for the April 2002 period. This formula shows a monthly data viewfor the parent Europe in the Tax application:
188 Hyperion Retrieve Functions

HPCONTRIB("Israel”,"ACTUAL","CABLES","APR 02","MON","EUROPE","TAX")
Note: The HPCONTRIB function uses the scale of the parent instead of the entity.
HPCUR - Currency FunctionYou use the HPCUR function to retrieve and show the default currency ID for a specified entity.Use this format:
HPCUR("Entity","Application")
Variable Description
Entity The entity for which you want to retrieve the default currency ID.
Application The application ID.
For example, this formula returns the default currency ID for the Israel entity in the Taxapplication:
HPCUR("Israel","TAX")
HPDCTRL - Direct Control FunctionYou use the HPDCTRL function to retrieve either the amount of voting shares owned or thepercentage directly controlled, depending on whether you input shares as units or percentages.Use this format:
HPDCTRL("Parent", "Child", "Category", "Period", "Application")
Variable Description
Parent The parent entity ID.
Child The child entity ID.
Category The category ID.
Period The period ID.
Application The ID for the application that contains the amount of voting shares.
For example, this formula returns the amount of voting shares for the parent Europe with thechild Israel in the Actual category for the period April 2002 in the Tax application.
HPDCTRL("EUROPE","Israel","ACTUAL","APR 02","TAX")
Function Syntax and Examples 189

HPDOWN - Direct Ownership FunctionYou use the HPDOWN function either to retrieve the number of shares that the partner directlyowns or to retrieve a direct ownership percentage, depending on whether you input shares asunits or percentages. Use this format:
HPDOWN("Parent", "Child", "Category", "Period", "Application")
Variable Description
Parent The parent entity ID.
Child The child entity ID.
Category The category ID.
Period The period ID.
Application The application that contains the number of shares directly owned.
For example, this formula returns the number of shares that the parent Europe owns of the childIsrael in the Actual category for the period of April 2002 in the Tax application:
HPDOWN("EUROPE","Israel","ACTUAL","APR 02","TAX")
HPDRV - Derived Sum FunctionThe results of the HPDRV function depend on the account type of a specified account. If youspecify an income, expense, or flow account, the HPDRV function returns the sum of theaccount's values for two specified periods for the current entity and category. If you specify anasset, liability, or balance account, the HPDRV function returns a value for the later of twoperiods for the current entity and category without adding that value to the earlier value.
Use this format:
HPDRV("Account","Value1","Value2","Application")
Variable Description
Account The account ID.
Value1 A formula, number, or cell reference for the later period's value.
Value2 A formula, number, or cell reference for the earlier period's value.
Application The application ID.
For example, suppose the Cost of Goods Sold account in the Tax application is a flow account,and you want to total its October 2002 and November 2002 values. If the account ID appears incell A5 of the worksheet, the November 2002 value appears in cell D5, and the October 2002value appears in cell C5, you could use this formula to return the sum of the values:
HPDRV(A5,D5,C5,"TAX")
190 Hyperion Retrieve Functions

HPECODE - Entity Code FunctionYou use the HPECODE function to retrieve the entity code, which is a user-assigned codeassociated with the entity for a particular category and period. Use this format:
HPECODE("Entity", "Category", "Period", "Application")
Variable Description
Entity The entity ID.
Category The category ID.
Period The period ID.
Application The application that contains the entity.
For example, this formula returns the entity code for the Israel entity in the Actual category forthe April 2002 period in the Tax application:
HPECODE("Israel","ACTUAL","APR 02","TAX")
HPELIM - Elimination Data FunctionYou use the HPELIM function to retrieve elimination data. Use this format:
HPELIM("Entity", "Category", "Account", "Period", "Frequency", "Parent", "Application")
Variable Description
Entity The entity ID.
Category The category ID.
Account The account ID.
Period The period ID.
Frequency The frequency ID.
Parent The parent entity ID.
Application The application that contains the elimination data.
For example, this formula returns elimination data for the Israel entity in the Actual categoryfor the Cables account for the April 2002 period with a monthly data view for the parent Europein the Tax application:
HPELIM("Israel","ACTUAL","CABLES","APR 02","MON","EUROPE","TAX")
Note: The HPELIM function uses the scale of the parent instead of the entity.
Function Syntax and Examples 191

HPFLW - Flow FunctionYou use the HPFLW function to return a 1 if a specified account is an income, expense, or flowaccount, or a -1 if it is any other type of account. You can use the results returned by the HPFLWfunction in Excel formulas to differentiate income statement accounts from balance sheetaccounts. Use this format:
HPFLW("Account","Application")
Variable Description
Account The account ID.
Application The application ID.
For example, this formula returns a 1 because the Pretax Earnings account in the Tax applicationis a flow account:
HPFLW("PTE","TAX")
HPFNA - First Entity Description FunctionYou use the HPFNA function to retrieve and show the first entity description for a specifiedentity. Use this format:
HPFNA("Entity","Application")
Variable Description
Entity The ID for the entity.
Application The ID for the application that contains the entity.
For example, suppose you type this formula for cell D27:
HPFNA(B14,"TAX")
If the entity USELIM.PADJ in the Tax application appears in cell B14 and the description forUSELIM is United States Eliminations, that description appears in the cell D27.
HPFRE - Default Frequency FunctionYou use the HPFRE function to retrieve and show the default frequency ID for a specifiedcategory. Use this format:
HPFRE("Category","Application")
Variable Description
Category The category ID.
192 Hyperion Retrieve Functions

Variable Description
Application The application ID.
For example, this formula returns the ID of the default frequency for the Forecast category inthe Tax application:
HPFRE("FORCST","TAX")
HPFSN - Subentity Description FunctionYou can use the HPFSN function to retrieve and show the descriptions of all specified subentities.Use this format:
HPFSN("Entity","Application")
Variable Description
Entity The ID for the entity or a cell reference.
Application The ID for the application that contains the name.
For example, suppose you type this formula for cell D27:
HPFSN(B14,"TAX)
If the entity USELIM.PADJ in the Tax application appears in cell B14 and the description forPADJ is Post-Adjustment, that description appears in the cell D27.
HPFUL - Entity Description FunctionYou use the HPFUL function to retrieve and show the description for a specified entity.
Use this format:
HPFUL("Entity","Application")
Variable Description
Entity The entity ID.
Application The application ID.
For example, this formula returns the description for the Belgium-Netherlands-Luxembourgentity in the Tax application:
HPFUL("BENELUX","TAX")
HPHEA - Account Description FunctionYou use the HPHEA function to retrieve and show the description for a specified account in aspecified application. Use this format:
Function Syntax and Examples 193

HPHEA("Account","Application")
Variable Description
Account The account ID.
Application The application ID.
For example, this formula returns the description for the SALES.FBALL.HLM account ID in theProduct application:
HPHEA("SALES.FBALL.HLM","PROD")
If the account description is Sales.Football.Helmets, that description appears in the cell thatcontains the formula.
HPHMJ - Major Account Description FunctionYou use the HPHMJ function to retrieve and show the major account description for a specifiedaccount. Use this format:
HPHMJ("Account","Application")
Variable Description
Account The ID for the account.
Application The ID for the application that contains the account.
For example, suppose you type this formula for cell A23:
HPHMJ(A14,"PROD")
If the account ID SALES.FBALL.HLM in the Product application appears in cell A14 and theSALES account description is Sales by Product, that description appears in cell A23.
HPHS1 - First-level Subaccount Description FunctionYou use the HPHS1 function to retrieve and show the first-level subaccount description for aspecified account. Use this format:
HPHS1("Account","Application")
Variable Description
Account The ID for the account.
Application The ID for the application that contains the account.
For example, suppose you type this formula for cell A28:
HPHS1(A14,"PROD")
194 Hyperion Retrieve Functions
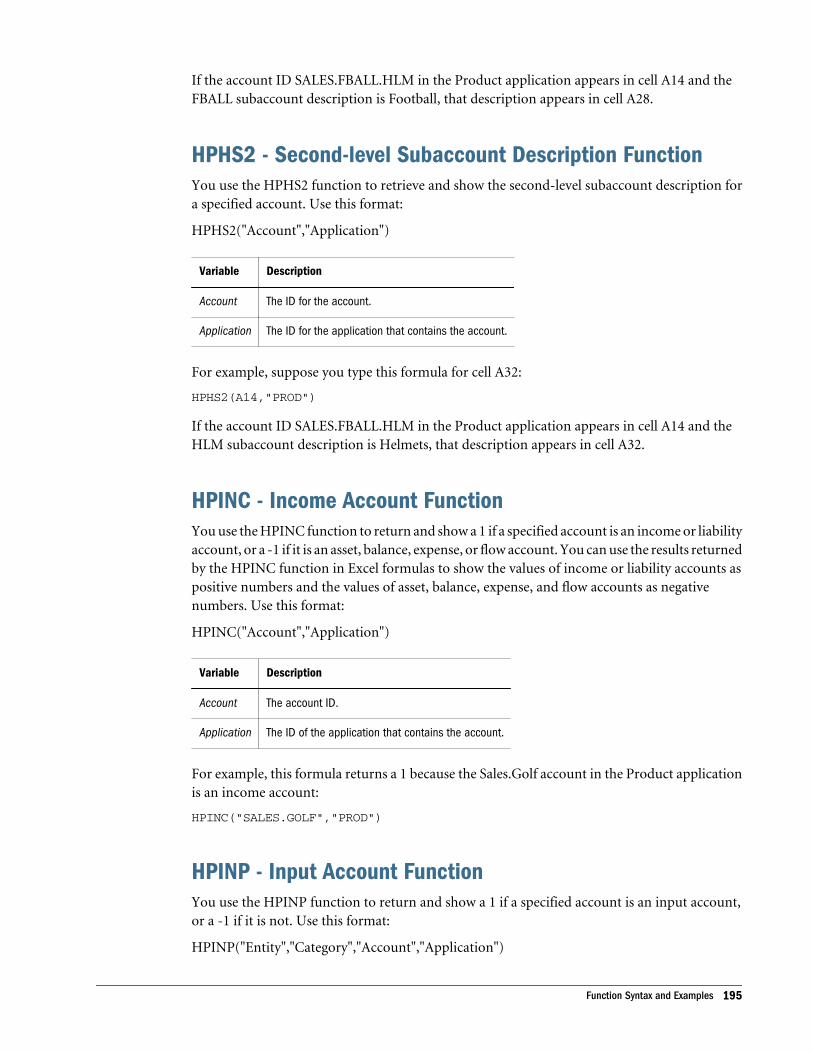
If the account ID SALES.FBALL.HLM in the Product application appears in cell A14 and theFBALL subaccount description is Football, that description appears in cell A28.
HPHS2 - Second-level Subaccount Description FunctionYou use the HPHS2 function to retrieve and show the second-level subaccount description fora specified account. Use this format:
HPHS2("Account","Application")
Variable Description
Account The ID for the account.
Application The ID for the application that contains the account.
For example, suppose you type this formula for cell A32:
HPHS2(A14,"PROD")
If the account ID SALES.FBALL.HLM in the Product application appears in cell A14 and theHLM subaccount description is Helmets, that description appears in cell A32.
HPINC - Income Account FunctionYou use the HPINC function to return and show a 1 if a specified account is an income or liabilityaccount, or a -1 if it is an asset, balance, expense, or flow account. You can use the results returnedby the HPINC function in Excel formulas to show the values of income or liability accounts aspositive numbers and the values of asset, balance, expense, and flow accounts as negativenumbers. Use this format:
HPINC("Account","Application")
Variable Description
Account The account ID.
Application The ID of the application that contains the account.
For example, this formula returns a 1 because the Sales.Golf account in the Product applicationis an income account:
HPINC("SALES.GOLF","PROD")
HPINP - Input Account FunctionYou use the HPINP function to return and show a 1 if a specified account is an input account,or a -1 if it is not. Use this format:
HPINP("Entity","Category","Account","Application")
Function Syntax and Examples 195

Variable Description
Entity The entity ID.
Category The category ID.
Account The account ID.
Application The ID of the application that contains the account.
For example, this formula returns a 1 because for the entity USWEST in the Sales category ofthe Product application, the Sales.Golf account is an input account:
HPINP("USWEST","ACTUAL","SALES.GOLF","PROD")
HPJAC - Journal Account FunctionYou use the HPJAC function to retrieve the account for a specified journal detail row. Use thisformat:
HPJAC("Journal", "Table", "Category", "Period", "Application", "Detail")
Variable Description
Journal The journal for which you want to return the account.
Table The type of journal: journal or template.
Category The category of the journal.
Period The period of the journal.
Application The application ID.
Detail A unique number assigned to each detail row. When you select the detail row using the Change JournalDetail option on the RHXL (in Excel)) menu, the system displays the record signature for that detail row.
For example, to display the account IDs for a journal entry, you can use the following formula:
HPJAC("RECLASS1","JOURNAL","ACTUAL","1","APP1","0")
HPJCR - Journal Credit Value FunctionYou use the HPJCR function to retrieve the credit value for a specified journal detail row. Usethis format:
HPJCR("Journal", "Table", "Category", "Period", "Application", "Detail")
Variable Description
Journal The journal for which you want to return the detail row’s credit value.
Table The type of journal: journal or template.
196 Hyperion Retrieve Functions
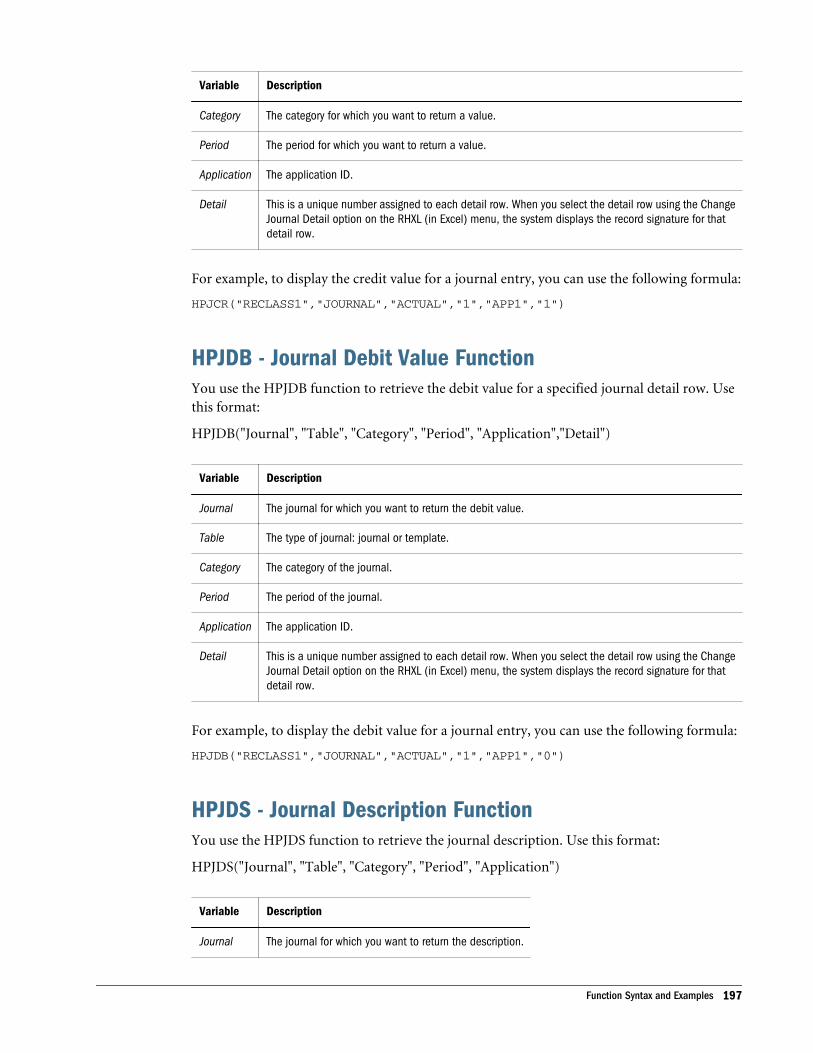
Variable Description
Category The category for which you want to return a value.
Period The period for which you want to return a value.
Application The application ID.
Detail This is a unique number assigned to each detail row. When you select the detail row using the ChangeJournal Detail option on the RHXL (in Excel) menu, the system displays the record signature for thatdetail row.
For example, to display the credit value for a journal entry, you can use the following formula:
HPJCR("RECLASS1","JOURNAL","ACTUAL","1","APP1","1")
HPJDB - Journal Debit Value FunctionYou use the HPJDB function to retrieve the debit value for a specified journal detail row. Usethis format:
HPJDB("Journal", "Table", "Category", "Period", "Application","Detail")
Variable Description
Journal The journal for which you want to return the debit value.
Table The type of journal: journal or template.
Category The category of the journal.
Period The period of the journal.
Application The application ID.
Detail This is a unique number assigned to each detail row. When you select the detail row using the ChangeJournal Detail option on the RHXL (in Excel) menu, the system displays the record signature for thatdetail row.
For example, to display the debit value for a journal entry, you can use the following formula:
HPJDB("RECLASS1","JOURNAL","ACTUAL","1","APP1","0")
HPJDS - Journal Description FunctionYou use the HPJDS function to retrieve the journal description. Use this format:
HPJDS("Journal", "Table", "Category", "Period", "Application")
Variable Description
Journal The journal for which you want to return the description.
Function Syntax and Examples 197

Variable Description
Table The type of journal: journal or template.
Category The category of the journal.
Period The period of the journal.
Application The application ID.
For example, to display the journal entry description for a journal entry, you would use thefollowing formula:
HPJDS("RECLASS1","JOURNAL","ACTUAL","1","APP1")
HPJEN - Journal Entity FunctionYou use the HPJEN function to retrieve the entity for a specified journal detail row. Use thisformat:
HPJEN("Journal", "Table", "Category", "Period", "Application", "Detail")
Variable Description
Journal The journal for which you want to return the entity.
Table The type of journal: journal or template.
Category The category of the journal.
Period The period of the journal.
Application The application ID.
Detail This is a unique number assigned to each detail row. When you select the detail row using the ChangeJournal Detail option on the RHXL (in Excel) menu, the system displays the record signature for thatdetail row.
For example, to display the entity for a journal entry, you can use the following formula:
HPJEN("RECLASS1","JOURNAL","ACTUAL","1","APP1","0")
HPJNO - Journal Number FunctionYou use the HPJNO function to retrieve the number that was assigned to the journal by thesystem. Use this format:
HPJNO("Journal", "Table", "Category", "Period", "Application")
Variable Description
Journal The journal for which you want to return the number.
198 Hyperion Retrieve Functions
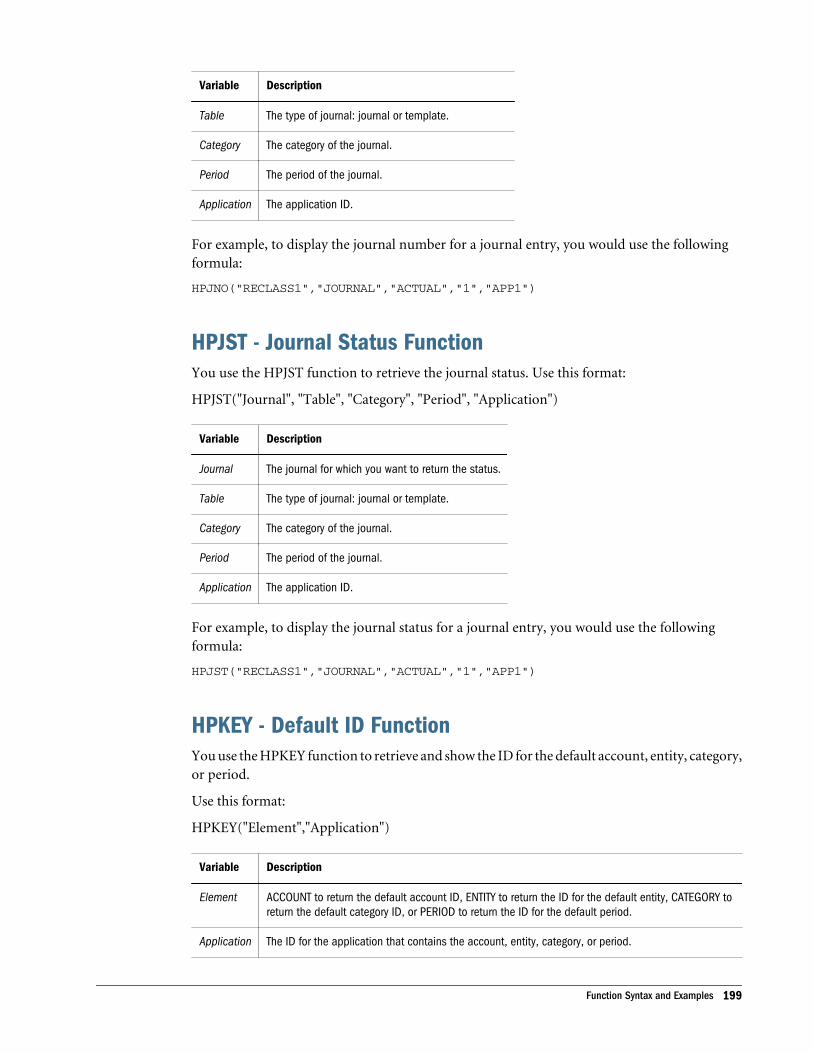
Variable Description
Table The type of journal: journal or template.
Category The category of the journal.
Period The period of the journal.
Application The application ID.
For example, to display the journal number for a journal entry, you would use the followingformula:
HPJNO("RECLASS1","JOURNAL","ACTUAL","1","APP1")
HPJST - Journal Status FunctionYou use the HPJST function to retrieve the journal status. Use this format:
HPJST("Journal", "Table", "Category", "Period", "Application")
Variable Description
Journal The journal for which you want to return the status.
Table The type of journal: journal or template.
Category The category of the journal.
Period The period of the journal.
Application The application ID.
For example, to display the journal status for a journal entry, you would use the followingformula:
HPJST("RECLASS1","JOURNAL","ACTUAL","1","APP1")
HPKEY - Default ID FunctionYou use the HPKEY function to retrieve and show the ID for the default account, entity, category,or period.
Use this format:
HPKEY("Element","Application")
Variable Description
Element ACCOUNT to return the default account ID, ENTITY to return the ID for the default entity, CATEGORY toreturn the default category ID, or PERIOD to return the ID for the default period.
Application The ID for the application that contains the account, entity, category, or period.
Function Syntax and Examples 199

For example, suppose you type this formula for cell A10:
HPKEY("CATEGORY","PROD")
If the default category for the Product application is Last Year and its ID is LASTYR, that IDappears in cell A10.
HPLNK - Link Data Value FunctionYou use the HPLNK function to send a data value from a spreadsheet to the Hyperion Enterprisedatabase for a specified entity, category, account, period, frequency, and application.
The name and account to which you are exporting data must be an input name and account.You must select either PER or CTD, rather than YTD, as the frequency view. You cannot exportdata from a spreadsheet to an open data file. If you are exporting to a journal entity, make surethat it does not have a journal lock applied. Turn off all cell protection in the worksheet whenusing the HPLNK option. Use this format:
HPLNK(Value,"Entity","Category","Account","Period","Frequency", "Application")
Variable Description
Value The value you want to send to Hyperion Enterprise.
Entity The entity for which you want to send a value.
Category The category for which you want to send a value.
Account The account for which you want to send a value.
Period The period for which you want to send a value.
Frequency The frequency code for the data you want to send to the database.
Application The application ID.
For example, this formula sends the value in cell A20 to the Forecast category's October 2002value for the Cables account and the Israel entity in the Tax application, with a monthly dataview:
HPLNK(A20,"Israel","FORCST","CABLES","OCT 02","MON","TAX")
For more information, see “Period Values in Hyperion Retrieve Functions” on page 209.
HPNAM - Entity FunctionYou use the HPNAM function to retrieve and show the ID for a specified entity. Use this format:
HPNAM("Entity","Application")
200 Hyperion Retrieve Functions
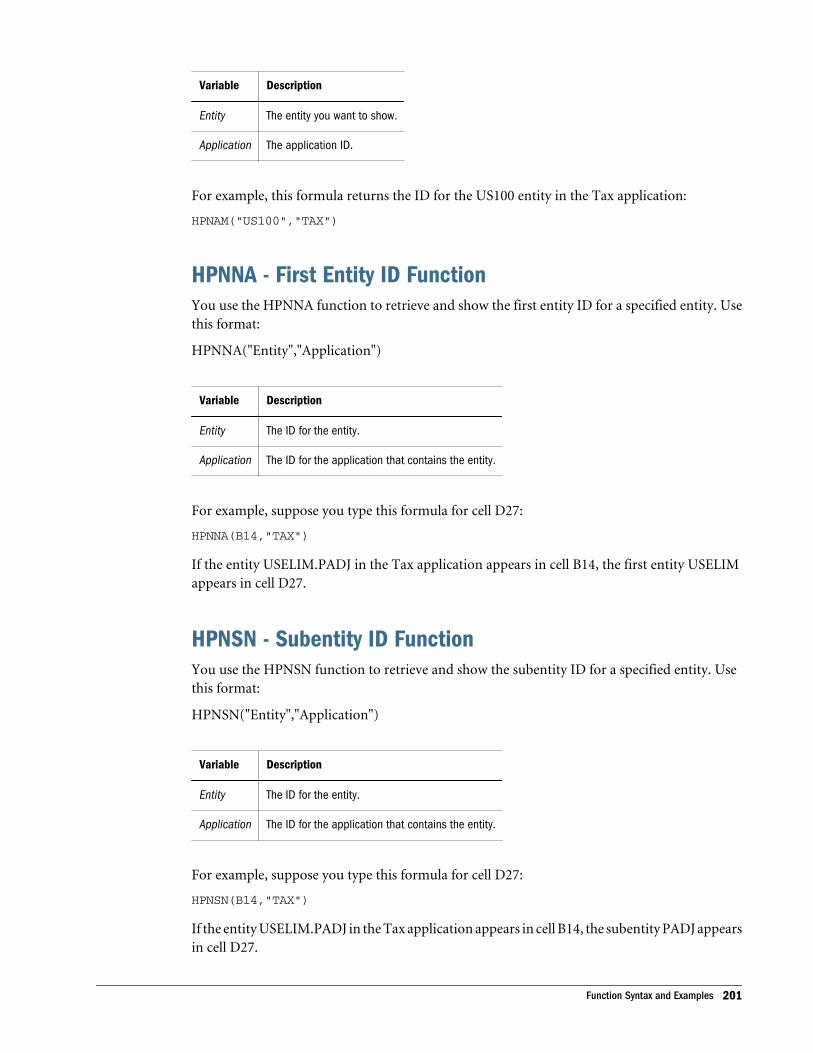
Variable Description
Entity The entity you want to show.
Application The application ID.
For example, this formula returns the ID for the US100 entity in the Tax application:
HPNAM("US100","TAX")
HPNNA - First Entity ID FunctionYou use the HPNNA function to retrieve and show the first entity ID for a specified entity. Usethis format:
HPNNA("Entity","Application")
Variable Description
Entity The ID for the entity.
Application The ID for the application that contains the entity.
For example, suppose you type this formula for cell D27:
HPNNA(B14,"TAX")
If the entity USELIM.PADJ in the Tax application appears in cell B14, the first entity USELIMappears in cell D27.
HPNSN - Subentity ID FunctionYou use the HPNSN function to retrieve and show the subentity ID for a specified entity. Usethis format:
HPNSN("Entity","Application")
Variable Description
Entity The ID for the entity.
Application The ID for the application that contains the entity.
For example, suppose you type this formula for cell D27:
HPNSN(B14,"TAX")
If the entity USELIM.PADJ in the Tax application appears in cell B14, the subentity PADJ appearsin cell D27.
Function Syntax and Examples 201

HPPARADJ - Parent Adjustment Data FunctionYou use the HPPARADJ function to retrieve parent adjustment data. Use this format:
HPPARADJ("Entity", "Category", "Account", "Period", "Frequency", "Parent", "Application")
Variable Description
Entity The entity ID.
Category The category ID.
Account The account ID.
Period The period ID.
Frequency The frequency ID.
Parent The parent entity ID.
Application The application that contains the parent adjustment data.
For example, this formula returns the parent adjustment data for the Israel entity in the Actualcategory for the Cables account for the April 2002 period. The formula shows a monthly dataview for the parent Europe in the Tax application:
HPPARADJ("Israel","ACTUAL","CABLES","APR 02","MON","EUROPE","TAX")
Note: The HPPARADJ function uses the scale of the parent instead of the entity.
HPPBE - Percentage Difference FunctionYou use the HPPBE function to return the percentage difference between two values for aspecified account. The difference appears with a plus sign ( + ) if it is positive or a minus sign( - ) if it is negative. Use this format:
HPPBE("Account","Value1","Value2","Application")
Variable Description
Account The account ID.
Value A formula, number, or cell reference for the first value.
Value2 A formula, number, or cell reference for the second value.
Application The application ID.
For example, suppose you want to return the percentage difference between the October 2002and November 2002 values of the Cost of Goods Sold account for the Tax application. If theaccount ID appears in cell A5 of the worksheet, the November 2002 value appears in cell D5,the October 2002 value appears in cell C5, and the application ID appears in cell A1, you coulduse this formula to return the percentage difference between the two values:
202 Hyperion Retrieve Functions
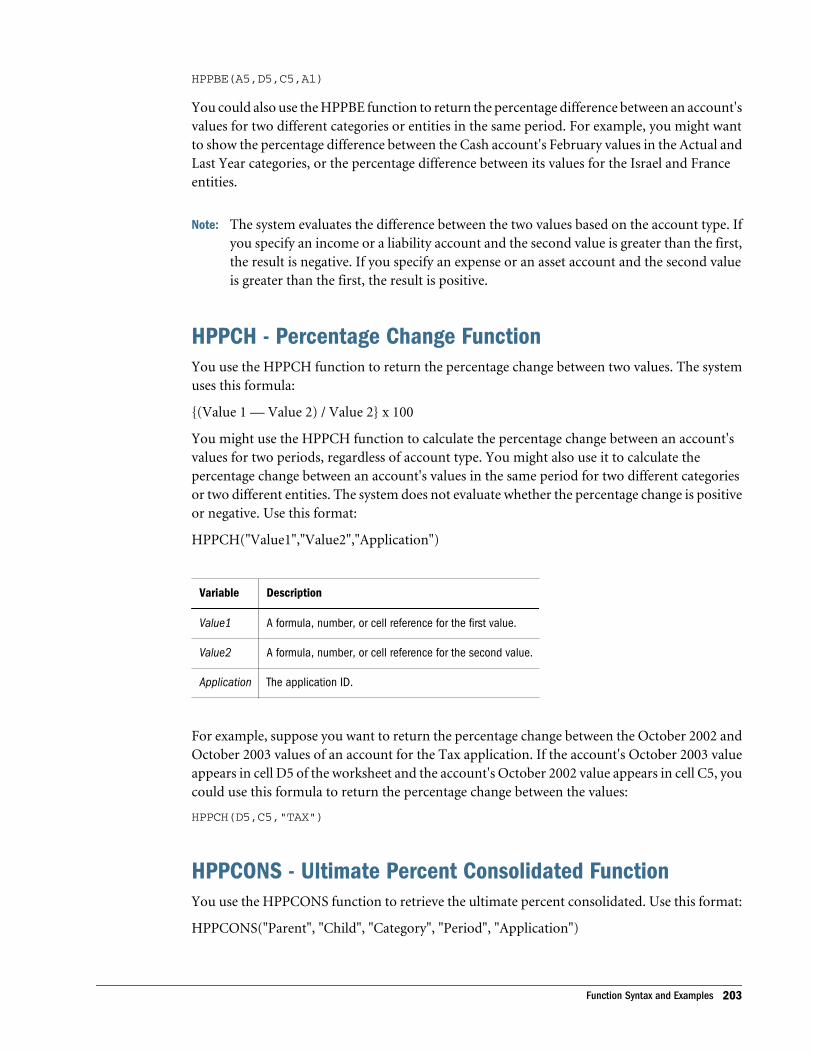
HPPBE(A5,D5,C5,A1)
You could also use the HPPBE function to return the percentage difference between an account'svalues for two different categories or entities in the same period. For example, you might wantto show the percentage difference between the Cash account's February values in the Actual andLast Year categories, or the percentage difference between its values for the Israel and Franceentities.
Note: The system evaluates the difference between the two values based on the account type. Ifyou specify an income or a liability account and the second value is greater than the first,the result is negative. If you specify an expense or an asset account and the second valueis greater than the first, the result is positive.
HPPCH - Percentage Change FunctionYou use the HPPCH function to return the percentage change between two values. The systemuses this formula:
{(Value 1 — Value 2) / Value 2} x 100
You might use the HPPCH function to calculate the percentage change between an account'svalues for two periods, regardless of account type. You might also use it to calculate thepercentage change between an account's values in the same period for two different categoriesor two different entities. The system does not evaluate whether the percentage change is positiveor negative. Use this format:
HPPCH("Value1","Value2","Application")
Variable Description
Value1 A formula, number, or cell reference for the first value.
Value2 A formula, number, or cell reference for the second value.
Application The application ID.
For example, suppose you want to return the percentage change between the October 2002 andOctober 2003 values of an account for the Tax application. If the account's October 2003 valueappears in cell D5 of the worksheet and the account's October 2002 value appears in cell C5, youcould use this formula to return the percentage change between the values:
HPPCH(D5,C5,"TAX")
HPPCONS - Ultimate Percent Consolidated FunctionYou use the HPPCONS function to retrieve the ultimate percent consolidated. Use this format:
HPPCONS("Parent", "Child", "Category", "Period", "Application")
Function Syntax and Examples 203
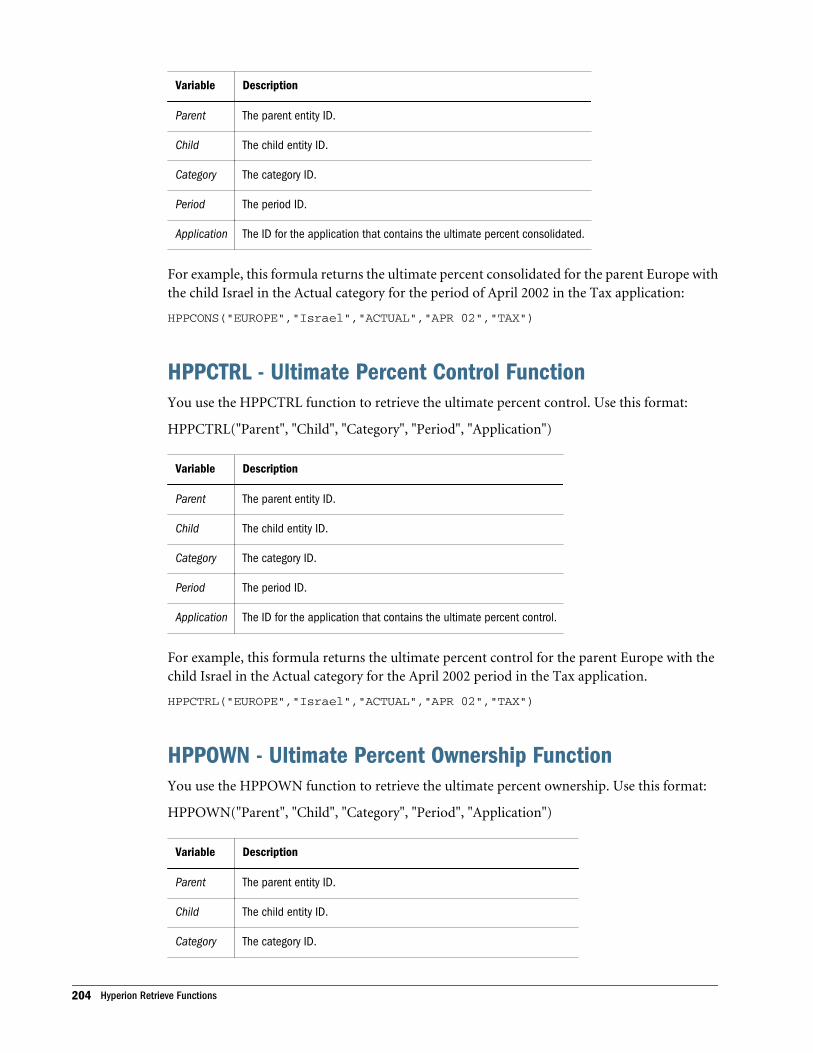
Variable Description
Parent The parent entity ID.
Child The child entity ID.
Category The category ID.
Period The period ID.
Application The ID for the application that contains the ultimate percent consolidated.
For example, this formula returns the ultimate percent consolidated for the parent Europe withthe child Israel in the Actual category for the period of April 2002 in the Tax application:
HPPCONS("EUROPE","Israel","ACTUAL","APR 02","TAX")
HPPCTRL - Ultimate Percent Control FunctionYou use the HPPCTRL function to retrieve the ultimate percent control. Use this format:
HPPCTRL("Parent", "Child", "Category", "Period", "Application")
Variable Description
Parent The parent entity ID.
Child The child entity ID.
Category The category ID.
Period The period ID.
Application The ID for the application that contains the ultimate percent control.
For example, this formula returns the ultimate percent control for the parent Europe with thechild Israel in the Actual category for the April 2002 period in the Tax application.
HPPCTRL("EUROPE","Israel","ACTUAL","APR 02","TAX")
HPPOWN - Ultimate Percent Ownership FunctionYou use the HPPOWN function to retrieve the ultimate percent ownership. Use this format:
HPPOWN("Parent", "Child", "Category", "Period", "Application")
Variable Description
Parent The parent entity ID.
Child The child entity ID.
Category The category ID.
204 Hyperion Retrieve Functions

Variable Description
Period The period ID.
Application The ID for the application that contains the ultimate percent ownership.
For example, this formula returns the ultimate percent ownership for the parent Europe withthe child Israel in the Actual category in the April 2002 period in the Tax application:
HPPOWN("EUROPE","Israel","ACTUAL","APR 02","TAX")
HPPROP - Proportion Data FunctionYou use the HPPROP function to retrieve proportion data. Use this format:
HPPROP("Entity", "Category", "Account", "Period", "Frequency", "Parent", "Application")
Variable Description
Entity The entity ID.
Category The category ID.
Account The account ID.
Period The period ID.
Frequency The frequency ID.
Parent The parent entity ID.
Application The ID for the application that contains the proportional data.
For example, this formula returns the proportion data for the Israel entity in the Actual categoryfor the Cables account for the April 2002 period with a monthly data view for the parent Europein the Tax application:
HPPROP("Israel","ACTUAL","CABLES","APR 02","MON","EUROPE","TAX")
Note: The HPPROP function uses the scale of the parent instead of the entity.
HPSCA - Scale FunctionYou use the HPSCA function to retrieve the scaling factor for a specified entity, category, andaccount. The scaling factor is returned as a power of 10. For example, a scale of 3 in HyperionEnterprise is returned as 100. If the entity has scaling defined, the scaling for the entity is returned.Otherwise, the scaling for the category is returned. If the Scaling option for the account is turnedoff in the Chart of Accounts window, the HPSCA function returns a value of 1. Use this format:
HPSCA("Entity","Category","Account","Application")
Function Syntax and Examples 205
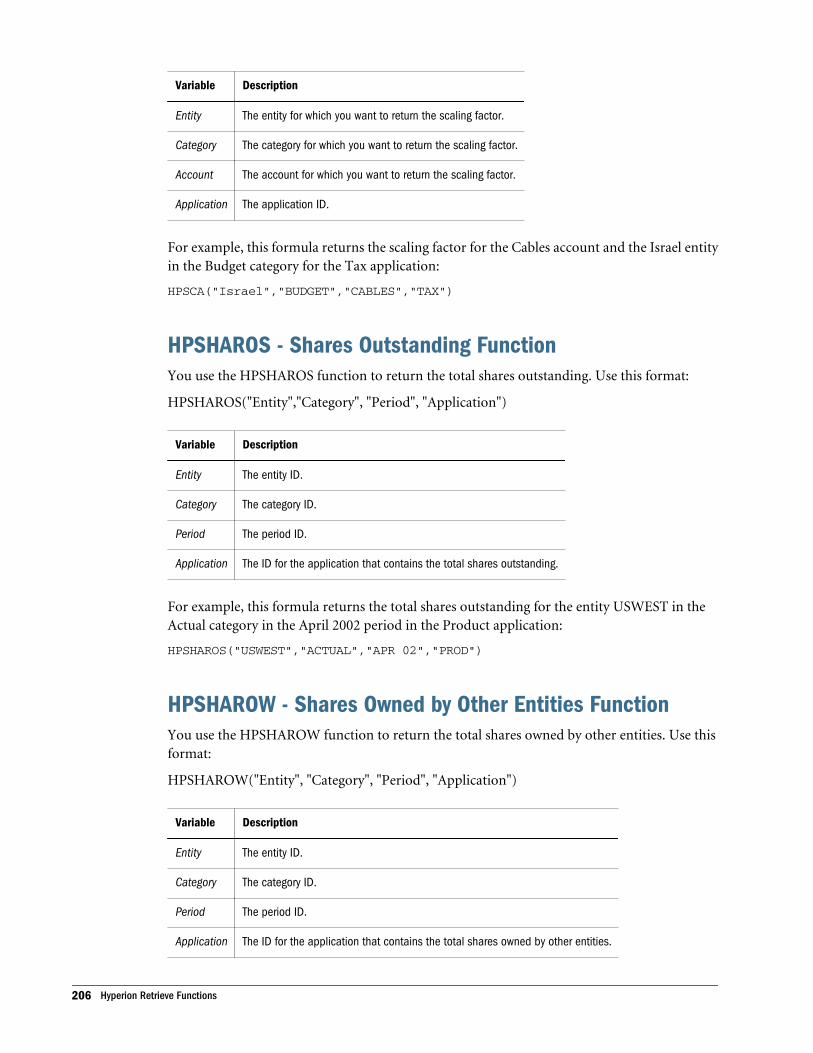
Variable Description
Entity The entity for which you want to return the scaling factor.
Category The category for which you want to return the scaling factor.
Account The account for which you want to return the scaling factor.
Application The application ID.
For example, this formula returns the scaling factor for the Cables account and the Israel entityin the Budget category for the Tax application:
HPSCA("Israel","BUDGET","CABLES","TAX")
HPSHAROS - Shares Outstanding FunctionYou use the HPSHAROS function to return the total shares outstanding. Use this format:
HPSHAROS("Entity","Category", "Period", "Application")
Variable Description
Entity The entity ID.
Category The category ID.
Period The period ID.
Application The ID for the application that contains the total shares outstanding.
For example, this formula returns the total shares outstanding for the entity USWEST in theActual category in the April 2002 period in the Product application:
HPSHAROS("USWEST","ACTUAL","APR 02","PROD")
HPSHAROW - Shares Owned by Other Entities FunctionYou use the HPSHAROW function to return the total shares owned by other entities. Use thisformat:
HPSHAROW("Entity", "Category", "Period", "Application")
Variable Description
Entity The entity ID.
Category The category ID.
Period The period ID.
Application The ID for the application that contains the total shares owned by other entities.
206 Hyperion Retrieve Functions
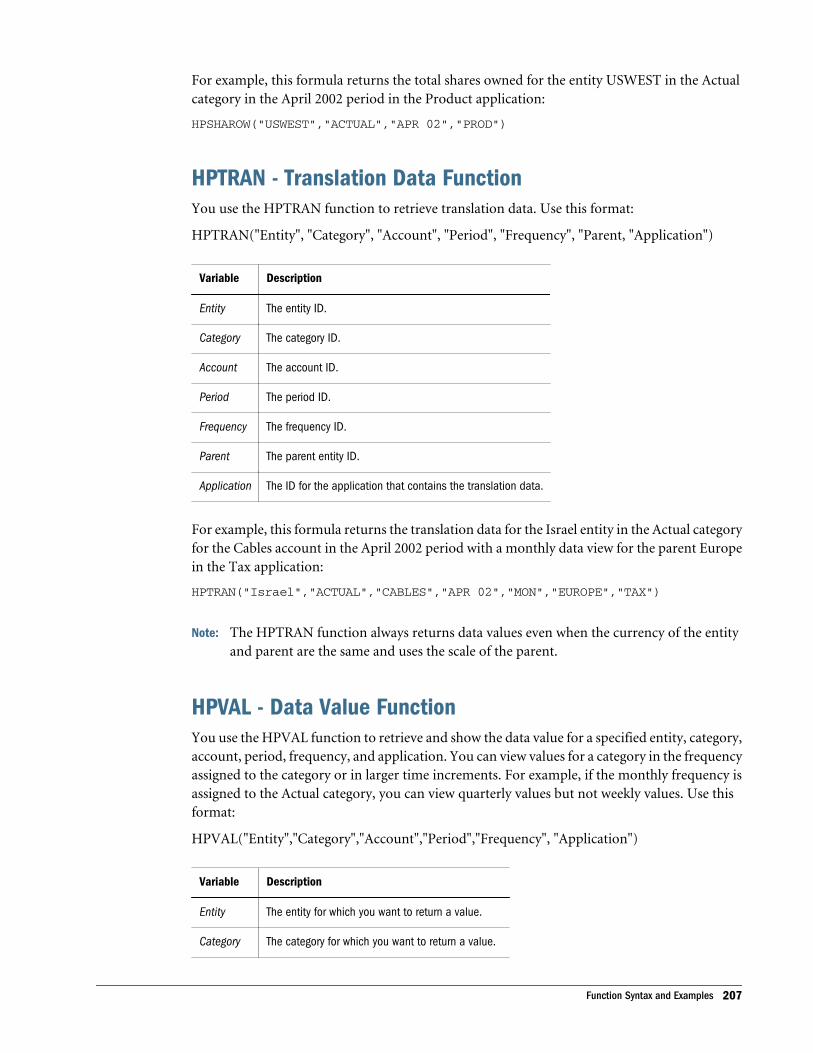
For example, this formula returns the total shares owned for the entity USWEST in the Actualcategory in the April 2002 period in the Product application:
HPSHAROW("USWEST","ACTUAL","APR 02","PROD")
HPTRAN - Translation Data FunctionYou use the HPTRAN function to retrieve translation data. Use this format:
HPTRAN("Entity", "Category", "Account", "Period", "Frequency", "Parent, "Application")
Variable Description
Entity The entity ID.
Category The category ID.
Account The account ID.
Period The period ID.
Frequency The frequency ID.
Parent The parent entity ID.
Application The ID for the application that contains the translation data.
For example, this formula returns the translation data for the Israel entity in the Actual categoryfor the Cables account in the April 2002 period with a monthly data view for the parent Europein the Tax application:
HPTRAN("Israel","ACTUAL","CABLES","APR 02","MON","EUROPE","TAX")
Note: The HPTRAN function always returns data values even when the currency of the entityand parent are the same and uses the scale of the parent.
HPVAL - Data Value FunctionYou use the HPVAL function to retrieve and show the data value for a specified entity, category,account, period, frequency, and application. You can view values for a category in the frequencyassigned to the category or in larger time increments. For example, if the monthly frequency isassigned to the Actual category, you can view quarterly values but not weekly values. Use thisformat:
HPVAL("Entity","Category","Account","Period","Frequency", "Application")
Variable Description
Entity The entity for which you want to return a value.
Category The category for which you want to return a value.
Function Syntax and Examples 207
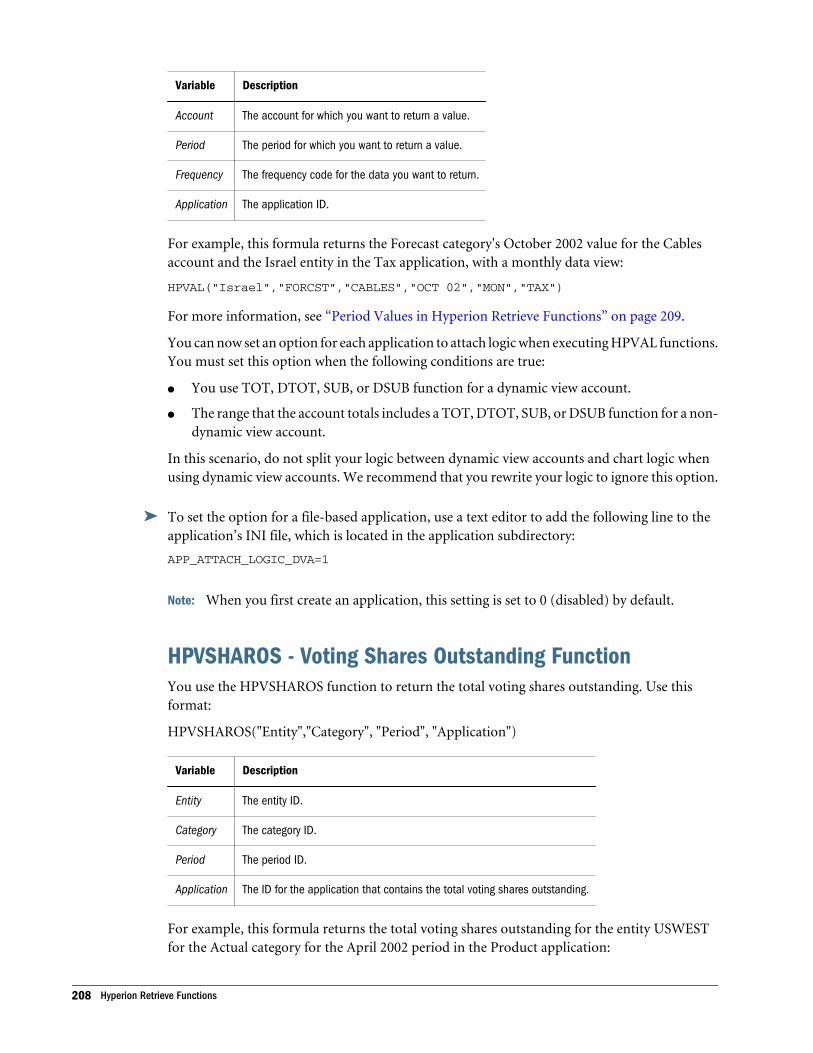
Variable Description
Account The account for which you want to return a value.
Period The period for which you want to return a value.
Frequency The frequency code for the data you want to return.
Application The application ID.
For example, this formula returns the Forecast category's October 2002 value for the Cablesaccount and the Israel entity in the Tax application, with a monthly data view:
HPVAL("Israel","FORCST","CABLES","OCT 02","MON","TAX")
For more information, see “Period Values in Hyperion Retrieve Functions” on page 209.
You can now set an option for each application to attach logic when executing HPVAL functions.You must set this option when the following conditions are true:
l You use TOT, DTOT, SUB, or DSUB function for a dynamic view account.
l The range that the account totals includes a TOT, DTOT, SUB, or DSUB function for a non-dynamic view account.
In this scenario, do not split your logic between dynamic view accounts and chart logic whenusing dynamic view accounts. We recommend that you rewrite your logic to ignore this option.
ä To set the option for a file-based application, use a text editor to add the following line to theapplication’s INI file, which is located in the application subdirectory:
APP_ATTACH_LOGIC_DVA=1
Note: When you first create an application, this setting is set to 0 (disabled) by default.
HPVSHAROS - Voting Shares Outstanding FunctionYou use the HPVSHAROS function to return the total voting shares outstanding. Use thisformat:
HPVSHAROS("Entity","Category", "Period", "Application")
Variable Description
Entity The entity ID.
Category The category ID.
Period The period ID.
Application The ID for the application that contains the total voting shares outstanding.
For example, this formula returns the total voting shares outstanding for the entity USWESTfor the Actual category for the April 2002 period in the Product application:
208 Hyperion Retrieve Functions

HPVSHAROS("USWEST","ACTUAL","APR 02","PROD")
HPVSHAROW - Voting Shares Owned by Other EntitiesFunctionYou use the HPVSHAROW function to return the total voting shares owned by other entities.Use this format:
HPVSHAROW("Entity", "Category", "Period", "Application")
Variable Description
Entity The entity ID.
Category The category ID.
Period The period ID.
Application The ID for the application that contains the total voting shares owned by other entities.
For example, this formula returns the total voting shares owned for the entity USWEST in theActual category for the April 2002 period in the Product application:
HPVSHAROW("USWEST","ACTUAL","APR 02","PROD")
Period Values in Hyperion Retrieve FunctionsThere are two methods for specifying the period when you use the HPLNK and HPVAL functionsto share data between Hyperion Enterprise and your spreadsheet program. You can type theperiod ID or the period number. The following sections show examples of the different methods.
Period IDWhen you type the period ID, be sure to include quotation marks and type a space before theyear. This indicates the April 2002 period:
"APR 02"
This indicates the second quarter period in 2002.
"Q2 02"
Period NumberWhen you type the period number, do not use quotation marks. This indicates the fourth periodin the specified category:
4
Period Values in Hyperion Retrieve Functions 209

210 Hyperion Retrieve Functions
10Product Documentation at
Oracle’s Technology NetworkSite
In This Chapter
Hyperion Enterprise Documentation ... . . . . . . . . . . . . . . . . . . . . . . . . . . . . . . . . . . . . . . . . . . . . . . . . . . . . . . . . . . . . . . . . . . . . . . . . . . . . . . . . . . . . . . . . 211
Hyperion Enterprise DocumentationTo access Oracle's Hyperion® Enterprise®, Oracle's Hyperion® Enterprise® Reporting, andOracle Hyperion Financial Data Quality Management, Fusion Edition documentations, forexample: PDF or HTML formats, see Oracle’s Technology Network (OTN) site.
Hyperion Enterprise Documentation 211

212 Product Documentation at Oracle’s Technology Network Site
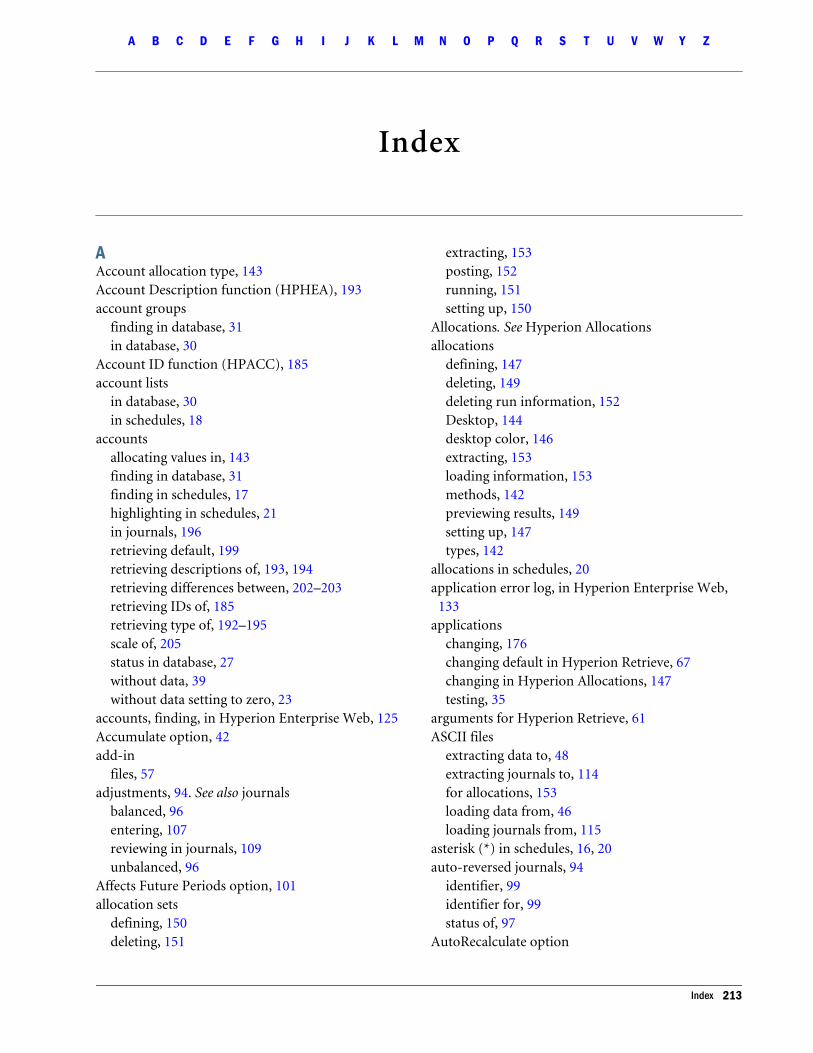
Index
AAccount allocation type, 143Account Description function (HPHEA), 193account groups
finding in database, 31in database, 30
Account ID function (HPACC), 185account lists
in database, 30in schedules, 18
accountsallocating values in, 143finding in database, 31finding in schedules, 17highlighting in schedules, 21in journals, 196retrieving default, 199retrieving descriptions of, 193, 194retrieving differences between, 202–203retrieving IDs of, 185retrieving type of, 192–195scale of, 205status in database, 27without data, 39without data setting to zero, 23
accounts, finding, in Hyperion Enterprise Web, 125Accumulate option, 42add-in
files, 57adjustments, 94. See also journals
balanced, 96entering, 107reviewing in journals, 109unbalanced, 96
Affects Future Periods option, 101allocation sets
defining, 150deleting, 151
extracting, 153posting, 152running, 151setting up, 150
Allocations. See Hyperion Allocationsallocations
defining, 147deleting, 149deleting run information, 152Desktop, 144desktop color, 146extracting, 153loading information, 153methods, 142previewing results, 149setting up, 147types, 142
allocations in schedules, 20application error log, in Hyperion Enterprise Web,
133applications
changing, 176changing default in Hyperion Retrieve, 67changing in Hyperion Allocations, 147testing, 35
arguments for Hyperion Retrieve, 61ASCII files
extracting data to, 48extracting journals to, 114for allocations, 153loading data from, 46loading journals from, 115
asterisk (*) in schedules, 16, 20auto-reversed journals, 94
identifier, 99identifier for, 99status of, 97
AutoRecalculate option
A B C D E F G H I J K L M N O P Q R S T U V W Y Z
Index 213

in database, 39in schedules, 22
BB in schedules, 16balanced journals, 96
CCALC status, 74Calculated Account function (HPCAL), 187calculated accounts
editing data in, 22loading data into, 45moving data in, 21reporting on, 45whether account is, 187
categoriesretrieving default, 199retrieving description of, 188scale of, 205
Category Description function (HPCDE), 188category-to-date data view
journals and, 101change the Hyperion Enterprise Application, 176CHANGED status, 74codes
for journals, 99retrieving, 191
colorsallocations desktop, 146in Hyperion Allocations, 146
consolidated accountsediting data in, 22moving data in, 21
consolidating data, 78consolidating dynamic organizations, 80consolidation
process of, 71retrieving percentage of, 203statuses for, 74
consolidation detailextracting, 49invalid, 41reporting on, 40, 81storing, 74viewing in schedules, 17
consolidation detail, in Hyperion Enterprise Web,125
consolidation statusdatabase changes and, 32
Consolidation window, 76Contribution Data function (HPCONTRIB), 188contribution detail
extracting, 49reporting on, 40retrieving, 188viewing, 17
controlretrieving percent of, 204
credit values, 196currencies
retrieving, 189Currency function (HPCUR), 189
Ddata
appearance in schedules, 16calculating difference, 187calculating in schedules, 15, 129clearing blocks of, 35consolidating, 78consolidating, in Hyperion Enterprise Web, 126copying in database, 33copying in schedules, 22defining formats for, 46editing, 19entering, 19entering using Hyperion Retrieve, 200entering with operator keys, 19entering, in Hyperion Enterprise Web, 130erasing, 35error file for, 45extracting, 48filling database with, 35formats for, 42highlighting blocks of, 21, 32loading, 46loading with Accumulate option, 42loading with Merge option, 44loading with Replace option, 43moving in database, 33moving in schedules, 21pasting in database, 34
A B C D E F G H I J K L M N O P Q R S T U V W Y Z
214 Index
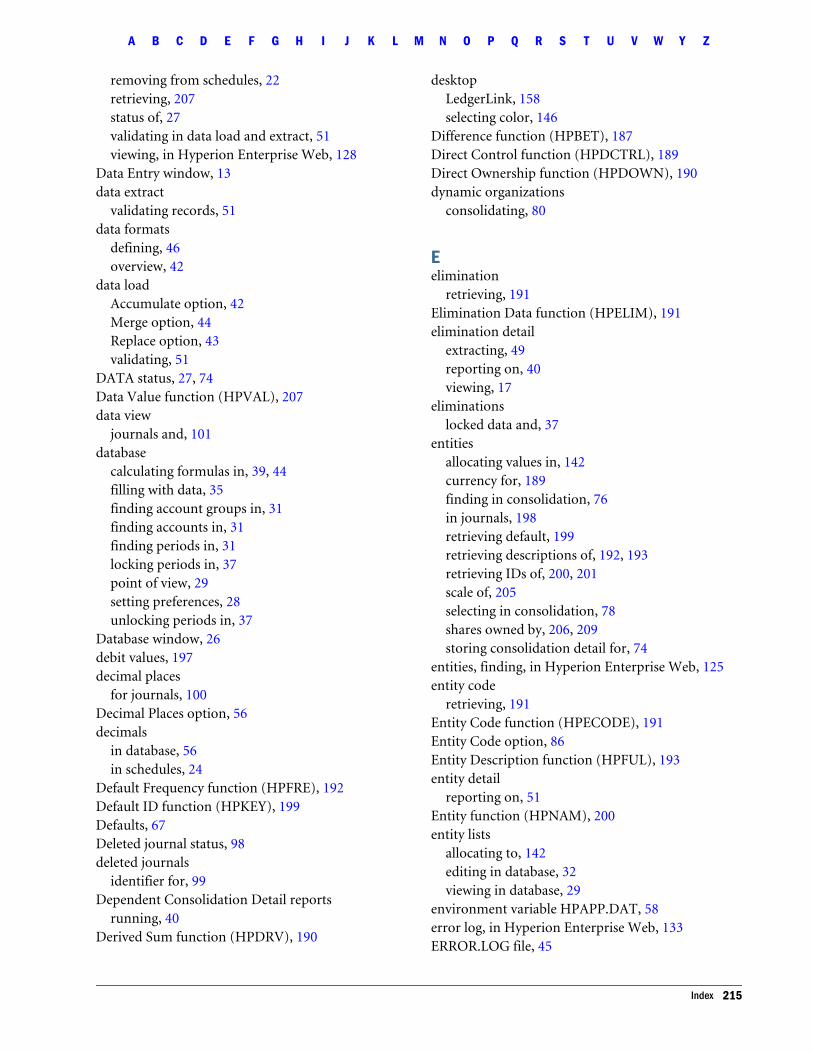
removing from schedules, 22retrieving, 207status of, 27validating in data load and extract, 51viewing, in Hyperion Enterprise Web, 128
Data Entry window, 13data extract
validating records, 51data formats
defining, 46overview, 42
data loadAccumulate option, 42Merge option, 44Replace option, 43validating, 51
DATA status, 27, 74Data Value function (HPVAL), 207data view
journals and, 101database
calculating formulas in, 39, 44filling with data, 35finding account groups in, 31finding accounts in, 31finding periods in, 31locking periods in, 37point of view, 29setting preferences, 28unlocking periods in, 37
Database window, 26debit values, 197decimal places
for journals, 100Decimal Places option, 56decimals
in database, 56in schedules, 24
Default Frequency function (HPFRE), 192Default ID function (HPKEY), 199Defaults, 67Deleted journal status, 98deleted journals
identifier for, 99Dependent Consolidation Detail reports
running, 40Derived Sum function (HPDRV), 190
desktopLedgerLink, 158selecting color, 146
Difference function (HPBET), 187Direct Control function (HPDCTRL), 189Direct Ownership function (HPDOWN), 190dynamic organizations
consolidating, 80
Eelimination
retrieving, 191Elimination Data function (HPELIM), 191elimination detail
extracting, 49reporting on, 40viewing, 17
eliminationslocked data and, 37
entitiesallocating values in, 142currency for, 189finding in consolidation, 76in journals, 198retrieving default, 199retrieving descriptions of, 192, 193retrieving IDs of, 200, 201scale of, 205selecting in consolidation, 78shares owned by, 206, 209storing consolidation detail for, 74
entities, finding, in Hyperion Enterprise Web, 125entity code
retrieving, 191Entity Code function (HPECODE), 191Entity Code option, 86Entity Description function (HPFUL), 193entity detail
reporting on, 51Entity function (HPNAM), 200entity lists
allocating to, 142editing in database, 32viewing in database, 29
environment variable HPAPP.DAT, 58error log, in Hyperion Enterprise Web, 133ERROR.LOG file, 45
A B C D E F G H I J K L M N O P Q R S T U V W Y Z
Index 215

Excelfile locations, 59pasting Hyperion Retrieve functions, 63setting up Hyperion Retrieve and, 57starting Hyperion Retrieve, 59
Exception rule, 165exception rule, 165exporting data. See extracting dataexternal list
create, 179creating, 179update, 179
extractingallocation sets, 153allocations, 153Consolidation detail, 49journals, 114
extracting data, 48formats for, 42
Ffactor method for allocations, 143field formats
verify, 177file types
translation, 162files
ERROR.LOG, 45for journals, 116
First Entity Description function (HPFNA), 192First Entity ID function (HPNNA), 201First-level Subaccount Description function
(HPHS1), 194First-level Subaccount ID function (HPAS1), 186flow accounts
whether account is, 192Flow function (HPFLW), 192fonts
in database, 28in Hyperion Allocations, 146in schedules, 15, 129
for LedgerLink, 159formulas
calculating in database, 28, 39, 44calculating in schedules, 22displaying in schedules, 15, 129in Hyperion Retrieve, 60
frequenciesretrieving, 192
GG/L Template Wizard, 160Global rule, 165, 166
Hhistory report, 117HPACC function, 185HPAMJ function, 185HPAPP.DAT
environment variables, 58HPAPP.DAT file, 58HPAS1 function, 186HPAS2 function, 186HPBET function, 187HPCAL function, 187HPCDE function, 188HPCONTRIB function, 188HPCUR function, 189HPDCTRL function, 189HPDOWN function, 190HPDRV function, 190HPECODE function, 191HPELIM function, 191HPFLW function, 192HPFNA function, 192HPFRE function, 192HPFSN function, 193HPFUL function, 193HPHEA function, 193HPHMJ function, 194HPHS1 function, 194HPHS2 function, 195HPINC function, 195HPINP function, 195HPJAC function, 196HPJCR function, 196HPJDB function, 197HPJDS function, 197HPJEN function, 198HPJNO function, 198HPJST function, 199HPKEY function, 199HPLNK function, 200
A B C D E F G H I J K L M N O P Q R S T U V W Y Z
216 Index

HPNAM function, 200HPNNA function, 201HPNSN function, 201HPPARADJ function, 202HPPBE function, 202HPPCH function, 203HPPCONS function, 203HPPCTRL function, 204HPPOWN function, 204HPPROP function, 205HPSCA function, 205HPSHAROS function, 206HPSHAROW function, 206HPTRAN function, 207HPVAL function, 207HPVSHAROS function, 208HPVSHAROW function, 209Hyperion Allocations
desktop, 144overview, 141starting, 145
Hyperion Retrievearguments, 61Display No Data as Zero option, 60formulas, 60functions, 61overview, 57pasting functions in Excel, 63setting up, 57starting for Excel, 59worksheets, 64
Hyperion Retrieve add-in file locations, 59
Iicons
for previewing allocations, 154in Hyperion Allocations, 147in Results View window, 169in Translation Builder window, 170
IMPACTED status, 74imported translation file rules, 167importing data. See loading dataINACTIVE status, 75Income Account function (HPINC), 195income accounts
whether accounts is, 195Input Account function (HPINP), 195
input accounts, 195intercompany. See eliminationintercompany matching
reporting on, 83–91intercompany matching reports
case studies, 89running, 88
Jjournal
identifier for, 99Journal Account function (HPJAC), 196Journal Credit Value function (HPJCR), 196Journal Debit Value function (HPJDB), 197Journal Description function (HPJDS), 197Journal Entity function (HPJEN), 198journal ID, 98journal locked status, 27Journal Number function (HPJNO), 198journal status
auto-reversed, 97Journal Status function (HPJST), 199journal templates
creating, 106editing, 113
journals, 95. See also parent adjustmentsbalanced, 96codes for, 99creating, 106creating templates for, 106creating using recurring templates, 108credit values in, 196data view and, 101debit values in, 197defined, 93deleting, 105editing, 113entering detail for, 107entities in, 198extracting, 114file formats for, 116for parent entities, 95future periods, 101loading, 115locked status, 27locking in database, 110numbering, 98
A B C D E F G H I J K L M N O P Q R S T U V W Y Z
Index 217

posting, 110–112posting to missing data, 102process of, 105repeating, 96retrieving account in, 196retrieving descriptions of, 197retrieving number of, 198reversing, 113reviewing, 109statuses, 97statuses of, 199templates for, 95types of, 94–95unbalanced, 96unlocking in database, 110unposting, 112viewing information about, 100
journals report, 117Journals window, 104
KK in schedules, 16
Llabels
selecting in Hyperion Retrieve, 66Language
of Hyperion Allocations, 146LedgerLink
starting, 175Link Data Value function (HPLNK), 200load data into Hyperion Enterprise, 183Load Error File option, 45Load panel, 173load profiles, 171
defining, 182Load to Hyperion Enterprise, 175loading data, 46
formats for, 42loading journals, 115locked data
extracting, 48Locked journal status, 97locked journals
identifier for, 99Locked status, 27, 75
locking data, 37effects of, 21, 22
locking journals, 110
MM in schedules, 16Major Account Description function (HPHMJ), 194Major Account ID function (HPAMJ), 185Merge option, 44Microsoft Excel, 57minus sign (-) in schedules, 20
NName allocation type, 142NODATA status, 27, 74numbering journals, 98numbers. See data
OOK status, 74operator keys, 19options
Entity Code, 86ownership
retrieving, 190retrieving percent of, 204
PParent Adjustment Data function (HPPARADJ), 202parent adjustment detail
viewing, 17parent adjustments
extracting, 49reporting on, 40retrieving, 202
parent journals, 95identifier, 99
parentsadjustments to, 95
percent controlretrieving, 189
Percent method for allocations, 143percent sign (%) in schedules, 20Percentage Change function (HPPCH), 203Percentage Difference function (HPPBE), 202
A B C D E F G H I J K L M N O P Q R S T U V W Y Z
218 Index

periodic data viewjournals and, 101
periodsallocations among, 143finding in consolidation, 77finding in database, 31finding in schedules, 17highlighting in schedules, 21locking in database, 37opening in journals, 105retrieving default, 199retrieving differences between, 203selecting in consolidation, 78status, 27unlocking in database, 37
plus sign (+) in schedules, 19point of view
in database, 29in Hyperion Allocations, 147in the Data Entry window, 16retrieving, 199
Posted and Edited journal status, 97posted and edited journals
identifier for, 99Posted journal status, 97posted journals
identifier, 99posting
allocation sets, 152posting journals, 110–112
data view and, 101POV, in Hyperion Enterprise Web, 122previewing
allocation reports, 154previewing of allocation results, 149printing allocation reports, 154profiles
load, 171translate, 171
program files, 57Proportion Data function (HPPROP), 205proportion detail
reporting on, 40retrieving, 205viewing, 17
QQ in schedules, 16question mark (?) in schedules, 20
RRange rule, 165, 166recurring templates, 96
creating journals from, 108identifier, 99
regular journals, 94identifier, 99
Replace option, 43report format
specify, 178reports
Consolidation Detail, 81for allocations, 154Intercompany Matching, 83journals, 117journals history, 117trial balance, 118
resultsview translation, 180
retrieving, 206, 209Reversed journal status, 97reversed journals
identifier, 99reversing journals, 113Reviewed journal status, 97reviewed journals
identifier, 99rounding
in schedules, 16Rules
imported translation file, 167Rules translation, 165
Ssample file
select a source, 161sample files, 159sample record
select, 176scale
extracting data and, 49retrieving, 205
A B C D E F G H I J K L M N O P Q R S T U V W Y Z
Index 219

Scale function (HPSCA), 205schedules
defining, 18deleting, 17displaying large values in, 16operator keys in, 19point of view, 16setting preferences for, 15, 129setting up, 17truncated data in, 16
Second-level Subaccount Description function(HPHS2), 195
Second-level Subaccount ID function (HPAS2), 186security classes
extracting data and, 48Set information
loading, 153shares, 206, 209
retrieving, 206, 208Shares Outstanding function (HPSHAROS), 206Shares Owned by Other Entities function
(HPSHAROW), 206slash (/) in schedules, 20source sample file
select, 161standard templates, 95
identifier, 99status
for journals, 97in database, 27
statusesin consolidation, 74of journals, 199
subaccountsallocating to, 143not displaying, 18retrieving descriptions of, 194, 195retrieving IDs for, 186
subaccounts in schedules, 18subentities
retrieving descriptions of, 193retrieving IDs of, 201
Subentity Description function (HPFSN), 193Subentity ID function (HPNSN), 201
TT in schedules, 16
task status, in Hyperion Enterprise Web, 127Template Wizard, 160templates, 106. See also journal templates
balanced, 96configure, 177for journals, 95unbalanced, 96
testing applications, 35Time allocation type, 143toolbars. See iconsTotal method for allocations, 144Translate / Load Profile Dialog Box, 172Translate / Load Profiles list box, 171Translate panel, 172Translate profiles, 171Translation builder, 162, 163Translation Data function (HPTRAN), 207translation detail
extracting, 49reporting on, 40retrieving, 207viewing, 17
Translation file types, 162translation files
importing, 181translation profiles
defining, 181translation results
viewing, 180Translation rules, 165
setting up, 179Trial Balance report, 118truncating data in schedules, 16
UUltimate Percent Consolidated function
(HPPCONS), 203Ultimate Percent Control function (HPPCTRL), 204Ultimate Percent Ownership function (HPPOWN),
204unbalanced journals, 96unlocking data, 37unlocking journals, 110unposted journals
identifier, 99Unposted journals status, 97unposting journals, 112
A B C D E F G H I J K L M N O P Q R S T U V W Y Z
220 Index
Update external list, 179
Vvalidated subaccounts
adding to schedules, 18Value method for allocations, 143values. See dataVerify field formats, 177voting shares
retrieving, 189, 208, 209Voting Shares Outstanding function (HPVSHAROS),
208Voting Shares Owned by Other Entities function
(HPVSHAROW), 209
WHyperion Enterprise Web. See Web, Hyperion
EnterpriseWeb,Hyperion Enterprise
accounts, finding, 125consolidation detail, 125data
consolidation, 126entering, 130viewing, 128
entities, finding, 125error log, 133POV, 122task status, 127using, 121
wildcardsin LedgerLink, 166
windowsConsolidation, 76Data Entry, 13Database, 26Journals, 104
worksheetsHyperion Retrieve, 64refreshing in Hyperion Retrieve, 67
Yyear-to-date data view
journals and, 101
ZZero No Data Load option, 45zero values
setting up, 39
A B C D E F G H I J K L M N O P Q R S T U V W Y Z
Index 221

A B C D E F G H I J K L M N O P Q R S T U V W Y Z
222 Index