hydro-retriever 3800 hydro-retriever 2042d2z4qs2e3spnc1.cloudfront.net/product_file/file/...4 - form...
TRANSCRIPT

4/04 revised 6/05 Form Number 56041587English
Hydro-Retriever™ 3800
Instructions For Use
BR 1100, 1100C, 1100C-XLHydro-Retriever™ 2042
Advance MODELS 56410000(disc), 56410350(cyl.), 56410001(2042)Nilfi sk MODEL 56410002(disc), 56410351(cyl.), 56410425 (1100C-XL)56307200(Haram BR 1100)


FORM NO. 56041587 - Hydro-Retriever™ 3800, 2042 / BR 1100, 1100C, 1100C-XL - 3
ENGLISH / 3TABLE OF CONTENTS page
Introduction ...............................................................................................3
Cautions and Warnings ............................................................................4Consignes de prudence et de sécurité .....................................................5
Know Your Machine ..................................................................................6Control Panel ............................................................................................7Functional Description of Control Buttons ................................................8Description of Indicators on the Control Panel .........................................9
Prepare the Machine for UseInstall the Batteries .................................................................................10Install the Brushes .................................................................................. 11Install the Squeegee ...............................................................................12Fill the Solution Tank ..............................................................................12
Operating the Machine ...........................................................................13Scrubbing ...............................................................................................13Wet Vacuuming ......................................................................................14After Use .................................................................................................14Maintenance Schedule ...........................................................................14Lubricating the Machine .........................................................................14Charging the Batteries ............................................................................15Check the Battery Electrolyte Level ........................................................15Squeegee Maintenance ..........................................................................16Squeegee Adjustment ............................................................................16Side Skirt Maintenance ......................................................................17-18
Troubleshooting ......................................................................................19Controller Error Codes .......................................................................20-21
Technical Specifi cations .........................................................................22
INTRODUCTIONThis manual will help you get the most from your Nilfi sk-Advance Rider Scrubber. Read it thoroughly before operating the machine.Note: Bold numbers in parentheses indicate an item illustrated on pages 6-7.This product is intended for commercial use only.
PARTS AND SERVICERepairs, when required, should be performed by your Authorized Nilfi sk-Advance Service Center, who employs factory trained service personnel, and main-tains an inventory of Nilfi sk-Advance original replacement parts and accessories.Call the NILFISK-ADVANCE DEALER named below for repair parts or service. Please specify the Model and Serial Number when discussing your machine.
NAME PLATEThe Model Number and Serial Number of your machine are shown on the Nameplate on the machine. This information is needed when ordering repair parts for the machine. Use the space below to note the Model Number and Serial Number of your machine for future reference.
MODEL NUMBER _____________________________________________
SERIAL NUMBER _____________________________________________
UNCRATE THE MACHINEWhen the machine is delivered, carefully inspect the shipping carton and the machine for damage. If damage is evident, save the shipping carton so that it can be inspected. Contact the Nilfi sk-Advance Customer Service Department immediately to fi le a freight damage claim.After removing the carton, cut the plastic straps and remove the wooden blocks next to the wheels. Use a ramp to roll the machine from the pallet to the fl oor.
4 - FORM NO. 56041587 - Hydro-Retriever™ 3800, 2042 / BR 1100, 1100C, 1100C-XL
4 / ENGLISH
CAUTIONS AND WARNINGSSYMBOLSNilfi sk-Advance uses the symbols below to signal potentially dangerous conditions. Always read this information carefully and take the necessary steps to protect personnel and property.
DANGER !Is used to warn of immediate hazards that will cause severe personal injury or death.
WARNING !Is used to call attention to a situation that could cause severe personal injury.
CAUTION !Is used to call attention to a situation that could cause minor personal injury or damage to the machine or other property.
GENERAL SAFETY INSTRUCTIONSSpecifi c Cautions and Warnings are included to warn you of potential danger of machine damage or bodily harm.
WARNING !* This machine shall be used only by properly trained and authorized persons.* While on ramps or inclines, avoid sudden stops when loaded. Avoid abrupt sharp turns. Use low speed down hills. Clean
only while ascending (driving up) the ramp.* Keep sparks, fl ame and smoking materials away from batteries. Explosive gases are vented during normal operation.* Charging the batteries produces highly explosive hydrogen gas. Charge batteries only in well-ventilated areas, away from
open fl ame. Do not smoke while charging the batteries.* Remove all jewelry when working near electrical components.* Turn the key switch off (O) and disconnect the batteries before servicing electrical components.* Never work under a machine without safety blocks or stands to support the machine.* Do not dispense fl ammable cleaning agents, operate the machine on or near these agents, or operate in areas where
fl ammable liquids exist.* Do not clean this machine with a pressure washer.* Only use the brushes provided with the appliance or those specifi ed in the instruction manual. The use of other brushes may
impair safety.
CAUTION !* This machine is not approved for use on public paths or roads.* This machine is not suitable for picking up hazardous dust.* Do not use scarifi er discs and grinding stones. Nilfi sk-Advance will not be held responsible for any damage to fl oor surfaces
caused by scarifi ers or grinding stones (can also cause damage to the brush drive system).* When operating this machine, ensure that third parties, particularly children, are not endangered.* Before performing any service function, carefully read all instructions pertaining to that function.* Do not leave the machine unattended without fi rst turning the key switch off (O), removing the key and applying the parking
brake.* Turn the key switch off (O) and remove the key, before changing the brushes, and before opening any access panels.* Take precautions to prevent hair, jewelry, or loose clothing from becoming caught in moving parts.* Use caution when moving this machine in below freezing temperature conditions. Any water in the solution or recovery tanks
or in the hose lines could freeze, causing damage to valves and fi ttings. Flush with windshield washer fl uid.* The batteries must be removed from the machine before the machine is scrapped. The disposal of the batteries should be
safely done in accordance with your local environmental regulations.* Do not use on surfaces having a gradient exceeding that marked on the machine.* All doors and covers are to be positioned as indicated in the instruction manual before using the machine.
SAVE THESE INSTRUCTIONS

FORM NO. 56041587 - Hydro-Retriever™ 3800, 2042 / BR 1100, 1100C, 1100C-XL - 5
ENGLISH / 5
CONSIGNES DE PRUDENCE ET DE SÉCURITÉSYMBOLESLes symboles reproduits ci-dessous sont utilisés pour attirer l’attention de l’opérateur sur des situations dangereuses. Il est donc conseillé de lire attentivement ces indications et de prendre les mesures adéquates en vue de protéger le personnel et le matériel.
DANGER !Ce symbole est utilisé pour mettre l’opérateur en garde contre les risques immédiats pouvant provoquer des dommages corpo-rels graves, voire entraîner la mort.
AVERTISSEMENT !Ce symbole est utilisé pour attirer l’attention sur une situation susceptible d’entraîner des dommages corporels graves.
ATTENTION !Ce symbole est utilisé pour attirer l’attention de l’opérateur sur une situation qui pourrait entraîner des dommages corporels minimes ou des dommages à la machine ou à d’autres équipements.
CONSIGNES GENERALES DE SECURITELes consignes spécifi ques de prudence et de sécurité mentionnées ici ont pour but de vous informer de la survenance de tout risque de dommages matériels ou corporels.
AVERTISSEMENT !* Cette machine ne pourra être utilisée que par du personnel parfaitement entraîné et dûment autorisé.* Evitez les arrêts subits lorsque la machine est chargée et se trouve sur des rampes ou des plans inclinés. Evitez les virages serrés. Adoptez une
vitesse réduite lorsque la machine est en descente. Ne nettoyez que lorsque la machine monte la pente.* Eloignez les batteries de toutes fl ammes, étincelles ou substance fumigène. Les gaz explosifs sont ventilés pendant le fonctionnement normal.* De plus, du gaz hydrogène explosif s’échappe des batteries lorsqu‘elles sont en charge. Ne procédez au chargement des batteries que dans une
zone bien ventilée, loin de toute fl amme. Ne fumez pas à proximité des batteries lorsqu‘elles sont en charge.* Otez tous vos bijoux lorsque vous travaillez à proximité de composants électriques.* Positionnez la clé de contact sur off (O) et déconnectez les batteries avant de procéder à l‘entretien des composants électriques.* Ne travaillez jamais sous une machine sans y avoir placé, au préalable, des blocs de sécurité ou des étais destinés à soutenir la machine* Ne déversez pas d‘agents nettoyants infl ammables, ne faites pas fonctionner la machine à proximité de ces agents ou d‘autres liquides infl ammab-
les.* Ne nettoyez pas cette machine avec un nettoyeur à pression.* Utilisez uniquement les brosses fournies avec l’appareil ou celles spécifi ées dans le manuel d’instructions. L’utilisation d’autres brosses peut mettre
la sécurité en péril.
ATTENTION !* Cette machine n’est pas conçue pour une utilisation sur les chemins ou voies publics.* Cette machine n‘est pas conçue pour le ramassage des poussières dangereuses.* N‘utilisez pas de disques de scarifi cateur ni de meules. Nilfi sk-Advance ne pourra en aucun cas être tenue pour responsable des dommages occasi-
onnés à vos sols par ce type d‘équipement (vous risquez également d‘endommager le système d‘entraînement des brosses).* Lors de l‘utilisation de cette machine, assurez-vous que des tiers, et notamment des enfants, ne courent pas le moindre risque.* Avant de procéder à toute opération d‘entretien, veuillez lire attentivement toutes les instructions qui s‘y rapportent.* Ne laissez pas la machine sans surveillance sans avoir, au préalable, coupé le contact, enlevé la clé de contact (O) et tiré le frein à main.* Positionnez la clé de contact sur off (O) avant de remplacer les brosses ou d’ouvrir tout panneau d’accès.* Prenez toutes les mesures nécessaires pour éviter que les cheveux, les bijoux ou les vêtements amples ne soient entraînés dans les parties mobiles
de la machine.* Faites attention lorsque vous déplacez cette machine dans un endroit où la température peut descendre sous 0°. Car l‘eau contenue dans les réser-
voirs de solution ou de récupération ou dans les conduites risquerait de geler et par là même d‘endommager les valves et raccords de la machine. Rincez avec un liquide de lave-glace.
* Prenez soin d‘enlever les batteries de la machine avant de mettre cette dernière au rebut. Pour ce qui est de l‘élimination des batteries, conformez-vous aux réglementations locales en matière d‘environnement.
* N’utilisez pas sur des surfaces dont la pente dépasse celle mentionnée sur la machine.* Toutes les portes et couvercles doivent être dans la position mentionnée dans le manuel d’instruction avant de mettre la machine en service.
CONSERVEZ SOIGNEUSEMENT CES INSTRUCTIONS
6 - FORM NO. 56041587 - Hydro-Retriever™ 3800, 2042 / BR 1100, 1100C, 1100C-XL
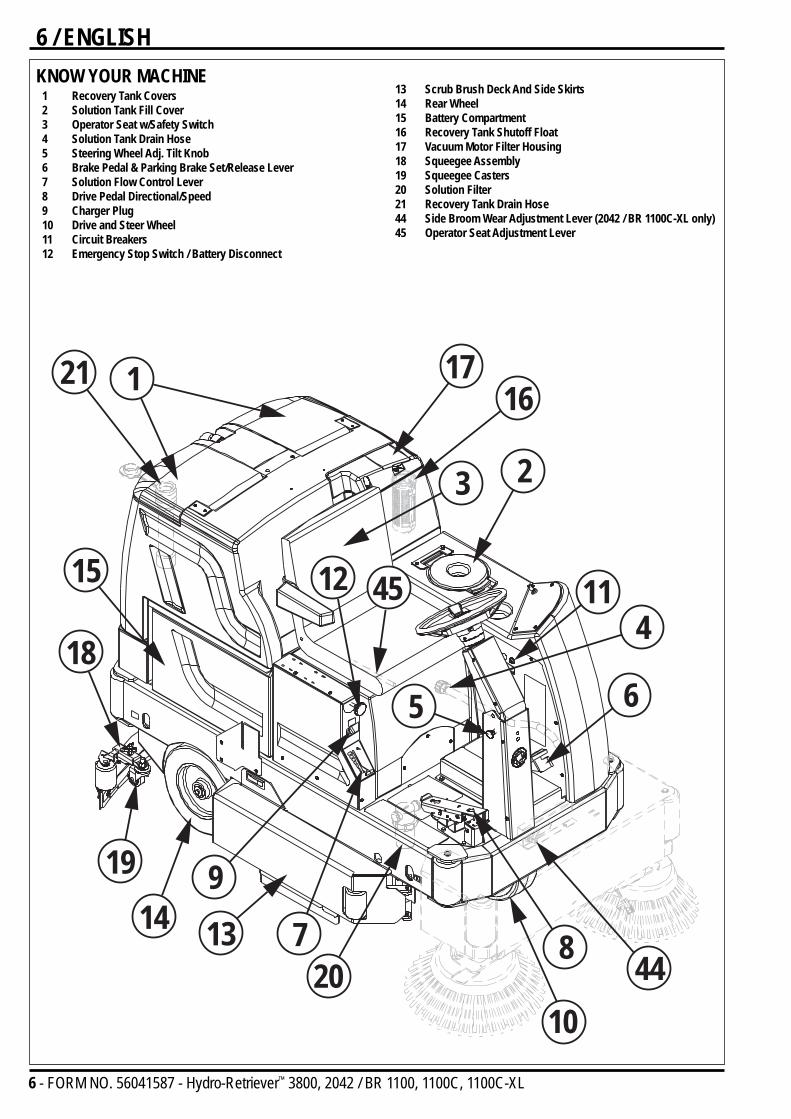
6 / ENGLISHKNOW YOUR MACHINE
1 Recovery Tank Covers2 Solution Tank Fill Cover3 Operator Seat w/Safety Switch4 Solution Tank Drain Hose5 Steering Wheel Adj. Tilt Knob6 Brake Pedal & Parking Brake Set/Release Lever7 Solution Flow Control Lever8 Drive Pedal Directional/Speed9 Charger Plug10 Drive and Steer Wheel11 Circuit Breakers12 Emergency Stop Switch / Battery Disconnect
13 Scrub Brush Deck And Side Skirts14 Rear Wheel15 Battery Compartment16 Recovery Tank Shutoff Float17 Vacuum Motor Filter Housing18 Squeegee Assembly19 Squeegee Casters20 Solution Filter21 Recovery Tank Drain Hose44 Side Broom Wear Adjustment Lever (2042 / BR 1100C-XL only)45 Operator Seat Adjustment Lever
1
23
5 6
7 8
9
10
1112
1314
15
1617
18
19
21
20
4
44
45

FORM NO. 56041587 - Hydro-Retriever™ 3800, 2042 / BR 1100, 1100C, 1100C-XL - 7
ENGLISH / 7CONTROL PANEL22 Horn Button23 Main Power Indicator24 Solution System Fault Indicator25 Scrub Off Button26 Normal Scrub Button27 Heavy Scrub Button28 Solution System Indicator29 Vacuum Button30 Solution Button31 Battery Condition Indicator32 Hourmeter/Status Display33 Master On/Off Key Switch34 Scrub Mode Off Indicator35 Normal Scrub Mode Indicator36 Heavy Scrub Mode Indicator37 Vacuum System Indicator38 Vacuum System Fault Indicator39 Presweep Dust Control Button (3800 / BR 1100 only - opt)40 Presweep Dust Control Indicator (3800 / BR 1100 only - opt)41 Presweep Power Indicator (3800 / BR 1100 only - opt)42 Sweep System Power Indicator (2042 / BR 1100C-XL only)43 Sweep System Control Button (2042 / BR 1100C-XL only)
kglb
kglb
1/10
31 3233
23
41 39
40
222430
2838293727
36263525
34
204242
431100C-XL

8 - FORM NO. 56041587 - Hydro-Retriever™ 3800, 2042 / BR 1100, 1100C, 1100C-XL
8 / ENGLISHFUNCTIONAL DESCRIPTION OF CONTROL BUTTONS:The controls were designed with one touch operation in mind. For single pass scrubbing the user can simply depress one button and all systems on the machine will be ready to go.For most single-pass scrubbing operations, the operator should only need to use the fi rst three buttons on the control panel. These are the Scrub Off (25), Normal Scrub (26), and Heavy Scrub (27) buttons. For this reason these buttons are outlined in bright white on the control panel while the other buttons are outlined in a darker color.Horn Button (22) - Pressing this button will activate the horn.Scrub Off Button (25) - Pressing this button when the unit is in a scrub mode will cause the following to occur:• The scrub brushes will turn off• The scrub deck will raise to the UP position• The solution fl ow will be stopped• The fi rst time that this button is pressed, the vacuum/squeegee system will NOT be turned off. This is so that any remaining water may be picked up
without having to turn the vacuum back on. If this button is pressed a second time (pressed after the scrub mode has been turned off) the squeegee will raise and the vacuum will shut off after a 6 second delay.
Normal Scrub Button (26) - Pressing the normal scrub button will enable the scrub system and set the scrub pressure to the last selected value for the nor-mal scrub mode. The status display will momentarily display the scrub pressure setting. This is indicated by “PA” followed by a number. Subsequent presses of the normal scrub button will step the pad pressure setting through the allowable range up to the maximum value programmed for the normal scrub mode. Once the maximum value is reached the pressure setting will step back to 1. The factory default maximum for the normal scrub mode is 4. The following will occur when this button is pressed:• The scrub deck will be lowered• The vacuum and solution systems will be enabled (vacuum and solution modes = AUTO)• As soon as a direction is commanded by the throttle (forward or reverse) the brushes will start turning and the vacuum will turn on. If the direction is
forward, the squeegee will lower and the solution fl ow will start. If the direction is reverse, the squeegee will go to the up position and the solution fl ow will be stopped.
Heavy Scrub Button (27) - Pressing the heavy scrub button will enable the scrub system and set the scrub pressure to the last selected value for the heavy scrub mode. The status display will momentarily display the scrub pressure setting. This is indicated by “PA” followed by a number. Subsequent presses of the heavy scrub button will step the pad pressure setting through the allowable range up to the maximum value programmed for the heavy scrub mode. Once the maximum value is reached the pressure setting will step back to (normal scrub limit + 1). The factory default maximum for the heavy scrub mode is 7 (cylindrical) or 9 (disc). The following will occur when this button is pressed:• The scrub deck will be lowered• The vacuum and solution systems will be enabled (vacuum and solution modes = AUTO)• As soon as a direction is commanded by the throttle (forward or reverse) the brushes will start turning and the vacuum will turn on. If the direction is
forward, the squeegee will lower and the solution fl ow will start. If the direction is reverse, the squeegee will go to the up position and the solution fl ow will be stopped.
Vacuum Button (29) - This button is used to select the mode of operation for the vacuum/squeegee system. There are 3 modes of operation for this system. These modes are OFF, AUTO, ON. Following is a description of each mode and how they are selected.OFF MODE: In this mode the vacuum is off and the squeegee is in the up position. As mentioned above, when a scrub mode is selected, the vacuum system will be placed in the AUTO mode. If it is desired to double-scrub (scrub without recovering the solution) the vacuum system can be turned off by pressing this button.AUTO MODE: This mode is automatically selected when a scrub mode is selected. In this mode the squeegee will be in the down position unless the re-verse direction is selected via the throttle. The vacuum will turn on if either direction is selected. While in this mode the vacuum will remain on for 10 seconds after the throttle returns to the neutral position. This is so that the solution in the squeegee and hose can be drawn into the tank. This mode can be selected independently of the scrub mode by pressing and releasing the vacuum button.ON MODE: In this mode the squeegee will remain in the UP position and the vacuum will be on regardless of the throttle position. This mode is selected by pressing and holding the vacuum button for approximately 1.5 seconds. The vacuum mode must fi rst be OFF before entering this mode. This mode is included in the event an external wand is to be used with this machine or if the operator wants to clean the squeegee using the vacuum hose.Solution Button (30) - This button is used to select the mode of operation for the solution system. There are 3 modes of operation for this system. The modes are OFF, AUTO, MOMENTARY ON. Following is a description of each mode and how they are selected.OFF MODE: In this mode the solution fl ow is turned off. As mentioned above, when a scrub mode is selected, the solution system will be placed in the AUTO mode. If it is desired to scrub without dispensing solution, the solution can be turned off by pressing this button.AUTO MODE: This mode is automatically selected when a scrub mode is selected. In this mode the solution fl ow will be turned on whenever the forward direction is selected via the throttle. The solution fl ow will be turned off otherwise.MOMENTARY ON MODE: This mode can only be selected when the scrub mode is OFF. Solution can be dispensed by pressing and holding the solution button. Solution will be dispensed for as long as the button is held. This is for pre-wetting the fl oor prior to scrubbing.Presweep Dust Control Button (opt / 39) - Use this button in conjunction with the optional presweep kit. The dust control feature will only work when the brooms are running on the presweep unit.Sweep System Control Button (2042 / BR 1100C-XL only) (43) - Use this button to turn the sweep system ON or OFF. The side brooms will only run when the scrub system is ON and the machine is in motion (not in neutral). If the scrub system is turned OFF while the sweep system is still ON, the side brooms will automatically lower and run the next time the scrub system is turned ON.Side Broom Wear Adjustment Lever (2042 / BR 1100C-XL only) (44) - Use this adjustment lever to periodically re-adjust the down limit of the side brooms as they wear. Loosening the lever, sliding it to the left and re-tightening it will cause the side brooms to drop closer to the fl oor.Operator Seat Adjustment Lever (45) – Use this lever to slide the operator’s seat forward or backward.

FORM NO. 56041587 - Hydro-Retriever™ 3800, 2042 / BR 1100, 1100C, 1100C-XL - 9
ENGLISH / 9DESCRIPTION OF INDICATORS ON THE CONTROL PANEL:In general, the following guidelines apply to the control panel indicators:A steady red indicator means that the function is inhibited for some reason. For example, if the scrub system is off and the operator is not on the seat, the scrub system indicator will be red indicating that the system cannot be turned on until the operator is on the seat.A fl ashing red indicator means that a fault has occurred in the particular system. An example of this would be an over-current fault.A yellow indicator means that the particular function has been enabled but is not currently on. For example, if a scrub mode is selected and the throttle is in neutral, the scrub system, vacuum, and solution indicators will all be yellow indicating that the systems are enabled and ready to turn on when the throttle is moved to forward or reverse.A green indicator means that the particular system is on. A fl ashing green indicator means that the particular system is in a delayed-off condition. An example of this is when a scrub mode is selected and the throttle goes from forward or reverse to neutral. When this happens the vacuum indicator will fl ash green indicating that the vacuum is still on but that it will be turn-ing off after the delay period.Scrub Mode Off Indicator (34): • This indicator will be RED if the scrub system is inhibited for any reason. Possible reasons are:
• Seat switch is open• The scrub deck has not returned to the UP position.• A system fault• Low voltage condition
• This indicator will be GREEN if the system is ready to be placed in either the normal or heavy scrub modes.• This indicator will be OFF if either the normal or heavy scrub modes have been selected.• This indicator will fl ash RED if there is a fault in one of the scrub system components. This will be accompanied by an error indication on the Hour Meter / Status Display
(32).Normal Scrub Mode Indicator (35): • This indicator will be YELLOW if the normal scrub mode has been selected but the scrub motor is off. This will be the case if the throttle is in the neutral position. The scrub
motor will stay on for approximately 3 seconds after the throttle returns to the neutral position. • This indicator will be GREEN if the normal scrub mode has been selected and the scrub motor is on.• This indicator will be OFF if the scrub mode is off or if the heavy scrub mode has been selected.Heavy Scrub Mode Indicator (36): • This indicator will be YELLOW if the heavy scrub mode has been selected but the scrub motor is off. This will be the case if the throttle is in the neutral position. The scrub
motor will stay on for approximately 3 seconds after the throttle returns to the neutral position. • This indicator will be GREEN if the heavy scrub mode has been selected and the scrub motor is on.• This indicator will be OFF if the scrub mode is off or if the normal scrub mode has been selected.Vacuum System Indicator (37): • This indicator will be YELLOW if the vacuum/squeegee system is in the AUTO mode and the throttle is in the neutral position. This indicates that the vacuum system is
enabled but the vacuum is currently off. • This indicator will be GREEN if the vacuum is currently on. This indicates that the system is in the AUTO mode and the throttle is not in neutral or that the vacuum system is
in the ON mode. • This indicator will FLASH GREEN if the shutoff delay is keeping the vacuum on. This occurs if the vacuum system is in the AUTO mode and the throttle goes to the neutral
position. This will also occur if the vacuum system is turned off while it was in either the AUTO or ON modes. The shutoff delay will turn the vacuum off after the delay period.
• This indicator will be OFF if the vacuum/squeegee system if in the OFF mode.Vacuum System Fault Indicator (38):• This indicator will fl ash red if there is a fault in the vacuum or squeegee systems. This will be accompanied by an error indication on the Hour Meter / Status Display (32).• This indicator will be RED and the Hour Meter / Status Display (32) will show “FULL” if the recovery tank fl oat valve has closed. If this indication occurs and the tank is not
full, see the Troubleshooting section.Solution System Indicator (28): • This indicator will be YELLOW if the solution system is in the AUTO mode and the throttle is in the neutral or reverse positions. This indicates that the solution system is
enabled but the solution fl ow is currently off.• This indicator will be GREEN if the solution system is in the AUTO mode and the throttle is in the forward position. It will also be GREEN if the solution system is in the
MOMENTARY ON mode. This indicates that the solution fl ow is currently on.• This indicator will be OFF if the solution system is in the OFF mode.Solution System Fault Indicator (24):• This indicator will fl ash red if there is a fault in the solution system. This will be accompanied by an error indication on the Hour Meter / Status Display (32).Main Power Indicator (23):• This indicator will be GREEN when the key switch is ON.• This indicator will fl ash RED if there is a system fault that requires turning the Master ON/OFF Key Switch (33) off to reset.• This indicator will fl ash fault codes from the Curtis Speed Control if a fault exists. This will be accompanied by an “Err03” indication on the Hourmeter/Status Display (32).Presweep Dust Control Indicator (40):• This indicator will be GREEN when the dust control feature is ON.• This indicator will be YELLOW when the dust control feature is enabled but not ON.• This indicator will be OFF if the dust control feature is not enabled or unit has the optional side broom kit installed.Presweep Power Indicator (41):• This indicator will be GREEN when either the optional presweep or side broom kits are installed and turned ON.• This indicator will be YELLOW when either the optional presweep or side broom kits are installed and enabled, but not ON (machine in neutral).• This indicator will be fl ashing YELLOW when the optional side broom kit is installed, selected and turned ON, but the scrub system is OFF.• This indicator will be OFF if the foot pedal on the optional presweep or side broom kits is UP.Sweep System Power Indicator (2042 / BR 1100C-XL only) (42):• This indicator will be GREEN when the sweep system is turned ON.• This indicator will be YELLOW when the sweep system is enabled, but not ON (machine in neutral).• This indicator will be OFF if the sweep system is turned OFF.

10 - FORM NO. 56041587 - Hydro-Retriever™ 3800, 2042 / BR 1100, 1100C, 1100C-XL
10 / ENGLISHDESCRIPTION OF THE BATTERY CONDITION INDICATORSThe battery condition indicators will give an indication of the state of charge of the batteries. The battery condition monitor will retain the state-of-charge even if the key has been turned off. The state-of-charge indication is reset to full charge when the batteries have been recharged. It is also possible to choose be-tween two different low voltage thresholds depending on whether maintenance free or standard batteries are being used (have qualifi ed service engineer perform this selection). NOTE: The following percentages are based on useable battery capacity not total battery capacity. Therefore, 100% discharge = 80% of total battery capacity for standard wet cell batteries or 70% of total battery capacity for maintenance free batteries.Green Indicator = full charge down to 50% dischargeGreen & Yellow Indicator = 50% discharge down to 75% dischargeYellow Indicator = 75% discharge down to 90% dischargeYellow & Red Indicator = 90% discharge down to 95% dischargeRed Indicator = 95% discharge down to 99% dischargeFlashing Red Indicator = 100% discharge - scrub system will automatically shut down
DESCRIPTION OF HOURMETER / STATUS DISPLAYThe 5 character display in the middle of the bottom row of the control panel is primarily used as a display for the hourmeter function. This display is also used to display the following information depending upon which mode the control is in:• Error codes*• Brush pressure adjustment settings for normal and heavy scrub mode (fi xed and adjustable)*• Display of control system default parameters*• Recovery tank FULL indicator** NOTE: Have a qualifi ed service engineer reference the Service Manual for explanations about the error code descriptions and scrub system control default parameter changes. A brief description of error codes can be found at the back of this manual.Emergency Stop Switch / Battery Disconnect (12): This will remove all power from the machine.
INSTALL THE BATTERIES WARNING !
Use extreme caution when working with batteries. Sulfuric acid in batteries can cause severe injury if allowed to contact the skin or eyes. Explosive hydrogen gas is vented from inside the batteries through openings in the battery caps. This gas can be ignited by any electrical arc, spark or fl ame.When Servicing Batteries...* Remove all jewelry.* Do not smoke.* Wear safety glasses, a rubber apron and rubber gloves.* Work in a well-ventilated area.* Do not allow tools to touch more than one battery terminal at a time.
CAUTION !Electrical components in this machine can be severely damaged if the batteries are not installed and connected properly. Batter-ies should be installed by Nilfi sk-Advance or by a qualifi ed electrician.1 Turn the Key Switch (33) off (O) and remove the key. Tip back the recovery tank to expose the battery compartment.2 Using (2) people and an appropriate lifting strap, carefully lift the batteries into the battery compartment and arrange as shown.3 See Figure 1. Insert spacers as shown. Install battery cables as shown and tighten the nuts on the battery terminals.4 Install the battery boots and secure tightly to the battery cables with the supplied tie straps.5 Install the battery cover and connect the battery pack connector to the machine connector, tip the recovery tank back forward.
NOTE! If total battery weight exceeds 920lbs / 417.31 kg, order and install Isolator Kit PN 56409721.
56409498
12V
12V
12V
56409499
+ +
+
56409498
6V
6V
6V
6V
6V
6V
56409499
56409499 +
+
+
+
+
+
56409499
36V
+
FIGURE 1
FORM NO. 56041587 - Hydro-Retriever™ 3800, 2042 / BR 1100, 1100C, 1100C-XL - 11
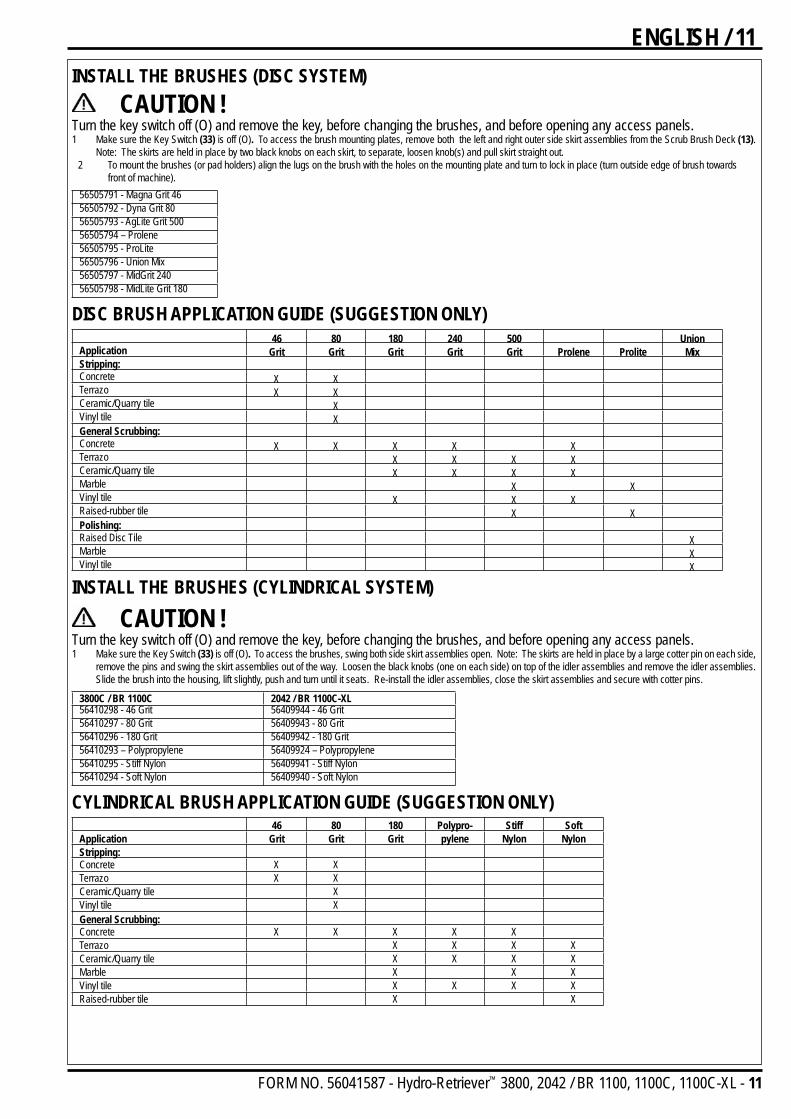
ENGLISH / 11INSTALL THE BRUSHES (DISC SYSTEM)
CAUTION !Turn the key switch off (O) and remove the key, before changing the brushes, and before opening any access panels.1 Make sure the Key Switch (33) is off (O). To access the brush mounting plates, remove both the left and right outer side skirt assemblies from the Scrub Brush Deck (13).
Note: The skirts are held in place by two black knobs on each skirt, to separate, loosen knob(s) and pull skirt straight out.2 To mount the brushes (or pad holders) align the lugs on the brush with the holes on the mounting plate and turn to lock in place (turn outside edge of brush towards
front of machine).56505791 - Magna Grit 4656505792 - Dyna Grit 8056505793 - AgLite Grit 50056505794 – Prolene56505795 - ProLite56505796 - Union Mix56505797 - MidGrit 24056505798 - MidLite Grit 180
DISC BRUSH APPLICATION GUIDE (SUGGESTION ONLY)46 80 180 240 500 Union
Application Grit Grit Grit Grit Grit Prolene Prolite MixStripping:Concrete X XTerrazo X XCeramic/Quarry tile XVinyl tile XGeneral Scrubbing:Concrete X X X X XTerrazo X X X XCeramic/Quarry tile X X X XMarble X XVinyl tile X X XRaised-rubber tile X XPolishing:Raised Disc Tile XMarble XVinyl tile X
INSTALL THE BRUSHES (CYLINDRICAL SYSTEM)
CAUTION !Turn the key switch off (O) and remove the key, before changing the brushes, and before opening any access panels.1 Make sure the Key Switch (33) is off (O). To access the brushes, swing both side skirt assemblies open. Note: The skirts are held in place by a large cotter pin on each side,
remove the pins and swing the skirt assemblies out of the way. Loosen the black knobs (one on each side) on top of the idler assemblies and remove the idler assemblies. Slide the brush into the housing, lift slightly, push and turn until it seats. Re-install the idler assemblies, close the skirt assemblies and secure with cotter pins.
3800C / BR 1100C 2042 / BR 1100C-XL56410298 - 46 Grit 56409944 - 46 Grit56410297 - 80 Grit 56409943 - 80 Grit56410296 - 180 Grit 56409942 - 180 Grit56410293 – Polypropylene 56409924 – Polypropylene56410295 - Stiff Nylon 56409941 - Stiff Nylon56410294 - Soft Nylon 56409940 - Soft Nylon
CYLINDRICAL BRUSH APPLICATION GUIDE (SUGGESTION ONLY)46 80 180 Polypro- Stiff Soft
Application Grit Grit Grit pylene Nylon NylonStripping:Concrete X XTerrazo X XCeramic/Quarry tile XVinyl tile XGeneral Scrubbing:Concrete X X X X XTerrazo X X X XCeramic/Quarry tile X X X XMarble X X XVinyl tile X X X XRaised-rubber tile X X
12 - FORM NO. 56041587 - Hydro-Retriever™ 3800, 2042 / BR 1100, 1100C, 1100C-XL
12 / ENGLISH
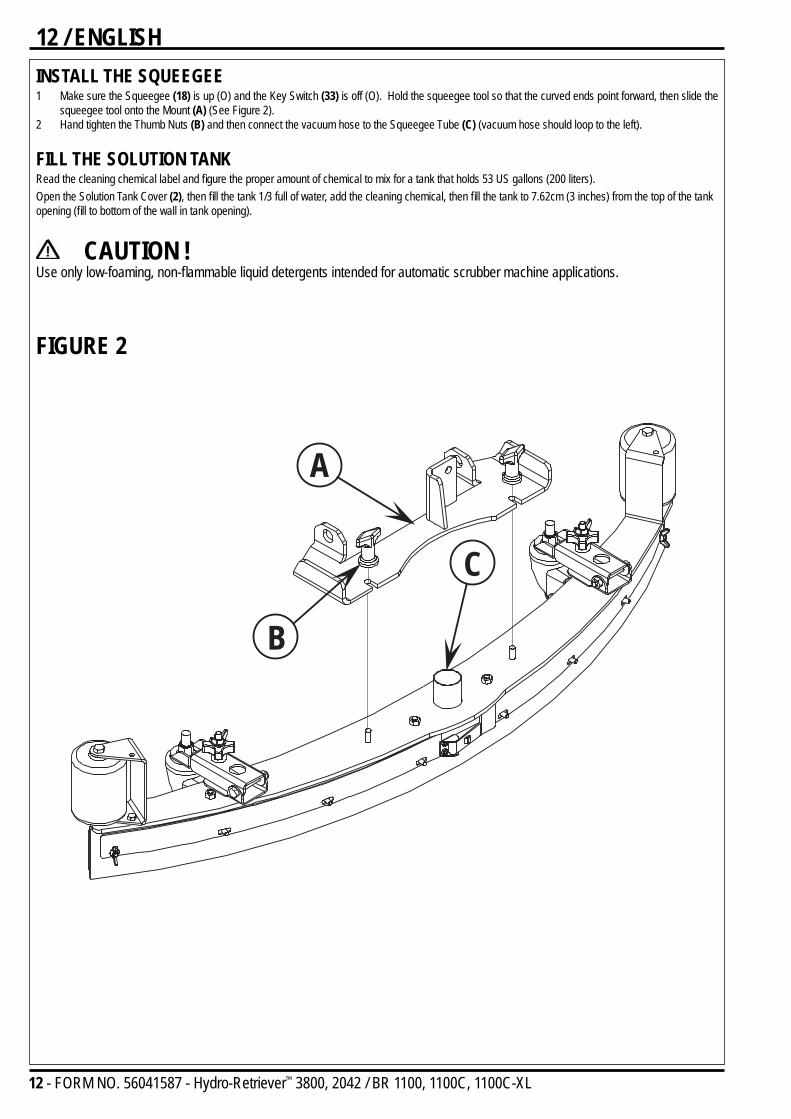
FIGURE 2
INSTALL THE SQUEEGEE1 Make sure the Squeegee (18) is up (O) and the Key Switch (33) is off (O). Hold the squeegee tool so that the curved ends point forward, then slide the
squeegee tool onto the Mount (A) (See Figure 2).2 Hand tighten the Thumb Nuts (B) and then connect the vacuum hose to the Squeegee Tube (C) (vacuum hose should loop to the left).
FILL THE SOLUTION TANKRead the cleaning chemical label and fi gure the proper amount of chemical to mix for a tank that holds 53 US gallons (200 liters).Open the Solution Tank Cover (2), then fi ll the tank 1/3 full of water, add the cleaning chemical, then fi ll the tank to 7.62cm (3 inches) from the top of the tank opening (fi ll to bottom of the wall in tank opening).
CAUTION !Use only low-foaming, non-fl ammable liquid detergents intended for automatic scrubber machine applications.
A
B
C

FORM NO. 56041587 - Hydro-Retriever™ 3800, 2042 / BR 1100, 1100C, 1100C-XL - 13
ENGLISH / 13OPERATING THE MACHINE
WARNING !Be sure you understand the operator controls and their functions.While on ramps or inclines, avoid sudden stops when loaded. Avoid abrupt sharp turns. Use low speed down hills. Clean only while ascending (driving up) the ramp.To Scrub...Follow the instructions in preparing the machine for use section of this manual.1 While seated on the machine, adjust the seat and steering wheel to a comfortable operating position using the adjustment controls (45) and (5).2 Turn the Master Key Switch (33) ON (I). This will display the control panel indicator lights, reference the Battery Condition Indicator (31) and Hour Meter
(32).3 Release the Parking Brake (6) by fl ipping the set/release lever to the rear while pushing on the Brake Pedal (6). To transport the machine to the work area,
apply even pressure with your foot on the front of the FWD/REV Drive Pedal (8) to go forward or the rear of the pedal for reverse. Vary the pressure on the foot pedal to obtain the desired speed.
4 Adjust the Solution Flow Control Valve Lever (7) to about 1/4 to 1/3 open position. Note the adjustment can be changed to allow variable solution fl ow for different types of fl oors to be scrubbed. Example: A rough or absorbent fl oor surface, such as unfi nished concrete, well require more solution than a smooth fi nished fl oor.
5 Press the Solution Control ON/OFF Touch Pad (30) and hold for 5 seconds. This is done to pre-wet the fl oor. Note: This will help prevent scarring of the fl oor surface when starting to scrub with dry brushes.
6 Press the Normal Scrub Button (26) for moderate scrub deck pressure or the Heavy Scrub Button (27) for the highest pressure mode. Note refer to the machine control description section to the have more detailed explanation of this and other control panel functions.
7 When either the Normal Scrub Button (26) or Heavy Scrub Button (27) are selected, the brushes and squeegee automatically are lowered to the fl oor. The machine’s scrub brushes rotation and solution system fl ow starts when the FWD/REV Drive Pedal (8) is activated. Note: When operating the machine in reverse, only the brushes will rotate, the solution is automatically shut off to conserve the solution usage.
8 Begin scrubbing by driving the machine forward in a straight line at a normal walking speed and overlap each path by 2-3 inches (50-75 mm). Adjust when necessary the machine speed and solution fl ow according to the condition of the fl oor.
CAUTION !To avoid damaging the fl oor, keep the machine moving while the brushes are turning.9 When scrubbing, check behind the machine occasionally to see that all of the waste water is being picked up. If there is water trailing the machine, you
may be dispensing too much solution, the recovery tank may be full, or the squeegee tool may require adjustment.10 For extremely dirty fl oors, a one-pass scrubbing operation may not be satisfactory and a “double-scrub” operation may be required. This operation is the
same as a one-pass scrubbing except on the fi rst pass the squeegee is in the up position (press the Vacuum Button (29) to raise the pick up squeegee). This allows the cleaning solution to remain on the fl oor to work longer. The fi nal pass is made over the same area, with the squeegee lowered to pick up the accumulated solution.
11 The recovery tank has an automatic fl oat shut-off to prevent solution from entering the vacuum system when the recovery tank is full. When the fl oat shut-off is activated, the control system will shut down the scrub, vacuum and solution systems. The Vacuum System Fault Indicator (38) will be lit and the Hour Meter / Status Display (32) will display “FULL”. To clear the display, press the Scrub OFF Button (25). When the fl oat closes, the recovery tank must be emptied. The machine will not pick up water with the fl oat closed. NOTE: If the control repeatedly gives a full indication when the tank is not full, the automatic shut-off feature can be disabled, have a qualifi ed service technician perform this function.
12 When the operator wants to stop scrubbing or the recovery tank is full, press the Scrub OFF Button (25) once. This will automatically stop the scrub brushes and solution fl ow and the scrub deck will raise UP. NOTE: the vacuum/squeegee system will not be turned off when the button is only pressed once, this is to allow any remaining water to be picked up without turning the vacuum back on. Press the button a second time and the squeegee will raise and the vacuum will stop after a 10 second delay.
13 Drive the machine to a designated waste water “DISPOSAL SITE” and empty the recovery tank. To empty, pull the Drain Hose (21) from it’s rear storage area, then remove the plug (hold the end of the hose above the water level in the tank to avoid sudden, uncontrolled fl ow of waste water). Refi ll the solution tank and continue scrubbing.

14 - FORM NO. 56041587 - Hydro-Retriever™ 3800, 2042 / BR 1100, 1100C, 1100C-XL
14 / ENGLISHWET VACUUMINGSteps to follow in fi tting the machine with optional attachments for wet vacuuming.1 Disconnect the recovery hose connection at the recovery tank inlet. Then fi t a 1-1/2 inch (38 mm) Dia. vacuum hose to the recovery inlet.2 Attach suitable wet pick-up tools to the hose. (An optional Wand Caddy Kit is available from Nilfi sk-Advance).3 Turn the Master Key Switch (33) ON, next press and hold the Vacuum Button (29) until the indicator light turns green. The vacuum motor will run
continuously until the button is pressed again to turn it OFF. NOTE: If the control repeatedly gives a full indication when the tank is not full, the automatic shut-off feature can be disabled, have a qualifi ed service technician perform this function.
AFTER USE1 When fi nished scrubbing, depress the Scrub Off Button (25) twice, this will automatically raise, retract and stop all the machine systems (brush, squeegee,
vacuum & solution). Then drive the machine to a service area for daily maintenance and review of other needed service up keep.2 To empty the solution tank, remove the Solution Drain Hose (24) from it’s storage clamp. Direct the hose to a designated “DISPOSAL SITE” and remove
the plug. Rinse the tank with clean water.3 To empty the recovery tank, pull the Recovery Tank Drain Hose (21) from it’s storage area. Direct the hose to a designated “DISPOSAL SITE” and remove
the plug (hold the end of the hose above the water level in the tank to avoid sudden, uncontrolled fl ow of waste water). Rinse the tank with clean water.4 Remove the brushes or pad holders. Rinse the brushes or pads in warm water and hang up to dry.5 Remove the squeegee, rinse it with warm water and re-install on mount.6 Remove the hopper on cylindrical systems and clean thoroughly. Remove from left side of machine by opening skirt and tilting hopper up and away from
housing, then pull out.7 Check the maintenance schedule below and perform any required maintenance before storage
MAINTENANCE SCHEDULEMAINTENANCE ITEM Daily Weekly Monthly YearlyCharge Batteries •Check/Clean Tanks & Hoses •Check/Clean/Rotate the Brushes/Pads •Check/Clean the Squeegee •Check/Clean Vacuum Shut-Off Float •Check/Clean the vacuum motor foam fi lter •Clean Hopper on Cylindrical System •Check Each Battery Cell(s) Water Level •Inspect Scrub Housing Skirts •Inspect and clean Solution Filter •Check Foot/ Parking Brake For Wear & Adjustment •Clean Solution Trough on Cylindrical System •Lubrication - Grease Fittings •* Check Carbon Brushes •
* Have Nilfi sk-Advance check the vacuum motor carbon motor brushes once a year or after 300 operating hours. The brush and drive motor carbon brushes check every 500 hours or once a year.NOTE: Refer to the Service Manual for more detail on maintenance and service repairs.8 Store the machine indoors in a clean dry place. Keep from freezing. Leave the tanks open to air them out.9 Turn the Master Key Switch (33) OFF (O) and remove the key.
LUBRICATING THE MACHINEOnce a month, pump a small amount of grease into each grease fi tting on the machine until grease seeps out around the bearings.Grease fi tting locations are:• Squeegee Caster Wheel Axle & Swivel (2) per Assembly• Steering Chain Idler Sprocket• Steering Wheel Shaft Universal jointOnce a month, apply light machine oil to lubricate the:• Steering Chain• Squeegee Height Adjustment Caster Hardware• General Pivot Points For the Squeegee, Brush Linkage and Side Skirts
FORM NO. 56041587 - Hydro-Retriever™ 3800, 2042 / BR 1100, 1100C, 1100C-XL - 15
ENGLISH / 15CHARGING THE BATTERIESCharge the batteries each time the machine is used, or whenever the Battery Condition Meter (31) is showing a yellow , red or fl ashing red indicator light(s).To Charge the Batteries...1 Drain and tip back the recovery tank to provide proper ventilation.2 Push the connector from the charger into the Battery Charger Plug (9).3 Follow the instructions on the battery charger.4 Check the fl uid level in all battery cells after charging the batteries. Add distilled water, if necessary, to bring the fl uid level up to the bottom of the fi ller
tubes.
WARNING !Do not fi ll the batteries before charging.Only charge batteries in a well-ventilated area.Do not smoke while servicing the batteries.
CAUTION !To avoid damage to fl oor surfaces, always wipe water and acid from the top of the batteries after charging.
CHECKING THE BATTERY ELECTROLYTE LEVELCheck the electrolyte level of the batteries at least once a week.After charging the batteries, remove the vent caps and check the electrolyte level in each battery cell. Use distilled water to fi ll the batteries to the bottom of the fi ller tube.Do not over-fi ll the batteries!
CAUTION !Acid can spill onto the fl oor if the batteries are overfi lled.Tighten the vent caps. If there is acid on the batteries, wash the tops of the batteries with a solution of baking soda and water (2 tablespoons of baking soda to 1 quart of water).

16 - FORM NO. 56041587 - Hydro-Retriever™ 3800, 2042 / BR 1100, 1100C, 1100C-XL
16 / ENGLISHSQUEEGEE MAINTENANCEIf the squeegee leaves narrow streaks or water, the blades may be dirty or damaged. Remove the squeegee, rinse it under warm water and inspect the blades. Reverse or replace the blades if they are cut, torn, wavy or worn.To Reverse or Replace the Rear Squeegee Wiping Blade...1 See Figure 3. Raise the squeegee tool off the fl oor, then unsnap the Center Latch (A) on the squeegee tool.2 Remove the Wing Nut (B) from each end of the squeegee, then remove the Tension Straps (C).3 Slip the rear blade off the alignment pins.4 The squeegee blade has 4 working edges. Turn the blade so a clean, undamaged edge points toward the front of the machine. Replace the blade if all
4 edges are nicked, torn or worn to a large radius.5 Install the blade, following the steps in reverse order and adjust the squeegee.To Reverse or Replace the Front Squeegee Blade...1 Raise the squeegee tool off the fl oor, then loosen the (2) Thumb Nuts (D) on top of the squeegee and remove the squueegee tool from the mount.2 Remove all the wing nuts that hold the front blade in place, then remove tension strap and blade.3 The squeegee blade has 4 working edges. Turn the blade so a clean, undamaged edge points toward the front of the machine. Replace the blade if all
4 edges are nicked, torn or worn to a large radius.4 Install the blade, following the steps in reverse order and adjust the squeegee.
SQUEEGEE ADJUSTMENTThere are two major squeegee tool adjustments, height and angle. The recommended adjustment steps are to set the tool angle fi rst, then adjust the blade height.Adjusting the Squeegee AngleAdjust the squeegee angle whenever a blade is reversed or replaced, or if the squeegee is not wiping the fl oor dry.1 Park the machine on a fl at, even surface and lower the squeegee. Then drive the machine forward enough to have the squeegee blades fold over to the
rear.2 Loosen the Lock Wing Nut (G) (hand tightened). This secures the squeegee mount angle from easily vibrating out of adjustment.3 Turn the Adjustment Knob (H) to tilt the tool forward or backwards, until the rear squeegee wiping blade touches the fl oor evenly across its entire width.4 Re-tighten by hand the Lock Wing Nut (G).Adjusting the Squeegee Blade HeightAdjust the squeegee height whenever a blade is reversed or replaced, or if the squeegee is not wiping the fl oor dry. The squeegee blade height is easily adjustable at the caster wheels. To adjust...1 Park the machine on a fl at even surface
and lower the squeegee. Then drive the machine forward enough to have the squeegee blades fold over to the rear.
2 Loosen both the lock adjustment Wing Nuts (E) (need to be hand tightened only) located on the top of the caster mount bracket.
3 Rotate the Adjustment Knobs (F) CW (clockwise) to lift the squeegee and CCW (counter clockwise) to lower it. A starting point when replacing the blades is to adjust the caster mounting bracket so it is level (parallel) to the top of the squeegee tool. Note: The Right and Left caster wheels must be adjusted equally to maintain level and even blade pressure.
4 Re-tighten the lock adjustment Wing Nuts (E) and test for proper squeegee pick-up.
A
B
C
BC
D
D
E
E
F
F
G
H
FIGURE 3
FORM NO. 56041587 - Hydro-Retriever™ 3800, 2042 / BR 1100, 1100C, 1100C-XL - 17
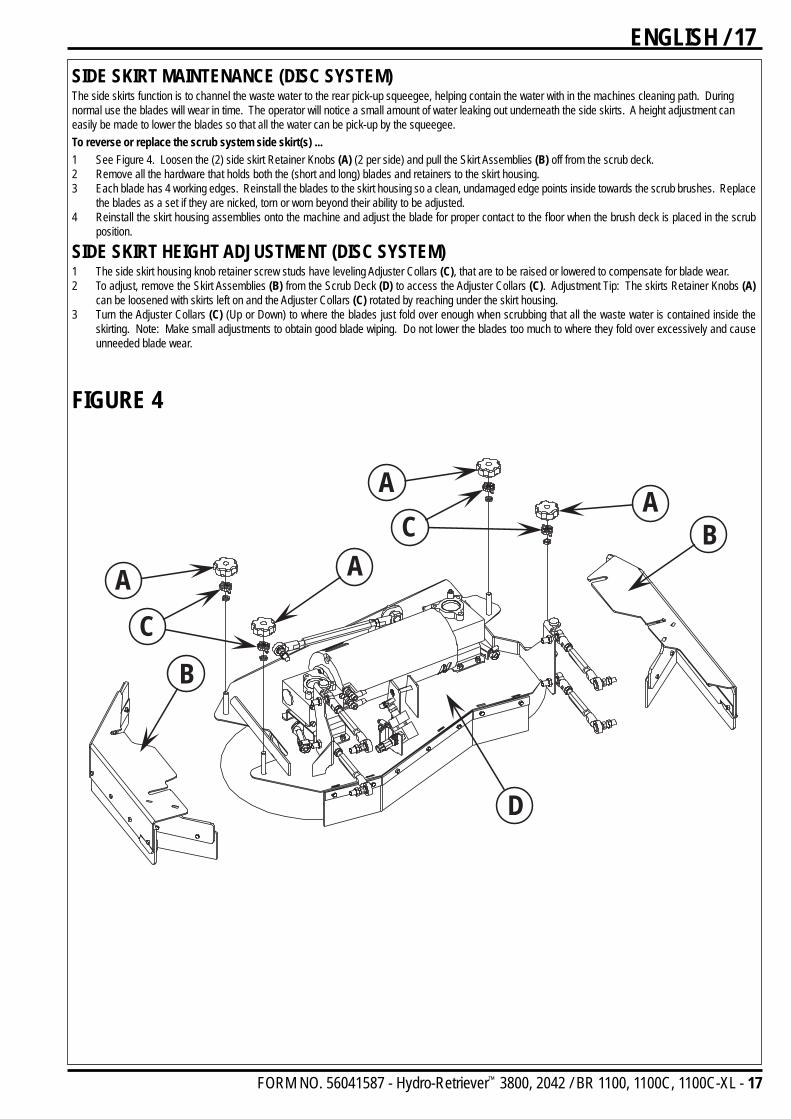
ENGLISH / 17SIDE SKIRT MAINTENANCE (DISC SYSTEM)The side skirts function is to channel the waste water to the rear pick-up squeegee, helping contain the water with in the machines cleaning path. During normal use the blades will wear in time. The operator will notice a small amount of water leaking out underneath the side skirts. A height adjustment can easily be made to lower the blades so that all the water can be pick-up by the squeegee.To reverse or replace the scrub system side skirt(s) ...1 See Figure 4. Loosen the (2) side skirt Retainer Knobs (A) (2 per side) and pull the Skirt Assemblies (B) off from the scrub deck.2 Remove all the hardware that holds both the (short and long) blades and retainers to the skirt housing.3 Each blade has 4 working edges. Reinstall the blades to the skirt housing so a clean, undamaged edge points inside towards the scrub brushes. Replace
the blades as a set if they are nicked, torn or worn beyond their ability to be adjusted. 4 Reinstall the skirt housing assemblies onto the machine and adjust the blade for proper contact to the fl oor when the brush deck is placed in the scrub
position.
SIDE SKIRT HEIGHT ADJUSTMENT (DISC SYSTEM)1 The side skirt housing knob retainer screw studs have leveling Adjuster Collars (C), that are to be raised or lowered to compensate for blade wear.2 To adjust, remove the Skirt Assemblies (B) from the Scrub Deck (D) to access the Adjuster Collars (C). Adjustment Tip: The skirts Retainer Knobs (A)
can be loosened with skirts left on and the Adjuster Collars (C) rotated by reaching under the skirt housing.3 Turn the Adjuster Collars (C) (Up or Down) to where the blades just fold over enough when scrubbing that all the waste water is contained inside the
skirting. Note: Make small adjustments to obtain good blade wiping. Do not lower the blades too much to where they fold over excessively and cause unneeded blade wear.
FIGURE 4
A
A
A
AB
B
C
C
D

18 - FORM NO. 56041587 - Hydro-Retriever™ 3800, 2042 / BR 1100, 1100C, 1100C-XL
18 / ENGLISH
FIGURE 5
SIDE SKIRT MAINTENANCE (CYLINDRICAL SYSTEM)The side skirts function is to channel the waste water to the rear pick-up squeegee, helping contain the water with in the machines cleaning path. During normal use the blades will wear in time. The operator will notice a small amount of water leaking out underneath the side skirts. Skirt height adjustment is automatic on this system. The skirt assemblies should move up and down freely for proper operation.To replace the scrub system side skirt(s) ...1 See Figure 5. Remove the (2) (A) Cotter Pins and swing the Skirt Assemblies open. Remove the (B) Screws and Nuts, remove the Skirts and replace.
FRONT
A
B

FORM NO. 56041587 - Hydro-Retriever™ 3800, 2042 / BR 1100, 1100C, 1100C-XL - 19
ENGLISH / 19GENERAL MACHINE TROUBLESHOOTING
Problem Possible Cause Remedy
Poor water pick-up Worn or torn squeegee blades Reverse or replaceSqueegee out of adjustment Adjust so blades touch fl oor evenly across entire widthRecovery tank full Empty recovery tankRecovery tank drain hose leak Secure drain hose cap or replaceRecovery tank cover gasket leak Replace gasket / Seat cover properlyDebris caught in squeegee Clean squeegee toolVacuum hose clogged Remove debrisUsing too much solution Adjust solution control valvesFoam fi lter cover not seated Seat cover properly
Poor scrubbing performance Worn brush or pad Rotate or replace brushesWrong brush or pad type Consult Nilfi sk-AdvanceWrong cleaning chemical Consult Nilfi sk-AdvanceMoving machine too fast Slow downNot using enough solution Adjust solution control valves
Inadequate solution fl ow or no solution Solution tank empty Fill solution tankSolution lines, valves, fi lter or trough clogged Flush lines, trough and clean solution fi lterSolution control valves not open Adjust solution control valvesSolution solenoid valve Clean or replace valve
Machine does not run Emergency stop switch Rotate the stop switch knob to releaseBattery charger port interlock Check for open circuit and replaceOperator seat safety switch Check for open circuit and replaceMain system controller Check error fault codes (see service manual)Tripped 10 Amp circuit breaker Check for electrical short circuit & reset
No FWD/REV wheel drive Drive system speed contoller Check error fault codes (see service manual)Tripped 80 Amp circuit breaker Check for drive motor overloadEmergency stop switch tripped Reconnect battery connectors
Vacuum shuts off and display shows“FULL” when recovery tank is not full
Plugged squeegee hose Clear debrisVacuuming large amounts of waterat a high travel speed
Slow down or disable auto shut-off feature(see service manual)
Poor Sweeping Performance(Cylindrical System)
Hopper Full Empty and clean hopperBrushes worn Replace brushesBristles have taken a set Rotate brushes

20 - FORM NO. 56041587 - Hydro-Retriever™ 3800, 2042 / BR 1100, 1100C, 1100C-XL
20 / ENGLISHCO
NTRO
LLER
ERR
OR C
ODES
For a
ll erro
r cod
es: T
urn k
ey sw
itch o
ff & th
en ba
ck on
. If er
ror p
ersis
ts co
nsult
char
t belo
w an
d/or s
ervic
e man
ual.
Erro
rCo
deDe
scrip
tion
Poss
ible
Caus
eCo
rrect
ive A
ctio
n
1Co
ntrol
fault
Contr
ol fai
lure
Turn
key s
witch
off &
back
on. If
prob
lem pe
rsists
cons
ult se
rvice
man
ual.
2Cr
itical
contr
ol fau
ltCo
ntrol
failur
eTu
rn ke
y swi
tch of
f & ba
ck on
. If pr
oblem
persi
sts co
nsult
servi
ce m
anua
l.3
Drive
syste
m fau
ltTr
ipped
whe
el dr
ive ci
rcuit b
reak
erRe
set c
ircuit
brea
ker
Thro
ttle no
t in ne
utral
(HPD
fault
)Ve
rify th
at thr
ottle
is in
neutr
al be
fore t
urnin
g key
on. A
djust
thrott
le me
cha-
nism.
Whe
el dr
ive sy
stem
prob
lemCo
nsult
servi
ce m
anua
l.4
Scru
b dec
k lift
actua
tor ov
erloa
dSc
rub d
eck o
bstru
ction
/ bind
ingRe
move
obstr
uctio
n. Lu
brica
te me
chan
ism.
Defec
tive a
ctuato
r moto
rCo
nsult
servi
ce m
anua
l.5
Scru
b dec
k lift
actua
tor se
vere
over
load
See e
rror c
ode 4
6Sc
rub d
eck l
ift ac
tuator
circu
it ope
n / ou
tput fa
ultBa
d elec
trical
conn
ectio
nCh
eck a
ll con
ectio
ns to
actua
tor m
otor.
Defec
tive a
ctuato
r moto
rCo
nsult
servi
ce m
anua
l.Co
ntrol
failur
eCo
nsult
servi
ce m
anua
l.7
Scru
b moto
r ove
rload
Scru
b moto
r obs
tructi
onRe
move
obstr
uctio
n. Ch
eck t
o see
that
motor
s rota
te fre
ely.
Defec
tive s
crub m
otor
Cons
ult se
rvice
man
ual.
8Sc
rub m
otor s
ever
e ove
rload
See e
rror c
ode 7
9Sc
rub m
otor c
ircuit
open
Bad e
lectric
al co
nnec
tion
Chec
k all c
onec
tions
to sc
rub m
otors.
Defec
tive s
crub m
otor(s
)Co
nsult
servi
ce m
anua
l.Co
ntrol
failur
eCo
nsult
servi
ce m
anua
l.10
Scru
b moto
r con
tactor
conta
cts sh
orted
Conta
ctor f
ailur
eCo
nsult
servi
ce m
anua
l.11
Not u
sed
12Sc
rub m
otor c
ontac
tor co
il ove
rload
Conta
ctor f
ailur
eCo
nsult
servi
ce m
anua
l.Co
il sup
pres
sion d
iode f
ailur
eCo
nsult
servi
ce m
anua
l.13
Scru
b moto
r con
tactor
coil s
ever
e ove
rload
See e
rror c
ode 1
214
Scru
b moto
r con
tactor
coil c
ircuit
open
/ outp
ut fau
ltBa
d elec
trical
conn
ectio
nCh
eck a
ll con
necti
ons t
o scru
b moto
r con
tactor
.Co
ntacto
r fail
ure
Cons
ult se
rvice
man
ual.
Contr
ol fai
lure
Cons
ult se
rvice
man
ual.
15No
t use
d16
Not u
sed
17Sc
rub m
otor c
able
therm
istor
fault
Mach
ine te
mper
ature
out o
f ran
geTh
is er
ror w
ill oc
cur if
the m
achin
e tem
pera
ture i
s belo
w 32
*F or
abov
e 185
*F.
This
erro
r will
not p
reve
nt op
erati
on of
the m
achin
e. Sc
rub p
ress
ure m
ay be
aff
ected
.Th
ermi
stor f
ailur
eCo
nsult
servi
ce m
anua
l.18
Sque
egee
lift a
ctuato
r ove
rload
Sque
egee
obstr
uctio
n / bi
nding
Remo
ve ob
struc
tion.
Lubr
icate
mech
anism
.De
fectiv
e actu
ator m
otor
Cons
ult se
rvice
man
ual.
19Sq
ueeg
ee lif
t actu
ator s
ever
e ove
rload
See e
rror c
ode 1
820
Sque
egee
lift a
ctuato
r circ
uit op
en / o
utput
fault
Bad e
lectric
al co
nnec
tion
Chec
k all c
onec
tions
to ac
tuator
moto
r.De
fectiv
e actu
ator m
otor
Cons
ult se
rvice
man
ual.
Contr
ol fai
lure
Cons
ult se
rvice
man
ual.
21No
t use
d22
Not u
sed
23No
t use
d
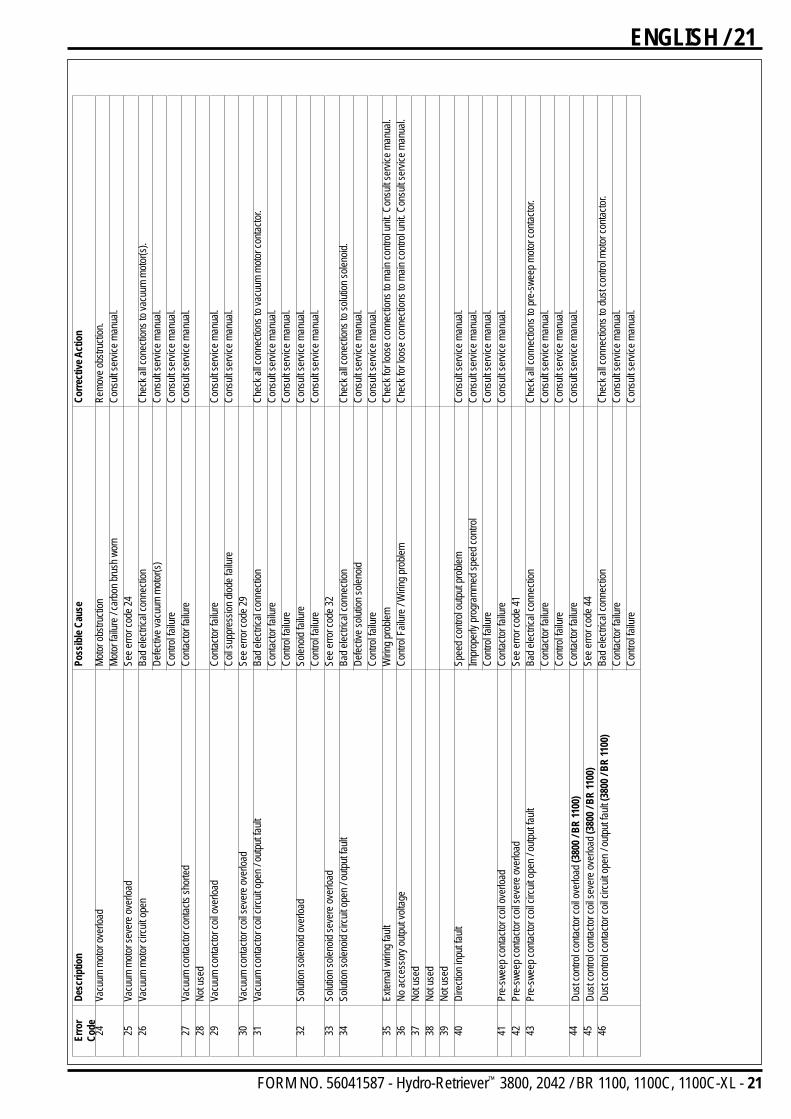
FORM NO. 56041587 - Hydro-Retriever™ 3800, 2042 / BR 1100, 1100C, 1100C-XL - 21
ENGLISH / 21Er
ror
Code
Desc
riptio
nPo
ssib
le Ca
use
Corre
ctive
Act
ion
24Va
cuum
moto
r ove
rload
Motor
obstr
uctio
nRe
move
obstr
uctio
n.Mo
tor fa
ilure
/ car
bon b
rush
wor
nCo
nsult
servi
ce m
anua
l.25
Vacu
um m
otor s
ever
e ove
rload
See e
rror c
ode 2
426
Vacu
um m
otor c
ircuit
open
Bad e
lectric
al co
nnec
tion
Chec
k all c
onec
tions
to va
cuum
moto
r(s).
Defec
tive v
acuu
m mo
tor(s)
Cons
ult se
rvice
man
ual.
Contr
ol fai
lure
Cons
ult se
rvice
man
ual.
27Va
cuum
conta
ctor c
ontac
ts sh
orted
Conta
ctor f
ailur
eCo
nsult
servi
ce m
anua
l.28
Not u
sed
29Va
cuum
conta
ctor c
oil ov
erloa
dCo
ntacto
r fail
ure
Cons
ult se
rvice
man
ual.
Coil s
uppr
essio
n diod
e fail
ure
Cons
ult se
rvice
man
ual.
30Va
cuum
conta
ctor c
oil se
vere
over
load
See e
rror c
ode 2
931
Vacu
um co
ntacto
r coil
circu
it ope
n / ou
tput fa
ultBa
d elec
trical
conn
ectio
nCh
eck a
ll con
necti
ons t
o vac
uum
motor
conta
ctor.
Conta
ctor f
ailur
eCo
nsult
servi
ce m
anua
l.Co
ntrol
failur
eCo
nsult
servi
ce m
anua
l.32
Solut
ion so
lenoid
over
load
Solen
oid fa
ilure
Cons
ult se
rvice
man
ual.
Contr
ol fai
lure
Cons
ult se
rvice
man
ual.
33So
lution
solen
oid se
vere
over
load
See e
rror c
ode 3
234
Solut
ion so
lenoid
circu
it ope
n / ou
tput fa
ultBa
d elec
trical
conn
ectio
nCh
eck a
ll con
ectio
ns to
solut
ion so
lenoid
.De
fectiv
e solu
tion s
oleno
idCo
nsult
servi
ce m
anua
l.Co
ntrol
failur
eCo
nsult
servi
ce m
anua
l.35
Exter
nal w
iring f
ault
Wirin
g pro
blem
Chec
k for
loos
e con
necti
ons t
o main
contr
ol un
it. Co
nsult
servi
ce m
anua
l.36
No ac
cess
ory o
utput
volta
geCo
ntrol
Failu
re / W
iring p
roble
mCh
eck f
or lo
ose c
onne
ction
s to m
ain co
ntrol
unit.
Cons
ult se
rvice
man
ual.
37No
t use
d38
Not u
sed
39No
t use
d40
Dire
ction
inpu
t fault
Spee
d con
trol o
utput
prob
lemCo
nsult
servi
ce m
anua
l.Im
prop
erly
prog
ramm
ed sp
eed c
ontro
lCo
nsult
servi
ce m
anua
l.Co
ntrol
failur
eCo
nsult
servi
ce m
anua
l.41
Pre-
swee
p con
tactor
coil o
verlo
adCo
ntacto
r fail
ure
Cons
ult se
rvice
man
ual.
42Pr
e-sw
eep c
ontac
tor co
il sev
ere o
verlo
adSe
e erro
r cod
e 41
43Pr
e-sw
eep c
ontac
tor co
il circ
uit op
en / o
utput
fault
Bad e
lectric
al co
nnec
tion
Chec
k all c
onne
ction
s to p
re-sw
eep m
otor c
ontac
tor.
Conta
ctor f
ailur
eCo
nsult
servi
ce m
anua
l.Co
ntrol
failur
eCo
nsult
servi
ce m
anua
l.44
Dust
contr
ol co
ntacto
r coil
over
load (
3800
/ BR
1100
)Co
ntacto
r fail
ure
Cons
ult se
rvice
man
ual.
45Du
st co
ntrol
conta
ctor c
oil se
vere
over
load (
3800
/ BR
1100
)Se
e erro
r cod
e 44
46Du
st co
ntrol
conta
ctor c
oil ci
rcuit o
pen /
outpu
t fault
(380
0 / B
R 11
00)
Bad e
lectric
al co
nnec
tion
Chec
k all c
onne
ction
s to d
ust c
ontro
l moto
r con
tactor
.Co
ntacto
r fail
ure
Cons
ult se
rvice
man
ual.
Contr
ol fai
lure
Cons
ult se
rvice
man
ual.

22 - FORM NO. 56041587 - Hydro-Retriever™ 3800, 2042 / BR 1100, 1100C, 1100C-XL
22 / ENGLISHTECHNICAL SPECIFICATIONS (as installed and tested on the unit)
Model BR 1100 / Haram BR 1100 BR 1100C BR 1100C-XL
Hydro-Retriever™ 3800 Hydro-Retriever™ 3800C Hydro-Retriever™ 2042Model No. 56410002 / 56307200 56410351 56410425
56410000 56410350 56410001Current A 136 103 115Voltage, Batteries V 36V 36V 36VBattery Capacity Ah 480@5 hr 480@5 hr
370@6 hr 370@6 hr 370@6 hrProtection Grade IPX3 IPX3 IPX3Sound Power Level (IEC 704-1) dB(A)/20μPa 73 73 73Gross Weight lbs / kg 2988 / 1355 2998 / 1360
2690 / 1220 2700 / 1225 2833 / 1285Vibrations at the Hand Controls m/s2 <2.5m/s2 <2.5m/s2 <2.5m/s2
Vibrations at the Seat m/s2 <0.5m/s2 <0.5m/s2 <0.5m/s2
Gradeability Transport 15% (8.50) 15% (8.50) 15% (8.50) Cleaning 12% (6.80) 12% (6.80) 12% (6.80)
revised 6/05


Deutsch Korrekte Entsorgung dieses Produkts (Elektromüll)(Anzuwenden in den Ländern der Europäischen Union und anderen euroäis-chen Ländern mit einem separaten Sammelsystem)
Die Kennzeichnung auf dem Produkt bzw. auf der dazugehörigen Literatur gibt an, dass esnach seiner Lebensdauer nicht zusammen mit dem normalen Haushaltsmüll entsorgt werdendarf. Entsorgen Sie dieses Gerät bitte getrennt von anderen Abfällen, um der Umwelt bzw. dermenschlichen Gesundheit nicht durch unkontrollierte Müllbeseitigung zu schaden. Recyceln Siedas Gerät, um die nachhaltige Wiederverwertung von stofflichen Ressourcen zu fördern.Private Nutzer sollten den Händler, bei dem das Produkt gekauft wurde, oder die zuständigenBehörden kontaktieren, um in Erfahrung zu bringen, wie sie das Gerät auf umweltfreundlicheWeise recyceln können.Gewerbliche Nutzer sollten sich an Ihren Lieferanten wenden und die Bedingungen desVerkaufsvertrags konsultieren. Dieses Produkt darf nicht zusammen mit anderem Gewerbemüllentsorgt werden.
Français Comment éliminer ce produit (déchets d’équipements électriques et électroniques)(Applicable dans les pays de l’Union Européen et aux autres pays européensdisposant de systémes de collecte sélective)
Ce symbole sur le produit ou sa documentation indique qu’il ne doit pas être éliminé en fin devie avec les autres déchets ménagers. L’élimination incontrôlée des déchets pouvant porterpréjudice à l’environnement ou à la santé humaine, veuillez le séparer des autres types dedéchets et le recycler de façon responsable. Vous favoriserez ainsi la réutilisation durable desressources matérielles.Les particuliers sont invités à contacter le distributeur leur ayant vendu le produit ou à se ren-seigner auprès de leur mairie pour savoir où et comment ils peuvent se débarrasser de ce pro-duit afin qu’il soit recyclé en respectant l’environnement.Les entreprises sont invitées à contacter leurs fournisseurs et à consulter les conditions de leurcontrat de vente. Ce produit ne doit pas être éliminé avec les autres déchets commerciaux.
Italiano Corretto smaltimento del prodotto (rifiuti elettrici ed elettronici)(Applicabile in i paesi dell’Unione Europea e in quelli con sistema di raccoltadifferenziata) Il marchio riportato sul prodotto o sulla sua documentazione indica che il prodotto non deveessere smaltito con altri rifiuti domestici al termine del ciclo di vita. Per evitare eventuali danniall'ambiente o alla salute causati dall'inopportuno smaltimento dei rifiuti, si invita l'utente a sep-arare questo prodotto da altri tipi di rifiuti e di riciclarlo in maniera responsabile per favorire ilriutilizzo sostenibile delle risorse materiali.
Gli utenti domestici sono invitati a contattare il rivenditore presso il quale è stato acquistato ilprodotto o l'ufficio locale preposto per tutte le informazioni relative alla raccolta differenziata eal riciclaggio per questo tipo di prodotto.
Gli utenti aziendali sono invitati a contattare il proprio fornitore e verificare i termini e le con-dizioni del contratto di acquisto. Questo prodotto non deve essere smaltito unitamente ad altririfiuti commerciali.
Sweden Korrekt avfallshantering av produkten (elektriska och elektroniska produkter)Denna markering på produkten och i manualen anger att den inte bör sorteras tillsammans medannat hushållsavfall när dess livstid är över. Till förebyggande av skada på miljö och hälsa bör pro-dukten hanteras separat för ändamålsenlig återvinning av dess beståndsdelar.Hushållsanvändare bör kontakta den återförsäljare som sålt produkten eller sin kommun förvidare information om var och hur produkten kan återvinnas på ett miljösäkert sätt.Företagsanvändare bör kontakta leverantören samt verifiera angivna villkor i köpekontraktet. Produktenbör inte hanteras tillsammans med annat kommersiellt avfall.
WEEE Symbol Information
English Correct Disposal of This Product (Waste Electrical & Electronic Equipment)(Applicable in the European Union and other European countries with separatecollection systems)
This marking shown on the product or its literature, indicates that it should not be disposed withother household wastes at the end of its working life. To prevent possible harm to the environ-ment or human health from uncontrolled waste disposal, please separate this from other typesof wastes and recycle it responsibly to promote the sustainable reuse of material resources.Household users should contact either the retailer where they purchased this product, or theirlocal government office, for details of where and how they can take this item for environmental-ly safe recycling.Business users should contact their supplier and check the terms and conditions of the pur-chase contract. This product should not be mixed with other commercial wastes for disposal.
DJ68-00320A REV(0.0)
Netherlands Correcte verwijdering van dit product (elektrische & elektronischeafvalapparatuur)Dit merkteken op het product of het bijbehorende informatiemateriaal duidt erop dat het niet metander huishoudelijk afval verwijderd moet worden aan het einde van zijn gebruiksduur. Ommogelijke schade aan het milieu of de menselijke gezondheid door ongecontroleerde afvalverwi-jdering te voorkomen, moet u dit product van andere soorten afval scheiden en op een verantwo-orde manier recyclen, zodat het duurzame hergebruik van materiaalbronnen wordt bevorderd.Huishoudelijke gebruikers moeten contact opnemen met de winkel waar ze dit product hebbengekocht of met de gemeente waar ze wonen om te vernemen waar en hoe ze dit product milieuvrien-delijk kunnen laten recyclen.Zakelijke gebruikers moeten contact opnemen met hun leverancier en de algemene voorwaar-den van de koopovereenkomsten nalezen. Dit product moet niet worden gemengd met anderbedrijfsafval voor verwijdering.
Denmark Korrekt affaldsbortskaffelse af dette produkt (elektrisk & elektronisk udstyr)Mærket på dette produkt eller i den medfølgende dokumentation betyder, at produktet ikke måbortskaffes sammen med almindeligt husholdningsaffald efter endt levetid. For at undgå skadeligemiljø- eller sundhedspåvirkninger på grund af ukontrolleret affaldsbortskaffelse skal dette produktbortskaffes særskilt fra andet affald og indleveres behørigt til fremme for bæredygtig materialegen-vinding.Hjemmebrugere bedes kontakte forhandleren, hvor de har købt produktet, eller den lokale myn-dighed for oplysning om, hvor og hvordan de kan indlevere produktet med henblik på miljø-forsvarlig genvinding.Erhvervsbrugere bedes kontakte leverandøren og læse betingelserne og vilkårene i købekon-trakten. Dette produkt bør ikke bortskaffes sammen med andet erhvervsaffald.
Portugal Eliminação Correcta Deste Produto (Resíduo de Equipamentos Eléctricose Electrónicos)Esta marca, apresentada no produto ou na sua literatura indica que ele não deverá ser eliminadojuntamente com os resíduos domésticos indiferenciados no final do seu período de vida útil. Paraimpedir danos ao ambiente e à saúde humana causados pela eliminação incontrolada de resídu-os deverá separar este equipamento de outros tipos de resíduos e reciclá-lo de forma responsáv-el, para promover uma reutilização sustentável dos recursos materiais.Os utilizadores domésticos deverão contactar ou o estabelecimento onde adquiriram este produ-to ou as entidades oficiais locais para obterem informações sobre onde e de que forma podemlevar este produto para permitir efectuar uma reciclagem segura em termos ambientais.Os utilizadores profissionais deverão contactar o seu fornecedor e consultar os termos econdições do contrato de compra. Este produto não deverá ser misturado com outros resíduoscomerciais para eliminação.
Republic of Ireland (Gaelic)Diúscairt Cheart an Táirge Seo (Trealamh Leictreach agus LeictreonachDramhaíola)Léiríonn an mharcáil seo atá ar an táirge nó sa litríocht a thagann leis, nár chóir é a dhiúscairt ledramhaíl tí eile ag deireadh a shaoil oibre. Chun cosaint i gcoinne dochar don chomhshaol nó doshláinte an duine, a d’fhéadfadh bheith mar thoradh ar an ndiúscairt dramhaíola neamhtheoran-ta, scar an dramhaíl seo ó chineálacha eile dramhaíola le do thoil agus déan athchursáil fhrea-grach air chun athúsáid inmharthana na hacmhainní ábhartha a chur chun cinn.Ba chóir dóibh siud a úsáideann an trealamh sa bhaile dul i dteagmháil leis an díoltóir ónar chean-naigh siad an táirge seo, nó lena n-oifig áitiúil Rialtais, ar mhaithe le sonraí a fháil faoi cá háit aguscathain is féidir athchúrsáil atá slán ó thaobh an chomhshaoil de a dhéanamh ar an táirge seo.Ba chóir dóibh siúd a úsáideann an trealamh seo ina ngnó dul i dteagmháil leis an soláthróiragus téarmaí agus coinníollacha an chonartha ceannaigh a sheiceáil. Níor chóir an táirge seoa chur le dramhaíl eile tráchtála agus diúscairt á déanamh.
Español Eliminación correcta de este producto (material eléctrico y electrónicode descarte)(Aplicable en la Unión Europea y en países europeos con sistenmas de recogi-da selectiva de residuos)La presencia de esta marca en el producto o en el material informativo que lo acompaña, indi-ca que al finalizar su vida útil no deberá eliminarse junto con otros residuos domésticos. Paraevitar los posibles daños al medio ambiente o a la salud humana que representa la eliminaciónincontrolada de residuos, separe este producto de otros tipos de residuos y recíclelo correcta-mente para promover la reutilización sostenible de recursos materiales.Los usuarios particulares pueden contactar con el establecimiento donde adquirieron el pro-ducto, o con las autoridades locales pertinentes, para informarse sobre cómo y dónde puedenllevarlo para que sea sometido a un reciclaje ecológico y seguro.Los usuarios comerciales pueden contactar con su proveedor y consultar las condiciones del con-trato de compra. Este producto no debe eliminarse mezclado con otros residuos comerciales.
Slovakia Správna likvidácia tohoto výrobku (Elektrotechnický a elektronický odpad)Toto oznaãenie na výrobku alebo v sprievodnej brožùre hovorí, že po skonãení jeho žvotnostiby nemal byÈ likvidovaný s ostatným odpadom. Prípadnému poškodeniu životného prostrediaalebo ºudského zdravia môžete predísÈ tým, že budete takéto typy výrobkov oddeºovaÈ odostatného odpadu a vrátite ich na recykláciu. Používatelia v domácnostiach by pre podrobné informácie, ako ekologicky bezpeãne naložiÈ s týmtovýrobkom, mali kontaktovaÈ buì predajcu, ktorý im výrobok predal, alebo príslušný ùrad v okolí ichbydliska.Priemyselní používatelia by mali kontaktovaÈ svojho dodávateºa a preveriÈ si podmienky kùpnej zmlu-vy. Tento výrobok by nemal byÈ likvidovaný spolu s ostatným priemyselným odpadom.
Hungary A termék megfelelŒ leadása (Elektromos és elektronikus készülékek hulladékkezelése)A terméken vagy a hozzá tartozó dokumentáción szereplŒ jelzés arra utal, hogy hasznos élettartamavégén a terméket nem szabad háztartási hulladékkal együtt kidobni. Annak érdekében, hogymegelŒzhetŒ legyen a szabálytalan hulladékleadás által okozott környezet- és egészségkárosodás,különítse ezt el a többi hulladéktól, és felelŒ sségteljesen gondoskodjon a hulladék leadásáról, a hul-ladékanyagok fenntartható szint¦ ùjrafelhasználása céljából.A háztartási felhasználók a termék forgalmazójától vagy a helyi önkormányzati szervektŒl kérjenek tanácsotarra vonatkozóan, hová és hogyan vihetik el ez elhasznált terméket a környezetvédelmi szempontból biz-tonságos hulladékleadás céljából.Az üzleti felhasználók lépjenek kapcsolatba a forgalmazóval, és vizsgálják meg az adásvételi szerzŒdésfeltételeit. A terméket nem szabad leadni kereskedelmi forgalomból származó egyéb hulladékkal együtt.
Czech RepublicSprávná likvidace tohoto produktu (Zni�ení elektrického a elektronického za�ízení)Tato znaãka zobrazená na produktu nebo v dokumentaci znamená, že by nemûl být používán s jinýmidomácími za�ízeními po skonãení svého funkãního období. Aby se zabránilo možnému zneãištûní život-ního prost�edí nebo zranûní ãlovûka díky nekontrolovanému zniãení, oddûlte je prosíme od dalších typÛodpadÛ a recyklujte je zodpovûdnû k podpo�e opûtovného využití hmotných zdrojÛ.âlenové domácnosti by mûli kontaktovat jak prodejce, u nûhož produkt zakoupili, tak místní vládníkancelá�, ohlednû podrobností, kde a jak mÛžete tento výrobek bezpeãnû vzhledem k životnímuprost�edí recyklovat.Obchodníci by mûli kontaktovat své dodavatele a zkontrolovat všechny podmínky koupû . Tentovýrobek by se nemûl míchat s jinými komerãními produkty, urãenými k likvidaci.
Slovenia Ustrezno odstranjevanje tega izdelka (odpadna elektri�na in elektronska oprema)Oznaka na izdelku ali spremljevalni dokumentaciji pomeni, da ga na koncu uporabne dobe ne smemoodstranjevati skupaj z drugimi gospodinjskimi odpadki. Da bi prepreãili morebitno tveganje za okolje alizdravje ãloveka zaradi nenadzorovanega odstranjevanja odpadkov, izdelek loãite od drugih vrst odpad-kov in ga odgovorno reciklirajte ter tako spodbudite trajnostno ponovno uporabo materialnih virov.Uporabniki v gospodinjstvih naj za podrobnosti o tem, kam in kako lahko odnesejo ta izdelek naokolju varno recikliranje, pokliãejo trgovino, kjer so izdelek kupili, ali lokalni vladni urad.Podjetja naj pokliãejo dobavitelja in preverijo pogoje nabavne pogodbe. Tega izdelka pri odstranjevan-ju ne smete mešati z drugimi gospodarskimi odpadki.
Estonia Õige viis toote kasutusest kõrvaldamiseks (elektriliste ja elektrooniliste seadmete jäätmed)Selline tähistus tootel või selle dokumentidel näitab, et toodet ei tohi kasutusaja lõppemisel kõrvalda-da koos muude olmejäätmetega. Selleks, et vältida jäätmete kontrollimatu kõrvaldamisega seotud või-maliku kahju tekitamist keskkonnale või inimeste tervisele ning edendada materiaalsete vahenditesäästvat taaskasutust, eraldage toode muudest jäätmetest ja suunake taasringlusse.Kodukasutajad saavad teavet keskkonnaohutu ringlussevõtu kohta kas toote müüjalt või keskkon-naametist.Firmad peaksid võtma ühendust tarnijaga ning kontrollima ostulepingu tingimusi ja sätteid. Toodet ei tohipanna muude hävitamiseks mõeldud kaubandusjäätmete hulka.
Finland Tämän tuotteen turvallinen hävittäminen (elektroniikka ja sähkölaitteet)Oheinen merkintä tuotteessa tai tuotteen oheismateriaalissa merkitsee, että tätä tuotettaei tule hävittää kotitalousjätteen mukana sen elinkaaren päätyttyä. Hallitsemattomasta jät-teenkäsittelystä ympäristölle ja kanssaihmisten terveydelle aiheutuvien vahinkojen vält-tämiseksi tuote tulee käsitellä muista jätteistä erillään. Jäte on hyvä kierrättää raaka-aineiksi kestävän ympäristökehityksen takia.Kotitalouskäyttäjien tulisi ottaa yhteyttä tuotteen myyneeseen jälleenmyyjään taipaikalliseen ympäristöviranomaiseen, jotka antavat lisätietoja tuotteen turvallisista kierrä-tysmahdollisuuksista.Yrityskäyttäjien tulisi ottaa yhteyttä tavarantoimittajaan ja selvittää hankintasopimuksenehdot. Tätä tuotetta ei tule hävittää muun kaupallisen jätteen seassa.

Norway Korrekt avhending av dette produkt (Avfall elektrisk og elektronisk utstyr)Denne merkingen som vises på produktet eller dens dokumentasjon, indikerer at den ikkeskal kastes sammen med annet husholdningsavfall ved slutten av sin levetid. For å hindremulig skade på miljøet eller menneskelig helse fra ukontrollert avfallsavhending, vennligstatskill dette fra andre typer avfall og resirkuler det ansvarlig for å fremme bærekraftig gjen-bruk av materielle ressurser.Husholdningsbrukere bør kontakte enten forhandleren de kjøpte produktet av, eller lokalemyndigheter, for detaljer om hvor og hvordan de kan frakte denne artikkelen for miljømessigtrygg resirkulering.Forretningsbrukere bør kontakte sin leverandør og undersøke vilkårene i kjøpekontrakten.Dette produktet skal ikke blandes med annet kommersielt avfall som skal kastes.
Lithuania
Latvia
Greece
Poland Prawid�owe usuwanie produktu (zu×yty sprz�t elektryczny i elektroniczny)Oznaczenie umieszczone na produkcie lub w odnoszàcych si� do niego tekstach wskazuje, ×e produktupo up�ywie okresu u×ytkowania nie nale×y usuwa� z innymi odpadami pochodzàcymi z gospodarstwdomowych. Aby uniknà� szkodliwego wp�ywu na Êrodowisko naturalne i zdrowie ludzi wskutek niekon-trolowanego usuwania odpadów, prosimy o oddzielenie produktu od innego typu odpadów orazodpowiedzialny recykling w celu promowania ponownego u×ycia zasobów materialnych jako sta�ej praktyki.W celu uzyskania informacji na temat miejsca i sposobu bezpiecznego dla Êrodowiska recyklingu tegoproduktu u×ytkownicy w gospodarstwach domowych powinni skontaktowa � si� z punktem sprzeda×ydetalicznej, w którym dokonali zakupu produktu, lub z organem w�adz lokalnych.U×ytkownicy w firmach powinni skontaktowa� si� ze swoim dostawcà i sprawdzi� warunki umowyzakupu. Produktu nie nale×y usuwa� razem z innymi odpadami komercyjnymi.

Austria (Sales Sub)Nil sk-Advance GmbH Phone: +43Voralberger Allee 46 1616 58 30 22A-1230 Wien Fax: +43info@nil sk-advance.at 1616 58 30 40 www.nil sk-advance.atBelgium (Sales Sub)Nil sk-Advance NV/SA Phone: +32Doornveld Sphere Business Park (0)2467 60 50 Industrie Asse 3, No. 11 Fax: +32B-1731 Zellik-Asse (0)2463 44 16www.nil sk-advance.beCzech Republic (Sales Sub)Nil sk-Advance s.r.o. Phone: +420Lysinská 44/1863 2 44 09 09 12143 00 Praha - Modrany +420Czech Republic 2 44 09 09 21 4
Fax: +4202 44 40 23 93
DenmarkNil sk-Advance A/S Phone: +45Sognevej 25 43 23 81 00DK-2605 Brøndby Fax: +45mail@nil sk-advance.dk 43 43 77 00www.nil sk-advance.comDenmark (Prod. Sub)Gerni A/S Phone: +45Myntevej 2 89 12 22 00DK-8900 Randers Fax: +45www.gerni.com 86 43 14 81Denmark (Sales Sub)Nil sk-Advance Nordic A/S Phone: +45Sognevej 25A 43 23 40 50 Postbox 344 Fax: +45DK-2605 Brøndby 43 23 40 60 kundeservice@nil sk-advance.dkwww.nil sk-advance.dkFrance (Sales Sub)Nil sk-Advance S.A. Phone: +3327 avenue de la Baltique 1695 98 700Villebon sur Yvette Fax: +33P.B. 246 1695 98 701F-91944 Courtaboeuf Cedexinfo@nil sk-advance.frwww.nil sk-advance.frGermany (Sales Sub)Nil sk-Advance AG Phone: +49Siemensstrasse 25-27 4101 3990Postfach 1361 Fax: +49D-25462 Rellingen 4101 39 91 91info@nil sk-advancedewww.nil sk-advance.deGreece (Sales Sub)Nil sk-Advance A.E. Tel.: +308, Thoukididou Str. 210 963 3443Argioupoli Fax: +30Gr - 164 52 Athens 210 965 0975Greece
Holland (Sales Sub)Nil sk-Advance B.V. Phone: +31Camerastraat 9 (2e verdieping) 36 546 07 001322 BB Almere Fax: +31Postbus 60112 36 523 51 481320 AC Almerewww.nil sk-advance.nlIreland (Sales Sub)Nil sk-Advance Limited Phone: +3528 Sandyford Of ce Park 3 12 94 38 38Sandyford, Dublin 18 Fax: +35Ireland 3 12 94 38 45Italy (Prod & Sales Sub)CFM SpA Phone: +39Nil sk-Advance Div. Guardamiglio 0377 /414021Localita Novella III /45 1124I-26862 Guardamiglio (Mi) Fax: +39
0377 51 443Italy (Prod & Sales Sub)CFM S.p.A. Phone: +39Via Porrettana 1991 059 973 0000I-41059 Zocca (Modena) Fax: [email protected] 059 973 0099Norway (Sales Sub)Nil sk-Advance AS Phone: +47Ulvenveien 89C 23 06 75 00N-0581 Oslo Fax: +47
23 06 75 01Poland (Sales Sub)Nil sk-Advance Sp.Z.O.O. Phone: +48 05-800 Pruszków 22 738 37 50ul. 3-go MAJA 8 Fax: +48Poland 22 738 37 51Portugal (Sales Sub)Nil sk-Advance, Lda. Phone: +35Sintra Business Park 121 911 2670Zona Industrial Da Abrunheira Fax: +35 Edi cio 1, 1o A 121 911 2679P-2710-089 SintraRussia (Sales Sub)Nil sk-Advance LLC Phone: 7Vyatskaya str. 27, bld. 7 095 783 9602127015 Moscow Fax: +7Russia 095 783 9603Spain (Sales Sub)Nil sk-Advance S.A. Phone: +34Torre D’Ara 93 741 2400Passeig del Rengle, 5 Pl.10 Fax: +34E-08302 Mataró (Barcelona) 93 757 8020nil sk@nil sk-advance.esSweden (Sales Sub)Nil sk -Advance A/S Phone: +46Sjöbjörnsvägen 5 8555 94400Box 44045 Fax: +46S-100 73 Stockholm 8555 94430info@nil sk-advance.sewww.nil sk-advance.se
Sweden (Prod.)Nil sk-Advance A/S Phone: +46Åmål Branch 5321 7500Strömsbergsgatan Fax: +46Box 127 5321 7595S-662 23 ÅmålSwitzerland (Sales Sub)Nil sk-Advance AG Phone: +41Ringsstrasse 19 71 92 38 444Kirchberg/Industrie Stelzl Fax: +41CH-9500 Wil 71 92 35 283www.nil sk-advance.chUK (Sales Sub)Nil sk-Advance Limited Phone: +44Newmarket Road 1284 763163Bury St. Edmunds Fax: +44UK-Suffolk IP33 3SR 1284 750 562USA (Prod.)Nil sk-Advance Inc. Phone: +1 76314600 21.st Avenue North 745 3500Plymouth, MN 55447-3408 Fax: +1 763www.mn.nil sk-advance.com 745 3718USA (Sales Sub)Nil sk-Advance America Inc. Phone: +1 610300 Technology Drive 647 6420Malvern, PA 19355 Fax: +1 610www.pa.nil sk-advance.com 647 6427Canada (Sales Sub)Nil sk-Advance Canada Comp. Phone: + 1 905396 Watline Avenue 712 3260Mississauga, Ontario L4Z 1X2 Fax: +1 905
712 3255Australia (Sales Sub)Nil sk-Advance Pty. Ltd. Phone: +61(0)248 Egerton Street 9648 2700Silverwater, NSW 2128 Fax: +61(0)2Postal addresse: 9648 2711PO Box 6046Silverwater. NSW 1811info@nil sk-advance.com.auwww.nil sk-advance.com.auChina (Shenzhen)Nil sk-Advance (Shenzhen) Ltd Phone: +86 755Blok 3, Unit 130, 1001 Honghua Road 8359 7937 el.Int. Commercial & Trade Center 8359 7939-42Fuitian Free Trade Zone Fax: +86 755518038 Shenzhen 8359 1063P.R. ChinaChina (Suzhou)Nil sk-Advance Professional Phone: +86 512Cleaning Equipment (Suzhou) Co. Ltd. 8918 5656306 Su Hong Zhong Road, Build. 2 Fax: +86 512Suzhou Industrial Park 8918 5666215021 SuzhouP.R. China
Hong Kong (Sales Sub)Nil sk-Advance Ltd. Phone: +8522001 HK Worsted Mills Ind’l Bldg., 2427 595131-39 Wo Tong Tsui St. Fax: +852Kwai Chung, Hong Kong 2487 5828Japan (Sales Sub)Nil sk-Advance Inc. Phone: +81453-17-40-101 Chigasaki Higashi 942 7741Tsuzuki-ku, Yokohama 224-0033 Fax: +8145 Japan 942 6545Malaysia (Sales Sub)Nil sk-Advance Sdn Bhd Phone: +60 3 No. 21, Jalan SS 25/41 7956 8188Mayang Industrial Park Fax: +60 347301 Petaling Jaya 7966 6828Selangor, MalaysiaNew Zealand (Sales Sub)Nil sk-Advance Limited Phone: +64(0)9Danish House 525 00926 Rockridge Avenue Fax: +64(0)9Penrose 92-829 525 6440Auckland1135Postal addresse:Private Bag 92 825AucklandNew ZealandSingapore (Sales Sub)Nil sk-Advance Pte. Ltd. Phone: + 6522,Woodlands Industrial Park E1 6 7599100Singapore 757740 Fax: +65 sales@nil sk-advance.com.sg 7599133Taiwan, ROC (Sales Sub)Nil sk-Advance Ltd. Phone: +886 Taiwan Branch (H.K.) 2 2239 88121F, No. 193, Sec.2 Fax: +886 Xing Long Rd., Taipei 2 2239 8832Taiwan, R.O.C. Thailand (Sales Sub)Nil sk-Advance Co. Ltd. Phone: +66 289 Soi Chokechai-Ruammitr 275-5630Viphavadee-Rangsit Road Fax: +66 2Ladyao, Jatuchak, Bangkok 10900 691-4079Thailand

©Nilfisk-Advance Incorporated, 4/04 .pas
_____________________________________________________ TYPE: BR1100, BR1100C
EU Overensstemmelseserklæring DK Déclaration CE de conformité B, F Batteridreven gulvaskemaskine Autolaveuse à batterie Maskinen er fremstillet i overensstemmelse med følgende direktiver:
Cette machine a été fabriquée conformément aux directives suivantes:
Maskindirektiv: 98/37/EØF Réglementation machine: 98/37/CEE EMC-direktiv: 89/336/EØF 92/31/EØF 93/68/EØF 98/13/EOF RéglementationCEM: 89/336/CEE 92/31/CEE 93/68/CEE
98/13/CEE Lavspændingsdirektiv: 73/23/EØF 93/68/EØF Harmoniserede standarder: EN 60 335-2-72
Règlement basse tension: 73/23/CEE 93/68/CEE Normes harmonisées: EN 60 335-2-72
EU Överensstämmelseförsäkran S, FIN EG-conformiteitsverklaring NL, B Batteri-Skurmaskin Vloeronderhoudmachine Maskinen är tillverkad i överensstämmelse med följande direktiver:
Deze machine is vervaardigd overeenkomstig de volgende richtlijnen:
Maskindirektiv: 98/37/EEG Machine richtlijn: 98/37/EEC EMC-direktiv: 89/336/EEG 92/31/EEG 93/68/EEG 98/13/EEG EMC-richtlijn: 89/336/EEC 92/31/EEC 93/68/EEC 98/13/EEC Lågspänningsdirektiv: 73/23/EEG 93/68/EEG Harmoniserade standarder: EN 60 335-2-72
Laagspanning richtlijn: 73/23/EEC 93/68/EEC Geharmoniseerde normen: EN 60 335-2-72
EU Declaration of Conformity GB, IRL Declaración de conformidad de la CEE E Battery powered floor scrubber Fregadoa a baterías This machine was manufactured in conformity with the following directives and standards:
Esta máquina ha sido fabricada en conformidad a las siguientes normativas:
Machine Directive: 98/37/EEC Normativa de la máquina: 98/37/CEE EMC-directive: 89/336/EEC 92/31/EEC 93/68/EEC 98/13/EEC Normativa EMC: 89/336/CEE 92/31/CEE 93/68/CEE 98/13/CEE Low voltage directive: 73/23/EEC 93/68/EEC Harmonized standards: EN 60 335-2-72
Normativa sobre baja tensión: 73/23/CEE 93/68/CEE Normas armonizadas: EN 60 335-2-72
Dichiarazione di conformità - CEE I EU Declaração de conformidade da CE P Lavasciuga a batteria Auto-lavadora a baterias È prodotto in conformità alle disposizioni contenute nelle Direttive del Consiglio dei Ministri:
Esta máquina foi fabricada em conformidae com as seguintes directrizes:
M-direttiva: 98/37/EEC Directriz de maquinaria: 98/37/CEE EMC-direttiva: 89/336/EEC 92/31/EEC 93/68/EEC 98/13/EEC Directriz EMC: 89/336/CEE 92/31/EEC 93/68/CEE 98/13/CEE LV-direttiva: 73/23/EEC 93/68/EEC Norme armonizzate: EN 60 335-2-72
Directriz de baixa voltagem: 73/23/CEE 93/68/CEE Normas harmonizadas: EN 60 335-2-72
EG – Konformitätserklärung D, A EU:n yhdenmukaisuudesta direktiiveihin FIN Batteriebetriebene Scheuersaugmaschine Akkukäyttöinen yhdistelmäkone Diese Maschine wurde gemäβ den folgenden Richtlinien hergestellt:
On valmistettu noudattaen yhteisön määräämiä direktiivejä:
Maschinerichtlinie: 98/37/EWG M-direktiivi: 98/37/CEE EMV-Richtlinie: 89/336/EWG 92/31/EWG 93/68/EWG 98/13/EWG EMC-direktiivi: 89/336/CEE 92/31/CEE 93/68/CEE 98/13/CEE Niederspannungsrichtlinie: 73/23/EWG 93/68/EWG Harmonisierte normen: EN 60 335-2-72
LV-direktiivi: 73/23/CEE 93/68/CEE Yhdenmukaistetut standardit: EN 60 335-2-72
∆ηλωσηπροσαρµογης/συóρϕωσης EU GR EL vastavusdeklaratsioon ET Μπαταριοκινητο µηχαυηµα πλυσης δαπεδων Akutoitega põrandapuhasti Το µηχανηµα ιχει καταοκευαοτει ονµψωϖα µε τις παρακατω προσιαγραψες:
Käesolev masin on valmistatud kooskõlas järgmiste direktiivide ja standarditega:
Προσιαγραωη µηχανηµατος: 98/37/EEC Masinadirektiiv: 98/37/EEC Προσιαραψη−EMC: 89/336/EEC 92/31/EEC 93/68/EEC 98/13/EEC
Elektromagnetilise sobivuse direktiiv: 89/336/EEC 92/31/EEC 93/68/EEC 98/13/EEC
Προσιαγραψη χαµηλης ταοεως: 73/23/EEC 93/68/EEC Madalpinge direktiiv: 73/23/EEC 93/68/EEC Εναρµονισµενα προτυπα: EN 60 335-2-72 Ühtlustatud standardid: EN 60 335-2-72

©Nilfisk-Advance Incorporated, 4/04 .pas
ES atbilstības deklarācija LV Pareiškimas apie atitikimą ES direktyvoms LT Grīdas beršanas mašīna ar akumulatoru barošanu Baterijos energija varomas grindų šveitimo įrenginys Šī mašīna izgatavota atbilstoši šādām direktīvām un standartiem: Šis įrenginys pagamintas laikantis tokių direktyvų bei standartų: Mašīnu direktīva: 98/37/EEC Įrengimų direktyva: 98/37/EEC Elektromagnētiskās savietojamības (EMC) direktīva: 89/336/EEC 92/31/EEC 93/68/EEC 98/13/EEC
EMC direktyva: 89/336/EEC 92/31/EEC 93/68/EEC 98/13/EEC
Zemsprieguma direktīva: 73/23/EEC 93/68/EEC Saskaņotie standarti: EN 60 335-2-72
Žemos įtampos įrengimų direktyva: 73/23/EEC 93/68/EEC Harmonizuoti standartai: EN 60 335-2-72
Deklaracija EU o skladnosti SL Prehlásenie o súlade EÚ SK Stroj za čiščenje tal na akumulatorski pogon Zariadenie na čistenie povrchov napájané batériou Ta stroj je izdelan v skladu z naslednjimi smernicami in standardi: Toto zariadenie bolo vyrobené v súlade s nasledujúcimi
direktívami a normami: Smernica o strojih: 98/37/EEC Direktíva o zariadeniach: 98/37/EEC Smernica o elektromagnetni združljivosti (EMC): 89/336/EEC 92/31/EEC 93/68/EEC 98/13/EEC
Direktíva EMC: 89/336/EEC 92/31/EEC 93/68/EEC 98/13/EEC
Smernica o nizki napetosti: 73/23/EEC 93/68/EEC Harmonizirani standardi: EN 60 335-2-72
Direktíva o nízkom napätí: 73/23/EEC 93/68/EEC Súvisiace normy: EN 60 335-2-72
EU Prohlášení o shodě CS Deklaracja zgodności z normami UE PL Bateriemi napájené zařízení pro mytí podlah Akumulatorowa cyklinarka podłogowa Tento stroj byl vyroben ve shodě s následujícími směrnicemi a normami:
Niniejsze urządzenie zostało wyprodukowane w zgodzie z następującymi dyrektywami i normami UE:
Směrnice o strojním zařízení: 98/37/EEC Dyrektywa dotycząca maszyn: 98/37/EEC Směrnice o elektromagnetické kompatibilitě: 89/336/EEC 92/31/EEC 93/68/EEC 98/13/EEC
Dyrektywa: kompatybilność elektromagnetyczna 89/336/EEC 92/31/EEC 93/68/EEC 98/13/EEC
Směrnice o nízkém napětí: 73/23/EEC 93/68/EEC Harmonizované normy: EN 60 335-2-72
Dyrektywa: urządzenia elektromagnetyczne niskonapięciowe 73/23/EEC 93/68/EEC Zharmonizowane normy: EN 60 335-2-72
EU megfelelőségi nyilatkozat HU Декларация изготовителя о соответствии директивам ЕС Akkumulátoros padlósúrológép Поломоечная машина, работающая на аккумуляторных
батареях Ez a gép az alábbi irányelvekkel és szabványokkal összhangban készült:
Данная машина разработана в соответствии со следующими инструкциями и стандартами:
Gépészeti irányelvek 98/37/EEC Инструкция по разработке машин: 98/37/EEC EMC-irányelvek 89/336/EEC 92/31/EEC 93/68/EEC 98/13/EEC Инструкция EMC: 89/336/EEC 92/31/EEC 93/68/EEC 98/13/EEC Kisfeszültségű irányelvek: 73/23/EEC 93/68/EEC Harmonizált szabványok: EN 60 335-2-72
Инструкция по использованию низких напряжений: 73/23/EEC 93/68/EEC Согласованные стандарты: EN 60 335-2-72
4.3.2004 . Larry Doerr, Vice President Operations Nilfisk-Advance, Inc. Nilfisk-Advance A/S 14600 21st Avenue North Sognevej 25 Plymouth, MN 55447 USA DK-2605 Brøndby, Denmark

www.nilfisk-advance.com © 2005 Printed in USA