human figures
DESCRIPTION
drawing of human proportion and perspectivesTRANSCRIPT
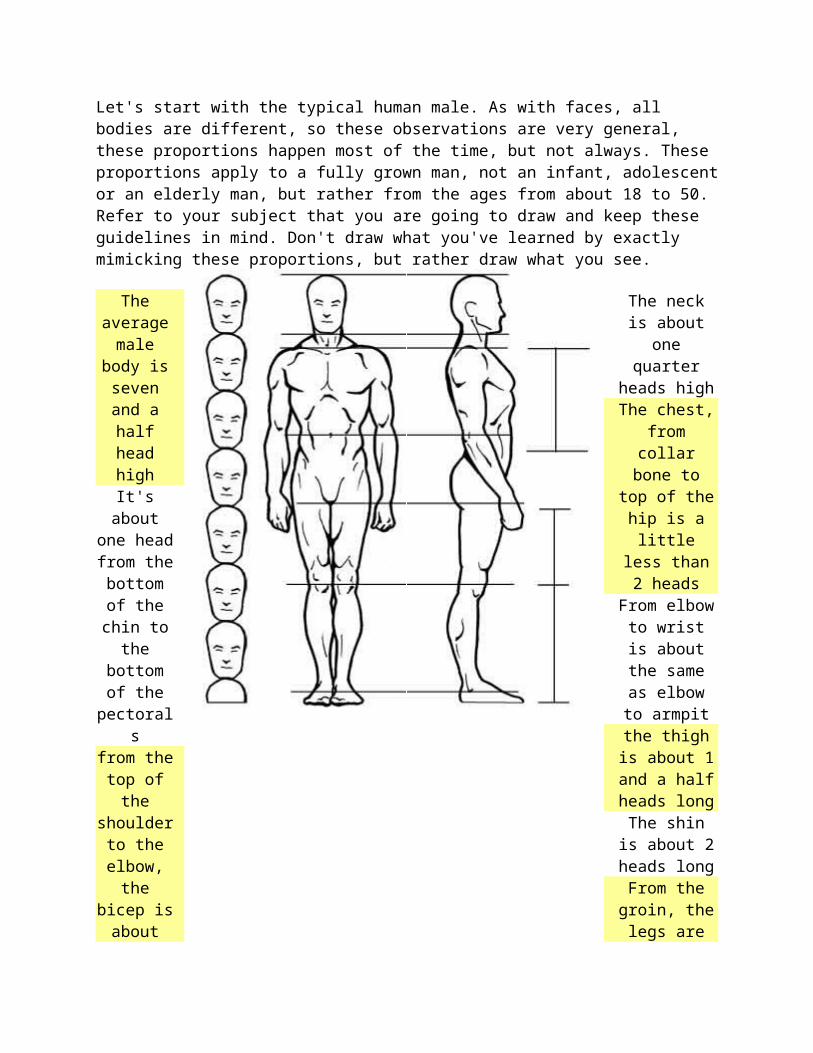
Let's start with the typical human male. As with faces, all bodies are different, so these observations are very general, these proportions happen most of the time, but not always. These proportions apply to a fully grown man, not an infant, adolescent or an elderly man, but rather from the ages from about 18 to 50. Refer to your subject that you are going to draw and keep these guidelines in mind. Don't draw what you've learned by exactly mimicking these proportions, but rather draw what you see.
The average male body
is seven and a half head
high
It's about one head from the bottom of the chin to the bottom
of the pectorals
from the top of the
shoulder to the elbow, the bicep is about one and a half heads long
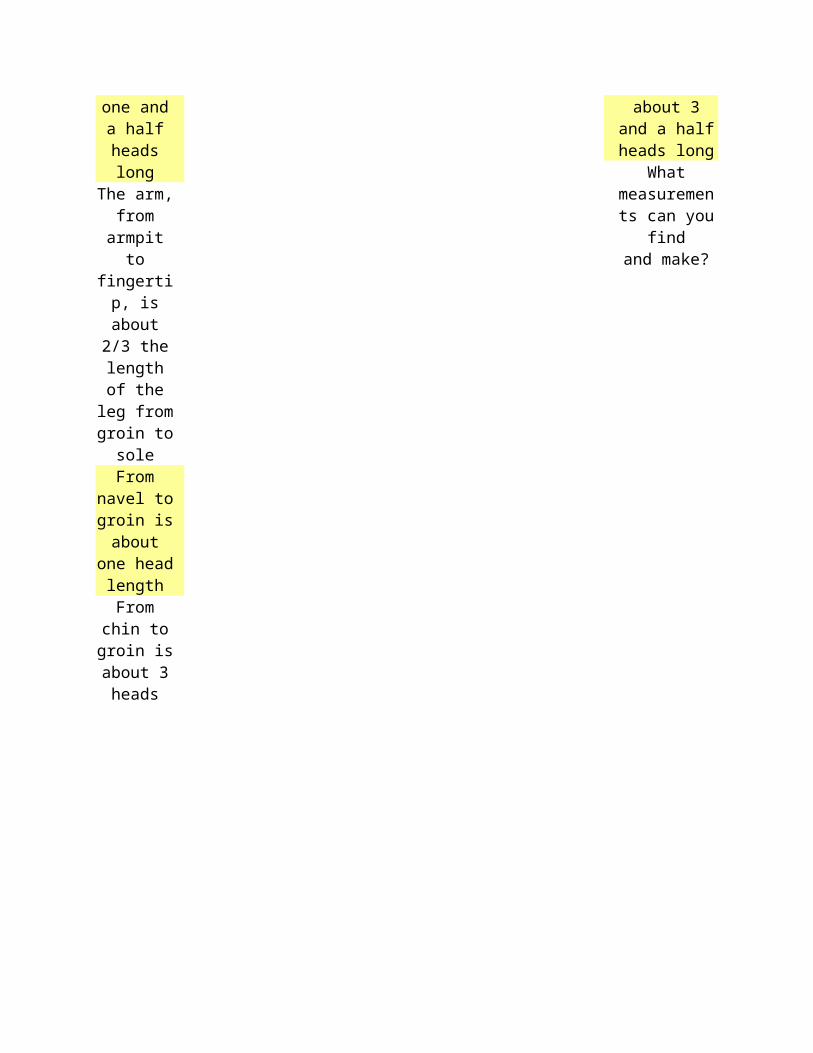
The arm, from armpit to fingertip, is about 2/3 the length of the leg
from groin to sole
From navel to groin is about one
head length
From chin to groin is
about 3 heads
The neck is about one
quarter heads high
The chest, from collar bone to
top of the hip is a little less than
2 heads
From elbow to wrist is about the same as
elbow to armpit
the thigh is
about 1 and a half heads long
The shin is
about 2heads long
From the groin, the legs are
about 3 and a half heads long
What measurements can you findand make?
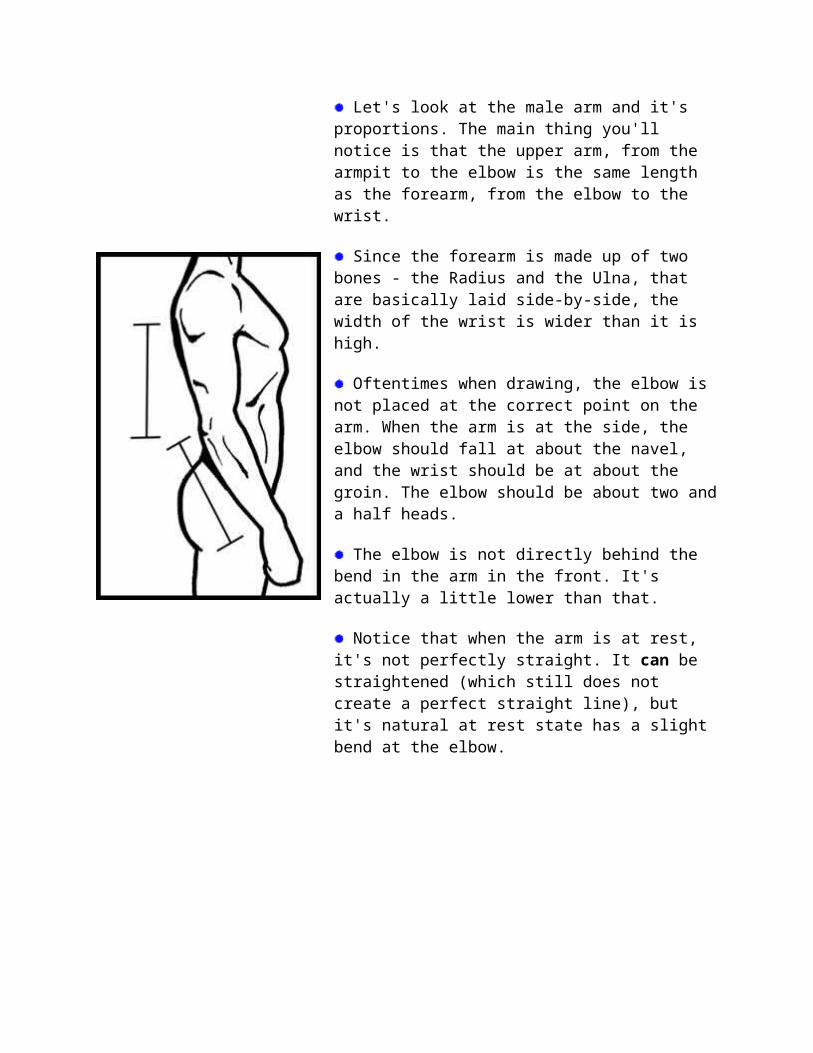
Let's look at the male arm and it's proportions. The main thing you'll notice is that the upper arm, from the armpit to the elbow is the same length as the forearm, from the elbow to the wrist.
Since the forearm is made up of two bones - the Radius and the Ulna, that are basically laid side-by-side, the width of the wrist is wider than it is high.
Oftentimes when drawing, the elbow is not placed at the correct point on the arm. When the arm is at the side, the elbow should fall at about the navel, and the wrist should be at about the groin. The elbow should be about two and a half heads.
The elbow is not directly behind the bend in the arm in the front. It's actually a little lower than that.
Notice that when the arm is at rest, it's not perfectly straight. It can be straightened (which still does not create a perfect straight line), but it's natural at rest state has a slight bend at the elbow.
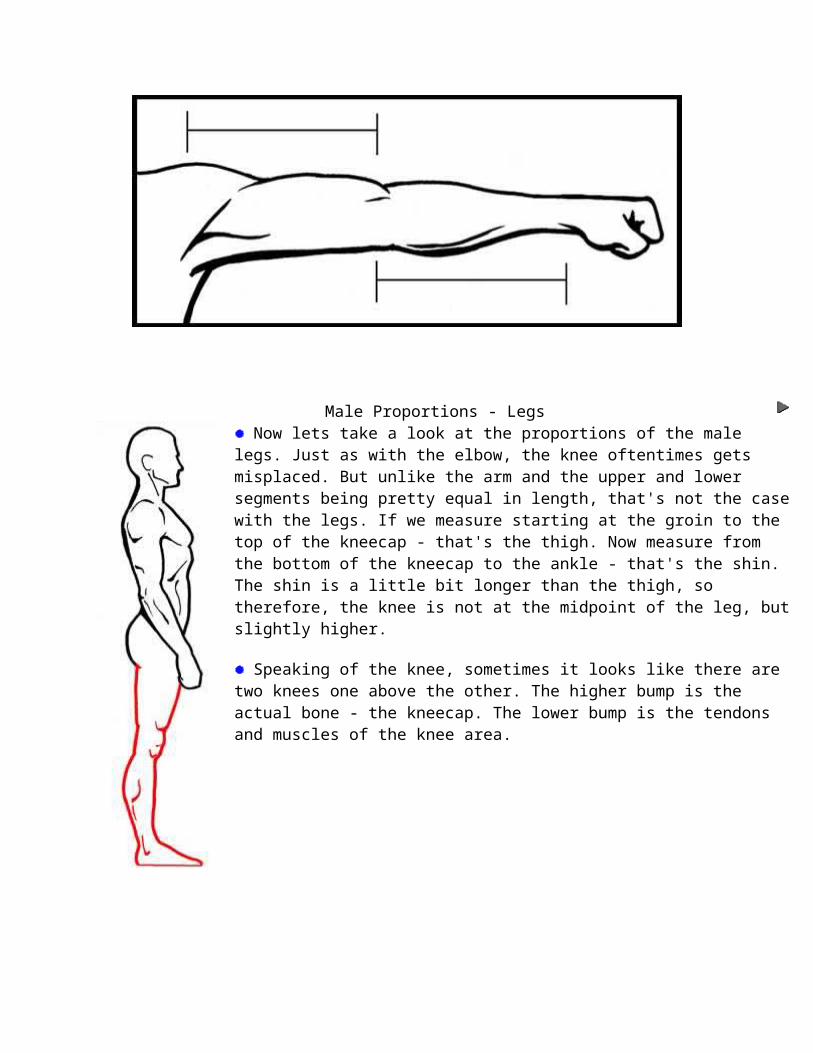
Male Proportions - Legs
Now lets take a look at the proportions of the male legs. Just as with the elbow, the knee oftentimes gets misplaced. But unlike the arm and the upper and lower segments being pretty equal in length, that's not the case with the legs. If we measure starting at the groin to the top of the kneecap - that's the thigh. Now measure from the bottom of the kneecap to the ankle - that's the shin. The shin is a little bit longer than the thigh, so therefore, the knee is not at the midpoint of the leg, but slightly higher.
Speaking of the knee, sometimes it looks like there are two knees one above the other. The higher bump is the actual bone - the kneecap. The lower bump is the tendons and muscles of the knee area.
In the image on the left, the leg is bent at the knee. Note the location of the kneecap. It's higher than you would expect.
Also in the left image, doesn't the thigh seem a bit too short? It's not, it just appears that way. So when you are drawing legs that are bent at the knee, guard against drawing the thigh too long.
Not only is it helpful to understand proportions when you're drawing a human figure, but it's also helpful to understand the basic muscle structure that a person has. Since most of the time your subject that you'll be drawing has skin covering the muscles (if there isn't any skin on your subject - your subject better not be alive!!!), I think a simplified muscle diagram that shows the major muscles that you can see under the skin is in order. No need for those medical-looking charts where the muscles are all pink and look like plastic. Also, since your subject probably
won't have the perfect body and has some degree of fat coving some or all of their muscles, that's another reason to do a more "real life" look at muscles. That's called "Artistic Anatomy", when we look at the human body not from a scientific or biological point of view, but from a point of view where we look at what you might actually come across in drawing a human being.
Here are the front and back views of a male whose major muscle groups are shown. This is what a male looks like with zero percent fat on the muscles. The detail of the hands and feet are not shown because we'll talk about drawing hands and feet further down the road.
Understanding where the muscles are and how they look will help you when figure drawing. If you study what the muscles look like and how they interconnect, you'll be able to understand what you're looking at when the figure is foreshortened in some manner. We will also discuss how to draw the human body when it is foreshortened elsewhere in this section. The muscle shapes change as the figure moves, either contracting or elongating, and if you understand how the muscles interact with each other, you'll understand more fully how and what to draw.
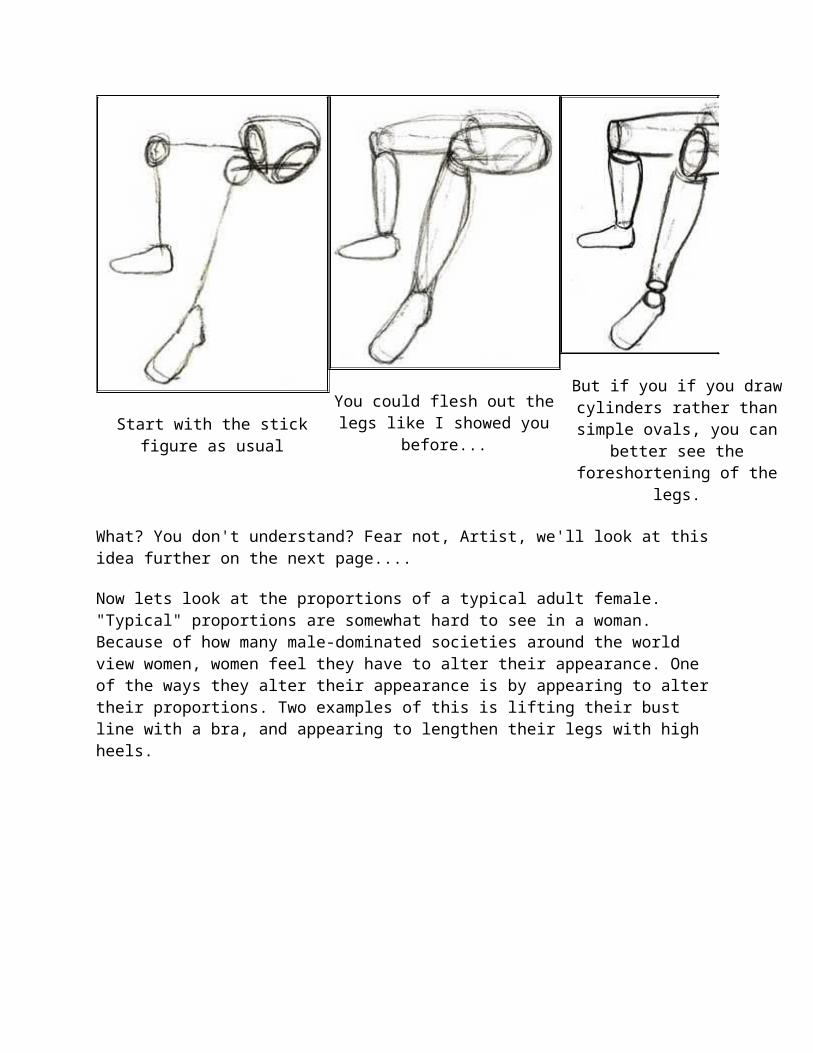
Let's say you were going to draw a seated figure and the figure's left foot is closer to you than the right foot.
You could flesh out the legs like I But if you if you draw cylinders rather than simple ovals, you can

Start with the stick figure as usualshowed you before... better see the foreshortening of the
legs.
What? You don't understand? Fear not, Artist, we'll look at this idea further on the next page....
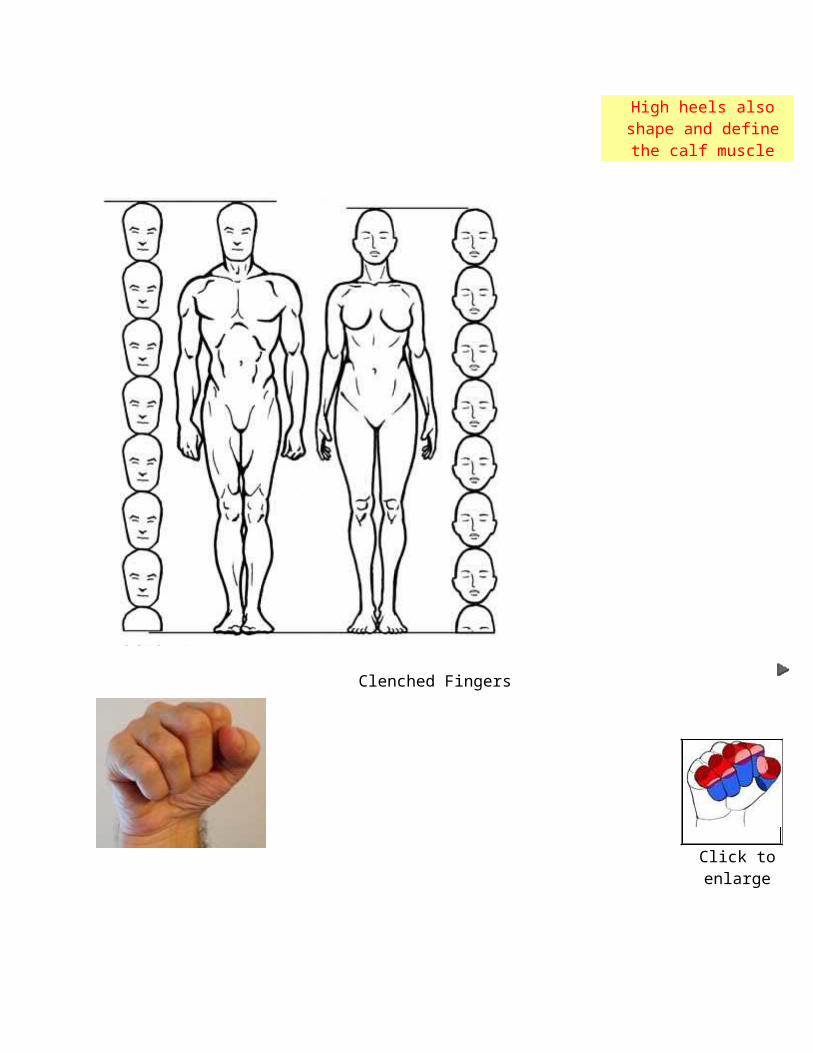
Now lets look at the proportions of a typical adult female. "Typical" proportions are somewhat hard to see in a woman. Because of how many male-dominated societies around the world view women, women feel they have to alter their appearance. One of the ways they alter their appearance is by appearing to alter their proportions. Two examples of this is lifting their bust line with a bra, and appearing to lengthen their legs with high heels.
The average female body is seven and a half head high
It's about one head from the bottom of the chin to the mid point of the breasts
from the top of the shoulder to the elbow, the bicep is
about one and a third heads long
The arm, from armpit to fingertip, is about 2/3 the
length of the leg from groin to sole
From navel to groin is about one head length
From chin to groin is about 3 heads
The waist is about one head wide
The hips are about one and a half heads wide
The neck is about one half heads high
The pelvis, from top of the
hip to groin is about one and one third heads
From elbow to wrist is
about the same as elbow to armpit
the thigh is about 1 and a half heads long
The shin is about 2heads long
From the groin, the legs are
about 3 and a half heads long
In profile, the pelvis is
about one head wide at it's widest point
What measurements can
you findand make?
Female legs are roughly the same proportions as that of a male, the shin is a little
longer and thinner than the thigh. However, using high
heels creates the illusion that the shin is much longer than the thigh. High heels also shape and define the
calf muscle

Click to enlarge
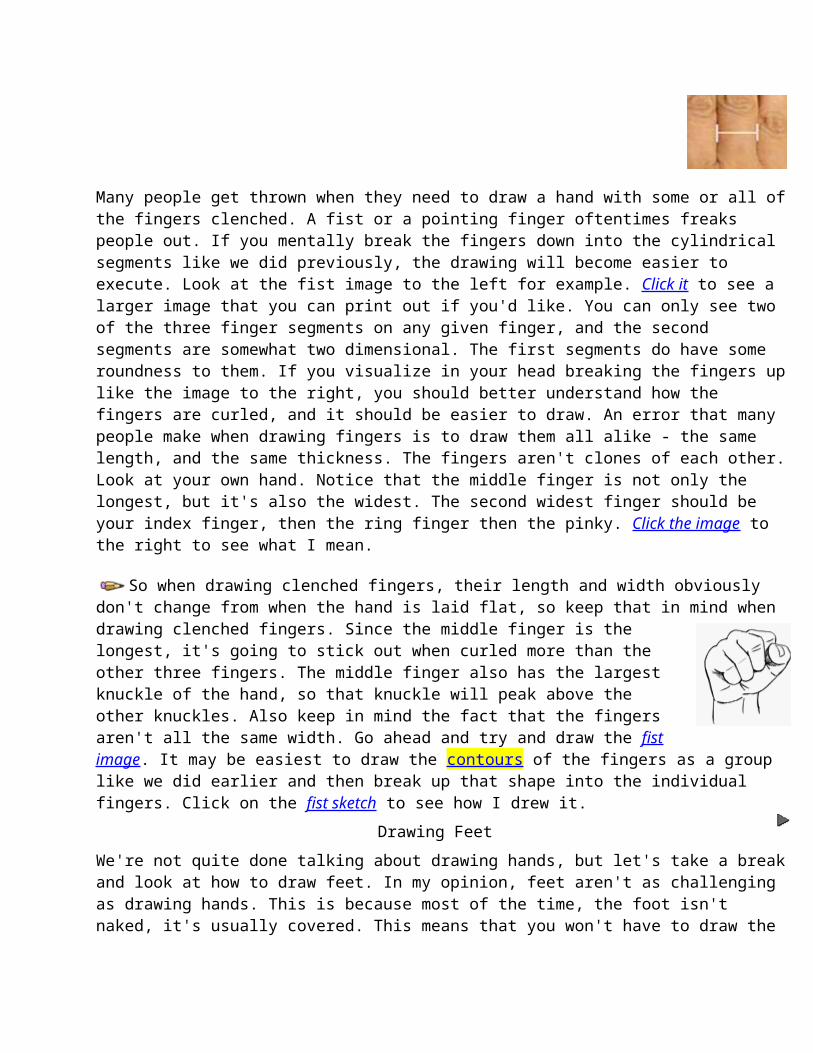
Many people get thrown when they need to draw a hand with some or all of the fingers clenched. A fist or a pointing finger oftentimes freaks people out. If you mentally break the fingers down into the cylindrical segments like we did previously, the drawing will become easier to execute. Look at the fist image to the left for example. Click it to see a larger image that you can print out if you'd like. You can only see two of the three finger segments on any given finger, and the second segments are somewhat two dimensional. The first segments do have some roundness to them. If you visualize in your head breaking the fingers up like the image to the right, you should better understand how the fingers are curled, and it should be easier to draw. An error that many people make when drawing fingers is to draw them all alike - the same length, and the same thickness. The fingers aren't clones of each other. Look at your own hand. Notice that the middle finger is not only the longest, but it's also the widest. The second widest finger should be your index finger, then the ring finger then the pinky. Click the image to the right to see what I mean.
So when drawing clenched fingers, their length and width obviously don't change from
when the hand is laid flat, so keep that in mind when drawing clenched fingers. Since the middle finger is the longest, it's going to stick out when curled more than the other three fingers. The middle finger also has the largest knuckle of the hand, so that knuckle will peak above the other knuckles. Also keep in mind the fact that the fingers aren't all the same width. Go ahead and try and draw the fist image. It may be easiest to draw the contours of the fingers as a group like we did earlier and then break up that shape into the individual fingers. Click on the fist sketch to see how I drew it.
Drawing Feet
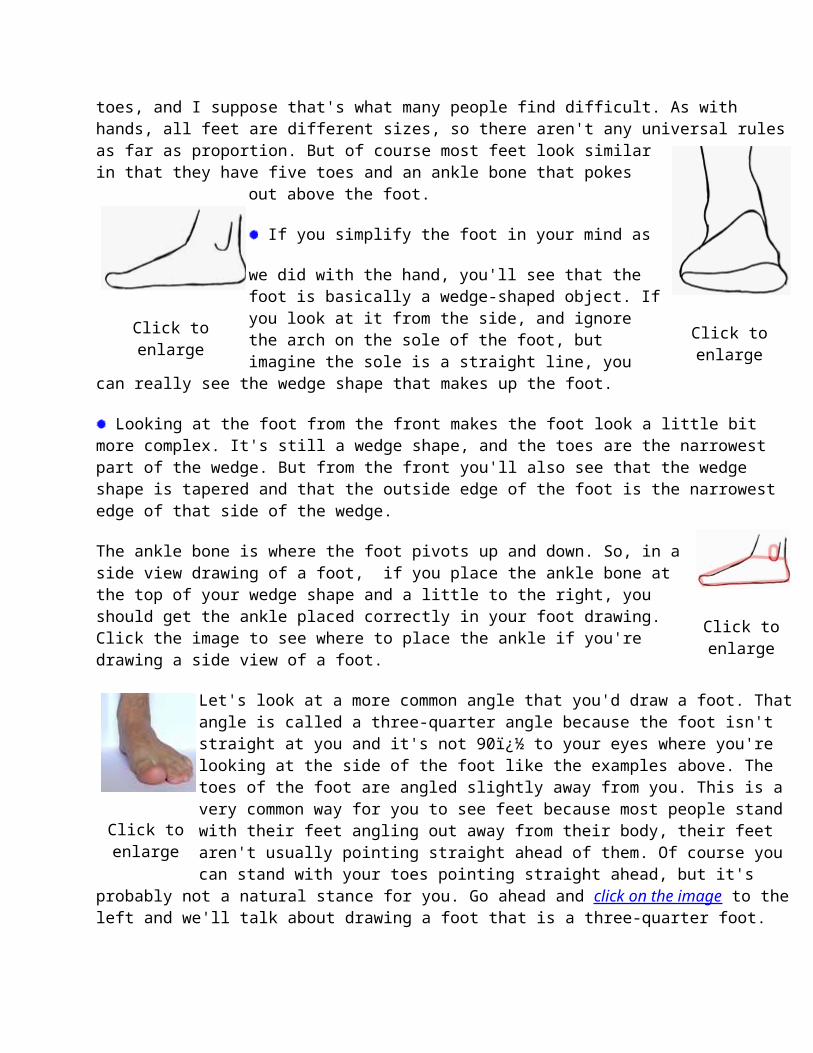
We're not quite done talking about drawing hands, but let's take a break and look at how to draw feet. In my opinion, feet aren't as challenging as drawing hands. This is because most of the time, the foot isn't naked, it's usually covered. This means that you won't have to draw the toes, and I suppose that's what many people find difficult. As with hands, all feet are different sizes, so there aren't any universal rules as far as proportion. But of course most feet look similar in that they have five toes and an ankle bone that pokes out above the foot.

If you simplify the foot in your mind as we did with the hand, you'll see that the foot is basically a wedge-shaped object. If you look at it from the side, and ignore the arch on the sole of the foot, but imagine the sole is a straight line, you can really see the wedge shape that makes up the foot.
Looking at the foot from the front makes the foot look a little
bit more complex. It's still a wedge shape, and the toes are the narrowest part of the wedge. But from the front you'll also see that the wedge shape is tapered and that the outside edge of the foot is the narrowest edge of that side of the wedge.
The ankle bone is where the foot pivots up and down. So, in a side view drawing of a foot, if you place the ankle bone at the top of your wedge shape and a little to the right, you should get the ankle placed correctly in your foot drawing. Click the image to see where to place the ankle if you're drawing a side view of a foot.
Let's look at a more common angle that you'd draw a foot. That angle is called a three-quarter angle because the foot isn't straight at you and it's not 90� to your eyes where you're looking at the side of the foot like the examples above. The toes of the foot are angled slightly away from you. This is a very common way for you to see feet because most people stand with their feet angling out away from their body, their feet aren't usually pointing straight ahead of them. Of course you can stand with your toes pointing straight ahead, but it's probably not a natural stance for you. Go
ahead and click on the image to the left and we'll talk about drawing a foot that is a three-quarter foot.
I said that feet are oftentimes covered, and that usually means they're easier to draw that way because you don't have to draw the toes. What you're really doing is drawing the footwear, not the foot inside. Basically what you'd have to do is draw the wedge shapes of the covered foot, then tighten up the drawing by drawing the contours of the footwear, not the foot itself. Here are two common ways you might see feet, in a shoe or a high heeled shoe. Click the pictures to see how to draw a foot inside a shoe.
So you don't have to be afraid of drawing feet. If you simplify the foot into it's basic wedge shapes, then tighten up the wedge shapes by drawing the contours of the foot (or footwear), you'll do fine.
Extreme Perspective
Click to enlarge
Click to enlarge
Click to enlarge
Click to enlarge
Click to enlarge
Click to enlarge
What is it?One thing that happens a lot when you're drawing hands is having to sometimes deal with extreme instances of proportion and perspective. For example when a finger is pointing almost directly at you, or your subject's arm is bent in such a way that the forearm is totally blocking the upper arm. How would would you draw something like these examples? Your logical mind begins to freak out because the portion of the body that you want to draw is angled in such a way that the body part no longer really looks like what it is. Let me show you what I mean. Can you tell what the image is on the right? Click it to find out.
What's happening with the pointed finger is that it's at such an angle that it's difficult to tell that it's a finger without seeing the whole hand. Your mind needs a context to place the object that it doesn't understand. So when your mind sees the whole hand, it understands that the object it didn't understand earlier is a finger. This happens a lot in figure drawing, so let's talk about how we can draw objects that are in extreme proportion or perspective (or both).
The easy answer is to break the figure down into three dimensional cylinders like we did earlier in this section. When your subject appears daunting, break it down into manageable pieces. So let's look at another hand where all the fingers have extreme perspective. Looking at each finger of this hand, at first look, the fingers appear to be way too short and stubby. But that's because in drawing, we're confined to the two dimensions of the paper. So in order to accomplish drawing this three dimensional hand where the fingers are pointing towards us, we need to visualize the fingers as three dimensional simple cylinders that are easy to draw in perspective. Go ahead and click on the hand and see how the drawing is broken down into cylinders.
The fingers above are coming out at you - but the idea of breaking down the figure works just as well when the body part is angling away from you, too. Look for example at the drawing of the bare back. The left upper and forearm (the whole arm) is angling away from your eye. The left forearm is also mostly obscured by the upper arm. With the right arm, the upper arm is pretty much parallel to your eye, but the right forearm is also angling away from your eye. So if you break the arms up into cylinders in your mind, you should be able to visualize how the arms are placed in space, and you should be able to draw simple
cylinders to understand the layout of your drawing. Remember, since the arms are angling away from your eye, the arms and hands will appear smaller than they actually are. So it might be better if you did some measuring to get the proper size relationships of the objects to the other objects in your composition.
If you envision your figure as stacks of simple three dimensional cylinders that are angled away or towards your eye, drawing extreme proportion and perspective will become easier and more comfortable for you to draw.
Drawing the Angled Head
It's quite common when figure drawing that your subject's head will be at an odd angle. Not too often is your
Click to enlarge
Click to enlarge
subject looking straight at you. The proportions and perspective that you see when the face is looking straight at you get blown out of the water when the head moves to an angled position. You won't be able to rely on standard proportions so you'll have to for sure draw what you see, and not what your logical mind tells you what is there. There are, however, some things that you can keep in mind when drawing an angled head to make it easier on you.When the head is looking Downward:
You'll see more forehead and top of the head than chin or bottom of the face.The ears appear to be higher up on the head than they actually are.You can draw an imaginary vertical line that bisects the face. As the face turns, that line will turn with the
face and become a sharper arc as the head turns.The nose appears to be longer and lower on the face than it actually is.Since the face is not a flat plane, but a curved surface, you can draw an imaginary horizontal line through
the eyes and mouth. The more the head turns down, the more the imaginary horizontal line arcs upward.
When the head is looking Upward:You'll see more chin, neck, and bottom of the chin than brow or forehead.The ears appear to be lower on the head than they actually are.You can draw an imaginary vertical line that bisects the face. As the face turns, that line will turn with the
face and become a sharper arc as the head turns.The nose appears to be shorter and higher on the face than it actually is. The nose can be see as a
triangular shape.Since the face is not a flat plane, but a curved surface, you can draw an imaginary horizontal line through
the eyes and mouth. The more the head turns up, the more the imaginary horizontal line arcs downward. These imaginary horizontal lines will help you to place the eyes and mouth.
Each image below is clickable so you can get a better look at it. I drew the head in blue, and drew the construction line bisecting the face and the lines across the eyes and mouth in pencil.
When you draw an angled head watch very closely what you are doing and measure your subject often. Because "normal" proportion gets thrown out the window, you'll have to rely on measuring one element against another element in order to create the angled head correctly. When the subject has a lot of hair, it makes the drawing that much harder because you can't see the scalp, and so you'll have to guess where the scalp is under all that hair. Finding the scalp will aid you a lot in finding correct proportions to the head.
To draw an angled head, draw an oval as close to your subject's head shape as you can, then bisect the oval vertically. Then draw the two arced lines representing the eyes and nose. Measure what you've drawn, and if anything is off, erase and draw again the part that is incorrect. Then draw in the features on the face. If you need some instruction on drawing the features of the face, check out the Drawing Portraits tutorials.