html5 fundamentals, part 4: the final touch
TRANSCRIPT
HTML5 fundamentals, Part 4: The final touchThe canvas
Skill Level: Intermediate
Grace Walker ([email protected])IT ConsultantWalker Automated Services
05 Jul 2011
HTML5 reflects the monumental changes in the way we now do business on the weband in the cloud. This article, the fourth in a four-part series designed to spotlightchanges in HTML5, introduces the HTML5 Canvas element, using several examplesto demonstrate functions.
The role of the HTML5 author, an intrepid combination of designer and developer, isto construct effective rich Internet applications (RIA) and especially rich UIs. Byeffective, I mean the creation of systemic and systematic enhancements that digitallyfacilitate the dialog among the site owner, agents of the owner, and the site's users.
RIAs are the source and vehicle of a satisfying user experience and, therefore, arean essential part of any successful net-centric venture. Net-centric activities, bynature, are collaborative to one degree or another. A winning approach to digitalcollaboration is essential for agency success at all levels, including marketing andmanagement. A lot rides on the efficiency with which the site satisfies the qualityexpectations of its visitors.
HTML5, as you have seen, is tailor-made for the collaborative "one web world" ofcross-platform capabilities, converging telecommunications, unified language,ubiquitous computing, and open systems. The first three installments of this seriesfocused on semantics, the proper coding methods, the role that input plays in thevital conversion process, and best practices of site management, all of which wasdesigned to lay the foundation for the creation of RIAs in an organized and logicalmanner. The common thread in each article has been that the production andmanagement of a rich user experience is critical to achieving the agency objectives
The final touch Trademarks© Copyright IBM Corporation 2011 Page 1 of 25

of the owners of the website. The HTML5 Canvas has a critical role to play in thedevelopment of effective RIAs.
Frequently used acronyms
• 2D: Two-dimensional
• Ajax: Asynchronous JavaScript + XML
• API: Application programming interface
• HTML: Hypertext Markup Language
• HTML5: HTML version 5
• UI: User interface
What is the Canvas?
The HTML5 Canvas is an extremely useful drawing and animation element. Canvasuses JavaScript to draw graphics directly on the page. It is a rectangular area thatyou define and control and that permits dynamic, scriptable rendering of 2D shapesand bitmap images.
The HTML5 Canvas is perfect for producing great visual material that enhances UIs,diagrams, photo albums, charts, graphs, animations, and embedded drawingapplications. The Canvas element has several methods for drawing paths,rectangles, circles, and characters.
Canvas coordinates
A prerequisite to drawing on the canvas is familiarity with the grid or coordinatespace. The spatial area measurements for the width and height are given in pixels.The canvas is built around the use of the x and y coordinates. The canvascoordinates at x=0, y=0 are in the upper-left corner.
The default attributes for the canvas rectangle area is 300 pixels wide and 150 pixelshigh, but you can determine the exact size of the canvas element by specifying widthand height. The diagram in Figure 1 shows how the x and y coordinates areimplemented.
Figure 1. Canvas coordinates
developerWorks® ibm.com/developerWorks
The final touch Trademarks© Copyright IBM Corporation 2011 Page 2 of 25
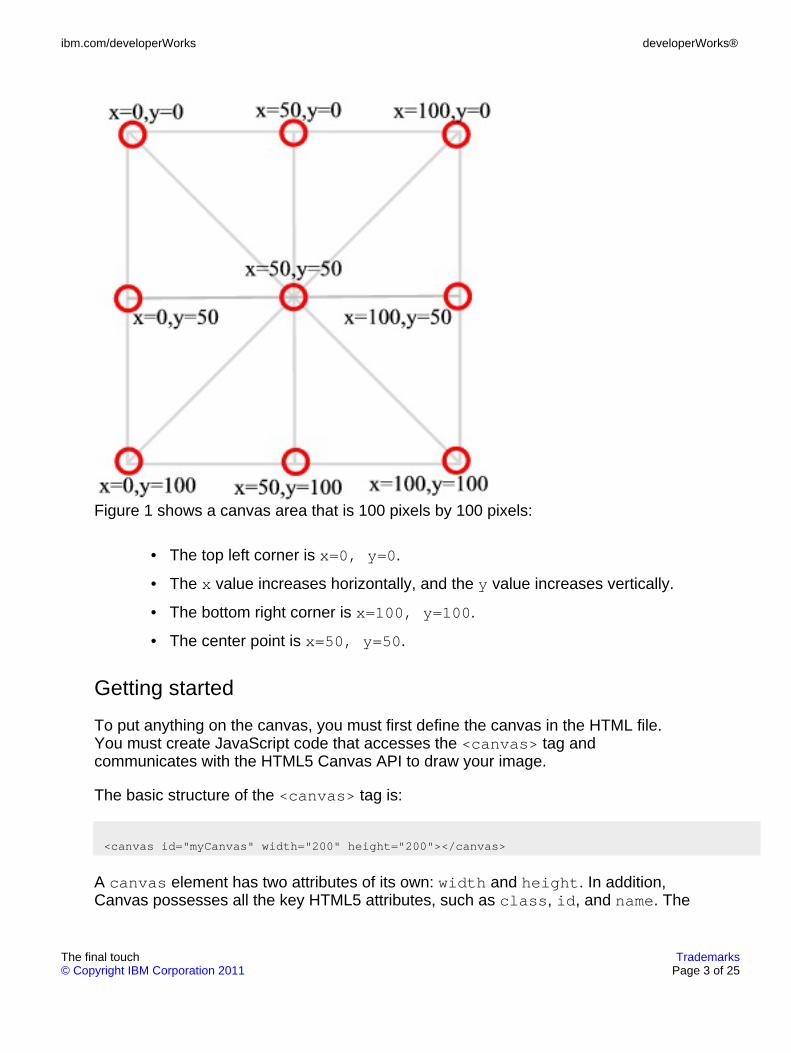
Figure 1 shows a canvas area that is 100 pixels by 100 pixels:
• The top left corner is x=0, y=0.
• The x value increases horizontally, and the y value increases vertically.
• The bottom right corner is x=100, y=100.
• The center point is x=50, y=50.
Getting started
To put anything on the canvas, you must first define the canvas in the HTML file.You must create JavaScript code that accesses the <canvas> tag andcommunicates with the HTML5 Canvas API to draw your image.
The basic structure of the <canvas> tag is:
<canvas id="myCanvas" width="200" height="200"></canvas>
A canvas element has two attributes of its own: width and height. In addition,Canvas possesses all the key HTML5 attributes, such as class, id, and name. The
ibm.com/developerWorks developerWorks®
The final touch Trademarks© Copyright IBM Corporation 2011 Page 3 of 25
id attribute is used in the code shown above. JavaScript uses the canvas idcreated here to identify the canvas to paint on. JavaScript determines theappropriate canvas using the document.getElementById() method, as shownhere:
var canvas = document.getElementById("myCanvas");
Every canvas must have a context definition, as shown below. Currently, the officialspecification recognizes only a 2D environment:
var context = canvas.getContext("2d");
After you identify the canvas and specify its context, you're ready to begin drawing.
Drawing tools, effects, and transformations
This discussion of the HTML5 Canvas goes over various drawing tools, effects, andtransformations. The drawing tools include:
• Lines
• Rectangles
• Arcs
• Bezier and quadratic curves
• Circles and semicircles
The Canvas effects you will use are:
• Fills and strokes
• Linear and radial gradients
The transformations discussed include:
• Scaling
• Rotation
• Translation
Drawing lines
To draw a line on the canvas, use the moveTo(), lineTo(), and stroke()
developerWorks® ibm.com/developerWorks
The final touch Trademarks© Copyright IBM Corporation 2011 Page 4 of 25
methods. In addition, you use the beginPath() method to reset the current path:
• context.beginPath();
• Context.moveTo(x,y);
• Context.lineTo(x,y);
• Context.stroke(x,y);
The beginPath() method starts a new path. Before you draw a new line withdifferent sub-paths, you must use beginPath() to indicate that a new starting pointfor a drawing is to follow. The beginPath() method does not have to be calledwhen you draw the first line.
The moveTo() method states where the new sub-path is to start. The lineTo()method creates sub-paths. You can change the appearance of the line withlineWidth and strokeStyle. The lineWidth element changes the thickness ofthe line, and strokeStyle changes the color.
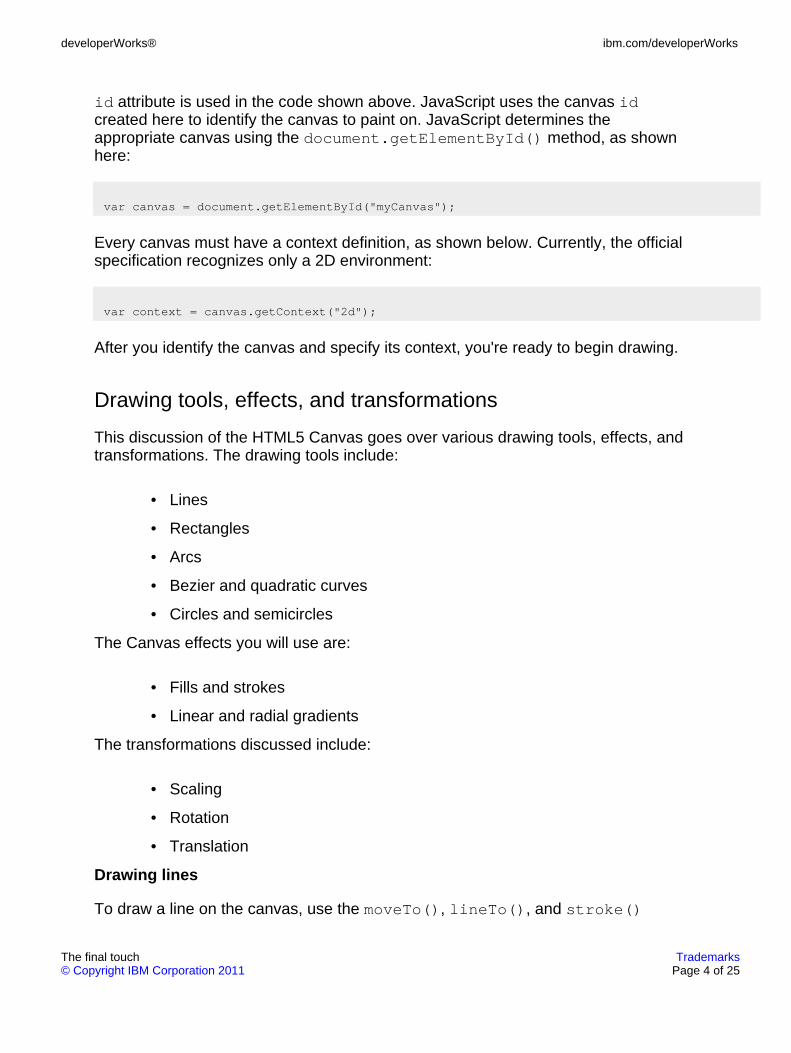
In Figure 2, three lines are drawn in blue, green, and purple, respectively.
Figure 2. Canvas with lines in three different colors
The lines in Figure 2 were created by the code in Listing 1. The blue line with roundends is created by first establishing that a new path is to begin:context.beginPath(). It is followed by:
• context.moveTo(50, 50), which places the starting point for the pathat (x=50, y-50)
• context.lineTo(300,50), which identifies the end point for the line
ibm.com/developerWorks developerWorks®
The final touch Trademarks© Copyright IBM Corporation 2011 Page 5 of 25
• context.lineWidth = 10, which is the width of the line
• context.strokeStyle = "#0000FF", which is the color of the line
• context.lineCap = "round", which makes the ends round
• context.stroke(), which actually paints the line on the canvas
All the lines are 50 pixels in length, though they appear to be different lengths—avisual illusion caused by the line caps. There are three possible line caps:
• Context.round (blue)
• Context.square (green)
• Context.butt (purple—the default)
The butt cap is the default value. When you use a round or square cap style thelength of the line increases by an amount equal to the width of the line. For example,a line that is 200 pixels long and 10 pixels wide with a round or square cap style willhave a resulting line length of 210 pixels, because each cap will add 5 pixels to eachend of the line. A line that is 200 pixels long and 20 pixels wide with a round orsquare cap style will have a resulting line length of 220 pixels, because each cap willadd 10 pixels to each end of the line.
Execute and alter the code in Listing 1 to gain a greater understanding of how linesare drawn.
Listing 1. Create three lines of different colors on the canvas
<!DOCTYPE HTML><html>
<head><title>Line Example</title>
<style>body {
margin: 0px;padding: 0px;
}
#myCanvas {border: 1px solid #9C9898;
}</style><script>
window.onload = function() {var canvas = document.getElementById("myCanvas");var context = canvas.getContext("2d");
// blue line with round endscontext.beginPath();context.moveTo(50, 50);context.lineTo(300,50);context.lineWidth = 10;context.strokeStyle = "#0000FF";
developerWorks® ibm.com/developerWorks
The final touch Trademarks© Copyright IBM Corporation 2011 Page 6 of 25
context.lineCap = "round";context.stroke();
// green line with square endscontext.beginPath();context.moveTo(50, 100);context.lineTo(300,100);context.lineWidth = 20;context.strokeStyle = "#00FF00";context.lineCap = "square";context.stroke();
// purple line with butt endscontext.beginPath();context.moveTo(50, 150);context.lineTo(300, 150);context.lineWidth = 30;context.strokeStyle = "#FF00FF";context.lineCap = "butt";context.stroke();
};</script>
</head><body>
<canvas id="myCanvas" width="400" height="200"></canvas>
</body></html>
Drawing rectangles
There are three methods for addressing a rectangular area on the canvas:
• fillRect(x,y,width,height), which draws a filled rectangle
• strokeRect(x,y,width,height), which draws a rectangular outline
• clearRect(x,y,width,height), which clears the given area andmakes it fully transparent
For each of the three methods, x and y indicate the position on the canvas relativeto the top-left corner of the rectangle (x=0, y=0), and width and height are thewidth and height of the rectangle, respectively.
Figure 3 shows the three rectangular areas created by the code in Listing 2.
Figure 3. Rectangle canvas
ibm.com/developerWorks developerWorks®
The final touch Trademarks© Copyright IBM Corporation 2011 Page 7 of 25

The fillRect() method creates a rectangle filled in with the default fill color ofblack. The clearRect() method clears a rectangular area in the center of the firstrectangle. It is in the center of the rectangle formed by the fillRect() method.The strokeRect creates a rectangle that has only a visible black border.
Listing 2. Rectangle canvas code
<!DOCTYPE HTML><html><head><title>Rectangle Example</title>
<style>body {
margin: 0px;padding: 0px;
}
#myCanvas {border: 1px solid #000000;background-color: #ffff00;
}</style>
<script type="text/javascript">function drawShape(){
var canvas = document.getElementById('myCanvas');
var context = canvas.getContext('2d');
context.fillRect(25,25,50,50);context.clearRect(35,35,30,30);context.strokeRect(100,100,50,50);
}</script></head><body onload="drawShape();">
<canvas id="myCanvas" width="200" height="200"></canvas></body></html>
developerWorks® ibm.com/developerWorks
The final touch Trademarks© Copyright IBM Corporation 2011 Page 8 of 25
Drawing arcs, curves, circles, and semicircles
Both the circle and semicircle use the arc() method. The arc() method takes sixarguments:
context.arc(centerX, centerY, radius, startingAngle, endingAngle, antiClockwise);
The centerX and centerY arguments are the coordinates of the circle's center.The radius is the same as the mathematical equivalent: a straight line from thecenter to the circumference. The arc created will be part of the defined circle. ThestartAngle and endAngle arguments are the starting and ending points of thearc, respectively, in radians. The anticlockwise argument is a Boolean value.When the value is true the arc is drawn counterclockwise; when it is false the arcis drawn in the clockwise direction.
To draw a circle using the arc() method, define the starting angle as 0 and theending angle as 2*PI, as shown here:
context.arc(centerX, centerY, radius, 0, 2 * Math.PI, false);
To draw a semicircle using the arc() method, define the ending angle asstartingAngle + PI, as shown here:
context.arc(centerX, centerY, radius, startingAngle, startingAngle + Math.PI, false);
Quadratic curve
You create a quadratic curve using the quadraticCurveTo() method shownbelow. Quadratic curves are defined by the context point, a control point, and anending point. The control point determines the curvature of the line.
context.moveTo(x, y);context.quadraticCurveTo(controlX, controlY, endX, endY);
Bezier curve
Just as with the quadratic curve, a Bezier curve has a start and end point; but unlikethe quadratic curve, it has two control points:
context.moveTo(x, y);context.bezierCurveTo(controlX1, controlY1, controlX2, controlY2, endX, endY);
ibm.com/developerWorks developerWorks®
The final touch Trademarks© Copyright IBM Corporation 2011 Page 9 of 25
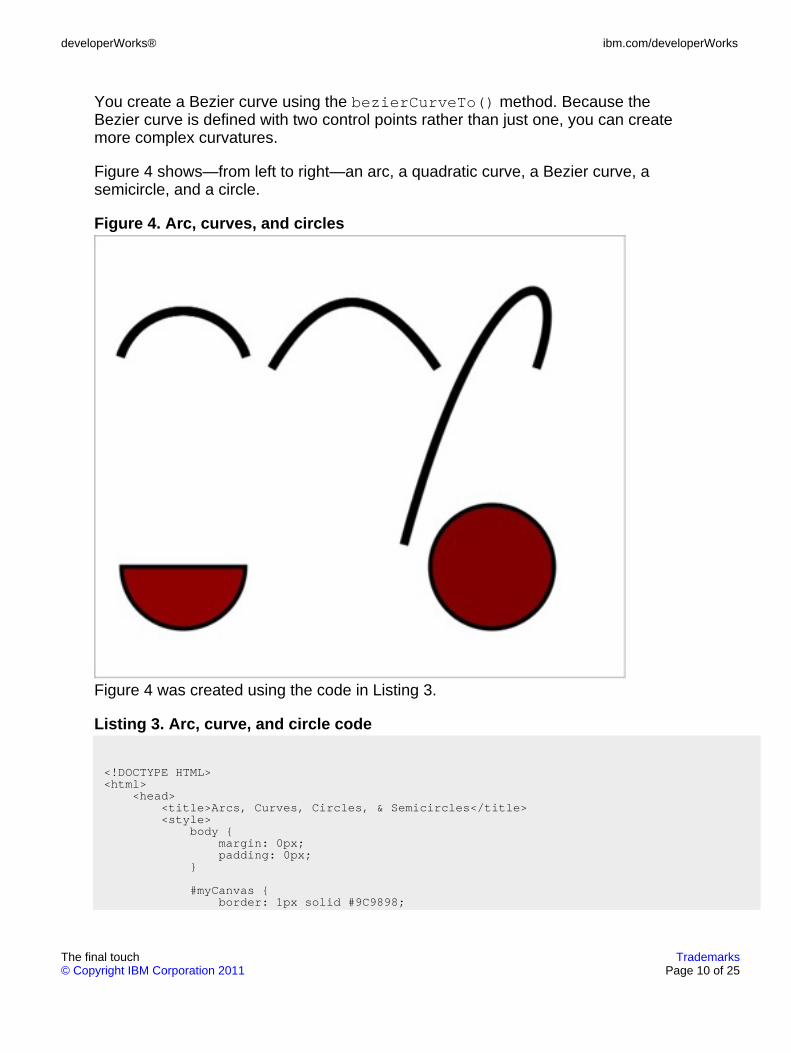
You create a Bezier curve using the bezierCurveTo() method. Because theBezier curve is defined with two control points rather than just one, you can createmore complex curvatures.
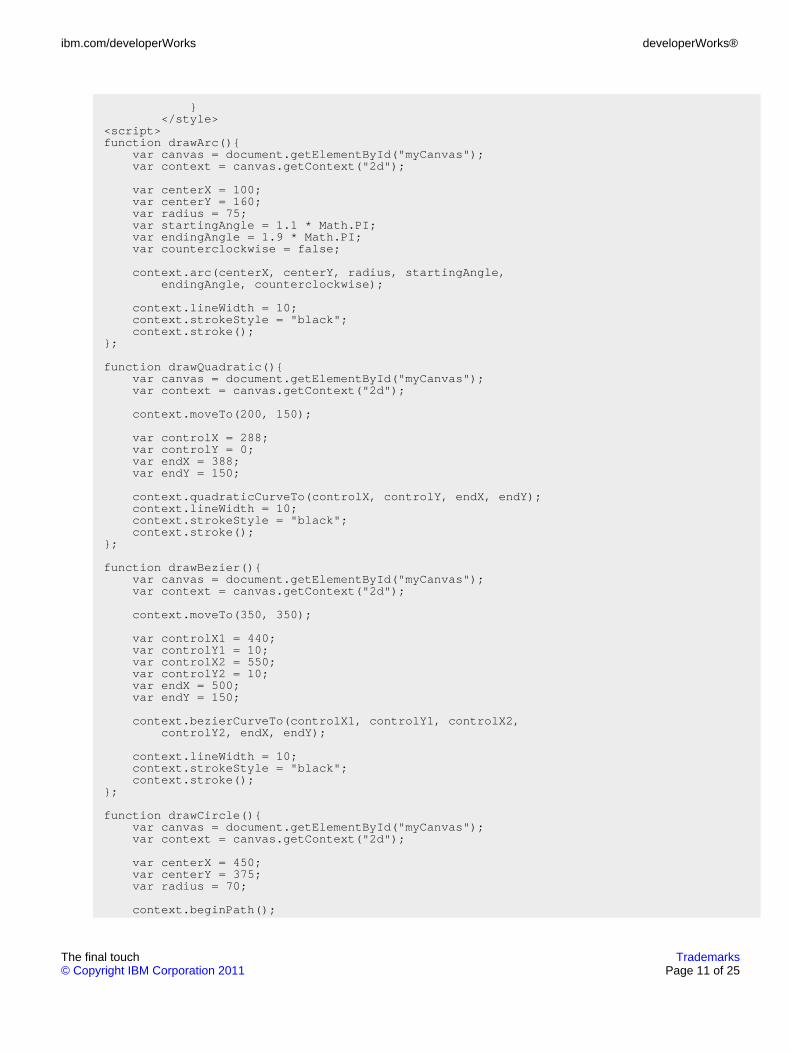
Figure 4 shows—from left to right—an arc, a quadratic curve, a Bezier curve, asemicircle, and a circle.
Figure 4. Arc, curves, and circles
Figure 4 was created using the code in Listing 3.
Listing 3. Arc, curve, and circle code
<!DOCTYPE HTML><html>
<head><title>Arcs, Curves, Circles, & Semicircles</title><style>
body {margin: 0px;padding: 0px;
}
#myCanvas {border: 1px solid #9C9898;
developerWorks® ibm.com/developerWorks
The final touch Trademarks© Copyright IBM Corporation 2011 Page 10 of 25
}</style>
<script>function drawArc(){
var canvas = document.getElementById("myCanvas");var context = canvas.getContext("2d");
var centerX = 100;var centerY = 160;var radius = 75;var startingAngle = 1.1 * Math.PI;var endingAngle = 1.9 * Math.PI;var counterclockwise = false;
context.arc(centerX, centerY, radius, startingAngle,endingAngle, counterclockwise);
context.lineWidth = 10;context.strokeStyle = "black";context.stroke();
};
function drawQuadratic(){var canvas = document.getElementById("myCanvas");var context = canvas.getContext("2d");
context.moveTo(200, 150);
var controlX = 288;var controlY = 0;var endX = 388;var endY = 150;
context.quadraticCurveTo(controlX, controlY, endX, endY);context.lineWidth = 10;context.strokeStyle = "black";context.stroke();
};
function drawBezier(){var canvas = document.getElementById("myCanvas");var context = canvas.getContext("2d");
context.moveTo(350, 350);
var controlX1 = 440;var controlY1 = 10;var controlX2 = 550;var controlY2 = 10;var endX = 500;var endY = 150;
context.bezierCurveTo(controlX1, controlY1, controlX2,controlY2, endX, endY);
context.lineWidth = 10;context.strokeStyle = "black";context.stroke();
};
function drawCircle(){var canvas = document.getElementById("myCanvas");var context = canvas.getContext("2d");
var centerX = 450;var centerY = 375;var radius = 70;
context.beginPath();
ibm.com/developerWorks developerWorks®
The final touch Trademarks© Copyright IBM Corporation 2011 Page 11 of 25
context.arc(centerX, centerY, radius, 0, 2 * Math.PI, false);
context.fillStyle = "#800000";context.fill();context.lineWidth = 5;context.strokeStyle = "black";context.stroke();
};
function drawSemicircle(){var canvas = document.getElementById("myCanvas");var context = canvas.getContext("2d");
var centerX = 100;var centerY = 375;var radius = 70;var lineWidth = 5;
context.beginPath();context.arc(centerX, centerY, radius, 0, Math.PI, false);context.closePath();
context.lineWidth = lineWidth;context.fillStyle = "#900000";context.fill();context.strokeStyle = "black";context.stroke();
};
window.onload = function (){drawArc();drawQuadratic();drawBezier();drawCircle();drawSemicircle()}</script>
</head><body>
<canvas id="myCanvas" width="600" height="500"></canvas>
</body></html>
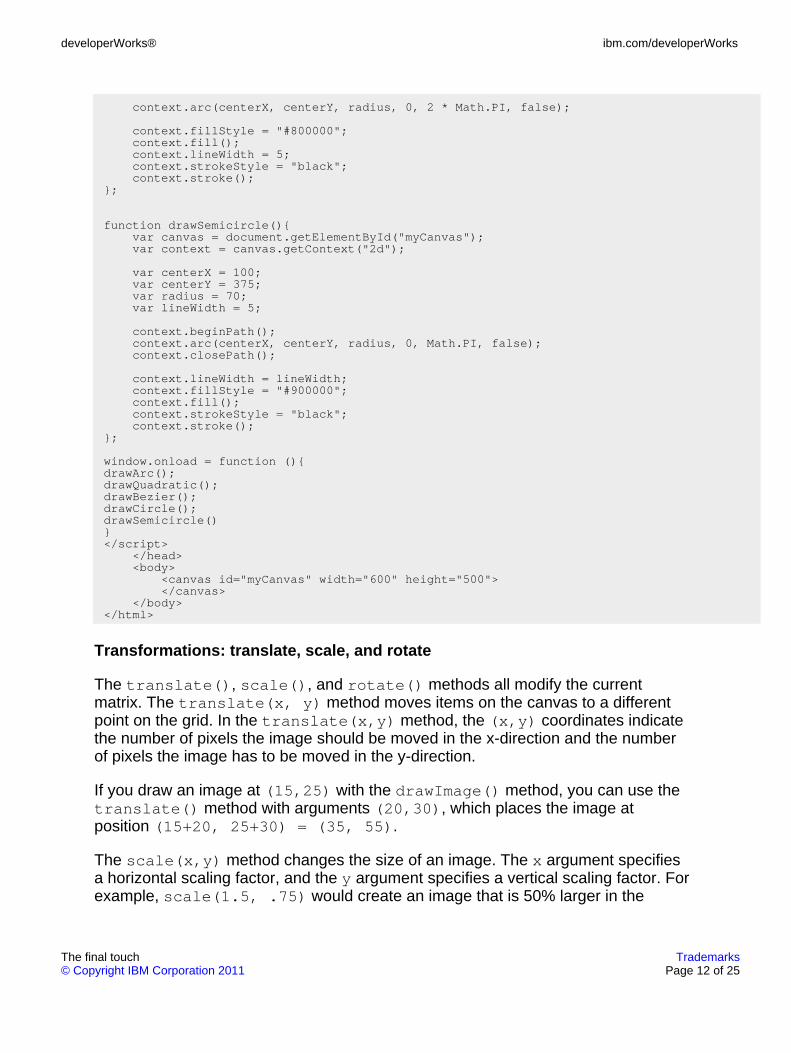
Transformations: translate, scale, and rotate
The translate(), scale(), and rotate() methods all modify the currentmatrix. The translate(x, y) method moves items on the canvas to a differentpoint on the grid. In the translate(x,y) method, the (x,y) coordinates indicatethe number of pixels the image should be moved in the x-direction and the numberof pixels the image has to be moved in the y-direction.
If you draw an image at (15,25) with the drawImage() method, you can use thetranslate() method with arguments (20,30), which places the image atposition (15+20, 25+30) = (35, 55).
The scale(x,y) method changes the size of an image. The x argument specifiesa horizontal scaling factor, and the y argument specifies a vertical scaling factor. Forexample, scale(1.5, .75) would create an image that is 50% larger in the
developerWorks® ibm.com/developerWorks
The final touch Trademarks© Copyright IBM Corporation 2011 Page 12 of 25

x-direction and only 75% of the current size in the y-direction. The rotate(angle)method turns an object based on the angle specified.
Figure 5 is an example of what can be rendered using the translate(), scale(),and rotate() methods.
Figure 5. Using transformations
Listing 4 provides the code that created the image in Figure 5.
Listing 4. Code to create transformations
<!DOCTYPE HTML><html><head><Title>Transformations Example</title><script>
window.onload = function() {var canvas=document.getElementById("myCanvas");var context=canvas.getContext("2d");
var rectWidth = 250;var rectHeight = 75;
// translate context to center of canvascontext.translate(canvas.width/2,canvas.height/2);
// half the y componentcontext.scale(1,0.5);
// rotate 45 degrees clockwisecontext.rotate(-Math.PI/4);
context.fillStyle="blue";context.fillRect(-rectWidth/2,-rectHeight/2,
rectWidth,rectHeight);
// flip context horizontallycontext.scale(-1,1);
context.font="30pt Calibri";
ibm.com/developerWorks developerWorks®
The final touch Trademarks© Copyright IBM Corporation 2011 Page 13 of 25
context.textAlign="center";context.fillStyle="#ffffff";context.fillText("Mirror Image",3,10);
}
</script></head><body>
<canvas id="myCanvas" width="400" height="400"></canvas></body></html>
Gradients
A gradient is a fill that moves from one color to another, blending the colors wherethey intersect. There are two types of gradients that you can create in Canvas: linearand radial.
You create a linear gradient using the createLinearGradient() method.createLinearGradient(x0,y0,x1,y1) produces a gradient along a straightline identified by two points: (x0,y0) and (x1,y1)—the start and end points of thegradient, respectively. The method returns an object.
A color gradient can have many colors. The addcolorStop(offset, color)method specifies the color stop for the indicated color to the gradient at the givenoffset. The addColorStop() method lets you specify an offset between 0 and 1,where the transition to the next color begins. The value 0 is the offset at one end ofthe gradient; 1 is the offset at the other end. After the color gradient has beendefined, the gradient object can be assigned to fillStyle(). You can also drawtext with a gradient using the fillText() method.
A radial gradient—createradialGradient(x0,y0,r0,x1,y1,r1)—combinestwo or more colors in a circular or conical pattern using six arguments:
• (x0,y0). The center of the first circle of the cone
• r0. The radius of the first circle
• (x1,y1). The center of the second circle of the cone
• r1. The radius of the second circle
Figure 6 contains four gradients: a linear gradient, a text gradient, a linear gradienton a diagonal, and a radial gradient.
Figure 6. Gradient example
developerWorks® ibm.com/developerWorks
The final touch Trademarks© Copyright IBM Corporation 2011 Page 14 of 25
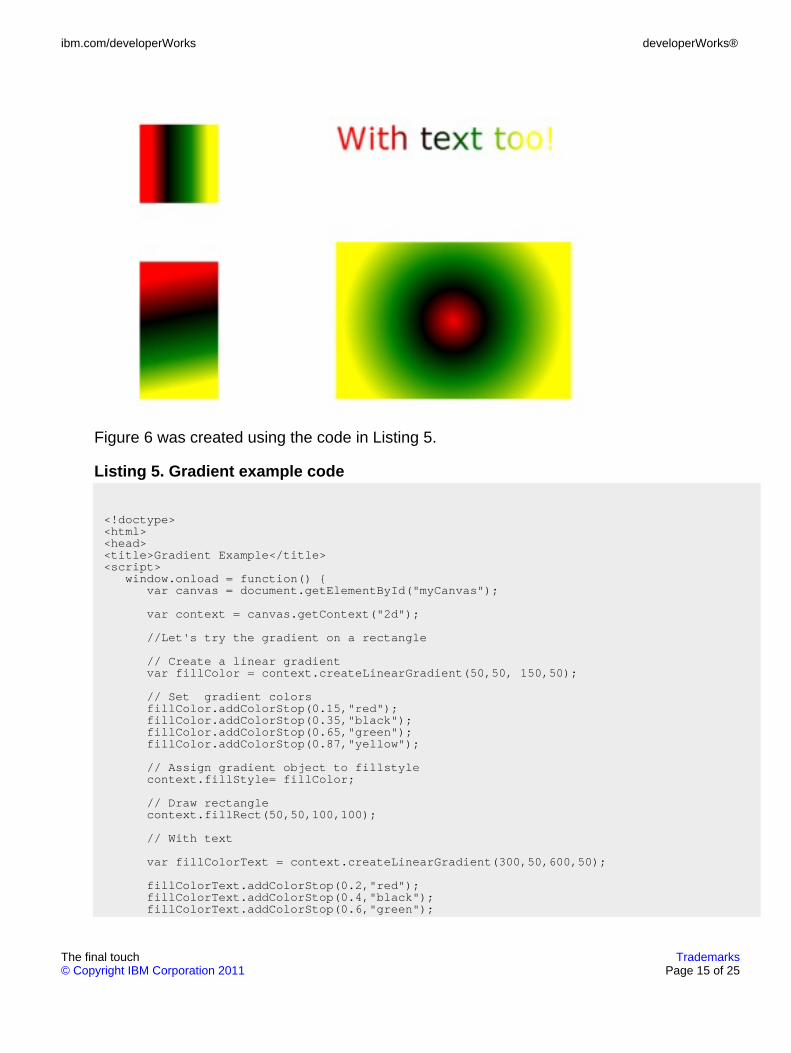
Figure 6 was created using the code in Listing 5.
Listing 5. Gradient example code
<!doctype><html><head><title>Gradient Example</title><script>
window.onload = function() {var canvas = document.getElementById("myCanvas");
var context = canvas.getContext("2d");
//Let's try the gradient on a rectangle
// Create a linear gradientvar fillColor = context.createLinearGradient(50,50, 150,50);
// Set gradient colorsfillColor.addColorStop(0.15,"red");fillColor.addColorStop(0.35,"black");fillColor.addColorStop(0.65,"green");fillColor.addColorStop(0.87,"yellow");
// Assign gradient object to fillstylecontext.fillStyle= fillColor;
// Draw rectanglecontext.fillRect(50,50,100,100);
// With text
var fillColorText = context.createLinearGradient(300,50,600,50);
fillColorText.addColorStop(0.2,"red");fillColorText.addColorStop(0.4,"black");fillColorText.addColorStop(0.6,"green");
ibm.com/developerWorks developerWorks®
The final touch Trademarks© Copyright IBM Corporation 2011 Page 15 of 25
fillColorText.addColorStop(0.8,"yellow");
context.fillStyle= fillColorText;
context.font="40px verdana";context.textBaseline="top";context.fillText("With text too!", 300,50)
// Gradient on a diagonalvar fillColordiagonal = context.createLinearGradient(50,200, 100,450);
// Gradient colorsfillColordiagonal.addColorStop(0.2,"red");fillColordiagonal.addColorStop(0.4,"black");fillColordiagonal.addColorStop(0.6,"green");fillColordiagonal.addColorStop(0.75,"yellow");
// Assign gradient object to fillstylecontext.fillStyle= fillColordiagonal;
// Draw rectanglecontext.fillRect(50,225, 100,250);
// Draw radial gradientfillColorRadial = context.createRadialGradient(450,300,0, 450,300,200);fillColorRadial.addColorStop(0, "red");fillColorRadial.addColorStop(0.2, "black");fillColorRadial.addColorStop(0.4, "green");fillColorRadial.addColorStop(0.7, "yellow");context.fillStyle = fillColorRadial;context.rect(300,200,500,400);context.fill();
}</script></head><body><div>
<p><canvas id="myCanvas" width="600" height="400"></canvas></p></div></body></html>
Image cropping
You can alter images by cropping selected areas out of them. Cropping on thecanvas is a function of overloading the drawImage() method. The drawImage()method has three options. You can use either three, five, or nine arguments.
The three-argument configuration—drawImage(image, dx, dy)—draws theimage on the canvas at the destination coordinates (dx, dy). The coordinatesform the upper-left corner of the image.
The-five argument configuration—drawImage(image, dx, dy, dw,dh)—provides a width and height for the destination. The image is scaled to fit thedestination width and height.
The nine-argument configuration—drawImage(image, sx, sy, sw, sh, dx,
developerWorks® ibm.com/developerWorks
The final touch Trademarks© Copyright IBM Corporation 2011 Page 16 of 25
dy, dw, dh)—takes an image, clips out a rectangular area that starts at thesource (sx,sy) coordinates with a width and height of (sw,sh), and scales it to fitthe destination width and height (dw,dh), placing it on the canvas at (dx,dy).
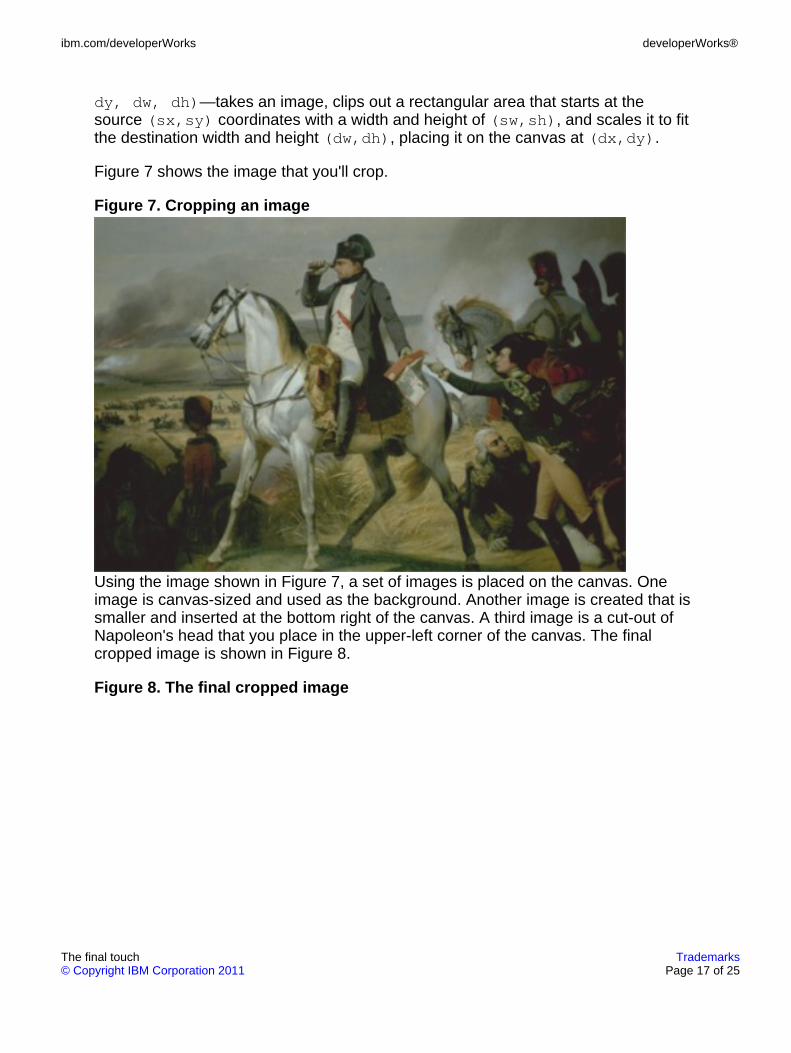
Figure 7 shows the image that you'll crop.
Figure 7. Cropping an image
Using the image shown in Figure 7, a set of images is placed on the canvas. Oneimage is canvas-sized and used as the background. Another image is created that issmaller and inserted at the bottom right of the canvas. A third image is a cut-out ofNapoleon's head that you place in the upper-left corner of the canvas. The finalcropped image is shown in Figure 8.
Figure 8. The final cropped image
ibm.com/developerWorks developerWorks®
The final touch Trademarks© Copyright IBM Corporation 2011 Page 17 of 25
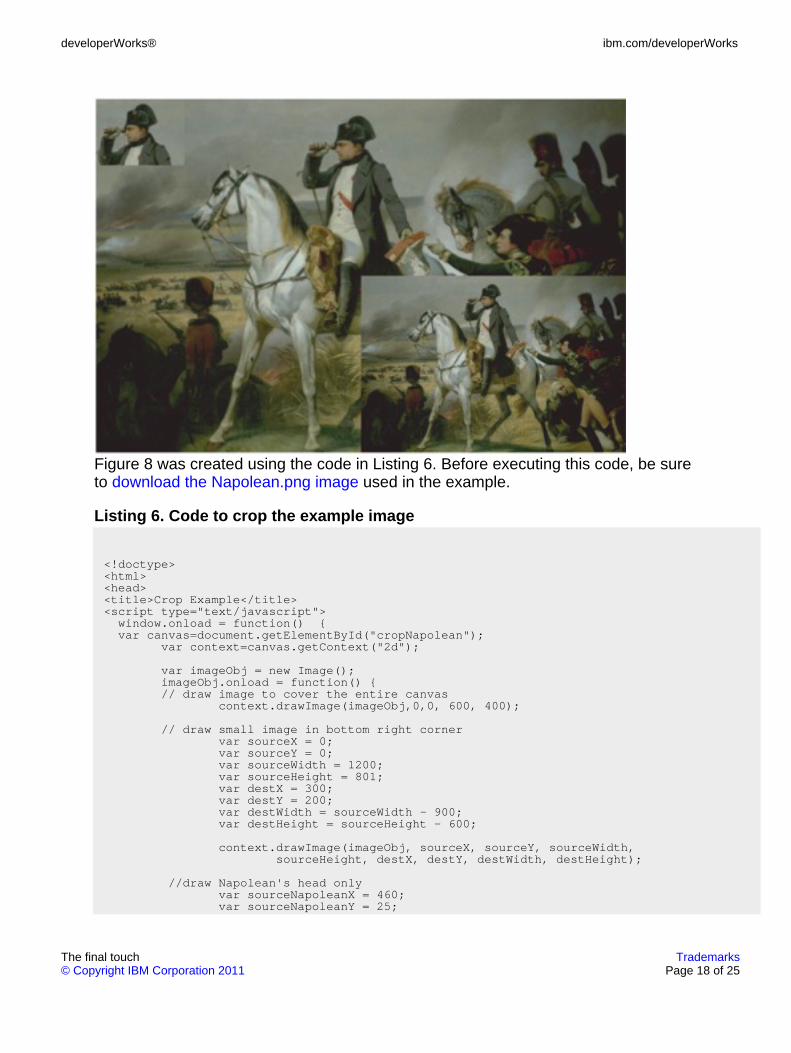
Figure 8 was created using the code in Listing 6. Before executing this code, be sureto download the Napolean.png image used in the example.
Listing 6. Code to crop the example image
<!doctype><html><head><title>Crop Example</title><script type="text/javascript">window.onload = function() {var canvas=document.getElementById("cropNapolean");
var context=canvas.getContext("2d");
var imageObj = new Image();imageObj.onload = function() {// draw image to cover the entire canvas
context.drawImage(imageObj,0,0, 600, 400);
// draw small image in bottom right cornervar sourceX = 0;var sourceY = 0;var sourceWidth = 1200;var sourceHeight = 801;var destX = 300;var destY = 200;var destWidth = sourceWidth - 900;var destHeight = sourceHeight - 600;
context.drawImage(imageObj, sourceX, sourceY, sourceWidth,sourceHeight, destX, destY, destWidth, destHeight);
//draw Napolean's head onlyvar sourceNapoleanX = 460;var sourceNapoleanY = 25;
developerWorks® ibm.com/developerWorks
The final touch Trademarks© Copyright IBM Corporation 2011 Page 18 of 25
var sourceNapoleanWidth = 250;var sourceNapoleanHeight = 175;var destNapoleanX = 0;var destNapoleanY = 0;var destNapoleanWidth = sourceNapoleanWidth - 150 ;var destNapoleanHeight = sourceNapoleanHeight - 100;
context.drawImage(imageObj, sourceNapoleanX, sourceNapoleanY,sourceNapoleanWidth, sourceNapoleanHeight,
destNapoleanX, destNapoleanY,destNapoleanWidth, destNapoleanHeight);
}imageObj.src = "Napoleon.png";
}</script>
</head><body><div>
<p><canvas id="cropNapolean" width="600" height="400"></canvas></p></div>
</body></html>
Animation and multiple canvases
When working with animation, the question of layers always arises. Layers allowcomponents to be isolated, which makes coding and debugging easier and moreefficient. The Canvas API doesn't have layers, but you can create multiple canvases.
Animation must be controlled over time. So, to create an animation, you mustaddress each frame of the animation. The Canvas API has one major limitationwhen it comes to animation: After a shape is drown on the canvas, it stays that way.To move the shape, you must redraw it.
To create an animation:
1. Clear the canvas of any shapes that have been drawn previously.
2. Save the canvas state to make sure the original state is used each time aframe is drawn.
3. Perform the steps to render the frames.
4. If you have saved the state, restore it before drawing a new frame.
You can control animation in two ways: by using the setInterval or setTimeoutfunctions, each of which can be used to call a function over a set time period. ThesetInterval function executes the provided code repeatedly. The setTimeoutfunction executes only once after the time provided has elapsed.
Figure 9 shows one frame of the multiple-canvas animation of the swimmer. The
ibm.com/developerWorks developerWorks®
The final touch Trademarks© Copyright IBM Corporation 2011 Page 19 of 25
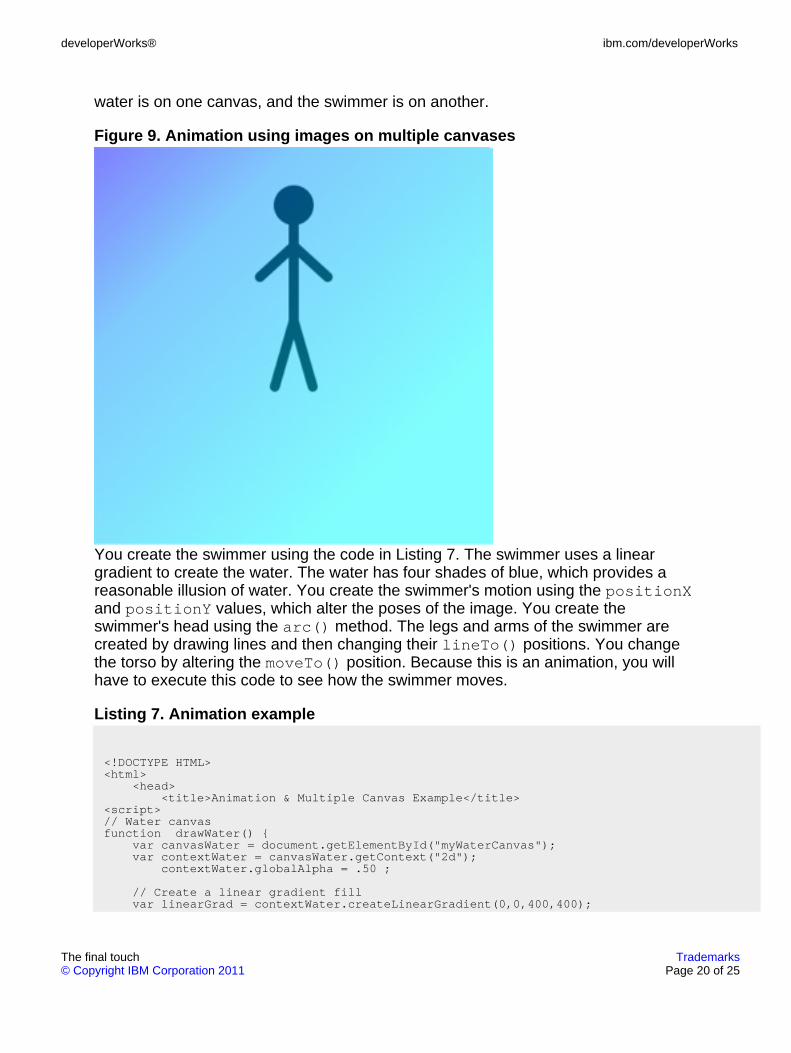
water is on one canvas, and the swimmer is on another.
Figure 9. Animation using images on multiple canvases
You create the swimmer using the code in Listing 7. The swimmer uses a lineargradient to create the water. The water has four shades of blue, which provides areasonable illusion of water. You create the swimmer's motion using the positionXand positionY values, which alter the poses of the image. You create theswimmer's head using the arc() method. The legs and arms of the swimmer arecreated by drawing lines and then changing their lineTo() positions. You changethe torso by altering the moveTo() position. Because this is an animation, you willhave to execute this code to see how the swimmer moves.
Listing 7. Animation example
<!DOCTYPE HTML><html>
<head><title>Animation & Multiple Canvas Example</title>
<script>// Water canvasfunction drawWater() {
var canvasWater = document.getElementById("myWaterCanvas");var contextWater = canvasWater.getContext("2d");
contextWater.globalAlpha = .50 ;
// Create a linear gradient fillvar linearGrad = contextWater.createLinearGradient(0,0,400,400);
developerWorks® ibm.com/developerWorks
The final touch Trademarks© Copyright IBM Corporation 2011 Page 20 of 25
linearGrad.addColorStop(0, '#0000ff'); // sets the first colorlinearGrad.addColorStop(.25, '#0099ff'); // sets the second colorlinearGrad.addColorStop(.50, '#00ccff'); // sets the third colorlinearGrad.addColorStop(.75, '#00ffff'); // sets the fourth colorcontextWater.fillStyle = linearGrad;contextWater.fillRect(0,0,400,400);
}
// Swimmer canvassetInterval(drawSwimmer, 30);var positionX = 0;var positionY = 0;
function drawSwimmer(){var canvasSwimmer = document.getElementById("mySwimmerCanvas");var contextSwimmer = canvasSwimmer.getContext("2d");contextSwimmer.clearRect(0,0,400,400);
if (positionX < 30){
positionX += 1;positionY += 1;
}else{
positionX = 0;positionY = 0;
}
contextSwimmer.save();
// draw circle for headvar centerX = 200;var centerY = 50;var radius = 20;
contextSwimmer.beginPath();contextSwimmer.arc(centerX, centerY+positionY,
radius, 0, 2 * Math.PI, false);
contextSwimmer.fillStyle = "#000000";contextSwimmer.fill();contextSwimmer.lineWidth = 5;
// torsocontextSwimmer.beginPath();contextSwimmer.moveTo(200,70+positionY);contextSwimmer.lineTo(200,175);contextSwimmer.lineWidth = 10;contextSwimmer.strokeStyle = "#000000";contextSwimmer.lineCap = "round";contextSwimmer.stroke();
// image right armcontextSwimmer.beginPath();contextSwimmer.moveTo(200, 100);contextSwimmer.lineTo(175-positionX,140-positionY);contextSwimmer.lineWidth = 10;contextSwimmer.strokeStyle = "#000000";contextSwimmer.lineCap = "round";contextSwimmer.stroke();
// image left armcontextSwimmer.beginPath();contextSwimmer.moveTo(200, 100);contextSwimmer.lineTo(225+positionX,140-positionY);contextSwimmer.lineWidth = 10;
ibm.com/developerWorks developerWorks®
The final touch Trademarks© Copyright IBM Corporation 2011 Page 21 of 25
contextSwimmer.strokeStyle = "#000000";contextSwimmer.lineCap = "round";contextSwimmer.stroke();
// image right legcontextSwimmer.beginPath();contextSwimmer.moveTo(200, 175);contextSwimmer.lineTo(190-positionX,250-positionY);contextSwimmer.lineWidth = 10;contextSwimmer.strokeStyle = "#000000";contextSwimmer.lineCap = "round";contextSwimmer.stroke();
// image left legcontextSwimmer.beginPath();contextSwimmer.moveTo(200, 175);contextSwimmer.lineTo(210+positionX,250-positionY);contextSwimmer.lineWidth = 10;contextSwimmer.strokeStyle = "#000000";contextSwimmer.lineCap = "round";contextSwimmer.stroke();
contextSwimmer.restore();
};
</script>
</head><body onload="drawWater();">
<canvas id="myWaterCanvas" width="400" height="400" style="z-index: 2;position:absolute;left:0px;top:0px;">
</canvas><canvas id="mySwimmerCanvas" width="400" height="400" style="z-index: 1;
position:absolute;left:0px;top:0px;"></canvas>
</body></html>
Conclusion
The HTML5 canvas is central to the construction of browser-based RIAs. It providesa utilitarian drawing environment powered by JavaScript and your imagination. It isnot really difficult to learn, and there are many support tools on the web for yourtraining and learning needs, including cheat sheets, blogs, online articles, video andnon-video tutorials, and sample applications.
The ability to alter text and images visually and to simulate motion makes Canvas anextremely valuable tool. Whether you approach it from the perspective of a designeror developer, use Canvas to build game applications to run on mobile devices, ormerely want to enhance the use of the overall screen real estate, Canvas is a criticalcomponent of the HTML5 experience.
developerWorks® ibm.com/developerWorks
The final touch Trademarks© Copyright IBM Corporation 2011 Page 22 of 25

Downloads
Description Name Size Downloadmethod
Napoleon image Napoleon.zip 2045KB HTTP
Information about download methods
ibm.com/developerWorks developerWorks®
The final touch Trademarks© Copyright IBM Corporation 2011 Page 23 of 25
Resources
Learn
• "Create great graphics with the HTML5 canvas" (developerWorks, February2011) is a guide to the development of graphical techniques and processes.
• The Safari Dev Center has a demo called Canvas Pixel Manipulation that is anexcellent example of managing the canvas to develop effective visual assets.
• WHATWG's HTML Living Standard provides a window to the evolvingdevelopment of the HTML5 canvas specs.
• W3Schools.com's HTML5 Canvas reference has several useful exercises tohelp you hone your canvas knowledge.
• MDM Docs's Canvas tutorial is a good, basic tutorial that reflects thedevelopment expertise of Mozilla.
• Let's Call It A Draw(ing Surface) is an innovative walk-through for a basiccomprehension of the HTML5 canvas.
• The Web development zone specializes in articles covering various Web-basedsolutions.
• Stay current with developerWorks technical events and webcasts focused on avariety of IBM products and IT industry topics.
• Follow developerWorks on Twitter.
Get products and technologies
• The Dojo Toolkit, an open source modular JavaScript library, helps you quicklydevelop cross-platform, JavaScript/Ajax-based applications and websites.
• Try out IBM software for free. Download a trial version, log into an online trial,work with a product in a sandbox environment, or access it through the cloud.Choose from over 100 IBM product trials.
Discuss
• Create your developerWorks profile today and set up a watchlist on HTML5.Get connected and stay connected with developerWorks community.
• Find other developerWorks members interested in web development.
• Share what you know: Join one of our developerWorks groups focused on webtopics.
• Roland Barcia talks about Web 2.0 and middleware in his blog.
• Follow developerWorks' members' shared bookmarks on web topics.
developerWorks® ibm.com/developerWorks
The final touch Trademarks© Copyright IBM Corporation 2011 Page 24 of 25
• Get answers quickly: Visit the Web 2.0 Apps forum.
• Get answers quickly: Visit the Ajax forum.
About the author
Grace WalkerGrace Walker, a partner in Walker Automated Services in Chicago,Illinois, is an IT consultant with a diverse background and broadexperience. She has worked in IT as a manager, administrator,programmer, instructor, business analyst, technical analyst, systemsanalyst, and web developer in various environments, includingtelecommunications, education, financial services, and software.
ibm.com/developerWorks developerWorks®
The final touch Trademarks© Copyright IBM Corporation 2011 Page 25 of 25