hrms83xto890
DESCRIPTION
PeopleSoft HCM 8.3 to 9.0TRANSCRIPT

Enterprise HRMS 8.3x to 8.9 Upgrade,Including Maintenance Pack 1
August 2006

Enterprise HRMS 8.3x to 8.9 Upgrade, Including Maintenance Pack 1SKU app848reposts_082906_uhrms83x_89Copyright © 2006, Oracle. All rights reserved.
The Programs (which include both the software and documentation) contain proprietary information; they areprovided under a license agreement containing restrictions on use and disclosure and are also protected by copyright,patent, and other intellectual and industrial property laws. Reverse engineering, disassembly, or decompilation of thePrograms, except to the extent required to obtain interoperability with other independently created software or asspecified by law, is prohibited.
The information contained in this document is subject to change without notice. If you find any problems in thedocumentation, please report them to us in writing. This document is not warranted to be error-free. Except as maybe expressly permitted in your license agreement for these Programs, no part of these Programsmay be reproduced ortransmitted in any form or by anymeans, electronic or mechanical, for any purpose.If the Programs are delivered to the United States Government or anyone licensing or using the Programs on behalf ofthe United States Government, the following notice is applicable:
U.S. GOVERNMENT RIGHTSPrograms, software, databases, and related documentation and technical data delivered to U.S. Governmentcustomers are “commercial computer software” or “commercial technical data” pursuant to the applicable FederalAcquisition Regulation and agency-specific supplemental regulations. As such, use, duplication, disclosure,modification, and adaptation of the Programs, including documentation and technical data, shall be subject tothe licensing restrictions set forth in the applicable Oracle license agreement, and, to the extent applicable, theadditional rights set forth in FAR 52.227-19, Commercial Computer Software--Restricted Rights (June 1987).Oracle Corporation, 500 Oracle Parkway, Redwood City, CA 94065.The Programs are not intended for use in any nuclear, aviation, mass transit, medical, or other inherently dangerousapplications. It shall be the licensee’s responsibility to take all appropriate fail-safe, backup, redundancy and othermeasures to ensure the safe use of such applications if the Programs are used for such purposes, and we disclaimliability for any damages caused by such use of the Programs.The Programsmay provide links toWeb sites and access to content, products, and services from third parties.Oracle is not responsible for the availability of, or any content provided on, third-partyWeb sites. You bear all risksassociated with the use of such content. If you choose to purchase any products or services from a third party, therelationship is directly between you and the third party. Oracle is not responsible for: (a) the quality of third-partyproducts or services; or (b) fulfilling any of the terms of the agreement with the third party, including delivery ofproducts or services and warranty obligations related to purchased products or services. Oracle is not responsible forany loss or damage of any sort that youmay incur from dealing with any third party.Oracle, JD Edwards, PeopleSoft, and Siebel are registered trademarks of Oracle Corporation and/or its affiliates.Other namesmay be trademarks of their respective owners.
Open Source DisclosureOracle takes no responsibility for its use or distribution of any open source or shareware software or documentationand disclaims any and all liability or damages resulting from use of said software or documentation. The followingopen source software may be used in Oracle’s PeopleSoft products and the following disclaimers are provided.Apache Software FoundationThis product includes software developed by the Apache Software Foundation (http://www.apache.org/). Copyright© 2000-2003. The Apache Software Foundation. All rights reserved. Licensed under the Apache License, Version2.0 (the “License”); youmay not use this file except in compliance with the License. Youmay obtain a copy of theLicense at http://www.apache.org/licenses/LICENSE-2.0.Unless required by applicable law or agreed to in writing, software distributed under the License is distributed on an“AS IS” BASIS,WITHOUTWARRANTIESORCONDITIONSOFANYKIND, either express or implied. See theLicense for the specific language governing permissions and limitations under the License.OpenSSL
Copyright © 1998-2005 The OpenSSL Project. All rights reserved.This product includes software developed by the OpenSSL Project for use in the OpenSSL Toolkit(http://www.openssl.org/).THIS SOFTWARE IS PROVIDEDBYTHEOpenSSL PROJECT “AS IS” ANDANYEXPRESSEDORIMPLIEDWARRANTIES, INCLUDING, BUTNOTLIMITEDTO, THE IMPLIEDWARRANTIESOFMERCHANTABILITYANDFITNESS FORAPARTICULAR PURPOSEAREDISCLAIMED. INNOEVENTSHALLTHEOpenSSL PROJECTOR ITSCONTRIBUTORSBELIABLE FORANYDIRECT, INDIRECT,INCIDENTAL, SPECIAL, EXEMPLARY, ORCONSEQUENTIALDAMAGES (INCLUDING, BUTNOTLIMITEDTO, PROCUREMENTOF SUBSTITUTEGOODSORSERVICES; LOSSOFUSE, DATA, ORPROFITS; ORBUSINESS INTERRUPTION)HOWEVERCAUSEDANDONANYTHEORYOFLIABILITY,WHETHER INCONTRACT, STRICT LIABILITY, OR TORT (INCLUDINGNEGLIGENCEOROTHERWISE)ARISING INANYWAYOUTOFTHEUSEOFTHIS SOFTWARE, EVEN IFADVISEDOFTHE POSSIBILITYOF SUCHDAMAGE.Loki LibraryCopyright © 2001 byAndrei Alexandrescu. This code accompanies the book: Alexandrescu, Andrei. “Modern C++Design: Generic Programming and Design Patterns Applied”. Copyright © 2001Addison-Wesley. Permission touse, copy, modify, distribute and sell this software for any purpose is hereby granted without fee, provided that theabove copyright notice appear in all copies and that both that copyright notice and this permission notice appear insupporting documentation.Helma ProjectCopyright © 1999-2004 Helma Project. All rights reserved. THIS SOFTWARE IS PROVIDED “AS IS”ANDANYEXPRESSEDOR IMPLIEDWARRANTIES, INCLUDING, BUTNOTLIMITEDTO, THEIMPLIEDWARRANTIESOFMERCHANTABILITYANDFITNESS FORAPARTICULARPURPOSEAREDISCLAIMED. INNOEVENT SHALL THEHELMAPROJECTOR ITSCONTRIBUTORSBE LIABLE FORANYDIRECT, INDIRECT, INCIDENTAL, SPECIAL, EXEMPLARY, ORCONSEQUENTIALDAMAGES(INCLUDING, BUTNOTLIMITEDTO, PROCUREMENTOF SUBSTITUTEGOODSOR SERVICES;LOSSOFUSE, DATA, OR PROFITS; ORBUSINESS INTERRUPTION) HOWEVERCAUSEDANDONANYTHEORYOFLIABILITY,WHETHER INCONTRACT, STRICT LIABILITY, OR TORT (INCLUDINGNEGLIGENCEOROTHERWISE) ARISING INANYWAYOUTOF THEUSEOF THIS SOFTWARE, EVEN IFADVISEDOFTHE POSSIBILITYOF SUCHDAMAGE.Helma includes third party software released under different specific license terms. See the licenses directory in theHelma distribution for a list of these license.SarissaCopyright © 2004Manos Batsis.This library is free software; you can redistribute it and/or modify it under the terms of the GNULesser GeneralPublic License as published by the Free Software Foundation; either version 2.1 of the License, or (at your option)any later version.This library is distributed in the hope that it will be useful, butWITHOUTANYWARRANTY; without even theimplied warranty ofMERCHANTABILITY or FITNESS FORAPARTICULARPURPOSE. See the GNULesserGeneral Public License for more details.You should have received a copy of the GNULesser General Public License along with this library; if not, write tothe Free Software Foundation, Inc., 59 Temple Place, Suite 330, Boston,MA 02111-1307 USA.ICUICU License - ICU 1.8.1 and later COPYRIGHTANDPERMISSIONNOTICECopyright © 1995-2003International BusinessMachines Corporation and others. All rights reserved.

Permission is hereby granted, free of charge, to any person obtaining a copy of this software and associateddocumentation files (the “Software”), to deal in the Software without restriction, including without limitation therights to use, copy, modify, merge, publish, distribute, and/or sell copies of the Software, and to permit personsto whom the Software is furnished to do so, provided that the above copyright notice(s) and this permissionnotice appear in all copies of the Software and that both the above copyright notice(s) and this permission noticeappear in supporting documentation. THE SOFTWARE IS PROVIDED “AS IS,”WITHOUTWARRANTYOFANYKIND, EXPRESSOR IMPLIED, INCLUDINGBUTNOTLIMITEDTOTHEWARRANTIESOFMERCHANTABILITY, FITNESS FORAPARTICULAR PURPOSEANDNONINFRINGEMENTOFTHIRDPARTYRIGHTS. INNOEVENT SHALL THECOPYRIGHTHOLDERORHOLDERS INCLUDED IN THISNOTICEBELIABLE FORANYCLAIM, ORANYSPECIAL INDIRECTORCONSEQUENTIALDAMAGES,ORANYDAMAGESWHATSOEVERRESULTING FROMLOSSOFUSE, DATAORPROFITS,WHETHER INANACTIONOFCONTRACT, NEGLIGENCEOROTHERTORTIOUSACTION, ARISINGOUTOFOR INCONNECTIONWITHTHEUSEOR PERFORMANCEOF THIS SOFTWARE. Except as contained in this notice,the name of a copyright holder shall not be used in advertising or otherwise to promote the sale, use or other dealingsin this Software without prior written authorization of the copyright holder.All trademarks and registered trademarks mentioned herein are the property of their respective owners.Sun’s JAXB Implementation – JDSDK 1.5 relaxngDatatype.jar 1.0 LicenseCopyright © 2001, Thai Open Source Software Center Ltd, SunMicrosystems. All rights reserved.THIS SOFTWARE IS PROVIDEDBYTHECOPYRIGHTHOLDERSANDCONTRIBUTORS “ASIS” ANDANYEXPRESSOR IMPLIEDWARRANTIES, INCLUDING, BUTNOTLIMITEDTO, THEIMPLIEDWARRANTIESOFMERCHANTABILITYANDFITNESS FORAPARTICULARPURPOSEAREDISCLAIMED. INNOEVENT SHALLTHEREGENTSORCONTRIBUTORSBELIABLE FORANYDIRECT, INDIRECT, INCIDENTAL, SPECIAL, EXEMPLARY, ORCONSEQUENTIALDAMAGES(INCLUDING, BUTNOTLIMITEDTO, PROCUREMENTOF SUBSTITUTEGOODSOR SERVICES;LOSSOFUSE, DATA, OR PROFITS; ORBUSINESS INTERRUPTION) HOWEVERCAUSEDANDONANYTHEORYOF LIABILITY,WHETHER INCONTRACT, STRICT LIABILITY, ORTORT (INCLUDINGNEGLIGENCEOROTHERWISE) ARISING INANYWAYOUTOF THEUSEOF THIS SOFTWARE, EVEN IFADVISEDOFTHE POSSIBILITYOF SUCHDAMAGE.W3C IPR SOFTWARENOTICECopyright © 2000WorldWideWeb Consortium, (Massachusetts Institute of Technology, Institut National deRecherche en Informatique et en Automatique, Keio University). All Rights Reserved.Note: The original version of theW3C Software Copyright Notice and License could be found athttp://www.w3.org/Consortium/Legal/copyright-software-19980720.THIS SOFTWAREANDDOCUMENTATION IS PROVIDED “AS IS,” ANDCOPYRIGHTHOLDERSMAKENOREPRESENTATIONSORWARRANTIES, EXPRESSOR IMPLIED, INCLUDINGBUTNOTLIMITEDTO,WARRANTIESOFMERCHANTABILITYOR FITNESS FORANYPARTICULAR PURPOSEORTHATTHEUSEOFTHE SOFTWAREORDOCUMENTATIONWILLNOT INFRINGEANYTHIRD PARTYPATENTS,COPYRIGHTS, TRADEMARKSOROTHERRIGHTS. COPYRIGHTHOLDERSWILLNOTBELIABLE FORANYDIRECT, INDIRECT, SPECIALORCONSEQUENTIALDAMAGESARISINGOUTOFANYUSEOFTHE SOFTWAREORDOCUMENTATION.

Contents
PrefaceAbout This Documentation... . .. . . . . . . . . . . . . . . . . . . . . . . . . . . . . . . . . .. . . . . . . . . . . . . . . . . . . . . . . . . . . . . . . . . . . . . . . . .xxvUnderstanding This Documentation.. . . . . . . . . . . . . . . . . . . . . . . . . . . . . . . . . . . . . . . . . . . . . . . . . . . . . . . . . . . . . . . . . . . . . . . . . . . . . . .xxvPrerequisites.. . . . . . . . . . . . . . . . . . . . . . . . . . . . . . . . . . . . . . . . . . . . . . . . . . . . . . . . . . . . . . . . . . . . . . . . . . . . . . . . . . . . . . . . . . . . . . . . . . . . . . . . . .xxvAudience.. . . . . . . . . . . . . . . . . . . . . . . . . . . . . . . . . . . . . . . . . . . . . . . . . . . . . . . . . . . . . . . . . . . . . . . . . . . . . . . . . . . . . . . . . . . . . . . . . . . . . . . . . . . . . . .xxvOrganization.. . . . . . . . . . . . . . . . . . . . . . . . . . . . . . . . . . . . . . . . . . . . . . . . . . . . . . . . . . . . . . . . . . . . . . . . . . . . . . . . . . . . . . . . . . . . . . . . . . . . . . . . . .xxviRelated Information.. . . . . . . . . . . . . . . . . . . . . . . . . . . . . . . . . . . . . . . . . . . . . . . . . . . . . . . . . . . . . . . . . . . . . . . . . . . . . . . . . . . . . . . . . . . . . . . . .xxvi
Chapter 1Prepare Your Database... .. . . . . . . . . . . . . . . . . . . . . . . . . . . . . . . . . . . . . . . . . . . . . . . . . . . . . . . . . . . . . . . . . . . . . . . . . . . . . . . . . . . .1Understanding Database Preparation.. . . . . . . . . . . . . . . . . . . . . . . . . . . . . . . . . . . . . . . . . . . . . . . . . . . . . . . . . . . . . . . . . . . . . . . . . . . . . . . .1Understanding Your Upgrade.. . . . . . . . . . . . . . . . . . . . . . . . . . . . . . . . . . . . . . . . . . . . . . . . . . . . . . . . . . . . . . . . . . . . . . . . . . . . . . . . . . . . . . . . . .2
Understanding PeopleSoft Upgrades.. . . . . . . . . . . . . . . . . . . . . . . . . . . . . . . . . . . . . . . . . . . . . . . . . . . . . . . . . . . . . . . . . . .. . . . . . . . . .2Verify the Software Installation.. . . . . . . . . . . . . . . . . . . . . . . . . . . . . . . . . . . . . . . . . . . . . . . . . . . . . . . . . . . . . . . . . . . . . . . . . . .. . . . . . . . . .2Define Upgrade Databases.. . . . . . . . . . . . . . . . . . . . . . . . . . . . . . . . . . . . . . . . . . . . . . . . . . . . . . . . . . . . . . . . . . . . . . . . . . . . . .. . . . . . . . . .2Review Upgrade Notes and Tips.. . . . . . . . . . . . . . . . . . . . . . . . . . . . . . . . . . . . . . . . . . . . . . . . . . . . . . . . . . . . . . . . . . . . . . . .. . . . . . . . . .3
Copying Your Production Database .. . . . . . . . . . . . . . . . . . . . . . . . . . . . . . . . . . . . . . . . . . . . . . . . . . . . . . . . . . . . . . . . . . . . . . . . . . . . . . . . . .4Make a Copy of Your Production Database.. . . . . . . . . . . . . . . . . . . . . . . . . . . . . . . . . . . . . . . . . . . . . . . . . . . . . . . . . . . .. . . . . . . . . .4Increase Database Space.. . . . . . . . . . . . . . . . . . . . . . . . . . . . . . . . . . . . . . . . . . . . . . . . . . . . . . . . . . . . . . . . . . . . . . . . . . . . . . . .. . . . . . . . . .5
Applying Upgrade Planning Files.. . . . . . . . . . . . . . . . . . . . . . . . . . . . . . . . . . . . . . . . . . . . . . . . . . . . . . . . . . . . . . . . . . . . . . . . . . . . . . . . . . . . . .5Understanding Applying Upgrade Planning Files.. . . . . . . . . . . . . . . . . . . . . . . . . . . . . . . . . . . . . . . . . . . . . . . . . . . . .. . . . . . . . . .6Apply the UPGOPT Project. . . . . . . . . . . . . . . . . . . . . . . . . . . . . . . . . . . . . . . . . . . . . . . . . . . . . . . . . . . . . . . . . . . . . . . . . . . . . . .. . . . . . . . . .6Build the UPGOPT Project. . . . . . . . . . . . . . . . . . . . . . . . . . . . . . . . . . . . . . . . . . . . . . . . . . . . . . . . . . . . . . . . . . . . . . . . . . . . . . . .. . . . . . . . . .6Set Up Security for Upgrade Planning.. . . . . . . . . . . . . . . . . . . . . . . . . . . . . . . . . . . . . . . . . . . . . . . . . . . . . . . . . . . . . . . . . .. . . . . . . . . .7Load Planning Messages and Strings.. . . . . . . . . . . . . . . . . . . . . . . . . . . . . . . . . . . . . . . . . . . . . . . . . . . . . . . . . . . . . . . . . .. . . . . . . . . .8Load Time and Labor Messages.. . . . . . . . . . . . . . . . . . . . . . . . . . . . . . . . . . . . . . . . . . . . . . . . . . . . . . . . . . . . . . . . . . . . . . . .. . . . . . . . . .8
Verifying Global Payroll. . . . . . . . . . . . . . . . . . . . . . . . . . . . . . . . . . . . . . . . . . . . . . . . . . . . . . . . . . . . . . . . . . . . . . . . . . . . . . . . . . . . . . . . . . . . . . . . . .8Verifying Federal.. . . . . . . . . . . . . . . . . . . . . . . . . . . . . . . . . . . . . . . . . . . . . . . . . . . . . . . . . . . . . . . . . . . . . . . . . . . . . . . . . . . . . . . . . . . . . . . . . . . . . . . . .9Updating Statistics... . . . . . . . . . . . . . . . . . . . . . . . . . . . . . . . . . . . . . . . . . . . . . . . . . . . . . . . . . . . . . . . . . . . . . . . . . . . . . . . . . . . . . . . . . . . . . . . . . . . . .9Running Initial Audit Reports.. . . . . . . . . . . . . . . . . . . . . . . . . . . . . . . . . . . . . . . . . . . . . . . . . . . . . . . . . . . . . . . . . . . . . . . . . . . . . . . . . . . . . . . . . . .9
Understanding Running Initial Audit Reports. . . . . . . . . . . . . . . . . . . . . . . . . . . . . . . . . . . . . . . . . . . . . . . . . . . . . . . . . . .. . . . . . . .10Run the Initial DDDAUDIT Report. . . . . . . . . . . . . . . . . . . . . . . . . . . . . . . . . . . . . . . . . . . . . . . . . . . . . . . . . . . . . . . . . . . . . . . .. . . . . . . .10Run the Initial SYSAUDIT Report. . . . . . . . . . . . . . . . . . . . . . . . . . . . . . . . . . . . . . . . . . . . . . . . . . . . . . . . . . . . . . . . . . . . . . . .. . . . . . . .10Run the Initial Alter Audit. . . . . . . . . . . . . . . . . . . . . . . . . . . . . . . . . . . . . . . . . . . . . . . . . . . . . . . . . . . . . . . . . . . . . . . . . . . . . . . . . .. . . . . . . .11
Copyright © 2006, Oracle. All rights reserved. v

Contents
Review the Initial Audits. . . . . . . . . . . . . . . . . . . . . . . . . . . . . . . . . . . . . . . . . . . . . . . . . . . . . . . . . . . . . . . . . . . . . . . . . . . . . . . . . . .. . . . . . . .14Running Application Audits.. . . . . . . . . . . . . . . . . . . . . . . . . . . . . . . . . . . . . . . . . . . . . . . . . . . . . . . . . . . . . . . . . . . . . . . . . . . . . . . . . . . . . . . . . . .15
Run Upgrade Reports.. . . . . . . . . . . . . . . . . . . . . . . . . . . . . . . . . . . . . . . . . . . . . . . . . . . . . . . . . . . . . . . . . . . . . . . . . . . . . . . . . . . . .. . . . . . . .15Run Person Relationship Audit Report. . . . . . . . . . . . . . . . . . . . . . . . . . . . . . . . . . . . . . . . . . . . . . . . . . . . . . . . . . . . . . . . . .. . . . . . . .17Run Jobcode Table Reports.. . . . . . . . . . . . . . . . . . . . . . . . . . . . . . . . . . . . . . . . . . . . . . . . . . . . . . . . . . . . . . . . . . . . . . . . . . . . . .. . . . . . . .19Run Personal Data Changes Report. . . . . . . . . . . . . . . . . . . . . . . . . . . . . . . . . . . . . . . . . . . . . . . . . . . . . . . . . . . . . . . . . . . . .. . . . . . . .20Refresh Personal Data Snapshot Table.. . . . . . . . . . . . . . . . . . . . . . . . . . . . . . . . . . . . . . . . . . . . . . . . . . . . . . . . . . . . . . . .. . . . . . . .22Run Dynamic ChartFields Audits.. . . . . . . . . . . . . . . . . . . . . . . . . . . . . . . . . . . . . . . . . . . . . . . . . . . . . . . . . . . . . . . . . . . . . . . .. . . . . . . .23
Preparing the Benefits Upgrade.. . . . . . . . . . . . . . . . . . . . . . . . . . . . . . . . . . . . . . . . . . . . . . . . . . . . . . . . . . . . . . . . . . . . . . . . . . . . . . . . . . . . .24Prepare Benefits Administration.. . . . . . . . . . . . . . . . . . . . . . . . . . . . . . . . . . . . . . . . . . . . . . . . . . . . . . . . . . . . . . . . . . . . . . . . .. . . . . . . .24Prepare COBRA Administration.. . . . . . . . . . . . . . . . . . . . . . . . . . . . . . . . . . . . . . . . . . . . . . . . . . . . . . . . . . . . . . . . . . . . . . . . .. . . . . . . .25
Preparing for System Element Deletions.. . . . . . . . . . . . . . . . . . . . . . . . . . . . . . . . . . . . . . . . . . . . . . . . . . . . . . . . . . . . . . . . . . . . . . . . . . .25Understanding System Element Deletions.. . . . . . . . . . . . . . . . . . . . . . . . . . . . . . . . . . . . . . . . . . . . . . . . . . . . . . . . . . . . .. . . . . . . .25View Element Relationships... . . . . . . . . . . . . . . . . . . . . . . . . . . . . . . . . . . . . . . . . . . . . . . . . . . . . . . . . . . . . . . . . . . . . . . . . . . . .. . . . . . . .27Find System Elements to Delete. . . . . . . . . . . . . . . . . . . . . . . . . . . . . . . . . . . . . . . . . . . . . . . . . . . . . . . . . . . . . . . . . . . . . . . . .. . . . . . . .28Verify System Elements for GP Japan... . . . . . . . . . . . . . . . . . . . . . . . . . . . . . . . . . . . . . . . . . . . . . . . . . . . . . . . . . . . . . . . .. . . . . . . .29Review Reports and Interface Setup .. . . . . . . . . . . . . . . . . . . . . . . . . . . . . . . . . . . . . . . . . . . . . . . . . . . . . . . . . . . . . . . . . . .. . . . . . . .29Update System PIN Number.. . . . . . . . . . . . . . . . . . . . . . . . . . . . . . . . . . . . . . . . . . . . . . . . . . . . . . . . . . . . . . . . . . . . . . . . . . . . .. . . . . . . .30
Auditing Global Payroll Settings.. . . . . . . . . . . . . . . . . . . . . . . . . . . . . . . . . . . . . . . . . . . . . . . . . . . . . . . . . . . . . . . . . . . . . . . . . . . . . . . . . . . . .30Understanding Global Payroll Settings .. . . . . . . . . . . . . . . . . . . . . . . . . . . . . . . . . . . . . . . . . . . . . . . . . . . . . . . . . . . . . . . . .. . . . . . . .30Verify PIN Element Numbers.. . . . . . . . . . . . . . . . . . . . . . . . . . . . . . . . . . . . . . . . . . . . . . . . . . . . . . . . . . . . . . . . . . . . . . . . . . . . .. . . . . . . .31
Making Functional Decisions.. . . . . . . . . . . . . . . . . . . . . . . . . . . . . . . . . . . . . . . . . . . . . . . . . . . . . . . . . . . . . . . . . . . . . . . . . . . . . . . . . . . . . . . .31Understanding Making Functional Decisions.. . . . . . . . . . . . . . . . . . . . . . . . . . . . . . . . . . . . . . . . . . . . . . . . . . . . . . . . . .. . . . . . . .31Assign Upgrade Default Values.. . . . . . . . . . . . . . . . . . . . . . . . . . . . . . . . . . . . . . . . . . . . . . . . . . . . . . . . . . . . . . . . . . . . . . . . . .. . . . . . . .31Exporting the Training Defaults. . . . . . . . . . . . . . . . . . . . . . . . . . . . . . . . . . . . . . . . . . . . . . . . . . . . . . . . . . . . . . . . . . . . . . . . . . .. . . . . . . .37Importing the Training Defaults. . . . . . . . . . . . . . . . . . . . . . . . . . . . . . . . . . . . . . . . . . . . . . . . . . . . . . . . . . . . . . . . . . . . . . . . . . .. . . . . . . .38Prepare Workflow Transactions.. . . . . . . . . . . . . . . . . . . . . . . . . . . . . . . . . . . . . . . . . . . . . . . . . . . . . . . . . . . . . . . . . . . . . . . . .. . . . . . . .39Complete eCompensation Transactions.. . . . . . . . . . . . . . . . . . . . . . . . . . . . . . . . . . . . . . . . . . . . . . . . . . . . . . . . . . . . . . . .. . . . . . . .39Complete eDevelopment Transactions.. . . . . . . . . . . . . . . . . . . . . . . . . . . . . . . . . . . . . . . . . . . . . . . . . . . . . . . . . . . . . . . . .. . . . . . . .40
Identifying Customizations.. . . . . . . . . . . . . . . . . . . . . . . . . . . . . . . . . . . . . . . . . . . . . . . . . . . . . . . . . . . . . . . . . . . . . . . . . . . . . . . . . . . . . . . . . . .40Reporting Row Count for Tables... . . . . . . . . . . . . . . . . . . . . . . . . . . . . . . . . . . . . . . . . . . . . . . . . . . . . . . . . . . . . . . . . . . . . . . . . . . . . . . . . . . .42Preparing Your Database .. . . . . . . . . . . . . . . . . . . . . . . . . . . . . . . . . . . . . . . . . . . . . . . . . . . . . . . . . . . . . . . . . . . . . . . . . . . . . . . . . . . . . . . . . . . .43
Understanding Database Preparation.. . . . . . . . . . . . . . . . . . . . . . . . . . . . . . . . . . . . . . . . . . . . . . . . . . . . . . . . . . . . . . . . . .. . . . . . . .43Verify Database Integrity. . . . . . . . . . . . . . . . . . . . . . . . . . . . . . . . . . . . . . . . . . . . . . . . . . . . . . . . . . . . . . . . . . . . . . . . . . . . . . . . . . .. . . . . . . .43Clean the PSOBJCHNG Table... . . . . . . . . . . . . . . . . . . . . . . . . . . . . . . . . . . . . . . . . . . . . . . . . . . . . . . . . . . . . . . . . . . . . . . . . .. . . . . . . .43Shrink Images... . . . . . . . . . . . . . . . . . . . . . . . . . . . . . . . . . . . . . . . . . . . . . . . . . . . . . . . . . . . . . . . . . . . . . . . . . . . . . . . . . . . . . . . . . . . .. . . . . . . .44Purge Message Queues.. . . . . . . . . . . . . . . . . . . . . . . . . . . . . . . . . . . . . . . . . . . . . . . . . . . . . . . . . . . . . . . . . . . . . . . . . . . . . . . . . .. . . . . . . .44
Preparing for the Application Upgrade... . . . . . . . . . . . . . . . . . . . . . . . . . . . . . . . . . . . . . . . . . . . . . . . . . . . . . . . . . . . . . . . . . . . . . . . . . . . .45Edit the Upgrade Planning DB2 Scripts.. . . . . . . . . . . . . . . . . . . . . . . . . . . . . . . . . . . . . . . . . . . . . . . . . . . . . . . . . . . . . . . .. . . . . . . .45Create a Copy of RecField Definitions.. . . . . . . . . . . . . . . . . . . . . . . . . . . . . . . . . . . . . . . . . . . . . . . . . . . . . . . . . . . . . . . . . .. . . . . . . .46
vi Copyright © 2006, Oracle. All rights reserved.
Contents
Copy Time and Labor Temp Table List. . . . . . . . . . . . . . . . . . . . . . . . . . . . . . . . . . . . . . . . . . . . . . . . . . . . . . . . . . . . . . . . . . .. . . . . . . .46Rename Directory Interface Tables. . . . . . . . . . . . . . . . . . . . . . . . . . . . . . . . . . . . . . . . . . . . . . . . . . . . . . . . . . . . . . . . . . . . . .. . . . . . . .46Verify Writable Array Records.. . . . . . . . . . . . . . . . . . . . . . . . . . . . . . . . . . . . . . . . . . . . . . . . . . . . . . . . . . . . . . . . . . . . . . . . . . . .. . . . . . . .47Drop Indexes.. . . . . . . . . . . . . . . . . . . . . . . . . . . . . . . . . . . . . . . . . . . . . . . . . . . . . . . . . . . . . . . . . . . . . . . . . . . . . . . . . . . . . . . . . . . . . . .. . . . . . . .48Edit the System Data Swap Script. . . . . . . . . . . . . . . . . . . . . . . . . . . . . . . . . . . . . . . . . . . . . . . . . . . . . . . . . . . . . . . . . . . . . . .. . . . . . . .48
Backing Up After Prepare Your Database.. . . . . . . . . . . . . . . . . . . . . . . . . . . . . . . . . . . . . . . . . . . . . . . . . . . . . . . . . . . . . . . . . . . . . . . . . .48
Chapter 2Apply PeopleTools Changes... . . . . . . . . . . . . . . . . . . . . . . . . . . . . . . . . . . . . . . . . . . . . . . . . . . . . . . . . . . . . . . . . . . . . . . . . . . . .51Understanding PeopleTools Changes.. . . . . . . . . . . . . . . . . . . . . . . . . . . . . . . . . . . . . . . . . . . . . . . . . . . . . . . . . . . . . . . . . . . . . . . . . . . . . .52Verifying Upgrade User.. . . . . . . . . . . . . . . . . . . . . . . . . . . . . . . . . . . . . . . . . . . . . . . . . . . . . . . . . . . . . . . . . . . . . . . . . . . . . . . . . . . . . . . . . . . . . . .52Performing Script Modifications.. . . . . . . . . . . . . . . . . . . . . . . . . . . . . . . . . . . . . . . . . . . . . . . . . . . . . . . . . . . . . . . . . . . . . . . . . . . . . . . . . . . . .53
Understanding Script Modifications.. . . . . . . . . . . . . . . . . . . . . . . . . . . . . . . . . . . . . . . . . . . . . . . . . . . . . . . . . . . . . . . . . . . . .. . . . . . . .53Copy the PTDDLUPG Script. . . . . . . . . . . . . . . . . . . . . . . . . . . . . . . . . . . . . . . . . . . . . . . . . . . . . . . . . . . . . . . . . . . . . . . . . . . . . .. . . . . . . .54Edit the PTDDLUPG Script.. . . . . . . . . . . . . . . . . . . . . . . . . . . . . . . . . . . . . . . . . . . . . . . . . . . . . . . . . . . . . . . . . . . . . . . . . . . . . . .. . . . . . . .54Run a DBTSFIX Report. . . . . . . . . . . . . . . . . . . . . . . . . . . . . . . . . . . . . . . . . . . . . . . . . . . . . . . . . . . . . . . . . . . . . . . . . . . . . . . . . . . .. . . . . . . .55Edit the DBTSFIX Output Scripts... . . . . . . . . . . . . . . . . . . . . . . . . . . . . . . . . . . . . . . . . . . . . . . . . . . . . . . . . . . . . . . . . . . . . . .. . . . . . . .55Edit the GRANT Script. . . . . . . . . . . . . . . . . . . . . . . . . . . . . . . . . . . . . . . . . . . . . . . . . . . . . . . . . . . . . . . . . . . . . . . . . . . . . . . . . . . . .. . . . . . . .56Edit the RELGA Script. . . . . . . . . . . . . . . . . . . . . . . . . . . . . . . . . . . . . . . . . . . . . . . . . . . . . . . . . . . . . . . . . . . . . . . . . . . . . . . . . . . . .. . . . . . . .56Edit the PSLANG Script. . . . . . . . . . . . . . . . . . . . . . . . . . . . . . . . . . . . . . . . . . . . . . . . . . . . . . . . . . . . . . . . . . . . . . . . . . . . . . . . . . .. . . . . . . .56Edit the PSLANGUAGES Script. . . . . . . . . . . . . . . . . . . . . . . . . . . . . . . . . . . . . . . . . . . . . . . . . . . . . . . . . . . . . . . . . . . . . . . . . .. . . . . . . .57Edit the TLSUPGNONCOMP Script. . . . . . . . . . . . . . . . . . . . . . . . . . . . . . . . . . . . . . . . . . . . . . . . . . . . . . . . . . . . . . . . . . . . .. . . . . . . .57Edit the PTxxxTLS Scripts.. . . . . . . . . . . . . . . . . . . . . . . . . . . . . . . . . . . . . . . . . . . . . . . . . . . . . . . . . . . . . . . . . . . . . . . . . . . . . . . .. . . . . . . .57Edit the DB2 Scripts.. . . . . . . . . . . . . . . . . . . . . . . . . . . . . . . . . . . . . . . . . . . . . . . . . . . . . . . . . . . . . . . . . . . . . . . . . . . . . . . . . . . . . . .. . . . . . . .58Edit Move to Production Import Scripts.. . . . . . . . . . . . . . . . . . . . . . . . . . . . . . . . . . . . . . . . . . . . . . . . . . . . . . . . . . . . . . . . .. . . . . . . .59Edit Move to Production Password.. . . . . . . . . . . . . . . . . . . . . . . . . . . . . . . . . . . . . . . . . . . . . . . . . . . . . . . . . . . . . . . . . . . . . .. . . . . . . .60Edit the DDLDB2 Script. . . . . . . . . . . . . . . . . . . . . . . . . . . . . . . . . . . . . . . . . . . . . . . . . . . . . . . . . . . . . . . . . . . . . . . . . . . . . . . . . . . .. . . . . . . .60Edit the DDLDBX Script. . . . . . . . . . . . . . . . . . . . . . . . . . . . . . . . . . . . . . . . . . . . . . . . . . . . . . . . . . . . . . . . . . . . . . . . . . . . . . . . . . .. . . . . . . .60Edit the DDLORA Script. . . . . . . . . . . . . . . . . . . . . . . . . . . . . . . . . . . . . . . . . . . . . . . . . . . . . . . . . . . . . . . . . . . . . . . . . . . . . . . . . . .. . . . . . . .61Edit the DDLIFX Script. . . . . . . . . . . . . . . . . . . . . . . . . . . . . . . . . . . . . . . . . . . . . . . . . . . . . . . . . . . . . . . . . . . . . . . . . . . . . . . . . . . . .. . . . . . . .61Edit the MSGTLSUPG Script. . . . . . . . . . . . . . . . . . . . . . . . . . . . . . . . . . . . . . . . . . . . . . . . . . . . . . . . . . . . . . . . . . . . . . . . . . . . .. . . . . . . .61Edit the Integration Broker Script. . . . . . . . . . . . . . . . . . . . . . . . . . . . . . . . . . . . . . . . . . . . . . . . . . . . . . . . . . . . . . . . . . . . . . . . .. . . . . . . .61Edit Multilingual Step Properties.. . . . . . . . . . . . . . . . . . . . . . . . . . . . . . . . . . . . . . . . . . . . . . . . . . . . . . . . . . . . . . . . . . . . . . . . .. . . . . . . .62Edit the Message Nodes Script. . . . . . . . . . . . . . . . . . . . . . . . . . . . . . . . . . . . . . . . . . . . . . . . . . . . . . . . . . . . . . . . . . . . . . . . . . .. . . . . . . .62Edit Data Type Steps.. . . . . . . . . . . . . . . . . . . . . . . . . . . . . . . . . . . . . . . . . . . . . . . . . . . . . . . . . . . . . . . . . . . . . . . . . . . . . . . . . . . . . .. . . . . . . .64
Updating PeopleTools System Tables .. . . . . . . . . . . . . . . . . . . . . . . . . . . . . . . . . . . . . . . . . . . . . . . . . . . . . . . . . . . . . . . . . . . . . . . . . . . . .64Understanding Updating PeopleTools System Tables. . . . . . . . . . . . . . . . . . . . . . . . . . . . . . . . . . . . . . . . . . . . . . . . .. . . . . . . .65Clean Up Message Data.. . . . . . . . . . . . . . . . . . . . . . . . . . . . . . . . . . . . . . . . . . . . . . . . . . . . . . . . . . . . . . . . . . . . . . . . . . . . . . . . . .. . . . . . . .65Create Tablespaces.. . . . . . . . . . . . . . . . . . . . . . . . . . . . . . . . . . . . . . . . . . . . . . . . . . . . . . . . . . . . . . . . . . . . . . . . . . . . . . . . . . . . . . .. . . . . . . .66
Copyright © 2006, Oracle. All rights reserved. vii

Contents
Create Tablespaces for Informix.. . . . . . . . . . . . . . . . . . . . . . . . . . . . . . . . . . . . . . . . . . . . . . . . . . . . . . . . . . . . . . . . . . . . . . . . .. . . . . . . .66Update System Catalog Views.. . . . . . . . . . . . . . . . . . . . . . . . . . . . . . . . . . . . . . . . . . . . . . . . . . . . . . . . . . . . . . . . . . . . . . . . . . .. . . . . . . .66Update PeopleTools System Tables.. . . . . . . . . . . . . . . . . . . . . . . . . . . . . . . . . . . . . . . . . . . . . . . . . . . . . . . . . . . . . . . . . . . .. . . . . . . .67Grant Privileges to the CONNECT ID... . . . . . . . . . . . . . . . . . . . . . . . . . . . . . . . . . . . . . . . . . . . . . . . . . . . . . . . . . . . . . . . . .. . . . . . . .67Run the RELGA Script. . . . . . . . . . . . . . . . . . . . . . . . . . . . . . . . . . . . . . . . . . . . . . . . . . . . . . . . . . . . . . . . . . . . . . . . . . . . . . . . . . . . .. . . . . . . .67Populate Languages for Login.. . . . . . . . . . . . . . . . . . . . . . . . . . . . . . . . . . . . . . . . . . . . . . . . . . . . . . . . . . . . . . . . . . . . . . . . . . .. . . . . . . .68Update the Product License Code... . . . . . . . . . . . . . . . . . . . . . . . . . . . . . . . . . . . . . . . . . . . . . . . . . . . . . . . . . . . . . . . . . . . .. . . . . . . .68Update PeopleTools Patch Information.. . . . . . . . . . . . . . . . . . . . . . . . . . . . . . . . . . . . . . . . . . . . . . . . . . . . . . . . . . . . . . . . .. . . . . . . .69Create Temporary Performance Indexes.. . . . . . . . . . . . . . . . . . . . . . . . . . . . . . . . . . . . . . . . . . . . . . . . . . . . . . . . . . . . . . .. . . . . . . .70Export PeopleTools System Tables.. . . . . . . . . . . . . . . . . . . . . . . . . . . . . . . . . . . . . . . . . . . . . . . . . . . . . . . . . . . . . . . . . . . . .. . . . . . . .70Import PeopleTools System Tables.. . . . . . . . . . . . . . . . . . . . . . . . . . . . . . . . . . . . . . . . . . . . . . . . . . . . . . . . . . . . . . . . . . . . . .. . . . . . . .70Reset Database Options Flag.. . . . . . . . . . . . . . . . . . . . . . . . . . . . . . . . . . . . . . . . . . . . . . . . . . . . . . . . . . . . . . . . . . . . . . . . . . . .. . . . . . . .71Rerun Update Statistics for DB2 zOS... . . . . . . . . . . . . . . . . . . . . . . . . . . . . . . . . . . . . . . . . . . . . . . . . . . . . . . . . . . . . . . . . .. . . . . . . .71Rerun RUNSTATS Report for DB2 UNIX NT... . . . . . . . . . . . . . . . . . . . . . . . . . . . . . . . . . . . . . . . . . . . . . . . . . . . . . . . .. . . . . . . .71Rerun Update Statistics for DB2 UNIX NT.. . . . . . . . . . . . . . . . . . . . . . . . . . . . . . . . . . . . . . . . . . . . . . . . . . . . . . . . . . . . .. . . . . . . .72Rerun Update Statistics for Informix. . . . . . . . . . . . . . . . . . . . . . . . . . . . . . . . . . . . . . . . . . . . . . . . . . . . . . . . . . . . . . . . . . . . .. . . . . . . .72Rerun Update Statistics for Oracle .. . . . . . . . . . . . . . . . . . . . . . . . . . . . . . . . . . . . . . . . . . . . . . . . . . . . . . . . . . . . . . . . . . . . .. . . . . . . .72
Turning Off Change Control . . . . . . . . . . . . . . . . . . . . . . . . . . . . . . . . . . . . . . . . . . . . . . . . . . . . . . . . . . . . . . . . . . . . . . . . . . . . . . . . . . . . . . . . . .72Loading Model Definition Data.. . . . . . . . . . . . . . . . . . . . . . . . . . . . . . . . . . . . . . . . . . . . . . . . . . . . . . . . . . . . . . . . . . . . . . . . . . . . . . . . . . . . . . .73
Understanding Model Definition Data Load Process.. . . . . . . . . . . . . . . . . . . . . . . . . . . . . . . . . . . . . . . . . . . . . . . . .. . . . . . . .73Load Model Definitions for DB2 zOS... . . . . . . . . . . . . . . . . . . . . . . . . . . . . . . . . . . . . . . . . . . . . . . . . . . . . . . . . . . . . . . . . . .. . . . . . . .73Load Model Definitions for DB2 UNIX NT... . . . . . . . . . . . . . . . . . . . . . . . . . . . . . . . . . . . . . . . . . . . . . . . . . . . . . . . . . . . .. . . . . . . .73Load Model Definitions for Oracle.. . . . . . . . . . . . . . . . . . . . . . . . . . . . . . . . . . . . . . . . . . . . . . . . . . . . . . . . . . . . . . . . . . . . . . .. . . . . . . .74Load Model Definitions for Informix.. . . . . . . . . . . . . . . . . . . . . . . . . . . . . . . . . . . . . . . . . . . . . . . . . . . . . . . . . . . . . . . . . . . . .. . . . . . . .74Load Model Definitions for Microsoft. . . . . . . . . . . . . . . . . . . . . . . . . . . . . . . . . . . . . . . . . . . . . . . . . . . . . . . . . . . . . . . . . . . . .. . . . . . . .74Load Model Definitions for Sybase.. . . . . . . . . . . . . . . . . . . . . . . . . . . . . . . . . . . . . . . . . . . . . . . . . . . . . . . . . . . . . . . . . . . . . .. . . . . . . .74
Loading Message Data.. . . . . . . . . . . . . . . . . . . . . . . . . . . . . . . . . . . . . . . . . . . . . . . . . . . . . . . . . . . . . . . . . . . . . . . . . . . . . . . . . . . . . . . . . . . . . . .75Renaming PeopleTools Records.. . . . . . . . . . . . . . . . . . . . . . . . . . . . . . . . . . . . . . . . . . . . . . . . . . . . . . . . . . . . . . . . . . . . . . . . . . . . . . . . . . . .75Comparing PeopleTools Objects . . . . . . . . . . . . . . . . . . . . . . . . . . . . . . . . . . . . . . . . . . . . . . . . . . . . . . . . . . . . . . . . . . . . . . . . . . . . . . . . . . . .75
Understanding Comparing PeopleTools Objects. . . . . . . . . . . . . . . . . . . . . . . . . . . . . . . . . . . . . . . . . . . . . . . . . . . . . . .. . . . . . . .76Compare Fields in the PPLTOOLS Project. . . . . . . . . . . . . . . . . . . . . . . . . . . . . . . . . . . . . . . . . . . . . . . . . . . . . . . . . . . . . .. . . . . . . .76Review the Field Compare Report. . . . . . . . . . . . . . . . . . . . . . . . . . . . . . . . . . . . . . . . . . . . . . . . . . . . . . . . . . . . . . . . . . . . . . .. . . . . . . .77
Exporting and Copying Projects .. . . . . . . . . . . . . . . . . . . . . . . . . . . . . . . . . . . . . . . . . . . . . . . . . . . . . . . . . . . . . . . . . . . . . . . . . . . . . . . . . . . .78Understanding Exporting and Copying Projects.. . . . . . . . . . . . . . . . . . . . . . . . . . . . . . . . . . . . . . . . . . . . . . . . . . . . . . .. . . . . . . .78Export and Copy PTPORTALDEL Project. . . . . . . . . . . . . . . . . . . . . . . . . . . . . . . . . . . . . . . . . . . . . . . . . . . . . . . . . . . . . . .. . . . . . . .78Export and Copy PPLTOOLS Project. . . . . . . . . . . . . . . . . . . . . . . . . . . . . . . . . . . . . . . . . . . . . . . . . . . . . . . . . . . . . . . . . . . .. . . . . . . .79Export and Copy PPLDELETE Project. . . . . . . . . . . . . . . . . . . . . . . . . . . . . . . . . . . . . . . . . . . . . . . . . . . . . . . . . . . . . . . . . .. . . . . . . .79Export and Copy PPLTLS84CUR Project. . . . . . . . . . . . . . . . . . . . . . . . . . . . . . . . . . . . . . . . . . . . . . . . . . . . . . . . . . . . . . .. . . . . . . .80Export and Copy PPLTLS84CURML Project. . . . . . . . . . . . . . . . . . . . . . . . . . . . . . . . . . . . . . . . . . . . . . . . . . . . . . . . . . .. . . . . . . .80Export and Copy PPLTLSML Project. . . . . . . . . . . . . . . . . . . . . . . . . . . . . . . . . . . . . . . . . . . . . . . . . . . . . . . . . . . . . . . . . . . .. . . . . . . .81
viii Copyright © 2006, Oracle. All rights reserved.

Contents
Export and Copy PPLTLS84CURDEL Project. . . . . . . . . . . . . . . . . . . . . . . . . . . . . . . . . . . . . . . . . . . . . . . . . . . . . . . . . .. . . . . . . .81Export and Copy PATCH84X Project. . . . . . . . . . . . . . . . . . . . . . . . . . . . . . . . . . . . . . . . . . . . . . . . . . . . . . . . . . . . . . . . . . . .. . . . . . . .82Export and Copy PATCH84XML Project. . . . . . . . . . . . . . . . . . . . . . . . . . . . . . . . . . . . . . . . . . . . . . . . . . . . . . . . . . . . . . . . .. . . . . . . .82
Populating Tablespace Data.. . . . . . . . . . . . . . . . . . . . . . . . . . . . . . . . . . . . . . . . . . . . . . . . . . . . . . . . . . . . . . . . . . . . . . . . . . . . . . . . . . . . . . . . .83Create Application Tablespaces.. . . . . . . . . . . . . . . . . . . . . . . . . . . . . . . . . . . . . . . . . . . . . . . . . . . . . . . . . . . . . . . . . . . . . . . . .. . . . . . . .83Populate Tablespace Data.. . . . . . . . . . . . . . . . . . . . . . . . . . . . . . . . . . . . . . . . . . . . . . . . . . . . . . . . . . . . . . . . . . . . . . . . . . . . . . .. . . . . . . .84Update Tablespace Names.... . . . . . . . . . . . . . . . . . . . . . . . . . . . . . . . . . . . . . . . . . . . . . . . . . . . . . . . . . . . . . . . . . . . . . . . . . . . .. . . . . . . .85
Building the PeopleTools Project. . . . . . . . . . . . . . . . . . . . . . . . . . . . . . . . . . . . . . . . . . . . . . . . . . . . . . . . . . . . . . . . . . . . . . . . . . . . . . . . . . . . .85Generate the PeopleTools Script. . . . . . . . . . . . . . . . . . . . . . . . . . . . . . . . . . . . . . . . . . . . . . . . . . . . . . . . . . . . . . . . . . . . . . . . .. . . . . . . .85Edit the PeopleTools Script. . . . . . . . . . . . . . . . . . . . . . . . . . . . . . . . . . . . . . . . . . . . . . . . . . . . . . . . . . . . . . . . . . . . . . . . . . . . . . . .. . . . . . . .86Run the PeopleTools Script. . . . . . . . . . . . . . . . . . . . . . . . . . . . . . . . . . . . . . . . . . . . . . . . . . . . . . . . . . . . . . . . . . . . . . . . . . . . . . .. . . . . . . .86
Building Updated PeopleTools Project. . . . . . . . . . . . . . . . . . . . . . . . . . . . . . . . . . . . . . . . . . . . . . . . . . . . . . . . . . . . . . . . . . . . . . . . . . . . . . .87Generate Updated PeopleTools Script.. . . . . . . . . . . . . . . . . . . . . . . . . . . . . . . . . . . . . . . . . . . . . . . . . . . . . . . . . . . . . . . . . .. . . . . . . .87Edit the Updated PeopleTools Script. . . . . . . . . . . . . . . . . . . . . . . . . . . . . . . . . . . . . . . . . . . . . . . . . . . . . . . . . . . . . . . . . . . . .. . . . . . . .87Run the Updated PeopleTools Script. . . . . . . . . . . . . . . . . . . . . . . . . . . . . . . . . . . . . . . . . . . . . . . . . . . . . . . . . . . . . . . . . . . .. . . . . . . .88
Migrating Records to New Tablespaces.. . . . . . . . . . . . . . . . . . . . . . . . . . . . . . . . . . . . . . . . . . . . . . . . . . . . . . . . . . . . . . . . . . . . . . . . . . . .88Understanding Migration of Records to New Tablespaces.. . . . . . . . . . . . . . . . . . . . . . . . . . . . . . . . . . . . . . . . . . .. . . . . . . .88Export and Copy the PT84TBLSPC Project. . . . . . . . . . . . . . . . . . . . . . . . . . . . . . . . . . . . . . . . . . . . . . . . . . . . . . . . . . . .. . . . . . . .88Build the Tablespace Alter Script. . . . . . . . . . . . . . . . . . . . . . . . . . . . . . . . . . . . . . . . . . . . . . . . . . . . . . . . . . . . . . . . . . . . . . . . .. . . . . . . .89Edit the Tablespace Alter Script. . . . . . . . . . . . . . . . . . . . . . . . . . . . . . . . . . . . . . . . . . . . . . . . . . . . . . . . . . . . . . . . . . . . . . . . . .. . . . . . . .89Run the Tablespace Alter Script. . . . . . . . . . . . . . . . . . . . . . . . . . . . . . . . . . . . . . . . . . . . . . . . . . . . . . . . . . . . . . . . . . . . . . . . . .. . . . . . . .89
Loading Base Data.. . . . . . . . . . . . . . . . . . . . . . . . . . . . . . . . . . . . . . . . . . . . . . . . . . . . . . . . . . . . . . . . . . . . . . . . . . . . . . . . . . . . . . . . . . . . . . . . . . . .90Loading Language Data.. . . . . . . . . . . . . . . . . . . . . . . . . . . . . . . . . . . . . . . . . . . . . . . . . . . . . . . . . . . . . . . . . . . . . . . . . . . . . . . . . . . . . . . . . . . . . .90
Populate Languages.. . . . . . . . . . . . . . . . . . . . . . . . . . . . . . . . . . . . . . . . . . . . . . . . . . . . . . . . . . . . . . . . . . . . . . . . . . . . . . . . . . . . . .. . . . . . . .90Load Language Data.. . . . . . . . . . . . . . . . . . . . . . . . . . . . . . . . . . . . . . . . . . . . . . . . . . . . . . . . . . . . . . . . . . . . . . . . . . . . . . . . . . . . . .. . . . . . . .91
Loading PeopleTools Data.. . . . . . . . . . . . . . . . . . . . . . . . . . . . . . . . . . . . . . . . . . . . . . . . . . . . . . . . . . . . . . . . . . . . . . . . . . . . . . . . . . . . . . . . . . .91Load NonComparable Objects.. . . . . . . . . . . . . . . . . . . . . . . . . . . . . . . . . . . . . . . . . . . . . . . . . . . . . . . . . . . . . . . . . . . . . . . . . . .. . . . . . . .91Load English Messages.. . . . . . . . . . . . . . . . . . . . . . . . . . . . . . . . . . . . . . . . . . . . . . . . . . . . . . . . . . . . . . . . . . . . . . . . . . . . . . . . . .. . . . . . . .91Load English String Data. . . . . . . . . . . . . . . . . . . . . . . . . . . . . . . . . . . . . . . . . . . . . . . . . . . . . . . . . . . . . . . . . . . . . . . . . . . . . . . . . .. . . . . . . .92Load Stored Statements Data.. . . . . . . . . . . . . . . . . . . . . . . . . . . . . . . . . . . . . . . . . . . . . . . . . . . . . . . . . . . . . . . . . . . . . . . . . . .. . . . . . . .92
Creating PeopleTools Views.. . . . . . . . . . . . . . . . . . . . . . . . . . . . . . . . . . . . . . . . . . . . . . . . . . . . . . . . . . . . . . . . . . . . . . . . . . . . . . . . . . . . . . . . .92Create PPLTOOLS Views.. . . . . . . . . . . . . . . . . . . . . . . . . . . . . . . . . . . . . . . . . . . . . . . . . . . . . . . . . . . . . . . . . . . . . . . . . . . . . . . .. . . . . . . .92Create Updated PeopleTools Views.. . . . . . . . . . . . . . . . . . . . . . . . . . . . . . . . . . . . . . . . . . . . . . . . . . . . . . . . . . . . . . . . . . . . .. . . . . . . .93
Converting PeopleTools Objects .. . . . . . . . . . . . . . . . . . . . . . . . . . . . . . . . . . . . . . . . . . . . . . . . . . . . . . . . . . . . . . . . . . . . . . . . . . . . . . . . . . . .93Expand Fields on Records.. . . . . . . . . . . . . . . . . . . . . . . . . . . . . . . . . . . . . . . . . . . . . . . . . . . . . . . . . . . . . . . . . . . . . . . . . . . . . . .. . . . . . . .93Alter Approval Rule Set Related Tables.. . . . . . . . . . . . . . . . . . . . . . . . . . . . . . . . . . . . . . . . . . . . . . . . . . . . . . . . . . . . . . . .. . . . . . . .94Update Message Nodes.. . . . . . . . . . . . . . . . . . . . . . . . . . . . . . . . . . . . . . . . . . . . . . . . . . . . . . . . . . . . . . . . . . . . . . . . . . . . . . . . . .. . . . . . . .94Update Message Nodes for Informix.. . . . . . . . . . . . . . . . . . . . . . . . . . . . . . . . . . . . . . . . . . . . . . . . . . . . . . . . . . . . . . . . . . . .. . . . . . . .94Convert Portal Objects.. . . . . . . . . . . . . . . . . . . . . . . . . . . . . . . . . . . . . . . . . . . . . . . . . . . . . . . . . . . . . . . . . . . . . . . . . . . . . . . . . . . .. . . . . . . .95Convert Query Prompt Headings.. . . . . . . . . . . . . . . . . . . . . . . . . . . . . . . . . . . . . . . . . . . . . . . . . . . . . . . . . . . . . . . . . . . . . . . .. . . . . . . .96
Copyright © 2006, Oracle. All rights reserved. ix
Contents
Load Conversion Data.. . . . . . . . . . . . . . . . . . . . . . . . . . . . . . . . . . . . . . . . . . . . . . . . . . . . . . . . . . . . . . . . . . . . . . . . . . . . . . . . . . . .. . . . . . . .96Report Conversion Details. . . . . . . . . . . . . . . . . . . . . . . . . . . . . . . . . . . . . . . . . . . . . . . . . . . . . . . . . . . . . . . . . . . . . . . . . . . . . . . .. . . . . . . .97Run Data Conversion.. . . . . . . . . . . . . . . . . . . . . . . . . . . . . . . . . . . . . . . . . . . . . . . . . . . . . . . . . . . . . . . . . . . . . . . . . . . . . . . . . . . . .. . . . . . . .97
Converting Integration Broker.. . . . . . . . . . . . . . . . . . . . . . . . . . . . . . . . . . . . . . . . . . . . . . . . . . . . . . . . . . . . . . . . . . . . . . . . . . . . . . . . . . . . . . . .97Understanding Converting Integration Broker. . . . . . . . . . . . . . . . . . . . . . . . . . . . . . . . . . . . . . . . . . . . . . . . . . . . . . . . . .. . . . . . . .98Updating Integration Broker Defaults. . . . . . . . . . . . . . . . . . . . . . . . . . . . . . . . . . . . . . . . . . . . . . . . . . . . . . . . . . . . . . . . . . . .. . . . . . . .98Creating Integration Broker Objects.. . . . . . . . . . . . . . . . . . . . . . . . . . . . . . . . . . . . . . . . . . . . . . . . . . . . . . . . . . . . . . . . . . . . .. . . . . . . .98Saving Application Messaging Objects.. . . . . . . . . . . . . . . . . . . . . . . . . . . . . . . . . . . . . . . . . . . . . . . . . . . . . . . . . . . . . . . . .. . . . . . . .98Exporting Node Transactions.. . . . . . . . . . . . . . . . . . . . . . . . . . . . . . . . . . . . . . . . . . . . . . . . . . . . . . . . . . . . . . . . . . . . . . . . . . . .. . . . . . . .99Preparing Integration Broker Deletes.. . . . . . . . . . . . . . . . . . . . . . . . . . . . . . . . . . . . . . . . . . . . . . . . . . . . . . . . . . . . . . . . . . .. . . . . . . .99Deleting Application Messaging Objects.. . . . . . . . . . . . . . . . . . . . . . . . . . . . . . . . . . . . . . . . . . . . . . . . . . . . . . . . . . . . . . .. . . . . . . .99Deleting Node Transactions.. . . . . . . . . . . . . . . . . . . . . . . . . . . . . . . . . . . . . . . . . . . . . . . . . . . . . . . . . . . . . . . . . . . . . . . . . . . . . .. . . . . . . .99
Verifying NonBase Language Pages.. . . . . . . . . . . . . . . . . . . . . . . . . . . . . . . . . . . . . . . . . . . . . . . . . . . . . . . . . . . . . . . . . . . . . . . . . . . . . .100Understanding NonBase Language Pages.. . . . . . . . . . . . . . . . . . . . . . . . . . . . . . . . . . . . . . . . . . . . . . . . . . . . . . . . . . . .. . . . . . .100Verify NonBase Language Pages.. . . . . . . . . . . . . . . . . . . . . . . . . . . . . . . . . . . . . . . . . . . . . . . . . . . . . . . . . . . . . . . . . . . . . . .. . . . . . .100Delete Unused Language Pages.. . . . . . . . . . . . . . . . . . . . . . . . . . . . . . . . . . . . . . . . . . . . . . . . . . . . . . . . . . . . . . . . . . . . . . . .. . . . . . .101
Clearing Process and Report Tables.. .. . . . . . . . . . . . . . . . . . . . . . . . . . . . . . . . . . . . . . . . . . . . . . . . . . . . . . . . . . . . . . . . . . . . . . . . . . . . .102Understanding Process and Report Tables.. . . . . . . . . . . . . . . . . . . . . . . . . . . . . . . . . . . . . . . . . . . . . . . . . . . . . . . . . . . .. . . . . . .102Purge Process Request Tables.. . . . . . . . . . . . . . . . . . . . . . . . . . . . . . . . . . . . . . . . . . . . . . . . . . . . . . . . . . . . . . . . . . . . . . . . . .. . . . . . .102
Setting Object Version Numbers.. . . . . . . . . . . . . . . . . . . . . . . . . . . . . . . . . . . . . . . . . . . . . . . . . . . . . . . . . . . . . . . . . . . . . . . . . . . . . . . . . . .103Converting Database Data Types.. . . . . . . . . . . . . . . . . . . . . . . . . . . . . . . . . . . . . . . . . . . . . . . . . . . . . . . . . . . . . . . . . . . . . . . . . . . . . . . . . .103
Understanding Converting Database Data Types.. . . . . . . . . . . . . . . . . . . . . . . . . . . . . . . . . . . . . . . . . . . . . . . . . . . . .. . . . . . .104Backing Up Before Platform Changes.. . . . . . . . . . . . . . . . . . . . . . . . . . . . . . . . . . . . . . . . . . . . . . . . . . . . . . . . . . . . . . . . . .. . . . . . .105Running Long Data Audit. . . . . . . . . . . . . . . . . . . . . . . . . . . . . . . . . . . . . . . . . . . . . . . . . . . . . . . . . . . . . . . . . . . . . . . . . . . . . . . . . .. . . . . . .105Validating Microsoft Database.. . . . . . . . . . . . . . . . . . . . . . . . . . . . . . . . . . . . . . . . . . . . . . . . . . . . . . . . . . . . . . . . . . . . . . . . . . .. . . . . . .105Reviewing Microsoft Settings.. . . . . . . . . . . . . . . . . . . . . . . . . . . . . . . . . . . . . . . . . . . . . . . . . . . . . . . . . . . . . . . . . . . . . . . . . . . .. . . . . . .105Creating Microsoft Conversion Project. . . . . . . . . . . . . . . . . . . . . . . . . . . . . . . . . . . . . . . . . . . . . . . . . . . . . . . . . . . . . . . . . .. . . . . . .106Generating Microsoft Conversion Script. . . . . . . . . . . . . . . . . . . . . . . . . . . . . . . . . . . . . . . . . . . . . . . . . . . . . . . . . . . . . . . . .. . . . . . .106Running Microsoft Conversion Script. . . . . . . . . . . . . . . . . . . . . . . . . . . . . . . . . . . . . . . . . . . . . . . . . . . . . . . . . . . . . . . . . . . .. . . . . . .106Granting Permissions to the CONNECT ID.. . . . . . . . . . . . . . . . . . . . . . . . . . . . . . . . . . . . . . . . . . . . . . . . . . . . . . . . . . . .. . . . . . .107Running Microsoft Conversion Report. . . . . . . . . . . . . . . . . . . . . . . . . . . . . . . . . . . . . . . . . . . . . . . . . . . . . . . . . . . . . . . . . . .. . . . . . .107Validating Oracle Database.. . . . . . . . . . . . . . . . . . . . . . . . . . . . . . . . . . . . . . . . . . . . . . . . . . . . . . . . . . . . . . . . . . . . . . . . . . . . . .. . . . . . .107Creating Oracle Audit Tables.. . . . . . . . . . . . . . . . . . . . . . . . . . . . . . . . . . . . . . . . . . . . . . . . . . . . . . . . . . . . . . . . . . . . . . . . . . . . .. . . . . . .108Auditing Duplicate Length Constraints.. . . . . . . . . . . . . . . . . . . . . . . . . . . . . . . . . . . . . . . . . . . . . . . . . . . . . . . . . . . . . . . . . .. . . . . . .108Auditing Disabled Constraints.. . . . . . . . . . . . . . . . . . . . . . . . . . . . . . . . . . . . . . . . . . . . . . . . . . . . . . . . . . . . . . . . . . . . . . . . . . . .. . . . . . .108Reviewing Oracle Settings.. . . . . . . . . . . . . . . . . . . . . . . . . . . . . . . . . . . . . . . . . . . . . . . . . . . . . . . . . . . . . . . . . . . . . . . . . . . . . . .. . . . . . .108Generating Oracle Conversion Scripts. . . . . . . . . . . . . . . . . . . . . . . . . . . . . . . . . . . . . . . . . . . . . . . . . . . . . . . . . . . . . . . . . .. . . . . . .109Running Long to LOB Script 1.. . . . . . . . . . . . . . . . . . . . . . . . . . . . . . . . . . . . . . . . . . . . . . . . . . . . . . . . . . . . . . . . . . . . . . . . . . .. . . . . . .110Running Long to LOB Script 2.. . . . . . . . . . . . . . . . . . . . . . . . . . . . . . . . . . . . . . . . . . . . . . . . . . . . . . . . . . . . . . . . . . . . . . . . . . .. . . . . . .111Running Long to LOB Script 3.. . . . . . . . . . . . . . . . . . . . . . . . . . . . . . . . . . . . . . . . . . . . . . . . . . . . . . . . . . . . . . . . . . . . . . . . . . .. . . . . . .111
x Copyright © 2006, Oracle. All rights reserved.
Contents
Running Long to LOB Script 4.. . . . . . . . . . . . . . . . . . . . . . . . . . . . . . . . . . . . . . . . . . . . . . . . . . . . . . . . . . . . . . . . . . . . . . . . . . .. . . . . . .111Running Long to LOB Script 5.. . . . . . . . . . . . . . . . . . . . . . . . . . . . . . . . . . . . . . . . . . . . . . . . . . . . . . . . . . . . . . . . . . . . . . . . . . .. . . . . . .111Running Long to LOB Script 6.. . . . . . . . . . . . . . . . . . . . . . . . . . . . . . . . . . . . . . . . . . . . . . . . . . . . . . . . . . . . . . . . . . . . . . . . . . .. . . . . . .112Running Long to LOB Script 7.. . . . . . . . . . . . . . . . . . . . . . . . . . . . . . . . . . . . . . . . . . . . . . . . . . . . . . . . . . . . . . . . . . . . . . . . . . .. . . . . . .112Running Long to LOB Script 8.. . . . . . . . . . . . . . . . . . . . . . . . . . . . . . . . . . . . . . . . . . . . . . . . . . . . . . . . . . . . . . . . . . . . . . . . . . .. . . . . . .112Auditing Long to LOB Conversion.. . . . . . . . . . . . . . . . . . . . . . . . . . . . . . . . . . . . . . . . . . . . . . . . . . . . . . . . . . . . . . . . . . . . . . .. . . . . . .112Running Character Length Script 1. . . . . . . . . . . . . . . . . . . . . . . . . . . . . . . . . . . . . . . . . . . . . . . . . . . . . . . . . . . . . . . . . . . . . .. . . . . . .113Running Character Length Script 2. . . . . . . . . . . . . . . . . . . . . . . . . . . . . . . . . . . . . . . . . . . . . . . . . . . . . . . . . . . . . . . . . . . . . .. . . . . . .113Running Character Length Script 3. . . . . . . . . . . . . . . . . . . . . . . . . . . . . . . . . . . . . . . . . . . . . . . . . . . . . . . . . . . . . . . . . . . . . .. . . . . . .113Running Character Length Script 4. . . . . . . . . . . . . . . . . . . . . . . . . . . . . . . . . . . . . . . . . . . . . . . . . . . . . . . . . . . . . . . . . . . . . .. . . . . . .113Running Character Length Script 5. . . . . . . . . . . . . . . . . . . . . . . . . . . . . . . . . . . . . . . . . . . . . . . . . . . . . . . . . . . . . . . . . . . . . .. . . . . . .114Running Character Length Script 6. . . . . . . . . . . . . . . . . . . . . . . . . . . . . . . . . . . . . . . . . . . . . . . . . . . . . . . . . . . . . . . . . . . . . .. . . . . . .114Running Character Length Script 7. . . . . . . . . . . . . . . . . . . . . . . . . . . . . . . . . . . . . . . . . . . . . . . . . . . . . . . . . . . . . . . . . . . . . .. . . . . . .114Running Character Length Script 8. . . . . . . . . . . . . . . . . . . . . . . . . . . . . . . . . . . . . . . . . . . . . . . . . . . . . . . . . . . . . . . . . . . . . .. . . . . . .114Auditing Character Length Semantics. . . . . . . . . . . . . . . . . . . . . . . . . . . . . . . . . . . . . . . . . . . . . . . . . . . . . . . . . . . . . . . . . . .. . . . . . .115Reviewing Conversion Reports.. . . . . . . . . . . . . . . . . . . . . . . . . . . . . . . . . . . . . . . . . . . . . . . . . . . . . . . . . . . . . . . . . . . . . . . . . .. . . . . . .115Updating Database Options.. . . . . . . . . . . . . . . . . . . . . . . . . . . . . . . . . . . . . . . . . . . . . . . . . . . . . . . . . . . . . . . . . . . . . . . . . . . . . .. . . . . . .115
Backing Up After PeopleTools Upgrade.. . . . . . . . . . . . . . . . . . . . . . . . . . . . . . . . . . . . . . . . . . . . . . . . . . . . . . . . . . . . . . . . . . . . . . . . . . .116
Chapter 3Run and Review Compare Reports... . . . . . . . . . . . . . . . . . . . . . . . . . . . . . . . . . . . . . . . . . . . . . . . . . . . . . . . . . . . . . . . . . . .117Understanding Compare Reports. . . . . . . . . . . . . . . . . . . . . . . . . . . . . . . . . . . . . . . . . . . . . . . . . . . . . . . . . . . . . . . . . . . . . . . . . . . . . . . . . . .117Preparing for Application Changes.. . . . . . . . . . . . . . . . . . . . . . . . . . . . . . . . . . . . . . . . . . . . . . . . . . . . . . . . . . . . . . . . . . . . . . . . . . . . . . . . .117
Load HR Ethnicities Table.. . . . . . . . . . . . . . . . . . . . . . . . . . . . . . . . . . . . . . . . . . . . . . . . . . . . . . . . . . . . . . . . . . . . . . . . . . . . . . . .. . . . . . .117Export Project Definitions.. . . . . . . . . . . . . . . . . . . . . . . . . . . . . . . . . . . . . . . . . . . . . . . . . . . . . . . . . . . . . . . . . . . . . . . . . . . . . . . . .. . . . . . .118Import Project Definitions.. . . . . . . . . . . . . . . . . . . . . . . . . . . . . . . . . . . . . . . . . . . . . . . . . . . . . . . . . . . . . . . . . . . . . . . . . . . . . . . . .. . . . . . .118Drop View ADP_ACCT_CD_VW... . . . . . . . . . . . . . . . . . . . . . . . . . . . . . . . . . . . . . . . . . . . . . . . . . . . . . . . . . . . . . . . . . . . . . .. . . . . . .118Run Drop Table Script. . . . . . . . . . . . . . . . . . . . . . . . . . . . . . . . . . . . . . . . . . . . . . . . . . . . . . . . . . . . . . . . . . . . . . . . . . . . . . . . . . . . . .. . . . . . .119
Renaming Records and Fields .. . . . . . . . . . . . . . . . . . . . . . . . . . . . . . . . . . . . . . . . . . . . . . . . . . . . . . . . . . . . . . . . . . . . . . . . . . . . . . . . . . . . .119Understanding Renaming Records and Fields.. . . . . . . . . . . . . . . . . . . . . . . . . . . . . . . . . . . . . . . . . . . . . . . . . . . . . . . .. . . . . . .119Run the RNHCUPH01 Script. . . . . . . . . . . . . . . . . . . . . . . . . . . . . . . . . . . . . . . . . . . . . . . . . . . . . . . . . . . . . . . . . . . . . . . . . . . . . .. . . . . . .120Run the RNHCGPH02 Script. . . . . . . . . . . . . . . . . . . . . . . . . . . . . . . . . . . . . . . . . . . . . . . . . . . . . . . . . . . . . . . . . . . . . . . . . . . . .. . . . . . .120Run the RNHCEOH201 Script. . . . . . . . . . . . . . . . . . . . . . . . . . . . . . . . . . . . . . . . . . . . . . . . . . . . . . . . . . . . . . . . . . . . . . . . . . . .. . . . . . .121Rename OSHA Fields.. . . . . . . . . . . . . . . . . . . . . . . . . . . . . . . . . . . . . . . . . . . . . . . . . . . . . . . . . . . . . . . . . . . . . . . . . . . . . . . . . . . .. . . . . . .121
Renaming Tables.. . . . . . . . . . . . . . . . . . . . . . . . . . . . . . . . . . . . . . . . . . . . . . . . . . . . . . . . . . . . . . . . . . . . . . . . . . . . . . . . . . . . . . . . . . . . . . . . . . . . .121Understanding Renamed Tables.. . . . . . . . . . . . . . . . . . . . . . . . . . . . . . . . . . . . . . . . . . . . . . . . . . . . . . . . . . . . . . . . . . . . . . . .. . . . . . .121Run the RNHCUPH02MSS Script . . . . . . . . . . . . . . . . . . . . . . . . . . . . . . . . . . . . . . . . . . . . . . . . . . . . . . . . . . . . . . . . . . . . . . .. . . . . . .122Run the RNHCUPH02DB2 Script. . . . . . . . . . . . . . . . . . . . . . . . . . . . . . . . . . . . . . . . . . . . . . . . . . . . . . . . . . . . . . . . . . . . . . . .. . . . . . .122Run the RNHCUPH02DBX Script. . . . . . . . . . . . . . . . . . . . . . . . . . . . . . . . . . . . . . . . . . . . . . . . . . . . . . . . . . . . . . . . . . . . . . . .. . . . . . .122
Copyright © 2006, Oracle. All rights reserved. xi

Contents
Run the RNHCUPH02IFX Script. . . . . . . . . . . . . . . . . . . . . . . . . . . . . . . . . . . . . . . . . . . . . . . . . . . . . . . . . . . . . . . . . . . . . . . . .. . . . . . .122Run the RNHCUPH02ORA Script. . . . . . . . . . . . . . . . . . . . . . . . . . . . . . . . . . . . . . . . . . . . . . . . . . . . . . . . . . . . . . . . . . . . . . . .. . . . . . .123Run the RNHCUPH02SYB Script. . . . . . . . . . . . . . . . . . . . . . . . . . . . . . . . . . . . . . . . . . . . . . . . . . . . . . . . . . . . . . . . . . . . . . . .. . . . . . .123
Running Upgrade Compare Reports.. . . . . . . . . . . . . . . . . . . . . . . . . . . . . . . . . . . . . . . . . . . . . . . . . . . . . . . . . . . . . . . . . . . . . . . . . . . . . . .123Understanding Upgrade Compare Reports. . . . . . . . . . . . . . . . . . . . . . . . . . . . . . . . . . . . . . . . . . . . . . . . . . . . . . . . . . . . .. . . . . . .124Modify Compare Options.. . . . . . . . . . . . . . . . . . . . . . . . . . . . . . . . . . . . . . . . . . . . . . . . . . . . . . . . . . . . . . . . . . . . . . . . . . . . . . . . .. . . . . . .124Run Compare UPGDBCOMP1... . . . . . . . . . . . . . . . . . . . . . . . . . . . . . . . . . . . . . . . . . . . . . . . . . . . . . . . . . . . . . . . . . . . . . . . .. . . . . . .125Run Compare UPGDBCOMP2... . . . . . . . . . . . . . . . . . . . . . . . . . . . . . . . . . . . . . . . . . . . . . . . . . . . . . . . . . . . . . . . . . . . . . . . .. . . . . . .125Run Compare UPGPRJCOMP... . . . . . . . . . . . . . . . . . . . . . . . . . . . . . . . . . . . . . . . . . . . . . . . . . . . . . . . . . . . . . . . . . . . . . . . .. . . . . . .126
Reviewing the Compare Reports.. . . . . . . . . . . . . . . . . . . . . . . . . . . . . . . . . . . . . . . . . . . . . . . . . . . . . . . . . . . . . . . . . . . . . . . . . . . . . . . . . . .127
Chapter 4Apply Application Changes..... . . . . . . . . . . . . . . . . . . . . . . . . . . . . . . . . . . . . . . . . . . . . . . . . . . . . . . . . . . . . . . . . . . . . . . . . . . .129Understanding Application Changes.. . . . . . . . . . . . . . . . . . . . . . . . . . . . . . . . . . . . . . . . . . . . . . . . . . . . . . . . . . . . . . . . . . . . . . . . . . . . . . .129Running the Upgrade Copy.. . . . . . . . . . . . . . . . . . . . . . . . . . . . . . . . . . . . . . . . . . . . . . . . . . . . . . . . . . . . . . . . . . . . . . . . . . . . . . . . . . . . . . . . .130
Understanding the Upgrade Copy.. . . . . . . . . . . . . . . . . . . . . . . . . . . . . . . . . . . . . . . . . . . . . . . . . . . . . . . . . . . . . . . . . . . . . . .. . . . . . .130Copy the UPGDBCOMP1 Project. . . . . . . . . . . . . . . . . . . . . . . . . . . . . . . . . . . . . . . . . . . . . . . . . . . . . . . . . . . . . . . . . . . . . . . .. . . . . . .130Copy the UPGDBCOMP2 Project. . . . . . . . . . . . . . . . . . . . . . . . . . . . . . . . . . . . . . . . . . . . . . . . . . . . . . . . . . . . . . . . . . . . . . . .. . . . . . .130Copy the UPGPRJCOMP Project. . . . . . . . . . . . . . . . . . . . . . . . . . . . . . . . . . . . . . . . . . . . . . . . . . . . . . . . . . . . . . . . . . . . . . . .. . . . . . .131Copy the UPGNONCOMP Project. . . . . . . . . . . . . . . . . . . . . . . . . . . . . . . . . . . . . . . . . . . . . . . . . . . . . . . . . . . . . . . . . . . . . . .. . . . . . .131Review Copy Results. . . . . . . . . . . . . . . . . . . . . . . . . . . . . . . . . . . . . . . . . . . . . . . . . . . . . . . . . . . . . . . . . . . . . . . . . . . . . . . . . . . . . .. . . . . . .131
Updating Database Overrides.. . . . . . . . . . . . . . . . . . . . . . . . . . . . . . . . . . . . . . . . . . . . . . . . . . . . . . . . . . . . . . . . . . . . . . . . . . . . . . . . . . . . . .132Understanding Database Overrides.. . . . . . . . . . . . . . . . . . . . . . . . . . . . . . . . . . . . . . . . . . . . . . . . . . . . . . . . . . . . . . . . . . . . .. . . . . . .132Set Index Parameters After Copy ... . . . . . . . . . . . . . . . . . . . . . . . . . . . . . . . . . . . . . . . . . . . . . . . . . . . . . . . . . . . . . . . . . . . . .. . . . . . .133Set Tablespace Names After Copy.. . . . . . . . . . . . . . . . . . . . . . . . . . . . . . . . . . . . . . . . . . . . . . . . . . . . . . . . . . . . . . . . . . . . . .. . . . . . .133Set Record Parameters After Copy.. . . . . . . . . . . . . . . . . . . . . . . . . . . . . . . . . . . . . . . . . . . . . . . . . . . . . . . . . . . . . . . . . . . . .. . . . . . .133Create New Tablespaces.. . . . . . . . . . . . . . . . . . . . . . . . . . . . . . . . . . . . . . . . . . . . . . . . . . . . . . . . . . . . . . . . . . . . . . . . . . . . . . . . .. . . . . . .134
Backing Up After the Upgrade Copy.. . . . . . . . . . . . . . . . . . . . . . . . . . . . . . . . . . . . . . . . . . . . . . . . . . . . . . . . . . . . . . . . . . . . . . . . . . . . . . .136Modifying the Database Structure.. . . . . . . . . . . . . . . . . . . . . . . . . . . . . . . . . . . . . . . . . . . . . . . . . . . . . . . . . . . . . . . . . . . . . . . . . . . . . . . . . .136
Understanding Modifying the Database Structure.. . . . . . . . . . . . . . . . . . . . . . . . . . . . . . . . . . . . . . . . . . . . . . . . . . . . .. . . . . . .137Build the Create Upgrade Tables Script. . . . . . . . . . . . . . . . . . . . . . . . . . . . . . . . . . . . . . . . . . . . . . . . . . . . . . . . . . . . . . . . .. . . . . . .137Run the Create Upgrade Tables Script. . . . . . . . . . . . . . . . . . . . . . . . . . . . . . . . . . . . . . . . . . . . . . . . . . . . . . . . . . . . . . . . . .. . . . . . .137Build Renamed Tables Script. . . . . . . . . . . . . . . . . . . . . . . . . . . . . . . . . . . . . . . . . . . . . . . . . . . . . . . . . . . . . . . . . . . . . . . . . . . . .. . . . . . .138Run the Renamed Tables Script. . . . . . . . . . . . . . . . . . . . . . . . . . . . . . . . . . . . . . . . . . . . . . . . . . . . . . . . . . . . . . . . . . . . . . . . . .. . . . . . .138Create the ALLTEMPTABS Project. . . . . . . . . . . . . . . . . . . . . . . . . . . . . . . . . . . . . . . . . . . . . . . . . . . . . . . . . . . . . . . . . . . . . .. . . . . . .138Build the Create Temp Tables Script. . . . . . . . . . . . . . . . . . . . . . . . . . . . . . . . . . . . . . . . . . . . . . . . . . . . . . . . . . . . . . . . . . . . .. . . . . . .139Create the ALLTABS Project. . . . . . . . . . . . . . . . . . . . . . . . . . . . . . . . . . . . . . . . . . . . . . . . . . . . . . . . . . . . . . . . . . . . . . . . . . . . . .. . . . . . .139Build the Create and Alter Scripts.. . . . . . . . . . . . . . . . . . . . . . . . . . . . . . . . . . . . . . . . . . . . . . . . . . . . . . . . . . . . . . . . . . . . . . .. . . . . . .139Edit the Create and Alter Scripts. . . . . . . . . . . . . . . . . . . . . . . . . . . . . . . . . . . . . . . . . . . . . . . . . . . . . . . . . . . . . . . . . . . . . . . . .. . . . . . .140
xii Copyright © 2006, Oracle. All rights reserved.

Contents
Create Temporary Tables.. . . . . . . . . . . . . . . . . . . . . . . . . . . . . . . . . . . . . . . . . . . . . . . . . . . . . . . . . . . . . . . . . . . . . . . . . . . . . . . . .. . . . . . .141Create Tables.. . . . . . . . . . . . . . . . . . . . . . . . . . . . . . . . . . . . . . . . . . . . . . . . . . . . . . . . . . . . . . . . . . . . . . . . . . . . . . . . . . . . . . . . . . . . . .. . . . . . .141Alter Tables.. . . . . . . . . . . . . . . . . . . . . . . . . . . . . . . . . . . . . . . . . . . . . . . . . . . . . . . . . . . . . . . . . . . . . . . . . . . . . . . . . . . . . . . . . . . . . . . . .. . . . . . .141Create Indexes.. . . . . . . . . . . . . . . . . . . . . . . . . . . . . . . . . . . . . . . . . . . . . . . . . . . . . . . . . . . . . . . . . . . . . . . . . . . . . . . . . . . . . . . . . . . . .. . . . . . .142Review the Create Indexes Log.. . . . . . . . . . . . . . . . . . . . . . . . . . . . . . . . . . . . . . . . . . . . . . . . . . . . . . . . . . . . . . . . . . . . . . . . .. . . . . . .142Drop Indexes for Data Conversion.. . . . . . . . . . . . . . . . . . . . . . . . . . . . . . . . . . . . . . . . . . . . . . . . . . . . . . . . . . . . . . . . . . . . . .. . . . . . .142Drop Triggers for Data Conversion.. . . . . . . . . . . . . . . . . . . . . . . . . . . . . . . . . . . . . . . . . . . . . . . . . . . . . . . . . . . . . . . . . . . . . .. . . . . . .143Create Indexes for Data Conversion.. . . . . . . . . . . . . . . . . . . . . . . . . . . . . . . . . . . . . . . . . . . . . . . . . . . . . . . . . . . . . . . . . . . .. . . . . . .143Set Index Parameters.. . . . . . . . . . . . . . . . . . . . . . . . . . . . . . . . . . . . . . . . . . . . . . . . . . . . . . . . . . . . . . . . . . . . . . . . . . . . . . . . . . . . .. . . . . . .146Set Tablespace Names for Temp Tables. . . . . . . . . . . . . . . . . . . . . . . . . . . . . . . . . . . . . . . . . . . . . . . . . . . . . . . . . . . . . . . .. . . . . . .146Set Tablespace Names... . . . . . . . . . . . . . . . . . . . . . . . . . . . . . . . . . . . . . . . . . . . . . . . . . . . . . . . . . . . . . . . . . . . . . . . . . . . . . . . . .. . . . . . .146Set Record Parameters... . . . . . . . . . . . . . . . . . . . . . . . . . . . . . . . . . . . . . . . . . . . . . . . . . . . . . . . . . . . . . . . . . . . . . . . . . . . . . . . . .. . . . . . .147Generate a RUNSTATS Script for DB2 UNIX... . . . . . . . . . . . . . . . . . . . . . . . . . . . . . . . . . . . . . . . . . . . . . . . . . . . . . . . .. . . . . . .147Update Statistics for DB2 UNIX.... . . . . . . . . . . . . . . . . . . . . . . . . . . . . . . . . . . . . . . . . . . . . . . . . . . . . . . . . . . . . . . . . . . . . . . .. . . . . . .147Update Statistics for DB2 zOS... . . . . . . . . . . . . . . . . . . . . . . . . . . . . . . . . . . . . . . . . . . . . . . . . . . . . . . . . . . . . . . . . . . . . . . . . .. . . . . . .148Update Statistics for Informix. . . . . . . . . . . . . . . . . . . . . . . . . . . . . . . . . . . . . . . . . . . . . . . . . . . . . . . . . . . . . . . . . . . . . . . . . . . . .. . . . . . .148Update Statistics for Oracle.. . . . . . . . . . . . . . . . . . . . . . . . . . . . . . . . . . . . . . . . . . . . . . . . . . . . . . . . . . . . . . . . . . . . . . . . . . . . . .. . . . . . .148
Loading Data for Data Conversion.. . . . . . . . . . . . . . . . . . . . . . . . . . . . . . . . . . . . . . . . . . . . . . . . . . . . . . . . . . . . . . . . . . . . . . . . . . . . . . . . .148Swap Languages on System Data. . . . . . . . . . . . . . . . . . . . . . . . . . . . . . . . . . . . . . . . . . . . . . . . . . . . . . . . . . . . . . . . . . . . . . .. . . . . . .149Export Application Messages.. . . . . . . . . . . . . . . . . . . . . . . . . . . . . . . . . . . . . . . . . . . . . . . . . . . . . . . . . . . . . . . . . . . . . . . . . . . .. . . . . . .149Import Application Messages.. . . . . . . . . . . . . . . . . . . . . . . . . . . . . . . . . . . . . . . . . . . . . . . . . . . . . . . . . . . . . . . . . . . . . . . . . . . .. . . . . . .150Export Record Groups.. . . . . . . . . . . . . . . . . . . . . . . . . . . . . . . . . . . . . . . . . . . . . . . . . . . . . . . . . . . . . . . . . . . . . . . . . . . . . . . . . . . .. . . . . . .150Import Record Groups.. . . . . . . . . . . . . . . . . . . . . . . . . . . . . . . . . . . . . . . . . . . . . . . . . . . . . . . . . . . . . . . . . . . . . . . . . . . . . . . . . . . .. . . . . . .150Export the System Setup Data .. . . . . . . . . . . . . . . . . . . . . . . . . . . . . . . . . . . . . . . . . . . . . . . . . . . . . . . . . . . . . . . . . . . . . . . . . .. . . . . . .151Import the System Setup Data.. . . . . . . . . . . . . . . . . . . . . . . . . . . . . . . . . . . . . . . . . . . . . . . . . . . . . . . . . . . . . . . . . . . . . . . . . . .. . . . . . .152Export the PW Pagelet Data. . . . . . . . . . . . . . . . . . . . . . . . . . . . . . . . . . . . . . . . . . . . . . . . . . . . . . . . . . . . . . . . . . . . . . . . . . . . . .. . . . . . .152Import the PW Pagelet Data. . . . . . . . . . . . . . . . . . . . . . . . . . . . . . . . . . . . . . . . . . . . . . . . . . . . . . . . . . . . . . . . . . . . . . . . . . . . . .. . . . . . .152Export the Pagelet Wizard Data. . . . . . . . . . . . . . . . . . . . . . . . . . . . . . . . . . . . . . . . . . . . . . . . . . . . . . . . . . . . . . . . . . . . . . . . . .. . . . . . .152Import the Pagelet Wizard Data.. . . . . . . . . . . . . . . . . . . . . . . . . . . . . . . . . . . . . . . . . . . . . . . . . . . . . . . . . . . . . . . . . . . . . . . . .. . . . . . .153Export Upgrade Defaults. . . . . . . . . . . . . . . . . . . . . . . . . . . . . . . . . . . . . . . . . . . . . . . . . . . . . . . . . . . . . . . . . . . . . . . . . . . . . . . . . .. . . . . . .153Import Upgrade Defaults. . . . . . . . . . . . . . . . . . . . . . . . . . . . . . . . . . . . . . . . . . . . . . . . . . . . . . . . . . . . . . . . . . . . . . . . . . . . . . . . . . .. . . . . . .153Export Global Payroll PIN.. . . . . . . . . . . . . . . . . . . . . . . . . . . . . . . . . . . . . . . . . . . . . . . . . . . . . . . . . . . . . . . . . . . . . . . . . . . . . . . .. . . . . . .154Export Global Payroll PIN for Sybase.. . . . . . . . . . . . . . . . . . . . . . . . . . . . . . . . . . . . . . . . . . . . . . . . . . . . . . . . . . . . . . . . . . .. . . . . . .154Import Global Payroll PIN.. .. . . . . . . . . . . . . . . . . . . . . . . . . . . . . . . . . . . . . . . . . . . . . . . . . . . . . . . . . . . . . . . . . . . . . . . . . . . . . . .. . . . . . .154Export Generic Notifications... . . . . . . . . . . . . . . . . . . . . . . . . . . . . . . . . . . . . . . . . . . . . . . . . . . . . . . . . . . . . . . . . . . . . . . . . . . . .. . . . . . .155Import Generic Notifications... . . . . . . . . . . . . . . . . . . . . . . . . . . . . . . . . . . . . . . . . . . . . . . . . . . . . . . . . . . . . . . . . . . . . . . . . . . . .. . . . . . .155Export Application Conversion Data.. . . . . . . . . . . . . . . . . . . . . . . . . . . . . . . . . . . . . . . . . . . . . . . . . . . . . . . . . . . . . . . . . . . .. . . . . . .155Import Application Conversion Data.. . . . . . . . . . . . . . . . . . . . . . . . . . . . . . . . . . . . . . . . . . . . . . . . . . . . . . . . . . . . . . . . . . . .. . . . . . .156Export Data Conversion Driver Data.. . . . . . . . . . . . . . . . . . . . . . . . . . . . . . . . . . . . . . . . . . . . . . . . . . . . . . . . . . . . . . . . . . . .. . . . . . .156Import Data Conversion Driver Data.. . . . . . . . . . . . . . . . . . . . . . . . . . . . . . . . . . . . . . . . . . . . . . . . . . . . . . . . . . . . . . . . . . . .. . . . . . .156
Copyright © 2006, Oracle. All rights reserved. xiii

Contents
Applying Updates Before Data Conversion.. . . . . . . . . . . . . . . . . . . . . . . . . . . . . . . . . . . . . . . . . . . . . . . . . . . . . . . . . . . . . . . . . . . . . . .157Configuring Scheduler and Server.. . . . . . . . . . . . . . . . . . . . . . . . . . . . . . . . . . . . . . . . . . . . . . . . . . . . . . . . . . . . . . . . . . . . . . . . . . . . . . . . .158Backing Up Before Data Conversions.. . . . . . . . . . . . . . . . . . . . . . . . . . . . . . . . . . . . . . . . . . . . . . . . . . . . . . . . . . . . . . . . . . . . . . . . . . . . .158Running Data Conversion .. . . . . . . . . . . . . . . . . . . . . . . . . . . . . . . . . . . . . . . . . . . . . . . . . . . . . . . . . . . . . . . . . . . . . . . . . . . . . . . . . . . . . . . . . .158
Review Data Conversion Tips.. . . . . . . . . . . . . . . . . . . . . . . . . . . . . . . . . . . . . . . . . . . . . . . . . . . . . . . . . . . . . . . . . . . . . . . . . . . .. . . . . . .159Run Data Conversion for Group 1.. .. . . . . . . . . . . . . . . . . . . . . . . . . . . . . . . . . . . . . . . . . . . . . . . . . . . . . . . . . . . . . . . . . . . . .. . . . . . .161Run Data Conversion for Group 2.. .. . . . . . . . . . . . . . . . . . . . . . . . . . . . . . . . . . . . . . . . . . . . . . . . . . . . . . . . . . . . . . . . . . . . .. . . . . . .161Run Data Conversion for Group 3.. .. . . . . . . . . . . . . . . . . . . . . . . . . . . . . . . . . . . . . . . . . . . . . . . . . . . . . . . . . . . . . . . . . . . . .. . . . . . .162Run Data Conversion for Group 4.. .. . . . . . . . . . . . . . . . . . . . . . . . . . . . . . . . . . . . . . . . . . . . . . . . . . . . . . . . . . . . . . . . . . . . .. . . . . . .162Run Data Conversion for Group 6.. .. . . . . . . . . . . . . . . . . . . . . . . . . . . . . . . . . . . . . . . . . . . . . . . . . . . . . . . . . . . . . . . . . . . . .. . . . . . .162Run Data Conversion for Group 7.. .. . . . . . . . . . . . . . . . . . . . . . . . . . . . . . . . . . . . . . . . . . . . . . . . . . . . . . . . . . . . . . . . . . . . .. . . . . . .162Run Data Conversion for Group 8.. .. . . . . . . . . . . . . . . . . . . . . . . . . . . . . . . . . . . . . . . . . . . . . . . . . . . . . . . . . . . . . . . . . . . . .. . . . . . .163
Backing Up After Data Conversion.. . . . . . . . . . . . . . . . . . . . . . . . . . . . . . . . . . . . . . . . . . . . . . . . . . . . . . . . . . . . . . . . . . . . . . . . . . . . . . . . .163Finalizing the Database Structure.. . . . . . . . . . . . . . . . . . . . . . . . . . . . . . . . . . . . . . . . . . . . . . . . . . . . . . . . . . . . . . . . . . . . . . . . . . . . . . . . . .163
Understanding Final Database Structure.. . . . . . . . . . . . . . . . . . . . . . . . . . . . . . . . . . . . . . . . . . . . . . . . . . . . . . . . . . . . . . .. . . . . . .164Build the Alter with Deletes Scripts.. . . . . . . . . . . . . . . . . . . . . . . . . . . . . . . . . . . . . . . . . . . . . . . . . . . . . . . . . . . . . . . . . . . . . .. . . . . . .164Alter Tables with Deletes.. . . . . . . . . . . . . . . . . . . . . . . . . . . . . . . . . . . . . . . . . . . . . . . . . . . . . . . . . . . . . . . . . . . . . . . . . . . . . . . . .. . . . . . .164Create Indexes Again.. . . . . . . . . . . . . . . . . . . . . . . . . . . . . . . . . . . . . . . . . . . . . . . . . . . . . . . . . . . . . . . . . . . . . . . . . . . . . . . . . . . . .. . . . . . .164Create Triggers. . . . . . . . . . . . . . . . . . . . . . . . . . . . . . . . . . . . . . . . . . . . . . . . . . . . . . . . . . . . . . . . . . . . . . . . . . . . . . . . . . . . . . . . . . . . .. . . . . . .165Run the AE SYNCIDGEN Process.. . . . . . . . . . . . . . . . . . . . . . . . . . . . . . . . . . . . . . . . . . . . . . . . . . . . . . . . . . . . . . . . . . . . . .. . . . . . .165Create All Views.. . . . . . . . . . . . . . . . . . . . . . . . . . . . . . . . . . . . . . . . . . . . . . . . . . . . . . . . . . . . . . . . . . . . . . . . . . . . . . . . . . . . . . . . . . .. . . . . . .165
Loading Data to Complete System Setup.. . . . . . . . . . . . . . . . . . . . . . . . . . . . . . . . . . . . . . . . . . . . . . . . . . . . . . . . . . . . . . . . . . . . . . . . .166Export Strings.. . . . . . . . . . . . . . . . . . . . . . . . . . . . . . . . . . . . . . . . . . . . . . . . . . . . . . . . . . . . . . . . . . . . . . . . . . . . . . . . . . . . . . . . . . . . . .. . . . . . .166Import Strings.. . . . . . . . . . . . . . . . . . . . . . . . . . . . . . . . . . . . . . . . . . . . . . . . . . . . . . . . . . . . . . . . . . . . . . . . . . . . . . . . . . . . . . . . . . . . . .. . . . . . .167Export EDI Statements.. . . . . . . . . . . . . . . . . . . . . . . . . . . . . . . . . . . . . . . . . . . . . . . . . . . . . . . . . . . . . . . . . . . . . . . . . . . . . . . . . . . .. . . . . . .167Import EDI Statements.. . . . . . . . . . . . . . . . . . . . . . . . . . . . . . . . . . . . . . . . . . . . . . . . . . . . . . . . . . . . . . . . . . . . . . . . . . . . . . . . . . . .. . . . . . .167Export Mass Change Data.. . . . . . . . . . . . . . . . . . . . . . . . . . . . . . . . . . . . . . . . . . . . . . . . . . . . . . . . . . . . . . . . . . . . . . . . . . . . . . .. . . . . . .168Import Mass Change Data.. . . . . . . . . . . . . . . . . . . . . . . . . . . . . . . . . . . . . . . . . . . . . . . . . . . . . . . . . . . . . . . . . . . . . . . . . . . . . . .. . . . . . .168Export XML Service Information.. . . . . . . . . . . . . . . . . . . . . . . . . . . . . . . . . . . . . . . . . . . . . . . . . . . . . . . . . . . . . . . . . . . . . . . . .. . . . . . .168Import XML Service Information.. . . . . . . . . . . . . . . . . . . . . . . . . . . . . . . . . . . . . . . . . . . . . . . . . . . . . . . . . . . . . . . . . . . . . . . . .. . . . . . .168Export Related Language System Data.. . . . . . . . . . . . . . . . . . . . . . . . . . . . . . . . . . . . . . . . . . . . . . . . . . . . . . . . . . . . . . . .. . . . . . .169Import Related Language System Data.. . . . . . . . . . . . . . . . . . . . . . . . . . . . . . . . . . . . . . . . . . . . . . . . . . . . . . . . . . . . . . . .. . . . . . .169Edit the System Data Scripts.. . . . . . . . . . . . . . . . . . . . . . . . . . . . . . . . . . . . . . . . . . . . . . . . . . . . . . . . . . . . . . . . . . . . . . . . . . . . .. . . . . . .169Export Application System Data.. . . . . . . . . . . . . . . . . . . . . . . . . . . . . . . . . . . . . . . . . . . . . . . . . . . . . . . . . . . . . . . . . . . . . . . . .. . . . . . .170Import Application System Data.. . . . . . . . . . . . . . . . . . . . . . . . . . . . . . . . . . . . . . . . . . . . . . . . . . . . . . . . . . . . . . . . . . . . . . . . .. . . . . . .170Export Common Portal System Options.. . . . . . . . . . . . . . . . . . . . . . . . . . . . . . . . . . . . . . . . . . . . . . . . . . . . . . . . . . . . . . . .. . . . . . .170Import Common Portal System Options.. . . . . . . . . . . . . . . . . . . . . . . . . . . . . . . . . . . . . . . . . . . . . . . . . . . . . . . . . . . . . . . .. . . . . . .171Export Setup Data.. . . . . . . . . . . . . . . . . . . . . . . . . . . . . . . . . . . . . . . . . . . . . . . . . . . . . . . . . . . . . . . . . . . . . . . . . . . . . . . . . . . . . . . . .. . . . . . .171Import Setup Data.. . . . . . . . . . . . . . . . . . . . . . . . . . . . . . . . . . . . . . . . . . . . . . . . . . . . . . . . . . . . . . . . . . . . . . . . . . . . . . . . . . . . . . . . .. . . . . . .171
Loading Stored Statements.. . . . . . . . . . . . . . . . . . . . . . . . . . . . . . . . . . . . . . . . . . . . . . . . . . . . . . . . . . . . . . . . . . . . . . . . . . . . . . . . . . . . . . . . .172
xiv Copyright © 2006, Oracle. All rights reserved.

Contents
Understanding Loading Stored Statements.. . . . . . . . . . . . . . . . . . . . . . . . . . . . . . . . . . . . . . . . . . . . . . . . . . . . . . . . . . . .. . . . . . .172Set PSOPTIONS for COBOL... . . . . . . . . . . . . . . . . . . . . . . . . . . . . . . . . . . . . . . . . . . . . . . . . . . . . . . . . . . . . . . . . . . . . . . . . . .. . . . . . .172Run the STOREBAS Script. . . . . . . . . . . . . . . . . . . . . . . . . . . . . . . . . . . . . . . . . . . . . . . . . . . . . . . . . . . . . . . . . . . . . . . . . . . . . . .. . . . . . .173Run the STOREGP Script. . . . . . . . . . . . . . . . . . . . . . . . . . . . . . . . . . . . . . . . . . . . . . . . . . . . . . . . . . . . . . . . . . . . . . . . . . . . . . . . .. . . . . . .173Run the STOREHRM Script.. . . . . . . . . . . . . . . . . . . . . . . . . . . . . . . . . . . . . . . . . . . . . . . . . . . . . . . . . . . . . . . . . . . . . . . . . . . . . .. . . . . . .173Run the STOREPAY Script. . . . . . . . . . . . . . . . . . . . . . . . . . . . . . . . . . . . . . . . . . . . . . . . . . . . . . . . . . . . . . . . . . . . . . . . . . . . . . . .. . . . . . .173Run the STOREPEN Script. . . . . . . . . . . . . . . . . . . . . . . . . . . . . . . . . . . . . . . . . . . . . . . . . . . . . . . . . . . . . . . . . . . . . . . . . . . . . . .. . . . . . .173Run the STOREPYI Script.. . . . . . . . . . . . . . . . . . . . . . . . . . . . . . . . . . . . . . . . . . . . . . . . . . . . . . . . . . . . . . . . . . . . . . . . . . . . . . . .. . . . . . .174Run the STOREBP Script. . . . . . . . . . . . . . . . . . . . . . . . . . . . . . . . . . . . . . . . . . . . . . . . . . . . . . . . . . . . . . . . . . . . . . . . . . . . . . . . .. . . . . . .174
Running Final Update Statistics.. . . . . . . . . . . . . . . . . . . . . . . . . . . . . . . . . . . . . . . . . . . . . . . . . . . . . . . . . . . . . . . . . . . . . . . . . . . . . . . . . . . .174Generate Final RUNSTATS for DB2 UNIX... . . . . . . . . . . . . . . . . . . . . . . . . . . . . . . . . . . . . . . . . . . . . . . . . . . . . . . . . . . .. . . . . . .174Run Final Statistics for DB2 UNIX... . . . . . . . . . . . . . . . . . . . . . . . . . . . . . . . . . . . . . . . . . . . . . . . . . . . . . . . . . . . . . . . . . . . . .. . . . . . .175Run Final Statistics for DB2 zOS... . . . . . . . . . . . . . . . . . . . . . . . . . . . . . . . . . . . . . . . . . . . . . . . . . . . . . . . . . . . . . . . . . . . . . .. . . . . . .175Run Final Statistics for Informix... . . . . . . . . . . . . . . . . . . . . . . . . . . . . . . . . . . . . . . . . . . . . . . . . . . . . . . . . . . . . . . . . . . . . . . . .. . . . . . .175Run Final Statistics for Oracle. . . . . . . . . . . . . . . . . . . . . . . . . . . . . . . . . . . . . . . . . . . . . . . . . . . . . . . . . . . . . . . . . . . . . . . . . . . .. . . . . . .176
Completing Application Processes.. . . . . . . . . . . . . . . . . . . . . . . . . . . . . . . . . . . . . . . . . . . . . . . . . . . . . . . . . . . . . . . . . . . . . . . . . . . . . . . . .176Refresh Personal Data Table.. . . . . . . . . . . . . . . . . . . . . . . . . . . . . . . . . . . . . . . . . . . . . . . . . . . . . . . . . . . . . . . . . . . . . . . . . . . .. . . . . . .176Export Setup Data for Rules. . . . . . . . . . . . . . . . . . . . . . . . . . . . . . . . . . . . . . . . . . . . . . . . . . . . . . . . . . . . . . . . . . . . . . . . . . . . . .. . . . . . .176Import Setup Data for Rules.. . . . . . . . . . . . . . . . . . . . . . . . . . . . . . . . . . . . . . . . . . . . . . . . . . . . . . . . . . . . . . . . . . . . . . . . . . . . . .. . . . . . .177Export Payroll Interface Tables. . . . . . . . . . . . . . . . . . . . . . . . . . . . . . . . . . . . . . . . . . . . . . . . . . . . . . . . . . . . . . . . . . . . . . . . . . .. . . . . . .177Import Payroll Interface Tables... . . . . . . . . . . . . . . . . . . . . . . . . . . . . . . . . . . . . . . . . . . . . . . . . . . . . . . . . . . . . . . . . . . . . . . . . .. . . . . . .177Export GL Interface Setup Tables. . . . . . . . . . . . . . . . . . . . . . . . . . . . . . . . . . . . . . . . . . . . . . . . . . . . . . . . . . . . . . . . . . . . . . . .. . . . . . .178Import GL Interface Setup Tables. . . . . . . . . . . . . . . . . . . . . . . . . . . . . . . . . . . . . . . . . . . . . . . . . . . . . . . . . . . . . . . . . . . . . . . .. . . . . . .178
Updating Language Data.. . . . . . . . . . . . . . . . . . . . . . . . . . . . . . . . . . . . . . . . . . . . . . . . . . . . . . . . . . . . . . . . . . . . . . . . . . . . . . . . . . . . . . . . . . . .179Understanding Updating Language Data.. . . . . . . . . . . . . . . . . . . . . . . . . . . . . . . . . . . . . . . . . . . . . . . . . . . . . . . . . . . . . . .. . . . . . .179Run the TSRECPOP Script. . . . . . . . . . . . . . . . . . . . . . . . . . . . . . . . . . . . . . . . . . . . . . . . . . . . . . . . . . . . . . . . . . . . . . . . . . . . . . .. . . . . . .179
Updating Object Version Numbers.. . . . . . . . . . . . . . . . . . . . . . . . . . . . . . . . . . . . . . . . . . . . . . . . . . . . . . . . . . . . . . . . . . . . . . . . . . . . . . . . .179Running the Final Audit Reports.. . . . . . . . . . . . . . . . . . . . . . . . . . . . . . . . . . . . . . . . . . . . . . . . . . . . . . . . . . . . . . . . . . . . . . . . . . . . . . . . . . . .179
Run the Final DDDAUDIT Report. . . . . . . . . . . . . . . . . . . . . . . . . . . . . . . . . . . . . . . . . . . . . . . . . . . . . . . . . . . . . . . . . . . . . . . .. . . . . . .180Run the Final SYSAUDIT Report.. . . . . . . . . . . . . . . . . . . . . . . . . . . . . . . . . . . . . . . . . . . . . . . . . . . . . . . . . . . . . . . . . . . . . . . .. . . . . . .180Create the FNLALTAUD Project. . . . . . . . . . . . . . . . . . . . . . . . . . . . . . . . . . . . . . . . . . . . . . . . . . . . . . . . . . . . . . . . . . . . . . . . . .. . . . . . .180Run the Final Alter Audit. . . . . . . . . . . . . . . . . . . . . . . . . . . . . . . . . . . . . . . . . . . . . . . . . . . . . . . . . . . . . . . . . . . . . . . . . . . . . . . . . . .. . . . . . .181Review the Final Audits. .. . . . . . . . . . . . . . . . . . . . . . . . . . . . . . . . . . . . . . . . . . . . . . . . . . . . . . . . . . . . . . . . . . . . . . . . . . . . . . . . . .. . . . . . .181Run a Final SETINDEX Report. . . . . . . . . . . . . . . . . . . . . . . . . . . . . . . . . . . . . . . . . . . . . . . . . . . . . . . . . . . . . . . . . . . . . . . . . . .. . . . . . .182Run a Final SETTABLE Report. . . . . . . . . . . . . . . . . . . . . . . . . . . . . . . . . . . . . . . . . . . . . . . . . . . . . . . . . . . . . . . . . . . . . . . . . . .. . . . . . .182
Chapter 5Complete Database Changes... . . . . . . . . . . . . . . . . . . . . . . . . . . . . . . . . . . . . . . . . . . . . . . . . . . . . . . . . . . . . . . . . . . . . . . . . . .183Understanding Database Changes.. . . . . . . . . . . . . . . . . . . . . . . . . . . . . . . . . . . . . . . . . . . . . . . . . . . . . . . . . . . . . . . . . . . . . . . . . . . . . . . .184
Copyright © 2006, Oracle. All rights reserved. xv

Contents
Configuring the Upgrade Environment.. . . . . . . . . . . . . . . . . . . . . . . . . . . . . . . . . . . . . . . . . . . . . . . . . . . . . . . . . . . . . . . . . . . . . . . . . . . .184Configure Application Server.. . . . . . . . . . . . . . . . . . . . . . . . . . . . . . . . . . . . . . . . . . . . . . . . . . . . . . . . . . . . . . . . . . . . . . . . . . . . .. . . . . . .184Configure Portal. . . . . . . . . . . . . . . . . . . . . . . . . . . . . . . . . . . . . . . . . . . . . . . . . . . . . . . . . . . . . . . . . . . . . . . . . . . . . . . . . . . . . . . . . . . . .. . . . . . .184
Reapplying Customizations.. . . . . . . . . . . . . . . . . . . . . . . . . . . . . . . . . . . . . . . . . . . . . . . . . . . . . . . . . . . . . . . . . . . . . . . . . . . . . . . . . . . . . . . . .185Understanding the Reapplication.. . . . . . . . . . . . . . . . . . . . . . . . . . . . . . . . . . . . . . . . . . . . . . . . . . . . . . . . . . . . . . . . . . . . . . . .. . . . . . .185Perform Customized Object Adjustment.. . . . . . . . . . . . . . . . . . . . . . . . . . . . . . . . . . . . . . . . . . . . . . . . . . . . . . . . . . . . . . . .. . . . . . .185Register Portal Navigation Components.. . . . . . . . . . . . . . . . . . . . . . . . . . . . . . . . . . . . . . . . . . . . . . . . . . . . . . . . . . . . . . . .. . . . . . .186
Setting Up Security. . . . . . . . . . . . . . . . . . . . . . . . . . . . . . . . . . . . . . . . . . . . . . . . . . . . . . . . . . . . . . . . . . . . . . . . . . . . . . . . . . . . . . . . . . . . . . . . . . . .186Understanding Security. . . . . . . . . . . . . . . . . . . . . . . . . . . . . . . . . . . . . . . . . . . . . . . . . . . . . . . . . . . . . . . . . . . . . . . . . . . . . . . . . . . .. . . . . . .187Set Up Security. . . . . . . . . . . . . . . . . . . . . . . . . . . . . . . . . . . . . . . . . . . . . . . . . . . . . . . . . . . . . . . . . . . . . . . . . . . . . . . . . . . . . . . . . . . . .. . . . . . .187Synchronize CREF Permissions.. . . . . . . . . . . . . . . . . . . . . . . . . . . . . . . . . . . . . . . . . . . . . . . . . . . . . . . . . . . . . . . . . . . . . . . . .. . . . . . .187Grant Access to Personalize Homepage... . . . . . . . . . . . . . . . . . . . . . . . . . . . . . . . . . . . . . . . . . . . . . . . . . . . . . . . . . . . . .. . . . . . .188
Updating Department Security. . . . . . . . . . . . . . . . . . . . . . . . . . . . . . . . . . . . . . . . . . . . . . . . . . . . . . . . . . . . . . . . . . . . . . . . . . . . . . . . . . . . . . .189Understanding Department Security. . . . . . . . . . . . . . . . . . . . . . . . . . . . . . . . . . . . . . . . . . . . . . . . . . . . . . . . . . . . . . . . . . . . .. . . . . . .189Refresh Operator Security. . . . . . . . . . . . . . . . . . . . . . . . . . . . . . . . . . . . . . . . . . . . . . . . . . . . . . . . . . . . . . . . . . . . . . . . . . . . . . . . .. . . . . . .190Refresh Transaction Records.. . . . . . . . . . . . . . . . . . . . . . . . . . . . . . . . . . . . . . . . . . . . . . . . . . . . . . . . . . . . . . . . . . . . . . . . . . . .. . . . . . .190
Backing Up Before Manual Changes.. . . . . . . . . . . . . . . . . . . . . . . . . . . . . . . . . . . . . . . . . . . . . . . . . . . . . . . . . . . . . . . . . . . . . . . . . . . . . .191Running the Person Organization Audits... . . . . . . . . . . . . . . . . . . . . . . . . . . . . . . . . . . . . . . . . . . . . . . . . . . . . . . . . . . . . . . . . . . . . . . . .191
Understanding the Person Organization Audits. . . . . . . . . . . . . . . . . . . . . . . . . . . . . . . . . . . . . . . . . . . . . . . . . . . . . . . .. . . . . . .191Running Conversion Audits.. . . . . . . . . . . . . . . . . . . . . . . . . . . . . . . . . . . . . . . . . . . . . . . . . . . . . . . . . . . . . . . . . . . . . . . . . . . . . .. . . . . . .192
Setting Up Pension.. . . . . . . . . . . . . . . . . . . . . . . . . . . . . . . . . . . . . . . . . . . . . . . . . . . . . . . . . . . . . . . . . . . . . . . . . . . . . . . . . . . . . . . . . . . . . . . . . . .192Setting Up PeopleSoft Benefits. . . . . . . . . . . . . . . . . . . . . . . . . . . . . . . . . . . . . . . . . . . . . . . . . . . . . . . . . . . . . . . . . . . . . . . . . . . . . . . . . . . . . .193
Consolidate the Limit Table .. . . . . . . . . . . . . . . . . . . . . . . . . . . . . . . . . . . . . . . . . . . . . . . . . . . . . . . . . . . . . . . . . . . . . . . . . . . . . .. . . . . . .193Upgrading GP Country Extensions.. . . . . . . . . . . . . . . . . . . . . . . . . . . . . . . . . . . . . . . . . . . . . . . . . . . . . . . . . . . . . . . . . . . . . . . . . . . . . . . . .193
Understanding GP Country Extensions.. . . . . . . . . . . . . . . . . . . . . . . . . . . . . . . . . . . . . . . . . . . . . . . . . . . . . . . . . . . . . . . . .. . . . . . .194Understand the GP CE Upgrade.. . . . . . . . . . . . . . . . . . . . . . . . . . . . . . . . . . . . . . . . . . . . . . . . . . . . . . . . . . . . . . . . . . . . . . . .. . . . . . .194Apply Rule Package... . . . . . . . . . . . . . . . . . . . . . . . . . . . . . . . . . . . . . . . . . . . . . . . . . . . . . . . . . . . . . . . . . . . . . . . . . . . . . . . . . . . . .. . . . . . .195Upgrade the Translations Rule Package.. . . . . . . . . . . . . . . . . . . . . . . . . . . . . . . . . . . . . . . . . . . . . . . . . . . . . . . . . . . . . . .. . . . . . .198Reapply Element Modifications.. . . . . . . . . . . . . . . . . . . . . . . . . . . . . . . . . . . . . . . . . . . . . . . . . . . . . . . . . . . . . . . . . . . . . . . . . .. . . . . . .201Export Final Upgrade Rule Package.. . . . . . . . . . . . . . . . . . . . . . . . . . . . . . . . . . . . . . . . . . . . . . . . . . . . . . . . . . . . . . . . . . . .. . . . . . .203Apply Upgrade Rule Package During MTP.. . . . . . . . . . . . . . . . . . . . . . . . . . . . . . . . . . . . . . . . . . . . . . . . . . . . . . . . . . . .. . . . . . .206Apply System Data with No PIN... . . . . . . . . . . . . . . . . . . . . . . . . . . . . . . . . . . . . . . . . . . . . . . . . . . . . . . . . . . . . . . . . . . . . . . .. . . . . . .208Apply System Data with PIN... . . . . . . . . . . . . . . . . . . . . . . . . . . . . . . . . . . . . . . . . . . . . . . . . . . . . . . . . . . . . . . . . . . . . . . . . . . .. . . . . . .209Set Up Global Payroll for Spain.. . . . . . . . . . . . . . . . . . . . . . . . . . . . . . . . . . . . . . . . . . . . . . . . . . . . . . . . . . . . . . . . . . . . . . . . . .. . . . . . .211Set Up Global Payroll for Switzerland.. . . . . . . . . . . . . . . . . . . . . . . . . . . . . . . . . . . . . . . . . . . . . . . . . . . . . . . . . . . . . . . . . . .. . . . . . .212Create Upgrade Rule Delete Package.. .. . . . . . . . . . . . . . . . . . . . . . . . . . . . . . . . . . . . . . . . . . . . . . . . . . . . . . . . . . . . . . . .. . . . . . .218Export Upgrade Rule Delete Package.. . . . . . . . . . . . . . . . . . . . . . . . . . . . . . . . . . . . . . . . . . . . . . . . . . . . . . . . . . . . . . . . . .. . . . . . .219Apply Upgrade Rule Delete Package.. . . . . . . . . . . . . . . . . . . . . . . . . . . . . . . . . . . . . . . . . . . . . . . . . . . . . . . . . . . . . . . . . . .. . . . . . .221Apply Updates to CE Rule Delete Package.. .. . . . . . . . . . . . . . . . . . . . . . . . . . . . . . . . . . . . . . . . . . . . . . . . . . . . . . . . . .. . . . . . .224Update Customer Installation Flag.. . . . . . . . . . . . . . . . . . . . . . . . . . . . . . . . . . . . . . . . . . . . . . . . . . . . . . . . . . . . . . . . . . . . . .. . . . . . .225
xvi Copyright © 2006, Oracle. All rights reserved.

Contents
Adding New GP Country Extensions.. . . . . . . . . . . . . . . . . . . . . . . . . . . . . . . . . . . . . . . . . . . . . . . . . . . . . . . . . . . . . . . . . . . . . . . . . . . . . .226Understanding New GP Country Extensions.. . . . . . . . . . . . . . . . . . . . . . . . . . . . . . . . . . . . . . . . . . . . . . . . . . . . . . . . . .. . . . . . .226Apply Base Language Data. . . . . . . . . . . . . . . . . . . . . . . . . . . . . . . . . . . . . . . . . . . . . . . . . . . . . . . . . . . . . . . . . . . . . . . . . . . . . . .. . . . . . .226Apply Translations Data.. . . . . . . . . . . . . . . . . . . . . . . . . . . . . . . . . . . . . . . . . . . . . . . . . . . . . . . . . . . . . . . . . . . . . . . . . . . . . . . . . .. . . . . . .229
Validating Alternative Overtime Upgrade.. . . . . . . . . . . . . . . . . . . . . . . . . . . . . . . . . . . . . . . . . . . . . . . . . . . . . . . . . . . . . . . . . . . . . . . . . .233Updating Payroll Interface Definitions.. . . . . . . . . . . . . . . . . . . . . . . . . . . . . . . . . . . . . . . . . . . . . . . . . . . . . . . . . . . . . . . . . . . . . . . . . . . . .234
Understanding Updates to Payroll Interface Definitions.. . . . . . . . . . . . . . . . . . . . . . . . . . . . . . . . . . . . . . . . . . . . . .. . . . . . .234Run Validate PI Field References Report. . . . . . . . . . . . . . . . . . . . . . . . . . . . . . . . . . . . . . . . . . . . . . . . . . . . . . . . . . . . . . .. . . . . . .234Update Payroll Interface Definitions.. . . . . . . . . . . . . . . . . . . . . . . . . . . . . . . . . . . . . . . . . . . . . . . . . . . . . . . . . . . . . . . . . . . . .. . . . . . .235
Running Assigned Company Cars Report. . . . . . . . . . . . . . . . . . . . . . . . . . . . . . . . . . . . . . . . . . . . . . . . . . . . . . . . . . . . . . . . . . . . . . . . .236Upgrading Rules.. . . . . . . . . . . . . . . . . . . . . . . . . . . . . . . . . . . . . . . . . . . . . . . . . . . . . . . . . . . . . . . . . . . . . . . . . . . . . . . . . . . . . . . . . . . . . . . . . . . . . .237
Understanding Rules Upgrade.. .. . . . . . . . . . . . . . . . . . . . . . . . . . . . . . . . . . . . . . . . . . . . . . . . . . . . . . . . . . . . . . . . . . . . . . . . .. . . . . . .237Run the Dropped Temp Tables Report.. . . . . . . . . . . . . . . . . . . . . . . . . . . . . . . . . . . . . . . . . . . . . . . . . . . . . . . . . . . . . . . . . .. . . . . . .237Recompile Template Built Rules.. . . . . . . . . . . . . . . . . . . . . . . . . . . . . . . . . . . . . . . . . . . . . . . . . . . . . . . . . . . . . . . . . . . . . . . . .. . . . . . .238Customize Template Built Rules.. . . . . . . . . . . . . . . . . . . . . . . . . . . . . . . . . . . . . . . . . . . . . . . . . . . . . . . . . . . . . . . . . . . . . . . . .. . . . . . .240Review and Modify User Exit Rules.. . . . . . . . . . . . . . . . . . . . . . . . . . . . . . . . . . . . . . . . . . . . . . . . . . . . . . . . . . . . . . . . . . . . .. . . . . . .242
Deleting Resume Files.. . . . . . . . . . . . . . . . . . . . . . . . . . . . . . . . . . . . . . . . . . . . . . . . . . . . . . . . . . . . . . . . . . . . . . . . . . . . . . . . . . . . . . . . . . . . . . .243Understanding Resume Deletion.. . . . . . . . . . . . . . . . . . . . . . . . . . . . . . . . . . . . . . . . . . . . . . . . . . . . . . . . . . . . . . . . . . . . . . . .. . . . . . .243Manually Delete Files from Old Location.. . . . . . . . . . . . . . . . . . . . . . . . . . . . . . . . . . . . . . . . . . . . . . . . . . . . . . . . . . . . . . .. . . . . . .243
Setting Up General Ledger Interface.. . . . . . . . . . . . . . . . . . . . . . . . . . . . . . . . . . . . . . . . . . . . . . . . . . . . . . . . . . . . . . . . . . . . . . . . . . . . . .243Understanding GL Interface Setup.. . . . . . . . . . . . . . . . . . . . . . . . . . . . . . . . . . . . . . . . . . . . . . . . . . . . . . . . . . . . . . . . . . . . . .. . . . . . .243Set Up the Liability Accounts.. . . . . . . . . . . . . . . . . . . . . . . . . . . . . . . . . . . . . . . . . . . . . . . . . . . . . . . . . . . . . . . . . . . . . . . . . . . . .. . . . . . .244Set Up the GL Activity Groupings.. . . . . . . . . . . . . . . . . . . . . . . . . . . . . . . . . . . . . . . . . . . . . . . . . . . . . . . . . . . . . . . . . . . . . . .. . . . . . .246Set Up the Expenses ChartField Mappings.. . . . . . . . . . . . . . . . . . . . . . . . . . . . . . . . . . . . . . . . . . . . . . . . . . . . . . . . . . . .. . . . . . .247
Reviewing PeopleTools Functionality. . . . . . . . . . . . . . . . . . . . . . . . . . . . . . . . . . . . . . . . . . . . . . . . . . . . . . . . . . . . . . . . . . . . . . . . . . . . . . .247Preparing the Content Provider Registry.. . . . . . . . . . . . . . . . . . . . . . . . . . . . . . . . . . . . . . . . . . . . . . . . . . . . . . . . . . . . . . . . . . . . . . . . . .248Updating the Portal Options Data.. . . . . . . . . . . . . . . . . . . . . . . . . . . . . . . . . . . . . . . . . . . . . . . . . . . . . . . . . . . . . . . . . . . . . . . . . . . . . . . . . .249Stamping the Database... . . . . . . . . . . . . . . . . . . . . . . . . . . . . . . . . . . . . . . . . . . . . . . . . . . . . . . . . . . . . . . . . . . . . . . . . . . . . . . . . . . . . . . . . . . . .249Reviewing Change Control. . . . . . . . . . . . . . . . . . . . . . . . . . . . . . . . . . . . . . . . . . . . . . . . . . . . . . . . . . . . . . . . . . . . . . . . . . . . . . . . . . . . . . . . . . .250Backing Up Before Testing.. . . . . . . . . . . . . . . . . . . . . . . . . . . . . . . . . . . . . . . . . . . . . . . . . . . . . . . . . . . . . . . . . . . . . . . . . . . . . . . . . . . . . . . . . .251Testing Your Copy of Production.. . . . . . . . . . . . . . . . . . . . . . . . . . . . . . . . . . . . . . . . . . . . . . . . . . . . . . . . . . . . . . . . . . . . . . . . . . . . . . . . . . .251
Chapter 6Apply Changes to Production Database..... . . . . . . . . . . . . . . . . . . . . . . . . . . . . . . . . . . . . . . . . . . . . . . . . . . . . . . . . . . .253Understanding the Move to Production.. . . . . . . . . . . . . . . . . . . . . . . . . . . . . . . . . . . . . . . . . . . . . . . . . . . . . . . . . . . . . . . . . . . . . . . . . . . .253Testing the Move to Production.. . . . . . . . . . . . . . . . . . . . . . . . . . . . . . . . . . . . . . . . . . . . . . . . . . . . . . . . . . . . . . . . . . . . . . . . . . . . . . . . . . . . .253
Understanding the Move to Production Test. . . . . . . . . . . . . . . . . . . . . . . . . . . . . . . . . . . . . . . . . . . . . . . . . . . . . . . . . . . .. . . . . . .253Understand Move to Production.. . . . . . . . . . . . . . . . . . . . . . . . . . . . . . . . . . . . . . . . . . . . . . . . . . . . . . . . . . . . . . . . . . . . . . . . .. . . . . . .254Creating a New Change Assistant Job.. . . . . . . . . . . . . . . . . . . . . . . . . . . . . . . . . . . . . . . . . . . . . . . . . . . . . . . . . . . . . . . . .. . . . . . .255
Copyright © 2006, Oracle. All rights reserved. xvii

Contents
Testing Once More.. . . . . . . . . . . . . . . . . . . . . . . . . . . . . . . . . . . . . . . . . . . . . . . . . . . . . . . . . . . . . . . . . . . . . . . . . . . . . . . . . . . . . . . . . . . . . . . . . . .256Performing the Move to Production.. . . . . . . . . . . . . . . . . . . . . . . . . . . . . . . . . . . . . . . . . . . . . . . . . . . . . . . . . . . . . . . . . . . . . . . . . . . . . . . .256Completing the Upgrade Survey .. . . . . . . . . . . . . . . . . . . . . . . . . . . . . . . . . . . . . . . . . . . . . . . . . . . . . . . . . . . . . . . . . . . . . . . . . . . . . . . . . . .256
Chapter 7Appendices... . .. . . . . . . . . . . . . . . . . . . . . . . . . . . . . . . . . . . . . . . . . . . . . . . . . . . . . . . . . . . . . . . . . . . . . . . . . . . . . . . . . . . . . . . . . . . . . . .259Understanding Appendices.. . . . . . . . . . . . . . . . . . . . . . . . . . . . . . . . . . . . . . . . . . . . . . . . . . . . . . . . . . . . . . . . . . . . . . . . . . . . . . . . . . . . . . . . .259
Appendix AApplying Fixes Required for Upgrade..... . . . . . . . . . . . . . . . . . . . . . . . . . . . . . . . . . . . . . . . . . . . . . . . . . . . . . . . . . . . . . .261Prepare to Apply Fixes... . . . . . . . . . . . . . . . . . . . . . . . . . . . . . . . . . . . . . . . . . . . . . . . . . . . . . . . . . . . . . . . . . . . . . . . . . . . . . . . . . . . . . . . . . . . . .261Apply Fixes During Installation.. . . . . . . . . . . . . . . . . . . . . . . . . . . . . . . . . . . . . . . . . . . . . . . . . . . . . . . . . . . . . . . . . . . . . . . . . . . . . . . . . . . . . .262Apply Fixes After Running Copy Project. . . . . . . . . . . . . . . . . . . . . . . . . . . . . . . . . . . . . . . . . . . . . . . . . . . . . . . . . . . . . . . . . . . . . . . . . . .262Apply Fixes After Data Conversion.. . . . . . . . . . . . . . . . . . . . . . . . . . . . . . . . . . . . . . . . . . . . . . . . . . . . . . . . . . . . . . . . . . . . . . . . . . . . . . . . .263Apply Fixes Before Move to Production.. . . . . . . . . . . . . . . . . . . . . . . . . . . . . . . . . . . . . . . . . . . . . . . . . . . . . . . . . . . . . . . . . . . . . . . . . . .263Apply Fixes During Move to Production.. . . . . . . . . . . . . . . . . . . . . . . . . . . . . . . . . . . . . . . . . . . . . . . . . . . . . . . . . . . . . . . . . . . . . . . . . . .264
Appendix BBenefits Upgrade Notes... . . . . . . . . . . . . . . . . . . . . . .. . . . . . . . . . . . . . . . . . . . . . . . . . . . . . . .. . . . . . . . . . . . . . . . . . . . . . . . . . .265COBRA Administration.. . . . . . . . . . . . . . . . . . . . . . . . . . . . . . . . . . . . . . . . . . . . . . . . . . . . . . . . . . . . . . . . . . . . . . . . . . . . . . . . . . . . . . . . . . . . . .265Savings Management .. . . . . . . . . . . . . . . . . . . . . . . . . . . . . . . . . . . . . . . . . . . . . . . . . . . . . . . . . . . . . . . . . . . . . . . . . . . . . . . . . . . . . . . . . . . . . . .265Review Benefit System Indicator on Job. . . . . . . . . . . . . . . . . . . . . . . . . . . . . . . . . . . . . . . . . . . . . . . . . . . . . . . . . . . . . . . . . . . . . . . . . . .266Review Benefit Record Number Display.. . . . . . . . . . . . . . . . . . . . . . . . . . . . . . . . . . . . . . . . . . . . . . . . . . . . . . . . . . . . . . . . . . . . . . . . . .266Review Effective Dating of Dependants.. . . . . . . . . . . . . . . . . . . . . . . . . . . . . . . . . . . . . . . . . . . . . . . . . . . . . . . . . . . . . . . . . . . . . . . . . . .267Review Effective Dating of Company Cars.. . . . . . . . . . . . . . . . . . . . . . . . . . . . . . . . . . . . . . . . . . . . . . . . . . . . . . . . . . . . . . . . . . . . . . . .267
Appendix CChanges on Employment Record.... . . . . . . . . .. . . . . . . . . . . . . . . . . . . . . . .. . . . . . . . . . . . . . . . . . . . . . . .. . . . . . . . . . . .269Understanding Changes to EMPLOYMENT Record.. . . . . . . . . . . . . . . . . . . . . . . . . . . . . . . . . . . . . . . . . . . . . . . . . . . . . . . . . . . .269Last Date Worked.. . . . . . . . . . . . . . . . . . . . . . . . . . . . . . . . . . . . . . . . . . . . . . . . . . . . . . . . . . . . . . . . . . . . . . . . . . . . . . . . . . . . . . . . . . . . . . . . . . . .269
Understanding Last Date Worked Settings.. . . . . . . . . . . . . . . . . . . . . . . . . . . . . . . . . . . . . . . . . . . . . . . . . . . . . . . . . . . . .. . . . . . .269Calculation Rules.. . . . . . . . . . . . . . . . . . . . . . . . . . . . . . . . . . . . . . . . . . . . . . . . . . . . . . . . . . . . . . . . . . . . . . . . . . . . . . . . . . . . . . . . . .. . . . . . .269
Termination Date.. . . . . . . . . . . . . . . . . . . . . . . . . . . . . . . . . . . . . . . . . . . . . . . . . . . . . . . . . . . . . . . . . . . . . . . . . . . . . . . . . . . . . . . . . . . . . . . . . . . . .270Calculation Rules.. . . . . . . . . . . . . . . . . . . . . . . . . . . . . . . . . . . . . . . . . . . . . . . . . . . . . . . . . . . . . . . . . . . . . . . . . . . . . . . . . . . . . . . . . .. . . . . . .270
xviii Copyright © 2006, Oracle. All rights reserved.

Contents
Appendix DChanges to Batch Programs.... . . . . . . . . . . . . . . . . . . . . . . . . . . . . . . . . . . . . . . . . . . . . . . . . . . . . . . . . . . . . . . . . . . . . . . . . . .273Changes to Batch Programs... . . . . . . . . . . . . . . . . . . . . . . . . . . . . . . . . . . . . . . . . . . . . . . . . . . . . . . . . . . . . . . . . . . . . . . . . . . . . . . . . . . . . . .273
Appendix EChanging the User Interface.... . . . . . . . . . . . . . . . . . . . . . . . . . . . . . . . . . . . . . . . . . . . . . . . . . . . . . . . . . . . . . . . . . . . . . . . . . . .275Change the User Interface.. . . . . . . . . . . . . . . . . . . . . . . . . . . . . . . . . . . . . . . . . . . . . . . . . . . . . . . . . . . . . . . . . . . . . . . . . . . . . . . . . . . . . . . . . .275Change the User Interface for Mobile.. . . . . . . . . . . . . . . . . . . . . . . . . . . . . . . . . . . . . . . . . . . . . . . . . . . . . . . . . . . . . . . . . . . . . . . . . . . . . .277
Appendix FData Archiving Tool.... . . . . . . . . . . . . . . . . . . . . . . . . . . . . . . . . . . . . . . . . . . . . . . . . . . . . . . . . . . . . . . . . . . . . . . . . . . . . . . . . . . . . . .279Data Archiving Tool. . . . . . . . . . . . . . . . . . . . . . . . . . . . . . . . . . . . . . . . . . . . . . . . . . . . . . . . . . . . . . . . . . . . . . . . . . . . . . . . . . . . . . . . . . . . . . . . . . . .279
Appendix GData Conversion Utilities.... . . . . . . . . . . . . . . . . . . . . . . . . . . . . . . . . . . . . . . . . . . . . . . . . . . . . . . . . . . . . . . . . . . . . . . . . . . . . . . .281Understand Data Conversion Utilities.. . . . . . . . . . . . . . . . . . . . . . . . . . . . . . . . . . . . . . . . . . . . . . . . . . . . . . . . . . . . . . . . . . . . . . . . . . . . . .281Application Engine Driver Program... . . . . . . . . . . . . . . . . . . . . . . . . . . . . . . . . . . . . . . . . . . . . . . . . . . . . . . . . . . . . . . . . . . . . . . . . . . . . . .281Upgrade Drivers Page... . . . . . . . . . . . . . . . . . . . . . . . . . . . . . . . . . . . . . . . . . . . . . . . . . . . . . . . . . . . . . . . . . . . . . . . . . . . . . . . . . . . . . . . . . . . . .281
Understanding Upgrade Drivers Page... . . . . . . . . . . . . . . . . . . . . . . . . . . . . . . . . . . . . . . . . . . . . . . . . . . . . . . . . . . . . . . . .. . . . . . .281Accessing The Upgrade Drivers Page... . . . . . . . . . . . . . . . . . . . . . . . . . . . . . . . . . . . . . . . . . . . . . . . . . . . . . . . . . . . . . . . .. . . . . . .282Adding New Upgrade Drivers Section Page.. . . . . . . . . . . . . . . . . . . . . . . . . . . . . . . . . . . . . . . . . . . . . . . . . . . . . . . . . . .. . . . . . .282Inactivating Upgrade Drivers Section.. . . . . . . . . . . . . . . . . . . . . . . . . . . . . . . . . . . . . . . . . . . . . . . . . . . . . . . . . . . . . . . . . . .. . . . . . .283
Data Conversion Report. . . . . . . . . . . . . . . . . . . . . . . . . . . . . . . . . . . . . . . . . . . . . . . . . . . . . . . . . . . . . . . . . . . . . . . . . . . . . . . . . . . . . . . . . . . . . .283
Appendix HDynamic ChartFields Upgrade Notes..... . . . . . . . . . . . . . . . . . . . . . . . . . . . . . . . . . . . . . . . . . . . . . . . . . . . . . . . . . . . . . . .285Understanding Dynamic ChartFields Upgrade.. . . . . . . . . . . . . . . . . . . . . . . . . . . . . . . . . . . . . . . . . . . . . . . . . . . . . . . . . . . . . . . . . . .285Changes in Account Code Table.. . . . . . . . . . . . . . . . . . . . . . . . . . . . . . . . . . . . . . . . . . . . . . . . . . . . . . . . . . . . . . . . . . . . . . . . . . . . . . . . . . .285
Understanding Combination Codes.. . . . . . . . . . . . . . . . . . . . . . . . . . . . . . . . . . . . . . . . . . . . . . . . . . . . . . . . . . . . . . . . . . . . .. . . . . . .285Understanding FDM_HASH... . . . . . . . . . . . . . . . . . . . . . . . . . . . . . . . . . . . . . . . . . . . . . . . . . . . . . . . . . . . . . . . . . . . . . . . . . . . .. . . . . . .286
Changes in GL Interface Setup.. . . . . . . . . . . . . . . . . . . . . . . . . . . . . . . . . . . . . . . . . . . . . . . . . . . . . . . . . . . . . . . . . . . . . . . . . . . . . . . . . . . . .287Understanding GL Interface Setup.. . . . . . . . . . . . . . . . . . . . . . . . . . . . . . . . . . . . . . . . . . . . . . . . . . . . . . . . . . . . . . . . . . . . . .. . . . . . .288Understanding Liability Accounts.. . . . . . . . . . . . . . . . . . . . . . . . . . . . . . . . . . . . . . . . . . . . . . . . . . . . . . . . . . . . . . . . . . . . . . . .. . . . . . .288Understanding GL Activity Grouping.. . . . . . . . . . . . . . . . . . . . . . . . . . . . . . . . . . . . . . . . . . . . . . . . . . . . . . . . . . . . . . . . . . . .. . . . . . .291Understanding Expenses ChartField Mapping.. . . . . . . . . . . . . . . . . . . . . . . . . . . . . . . . . . . . . . . . . . . . . . . . . . . . . . . .. . . . . . .296
Upgrade Time and Labor ChartFields.. . . . . . . . . . . . . . . . . . . . . . . . . . . . . . . . . . . . . . . . . . . . . . . . . . . . . . . . . . . . . . . . . . . . . . . . . . . . .301
Copyright © 2006, Oracle. All rights reserved. xix
Contents
Appendix IHRMS Upgrade Notes.... . . . . . . . . . . . . .. . . . . . . . . . . . . . . . . .. . . . . . . . . . . . . . . .. . . . . . . . . . . . .. . . . . . . . . . . . .. . . . . . . . . .303Record and Field Conversions.. . . . . . . . . . . . . . . . . . . . . . . . . . . . . . . . . . . . . . . . . . . . . . . . . . . . . . . . . . . . . . . . . . . . . . . . . . . . . . . . . . . . . .303
Understanding Record and Field Conversions.. . . . . . . . . . . . . . . . . . . . . . . . . . . . . . . . . . . . . . . . . . . . . . . . . . . . . . . .. . . . . . .303Status Conversions.. . . . . . . . . . . . . . . . . . . . . . . . . . . . . . . . . . . . . . . . . . . . . . . . . . . . . . . . . . . . . . . . . . . . . . . . . . . . . . . . . . . . . . . .. . . . . . .303
Records with Duplicate Key Structures... . . . . . . . . . . . . . . . . . . . . . . . . . . . . . . . . . . . . . . . . . . . . . . . . . . . . . . . . . . . . . . . . . . . . . . . . . .304Schedule Defaults. . . . . . . . . . . . . . . . . . . . . . . . . . . . . . . . . . . . . . . . . . . . . . . . . . . . . . . . . . . . . . . . . . . . . . . . . . . . . . . . . . . . . . . . . . . . . . . . . . . . .305
Shift and Workdays Upgrade.. .. . . . . . . . . . . . . . . . . . . . . . . . . . . . . . . . . . . . . . . . . . . . . . . . . . . . . . . . . . . . . . . . . . . . . . . . . . .. . . . . . .305Effective Date of Schedule Definitions.. . . . . . . . . . . . . . . . . . . . . . . . . . . . . . . . . . . . . . . . . . . . . . . . . . . . . . . . . . . . . . . . . .. . . . . . .305Schedule Override Tables. . . . . . . . . . . . . . . . . . . . . . . . . . . . . . . . . . . . . . . . . . . . . . . . . . . . . . . . . . . . . . . . . . . . . . . . . . . . . . . . .. . . . . . .306
Appendix JModifying the Approval Rule Set Program..... . . . . . . .. . . . . . . . . . . . . . . . .. . . . . . . . . . . . . . . . . .. . . . . . . . . . . . . .307Modify Approval Rule Set Related Tables.. . . . . . . . . . . . . . . . . . . . . . . . . . . . . . . . . . . . . . . . . . . . . . . . . . . . . . . . . . . . . . . . . . . . . . . . .307
Appendix KPerformance Management Upgrade Notes... . . . . . . . . . . . . . . . . . . . . . . . . . . . . . . . . . . . . . . . . . . . . . . . . . . . . . . . . .309Understanding Upgrade Notes.. . . . . . . . . . . . . . . . . . . . . . . . . . . . . . . . . . . . . . . . . . . . . . . . . . . . . . . . . . . . . . . . . . . . . . . . . . . . . . . . . . . . .309Employee Review Tables .. . . . . . . . . . . . . . . . . . . . . . . . . . . . . . . . . . . . . . . . . . . . . . . . . . . . . . . . . . . . . . . . . . . . . . . . . . . . . . . . . . . . . . . . . . .309
Understanding Employee Review Tables. . . . . . . . . . . . . . . . . . . . . . . . . . . . . . . . . . . . . . . . . . . . . . . . . . . . . . . . . . . . . . .. . . . . . .309Employee Review Records.. . . . . . . . . . . . . . . . . . . . . . . . . . . . . . . . . . . . . . . . . . . . . . . . . . . . . . . . . . . . . . . . . . . . . . . . . . . . . . .. . . . . . .309Performance Improvement Plan (USF) Records.. . . . . . . . . . . . . . . . . . . . . . . . . . . . . . . . . . . . . . . . . . . . . . . . . . . . . .. . . . . . .310Merit Scale Setup Records.. . . . . . . . . . . . . . . . . . . . . . . . . . . . . . . . . . . . . . . . . . . . . . . . . . . . . . . . . . . . . . . . . . . . . . . . . . . . . . .. . . . . . .310Rating Scale Setup Records.. . . . . . . . . . . . . . . . . . . . . . . . . . . . . . . . . . . . . . . . . . . . . . . . . . . . . . . . . . . . . . . . . . . . . . . . . . . . .. . . . . . .310Review Band Setup Records.. . . . . . . . . . . . . . . . . . . . . . . . . . . . . . . . . . . . . . . . . . . . . . . . . . . . . . . . . . . . . . . . . . . . . . . . . . . .. . . . . . .310Performance Plan (USF) Setup Records.. . . . . . . . . . . . . . . . . . . . . . . . . . . . . . . . . . . . . . . . . . . . . . . . . . . . . . . . . . . . . . .. . . . . . .310
Employee Review Data .. . . . . . . . . . . . . . . . . . . . . . . . . . . . . . . . . . . . . . . . . . . . . . . . . . . . . . . . . . . . . . . . . . . . . . . . . . . . . . . . . . . . . . . . . . . . .311
Appendix LPerformance Tips and Techniques..... . . . . . . . . . . . . . . . . . . . . . . . . . . . . . . . . . . . . . . . . . . . . . . . . . . . . . . . . . . . . . . . . . .313Understanding Performance Tips and Techniques.. . . . . . . . . . . . . . . . . . . . . . . . . . . . . . . . . . . . . . . . . . . . . . . . . . . . . . . . . . . . . . .313Plan Your Upgrade for Performance.. . . . . . . . . . . . . . . . . . . . . . . . . . . . . . . . . . . . . . . . . . . . . . . . . . . . . . . . . . . . . . . . . . . . . . . . . . . . . . .313What To Do During the Upgrade.. . . . . . . . . . . . . . . . . . . . . . . . . . . . . . . . . . . . . . . . . . . . . . . . . . . . . . . . . . . . . . . . . . . . . . . . . . . . . . . . . . .314
What To Do During the Upgrade.. . . . . . . . . . . . . . . . . . . . . . . . . . . . . . . . .. . . . . . . . . . . . . . . . . . . . . . . . . . . . . . . . . . . . . . . .. . . . . . .314Create and Alter SQL Scripts. . . . . . . . . . . . . . . . . . . . . . . . . . . . . . . . . . . . . . . . . . . . . . . . . . . . . . . . . . . . . . . . . . . . . . . . . . . . .. . . . . . .314Data Conversion.. . . . . . . . . . . . . . . . . . . . . . . . . . . . . . . . . . . . . . . . . . . . . . . . . . . . . . . . . . . . . . . . . . . . . . . . . . . . . . . . . . . . . . . . . . .. . . . . . .314
Improve Performance for Your Platform... . . . . . . . . . . . . . . . . . . . . . . . . . . . . . . . . . . . . . . . . . . . . . . . . . . . . . . . . . . . . . . . . . . . . . . . . .314
xx Copyright © 2006, Oracle. All rights reserved.

Contents
Oracle.. . . . . . . . . . . . . . . . . . . . . . . . . . . . . . . . . . . . . . . . . . . . . . . . . . . . . . . . . . . . . . . . . . . . . . . . . . . . . . . . . . . . . . . . . . . . . . . . . . . . . . .. . . . . . .315DB2... . . . . . . . . . . . . . . . . . . . . . . . . . . . . . . . . . . . . . . . . . . . . . . . . . . . . . . . . . . . . . . . . . . . . . . . . . . . . . . . . . . . . . . . . . . . . . . . . . . . . . . . .. . . . . . .315
Consult the Global Support Center. . . . . . . . . . . . . . . . . . . . . . . . . . . . . . . . . . . . . . . . . . . . . . . . . . . . . . . . . . . . . . . . . . . . . . . . . . . . . . . . . .316
Appendix MQueries Trees and Tree Structures... . . . . . . . . . . . . . . . . . . . . . . . . . . . . . . . . . . . . . . . . . . . . . . . . . . . . . . . . . . . . . . . . . . .317Preserve Queries and Trees.. . . . . . . . . . . . . . . . . . . . . . . . . . . . . . . . . . . . . . . . . . . . . . . . . . . . . . . . . . . . . . . . . . . . . . . . . . . . . . . . . . . . . . . .317Prepare the Database.. . . . . . . . . . . . . . . . . . . . . . . . . . . . . . . . . . . . . . . . . . . . . . . . . . . . . . . . . . . . . . . . . . . . . . . . . . . . . . . . . . . . . . . . . . . . . . .318Create a New Project. . . . . . . . . . . . . . . . . . . . . . . . . . . . . . . . . . . . . . . . . . . . . . . . . . . . . . . . . . . . . . . . . . . . . . . . . . . . . . . . . . . . . . . . . . . . . . . . .318Compare the New Project. . . . . . . . . . . . . . . . . . . . . . . . . . . . . . . . . . . . . . . . . . . . . . . . . . . . . . . . . . . . . . . . . . . . . . . . . . . . . . . . . . . . . . . . . . . .319Copy the Project. . . . . . . . . . . . . . . . . . . . . . . . . . . . . . . . . . . . . . . . . . . . . . . . . . . . . . . . . . . . . . . . . . . . . . . . . . . . . . . . . . . . . . . . . . . . . . . . . . . . . . .320Test the Project. . . . . . . . . . . . . . . . . . . . . . . . . . . . . . . . . . . . . . . . . . . . . . . . . . . . . . . . . . . . . . . . . . . . . . . . . . . . . . . . . . . . . . . . . . . . . . . . . . . . . . . .320ReExport the PeopleTools Tables.. . . . . . . . . . . . . . . . . . . . . . . . . . . . . . . . . . . . . . . . . . . . . . . . . . . . . . . . . . . . . . . . . . . . . . . . . . . . . . . . . .320
Appendix NSizing Tables for the Upgrade..... . . . . . . . . . . . . . . . . . . . . . . . . . . . . . . . . . . . . . . . . . . . . . . . . . . . . . . . . . . . . . . . . . . . . . . . .323Size Tables.. . . . . . . . . . . . . . . . . . . . . . . . . . . . . . . . . . . . . . . . . . . . . . . . . . . . . . . . . . . . . . . . . . . . . . . . . . . . . . . . . . . . . . . . . . . . . . . . . . . . . . . . . . . .323
Appendix OTesting Techniques.... . . . . . . . . . . . . . .. . . . . . . . . . . . . . . .. . . . . . . . . . . . . . .. . . . . . . . . . . . . . . .. . . . . . . . . . . . . . . .. . . . . . . . .331Understanding Testing Techniques.. . . . . . . . . . . . . . . . . . . . . . . . . . . . . . . . . . . . . . . . . . . . . . . . . . . . . . . . . . . . . . . . . . . . . . . . . . . . . . . . .331When to Test. . . . . . . . . . . . . . . . . . . . . . . . . . . . . . . . . . . . . . . . . . . . . . . . . . . . . . . . . . . . . . . . . . . . . . . . . . . . . . . . . . . . . . . . . . . . . . . . . . . . . . . . . . .331Evaluate Your Testing Requirements. . . . . . . . . . . . . . . . . . . . . . . . . . . . . . . . . . . . . . . . . . . . . . . . . . . . . . . . . . . . . . . . . . . . . . . . . . . . . . .332Define Your Testing Strategy.. . . . . . . . . . . . . . . . . . . . . . . . . . . . . . . . . . . . . . . . . . . . . . . . . . . . . . . . . . . . . . . . . . . . . . . . . . . . . . . . . . . . . . . .332
Understanding Your Testing Strategy.. . . . . . . . . . . . . . . . . . . . . . . . . . . . . . . . . . . . . . . . . . . . . . . . . . . . . . . . . . . . . . . . . . .. . . . . . .332Evaluating Unit Testing .. . . . . . . . . . . . . . . . . . . . . . . . . . . . . . . . . . . . . . . . . . . . . . . . . . . . . . . . . . . . . . . . . . . . . . . . . . . . . . . . . . .. . . . . . .332Evaluating System Testing .. . . . . . . . . . . . . . . . . . . . . . . . . . . . . . . . . . . . . . . . . . . . . . . . . . . . . . . . . . . . . . . . . . . . . . . . . . . . . . .. . . . . . .333Evaluating Integration Testing .. . . . . . . . . . . . . . . . . . . . . . . . . . . . . . . . . . . . . . . . . . . . . . . . . . . . . . . . . . . . . . . . . . . . . . . . . . .. . . . . . .333Evaluating Parallel Testing .. . . . . . . . . . . . . . . . . . . . . . . . . . . . . . . . . . . . . . . . . . . . . . . . . . . . . . . . . . . . . . . . . . . . . . . . . . . . . . .. . . . . . .333Evaluating Performance Testing .. . . . . . . . . . . . . . . . . . . . . . . . . . . . . . . . . . . . . . . . . . . . . . . . . . . . . . . . . . . . . . . . . . . . . . . .. . . . . . .334Evaluating User Acceptance Testing .. . . . . . . . . . . . . . . . . . . . . . . . . . . . . . . . . . . . . . . . . . . . . . . . . . . . . . . . . . . . . . . . . . .. . . . . . .334Evaluating Regression Testing .. . . . . . . . . . . . . . . . . . . . . . . . . . . . . . . . . . . . . . . . . . . . . . . . . . . . . . . . . . . . . . . . . . . . . . . . . .. . . . . . .334
Determine the Testing Conditions.. . . . . . . . . . . . . . . . . . . . . . . . . . . . . . . . . . . . . . . . . . . . . . . . . . . . . . . . . . . . . . . . . . . . . . . . . . . . . . . . . .335Develop Your Test Plan.. . . . . . . . . . . . . . . . . . . . . . . . . . . . . . . . . . . . . . . . . . . . . . . . . . . . . . . . . . . . . . . . . . . . . . . . . . . . . . . . . . . . . . . . . . . . . .335Develop Test Scripts. . . . . . . . . . . . . . . . . . . . . . . . . . . . . . . . . . . . . . . . . . . . . . . . . . . . . . . . . . . . . . . . . . . . . . . . . . . . . . . . . . . . . . . . . . . . . . . . . .336Tips and Techniques.. . . . . . . . . . . . . . . . . . . . . . . . . . . . . . . . . . . . . . . . . . . . . . . . . . . . . . . . . . . . . . . . . . . . . . . . . . . . . . . . . . . . . . . . . . . . . . . . .337
Reducing the Time of Upgrade Process.. . . . . . . . . . . . . . . . . . . . . . . . . . . . . . . . . . . . . . . . . . . . . . . . . . . . . . . . . . . . . . . .. . . . . . .337
Copyright © 2006, Oracle. All rights reserved. xxi

Contents
Performing Testing on Up to Date Data.. . . . . . . . . . . . . . . . . . . . . . . . . . . . . . . . . . . . . . . . . . . . . . . . . . . . . . . . . . . . . . . . .. . . . . . .337Performing Test Move to Production.. . . . . . . . . . . . . . . . . . . . . . . . . . . . . . . . . . . . . . . . . . . . . . . . . . . . . . . . . . . . . . . . . . . .. . . . . . .338Tracking Issues.. . . . . . . . . . . . . . . . . . . . . . . . . . . . . . . . . . . . . . . . . . . . . . . . . . . . . . . . . . . . . . . . . . . . . . . . . . . . . . . . . . . . . . . . . . . .. . . . . . .338Reviewing Testing Tools.. . . . . . . . . . . . . . . . . . . . . . . . . . . . . . . . . . . . . . . . . . . . . . . . . . . . . . . . . . . . . . . . . . . . . . . . . . . . . . . . . .. . . . . . .338Discussing Change Control. . . . . . . . . . . . . . . . . . . . . . . . . . . . . . . . . . . . . . . . . . . . . . . . . . . . . . . . . . . . . . . . . . . . . . . . . . . . . . .. . . . . . .338Discussing Back Up Procedures.. . . . . . . . . . . . . . . . . . . . . . . . . . . . . . . . . . . . . . . . . . . . . . . . . . . . . . . . . . . . . . . . . . . . . . . .. . . . . . .338Evaluating Unexpected Results. . . . . . . . . . . . . . . . . . . . . . . . . . . . . . . . . . . . . . . . . . . . . . . . . . . . . . . . . . . . . . . . . . . . . . . . . .. . . . . . .339Evaluating Reasons for Failure.. . . . . . . . . . . . . . . . . . . . . . . . . . . . . . . . . . . . . . . . . . . . . . . . . . . . . . . . . . . . . . . . . . . . . . . . . .. . . . . . .339
Appendix PUnderstanding Core Record Modifications... . . . . . . . . . . . . .. . . . . . . . . . . . . . . . . . . . . . . . . . . . . . . . . . . . . . . . . . . .341Understanding Core Record Modifications... . . . . . . . . . . . . . . . . . . . . . . . . . . . . . . . . . . . . . . . . . . . . . . . . . . . . . . . . . . . . . . . . . . . . . .341
Appendix QUnderstanding the Comparison Process..... .. . . . . . . . . . . . . . . . . . . . . . . . . . . . . . . . . . . . . . . . . . . . . . . . . . . . . . . . .347How the Comparison Process Works.. . . . . . . . . . . . . . . . . . . . . . . . . . . . . . . . . . . . . . . . . . . . . . . . . . . . . . . . . . . . . . . . . . . . . . . . . . . . . .347
Source and Target Columns.. .. . . . . . . . . . . . . . . . . . . . . . . . . . . . . . . . . . . . . . . . . . . . . . . . . . . . . . . . . . . . . . . . . . . . . . . . . . . .. . . . . . .348Action Column... . . . . . . . . . . . . . . . . . . . . . . . . . . . . . . . . . . . . . . . . . . . . . . . . . . . . . . . . . . . . . . . . . . . . . . . . . . . . . . . . . . . . . . . . . . .. . . . . . .349Upgrade Column... . . . . . . . . . . . . . . . . . . . . . . . . . . . . . . . . . . . . . . . . . . . . . . . . . . . . . . . . . . . . . . . . . . . . . . . . . . . . . . . . . . . . . . . . .. . . . . . .349Putting it All Together.. . . . . . . . . . . . . . . . . . . . . . . . . . . . . . . . . . . . . . . . . . . . . . . . . . . . . . . . . . . . . . . . . . . . . . . . . . . . . . . . . . . . . .. . . . . . .350
Understanding Upgrade Compare Reports.. . . . . . . . . . . . . . . . . . . . . . . . . . . . . . . . . . . . . . . . . . . . . . . . . . . . . . . . . . . . . . . . . . . . . . .350Report Columns.. .. . . . . . . . . . . . . . . . . . . . . . . . . . . . . . . . . . . . . . . . . . . . . . . . . . . . . . . . . . . . . . . . . . . . . . . . . . . . . . . . . . . . . . . . . .. . . . . . .351Using Reports... . . . . . . . . . . . . . . . . . . . . . . . . . . . . . . . . . . . . . . . . . . . . . . . . . . . . . . . . . . . . . . . . . . . . . . . . . . . . . . . . . . . . . . . . . . . .. . . . . . .351Effect of Field Rename on Copy Overrides.. . . . . . . . . . . . . . . . . . . . . . . . . . . . . . . . . . . . . . . . . . . . . . . . . . . . . . . . . . . .. . . . . . .353
Appendix RUnderstanding FTE Enhancement... . . . . . . . . . . . . . . . . . . . . . . . . . .. . . . . . . . . . . . . . . . . . . . . . . . . . . . . . . . . . . . . . . . . .355Understanding FTE Enhancement.. . . . . . . . . . . . . . . . . . . . . . . . . . . . . . . . . . . . . . . . . . . . . . . . . . . . . . . . . . . . . . . . . . . . . . . . . . . . . . . . .355
Appendix SUnderstanding Person Model Changes..... . . . . . . . . . . . . . . . . . . . . . . . . . . . . . . . . . . . . . . . . . . . . . . . . . . . . . . . . . . . .357Understanding Changes... . . . . . . . . . . . . . . . . . . . . . . . . . . . . . . . . . . . . . . . . . . . . . . . . . . . . . . . . . . . . . . . . . . . . . . . . . . . . . . . . . . . . . . . . . . .357Entity Relationship Diagrams... . . . . . . . . . . . . . . . . . . . . . . . . . . . . . . . . . . . . . . . . . . . . . . . . . . . . . . . . . . . . . . . . . . . . . . . . . . . . . . . . . . . . .358
Understanding Entity Relationship Diagrams... . . . . . . . . . . . . . . . . . . . . . . . . . . . . . . . . . . . . . . . . . . . . . . . . . . . . . . . .. . . . . . .358PeopleSoft 8.0 Diagram... . . . . . . . . . . . . . . . . . . . . . . . . . . . . . . . . . . . . . . . . . . . . . . . . . . . . . . . . . . . . . . . . . . . . . . . . . . . . . . . .. . . . . . .358PeopleSoft 8.3 and 8.8 Diagram... . . . . . . . . . . . . . . . . . . . . . . . . . . . . . . . . . . . . . . . . . . . . . . . . . . . . . . . . . . . . . . . . . . . . . . .. . . . . . .359
xxii Copyright © 2006, Oracle. All rights reserved.

Contents
PeopleSoft 8.9 Diagrams... . . . . . . . . . . . . . . . . . . . . . . . . . . . . . . . . . . . . . . . . . . . . . . . . . . . . . . . . . . . . . . . . . . . . . . . . . . . . . . .. . . . . . .360Record and Table Changes.. . . . . . . . . . . . . . . . . . . . . . . . . . . . . . . . . . . . . . . . . . . . . . . . . . . . . . . . . . . . . . . . . . . . . . . . . . . . . . . . . . . . . . . . .364
Record Changes... . . . . . . . . . . . . . . . . . . . . . . . . . . . . . . . . . . . . . . . . . . . . . . . . . . . . . . . . . . . . . . . . . . . . . . . . . . . . . . . . . . . . . . . . .. . . . . . .364Table Changes.. . . . . . . . . . . . . . . . . . . . . . . . . . . . . . . . . . . . . . . . . . . . . . . . . . . . . . . . . . . . . . . . . . . . . . . . . . . . . . . . . . . . . . . . . . . . .. . . . . . .380
Appendix TUpgrading Content Provider Registry.... . . . . . . . . . . . . . . . . . . . . . . . . . . . . . . . . . . . . . . . . . . . . . . . . . . . . . . . . . . . . . . .383Understanding the Content Provider Registry Upgrade.. . . . . . . . . . . . . . . . . . . . . . . . . . . . . . . . . . . . . . . . . . . . . . . . . . . . . . . . .383Copying Your Enterprise Portal Database.. . . . . . . . . . . . . . . . . . . . . . . . . . . . . . . . . . . . . . . . . . . . . . . . . . . . . . . . . . . . . . . . . . . . . . . .384Upgrading Enterprise Portal PeopleTools.. . . . . . . . . . . . . . . . . . . . . . . . . . . . . . . . . . . . . . . . . . . . . . . . . . . . . . . . . . . . . . . . . . . . . . . . .384Updating Registry Permission Lists.. . . . . . . . . . . . . . . . . . . . . . . . . . . . . . . . . . . . . . . . . . . . . . . . . . . . . . . . . . . . . . . . . . . . . . . . . . . . . . . .385
Understanding Registry Permission Lists Updates.. . . . . . . . . . . . . . . . . . . . . . . . . . . . . . . . . . . . . . . . . . . . . . . . . . .. . . . . . .385Updating Portal Registry.. . . . . . . . . . . . . . . . . . . . . . . . . . . . . . . . . . . . . . . . . . . . . . . . . . . . . . . . . . . . . . . . . . . . . . . . . . . . . . . . . .. . . . . . .385Deleting the Database Cache.. . . . . . . . . . . . . . . . . . . . . . . . . . . . . . . . . . . . . . . . . . . . . . . . . . . . . . . . . . . . . . . . . . . . . . . . . . . .. . . . . . .385
Creating the Portal Project. . . . . . . . . . . . . . . . . . . . . . . . . . . . . . . . . . . . . . . . . . . . . . . . . . . . . . . . . . . . . . . . . . . . . . . . . . . . . . . . . . . . . . . . . . .386Understanding Portal Project Creation.. . . . . . . . . . . . . . . . . . . . . . . . . . . . . . . . . . . . . . . . . . . . . . . . . . . . . . . . . . . . . . . . .. . . . . . .386Creating the Target Enterprise Portal Project. . . . . . . . . . . . . . . . . . . . . . . . . . . . . . . . . . . . . . . . . . . . . . . . . . . . . . . . . . .. . . . . . .386Cleaning the Target Enterprise Portal Project. . . . . . . . . . . . . . . . . . . . . . . . . . . . . . . . . . . . . . . . . . . . . . . . . . . . . . . . . .. . . . . . .387Deleting the Target Enterprise Portal Database Cache.. . . . . . . . . . . . . . . . . . . . . . . . . . . . . . . . . . . . . . . . . . . . . .. . . . . . .388Copying the Target Enterprise Portal Project Definition.. . . . . . . . . . . . . . . . . . . . . . . . . . . . . . . . . . . . . . . . . . . . . .. . . . . . .388Creating the Copy of Production Portal Project. . . . . . . . . . . . . . . . . . . . . . . . . . . . . . . . . . . . . . . . . . . . . . . . . . . . . . . . .. . . . . . .388Cleaning the Copy of Production Portal Project. . . . . . . . . . . . . . . . . . . . . . . . . . . . . . . . . . . . . . . . . . . . . . . . . . . . . . . .. . . . . . .391Deleting the Copy of Production Database Cache.. . . . . . . . . . . . . . . . . . . . . . . . . . . . . . . . . . . . . . . . . . . . . . . . . . . .. . . . . . .391
Comparing the Portal Project. . . . . . . . . . . . . . . . . . . . . . . . . . . . . . . . . . . . . . . . . . . . . . . . . . . . . . . . . . . . . . . . . . . . . . . . . . . . . . . . . . . . . . . .391Reviewing the Portal Project. . . . . . . . . . . . . . . . . . . . . . . . . . . . . . . . . . . . . . . . . . . . . . . . . . . . . . . . . . . . . . . . . . . . . . . . . . . . . . . . . . . . . . . . .392Copying the Portal Project. . . . . . . . . . . . . . . . . . . . . . . . . . . . . . . . . . . . . . . . . . . . . . . . . . . . . . . . . . . . . . . . . . . . . . . . . . . . . . . . . . . . . . . . . . .392
Understanding Portal Project Copying.. . . . . . . . . . . . . . . . . . . . . . . . . . . . . . . . . . . . . . . . . . . . . . . . . . . . . . . . . . . . . . . . . .. . . . . . .392Copying the Portal Project.. . . . . . . . . . . . . . . . . . . . . . . . . . . . . . . . . . . . . . . . . . . . . . . . . . . . . . . . . . . . . . . . . . . . . . . . . . . . . . . .. . . . . . .393Deleting the Enterprise Portal Database Cache.. . . . . . . . . . . . . . . . . . . . . . . . . . . . . . . . . . . . . . . . . . . . . . . . . . . . . . .. . . . . . .393
Copying Portal Project to Production.. . . . . . . . . . . . . . . . . . . . . . . . . . . . . . . . . . . . . . . . . . . . . . . . . . . . . . . . . . . . . . . . . . . . . . . . . . . . . .393Understanding Portal Project to Production Copying.. . . . . . . . . . . . . . . . . . . . . . . . . . . . . . . . . . . . . . . . . . . . . . . . .. . . . . . .394Copying the Portal Project to File.. . . . . . . . . . . . . . . . . . . . . . . . . . . . . . . . . . . . . . . . . . . . . . . . . . . . . . . . . . . . . . . . . . . . . . .. . . . . . .394Copying the Portal Project From File. . . . . . . . . . . . . . . . . . . . . . . . . . . . . . . . . . . . . . . . . . . . . . . . . . . . . . . . . . . . . . . . . . . .. . . . . . .394Deleting the Enterprise Portal Database Cache Again. . . . . . . . . . . . . . . . . . . . . . . . . . . . . . . . . . . . . . . . . . . . . . . .. . . . . . .395
Deleting Obsolete Folders.. . . . . . . . . . . . . . . . . . . . . . . . . . . . . . . . . . . . . . . . . . . . . . . . . . . . . . . . . . . . . . . . . . . . . . . . . . . . . . . . . . . . . . . . . . .395Understanding Obsolete Folder Deletion.. . . . . . . . . . . . . . . . . . . . . . . . . . . . . . . . . . . . . . . . . . . . . . . . . . . . . . . . . . . . . . .. . . . . . .395Deleting Obsolete Folders on Enterprise Portal 8.4.. . . . . . . . . . . . . . . . . . . . . . . . . . . . . . . . . . . . . . . . . . . . . . . . . . .. . . . . . .395Deleting Obsolete Folders on Enterprise Portal 8.8.. . . . . . . . . . . . . . . . . . . . . . . . . . . . . . . . . . . . . . . . . . . . . . . . . . .. . . . . . .396
Updating Registry Folder Permissions.. . . . . . . . . . . . . . . . . . . . . . . . . . . . . . . . . . . . . . . . . . . . . . . . . . . . . . . . . . . . . . . . . . . . . . . . . . . .396
Copyright © 2006, Oracle. All rights reserved. xxiii

Contents
Understanding Registry Folder Permissions Updates.. . . . . . . . . . . . . . . . . . . . . . . . . . . . . . . . . . . . . . . . . . . . . . . .. . . . . . .396Updating the Enterprise Portal Registry Folder Permissions.. . . . . . . . . . . . . . . . . . . . . . . . . . . . . . . . . . . . . . . .. . . . . . .396Deleting the Enterprise Portal Cache.. . . . . . . . . . . . . . . . . . . . . . . . . . . . . . . . . . . . . . . . . . . . . . . . . . . . . . . . . . . . . . . . . . .. . . . . . .397
Appendix UUpgrading System Element Deletions... . . . . . . . . . . . . . . . . . . . . . . . . . . . . . . . . . . . . . . . . . . . . . . . . . . . . . . . . . . . . . . .399Retaining System Element Functionality. . . . . . . . . . . . . . . . . . . . . . . . . . . . . . . . . . . . . . . . . . . . . . . . . . . . . . . . . . . . . . . . . . . . . . . . . . .399
Understanding System Element Functionality Retention.. . . . . . . . . . . . . . . . . . . . . . . . . . . . . . . . . . . . . . . . . . . . .. . . . . . .399Define a Variable.. . . . . . . . . . . . . . . . . . . . . . . . . . . . . . . . . . . . . . . . . . . . . . . . . . . . . . . . . . . . . . . . . . . . . . . . . . . . . . . . . . . . . . . . . . .. . . . . . .399Define an Array.. . . . . . . . . . . . . . . . . . . . . . . . . . . . . . . . . . . . . . . . . . . . . . . . . . . . . . . . . . . . . . . . . . . . . . . . . . . . . . . . . . . . . . . . . . . .. . . . . . .401
Change References to System Elements .. . . . . . . . . . . . . . . . . . . . . . . . . . . . . . . . . . . . . . . . . . . . . . . . . . . . . . . . . . . . . . . . . . . . . . . .405Understanding Change References to System Elements.. . . . . . . . . . . . . . . . . . . . . . . . . . . . . . . . . . . . . . . . . . . .. . . . . . .405Rule Definition.. . . . . . . . . . . . . . . . . . . . . . . . . . . . . . . . . . . . . . . . . . . . . . . . . . . . . . . . . . . . . . . . . . . . . . . . . . . . . . . . . . . . . . . . . . . . .. . . . . . .405Verify Non-Rule Definitions.. . . . . . . . . . . . . . . . . . . . . . . . . . . . . . . . . . . . . . . . . . . . . . . . . . . . . . . . . . . . . . . . . . . . . . . . . . . . . . .. . . . . . .406Record Field Usage.. . . . . . . . . . . . . . . . . . . . . . . . . . . . . . . . . . . . . . . . . . . . . . . . . . . . . . . . . . . . . . . . . . . . . . . . . . . . . . . . . . . . . . .. . . . . . .409Arrays.. . . . . . . . . . . . . . . . . . . . . . . . . . . . . . . . . . . . . . . . . . . . . . . . . . . . . . . . . . . . . . . . . . . . . . . . . . . . . . . . . . . . . . . . . . . . . . . . . . . . . . .. . . . . . .409Trigger Definition... . . . . . . . . . . . . . . . . . . . . . . . . . . . . . . . . . . . . . . . . . . . . . . . . . . . . . . . . . . . . . . . . . . . . . . . . . . . . . . . . . . . . . . . . .. . . . . . .410
Appendix VUpgrading with Tax Updates... . . . . . . . . . . . . . . . . . . . . . . . . . . . . . . . . . . . . . . . . . . . . . . . . . . . . . . . . . . . . . . . . . . . . . . . . . . .411Upgrading with Tax Updates.. . . . . . . . . . . . . . . . . . . . . . . . . . . . . . . . . . . . . . . . . . . . . . . . . . . . . . . . . . . . . . . . . . . . . . . . . . . . . . . . . . . . . . . .411
Index .... . . . . . . . . . . . . . .. . . . . . . . . . . . . . . .. . . . . . . . . . . . . . . .. . . . . . . . . . . . . . . . .. . . . . . . . . . . . . . . .. . . . . . . . . . . . . .. . . . . . . . . . .413
xxiv Copyright © 2006, Oracle. All rights reserved.

About This Documentation
This preface discusses:
• Understanding This Documentation
• Prerequisites
• Audience
• Organization
• Related Information
Understanding This DocumentationThis documentation is designed to direct you through the process of upgrading to your new PeopleSoft release.
This section describes information you should know before you begin working with PeopleSoft products anddocumentation, including PeopleSoft-specific documentation conventions.
PrerequisitesYou must complete the tasks in the document Getting Started on Your PeopleSoft Upgrade before beginningthis upgrade. If you have not yet completed these tasks, do so now.
See PeopleSoft Customer Connection (Implement Optimize + Upgrade, Upgrade Guide, UpgradeDocumentation and Software, Upgrade Documentation and Scripts).
AudienceThis documentation assumes you have a basic understanding of the PeopleSoft system. One of the mostimportant components of a successful upgrade of your PeopleSoft installation is your onsite experience.
You should be familiar with your operating hardware environment and have the necessary skills to support thatenvironment. You should also have a working knowledge of:
• SQL and SQL command syntax• PeopleSoft system navigation• PeopleSoft windows, menus, and pages (and how to modify them)• The World Wide Web• Microsoft® Windows or Windows NT graphical user interface
Copyright © 2006, Oracle. All rights reserved. xxv
Preface
PeopleSoft recommends that you complete at least one PeopleSoft introductory training course beforeperforming this upgrade.
See PeopleSoft Customer Connection, Oracle University.
OrganizationThis documentation is divided into chapters, each containing tasks that represent major milestones in theupgrade process:
• Prepare Your Database• Apply PeopleTools Changes• Run and Review Compare Reports• Apply Application Changes• Complete Database Changes• Apply Changes to Production Database
This documentation may also contain Appendices. When additional information is required to complete anupgrade task, you will be directed to the appropriate appendix.
Related InformationPeopleSoft provides additional information that may help with your upgrade. The following information (aswell as updates to our upgrade) is available on PeopleSoft Customer Connection:
• PeopleSoft Release Notes. Before you begin your upgrade, read the PeopleTools and PeopleSoftapplication Release Notes to determine what has changed in the system and to familiarize yourself with thenew features in this release. The Release Notes also indicate whether you need to upgrade other portionsof your system, such as your RDMBS software or batch files.
• Upgrades Database. The Upgrade Documentation database on PeopleSoft Customer Connection containsinformation posted after shipment of this release that may not be included in these upgrade instructions.This information may include Updates & Fixes required at upgrade. Always check the UpgradeDocumentation database for the most current documentation and information.
• Getting Started on Your PeopleSoft Upgrade. Before beginning a PeopleSoft upgrade, you must completethe tasks in the document Getting Started on Your PeopleSoft Upgrade. This document guides you throughplanning your upgrade as well as installing the software necessary to upgrade to the next PeopleSoftrelease. If you did not complete the tasks in this documentation, do so now.
Important! Before upgrading, it is imperative that you check the Upgrade Documentation database onPeopleSoft Customer Connection for updates to the upgrade instructions. We continually post updates aswe refine the upgrade process.
xxvi Copyright © 2006, Oracle. All rights reserved.

Preface
See PeopleSoft Customer Connection (Implement Optimize + Upgrade, Upgrade Guide, UpgradeDocumentation and Software).
Copyright © 2006, Oracle. All rights reserved. xxvii

Preface
xxviii Copyright © 2006, Oracle. All rights reserved.
CHAPTER 1
Prepare Your Database
This chapter discusses:
• Understanding Database Preparation
• Understanding Your Upgrade
• Copying Your Production Database
• Applying Upgrade Planning Files
• Verifying Global Payroll
• Verifying Federal
• Updating Statistics
• Running Initial Audit Reports
• Running Application Audits
• Preparing the Benefits Upgrade
• Preparing for System Element Deletions
• Auditing Global Payroll Settings
• Making Functional Decisions
• Identifying Customizations
• Reporting Row Count for Tables
• Preparing Your Database
• Preparing for the Application Upgrade
• Backing Up After Prepare Your Database
Understanding Database PreparationYou must make a copy of your production database before you start preparations for the technical portion ofthe upgrade. Unless otherwise noted, run these tasks on your Copy of Production database (not the Demodatabase). These tasks do not use the new PeopleSoft release. You should use your current codeline andcurrent PeopleTools release to perform these tasks unless instructed otherwise.
Important! You must read the documentation Getting Started on Your PeopleSoft Upgrade before youcontinue with your upgrade. This documentation will not make sense, nor will you be able to upgrade, withoutcompleting the tasks outlined in that documentation.
Copyright © 2006, Oracle. All rights reserved. 1

Prepare Your Database Chapter 1
Task 1-1: Understanding Your UpgradeThis section discusses:
• Understanding PeopleSoft Upgrades
• Verify the Software Installation
• Define Upgrade Databases
• Review Upgrade Notes and Tips
Understanding PeopleSoft UpgradesThis task reviews information you need to know before you begin your upgrade. It explains the different typesof databases you will use and provides useful upgrade tips and information you may need to apply beforebeginning your upgrade.
Task 1-1-1: Verify the Software InstallationBefore continuing with the upgrade, you must complete all of the tasks in Getting Started on Your PeopleSoftUpgrade, “Install the Software Release.” Verify that the following tasks are complete:
• Installing the new release
• Applying updates required for upgrade
• Installing the Change Assistant
• Creating the Change Assistant job
• Reviewing the Change Assistant properties
Properties
DatabaseOrientation
Initial or MTP Products Platforms Languages
Source Initial All All All
Task 1-1-2: Define Upgrade DatabasesThe following databases will be used during your upgrade:
• The Demo database always refers to the database delivered with your new PeopleSoft release. It containsthe new and changed database objects you want to add.
• The Copy of Production database refers to the copy of your production database, into which you will addthe new and changed objects for this release from the Demo database.
Note. You will create more than one Copy of Production database. Your second and subsequent copiesare referred to as the New Copy of Production.
• Copy of Current Demo refers to the database provided for the release you are currently using.
2 Copyright © 2006, Oracle. All rights reserved.

Chapter 1 Prepare Your Database
Properties
DatabaseOrientation
Initial or MTP Products Platforms Languages
Target Initial All All All
Task 1-1-3: Review Upgrade Notes and TipsThis section contains information that may apply to your upgrade product. Review the information in thissection before beginning your upgrade.
• Performance RecommendationsBefore beginning your upgrade, you should plan for performance issues.
See “Appendix: Performance Tips and Techniques.”• Tax Update Status for Payroll SitesPeopleSoft HRMS 8.9 MP1 is current through Tax Update 05-A.PeopleSoft recommends you run your upgrade using your Copy of Production at the same Tax Updatelevel as the HRMS Demo database. If your Demo database is not at the same Tax Update level as listedabove, follow the recommendations in the appendix Upgrading with Tax Updates.
See “Appendix: Upgrading with Tax Updates.”
Note. If you are unsure of what tax update level you are on, from your Copy of Production, navigate toDefine Business Rules, Payroll Taxes, Report, Tax Update, and note the latest that is listed.
• Changes to Company, Company State Taxes, Company Local Taxes, Wage Loss Plan Table, andDeduction Table during the upgrade.If you are using non-commitment accounting in Payroll for North America, after you create your Copy ofProduction database in initial pass, do not make any changes in your production database for Company,Company State Taxes, Company Local Taxes, Wage Loss Plan Table, and Deduction Table until youcomplete the upgrade. If you make any changes to these tables, you will not be able to use the importscript during Move to Production pass to import data that you set up in the initial pass. You will eitherneed to synchronize the data between production and copy of the production in the initial pass beforeyou set up data and do the export, or manually set up data in your copy of the production during theMove to Production pass.If you are using Time and Labor and integrate to PeopleSoft projects, then you must read and follow theimpact of the ChartField upgrade in the appendix Dynamic ChartFields Upgrade Notes.
See “Appendix: Dynamic ChartFields Upgrade Notes.”
• Upgrading approvals for job openings and job offers
This upgrade will not upgrade the approvals for job openings and job offers. To upgrade your approvalsafter completing this upgrade, see Customer Connection for the Approval Documentation. If you do notwant to use the documentation from Customer Connection, all job openings and job offers must already beapproved or not started before beginning this upgrade.
• Review HRMS Record Changes
Copyright © 2006, Oracle. All rights reserved. 3
Prepare Your Database Chapter 1
Many record changes in the new PeopleSoft release will affect the data in your system. These changeswill be made through data conversion. To fully understand these changes, please review the followingappendices.
See “Appendix: HRMS Upgrade Notes.”
See “Appendix: Understanding Person Model Changes.”
See “Appendix: Benefits Upgrade Notes.”
See “Appendix: Understanding FTE Enhancement.”
See “Appendix: Performance Management Upgrade Notes.”• Upgrading Time and Labor RulesYour custom Time and Labor Rules will be manually recompiled during your initial upgrade pass only.You should not create any new custom rules in your production database after you have created your Copyof Production database for the initial pass until after you have completed your final move to productionand have gone live with the new PeopleSoft release. If you do create new Time and Labor Rules inproduction, you should manually create them again in your upgraded Copy of Production database fromthe previous pass before starting your next pass. This is the database that will be the source database foryour Move to Production pass.
• Microsoft SQL Server 2000 Column StatisticsMicrosoft SQL Server 2000 introduced a feature to create user-defined statistics on columns within atable. This feature is not supported by PeopleTools. If you added user-defined statistics to any columnsin your PeopleSoft application, it may cause errors to occur during the upgrade steps that alter tables.PeopleSoft recommends that you drop all user-defined statistics on columns of PeopleSoft tables beforeproceeding with your upgrade.
Properties
DatabaseOrientation
Initial or MTP Products Platforms Languages
Target Both All All All
Task 1-2: Copying Your Production DatabaseThis section discusses:
• Make a Copy of Your Production Database
• Increase Database Space
Task 1-2-1: Make a Copy of Your Production DatabaseMake a copy of your production database. You will upgrade this database, rather than performing the upgradedirectly to your production database. Performing an upgrade on a copy of your production database enablesyou to test your upgrade in a controlled environment. Refer to the administration guide for your databaseplatform for information on copying databases.
4 Copyright © 2006, Oracle. All rights reserved.
Chapter 1 Prepare Your Database
Note. Move to Production: This is a second Copy of Production sometimes referred to as the New Copy ofProduction. The first Copy of Production, or “old” Copy of Production, will now be the source database (it wasthe target database in the initial test pass). The second, or “new” Copy of Production, is now the target database.
Properties
DatabaseOrientation
Initial or MTP Products Platforms Languages
Target Both All All All
Task 1-2-2: Increase Database SpaceTo prepare for the upgrade, you may need to increase the space allocated to your Copy of Production database.Depending on your RDBMS, this may include allocating space to Tablespaces or allocating database primaryspace and log files. Be aware that your new environment needs to accommodate both the existing data in yourCopy of Production database as well as the new data, new data structures, and new database objects. Every siteand configuration is different, so PeopleSoft cannot offer a guaranteed estimate of your database sizing needs.
As part of the initial upgrade pass, you may need to revisit your initial space allocation settings more than onceas you progress through the upgrade. At the end of the initial pass, the final space allocation settings willclosely reflect the space you will need to complete any subsequent Move to Production passes. Work with yourDBA to ensure that your environment is set up appropriately for both the initial and Move to Production passes.
See “Appendix: Sizing Tables for the Upgrade.”
See PeopleSoft installation documentation for your product line and release.
Note. Oracle customers also need to alter the Tablespace for PSIMAGE and increase it to 200mb; autoextendon next 10mb; maxsize unlimited.
Properties
DatabaseOrientation
Initial or MTP Products Platforms Languages
Target Both All All All
Task 1-3: Applying Upgrade Planning FilesThis section discusses:
• Understanding Applying Upgrade Planning Files
• Apply the UPGOPT Project
• Build the UPGOPT Project
• Set Up Security for Upgrade Planning
• Load Planning Messages and Strings
Copyright © 2006, Oracle. All rights reserved. 5

Prepare Your Database Chapter 1
• Load Time and Labor Messages
Understanding Applying Upgrade Planning FilesIn this task, you apply the upgrade planning files that you downloaded from the Upgrade database on CustomerConnection to your current codeline. These files may include SQRs and scripts that you will execute in latertasks, and a project that you will apply to your Copy of Production database. This project may includerecords, fields, pages, menus, queries, and process definitions that allow functional users to define conversioninformation needed for later upgrade tasks.
Task 1-3-1: Apply the UPGOPT ProjectIn this step, apply the UPGOPT project to your Copy of Production database using the Copy Project fromFile process.
You can find the UPGOPT project files in the directory PS_HOME\PROJECTS\HC83X on your currentcodeline.
To apply the UPGOPT project:
1. Using your current codeline, launch Application Designer and sign on to your Copy of Production database.2. Select File, Copy Project from File.3. Select Tools, Copy Project, From File.4. From the dialog box, select the import directory PS_HOME\PROJECTS (current codeline).5. Select UPGOPT in the Project Name box, and then click the Copy button.6. When the Copy dialog appears, click the Options button.On the Copy Options tab, if you see a Filter By Release check box, make sure it is cleared.Whether you see this will depend on your version of PeopleTools.
7. Click OK to return to the Copy dialog.8. Click Copy.This copies the UPGOPT project onto your Copy of Production database.
9. Using your current codeline, launch Data Mover and sign on to your Copy of Production database.10. Run the following script to load Access Groups and the Upgrade Query Tree:
\PS_HOME\SCRIPTS\UPGOPT_HC83.DMS
Properties
DatabaseOrientation
Initial or MTP Products Platforms Languages
Target Both All All All
Task 1-3-2: Build the UPGOPT ProjectIn this step, you re-create and alter tables, delete any data that exists in the tables, and create views.
To build the UPGOPT project:
6 Copyright © 2006, Oracle. All rights reserved.
Chapter 1 Prepare Your Database
1. Using your current codeline, launch Application Designer and sign on to your Copy of Production database.2. Select File, Open…3. In the Definition drop-down list box, select Project and click Open to display the list of projects.4. Select UPGOPT and click Open again.5. Select Build, Project…6. Under Build Options, select Create Tables, Create Views.7. Click Settings…8. On the Create tab, select Recreate View if it already exists and Recreate Table if it already exists.9. On the Logging tab, select Fatal errors, warnings and informational messages.10. On the Scripts tab, select Output to separate files.11. In the Script File Names box, give your scripts a unique name that reflects this task number and theobject being created.
12. Click OK.13. Under Build Execute Options, select Build script file.14. Click Build.
Properties
DatabaseOrientation
Initial or MTP Products Platforms Languages
Target Both All All All
Task 1-3-3: Set Up Security for Upgrade PlanningIn this step, you will set up security on your Copy of Production database.
To set up security:
1. From the Go menu, select PeopleTools, Maintain Security.2. Select Use, Permission Lists, Pages, Update/Display.3. Select the permission list for the users who will be reviewing and setting up functional requirementsfor the upgrade.
4. Select or insert the menu name UPG_DEFINE_DEFAULTS, and click Edit Components.5. Click Select All, then OK.6. Select File, Save.7. Navigate to the Query tab.8. Select Access Group Permissions.9. Add one row with the Tree Name UPG_QUERY_TREE and the Access Group UPG_ACCESS_GROUP.10. Select OK, Save.
Copyright © 2006, Oracle. All rights reserved. 7

Prepare Your Database Chapter 1
Properties
DatabaseOrientation
Initial or MTP Products Platforms Languages
Target Both All All All
Task 1-3-4: Load Planning Messages and StringsThis script loads messages and strings needed for the Upgrade Planning Pages. The script name isPUHCEPY109I.DMS and the data file is PUHCEPY109.DAT.
Properties
DatabaseOrientation
Initial or MTP Products Platforms Languages
Target Initial All All All
Task 1-3-5: Load Time and Labor MessagesThis script loads messages and strings needed for the Upgrade Planning Pages.
The script name for your upgrade path is:
PUCSFAG02.DMS
The data file for your upgrade is:PUCSFAG02.DAT
Properties
DatabaseOrientation
Initial or MTP Products Platforms Languages
Target Initial All All All
Task 1-4: Verifying Global PayrollComplete this step if you have Global Payroll installed.
As part of performing the upgrade process, it is important that all Payroll activities are in a state of completion.Verify that all Calendar Group IDs were finalized, and that any payroll dependent interfaces were alsoprocessed; such as transactions sent to Banking, General Ledger, or other third-party vendors. Also, make surethat you do not have any packages that are in the process of being upgraded from one database to another. Allpackager-related processing needs to be completed before starting the upgrade process.
8 Copyright © 2006, Oracle. All rights reserved.

Chapter 1 Prepare Your Database
Properties
DatabaseOrientation
Initial or MTP Products Platforms Languages
Target Both Global Payroll All All
Task 1-5: Verifying FederalComplete this step if you have Federal installed.
As part of performing the upgrade process, it is important that all CPDF processing are in a state of completion.During the upgrade, the GVT_CPDF_ERRTBL table is dropped. The table will be replaced, therefore, allCPDF processing must be completed before starting the upgrade process.
Properties
DatabaseOrientation
Initial or MTP Products Platforms Languages
Target Both Federal All All
Task 1-6: Updating StatisticsRun this task to improve performance of your compare and copy processes. Have your database administratorupdate statistics on your database before proceeding with your upgrade. Later in the upgrade, you will updateyour statistics again due to changes in the database structure.
Properties
DatabaseOrientation
Initial or MTP Products Platforms Languages
Target Both All All All
Task 1-7: Running Initial Audit ReportsThis section discusses:
• Understanding Running Initial Audit Reports
• Run the Initial DDDAUDIT Report
• Run the Initial SYSAUDIT Report
• Run the Initial Alter Audit
Copyright © 2006, Oracle. All rights reserved. 9
Prepare Your Database Chapter 1
• Review the Initial Audits
Understanding Running Initial Audit ReportsIn this task, you run and review your initial DDDAUDIT, SYSAUDIT, and Alter Audit reports. Running thesereports ensures that your database is as clean as possible for the remainder of the upgrade.
Task 1-7-1: Run the Initial DDDAUDIT ReportDDDAUDIT is an SQR that compares your production SQL data tables with the PeopleTools recorddefinitions to identify inconsistencies.
In this step, DDDAUDIT is run using SQR from your current (old) release of PeopleSoft against the Copy ofProduction to ensure that you are starting with a clean database.
You will review the output from the report in a later step.
See Review the Initial Audits.
See Enterprise PeopleTools PeopleBook, System and Server Administration information, for your currentrelease.
Properties
DatabaseOrientation
Initial or MTP Products Platforms Languages
Target Both All All All
Task 1-7-2: Run the Initial SYSAUDIT ReportSYSAUDIT is an SQR used to identify “orphaned” PeopleSoft objects. For example, SYSAUDIT can identifya module of PeopleCode that exists but does not relate to any other objects in the system. SYSAUDIT alsoidentifies other inconsistencies within your database.
In this step, SYSAUDIT is run using SQR from your current (old) release of PeopleSoft against the Copy ofProduction to ensure that you are starting with a clean database.
See Enterprise PeopleTools PeopleBook, System and Server Administration information, for your currentrelease.
Properties
DatabaseOrientation
Initial or MTP Products Platforms Languages
Target Both All All All
10 Copyright © 2006, Oracle. All rights reserved.

Chapter 1 Prepare Your Database
Task 1-7-3: Run the Initial Alter AuditTo verify that the PeopleTools definitions are synchronized with the underlying SQL data tables in yourdatabase, run the PeopleTools alter record process on all records in your system. This process, called an AlterAudit, compares the data structures of your database tables with the PeopleTools definitions to identifyinconsistencies. Alter Audit then creates SQL scripts with the data definition language (DDL) changes that arerequired to synchronize your database with the PeopleTools definitions.
To run Alter Audit:
1. Launch PeopleTools and sign on to the Copy of Production database.
2. From Application Designer, select File, New…
3. Select Project, and then click OK.
4. Select Insert, Objects into Project...
5. Select Records from the Object Type drop-down list box.
6. Select Table from the Type drop-down list box.
7. Click Insert, and then click Select All.
8. Click Insert, and then click Close.
9. Select File, Save All.
10. Enter a project name of your choice.
11. Click OK.12. Select Build, Project...
The Build dialog box appears:
Build dialog box
13. Under Build Options, select Alter Tables.
Create Indexes is automatically selected.
Copyright © 2006, Oracle. All rights reserved. 11
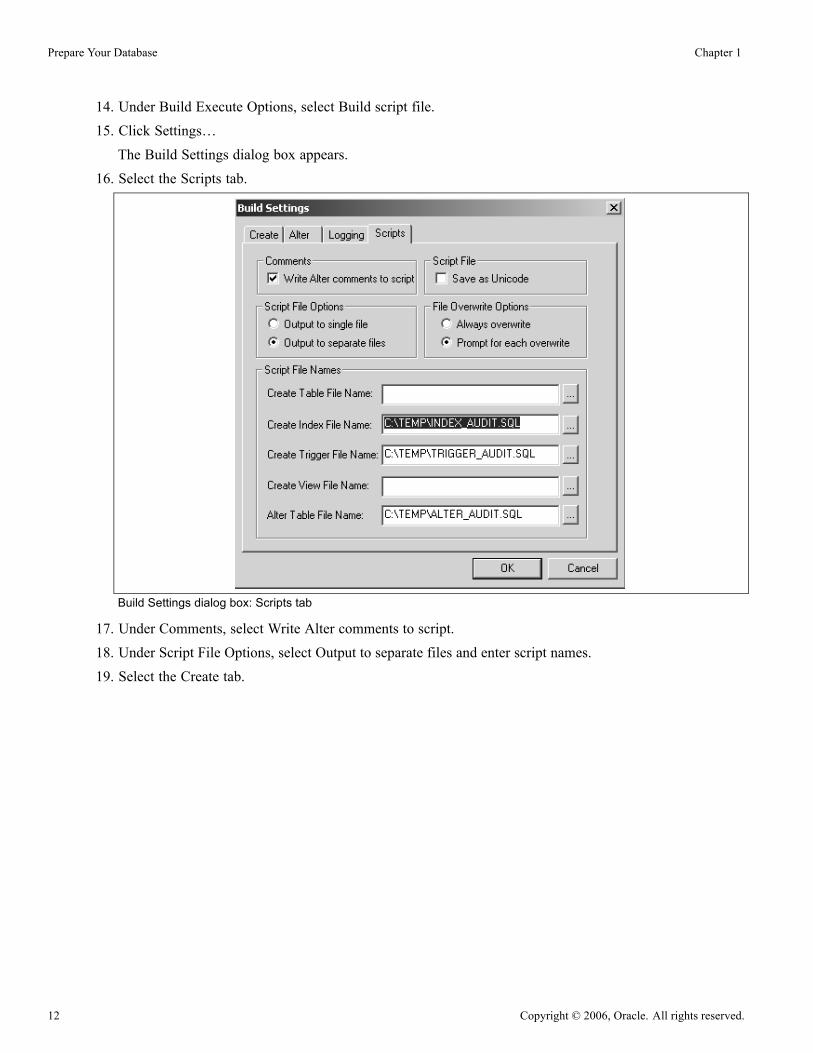
Prepare Your Database Chapter 1
14. Under Build Execute Options, select Build script file.15. Click Settings…The Build Settings dialog box appears.
16. Select the Scripts tab.
Build Settings dialog box: Scripts tab
17. Under Comments, select Write Alter comments to script.18. Under Script File Options, select Output to separate files and enter script names.19. Select the Create tab.
12 Copyright © 2006, Oracle. All rights reserved.
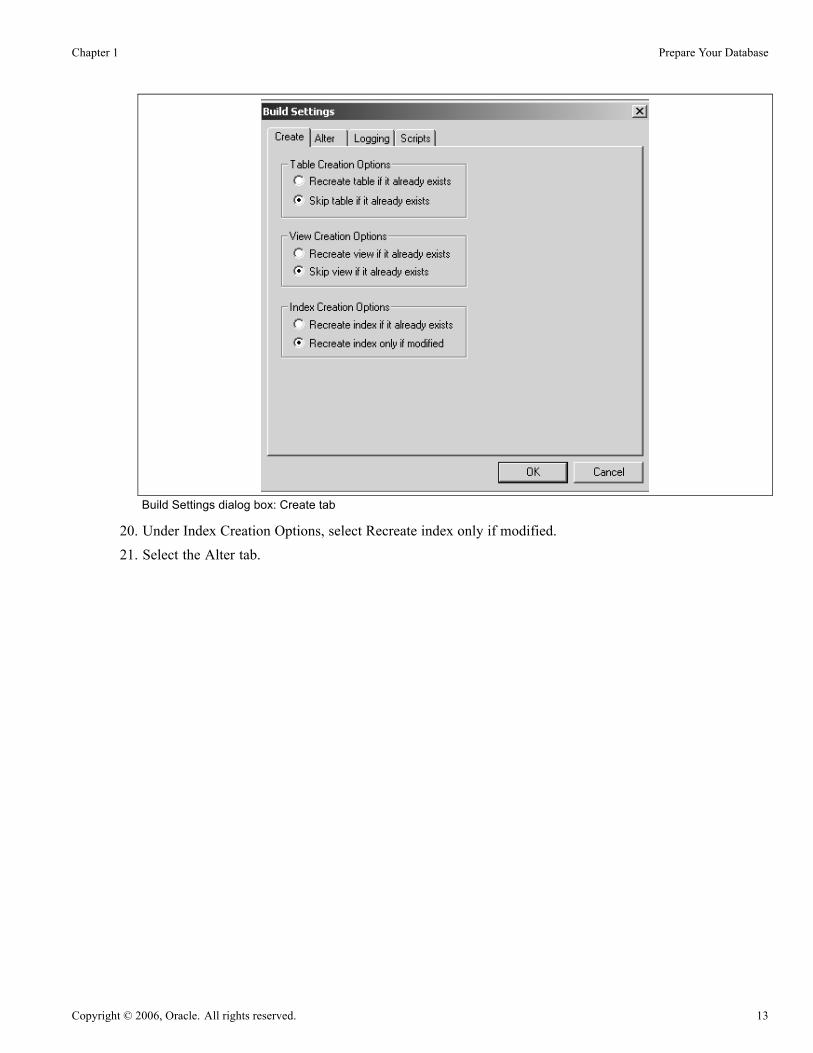
Chapter 1 Prepare Your Database
Build Settings dialog box: Create tab
20. Under Index Creation Options, select Recreate index only if modified.21. Select the Alter tab.
Copyright © 2006, Oracle. All rights reserved. 13

Prepare Your Database Chapter 1
Build Settings dialog box: Alter tab
22. Ensure that the following fields are set correctly:• Under the Alter Any option section, the Adds, Changes, Renames, and Deletes check boxes should beselected.
• Drop Column Options should be set to Drop Column if data present.• Change Column Length Options should be set to Truncate data if field too short.
23. Click OK.The Build dialog box reappears.
24. Click Build on the Build Dialog.25. Click Close when complete.
Properties
DatabaseOrientation
Initial or MTP Products Platforms Languages
Target Both All All All
Task 1-7-4: Review the Initial AuditsIn this step, you review the audits you performed earlier in this task. Review the audits before proceedingwith the upgrade.
14 Copyright © 2006, Oracle. All rights reserved.

Chapter 1 Prepare Your Database
Review the output from the SYSAUDIT and DDDAUDIT reports and correct any discrepancies. Whenapplication tables are deleted from the Application Designer, they are not automatically deleted from thesystem tables. PeopleSoft takes this precaution in case you have customized information that you want topreserve. When you review your DDDAUDIT listing, these tables are listed as a discrepancy between thePeopleSoft application and the database.
Now you must decide whether to drop these tables or retain them. In most cases, you will want to drop thetables, using your SQL tool to drop the tables from the system catalogs. If you have customized information orprocesses that access these tables, you may want to retain them in the system tables even though they will nolonger be accessed or updated by PeopleSoft. Drop any unnecessary deleted tables now so that your futureDDDAUDIT reports will be as clean as possible.
The Alter Audit produces your named scripts from the previous step. These scripts contain SQL that correctsany discrepancies between your PeopleTools Record definitions and the database system catalog tabledefinitions. Review the Alter Audit output and correct any discrepancies.
Note. You will rerun the DDDAUDIT and SYSAUDIT SQRs later in the upgrade. If you wish to preservethe log files generated by Change Assistant from this run, you will need to manually rename the files aftercompleting this task.
See Enterprise PeopleTools PeopleBook, System and Server Administration information, for your currentrelease.
Properties
DatabaseOrientation
Initial or MTP Products Platforms Languages
Target Both All All All
Task 1-8: Running Application AuditsThis section discusses:
• Run Upgrade Reports
• Run Person Relationship Audit Report
• Run Jobcode Table Reports
• Run Personal Data Changes Report
• Refresh Personal Data Snapshot Table
• Run Dynamic ChartFields Audits
Task 1-8-1: Run Upgrade ReportsThis section discusses:
• Understanding Upgrade Reports
• Audit for Merit Scale Table Collisions with Rating Models
• Listing of the Review Distribution Table
Copyright © 2006, Oracle. All rights reserved. 15

Prepare Your Database Chapter 1
• Run Account Code Table Audit
Understanding Upgrade ReportsIn this step, you run upgrade reports that list erroneous data that you need to clean up before starting theupgrade.
To run the Application Audit Reports:
1. Sign on to the Copy of Production database.
2. Navigate to Define Business Rules, Define Upgrade Options, Report.
3. Select the appropriate reports. (Reports are identified and explained in the remainder of this task.)
4. Select Add.5. Enter run control UPGRADE.
6. Click the Run button.
7. Click the Process Monitor link to monitor the program’s process.
Audit for Merit Scale Table Collisions with Rating ModelsRun the Audit for Merit Scale Table Collisions with Rating Models report − PUHRY65.SQR.
For the new PeopleSoft release, the Review Band series defined in the Merit Scale Table (for use in SalaryPlanning) is being consolidated into the Rating Model structure. To do this, PeopleSoft has created new RatingModels for each existing Merit Scale that is based on a Review Band. However, it is possible that a RatingModel already exists with the same name (Key) as the Merit Scale being converted, in which case that MeritScale (Review Band series) will not be able to upgrade. This report identifies any such points of conflict.If this report identifies any "empty" Rating Model, where a Rating Model description has been defined butno review ratings have been entered for it you must delete the empty Rating Model to avoid errors duringthe upgrade. If the report identifies key-name conflicts you can manually redefine a comparable RatingModel after upgrade is complete, but this is optional.
To delete the empty rating models:
1. Sign on to your Copy of Production database.2. Navigate to Administer Workforce, Plan Salaries (GBL), Setup, Rating Model Table, Update/Display.3. Enter the Rating Model from the report to be deleted, Click OK.4. Select Edit, Delete Row.
Listing of the Review Distribution TableRun the Listing of the Review Distribution Table report − PUHRY62.SQR.
In this PeopleSoft release, the Review Distribution tables (REVIEW_DISTRIB, REVW_DESIR_DIST)used to analyze performance results are being replaced by new structures (EP_DESIRED_DIST andEP_DES_DIST_PCT), which integrate better with ePerformance. The existing data in these tables cannot beupgraded due to the wide differences in usage and business flow. This report displays your existing distributionsetup in a format to assist you in reestablishing your distribution requirements under the ePerformancestructures after the upgrade is complete if you would like.
Run Account Code Table AuditRun the Account Code Table Audit Report — PUPYW01.SQR.
16 Copyright © 2006, Oracle. All rights reserved.

Chapter 1 Prepare Your Database
This report lists all account codes that have the following ChartField setup:
• No ChartFields defined.
• Some ChartFields are defined but account has not been defined.
Records without defined ChartFields are not converted during the upgrade. If you have any recordsdefined without defined ChartFields and you want to convert them to the new PeopleSoft release, updateACCT_CD_TBL with at least Account value.
Records with some ChartFields defined but without Account ChartField value will still be converted during theupgrade unless it has not been used for distribution anywhere in PeopleSoft HRMS. However, if you have anyrecords defined like this, you must update ACCT_CD_TBL with Account value. Account is a mandatory fieldin the new PeopleSoft release and conversion without that value cannot complete correctly.
To update the Account Code Table with ChartField values:
1. Using your current codeline, launch Application Designer and sign on to your Copy of Production database.2. Select Define Business Rules, Define Payroll Process, Setup 1, Account Code Table or Define BusinessRules, Define Commit Accounting, Setup, Account Code Table.
3. Enter the account code from the report.4. Click Search.5. Insert new effective date and update ChartFields Details.6. Click Save.
Properties
DatabaseOrientation
Initial or MTP Products Platforms Languages
Target Both All All All
Task 1-8-2: Run Person Relationship Audit ReportThis section discusses:
• Understanding the Person Relationship Audit Report
• Running Person Relationship Audit Report
• Correcting Invalid Relationships
Understanding the Person Relationship Audit ReportThe validation report PUHCV01.SQR shows invalid relationships among tables PERS_DATA_EFFDT,PERSONAL_DATA, PERSON, JOB, EMPLOYMENT, PA_RT_EMP_SETUP, ASGN_HOME_HOST,ASSIGNMENT.
These must be corrected before running the data conversion or they will remain orphaned.
Running Person Relationship Audit ReportFollow the steps below to run person relationship audit report.
To run the report:
Copyright © 2006, Oracle. All rights reserved. 17
Prepare Your Database Chapter 1
1. Sign on to the Copy of Production database.2. Navigate to Define Business Rules, Define Upgrade Options, Reports, Relationships Validation, Add.3. Enter run control UPG_PERSON_AUDIT.4. Click the Run button.5. Click the Process Monitor link to monitor the program’s process.
Correcting Invalid RelationshipsThis audit reveals any missing or inaccurate relationships that exist in your current Person and Job data. Thesuccess of the conversion process is dependent on this data being correct.
The actions you must take will depend on the results of your investigation. If data exists in one record withoutbeing in another, then one of two things is needed. You should either delete the record from the table it appearsin, or add the record to the table it is missing from.
If you need to add a missing row, you will probably need to do some functional research to determine whatdata should be entered.
The information below may help you correct invalid relationships.
PUHCV01.SQR lists:
• All EMPLIDs in PERSON that are not in EMPLOYMENT
PERSON is the Parent record to EMPLOYMENT. A row is required in EMPLOYMENT for every row inPERSON, unless the customer is using Campus Solutions.
• All EMPLIDs in PERS_DATA_EFFDT that are not in PERSON
PERSON is the Parent record to PERS_DATA_EFFDT. A row is required in PERS_DATA_EFFDTfor every row in PERSON.
• All EMPLIDs in EMPLOYMENT that are not in PERSON
PERSON is the Parent record to EMPLOYMENT. A row is required in EMPLOYMENT for everyrow in PERSON.
• All EMPLID/EMPL_RCDS in EMPLOYMENT that are not in JOB
EMPLOYMENT is the Parent record to JOB. A row is required in JOB for every distinctEMPLID/EMPL_RCD in EMPLOYMENT.
• All EMPLID/EMPL_RCDS in JOB that are not in EMPLOYMENT
EMPLOYMENT is the Parent record to JOB. A row is required in EMPLOYMENT for every distinctEMPLID/EMPL_RCD in JOB.
• All EMPLIDs with PER_TYPE = P in PERS_DATA_EFFDT that are not in PA_RT_EMP_SETUP asEMPLID or EMPLID_PAYEE
The PER_TYPE = ‘P’ is for Pension non-employees. Anyone with this PER_TYPE should also be inPA_RT_EMP_SETUP. If they are not, then the PER_TYPE is probably incorrect and should be fixedbefore running the conversion.
• All EMPLID_PAYEE /EMPL_RCD_PAYEE in PA_RT_EMP_SETUP that are not in EMPLOYMENT
Any record in PA_RT_EMP_SETUP should have a corresponding row in EMPLOYMENT. This iswhen the EMPLID is in the EMPLID_PAYEE field in PA_RT_EMP_SETUP. If not, then they will notbe correctly processed as Pension Payees. Determine whether the Pension data is correct and createEmployment/JOB/JOB_JR data if it is. Otherwise delete the Pension data.
18 Copyright © 2006, Oracle. All rights reserved.
Chapter 1 Prepare Your Database
• All EMPLID/EMPL_RCD in PA_RT_EMP_SETUP that are not in EMPLOYMENTAny record in PA_RT_EMP_SETUP should have a corresponding row in EMPLOYMENT. This iswhen the EMPLID is in the EMPLID field in PA_RT_EMP_SETUP. If not, then they will not becorrectly processed as Pension Payees. Determine whether the Pension data is correct and createEmployment/JOB/JOB_JR data if it is. Otherwise delete the Pension data.
• All EMPLID/EMPL_RCDs flagged as HOST records that are not in the Global Assignment table -PS_ASGN_HOME_HOSTThis report shows all EMPLID/EMPL_RCDs flagged as HOST records that are not in the GlobalAssignment table - PS_ASGN_HOME_HOST. Either create the Assignment and Assignment Home/hostrecords or change the HOME_HOST_CLASS to M’ in EMPLOYMENT
• All EMPLID/EMPL_RCDs flagged as HOST records that are not in the Global AssignmentPS_ASSIGNMENTThis report shows all EMPLID/EMPL_RCDs flagged as HOME records that are not in the GlobalAssignment PS_ASSIGNMENT. Either create the Assignment and Assignment Home/host records orremove them from change the HOME_HOST_CLASS to M’ in EMPLOYMENT.
• All EMPLID/EMPL_RCDs flagged as HOST records that were created with HIRE not ASGHost Records must have been created with the Action ASG. These records should be changed to haveEMPLOYMENT.HOME_HOST_CLASS set to ‘M’.
Properties
DatabaseOrientation
Initial or MTP Products Platforms Languages
Target Both All All All
Task 1-8-3: Run Jobcode Table ReportsThis section discusses:
• Understanding Jobcode Table Reports
• Running Jobcode Table Reports
• Updating Jobcode Tables
Understanding Jobcode Table ReportsIn previous PeopleSoft releases, the Jobcode Table did not prompt off of the EEO Job Group Table for the EEOJob Group field but it does in the new PeopleSoft release.
Report PUHRY75.SQR contains two reports that print the EEO Job Groups, which exist in the Jobcode Table.
Running Jobcode Table ReportsTo run the jobcode table reports:
1. Navigate to Define Business Rules, Define Upgrade Options, Jobcode EEO Group Reports, Add.
2. Enter run control UPG_JOBCODE_EEO.
3. Click the Run button.
4. Click the Process Monitor link to monitor the program’s process.
Copyright © 2006, Oracle. All rights reserved. 19

Prepare Your Database Chapter 1
The first report indicates the SETID, Jobcode, Effective Date, Jobcode Description, and EEO Job Group foreach row within the Jobcode table. The second report indicates the unique values of each EEO Job Groupthat is found within the Jobcode Table. For each unique EEO Job Group that is found during the conversionprocess, a row will be inserted into the EEO Job Group Table. The value listed for EEO Job Group will beused for the Description and Short Description when the row is inserted.
You can limit the number of different values that will be inserted into the EEO Job Group Table by updatingthe Job Code Table now. You can then run the report again to determine if there are any remaining rows thatwill be inserted during data conversion.
Updating Jobcode TablesTo update the job code table:
1. Sign on to your Copy of Production database.
2. Select Define Business Rules, Manage Human Resources, Setup, Job Code Table, Update/Display.
3. Enter the Job Code you want to update.
4. Enter EEO Job Group for the Job Code.
5. Select File, Save.
Properties
DatabaseOrientation
Initial or MTP Products Platforms Languages
Target Both All All All
Task 1-8-4: Run Personal Data Changes ReportThis section discusses:
• Understanding Personal Data Changes Report
• Setting Up Variable Compensation
• Removing/Replacing Group Build Where Clause
• Updating Global Payroll
• Updating Time and Labor
• Running Personal Data Reports
Understanding Personal Data Changes ReportThe PUGPY51.SQR for Personal Data Changes run to identify the areas where you must take action priorto the upgrade. This SQR identifies the data and records where the record PERSONAL_DATA was used asa field value and cannot be modified by the upgrade process. The following subtopics describe the foursections found in the report.
See “Appendix: Understanding the Person Model Changes”
20 Copyright © 2006, Oracle. All rights reserved.

Chapter 1 Prepare Your Database
Setting Up Variable CompensationThe Variable Compensation section lists the Variable Compensation Formula that has a differentPERSONAL_DATA field than YEARS_OF_EXP. All fields from PERSONAL_DATA need to be removedor replaced. During the upgrade process, any reference to PERSONAL_DATA.YEARS_OF_EXP toPERS_DATA_EFFDT.YEARS_OF_EXP will be converted. The Variable Compensation section of the reportcan be viewed in the VC_PAYFORM_TBL that uses the Record PERSONAL_DATA and a field other thanYEARS_OF_EXP. You will need to correct these manually, as the presence of these fields in the payform tableis a result of a customization. Follow the steps below to set up the variable manually.
To manually set up the variable:
1. Sign on to your Copy of Production database.2. Select Compensate Employees, Manage Variable Compensation, Setup, Payout Formulas.
Removing/Replacing Group Build Where ClauseThe Group Build section lists the groups in which a field from the PERSONAL_DATA is used in theGroup Build’s Where Clause, and not in the PERSON or PERS_DATA_EFFDT. All fields from thePERSONAL_DATA need to be removed or replaced. During the upgrade process, any field from thePERSONAL_DATA that is in PERSON or PERS_DATA_EFFDT will be converted. You will need to delete ormodify them online. Follow the steps below to remove or replace the Group Build Where Clause.
To manually remove or replace the Group Build Where Clause:
1. Using your current codeline, launch Application Designer and sign on to your Copy of Production database.
2. Select one of the following as appropriate:
a. Define Business Rules, Manage Human Resources, Setup, Group Definition.
b. Define Business Rules, Manage Human Resources, Setup, Group Criteria Definition.
c. Global Payroll Australia, Define Payroll Setup (AUS), Setup, Group Build Definition.
d. Global Payroll Australia, Define Payroll Setup (AUS), Setup, Group Criteria Definition.
e. Global Payroll Hong Kong, Define Payroll Setup (HKG), Setup, Group Build Definition.
f. Global Payroll Hong Kong, Define Payroll Setup (HKG), Setup, Group Criteria Definition.
g. Compensate Employees, Manage Variable Compensation, Setup, VC Group Build.
3. Continue to remove or replace the Group Build Where Clause.
Updating Global PayrollThe Global Payroll section lists the Global Payroll Triggers that use PERSONAL_DATA. During the upgradeprocess all fields that need to be removed will be deleted. You will need to determine if you want to replace thetriggers with ones from the other tables and which triggers you will use to replace the exiting ones. Followthe steps below to manually update Global Payroll.
Note. The triggers on PERSONAL_DATA were never executed in PeopleSoft 8.3.
To manually update the Global Payroll:
1. Using your current codeline, launch Application Designer and sign on to your Copy of Production database.2. Select Define Business Rules, Define Global Payroll Rules, Setup 5, Trigger Definition.
Copyright © 2006, Oracle. All rights reserved. 21
Prepare Your Database Chapter 1
Updating Time and LaborThe Time and Labor (TL) section lists all the PERSONAL_DATA fields used in TL Group Definition. All thefields need to be replaced or removed. During the upgrade process PERSONAL_DATA will be replaced withPERSONAL_DT_FST for fields that exist in that view, others will be deleted. You will need to determineif you want to replace the entries for Address or Phone fields with different tables prior to performing theupgrade. Follow the steps below to manually update Time and Labor.
To manually update Time and Labor:
1. Using your current codeline, launch Application Designer and sign on to your Copy of Production database.2. Select one of the following:a. Define Business Rules, Define Global Payroll Rules, Setup 5, TL Group Creation Security.b. Define Business Rules, Define Global Payroll Rules, Setup 5, TL Dynamic Group.c. Define Business Rules, Define Global Payroll Rules, Setup 5, TL Static Group.d. Define Business Rules, Define Time and Labor, Enroll, Group Creation Security.e. Define Business Rules, Define Time and Labor, Enroll, Dynamic Group.f. Define Business Rules, Define Time and Labor, Enroll, Static Group.
Running Personal Data ReportsFollow the steps below to run personal data reports. To run the personal data reports:
1. Sign on to the Copy of Production database.2. Navigate to Define Business Rules, Define Upgrade Options, Reports, Personal Data Reports, Add.3. Enter run control UPG_PERSONAL_DATA.4. Click the Run button.5. Click the Process Monitor link to monitor the program’s process.
Properties
DatabaseOrientation
Initial or MTP Products Platforms Languages
Target Both All All All
Task 1-8-5: Refresh Personal Data Snapshot TableAn important preparatory step to take prior to any data conversion upgrade is to ensure that thePERSONAL_DATA snapshot table is up to date by running the Application Engine process that will refresh thedata. The process, called PERS_REFRESH, will delete all the data from PERSONAL_DATA and then reloadit from the PERSON, PERS_DATA_EFFDT, NAMES, ADDRESSES, and PERSONAL_PHONE records.
To refresh the personal data snapshot table:
1. Using the browser, sign on to your Copy of Production.2. Navigate to Define Business Rules, Administer HR System, Process, Refresh PS_PERSONAL_DATAtable.
3. Run the process.
22 Copyright © 2006, Oracle. All rights reserved.

Chapter 1 Prepare Your Database
4. When the process is finished validate, using your SQL tool, that the count in PERSONAL_DATA is thesame as in PERSON.
Properties
DatabaseOrientation
Initial or MTP Products Platforms Languages
Target Both All All All
Task 1-8-6: Run Dynamic ChartFields AuditsThis section discusses:
• Understanding Dynamic ChartFields Audit Reports
• Running the Dynamic ChartFields Audit Reports
Understanding Dynamic ChartFields Audit ReportsIn this task, you run and review the Dynamic ChartFields Audit reports. Running these reports assists you indeciding how you want to set up data for the General Ledger Interface. There are four reports, listed below:
Note. Run this step only if you are using non-commitment accounting in Payroll for North America.
• ChartKey Usage by Company and Business Unit. This report indicates the Company Earnings Accounts,Company Deduction Accounts, US Company Tax Accounts, and Canadian Company Tax Accounts.
• ChartKey Usage by Expense Type. This report shows Earnings Expense Accounts, Deduction ExpenseAccounts, US Tax Expense Accounts, and Canadian Tax Expense Accounts.
• Liability ChartField Usage. This report displays Local Tax Liability ChartFields and Deduction LiabilityChartFields.
• List Payroll-GL Chart Key Mappings. This is an existing report and shows all ChartField records.
The reports list the existing setup for expenses and liability accounts. You should work with General Ledgerstaff to decide how to group payroll activities, what ChartField combination to use for each group, and whatliability accounts to use to offset the credit transactions for payroll activities. After making those decisionsyou will manually set up the data in tables used for General Ledger Interface. You will perform this tasklater in the upgrade process.
See Setting Up General Ledger Interface.
See “Appendix: Dynamic ChartFields Upgrade Notes.”
Running the Dynamic ChartFields Audit ReportsTo run the reports:
1. Sign on to the Copy of Production database.2. Navigate to Define Business Rules, Define Upgrade Options, Reports, ChartField Audit Reports.3. Select Add a New Value.4. Enter run control UPG_PUPYY01_RUN.5. Click Add.
Copyright © 2006, Oracle. All rights reserved. 23
Prepare Your Database Chapter 1
6. Click Run.7. Select all reports.8. Click OK.9. Click the Process Monitor link to monitor the program’s process.10. Navigate to Compensate Employees, Administer GL Interface, Report, Chartkey Values.11. Select Add a New Value.12. Enter run control Chartkey.13. Click Add.14. Click Run.15. Click OK.16. Click the Process Monitor link to monitor the program’s process.
See “Complete Database Changes,” Setting Up General Ledger Interface
See “Appendix: Dynamic ChartFields Upgrade Notes.”
Properties
DatabaseOrientation
Initial or MTP Products Platforms Languages
Target Initial Payroll for NorthAmerica
All All
Task 1-9: Preparing the Benefits UpgradeThis section discusses:
• Prepare Benefits Administration
• Prepare COBRA Administration
Task 1-9-1: Prepare Benefits AdministrationThis step is performed by the Benefits Administrator. Run this step if you are licensed for PeopleSoft BenefitsAdministration.
You need to create events for all pending data changes that could affect Benefits eligibility because dataconversion cannot convert pending data change "triggers." To create events, perform a single EventMaintenance (EM) run (using any single arbitrary existing EM schedule, the smaller the schedule the lessimpact this will have on your timeline). Then review all Benefits Administration messages to ensure that allpending activity has been successfully processed to events in at least a "prepared" status. The events do nothave to be finalized or closed. After running Event Maintenance, confirm that no more pending changes existby verifying on the BAS Activity page that the BAS Activity grid is empty.
24 Copyright © 2006, Oracle. All rights reserved.
Chapter 1 Prepare Your Database
Properties
DatabaseOrientation
Initial or MTP Products Platforms Languages
Target Both BenefitsAdministration
All All
Task 1-9-2: Prepare COBRA AdministrationThis step is to be performed by the Benefits Administrator. Run this step if you are using the COBRAAdministration module within Base Benefits.
You need to create events for all pending data changes that could trigger COBRA qualification because dataconversion cannot convert pending data change "triggers." To create events, perform a COBRA process run.Then review all COBRA Administration messages to ensure that all pending activity has been processed toevents. The events do not have to be finalized or closed. After running the COBRA process, confirm that nomore pending changes exist by verifying that the COBRA Activity grid is empty on the COBRA Activity page.
Properties
DatabaseOrientation
Initial or MTP Products Platforms Languages
Target Both All All All
Task 1-10: Preparing for System Element DeletionsThis section discusses:
• Understanding System Element Deletions
• View Element Relationships
• Find System Elements to Delete
• Verify System Elements for GP Japan
• Review Reports and Interface Setup
• Update System PIN Number
Note. Complete this task if you have Global Payroll installed.
Understanding System Element DeletionsWith the upgrade to the new PeopleSoft release, some system elements will be deleted for Global Payroll. Youmay not use these system elements or the record fields that correspond to these system elements. However,you will need to complete the steps below to verify if you are using these elements or record fields. If youfind that you do use the system elements or record fields that will be deleted, you will be referred to anappendix where you will find procedures to retain the functionality that was provided by the system elementand/or record field usage.
Copyright © 2006, Oracle. All rights reserved. 25
Prepare Your Database Chapter 1
• AGE 18+ ALL• CPAMID FRA ALL• EXPCT MILIT DT DEU ALL• ENTRY DT FRA ALL• MILIT STATUS FRA ALL• MEDICARE ENTLD DT ALL• MILITARY STATUS ALL• PERSON TYPE ALL• PREV HCE ALL• SMOKER ALL• US WORK ELIGIBILITY ALL• YRS OF WORK EXPER ALL• QDRO IND YN ALL• RATING SCALE ALL• REVIEW DT ALL• REVIEW RATING ALL• SALARY MATRIX CD ALL• WRKS CNCL MEM DEU ALL
Each of these are “database” system elements. The record field that corresponds to each will be removed;therefore the system element will be removed as well.
The System Element Mapping Table, provided below, details the record field that the system elementmapped to.
PIN Code Record Field
AGE 18+ ALL PERSONAL_DATA AGE_STATUS
CPAMID FRA ALL PERSONAL_DATA CPAMID
EXPCTMILIT DT DEUALL PERSONAL_DATA EXPCTD_MILITARY_DT
ENTRYDT FRA ALL PERSONAL_DATA ENTRY_DT_FRA
MILIT STATUS FRA ALL PERSONAL_DATA MILIT_SITUATN_FRA
MEDICARE ENTLD DT ALL PERSONAL_DATA MEDICARE_ENTLD_DT
MILITARY STATUS ALL PERSONAL_DATA MILITARY_STATUS
PERSON TYPE ALL PERSONAL_DATA PER_TYPE
PREV HCE ALL PERSONAL_DATA HIGHLY_COMP_EMPL_P
QDRO IND YNALL PERSONAL_DATA QDRO_IND_YN
26 Copyright © 2006, Oracle. All rights reserved.

Chapter 1 Prepare Your Database
PIN Code Record Field
RATING SCALE ALL JOB RATING_SCALE
REVEWDTALL JOB REVIEW_DT
REVIEWRATING ALL JOB REVIEW_RATING
SALARYMATRIX CD ALL JOB SALARY_MATRIX_CD
SMOKER ALL PERS_DATA_EFFDT SMOKER
USWORK ELIGIBILITY ALL PERSONAL_DATA US_WORK_ELIGIBILITY
WRKS CNCLMEMDEUALL JOB WRKS_CNCL_MEM_GER
YRS OFWORK EXPER ALL PERSONAL_DATA YEARS_OF_EXP
In this task, you view the element relationships and run PUGPW10.SQR. In addition, you need to manuallyreview any customized reports/interface setup you have to see if they were referencing these system elementsand/or record fields.
Task 1-10-1: View Element RelationshipsThis section discusses:
• Understanding Element Relationships
• Rebuilding the Element Relationship Map
• Finding System Elements in Rules
Understanding Element RelationshipsThis step determines if the system element is used in a rule definition. First you need to rebuild the elementrelationship map.
Rebuilding the Element Relationship MapTo rebuild the element relationship map:
1. Navigate to Home, Define Business Rules, Define Global Payroll Rules, Utilities, Define ElementRelationships.
2. Click Rebuild Effdt Element Map.3. Ensure that the map builds successfully with no errors.
See PeopleSoft Global Payroll PeopleBook, for you current release.
Finding System Elements in RulesYou will need to repeat the following instructions for EACH system element being deleted. If you do not, thedata will be left in an inconsistent state after the upgrade.
To find system elements in rules:
Copyright © 2006, Oracle. All rights reserved. 27

Prepare Your Database Chapter 1
1. To obtain the Element Name navigate to Home, Define Business Rules, Define Global Payroll Rules,Inquire, System Elements by Source.
2. On the Search page specify the following:• System Element Source=Database-Field• Record Name=<Record Name> Refer to the System Element Mapping Table in the following appendix.
See “Appendix: Upgrading System Element Deletions.”
• Look for the field that corresponds to your system element and look for the Element Name from that row.Make note of this Element Name, as you will use this information in step 4 below.
3. Navigate to Home, Define Business Rules, Define Global Payroll Rules, Utilities, View ElementRelationshipsto check if the system element is used in any rule.
4. On the Search page, specify the following:
• Element Type=<SY>
• Element Name=<System Element Name>
5. Click Search.6. Click Used By.7. Specify As Of Date to be the date used in your system (the effective date used in your rule definitions).
8. If no data is returned, the system element has not been used in any rule. Continue to the next systemelement. When finished with all system elements, proceed to the next step.
9. If data is returned, make note of it now. You will need these values later in the upgrade. Refer to theappendix titled, “Upgrading System Element Deletions” after you complete the step titled, “Find SystemElements to Delete.”
Note. PeopleSoft Global Payroll Germany customers: The system element WRKS_CNCL_MEM_DEUis used in the PeopleSoft delivered/maintained rule, Writable Array DE_RP_0001. Changes to this ruleare not necessary as the update is delivered with the upgrade rules packages from PeopleSoft GlobalPayroll Germany.
10. Repeat these steps for each system element in the table above.
See Find System Elements to Delete.
See “Appendix: Upgrading System Element Deletions.”
Properties
DatabaseOrientation
Initial or MTP Products Platforms Languages
Target Both Global Payroll All All
Task 1-10-2: Find System Elements to DeleteRun the report “Pre-Delete System Elements,” PUGPW10.SQR. This SQR looks for references of systemelements in non-rules (anything not covered in the step “View Element Relationships”) as well as records fieldusage. If you have used the system element or record field, the results of this SQR will report them. If valuesare returned refer to the appendix, “Upgrading System Element Deletions,” now.
28 Copyright © 2006, Oracle. All rights reserved.

Chapter 1 Prepare Your Database
To run the Find System Elements to Delete Report:
1. Sign on to the Copy of Production database.
2. Navigate to Define Business Rules, Define Upgrade Options, Reports, Pre-Delete System Elements, Add.
3. Enter UPG_GP_FIND_ELEMENTS on the Run Control selection panel and click OK.
4. Click Run.5. Click OK from the Process Scheduler Request panel.
See View Element Relationships.
See “Appendix: Upgrading System Element Deletions.”
Properties
DatabaseOrientation
Initial or MTP Products Platforms Languages
Target Both Global Payroll All All
Task 1-10-3: Verify System Elements for GP JapanIf you have installed the Global Payroll (GP) Japan module, run the GP Japan Audit Report, PUGPH50.SQR.This SQR lists references to the element ER BASE PAYM in your database, which will be deleted during thisupgrade by the script DLHCGJPH402.DMS. If this report lists references to this element, you will need tochange the script DLHCGJPH402.DMS so that it does not remove the element from the system.
To Run the GP Japan Audit Report:
1. Sign on to the Copy of Production database using your current version of PeopleTools.2. From the Go menu, choose Define Business Rules, Define Upgrade Options, Reports, GP Japan AuditReport, Add.
3. Enter UPG_GPJPN_AUDIT on the Run Control selection panel and click OK.4. Click Run.5. Click OK from the Process Scheduler Request panel.
Properties
DatabaseOrientation
Initial or MTP Products Platforms Languages
Target Both Global Payroll Japan All All
Task 1-10-4: Review Reports and Interface SetupYou will need to manually review any customized reports/interface setup you have to see if they are referencingthese system elements and record fields. Refer to the appendix “Upgrading System Element Deletions” if youfind you have referenced these elements or fields.
See “Appendix: Upgrading System Element Deletions.”
Copyright © 2006, Oracle. All rights reserved. 29

Prepare Your Database Chapter 1
There you will find procedures to retain the functionality that was provided by the system element andrecord field usage.
Properties
DatabaseOrientation
Initial or MTP Products Platforms Languages
Target Both Global Payroll All All
Task 1-10-5: Update System PIN NumberThe system element PI ACTION TYPE has PIN number 838 in PeopleSoft 8.3x. This system element has PINnumber 871 in the new release. This process runs application engine UPG_GP_PIN.
This task updates all records referencing the old PIN number value, 838, to the correct PIN number, 871. Itwill search all applicable RECORD.FIELDNAMES and update if any references are found.
After the references are updated, the Element Relationship is rebuilt.
To update the system PIN number:
1. Sign on to the Copy of Production database.2. Navigate to Define Business Rules, Define Upgrade Options, Use, Update System Pin Number.3. Enter UPG_GP_PIN on the Run Control selection panel and click OK.4. Click Run.5. On the Process Scheduler Request panel, click OK.
Properties
DatabaseOrientation
Initial or MTP Products Platforms Languages
Target Initial All All All
Task 1-11: Auditing Global Payroll SettingsThis section discusses:
• Understanding Global Payroll Settings
• Verify PIN Element Numbers
Understanding Global Payroll SettingsIn this task you will verify your PIN Element Numbers.
Note. Complete this task only if you have Global Payroll installed.
30 Copyright © 2006, Oracle. All rights reserved.

Chapter 1 Prepare Your Database
Task 1-11-1: Verify PIN Element NumbersPIN (Element) Numbers in the range of 1 to 10000 are reserved for use by PeopleSoft. Do not create PINsin this range. In PeopleSoft 8.3, an online validation was added to the Installation table setup component toensure that the Last Used Element Number cannot be set to a value less than 10000. Please verify that you didnot create or renumber any elements so that the PIN (Element) Number is less than 10001. If you have, youneed to renumber these elements (via the Packager) so that the PIN (Element) Number is greater than 10000.
Note. PeopleSoft 8.3x was shipped with the Last Element Number set to 10000. Any new elements youcreated would have been assigned a PIN (element) number above 10000. In order for you to have created orrenumbered any elements where that PIN (element) number has a value less than 10000, you would have hadto change the field PIN_NUM_LAST on the PS_INSTALLATION table via SQL.
Properties
DatabaseOrientation
Initial or MTP Products Platforms Languages
Target Both Global Payroll All All
Task 1-12: Making Functional DecisionsThis section discusses:
• Understanding Making Functional Decisions
• Assign Upgrade Default Values
• Exporting the Training Defaults
• Importing the Training Defaults
• Prepare Workflow Transactions
• Complete eCompensation Transactions
• Complete eDevelopment Transactions
Understanding Making Functional DecisionsIn this task, you choose the default values that will be assigned to fields by conversion programs duringthe upgrade.
Task 1-12-1: Assign Upgrade Default ValuesThis section discusses:
• Understanding Upgrade Default Values
• Opening the Upgrade Defaults Dialog Box
• Assigning Upgrade Defaults for Performance Management
• Mapping Recruiting Solutions Upgrade Fields
Copyright © 2006, Oracle. All rights reserved. 31
Prepare Your Database Chapter 1
• Alternative Overtime
• Assigning Schedule Defaults
• Assigning Upgrade Defaults for Global Payroll for Hong Kong
• Assigning the Training Employee Record Default Values
Understanding Upgrade Default ValuesThis upgrade contains many new fields that need default values. In addition, current values will need tobe mapped to new values. In this step, you choose your default values that will be assigned to fields byconversion programs during the upgrade. You will also structure some of the mapping to the way in whichyou will use the system.
Opening the Upgrade Defaults Dialog BoxTo open the Upgrade Defaults dialog box:
1. Sign on to the Copy of Production database.2. Navigate to Define Business Rules, Define Upgrade Options, Use, Define Upgrade Defaults.Follow the instructions in the remainder of this task to complete the Upgrade Default panels.
Assigning Upgrade Defaults for Performance ManagementIn this step assign the default values for Performance Management. Complete the information on thePerformance Management tab using the instructions below.
In the new PeopleSoft release, the structure of the review rating criteria used in Performance Management andSalary Planning has changed. Specifically, the Review Band series defined in the Merit Scale Table are beingconsolidated into the Rating Model structure. Under this structure, the Review Band Code has changed fromfour characters to a single character. Therefore, any existing Review Bands with keys longer than a singlecharacter must be renamed or mapped to a new code of only a single character (A-Z and 0-9).
Note. If there are no Review Band Codes that need mapping (either you do not have any Review Bandsdefined or all codes are already single-characters) then the grid will be disabled and no action is required.
32 Copyright © 2006, Oracle. All rights reserved.

Chapter 1 Prepare Your Database
ePerformance Page
The grid above shows all existing Review Band Codes. For any code that is longer than a single character, adata entry field is available for you to define a new single-character code for that Review Band. It is veryimportant that you do not leave any Review Bands with codes longer than a single character. During theupgrade, these codes will be truncated and this could create conflicts with previously defined codes. Forexample, codes "ABCD", "AXYZ", and "A123" would all be truncated to "A" creating a conflict.
Note. If you have more than 36 Review Bands defined (although this is highly unlikely) the system will not beable to upgrade them accurately since the number of Review Bands exceeds the number of available codes. Inthis case, you must "map" the codes that are most important and delete the remaining. To delete excess ReviewBands, navigate to Administer Workforce, Plan Salaries (GBL), Setup, Review Band Table.
Mapping Recruiting Solutions Upgrade FieldsThe URL field is only pertinent if you are using Resume Processing. In this PeopleSoft release, resumeattachments will be stored in one location regardless of whether the resume came from Resume Processing,Apply Online, or attached in Applicant Data. This location is specified in Set Up HRMS, Product Related,Recruiting, Attachment Types for that specific resume type. For conversion purposes, enter the actual URLyou will be using for this centralized resume location in the URL field. If you choose, you may store yourresume attachments in the database instead of a file server by specifying <record://HRS_ATTACHMENTS>in the URL field.
Alternative OvertimeIn this step you specify whether you want to do the Alternative Overtime Upgrade, and if so, enter the EffectiveDate for inserting new effective dated rows into Job table, SetID, and States required for inserting rowsinto the Alternative Overtime State table.
Copyright © 2006, Oracle. All rights reserved. 33

Prepare Your Database Chapter 1
The Alternative Overtime upgrade is for sites with North American Payroll installed. If you do not have thisproduct installed set the Perform Upgrade option on the Alternative Overtime page to off. If you have thisproduct you will need to review the Alternative Overtime feature in the new release to determine if you wantthe upgrade steps performed.
Alternative Overtime tab
To set Effective Date for Job table, SetID, and States for Alternative Overtime State table:
1. Select the Alt Overtime tab.
2. Specify the required data:
Perform Upgrade The check box value will be used to determine whether you want to do theAlternative Overtime Upgrade.If you select this check box you must enter all other fields on this page.
Effective Date for Upgrade The date specified here will be used for inserting new effective dated rowsinto the Job table with a new FLSA status of Alt OT for all employees whomeet following criteria:
• Currently have FLSA Status = Nonexempt, and• HR Status is not equal to Terminated, and• Work in a state specified on the Alt Overtime upgrade defaults page.
34 Copyright © 2006, Oracle. All rights reserved.
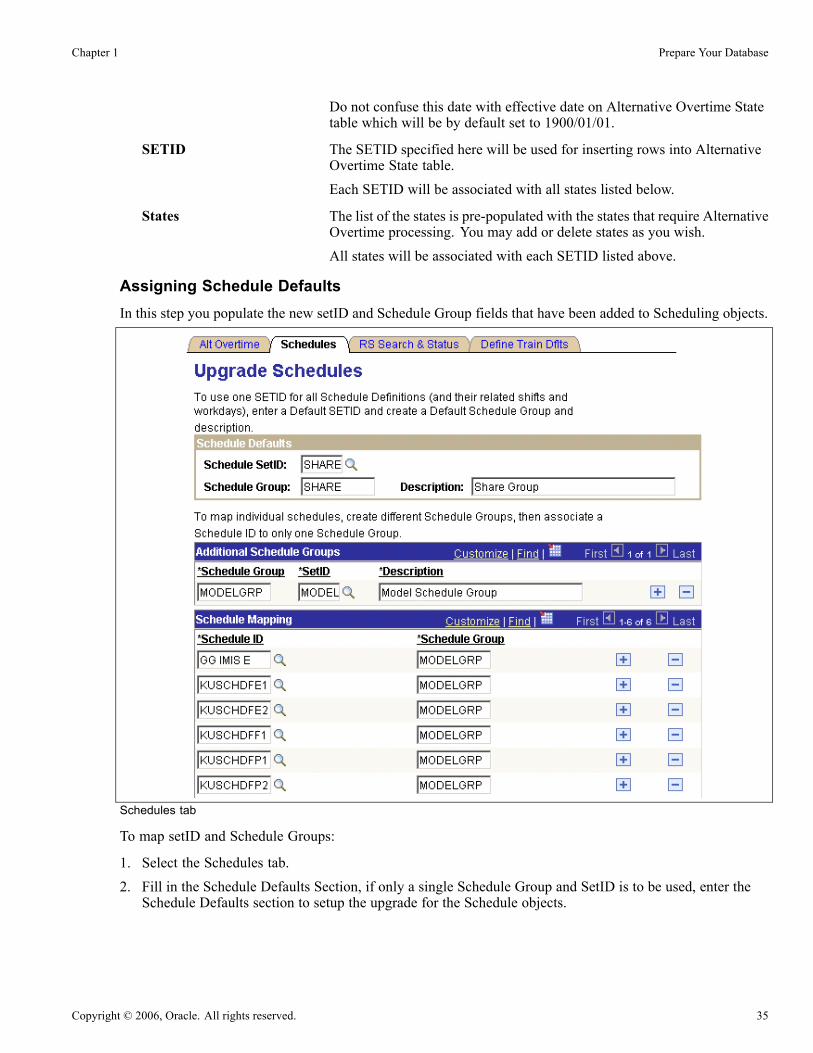
Chapter 1 Prepare Your Database
Do not confuse this date with effective date on Alternative Overtime Statetable which will be by default set to 1900/01/01.
SETID The SETID specified here will be used for inserting rows into AlternativeOvertime State table.Each SETID will be associated with all states listed below.
States The list of the states is pre-populated with the states that require AlternativeOvertime processing. You may add or delete states as you wish.
All states will be associated with each SETID listed above.
Assigning Schedule DefaultsIn this step you populate the new setID and Schedule Group fields that have been added to Scheduling objects.
Schedules tab
To map setID and Schedule Groups:
1. Select the Schedules tab.
2. Fill in the Schedule Defaults Section, if only a single Schedule Group and SetID is to be used, enter theSchedule Defaults section to setup the upgrade for the Schedule objects.
Copyright © 2006, Oracle. All rights reserved. 35

Prepare Your Database Chapter 1
Schedule SetID The setID specified here will be used to populate the SetID field on allScheduling objects (Shift, Workdays, Schedule Definitions and ScheduleOverrides). This setID must already be defined.
Schedule Group Specify a Schedule Group that is to be associated with the above SetID.The value cannot be greater than 10 characters in length.The upgrade process creates this Schedule Group.
Description Enter a description of the Schedule Group (no more than 20 characters inlength).
3. If Schedules are to be split up and assigned to more than one Schedule Group or SETID, fill out theAdditional Schedule Groups section. Enter a row in this grid for each additional Schedule Group that is tobe created during the upgrade.
Schedule SetID The setID specified here will be used to populate the setID field forthe associated Schedule Group when it is created during the upgrade.Each Schedule Group must be associated with a setID. This setID mustalready be defined.
Schedule Group Specify a Schedule Group that is to be associated with the above setID.The value cannot be greater than 10 characters in length. This ScheduleGroup will be created by the upgrade process.
Description Enter a description of the Schedule Group (no more than 30 characters inlength). Each Schedule Group must be given a description.
4. Fill in the Schedule Mapping Section. If you have Schedules that will NOT use the default ScheduleGroup/SetID use this section to define the associated Schedule Group. Each Schedule Group must beassociated with a setID in the Additional Schedule Groups section grid, above. The setID assigned to theSchedule will be that of the selected Schedule Group.The Schedule Group on employee Schedule Assignments, Time and Labor Workgroups and GP Paygroupwill be populated using the Schedule Group associated with the Schedule they are assigned to.The Alternate SetID and Schedule Group are populated wherever an Alternate Schedule ID is present,using the same mappings as for the Primary Schedule.
Schedule ID The Schedule ID to be associated with the Schedule Group. Each Schedulemay only be associated with one Schedule Group.
Schedule Group Specify a Schedule Group that is to be associated with the above ScheduleID. The value must be defined in the Additional Schedule Groupssection grid.
For additional information about Effective Date and Schedule Definition as well as Schedule ID see thereference below.
See “Appendix: “HRMS Upgrade Notes, Reviewing Schedule Defaults.”
Assigning Upgrade Defaults for Global Payroll for Hong KongIn this step you will assign a value for Global Payroll (GP) for Hong Kong. Select the GP Hong Kong tab andenter a default value for Tax Reference Number. The Tax Reference Number is unique for a company andused for Hong Kong’s Inland Revenue reporting.
36 Copyright © 2006, Oracle. All rights reserved.

Chapter 1 Prepare Your Database
Assigning the Training Employee Record Default ValuesThe EMPL_RCD field was added to the TRAINING and TRN_INSTRCT_TBL record as a key. In this step,you assign the chargeable employee record for trainees and instructors that have multiple employee recordsin PS_JOB.
Run the Training query report before updating the Training Employee Record page. This query report lists alltrainees and instructors with multiple employee records in PS_JOB. Use this report to help determine whichemployee record is chargeable. Keep this report for use during the Move to Production pass.
To run the Training query report and assign employee record default values:
1. Navigate to Reporting Tools, Query, Query Manager..
2. Run the following query report:
UPG_TRN_TMP_QRY
For the Initial pass only:
To update the Training Employee Record Page:
1. Click the Load Upgrade Training Temp Tbl button.
This displays all trainees and instructors with multiple employee records in PS_JOB.
Define Training Employee Record page
2. Use the training report to help determine which employee records are changeable.
Note. Initial value are set to zero if updates are not made to this page.
3. To assign the Training Employee Record default values choose a valid EMPL_RCD value to be populatedon the PS_TRAINING and PS_TRN_INSTRUCT_TBL, (where applicable) during the conversion process.
Properties
DatabaseOrientation
Initial or MTP Products Platforms Languages
Target Initial All All All
Task 1-12-2: Exporting the Training DefaultsIn this step, you use Data Mover to export the default values defined in the previous step for the TrainingEmployee Record page. Use this data during the next Move to Production pass.
Repeat this step for each pass, (initial and move to production).
The name of the script for your path is:
Copyright © 2006, Oracle. All rights reserved. 37
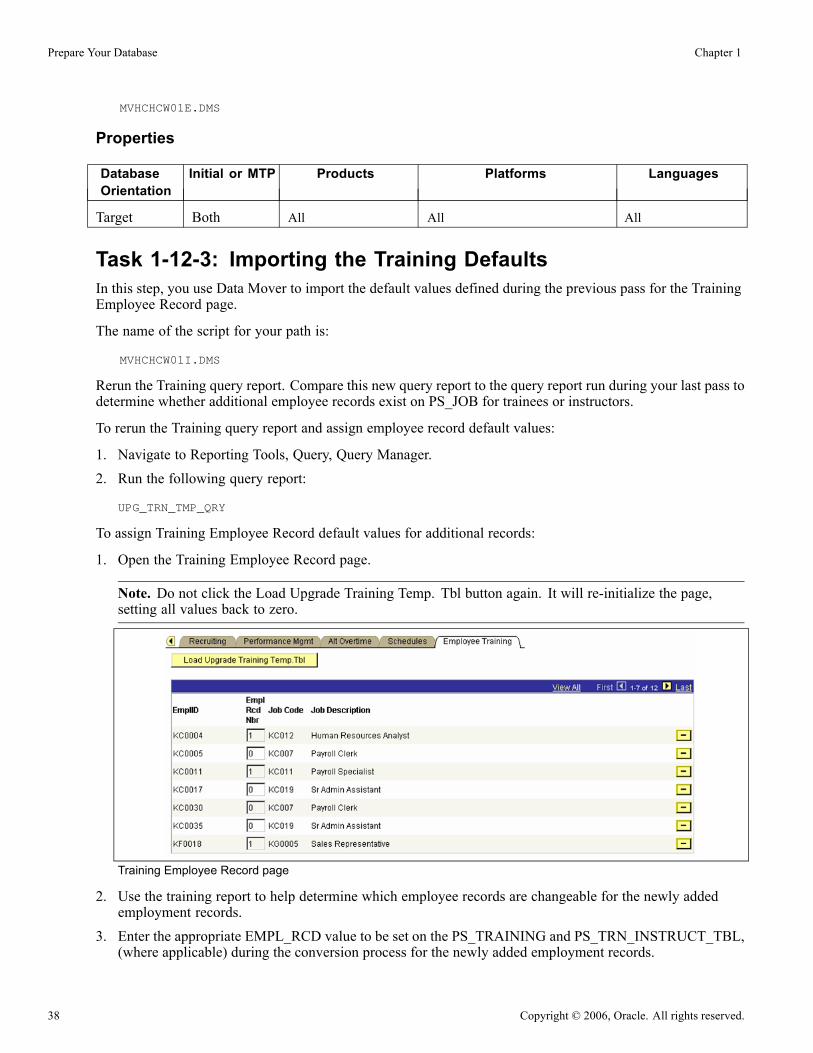
Prepare Your Database Chapter 1
MVHCHCW01E.DMS
Properties
DatabaseOrientation
Initial or MTP Products Platforms Languages
Target Both All All All
Task 1-12-3: Importing the Training DefaultsIn this step, you use Data Mover to import the default values defined during the previous pass for the TrainingEmployee Record page.
The name of the script for your path is:
MVHCHCW01I.DMS
Rerun the Training query report. Compare this new query report to the query report run during your last pass todetermine whether additional employee records exist on PS_JOB for trainees or instructors.
To rerun the Training query report and assign employee record default values:
1. Navigate to Reporting Tools, Query, Query Manager.2. Run the following query report:
UPG_TRN_TMP_QRY
To assign Training Employee Record default values for additional records:
1. Open the Training Employee Record page.
Note. Do not click the Load Upgrade Training Temp. Tbl button again. It will re-initialize the page,setting all values back to zero.
Training Employee Record page
2. Use the training report to help determine which employee records are changeable for the newly addedemployment records.
3. Enter the appropriate EMPL_RCD value to be set on the PS_TRAINING and PS_TRN_INSTRUCT_TBL,(where applicable) during the conversion process for the newly added employment records.
38 Copyright © 2006, Oracle. All rights reserved.

Chapter 1 Prepare Your Database
Note. Initial values for the newly added records are set to zero if you do not update this page.
Properties
DatabaseOrientation
Initial or MTP Products Platforms Languages
Target MTP All All All
Task 1-12-4: Prepare Workflow TransactionsIn this step verify that all of your Workflow Transactions are complete. Complete this step if you are usingeCompensation or eDevelopment modules.
To verify that all transactions are complete:
1. Select Worklist, Worklist.2. Verify all transactions have a “Done” status.
Properties
DatabaseOrientation
Initial or MTP Products Platforms Languages
Target Both eCompensation
eDevelopment
All All
Task 1-12-5: Complete eCompensation TransactionsThe Salary Change transactions, in the new PeopleSoft release, replaces both the Employee Salary Changeand Group Salary Change without Budget transactions. The table structure supporting the new transactionhas changed to support new functionality, including workflow notifications and the ability to update coretables via automatic database updates. You should finish all transactions that are in process before runningthe conversion program.
Employee Salary Data — The Change Employee Salary Detail data is stored as an email in one field, but theconversion process does not parse these email entries. The data is placed into the new transaction tables.
Group Salary Data — The data saved for later transactions and group calculation amounts will be lost duringupgrade because this functionality is not supported in the new PeopleSoft release.
To verify that all transactions are complete:
1. Navigate to Manager Self Service, Compensation and Stock, View Ad Hoc Salary Chg Status.2. Verify that there are no active employee salary change requests. If there are salary changes requests, youwill need to work with the approvers to approve or deny any changes.
3. Navigate to Manager Self Service, Compensation and Stock, View Budgeted Sal Chg Status.4. Verify that there are no groups without allocated budget. If there are groups without allocated budgets, youwill need to work with those who approve or deny the group requests.
Copyright © 2006, Oracle. All rights reserved. 39
Prepare Your Database Chapter 1
Properties
DatabaseOrientation
Initial or MTP Products Platforms Languages
Target Both eCompensation
eDevelopment
All All
Task 1-12-6: Complete eDevelopment TransactionsThe table structure supporting the new transaction has changed to support new functionality, includingworkflow notifications and the ability to update core tables via automatic database updates. It isrecommended you finish all transactions in progress before running the conversion process. The recordsPS_HR_ENROLL_DAT, and PS_HR_ENROLL_STA, will be deprecated in the future.
To verify that all transactions are complete:
1. Navigate to Self Service, Manager, Tasks, Approve Training.
2. Verify that there are no active training requests. If there are training requests, you will need to work withthose who approve or deny the requests.
Properties
DatabaseOrientation
Initial or MTP Products Platforms Languages
Target Both eCompensation
eDevelopment
All All
Task 1-13: Identifying CustomizationsIn this task, identify your modifications to Mass Change, EDI, Message Catalog, SQR Strings, XML ServiceInformation, Verity Based Indexes, Setup Manager data, and related language system data, so that you canreload them later in the upgrade process.
The upgrade tasks will replace all Mass Change processes, Verity Based Indexes, and Setup Manager data.You cannot print Mass Change code. Be sure you have extracted your modifications to reapply them later. Youmust extract your modifications, using cut and paste, to a file for manual reapplication later. EDI tables mustbe handled in the same way. Reload additional data and review customizations in PeopleSoft-delivered data.
Message sets 0-20,000 will be overlaid during the upgrade, so any customizations you have made in thisrange will be lost. In addition, all SQR strings will be replaced. To save your customizations, cut and pasteyour changes to a file and manually reapply them.
Be aware that the PeopleSoft-loaded data must not be overwritten.
If you have multiple languages loaded, you should save any custom data you have in related language tablesfor system data. For these tables, data will be exported from the Demo database when you export relatedlanguage system data and imported to your Copy of Production when you import related language system data.The import may delete your custom data, depending on the import option.
40 Copyright © 2006, Oracle. All rights reserved.

Chapter 1 Prepare Your Database
The tables that need to be reviewed are listed in the following scripts. These scripts can be found in your newrelease PS_HOME\SCRIPTS directory.
Important! The script(s) below are delivered with and run from your new PeopleSoft release. These scriptsare not run in this task. You will run these scripts later in the upgrade process.
Review the tables that will be overwritten in these scripts:
Tables Script
Message Catalog DLUPX01E.DMS
SQR Strings DLUPX04E.DMS
EDI DLUPX05E.DMS
Mass Change DLUPX06E.DMS
XML Service Information DLUPX13E.DMS
Verity Based Indexes DLUPX16E.DMS
Setup Manager DLUPX16E.DMS
If your database contains translations review the list of related language system data tables that will beexported and imported in these scripts:
DLHCLASYSE.DMS
DLHCLASYSI.DMS
Note. Move to Production: Once you have reapplied these customizations at the end of your initial upgradepass, you will not need to apply them again. The affected tables are moved from the old Copy of Production tothe New Copy of Production by the scripts listed in the following table:
Tables Scripts
Mass Change MVAPPEXP.DMS
MVAPPIMP.DMS
EDI MVPRDEXP.DMS
MVPRDIMP.DMS
Strings MVAPPEXP.DMS
MVAPPIMP.DMS
Messages MVAPPEXP.DMS
MVAPPIMP.DMS
XML Service Information MVPRDEXP.DMS
MVPRDIMP.DMS
Copyright © 2006, Oracle. All rights reserved. 41

Prepare Your Database Chapter 1
Tables Scripts
Verity Based Indexes MVAPPEXP.DMS
MVAPPIMP.DMS
Setup Manager MVAPPEXP.DMS
MVAPPIMP.DMS
See Also“Apply Application Changes,” Loading Data for Data Conversion
“Apply Application Changes,” Loading Data to Complete System Setup
Properties
DatabaseOrientation
Initial or MTP Products Platforms Languages
Target Initial All All All
Task 1-14: Reporting Row Count for TablesYou may find it helpful to run a report that identifies any table without rows, that is, any table not used in yourproduction database. This information can help you determine whether to accept a change from the Demodatabase. The UPGCOUNT process reports the row counts of all PeopleSoft tables in your database.
If you use PeopleTools 8.13 or earlier, use SQR from your current (old) release of PeopleSoft to run thefollowing script against your Copy of Production:
\PS_HOME\SQR\UPGCOUNT.SQR
In PeopleTools 8.14, UPGCOUNT was converted to an Application Engine program. If your Copy ofProduction is using PeopleTools 8.14 or later, run UPGCOUNT as an Application Engine program. Using yourcurrent (old) release of PeopleSoft, run the Application Engine program UPGCOUNT from the command lineon your client workstation against the Target database. You can find the resulting report (UPGCOUNT.LIS) inyour C:\TEMP directory. The command line command is as follows:
\PS_HOME\bin\client\winx86\psae -CT <dbtype> -CS <server - Informix and Sybase only⇒> -CD <dbname> -CO <oprid> -CP <oprpswd> -R UPG -AI UPGCOUNT
Properties
DatabaseOrientation
Initial or MTP Products Platforms Languages
Target Initial All All All
42 Copyright © 2006, Oracle. All rights reserved.
Chapter 1 Prepare Your Database
Task 1-15: Preparing Your DatabaseThis section discusses:
• Understanding Database Preparation
• Verify Database Integrity
• Clean the PSOBJCHNG Table
• Shrink Images
• Purge Message Queues
Understanding Database PreparationIn this task, you perform a variety of steps in preparation for the PeopleTools upgrade. These steps preventerrors in tasks later in the upgrade.
Task 1-15-1: Verify Database IntegrityThe DBCC CHECKDB command is run to perform a database consistency check on your Copy of Productiondatabase. A database consistency check ensures that your database platform environment is clean andminimizes any potential upgrade errors due to possible database corruption.
Properties
DatabaseOrientation
Initial or MTP Products Platforms Languages
Target Both All MSSQL Server
Sybase
All
Task 1-15-2: Clean the PSOBJCHNG TableThis step deletes all data stored in the PSOBJCHNG table, which contains all renamed records and fields. Thedata stored in the PSOBJCHNG table must be deleted before starting your upgrade. The build process looks inthis table when running alter renames. Change Assistant will execute the following SQL:
DELETE FROM PSOBJCHNG
Note. Move to Production: If you rename records or fields later in your upgrade, you should expect to seerows in the PSOBJCHNG table at the end of the upgrade pass. During the Move to Production these rowswill be copied from your old Copy of Production to your new Copy of Production. Thus, this step is notnecessary during Move to Production.
See “Apply PeopleTools Changes,” Renaming PeopleTools Records.
See “Apply Application Changes,” Modifying the Database Structure.
Copyright © 2006, Oracle. All rights reserved. 43
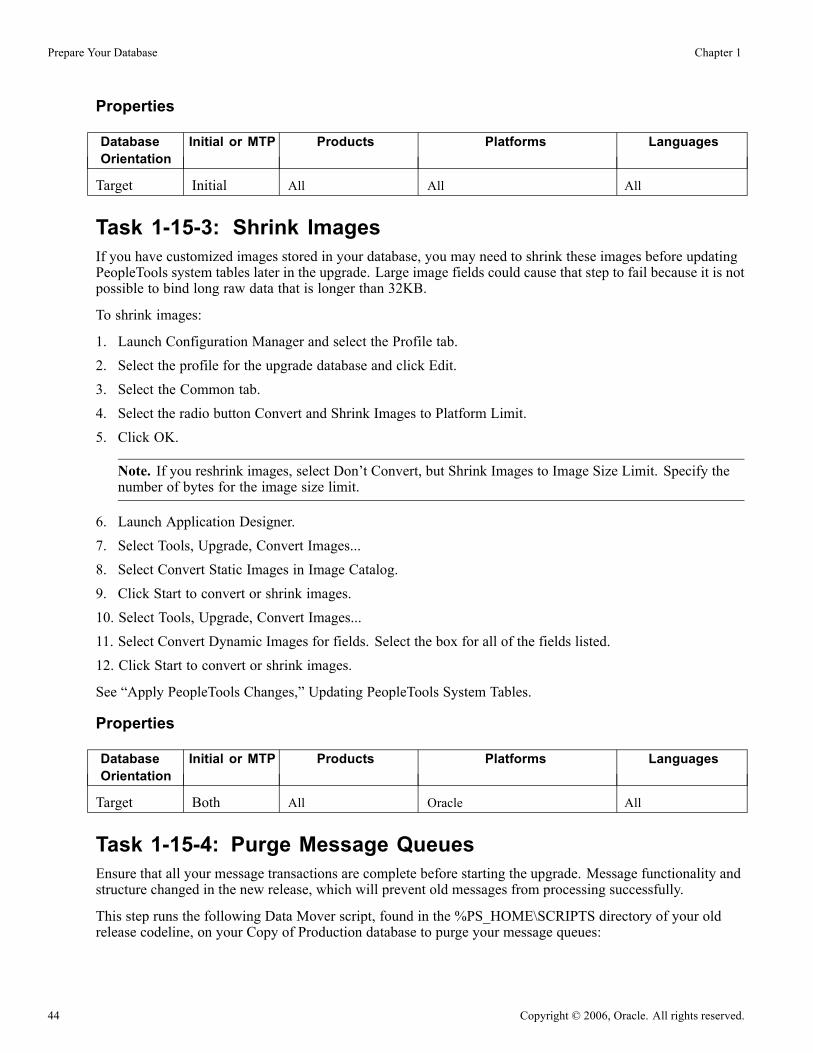
Prepare Your Database Chapter 1
Properties
DatabaseOrientation
Initial or MTP Products Platforms Languages
Target Initial All All All
Task 1-15-3: Shrink ImagesIf you have customized images stored in your database, you may need to shrink these images before updatingPeopleTools system tables later in the upgrade. Large image fields could cause that step to fail because it is notpossible to bind long raw data that is longer than 32KB.
To shrink images:
1. Launch Configuration Manager and select the Profile tab.2. Select the profile for the upgrade database and click Edit.3. Select the Common tab.4. Select the radio button Convert and Shrink Images to Platform Limit.5. Click OK.
Note. If you reshrink images, select Don’t Convert, but Shrink Images to Image Size Limit. Specify thenumber of bytes for the image size limit.
6. Launch Application Designer.7. Select Tools, Upgrade, Convert Images...8. Select Convert Static Images in Image Catalog.9. Click Start to convert or shrink images.10. Select Tools, Upgrade, Convert Images...11. Select Convert Dynamic Images for fields. Select the box for all of the fields listed.12. Click Start to convert or shrink images.
See “Apply PeopleTools Changes,” Updating PeopleTools System Tables.
Properties
DatabaseOrientation
Initial or MTP Products Platforms Languages
Target Both All Oracle All
Task 1-15-4: Purge Message QueuesEnsure that all your message transactions are complete before starting the upgrade. Message functionality andstructure changed in the new release, which will prevent old messages from processing successfully.
This step runs the following Data Mover script, found in the %PS_HOME\SCRIPTS directory of your oldrelease codeline, on your Copy of Production database to purge your message queues:
44 Copyright © 2006, Oracle. All rights reserved.
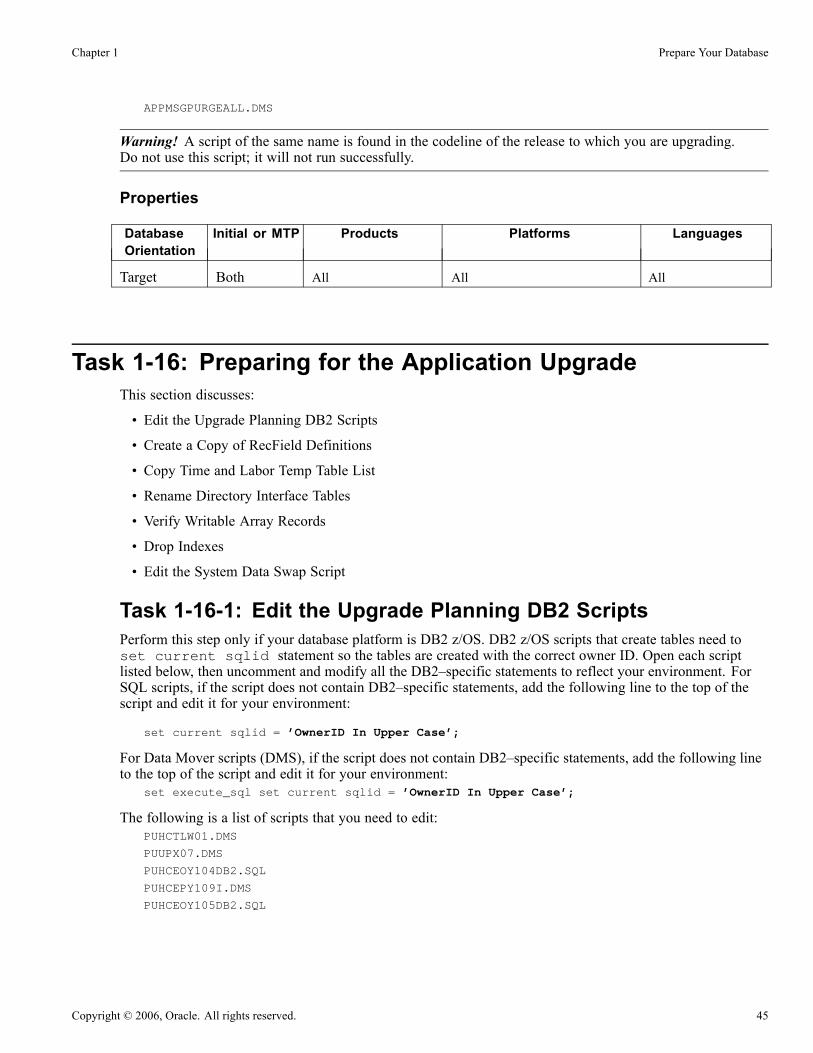
Chapter 1 Prepare Your Database
APPMSGPURGEALL.DMS
Warning! A script of the same name is found in the codeline of the release to which you are upgrading.Do not use this script; it will not run successfully.
Properties
DatabaseOrientation
Initial or MTP Products Platforms Languages
Target Both All All All
Task 1-16: Preparing for the Application UpgradeThis section discusses:
• Edit the Upgrade Planning DB2 Scripts
• Create a Copy of RecField Definitions
• Copy Time and Labor Temp Table List
• Rename Directory Interface Tables
• Verify Writable Array Records
• Drop Indexes
• Edit the System Data Swap Script
Task 1-16-1: Edit the Upgrade Planning DB2 ScriptsPerform this step only if your database platform is DB2 z/OS. DB2 z/OS scripts that create tables need toset current sqlid statement so the tables are created with the correct owner ID. Open each scriptlisted below, then uncomment and modify all the DB2–specific statements to reflect your environment. ForSQL scripts, if the script does not contain DB2–specific statements, add the following line to the top of thescript and edit it for your environment:
set current sqlid = ’OwnerID In Upper Case’;
For Data Mover scripts (DMS), if the script does not contain DB2–specific statements, add the following lineto the top of the script and edit it for your environment:
set execute_sql set current sqlid = ’OwnerID In Upper Case’;
The following is a list of scripts that you need to edit:PUHCTLW01.DMS
PUUPX07.DMS
PUHCEOY104DB2.SQL
PUHCEPY109I.DMS
PUHCEOY105DB2.SQL
Copyright © 2006, Oracle. All rights reserved. 45

Prepare Your Database Chapter 1
Properties
DatabaseOrientation
Initial or MTP Products Platforms Languages
Target Both All DB2 z/OS All
Task 1-16-2: Create a Copy of RecField DefinitionsThis step creates a copy of the contents of PSRECFIELD, before the upgrade is begun. It is used by the dataconversion code to determine the structure of tables that may have been impacted by fixes you applied.The script name is:
PUUPX07.DMS
Properties
DatabaseOrientation
Initial or MTP Products Platforms Languages
Target Both All All All
Task 1-16-3: Copy Time and Labor Temp Table ListThis script makes a copy of the temp tables list used in the process TL_TIMEADMIN. After the upgrade iscomplete, you run a report to see which tables were removed from the new release. You then need to modifyany of your custom Time and Labor Rules and Time Administration Application Engine steps that use thetemp tables.
The script name is:
PUHCTLW01.DMS
Properties
DatabaseOrientation
Initial or MTP Products Platforms Languages
Target Initial Time and Labor All All
Task 1-16-4: Rename Directory Interface TablesThere were PeopleTools tables added to the database for Directory Interface to work. These PeopleTools tablesare now part of the core product. Renaming these tables now will preserve the data and prevent conflictduring the PeopleTools upgrade.
If you have applied Service Pack 1 or you have applied HR-A 2002 Bundle #7 you should run the followingscript based upon your database platform:
• PUHCEOY105MSS.SQL For MS SQL Server• PUHCEOY105ORA.SQL For Oracle• PUHCEOY105IFX.SQL. For Informix• PUHCEOY105SYB.SQL. For Sybase
46 Copyright © 2006, Oracle. All rights reserved.
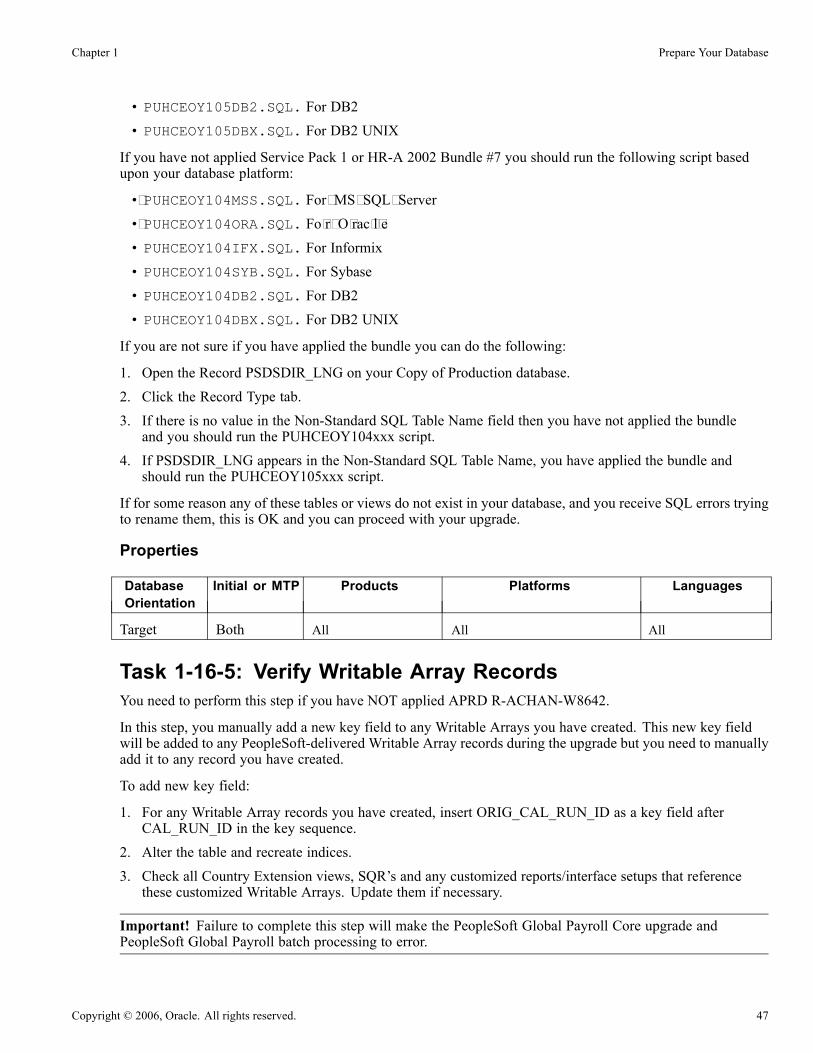
Chapter 1 Prepare Your Database
• PUHCEOY105DB2.SQL. For DB2• PUHCEOY105DBX.SQL. For DB2 UNIX
If you have not applied Service Pack 1 or HR-A 2002 Bundle #7 you should run the following script basedupon your database platform:
• PUHCEOY104MSS.SQL. For MS SQL Server• PUHCEOY104ORA.SQL. Fo r O rac l e• PUHCEOY104IFX.SQL. For Informix• PUHCEOY104SYB.SQL. For Sybase• PUHCEOY104DB2.SQL. For DB2• PUHCEOY104DBX.SQL. For DB2 UNIX
If you are not sure if you have applied the bundle you can do the following:
1. Open the Record PSDSDIR_LNG on your Copy of Production database.
2. Click the Record Type tab.
3. If there is no value in the Non-Standard SQL Table Name field then you have not applied the bundleand you should run the PUHCEOY104xxx script.
4. If PSDSDIR_LNG appears in the Non-Standard SQL Table Name, you have applied the bundle andshould run the PUHCEOY105xxx script.
If for some reason any of these tables or views do not exist in your database, and you receive SQL errors tryingto rename them, this is OK and you can proceed with your upgrade.
Properties
DatabaseOrientation
Initial or MTP Products Platforms Languages
Target Both All All All
Task 1-16-5: Verify Writable Array RecordsYou need to perform this step if you have NOT applied APRD R-ACHAN-W8642.
In this step, you manually add a new key field to any Writable Arrays you have created. This new key fieldwill be added to any PeopleSoft-delivered Writable Array records during the upgrade but you need to manuallyadd it to any record you have created.
To add new key field:
1. For any Writable Array records you have created, insert ORIG_CAL_RUN_ID as a key field afterCAL_RUN_ID in the key sequence.
2. Alter the table and recreate indices.3. Check all Country Extension views, SQR’s and any customized reports/interface setups that referencethese customized Writable Arrays. Update them if necessary.
Important! Failure to complete this step will make the PeopleSoft Global Payroll Core upgrade andPeopleSoft Global Payroll batch processing to error.
Copyright © 2006, Oracle. All rights reserved. 47

Prepare Your Database Chapter 1
Properties
DatabaseOrientation
Initial or MTP Products Platforms Languages
Target Initial Global Payroll All All
Task 1-16-6: Drop IndexesDrop the following indexes using the SQL tool of your choice. These tables are changing key structure anddata conversion cannot update the new columns if these old indexes exist.
• PSMAPRECFIELD.PSAPSMAPRECFIELD• PSMAPROLEBIND.PSAPSMAPROLEBIND
Properties
DatabaseOrientation
Initial or MTP Products Platforms Languages
Target Both All All All
Task 1-16-7: Edit the System Data Swap ScriptThis step should only be done if your Copy of Production has a base language other than English. In the nextstep you will be swapping all system data tables that have related language on your Demo database, sothat it is translated correctly when you copy to your Copy of Production. You will first need to edit thescript that will do the swapping to set your Demo database language to the same language as your Copy ofProduction. To do this, edit the line that says, "SET BASE_LANGUAGE <NEW LANGUAGE_CD>;"changing <NEW LANGUAGE_CD> to the language code on your Copy of Production. The swap system datascript for your path is:
DLHCLASWAP.DMS
Properties
DatabaseOrientation
Initial or MTP Products Platforms Languages
Target Initial All All Non-English BaseLanguage
Task 1-17: Backing Up After Prepare Your DatabaseBack up your Copy of Production database now. This enables you to restart your upgrade from this point,should you experience any database integrity problems during the remaining tasks in the upgrade process.
48 Copyright © 2006, Oracle. All rights reserved.
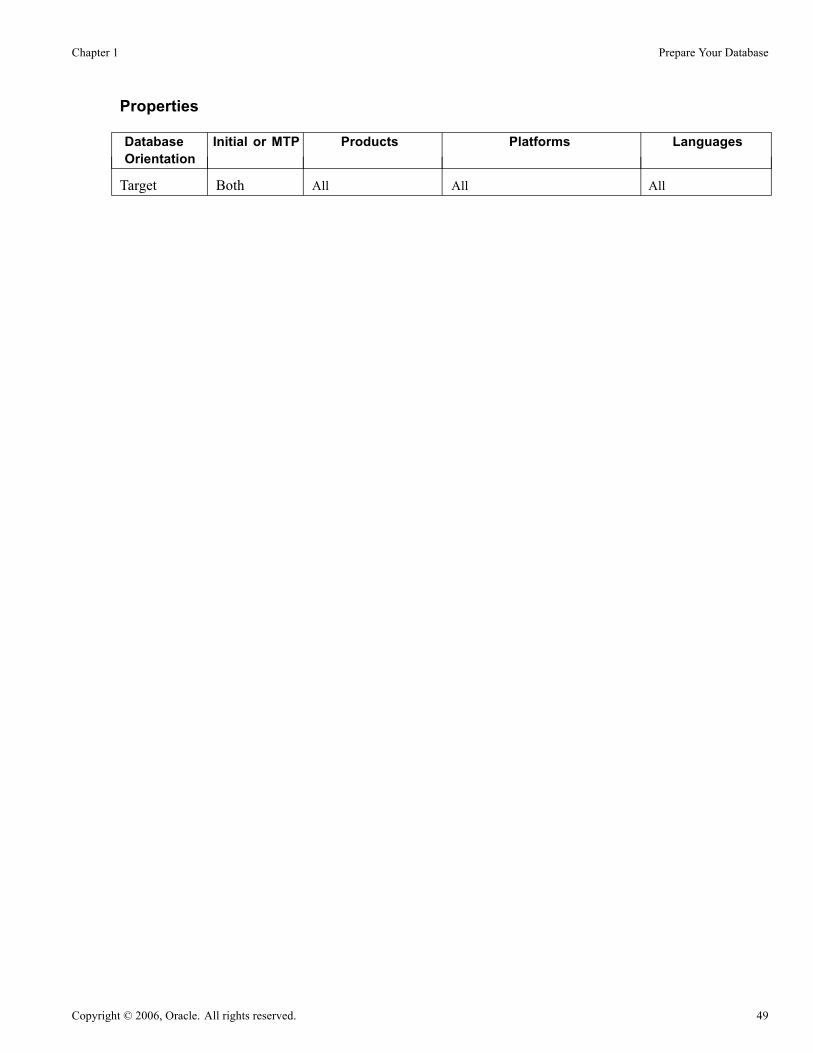
Chapter 1 Prepare Your Database
Properties
DatabaseOrientation
Initial or MTP Products Platforms Languages
Target Both All All All
Copyright © 2006, Oracle. All rights reserved. 49

Prepare Your Database Chapter 1
50 Copyright © 2006, Oracle. All rights reserved.

CHAPTER 2
Apply PeopleTools Changes
This chapter discusses:
• Understanding PeopleTools Changes
• Verifying Upgrade User
• Performing Script Modifications
• Updating PeopleTools System Tables
• Turning Off Change Control
• Loading Model Definition Data
• Loading Message Data
• Renaming PeopleTools Records
• Comparing PeopleTools Objects
• Exporting and Copying Projects
• Populating Tablespace Data
• Building the PeopleTools Project
• Building Updated PeopleTools Project
• Migrating Records to New Tablespaces
• Loading Base Data
• Loading Language Data
• Loading PeopleTools Data
• Creating PeopleTools Views
• Converting PeopleTools Objects
• Converting Integration Broker
• Verifying NonBase Language Pages
• Clearing Process and Report Tables
• Setting Object Version Numbers
• Converting Database Data Types
• Backing Up After PeopleTools Upgrade
Copyright © 2006, Oracle. All rights reserved. 51

Apply PeopleTools Changes Chapter 2
Understanding PeopleTools ChangesIn order to implement a successful upgrade, you must apply the necessary PeopleTools changes. This involvesupdating PeopleTools system tables, copying and building PeopleTools projects, loading PeopleTools seeddata, and converting PeopleTools objects. From this point forward, you run all steps using your newly installedversion of PeopleTools.
Note. Unless otherwise indicated, all scripts can be found in your new release PeopleSoft codelinePS_HOME\SCRIPTS directory. The actual script name is indicated in the description of each step inuppercase letters.
Task 2-1: Verifying Upgrade UserIn this task, you verify that the user performing the upgrade steps has proper permissions to completethe upgrade.
Ensure that your upgrade user has PeopleSoft administrator privileges. This allows access to the PeopleSoftportal to make necessary security changes for the upgrade and to run the Portal Application Engine upgradeprogram. You use this ID to update the security setting for your other users so they can sign on after the upgrade.
Warning! You must perform this step now using your old version of PeopleTools. If you skip this step,or if your user has insufficient PeopleSoft administrator privileges, you will not be able to complete yourupgrade. You cannot complete this step later in the upgrade process. Perform the following steps to grantadministrator privileges now.
To grant your upgrade user PeopleSoft administrator privileges:
1. From the Go menu, select PeopleTools, Maintain Security.2. Select Use, User Profiles, Administrator, Update/Display.3. Select the user ID for your upgrade user.4. Select the Is User System Administrator? check box on the User Profile if it is cleared.5. Save the User Profile.6. From Maintain Security, select Use, Permission Lists, General, Update/Display.7. Select the Primary Permission List for your upgrade user.8. Select the Can Start Application Server? check box if it is cleared.9. Save the Permission List.
See Enterprise PeopleTools PeopleBook: Security Administration for your new release.
Properties
DatabaseOrientation
Initial or MTP Products Platforms Languages
Target Both All All All
52 Copyright © 2006, Oracle. All rights reserved.

Chapter 2 Apply PeopleTools Changes
Task 2-2: Performing Script ModificationsThis section discusses:
• Understanding Script Modifications
• Copy the PTDDLUPG Script
• Edit the PTDDLUPG Script
• Run a DBTSFIX Report
• Edit the DBTSFIX Output Scripts
• Edit the GRANT Script
• Edit the RELGA Script
• Edit the PSLANG Script
• Edit the PSLANGUAGES Script
• Edit the TLSUPGNONCOMP Script
• Edit the PTxxxTLS Scripts
• Edit the DB2 Scripts
• Edit Move to Production Import Scripts
• Edit Move to Production Password
• Edit the DDLDB2 Script
• Edit the DDLDBX Script
• Edit the DDLORA Script
• Edit the DDLIFX Script
• Edit the MSGTLSUPG Script
• Edit the Integration Broker Script
• Edit Multilingual Step Properties
• Edit the Message Nodes Script
• Edit Data Type Steps
Understanding Script ModificationsIn this task, you perform preparation steps and make manual modifications to scripts delivered with yournew PeopleSoft release. You must make the following modifications before proceeding with the remainderof your upgrade.
Note. Move to Production: These steps will be repeated in the Move to Production (MTP) pass. The script youpreviously edited may be acceptable, or you may need to change it again if your New Copy of Production hasa different security or data definition language (DDL) configuration.
Copyright © 2006, Oracle. All rights reserved. 53
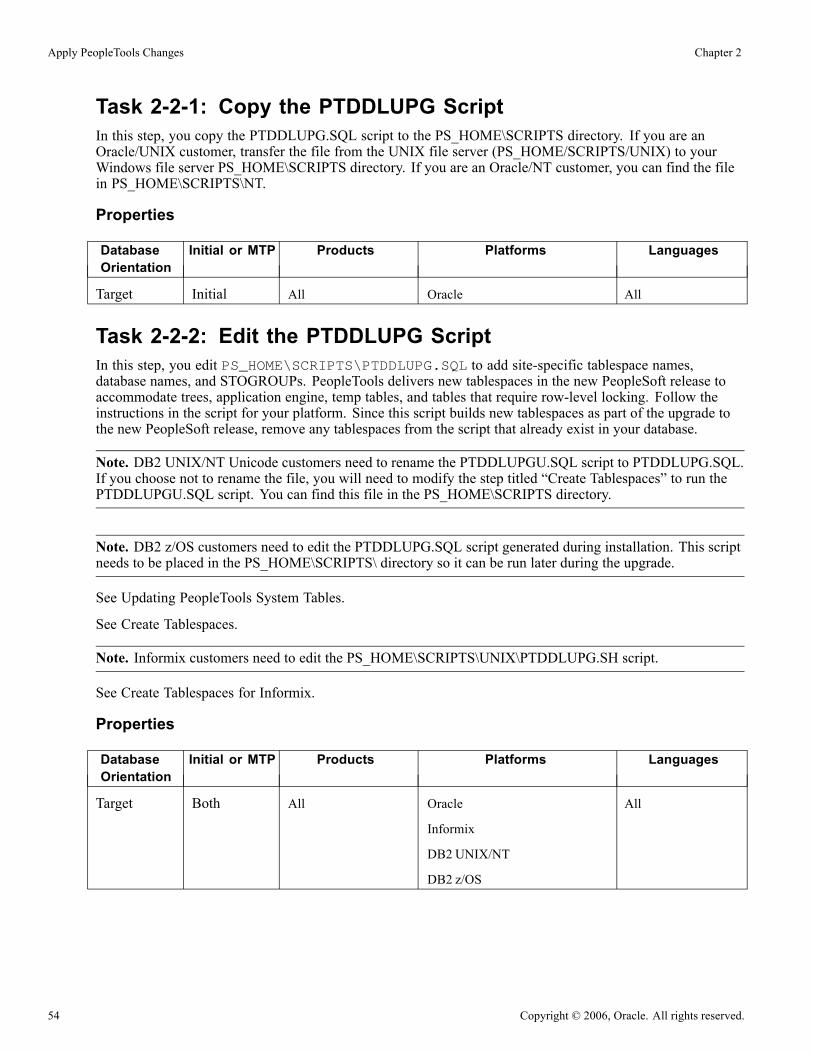
Apply PeopleTools Changes Chapter 2
Task 2-2-1: Copy the PTDDLUPG ScriptIn this step, you copy the PTDDLUPG.SQL script to the PS_HOME\SCRIPTS directory. If you are anOracle/UNIX customer, transfer the file from the UNIX file server (PS_HOME/SCRIPTS/UNIX) to yourWindows file server PS_HOME\SCRIPTS directory. If you are an Oracle/NT customer, you can find the filein PS_HOME\SCRIPTS\NT.
Properties
DatabaseOrientation
Initial or MTP Products Platforms Languages
Target Initial All Oracle All
Task 2-2-2: Edit the PTDDLUPG ScriptIn this step, you edit PS_HOME\SCRIPTS\PTDDLUPG.SQL to add site-specific tablespace names,database names, and STOGROUPs. PeopleTools delivers new tablespaces in the new PeopleSoft release toaccommodate trees, application engine, temp tables, and tables that require row-level locking. Follow theinstructions in the script for your platform. Since this script builds new tablespaces as part of the upgrade tothe new PeopleSoft release, remove any tablespaces from the script that already exist in your database.
Note. DB2 UNIX/NT Unicode customers need to rename the PTDDLUPGU.SQL script to PTDDLUPG.SQL.If you choose not to rename the file, you will need to modify the step titled “Create Tablespaces” to run thePTDDLUPGU.SQL script. You can find this file in the PS_HOME\SCRIPTS directory.
Note. DB2 z/OS customers need to edit the PTDDLUPG.SQL script generated during installation. This scriptneeds to be placed in the PS_HOME\SCRIPTS\ directory so it can be run later during the upgrade.
See Updating PeopleTools System Tables.
See Create Tablespaces.
Note. Informix customers need to edit the PS_HOME\SCRIPTS\UNIX\PTDDLUPG.SH script.
See Create Tablespaces for Informix.
Properties
DatabaseOrientation
Initial or MTP Products Platforms Languages
Target Both All Oracle
Informix
DB2 UNIX/NT
DB2 z/OS
All
54 Copyright © 2006, Oracle. All rights reserved.

Chapter 2 Apply PeopleTools Changes
Task 2-2-3: Run a DBTSFIX ReportThe DBTSFIX.SQR script aligns the tablespaces in the delivered release scripts with the Target database usedduring the upgrade. This process generates new release scripts, conforming to the RELxxxDBTSFIX.SQLnaming convention that you run in a later task. Run this script to preserve your existing table-to-tablespacemapping in the Target database. The result of this task will be a RELxxxDBTSFIX.SQL script in which xxxrepresents a release number (for example, 800, 810, 811, 812, and so on) associated with your particular path.
Note. Before running this step, verify that the PS_HOME values are set correctly in the Change Assistantenvironment for your upgrade job. Change Assistant uses the PS_HOME information to determine whichscripts need to be generated.
Important! Do not run the new release script at this point. You will be instructed to run this script laterin the upgrade process.
Properties
DatabaseOrientation
Initial or MTP Products Platforms Languages
Target Both All Oracle
Informix
DB2 UNIX/NT
DB2 z/OS
All
Task 2-2-4: Edit the DBTSFIX Output ScriptsEdit the generated RELxxxDBTSFIX scripts according to the comments within each script. Verify that the datadefinition language (DDL) is accurate for your environment for tablespaces, database names, owner IDs, andso forth. The scripts can be found in your Change Assistant output directory for this upgrade path.
Warning! Do not run output scripts at this time. At this point in the upgrade process, you must only reviewthe DBTSFIX output scripts.
Note. For DB2 z/OS customers only: When upgrading from one PeopleSoft release to the next, it is possible tomove tables from a tablespace using a 4-KB buffer pool to one using a 32-KB buffer pool. The tablespacesPSIMAGE and PSIMGR use 32-KB buffer pools in PeopleSoft-delivered applications. To maintain thetablespace schema used at your site, the DBTSFIX.SQR script will revise the upgrade scripts with thedatabase and tablespace information from your database (the Target database). Tables assigned to tablespacesPSIMAGE or PSIMGR in the upgrade scripts are the exception to this approach. Note that PeopleSoft hasreassigned some tables to PSIMAGE or PSIMGR because they now require a 32-KB buffer pool. You mustmanually edit the “Create Table” statements in the upgrade scripts to replace the tablespace name PSIMAGEor PSIMGR with an appropriate tablespace name in your implementation that utilizes a 32-KB buffer pool.The database name must also be replaced with the value corresponding to the tablespace you are using.
Copyright © 2006, Oracle. All rights reserved. 55

Apply PeopleTools Changes Chapter 2
Properties
DatabaseOrientation
Initial or MTP Products Platforms Languages
Target Both All Oracle
Informix
DB2 UNIX/NT
DB2 z/OS
All
Task 2-2-5: Edit the GRANT ScriptEdit PS_HOME\SCRIPTS\GRANT.SQL and make the necessary modifications as documented in the script.
Properties
DatabaseOrientation
Initial or MTP Products Platforms Languages
Target Both All All All
Task 2-2-6: Edit the RELGA ScriptEdit PS_HOME\SCRIPTS\RELGA.DMS and make the necessary OWNERID and synonym modificationsas documented in the script.
The Update_Oprdefn command in this script performs the following functions:
• Decrypts passwords in PSOPRDEFN, using old Data Encryption Standard (DES) algorithms, andre-encrypts using Secure Hashing Algorithm 1 (SHA-1) hashing.
• Decrypts passwords in PSACCESSPRFL using old keys and re-encrypts using new keys.• Updates PSAUTHITEM to remove high-order bits from the Authorized Actions table.• Updates permissions from Security Administrator to Maintain Security.
Properties
DatabaseOrientation
Initial or MTP Products Platforms Languages
Target Initial All DB2 z/OS All
Task 2-2-7: Edit the PSLANG ScriptEdit PS_HOME\SCRIPTS\PSLANG.DMS and make the necessary modifications as documented in the script.
56 Copyright © 2006, Oracle. All rights reserved.
Chapter 2 Apply PeopleTools Changes
Properties
DatabaseOrientation
Initial or MTP Products Platforms Languages
Target Both All DB2 z/OS All
Task 2-2-8: Edit the PSLANGUAGES ScriptEdit PS_HOME\SCRIPTS\PSLANGUAGES.DMS and make the necessary modifications as documented inthe script.
Properties
DatabaseOrientation
Initial or MTP Products Platforms Languages
Target Both All DB2 z/OS All
Task 2-2-9: Edit the TLSUPGNONCOMP ScriptEdit PS_HOME\SCRIPTS\TLSUPGNONCOMP.DMS and make the necessary modifications as documentedin the script.
Properties
DatabaseOrientation
Initial or MTP Products Platforms Languages
Target Both All DB2 z/OS All
Task 2-2-10: Edit the PTxxxTLS ScriptsThis step applies only if you are running on a DB2 z/OS platform.
To edit the PTxxxTLS scripts:
1. Edit all the scripts in the PS_HOME\SCRIPTS directory on the file server that conform to this file namingconvention:
PTxxxTLS.DMS
PTxxxTLSyyy.DMS
The xxx represents a PeopleTools release greater than your current PeopleTools release and yyy representsthe three-letter language code.
2. Uncomment and modify the set owner ID command within each script, as in the following example:
set execute_sql set current sqlid = ’OwnerId In Upper Case’;
Copyright © 2006, Oracle. All rights reserved. 57
Apply PeopleTools Changes Chapter 2
Properties
DatabaseOrientation
Initial or MTP Products Platforms Languages
Target Both All DB2 z/OS All
Task 2-2-11: Edit the DB2 ScriptsPerform this step only if your database platform is DB2 z/OS. DB2 z/OS scripts that create tables need theset current sqlid statement so that the tables are created with the correct owner ID. Open each scriptlisted below, then uncomment and modify all of the DB2-specific statements to reflect your environment.
For SQL scripts, if the script does not contain DB2-specific statements, add the following line to the top of thescript and edit it for your environment:
set current sqlid = ’OWNERID (in uppercase)’;
For Data Mover scripts (DMSs), if the script does not contain DB2-specific statements, add the following lineto the top of the script and edit it for your environment:
set execute_sql set current sqlid = ’OWNERID (in uppercase)’;
Following is a list of the scripts you need to edit:DB2TMPIDXCREATE.SQL
DLUPX02I.DMS
DLUPX13I.DMS
DLUPX14I.DMS
DLUPX96I.DMS
PT_RELEASE_IMPORT.DMS
PUUPX07.DMS
DB2ALLCCSIDUPD.SQL
DLHCSYSI.DMS
DLHCLASYSI.DMS
DLHCHRW01.DMS
RNHCUPH02DB2.SQL
DLHCUPY413.SQL
DLHCUPH01.DMS
Note. If you upgraded your system before, you may need to drop PSRECFIELD_TMP prior to runningthis script.
Note. The DLUPX96I.DMS script will run on your Source database. Remember to edit this script for yourSource database. All of the other scripts listed will run against the Target database.
In several steps in the upgrade process, project definitions are copied into the database. Any DB2 z/OS scriptsthat are built from these project definitions will need to be modified before you run them. Set the followingsteps in your Change Assistant job to a manual stop and edit the scripts for correct database/tablespaceinformation. When you build the SQL scripts after copying the project, the database/tablespace names are thedefault values. You need to change these to the Target database specific values. To set a step as a manual stopin Change Assistant, highlight the step and select Edit, Stop from the menu bar.
58 Copyright © 2006, Oracle. All rights reserved.

Chapter 2 Apply PeopleTools Changes
Following is a list of the steps in Chapter 4, “Apply Application Changes,” that you will need to set as amanual stop and the names of the scripts you need to edit:
• Run the Create Upgrade Tables Script (in the task Modifying the Database Structure)
When you get to this step, edit the script UPGCONVERT_CRTTBL.SQL
Properties
DatabaseOrientation
Initial or MTP Products Platforms Languages
Target Both All DB2 z/OS All
Task 2-2-12: Edit Move to Production Import ScriptsPerform this step only if your database platform is DB2 z/OS.
During the Move to Production, there are several scripts that export data from the previous Copy of Productionto the New Copy of Production. These scripts export the tables to a DAT file. When the tables are exported, allthe table attributes, including the database specific information (table owner, database name, and tablespacename), are stored in the DAT file. When you run the import script, it tries to create the tables and indexes usingthe database-specific information from the DAT file. So even though you ran the import script against yourCopy of Production, you would still create tables in the upgraded database (which is the source database forthe Move to Production step). To create the tables in the Target database, open each script listed below, thenuncomment and modify all of the DB2-specific statements to reflect your environment.
You will also need to add the following command into MVPRDIMP.DMS, near the end of the script, justafter the REPLACE_DATA PSSTATUS command, but before the REPLACE_VIEW PSTEMPTBLCNTVWcommand, to change ownerid to the owner ID of your database.
Update PSSTATUS set OWNERID=’OWNERID (in uppercase)’;
Following is a list of the scripts you need to edit:MVAPPIMP.DMS
MVPRDIMP.DMS
MVHCPYW01I.DMS
PUCSFAG02.DMS
MVHR83IMP.DMS
If you prefer, you can copy these overrides from the xxDMODBO.DMS script that was generated fromDBSetup while installing your database. Make sure you remove the SET NO RECORD if you copy from theDBSetup generated file.
See Enterprise PeopleTools PeopleBook: Data Management for your new release.
See “Apply Changes to Production Database,” Performing the Move to Production.
Properties
DatabaseOrientation
Initial or MTP Products Platforms Languages
Target MTP All DB2 z/OS All
Copyright © 2006, Oracle. All rights reserved. 59

Apply PeopleTools Changes Chapter 2
Task 2-2-13: Edit Move to Production PasswordIf your access ID and access password are different in the Copy of Production database than in the New Copyof Production database, you need to reset the access password in the MVPRDIMP.DMS script.
To modify passwords in your New Copy of Production database, append the following to yourMVPRDIMP.DMS script and replace ownerID, accessID, and accesspswd with your values in the NewCopy of Production database:
UPDATE PSSTATUS set OWNERID = ’ownerID’;
UPDATE PSACCESSPRFL SET ACCESSID = ’accessID’,
ACCESSPSWD = ’accesspswd’, ENCRYPTED = 0;
ENCRYPT_PASSWORD *;
Properties
DatabaseOrientation
Initial or MTP Products Platforms Languages
Target MTP All All All
Task 2-2-14: Edit the DDLDB2 ScriptEdit PS_HOME\SCRIPTS\DDLDB2.DMS. At the bottom of this script, you will see an insert intoPSDDLDEFPARMS. This insert contains default information used when creating a table, an index, a uniqueindex, or a tablespace. Verify with your database administrator that the last value for each row is appropriatefor your environment by checking the values currently stored in your PSDDLDEFPARMS table. Otherwise,the values will be reset to the default values delivered by PeopleSoft in this script.
Properties
DatabaseOrientation
Initial or MTP Products Platforms Languages
Target Both All DB2 z/OS All
Task 2-2-15: Edit the DDLDBX ScriptEdit PS_HOME\SCRIPTS\DDLDBX.DMS. At the bottom of this script, you will see an insert intoPSDDLDEFPARMS. This insert contains default information used when creating a table, an index, a uniqueindex, or a tablespace. Verify with your database administrator that the last value for each row is appropriatefor your environment by checking the values currently stored in your PSDDLDEFPARMS table. Otherwise,the values will be reset to the default values delivered by PeopleSoft in this script.
Properties
DatabaseOrientation
Initial or MTP Products Platforms Languages
Target Both All DB2 UNIX/NT All
60 Copyright © 2006, Oracle. All rights reserved.

Chapter 2 Apply PeopleTools Changes
Task 2-2-16: Edit the DDLORA ScriptEdit PS_HOME\SCRIPTS\DDLORA.DMS. At the bottom of this script, you will see an insert intoPSDDLDEFPARMS. This insert contains default information used when creating a table, an index, a uniqueindex, or a tablespace. Verify with your database administrator that the last value for each row is appropriatefor your environment by checking the values currently stored in your PSDDLDEFPARMS table. Otherwise,the values will be reset to the default values delivered by PeopleSoft in this script.
Properties
DatabaseOrientation
Initial or MTP Products Platforms Languages
Target Both All Oracle All
Task 2-2-17: Edit the DDLIFX ScriptEdit PS_HOME\SCRIPTS\DDLIFX.DMS. At the bottom of this script, you will see an insert intoPSDDLDEFPARMS. This insert contains default information used when creating a table, an index, a uniqueindex, or a tablespace. Verify with your database administrator that the last value for each row is appropriatefor your environment by checking the values currently stored in your PSDDLDEFPARMS table. Otherwise,the values will be reset to the default values delivered by PeopleSoft in this script.
Properties
DatabaseOrientation
Initial or MTP Products Platforms Languages
Target Both All Informix All
Task 2-2-18: Edit the MSGTLSUPG ScriptEdit PS_HOME\SCRIPTS\MSGTLSUPG.DMS and make the necessary modifications as documented inthe script.
Properties
DatabaseOrientation
Initial or MTP Products Platforms Languages
Target Both All DB2 z/OS All
Task 2-2-19: Edit the Integration Broker ScriptEdit PS_HOME\SCRIPTS\PTIBUPGRADE.DMS and make the necessary modifications as documented inthe script. User level node security and transactional security have been added as of PeopleTools 8.48. Servicenamespace information, a low-level user on the node, and a low-level permission list for service operations,need to be specified. Consult with your Integration Broker specialist for assistance.
Copyright © 2006, Oracle. All rights reserved. 61

Apply PeopleTools Changes Chapter 2
Note. If you are upgrading from PeopleTools 8.48 or later, this step and all of the steps in the task “ConvertingIntegration Broker” do not need to be run since the Integration Broker conversion has already been performed.You may mark all of these steps as “Complete” in your upgrade job. If you don’t mark these steps as complete,the upgrade will try to unnecessarily reconvert your objects.
Properties
DatabaseOrientation
Initial or MTP Products Platforms Languages
Target Initial All All All
Task 2-2-20: Edit Multilingual Step PropertiesIn this step, you will edit the Change Assistant step properties for the multilingual PeopleTools project copystep (or steps). Copy only the translated objects for the languages you license. This prevents the translatedobjects for unlicensed languages from copying over. You will copy any multilingual projects later in theupgrade process.
Depending on which languages you license, you will need to complete the following instructions once ortwice. If you license any of these languages, Arabic, Czech, Danish, Finnish, French, Hebrew, Hungarian,Norwegian, Polish, Russian, or Turkish, perform the following instructions for the step “Export and CopyPPLTLSML Project.” If you license any of these languages, Canadian French, Dutch, German, Greek, Italian,Japanese, Korean, Malay, Portuguese, Simplified Chinese, Spanish, Swedish, Traditional Chinese, or Thai,perform the following instructions for the step “Export and Copy PPLTLS84CURML Project.”
To edit multilingual step properties:
1. In Change Assistant, select the step.2. Open the Step Properties dialog box.3. Click the Upgrade button, and then click the Options button.4. On the Copy Options tab, deselect any languages that you do not license.Common and English should remain deselected.
5. Click OK three times.6. Save the template in Change Assistant.
See Export and Copy PPLTLS84CURML Project.
See Export and Copy PPLTLSML Project.
Properties
DatabaseOrientation
Initial or MTP Products Platforms Languages
Target Initial All All All Non-English
Task 2-2-21: Edit the Message Nodes ScriptYou need to run the PORTALNODES.DMS script before the PeopleTools upgrade UPG84PORTAL process.
62 Copyright © 2006, Oracle. All rights reserved.

Chapter 2 Apply PeopleTools Changes
In this step, you edit the PORTALNODES.DMS script. If you are using the Informix platform, edit thePORTALNODES.SQL script instead.
To edit the message nodes script:
1. Run the following SQL to determine your default local node value:
SELECT MSGNODENAME FROM PSMSGNODEDEFN WHERE LOCALNODE = 1
2. Replace all instances of PSFT_PE with the default local node name returned from the previous SQL.
Note. The values updated in this script must reflect the values for your Copy of Production databasebecause that is the database being upgraded. This means that the database web server hostname andpshome values are the values that will exist for your upgraded web server for the upgraded database.
3. Replace all instances of localhost with the host name of the web server. Include the port number andnetwork domain name as needed. Unicode databases will need to add a G or N in front of the localhostname.Example: http://myserver/psc/pshome/Example: http://myserver:8080/psc/pshome/Example: http://myserver.mydomain.com:8080/psc/pshome/
4. Replace all instances of pshome with the name of the directory where you installed the PeopleSoft webserver files.http://myserver/psc/PA840DMO/
Note. The 8.x content provider message nodes are: BP, CRM, EPM, ERP, HRMS, and SA.
5. Adjust the node type for the 8.x content provider message nodes. In the 8.4 composite REL script, allcontent provider nodes have a node type of ICT to allow for the use of the 8.1x URL format. If a particularnode name corresponds to a production application database that is being upgraded to PeopleTools 8.4, themessage node type must be changed from ICT to PIA. (If the node type is not changed to PIA, the portalcontent references using that node will not be converted to the 8.4 simple URL format.)
If a particular node name corresponds to a production application database that will remain on PeopleTools8.1x, then keep the node type as ICT. (If the node type is not left as ICT, the portal content references usingthat node will not be able to access the 8.1x application database.)
6. Replace all instances of EMPLOYEE with the default portal registry name if you need a different portalregistry as the default; for example, CUSTOMER or SUPPLIER.
Properties
DatabaseOrientation
Initial or MTP Products Platforms Languages
Target Initial All All All
Copyright © 2006, Oracle. All rights reserved. 63
Apply PeopleTools Changes Chapter 2
Task 2-2-22: Edit Data Type StepsFor PeopleTools 8.48 and later, new data types are supported for Microsoft SQL Server 2005 or later andOracle. These data type changes are only available for use in conjunction with application release 9.0 or later.If you have already converted data types or are upgrading to an application release earlier than 9.0, you mustmark these steps as complete in the template now. Do NOT run these steps unnecessarily.
To set the Data Conversion steps as complete:
1. In Change Assistant, select all the steps within the task Converting Database Data Types.2. Press the F7 key.3. Save the upgrade job in Change Assistant.
See Converting Database Data Types
Properties
DatabaseOrientation
Initial or MTP Products Platforms Languages
Target Both All MS SQL Server
Oracle
All
Task 2-3: Updating PeopleTools System TablesThis section discusses:
• Understanding Updating PeopleTools System Tables
• Clean Up Message Data
• Create Tablespaces
• Create Tablespaces for Informix
• Update System Catalog Views
• Update PeopleTools System Tables
• Grant Privileges to the CONNECT ID
• Run the RELGA Script
• Populate Languages for Login
• Update the Product License Code
• Update PeopleTools Patch Information
• Create Temporary Performance Indexes
• Export PeopleTools System Tables
• Import PeopleTools System Tables
• Reset Database Options Flag
64 Copyright © 2006, Oracle. All rights reserved.
Chapter 2 Apply PeopleTools Changes
• Rerun Update Statistics for DB2 zOS
• Rerun RUNSTATS Report for DB2 UNIX NT
• Rerun Update Statistics for DB2 UNIX NT
• Rerun Update Statistics for Informix
• Rerun Update Statistics for Oracle
Understanding Updating PeopleTools System TablesIn this task, you update your PeopleTools system tables by running various scripts.
Important! From this point forward, run all steps using the new release of PeopleTools on your Copy ofProduction database, unless otherwise indicated.
Note. If you license the PeopleSoft Rapid Apps Archiving Tool, read the appendix that describes it beforebeginning this step.
See Appendix: “Data Archiving Tool.”
Task 2-3-1: Clean Up Message DataIf you are upgrading from PeopleTools 8.47 or earlier, perform this step to clean out obsolete message data.Message functionality and structure changed as of PeopleTools 8.48 and the old data is obsolete. EditPS_HOME\SCRIPTS\PTUPGIBDEL.SQL to delete data from the tables that only exist in the old PeopleToolsrelease. Open the script and make the following modifications:
1. Search for the string “--- End of PT8.1x/8.2x ---”.2. Delete the entire portion of the script below this string.3. Save the script as PS_HOME\SCRIPTS\PTUPGIBDEL81X.SQL.
Important! Save the script using the naming convention shown above. This will preserve the original script foruse in updating other databases at different PeopleTools releases, and assist in running the script automatically.
Follow this procedure to edit your template so the script can run automatically:
1. Select this step and open the Step Properties dialog box.
2. Change the Type from ManualStop to SQLScript, and click OK.
3. In your upgrade job, mark the step as Run.
Properties
DatabaseOrientation
Initial or MTP Products Platforms Languages
Target Both All All All
Copyright © 2006, Oracle. All rights reserved. 65

Apply PeopleTools Changes Chapter 2
Task 2-3-2: Create TablespacesThis step runs the PTDDLUPG script, which builds new tablespaces as part of the upgrade to the newPeopleSoft release. PeopleTools delivers new tablespaces in this PeopleSoft release to accommodate trees, theapplication engine, temp tables, and tables that require row-level locking.
Note. DB2 UNIX/NT and DB2 z/OS Unicode customers: If you did not rename the PTDDLUPGU.SQL filewhen you edited the PTDDLUPG script, you must modify this step to run the PTDDLUPGU.SQL script. Thisfile can be found in the \PS_HOME\SCRIPTS directory.
See Edit the PTDDLUPG Script.
Properties
DatabaseOrientation
Initial or MTP Products Platforms Languages
Target Both All Oracle
DB2 UNIX/NT
DB2 z/OS
All
Task 2-3-3: Create Tablespaces for InformixFTP the PTDDLUPG.SH script file to the server. Log on as the database owner (Informix user) and runPTDDLUPG.SH to create the new tablespaces. This script creates new tablespaces introduced in the newPeopleSoft release. Tablespace changes have been made in order to group temp tables, take advantage ofrow-level locking, and group tables with similar attributes.
See Edit the PTDDLUPG Script.
Properties
DatabaseOrientation
Initial or MTP Products Platforms Languages
Target Both All Informix All
Task 2-3-4: Update System Catalog ViewsThis step runs the UPDOBJ.SQL script, which re-creates system catalog views that both DataMover andPeopleTools use.
Properties
DatabaseOrientation
Initial or MTP Products Platforms Languages
Target Initial All Microsoft All
66 Copyright © 2006, Oracle. All rights reserved.

Chapter 2 Apply PeopleTools Changes
Task 2-3-5: Update PeopleTools System TablesRelease scripts are SQL scripts that modify the underlying table structure of a database so that it is compatiblewith a more recent PeopleTools release. They are located in the PS_HOME\SCRIPTS directory. Releasescripts can be identified by their common naming standard, RELxxx.SQL, in which xxx designates aPeopleTools release number.
These release (REL) scripts alter and update your PeopleTools tables to the current release. Change Assistantdetermines which RELxxx scripts to run based on the PeopleTools release of your Source and Target databases.
If you created RELxxxDBTSFIX (in which xxx is a PeopleTools release) earlier in your upgrade, theprocedure will look at your Output folder and will know to run RELxxxDBTSFIX. If you did not runDBTSFIX, Change Assistant will run RELxxx.
Note. Before running this step, verify that the PS_HOME values are set correctly in the Change Assistantenvironment for your upgrade job. Your new release PS_HOME/SCRIPTS directory should contain all scriptsthat will be run during this step. This step runs at least one script. Do not proceed to the next step untilthese scripts run successfully.
See Enterprise PeopleTools PeopleBook: PeopleSoft Software Updates for your new release.
Properties
DatabaseOrientation
Initial or MTP Products Platforms Languages
Target Both All All All
Task 2-3-6: Grant Privileges to the CONNECT IDThis step runs the GRANT.SQL script. This script grants select access to the connect ID for tables necessaryfor sign on.
Properties
DatabaseOrientation
Initial or MTP Products Platforms Languages
Target Both All All All
Task 2-3-7: Run the RELGA ScriptThis step runs the RELGA.DMS script using bootstrap mode. All users will be captured in the log file.However, if a user ID has not been logged into the database before the upgrade, that user ID will be flaggedin the log file. The message will state that the user’s password cannot be decrypted and the password willbe reset to the user’s ID. This message occurs if the password column is null or blank. It will also occur ifyou have PSLOCK.SECURITY_OPTION set to Y. In this case, after RELGA.DMS runs, all of your users’passwords (OPERPSWD) in PSOPRDEFN will be set to the user ID.
The Update_Oprdefn command in Data Mover performs the following functions:
• Decrypts passwords in PSOPRDEFN using old DES algorithms and re-encrypts using SHA-1 hashing.• Decrypts passwords in PSACCESSPRFL using old keys and re-encrypts using new keys.
Copyright © 2006, Oracle. All rights reserved. 67

Apply PeopleTools Changes Chapter 2
• Updates PSAUTHITEM to remove high-order bits from the Authorized Actions table.• Updates permissions from Security Administrator to Maintain Security.
Properties
DatabaseOrientation
Initial or MTP Products Platforms Languages
Target Initial All All All
Task 2-3-8: Populate Languages for LoginThis step runs the PSLANG.DMS script, which populates the PSLANGUAGES table.
Properties
DatabaseOrientation
Initial or MTP Products Platforms Languages
Target Initial All All All
Task 2-3-9: Update the Product License CodeThis section discusses:
• Understanding the Product License Code
• Updating the Product License Code
Understanding the Product License CodeThe new PeopleSoft release stores your application product license code on the database. This code is usedto unlock the pages and Application Engine programs that you licensed. It also provides necessary productinformation about your database to be used for identifying software maintenance that may need to be applied.
You need to populate the databases that were upgraded to the new PeopleSoft release so that you have thecorrect access to Pages and Application Engine programs that you licensed.
When your new PeopleSoft databases were installed, the appropriate application license code was added to yourdatabase in the PSOPTIONS table. This was done in an update statement that was created when DBSETUPwas run to create the Data Mover script for the new PeopleSoft release. The location of this script is:
PS_HOME\SCRIPTS\DBnameDBplatform.DMS
DBname is the name of the Demo database you installed and DBplatform represents the database platformusing the following chart:
Database Platform Code Used
Microsoft SQL Server MSS
DB2 UDB z/OS DB2
DB2 UDBUNIX/NT DBX
68 Copyright © 2006, Oracle. All rights reserved.

Chapter 2 Apply PeopleTools Changes
Database Platform Code Used
Oracle ORA
Informix INF
Sybase SYB
Updating the Product License CodeFollow the steps below to update your product license code.
To update the product license code:
1. From the Data Mover script that was created for your new PeopleSoft database installation, copy outthe update to PSOPTIONS.The statement should look similar to this:
update PSOPTIONS set LICENSE_CODE = ’xxxxxxxxxxxxxxxxxxxxxxxxxxxxxxxx’, LICENSE_⇒GROUP = ’xx’;
where ’xxxxxxxxxxxxxxxxxxxxxxxxxxxxxxxx’ equals your license code and ’xx’ equals your license group.2. Run the SQL command identified above using your SQL tool.
Your database is now updated with the appropriate license code. You can now access the pages and ApplicationEngine programs that you licensed.
Properties
DatabaseOrientation
Initial or MTP Products Platforms Languages
Target Initial All All All
Task 2-3-10: Update PeopleTools Patch InformationIn this step, you update your database with the version of the PeopleTools patch being applied.
Note. You only need to run this step if you are applying a PeopleTools patch as part of the upgrade process.
Log on to Data Mover in user mode and run the %PS_HOME\SCRIPTS\PTPATCH.DMS script.
Review the PeopleTools patch instructions and perform any additional database upgrade instructions that maybe listed prior to the copy of the patch project. The patch project will be copied later during the upgrade.
Properties
DatabaseOrientation
Initial or MTP Products Platforms Languages
Target Initial All All All
Copyright © 2006, Oracle. All rights reserved. 69
Apply PeopleTools Changes Chapter 2
Task 2-3-11: Create Temporary Performance IndexesPerform this step only if you are running on a DB2 z/OS platform. This step runs the DB2TMPIDXCREATEscript to create multiple indexes for rename performance. You will drop these indexes later in the upgradeprocess.
Properties
DatabaseOrientation
Initial or MTP Products Platforms Languages
Target Initial All DB2 z/OS All
Task 2-3-12: Export PeopleTools System TablesThe script for this step exports the content of the PeopleTools tables from the Copy of Production databaseduring your Move to Production passes. During the initial pass, you run programs to convert some objects, likePeopleCode and Fields. You perform analysis to decide which objects, such as records and menus, to bring overto your production database and which customized objects to keep. At the end of the initial pass, you reapplycustomizations or make other changes, such as modifying your permission lists. You do not need to repeat thosetasks in the Move to Production pass because this script exports all your changes to the PeopleTools objects.
The script name for your upgrade path is:
MVPRDEXP.DMS
Properties
DatabaseOrientation
Initial or MTP Products Platforms Languages
Source MTP All All All
Task 2-3-13: Import PeopleTools System TablesThe script for this step imports the content of the PeopleTools tables into your New Copy of Productiondatabase during your Move to Production passes.
These MVPRD* scripts replace tasks and steps performed in the initial pass. These tasks and steps may include:
• Exporting and Copying Projects• Converting PeopleTools Objects• Renaming Records and Fields• Running Upgrade Compare Reports• Running Project Compare Reports• Running the Upgrade Copy
If your relational database management system (RDBMS) uses tablespaces, edit this script for the properDDL information.
The script name for your upgrade path is:
MVPRDIMP.DMS
70 Copyright © 2006, Oracle. All rights reserved.

Chapter 2 Apply PeopleTools Changes
Properties
DatabaseOrientation
Initial or MTP Products Platforms Languages
Target MTP All All All
Task 2-3-14: Reset Database Options FlagThis step runs UPGDBOPTIONS_DISABLE.SQL, which resets the PSSTATUS.UPGDBOPTIONS flag.The flag is only reset for upgrades where you are coming from an application release prior to 9.0 andgoing to an application release of 9.0 or later with PeopleTools 8.48 or later. The PeopleTools upgrademust be applied using the old datatypes as the datatype conversion will occur after the PeopleTools changeshave been completed.
Properties
DatabaseOrientation
Initial or MTP Products Platforms Languages
Target MTP All MS SQL Server
Oracle
All
Task 2-3-15: Rerun Update Statistics for DB2 zOSEarlier in the upgrade process, you updated your statistics for DB2 z/OS. Due to changes in the databasestructure, you must update statistics again to improve the performance of your compare and copy. Contact yourdatabase administrator to have the statistics updated on your database before proceeding with your upgrade.
Properties
DatabaseOrientation
Initial or MTP Products Platforms Languages
Target Both All DB2 z/OS All
Task 2-3-16: Rerun RUNSTATS Report for DB2 UNIX NTThis script creates the RUNSTATS.DAT file for the script to update the statistics for DB2 UDB on UNIX,Linux, or Windows.
Properties
DatabaseOrientation
Initial or MTP Products Platforms Languages
Target Both All DB2 UNIX/NT All
Copyright © 2006, Oracle. All rights reserved. 71
Apply PeopleTools Changes Chapter 2
Task 2-3-17: Rerun Update Statistics for DB2 UNIX NTEarlier in the upgrade process, you updated your statistics for DB2 UDB on UNIX, Linux, or Windows. Dueto changes in the database structure, you must update statistics again to improve the performance of yourcompare and copy. This step runs RUNSTATS.SQL to update statistics on your database.
Properties
DatabaseOrientation
Initial or MTP Products Platforms Languages
Target Both All DB2 UNIX/NT All
Task 2-3-18: Rerun Update Statistics for InformixEarlier in the upgrade process, you updated your statistics for Informix. Due to changes in the databasestructure, you must update statistics again to improve the performance of your compare and copy. This stepruns UPDATESTATS to update statistics on your database.
Properties
DatabaseOrientation
Initial or MTP Products Platforms Languages
Target Both All Informix All
Task 2-3-19: Rerun Update Statistics for OracleEarlier in the upgrade process, you updated your statistics for Oracle. Due to changes in the database structure,you must update statistics again to improve the performance of your compare and copy. Contact your databaseadministrator to have the statistics updated on your database before proceeding with your upgrade.
Properties
DatabaseOrientation
Initial or MTP Products Platforms Languages
Target Both All Oracle All
Task 2-4: Turning Off Change ControlThis task executes a SQL statement that turns off the Change Control feature to improve performance forthe upgrade copy. One of the tasks for completing database changes will remind you to turn this featureon again, if you want to use it.
Note. Move to Production: The Change Control feature slows down copy functions. The large copy projectsare only executed during the initial pass and the feature is only disabled for the initial pass.
See “Complete Database Changes,” Reviewing Change Control.
72 Copyright © 2006, Oracle. All rights reserved.
Chapter 2 Apply PeopleTools Changes
Properties
DatabaseOrientation
Initial or MTP Products Platforms Languages
Target Initial All All All
Task 2-5: Loading Model Definition DataThis section discusses:
• Understanding Model Definition Data Load Process
• Load Model Definitions for DB2 zOS
• Load Model Definitions for DB2 UNIX NT
• Load Model Definitions for Oracle
• Load Model Definitions for Informix
• Load Model Definitions for Microsoft
• Load Model Definitions for Sybase
Understanding Model Definition Data Load ProcessIn this task, you load model definition scripts for your database platform and populate DDL model definitions.This step runs the DDL model definition script applicable to your database platform. If required by yourdatabase platform, you modified this script in the task “Performing Script Modifications,” to use yoursite-specific information.
See Performing Script Modifications.
Task 2-5-1: Load Model Definitions for DB2 zOSThis step runs the DDLDB2.DMS script to populate DDL model definitions for the DB2 z/OS platform.
Properties
DatabaseOrientation
Initial or MTP Products Platforms Languages
Target Both All DB2 z/OS All
Task 2-5-2: Load Model Definitions for DB2 UNIX NTThis step runs the DDLDBX.DMS script to populate DDL model definitions for DB2 UDB on UNIX, Linux,or Windows.
Copyright © 2006, Oracle. All rights reserved. 73

Apply PeopleTools Changes Chapter 2
Properties
DatabaseOrientation
Initial or MTP Products Platforms Languages
Target Both All DB2 UNIX/NT All
Task 2-5-3: Load Model Definitions for OracleThis step runs the DDLORA.DMS script to populate DDL model definitions for the Oracle platform.
Properties
DatabaseOrientation
Initial or MTP Products Platforms Languages
Target Both All Oracle All
Task 2-5-4: Load Model Definitions for InformixThis step runs the DDLIFX.DMS script to populate DDL model definitions for the Informix platform.
Properties
DatabaseOrientation
Initial or MTP Products Platforms Languages
Target Both All Informix All
Task 2-5-5: Load Model Definitions for MicrosoftThis step runs the DDLMSS.DMS script to populate DDL model definitions for the Microsoft SQL Server.
Properties
DatabaseOrientation
Initial or MTP Products Platforms Languages
Target Both All MS SQL Server All
Task 2-5-6: Load Model Definitions for SybaseThis step runs the DDLSYB.DMS script to populate DDL model definitions for the Sybase platform.
Properties
DatabaseOrientation
Initial or MTP Products Platforms Languages
Target Both All Sybase All
74 Copyright © 2006, Oracle. All rights reserved.
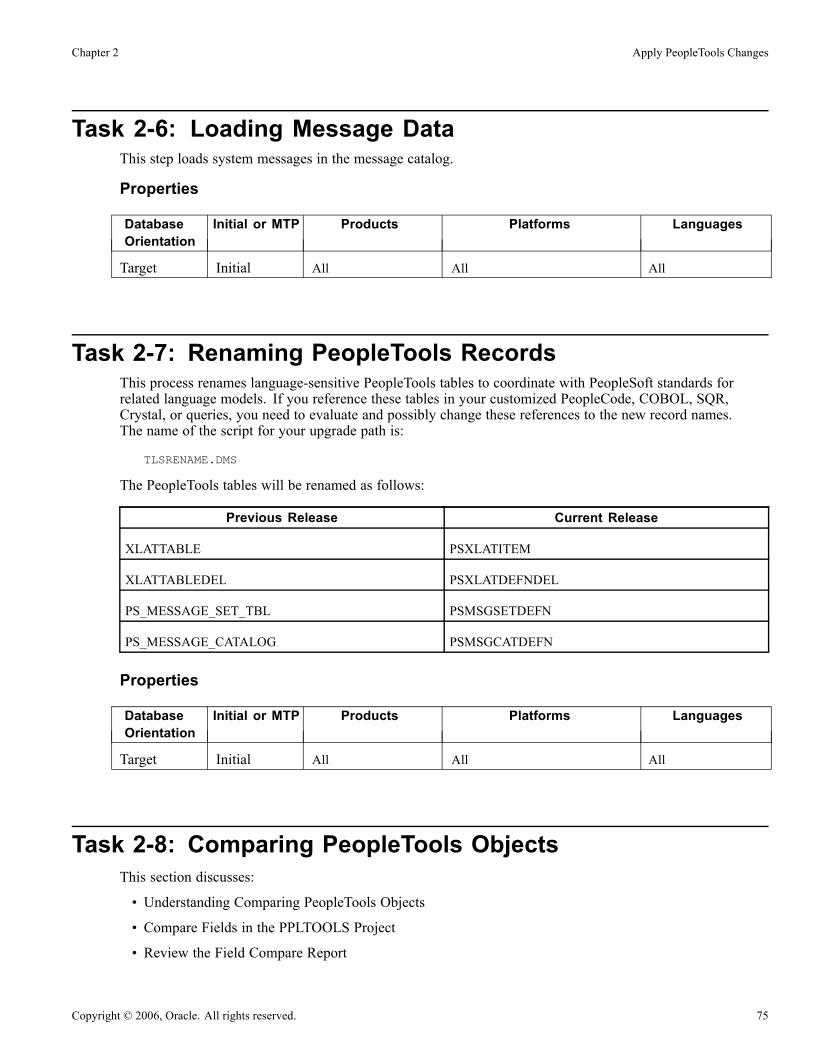
Chapter 2 Apply PeopleTools Changes
Task 2-6: Loading Message DataThis step loads system messages in the message catalog.
Properties
DatabaseOrientation
Initial or MTP Products Platforms Languages
Target Initial All All All
Task 2-7: Renaming PeopleTools RecordsThis process renames language-sensitive PeopleTools tables to coordinate with PeopleSoft standards forrelated language models. If you reference these tables in your customized PeopleCode, COBOL, SQR,Crystal, or queries, you need to evaluate and possibly change these references to the new record names.The name of the script for your upgrade path is:
TLSRENAME.DMS
The PeopleTools tables will be renamed as follows:
Previous Release Current Release
XLATTABLE PSXLATITEM
XLATTABLEDEL PSXLATDEFNDEL
PS_MESSAGE_SET_TBL PSMSGSETDEFN
PS_MESSAGE_CATALOG PSMSGCATDEFN
Properties
DatabaseOrientation
Initial or MTP Products Platforms Languages
Target Initial All All All
Task 2-8: Comparing PeopleTools ObjectsThis section discusses:
• Understanding Comparing PeopleTools Objects
• Compare Fields in the PPLTOOLS Project
• Review the Field Compare Report
Copyright © 2006, Oracle. All rights reserved. 75

Apply PeopleTools Changes Chapter 2
Understanding Comparing PeopleTools ObjectsIn this task, you compare PeopleTools fields and identify any fields you may have changed. Then you reviewyour field compare report.
See Appendix: “Understanding the Comparison Process.”
Note. If you are running Sybase, check the configuration parameter for open objects. If this parameteris set too low, you may encounter the following error: ct_connect(): network packet layer:internal net library error during the compare or copy process. If you encounter this error, youneed to increase the value accordingly.
Task 2-8-1: Compare Fields in the PPLTOOLS ProjectThis step applies only if you have modified PeopleTools fields. However, because fields are sometimesinadvertently modified, PeopleSoft recommends that all upgrade customers perform this step to ensure thatall PeopleTools field modifications are identified.
The fields delivered by PeopleTools should not be modified in any way. Doing so may result in systeminstability or crashes in your PeopleSoft application. However, it is possible that a PeopleTools field couldbecome modified from its delivered state. Compare the fields in the PPLTOOLS and PPLTLS84CUR projectsto identify any fields that were inadvertently modified. It is also possible that PeopleTools delivered a newfield that conflicts with a field you added to your PeopleSoft system. If you modified any fields deliveredin the PeopleTools project, you need to identify those fields using the steps below so that any data in themodified field is converted appropriately to match the PeopleTools-delivered field definition or format. This isespecially necessary if the size of the field changed. You must take the PeopleSoft-delivered field definitionor your system may become unstable.
The PPLTOOLS and PPLTLS84CUR projects that you will copy in the next task contain changes to all thePeopleTools objects. You must copy these projects in their entirety for the system to work properly. If youused any of the fields in the projects in any of your modifications, these field changes may negatively impactyour data. To ensure that this won’t happen, you should compare the fields to your Copy of Production.
Note. In order for PeopleTools to operate correctly, any customizations to PeopleTools fields must not beretained during the copy process.
To compare fields to your copy of production:
1. Sign on to the Demo database using the new PeopleTools.2. From the Go menu, select Application Designer.3. Select File, Open....4. From the Definition drop-down list box, select Project and click Open to display a list of all projects.5. Select the PPLTOOLS project and click Open again.6. Select File, Save Project As...7. Enter COMPARE_PPLTOOLS and click OK.8. If the PPLTLS84CUR project does not exist on your Demo (source) database, then complete this stepto copy the project definition; otherwise, continue to the next step.a. Select Tools, Copy Project, From File...b. In the resulting dialog box, change the import directory to PS_HOME\PROJECTS.c. Select PPLTLS84CUR from the list of projects and click Open.
76 Copyright © 2006, Oracle. All rights reserved.
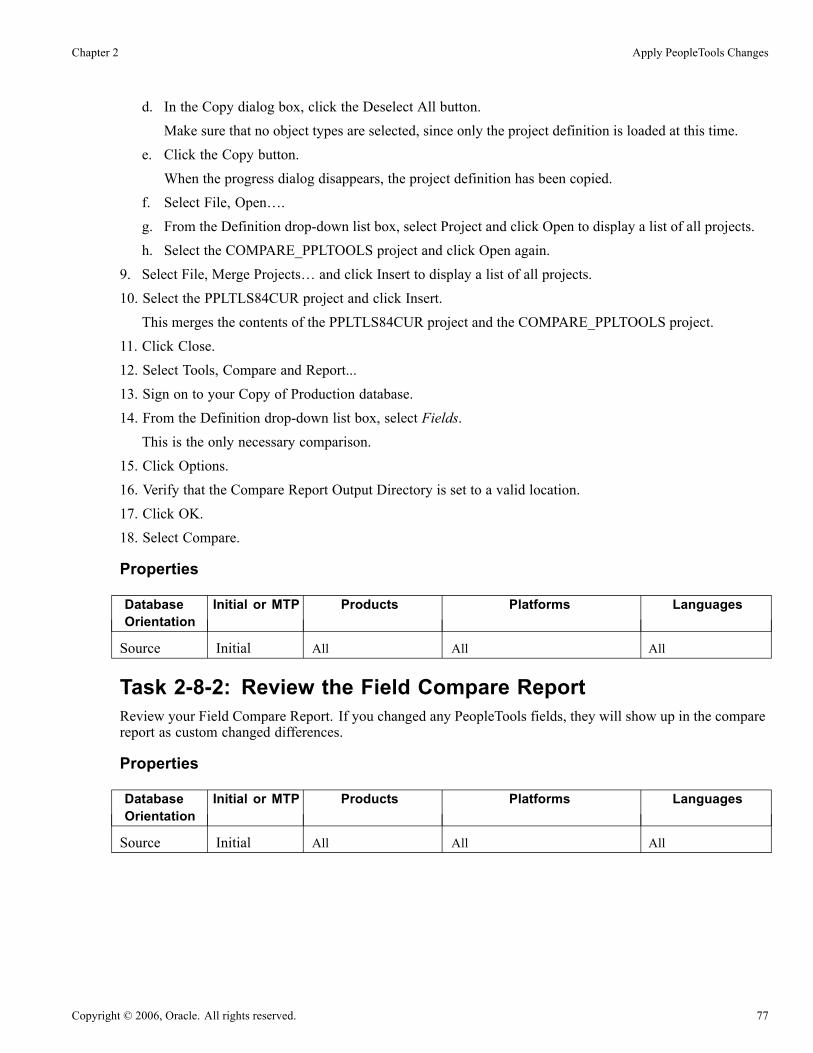
Chapter 2 Apply PeopleTools Changes
d. In the Copy dialog box, click the Deselect All button.Make sure that no object types are selected, since only the project definition is loaded at this time.
e. Click the Copy button.When the progress dialog disappears, the project definition has been copied.
f. Select File, Open….g. From the Definition drop-down list box, select Project and click Open to display a list of all projects.h. Select the COMPARE_PPLTOOLS project and click Open again.
9. Select File, Merge Projects… and click Insert to display a list of all projects.10. Select the PPLTLS84CUR project and click Insert.This merges the contents of the PPLTLS84CUR project and the COMPARE_PPLTOOLS project.
11. Click Close.12. Select Tools, Compare and Report...13. Sign on to your Copy of Production database.14. From the Definition drop-down list box, select Fields.This is the only necessary comparison.
15. Click Options.16. Verify that the Compare Report Output Directory is set to a valid location.17. Click OK.18. Select Compare.
Properties
DatabaseOrientation
Initial or MTP Products Platforms Languages
Source Initial All All All
Task 2-8-2: Review the Field Compare ReportReview your Field Compare Report. If you changed any PeopleTools fields, they will show up in the comparereport as custom changed differences.
Properties
DatabaseOrientation
Initial or MTP Products Platforms Languages
Source Initial All All All
Copyright © 2006, Oracle. All rights reserved. 77

Apply PeopleTools Changes Chapter 2
Task 2-9: Exporting and Copying ProjectsThis section discusses:
• Understanding Exporting and Copying Projects
• Export and Copy PTPORTALDEL Project
• Export and Copy PPLTOOLS Project
• Export and Copy PPLDELETE Project
• Export and Copy PPLTLS84CUR Project
• Export and Copy PPLTLS84CURML Project
• Export and Copy PPLTLSML Project
• Export and Copy PPLTLS84CURDEL Project
• Export and Copy PATCH84X Project
• Export and Copy PATCH84XML Project
Understanding Exporting and Copying ProjectsIn this task, you export and copy projects.
PeopleSoft recommends that you verify the results of all copied projects. After a project has been copied, eachobject is identified with a checkmark in the Done column. You can view these results from the Upgrade tab inApplication Designer. It is also recommended that you copy the PeopleTools projects with the take actionflags set as they originally were set when the database was delivered.
Note. If you are running Sybase, check the configuration parameter for “open objects.” If this parameter isset too low, you may encounter the following error: ct_connect(): network packet layer:internal net library error during the compare or copy process. If you encounter this error, youwill need to increase your parameter accordingly.
See Enterprise PeopleTools PeopleBook: PeopleSoft Application Designer for your new release.
Task 2-9-1: Export and Copy PTPORTALDEL ProjectThis step deletes obsolete or changed Portal registry structures. These obsolete or changed structures must bedeleted before the new Portal registry structures are copied, when you export and copy the PPLTOOLS project.
See Export and Copy PPLTOOLS Project.
Properties
DatabaseOrientation
Initial or MTP Products Platforms Languages
Target Initial All All All
78 Copyright © 2006, Oracle. All rights reserved.
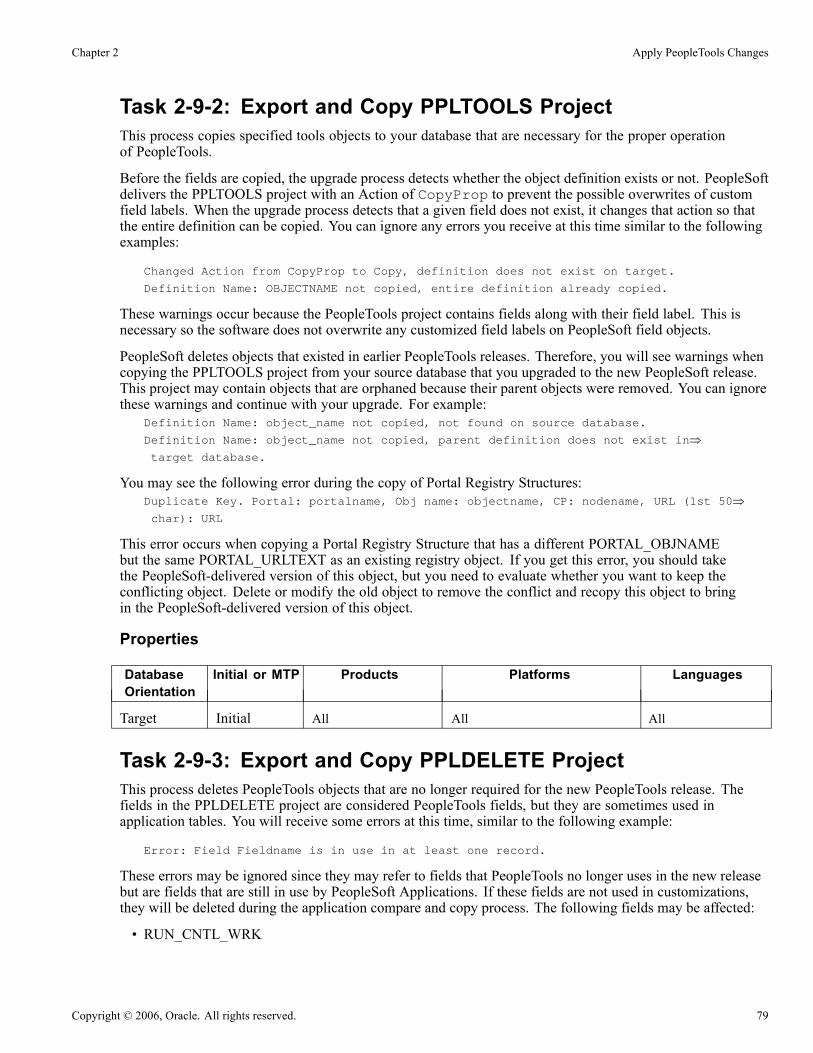
Chapter 2 Apply PeopleTools Changes
Task 2-9-2: Export and Copy PPLTOOLS ProjectThis process copies specified tools objects to your database that are necessary for the proper operationof PeopleTools.
Before the fields are copied, the upgrade process detects whether the object definition exists or not. PeopleSoftdelivers the PPLTOOLS project with an Action of CopyProp to prevent the possible overwrites of customfield labels. When the upgrade process detects that a given field does not exist, it changes that action so thatthe entire definition can be copied. You can ignore any errors you receive at this time similar to the followingexamples:
Changed Action from CopyProp to Copy, definition does not exist on target.
Definition Name: OBJECTNAME not copied, entire definition already copied.
These warnings occur because the PeopleTools project contains fields along with their field label. This isnecessary so the software does not overwrite any customized field labels on PeopleSoft field objects.
PeopleSoft deletes objects that existed in earlier PeopleTools releases. Therefore, you will see warnings whencopying the PPLTOOLS project from your source database that you upgraded to the new PeopleSoft release.This project may contain objects that are orphaned because their parent objects were removed. You can ignorethese warnings and continue with your upgrade. For example:
Definition Name: object_name not copied, not found on source database.
Definition Name: object_name not copied, parent definition does not exist in⇒target database.
You may see the following error during the copy of Portal Registry Structures:Duplicate Key. Portal: portalname, Obj name: objectname, CP: nodename, URL (1st 50⇒char): URL
This error occurs when copying a Portal Registry Structure that has a different PORTAL_OBJNAMEbut the same PORTAL_URLTEXT as an existing registry object. If you get this error, you should takethe PeopleSoft-delivered version of this object, but you need to evaluate whether you want to keep theconflicting object. Delete or modify the old object to remove the conflict and recopy this object to bringin the PeopleSoft-delivered version of this object.
Properties
DatabaseOrientation
Initial or MTP Products Platforms Languages
Target Initial All All All
Task 2-9-3: Export and Copy PPLDELETE ProjectThis process deletes PeopleTools objects that are no longer required for the new PeopleTools release. Thefields in the PPLDELETE project are considered PeopleTools fields, but they are sometimes used inapplication tables. You will receive some errors at this time, similar to the following example:
Error: Field Fieldname is in use in at least one record.
These errors may be ignored since they may refer to fields that PeopleTools no longer uses in the new releasebut are fields that are still in use by PeopleSoft Applications. If these fields are not used in customizations,they will be deleted during the application compare and copy process. The following fields may be affected:
• RUN_CNTL_WRK
Copyright © 2006, Oracle. All rights reserved. 79
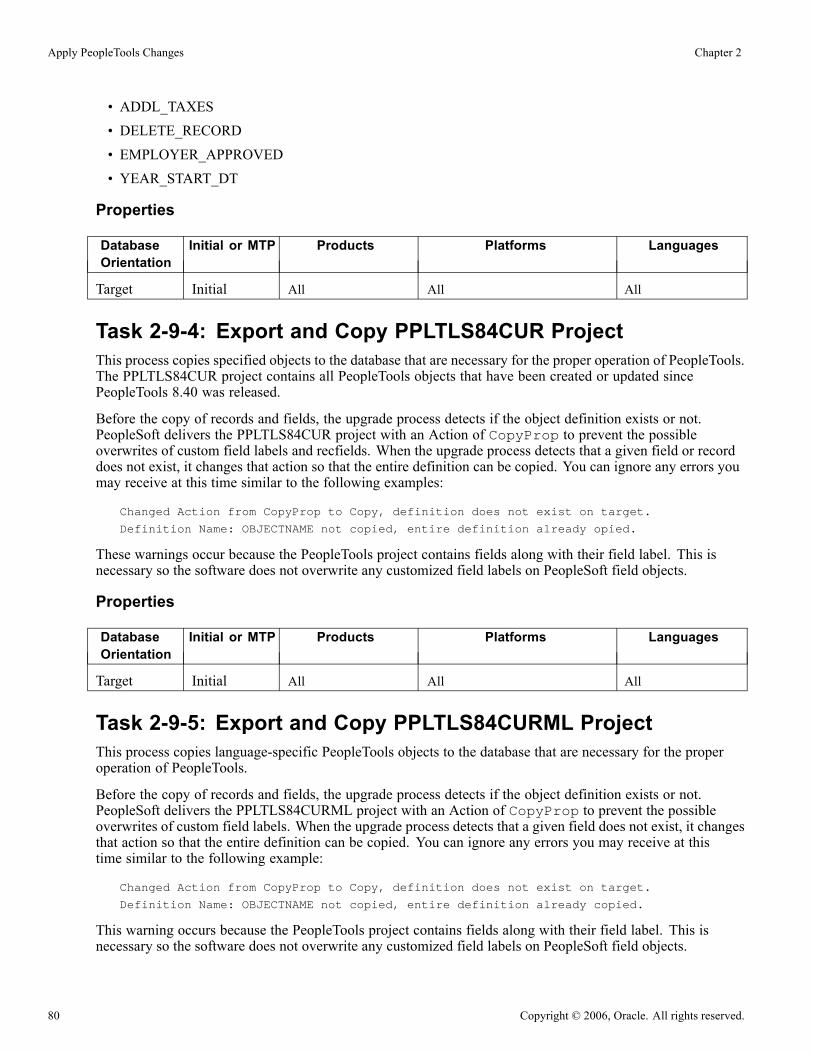
Apply PeopleTools Changes Chapter 2
• ADDL_TAXES• DELETE_RECORD• EMPLOYER_APPROVED• YEAR_START_DT
Properties
DatabaseOrientation
Initial or MTP Products Platforms Languages
Target Initial All All All
Task 2-9-4: Export and Copy PPLTLS84CUR ProjectThis process copies specified objects to the database that are necessary for the proper operation of PeopleTools.The PPLTLS84CUR project contains all PeopleTools objects that have been created or updated sincePeopleTools 8.40 was released.
Before the copy of records and fields, the upgrade process detects if the object definition exists or not.PeopleSoft delivers the PPLTLS84CUR project with an Action of CopyProp to prevent the possibleoverwrites of custom field labels and recfields. When the upgrade process detects that a given field or recorddoes not exist, it changes that action so that the entire definition can be copied. You can ignore any errors youmay receive at this time similar to the following examples:
Changed Action from CopyProp to Copy, definition does not exist on target.
Definition Name: OBJECTNAME not copied, entire definition already opied.
These warnings occur because the PeopleTools project contains fields along with their field label. This isnecessary so the software does not overwrite any customized field labels on PeopleSoft field objects.
Properties
DatabaseOrientation
Initial or MTP Products Platforms Languages
Target Initial All All All
Task 2-9-5: Export and Copy PPLTLS84CURML ProjectThis process copies language-specific PeopleTools objects to the database that are necessary for the properoperation of PeopleTools.
Before the copy of records and fields, the upgrade process detects if the object definition exists or not.PeopleSoft delivers the PPLTLS84CURML project with an Action of CopyProp to prevent the possibleoverwrites of custom field labels. When the upgrade process detects that a given field does not exist, it changesthat action so that the entire definition can be copied. You can ignore any errors you may receive at thistime similar to the following example:
Changed Action from CopyProp to Copy, definition does not exist on target.
Definition Name: OBJECTNAME not copied, entire definition already copied.
This warning occurs because the PeopleTools project contains fields along with their field label. This isnecessary so the software does not overwrite any customized field labels on PeopleSoft field objects.
80 Copyright © 2006, Oracle. All rights reserved.

Chapter 2 Apply PeopleTools Changes
Properties
DatabaseOrientation
Initial or MTP Products Platforms Languages
Target Initial All All All Non-English
Task 2-9-6: Export and Copy PPLTLSML ProjectThis process copies language-specific PeopleTools objects to the database that are necessary for the properoperation of PeopleTools.
Before copying records and fields, the upgrade process detects whether the object definition exists. PeopleSoftdelivers the PPLTLSML project with an Action of CopyProp to prevent the possible overwrites of customfield labels and recfields. When the upgrade process detects that a given field or record does not exist, itchanges that action so that the entire definition can be copied. You can ignore any errors you may receive atthis time similar to the following examples:
Changed Action from CopyProp to Copy, definition does not exist on target.
Definition Name: OBJECTNAME not copied, entire definition already copied.
These warnings occur because the PeopleTools project contains fields along with their field labels. This isnecessary so PeopleSoft does not overwrite any customized field labels on PeopleSoft field objects.
Properties
DatabaseOrientation
Initial or MTP Products Platforms Languages
Target Initial All All Arabic
Czech
Danish
Finnish
French
Hebrew
Hungarian
Norwegian
Polish
Russian
Turkish
Task 2-9-7: Export and Copy PPLTLS84CURDEL ProjectThis process deletes specified PeopleTools objects from your database.
Copyright © 2006, Oracle. All rights reserved. 81

Apply PeopleTools Changes Chapter 2
Properties
DatabaseOrientation
Initial or MTP Products Platforms Languages
Target Initial All All All
Task 2-9-8: Export and Copy PATCH84X ProjectThis process copies specified objects to the database that are necessary for the proper operation of PeopleTools.
Note. Perform this process only if you are applying a PeopleTools patch that includes a database project.Check the patch documentation to verify whether a database project was delivered with the patch.
Use Application Designer to perform the following steps.
To export and copy the project:
1. Log on to your Target database as a valid user.2. Select Tools, Copy Project, From File…3. In the Import Directory field, enter PS_HOME\PROJECTS.4. Select the PATCH84X project from the list, where 84X corresponds to the PeopleTools release of the patchproject. This should correspond with the PeopleTools release to which you are upgrading.
5. Click Copy.
Properties
DatabaseOrientation
Initial or MTP Products Platforms Languages
Target Initial All All All
Task 2-9-9: Export and Copy PATCH84XML ProjectThis process copies language-specific PeopleTools objects to your database that are necessary for the properoperation of PeopleTools.
Note. Perform this process only if you are applying a PeopleTools patch that includes a database project.Check the patch documentation to verify whether a multilingual database project was delivered with the patch.
Use Application Designer to perform the following steps.
To export and copy the project:
1. Log on to your Target database as a valid user.
2. Select Tools, Copy Project, From File…
3. In the Import Directory field, enter PS_HOME\PROJECTS.
4. Select the PATCH84XML project from the list, where 84X represents the PeopleTools release of the patchproject. This should correspond to the PeopleTools release to which you are upgrading.
82 Copyright © 2006, Oracle. All rights reserved.
Chapter 2 Apply PeopleTools Changes
5. Click Options, and then select the Copy Options tab and verify that only the non-English languagesthat are installed are selected.
Note. The languages English and Common should not be selected.
6. Click OK.7. Click Copy.
Properties
DatabaseOrientation
Initial or MTP Products Platforms Languages
Target Initial All All All Non-English
Task 2-10: Populating Tablespace DataThis section discusses:
• Create Application Tablespaces
• Populate Tablespace Data
• Update Tablespace Names
Task 2-10-1: Create Application TablespacesDuring each Move to Production pass, you must create any new tablespaces. You can reuse the same scriptcreated during the initial pass when you created new tablespaces, or you can build a new one if you plan to usedifferent tablespaces on your production system.
See “Apply Application Changes,” Updating Database Overrides.
See “Apply Application Changes,” Create New Tablespaces.
The script supplied by PeopleSoft to create tablespaces for your upgrade is:
HCDDL.SQL
Important! For DB2 UNIX/NT sites, the script name is HCDDLDMS.SQL for ANSI, and HCDDLDMSU.SQLfor Unicode.
Once you have determined which script to run during Move to Production, you can change this step to runautomatically.
To run the Create Application Tablespaces step automatically:
1. In Change Assistant, open your upgrade job.2. In the task Populating Tablespace Data, right-click on the step Create Application Tablespaces, andthen select Step Properties.
3. In the Step Properties dialog box, change the value in the Type field from Manual - Stop to SQL Script.
Copyright © 2006, Oracle. All rights reserved. 83

Apply PeopleTools Changes Chapter 2
4. In the Script/Procedure field, enter the name of the script you want to run and click OK.5. Select File, Save.6. Select the step Create Application Tablespaces.7. Select Edit, Run.
Properties
DatabaseOrientation
Initial or MTP Products Platforms Languages
Target MTP All Oracle
Informix
DB2 UNIX/NT
DB2 z/OS
All
Task 2-10-2: Populate Tablespace DataThis step populates all tablespace information in the PSRECTBLSPC table. This step runs the SETSPACE.SQRscript, which ensures that the correct tablespace information is populated for tasks later in the upgrade process.
The values stored in the DDLSPACENAME field are updated with current values found in the system catalogfor tables already defined in your database. If you modified tablespace names from the PeopleSoft-deliverednames, this step makes those same changes in the PeopleSoft record definition.
If you receive any errors when you run this script, correct them by creating the needed tablespace or changingthe tablespace definition on the record object. Then run the script again to validate that you have created alltablespaces.
Properties
DatabaseOrientation
Initial or MTP Products Platforms Languages
Target Both All Oracle
Informix
DB2 UNIX/NT
DB2 z/OS
All
84 Copyright © 2006, Oracle. All rights reserved.

Chapter 2 Apply PeopleTools Changes
Task 2-10-3: Update Tablespace NamesThe SETSPACE SQR script identifies the tables with an invalid database name/tablespace combination.However, the PeopleTools Metadata tables in your Copy of Production (Target) database contain thedatabase/tablespace values from the Demo (Source) database. This also occurs if your Demo and Copy ofProduction databases are in the same DB2 subsystem after the upgrade/copy is completed. SETSPACE.SQRcorrects these values for those tables defined in DB2. For those tables that are defined in the PeopleToolsmetadata tables, but have not been defined in DB2, you need to review the SETSPACE SQR script for thosetables that are reported as not defined in the database, but where the database/tablespace combination is valid.If the report shows an invalid database/tablespace combination, or shows your Demo (source) database andtablespace names instead of your Copy of Production (target) database and tablespace names, you can correctthe database and tablespace names using one of the following options:
• Generate the alter/create scripts and globally edit the scripts, changing the database/tablespace valuesto those of your Copy of Production.
• Directly update the PSRECTBLSPC table with your Target database names before generating thealter/create scripts. This will ensure that the database name/tablespace names in the generated alter/createscripts will be correct. The syntax to update the PSRECTBLSPC table is as follows:
UPDATE PSRECTBLSPC SET DBNAME = dbname, DDLSPACENAME = tablespace name WHERE⇒DDLSPACENAME = tablespace identified in SETSPACE OUTPUT AND DBNAME = database⇒identified in SETSPACE OUTPUT;
If you are using the PeopleSoft-delivered tablespaces, you can omit the references to DDLSPACENAMEin the SQL statement above.
Properties
DatabaseOrientation
Initial or MTP Products Platforms Languages
Target Both All DB2 z/OS All
Task 2-11: Building the PeopleTools ProjectThis section discusses:
• Generate the PeopleTools Script
• Edit the PeopleTools Script
• Run the PeopleTools Script
Task 2-11-1: Generate the PeopleTools ScriptThis step generates the PeopleTools Create and Alter script to create and alter records of the type Table that aredelivered in the PPLTOOLS project. The tables are altered to add new columns, rename existing columns, andchange columns that have modified properties, such as length, and delete columns. The script also creates newindexes, re-creates modified indexes, and creates triggers. The script name is:
PTCREATEANDALTERTABLES.SQL
Copyright © 2006, Oracle. All rights reserved. 85

Apply PeopleTools Changes Chapter 2
Note. You may receive the following error: Error: WEBLIB_XMLTOCI - Fatal error tryingto open this record. Record not processed. (76,45).
This error occurs for any records deleted in the PPLTLS84CURDEL project. Ignore this error and continuewith the upgrade.
Note. For DB2 z/OS sites, if this step takes an exceptionally long time, performing a RUNSTATS on theSystem Catalog tablespace SYSDBASE may improve performance.
Properties
DatabaseOrientation
Initial or MTP Products Platforms Languages
Target Both All All All
Task 2-11-2: Edit the PeopleTools ScriptIn this step, you edit the script you generated in the previous task for tablespace names and sizing. If you arerunning on an RDBMS platform that uses tablespaces, and you are not using the PeopleSoft tablespace names,have your database administrator review these scripts and modify the tablespace names appropriately.
Properties
DatabaseOrientation
Initial or MTP Products Platforms Languages
Target Both All DB2 z/OS
DB2 UNIX/NT
Oracle
Informix
All
Task 2-11-3: Run the PeopleTools ScriptIn this step, you run the script you generated in the previous step to create all records of the type Table. Thisstep creates new table structures, alters existing PeopleSoft table structures, creates new indexes, re-createsmodified indexes, and creates triggers.
Properties
DatabaseOrientation
Initial or MTP Products Platforms Languages
Target Both All All All
86 Copyright © 2006, Oracle. All rights reserved.

Chapter 2 Apply PeopleTools Changes
Task 2-12: Building Updated PeopleTools ProjectThis section discusses:
• Generate Updated PeopleTools Script
• Edit the Updated PeopleTools Script
• Run the Updated PeopleTools Script
Task 2-12-1: Generate Updated PeopleTools ScriptThis step generates the SQL script to create and alter records of the type table that are delivered in thePPLTLS84CUR project. The tables are altered to add new columns, rename existing columns, and changecolumns that have modified properties, such as length, and delete columns. The script will also create newindexes, re-create modified indexes, and create triggers. The script name is:
PPLTLS84CURTABLES.SQL
Note. For DB2 z/OS sites, if this step takes an exceptionally long time, performing a RUNSTATS on thesystem catalog tablespace SYSDBASE may improve performance.
Properties
DatabaseOrientation
Initial or MTP Products Platforms Languages
Target Both All All All
Task 2-12-2: Edit the Updated PeopleTools ScriptIn this step, you edit the PPLTLS84CURTABLES.SQL script that was generated in the previous step fortablespace names and sizing. If you are running on a relational database management system (RDBMS)platform that uses tablespaces, and you are not using the PeopleSoft tablespace names, have your databaseadministrator review this script and modify the tablespace names appropriately. The script can be found inyour Change Assistant output directory for this upgrade path.
Properties
DatabaseOrientation
Initial or MTP Products Platforms Languages
Target Both All DB2 z/OS
DB2 UNIX/NT
Oracle
Informix
All
Copyright © 2006, Oracle. All rights reserved. 87

Apply PeopleTools Changes Chapter 2
Task 2-12-3: Run the Updated PeopleTools ScriptThis step runs the script you generated in this task to create all records of the type table. This creates new tablestructures, alters existing PeopleSoft table structures, creates new indexes, re-creates modified indexes, andcreates triggers.
Properties
DatabaseOrientation
Initial or MTP Products Platforms Languages
Target Both All All All
Task 2-13: Migrating Records to New TablespacesThis section discusses:
• Understanding Migration of Records to New Tablespaces
• Export and Copy the PT84TBLSPC Project
• Build the Tablespace Alter Script
• Edit the Tablespace Alter Script
• Run the Tablespace Alter Script
Understanding Migration of Records to New TablespacesIn this task you migrate the tables delivered in the PT84TBLSPC project to the correct tablespaces.
Task 2-13-1: Export and Copy the PT84TBLSPC ProjectThis process copies the records that moved to different tablespaces in the new release of PeopleTools. Theupgrade copy options are set to “Copy From Source” for record DDL to pick up the new tablespace information.
Properties
DatabaseOrientation
Initial or MTP Products Platforms Languages
Target Initial All DB2 z/OS
DB2 UNIX/NT
Oracle
Informix
All
88 Copyright © 2006, Oracle. All rights reserved.
Chapter 2 Apply PeopleTools Changes
Task 2-13-2: Build the Tablespace Alter ScriptThis step generates the SQL script to alter records of the type table that are delivered in the PT84TBLSPCproject. The tables are altered to move them to the correct tablespaces for the new release of PeopleTools.The script name is:
TABLESPACEALTERTABLES.SQL
Note. For DB2 z/OS sites, if this step takes an exceptionally long time, performing a RUNSTATS on thesystem catalog tablespace SYSDBASE may improve performance.
Properties
DatabaseOrientation
Initial or MTP Products Platforms Languages
Target Both All DB2 z/OS
DB2 UNIX/NT
Oracle
Informix
All
Task 2-13-3: Edit the Tablespace Alter ScriptIn this step, you edit the TABLESPACEALTERTABLES.SQL script for tablespace names and sizing. If youare running on an RDBMS platform that uses tablespaces, and you are not using the PeopleSoft tablespacenames, you need to review and modify the scripts above. Have your database administrator review thesescripts and modify the tablespace names appropriately. The script can be found in your Change Assistantoutput directory for this upgrade path.
Note. If you are a DB2 z/OS customer, you must edit the scripts for database name regardless of whether youare using the delivered PeopleSoft tablespace names.
Properties
DatabaseOrientation
Initial or MTP Products Platforms Languages
Target Both All DB2 z/OS
DB2 UNIX/NT
Oracle
Informix
All
Task 2-13-4: Run the Tablespace Alter ScriptThis step runs the TABLESPACEALTERTABLES.SQL script to move the tables to the new tablespaces.
Copyright © 2006, Oracle. All rights reserved. 89

Apply PeopleTools Changes Chapter 2
Properties
DatabaseOrientation
Initial or MTP Products Platforms Languages
Target Both All DB2 z/OS
DB2 UNIX/NT
Oracle
Informix
All
Task 2-14: Loading Base DataThese Data Mover scripts (DMSs) initialize and modify the data in various PeopleTools tables required for thesystem to execute properly. This step runs scripts conforming to the PTxxxTLS.DMS and PTxxxTLSyyy.DMSnaming conventions that are greater than your current PeopleTools release, where xxx represents a PeopleToolsrelease number and yyy represents a three-letter language code. For some upgrades, no data scripts arerequired. In this case, Change Assistant continues to the next step without producing a log file.
Properties
DatabaseOrientation
Initial or MTP Products Platforms Languages
Target Initial All All All
Task 2-15: Loading Language DataThis section discusses:
• Populate Languages
• Load Language Data
Task 2-15-1: Populate LanguagesThis step runs the PSLANGUAGES.DMS script. This script populates the PSLANGUAGES table withVerity Locale data and other language-specific data.
Properties
DatabaseOrientation
Initial or MTP Products Platforms Languages
Target Initial All All All
90 Copyright © 2006, Oracle. All rights reserved.
Chapter 2 Apply PeopleTools Changes
Task 2-15-2: Load Language DataIf your database has languages installed in addition to English, you must populate the PSLANGUAGES table.
To load language data:
1. From the DMS that was created for your PeopleSoft 8.x database installation, find the UPDATE toPSLANGUAGES. The statement should look similar to the following:
UPDATE PSLANGUAGES SET INSTALLED=1 WHERE LANGUAGE_CD = ’xxx’;
2. Run the SQL command identified above using your SQL tool.Your database is now updated with the language data.
Properties
DatabaseOrientation
Initial or MTP Products Platforms Languages
Target Initial All All All Non-English
Task 2-16: Loading PeopleTools DataThis section discusses:
• Load NonComparable Objects
• Load English Messages
• Load English String Data
• Load Stored Statements Data
Task 2-16-1: Load NonComparable ObjectsThis step runs the TLSUPGNONCOMP.DMS script. This script loads the TLSUPGNONCOMP project andall PeopleTools-owned object definitions that cannot be delivered using Copy Project to File.
Properties
DatabaseOrientation
Initial or MTP Products Platforms Languages
Target Initial All All All
Task 2-16-2: Load English MessagesThis script loads English messages into your database.
Copyright © 2006, Oracle. All rights reserved. 91

Apply PeopleTools Changes Chapter 2
Properties
DatabaseOrientation
Initial or MTP Products Platforms Languages
Target Initial All All English
Task 2-16-3: Load English String DataThis step runs the PTSTRENG.DMS script, which loads English string data into the STRINGS_TBL table.
Note. The non-English language data was loaded in the task “Loading Base Data.”
Properties
DatabaseOrientation
Initial or MTP Products Platforms Languages
Target Initial All All All
Task 2-16-4: Load Stored Statements DataLoading the stored statements ensures that the dynamic SQL statements will work correctly with the deliveredCOBOL programs.
This script loads the dynamic SQL used by the PeopleTools-delivered COBOL.
Properties
DatabaseOrientation
Initial or MTP Products Platforms Languages
Target Both All All All
Task 2-17: Creating PeopleTools ViewsThis section discusses:
• Create PPLTOOLS Views
• Create Updated PeopleTools Views
Task 2-17-1: Create PPLTOOLS ViewsThis step creates all views defined in the PPLTOOLS project. These views are required for tasks later inthe upgrade.
92 Copyright © 2006, Oracle. All rights reserved.
Chapter 2 Apply PeopleTools Changes
Note. The upgrade is designed to continue on regardless if any errors are encountered in this step. You mayignore any errors on views that fail to create at this time if they are created successfully in the next step “CreateUpdated PeopleTools Views.” However, if you see any other types of index creation errors, such as spaceproblems, you must correct them before you continue with the upgrade.
Properties
DatabaseOrientation
Initial or MTP Products Platforms Languages
Target Both All All All
Task 2-17-2: Create Updated PeopleTools ViewsThis step creates all views defined in the PPLTLS84CUR project. These are PeopleTools views that havechanged and are required for tasks later in the upgrade.
Properties
DatabaseOrientation
Initial or MTP Products Platforms Languages
Target Both All All All
Task 2-18: Converting PeopleTools ObjectsThis section discusses:
• Expand Fields on Records
• Alter Approval Rule Set Related Tables
• Update Message Nodes
• Update Message Nodes for Informix
• Convert Portal Objects
• Convert Query Prompt Headings
• Load Conversion Data
• Report Conversion Details
• Run Data Conversion
Task 2-18-1: Expand Fields on RecordsThis step runs the Application Engine program, UPG84. This process clears the table PSRECFIELDDB.It then opens each record, expands the fields in subrecords, and writes the list of expanded fields intoPSRECFIELDDB.
Copyright © 2006, Oracle. All rights reserved. 93
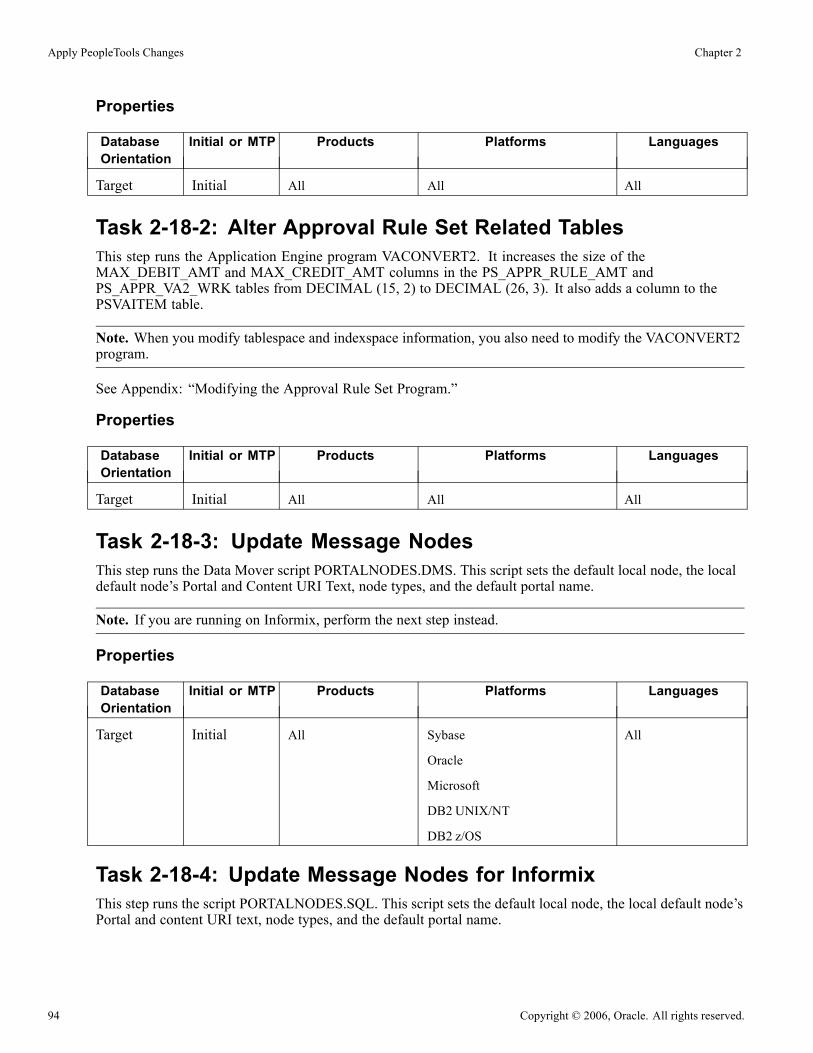
Apply PeopleTools Changes Chapter 2
Properties
DatabaseOrientation
Initial or MTP Products Platforms Languages
Target Initial All All All
Task 2-18-2: Alter Approval Rule Set Related TablesThis step runs the Application Engine program VACONVERT2. It increases the size of theMAX_DEBIT_AMT and MAX_CREDIT_AMT columns in the PS_APPR_RULE_AMT andPS_APPR_VA2_WRK tables from DECIMAL (15, 2) to DECIMAL (26, 3). It also adds a column to thePSVAITEM table.
Note. When you modify tablespace and indexspace information, you also need to modify the VACONVERT2program.
See Appendix: “Modifying the Approval Rule Set Program.”
Properties
DatabaseOrientation
Initial or MTP Products Platforms Languages
Target Initial All All All
Task 2-18-3: Update Message NodesThis step runs the Data Mover script PORTALNODES.DMS. This script sets the default local node, the localdefault node’s Portal and Content URI Text, node types, and the default portal name.
Note. If you are running on Informix, perform the next step instead.
Properties
DatabaseOrientation
Initial or MTP Products Platforms Languages
Target Initial All Sybase
Oracle
Microsoft
DB2 UNIX/NT
DB2 z/OS
All
Task 2-18-4: Update Message Nodes for InformixThis step runs the script PORTALNODES.SQL. This script sets the default local node, the local default node’sPortal and content URI text, node types, and the default portal name.
94 Copyright © 2006, Oracle. All rights reserved.
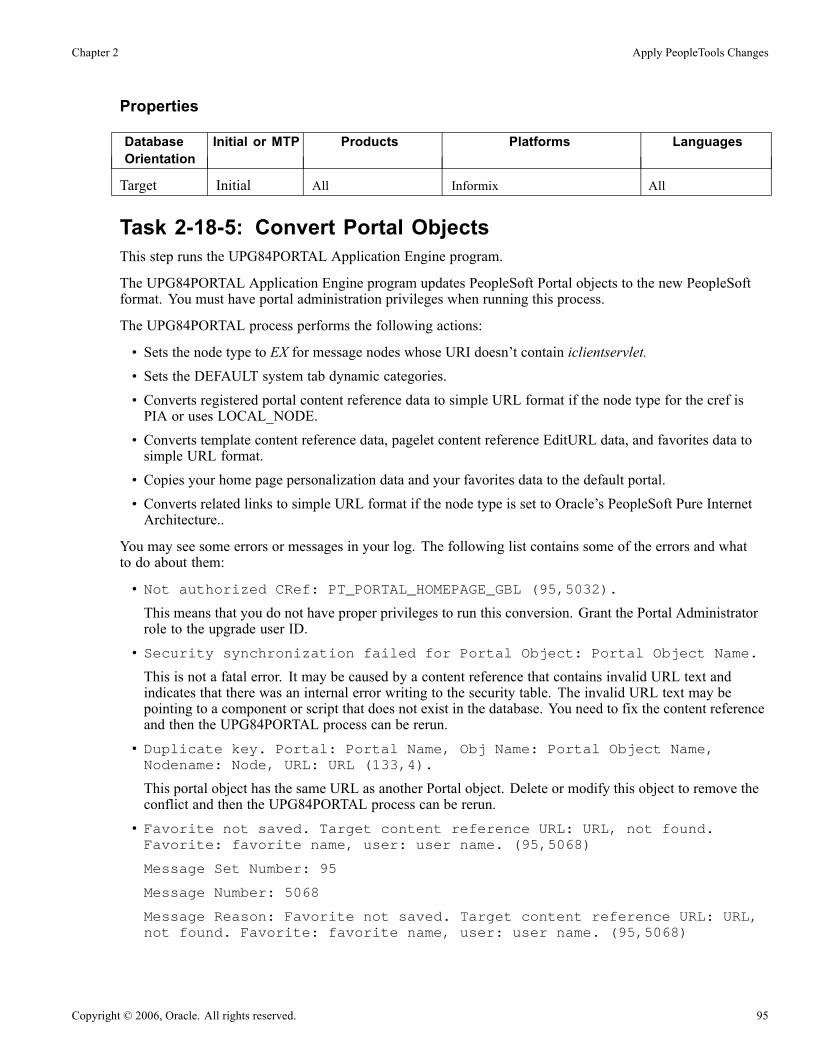
Chapter 2 Apply PeopleTools Changes
Properties
DatabaseOrientation
Initial or MTP Products Platforms Languages
Target Initial All Informix All
Task 2-18-5: Convert Portal ObjectsThis step runs the UPG84PORTAL Application Engine program.
The UPG84PORTAL Application Engine program updates PeopleSoft Portal objects to the new PeopleSoftformat. You must have portal administration privileges when running this process.
The UPG84PORTAL process performs the following actions:
• Sets the node type to EX for message nodes whose URI doesn’t contain iclientservlet.
• Sets the DEFAULT system tab dynamic categories.
• Converts registered portal content reference data to simple URL format if the node type for the cref isPIA or uses LOCAL_NODE.
• Converts template content reference data, pagelet content reference EditURL data, and favorites data tosimple URL format.
• Copies your home page personalization data and your favorites data to the default portal.
• Converts related links to simple URL format if the node type is set to Oracle’s PeopleSoft Pure InternetArchitecture..
You may see some errors or messages in your log. The following list contains some of the errors and whatto do about them:
• Not authorized CRef: PT_PORTAL_HOMEPAGE_GBL (95,5032).
This means that you do not have proper privileges to run this conversion. Grant the Portal Administratorrole to the upgrade user ID.
• Security synchronization failed for Portal Object: Portal Object Name.
This is not a fatal error. It may be caused by a content reference that contains invalid URL text andindicates that there was an internal error writing to the security table. The invalid URL text may bepointing to a component or script that does not exist in the database. You need to fix the content referenceand then the UPG84PORTAL process can be rerun.
• Duplicate key. Portal: Portal Name, Obj Name: Portal Object Name,Nodename: Node, URL: URL (133,4).
This portal object has the same URL as another Portal object. Delete or modify this object to remove theconflict and then the UPG84PORTAL process can be rerun.
• Favorite not saved. Target content reference URL: URL, not found.Favorite: favorite name, user: user name. (95,5068)
Message Set Number: 95
Message Number: 5068
Message Reason: Favorite not saved. Target content reference URL: URL,not found. Favorite: favorite name, user: user name. (95,5068)
Copyright © 2006, Oracle. All rights reserved. 95

Apply PeopleTools Changes Chapter 2
The favorite referenced in the previous message will not be converted to simple URL format. After thefinal Move to Production upgrade pass, the end-user will have to reenter the favorite with a valid valueon the upgraded production database.
• Error getting Favorite for label XXXX.(Where XXXX represents a favoritelabel.) (96,58)
Ignore this error. It will not cause any problems to occur.• Access denied, source message node not defined. (94,24)
Message Set Number: 94
Message Number: 24
Message Reason: Access denied, source message node not defined. (94,24)
The favorite referenced in this message will not be converted to simple URL format. After the finalMove to Production upgrade pass, the end-user will have to reenter the favorite with a valid value on theupgraded production database.
Properties
DatabaseOrientation
Initial or MTP Products Platforms Languages
Target Initial All All All
Task 2-18-6: Convert Query Prompt HeadingsThis step runs the Application Engine program UPGQRYDUPHED, which searches for duplicate promptheadings in the table PSQRYBIND and appends numbers onto the text. For example, Item ID would becomeItem ID 2. When you run Crystal 9 through the process scheduler, it cannot handle queries with two or moreprompts that have the same heading. These duplicates are also not legal in Query. You need to alter any oldqueries that have duplicate prompt headings so that they work with Crystal 9.
If you find a duplicate heading that exceeds the length of the field HEADING, you need to manually changethe heading. In these cases, the following error is written to the log file:
The prompt heading HEADING for Query QUERY is duplicated. Please manually correct.⇒(108, 1108)
See Enterprise PeopleTools PeopleBook: PeopleSoft Query for your new release.
Properties
DatabaseOrientation
Initial or MTP Products Platforms Languages
Target Initial All All All
Task 2-18-7: Load Conversion DataThis step imports PeopleTools data conversion Application Engine driver data into your database.
96 Copyright © 2006, Oracle. All rights reserved.

Chapter 2 Apply PeopleTools Changes
Properties
DatabaseOrientation
Initial or MTP Products Platforms Languages
Target Both All All All
Task 2-18-8: Report Conversion DetailsThis step runs the PTUCONV.SQR script. It details which sections will be called by the Upgrade Driverprogram and what they are doing. Each of the upgrade data conversion sections contains comments thatdescribe the processing done by the section. The information contained in the report is used to evaluate theconversions run in the next step and any actions that are required as a result of the conversion.
Properties
DatabaseOrientation
Initial or MTP Products Platforms Languages
Target Both All All All
Task 2-18-9: Run Data ConversionThe Upgrade Driver Application Engine program, PTUPGCONVERT, runs additional PeopleTools upgradedata conversions. The program then reads the table PS_PTUPGCONVERT, selecting all rows with the groupnumber of 01 and ordering them by the sequence number on the row. A list of Application Engine librarysections that must be run for data conversion is returned. The program then calls each section in the order ofthe sequence number. After running PTUPGCONVERT, review the output data generated in the previous stepfor more details.
Properties
DatabaseOrientation
Initial or MTP Products Platforms Languages
Target Both All All All
Task 2-19: Converting Integration BrokerThis section discusses:
• Understanding Converting Integration Broker
• Updating Integration Broker Defaults
• Creating Integration Broker Objects
• Saving Application Messaging Objects
• Exporting Node Transactions
• Preparing Integration Broker Deletes
Copyright © 2006, Oracle. All rights reserved. 97

Apply PeopleTools Changes Chapter 2
• Deleting Application Messaging Objects
• Deleting Node Transactions
Understanding Converting Integration BrokerIf you are upgrading from PeopleTools 8.48 or later, this task does not need to be run since the IntegrationBroker conversion has already been performed. You may mark all of the steps in this task as “Complete” inyour upgrade job. If you don’t mark these steps as complete, the upgrade will try to unnecessarily reconvertyour objects.
Task 2-19-1: Updating Integration Broker DefaultsThis step runs the PTIBUPGRADE.DMS script. This script populates the default values specified earlier inthe upgrade.
Properties
DatabaseOrientation
Initial or MTP Products Platforms Languages
Target Initial All All All
Task 2-19-2: Creating Integration Broker ObjectsThe PeopleTools Upgrade Driver Application Engine program, PTUPGCONVERT, runs additionalPeopleTools upgrade data conversions. The program then reads the table PS_PTUPGCONVERT, selectingall rows with a group number of 03 and ordering them by the row sequence number. A list of ApplicationEngine library sections that must be run for data conversion is returned. The program then calls eachsection in the sequence number order. Review the report generated by PTUCONV.SQR for details on theconversions run in this step.
Properties
DatabaseOrientation
Initial or MTP Products Platforms Languages
Target Initial All All All
Task 2-19-3: Saving Application Messaging ObjectsThis step copies the PTUPGIBCLONE project to the PS_HOME\projects directory. This project was createdby the UPGPT848IBUG Application Engine program and contains objects that were successfully converted.The objects are copied to file as a precautionary measure since they will be deleted from the upgrade database.
After running this step, save the exported project in a permanent location where it can be accessed post-upgradein case there is a need to review or import the old objects.
98 Copyright © 2006, Oracle. All rights reserved.

Chapter 2 Apply PeopleTools Changes
Properties
DatabaseOrientation
Initial or MTP Products Platforms Languages
Target Initial All All All
Task 2-19-4: Exporting Node TransactionsThis step runs PTUPG_TRX_EXPORT.DMS to save out the old pre-conversion node transaction data. Thegenerated .dat file is written to the DataMover output directory defined in Configuration Manager, whichshould be your PS_HOME\data directory.
After running this step, save PTUPG_TRX_EXPORT.DAT in a permanent location where it can be accessedpost-upgrade in case there is a need to review or import the old objects.
Properties
DatabaseOrientation
Initial or MTP Products Platforms Languages
Target Initial All All All
Task 2-19-5: Preparing Integration Broker DeletesThis step copies the PTUPGIBDELETE project to your PS_HOME\projects directory in preparation fordeleting the obsolete pre-conversion object definitions from the upgrade database. This project was created bythe UPGPT848IBUG Application Engine program and contains the same objects as PTUPGIBCLONE.
Properties
DatabaseOrientation
Initial or MTP Products Platforms Languages
Target Initial All All All
Task 2-19-6: Deleting Application Messaging ObjectsThis step copies the PTUPGIBDELETE project definition from file. Since the actions in the project are set toDelete, this will delete the obsolete pre-conversion object definitions from the upgrade database.
Properties
DatabaseOrientation
Initial or MTP Products Platforms Languages
Target Initial All All All
Task 2-19-7: Deleting Node TransactionsThis step runs PTUPG_TRX.dms, which removes obsolete node transaction data associated with the obsoleteobjects in the PTUPGIBDELETE project. This script was generated by the UPGPT848IBUG ApplicationEngine program.
Copyright © 2006, Oracle. All rights reserved. 99
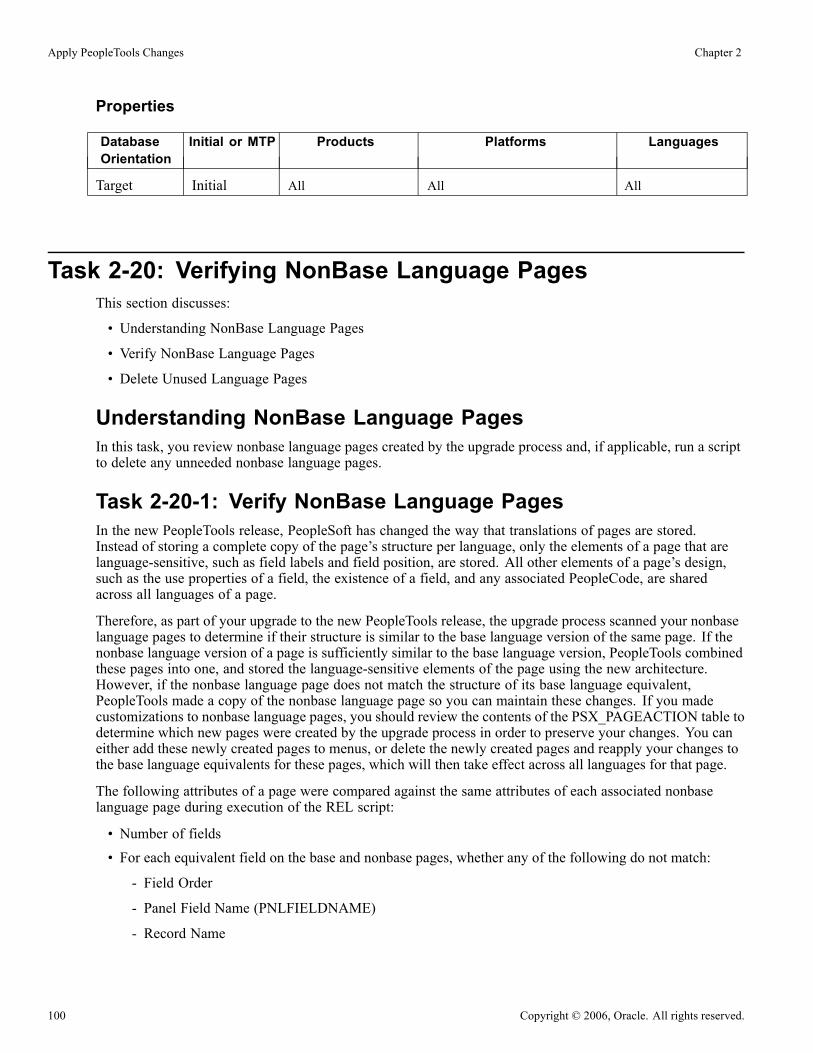
Apply PeopleTools Changes Chapter 2
Properties
DatabaseOrientation
Initial or MTP Products Platforms Languages
Target Initial All All All
Task 2-20: Verifying NonBase Language PagesThis section discusses:
• Understanding NonBase Language Pages
• Verify NonBase Language Pages
• Delete Unused Language Pages
Understanding NonBase Language PagesIn this task, you review nonbase language pages created by the upgrade process and, if applicable, run a scriptto delete any unneeded nonbase language pages.
Task 2-20-1: Verify NonBase Language PagesIn the new PeopleTools release, PeopleSoft has changed the way that translations of pages are stored.Instead of storing a complete copy of the page’s structure per language, only the elements of a page that arelanguage-sensitive, such as field labels and field position, are stored. All other elements of a page’s design,such as the use properties of a field, the existence of a field, and any associated PeopleCode, are sharedacross all languages of a page.
Therefore, as part of your upgrade to the new PeopleTools release, the upgrade process scanned your nonbaselanguage pages to determine if their structure is similar to the base language version of the same page. If thenonbase language version of a page is sufficiently similar to the base language version, PeopleTools combinedthese pages into one, and stored the language-sensitive elements of the page using the new architecture.However, if the nonbase language page does not match the structure of its base language equivalent,PeopleTools made a copy of the nonbase language page so you can maintain these changes. If you madecustomizations to nonbase language pages, you should review the contents of the PSX_PAGEACTION table todetermine which new pages were created by the upgrade process in order to preserve your changes. You caneither add these newly created pages to menus, or delete the newly created pages and reapply your changes tothe base language equivalents for these pages, which will then take effect across all languages for that page.
The following attributes of a page were compared against the same attributes of each associated nonbaselanguage page during execution of the REL script:
• Number of fields• For each equivalent field on the base and nonbase pages, whether any of the following do not match:
- Field Order
- Panel Field Name (PNLFIELDNAME)
- Record Name
100 Copyright © 2006, Oracle. All rights reserved.

Chapter 2 Apply PeopleTools Changes
- Record Field Name
- Occurs Level
- Field Type (for example, checkbox, dropdown list, or edit box)
- Field Use (for example, invisible or related display) except for Use Default Label
If any of these attributes differed between the base language page and its nonbase language equivalents, thenonbase language page was duplicated. If all these attributes matched, then the base and nonbase languagepages differed only in user interface and were merged
Follow the steps below to determine which action was taken against each of your pages and the appropriateresponse.
To verify nonbase language pages:
1. Examine the PSPNLDEFN with the following SQL statement. The results will be the original page nameplus underscore language code (for example, TRANSLATION_RECORDS_FRA), and the name of thenew page created to preserve the language-specific structural changes.
SELECT DESCR, PNLNAME
FROM PSPNLDEFN
WHERE PNLNAME LIKE ’FIXPGNAME%’
2. Take one of the following actions on the pages from the output of the SQL select statement above:• If you did not customize the pages, or if you no longer want to maintain the structural changes on thenonbase language page that differ from the base language page, you can safely delete the newly createdpages using Application Designer, once you perform a backup after upgrading.
See Backing Up After PeopleTools Upgrade.• If you do not want to preserve the language-specific structural changes to any of the pages in theresult set from the SQL select statement above, follow the instructions in the next step to delete allcorresponding duplicate pages.
See Delete Unused Language Pages.
Properties
DatabaseOrientation
Initial or MTP Products Platforms Languages
Target Initial All All All
Task 2-20-2: Delete Unused Language PagesIf you currently use only the base language of your database or do not want to preserve any of thecustomizations you made to nonbase language pages, you can delete all of the new pages created by theupgrade process (where nonbase languages did not match their base language equivalents). Run the followingscript manually in Data Mover user mode to maintain only the customizations on the base language pages andto delete customizations on nonbase language pages.
PT84RLPD.DMS
Copyright © 2006, Oracle. All rights reserved. 101
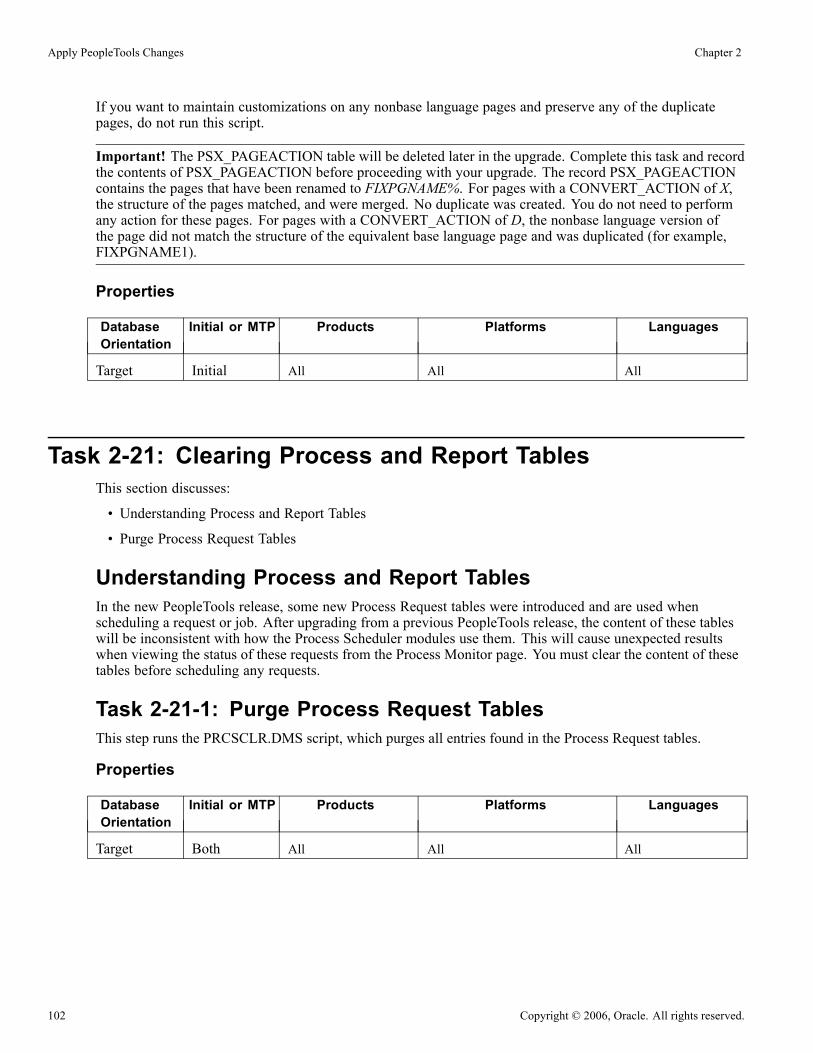
Apply PeopleTools Changes Chapter 2
If you want to maintain customizations on any nonbase language pages and preserve any of the duplicatepages, do not run this script.
Important! The PSX_PAGEACTION table will be deleted later in the upgrade. Complete this task and recordthe contents of PSX_PAGEACTION before proceeding with your upgrade. The record PSX_PAGEACTIONcontains the pages that have been renamed to FIXPGNAME%. For pages with a CONVERT_ACTION of X,the structure of the pages matched, and were merged. No duplicate was created. You do not need to performany action for these pages. For pages with a CONVERT_ACTION of D, the nonbase language version ofthe page did not match the structure of the equivalent base language page and was duplicated (for example,FIXPGNAME1).
Properties
DatabaseOrientation
Initial or MTP Products Platforms Languages
Target Initial All All All
Task 2-21: Clearing Process and Report TablesThis section discusses:
• Understanding Process and Report Tables
• Purge Process Request Tables
Understanding Process and Report TablesIn the new PeopleTools release, some new Process Request tables were introduced and are used whenscheduling a request or job. After upgrading from a previous PeopleTools release, the content of these tableswill be inconsistent with how the Process Scheduler modules use them. This will cause unexpected resultswhen viewing the status of these requests from the Process Monitor page. You must clear the content of thesetables before scheduling any requests.
Task 2-21-1: Purge Process Request TablesThis step runs the PRCSCLR.DMS script, which purges all entries found in the Process Request tables.
Properties
DatabaseOrientation
Initial or MTP Products Platforms Languages
Target Both All All All
102 Copyright © 2006, Oracle. All rights reserved.

Chapter 2 Apply PeopleTools Changes
Task 2-22: Setting Object Version NumbersIn this task, you run the VERSION Application Engine program. This ensures that all of your version numbersare correct and, if not, resets them to 1.
Note. You will rerun the VERSION application engine program later in the upgrade. If you wish to preservethe log files generated by Change Assistant from this run, you will need to manually rename the files aftercompleting this task.
Properties
DatabaseOrientation
Initial or MTP Products Platforms Languages
Target Both All All All
Task 2-23: Converting Database Data TypesThis section discusses:
• Understanding Converting Database Data Types
• Backing Up Before Platform Changes
• Running Long Data Audit
• Validating Microsoft Database
• Reviewing Microsoft Settings
• Creating Microsoft Conversion Project
• Generating Microsoft Conversion Script
• Running Microsoft Conversion Script
• Granting Permissions to the CONNECT ID
• Running Microsoft Conversion Report
• Validating Oracle Database
• Creating Oracle Audit Tables
• Auditing Duplicate Length Constraints
• Auditing Disabled Constraints
• Reviewing Oracle Settings
• Generating Oracle Conversion Scripts
• Running Long to LOB Script 1
• Running Long to LOB Script 2
• Running Long to LOB Script 3
Copyright © 2006, Oracle. All rights reserved. 103

Apply PeopleTools Changes Chapter 2
• Running Long to LOB Script 4
• Running Long to LOB Script 5
• Running Long to LOB Script 6
• Running Long to LOB Script 7
• Running Long to LOB Script 8
• Auditing Long to LOB Conversion
• Running Character Length Script 1
• Running Character Length Script 2
• Running Character Length Script 3
• Running Character Length Script 4
• Running Character Length Script 5
• Running Character Length Script 6
• Running Character Length Script 7
• Running Character Length Script 8
• Auditing Character Length Semantics
• Reviewing Conversion Reports
• Updating Database Options
Understanding Converting Database Data TypesAs of PeopleTools 8.48, new database data types are supported for Microsoft SQL Server 2005 or later andOracle 9i or later. These data type changes are mandatory but only available for use in conjunction withapplication releases 9.0 or later.
For Microsoft SQL Server 2005 and later, the data types VARCHAR, NVARCHAR, VARBINARY(MAX),and VARCHAR(MAX) are now supported. Databases on Microsoft SQL Server 2000 and earlier will notuse these new data types. The data types as defined in Application Designer are not changed; only thedatabase-level definition will be different.
• Records with fields defined as PeopleSoft CHAR(N) will now use VARCHAR(N).
• Records with fields defined as PeopleSoft NCHAR(N) will now use NVARCHAR(N).
• Records with fields defined as PeopleSoft Long Character(N) will now use VARCHAR(N) if N is <=4000and VARCHAR(MAX) if N is > 4000 for non-Unicode.
• Records with fields defined as PeopleSoft Long Character(N) will now use NVARCHAR(N) if N is<=4000 and VARCHAR(MAX) if N is > 4000 for Unicode databases.
• Records with fields defined as PeopleSoft IMAGE will now use VARBINARY(MAX).
For Oracle 9i or later, the data types CLOB and BLOB are now supported. In addition, the Character LengthSemantics feature is also supported for Unicode databases when creating PeopleSoft CHAR fields and LONGCHARACTER fields with specified lengths less than 1334.
• Records with fields defined as PeopleSoft IMAGE or PeopleSoft LONG CHARACTER with Raw Binarywill now use BLOB.
104 Copyright © 2006, Oracle. All rights reserved.
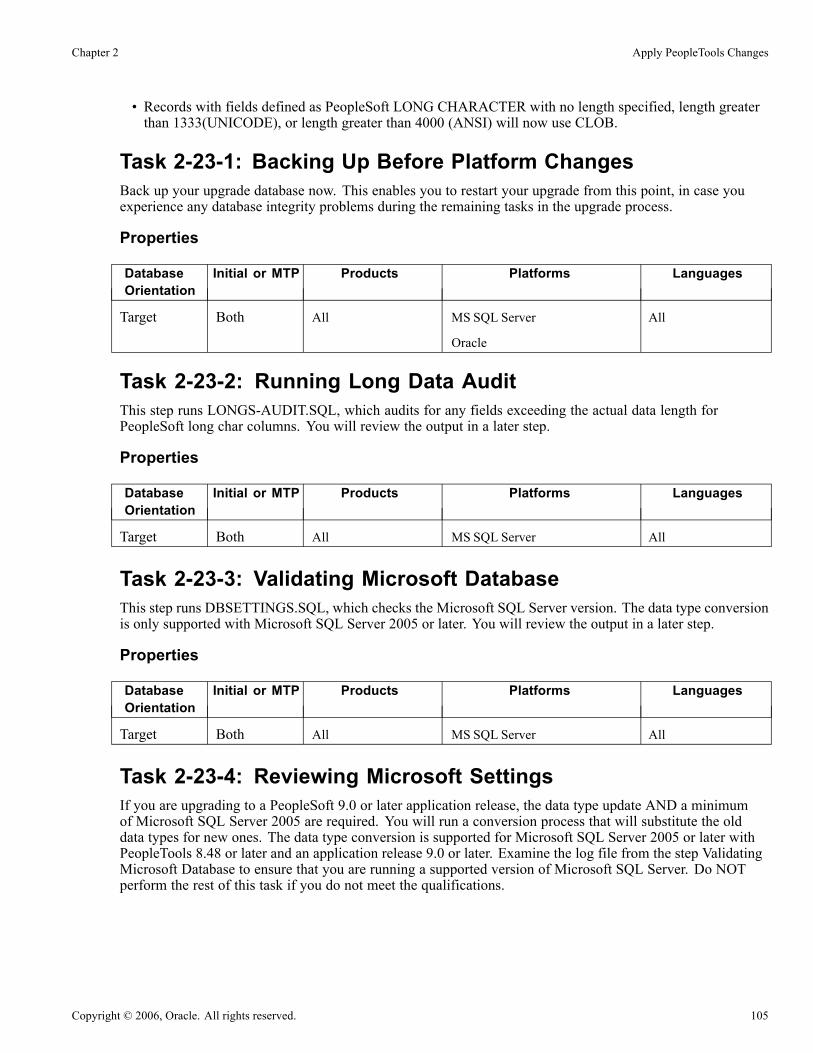
Chapter 2 Apply PeopleTools Changes
• Records with fields defined as PeopleSoft LONG CHARACTER with no length specified, length greaterthan 1333(UNICODE), or length greater than 4000 (ANSI) will now use CLOB.
Task 2-23-1: Backing Up Before Platform ChangesBack up your upgrade database now. This enables you to restart your upgrade from this point, in case youexperience any database integrity problems during the remaining tasks in the upgrade process.
Properties
DatabaseOrientation
Initial or MTP Products Platforms Languages
Target Both All MS SQL Server
Oracle
All
Task 2-23-2: Running Long Data AuditThis step runs LONGS-AUDIT.SQL, which audits for any fields exceeding the actual data length forPeopleSoft long char columns. You will review the output in a later step.
Properties
DatabaseOrientation
Initial or MTP Products Platforms Languages
Target Both All MS SQL Server All
Task 2-23-3: Validating Microsoft DatabaseThis step runs DBSETTINGS.SQL, which checks the Microsoft SQL Server version. The data type conversionis only supported with Microsoft SQL Server 2005 or later. You will review the output in a later step.
Properties
DatabaseOrientation
Initial or MTP Products Platforms Languages
Target Both All MS SQL Server All
Task 2-23-4: Reviewing Microsoft SettingsIf you are upgrading to a PeopleSoft 9.0 or later application release, the data type update AND a minimumof Microsoft SQL Server 2005 are required. You will run a conversion process that will substitute the olddata types for new ones. The data type conversion is supported for Microsoft SQL Server 2005 or later withPeopleTools 8.48 or later and an application release 9.0 or later. Examine the log file from the step ValidatingMicrosoft Database to ensure that you are running a supported version of Microsoft SQL Server. Do NOTperform the rest of this task if you do not meet the qualifications.
Copyright © 2006, Oracle. All rights reserved. 105

Apply PeopleTools Changes Chapter 2
Examine the log file from the step Running Long Data Audit to determine if there are any fields shorter thanlength 4000 in the database that exceed the actual data length defined for the PeopleSoft long character fields.Prior to PeopleTools 8.48, all PeopleSoft Long Character fields were created using the TEXT SQL Serverdata type, and no matter the length defined by the Application Designer, the data in the field could grow asmuch as the TEXT limits on SQL Server. After the data type conversion, the length specified in ApplicationDesigner will be enforced for all fields shorter than length 4000, except for those with length zero. If your datais larger than the length defined in Application Designer, then you must correct the length using ApplicationDesigner or change the data itself using your SQL query tool. You must decide whether you want a changein the field length definition or a change in the data. The log file created by LONGS-AUDIT.SQL willonly show all the fields that contain data exceeding a length between 1 and 4000 and will be empty if thiscondition does not occur with no other action to take.
Resolve these problems before continuing to the next step, otherwise the conversion process will fail. Ifnecessary, contact your DBA for assistance in modifying the fields. If no fields are listed in the log file, nofurther action is needed and you may proceed with the upgrade.
Properties
DatabaseOrientation
Initial or MTP Products Platforms Languages
Target Both All MS SQL Server All
Task 2-23-5: Creating Microsoft Conversion ProjectThis step runs MSSNEWTYPE.SQL, which generates and populates the MSSNEWTYPE project. The projectcontains all the records that need to be modified to use the newly supported data types.
Properties
DatabaseOrientation
Initial or MTP Products Platforms Languages
Target Both All MS SQL Server All
Task 2-23-6: Generating Microsoft Conversion ScriptThis step generates the SQL script MSSNEWTYPE_ALTER.SQL to alter the records in the MSSNEWTYPEproject. The generated script will alter the tables with the new data types.
Properties
DatabaseOrientation
Initial or MTP Products Platforms Languages
Target Both All MS SQL Server All
Task 2-23-7: Running Microsoft Conversion ScriptThis step runs the generated script from the previous step. This will alter the existing tables to use the new datatypes. All the tables will be copied into their new representation using the new data types and all the additionalpadding blanks derived from the use of the old data types will be truncated.
106 Copyright © 2006, Oracle. All rights reserved.

Chapter 2 Apply PeopleTools Changes
Properties
DatabaseOrientation
Initial or MTP Products Platforms Languages
Target Both All MS SQL Server All
Task 2-23-8: Granting Permissions to the CONNECT IDThis step runs the GRANT.SQL script. This script grants select access to the CONNECT ID for tablesnecessary for sign on.
Properties
DatabaseOrientation
Initial or MTP Products Platforms Languages
Target Both All MS SQL Server All
Task 2-23-9: Running Microsoft Conversion ReportThis step runs CONVERSION-AUDIT.SQL, which audits for all unconverted fields. You will review theoutput in a later step.
Properties
DatabaseOrientation
Initial or MTP Products Platforms Languages
Target Both All MS SQL Server All
Task 2-23-10: Validating Oracle DatabaseThis step runs the DBSETTINGS.SQL script, which queries the database in order to determine the value of theNLS_LENGTH_SEMANTICS parameter. You will review the output in a later step.
There are two possible conversions that may occur depending on whether or not the database is Unicode.The Long to LOB conversion will apply to all databases, Unicode or ANSI. CHARACTER LENGTHSEMANTICS (CLS) only applies to Unicode databases. The CLS conversion has a dependency on the init.oraparameter NLS_LENGTH_SEMANTICS. The init.ora parameter NLS_LENGTH_SEMANTICS=CHAR,must be enabled for PeopleSoft Enterprise Unicode databases prior to executing the conversion. If the databasebeing converted is ANSI, then this setting is not necessary.
Properties
DatabaseOrientation
Initial or MTP Products Platforms Languages
Target Both All Oracle All
Copyright © 2006, Oracle. All rights reserved. 107

Apply PeopleTools Changes Chapter 2
Task 2-23-11: Creating Oracle Audit TablesThis step runs PRECNVADT1A.SQL, which drops and re-creates some temporary tables required by thePre-Conversion Audit SQR’s.
Note. If the tables being dropped, CHECK_CONSTRAINTS, DUPLICATE_CONSTRAINTS, andDROP_CONSTRAINTS don’t exist, the execution of this script will generate the following error, whichcan safely be ignored:
ORA-00942: table or view does not exist
Properties
DatabaseOrientation
Initial or MTP Products Platforms Languages
Target Both All Oracle All
Task 2-23-12: Auditing Duplicate Length ConstraintsThis step runs PRECNVADT1.SQR, which checks for duplicate length constraints. This condition cangenerally exist if the database was created using the Oracle Import utility and CONSTRAINTS=Y wasenabled, which is the default setting. You will review the output in a later step.
Properties
DatabaseOrientation
Initial or MTP Products Platforms Languages
Target Both All Oracle All
Task 2-23-13: Auditing Disabled ConstraintsThis step runs PRECNVADT2.SQR, which checks for ‘not_validated’ constraints. Although this conditionshould not exist in a production database, it may have occurred if data was imported via external utilities, e.g.SQL Loader. You will review the output in a later step.
Properties
DatabaseOrientation
Initial or MTP Products Platforms Languages
Target Both All Oracle All
Task 2-23-14: Reviewing Oracle SettingsThe data type conversion is only supported for Oracle 9i or later with PeopleTools 8.48 or later and anapplication release 9.0 or later. Do NOT perform the rest of this task if you do not meet the qualifications.
108 Copyright © 2006, Oracle. All rights reserved.
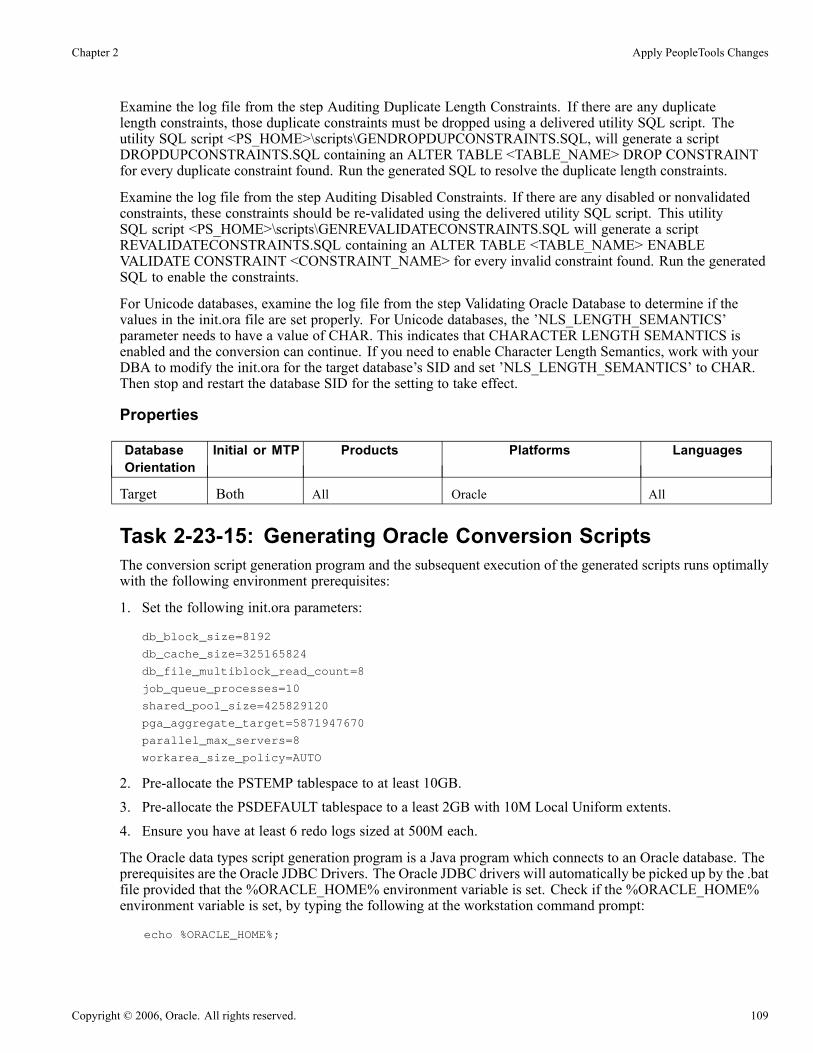
Chapter 2 Apply PeopleTools Changes
Examine the log file from the step Auditing Duplicate Length Constraints. If there are any duplicatelength constraints, those duplicate constraints must be dropped using a delivered utility SQL script. Theutility SQL script <PS_HOME>\scripts\GENDROPDUPCONSTRAINTS.SQL, will generate a scriptDROPDUPCONSTRAINTS.SQL containing an ALTER TABLE <TABLE_NAME> DROP CONSTRAINTfor every duplicate constraint found. Run the generated SQL to resolve the duplicate length constraints.
Examine the log file from the step Auditing Disabled Constraints. If there are any disabled or nonvalidatedconstraints, these constraints should be re-validated using the delivered utility SQL script. This utilitySQL script <PS_HOME>\scripts\GENREVALIDATECONSTRAINTS.SQL will generate a scriptREVALIDATECONSTRAINTS.SQL containing an ALTER TABLE <TABLE_NAME> ENABLEVALIDATE CONSTRAINT <CONSTRAINT_NAME> for every invalid constraint found. Run the generatedSQL to enable the constraints.
For Unicode databases, examine the log file from the step Validating Oracle Database to determine if thevalues in the init.ora file are set properly. For Unicode databases, the ’NLS_LENGTH_SEMANTICS’parameter needs to have a value of CHAR. This indicates that CHARACTER LENGTH SEMANTICS isenabled and the conversion can continue. If you need to enable Character Length Semantics, work with yourDBA to modify the init.ora for the target database’s SID and set ’NLS_LENGTH_SEMANTICS’ to CHAR.Then stop and restart the database SID for the setting to take effect.
Properties
DatabaseOrientation
Initial or MTP Products Platforms Languages
Target Both All Oracle All
Task 2-23-15: Generating Oracle Conversion ScriptsThe conversion script generation program and the subsequent execution of the generated scripts runs optimallywith the following environment prerequisites:
1. Set the following init.ora parameters:
db_block_size=8192
db_cache_size=325165824
db_file_multiblock_read_count=8
job_queue_processes=10
shared_pool_size=425829120
pga_aggregate_target=5871947670
parallel_max_servers=8
workarea_size_policy=AUTO
2. Pre-allocate the PSTEMP tablespace to at least 10GB.
3. Pre-allocate the PSDEFAULT tablespace to a least 2GB with 10M Local Uniform extents.
4. Ensure you have at least 6 redo logs sized at 500M each.
The Oracle data types script generation program is a Java program which connects to an Oracle database. Theprerequisites are the Oracle JDBC Drivers. The Oracle JDBC drivers will automatically be picked up by the .batfile provided that the %ORACLE_HOME% environment variable is set. Check if the %ORACLE_HOME%environment variable is set, by typing the following at the workstation command prompt:
echo %ORACLE_HOME%;
Copyright © 2006, Oracle. All rights reserved. 109

Apply PeopleTools Changes Chapter 2
This should return a path, e.g.:c:\oracle\product\10.1.0\client_1;
If the %ORACLE_HOME% environment variable is not set, then set it in the command prompt window bytyping the following at the workstation command prompt:
SET ORACLE_HOME=<Oracle_Home_location>;
The Oracle data types script generation program is executed via the <PS_HOME>\utility\PSORADataTypesConversion.BAT file, which requires five input parameters:
1. THREADS – the number of Java threads the conversion script generation spawns to generate the scripts.We recommend 10 threads for running this program on Windows.
2. DBNAME – the database name
3. ACCESSID – the access id for the database to be converted
4. ACCESSIDPW – the access password for the database to be converted
5. OUTPUTDIR - a directory path to redirect the generated conversion scripts to a user specified directory.This should be set to the Change Assistant output directory for your upgrade pass. Change Assistantwill run the generated scripts later in the upgrade.
Example:
<PS_HOME>\utility\PSORADataTypesConversion.bat THREADS MYDB SYSADM SYSADM c:⇒\upgrade\output\change_assistant_job_directory where THREADS = 10, DBNAME =⇒MYDB, ACCESSID = SYSADM, ACCESSIDPW = SYSADM, and OUTPUTDIR = c:\upgrade⇒
\output\change_assistant_job_directory
Open a command prompt window on the client workstation and execute the Oracle data types scriptgeneration program by invoking <PS_HOME>\utility\PSORADataTypesConversion.bat. The program willdisplay and write a log (PsOraCnv.log) to the specified directory specified by the OUTPUTDIR parameterindicating the status of the conversion program. Review PsOraCnv.log and ensure that the conversion scriptswere generated cleanly.
For ANSI databases, only LONGTOLOBALTER conversion scripts are generated. For Unicodedatabases, two sets of scripts are generated: LONGTOLOBALTER conversion scripts andCHARACTERLENGTHSEMANTICSALTER scripts.
After successfully running the conversion program, verify that the generated .SQL scripts are located in thestaging Change Assistant output directory for your upgrade pass. Later in the upgrade, Change Assistantwill automatically run the SQL scripts later in the upgrade from the Change Assistant output directory foryour upgrade pass.
Properties
DatabaseOrientation
Initial or MTP Products Platforms Languages
Target Both All Oracle All
Task 2-23-16: Running Long to LOB Script 1This step runs LONGTOLOBALTER1.SQL, which was generated using PSORADataTypesConversion.bat.The Oracle long to LOB conversion scripts are designed to run concurrently to improve performance.
110 Copyright © 2006, Oracle. All rights reserved.

Chapter 2 Apply PeopleTools Changes
Properties
DatabaseOrientation
Initial or MTP Products Platforms Languages
Target Both All Oracle All
Task 2-23-17: Running Long to LOB Script 2This step runs LONGTOLOBALTER2.SQL, which was generated using PSORADataTypesConversion.bat.The Oracle long to LOB conversion scripts are designed to run concurrently to improve performance.
Properties
DatabaseOrientation
Initial or MTP Products Platforms Languages
Target Both All Oracle All
Task 2-23-18: Running Long to LOB Script 3This step runs LONGTOLOBALTER3.SQL, which was generated using PSORADataTypesConversion.bat.The Oracle long to LOB conversion scripts are designed to run concurrently to improve performance.
Properties
DatabaseOrientation
Initial or MTP Products Platforms Languages
Target Both All Oracle All
Task 2-23-19: Running Long to LOB Script 4This step runs LONGTOLOBALTER4.SQL, which was generated using PSORADataTypesConversion.bat.The Oracle long to LOB conversion scripts are designed to run concurrently to improve performance.
Properties
DatabaseOrientation
Initial or MTP Products Platforms Languages
Target Both All Oracle All
Task 2-23-20: Running Long to LOB Script 5This step runs LONGTOLOBALTER5.SQL, which was generated using PSORADataTypesConversion.bat.The Oracle long to LOB conversion scripts are designed to run concurrently to improve performance.
Copyright © 2006, Oracle. All rights reserved. 111
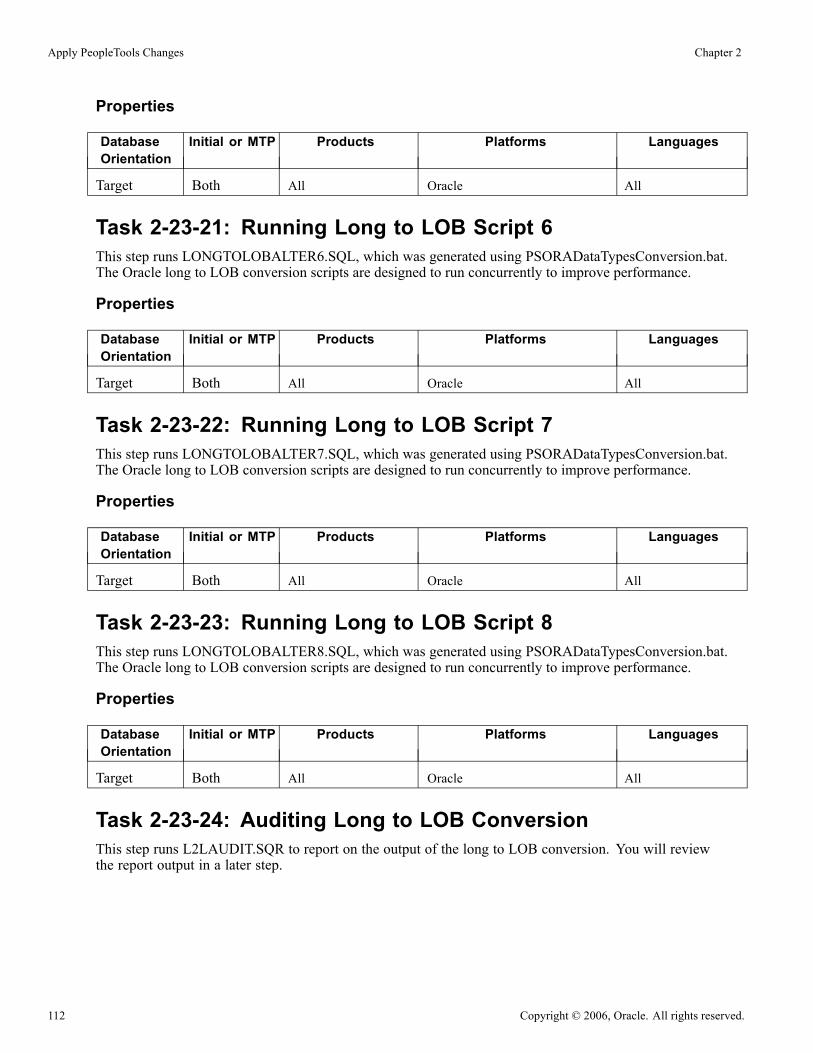
Apply PeopleTools Changes Chapter 2
Properties
DatabaseOrientation
Initial or MTP Products Platforms Languages
Target Both All Oracle All
Task 2-23-21: Running Long to LOB Script 6This step runs LONGTOLOBALTER6.SQL, which was generated using PSORADataTypesConversion.bat.The Oracle long to LOB conversion scripts are designed to run concurrently to improve performance.
Properties
DatabaseOrientation
Initial or MTP Products Platforms Languages
Target Both All Oracle All
Task 2-23-22: Running Long to LOB Script 7This step runs LONGTOLOBALTER7.SQL, which was generated using PSORADataTypesConversion.bat.The Oracle long to LOB conversion scripts are designed to run concurrently to improve performance.
Properties
DatabaseOrientation
Initial or MTP Products Platforms Languages
Target Both All Oracle All
Task 2-23-23: Running Long to LOB Script 8This step runs LONGTOLOBALTER8.SQL, which was generated using PSORADataTypesConversion.bat.The Oracle long to LOB conversion scripts are designed to run concurrently to improve performance.
Properties
DatabaseOrientation
Initial or MTP Products Platforms Languages
Target Both All Oracle All
Task 2-23-24: Auditing Long to LOB ConversionThis step runs L2LAUDIT.SQR to report on the output of the long to LOB conversion. You will reviewthe report output in a later step.
112 Copyright © 2006, Oracle. All rights reserved.
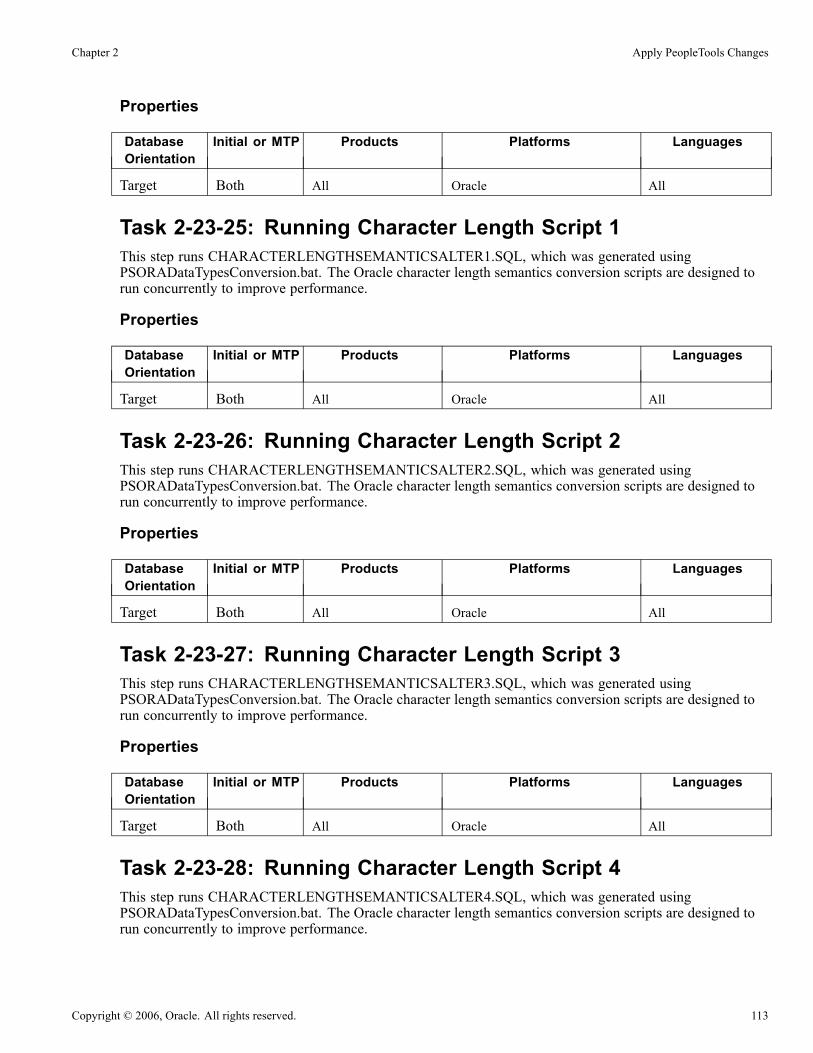
Chapter 2 Apply PeopleTools Changes
Properties
DatabaseOrientation
Initial or MTP Products Platforms Languages
Target Both All Oracle All
Task 2-23-25: Running Character Length Script 1This step runs CHARACTERLENGTHSEMANTICSALTER1.SQL, which was generated usingPSORADataTypesConversion.bat. The Oracle character length semantics conversion scripts are designed torun concurrently to improve performance.
Properties
DatabaseOrientation
Initial or MTP Products Platforms Languages
Target Both All Oracle All
Task 2-23-26: Running Character Length Script 2This step runs CHARACTERLENGTHSEMANTICSALTER2.SQL, which was generated usingPSORADataTypesConversion.bat. The Oracle character length semantics conversion scripts are designed torun concurrently to improve performance.
Properties
DatabaseOrientation
Initial or MTP Products Platforms Languages
Target Both All Oracle All
Task 2-23-27: Running Character Length Script 3This step runs CHARACTERLENGTHSEMANTICSALTER3.SQL, which was generated usingPSORADataTypesConversion.bat. The Oracle character length semantics conversion scripts are designed torun concurrently to improve performance.
Properties
DatabaseOrientation
Initial or MTP Products Platforms Languages
Target Both All Oracle All
Task 2-23-28: Running Character Length Script 4This step runs CHARACTERLENGTHSEMANTICSALTER4.SQL, which was generated usingPSORADataTypesConversion.bat. The Oracle character length semantics conversion scripts are designed torun concurrently to improve performance.
Copyright © 2006, Oracle. All rights reserved. 113
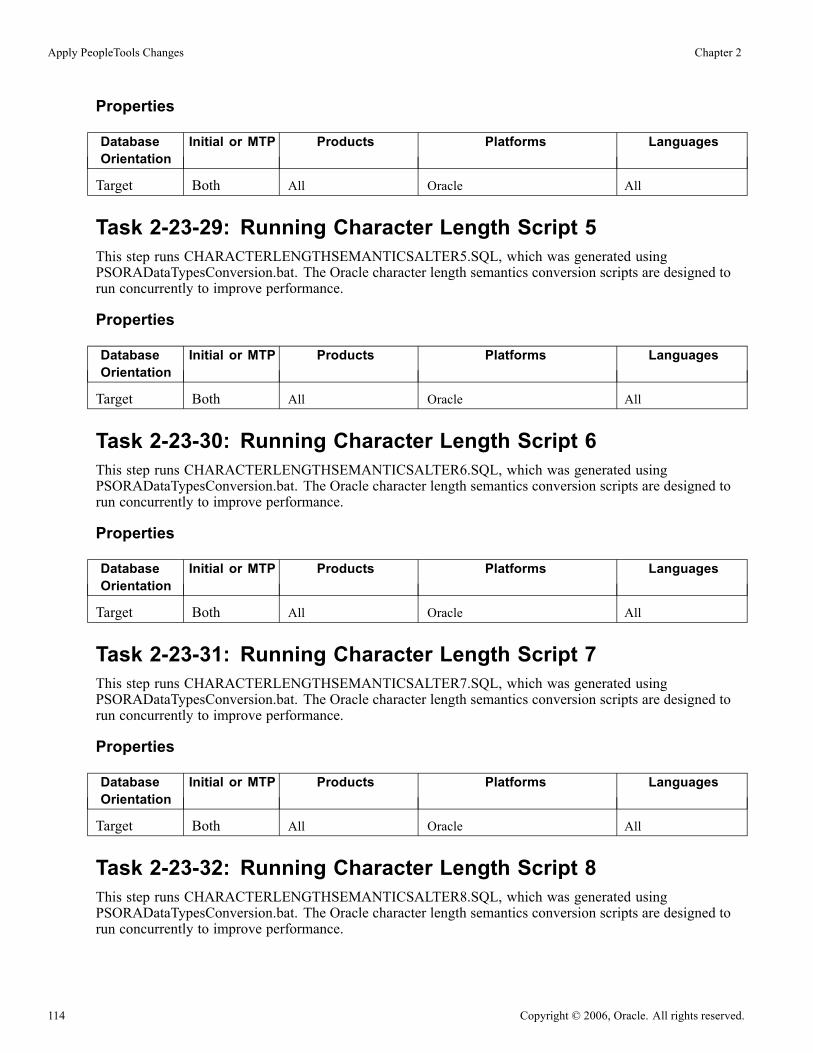
Apply PeopleTools Changes Chapter 2
Properties
DatabaseOrientation
Initial or MTP Products Platforms Languages
Target Both All Oracle All
Task 2-23-29: Running Character Length Script 5This step runs CHARACTERLENGTHSEMANTICSALTER5.SQL, which was generated usingPSORADataTypesConversion.bat. The Oracle character length semantics conversion scripts are designed torun concurrently to improve performance.
Properties
DatabaseOrientation
Initial or MTP Products Platforms Languages
Target Both All Oracle All
Task 2-23-30: Running Character Length Script 6This step runs CHARACTERLENGTHSEMANTICSALTER6.SQL, which was generated usingPSORADataTypesConversion.bat. The Oracle character length semantics conversion scripts are designed torun concurrently to improve performance.
Properties
DatabaseOrientation
Initial or MTP Products Platforms Languages
Target Both All Oracle All
Task 2-23-31: Running Character Length Script 7This step runs CHARACTERLENGTHSEMANTICSALTER7.SQL, which was generated usingPSORADataTypesConversion.bat. The Oracle character length semantics conversion scripts are designed torun concurrently to improve performance.
Properties
DatabaseOrientation
Initial or MTP Products Platforms Languages
Target Both All Oracle All
Task 2-23-32: Running Character Length Script 8This step runs CHARACTERLENGTHSEMANTICSALTER8.SQL, which was generated usingPSORADataTypesConversion.bat. The Oracle character length semantics conversion scripts are designed torun concurrently to improve performance.
114 Copyright © 2006, Oracle. All rights reserved.

Chapter 2 Apply PeopleTools Changes
Properties
DatabaseOrientation
Initial or MTP Products Platforms Languages
Target Both All Oracle All
Task 2-23-33: Auditing Character Length SemanticsThis step runs CLSAUDIT.SQR to report on the output of the character length semantics conversion. You willreview the report output in a later step.
Properties
DatabaseOrientation
Initial or MTP Products Platforms Languages
Target Both All Oracle All
Task 2-23-34: Reviewing Conversion ReportsTo review the conversion report for Microsoft, examine the log file from the step Running MicrosoftConversion Report. It contains a list of unconverted columns on tables along with its old data type. Fieldson tables with no Application Designer definition will be included in this log. Any unresolved errors fromthe step Running Microsoft Conversion will also be included. If you are using these tables it is possible toupdate them manually to use the new data types with a SQL query tool or with an ETL tool. Be very cautiouswhen changing a table as this could result in data loss or affected functionality. Once any underlying problemshave been resolved, you may rerun all of the previous steps in this task to reconvert any remaining objectslisted by the audit report.
To review the conversion report for Oracle, examine the log files from running the LONGTOLOBALTER*.SQLscripts. If the database is Unicode, also examine the output of the CHARACTERLENGTHSEMANTICS*,RECREATEINDEXES1, and ALTERINDEXES1 scripts. L2LAUDIT reports on any unconverted longVARCHAR and long raw columns. The tablename, columnname, and column data type are listed. CLSAUDITreports on any unconverted character length columns (Unicode only).
Properties
DatabaseOrientation
Initial or MTP Products Platforms Languages
Target Both All MS SQL Server
Oracle
All
Task 2-23-35: Updating Database OptionsThis step runs UPGDBOPTIONS_ENABLE.SQL. This script updates the database to indicate that the newdata types are now enabled.
Copyright © 2006, Oracle. All rights reserved. 115

Apply PeopleTools Changes Chapter 2
Properties
DatabaseOrientation
Initial or MTP Products Platforms Languages
Target Both All MS SQL Server
Oracle
All
Task 2-24: Backing Up After PeopleTools UpgradeBack up your Copy of Production database now. This enables you to restart your upgrade from this point, incase you experience any database integrity problems during the remaining tasks in the upgrade process.
Properties
DatabaseOrientation
Initial or MTP Products Platforms Languages
Target Initial All All All
116 Copyright © 2006, Oracle. All rights reserved.

CHAPTER 3
Run and Review Compare Reports
This chapter discusses:
• Understanding Compare Reports
• Preparing for Application Changes
• Renaming Records and Fields
• Renaming Tables
• Running Upgrade Compare Reports
• Reviewing the Compare Reports
Understanding Compare ReportsNow that your Copy of Production database is at the same PeopleTools release as your new release, youcan compare the two databases to see the differences. In this chapter you run and review compare reportsin order to make decisions regarding your upgrade. Be sure you have plenty of space to run these reports,as some can be rather large.
Task 3-1: Preparing for Application ChangesThis section discusses:
• Load HR Ethnicities Table
• Export Project Definitions
• Import Project Definitions
• Drop View ADP_ACCT_CD_VW
• Run Drop Table Script
Task 3-1-1: Load HR Ethnicities TableIn this step you populate the UPG_HR_ETHNIC table for upgrading ethnicities. You will use this data duringdata conversion. The DataMover script for your path is:
DLHCHRW01.DMS
Copyright © 2006, Oracle. All rights reserved. 117

Run and Review Compare Reports Chapter 3
Properties
DatabaseOrientation
Initial or MTP Products Platforms Languages
Target Both All All All
Task 3-1-2: Export Project DefinitionsIn this step you will export from your Demo database the definition of projects that will be used later in thisupgrade. You will import these definitions in the next step. Your export script is:
DLUPX08E.DMS
Properties
DatabaseOrientation
Initial or MTP Products Platforms Languages
Source Both All All All
Task 3-1-3: Import Project DefinitionsIn this step you will import the project definitions into your Copy of Production database. These projects willbe used later in this upgrade. Your import script is:
DLUPX08I.DMS
Properties
DatabaseOrientation
Initial or MTP Products Platforms Languages
Target Both All All All
Task 3-1-4: Drop View ADP_ACCT_CD_VWRun this task only if you have ADP Connector installed and DB2 OS/390 or DB2 UDB database.
This step drops the view ADP_ACCT_CD_VW to avoid possible errors when renaming table ACCT_CD_TBLin the task Renaming Tables. Run the following script to drop the view:
DLHCPIW01.DMS
Properties
DatabaseOrientation
Initial or MTP Products Platforms Languages
Target Both Payroll Interface DB2 z/OS
DB2/UNIX NT
All
118 Copyright © 2006, Oracle. All rights reserved.

Chapter 3 Run and Review Compare Reports
Task 3-1-5: Run Drop Table ScriptIn this step you will run the drop table script. It will drop tables that contain data that is no longer needed orcannot be converted. The script for your path is:
DLHCUPG01.DMS
This script drops the RC_TAX810TX, GPIT_GV93_TMP and GVT_CPDF_ERRTBL tables on your Copy ofProduction database. The RC_TAX810TX table was delivered with Tax Update 04B and is only used duringPayroll processing. The field, OUTSIDE_EES is changing from character to numeric. The GPIT_GV93_TMPtable is used for Global Payroll Italy’s GV93 report processing. The decimal position is removed from severalfields. The GVT_CPDF_ERRTBL table is used for CPDF processing. The GVT_CPDF_NOA_EFFDT field ischanging from a character to date. These are all unsupported conversions and will cause warnings and errorswhen attempting to alter the table during the upgrade.
Before running the script, please ensure all CPDF processing is complete. Also, verify whether the tables exist.If either one of the tables do not exist, edit the script to comment out the Drop Table command for that table.
The script is:DLHCUPH01.DMS
Properties
DatabaseOrientation
Initial or MTP Products Platforms Languages
Target Both All All All
Task 3-2: Renaming Records and FieldsThis section discusses:
• Understanding Renaming Records and Fields
• Run the RNHCUPH01 Script
• Run the RNHCGPH02 Script
• Run the RNHCEOH201 Script
• Rename OSHA Fields
Understanding Renaming Records and FieldsDuring development of new releases, PeopleSoft sometimes renames records, fields, or specific occurrencesof a field on a record (recfield renames). In this task, you will execute scripts to rename those same objectsin your Copy of Production.
With these commands, Data Mover renames the objects in the record and field definitions in ApplicationDesigner and then logs an entry on the table PSOBJCHNG. It also changes all references to these objects inpages and PeopleCode. This will not rename the objects on the database tables at this time.
Copyright © 2006, Oracle. All rights reserved. 119
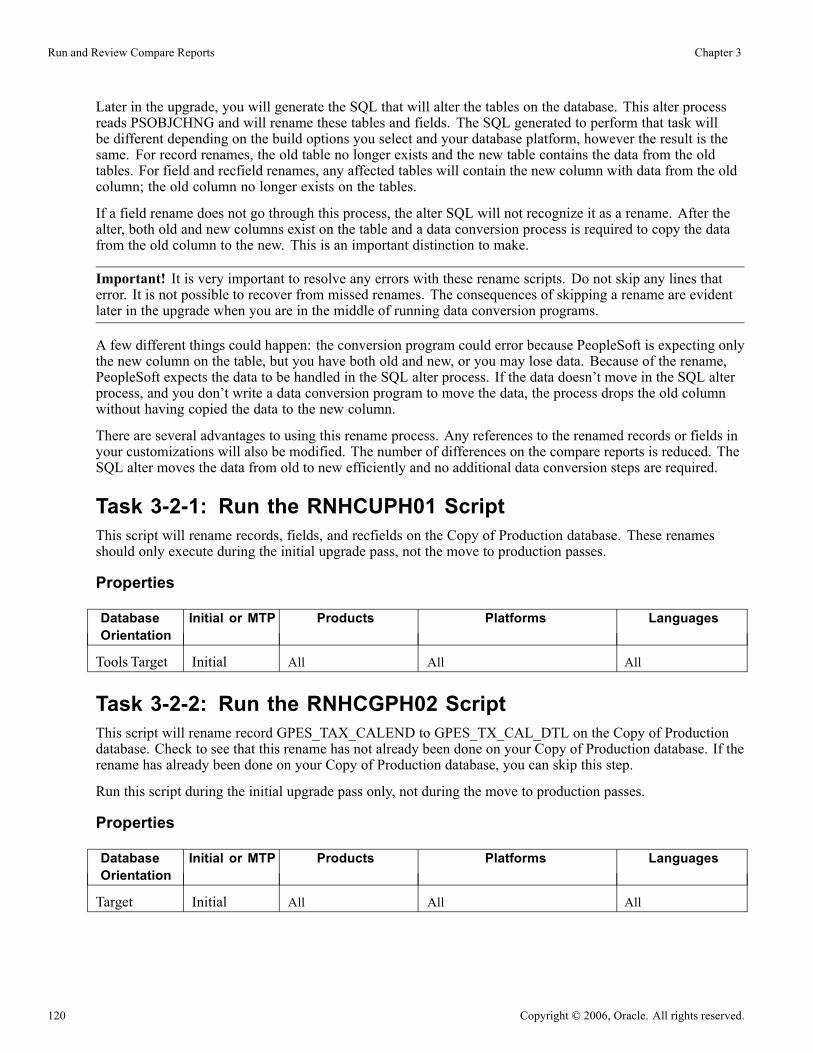
Run and Review Compare Reports Chapter 3
Later in the upgrade, you will generate the SQL that will alter the tables on the database. This alter processreads PSOBJCHNG and will rename these tables and fields. The SQL generated to perform that task willbe different depending on the build options you select and your database platform, however the result is thesame. For record renames, the old table no longer exists and the new table contains the data from the oldtables. For field and recfield renames, any affected tables will contain the new column with data from the oldcolumn; the old column no longer exists on the tables.
If a field rename does not go through this process, the alter SQL will not recognize it as a rename. After thealter, both old and new columns exist on the table and a data conversion process is required to copy the datafrom the old column to the new. This is an important distinction to make.
Important! It is very important to resolve any errors with these rename scripts. Do not skip any lines thaterror. It is not possible to recover from missed renames. The consequences of skipping a rename are evidentlater in the upgrade when you are in the middle of running data conversion programs.
A few different things could happen: the conversion program could error because PeopleSoft is expecting onlythe new column on the table, but you have both old and new, or you may lose data. Because of the rename,PeopleSoft expects the data to be handled in the SQL alter process. If the data doesn’t move in the SQL alterprocess, and you don’t write a data conversion program to move the data, the process drops the old columnwithout having copied the data to the new column.
There are several advantages to using this rename process. Any references to the renamed records or fields inyour customizations will also be modified. The number of differences on the compare reports is reduced. TheSQL alter moves the data from old to new efficiently and no additional data conversion steps are required.
Task 3-2-1: Run the RNHCUPH01 ScriptThis script will rename records, fields, and recfields on the Copy of Production database. These renamesshould only execute during the initial upgrade pass, not the move to production passes.
Properties
DatabaseOrientation
Initial or MTP Products Platforms Languages
Tools Target Initial All All All
Task 3-2-2: Run the RNHCGPH02 ScriptThis script will rename record GPES_TAX_CALEND to GPES_TX_CAL_DTL on the Copy of Productiondatabase. Check to see that this rename has not already been done on your Copy of Production database. If therename has already been done on your Copy of Production database, you can skip this step.
Run this script during the initial upgrade pass only, not during the move to production passes.
Properties
DatabaseOrientation
Initial or MTP Products Platforms Languages
Target Initial All All All
120 Copyright © 2006, Oracle. All rights reserved.

Chapter 3 Run and Review Compare Reports
Task 3-2-3: Run the RNHCEOH201 ScriptYou only need to run this script if you had Directory Interface installed on your Copy of Production database.
This script will rename records, fields, and recfields on the Copy of Production database. These renamesshould only execute during the initial upgrade pass, not the move to production passes.
Properties
DatabaseOrientation
Initial or MTP Products Platforms Languages
Tools Target Initial Directory Interface All All
Task 3-2-4: Rename OSHA FieldsRun this step if you have applied the OSHA modification prior to starting your upgrade. If you are unsureif you have applied these modifications, check to see if you have the table PS_OSHA_300_RUNS. If youhave this table, you have applied the modifications.
This step renames the FILE_DATA field to FILE_DATA_CHAR. Run the following script to make the change:
RNHCHRH02.DMS
Properties
DatabaseOrientation
Initial or MTP Products Platforms Languages
Target Initial All All All
Task 3-3: Renaming TablesThis section discusses:
• Understanding Renamed Tables
• Run the RNHCUPH02MSS Script
• Run the RNHCUPH02DB2 Script
• Run the RNHCUPH02DBX Script
• Run the RNHCUPH02IFX Script
• Run the RNHCUPH02ORA Script
• Run the RNHCUPH02SYB Script
Understanding Renamed TablesThese SQL scripts rename tables, at the database level, to temporary table names. They do not change theRecord Definition. These temporary tables will be used in the data conversion programs in a later step.
Copyright © 2006, Oracle. All rights reserved. 121

Run and Review Compare Reports Chapter 3
Near the end of the upgrade tasks, you will run a DDDAUDIT report again. On the report, these temporarytables will be listed in the section listing: “SQL Table defined in the Database and not found in the ApplicationDesigner.” Either at that point or later when you are comfortable with the results of the data conversion, youcan drop these temporary tables.
In some database platforms, the related indexes and views must be dropped before the table can be renamed.PeopleSoft has included drop statements for these objects that exist on the DMO version of the database.However, the list of related objects may be different in your environment because of customizations or appliedproduct incidents. You may encounter errors in these scripts because of these differences—for example,the script tries to drop an index that you do not have or it cannot rename the table because there are morerelated objects that need to be dropped. Simply modify these scripts to work for your database and you willnot encounter these errors in your next test pass.
Task 3-3-1: Run the RNHCUPH02MSS ScriptThe RNHCUPH02MSS.SQL script renames tables on the Copy of Production database. This script is for SQLServer databases and will run in initial and Move to Production passes.
Properties
DatabaseOrientation
Initial or MTP Products Platforms Languages
Target Both All MS SQL Server All
Task 3-3-2: Run the RNHCUPH02DB2 ScriptThe RNHCUPH02DB2.SQL script renames tables on the Copy of Production database. This script is for DB2z/OS databases and will run in initial and Move to Production passes.
Properties
DatabaseOrientation
Initial or MTP Products Platforms Languages
Target Both All DB2 z/OS All
Task 3-3-3: Run the RNHCUPH02DBX ScriptThe RNHCUPH02DBX.SQL script renames tables on the Copy of Production database. This script is for DB2UDB databases and will run in initial and Move to Production passes.
Properties
DatabaseOrientation
Initial or MTP Products Platforms Languages
Target Both All DB2/UNIX NT All
Task 3-3-4: Run the RNHCUPH02IFX ScriptThe RNHCUPH02IFX.SQL script renames tables on the Copy of Production database. This script is forInformix databases and will run in initial and Move to Production passes.
122 Copyright © 2006, Oracle. All rights reserved.
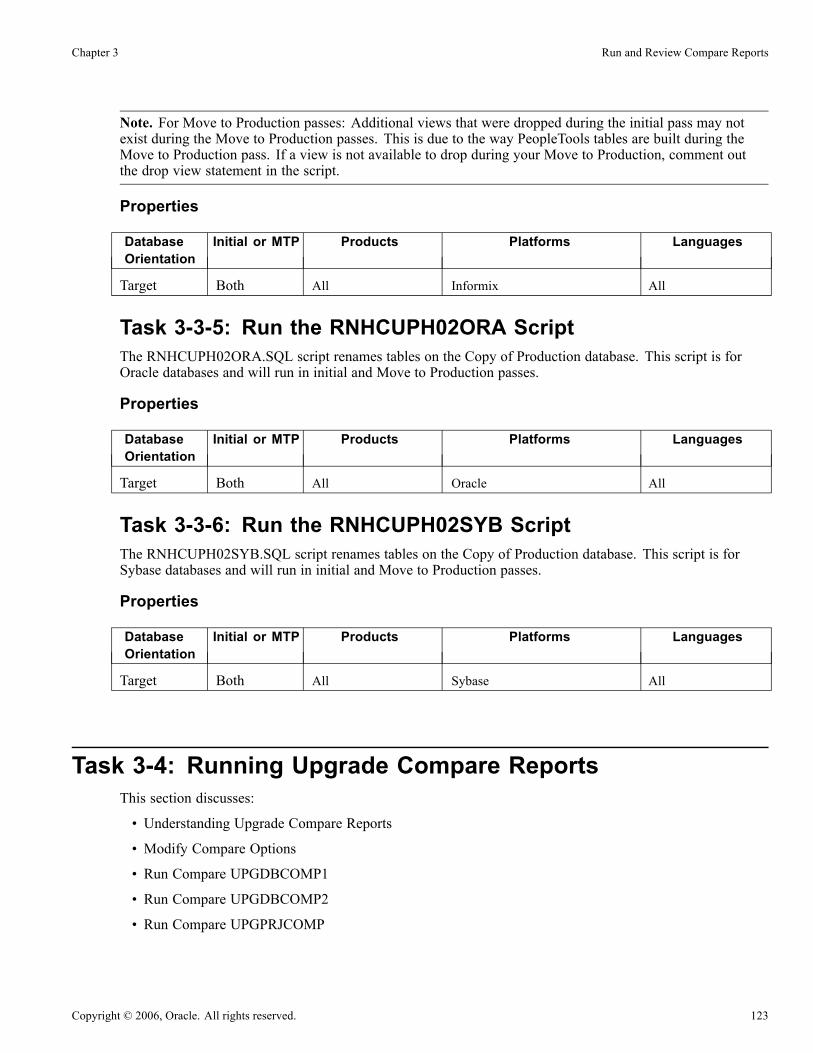
Chapter 3 Run and Review Compare Reports
Note. For Move to Production passes: Additional views that were dropped during the initial pass may notexist during the Move to Production passes. This is due to the way PeopleTools tables are built during theMove to Production pass. If a view is not available to drop during your Move to Production, comment outthe drop view statement in the script.
Properties
DatabaseOrientation
Initial or MTP Products Platforms Languages
Target Both All Informix All
Task 3-3-5: Run the RNHCUPH02ORA ScriptThe RNHCUPH02ORA.SQL script renames tables on the Copy of Production database. This script is forOracle databases and will run in initial and Move to Production passes.
Properties
DatabaseOrientation
Initial or MTP Products Platforms Languages
Target Both All Oracle All
Task 3-3-6: Run the RNHCUPH02SYB ScriptThe RNHCUPH02SYB.SQL script renames tables on the Copy of Production database. This script is forSybase databases and will run in initial and Move to Production passes.
Properties
DatabaseOrientation
Initial or MTP Products Platforms Languages
Target Both All Sybase All
Task 3-4: Running Upgrade Compare ReportsThis section discusses:
• Understanding Upgrade Compare Reports
• Modify Compare Options
• Run Compare UPGDBCOMP1
• Run Compare UPGDBCOMP2
• Run Compare UPGPRJCOMP
Copyright © 2006, Oracle. All rights reserved. 123
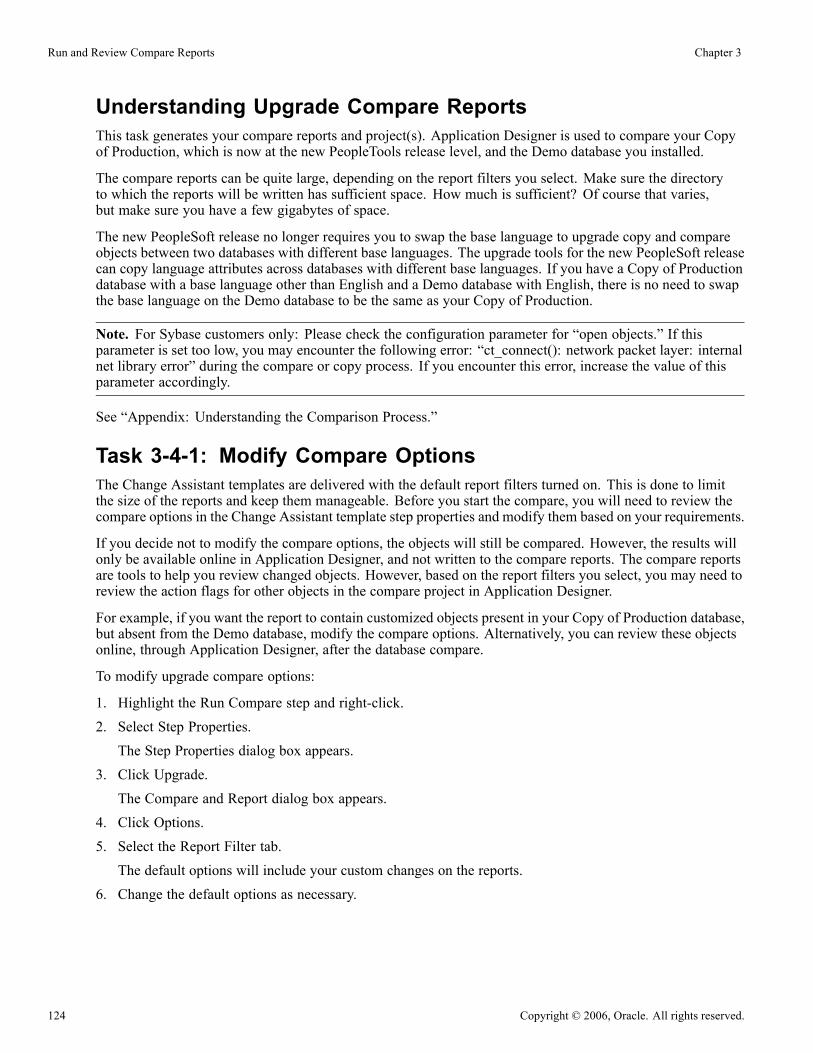
Run and Review Compare Reports Chapter 3
Understanding Upgrade Compare ReportsThis task generates your compare reports and project(s). Application Designer is used to compare your Copyof Production, which is now at the new PeopleTools release level, and the Demo database you installed.
The compare reports can be quite large, depending on the report filters you select. Make sure the directoryto which the reports will be written has sufficient space. How much is sufficient? Of course that varies,but make sure you have a few gigabytes of space.
The new PeopleSoft release no longer requires you to swap the base language to upgrade copy and compareobjects between two databases with different base languages. The upgrade tools for the new PeopleSoft releasecan copy language attributes across databases with different base languages. If you have a Copy of Productiondatabase with a base language other than English and a Demo database with English, there is no need to swapthe base language on the Demo database to be the same as your Copy of Production.
Note. For Sybase customers only: Please check the configuration parameter for “open objects.” If thisparameter is set too low, you may encounter the following error: “ct_connect(): network packet layer: internalnet library error” during the compare or copy process. If you encounter this error, increase the value of thisparameter accordingly.
See “Appendix: Understanding the Comparison Process.”
Task 3-4-1: Modify Compare OptionsThe Change Assistant templates are delivered with the default report filters turned on. This is done to limitthe size of the reports and keep them manageable. Before you start the compare, you will need to review thecompare options in the Change Assistant template step properties and modify them based on your requirements.
If you decide not to modify the compare options, the objects will still be compared. However, the results willonly be available online in Application Designer, and not written to the compare reports. The compare reportsare tools to help you review changed objects. However, based on the report filters you select, you may need toreview the action flags for other objects in the compare project in Application Designer.
For example, if you want the report to contain customized objects present in your Copy of Production database,but absent from the Demo database, modify the compare options. Alternatively, you can review these objectsonline, through Application Designer, after the database compare.
To modify upgrade compare options:
1. Highlight the Run Compare step and right-click.2. Select Step Properties.The Step Properties dialog box appears.
3. Click Upgrade.The Compare and Report dialog box appears.
4. Click Options.5. Select the Report Filter tab.The default options will include your custom changes on the reports.
6. Change the default options as necessary.
124 Copyright © 2006, Oracle. All rights reserved.

Chapter 3 Run and Review Compare Reports
Upgrade Options panel: Report Filter tab
Properties
DatabaseOrientation
Initial or MTP Products Platforms Languages
Source Initial All All All
Task 3-4-2: Run Compare UPGDBCOMP1This step creates a project called UPGDBCOMP1 and executes a database compare of Records, Fields,Indexes, Field Formats, and Translate Values.
Properties
DatabaseOrientation
Initial or MTP Products Platforms Languages
Target Initial All All All
Task 3-4-3: Run Compare UPGDBCOMP2This step creates a project called UPGDBCOMP2 and executes a database compare of most other object types.Excluded from the database compare are the objects found in UPGDBCOMP1 and the following:
Copyright © 2006, Oracle. All rights reserved. 125
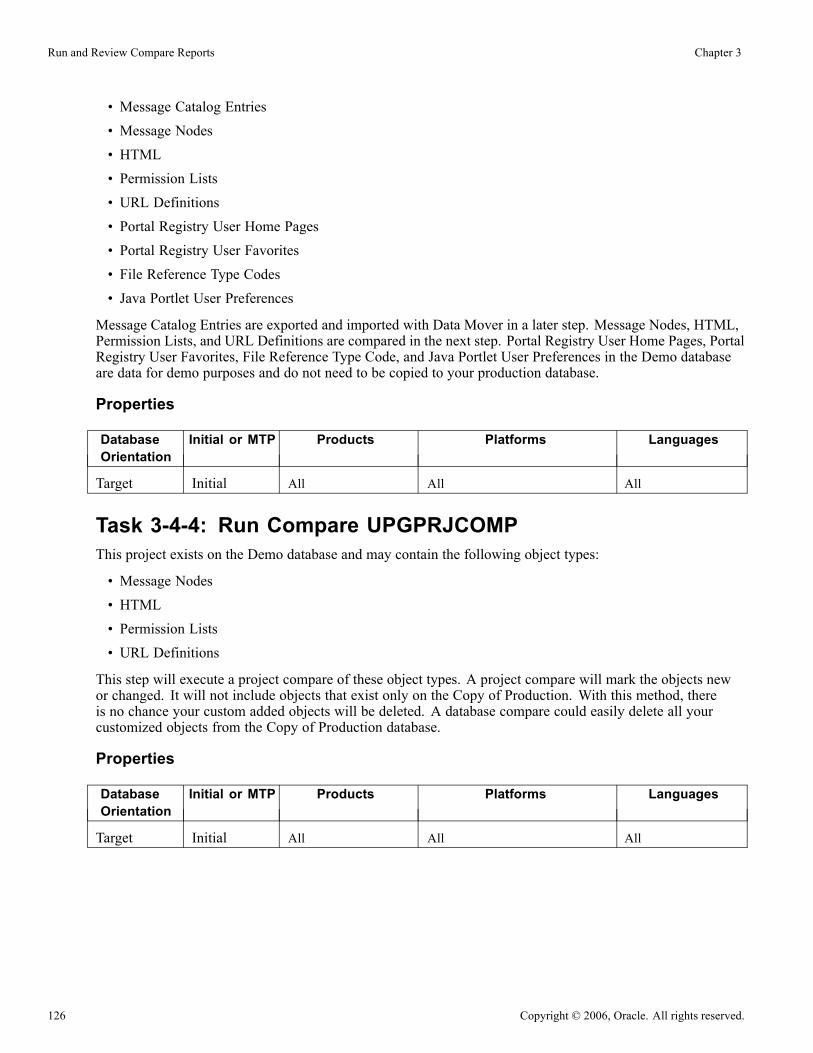
Run and Review Compare Reports Chapter 3
• Message Catalog Entries• Message Nodes• HTML• Permission Lists• URL Definitions• Portal Registry User Home Pages• Portal Registry User Favorites• File Reference Type Codes• Java Portlet User Preferences
Message Catalog Entries are exported and imported with Data Mover in a later step. Message Nodes, HTML,Permission Lists, and URL Definitions are compared in the next step. Portal Registry User Home Pages, PortalRegistry User Favorites, File Reference Type Code, and Java Portlet User Preferences in the Demo databaseare data for demo purposes and do not need to be copied to your production database.
Properties
DatabaseOrientation
Initial or MTP Products Platforms Languages
Target Initial All All All
Task 3-4-4: Run Compare UPGPRJCOMPThis project exists on the Demo database and may contain the following object types:
• Message Nodes• HTML• Permission Lists• URL Definitions
This step will execute a project compare of these object types. A project compare will mark the objects newor changed. It will not include objects that exist only on the Copy of Production. With this method, thereis no chance your custom added objects will be deleted. A database compare could easily delete all yourcustomized objects from the Copy of Production database.
Properties
DatabaseOrientation
Initial or MTP Products Platforms Languages
Target Initial All All All
126 Copyright © 2006, Oracle. All rights reserved.

Chapter 3 Run and Review Compare Reports
Task 3-5: Reviewing the Compare ReportsIn this task, you will review your upgrade projects to evaluate how they will affect your customizations.There are three types of projects to review.
• Database Compare Project(s): This is the project(s) you created by doing the database compare in theprevious task. This project contains all of the differences between the Demo database and your Copyof Production database for the objects in the project(s). This project will include object definitions thatare on your Copy of Production database and are not on the Demo database. These object definitionswill be deleted during the copy of the project from the Demo database to your Copy of Production. Ifthese objects are your custom objects, you may not want to delete them. The database compare producescompare reports that can be viewed by opening the project in Application Designer. Using these reports,you will decide on your copy actions. Your database compare project(s) is:
UPGDBCOMP1
UPGDBCOMP2
• Project Compare Project(s): This project is delivered in your Demo database. It contains object definitions,such as Permission Lists, that you will need in order for your upgraded database to function properly.Because you may have created your own object definitions that you need for your system to function,PeopleSoft has put these objects in a project so you can perform a project compare. If the objects wereincluded in the database compare, object definitions that are on your Copy of Production but not on theDemo database would be marked for deletion. This project was compared in the previous step so that youcan review the differences between the version of the object on the Demo database and your Copy ofProduction database. The database compare produces compare reports, which can be viewed by openingthe project in Application Designer. Use the compare reports to determine whether you have customizedany of these objects. Later in the upgrade you can reapply customizations that you want to use in yourupgraded database. Your project compare project is:
UPGPRJCOMP
PeopleSoft may include obsolete PeopleSoft-owned objects in this project. These may have an action ofDelete in the compared project. Review any such items, and verify that deleting them from the Copy ofProduction database is acceptable. If you want to keep these items in your database, then uncheck theirproject item Upgrade flags.
• Non Compare Project: This project is delivered in your Demo database. It contains object definitions thatcannot be compared using Application Designer. These object definitions are required for your upgradeddatabase to function correctly. You will need to review this project to see if you have customized any ofthe objects and reapply those customizations later in the upgrade. Your non-compare project is:
UPGNONCOMP
When you review these projects, you will be looking for the customizations you have applied to your database.Object definitions that you have changed will have *Changed or *Unchanged in the Target column of thecompare report (the * means the change was not made by PeopleSoft). Review these objects carefully. Forobjects delivered by PeopleSoft, the Source column of the report reads Changed. Note the changes you madeto the object, and when you are testing the upgraded system, decide whether you still need the customization.You can reapply the customization at that time.
Copyright © 2006, Oracle. All rights reserved. 127
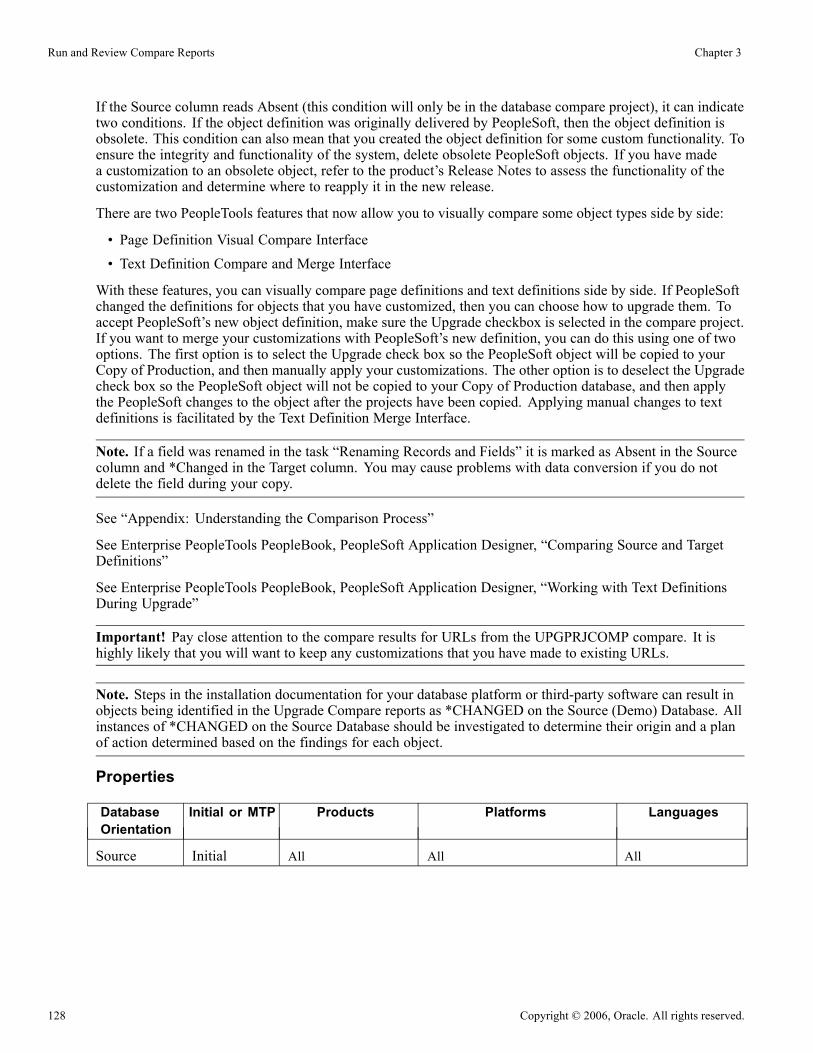
Run and Review Compare Reports Chapter 3
If the Source column reads Absent (this condition will only be in the database compare project), it can indicatetwo conditions. If the object definition was originally delivered by PeopleSoft, then the object definition isobsolete. This condition can also mean that you created the object definition for some custom functionality. Toensure the integrity and functionality of the system, delete obsolete PeopleSoft objects. If you have madea customization to an obsolete object, refer to the product’s Release Notes to assess the functionality of thecustomization and determine where to reapply it in the new release.
There are two PeopleTools features that now allow you to visually compare some object types side by side:
• Page Definition Visual Compare Interface• Text Definition Compare and Merge Interface
With these features, you can visually compare page definitions and text definitions side by side. If PeopleSoftchanged the definitions for objects that you have customized, then you can choose how to upgrade them. Toaccept PeopleSoft’s new object definition, make sure the Upgrade checkbox is selected in the compare project.If you want to merge your customizations with PeopleSoft’s new definition, you can do this using one of twooptions. The first option is to select the Upgrade check box so the PeopleSoft object will be copied to yourCopy of Production, and then manually apply your customizations. The other option is to deselect the Upgradecheck box so the PeopleSoft object will not be copied to your Copy of Production database, and then applythe PeopleSoft changes to the object after the projects have been copied. Applying manual changes to textdefinitions is facilitated by the Text Definition Merge Interface.
Note. If a field was renamed in the task “Renaming Records and Fields” it is marked as Absent in the Sourcecolumn and *Changed in the Target column. You may cause problems with data conversion if you do notdelete the field during your copy.
See “Appendix: Understanding the Comparison Process”
See Enterprise PeopleTools PeopleBook, PeopleSoft Application Designer, “Comparing Source and TargetDefinitions”
See Enterprise PeopleTools PeopleBook, PeopleSoft Application Designer, “Working with Text DefinitionsDuring Upgrade”
Important! Pay close attention to the compare results for URLs from the UPGPRJCOMP compare. It ishighly likely that you will want to keep any customizations that you have made to existing URLs.
Note. Steps in the installation documentation for your database platform or third-party software can result inobjects being identified in the Upgrade Compare reports as *CHANGED on the Source (Demo) Database. Allinstances of *CHANGED on the Source Database should be investigated to determine their origin and a planof action determined based on the findings for each object.
Properties
DatabaseOrientation
Initial or MTP Products Platforms Languages
Source Initial All All All
128 Copyright © 2006, Oracle. All rights reserved.

CHAPTER 4
Apply Application Changes
This chapter discusses:
• Understanding Application Changes
• Running the Upgrade Copy
• Updating Database Overrides
• Backing Up After the Upgrade Copy
• Modifying the Database Structure
• Loading Data for Data Conversion
• Applying Updates Before Data Conversion
• Configuring Scheduler and Server
• Backing Up Before Data Conversions
• Running Data Conversion
• Backing Up After Data Conversion
• Finalizing the Database Structure
• Loading Data to Complete System Setup
• Loading Stored Statements
• Running Final Update Statistics
• Completing Application Processes
• Updating Language Data
• Updating Object Version Numbers
• Running the Final Audit Reports
Understanding Application ChangesEarlier in the upgrade, you made various application changes. Now it is time to apply these applicationchanges to your Copy of Production database.
Copyright © 2006, Oracle. All rights reserved. 129
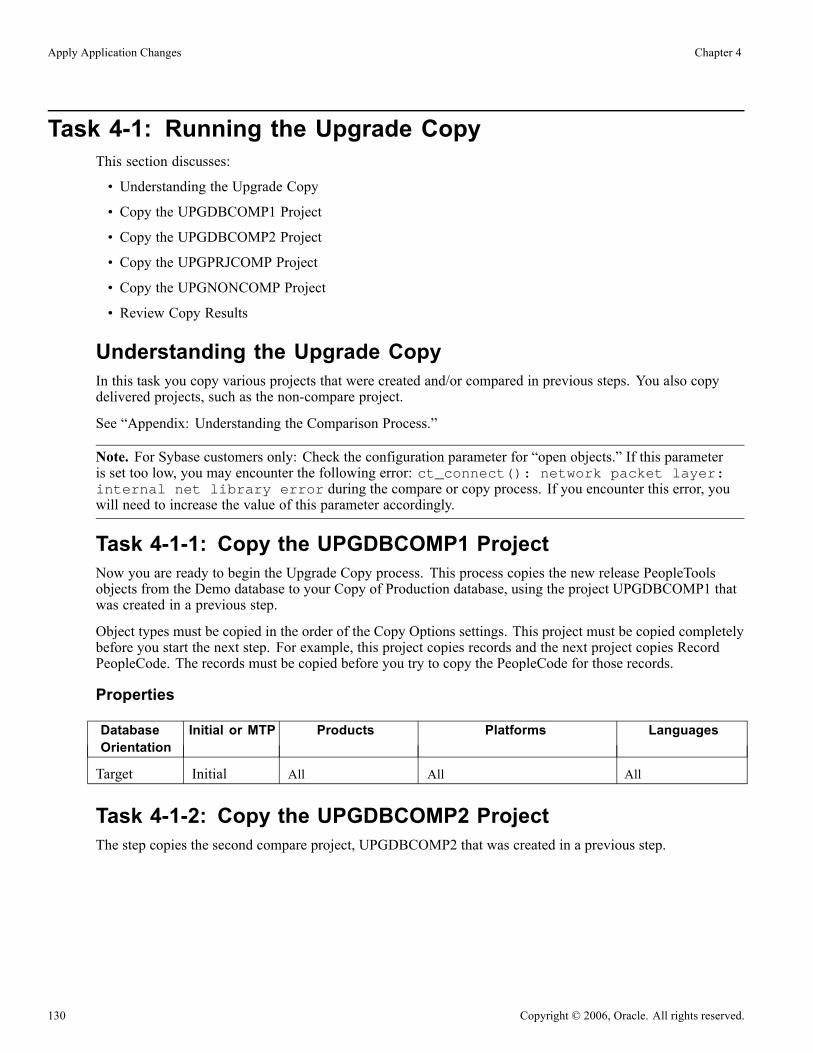
Apply Application Changes Chapter 4
Task 4-1: Running the Upgrade CopyThis section discusses:
• Understanding the Upgrade Copy
• Copy the UPGDBCOMP1 Project
• Copy the UPGDBCOMP2 Project
• Copy the UPGPRJCOMP Project
• Copy the UPGNONCOMP Project
• Review Copy Results
Understanding the Upgrade CopyIn this task you copy various projects that were created and/or compared in previous steps. You also copydelivered projects, such as the non-compare project.
See “Appendix: Understanding the Comparison Process.”
Note. For Sybase customers only: Check the configuration parameter for “open objects.” If this parameteris set too low, you may encounter the following error: ct_connect(): network packet layer:internal net library error during the compare or copy process. If you encounter this error, youwill need to increase the value of this parameter accordingly.
Task 4-1-1: Copy the UPGDBCOMP1 ProjectNow you are ready to begin the Upgrade Copy process. This process copies the new release PeopleToolsobjects from the Demo database to your Copy of Production database, using the project UPGDBCOMP1 thatwas created in a previous step.
Object types must be copied in the order of the Copy Options settings. This project must be copied completelybefore you start the next step. For example, this project copies records and the next project copies RecordPeopleCode. The records must be copied before you try to copy the PeopleCode for those records.
Properties
DatabaseOrientation
Initial or MTP Products Platforms Languages
Target Initial All All All
Task 4-1-2: Copy the UPGDBCOMP2 ProjectThe step copies the second compare project, UPGDBCOMP2 that was created in a previous step.
130 Copyright © 2006, Oracle. All rights reserved.
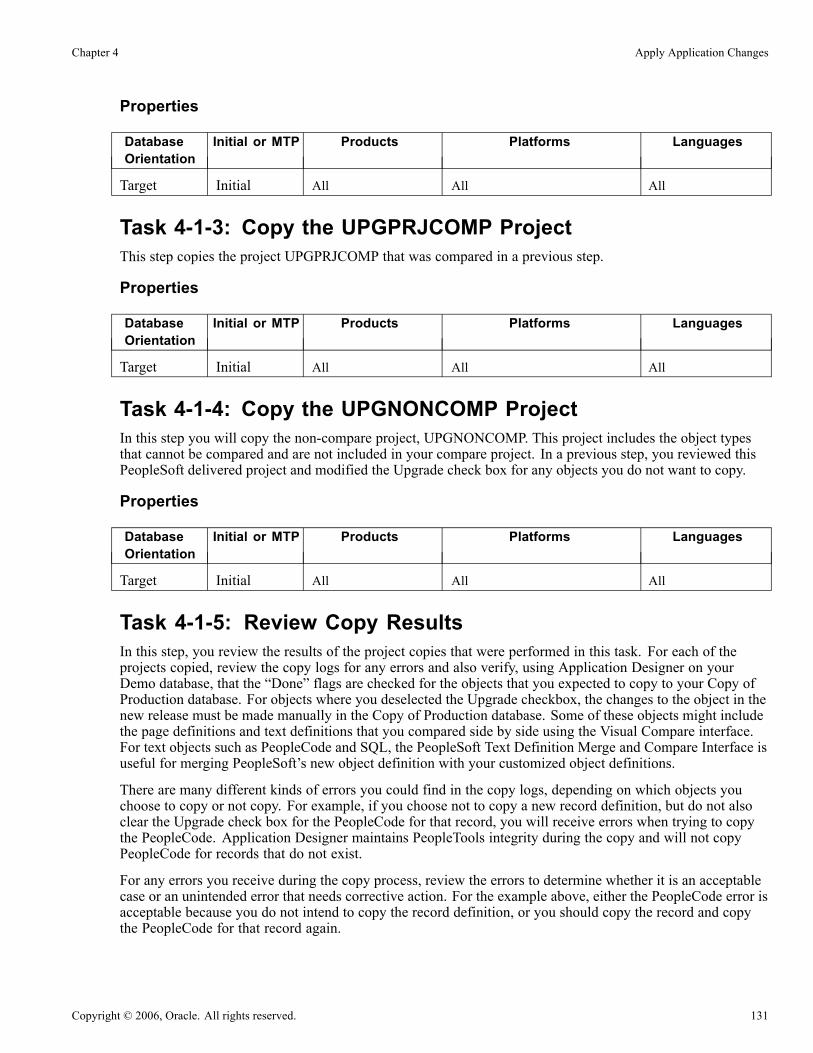
Chapter 4 Apply Application Changes
Properties
DatabaseOrientation
Initial or MTP Products Platforms Languages
Target Initial All All All
Task 4-1-3: Copy the UPGPRJCOMP ProjectThis step copies the project UPGPRJCOMP that was compared in a previous step.
Properties
DatabaseOrientation
Initial or MTP Products Platforms Languages
Target Initial All All All
Task 4-1-4: Copy the UPGNONCOMP ProjectIn this step you will copy the non-compare project, UPGNONCOMP. This project includes the object typesthat cannot be compared and are not included in your compare project. In a previous step, you reviewed thisPeopleSoft delivered project and modified the Upgrade check box for any objects you do not want to copy.
Properties
DatabaseOrientation
Initial or MTP Products Platforms Languages
Target Initial All All All
Task 4-1-5: Review Copy ResultsIn this step, you review the results of the project copies that were performed in this task. For each of theprojects copied, review the copy logs for any errors and also verify, using Application Designer on yourDemo database, that the “Done” flags are checked for the objects that you expected to copy to your Copy ofProduction database. For objects where you deselected the Upgrade checkbox, the changes to the object in thenew release must be made manually in the Copy of Production database. Some of these objects might includethe page definitions and text definitions that you compared side by side using the Visual Compare interface.For text objects such as PeopleCode and SQL, the PeopleSoft Text Definition Merge and Compare Interface isuseful for merging PeopleSoft’s new object definition with your customized object definitions.
There are many different kinds of errors you could find in the copy logs, depending on which objects youchoose to copy or not copy. For example, if you choose not to copy a new record definition, but do not alsoclear the Upgrade check box for the PeopleCode for that record, you will receive errors when trying to copythe PeopleCode. Application Designer maintains PeopleTools integrity during the copy and will not copyPeopleCode for records that do not exist.
For any errors you receive during the copy process, review the errors to determine whether it is an acceptablecase or an unintended error that needs corrective action. For the example above, either the PeopleCode error isacceptable because you do not intend to copy the record definition, or you should copy the record and copythe PeopleCode for that record again.
Copyright © 2006, Oracle. All rights reserved. 131

Apply Application Changes Chapter 4
With the new PeopleTools release, it is possible to have “orphaned” objects in your Demo database. Forexample, a SQL object could exist where the Application Engine Step no longer exists. If your Demo databasecontains these kinds of objects, they will be included in your full database compare reports. When PeopleToolstries to copy the object to the target, you will get a message similar to “not copied, parent object does not existin target database.” This is OK, and you can ignore these messages if they are due to orphans.
You may get messages similar to “Warning: FIELDNAME is a key field and has been appended to the end ofthe RECORDNAME record.” This is OK, and you can ignore these messages.
The following error occurs when copying a Portal Registry Structure that has a different PORTAL_OBJNAMEbut the same PORTAL_URLTEXT as an existing registry object. You should take the PeopleSoft deliveredversion of these objects, but you will need to evaluate whether or not you want to keep the conflicting objects.Delete or modify the old objects on your Copy of Production to remove the conflict and recopy these objectsto bring in the PeopleSoft-delivered version of these objects. In some cases, a new object is added, causinga conflict, and then the old object is deleted later in the copy process, resolving the conflict. In such cases,no further action is required.
Duplicate Key. Portal: <portalname>, Obj name: <objectname>, CP: <nodename>, URL ⇒(1st 50 char): <URL>
See Enterprise PeopleTools PeopleBook, PeopleSoft Application Designer, “Comparing Source and TargetDefinitions”
See Enterprise PeopleTools PeopleBook, PeopleSoft Application Designer, “Working with Text DefinitionsDuring Upgrades”
Properties
DatabaseOrientation
Initial or MTP Products Platforms Languages
Source Initial All All All
Task 4-2: Updating Database OverridesThis section discusses:
• Understanding Database Overrides
• Set Index Parameters After Copy
• Set Tablespace Names After Copy
• Set Record Parameters After Copy
• Create New Tablespaces
Understanding Database OverridesIn this task, you update PeopleTools tables with DDL information from your physical database DDL. You mayhave overwritten information about where tables exist in your database during the copy project steps of thisupgrade. The following steps synchronize your PeopleTools table definitions with your database again.
132 Copyright © 2006, Oracle. All rights reserved.

Chapter 4 Apply Application Changes
Task 4-2-1: Set Index Parameters After CopyThis step updates index overrides stored in the PSIDXDDLPARM table. The values stored in thePARMVALUE field are updated with current values found in the system catalog. The name of the process is:
SETINDEX.SQR
Properties
DatabaseOrientation
Initial or MTP Products Platforms Languages
Target Initial All Oracle
DB2 z/OS
All
Task 4-2-2: Set Tablespace Names After CopyThis step updates Tablespace names stored in the PSRECTBLSPC table. In addition, the values stored in theDDLSPACENAME field are updated with current values found in the system catalog. If you modifiedTablespace names from the PeopleSoft-delivered names, this process makes those same changes in thePeopleSoft record definition. It also corrects any Tablespace names that were reset with values from the Demodatabase during the copy project step. The process then lists any Tablespaces defined in the PeopleTools tablesthat are not currently on your database. Use this report to create new Tablespaces later in this task. Thename of the process is:
SETSPACE.SQR
Note. This step updates both the Database and Tablespace names in the PSRECTBLSPC table for DB2 z/OSsites. The report produced by this process lists Database/Tablespace combinations that were not defined in theDB2 system catalog. The report may show your Demo database and Tablespace names instead of your Copy ofProduction database and Tablespace names. You will correct this situation when you create new Tablespaces.
See Create New Tablespaces.
Properties
DatabaseOrientation
Initial or MTP Products Platforms Languages
Target Initial All Oracle
Informix
DB2/UNIX
DB2 z/OS
All
Task 4-2-3: Set Record Parameters After CopyThis step updates table overrides stored in the PSRECDDLPARM table. The values stored in the PARMVALUEfield are updated with the current values found in the system catalog. The name of the process is:
SETTABLE.SQR
Copyright © 2006, Oracle. All rights reserved. 133

Apply Application Changes Chapter 4
Properties
DatabaseOrientation
Initial or MTP Products Platforms Languages
Target Initial All Oracle All
Task 4-2-4: Create New TablespacesThis section discusses:
• Creating PeopleSoft Delivered Tablespaces
• Creating Custom Tablespaces
Creating PeopleSoft Delivered TablespacesIf you use PeopleSoft-delivered Tablespace names, be aware that there may be new ones in this release. Thereport that you produced when you set Tablespace names after copying provides a list of Tablespaces that aremissing from your database.
See Set Tablespace Names After Copy.
You need to create all of the Tablespaces listed on the report as missing on the database. Once you create all ofthe Tablespaces, you can rerun the SETSPACE.SQR; the report should show that no additional modificationsare needed.
Note. For DBX sites, create all of the Tablespaces on the report listed as missing on the database in addition tothe corresponding index (IDX) Tablespace.
PeopleSoft delivered a shell SQL script containing the DDL commands to create all of the PeopleSoft-deliveredTablespaces. Edit the script to create just the new Tablespaces and to set up the script for your environment.
Note. PeopleSoft reassigned some tables to larger Tablespaces because they now require a 32K bufferpool.You must manually edit the Create Table statements in the upgrade scripts to replace the Tablespace nameswith an appropriate Tablespace name in your implementation that utilizes a 32K bufferpool.
The script name is:
HCDDL.SQL
Important! For DB2UNIX and DB2NT sites the script name is HCDDLDMS.SQL for ANSI, andHCDDLDMSU.SQLfor Unicode.
DB2 z/OS sites must also consider how database names are assigned. After the upgrade/copy is completed,some of the PeopleTools metadata tables in your Copy of Production database will contain the database valuesfrom the Demo database. Review the SETSPACE SQR report for those tables that are reported as not definedin the database. If the report shows your Demo database names instead of your Copy of Production databasenames you can reset them with the following SQL:
UPDATE PSRECTBLSPC SET DBNAME = ‘<Copy of Production dbname>’
WHERE DBNAME = ‘<Demo dbname>’
134 Copyright © 2006, Oracle. All rights reserved.
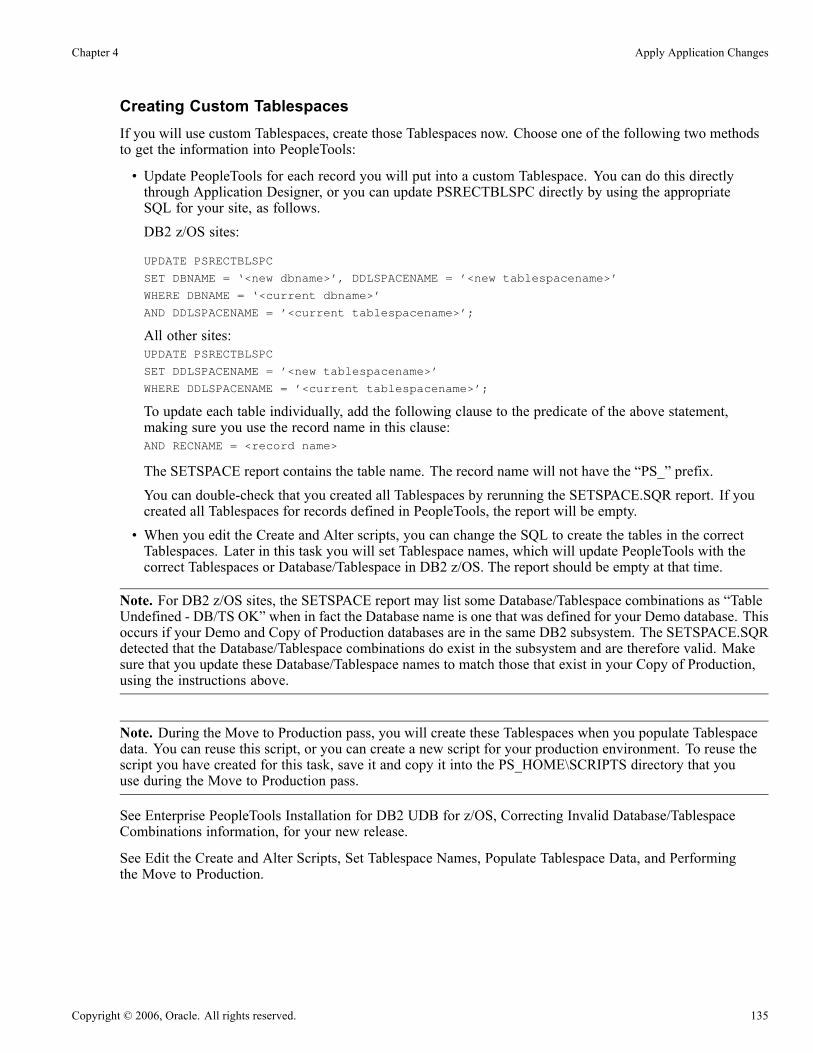
Chapter 4 Apply Application Changes
Creating Custom TablespacesIf you will use custom Tablespaces, create those Tablespaces now. Choose one of the following two methodsto get the information into PeopleTools:
• Update PeopleTools for each record you will put into a custom Tablespace. You can do this directlythrough Application Designer, or you can update PSRECTBLSPC directly by using the appropriateSQL for your site, as follows.DB2 z/OS sites:
UPDATE PSRECTBLSPC
SET DBNAME = ‘<new dbname>’, DDLSPACENAME = ’<new tablespacename>’
WHERE DBNAME = ‘<current dbname>’
AND DDLSPACENAME = ’<current tablespacename>’;
All other sites:UPDATE PSRECTBLSPC
SET DDLSPACENAME = ’<new tablespacename>’
WHERE DDLSPACENAME = ’<current tablespacename>’;
To update each table individually, add the following clause to the predicate of the above statement,making sure you use the record name in this clause:AND RECNAME = <record name>
The SETSPACE report contains the table name. The record name will not have the “PS_” prefix.You can double-check that you created all Tablespaces by rerunning the SETSPACE.SQR report. If youcreated all Tablespaces for records defined in PeopleTools, the report will be empty.
• When you edit the Create and Alter scripts, you can change the SQL to create the tables in the correctTablespaces. Later in this task you will set Tablespace names, which will update PeopleTools with thecorrect Tablespaces or Database/Tablespace in DB2 z/OS. The report should be empty at that time.
Note. For DB2 z/OS sites, the SETSPACE report may list some Database/Tablespace combinations as “TableUndefined - DB/TS OK” when in fact the Database name is one that was defined for your Demo database. Thisoccurs if your Demo and Copy of Production databases are in the same DB2 subsystem. The SETSPACE.SQRdetected that the Database/Tablespace combinations do exist in the subsystem and are therefore valid. Makesure that you update these Database/Tablespace names to match those that exist in your Copy of Production,using the instructions above.
Note. During the Move to Production pass, you will create these Tablespaces when you populate Tablespacedata. You can reuse this script, or you can create a new script for your production environment. To reuse thescript you have created for this task, save it and copy it into the PS_HOME\SCRIPTS directory that youuse during the Move to Production pass.
See Enterprise PeopleTools Installation for DB2 UDB for z/OS, Correcting Invalid Database/TablespaceCombinations information, for your new release.
See Edit the Create and Alter Scripts, Set Tablespace Names, Populate Tablespace Data, and Performingthe Move to Production.
Copyright © 2006, Oracle. All rights reserved. 135

Apply Application Changes Chapter 4
Properties
DatabaseOrientation
Initial or MTP Products Platforms Languages
Target Initial All Oracle
Informix
DB2 z/OS
DB2/UNIX
All
Task 4-3: Backing Up After the Upgrade CopyBack up your database now. This enables you to restart your upgrade from this point, should you experienceany database integrity problems during the remaining tasks in the upgrade process.
Properties
DatabaseOrientation
Initial or MTP Products Platforms Languages
Target Initial All All All
Task 4-4: Modifying the Database StructureThis section discusses:
• Understanding Modifying the Database Structure
• Build the Create Upgrade Tables Script
• Run the Create Upgrade Tables Script
• Build Renamed Tables Script
• Run the Renamed Tables Script
• Create the ALLTEMPTABS Project
• Build the Create Temp Tables Script
• Create the ALLTABS Project
• Build the Create and Alter Scripts
• Edit the Create and Alter Scripts
• Create Temporary Tables
• Create Tables
• Alter Tables
136 Copyright © 2006, Oracle. All rights reserved.
Chapter 4 Apply Application Changes
• Create Indexes
• Review the Create Indexes Log
• Drop Indexes for Data Conversion
• Drop Triggers for Data Conversion
• Create Indexes for Data Conversion
• Set Index Parameters
• Set Tablespace Names for Temp Tables
• Set Tablespace Names
• Set Record Parameters
• Generate a RUNSTATS Script for DB2 UNIX
• Update Statistics for DB2 UNIX
• Update Statistics for DB2 zOS
• Update Statistics for Informix
• Update Statistics for Oracle
Understanding Modifying the Database StructureIn this task you run various scripts and processes that will modify your database structure, including creatingnew tables and altering existing ones.
Task 4-4-1: Build the Create Upgrade Tables ScriptThis step generates the SQL script to drop and re-create all the tables in the project named UPGCONVERT.These tables will be used during data conversion by Application Engine programs. They can be safely droppedat this time because they do not contain application data required by your PeopleSoft system. The scriptname for your upgrade path is:
UPGCONVERT_CRTTBL.SQL
Properties
DatabaseOrientation
Initial or MTP Products Platforms Languages
Target Both All All All
Task 4-4-2: Run the Create Upgrade Tables ScriptThis step runs the SQL script you generated to create all the tables in the project named UPGCONVERT.The script name for your upgrade path is:
UPGCONVERT_CRTTBL.SQL
Copyright © 2006, Oracle. All rights reserved. 137

Apply Application Changes Chapter 4
Properties
DatabaseOrientation
Initial or MTP Products Platforms Languages
Target Both All All All
Task 4-4-3: Build Renamed Tables ScriptIn this step, you will create the SQL script to alter the tables that were renamed with Data Mover renamescripts in an earlier task. Data Mover only renamed the records in Application Designer. This step will buildthe SQL to perform the corresponding rename at the database level. The generated script name is:
UPGRNHC83.SQL
Properties
DatabaseOrientation
Initial or MTP Products Platforms Languages
Target Both All All All
Task 4-4-4: Run the Renamed Tables ScriptIn this step, you will run the script to alter the tables that were renamed in the Data Mover rename scripts in anearlier task. The script name for your upgrade path is:
UPGRNHC83.SQL
When the Change Assistant runs the Create Indexes script to create indexes, it will not stop when it encounterserrors. You may view the log file, and will see some indexes cannot be created due to unique index constraints.The data causing those indexes to fail will be updated during the task, “Running Data Conversion.” Theindexes will then create successfully during the task, “Finalizing the Database Structure.” The log for yourupgrade path is:
UPGRNHC83.LOG
See Running Data Conversion.
See Finalizing the Database Structure.
Properties
DatabaseOrientation
Initial or MTP Products Platforms Languages
Target Both All All All
Task 4-4-5: Create the ALLTEMPTABS ProjectThis step creates a project named ALLTEMPTABS and inserts all records of the type Temporary Table.
138 Copyright © 2006, Oracle. All rights reserved.
Chapter 4 Apply Application Changes
Properties
DatabaseOrientation
Initial or MTP Products Platforms Languages
Target Both All All All
Task 4-4-6: Build the Create Temp Tables ScriptThis step generates the SQL script to drop and re-create all the records of type Temporary Table in thedatabase. Processes use the Temporary Tables dynamically in your system. They can be safely dropped at thistime because they do not contain transaction data required by your PeopleSoft system. The script name foryour upgrade path is:
ALLTEMPTABS_CRTTBL.SQL
Properties
DatabaseOrientation
Initial or MTP Products Platforms Languages
Target Both All All All
Task 4-4-7: Create the ALLTABS ProjectThis step creates a project named ALLTABS and inserts all records of the type Table.
Properties
DatabaseOrientation
Initial or MTP Products Platforms Languages
Target Both All All All
Task 4-4-8: Build the Create and Alter ScriptsThis step generates the SQL script to create all new records of the type Table. The script name is:
ALLTABS_CRTTBL.SQL
This step generates the SQL script to alter all existing records ofthe type Table. This script is referred to asAlter Without Deletes. The tables are altered to add new columns, rename existing columns and changecolumns that have modified properties, such as length. Columns that will eventually be deleted will still existon the tables after this script is executed. The script name is:
ALLTABS_ALTTBL.SQL
This step generates the SQL script to create new indexes and to re-create modified indexes as needed for thetables in the first two scripts. The script name is:
ALLTABS_CRTIDX.SQL
Note. This step also creates the script ALLTABS_CRTTRG.SQL, which re-creates all database triggers. Youdo not need to run this script, because all database triggers will be created in the “Finalizing the DatabaseStructure” task.
Copyright © 2006, Oracle. All rights reserved. 139

Apply Application Changes Chapter 4
Note. For DB2 z/OS sites, if this step takes an exceptionally long time, performing a RUNSTATS on theSystem Catalog Tablespace SYSDBASE may improve performance.
See Finalizing the Database Structure.
Properties
DatabaseOrientation
Initial or MTP Products Platforms Languages
Target Both All All All
Task 4-4-9: Edit the Create and Alter ScriptsIn this step, you will edit the SQL create and alter scripts for Tablespace names and sizing. The script namesfor your upgrade path are:
ALLTEMPTABS_CRTTBL.SQL
ALLTABS_CRTTBL.SQL
ALLTABS_ALTTBL.SQL
ALLTABS_CRTIDX.SQL
If you are not using the PeopleSoft Tablespace names, you will need to review and modify the scripts above.When the new record was copied to the Copy of Production database, the PeopleSoft default Tablespace namewas copied as well. When you performed the step “Create Tablespaces” you were given the option to correctthe Tablespace names online or to wait and edit the scripts. After you have completed running these scripts youwill run the programs that synchronize the PeopleTools definitions with the database catalog again. Therefore,any changes you make to the scripts now will be reflected in the PeopleTools definition. Have your databaseadministrator review these scripts and modify the Tablespace names appropriately.
Many of the new tables and indexes will be populated during the upgrade. If they are not sized appropriatelyfor your database, the conversion programs will stop with errors. After the upgrade is complete, you maywant your database administrator to review and make adjustments to the amount of free space left in someof the tables or Tablespaces.
PeopleSoft has provided a list of these new tables with information about how to size them relative to the sizeof your existing data. This information is meant to give you a rough estimate on an initial size, so you canexecute the conversion programs without errors.
See “Appendix: Sizing Tables for the Upgrade.”
140 Copyright © 2006, Oracle. All rights reserved.
Chapter 4 Apply Application Changes
Properties
DatabaseOrientation
Initial or MTP Products Platforms Languages
Target Both All DB2 z/OS
DB2/UNIX
Oracle
Informix
All
Task 4-4-10: Create Temporary TablesThis step runs the SQL script you generated to create all the records of the type Temporary Table. The scriptname for your upgrade path is:
ALLTEMPTABS_CRTTBL.SQL
Properties
DatabaseOrientation
Initial or MTP Products Platforms Languages
Target Both All All All
Task 4-4-11: Create TablesThis step runs the SQL script you generated to create all the records of the type Table. This step creates newtable structures in your database. The script name for your upgrade path is:
ALLTABS_CRTTBL.SQL
Properties
DatabaseOrientation
Initial or MTP Products Platforms Languages
Target Both All All All
Task 4-4-12: Alter TablesThis step runs the SQL script you generated to alter the existing records of type Table. This step altersexisting PeopleSoft table structures to comply with your new PeopleSoft release. The script name for yourupgrade path is:
ALLTABS_ALTTBL.SQL
Copyright © 2006, Oracle. All rights reserved. 141

Apply Application Changes Chapter 4
Properties
DatabaseOrientation
Initial or MTP Products Platforms Languages
Target Both All All All
Task 4-4-13: Create IndexesThis step runs the SQL script you generated to create indexes on records of the type Table. This step creates ormodifies indexes as required. The script name for your upgrade path is:
ALLTABS_CRTIDX.SQL
Properties
DatabaseOrientation
Initial or MTP Products Platforms Languages
Target Both All All All
Task 4-4-14: Review the Create Indexes LogWhen the Change Assistant runs the Create Indexes script to create indexes, it will not stop when it encounterserrors. When you view the log file, you will see that some indexes cannot be created due to unique indexconstraints. The data causing those indexes to fail will be updated during the task, “Running Data Conversion.”The indexes will then create successfully during the task, “Finalizing the Database Structure.” Review theerrors in the log file. Unique constraint errors are acceptable. If you see any other types of index creation errors,such as space problems, you must correct them before you continue with the upgrade. If you do not correct theerrors, it may degrade your performance during data conversion. The log file name for your upgrade path is:
ALLTABS_CRTIDX.LOG
See Running Data Conversion.
See Finalizing the Database Structure.
Properties
DatabaseOrientation
Initial or MTP Products Platforms Languages
Target Both All All All
Task 4-4-15: Drop Indexes for Data ConversionDrop the following indexes using the SQL tool of your choice. These tables are changing key structure anddata conversion cannot update the new columns if these old indexes exist. Some of these indexes may not existbecause they did not create in the earlier Create Indexes step this is acceptable.
142 Copyright © 2006, Oracle. All rights reserved.

Chapter 4 Apply Application Changes
Table Name Index Name
PS_HRS_APP_DSTNCT PS_HRS_APP_DSTNCT
PS_STEPINC_TBL_JPN PS_STEPINC_TBL_JPN
PS_SAL_AMT_TBL_JPN PS_SAL_AMT_TBL_JPN
PS_SAVINGS_MGT_EE PS_SAVINGS_MGT_EE
PS_SCH_ADHOC_DTL PS_SCH_ADHOC_DTL
PS_SCH_ADHOC_DTL PS_SCH_ADHOC_DTL
Properties
DatabaseOrientation
Initial or MTP Products Platforms Languages
Target Both All All All
Task 4-4-16: Drop Triggers for Data ConversionDrop all triggers on the following tables using the SQL tool of your choice. These tables add new rows anddata conversion cannot update the SyncID’s. The Triggers and SyncID’s will be updated later in the upgrade.
Drop all triggers on the following:
• PS_SCH_SHIFT_TBL• PS_SCH_SHIFT_DTL
Properties
DatabaseOrientation
Initial or MTP Products Platforms Languages
Target Both All All All
Task 4-4-17: Create Indexes for Data ConversionDuring this step, you will create indexes to improve performance during data conversion. These indexes areonly used for the purposes of data conversion. They are not required for regular operation of the products,therefore they were not created in previous steps nor are they delivered with the record definitions on theDemo database. In this step you are asked to manually create those indexes that apply to you (not usingApplication Designer).
It is important to follow the following naming convention so the Alter with Deletes script you run in the task“Finalizing Database Structure” will drop this indexes automatically. Use PS[X]Record Name where X is anyletter A-Z. For example, if you have to create an index for table PS_COUNTRY_TBL a proper index namewould be PSUCOUNTRY_TBL. If an additional index is required for that same table, you can then name it(for example) PSYCOUNTRY_TBL. However, it is important to ensure that the new name of the index youare creating is not defined in the database already.
Copyright © 2006, Oracle. All rights reserved. 143

Apply Application Changes Chapter 4
Not all listed indexes are required for all customers. Reading the comments with each listed index will helpyou determine if the index is applicable to your specific upgrade. Work with your database administrator tocreate a script that will build the indexes in your Copy of Production. You can then modify the ChangeAssistant Template to automate this step (for the initial pass and all future passes too). To do that, go to theUpgrade Template view, then right-click on the step and edit the step properties. Add your script name, withoutthe file extension, in the Script/Procedure field and change the Type to SQL Script.
After reading the comments to determine whether the index is applicable to your situation, create or modify thefollowing indexes in your Copy of Production database:
Table With Columns Comments
PS_GP_PIN PIN_CODE This index should be non-unique. It willsignificantly improve performance forstep UPG_GP83.HCGPY10B.Step020in updating fields in PS_UPG_GP_01_TAO.
PS_TL_MTCHD_2 PROCESS_INSTANCE, EMPLID,EMPL_RCD, PUNCH_BEGIN,TIMEZONE, DUR
This index should be non-unique. It willsignificantly improve performance forstep UPG_TL88.HCTLWO8.Step09(SQL).
PSTZOFFSET TIMEZONE, STARTDATETIME,ENDDATETIME, BASEOFFSET
This index should be non-unique. It willsignificantly improve performance forstep UPG_TL88.HCTLWO8.Step09(SQL).
PS_JOB ACTION
EMPLID
EMPL_RCD
EFFDT
EFFSEQ
This index should be non-unique. It willsignificantly improve performance forsection UPG_HC88. HCHCW12
PS_APPLICATN_ROUTE APPLID
APP_DT
JOB_REQ_NBR
ROUTE_DT
This index should be non-unique. It willsignificantly improve performance forsection UPG_ER88.HRATRTE1
PS_HRS_RTE_TAO HRS_PERSON_ID
HRS_RCMNT_ID
This index should be non-unique. It willsignificantly improve performance forsection UPG_ER88.HRATRTE1
144 Copyright © 2006, Oracle. All rights reserved.

Chapter 4 Apply Application Changes
Table With Columns Comments
PS_HRS_RTES_TAO HRS_PERSON_ID
HRS_RCMNT_ID
HRS_RTE_ID
STATUS_CODE
STATUS_DT
SEQ_NUM
This index should be non-unique. It willsignificantly improve performance forsection UPG_ER88. HRATRTE3
PS_HRS_RTED_TAO HRS_PERSON_ID
HRS_RCMNT_ID
HRS_RTE_ID
HRS_RTE_SEQ
STATUS_CODE
STATUS_DT
SEQ_NUM
This index should be non-unique. It willsignificantly improve performance forsection UPG_ER88.HRATRTE4
PS_HRS_RCMS_TAO HRS_PERSON_ID
HRS_RCMNT_ID
STATUS_DT
SEQ_NUM
This index should be non-unique. It willsignificantly improve performance forsection UPG_ER88.HRATRCM6
PS_HRS_RCMNT_TAO HRS_PERSON_ID
HRS_JOB_OPENING_ID
HRS_PROFILE_SEQ
This index should be non-unique. It willsignificantly improve performance forsection UPG_ER88.HRATRCM1
PS_HRS_JO_STS STATUS_CODE This index should be non-unique. It willsignificantly improve performance forsection UPG_ER83.HCERH21
PS_HRS_APPLICANT APPLID This index should be non-unique. It willsignificantly improve performance forsection UPG_ER83.HCERH03
PS_APP_PRIWRK_EXPR APPLID
APP_DT
This index should be non-unique. It willsignificantly improve performance forsection UPG_ER88.HCERW202
Copyright © 2006, Oracle. All rights reserved. 145

Apply Application Changes Chapter 4
Properties
DatabaseOrientation
Initial or MTP Products Platforms Languages
Target Both All All All
Task 4-4-18: Set Index ParametersThis step updates index overrides stored in the PSIDXDDLPARM table. The values stored in thePARMVALUE field are updated with current values found in the system catalog. The name of the process is:
SETINDEX.SQR
Properties
DatabaseOrientation
Initial or MTP Products Platforms Languages
Target Both All Oracle
DB2 z/OS
All
Task 4-4-19: Set Tablespace Names for Temp TablesThis step populates the PeopleTools table PSRECTBLSPC with the Table Name, Database name andTablespace name information for the Temporary Table instances created on the database in a previous step.This information will be required by processes that perform in-stream RUNSTATS (%UpdateStats) on theTemporary Table instances.
SETTMPIN.SQR
Properties
DatabaseOrientation
Initial or MTP Products Platforms Languages
Target Both All DB2 z/OS All
Task 4-4-20: Set Tablespace NamesThis step populates all Tablespace information in the PSRECTBLSPC table. The values stored in theDDLSPACENAM field are updated with current values found in the system catalog. If you modifiedTablespace names when you edited the SQL script that created your new tables from the PeopleSoft-deliverednames, this will make those same changes in the PeopleSoft record definition. The name of the process is:
SETSPACE.SQR
146 Copyright © 2006, Oracle. All rights reserved.

Chapter 4 Apply Application Changes
Properties
DatabaseOrientation
Initial or MTP Products Platforms Languages
Target Both All Oracle
Informix
DB2/UNIX
DB2 z/OS
All
Task 4-4-21: Set Record ParametersThis step updates table overrides stored in the PSRECDDLPARM table. The values stored in the PARMVALUEfield are updated with the current values found in the system catalog. The name of the process is:
SETTABLE.SQR
Properties
DatabaseOrientation
Initial or MTP Products Platforms Languages
Target Both All Oracle All
Task 4-4-22: Generate a RUNSTATS Script for DB2 UNIXThis step executes the RUNSTATS.SQR that creates the RUNSTATS.SQL to update the statistics onDB2/UNIX.
Properties
DatabaseOrientation
Initial or MTP Products Platforms Languages
Target Both All DB2/UNIX All
Task 4-4-23: Update Statistics for DB2 UNIXEarlier in the upgrade process, you updated your statistics. Now that you have copied your new objects andcreated new indexes, update your statistics again. Run the RUNSTATS.SQL script created in the previous stepto improve performance of your data conversions and generation of the Alter with Delete script.
Properties
DatabaseOrientation
Initial or MTP Products Platforms Languages
Target Both All DB2/UNIX All
Copyright © 2006, Oracle. All rights reserved. 147
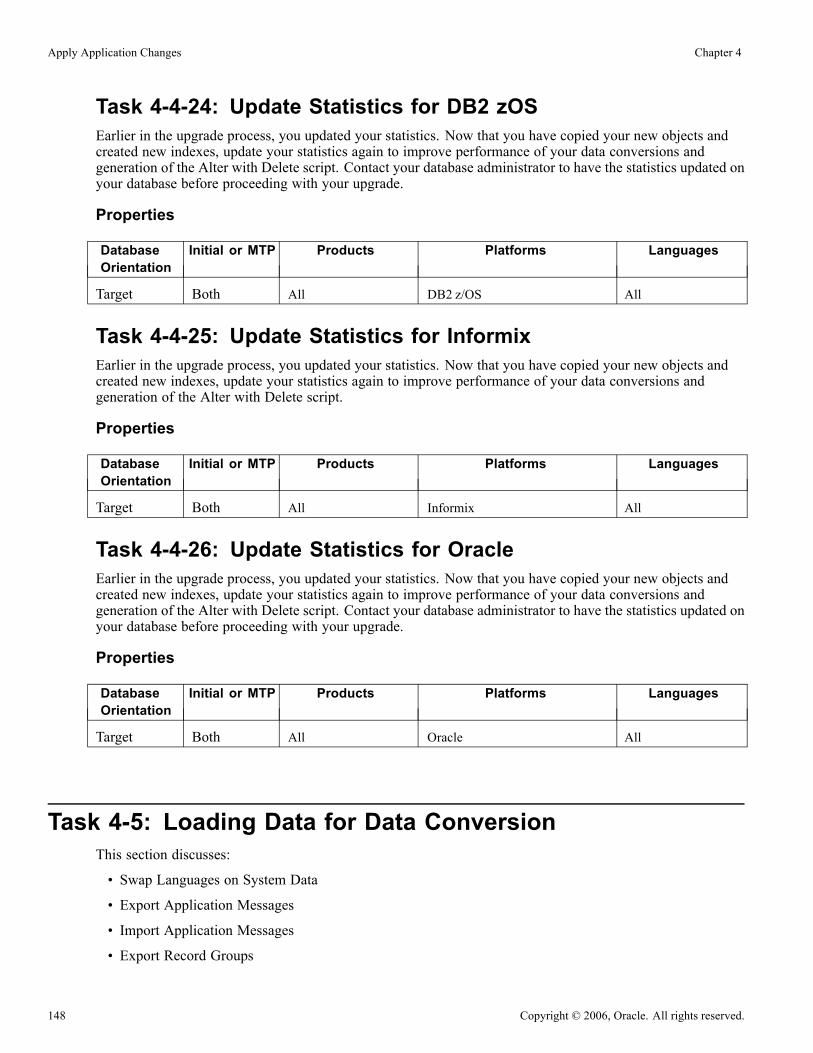
Apply Application Changes Chapter 4
Task 4-4-24: Update Statistics for DB2 zOSEarlier in the upgrade process, you updated your statistics. Now that you have copied your new objects andcreated new indexes, update your statistics again to improve performance of your data conversions andgeneration of the Alter with Delete script. Contact your database administrator to have the statistics updated onyour database before proceeding with your upgrade.
Properties
DatabaseOrientation
Initial or MTP Products Platforms Languages
Target Both All DB2 z/OS All
Task 4-4-25: Update Statistics for InformixEarlier in the upgrade process, you updated your statistics. Now that you have copied your new objects andcreated new indexes, update your statistics again to improve performance of your data conversions andgeneration of the Alter with Delete script.
Properties
DatabaseOrientation
Initial or MTP Products Platforms Languages
Target Both All Informix All
Task 4-4-26: Update Statistics for OracleEarlier in the upgrade process, you updated your statistics. Now that you have copied your new objects andcreated new indexes, update your statistics again to improve performance of your data conversions andgeneration of the Alter with Delete script. Contact your database administrator to have the statistics updated onyour database before proceeding with your upgrade.
Properties
DatabaseOrientation
Initial or MTP Products Platforms Languages
Target Both All Oracle All
Task 4-5: Loading Data for Data ConversionThis section discusses:
• Swap Languages on System Data
• Export Application Messages
• Import Application Messages
• Export Record Groups
148 Copyright © 2006, Oracle. All rights reserved.
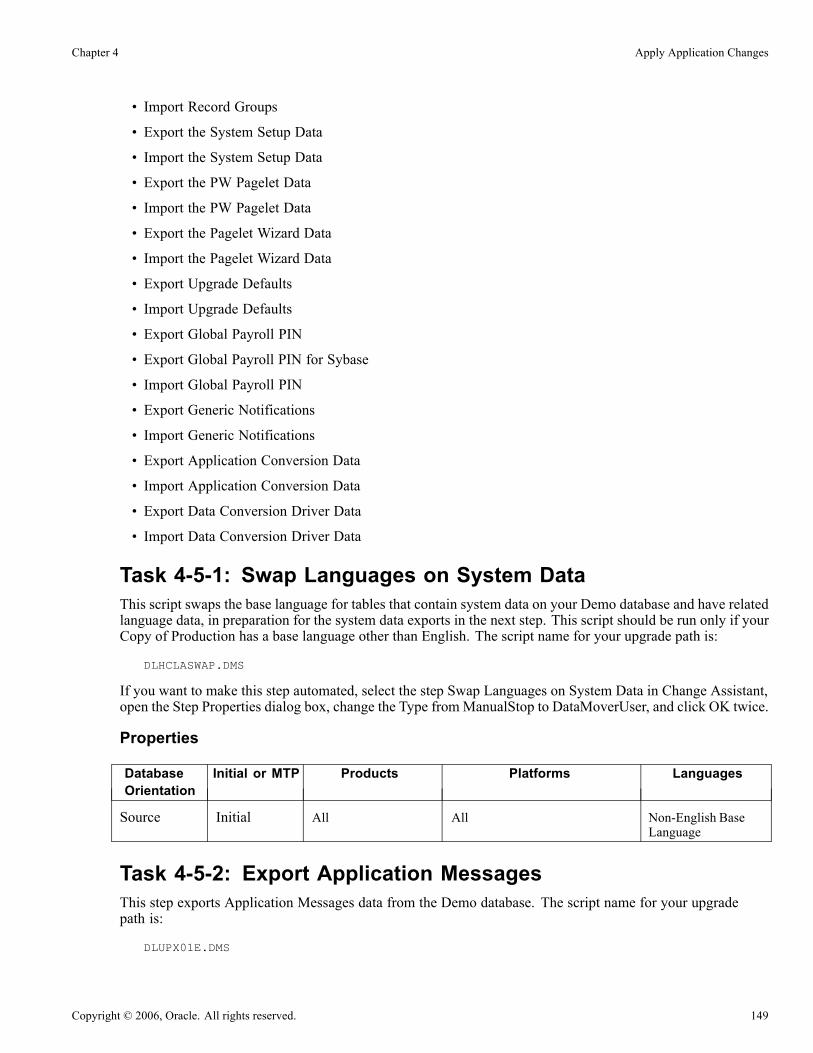
Chapter 4 Apply Application Changes
• Import Record Groups
• Export the System Setup Data
• Import the System Setup Data
• Export the PW Pagelet Data
• Import the PW Pagelet Data
• Export the Pagelet Wizard Data
• Import the Pagelet Wizard Data
• Export Upgrade Defaults
• Import Upgrade Defaults
• Export Global Payroll PIN
• Export Global Payroll PIN for Sybase
• Import Global Payroll PIN
• Export Generic Notifications
• Import Generic Notifications
• Export Application Conversion Data
• Import Application Conversion Data
• Export Data Conversion Driver Data
• Import Data Conversion Driver Data
Task 4-5-1: Swap Languages on System DataThis script swaps the base language for tables that contain system data on your Demo database and have relatedlanguage data, in preparation for the system data exports in the next step. This script should be run only if yourCopy of Production has a base language other than English. The script name for your upgrade path is:
DLHCLASWAP.DMS
If you want to make this step automated, select the step Swap Languages on System Data in Change Assistant,open the Step Properties dialog box, change the Type fromManualStop to DataMoverUser, and click OK twice.
Properties
DatabaseOrientation
Initial or MTP Products Platforms Languages
Source Initial All All Non-English BaseLanguage
Task 4-5-2: Export Application MessagesThis step exports Application Messages data from the Demo database. The script name for your upgradepath is:
DLUPX01E.DMS
Copyright © 2006, Oracle. All rights reserved. 149

Apply Application Changes Chapter 4
Properties
DatabaseOrientation
Initial or MTP Products Platforms Languages
Source Initial All All All
Task 4-5-3: Import Application MessagesThis step imports Application Message data into your Copy of Production database. Message Sets 0-999 areoverlaid during the PeopleTools Upgrade. Application Message Sets 1000-19,999 are overlaid with thistask. If you have added custom messages in this set range, you must add those messages again at the endof the upgrade. To prevent this from happening again in future maintenance or upgrades, add your custommessages in a set range of 20,000 or greater.
Note. If the script fails, verify that your Configuration Manager Profile output and input directories are set tothe same location. If not, this could be the cause of the problem.
The script name for your upgrade path is:
DLUPX01I.DMS
Properties
DatabaseOrientation
Initial or MTP Products Platforms Languages
Target Initial All All All
Task 4-5-4: Export Record GroupsThis step exports Record Group data from the Demo database. The script name for your upgrade path is:
DLUPX02E.DMS
Properties
DatabaseOrientation
Initial or MTP Products Platforms Languages
Source Initial All All All
Task 4-5-5: Import Record GroupsThis step imports Record Group data and populates Set Control data in your Copy of Production database. Thefollowing records are related to Record Groups and Set Control data:
• REC_GROUP_REC• REC_GROUP_TBL• SET_CNTRL_TBL• SET_CNTRL_GROUP
150 Copyright © 2006, Oracle. All rights reserved.

Chapter 4 Apply Application Changes
• SET_CNTRL_REC• SETID_TBL
The import script deletes from, and then reloads, the Record Group tables, REC_GROUP_REC andREC_GROUP_TBL. These are the tables that are modified when you use PeopleTools, Utilities,Administration, Record Group. The script then rebuilds the related setID tables, PS_SET_CNTRL_GROUPand PS_SET_CNTRL_REC. The PS_SET_CNTRL_TBL and PS_SETID_TBL tables contain the setIDs youuse in your system; this script does not update PS_SET_CNTRL_TBL. However, it does check for orphan SetID references in PS_SET_CNTRL_REC and adds the missing Set IDs to PS_SETID_TBL.
If you have moved a PeopleSoft delivered record into a custom added record group, and deleted the recordfrom the PeopleSoft delivered record group, this script will put the record back into the PeopleSoft deliveredrecord group and remove it from the custom added record group.
If you have created a new record group, it will be deleted in this step if all of its records are assigned toPeopleSoft delivered record groups in the new release. To continue using your custom record group, you willneed to recreate it in the Reapply Customizations task.
This script creates an output file and uses it to create a temporary table. To run successfully, the ConfigurationManager input and output Data Mover directories should be the same.
Note. If the script fails, verify that your Configuration Manager Profile output and input directories are set tothe same location. If not, this could be the cause of the problem.
The script name for your upgrade path is:
DLUPX02I.DMS
Properties
DatabaseOrientation
Initial or MTP Products Platforms Languages
Target Initial All All All
Task 4-5-6: Export the System Setup DataThis script exports the contents of the Message, Strings, Stored Statements, Record Group, data conversiondriver, EDI, and Mass Change tables from the Copy of Production database during your Move to Productionpasses. During the initial pass, you ran other scripts to load this data and in some cases had to reapplycustomizations. This script exports the entire contents of these tables including customizations so that you willnot need to reapply them after the Move to Production. The script name for your upgrade path is:
MVAPPEXP.DMS
Properties
DatabaseOrientation
Initial or MTP Products Platforms Languages
Source MTP All All All
Copyright © 2006, Oracle. All rights reserved. 151
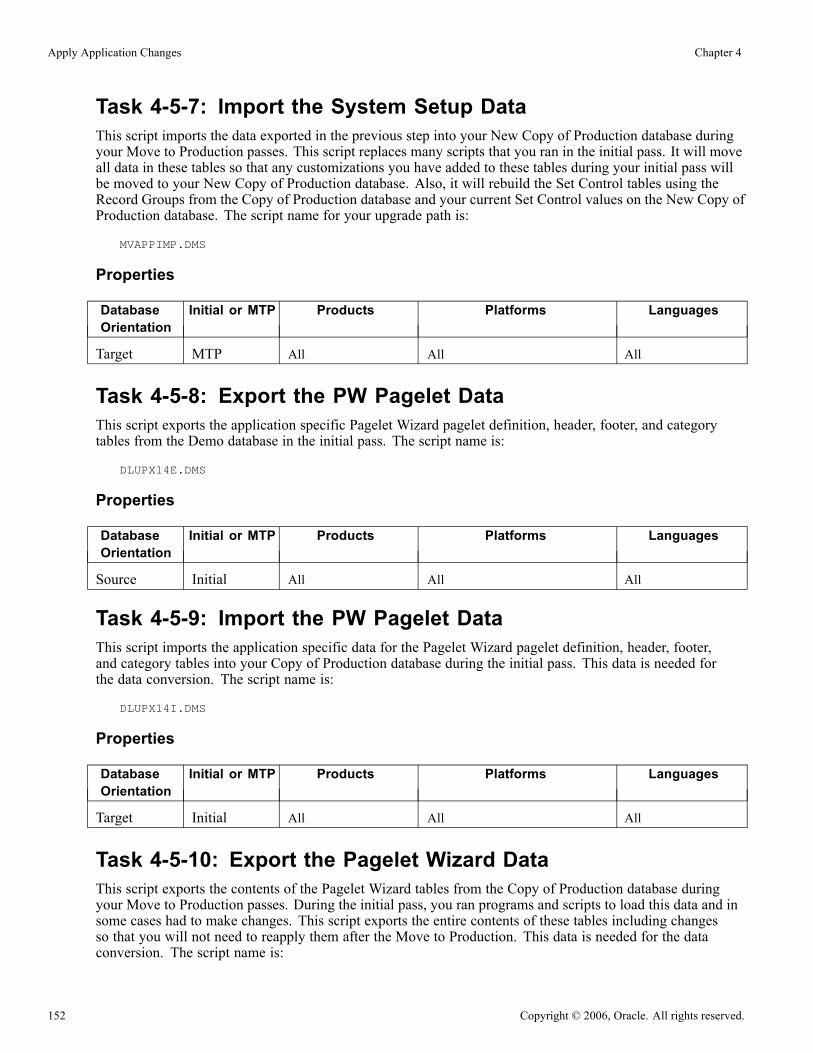
Apply Application Changes Chapter 4
Task 4-5-7: Import the System Setup DataThis script imports the data exported in the previous step into your New Copy of Production database duringyour Move to Production passes. This script replaces many scripts that you ran in the initial pass. It will moveall data in these tables so that any customizations you have added to these tables during your initial pass willbe moved to your New Copy of Production database. Also, it will rebuild the Set Control tables using theRecord Groups from the Copy of Production database and your current Set Control values on the New Copy ofProduction database. The script name for your upgrade path is:
MVAPPIMP.DMS
Properties
DatabaseOrientation
Initial or MTP Products Platforms Languages
Target MTP All All All
Task 4-5-8: Export the PW Pagelet DataThis script exports the application specific Pagelet Wizard pagelet definition, header, footer, and categorytables from the Demo database in the initial pass. The script name is:
DLUPX14E.DMS
Properties
DatabaseOrientation
Initial or MTP Products Platforms Languages
Source Initial All All All
Task 4-5-9: Import the PW Pagelet DataThis script imports the application specific data for the Pagelet Wizard pagelet definition, header, footer,and category tables into your Copy of Production database during the initial pass. This data is needed forthe data conversion. The script name is:
DLUPX14I.DMS
Properties
DatabaseOrientation
Initial or MTP Products Platforms Languages
Target Initial All All All
Task 4-5-10: Export the Pagelet Wizard DataThis script exports the contents of the Pagelet Wizard tables from the Copy of Production database duringyour Move to Production passes. During the initial pass, you ran programs and scripts to load this data and insome cases had to make changes. This script exports the entire contents of these tables including changesso that you will not need to reapply them after the Move to Production. This data is needed for the dataconversion. The script name is:
152 Copyright © 2006, Oracle. All rights reserved.

Chapter 4 Apply Application Changes
MVUPX16E.DMS
Properties
DatabaseOrientation
Initial or MTP Products Platforms Languages
Source MTP All All All
Task 4-5-11: Import the Pagelet Wizard DataThis script imports the Pagelet Wizard tables from the Copy of Production database into the New Copy ofProduction during your Move to Production passes. This script replaces processes that you ran in the initialpass. It will move all data in the affected tables so that any changes you have made during your initial passwill be moved to your New Copy of Production database. This data is needed for the data conversion. Thescript name is:
MVUPX16I.DMS
Properties
DatabaseOrientation
Initial or MTP Products Platforms Languages
Target MTP All All All
Task 4-5-12: Export Upgrade DefaultsThis script exports the upgrade default data values and mapping during your Move to Production passes. Thisis the data that you set up during the chapter “Prepare Your Database” of your initial upgrade pass. You willload this information into your New Copy of Production later in the Move to Production upgrade pass.The script name for your upgrade path is:
MVHC83EXP.DMS
See “Prepare Your Database.”
Properties
DatabaseOrientation
Initial or MTP Products Platforms Languages
Source MTP All All All
Task 4-5-13: Import Upgrade DefaultsThis script imports the upgrade default data values and mapping that you set up during the chapter “PrepareYour Database,” of your initial upgrade pass. The script name for your upgrade path is:
MVHC83IMP.DMS
See “Prepare Your Database.”
Copyright © 2006, Oracle. All rights reserved. 153

Apply Application Changes Chapter 4
Properties
DatabaseOrientation
Initial or MTP Products Platforms Languages
Target MTP All All All
Task 4-5-14: Export Global Payroll PINThis script exports data from PS_GP_PIN that is needed for data conversion. This version of the scriptworks on all platforms other than Sybase.
DLHCUPY412E.DMS
Properties
DatabaseOrientation
Initial or MTP Products Platforms Languages
Source Both All Oracle
MS SQL
DB2 z/OS
DB2/UNIX
Informix
All
Task 4-5-15: Export Global Payroll PIN for SybaseThis script exports data from PS_GP_PIN that is needed for data conversion. This version of the scriptworks on Sybase only.
DLHCUPY412SYBE.DMS
Properties
DatabaseOrientation
Initial or MTP Products Platforms Languages
Source Both All Sybase All
Task 4-5-16: Import Global Payroll PINThis script imports data from PS_GP_PIN into a table called PS_UPG_GP_01_TAO. This data is needed fordata conversion.
DLHCUPY412I.DMS
154 Copyright © 2006, Oracle. All rights reserved.

Chapter 4 Apply Application Changes
Properties
DatabaseOrientation
Initial or MTP Products Platforms Languages
Target Both All All All
Task 4-5-17: Export Generic NotificationsThis step exports Generic Notification Templates data from the Demo database. The script name for yourupgrade path is:
DLERW04E.DMS
Properties
DatabaseOrientation
Initial or MTP Products Platforms Languages
Source Initial All All All
Task 4-5-18: Import Generic NotificationsThis step imports Generic Notification Templates data into your Copy of Production database.
Note. If the script fails, verify that your Configuration Manager Profile output and input directories are set tothe same location. If not, this could be the cause of the problem.
The script name for your upgrade path is:
DLERW04I.DMS
Properties
DatabaseOrientation
Initial or MTP Products Platforms Languages
Target Initial All All All
Task 4-5-19: Export Application Conversion DataIn this step, you will export data from the Demo database that is required for data conversion. The scriptname for your upgrade path is as follows:
DLHCHCW01E.DMS
Copyright © 2006, Oracle. All rights reserved. 155
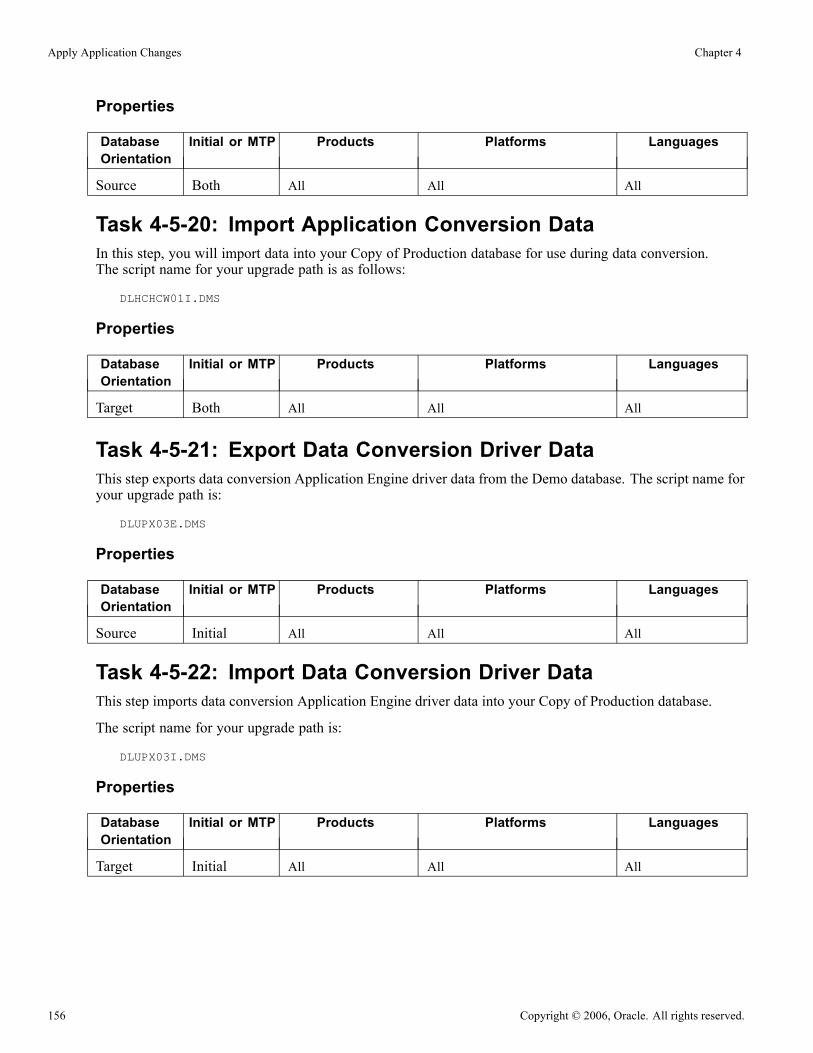
Apply Application Changes Chapter 4
Properties
DatabaseOrientation
Initial or MTP Products Platforms Languages
Source Both All All All
Task 4-5-20: Import Application Conversion DataIn this step, you will import data into your Copy of Production database for use during data conversion.The script name for your upgrade path is as follows:
DLHCHCW01I.DMS
Properties
DatabaseOrientation
Initial or MTP Products Platforms Languages
Target Both All All All
Task 4-5-21: Export Data Conversion Driver DataThis step exports data conversion Application Engine driver data from the Demo database. The script name foryour upgrade path is:
DLUPX03E.DMS
Properties
DatabaseOrientation
Initial or MTP Products Platforms Languages
Source Initial All All All
Task 4-5-22: Import Data Conversion Driver DataThis step imports data conversion Application Engine driver data into your Copy of Production database.
The script name for your upgrade path is:
DLUPX03I.DMS
Properties
DatabaseOrientation
Initial or MTP Products Platforms Languages
Target Initial All All All
156 Copyright © 2006, Oracle. All rights reserved.

Chapter 4 Apply Application Changes
Task 4-6: Applying Updates Before Data ConversionYou should have downloaded and applied Required For Upgrade updates just after you installed your Demodatabase. Now is a great time to check PeopleSoft Customer Connection again for any new postings, and applythem now. Before data conversion, you should also verify that you have the most current UPGCONVERT.EXE.
See PeopleSoft Customer Connection (Implement, Optimize + Upgrade, Upgrade Guide, UpgradeDocumentation and Software, Upgrade Documentation and Scripts, Release, HRMS, PeopleSoft 8.8, HumanResource Management System 8.3 to 8.8 Upgrade, Upgrade Scripts and Templates).
This is just one place that you can apply updates. There are other places in the upgrade process whereapplying updates may be applicable as well. How you apply the update varies depending on where youare in the upgrade.
See “Appendix: Applying Fixes Required for Upgrade.”
Important! Apply all fixes listed under the product line/release, even if you have not licensed the product thefix is listed under. There are many interdependencies between products and database objects. If you do notapply the fix, you may be introducing another error in a different area of the conversion code.
To apply PeopleSoft project fixes before data conversion:
1. Download Required for Upgrade Change Package(s) using the “Download Change Package” functionalityin Change Assistant.
2. Use Change Assistant to install/apply the update(s) into your Demo database for this upgrade pass. Reviewthe documentation included with each update prior to applying the update.
See Enterprise PeopleTools PeopleBook, PeopleSoft Software Updates, for your current release.3. The project is now loaded on your Demo database. You should run a project compare to make sure theobjects in the fix will not overwrite any of your customizations. If you find customizations, you mustdecide how to deal with them before you copy the fix to your Copy of Production.
4. If you are performing a Move to Production upgrade pass, first migrate the Change Package(s) into theSource database for this upgrade pass. If needed, first setup Change Assistant with the environmentinformation for your Source Database. If you customized any of the objects delivered in the ChangePackage, you should repackage the fix to include your customizations. If you did not customize any objectsdelivered in the fix you may directly apply it to the Source database.
See Enterprise PeopleTools PeopleBook, PeopleSoft Software Updates, Appendix: Migrating ChangePackages or Maintenance Updates, for your current release.
5. Migrate the Change Package(s) into the Target database for this upgrade pass. If needed, first set upChange Assistant with the environment information for your Target Database.
Properties
DatabaseOrientation
Initial or MTP Products Platforms Languages
Target Both All All All
Copyright © 2006, Oracle. All rights reserved. 157
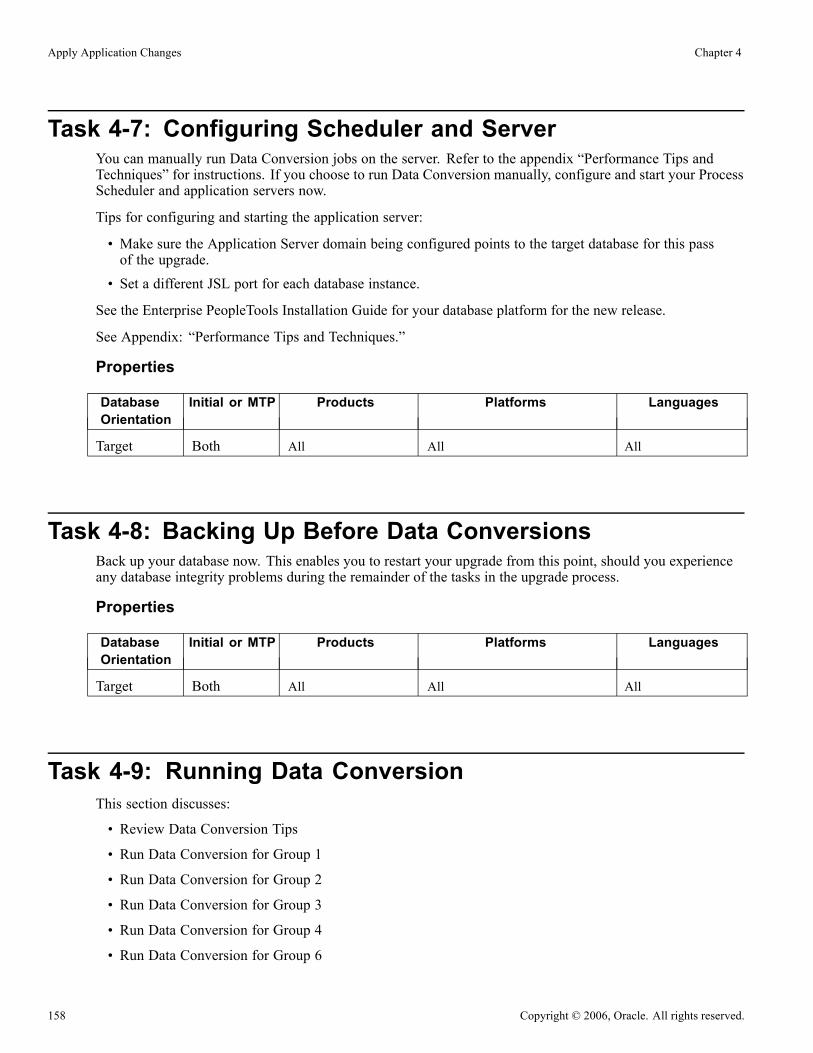
Apply Application Changes Chapter 4
Task 4-7: Configuring Scheduler and ServerYou can manually run Data Conversion jobs on the server. Refer to the appendix “Performance Tips andTechniques” for instructions. If you choose to run Data Conversion manually, configure and start your ProcessScheduler and application servers now.
Tips for configuring and starting the application server:
• Make sure the Application Server domain being configured points to the target database for this passof the upgrade.
• Set a different JSL port for each database instance.
See the Enterprise PeopleTools Installation Guide for your database platform for the new release.
See Appendix: “Performance Tips and Techniques.”
Properties
DatabaseOrientation
Initial or MTP Products Platforms Languages
Target Both All All All
Task 4-8: Backing Up Before Data ConversionsBack up your database now. This enables you to restart your upgrade from this point, should you experienceany database integrity problems during the remainder of the tasks in the upgrade process.
Properties
DatabaseOrientation
Initial or MTP Products Platforms Languages
Target Both All All All
Task 4-9: Running Data ConversionThis section discusses:
• Review Data Conversion Tips
• Run Data Conversion for Group 1
• Run Data Conversion for Group 2
• Run Data Conversion for Group 3
• Run Data Conversion for Group 4
• Run Data Conversion for Group 6
158 Copyright © 2006, Oracle. All rights reserved.

Chapter 4 Apply Application Changes
• Run Data Conversion for Group 7
• Run Data Conversion for Group 8
Note. In this task you will populate new tables and columns. Earlier, you altered tables and added all new andmodified columns. You did not, however, remove obsolete columns. The following steps will move data fromthe obsolete columns to the new columns and tables. Later in this chapter, in the task “Finalizing the DatabaseStructure,” you will generate and run SQL to delete those obsolete columns. The Upgrade Driver ApplicationEngine program, UPG_DATACONV, will run all upgrade data conversions.
Task 4-9-1: Review Data Conversion TipsThis section discusses:
• Upgrade Driver Program − UPG_DATACONV
• Data Conversion Documentation
• Running Data Conversion Concurrently
• Writing Data Conversion for Your Non-PeopleSoft Records
• Data Conversion Errors Expected During the Initial Upgrade Pass
• Restarting Data Conversion
Upgrade Driver Program − UPG_DATACONVUPG_DATACONV is an Application Engine program designed to run all upgrade data conversions. Eachtime the program is run during an upgrade pass, Change Assistant passes a group number parameter tothe program. The program then reads the table PS_UPG_DATACONV, selecting all rows with that groupnumber and ordering them by the sequence number on the row. A list of Application Engine library sectionsthat must be run for data conversion is returned. The program then calls each section in the order of thesequence number. You can review the sections that are called by the Upgrade Driver program by accessing theDefine Upgrade Drivers page on the Demo database.
Data Conversion DocumentationEach section called by the Upgrade Driver program contains comments describing the underlying conversion.By running the UDATACNV SQR report you can find which sections are called by the Upgrade Driverprogram and what they are doing.
See “Appendix: Data Conversion Utilities.”
Running Data Conversion ConcurrentlyEach data conversion step in this task corresponds to a group number as defined in the Define Upgrade Driverspage. Each group is independent of the others unless otherwise documented, allowing the groups to be runconcurrently. PeopleSoft recommends that you run data conversion in the order it appears in your templateduring the initial upgrade pass to determine processing times. This is why the Change Assistant templatesare delivered with the data conversion steps’ “Run Concurrently” property set to “No.” To reduce overallprocessing time during your Move to Production passes, you may decide to run some or all conversion stepsconcurrently. To run steps concurrently, reset the “Run Concurrently” property to “Yes” in your ChangeAssistant template.
See Enterprise PeopleTools PeopleBook, PeopleSoft Software Updates, for your new release.
Copyright © 2006, Oracle. All rights reserved. 159
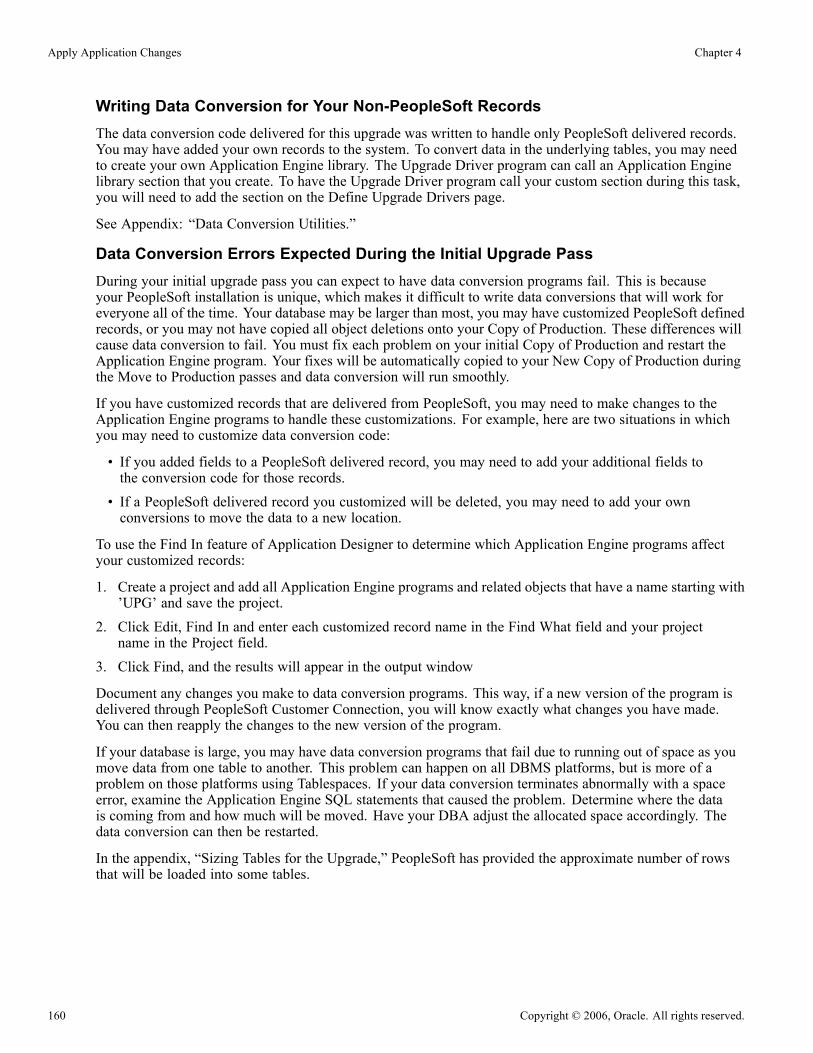
Apply Application Changes Chapter 4
Writing Data Conversion for Your Non-PeopleSoft RecordsThe data conversion code delivered for this upgrade was written to handle only PeopleSoft delivered records.You may have added your own records to the system. To convert data in the underlying tables, you may needto create your own Application Engine library. The Upgrade Driver program can call an Application Enginelibrary section that you create. To have the Upgrade Driver program call your custom section during this task,you will need to add the section on the Define Upgrade Drivers page.
See Appendix: “Data Conversion Utilities.”
Data Conversion Errors Expected During the Initial Upgrade PassDuring your initial upgrade pass you can expect to have data conversion programs fail. This is becauseyour PeopleSoft installation is unique, which makes it difficult to write data conversions that will work foreveryone all of the time. Your database may be larger than most, you may have customized PeopleSoft definedrecords, or you may not have copied all object deletions onto your Copy of Production. These differences willcause data conversion to fail. You must fix each problem on your initial Copy of Production and restart theApplication Engine program. Your fixes will be automatically copied to your New Copy of Production duringthe Move to Production passes and data conversion will run smoothly.
If you have customized records that are delivered from PeopleSoft, you may need to make changes to theApplication Engine programs to handle these customizations. For example, here are two situations in whichyou may need to customize data conversion code:
• If you added fields to a PeopleSoft delivered record, you may need to add your additional fields tothe conversion code for those records.
• If a PeopleSoft delivered record you customized will be deleted, you may need to add your ownconversions to move the data to a new location.
To use the Find In feature of Application Designer to determine which Application Engine programs affectyour customized records:
1. Create a project and add all Application Engine programs and related objects that have a name starting with’UPG’ and save the project.
2. Click Edit, Find In and enter each customized record name in the Find What field and your projectname in the Project field.
3. Click Find, and the results will appear in the output window
Document any changes you make to data conversion programs. This way, if a new version of the program isdelivered through PeopleSoft Customer Connection, you will know exactly what changes you have made.You can then reapply the changes to the new version of the program.
If your database is large, you may have data conversion programs that fail due to running out of space as youmove data from one table to another. This problem can happen on all DBMS platforms, but is more of aproblem on those platforms using Tablespaces. If your data conversion terminates abnormally with a spaceerror, examine the Application Engine SQL statements that caused the problem. Determine where the datais coming from and how much will be moved. Have your DBA adjust the allocated space accordingly. Thedata conversion can then be restarted.
In the appendix, “Sizing Tables for the Upgrade,” PeopleSoft has provided the approximate number of rowsthat will be loaded into some tables.
160 Copyright © 2006, Oracle. All rights reserved.

Chapter 4 Apply Application Changes
If you get a data conversion error because a field does not exist on a table, and the field is not one youhave customized, check your field renames. If a field that appears on a record that is deleted in the newPeopleSoft release but was not deleted in your compare and copy, your table will be out of sync with what isexpected by data conversion. If you had deleted the record, the rename would not happen on the physicaltable and the field would have the old name. This is what the data conversion program expects. If you did notdelete the record, the field was renamed during the altering of tables and the data conversion program willterminate abnormally. Edit the Application Engine SQL to use the name, which is now on your table, andthen restart the data conversion.
See Appendix: “Understanding the Comparison Process,” Effect of Field Rename on Copy Overrides.
See Appendix: “Sizing Tables for the Upgrade”
Restarting Data ConversionBefore restarting a data conversion step, rename the log file. Change Assistant uses the same log file nameeach time you start or restart an Application Engine program. This means that the restarted Application Engineprogram will replace the original log file if it is not renamed.
If your data conversion program fails, fix the problem on your Copy of Production and restart the program.When you set the data conversion step to Restart in your Change Assistant job, it will rerun the program usingthe PROCESS_INSTANCE and RUN_CNTL_ID from the initial run and the conversion will restart right afterthe last committed SQL command. Application Engine keeps track of data committed to the database in thetable PS_AERUNCONTROL, keyed by PROCESS_INSTANCE and RUN_CNTL_ID.
See Finalizing the Database Structure.
See “Appendix: Sizing Tables for the Upgrade.”
Properties
DatabaseOrientation
Initial or MTP Products Platforms Languages
Target Initial All All All
Task 4-9-2: Run Data Conversion for Group 1This step runs the UPG_DATACONV Application Engine program for Group 1. For additional documentationfor Group 1, run the UDATACNV report.
Group 1 must execute successfully before any other groups can run. If you decide to run groups concurrently,group 1 must complete before you launch any other groups concurrently.
Properties
DatabaseOrientation
Initial or MTP Products Platforms Languages
Target Both All All All
Task 4-9-3: Run Data Conversion for Group 2This step runs the UPG_DATACONV Application Engine program for Group 2. If you want to see additionaldocumentation for Group 2, then run the UDATACNV report.
Copyright © 2006, Oracle. All rights reserved. 161
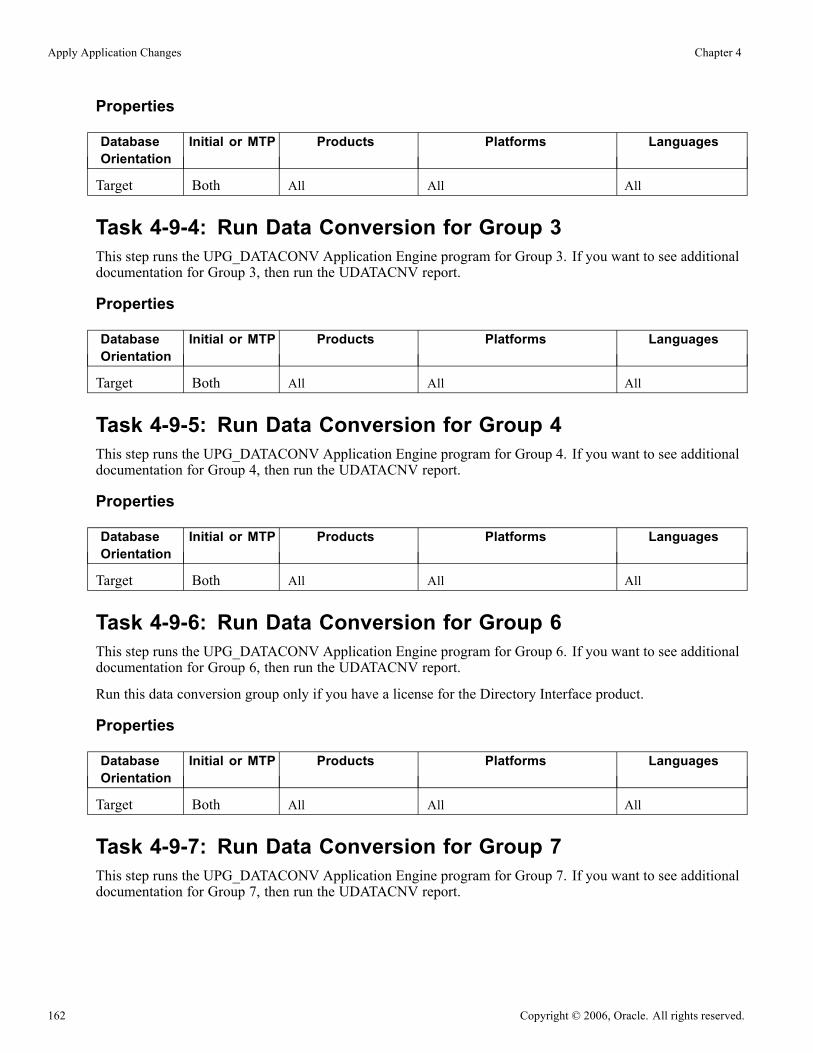
Apply Application Changes Chapter 4
Properties
DatabaseOrientation
Initial or MTP Products Platforms Languages
Target Both All All All
Task 4-9-4: Run Data Conversion for Group 3This step runs the UPG_DATACONV Application Engine program for Group 3. If you want to see additionaldocumentation for Group 3, then run the UDATACNV report.
Properties
DatabaseOrientation
Initial or MTP Products Platforms Languages
Target Both All All All
Task 4-9-5: Run Data Conversion for Group 4This step runs the UPG_DATACONV Application Engine program for Group 4. If you want to see additionaldocumentation for Group 4, then run the UDATACNV report.
Properties
DatabaseOrientation
Initial or MTP Products Platforms Languages
Target Both All All All
Task 4-9-6: Run Data Conversion for Group 6This step runs the UPG_DATACONV Application Engine program for Group 6. If you want to see additionaldocumentation for Group 6, then run the UDATACNV report.
Run this data conversion group only if you have a license for the Directory Interface product.
Properties
DatabaseOrientation
Initial or MTP Products Platforms Languages
Target Both All All All
Task 4-9-7: Run Data Conversion for Group 7This step runs the UPG_DATACONV Application Engine program for Group 7. If you want to see additionaldocumentation for Group 7, then run the UDATACNV report.
162 Copyright © 2006, Oracle. All rights reserved.

Chapter 4 Apply Application Changes
Properties
DatabaseOrientation
Initial or MTP Products Platforms Languages
Target Both All All All
Task 4-9-8: Run Data Conversion for Group 8This step runs the UPG_DATACONV Application Engine program for Group 8. If you want to see additionaldocumentation for Group 8, then run the UDATACNV report.
Note. You must run Group 8 after all other data conversion groups have completed. It can not be runconcurrently with any other data conversion group.
Properties
DatabaseOrientation
Initial or MTP Products Platforms Languages
Target Both All All All
Task 4-10: Backing Up After Data ConversionBack up your database now. This enables you to restart your upgrade from this point, should you experienceany database integrity problems during the remaining tasks in the upgrade process.
Properties
DatabaseOrientation
Initial or MTP Products Platforms Languages
Target Both All All All
Task 4-11: Finalizing the Database StructureThis section discusses:
• Understanding Final Database Structure
• Build the Alter with Deletes Scripts
• Alter Tables with Deletes
• Create Indexes Again
• Create Triggers
• Run the AE SYNCIDGEN Process
Copyright © 2006, Oracle. All rights reserved. 163

Apply Application Changes Chapter 4
• Create All Views
Understanding Final Database StructureNow that Data Conversion is completed, this task will alter the tables to remove obsolete columns, createfinal indexes and views.
Task 4-11-1: Build the Alter with Deletes ScriptsThis step uses the previously created project ALLTABS and generates three SQL scripts: one that will altertables to drop obsolete columns, one that will also create any remaining indexes that could not be created withthe first alter, and one that will create triggers. The script names are:
ALLTABS_DEL_ALTTBL.SQL
ALLTABS_DEL_CRTIDX.SQL
ALLTABS_DEL_CRTTRG.SQL
Important! All indexes should create when the ALLTABS_DEL_CRTIDX.SQL script is run. When a uniqueindex fails to create, it is probably due to a data conversion issue. If a unique index fails to create, you mustresolve the issue and not simply remove the index. To prevent this issue, you can back up tables in theALLTABS_DEL_ALTTBL.SQL script that will be dropping recfields that have data. This way, if you havean issue you may have the old fields and data you need to correct it.
Note. For DB2 z/OS sites, if this step takes an exceptionally long time, performing a RUNSTATS on theSystem Catalog Tablespace SYSDBASE may improve performance.
Properties
DatabaseOrientation
Initial or MTP Products Platforms Languages
Target Both All All All
Task 4-11-2: Alter Tables with DeletesThis step executes the script, ALLTABS_DEL_ALTTBL.SQL, which was generated in the previous step.
Properties
DatabaseOrientation
Initial or MTP Products Platforms Languages
Target Both All All All
Task 4-11-3: Create Indexes AgainThis step executes the script ALLTABS_DEL_CRTIDX.SQL, which was generated in the previous step.All indexes should create at this time.
164 Copyright © 2006, Oracle. All rights reserved.
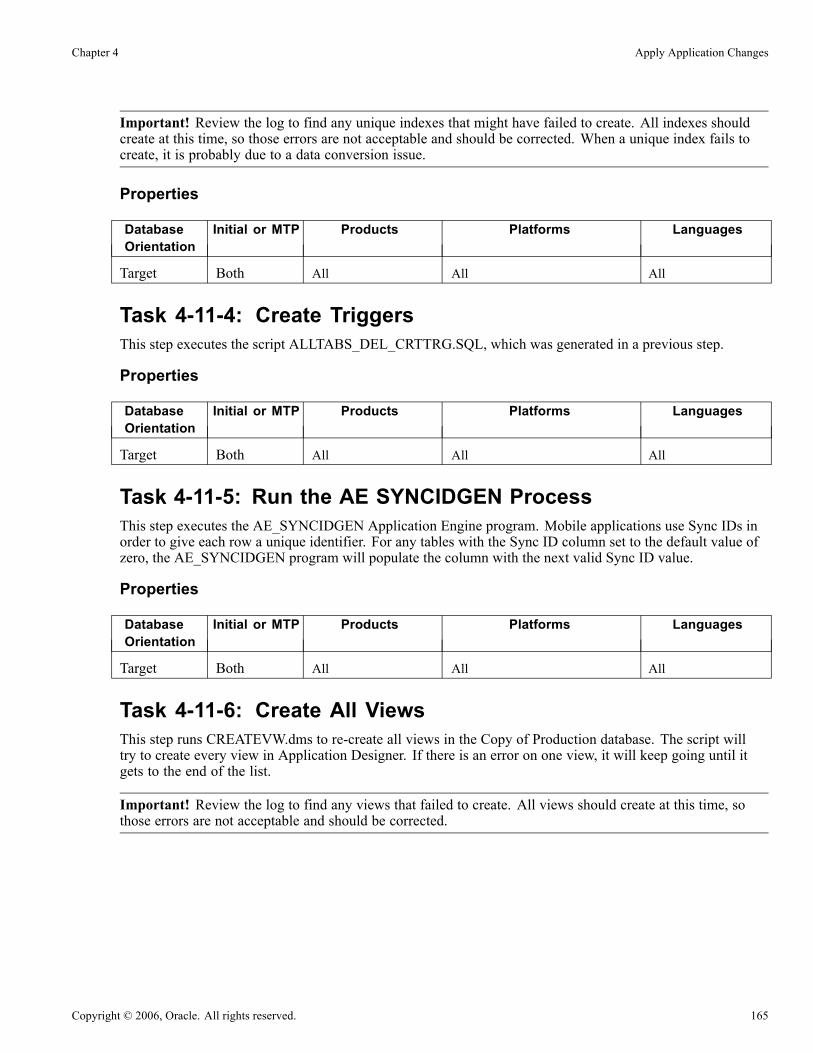
Chapter 4 Apply Application Changes
Important! Review the log to find any unique indexes that might have failed to create. All indexes shouldcreate at this time, so those errors are not acceptable and should be corrected. When a unique index fails tocreate, it is probably due to a data conversion issue.
Properties
DatabaseOrientation
Initial or MTP Products Platforms Languages
Target Both All All All
Task 4-11-4: Create TriggersThis step executes the script ALLTABS_DEL_CRTTRG.SQL, which was generated in a previous step.
Properties
DatabaseOrientation
Initial or MTP Products Platforms Languages
Target Both All All All
Task 4-11-5: Run the AE SYNCIDGEN ProcessThis step executes the AE_SYNCIDGEN Application Engine program. Mobile applications use Sync IDs inorder to give each row a unique identifier. For any tables with the Sync ID column set to the default value ofzero, the AE_SYNCIDGEN program will populate the column with the next valid Sync ID value.
Properties
DatabaseOrientation
Initial or MTP Products Platforms Languages
Target Both All All All
Task 4-11-6: Create All ViewsThis step runs CREATEVW.dms to re-create all views in the Copy of Production database. The script willtry to create every view in Application Designer. If there is an error on one view, it will keep going until itgets to the end of the list.
Important! Review the log to find any views that failed to create. All views should create at this time, sothose errors are not acceptable and should be corrected.
Copyright © 2006, Oracle. All rights reserved. 165
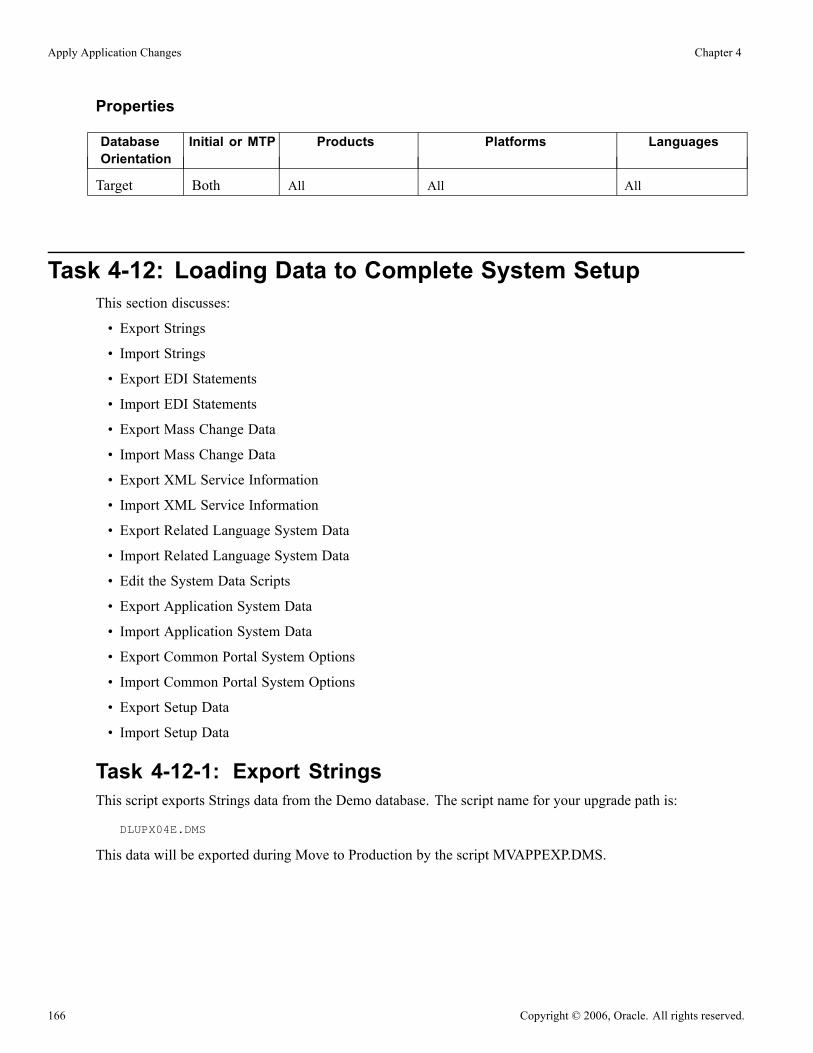
Apply Application Changes Chapter 4
Properties
DatabaseOrientation
Initial or MTP Products Platforms Languages
Target Both All All All
Task 4-12: Loading Data to Complete System SetupThis section discusses:
• Export Strings
• Import Strings
• Export EDI Statements
• Import EDI Statements
• Export Mass Change Data
• Import Mass Change Data
• Export XML Service Information
• Import XML Service Information
• Export Related Language System Data
• Import Related Language System Data
• Edit the System Data Scripts
• Export Application System Data
• Import Application System Data
• Export Common Portal System Options
• Import Common Portal System Options
• Export Setup Data
• Import Setup Data
Task 4-12-1: Export StringsThis script exports Strings data from the Demo database. The script name for your upgrade path is:
DLUPX04E.DMS
This data will be exported during Move to Production by the script MVAPPEXP.DMS.
166 Copyright © 2006, Oracle. All rights reserved.

Chapter 4 Apply Application Changes
Properties
DatabaseOrientation
Initial or MTP Products Platforms Languages
Source Initial All All All
Task 4-12-2: Import StringsThis script imports Strings data into the Copy of Production database. The script name for your upgrade path is:
DLUPX04I.DMS
This data will be imported during Move to Production by the script MVAPPIMP.DMS.
Properties
DatabaseOrientation
Initial or MTP Products Platforms Languages
Target Initial All All All
Task 4-12-3: Export EDI StatementsThis script exports EDI Statements from the Demo database. The script name for your upgrade path is:
DLUPX05E.DMS
This data will be exported during Move to Production by the script MVPRDEXP.DMS.
Properties
DatabaseOrientation
Initial or MTP Products Platforms Languages
Source Initial All All All
Task 4-12-4: Import EDI StatementsThis script imports the EDI Statements into the Copy of Production database. The script name for yourupgrade path is:
DLUPX05I.DMS
This data will be imported during Move to Production by the script MVPRDIMP.DMS.
Properties
DatabaseOrientation
Initial or MTP Products Platforms Languages
Target Initial All All All
Copyright © 2006, Oracle. All rights reserved. 167

Apply Application Changes Chapter 4
Task 4-12-5: Export Mass Change DataThis script exports Mass Change tables from the Demo database. The script name for your upgrade path is:
DLUPX06E.DMS
This data will be exported during Move to Production by the script MVAPPEXP.DMS.
Properties
DatabaseOrientation
Initial or MTP Products Platforms Languages
Source Initial All All All
Task 4-12-6: Import Mass Change DataThis script imports Mass Change tables into the Copy of Production database. The script name for yourupgrade path is:
DLUPX06I.DMS
This data will be imported during Move to Production by the script MVAPPIMP.DMS.
Properties
DatabaseOrientation
Initial or MTP Products Platforms Languages
Target Initial All All All
Task 4-12-7: Export XML Service InformationThis script exports XML service data from the Demo database. The script name for your upgrade path is:
DLUPX13E.DMS
This data will be exported during Move to Production by the script MVPRDEXP.DMS.
Properties
DatabaseOrientation
Initial or MTP Products Platforms Languages
Source Initial All All All
Task 4-12-8: Import XML Service InformationThis script imports XML service data into the Copy of Production database. The script name for yourupgrade path is:
DLUPX13I.DMS
This data will be imported during Move to Production by the script MVPRDIMP.DMS.
168 Copyright © 2006, Oracle. All rights reserved.

Chapter 4 Apply Application Changes
Properties
DatabaseOrientation
Initial or MTP Products Platforms Languages
Target Initial All All All
Task 4-12-9: Export Related Language System DataThis script exports system data from various application related language tables in your Demo database into aData Mover *.dat file. In a later step, this data will be loaded into your Copy of Production. The scriptname for your upgrade path is:
DLHCLASYSE.DMS
Note. During Move to Production passes you can reuse the data files that are created by this export script.Preserve this DAT file, and set the ’Type of Upgrade’ property in the Change Assistant template to InitialUpgrade for this step.
Properties
DatabaseOrientation
Initial or MTP Products Platforms Languages
Source Both All All Any installed inaddition to English
Task 4-12-10: Import Related Language System DataThis script will delete old related language system data from related language tables. The script then importsthe data exported by the scripts above. The script name for your upgrade path is:
DLHCLASYSI.DMS
Properties
DatabaseOrientation
Initial or MTP Products Platforms Languages
Target Both All All Any installed inaddition to English
Task 4-12-11: Edit the System Data ScriptsOracle sites will need to edit the system data scripts for date formats. Change the date format YYYY-MM-DD toDD-MMM-YYYY. For example, a date 1900-01-01 would need to be changed to 01-JAN-1900. The scripts youwill need to edit are as follows:
DLHCSYSE.DMS
DLHCSYSI.DMS
Copyright © 2006, Oracle. All rights reserved. 169
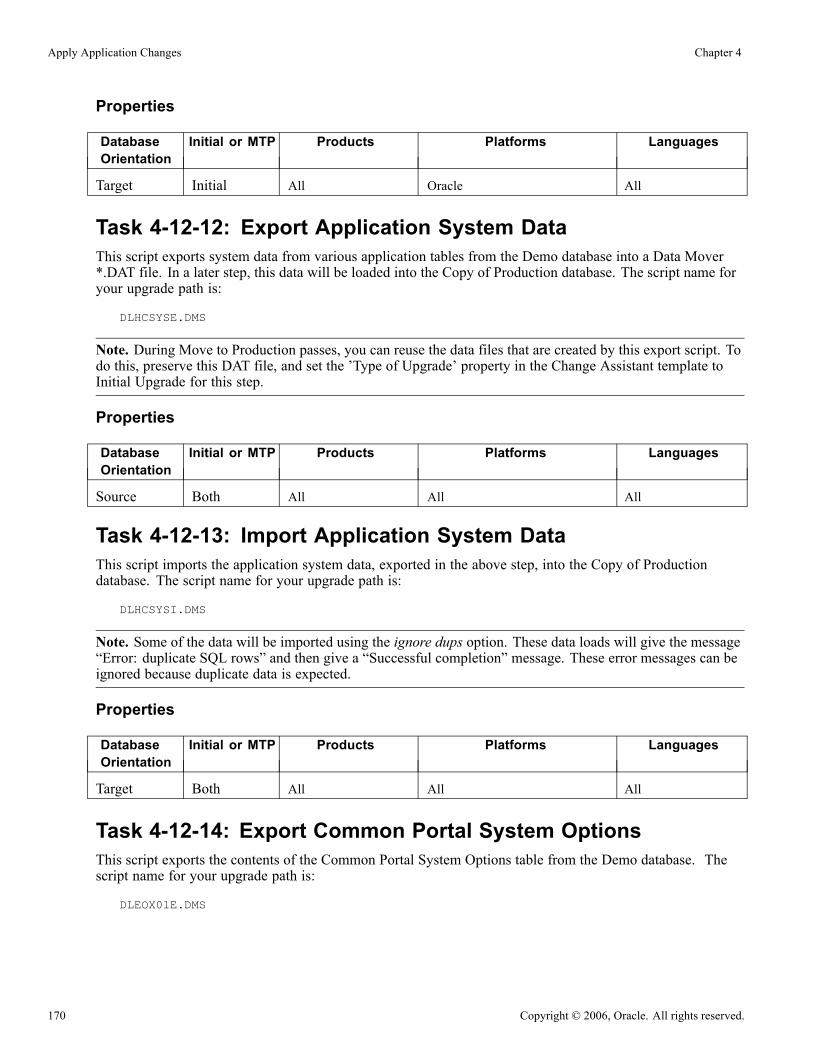
Apply Application Changes Chapter 4
Properties
DatabaseOrientation
Initial or MTP Products Platforms Languages
Target Initial All Oracle All
Task 4-12-12: Export Application System DataThis script exports system data from various application tables from the Demo database into a Data Mover*.DAT file. In a later step, this data will be loaded into the Copy of Production database. The script name foryour upgrade path is:
DLHCSYSE.DMS
Note. During Move to Production passes, you can reuse the data files that are created by this export script. Todo this, preserve this DAT file, and set the ’Type of Upgrade’ property in the Change Assistant template toInitial Upgrade for this step.
Properties
DatabaseOrientation
Initial or MTP Products Platforms Languages
Source Both All All All
Task 4-12-13: Import Application System DataThis script imports the application system data, exported in the above step, into the Copy of Productiondatabase. The script name for your upgrade path is:
DLHCSYSI.DMS
Note. Some of the data will be imported using the ignore dups option. These data loads will give the message“Error: duplicate SQL rows” and then give a “Successful completion” message. These error messages can beignored because duplicate data is expected.
Properties
DatabaseOrientation
Initial or MTP Products Platforms Languages
Target Both All All All
Task 4-12-14: Export Common Portal System OptionsThis script exports the contents of the Common Portal System Options table from the Demo database. Thescript name for your upgrade path is:
DLEOX01E.DMS
170 Copyright © 2006, Oracle. All rights reserved.

Chapter 4 Apply Application Changes
Properties
DatabaseOrientation
Initial or MTP Products Platforms Languages
Source Both All All All
Task 4-12-15: Import Common Portal System OptionsThis script imports the Common Portal System Options data into your Copy of Production database. The scriptname for your upgrade path is:
DLEOX01I.DMS
Properties
DatabaseOrientation
Initial or MTP Products Platforms Languages
Target Both All All All
Task 4-12-16: Export Setup DataThis script exports setup data from the Demo database. The script name for your upgrade path is:
DLUPX16E.DMS
This data will be imported during Move to Production by the script MVAPPEXP.DMS.
Properties
DatabaseOrientation
Initial or MTP Products Platforms Languages
Source Initial All All All
Task 4-12-17: Import Setup DataThis script imports setup data into the Copy of Production database. The script name for your upgrade path is:
DLUPX16I.DMS
This data will be imported during Move to Production by the script MVAPPIMP.DMS.
Properties
DatabaseOrientation
Initial or MTP Products Platforms Languages
Target Initial All All All
Copyright © 2006, Oracle. All rights reserved. 171

Apply Application Changes Chapter 4
Task 4-13: Loading Stored StatementsThis section discusses:
• Understanding Loading Stored Statements
• Set PSOPTIONS for COBOL
• Run the STOREBAS Script
• Run the STOREGP Script
• Run the STOREHRM Script
• Run the STOREPAY Script
• Run the STOREPEN Script
• Run the STOREPYI Script
• Run the STOREBP Script
Understanding Loading Stored StatementsThis task loads all the new COBOL stored statements in your database. The STORE*.DMS scripts arelocated in the PS_HOME\SRC\CBL\BASE directory. These scripts are only delivered if you have licensedthe product and should only appear in the Change Assistant job based on the product configuration in theenvironment definition.
The stored statements scripts are executed only in the initial pass. In the move to production passes, a differentscript will export the stored statement table, PS_SQLSTMT_TBL, from the first copy of production and importit into the second copy of production.
If you use DB2 z/OS you also update the COBOL settings in the PSOPTIONS in this task.
Task 4-13-1: Set PSOPTIONS for COBOLThis step runs DB2ALLCCSIDUPD.SQL and updates PSOPTIONS.DB2ALLCCSIDOK. The purpose ofthe field PSOPTIONS.DB2ALLCCSIDOK is to control whether COBOL processing should be allowed forCOBOL processes running under Windows NT/2000 or UNIX against a DB2 z/OS database where the DB2subsystem zparm for SCCSID is not 37 (US English EBCDIC). A value of ’N’ in this field will result in theCOBOL process being terminated and value of ’Y’ will allow the process to continue.
Note. Move to Production: PSOPTIONS is copied in the Move to Production pass with the MVPRDEXP/IMPscripts.
Properties
DatabaseOrientation
Initial or MTP Products Platforms Languages
Target Initial All DB2 z/OS All
172 Copyright © 2006, Oracle. All rights reserved.
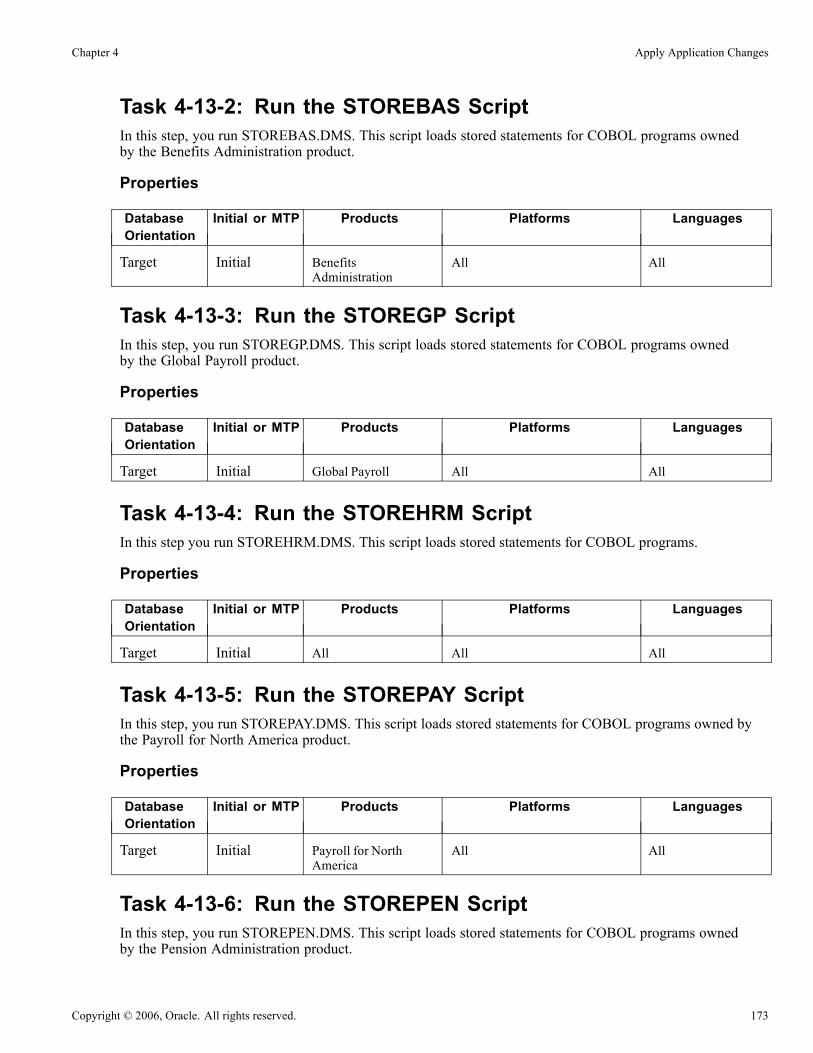
Chapter 4 Apply Application Changes
Task 4-13-2: Run the STOREBAS ScriptIn this step, you run STOREBAS.DMS. This script loads stored statements for COBOL programs ownedby the Benefits Administration product.
Properties
DatabaseOrientation
Initial or MTP Products Platforms Languages
Target Initial BenefitsAdministration
All All
Task 4-13-3: Run the STOREGP ScriptIn this step, you run STOREGP.DMS. This script loads stored statements for COBOL programs ownedby the Global Payroll product.
Properties
DatabaseOrientation
Initial or MTP Products Platforms Languages
Target Initial Global Payroll All All
Task 4-13-4: Run the STOREHRM ScriptIn this step you run STOREHRM.DMS. This script loads stored statements for COBOL programs.
Properties
DatabaseOrientation
Initial or MTP Products Platforms Languages
Target Initial All All All
Task 4-13-5: Run the STOREPAY ScriptIn this step, you run STOREPAY.DMS. This script loads stored statements for COBOL programs owned bythe Payroll for North America product.
Properties
DatabaseOrientation
Initial or MTP Products Platforms Languages
Target Initial Payroll for NorthAmerica
All All
Task 4-13-6: Run the STOREPEN ScriptIn this step, you run STOREPEN.DMS. This script loads stored statements for COBOL programs ownedby the Pension Administration product.
Copyright © 2006, Oracle. All rights reserved. 173
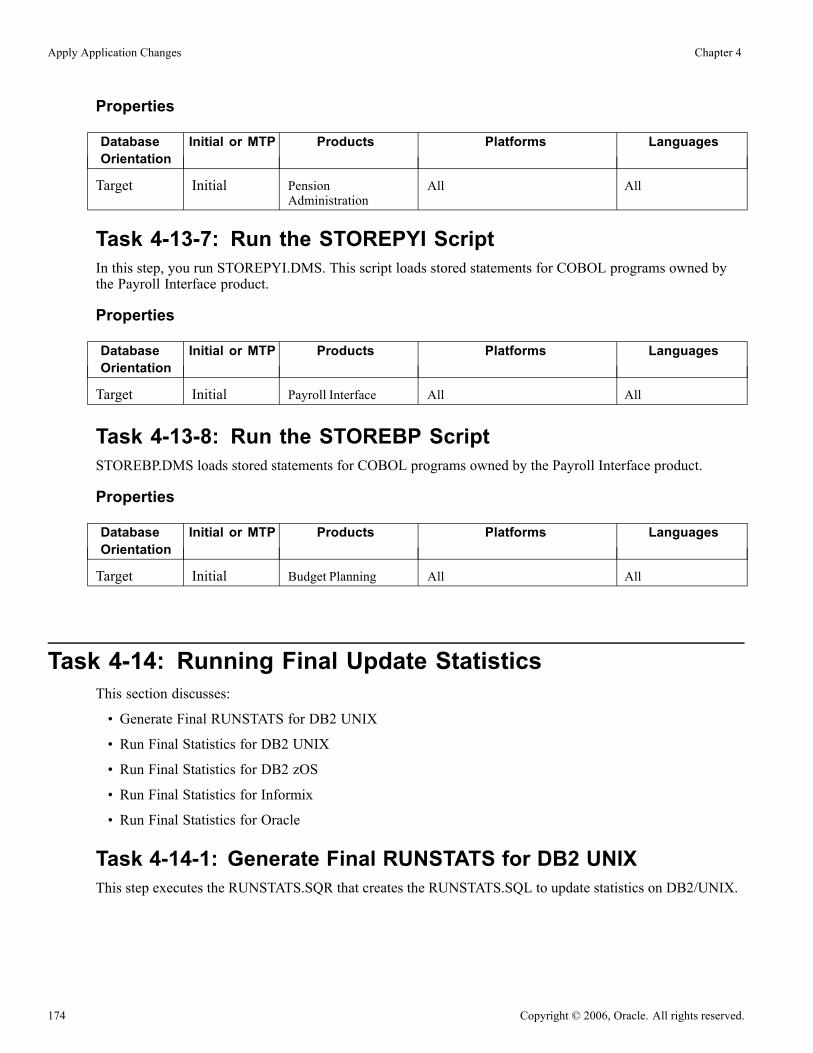
Apply Application Changes Chapter 4
Properties
DatabaseOrientation
Initial or MTP Products Platforms Languages
Target Initial PensionAdministration
All All
Task 4-13-7: Run the STOREPYI ScriptIn this step, you run STOREPYI.DMS. This script loads stored statements for COBOL programs owned bythe Payroll Interface product.
Properties
DatabaseOrientation
Initial or MTP Products Platforms Languages
Target Initial Payroll Interface All All
Task 4-13-8: Run the STOREBP ScriptSTOREBP.DMS loads stored statements for COBOL programs owned by the Payroll Interface product.
Properties
DatabaseOrientation
Initial or MTP Products Platforms Languages
Target Initial Budget Planning All All
Task 4-14: Running Final Update StatisticsThis section discusses:
• Generate Final RUNSTATS for DB2 UNIX
• Run Final Statistics for DB2 UNIX
• Run Final Statistics for DB2 zOS
• Run Final Statistics for Informix
• Run Final Statistics for Oracle
Task 4-14-1: Generate Final RUNSTATS for DB2 UNIXThis step executes the RUNSTATS.SQR that creates the RUNSTATS.SQL to update statistics on DB2/UNIX.
174 Copyright © 2006, Oracle. All rights reserved.

Chapter 4 Apply Application Changes
Properties
DatabaseOrientation
Initial or MTP Products Platforms Languages
Target Both All DB2/UNIX All
Task 4-14-2: Run Final Statistics for DB2 UNIXEarlier in the upgrade process you updated your statistics. Now that you have converted all of your data andmodified all indexes, update your statistics again to improve performance of your post upgrade processes andteseting. Run the RUNSTATS.SQL script created in the previous step.
Properties
DatabaseOrientation
Initial or MTP Products Platforms Languages
Target Both All DB2 UNIX All
Task 4-14-3: Run Final Statistics for DB2 zOSEarlier in the upgrade process you updated your statistics. Now that you have converted all of your data andmodified all indexes, update your statistics again to improve performance of your post upgrade processesand testing. Contact your database administrator to have the statistics updated on your database beforeproceeding with your upgrade.
Properties
DatabaseOrientation
Initial or MTP Products Platforms Languages
Target Both All DB2 z/OS All
Task 4-14-4: Run Final Statistics for InformixEarlier in the upgrade process you updated your statistics. Now that you have converted all of your data andmodified all indexes, update your statistics again to improve performance of your post upgrade processes andtesting. This step runs UPDATESTATS to update the statistics on your database.
Properties
DatabaseOrientation
Initial or MTP Products Platforms Languages
Target Both All Informix All
Copyright © 2006, Oracle. All rights reserved. 175

Apply Application Changes Chapter 4
Task 4-14-5: Run Final Statistics for OracleEarlier in the upgrade process you upgraded your statistics. Now that you have converted all of your data andmodified all indexes, update your statistics again to improve performance of your post upgrade processes.Contact your database administrator to have the statistics updated on your database before proceeding withyour upgrade and testing.
Properties
DatabaseOrientation
Initial or MTP Products Platforms Languages
Target Both All Oracle All
Task 4-15: Completing Application ProcessesThis section discusses:
• Refresh Personal Data Table
• Export Setup Data for Rules
• Import Setup Data for Rules
• Export Payroll Interface Tables
• Import Payroll Interface Tables
• Export GL Interface Setup Tables
• Import GL Interface Setup Tables
Task 4-15-1: Refresh Personal Data TableIn this step, you refresh the Personal Data snapshot table used for reporting. Run the Application Engineprogram PERS_REFRESH to refresh the table.
Properties
DatabaseOrientation
Initial or MTP Products Platforms Languages
Target Both All All All
Task 4-15-2: Export Setup Data for RulesRun this step only during Move to Production passes. It exports data from tables that were updated forTemplate Built and Custom Rules setup during the initial pass.
Run the following script:
MVTLW01E.DMS
176 Copyright © 2006, Oracle. All rights reserved.
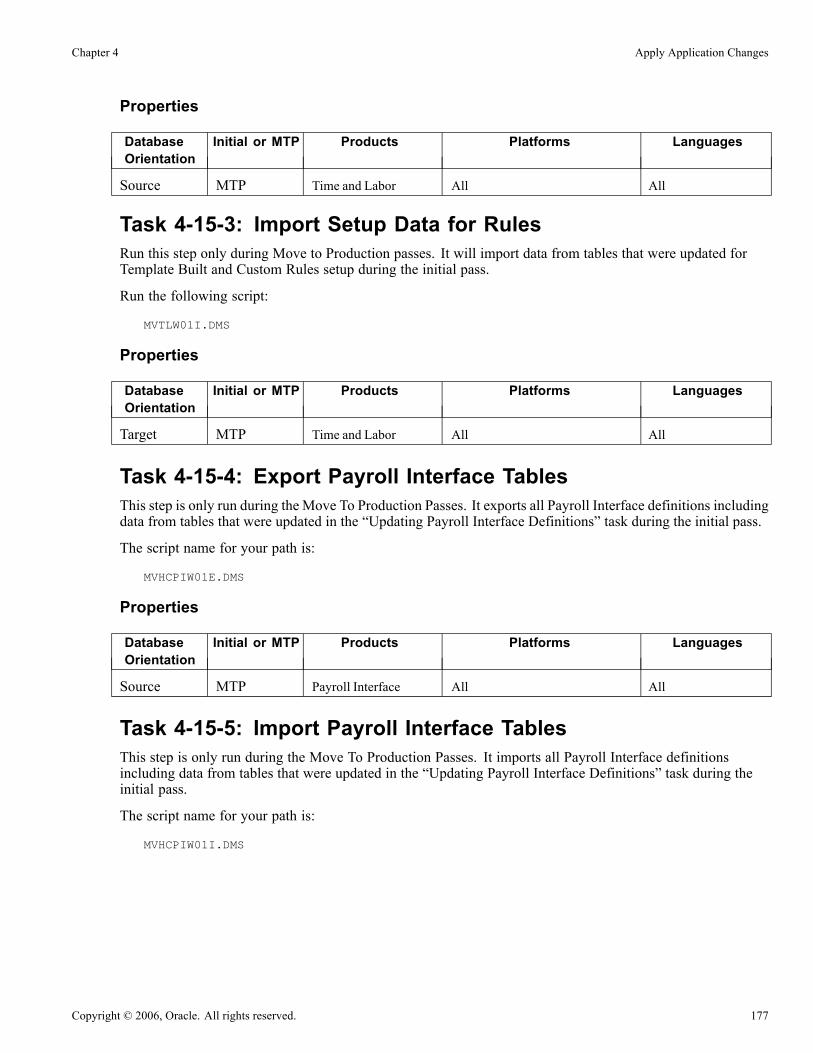
Chapter 4 Apply Application Changes
Properties
DatabaseOrientation
Initial or MTP Products Platforms Languages
Source MTP Time and Labor All All
Task 4-15-3: Import Setup Data for RulesRun this step only during Move to Production passes. It will import data from tables that were updated forTemplate Built and Custom Rules setup during the initial pass.
Run the following script:
MVTLW01I.DMS
Properties
DatabaseOrientation
Initial or MTP Products Platforms Languages
Target MTP Time and Labor All All
Task 4-15-4: Export Payroll Interface TablesThis step is only run during the Move To Production Passes. It exports all Payroll Interface definitions includingdata from tables that were updated in the “Updating Payroll Interface Definitions” task during the initial pass.
The script name for your path is:
MVHCPIW01E.DMS
Properties
DatabaseOrientation
Initial or MTP Products Platforms Languages
Source MTP Payroll Interface All All
Task 4-15-5: Import Payroll Interface TablesThis step is only run during the Move To Production Passes. It imports all Payroll Interface definitionsincluding data from tables that were updated in the “Updating Payroll Interface Definitions” task during theinitial pass.
The script name for your path is:
MVHCPIW01I.DMS
Copyright © 2006, Oracle. All rights reserved. 177
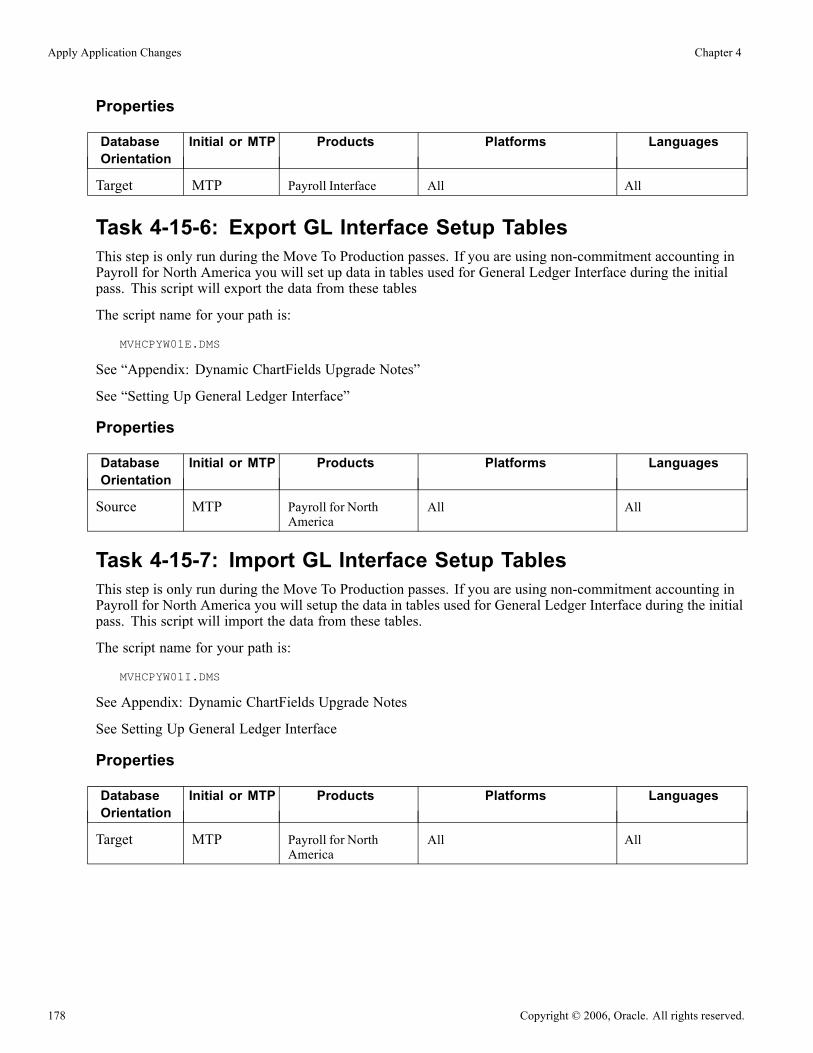
Apply Application Changes Chapter 4
Properties
DatabaseOrientation
Initial or MTP Products Platforms Languages
Target MTP Payroll Interface All All
Task 4-15-6: Export GL Interface Setup TablesThis step is only run during the Move To Production passes. If you are using non-commitment accounting inPayroll for North America you will set up data in tables used for General Ledger Interface during the initialpass. This script will export the data from these tables
The script name for your path is:
MVHCPYW01E.DMS
See “Appendix: Dynamic ChartFields Upgrade Notes”
See “Setting Up General Ledger Interface”
Properties
DatabaseOrientation
Initial or MTP Products Platforms Languages
Source MTP Payroll for NorthAmerica
All All
Task 4-15-7: Import GL Interface Setup TablesThis step is only run during the Move To Production passes. If you are using non-commitment accounting inPayroll for North America you will setup the data in tables used for General Ledger Interface during the initialpass. This script will import the data from these tables.
The script name for your path is:
MVHCPYW01I.DMS
See Appendix: Dynamic ChartFields Upgrade Notes
See Setting Up General Ledger Interface
Properties
DatabaseOrientation
Initial or MTP Products Platforms Languages
Target MTP Payroll for NorthAmerica
All All
178 Copyright © 2006, Oracle. All rights reserved.
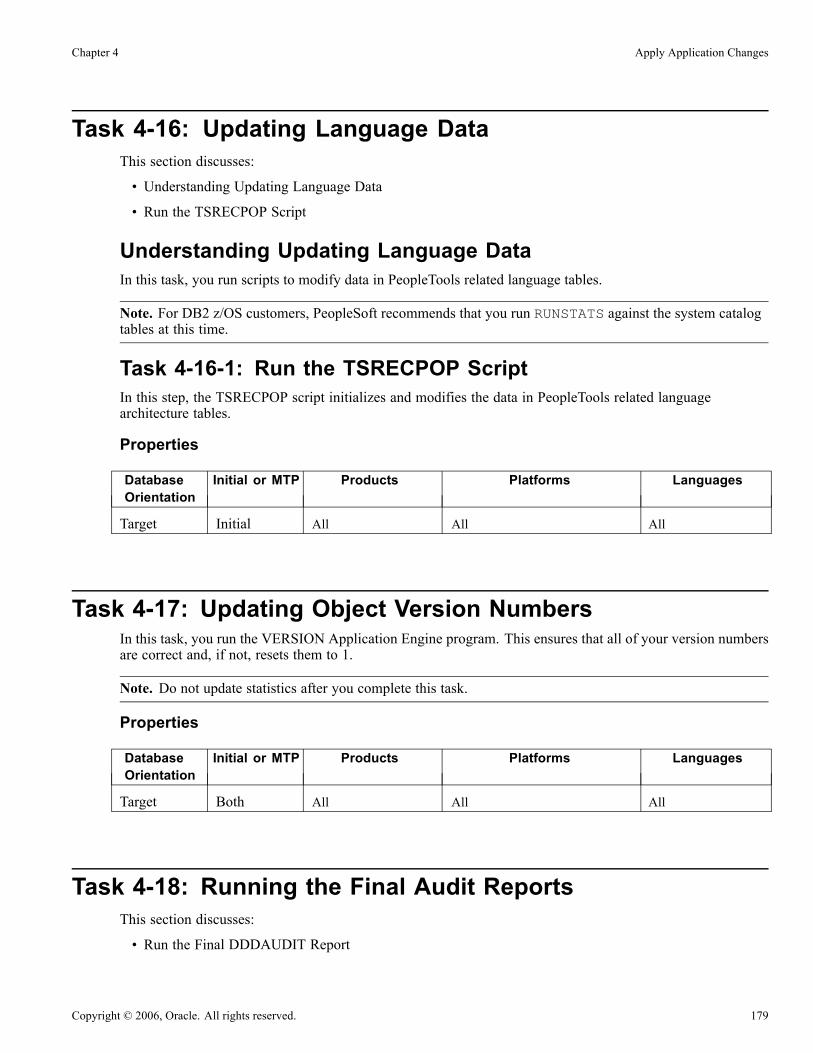
Chapter 4 Apply Application Changes
Task 4-16: Updating Language DataThis section discusses:
• Understanding Updating Language Data
• Run the TSRECPOP Script
Understanding Updating Language DataIn this task, you run scripts to modify data in PeopleTools related language tables.
Note. For DB2 z/OS customers, PeopleSoft recommends that you run RUNSTATS against the system catalogtables at this time.
Task 4-16-1: Run the TSRECPOP ScriptIn this step, the TSRECPOP script initializes and modifies the data in PeopleTools related languagearchitecture tables.
Properties
DatabaseOrientation
Initial or MTP Products Platforms Languages
Target Initial All All All
Task 4-17: Updating Object Version NumbersIn this task, you run the VERSION Application Engine program. This ensures that all of your version numbersare correct and, if not, resets them to 1.
Note. Do not update statistics after you complete this task.
Properties
DatabaseOrientation
Initial or MTP Products Platforms Languages
Target Both All All All
Task 4-18: Running the Final Audit ReportsThis section discusses:
• Run the Final DDDAUDIT Report
Copyright © 2006, Oracle. All rights reserved. 179

Apply Application Changes Chapter 4
• Run the Final SYSAUDIT Report
• Create the FNLALTAUD Project
• Run the Final Alter Audit
• Review the Final Audits
• Run a Final SETINDEX Report
• Run a Final SETTABLE Report
Task 4-18-1: Run the Final DDDAUDIT ReportDDDAUDIT is an SQR that compares your production SQL data tables with the PeopleTools recorddefinitions to uncover inconsistencies. You can expect some errors from this report. You will review theoutput from the report in another step.
Properties
DatabaseOrientation
Initial or MTP Products Platforms Languages
Target Both All All All
Task 4-18-2: Run the Final SYSAUDIT ReportSYSAUDIT is an SQR that identifies orphaned PeopleSoft objects. For example, SYSAUDIT will identifya module of PeopleCode that exists but does not relate to any other objects in the system. SYSAUDIT alsoidentifies other inconsistencies within your database.
Properties
DatabaseOrientation
Initial or MTP Products Platforms Languages
Target Both All All All
Task 4-18-3: Create the FNLALTAUD ProjectIn this step, you create the FNLALTAUD project and use it to run your final Alter Audit. Creating this newproject now ensures that all the records in your system are audited, including SQL tables and temp tables. Thisproject also includes any custom records that you have created in your system.
Properties
DatabaseOrientation
Initial or MTP Products Platforms Languages
Target Both All All All
180 Copyright © 2006, Oracle. All rights reserved.

Chapter 4 Apply Application Changes
Task 4-18-4: Run the Final Alter AuditRun the PeopleTools alter record process on all tables in your system to check whether the PeopleToolsdefinitions are synchronized with the underlying SQL data tables in your database. PeopleSoft calls thisprocess an Alter Audit. Alter Audit compares the data structures of your database tables with the PeopleToolsdefinitions to uncover inconsistencies. Alter Audit then creates an SQL script with the DDL changes needed tosynchronize your database with the PeopleTools definitions.
The Alter Audit script is built using the FNLALTAUD project created in the previous step.
Properties
DatabaseOrientation
Initial or MTP Products Platforms Languages
Target Both All All All
Task 4-18-5: Review the Final AuditsThe Alter Audit process creates SQL scripts that correct any discrepancies between your PeopleTools Recorddefinitions and the database system catalog table definitions. Review the Alter Audit output and correctany discrepancies noted by running the generated scripts with your platform-specific SQL tool. The scriptnames are:
FNLALTAUD_ALTTBL.SQL
FNLALTAUD_CRTIDX.SQL
Note. The Alter Audit process also creates the script FNLALTAUD_CRTTRG.SQL, which re-creates alldatabase triggers. You do not need to run this script, since all database triggers were created in a previous task.
See Finalizing the Database Structure.
Note. For Informix sites, if your database has Application Functions, you use SQL to drop and re-create thesefunctions and their associated indexes, even though the underlying tables and indexes have not changed.
Note. For Microsoft SQL Server and DB2 UNIX platforms, if your database has tables containing theMSSCONCATCOL or DBXCONCATCOL column, you will see SQL alter the tables and re-create theirassociated indexes, even though the underlying tables and indexes may not have changed.
Review the output from the SYSAUDIT and DDDAUDIT reports and correct any discrepancies.
Your DDDAUDIT listing shows some expected discrepancies. Tables and views deleted from the ApplicationDesigner are not automatically deleted from the system tables. PeopleSoft takes this precaution in case youhave customized information that you want to preserve. Therefore, the report lists any tables and views thatthe new release does not have. Review these tables to verify that you do not wish to preserve any customdata, and then drop the tables and views.
Your SYSAUDIT report may have some errors due to references to obsolete PeopleSoft-owned objects. Forinstance, if PeopleSoft deletes a Role, and you have a User that still refers to the Role, then it will appear onthe SYSAUDIT report.
See Enterprise PeopleTools PeopleBook, Data Management, for your new release.
Copyright © 2006, Oracle. All rights reserved. 181

Apply Application Changes Chapter 4
Properties
DatabaseOrientation
Initial or MTP Products Platforms Languages
Target Both All All All
Task 4-18-6: Run a Final SETINDEX ReportThe SETINDEX SQR updates index overrides stored in the PSIDXDDLPARM table. The SQR updates thevalues stored in the PARMVALUE field with current values found in the system catalog. Running SETINDEXcleans up fragmentation issues that may have occurred during data conversion.
Properties
DatabaseOrientation
Initial or MTP Products Platforms Languages
Target Both All DB2 z/OS
Oracle
All
Task 4-18-7: Run a Final SETTABLE ReportThe SETTABLE SQR updates table overrides stored in the PSRECDDLPARM table. The SQR updatesthe values stored in the PARMVALUE field with the current values found in the system catalog. RunningSETTABLE will clean up fragmentation issues that may have occurred during data conversion.
Properties
DatabaseOrientation
Initial or MTP Products Platforms Languages
Target Both All Oracle All
182 Copyright © 2006, Oracle. All rights reserved.

CHAPTER 5
Complete Database Changes
This chapter discusses:
• Understanding Database Changes
• Configuring the Upgrade Environment
• Reapplying Customizations
• Setting Up Security
• Updating Department Security
• Backing Up Before Manual Changes
• Running the Person Organization Audits
• Setting Up Pension
• Setting Up PeopleSoft Benefits
• Upgrading GP Country Extensions
• Adding New GP Country Extensions
• Validating Alternative Overtime Upgrade
• Updating Payroll Interface Definitions
• Running Assigned Company Cars Report
• Upgrading Rules
• Deleting Resume Files
• Setting Up General Ledger Interface
• Reviewing PeopleTools Functionality
• Preparing the Content Provider Registry
• Updating the Portal Options Data
• Stamping the Database
• Reviewing Change Control
• Backing Up Before Testing
• Testing Your Copy of Production
Copyright © 2006, Oracle. All rights reserved. 183
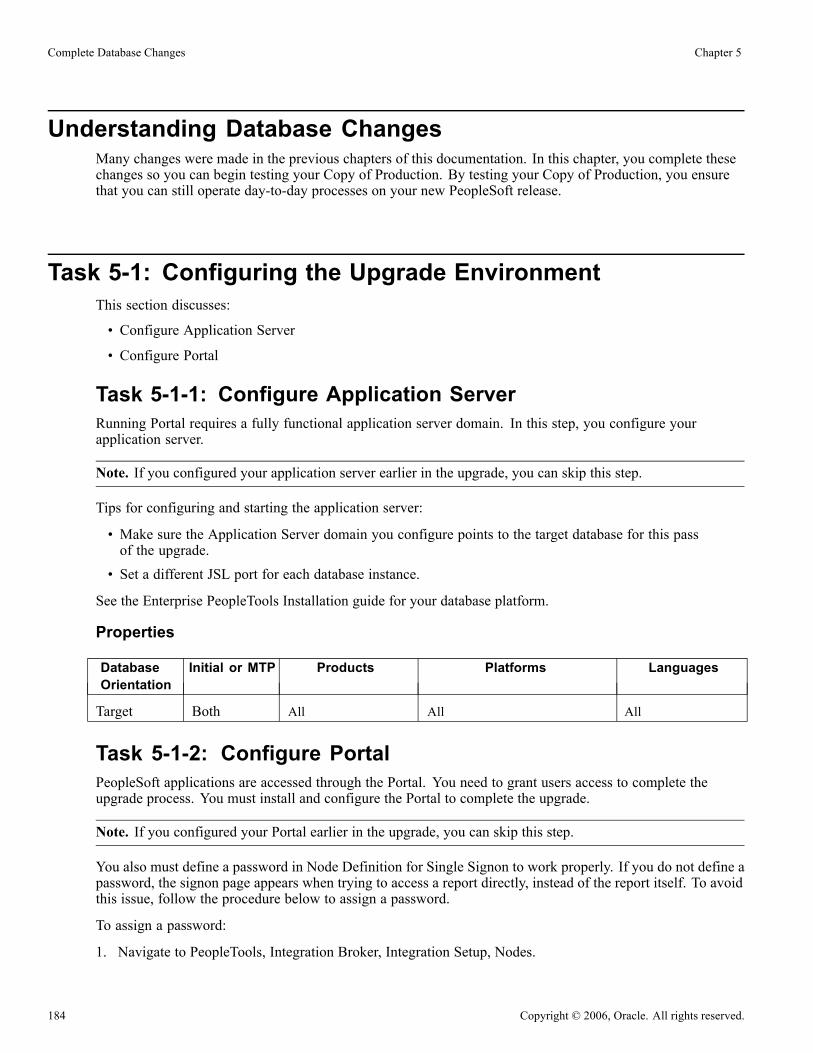
Complete Database Changes Chapter 5
Understanding Database ChangesMany changes were made in the previous chapters of this documentation. In this chapter, you complete thesechanges so you can begin testing your Copy of Production. By testing your Copy of Production, you ensurethat you can still operate day-to-day processes on your new PeopleSoft release.
Task 5-1: Configuring the Upgrade EnvironmentThis section discusses:
• Configure Application Server
• Configure Portal
Task 5-1-1: Configure Application ServerRunning Portal requires a fully functional application server domain. In this step, you configure yourapplication server.
Note. If you configured your application server earlier in the upgrade, you can skip this step.
Tips for configuring and starting the application server:
• Make sure the Application Server domain you configure points to the target database for this passof the upgrade.
• Set a different JSL port for each database instance.
See the Enterprise PeopleTools Installation guide for your database platform.
Properties
DatabaseOrientation
Initial or MTP Products Platforms Languages
Target Both All All All
Task 5-1-2: Configure PortalPeopleSoft applications are accessed through the Portal. You need to grant users access to complete theupgrade process. You must install and configure the Portal to complete the upgrade.
Note. If you configured your Portal earlier in the upgrade, you can skip this step.
You also must define a password in Node Definition for Single Signon to work properly. If you do not define apassword, the signon page appears when trying to access a report directly, instead of the report itself. To avoidthis issue, follow the procedure below to assign a password.
To assign a password:
1. Navigate to PeopleTools, Integration Broker, Integration Setup, Nodes.
184 Copyright © 2006, Oracle. All rights reserved.
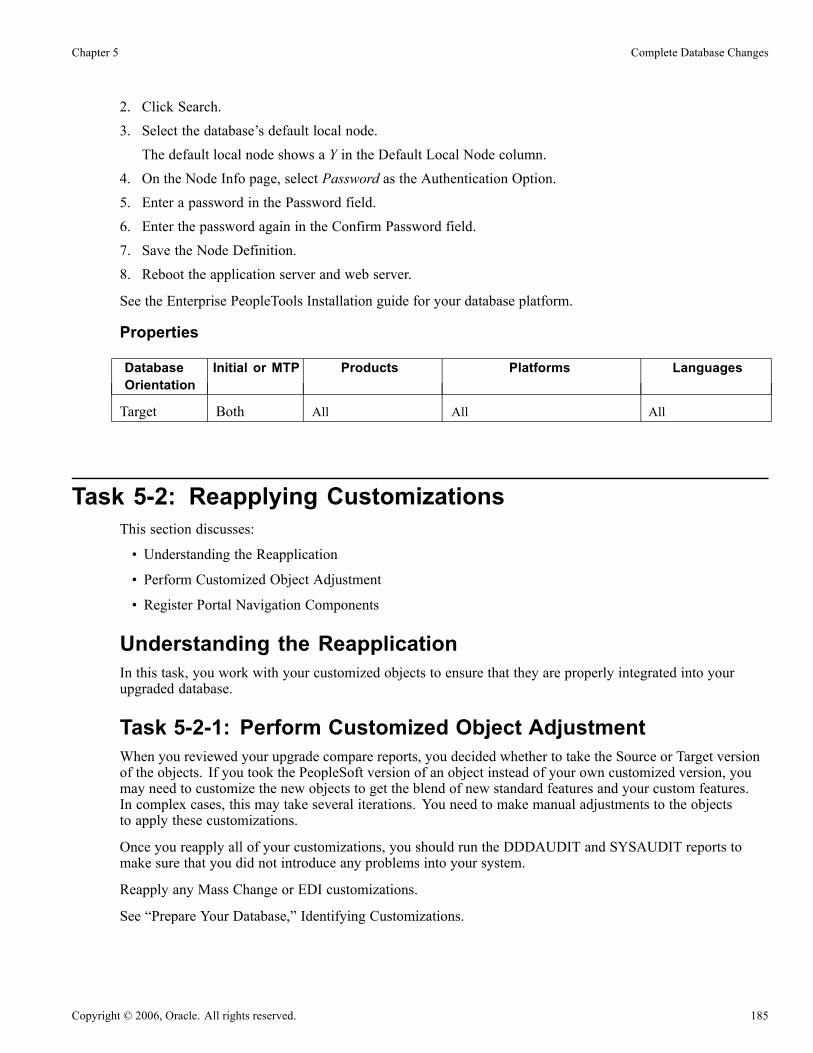
Chapter 5 Complete Database Changes
2. Click Search.3. Select the database’s default local node.The default local node shows a Y in the Default Local Node column.
4. On the Node Info page, select Password as the Authentication Option.5. Enter a password in the Password field.6. Enter the password again in the Confirm Password field.7. Save the Node Definition.8. Reboot the application server and web server.
See the Enterprise PeopleTools Installation guide for your database platform.
Properties
DatabaseOrientation
Initial or MTP Products Platforms Languages
Target Both All All All
Task 5-2: Reapplying CustomizationsThis section discusses:
• Understanding the Reapplication
• Perform Customized Object Adjustment
• Register Portal Navigation Components
Understanding the ReapplicationIn this task, you work with your customized objects to ensure that they are properly integrated into yourupgraded database.
Task 5-2-1: Perform Customized Object AdjustmentWhen you reviewed your upgrade compare reports, you decided whether to take the Source or Target versionof the objects. If you took the PeopleSoft version of an object instead of your own customized version, youmay need to customize the new objects to get the blend of new standard features and your custom features.In complex cases, this may take several iterations. You need to make manual adjustments to the objectsto apply these customizations.
Once you reapply all of your customizations, you should run the DDDAUDIT and SYSAUDIT reports tomake sure that you did not introduce any problems into your system.
Reapply any Mass Change or EDI customizations.
See “Prepare Your Database,” Identifying Customizations.
Copyright © 2006, Oracle. All rights reserved. 185
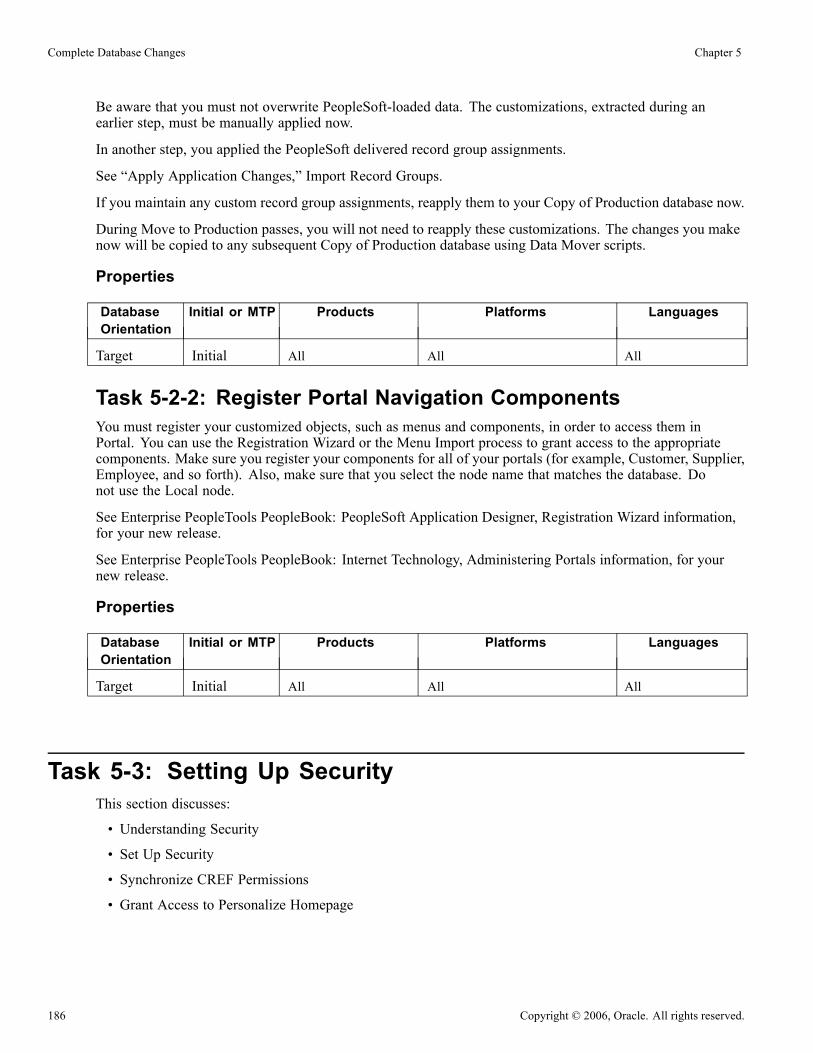
Complete Database Changes Chapter 5
Be aware that you must not overwrite PeopleSoft-loaded data. The customizations, extracted during anearlier step, must be manually applied now.
In another step, you applied the PeopleSoft delivered record group assignments.
See “Apply Application Changes,” Import Record Groups.
If you maintain any custom record group assignments, reapply them to your Copy of Production database now.
During Move to Production passes, you will not need to reapply these customizations. The changes you makenow will be copied to any subsequent Copy of Production database using Data Mover scripts.
Properties
DatabaseOrientation
Initial or MTP Products Platforms Languages
Target Initial All All All
Task 5-2-2: Register Portal Navigation ComponentsYou must register your customized objects, such as menus and components, in order to access them inPortal. You can use the Registration Wizard or the Menu Import process to grant access to the appropriatecomponents. Make sure you register your components for all of your portals (for example, Customer, Supplier,Employee, and so forth). Also, make sure that you select the node name that matches the database. Donot use the Local node.
See Enterprise PeopleTools PeopleBook: PeopleSoft Application Designer, Registration Wizard information,for your new release.
See Enterprise PeopleTools PeopleBook: Internet Technology, Administering Portals information, for yournew release.
Properties
DatabaseOrientation
Initial or MTP Products Platforms Languages
Target Initial All All All
Task 5-3: Setting Up SecurityThis section discusses:
• Understanding Security
• Set Up Security
• Synchronize CREF Permissions
• Grant Access to Personalize Homepage
186 Copyright © 2006, Oracle. All rights reserved.
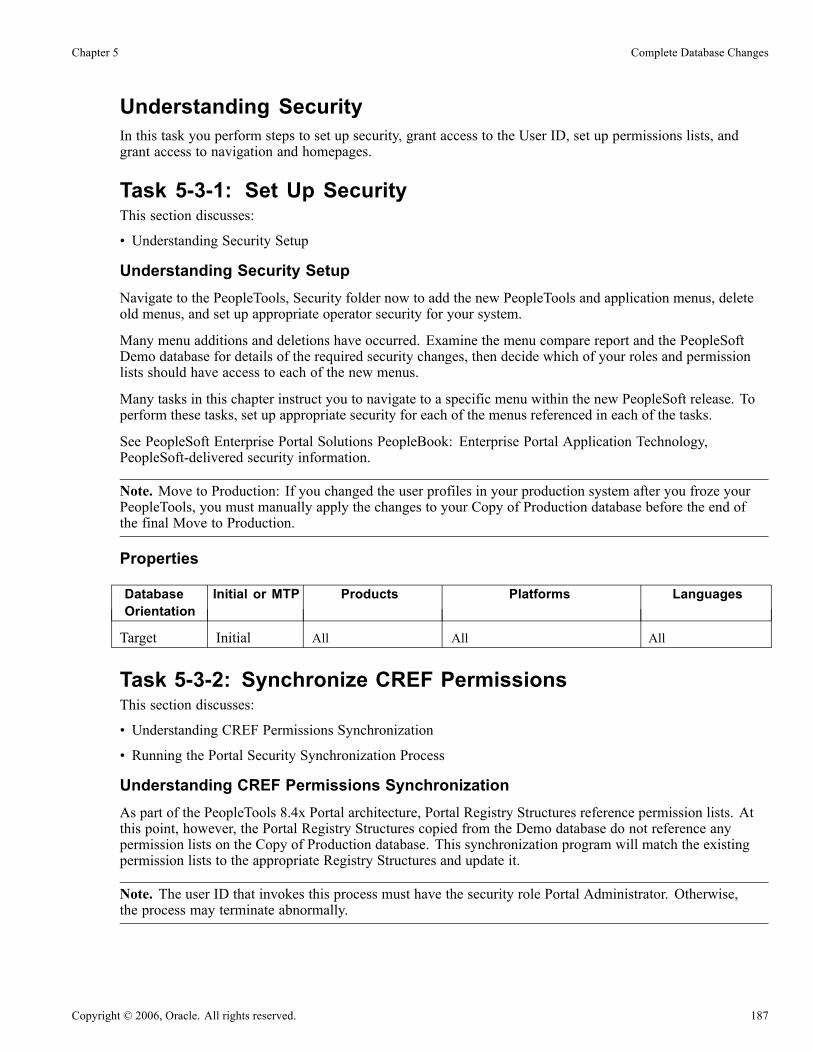
Chapter 5 Complete Database Changes
Understanding SecurityIn this task you perform steps to set up security, grant access to the User ID, set up permissions lists, andgrant access to navigation and homepages.
Task 5-3-1: Set Up SecurityThis section discusses:
• Understanding Security Setup
Understanding Security SetupNavigate to the PeopleTools, Security folder now to add the new PeopleTools and application menus, deleteold menus, and set up appropriate operator security for your system.
Many menu additions and deletions have occurred. Examine the menu compare report and the PeopleSoftDemo database for details of the required security changes, then decide which of your roles and permissionlists should have access to each of the new menus.
Many tasks in this chapter instruct you to navigate to a specific menu within the new PeopleSoft release. Toperform these tasks, set up appropriate security for each of the menus referenced in each of the tasks.
See PeopleSoft Enterprise Portal Solutions PeopleBook: Enterprise Portal Application Technology,PeopleSoft-delivered security information.
Note. Move to Production: If you changed the user profiles in your production system after you froze yourPeopleTools, you must manually apply the changes to your Copy of Production database before the end ofthe final Move to Production.
Properties
DatabaseOrientation
Initial or MTP Products Platforms Languages
Target Initial All All All
Task 5-3-2: Synchronize CREF PermissionsThis section discusses:
• Understanding CREF Permissions Synchronization
• Running the Portal Security Synchronization Process
Understanding CREF Permissions SynchronizationAs part of the PeopleTools 8.4x Portal architecture, Portal Registry Structures reference permission lists. Atthis point, however, the Portal Registry Structures copied from the Demo database do not reference anypermission lists on the Copy of Production database. This synchronization program will match the existingpermission lists to the appropriate Registry Structures and update it.
Note. The user ID that invokes this process must have the security role Portal Administrator. Otherwise,the process may terminate abnormally.
Copyright © 2006, Oracle. All rights reserved. 187

Complete Database Changes Chapter 5
Note. Your Process Scheduler must be running in order to perform this task.
Running the Portal Security Synchronization ProcessFollow the steps below to run the Portal security synchronization process.
To run the security synchronization process:
1. From your browser, sign on to your target database.2. Navigate to PeopleTools, Portal, Portal Security Sync.3. Select the Add a New Value tab.4. Enter the run control ID UPG_PORTAL_SYNC_BOTH.5. Click Add.6. Keep the default value for the default portal registry name in the Portal Name field (for example:EMPLOYEE, CUSTOMER, or SUPPLIER).
7. Click Save.8. Click Run.9. In the Process Scheduler page, check that you set your parameters correctly.10. Click OK.11. Click the Process Monitor link to monitor the program’s process.12. Repeat steps 6 through 11 for each Portal name used in the database for your specific applications. Witheach repeat, in step 6 change the Portal Name field to one of the following: EMPLOYEE, CUSTOMER,SUPPLIER, MOBILE, and so on.
13. Review any messages received during the running of this process with your Portal Administrator.
See Enterprise PeopleTools PeopleBook, Internet Technology.
Note. If the permission lists for your upgrade user do not allow you access to a component, you willencounter this error when running the security synchronization process for that page: Securitysynchronization failed for Portal Object. This error may indicate other problems with thecomponent or folder, but you should check your security first.
Properties
DatabaseOrientation
Initial or MTP Products Platforms Languages
Target Initial All All All
Task 5-3-3: Grant Access to Personalize HomepageThis section discusses:
• Understanding Access to Portal Homepage
• Updating Homepage Personalization Permission List
• Adding the Portal User Role
188 Copyright © 2006, Oracle. All rights reserved.

Chapter 5 Complete Database Changes
Understanding Access to Portal HomepageYou must complete this step if you use any of the Portal Pack products or pagelets. In order to add, remove,or change the layout of the homepage, you must grant homepage personalization security access to allnon-guest users.
Updating Homepage Personalization Permission ListTo update the homepage personalization permission list:
1. Using PeopleSoft Data Mover, sign on to the Target database.
2. Open the Data Mover script <PS_HOME>\SCRIPTS\ PORTAL_HP_PERS.DMS.
3. Run this script against the Target database.
4. Close Data Mover.
Adding the Portal User RoleTo add the Portal User Role to the user IDs:
1. Using PeopleSoft Data Mover, sign on to the Target database.
2. Open the Data Mover script <PS_HOME>\SCRIPTS\ PORTAL_ ADD_ROLE.DMS.
3. Run this script against the Target database.
4. Close Data Mover.
Note. You should grant the PAPP_USER role to all new user IDs for access to the homepage personalization.After running this script, manually remove the role PAPP_USER from any GUEST user ID, since a GUESTuser should not be personalizing the common homepage.
Properties
DatabaseOrientation
Initial or MTP Products Platforms Languages
Target Both All All All
Task 5-4: Updating Department SecurityThis section discusses:
• Understanding Department Security
• Refresh Operator Security
• Refresh Transaction Records
Understanding Department SecurityIn this task you update the Operator Security Join table and the transaction side Security Join Tables sothat they are based on the most current information. You need to run this step whether you use departmentlevel security or not.
Copyright © 2006, Oracle. All rights reserved. 189
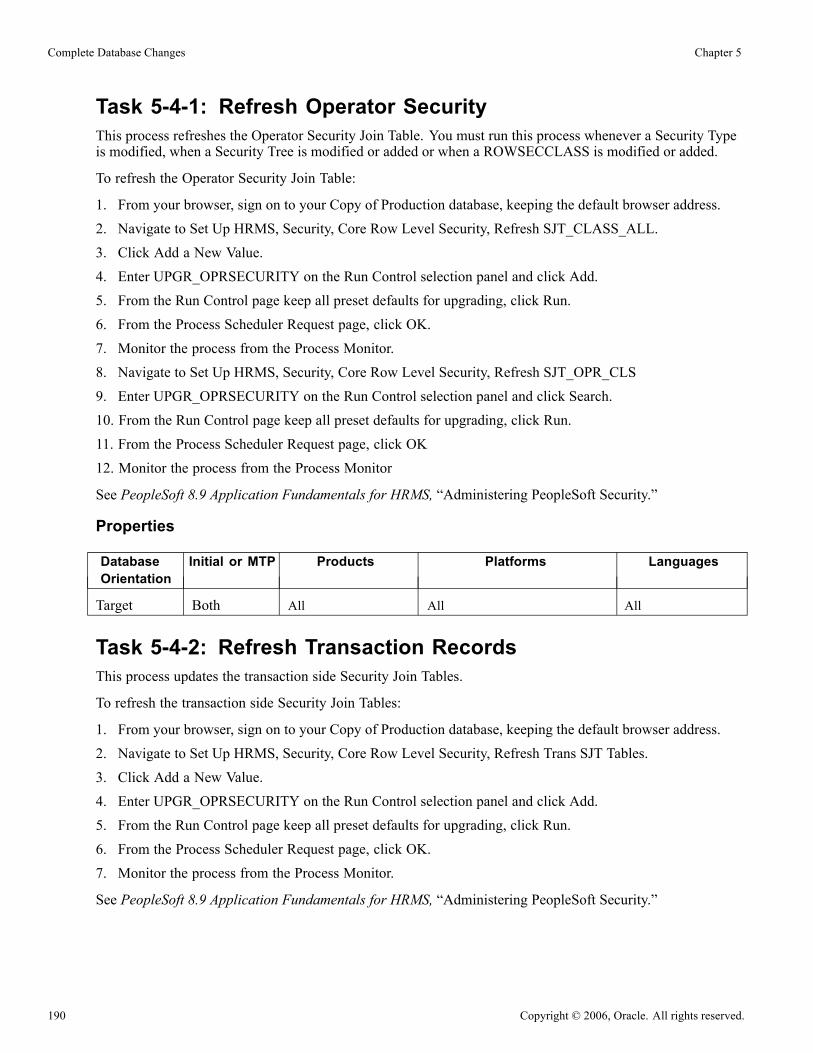
Complete Database Changes Chapter 5
Task 5-4-1: Refresh Operator SecurityThis process refreshes the Operator Security Join Table. You must run this process whenever a Security Typeis modified, when a Security Tree is modified or added or when a ROWSECCLASS is modified or added.
To refresh the Operator Security Join Table:
1. From your browser, sign on to your Copy of Production database, keeping the default browser address.2. Navigate to Set Up HRMS, Security, Core Row Level Security, Refresh SJT_CLASS_ALL.3. Click Add a New Value.4. Enter UPGR_OPRSECURITY on the Run Control selection panel and click Add.5. From the Run Control page keep all preset defaults for upgrading, click Run.6. From the Process Scheduler Request page, click OK.7. Monitor the process from the Process Monitor.8. Navigate to Set Up HRMS, Security, Core Row Level Security, Refresh SJT_OPR_CLS9. Enter UPGR_OPRSECURITY on the Run Control selection panel and click Search.10. From the Run Control page keep all preset defaults for upgrading, click Run.11. From the Process Scheduler Request page, click OK12. Monitor the process from the Process Monitor
See PeopleSoft 8.9 Application Fundamentals for HRMS, “Administering PeopleSoft Security.”
Properties
DatabaseOrientation
Initial or MTP Products Platforms Languages
Target Both All All All
Task 5-4-2: Refresh Transaction RecordsThis process updates the transaction side Security Join Tables.
To refresh the transaction side Security Join Tables:
1. From your browser, sign on to your Copy of Production database, keeping the default browser address.
2. Navigate to Set Up HRMS, Security, Core Row Level Security, Refresh Trans SJT Tables.
3. Click Add a New Value.
4. Enter UPGR_OPRSECURITY on the Run Control selection panel and click Add.
5. From the Run Control page keep all preset defaults for upgrading, click Run.
6. From the Process Scheduler Request page, click OK.
7. Monitor the process from the Process Monitor.
See PeopleSoft 8.9 Application Fundamentals for HRMS, “Administering PeopleSoft Security.”
190 Copyright © 2006, Oracle. All rights reserved.

Chapter 5 Complete Database Changes
Properties
DatabaseOrientation
Initial or MTP Products Platforms Languages
Target Both All All All
Task 5-5: Backing Up Before Manual ChangesBack up your Copy of Production database now. This enables you to restart your upgrade from this pointshould you experience any database integrity problems during the remaining tasks in the upgrade process.
Properties
DatabaseOrientation
Initial or MTP Products Platforms Languages
Target Both All All All
Task 5-6: Running the Person Organization AuditsThis section discusses:
• Understanding the Person Organization Audits
• Running Conversion Audits
Understanding the Person Organization AuditsAt the beginning of the upgrade you ran the Person Relationship Audit Report to list ophaned rows. If youdid not clean up the orphans listed on those reports you will have orphans in the PER_ORG_INST andPER_ORG_ASGN. This report audits the load of record PER_ORG_ASGN against records PERSON andEMPLOYMENT. You will need to work with your Database Administrator to correct these orphans using yourplatform-specific SQL tool. These rows will not be accessible through the new PeopleSoft release.
This report will list the following:
• The audit of the load of PER_ORG_ASGN against PERSON lists EMPLIDs that are not inPER_ORG_ASGN. Conversion of a commercial database should result in at least one row inPER_ORG_ASGN for every EMPLID.
• The audit of the load of PER_ORG_ASGN against EMPLOYMENT checks that everyEMPLID/EMPL_RCD was converted to PER_ORG_ASGN. There should be a one to one relationshipbetween the rows in EMPLOYMENT and the rows in PER_ORG_ASGN.
• Check number of rows inserted in record PER_ORG_ASGN is correct against PERSON andEMPLOYMENT.
Copyright © 2006, Oracle. All rights reserved. 191

Complete Database Changes Chapter 5
Task 5-6-1: Running Conversion AuditsFollow the steps below to run Conversion Audits for PER_ORG_INST and PER_ORG_ASGN.
To run the report:
1. Launch PeopleTools and sign on to the Copy of Production database.2. Navigate to Set Up HRMS, Upgrade, Reports, PER_ORG Records Audits.3. Click the Add button.4. Enter run control UPG_PER_ORG.5. Click the Run button.6. Click the Process Monitor link to monitor the program’s process.
Properties
DatabaseOrientation
Initial or MTP Products Platforms Languages
Target Initial All All All
Task 5-7: Setting Up PensionIn the new PeopleSoft release, the system delivered and your own customized database aliases thatreference PERSONAL_DATA will be converted to map to records PERSON, PERS_DATA_EFFDT,ORIG_HIR_PER_VW, or PERSON_NAME based upon the field name mapping. An audit report in theformat, PAAUDALS_yyyymmdd_hhmm.LIS, will be produced during data conversion. This report lists thedatabase aliases that could not be successfully converted. These reported exceptions will need to be fixedmanually since they do not map to records that have an appropriate database alias key structure.
Three new database aliases are delivered as system data:
Alias Name Record Mapping Field Mapping
COMPANY JOB COMPANY
REG_REGION JOB REG_REGION
DC_FRACTN PA_DC_FRACT DC_FRACTION
During data conversion, any customer database alias names that match the above names will be renamed topreserve the mapping. Any conflicts will be reported in the audit file PACONVALS_yyyymmdd_hhmm.LIS.These conflicts will need to be analyzed to determine the impact on Pension plan implementation steps. ThePension Alias Cross Reference utility can be used to find all impacted items.
See AlsoPeopleSoft 8.9 Pension Administration: “Using Aliases When Tables Have an Extended Key Structure”
192 Copyright © 2006, Oracle. All rights reserved.
Chapter 5 Complete Database Changes
Properties
DatabaseOrientation
Initial or MTP Products Platforms Languages
Target Both PensionAdministration
All All
Task 5-8: Setting Up PeopleSoft BenefitsThis section discusses:
• Consolidate the Limit Table
Task 5-8-1: Consolidate the Limit TableTo simplify the maintenance of regulatory limits, and make their application more consistent, the BenefitProgram has been removed as a key to the Limit Table. Maintaining virtually identical copies of each limit foreach Benefit Program created significant redundant entry. You now only have to maintain a single version ofeach regulatory limit. During data conversion, the system consolidates all versions of existing limits into one“master” limit, combining by Limit Type and Effective Date. This “master” limit contains comprehensivelists of deductions “Subject to the Limit” or “Adjusting the Special Accumulator.” It is imperative that youcarefully review the results of this consolidation, since a simple “mechanical “ process is performed that couldpossibly not be consistent with your business policy. PeopleSoft suggests running the Limit Table report afterupgrade is complete to assist in the verification of the new consolidated limits. Navigate to Set Up HRMS,Product-Related, Base Benefits, Rate/Rule Reports, Limit Table (BEN721).
Properties
DatabaseOrientation
Initial or MTP Products Platforms Languages
Target Both All All All
Task 5-9: Upgrading GP Country ExtensionsThis section discusses:
• Understanding GP Country Extensions
• Understand the GP CE Upgrade
• Apply Rule Package
• Upgrade the Translations Rule Package
• Reapply Element Modifications
• Export Final Upgrade Rule Package
Copyright © 2006, Oracle. All rights reserved. 193

Complete Database Changes Chapter 5
• Apply Upgrade Rule Package During MTP
• Apply System Data with No PIN
• Apply System Data with PIN
• Set Up Global Payroll for Spain
• Set Up Global Payroll for Switzerland
• Create Upgrade Rule Delete Package
• Export Upgrade Rule Delete Package
• Apply Upgrade Rule Delete Package
• Apply Updates to CE Rule Delete Package
• Update Customer Installation Flag
Understanding GP Country ExtensionsIn this task you will upgrade PeopleSoft-delivered Elements for each Global Payroll Country Extension usingthe Rule Packager functionality delivered as part of the Global Payroll Core Engine. You will also applyadditional steps for each Country (when required).
Note. Perform this task only if you are upgrading PeopleSoft Global Payroll (GP) Country Extensions (CE)already installed in your Copy of Production database. If you use only the PeopleSoft Global Payroll Coreproduct or if you are only adding new Country Extensions, you can skip this task.
Task 5-9-1: Understand the GP CE UpgradeDuring this step, the instructions will refer to various naming conventions and codes as listed below:
• Upgrade Path To Release CodePeopleSoft uses the convention <TO> to indicate the applicable release to which you are moving. Toapply these instructions, you need to replace <TO> with the applicable release number, as in the followingexample:If you are upgrading to HRMS 8.9, replace the references to <TO> with 890.
• Country Extension Country Codes
PeopleSoft uses the convention <XX> to indicate the two-character country code and <XXX> to indicate thethree-character code defined by ISO. To apply these instructions, you need to replace <XX> or <XXX> withthe relevant country code as shown in the list below:
Country Extension Country Codes (ISO codes)
Australia AU/AUS
France FR/FRA
Germany DE/DEU
Hong Kong HK/HKG
Italy IT/ITA
194 Copyright © 2006, Oracle. All rights reserved.
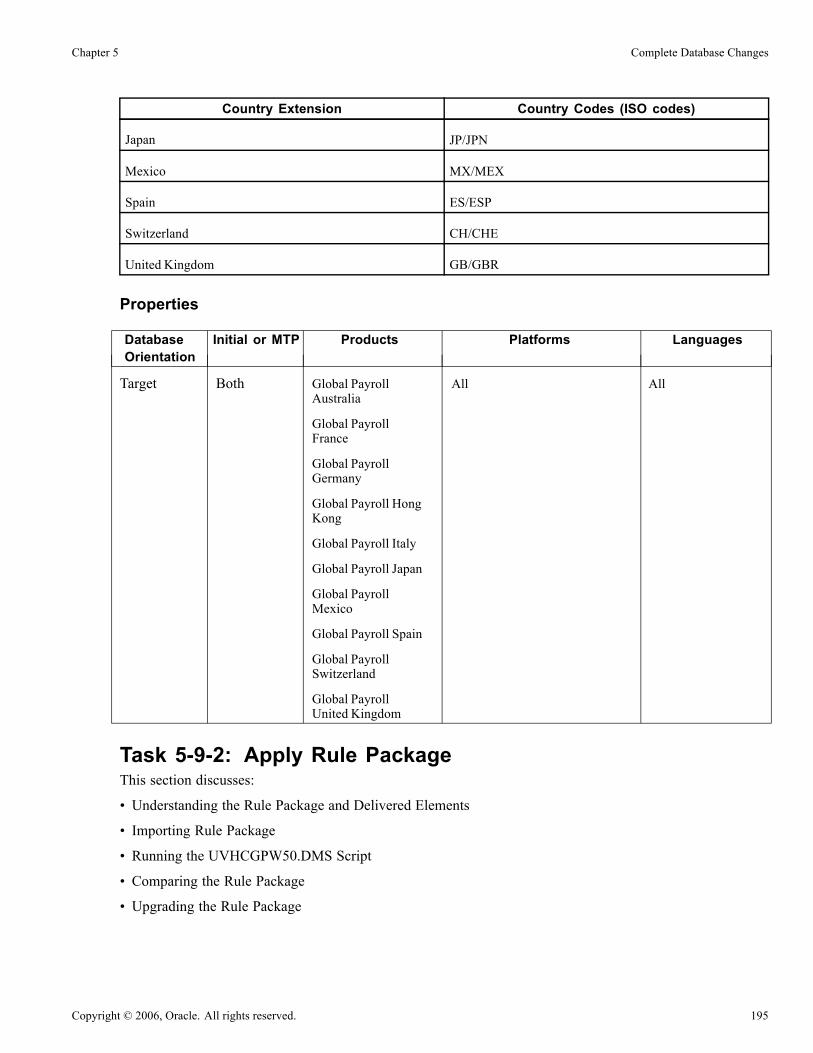
Chapter 5 Complete Database Changes
Country Extension Country Codes (ISO codes)
Japan JP/JPN
Mexico MX/MEX
Spain ES/ESP
Switzerland CH/CHE
United Kingdom GB/GBR
Properties
DatabaseOrientation
Initial or MTP Products Platforms Languages
Target Both Global PayrollAustralia
Global PayrollFrance
Global PayrollGermany
Global Payroll HongKong
Global Payroll Italy
Global Payroll Japan
Global PayrollMexico
Global Payroll Spain
Global PayrollSwitzerland
Global PayrollUnited Kingdom
All All
Task 5-9-2: Apply Rule PackageThis section discusses:
• Understanding the Rule Package and Delivered Elements
• Importing Rule Package
• Running the UVHCGPW50.DMS Script
• Comparing the Rule Package
• Upgrading the Rule Package
Copyright © 2006, Oracle. All rights reserved. 195

Complete Database Changes Chapter 5
Understanding the Rule Package and Delivered ElementsDuring this step, apply the Rule Package that includes modified and new PeopleSoft-delivered Elements. Youwill import, compare, and upgrade the Rule Package to your Copy of Production database. This brings thePeopleSoft-modified and new elements into your database and gives you the opportunity to decide if you wantto take each updated element definition.
Note. If you are upgrading multiple Country Extensions, complete this entire step one Country Extension ata time (during your Initial Upgrade Pass). Repeat the steps for each Country Extension you are upgrading.However, make sure you complete one Rule Package before moving on to the next.
Note. If you are upgrading for the country extension Mexico on the Informix platform you will need todrop the unique indexes on PS_GP_ACM_MBR and PS_GP_ELM_GRP_MBR. Then recreate them asnon-unique indexes. After completing the upgrade you will need to drop the non-unique index and createthem as unique indexes again.
Importing Rule PackageIn this step you will import the Country Extension Rule Package.
To import the Upgrade Rule Package:
1. Using Data Mover, log onto your Copy of Production database.2. Run the script <XX>RUL_IMP.DMS.3. Run update statistics on the GP_PKG_ELEMENTS and GP_PKG_PINMAP tables (or in the case ofusing DB2 against tablespace GPAPP) each time after you import a Global Payroll Country ExtensionUpgrade Rule Package into a database, as these tables can have a substantial increase in size when youare applying an rule package.
Running the UVHCGPW50.DMS ScriptIn this step you run a script that updates data in your Copy of Production database before Comparing theRule Package.
To run the Data Mover script:
1. Using Data Mover, log onto your Copy of Production database.2. Run the script UVHCGPW50. DMS.
Comparing the Rule PackageIn this step compare the Country Extension Rule Package.
To compare the Rule Package:
1. From your browser, sign onto your Copy of Production database.2. Navigate to Set Up HRMS, Product Related, Global Payroll & Absence Mgmt, Elements, Manage GlobalPayroll Packages, Compare/Upgrade Rule Package.
3. Enter <XX>RUL in the field Package ID and click the Search button.4. Go to the Package Elements page.5. Click the Compare button. This launches the GP_PKG_CMP Application Engine program. Make sure youhave the Process Scheduler up and running at this time. This will take you to the Process Monitor.
196 Copyright © 2006, Oracle. All rights reserved.

Chapter 5 Complete Database Changes
6. When the process has completed successfully, click the Details link and then the Message Log link.Review the message log to verify that program completed with no errors.
7. Click Go Back to Compare/ Rule Package hyperlink.8. Enter <XX>RUL in the field Package ID and click the Search button.9. Go to the Package Elements page. Go to the Package Upgrade folder.10. Make sure that the first element shows Success in the Results column (as any invalid compares willsort to the top).
See PeopleSoft PeopleBooks, for information on Global Payroll Utilities, for your new release.
11. Review the Rule Package Compare Report pdf file that was generated for detailed information aboutwhich elements are in an error/warning status as well as if an element is being added, modified, or remainsunchanged. This is a field-by field compare report.
See PeopleSoft PeopleBooks, for information on Global Payroll Utilities (including the Rule PackageCompare Report).
12. Select and reevaluate the upgrade flag settings.All elements with a warning or error message will be sorted to the top of your list. You need to review allmessages and correct them. You can ignore any elements with an Action = Info Only and the Upgradecheckbox turned off and grayed out as these elements are informational only and will not be upgraded.The compare process turns the upgrade flag off for any elements contained in the PeopleSoft RulePackage with an Action = Upgrade for which you have taken ownership and modified. Therefore youshould do the following:a. Document the modifications you made to the original element.b. Select the upgrade flag to apply the current PeopleSoft settings of the element.
You will reapply the modifications later in the upgrade.
See Reapply Element Modifications.
These updates are included in the Rule Package you apply during the Move to Production phase.
Note. There are some Element changes that you can make to PeopleSoft-delivered Elements that do not forceyou to take ownership of the Element (and thus the Upgrade flag might still be turned on for these elements).PeopleSoft suggests that during this step you review all of the modifications you made to PeopleSoft-deliveredElements to determine if you want to take the updated PeopleSoft-delivered Element definitions or retain yourelement modifications. Review the Upgrade Flags on the Rule Package and set them accordingly.
Upgrading the Rule PackageIn this step you will upgrade the Country Extension Rule Package.
To upgrade the Rule Package:
1. From your browser, sign onto your Copy of Production database.
2. Navigate to Set Up HRMS, Product Related, Global Payroll & Absence Mgmt, Elements, Manage GlobalPayroll Packages, Compare/Upgrade Rule Package.
3. Enter <XX>RUL in the field Package ID and click the Search button.
4. Go to the Package Elements page.
Copyright © 2006, Oracle. All rights reserved. 197

Complete Database Changes Chapter 5
5. Click the Upgrade button. This launches the GP_PKG_COPY Application Engine program. At this time,you need to have the Process Scheduler up and running.
6. Verify that the program has completed without any errors (by reviewing the message log).7. Click the Go Back to Compare/ Rule Package hyperlink.8. Enter <XX>RUL in the field Package ID and click the Search button.9. Go to the Package Elements page. Go to the Package Upgrade folder.10. Make sure that the first element shows Success in the Results column. Then scroll down until you see thefirst element that has the Upgrade checkbox turned on and make sure that the Upgrade Status shows Done.
See PeopleSoft PeopleBooks, for information on Global Payroll Utilities, for your new release.
Properties
DatabaseOrientation
Initial or MTP Products Platforms Languages
Target Initial Global PayrollAustralia
Global PayrollFrance
Global PayrollGermany
Global Payroll HongKong
Global Payroll Italy
Global Payroll Japan
Global PayrollMexico
Global Payroll Spain
Global PayrollSwitzerland
Global PayrollUnited Kingdom
All All
Task 5-9-3: Upgrade the Translations Rule PackageThis section discusses:
• Understanding Translations Data Application
• Importing CE Translations Rule Package
• Comparing CE Translations Rule Package
• Upgrading the CE Translations Rule Package
198 Copyright © 2006, Oracle. All rights reserved.

Chapter 5 Complete Database Changes
Note. This step applies only if you have loaded translations for existing Global Payroll Country Extension(s)in your Copy of Production database. If your database contains only English (or if the Country Extension isnot translated) then you may skip this task.
Understanding Translations Data ApplicationIn this step, you import, compare, and upgrade the Translations Rule Package to your Copy of Productiondatabase. This brings translations for all PeopleSoft-delivered Elements into your database and gives you theopportunity to decide if you want to take each updated element translation.
In this section, the convention <LNG> is used to indicate the one-character language code that applies to thetranslations (where applicable). To apply these instructions, you need to replace <LNG> with the applicablelanguage code abbreviation as shown in the list below:
Country Language Codes (three-characters)
France FRA (French)
Germany GER (German)
Hong Kong ZHT (Traditional Chinese)
Italy ITA (Italian)
Japan JPN (Japanese)
Mexico ESP (Spanish)
Spain ESP (Spanish)
Switzerland XXX (French, German, Italian)
Importing CE Translations Rule PackageFollow the steps below to import country extension rule data translations.
To import the Translations Rule package:
1. Using Data Mover, log on to your Copy of Production database.2. Run the Script <XX>RUL<LNG> IMP.DMS.
Note. It is recommended that you run Update Statistics on the GP_PKG_ELEMENTS and GP_PKG_PINMAPtables (or in case of using DB2 against tablespace GPAPP) each time AFTER a Global Payroll CountryExtension has been imported into a database as these tables have a substantial increase in size when you areinstalling Rules for a Country Extension.
Comparing CE Translations Rule PackageFollow the steps below to compare country extension rule data translations.
To compare the Translations Rule package:
1. From your browser, log on to your Copy of Production Database.
Copyright © 2006, Oracle. All rights reserved. 199

Complete Database Changes Chapter 5
2. Navigate to Set Up HRMS, Product Related, Global Payroll & Absence Mgmt, Elements, Manage GlobalPayroll Packages, Compare/Upgrade Rule Package.
3. Enter <XX>RUL<LNG> in the field Package ID and click Search.4. Go to the Package Elements page.5. Select the Create Compare Report checkbox.6. Click the Compare button. This will launch the GP_PKG_CMP Application Engine program. You needto have the Process Scheduler up and running.
7. Review the message log to verify that the programs completed with no errors.8. Click the Go Back to Compare/Upgrade Rule Package hyperlink.9. Enter <XX>RUL<LNG> in the field Package ID and click Search.10. Go to the Package Elements page.11. Click the Package Upgrade folder.12. Verify that the first element shows ‘Success’ in the Results column (as any invalid compares will sortto the top).
13. Review the Rule Package Compare Report pdf file that was generated for detailed information about whichelements are in an error/warning status as well as if an element is being added, modified, or remainsunchanged. This is a field-by field compare report.
See PeopleSoft PeopleBooks, for information on Global Payroll Utilities (including the Rule PackageCompare Report).
Upgrading the CE Translations Rule PackageFollow the steps below to upgrade the country extension rule data translations.
To upgrade the Translations Rule package:
1. From your browser, log on to your Copy of Production Database.2. Navigate to Set Up HRMS, Product Related, Global Payroll & Absence Mgmt, Elements, Manage GlobalPayroll Packages, Compare/Upgrade Rule Package.
3. Enter <XX>RUL<LNG> in the field Package ID and click Search.4. Go to the Package Elements page.5. Click the Upgrade button. This will launch the GP_PKG_COPY Application Engine program. You needto have the Process Scheduler up and running.
6. Review the message log to verify that the programs completed with no errors.7. Click the Go Back to Compare/Upgrade Rule Package hyperlink.8. Enter <XX>RUL<LNG> in the field Package ID and click Search.9. Go to the Package Elements page.10. Click the Package Upgrade folder.11. Verify that the first element shows ‘Success’ in the Results column.12. Next, scroll down until you are at the first element that has the Upgrade checkbox turned on. Check tomake sure that the Upgrade Status shows ‘Done’.
200 Copyright © 2006, Oracle. All rights reserved.

Chapter 5 Complete Database Changes
Properties
DatabaseOrientation
Initial or MTP Products Platforms Languages
Target Initial Global PayrollFrance
Global PayrollGermany
Global Payroll HongKong
Global Payroll Italy
Global Payroll Japan
Global PayrollMexico
Global Payroll Spain
Global PayrollSwitzerland
All All
Task 5-9-4: Reapply Element ModificationsThis section discusses:
• Reapplying Element Modifications
• Stamping Modified Rules with the New Version
Reapplying Element ModificationsIn this step, you will reapply your element modifications to ensure that they are properly integrated intoyour upgraded database.
When you reviewed your upgrade compare reports, you had to decide whether to take the Source or Targetversion of the elements. If you have taken the PeopleSoft version of an element over your own modifiedversion, you may need to do some modifications to the new elements to get the blend of new standard featuresand your custom features. In complex cases, this may take several iterations. You need to make manualadjustments to the elements to apply these modifications.
When you reapply an Element modification, it blanks out the corresponding GP_VERSION value onthe Element (GP_PIN) and/or corresponding parent Element Definition Record (GP_VARIABLE,GP_FORMULA, etc.). In the next task you will update these blank versions so you can identify the Elementswhere you reapplied modifications.
Stamping Modified Rules with the New VersionIn this step you will stamp the modified rules with a new version. You will complete version stamping forall elements that you modified during the previous step. This process updates the GP_VERSION field (onGP_PIN and/or the parent Element Definition record) with the updated version.
To stamp Modified Rules with the new version:
1. From your browser, sign onto your Copy of Production database
Copyright © 2006, Oracle. All rights reserved. 201

Complete Database Changes Chapter 5
2. Navigate to Set Up HRMS, Product Related, Global Payroll & Absence Mgmt, Elements, Manage GlobalPayroll Packages, Version Stamping.
Version Stamping page
3. Select the Specific Country in the Used By field. Select the Country Code for the Country Extensionyou are upgrading in the Country field.Select Stamp Type of blank version. Enter <TO Release> in the field New Version, where <TO Release>is the Release you are upgrading to in the following format:
x.xx.00.00 (with x.xx representing release number, such as 8.90)
If you are upgrading to HRMS 8.9, you will replace the references to <TO Release> with 8.90.00.00.4. Click the Stamp GP Records button. At this time, all elements that do not have a version number will bestamped with version C_<TO Release>.
Note. PeopleSoft Elements are always delivered with a version number.
If you are upgrading to HRMS 8.9, the elements will be stamped with version C_8.90.00.00.
202 Copyright © 2006, Oracle. All rights reserved.
Chapter 5 Complete Database Changes
Properties
DatabaseOrientation
Initial or MTP Products Platforms Languages
Target Initial Global PayrollAustralia
Global PayrollFrance
Global PayrollGermany
Global Payroll HongKong
Global Payroll Italy
Global Payroll Japan
Global PayrollMexico
Global Payroll Spain
Global PayrollSwitzerland
Global PayrollUnited Kingdom
All All
Task 5-9-5: Export Final Upgrade Rule PackageThis section discusses:
• Understanding the Final Upgrade Rule Package
• Defining and Creating the Final Upgrade Rule Package
• Exporting Final Upgrade Rule Package
Important! Perform this step only once for all Country Extensions.
Understanding the Final Upgrade Rule PackageDuring this step you will define, create, and export a final Upgrade Rule Package from your Old Copy ofProduction database. This package will contain all PeopleSoft-delivered and Customer-defined CountryExtension Elements for those Country Extensions you installed.. It also contains translations for all CountryElements, if translations are applicable. You will then apply this final Upgrade Rule Package definition to yourProduction database during your Move to Production passes in the next step in your upgrade.
Defining and Creating the Final Upgrade Rule PackageIn this step you will define a Rule Package and then run the Create Rule Package process. This selectsall Country Extension Elements delivered by PeopleSoft as well as all of your customer-defined elementsfor the specified Country Extensions.
To Define and Create the Final Upgrade Rule Package:
Copyright © 2006, Oracle. All rights reserved. 203

Complete Database Changes Chapter 5
1. From your browser, sign onto your Old Copy of Production database.2. Navigate to Set Up HRMS, Product Related, Global Payroll & Absence Mgmt, Elements, Manage GlobalPayroll Packages, Create Rule Package.
3. Click Add New Value.4. Enter <TO>UPG in the field Package ID and click the Add button.5. Enter the following information:
Field Value
Description <TO> Final Upgrade Package
Short Description: <TO> Final
Comments: <TO> Final Upgrade Package
6. Go to the Packaging Criteria2 page.
7. Enter the following information on the Attributes Set1 folder:
Field Value
Include: Focus Element Only
Language: All
Action: Upgrade
Element Type: leave blank
Element Owner: leave blank
8. Go to the Attributes Set2 folder and enter the following information:
Field Value
Used By: Specific Country
Country: <select applicable Country Extension>l
Category: leave blank
Element Class: leave blank
Where Clause Option: Use Default Where Clause
Insert an additional row for each Country Extension you installed. For example, if you installed France andthe United Kingdom, you would have two rows of data, one for FRA and one for GBR.
9. Click the Create Package button.This launches the GP_PKG_CR Application Engine program. You need to have the Process Schedulerup and running at this time.
10. Verify that program completed with no errors (by reviewing the message log).11. Click the Go Back to Create Rule Package hyperlink.
204 Copyright © 2006, Oracle. All rights reserved.
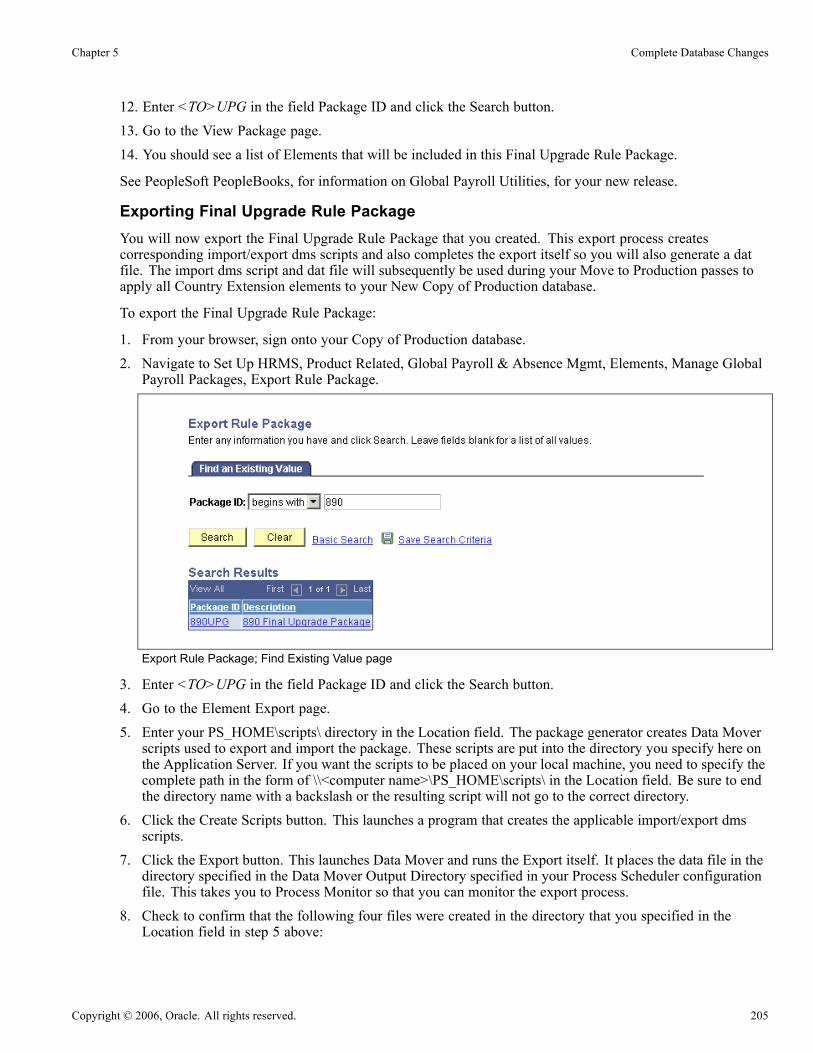
Chapter 5 Complete Database Changes
12. Enter <TO>UPG in the field Package ID and click the Search button.13. Go to the View Package page.14. You should see a list of Elements that will be included in this Final Upgrade Rule Package.
See PeopleSoft PeopleBooks, for information on Global Payroll Utilities, for your new release.
Exporting Final Upgrade Rule PackageYou will now export the Final Upgrade Rule Package that you created. This export process createscorresponding import/export dms scripts and also completes the export itself so you will also generate a datfile. The import dms script and dat file will subsequently be used during your Move to Production passes toapply all Country Extension elements to your New Copy of Production database.
To export the Final Upgrade Rule Package:
1. From your browser, sign onto your Copy of Production database.2. Navigate to Set Up HRMS, Product Related, Global Payroll & Absence Mgmt, Elements, Manage GlobalPayroll Packages, Export Rule Package.
Export Rule Package; Find Existing Value page
3. Enter <TO>UPG in the field Package ID and click the Search button.4. Go to the Element Export page.5. Enter your PS_HOME\scripts\ directory in the Location field. The package generator creates Data Moverscripts used to export and import the package. These scripts are put into the directory you specify here onthe Application Server. If you want the scripts to be placed on your local machine, you need to specify thecomplete path in the form of \\<computer name>\PS_HOME\scripts\ in the Location field. Be sure to endthe directory name with a backslash or the resulting script will not go to the correct directory.
6. Click the Create Scripts button. This launches a program that creates the applicable import/export dmsscripts.
7. Click the Export button. This launches Data Mover and runs the Export itself. It places the data file in thedirectory specified in the Data Mover Output Directory specified in your Process Scheduler configurationfile. This takes you to Process Monitor so that you can monitor the export process.
8. Check to confirm that the following four files were created in the directory that you specified in theLocation field in step 5 above:
Copyright © 2006, Oracle. All rights reserved. 205

Complete Database Changes Chapter 5
<TO>UPG_IMP.DMS
<TO>UPG_EXP.DMS
<TO>UPG_DAT.DAT
CLEANUP.DMS
Properties
DatabaseOrientation
Initial or MTP Products Platforms Languages
Source MTP Global PayrollAustralia
Global PayrollFrance
Global PayrollGermany
Global Payroll HongKong
Global Payroll Italy
Global Payroll Japan
Global PayrollMexico
Global Payroll Spain
Global PayrollSwitzerland
Global PayrollUnited Kingdom
All All
Task 5-9-6: Apply Upgrade Rule Package During MTPThis section discusses:
• Understanding Upgrade Rule Package During MTP
• Importing the Final Upgrade Rule Package
• Comparing the Final Upgrade Rule Package
• Upgrading the Final Upgrade Rule Package
Important! Perform this step only once for all Country Extensions.
Understanding Upgrade Rule Package During MTPDuring this step you will apply the final Upgrade Rule Package to your New Copy of Production databaseduring your test moves to production and final move to production. This brings all Country ExtensionElements and corresponding translations, if applicable, into your upgraded database.
Importing the Final Upgrade Rule PackageIn this procedure you will import the Country Extension Final Upgrade Rule Package definition.
206 Copyright © 2006, Oracle. All rights reserved.

Chapter 5 Complete Database Changes
To Import Final Upgrade Rule Package:
1. Using Data Mover, log onto your New Copy of Production database.
2. Run the script <TO>UPG_IMP.DMS.
3. Run Update Statistics.
You should run Update Statistics on the GP_PKG_ELEMENTS and GP_PKG_PINMAP tables (or, ifusing DB2, against tablespace GPAPP) after the Global Payroll Country Extension Upgrade Rule Packagehas been imported into a database as these tables can have a substantial increase in size when you areapplying an Upgrade Rule Package.
Comparing the Final Upgrade Rule PackageIn this step you will compare the Country Extension Final Upgrade Rule Package.
To compare the Final Upgrade Rule Package:
1. Select Set Up HRMS, Product Related, Global Payroll & Absence Mgmt, Elements, Manage GlobalPayroll Packages, Compare/Upgrade Rule Package.
2. Enter <TO>UPG in the field Package ID and click the Search button.3. Go to the Package Elements page.4. Click the Compare button. This launches the GP_PKG_CMP Application Engine program. You need tohave the Process Scheduler up and running at this time.
Note. You do not need to run the Create Compare Report at this time because you did thecomparisons/analysis you needed in your Initial Pass. This process moves all of your updated elementsinto your production database.
5. Verify that program completed with no errors (by reviewing the message log).
6. Click the Go Back to Compare/Upgrade Rule Package hyperlink.
7. Enter <TO>UPG in the field Package ID and click the Search button.
8. Go to the Package Elements page. Go to the Package Upgrade folder.
9. Make sure that the first element shows Success in the Results column (as any invalid compares willsort to the top).
See PeopleSoft PeopleBooks, for information on Global Payroll Utilities, for your new release.
Upgrading the Final Upgrade Rule PackageFollow the steps below to upgrade the Country Extension Final Upgrade Rule Package.
To Upgrade the Final Upgrade Rule Package:
1. Select Set Up HRMS, Product Related, Global Payroll & Absence Mgmt, Elements, Manage GlobalPayroll Packages, Compare/Upgrade Rule Package.
2. Enter <TO>UPG in the field Package ID and click the Search button.3. Go to the Package Elements page.4. Click the Upgrade button. This launches the GP_PKG_COPY Application Engine program. At this time,you need to have the Process Scheduler up and running.
Copyright © 2006, Oracle. All rights reserved. 207
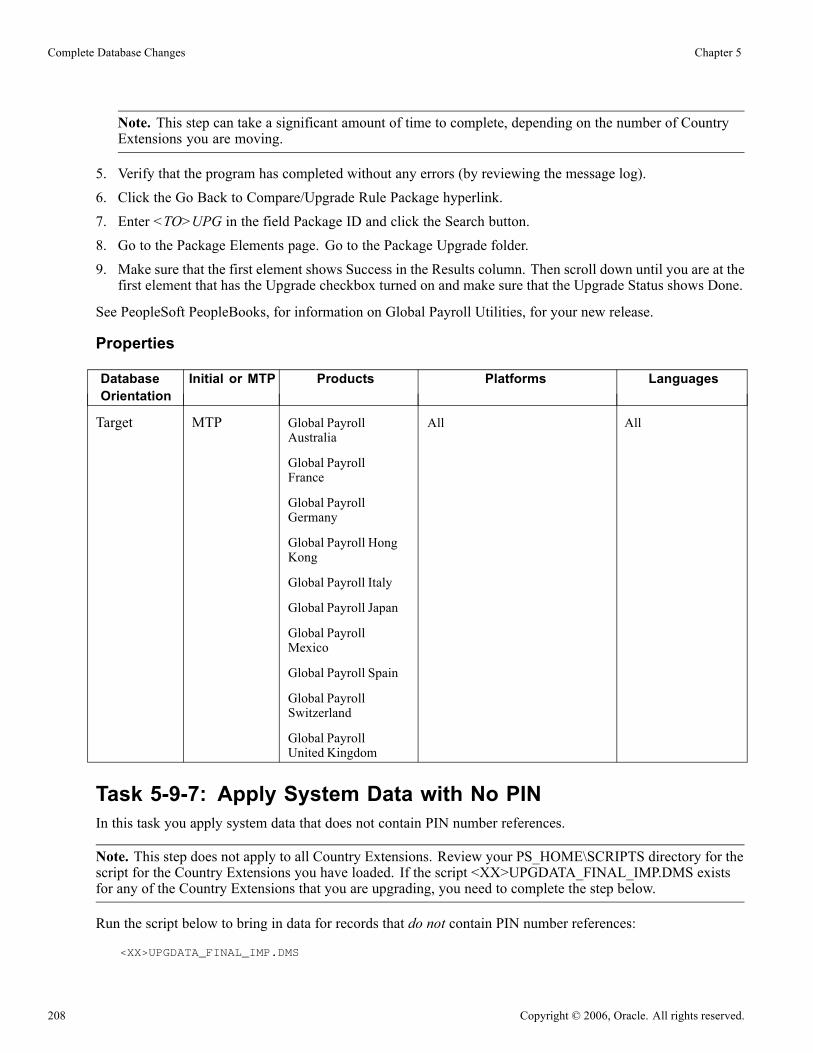
Complete Database Changes Chapter 5
Note. This step can take a significant amount of time to complete, depending on the number of CountryExtensions you are moving.
5. Verify that the program has completed without any errors (by reviewing the message log).6. Click the Go Back to Compare/Upgrade Rule Package hyperlink.7. Enter <TO>UPG in the field Package ID and click the Search button.8. Go to the Package Elements page. Go to the Package Upgrade folder.9. Make sure that the first element shows Success in the Results column. Then scroll down until you are at thefirst element that has the Upgrade checkbox turned on and make sure that the Upgrade Status shows Done.
See PeopleSoft PeopleBooks, for information on Global Payroll Utilities, for your new release.
Properties
DatabaseOrientation
Initial or MTP Products Platforms Languages
Target MTP Global PayrollAustralia
Global PayrollFrance
Global PayrollGermany
Global Payroll HongKong
Global Payroll Italy
Global Payroll Japan
Global PayrollMexico
Global Payroll Spain
Global PayrollSwitzerland
Global PayrollUnited Kingdom
All All
Task 5-9-7: Apply System Data with No PINIn this task you apply system data that does not contain PIN number references.
Note. This step does not apply to all Country Extensions. Review your PS_HOME\SCRIPTS directory for thescript for the Country Extensions you have loaded. If the script <XX>UPGDATA_FINAL_IMP.DMS existsfor any of the Country Extensions that you are upgrading, you need to complete the step below.
Run the script below to bring in data for records that do not contain PIN number references:
<XX>UPGDATA_FINAL_IMP.DMS
208 Copyright © 2006, Oracle. All rights reserved.

Chapter 5 Complete Database Changes
Properties
DatabaseOrientation
Initial or MTP Products Platforms Languages
Target Both Global PayrollAustralia
Global PayrollFrance
Global PayrollGermany
Global Payroll HongKong
Global Payroll Italy
Global Payroll Japan
Global PayrollMexico
Global Payroll Spain
Global PayrollSwitzerland
Global PayrollUnited Kingdom
All All
Task 5-9-8: Apply System Data with PINThis section discusses:
• Applying System Data for Records with PIN References
• Apply Country Extension Non-Rule Packages
• Comparing the Country Extension Non-Rule Package Elements
• Importing the Country Extension Non-Rule Package Records
• Upgrading the Country Extension Non-Rule Package
Applying System Data for Records with PIN ReferencesThis step does not apply to all Country Extensions. This is step will bring in data for records that do containPIN number references. Review your PS_HOME\SCRIPTS directory for the scripts for the CountryExtensions you have loaded. If the following scripts exist, you will need to apply the Non-Rules Packageon your Copy of Production Database:
<XX>SYSUPG_ELEMENTS_IMP.DMS
<XX>SYSUPG_RECORDS_IMP.DMS
Apply Country Extension Non-Rule PackagesFollow the steps below to import country extension system data non-rule package elements to your Copyof Production database.
Copyright © 2006, Oracle. All rights reserved. 209

Complete Database Changes Chapter 5
To import the Non-Rule package elements:
1. Using Data Mover, log on to your Copy of Production database.
2. Run the following script:
<XX>SYSUPG_ELEMENTS_IMP.DMS
Comparing the Country Extension Non-Rule Package ElementsFollow the steps below to compare country extension system data non-rule package elements to your Copyof Production database.
To compare the Non-Rule package:
1. From your browser, sign on to your Copy of Production database.2. Navigate to Set Up HRMS, Product Related, Global Payroll & Absence Mgmt, Elements, Manage GlobalPayroll Packages, Compare Non-Rule Package.
3. Enter <XX>SYSUPG in the field Package ID and click Search.4. Go to the Package Elements page.5. Click the Compare button.6. A message dialog box appears indicating that the compare process has completed successfully. You cannow proceed to import Non-Rule Package Records.
Importing the Country Extension Non-Rule Package RecordsFollow the steps below to import the country extension system data non-rule package Records to your Copyof Production database.
To import the Non-Rule package records:
1. Using Data Mover, log on to your Copy of Production database.2. Run the following script:
<XX>SYSUPG_RECORDS_IMP.DMS
Upgrading the Country Extension Non-Rule PackageFollow the steps below to upgrade the country extension system data non-rule package to your Copy ofProduction database.
To upgrade the Non-Rule package:
1. From your browser, sign on to your Copy of Production database.
2. Navigate to Set Up HRMS, Product Related, Global Payroll & Absence Mgmt, Elements, Manage GlobalPayroll Packages, Upgrade Non-Rule Package.
3. Enter <XX> SYSUPG in the field Package ID and click on the Search button.
4. Go to the Package Records page.
5. Click the Upgrade button.
A message dialog box prompts, “Upgrade Process Completed Successfully.”
210 Copyright © 2006, Oracle. All rights reserved.

Chapter 5 Complete Database Changes
Note. If you have loaded translations for any of the translated Country Extensions in your Copy of Productiondatabase, follow the same instructions for applying System Data with PIN using the Package with ID<XX>SYSU<LNG>. The convention <LNG> is used to indicate the one-character language code that appliesto the translations (where applicable). To apply these instructions, you need to replace <LNG> with theapplicable language code abbreviation as shown in the list below:
Country Language Codes (three characters)
France FRA (French)
Germany GER (German)
Properties
DatabaseOrientation
Initial or MTP Products Platforms Languages
Target Both Global PayrollAustralia
Global PayrollFrance
Global PayrollGermany
Global Payroll HongKong
Global Payroll Italy
Global Payroll Japan
Global PayrollMexico
Global Payroll Spain
Global PayrollSwitzerland
Global PayrollUnited Kingdom
All All
Task 5-9-9: Set Up Global Payroll for SpainThis section discusses:
• Setting Up Global Payroll for Spain
• Completing Print Order Field
• Completing Social Security Contributions
Setting Up Global Payroll for SpainTo set up Global Payroll for Spain:
Copyright © 2006, Oracle. All rights reserved. 211

Complete Database Changes Chapter 5
1. Run script UVHCGESH501.DMSThis script updates earnings type, for those earnings eligible for extra periods. Some types of earnings needto be identified during payroll calculations in order to perform some special processing. Those earnings arealso given a sequence number in order to process them in the correct order.
2. Run script UVHCGESH502.DMSThis script converts the tax calendars coming from PeopleSoft 8.3. There can be different tax calendarsapplied to each fiscal territory so a Calendar ID and an Effective Date keys the tax calendars. The scriptalso updates the “hacienda estatal” fiscal territory in order to add the converted tax calendar for all payentities that already exist in the system for Spain. The script names the new tax calendar code as ‘CLU’.In case you want a different tax calendar code just replace all occurrences of ‘CLU’ by the desired taxcalendar code in the script.
Completing Print Order FieldPeopleSoft added a new Print Order field to the IRPF tab in the PaySlip Template for Spain. You need to fillin that field based on your requirement
To complete the Print Order Field:
1. Select Setup HRMS, Product Related, Global Payroll & Absence Mgmt, PaySlips, Templates ESP.
2. Enter the ID of your template in the PaySlip ID field and click the Search button. Select the IRPF tab.
Completing Social Security ContributionsPeopleSoft delivered three new deductions to manage Social Security contributions for vacation days paidduring Termination (LIQ V SS CC, LIQ V SS DS, LIQ V SS FP). You need to include them in your PaySlipTemplate(s) and the corresponding Eligibility Group(s)
Properties
DatabaseOrientation
Initial or MTP Products Platforms Languages
Target Both Global Payroll Spain All All
Task 5-9-10: Set Up Global Payroll for SwitzerlandThis section discusses:
• Reviewing Application CH_PRINTCLASS
• Defining Element Groups
• Define List Set
• Preparing Migration Script
• Run Migration Script
• Review Element Group Members
Reviewing Application CH_PRINTCLASSTo review application CH_PRINTCLASS:
1. Go to Set Up HRMS, Product Related, Global Payroll & Absence Mgmt, Elements, Define Application.
212 Copyright © 2006, Oracle. All rights reserved.
Chapter 5 Complete Database Changes
2. In the Country field, enter CHE.3. In the Application field, enter CH_PRINTCLASS.4. Click Search.5. Verify that the following screen appears:
Define Application screen
Defining Element GroupsTo define Element Groups:
1. Go to Set Up HRMS, Product Related, Global Payroll & Absence Mgmt, Elements, Element Groups.2. Click on the Add a New Value link. This takes you to the Element Group Name page.
Copyright © 2006, Oracle. All rights reserved. 213

Complete Database Changes Chapter 5
Element Group Name page
3. In the Name field, enter the identifier for the new element group. This can be any identifier that satisfiesyour naming conventions.
4. In the Description field, enter a descriptive text.5. In the Owner field, enter Customer Maintained.6. In the Class field, enter Customary.7. In the Used By field, enter Specific Country.8. In the Country field, enter CHE.9. Select the Element Group Members tab.
Element Group Members tab
214 Copyright © 2006, Oracle. All rights reserved.
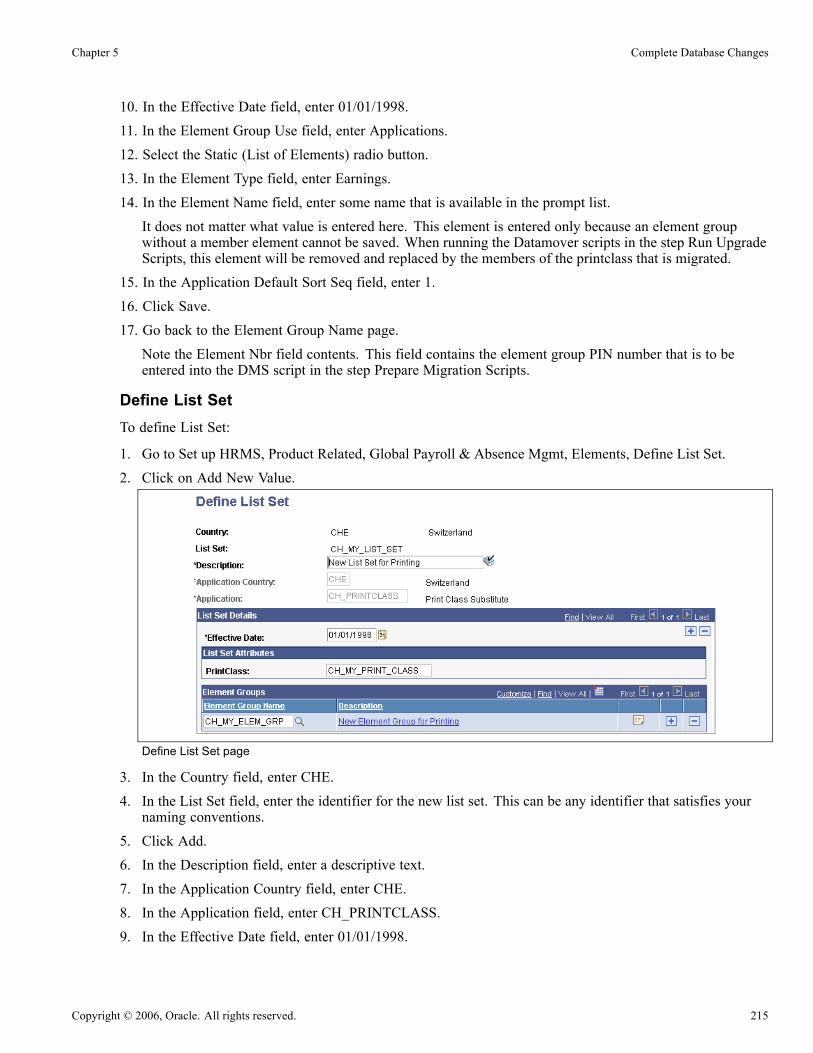
Chapter 5 Complete Database Changes
10. In the Effective Date field, enter 01/01/1998.11. In the Element Group Use field, enter Applications.12. Select the Static (List of Elements) radio button.13. In the Element Type field, enter Earnings.14. In the Element Name field, enter some name that is available in the prompt list.It does not matter what value is entered here. This element is entered only because an element groupwithout a member element cannot be saved. When running the Datamover scripts in the step Run UpgradeScripts, this element will be removed and replaced by the members of the printclass that is migrated.
15. In the Application Default Sort Seq field, enter 1.16. Click Save.17. Go back to the Element Group Name page.Note the Element Nbr field contents. This field contains the element group PIN number that is to beentered into the DMS script in the step Prepare Migration Scripts.
Define List SetTo define List Set:
1. Go to Set up HRMS, Product Related, Global Payroll & Absence Mgmt, Elements, Define List Set.2. Click on Add New Value.
Define List Set page
3. In the Country field, enter CHE.
4. In the List Set field, enter the identifier for the new list set. This can be any identifier that satisfies yournaming conventions.
5. Click Add.6. In the Description field, enter a descriptive text.
7. In the Application Country field, enter CHE.
8. In the Application field, enter CH_PRINTCLASS.
9. In the Effective Date field, enter 01/01/1998.
Copyright © 2006, Oracle. All rights reserved. 215

Complete Database Changes Chapter 5
10. In the PrintClass field, enter the printclass name you are migrating.11. In the Element Group Name field, enter the name for the element group created in the step DefineElement Groups.
12. Click Save.
Preparing Migration ScriptThe UVHCGCHW50.DMS script migrates the members of your printclass to the newly created elementgroup. To execute the script correctly, the element group PIN number, the list identifier, and the printclassidentifier must be entered at the appropriate locations. The script currently contains placeholders. Replacethese placeholders as follows:
• Replace the <PIN_NUM> string with the PIN number defined in the step Define Element Groups.• Replace the <LIST_SET> string with the list set identifier defined in the step Define List Step.• Replace the <PRINT_CLASS> string with the printclass identifier you are migrating.
Note. Replace the entire placeholder, including the enclosing brackets (< >). If the placeholders are enclosedby quotes, do not replace the quotes.
The following example shows the script after placeholder replacement:
SET LOG UVHCGCHW50.LOG;
-- Populate Element Group members
DELETE FROM PS_GP_ELEM_GRP_MBR
WHERE PIN_NUM = Your PIN Number
/
INSERT INTO PS_GP_ELEM_GRP_MBR
(
PIN_NUM
, EFFDT
, PIN_ELEM_NUM
, ENTRY_TYPE_ID
, ELEM_ASSIGNMENT
, GP_ORDER
)
SELECT Your PIN Number
, %DateIn(’1998-01-01’)
, CH.PIN_NUM
, CH.ENTRY_TYPE_ELEM
, ’ ’
, CH.GPCH_BL_PR_GROUP
FROM PS_GPCH_BL_PRINT CH
WHERE CH.GPCH_RC_REPORTNAME = ’Your PrintClass Identifier’
/
-- Populate List Setup
216 Copyright © 2006, Oracle. All rights reserved.
Chapter 5 Complete Database Changes
DELETE FROM PS_GP_ELN_PIN_ATTR
WHERE COUNTRY = ’CHE’
AND GP_ELN_SET = ’Your List Set Identifier’
/
INSERT INTO PS_GP_ELN_PIN_ATTR
(
COUNTRY
, GP_ELN_SET
, EFFDT
, PIN_ELEM_GRP_NUM
, PIN_NUM
, GP_ELN_ATTR1
, GP_ELN_ATTR2
, GP_ELN_ATTR3
, GP_ELN_ATTR4
, GP_ELN_ATTR5
, GP_ELN_ATTR6
, GP_ELN_ATTR7
, GP_ELN_ATTR8
, GP_ELN_ATTR9
, GP_ELN_ATTR10
, DATA_TYPE_CD
)
SELECT ’CHE’
, ’Your List Set Identifier’
, %DateIn(’1998-01-01’)
, Your PIN Number
, CH.PIN_NUM
, CH.GPCH_AL_OVERRIDE
, CH.GPCH_BL_PR_GROUP
, CH.GPCH_BL_PR_ORDER
, CH.GPCH_BL_PR_CALC
, CH.GPCH_BL_PR_BASE
, CH.GPCH_BL_PR_RATE
, CH.GPCH_BL_PR_UNITS
, CH.GPCH_BL_PR_PERCENT
, CH.GPCH_BL_PR_SUM
, CH.GPCH_AL_SIGNVALUE
, ’N’
FROM PS_GPCH_BL_PRINT CH
WHERE GPCH_RC_REPORTNAME = ’Your PrintClass Identifier’
/
Run Migration ScriptTo run the migration script:
1. Open Datamover.
Copyright © 2006, Oracle. All rights reserved. 217

Complete Database Changes Chapter 5
2. Run the UVHCGCHW50.DMS script.
Review Element Group MembersTo review Element Group Members:
1. Go to Set up HRMS, Product Related, Global Payroll & Absence Mgmt, Elements, Define List Set.2. In the Country field, enter CHE.3. In the List Set field, enter the List Set identifier you created in the step Define List Set.4. Click Search. This will take you to the page Define List Set.5. In the Elements Group scroll, select the element group that you entered in the step Define List Set. Forthat element group, click on the Element Group Details icon. This takes you to the Element GroupAttributes page.
6. Verify that this page contains all elements that were previously printclass members.7. Click OK. This will take you back to the page Define List Set.8. Modify the contents of the Description field without changing its meaning. (For example, insert aspace or change a letter from lowercase to uppercase.) This change ensures the system validates thenewly migrated data.
9. Save.
This will update Global Payroll shadow processing tables that are required to use the List Set during a payrollrun but that cannot be populated with the migration script.
Properties
DatabaseOrientation
Initial or MTP Products Platforms Languages
Target Both Global PayrollSwitzerland
All All
Task 5-9-11: Create Upgrade Rule Delete PackageThis step applies if you are upgrading PeopleSoft Global Payroll (GP) Country Extensions already installed inyour Copy of Production database. If you use only the PeopleSoft Global Payroll Core product or are justadding new Country Extensions, you can skip this step.
This step runs an Application Engine program that creates an Upgrade Rule Delete Package definition onyour Copy of Production database for each Country Extension you have installed. The package containsPeopleSoft-delivered elements that have been deleted for your specific upgrade path. You will subsequentlyuse this Upgrade Rule Delete Package to remove all PeopleSoft-delivered elements that have been deletedfrom your Copy of Production database. The Application Engine named UPG_GPCEDEL has to be executedwith Run Control ID: UPG<XXX>DEL.
218 Copyright © 2006, Oracle. All rights reserved.

Chapter 5 Complete Database Changes
Properties
DatabaseOrientation
Initial or MTP Products Platforms Languages
Target Initial Global PayrollAustralia
Global PayrollFrance
Global PayrollGermany
Global Payroll HongKong
Global Payroll Italy
Global Payroll Japan
Global PayrollMexico
Global Payroll Spain
Global PayrollSwitzerland
Global PayrollUnited Kingdom
All All
Task 5-9-12: Export Upgrade Rule Delete PackageThis section discusses:
• Understanding Exporting Upgrade Rule Delete Package
• Creating the Upgrade Rule Delete Package
• Exporting the Upgrade Rule Delete Package
Understanding Exporting Upgrade Rule Delete PackageDuring this step, you create and export your Upgrade Rule Delete Package. This includes all deletedPeopleSoft-delivered elements from your Copy of Production database.
Important! Repeat this step for every Country Extension you are upgrading.
Creating the Upgrade Rule Delete PackageIn this step you create a PeopleSoft Upgrade Rule Delete Package definition from your Copy of Productiondatabase. This package contains all PeopleSoft-delivered elements that have been deleted by PeopleSoftbetween your previous release and the new PeopleSoft release. These elements will subsequently be includedin this Upgrade Rule Delete Package for you to apply to your Copy of Production database.
To create the Upgrade Rule Delete Package:
1. From your browser, sign on to your Copy of Production database.
Copyright © 2006, Oracle. All rights reserved. 219
Complete Database Changes Chapter 5
2. Navigate to Set Up HRMS, Product Related, Global Payroll & Absence Mgmt, Elements, Manage GlobalPayroll Packages, Create Rule Package.
3. Enter <XX>RULD in the Package ID field.4. Click Search.
Note. If after the search no rows are returned, no elements were deleted for your country extension.You can skip the remainder of this step.
5. Go to the Packaging Criteria 1 page.6. Click the Create Package button. This launches the GP_PKG_CR Application Engine program. You needto have Process Scheduler up and running at this time.
7. Verify that the program completed with no errors by reviewing the message log.8. Click the Go Back to Create Rule Package hyperlink.9. Enter <XX>RULD in the Package ID field.10. Click Search.11. Go to the View Package page.12. You should see a list of elements included in this Upgrade Rule Delete Package.
See Enterprise PeopleSoft PeopleBooks for Global Payroll Utilities, for your new release.
Exporting the Upgrade Rule Delete PackageIn this step you export the Upgrade Rule Delete Package you just created. The export process createscorresponding import/export.DMS scripts and completes the export. You generate a .DAT file as well in thisstep. The import DMS script and DAT files are subsequently used to apply the deleted rules to your Copyof Production database.
To export the Upgrade Rule Delete Package:
1. From your browser, sign on to your Copy of Production database.
2. Navigate to Set Up HRMS, Product Related, Global Payroll & Absence Mgmt, Elements, Manage GlobalPayroll Packages, Export Rule Package.
3. Enter <XX>RULD in the field Package ID.
4. Click Search.5. Go to the Element Export page.
6. Enter your PS_HOME\scripts\directory in the Location field. The package generator creates Data Movescripts used to export and import the package. These scripts are put into the directory you specify on theApplication Server. If you want the scripts to be placed on your local machine, you need to specify thecomplete path in the form of \\<computer name>\PS_HOME\scripts\ in the Location field. Be sure to endthe directory name with a backslash or the resulting script will not go to the correct directory.
7. Click the Create Scripts button. This launches a program that creates the applicable import/export DMSscripts.
8. Click the Export button. This launches Data Mover and runs the Export. It places the data file in thedirectory specified in the Data Mover Output Directory specified in your Process Scheduler configurationfile. This takes you to Process Monitor so that you can monitor the export process.
9. Check to confirm that the following four files were created in the appropriate directory:
220 Copyright © 2006, Oracle. All rights reserved.

Chapter 5 Complete Database Changes
• <XX>RULD_IMP.DMS• <XX>RULD_EXP.DMS• <XX>RULD_DAT.DAT• CLEANUP.DMS
Properties
DatabaseOrientation
Initial or MTP Products Platforms Languages
Target Initial Global PayrollAustralia
Global PayrollFrance
Global PayrollGermany
Global Payroll HongKong
Global Payroll Italy
Global Payroll Japan
Global PayrollMexico
Global Payroll Spain
Global PayrollSwitzerland
Global PayrollUnited Kingdom
All All
Task 5-9-13: Apply Upgrade Rule Delete PackageThis section discusses:
• Understanding Applying Rule Delete Packages
• Importing Country Extension Rule Delete Package
• Comparing Country Extension Delete Package
• Upgrade the Country Extension Rule Delete Package
Understanding Applying Rule Delete PackagesIn this step you update the Customer Installation flag to “N” and apply an Upgrade Rule Delete Package todelete statements no longer being used in the Country Extension.
To update the Customer Installation flag, execute the Application Engine named UPG_GPCEDEL with RunControl ID: UPG<XXX>CIN.
Copyright © 2006, Oracle. All rights reserved. 221
Complete Database Changes Chapter 5
Importing Country Extension Rule Delete PackageFollow the steps below to import the country extension rule delete package.
To import Country Extension rule Delete package:
1. Using Data Mover, log on to your Copy of Production database.2. Run the Script <XX>RULD_IMP.DMS.
Note. It is recommended that you run Update Statistics on the GP_PKG_ELEMENTS andGP_PKG_PINMAP tables (or in case of using DB2 against tablespace GPAPP) each time AFTER aGlobal Payroll Country.
Extension has been imported into a database as these tables have a substantial increase in size when you areinstalling Rules for a Country Extension.
Comparing Country Extension Delete PackageFollow the steps below to compare country extension rule delete package.
To compare Country Extension rule Delete package:
1. From your browser, log on to your Copy of Production Database.2. Navigate to Set Up HRMS, Product Related,Global Payroll & Absence Mgmt, Elements, Manage GlobalPayroll Packages, Compare/Upgrade Rule Package.
3. Enter <XX>RULD in the field Package ID and click Search.4. Go to the Package Elements page.5. Select the Create Compare Report checkbox.6. Click the Compare button. This will launch the GP_PKG_CMP Application Engine program. You needto have the Process Scheduler up and running.
Note. You will receive a message saying: “Source and the Target databases are the same for thisimport/compare/upgrade. The Source and Target databases are the same for the import or compare orupgrade process. Upgrading a package in the database it was created in can result in lost data.” Youshould click OK and continue.
7. Review the message log to verify that the programs completed with no errors.8. Click the Go Back to Compare/Upgrade Rule Package hyperlink.9. Enter <XX>RULD in the field Package ID and click Search.10. Go to the Package Elements page.11. Click the Package Upgrade folder.12. Verify that the first element shows ‘Success’ in the Results column (as any invalid compares will sortto the top).After comparing your country extension delete package you may have some elements that appear with acompare result of failure. Refer to the following notes for a discussion of appropriate actions.Failure, Element does not exist. This indicates that you do not currently have that element in your database,so no delete is required. No further action is necessary - the element can be left in failure status andthe upgrade box can be left selected.
222 Copyright © 2006, Oracle. All rights reserved.
Chapter 5 Complete Database Changes
Failure, Used in Rule Defn. This indicates that a child element that is to be deleted is referenced by one ormore parent elements in your database. These parent elements may be your own customized elements orthey could also be other elements that are included in the delete package. You can use the view elementrelationships functionality to determine how the child element to be deleted is currently referenced. If youwant to proceed with the deletion, go to the parent element definition(s) and remove references to thechild element. This process is known as unhooking. Once elements have been unhooked compare yourcountry extension delete package again and the compare results should no longer indicate a failure for therelevant child elements. If you do not wish the elements to be deleted then no further action is necessary- the elements can remain in failure status and the upgrade boxes can be left selected. The elementswill not be deleted in the upgrade package step.
See Enterprise PeopleSoft 8.9 Global Payroll PeopleBook, “Using the Utilities”
13. Review the Rule Package Compare Report pdf file that was generated for detailed information aboutwhich elements are in an error/warning status as well as if an element is being added, modified, or remainsunchanged. This is a field-by field compare report.
See PeopleSoft PeopleBooks, for information on Global Payroll Utilities (including the Rule PackageCompare Report).
Note. Make sure the exact same elements are selected to be deleted for the Initial and MTP passes.
Upgrade the Country Extension Rule Delete PackageFollow the steps below to upgrade the country extension rule delete package.
To upgrade Country Extension rule Delete package:
1. From your browser, log on to your Copy of Production Database.
2. Navigate to Set Up HRMS, Product Related, Global Payroll & Absence Mgmt, Elements, Manage GlobalPayroll Packages, Compare/Upgrade Rule Package.
3. Enter <XX>RULD in the field Package ID and click Search.
4. Go to the Package Elements page.
5. Click the Upgrade button. This will launch the GP_PKG_COPY Application Engine program. You needto have the Process Scheduler up and running.
Note. You will receive a message saying: “Source and the Target databases are the same for thisimport/compare/upgrade. The Source and Target databases are the same for the import or compare orupgrade process. Upgrading a package in the database it was created in can result in lost data.” Youshould click OK and continue.
6. Review the message log to verify that the programs completed with no errors.7. Click the Go Back to Compare/Upgrade Rule Package hyperlink.8. Enter <XX>RULD in the field Package ID and click Search.9. Go to the Package Elements page.10. Click the Package Upgrade folder.11. Verify that the first element shows ‘Success’ in the Results column.12. Next, scroll down until you are at the first element that has the Upgrade checkbox turned on. Check tomake sure that the Upgrade Status shows “Done.”
Copyright © 2006, Oracle. All rights reserved. 223

Complete Database Changes Chapter 5
Properties
DatabaseOrientation
Initial or MTP Products Platforms Languages
Target Both Global PayrollAustralia
Global PayrollFrance
Global PayrollGermany
Global Payroll HongKong
Global Payroll Italy
Global Payroll Japan
Global PayrollMexico
Global Payroll Spain
Global PayrollSwitzerland
Global PayrollUnited Kingdom
All All
Task 5-9-14: Apply Updates to CE Rule Delete PackageThis step runs an Application Engine program that applies final updates to Owner, Version, and Last Updatedfields. Execute the Application Engine named UPG_GPCEDEL with Run Control ID: UPG<XXX>OWN.
224 Copyright © 2006, Oracle. All rights reserved.

Chapter 5 Complete Database Changes
Properties
DatabaseOrientation
Initial or MTP Products Platforms Languages
Target Initial Global PayrollAustralia
Global PayrollFrance
Global PayrollGermany
Global Payroll HongKong
Global Payroll Italy
Global Payroll Japan
Global PayrollMexico
Global Payroll Spain
Global PayrollSwitzerland
Global PayrollUnited Kingdom
All All
Task 5-9-15: Update Customer Installation FlagThis step runs an Application Engine program that sets the Customer Installation field to “Y.” Execute theApplication Engine named UPG_GPCEDEL with Run Control ID: UPG<XXX>CIY.
Copyright © 2006, Oracle. All rights reserved. 225
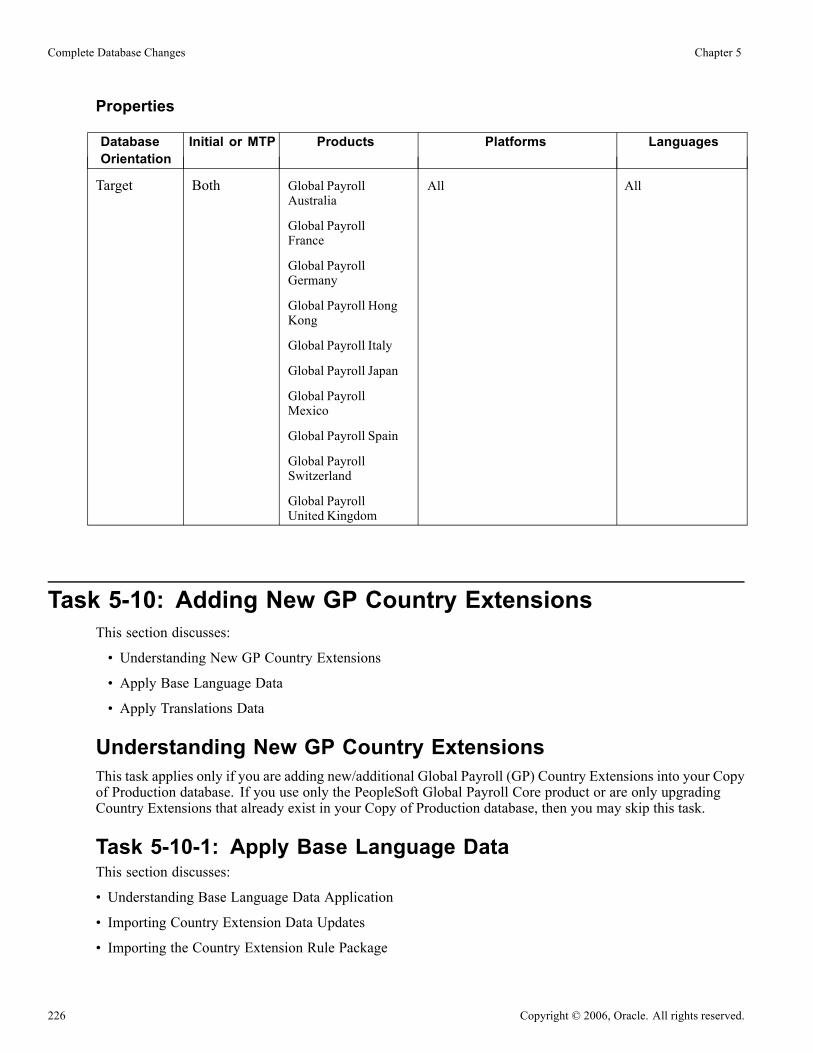
Complete Database Changes Chapter 5
Properties
DatabaseOrientation
Initial or MTP Products Platforms Languages
Target Both Global PayrollAustralia
Global PayrollFrance
Global PayrollGermany
Global Payroll HongKong
Global Payroll Italy
Global Payroll Japan
Global PayrollMexico
Global Payroll Spain
Global PayrollSwitzerland
Global PayrollUnited Kingdom
All All
Task 5-10: Adding New GP Country ExtensionsThis section discusses:
• Understanding New GP Country Extensions
• Apply Base Language Data
• Apply Translations Data
Understanding New GP Country ExtensionsThis task applies only if you are adding new/additional Global Payroll (GP) Country Extensions into your Copyof Production database. If you use only the PeopleSoft Global Payroll Core product or are only upgradingCountry Extensions that already exist in your Copy of Production database, then you may skip this task.
Task 5-10-1: Apply Base Language DataThis section discusses:
• Understanding Base Language Data Application
• Importing Country Extension Data Updates
• Importing the Country Extension Rule Package
226 Copyright © 2006, Oracle. All rights reserved.
Chapter 5 Complete Database Changes
• Comparing the Country Extension Rule Package
• Upgrading the Country Extension Rule Package
• Importing the Country Extension Non-Rule Package Elements
• Comparing the Country Extension Non-Rule Package Elements
• Importing the Country Extension Non-Rule Package Records
• Upgrading the Country Extension Non-Rule Package
Understanding Base Language Data ApplicationFollow the steps below to install base language data for your Global Payroll Country Extensions. You need tocomplete these steps in your Copy of Production (during initial pass) and Production (during your Move toProduction pass) databases. These are the same steps that you applied when loading the country Extension intoyour Demo Database.
Importing Country Extension Data UpdatesFollow the steps below to import country extension data updates into your Copy of Production Database.
To import country extension data updates:
1. Using Data Mover, log onto your Copy of Production Database.
Note. This step only applies to some of the Global Payroll Country Extension’s − not to all CountryExtension’s. It should only be completed for those Countries for which you find the script described inthe step below.
2. Run the Script <XX>DATA_IMP.DMS.
Importing the Country Extension Rule PackageFollow the steps below to import the country extension rule package into your Copy of Production Database.
To import the Country Extension rule package:
1. Using Data Mover, log in to your Copy of Production Database.
2. Run the script <XX>RUL_IMP.DMS.
Note. It is recommended that you run Update Statistics on the GP_PKG_PINMAP tables (or in case ofusing DB2 against Tablespace GPAPP) each time after a Global Payroll Country Extension has beenimported into a database as these tables have a substantial increase in size when you are installing Rules fora Country Extension.
Comparing the Country Extension Rule PackageFollow the steps below to compare the Country Extension Rule Package.
To compare the Country Extension rule package:
1. From your Browser, sign onto your Copy of Production database.2. Navigate to Set Up HRMS, Product Related, Global Payroll & Absence Mgmt, Elements, Manage GlobalPayroll Packages, Compare/Upgrade Rule Package.
3. Enter <XX>RUL in the field Package ID and click the Search.
Copyright © 2006, Oracle. All rights reserved. 227

Complete Database Changes Chapter 5
4. Go to the Package Elements page.5. Click the Compare button. This will launch the GP_PKG_CMP Application Engine program. You needto have the Process Scheduler up and running.
6. Review the message log to verify that the programs completed with no errors.7. Click the Go Back to Compare/Upgrade Rule Package hyperlink.8. Enter the <XX>RUL in the field Package ID and click Search.9. Go to the Package Elements page.10. Open the Package Upgrade folder.11. Make sure that the first element shows ‘Success’ in the Results column (as any invalid compares willsort to the top).
Upgrading the Country Extension Rule PackageFollow the steps below to upgrade the country extension rule package.
To upgrade the Country Extension rule package:
1. From your browser, sign on to your Copy of Production database.
2. Navigate to Set Up HRMS, Product Related, Global Payroll & Absence Mgmt, Elements, Manage GlobalPayroll Packages, Compare/Upgrade Rule Package.
3. Enter <XX>RUL in the field Package ID and click Search.
4. Go to the Package Elements page.
5. Click the Upgrade button. This will launch the GP_PKG_COPY Application Engine program. You needto have the Process Scheduler up and running.
6. Review the message log to verify that the programs completed with no errors.
7. Click the Go Back to Compare/Upgrade Rule Package hyperlink.
8. Enter <XX>RUL in the field Package ID and click Search.
9. Go to the Package Elements page.
10. Open the Package Upgrade folder.
11. Make sure that the first element shows ‘Success’ in the Results column.
12. Next, scroll down until you are at the first element that has the Upgrade checkbox turned. Check to makesure the Upgrade Status shows ‘Done’.
Importing the Country Extension Non-Rule Package ElementsFollow the steps below to import country extension system data non-rule package elements to your Copyof Production database.
To import the Country Extension non-rule package:
1. Using Data Mover, log on to your Copy of Production database.2. Run the script <XX>SYS_ELEMENTS_IMP.DMS.
Comparing the Country Extension Non-Rule Package ElementsFollow the steps below to compare country extension system data non-rule package elements to your Copyof Production database.
228 Copyright © 2006, Oracle. All rights reserved.

Chapter 5 Complete Database Changes
To compare the Country Extension non-rule package:
1. From your browser, sign on to your Copy of Production database.
2. Navigate to Set Up HRMS, Product Related, Global Payroll & Absence Mgmt, Elements, Manage GlobalPayroll Packages, Compare Non-Rule Package.
3. Enter <XX>SYS in the field Package ID and click Search.
4. Go to the Package Elements page.
5. Click the Compare button.
Note. Some Country Extensions may receive the message, “This package contains no Elements (17000,3015).” Click the OK button and proceed.
6. A message dialog box appears indicating that the compare process has completed successfully. You cannow proceed to import Non-Rule Package Records.
Importing the Country Extension Non-Rule Package RecordsFollow the steps below to import the country extension system data non-rule package Records to your Copyof Production database.
To import the Country Extension non-rule package:
1. Using Data Mover, log on to your Copy of Production database.
2. Run the script <XX>SYS_RECORDS_IMP.DMS.
Upgrading the Country Extension Non-Rule PackageFollow the steps below to upgrade the country extension system data non-rule package to your Copy ofProduction database.
To upgrade the Country Extension non-rule package:
1. From your browser, sign on to your Copy of Production database.2. Navigate to Set Up HRMS, Product Related, Global Payroll & Absence Mgmt, Elements, Manage GlobalPayroll Packages, Upgrade Non-Rule Package.
3. Enter <XX> SYS in the field Package ID and click on the Search button.4. Go to the Package Records page.5. Click the Upgrade button.6. A message dialog box prompts, “Upgrade Process Completed Successfully.”
Properties
DatabaseOrientation
Initial or MTP Products Platforms Languages
Target Both Global Payroll AllCountries
All All
Task 5-10-2: Apply Translations DataThis section discusses:
Copyright © 2006, Oracle. All rights reserved. 229
Complete Database Changes Chapter 5
• Understanding Translations Data Application
• Importing Country Extension Translations Rule Package
• Comparing Country Extension Translations Rule Package
• Upgrade the CE Translations Rule Package
• Importing Country Extension Translations Non-Rule Package Elements
• Comparing Country Extension Translations Non-Rule Package Elements
• Importing Country Extension Translations Non-Rule Package Records
• Upgrading Country Extension Translations Non-Rule Package
Understanding Translations Data ApplicationThis step applies only if you are loading translations for your new/additional Global Payroll CountryExtension(s) in your target database. If your database contains only English (or if the Country Extension is nottranslated), then you may skip this task.
Follow the steps in the next procedure to install language packs for your Global Payroll Country Extensions.You need to complete these steps in your Copy of Production (during Initial Pass) and Production (during yourMove to Production pass) databases. These are the same steps that you applied when loading the CountryExtension into your Demo Database.
In this section, we use the convention <LNG> to indicate the one-character language code that applies to thetranslations (where applicable). To apply these instructions, you need to replace <LNG> with the applicablelanguage code abbreviation as shown in the list below:
Country Language Codes (three-characters)
Brazil POR (Portuguese)
France FRA (French)
Germany GER (German)
Hong Kong ZHT (Traditional Chinese)
Italy ITA (Italian)
Japan JPN (Japanese)
Mexico ESP (Spanish)
Netherlands DUT (Dutch)
230 Copyright © 2006, Oracle. All rights reserved.
Chapter 5 Complete Database Changes
Country Language Codes (three-characters)
Spain ESP (Spanish)
Switzerland Rule Data
XXX (French, German, and Italian)
System Data:
FRA (French)
GER (German)
ITA (Italian)
Note. For Switzerland: There is only a single language pack for each Country Extension. If a CountryExtension has more than one language − such as Switzerland − all applicable languages (French, German, andItalian) will be loaded. If you do NOT want to retain language data for all three languages, you can deleteapplicable language rows for Switzerland elements after you complete loading the Rule Data Translations.To delete rows of data, you should delete from PS_GP_PIN_LANG WHERE PIN_CODE LIKE ‘%CHE’AND LANGUAGE_CD = ‘xxx’.
Importing Country Extension Translations Rule PackageFollow the steps below to import country extension rule data translations.
To import CE Translations rule package:
1. Using Data Mover, log on to your Copy of Production database.2. Run the Script <XX>RUL<LNG> IMP.DMS.
Note. It is recommended that you run Update Statistics on the GP_PKG_ELEMENTS and GP_PKG_PINMAPtables (or in case of using DB2 against tablespace GPAPP) each time AFTER a Global Payroll CountryExtension has been imported into a database as these tables have a substantial increase in size when you areinstalling Rules for a Country Extension.
Comparing Country Extension Translations Rule PackageFollow the steps below to compare country extension rule data translations.
To compare CE Translations rule package:
1. From your browser, log on to your Copy of Production Database.
2. Navigate to Set Up HRMS, Product Related, Global Payroll & Absence Mgmt, Elements, Manage GlobalPayroll Packages, Compare/Upgrade Rule Package.
3. Enter <XX>RUL<LNG> in the field Package ID and click Search.
4. Go to the Package Elements page.
5. Click the Compare button. This will launch the GP_PKG_CMP Application Engine program. You needto have the Process Scheduler up and running.
6. Review the message log to verify that the programs completed with no errors.
7. Click the Go Back to Compare/Upgrade Rule Package hyperlink.
8. Enter <XX>RUL<LNG> in the field Package ID and click Search.
Copyright © 2006, Oracle. All rights reserved. 231

Complete Database Changes Chapter 5
9. Go to the Package Elements page.10. Click the Package Upgrade folder.11. Verify that the first element shows ‘Success’ in the Results column (as any invalid compares will sortto the top).
Upgrade the CE Translations Rule PackageFollow the steps below to compare country extension rule data translations.
To upgrade CE Translations rule package:
1. From your browser, log on to your Copy of Production Database.
2. Navigate to Set Up HRMS, Product Related, Global Payroll & Absence Mgmt, Elements, Manage GlobalPayroll Packages, Compare/Upgrade Rule Package.
3. Enter <XX>RUL<LNG> in the field Package ID and click Search.
4. Go to the Package Elements page.
5. Click the Upgrade button. This will launch the GP_PKG_COPY Application Engine program. You needto have the Process Scheduler up and running.
6. Review the message log to verify that the programs completed with no errors.
7. Click the Go Back to Compare/Upgrade Rule Package hyperlink.
8. Enter <XX>RUL<LNG> in the field Package ID and click Search.
9. Go to the Package Elements page.
10. Click the Package Upgrade folder.
11. Verify that the first element shows ‘Success’ in the Results column.
12. Next, scroll down until you are at the first element that has the Upgrade checkbox turned on. Check tomake sure that the Upgrade Status shows ‘Done’.
Importing Country Extension Translations Non-Rule Package ElementsFollow the steps below to import country extension system data non-rules package elements.
To import translations non-rule package elements:
1. Using Data Mover, log onto your Copy of Production database.2. Run the script <XX>SYS<LNG> ELEMENTS_IMP.DMS.
Comparing Country Extension Translations Non-Rule Package ElementsFollow the steps below to compare country extension system data non-rule package elements.
To compare translations non-rule package elements:
1. Navigate to Set Up HRMS, Product Related, Global Payroll & Absence Mgmt, Elements, Manage GlobalPayroll Packages, Compare Non-Rule Package.
2. Enter <XX>SYS<LNG> in the field Package ID and Click Search.3. Go to the Package Elements page.4. Click the Compare button.
232 Copyright © 2006, Oracle. All rights reserved.

Chapter 5 Complete Database Changes
Note. Some Country Extensions may receive the message, “This package contains no Elements (17000,3015).” Click the OK button and proceed.
5. A message dialog box appears indicating that the compare process has completed successfully. You cannow proceed to import Non-Rule Package Records.
Importing Country Extension Translations Non-Rule Package RecordsFollow the steps below to import country extension system data non-rules package records.
To import translations non-rule package records:
1. Using Data Mover, log onto your Copy of Production database.2. Run the script <XX>SYS<LNG>_RECORDS_IMP.DMS.
Upgrading Country Extension Translations Non-Rule PackageFollow the steps below to upgrade country extension system data non-rule package translations.
To upgrade translations non-rule package:
1. Navigate to Set Up HRMS, Product Related, Global Payroll & Absence Mgmt, Elements, Manage GlobalPayroll Packages, Upgrade Non-Rule Package.
2. Enter <XX>SYS<LNG> in the field Package ID and click Search.3. Go to the Package Records page.4. Click the Upgrade button.5. A message dialog box prompts, “Upgrade Process Completed Successfully.”
Properties
DatabaseOrientation
Initial or MTP Products Platforms Languages
Target Both Global Payroll AllCountries
All All except English
Task 5-11: Validating Alternative Overtime UpgradeIf you requested the Alternative Overtime upgrade during the “Making Functional Decisions” task at thebeginning of the upgrade, the upgrade process has populated the new ALT_OT_STATES table with datarepresenting the US states that require Alternative Overtime processing. This data is keyed by SETID andEFFDT. For TableSet Control purposes, the ALT_OT_STATES table is in the new PY_04 Record Group.The upgrade process created the new Record Group within every TableSet, and assigned to it the defaultSetID that is associated with that TableSet.
Copyright © 2006, Oracle. All rights reserved. 233

Complete Database Changes Chapter 5
Using the PeopleTools Administration navigation, you should now review in TableSet Controls the defaultSetID values that have been assigned to the PY_04 Record Group, and ensure that they are appropriate toyour requirements. The Alternative Overtime payroll processes will use COMPANY as the Set Control Valuefor TableSet Controls when looking up the Alternative Overtime States. If all your companies will requireAlternative Overtime processing for the same states, then you should only have data for one SetID on theALT_OT_STATES table. This SetID should be assigned to the PY_04 Record Group for all Set Controlvalues. In this context, Set Control value = Company. Conversely, if the states will be different for somecompanies, then there should be data for separate SetIDs on the ALT_OT_STATES table, and you shouldassign different SetIDs to the PY_04 Record Group.
Properties
DatabaseOrientation
Initial or MTP Products Platforms Languages
Target Initial Payroll for NorthAmerica
All All
Task 5-12: Updating Payroll Interface DefinitionsThis section discusses:
• Understanding Updates to Payroll Interface Definitions
• Run Validate PI Field References Report
• Update Payroll Interface Definitions
Understanding Updates to Payroll Interface DefinitionsIn this task you perform steps to update the PeopleSoft Payroll Interface Definitions.
Note. Perform this task only if you have PeopleSoft Payroll Interface and currently have field entries that userecord (table) names impacted by structural changes in PeopleSoft 8.9.
A number of enhancements were made in the new PeopleSoft release that involved record structure changesthat may impact Payroll Interface. Some of your existing Payroll Interface Definitions may not be valid asa result of these changes. You must review your Payroll Interface Definitions and update PS Tables, FieldDefinition Table and Instance Table if needed.
Task 5-12-1: Run Validate PI Field References ReportIn this task you run a report that lists all invalid record/field references as a result of a new and modifiedrecord structures.
To run the Validate PI Field References Report:
1. From your browser, sign on to your Copy of Production database, keeping the default browser address.2. Navigate to Setup HRMS, Upgrade, Reports, Validate PI Field References.3. Select the Add a New Value tab.
234 Copyright © 2006, Oracle. All rights reserved.

Chapter 5 Complete Database Changes
4. Enter the run control ID UPG_PI_DEFN.5. Click Add.6. From the Runctl, click Run.7. Analyze the data presented in the report to decide if any changes to Payroll Interface definitions are needed.
The report has three different sections:
• Invalid references in PS Tables• PI Field Tbl• PI Instance Tbl
If the report lists any data in any section, proceed with updating the corresponding definitions in the followingstep.
Properties
DatabaseOrientation
Initial or MTP Products Platforms Languages
Target Initial Payroll Interface All All
Task 5-12-2: Update Payroll Interface DefinitionsThis section discusses:
• Understanding Payroll Interface Definitions Update
• Updating PS Table Definitions
• Updating Field Definition Table
• Updating Instance Table Definitions
Understanding Payroll Interface Definitions UpdateBefore updating Payroll Interface Definitions you need to do an analysis of structural changes in the newPeopleSoft release, to properly locate all impacted record/fields. For example, for personal data changes,you can review the appendix “Understanding the Person Model Changes” and decide how you will updateyour tables.
Updating PS Table DefinitionsTo update PS Table Definitions:
1. From your browser, sign on to your Copy of Production database, keeping the default browser address.2. Navigate to Set Up HRMS, Product Related, Payroll Interface, Interface Controls, PS Tables, Find anExisting Value.
3. Select a Payroll Interface System ID and Record (Table) Name listed in the PS Tables section of thereport, if you see any.
4. Review and update the Field Details on the PeopleSoft Tables page.5. Delete the fields from the Field Details of the records where they used to be then add the fields to therecords where they are moved to in this release.
Copyright © 2006, Oracle. All rights reserved. 235

Complete Database Changes Chapter 5
6. Repeat steps 1 through 5 for each record listed in the PS Tables section of the report.
Updating Field Definition TableTo update Field Definition Table:
1. Navigate to Set Up HRMS, Product Related, Payroll Interface, Interface Controls, Field Definition Table,Find an Existing Value.
2. Select a Payroll Interface System ID, Payroll Interface Field ID and Process Type for fields listed in thePS Field Tbl section of the report, if you see any.
3. Review and update the Field Definition on the Interface Field2 page.4. Repeat steps 1 through 3 for each field listed in PI Field Table section of the report.
Updating Instance Table DefinitionsTo update Instance Table Definitions:
1. Navigate to Set Up HRMS, Product Related, Payroll Interface, Interface Controls, Instance Table, Find anExisting Value.
2. Select a Payroll Interface System ID and Instance ID listed in the PI Instance Tbl section of the report,if you see any.
3. Review and update the Record Name and Field1 Name.4. Repeat steps 1 through 3 for each Instance ID listed in the PI Instance Table section of the report.
You may want to run the Validate PI Field References report again to be sure that you have updated all data.If the updates are done correctly the report should have no invalid references. If the report lists any invalidreferences, repeat the preceding directions in this step until you complete all updates correctly.
See Also“Appendix: Understanding Person Model Changes.”
Properties
DatabaseOrientation
Initial or MTP Products Platforms Languages
Target Initial Payroll Interface All All
Task 5-13: Running Assigned Company Cars ReportIn the new PeopleSoft release, two new fields have been added to the Company Car Allocation page. The fieldCar Type is used to indicate if the car is the first, second, or replacement car assigned to an employee. Thefield Frequency Type is located in the Payments Towards Private Use section, which specifies the frequencyof the company car payment.
To Run the Assigned Company Cars Report:
1. From your browser, sign on to your Copy of Production database, keeping the default browser address.2. Navigate to Setup HRMS, Upgrade, Reports, Assigned Company Cars UK.
236 Copyright © 2006, Oracle. All rights reserved.

Chapter 5 Complete Database Changes
3. Select the Add a New Value tab.4. Enter the run control IDUPG_ASSIGN_CO_CAR.5. Click Add.6. From the Runctl UVHCZ300, click Run.7. Analyze the data presented in the report to decide whether the Payments Towards Private Use have thecorrect frequency of payment in the Company Car Allocation page under the UK section. By defaultthis will be "Monthly."
The Car Type should also be reviewed to decide between the different car types, which by default will be"Other" for those cars that were not specified to be a Second Car. For the cars allocated which had the SecondCar box selected, the Car Type will be "Secondary Car."
If any of the default values are incorrect, the information should be changed online.
Properties
DatabaseOrientation
Initial or MTP Products Platforms Languages
Target Both Global Payroll UK All All
Task 5-14: Upgrading RulesThis section discusses:
• Understanding Rules Upgrade
• Run the Dropped Temp Tables Report
• Recompile Template Built Rules
• Customize Template Built Rules
• Review and Modify User Exit Rules
Understanding Rules UpgradeThis task applies only if you are upgrading the PeopleSoft HRMS Time and Labor product.
Many SQL objects may have been modified for performance and functionality enhancements.
Task 5-14-1: Run the Dropped Temp Tables ReportIn this step you run a report to list any temp tables that you use to customize rules that were dropped for thenew release. You will fix these rules as you complete the steps in this task. Refer to this report to see whichrules have temp tables to be fixed. After you complete this step, rerun this report to validate that all rules wereupgraded.
The script is:
UVTLW10.SQR
Copyright © 2006, Oracle. All rights reserved. 237

Complete Database Changes Chapter 5
To run the deleted temp table report:
1. Navigate to Setup HRMS, Upgrade, Reports, TL Temp Tables List.
2. Select the Add a New Value tab.
3. Enter the run control ID UPG_RULE.
4. Click Add.5. Click OK.6. Click the Process Monitor link to monitor the Program’s process.
The resulting report lists any of the rules that use temp tables that were dropped in the new release. Review therules and change them to work in the new system.
Check to see if the temp table mentioned in the report exists in the database. If it exists, then add that table tothe properties for the TL_TIMEADMIN application engine. If the temp table does not exist , then check theobject where that table is used and fix the object.
Properties
DatabaseOrientation
Initial or MTP Products Platforms Languages
Target Initial Time and Labor All All
Task 5-14-2: Recompile Template Built RulesAll rules that you have built from rule templates need to be recompiled. To recompile Template-Built Rulesyou will need to follow the steps below.
To recompile Template-Built Rules:
1. If you are using Referential Integrity, you need to make sure you export any data you have in theTL_RI_CNTRL_TBL before you turn off the Production Environment Flag on the TL InstallationSettings page. This table will be deleted once you clear the flag, and you will re-import this data laterin the procedure.
2. Now turn off the Production Environment flag (circled) as shown below.
238 Copyright © 2006, Oracle. All rights reserved.

Chapter 5 Complete Database Changes
TL Installation Settings Page
3. Use the navigation in the screenshot below (on the left) to recompile Template-Built Rules. Instead ofentering any values in any field, click on the Search button. This will display all the Template-BuiltRules in your system.
Template-Built Rules page
4. Select each rule to review, making changes if required. Then save the component. Saving the componentwill recompile the rule for you. If no changes are required, you will need to make some minor change to
Copyright © 2006, Oracle. All rights reserved. 239
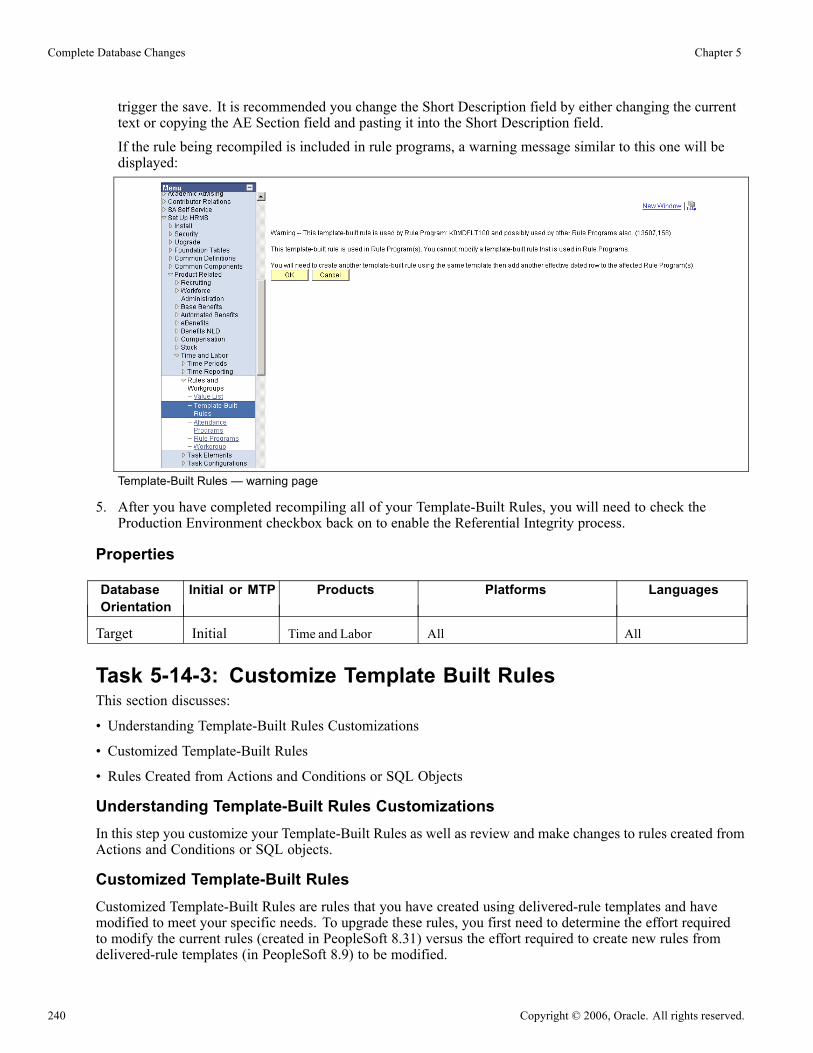
Complete Database Changes Chapter 5
trigger the save. It is recommended you change the Short Description field by either changing the currenttext or copying the AE Section field and pasting it into the Short Description field.If the rule being recompiled is included in rule programs, a warning message similar to this one will bedisplayed:
Template-Built Rules — warning page
5. After you have completed recompiling all of your Template-Built Rules, you will need to check theProduction Environment checkbox back on to enable the Referential Integrity process.
Properties
DatabaseOrientation
Initial or MTP Products Platforms Languages
Target Initial Time and Labor All All
Task 5-14-3: Customize Template Built RulesThis section discusses:
• Understanding Template-Built Rules Customizations
• Customized Template-Built Rules
• Rules Created from Actions and Conditions or SQL Objects
Understanding Template-Built Rules CustomizationsIn this step you customize your Template-Built Rules as well as review and make changes to rules created fromActions and Conditions or SQL objects.
Customized Template-Built RulesCustomized Template-Built Rules are rules that you have created using delivered-rule templates and havemodified to meet your specific needs. To upgrade these rules, you first need to determine the effort requiredto modify the current rules (created in PeopleSoft 8.31) versus the effort required to create new rules fromdelivered-rule templates (in PeopleSoft 8.9) to be modified.
240 Copyright © 2006, Oracle. All rights reserved.

Chapter 5 Complete Database Changes
If you choose to modify the current rule (created in PeopleSoft 8.31), you will need to review and modifyall the steps in the rule to accommodate the addition of the PROCESS_INSTANCE field to temp tablesused in the rule.
Changes to SQL statements have to be made in the Define Actions, Define Conditions, or SQL Objectscomponents. Use the following navigation in the example below to review custom rules by entering the firstfew characters of the Rule ID that will follow your naming convention for custom rules:
Rules page
Rules Created from Actions and Conditions or SQL ObjectsFor rules created from Actions and Conditions or SQL objects, you need to review and make necessarychanges as mentioned in the "Customized Template-Built Rules" step above.
To modify Template-Built Rules:
1. If you used delivered rules objects (Actions and Condition, SQL Objects, Temp Tables) in your customrules without any modifications, you only need to recompile them. To recompile custom rules, press theCompile Rule button (circled) on the Define Rule Header page as shown below:
Copyright © 2006, Oracle. All rights reserved. 241
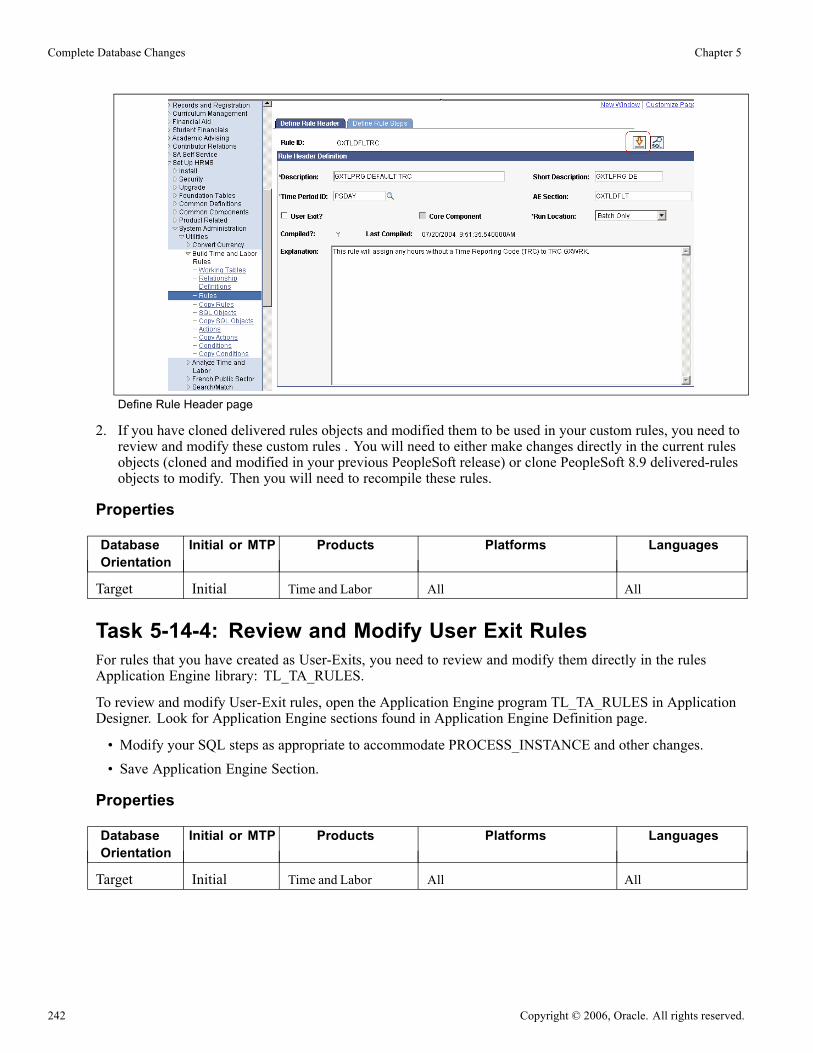
Complete Database Changes Chapter 5
Define Rule Header page
2. If you have cloned delivered rules objects and modified them to be used in your custom rules, you need toreview and modify these custom rules . You will need to either make changes directly in the current rulesobjects (cloned and modified in your previous PeopleSoft release) or clone PeopleSoft 8.9 delivered-rulesobjects to modify. Then you will need to recompile these rules.
Properties
DatabaseOrientation
Initial or MTP Products Platforms Languages
Target Initial Time and Labor All All
Task 5-14-4: Review and Modify User Exit RulesFor rules that you have created as User-Exits, you need to review and modify them directly in the rulesApplication Engine library: TL_TA_RULES.
To review and modify User-Exit rules, open the Application Engine program TL_TA_RULES in ApplicationDesigner. Look for Application Engine sections found in Application Engine Definition page.
• Modify your SQL steps as appropriate to accommodate PROCESS_INSTANCE and other changes.• Save Application Engine Section.
Properties
DatabaseOrientation
Initial or MTP Products Platforms Languages
Target Initial Time and Labor All All
242 Copyright © 2006, Oracle. All rights reserved.
Chapter 5 Complete Database Changes
Task 5-15: Deleting Resume FilesThis section discusses:
• Understanding Resume Deletion
• Manually Delete Files from Old Location
Understanding Resume DeletionRun this task only if you have licensed eRecruit Resume Processing and have resumes on a file system.
Task 5-15-1: Manually Delete Files from Old LocationThe resume file name in the Resume Text Table was updated to reflect the full resume file name on your filesystem during data conversion. If you specified ER_ATTACHMENTS as the record URL during the task“Making Functional Decisions,” your resumes migrated from the file server into the database. If you arecontinuing to use a file system, your resume files moved to the alternate location specified in this URL field.You need to manually delete the resume files from the old location once the rename and migrate processeshave completed successfully.
See “Prepare Your Database,” Making Functional Decisions.
Properties
DatabaseOrientation
Initial or MTP Products Platforms Languages
Target Both All All All
Task 5-16: Setting Up General Ledger InterfaceThis section discusses:
• Understanding GL Interface Setup
• Set Up the Liability Accounts
• Set Up the GL Activity Groupings
• Set Up the Expenses ChartField Mappings
Understanding GL Interface SetupIn this task you will setup the tables that are used for GL Interface based on the decisions you made afterreviewing audit reports and discussing ChartFields combinations with general ledger staff.
Note. Run this task only if you are using non-commitment accounting in Payroll for North America.
Copyright © 2006, Oracle. All rights reserved. 243
Complete Database Changes Chapter 5
Important! Once you create your copy of the production database in the initial pass, you should not make anychanges in your production database for Company, Company State Taxes, Company Local Taxes, Wage LossPlan Table and Deduction Table until you complete the upgrade. If you make any changes to any of the tableslisted above, you will not be able to use import scripts during the Move to Production passes to import datathat you have setup in the initial pass. You will either have to synchronize the data between production and thecopy of the production you created in the initial pass before you setup the data and do the export, or manuallysetup data in your new copy of the production during the Move to Production pass.
See Appendix: Dynamic ChartFields Upgrade Notes.
See Run Dynamic ChartFields Audits
Task 5-16-1: Set Up the Liability AccountsThis section discusses:
• Understanding Liability Accounts
• Setting Up NetPay, Direct Deposit, and Federal Tax Liability Accounts
• Setting Up State Tax Liability Accounts
• Setting Up Local Tax Liability Accounts
• Setting Up Canadian Tax Liability Accounts
• Setting Up Deduction Liability Accounts
Understanding Liability AccountsUse the data listed in Liability ChartField Usage audit report to work with General Ledger staff and makedecisions about how you want to set up the liability accounts that will offset the credit transactions for payrollactivities. Your setup will vary depending on whether you are using US Payroll or Canadian Payroll. Followthe steps in this section to set up the liability accounts that are applicable to payroll you are using.
Note. NetPay, Direct Deposit, and Deduction liability accounts are for both, US Payroll, and Canadian Payroll.Federal Tax, State Tax, and Local Tax liability accounts are for US Payroll only. Canadian Tax liabilityaccounts are for Canadian Payroll only.
Setting Up NetPay, Direct Deposit, and Federal Tax Liability AccountsTo set up liability accounts for NetPay, Direct Deposit and Federal Tax:
1. Sign on to the Copy of Production database.2. From the Go menu, choose Setup HRMS, Foundation Tables, Organization, Company.3. Enter the Company.4. Click Search.5. Select the Default Settings tab and the General Ledger Accounts hyperlink.6. Enter liability accounts.7. Click Save.8. Repeat steps 1-7 for each Company that needs to be set up.
244 Copyright © 2006, Oracle. All rights reserved.

Chapter 5 Complete Database Changes
Setting Up State Tax Liability AccountsTo setup liability accounts for State Tax:
1. Sign on to the Copy of Production database.2. From the Go menu, choose Setup HRMS, Product Related, Payroll for North America, Federal/ StateTaxes, Company State Tax Table.
3. Enter the Company / State combination.4. Click Search.5. Select the GL Accounts tab.6. Enter liability accounts.7. Click Save.8. Repeat steps 1-7 for each Company or State combination that needs to be set up.
Setting Up Local Tax Liability AccountsTo setup liability accounts for Local Tax:
1. Sign on to the Copy of Production database.2. From the Go menu, choose Setup HRMS, Product Related, Payroll for North America, Local Taxes,Company Local Tax Table.
3. Enter the Company / State / Locality combination.4. Click Search.5. Enter liability accounts.6. Click Save.7. Repeat steps 1-6 for each Company / State / Locality combination that needs to be set up.
Setting Up Canadian Tax Liability AccountsTo setup liability accounts for Canadian Tax:
1. Sign on to the Copy of Production database.2. From the Go menu, choose Setup HRMS, Product Related, Payroll for North America, Canadian Taxes,Wage Loss Plan Table.
3. Enter the Company / Wage Loss Replacement Plan combination.4. Click Search.5. Enter liability accounts.6. Click Save.7. Repeat steps 1-6 for each Company or Wage Loss Replacement Plan combination that needs to be set up.
Setting Up Deduction Liability AccountsTo setup liability accounts for Deductions:
1. Sign on to the Copy of Production database.2. From the Go menu, choose Setup HRMS, Product Related, Payroll for North America, Deductions,Deduction Table.
Copyright © 2006, Oracle. All rights reserved. 245
Complete Database Changes Chapter 5
3. Enter the Plan Type/Deduction Code combination.4. Click Search.5. Select the Process tab.6. Enter liability accounts.7. Click Save.8. Repeat steps 1-7 for each Plan Type or Deduction Code combination that needs to be set up.
Properties
DatabaseOrientation
Initial or MTP Products Platforms Languages
Target Initial Payroll for NorthAmerica
All All
Task 5-16-2: Set Up the GL Activity GroupingsUse the data listed in the Chartkey Usage by Expense Types audit report to work with general ledger staffand make decisions about how you want to set up the payroll activities. The payroll activities are mappedto ChartFields combinations later in the upgrade.
Follow the steps below to set up the GL Activity Groupings.
To set up the GL activity groupings:
1. Sign on to the Copy of Production database.2. From the Go menu, choose Setup HRMS, Product Related, Payroll for North America, GL Interface,GL Activity Grouping.
3. Click Add a New Value.4. Enter Company/GL Group Name.5. Click Add.6. Enter data into Earnings Expenses tab, if applicable.7. Enter data into Deduction Expenses tab, if applicable.8. Enter data into Tax Expenses tab if applicable.9. Click Save.10. Repeat steps one through nine for each Company/GL Group Name you need to set up.
Properties
DatabaseOrientation
Initial or MTP Products Platforms Languages
Target Initial Payroll for NorthAmerica
All All
246 Copyright © 2006, Oracle. All rights reserved.

Chapter 5 Complete Database Changes
Task 5-16-3: Set Up the Expenses ChartField MappingsUse the data listed in Chartkey Usage by Expense Types and Chartkey Usage by Company and Business Unitaudit reports to work with General Ledger staff and make decisions about how you want to map payrollactivities to a ChartFields combination.
To set up the Expenses ChartField Mappings:
1. Sign on to the Copy of Production database.2. From the Go menu, choose Setup HRMS, Product Related, Payroll for North America, GL Interface,Payroll Exp ChartField Mapping.
3. Click Add a New Value.4. Enter Company, Business Unit, Mapping Level. Depending on the mapping level you selected, enteradditional information if needed.
5. Click Add.6. Enter data on the Earnings Mapping tab, if applicable.7. Enter data on the Deductions Mapping tab, if applicable.8. Enter data into U.S. Tax Mapping tab, if applicable.9. Enter data in Canadian Tax Mapping, if applicable.10. Click Save.11. Repeat steps 1 – 10 for each Company, Business Unit, Mapping Level you need to setup.
Properties
DatabaseOrientation
Initial or MTP Products Platforms Languages
Target Initial Payroll for NorthAmerica
All All
Task 5-17: Reviewing PeopleTools FunctionalityIf you applied a PeopleTools patch earlier in the upgrade, review the patch documentation and run any stepsthat you have not already performed during the upgrade. Check your Change Assistant output directory if youdo not know whether a script was already run during the upgrade process.
PeopleTools has updated the styles that define the look of the user interface. The classic (old) style sheet,as well as two new styles, are delivered with this release of PeopleTools. PeopleTools system databasesand PeopleSoft 8.4 applications use the classic style, whereas all other applications use the new dark bluestyle. After the PeopleTools portion of the upgrade, PeopleSoft sets the classic style as the default, but youcan update to one of the new user interface styles.
See “Appendix: Changing the User Interface.”
Note. The new user interface styles are supported by Internet Explorer release 5 and above and NetscapeNavigator release 6 and above. If you are using any other browser or release, the system defaults to theclassic style.
Copyright © 2006, Oracle. All rights reserved. 247
Complete Database Changes Chapter 5
PeopleTools uses Verity release 5.0 to implement free text search. Verity 5.0 is not compatible with the versionof Verity that was used in previous PeopleTools releases. Check the necessary application patches that may berequired in order to use the new version of Verity.
Note. An upgrade may cause the Web server domain name, port number, or servlet path required to accessWeb Server resources in PIA to change. As a result performing PS/nVision Drilldown operations on reportsthat were created prior to upgrade would fail. This is mainly because Drilldown Hyperlinks are by design hardcoded into PS/nVision reports. A simple search and replace utility has been provided that can be used to replaceold Hyperlinks with new ones. This MS Excel macro is located at %PS_HOME%\EXCEL\UpdateNvsDrill.xls.
Integration Broker was rewritten in PeopleTools 8.48. If you use Integration Broker, you will need to performsetup configuration and review the explanation of metadata mapping.
See Enterprise PeopleTools 8.48 PeopleBook: PeopleSoft Integration Broker.
See PeopleSoft Customer Connection (Updates + Fixes, Required for Install or Upgrade).
See the Enterprise PeopleTools Installation guide for your database platform for your new release.
See PeopleSoft Customer Connection (Implement, Optimize + Upgrade, Upgrade Guide, UpgradeDocumentation and Software, Release Notes).
Properties
DatabaseOrientation
Initial or MTP Products Platforms Languages
Target Initial All All All
Task 5-18: Preparing the Content Provider RegistryYou should perform the this task if you use Enterprise Portal 8.4 or higher running on PeopleToosl 8.4xwith full or partial navigation load access method. This means you do not use a single link to access yourcontent provider databases, but instead you load some or all of the portal registry structures from the contentprovider database into your Enterprise Portal database. PeopleSoft refers to Content Provider databases asthe application database(s) that contain the transaction content. You Copy of Production database is yourContent Provider database for this task.
When you upgrade a content provider database, the registry structures are updated, old registry structures areremoved, and new registry structures are added. These changes need to be copied to the Enterprise Portaldatabase by updating the portal registry structures in your Enterprise Portal database to match what is in theContent Provider database. Follow the detailed instructions in the appendix referenced below.
See “Appendix: Upgrading the Content Provider Registry.”
248 Copyright © 2006, Oracle. All rights reserved.

Chapter 5 Complete Database Changes
Properties
DatabaseOrientation
Initial or MTP Products Platforms Languages
Target Both All All All
Task 5-19: Updating the Portal Options DataIn this step you update the PeopleTools Portal Options data.
Note. Only perform this step if your upgraded database in on PeopleTools 8.46 or greater.
This step sets the portal options prefix and Owner ID. These values are used when creating for PageletWizard definitions and Navigation Collection objects.
To set the Portal Options Prefix and Owner ID:
1. From your browser, sign on to your New Copy of Production database.2. Navigate to PeopleTools, Portal, Portal Utilities, System Options.3. Update the value for the Registry Object Prefix with a 1– to 4– character prefix that is unique to yourorganization.
Note. Do not use PAPP, PAPX, PAPQ, PAPI, PRTL, EO, or PT. Do not use any product line specific prefix(such as CR, HC, EP, or CI). Do not use a blank value.
4. Enter the Owner ID value with your organization’s specific owner ID.
Note. The Owner ID is a translate value on the PeopleTools field OBJECTOWNERID. Do not useany delivered product Owner ID. If you do not have an Owner ID, then either create one, or leave theOwner ID value as a blank space.
5. Click Save.
Properties
DatabaseOrientation
Initial or MTP Products Platforms Languages
Target MTP All All All
Task 5-20: Stamping the DatabaseIn this step, you set the database to the release level of the Demo database. The values you enter here appearwhenever you view the Help, About PeopleTools dialog.
To stamp the database:
Copyright © 2006, Oracle. All rights reserved. 249
Complete Database Changes Chapter 5
1. Launch Application Designer on your Copy of Production database using the new PeopleSoft release.2. Select Tools, Upgrade, Stamp Database...3. Fill in all three of the PeopleSoft Release fields with the appropriate value for your product line andrelease number:
HRMS and Campus Solutions, 8.90
4. In the Service Pack field, enter the service pack number to which you are upgrading. For example, ifyou are upgrading to SP2, enter the number 2. If you are upgrading to a release that is not at a servicepack level, enter 0.
5. Click Stamp.6. Close Application Designer.
Properties
DatabaseOrientation
Initial or MTP Products Platforms Languages
Target Both All All All
Task 5-21: Reviewing Change ControlEarlier in the upgrade process, in the beginning of the chapter “Apply PeopleTools Changes,” the ChangeControl feature was disabled. In this step, you re-enable Change Control, if your site uses this functionality.
To turn on Change Control:
1. Sign on to the target database using Application Designer.2. Select Tools, Change Control, Administrator.The following dialog box appears:
Change Control Administrator dialog box
3. Set Use change control locking and Use change control history according to your site specifications.
250 Copyright © 2006, Oracle. All rights reserved.

Chapter 5 Complete Database Changes
Note. Move to Production: The Change Control feature slows down copy functions. The large copy projectsare only executed during the initial pass, and the feature is only disabled during the initial pass. If you enablethe feature at this point, it will remain enabled during future test Move to Production passes.
See “Turning Off Change Control.”
Properties
DatabaseOrientation
Initial or MTP Products Platforms Languages
Target Initial All All All
Task 5-22: Backing Up Before TestingBack up your Copy of Production database now. This enables you to restart your upgrade from this point,should you experience any database integrity problems during the remaining tasks in the upgrade process.
See “Appendix: Testing Techniques.”
Properties
DatabaseOrientation
Initial or MTP Products Platforms Languages
Target Both All All All
Task 5-23: Testing Your Copy of ProductionIn this task, you test your Copy of Production. Testing your Copy of Production will ensure that you canstill operate your day-to-day processes on your new release. After you have reviewed your DDDAUDITand SYSAUDIT, verify that the system is working properly by reviewing the system online. After you arecomfortable that the system is working properly, you can perform the Test Move to Production upgrade pass.
See “Appendix: Testing Techniques.”
Properties
DatabaseOrientation
Initial or MTP Products Platforms Languages
Target Both All All All
Copyright © 2006, Oracle. All rights reserved. 251

Complete Database Changes Chapter 5
252 Copyright © 2006, Oracle. All rights reserved.
CHAPTER 6
Apply Changes to Production Database
This chapter discusses:
• Understanding the Move to Production
• Testing the Move to Production
• Testing Once More
• Performing the Move to Production
• Completing the Upgrade Survey
Understanding the Move to ProductionOnce you complete all of the necessary tasks to launch your system into production, you are ready to beginyour Test Move to Production passes or to move your system into production.
Task 6-1: Testing the Move to ProductionThis section discusses:
• Understanding the Move to Production Test
• Understand Move to Production
• Creating a New Change Assistant Job
Understanding the Move to Production TestEverything you have done to this point is the initial pass of the upgrade process. Now you are ready to startthe Test Move to Production pass. The initial pass is very time consuming and requires a lot of analysis atdifferent steps of the process and to troubleshoot issues. The Test Move to Production pass is a different seriesof steps, which includes a subset of the previous tasks, and takes advantage of the tasks performed duringthe first upgrade pass.
You should perform as many test moves to production as necessary to work out any issues and to becomfortable with the process. During each Test Move to Production you will be able to refine the process sothat you can save time and avoid manual processes. These test passes will also let you know how long theprocess takes so you can plan your production downtime for your move to production weekend.
Copyright © 2006, Oracle. All rights reserved. 253

Apply Changes to Production Database Chapter 6
Task 6-1-1: Understand Move to ProductionThe following text is a high level view of what you will be doing in the Move to Production test pass. Theremaining steps in this task will prepare your test environment. For example, you may need to move somescripts generated in the initial pass to a new Change Assistant staging directory. Next you will create a newChange Assistant job, setting the Type of Upgrade to Move to Production. That will give you a job with stepsfiltered with only those steps that apply to the Move to Production (MTP) test pass. From that point forward,you will simply follow the steps as they exist in your new job.
One of those first steps will be to take a Copy of Production. This second Copy of Production is sometimesreferred to as the “New Copy of Production.” The first Copy of Production, or “old” Copy of Production, willnow be the source database (it was the target database in the initial test pass). The New Copy of Production isnow the target database.
The steps executed in the MTP pass vary in several ways. Many of the tasks/steps in the initial test pass will bereplaced in the MTP pass with Data Mover export and import scripts. In the initial pass, some steps requiredyou to make functional decisions and take time to manually setup data. That data can be copied from the firstdatabase to the next, saving you setup time and eliminating the chance for manual error or typos.
Also, the MTP pass does not repeat the database compare/copy steps. You made the decisions once; thereis no need to repeat these steps. Instead, a Data Mover script, MVPRDEXP, will export all the tables thatcontain the PeopleTools objects like records and PeopleCode from the first database. Another Data Moverscript, MVPRDIMP, will import those tables into the second database. Anything you have done to PeopleToolsobjects while executing or testing the first pass—copied objects from DMO, reapplied customizations,applied updates from the PeopleSoft Customer Connection website—will be moved to the second Copy ofProduction with these scripts.
Another important difference with the MTP pass is the handling of SQL scripts that create and alter tables.In the initial pass, you generated the SQL scripts, sometimes edited the SQL script, and then executed theSQL scripts. In the MTP pass, you may be able to skip the generation steps and use the SQL you previouslygenerated. This is another way to save time in your critical go-live window and is the ultimate goal, but it is anincremental process to get to that point.
In the first MTP pass, everyone must regenerate the SQL. There are small differences between the initial andMTP passes that require the SQL to be regenerated in at least one MTP pass. The Change Assistant Templatesare delivered with the steps set this way.
In subsequent MTP passes, you may choose to “turn off” the generation steps if possible. If you have notchanged any records at the end of one MTP pass, then you can reuse the SQL in your next pass. If you havedone anything to change records, you should generate SQL again. This can include things like applyingPeopleTools upgrades (for example, 8.41 to 8.42), or applying updates from the PeopleSoft CustomerConnection website that involve record changes, or making additional customizations to records.
If you choose to skip some of these steps, do one of the following: mark the step complete in your job, orchange the step properties in the template, so the step will never show up in your MTP filtered job again. Tochange the step properties, double-click on the step to open the Step Properties dialog, and change the Type ofUpgrade to Initial Upgrade. In addition, copy the SQL scripts from the previous pass output directory to thenew pass output directory. Change Assistant will look for the SQL scripts in the output directory set on thejob’s Database Configuration, so make sure it will find them when it tries to run them.
The steps that are eligible for this treatment will contain Move To Production documentation notes indicatingsuch.
Note. If you have made any changes to your trees, tree structures, or PS/Query objects since the upgradebegan, you may want information on how to preserve those changes.
254 Copyright © 2006, Oracle. All rights reserved.

Chapter 6 Apply Changes to Production Database
See “Appendix: Queries Trees and Tree Structures.”
Properties
DatabaseOrientation
Initial or MTP Products Platforms Languages
Target Both All All All
Task 6-1-2: Creating a New Change Assistant JobYou need to create a new Change Assistant Job for each test Move to Production pass.
To create a new Change Assistant job:
1. PeopleSoft recommends that you use new output and stage directories for each new test pass. Createthose directories now.
2. From Change Assistant, select Tools, Options and specify the new output and staging directories onthe Change Assistant Options page.
3. Select File, Open Environment and select the environment.4. Review the configuration on the General Settings window.The Database Type, Language and SQL Query Executable will be the same as your previous job. Makechanges to the PS_HOME settings, if necessary, and select Next.
5. Specify the Source Database setup information and click Next.This is the Copy of Production database from your previous pass.
6. Specify the Target Database setup in formation and click Next.This is the new Copy of Production database.
7. Review the environment configuration on the Confirm Selections window and click Next to save thechanges to the environment.
8. Select File, New Job.9. Select the template on the Use Template window and click OK.10. On the Type of Upgrade window, select Move to Production.11. Click OK.A new upgrade job using the naming convention of <Template>_<Environment>_Move to Productionis created.
12. Highlight the job name and select Edit, Set Documentation Directory, then select the directory where thedocumentation is located and click OK.If you have been using documentation printed from the filtered view on the jobs, print the documentationagain. The steps for Move to Production are different than in the initial pass.
13. Select View, Documentation.14. Select View, Expand All to display all the steps in the job that apply to your upgrade.The job will contain steps that were not in the initial upgrade pass and will exclude some steps that were inthe initial upgrade pass based on the step properties.
Now you are ready to run the job.
Copyright © 2006, Oracle. All rights reserved. 255

Apply Changes to Production Database Chapter 6
Properties
DatabaseOrientation
Initial or MTP Products Platforms Languages
Target Both All All All
Task 6-2: Testing Once MoreAs in any implementation project, you must consider planning, resources, development, and training. Testingalso needs to be an integral part of your implementation project. Testing your database once more, afteryou have completed the upgrade, ensures that you can still operate your day-to-day processes on your newPeopleSoft release.
The level of testing in this task will focus primarily on the strategies to employ before moving into production.
See “Appendix: Testing Techniques.”
Properties
DatabaseOrientation
Initial or MTP Products Platforms Languages
Target Both All All All
Task 6-3: Performing the Move to ProductionWhen you are ready, you can move the system into production. Take your system out of production andperform all of the steps involved in testing the Move to Production against your production database.
See Testing the Move to Production
Properties
DatabaseOrientation
Initial or MTP Products Platforms Languages
Target MTP All All All
Task 6-4: Completing the Upgrade SurveyWe are interested in feedback on your upgrade experience and any thoughts and/or suggestions you have onhow we can improve the process in the future. Note that this survey should only be accessed once you havecompleted your upgrade and are in production on the new release.
256 Copyright © 2006, Oracle. All rights reserved.
Chapter 6 Apply Changes to Production Database
See Alsohttp://www.peoplesoft.com/go/upgradesurvey
Properties
DatabaseOrientation
Initial or MTP Products Platforms Languages
Target MTP All All All
Copyright © 2006, Oracle. All rights reserved. 257

Apply Changes to Production Database Chapter 6
258 Copyright © 2006, Oracle. All rights reserved.
CHAPTER 7
Appendices
Understanding AppendicesThe Appendices portion of this documentation contains information you may need for your upgrade. Theappendices have been referenced throughout the upgrade documentation for further understanding of theupgrade you are performing. PeopleSoft recommends that you read each appendix as it is referenced inthe documentation.
Copyright © 2006, Oracle. All rights reserved. 259

Appendices Chapter 7
260 Copyright © 2006, Oracle. All rights reserved.
APPENDIX A
Applying Fixes Required for Upgrade
This appendix discusses:
• Prepare to Apply Fixes
• Apply Fixes During Installation
• Apply Fixes After Running Copy Project
• Apply Fixes After Data Conversion
• Apply Fixes Before Move to Production
• Apply Fixes During Move to Production
Task A-1: Prepare to Apply FixesThis appendix gives general instructions for applying a Required for Upgrade fix for your upgrade. If thedirections given in a particular fix are different from those given here, then follow the instructions in the fix.
It is important that you run your upgrade using the latest versions of all upgrade software. In CustomerConnection, check the Upgrade pagea nd the Updates and Fixes page to ensure that you have all of thelatest code.
Note. Because of interdependencies between products and product lines, you will need to download all fixesfor all HRMS products and product lines, even if you are not licensed for them. If you do not need theprogram, the upgrade will detect it but you can introduce an error by not applying it. This includes HRMSCommercial, HRMS Education and Government, and HRMS Federal Government product lines, as wellas all products within the product lines.
Ideally, you should follow the steps below to apply the various files and fixes.
To apply files and fixes:
1. Install the new release from the CD.2. Apply any additional scripts and projects from the Customer Connection Upgrade page to your new releasecodeline (and to the new Demo database, if applicable).
3. Apply any other Required for Upgrade fixes from Customer Connection’s Updates and Fixes to your newrelease codeline (and to the new Demo database, if applicable).
4. Run your initial pass of the upgrade.5. Before you begin each subsequent upgrade pass, check the Upgrade page for new versions of any files youpreviously applied. Then check Updates and Fixes for any new Required for Upgrade fixes.
Copyright © 2006, Oracle. All rights reserved. 261

Applying Fixes Required for Upgrade Appendix A
Your initial upgrade pass will differ from your subsequent test Move to Production passes. Some of theupgrade tasks and steps are common to both the initial upgrade pass and the Move to Production pass. For thisreason, you may find Required for Upgrade fixes that do not apply to the upgrade pass that you are currentlyperforming. The details provided with each fix will help you determine whether to apply the fix and when toapply it. The fix will also tell you what to do if you have already passed the step for which the fix is needed.
How you apply a fix depends on where you are in the upgrade process. This appendix explains how to apply atypical fix, and is organized by the various points within the upgrade where you will apply fixes.
Task A-2: Apply Fixes During InstallationIn the chapter, “Install the Software” of Getting Started on Your PeopleSoft Upgrade, you should firstdownload and apply all files and objects from the Upgrade page on Customer Connection. Then you mustdownload all Required for Upgrade fixes from Updates and Fixes on Customer Connection. You can use theinstructions in this section to apply any additional fixes that are posted, until you reach the task, “RunningUpgrade Compare Reports.”
If a fix contains a project that needs to be copied from a file, apply it to your Demo database during installation.If the project contains changes for Records or Fields, those objects will be updated during the normal compareand copy steps in the upgrade. You will not have to build objects in the project separately or consider whetherit will have impact on customizations. You will do that with the rest of the objects during the upgrade.Apply as many of the fixes as you can at this time.
To apply script fixes during installation:
1. Download Required for Upgrade Change Package(s) using the “Download Change Package” functionalityin Change Assistant.
2. Use Change Assistant to install/apply the update(s) into your Demo database. Review the documentationincluded with each update prior to applying each update. There may be manual steps that need to beperformed in order to successfully apply the update.
See Enterprise PeopleTools PeopleBook, PeopleSoft Software Updates, Using PeopleSoft Change Assistantfor Updates, for your current release.
Task A-3: Apply Fixes After Running Copy ProjectIt is best not to apply fixes during the Compare and Copy tasks in the “Run and Review Compare Reports”and “Apply Application Changes” chapters of the initial upgrade pass. It can also be cumbersome to applyrecord and field changes during the Creating and Altering of tables in the “Complete Database Changes”chapter. It is, therefore, best to wait until just before the “Running Data Conversions” task in the “ApplyApplication Changes” chapter to apply additional fixes. Most of the fixed objects will be data conversioncode, delivered in projects.
To apply PeopleSoft project fixes before data conversion:
1. Download Required for Upgrade Change Package(s) using the “Download Change Package” functionalityin Change Assistant.
2. Use Change Assistant to install/apply the update(s) into your Demo database for this upgrade pass. Reviewthe documentation included with each update prior to applying each update.
262 Copyright © 2006, Oracle. All rights reserved.

Appendix A Applying Fixes Required for Upgrade
See Enterprise PeopleTools PeopleBook, PeopleSoft Software Updates, Using PeopleSoft ChangeAssistant for Updates, for your current release.
3. The project is now loaded on your Demo database. You should run a project compare to make sure theobjects in the fix will not overwrite any of your customizations. If you find customizations, you mustdecide how to deal with them before you copy the fix to your Copy of Production.
4. If you are performing a Move to Production upgrade pass, first migrate the Change Package(s) into theSource database for this upgrade pass. If needed, first set up Change Assistant with the environmentinformation for your Source Database. If you customized any of the objects delivered in the ChangePackage, you should repackage the fix to include your customizations. If you did not customize any objectsdelivered in the fix you may directly apply them to your source database.
See Enterprise PeopleTools PeopleBook, PeopleSoft Software Updates, Appendix: Migrating ChangePackages or Maintenance Updates, for your current release.
5. Migrate the Change Package(s) into the Target database for this upgrade pass. If needed, first set upChange Assistant with the environment information for your Target Database.
Task A-4: Apply Fixes After Data ConversionAt this point, you have already converted all of your data for the upgrade pass, and you cannot applyApplication Engine program fixes and use them in this upgrade pass. You should refer to the fix instructions todetermine what to do in each case. Often, the instructions say that you need to restore your database from apre-conversion backup and rerun data conversion to get the benefits of the fix. Since this is the only way youcan get the fix onto your current Copy of Production, you may decide to allow the error and not apply thefix until you do a test Move to Production. Then after you have completed that test pass, you can test theaffected function. However, you should not do this if your next pass is your final Move to Production, andyou are going into production with the resulting database. You should always test your upgraded databasebetween test passes if changes have been made to procedures, scripts, or programs. You do not want anysurprises during the final Move to Production.
Task A-5: Apply Fixes Before Move to ProductionYou can apply fixes just before you start a test Move to Production pass in the same way you would in the stepabove, Apply Fixes After Running Copy Project. In those instructions, you apply the fix to your Demo databaseand compare it to the Copy of Production. Make sure that you do the database comparison in order to verifythat the fix does not wipe out any customizations you made to Application Engine programs during your initialupgrade pass. If you have made customizations, merge your customizations into the new Application Enginecode on the Demo database. Then apply the fix to your Copy of Production, which you will use as the Sourcedatabase in the test Move to Production. The fix will then get moved to your New Copy of Production whenyou run the MVPRDEXP.DMS and MVPRDIMP.DMS scripts in the “Apply PeopleTools Changes” chapter.
Copyright © 2006, Oracle. All rights reserved. 263

Applying Fixes Required for Upgrade Appendix A
Task A-6: Apply Fixes During Move to ProductionOnce you have started a test Move to Production, do not apply any fixes until just before data conversion.Apply any fixes using the step above, “Apply Fixes After Running Copy Project”. In those instructions youapply the fix to your Demo database and compare it to your Copy of Production. Instead of using the originalCopy of Production as the Target, you must now use your New Copy of Production, the one defined as theTarget in your Move to Production Change Assistant job. Be sure to do the database comparison to verify thatthe fix does not wipe out any customizations you made to Application Engine programs during your initialupgrade pass. If you have made customizations, merge your customizations into the new Application Enginecode on the Demo database, then copy the project to your New Copy of Production.
264 Copyright © 2006, Oracle. All rights reserved.

APPENDIX B
Benefits Upgrade Notes
Task B-1: COBRA AdministrationPeopleSoft has created a table (PS_BEN_CONTACT_TBL) for storing names and address information forinternal benefits administrative contacts. This was motivated by a need to better support HIPAA certification,but it also lends itself to supporting COBRA Administration notices. The system converts existing COBRAAdministrator records into the new general contact format, and then updates associated Benefit Programsto use the new corresponding administrative contact. The conversion of existing COBRA Administratorrecords is somewhat problematic because the same contact person may administer COBRA for many BenefitPrograms. Under the old structure this meant multiple essentially identical COBRA Administrator records hadto be created (one for each Benefit Program). The system attempts to identify and consolidate these possiblemultiple records during conversion by grouping them by the administrator NAME field. However, if theNAME of the Administrator was inadvertently entered slightly differently on multiple records, the systemmay end up creating several new contact records for them in PS_BEN_CONTACT_TBL. If you are usingPeopleSoft COBRA Administration, review the results of the conversion navigating to the page Set Up HRMS,Product Related, Base Benefits, Plans and Providers, Administrative Contacts.
Task B-2: Savings ManagementThis section applies if you have not applied Service Pack 1 or HRMS 8.3 deduction Calculation2002/Bundle#01.
The Economic Growth and Tax Relief Reconciliation Act of 2001 changed the manner in which certainregulatory limits are applied to savings contributions. Prior to the Act, the administration of 403 (b)plans required the maintenance of life-to-date earnings and contribution information. It also required thatprojections be made through year-end to anticipate limits. Because of this, the Savings Management record(SAVINGS_MGT_EE or SAVINGS_403B_EE, depending on your PeopleSoft release) was keyed by SavingsPlan Type and included a variety of fields for managing projected data. Under the Act, the focus is now moreon managing voluntary extensions to specific regulatory limit types (such as 402 (g)) and as such not only arethe projection fields being dropped, but the record’s key structure has been changed.
To preserve the data, which is recorded in the Savings Management record, therefore, all existing data iscopied into the table SAVINGS_403B_EE. This data is available through PS Query for reference (via theEmployee Benefit Enrollments (EE_BENEFIT_INFO) access group of the Base Benefits query access tree).All current and future management is performed within the SAVINGS_MGT_EE table, using essentiallythe same pages and process.
Note. SAVINGS_403B_EE table is considered obsolete and will not be maintained by PeopleSoft. It is subjectto being removed from the system in future PeopleSoft releases.
Copyright © 2006, Oracle. All rights reserved. 265
Benefits Upgrade Notes Appendix B
Task B-3: Review Benefit System Indicator on JobIn the new PeopleSoft release a new value was added to the translate list for Benefit System “OT” (Other orNot managed by PeopleSoft Benefits). This compliments the existing values of the “BN” (Base Benefits)and “BA” (Automated Benefits Administration). This new value, in conjunction with changes to the PersonModel, allow for better management of contingent workers and non-employee persons-of-interest. Thesepersons can be assigned to Benefits System OT and will thereby be screened out of most Benefits-relatedsearch views and processes. Further, persons assigned to Benefit System OT will not have default BenefitProgram assigned to them in the Job Data pages.
During the upgrade, we attempt to identify persons who are currently assigned to Benefit System “BN” onlybecause no other choice was available. Most notably, these are persons for whom prior hiring logic did notrequire a Benefits Program Participation record. All persons lacking a Benefits Program Participation record(PS_BEN_PROG_PARTIC) are moved to the Benefit System OT. This may leave many persons assigned toBenefit System BN for whom the you don’t actually manage benefits. Unfortunately, the upgrade processcannot reliably identify such persons because of the wide range of business practices in use. (For example,some companies want certain persons assigned to a Benefit Program for administrative or third-party purposes,even though these persons never have active benefit elections recorded for them). Leaving such persons inBenefit System BN will not be a problem, as the system will continue to process (or ignore) them as before.
Task B-4: Review Benefit Record Number DisplayIn prior PeopleSoft releases, a configuration parameter on the Installation Table was used to indicate whethermultiple simultaneous jobs for employees were managed. In the new PeopleSoft release, this system capabilityis now permanently turned on. (This gives the ability to track persons-of-interest and contingent workers,and allow for these persons to transition to employees while retaining their original high-level Person ID.)Because of this system-wide change, the concept of the Benefit Record Number is now more prominentthan it was in previous releases. In fact, all Base Benefits pages now display Benefit Record Number(BENEFIT_RCD_NBR) rather than Employment Record Number (EMPL_RCD).
In the past, if you only managed single jobs for your employees you were “shielded” from the BenefitRecord Number. This was possible because the employee’s single Benefit Record Number was generated toequal the employee’s single Employment Record Number, so the concept of Benefit Record Number waskept “hidden” for clarity. If you manager multiple jobs for your employees you know that Benefit RecordNumber is the key for grouping together several jobs who share the same set benefits. For these customers,the Employment Record Number displayed in the Base Benefits has corresponded to the “primary” jobwithin the Benefit Record Number group.
With the new PeopleSoft release, the Base Benefits search dialogs and pages all use and display BenefitRecord Number.
Note. This in now way changes how benefits are managed, and is not a functional change in how thePeopleSoft system behaves.
This is simply an attempt to make the system visually and functionally consistent. If you only manage singlejobs for your employees, you can ignore the Benefit Record Number, which is automatically assigned toemployees, contingent workers and persons-of-interest in a manner consistent with previous releases. If youmanager multiple jobs for with multiple benefit tracks should find that the new search view criteria andpage displays result in improved usability.
266 Copyright © 2006, Oracle. All rights reserved.
Appendix B Benefits Upgrade Notes
Task B-5: Review Effective Dating of DependantsDependant/Beneficiary information is now effective-dated. The existing dependant information has beenrestructured in a manner similar to the core Person information: a core set of identifying information which doesnot change with time (PS_DEP_BEN); biographical information which is time sensitive (PS_DEP_BEN_EFF);and separate records for Name (PS_DEP_BEN_NAME), Addresses (PS_DEP_BEN_ADDR), and NationalID (PS_DEP_BENEF_NID). However, because of the significant impact of this kind of structural changeon existing applications, it is being introduced in phases. This release lays the technical foundation forfull effective-dated processing in future releases. For this release, most processes which use dependent (orbeneficiary) information will not be fully effective-date enabled. Rather, these processes will continue to workas they have in the past. They will retrieve or process dependant information based solely on the state ofthat data on the day of processing (the “system date”), not based on any historical or functional event dateor “as-of” date.
Task B-6: Review Effective Dating of Company CarsCompany car data is now effective-dated with effective status. In the previous PeopleSoft release, carsthat were not required were deleted (CAR_DATA) from the table to avoid incorrect allocation. In the newPeopleSoft release, cars are made Active or Inactive (when not required) and can maintain their history.
Copyright © 2006, Oracle. All rights reserved. 267

Benefits Upgrade Notes Appendix B
268 Copyright © 2006, Oracle. All rights reserved.
APPENDIX C
Changes on Employment Record
This appendix discusses:
• Understanding Changes to EMPLOYMENT Record
• Last Date Worked
• Termination Date
Understanding Changes to EMPLOYMENT RecordIn the new PeopleSoft release, there have been changes to the setting of the Last Date Worked and theTermination Date on the EMPLOYMENT Record. In previous releases these settings did not always workproperly but they have been fixed in the new PeopleSoft release.
Task C-1: Last Date WorkedThis section discusses:
• Understanding Last Date Worked Settings
• Calculation Rules
Task C-1-1: Understanding Last Date Worked SettingsThe setting of the Last Date Worked has been corrected in the new PeopleSoft release and is being back portedto PeopleSoft 8.3 and PeopleSoft 8 Service Pack 1. The changes made in the new release do not represent achange as to how this date field is meant to be used. Please read the following information if you have madecustomizations to your system to work around the problem.
Task C-1-2: Calculation RulesThe dates in EMPLOYMENT represent the most future dated row in JOB.
For Last Date Worked, this date should be the (EFFDT −1 day) of the “first Job row” that put the person in themost recent inactive status. Therefore, if a person is put on Leave of Absence (LOA) and then terminatedthe Last Date Worked (LDW) will remain the date of the initial LOA. This will clear when the employee ischanged to Active.
Copyright © 2006, Oracle. All rights reserved. 269

Changes on Employment Record Appendix C
An employee should be able to go on multiple leaves without having to return in between, but the action thatreturns them from leave should match the last Leave type row. Only one action is required to return theemployee to Active status. If the employee is Terminated after a leave (the LDW remains the LOA date) andthen rehired, they will be returned to Active Status and the Last Date Worked will be cleared.
The following table is an example of what the EMPLOYEE record would look like:
EFFDT Action Status Last Date Worked Termination
10/01/01 HIR Active Null Null
05/05/02 LOA Leave 05/04/02 Null
06/06/02 LWP Leave with pay 05/04/02 Null
09/15/02 TER Terminated 05/04/02 09/14/02
Task C-2: Termination DateThis section discusses:
• Calculation Rules
Note. The changes made to the Termination date represent a function change.
Note. If you have added customizations that work around the fact that the Termination Date used to be resetwith each Termination or Retirement Action, (VW) then you will need to remove those customizationswhen you upgrade to the new PeopleSoft release. However, these changes are not back ported to previousPeopleSoft releases.
Task C-2-1: Calculation RulesThe dates in EMPLOYMENT represent the most future dated row in JOB.
For a termination, this date should be the (EFFDT − 1 day (VW)) of the “first Job row” that put the person ina Terminated, Retired, or Deceased status. Therefore, if an employee is Terminated with an action of Termwith Pay and then Terminated with an action of TER, the Termination date will remain the date of the initialTermination with Pay. This will clear when the employee is rehired.
The following is an example of the EMPLOYMENT record:
EFFDT Action Status Last Date Worked Termination
10/01/01 HIR Active Null Null
05/05/02 LOA Leave 05/04/02 Null
06/06/02 LWP Leave with Pay 05/04/02 Null
270 Copyright © 2006, Oracle. All rights reserved.

Appendix C Changes on Employment Record
EFFDT Action Status Last Date Worked Termination
09/15/02 TWP Term with Pay 05/04/02 09/14/02
10/03/02 TER Term 05/04/02 09/14/02
The following are the valid actions that can be entered after the initial terminating action:
Initial Action After Initial Action
Terminated Retired
Terminated Retired with Pay
Term with Pay Terminated
Term with Benefits Terminated
Retired Terminated
Retired Terminated with Pay
Retired with Pay Retired
For Pension Payees:
Initial Action After Initial Action
Retired Terminated − Pension Payout
Retired Retired − Pension Payout
Retired with Pay Terminated − Pension Payout
Retired with Pay Retired − Pension Payout
Term with Pay Terminated − Pension Payout
Term with Pay Retired − Pension Payout
Copyright © 2006, Oracle. All rights reserved. 271

Changes on Employment Record Appendix C
272 Copyright © 2006, Oracle. All rights reserved.

APPENDIX D
Changes to Batch Programs
Changes to Batch ProgramsThis section applies if you have not applied Service Pack 1 or HRMS 8.3 deduction Calculation2002/Bundle#01.
In PeopleSoft 8.x, many batch processes were rewritten from the previous version. Some were converted toApplication Engine while others were rewritten and renamed. The following table lists the batch programs(COBOL and SQR) that were changed in PeopleSoft 8.x. Use this list when you review your batch processcustomization. If you know you have customized a particular program on this list, review the new program toverify if you still need that customization.
Program Name in Previous Release 8.x Program Environment 8.x Program Name
BEN200.SQR
BEN201.SQR
BEN202.SQR
Not Applicable: Removed asobsolete.
Not Applicable: Removed asobsolete.
Copyright © 2006, Oracle. All rights reserved. 273

Changes to Batch Programs Appendix D
274 Copyright © 2006, Oracle. All rights reserved.

APPENDIX E
Changing the User Interface
This appendix discusses:
• Change the User Interface
• Change the User Interface for Mobile
Task E-1: Change the User InterfaceThree user interface options were delivered with your current release of PeopleSoft 8.x. The classic style, thestyle seen in previous releases of your PeopleSoft application, is set as your default style. The following areexamples of the three delivered styles: classic, light blue, and dark blue.
The classic style, shown below, is set as your default style delivered with your PeopleSoft release.
The classic style user interface option
The following example represents the light blue style.
Copyright © 2006, Oracle. All rights reserved. 275
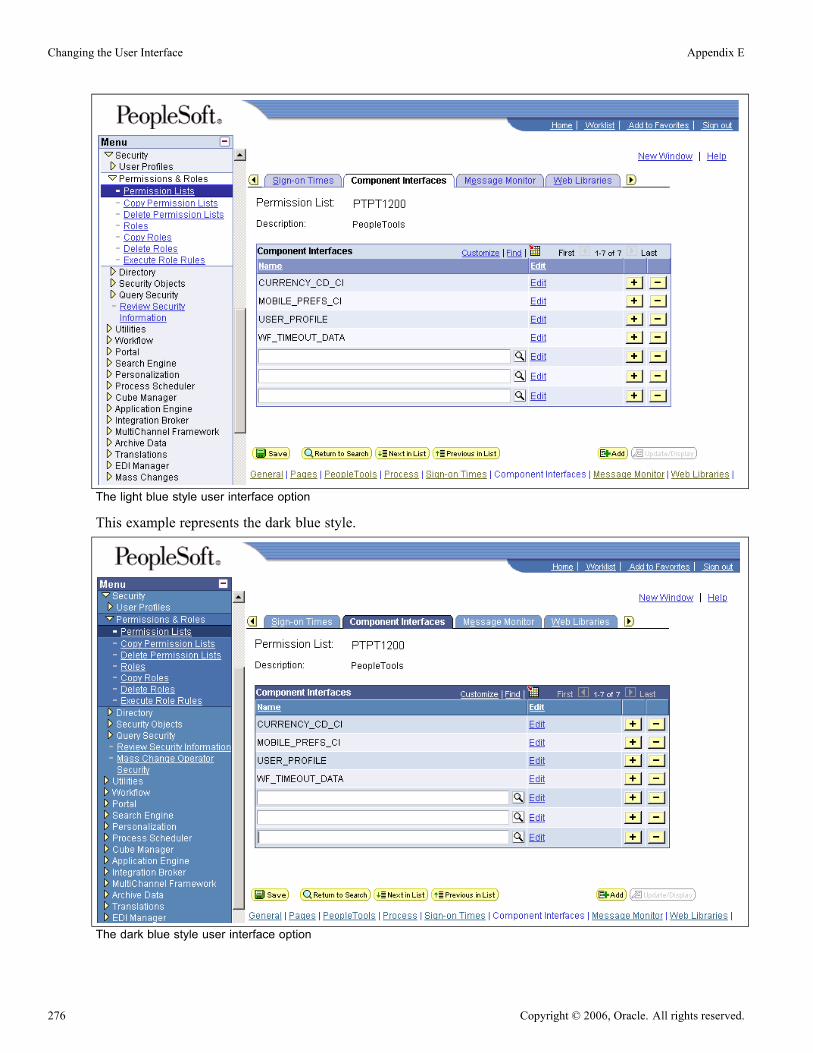
Changing the User Interface Appendix E
The light blue style user interface option
This example represents the dark blue style.
The dark blue style user interface option
276 Copyright © 2006, Oracle. All rights reserved.

Appendix E Changing the User Interface
See Enterprise PeopleTools PeopleBook, PeopleSoft Application Designer information, for your new release.
To change your styles, you must delete the substyle sheets associated with the classic style and replacethem with either the light or dark blue substyle sheet.
Note. The new user interface looks are supported by Internet Explorer release 5 and above and NetscapeNavigator release 6 and above. If using a browser and release other than these, the system defaults tothe classic style.
To enable one of the new user interface looks:
1. In Application Designer, open the stylesheet PSSTYLEDEF.
2. Click on the PSALTERNATE Sub Style Sheet, and press Delete.
3. Select Insert, Insert Sub Style Sheet.
4. Select PSALTERNATE_LIGHTBLUE or PSALTERNATE_DARKBLUE.
5. Repeat steps 1 through 4 for the PTSTYLEDEF and PSACE Sub Style Sheets, making sure to use the sameextension (_LIGHTBLUE or _DARKBLUE) as you did for PSALTERNATE.
6. Select Save.7. Open the stylesheet PSQUERYSTYLEDEF.
8. Click on the PTQUERYSTYLESUB Sub Style Sheet, and press Delete.
9. Select Insert, Insert Sub Style Sheet.
10. Select PTQUERYSTYLESUB_LIGHTBLUE or PTQUERYSTYLESUB_DARKBLUE. Use the sameextension as you did in Step 4.
11. Select Save.
Task E-2: Change the User Interface for MobileYou use Related Content Projects to synchronize extraneous PeopleTools objects to a mobile device. Inparticular, you can use a Related Content Project to synchronize a new or customized stylesheet to the mobiledevice. Related Content Projects are associated with a Component Interface. PeopleSoft recommends thatyou associate a given Related Content Project with a synchronizable Component Interface that is common toyour mobile application.
Copyright © 2006, Oracle. All rights reserved. 277

Changing the User Interface Appendix E
The Synchronization tab
To change the user interface look for mobile applications:
1. Follow the procedure above to add the new or customized stylesheet to a PeopleTools Project.2. In Application Designer, open a synchronizable Component Interface that is common to your mobileapplication.
3. Open the Properties dialog box from the pop-up menu.4. Select the Synchronization tab.5. Click the Select button for the Related Content Project.6. Find and highlight the desired project and click Select.7. Select Save.The stylesheet will be synchronized to the mobile device during the next Bootstrap or Update Applicationssynchronization.
See Enterprise PeopleTools PeopleBook, PeopleSoft Component Interfaces information, for your new release.
See Enterprise PeopleTools PeopleBook, PeopleSoft Mobile Agent information, for your new release.
278 Copyright © 2006, Oracle. All rights reserved.
APPENDIX F
Data Archiving Tool
This appendix discusses:
• Data Archiving Tool
Data Archiving ToolThis appendix contains information for customers who have the Rapid Apps (or Strategic CustomizationService) Data Archiving Tool. The following tables need to be dropped from your database prior to runningthe task Updating PeopleTools System Tables. If you do not drop these tables prior to running this task, youwill receive errors because the upgrade process will try to create these tables.
• PS_ARCH_AUDIT• PS_ARCH_COMMON_KEY• PS_ARCH_CTRL• PS_ARCH_FLT_OPT• PS_ARCH_FLT_RQST• PS_ARCH_HST_OPT• PS_ARCH_HST_RQST• PS_ARCH_IMP_OPT• PS_ARCH_IMP_RQST• PS_ARCH_LNG_TMP• PS_ARCH_OTH_CTRL• PS_ARCH_PROJ• PS_ARCH_RPT_RQST• PS_ARCH_RQST• PS_ARCH_RQST_OPT• PS_ARCH_SECURITY• PS_ARCH_SQL_LNG• PS_ARCH_SQRFLD• PS_ARCH_TBL
Copyright © 2006, Oracle. All rights reserved. 279
Data Archiving Tool Appendix F
Dropping these tables results in the loss of your archive templates. Archive templates created from the RapidApps Data Archive Tool cannot be upgraded and are not compatible with archive templates used by thePeopleTools 8.4x Data Archive Manager. If you want to use the templates you previously defined in the RapidApps Data Archive Tool, redefine them in the Data Archive Manager.
280 Copyright © 2006, Oracle. All rights reserved.
APPENDIX G
Data Conversion Utilities
This appendix discusses:
• Understand Data Conversion Utilities
• Application Engine Driver Program
• Upgrade Drivers Page
• Data Conversion Report
Understand Data Conversion UtilitiesThis appendix contains information regarding the Application Engine program UPG_DATACONV and thePS_UPG_DATACONV table.
Task G-1: Application Engine Driver ProgramIn order to run all data conversions in the correct sequence, PeopleSoft has provided the Application Engineprogram UPG_DATACONV and the PS_UPG_DATACONV table. This program runs the Application Enginesections defined in the table PS_UPG_DATACONV. The PS_UPG_DATACONV table contains a list of all ofthe Application Engine sections that you need to run and in what sequence they should be run.
Task G-2: Upgrade Drivers PageThis section discusses:
• Understanding Upgrade Drivers Page
• Accessing The Upgrade Drivers Page
• Adding New Upgrade Drivers Section Page
• Inactivating Upgrade Drivers Section
Understanding Upgrade Drivers PageBefore you run data conversion, you may need to change what the Upgrade Driver program runs. You can add,remove, or deactivate Application Engine sections through the Upgrade Drivers page.
Copyright © 2006, Oracle. All rights reserved. 281
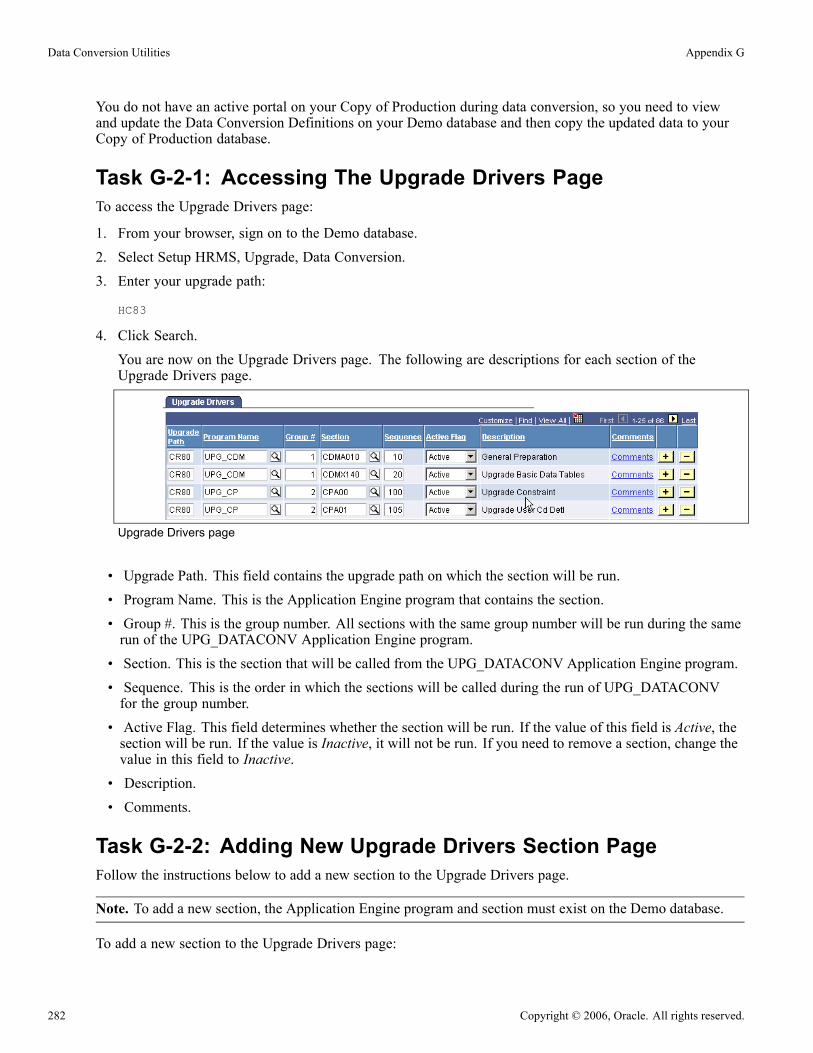
Data Conversion Utilities Appendix G
You do not have an active portal on your Copy of Production during data conversion, so you need to viewand update the Data Conversion Definitions on your Demo database and then copy the updated data to yourCopy of Production database.
Task G-2-1: Accessing The Upgrade Drivers PageTo access the Upgrade Drivers page:
1. From your browser, sign on to the Demo database.
2. Select Setup HRMS, Upgrade, Data Conversion.
3. Enter your upgrade path:
HC83
4. Click Search.You are now on the Upgrade Drivers page. The following are descriptions for each section of theUpgrade Drivers page.
Upgrade Drivers page
• Upgrade Path. This field contains the upgrade path on which the section will be run.• Program Name. This is the Application Engine program that contains the section.• Group #. This is the group number. All sections with the same group number will be run during the samerun of the UPG_DATACONV Application Engine program.
• Section. This is the section that will be called from the UPG_DATACONV Application Engine program.• Sequence. This is the order in which the sections will be called during the run of UPG_DATACONVfor the group number.
• Active Flag. This field determines whether the section will be run. If the value of this field is Active, thesection will be run. If the value is Inactive, it will not be run. If you need to remove a section, change thevalue in this field to Inactive.
• Description.• Comments.
Task G-2-2: Adding New Upgrade Drivers Section PageFollow the instructions below to add a new section to the Upgrade Drivers page.
Note. To add a new section, the Application Engine program and section must exist on the Demo database.
To add a new section to the Upgrade Drivers page:
282 Copyright © 2006, Oracle. All rights reserved.

Appendix G Data Conversion Utilities
1. From your browser, sign on to the Demo database.2. Select Set Up HRMS, Upgrade, Data Conversion.3. Select Add a New Value.4. Click Add.5. Click Save.6. When you have completed all changes, sign on to your Demo database using Data Mover and run thefollowing script to export the updated data conversion data:
DLUPX03E.DMS
7. Sign on to your Copy of Production database using Data Mover and run the following script to load theupdated data conversion data:
DLUPX03I.DMS
Task G-2-3: Inactivating Upgrade Drivers SectionFollow the instructions below to deactivate a section on the Upgrade Drivers page. Once deactivated, thesection will not run as part of data conversion.
To inactivate a section on the Upgrade Drivers page:
1. From your browser, sign on to the Demo database.2. Select Set Up HRMS, Upgrade, Data Conversion.3. Enter your upgrade path:
HC83
4. Click Search.5. Find the row with the Program Name and Section you want to remove and change the value of the ActiveFlag field to Inactive.
6. Click Save.7. When you have completed all changes, sign on to your Demo database using Data Mover and run thefollowing script to export the updated data conversion data:
DLUPX03E.DMS
8. Sign on to your Copy of Production database using Data Mover and run the following script to load theupdated data conversion data:
DLUPX03I.DMS
Task G-3: Data Conversion ReportEach of the upgrade data conversion sections contains comments that describe the processing performed by thesection. PeopleSoft has delivered an SQR to list all of these comments by the group and sequence numbersthat determine how they run. The name of this report is UDATACNV.
To run UDATACNV:
Copyright © 2006, Oracle. All rights reserved. 283

Data Conversion Utilities Appendix G
1. Using SQRW, run SQR UDATACNV on your Copy of Production database.2. When prompted for Upgrade Path, enter:
HC83
3. When prompted for Group Number, enter the two-digit group number to report on, or enter 0 to seethe comments for all groups.
284 Copyright © 2006, Oracle. All rights reserved.
APPENDIX H
Dynamic ChartFields Upgrade Notes
This appendix discusses:
• Understanding Dynamic ChartFields Upgrade
• Changes in Account Code Table
• Changes in GL Interface Setup
• Upgrade Time and Labor ChartFields
Understanding Dynamic ChartFields UpgradeIn PeopleSoft 8.9 there have been changes in the way Payroll for North America uses Standard ChartFieldconfiguration. This new functionality will vary according to financials system being used but no matter whatfinancials system you use, the upgrade will impact your existing data.
Note. Changes in General Ledger Interface Setup impact you only if you use non-commitment accounting,while changes in Account Code Table impact you no matter what type of accounting you use.
Task H-1: Changes in Account Code TableThis section discusses:
• Understanding Combination Codes
• Understanding FDM_HASH
Task H-1-1: Understanding Combination CodesCombination Code represents a particular set of ChartField values. The ChartField values used to be stored inACCT_CD_TBL.
In PeopleSoft 8.9 the structure of ACCT_CD_TBL is changing as well as the content. The newACCT_CD_TBL will store only combination codes used in Payroll for North America for either commitmentaccounting or noncommitment accounting.
In PeopleSoft 8.9 there is a new table VALID_COMBO_TBL that will store combination codes as they aredefined in Financials database.
Both tables will be populated during upgrade process with the data from your ACCT_CD_TBL as follows:
• Current ACCT_CD_TBL will be physically renamed into UPG_ACCT_CD_TBL.
Copyright © 2006, Oracle. All rights reserved. 285

Dynamic ChartFields Upgrade Notes Appendix H
• Current ACCT_CD_TBL_LNG will be physically renamed into UPG_ACCT_CD_LNG.• To avoid confusion between DEPTID used in Financial database and DEPTID used in HCM database, theDEPTID in CHARTFLD_KY_SBR will be renamed into DEPTID_CF.
New tables will have key structure as follows:
• ACCT_CD_TBL:FDM_HASH – a new value built for efficient access of the data. It is not going to be visible on any ofthe pages.
• VALID_COMBO_TBL:
- SETID – value converted from UPG_ACCT_CD_TBL.SETID
- PROCESS_GROUP – blank value
- FDM_HASH – a new value built for efficient access of the data. It is not going to be visible onany of the pages.
- EFFDT – value converted from UPG_ACCT_CD_TBL.EFFDT.
ACCT_CD, the old key in ACCT_CD_TBL, will still be saved in both tables but since it does not represent thesame values in both tables it will be saved as follows:
• ACCT_CD in ACCT_CD_TBL• FDM_COMBO_CD in VALID_COMBO_TBL
You will be able to use these fields to reconcile your conversion and verify that all data are convertedas expected.
Both tables will be populated during the upgrade, but that does not mean you have to use them both in yournew release. Using ACCT_CD_TBL is mandatory, but using VALID_COMBO_TBL is optional and youcan clear the table if you are not planning to use it. However, the timing of deleting these entries is crucialand might impact your setup of Expenses ChartField Mapping if you are planning to use that functionality.Please keep in mind that ACCT_CD_TBL in a new release might have less entries than you had in the oldrelease because it will only have entries you actually used. All entries from VALID_COMBO_TBL thatyou are planning to use in a new release will be saved in ACCT_CD_TBL during the Expenses ChartFieldMapping, if they have not been used already. If you clear VALID_COMBO_TBL before you complete thesetup, you might not have all expected entries available for a setup.
Note. Recommendation: Ensure all combination codes you need for setting up Expenses ChartField Mappingin a new release are entered in your old release before you make a copy of production database.
See AlsoPeopleSoft Application Fundamentals for HRMS PeopleBook, for your new release.
PeopleSoft Payroll for North America PeopleBook, for your new release.
PeopleSoft Human Resources PeopleBook: Manage Commitment Accounting, for your new release.
Task H-1-2: Understanding FDM_HASHFDM_HASH is unique value representing combination of all 16 ChartFields. It consists of two parts:characters 1-28 are hash value built based on ChartField combination, characters 29-31 are sequence numberadded to hash value to ensure uniqueness of the key.
286 Copyright © 2006, Oracle. All rights reserved.
Appendix H Dynamic ChartFields Upgrade Notes
FDM_HASH is dependent on the format of each ChartField, therefore the format of each ChartField inUPG_ACCT_CD_TBL is updated to uppercase to ensure that hash value will be build correctly.
Note. Each record in UPG_ACCT_CD_TBL that has SETID and at least one ChartField populated will beinserted into VALID_COMBO_TBL.
It is possible that same ChartField combination is represented with two different account codes in theUPG_ACCT_CD_TBL:
• If second (and any following) identical ChartField combination is within same SETID, the sequencenumber of the FDM_HASH will be incremented by 1. If any of these identical ChartField combinationshas ‘Active’ Effective Status, all of them will have Effective Status updated to ‘Active’.
• If second (and any following) identical ChartField combinations is within two different SETIDs, thesequence number of the FDM_HASH will not be incremented. This will result with two or more recordswith identical FDM_HASH, but it is valid because FDM_HASH is just one of the keys and the insertedrecords will not be duplicates.
It is possible that the algorithm used to create FDM_HASH returns the same value for two different ChartFieldcombinations:
• If second ChartField combination is within the same SETID, the sequence number of the FDM_HASHwill be incremented by 1.
• If the second ChartField combination is within two different SETIDs, the sequence number of theFDM_HASH will not be incremented.
Note. Each record in UPG_ACCT_CD_TBL that has been used for distribution anywhere in PeopleSoft HCMand has at least one ChartField populated will be inserted into a new ACCT_CD_TBL.
FDM_HASH on ACCT_CD_TBL should be in sync with FDM_HASH on VALID_COMBO_TBL in themajority of the cases, but there are some exceptions to this:
• It is possible that the ChartField combination doesn’t exist on VALID_COMBO_TBL, but becauseit was used for distribution it has to be converted into a new structure of ACCT_CD_TBL. ChartFieldcombinations that have blank SETID are skipped during VALID_COMBO_TBL conversion.
• It is possible that FDM_HASH is duplicate on the new ACCT_CD_TBL even though it is not duplicate onVALID_COMBO_TBL. VALID_COMBO_TBL has unique FDM_HASH within SETID. If there aretwo or more records with different account codes, but the same ChartField combination within differentSETIDs, they will not be duplicates in VALID_COMBO_TBL but will be duplicates in ACCT_CD_TBL.To avoid this problem with duplicates and keep the distribution history as is, the sequence number of theFDM_HASH will be incremented by 1.
Task H-2: Changes in GL Interface SetupThis section discusses:
• Understanding GL Interface Setup
• Understanding Liability Accounts
• Understanding GL Activity Grouping
Copyright © 2006, Oracle. All rights reserved. 287
Dynamic ChartFields Upgrade Notes Appendix H
• Understanding Expenses ChartField Mapping
Understanding GL Interface SetupIn PeopleSoft 8.9, there have been changes to the General Ledger Interface setup procedure for organizationsthat use non-commitment accounting. There are some new interface tables introduced that provide moreflexible integration between Payroll for North America and General Ledger.
Chart Dist HR and Chart Keys HR will not be used in PeopleSoft 8.9. Instead, new tables are defined to grouppayroll activities and map defined groupings to specific ChartFields. Liability offset accounts are defined onthe payroll source table directly.
Chart Dist HR and Chart Keys HR can be deleted at the end of the conversion.
The fields that represent Expenses Account Type in the COMPANY_TBL_GL, WGLS_EXP_GL_ACC,EARNINGS_TBL and DEDUCTION_CLASS tables will not be physically deleted, but they are not accessiblefrom any of the pages.
Important! Once you create your Copy of Production database during the initial pass you should not makeany changes in your production database for Company, Company State Taxes, Company Local Taxes, WageLoss Plan Table, and Deduction Table until you complete the upgrade. If you make changes to any of theabove tables you will not be able to use the import script during the Move to Production pass to import the datathat you have set up in the initial pass. You will either have to synchronize the data between production and thecopy of the production in the initial pass before you set up data and complete the export, or manually set updata in your Copy of Production during the Move to Production pass.
Task H-2-1: Understanding Liability AccountsThe General Ledger Interface process enforces balancing of GL transactions by creating offset credittransactions using Liability accounts. In PeopleSoft 8.9, these liability accounts are defined directly onpayroll source tables.
If you are using noncommitment accounting you must do following:
• Run and review Liability ChartField Usage audit report on your copy of the production during initial pass.Work in conjunction with general ledger staff to make sure the reviewed liability accounts are correctlyassigned.
See Run Dynamic ChartFields Audits• Manually update tables with liability accounts, if any update are needed.
See Set Up the Liability Accounts• Export tables updated in your copy of the production during the initial pass of the upgrade.
See Export GL Interface Setup Tables• Import tables into your new copy of the production during the Move to Production (MTP) phase.
See Import GL Interface Setup Tables
Sections of audit reports listed under table name will help to decide how you want to set up data in each table:
• Company - COMPANY_TBL_GL
288 Copyright © 2006, Oracle. All rights reserved.
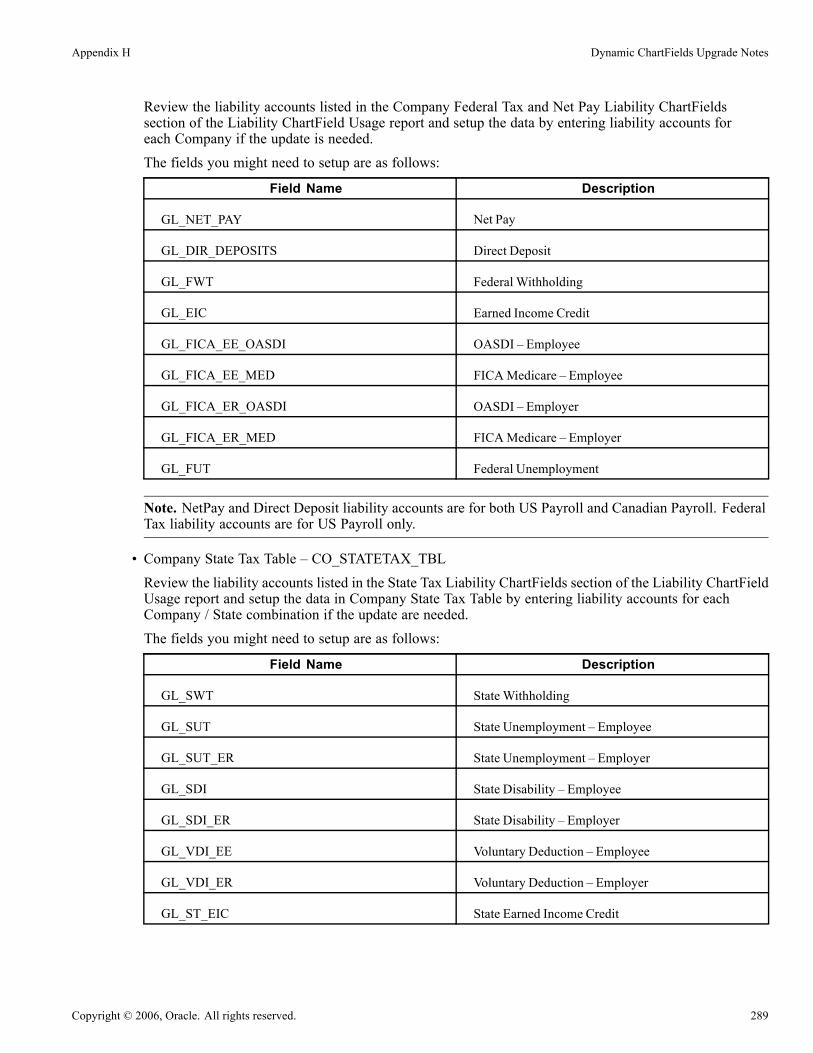
Appendix H Dynamic ChartFields Upgrade Notes
Review the liability accounts listed in the Company Federal Tax and Net Pay Liability ChartFieldssection of the Liability ChartField Usage report and setup the data by entering liability accounts foreach Company if the update is needed.The fields you might need to setup are as follows:
Field Name Description
GL_NET_PAY Net Pay
GL_DIR_DEPOSITS Direct Deposit
GL_FWT Federal Withholding
GL_EIC Earned Income Credit
GL_FICA_EE_OASDI OASDI – Employee
GL_FICA_EE_MED FICAMedicare – Employee
GL_FICA_ER_OASDI OASDI – Employer
GL_FICA_ER_MED FICAMedicare – Employer
GL_FUT Federal Unemployment
Note. NetPay and Direct Deposit liability accounts are for both US Payroll and Canadian Payroll. FederalTax liability accounts are for US Payroll only.
• Company State Tax Table – CO_STATETAX_TBLReview the liability accounts listed in the State Tax Liability ChartFields section of the Liability ChartFieldUsage report and setup the data in Company State Tax Table by entering liability accounts for eachCompany / State combination if the update are needed.The fields you might need to setup are as follows:
Field Name Description
GL_SWT State Withholding
GL_SUT State Unemployment – Employee
GL_SUT_ER State Unemployment – Employer
GL_SDI State Disability – Employee
GL_SDI_ER State Disability – Employer
GL_VDI_EE Voluntary Deduction – Employee
GL_VDI_ER Voluntary Deduction – Employer
GL_ST_EIC State Earned Income Credit
Copyright © 2006, Oracle. All rights reserved. 289

Dynamic ChartFields Upgrade Notes Appendix H
Note. State Tax liability accounts are for US Payroll only.
• Company Local Tax Table – CO_LOCALTAX_TBLReview the liability accounts listed in the Local Tax Liability ChartFields section of the LiabilityChartField Usage report and setup the data in Company Local Tax Table by entering liability accounts foreach Company / State / Locality combination if the update are needed.The fields you might need to setup are as follows:
Field Name Description
GL_LWT Local Withholding – Employee
GL_LWT_ER Local Withholding – Employer
Note. Local Tax liability accounts are for US Payroll only
• Wage Loss Plan Table – WGLS_LIA_GL_ACCReview the liability accounts listed in the Canadian Tax Liability ChartFields section of the LiabilityChartField Usage report and setup the data in Wage Loss Table by entering liability accounts for eachWage Loss Plan / Tax Class combination if the update are needed.The fields you might need to setup are as follows:
Field Name Tax Class Description
GL_NBR CIT Canadian Income Tax
GL_NBR CPP Canadian Pension Plan –Employee
GL_NBR CPR Canadian Pension Plan –Employer
GL_NBR EIE Employment Insurance -Employee
GL_NBR EIR Employment Insurance - Employer
GL_NBR HTX Health Tax
GL_NBR PYT Payroll Tax
GL_NBR QBT Quebec Bonus Tax
GL_NBR QIT Quebec Income Tax
GL_NBR QPP Quebec Pension Plan – Employee
GL_NBR QPR Quebec Pension Plan – Employer
290 Copyright © 2006, Oracle. All rights reserved.

Appendix H Dynamic ChartFields Upgrade Notes
Field Name Tax Class Description
GL_NBR RV2 Quebec Income Tax – RL2
GL_NBR T4A Canadian Income Tax – T4A
Note. Canadian Tax liability accounts are for Canadian Payroll only.
• Deduction Table: DEDUCTION_CLASS
Review the liability accounts listed in the Deduction Liability ChartFields section of the LiabilityChartField Usage report and setup the data in Deduction Table for each Wage Deduction Code / DeductionClass combination, if update are needed.
The fields you might need to setup are:
Field Name Description
GL_LIABILITY Deduction Liability
Note. Deduction liability accounts are for both US and Canadian payroll.
Task H-2-2: Understanding GL Activity GroupingIn PeopleSoft 8.9, organizations that use non-commitment accounting can track expenses by using payrollactivities groups. In prior releases, GL accounts were assigned to individual earning, deduction, and taxactivities. In PeopleSoft 8.9, organizations can group payroll activities that share similar characteristics andthat are assigned to one ChartField combination.
If you are using non-commitment accounting you must do following:
• Run and review Chartkey Usage by Expense Types audit report on your copy of the production duringinitial pass. The report lists all earnings code, deduction code, US taxes, Canadian taxes expenses accountsdefined on Chart Dist HR and Chart Keys HR tables in prior releases.
See Run Dynamic ChartFields Audits• Manually setup the GL activity groupings. Work in conjunction with general ledger staff to make sure youwill group payroll activities and be able to map them correctly to corresponding ChartFields in later step.
See Set Up the GL Activity Groupings• Export tables updated in your copy of the production during initial pass of the upgrade.
See Export GL Interface Setup Tables• Import tables into your new copy of the production during Move to Production pass.
See Import GL Interface Setup Tables
Tables created for Payroll Activities grouping are:
Copyright © 2006, Oracle. All rights reserved. 291
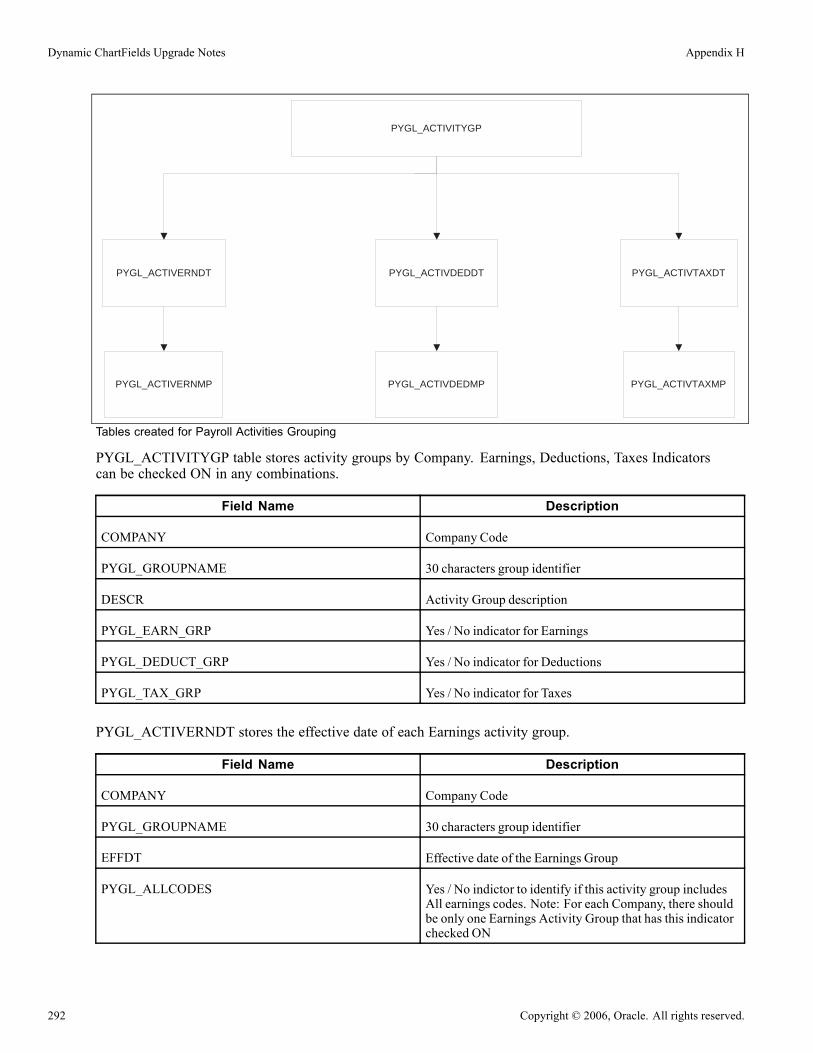
Dynamic ChartFields Upgrade Notes Appendix H
PYGL_ACTIVITYGP
PYGL_ACTIVERNDT PYGL_ACTIVDEDDT PYGL_ACTIVTAXDT
PYGL_ACTIVERNMP PYGL_ACTIVDEDMP PYGL_ACTIVTAXMP
Tables created for Payroll Activities Grouping
PYGL_ACTIVITYGP table stores activity groups by Company. Earnings, Deductions, Taxes Indicatorscan be checked ON in any combinations.
Field Name Description
COMPANY Company Code
PYGL_GROUPNAME 30 characters group identifier
DESCR Activity Group description
PYGL_EARN_GRP Yes / No indicator for Earnings
PYGL_DEDUCT_GRP Yes / No indicator for Deductions
PYGL_TAX_GRP Yes / No indicator for Taxes
PYGL_ACTIVERNDT stores the effective date of each Earnings activity group.
Field Name Description
COMPANY Company Code
PYGL_GROUPNAME 30 characters group identifier
EFFDT Effective date of the Earnings Group
PYGL_ALLCODES Yes / No indictor to identify if this activity group includesAll earnings codes. Note: For each Company, there shouldbe only one Earnings Activity Group that has this indicatorchecked ON
292 Copyright © 2006, Oracle. All rights reserved.

Appendix H Dynamic ChartFields Upgrade Notes
PYGL_ACTIVERNMP stores all earnings codes that are included in the Earnings activity group.
Field Name Description
COMPANY Company Code
PYGL_GROUPNAME 30 characters group identifier
EFFDT Effective date of the Earnings Group
ERNCD Earnings Code
Following is an example of the Earnings Activity Group setup for Sick Leave:
Earnings Expenses page
PYGL_ACTIVDEDDT stores the effective date of each Deduction activity group
FieldName Description
COMPANY Company Code
PYGL_GROUPNAME 30 characters group identifier
EFFDT Effective date of the Deduction Group
PYGL_ALLCODES Yes / No indictor to identify if this activity group includesAll deduction codes. Note: For each Company, thereshould be only one Deduction Activity Group that has thisindicator checked ON
PYGL_ACTIVDEDMP stores all deduction codes that are included in the Deduction activity group.
Copyright © 2006, Oracle. All rights reserved. 293

Dynamic ChartFields Upgrade Notes Appendix H
FieldName Description
COMPANY Company Code
PYGL_GROUPNAME 30 characters group identifier
EFFDT Effective date of the Deduction Group
PLAN_TYPE Deductions plan type
DED_CLASS Deduction Classification
DEDCD Deduction Code
DED_SLSTX_CLASS Sales Tax Type
Following is an example of the Deduction Activity Group setup for Health Benefits:
Deduction Expenses page
PYGL_ACTIVTAXDT stores the effective date of each Tax activity group.
FieldName Description
COMPANY Company Code
PYGL_GROUPNAME 30 characters group identifier
294 Copyright © 2006, Oracle. All rights reserved.
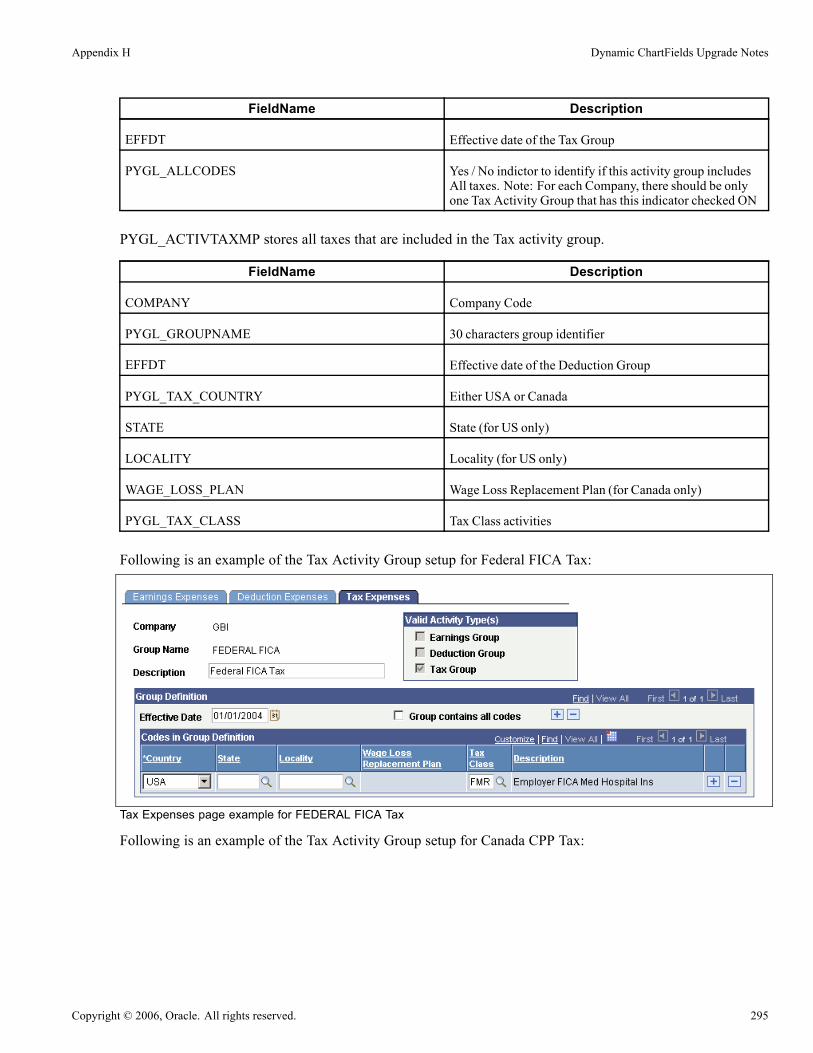
Appendix H Dynamic ChartFields Upgrade Notes
FieldName Description
EFFDT Effective date of the Tax Group
PYGL_ALLCODES Yes / No indictor to identify if this activity group includesAll taxes. Note: For each Company, there should be onlyone Tax Activity Group that has this indicator checked ON
PYGL_ACTIVTAXMP stores all taxes that are included in the Tax activity group.
FieldName Description
COMPANY Company Code
PYGL_GROUPNAME 30 characters group identifier
EFFDT Effective date of the Deduction Group
PYGL_TAX_COUNTRY Either USA or Canada
STATE State (for US only)
LOCALITY Locality (for US only)
WAGE_LOSS_PLAN Wage Loss Replacement Plan (for Canada only)
PYGL_TAX_CLASS Tax Class activities
Following is an example of the Tax Activity Group setup for Federal FICA Tax:
Tax Expenses page example for FEDERAL FICA Tax
Following is an example of the Tax Activity Group setup for Canada CPP Tax:
Copyright © 2006, Oracle. All rights reserved. 295

Dynamic ChartFields Upgrade Notes Appendix H
Tax Expenses page example for Canada CPP Tax
See AlsoPeopleSoft Payroll for North America PeopleBook, for your new release.
Task H-2-3: Understanding Expenses ChartField MappingIn the new PeopleSoft release, organizations that use non-commitment accounting, can assign ChartFieldsto payroll activity in various report levels. There are five report levels – Company, Department, Position,JobCode and employment record. Organizations can track expenses down to individual employment recordlevel if desired
Earnings, Deductions and Taxes are defined as separate mapping entries. Therefore, they could be mapped todifferent levels. For example, organizations can track earnings expenses in employment record level and trackfringe benefits (deductions and taxes) at Department level. The General Ledger Interface process retrieve thesemapping starting from the lowest level (employment record) and reach up to JobCode, Position, Departmentand Company until a mapping definition is found.
If you are using non-commitment accounting you must do following:
1. Run and review Chartkey Usage by Company and Business Unit and Chartkey Usage by Expense Typesaudit reports on your copy of the production during initial pass. The reports list all earnings code,deduction code, US taxes, Canadian taxes expenses accounts defined on Chart Dist HR and Chart KeysHR tables in prior releases.
See Run Dynamic ChartFields Audits2. Manually setup the expenses ChartField mappings. Work in conjunction with general ledger staff to makesure you will map payroll activities groupings correctly to each company / business unit combination.
See Set Up the Expenses ChartField Mappings
3. Export tables updated in your copy of the production during initial pass of the upgrade.
See Export GL Interface Setup Tables4. Import tables into your new copy of the production during Move to Production pass.
See Import GL Interface Setup Tables
Tables created for Company ChartField Mappings:
296 Copyright © 2006, Oracle. All rights reserved.

Appendix H Dynamic ChartFields Upgrade Notes
PYGL_CF_MAPPING
PYGL_CF_CPNYLEV
PYGL_CF_CPNYERN PYGL_CF_CPNYDED PYGL_CF_CPNYTAX PYGL_CF_CPNYCTX
Tables created for Company ChartField Mappings
PYGL_CF_MAPPING table stores Company and HR Business Unit that require Expense Account setup.
FieldName Description
COMPANY Company Code
BUSINESS_UNIT HR Business Unit
PYGL_CF_CPNYLEV table stores the level of the mapping.
FieldName Description
COMPANY Company Code.
BUSINESS_UNIT HR Business Unit
DEPTID Department ID
JOBCODE Job Code
POSITION_NBR Position Number
EMPLID Employment ID
EMPL_RCD Employment Record
EFFDT Effective date of the mapping level
EFF_STATUS Effective status of the mapping level
COMPANY_LEVEL_INDC Mapping Level – either Company, Department, Position,JobCode or Employment record.
Copyright © 2006, Oracle. All rights reserved. 297

Dynamic ChartFields Upgrade Notes Appendix H
PYGL_CF_CPNYERN table stores ChartField assignment to each earnings activity group
PYGL_CF_CPNYDED table stores ChartField assignment to each deduction activity group.
PYGL_CF_CPNYTAX table stores ChartField assignment to each US Tax activity group.
PYGL_CF_CPNYCTX table stores ChartField assignment to each Canada Tax activity group.
All these tables share the same record layout:
FieldName Description
COMPANY Company Code
BUSINESS_UNIT HR Business Unit
DEPTID Department ID
JOBCODE Job Code
POSITION_NBR Position Number
EMPLID Employment ID
EMPL_RCD Employment Record
EFFDT Effective date of the mapping level
PYGL_GROUPNAME Payroll Activity Group name
ACCT_CD ChartField Combination code
Sections of audit reports listed under table name will help you in deciding how you want to set up data ineach table:
• PYGL_CF_CPNYERN tableReview the expense accounts listed in:
- ChartKey Usage by Company and Business Unit audit report, Company Earnings Accounts section
- ChartKey Usage by Expense Type audit report, Earnings Expense Accounts section• PYGL_CF_CPNYDED tableReview the expense accounts listed in:
- ChartKey Usage by Company and Business Unit audit report, Company Deduction Accounts section
- ChartKey Usage by Expense Type audit report, Deduction Expense Accounts section• PYGL_CF_CPNYTAX tableReview the expense accounts listed in:
- ChartKey Usage by Company and Business Unit audit report, US Company Tax Accounts section
- ChartKey Usage by Expense Type audit report, US Tax Expense Accounts section• PYGL_CF_CPNYCTX table
298 Copyright © 2006, Oracle. All rights reserved.
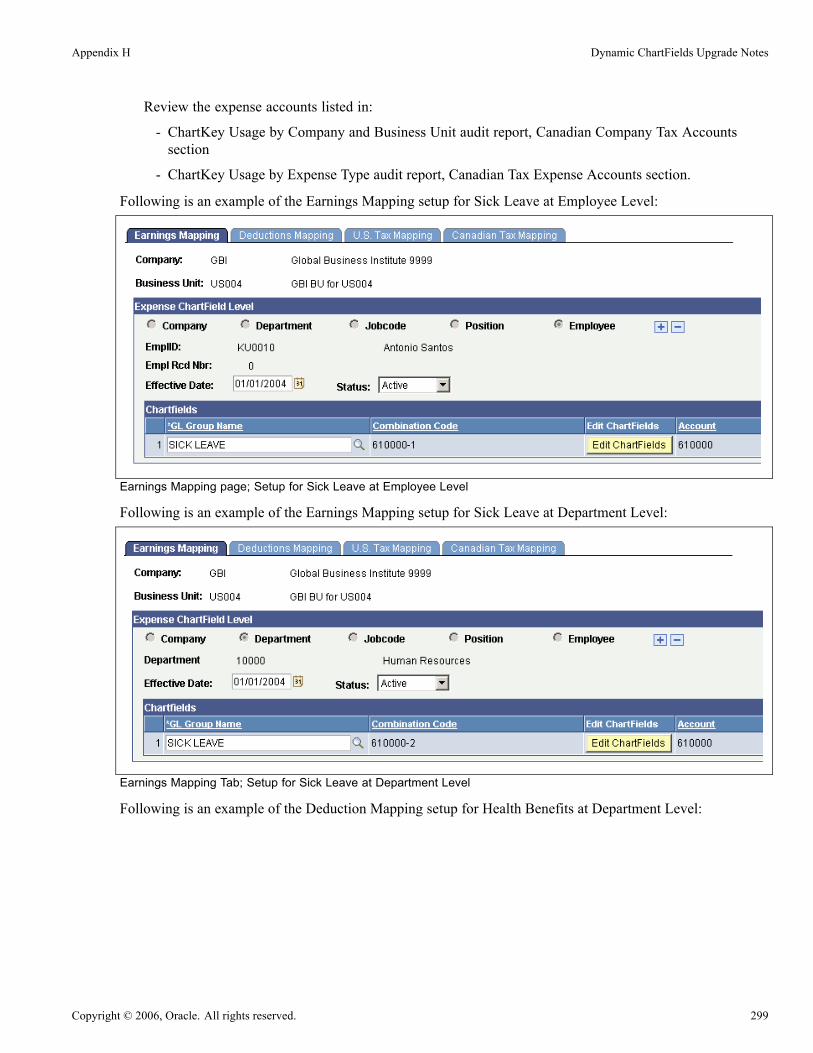
Appendix H Dynamic ChartFields Upgrade Notes
Review the expense accounts listed in:
- ChartKey Usage by Company and Business Unit audit report, Canadian Company Tax Accountssection
- ChartKey Usage by Expense Type audit report, Canadian Tax Expense Accounts section.
Following is an example of the Earnings Mapping setup for Sick Leave at Employee Level:
Earnings Mapping page; Setup for Sick Leave at Employee Level
Following is an example of the Earnings Mapping setup for Sick Leave at Department Level:
Earnings Mapping Tab; Setup for Sick Leave at Department Level
Following is an example of the Deduction Mapping setup for Health Benefits at Department Level:
Copyright © 2006, Oracle. All rights reserved. 299
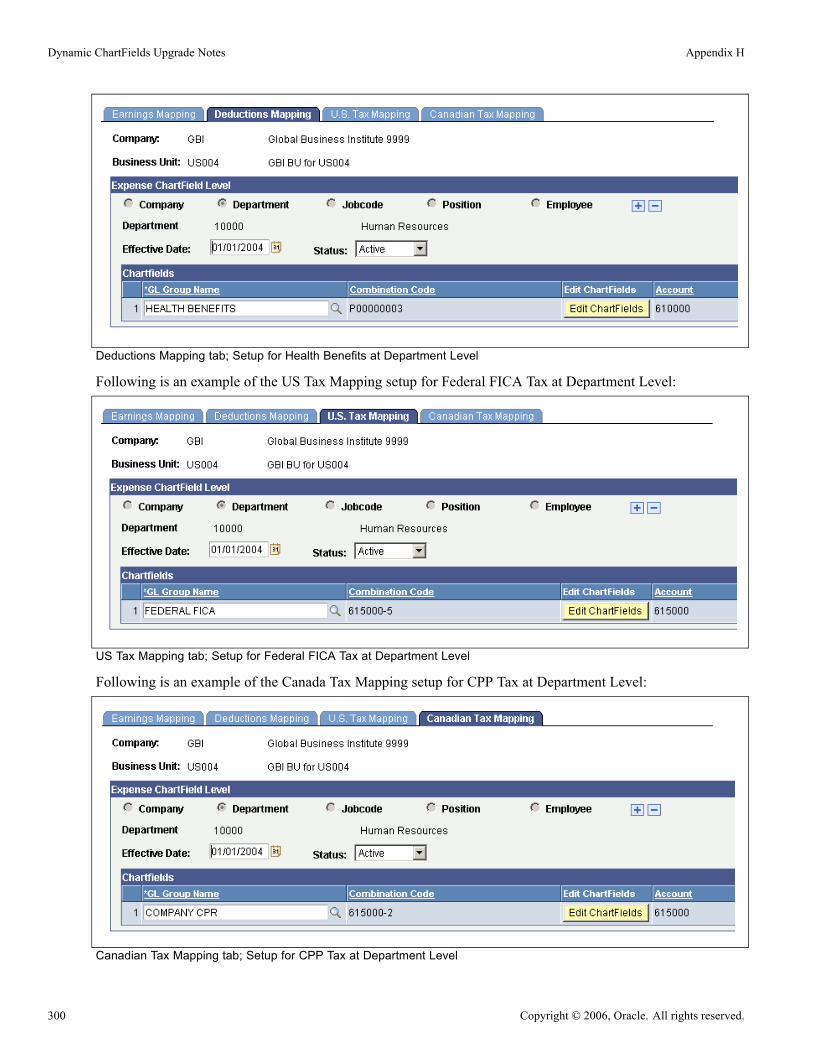
Dynamic ChartFields Upgrade Notes Appendix H
Deductions Mapping tab; Setup for Health Benefits at Department Level
Following is an example of the US Tax Mapping setup for Federal FICA Tax at Department Level:
US Tax Mapping tab; Setup for Federal FICA Tax at Department Level
Following is an example of the Canada Tax Mapping setup for CPP Tax at Department Level:
Canadian Tax Mapping tab; Setup for CPP Tax at Department Level
300 Copyright © 2006, Oracle. All rights reserved.
Appendix H Dynamic ChartFields Upgrade Notes
See Also“PeopleSoft Payroll for North America PeopleBook, for your new release.”
Task H-3: Upgrade Time and Labor ChartFieldsChartField enhancements are provided with the new PeopleSoft release. The individual ChartFields wereexpanded from 14 fields to 16 fields and the Account Code field was relabeled as Combo Code. The biggestchange is that now commitment accounting and non-commitment accounting customers have access to allChartFields and the associated functionality. A distinction between the two no longer exists in Time and Labor.
Prior to the new release, a user was able to report an Account Code and a Project ID for a single transaction.The reported Account Code might have an associated Project ID. The associated Project ID could be the sameor different from the Project ID entered on the transaction row. This functionality is still available in the newrelease, however; if Project ID is an active ChartField then the Combo Code that is reflected on the transactionneeds to represent the combination of associated individual ChartField values correctly.
To upgrade the data from prior releases correctly, a process was created to identify all transactions that have anAccount Code and Project ID reported together. Data from TL_PAYABLE_TIME, TL_RPTD_TIME andTL_TSKPRF_DETL tables is pulled into an upgrade table, and then the comparison is performed to identify ifthe Project ID associated with the Account Code is the same as the Project ID reported directly. If the AccountCode does not reflect the reported Project ID, then a new Combo Code is generated or an existing ComboCode is identified, from the ACCT_CD_TBL, and all transaction rows associated are updated with the newvalue. This process will only impact transaction rows where the application is integrated with PeopleSoftProject Costing and not transaction rows that have a Time and Labor Project reported.
During the process outlined above, Combo Codes that were inactive at the start of the upgrade may bereactivated. The new release captured these Combo Codes for informational purposes. The following query:‘UPG_TL_ACCT_CD_ACTIVATED – Upgrade TL activated Account Codes’ displays a list of impactedCombo Codes. If you are using the Account Code Load Process from PeopleSoft Financials, run this at the endof the upgrade to inactivate any Combo Codes that are no longer valid.
In the new release, the Project ID associated with a Combo Code is stored in the project field throughout theapplication. Prior to the new release, only the Account Code was stored, the associated Project ID was not. Inthe new release, this will cause exceptions to be generated when Interface with PeopleSoft/Projects flag ischecked on the Time and Labor Installation page. To assist with preventing these exceptions, the upgradeprocess will query all transaction rows to determine if a reported Account Code has an associated ProjectID and a Business Unit PC also exists. For these transactions the Project ID associated with the ComboCode will be stored in the project field.
The new release provides some queries that can be generated to compare the upgraded data to what existed inthe system prior to the upgrade process. These queries all begin with UPG_TL and are:
• UPG_TL_CFOLDNEW – Upgrade TL Account Code
Provides a list of account codes that have been impacted during the upgrade. They are either old onesthat need to be reactivated or new ones that have been generated.
• UPG_TL_PAY_NEWACC – TL Upgrade Payable Time New Account Code
Provides a list of payable time rows that have been changed. The existing account code has beenreplaced with a newly generated account code that represents the combination of data originally storedin payable time.
• UPG_TL_PAY_REUSED – TL Upgrade Payable Time Reused Account Code
Copyright © 2006, Oracle. All rights reserved. 301
Dynamic ChartFields Upgrade Notes Appendix H
Provides a list of payable time rows that have been changed. The existing account code has beenreplaced with a previously existing account code that represents the combination of data originally storedin payable time.
• UPG_TL_PAY_UPDATED – TL Upgrade Payable Time UpdatedProvides a list of payable time rows that have been changed because the Project ID associated with theaccount code is now stored in the project id field.
• UPG_TL_PRJ_NEWACC – TL Upgrade Task Profile New Account CodeProvides a list of task profiles that have been changed. The existing account code has been replaced with anewly generated account code that represents the combination of data originally stored on the task profile.
• UPG_TL_PRJ_REUSED – TL Upgrade Task Profile Reused Account CodeProvides a list of task profiles rows that have been changed. The existing account code has been replacedwith a previously existing account code that represents the combination of data originally stored onthe task profile.
• UPG_TL_PRJ_UPDATED – TL Upgrade Task Profile UpdatedProvides a list of task profiles that have been changed because the Project ID associated with the accountcode has been stored in the project id field.
• UPG_TL_RPTD_NEWACC – TL Upgrade Reported Time New Account CodeProvides a list of reported time rows that have been changed. The existing account code has beenreplaced with a newly generated account code that represents the combination of data originally storedin reported time.
• UPG_TL_RPTD_REUSED – TL Upgrade Reported Time Reused Account CodeProvides a list of reported time rows that have been changed. The existing account code has beenreplaced with a previously existing account code that represents the combination of data originally storedin reported time.
• UPG_TL_RPTD_UPDATED – TL Upgrade Reported Time UpdatedProvides a list of reported time rows that have been changed because the Project ID associated with theaccount code is now stored in the project id field.
Additionally, the new release provides a query for users to identify if the Combo Code associated to a TaskProfile is invalid, ‘UPG_TL_INVALID_TSKPRF – Task Profile-Invalid Combo Code’. This query will onlyvalidate using the table method and not the sync message with PeopleSoft Financials. Run this anytimeindividual ChartField values or Combo Codes are inactivated.
302 Copyright © 2006, Oracle. All rights reserved.

APPENDIX I
HRMS Upgrade Notes
This appendix discusses:
• Record and Field Conversions
• Records with Duplicate Key Structures
• Schedule Defaults
Task I-1: Record and Field ConversionsThis section discusses:
• Understanding Record and Field Conversions
• Status Conversions
Understanding Record and Field ConversionsThis section discusses a number of columns in your database that will be converted during the upgrade but willneed some functional analysis performed prior to running the data conversion scripts. Review the items belowto determine if you wish to modify the delivered scripts, prior to running them.
Task I-1-1: Status ConversionsIn PeopleSoft 8.3, the status indicators for six Recruit Workforce Records are changed from Translate Valuesto system-defined status codes. The following record.fields are converted:
• JOB_REQUISITION.JOB_REQ_STATUS• APPLICATN_DATA.APP_STATUS• POSN_APPLIEDFOR.APP_STATUS• OFFER.RESPONSE_OFFER• APPLICATN_ROUTE.RESPONSE_CD• INTERVIEW.RECOMMENDATION
• ER_STATUS_TBL• ER_STS_RSN_TBL
Copyright © 2006, Oracle. All rights reserved. 303
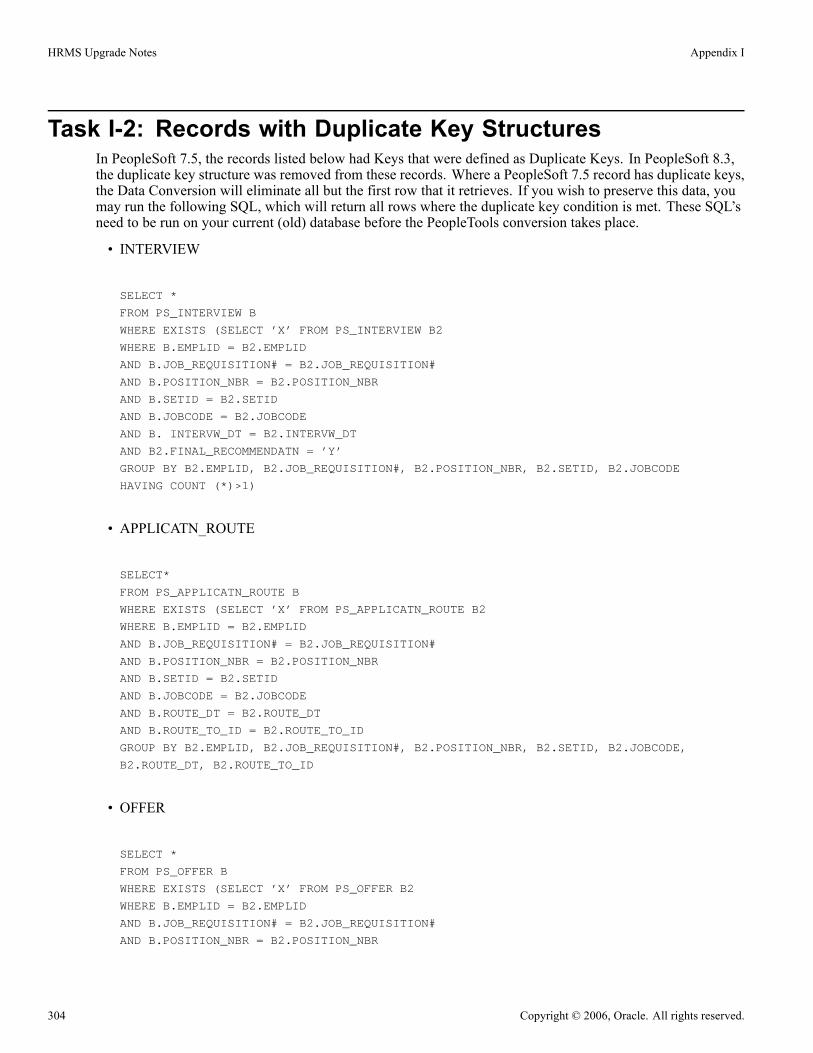
HRMS Upgrade Notes Appendix I
Task I-2: Records with Duplicate Key StructuresIn PeopleSoft 7.5, the records listed below had Keys that were defined as Duplicate Keys. In PeopleSoft 8.3,the duplicate key structure was removed from these records. Where a PeopleSoft 7.5 record has duplicate keys,the Data Conversion will eliminate all but the first row that it retrieves. If you wish to preserve this data, youmay run the following SQL, which will return all rows where the duplicate key condition is met. These SQL’sneed to be run on your current (old) database before the PeopleTools conversion takes place.
• INTERVIEW
SELECT *
FROM PS_INTERVIEW B
WHERE EXISTS (SELECT ’X’ FROM PS_INTERVIEW B2
WHERE B.EMPLID = B2.EMPLID
AND B.JOB_REQUISITION# = B2.JOB_REQUISITION#
AND B.POSITION_NBR = B2.POSITION_NBR
AND B.SETID = B2.SETID
AND B.JOBCODE = B2.JOBCODE
AND B. INTERVW_DT = B2.INTERVW_DT
AND B2.FINAL_RECOMMENDATN = ’Y’
GROUP BY B2.EMPLID, B2.JOB_REQUISITION#, B2.POSITION_NBR, B2.SETID, B2.JOBCODE
HAVING COUNT (*)>1)
• APPLICATN_ROUTE
SELECT*
FROM PS_APPLICATN_ROUTE B
WHERE EXISTS (SELECT ’X’ FROM PS_APPLICATN_ROUTE B2
WHERE B.EMPLID = B2.EMPLID
AND B.JOB_REQUISITION# = B2.JOB_REQUISITION#
AND B.POSITION_NBR = B2.POSITION_NBR
AND B.SETID = B2.SETID
AND B.JOBCODE = B2.JOBCODE
AND B.ROUTE_DT = B2.ROUTE_DT
AND B.ROUTE_TO_ID = B2.ROUTE_TO_ID
GROUP BY B2.EMPLID, B2.JOB_REQUISITION#, B2.POSITION_NBR, B2.SETID, B2.JOBCODE,
B2.ROUTE_DT, B2.ROUTE_TO_ID
• OFFER
SELECT *
FROM PS_OFFER B
WHERE EXISTS (SELECT ’X’ FROM PS_OFFER B2
WHERE B.EMPLID = B2.EMPLID
AND B.JOB_REQUISITION# = B2.JOB_REQUISITION#
AND B.POSITION_NBR = B2.POSITION_NBR
304 Copyright © 2006, Oracle. All rights reserved.

Appendix I HRMS Upgrade Notes
AND B.SETID = B2.SETID
AND B.JOBCODE = B2.JOBCODE
Task I-3: Schedule DefaultsThis section discusses:
• Shift and Workdays Upgrade
• Effective Date of Schedule Definitions
• Schedule Override Tables
Task I-3-1: Shift and Workdays UpgradeReview the list below to see how the upgrade modified Shifts and Workdays.
• The effective date of the Shift IDs and Workday IDs are set to the earliest Effective Date from theSchedule Definition, in which they are used, only if the Schedule Definition has an earlier effectivedate than that of the Shift or Workday.
• The setID is set to the setID of the Schedule Definition in which they are used.• If the Shifts and Workdays are used in multiple Schedule Definitions with different setIDs, a copy of theShift and Workday are created for each of the setIDs.
Task I-3-2: Effective Date of Schedule DefinitionsThe upgrade process determines the Effective Date of the Schedule Definitions. It begins by determiningthe minimum effective date of where the Schedule ID is used. This is called the “First Date Used.” Thelocations to check for the use of the Schedule ID are:
• Assign Work Schedule (SCH_ASSIGN) as the Schedule ID or the Alternate Schedule ID.
• Global Payroll Paygroup (GP_PYGRP_DTL) as the Schedule ID or the Alternate Schedule ID.
• Workgroup (TL_WRKGRP_TBL) as the Schedule ID.
Follow the steps below to determine the effective date of the Schedule Definition:
1. Check the last date that was built for the Schedule ID from the Schedule Calendar (SCH_CLND_TBL) bychecking the View Schedule Calendar page in the source database.
2. Determine the number of days for that Schedule Definition.This process is done after converting the rest of the Schedule Definition so the Num Days in Scheduleis already determined.
3. Add one day then start subtracting the “Number of Days” for that Schedule Definition, to get the Start Dayof the last schedule pattern of the Schedule Calendar.
4. Continue subtracting by that “Number of Days” for that schedule, until the system derives the date on orbefore the “First Date Used” determined earlier.
For example, Schedule ID KUSCHDFP1 has a First date used=Schedule ID KUSCHDFP1.
Copyright © 2006, Oracle. All rights reserved. 305

HRMS Upgrade Notes Appendix I
• 1/1/1980 is the earliest effective date used in a Workgroup KUWRKGRP1.• 9/25/1982 is the earliest effective date used for EmplID KU0020 in SCH_ASSIGN as Schedule IDThe last date of the schedule calendar for KUSCHDFP1 Schedule Definition = 12/30/2006 from thePS_SCH_CLND_TBL. Add one day, then subtract the number of days in schedule (Duration of schedule =seven days) from 12/31/2006 = 12/24/2006. Continue subtracting the “Num Days in Schedule” until youget a date to begin the schedule pattern, which is on or before the “First Day Used” = 12/30/1979 = Sunday.
Task I-3-3: Schedule Override TablesThe following list explains how the Schedule Override tables are upgraded in the new PeopleSoft release:
• Shift ID has been added to the SCH_MNG_SCH_TBL. This was the storage table for the OverrideSchedule Workday. The Shift ID will be populated from the old Workday details.
• If workday had consisted of more than one shift, then a new row would be inserted intoSCH_MNG_SCH_TBL for each of the Shifts, whether a Primary or Alternate Workday override.
• The entries for Sched Hrs, Sch Config Totals, and Start and End Times are all populated from the ShiftTables.
• The SETID is set to the SETID of the Workday.
• If there is an Alternate Workday override from PeopleSoft 8 SP1, there will be another row in theSCH_MNG_SCH_TBL for the Alternate override.
• The SCH_MNG_SCH_TBL is now populated for any third-party overrides that exist inSCH_ADHOC_DTL. (In previous PeopleSoft releases any Scheduling third-party interface populatedonly SCH_ADHOC_DTL).
• The SCH_ADHOC_DTL table is now also populated for the Alternate as well as the Primary ScheduleOverrides, using details from the Shift table. (In previous PeopleSoft releases, this was only populated forPrimary Workday overrides.)
306 Copyright © 2006, Oracle. All rights reserved.
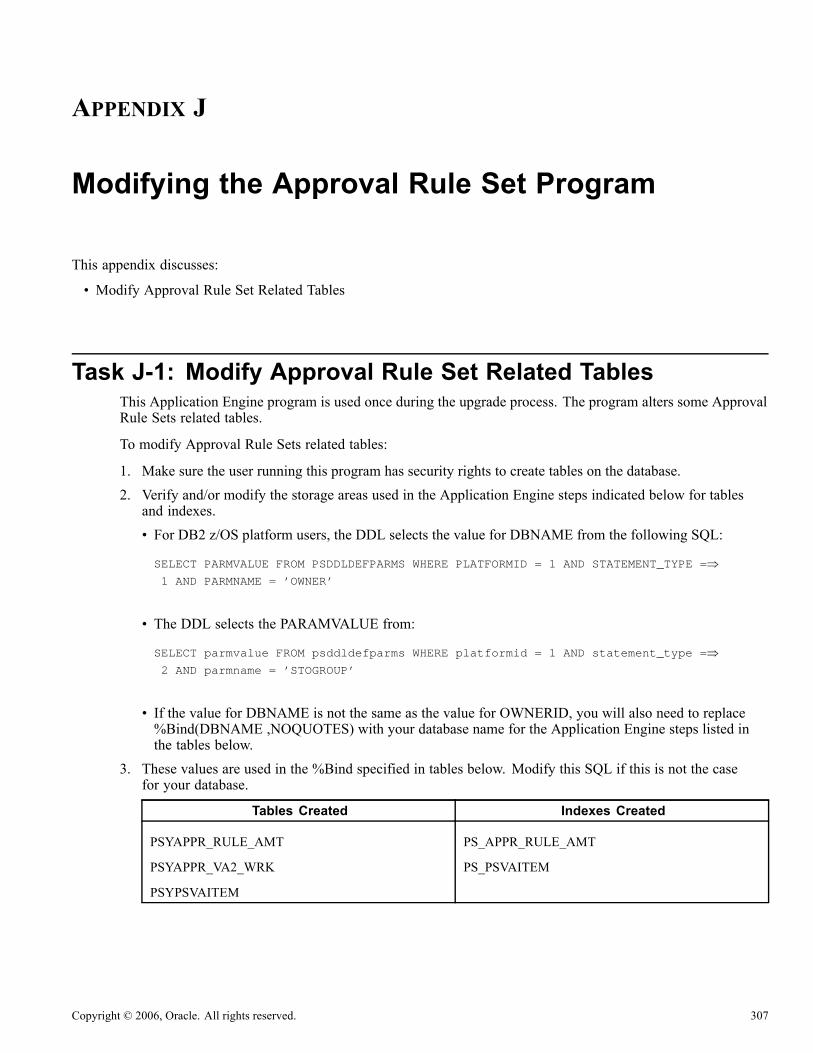
APPENDIX J
Modifying the Approval Rule Set Program
This appendix discusses:
• Modify Approval Rule Set Related Tables
Task J-1: Modify Approval Rule Set Related TablesThis Application Engine program is used once during the upgrade process. The program alters some ApprovalRule Sets related tables.
To modify Approval Rule Sets related tables:
1. Make sure the user running this program has security rights to create tables on the database.2. Verify and/or modify the storage areas used in the Application Engine steps indicated below for tablesand indexes.• For DB2 z/OS platform users, the DDL selects the value for DBNAME from the following SQL:
SELECT PARMVALUE FROM PSDDLDEFPARMS WHERE PLATFORMID = 1 AND STATEMENT_TYPE =⇒1 AND PARMNAME = ’OWNER’
• The DDL selects the PARAMVALUE from:
SELECT parmvalue FROM psddldefparms WHERE platformid = 1 AND statement_type =⇒2 AND parmname = ’STOGROUP’
• If the value for DBNAME is not the same as the value for OWNERID, you will also need to replace%Bind(DBNAME ,NOQUOTES) with your database name for the Application Engine steps listed inthe tables below.
3. These values are used in the %Bind specified in tables below. Modify this SQL if this is not the casefor your database.
Tables Created Indexes Created
PSYAPPR_RULE_AMT
PSYAPPR_VA2_WRK
PSYPSVAITEM
PS_APPR_RULE_AMT
PS_PSVAITEM
Copyright © 2006, Oracle. All rights reserved. 307

Modifying the Approval Rule Set Program Appendix J
Platform SQL Section DDLstatements
Table CreationStorage Area
Index CreationStorage Area
DB2 Unix ANSI.Step01
UNICODE.Step01
IN PTTBL INDEXIN PTTBLIDX NOTLOGGED INITIALLY
IN PTWORK INDEXIN PTWORKIDX NOTLOGGED INITIALLY
IN PSIMAGE INDEXIN PSIMAGEIDX NOTLOGGED INITIALLY
No name specified
DB2 z/OS ANSI.Step01
UNICODE.Step01
%Bind(DBNAME,NOQUOTES).PTTBL
USING STOGROUP%Bind(PARMVALUE,NOQUOTES) CLUSTERBUFFERPOOL BP3CLOSE NO
Informix ANSI.Step01
UNICODE.Step01
PTTBL PSINDEX
Oracle ANSI.Step01 to
ANSI.Step14
UNICODE.Step01 to
UNICODE.Step14
TABLESPACE PTTBLSTORAGE (INITIAL40000 NEXT 100000MAXEXTENTSUNLIMITEDPCTINCREASE 0)PCTFREE 10 PCTUSED80
TABLESPACE PTWORKSTORAGE (INITIAL40000 NEXT 100000MAXEXTENTSUNLIMITEDPCTINCREASE 0)PCTFREE 10 PCTUSED80
TABLESPACE PSIMAGESTORAGE (INITIAL40000 NEXT 100000MAXEXTENTSUNLIMITEDPCTINCREASE 0)PCTFREE 10 PCTUSED80
TABLESPACE PSINDEXSTORAGE (INITIAL10000 NEXT 100000MAXEXTENTSUNLIMITEDPCTINCREASE 0)PCTFREE 10
Sybase/SQL Server ANSI.Step01
UNICODE.Step01
No name specified No name specified
308 Copyright © 2006, Oracle. All rights reserved.

APPENDIX K
Performance Management Upgrade Notes
Understanding Upgrade NotesThis appendix describes the changes that have been made for ePerformance in the new PeopleSoft release.
Note. In the discussions that follow, the term “ePerformance” is used as a convenience to refer not only to thenew product of that name, but also to any existing business functions contained in Career Planning, SalaryPlanning and eDevelopment that are now implemented on top of these new data structures and businessprocesses.
Task K-1: Employee Review TablesThis section discusses:
• Understanding Employee Review Tables
• Employee Review Records
• Performance Improvement Plan (USF) Records
• Merit Scale Setup Records
• Rating Scale Setup Records
• Review Band Setup Records
• Performance Plan (USF) Setup Records
Understanding Employee Review TablesThe ePerformance application was developed to provide a comprehensive but flexible tool for managingworkforce performance toward a set of goals and objectives. Prior to the new PeopleSoft release, there waslimited Employee Review functionality under the Salary Planning, Career Planning, and eDevelopmentmodules and was primarily limited to storing information about an employee’s performance against a set ofcompetencies. It did not address the overall business process of hierarchical planning, collaborative goalsetting and performance monitoring, and approval.
Task K-1-1: Employee Review RecordsThe following are Employee review records:
REVIEW_REVIEWER
REVW_REVWER_CMP
REVIEW_GOALS
REVIEW_COMMENTS
Copyright © 2006, Oracle. All rights reserved. 309

Performance Management Upgrade Notes Appendix K
GVT_EMP_ELEMNT
GVT_EMP_STAN
GVT_LATE_RV_TBL
Task K-1-2: Performance Improvement Plan (USF) RecordsThe following are Performance Improvement Plan (USF) Records:
GVT_EMPL_PIP
Task K-1-3: Merit Scale Setup RecordsThe following are Merit Scale Setup Records:
MERIT_SCALE_TBL
MERIT_GROUP_TBL
Task K-1-4: Rating Scale Setup RecordsThe following are Rating Scale Setup Records:
REVW_SCALE_TBL
REVW_FACTOR_TBL
REVW_FCT_PT_TBL
Task K-1-5: Review Band Setup RecordsThe following is a Review Band Setup Record:
REVIEW_BAND_TBL
Task K-1-6: Performance Plan (USF) Setup RecordsThe following are Performance Plan Setup records:
GVT_PERF_PLAN
GVT_PERF_ELEMNT
GVT_PERF_STAN
As discussed below, the data in these tables will not be upgraded but the tables will temporarily be retainedfor historical reference. However, no editing or processing of this data will be available. This data canstill be accessed in the following ways:
• Ad Hoc Querying: All of these tables are included in the ePerformance Query Access Tree and aretherefore available for ad hoc querying.
• Portal Access: Navigate to Compensation, Salary Planning, Employee Review History. This includesEmployee Review History, the Employee Review Audit (PER088), Review History USF, and ReviewPerformance Improvement USF (both US Federal Government pages were previously under the ManagePerformance USF menu but have been consolidated here). Note that these pages are read-only (no data canbe changed) and no standard page access will be available for the underlying support tables.
These objects (records, pages and reports) will be retained (but no longer a maintained functionally) for areasonable period of time (one to two major releases) to allow for transition, at which point they will bedropped. If you want to retain them beyond that point they will have to be treated like custom objects.
310 Copyright © 2006, Oracle. All rights reserved.
Appendix K Performance Management Upgrade Notes
Note. U.S. Federal Government users: The field GVT_PERF_PLAN is no longer displayed on the Job CodeTable or Position Data Table, since this field no longer applies to the new business process. The field itself isretained on these tables, however, so existing data can still be accessed through PS Query.
Task K-2: Employee Review DataIn the new PeopleSoft release, Employee Review Data will not be upgraded. For ePerformance, a completelynew, and highly flexible, record structure for managing employee reviews/appraisals (PS_EP_APPR and itis children) has been developed. This involves the creation of template building blocks, which defines thecontent and behavior of any area of a review, such as mission objectives, initiatives, goals, responsibilities,competencies, and so forth. Reviews are keyed by a single unique Appraisal ID with alternate keys ofEmployee ID, Review Period (begin and end). The conducting of reviews during the review period is managedby a clear set of review statuses and a separate approval status. Different review types can be optionallymarked as official. It is anticipated that the major use of this flag will be to indicate which reviews affect salary(as opposed to ad hoc reviews, or checkpoint reviews such as quarterly versus annual).
The existing Employee Review family (PS_EMPLOYEE_REVIEW) stores both the Commercial and Federalreviews/appraisals. After analyzing the key structure and functionality of the Employee Review structures, itwas realized that there is no way to upgrade this data into the new ePerformance (PS_EP_APPR) key structurewith any certainty of functional accuracy. This is because the keys to PS_EMPLOYEE_REVIEW are:
Primary Key: EMPLID, EMPL_RCD, EFFDT
Optional Attributes: REVIEW_TYPE, REVIEW_FROM_DT, and REVIEW_THRU_DT
While the keys to the new PS_EP_APPR structure are:
Primary Key: EP_APPRAISAL_ID
Alternate Key: EMPLID, EMPL_RCD, PERIOD_BEGIN_DT, PERIOD_END_DT
The fact that PS_EMPLOYEE_REVIEW is effective-dated, and its FROM/THRU dates attributes areboth optional, make it almost impossible to translate into PS_EP_APPR’s required Period dates. Even thefundamental question of “What does a new effective-date mean?” is ambiguous. It could mean a new reviewperiod was started, or it could simply indicate that a checkpoint was taken. The tables’ key structures do notprohibit a new effective-dated row from having a different review type with the same FROM/THRU dates asanother row, or from having different or overlapping FROM/THRU dates, or from having no FROM/THRUdates at all. Further, the existing REVIEW_TYPE translate values are a mixture of review types and reviewstatuses. There is a REVIEW_TYPE of Official Rating, but there is no other indication or status for when areview is "complete" and therefore whether its Rating has indeed become official.
In the final analysis, there is no benefit of having historical review data (which was conducted on top ofan entirely different rating system and business process) brought into the new structure. Once a review iscomplete, it is not subject to modification (almost by definition). The main requirement for historical reviewsis that they be available for query. (For the Federal Government, the requirement that the final rating forcertain historical appraisals be available to the WGI and other processes is satisfied by changes made to certainprogram interfaces to consider both pre- and post-HRMS 8.9 reviews).
Copyright © 2006, Oracle. All rights reserved. 311

Performance Management Upgrade Notes Appendix K
312 Copyright © 2006, Oracle. All rights reserved.

APPENDIX L
Performance Tips and Techniques
This appendix discusses:
• Understanding Performance Tips and Techniques
• Plan Your Upgrade for Performance
• What To Do During the Upgrade
• Improve Performance for Your Platform
• Consult the Global Support Center
Understanding Performance Tips and TechniquesPerformance is always a challenge when you are upgrading. Much of the data currently in your database willbe affected. No other batch processing works quite like it. Upgrade performance is sensitive to your uniqueenvironment and data. These performance recommendations are designed to help you improve performanceduring your upgrade.
Task L-1: Plan Your Upgrade for PerformanceReview the following guidelines to help plan for better upgrade performance:
• Provide as much hardware, memory, and disk space as you can.
• Run long processes on a dedicated server, not the client. Configure that server similarly to your productionenvironment.
• Size the Copy of Production database (Target) like your production database — allow for growth.
• Use the appendix titled “Sizing Tables for the Upgrade” to determine how much space you will need.These recommendations are minimum levels; you should plan to use more.
• Use a dedicated workstation, configured like the production environment.
• Provide an application server and process scheduler for the Target database on the new PeopleSoft release.
• Look for fragmented tables. Resize or reorganize the initial and next extends accordingly.
• Know which tables are your largest. This information will be valuable during the upgrade.
Copyright © 2006, Oracle. All rights reserved. 313

Performance Tips and Techniques Appendix L
Task L-2: What To Do During the UpgradeThis section discusses:
• What To Do During the Upgrade
• Create and Alter SQL Scripts
• Data Conversion
Task L-2-1: What To Do During the UpgradeWhen performing the “Modifying the Database Structure” task, perform all recommended Update Statistics, sothe optimizer can make a good decision.
Task L-2-2: Create and Alter SQL ScriptsThe following list provides tips to use when performing the “Modifying the Database Structure” task.
• Perform all recommended Update Statistics, so the optimizer can make a good decision.• Look for large tables that are being altered. Create separate scripts for each of these tables and run thescript concurrently with your other alter scripts. You can run these concurrently even if you are usingthe Alter by Rename build option because each table creation uses an independent temporary table namein the new PeopleSoft release (PSY<recname>).
• Run your Create Table script concurrently with Alter tables without Deletes script.• Some indexes will not create during alter without deletes because of a Unique Key violation. You canexpect this because index structures have changed. The data in these indexes will be corrected during dataconversion. You can create the index as a non-unique key for data conversion. Create this non-uniqueindex, without the field that caused the error, so that data conversion does not have to update the index aswell as the data pages as it corrects the data in this field.
Task L-2-3: Data ConversionPeopleSoft delivers the Change Assistant templates to run the steps on the client by default. The server can runApplication Engine programs. You may want to run these programs on the server to increase performance.Change Assistant uses the PSEMHUB and PSEMAgent to execute jobs to the server. You will need toconfigure and start your Environment Management Hub and Agent, enter the Environment Managementinformation into the Change Assistant Options, set your Change Assistant Mode, check the Perform ServerProcessing check box, and modify the Run Location of the steps you wish to run on the server. Considerrunning data conversion application engine programs concurrently as they were designed with no dependenciesbetween programs. Any exceptions to this are noted in the documentation. If you would like to take advantageof concurrent processing, modify the step properties and set the Run Concurrently radio button to Yes.
See Enterprise PeopleTools PeopleBook, PeopleSoft Software Updates, for your new release.
Task L-3: Improve Performance for Your PlatformThis section discusses:
314 Copyright © 2006, Oracle. All rights reserved.
Appendix L Performance Tips and Techniques
• Oracle
• DB2
Task L-3-1: OracleYou should use the Cost-based optimizer during the upgrade. The application engine scripts use MetaSQL torun the Update Statistics command at various times during data conversion. If you are running the Rule-basedoptimizer, you will not take advantage of these statements.
When running the alter scripts, remember the Oracle hint /*APPEND*/. This command will improve theperformance of your alter script if you are doing an “Alter by Rename.” This hint performs like an OracleDirect Load Insert and does not capture redo or recovery information. The syntax is as follows:
INSERT /*+ APPEND */ INTO <TABLENAME> (FIELD1, FIELD2, ...
Make sure your database administrator has turned autoextend on. Autoextend allows Tablespaces to growlarger than their set maximum size and will be useful during the upgrade process since Tablespaces growseveral times larger than they would in production.
Alter the Tablespace for PSIMAGE and increase it to 200mb; autoextend on the next 10mb; set the maxsize tounlimited.
Task L-3-2: DB2Perform all recommended Update Statistics on the system catalog as well as the application Tablespaces.
Interspersed throughout the Application Engine data conversion programs are steps that make a dynamic callfor RUNSTATS to be performed against selected tables. An example of how this is used follows:
• Step01 - Start with an empty Temp_Table_TAO
• Step02 - INSERT 60,000 rows into the Temp_Table_TAO
• Step03 - Application Engine Step calls %UpdateStats(Temp_Table_TAO)
• Step04 - You can now perform SQL against Temp_Table_TAO using new statistics
This will allow you to use indexes when processing against Temp_Table_TAO. If DB2 z/OS is not configuredcorrectly, Application Engine programs skip these steps and the performance of the SQL steps that followwill suffer.
In order to take advantage of the %UpdateStats feature, at least one of these conditions must be met:
• You implement the DSNUTILS stored procedure
• You followed the Enhanced Installation path
See the Enterprise PeopleTools Installation Guide for your database platform for your new release.
Note. If you disable the %UpdateStats feature of Application Engine, it will adversely affect the performanceof your data conversion programs, because statistics will not update when the tables are loaded with largevolumes of data.
Copyright © 2006, Oracle. All rights reserved. 315

Performance Tips and Techniques Appendix L
Task L-4: Consult the Global Support CenterIf you do have a problem with your upgrade, contact the Global Support Center (GSC). PeopleSoft will be ableto give you a solution to the problem faster if you supply the following information:
• Include details about the table row counts and indexes available on the tables involved in the processing:
- Include indexes in your physical database, not those defined in Application Designer.
- Mention any additional indexes that you custom-added; they could be getting in the way.• Include DBMS (ORA, MSS, DB2, etc.) and DBMS release (ORA 7.3, 8.16, etc.).• If you are running on Oracle, specify whether you are you running in Cost-based or Rule-based mode.• Include the PeopleSoft upgrade path for both Tools and Application.• Provide trace files: Tools trace and DBMS specific trace files, SQL Explains, etc.
316 Copyright © 2006, Oracle. All rights reserved.

APPENDIX M
Queries Trees and Tree Structures
This appendix discusses:
• Preserve Queries and Trees
• Prepare the Database
• Create a New Project
• Compare the New Project
• Copy the Project
• Test the Project
• ReExport the PeopleTools Tables
Task M-1: Preserve Queries and TreesThis appendix contains information for preserving queries, trees, and tree structures. At the beginning of yourupgrade, you should have informed your end-users and development team that your PeopleSoft system wasfrozen, meaning that no changes should have been made to any PeopleTools tables or objects includingqueries, trees, and tree structures. The freeze on PeopleTools changes is important because you will lose anychanges to these objects made during an upgrade to PeopleTools tables. Occasionally, however, end-users mayhave to make critical changes to trees, tree structures, and PS/Query objects. If this has happened in yoursystem, you can perform a process to preserve those additions and changes to trees, tree structures, andqueries. You will have to work with your end-users and developers to obtain a list of queries, trees, andtree structures that you need to preserve.
You will run through the test Move to Production steps several times for practice and testing purposes. Pleasenote that you have the option to perform the preserving queries and trees procedure during each of your testMove to Production runs, but you must perform it during the last run of the test Move to Production. If you donot perform this procedure during your last run in order to preserve the trees, tree structures, and queries thathave been changed since the beginning of your upgrade, they will be lost.
Note. The process outlined in this appendix to preserve trees and queries should be performed prior to dataconversion so that any additional conversion would be taken care of by the appropriate data conversionprograms.
This appendix includes instructions to prepare your database and create a project on which to preserve yourqueries, trees, and tree structure changes.
Copyright © 2006, Oracle. All rights reserved. 317

Queries Trees and Tree Structures Appendix M
Task M-2: Prepare the DatabaseIn this step, you create a new copy of your current production database, perform steps on the new copy, and runscripts against the new copy to update the release level.
To prepare the database:
1. At the beginning of the test Move to Production, you should make a new copy of your current productiondatabase. To preserve queries and trees, you need to make not only that Copy of Production but also anadditional copy of your current production database. For clarity, PeopleSoft refers to this additional copyof your production database as the Tree/Query Copy of Production database. So now you should have aCopy of Production database and a Tree/Query Copy of Production database.
2. Perform the test Move to Production on your Copy of Production database.3. To obtain the queries and trees that you want to preserve, the Tree/Query Copy of Production databaseneeds to be at the same release level as the Copy of Production database on which you just completedthe test Move to Production. To update your Tree/Query Copy of Production to the same release, yourun release scripts against this database. PeopleSoft refers to this as “reling up” the database. Use theCustom Compare template to “rel up” your database. Select the Product Line PEOPLETOOLS whenconfiguring your Change Assistant job.
Task M-3: Create a New ProjectNow that your Tree/Query Copy of Production is at the same release as your Copy of Production database,you create a project in the Tree/Query Copy of Production that contains all of the queries and trees thatyou wish to preserve.
To create a new project:
1. Using PeopleTools 8.4x, sign on to the Tree/Query Copy of Production using a valid PeopleSoft UserID and launch Application Designer.
2. Select File, New...
3. Select Project for Object Type.
4. Select File, Save Project and enter a project name; for example, PRESERVED.
5. Select the Upgrade tab in Application Designer.
Note. Queries and trees do not appear in projects under the Development tab in Application Designer. Tosee the queries and trees that you will insert into the PRESERVED project in the next step, you must makesure that you are using the Upgrade view of Application Designer.
6. Select Insert, Definitions into Project...7. Select Queries from the Definition Type drop-down list box and click Insert.8. Using your list of identified queries that need to be preserved, highlight each one of those queries fromthe Application Designer list.You can highlight more than one by holding down the Control (CTRL) key while you click the name ofthe query.
318 Copyright © 2006, Oracle. All rights reserved.

Appendix M Queries Trees and Tree Structures
9. After you have highlighted all of the queries that you want to preserve, click Insert, then click Close.Under the PRESERVED project name in the Upgrade view of Application Designer, you will see Queriesas an object type in the project.
10. Double-click on queries under the PRESERVED project to see a listing of all of the queries to preserve inthe right-hand window of Application Designer.
11. Select File, Save Project.12. Repeat steps 6 through 11 for trees and tree structures.Now your PRESERVED project should contain all of the queries, trees, and tree structures that youwant to preserve.
Task M-4: Compare the New ProjectIn this step, you compare the queries, trees, and tree structures that are in your PRESERVED project againstyour Copy of Production database. Because the tree objects in your PRESERVED project are not comparableobjects in Application Designer, you must manually compare the tree objects that you want to preserve. Duringthe query and tree structure compare process, the Application Upgrade utility sets the project flags. These flagsdetermine whether the following actions will occur:
• Changes will be performed on the Copy of Production (Target) database when you perform the exportand copy.
• Changes will be tagged as Copy or Delete operations.
• The project flags will be set to automatically take these actions or not.
These settings are determined based on whether or not the objects in the project currently exist on the Copy ofProduction (Target) database.
To compare the new project:
1. Using PeopleTools 8.4x, sign on to the Tree/Query Copy of Production using a valid PeopleSoft UserID and launch Application Designer.
2. Select File, Open...
3. For Definition, select Project and click Open to display the list of projects.
4. Select the PRESERVED project and click Open.
5. Select Tools, Compare and Report.
6. Sign on to your Copy of Production.
7. From the Object Type box, select Queries and Tree Structures.
8. Click Options…
9. Select PeopleSoft Vanilla for the Target Orientation.
10. Select Project for the Compare Type.
11. Verify that the Compare Report output directory is set to the correct location.
12. Select the Report Filter tab and set the report filter check boxes appropriately for your compare.
13. Click OK.
Copyright © 2006, Oracle. All rights reserved. 319

Queries Trees and Tree Structures Appendix M
14. Select Compare.15. Review the compare reports for queries and tree structures. In addition, perform a manual compare of thetrees that you want to preserve. Based on the results of this review, set the Action and Upgrade checkbox appropriately in the PRESERVED project.
Task M-5: Copy the ProjectIn the following steps, you copy the PRESERVED project to the target database. This is the Copy ofProduction database on which you ran the test Move to Production.
To copy the project:
1. Using PeopleTools 8.4x, sign on to the Tree/Query Copy of Production using a valid PeopleSoft UserID and launch Application Designer.
2. Select File, Open...3. For Definition, select Project and click Open to display the list of projects.4. Select the PRESERVED project and click Open.5. Select Tools, Upgrade, Copy.6. Sign on to your Copy of Production database.7. Make sure that the Reset Done Flags and Copy Project check boxes are selected.8. Click the Select All button.9. Click the Copy button.10. Using the Upgrade view of the PRESERVED project in Application Designer, review the Done flags in theproject to make sure that all of the objects that you wanted to preserve were copied to the Target database.
Task M-6: Test the ProjectNow that the queries, trees, and tree structures that you wanted to preserve are in the Copy of Productiondatabase, you must test and re-test and make any necessary changes if the test results are not what you expected.
Task M-7: ReExport the PeopleTools TablesOnce you are satisfied with the test results, you must re-export the PeopleTools tables in order toactually preserve the queries, trees, and tree structures. During your test Move to Production, you ranMVPRDEXP.DMS in order to export the PeopleTools tables. You will use the output files created fromrunning this job as input files during your Move to Production. Because these files were created beforecopying the queries, trees, and tree structures that you wanted to preserve, the files do not contain the preservedobjects, so you must run the MVPRDEXP.DMS script again. Running the MVPRDEXP.DMS script againensures that you have the most current PeopleTools tables.
To re-export the PeopleTools tables:
320 Copyright © 2006, Oracle. All rights reserved.
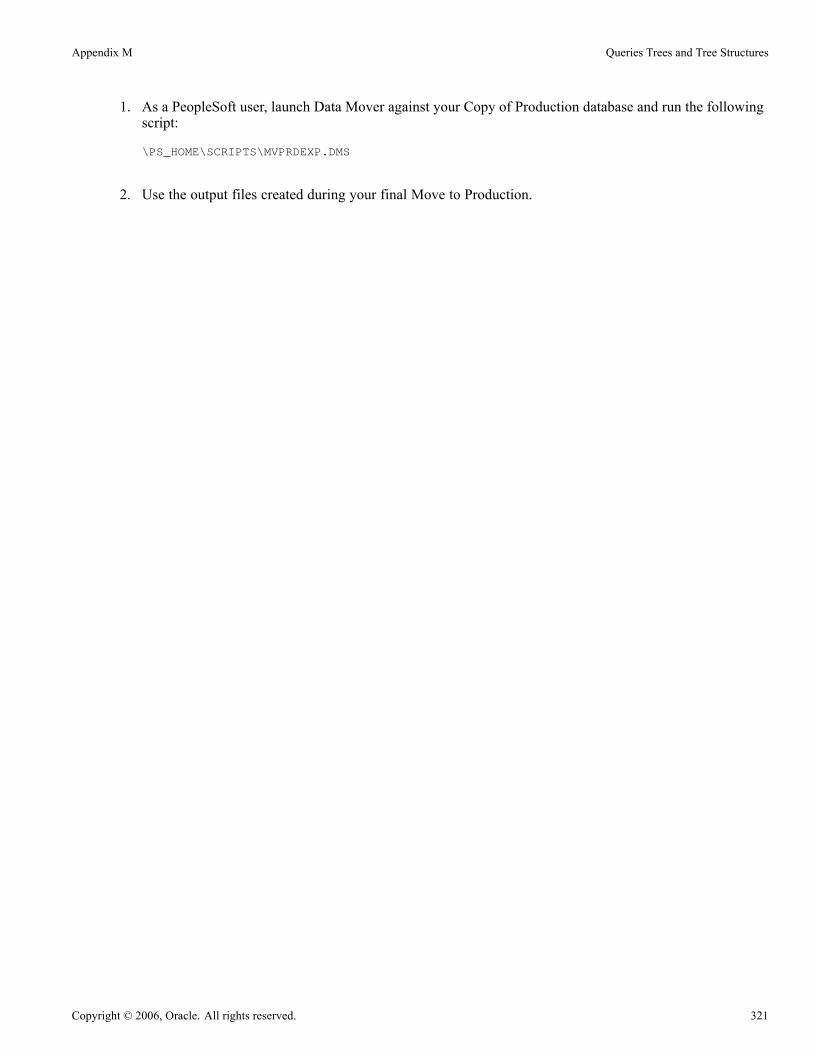
Appendix M Queries Trees and Tree Structures
1. As a PeopleSoft user, launch Data Mover against your Copy of Production database and run the followingscript:
\PS_HOME\SCRIPTS\MVPRDEXP.DMS
2. Use the output files created during your final Move to Production.
Copyright © 2006, Oracle. All rights reserved. 321

Queries Trees and Tree Structures Appendix M
322 Copyright © 2006, Oracle. All rights reserved.
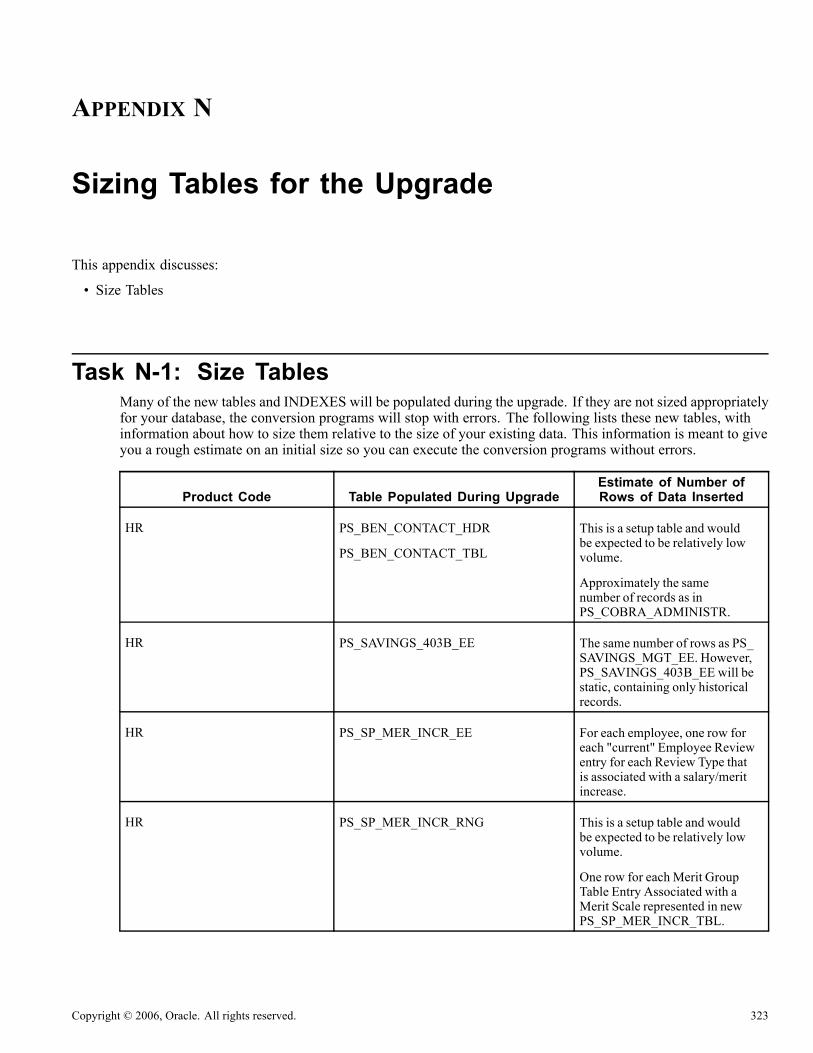
APPENDIX N
Sizing Tables for the Upgrade
This appendix discusses:
• Size Tables
Task N-1: Size TablesMany of the new tables and INDEXES will be populated during the upgrade. If they are not sized appropriatelyfor your database, the conversion programs will stop with errors. The following lists these new tables, withinformation about how to size them relative to the size of your existing data. This information is meant to giveyou a rough estimate on an initial size so you can execute the conversion programs without errors.
Product Code Table Populated During UpgradeEstimate of Number ofRows of Data Inserted
HR PS_BEN_CONTACT_HDR
PS_BEN_CONTACT_TBL
This is a setup table and wouldbe expected to be relatively lowvolume.
Approximately the samenumber of records as inPS_COBRA_ADMINISTR.
HR PS_SAVINGS_403B_EE The same number of rows as PS_SAVINGS_MGT_EE. However,PS_SAVINGS_403B_EE will bestatic, containing only historicalrecords.
HR PS_SP_MER_INCR_EE For each employee, one row foreach "current" Employee Reviewentry for each Review Type thatis associated with a salary/meritincrease.
HR PS_SP_MER_INCR_RNG This is a setup table and wouldbe expected to be relatively lowvolume.
One row for each Merit GroupTable Entry Associated with aMerit Scale represented in newPS_SP_MER_INCR_TBL.
Copyright © 2006, Oracle. All rights reserved. 323

Sizing Tables for the Upgrade Appendix N
Product Code Table Populated During UpgradeEstimate of Number ofRows of Data Inserted
HR PS_SP_MER_INCR_TBL This is a setup table and wouldbe expected to be relatively lowvolume.
One row for each Review ScaleTable entry of type "Summation."
TL PS_TL_RPTD_TIME All the data from PS_TL_RPTD_ELPTIME andPS_TL_RPTD_PCHTIMEwill be moved to this new table.
TL AUDIT_TLRPTTIME All the audit data will be moved tothis new table.
TL PS_TL_TR_COMMENTS If you used comments in timereporting then this table will havecomments rows for both Punch aswell as Elapsed data tables.
TL PS_AUDIT_SCH_TBL Audit Scheduling table
TL PS_AUDIT_TL_PAY_TM Audit payable time
TL PS_TL_SCH_EXT_DTL Scheduling external detail table
GP GPGB_EE_TAX Will have the same numberof rows as the existingGPGB_EE_STDTLS record.
GP GPGB_EE_IN Will have the same numberof rows as the existingGPGB_EE_STDTLS record.
EP PS_EP_APPR_B_ITEM One row for each item within eachappraisal if using the baselinedocuments.
EP PS_EP_APPR_B_ROLE One row for each role within eachappraisal if using the baselinedocumentation.
EP PS_EP_APPR_B_SEC One row for each section withineach appraisal if using the baselinedocumentation.
EP PS_EP_APPR_B_SUB One row for each subitem withineach appraisal if using the baselinedocumentation.
EP PS_EP_APPR_NOMINEE One row for each reviewernominated to participate in areview— per appraisal.
324 Copyright © 2006, Oracle. All rights reserved.
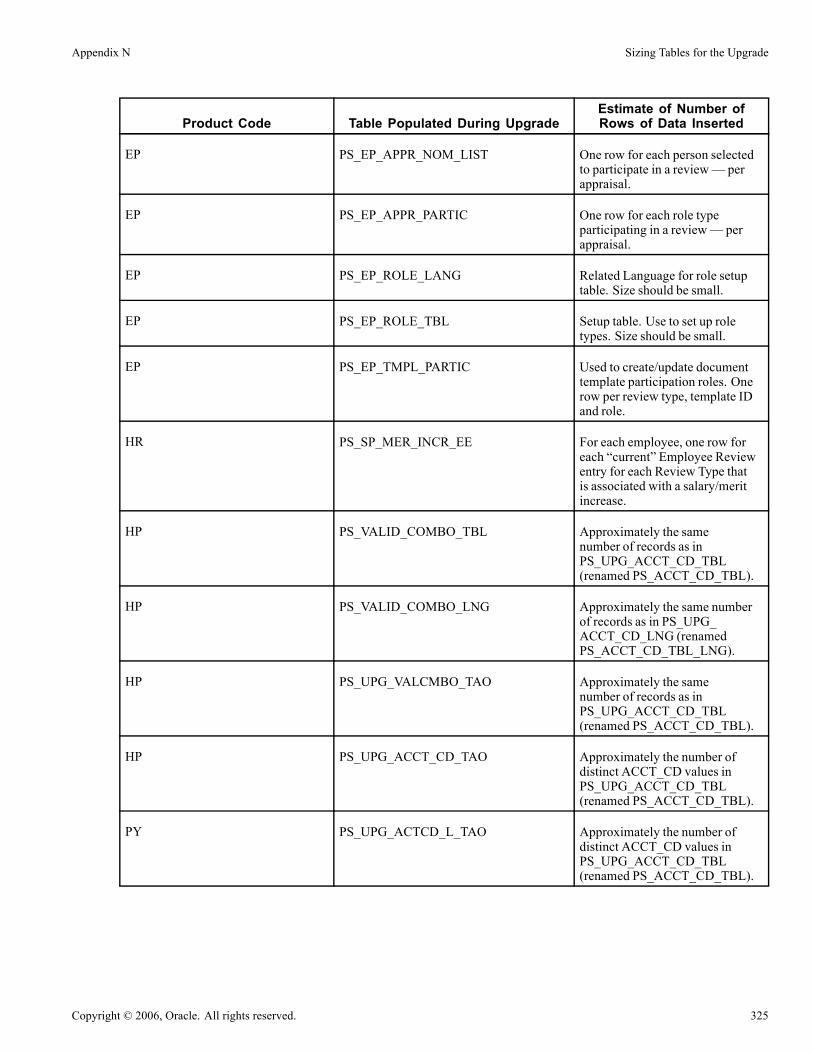
Appendix N Sizing Tables for the Upgrade
Product Code Table Populated During UpgradeEstimate of Number ofRows of Data Inserted
EP PS_EP_APPR_NOM_LIST One row for each person selectedto participate in a review— perappraisal.
EP PS_EP_APPR_PARTIC One row for each role typeparticipating in a review— perappraisal.
EP PS_EP_ROLE_LANG Related Language for role setuptable. Size should be small.
EP PS_EP_ROLE_TBL Setup table. Use to set up roletypes. Size should be small.
EP PS_EP_TMPL_PARTIC Used to create/update documenttemplate participation roles. Onerow per review type, template IDand role.
HR PS_SP_MER_INCR_EE For each employee, one row foreach “current” Employee Reviewentry for each Review Type thatis associated with a salary/meritincrease.
HP PS_VALID_COMBO_TBL Approximately the samenumber of records as inPS_UPG_ACCT_CD_TBL(renamed PS_ACCT_CD_TBL).
HP PS_VALID_COMBO_LNG Approximately the same numberof records as in PS_UPG_ACCT_CD_LNG (renamedPS_ACCT_CD_TBL_LNG).
HP PS_UPG_VALCMBO_TAO Approximately the samenumber of records as inPS_UPG_ACCT_CD_TBL(renamed PS_ACCT_CD_TBL).
HP PS_UPG_ACCT_CD_TAO Approximately the number ofdistinct ACCT_CD values inPS_UPG_ACCT_CD_TBL(renamed PS_ACCT_CD_TBL).
PY PS_UPG_ACTCD_L_TAO Approximately the number ofdistinct ACCT_CD values inPS_UPG_ACCT_CD_TBL(renamed PS_ACCT_CD_TBL).
Copyright © 2006, Oracle. All rights reserved. 325

Sizing Tables for the Upgrade Appendix N
Product Code Table Populated During UpgradeEstimate of Number ofRows of Data Inserted
PY PS_UPG_ACTBU_TAO Approximately the number ofdistinct ACCT_CD values inPS_UPG_ACCT_CD_TBLmultiplied by number of GLBusiness Units you use.
PY PS_PYGL_ACTIVITYGP Summary of Earnings, Deductionsand Taxes Activity Groups.
Earnings Activity Groups— approximately onerow per Company foreach Activity defined inPS_CHART_KEYS_HRthat is used as a distinctExpense Account inPS_EARNINGS_TBL.
Deductions Activity Groups— approximately onerow per Company foreach Activity defined inPS_CHART_KEYS_HRthat is used as a distinctExpense Account inPS_DEDUCTION_CLASS.
Taxes Activity Groups—approximately one rowper USA Company foreach Activity defined inPS_CHART_KEYS_HR thatis used as Expense Accountin PS_COMPANY_TBL_GLand/or one row per CanadianCompany, Wage Loss Planand each Activity defined inPS_CHART_KEYS_HR that isused as an Expense Account inPS_WGLS_EXP_GL_ACC.
PY PS_PYGL_ACTIVERNDT Approximately same number ofrows as Earnings and ActivityGroups.
PY PS_PYGL_ACTIVERNMP Approximately one row perCompany and Earnings ActivityGroup for each Earnings Codewithin that group that uses sameExpense Account.
PY PS_PYGL_ACTIVDEDDT Approximately same numberof rows as Deductions ActivityGroup.
326 Copyright © 2006, Oracle. All rights reserved.
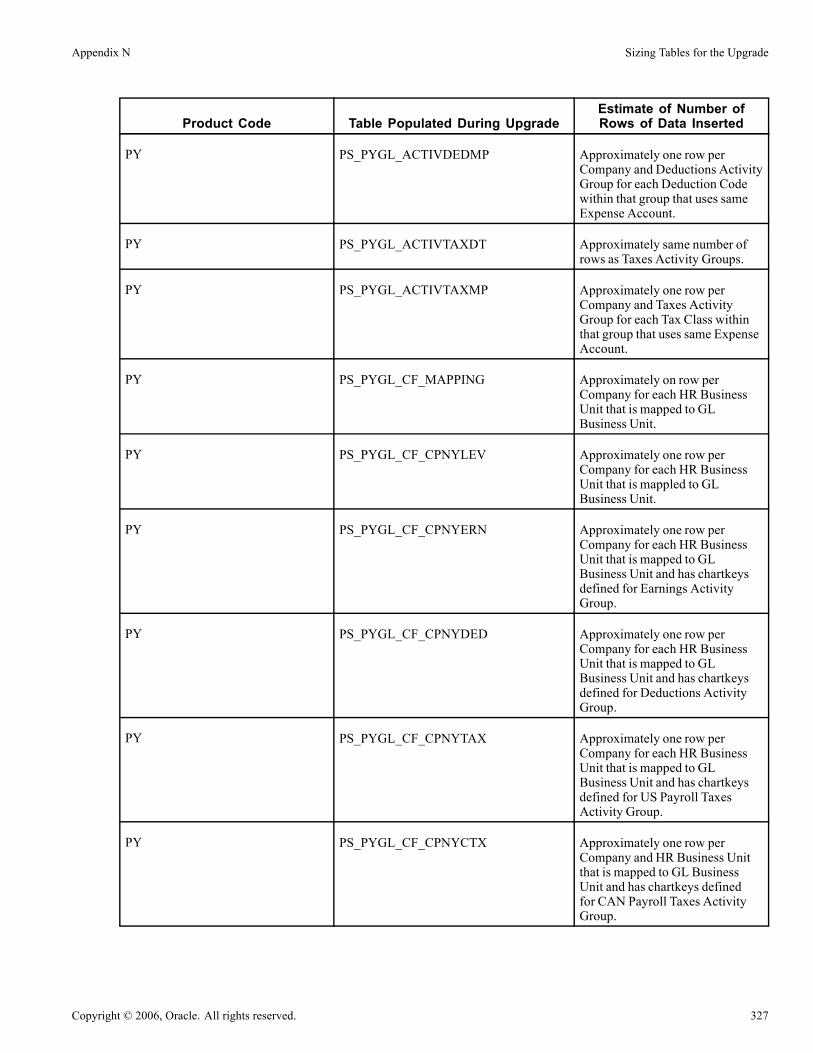
Appendix N Sizing Tables for the Upgrade
Product Code Table Populated During UpgradeEstimate of Number ofRows of Data Inserted
PY PS_PYGL_ACTIVDEDMP Approximately one row perCompany and Deductions ActivityGroup for each Deduction Codewithin that group that uses sameExpense Account.
PY PS_PYGL_ACTIVTAXDT Approximately same number ofrows as Taxes Activity Groups.
PY PS_PYGL_ACTIVTAXMP Approximately one row perCompany and Taxes ActivityGroup for each Tax Class withinthat group that uses same ExpenseAccount.
PY PS_PYGL_CF_MAPPING Approximately on row perCompany for each HR BusinessUnit that is mapped to GLBusiness Unit.
PY PS_PYGL_CF_CPNYLEV Approximately one row perCompany for each HR BusinessUnit that is mappled to GLBusiness Unit.
PY PS_PYGL_CF_CPNYERN Approximately one row perCompany for each HR BusinessUnit that is mapped to GLBusiness Unit and has chartkeysdefined for Earnings ActivityGroup.
PY PS_PYGL_CF_CPNYDED Approximately one row perCompany for each HR BusinessUnit that is mapped to GLBusiness Unit and has chartkeysdefined for Deductions ActivityGroup.
PY PS_PYGL_CF_CPNYTAX Approximately one row perCompany for each HR BusinessUnit that is mapped to GLBusiness Unit and has chartkeysdefined for US Payroll TaxesActivity Group.
PY PS_PYGL_CF_CPNYCTX Approximately one row perCompany and HR Business Unitthat is mapped to GL BusinessUnit and has chartkeys definedfor CAN Payroll Taxes ActivityGroup.
Copyright © 2006, Oracle. All rights reserved. 327

Sizing Tables for the Upgrade Appendix N
Product Code Table Populated During UpgradeEstimate of Number ofRows of Data Inserted
PY PS_PY_TAX_GL_CLASS This is a setup table and wouldbe expected to be relatively lowvolume.
One row for each Payroll Activityand Account Type for USA andCanada.
PY PS_ALT_OT_STATES This table will be populated if youmake functional decisions to doAlternative Overtime conversion.This is a setup table and wouldbe expected to be relatively lowvolume.
One row for each state allowingalternative overtime per setID, asspecified on the Upgrade Defaultspage.
PY PS_UPG831JOBTMP This table will be populated ifyou make functional decisionsto do the Alternative Overtimeconversion. Approximately onerow per employee/employeerecord for the employees whoseJob record currently have FLSAStatus equal to Nonexempt, HRStatus not equal to Terminated,and who work in a state specifiedon the Alt Overtime upgradedefault page.
PY PS_ALTOT_JOBJR_TMP This table will be populated ifyou make functional decisionsto do the Alternative Overtimeconversion. Approximately onerow per employee/employeerecord for the employees whoseJob record currently has FLSAstatus equal to Nonexempt, HRstatus not equal to Terminated, andwho work in a state specified onthe Alt Overtime upgrade defaultpage.
328 Copyright © 2006, Oracle. All rights reserved.

Appendix N Sizing Tables for the Upgrade
Product Code Table Populated During UpgradeEstimate of Number ofRows of Data Inserted
PY PS_ALTOT_COMP_TMP This table will be populated ifyou make functional decisionsto do the Alternative Overtimeconversion. Approximately onerow per employee/employeerecord/compensation rate forthe employees whose Job recordcurrently has FLSA status equal toNonexempt, HR status not equalto Terminated, and who work in astate specified on the Alt Overtimeupgrade default page.
PY PS_ALTOT_JOBAUSTMP This table will be populated ifyou make functional decisionsto do the Alternative Overtimeconversion. Approximately onerow per employee/employeerecord for the employees whoseJob record currently has FLSAstatus equal to Nonexempt, HRstatus not equal to Terminated, andwho work in a state specified onthe Alt Overtime upgrade defaultpage.
PY PS_ALTOT_JOBINDTMP This table will be populated ifyou make functional decisionsto do the Alternative Overtimeconversion. Approximately onerow per employee/employeerecord for the employees whoseJob record currently has FLSAstatus equal to Nonexempt, HRstatus not equal to Terminated, andwho work in a state specified onthe Alt Overtime upgrade defaultpage.
PY PS_ALTOT_JOBKEYS This table will be populated ifyou make functional decisionsto do the Alternative Overtimeconversion. Approximately onerow per employee/employeerecord for the employees whoseJob record currently has FLSAstatus equal to Nonexempt, HRstatus not equal to Terminated, andwho work in a state specified onthe Alt Overtime upgrade defaultpage.
Copyright © 2006, Oracle. All rights reserved. 329

Sizing Tables for the Upgrade Appendix N
Product Code Table Populated During UpgradeEstimate of Number ofRows of Data Inserted
PY PS_ALTOT_JOBUSFTMP This table will be populated ifyou make functional decisionsto do the Alternative Overtimeconversion and you havethe Federal HRMS product.Approximately one row peremployee/employee record forthe employees whose Job recordcurrently have the FLSA statusequal to Nonexempt, HR Statusnot equal to Terminated and whowork in a state specified on the AltOvertime upgrade default page.
PY PS_UPG_HRSNRDTSTMP This table will be populated ifyou make functional decisionsto do the Alternative Overtimeconversion. Approximately onerow per employee/employeerecord for the employees whoseJob record currently has FLSAstatus equal to Nonexempt, HRstatus not equal to Terminated, andwho work in a state specified onthe Alt Overtime upgrade defaultpage.
330 Copyright © 2006, Oracle. All rights reserved.

APPENDIX O
Testing Techniques
This appendix discusses:
• Understanding Testing Techniques
• When to Test
• Evaluate Your Testing Requirements
• Define Your Testing Strategy
• Determine the Testing Conditions
• Develop Your Test Plan
• Develop Test Scripts
• Tips and Techniques
Understanding Testing TechniquesAs with any project, testing is a critical part of your upgrade project. With proper testing, you can ensure thatyou upgrade successfully and you are ready for your Move to Production.
Upgrades vary in complexity and scale from release to release and customer to customer, so the testing periodsand the activities required to perform testing vary from upgrade to upgrade. Because PeopleSoft cannotanticipate how every organization uses the system to fit their own business practices, including customizationsand data setup, PeopleSoft does not deliver upgrade test scripts. However, there are some general testingguidelines that you can follow to assist with your upgrade testing. In this section, you will find informationthat will help you plan your testing efforts.
Task O-1: When to TestAn effective testing strategy involves an understanding of the stages of a PeopleSoft upgrade and where,within these stages, testing should be performed. You can take more than one approach and use more than onemethod to test your upgrade.
Copyright © 2006, Oracle. All rights reserved. 331
Testing Techniques Appendix O
Task O-2: Evaluate Your Testing RequirementsTo evaluate your testing requirements, you need the following information:
• The number of products and modules you currently have in your production database.
• The number of customizations you have in your production database.
• The functional design and business requirements addressed by each customization.
• Your online, batch, and reporting business processes that you want to include in testing.
Task O-3: Define Your Testing StrategyThis section discusses:
• Understanding Your Testing Strategy
• Evaluating Unit Testing
• Evaluating System Testing
• Evaluating Integration Testing
• Evaluating Parallel Testing
• Evaluating Performance Testing
• Evaluating User Acceptance Testing
• Evaluating Regression Testing
Understanding Your Testing StrategyOnce you evaluate your testing requirements, you can determine what types of testing you need. You shoulddefine the tests to be performed for the project and the goals of each test— including roles and responsibilities,test-case management, control points, and success criteria. In addition, you should define and document thescope of each type of testing. Use the definitions below to determine the levels of testing required in yourorganization.
To ensure upgrade success, be sure to train upgrade members before the upgrade. It is critical to have educatedtesters to ensure adequate test coverage of new functionality.
Task O-3-1: Evaluating Unit TestingIn this stage of testing, you have completed your upgrade tasks and your database is now at the new releaselevel. However, you should unit test before you use the new system. Unit testing validates data, business rules,and business process requirements. In addition, it ensures that business processes work as designed and yourdatabase is ready for full functionality testing. The processes for performing unit testing are described below:
• Test individual online transactions and batch processes on the upgraded database.• Validate data converted during the upgrade.• Verify that you can access existing data and enter new data successfully.
332 Copyright © 2006, Oracle. All rights reserved.

Appendix O Testing Techniques
• Test customizations reapplied to the upgraded database.• Each customization is tested individually along with all related processes.• Business processes are not tested.• Test scripts are not required.• Test − Document − Resolve issues − Retest.
Task O-3-2: Evaluating System TestingSystem testing ensures that all business functions and processes execute appropriately from the customer’sview. Business processes are tested from beginning to end during system testing; this is sometimes referred toas end-to-end testing. The processes for performing system testing are described below:
• Create system test environment via a test Move to Production.
• Test inbound and outbound interfaces and related business processes.
• Test online business processes using relevant security (i.e., user IDs, roles, and permission lists).
• Test batch business processes.
• Test reporting processes (SQR, PS/Query, nVision, and Crystal).
• Test customizations to business processes.
• Perform using test scripts.
• Compare expected results to actual results.
• Test − Document − Resolve issues − Retest − Document − Sign off.
Task O-3-3: Evaluating Integration TestingAfter system testing, you perform integration testing. In this stage, you test business processes and groups ofrelated business processes within the application to determine that they function as designed. In addition,you ensure that any design flaws are resolved before user testing. The following list of activities describesintegration testing:
• Create integration test environment via a test Move to Production.• Test specific business processes.• Test integration between modules and business processes.• Perform using test scripts.• Compare expected results to actual results.• Test − Document − Resolve issues − Retest − Document − Sign off.
Task O-3-4: Evaluating Parallel TestingParallel testing validates that the current production system and the upgraded database generate the expectedresults for specific business events. Parallel testing is optional, but frequently used to ensure that the newrelease will generate the same results given the same testing scenarios. The processes for performing paralleltesting are described below:
Copyright © 2006, Oracle. All rights reserved. 333

Testing Techniques Appendix O
• Create a parallel test environment via a test Move to Production. The Copy of Production should be takenbefore the major business processes/events are executed so that the same processes can be run duringthe parallel test.
• Retain any output from production processes for later comparison.• Run the same business processes/events in the upgraded database.• Compare results generated in the production system with the results generated using the upgraded database.• Perform using test scripts.• Test − Document − Resolve issues − Retest − Document − Sign off.
Task O-3-5: Evaluating Performance TestingYou conduct performance testing to determine if the system can accomplish stated objectives within a specifiedtime period. Performance of the current production system is often used as a baseline. The processes forperforming performance testing are described below:
• Define performance objectives for each business process included in the scope of the test.
• Perform business process.
• Monitor performance.
• Compare actual performance and acceptance criteria.
• Perform using test scripts.
• Test − Document − Resolve issues − Retest − Document − Sign off.
Task O-3-6: Evaluating User Acceptance TestingUser acceptance testing determines if day-to-day users can complete daily work activities within the systemwith an acceptable level of effort. For example, run through business processes such as hiring, terminating,and paying an employee in Human Resources or creating, editing, and posting journals in Financials. Theprocesses for performing user acceptance testing are described below:
• Functional resources should execute test scenarios (with their appropriate production security access toensure they have access to all the components, pages, and processes used in their daily functions).
• Perform using test scripts.• User testing should not be performed with developer or Super User access.• Test − Document − Resolve issues − Retest − Test − Document − Sign off.
Task O-3-7: Evaluating Regression TestingYou perform regression, or re-testing, if problems were found and resolved or changes were made during anyof the previous tests. This stage of testing validates the test Move to Production and Move to Production partsof the upgrade. When all the tests have received sign-off, you will use the initial Copy of Production toupgrade the production database/environment. You then perform a test move into the production environmentand customers confirm that the test move executed successfully. At this point you conduct regression testing.The following tips will assist you with regression testing:
• Ensure that no new defects have been introduced during the move.• Execute a predefined set of scripts to confirm the test move.
334 Copyright © 2006, Oracle. All rights reserved.
Appendix O Testing Techniques
• Performed by Functional Resources before Go Live.• Rerun scripts from previous testing.
Task O-4: Determine the Testing ConditionsAfter you identify the types of testing to include in your upgrade, determine conditions for each stage of testing.Be sure to test the actual test Move to Production to resolve any technical issues in the upgrade process itself inaddition to performing functional application testing. Perform the following actions for each testing type:
• Determine criteria for successful completion.
• Determine which tests you can run concurrently and which you must run serially.
• Set up test plans and test scripts you will need.
• Define the testing environment.
• Define issue resolution procedures.
• Define change control and migration procedures.
• Define which third-party tools you must install and configure.
• Identify database maintenance procedures, for example, backup and refresh.
• Evaluate the need for a testing tool to aid in the testing process.
Task O-5: Develop Your Test PlanIf you have test plans from your implementation or previous upgrades, consider modifying them for thisupgrade project, ensuring that you incorporate features and functions delivered with the new release. Useexisting test plans and scripts wherever possible. Identify modifications during the fit/gap analysis andcomplete script generation during the initial upgrade. Based on the objectives and scope defined in your teststrategy, identify the following items for each type of testing:
• Test procedures• Assumptions• Timing• Deliverables• Acceptance criteria• Roles and responsibilities• Resource requirements• Training requirements• Test environment• Data requirements• Issue and change control tracking procedures
Copyright © 2006, Oracle. All rights reserved. 335
Testing Techniques Appendix O
• Testing Tools
Task O-6: Develop Test ScriptsThe process of developing test scripts can assist with detecting problems in the requirements or design of anapplication. It requires thinking through the entire operation of the application. For this reason, you may findit useful to start preparing test scripts early in the upgrade cycle and, if possible, base them on existing testscripts from your implementation project or previous upgrade.
If you have test scripts from your original implementation, recycle them and modify them to accommodate newfunctionality. That way, you can be sure to cover your critical end-to-end business processes. You will alsowant to focus additional testing time on your customizations to verify that they have upgraded successfully.
If you do not have test scripts from your implementation, you can create them by documenting what youcurrently do within the system.
Create a test script for each business process to define the Action or Event, Input, and the expected resultto determine if a feature of an application is working correctly. Functional people who are aware of currentprocesses should write your test scripts. However, when writing test scripts, assume the person testing does notknow how to use the system. Use the following procedure for developing test scripts:
• Test scripts should contains specifics, such as test identifier, test name, objective, test conditions and setup,input data requirements, steps, and expected results.
• Write as a step-by-step guide, stating what data should be entered, when, and where.
• Organize by module, business process, and process cycles.
• Create with full production security in mind.
• Create early in the upgrade process.
Make sure that your tests are consistent with the following tips:
• Action
- Include the script name, description, and purpose.
- Include the navigation steps in PeopleSoft.
- Include navigation steps outside of PeopleSoft.
• Input
- Include security requirements: what User ID, Role, and Permission List should be used to perform thetest.
- Specify key data elements: entering new or accessing existing data.
• Results
- Include the exact results.
- Print screens to support the results and print the report output.
336 Copyright © 2006, Oracle. All rights reserved.

Appendix O Testing Techniques
Task O-7: Tips and TechniquesThis section discusses:
• Reducing the Time of Upgrade Process
• Performing Testing on Up to Date Data
• Performing Test Move to Production
• Tracking Issues
• Reviewing Testing Tools
• Discussing Change Control
• Discussing Back Up Procedures
• Evaluating Unexpected Results
• Evaluating Reasons for Failure
Task O-7-1: Reducing the Time of Upgrade ProcessAll testing can be performed at the end, including running the tests on the current system to obtain resultsfor comparison. One way to reduce the overall timeframe of an upgrade is to execute the tests on the currentsystem while the upgrade is in progress. This way you will have the results ready when the upgraded databaseis to be tested. This can be achieved by taking two copies of the production database at the start of the upgrade.Only one copy is upgraded, while the other remains at current release. The testing time is now reduced to onlyperforming the tests on one database.
After each test Move to Production, you may want to turn over the upgraded database to the testing team whilethe technical team begins a new iteration of the test Move to Production. Conducting the two efforts in parallelmay decrease the overall time required to upgrade. Any issues that are found by the testing team can beincorporated into the newly upgraded database as soon as it is available.
One approach that may be used for the Move to Production is to run the production database and upgradeddatabase in parallel to ensure that key business processes operate as expected. Although this may requiredual maintenance of data during the parallel testing period, it may minimize the impact of the actualMove to Production. If you are interested in using this method, once you have performed a test Move toProduction to your satisfaction, schedule the production cutover weekend. Then, perform the next test Move toProduction during that weekend. Bring the existing production system back up and run the upgraded databaseconcurrently. If, after comparing the outcome of your critical business processes, you are satisfied with theresults, simply set the upgraded database to your production system. If you are not satisfied with the results,make the necessary adjustments and perform another test Move to Production.
Task O-7-2: Performing Testing on Up to Date DataThe previous technique will mean that testing is performed on old data. The copies of production may havebeen taken some weeks or months in the past. It will confirm that the data you started with has upgradedsuccessfully. However, it may be required to perform the tests on the most recent data set as follows:
• Take a copy of production and upgrade
• Perform all phases of testing on the upgrade version up to unit testing
• Determine that the database is ready for full functionality testing
Copyright © 2006, Oracle. All rights reserved. 337

Testing Techniques Appendix O
Task O-7-3: Performing Test Move to ProductionPerforming a test Move to Production is a good technique for assuring database readiness as follows:
• Take two up to date copies of the production database.• Perform the test Move to Production steps to upgrade one of the databases.• Execute test scripts on the remaining database.• Perform tests on the upgraded database and compare results.
Task O-7-4: Tracking IssuesYou should implement a method for tracking the tests and issues discovered during testing. Tracking issuesand resolutions on a central document serves as a communication tool and minimizes duplication effort. Thefollowing tips should be considered while tracking issues:
• Categorize issues:Critical, Major, Minor, Cosmetic
• Use a central document repository or tracking tool
Task O-7-5: Reviewing Testing ToolsSQA Robot :
• Records key strokes (like a macro recorder) into Visual Basic scripts.
• Useful for regression testing.
• SQA Manager—can be used to simulate multiple users.
Test Director by Mercury/Interactive:
• Tool that manages test scripts—tracks execution and defects.• Useful for regression testing.
Task O-7-6: Discussing Change ControlMake sure that you have a procedure for implementing changes during the testing stage. You may have severaldatabases, if server space permits. All changes should be made in a master database. If an issue is foundduring testing, the resolution should be applied to the master database and promoted via pre-defined migrationprocedures. Remember that a master database will also be required to perform the Move to Production.
Task O-7-7: Discussing Back Up ProceduresThe following tips should be considered when backing up your data:
• Back up at baseline before testing (use a backup technique that will allow you to restore individual tables).
• Back up at key points for point in time testing.
• Implement refresh procedures to avoid duplicate data.
338 Copyright © 2006, Oracle. All rights reserved.
Appendix O Testing Techniques
Task O-7-8: Evaluating Unexpected ResultsIn the event you receive unexpected results and you cannot determine their cause, attempt to replicate anyissues you encounter in your Copy of Production database on a delivered Demo database. If the issue doesoccur on Demo, it should be reported to the Global Support Center. Check PeopleSoft Customer Connectionto see if a fix has been posted to resolve the issue.
See PeopleSoft Customer Connection (Updates + Fixes).
Task O-7-9: Evaluating Reasons for FailureThe list below identifies reasons why your test plan might have failed:
• Testing strategy was poorly defined• Test plans were poorly defined• Test scripts were poorly defined• Lack of resources and resource commitment• Lack of understanding of the upgrade process
Copyright © 2006, Oracle. All rights reserved. 339

Testing Techniques Appendix O
340 Copyright © 2006, Oracle. All rights reserved.

APPENDIX P
Understanding Core Record Modifications
Understanding Core Record ModificationsThe following summarizes the changes in the new PeopleSoft HRMS Core Record.
Table Change Field Label Upgrade Notes
PERS_DATA_EFFDT
Delete QDRO_IND_YN QDRO IndicatorCode
Value of thefield is derivablefrom the data inPA_QDRODATso there is noneed to keep theinformation inPERS_DATA_EFFDT.
Logic:
If there is aPA_QDRODATrecord that has theperson entered inthe QDRO_IDfield, then theQDRO indicatorwould be Aelse if there is aPA_QDRODATrecord that has theperson entered inthe EMPLID field,then the QDROindicator wouldbe Q, else QDROindicator would beblank.
DISABILITY Add DISABILITY_GR_JPN Disability Grade New Field
DISABILITY Add DISABILITY_CD_JPN Disability Code New Field
DISABILITY Add WKRCOMP_DISGRD_JPN Worker CompDisability
New Field
DISABILITY Add WKRCOMP_ISGRD_JPN WC Injury andSickness
New Field
Copyright © 2006, Oracle. All rights reserved. 341

Understanding Core Record Modifications Appendix P
Table Change Field Label Upgrade Notes
EMPLOYMENT Add INS_DAYS_BRA INSS Days New Field
EMPLOYMENT Add INS_MONTHS_BRA INSSMonths New Field
EMPLOYMENT Add INS_YEARS_BRA INSS Years New Field
JOB Add APPT_TYPE AppointmentType − usedto distinguishbetween a FrenchPublic Sector row,an AdditionalAppointmentfor JPNrow anda normal core row.
New Field
JOB Add MAIN_APPT_NUM_JPN Main ApptNumber ofan AdditionalAppointment Rowfor JPN
New Field
JOB Delete RATING_SCALE Rating Scale Informationnow kept inPerformanceManagementRecords by Group− see REVIEW_DISTRIB.
JOB Delete REVIEW_DT Review Date Informationnow kept inPerformanceManagementRecord in adifferencemanner− EE_APPR.
JOB Delete REVIEW_RATING Review Rating Informationnow kept inPerformanceManagementRecordin adifferent manner− EE_APPR.
JOB Delete SALARY_MATRIX_CD Salary MatrixCode
Informationnow kept inPerformanceManagementRecords by Group− see REVIEW_DISTRIB.
342 Copyright © 2006, Oracle. All rights reserved.

Appendix P Understanding Core Record Modifications
Table Change Field Label Upgrade Notes
JOB Delete WRKS_CNCL_ID_LCL Works Council ID Field renamedWC_COUNCIL_ID
Data is now keptat the CompanyLocation Level.
JOB Delete WRKS_CNCL_MEM_GER Works CouncilMember
Data is now keptat the CompanyLocation Level.
JOB Change FTE FTE Decimal Posincreased to 6
JOB Change PAID_FTE Paid FTE Decimal Posincreased to 6
JOB_JR Add START_DATE_JPN JPN Start Date New Field
JOB_JR Add EXP_END_DATE_JPN JPN Expected EndDate
New Field
JOB_JR Add END_DATE_JPN JPN Actual EndDate
New Field
JOB_JR Add WORKDAYS_NLD NLDNumber ofWorking days perweek
New Field
JOB_JR Add CONT_SAL_TYPE_BRA BRA ContractSalary Type
New Field
JOB_JR Add CBO_CD_BRA BRAOccupationCode
New Field
JOB_JR Add SEFIP_CATEGORY_BRA BRA SEFIPCategory
New Field
JOB_JR Add UNION_CD_ALT_BRA BRAAlternateUnion
New Field
JOB_JR Add SUSBTIT_REASON_ESP ESP SubstitutionReason
New Field
JOB_JR Add SUSBTIT_EMPLID_ESP ESP SubstitutionEMPLID
New Field
JOB_JR Add PART_SUBROGTN_ESP ESP PartialSubrogation
New Field
JOB_JR Add LABOR_RLTNSHIP_ESP ESP SpecialLabor Relations
New Field
Copyright © 2006, Oracle. All rights reserved. 343
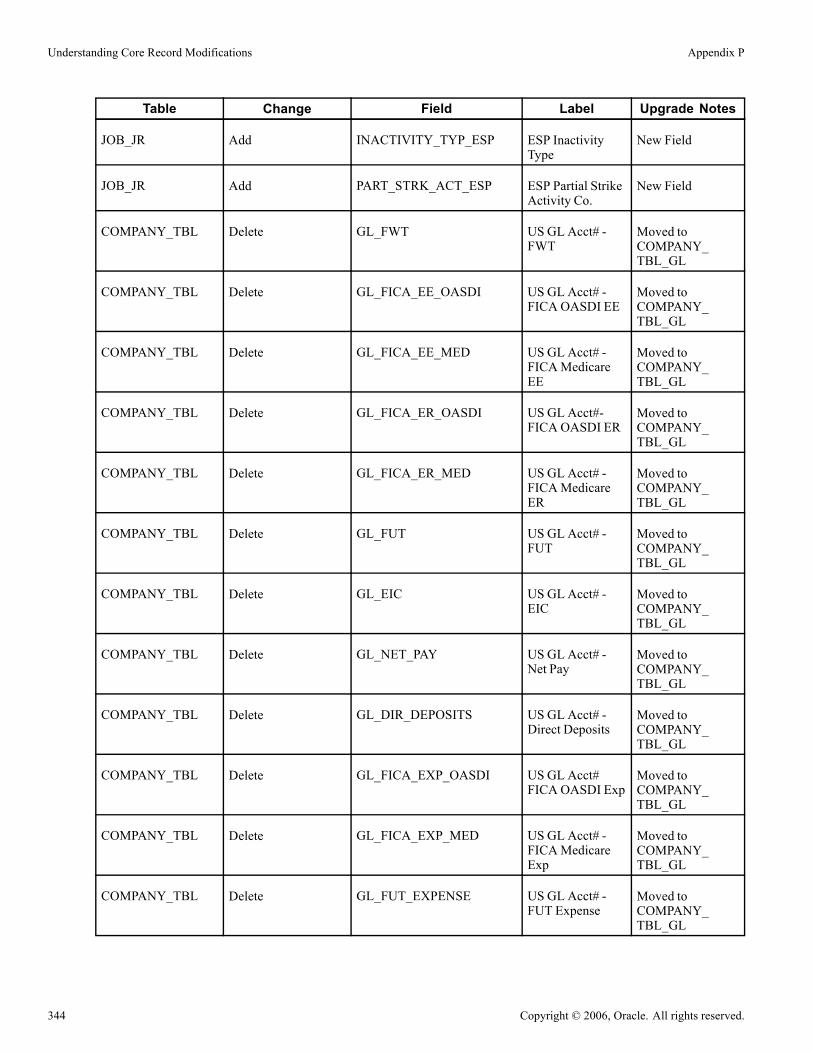
Understanding Core Record Modifications Appendix P
Table Change Field Label Upgrade Notes
JOB_JR Add INACTIVITY_TYP_ESP ESP InactivityType
New Field
JOB_JR Add PART_STRK_ACT_ESP ESP Partial StrikeActivity Co.
New Field
COMPANY_TBL Delete GL_FWT US GL Acct# -FWT
Moved toCOMPANY_TBL_GL
COMPANY_TBL Delete GL_FICA_EE_OASDI US GL Acct# -FICA OASDI EE
Moved toCOMPANY_TBL_GL
COMPANY_TBL Delete GL_FICA_EE_MED US GL Acct# -FICAMedicareEE
Moved toCOMPANY_TBL_GL
COMPANY_TBL Delete GL_FICA_ER_OASDI US GL Acct#-FICA OASDI ER
Moved toCOMPANY_TBL_GL
COMPANY_TBL Delete GL_FICA_ER_MED US GL Acct# -FICAMedicareER
Moved toCOMPANY_TBL_GL
COMPANY_TBL Delete GL_FUT US GL Acct# -FUT
Moved toCOMPANY_TBL_GL
COMPANY_TBL Delete GL_EIC US GL Acct# -EIC
Moved toCOMPANY_TBL_GL
COMPANY_TBL Delete GL_NET_PAY US GL Acct# -Net Pay
Moved toCOMPANY_TBL_GL
COMPANY_TBL Delete GL_DIR_DEPOSITS US GL Acct# -Direct Deposits
Moved toCOMPANY_TBL_GL
COMPANY_TBL Delete GL_FICA_EXP_OASDI US GL Acct#FICA OASDI Exp
Moved toCOMPANY_TBL_GL
COMPANY_TBL Delete GL_FICA_EXP_MED US GL Acct# -FICAMedicareExp
Moved toCOMPANY_TBL_GL
COMPANY_TBL Delete GL_FUT_EXPENSE US GL Acct# -FUT Expense
Moved toCOMPANY_TBL_GL
344 Copyright © 2006, Oracle. All rights reserved.

Appendix P Understanding Core Record Modifications
Table Change Field Label Upgrade Notes
COMPANY_TBL Delete GL_SUT_EXPENSE US GL Acct# -SUT Expense
Moved toCOMPANY_TBL_GL
COMPANY_TBL Delete GL_SDI_EXPENSE US GL Acct# -SDI Expense
Moved toCOMPANY_TBL_GL
COMPANY_TBL Delete GL_VDI_EXPENSE US GL Acct# -VDI Expense
Moved toCOMPANY_TBL_GL
COMPANY_TBL Delete GL_LCL_EXP US GL Acct# -LCL Expense
Moved toCOMPANY_TBL_GL
COMPANY_TBL Delete WRKS_CNCL_REQ_GER GERWorksCouncilAdministrationRequired
JOBCODE_TBL Add JOB_PROFILE_ID Job Profile ID New Field
LOCATION_TBL Delete WRKS_CNCL_ID_LCL Works Council ID Data is now keptat the CompanyLocation Level.
LOCATION_TBL Add MESSAGE_TEXT2 Check CashLocation
New Field
ACTN_REASON_TBL
Delete WRKS_CNCL_APPR_GER Works CouncilApprovalRequired
No upgrade −data delivered assystem data.
ACTN_REASON_TBL
Delete DECISIONGRP_GER GER DecisionGroup
Field renamedWC_DECISIONGRP_ID
No upgrade −data delivered assystem data.
ACTN_REASON_TBL
Add AFI_EE_STATUS_ESP ESP EmployeeStatus
New Field
ACTN_REASON_TBL
Add AFI_SS_ACTION_ESP ESP SocialSecurity Action
New Field
ESTAB_TBL Add FONGECIF_CD_FRA FRA FONGECIFCode
New Field
ESTAB_TBL Add ESTAB_CONTACT_ID FRA Contact forEstablishment
New Field
Copyright © 2006, Oracle. All rights reserved. 345
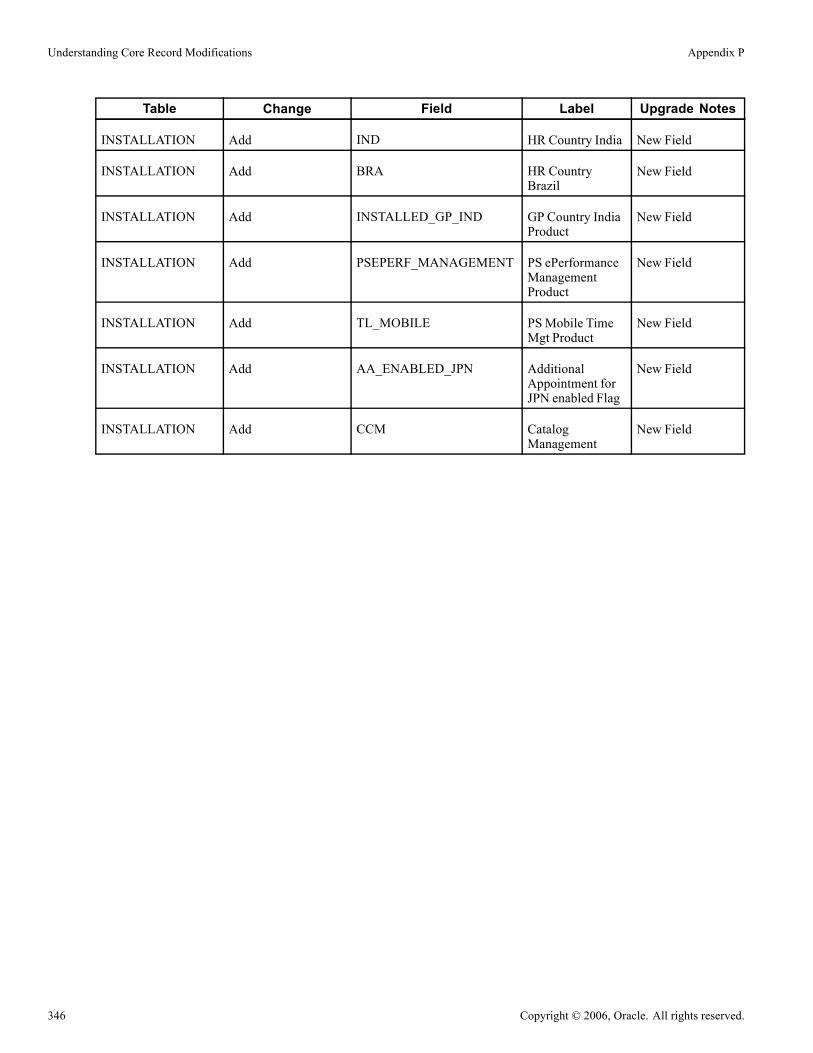
Understanding Core Record Modifications Appendix P
Table Change Field Label Upgrade Notes
INSTALLATION Add IND HR Country India New Field
INSTALLATION Add BRA HR CountryBrazil
New Field
INSTALLATION Add INSTALLED_GP_IND GP Country IndiaProduct
New Field
INSTALLATION Add PSEPERF_MANAGEMENT PS ePerformanceManagementProduct
New Field
INSTALLATION Add TL_MOBILE PSMobile TimeMgt Product
New Field
INSTALLATION Add AA_ENABLED_JPN AdditionalAppointment forJPN enabled Flag
New Field
INSTALLATION Add CCM CatalogManagement
New Field
346 Copyright © 2006, Oracle. All rights reserved.

APPENDIX Q
Understanding the Comparison Process
This appendix discusses:
• How the Comparison Process Works
• Understanding Upgrade Compare Reports
Task Q-1: How the Comparison Process WorksThis section discusses:
• Source and Target Columns
• Action Column
• Upgrade Column
• Putting it All Together
During the upgrade, you run several compare processes and then review the resulting reports. The compareprocess first compares every property of an object definition on the Demo database to the properties ofobject definitions on the Copy of Production database. PeopleSoft tracks object changes using the contentsof the PSRELEASE table, and the value of two fields, LASTUPDDTTM and LASTUPDOPRID, used inthe PeopleTools tables.
• The PSRELEASE table maintains the Comparison Release Level. This table contains rows of data forevery release level at which the database has ever existed. The first column in this table, RELEASEDTTM,contains a date/time stamp identifying when each release level was “stamped.” The second column,RELEASELABEL, identifies the release level. The format of a release label is M XX.XX.XX.YYY, whereM is the market code, XX is an integer from 0 to 99, and YYY is an integer from 0 to 999. A release labelhas two parts: the PeopleSoft release number (M XX.XX.XX) and the customer release number (YYY).Each time you customize your production database, you can stamp it with a new customer release levelto help you track your changes over time. You should not change any portion of the PeopleSoft releasenumber unless specifically instructed to do so.
• The LASTUPDDTTM field in our PS<object>DEFN tables—such as PSRECDEFN, PSPNLDEFN, andso on—stores a date/time stamp of when each object was last modified.
• The LASTUPDOPRID field stores the operator ID of the user who made the modification. If PeopleSoftmade the modification, the p roprietary ID PPLSOFT is used.
Note. Maintain Security prevents you from creating an operator named PPLSOFT.
If an object definition is defined differently in the Demo database than in the Copy of Production,the compare process will check to see whether either object definition has changed since thecomparison release. If the object’s LASTUPDDTTM value is greater than the RELEASEDTTM value
Copyright © 2006, Oracle. All rights reserved. 347
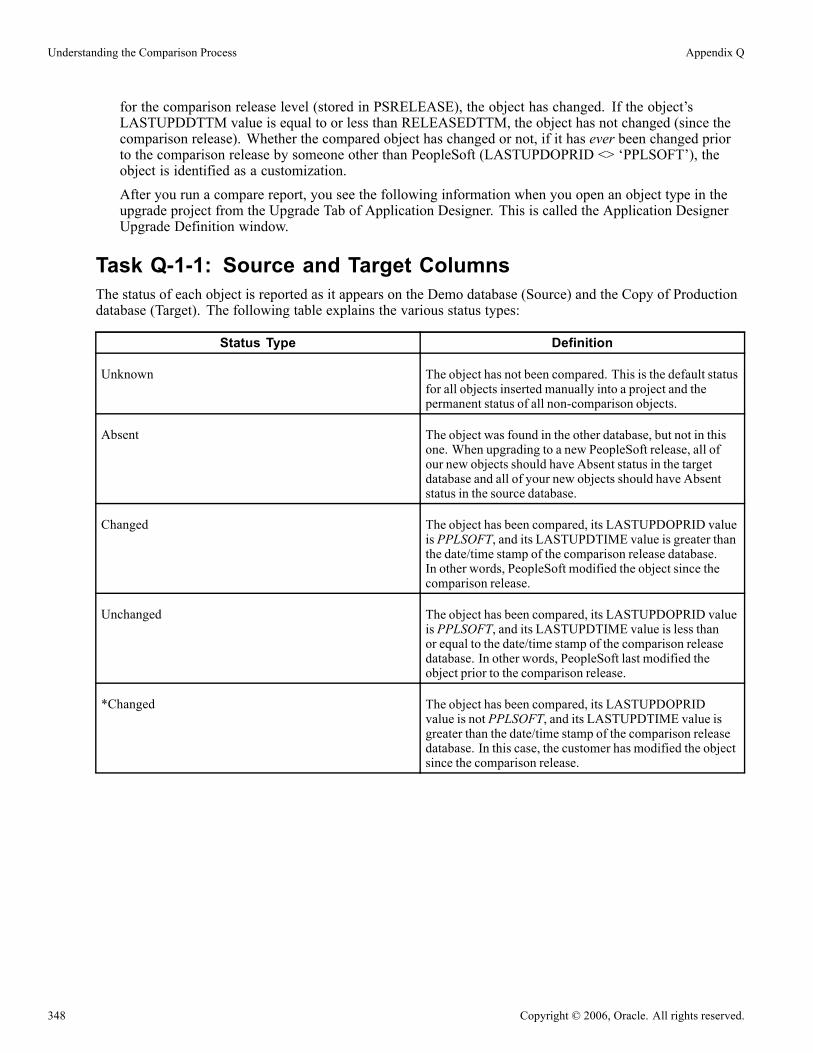
Understanding the Comparison Process Appendix Q
for the comparison release level (stored in PSRELEASE), the object has changed. If the object’sLASTUPDDTTM value is equal to or less than RELEASEDTTM, the object has not changed (since thecomparison release). Whether the compared object has changed or not, if it has ever been changed priorto the comparison release by someone other than PeopleSoft (LASTUPDOPRID <> ‘PPLSOFT’), theobject is identified as a customization.After you run a compare report, you see the following information when you open an object type in theupgrade project from the Upgrade Tab of Application Designer. This is called the Application DesignerUpgrade Definition window.
Task Q-1-1: Source and Target ColumnsThe status of each object is reported as it appears on the Demo database (Source) and the Copy of Productiondatabase (Target). The following table explains the various status types:
Status Type Definition
Unknown The object has not been compared. This is the default statusfor all objects inserted manually into a project and thepermanent status of all non-comparison objects.
Absent The object was found in the other database, but not in thisone. When upgrading to a new PeopleSoft release, all ofour new objects should have Absent status in the targetdatabase and all of your new objects should have Absentstatus in the source database.
Changed The object has been compared, its LASTUPDOPRID valueis PPLSOFT, and its LASTUPDTIME value is greater thanthe date/time stamp of the comparison release database.In other words, PeopleSoft modified the object since thecomparison release.
Unchanged The object has been compared, its LASTUPDOPRID valueis PPLSOFT, and its LASTUPDTIME value is less thanor equal to the date/time stamp of the comparison releasedatabase. In other words, PeopleSoft last modified theobject prior to the comparison release.
*Changed The object has been compared, its LASTUPDOPRIDvalue is not PPLSOFT, and its LASTUPDTIME value isgreater than the date/time stamp of the comparison releasedatabase. In this case, the customer has modified the objectsince the comparison release.
348 Copyright © 2006, Oracle. All rights reserved.

Appendix Q Understanding the Comparison Process
Status Type Definition
*Unchanged The object has been compared, its LASTUPDOPRID valueis not PPLSOFT, and its LASTUPDTIME value is less thanor equal to the date/time stamp of the comparison releasedatabase. In this case, the customer last modified the objectprior to the comparison release.
Same The object has been compared and is defined as the samein both databases. When an object in one database has thisstatus, so will its counterpart in the other database. Thisstatus would never be seen when performing a databasecomparison because in that case, the project is onlypopulated with objects defined differently. However, itcan occur when performing a project comparison becausein a project comparison, the project contents are static; theproject is not repopulated based on the comparison results.
Task Q-1-2: Action ColumnThe default actions for each object that you compared are reported in the Action column. The compare setsthe action column based on what you need to do to make the Copy of Production database consistent withthe source. You should not change these actions. You can decide whether or not to accept each action bysetting the Upgrade value. Action types include:
Action Type Definition
Copy Object will be added to the Copy of Production database.
Copy Prop (Records and Fields only) Object Properties will be added to the Copy of Productiondatabase.
Delete Object will be deleted from the Copy of Productiondatabase.
None No action will be taken on this object.
PeopleSoft assigns one of these action types to every object in a comparison project and in the compare reports.However, these actions are not necessarily carried out during the copy process. The value of the Upgradecolumn for each object makes that determination.
Task Q-1-3: Upgrade ColumnThe Upgrade values for each object—Yes or No—determine whether the object action will be carried outduring the copy process. The upgrade orientation you assign during the compare process determines thesesettings. You can orient the upgrade to keep PeopleSoft changes or to retain your changes in the Copy ofProduction. Whichever orientation you choose, you will still have the option to set each Upgrade valueindividually before copying your project into your target database.
You may find that after the compare process, your project contains objects that have a Source status ofUnchanged and a Target Status of Changed and the Upgrade column is not checked. What this statuscombination means is that the PeopleSoft object on your Copy of Production was changed more recently thanon the Demo database. In these instances, PeopleSoft recommends that you check the Upgrade column, settingthe value to Yes, so that the object will be copied to your Copy of Production when you copy the project.
Copyright © 2006, Oracle. All rights reserved. 349

Understanding the Comparison Process Appendix Q
Task Q-1-4: Putting it All TogetherThe following chart summarizes every possible Status, Action, and Upgrade value that could be set by thecompare process to a single object:
Source Status Target Status Action PeopleSoft Vanilla KeepCustomizations
(Any) Absent COPY YES YES
Changed orUnchanged
DELETE YES YESAbsent
Changed* orUnchanged*
DELETE NO NO
Changed orUnchanged
COPY YES YESChanged
Changed* orUnchanged*
COPY YES NO
Changed COPY NO NO
Unchanged COPY YES YES
Unchanged
Changed* orUnchanged*
COPY YES NO
Changed orUnchanged
COPY NO YESChanged*
Changed* orUnchanged*
COPY YES YES
Changed orUnchanged
COPY NO YES
Changed* COPY NO NO
Unchanged*
Unchanged* COPY YES YES
Task Q-2: Understanding Upgrade Compare ReportsThis section discusses:
• Report Columns
• Using Reports
• Effect of Field Rename on Copy Overrides
350 Copyright © 2006, Oracle. All rights reserved.

Appendix Q Understanding the Comparison Process
When you run the compare process, it creates reports to help you understand what objects differ between theSource and Target databases, and how they differ. If you have documentation of your database modifications,you should retrieve it before reviewing these reports. This will help you understand how the Target objectshave changed and enable you to better compare the Target version of the object with the Source version. If youare upgrading to a new PeopleSoft release, you should also review the Release Notes for your product. Thesenotes will identify and explain object changes in the source database.
Upgrade reports can be a little intimidating at first glance, until you understand what data you are lookingfor and how best to use it. This section includes the following topics:
• Report Columns• Using Reports• Effect of Field Rename on Copy Overrides
Task Q-2-1: Report ColumnsFor the most part, the columns in upgrade reports correspond with the columns you see in ApplicationDesigner’s upgrade definition window. Moving from left to right, you see the Name of the object, then otherkey columns that vary by object type, then the Source and Target status, the Action value and Upgradeflag (Yes or No).
After these columns are three more that are not included in Application Designer. The first is Attribute. Thistells you the type of difference that was found between the two objects. For example, record field Attributevalues include Use/Edit, which identifies key or audit differences, and Default Field Name (Def. Fldnm),which identifies differences in a default value. Lastly, there is a Source column and a Target column. Thesewide columns display the actual differences between the object definitions. For example, on a Use/Editattribute recfield difference, the Source column might contain Xlat Table Edit while the Target column isempty. This means the Source record field has a translate table edit while the Target record field does not.
If you are unsure of the meaning of any value in the last three report columns, open the PeopleTool that editsthe particular object. The values in these columns correspond directly to dialog options in the tool.
Task Q-2-2: Using ReportsPeopleSoft delivers several cross-reference reports that you can run to provide information about theinter-relationships between various objects. PeopleSoft delivers these reports in the form of SQRs (found inPS_HOME\SQR), Crystal Reports (found in PS_HOME\CRW\ENG), and Queries.
The cross-reference reports include:
Object Type(s) Report Name Report Description
Applications and Fields XRFAPFL Lists all application windows, suchas General Tables, in alphabeticalorder, as well as the fields within eachwindow. For each field, the reportdetails the Field Name, Field Type,Length, and Format, as well as allthe record and page definitions thatcontain the field (within the window).
Copyright © 2006, Oracle. All rights reserved. 351

Understanding the Comparison Process Appendix Q
Object Type(s) Report Name Report Description
Fields Referenced by PeopleCodePrograms
XRFFLPC Lists all PeopleCode programs inalphabetical order by associatedrecord definition/field. The reportincludes type of field and lists allfields referenced in the PeopleCodeprogram.
Fields and Panels XRFFLPN Lists all fields in alphabetical order.The report includes the names of allrecord and page definitions in whicheach field is used, as well as the LongName of each field.
Records and Fields XRFFLRC Lists all fields in alphabetical order.The report details the Long Name,Field Type, Field Length, andFormatting specified for the field,and includes the names of all recorddefinitions that contain the field.
Field Listing XRFIELDS Lists all fields in alphabetical order.The report includes Field Type,Length, Format, Long Name and ShortName.
Menu Listing XRFMENU Lists application windows inalphabetical order. The report detailsall menus within each window, and allpage definitions within each menu.It also includes the associated searchrecord definition name and detail pagedefinition name.
Panel Listing XRFPANEL Lists all page definitions inalphabetical order.
PeopleCode Programs and FieldReferences
XRFPCFL Lists record definitions that containfields with PeopleCode programattributes. The report includesthe Field Name, as well as theassociated record definitions andfields referenced in the PeopleCodeprogram.
Panels with PeopleCode XRFPNPC Lists all pages that contain fields withPeopleCode attributes. For each page,the report includes the name of therecord definition(s) that contain thefield as well as the Field Name andType.
352 Copyright © 2006, Oracle. All rights reserved.

Appendix Q Understanding the Comparison Process
Object Type(s) Report Name Report Description
Fields and Records XRFRCFL Lists all fields in alphabetical order byassociated record definition name. Thereport details the Long Name, FieldType, Field Length, and Formattingspecified for the field.
Records and Panels XRFRCPN Lists all record definitions inalphabetical order. The reportincludes the menu and page definitionsassociated with each record definition.
Window Listing XRFWIN Lists all application windows inalphabetical order.
In addition to using our standard cross-reference reports, you can also generate ad hoc reports to extract theexact combination of information you need. Or, you can create permanent custom reports for informationyou extract on a regular basis.
PeopleSoft recommends that you mark your upgrade reports using a color-coding system to help you quicklyidentify what you need to do to certain objects.
If you have several people reviewing sections of the reports, a good documentation policy is to have everyoneon your review cycle initial and date the action defaults and overrides they select.
You may also find it easier to change some objects manually after the upgrade, rather than copying thenew versions from the source.
See AlsoEnterprise PeopleTools PeopleBook: Crystal Reports for PeopleSoft
Task Q-2-3: Effect of Field Rename on Copy OverridesRenaming fields has an impact on data conversion that you need to understand when performing theseoverrides. What changes you copy to your Target, how you alter the tables, and how the data conversion scriptsare written, are very subtly linked. If done incorrectly, the delivered conversion scripts will not execute. Youmust take action to prevent these errors in this task.
Rename scripts change field names in all PeopleTools objects; for example, records, pages, PeopleCode, andso forth. The scripts do not rename the fields on the physical tables in the database. At this point, the physicaltables still contain the old field name.
After running the field renames, you ran the compare reports that contained the details of the differencesbetween the delivered PeopleSoft Demo database and your Copy of Production that now contains the new fieldnames. There are two cases to consider:
• Case 1: The PeopleSoft record contains a field and your Copy of Production record contains the samefield. No difference shows on the compare report.
• Case 2: Your Copy of Production record contains the newly renamed field, but the PeopleSoft record nolonger contains the field. The compare report lists these fields, and you can expect them to be deleted.
Copyright © 2006, Oracle. All rights reserved. 353

Understanding the Comparison Process Appendix Q
Later in the upgrade, when the Renamed Tables script is run, Case 1 and Case 2 will be handled differently.For Case 1, because the field still exists in the Application Designer definition of the record, the program willalter the table to rename the field. If conversion programs reference these fields, they are written to selectfrom the new field name. For Case 2, because the field no longer exists in the Application Designer definitionof the record, the table is not altered to rename the field. If conversion programs reference these fields,they are written to select from the old field names.
If you do not delete a field that PeopleSoft expects to be deleted, or delete a record that PeopleSoft expects tobe deleted, the table will be altered, renaming the field from the old name to the new name. The conversionprogram, however, will look for the old field name.
354 Copyright © 2006, Oracle. All rights reserved.

APPENDIX R
Understanding FTE Enhancement
Understanding FTE EnhancementThis appendix explains the enhancements made in the new PeopleSoft release for the Full Time Equivalence(FTE) and the Full Time Equivalence-related calculations.
To improve precision in FTE and FTE-related calculations, such as employee compensation, PeopleSoft hasexpanded the number of decimal positions displayed and calculated in the FTE field to six.
In the new PeopleSoft release, the FTE field has the following definition: 1 integer, 6 decimals.
In addition, a set of external rounding rules (Set Up HRMS, Foundation Tables, Organization, Company -Rules Definition tab) has been provided that allow you to define at the company level the preferred number ofsignificant decimals for FTE calculations. A new table PS_COMPANY_TBL_AR was created for housing theeffective-dated rounding rules.
The new upgrade process creates a new FTE rounding rule of two-decimal-precision for each of your existingcompanies with the lowest effective date available for the particular company. By doing this, the roundingrule is matched with FTE decimal size from the previous release. (In previous HRMS releases, FTE fieldhad the following definition: 1 integer, 2 decimals.)
Therefore, after you have completed your upgrade to the new PeopleSoft release, it is recommended youvisit company table set up and double check the current value for your existing companies. If you hadcustomized FTE decimal size in your system, you may want to modify FTE rounding rule values to matchyour customized FTE field definition.
Note. FTE enhancements extend to the French-specific PAID FTE field as well.
Copyright © 2006, Oracle. All rights reserved. 355

Understanding FTE Enhancement Appendix R
356 Copyright © 2006, Oracle. All rights reserved.
APPENDIX S
Understanding Person Model Changes
Understanding ChangesThis appendix discusses the changes to the core record structures for a Person, the Person’s basic biographicaldata, and the relationships that the Person has with the organization. These record structures evolved ineach of the releases from PeopleSoft 8.0 to PeopleSoft 8.9. Because the biggest changes occurred betweenPeopleSoft 8.0 and PeopleSoft 8.3 and between PeopleSoft 8.3 and PeopleSoft 8.9, these changes will be thefocus of this appendix.
The main goals of the changes were to:
1. Normalize the Person data structures as follows:• Remove the storing of a single address in 7 different tables.• Remove all redundant fields from PERSONAL_DATA.• Simplify the maintenance of names and addresses.
2. Separate the Person data structures into components by moving non-core data into distinct records.• This was done to minimize the amount of blank fields that had to be captured in a record. If a customerdoesn’t use a particular country, then no data has to be stored in those fields.
• While this does increase the number of records in PERSONAL_DATA component, it allows us toseparate the business logic and the processing. Eventually it will allow us to compartmentalize the actualcomponent and only bring into the buffer the data that you need.
• It also makes adding additional non-core fields easier to manage, as their addition will not break anyusage of the core records.
3. Keep one ID for a person.This feature adds the ability to have a single ID for a Person regardless of how many different relationshipsto the organization that person has. This means that you no longer have to create a separate ID if someonewas an employee and is now a contingent worker.
4. Allow a Person to be created without having to create JOB records.This change means that instead of having to create new EMPLIDs whenever a Person is both and Employeeand a Non-employee, this model will allow a Person to have multiple organizational relationships. Inaddition, we are splitting the Non-employees into two categories: Contingent Workers and Persons ofInterest. This allows us to be able to treat Employees and Contingent Workers as part of the workforce —and the other Persons of Interest as not part of the workforce.The three organizational relationships that a Person can have are:• Employee (EMP)• Contingent Worker (CWR)
Copyright © 2006, Oracle. All rights reserved. 357
Understanding Person Model Changes Appendix S
• Person of Interest (POI)Employees and Contingent Workers comprise the workforce and are required to have a JOB history.Persons of Interest might have a JOB record if certain products process them. POIs include CobraParticipants, Pension Payees, and Stock non-emps, Learning Solution Students needing a refund viaNA Payroll, External Trainers, and External Students. Because processes are already built for thesegroupings that need information on the JOB record, those groups will need to have a JOB record.Currently, the only POI types that don’t need a JOB record are the External Trainers and ExternalStudents (including the Applicants needing training prior to hire).The new model will allow a Person to be an Employee, a Contingent Worker, and/or a Person ofInterest simultaneously or in succession using the same EMPLID. Each organizational relationshipwill be separated by EMPL_RCD — meaning any one EMPL_RCD for a Person can only be for oneorganizational relationship history. But there is no intelligence in the actual EMPL_RCD number.
The PeopleSoft 8.81 to 8.9 upgrade deals with creating the new structure that allows a single EMPLID to havemore than one Relationship to the organization. In addition, the separation of the non-core data is finished.
The main changes:
• The upgrade process will not attempt to merge EMPLIDs.• The current EMPL_RCDs assigned to an EMPLID will not change.• No EMPL_RCDs will be deleted.• Customers do not have to remove references to PERSONAL_DATA or EMPLOYMENT in theircustomized code.
Task S-1: Entity Relationship DiagramsThis section discusses:
• Understanding Entity Relationship Diagrams
• PeopleSoft 8.0 Diagram
• PeopleSoft 8.3 and 8.8 Diagram
• PeopleSoft 8.9 Diagrams
Understanding Entity Relationship DiagramsThe following Entity Relationship Diagrams (ERDs) are designed to provide you with a visual representationof some of the key relationships Person records had in earlier PeopleSoft releases.
Task S-1-1: PeopleSoft 8.0 DiagramThe following ERD describes the interrelationships of the PERSONAL_DATA, PERS_DATA_EFFDT andother records where Addresses and Names are stored redundantly.
358 Copyright © 2006, Oracle. All rights reserved.
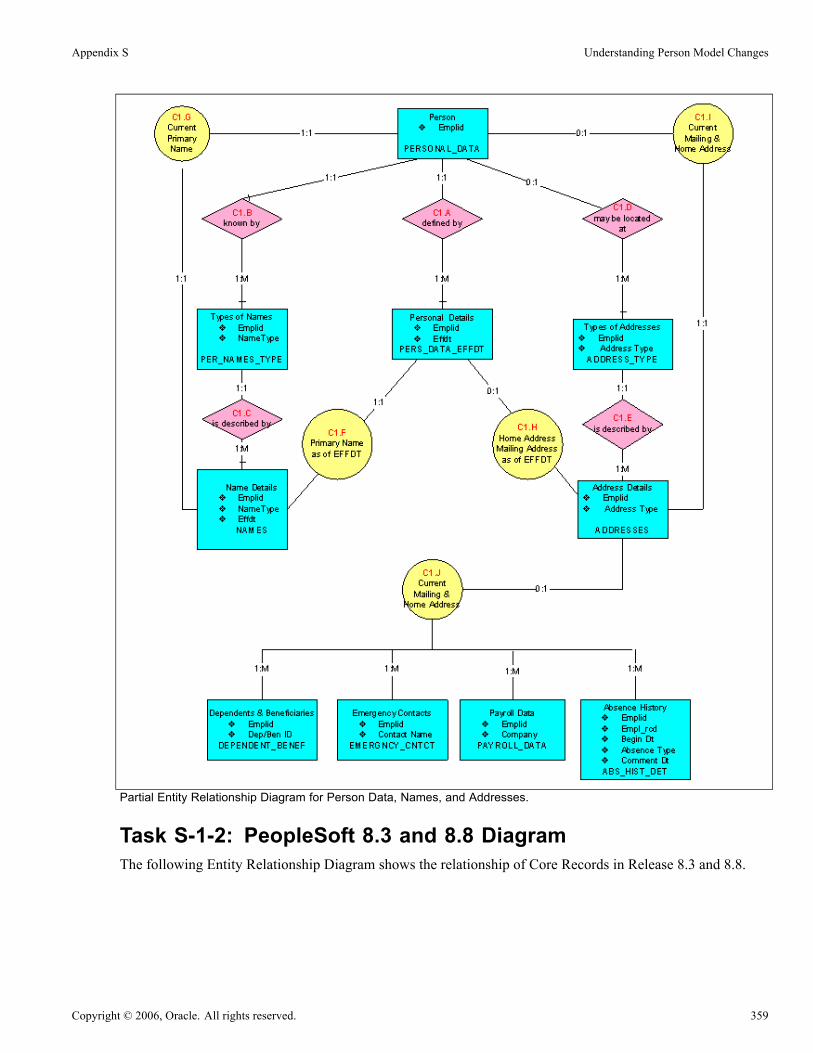
Appendix S Understanding Person Model Changes
Partial Entity Relationship Diagram for Person Data, Names, and Addresses.
Task S-1-2: PeopleSoft 8.3 and 8.8 DiagramThe following Entity Relationship Diagram shows the relationship of Core Records in Release 8.3 and 8.8.
Copyright © 2006, Oracle. All rights reserved. 359

Understanding Person Model Changes Appendix S
Entity Relationship Diagram of the Core Records in PeopleSoft 8.3 and 8.8
Task S-1-3: PeopleSoft 8.9 DiagramsThis section discusses:
• Understanding PeopleSoft 8.9 Diagrams
• Person Object Model
• Person and Organization Entities
• Worker Entity
• What Happens to PERSONAL_DATA
• What Happens to EMPLOYMENT
Understanding PeopleSoft 8.9 DiagramsThe following Entity Relationship Diagrams (ERDs) provide a visual representation of some of the keyrelationships the Person Object has with other records in PeopleSoft 8.9.
Person Object ModelThe following Entity Relationship Diagram illustrates the Person Object Model, showing core requirementsand optional core records as well as the type and number of extensions.
360 Copyright © 2006, Oracle. All rights reserved.

Appendix S Understanding Person Model Changes
Person Object Model ERD
Person and Organization EntitiesThe following Entity Relationship Diagram shows the relationship between Person and OrganizationalRelationship entities.
Copyright © 2006, Oracle. All rights reserved. 361
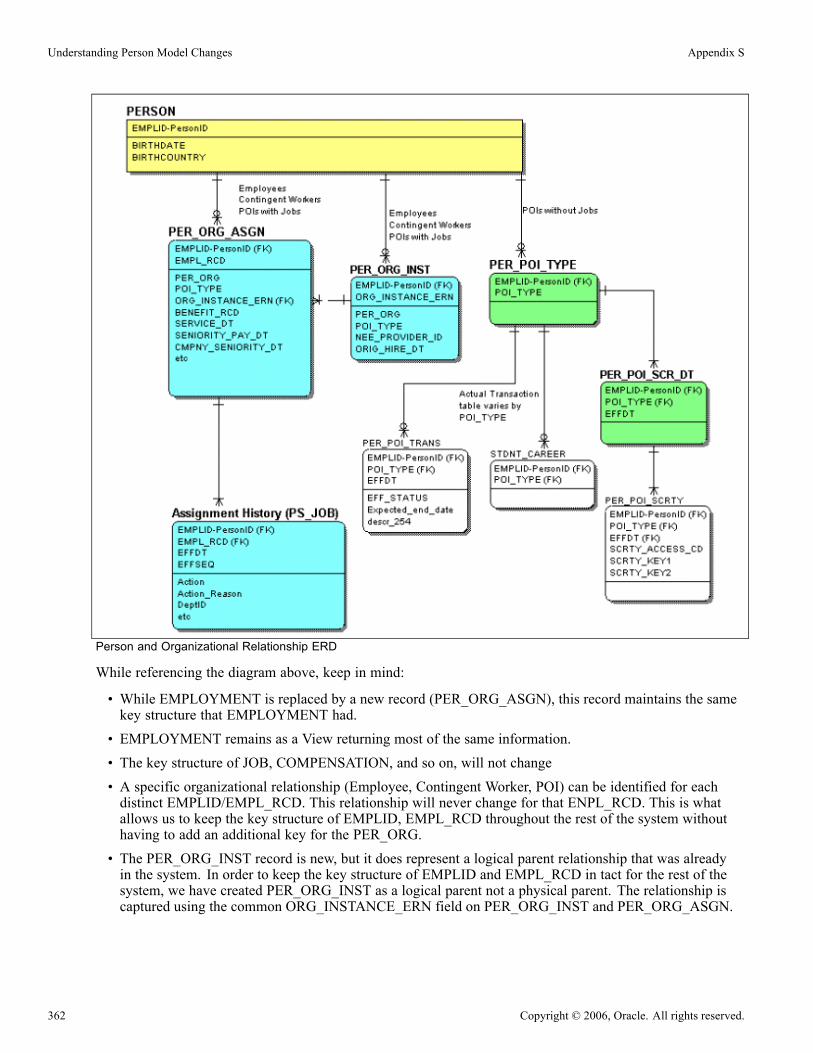
Understanding Person Model Changes Appendix S
Person and Organizational Relationship ERD
While referencing the diagram above, keep in mind:
• While EMPLOYMENT is replaced by a new record (PER_ORG_ASGN), this record maintains the samekey structure that EMPLOYMENT had.
• EMPLOYMENT remains as a View returning most of the same information.• The key structure of JOB, COMPENSATION, and so on, will not change• A specific organizational relationship (Employee, Contingent Worker, POI) can be identified for eachdistinct EMPLID/EMPL_RCD. This relationship will never change for that ENPL_RCD. This is whatallows us to keep the key structure of EMPLID, EMPL_RCD throughout the rest of the system withouthaving to add an additional key for the PER_ORG.
• The PER_ORG_INST record is new, but it does represent a logical parent relationship that was alreadyin the system. In order to keep the key structure of EMPLID and EMPL_RCD in tact for the rest of thesystem, we have created PER_ORG_INST as a logical parent not a physical parent. The relationship iscaptured using the common ORG_INSTANCE_ERN field on PER_ORG_INST and PER_ORG_ASGN.
362 Copyright © 2006, Oracle. All rights reserved.

Appendix S Understanding Person Model Changes
Worker EntityThe following illustrates the Worker entity relationships.
Worker ERD
Copyright © 2006, Oracle. All rights reserved. 363
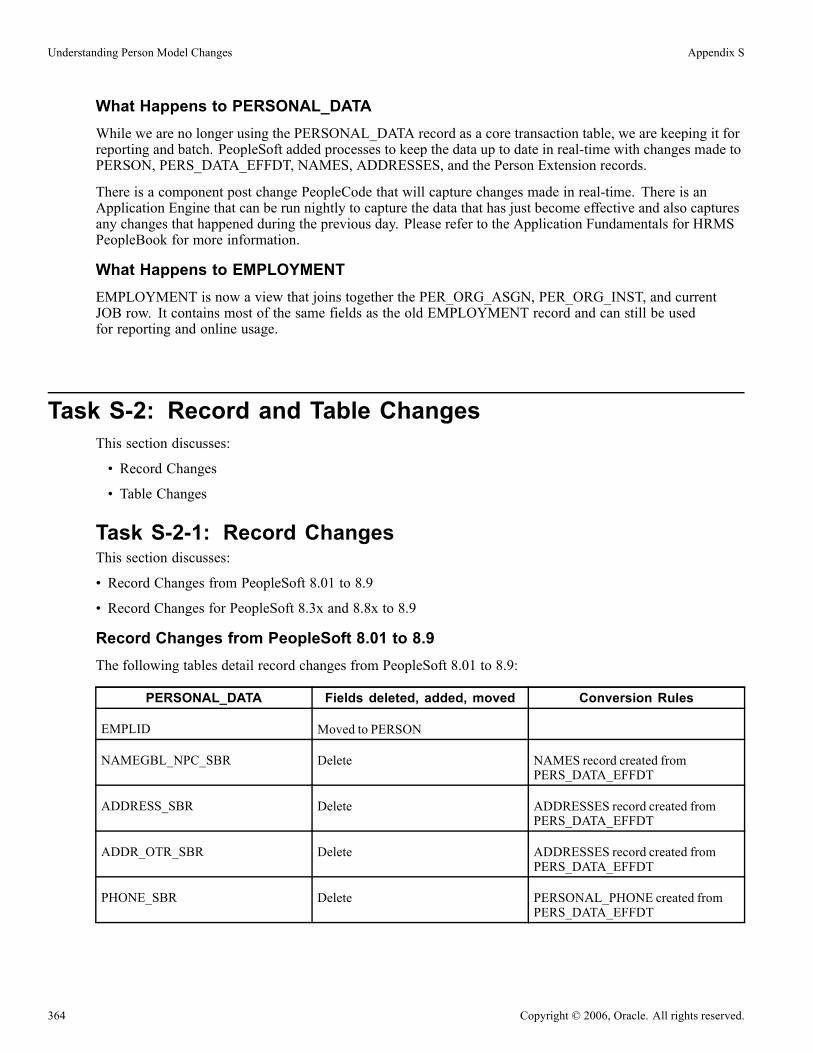
Understanding Person Model Changes Appendix S
What Happens to PERSONAL_DATAWhile we are no longer using the PERSONAL_DATA record as a core transaction table, we are keeping it forreporting and batch. PeopleSoft added processes to keep the data up to date in real-time with changes made toPERSON, PERS_DATA_EFFDT, NAMES, ADDRESSES, and the Person Extension records.
There is a component post change PeopleCode that will capture changes made in real-time. There is anApplication Engine that can be run nightly to capture the data that has just become effective and also capturesany changes that happened during the previous day. Please refer to the Application Fundamentals for HRMSPeopleBook for more information.
What Happens to EMPLOYMENTEMPLOYMENT is now a view that joins together the PER_ORG_ASGN, PER_ORG_INST, and currentJOB row. It contains most of the same fields as the old EMPLOYMENT record and can still be usedfor reporting and online usage.
Task S-2: Record and Table ChangesThis section discusses:
• Record Changes
• Table Changes
Task S-2-1: Record ChangesThis section discusses:
• Record Changes from PeopleSoft 8.01 to 8.9
• Record Changes for PeopleSoft 8.3x and 8.8x to 8.9
Record Changes from PeopleSoft 8.01 to 8.9The following tables detail record changes from PeopleSoft 8.01 to 8.9:
PERSONAL_DATA Fields deleted, added, moved Conversion Rules
EMPLID Moved to PERSON
NAMEGBL_NPC_SBR Delete NAMES record created fromPERS_DATA_EFFDT
ADDRESS_SBR Delete ADDRESSES record created fromPERS_DATA_EFFDT
ADDR_OTR_SBR Delete ADDRESSES record created fromPERS_DATA_EFFDT
PHONE_SBR Delete PERSONAL_PHONE created fromPERS_DATA_EFFDT
364 Copyright © 2006, Oracle. All rights reserved.

Appendix S Understanding Person Model Changes
PERSONAL_DATA Fields deleted, added, moved Conversion Rules
PER_STATUS Delete Replaced by PER_ORG_ASGN.PER_ORG
ORIG_HIRE_DT Move to PER_ORG_INST
SEX Move to PERS_DATA_EFFDT
AGE_STATUS Move to PERS_DATA_DEU
MAR_STATUS Move to PERS_DATA_EFFDT
BIRTHDATE Move to PERSON
BIRTHPLACE Move to PERSON
BIRTHCOUNTRY Move to PERSON
BIRTHSTATE Move to PERSON
DT_OF_DEATH Move to PERSON
HIGHEST_EDUC_LVL Move to PERS_DATA_EFFDT
FT_STUDENT Move to PERS_DATA_EFFDT
REFERRAL_SOURCE Move to PERS_APPL_INFO
EMPL_REFERRAL_ID Move to PERS_APPL_INFO
SPECIFIC_REFER_SRC Move to PERS_APPL_INFO
HIGHLY_COMP_EMPL_P Move to BN_PERSON
HIGHLY_COMP_EMPL_C Move to BN_PERSON
RESUME_TEXT_FILE Move to PERS_DATA_APPL
QDRO_IND_YN Deleted
PER_TYPE Move to PER_ORG_ASGN asPOI_TYPE
PERS_DTUSA_SBR Move to PERS_DATA_USA
PERS_DTCAN_SBR Move to PERS_DATA_CAN
PERS_DTCHE_SBR Move to PERS_DATA_CHE
PERS_DTGER_SBR Move to PERS_DATA_DEU
PERS_DTFRA_SBR Move to PERS_DATA_FRA
PERS_DTJPN_SBR Move to PERS_DATA_JPN
Copyright © 2006, Oracle. All rights reserved. 365

Understanding Person Model Changes Appendix S
PERSONAL_DATA Fields deleted, added, moved Conversion Rules
PERS_DTUK_SBR Move to PERS_DATA_UK
PERS_DTITA_SBR Move to PERS_DATA_ITA
PERS_DTESP_SBR Move to PERS_DATA_ESP
LANG_CD Move to PERS_DATA_EFFDT
YEARS_OF_EXP Move to PRIORWORK_SUM
APPLID Move to PERS_APPL_INFO
APP_DT Move to PERS_APPL_INFO
ON_DM_EM_DOSAVENOW Delete
PERS_DTFED2_SBR Move to PERS_DATA_USF
ALTER_EMPLID Move to PERS_DATA_EFFDT
ADDRESS1_AC Delete See PERS_DATA_EFFDT
ADDRESS2_AC Delete See PERS_DATA_EFFDT
ADDRESS3_AC Delete See PERS_DATA_EFFDT
CITY_AC Delete See PERS_DATA_EFFDT
PERS_DATA_EFFDT Fields deleted, added, moved Conversion Rules
EMPLID
EFFDT
UPDATE_PERS_DATA Delete
ADDRESS_SBR Move to ADDRESSES As ADDRESS_TYPE = HOME
ADDR_OTR_SBR Move to ADDRESSES As ADDRESS_TYPE =MAIL
MAR_STATUS
SMOKER Move to PERS_SMOKER
NAMEGBL_SBR Move to NAMES As NAME_TYPE = PRI
ADDRESS1_AC Move to ADDRESSES As ADDRESS_TYPE = HOME
ADDRESS2_AC Move to ADDRESSES As ADDRESS_TYPE = HOME
366 Copyright © 2006, Oracle. All rights reserved.

Appendix S Understanding Person Model Changes
PERS_DATA_EFFDT Fields deleted, added, moved Conversion Rules
ADDRESS3_AC Move to ADDRESSES As ADDRESS_TYPE = HOME
CITY_AC Move to ADDRESSES As ADDRESS_TYPE = HOME
Record Changes for PeopleSoft 8.3x and 8.8x to 8.9The PeopleSoft 8.8 x to 8.9 upgrade deals with creating the new structure that allows a single EMPLID to havemore than one relationship to the organization. In addition splitting the non-core data into components hasbeen completed. Therefore the following will not be done during your upgrade:
• The upgrade process will not attempt to merge EMPLIDs.• The upgrade process will not assign the current EMPL_RCDs to an EMPLID change.• No EMPL_RCDs will be deleted.
The upgrade converts EMPL_RCDs that are in EMPLOYMENT to PER_ORG_ASGN and PER_ORG_INST.All rows in EMPLOYEMNT will be moved to PER_ORG_ASGN. PER_ORG_INST will contain the relationship between EMPL_RCDs in PER_ORG ASGN. Some EMPL_RCDs are considered Instances which actuallycreates a new employment instance. Others are additional assignments that the person may have over timebut that should not be considered a “hire action”. See the reference below for more information on thedifferences between Instances and Assignments.
See PeopleSoft Enterprise HCM Application Fundamentals 8.9
EMPL_RCDs that are Instances will also be in PER_ORG_INST. EMPL_RCDs that aretrue additional assignments will not be in PER_ORG_INST but will have a value in theirPER_ORG_ASGN.ORG_INSTANCE_ERN that will connect them with an Instance.
The following will occur during the upgrade:
• EMPL_RCDs that were created with the HIR action will be created as separate Organizational Instances.
• EMPL_RCDs that were created with the ADL action will be created as additional assignments and willbe related to an appropriate Instance.
• EMPL_RCDs that have Host assignments will be created as Instances.
• EMPL_RCDs that are Host assignments will be created as Assignments related to the HOME assignment.
• Japanese main appointments will be created as Instances.
• Japanese additional assignments will be created as assignments connect to the Main appointment.
If you want EMPL_RCDs that you created with the ADL action to be created as separate Instances, you shouldchange that action to HIR in your source data prior to data conversion.
PERSON
PERSON Fields Deleted, Moved, Added Conversion Rules
EMPLID
PER_STATUS Replaced by PER_ORG_ASGN.PER_ORG
E = EMP
N= See Chart 2—UpgradeConversion Chart below.
Copyright © 2006, Oracle. All rights reserved. 367
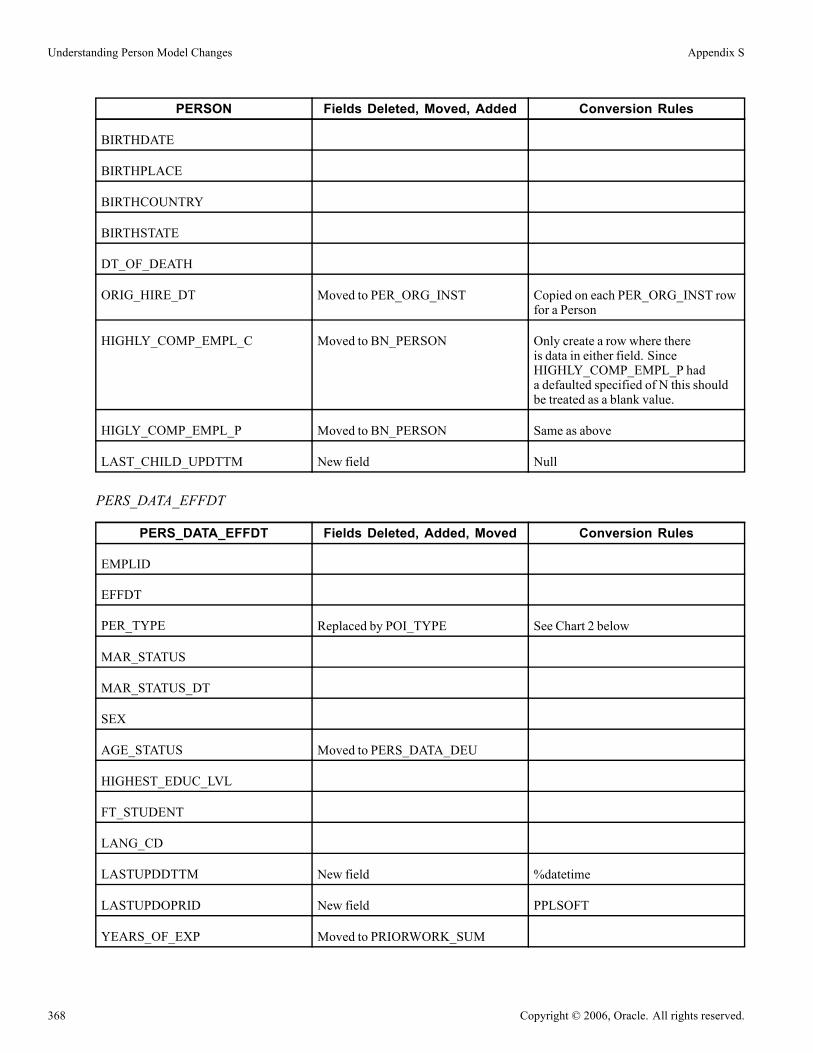
Understanding Person Model Changes Appendix S
PERSON Fields Deleted, Moved, Added Conversion Rules
BIRTHDATE
BIRTHPLACE
BIRTHCOUNTRY
BIRTHSTATE
DT_OF_DEATH
ORIG_HIRE_DT Moved to PER_ORG_INST Copied on each PER_ORG_INST rowfor a Person
HIGHLY_COMP_EMPL_C Moved to BN_PERSON Only create a row where thereis data in either field. SinceHIGHLY_COMP_EMPL_P hada defaulted specified of N this shouldbe treated as a blank value.
HIGLY_COMP_EMPL_P Moved to BN_PERSON Same as above
LAST_CHILD_UPDTTM New field Null
PERS_DATA_EFFDT
PERS_DATA_EFFDT Fields Deleted, Added, Moved Conversion Rules
EMPLID
EFFDT
PER_TYPE Replaced by POI_TYPE See Chart 2 below
MAR_STATUS
MAR_STATUS_DT
SEX
AGE_STATUS Moved to PERS_DATA_DEU
HIGHEST_EDUC_LVL
FT_STUDENT
LANG_CD
LASTUPDDTTM New field %datetime
LASTUPDOPRID New field PPLSOFT
YEARS_OF_EXP Moved to PRIORWORK_SUM
368 Copyright © 2006, Oracle. All rights reserved.
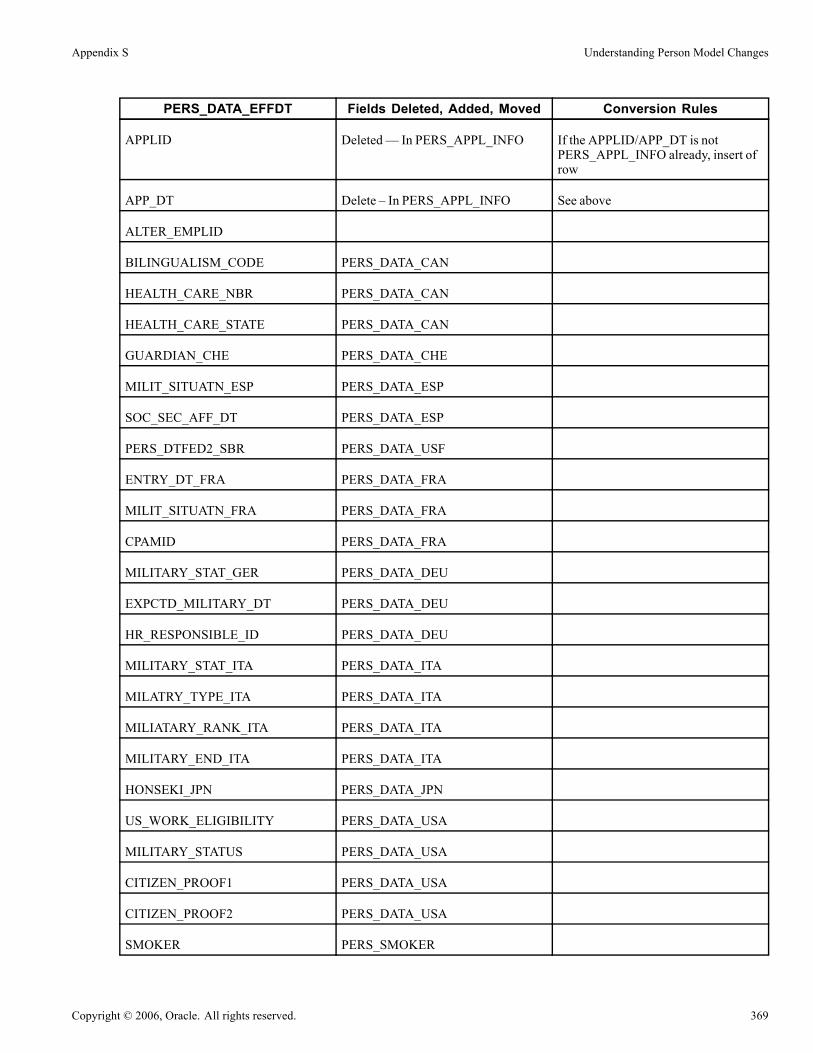
Appendix S Understanding Person Model Changes
PERS_DATA_EFFDT Fields Deleted, Added, Moved Conversion Rules
APPLID Deleted— In PERS_APPL_INFO If the APPLID/APP_DT is notPERS_APPL_INFO already, insert ofrow
APP_DT Delete – In PERS_APPL_INFO See above
ALTER_EMPLID
BILINGUALISM_CODE PERS_DATA_CAN
HEALTH_CARE_NBR PERS_DATA_CAN
HEALTH_CARE_STATE PERS_DATA_CAN
GUARDIAN_CHE PERS_DATA_CHE
MILIT_SITUATN_ESP PERS_DATA_ESP
SOC_SEC_AFF_DT PERS_DATA_ESP
PERS_DTFED2_SBR PERS_DATA_USF
ENTRY_DT_FRA PERS_DATA_FRA
MILIT_SITUATN_FRA PERS_DATA_FRA
CPAMID PERS_DATA_FRA
MILITARY_STAT_GER PERS_DATA_DEU
EXPCTD_MILITARY_DT PERS_DATA_DEU
HR_RESPONSIBLE_ID PERS_DATA_DEU
MILITARY_STAT_ITA PERS_DATA_ITA
MILATRY_TYPE_ITA PERS_DATA_ITA
MILIATARY_RANK_ITA PERS_DATA_ITA
MILITARY_END_ITA PERS_DATA_ITA
HONSEKI_JPN PERS_DATA_JPN
US_WORK_ELIGIBILITY PERS_DATA_USA
MILITARY_STATUS PERS_DATA_USA
CITIZEN_PROOF1 PERS_DATA_USA
CITIZEN_PROOF2 PERS_DATA_USA
SMOKER PERS_SMOKER
Copyright © 2006, Oracle. All rights reserved. 369

Understanding Person Model Changes Appendix S
PERS_DATA_EFFDT Fields Deleted, Added, Moved Conversion Rules
MEDICARE_ENTLD_DT PERS_DATA_USA
SMOKER_DT PERS_SMOKER
FP_ACTION_2 PERS_DATA_FPS
ACTION_REASON PERS_DATA_FPS
FP_ACTION_REQ PERS_DATA_FPS
FP_SUPDOC_REQ PERS_DATA_FPS
LAST_UPDATE_DATE PERS_DATA_FPS
NAMES
NAMES Field Added Conversion Rules
EMPLID
NAME_TYPE
EFFDT
COUNTRY_NM_FORMAT Prompt Table is now NAME_FORMAT_TBL. Some values willneed to be set to a default format value.
NAME_DISPLAY New field Casual formatted name whichcan be used on pages and reports.Formatting rules are based on theCOUNTRY_NM_FORMAT.
NAME_FORMAL New field Formally formatted namewhich can be used for letters.Formatting rules are based on theCOUNTRY_NM_FORMAT
LASTUPDDTTM New field %datetime
LASTUPDOPRID New field ’PPLSOFT’
PERSONAL_PHONE
PERSONAL_PHONE Field Added Conversion Rules
EMPLID
PHONE_TYPE
COUNTRY_CODE
370 Copyright © 2006, Oracle. All rights reserved.

Appendix S Understanding Person Model Changes
PERSONAL_PHONE Field Added Conversion Rules
PHONE
PREF_PHONE_FLAG New field Order used in the upgrade is HOME,BUSN, MAIN else first found.
EMAIL_ADDR
EMAIL_ADDRESS Field Added Conversion Rules
EMPLID
E_ADDR_TYPE
EMAIL_ADDR
PREF_EMAIL_FLAG New field Order is BUSN
EMPLOYMENT
EMPLOYMENTReplaced with a View based on
new records Conversion Rules
EMPLID Moved to PERS_ORG_ASGN
EMPL_RCD Moved to PERS_ORG_ASGN
BENEFIT_RCD_NBR Moved to PERS_ORG_ASGN
HOME_HOST_CLASS Moved to PERS_ORG_ASGN
HIRE_DT Moved to JOB
REHIRE_DT Moved to JOB as LST_HIRE_DT
CMPNY_SENORITY_DT Data copied to PER_ORG_ASGN.SEN_PAY_DT_OVR andPER_ORG_ASGN.CMPNY_SENIORITY_DT
SERVICE_DT Moved to PERS_ORG_ASGN
PROF_EXERIENCE_DT Moved to PERS_ORG_ASGN
LAST_VERIFICATN_DT Moved to PERS_ORG_ASGN
EXPECTED_RETURN_DT Moved to JOB
TERMINATION_DT Moved to JOB
LAST_DATE_WORKED Moved to JOB
LAST_INCREASE_DT Moved to PERS_ORG_ASGN
Copyright © 2006, Oracle. All rights reserved. 371

Understanding Person Model Changes Appendix S
EMPLOYMENTReplaced with a View based on
new records Conversion Rules
OWN_5PERCENT_CO Moved to PERS_ORG_ASGN
BUSINESS_TITLE Moved to PERS_ORG_ASGN
REPORTS_TO Delete (was moved to JOB inPeopleSoft 8.0)
SUPERVISOR_ID Delete (was moved to JOB inPeopleSoft 8.0)
PROBATION_DT Moved to PERS_ORG_ASGN
SECURITY_CLEARANCE Moved to PERS_ORG_ASGN
COUNTRY_CODE Moved to PERS_ORG_ASGN
PHONE Moved to PERS_ORG_ASGN asPOSITION_PHONE
TIME_RPT_LOC Deleted— not used
JOB_REPORTING Deleted— not used
DED_TAKEN Moved to DED_NA
DED_SUBSET_ID Moved to DED_NA
GVT_SCD_RETIRE Moved to JOB_USF
GVT_SCD_TSP Moved to JOB_USF
GVT_SCD_LEO Moved to JOB_USF
GVT_SCD_SEVPAY Moved to JOB_USF
GVT_SECPAY_PRV_WRKS Moved to JOB_USF
GVT_MAND_RET_DAT Moved to JOB_USF
GVT_WGI_STATUS Moved to JOB_USF
GVT_INTRM_DAYS_WGI Moved to JOB_USF
GVT_NONPAY_NOA Moved to JOB_USF
GVT_NONPAY_HRS_WGI Moved to JOB_USF
GVT_NONPAY_HRS_SCD Moved to JOB_USF
GVT_NONPAY_HRS_TNR Moved to JOB_USF
GVT_NONPAY_HRS_PRB Moved to JOB_USF
372 Copyright © 2006, Oracle. All rights reserved.

Appendix S Understanding Person Model Changes
EMPLOYMENTReplaced with a View based on
new records Conversion Rules
GVT_TEMP_PRO_EXPIR Moved to JOB_USF
GVT_TEMP_PSN_EXPIR Moved to JOB_USF
GVT_DETAIL_EXPIRES Moved to JOB_USF
GVT_SABBATIC_EXPIR Moved to JOB_USF
GVT_RTND_GRADE_BEG Moved to JOB_USF
GVT_RTND_GRADE_EXP Moved to JOB_USF
GVT_NOA_CODE Moved to JOB_USF
GVT_CURR_APT_AUTH1 Moved to JOB_USF
GVT_CURR_APT_AUTH2 Moved to JOB_USF
GVT_APPT_EXPIR_DT Moved to JOB_USF
GVT_CNV_BEGIN_DATE Moved to JOB_USF
GVT_CAREER_CNV_DUE Moved to JOB_USF
GVT_CAREER_COND_DT Moved to JOB_USF
GVT_APPT_LIMIT_HRS Moved to JOB_USF
GVT_APPT_LIMIT_DYS Moved to JOB_USF
GVT_APPT_LIMIT_AMT Moved to JOB_USF
GVT_SUPV_PROB_DT Moved to JOB_USF
GVT_SES_PROB_DT Moved to JOB_USF
GVT_SEC_CLR_STATUS Moved to JOB_USF
GVT_CLRNCE_STAT_DT Moved to JOB_USF
GVT_ERN_PGM_PERM Moved to JOB_USF
GVT_OCC_SERS_PERM Moved to JOB_USF
GVT_GRADE_PERM Moved to JOB_USF
GVT_COMP_AREA_PERM Moved to JOB_USF
GVT_COMPA_LVL_PERM Moved to JOB_USF
GVT_CHANGE_FLAG Moved to JOB_USF
Copyright © 2006, Oracle. All rights reserved. 373

Understanding Person Model Changes Appendix S
EMPLOYMENTReplaced with a View based on
new records Conversion Rules
GVT_SPEP Moved to JOB_USF
GVT_WGI_DUE_DATE Moved to JOB_USF
GVT_DT_LEI Moved to JOB_USF
GVT_FIN_DISCLOSURE Moved to JOB_USF
GVT_FIN_DISCL_DATE Moved to JOB_USF
GVT_TENURE Moved to JOB_USF
GVT_DETL_BARG_UNIT Moved to JOB_USF
GVT_DETL_UNION_CD Moved to JOB_USF
NEXT_REVIEW_DATE Moved to JOB_USF
GVT_WELFARE_WK_CD Moved to JOB_USF
TENURE_ACCR_FLG Moved to PER_ORG_ASG_HP
FTE_TENURE Moved to PER_ORG_ASG_HP
EG_GROUP Moved to PER_ORG_ASG_HP
FTE_FLX_SRVC Moved to PER_ORG_ASG_HP
CONTRACT_LENGTH Moved to PER_ORG_ASG_HP
APPOINT_END_DT Moved to PER_ORG_ASG_HP
NEE_PROVIDER_ID Moved to PER_ORG_INST
FA_PAY_PROGRAM Moved to PER_ORG_ASG_FA
FA_TYPE Moved to PER_ORG_ASG_FA
FA_ELIG_DT Moved to PER_ORG_ASG_FA
EDUC_LVVL_AD_BTD Moved to PER_ORG_ASG_JPN
OFFICIAL_LANG Moved to PER_ORG_ASG_BEL
RELAT_TO_OWNER_NLD Moved to PER_ORG_ASG_NLD
INS_DAYS_BRA Moved to PER_ORG_ASG_BRA
INS_MOTHS_BRA Moved to PER_ORG_ASG_BRA
INS_YEARS_BRA Moved to PER_ORG_ASG_BRA
374 Copyright © 2006, Oracle. All rights reserved.
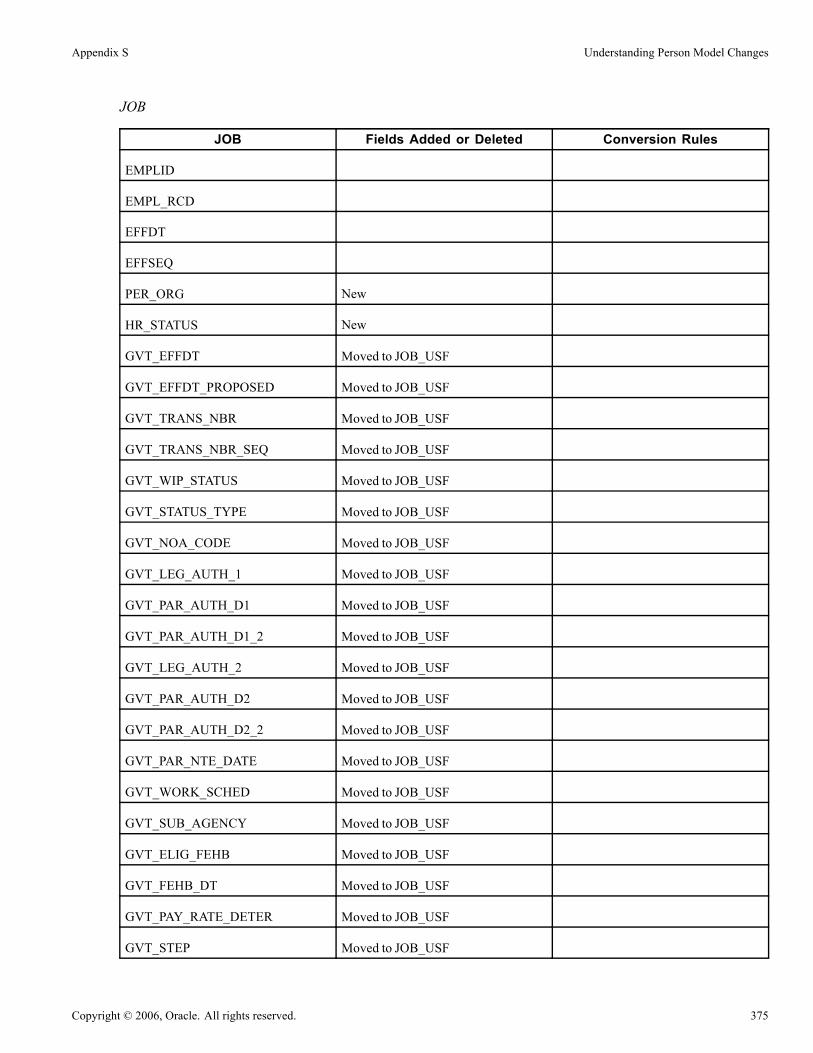
Appendix S Understanding Person Model Changes
JOB
JOB Fields Added or Deleted Conversion Rules
EMPLID
EMPL_RCD
EFFDT
EFFSEQ
PER_ORG New
HR_STATUS New
GVT_EFFDT Moved to JOB_USF
GVT_EFFDT_PROPOSED Moved to JOB_USF
GVT_TRANS_NBR Moved to JOB_USF
GVT_TRANS_NBR_SEQ Moved to JOB_USF
GVT_WIP_STATUS Moved to JOB_USF
GVT_STATUS_TYPE Moved to JOB_USF
GVT_NOA_CODE Moved to JOB_USF
GVT_LEG_AUTH_1 Moved to JOB_USF
GVT_PAR_AUTH_D1 Moved to JOB_USF
GVT_PAR_AUTH_D1_2 Moved to JOB_USF
GVT_LEG_AUTH_2 Moved to JOB_USF
GVT_PAR_AUTH_D2 Moved to JOB_USF
GVT_PAR_AUTH_D2_2 Moved to JOB_USF
GVT_PAR_NTE_DATE Moved to JOB_USF
GVT_WORK_SCHED Moved to JOB_USF
GVT_SUB_AGENCY Moved to JOB_USF
GVT_ELIG_FEHB Moved to JOB_USF
GVT_FEHB_DT Moved to JOB_USF
GVT_PAY_RATE_DETER Moved to JOB_USF
GVT_STEP Moved to JOB_USF
Copyright © 2006, Oracle. All rights reserved. 375
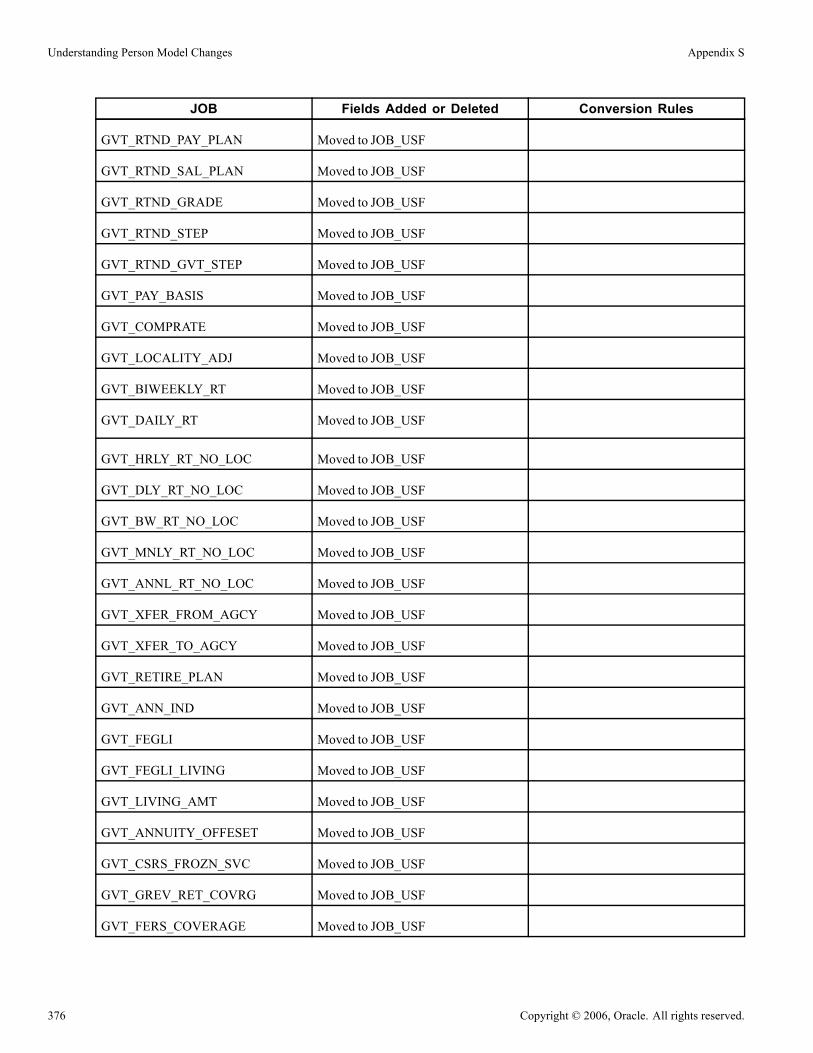
Understanding Person Model Changes Appendix S
JOB Fields Added or Deleted Conversion Rules
GVT_RTND_PAY_PLAN Moved to JOB_USF
GVT_RTND_SAL_PLAN Moved to JOB_USF
GVT_RTND_GRADE Moved to JOB_USF
GVT_RTND_STEP Moved to JOB_USF
GVT_RTND_GVT_STEP Moved to JOB_USF
GVT_PAY_BASIS Moved to JOB_USF
GVT_COMPRATE Moved to JOB_USF
GVT_LOCALITY_ADJ Moved to JOB_USF
GVT_BIWEEKLY_RT Moved to JOB_USF
GVT_DAILY_RT Moved to JOB_USF
GVT_HRLY_RT_NO_LOC Moved to JOB_USF
GVT_DLY_RT_NO_LOC Moved to JOB_USF
GVT_BW_RT_NO_LOC Moved to JOB_USF
GVT_MNLY_RT_NO_LOC Moved to JOB_USF
GVT_ANNL_RT_NO_LOC Moved to JOB_USF
GVT_XFER_FROM_AGCY Moved to JOB_USF
GVT_XFER_TO_AGCY Moved to JOB_USF
GVT_RETIRE_PLAN Moved to JOB_USF
GVT_ANN_IND Moved to JOB_USF
GVT_FEGLI Moved to JOB_USF
GVT_FEGLI_LIVING Moved to JOB_USF
GVT_LIVING_AMT Moved to JOB_USF
GVT_ANNUITY_OFFESET Moved to JOB_USF
GVT_CSRS_FROZN_SVC Moved to JOB_USF
GVT_GREV_RET_COVRG Moved to JOB_USF
GVT_FERS_COVERAGE Moved to JOB_USF
376 Copyright © 2006, Oracle. All rights reserved.

Appendix S Understanding Person Model Changes
JOB Fields Added or Deleted Conversion Rules
GVT_TYPE_OF_APPT Moved to JOB_USF
GVT_POI Moved to JOB_USF
GVT_POSN_OCCUPIED Moved to JOB_USF
GVT_CONT_EMPLID Moved to JOB_USF
GVT_ROUTE_NEXT Moved to JOB_USF
GVT_CHANGE_FLAG Moved to JOB_USF
GVT_TSP_UPD_IND Moved to JOB_USF
GVT_PI_UPD_IND Moved to JOB_USF
GVT_SF52_NBR Moved to JOB_USF
GVT_S113G_CEILING Moved to JOB_USF
GVT_LEO_POSITION Moved to JOB_USF
GVT_ANNUIT_COM_DT Moved to JOB_USF
GVT_BASIC_LIFE_RED Moved to JOB_USF
GVT_DED_PROPT_DT Moved to JOB_USF
GVT_FEGLI_BASC_PCT Moved to JOB_USF
GVT_FEGLI_OPT_PCT Moved to JOB_USF
GVT_FEHB_PCT Moved to JOB_USF
GVT_RETRO_FLAG Moved to JOB_USF
GVT_RETRO_DED_FLAG Moved to JOB_USF
GVT_RETRO_JOB_FLAG Moved to JOB_USF
GVT_RETRO_BSE_FLAG Moved to JOB_USF
GVT_OTH_PAY_CHG Moved to JOB_USF
GVT_DETL_POSN_NBR Moved to JOB_USF
ANNL_BEN_BASE_OVRD Moved to JOB_USF
BENEFIT_PROGRAM Moved to JOB_USF
UPDATE_PAYROLL Moved to JOB_USF
GVT_PAY_PLAN Moved to JOB_USF
Copyright © 2006, Oracle. All rights reserved. 377
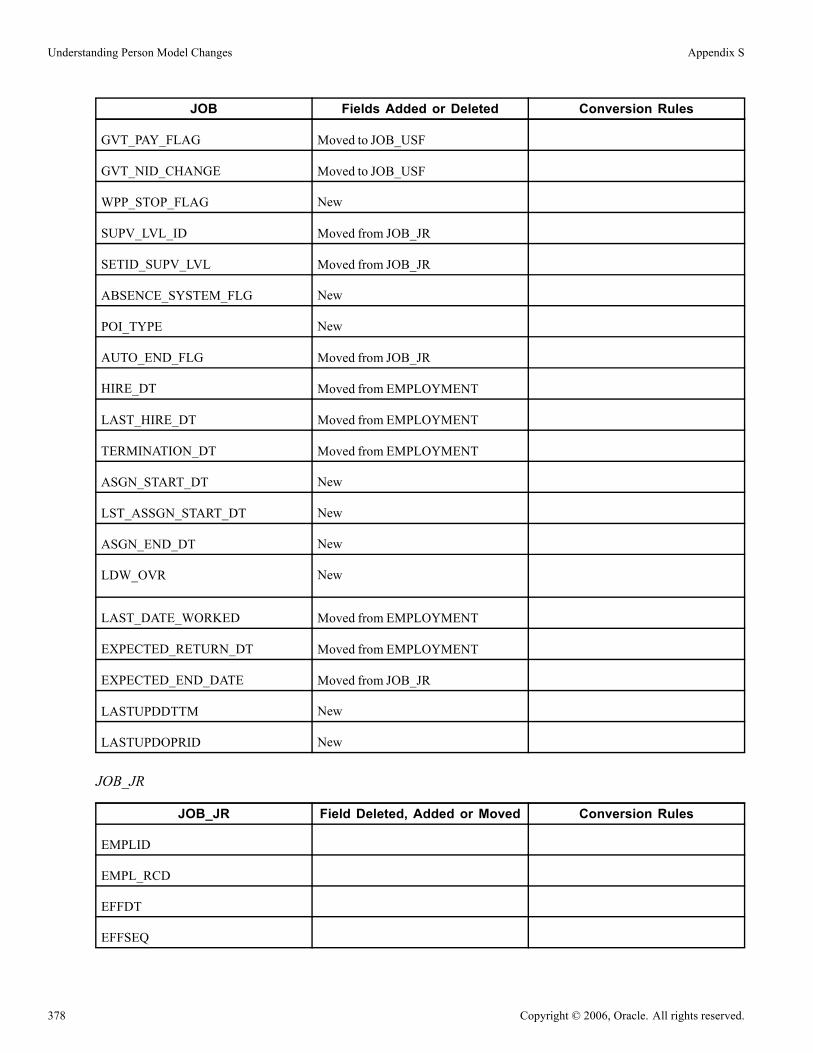
Understanding Person Model Changes Appendix S
JOB Fields Added or Deleted Conversion Rules
GVT_PAY_FLAG Moved to JOB_USF
GVT_NID_CHANGE Moved to JOB_USF
WPP_STOP_FLAG New
SUPV_LVL_ID Moved from JOB_JR
SETID_SUPV_LVL Moved from JOB_JR
ABSENCE_SYSTEM_FLG New
POI_TYPE New
AUTO_END_FLG Moved from JOB_JR
HIRE_DT Moved from EMPLOYMENT
LAST_HIRE_DT Moved from EMPLOYMENT
TERMINATION_DT Moved from EMPLOYMENT
ASGN_START_DT New
LST_ASSGN_START_DT New
ASGN_END_DT New
LDW_OVR New
LAST_DATE_WORKED Moved from EMPLOYMENT
EXPECTED_RETURN_DT Moved from EMPLOYMENT
EXPECTED_END_DATE Moved from JOB_JR
LASTUPDDTTM New
LASTUPDOPRID New
JOB_JR
JOB_JR Field Deleted, Added or Moved Conversion Rules
EMPLID
EMPL_RCD
EFFDT
EFFSEQ
378 Copyright © 2006, Oracle. All rights reserved.
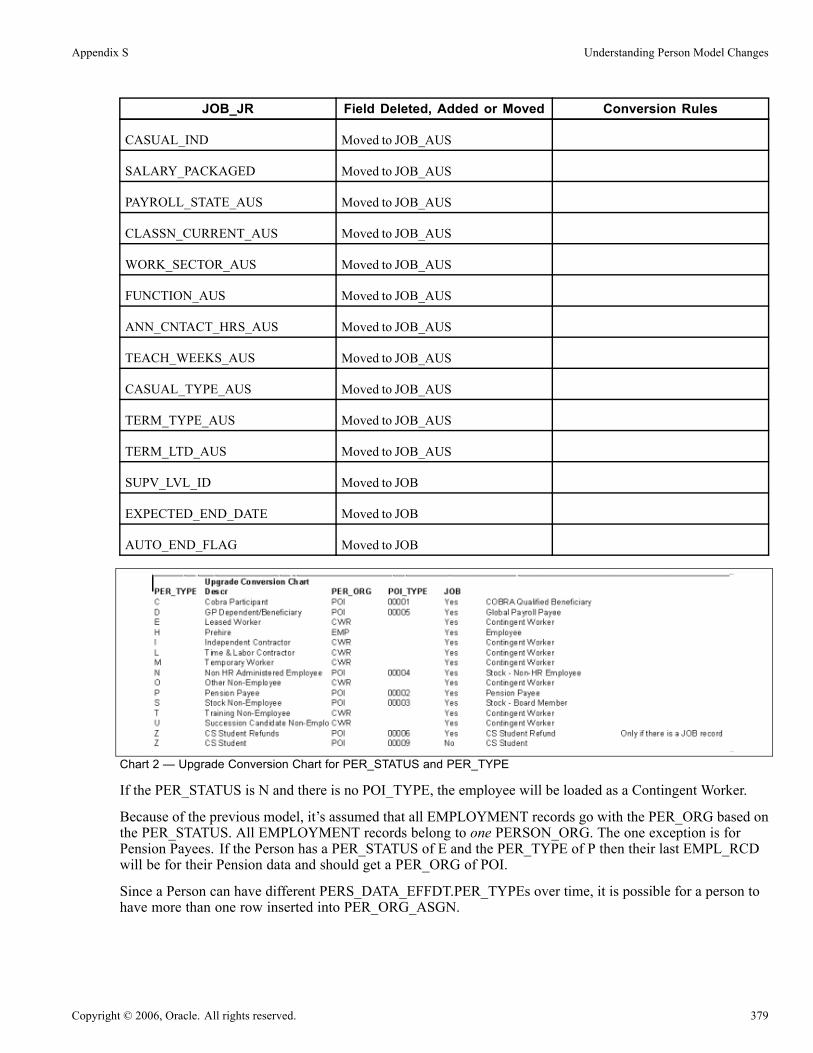
Appendix S Understanding Person Model Changes
JOB_JR Field Deleted, Added or Moved Conversion Rules
CASUAL_IND Moved to JOB_AUS
SALARY_PACKAGED Moved to JOB_AUS
PAYROLL_STATE_AUS Moved to JOB_AUS
CLASSN_CURRENT_AUS Moved to JOB_AUS
WORK_SECTOR_AUS Moved to JOB_AUS
FUNCTION_AUS Moved to JOB_AUS
ANN_CNTACT_HRS_AUS Moved to JOB_AUS
TEACH_WEEKS_AUS Moved to JOB_AUS
CASUAL_TYPE_AUS Moved to JOB_AUS
TERM_TYPE_AUS Moved to JOB_AUS
TERM_LTD_AUS Moved to JOB_AUS
SUPV_LVL_ID Moved to JOB
EXPECTED_END_DATE Moved to JOB
AUTO_END_FLAG Moved to JOB
Chart 2 — Upgrade Conversion Chart for PER_STATUS and PER_TYPE
If the PER_STATUS is N and there is no POI_TYPE, the employee will be loaded as a Contingent Worker.
Because of the previous model, it’s assumed that all EMPLOYMENT records go with the PER_ORG based onthe PER_STATUS. All EMPLOYMENT records belong to one PERSON_ORG. The one exception is forPension Payees. If the Person has a PER_STATUS of E and the PER_TYPE of P then their last EMPL_RCDwill be for their Pension data and should get a PER_ORG of POI.
Since a Person can have different PERS_DATA_EFFDT.PER_TYPEs over time, it is possible for a person tohave more than one row inserted into PER_ORG_ASGN.
Copyright © 2006, Oracle. All rights reserved. 379

Understanding Person Model Changes Appendix S
There are the PER_STATUS and PER_TYPEs that are added as system data. If you have added additionalones or if you are using the PER_TYPEs differently, you will need to determine which PER_ORG their valuesmatch to and modify your insert statements accordingly. If you are unsure, you can make the person a POIand change it later if needed.
Task S-2-2: Table ChangesThis section discusses:
• PERSON Record
• PERS_DATA_EFFDT Record
• NAMES
• ADDRESSES
• DEPENDENT_BENEF
• EMERGENCY_CNTCT
• PAYROLL_DATA
• ABS_HIST_DET
• New Views
• PERSON_NAME
• PERSON_ADDRESS
• PERSONAL_DT_FST
PERSON RecordPERSON is a new Record that serves as the parent to PERS_DATA_EFFDT, EMPLOYMENT, and all otherrecords that used to use PERSONAL_DATA as the parent.
The upgrade scripts will load this record with the information from PERSONAL_DATA.
PERS_DATA_EFFDT RecordThe upgrade scripts will ensure that all PERS_DATA_EFFDT rows are updated with the data from PERSONfor the fields moved from PERSONAL_DATA to PERS_DATA_EFFDT.
NAMESThis is the only source of Name data for a person in the record, PERSON.
The upgrade scripts will ensure that a row is created in NAMES for any PERS_DATA_EFFDT row that had aname change for NAME_TYPE = ‘PRI’.
The fields NAME_DISPLAY and NAME_FORMAL are new in this PeopleSoft release. To populatethem, you must run the Application Engine process NAME_DISPLAY.. This process is called during dataconversion. If the fields are not populated after data conversion you can run the Refresh Name DisplayValues process at any time.
To run the Refresh Name Display Values process:
Select Set Up HRMS, System Administration, Database Processes, Refresh Name Display Values.
380 Copyright © 2006, Oracle. All rights reserved.
Appendix S Understanding Person Model Changes
To update all name formats check Update All Name Formats?. Otherwise, select a Name format Type.Be sure that the following checkboxes are selected:
• Update NAMES record
• Update Dependants
• Update HS Non-Employees
• Update French Public Sector
• Update US Federal Names
ADDRESSESThis is the only source of Address data for a person in the record, PERSON.
The upgrade scripts will ensure that a row is created in ADDRESSES for any PERS_DATA_EFFDT row thathad an address change for the ADDRESS_TYPE = ‘HOME’.
The upgrade scripts will ensure that a row is created in ADDRESSES for any PERS_DATA_EFFDT rowthat had another address change for the ADDRESS_TYPE = ‘MAIL’.
DEPENDENT_BENEFIf the Address is the same as the employee’s then the address data is not physically stored on the record,only the Address_type is. If the Address is not the same as the employee’s, then the dependent’s address isdirectly stored on the record.
If the Phone is the same as the employees, then the phone data is not physically stored on the record, onlythe PHONE_TYPE is. If the Phone is not the same as the employee’s, then the dependent’s phone is directlystored on the record. There is now the ability to have the address be the same as the employee’s while thePhone is different.
The Upgrade scripts will enter an Address_type of HOME and a Phone_Type of MAIN if the Same Addressas Employee is Yes. The address and phone fields will then be cleared. No change will happen if the SameAddress as Employee is No.
EMERGENCY_CNTCTIf the Address is the same as the employee’s then the address data is not physically stored on the record,only the Address_type is. If the Address is not the same as the employee’s, then the contact’s address isdirectly stored on the record.
If the Phone is the same as the employee’s then the phone data is not physically stored on the record, onlythe PHONE_TYPE is. If the Phone is not the same as the employee’s, then the contact’s phone is directlystored on the record. There is now the ability to have the address be the same as the employee’s while thePhone is different.
The Upgrade scripts will enter an Address_type of HOME and a Phone_Type of MAIN if the Same Addressas Employee is Yes. The address and phone fields will then be cleared. No change will happen if the SameAddress as Employee is No.
PAYROLL_DATAThe Address fields were removed from PAYROLL_DATA. Any address used to send the paycheck or adviceto must exist in ADDRESSES. However, the PAYROLL_DATA component allows the user to select theHOME or MAILING address or to enter a different CHECK address.
Copyright © 2006, Oracle. All rights reserved. 381
Understanding Person Model Changes Appendix S
The Upgrade scripts will create an ADDRESSES record with the data from PAYROLL_DATA with theappropriate ADDRESS_TYPE if this data does not exist in ADDRESSES.
ABS_HIST_DETIf the Address is the same as the employee’s then the address data is not physically stored on the record, onlythe ADDRESS_TYPE is. If the Address is not the same as the employee’s, then the address is directlystored on the record.
The Upgrade scripts will enter an Address_type of HOME and a Phone_Type of MAIN if the Same Addressas Employee is Yes. The address and phone fields will then be cleared. No change will happen if the SameAddress as Employee is No.
New ViewsThe following lists the new views that have been created.
PERSON_NAMEThis view returns a Person’s current Primary Name. One row per PERSON will always exist in this view.
PERSON_ADDRESSThis view returns a Person’s current Address of each ADDRESS_TYPE. One row per Person per Address_typewill exist in this view. Since Addresses are not required, this view will not return all People in PERSON.
PERSONAL_DT_FSTThis view is a combination of PERSON, current primary name from NAMES, and the current row fromPERS_DATA_EFFDT. One row will exist for each person in PERSON.
382 Copyright © 2006, Oracle. All rights reserved.
APPENDIX T
Upgrading Content Provider Registry
Understanding the Content Provider Registry UpgradeYou should perform this task if you use the Enterprise Portal 8.4 or higher running on PeopleTools 8.4x withthe full navigation load access method. This means you do not use a single link to access your contentprovider database, but instead load some or all of the portal registry structures from the content providerdatabase into your Enterprise Portal database. PeopleSoft refers to its application databases that containthe transaction content as Content Provider databases. Your Copy of Production database is your ContentProvider database for this task.
When you upgrade a content provider database, the registry structures are updated, removed and added.These changes need to be copied to the Enterprise Portal database. This task will update the portal registrystructures in your Enterprise Portal database to match what is in the Content Provider database. This isaccomplished by the following:
• Upgrade the PeopleTools on a copy of the Enterprise Portal database. This allows a project compare to runbetween the Enterprise Portal and the Content Provider database.
• Create a portal project in the Enterprise Portal database containing all of the existing Content Providerregistry structures. Copy the portal project (definition only) to the Content Provider database.
• Create a portal project in the Content Provider database containing all of the current Content Providerregistry structures, then merge the project definition copied from the Enterprise Portal database into thisproject. You will have a complete list of all registry structures for the Content Provider, including what iscurrent and what should be deleted.
• Compare the complete list of registry structures in the Content Provider database to what exists in theEnterprise Portal, via project compare. This marks the missing registry structures as delete and the updatedor added registry structures as copy in the portal project definition.
• Copy the portal project from the Content Provider database to the Enterprise Portal database. This deleted,updates, and adds registry structures to the Enterprise Portal database which syncs it up with what iscurrent in the Content Provider database.
If you use Enterprise Portal 8 SP2, PeopleSoft recommends you upgrade your Enterprise Portal to the latestavailable release. If you do upgrade your Enterprise Portal database, you must be on PeopleTools 8.46 or higher.
Note. If you use Enterprise Portal 8.4 you do not need to upgrade to Enterprise Portal 8.8. You can stillupgrade to PeopleTools 8.46.
See Enterprise Portal 8.1x Managing Information Architecture, PeopleSoft Customer Connection website(Support, Documentation, Documentation Updates, Portal Products, Enterprise Portal 8.1x — ManagingInformation Architecture.
In this appendix, you load your new Portal Registry definitions from your Copy of Production database to acopy of your Enterprise Portal database.
Copyright © 2006, Oracle. All rights reserved. 383
Upgrading Content Provider Registry Appendix T
Note. You must complete the tasks in the appendix for each of your separately installed Enterprise Portaldatabases that correspond to one of the four Portal Registry definitions: EMPLOYEE, CUSTOMER,SUPPLIER, and PARTNER. If your installed Enterprise Portal uses all the registries, then complete this taskfor each of the portal registries using the same copy of the single Enterprise Portal database.
In the first task of this appendix, creates a copy of your Enterprise Portal database. You use this copy for allsubsequent steps for the initial and test Move to Production upgrade passes. For the final Move to Production,do not make a copy, instead perform the steps on the production Enterprise Portal database.
This document uses the term “target Enterprise Portal database” to refer to the Enterprise Portal database usedin the upgrade steps. Use the table below to determine the correct copy of your Enterprise Portal database foreach pass.
Upgrade Pass Target Enterprise Portal Database
Initial pass Copy of the Enterprise Portal database
Test Move to Production Copy of the Enterprise Portal database
Final Move to Production Enterprise Portal production database
Task T-1: Copying Your Enterprise Portal DatabaseYou initially upgrade the Content Provider registry on a copy of your Enterprise Portal database, then testthe results of the upgrade. During your test Move to Production, you perform this task against another Copyof the Enterprise Portal.
Create a copy of your current Enterprise Portal production database now. Use this database as your targetEnterprise Portal database.
Note. During your final Move to Production, you copy the registry definitions directly to your Enterprise Portalproduction database. Therefore, you do not need to execute this step during your final Move to Production.
Task T-2: Upgrading Enterprise Portal PeopleToolsDuring the initial upgrade pass, your Enterprise Portal database must run on the same PeopleTools release levelas your Copy of Production database so that you can do the compare step. Since you do not need to run thecompare step during your Move to Production passes, you can skip this task during Move to Production passes.
If the release level of PeopleTools on your target Enterprise Portal database is not the same as your CopyProduction database release level, upgrade your PeopleTools now.
See PeopleSoft Customer Connection Implement, Optimize, + Upgrade, Upgrade Guide, UpgradeDocumentation and Software, Upgrade Documentation and Scripts.
384 Copyright © 2006, Oracle. All rights reserved.

Appendix T Upgrading Content Provider Registry
Task T-3: Updating Registry Permission ListsThis section discusses:
• Understanding Registry Permission Lists Updates
• Updating Portal Registry
• Deleting the Database Cache
Understanding Registry Permission Lists UpdatesThis task applies only to the initial upgrade pass.
Earlier in this upgrade you copied portal registry data from the Demo database to your Copy of Productiondatabase. You must update this registry data to include your permission list changes. After updating the portalregistry permission lists, delete the database cache.
This process takes between a few minutes and a few hours, depending on the volume of the portal data.
Note. The user ID that invokes this process must have the security role Portal Administrator, or the processmay terminate with an abend.
Note. You must have a process scheduler started for your Copy of Production database.
Task T-3-1: Updating Portal RegistryFollow the steps below to update your portal registry permission lists.
To update the portal registry permission lists:
1. On your Copy of Production database, select PeopleTools, Portal, Portal Security Sync.2. Select the Add a New Value tab.3. Add a run control as follows:a. Enter a value for the Run Control ID. The Run Control ID is SECURITY_SYNC_XXXX, where XXXXrepresents the portal registry name (EMPLOYEE, CUSTOMER, SUPPLIER, or PARTNER).
b. Click Add.4. Enter a value for the Portal Name. This value must match the portal registry name you used to replace theXXXX in the run control ID.
5. Click Save.6. Click Run.7. Set up the process scheduler information and click OK.8. Click the Process Monitor link to view the progress of the process.
Task T-3-2: Deleting the Database CacheFollow the steps below to delete the database cache.
To delete the database cache:
Copyright © 2006, Oracle. All rights reserved. 385

Upgrading Content Provider Registry Appendix T
1. Delete the Copy of Production database application server cache.2. Stop and restart the Copy of Production database web server service.
Task T-4: Creating the Portal ProjectThis section discusses:
• Understanding Portal Project Creation
• Creating the Target Enterprise Portal Project
• Cleaning the Target Enterprise Portal Project
• Deleting the Target Enterprise Portal Database Cache
• Copying the Target Enterprise Portal Project Definition
• Creating the Copy of Production Portal Project
• Cleaning the Copy of Production Portal Project
• Deleting the Copy of Production Database Cache
Understanding Portal Project CreationThis task applies only to the initial upgrade pass. In this task, you create and modify a project on your targetEnterprise Portal database. Then you copy the project definition to the Copy of Production database, whereyou further modify the project.
Task T-4-1: Creating the Target Enterprise Portal ProjectFollow the steps below to create the target Enterprise Portal project.
To create the target Enterprise Portal project:
1. Launch Application Designer and sign on to your target Enterprise Portal database.
2. Select Insert, Definitions into Project…
3. Select the following values:
a. For Definition Type, select Portal Registry Structures.
b. Leave the Portal Name field blank.
c. For Owner ID, select All Owners.
d. Do not select any values for Related Definitions.
386 Copyright © 2006, Oracle. All rights reserved.
Appendix T Upgrading Content Provider Registry
Insert into Project dialog box
4. Click Insert.
5. Click Select All, and the click Insert again
6. Click Close.
7. From Application Designer, select File, Save Project As….
8. Enter the project name PORTAL_PA84X_REGISTRY.
9. Close Application Designer.
Task T-4-2: Cleaning the Target Enterprise Portal ProjectIn this step, you clean the target Enterprise Portal Project so that it contains only the existing Content Providerregistry structure content references.
To clean the target Enterprise Portal project:
1. In your Enterprise Portal database, navigate to PeopleTools, Portal, Portal Utilities, Clean Portal Project.
Warning! Do not follow the instructions on the Clean Portal Project page. Instead, follow the instructionsbelow.
2. Add the run control ID CLEAN_PORTAL_XXXXXXXX where XXXXXXXX represents the portaldefinition name: EMPLOYEE, CUSTOMER, SUPPLIER or PARTNER for example.
3. In the Project Name field, enter the project name PORTAL_PA84X_REGISTRY.4. Enter a value in the Portal Name field; EMPLOYEE for example.
Copyright © 2006, Oracle. All rights reserved. 387
Upgrading Content Provider Registry Appendix T
5. Enter a value in the Content Provider Name field; CRM for example.
Note. Before running the Clean Portal Project you must enter the Node URI text for the Message Nodeyou selected.
6. Select Full Navigation.7. Click Save.8. Click Run.9. Set up the Process Scheduler information and click OK.10. Select the Process Monitor link to view the progress of the process.
Task T-4-3: Deleting the Target Enterprise Portal Database CacheIn this step, you delete the target Enterprise Portal database cache.
To delete the target Enterprise Portal database cache:
1. On your target Enterprise Portal database, launch Configuration Manager.
2. On the Startup tab, click Purge Cache Directories…
3. Select the target Enterprise Portal database name.
4. Click Delete.5. Click OK.6. Click Close.7. Click OK to close Configuration Manager.
Task T-4-4: Copying the Target Enterprise PortalProject DefinitionIn this step, you copy the target Enterprise Portal project definition to your Copy of Production database.
To copy the target Enterprise Portal project definition:
1. Using PeopleSoft Data Mover, sign on to your target Enterprise Portal database.
2. Run the following Data Mover script:
<PS_HOME>\SCRIPTS\UVUPX10E.dms
3. Close Data Mover.4. Using PeopleSoft Data Mover, sign on to the Copy of Production database.5. Run the following Data Mover script:
<PS_HOME>\SCRIPTS\UVUPX10I.dms
6. Close Data Mover.
Task T-4-5: Creating the Copy of Production Portal ProjectCreate a project containing all Portal Registry data on your Copy of Production database.
388 Copyright © 2006, Oracle. All rights reserved.

Appendix T Upgrading Content Provider Registry
To create the Copy of Production Portal project:
1. Launch Application Designer and sign on to your Copy of Production database.
2. Select Insert, Definitions into Project….
3. For Definition Type, select Permission Lists.
Insert into Project dialog box: Definition Type Permission Lists
4. Click Insert.
5. Click Select All, and then click Insert again.
6. Select the following values:
a. For Definition Type, select Portal Registry Definitions.
b. For Name, enter the Enterprise Portal database’s default portal name (EMPLOYEE, CUSTOMER,SUPPLIER or PARTNER).
c. For Owner ID, select All Owners.
d. For Related Definitions, select Portal Registry Structures.
Copyright © 2006, Oracle. All rights reserved. 389

Upgrading Content Provider Registry Appendix T
Insert into Project dialog box with Portal Registry Structures selected
7. Click Insert.8. Click Select All, then click Insert again.9. Click Close.10. From Application Designer, select File, Save Project As….11. Enter the appropriate new project name from the table below. This project is referred to as the Portal Project.
Portal Name Project Name
EMPLOYEE PORTAL_APP84X_EMPLOYEE
CUSTOMER PORTAL_APP84X_CUSTOMER
PARTNER PORTAL_APP84X_PARTNER
SUPPLIER PORTAL_APP84X_SUPPLIER
12. Click OK.13. From Application Designer, select File, Merge Projects...14. Enter the Project Name PORTAL_PA84X_REGISTRY.This merges the objets from the PORTAL_PA84XREGISTERY project into your newly created PortalProject.
15. Select File, Save Project to save the updated Portal Project.16. Close Application Designer.
390 Copyright © 2006, Oracle. All rights reserved.

Appendix T Upgrading Content Provider Registry
Task T-4-6: Cleaning the Copy of Production Portal ProjectIn this step, you clean the Copy of Production Portal project so that it contains only the Content Providerregistry data.
Important! Before using the Copy of Production Portal project, you must run the Clean Portal Project on theCopy of Production database. Follow the directions on the Clean Portal Project Page.
To clean the Copy of Production Portal project:
1. In your Copy of Production database, navigate to PeopleTools, Portal, Portal Utilities, Clean Portal Project.2. Add the run control ID, CLEAN_PORTAL_XXXXXXXX, where XXXXXXXX represents the portal definitionname; EMPLOYEE, CUSTOMER, SUPPLIER, or PARTNER, for example.
3. In the Project Name field, enter the Portal Project name you created in the Creating the Copy of ProductionPortal Project step (PORTAL_APP84X_[your portal name here].
4. Enter a value in the Portal Name field; EMPLOYEE, for example.5. Enter a value in the Content Provider Name field; CRM, for example.
Important! Before running the Clean Portal Project, you must enter the Node URI text for the MessageNode you selected.
6. Select Full Navigation.7. Click Save.8. Click Run.9. Set up the Process Scheduler information and click OK.10. Select the Process Monitor link to view the progress of the process.
Task T-4-7: Deleting the Copy of Production Database CacheIn this step, you delete the Copy of Production database cache.
To delete the Copy of Production database cache:
1. On your Copy of Production database, start Configuration Manager.2. On the Startup tab, click Purge Cache Directories…3. Select the Copy of Production database name.4. Click Delete.5. Click OK.6. Click Close.7. Click OK to close Configuration Manager.
Task T-5: Comparing the Portal ProjectThis task only applies to the initial upgrade pass.
Copyright © 2006, Oracle. All rights reserved. 391

Upgrading Content Provider Registry Appendix T
In this step, you compare the Portal project you created in the previous step and then review the compareresults. This will allow you to adjust the portal project as necessary before copying it into the EnterprisePortal database.
To compare the Portal Project:
1. Launch Application Designer and sign on to your Copy of Production database.2. Select Tools, Compare and Report....3. Enter the Portal Project name you specified in the step “Creating the Copy of Production Portal Project”(PORTAL_APP84X_[your portal name here])..
4. Enter the database name of your target Enterprise Portal database, and the user ID and password.5. Click the Options button.6. For the Compare Type, select Project, and click OK.7. Select all object types and click OK.8. Close Application Designer.
Task T-6: Reviewing the Portal ProjectThis task applies only to the initial upgrade pass.
Review the Portal project (PORTAL_APP84X_[your portal name here]) on the Copy of Production database,looking for customizations that you have applied to your database. Object definitions that you changed have*Changed or *Unchanged in the Target column of the compare report. The * indicates that the change was notmade by PeopleSoft. Review each of these objects carefully. If PeopleSoft delivered the object, the Sourcecolumn of the report will read Changed. Note the changes you made to the object. After you completethe upgrade, when you test the system, you can decide whether you still need the customization. You canreapply the customization at that time.
See “Appendix: Understanding the Comparison Process.”
Task T-7: Copying the Portal ProjectThis section discusses:
• Understanding Portal Project Copying
• Copying the Portal Project
• Deleting the Enterprise Portal Database Cache
Understanding Portal Project CopyingThis task only applies to the initial upgrade pass.
In this step, you copy the project from your Copy of Production database to your target Enterprise Portaldatabase.
392 Copyright © 2006, Oracle. All rights reserved.

Appendix T Upgrading Content Provider Registry
Task T-7-1: Copying the Portal ProjectFollow the steps below to copy the Portal Project to the Enterprise Portal database.
Important! Before exporting the Portal Project from the Content Provider database, you must successfullyclean the Copy of Production Portal Project. If you proceed with this step without cleaning the project,you will overwrite critical Enterprise Portal data.
See Creating the Portal Project, Cleaning the Copy of Production Portal Project.
To copy the Portal Project:
1. Launch Application Designer and sign on to your Copy of Production database.2. Select File, Open...3. For the Definition, select Project and click Open.4. Highlight the newly created Portal Project name (PORTAL_APP84X_[your portal name])and click Openagain.
5. Select Tools, Copy Project, To Database...6. Enter the name of your target Enterprise Portal database, and the user ID and password.7. Click Select All.8. Click Copy.This may take a few minutes.
9. Close Application Designer.
Note. You do not need to create or alter any records or views.
Task T-7-2: Deleting the Enterprise Portal Database CacheIn this step, you delete the Enterprise Portal database cache.
To delete the Enterprise Portal database cache:
1. Delete the target Enterprise Portal database application server cache.2. Stop and restart the target Enterprise Portal database web server service.
Task T-8: Copying Portal Project to ProductionThis section discusses:
• Understanding Portal Project to Production Copying
• Copying the Portal Project to File
• Copying the Portal Project From File
• Deleting the Enterprise Portal Database Cache Again
Copyright © 2006, Oracle. All rights reserved. 393

Upgrading Content Provider Registry Appendix T
Understanding Portal Project to Production CopyingYou must perform this step during both your test and final Move to Production upgrade passes.
Task T-8-1: Copying the Portal Project to FileFollow the steps below to copy the Portal Project to file.
Note. If your Copy of Production and target Enterprise Portal databases run on the same PeopleTools releaseand database platform, you can copy the project directly to the target Enterprise Portal database from withinthe Copy of Production Application Designer and skip the rest of this step.
To copy the Portal Project to file:
1. Launch Application Designer and sign on to your Copy Production database.
2. Select File, Open....
3. For the Definition, select Project. Click Open.
4. Highlight the newly created Portal Project name (PORTAL_APP84X_[your portal name]) and clickOpen again.
5. Select Tools, Copy Project, To File....
6. Click the Browse button for the Export Directory. Navigate to a temporary directory. Click OK.
7. Click Select All.
8. Click Copy.This may take a few minutes.
9. Close Application Designer.
Task T-8-2: Copying the Portal Project From FileIn this step, you copy the Portal project from file.
To copy the Portal project from file:
1. Launch Application Designer and sign on to your target Enterprise Portal database.2. Select Tools, Copy Project, From File....3. Browse to the Copy of Production database server’s temporary directory.If you cannot access the Copy of Production database server’s temporary directory, then copy the portalproject folder and files from the temporary directory to the target Enterprise Portal database server’s<PS_HOME>\PROJECTS directory, and browse to that directory.
4. Select the Portal project name you just copied to file in the previous step.5. Click Open.6. Click Select All.7. Set the project language options as follows:a. Click Options...b. In the Copy Options tab, select English, and COMMON.
394 Copyright © 2006, Oracle. All rights reserved.
Appendix T Upgrading Content Provider Registry
c. If your Enterprise Portal database is a multi-language database, then also select the languages youhave installed on your Enterprise Portal database.
d. Click OK.8. Click Copy.9. Select the Upgrade tab and view the Output window.All objects should have copied successfully.
10. Close Application Designer.
Note. After the copy, you do not need to create or alter any records or views on the target Enterprise Portaldatabase.
Task T-8-3: Deleting the Enterprise Portal Database Cache AgainIn this step, you delete the Enterprise Portal database cache.
To delete the Enterprise Portal database cache:
1. Delete the target Enterprise Portal database’s application server cache.2. Stop and restart the target Enterprise Portal database web server service.
Task T-9: Deleting Obsolete FoldersThis section discusses:
• Understanding Obsolete Folder Deletion
• Deleting Obsolete Folders on Enterprise Portal 8.4
• Deleting Obsolete Folders on Enterprise Portal 8.8
Understanding Obsolete Folder DeletionThis task applies to all upgrade passes: Initial, Test Move to Production, and Final Move to Production.
In this step, you delete folders on your target Enterprise Portal database that the Portal Registry Structures nolonger reference. The process you run depends on your version of Enterprise Portal.
Task T-9-1: Deleting Obsolete Folders on Enterprise Portal 8.4Follow this procedure to delete obsolete folders on Enterprise Portal 8.4.
To delete obsolete folders on Enterprise Portal 8.4:
1. Using PeopleSoft Data Mover, sign on to your target Enterprise Portal database.
2. Run the following Data Mover script, located in the Enterprise Portal PS_HOME\SCRIPTS directory:
PORTAL_REG_FOLDER_DEL.DMS
3. Close Data Mover.
Copyright © 2006, Oracle. All rights reserved. 395
Upgrading Content Provider Registry Appendix T
Task T-9-2: Deleting Obsolete Folders on Enterprise Portal 8.8Follow this procedure to delete obsolete folders on Enterprise Portal 8.8 or higher.
To delete obsolete folders on Enterprise Portal 8.8 or higher:
1. On your target Enterprise Portal database, navigate accordingly:a. For Enterprise Portal 8.8: Portal Administration, Navigation, Run Folder Cleanup.b. For Enterprise Portal 8.9 or higher: Portal Administration, Navigation, Delete Empty Folders.
2. Add a run control as follows:a. Enter a value for Run Control ID. The run control ID is FOLDER_CLEAN_XXXX, where XXXXrepresents the portal registry name (EMPLOYEE, CUSTOMER, PARTNER, or SUPPLIER).
b. Click Add.3. Enter a value for Portal Name. This value must match the portal registry name you used to replace XXXXin the run control ID (EMPLOYEE, CUSTOMER, PARTNER, or SUPPLIER).
4. Click Save.5. Click Run.6. Set up the process scheduler information and click OK.7. Click the Process Monitor link to view the progress of the process.
Task T-10: Updating Registry Folder PermissionsThis section discusses:
• Understanding Registry Folder Permissions Updates
• Updating the Enterprise Portal Registry Folder Permissions
• Deleting the Enterprise Portal Cache
Understanding Registry Folder Permissions UpdatesThis task applies to all upgrade passes: Initial, Test Move to Production, and Final Move to Production.
Portal data from different Content Provider databases may share a common portal folder. After copying theregistry projects, you must update the folder permissions to reflect the changes. After you update the folderpermissions, you must delete the target Enterprise Portal database cache files to propagate the changes.
Task T-10-1: Updating the Enterprise Portal RegistryFolder PermissionsFollow this procedure to update your Enterprise Portal registry folder permissions.
Note. This process will take between a few minutes to a few hours, depending on the volume of portaldata. The user ID that invokes this process must have the security role Portal Administrator, or the processmay terminate with an abend.
396 Copyright © 2006, Oracle. All rights reserved.
Appendix T Upgrading Content Provider Registry
To update the Enterprise Portal folder permissions:
1. On your target Enterprise Portal database, navigate to PeopleTools, Portal, Portal Security Sync.
2. Add a run control as follows:
a. Enter a value for Run Control ID. The run control ID is SECURITY_SYNC_XXXX, where XXXXrepresents the portal registry name (EMPLOYEE, CUSTOMER, PARTNER, or SUPPLIER).
b. Click Add.3. Enter a value for Portal Name. This value must match the portal registry name you used to replace XXXXin the run control ID (EMPLOYEE, CUSTOMER, PARTNER, or SUPPLIER).
4. Click Save.5. Click Run.6. Set up the process scheduler information and click OK.
7. Click the Process Monitor link to view the progress of the process.
Task T-10-2: Deleting the Enterprise Portal CacheIn this step delete the Enterprise Portal cache.
To delete the Enterprise Portal cache:
1. Delete the target Enterprise Portal database application server cache.2. Stop and restart the target Enterprise Portal database web server service.
Copyright © 2006, Oracle. All rights reserved. 397

Upgrading Content Provider Registry Appendix T
398 Copyright © 2006, Oracle. All rights reserved.

APPENDIX U
Upgrading System Element Deletions
This appendix discusses:
• Retaining System Element Functionality
• Change References to System Elements
Task U-1: Retaining System Element FunctionalityThis section discusses:
• Understanding System Element Functionality Retention
• Define a Variable
• Define an Array
Understanding System Element Functionality RetentionThe steps below will provide the instructions on how to define a variable and an array. The array will beused to retrieve data to support retaining existing system element functionality. The variable will be usedin the array definition to store the retrieved data.
Task U-1-1: Define a VariableDefine a variable using the same attributes as the system element.
To obtain the system element attributes:
1. Navigate to Home, Define Business Rules, Define Global Payroll Rules, Inquire, Element Name.2. Enter the name of the system element to be deleted.3. Click the Search button.4. Take screen shots of the System Element Name page including the subpages for Customer Fields,Comments, and Source and Use. See the examples of screen shots below.
Copyright © 2006, Oracle. All rights reserved. 399
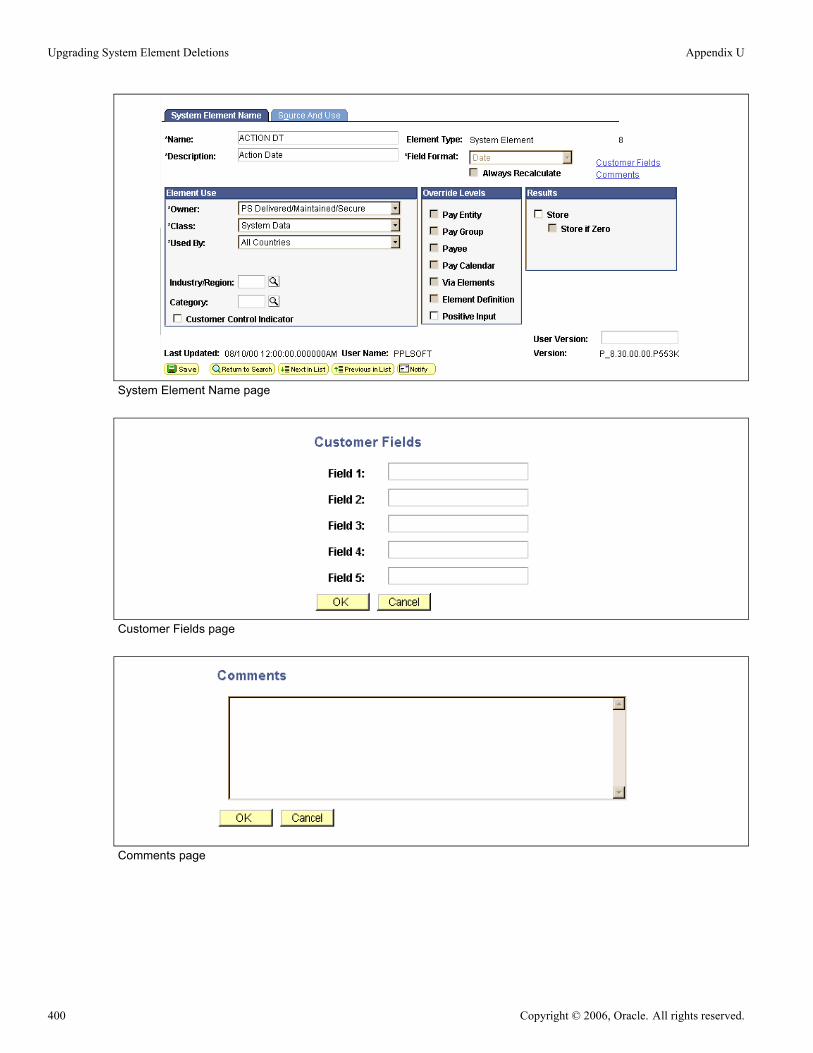
Upgrading System Element Deletions Appendix U
System Element Name page
Customer Fields page
Comments page
400 Copyright © 2006, Oracle. All rights reserved.

Appendix U Upgrading System Element Deletions
Source and Use page
The previous screen shots contain all the attributes you will need in defining your variable. Remember touse the appropriate effective date for the variable definition.
Task U-1-2: Define an ArrayThis section discusses:
• Understanding Array Definition
• Array Logic for System Element QDRO IND YN ALL
• Array Logic for System Elements RATING SCALE ALL, REVIEW DT ALL, REVIEW RATING ALL
• For Retrieval From Record EP_APPR
• For Retrieval From Record EMPLOYEE_REVIEW
• Array Logic for System Element SALARY MATRIX CD ALL
• Array Logic for System Element WRKS CNCL MEM DEU ALL
Understanding Array DefinitionDefine an array to retrieve information that was previously contained in the record field that the system elementcame from. Use the variable in the array to contain the value previously contained by the system element.
Array logic will be different for each system element as shown below.
Array Logic for System Element QDRO IND YN ALLFor the system element QDRO IND YN ALL, the array logic is the following:
• If no court order has been defined (PA_ QDRODAT record does not exist for the employee), thenQDRO_IND_YN value for the employee is ‘N’.
Copyright © 2006, Oracle. All rights reserved. 401

Upgrading System Element Deletions Appendix U
• If a court order does exist for the employee, then the employee’s QDRO_IND_YN= ‘Q’. The alternatepayee (QDRO_ID) will have a value of ‘A’ for the QDRO_IND_YN.
Array Logic for System Elements RATING SCALE ALL, REVIEW DT ALL, REVIEWRATING ALLThe following table shows where these system elements were sourced in previous releases and where youwill be able to find this data after you upgrade to PeopleSoft 8.8. The information following this table willhelp you define your array. The “Source Prior to PeopleSoft 8.8” refers to the record field used by GlobalPayroll to retrieve the system element value. The “True Source prior to PeopleSoft 8.8,” therefore, refers tothe original home of the system element. An HR process would move the value to the JOB record. The lastcolumn, “Source for PeopleSoft 8.8” is where the system element will reside after the upgrade.
PIN CODE of GPSystem Element
Source prior toPeopleSoft 8.8
True Source prior toPeopleSoft 8.8
Source for PeopleSoft8.8
RATING SCALE ALL JOB.RATING_SCALE EMPLOYEE_REVIEW.RATING_SCALE
EP_APPR.RATING_MODEL
REVIEWDT ALL JOB.REVIEW_DT EMPLOYEE_REVIEW.EFFDT
EP_APPR.PERIOD_END_DT
REVIEW RATING ALL JOB.REVIEW_RATING EMPLOYEE_REVIEW.REVIEW_RATING
EP_APPR.REVIEW_RATING
SALARYMATRIX CDALL
JOB.SALARY_MATRIX_CD
SAL_GRADE_TBL SAL_GRADE_TBL
For Retrieval From Record EP_APPRThe following instructions and SQL statements will help you define your array.
For any specified employee and target date:
Select the maximum EP_APPR record whose PERIOD_END_DT is less than the target date
Whose EP_REVIEW_STATUS is “Complete”
Whose EP_APPROVAL_STATUS is either “Approved” or “Not Required”
If the above returns more than one row, take the row with the latest PERIOD_BEGIN_DT.
The possible SQL for this approach would be:
Select RATING_MODEL, REVIEW_RATING, PERIOD_END_DT
From PS_EP_APPR
Where EMPLID = ????
And EMPL_RCD = ????
And EP_REVIEW_STATUS = ’CO’
And EP_APPROVAL_STATUS In (’NRQD’, ’APPR’))
And PERIOD_END_DT <=
(Select Max(PERIOD_END_DT)
From PS_EP_APPR
Where EMPLID = PS_EP_APPR.EMPLID
And EMPL_RCD = PS_EP_APPR.EMPL_RCD
402 Copyright © 2006, Oracle. All rights reserved.

Appendix U Upgrading System Element Deletions
And PERIOD_END_DT <= ????
And EP_REVIEW_STATUS = ’CO’
And EP_APPROVAL_STATUS In (’NRQD’, ’APPR’))
And PERIOD_BEGIN_DT <=
(Select Max(PERIOD_BEGIN_DT)
From PS_EP_APPR
Where EMPLID = PS_EP_APPR.EMPLID
And EMPL_RCD = PS_EP_APPR.EMPL_RCD
And PERIOD_END_DT = PS_EP_APPR.PERIOD_END_DT
And EP_REVIEW_STATUS = ’CO’
And EP_APPROVAL_STATUS In (’NRQD’, ’APPR’))
A new functionality has been introduced for PeopleSoft 8.8, where you can mark certain types of reviewsas official. This could be used to indicate those reviews that affect salary, but the indicator will only beinformational. If you use this feature, use the above SQL with the following criteria within each sub-Select:
And EP_OFFICIAL_SW= ‘Y’
The existing PS_EMPLOYEE_REVIEW data will not be converted during the upgrade but it will remain ashistorical data. Key structures are vastly different from each PeopleSoft release, making it so the data couldnot accurately be converted into the new business process.
As a result, another array will need to be defined to retrieve the above data from PS_EMPLOYEE_REVIEW.This is to support retroactive processing that could go to a period where data in EP_APPR is not available anddata from EMPLOYEE_REVIEW has to be read instead.
For Retrieval From Record EMPLOYEE_REVIEWTo retrieve the values from EMPLOYEE_REVIEW, you want to fetch the employee’s latest Employee Reviewrow of rating scale type ‘Average’ (determined by REVW_SCALE_TBL.REVW.SCALE_TYPE = ‘A’).
Note. The EMPLOYEE_REVIEW.EFFDT is used as the REVIEW_DT.
Note. The review status (field EMPLOYEE_REVIEW.EMPL_REVW_STATUS) has no impact because thisfield is not used for employee reviews of rating scale type ‘Average.’
For example, you want to fetch the values for EmplID KC0001, Empl Rcd 0, As-Of-Date 01-01-2002. TheSQL would look like the following:
SELECT
ER.EFFDT, -- replacement for JOB.REVIEW_DT
ER.REVIEW_RATING, -- replacement for JOB.REVIEW_RATING
ER.RATING_SCALE -- replacement for JOB.RATING_SCALE
FROM PS_EMPLOYEE_REVIEW ER
,PS_REVW_SCALE_TBL RS
WHERE ER.EMPLID = ’KC0001’
AND ER.EMPL_RCD = 0
AND ER.EFFDT = (SELECT MAX(ER1.EFFDT)
FROM PS_EMPLOYEE_REVIEW ER1
WHERE ER1.EMPLID = ER.EMPLID
Copyright © 2006, Oracle. All rights reserved. 403
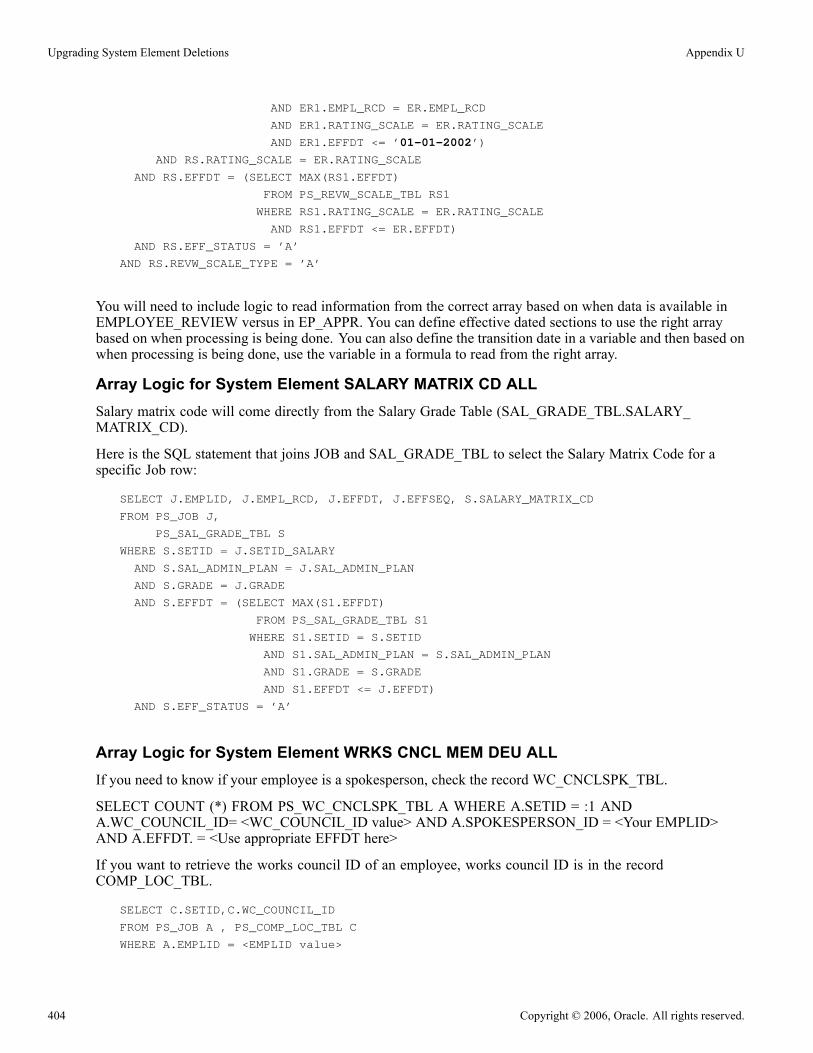
Upgrading System Element Deletions Appendix U
AND ER1.EMPL_RCD = ER.EMPL_RCD
AND ER1.RATING_SCALE = ER.RATING_SCALE
AND ER1.EFFDT <= ’01-01-2002’)
AND RS.RATING_SCALE = ER.RATING_SCALE
AND RS.EFFDT = (SELECT MAX(RS1.EFFDT)
FROM PS_REVW_SCALE_TBL RS1
WHERE RS1.RATING_SCALE = ER.RATING_SCALE
AND RS1.EFFDT <= ER.EFFDT)
AND RS.EFF_STATUS = ’A’
AND RS.REVW_SCALE_TYPE = ’A’
You will need to include logic to read information from the correct array based on when data is available inEMPLOYEE_REVIEW versus in EP_APPR. You can define effective dated sections to use the right arraybased on when processing is being done. You can also define the transition date in a variable and then based onwhen processing is being done, use the variable in a formula to read from the right array.
Array Logic for System Element SALARY MATRIX CD ALLSalary matrix code will come directly from the Salary Grade Table (SAL_GRADE_TBL.SALARY_MATRIX_CD).
Here is the SQL statement that joins JOB and SAL_GRADE_TBL to select the Salary Matrix Code for aspecific Job row:
SELECT J.EMPLID, J.EMPL_RCD, J.EFFDT, J.EFFSEQ, S.SALARY_MATRIX_CD
FROM PS_JOB J,
PS_SAL_GRADE_TBL S
WHERE S.SETID = J.SETID_SALARY
AND S.SAL_ADMIN_PLAN = J.SAL_ADMIN_PLAN
AND S.GRADE = J.GRADE
AND S.EFFDT = (SELECT MAX(S1.EFFDT)
FROM PS_SAL_GRADE_TBL S1
WHERE S1.SETID = S.SETID
AND S1.SAL_ADMIN_PLAN = S.SAL_ADMIN_PLAN
AND S1.GRADE = S.GRADE
AND S1.EFFDT <= J.EFFDT)
AND S.EFF_STATUS = ’A’
Array Logic for System Element WRKS CNCL MEM DEU ALLIf you need to know if your employee is a spokesperson, check the record WC_CNCLSPK_TBL.
SELECT COUNT (*) FROM PS_WC_CNCLSPK_TBL A WHERE A.SETID = :1 ANDA.WC_COUNCIL_ID= <WC_COUNCIL_ID value> AND A.SPOKESPERSON_ID = <Your EMPLID>AND A.EFFDT. = <Use appropriate EFFDT here>
If you want to retrieve the works council ID of an employee, works council ID is in the recordCOMP_LOC_TBL.
SELECT C.SETID,C.WC_COUNCIL_ID
FROM PS_JOB A , PS_COMP_LOC_TBL C
WHERE A.EMPLID = <EMPLID value>
404 Copyright © 2006, Oracle. All rights reserved.
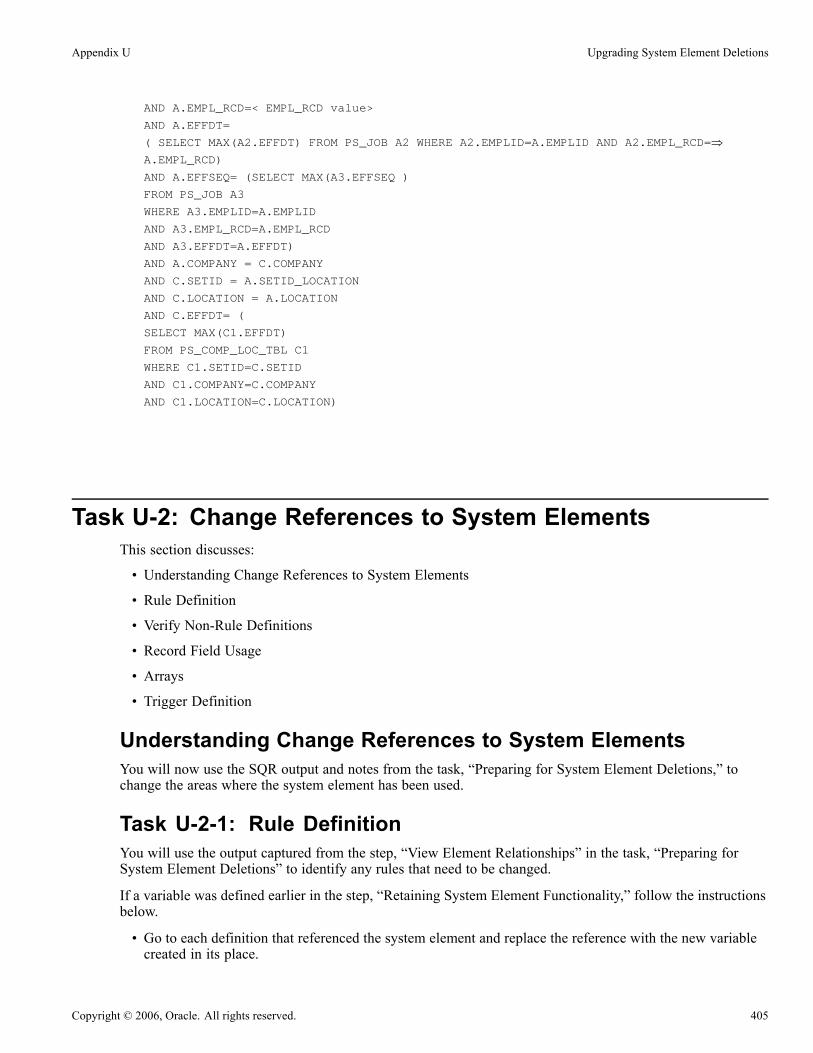
Appendix U Upgrading System Element Deletions
AND A.EMPL_RCD=< EMPL_RCD value>
AND A.EFFDT=
( SELECT MAX(A2.EFFDT) FROM PS_JOB A2 WHERE A2.EMPLID=A.EMPLID AND A2.EMPL_RCD=⇒A.EMPL_RCD)
AND A.EFFSEQ= (SELECT MAX(A3.EFFSEQ )
FROM PS_JOB A3
WHERE A3.EMPLID=A.EMPLID
AND A3.EMPL_RCD=A.EMPL_RCD
AND A3.EFFDT=A.EFFDT)
AND A.COMPANY = C.COMPANY
AND C.SETID = A.SETID_LOCATION
AND C.LOCATION = A.LOCATION
AND C.EFFDT= (
SELECT MAX(C1.EFFDT)
FROM PS_COMP_LOC_TBL C1
WHERE C1.SETID=C.SETID
AND C1.COMPANY=C.COMPANY
AND C1.LOCATION=C.LOCATION)
Task U-2: Change References to System ElementsThis section discusses:
• Understanding Change References to System Elements
• Rule Definition
• Verify Non-Rule Definitions
• Record Field Usage
• Arrays
• Trigger Definition
Understanding Change References to System ElementsYou will now use the SQR output and notes from the task, “Preparing for System Element Deletions,” tochange the areas where the system element has been used.
Task U-2-1: Rule DefinitionYou will use the output captured from the step, “View Element Relationships” in the task, “Preparing forSystem Element Deletions” to identify any rules that need to be changed.
If a variable was defined earlier in the step, “Retaining System Element Functionality,” follow the instructionsbelow.
• Go to each definition that referenced the system element and replace the reference with the new variablecreated in its place.
Copyright © 2006, Oracle. All rights reserved. 405

Upgrading System Element Deletions Appendix U
• In order for the variable to resolve correctly, put the array defined earlier in the step, “Retaining SystemElement Functionality,” in the appropriate place on the appropriate process list.
• If the system element was used in any element that was sliced, put the array on the corresponding event list.• If the system element was also used in an element that was not sliced, call the array from a formula that isnot sliced so that it is also resolved for the segment.
If you did not define a variable earlier, you need to change each definition that was referencing the systemelement to not refer to that system element any more meaning you have decideded to not retain the systemelement functionality.
Task U-2-2: Verify Non-Rule DefinitionsThis section discusses:
• Understanding Non-Rule Definition Verification
• Output Result Tables − Checking PS_GP_RSLT_PIN
• Positive Input Supporting Element Overrides
• Packages
• Non Rule Package and Records − Checking PS_GP_NR_PKG_ELMTS
• Other Records
Understanding Non-Rule Definition VerificationThe following steps correspond to the output you got from running PUHCY100.SQR. Each step herecorresponds to the output of the SQR. Complete these steps ONLY if the SQR output indicates that thesystem element has been used in that area.
Note. The steps below need to be followed for EVERY system element.
For the following steps, the <Variable PIN NUM> refers to the PIN_NUM of the variable, if one was createdearlier. If a variable was not defined earlier, you decided not to retain system element functionality. The<System Element PIN NUM> refers to the PIN_NUM of the system element found in the SQR output.These steps provide SQL to update places where the system element was used to use the variable definedearlier instead of the deleted element. If a variable was not created, these steps provide SQL to delete thedata accordingly.
Output Result Tables − Checking PS_GP_RSLT_PINIf a variable was defined earlier, use the following SQL to update the data.
UPDATE PS_GP_RSLT_PIN
SET PIN_NUM=<Variable PIN NUM>
WHERE PIN_NUM=<System Element PIN NUM>
If a variable was not defined earlier, use the following SQL to delete the row from the PS_GP_RSLT_PIN.DELETE FROM PS_GP_RSLT_PIN
WHERE PIN_NUM=<System Element PIN NUM>
406 Copyright © 2006, Oracle. All rights reserved.

Appendix U Upgrading System Element Deletions
Positive Input Supporting Element OverridesPositive Input Supporting Element Override 1 − Checking PS_GP_PI_MNL_SOVR
If a variable was defined earlier, use the following SQL to update the data:
UPDATE PS_GP_PI_MNL_SOVR
SET PIN_SOVR_NUM=<Variable PIN NUM>
WHERE PIN_SOVR_NUM=<System Element PIN NUM>
If a variable was not defined earlier, use the following SQL to delete the row:DELETE FROM PS_GP_PI_MNL_SOVR
WHERE PIN_NUM=<System Element PIN NUM>
• Positive Input Supporting Element Override 2 − Checking PS_GP_PI_GEN_SOVR
If a variable was defined earlier, use the following SQL to update that data.
UPDATE PS_GP_PI_GEN_SOVR
SET PIN_SOVR_NUM=<Variable PIN NUM>
WHERE PIN_SOVR_NUM=<System Element PIN NUM>
If a variable was not defined earlier, use the following SQL to delete the row.DELETE FROM PS_GP_PI_GEN_SOVR
WHERE PIN_NUM=<System Element PIN NUM>
• Positive Input Supporting Element Override 3 − Checking PS_GP_RSLT_PI_SOVRIf a variable was defined earlier, use this SQL to update the data.
UPDATE PS_GP_RSLT_PI_SOVR
SET PIN_SOVR_NUM=<Variable PIN NUM>
WHERE PIN_SOVR_NUM=<System Element PIN NUM>
If a variable was not defined earlier, issue the following SQL to delete the row fromPS_GP_RSLT_PI_SOVR.DELETE FROM PS_GP_RSLT_PI_SOVR
WHERE PIN_NUM=<System Element PIN NUM>
Copyright © 2006, Oracle. All rights reserved. 407

Upgrading System Element Deletions Appendix U
PackagesThis section needs to be done with the help of a functional user who understands the Global Payroll Packagerfunctionality.
• Rule Package Criteria − Checking PS_GP_PKG_CRIT1If a variable was defined earlier, issue the following SQL to update the data:
UPDATE PS_GP_PKG_CRIT1
SET PIN_NUM=<Variable PIN NUM>,
PIN_TYPE=’VR’
WHERE PIN_NUM=<System Element PIN NUM>
If a variable was not defined earlier, issue the following SQL to delete the row from PG_PKG_CRIT1.DELETE FROM PS_GP_PKG_CRIT1
WHERE PIN_NUM=<System Element PIN NUM>
At the end of the upgrade process, you will need to recreate the packages impacted by the changes abovebefore they can be used again. The impacted packages can be found in the <PUHCY100>SQR output.
• Rule Package Output − Checking PS_GP_PKG_ELEMENTS
If the system element is listed in the Rule Package Output, you will need to recreate the packages listed inthe <PUHCY100>SQR output before they can be used again. This needs to be done at the end of theupgrade process. (Do not include the ones that were already covered by the Rule Package Criteria output.)
• Version Package − Checking PS_GP_PKG_VER_DTL
If the sytem element is listed in the Version Package, you will need to recreate the packages listed in the<PUHCY100>SQR output before they can be used again. Complete this step at the end of the entireupgrade process. If the existing system element had a value of Version starting with ‘C_’ it means thatit is a version specified by you, the customer. If you want to retain it, stamp the variable with the sameversion. This is stored in the field GP_VERSION that exists on both GP_PIN and GP_SYSTEM_PIN. Avalue of Version starting with ‘P_’ indicates that this value is a PeopleSoft value and it does not need to beretained, as it will be deleted.
Non Rule Package and Records − Checking PS_GP_NR_PKG_ELMTSIf a variable was defined earlier, update the Non-Rule record that contained the system element to use thevariable created in its place.
If a variable was not defined, change the record to either use some other element or to not reference anelement at all.
Note. At the end of the upgrade process, you will need to recreate the packages listed in the SQR outputbefore these can be used again.
Other RecordsIf a variable was defined earlier, update the record that contained the system element to use the variablethat was created in its place.
408 Copyright © 2006, Oracle. All rights reserved.

Appendix U Upgrading System Element Deletions
If a variable was not defined earlier, change the record to either use some other element or no element at all.
Task U-2-3: Record Field UsageThe following sections correspond to the output from PUHCY100.SQR. Complete these steps only if theSQR output indicates that the record field has been used in that area. Each section must be completed foreach record field that the sytem element maps to.
The following is the criteria you should follow for this step:
• <Array PIN NUM> = PIN_NUM of the array that used the record field (as seen in the SQR output)• <Field Name> = Fieldname that is used on the array (see table below)• <Record Name> = Record name that contained the field (see table below)
The following table shows which record field the system element has been mapped to:
PIN CODE Record Field
QRDO IND YNALL PERS_DATA_EFFDT QDRO_IND_YN
RATING SCALE ALL JOB RATING_SCALE
REVIEWDTALL JOB REVIEW_DT
REVIEWRATING ALL JOB REVIEW RATING
SALARYMATRIX CD ALL JOB SALARY_MATRIX_CD
WRKS CNCLMEMDEUALL JOB WRKS_CNCL_MEM_GER
Task U-2-4: ArraysThis section discusses:
• Understanding Arrays
• Array Field − PS_GP_ARRAY_FLD
• Array Keys PS_GP_ARRAY_KEY
Understanding ArraysAny array definitions that used the record field need to be changed to not use the record field since it no longerexists. If you need to use the functionality that was provided by the field, you could define another array asexplained earlier in the step titled, “Define an Array.”
Array Field − PS_GP_ARRAY_FLDExamine the following Array definition:
DELETE FROM PS_GP_ARRAY_FLD
WHERE PIN_NUM=<Array PIN NUM>
AND FIELDNAME=<Field Name>
Copyright © 2006, Oracle. All rights reserved. 409

Upgrading System Element Deletions Appendix U
You also need to blank out the Version field on GP_ARRAY to indicate that the array has been changed. Thisis done to mimic the functionality provided when an array definition is changed via the online application.Whenever an array defintion is changed via the online application, the GP_VERSION field is blanked out.
UPDATE PS_GP_ARRAY
SET GP_VERSION=’ ‘
Array Keys PS_GP_ARRAY_KEYExamine the following Array definition:
DELETE FROM PS_GP_ARRAY_KEY
WHERE PIN_NUM=<Array PIN NUM>
AND FIELDNAME=<Field Name>
You also need to blank out the Version field on GP_ARRAY to indicate that the array has been changed.UPDATE PS_GP_ARRAY
SET GP_VERSION=’ ‘
WHERE PIN_NUM=<Array PIN NUM>
Task U-2-5: Trigger DefinitionThis section discusses:
• Understanding Trigger Definition
• Trigger Field − Checking PS_GP_TRGR_RECFLD
• Trigger Value − Checking PS_GP_TRGR_VALUE
Understanding Trigger DefinitionA functional user who understands the Global Payroll Trigger functionality needs to work on this section aswell.
Any trigger definitions that used the record field need to be changed to not use the record field since it will notexist. You also need to evaluate where you need to define a NEW trigger definition based on location of wheredata is now stored. Remember to add trigger PC to that record if needed as well.
Trigger Field − Checking PS_GP_TRGR_RECFLDExamine the following Array definition:
DELETE FROM PS_GP_TRGR_RECFLD
WHERE RECNAME=<Record Name>
AND FIELDNAME=<Field Name>
Trigger Value − Checking PS_GP_TRGR_VALUEExamine the following Array definition:
DELETE FROM PS_GP_TRGR_VALUE
WHERE RECNAME=<Record Name>
AND FIELDNAME=<Field Name>
410 Copyright © 2006, Oracle. All rights reserved.

APPENDIX V
Upgrading with Tax Updates
Upgrading with Tax UpdatesYour HRMS Demo database was delivered with a predetermined level of Tax Updates applied. This TaxUpdate level is listed in the task, “Understanding Your Upgrade.” PeopleSoft recommends you run yourupgrade using your Copy of Production at the same Tax Update level as the HRMS Demo database. YourCopy of Production database may be in one of three states relative to the Demo database.
• You will need to update the delivered HRMS Demo database with all tax updates through the latest taxupdate on your Copy of Production before you start your initial upgrade pass. This is required so youwill not lose any of the more current Tax Updates. Do not apply any more updates to your productionsystem until your upgrade is complete and you go live on the new release of PeopleSoft. If you applyadditional updates to your production system while running the upgrade passes, you will loose thoseupdates during your Move to Production pass. You will then need to reapply the tax updates that wereapplied to your production since your Initial upgrade pass.
• The Copy of Production database may be current with the Tax Update from the Demo database applied(but not beyond). You do not need to apply any tax updates.
• The Copy of Production database may not be current with the Tax Update from the Demo database.PeopleSoft strongly recommends that you apply all of the Tax Updates to bring your Copy of Productiondatabase to the same Tax Update level as your HRMS Demo database. This will assure that your taxinformation will be correct when you have completed your upgrade. If this is not possible, be aware of thefollowing potential issues and act accordingly:
Copyright © 2006, Oracle. All rights reserved. 411

Upgrading with Tax Updates Appendix V
- To get your Tax Tables up to date, you will need to compare data in the Tax Tables from your Copy ofProduction to the HRMS Demo database. Any needed updates from the Demo Database should beapplied to the Copy of Production database manually. The tables involved are as follows:
PS_CAN_TAX_TBL
PS_CAN_TAX_CITLUMP
PS_CAN_TAX_QITLUMP
PS_CAN_TAX_CITRATE
PS_CAN_TAX_QITRATE
PS_CAN_TAX_PROV
PS_CAN_TAX_PROVNCT
PS_CAN_TAX_PROVTHR
PS_GARN_RULE_TBL
PS_GARN_EXEMPT_TBL
PS_GARN_OPERANDS
PS_GARN_DE_DEFN
PS_GARN_DE_DED
PS_GARN_PRORATE_RL
PS_STATE_TAX_TBL
PS_STATE_TAXRT_TBL
PS_ST_OTH_TAX_TBL
PS_STTAX_RECIP_TBL
PS_LOCTX_RECIP_TBL
PS_TAXGR_DEFN_TBL
PS_TAXGR_BASE_TBL
PS_TAXGR_CMPNT_TBL
PS_LOCAL_TAX_TBL
PS_LOCAL_TAX_TBL2
PS_SWT_MARSTAT_TBL
PS_LCLWK_TXRCP_TBL
- You should also review the Tax Update documentation to guide you on specific Tax Updates. Thisdocumentation is available on Customer Connection.
412 Copyright © 2006, Oracle. All rights reserved.
Index
AaddingGlobal Payroll country extensions 226
AE SYNCIDGEN, running 165ALLTABS project, creating 139ALLTEMPTABS project, creating 138Alter Auditreviewing final 181running final 181running initial 11
alter tables script, running 141alter with deletes scriptbuilding 164running 164
alternative overtime upgrade,validating 233application audits, running 15application changespreparing 117
application conversion data,exporting 155application conversion data,importing 156Application Engine Driver program 281application messagesexporting 149importing 150
application messagingobjects, deleting 99objects, saving 98
application server, configuring 184application serversgranting administrator permissions 52
application system dataexporting 170importing 170
application tablespaces, creating 83application upgrade, preparing 45applyingfixes after data conversion 263fixes after running copy project 262fixes before Move to Production 263fixes during installation 262fixes during Move to Production 264rule package 195
system data with no PIN 208system data with PIN 209updates before data conversion 157updates to CE rule delete package 224UPGOPT project 6upgrade planning files 5upgrade rule delete package 221upgrade rule package for MTP 206
Approval Rule Setmodifying related tables 307
approval rule setsaltering 94
assigning, upgrade default values 31auditingcharacter length semantics 115disabled constraints 108duplicate length constraints 108long to LOB conversion 112
auditsAlter Audit 11
Bbacking upafter data conversion 163after PeopleTools upgrade 116after preparing your database 48after upgrade copy 136before conversions 158before manual changes 191before platform changes 105before testing 251
base data, loading 90benefitssetting up 193
buildingalter with deletes script 164PPLTOOLS project 85tablespace alter script 89UPGOPT project 6
CChange Assistantediting multilingual step properties 62
Change Assistant, creating new job 255change control
Copyright © 2006, Oracle. All rights reserved. 413
Index
reviewing 250turning off 72
character length script 1, running 113character length script 2, running 113character length script 3, running 113character length script 4, running 113character length script 5, running 114character length script 6, running 114character length script 7, running 114character length script 8, running 114character length semantics, auditing 115COBOLsetting PSOPTIONS for 172
common portal system optionsexporting 170importing 171
Company Cars Report, running 236compare options, modifying 124compare reportscolumns 351effect of field renames 353reviewing 127understanding 350using 351
comparingfields in PPLTOOLS project 76PeopleTools objects 75
comparison processdefault actions for objects 349settings for objects 350status of objects 348Upgrade column 349
completing system setupexporting data 166, 168exporting EDI statements 167exporting mass change data 168importing data 167–168importing EDI statements 167importing mass change data 168loading data 166
configuringapplication server 184Portal 184Process Scheduler 158upgrade environment 184
CONNECT ID, granting permissions 107connect ID, granting privileges to 67consolidate, limit table 193contacting global support 316Content Provider registry
upgrading 248conversionloading data 96reporting details 97running data conversion 97
conversion reports, reviewing 115conversion scriptsOracle, generating 109
convertingdatabase data types 103Integration Broker 97PeopleTools objects 93Portal objects 95query prompt headings 96
Copy of Productioncreating 4setting up security 7testing 251
Copy of Production databasebacking up 116
Copy of Production database cache,deleting 385copy resultsreviewing 131
copyingEnterprise Portal database 384PATCH84X project 82PATCH84XML project 82PPLDELETE project 79PPLTLS84CUR project 80PPLTLS84CURDEL project 81PPLTLS84CURML project 80PPLTLSML project 81PPLTOOLS project 79production database 4projects 78PT84TBLSPC project 88PTDDLUPG script 54PTPORTALDEL project 78Time and Labor temp table list 46
country extensionsadding new 226
create and alter scriptsbuilding 139editing 140
create indexes log, reviewing 142create indexes script, running 142, 164create tables script, running 141create temp tables scriptbuilding 139
414 Copyright © 2006, Oracle. All rights reserved.
Index
running 141create triggers script, running 165create upgrade tables scriptbuilding 137running 137
CREATEVW, running 165creatingall views 165ALLTABS project 139ALLTEMPTABS project 138application tablespaces 83FNLALTAUD project 180indexes 86Integration Broker objects 98Microsoft conversion project 106new Change Assistant job 255new Tablespaces 134Oracle audit tables 108PPLTOOLS views 92RUNSTATS.DAT 71tablespaces 66tablespaces for Informix 66target Enterprise Portal project 386temporary performance indexes 70triggers 86updated PeopleTools views 93upgrade rule delete package 218
CREF permissions, synchronizing 187customer installation flagupdating 225
customizationsidentifying 40reapplying 185
customizingtemplate built rules 240
Ddatabase data, loading 90conversion data, loading 96data conversion, running 97English messages, loading 91English string data, loading 92language data, loading 91PeopleTools data, loading 91stored statements data, loading 92
Data Archiving Tool, dropping tables 279data conversionapplying updates before 157backing up after 163
creating indexes 143dropping indexes 142dropping triggers 143loading data 148loading data for PeopleTools 96reporting details 97running 158running for group 1 161running for group 2 161–162running for group 3 162running for group 4 162running for group 7 162running for group 8 163running for PeopleTools changes 97understanding 159
data conversion driver dataexporting 156importing 156
data conversion report 283data model definitions, loadingDB2 UNIX/NT 73DB2 z/OS 73Informix 74Oracle 74SQL Server 74Sybase 74understanding 73
data type steps, editing 64databaseincreasing space 5preparing 43stamping 249understanding preparation 1updating overrides 132verifying integrity 43
database cachedeleting from Copy of Production 385
database data types, converting 103database options flag, resetting 71database options, updating 115database servers, backing up 116database structurefinalizing 163modifying 136
DB2edit upgrade planning scripts 45
DB2 UNIXgenerating final RUNSTATS 174running final statistics 175
DB2 UNIX/NT
Copyright © 2006, Oracle. All rights reserved. 415

Index
loading data model definitions 73rerunning RUNSTATS 71updating statistics 72
DB2 z/OSediting create table scripts 58editing MTP import scripts 59loading data model definitions 73running final statistics 175updating statistics 71
DB2TMPIDXCREATE script 70DBTSFIX output scriptsediting 55running 67
DBTSFIX script, running 55DDDAUDIT reportrunning final 180running initial 10
DDLDB2 scriptediting 60running 73
DDLDBX scriptediting 60running 73
DDLIFX scriptediting 61running 74
DDLMSS script, running 74DDLORA scriptediting 61running 74
DDLSYB script, running 74deletingapplication messaging objects 99Copy of Production database cache 385node transactions 99resume files 243unused language pages 101
developingtest plan 335test scripts 336
directory interface tablesrenaming 46
disabled constraints, auditing 108drop table scriptrunning 119
droppingindexes 48triggers for data conversion 143
duplicate length constraints, auditing 108
EeCompensationcompleting transactions 39
eDevelopmentcomplete transactions 40
EDI tables, identifying 40editupgrade planning DB2 scripts 45
editingdata type steps 64DB2 z/OS create table scripts 58DB2 z/OS MTP import scripts 59DBTSFIX output scripts 55DDLDB2 script 60DDLDBX script 60DDLIFX script 61DDLORA script 61GRANT script 56Integration Broker script 61Move to Production import scripts 59MSGTLSUPG script 61multilingual step properties 62MVPRDIMP script 60PeopleTools script 86PORTALNODES script 62PPLTLS84CURTABLES script 87PSLANG script 56PSLANGUAGES script 57PTDDLUPG script 54PTxxxTLS scripts 57RELGA script 56system data scripts 169tablespace alter script 89TLSUPGNONCOMP script 57
element modificationsreapplying 201
Enterprise Portalcopying database 384upgrading PeopleTools 384
Enterprise Portal project, targetcreating 386
expanding fields on records 93exportingapplication conversion data 155application messages 149application system data 170common portal system options 170data conversion driver data 156final upgrade rule package 203
416 Copyright © 2006, Oracle. All rights reserved.
Index
generic notifications 155node transactions 99Pagelet Wizard application data 152Pagelet Wizard data 152PATCH84X project 82PATCH84XML project 82PeopleTools system tables 70PPLDELETE project 79PPLTLS84CUR project 80PPLTLS84CURDEL project 81PPLTLS84CURML project 80PPLTLSML project 81PPLTOOLS project 79project definitions 118projects 78PT84TBLSPC project 88PTPORTALDEL project 78record groups 150related language system data 169setup data 171system setup data 151upgrade defaults 153upgrade rule delete package 219
Ffederalverifying 9
field compare report, reviewing 77field renames, effect of 353fieldsrenaming 119
file serversediting PTxxxTLS scripts 57
final audit reportsrunning 179
final upgrade rule packageexporting 203
findsystem elements to delete 28
fixesapplying after data conversion 263applying after running copy project 262applying before Move toProduction 263applying during installation 262applying during Move toProduction 264applying for upgrade 261
FNLALTAUD project, creating 180functional decisions, making 31
Ggeneratingfinal RUNSTATS 174Microsoft conversion scripts 106Oracle conversion scripts 109PeopleTools script 85PPLTLS84CURTABLES script 87
generic notificationsexporting 155importing 155
GL interface setup tablesexporting 178importing 178
Global Payrolladding new country extensions 226upgrading country extensions 193verify 8
global payroll settingsauditing 30
global support, contacting 316GRANT scriptediting 56running 67
grantingprivileges to connect ID 67
granting permissionsCONNECT ID 107
Hhomepage, granting personalizationaccess 188HR ethnicitiesloading 117
Iidentifyingcustomizations 40EDI tables 40mass change 40
Iindexes, dropping 48images, shrinking 44importing 177application conversion data 156application messages 150application system data 170common portal system options 171data conversion driver data 156DB2 z/OS-specific information 59generic notifications 155
Copyright © 2006, Oracle. All rights reserved. 417

Index
Pagelet Wizard application data 152Pagelet Wizard data 153PeopleTools system tables 70project definitions 118record groups 150related language system data 169setup data 171system setup data 152upgrade defaults 153
increasing space, log file and database 5index parameterssetting 146setting after copy 133
indexescreating 86dropping for data conversion 142temporary performance, creating 70
Informixloading data model definitions 74running final statistics 175updating message nodes for 94updating statistics 72
initial audit reportsreviewing 14running 9
installation, applying fixes during 262Integration Brokerconverting 97defaults, updating 98deletes, preparing 99objects, creating 98
Integration Broker script, editing 61integration testing 333
JJobcode Table, running reports 19
Llanguage dataupdating 179
language system dataexport related 169importing related 169
languagesdeleting unused pages 101loading data 91populating 90populating for login 68swapping on system data 149
verifying nonbase pages 100license code, updating 68Limit Table, consolidate 193loadingbase data 90conversion data 96data for data conversion 148data model definitions 73data to complete system setup 166English messages 91English string data 92HR ethnicities 117language data 91message data 75noncomparable objects 91PeopleTools data 91stored statements 172stored statements data 92system messages 75
Loadingplanning messages and strings 8
log file, increasing space 5login, populating languages for 68long data audit, running 105long to LOB conversion, auditing 112long to LOB script 1, running 110long to LOB script 2, running 111long to LOB script 3, running 111long to LOB script 4, running 111long to LOB script 5, running 111long to LOB script 6, running 112long to LOB script 7, running 112long to LOB script 8, running 112
Mmaking, functional decisions 31mass change, identifying 40message dataloading 75loading English messages 91
message data, cleaning up 65message nodesscript, editing 62updating 94updating for Informix 94
message queues, purging 44Microsoft conversion project,creating 106Microsoft conversion report, running 107
418 Copyright © 2006, Oracle. All rights reserved.

Index
Microsoft conversion scripts,generating 106Microsoft conversion scripts, running 106Microsoft database, validating 105Microsoft settings, reviewing 105migrating records 88model definitions, See data modeldefinitionsmodifyingcompare options 124database structure 136user exit rules 242
Move to Productionapplying Upgrade Rule Package 206editing import scripts 59editing password 60performing 256testing 253understanding 254
MSGTLSUPG script, editing 61multilingual step properties, editing 62MVPRDIMP script, editing 60
NNew Copy of Production databaseimporting data 59
node transactionsdeleting 99exporting 99
nonbase language pages, verifying 100notes and tips, upgrade 3
Oobject version numberssetting 103
object version numbers, updating 179Oracleloading data model definitions 74running final statistics 176updating statistics 72
Oracle audit tables, creating 108Oracle conversion scripts, generating 109Oracle database, validating 107Oracle settings, reviewing 108OSHA fieldsrenaming 121
PPagelet Wizard
exporting application data 152exporting data 152importing application data 152importing data 153
parallel testing 333password, Move to Production 60patch information, updating 69PATCH84X project 82PATCH84XML project 82payroll interfaceupdating 235
Payroll Interface Definitions,updating 234payroll interface tablesexporting 177importing 177
pensionsetting up 192
PeopleSoft upgrade survey 256PeopleToolscomparing objects 75data, loading 91editing script 86exporting system tables 70generating script 85importing system tables 70objects, converting 93re-exporting tables 320renaming tables 75reviewing functionality 247running script 86script 87updating patch information 69updating system tables 64upgrade, backing up after 116upgrading Enterprise Portal 384
performanceimproving for your platform 314
performance testing 334performance tipsfor creating and altering SQL 314for data conversion 314for DB2 315for modify database structures 314for Oracle 315
permission listsupdating Portal registry 385
permissions listsunderstanding registry updates 385
PERSONAL DATA
Copyright © 2006, Oracle. All rights reserved. 419
Index
refreshing snapshot table 22running changes report 20
personal data tablerefreshing 176
PIN element numbersverifying 31
platform changes, backing up before 105Portalconverting objects 95
Portal navigation components,registering 186portal options data, updating 249Portal registryupdating permission lists 385
Portal security synchronization,running 188Portal User Role, adding 189Portal, configuring 184PORTALNODES scriptediting 62
PPLDELETE project 79PPLTLS84CUR project 80PPLTLS84CURDEL project 81PPLTLS84CURML project 80PPLTLS84CURTABLES scriptediting 87generating 87running 88
PPLTLSML project 81PPLTOOLS projectbuilding 85comparing fields 76exporting and copying 79
preparingapplication upgrade 45database 43Integration Broker deletes 99
preserving queries and trees 317process and report tables, clearing 102product license code, updating 68production database, copying 4project definitionsexporting 118importing 118
projectsexporting and copying 78PATCH84X 82PATCH84XML 82PPLDELETE 79PPLTLS84CUR 80
PPLTLS84CURDEL 81PPLTLS84CURML 80PPLTLSML 81PPLTOOLS 85PT84TBLSPC 88PTPORTALDEL 78
PSLANG scriptediting 56running 68
PSLANGUAGES scriptediting 57running 90
PSOBJCHNG table, cleaning 43PSOPTIONSsetting for COBOL 172
PSX_PAGEACTION table 100PT84RLPD script 101PT84TBLSPC project 88PTDDLUPG scriptcopying 54editing 54running 66
PTPORTALDEL project 78PTUPGCONVERT program 97PTxxxTLS scriptsediting 57running 90
Qqueries and trees, preserving 317query prompt headings, converting 96
Rreapplyingelement modifications 201
reapplying customizations 185RecFielddefinitions 46
recompilingtemplate built rules 238
record fieldpreparing for deletion 25
record groupsexporting 150importing 150
record parameterssetting 147setting after copy 133
records
420 Copyright © 2006, Oracle. All rights reserved.

Index
migrating 88renaming 119
Refresh, personal data snapshot table 22refreshingpersonal data table 176
registering Portal navigationcomponents 186registry permission lists, understandingupdates 385registry, upgrading Content Provider 248regression testing 334RELGA scriptediting 56running 67
renamed tables scriptbuilding 138running 138
renamingdirectory interface tables 46fields 119PeopleTools tables 75records 119tables 121
reporting conversion details 97reportsjobcode table 19personal data changes 20run person relationship 17upgrade 16
resettingdatabase options flag 71
reviewingchange control 250compare reports 127conversion reports 115copy results 131field compare report 77final Alter Audit 181initial audits 14Microsoft settings 105Oracle settings 108PeopleTools functionality 247user exit rules 242
RNHCEOH201 scriptrunning 121
RNHCGPH02 scriptrunning 120
RNHCUPH01 scriptrunning 120
row count report, running 42
rule packageapplying 195
rulesupgrading 237
runningAlter Audit 11alter tables script 141alter with deletes script 164application audits 15character length script 1 113character length script 2 113character length script 3 113character length script 4 113character length script 5 114character length script 6 114character length script 7 114character length script 8 114company cars report 236compare UPGDBCOMP1 125compare UPGDBCOMP2 125compare UPGPRJCOMP 126create indexes script 142create tables script 141create temp tables script 141create triggers script 165data conversion 158data conversion, for PeopleToolschanges 97DB2TMPIDXCREATE script 70DBTSFIX output scripts 67DBTSFIX script 55DDLDB2 script 73DDLDBX script 73DDLIFX script 74DDLMSS script 74DDLORA script 74DDLSYB script 74dropped temp tables report 237dynamic chartfields audits 23final Alter Audit 181final audit reports 179final DDDAUDIT 180final SETINDEX report 182final SETTABLE report 182final statistics for DB2 UNIX 175final statistics for DB2 z/OS 175final statistics for Informix 175final statistics for Oracle 176final SYSAUDIT report 180final update statistics 174
Copyright © 2006, Oracle. All rights reserved. 421

Index
GRANT script 67initial audit reports 9initial DDDAUDIT 10initial SYSAUDIT 10long data audit 105long to LOB script 1 110long to LOB script 2 111long to LOB script 3 111long to LOB script 4 111long to LOB script 5 111long to LOB script 6 112long to LOB script 7 112long to LOB script 8 112Microsoft conversion report 107Microsoft conversion scripts 106PeopleTools script 86person organization audits 191personal data changes report 20PPLTLS84CURTABLES script 88PSLANG script 68PSLANGUAGES script 90PT84RLPD script 101PTDDLUPG script 66PTUPGCONVERT program 97PTxxxTLS scripts 90RELGA script 67row count report 42tablespace alter script 89TLSUPGNONCOMP script 91TSRECPOP script 179UPGCOUNTSQR report 42upgrade compare reports 123upgrade copy 130upgrade reports 15UVHCZ300.SQR 236
RunningRNHCEOH201 script 121RNHCUPH01 script 120STOREBAS script 173STOREGP script 173STOREHRM script 173STOREPAY script 173STOREPEN script 173STOREPYI script 174
RUNSTATS script, generating 147RUNSTATS.DAT, creating 71
Ssavingapplication messaging objects 98
scriptsDB2 z/OS create table scripts 58DB2 z/OS MTP import scripts 59DB2TMPIDXCREATE 70DBTSFIX, editing 55DBTSFIX, running 55DDLDB2, editing 60DDLDB2, running 73DDLDBX, editing 60DDLDBX, running 73DDLIFX, editing 61DDLIFX, running 74DDLMSS, running 74DDLORA, editing 61DDLORA, running 74DDLSYB, running 74DHC8X01DMS 150GRANT 67GRANT, editing 56Integration Broker 61message nodes 62MSGTLSUPG 61MVPRDIMP 60PeopleTools 87PORTALNODES 62PPLTLS84CURTABLES 87PSLANG 56, 68PSLANGUAGES 90PSLANGUAGES, editing 57PT84RLPD 101PTDDLUPG 54PTxxxTLS scripts 90PTxxxTLS scripts, editing 57RELGA, editing 56RELGA, running 67running ALLTABS_ALTTBL 141running ALLTABS_CRTTBL 141running RNHCUPH02DB2 122running RNHCUPH02DBX 122running RNHCUPH02IFX 122running RNHCUPH02MSS 122running RNHCUPH02ORA 123running RNHCUPH02SYB 123TLSUPGNONCOMP 91TLSUPGNONCOMP, editing 57
securitysetting up 187setting up on Copy of Production 7
security setup, understanding 187security, setting up menu 186
422 Copyright © 2006, Oracle. All rights reserved.

Index
serversdatabase servers 116file servers 57web servers 62
SETINDEX, running final report 182SETTABLE, running final report 182setting 103object version numbers 103PSOPTIONS for COBOL 172
setting upbenefits 193Global Payroll for Spain 211Global Payroll for Switzerland 212pension 192security 187security for upgrade planning 7
settingsMicrosoft, reviewing 105Oracle, reviewing 108
setup data for rules 177exporting 176
setup data, exporting 171setup data, importing 171shrinking images 44software installationverifying 2
SQL Serverloading data model definitions 74
stamping the database 249startingapplication server 184Process Scheduler 158
statisticsDB2 UNIX/NT, updating 72DB2 z/OS, updating 71Informix, updating 72Oracle, updating 72running final 174updating 9
STOREBAS script, running 173stored statements data, loading 92stored statements, loading 172STOREGP script, running 173STOREHRM script, running 173STOREPAY script, running 173STOREPEN script, running 173STOREPYI script, running 174string data, loading 92support, contacting 316Sybase
loading data model definitions 74SYSAUDIT reportrunning final 180running initial 10
systemmessages, loading 75tables, exporting 70tables, importing 70
system catalog views, updating 66system dataapplying data with PIN 209applying data without PIN 208
system data scripts, editing 169system data swap script, editing 48system elementview relationships 27
system element deletionpreparing 25
system elements to delete, finding 28system PIN, updating 30system setup dataexporting 151importing 152
system testing 333
Ttablescreating and altering 86moving to new tablespaces 89PeopleTools system tables, updating 64PeopleTools tables, renaming 75process and report tables, clearing 102PSX_PAGEACTION 100renaming 121system tables, exporting 70system tables, importing 70
Tablespace namessetting 146setting after copy 133setting for temp tables 146
tablespacesalter script 89alter script, building 89alter script, editing 89creating 66creating for Informix 66migrating records to 88populating data 83updating names 85
Tablespaces
Copyright © 2006, Oracle. All rights reserved. 423
Index
creating custom 135creating new 134creating PeopleSoft-delivered 134
template built rulescustomizing 240recompiling 238
temporary tables, setting Tablespacenames 146test plan, developing 335test scripts, developing 336testingCopy of Production 251determining conditions 335evaluating requirements 332integration 333Move to Production 253once more 256parallel 333performance 334regression 334system 333tips and techniques 337unit 332user acceptance 334
testing strategydefining 332determining conditions 335when to test 331
TLSUPGNONCOMP scriptediting 57running 91
transactionseCompensation 39eDevelopment 40preparing workflow 39
translations rule packageupgrading 198
Tree/Query Copy of Productioncomparing project 319copying project 320creating project in 318preparing database 318
Triggersdropping for data conversion 143
triggers, creating 86TSRECPOP script, running 179turning off change control 72
Uunit testing 332
updatesapplying before data conversion 157
updates to CE rule delete packageapplying 224
updatingcustomer installation flag 225database options 115database overrides 132homepage personalizationpermissions 189Integration Broker defaults 98language data 179message nodes 94payroll interface definitions 235Payroll Interface Definitions 234PeopleSoft object version numbers 179PeopleTools patch information 69PeopleTools system tables 64portal options data 249product license code 68statistics 9statistics for DB2 UNIX/NT 72statistics for DB2 z/OS 71statistics for Informix 72statistics for Oracle 72system catalog views 66system PIN 30tablespace names 85
updating statisticsDB2 UNIX 147DB2 UNIX/NT 72DB2 z/OS 71, 148Informix 72, 148Oracle 72, 148
UPGCOUNTSQR report, running 42UPGDBCOMP1copying 130running compare 125
UPGDBCOMP2copying 130running compare 125
UPGNONCOMP project, copying 131UPGOPT projectapplying 6building 6
UPGPRJCOMPcopying 131running compare 126
upgradeapplying required fixes 261
424 Copyright © 2006, Oracle. All rights reserved.

Index
compare reports, understanding 350configuring environment 184notes and tips 3PeopleTools, backing up after 116planning for performance 313run copy 130user, verifying 52
upgrade compare reports, running 123upgrade databasesdefining 2
upgrade default values, assigning 31upgrade defaultsexporting 153importing 153
Upgrade Drivers pageaccessing 281adding new section 282inactivating section 283
upgrade planningsetting up security 7
upgrade planning files, applying 5upgrade reports, running 15upgrade rule delete packageapplying 221creating 218exporting 219
Upgrade Rule Packageapplying during MTP 206
upgradingContent Provider registry 248Enterprise Portal PeopleTools 384Global Payroll country extensions 193rules 237translations rule package 198
user acceptance testing 334user exit rulesmodifying 242reviewing 242
user interfacechanging for mobile device 277options 275
Vvalidatingalternative overtime upgrade 233Microsoft database 105Oracle database 107
Verifyglobal payroll 8
verifying
nonbase language pages 100PIN element numbers 31upgrade user 52Writable Array records 47
version numberssetting 103
version numbers, updating 179view ADP_ACCT_CD_VWdropping 118
viewscreating all 165creating PPLTOOLS 92
Wweb serversediting message nodes script 62
workflow transactionspreparing 39
Writable Array records, verify 47
Copyright © 2006, Oracle. All rights reserved. 425

Index
426 Copyright © 2006, Oracle. All rights reserved.