hpe operations bridge reporter... · · 2017-02-08– the content designer tool enables you to...
TRANSCRIPT

HPE Operations Bridge ReporterContent Designer 10.01 – Webinar #2
September 2016

Agenda
– Content Designer – A recap
– Overview of Content Designer : Advanced
– Application Content Component : A deep-dive
– Q&A
2
Content Designer – A Re-cap
3
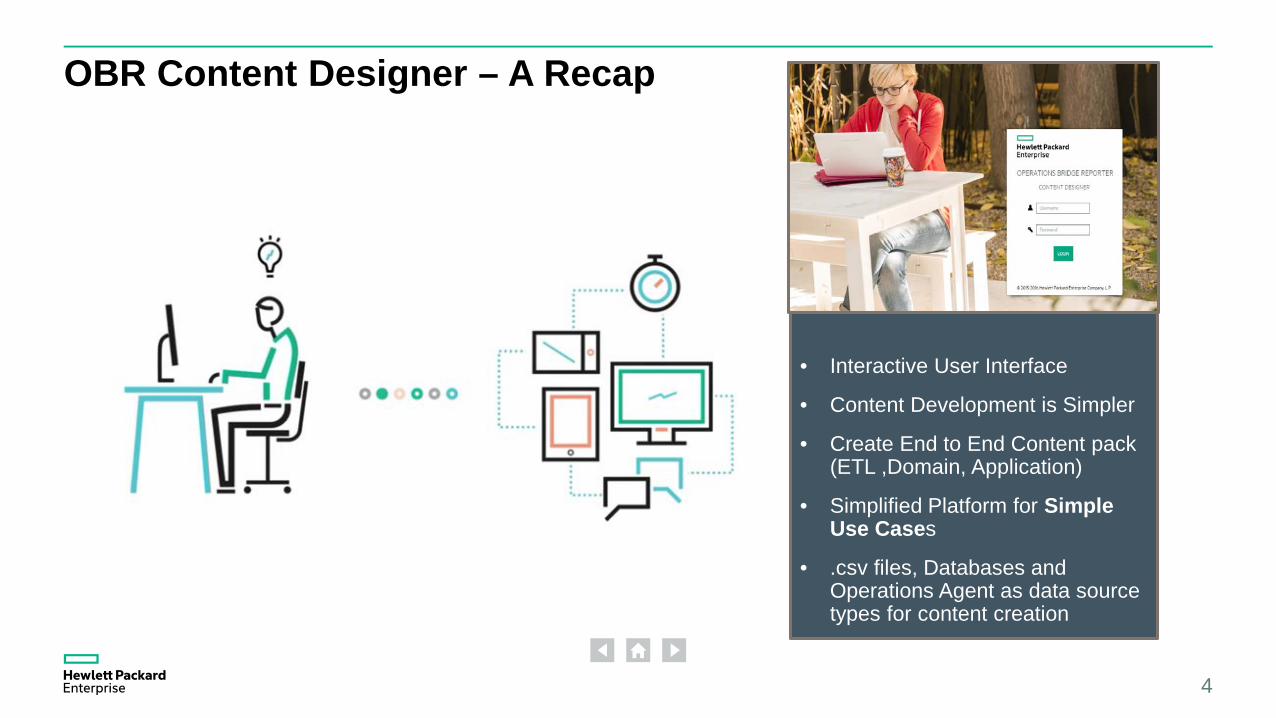
OBR Content Designer – A Recap
4
• Interactive User Interface
• Content Development is Simpler
• Create End to End Content pack (ETL ,Domain, Application)
• Simplified Platform for Simple Use Cases
• .csv files, Databases and Operations Agent as data source types for content creation
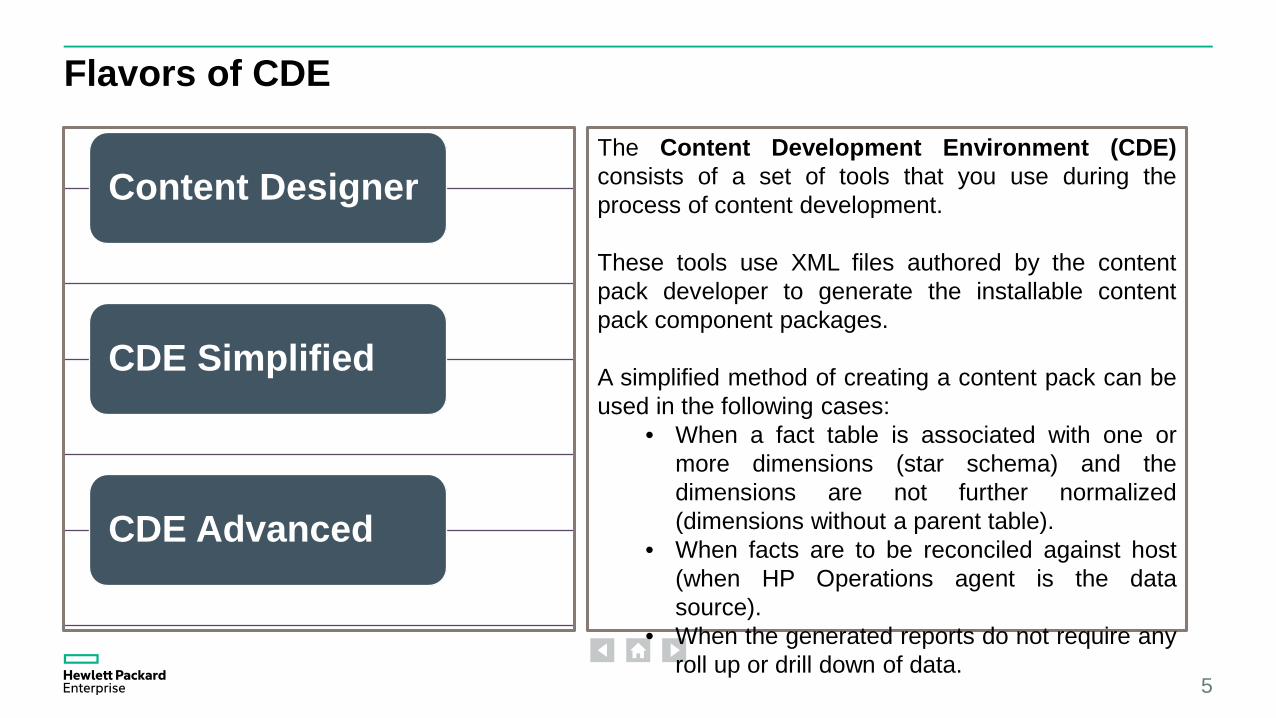
Flavors of CDE
Content Designer
CDE Simplified
CDE Advanced
5
The Content Development Environment (CDE)consists of a set of tools that you use during theprocess of content development.
These tools use XML files authored by the contentpack developer to generate the installable contentpack component packages.
A simplified method of creating a content pack can beused in the following cases:
• When a fact table is associated with one ormore dimensions (star schema) and thedimensions are not further normalized(dimensions without a parent table).
• When facts are to be reconciled against host(when HP Operations agent is the datasource).
• When the generated reports do not require anyroll up or drill down of data.
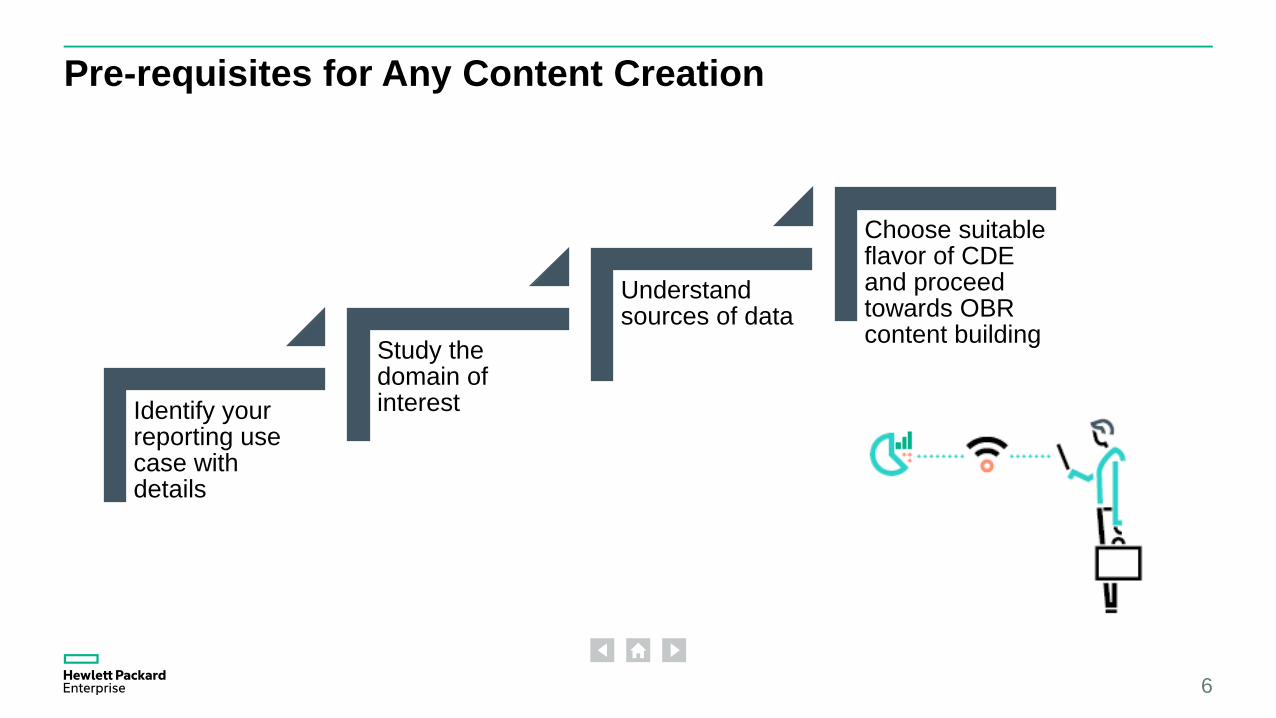
Identify your reporting use case with details
Study the domain of interest
Understand sources of data
Choose suitable flavor of CDE and proceed towards OBR content building
Pre-requisites for Any Content Creation
6
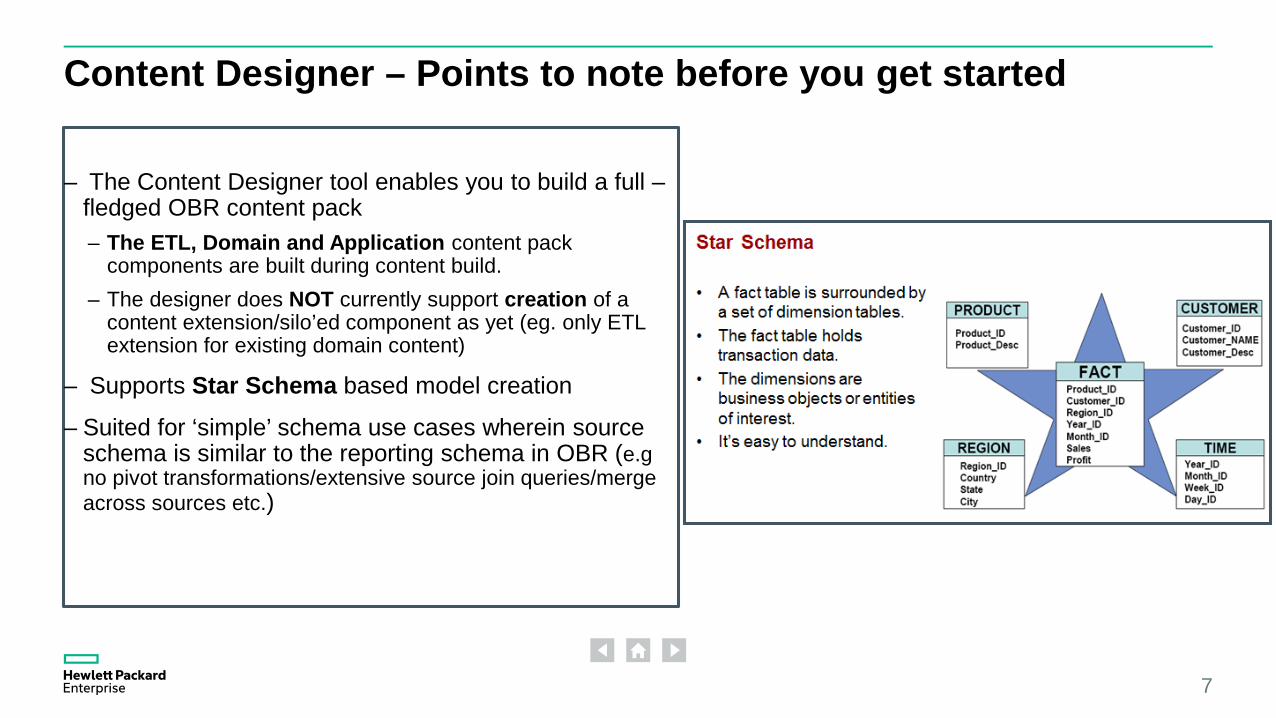
Content Designer – Points to note before you get started
– The Content Designer tool enables you to build a full –fledged OBR content pack– The ETL, Domain and Application content pack
components are built during content build.– The designer does NOT currently support creation of a
content extension/silo’ed component as yet (eg. only ETL extension for existing domain content)
– Supports Star Schema based model creation
– Suited for ‘simple’ schema use cases wherein source schema is similar to the reporting schema in OBR (e.gno pivot transformations/extensive source join queries/merge across sources etc.)
7
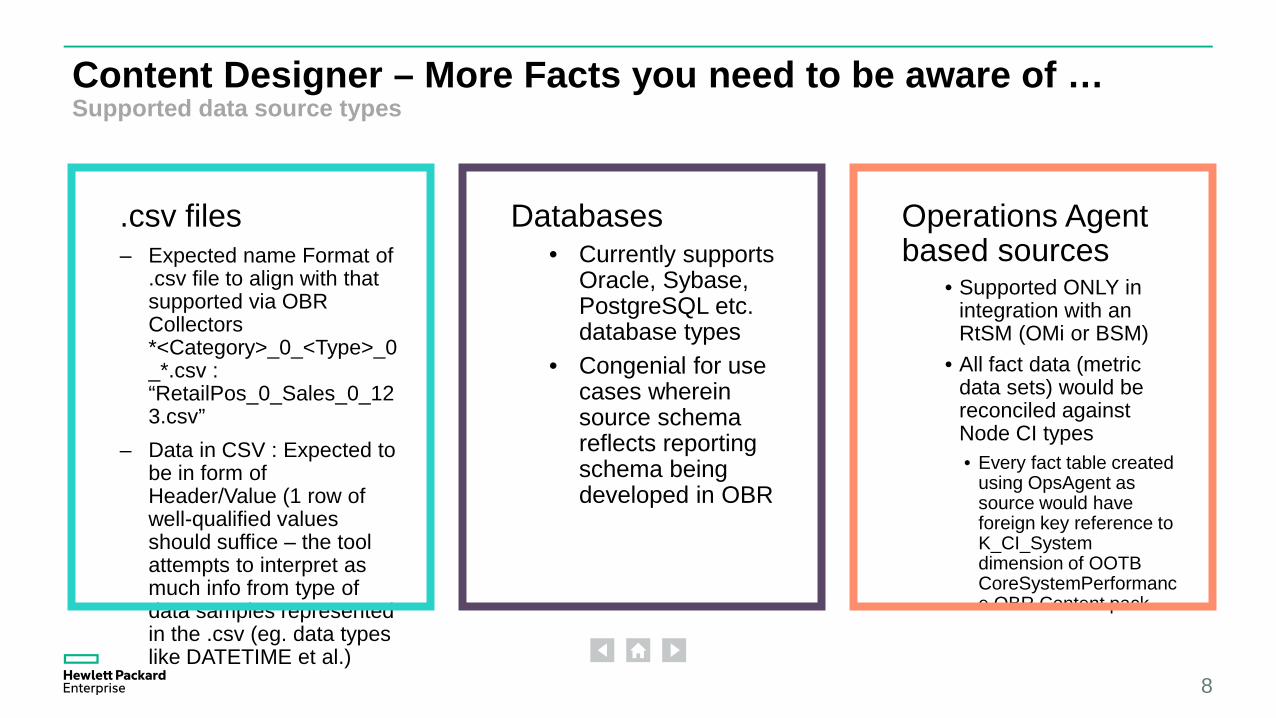
.csv files– Expected name Format of
.csv file to align with that supported via OBR Collectors *<Category>_0_<Type>_0_*.csv : “RetailPos_0_Sales_0_123.csv”
– Data in CSV : Expected to be in form of Header/Value (1 row of well-qualified values should suffice – the tool attempts to interpret as much info from type of data samples represented in the .csv (eg. data types like DATETIME et al.)
8
Databases• Currently supports
Oracle, Sybase, PostgreSQL etc. database types
• Congenial for use cases wherein source schema reflects reporting schema being developed in OBR
Operations Agent based sources
• Supported ONLY in integration with an RtSM (OMi or BSM)
• All fact data (metric data sets) would be reconciled against Node CI types• Every fact table created
using OpsAgent as source would have foreign key reference to K_CI_Systemdimension of OOTB CoreSystemPerformance OBR Content pack .
Content Designer – More Facts you need to be aware of …Supported data source types

Content Designer : Settings Page
9

Content Designer– Enabling content build
10
Step 1 : Select the data source type against which you want to develop reporting content
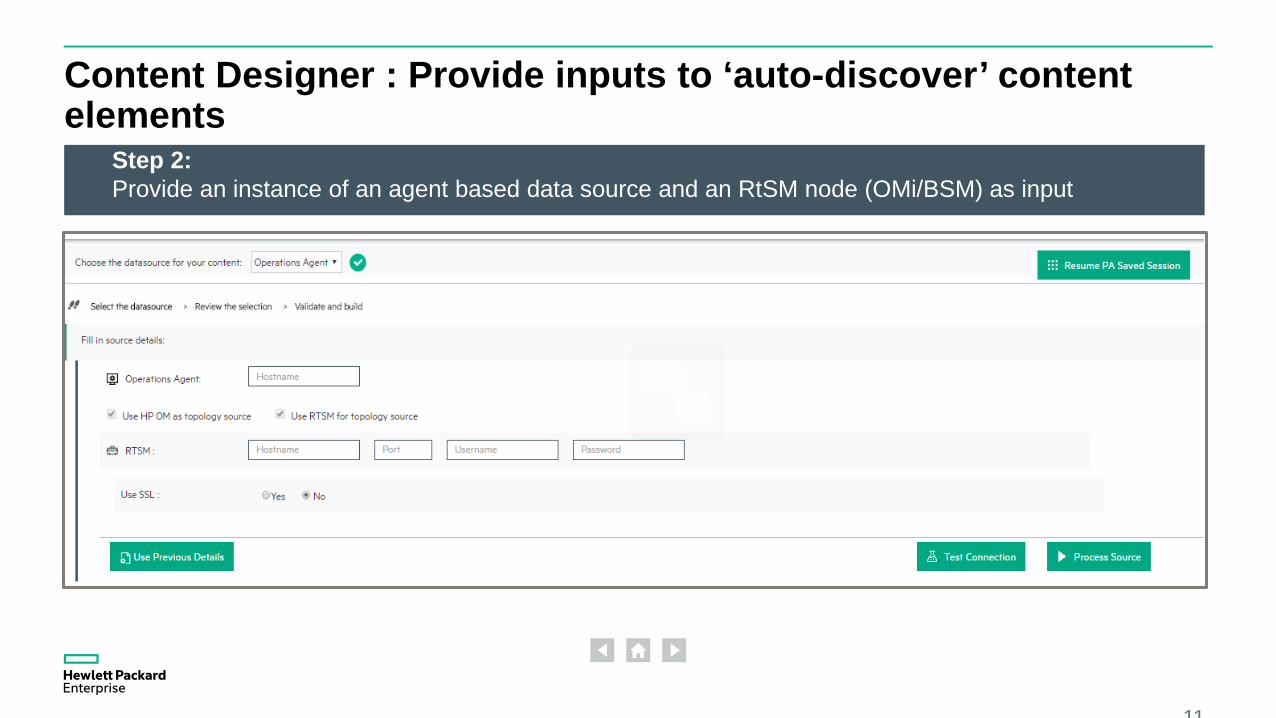
Content Designer : Provide inputs to ‘auto-discover’ content elements
11
Step 2: Provide an instance of an agent based data source and an RtSM node (OMi/BSM) as input
Content Designer : Define/qualify content elements
12
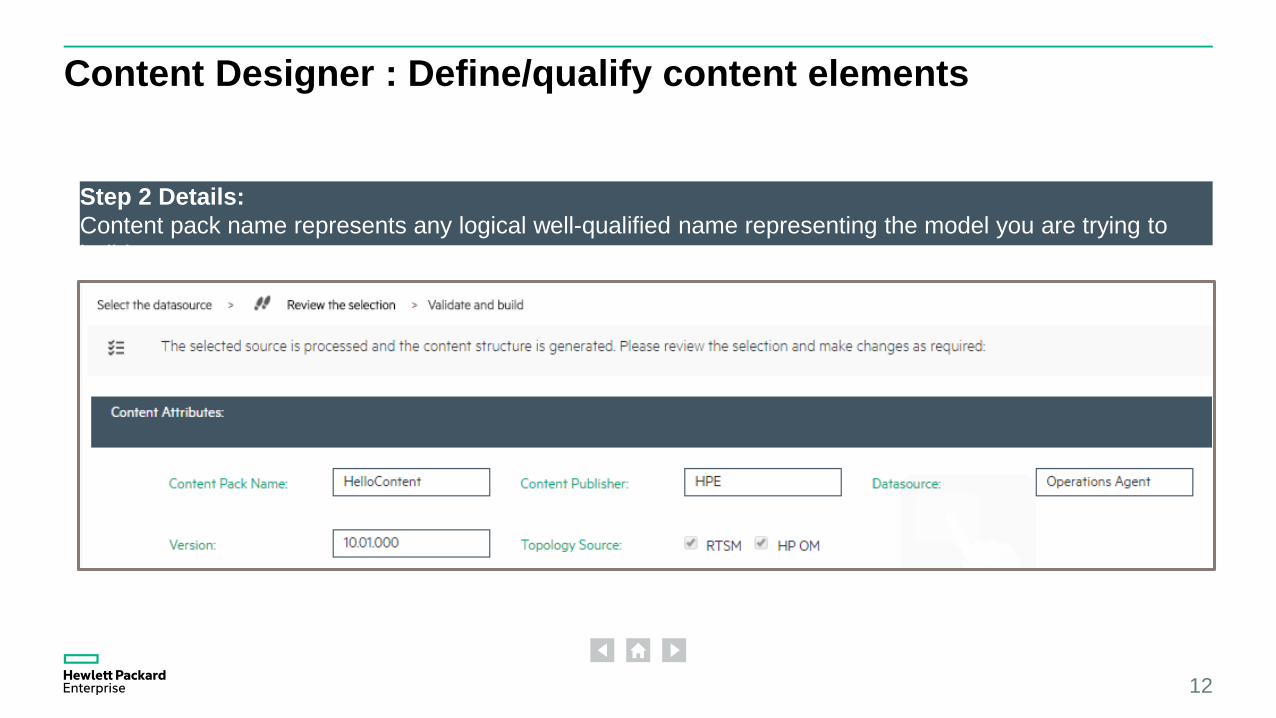
Step 2 Details:Content pack name represents any logical well-qualified name representing the model you are trying to build

Content Designer : Define/qualify content elementsSelect Agent Datasource and Class
• Both Dimension and Fact should be selected for each unique Datasource/Class combination
• Upon deploying the generated content in OBR, Dimension & Fact tables would be created for each such combination
13
Step 2 Details:Picking dimension and fact entities from source
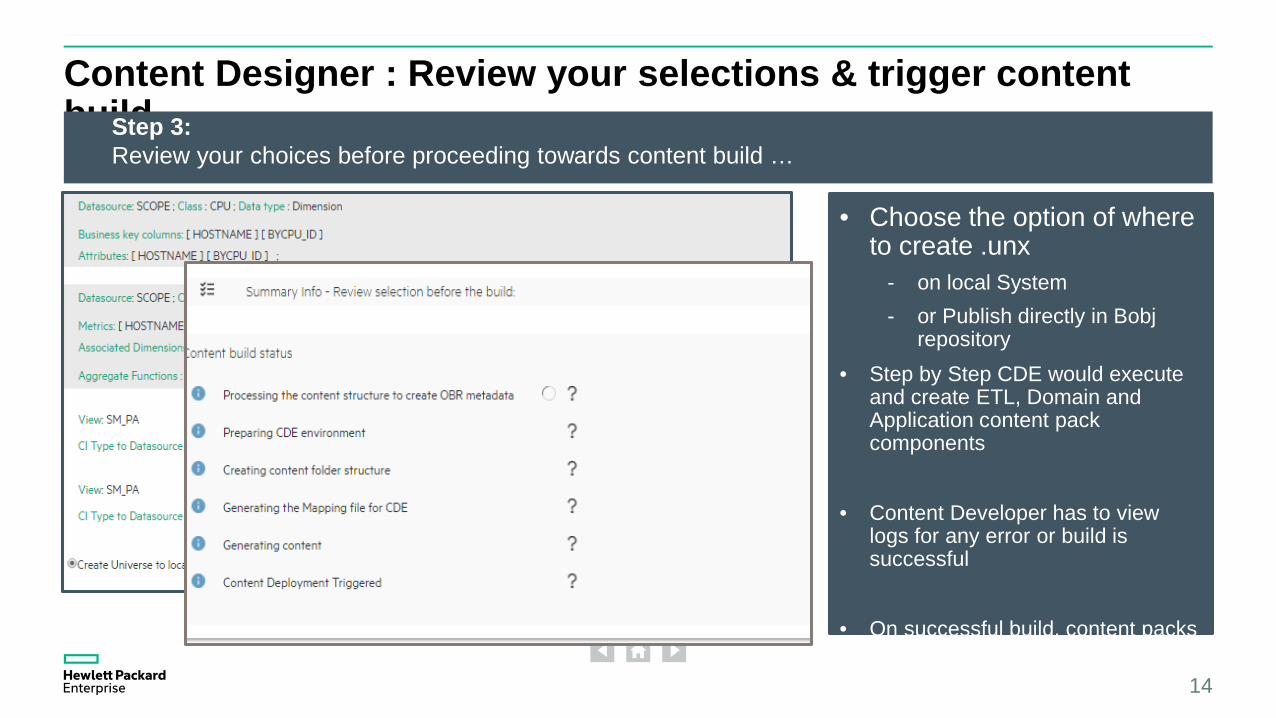
Content Designer : Review your selections & trigger content build
• Choose the option of where to create .unx
- on local System - or Publish directly in Bobj
repository• Step by Step CDE would execute
and create ETL, Domain and Application content pack components
• Content Developer has to view logs for any error or build is successful
• On successful build, content packs would be available under CDE workspace 14
Step 3: Review your choices before proceeding towards content build …

Generated Artifacts
– The folders for the content pack components(Domain, ETL, and Report) are created in theCDE workspace.
– The newly-created directory structure containsall the required source artifacts that have beengenerated by the tool.
– Model Mapper CSV file is generated andavailable in the output location. A ModelMapper CSV file is an intermediate documentbefore generating the end-to-end content packfor Domain and ETL containing the metadatainformation user have selected in the CDE UI.
– Name of the file will be <CSV policy's nameattribute>_MappingFile_<timestamp>.CSV.The content developer has the option to editthe required column names in the CSV file ifneed be and re-run the CDE build viacommand line.
15
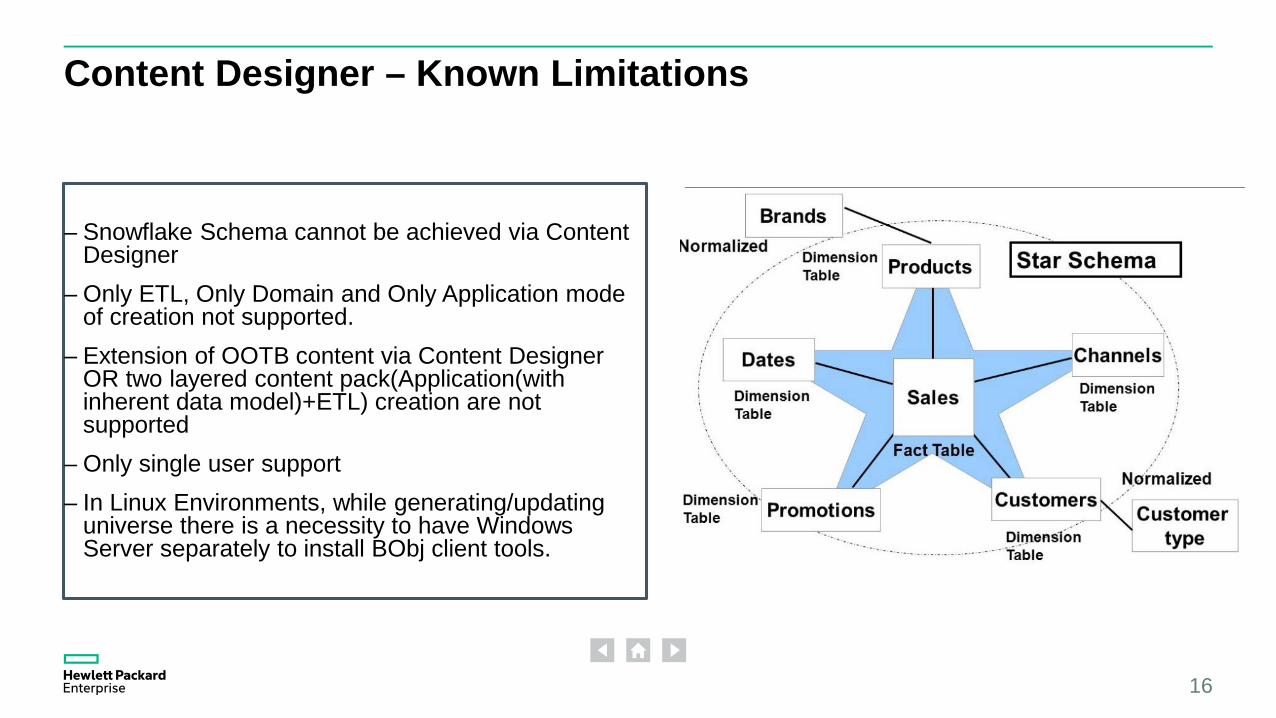
Content Designer – Known Limitations
– Snowflake Schema cannot be achieved via Content Designer
– Only ETL, Only Domain and Only Application mode of creation not supported.
– Extension of OOTB content via Content Designer OR two layered content pack(Application(with inherent data model)+ETL) creation are not supported
– Only single user support– In Linux Environments, while generating/updating
universe there is a necessity to have Windows Server separately to install BObj client tools.
16
Are there any means to get past some of these limitations? Universes/Reports ?
17
Content Designer Advanced
18

Content Designer Advanced Tab
As seen earlier, a basic content build using content designer is initially done using the flow in the 1st tab.
19
Tab 1: Select your sources and create Content …

Content Designer Advanced Tab : In Depth
Edit of generated content is possible once the content build has been successfully completed without any errors in log file.
The generated content source artifacts would be available in the advanced tab for further edit. Currently, supports edit of XML files only.
The content artifacts are loaded from {CDE_HOME}/workspace folder
Once edit is done, user can trigger content rebuild
20
Tab 2: Content Designer Advanced Tab – Enabling Edit of Generated Content Artifacts …

Navigating through the Content Structure on the left would help you to select the artifacts required for editing.
21
Step 1 :Select the artifacts for editing
Content Designer Advanced Tab – In Depth [Contd]

Click on Edit to open the respective XML file in an Editor.
User can edit the xml file and click on “save” icon at the top corner.
Similarly all the required artifacts can be edited
Ensure that logically all ‘dependent’ artifacts are edited for consistency and correctness
22
Step 2 :Edit the artifactsContent Designer Advanced Tab – In Depth Contd
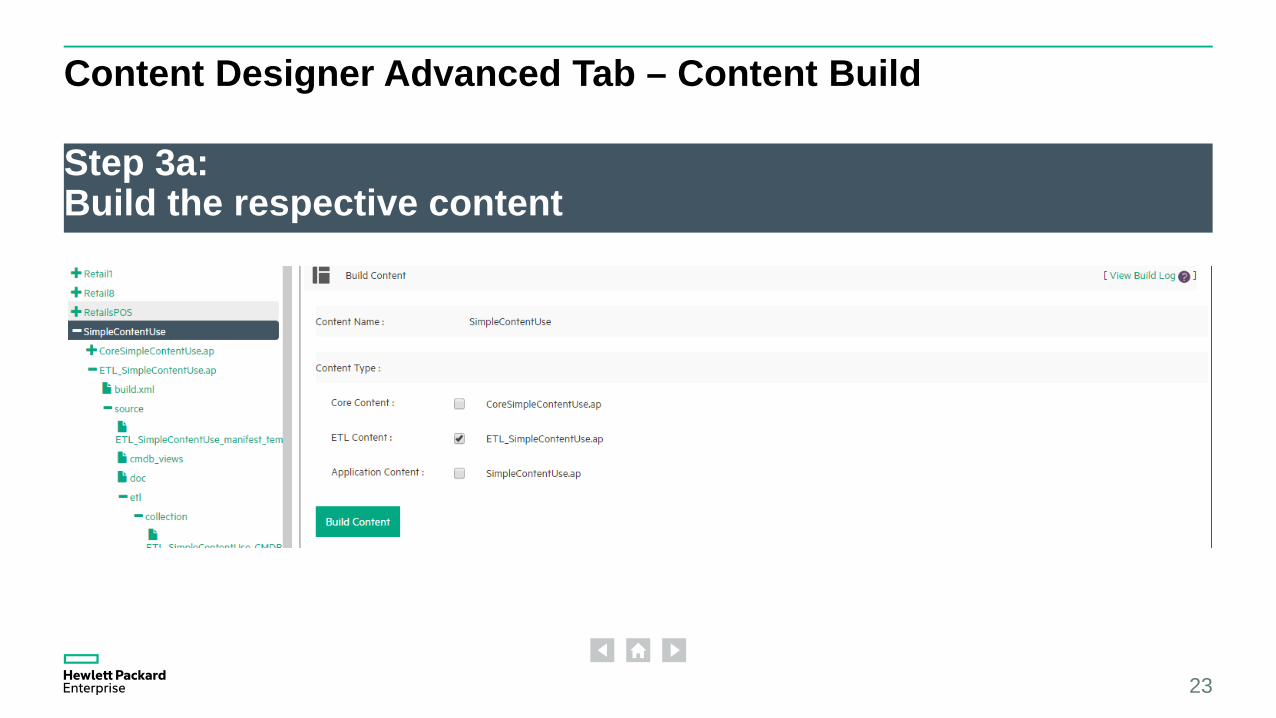
Content Designer Advanced Tab – Content Build
23
Step 3a:Build the respective content

Content Designer Advanced : Trigger all in one Content Build
24
Step 3b :Select and Build all content
-The generated content would be available in the CDE system under %CDE_HOME%/workspace
Demo of CDE Advanced
25

Application Content Deep-dive
26
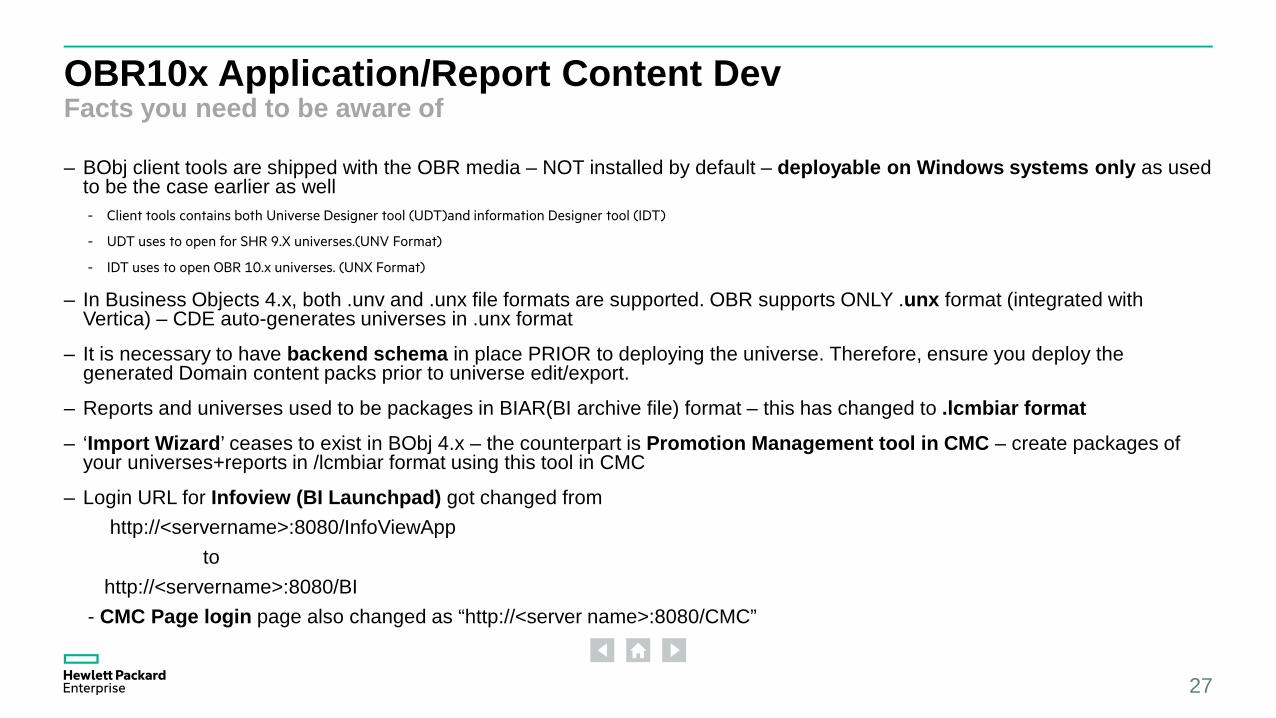
OBR10x Application/Report Content DevFacts you need to be aware of
– BObj client tools are shipped with the OBR media – NOT installed by default – deployable on Windows systems only as used to be the case earlier as well- Client tools contains both Universe Designer tool (UDT)and information Designer tool (IDT)
- UDT uses to open for SHR 9.X universes.(UNV Format)
- IDT uses to open OBR 10.x universes. (UNX Format)
– In Business Objects 4.x, both .unv and .unx file formats are supported. OBR supports ONLY .unx format (integrated with Vertica) – CDE auto-generates universes in .unx format
– It is necessary to have backend schema in place PRIOR to deploying the universe. Therefore, ensure you deploy the generated Domain content packs prior to universe edit/export.
– Reports and universes used to be packages in BIAR(BI archive file) format – this has changed to .lcmbiar format
– ‘Import Wizard’ ceases to exist in BObj 4.x – the counterpart is Promotion Management tool in CMC – create packages of your universes+reports in /lcmbiar format using this tool in CMC
– Login URL for Infoview (BI Launchpad) got changed from http://<servername>:8080/InfoViewApp
tohttp://<servername>:8080/BI
- CMC Page login page also changed as “http://<server name>:8080/CMC”
27
OBR10x Application/Report Content DevFacts you need to be aware of [Contd.]
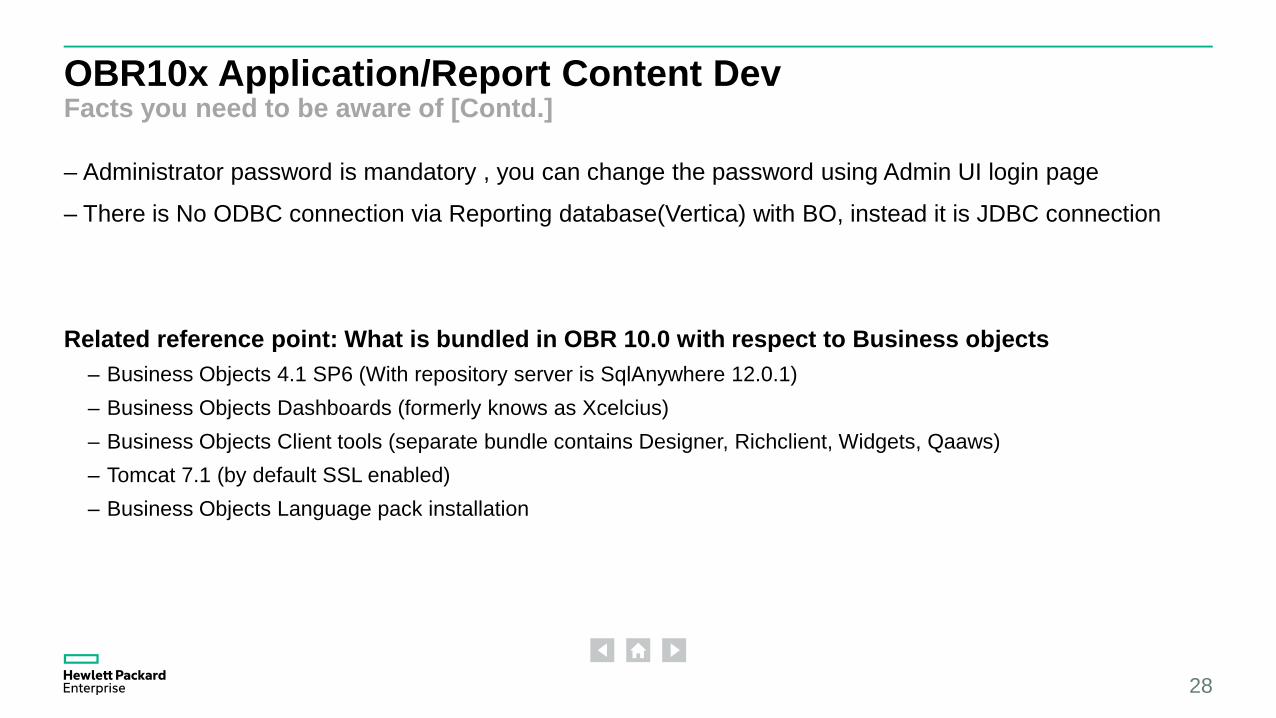
– Administrator password is mandatory , you can change the password using Admin UI login page
– There is No ODBC connection via Reporting database(Vertica) with BO, instead it is JDBC connection
Related reference point: What is bundled in OBR 10.0 with respect to Business objects– Business Objects 4.1 SP6 (With repository server is SqlAnywhere 12.0.1)– Business Objects Dashboards (formerly knows as Xcelcius)– Business Objects Client tools (separate bundle contains Designer, Richclient, Widgets, Qaaws)– Tomcat 7.1 (by default SSL enabled)– Business Objects Language pack installation
28
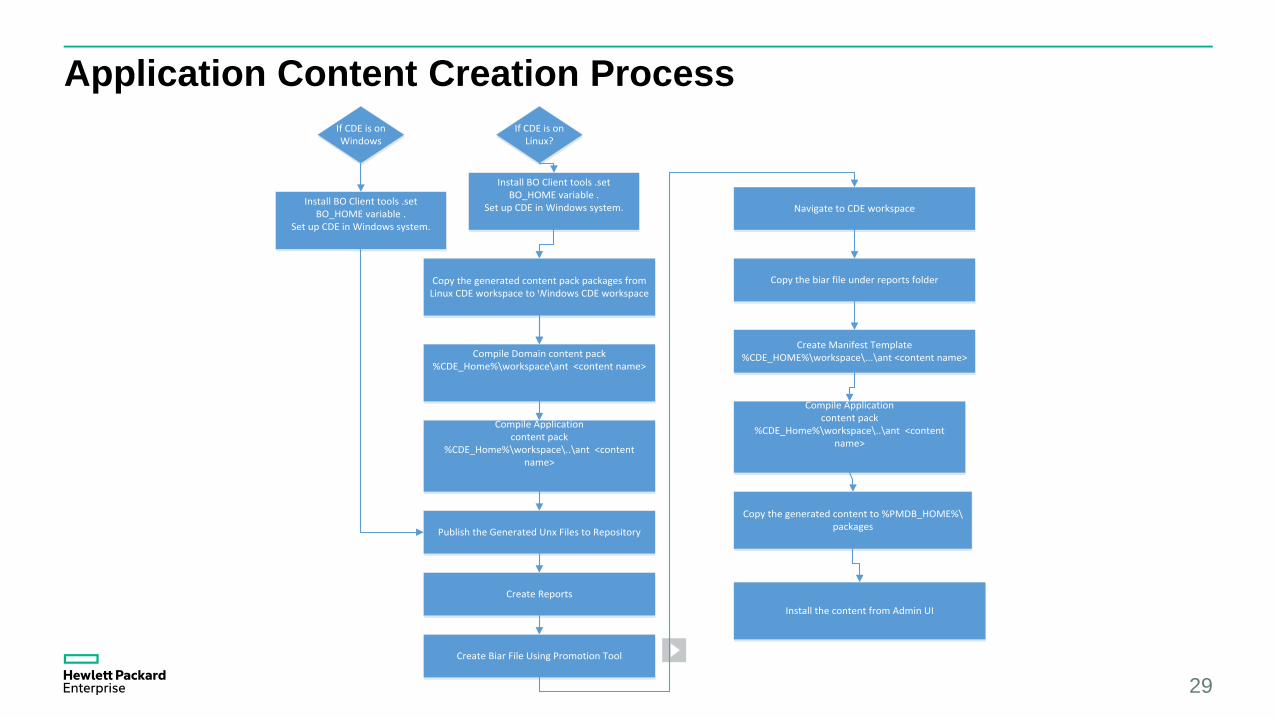
Application Content Creation Process
29
If CDE is on Linux?
Install BO Client tools .set BO_HOME variable .
Set up CDE in Windows system.
Compile Domain content pack%CDE_Home%\workspace\ant <content name>
Compile Applicationcontent pack
%CDE_Home%\workspace\..\ant <content name>
Publish the Generated Unx Files to Repository
Create Reports
Create Biar File Using Promotion Tool
Navigate to CDE workspace
Copy the biar file under reports folder
Create Manifest Template%CDE_HOME%\workspace\...\ant <content name>
Compile Applicationcontent pack
%CDE_Home%\workspace\..\ant <content name>
Copy the generated content to %PMDB_HOME%\packages
Copy the generated content pack packages from Linux CDE workspace to Windows CDE workspace
If CDE is on Windows
Install the content from Admin UI
Install BO Client tools .set BO_HOME variable .
Set up CDE in Windows system.
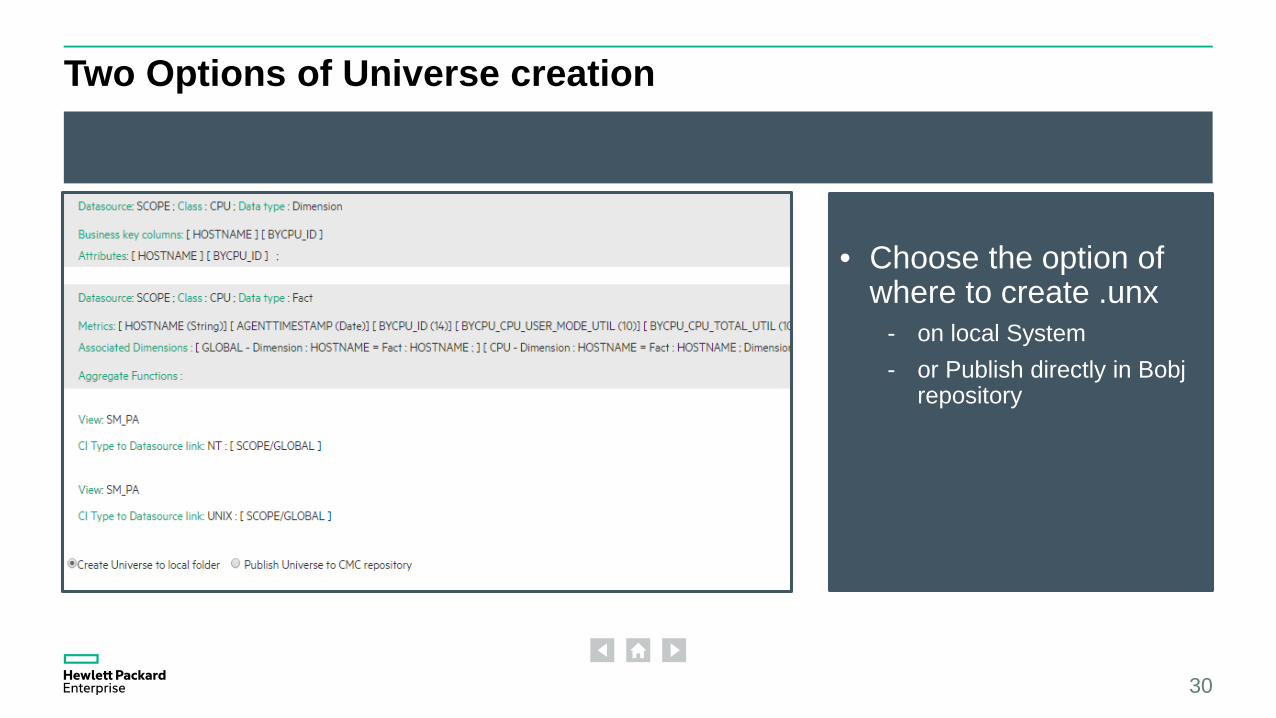
Two Options of Universe creation
• Choose the option of where to create .unx
- on local System - or Publish directly in Bobj
repository
30

Option 1a. Create Universe in Local Folder (Windows)
31
– UNX files that can be opened from BObjClient tooI (Information Design Tool).[Note that client tools like IDT have to beinstalled separately on a Windows systemas detailed in the product manuals.]
– In case universe edits are further plannedbetter to choose this option
– In this case , create sample project in IDTand perform the steps detailed further.
– Set BO_HOME after installing BO Clienttools in case of windows. If it has places ,include within double quotes

Step 1: Information Design Tool
32
– Project Name :- The name which youwant to give typically the CP Name.
– Project Location :- Browse to Universe connection folder in the content pack.
– e.g.: {CDE_HOME}\RetailPOS\RetailPOS.ap\UnxFolder\UnxLayers

Step2: Information Design Tool – Connections and more …
33
– After selecting the folder, we can see the contents of thefolder listed under the project name that we gave in theprevious slide.
– Right click on ApplicationRetailPOS.cnx and publish theconnection to repository “Common Connections” folder andclick Finish, this step asks for shortcut of connection toproject. Click on Yes.
– Now we will observe one more connection calledOBR_CONNECTION.cns
– Delete the connection ApplicationRetailPOS.cnx and openApplicationRetailPOS.dfx. And change the connection toOBR_CONNECTION
– Double click on ApplicationRetailPOS.dfx so that it will openon the right side panel,
– Verify the database connection details and click on Edit, clickon Next, change Array Fetch Size to 5 instead of 10 andfinish.
__ Make sure you have copied respective vertica.sbo andvertica-jdbc .jar from BO installed server to client tools installedserver path (details in notes)– Do test connection and save– Right click on ApplicationRetailPOS.blx and publish to
repository.

Information Design Tool – Check Integrity
34

Create Report using BI Launch Pad
35
– Open Bi Launchpad http://<servername>:8080/BI
– Select the generated universe and create a sample report.

Option 1b. Create Universe in Local Folder (Linux)
• Note that Copying the UnxLayers folder from Linux to windows will not work as is –App CP creation is recommended on a Windows system.
• Set up CDE in Windows as per the documentation
• Copy the content pack packages from the Linux workspace folder to Windows CDE workspace folder (Domain and Application)
• Compile your domain content pack via ant from command prompt .
• Next compile the Application content pack
• UnxLayers would be created in the Windows box.
• Need to follow the previously discussed steps to publish to repository
36
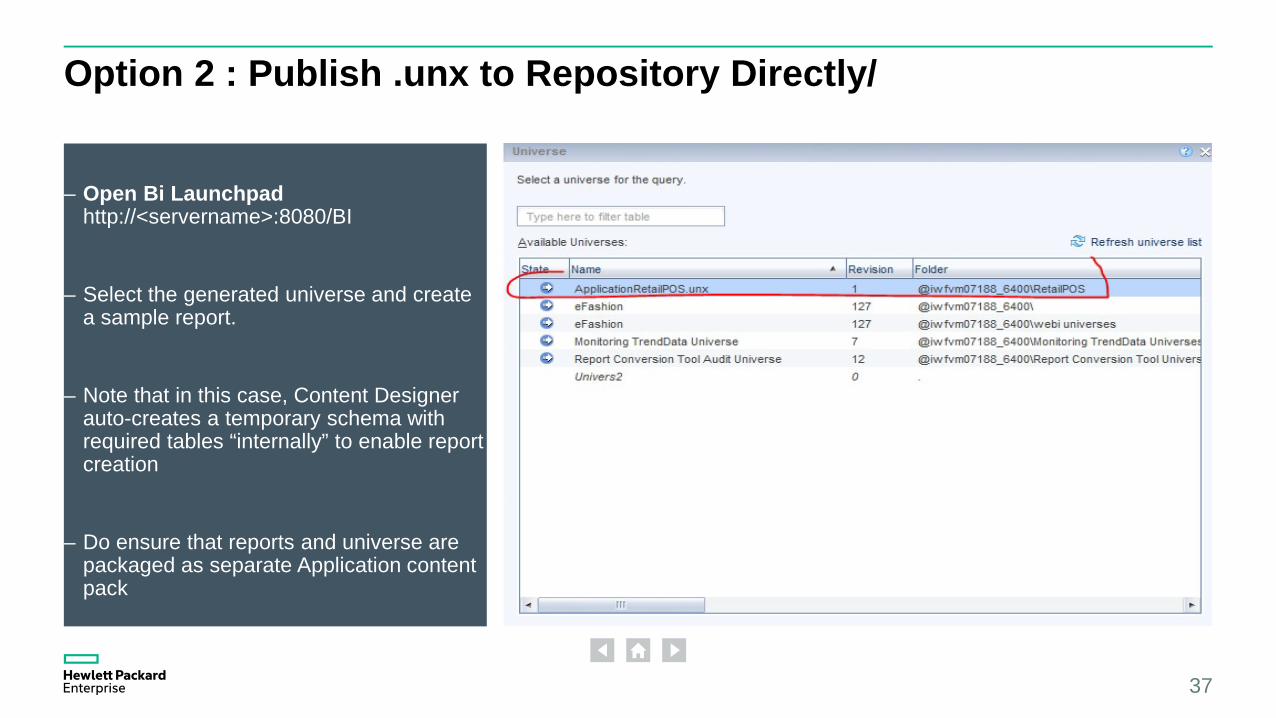
Option 2 : Publish .unx to Repository Directly/
37
– Open Bi Launchpad http://<servername>:8080/BI
– Select the generated universe and create a sample report.
– Note that in this case, Content Designer auto-creates a temporary schema with required tables “internally” to enable report creation
– Do ensure that reports and universe are packaged as separate Application content pack
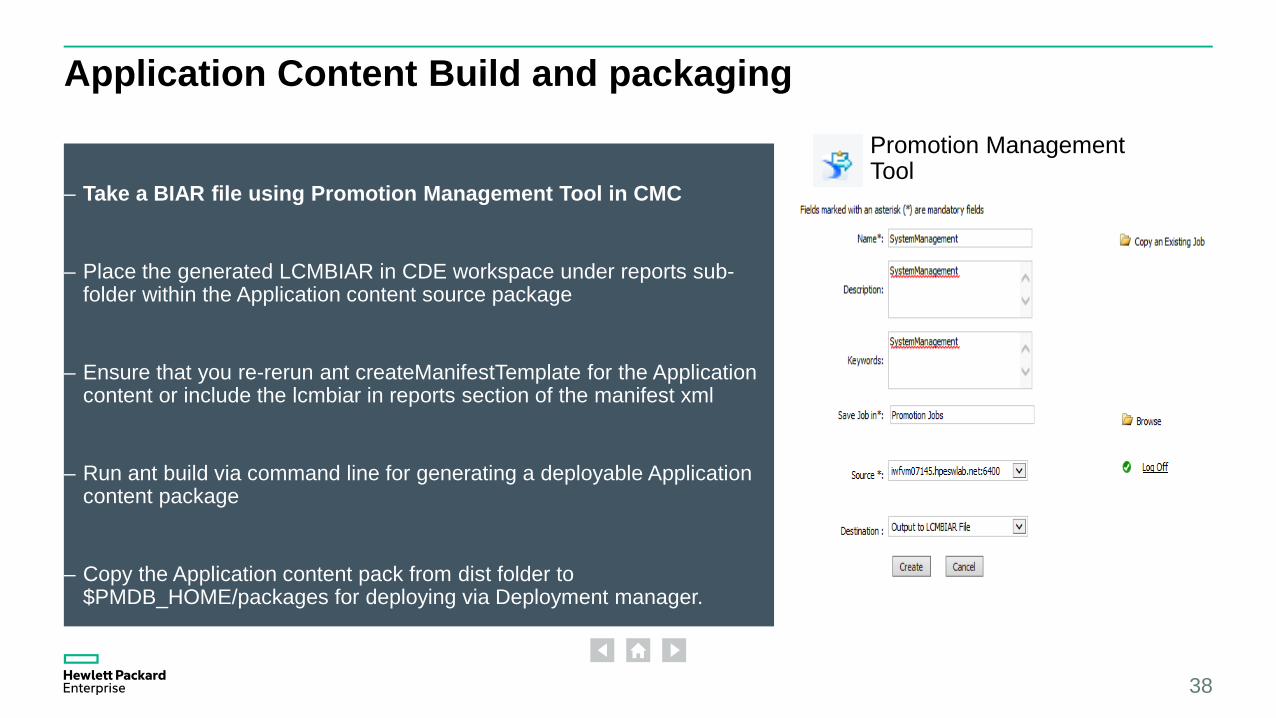
Application Content Build and packaging
38
– Take a BIAR file using Promotion Management Tool in CMC
– Place the generated LCMBIAR in CDE workspace under reports sub-folder within the Application content source package
– Ensure that you re-rerun ant createManifestTemplate for the Application content or include the lcmbiar in reports section of the manifest xml
– Run ant build via command line for generating a deployable Application content package
– Copy the Application content pack from dist folder to $PMDB_HOME/packages for deploying via Deployment manager.
Promotion ManagementTool
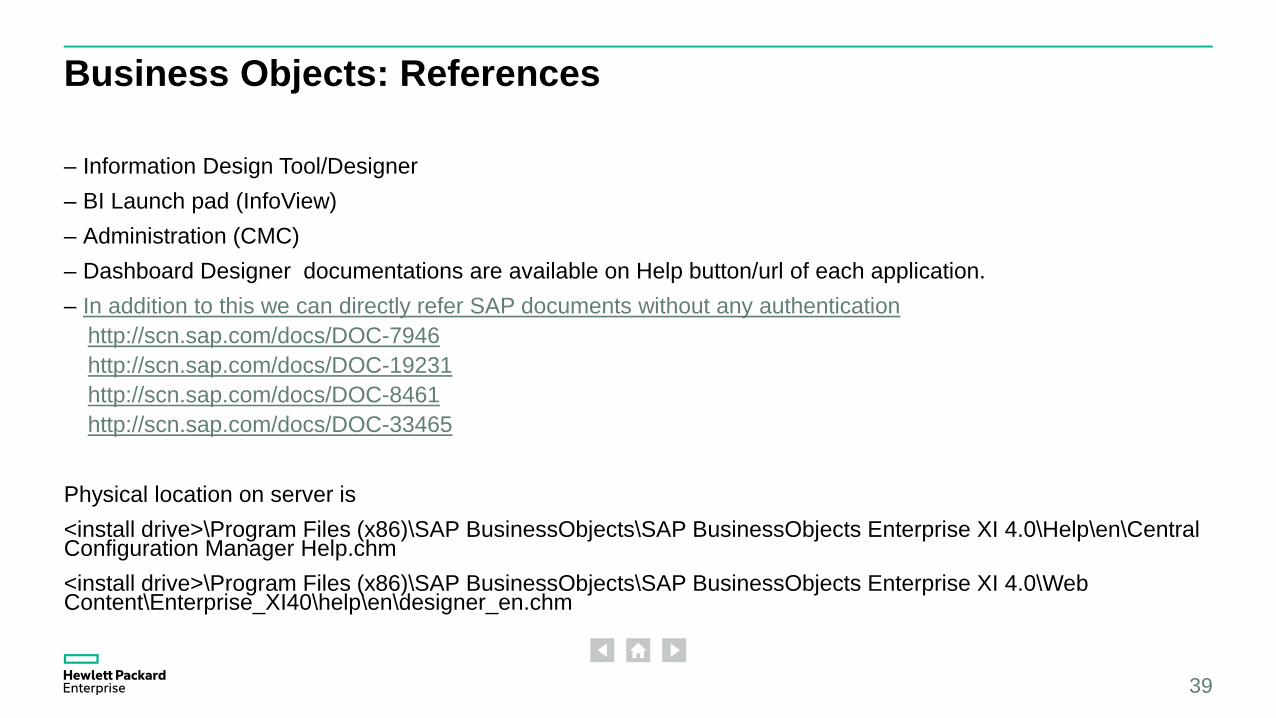
Business Objects: References
– Information Design Tool/Designer– BI Launch pad (InfoView)– Administration (CMC) – Dashboard Designer documentations are available on Help button/url of each application.– In addition to this we can directly refer SAP documents without any authentication
http://scn.sap.com/docs/DOC-7946http://scn.sap.com/docs/DOC-19231http://scn.sap.com/docs/DOC-8461http://scn.sap.com/docs/DOC-33465
Physical location on server is<install drive>\Program Files (x86)\SAP BusinessObjects\SAP BusinessObjects Enterprise XI 4.0\Help\en\Central Configuration Manager Help.chm<install drive>\Program Files (x86)\SAP BusinessObjects\SAP BusinessObjects Enterprise XI 4.0\Web Content\Enterprise_XI40\help\en\designer_en.chm
39

Application Content creationA walkthrough
40
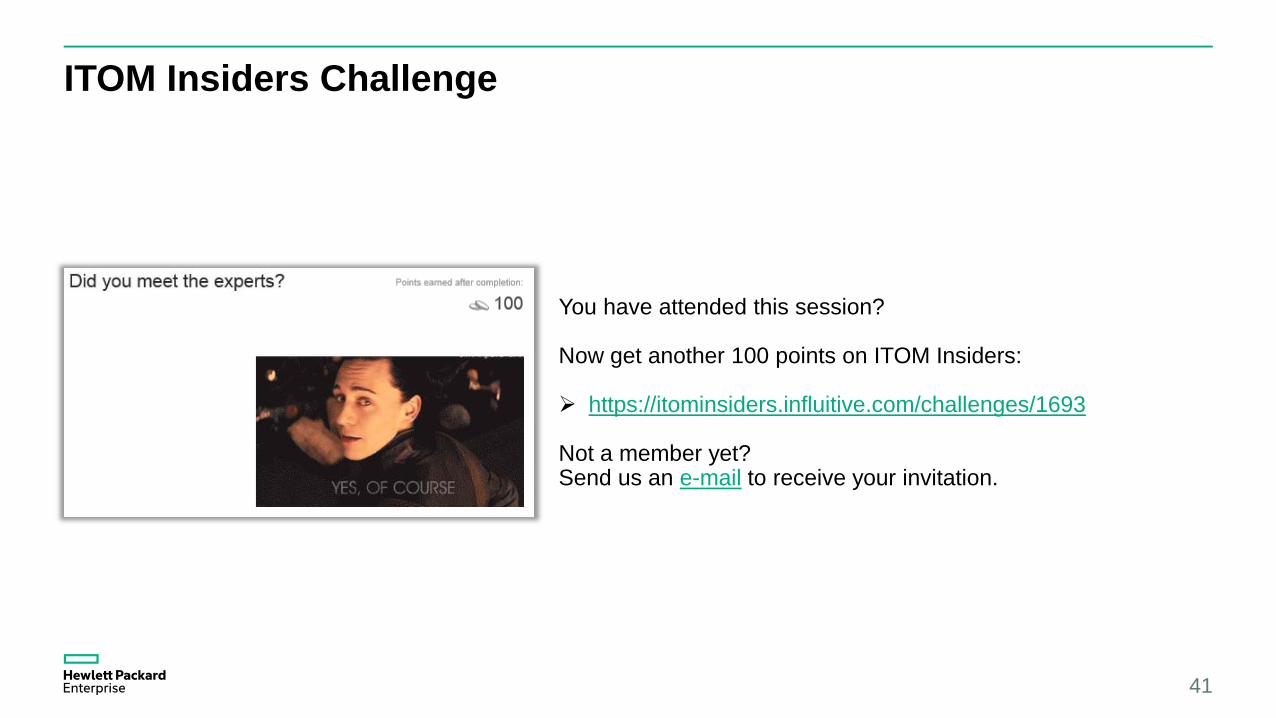
ITOM Insiders Challenge
41
You have attended this session?
Now get another 100 points on ITOM Insiders:
https://itominsiders.influitive.com/challenges/1693
Not a member yet?Send us an e-mail to receive your invitation.
Help & Resources
42For HPE and HPE Channel Partner Internal Use
Watch out for more information via e-mail.
R&D Experts will answer your questions Operations Bridge Reporter Practitioners Forum
Meet the experts in another live session on Wednesday See your welcome e-mail for the invitation link
Find more content and free resources Operations Bridge Reporter @ HPE Live Network Operations Bridge @ HPE Live Network
General questions about the workshop? Send an e-mail to [email protected]
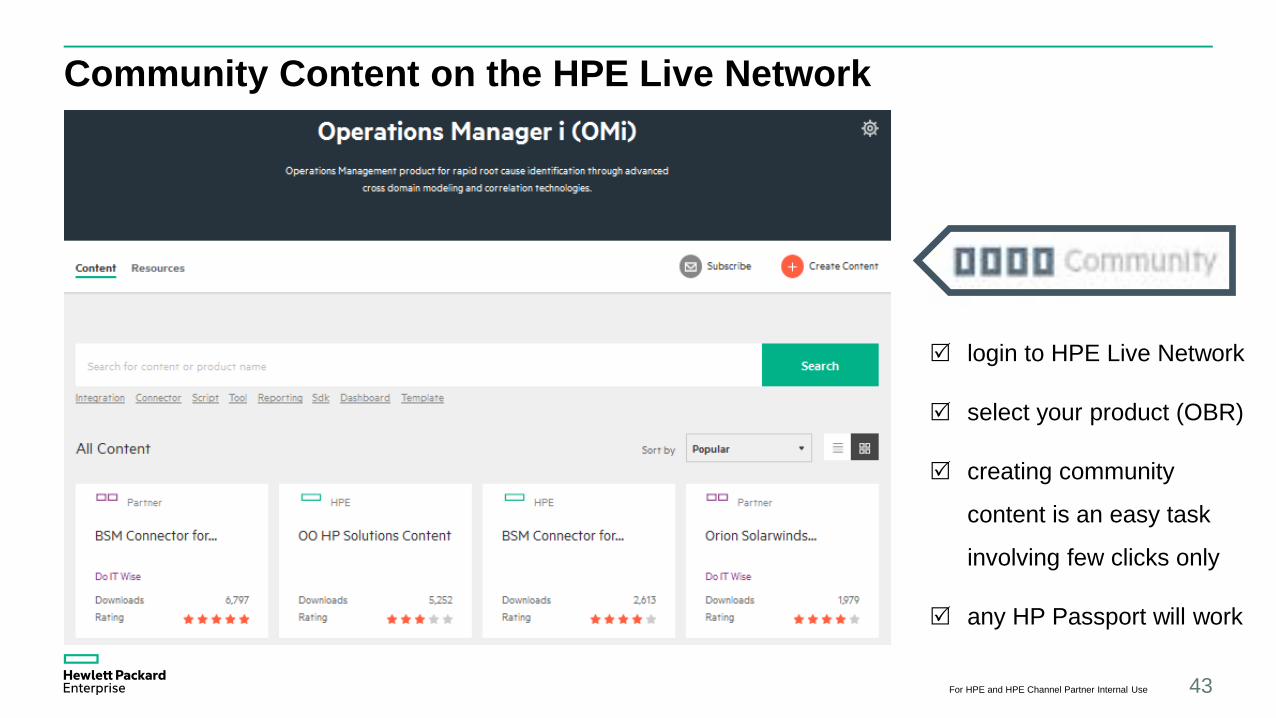
Community Content on the HPE Live Network
43For HPE and HPE Channel Partner Internal Use
login to HPE Live Network
select your product (OBR)
creating community
content is an easy task
involving few clicks only
any HP Passport will work
Questions?
44

Thank youhttps://hpln.hpe.com/product/operations-bridge-reporter
45