hp universal print driver - hp® official siteh10032. · hp upd vs hp mobile print driver for...
TRANSCRIPT
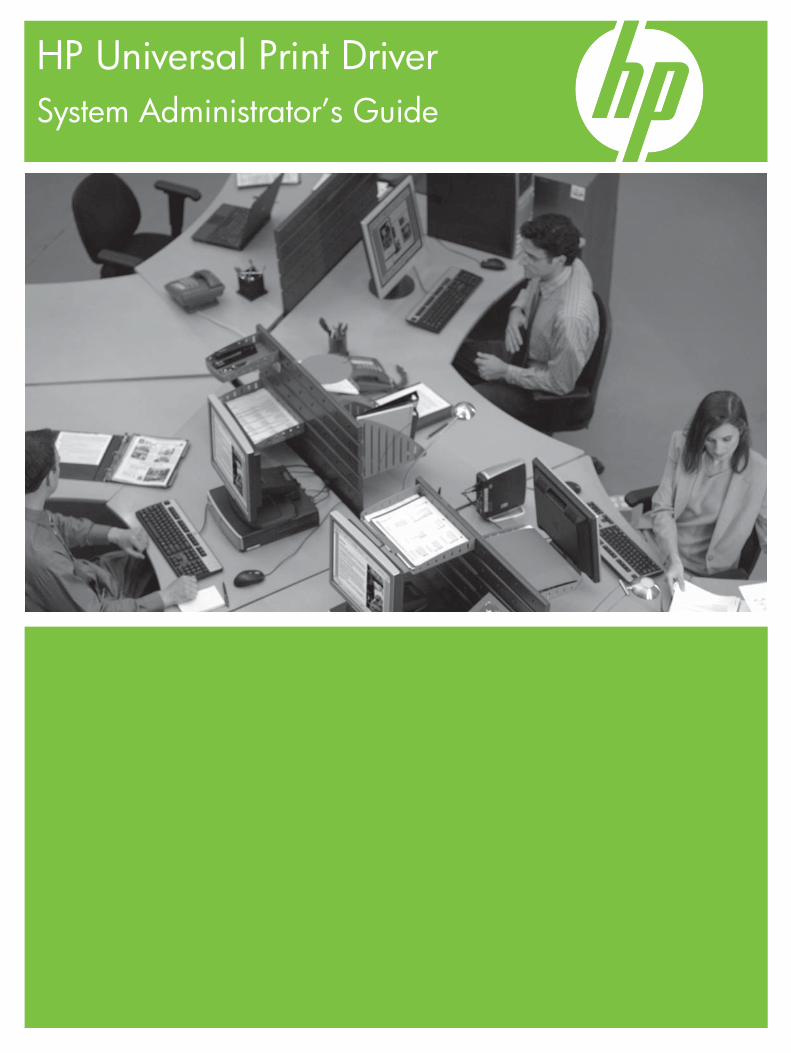
HP Universal Print Driver System Administrator’s Guide

HP Universal Print Driver
System Administrator's Guide
Copyright and license
©2006 Copyright Hewlett-PackardDevelopment Company, L.P.
Reproduction, adaptation or translationwithout prior written permission is prohibited,except as allowed under the copyright laws.
The information contained herein is subjectto change without notice.
The only warranties for HP products andservices are set forth in the express warrantystatements accompanying such productsand services. Nothing herein should beconstrued as constituting an additionalwarranty. HP shall not be liable for technicalor editorial errors or omissions containedherein.
Edition 2, 1/2007
Trademark credits
Adobe®, Acrobat®, PostScript®, and theAcrobat logo® are trademarks of AdobeSystems Incorporated.
Java™ is a trademark of Sun Microsystems,Incorporated.
Linux® is a U.S. registered trademark ofLinus Torvalds.
Microsoft®, Windows®, Windows NT®, andWindows® XP are U.S. registeredtrademarks of Microsoft Corporation.
Pentium® is a trademark or registeredtrademark of Intel Corporation or itssubsidiaries in the United States and othercountries.
UNIX® is a registered trademark of TheOpen Group.
Table of contents
1 Purpose and ScopeIntroduction ........................................................................................................................................... 1Conventions used in this guide ............................................................................................................ 3Supported devices ................................................................................................................................ 4
Supported devices by HP MPA and HP UPD ...................................................................... 4Supported devices with Plug and Play ................................................................................ 6
2 Software descriptionIntroduction ........................................................................................................................................... 9HP UPD and HP mobile printer drivers for Windows ......................................................................... 10
HP UPD vs product-specific drivers ................................................................................... 10HP UPD vs HP mobile print driver for Windows 2.0 .......................................................... 11
System requirements ......................................................................................................................... 12Software availability ............................................................................................................................ 13Select the best print driver .................................................................................................................. 14
HP PCL 6 driver ................................................................................................................. 14HP PCL 5 driver ................................................................................................................. 14PS Emulation driver ........................................................................................................... 14
3 Install and Uninstall of the HP Universal Print Driver (UPD)Install .................................................................................................................................................. 16
Install using the Add Printer Wizard ................................................................................... 16Install by using the Install.exe ............................................................................................ 27Install by using the command prompt ................................................................................ 31
Create custom installations by using command options ................................... 32Available command options .............................................................................. 32
Install by using point and print ........................................................................................... 35Install by using the HP Webjet Admin display plug-in ........................................................ 35Install on a cluster server ................................................................................................... 35Install on a Terminal Server/Citrix ...................................................................................... 35Install by using Novell NDS ............................................................................................... 36
Novell Iprint ....................................................................................................... 36NDPS ................................................................................................................ 36
Uninstall .............................................................................................................................................. 37
4 Use HP universal print driversIntroduction ......................................................................................................................................... 39Use the HP UPD ................................................................................................................................ 40
ENWW iii
Universal print driver modes .............................................................................................. 40Dynamic mode .................................................................................................. 40Traditional mode ............................................................................................... 40
Access Printing Preferences and Properties driver tabs ................................................... 40Change the general settings for the HP UPD .................................................................... 41
Select destination-printer prompts .................................................................... 41Modify printer location profiles .......................................................................... 42Set verification level .......................................................................................... 43
Configure the HP UPD by TCP/IP address ....................................................................... 44TCP/IP address is known .................................................................................. 44TCP/IP address is unknown .............................................................................. 44
Define a printer location profile .......................................................................................... 45Help ................................................................................................................................... 45
Print using the HP UPD ...................................................................................................................... 46Dynamic mode ................................................................................................................... 46
Change the selected printer .............................................................................. 46Traditional mode ................................................................................................................ 47
Printing in Traditional mode .............................................................................. 47Manage the HP UPD .......................................................................................................................... 48
Manage destination printers .............................................................................................. 48Add a destination printer ................................................................................... 48
Specify the IP address, host name, IPX/SPX address, or UNCpath ................................................................................................... 48Use the HP Universal Printing Destination Wizard ........................... 49
Search for a destination printer ......................................................................... 49Create location files ........................................................................................... 49Cache printer settings ....................................................................................... 50
HP UPD features ............................................................................................................... 50Status notification pop-ups (SNPs) ................................................................... 50
Configure SNPs ................................................................................ 52HP Managed Printing Administration (MPA) .................................... 52HP Driver Preconfiguration ............................................................... 52Registry settings ............................................................................... 53
5 Use HP Managed Printing Administration (MPA) softwareIntroduction ......................................................................................................................................... 55Install and uninstall the HP MPA software ......................................................................................... 56
HP MPA software requirements ........................................................................................ 56Software availability ........................................................................................................... 56Install the HP MPA software .............................................................................................. 57Uninstall the HP MPA software .......................................................................................... 60
Uninstall HP MPA using HP Managed Printing Admin Setup Wizard ............... 60Uninstall HP MPA using Add/Remove Programs .............................................. 63
Access HP MPA ................................................................................................................................. 64Classic interface ................................................................................................................ 65Graphic interface ............................................................................................................... 65
Use Help ............................................................................................................................................. 69Use Managed Printer Policies (MPPs) ............................................................................................... 70
Create a new MPP ............................................................................................................. 71UseMode settings ............................................................................................. 73
iv ENWW

Color Access ..................................................................................................... 77User Search capabilities ................................................................................... 79Status and supplies notifications ....................................................................... 81Job accounting and job delivery ........................................................................ 83
Job Accounting settings .................................................................... 83Job Delivery settings ........................................................................ 85Environment variables ...................................................................... 87
Basic MPP Settings ........................................................................................... 88Update an MPP ................................................................................................. 90
Edit an existing MPP .......................................................................................................... 91Associate MPLs with an MPP ............................................................................................ 92Duplicate an existing MPP ................................................................................................. 93Associate user groups with an MPP .................................................................................. 94Remove an existing MPP .................................................................................................. 95
Use Managed Printer Lists (MPLs) .................................................................................................... 97Create a new MPL ............................................................................................................. 99
Auto printer discovery ..................................................................................... 101Discover locally connected network printers .................................. 102Discover printers on a print server (\\serverName) ......................... 103Import printers from an XML file ..................................................... 105
Manual printer entry ........................................................................................ 107Edit an existing MPL ........................................................................................................ 112Associate a MPL with a MPP ........................................................................................... 113Duplicate an existing MPL ............................................................................................... 114Manage the MPL view ..................................................................................................... 114
Select a view ................................................................................................... 117Clickable image map view .............................................................. 117List with printer graphics view ......................................................... 121Tabular HTML view ........................................................................ 123
Advanced view settings ................................................................................... 124Manage virtual printers .................................................................................................... 125
Create a new virtual printer ............................................................................. 126Edit existing virtual printer ............................................................................... 127
Remove an existing MPL ................................................................................................. 128Remove printers from an MPL ......................................................................................... 128
Use User Groups .............................................................................................................................. 130Create a new user group ................................................................................................. 130Edit an existing user group .............................................................................................. 132Associate a user group with a MPP ................................................................................. 133Remove a user group ...................................................................................................... 133
Appendix A HP Universal Print Driver Frequently Asked Questions (FAQs)Troubleshoot .................................................................................................................................... 136Mobile Print Driver FAQs .................................................................................................................. 137
What should I use to manage my MPP and MPL content? ............................................. 137Can I change the address that "HP Managed Printer Lists" uses to look up printers? .... 137What type of environment should "HP Managed Printer Lists" be used? ........................ 138How can I get MPLs that are user, domain, or TCP/IP address specific? ....................... 138How can I allow only a specific user to see a certain custom MPL? ............................... 138
ENWW v

Can custom MPLs contain environment variables directly, or are they only valid insidethe XML file? .................................................................................................................... 139Can "HP Managed Printer Lists" be used in Hot Spots? ................................................. 139Does the server where the MPLs reside have to be Windows? ...................................... 139Can large corporations or enterprise environments benefit from this technology? .......... 139How often can I modify the printers that the HP MPL or the custom MPLs point to? ...... 139Technical FAQs ............................................................................................................... 139
How do I install without using the install.exe? .................................................................................. 140When a printer is connected locally via USB I can not install an IP printer. ..................................... 141Why do I see color tabs for a mono LaserJet? ................................................................................. 142What is the difference between a high, medium, and low Device Verification Level (DVL)? ........... 143What is the best way to update ll of my queues on my Microsoft print servers when a new versionof the HP UPD becomes available? ................................................................................................. 144My HP Color LaserJet 2550 printer does not print in color when using the PCL5 driver. ................ 145
Index ................................................................................................................................................................. 147
vi ENWW
List of tables
Table 1-1 HP Universal Print Driver System Administrator's Guide overview .................................................... 1Table 2-1 Driver comparison — HP UPD vs product-specific drivers .............................................................. 10Table 2-2 Driver comparison — HP UPD vs HP mobile print driver for Windows 2.0 ...................................... 11Table 3-1 Command options ............................................................................................................................ 32Table 4-1 SNP settings .................................................................................................................................... 53Table 5-1 HP MPA classic interface options .................................................................................................... 65Table 5-2 HP MPA graphic interface options ................................................................................................... 66Table 5-3 UseMode Settings panel – Template drop-down list options ........................................................... 73Table 5-4 UseMode Settings — Properties panel options ............................................................................... 74Table 5-5 Color Access panel – Template drop-down list options ................................................................... 77Table 5-6 Color-printing user access ............................................................................................................... 78Table 5-7 User Search Capabilities panel – Template drop-down list options ................................................. 79Table 5-8 User search capabilities ................................................................................................................... 80Table 5-9 Supplies Status Notifications panel – Template drop-down list options ........................................... 81Table 5-10 Status and Supplies Notifications panel — Printer Alert Notification Settings drop-down menuoptions ................................................................................................................................................................ 82Table 5-11 Status and Supplies Notifications panel — Device Query Interval drop-down menu options ........ 82Table 5-12 Status and supplies notification options ......................................................................................... 82Table 5-13 Job Accounting panel – Template drop-down list options .............................................................. 83Table 5-14 Job Accounting panel — Radio button options .............................................................................. 84Table 5-15 Job Accounting panel – Template drop-down list options .............................................................. 85Table 5-16 UPD environment variables ........................................................................................................... 88Table 5-17 Local environment variables .......................................................................................................... 88Table 5-18 Managed Print Policy – Update Policy panel options .................................................................... 90Table 5-19 Managed Printer Policy — Manage MPL associations panel options ............................................ 92Table 5-20 Managed Printer Policy — Associate with an MPP panel options ................................................. 93Table 5-21 Managed Printer Policy — Manage MPL associations panel options ............................................ 94Table 5-22 Managed Printer Policy — Associate with an MPP panel options ................................................. 95Table 5-23 MPL printers panel – Options ...................................................................................................... 100Table 5-24 Discovered printers screen options .............................................................................................. 102Table 5-25 Discovered printers screen options .............................................................................................. 104Table 5-26 Discovered printers screen options .............................................................................................. 106Table 5-27 MPL printers panel – Manual Printer Entry options ..................................................................... 108Table 5-28 MPL printers – Advanced panel options ...................................................................................... 110Table 5-29 Select a view type panel — View options .................................................................................... 117Table 5-30 Printer image panel options ......................................................................................................... 119Table 5-31 Labels panel options .................................................................................................................... 121Table 5-32 Graphics view — List format options ............................................................................................ 122Table 5-33 Printer image panel options ......................................................................................................... 122
ENWW vii

Table 5-34 Complete panel options ............................................................................................................... 123Table 5-35 Select a view panel options ......................................................................................................... 124Table 5-36 Edit existing virtual printers panel options .................................................................................... 127
viii ENWW
List of figures
Figure 3-1 Add Printer Wizard — Welcome window ........................................................................................ 17Figure 3-2 Add Printer Wizard — Local or Network Printer window ................................................................. 17Figure 3-3 Add Printer Wizard — Select a Printer Port window ....................................................................... 18Figure 3-4 Add Standard TCP/IP Printer Port Wizard — Welcome window .................................................... 19Figure 3-5 Add Standard TCP/IP Printer Port Wizard — Add Port window ..................................................... 20Figure 3-6 Add Standard TCP/IP Printer Port Wizard — Additional Port Information Required window ......... 21Figure 3-7 Add Standard TCP/IP Printer Port Wizard — Completing the Add Standard Port Wizardwindow ................................................................................................................................................................ 22Figure 3-8 Add Printer Wizard — Install Printer Software window ................................................................... 23Figure 3-9 Add Printer Wizard — Install Printer Software window, driver listed ............................................... 24Figure 3-10 Add Printer Wizard — Name Your Printer window ....................................................................... 25Figure 3-11 Add Printer Wizard — Printer Sharing window ............................................................................. 26Figure 3-12 Add Printer Wizard — Print Test Page window ............................................................................ 27Figure 3-13 HP Universal Printing Installer Wizard — Welcome and Software License Agreementwindow ................................................................................................................................................................ 28Figure 3-14 HP Universal Printing Installer Wizard — Installation Mode window ............................................ 29Figure 3-15 HP Universal Printing Installer Wizard — Installing window ......................................................... 30Figure 3-16 HP Universal Printing Installer Wizard — Finish window .............................................................. 31Figure 4-1 General tab ..................................................................................................................................... 41Figure 4-2 Location Profiles tab ....................................................................................................................... 42Figure 4-3 Device Verification tab .................................................................................................................... 43Figure 4-4 Status notification pop-up (sample) ................................................................................................ 51Figure 4-5 Notification Settings dialog box ....................................................................................................... 52Figure 5-1 HP MPA Setup Wizard — Welcome window .................................................................................. 57Figure 5-2 HP MPA Setup Wizard — Confirm Installation window .................................................................. 58Figure 5-3 HP MPA Setup Wizard — Installing HP MPA window .................................................................... 59Figure 5-4 HP MPA Setup Wizard — Installation Complete window ............................................................... 60Figure 5-5 HP MPA Setup Wizard – HP MPA Remove or Repair window ....................................................... 61Figure 5-6 HP MPA Setup Wizard – Removing HP MPA window .................................................................... 62Figure 5-7 HP Managed Printing Admin icon ................................................................................................... 64Figure 5-8 HP MPA — Graphic interface view ................................................................................................. 66Figure 5-9 Create a new MPP screen .............................................................................................................. 71Figure 5-10 HP MPA — Properties screen ...................................................................................................... 72Figure 5-11 UseMode Settings panel ............................................................................................................... 73Figure 5-12 Color Access panel ....................................................................................................................... 77Figure 5-13 User Search Capabilities panel .................................................................................................... 79Figure 5-14 Status & Supplies Notifications panel ........................................................................................... 81Figure 5-15 Job Accounting panel ................................................................................................................... 83Figure 5-16 Job Delivery panel ........................................................................................................................ 85
ENWW ix
Figure 5-17 Basic MPP settings panel ............................................................................................................. 89Figure 5-18 Update policy panel ...................................................................................................................... 90Figure 5-19 Edit an existing MPP — Select an MPP panel ............................................................................. 91Figure 5-20 Associate MPLs with an MPP — Select an MPP screen .............................................................. 92Figure 5-21 Duplicate an existing MPP — Select an MPP to duplicate screen ............................................... 93Figure 5-22 Associate user groups with an MPP screen ................................................................................. 94Figure 5-23 Remove an existing MPP – Select an MPP panel ........................................................................ 95Figure 5-24 Remove an existing MPP — Confirmation screen ........................................................................ 96Figure 5-25 Create a new MPL screen ............................................................................................................ 99Figure 5-26 MPL printers panel ...................................................................................................................... 100Figure 5-27 Add automatically screen ............................................................................................................ 101Figure 5-28 Discovered printers screen ......................................................................................................... 102Figure 5-29 Discovered printers screen ......................................................................................................... 104Figure 5-30 Discovered printers screen ......................................................................................................... 106Figure 5-31 MPL printers screen — manual printer entry .............................................................................. 108Figure 5-32 MPL printers screen – MPL settings panel ................................................................................. 111Figure 5-33 Edit an existing MPL — Select an MPL screen .......................................................................... 112Figure 5-34 Edit an existing MPL — Printers screen ..................................................................................... 113Figure 5-35 Duplicate an existing MPL — Select an MPL to duplicate panel ................................................ 114Figure 5-36 Manage MPL view — Select an MPL screen ............................................................................. 115Figure 5-37 Select a view type screen ........................................................................................................... 116Figure 5-38 Configure image map screen ...................................................................................................... 118Figure 5-39 Select a background image screen ............................................................................................ 118Figure 5-40 Labels panel ................................................................................................................................ 120Figure 5-41 Configure list with printer graphics screen .................................................................................. 122Figure 5-42 Tabular HTML view — HP MPL Printer Groups screen (sample) ............................................... 124Figure 5-43 Advanced view settings panel .................................................................................................... 125Figure 5-44 Create a new virtual printer ......................................................................................................... 126Figure 5-45 Edit existing virtual printers panel ............................................................................................... 127Figure 5-46 Remove an existing MPL — Select a MPL screen ..................................................................... 128Figure 5-47 Remove an existing MPL — confirmation screen (sample) ........................................................ 128Figure 5-48 Printers screen ............................................................................................................................ 128Figure 5-49 Remove printers — confirmation dialog box ............................................................................... 129Figure 5-50 Create a new user group screen ................................................................................................ 130Figure 5-51 Users screen ............................................................................................................................... 131Figure 5-52 Edit an existing user group screen ............................................................................................. 132Figure 5-53 Included users panel ................................................................................................................... 132Figure 5-54 Remove an existing user group — Confirm screen .................................................................... 134
x ENWW
1 Purpose and Scope
IntroductionThis system administrator's guide provides information about and troubleshooting tips for the HPUniversal Print Driver (UPD) software.
This guide is prepared in an electronic format to serve as a quick-reference tool for informationtechnology (IT) administrators, Customer Care Center (CCC) agents, support engineers, systemadministrators, management information systems (MIS) personnel, and printer end-users, asappropriate.
The following information is included in this guide:
● Descriptions of the HP Universal Print Driver (UPD), the management available depending on theinstallation mode, and the benefits, use, and features of the HP UPD.
● Descriptions of the HP Managed Print Adminstration (MPA) software, including Managed PrinterPolicies (MPPs) and Managed Printer Lists (MPLs), which are used by administrators to configureand manage settings for the HP UPD.
● Procedures for installing and uninstalling software components
The following table describes the structure of this System Administrator's Guide.
Table 1-1 HP Universal Print Driver System Administrator's Guide overview
Chapter Content
Chapter 1, Purpose and scope This chapter describes the focus and intent of this system administrator's guide,including the conventions used in this description, and the hardware to which thisguide pertains.
Chapter 2, Software description This chapter describes the HP UPD software, including software requirementsneeded to install the HP UPD and software availability. This chapter also describesthe different driver versions (HP PCL 6, HP PCL 5, and HP PS emulation), theirspecific purposes, and the modes in which these HP UPD versions can beinstalled.
Chapter 3, Install and uninstall of the HPUPD
This chapter provides instructions for installing and uninstalling of the HP UPD inDynamic and Traditional mode.
ENWW Introduction 1
Purp
ose
and
Scop
e
Chapter Content
Chapter 4, Use HP UPD This chapter includes information about the following topics:
● Using the HP UPD:
● Mode description
● UPD features
● Accessing the HP UPD
● Printing using the HP UPD
● Managing the HP UPD
Chapter 5, Use HP MPA This chapter describes the HP MPA features and includes information about thefollowing topics:
● Installing and uninstalling the HP MPA
● Accessing the HP MPA
● Using Managed Printer Policies (MPPs)
● Using Managed Printer Lists (MPLs)
● Using User Groups
Chapter 6, Use Active Directory This chapter includes information about the following topics:
● Using Active Directory to manage the HP UPD
● Using Active Directory with HP MPA to manage the HP UPD
For additional information about the location of information within these chapters, see the table ofcontents. An index is provided in the back of this guide.
Table 1-1 HP Universal Print Driver System Administrator's Guide overview (continued)
2 Chapter 1 Purpose and Scope ENWW
Purpose and Scope

Conventions used in this guideThis guide uses the following conventions:
● Keyboard keys appear in colored typeface. For example: Press the Shift key.
● Directory paths, file names, and file extensions appear in user-interface (UI)-specific typeface. Filenames and file extensions appear in uppercase.
For example: Locate the SAMPLE.TXT file in the C:\Temp directory
● Menu names, field names, and options to select are shown in bold type.
For example: On the File menu, click New.
● Windows, screens, and panels are shown in bold type.
For example: The Job Manager window appears.
● References to other sections in this guide are underlined.
For example: For more information, see Software description on page 9.
ENWW Conventions used in this guide 3
Purp
ose
and
Scop
e
Supported devicesFor and updated list of supported devices, see the following Web sites:
www.hp.com/go/mpa
www.hp.com/go/upd
Supported devices by HP MPA and HP UPD
Devices supported by HP MPA and HP UPD (HP PCL 6, HP PCL 5, and HP PS emulation)
● HP LaserJet 1150
● HP LaserJet 1160
● HP LaserJet 1200
● HP LaserJet 1300
● HP LaserJet 1320
● HP LaserJet 2100
● HP LaserJet 2200
● HP LaserJet 2300
● HP LaserJet 2420/30/40
● HP LaserJet 2500
● HP LaserJet 2550
● HP LaserJet 2605
● HP LaserJet 3000
● HP LaserJet 301x
● HP LaserJet 3020
● HP LaserJet 3030
● HP LaserJet 3050 All-in-One
● HP LaserJet 3200
● HP LaserJet 3300
● HP LaserJet 3300 MFP
● HP LaserJet 3390 All-in-One
● HP LaserJet 3392 All-in-One
● HP LaserJet 3700
● HP LaserJet 3800
● HP LaserJet 4000
4 Chapter 1 Purpose and Scope ENWW
Purpose and Scope
● HP LaserJet 4050
● HP LaserJet 4100
● HP LaserJet 4100 MFP
● HP LaserJet 4200
● HP LaserJet 4240
● HP LaserJet 4250
● HP LaserJet 4300
● HP LaserJet 4345 MFP
● HP LaserJet 4350
● HP LaserJet 4500
● HP LaserJet 4550
● HP LaserJet 4600
● HP LaserJet 4610
● HP LaserJet 4650
● HP LaserJet 4700
● HP LaserJet 4730 MFP
● HP LaserJet 5000
● HP LaserJet 5100
● HP LaserJet 5200
● HP LaserJet 5500
● HP LaserJet 5550
● HP LaserJet 8000
● HP LaserJet 8150
● HP LaserJet 8150 MFP
● HP LaserJet 9000
● HP LaserJet 9000 MFP
● HP LaserJet 9040
● HP LaserJet 9040 MFP
● HP LaserJet 9050
● HP LaserJet 9050 MFP
● HP LaserJet 9055 MFP
ENWW Supported devices 5
Purp
ose
and
Scop
e
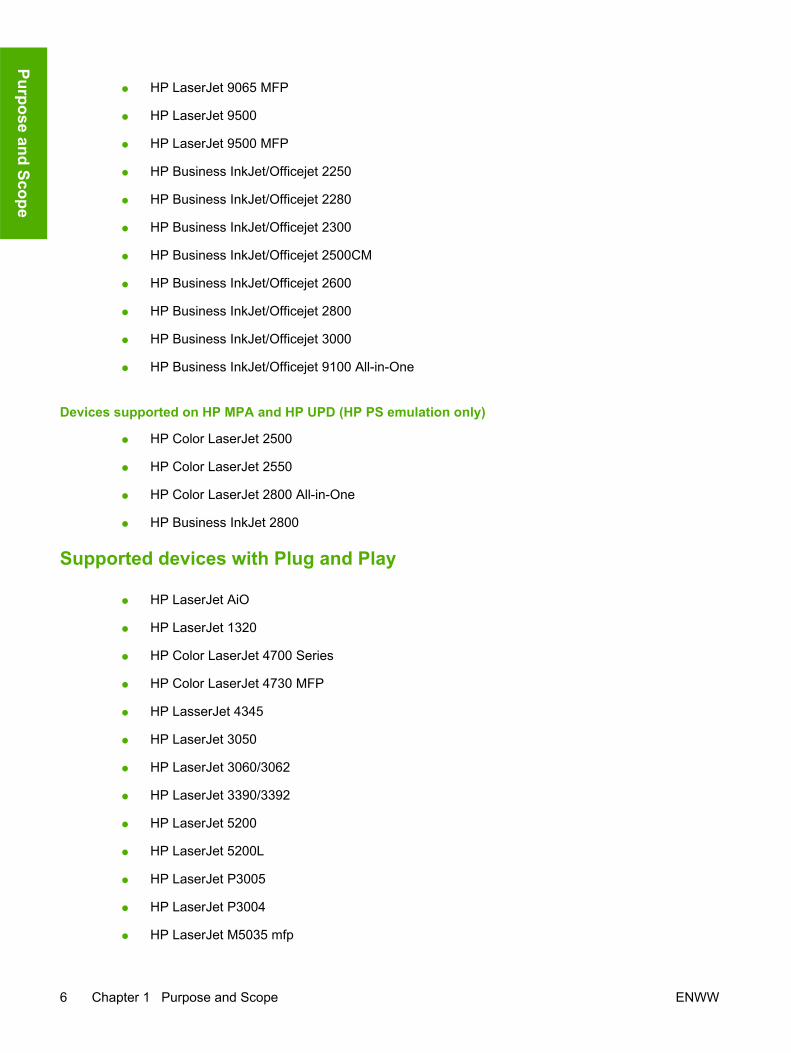
● HP LaserJet 9065 MFP
● HP LaserJet 9500
● HP LaserJet 9500 MFP
● HP Business InkJet/Officejet 2250
● HP Business InkJet/Officejet 2280
● HP Business InkJet/Officejet 2300
● HP Business InkJet/Officejet 2500CM
● HP Business InkJet/Officejet 2600
● HP Business InkJet/Officejet 2800
● HP Business InkJet/Officejet 3000
● HP Business InkJet/Officejet 9100 All-in-One
Devices supported on HP MPA and HP UPD (HP PS emulation only)
● HP Color LaserJet 2500
● HP Color LaserJet 2550
● HP Color LaserJet 2800 All-in-One
● HP Business InkJet 2800
Supported devices with Plug and Play
● HP LaserJet AiO
● HP LaserJet 1320
● HP Color LaserJet 4700 Series
● HP Color LaserJet 4730 MFP
● HP LasserJet 4345
● HP LaserJet 3050
● HP LaserJet 3060/3062
● HP LaserJet 3390/3392
● HP LaserJet 5200
● HP LaserJet 5200L
● HP LaserJet P3005
● HP LaserJet P3004
● HP LaserJet M5035 mfp
6 Chapter 1 Purpose and Scope ENWW
Purpose and Scope
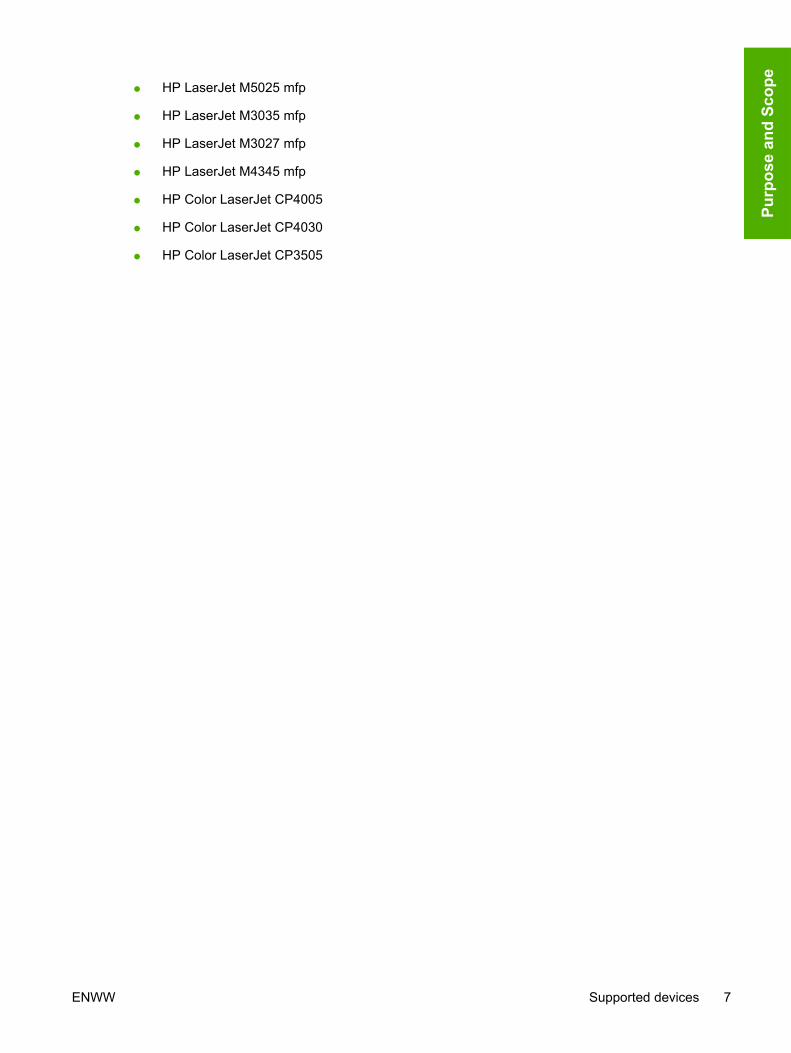
● HP LaserJet M5025 mfp
● HP LaserJet M3035 mfp
● HP LaserJet M3027 mfp
● HP LaserJet M4345 mfp
● HP Color LaserJet CP4005
● HP Color LaserJet CP4030
● HP Color LaserJet CP3505
ENWW Supported devices 7
Purp
ose
and
Scop
e

8 Chapter 1 Purpose and Scope ENWW
Purpose and Scope
2 Software description
IntroductionThree versions of the HP Universal Print Driver (UPD) are available:
● HP PCL 6
● HP PCL 5
● HP Postscript level 2 and level 3 emulation
Topics:
● HP UPD and HP mobile printer drivers for Windows
● System requirements
● Software availability
● Select the best print driver
ENWW Introduction 9
Softw
are
desc
riptio
n
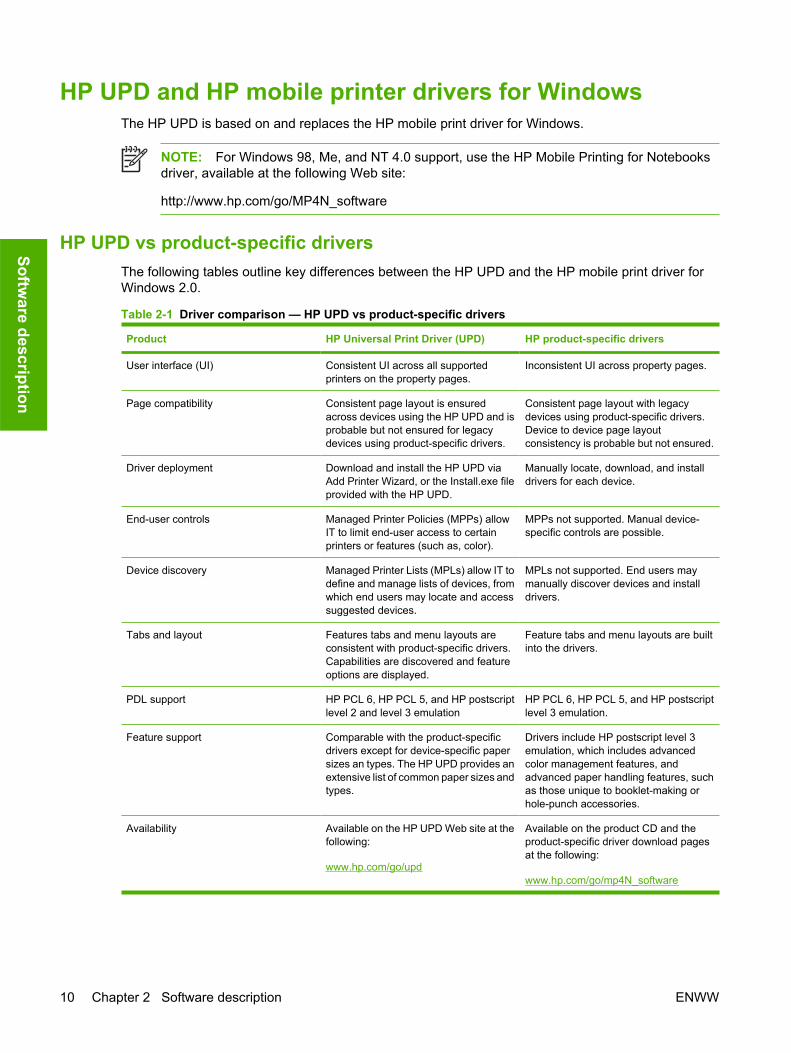
HP UPD and HP mobile printer drivers for WindowsThe HP UPD is based on and replaces the HP mobile print driver for Windows.
NOTE: For Windows 98, Me, and NT 4.0 support, use the HP Mobile Printing for Notebooksdriver, available at the following Web site:
http://www.hp.com/go/MP4N_software
HP UPD vs product-specific driversThe following tables outline key differences between the HP UPD and the HP mobile print driver forWindows 2.0.
Table 2-1 Driver comparison — HP UPD vs product-specific drivers
Product HP Universal Print Driver (UPD) HP product-specific drivers
User interface (UI) Consistent UI across all supportedprinters on the property pages.
Inconsistent UI across property pages.
Page compatibility Consistent page layout is ensuredacross devices using the HP UPD and isprobable but not ensured for legacydevices using product-specific drivers.
Consistent page layout with legacydevices using product-specific drivers.Device to device page layoutconsistency is probable but not ensured.
Driver deployment Download and install the HP UPD viaAdd Printer Wizard, or the Install.exe fileprovided with the HP UPD.
Manually locate, download, and installdrivers for each device.
End-user controls Managed Printer Policies (MPPs) allowIT to limit end-user access to certainprinters or features (such as, color).
MPPs not supported. Manual device-specific controls are possible.
Device discovery Managed Printer Lists (MPLs) allow IT todefine and manage lists of devices, fromwhich end users may locate and accesssuggested devices.
MPLs not supported. End users maymanually discover devices and installdrivers.
Tabs and layout Features tabs and menu layouts areconsistent with product-specific drivers.Capabilities are discovered and featureoptions are displayed.
Feature tabs and menu layouts are builtinto the drivers.
PDL support HP PCL 6, HP PCL 5, and HP postscriptlevel 2 and level 3 emulation
HP PCL 6, HP PCL 5, and HP postscriptlevel 3 emulation.
Feature support Comparable with the product-specificdrivers except for device-specific papersizes an types. The HP UPD provides anextensive list of common paper sizes andtypes.
Drivers include HP postscript level 3emulation, which includes advancedcolor management features, andadvanced paper handling features, suchas those unique to booklet-making orhole-punch accessories.
Availability Available on the HP UPD Web site at thefollowing:
www.hp.com/go/upd
Available on the product CD and theproduct-specific driver download pagesat the following:
www.hp.com/go/mp4N_software
10 Chapter 2 Software description ENWW
Software description
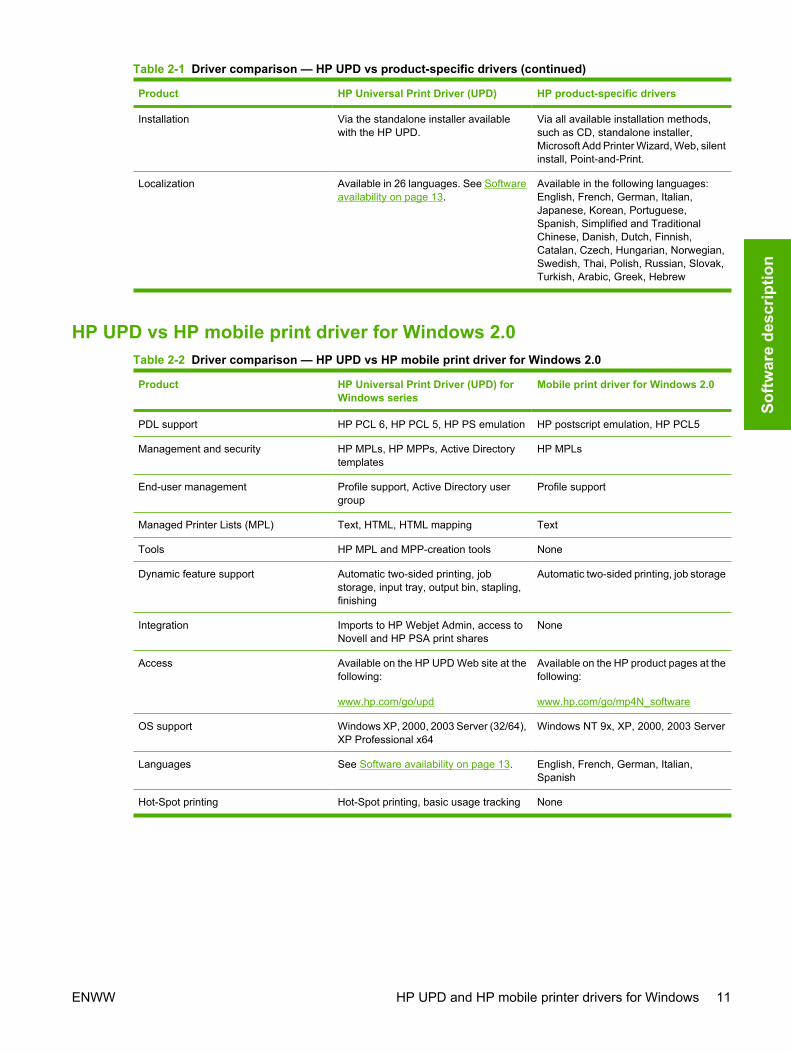
Product HP Universal Print Driver (UPD) HP product-specific drivers
Installation Via the standalone installer availablewith the HP UPD.
Via all available installation methods,such as CD, standalone installer,Microsoft Add Printer Wizard, Web, silentinstall, Point-and-Print.
Localization Available in 26 languages. See Softwareavailability on page 13.
Available in the following languages:English, French, German, Italian,Japanese, Korean, Portuguese,Spanish, Simplified and TraditionalChinese, Danish, Dutch, Finnish,Catalan, Czech, Hungarian, Norwegian,Swedish, Thai, Polish, Russian, Slovak,Turkish, Arabic, Greek, Hebrew
HP UPD vs HP mobile print driver for Windows 2.0Table 2-2 Driver comparison — HP UPD vs HP mobile print driver for Windows 2.0
Product HP Universal Print Driver (UPD) forWindows series
Mobile print driver for Windows 2.0
PDL support HP PCL 6, HP PCL 5, HP PS emulation HP postscript emulation, HP PCL5
Management and security HP MPLs, HP MPPs, Active Directorytemplates
HP MPLs
End-user management Profile support, Active Directory usergroup
Profile support
Managed Printer Lists (MPL) Text, HTML, HTML mapping Text
Tools HP MPL and MPP-creation tools None
Dynamic feature support Automatic two-sided printing, jobstorage, input tray, output bin, stapling,finishing
Automatic two-sided printing, job storage
Integration Imports to HP Webjet Admin, access toNovell and HP PSA print shares
None
Access Available on the HP UPD Web site at thefollowing:
www.hp.com/go/upd
Available on the HP product pages at thefollowing:
www.hp.com/go/mp4N_software
OS support Windows XP, 2000, 2003 Server (32/64),XP Professional x64
Windows NT 9x, XP, 2000, 2003 Server
Languages See Software availability on page 13. English, French, German, Italian,Spanish
Hot-Spot printing Hot-Spot printing, basic usage tracking None
Table 2-1 Driver comparison — HP UPD vs product-specific drivers (continued)
ENWW HP UPD and HP mobile printer drivers for Windows 11
Softw
are
desc
riptio
n
System requirementsMinimum system requirements for the HP UPD 3.0 are as follows:
● One of the following MS Windows operating systems:
● MS Windows Vista
● MS Windows XP
● MS Windows 2000
● MS Windows Server 2003
HP UPD can be used independently of the HP MPA software. For network administrators, HP MPAsoftware is recommended.
Other supported environments and standards are as follows:
● Protocol: TCP/IP protocol for Windows
● Browsers: Microsoft Internet Explorer 5.5 and FireFox 1.5
12 Chapter 2 Software description ENWW
Software description
Software availabilityThe HP Universal Print Driver v 3.0 is available in the following languages:
● French
● German
● Italian
● Spanish
● Dutch
● Finnish
● Norwegian
● Swedish
● Russian
● Turkish
● Polish
● Portuguese
● Korean
● Simplified Chinese
● Traditional Chinese
● Catalan
● Czech
● Hungarian
● Arabic
● Greek
● Hebrew
● Bahasa Indonesian
● Thai
● Japanese
ENWW Software availability 13
Softw
are
desc
riptio
n
Select the best print driverHP UPDs are designed for corporate or IT-managed MS Windows environments. These drivers providea single driver for use with multiple printer models.
The HP UPDs are recommended when printing to multiple printer models or from a mobile MS Windowscomputer.
● Provides a single driver solution for use with multiple printer models; designed for corporate or IT-managed Windows environments
● Preferred when printing in an enterprise or managed print server environment to multiple printermodels in either a traditional or dynamic print environment
There are three types of HP UPD. See the following for more information about choosing the best drivertype for your printing needs.
Topics:
● HP PCL 6 driver
● HP PCL 5 driver
● PS Emulation driver
HP PCL 6 driverOverall, the HP PCL 6 driver provides the best performance, print quality, and printer-feature supportfor most users. The driver aligns with MS Windows graphic device interface (GDI) for best performancein MS Windows environments.
The HP PCL 6 driver may not be fully compatible with third-party and custom solutions that are basedon the HP PCL 5.
HP PCL 5 driverThe HP PCL 5 driver is recommended for general office monochrome printing in MS Windowsenvironments. The driver is compatible with previous version of PCL and legacy HP LaserJet printers.
The HP PCL 5 driver is the best choice for:
● Any third-party or home-grown custom solutions that use forms, fonts, and SAP programs.
● Any environment with mixed operating-systems (such as UNIX, Linux, and mainframe)
PS Emulation driverThe PS Emulation driver is recommended for printing with Adobe or other graphics-rich softwareprograms. The driver is compatible with postscript level 2 and level 3, and supports postscript fontDIMMs.
Use the PS Emulation driver in primarily postcript-specific software programs such as Adobe and Corel.
14 Chapter 2 Software description ENWW
Software description
3 Install and Uninstall of the HP UniversalPrint Driver (UPD)
The HP Universal Print Driver (UPD) is supported by Windows XP, Windows Vista, Windows 2000, andWindows Server 2003.
NOTE: If you are using Windows 98 or Windows NT, you can use HP Mobile Printing forNotebooks.
For more information, go to the following Web site:
www.hp.com/go/upd
The HP UPD can be installed in one of two modes: Traditional or Dynamic. The mode in which the driveris installed determines the end-user experience of the HP UPD, and also influence the extent to whichthe HP UPD can be managed.
● Dynamic mode:
An HP UPD installed in Dynamic mode allows the most flexibility. An end user can print within anynetwork or print environment without downloading a product-specific driver. When printing in amobile environment, the end user can print to any printer using the features within the HP UPDsoftware.
A permanent instance of this driver can be created, and later changed if the end user moveslocation.
An HP UPD installed in Dynamic mode also allows for the greatest possible manageability. Theadministrator can dictate end-user use and experience of the HP UPD using such managementtools as the HP Managed Print Adminstration (MPA). (See Use HP Managed PrintingAdministration (MPA) software on page 55 for more information.)
● Traditional mode:
An HP UPD installed in Traditional mode behaves like a discrete driver. During installation, thedriver is associated to a specific printer, creating a permanent instance of the driver. Theadministrator has limited ability to manage the driver.
The following information provides detailed instructions for installing the HP UPD in either Traditionalor Dynamic mode, and uninstalling the HP UPD.
Topics:
● Install
● Uninstall
ENWW 15
Inst
all H
P U
PD
InstallInstall or modify the HP UPD by using one of the following methods:
● Install using the Add Printer Wizard
● Install by using the Install.exe
● Install by using the command prompt
● Install by using point and print
● Install by using the HP Webjet Admin display plug-in
● Install on a cluster server
● Install on a Terminal Server/Citrix
● Install by using Novell NDS
Install using the Add Printer WizardTo install the HP UPD in Traditional mode using the Windows Add Printer Wizard, follow these steps:
NOTE: The Windows Add Printer Wizard runs through the standard Windows driver installationand does not provide any customization options. If you install the HP Universal Print Driver byusing this method, the driver is installed so that the end-user has common printing functionality.
1. Go to the following Web site:
www.hp.com/go/upd
2. Download and save the HP UPD specific to your operating system, and printing needs. (See Selectthe best print driver on page 14.)
3. Navigate to and unzip the HP UPD download file to a folder.
4. From the Control Panel, click Printers and Other Hardware, and then click Add Printer.
16 Chapter 3 Install and Uninstall of the HP Universal Print Driver (UPD) ENWW
Install HP U
PD
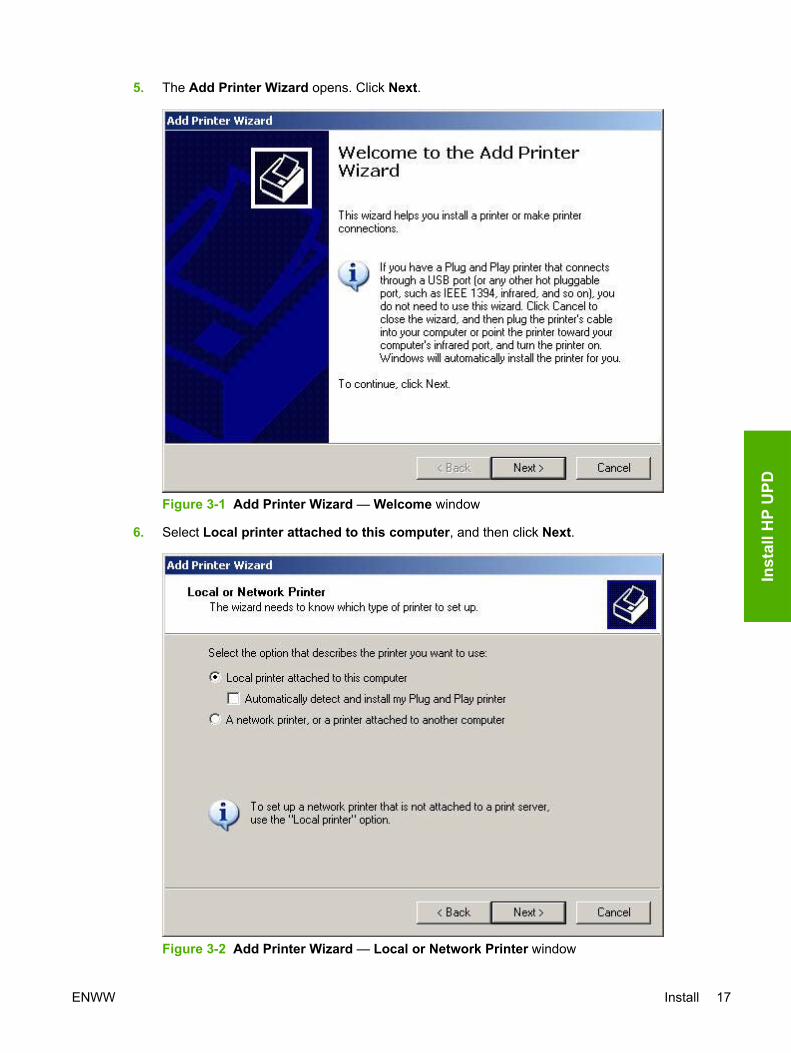
5. The Add Printer Wizard opens. Click Next.
Figure 3-1 Add Printer Wizard — Welcome window
6. Select Local printer attached to this computer, and then click Next.
Figure 3-2 Add Printer Wizard — Local or Network Printer window
ENWW Install 17
Inst
all H
P U
PD
7. Select Create a new port, and then select HP Standard TCP/IP or Standard TCP/IP. Then,click Next.
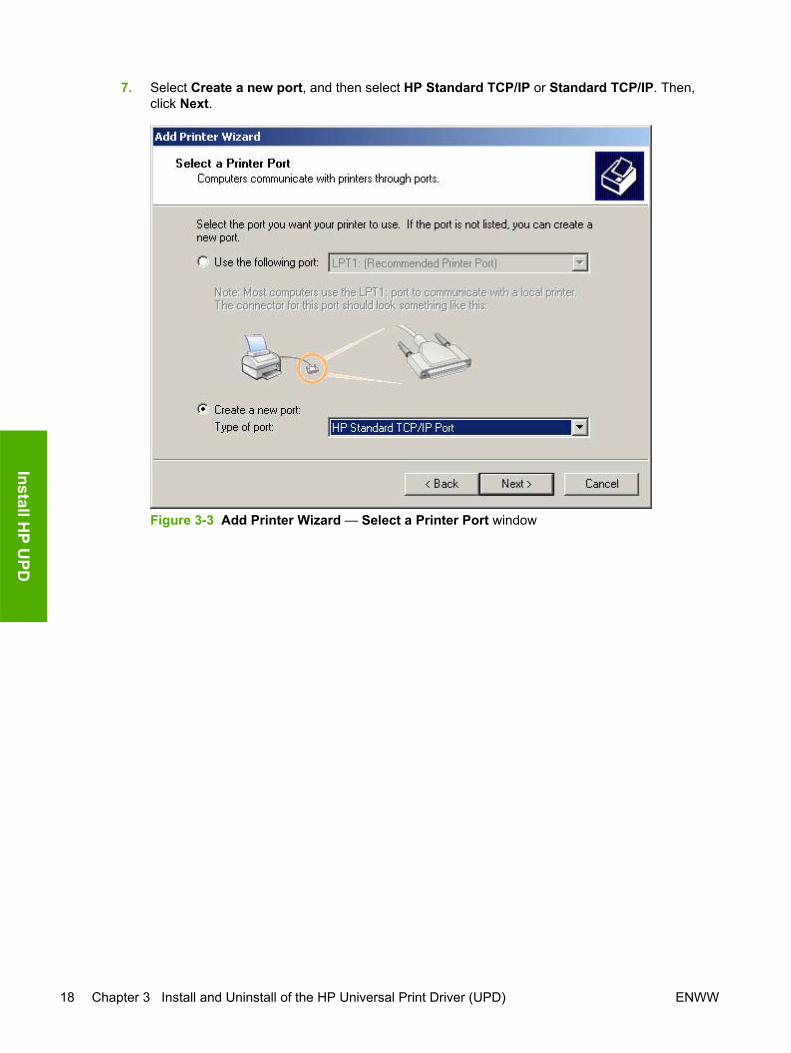
Figure 3-3 Add Printer Wizard — Select a Printer Port window
18 Chapter 3 Install and Uninstall of the HP Universal Print Driver (UPD) ENWW
Install HP U
PD
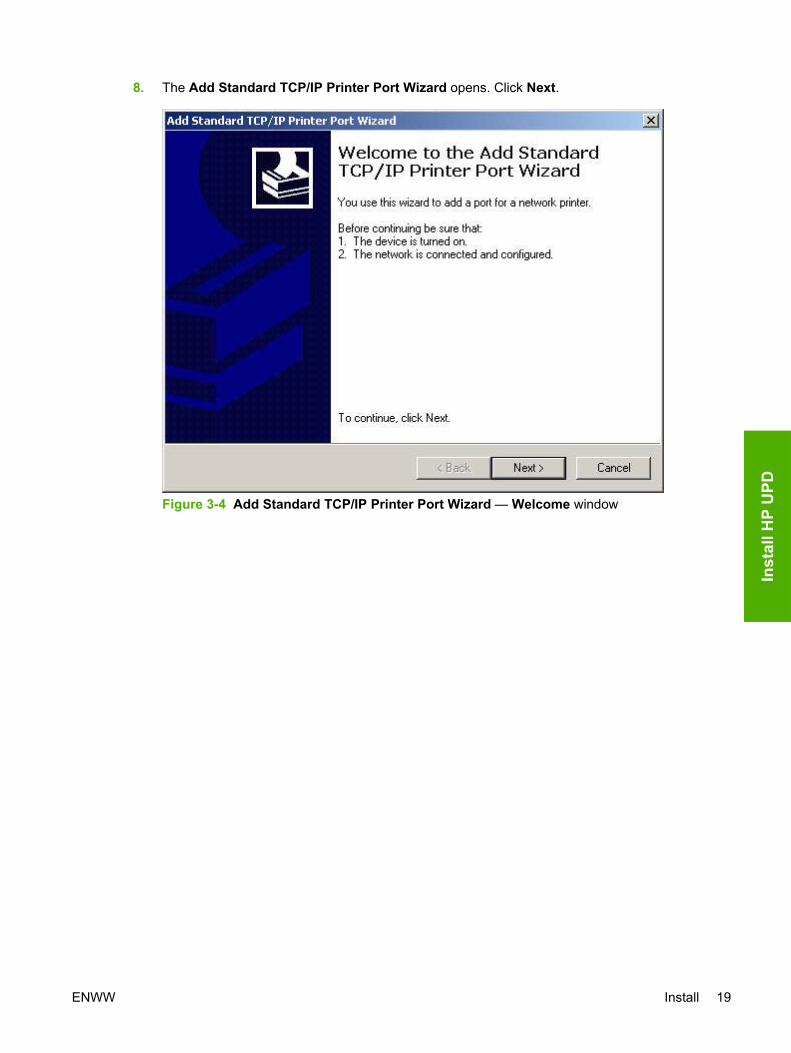
8. The Add Standard TCP/IP Printer Port Wizard opens. Click Next.
Figure 3-4 Add Standard TCP/IP Printer Port Wizard — Welcome window
ENWW Install 19
Inst
all H
P U
PD
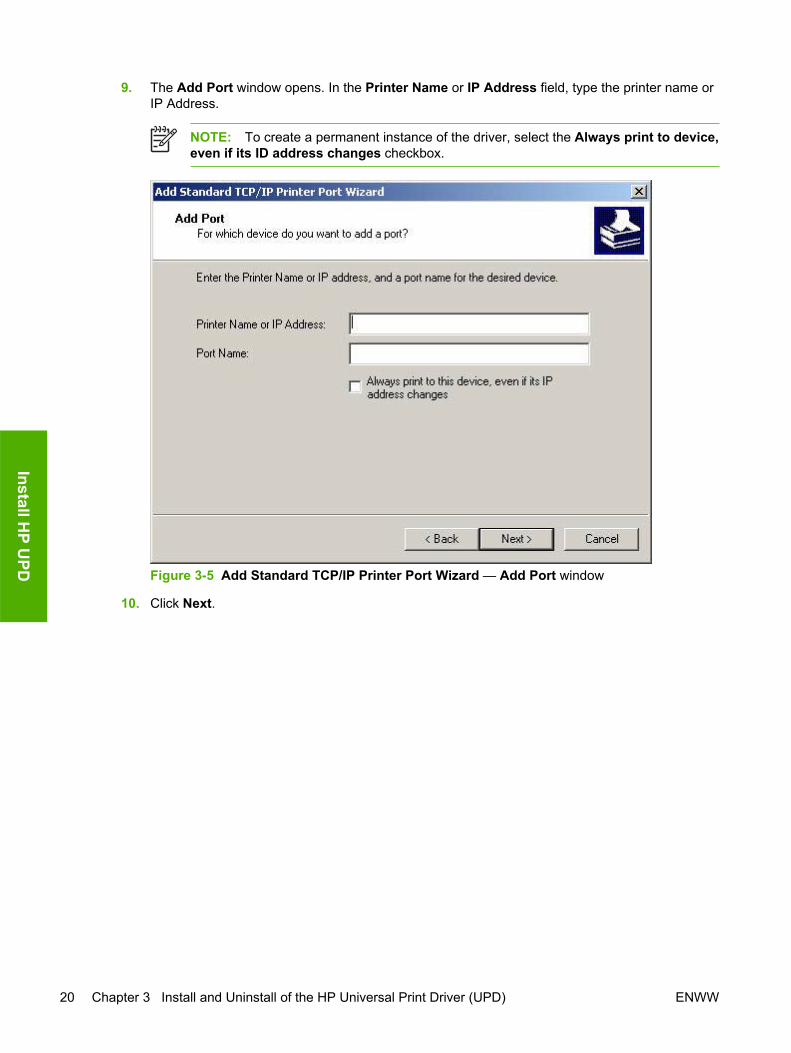
9. The Add Port window opens. In the Printer Name or IP Address field, type the printer name orIP Address.
NOTE: To create a permanent instance of the driver, select the Always print to device,even if its ID address changes checkbox.
Figure 3-5 Add Standard TCP/IP Printer Port Wizard — Add Port window
10. Click Next.
20 Chapter 3 Install and Uninstall of the HP Universal Print Driver (UPD) ENWW
Install HP U
PD
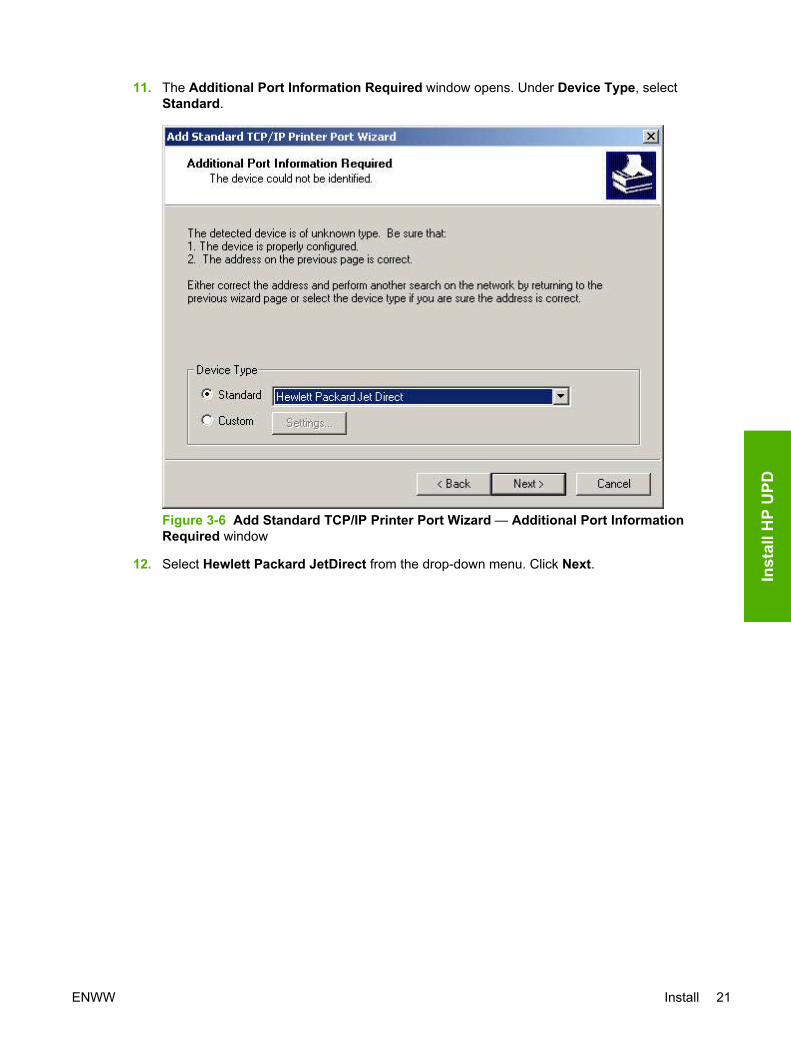
11. The Additional Port Information Required window opens. Under Device Type, selectStandard.
Figure 3-6 Add Standard TCP/IP Printer Port Wizard — Additional Port InformationRequired window
12. Select Hewlett Packard JetDirect from the drop-down menu. Click Next.
ENWW Install 21
Inst
all H
P U
PD
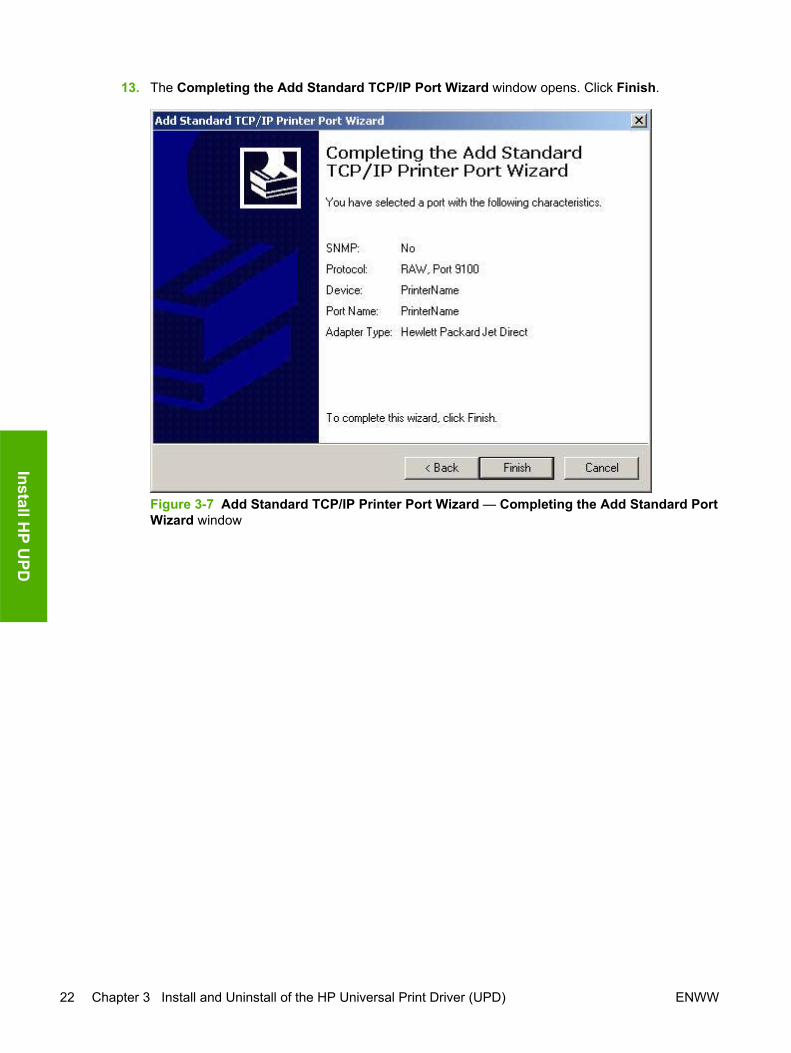
13. The Completing the Add Standard TCP/IP Port Wizard window opens. Click Finish.
Figure 3-7 Add Standard TCP/IP Printer Port Wizard — Completing the Add Standard PortWizard window
22 Chapter 3 Install and Uninstall of the HP Universal Print Driver (UPD) ENWW
Install HP U
PD
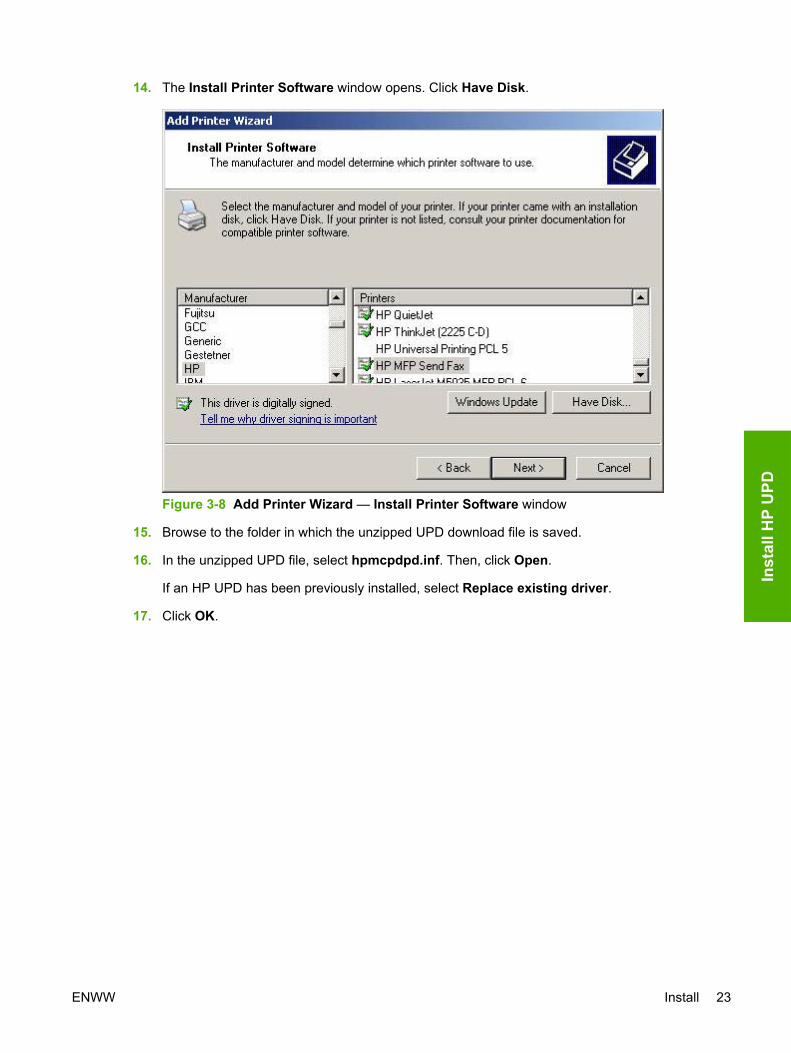
14. The Install Printer Software window opens. Click Have Disk.
Figure 3-8 Add Printer Wizard — Install Printer Software window
15. Browse to the folder in which the unzipped UPD download file is saved.
16. In the unzipped UPD file, select hpmcpdpd.inf. Then, click Open.
If an HP UPD has been previously installed, select Replace existing driver.
17. Click OK.
ENWW Install 23
Inst
all H
P U
PD
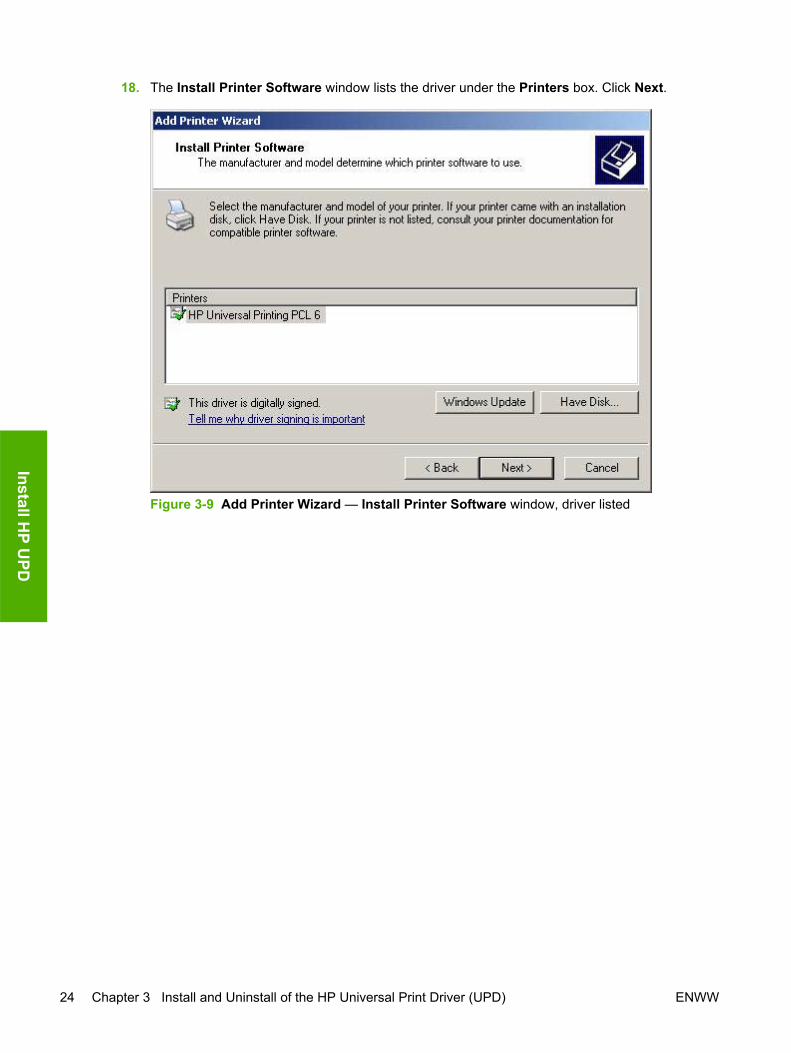
18. The Install Printer Software window lists the driver under the Printers box. Click Next.
Figure 3-9 Add Printer Wizard — Install Printer Software window, driver listed
24 Chapter 3 Install and Uninstall of the HP Universal Print Driver (UPD) ENWW
Install HP U
PD
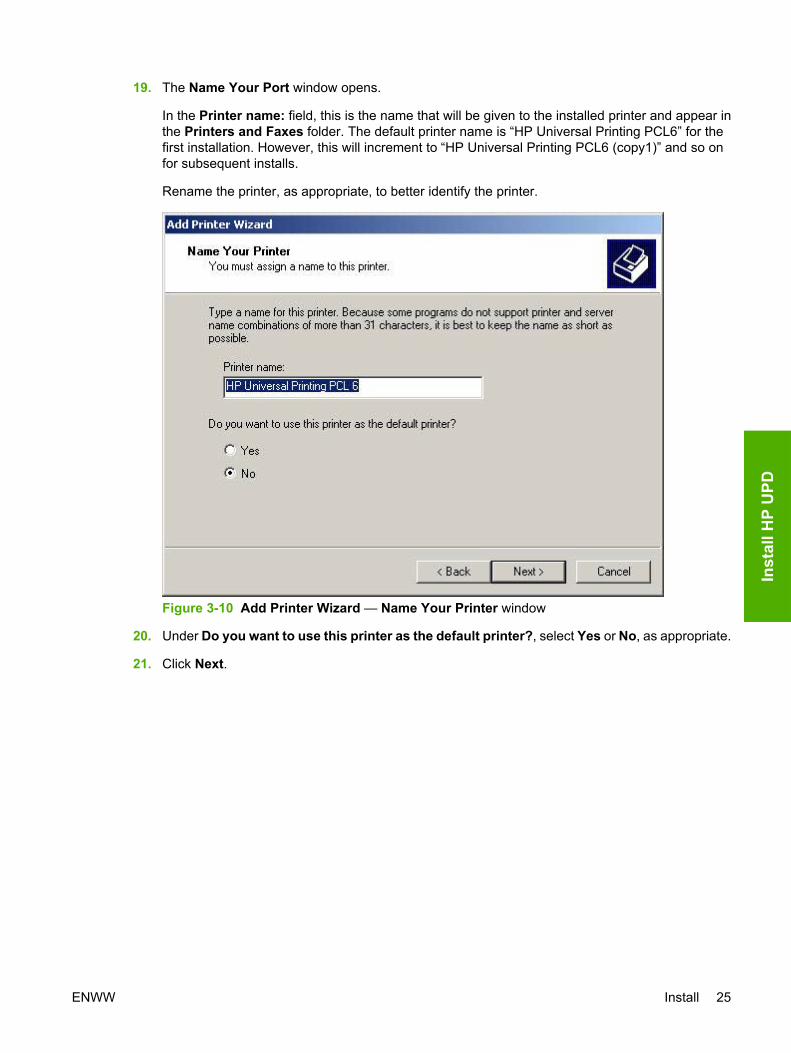
19. The Name Your Port window opens.
In the Printer name: field, this is the name that will be given to the installed printer and appear inthe Printers and Faxes folder. The default printer name is “HP Universal Printing PCL6” for thefirst installation. However, this will increment to “HP Universal Printing PCL6 (copy1)” and so onfor subsequent installs.
Rename the printer, as appropriate, to better identify the printer.
Figure 3-10 Add Printer Wizard — Name Your Printer window
20. Under Do you want to use this printer as the default printer?, select Yes or No, as appropriate.
21. Click Next.
ENWW Install 25
Inst
all H
P U
PD
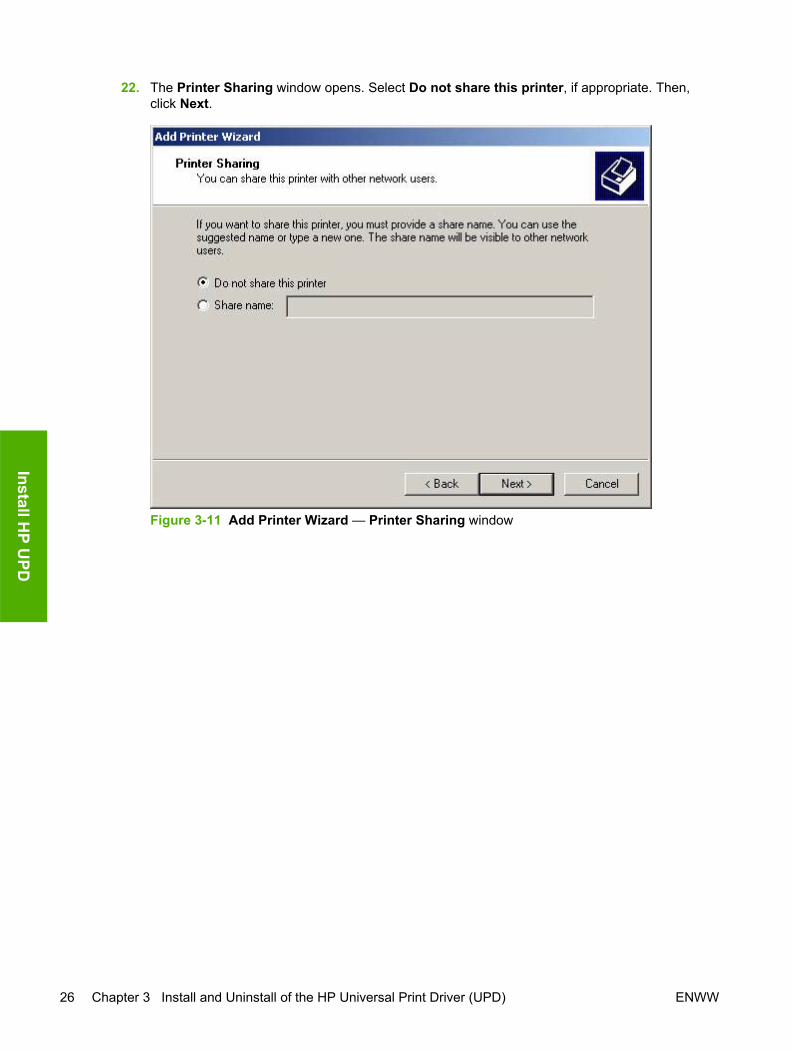
22. The Printer Sharing window opens. Select Do not share this printer, if appropriate. Then,click Next.
Figure 3-11 Add Printer Wizard — Printer Sharing window
26 Chapter 3 Install and Uninstall of the HP Universal Print Driver (UPD) ENWW
Install HP U
PD

23. The Print Test Page window opens. Select No.
Figure 3-12 Add Printer Wizard — Print Test Page window
24. The Completing the Add Printer Wizard opens. Click Finish.
Install by using the Install.exe
NOTE: Installing the HP UPD using the Install.exe allows the driver to be installed in Traditionalor Dynamic mode.
To install the HP UPD using the HP Universal Printing Installer Wizard, follow these steps:
1. Go to the following Web site:
www.hp.com/go/upd
2. Download and save the HP UPD specific to your operating system, and printing needs. (See Selectthe best print driver on page 14 for more information.)
3. Navigate to and unzip the HP UPD file.
4. Open the unzipped HP UPD folder.
5. Double-click Install.exe.
ENWW Install 27
Inst
all H
P U
PD
6. The Universal Printing Installer Wizard opens. Read the software license agreement, and thenclick Yes to continue.
Figure 3-13 HP Universal Printing Installer Wizard — Welcome and Software LicenseAgreement window
7. The Installation Mode window opens. Select Dynamic mode or Traditional mode, asappropriate.
● Dynamic mode: Creates a flexible instance of the driver, allowing you to specify a printereach time you print.
If you select Dynamic mode, click Install and continue to the next step.
● Traditional mode: Creates a permanent instance of the driver that is associated to a specificprinter.
If you select Traditional mode, click Install. The Add Printer Wizard opens. See Install usingthe Add Printer Wizard on page 16 to complete installation.
28 Chapter 3 Install and Uninstall of the HP Universal Print Driver (UPD) ENWW
Install HP U
PD
Figure 3-14 HP Universal Printing Installer Wizard — Installation Mode window
ENWW Install 29
Inst
all H
P U
PD
8. The Installing window opens. Wait for install to complete.
Figure 3-15 HP Universal Printing Installer Wizard — Installing window
30 Chapter 3 Install and Uninstall of the HP Universal Print Driver (UPD) ENWW
Install HP U
PD
9. The Finish window opens. Click Finish.
Figure 3-16 HP Universal Printing Installer Wizard — Finish window
Install by using the command promptIf you use the INSTALL.EXE file to install the HP Universal Print Driver, you can use the providedcommand options to control how the HP UPD is installed or how the HP UPD runs after it is installed.
At the command prompt, type C:\Folder\Install /option, where Folder is the location of theINSTALL.EXE file, / is a forward slash, and option is the command option. For a list of available commandoptions, see Available command options on page 32.
NOTE: To view a complete list of options, when using the installer, type the following at thecommand prompt:
c:\instll/ ?
For example, if you want the installation to be completely silent by making it available through an .EXE-based administration tool (such as AIM or SMS), type the following syntax:
C:\folder\Install /q /h
Or, if you want to install the driver in Dynamic mode, type the following:
C:\folder\Install /dm
Topics:
● Create custom installations by using command options
ENWW Install 31
Inst
all H
P U
PD
● Available command options
Create custom installations by using command optionsTo create several shortcuts so that you can create several copies of the INSTALL.EXE file, each witha different configuration, follow these steps:
1. Create a shortcut to the INSTALL.EXE file.
2. Right-click the shortcut file, and then click Properties.
3. In the Target text box, type:
C:\Folder\Install /option
where:
● Folder is the location of the INSTALL.EXE file
● / is a forward slash
● option is the command option
For example, you have an HP LaserJet 4100 printer with the IP address of 192.168.0.0 or UNCof \\server\printShare that is located in building five and is connected to your network. Youcan give this printer a descriptive name to help identify the model and location. To create aTraditional-mode instance of this printer on your Windows print server, use the appropriate syntax:
With the IP address. For example:
C:\Folder\Install /n"Bldg 5 HP LaserJet 4100" /sm192.168.0.0
With the UNC. For example:
C:\Folder\Install /n"Bldg 5 HP LaserJet 4100" /sm\\server\primetShare
For a list of available command options, see Available command options on page 32.
4. Click OK.
Available command optionsTo view the available command options, at the command prompt, type:
C:\Folder\Install /?
where:
● Folder is the location of the INSTALL.EXE file.
● / is a forward slash.
The command options are explained in the following table.
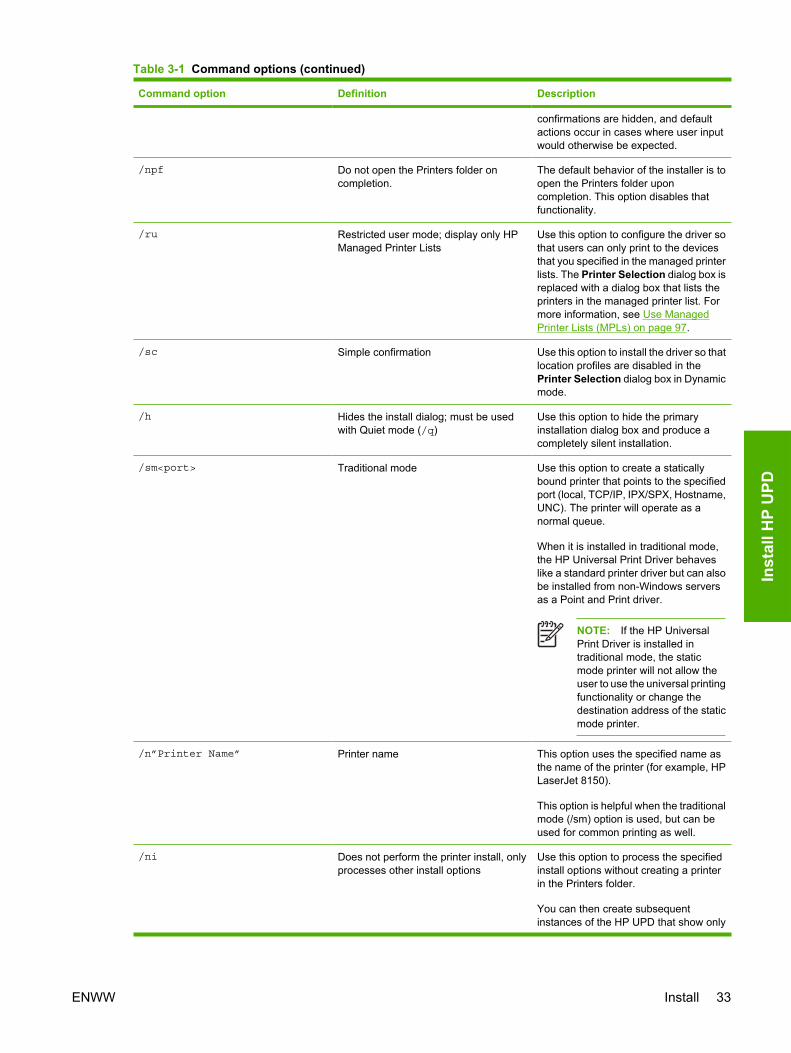
Table 3-1 Command options
Command option Definition Description
/q Quiet mode, no prompts Use this option to install the driver andpresent only a single progress dialog boxto the user. All other warnings and
32 Chapter 3 Install and Uninstall of the HP Universal Print Driver (UPD) ENWW
Install HP U
PD
Command option Definition Description
confirmations are hidden, and defaultactions occur in cases where user inputwould otherwise be expected.
/npf Do not open the Printers folder oncompletion.
The default behavior of the installer is toopen the Printers folder uponcompletion. This option disables thatfunctionality.
/ru Restricted user mode; display only HPManaged Printer Lists
Use this option to configure the driver sothat users can only print to the devicesthat you specified in the managed printerlists. The Printer Selection dialog box isreplaced with a dialog box that lists theprinters in the managed printer list. Formore information, see Use ManagedPrinter Lists (MPLs) on page 97.
/sc Simple confirmation Use this option to install the driver so thatlocation profiles are disabled in thePrinter Selection dialog box in Dynamicmode.
/h Hides the install dialog; must be usedwith Quiet mode (/q)
Use this option to hide the primaryinstallation dialog box and produce acompletely silent installation.
/sm<port> Traditional mode Use this option to create a staticallybound printer that points to the specifiedport (local, TCP/IP, IPX/SPX, Hostname,UNC). The printer will operate as anormal queue.
When it is installed in traditional mode,the HP Universal Print Driver behaveslike a standard printer driver but can alsobe installed from non-Windows serversas a Point and Print driver.
NOTE: If the HP UniversalPrint Driver is installed intraditional mode, the staticmode printer will not allow theuser to use the universal printingfunctionality or change thedestination address of the staticmode printer.
/n”Printer Name” Printer name This option uses the specified name asthe name of the printer (for example, HPLaserJet 8150).
This option is helpful when the traditionalmode (/sm) option is used, but can beused for common printing as well.
/ni Does not perform the printer install, onlyprocesses other install options
Use this option to process the specifiedinstall options without creating a printerin the Printers folder.
You can then create subsequentinstances of the HP UPD that show only
Table 3-1 Command options (continued)
ENWW Install 33
Inst
all H
P U
PD
Command option Definition Description
the configured options that are notqueue-specific.
You can also add managed printer listlocations to or remove them from a targetsystem without completely updating thesolution.
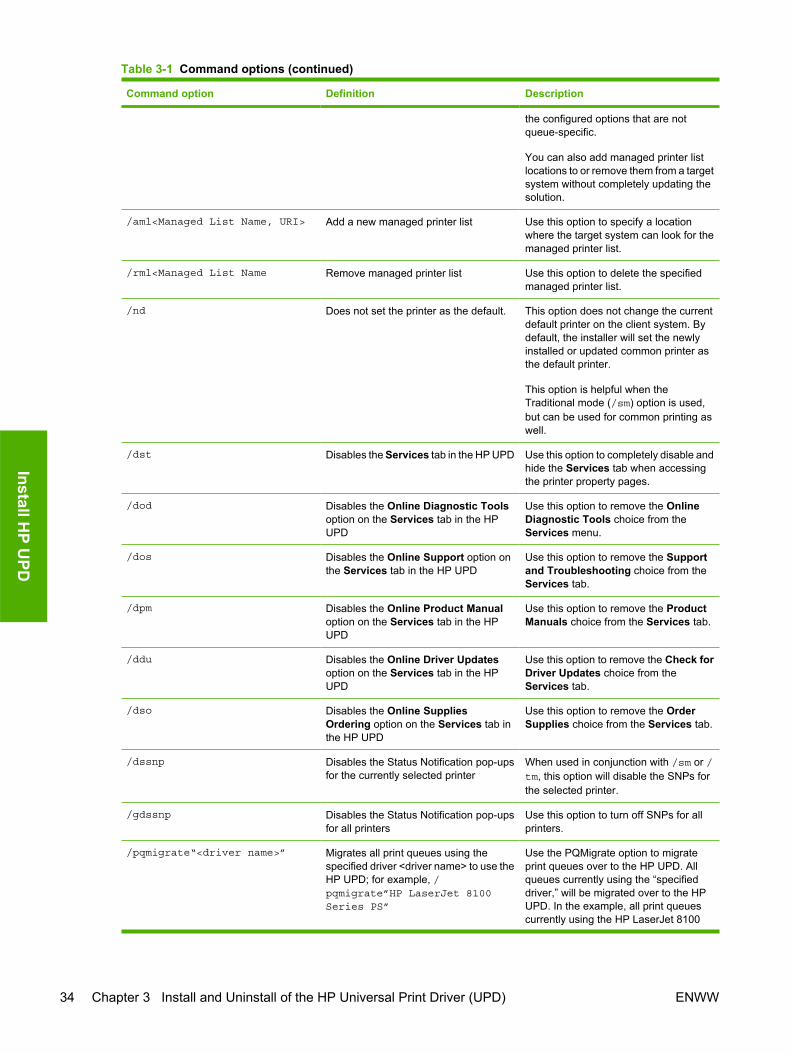
/aml<Managed List Name, URI> Add a new managed printer list Use this option to specify a locationwhere the target system can look for themanaged printer list.
/rml<Managed List Name Remove managed printer list Use this option to delete the specifiedmanaged printer list.
/nd Does not set the printer as the default. This option does not change the currentdefault printer on the client system. Bydefault, the installer will set the newlyinstalled or updated common printer asthe default printer.
This option is helpful when theTraditional mode (/sm) option is used,but can be used for common printing aswell.
/dst Disables the Services tab in the HP UPD Use this option to completely disable andhide the Services tab when accessingthe printer property pages.
/dod Disables the Online Diagnostic Toolsoption on the Services tab in the HPUPD
Use this option to remove the OnlineDiagnostic Tools choice from theServices menu.
/dos Disables the Online Support option onthe Services tab in the HP UPD
Use this option to remove the Supportand Troubleshooting choice from theServices tab.
/dpm Disables the Online Product Manualoption on the Services tab in the HPUPD
Use this option to remove the ProductManuals choice from the Services tab.
/ddu Disables the Online Driver Updatesoption on the Services tab in the HPUPD
Use this option to remove the Check forDriver Updates choice from theServices tab.
/dso Disables the Online SuppliesOrdering option on the Services tab inthe HP UPD
Use this option to remove the OrderSupplies choice from the Services tab.
/dssnp Disables the Status Notification pop-upsfor the currently selected printer
When used in conjunction with /sm or /tm, this option will disable the SNPs forthe selected printer.
/gdssnp Disables the Status Notification pop-upsfor all printers
Use this option to turn off SNPs for allprinters.
/pqmigrate“<driver name>” Migrates all print queues using thespecified driver <driver name> to use theHP UPD; for example, /pqmigrate”HP LaserJet 8100 Series PS”
Use the PQMigrate option to migrateprint queues over to the HP UPD. Allqueues currently using the “specifieddriver,” will be migrated over to the HPUPD. In the example, all print queuescurrently using the HP LaserJet 8100
Table 3-1 Command options (continued)
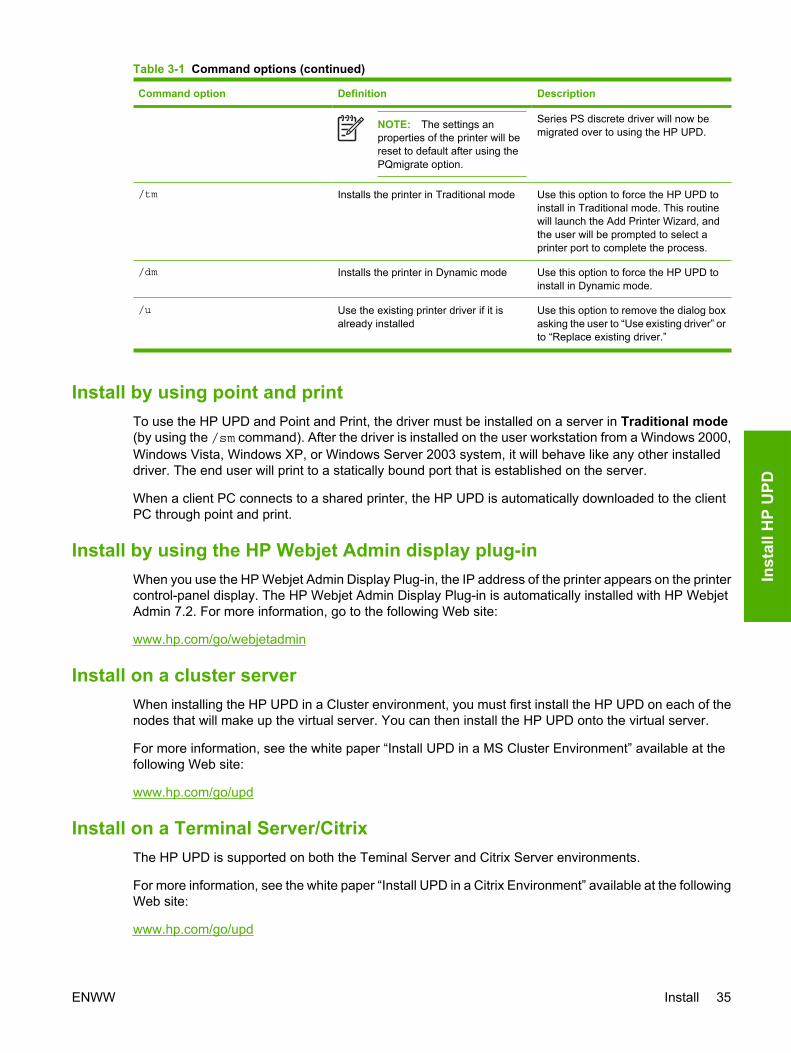
34 Chapter 3 Install and Uninstall of the HP Universal Print Driver (UPD) ENWW
Install HP U
PD
Command option Definition Description
NOTE: The settings anproperties of the printer will bereset to default after using thePQmigrate option.
Series PS discrete driver will now bemigrated over to using the HP UPD.
/tm Installs the printer in Traditional mode Use this option to force the HP UPD toinstall in Traditional mode. This routinewill launch the Add Printer Wizard, andthe user will be prompted to select aprinter port to complete the process.
/dm Installs the printer in Dynamic mode Use this option to force the HP UPD toinstall in Dynamic mode.
/u Use the existing printer driver if it isalready installed
Use this option to remove the dialog boxasking the user to “Use existing driver” orto “Replace existing driver.”
Install by using point and printTo use the HP UPD and Point and Print, the driver must be installed on a server in Traditional mode(by using the /sm command). After the driver is installed on the user workstation from a Windows 2000,Windows Vista, Windows XP, or Windows Server 2003 system, it will behave like any other installeddriver. The end user will print to a statically bound port that is established on the server.
When a client PC connects to a shared printer, the HP UPD is automatically downloaded to the clientPC through point and print.
Install by using the HP Webjet Admin display plug-inWhen you use the HP Webjet Admin Display Plug-in, the IP address of the printer appears on the printercontrol-panel display. The HP Webjet Admin Display Plug-in is automatically installed with HP WebjetAdmin 7.2. For more information, go to the following Web site:
www.hp.com/go/webjetadmin
Install on a cluster serverWhen installing the HP UPD in a Cluster environment, you must first install the HP UPD on each of thenodes that will make up the virtual server. You can then install the HP UPD onto the virtual server.
For more information, see the white paper “Install UPD in a MS Cluster Environment” available at thefollowing Web site:
www.hp.com/go/upd
Install on a Terminal Server/CitrixThe HP UPD is supported on both the Teminal Server and Citrix Server environments.
For more information, see the white paper “Install UPD in a Citrix Environment” available at the followingWeb site:
www.hp.com/go/upd
Table 3-1 Command options (continued)
ENWW Install 35
Inst
all H
P U
PD
Install by using Novell NDSSee the white paper “Install UPD in a Novell Environment” available at the following Web site:
www.hp.com/go/upd
Novell IprintNovell recently released a newer version of their Iprint client, which allows the HP UPD to communicatewith the printers and gather device specific information. Ensure that the client PCs are using the latestIprint clients when using the HP UPD.
NDPSThe HP UPD will function with limited capabilities in the Novell NDPS environment. This is due to theHP UPD not being able to communicate with the device directly, therefore loosing the ability to gatherdevice-specific information back from the printers.
36 Chapter 3 Install and Uninstall of the HP Universal Print Driver (UPD) ENWW
Install HP U
PD
UninstallTo uninstall the HP UPD, do the following:
1. From the Printers and Faxes or Printers folder, click File, and then Server Properties.
2. Click the Drivers tab.
3. Select the driver to uninstall, then click Remove.
4. A confirmation dialog appears: “Deleting this printer driver will remove it from the system. Areyou sure you want to delete the HP Universal Printing?”
Click Yes.
ENWW Uninstall 37
Inst
all H
P U
PD
38 Chapter 3 Install and Uninstall of the HP Universal Print Driver (UPD) ENWW
Install HP U
PD
4 Use HP universal print drivers
IntroductionThe HP Universal Print Driver (UPD) combines a general-purpose print driver with software that youcan use to add and print to:
● Devices on a local port
● Devices on a network
● Devices on a managed printer list
The following sections describe the HP UPD features, and the following.
Topics:
● Use the HP UPD
● Print using the HP UPD
● Manage the HP UPD
ENWW Introduction 39
Use
HP
UPD
Use the HP UPD● Universal print driver modes
● Access Printing Preferences and Properties driver tabs
● Change the general settings for the HP UPD
● Configure the HP UPD by TCP/IP address
● Define a printer location profile
● Help
Universal print driver modesThe HP UPD can be installed in one of two modes: Dynamic and Traditional. The mode in which thedriver is installed affects how the driver behaves, and the extent to which the HP UPD can be managed.
For more information about installing the HP UPD in these modes, see Install and Uninstall of the HPUniversal Print Driver (UPD) on page 15.
Dynamic modeAn HP UPD installed in Dynamic mode allows the most flexibility. An end user can print within anynetwork or print environment without downloading a product-specific driver. When printing in a mobileenvironment, the end user can print to any printer using the features within the HP UPD software.
A permanent instance of this driver can be created, and later changed if the end user moves location.
An HP UPD installed in Dynamic mode also allows for the greatest possible manageability. Theadministrator can dictate end-user user and experience of the HP UPD using such management toolsas the HP Managed Print Adminstration (MPA). (See Use HP Managed Printing Administration (MPA)software on page 55 for more information.)
Dynamic mode requires user intervention as it will present the user with a dialog screen so they canenter the IP address or host name of the printer they wish to print to. They can also use the built insearch capabilities to find printers located on their local subnet.
Traditional modeAn HP UPD installed in Traditional mode behaves like a discrete driver. During installation, the driveris associated to a specific printer, creating a permanent instance of the driver. The administrator haslimited ability to manage the driver.
Access Printing Preferences and Properties driver tabsThe processes for accessing the Printing Preferences and Properties are similar.
To access the Printing Preferences and Properties, do the following:
1. Click Start, Settings, then Printers and Faxes (in Windows XP and Windows Server 2003) orPrinters.
2. In the Printers and Faxes or Printers window, right-click the driver.
3. Click Properties or Printing Preferences, as appropriate.
40 Chapter 4 Use HP universal print drivers ENWW
Use H
P UPD
How the Printing Preferences and Properties behave is dependant upon which mode the driver wasinstalled. For more information about Printing Preferences and Properties behavior and features, seethe mode-specific section below.
Change the general settings for the HP UPDUse the HP Universal Printing Settings dialog box to perform the following actions:
● Select destination-printer prompts
● Modify printer location profiles
● Set verification level
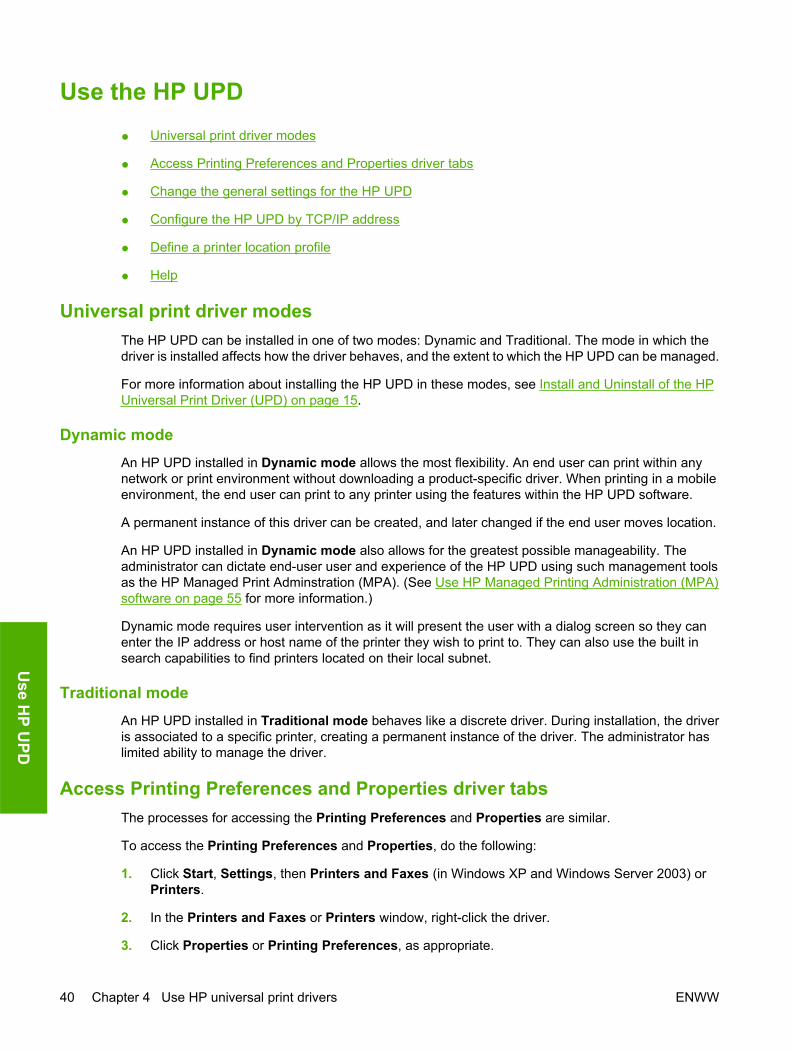
Select destination-printer promptsTo dictate how you want to be prompted for destination printers when you are printing, follow thesesteps:
1. Click HP Universal Printing Settings.
2. Click the General tab. A sample General tab is shown in the following figure.
Figure 4-1 General tab
ENWW Use the HP UPD 41
Use
HP
UPD
3. Select one of the following options:
● Always prompt for the destination when printing a job.
The HP Universal Printing dialog box appears every time HP Universal Printing is selectedas the printer. You can select a destination printer in this dialog box.
● Only prompt the first time a job is printed from an application.
The HP Universal Printing dialog box appears the first time HP Universal Printing is selectedas the printer from a program. This option is helpful if the subsequent print jobs from thatprogram will be sent to the same printer.
● Only prompt if the last known destination is no longer available.
The HP Universal Printing dialog box appears if the printer that was last used is no longeravailable.
4. Click OK.
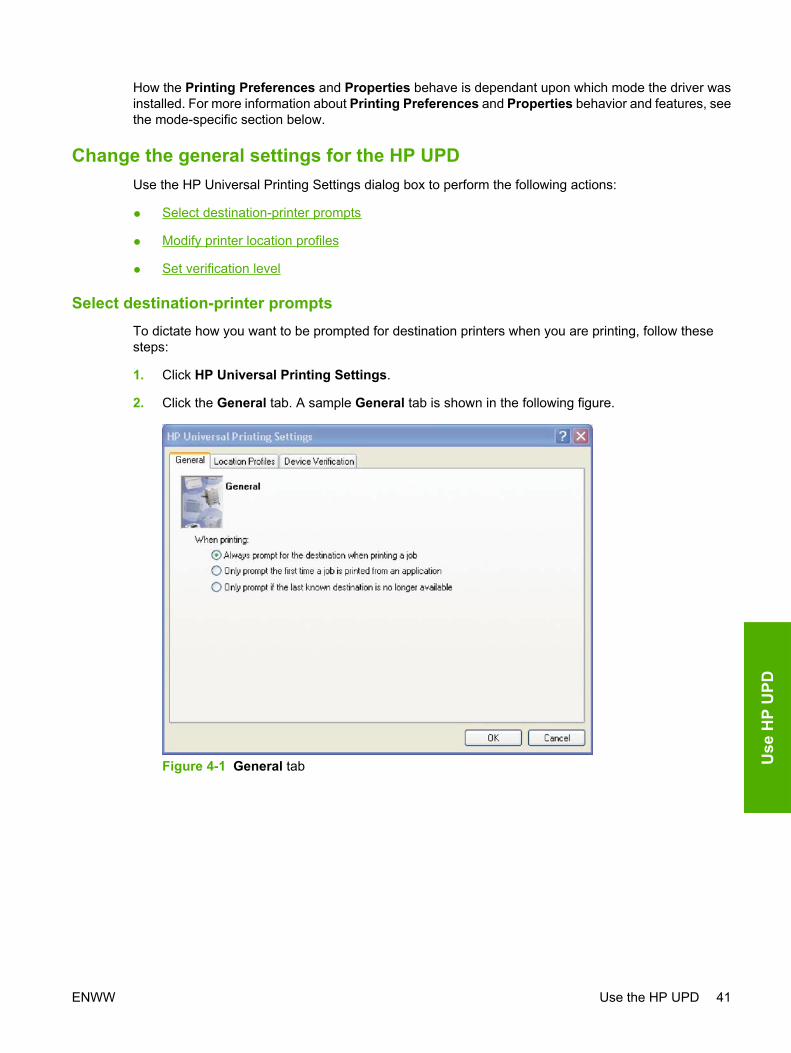
Modify printer location profilesTo modify or delete location profiles and specify the maximum number of printers, follow these steps:
1. Click HP Universal Printing Settings.
2. Click the Location Profiles tab. A sample Location Profiles tab is shown in the following figure.
Figure 4-2 Location Profiles tab
3. Select the Enable Location Profiles check box to allow location profiles to be added, modified,or deleted. You can use location profiles to organize destination printers.
4. Add, modify, or delete location profiles.
5. Specify the maximum number of printers that you want HP Universal Printing to maintain in thePrinters list. The default number is 10 printers, but the number can range from 5 to 100.
42 Chapter 4 Use HP universal print drivers ENWW
Use H
P UPD
If the number of printers in the Printers list exceeds the maximum number of printers that youspecify, HP Universal Printing deletes printers from the Printers list, beginning with the printer thathas not been used for the longest period of time.
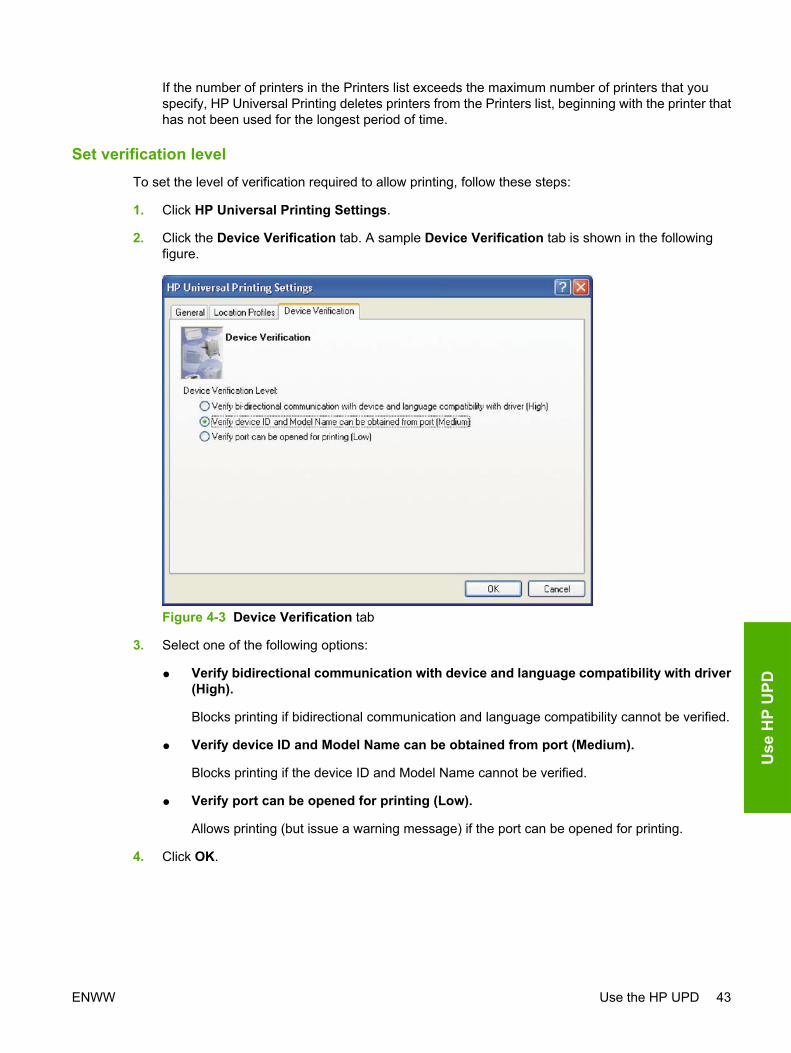
Set verification levelTo set the level of verification required to allow printing, follow these steps:
1. Click HP Universal Printing Settings.
2. Click the Device Verification tab. A sample Device Verification tab is shown in the followingfigure.
Figure 4-3 Device Verification tab
3. Select one of the following options:
● Verify bidirectional communication with device and language compatibility with driver(High).
Blocks printing if bidirectional communication and language compatibility cannot be verified.
● Verify device ID and Model Name can be obtained from port (Medium).
Blocks printing if the device ID and Model Name cannot be verified.
● Verify port can be opened for printing (Low).
Allows printing (but issue a warning message) if the port can be opened for printing.
4. Click OK.
ENWW Use the HP UPD 43
Use
HP
UPD
Configure the HP UPD by TCP/IP addressTo configure the HP UPD by TCP/IP address, follow these steps:
1. With the document open in a Windows-based software program, select File and then click Print.
2. Select HP Universal Printing from the Printer Name drop-down menu and then click OK orPrint.
Depending on whether the TCP/IP address is known or unknown, continue with one of the followingprocedures:
● TCP/IP address is known
● TCP/IP address is unknown
TCP/IP address is knownIf the IP address, Host, or UNC path name is known, when the HP Universal Printing dialogue boxappears, type the IP address or network path of the HP UPD-enabled printer.
TCP/IP address is unknownThis option allows the user to search for shared printers on the network. Here you can enter the networkprinter address of the print server followed by the share name of the printer, or browse the network forprint servers. An example of the network printer address would be \\PrintServer\hplj900mfp.
If the TCP/IP address is unknown, do the following:
1. When the HP Universal Printing dialog box appears, click Search... to launch the Welcome to theHP Universal Printing Destination Wizard.
The HP UPD performs a network (mDNS) local query to discover available printers.
2. Select the type of printer from the Search... pull-down menu. Select one of the following optionsfor connecting with a printer.
Local Ports
a. Open the Local Ports window.
b. In the Local Ports option window, select the HP postscript emulation or PCL-enabled printeryou want for your destination printer by port type, DOT4 or USB, and press Finish to returnto the HP Universal Printing window.
Network Print Shares
a. Open the Network Print Shares window.
b. Click Browse. The Browse for Printer window appears.
c. Navigate through the directory tree to locate the desired print servers.
d. Select the printer and click OK to return to the Network Print Shares window. The selectedprinter appears in the Destination Printer field.
e. Click Finish to return to the HP Universal Printing window.
44 Chapter 4 Use HP universal print drivers ENWW
Use H
P UPD
Network Printers
● When searching for network printers, the HP UPD will preform an mDNS broadcast on thelocal subnet only. Only printers on the local subnet, and those with the mDNS protocol enabledwill respond and be listed in the Printers box.
● When the list is updated, select the printer that you want for your destination printer andclick Finish to return to the HP Universal Printing window.
HP Managed Printer List
a. If your administrator has created printer lists, the names of each of the printer lists will appearin the Search drop-down window, along with the options for local ports, Network Print Shares,and Network Printers. Click the appropriate printer list and select the printer you wish to printto.
b. Select the printer that you want for your destination printer and click Finish to return to theHP Universal Printing window.
NOTE: For more information, see Use HP Managed Printing Administration (MPA)software on page 55.
3. Click OK to exit the HP Universal Printing software and return to the main Print window.
Define a printer location profileIf you travel between work sites, you can use the definable printer location profile to group printers ateach site. At multiple building sites, you can group the printer by building names.
To define a printer location profile, follow these steps:
1. With the document open in a Windows-based software program, select File and then click Print.
2. Select HP Universal Printing from the Printer Name drop-down menu and then click OK orPrint.
3. Select the HP Universal Printing Settings link. The HP UPD search dialog box appears.
4. At the Location Profile, click New to create a new printer location profile
5. Type the name of the new location profile and click OK.
6. Select the new profile in the Location Profile options box.
7. The printer you choose or search for now will be entered in the location profile you just created.
NOTE: Add printers can only be done in the HP Universal Printing dialog box.
HelpClick the Help button in the HP Universal Print Driver software to open the HP Universal Print Driver forWindows User Guide.
To find information about a specific dialog box option, right-click the dialog box option, and then clickWhat's This?.
ENWW Use the HP UPD 45
Use
HP
UPD
Print using the HP UPDHow one prints using the HP UPD depends upon the mode in which the HP UPD was installed.
An HP UPD installed in Dynamic mode will function within the constraints the administrator establishesto manage the printer. Thus, if a feature does not behave normally, the administrator may have limitedthe functionality.
An HP UPD installed in Traditional mode will function like a discrete driver. The HP UPD will behaveaccording to the driver features available for the device to which the driver is tied.
See the following sections for more information. This section has been divided according to theinstallation method, as the installation method dictates how the HP UPD behaves.
● Dynamic mode
● Traditional mode
Dynamic modeTo print a document by using the HP Universal Print Driver in Dynamic mode, perform the followingsteps:
1. Open the file that is to be printed.
2. On the File menu, click Print.
3. In the Print dialog box, select HP Universal Printing from the printer list.
4. Click OK or Print, or click Properties or Setup. (The options vary from one software program toanother.) The HP Universal Printing dialog box appears.
5. Depending on how your administrator configured the driver, perform one of the following steps:
● Select the location profile and destination printer to which you want to print.
● Select the printer to which you want to print from a managed printer list dialog or an interfaceset up by your administrator.
NOTE: To add a destination printer, see Add a destination printer on page 48.
6. Modify print settings as necessary, and then click OK.
NOTE: These steps only occur on the first use of the driver after installing. All subsequentprinting will automatically go to the last selected printer.
Change the selected printerOnce the print driver is setup, all printing using that driver automatically goes to the selected printer. Tochange this selected printer, follow these steps:
1. In the Printers and Faxes or Printers window, right-click the driver.
2. Click Properties or Printing Preferences, as appropriate.
46 Chapter 4 Use HP universal print drivers ENWW
Use H
P UPD
3. On the Print Properties page, select another printer either through the drop down menu, or bysearching.
4. Click OK. All subsequent printing will now be directed to the new printer.
Traditional modeAn HP UPD installed in Traditional mode will function like a product-specific driver.
See the product-specific documentation for more product-specific driver information.
Printing in Traditional modeTo print in using an HP UPD in Traditional mode, do the following:
1. In the application, click File, and then click Print.
2. The Print dialogue will open. Select the from the list of available printers.
3. Click Properties and modify the driver features, as appropriate. (For example, select theFinishing tab, and select Print on both sides.)
Then, click OK when complete.
4. Click Print.
ENWW Print using the HP UPD 47
Use
HP
UPD
Manage the HP UPD● Manage destination printers
● HP UPD features
Manage destination printersYour administrator may have installed the HP Universal Print Driver (UPD) so that it behaves like aregular printer driver (Traditional mode). In this case, the HP UPD is bound to a single printer, thereforeyou will not have the ability to change the destination address.
In Dynamic mode, depending on how your administrator set up the HP UPD, you can either search forprinters over the network or select from a defined list of printers. Your administrator may also havedefined a managed print policy (MPP) that determines which search options are available and how theprinter selection window works.
If you do not know the IP address, host name, or UNC path you can search for the destination printer(if it is connected via a supported connection type, such as Bluetooth technology).
Add a destination printerTwo procedures are available to add destination printers:
● Adding a destination printer by specifying the IP address, host name, IPX/SPX address, or UNCpath.
● Adding a destination printer using the Destination Wizard.
Specify the IP address, host name, IPX/SPX address, or UNC path
1. Select the location profile to which you want to add a destination printer. To create a new locationprofile, see Creating a category for destination printers.
2. In the HP Universal Printing dialog box, type the IP address (for example, 192.168.0.0), host name(for example, NPIEBB9E.mycorp.com), IPX/SPX address (NetworkNumber.Hardware Address; forexample, 006420.00IAEA0090), or Universal Naming Convention (UNC) path (for example, \\servername\sharename) of a printer.
3. Type a nickname for the printer so that when you need to select a destination printer from the list,you do not have to remember the IP address, host name, IPX/SPX address, or UNC path that isassociated with the printer.
4. Select the Make a permanent instance of this printer in my Printers folder check box to have theselected destination printer listed in both the Printers folder and the Print dialog box of the programthat you are using.
48 Chapter 4 Use HP universal print drivers ENWW
Use H
P UPD
Use the HP Universal Printing Destination Wizard
If you do not know the IP address, host name, IPX/SPX address, or UNC path of a printer, you can usethe HP Universal Printing Destination Wizard to search for a printer. You can search for the followingtypes of printers:
● Local transmission control protocol/Internet protocol (TCP/IP) printers that are connected to thenetwork. When this option is selected, the HP Universal Printing Destination Wizard searches forDNS-compliant products, and depending on how the network is setup, this search could cover asubnetwork (for example, all of the computers in one geographic location, such as a building) oran entire network.
● Printers that are shared on a network.
● Printers that your administrator has added to a managed printer list.
● Printers that are connected to a local port, such as LPT1 or USB.
Search for a destination printerTo search for a destination printer
1. Select the location profile to which you want to add a destination printer. To create a new locationprofile, see Define a printer location profile on page 45.
2. Click the Search button to open the HP Universal Printing Destination Wizard. You can use thiswizard to search for a printer.
3. Select the type of printer that you want to search for, and then click Next.
4. Do one of the following:
● If you selected Local Ports, select one of the printers in the Ports list.
● If you selected Network Print Shares, browse to a printer on the network.
● If you selected HP Managed Printer Lists, select a printer from the managed printer list.
● If you selected Network Printers, follow the instructions in the Wizard.
5. Click Finish.
6. Type a nickname for the printer so that when you need to select a destination printer from the list,you do not have to remember the IP address, host name, IPX/SPX address, or UNC path that isassociated with the printer.
7. If available, select the Make a permanent instance of this printer in my Printers folder checkbox to have the selected destination printer listed in both the Printers folder and the Print dialogbox of the program that you are using.
8. Click OK. The destination printer is added to the location profile.
Create location filesYou can group destination printers into categories or location profiles. For example, if you work in twodifferent offices, then you can name one location profile "NewYork" and the other location profile"London." Then, you can add the applicable destination printers to each location profile.
ENWW Manage the HP UPD 49
Use
HP
UPD
To add a location profile
1. In the HP Universal Printing dialog box, click New.
2. Type the name of the profile location in the Name box, and then click OK.
3. To add a printer to the new location profile, type the IP address (for example, 192.168.0.0), hostname (for example, NPIEBB9E.mycorp.com), IPX/SPX address (NetworkNumber.HardwareAddress; for example, 006420.00IAEA0090), or Universal Naming Convention (UNC) path (forexample, \\servername\sharename) of a printer. If you do not know the IP address, host name,IPX/SPX address, or UNC path of a printer, click the Search button to search for a printer or askan administrator.
Cache printer settingsPrinter settings can be cached to allow switching of physical devices while maintaining the same TCP/IP address.
This element (<Policy>node member) can be used to control how often the current MPP is to berefreshed. What this means is that MPP content that is downloaded will be cached for the specified (ordefault) amount of time, and any future requests for retrieval of the MPP will result in using the cachedcontent.
HP UPD features
Status notification pop-ups (SNPs)For more information describing management of the SNPs for the HP UPD, see the White paper titled,“HP Universal Print Driver Series for Windows — Managing the Status Notification Pop-ups (SNP).”
NOTE: To access the White paper, do the following:
1. Go to the following: www.hp.com/go/upd
2. Click Technical Support, then click Manuals.
3. Then, click the desired White paper.
The status notification pop-up (SNP) feature provides immediate job and printer status information tothe client computer.
● Printer status and error messages.
Provides users with printer status information so they can respond to and resolve many minorprinter problems such as an open cover or paper jams reducing the number of Help Desk calls.
● Dashboard view of supply levels.
This allows users to plan ahead and ensure that there are sufficient supplies in the printer prior toprinting large print jobs. It also provides current information about printer consumables such astoner and paper levels.
● Links to the HP SureSupply ordering system.
50 Chapter 4 Use HP universal print drivers ENWW
Use H
P UPD
This makes it convenient to order genuine HP supplies. Click on the SNP Windows option “Shopfor Supplies” to access the HP SureSupply ordering system.
● Links to HP Support pages.
Get instant support for many printer problems by clicking on “HP Support” to get detailedinformation on printer status and error messages.
The Status Notification Pop-ups (SNP) feature, which appears during the submittal of a print job, canbe configured through several tools that are available to administrators.
When the UPD is selected for printing, it attempts to communicate directly with the printer to gatherstatus and job information during printing. By querying the printer through SNMP get commands,network traffic is kept to a minimum because it occurs only during printing. If the UPD is unable tocommunicate with the printer, possibly because of security settings or because of the SNMP communitynames that are set on the printing devices, then the pop-ups will not appear on the client machines.Normal printing will not be affected. The following figure shows a sample SNP.
Figure 4-4 Status notification pop-up (sample)
The following links appear at the bottom of the pop-up:
● Notification Settings
Click this link to open the Notification Settings dialog box. The following settings are available:
NOTE: The Notification Settings link appears in the pop-up only in environments whereno managed print policies have been configured for the network. For more information, seeyour administrator.
● Enabled. When this option is selected, you must select on of the following settings: WheneverI print to the printer; When there is a warning or error; and When there is an error (printerhas stopped).
● Disabled. Select this option to disable pop-up messages for any printer condition.
NOTE: When disabled, the pop-ups cannot easily be re-enabled. It will be necessaryto reinstall the UPD printer or change the Windows registry.
ENWW Manage the HP UPD 51
Use
HP
UPD

Figure 4-5 Notification Settings dialog box
● HP Support
● Shop for Supplies
● Supplies Details
NOTE: In enterprise environments where the domain name does not end in .local, the HP UPDwill programmatically disable the HP Support and Shop for Supplies links. In most of theseenvironments, the ordering of supplies is handled by internal centralized ordering personnel, andinternal Help Desks exist to assist end users with day to day problem resolution.
● Configure SNPs
● HP Managed Printing Administration (MPA)
● HP Driver Preconfiguration
● Registry settings
Configure SNPs
SNPs can be configured and managed in several ways, depending on your environment and deploymentstrategy. If you wish to configure the HP UPD prior to deployment. HP recommends the followingmethods:
HP Managed Printing Administration (MPA)
Unlike any other print driver, the HP UPD can be controlled by a Managed Printer Policy (MPP). A MPPis an XML document that controls the driver operation mode in a particular printing environment. Inaddition, the MPPs can also manage the behavior of the SNPs each printer user will experience. Thenew HP Managed Print Adminstration tool (MPA) allows print administrators to create MPP to attain thedesired SNP experience. The HP MPA tool is available at: www.hp.com/go/mpa.
See Use HP Managed Printing Administration (MPA) software on page 55 for more information.
HP Driver Preconfiguration
HP’s Driver Pre-configuration utility is a software application that Information Technology (IT)administrators can use to pre-configure the HP UPD before deploying and installing it in 4 an operating
52 Chapter 4 Use HP universal print drivers ENWW
Use H
P UPD
environment. It is most beneficial when configuring the HP UPD for multiple workstations or print serversfor print queues that share the same configuration.
Follow these steps to pre-configure the SNP behavior of the HP UPD.
1. Download and launch the DMC driver Pre-configuration utility (www.hp.com/go/hpdriverpreconfig).You will see a message indicating that depending on how the HP UPD driver is installed, changesmade to the HP UPD may invalidate the digital signature and Microsoft may display a warningmessage. This is normal behavior. Click OK to continue.
2. Click File, then Open and browse to the directory where the HP UPD resides.
3. Select the HP UPD’s .inf file and click the Open button. The following screen will appear.
4. Click Device settings and expand the SSNP_Level listing by clicking the Plus sign (+). Selectthe SNP characteristics you desire.
5. When finished, click File and Save to complete.
A file will be created in the same folder as the HP UPD file named hpmcpd25.cfg. This configuration filewill follow all installations of the HP UPD and control the SNP behavior for each installation. Foradditional information on the HP Driver Pre-configuration utility, please refer to the PDF manual that isincluded in the download image of the HP Pre-configuration utility.
The HP Driver Pre-configuration utility is also available as a plug-in for HP’s Webjet Admin application.Refer to the WJA documentation for instructions on using the Driver Preconfiguration within WJA.Download the HP Driver Pre-configuration plug-ins via: http://www.hp.com/go/wja_components
Registry settings
All of the previous methods for changing the behavior of SNP make changes to the specific registrysettings. It is also possible to directly change the SNP settings by editing the registry directly. Editingthe registry to modify SNP behavior is beyond the scope of this document.
The registry location below contains the entries that modify the SNP behavior for each installed printeron the client PC or server. Modify the SNP behavior by making changes to each of the installed printers.
HKEY_LOCAL_MACHINE\SYSTEM\CurrentControlSet\Control\Print\Printers\<PrinterName>\PrinterDriverData
Where <PrinterName> represents the names of each of your installed printers.
Table 4-1 SNP settings
Setting Type Value
SSNPDeviceUpdateInterval REG_DWORD 0x00000000 (0)
0 = Normal, 1 = Minimize
SSNPNotifyEventSetting REG_DWORD 0x00000001 (1)
0 = Disabled, 1 = When Printing, 2 = OnWarnings or Errors 3 = On Errors only
SSNPShowAlertLink REG_DWORD 0x00000001 (1)
0 = Hide, 1 = Show
SSNPShowShopLink REG_DWORD 0x00000000 (0)
0 = Hide, 1 = Show
ENWW Manage the HP UPD 53
Use
HP
UPD
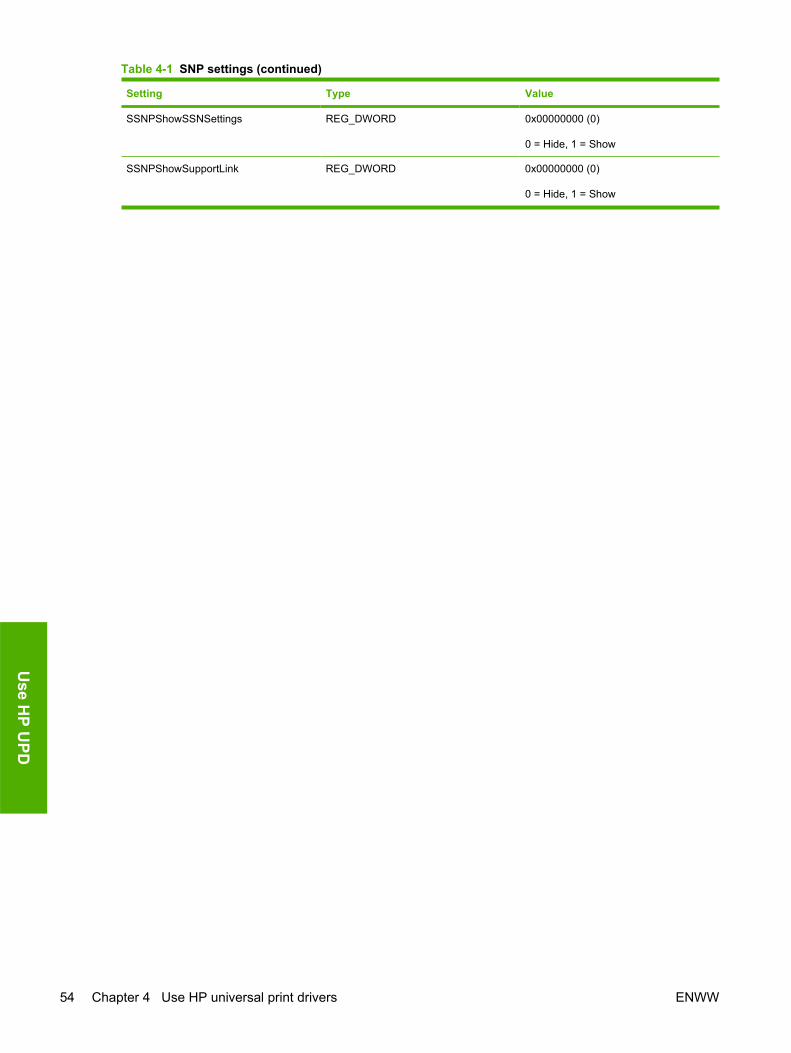
Setting Type Value
SSNPShowSSNSettings REG_DWORD 0x00000000 (0)
0 = Hide, 1 = Show
SSNPShowSupportLink REG_DWORD 0x00000000 (0)
0 = Hide, 1 = Show
Table 4-1 SNP settings (continued)
54 Chapter 4 Use HP universal print drivers ENWW
Use H
P UPD
5 Use HP Managed PrintingAdministration (MPA) software
IntroductionThe HP Managed Print Adminstration (MPA) software provides a method to create controlled andcustomized print environment using an HP Universal Print Driver (UPD).
The HP MPA software consists of three main components:
● Managed Printer Policies (MPPs)
● Managed Printer Lists (MPLs)
● User Groups
For more information, see the HP MPA Web site: www.hp.com/go/mpa
Topics:
● Install and uninstall the HP MPA software
● Access HP MPA
● Use Help
● Use Managed Printer Policies (MPPs)
● Use Managed Printer Lists (MPLs)
● Use User Groups
ENWW Introduction 55
HP
MPA
Install and uninstall the HP MPA softwareBy default, the HP UPD assumes that the HP MPA will be installed on a server named managed-print. As a result, the HP UPD will search the network for http://managed-print for Managed PrinterPolicies or Managed Printer Lists. If you plan on installing the HP MPA on a computer with a name otherthan managed-print, you will have to change the HP UPD default settings. To change the HP UPDdefault behavior, use the following switch options when installing the HP UPD.
Install /Policy”<computername>” or Install /Policy”<IPaddress>” where thecomputername or IP address represents the name of the computer with HP MPA installed.
For example, if you plan on installing the HP MPA on a server named mgmt-srvr, you would use thefollowing install command for the HP UPD:
Install /Policy”mgmt-srvr”
● HP MPA software requirements
● Software availability
● Install the HP MPA software
● Uninstall the HP MPA software
HP MPA software requirementsSystem requirements for the HP MPA software are as follows:
● One of the following MS Windows operating systems:
● MS Windows Vista
● MS Windows 2000
● MS Windows XP
● MS Windows Server 2003
● Microsoft Internet Information Services (IIS)
● HP PCL 6, HP PCL 5, or HP PS emulation printers (HP LaserJet 4000 or higher)
Other supported environments and standards are as follows:
● Protocol: TCP/IP protocol for Windows
● Browsers: Microsoft Internet Explorer 5.5 and FireFox 1.5
The graphic interface of the HP MPA software also requires Java Plug-in 1.4 or later (Java Plug-inV1.1.1). This plug-in is available at the following Web site:
http://java.com/en/download/index.jsp
Software availabilityThe HP MPA is currently available in the following languages:
● English
56 Chapter 5 Use HP Managed Printing Administration (MPA) software ENWW
HP M
PA
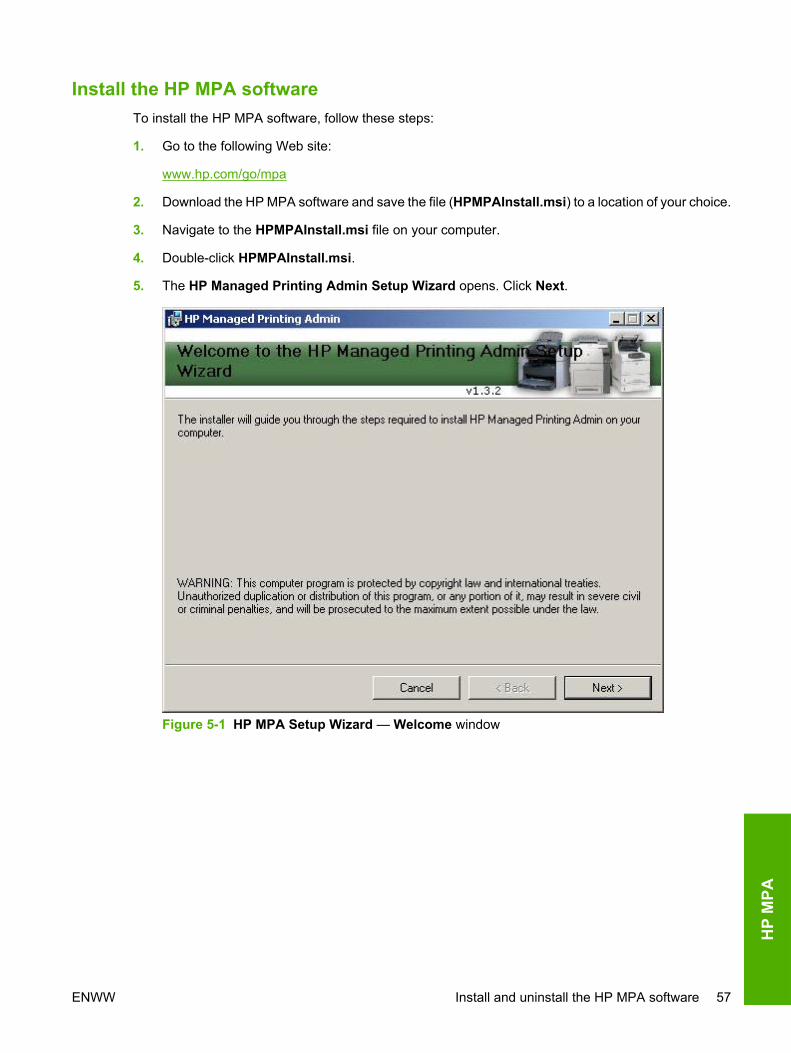
Install the HP MPA softwareTo install the HP MPA software, follow these steps:
1. Go to the following Web site:
www.hp.com/go/mpa
2. Download the HP MPA software and save the file (HPMPAInstall.msi) to a location of your choice.
3. Navigate to the HPMPAInstall.msi file on your computer.
4. Double-click HPMPAInstall.msi.
5. The HP Managed Printing Admin Setup Wizard opens. Click Next.
Figure 5-1 HP MPA Setup Wizard — Welcome window
ENWW Install and uninstall the HP MPA software 57
HP
MPA
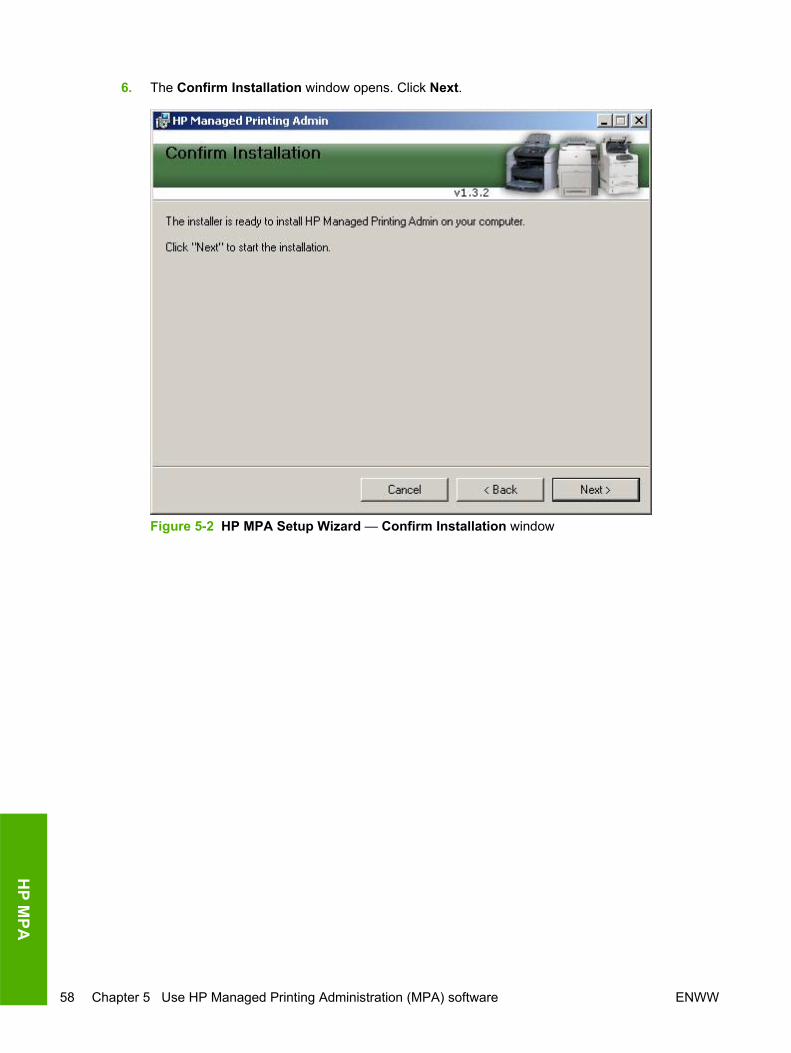
6. The Confirm Installation window opens. Click Next.
Figure 5-2 HP MPA Setup Wizard — Confirm Installation window
58 Chapter 5 Use HP Managed Printing Administration (MPA) software ENWW
HP M
PA
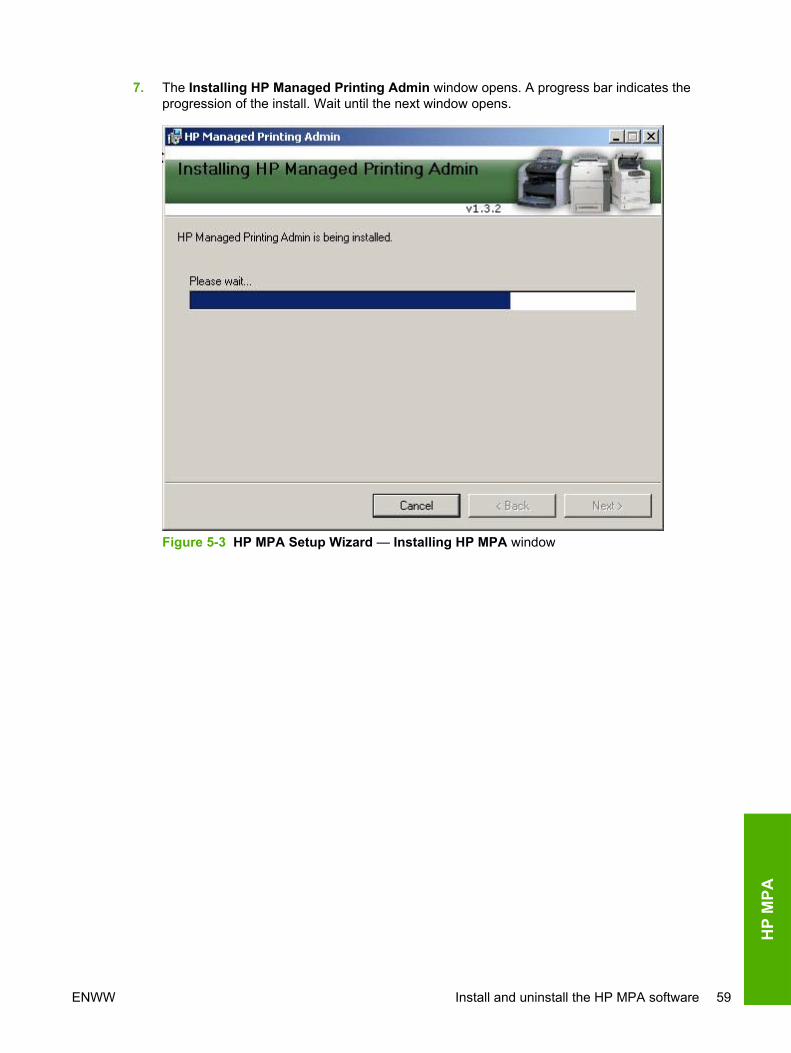
7. The Installing HP Managed Printing Admin window opens. A progress bar indicates theprogression of the install. Wait until the next window opens.
Figure 5-3 HP MPA Setup Wizard — Installing HP MPA window
ENWW Install and uninstall the HP MPA software 59
HP
MPA
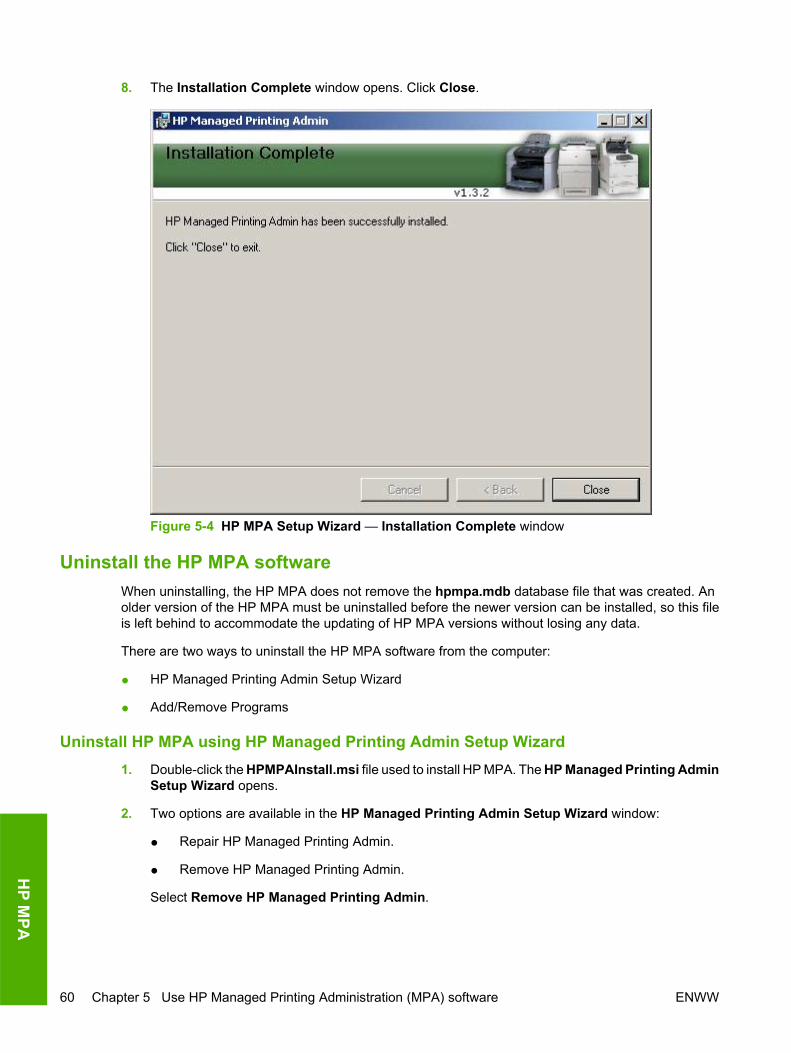
8. The Installation Complete window opens. Click Close.
Figure 5-4 HP MPA Setup Wizard — Installation Complete window
Uninstall the HP MPA softwareWhen uninstalling, the HP MPA does not remove the hpmpa.mdb database file that was created. Anolder version of the HP MPA must be uninstalled before the newer version can be installed, so this fileis left behind to accommodate the updating of HP MPA versions without losing any data.
There are two ways to uninstall the HP MPA software from the computer:
● HP Managed Printing Admin Setup Wizard
● Add/Remove Programs
Uninstall HP MPA using HP Managed Printing Admin Setup Wizard1. Double-click the HPMPAInstall.msi file used to install HP MPA. The HP Managed Printing Admin
Setup Wizard opens.
2. Two options are available in the HP Managed Printing Admin Setup Wizard window:
● Repair HP Managed Printing Admin.
● Remove HP Managed Printing Admin.
Select Remove HP Managed Printing Admin.
60 Chapter 5 Use HP Managed Printing Administration (MPA) software ENWW
HP M
PA
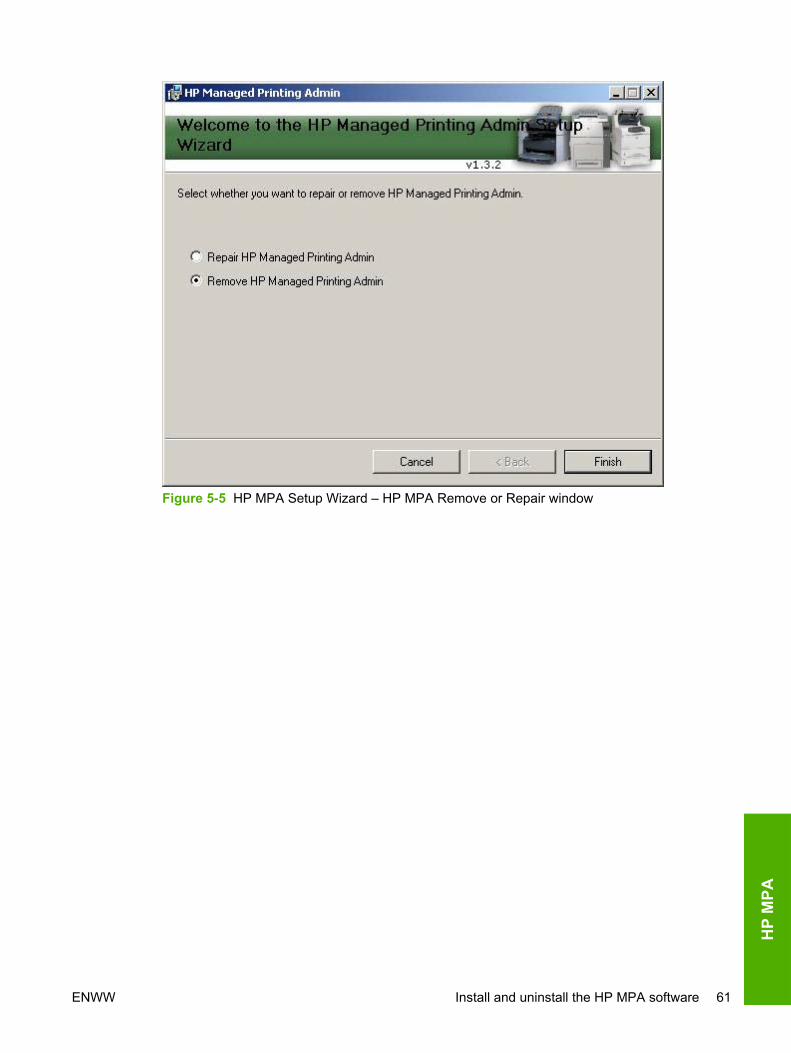
Figure 5-5 HP MPA Setup Wizard – HP MPA Remove or Repair window
ENWW Install and uninstall the HP MPA software 61
HP
MPA
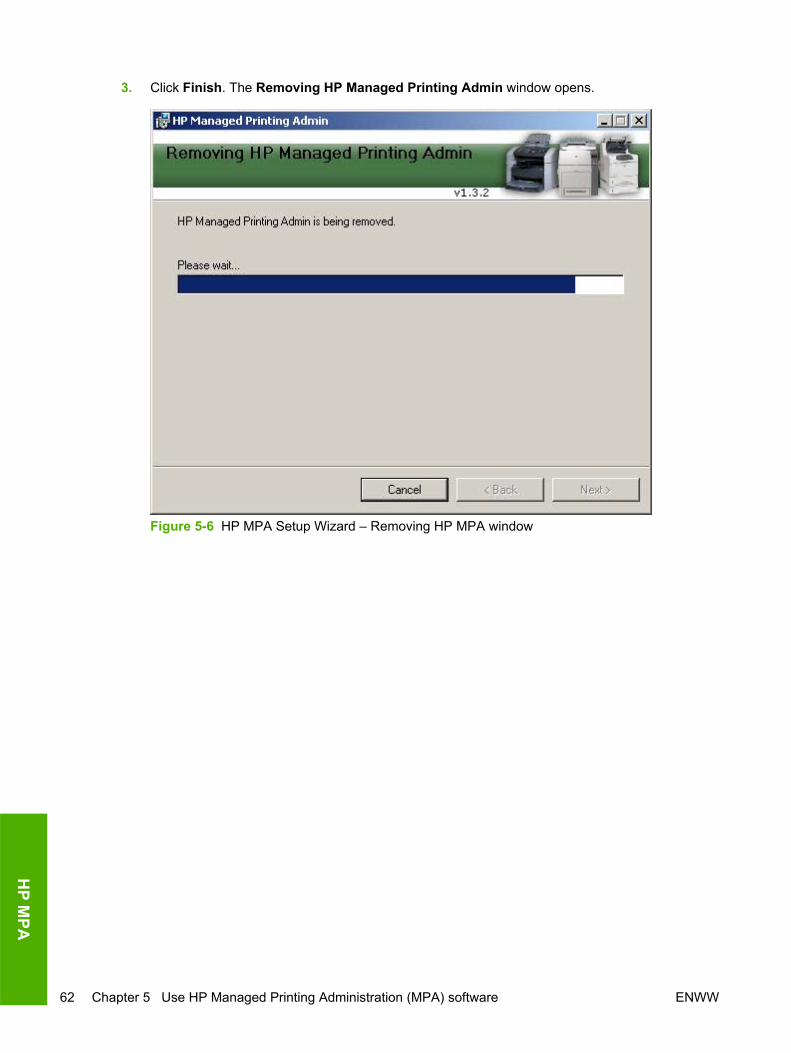
3. Click Finish. The Removing HP Managed Printing Admin window opens.
Figure 5-6 HP MPA Setup Wizard – Removing HP MPA window
62 Chapter 5 Use HP Managed Printing Administration (MPA) software ENWW
HP M
PA
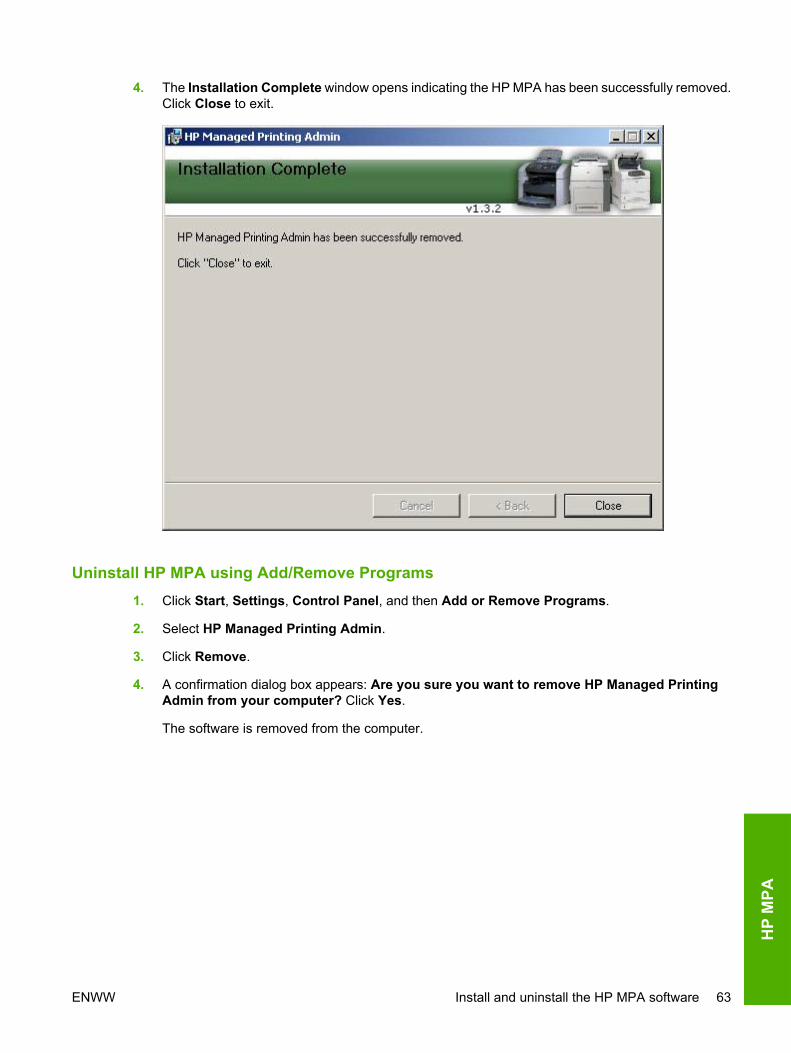
4. The Installation Complete window opens indicating the HP MPA has been successfully removed.Click Close to exit.
Uninstall HP MPA using Add/Remove Programs1. Click Start, Settings, Control Panel, and then Add or Remove Programs.
2. Select HP Managed Printing Admin.
3. Click Remove.
4. A confirmation dialog box appears: Are you sure you want to remove HP Managed PrintingAdmin from your computer? Click Yes.
The software is removed from the computer.
ENWW Install and uninstall the HP MPA software 63
HP
MPA
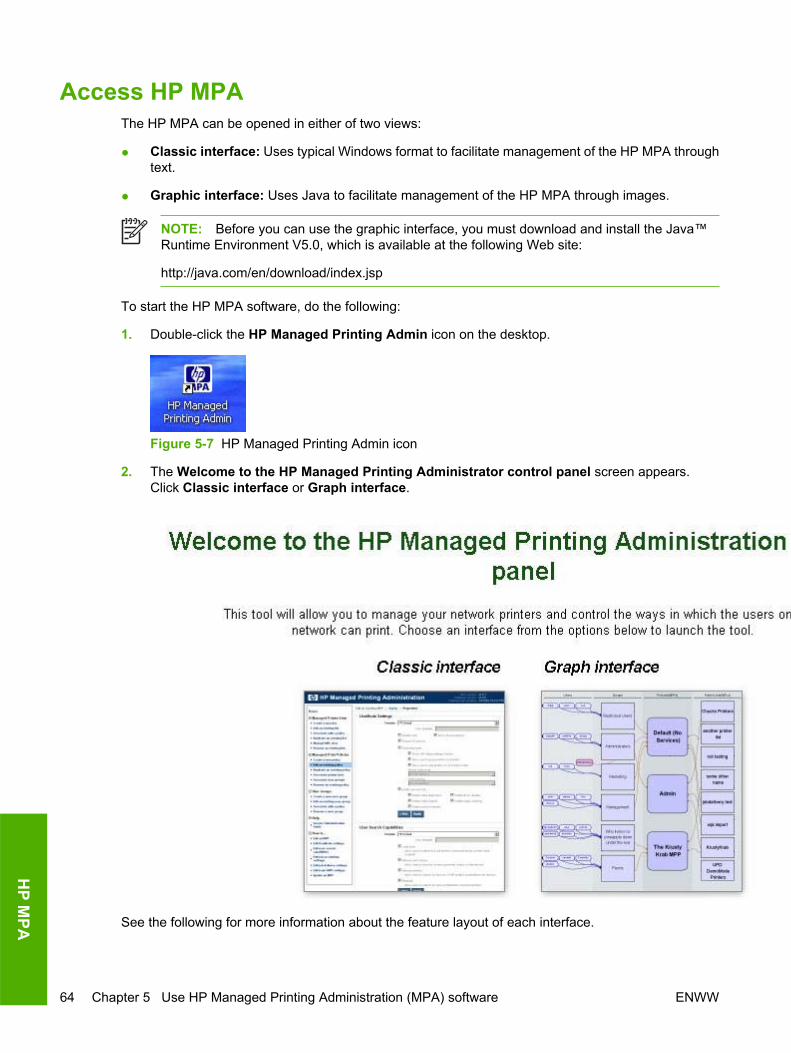
Access HP MPAThe HP MPA can be opened in either of two views:
● Classic interface: Uses typical Windows format to facilitate management of the HP MPA throughtext.
● Graphic interface: Uses Java to facilitate management of the HP MPA through images.
NOTE: Before you can use the graphic interface, you must download and install the Java™Runtime Environment V5.0, which is available at the following Web site:
http://java.com/en/download/index.jsp
To start the HP MPA software, do the following:
1. Double-click the HP Managed Printing Admin icon on the desktop.
Figure 5-7 HP Managed Printing Admin icon
2. The Welcome to the HP Managed Printing Administrator control panel screen appears.Click Classic interface or Graph interface.
See the following for more information about the feature layout of each interface.
64 Chapter 5 Use HP Managed Printing Administration (MPA) software ENWW
HP M
PA
● Classic interface
● Graphic interface
Classic interfaceThe classic interface screen briefly describes the main components of the application and shows therelationship between Users, Groups, Policies, and Printer Lists.
In the classic interface, a navigation bar in the top left of the main screen provides links to all featuresand tasks within the HP MPA software to manage printer use.
The following table lists the options provided in the left-hand navigation bar. The left-side of the tablelists the main headings, and the right-side of the table lists the corresponding task-oriented sub-headingsavailable.
Table 5-1 HP MPA classic interface options
Option Item
Managed Printer Lists Create a new list
Edit an existing list
Associate with a policy
Duplicate an existing list
Manage the MPL view
Manage virtual printers
Remove an existing list
Managed Printer Policies Create a new policy
Edit an existing policy
Duplicate an existing policy
Associate printer lists
Associate user groups
Remove an existing policy
User Groups Create a new user group
Edit an existing user group
Associate with a policy
Remove a user group
Help Service Administration Guide
Graphic interfaceThe graphic interface screen shows a mapping of Users, Groups, Policies, and Printer Lists in real time.
The following figure shows the main screen of the graphic interface.
ENWW Access HP MPA 65
HP
MPA
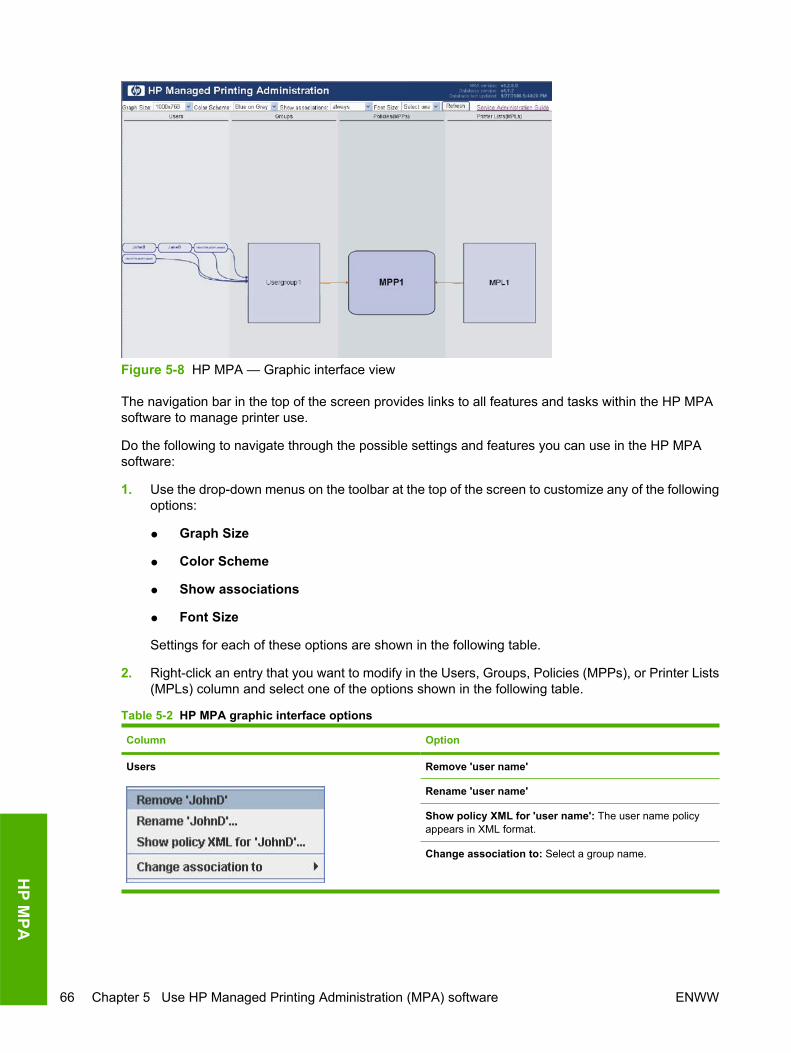
Figure 5-8 HP MPA — Graphic interface view
The navigation bar in the top of the screen provides links to all features and tasks within the HP MPAsoftware to manage printer use.
Do the following to navigate through the possible settings and features you can use in the HP MPAsoftware:
1. Use the drop-down menus on the toolbar at the top of the screen to customize any of the followingoptions:
● Graph Size
● Color Scheme
● Show associations
● Font Size
Settings for each of these options are shown in the following table.
2. Right-click an entry that you want to modify in the Users, Groups, Policies (MPPs), or Printer Lists(MPLs) column and select one of the options shown in the following table.
Table 5-2 HP MPA graphic interface options
Column Option
Users Remove 'user name'
Rename 'user name'
Show policy XML for 'user name': The user name policyappears in XML format.
Change association to: Select a group name.
66 Chapter 5 Use HP Managed Printing Administration (MPA) software ENWW
HP M
PA
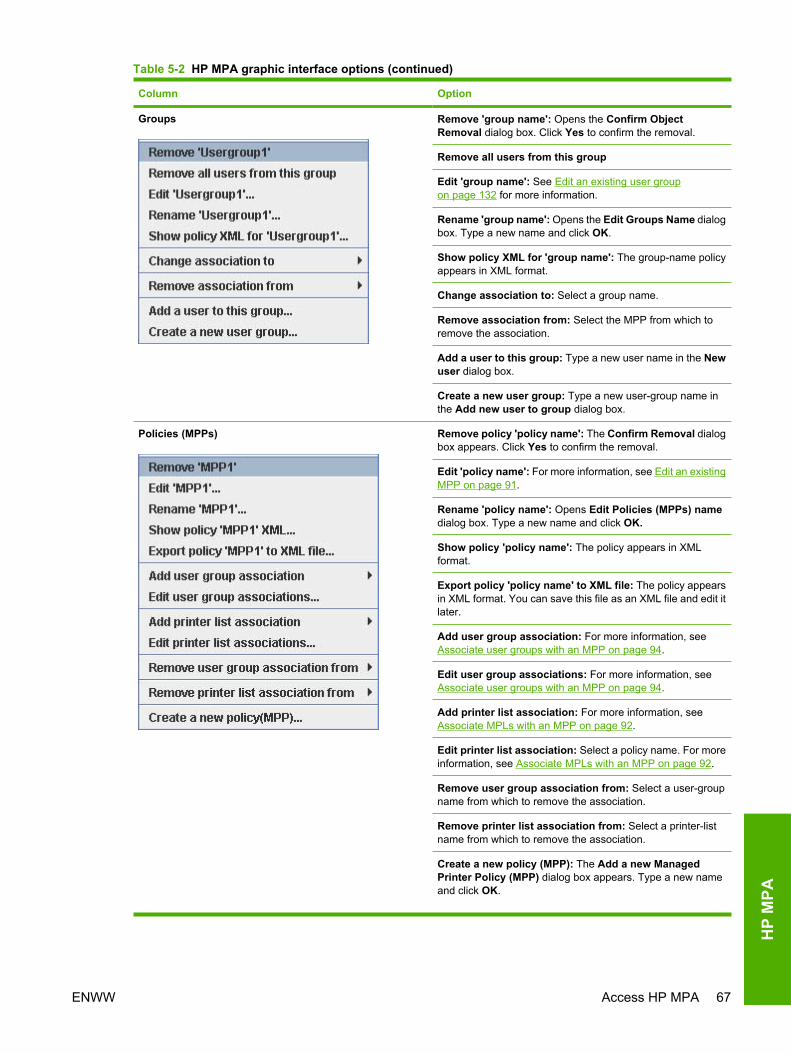
Column Option
Groups Remove 'group name': Opens the Confirm ObjectRemoval dialog box. Click Yes to confirm the removal.
Remove all users from this group
Edit 'group name': See Edit an existing user groupon page 132 for more information.
Rename 'group name': Opens the Edit Groups Name dialogbox. Type a new name and click OK.
Show policy XML for 'group name': The group-name policyappears in XML format.
Change association to: Select a group name.
Remove association from: Select the MPP from which toremove the association.
Add a user to this group: Type a new user name in the Newuser dialog box.
Create a new user group: Type a new user-group name inthe Add new user to group dialog box.
Policies (MPPs) Remove policy 'policy name': The Confirm Removal dialogbox appears. Click Yes to confirm the removal.
Edit 'policy name': For more information, see Edit an existingMPP on page 91.
Rename 'policy name': Opens Edit Policies (MPPs) namedialog box. Type a new name and click OK.
Show policy 'policy name': The policy appears in XMLformat.
Export policy 'policy name' to XML file: The policy appearsin XML format. You can save this file as an XML file and edit itlater.
Add user group association: For more information, seeAssociate user groups with an MPP on page 94.
Edit user group associations: For more information, seeAssociate user groups with an MPP on page 94.
Add printer list association: For more information, seeAssociate MPLs with an MPP on page 92.
Edit printer list association: Select a policy name. For moreinformation, see Associate MPLs with an MPP on page 92.
Remove user group association from: Select a user-groupname from which to remove the association.
Remove printer list association from: Select a printer-listname from which to remove the association.
Create a new policy (MPP): The Add a new ManagedPrinter Policy (MPP) dialog box appears. Type a new nameand click OK.
Table 5-2 HP MPA graphic interface options (continued)
ENWW Access HP MPA 67
HP
MPA
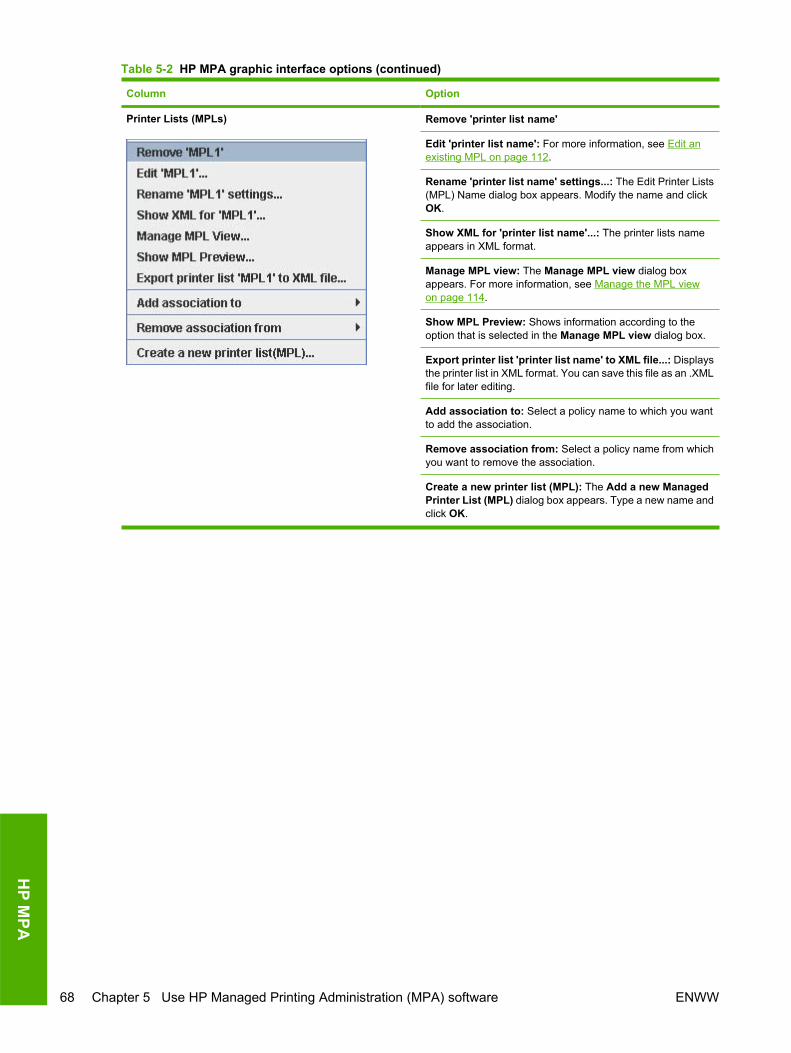
Column Option
Printer Lists (MPLs) Remove 'printer list name'
Edit 'printer list name': For more information, see Edit anexisting MPL on page 112.
Rename 'printer list name' settings...: The Edit Printer Lists(MPL) Name dialog box appears. Modify the name and clickOK.
Show XML for 'printer list name'...: The printer lists nameappears in XML format.
Manage MPL view: The Manage MPL view dialog boxappears. For more information, see Manage the MPL viewon page 114.
Show MPL Preview: Shows information according to theoption that is selected in the Manage MPL view dialog box.
Export printer list 'printer list name' to XML file...: Displaysthe printer list in XML format. You can save this file as an .XMLfile for later editing.
Add association to: Select a policy name to which you wantto add the association.
Remove association from: Select a policy name from whichyou want to remove the association.
Create a new printer list (MPL): The Add a new ManagedPrinter List (MPL) dialog box appears. Type a new name andclick OK.
Table 5-2 HP MPA graphic interface options (continued)
68 Chapter 5 Use HP Managed Printing Administration (MPA) software ENWW
HP M
PA
Use HelpThe HP MPA software provides links to online help. Online help is launched when you select the ServiceAdministration Guide link listed under the Help menu heading.
When you select items on the menu at the left of the screen, a How to... heading appears. This is ahelp link to information about the currently selected task. For example, when you select the Create anew policy link listed under the Managed Print Policies heading, the Create a new MPP help linkappears.
ENWW Use Help 69
HP
MPA
Use Managed Printer Policies (MPPs)Use Managed Printer Policies (MPPs) to control the driver operation mode and customize the printenvironment for the end-user, and to limit end-user network access to certain printers or features. Whenenabled, MPPs prevent users from overriding or circumventing settings by downloading a new versionof the driver.
A Managed Printer Policy (MPP) is an XML document that controls the driver operation mode in aparticular printing environment. For example, users in one environment could search or discover printersusing any available search option, while the same user, using the same driver, in another environmentcould be limited to printing to only a select few devices as defined by the restricted mode use settings.
One benefit of an MPP is that it extends the control of IT administrators over the printer environment,ultimately reducing support costs, supplies costs, and productivity costs in the company. Another benefitis that the IT Administrator can define, by using a policy ticket, how the HP UPD behaves when operatedin a given environment and any and every user printing through the HP UPD is limited or controlled bythat definition, whether they download the driver from an IT specified location or from the HP Web site,the first time or the 100th time. That control extends even to laptop computers with the HP UPD installedthat are being used at a site which defines an MPP—the printing is controlled by the defined policy.
The MPP contains the following features:
● UseMode settings. Controls the mode end-users use to access the printing environment; and,controls printing attributes, detection of HP printers, device-verification level, and availability ofservices. (See UseMode settings on page 73 for detailed instructions.)
● Color access. Controls the end-users access to printing color on a color-capable device. (SeeColor Access on page 77 for detailed instructions.)
● User search capabilities. Controls user searches based on local ports, network print shares, andnetwork printers (in Dynamic mode). (See User Search capabilities on page 79 capabilities fordetailed instructions.)
● Status and supplies notifications. Controls what status and supplies notifications (if any) appearwhen the end-user opens the HP UPD dialog box. (See Status and supplies notificationson page 81 for detailed instructions.)
● Job accounting. Controls what job accounting information to submit to an external application orpost to a Web server. (See Job accounting and job delivery on page 83 for detailed instructions.)
● Job delivery. Controls what print-job data to submit to an external application. For example, thejob data can be used in a pay-for-print environment. (See Job accounting and job deliveryon page 83 for detailed instructions.)
● Basic MPP settings. Controls basic features such as refresh rate, name, and default MPP for end-users who are not currently associated to a specific MPP.
This section contains more information on the following.
Topics:
● Create a new MPP
● Edit an existing MPP
● Associate MPLs with an MPP
● Duplicate an existing MPP
70 Chapter 5 Use HP Managed Printing Administration (MPA) software ENWW
HP M
PA
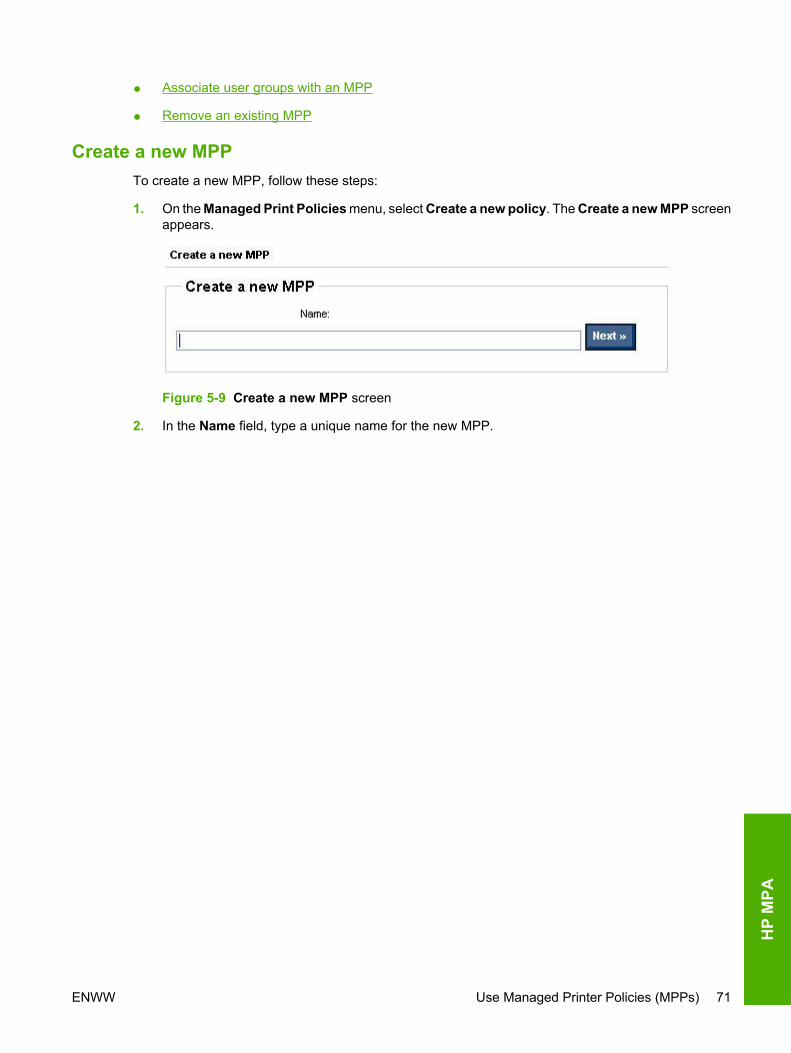
● Associate user groups with an MPP
● Remove an existing MPP
Create a new MPPTo create a new MPP, follow these steps:
1. On the Managed Print Policies menu, select Create a new policy. The Create a new MPP screenappears.
Figure 5-9 Create a new MPP screen
2. In the Name field, type a unique name for the new MPP.
ENWW Use Managed Printer Policies (MPPs) 71
HP
MPA
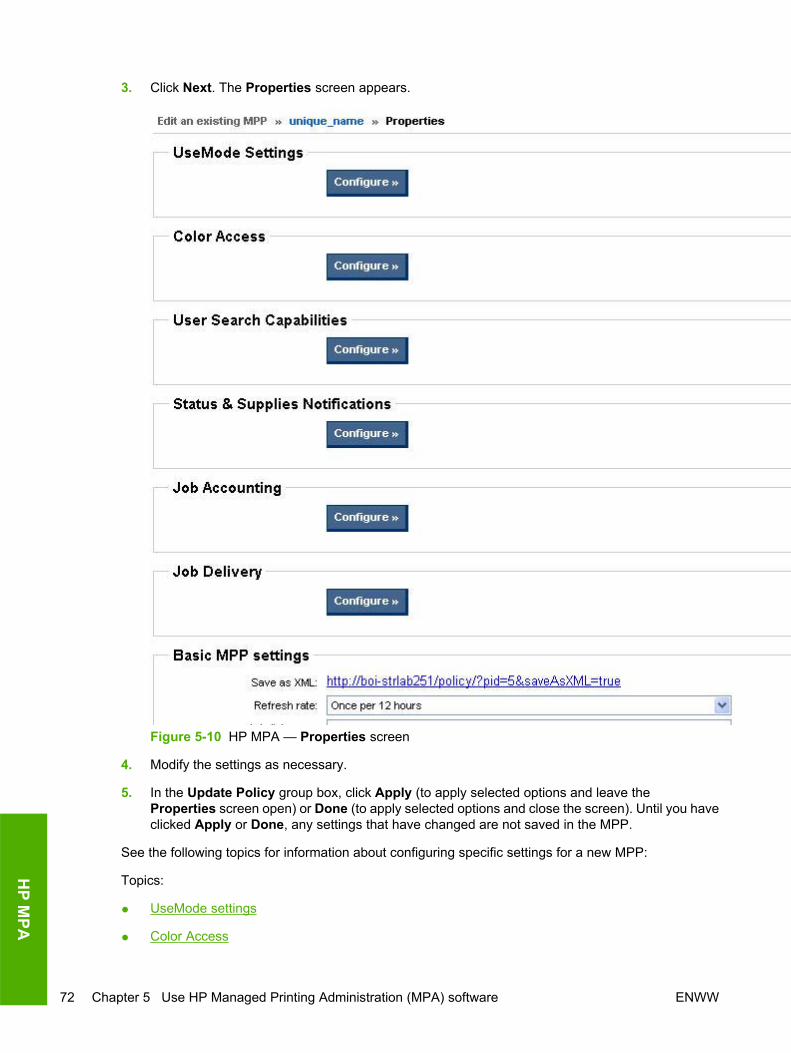
3. Click Next. The Properties screen appears.
Figure 5-10 HP MPA — Properties screen
4. Modify the settings as necessary.
5. In the Update Policy group box, click Apply (to apply selected options and leave theProperties screen open) or Done (to apply selected options and close the screen). Until you haveclicked Apply or Done, any settings that have changed are not saved in the MPP.
See the following topics for information about configuring specific settings for a new MPP:
Topics:
● UseMode settings
● Color Access
72 Chapter 5 Use HP Managed Printing Administration (MPA) software ENWW
HP M
PA
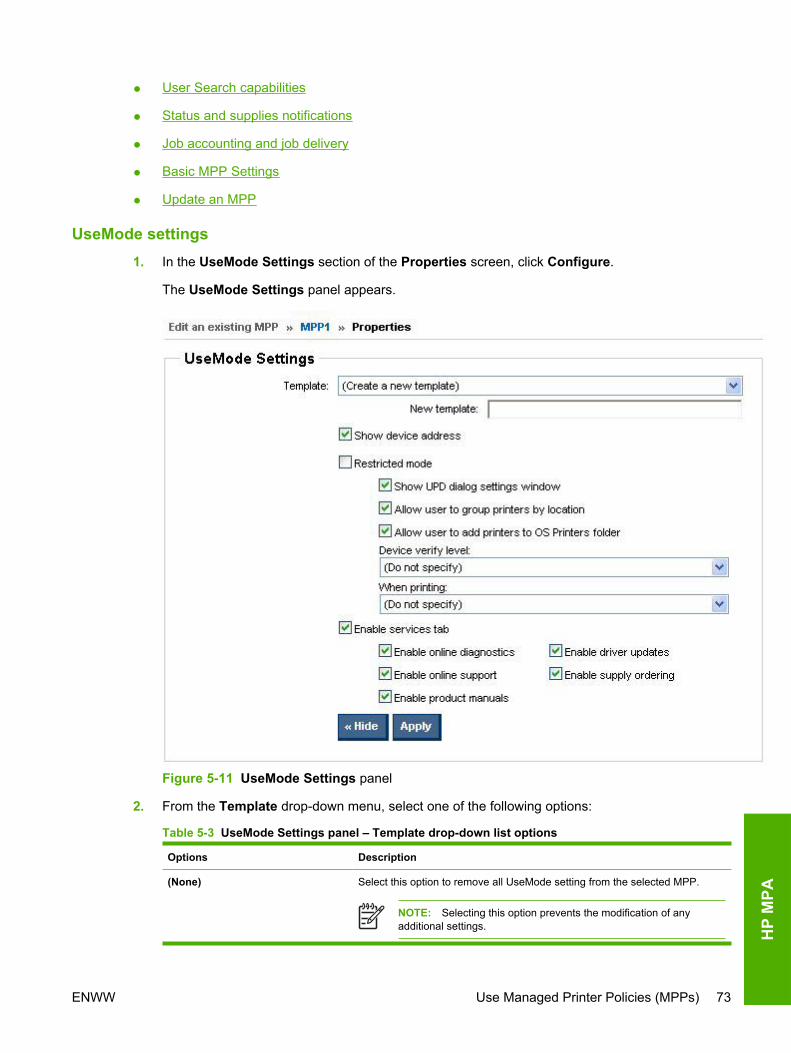
● User Search capabilities
● Status and supplies notifications
● Job accounting and job delivery
● Basic MPP Settings
● Update an MPP
UseMode settings1. In the UseMode Settings section of the Properties screen, click Configure.
The UseMode Settings panel appears.
Figure 5-11 UseMode Settings panel
2. From the Template drop-down menu, select one of the following options:
Table 5-3 UseMode Settings panel – Template drop-down list options
Options Description
(None) Select this option to remove all UseMode setting from the selected MPP.
NOTE: Selecting this option prevents the modification of anyadditional settings.
ENWW Use Managed Printer Policies (MPPs) 73
HP
MPA
(Create a new template) Select this option to create a new UseMode template. When you select thisoption, all fields can be modified. The new template name should be meaningfulto your organization. You might also determine whether a naming conventionhas been established for your organization.
HP Default When this option is selected, HP defaultUseMode values are applied to thisMPP.
Existing template name Select a previously defined UseMode template to apply to the selected MPP.
3. In the New template field, type a name for the new template of UseMode settings.
4. Then, select options to apply to all users who are assigned to this policy, based on the descriptionsin the following table.
Table 5-4 UseMode Settings — Properties panel options
Option Description
Show device address Select this option to provide the device address to users who are associatedwith this MPP. (Selected by default.)
Restricted mode Select this option to restrict the selection of destination printers not selectedthrough a defined MPL or normal mode. In Restricted mode, only those printersthat are defined in the MPL are available for printing. When this box is notselected (clear), the default is to operate in Normal mode. (Not selected bydefault.)
When this option is not selected (clear), the following additional options can beselected:
● Show UPD dialog settings window.
Select this option to display the link to the HP UPD dialog settings window.If this option is enabled, a note at the bottom of the HP Universal Printingdialog box displays the HP Universal Printer Setting link.
● Allow user to group printers by location.
Select this option to allow users to include the selected printer in a localgroup with a custom name. When this option is enabled, add a newcustomized name by clicking the New button next to the Location file drop-down menu. You can also add a printer to the list by searching for theprinter while the location is selected. Create and edit Custom ManagedPrinter Lists by using the Create a new MPL, and Edit an existingMPL features in the HP MPA.
● Allow user to add printers to OS Printers folder.
Select this option to allow users to create a permanent instance of theselected printer in the OS printers folder. If this option is disabled, the Makea permanent instance of this printer in my Printers folder check boxdoes not appear in the HP Universal Printing dialog box. To add a printer,use the Add Printer Wizard. (See Install using the Add Printer Wizardon page 16.)
Device verify level The device verify level controls the HP UPD behavior when the HP UPD isunable to get model name and PDLs information from the printer. The deviceverification level determines if the user is allowed to use the device and how
Table 5-3 UseMode Settings panel – Template drop-down list options (continued)
74 Chapter 5 Use HP Managed Printing Administration (MPA) software ENWW
HP M
PA
Option Description
strict compatibility checking should be. Select one of the following options fromthe drop-down list to determine the device-verification level:
● Verify communication and compatibility with driver (High).
Select this option to check for the highest level of positive identification.This option validates that the user has access to the printer and there isPDL support from a network-connected device or direct-connected device.If verification fails, you cannot use the address or device. An error messageconveys that the device is not supported.
● Verify device ID and Model Name can be obtained (Medium).
Select this option to validate the printer model name, device ID, and PDLsupport from a network-connected device or direct-connected device. Ifverification fails because the device can not be verified, but the model isrecognized, you are prompted that a driver incompatibility might exist. Atthis point, you can cancel out, or continue using the device at your ownrisk.
● Verify port can be opened for printing (Low).
Select this option to verify that the port can be opened before the deviceis available for printing. The model name and PDL are verified, but notvalidated. This setting assumes that the printer is available and there areno driver compatibility problems. Use this option in the following situations:
● The device is directly connected, but bidirectional communication isnot configured for the local port connection (USB, LPT, COM).
● A network print queue exists where the network printer server is non-Windows based and the HP UPD cannot communicate directly withthe device.
Table 5-4 UseMode Settings — Properties panel options (continued)
ENWW Use Managed Printer Policies (MPPs) 75
HP
MPA
Option Description
When printing This drop-down list controls how the HP UPD prompts users who are associatedto this MPP when they select a destination printer based on the selection of oneof the following options:
NOTE: Selecting one of these options (with the exception of (Do notspecify)) overrides the local configuration.
● (Do not specify).
Select this option to maintain local configuration.
● Always prompt for the destination when printing a job.
Select this option to prompt users to select a destination printer each timea job is sent.
● Only prompt the first time a job is printed from an application.
Select this option to prompt users to select a destination printer only thefirst time a job is printed from an application.
● Only prompt if the last known destination is no longer available.
Select this option to prompt users to select a destination printer only if thelast known destination is no longer available.
Enable services tab Select this option to enable the Services tab for users who are associated to thisMPP. When this option is selected, the following check boxes are automaticallyselected and can be cleared, as appropriate. (Selected by default.)
● Enable online diagnostics
● Enable online support
● Enable product manuals
● Enable driver updates
● Enable supply ordering
5. Click Apply to save your changes, or click Hide to close the UseMode settings panel withoutsaving your the changes.
NOTE: You are prompted with an error message at the top of the screen if you clickApply without providing sufficient information in the UseMode settings panel.
The following is an example of such an error message: Please review the following errors:You specified creation of a new template for use mode settings, but did not give aname.
6. Optionally, if no additional properties have to be applied to the selected MPP, select one of theoptions in the Update policy panel. For more information, see Update an MPP on page 90.
Table 5-4 UseMode Settings — Properties panel options (continued)
76 Chapter 5 Use HP Managed Printing Administration (MPA) software ENWW
HP M
PA
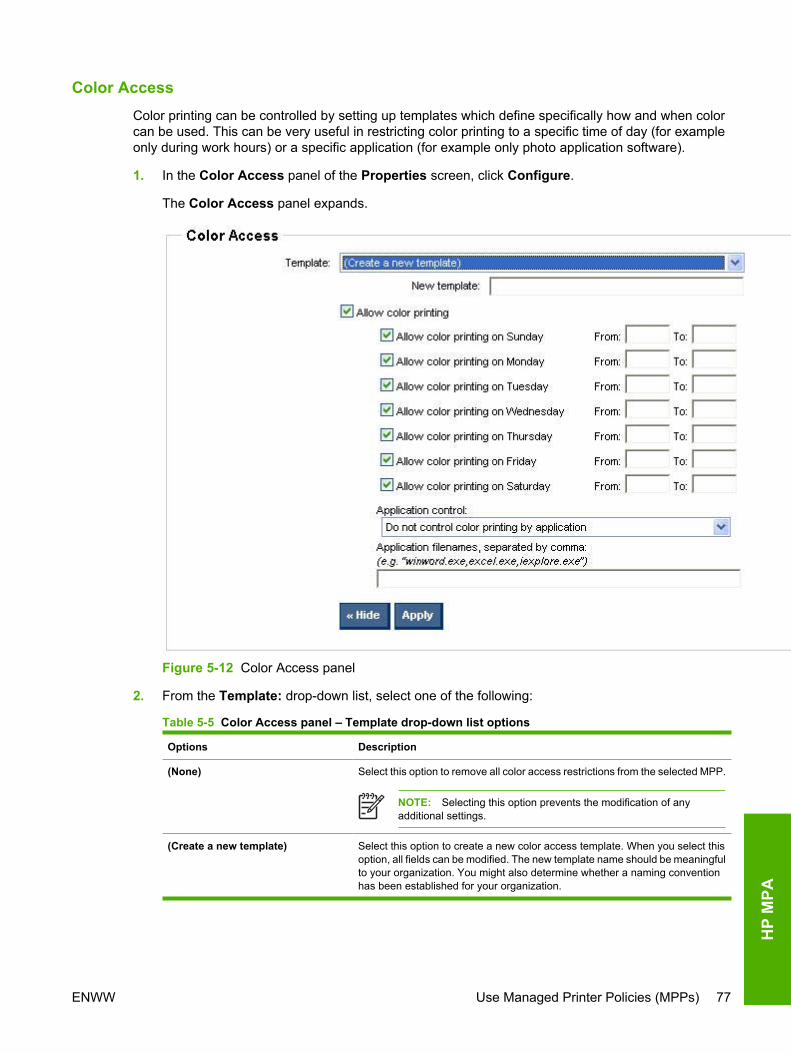
Color AccessColor printing can be controlled by setting up templates which define specifically how and when colorcan be used. This can be very useful in restricting color printing to a specific time of day (for exampleonly during work hours) or a specific application (for example only photo application software).
1. In the Color Access panel of the Properties screen, click Configure.
The Color Access panel expands.
Figure 5-12 Color Access panel
2. From the Template: drop-down list, select one of the following:
Table 5-5 Color Access panel – Template drop-down list options
Options Description
(None) Select this option to remove all color access restrictions from the selected MPP.
NOTE: Selecting this option prevents the modification of anyadditional settings.
(Create a new template) Select this option to create a new color access template. When you select thisoption, all fields can be modified. The new template name should be meaningfulto your organization. You might also determine whether a naming conventionhas been established for your organization.
ENWW Use Managed Printer Policies (MPPs) 77
HP
MPA
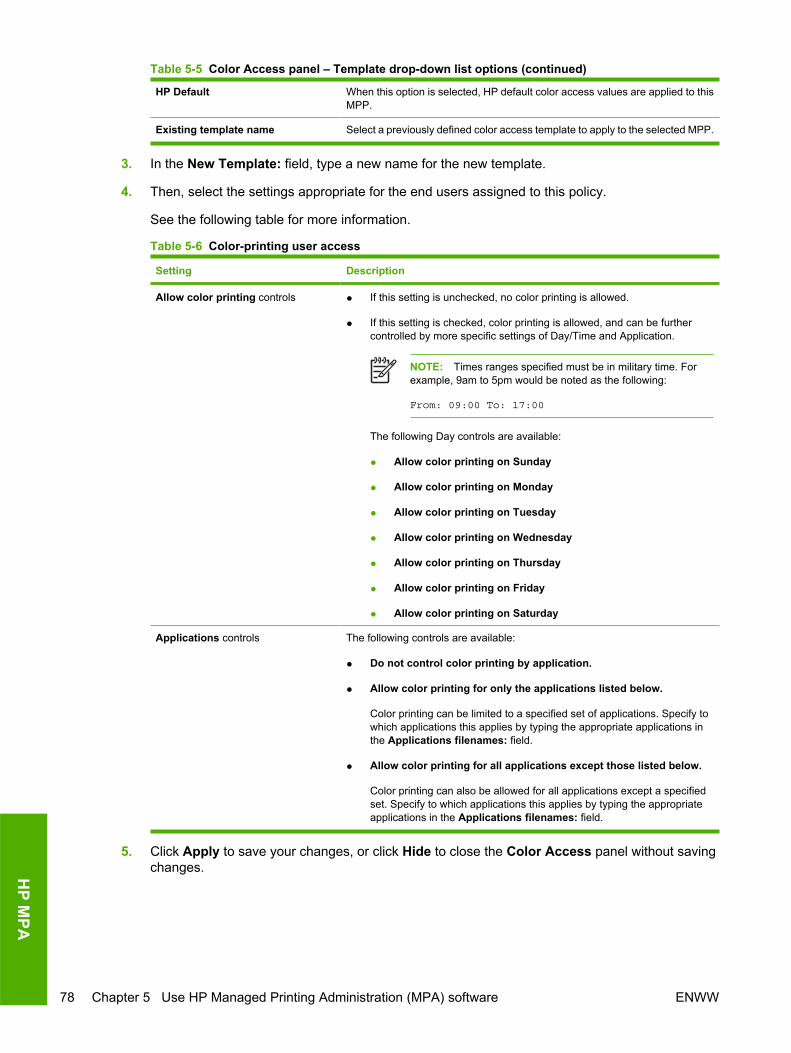
HP Default When this option is selected, HP default color access values are applied to thisMPP.
Existing template name Select a previously defined color access template to apply to the selected MPP.
3. In the New Template: field, type a new name for the new template.
4. Then, select the settings appropriate for the end users assigned to this policy.
See the following table for more information.
Table 5-6 Color-printing user access
Setting Description
Allow color printing controls ● If this setting is unchecked, no color printing is allowed.
● If this setting is checked, color printing is allowed, and can be furthercontrolled by more specific settings of Day/Time and Application.
NOTE: Times ranges specified must be in military time. Forexample, 9am to 5pm would be noted as the following:
From: 09:00 To: 17:00
The following Day controls are available:
● Allow color printing on Sunday
● Allow color printing on Monday
● Allow color printing on Tuesday
● Allow color printing on Wednesday
● Allow color printing on Thursday
● Allow color printing on Friday
● Allow color printing on Saturday
Applications controls The following controls are available:
● Do not control color printing by application.
● Allow color printing for only the applications listed below.
Color printing can be limited to a specified set of applications. Specify towhich applications this applies by typing the appropriate applications inthe Applications filenames: field.
● Allow color printing for all applications except those listed below.
Color printing can also be allowed for all applications except a specifiedset. Specify to which applications this applies by typing the appropriateapplications in the Applications filenames: field.
5. Click Apply to save your changes, or click Hide to close the Color Access panel without savingchanges.
Table 5-5 Color Access panel – Template drop-down list options (continued)
78 Chapter 5 Use HP Managed Printing Administration (MPA) software ENWW
HP M
PA
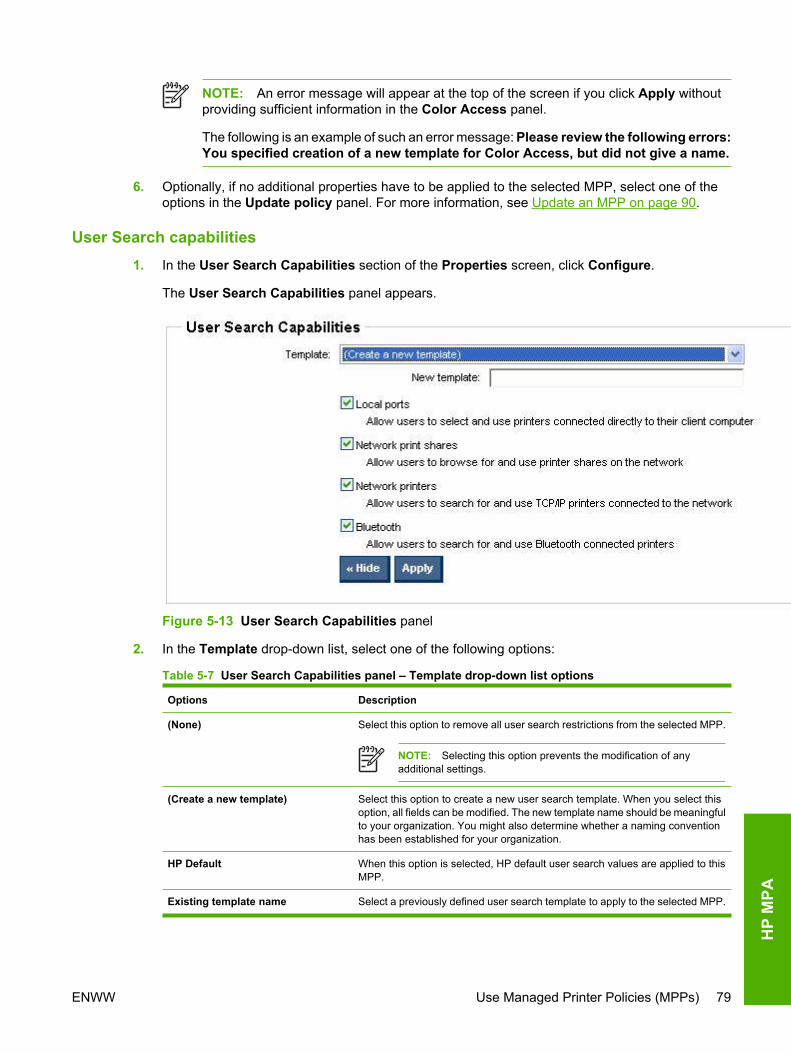
NOTE: An error message will appear at the top of the screen if you click Apply withoutproviding sufficient information in the Color Access panel.
The following is an example of such an error message: Please review the following errors:You specified creation of a new template for Color Access, but did not give a name.
6. Optionally, if no additional properties have to be applied to the selected MPP, select one of theoptions in the Update policy panel. For more information, see Update an MPP on page 90.
User Search capabilities1. In the User Search Capabilities section of the Properties screen, click Configure.
The User Search Capabilities panel appears.
Figure 5-13 User Search Capabilities panel
2. In the Template drop-down list, select one of the following options:
Table 5-7 User Search Capabilities panel – Template drop-down list options
Options Description
(None) Select this option to remove all user search restrictions from the selected MPP.
NOTE: Selecting this option prevents the modification of anyadditional settings.
(Create a new template) Select this option to create a new user search template. When you select thisoption, all fields can be modified. The new template name should be meaningfulto your organization. You might also determine whether a naming conventionhas been established for your organization.
HP Default When this option is selected, HP default user search values are applied to thisMPP.
Existing template name Select a previously defined user search template to apply to the selected MPP.
ENWW Use Managed Printer Policies (MPPs) 79
HP
MPA

3. Modify the user search settings for all users who are associated with this MPP, using the optionsdescribed in the following table.
NOTE: Clearing the settings provided in the following table prevents users from printingto an address of the search type that you cleared. For example, if the Network printersoption is cleared, users cannot locate printers with an address type of TCP/IP or hostname.
Table 5-8 User search capabilities
Options Description
Local ports Select this option to allow users to select and use printers connected directly totheir client computer. (Selected by default.)
Network print shares Select this option to allow users to browse for and use printer shares on thenetwork. (Selected by default.)
Network printers Select this option to allow users to search for and use TCP/IP printers that areconnected to the network. (Selected by default.)
Bluetooth Select this option to allow users to search for and use Bluetooth-connectedprinters. (Selected by default.)
4. In the New template field, type a name for the new user-search template.
5. Click Apply to save your changes, or click Hide to close the User search capabilities panelwithout saving your the changes.
NOTE: An error message will appear at the top of the screen if you click Apply withoutproviding sufficient information in the User search capabilities panel.
The following is an example of such an error message: Please review the following errors:You specified creation of a new template for user search capabilities, but did not givea name.
6. Optionally, if no additional properties have to be applied to the selected MPP, select one of theoptions in the Update policy panel. For more information, see Update an MPP on page 90.
80 Chapter 5 Use HP Managed Printing Administration (MPA) software ENWW
HP M
PA
Status and supplies notificationsThis section provides instructions to configure status and supplies notifications settings. The settingson the Status & Supplies Notification panel control the information that appears in the pop-up windowwhen an end user opens the HP Universal Print Driver dialog box.
1. In the Status & Supplies Notifications section of the Properties screen, click Configure.
The Status & Supplies Notifications panel expands.
Figure 5-14 Status & Supplies Notifications panel
2. From the Template drop-down list, select one of the following options:
Table 5-9 Supplies Status Notifications panel – Template drop-down list options
Options Description
(None) Select this option to remove all status and supplies notifications restrictions fromthe selected MPP.
NOTE: Selecting this option prevents the modification of anyadditional settings.
(Create a new template) Select this option to create a new status-and-supplies notification template.When you select this option, all status-and-supplies notification options can bemodified. The new template name should be meaningful to your organization.You might also determine whether a naming convention has been establishedfor your organization.
HP Default When this option is selected, HP default status-and-supplies notification valuesare applied to this MPP.
Existing template name Select a previously defined supplies status notifications template to apply to theselected MPP.
3. In the New template field, type a name for the new status-and-supplies notifications template.
ENWW Use Managed Printer Policies (MPPs) 81
HP
MPA
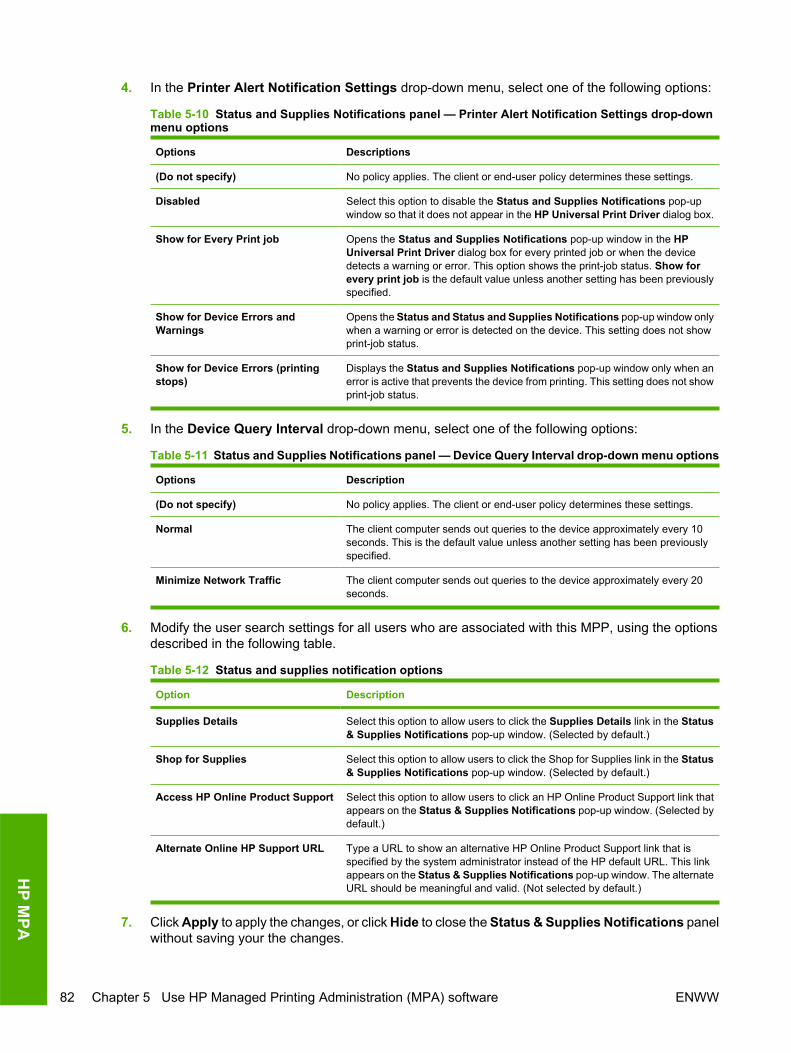
4. In the Printer Alert Notification Settings drop-down menu, select one of the following options:
Table 5-10 Status and Supplies Notifications panel — Printer Alert Notification Settings drop-downmenu options
Options Descriptions
(Do not specify) No policy applies. The client or end-user policy determines these settings.
Disabled Select this option to disable the Status and Supplies Notifications pop-upwindow so that it does not appear in the HP Universal Print Driver dialog box.
Show for Every Print job Opens the Status and Supplies Notifications pop-up window in the HPUniversal Print Driver dialog box for every printed job or when the devicedetects a warning or error. This option shows the print-job status. Show forevery print job is the default value unless another setting has been previouslyspecified.
Show for Device Errors andWarnings
Opens the Status and Status and Supplies Notifications pop-up window onlywhen a warning or error is detected on the device. This setting does not showprint-job status.
Show for Device Errors (printingstops)
Displays the Status and Supplies Notifications pop-up window only when anerror is active that prevents the device from printing. This setting does not showprint-job status.
5. In the Device Query Interval drop-down menu, select one of the following options:
Table 5-11 Status and Supplies Notifications panel — Device Query Interval drop-down menu options
Options Description
(Do not specify) No policy applies. The client or end-user policy determines these settings.
Normal The client computer sends out queries to the device approximately every 10seconds. This is the default value unless another setting has been previouslyspecified.
Minimize Network Traffic The client computer sends out queries to the device approximately every 20seconds.
6. Modify the user search settings for all users who are associated with this MPP, using the optionsdescribed in the following table.
Table 5-12 Status and supplies notification options
Option Description
Supplies Details Select this option to allow users to click the Supplies Details link in the Status& Supplies Notifications pop-up window. (Selected by default.)
Shop for Supplies Select this option to allow users to click the Shop for Supplies link in the Status& Supplies Notifications pop-up window. (Selected by default.)
Access HP Online Product Support Select this option to allow users to click an HP Online Product Support link thatappears on the Status & Supplies Notifications pop-up window. (Selected bydefault.)
Alternate Online HP Support URL Type a URL to show an alternative HP Online Product Support link that isspecified by the system administrator instead of the HP default URL. This linkappears on the Status & Supplies Notifications pop-up window. The alternateURL should be meaningful and valid. (Not selected by default.)
7. Click Apply to apply the changes, or click Hide to close the Status & Supplies Notifications panelwithout saving your the changes.
82 Chapter 5 Use HP Managed Printing Administration (MPA) software ENWW
HP M
PA
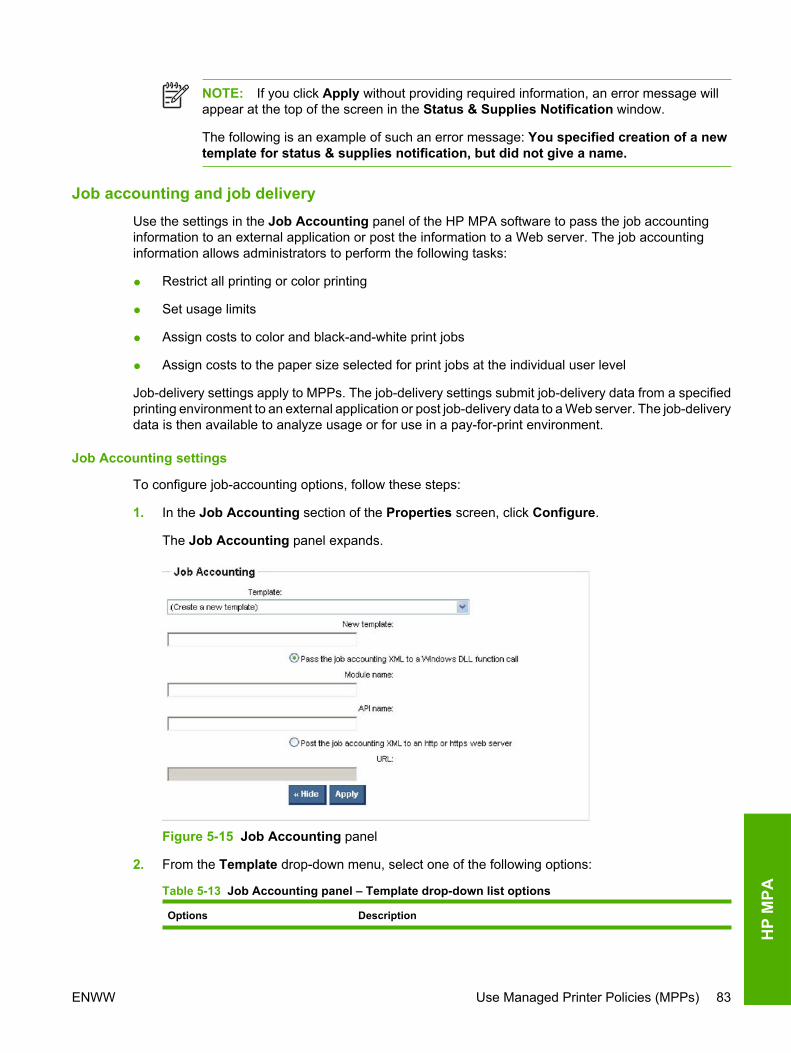
NOTE: If you click Apply without providing required information, an error message willappear at the top of the screen in the Status & Supplies Notification window.
The following is an example of such an error message: You specified creation of a newtemplate for status & supplies notification, but did not give a name.
Job accounting and job deliveryUse the settings in the Job Accounting panel of the HP MPA software to pass the job accountinginformation to an external application or post the information to a Web server. The job accountinginformation allows administrators to perform the following tasks:
● Restrict all printing or color printing
● Set usage limits
● Assign costs to color and black-and-white print jobs
● Assign costs to the paper size selected for print jobs at the individual user level
Job-delivery settings apply to MPPs. The job-delivery settings submit job-delivery data from a specifiedprinting environment to an external application or post job-delivery data to a Web server. The job-deliverydata is then available to analyze usage or for use in a pay-for-print environment.
Job Accounting settings
To configure job-accounting options, follow these steps:
1. In the Job Accounting section of the Properties screen, click Configure.
The Job Accounting panel expands.
Figure 5-15 Job Accounting panel
2. From the Template drop-down menu, select one of the following options:
Table 5-13 Job Accounting panel – Template drop-down list options
Options Description
ENWW Use Managed Printer Policies (MPPs) 83
HP
MPA
(None) Select this option to remove all job-accounting restrictions from the selectedMPP.
NOTE: Selecting this option prevents the modification of anyadditional settings.
(Create a new template) Select this option to create a new job-accounting template. When you select thisoption, all job-accounting options can be modified. The new template nameshould be meaningful to your organization. You might also determine whethera naming convention has been established for your organization.
Existing template name Select a previously defined job-accounting template to apply to the selectedMPP.
3. In the New template field, type a name for the new job-accounting template.
4. In the Job Accounting panel, click one of the following two options to determine how the jobaccounting XML file is managed for all users who are associated with this MPP:
NOTE: Because the following options are mutually exclusive, only one option can beselected.
Table 5-14 Job Accounting panel — Radio button options
Options Description
Pass the job accounting XML to aWindows DLL function call
Select this option to specify a dynamic Link Library (DLL) to submit the jobaccounting information to. When this option is selected, you must provide thefollowing information:
● Module name.
Type the name of the module to pass the job accounting XML file to.
For example, \\mycorp\hpprint$\jobsubmit.dll
● API name.
Type the name of the API for the module to submit the job accounting XMLfile to.
For example, MYCORPJOBACCOUNTING
Post the job accounting XML to anhttp or https Web server
● Select this option to allow users to post the job accounting XML to an httpor https Web server. When this option is selected, you must provide a URL.
In the URL: field, type the Internet address of the Web server for the jobaccounting XML file posting.
For example, http://Mycorp.Com/Usermpl
● The HP MPA tool includes several default values that can be used forexperimenting or customizing a printing environment.
For job accounting, the default URL is http://[webserver]/hpmpa/jobAcct/Default.Asp/? jobId=%JOBID%=%USERID%
where [webserver] is the name of the computer where the MPA softwareis installed.
● The default URL specified accepts the job accounting XML generated bythe HP UPD and saves it to the Web server. The path where the print job
Table 5-13 Job Accounting panel – Template drop-down list options (continued)
84 Chapter 5 Use HP Managed Printing Administration (MPA) software ENWW
HP M
PA
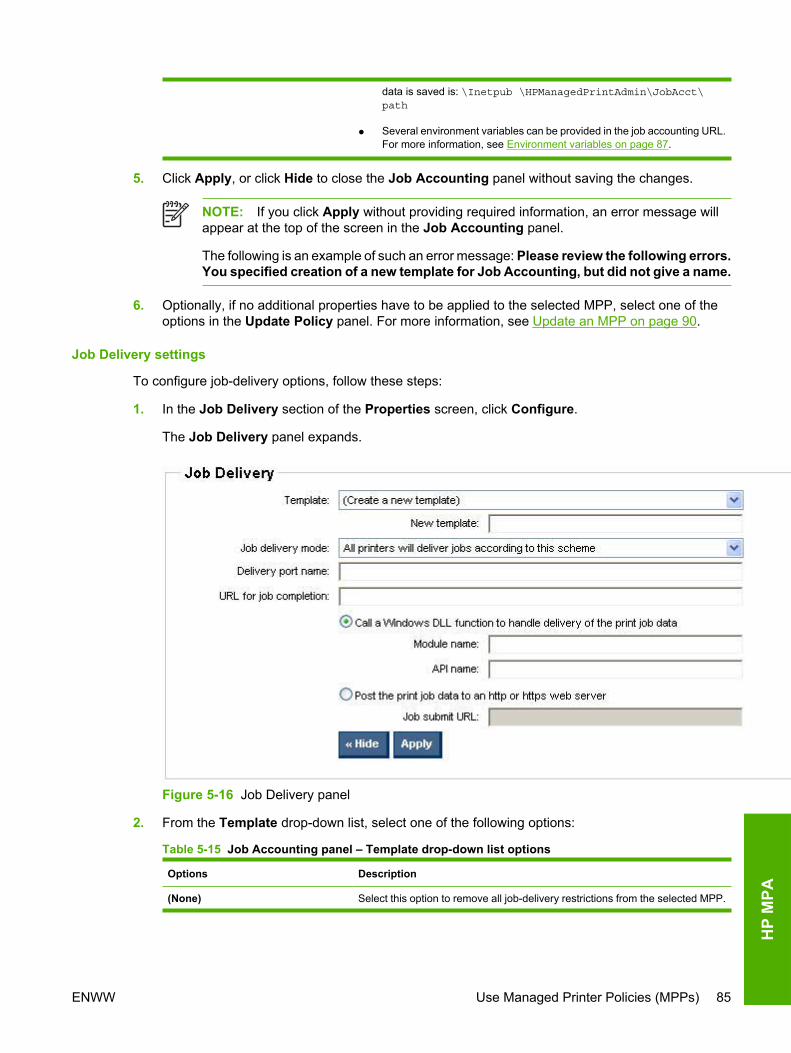
data is saved is: \Inetpub \HPManagedPrintAdmin\JobAcct\ path
● Several environment variables can be provided in the job accounting URL.For more information, see Environment variables on page 87.
5. Click Apply, or click Hide to close the Job Accounting panel without saving the changes.
NOTE: If you click Apply without providing required information, an error message willappear at the top of the screen in the Job Accounting panel.
The following is an example of such an error message: Please review the following errors.You specified creation of a new template for Job Accounting, but did not give a name.
6. Optionally, if no additional properties have to be applied to the selected MPP, select one of theoptions in the Update Policy panel. For more information, see Update an MPP on page 90.
Job Delivery settings
To configure job-delivery options, follow these steps:
1. In the Job Delivery section of the Properties screen, click Configure.
The Job Delivery panel expands.
Figure 5-16 Job Delivery panel
2. From the Template drop-down list, select one of the following options:
Table 5-15 Job Accounting panel – Template drop-down list options
Options Description
(None) Select this option to remove all job-delivery restrictions from the selected MPP.
ENWW Use Managed Printer Policies (MPPs) 85
HP
MPA
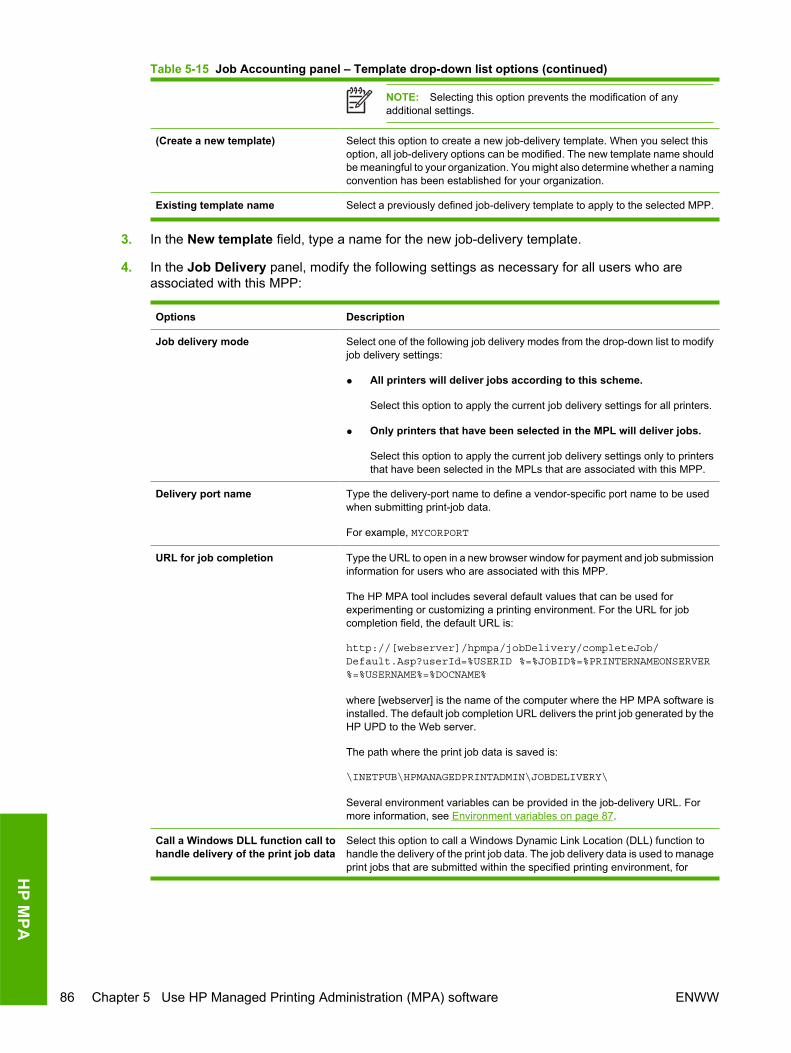
NOTE: Selecting this option prevents the modification of anyadditional settings.
(Create a new template) Select this option to create a new job-delivery template. When you select thisoption, all job-delivery options can be modified. The new template name shouldbe meaningful to your organization. You might also determine whether a namingconvention has been established for your organization.
Existing template name Select a previously defined job-delivery template to apply to the selected MPP.
3. In the New template field, type a name for the new job-delivery template.
4. In the Job Delivery panel, modify the following settings as necessary for all users who areassociated with this MPP:
Options Description
Job delivery mode Select one of the following job delivery modes from the drop-down list to modifyjob delivery settings:
● All printers will deliver jobs according to this scheme.
Select this option to apply the current job delivery settings for all printers.
● Only printers that have been selected in the MPL will deliver jobs.
Select this option to apply the current job delivery settings only to printersthat have been selected in the MPLs that are associated with this MPP.
Delivery port name Type the delivery-port name to define a vendor-specific port name to be usedwhen submitting print-job data.
For example, MYCORPORT
URL for job completion Type the URL to open in a new browser window for payment and job submissioninformation for users who are associated with this MPP.
The HP MPA tool includes several default values that can be used forexperimenting or customizing a printing environment. For the URL for jobcompletion field, the default URL is:
http://[webserver]/hpmpa/jobDelivery/completeJob/Default.Asp?userId=%USERID %=%JOBID%=%PRINTERNAMEONSERVER%=%USERNAME%=%DOCNAME%
where [webserver] is the name of the computer where the HP MPA software isinstalled. The default job completion URL delivers the print job generated by theHP UPD to the Web server.
The path where the print job data is saved is:
\INETPUB\HPMANAGEDPRINTADMIN\JOBDELIVERY\
Several environment variables can be provided in the job-delivery URL. Formore information, see Environment variables on page 87.
Call a Windows DLL function call tohandle delivery of the print job data
Select this option to call a Windows Dynamic Link Location (DLL) function tohandle the delivery of the print job data. The job delivery data is used to manageprint jobs that are submitted within the specified printing environment, for
Table 5-15 Job Accounting panel – Template drop-down list options (continued)
86 Chapter 5 Use HP Managed Printing Administration (MPA) software ENWW
HP M
PA
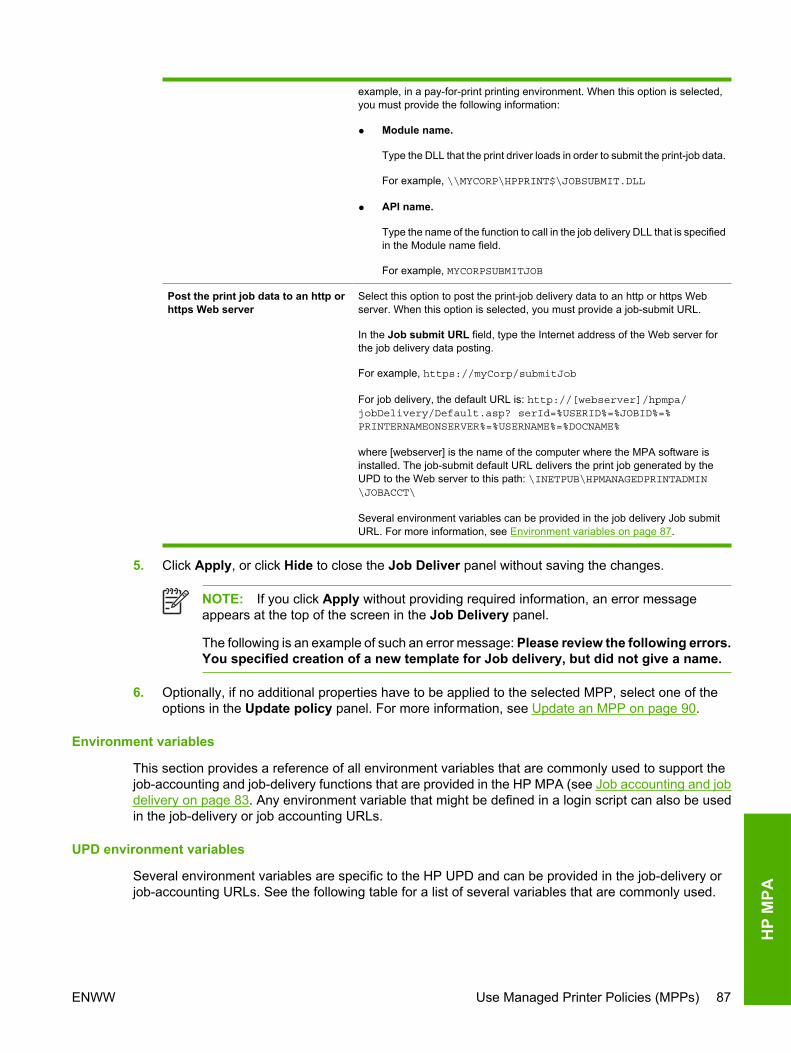
example, in a pay-for-print printing environment. When this option is selected,you must provide the following information:
● Module name.
Type the DLL that the print driver loads in order to submit the print-job data.
For example, \\MYCORP\HPPRINT$\JOBSUBMIT.DLL
● API name.
Type the name of the function to call in the job delivery DLL that is specifiedin the Module name field.
For example, MYCORPSUBMITJOB
Post the print job data to an http orhttps Web server
Select this option to post the print-job delivery data to an http or https Webserver. When this option is selected, you must provide a job-submit URL.
In the Job submit URL field, type the Internet address of the Web server forthe job delivery data posting.
For example, https://myCorp/submitJob
For job delivery, the default URL is: http://[webserver]/hpmpa/jobDelivery/Default.asp? serId=%USERID%=%JOBID%=%PRINTERNAMEONSERVER%=%USERNAME%=%DOCNAME%
where [webserver] is the name of the computer where the MPA software isinstalled. The job-submit default URL delivers the print job generated by theUPD to the Web server to this path: \INETPUB\HPMANAGEDPRINTADMIN\JOBACCT\
Several environment variables can be provided in the job delivery Job submitURL. For more information, see Environment variables on page 87.
5. Click Apply, or click Hide to close the Job Deliver panel without saving the changes.
NOTE: If you click Apply without providing required information, an error messageappears at the top of the screen in the Job Delivery panel.
The following is an example of such an error message: Please review the following errors.You specified creation of a new template for Job delivery, but did not give a name.
6. Optionally, if no additional properties have to be applied to the selected MPP, select one of theoptions in the Update policy panel. For more information, see Update an MPP on page 90.
Environment variables
This section provides a reference of all environment variables that are commonly used to support thejob-accounting and job-delivery functions that are provided in the HP MPA (see Job accounting and jobdelivery on page 83. Any environment variable that might be defined in a login script can also be usedin the job-delivery or job accounting URLs.
UPD environment variables
Several environment variables are specific to the HP UPD and can be provided in the job-delivery orjob-accounting URLs. See the following table for a list of several variables that are commonly used.
ENWW Use Managed Printer Policies (MPPs) 87
HP
MPA
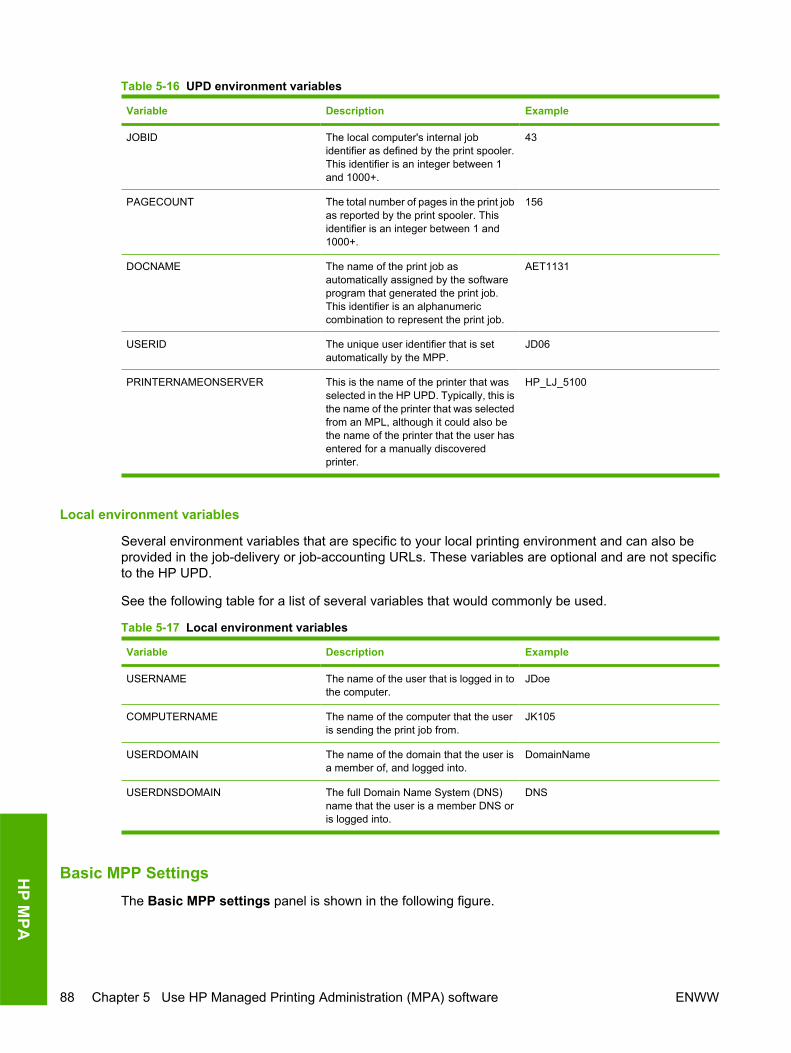
Table 5-16 UPD environment variables
Variable Description Example
JOBID The local computer's internal jobidentifier as defined by the print spooler.This identifier is an integer between 1and 1000+.
43
PAGECOUNT The total number of pages in the print jobas reported by the print spooler. Thisidentifier is an integer between 1 and1000+.
156
DOCNAME The name of the print job asautomatically assigned by the softwareprogram that generated the print job.This identifier is an alphanumericcombination to represent the print job.
AET1131
USERID The unique user identifier that is setautomatically by the MPP.
JD06
PRINTERNAMEONSERVER This is the name of the printer that wasselected in the HP UPD. Typically, this isthe name of the printer that was selectedfrom an MPL, although it could also bethe name of the printer that the user hasentered for a manually discoveredprinter.
HP_LJ_5100
Local environment variables
Several environment variables that are specific to your local printing environment and can also beprovided in the job-delivery or job-accounting URLs. These variables are optional and are not specificto the HP UPD.
See the following table for a list of several variables that would commonly be used.
Table 5-17 Local environment variables
Variable Description Example
USERNAME The name of the user that is logged in tothe computer.
JDoe
COMPUTERNAME The name of the computer that the useris sending the print job from.
JK105
USERDOMAIN The name of the domain that the user isa member of, and logged into.
DomainName
USERDNSDOMAIN The full Domain Name System (DNS)name that the user is a member DNS oris logged into.
DNS
Basic MPP SettingsThe Basic MPP settings panel is shown in the following figure.
88 Chapter 5 Use HP Managed Printing Administration (MPA) software ENWW
HP M
PA
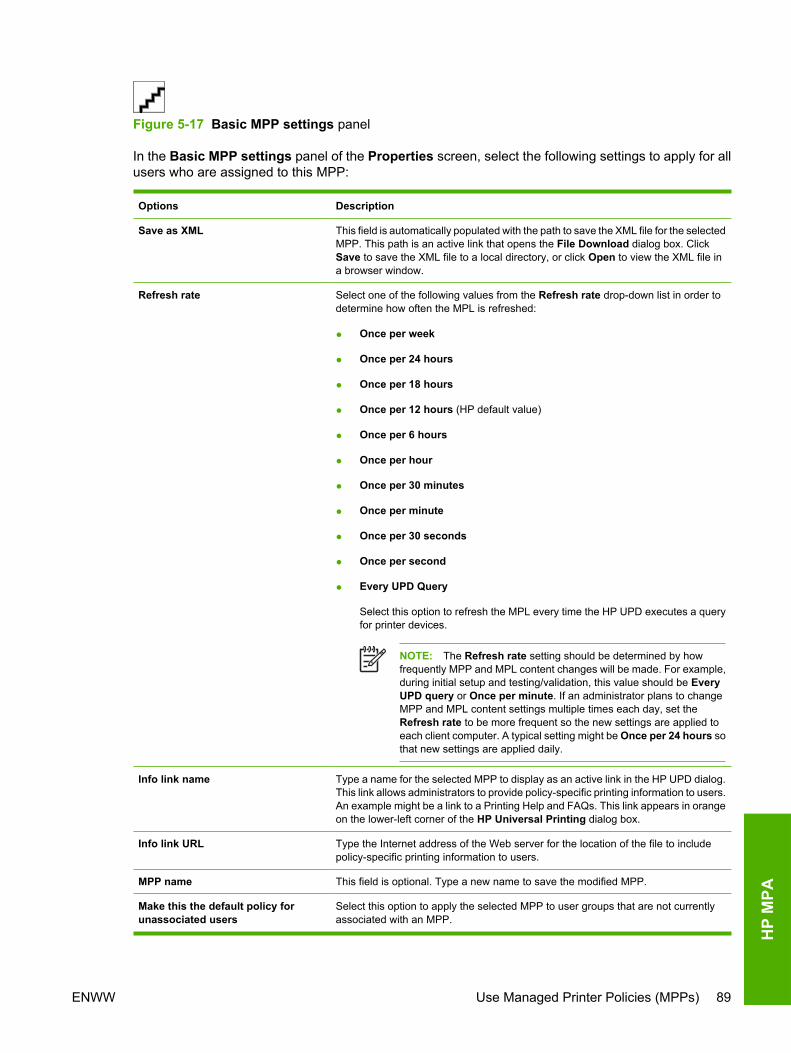
Figure 5-17 Basic MPP settings panel
In the Basic MPP settings panel of the Properties screen, select the following settings to apply for allusers who are assigned to this MPP:
Options Description
Save as XML This field is automatically populated with the path to save the XML file for the selectedMPP. This path is an active link that opens the File Download dialog box. ClickSave to save the XML file to a local directory, or click Open to view the XML file ina browser window.
Refresh rate Select one of the following values from the Refresh rate drop-down list in order todetermine how often the MPL is refreshed:
● Once per week
● Once per 24 hours
● Once per 18 hours
● Once per 12 hours (HP default value)
● Once per 6 hours
● Once per hour
● Once per 30 minutes
● Once per minute
● Once per 30 seconds
● Once per second
● Every UPD Query
Select this option to refresh the MPL every time the HP UPD executes a queryfor printer devices.
NOTE: The Refresh rate setting should be determined by howfrequently MPP and MPL content changes will be made. For example,during initial setup and testing/validation, this value should be EveryUPD query or Once per minute. If an administrator plans to changeMPP and MPL content settings multiple times each day, set theRefresh rate to be more frequent so the new settings are applied toeach client computer. A typical setting might be Once per 24 hours sothat new settings are applied daily.
Info link name Type a name for the selected MPP to display as an active link in the HP UPD dialog.This link allows administrators to provide policy-specific printing information to users.An example might be a link to a Printing Help and FAQs. This link appears in orangeon the lower-left corner of the HP Universal Printing dialog box.
Info link URL Type the Internet address of the Web server for the location of the file to includepolicy-specific printing information to users.
MPP name This field is optional. Type a new name to save the modified MPP.
Make this the default policy forunassociated users
Select this option to apply the selected MPP to user groups that are not currentlyassociated with an MPP.
ENWW Use Managed Printer Policies (MPPs) 89
HP
MPA
NOTE: This option is followed by a parenthetical message indicating thecurrent MPP association for unassociated users. For example,“MPP_Demo” is currently the default policy or There is currently nodefault policy specified.
Optionally, if no additional properties have to be applied to the selected MPP, select one of the optionsin the Update policy panel. For more information, see Update an MPP on page 90.
Update an MPPThe Update policy panel is shown in the following figure.
Figure 5-18 Update policy panel
In the Update policy section located at the bottom of the Properties screen, select one of the followingoptions:
Table 5-18 Managed Print Policy – Update Policy panel options
Option Description
Back Select this option to return to the Select an MPP screen without saving any changes.
Apply Select this option to apply the changes to the selected MPP. Use this option to remainin the Properties screen and make additional changes.
Associate MPL(s) Select this option to save your changes to the selected MPP, and then navigate tothe Associate MPLs with an MPP screen to establish an association with existingMPLs. For more information, see Associate MPLs with an MPP on page 92.
Associate User Group(s) Select this option to save your changes to the selected MPP, and then navigate tothe Associate User Groups with an MPP screen to establish an association withexisting user groups. For more information, see Associate a user group with aMPP on page 133.
Done Select this option to apply your changes to the MPP. The Done screen appears,providing a confirmation that the MPP has been successfully modified and a list ofpossible next steps.
90 Chapter 5 Use HP Managed Printing Administration (MPA) software ENWW
HP M
PA
Edit an existing MPP1. On the Managed Printer Policies menu, select Edit an existing policy. The Select an MPP
screen appears.
Figure 5-19 Edit an existing MPP — Select an MPP panel
2. In the Name drop-down menu, select the MPP to edit.
3. Click Next. The Properties screen appears.
4. Modify the settings for the selected MPP, as necessary. For more information, see Create a newMPP on page 71.
ENWW Use Managed Printer Policies (MPPs) 91
HP
MPA
Associate MPLs with an MPP1. On the Managed Printer Policies menu, select Associate printer lists.
The Associate MPLs with an MPP screen appears.
Figure 5-20 Associate MPLs with an MPP — Select an MPP screen
2. From the Name drop-down menu, select the name of an existing MPP with which to associate theMPLs.
3. Click Refresh. The Manage MPL associations window is automatically populated with the namesof all existing MPLs and their current associations.
4. Select the check box next to any MPL that appears in the following two panels:
Table 5-19 Managed Printer Policy — Manage MPL associations panel options
Option Descriptions
92 Chapter 5 Use HP Managed Printing Administration (MPA) software ENWW
HP M
PA
Associated with other MPP(s) To establish an association with the selected MPP, select the check box nextto any MPL that is listed in this panel, as necessary.
Not associated with any MPP To establish an association with the selected MPP, select the check box nextto any MPL that is listed in this panel, as necessary.
5. Select one of the following options:
Table 5-20 Managed Printer Policy — Associate with an MPP panel options
Option Descriptions
Apply Click this button to apply the associations and remain in the Associate MPLswith an MPL screen to make any additional changes. The Associated withthis MPP panel is automatically populated with any MPLs selected forassociation with the MPP.
View/edit policy settings Click this link to modify the settings for the selected MPP. For more information,see Create a new MPP on page 71.
Done Click this button to apply the associations and close the screen.
Duplicate an existing MPP1. On the Managed Print Policies menu, select Duplicate an existing policy.
The Select an MPP to duplicate screen appears.
Figure 5-21 Duplicate an existing MPP — Select an MPP to duplicate screen
2. From the Copy from drop-down list, select the name of an existing MPP.
3. In the New name field, type a name for the new MPP.
4. Click Next. The Properties screen appears.
5. Modify the settings for the selected MPP, as necessary. For more information, see Create a newMPP on page 71.
Table 5-19 Managed Printer Policy — Manage MPL associations panel options (continued)
ENWW Use Managed Printer Policies (MPPs) 93
HP
MPA
Associate user groups with an MPP1. On the Managed Printer Policies menu, select Associate User Groups.
The Associate User Groups with an MPP screen appears.
Figure 5-22 Associate user groups with an MPP screen
2. From the Name drop-down list, select the name of the MPP with which you want to establish anassociation with existing user groups.
3. Click Refresh. The Manage user group associations panel is automatically populated with allthe existing user groups and their current associations.
4. Select the check box next to user groups that appear in the following two panels:
Table 5-21 Managed Printer Policy — Manage MPL associations panel options
Option Descriptions
94 Chapter 5 Use HP Managed Printing Administration (MPA) software ENWW
HP M
PA
Associated with other MPP(s) To establish an association with the selected MPP, select the check box nextto user groups that are listed in this panel, as necessary.
Not associated with any MPP To establish an association with the selected MPP, select the check box nextto the user groups that are listed in this panel, as necessary.
5. Select one of the following options:
Table 5-22 Managed Printer Policy — Associate with an MPP panel options
Option Descriptions
Apply Click this button to apply the associations and remain in the Associate MPLswith an MPL screen to make any additional changes. The Associated withthis MPP panel is automatically populated with any MPLs selected forassociation with the MPP.
View/edit policy settings Click this link to modify the settings for the selected MPP. For more information,see Create a new MPP on page 71.
Done Click this button to apply the associations and close the screen.
Remove an existing MPP1. On the Managed Print Policies menu, select Remove an existing policy.
Figure 5-23 Remove an existing MPP – Select an MPP panel
2. From the Name drop-down list, select the name of the MPP to be removed.
Table 5-21 Managed Printer Policy — Manage MPL associations panel options (continued)
ENWW Use Managed Printer Policies (MPPs) 95
HP
MPA
3. Click Next. The Confirm screen is automatically populated with the MPLs and user groups thatare associated with the MPP that is selected for removal.
Figure 5-24 Remove an existing MPP — Confirmation screen
4. Click Remove to proceed with the removal of the selected MPP, or click Back to return to theSelect an MPP screen without removing the MPP.
The confirmation screen provides confirmation that the MPP has been successfully removed andprovides a list of possible next steps (for example, create a new MPP, edit an existing MPP, andso on).
96 Chapter 5 Use HP Managed Printing Administration (MPA) software ENWW
HP M
PA
Use Managed Printer Lists (MPLs)Use the HP MPA software to create Managed Printer Lists (MPLs), add printers to existing MPLs, andestablish associations with MPPs and User Groups. The MPLs provide a simple method for users tolocate and use HP printing devices. The MPL defines groupings of printers based on various attributes,and controls features at both the group and individual-printer levels. Administrators can also use theHP MPA software to customize HTML views of MPLs to assist end users in locating available printersin their environment.
Through the HP MPA tool you can create, edit, and manage all of the content that is made available tothe HP UPD without having to worry about the XML syntax and contents for each document type. Thistool stores all of the settings in a database running on the centrally managed server, and when the HPUPD queries for the MPP or MPL content, scripts convert the settings stored in the database into theproperly formatted XML content to be consumed by the HP UPD. The HP MPA tool should be used tomanage the MPP and MPL contents as well as the associations between them.
What is an MPL?
MPLs are XML documents that provide the information required for a print job to use a printing device.The details of a printer are contained in this centrally managed XML document in an easy-to-read andmodify text file format. The administrator defines printer details in the XML file to assist users in findingsupported printers that they can print to using the HP UPD for Windows (HP UPD MPLs provideadministrators with the ability to specify which products users can print to).
MPLs create a reliable and seamless way of discovering and connecting to devices in the office, orpublic printing venues.
MPLs allow users to select a printer with a descriptive name from a pre-defined list. Users do not needto know about network print shares, TCP/IP addresses, printer host names, user access permissions,or other printer connection details. Instead they simply select a printer from the list dialog box and print.Printing does not get any easier than using MPLs.
Create and Edit MPLs
The MPLs can be created and edited through the graphical based tool called HP MPA. This tool willmanage all of the details of the printers such as the addresses, friendly name displayed by the HP UPD,comments, and other printer settings so that you do not have to be concerned with the formatting andmaintaining an XML file.
Through the HP MPA tool, you can also customize the view of each MPL such that users can selectprinters by clicking an image map or a picture of the printer to help the user locate and identify the desireddestination printer.
Who should use MPLs?
MPLs can vastly simplify printing for end users and/or improve control over the environment byadministrators. Costs savings in productivity, security, support, and supplies frequently justify the effortof implementing MPLs.
ENWW Use Managed Printer Lists (MPLs) 97
HP
MPA
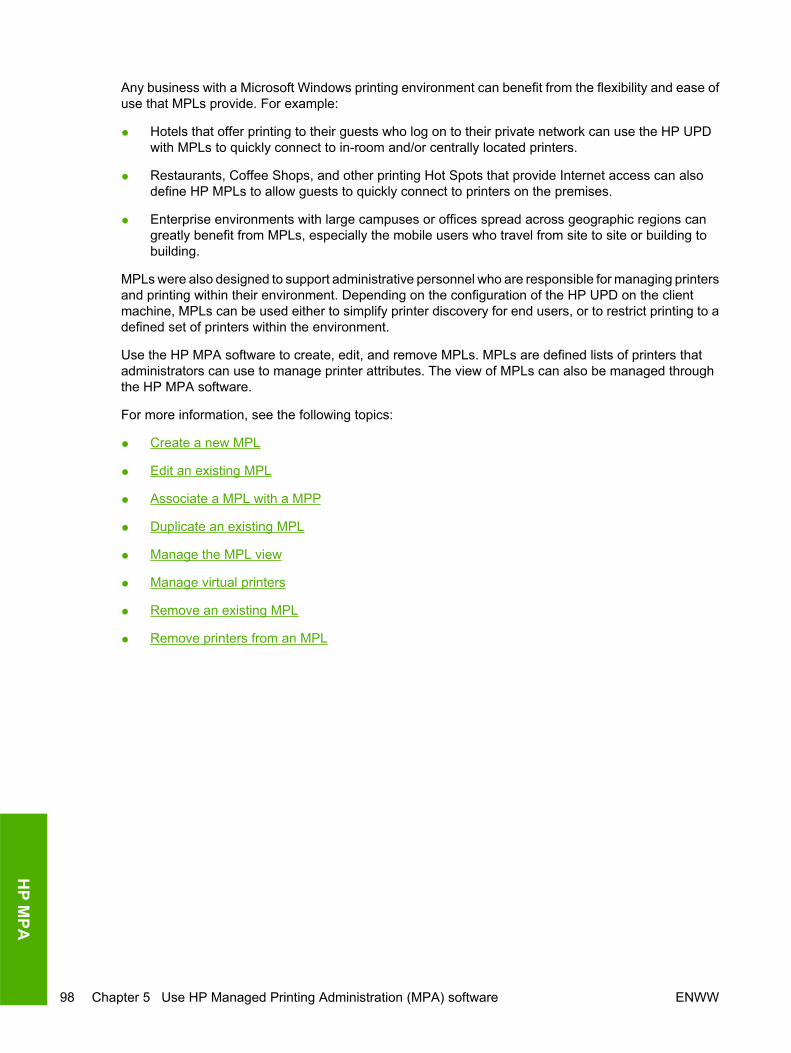
Any business with a Microsoft Windows printing environment can benefit from the flexibility and ease ofuse that MPLs provide. For example:
● Hotels that offer printing to their guests who log on to their private network can use the HP UPDwith MPLs to quickly connect to in-room and/or centrally located printers.
● Restaurants, Coffee Shops, and other printing Hot Spots that provide Internet access can alsodefine HP MPLs to allow guests to quickly connect to printers on the premises.
● Enterprise environments with large campuses or offices spread across geographic regions cangreatly benefit from MPLs, especially the mobile users who travel from site to site or building tobuilding.
MPLs were also designed to support administrative personnel who are responsible for managing printersand printing within their environment. Depending on the configuration of the HP UPD on the clientmachine, MPLs can be used either to simplify printer discovery for end users, or to restrict printing to adefined set of printers within the environment.
Use the HP MPA software to create, edit, and remove MPLs. MPLs are defined lists of printers thatadministrators can use to manage printer attributes. The view of MPLs can also be managed throughthe HP MPA software.
For more information, see the following topics:
● Create a new MPL
● Edit an existing MPL
● Associate a MPL with a MPP
● Duplicate an existing MPL
● Manage the MPL view
● Manage virtual printers
● Remove an existing MPL
● Remove printers from an MPL
98 Chapter 5 Use HP Managed Printing Administration (MPA) software ENWW
HP M
PA
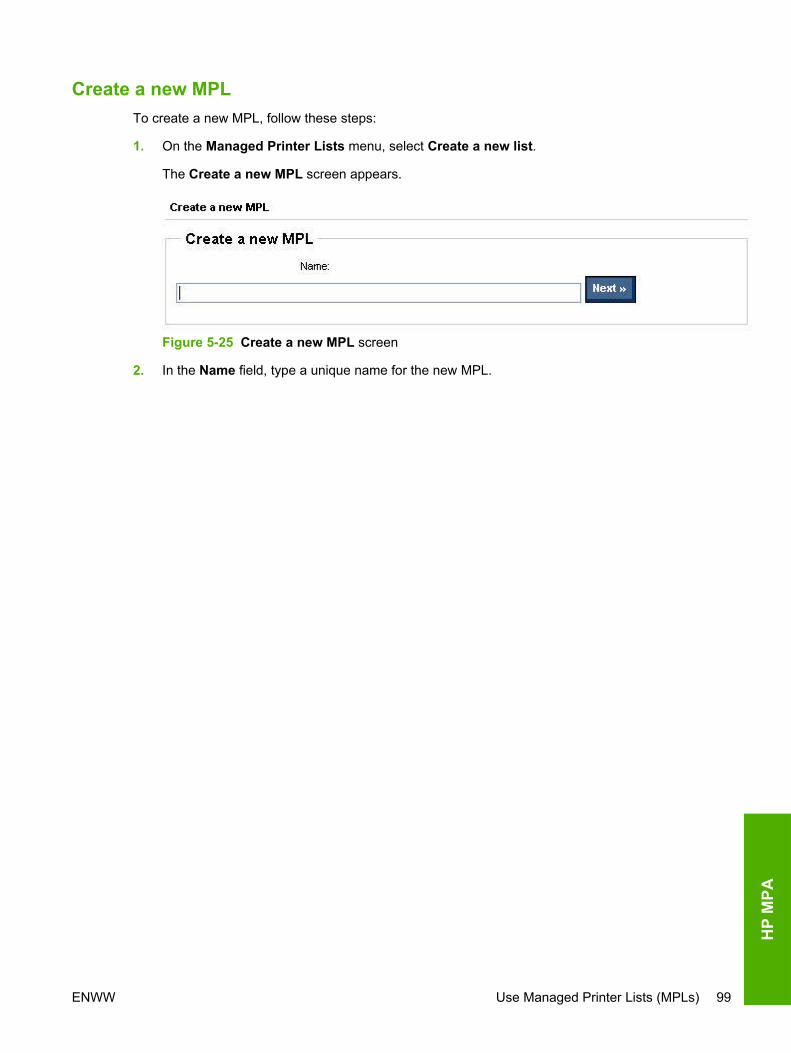
Create a new MPLTo create a new MPL, follow these steps:
1. On the Managed Printer Lists menu, select Create a new list.
The Create a new MPL screen appears.
Figure 5-25 Create a new MPL screen
2. In the Name field, type a unique name for the new MPL.
ENWW Use Managed Printer Lists (MPLs) 99
HP
MPA
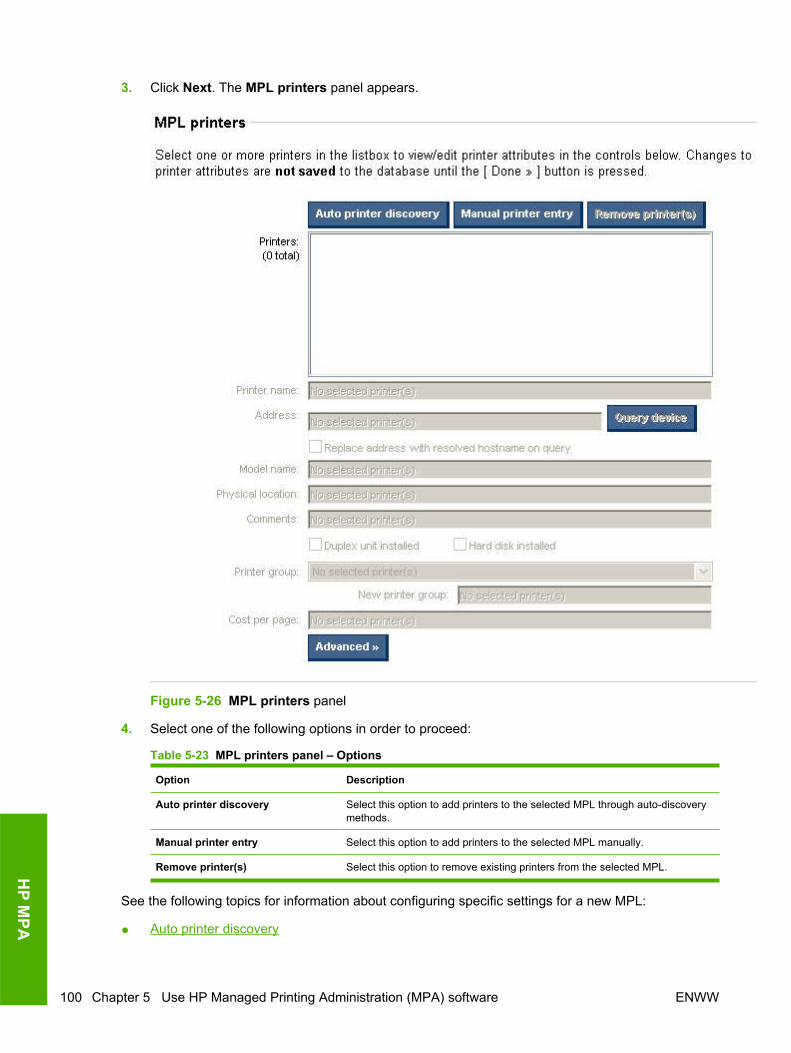
3. Click Next. The MPL printers panel appears.
Figure 5-26 MPL printers panel
4. Select one of the following options in order to proceed:
Table 5-23 MPL printers panel – Options
Option Description
Auto printer discovery Select this option to add printers to the selected MPL through auto-discoverymethods.
Manual printer entry Select this option to add printers to the selected MPL manually.
Remove printer(s) Select this option to remove existing printers from the selected MPL.
See the following topics for information about configuring specific settings for a new MPL:
● Auto printer discovery
100 Chapter 5 Use HP Managed Printing Administration (MPA) software ENWW
HP M
PA
● Manual printer entry
Auto printer discoveryIn the MPL printers screen, click Auto printer discovery to open the Add Automatically screen, asshown in the following figure.
Figure 5-27 Add automatically screen
Auto printer discovery can be used to create a new MPL or to add printers to an existing MPL. Threemethods of auto-printer discovery are available:
● Discover locally connected network printers
● Discover printers on a print server (\\serverName)
● Import printers from an XML file
After printers have been discovered by using each of these method, all fields can be modified manually,as necessary. For more information, see Manual printer entry on page 107.
ENWW Use Managed Printer Lists (MPLs) 101
HP
MPA
Discover locally connected network printers
To discover locally connected network printers and add them to an existing MPL, follow these steps:
1. In the MPL printers window, click Auto printer discovery. The Add automatically screenappears.
2. On the Discover locally connected network printers panel, click Discover.
During discovery, the HP MPA performs a local mDNS discovery on the local subnet. Printingdevices that have the mDNS protocol enabled, and are on the same subnet as the HP MPAsoftware will show up in the printer list.
The Discovered printers screen appears, and locally connected printers that were discoveredautomatically populate the Printer group box, as shown in the following figure.
Figure 5-28 Discovered printers screen
3. In the Printer group box, select the check box next to printers that you want to add to the MPL.(All printers are selected by default.)
4. Modify the following settings as necessary:
Table 5-24 Discovered printers screen options
Option Description
102 Chapter 5 Use HP Managed Printing Administration (MPA) software ENWW
HP M
PA
Select/deselect all printers Select this check box to toggle between selecting all or none of the printers inthe Printer window to be included in the selected MPL. (Selected by default.)
Query device configuration Select this check box to query the printing device in order to determine thefollowing information. (Selected by default.)
● Presence of printer features such as hard disk, duplexer, and color
● Printer model name
● Address of the printer (for example, IP address, UNC path, IPX/SPXprotocol, or hostname)
Use resolved hostname in place of IPaddress
Select this check box to replace the printer IP address in the Address field withthe resolved hostname. (Not selected by default.)
Set printer's IP address in thecomments field
Select this check box to include the printer IP address in the Comments field.(Not selected by default.)
5. Click Add checked printers to add the selected printers to the MPL. The information that isassociated with the selected printer automatically populates the MPL Printers screen.
Alternatively, click Back to return to the Add automatically screen without saving the changes.
6. Modify any additional fields as necessary. For more information, see Manual printer entryon page 107.
Discover printers on a print server (\\serverName)
To add any number of printers that are already installed on a known print server, follow these steps:
1. In the MPL printers screen, click Auto printer discovery. The Add automatically screenappears.
2. In the Discover printers on a print server (\\serverName) section, specify a name in the Printserver field. For example:
● \\printserver
● \\winprintserver
● \\novellServer.tree1
● \\novellServer.context1.context2
3. Optionally, in the Connect as user field, type the username for the server that you provided inthe Print server field, and type the associated password in the Password field.
4. Select the Print server is a non-Windows machine check box if the print server is a non-Windowscomputer.
Table 5-24 Discovered printers screen options (continued)
ENWW Use Managed Printer Lists (MPLs) 103
HP
MPA
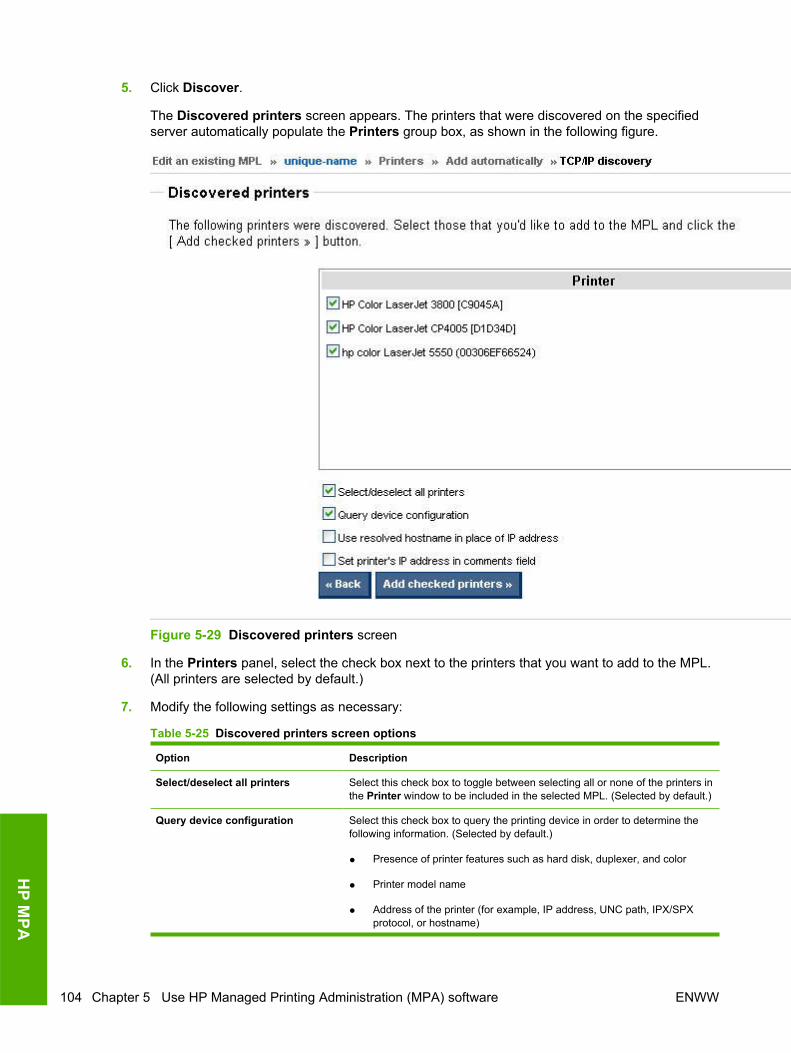
5. Click Discover.
The Discovered printers screen appears. The printers that were discovered on the specifiedserver automatically populate the Printers group box, as shown in the following figure.
Figure 5-29 Discovered printers screen
6. In the Printers panel, select the check box next to the printers that you want to add to the MPL.(All printers are selected by default.)
7. Modify the following settings as necessary:
Table 5-25 Discovered printers screen options
Option Description
Select/deselect all printers Select this check box to toggle between selecting all or none of the printers inthe Printer window to be included in the selected MPL. (Selected by default.)
Query device configuration Select this check box to query the printing device in order to determine thefollowing information. (Selected by default.)
● Presence of printer features such as hard disk, duplexer, and color
● Printer model name
● Address of the printer (for example, IP address, UNC path, IPX/SPXprotocol, or hostname)
104 Chapter 5 Use HP Managed Printing Administration (MPA) software ENWW
HP M
PA
Use resolved hostname in place of IPaddress
Select this check box to replace the printer IP address in the Address field withthe resolved hostname. (Not selected by default.)
Set printer's IP address in thecomments field
Select this check box to include the printer IP address in the Comments field.(Not selected by default.)
8. Click Add checked printers to add the selected printers to the MPL. The information that isassociated with the selected printer automatically populates the MPL Printers screen.
Alternatively, click Back to return to the Add automatically screen without saving the changes.
9. Modify any additional fields as necessary. For more information, see Manual printer entryon page 107.
Import printers from an XML file
Administrators can use this method to add static printer information from an XML file; for example, anXML file from a previous MPL or a Webjet Admin file. When the XML file is imported the data will remainthe same; only its format is converted when it is added to the MPL.
To add static printer information from an XML file, follow these steps:
1. On the MPL printers screen, click Auto printer discovery. The Add automatically screenappears.
2. In the Import printers from XML file panel, you must provide the URL of the XML file or UNC pathin order to proceed. In the XML URL or UNC field, type the Internet address that corresponds tothe location of the XML file on a Web server or the Universal Naming Convention (UNC) thatcorresponds to the location of the XML file on a local-area network.
Table 5-25 Discovered printers screen options (continued)
ENWW Use Managed Printer Lists (MPLs) 105
HP
MPA
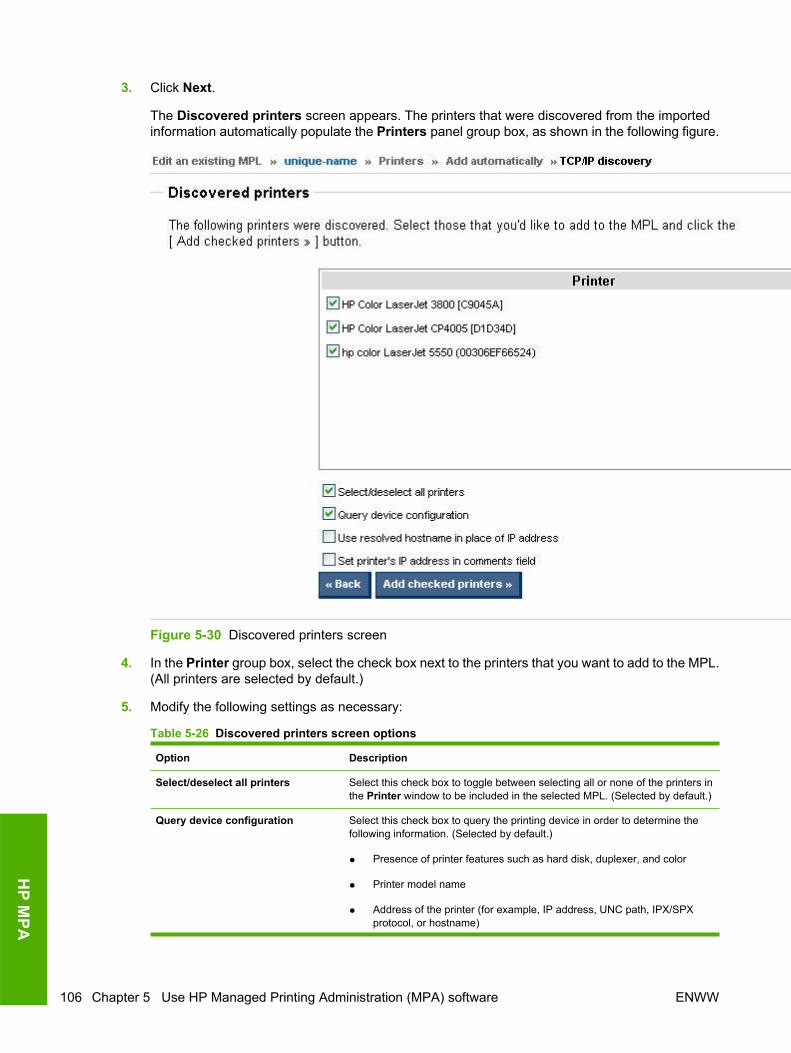
3. Click Next.
The Discovered printers screen appears. The printers that were discovered from the importedinformation automatically populate the Printers panel group box, as shown in the following figure.
Figure 5-30 Discovered printers screen
4. In the Printer group box, select the check box next to the printers that you want to add to the MPL.(All printers are selected by default.)
5. Modify the following settings as necessary:
Table 5-26 Discovered printers screen options
Option Description
Select/deselect all printers Select this check box to toggle between selecting all or none of the printers inthe Printer window to be included in the selected MPL. (Selected by default.)
Query device configuration Select this check box to query the printing device in order to determine thefollowing information. (Selected by default.)
● Presence of printer features such as hard disk, duplexer, and color
● Printer model name
● Address of the printer (for example, IP address, UNC path, IPX/SPXprotocol, or hostname)
106 Chapter 5 Use HP Managed Printing Administration (MPA) software ENWW
HP M
PA
Use resolved hostname in place of IPaddress
Select this check box to replace the printer IP address in the Address field withthe resolved hostname. (Not selected by default.)
Set printer's IP address in thecomments field
Select this check box to include the printer IP address in the Comments field.(Not selected by default.)
6. Click Add checked printers to add the selected printers to the MPL. The information that isassociated with the selected printer automatically populates the MPL Printers screen.
Alternatively, click Back to return to the Add automatically screen without saving changes.
7. Modify additional printer attributes as necessary. For more information, see Manual printer entryon page 107.
Manual printer entryThis section provides instructions to add printers to an MPL manually or edit printers previously added.If you have performed one of the auto printer discovery methods, many of the fields described here maybe automatically populated. For more information, see Auto printer discovery on page 101.
NOTE: Changes that you make in this section apply only to printers that are selected in thePrinters window. To select multiple printers, hold down the CTRL key and then select printers.
Table 5-26 Discovered printers screen options (continued)
ENWW Use Managed Printer Lists (MPLs) 107
HP
MPA
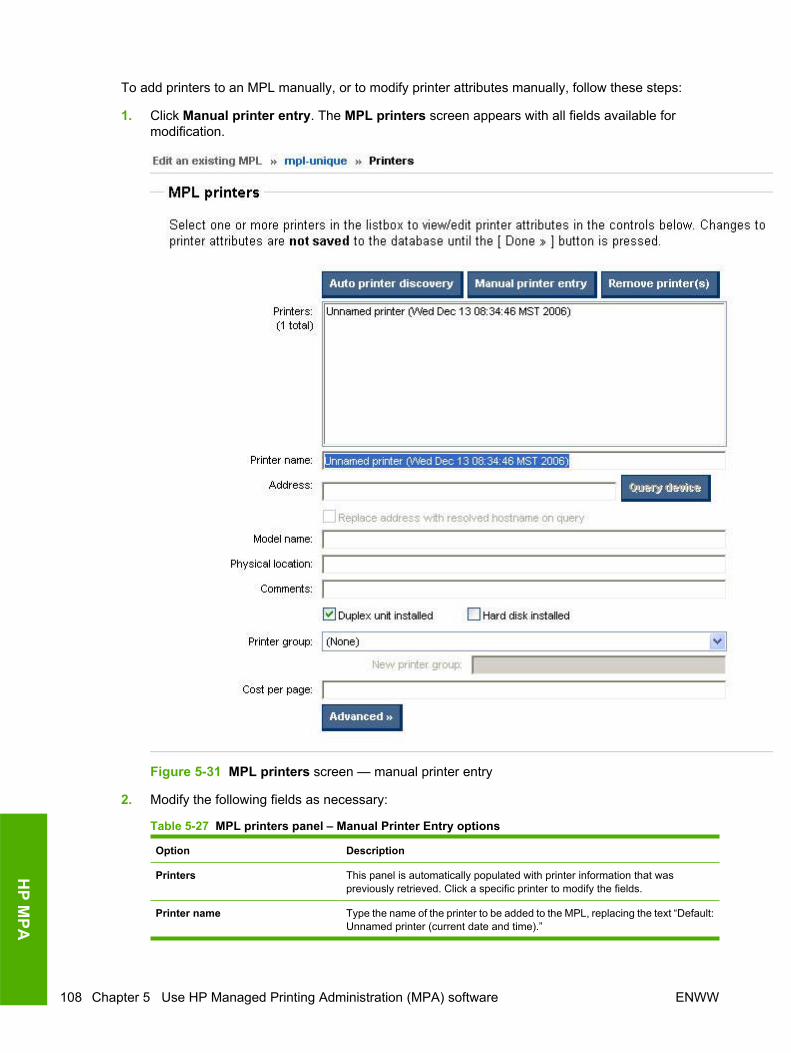
To add printers to an MPL manually, or to modify printer attributes manually, follow these steps:
1. Click Manual printer entry. The MPL printers screen appears with all fields available formodification.
Figure 5-31 MPL printers screen — manual printer entry
2. Modify the following fields as necessary:
Table 5-27 MPL printers panel – Manual Printer Entry options
Option Description
Printers This panel is automatically populated with printer information that waspreviously retrieved. Click a specific printer to modify the fields.
Printer name Type the name of the printer to be added to the MPL, replacing the text “Default:Unnamed printer (current date and time).”
108 Chapter 5 Use HP Managed Printing Administration (MPA) software ENWW
HP M
PA

Address Provide one of the following addresses to define the type of connection and theprinter address for end users to connect to the printer:
● IP address:
The IP address of the printer can be retrieved from the configuration page(for example, 115.22.112.151).
● UNC path:
The UNC path tag includes any Windows printer share (also known as aNetwork print queue) or non-Windows print queues such as a PSA orNovell (for example, \\serverName\printerName, \\printServer\hplj4000, \\NovellTree1\Context1 \Context2\OU3.hplj5500, or \\LabTree\Bldg7.SEMeetingRoom.Printers.hp4100).
● Hostname:
The hostname of a device can be retrieved from the configuration page (forexample, NPIBB99EE, testlab.hou.com).
● IPX/SPX:
The IPX/SPX protocol includes the “NetworkNumber.NodeNumber”format.
NOTE: To use an IPX/SPX protocol, the IPX/SPX clientnetworking software must be installed on the computer . Also, theHP IPX port monitor must be installed, which is supported only inWindows 2000.
Replace address with resolvedhostname on query
After the Address field is populated with a valid printer address, select thisoption to query the printing device in order to determine the followinginformation:
● Presence of printer features such as hard disk, duplexer, and color
● Printer model name
● Address of the printer (for example, IP address, UNC path, IPX/SPXprotocol, or hostname)
Model name Type the model name of the printer (for example, HP LaserJet 4100 MFP).
Physical location Type the physical location of the printer to be added to the MPL (for example,HP LaserJet 4100 in Room 1002).
Comments Type in any comments (for example, tray 2 contains color paper).
Check boxes The following two check boxes are available. Select as appropriate.
● Duplex unit installed
● Hard disk installed
Table 5-27 MPL printers panel – Manual Printer Entry options (continued)
ENWW Use Managed Printer Lists (MPLs) 109
HP
MPA
Printer group The following two options are available.
● (None).
Select this option if this MPL is not associated with a specific printer group.
● (Create new group).
Select this option to define a new printer group. Type the name of this groupin the New Printer Group field.
Cost per page Provide a cost value to appear in a pay-for-print environment where print jobsare assigned a cost (for example, $1.09).
3. Optionally, click Advanced to open the Advanced panel. Select one of the following options, asnecessary:
Table 5-28 MPL printers – Advanced panel options
Option Description
Disable color printing Select this check box to disable color printing for the selected printer.
Validate when printing Select this check box to require communication with the printer before it isavailable for printing. If the printer is on a print server (for example, Novell) thatdoes not allow bidirectional communication, this check box should be clear.
Select for job delivery Select this check box to apply the job delivery settings for all the print jobs thatare submitted to the selected printer.
NOTE: This option is applicable only when the job-delivery settingsare configured in the MPP. For more information, see Job Deliverysettings on page 85.
Secure print path Select this check box to indicate to users that the selected printer is on a secureprint path.
Configuration Select the appropriate configuration option:
● Use the configuration from the address specified:
The configuration will be queried directly from the printer at this address.
● Use the device from an alternate address:
The configuration will be queried from the printer at this alternate address.
● Use the device from a virtual printer:
The configuration will be queried from a virtual printer. See Manage virtualprinters on page 125 for more information on setting up a virtual printer.
4. Click Hide to save the settings to the selected printer and close the Advanced panel.
5. In the MPL settings panel, select the following options as necessary:
Table 5-27 MPL printers panel – Manual Printer Entry options (continued)
110 Chapter 5 Use HP Managed Printing Administration (MPA) software ENWW
HP M
PA
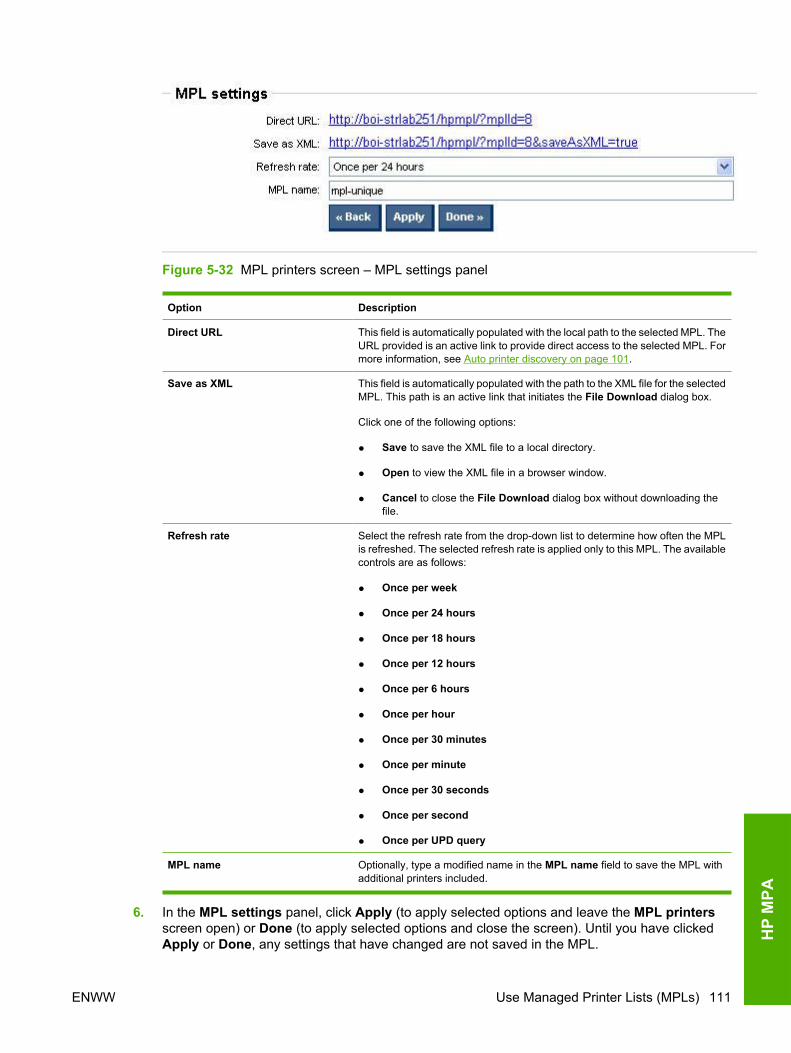
Figure 5-32 MPL printers screen – MPL settings panel
Option Description
Direct URL This field is automatically populated with the local path to the selected MPL. TheURL provided is an active link to provide direct access to the selected MPL. Formore information, see Auto printer discovery on page 101.
Save as XML This field is automatically populated with the path to the XML file for the selectedMPL. This path is an active link that initiates the File Download dialog box.
Click one of the following options:
● Save to save the XML file to a local directory.
● Open to view the XML file in a browser window.
● Cancel to close the File Download dialog box without downloading thefile.
Refresh rate Select the refresh rate from the drop-down list to determine how often the MPLis refreshed. The selected refresh rate is applied only to this MPL. The availablecontrols are as follows:
● Once per week
● Once per 24 hours
● Once per 18 hours
● Once per 12 hours
● Once per 6 hours
● Once per hour
● Once per 30 minutes
● Once per minute
● Once per 30 seconds
● Once per second
● Once per UPD query
MPL name Optionally, type a modified name in the MPL name field to save the MPL withadditional printers included.
6. In the MPL settings panel, click Apply (to apply selected options and leave the MPL printersscreen open) or Done (to apply selected options and close the screen). Until you have clickedApply or Done, any settings that have changed are not saved in the MPL.
ENWW Use Managed Printer Lists (MPLs) 111
HP
MPA
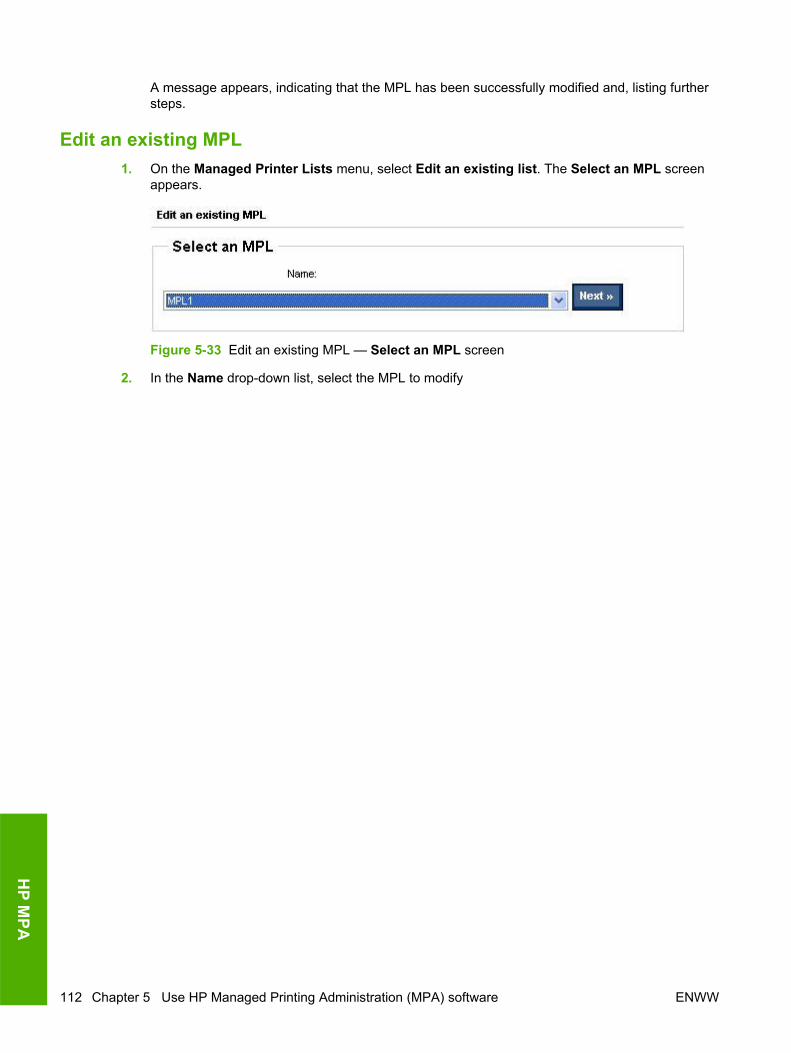
A message appears, indicating that the MPL has been successfully modified and, listing furthersteps.
Edit an existing MPL1. On the Managed Printer Lists menu, select Edit an existing list. The Select an MPL screen
appears.
Figure 5-33 Edit an existing MPL — Select an MPL screen
2. In the Name drop-down list, select the MPL to modify
112 Chapter 5 Use HP Managed Printing Administration (MPA) software ENWW
HP M
PA
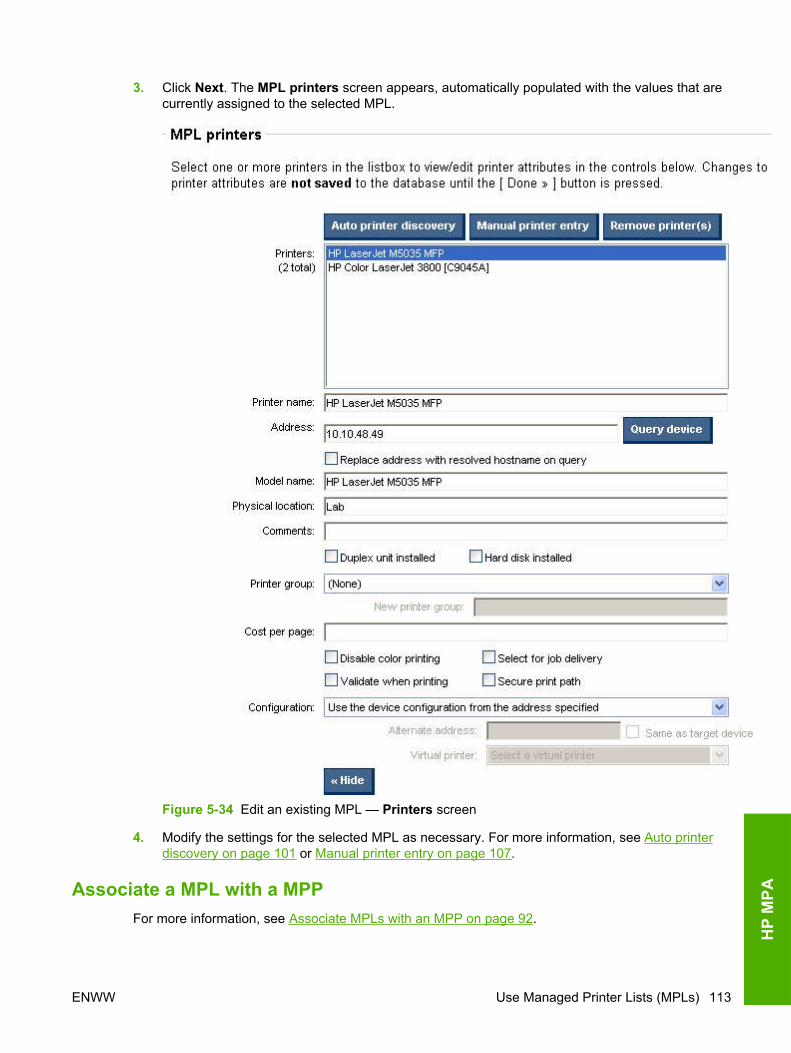
3. Click Next. The MPL printers screen appears, automatically populated with the values that arecurrently assigned to the selected MPL.
Figure 5-34 Edit an existing MPL — Printers screen
4. Modify the settings for the selected MPL as necessary. For more information, see Auto printerdiscovery on page 101 or Manual printer entry on page 107.
Associate a MPL with a MPPFor more information, see Associate MPLs with an MPP on page 92.
ENWW Use Managed Printer Lists (MPLs) 113
HP
MPA

Duplicate an existing MPLTo duplicate an existing MPL, follow these steps:
1. In the Managed Printer List menu, select Duplicate an existing list.
The Select an MPL to duplicate screen appears.
Figure 5-35 Duplicate an existing MPL — Select an MPL to duplicate panel
2. In the Copy from: drop-down menu, select the MPL to be duplicated.
3. In the New name: field, type the name for the new MPL.
4. Click Next. The MPL printer screen appears and automatically populates with the values assignedto the duplicated MPL.
5. Modify the settings for the selected MPL, as necessary. For more information, see Auto printerdiscovery on page 101 or Manual printer entry on page 107.
6. Click Apply (to apply selected options and leave the MPL printers screen open) or Done (to applyselected options and close the screen). Until you have clicked Apply or Done, any settings thathave changed are not saved in the MPL.
A message appears, indicating that the MPL has been successfully modified and, listing furthersteps.
Manage the MPL viewMPL views can be modified to assist users in selecting printers.
114 Chapter 5 Use HP Managed Printing Administration (MPA) software ENWW
HP M
PA
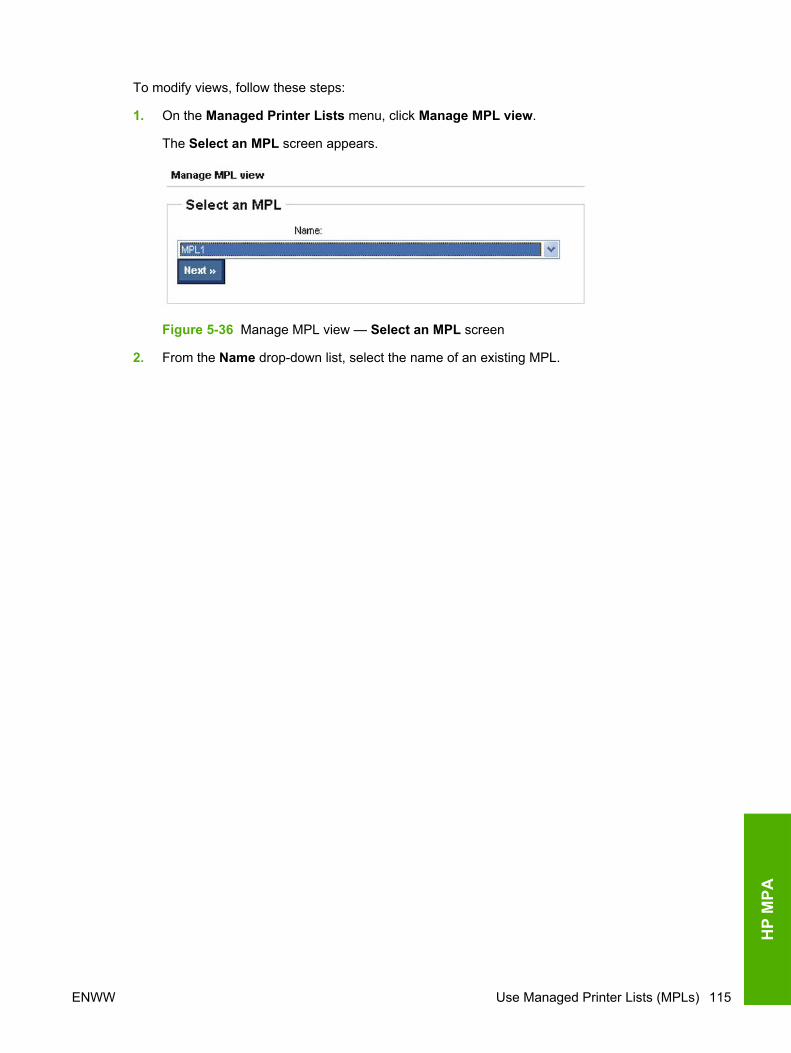
To modify views, follow these steps:
1. On the Managed Printer Lists menu, click Manage MPL view.
The Select an MPL screen appears.
Figure 5-36 Manage MPL view — Select an MPL screen
2. From the Name drop-down list, select the name of an existing MPL.
ENWW Use Managed Printer Lists (MPLs) 115
HP
MPA
3. Click Next. The Select a view type screen appears.
Figure 5-37 Select a view type screen
116 Chapter 5 Use HP Managed Printing Administration (MPA) software ENWW
HP M
PA
Modify views from one or both of the following panels:
● Select a view
● Advanced view settings
Select a view1. On the Select a view type panel, click one of the following options to select a view type:
NOTE: The Don’t require user to confirm printer after selection from view check boxis located below the MPL view-type options. This box must be selected after you create aview if you want to allow users to select printers from a view without providing an additionalconfirmation. This box is selected by default.
Table 5-29 Select a view type panel — View options
Option Description
Default UPD view Select this option to show a specified MPL in the HP UPD dialog box.
Clickable image map Select this option to create a clickable image map for the selected MPL.
List with printer graphics Select this option to create a list of printers that contains an associated graphicfor the selected MPL.
Tabular HTML view Select this option to create a table of printers for the selected MPL.
2. Optionally, to view the result in a new window, click the Preview button below the selection.
3. Click Configure to apply the selections.
See the following topics for more information about each view type:
● Clickable image map view
● List with printer graphics view
● Tabular HTML view
Clickable image map view
The clickable image map view is an interactive image-based map that shows printers that can beselected by end users who are associated with the specified MPL. The clickable image map allows endusers to drill down from a large-scale image to a local image that provides links to local printers.
1. From the Select a view type screen, select Clickable image map.
ENWW Use Managed Printer Lists (MPLs) 117
HP
MPA
2. Click Configure. The Image map screen appears.
Figure 5-38 Configure image map screen
3. On the View settings panel, click Select background image from library to select a backgroundimage.
The Select a background image screen appears.
Figure 5-39 Select a background image screen
4. Select the radio button above the image to apply to image-map background, and then click one ofthe following options:
Option Description
118 Chapter 5 Use HP Managed Printing Administration (MPA) software ENWW
HP M
PA
Back Select this option to return to the Configure image map screen without applyinga new image.
Delete selected image Select this option to remove the selected image from the HP MPA software.
Upload new image Select this option to upload a new image from an external source. The Uploada new background image screen appears.
When the Upload new image option is selected, you must perform the followingsteps:
1. Click Browse to the right of the File field. The Choose file windowappears.
2. Select the file to upload and click Open. The File field is automaticallypopulated with the filename and path.
3. Optionally, in the Description field, type a description for the selectedbackground image.
4. Click Upload Image. The image becomes available for selection on theSelect a background image screen.
Select image The selected image appears in the Image map panel with graphics for addedprinters on the left-hand side.
5. Select Show legend to include a legend at the bottom of the image map. (This option is not selectedby default.)
6. In the Printer select panel, select a printer to which you want to assign an image.
7. Click Auto match images for all printers to automatically match all the printers with theircorresponding image. The printer image that is currently selected in the Printer select drop-downmenu appears in the Printer image panel.
Other automatically matched images appear as icons in the Image map panel
8. In the Printer image panel, select one of the following options:
Table 5-30 Printer image panel options
Option Description
Replace image Select this option to replace the image that is automatically assigned to theselected printer with an image from the library. When you select this option, youmust perform the following steps:
1. Click Browse images to view the list of available images to match with theselected printer. The Select an image for [ Printer Name ] screenappears.
2. Click the option button above the image that you want to assign to theselected printer.
3. Click Select image. The selected printer image appears in the Printerimage section.
Add to map Click this option to place the image on the image map.
ENWW Use Managed Printer Lists (MPLs) 119
HP
MPA
Refresh
Reduce to Optionally, select the check box to modify the size of the image selected on theimage map. When this option is selected, the following options are available:
● (original size)
● 35 pixels
● 50 pixels
● 75 pixels
● 100 pixels
● 150 pixels
● 200 pixels
9. Drag the images in the Image map panel to the location that you want by clicking the image, holdingdown the left-mouse button, and then dragging to the appropriate location.
10. In the Labels panel, click Show. The Labels panel appears.
A label can be created for an image already added to the Image map panel, or can be used insteadof an image.
● To add a label to an existing image in the Image map panel, select the image and continuewith the following steps.
● To add a label to the Image map panel that is not associated with an image, continue withthe following steps.
Figure 5-40 Labels panel
11. From the Labels drop-down menu, select the name of an existing label, or select (Create a newtext label).
Table 5-30 Printer image panel options (continued)
120 Chapter 5 Use HP Managed Printing Administration (MPA) software ENWW
HP M
PA
12. Modify the following settings, as necessary:
NOTE: These settings will be automatically reflected on the Image map panel.
Table 5-31 Labels panel options
Option Description
Text Type the text to appear on the label.
Size Select one of the following to apply the appropriate font size. (Medium is thedefault.)
● Large
● Medium
● Small
Weight Select one of the following to apply the appropriate font weight. (Normal is thedefault.)
● Normal
● Bold
Color Select one of the following color options from the drop-down list to apply theappropriate color to the label text. (Black is the default.)
● Black
● Red
● Blue
● Green
Width Select one of the following options to set the appropriate width of the label textbox. (The 200 pixels option is the default.)
● 100 pixels
● 200 pixels
● 300 pixels
13. Click Add to map. The new label is automatically added to the image map.
14. To move the label to an appropriate location on the image map, click the label text box on the imagemap and drag to the appropriate location.
15. Click a new printer on the image map to add additional labels as necessary, or click Hide to closethe label panel.
NOTE: To remove a label, select the label in the Image map panel or in the Labels drop-downmenu. Then, click Remove label in the Labels panel.
List with printer graphics view
1. Click the option button next to List with printer graphics.
2. Optionally, select the Show device address check box to display the device address in the listwith the printer graphics view. (This box is not selected by default.)
ENWW Use Managed Printer Lists (MPLs) 121
HP
MPA
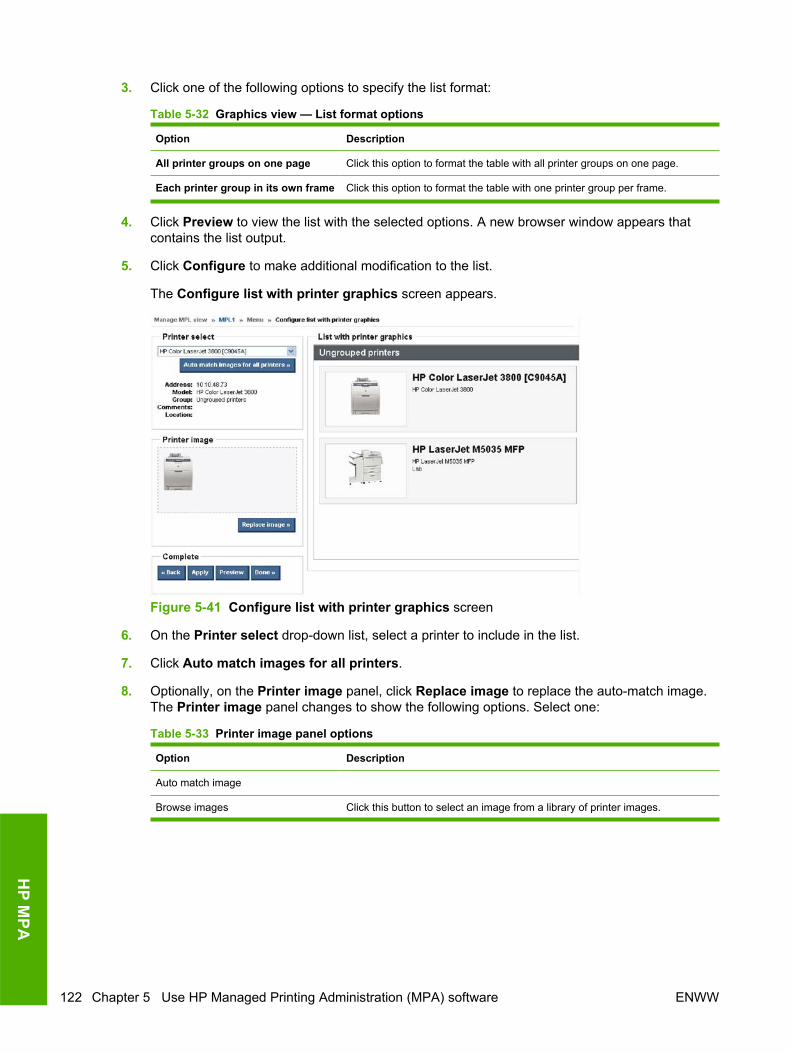
3. Click one of the following options to specify the list format:
Table 5-32 Graphics view — List format options
Option Description
All printer groups on one page Click this option to format the table with all printer groups on one page.
Each printer group in its own frame Click this option to format the table with one printer group per frame.
4. Click Preview to view the list with the selected options. A new browser window appears thatcontains the list output.
5. Click Configure to make additional modification to the list.
The Configure list with printer graphics screen appears.
Figure 5-41 Configure list with printer graphics screen
6. On the Printer select drop-down list, select a printer to include in the list.
7. Click Auto match images for all printers.
8. Optionally, on the Printer image panel, click Replace image to replace the auto-match image.The Printer image panel changes to show the following options. Select one:
Table 5-33 Printer image panel options
Option Description
Auto match image
Browse images Click this button to select an image from a library of printer images.
122 Chapter 5 Use HP Managed Printing Administration (MPA) software ENWW
HP M
PA
In the select image screen, three options are available:
● Back.
Select this option to return to the Configure image map screen withoutapplying a new image.
● Delete selected image.
Select this option to remove the selected image from the HP MPA software.
● Upload new image.
Select this option to upload a new image from an external source. TheUpload a new background image screen appears. See the following formmore instructions for uploading a new image.
When the Upload new image option is selected, you must perform the followingsteps:
1. Click Browse to the right of the File field. The Choose file windowappears.
2. Select the file to upload and click Open. The File field is automaticallypopulated with the filename and path.
3. Optionally, in the Description field, type a description for the selectedbackground image.
4. Click Upload Image. The image becomes available for selection on theSelect a background image screen.
Select image The selected image appears in the Image map panel with graphics for addedprinters on the left-hand side.
9. In the Complete panel, select one of the following options:
Table 5-34 Complete panel options
Option Description
Back Click Back to return to the Select an MPL screen without saving the changes.
Apply Click Apply to apply your changes to the MPL view and remain in the Configurelist with graphics view screen to make any additional modifications.
Preview Click Preview to view the applied changes. A new browser window appears withthe list output.
Done Click Done to apply the changes to the MPL view. A confirmation screenappears and provides a list of suggested next steps.
Tabular HTML view
To create a table of all available printers in the specified MPL, follow these steps:
1. Click the radio button next to Tabular HTML view.
2. Optionally, select the Hide empty columns check box to hide any columns that have no values.
3. Optionally, select the Show device address check box to show the device address in the tabularHTML view.
4. Click one of the following option buttons to select the list format:
Table 5-33 Printer image panel options (continued)
ENWW Use Managed Printer Lists (MPLs) 123
HP
MPA
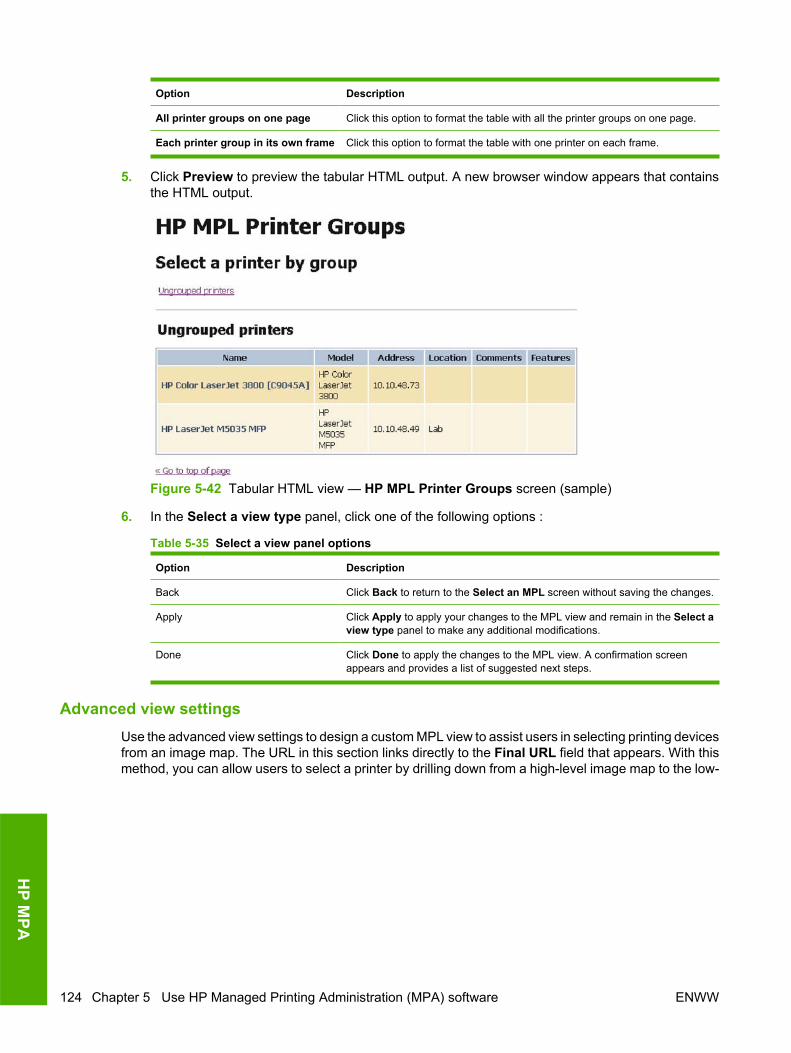
Option Description
All printer groups on one page Click this option to format the table with all the printer groups on one page.
Each printer group in its own frame Click this option to format the table with one printer on each frame.
5. Click Preview to preview the tabular HTML output. A new browser window appears that containsthe HTML output.
Figure 5-42 Tabular HTML view — HP MPL Printer Groups screen (sample)
6. In the Select a view type panel, click one of the following options :
Table 5-35 Select a view panel options
Option Description
Back Click Back to return to the Select an MPL screen without saving the changes.
Apply Click Apply to apply your changes to the MPL view and remain in the Select aview type panel to make any additional modifications.
Done Click Done to apply the changes to the MPL view. A confirmation screenappears and provides a list of suggested next steps.
Advanced view settingsUse the advanced view settings to design a custom MPL view to assist users in selecting printing devicesfrom an image map. The URL in this section links directly to the Final URL field that appears. With thismethod, you can allow users to select a printer by drilling down from a high-level image map to the low-
124 Chapter 5 Use HP Managed Printing Administration (MPA) software ENWW
HP M
PA
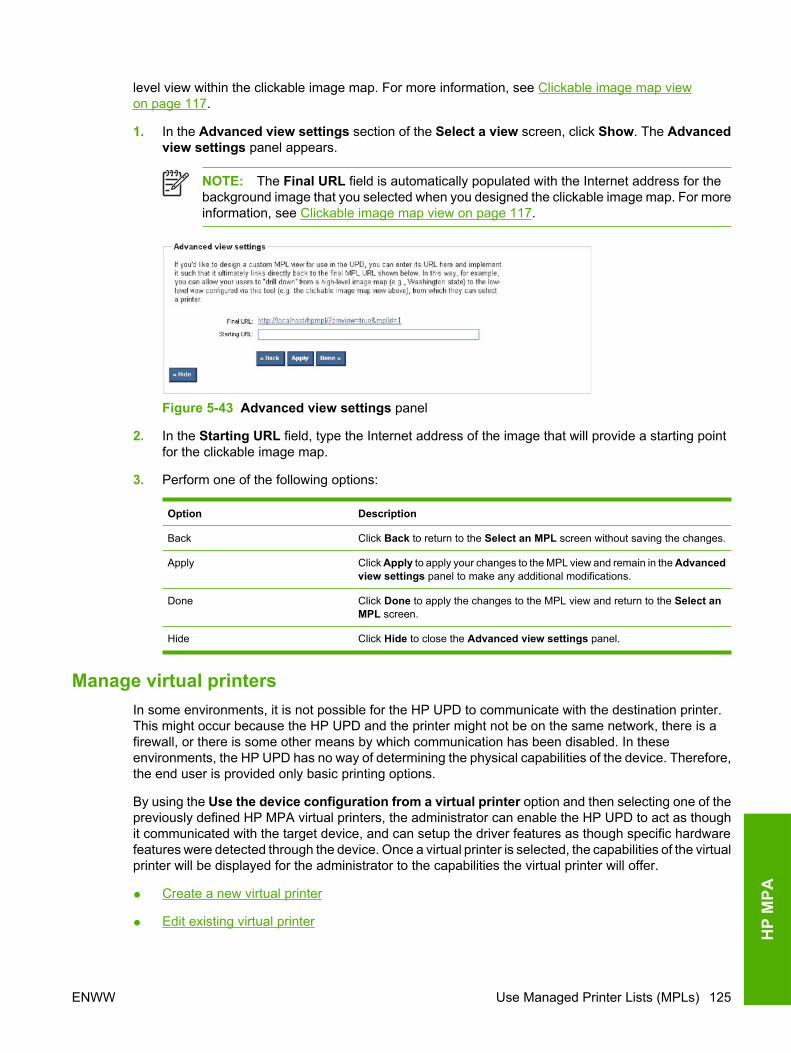
level view within the clickable image map. For more information, see Clickable image map viewon page 117.
1. In the Advanced view settings section of the Select a view screen, click Show. The Advancedview settings panel appears.
NOTE: The Final URL field is automatically populated with the Internet address for thebackground image that you selected when you designed the clickable image map. For moreinformation, see Clickable image map view on page 117.
Figure 5-43 Advanced view settings panel
2. In the Starting URL field, type the Internet address of the image that will provide a starting pointfor the clickable image map.
3. Perform one of the following options:
Option Description
Back Click Back to return to the Select an MPL screen without saving the changes.
Apply Click Apply to apply your changes to the MPL view and remain in the Advancedview settings panel to make any additional modifications.
Done Click Done to apply the changes to the MPL view and return to the Select anMPL screen.
Hide Click Hide to close the Advanced view settings panel.
Manage virtual printersIn some environments, it is not possible for the HP UPD to communicate with the destination printer.This might occur because the HP UPD and the printer might not be on the same network, there is afirewall, or there is some other means by which communication has been disabled. In theseenvironments, the HP UPD has no way of determining the physical capabilities of the device. Therefore,the end user is provided only basic printing options.
By using the Use the device configuration from a virtual printer option and then selecting one of thepreviously defined HP MPA virtual printers, the administrator can enable the HP UPD to act as thoughit communicated with the target device, and can setup the driver features as though specific hardwarefeatures were detected through the device. Once a virtual printer is selected, the capabilities of the virtualprinter will be displayed for the administrator to the capabilities the virtual printer will offer.
● Create a new virtual printer
● Edit existing virtual printer
ENWW Use Managed Printer Lists (MPLs) 125
HP
MPA
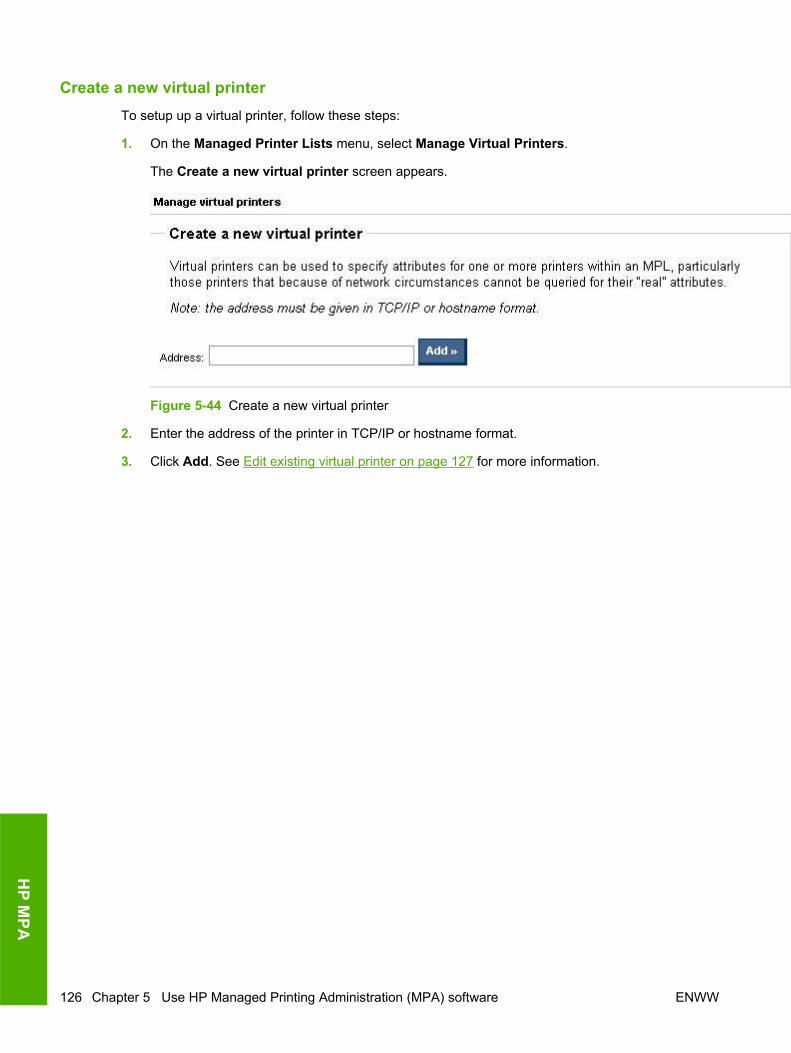
Create a new virtual printerTo setup up a virtual printer, follow these steps:
1. On the Managed Printer Lists menu, select Manage Virtual Printers.
The Create a new virtual printer screen appears.
Figure 5-44 Create a new virtual printer
2. Enter the address of the printer in TCP/IP or hostname format.
3. Click Add. See Edit existing virtual printer on page 127 for more information.
126 Chapter 5 Use HP Managed Printing Administration (MPA) software ENWW
HP M
PA
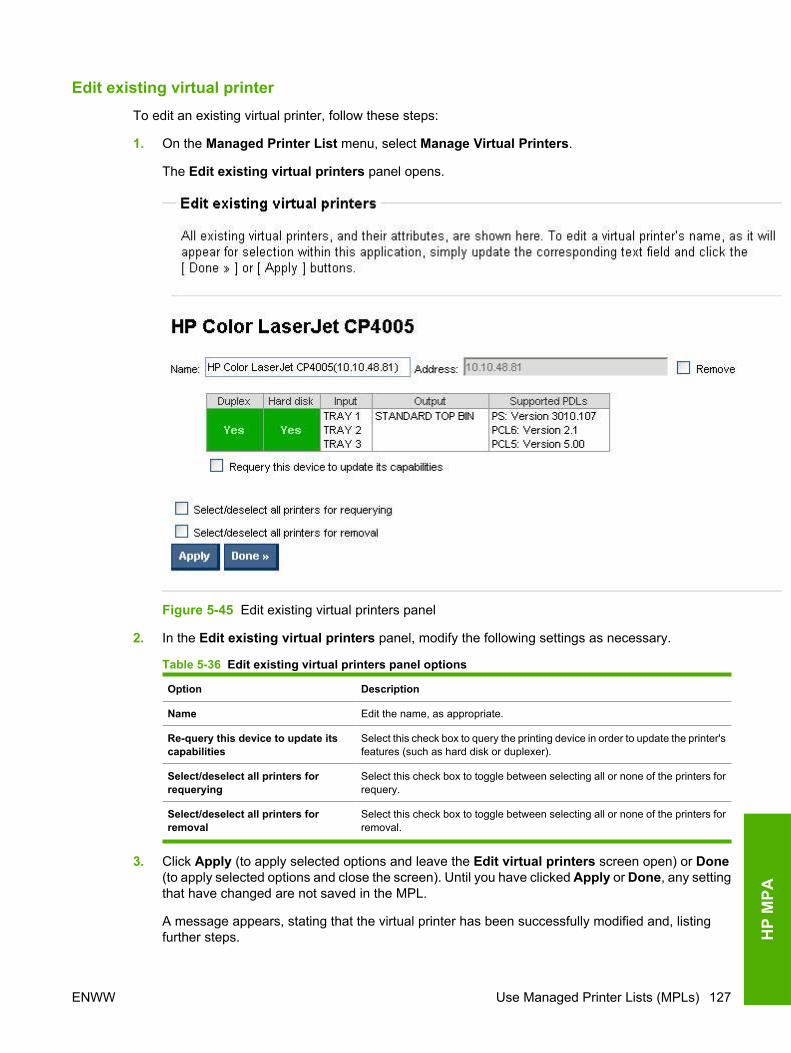
Edit existing virtual printerTo edit an existing virtual printer, follow these steps:
1. On the Managed Printer List menu, select Manage Virtual Printers.
The Edit existing virtual printers panel opens.
Figure 5-45 Edit existing virtual printers panel
2. In the Edit existing virtual printers panel, modify the following settings as necessary.
Table 5-36 Edit existing virtual printers panel options
Option Description
Name Edit the name, as appropriate.
Re-query this device to update itscapabilities
Select this check box to query the printing device in order to update the printer'sfeatures (such as hard disk or duplexer).
Select/deselect all printers forrequerying
Select this check box to toggle between selecting all or none of the printers forrequery.
Select/deselect all printers forremoval
Select this check box to toggle between selecting all or none of the printers forremoval.
3. Click Apply (to apply selected options and leave the Edit virtual printers screen open) or Done(to apply selected options and close the screen). Until you have clicked Apply or Done, any settingthat have changed are not saved in the MPL.
A message appears, stating that the virtual printer has been successfully modified and, listingfurther steps.
ENWW Use Managed Printer Lists (MPLs) 127
HP
MPA
Remove an existing MPLTo remove an existing MPL, follow these steps:
1. On the Managed Printer Lists menu, select Remove an existing list.
The Select an MPL screen appears.
Figure 5-46 Remove an existing MPL — Select a MPL screen
2. From the Name drop-down list, select the name of an existing MPL.
3. Click Next. A confirmation screen appears, as shown in the following figure. It is automaticallypopulated with the list of all printers that are currently assigned to the selected MPL.
Figure 5-47 Remove an existing MPL — confirmation screen (sample)
4. Click Remove to confirm the removal of the selected MPL, or click Back to return to the Select aMPL screen without saving the changes.
Remove printers from an MPLTo remove printers from an MPL, follow these steps:
1. On the Managed Printer Lists menu, click Edit an existing list. The Select an MPL screenappears.
2. Select the MPL from which a printer or printers are to be removed and click Next. The Printersscreen appears.
Figure 5-48 Printers screen
3. On the MPL printers screen, select the printers to remove by clicking them in the Printers panel.(Hold down the CTRL key to select more than one printer.)
128 Chapter 5 Use HP Managed Printing Administration (MPA) software ENWW
HP M
PA

4. Click Remove printer(s). A confirmation dialog box appears that contains the list of the printersthat you selected for deletion.
Figure 5-49 Remove printers — confirmation dialog box
5. Click OK to confirm, or click Cancel to return to the Confirm screen to view printer details.
ENWW Use Managed Printer Lists (MPLs) 129
HP
MPA
Use User GroupsUse the HP MPA software to create, import, and modify groups of users. The HP MPA software is alsoused to establish associations for existing user groups with available MPPs to manage user-groupaccess to available printers and to control features. Users who are added to these groups are likely tobe domain users, although users can be added with their local login name.
Use the HP MPA software to create user groups and modify permissions for HP UPD users.
For more information about creating user groups, see the following topics:
● Create a new user group
● Edit an existing user group
● Associate a user group with a MPP
● Remove a user group
Create a new user group1. On the User Groups menu, select Create a new user group.
The Create a new user group screen appears.
Figure 5-50 Create a new user group screen
2. In the Name field, type a name for the new user group.
130 Chapter 5 Use HP Managed Printing Administration (MPA) software ENWW
HP M
PA
3. Click Next. The Users screen appears, as shown in the following figure.
Figure 5-51 Users screen
4. In the Users field on the Included Users panel, type the user entries in the format that is specifiedon the screen.
Alternatively, you can paste user entries from an external, semicolon-delimited list.
5. Optionally, in the User group name field on the User Group Settings panel, type a name for thenew user group.
6. Perform one of the following options:
Option Description
Back Click Back to return to the main menu without saving the changes.
Apply Click Apply to update the user entries and remain in the Included users screento make additional modifications.
Done Click Done to update user entries and return to the main menu.
ENWW Use User Groups 131
HP
MPA
Edit an existing user group1. On the User Groups menu, select Edit an existing user group.
The Edit an existing user group screen appears.
Figure 5-52 Edit an existing user group screen
2. From the Name drop-down list, select the name of an existing user group.
3. Click Next. The Included users screen that appears is automatically populated with all usersincluded in the selected user group.
Figure 5-53 Included users panel
132 Chapter 5 Use HP Managed Printing Administration (MPA) software ENWW
HP M
PA
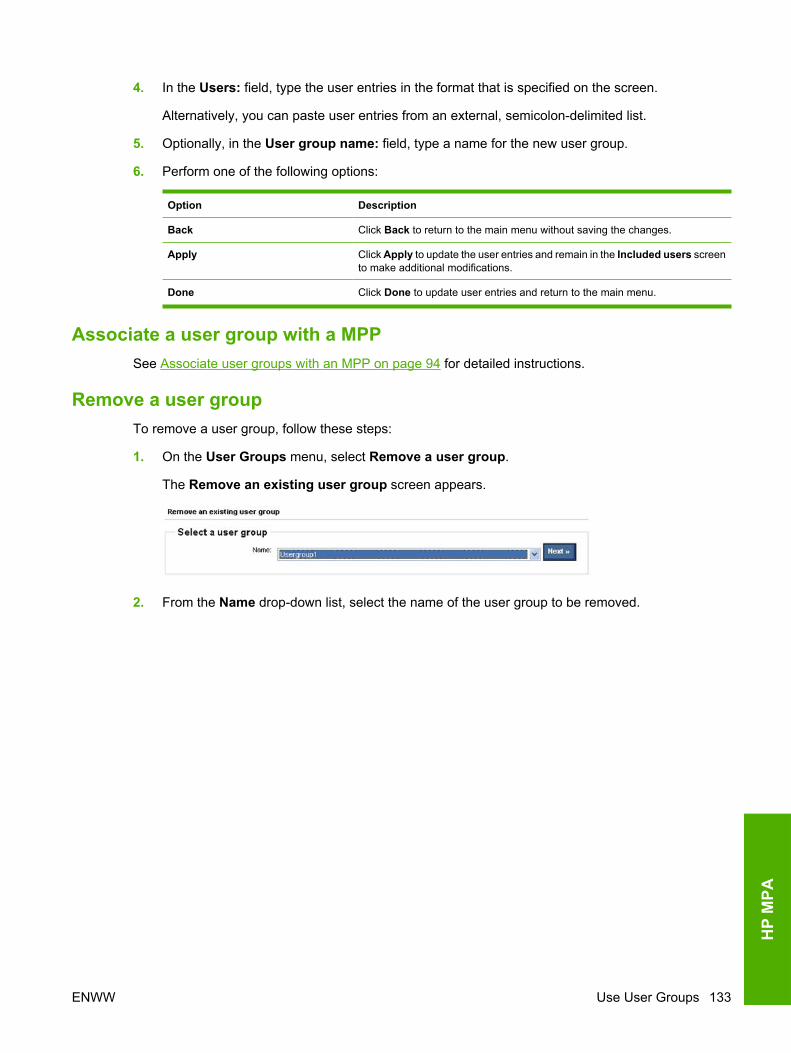
4. In the Users: field, type the user entries in the format that is specified on the screen.
Alternatively, you can paste user entries from an external, semicolon-delimited list.
5. Optionally, in the User group name: field, type a name for the new user group.
6. Perform one of the following options:
Option Description
Back Click Back to return to the main menu without saving the changes.
Apply Click Apply to update the user entries and remain in the Included users screento make additional modifications.
Done Click Done to update user entries and return to the main menu.
Associate a user group with a MPPSee Associate user groups with an MPP on page 94 for detailed instructions.
Remove a user groupTo remove a user group, follow these steps:
1. On the User Groups menu, select Remove a user group.
The Remove an existing user group screen appears.
2. From the Name drop-down list, select the name of the user group to be removed.
ENWW Use User Groups 133
HP
MPA
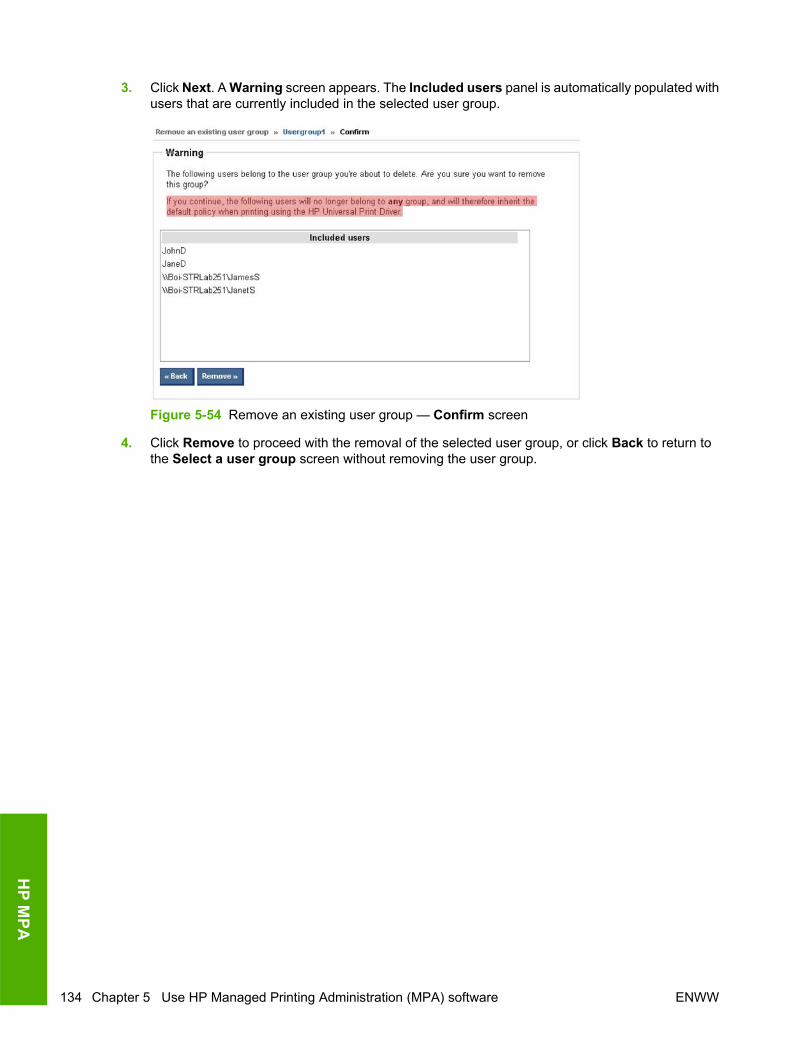
3. Click Next. A Warning screen appears. The Included users panel is automatically populated withusers that are currently included in the selected user group.
Figure 5-54 Remove an existing user group — Confirm screen
4. Click Remove to proceed with the removal of the selected user group, or click Back to return tothe Select a user group screen without removing the user group.
134 Chapter 5 Use HP Managed Printing Administration (MPA) software ENWW
HP M
PA
A HP Universal Print Driver FrequentlyAsked Questions (FAQs)
See the following topics:
● Troubleshoot
● Mobile Print Driver FAQs
● How do I install without using the install.exe?
● When a printer is connected locally via USB I can not install an IP printer.
● Why do I see color tabs for a mono LaserJet?
● What is the difference between a high, medium, and low Device Verification Level (DVL)?
● What is the best way to update ll of my queues on my Microsoft print servers when a new versionof the HP UPD becomes available?
● My HP Color LaserJet 2550 printer does not print in color when using the PCL5 driver.
ENWW 135
HP
UPD
FA
Qs
TroubleshootFor troubleshooting information, first contact your administrator.
For more information, go to the following HP Web site:
www.hp.com/go/mpa
The following resources are available at the Web site:
● HP Universal Print Driver for Windows User Guide
● Troubleshooting information
● Minimum system requirements
● Specifications
136 Appendix A HP Universal Print Driver Frequently Asked Questions (FAQs) ENWW
HP U
PD FA
Qs

Mobile Print Driver FAQsThis section covers a list of questions and answers that you might have or that may be related to yourenvironment and the operation of MPLs. See the document "HP Managed Printing and the HP UniversalPrint Driver" for more examples.
Topics:
● What should I use to manage my MPP and MPL content?
● Can I change the address that "HP Managed Printer Lists" uses to look up printers?
● What type of environment should "HP Managed Printer Lists" be used?
● How can I get MPLs that are user, domain, or TCP/IP address specific?
● How can I allow only a specific user to see a certain custom MPL?
● Can custom MPLs contain environment variables directly, or are they only valid inside the XMLfile?
● Can "HP Managed Printer Lists" be used in Hot Spots?
● Does the server where the MPLs reside have to be Windows?
● Can large corporations or enterprise environments benefit from this technology?
● How often can I modify the printers that the HP MPL or the custom MPLs point to?
● Technical FAQs
What should I use to manage my MPP and MPL content?The HP Managed Printing Administration tool should be used to manage the MPP and MPL content tocentrally manage and control the UPD printing experience for your users.
This tool provides a graphical interface for managing the content of the MPPs and MPLs as well asmanaging the associations of them. It requires a Windows computer (Windows 2000 or later) runningMicrosoft Internet Information Services (IIS) to serve up the content to the UPD on request.
Can I change the address that "HP Managed Printer Lists" uses to look upprinters?
No, not specifically. The address that "HP Managed Printer Lists" uses internally should be the samegeneric address, so that mobile users, those who travel from one location to another can resolve "HPManaged Printer lists" independent of their location. You can however, implement your Web servertechnology to take some different action (like say run a CGI or ASP script) when the HTTP request for"HP Managed Printer Lists" occurs.
The benefit of the internal "HP Managed Printer Lists" is that a mobile user can use this search optionno matter where you are connected to look up the list of available printers that are specific to your locale.If the mobile user searches "HP Managed Printer Lists" on Tuesday from his office to print, and then onWednesday searches the "HP Managed Printer Lists" for a printer in the coffee shop, he will besuccessful in finding printers as long as the network he is connected to resolves one of the MPL publicnames.
ENWW Mobile Print Driver FAQs 137
HP
UPD
FA
Qs
What type of environment should "HP Managed Printer Lists" be used?Any environment where the list of printers available to users, can be managed from a central locationshould define the "HP Managed Printers Lists". This includes Hot Spots (such as coffee shops or airports), hotels, businesses that have mobile users, businesses that frequently have customers or visitorswho meet on their site, small offices, or even home networks. Just about any location where computerusers have a need to print, and the person managing the printing environment doesn’t want to managemultiple drivers for multiple printers.
How can I get MPLs that are user, domain, or TCP/IP address specific?The best approach to solving this problem is to use the HP Managed Printing Administration tool as itlets you associate users and groups, and even multiple groups to one or more MPLs. See the HPManaged Printing Administration Guide for more details.
You can create custom MPLs that take as arguments the current user name, computer name, or domainname and pass that into the HTTP query. Using the environment variables you can pass anything youwant into the HTTP query.
For example, say you want to provide the list of available printers based on the domain name of thecomputer making the request. You can use the <ManagedList> XML tag to include the user specificinformation in the query.
In the above example, the %USERDOMAIN% is replaced at runtime by the Universal Print Driver withthe actual environment variable value and then the HTTP request is made with the real value. Theuserlist.cgi script would need some logic to parse the query string and take the appropriate actionbased on the value of "domain".
If you open a command prompt and type in the command set you will see a listing of all of theenvironment variables defined for the current user. Any of these environment variables may be used,including any that you may define in your login script, when calling into the custom MPLs.
How can I allow only a specific user to see a certain custom MPL?The best approach to solving this problem is to use the HP Managed Printing Administration tool as itlets you associate users and groups, and even multiple groups to one or more MPLs. See the HPManaged Printing Administration Guide for more details.
Using the same approach listed in the previous question, you can create a custom MPL query thatchecks the current user making the request and only includes additional printers if that username isspecified in the MPL. This can be useful for private printers or printers that you only want certainindividuals to have access to.
An example would be to only allow the user "jdoe" to see the private printer lists in addition to the publiclists, while everyone else sees just the public list.
In the above example, %USERNAME% would be replaced with the name of the user logged into thecomputer. Inside privatelist.cgi, the script would need to compare the "user" query string variableto "jdoe", and if they are identical, then it also returns XML for private printers that only user "jdoe" cansee in addition to all of the public printers that everyone else can see.
Another way solve this problem is to get the user name from the MPP, and then provide a<CustomMPL> that is only present for the specified user. When the MPP is queried, the query madelooks like:
http://managed-print/policy?userName=%USERNAME%
138 Appendix A HP Universal Print Driver Frequently Asked Questions (FAQs) ENWW
HP U
PD FA
Qs
The %USERNAME% portion of the query will be specific to the user who is logged into the computermaking the request. This userName can then be used by the script processing the http request to returna user specific policy ticket that contains MPLs or printers that only a certain user can see.
Can custom MPLs contain environment variables directly, or are they onlyvalid inside the XML file?
Yes, you can define custom MPLs to be defined at install time by using the Install.exe /aml commandline option. When you use environment variables in the command line to the Install.exe be sure to usetwo % signs for each variable. Otherwise the values will be substituted for the current user informationwhen the Install occurs.
For example, if you want to create an MPL entry for the current user, the install command line mightlook like:
Install.exe /aml"User Specific List",http://printserver/cgi-bin/userlist.cgi?user=%% USERNAME%%
Can "HP Managed Printer Lists" be used in Hot Spots?Yes. Defining an "HP Managed Printer Lists" in certain Hot Spots will allow users with the UniversalPrint Driver installed to quickly and easily find printers they can use when connected to your privatenetwork. In this type of environment a MPP is suggested to control the printing experience and limit theprinters that a user could print to.
Does the server where the MPLs reside have to be Windows?No. The server can be any platform, it only needs to support either UNC paths for file sharing, or it needsto be able to run an HTTP server.
However, HP recommends that you use the HP Managed Printing Administration tool, as it lets youmanage the MPLs in a graphical user interface that is easy to use and allows for greater flexibility inhow you present the MPL content to your users.
Can large corporations or enterprise environments benefit from thistechnology?
Yes. If you are an administrator looking to reduce the effort involved in managing printers and printerlists, you can define one central list of printers that everyone accesses from a single HP driver. The MPLfunctionality reduces the number of drivers you have to support and the messaging and communicationfor providing access to these printers to your users is controlled through the contents of the MPL andthe MPP.
How often can I modify the printers that the HP MPL or the custom MPLspoint to?
The MPL content and the number of MPLs can be modified as often as needed. As you add printers,remove printers, or change the way users will connect to certain printers, you can modify the MPL XMLfile when ever you need to, and it will be available to the users as soon as their next request to print.
Technical FAQsFor more technical FAQs see the document named HP Universal Print Driver - Technical FAQ.doc.
ENWW Mobile Print Driver FAQs 139
HP
UPD
FA
Qs
How do I install without using the install.exe?If you do not want the driver to include the install.exe, you can still install the driver by removing theinstall.exe and install.dll files from the package and use the Add Printer Wizard to perform the printerinstallation.
The UPD Install.exe is nothing more than a wrapper to the AddPrinterWizard's PRINTUI.DLL function"PrintUIEntry". The Install.exe calls this function to perform automated installation of the APW withoutprompting the user.
For information about how Install.exe works, see the following Web site:
http://support.microsoft.com/default.aspx?scid=KB;en-us;q189105
NOTE: The link is not part of the Hewlett-Packard Web site. HP does not control and is notresponsible for information outside of the HP Web site.
140 Appendix A HP Universal Print Driver Frequently Asked Questions (FAQs) ENWW
HP U
PD FA
Qs
When a printer is connected locally via USB I can not installan IP printer.
This may be the result of plug and play software hanging the UPD. If so, complete USB installation ordisconnect it the USB connection and then complete the UPD printer installation.
ENWW When a printer is connected locally via USB I can not install an IP printer. 141
HP
UPD
FA
Qs
Why do I see color tabs for a mono LaserJet?The HP UPD advertises itself as a color printer driver and will render the jobs correctly when printing toa black and white printing device. The color tab will become ineffective in this scenario.
142 Appendix A HP Universal Print Driver Frequently Asked Questions (FAQs) ENWW
HP U
PD FA
Qs
What is the difference between a high, medium, and lowDevice Verification Level (DVL)?
The IP query is much the same for each level. The DVL helps determine how strict the device compliancechecking should be:
● High. If we can communicate with the device and determine it does not support the PDL this driverwill generate, the UPD will display a message box indicating it will not allow printing to the device.
● Medium. If we communicate with the device but cannot confirm if it supports the current PDL thisdriver generates, we will display a message box indicating the device does no appear to supportthis driver, however the user can try it (sort of buyer beware).
● Low. If we cannot communicate with the device, but can still open a connection to the device, thissetting will still allow the job to go through but no warning is a displayed (as in medium), and noprevention occurs (as in high).
ENWW What is the difference between a high, medium, and low Device Verification Level (DVL)? 143
HP
UPD
FA
Qs
What is the best way to update ll of my queues on myMicrosoft print servers when a new version of the HP UPDbecomes available?
Replace a single instance of the HP UPD on a printer through the driver Properties. Do the following:
1. On the Properties window, click the Advanced tab.
2. Click the New Driver button.
OR
1. In the Server Properties, click Drivers.
2. Then, click Add to add the new version of the HP UPD.
3.
All of the print queues using the HP UPD will be automatically upgraded.
Similarly, for the client PC connected to the shares on the print servers, the new version of the HP UPDwill automatically be pushed down to the clients the next time they send a print job through the printserver.
This is a function of point and print capabilities within the Microsoft printing environment.
144 Appendix A HP Universal Print Driver Frequently Asked Questions (FAQs) ENWW
HP U
PD FA
Qs

My HP Color LaserJet 2550 printer does not print in colorwhen using the PCL5 driver.
The HP Color LaserJet 2550 printer does not support a color path in any HP PCL 5 driver. A color pathis supported only in PCL 6 and PS emulation drivers.
ENWW My HP Color LaserJet 2550 printer does not print in color when using the PCL5 driver. 145
HP
UPD
FA
Qs

146 Appendix A HP Universal Print Driver Frequently Asked Questions (FAQs) ENWW
HP U
PD FA
Qs
Index
AAdd Printer Wizard
Add Standard TCP/IP PrinterPort Wizard 19
Traditional mode, install 16Add Standard TCP/IP Printer Port
WizardAdd Printer Wizard 19UPD, install 19
Add/Remove ProgramsHP MPA, uninstall 63Uninstall HP MPA, using 63
Advanced View settingsConfigure 124
AvailabilityHP Managed Print Administrator
(MPA) 56UPD 13
BBasic MPP settings
Configure 88
CClassic interface
Options 65Clickable image map view
Configure 117Cluster server
Install UPD on 35UPD, install 35
Color Access settingsConfigure 77
Command promptCommand options 32Custom install 32Custom install of UPD,
using 31Custom installation 32Install, custom 32
Install, UPD 31UPD, custom install of 31
DDestination printer
Add within HP UPD 48Managing within HP UPD 48Search within HP UPD 49
Driver comparisonHP mobile printer drivers 10HP UPD 10Product-specific drivers 10
Driver comparison tableHP mobile print driver 11Product-specific drivers 10UPD 10, 11
Dynamic modeabout 15Change the selected printer
when printing 46Description of 40Printing in 46
GGraphic interface
Options 65
HHelp
HP MPA, Service AdministrationGuide 69
HP Universal Print Driver(UPD) 45
Service Administration Guide,HP MPA 69
HP Managed Print Administration(MPA)
Install, softwarerequirements 56
Software requirements forinstall 56
HP Managed Print Administrator(MPA)
HP MPA Setup Wizard 57Install 57
HP Managed Print Adminstrator(MPA)
Availability 56Languages available in 56Software availability 56
HP Managed Printing Admin SetupWizard
HP MPA, uninstall 60Uninstalling HP MPA 60
HP mobile print driverCompare with UPD 11
HP MPAAccess of 64Classic interface 65Graphic interface 65Help 69HP Managed Printing Admin
Setup Wizard, uninstallusing 60
HP Managed PrintingAdministration controlpanel 64
HP PCL6, PCL5, PS emulation,devices supported in 4
HP PS emulation only, devicessupported in 6
Managed Printer Lists (MPLs),overview 97
ENWW Index 147
Plug and Play, supporteddevices with 6
Supported devices 4Uninstall 60User Groups 130
HP MPA Setup WizardInstall, MPA 57MPA, install 57
HP Universal Print Driver (UPD)Add destination printer 48Add location files 49Cache printer settings 50Configure SNPs 52Configure using TCP/IP
address 44Configure using TCP/IP
address, TCP/IP addressunknown 44
Create location files 49Destination printer, add 48Destination printer, search
for 49Destination printers,
manage 48Destination-printer prompts,
select 41Dynamic mode, printing in 46Features 50General settings, modify 41Help 45Location files, add 49Location files, create 49Manage destination
printers 48Manage using properties 48Print, using 46Printer location profile,
define 45Printer location profiles,
modify 42Printing in Dynamic mode 46Search for a destination
printer 49SNPs 50SNPs, configure 52Status notification pop-ups
(SNPs) 50Traditional mode, printing 47Verification level, set 43
HP Universal Print Driver SystemAdminstrator Guide. See HP UPDSAG
HP Universal Printing InstallerWizard
Dynamic mode 27Install, UPD 27Traditional mode 27UPD, default installation 27
HP UPDHP PCL6, PCL5, PS emulation,
devices supported in 4HP PS emulation only, devices
supported in 6Plug and Play, supported
devices with 6Supported devices 4
HP UPD SAGConventions used in 3Overview of 1
HP Webjet Admin display plug-inInstall UPD, using 35
IInstall
Add Printer Wizard 16Cluster server, install UPD
on 35Command prompt, using 31,
32Custom 32Dynamic mode 15, 27HP Managed Print Administrator
(MPA) 57HP MPA Setup Wizard 57HP Universal Printing Installer
Wizard 27Novell NDS, install UPD
using 36Terminal Server/Citrix, install on
UPD 35Traditional mode 15, 16, 27UPD 15, 16UPD, custom 31UPD, default installation 27UPD, on a cluster server 35UPD, on a Terminal Server/
Citrix 35UPD, using HPD Webjet Admin
display plug-in 35
UPD, using Novell NDS 36UPD, using point and print 35
InstallationUPD 15
Installation mode, UPDDynamic mode 15Traditional mode 15
Installation of UPD. See Install
JJob Accounting settings
Configure 83Job Delivery settings
Configure 85
LLinux operating systems
drivers 14
MManage virtual printers
Create a new virtualprinters 126
Edit existing virtual printer 127Overview 125
Managed Print Policies (MPPs)Associate printer lists 92Associate user groups 94Basic MPP settings,
configure 88Color Access settings,
configure 77Create a new MPP 71Duplicate an existing
policy 93Edit an existing MPP 91Job Accounting setting,
overview 83Job Accounting settings,
configure 83Job Delivery settings,
configure 85Job Delivery, overview 83Remove an existing policy 95Status and Supplies
notifications, configure 81Update an MPP 90UseMode settings,
configure 73User Search capabilities,
configure 79
148 Index ENWW
Managed Printer Lists (MPLs)Advanced View settings 124Associate an existing list 113Auto printer discover 101Clickable image map
view 117Create a new list 99Create a new virtual
printer 126Create an existing virtual
printer 127Duplicate an existing list 114Edit an existing list 112Manage MPL view 114Manage virtual printers 125Manage virtual printers, create
new 126Manage virtual printers, edit
existing 127Manual printer entry 107Overview 97Printer graphics view 121Remove an existing list 128Remove printers from list 128Select a MPL view 117Tabular HTML view 123Use of 97View 114View, Clickable image
map 117View, options 117View, Tabular HTML 123Virtual printer, create new 126Virtual printer, edit
existing 127Managed Printer Policies (MPPs)
Overview 70Use of 70
MPA. See HP Managed PrintAdministration (MPA)
MPL. See Managed Printer Lists(MPLs)
MPP. See Managed Printer Policies(MPPs)
NNovell NDS
Install UPD, using 36UPD, install using 36
PPCL 5 driver
about 14PCL 6 driver
about 14Point and print
Install UPD, using 35Print driver mode
Dynamic mode, descriptionof 40
Traditional mode, descriptionof 40
Print driver modesDescription of 40
Printer graphics viewConfigure 121
Printing PreferencesAccess to 40
Product-specific driversCompare with UPD 10
PropertiesAccess to 40
PS emulation driverabout 14
SSNPs. See Status notification pop-
ups (SNPs)Software availability
UPD 13Status and Supplies Notifications
(SNPs)Configure, using HP MPA 81
Status notification pop-ups (SNPs)Configure using HP MPA 52Configure using HP UPD 50,
52Description 50HP Driver Preconfiguration 52Registry settings 53
System requirementsUPD 12
TTabular HTML view
Configure 123Terminal Server/Citrix
Install UPD on 35UPD, install 35
Traditional modeabout 15Add Printer Wizard 16Description of 40Install 16Printing in 47
UUninstall
Add/Remove Programs, of HPMPA using 63
HP Managed Printing AdminSetup Wizard, using 60
HP MPA 60HP MPA, using Add/Remove
Programs 63hpmpa.mdb 60MPA 60UPD 37
UNIX operating systemsdrivers 14
UPDAccess to, driver tabs 40Availability 13Cluster server, install on 35Command prompt, install
using 32Compare with HP mobile printer
driver 11Compare with product-specific
drivers 10Custom install of 32Description of software 9Driver tabs, access to 40Driver tabs, Printing
Preferences 40Driver tabs, Properties 40Driver versions, selection
of 14Dynamic mode, about 15Dynamic mode, description
of 40HP Universal Printing Installer
Wizard 27Install 15Install of, using HP Webjet
Admin display plug-in 35Install on a cluster server 35Install on a Terminal Server/
Citrix 35
ENWW Index 149
Install, custom 32Install, default 27Install, point and print 35Install, using Novell NDS 36Installation 15Installation mode, Dynamic 15Installation mode,
Traditional 15Novell NDS, install using 36PCL 5, about 14Point and print, install 35Postscript-specific driver 14Print driver modes 40Printing Preferences, driver
tabs 40Properties, driver tabs 40PS emulation driver, about 14System requirements 12Terminal Server/Citrix, install
on 35Traditional mode, about 15Traditional mode, description
of 40Uninstall 37
UseMode settingsConfigure 73
User GroupsAssociate with a policy 133Create a new user group 130Edit an existing user
group 132Overview 130
User Search capabilitiesConfigure 79
150 Index ENWW


© 2007 Hewlett-Packard Development Company, L.P.
www.hp.com