hp passport 1912nm and 1912nc internet monitors user guide
TRANSCRIPT

HP Passport 1912nm and 1912ncInternet Monitors
User Guide

© 2012 Hewlett-Packard DevelopmentCompany, L.P.
The only warranties for HP products andservices are set forth in the expresswarranty statements accompanying suchproducts and services . Nothing hereinshould be construed as constituting anadditional warranty. HP shall not be liablefor technical or editorial errors or omissionscontained herein.
Windows® is a U.S. registered trademarkof Microsoft Corporation.
Adobe® and Adobe® Flash® aretrademarks of Adobe SystemsIncorporated.
This document contains proprietaryinformation that is protected by copyright.No part of this document may bephotocopied, reproduced, or translated toanother language without the prior writtenconsent of Hewlett-Packard Company.
First Edition (May 2012)
Document Part Number: 674720-001

About This Guide
This guide provides information on setting up and using the Internet monitor.
WARNING! Text set off in this manner indicates that failure to follow directions could result in bodilyharm or loss of life.
CAUTION: Text set off in this manner indicates that failure to follow directions could result indamage to equipment or loss of information.
NOTE: Text set off in this manner provides important supplemental information.
ENWW iii

iv About This Guide ENWW

Table of contents
1 Product Features ............................................................................................................................................ 1
HP Passport 1912nm and 1912nc Internet Monitors ........................................................................... 1
Net Mode vs PC Mode ......................................................................................................................... 2
2 Setting Up the Monitor ................................................................................................................................... 3
Preparing the Monitor for Desktop Use ................................................................................................ 3
Preparing the Monitor for Wall-Mounting .............................................................................................. 4
Rear Components ................................................................................................................................ 6
Connecting the Cables ......................................................................................................................... 7
Connecting the Cables for Net Mode ................................................................................... 7
Connecting the Cables for PC Mode ................................................................................... 9
Front Panel Controls .......................................................................................................................... 12
Power Button Lockout ........................................................................................................................ 13
Adjusting the Tilt ................................................................................................................................. 13
Installing a Cable Lock ....................................................................................................................... 14
Turning on the Monitor for the First Time ........................................................................................... 14
3 Using the Net Mode Interface ...................................................................................................................... 16
Browsing the Internet ......................................................................................................................... 17
Listening to Music ............................................................................................................................... 17
Watching Videos ................................................................................................................................ 18
Viewing Photographs ......................................................................................................................... 19
Adjusting the Settings ......................................................................................................................... 20
Slide Show Options ........................................................................................................... 20
Network Settings ................................................................................................................ 20
Date/Time Settings ............................................................................................................ 21
Language Settings ............................................................................................................. 21
System Settings ................................................................................................................. 22
Password Settings ............................................................................................................. 23
Printing in Net Mode ........................................................................................................................... 24
Introducing ePrint ............................................................................................................... 24
ENWW v

4 Finding More Information ............................................................................................................................. 25
Reference Guides .............................................................................................................................. 25
Product Support ................................................................................................................................. 25
5 Technical Specifications .............................................................................................................................. 26
1912nm and 1912nc Models .............................................................................................................. 26
Recognizing Preset Display Resolutions ............................................................................................ 28
1912nm and 1912nc Models (PC Mode) ........................................................................... 28
Entering User Modes ......................................................................................................... 28
Energy Saver Feature ........................................................................................................................ 29
ENERGY STAR® Qualification .......................................................................................................... 29
vi ENWW

1 Product Features
HP Passport 1912nm and 1912nc Internet MonitorsThe HP Passport 1912nm and HP Passport 1912nc Internet monitors are designed to provide easy,simple access to the internet, streaming views of media content (video, audio, photos) directlythrough the monitor without the need for a PC. The monitors can also operate as standard externalmonitors when connected to a PC.
The Internet monitors have an active matrix, thin-film transistor (TFT) panel. The monitor models andfeatures include:
● 1912nm and 1912nc models, 47 cm (18.5-inch) diagonal viewable area display with 1366 x 768resolution, plus full-screen support for lower resolutions; includes custom scaling for maximumimage size while preserving original aspect ratio
● Non-glare panel with CCFL backlight
● Web browser, video player, music player, and photo viewer
● Internet access and streaming views of media content without the need for a PC when in Netmode
● PC connectivity support when used as a standard monitor in PC mode
● Plug and play capability in PC mode
● Mode button on front panel that toggles between PC mode and Net mode
● 5ms response time
● Fast boot time
● USB 2.0 hub with one upstream port (connects to a computer) and five downstream ports(connects to USB devices)
● Audio in and audio out ports
● Built-in stereo speakers
● 4-in-1 media card reader (SD, MMC, MS, xD)
● Video signal input to support VGA analog
● Wired USB keyboard and mouse included
● Removable stand and Video Electronics Standards Association (VESA) standard mountingholes for flexible mounting solutions, including wall-mounting
ENWW HP Passport 1912nm and 1912nc Internet Monitors 1

● Security slot provision on rear of monitor for optional cable lock
● Tilt capability
● On-Screen Display (OSD) adjustments in several languages for easy setup and screenoptimization
● Energy saver feature to meet requirements for reduced power consumption
● Energy Star® qualified
● Compliant with the following regulated specifications (for additional certifications and agencynotices, refer to the HP LCD Monitors Reference Guide available on http://www.hp.com/support):
◦ European Union CE Directives
◦ Swedish TCO Requirements
Net Mode vs PC ModeThe monitor can operate as a stand-alone Internet monitor (Net mode) or as a standard externalmonitor connected to a PC (PC mode).
● Net Mode: No PC is required. An active Ethernet cable is required for Internet access. In thismode you can browse the Internet, watch videos, listen to music, or view photographs.
● PC Mode: A PC is required. In this mode the monitor functions as a standard monitor and istotally independent of the Net mode interface and settings.
You can set up the monitor for both Net mode and PC mode and switch between the two modes bypressing the Mode button on the front of the monitor.
To set up the monitor for Net mode, refer to Connecting the Cables for Net Mode on page 7. Toset up the monitor for PC mode, refer to Connecting the Cables for PC Mode on page 9.
2 Chapter 1 Product Features ENWW

2 Setting Up the Monitor
You can install the monitor on a desktop or mount it on a mounting fixture such as a wall mount orswing arm. Be sure to place the monitor in a convenient, well- ventilated location. Connect themonitor cables after you have installed the monitor.
To set up the monitor, ensure that the power is turned off to the monitor and all attached devices,then follow the instructions below for your configuration.
Preparing the Monitor for Desktop UseTo assemble the monitor for desktop use:
1. Set the monitor screen face down on a flat, soft, protected table or desk surface with the supportcolumn overhanging the edge.
2. Align the center column with the base and push the center column onto the base (1). Then alignthe monitor support column with the center column and push the monitor all the way onto thecenter column (2) until it snaps securely in place.
Figure 2-1 Installing the Monitor Center Column and Base
3. Lift the monitor to an upright position and place on a flat, stable surface.
ENWW Preparing the Monitor for Desktop Use 3

Preparing the Monitor for Wall-MountingNOTE: This apparatus is intended to be supported by UL or CSA Listed wall mount bracket.
To attach the monitor to a mounting fixture:
1. Set the monitor screen face down on a flat, soft, protected table or desk surface with the supportcolumn overhanging the edge.
2. If the center column and base are attached to the monitor, pinch together the two release tabson the bottom of the base (1) and pull the base off the center column (2). Then press the buttonon the rear of the center column (3) and slide the center column off the monitor support column(4).
Figure 2-2 Removing the Monitor Center Column and Base
3. Remove the two screws that attach the support column to the monitor (1), then slide the supportcolumn back and remove it from the monitor (2).
Figure 2-3 Removing the Monitor Support Column
4 Chapter 2 Setting Up the Monitor ENWW

4. To attach the monitor to a mounting fixture, insert four 10mm screws through the holes on themounting plate and into the mounting holes on the monitor.
CAUTION: This monitor supports the VESA industry standard 100 mm mounting holes. Toattach a third-party mounting solution to the monitor, four 4 mm, 0.7 pitch, and 10 mm longscrews are required. Longer screws must not be used because they may damage the monitor. Itis important to verify that the manufacturer’s mounting solution is compliant with the VESAstandard and is rated to support the weight of the monitor display panel. For best performance, itis important to use the power and video cables provided with the monitor.
Figure 2-4 Mounting the Monitor
ENWW Preparing the Monitor for Wall-Mounting 5
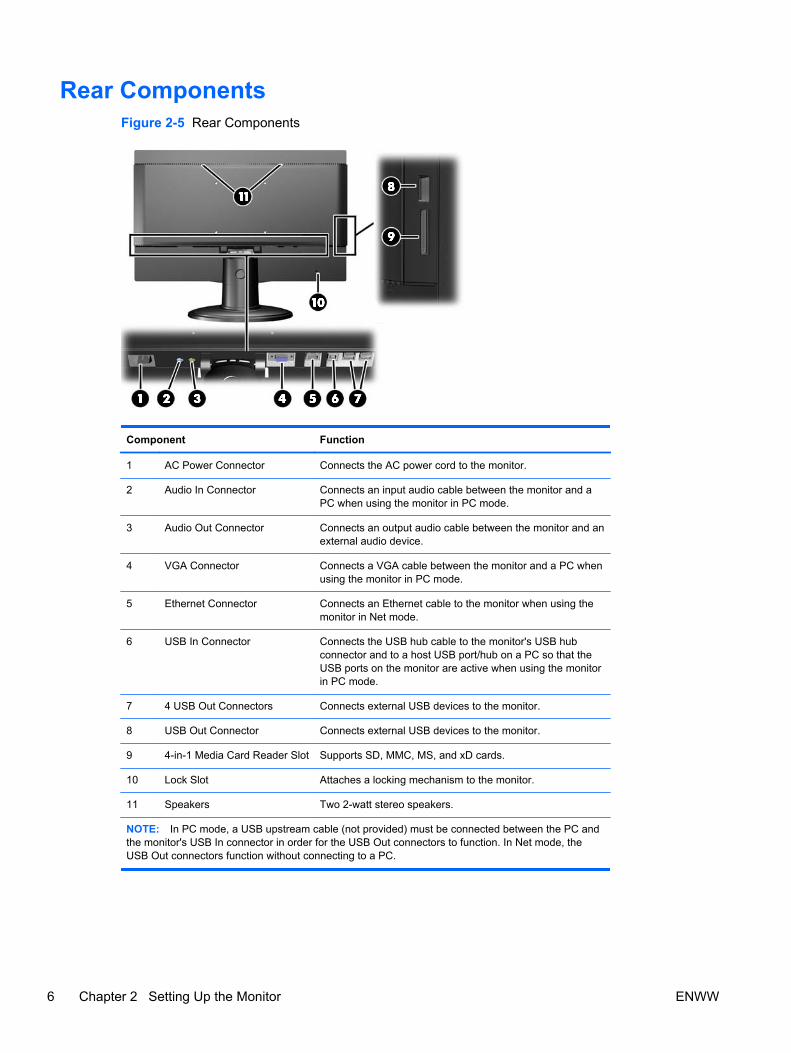
Rear ComponentsFigure 2-5 Rear Components
Component Function
1 AC Power Connector Connects the AC power cord to the monitor.
2 Audio In Connector Connects an input audio cable between the monitor and aPC when using the monitor in PC mode.
3 Audio Out Connector Connects an output audio cable between the monitor and anexternal audio device.
4 VGA Connector Connects a VGA cable between the monitor and a PC whenusing the monitor in PC mode.
5 Ethernet Connector Connects an Ethernet cable to the monitor when using themonitor in Net mode.
6 USB In Connector Connects the USB hub cable to the monitor's USB hubconnector and to a host USB port/hub on a PC so that theUSB ports on the monitor are active when using the monitorin PC mode.
7 4 USB Out Connectors Connects external USB devices to the monitor.
8 USB Out Connector Connects external USB devices to the monitor.
9 4-in-1 Media Card Reader Slot Supports SD, MMC, MS, and xD cards.
10 Lock Slot Attaches a locking mechanism to the monitor.
11 Speakers Two 2-watt stereo speakers.
NOTE: In PC mode, a USB upstream cable (not provided) must be connected between the PC andthe monitor's USB In connector in order for the USB Out connectors to function. In Net mode, theUSB Out connectors function without connecting to a PC.
6 Chapter 2 Setting Up the Monitor ENWW

Connecting the CablesThe cable connections required depends on whether you will operate the monitor as a stand-aloneInternet monitor (Net mode) or as a standard external monitor connected to a PC (PC mode).
NOTE: You can connect the cables for both Net mode and PC mode and switch between the twomodes by pressing the Mode button on the front of the monitor.
Connecting the Cables for Net Mode
1. Place the monitor in a convenient, well-ventilated location.
2. Connect an active Ethernet cable to the Ethernet port on the monitor's rear panel.
Figure 2-6 Connecting the Ethernet Cable
ENWW Connecting the Cables 7

3. Connect the supplied keyboard and mouse (required to navigate) to the USB ports on themonitor's rear panel.
Figure 2-7 Connecting the Keyboard and Mouse
4. Connect one end of the power cord to the AC power connector on the back of the monitor andthe other end to an electrical wall outlet.
Figure 2-8 Connecting the Power Cord
8 Chapter 2 Setting Up the Monitor ENWW

Connecting the Cables for PC Mode
1. Place the monitor in a convenient, well-ventilated location near the PC.
2. Connect the supplied keyboard and mouse (required to navigate) to the USB ports on themonitor's rear panel.
Figure 2-9 Connecting the Keyboard and Mouse
3. Connect a VGA cable between the VGA connector on the PC and the VGA connector on therear of the monitor.
Figure 2-10 Connecting the VGA Cable
ENWW Connecting the Cables 9

4. Connect the upstream end of a USB cable to the USB In connector on the monitor's rear paneland the downstream end to a USB Out connector on the PC.
NOTE: This step is optional. However, the USB cable is required for the USB Out ports andthe 4-in-1 media card reader on the monitor to function in PC mode.
Figure 2-11 Connecting a USB Cable
5. Connect one end of an audio cable to the Audio In connector on the monitor's rear panel and theother end to an Audio Out connector on the PC.
NOTE: This step is optional. However, the audio cable is required for the monitor's speakers tofunction in PC mode.
Figure 2-12 Connecting an Audio Cable
10 Chapter 2 Setting Up the Monitor ENWW

6. Connect one end of the power cord to the AC power connector on the back of the monitor andthe other end to an electrical wall outlet.
Figure 2-13 Connecting the Power Cord
7. After turning on power to the monitor, you must press the Mode button on the monitor's frontpanel to change from Net mode to PC mode.
Figure 2-14 Pressing the Mode Button
ENWW Connecting the Cables 11

Front Panel ControlsFigure 2-15 Monitor Front Panel Controls
Table 2-1 Monitor Front Panel Controls
Control Function
1 Menu Opens the On-Screen Display (OSD) menu, selects items within the OSDmenu, and closes the OSD menu.
2 – (Minus) If the OSD menu is on, press to navigate backward through the OSDmenu and decrease adjustment levels.
If the OSD menu is inactive, press to open the OSD volume control menuand adjust the volume level.
3 + (Plus) If the OSD menu is on, press to navigate forward through the OSD menuand increase adjustment levels.
If the OSD menu is inactive and the monitor is in Net mode, press to openthe OSD volume control menu and adjust the volume level.
If the OSD menu is inactive and the monitor is in PC mode, press toactivate the auto adjustment feature to optimize the screen image.
4 Mode Toggles the monitor between Net mode and PC mode.
5 Power Turns the monitor on or off.
6 Power LED Blue = Fully powered.
Amber = Sleep mode.
Flashing Amber = Sleep Timer mode.
12 Chapter 2 Setting Up the Monitor ENWW

Power Button LockoutThe monitor includes a Power Button Lockout feature that allows you to disable the power button forsituations that require this capability.
You can enable or disable the power button by pressing and holding the Mode, + (Plus), and Powerbuttons simultaneously while the monitor is active.
Adjusting the TiltFor optimal viewing, adjust the screen tilt to your own preference.
1. Face the front of the monitor and hold the base so that you do not topple the monitor whilechanging the tilt.
2. Adjust the tilt by moving the top edge of the monitor either toward or away from you, withouttouching the screen.
Figure 2-16 Adjusting the Tilt
ENWW Power Button Lockout 13

Installing a Cable LockYou can secure the monitor to a fixed object with an optional cable lock available from HP.
Figure 2-17 Installing a Cable Lock
Turning on the Monitor for the First TimeAfter connecting the cables, press the power button on the front of the monitor to turn it on.
NOTE: Net mode is the monitor's default mode. You can toggle between Net mode and PC modeby pressing the Mode button on the monitor's front panel.
CAUTION: Burn-in image damage may occur on monitors that display the same static image onscreen for a prolonged period of time.* To avoid burn-in image damage on the monitor screen, youshould always turn off the monitor when it is not in use for a prolonged period of time. Image retentionis a condition that may occur on all LCD screens. Monitors with a “burned-in image” are not coveredunder the HP warranty.
* A prolonged period of time is 12 consecutive hours of non-use.
The first time you turn on the monitor there will be a brief video highlighting the monitor's features(select models only). You can bypass the video by pressing the Esc key on your keyboard. If youwould like to play this video again, it is stored as a sample in the Video player.
After the video ends or is bypassed the Startup Wizard will begin. Follow the instructions in theStartup Wizard to:
● Select your language
● Set the date and time
● Set the timer to turn off the display after an assigned period of inactivity
● Enter the network settings
● Assign a password that secures access to the monitor settings and unlocks the monitor, ifdesired
14 Chapter 2 Setting Up the Monitor ENWW

NOTE: You can modify the settings that were entered in the Startup Wizard any time by clicking theSettings icon on the Net mode Home page. For more information on the settings in the StartupWizard, refer to Adjusting the Settings on page 20.
After completing the Startup Wizard, the Net mode Home page will be displayed.
ENWW Turning on the Monitor for the First Time 15

3 Using the Net Mode Interface
The Net mode Home page is displayed when the monitor is powered on. Click on one of the icons touse that feature of the Internet monitor.
NOTE: The user interface and features in this chapter are only available when the monitor is in Netmode.
Figure 3-1 Net Mode Home Page
NOTE: The Net mode modules listed below are independent applications that cannot be runsimultaneously. For example, if you are listening to music in the Music module and switch to theBrowser module, the music session will end.
Music Click this icon to listen to music stored on a media device.
Video Click this icon to watch videos stored on a media device.
Browser Click this icon to browse the Internet.
Photo Click this icon to view photographs stored on a media device.
16 Chapter 3 Using the Net Mode Interface ENWW

Settings Click this icon to adjust the monitor settings.
Home This icon is displayed in the lower left corner of the screen when you are not at theHome page. You can click the Home icon at any time to return to the Home page.
NOTE: When you return to the Home page any Net mode application you wererunning will close (Video, Browser, Music, Photo).
Browsing the InternetThe monitor uses the Firefox web browser to browse the Internet and includes support for Adobe®Flash® and HTML5. You must have Internet access to browse the Internet (not provided).
To browse the Internet:
1. Ensure that you have a live Ethernet cable (not provided) plugged into the monitor.
2. Click the Browser icon on the Net mode Home page.
3. If you are in an environment with a firewall, you must manually enter an HTTP proxyconfiguration to use the browser. On the browser toolbar, go to Edit > Preferences > Advanced> Network > Settings > Manual Proxy Configuration, enter the information provided by yourIT support and click the OK button to apply.
4. Use the browser to browse the Internet.
To change your browser's landing page:
1. Go the website that you would like to become your landing page.
2. Using the browser controls, go to Edit and then select Preferences.
3. In the new page that appears, the first part is Startup. Under Startup, use the drop-down arrowto select Show my home page. Then click the Use Current Page button under the Home Pagesection.
Listening to MusicYou can use the music player to listen to music that you have stored on a USB flash media device ormedia card.
NOTE: The audio file name and the folder(s) name can be any length but cannot include specialcharacters or spaces in order for the file manager to recognize the audio file.
To listen to music:
1. Click the Music icon on the Net mode Home page.
2. Insert the media device into the 4-in-1 media card reader or a USB port on the monitor.
ENWW Browsing the Internet 17

3. In the Music module, select the media device that you inserted, navigate to the desired music fileand click on it.
NOTE: If a photos folder was selected in the Slide Show options section of the Settingsmodule, a slide show of the selected photos will be displayed while the music is playing (refer toSlide Show Options on page 20 to configure a slide show). If you do not want to view a slideshow of photos while playing music, make sure that no folder is selected in the Slide Showoptions section of the Settings module.
4. Use the controls at the bottom of the slide show player to stop, start, or pause the slide showand adjust volume levels.
5. To return to the navigation folder where your music is stored, click at the bottom of the slide
show player.
The following audio formats are supported and will be displayed:
● MP3
● AAC
● WMA
Watching VideosYou can use the video player to watch videos that you have stored on a USB flash media device ormedia card.
NOTE: The video file name and the folder(s) name can be any length but cannot include specialcharacters or spaces in order for the file manager to recognize the video file.
To watch a video:
1. Click the Video icon on the Net mode Home page.
2. Insert the media device into the 4-in-1 media card reader or a USB port on the monitor.
3. In the Video module, select the media device that you inserted, navigate to the desired video fileand click on it. The video will begin playing.
4. Use the controls at the bottom of the video player to stop, start, or pause the video and adjustvolume levels.
5. To return to the navigation folder where your video is stored, click at the bottom of the video
player.
The following video formats are supported and will be displayed:
● MPEG4 H.263
● MPEG4 H.264
● MPEG2 VC1
18 Chapter 3 Using the Net Mode Interface ENWW

Viewing PhotographsYou can use the photograph viewer to view photographs that you have stored on a USB flash mediadevice or media card.
NOTE: The photo file name and the folder(s) name can be any length but cannot include specialcharacters or spaces in order for the file manager to recognize the photo file.
To view photographs:
1. Click the Photo icon on the Net mode Home page.
2. Insert the media device into the 4-in-1 media card reader or a USB port on the monitor.
3. In the Photo module, select the media device that you inserted, navigate to the desired photo fileand click on it. The photograph will be displayed.
4. Use the controls at the bottom of the video player to go to the next or previous photograph,rotate the photograph or run a slide show of the photographs. The slide show will display all thephotographs you have stored in the same media device folder.
NOTE: To run a slide show of photos while playing music, configure the slide show in the SlideShow Settings (refer to Slide Show Options on page 20) then select the music in the Musicmodule (refer to Listening to Music on page 17). You cannot play music while viewing photoswithin the Photo module.
5. To return to the navigation folder where your photographs are stored, click at the bottom at
the bottom of the slide show player.
The following picture formats are supported and will be displayed:
● JPEG
● GIF
● PNG
● BMP
ENWW Viewing Photographs 19

Adjusting the SettingsTo configure the settings, click the Settings icon on the Net mode Home page.
The Settings module includes five tabs for configuring and adjusting the settings:
● Slide Show Options: Sets up and customize a music and photograph slide show.
● Network: Configures the monitor’s network connection.
● Date/Time: Sets the monitor’s date and time.
● Language: Selects a language for the monitor.
● System: Returns all settings to their factory default values, sets the timer, updates the software,locks the monitor, and enables or disables fast boot.
● Password: Sets a password required to access the Settings module and unlock the monitor.
Slide Show Options
The Slide Show Options allow you to select photos that will be displayed during all music playback.
To configure a slide show of photos during all music playback:
1. Select the Slide Show Options tab in the Settings module.
2. In the Select Photos for Display during Music playback section, click the folder icon andnavigate to the folder with photos that you want to run as a slide show while playing music.
3. In the Slide Show Photo Settings section, select an effect of how the photographs transitionfrom one photograph to another in the slide show.
4. In the Slide Show Photo Settings section, select a time period to display each of thephotographs in the slide show.
5. Click the Apply button to save the configuration.
After the slide show is configured, the slide show of photos that you selected will run when you playany music from the Music module (see Listening to Music on page 17).
NOTE: If USB Hard Drive is selected for the Slide Show directory, the directory will change afteryou switch off the monitor and switch it back on. The Slide Show directory stays the same if USBthumb drive or SD card is selected.
Network Settings
The Network settings allow you to configure the network connection.
To configure the network settings:
1. Select the Network tab in the Settings module.
2. Click the Auto button in the Wizard section and follow the instructions on the screen, or click theManual button to enter the information manually then click the Apply button.
20 Chapter 3 Using the Net Mode Interface ENWW

Date/Time Settings
The Date/Time settings allow you to set the date and time for the monitor.
To set the date and time:
1. Select the Date/Time tab in the Settings module.
2. Select your time zone to automatically set the date and time or click the Manual button andmanually set the date and time.
3. Click the Apply button to save the settings.
Language Settings
The Language settings allow you to select a language for the monitor.
To select a language:
1. Select the Language tab in the Settings module.
2. Select a language.
3. Click the Apply button to save the settings.
Once a non-English language is selected, your product allows you the capability to:
1. Toggle between that selected language keyboard and an English keyboard:
● With Brazilian Portuguese, French, German, Italian, Dutch, Portuguese, Russian, andSpanish this can be accomplished by pressing Alt-Shift.
● With Korean, Japanese, Simplified Chinese, and Traditional Chinese this can beaccomplished by pressing Ctrl-Space.
2. Select the SCIM options available for your language:
● Applicable only to Korean, Japanese, Simplified Chinese, and Traditional Chinese.
● All of these languages have multiple input methods that are user selectable from within theSCIM menu.
● The SCIM menu is enabled (visible) or disabled (not visible) by pressing Ctrl-Space. Whendisabled, the SCIM menu reverts the keyboard to English.
NOTE: The Windows and Function keys are disabled.
ENWW Adjusting the Settings 21

System Settings
The System settings allow you to return all settings to the factory default values, set the monitor’stimer to put the display in standby mode after a designated period of inactivity, update the software,lock the monitor's screen, and enable or disable the fast boot feature.
To return all settings to the factory default values:
1. Select the System tab in the Settings module.
2. Click the Set Default Value button.
3. Click the Apply button to save the settings.
To set the timer so that the monitor goes into standby mode after a designated period ofinactivity:
1. Select the System tab in the Settings module.
2. In the Turn Off the Display section, adjust the hours and/or minutes to transpire before thedisplay automatically goes into standby mode if there is no activity detected. You can also selectthe Never button to disable the timer. The monitor will return to full power if it detects mouse orkeyboard activity.
3. Click the Apply button to save the timer’s settings.
To update the software:
NOTE: The monitor must be connected to the Internet to update the software. Internet access is notprovided. Contact your local Broadband supplier.
1. Select the System tab in the Settings module.
2. In the Software Version section, click the Update Now button or click the Auto Update buttonand adjust the number of days to transpire before the software is automatically updated.
3. Click the Apply button to save the software update settings.
To lock the monitor's screen and restrict access to your current session without a password(after a password is set up):
1. Select the System tab in the Settings module.
2. Click the Lock Screen button.
3. To unlock the monitor's screen, enter your password and click the Done button. For moreinformation on passwords, refer to Password Settings on page 23.
To enable or disable the fast boot feature:
1. Select the System tab in the Settings module.
2. In the Fast Boot section, click either the Disable or Enable button.
3. Click the Apply button to save the fast boot settings.
NOTE: When Fast Boot is enabled, the monitor will resume from standby within seconds. FastBoot must be disabled to meet Energy Star qualification.
22 Chapter 3 Using the Net Mode Interface ENWW

Password Settings
The Password settings allow you to create a password that is required to access the Settings moduleand unlock the monitor's screen if it has been locked.
To set a password:
1. Select the Password tab in the Settings module.
2. Click the On button (or click the Off button if you do not want access to the Settings module torequire a password or if you do not want a password required to unlock the monitor's screen).
3. Enter your password in the Password text box. The password must be 6 to 10 characters and isnot case sensitive. Special characters are allowed but spaces are not allowed.
4. Enter your password again in the Verify Password text box.
5. Click the Apply button to save the settings.
To change your password:
1. Select the Password tab in the Settings module.
2. Ensure that the On button is selected.
3. Enter your new password in the Password text box. The password must be 6 to 10 charactersand is not case sensitive. Special characters are allowed but spaces are not allowed.
4. Enter your new password again in the Verify Password text box.
5. Click the Apply button to save the settings.
To cancel a password:
1. Select the Password tab in the Settings module.
2. Click the Off button. A password will not be required to access the Settings module or unlock themonitor's screen
3. Click the Apply button to save the settings.
If you forgot your password and need to reset all settings to the default values:
NOTE: The only way to access the Settings module and unlock the monitor's screen if you haveforgotten your password is to reset all Settings to the default values. The default setting for thepassword is Off.
1. Turn off the monitor by pressing the power button.
2. Hold down the Menu button and the – (Minus) button on the monitor's front panel at the sametime (hold down through step 4).
3. Press the power button once to turn on the monitor.
4. Continue pressing the Menu button and the – (Minus) button until you see the followingwarning:
Warning:
Could not detect /dev/SDA1
ENWW Adjusting the Settings 23

System will enter recovery mode after 25 seconds
5. Release the Menu button and the – (Minus) button and allow the recovery to complete. It willreboot the unit automatically.
6. Upon reboot you should see the introduction video.
Printing in Net ModeStandard print functionality in Net mode is not supported. However, convenience printing may besupported via HP ePrint.
NOTE: HP ePrint provides convenience printing, and documents printed with ePrint may appeardifferent from the original. Style, formatting and text flow may differ slightly from the originaldocument. For documents requiring a higher quality (such as legal documents), HP recommends thatyou print from the software application on your computer where you will have more control over howyour printouts appear.
Introducing ePrint
HP ePrint lets you print from virtually anywhere to an HP printer that supports ePrint. Once enabled,ePrint assigns an email address to your printer. To print, simply send an email containing yourdocument to your printer’s address. For more information, visit http://www.hp.com/go/ePrintCenter forcompatibility and details.
24 Chapter 3 Using the Net Mode Interface ENWW

4 Finding More Information
Reference GuidesRefer to the HP LCD Monitors Reference Guide at http://www.hp.com/support for additionalinformation on:
● Optimizing monitor performance
● Safety and maintenance guidelines
● Agency regulatory and environmental notices
● Using the OSD menu
● Downloading additional software from the Web for PC mode
Product SupportFor additional information on using and adjusting your monitor, go to http://www.hp.com/support.Select your country or region, select Product Support & Troubleshooting, and then enter yourmonitor model in the SEARCH window.
NOTE: The monitor user guide, reference guide, and drivers are available at http://www.hp.com/support.
The VGA cable, USB upstream cable, audio cable, Ethernet cable, and Internet access are notprovided.
If the information provided in the guide or in the HP LCD Monitors Reference Guide do not addressyour questions, you can contact support. For U.S. support, go to http://www.hp.com/go/contactHP.For worldwide support, go to http://welcome.hp.com/country/us/en/wwcontact_us.html.
Here you can:
● Chat online with an HP technician
NOTE: When support chat is not available in a particular language, it is available in English.
● E-mail support
● Find support telephone numbers
● Locate an HP service center
ENWW Reference Guides 25

5 Technical Specifications
NOTE: All specifications represent the typical specifications provided by HP's componentmanufacturers; actual performance may vary either higher or lower. Specifications are subject tochange. The complete and latest specifications on display products are available onhttp://www.hp.com/support.
1912nm and 1912nc ModelsTable 5-1 1912nm and 1912nc Specifications
Maximum Weight (Unpacked) 3.65 kg 8.05 lbs
Dimensions (include base)
Height
Depth
Width
34.8 cm
18.0 cm
44.8 cm
13.7 inches
7.09 inches
17.64 inches
Maximum Graphic Resolution 1366 × 768 (60 Hz)
Optimum Graphic Resolution 1366 × 768 (60 Hz)
Power Source 100 – 240 VAC 50/60 Hz
Graphics Input Terminal One VGA connector for PC mode (cablenot included)
ARM based Processor IT OMAP4430 ARM Cortex-A9 1.0 GHzDual Core
Flash RAM Memory 2GB
DDR II Memory 1G
USB 2.0 ports 1 upstream + 5 downstream
Supported USB Devices USB 2.0 Storage Devices
USB Keyboard and Mouse (Provided)
Audio Line In + Line Out
HID USB Keyboard + USB Mouse
Operating System Custom HP Linux Kernal 2.6.35
Image / Component Updates HP Easy Update Manager
Internet Solution (Browser) Firefox v4.0
26 Chapter 5 Technical Specifications ENWW

Table 5-1 1912nm and 1912nc Specifications (continued)
Video Player Support
Audio Player Support
Photo Frame Support
Video Codecs H.264, H.263, MPEG2, MPEG4, VC-1
Video Container MP4, M4V, MPG, MKV, WMV, AVI,MOV, ASF, 3GP, VOB
Audio Codecs MP3, AACLC, HE-ACC, WMA10 std,WMA Pro, WMA9 Lossless
Audio Container MP1, MP2, MP3, AAC, M4A, WMA, ASF
Picture Codecs (2048 x 1536 3M max) JPEG, PNG, GIF, BMP
Productivity - Document Handler Box.net / Google Docs
Adobe® Flash® (720P) Adobe® Flash® 10.1
External Input Devices 4-in-1 Card Reader (for SD, MMC, MS,xD) and USB (2.0) Thumb Drive
For a list of recommended USB and card reader storage devices consult the 1912nm Quickspecs.
NOTE: HP recommends that the storage device is formatted FAT16/32.
ENWW 1912nm and 1912nc Models 27

Recognizing Preset Display ResolutionsThe display resolutions listed below are the most commonly used modes and are set as factorydefaults. This monitor automatically recognizes these preset modes and they will appear properlysized and centered on the screen.
NOTE: The preset modes can only be adjusted if the monitor is in PC mode. In Net mode, thepreset is locked at 1366 x 768 at 60Hz and cannot be adjusted.
1912nm and 1912nc Models (PC Mode)
Table 5-2 Factory Preset Modes
Preset Pixel Format Horz Freq (kHz) Vert Freq (Hz)
1 640 × 480 31.47 59.94
2 720 × 400 31.47 70.09
3 800 × 600 37.88 60.32
4 1024 × 768 48.36 60.00
5 1280 × 720 45.0 60.0
6 1280 × 960 60.0 60.0
7 1280 × 1024 63.98 60.02
8 1366 × 768 47.71 59.79
Table 5-3 High Definition Video Formats
Preset Timing Name Pixel Format Horz Freq (kHz) Vert Freq (Hz)
1 480p 720 × 480 31.469 60
2 576p 720 × 576 31.25 50
3 720p50 1280 × 720 37.5 50
4 720p60 1280 × 720 45 60
Entering User Modes
The video controller signal may occasionally call for a mode that is not preset if:
● You are not using a standard graphics adapter.
● You are not using a preset mode.
It this occurs, you may need to readjust the parameters of the monitor screen by using the on-screendisplay. Your changes can be made to any or all of these modes and saved in memory. The monitorautomatically stores the new setting, then recognizes the new mode just as it does a preset mode. Inaddition to the factory preset modes, there are at least 10 user modes that can be entered andstored.
28 Chapter 5 Technical Specifications ENWW

Energy Saver FeatureThe monitors support a reduced power state. The reduced power state will be entered into if themonitor detects the absence of either the horizontal sync signal and/or the vertical sync signal. Upondetecting the absence of these signals, the monitor screen is blanked, the backlight is turned off, andthe power light is turned amber. When the monitor is in the reduced power state, the monitor willutilize less than one watt of power. There is a brief warm up period before the monitor will return to itsnormal operating mode.
Refer to the computer manual for instructions on setting energy saver features (sometimes calledpower management features).
NOTE: The above power saver feature only works when connected to computers that have energysaver features.
By selecting the settings in the monitor's Energy Saver utility, you can also program the monitor toenter into the reduced power state at a predetermined time. When the monitor's Energy Saver utilitycauses the monitor to enter the reduced power state, the power light blinks amber.
ENERGY STAR® QualificationHP computers marked with the ENERGY STAR® Logo are compliant with the applicable U.S.Environmental Protection Agency (EPA) ENERGY STAR specifications for computers. The EPAENERGY STAR Logo does not imply endorsement by the EPA. As an ENERGY STAR Partner,Hewlett-Packard Company has determined the products marked with the ENERGY STAR Logo areENERGY STAR qualified as per the applicable ENERGY STAR guidelines for energy efficiency. Thefollowing logo will appear on all ENERGY STAR qualified computers:
The ENERGY STAR Computers Program was created by the EPA to promote energy efficiency andreduce air pollution through more energy-efficient equipment in homes, offices, and factories.
The Power Management feature allows the computer to enter into a low-power or “sleep” mode aftera period of user inactivity. To take advantage of this energy savings:
● The Power Management feature has been preset to power down the computer when the userpresses the power button.
● The Power Management feature has been preset to enter into “sleep” mode after 10 minutes ofuser inactivity.
This product can be woken from “sleep” mode through user interaction with the computer’s inputdevices (mouse, keyboard).
ENWW Energy Saver Feature 29

More information on the energy and financial savings potential of the Power Management Featurecan be found at the EPA’s ENERGY STAR Power Management website: http://www.energystar.gov/powermanagement.
More information on the ENERGY STAR program and its environmental benefits are available byvisiting the EPA’s ENERGY STAR website address: http://www.energystar.gov.
CAUTION: Using the Energy Save Monitor feature with non–ENERGY STAR compliant monitorsmay cause video distortion when the Energy Save timeout occurs.
30 Chapter 5 Technical Specifications ENWW