hp openvms guide to system security - apache welcome …h20628. · enteringasystempassword.....50...
TRANSCRIPT

HP OpenVMS Guide to System SecurityOpenVMS Version 8.4
HP Part Number: BA554-90015Published: June 2010
© Copyright 2010 Hewlett-Packard Development Company, L.P
Legal Notice
Confidential computer software. Valid license from HP required for possession, use or copying. Consistent with FAR 12.211 and 12.212, CommercialComputer Software, Computer Software Documentation, and Technical Data for Commercial Items are licensed to the U.S. Government undervendor's standard commercial license.
The information contained herein is subject to change without notice. The only warranties for HP products and services are set forth in the expresswarranty statements accompanying such products and services. Nothing herein should be construed as constituting an additional warranty. HPshall not be liable for technical or editorial errors or omissions contained herein.
Intel and Itanium are trademarks or registered trademarks of Intel Corporation or its subsidiaries in the United States and other countries.
Java, the coffee cup logo, and all Java based marks are trademarks or registered trademarks of Sun Microsystems in the United States or othercountries.
Kerberos is a trademark of the Massachusetts Institute of Technology.
Microsoft and Windows are U.S. registered trademarks of Microsoft Corporation.
UNIX is a registered trademark of The Open Group.
IBM is a registered trademark of International Business Machines Corporation.
The HP OpenVMS documentation set is available on CD-ROM.
Table of Contents
Preface..............................................................................................................................19Intended Audience................................................................................................................................19Document Organization.......................................................................................................................19Typographical Conventions..................................................................................................................20Related Documents...............................................................................................................................21HP Encourages Your Comments..........................................................................................................21How to Order Additional Documentation...........................................................................................21
I Security Overview..........................................................................................................23
1 Understanding System Security..............................................................................27Types of Computer Security Problems............................................................................................27Levels of Security Requirements.....................................................................................................28Building a Secure System Environment..........................................................................................29Encryption.......................................................................................................................................29
Encryption Process.....................................................................................................................30AES Encryption Algorithm...................................................................................................30DES Encryption Algorithm...................................................................................................30Keys.......................................................................................................................................30Decryption............................................................................................................................31
Authentication Process...............................................................................................................31Encryption Interfaces.................................................................................................................32Compatibility.............................................................................................................................32
Common Data Security Architecture (CDSA).................................................................................33Secure Sockets Layer (SSL)..............................................................................................................33Kerberos...........................................................................................................................................34
2 OpenVMS Security Model.....................................................................................35Structure of a Secure Operating System..........................................................................................35
Reference Monitor Concept........................................................................................................35How the Reference Monitor Enforces Security Rules................................................................36
Implementation of the Reference Monitor......................................................................................36Subjects.......................................................................................................................................36Objects........................................................................................................................................37Authorization Database.............................................................................................................37Audit Trail..................................................................................................................................38Reference Monitor......................................................................................................................39Authorization Database Represented as an Access Matrix.......................................................39
Summary: System Security Design.................................................................................................41
II Security for the User.....................................................................................................43
3 Using the System Responsibly................................................................................49Choosing a Password for Your Account..........................................................................................49
Obtaining Your Initial Password................................................................................................49Observing System Restrictions on Passwords...........................................................................50
Knowing What Type of Password to Use........................................................................................50
Table of Contents 3
Entering a System Password......................................................................................................50Entering a Secondary Password.................................................................................................51
Password Requirements for Different Types of Accounts..............................................................51Types of Logins and Login Classes.................................................................................................52
Logging In Interactively: Local, Dialup, and Remote Logins....................................................52Logging In Using External Authentication................................................................................52Reading Informational Messages...............................................................................................52When the System Logs In for You: Network and Batch Logins.................................................54
Login Failures: When You Are Unable to Log In............................................................................54Using a Terminal That Requires a System Password.................................................................55Observing Your Login Class Restrictions...................................................................................55Using an Account Restricted to Certain Days and Times..........................................................55Failing to Enter the Correct Password During a Dialup Login.................................................55Knowing When Break-In Evasion Procedures Are in Effect.....................................................56
Changing Your Password................................................................................................................56Selecting Your Own Password...................................................................................................56Using Generated Passwords......................................................................................................56Changing a Secondary Password...............................................................................................58Changing Your Password As You Log In...................................................................................58
Password and Account Expiration Times.......................................................................................58Changing an Expired Password.................................................................................................58Renewing an Expired Account..................................................................................................59
Guidelines for Protecting Your Password.......................................................................................59Network Security Considerations...................................................................................................60
Protecting Information in Access Control Strings.....................................................................60Using Proxy Login Accounts to Protect Passwords...................................................................61
Auditing Access to Your Account and Files....................................................................................63Observing Your Last Login Time...............................................................................................63Adding Access Control Entries to Sensitive Files......................................................................63Asking Your Security Administrator to Enable Auditing..........................................................64
Auditing File Access.............................................................................................................64Additional Events to Audit...................................................................................................65
Logging Out Without Compromising System Security..................................................................65Clearing Your Terminal Screen..................................................................................................65Disposing of Hardcopy Output.................................................................................................66Removing Disconnected Processes............................................................................................66Breaking the Connection to a Dialup Line.................................................................................66Turning Off a Terminal...............................................................................................................66
Checklist for Contributing to System Security................................................................................66
4 Protecting Data........................................................................................................69Contents of a User's Security Profile...............................................................................................69
Per-Thread Security....................................................................................................................69Persona Security Block Data Structure (PSB).............................................................................69Previous Security Model............................................................................................................70Per-Thread Security Model........................................................................................................70User Identification Code (UIC)..................................................................................................71
Format of a UIC.....................................................................................................................71Guidelines for Creating a UIC..............................................................................................72How Your Process Acquires a UIC.......................................................................................72
Rights Identifiers........................................................................................................................72Types of Identifiers...............................................................................................................72Process and System Rights Lists...........................................................................................73Displaying the Rights Identifiers of Your Process................................................................73
4 Table of Contents
How Rights Identifiers Appear in the Audit Trail................................................................74Privileges....................................................................................................................................74
Security Profile of Objects................................................................................................................75Definition of a Protected Object.................................................................................................75Contents of an Object's Profile...................................................................................................75Owner.........................................................................................................................................76Protection Code..........................................................................................................................76Access Control List (ACL)..........................................................................................................76
Displaying a Security Profile...........................................................................................................77Modifying a Security Profile............................................................................................................77Specifying an Object's Class............................................................................................................78Access Required to Modify a Profile...............................................................................................79How the System Determines if a User Can Access a Protected Object...........................................79Controlling Access with ACLs........................................................................................................84
Using Identifier Access Control Entries (ACEs)........................................................................84Granting Access to Particular Users...........................................................................................85Preventing Users from Accessing an Object..............................................................................85Limiting Access to a Device.......................................................................................................85Limiting Access to an Environment...........................................................................................86Ordering ACEs Within a List.....................................................................................................86Establishing an Inheritance Scheme for Files.............................................................................87Displaying ACLs........................................................................................................................88Adding ACEs to an Existing ACL..............................................................................................88Deleting an ACL.........................................................................................................................89Deleting ACEs from an ACL......................................................................................................89Replacing Part of an ACL...........................................................................................................89Restoring a File's Default ACL...................................................................................................90Copying an ACL.........................................................................................................................90
Controlling Access with Protection Codes......................................................................................90Format of a Protection Code......................................................................................................91Types of Access in a Protection Code.........................................................................................91Processing a Protection Code.....................................................................................................92Changing a Protection Code......................................................................................................92Enhancing Protection for Sensitive Objects...............................................................................93Providing a Default Protection Code for a Directory Structure................................................93Restoring a File's Default Security Profile..................................................................................93
Understanding Privileges and Control Access...............................................................................94How Privileges Affect Protection Mechanisms.........................................................................94Using Control Access to Modify an Object Profile....................................................................94Object-Specific Access Considerations.......................................................................................95
Auditing Protected Objects.............................................................................................................95Kinds of Events the System Audits............................................................................................95Enabling Auditing for a Class of Objects...................................................................................95Adding Security-Auditing ACEs...............................................................................................96
5 Descriptions of Object Classes...............................................................................97Capabilities......................................................................................................................................97
Naming Rules.............................................................................................................................97Types of Access...........................................................................................................................97Template Profile.........................................................................................................................97Kinds of Auditing Performed....................................................................................................98Permanence of the Object...........................................................................................................98
Common Event Flag Clusters..........................................................................................................98Naming Rules.............................................................................................................................98
Table of Contents 5

Types of Access...........................................................................................................................98Template Profile.........................................................................................................................98Privilege Requirements..............................................................................................................99Kinds of Auditing Performed....................................................................................................99Permanence of the Object...........................................................................................................99
Devices.............................................................................................................................................99Naming Rules.............................................................................................................................99Types of Access.........................................................................................................................100Access Requirements for I/O Operations.................................................................................100Template Profile........................................................................................................................101Setting Up Profiles for New Devices........................................................................................102Privilege Requirements............................................................................................................103Kinds of Auditing Performed...................................................................................................103Permanence of the Object.........................................................................................................103
Files................................................................................................................................................104Naming Rules...........................................................................................................................104Types of Access.........................................................................................................................104Access Requirements................................................................................................................104Creation Requirements.............................................................................................................105Profile Assignment...................................................................................................................105
Rules for Assigning Ownership..........................................................................................105Rules for Assigning a Protection Code and ACL...............................................................105Using the COPY and RENAME Commands......................................................................106
Kinds of Auditing Performed...................................................................................................107Protecting Information When Disk Space Is Reassigned.........................................................107
Overwriting Disk Blocks.....................................................................................................107Setting a High-water Mark..................................................................................................108Accessibility of Data in a File..............................................................................................108
Suggestions for Optimizing File Security.................................................................................108Global Sections...............................................................................................................................109
Naming Rules...........................................................................................................................109Types of Access.........................................................................................................................109Template Profile........................................................................................................................109Privilege Requirements............................................................................................................110Kinds of Auditing Performed...................................................................................................110Permanence of the Object.........................................................................................................110
Logical Name Tables......................................................................................................................110Naming Rules...........................................................................................................................110Types of Access.........................................................................................................................111Template Profile........................................................................................................................111Privilege Requirements............................................................................................................111Kinds of Auditing Performed...................................................................................................111Permanence of the Object.........................................................................................................111
Queues...........................................................................................................................................112Naming Rules...........................................................................................................................112Types of Access.........................................................................................................................112Template Profile........................................................................................................................112Privilege Requirements............................................................................................................112Kinds of Auditing Performed...................................................................................................112Permanence of the Object.........................................................................................................113
Resource Domains.........................................................................................................................113Naming Rules...........................................................................................................................113Types of Access.........................................................................................................................113Template Profile........................................................................................................................113Privilege Requirements............................................................................................................113
6 Table of Contents
Kinds of Auditing Performed...................................................................................................114Permanence of the Object.........................................................................................................114
Security Classes.............................................................................................................................114Naming Rules...........................................................................................................................114Types of Access.........................................................................................................................114Template Profile........................................................................................................................115Kinds of Auditing Performed...................................................................................................115Permanence of the Object.........................................................................................................115
Volumes.........................................................................................................................................115Naming Rules...........................................................................................................................115Types of Access.........................................................................................................................115Template Profile........................................................................................................................116Privilege Requirements............................................................................................................116Kinds of Auditing Performed...................................................................................................116Permanence of the Object.........................................................................................................116
III Security for the System Administrator......................................................................117
6 Managing the System and its Data....................................................................127Role of a Security Administrator...................................................................................................127Site Security Policies......................................................................................................................127Tools for Setting Up a Secure System............................................................................................129Account Requirements for a Security Administrator....................................................................129Training the New User...................................................................................................................130Logging a User's Session................................................................................................................131Ongoing Tasks to Maintain a Secure System.................................................................................132
7 Managing System Access....................................................................................135Defining Times and Conditions for System Access......................................................................135
Restricting Work Times............................................................................................................136Restricting Modes of Operation...............................................................................................136Restricting Account Duration...................................................................................................136Disabling Accounts...................................................................................................................137Restricting Disk Volumes.........................................................................................................137Marking Accounts for External Authentication.......................................................................137
Assigning Appropriate Accounts to Users....................................................................................137Types of System Accounts........................................................................................................137
Interactive Account Example..............................................................................................138Limited-Account Example..................................................................................................139
Privileged Accounts.................................................................................................................139Interactive Accounts.................................................................................................................140Captive Accounts.....................................................................................................................140
Setting Up Captive Accounts..............................................................................................141Guidelines for Captive Command Procedures...................................................................142
Restricted Accounts..................................................................................................................143Automatic Login Accounts.......................................................................................................144Guest Accounts.........................................................................................................................145Proxy Accounts.........................................................................................................................145Externally Authenticated Accounts.........................................................................................146
Using Passwords to Control System Access..................................................................................146Types of Passwords..................................................................................................................146
Primary Passwords.............................................................................................................146System Passwords...............................................................................................................147
Table of Contents 7
Secondary Passwords..........................................................................................................148Console Passwords..............................................................................................................149Authentication Cards..........................................................................................................149
Enforcing Minimum Password Standards...............................................................................150Expiring Passwords.............................................................................................................150Enforcing Change of Expired Password.............................................................................151Requiring a Minimum Password Length............................................................................151Generated Passwords..........................................................................................................152Site Password Algorithms...................................................................................................152
Screening New Passwords.......................................................................................................152System Dictionary...............................................................................................................153History Lists........................................................................................................................153Site-Specific Filters..............................................................................................................154
Password Protection Checklist.................................................................................................154Enabling External Authentication.................................................................................................155
Overriding External Authentication........................................................................................158Impact on Layered Products and Applications.......................................................................159Setting a New Password...........................................................................................................159Case Sensitivity in Passwords and User Names......................................................................159User Name Mapping and Password Verification.....................................................................160Password Synchronization.......................................................................................................160Specifying the SYS$SINGLE_SIGNON Logical Name Bits.....................................................161Authentication and Credentials Management Extensions (ACME) Subsystem......................162
ACME Subsystem Overview..............................................................................................163ACME Agent Operational Environment............................................................................163ACME Subsystem Controls................................................................................................164
Start, Stop, Restart, and Configure ACME_SERVER Process and ACME Agents........164Other ACME Agent Commands...................................................................................166SYSUAF Flags................................................................................................................166System Parameter SECURITY_POLICY Bit Mask Values.............................................166
Authentication Policies.......................................................................................................167OpenVMS policy............................................................................................................167LDAP authentication policy..........................................................................................168Advanced Server for OpenVMS policy.........................................................................168Kerberos authentication policy......................................................................................168
Controlling the Login Process.......................................................................................................168Informational Display During Login.......................................................................................168
Announcement Message.....................................................................................................168Welcome Message...............................................................................................................169Last Login Messages...........................................................................................................169New Mail Announcements.................................................................................................169
Limiting Disconnected Processes.............................................................................................169Providing Automatic Login.....................................................................................................170Using the Secure Server............................................................................................................170Detecting Intruders...................................................................................................................171Understanding the Intrusion Database....................................................................................171
How Intrusion Detection Works.........................................................................................172Setting the Exclusion Period...............................................................................................173System Parameters Controlling Login Attempts................................................................173
Security Server Process.............................................................................................................174
8 Controlling Access to System Data and Resources............................................175Designing User Groups.................................................................................................................175
Example of UIC Group Design................................................................................................175
8 Table of Contents
Limitations to UIC Group Design............................................................................................176Naming Individual Users in ACLs................................................................................................176Defining Sharing of Rights............................................................................................................177Conditionalizing Identifiers for Different Users...........................................................................177Designing ACLs.............................................................................................................................178Populating the Rights Database.....................................................................................................178
Displaying the Database...........................................................................................................179Adding Identifiers....................................................................................................................179Restoring the Rights Database.................................................................................................179Assigning Identifiers to Users..................................................................................................180Removing Holder Records.......................................................................................................180Removing Identifiers................................................................................................................180Customizing Identifiers............................................................................................................181
Dynamic Attribute..............................................................................................................181Holder Hidden Attribute....................................................................................................182Name Hidden Attribute......................................................................................................182No Access Attribute............................................................................................................182Resource Attribute..............................................................................................................182Subsystem Attribute............................................................................................................183
Modifying a System or Process Rights List..............................................................................183Giving Users Privileges.................................................................................................................184
Categories of Privilege.............................................................................................................184Suggested Privilege Allocations...............................................................................................185Limiting User Privileges...........................................................................................................185Installing Images with Privilege...............................................................................................186Restricting Command Output..................................................................................................186
Setting Default Protection and Ownership...................................................................................187Controlling File Access.............................................................................................................187
Adjusting Protection Defaults.............................................................................................190Setting Defaults for a Directory Owned by a Resource Identifier......................................191
Setting Up the Resource Identifier.................................................................................191Setting Up the Directory of a Resource Identifier.........................................................192Setting Up the ACL........................................................................................................192
Setting Defaults for Objects Other Than Files..........................................................................193Displaying Class Defaults...................................................................................................193Modifying Class Templates.................................................................................................194
Added Protection for System Data and Resources........................................................................195Precautions to Take When Installing New Software................................................................195
Potentially Harmful Programs............................................................................................195Installing Programs with Privilege.....................................................................................196
Protecting System Files.............................................................................................................196Restricting DCL Command Usage...........................................................................................198Protecting Disks........................................................................................................................198
Erasing Techniques.............................................................................................................198Prevention Through High-Water Marking.........................................................................199Summary of Prevention Techniques...................................................................................199
Protecting Backup Media.........................................................................................................199Backing Up Disks................................................................................................................199Protecting a Backup Save Set..............................................................................................200Retrieving Files from Backup Save Sets..............................................................................200
Protecting Terminals.................................................................................................................201Restricting Terminal Use.....................................................................................................201Restricting Application Terminals and Miscellaneous Devices..........................................201Configuring Terminal Lines for Modems...........................................................................201
Table of Contents 9
9 Using Encryption...................................................................................................203Defining Keys................................................................................................................................203
Specifying the Key Name.........................................................................................................203Specifying the Key Value..........................................................................................................203Verifying Key Creation.............................................................................................................204Specifying Key Storage Tables .................................................................................................204Maintaining Keys.....................................................................................................................205
Encrypting Files.............................................................................................................................206Input File Specification.............................................................................................................206Output File Specification..........................................................................................................206Displaying Processing Information..........................................................................................207
FILES Keyword...................................................................................................................207STATISTICS Keyword.........................................................................................................207
Specifying Files to Encrypt.......................................................................................................207/BACKUP Qualifier.............................................................................................................208/BEFORE Qualifier..............................................................................................................208/BY_OWNER Qualifier.......................................................................................................208/CONFIRM Qualifier...........................................................................................................209/EXCLUDE Qualifier...........................................................................................................209/EXPIRED Qualifier.............................................................................................................209/MODIFIED Qualifier..........................................................................................................210/SINCE Qualifier.................................................................................................................210
Deleting Encrypted Files..........................................................................................................210/DELETE Qualifier..............................................................................................................210/ERASE Qualifier.................................................................................................................211
Encryption Algorithms.............................................................................................................211Encryption Algorithm Qualifiers ............................................................................................212
/KEY_ALGORITHM Qualifier............................................................................................213/DATA_ALGORITHM Qualifier ........................................................................................213
Specifying AES Data Algorithm and AES Key Algorithm......................................................213File Compression......................................................................................................................214Displaying the Version Number...............................................................................................215
Authenticating Files.......................................................................................................................215Associating MACs with Files...................................................................................................216Checking Files..........................................................................................................................216Specifying a File for MACs Generated from File Contents......................................................216Specifying a Security MAC File................................................................................................217Specifying a Listing File...........................................................................................................217Logging the Authentication Operation....................................................................................218
Deleting Key Definitions...............................................................................................................218Decrypting Files.............................................................................................................................218
Input File Specification.............................................................................................................219Output File Specification .........................................................................................................219Displaying Processing Information..........................................................................................220
FILES Keyword...................................................................................................................220STATISTICS Keyword.........................................................................................................220
Specifying Files to Decrypt.......................................................................................................220/BACKUP Qualifier ............................................................................................................221/BEFORE Qualifier..............................................................................................................221/BY_OWNER Qualifier.......................................................................................................221/CONFIRM Qualifier...........................................................................................................221/EXCLUDE Qualifier...........................................................................................................222/EXPIRED Qualifier.............................................................................................................222/MODIFIED Qualifier..........................................................................................................222
10 Table of Contents
/SINCE Qualifier.................................................................................................................223Deleting Decrypted Files .........................................................................................................223
/DELETE Qualifier .............................................................................................................223/ERASE Qualifier.................................................................................................................223
Algorithm Qualifiers................................................................................................................224Encrypting Save Sets......................................................................................................................224
Restoring Files..........................................................................................................................225Encrypting Distribution Files...................................................................................................226
10 Security Auditing.................................................................................................227Overview of the Auditing Process.................................................................................................227Reporting Security-Relevant Events..............................................................................................228
Ways to Generate Audit Information.......................................................................................228Auditing Categories of Activity..........................................................................................228Attaching a Security-Auditing ACE...................................................................................230Modifying a User Authorization Record............................................................................231
Kinds of System Activity the Operating System Can Report..................................................232Suppression of Certain Privilege Audits............................................................................232Suppression of Certain Process Control Audits.................................................................233
Sources of Event Information...................................................................................................233Developing an Auditing Plan........................................................................................................234
Assessing Your Auditing Requirements..................................................................................234Selecting a Destination for the Event Message.........................................................................236Considering the Performance Impact.......................................................................................237
Methods of Capturing Event Messages.........................................................................................237Using an Audit Log File...........................................................................................................238
Maintaining the File............................................................................................................238Moving the File from the System Disk...............................................................................239
Enabling a Terminal to Receive Alarms...................................................................................239Secondary Destinations for Event Messages............................................................................240
Using a Remote Log File.....................................................................................................240Using a Listener Mailbox....................................................................................................241
Analyzing a Log File......................................................................................................................241Recommended Procedure........................................................................................................241Invoking the Audit Analysis Utility.........................................................................................243Providing Report Specifications...............................................................................................243Using the Audit Analysis Utility Interactively........................................................................245Examining the Report...............................................................................................................245
Managing the Auditing Subsystem...............................................................................................247Tasks Performed by the Audit Server......................................................................................247Disabling and Reenabling Startup of the Audit Server............................................................248Changing the Point in Startup When the Operating System Initiates Auditing.....................249Choosing the Number of Outstanding Messages That Trigger Process Suspension...............249
Controlling Message Flow..................................................................................................249Preventing Process Suspension...........................................................................................250
Reacting to Insufficient Memory..............................................................................................250Maintaining the Accuracy of Message Time-Stamping...........................................................251Adjusting the Transfer of Messages to Disk.............................................................................251Allocating Disk Space for the Audit Log File...........................................................................251Error Handling in the Auditing Facility..................................................................................252
Disabling Disk Monitoring.................................................................................................252Losing the Link to a Remote Log File.................................................................................252
Table of Contents 11
11 System Security Breaches....................................................................................253Forms of System Attacks...............................................................................................................253Indications of Trouble....................................................................................................................253
Reports from Users...................................................................................................................253Monitoring the System.............................................................................................................254
Routine System Surveillance.........................................................................................................254System Accounting...................................................................................................................255Security Auditing.....................................................................................................................255
Handling a Security Breach...........................................................................................................257Unsuccessful Intrusion Attempts.............................................................................................257
Detecting Intrusion Attempts.............................................................................................257Identifying the Perpetrator.................................................................................................257Preventing Intrusion Attempts...........................................................................................257
Successful Intrusions................................................................................................................258Identifying the Successful Perpetrator................................................................................258Securing the System............................................................................................................259Repair After a Successful Intrusion....................................................................................259
12 Securing a Cluster...............................................................................................261Overview of Clusters.....................................................................................................................261Building a Common Environment................................................................................................261
Required Common System Files..............................................................................................262Recommended Common System Files.....................................................................................262Synchronizing Multiple Versions of Files................................................................................263
Synchronizing Authorization Data................................................................................................264Managing the Audit Log File.........................................................................................................265Protecting Objects..........................................................................................................................265Storing Profiles and Auditing Information...................................................................................266clusterwide Intrusion Detection....................................................................................................266Using the System Management Utility..........................................................................................267Managing Cluster Membership.....................................................................................................267Using DECnet Between Cluster Nodes.........................................................................................267
13 Security in a Network Environment...................................................................269Managing Network Security.........................................................................................................269
Requirements for Achieving Security......................................................................................269Auditing in the Network..........................................................................................................270
Hierarchy of Access Controls........................................................................................................270Using Explicit Access Control..................................................................................................271Using Proxy Logins..................................................................................................................271Using Default Application Accounts.......................................................................................271
Proxy Access Control.....................................................................................................................272Special Security Measures with Proxy Access.........................................................................272Setting Up a Proxy Database....................................................................................................272
Enabling and Disabling Incoming Proxy Access................................................................274Removing Proxy Access......................................................................................................274Procedure for Creating a Proxy Account............................................................................274
Example of a Proxy Account....................................................................................................275Using DECnet Application (Object) Accounts..............................................................................276
Summary of Network Objects..................................................................................................277Configuring Network Objects Manually..................................................................................278Removing Default DECnet Access to the System....................................................................280Setting Privilege Requirements for Remote Object Connections.............................................281
12 Table of Contents
Specifying Routing Initialization Passwords.................................................................................281Establishing a Dynamic Asynchronous Connection................................................................281
Sharing Files in a Network............................................................................................................285Using the Mail Utility...............................................................................................................286Setting Up Accounts for Local and Remote Users...................................................................286Admitting Remote Users to Multiple Accounts.......................................................................286
14 Using Protected Subsystems...............................................................................291Advantages of Protected Subsystems............................................................................................291Applications for Protected Subsystems.........................................................................................291How Protected Subsystems Work.................................................................................................291Design Considerations...................................................................................................................292System Management Requirements..............................................................................................293Building the Subsystem.................................................................................................................294Enabling Protected Subsystems on a Trusted Volume..................................................................294Giving Users Access......................................................................................................................295Example of a Protected Subsystem................................................................................................295
Protecting the Top-Level Directory..........................................................................................296Protecting Subsystem Directories.............................................................................................297Protecting the Images and Data Files.......................................................................................298Protecting the Printer...............................................................................................................299Command Procedure for Building the Subsystem..................................................................300
A Assigning Privileges..............................................................................................303ACNT Privilege (Devour)..............................................................................................................303ALLSPOOL Privilege (Devour).....................................................................................................303ALTPRI Privilege (System)............................................................................................................303AUDIT Privilege (System).............................................................................................................304BUGCHK Privilege (Devour)........................................................................................................304BYPASS Privilege (All)..................................................................................................................304CMEXEC Privilege (All)................................................................................................................305CMKRNL Privilege (All)...............................................................................................................305DIAGNOSE Privilege (Objects).....................................................................................................306DOWNGRADE Privilege (All)......................................................................................................307EXQUOTA Privilege (Devour)......................................................................................................307GROUP Privilege (Group).............................................................................................................307GRPNAM Privilege (Devour)........................................................................................................307GRPPRV Privilege (Group)............................................................................................................308IMPERSONATE Privilege (All) (Formerly DETACH)..................................................................308IMPORT Privilege (Objects)..........................................................................................................309LOG_IO Privilege (All)..................................................................................................................309MOUNT Privilege (Normal)..........................................................................................................309NETMBX Privilege (Normal).........................................................................................................309OPER Privilege (System)...............................................................................................................309PFNMAP Privilege (All)................................................................................................................312PHY_IO Privilege (All)..................................................................................................................312PRMCEB Privilege (Devour).........................................................................................................313PRMGBL Privilege (Devour).........................................................................................................313PRMMBX Privilege (Devour)........................................................................................................313PSWAPM Privilege (System).........................................................................................................314READALL Privilege (Objects).......................................................................................................314SECURITY Privilege (System).......................................................................................................314SETPRV Privilege (All)..................................................................................................................315
Table of Contents 13
SHARE Privilege (All)...................................................................................................................315SHMEM Privilege (Devour)..........................................................................................................315SYSGBL Privilege (Files)................................................................................................................315SYSLCK Privilege (System)...........................................................................................................315SYSNAM Privilege (All)................................................................................................................315SYSPRV Privilege (All)..................................................................................................................316TMPMBX Privilege (Normal)........................................................................................................317UPGRADE Privilege (All)..............................................................................................................317VOLPRO Privilege (Objects)..........................................................................................................317WORLD Privilege (System)...........................................................................................................318
B Protection for OpenVMS System Files.................................................................319Standard Ownership and Protection.............................................................................................319Listing of OpenVMS System Files.................................................................................................320
Files in Top-Level Directories...................................................................................................321Files in SYS$KEYMAP..............................................................................................................321Files in SYS$LDR......................................................................................................................321Files in SYS$STARTUP and SYS$ERR......................................................................................323Files in SYSEXE.........................................................................................................................324Files in SYSHLP........................................................................................................................328Files in SYSLIB..........................................................................................................................331Files in SYSMGR.......................................................................................................................335Files in SYSMSG.......................................................................................................................337Files in SYSTEST.......................................................................................................................338Files in SYSUPD........................................................................................................................338Files in VUE$LIBRARY............................................................................................................339
C Alarm Messages...................................................................................................341
Glossary.........................................................................................................................349
Index...............................................................................................................................357
14 Table of Contents
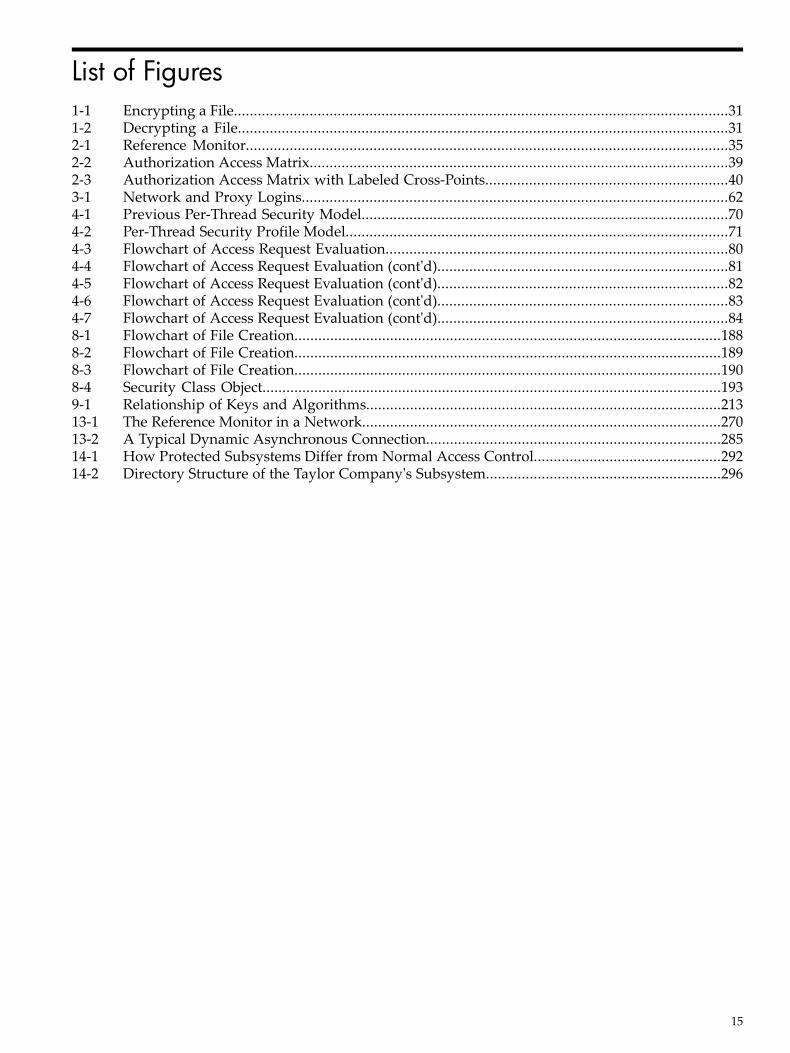
List of Figures1-1 Encrypting a File............................................................................................................................311-2 Decrypting a File...........................................................................................................................312-1 Reference Monitor.........................................................................................................................352-2 Authorization Access Matrix.........................................................................................................392-3 Authorization Access Matrix with Labeled Cross-Points.............................................................403-1 Network and Proxy Logins...........................................................................................................624-1 Previous Per-Thread Security Model............................................................................................704-2 Per-Thread Security Profile Model................................................................................................714-3 Flowchart of Access Request Evaluation......................................................................................804-4 Flowchart of Access Request Evaluation (cont'd).........................................................................814-5 Flowchart of Access Request Evaluation (cont'd).........................................................................824-6 Flowchart of Access Request Evaluation (cont'd).........................................................................834-7 Flowchart of Access Request Evaluation (cont'd).........................................................................848-1 Flowchart of File Creation...........................................................................................................1888-2 Flowchart of File Creation...........................................................................................................1898-3 Flowchart of File Creation...........................................................................................................1908-4 Security Class Object...................................................................................................................1939-1 Relationship of Keys and Algorithms.........................................................................................21313-1 The Reference Monitor in a Network..........................................................................................27013-2 A Typical Dynamic Asynchronous Connection..........................................................................28514-1 How Protected Subsystems Differ from Normal Access Control...............................................29214-2 Directory Structure of the Taylor Company's Subsystem...........................................................296
15
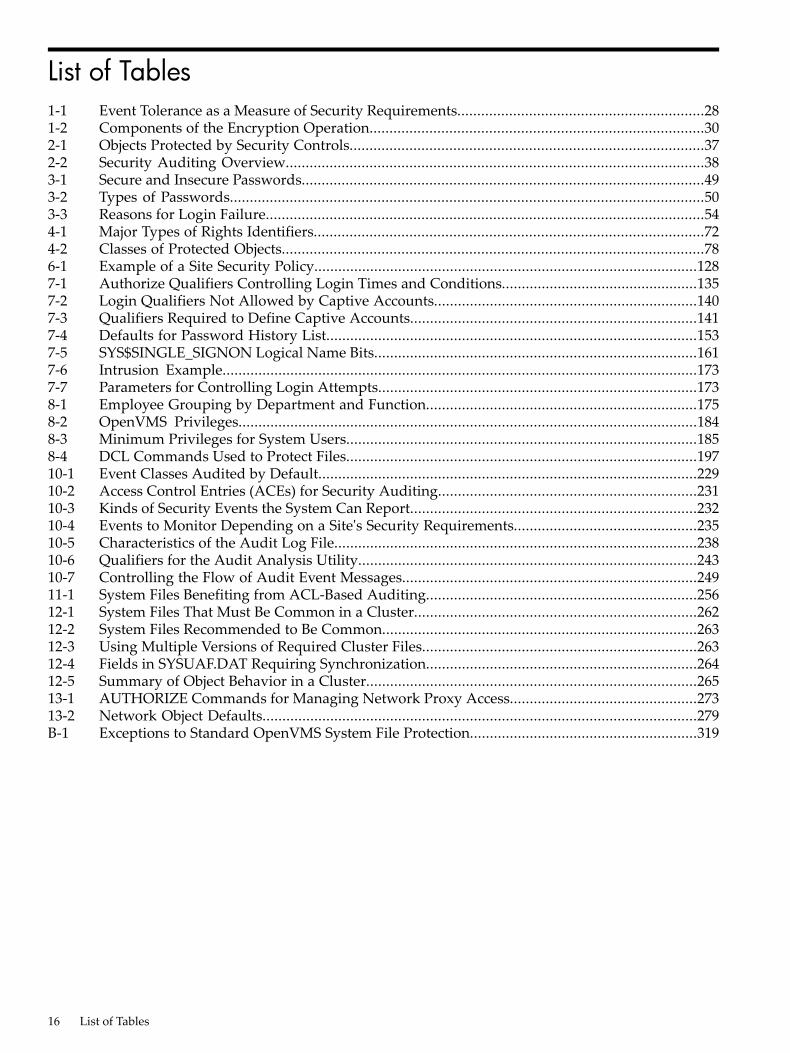
List of Tables1-1 Event Tolerance as a Measure of Security Requirements..............................................................281-2 Components of the Encryption Operation....................................................................................302-1 Objects Protected by Security Controls.........................................................................................372-2 Security Auditing Overview.........................................................................................................383-1 Secure and Insecure Passwords.....................................................................................................493-2 Types of Passwords.......................................................................................................................503-3 Reasons for Login Failure..............................................................................................................544-1 Major Types of Rights Identifiers..................................................................................................724-2 Classes of Protected Objects..........................................................................................................786-1 Example of a Site Security Policy................................................................................................1287-1 Authorize Qualifiers Controlling Login Times and Conditions.................................................1357-2 Login Qualifiers Not Allowed by Captive Accounts..................................................................1407-3 Qualifiers Required to Define Captive Accounts........................................................................1417-4 Defaults for Password History List.............................................................................................1537-5 SYS$SINGLE_SIGNON Logical Name Bits.................................................................................1617-6 Intrusion Example.......................................................................................................................1737-7 Parameters for Controlling Login Attempts................................................................................1738-1 Employee Grouping by Department and Function....................................................................1758-2 OpenVMS Privileges...................................................................................................................1848-3 Minimum Privileges for System Users........................................................................................1858-4 DCL Commands Used to Protect Files........................................................................................19710-1 Event Classes Audited by Default...............................................................................................22910-2 Access Control Entries (ACEs) for Security Auditing.................................................................23110-3 Kinds of Security Events the System Can Report........................................................................23210-4 Events to Monitor Depending on a Site's Security Requirements..............................................23510-5 Characteristics of the Audit Log File...........................................................................................23810-6 Qualifiers for the Audit Analysis Utility.....................................................................................24310-7 Controlling the Flow of Audit Event Messages..........................................................................24911-1 System Files Benefiting from ACL-Based Auditing....................................................................25612-1 System Files That Must Be Common in a Cluster.......................................................................26212-2 System Files Recommended to Be Common...............................................................................26312-3 Using Multiple Versions of Required Cluster Files.....................................................................26312-4 Fields in SYSUAF.DAT Requiring Synchronization....................................................................26412-5 Summary of Object Behavior in a Cluster...................................................................................26513-1 AUTHORIZE Commands for Managing Network Proxy Access...............................................27313-2 Network Object Defaults.............................................................................................................279B-1 Exceptions to Standard OpenVMS System File Protection.........................................................319
16 List of Tables
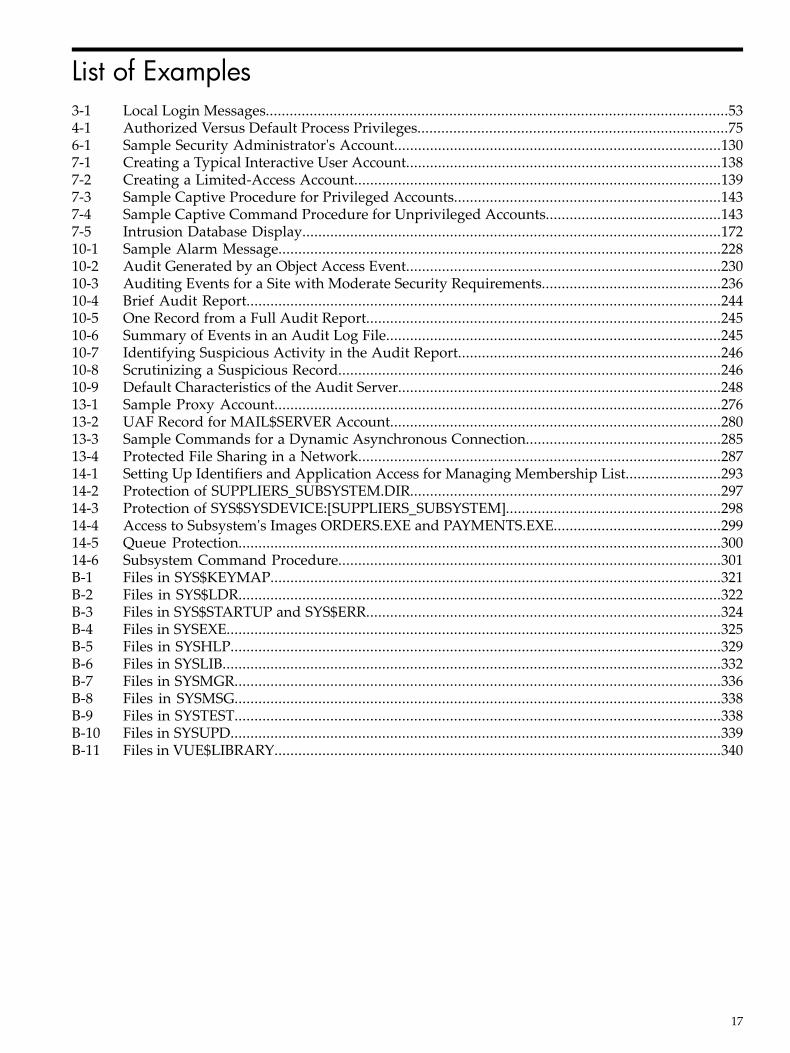
List of Examples3-1 Local Login Messages....................................................................................................................534-1 Authorized Versus Default Process Privileges..............................................................................756-1 Sample Security Administrator's Account..................................................................................1307-1 Creating a Typical Interactive User Account...............................................................................1387-2 Creating a Limited-Access Account............................................................................................1397-3 Sample Captive Procedure for Privileged Accounts...................................................................1437-4 Sample Captive Command Procedure for Unprivileged Accounts............................................1437-5 Intrusion Database Display.........................................................................................................17210-1 Sample Alarm Message...............................................................................................................22810-2 Audit Generated by an Object Access Event...............................................................................23010-3 Auditing Events for a Site with Moderate Security Requirements.............................................23610-4 Brief Audit Report.......................................................................................................................24410-5 One Record from a Full Audit Report.........................................................................................24510-6 Summary of Events in an Audit Log File....................................................................................24510-7 Identifying Suspicious Activity in the Audit Report..................................................................24610-8 Scrutinizing a Suspicious Record................................................................................................24610-9 Default Characteristics of the Audit Server.................................................................................24813-1 Sample Proxy Account................................................................................................................27613-2 UAF Record for MAIL$SERVER Account...................................................................................28013-3 Sample Commands for a Dynamic Asynchronous Connection.................................................28513-4 Protected File Sharing in a Network...........................................................................................28714-1 Setting Up Identifiers and Application Access for Managing Membership List........................29314-2 Protection of SUPPLIERS_SUBSYSTEM.DIR..............................................................................29714-3 Protection of SYS$SYSDEVICE:[SUPPLIERS_SUBSYSTEM]......................................................29814-4 Access to Subsystem's Images ORDERS.EXE and PAYMENTS.EXE..........................................29914-5 Queue Protection.........................................................................................................................30014-6 Subsystem Command Procedure................................................................................................301B-1 Files in SYS$KEYMAP.................................................................................................................321B-2 Files in SYS$LDR.........................................................................................................................322B-3 Files in SYS$STARTUP and SYS$ERR.........................................................................................324B-4 Files in SYSEXE............................................................................................................................325B-5 Files in SYSHLP...........................................................................................................................329B-6 Files in SYSLIB.............................................................................................................................332B-7 Files in SYSMGR..........................................................................................................................336B-8 Files in SYSMSG..........................................................................................................................338B-9 Files in SYSTEST..........................................................................................................................338B-10 Files in SYSUPD...........................................................................................................................339B-11 Files in VUE$LIBRARY................................................................................................................340
17

18
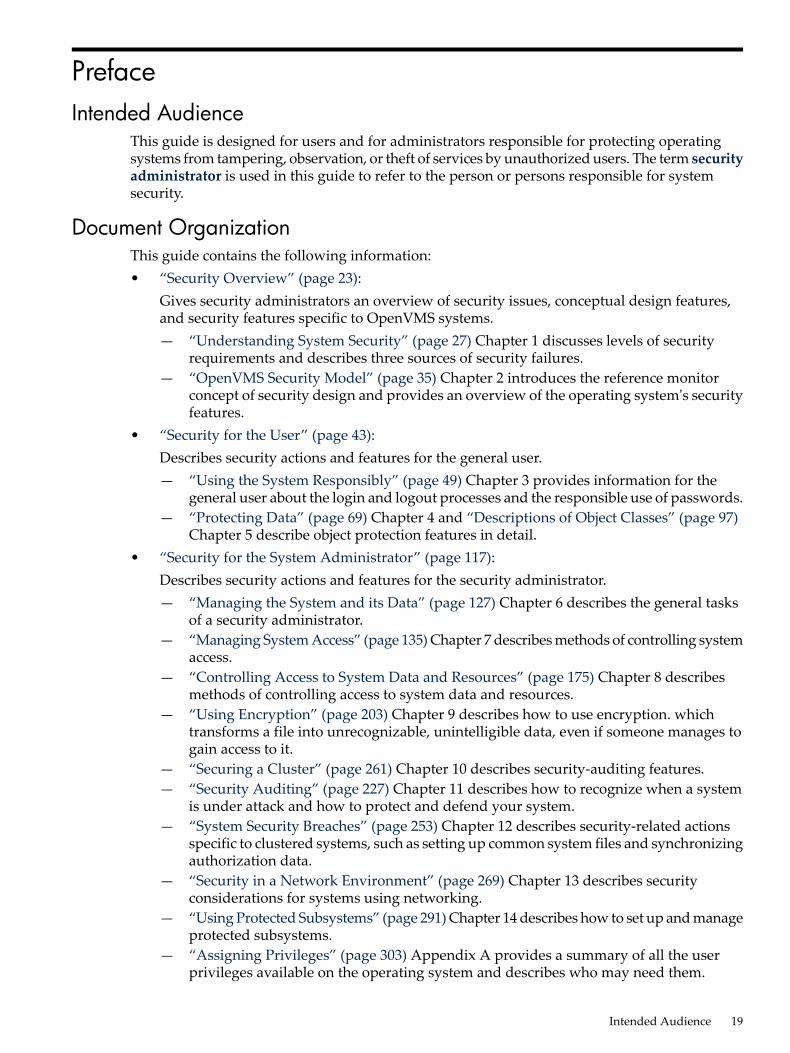
PrefaceIntended Audience
This guide is designed for users and for administrators responsible for protecting operatingsystems from tampering, observation, or theft of services by unauthorized users. The term securityadministrator is used in this guide to refer to the person or persons responsible for systemsecurity.
Document OrganizationThis guide contains the following information:• “Security Overview” (page 23):
Gives security administrators an overview of security issues, conceptual design features,and security features specific to OpenVMS systems.— “Understanding System Security” (page 27) Chapter 1 discusses levels of security
requirements and describes three sources of security failures.— “OpenVMS Security Model” (page 35) Chapter 2 introduces the reference monitor
concept of security design and provides an overview of the operating system's securityfeatures.
• “Security for the User” (page 43):Describes security actions and features for the general user.— “Using the System Responsibly” (page 49) Chapter 3 provides information for the
general user about the login and logout processes and the responsible use of passwords.— “Protecting Data” (page 69) Chapter 4 and “Descriptions of Object Classes” (page 97)
Chapter 5 describe object protection features in detail.• “Security for the System Administrator” (page 117):
Describes security actions and features for the security administrator.— “Managing the System and its Data” (page 127) Chapter 6 describes the general tasks
of a security administrator.— “Managing System Access” (page 135) Chapter 7 describes methods of controlling system
access.— “Controlling Access to System Data and Resources” (page 175) Chapter 8 describes
methods of controlling access to system data and resources.— “Using Encryption” (page 203) Chapter 9 describes how to use encryption. which
transforms a file into unrecognizable, unintelligible data, even if someone manages togain access to it.
— “Securing a Cluster” (page 261) Chapter 10 describes security-auditing features.— “Security Auditing” (page 227) Chapter 11 describes how to recognize when a system
is under attack and how to protect and defend your system.— “System Security Breaches” (page 253) Chapter 12 describes security-related actions
specific to clustered systems, such as setting up common system files and synchronizingauthorization data.
— “Security in a Network Environment” (page 269) Chapter 13 describes securityconsiderations for systems using networking.
— “Using Protected Subsystems” (page 291) Chapter 14 describes how to set up and manageprotected subsystems.
— “Assigning Privileges” (page 303) Appendix A provides a summary of all the userprivileges available on the operating system and describes who may need them.
Intended Audience 19
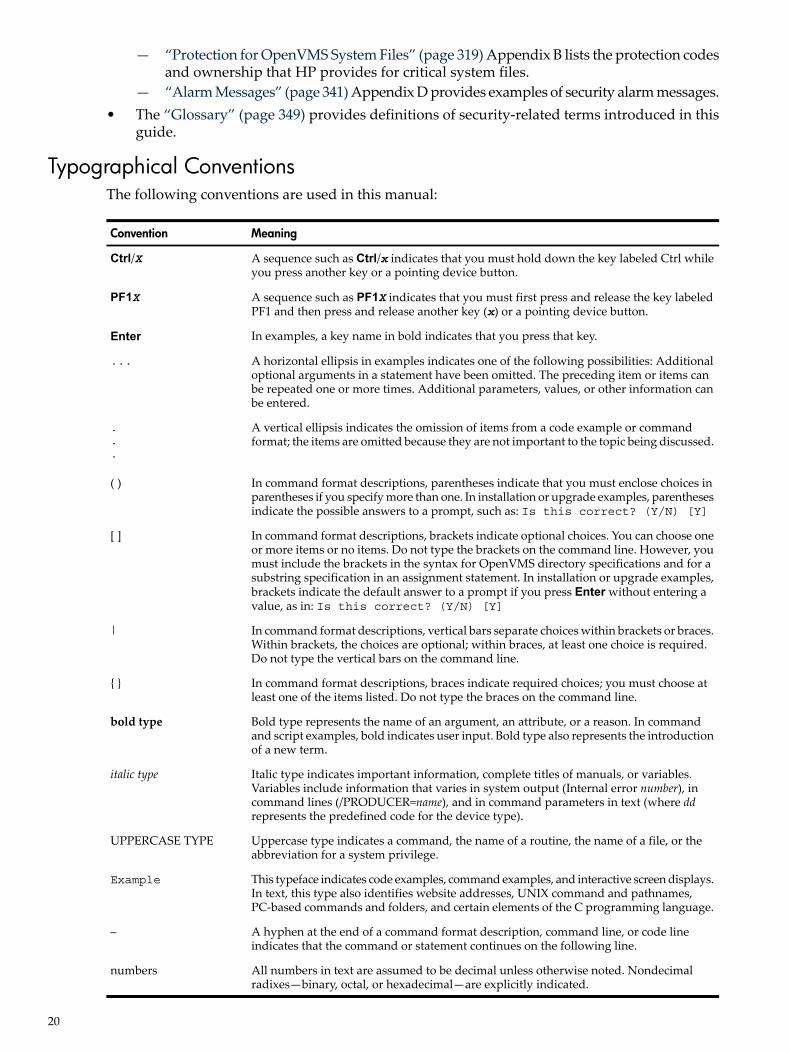
— “Protection for OpenVMS System Files” (page 319) Appendix B lists the protection codesand ownership that HP provides for critical system files.
— “Alarm Messages” (page 341) Appendix D provides examples of security alarm messages.• The “Glossary” (page 349) provides definitions of security-related terms introduced in this
guide.
Typographical ConventionsThe following conventions are used in this manual:
MeaningConvention
A sequence such as Ctrl/x indicates that you must hold down the key labeled Ctrl whileyou press another key or a pointing device button.
Ctrl/X
A sequence such as PF1X indicates that you must first press and release the key labeledPF1 and then press and release another key (x) or a pointing device button.
PF1X
In examples, a key name in bold indicates that you press that key.Enter
A horizontal ellipsis in examples indicates one of the following possibilities: Additionaloptional arguments in a statement have been omitted. The preceding item or items canbe repeated one or more times. Additional parameters, values, or other information canbe entered.
...
A vertical ellipsis indicates the omission of items from a code example or commandformat; the items are omitted because they are not important to the topic being discussed.
.
.
.
In command format descriptions, parentheses indicate that you must enclose choices inparentheses if you specify more than one. In installation or upgrade examples, parenthesesindicate the possible answers to a prompt, such as: Is this correct? (Y/N) [Y]
( )
In command format descriptions, brackets indicate optional choices. You can choose oneor more items or no items. Do not type the brackets on the command line. However, youmust include the brackets in the syntax for OpenVMS directory specifications and for asubstring specification in an assignment statement. In installation or upgrade examples,brackets indicate the default answer to a prompt if you press Enter without entering avalue, as in: Is this correct? (Y/N) [Y]
[ ]
In command format descriptions, vertical bars separate choices within brackets or braces.Within brackets, the choices are optional; within braces, at least one choice is required.Do not type the vertical bars on the command line.
|
In command format descriptions, braces indicate required choices; you must choose atleast one of the items listed. Do not type the braces on the command line.
{ }
Bold type represents the name of an argument, an attribute, or a reason. In commandand script examples, bold indicates user input. Bold type also represents the introductionof a new term.
bold type
Italic type indicates important information, complete titles of manuals, or variables.Variables include information that varies in system output (Internal error number), incommand lines (/PRODUCER=name), and in command parameters in text (where ddrepresents the predefined code for the device type).
italic type
Uppercase type indicates a command, the name of a routine, the name of a file, or theabbreviation for a system privilege.
UPPERCASE TYPE
This typeface indicates code examples, command examples, and interactive screen displays.In text, this type also identifies website addresses, UNIX command and pathnames,PC-based commands and folders, and certain elements of the C programming language.
Example
A hyphen at the end of a command format description, command line, or code lineindicates that the command or statement continues on the following line.
–
All numbers in text are assumed to be decimal unless otherwise noted. Nondecimalradixes—binary, octal, or hexadecimal—are explicitly indicated.
numbers
20
Related DocumentsThe HP OpenVMS Guide to System Security assumes you are familiar with the reference materialin the HP OpenVMS System Management Utilities Reference Manual pertaining to the followingsecurity-related utilities:• Access control list editor (ACL editor)• Accounting utility• Audit Analysis utility• Authorize utility• Backup utility• System Management (SYSMAN) utilityYou might find the security information helpful in the following manuals:• HP Open Source Security for OpenVMS, Volume 1: CDSA• HP Open Source Security for OpenVMS, Volume 2: HP SSL for OpenVMS• HP Open Source Security for OpenVMS, Volume 3: Kerberos• HP OpenVMS DCL Dictionary• HP OpenVMS System Manager's Manual• HP OpenVMS Cluster Systems• OpenVMS Utility Routines ManualFor more information about HP OpenVMS products and services, see:http://www.hp.com/go/openvms/
HP Encourages Your CommentsHP welcomes your comments on this manual. Please send your comments or suggestions to:[email protected]
How to Order Additional DocumentationFor more information about how to order additional documentation, see:http://www.hp.com/go/openvms/doc/order
Related Documents 21

22
Part I Security OverviewThe chapters in this part discuss the following topics:• Sources of security failures (“Types of Computer Security Problems” (page 27))• Levels of security requirements (“Levels of Security Requirements” (page 28))• Reference monitor concept of security design(“Structure of a Secure Operating System” (page 35))• Security features of the operating system (“Implementation of the Reference Monitor” (page 36))
23

24
Table of Contents
1 Understanding System Security..................................................................................27Types of Computer Security Problems.................................................................................................27Levels of Security Requirements...........................................................................................................28Building a Secure System Environment...............................................................................................29Encryption.............................................................................................................................................29
Encryption Process..........................................................................................................................30AES Encryption Algorithm........................................................................................................30DES Encryption Algorithm........................................................................................................30Keys............................................................................................................................................30Decryption..................................................................................................................................31
Authentication Process....................................................................................................................31Encryption Interfaces.......................................................................................................................32Compatibility...................................................................................................................................32
Common Data Security Architecture (CDSA)......................................................................................33Secure Sockets Layer (SSL)...................................................................................................................33Kerberos................................................................................................................................................34
2 OpenVMS Security Model..........................................................................................35Structure of a Secure Operating System...............................................................................................35
Reference Monitor Concept.............................................................................................................35How the Reference Monitor Enforces Security Rules.....................................................................36
Implementation of the Reference Monitor............................................................................................36Subjects............................................................................................................................................36Objects..............................................................................................................................................37Authorization Database...................................................................................................................37Audit Trail........................................................................................................................................38Reference Monitor...........................................................................................................................39Authorization Database Represented as an Access Matrix.............................................................39
Summary: System Security Design.......................................................................................................41
Table of Contents 25

26
1 Understanding System SecurityEffective operating system security measures help prevent unauthorized access and theft ofcomputer time and any kind of sensitive information, such as marketing plans, formulas, orproprietary software. These measures can also protect equipment, software, and files fromdamage caused by tampering.This chapter provides security administrators with an overview of security measures availablewith the operating system. “Security for the System Administrator” (page 117) provides morespecific information regarding site security policies, the tasks of security administrators, andmethods of protecting site computer systems and resources.
Types of Computer Security ProblemsOn any system there can be two types of users: authorized and unauthorized. Any personauthorized to use the computer system has the right to access the system and its resourcesaccording to the authorization criteria set up by the site security administrator. Usage criteriamay include the time of day, types of logins, use of different resources like printers and terminals,and so on. Unauthorized users have no right to use the system at all or only at a given time ofday, or they have no right to use certain system resources.On a computer system, security breaches usually result from one of four types of actions:• User irresponsibility refers to situations where the user purposely or accidentally causes
some noticeable damage. One example would be a user who is authorized to access certainfiles making a copy of a key file to sell.There is little that an operating system can do to protect sites from this source of securityfailure. The problem frequently lies in application design deficiencies or inconsistent use ofavailable controls by users and the security administrator. Sometimes the failure to enforceadequate environmental security unwittingly encourages this type of security problem.Even the best security system will fail if implemented inconsistently. This, along with thefailure to motivate your users to observe good security practices, will make your systemvulnerable to security failures caused by user irresponsibility. “Using the System Responsibly”(page 49) discusses what users can do to help maintain system security.
• User probing refers to situations where a user exploits insufficiently protected parts of thesystem. Some users consider gaining access to a forbidden system area as an intellectualchallenge, playing a game of user versus system. Although intentions may be harmless,theft of services is a crime. Users with more serious intent may seek confidential information,attempt embezzlement, or even destroy data by probing. Always treat user probing seriously.The system provides many security features to combat user probing. Based on securityneeds, the security administrator implements features on either a temporary or permanentbasis. See “Protecting Data” (page 69) for information on protecting data and resources withprotection codes and access control lists.
• User penetration refers to situations where the user breaks through security controls to gainaccess to the system. While the system has security features that make penetration extremelydifficult, it is impossible to make any operating system completely impenetrable.A user who succeeds in penetrating a system is both skilled and malicious. Thus, penetrationis the most serious and potentially dangerous type of security breach. With properimplementation of the OpenVMS security features, however, it is also the rarest securitybreach, requiring unusual skills and perseverance.
• Social engineering refers to situations in which an intruder gains access to a system not bytechnical means, but by deceiving users, operators, or administrators. Potential intrudersmay impersonate authorized users over the phone. Potential intruders may request
Types of Computer Security Problems 27
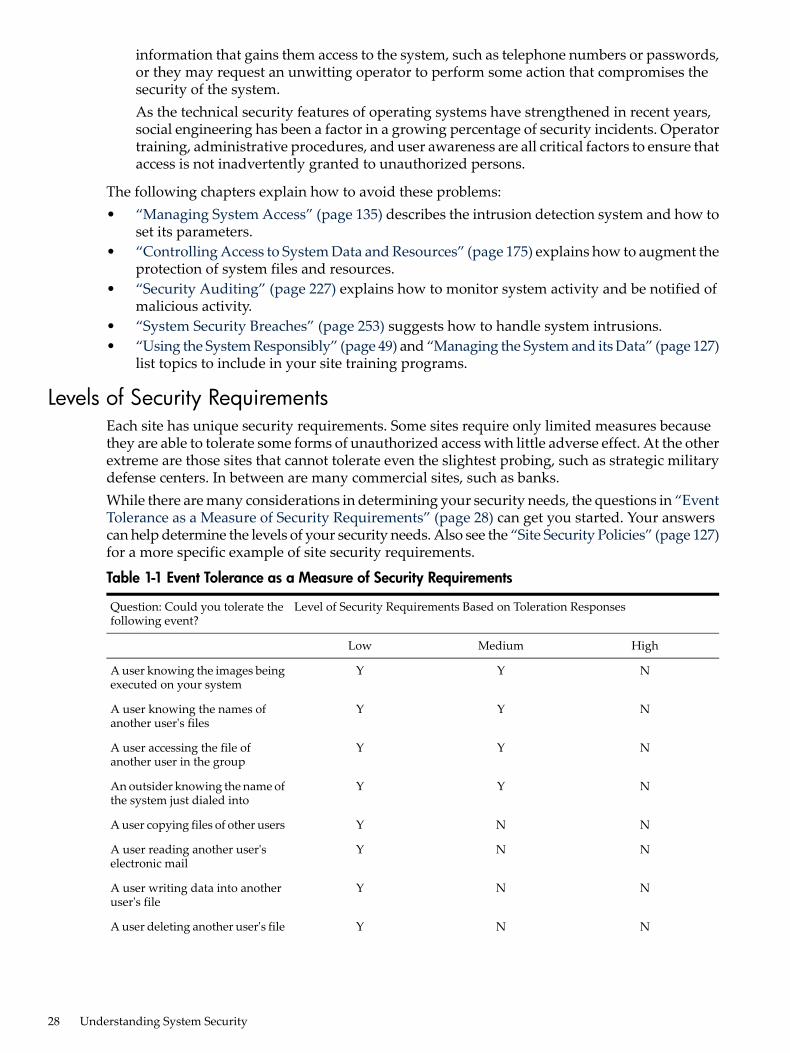
information that gains them access to the system, such as telephone numbers or passwords,or they may request an unwitting operator to perform some action that compromises thesecurity of the system.As the technical security features of operating systems have strengthened in recent years,social engineering has been a factor in a growing percentage of security incidents. Operatortraining, administrative procedures, and user awareness are all critical factors to ensure thataccess is not inadvertently granted to unauthorized persons.
The following chapters explain how to avoid these problems:• “Managing System Access” (page 135) describes the intrusion detection system and how to
set its parameters.• “Controlling Access to System Data and Resources” (page 175) explains how to augment the
protection of system files and resources.• “Security Auditing” (page 227) explains how to monitor system activity and be notified of
malicious activity.• “System Security Breaches” (page 253) suggests how to handle system intrusions.• “Using the System Responsibly” (page 49) and “Managing the System and its Data” (page 127)
list topics to include in your site training programs.
Levels of Security RequirementsEach site has unique security requirements. Some sites require only limited measures becausethey are able to tolerate some forms of unauthorized access with little adverse effect. At the otherextreme are those sites that cannot tolerate even the slightest probing, such as strategic militarydefense centers. In between are many commercial sites, such as banks.While there are many considerations in determining your security needs, the questions in “EventTolerance as a Measure of Security Requirements” (page 28) can get you started. Your answerscan help determine the levels of your security needs. Also see the “Site Security Policies” (page 127)for a more specific example of site security requirements.
Table 1-1 Event Tolerance as a Measure of Security Requirements
Level of Security Requirements Based on Toleration ResponsesQuestion: Could you tolerate thefollowing event?
HighMediumLow
NYYA user knowing the images beingexecuted on your system
NYYA user knowing the names ofanother user's files
NYYA user accessing the file ofanother user in the group
NYYAn outsider knowing the name ofthe system just dialed into
NNYA user copying files of other users
NNYA user reading another user'selectronic mail
NNYA user writing data into anotheruser's file
NNYA user deleting another user's file
28 Understanding System Security
Table 1-1 Event Tolerance as a Measure of Security Requirements (continued)
NNYA user being able to read sectionsof a disk that might containvarious old files
NNYA user consuming machine timeand resources to performunrelated or unauthorized work,possibly even playing games
If you can tolerate most of the events listed, your security requirements are quite low. If youranswers are mixed, your requirements are in the medium to high range. Generally, those sitesthat are most intolerant to the listed events have very high levels of security requirements.When you review your site's security needs, do not confuse a weakness in site operations orrecovery procedures as a security problem. Ensure that your operations policies are effectiveand consistent before evaluating your system security requirements.
Building a Secure System EnvironmentThere are two sources of security problems outside the operating system domain: employeecarelessness and facility vulnerability. If you have a careless or malicious employee or yourfacility is insecure, none of the security measures discussed in this guide will protect you fromsecurity breaches.Most system penetration occurs through these environmental weaknesses. It is much easier tophysically remove a small reel of tape than it is to break access protection codes or change fileprotection.HP strongly encourages you to stress environmental considerations as well as operating systemprotection when reviewing site security.This book discusses operating system security measures. When deciding which of these measuresto implement, it is important for you to assess site security needs realistically. While institutingadequate security for your site is essential, instituting more security than actually necessary iscostly and time-consuming.When deciding which security measures to apply to your system, remember the following:• The most secure system is also the most difficult to use.• Increasing security can increase costs in terms of slower access to data, slower machine
operations, and slower system performance.• More security measures require more personnel time.The operating system provides the basic mechanisms to control access to the system and its data.It also provides monitoring tools to ensure that access is restricted to authorized users. However,many computer crimes are committed by authorized users with no violation of the operatingsystem's security controls.Therefore, the security of your operation depends on how you apply these security features andhow you control your employees and your site. By first building appropriate supervisory controlsinto your application and designing your application with the goal of minimizing opportunitiesfor abuse, you can then implement operating system and site security features and produce aless vulnerable environment. For an example of one organization's security plan, see “Managingthe System and its Data” (page 127).
EncryptionThe OpenVMS operating system provides several data protection schemes. For example, byusing UIC-based protection you can protect data by controlling access to files. You can use ACLsto refine access control to specific groups or individual users. For a protection scheme with yet
Building a Secure System Environment 29
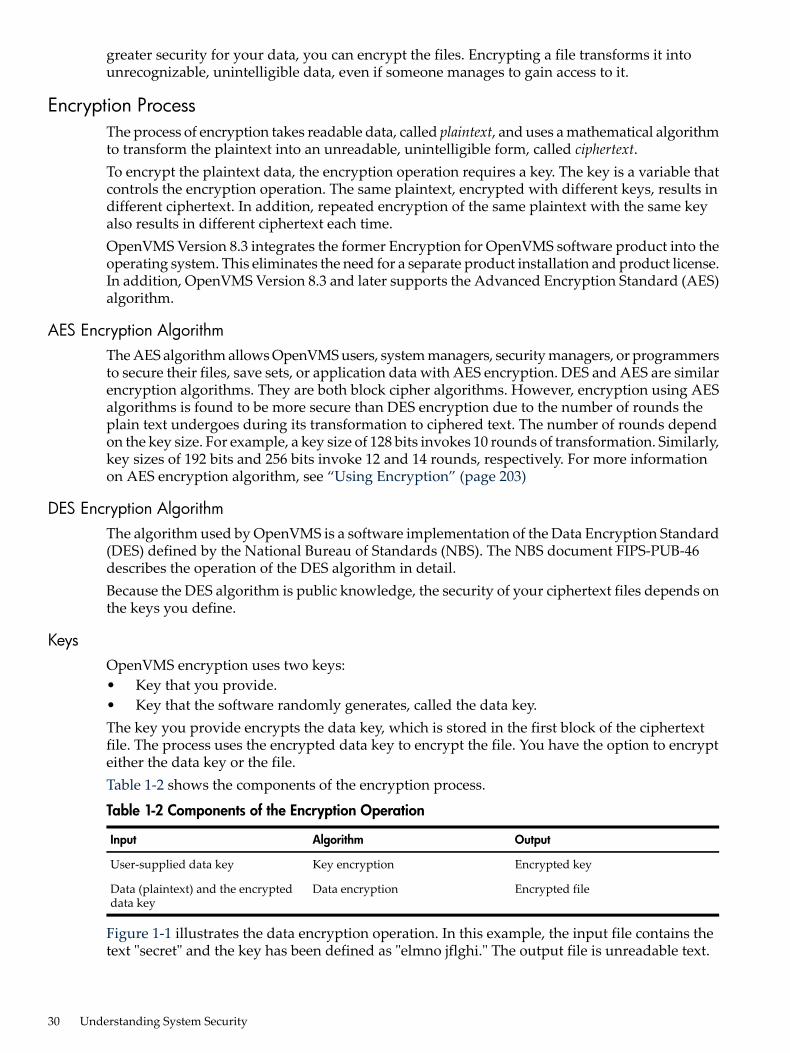
greater security for your data, you can encrypt the files. Encrypting a file transforms it intounrecognizable, unintelligible data, even if someone manages to gain access to it.
Encryption ProcessThe process of encryption takes readable data, called plaintext, and uses a mathematical algorithmto transform the plaintext into an unreadable, unintelligible form, called ciphertext.To encrypt the plaintext data, the encryption operation requires a key. The key is a variable thatcontrols the encryption operation. The same plaintext, encrypted with different keys, results indifferent ciphertext. In addition, repeated encryption of the same plaintext with the same keyalso results in different ciphertext each time.OpenVMS Version 8.3 integrates the former Encryption for OpenVMS software product into theoperating system. This eliminates the need for a separate product installation and product license.In addition, OpenVMS Version 8.3 and later supports the Advanced Encryption Standard (AES)algorithm.
AES Encryption AlgorithmThe AES algorithm allows OpenVMS users, system managers, security managers, or programmersto secure their files, save sets, or application data with AES encryption. DES and AES are similarencryption algorithms. They are both block cipher algorithms. However, encryption using AESalgorithms is found to be more secure than DES encryption due to the number of rounds theplain text undergoes during its transformation to ciphered text. The number of rounds dependon the key size. For example, a key size of 128 bits invokes 10 rounds of transformation. Similarly,key sizes of 192 bits and 256 bits invoke 12 and 14 rounds, respectively. For more informationon AES encryption algorithm, see “Using Encryption” (page 203)
DES Encryption AlgorithmThe algorithm used by OpenVMS is a software implementation of the Data Encryption Standard(DES) defined by the National Bureau of Standards (NBS). The NBS document FIPS-PUB-46describes the operation of the DES algorithm in detail.Because the DES algorithm is public knowledge, the security of your ciphertext files depends onthe keys you define.
KeysOpenVMS encryption uses two keys:• Key that you provide.• Key that the software randomly generates, called the data key.The key you provide encrypts the data key, which is stored in the first block of the ciphertextfile. The process uses the encrypted data key to encrypt the file. You have the option to encrypteither the data key or the file.Table 1-2 shows the components of the encryption process.
Table 1-2 Components of the Encryption Operation
OutputAlgorithmInput
Encrypted keyKey encryptionUser-supplied data key
Encrypted fileData encryptionData (plaintext) and the encrypteddata key
Figure 1-1 illustrates the data encryption operation. In this example, the input file contains thetext "secret" and the key has been defined as "elmno jflghi." The output file is unreadable text.
30 Understanding System Security
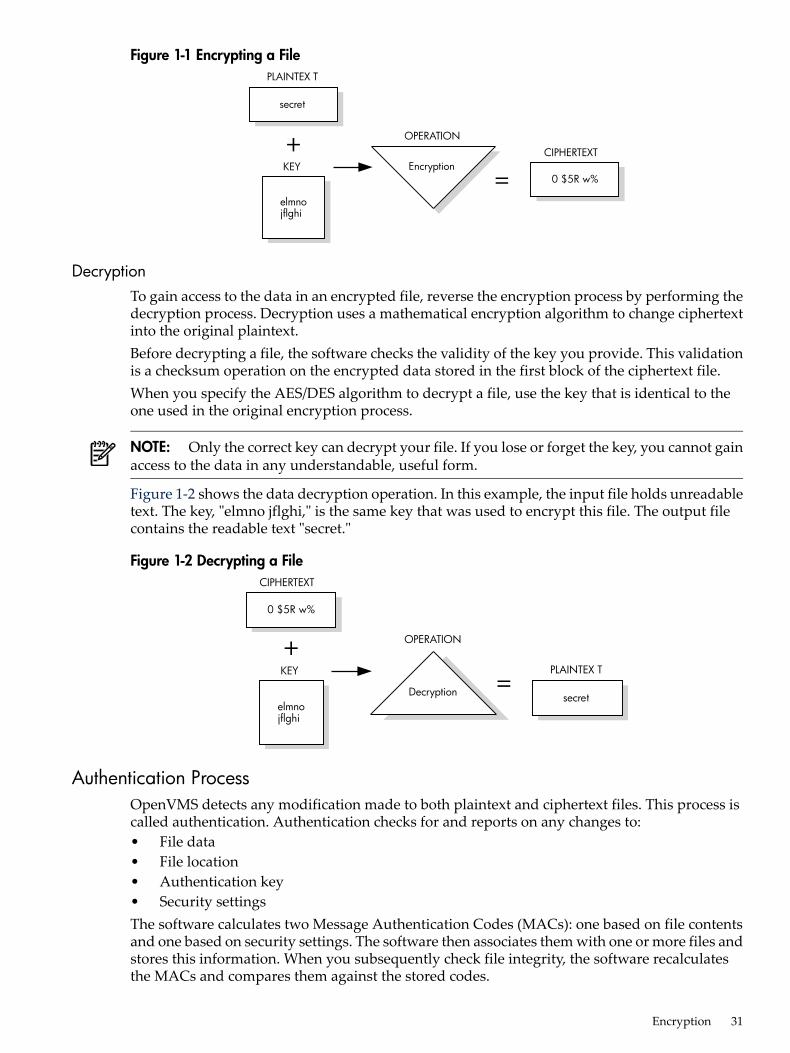
Figure 1-1 Encrypting a FilePLAINTEX T
KEY
OPERATIONCIPHERTEXT
elmnojflghi
secret
Encryption0 $5R w%
+=
DecryptionTo gain access to the data in an encrypted file, reverse the encryption process by performing thedecryption process. Decryption uses a mathematical encryption algorithm to change ciphertextinto the original plaintext.Before decrypting a file, the software checks the validity of the key you provide. This validationis a checksum operation on the encrypted data stored in the first block of the ciphertext file.When you specify the AES/DES algorithm to decrypt a file, use the key that is identical to theone used in the original encryption process.
NOTE: Only the correct key can decrypt your file. If you lose or forget the key, you cannot gainaccess to the data in any understandable, useful form.
Figure 1-2 shows the data decryption operation. In this example, the input file holds unreadabletext. The key, "elmno jflghi," is the same key that was used to encrypt this file. The output filecontains the readable text "secret."
Figure 1-2 Decrypting a File
PLAINTEX TKEY
OPERATION
CIPHERTEXT
elmnojflghi
secretDecryption
0 $5R w%
+=
Authentication ProcessOpenVMS detects any modification made to both plaintext and ciphertext files. This process iscalled authentication. Authentication checks for and reports on any changes to:• File data• File location• Authentication key• Security settingsThe software calculates two Message Authentication Codes (MACs): one based on file contentsand one based on security settings. The software then associates them with one or more files andstores this information. When you subsequently check file integrity, the software recalculatesthe MACs and compares them against the stored codes.
Encryption 31
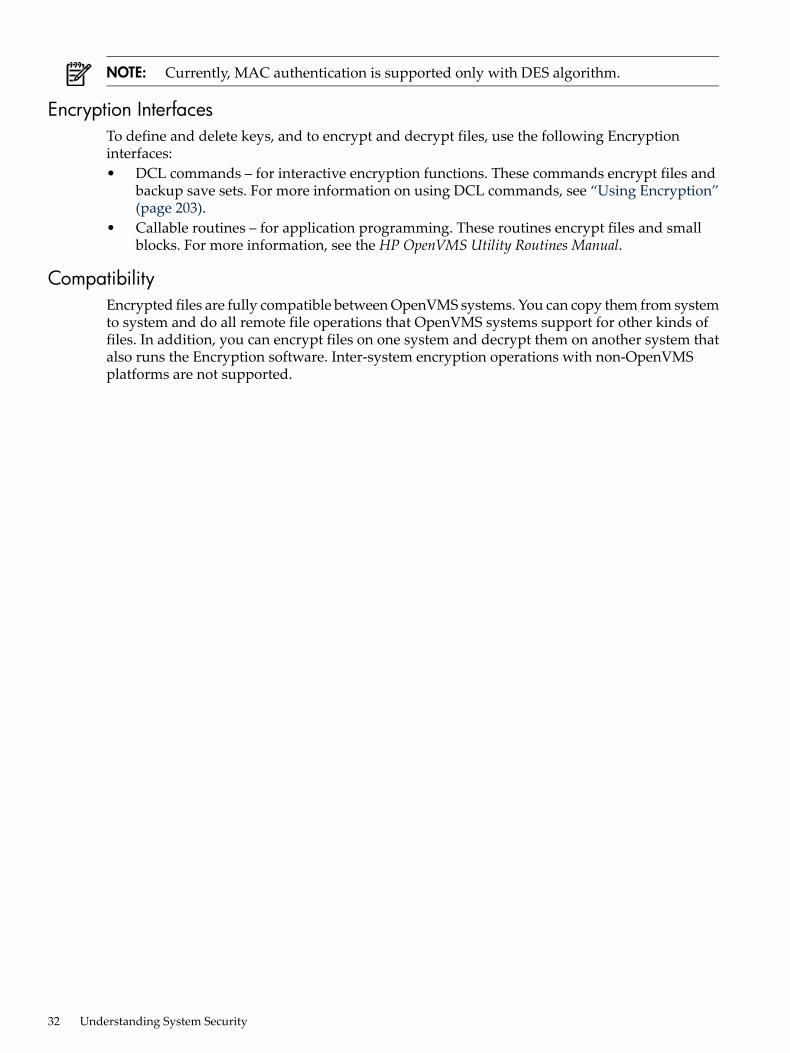
NOTE: Currently, MAC authentication is supported only with DES algorithm.
Encryption InterfacesTo define and delete keys, and to encrypt and decrypt files, use the following Encryptioninterfaces:• DCL commands – for interactive encryption functions. These commands encrypt files and
backup save sets. For more information on using DCL commands, see “Using Encryption”(page 203).
• Callable routines – for application programming. These routines encrypt files and smallblocks. For more information, see the HP OpenVMS Utility Routines Manual.
CompatibilityEncrypted files are fully compatible between OpenVMS systems. You can copy them from systemto system and do all remote file operations that OpenVMS systems support for other kinds offiles. In addition, you can encrypt files on one system and decrypt them on another system thatalso runs the Encryption software. Inter-system encryption operations with non-OpenVMSplatforms are not supported.
32 Understanding System Security
Common Data Security Architecture (CDSA)The Common Data Security Architecture (CDSA) is a multiplatform, industry-standard securityinfrastructure.Starting with Version 7.3-1, HP provides CDSA as part of the OpenVMS Alpha operating system.CDSA is compatible with OpenVMS Alpha Version 7.2-2 and higher.CDSA provides a stable, standards-based programming interface that enables applications toaccess operating system security services. With CDSA, you can create cross-platform,security-enabled applications. Security services, such as cryptography and other public keyoperations, are available through a dynamically extensible interface to a set of plug-in modules.These modules can be supplemented or changed as business needs and technologies evolve.CDSA is security middleware that provides flexible mix-and-match solutions across a variety ofapplications and security services. CDSA insulates you from the issues of incorporating securityinto applications, freeing you to focus on the applications themselves. The security underpinningsare transparent to the user.CDSA was originally developed by Intel Architecture Labs and was released to the OpenSourcecommunity in May 2000. HP's CDSA implementation is based on the Intel V2.0 Release 3 referenceplatform, which implements CDSA V2.0 with Corrigenda, as defined in The Open Group'sTechnical Standard C914, May 2000.For more information about CDSA, see HPOpen Source Security for OpenVMS, Volume 1: CommonData Security Architecture (CDSA).
Secure Sockets Layer (SSL)Secure Sockets Layer (SSL) is the open standard security protocol for the secure transfer ofsensitive information over the Internet. SSL provides three things: privacy through encryption,server authentication, and message integrity. Client authentication is available as an optionalfunction.Starting with Version 7.3-1, HP provides SSL as part of the OpenVMS Alpha operating system.HP SSL is compatible with OpenVMS Alpha Version 7.2-2 and higher, and OpenVMS VAXVersion 7.3 and higher.Protecting communication links to OpenVMS applications over a TCP/IP connection can beaccomplished through the use of SSL. The OpenSSL APIs establish private, authenticated andreliable communications links between applications.The SSL protocol works cooperatively on top of several other protocols. SSL works at theapplication level.The underlying mechanism is TCP/IP (Transmission Control Protocol/InternetProtocol), which governs the transport and routing of data over the Internet. Application protocols,such as HTTP (HyperText Transport Protocol), LDAP (Lightweight Directory Access Protocol),and IMAP (Internet Messaging Access Protocol), run on top of TCP/IP. They use TCP/IP tosupport typical application tasks, such as displaying web pages or running email servers.SSL addresses three fundamental security concerns about communication over the Internet andother TCP/IP networks:• SSL server authentication -- Allows a user to confirm a server's identity. SSL-enabled client
software can use standard techniques of public-key cryptography to check whether a server'scertificate and publicID are valid and have been issued by a Certificate Authority (CA) listedin the client's list of trusted CAs. Server authentication is used, for example, when a PC useris sending a credit card number to make a purchase on the web and wants to check thereceiving server's identity.
• SSL client authentication -- Allows a server to confirm a user's identity. Using the sametechniques as those used for server authentication, SSL-enabled server software can checkwhether a client's certificate and public ID are valid and have been issued by a CertificateAuthority (CA) listed in the server's list of trusted CAs. Client authentication is used, for
Common Data Security Architecture (CDSA) 33
example, when a bank is sending confidential financial information to a customer and wantsto check the recipient's identity.
• An encrypted SSL connection -- Requires all information sent between a client and a serverto be encrypted by the sending software and decrypted by the receiving software, therebyproviding a high degree of confidentiality. Confidentiality is important for both parties toany private transaction. In addition, all data sent over an encrypted SSL connection isprotected with a mechanism that automatically detects whether data has been altered intransit.
For more information about SSL, see the HPOpen Source Security for OpenVMS, Volume 2: HP SSLfor OpenVMS or the HP SSL website athttp://h71000.www7.hp.com/openvms/products/ssl/
KerberosKerberos is a network authentication protocol designed to provide strong authentication forclient/server applications by using secret-key cryptography. It was developed at the MassachusettsInstitute of Technology as part of Project Athena in the mid-1980s. Project Athena's mandate wasto explore diverse uses of computing and to build the knowledge base needed for longer-termstrategic decisions about how computers fit into the MIT curriculum.Starting with Version 7.3-1, HP provides Kerberos as part of the OpenVMS Alpha operatingsystem. Kerberos is compatible with OpenVMS Alpha Version 7.2-2 and higher, and OpenVMSVAX Version 7.3 and higher.Until Kerberos V4, this technology was not available to the general public. Prior versions werefor only internal Project Athena use. Kerberos V5, the current implementation, is the firstcommercial-ready release.The Kerberos protocol uses strong cryptography, so that a client can prove its identity to a server(and vice versa) across an insecure network connection. After a client and server have usedKerberos to prove their identity, they can also encrpt all of their communications to assure privacyand data integrity.For more information about Kerberos, seeHPOpen Source Security for OpenVMS, Volume 3: Kerberosor the Kerberos for OpenVMS website at:http://h71000.www7.hp.com/openvms/products/kerberos/
34 Understanding System Security
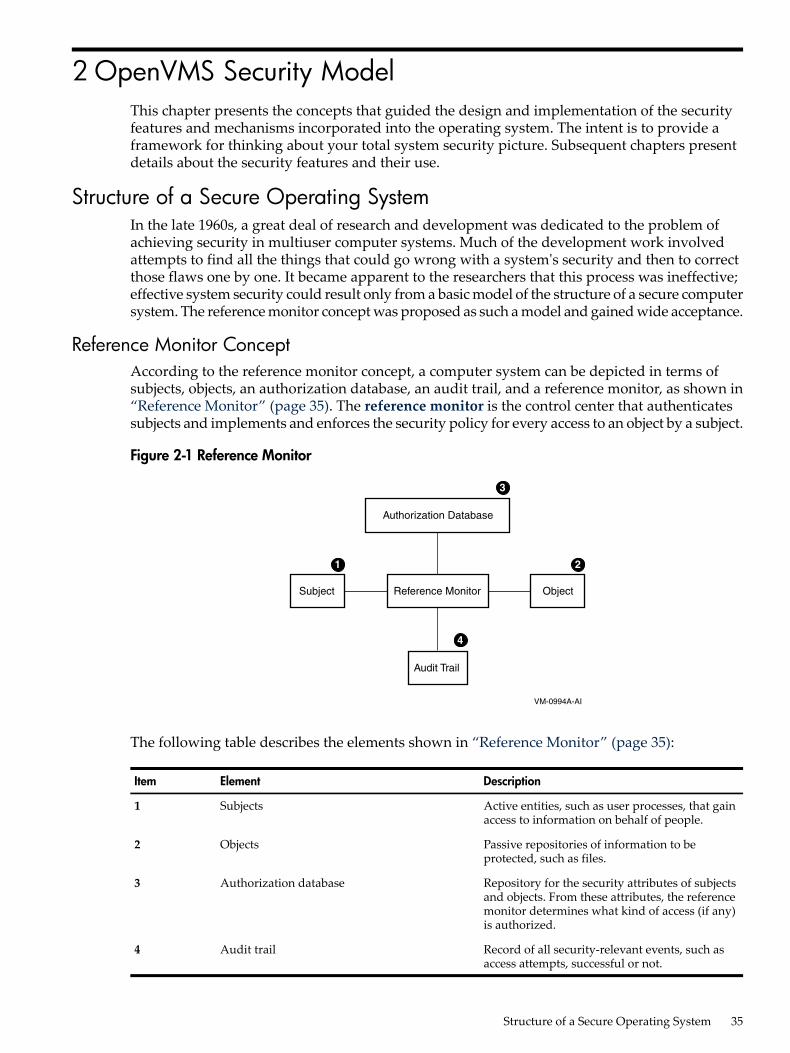
2 OpenVMS Security ModelThis chapter presents the concepts that guided the design and implementation of the securityfeatures and mechanisms incorporated into the operating system. The intent is to provide aframework for thinking about your total system security picture. Subsequent chapters presentdetails about the security features and their use.
Structure of a Secure Operating SystemIn the late 1960s, a great deal of research and development was dedicated to the problem ofachieving security in multiuser computer systems. Much of the development work involvedattempts to find all the things that could go wrong with a system's security and then to correctthose flaws one by one. It became apparent to the researchers that this process was ineffective;effective system security could result only from a basic model of the structure of a secure computersystem. The reference monitor concept was proposed as such a model and gained wide acceptance.
Reference Monitor ConceptAccording to the reference monitor concept, a computer system can be depicted in terms ofsubjects, objects, an authorization database, an audit trail, and a reference monitor, as shown in“Reference Monitor” (page 35). The reference monitor is the control center that authenticatessubjects and implements and enforces the security policy for every access to an object by a subject.
Figure 2-1 Reference Monitor
VM-0994A-AI
Authorization Database
Reference Monitor
Audit Trail
ObjectSubject
3
1
4
2
The following table describes the elements shown in “Reference Monitor” (page 35):
DescriptionElementItem
Active entities, such as user processes, that gainaccess to information on behalf of people.
Subjects1
Passive repositories of information to beprotected, such as files.
Objects2
Repository for the security attributes of subjectsand objects. From these attributes, the referencemonitor determines what kind of access (if any)is authorized.
Authorization database3
Record of all security-relevant events, such asaccess attempts, successful or not.
Audit trail4
Structure of a Secure Operating System 35
How the Reference Monitor Enforces Security RulesThe reference monitor enforces the security policy by authorizing the creation of subjects, bygranting subjects access to objects based on the information in a dynamic authorization database,and by recording events, as necessary, in the audit trail. In an ideal system, the reference monitormust meet the following three requirements:• Mediate every attempt by a subject to gain access to an object• Provide a tamperproof database and audit trail that are thoroughly protected from
unauthorized observation and modification• Remain a small, simple, and well-structured piece of software so that it is effective in enforcing
security requirementsThese are the requirements proposed for systems that are secure even against penetration. Insuch systems, the reference monitor is implemented by a security-related subset, or securitykernel, of the operating system.
Implementation of the Reference MonitorWhile the OpenVMS operating system does not implement the reference monitor as asecurity-related subset, or security kernel, its interface to users and system managers does mirrorthe basic structure dictated by the reference monitor concept. Experience shows that incorporatingsuch a structure is the best way to build a system resistant to probing and to most attempts atpenetration.The following sections describe the OpenVMS operating system's implementation of the referencemonitor model.
SubjectsSubjects are the users or user agents (the user processes) that access information and, in somecases, may be prevented from accessing information. Subjects can be interactive processes,network processes, or batch jobs, and:• Must pass security controls
During process creationDuring information access
• Require identificationUser namesPasswordsUser identification codesRights identifiers
When a user logs in to use the operating system interactively or when a batch or network jobstarts, the operating system creates a process that includes the identity of the user. That processgains access to information as the agent for the user, as described in “Protecting Data” (page 69).Processes are vulnerable to security breaches while they are being created and while they areaccessing information. The system manages process access to information by using itsauthorization data and internal mechanisms, such as hardware controls. Because process creationhas many areas of security vulnerability, many operating security features concentrate on thearea of process (or subject) creation.When a user attempts to log in to a system, the user provides a user name (a name that will begiven to the resulting process) and a password. The password serves as an authenticator thatshould be known only to the user and to the operating system.Because a short or obvious password is likely to fail this requirement, the system incorporatesmany password protection mechanisms that can be invoked by the user or required by the
36 OpenVMS Security Model
security administrator (see “Managing System Access” (page 135)). The operating system is alsocapable of limiting the number of attempts that an intruder can make to guess a password.The file of users' passwords is part of the security database that must be protected fromunauthorized observation and modification. The system meets this requirement by storing thepasswords in a file protected from general access, the system user authorization file(SYSUAF.DAT). The system takes the additional precaution of storing passwords in an encodedform that is hard to use if stolen.Once the operating system creates a process for a user, it assigns a user identification code orUIC from the user authorization record to that process. The UIC corresponds to the name of theuser who created the process (as authenticated by the user's password). In addition, the UICindicates the user's membership in a group that can correspond to the user's department, project,or function. The system can also attach additional information to the process regarding thecreation of the process and the affiliation of the process owner with other groups. This additionalinformation plays a part in the application of the authorization database. (Both “Protecting Data”(page 69) and “Controlling Access to System Data and Resources” (page 175) discuss UICs.)
ObjectsIn the reference monitor concept, objects are passive repositories of information. In the OpenVMSsystem, there are many objects, such as files and devices, that are subject to protection, as describedin “Objects Protected by Security Controls” (page 37). The operating system protects objectsfrom unauthorized access and provides a variety of mechanisms (described in “Protecting Data”(page 69) and “Descriptions of Object Classes” (page 97) ) for sharing them in a controlledmanner. These mechanisms are also used to control access to system resources.
Table 2-1 Objects Protected by Security Controls
DefinitionClass Name
A resource to which the system controls access; currently, the only definedcapability is the vector processor.
Capability
A set of 32 event flags that enable cooperating processes to post eventnotifications to each other.
Common event flag cluster
A class of peripherals connected to a processor that are capable of receiving,storing, or transmitting data.
Device
Files-11 On-Disk Structure Level 2 or 5 (ODS-2 or ODS-5) files and directories.File
A shareable memory section potentially available to all processes in the samegroup.
Group global section
A shareable table of logical names and their equivalence names for the systemor a particular group.
Logical name table
A set of jobs to be processed in a batch, terminal, server, or print job queue.Queue
A namespace controlling access to the lock manager's resources.Resource domain
A data structure containing the elements and management routines for allmembers of the security class.
Security class
A shareable memory section potentially available to all processes in the system.System global section
A mass storage medium, such as a disk or tape, that is in ODS-2 or ODS-5format. Volumes contain files and may be mounted on devices.
Volume
Authorization DatabaseAccording to the reference monitor model, each subject's authorization to gain access to an objectis based on an abstract authorization database. This database is a set of dynamic security attributesthat govern a subject's access to an object at any given time. In the OpenVMS system, the database
Implementation of the Reference Monitor 37
is distributed and stored in association with the objects that must be protected. For example, theauthorization data for a file or directory is stored in the file header for that file or directory. Thefollowing table summarizes the information stored in the authorization database.
Data Used to InterpretContentsFile
LoginsUser names#SYSUAF.DAT
LoginsPasswords
Access control checksUICs
LoginsUser names#NETPROXY.DAT
LoginsUser names#NET$PROXY.DAT
Access control checksRights identifiers#RIGHTSLIST.DAT
Access control checksUICs#VMS$OBJECTS.DAT
Access control checksProtection codes
Access control checksAccess control lists
Reporting of eventsAuditable events#VMS$AUDIT_ #SERVER.DAT
As “Objects” (page 37) suggests, different objects in the OpenVMS system can be shared withdiffering levels of flexibility. Protected objects are subject to a protection code. This code specifieswhether access is allowed or denied to processes run on behalf of system users, the user who isowner of the object, other members of the UIC group of the owner, and all other users.In addition to the protection code, objects can be shared under control of access control lists(ACLs). ACLs provide a finer granularity of access control than UIC-based protection, especiallyfor user groups or subsets of groups. ACLs list individual users or groups of users who are tobe allowed or denied particular types of access to the object. ACLs specify sharing on the basisof UIC identification as well as other groupings or identifiers that can be associated with aprocess. For example, it is possible to specify that a file should never be read by a processconnected to a terminal on a dialup line. “Authorization Database Represented as an AccessMatrix” (page 39) uses an access matrix to explain the concept of an ACL. “Controlling Accesswith ACLs” (page 84) gives a general discussion of ACLs and identifiers, and “ControllingAccess to System Data and Resources” (page 175) explains how you, as security administrators,can create identifiers and construct ACLs for system resources.
Audit TrailAll security-relevant events can be recorded in an audit log file, sent to an operator terminal, orboth. A terminal can be designated as a security operator terminal where all auditable eventscan be displayed. An audit log file provides a permanent record of security events. Many timesa security administrator can find a pattern of activity, called an audit trail, by studying the logfile.The operating system audits the classes of security events shown in “Security Auditing Overview”(page 38) by default. You can select other events for auditing, such as volume mounts or changesto system time.
Table 2-2 Security Auditing Overview
Events Audited by DefaultDestination
Authorization database changesLog file or terminal display
Intrusion attempts
Login failures
38 OpenVMS Security Model
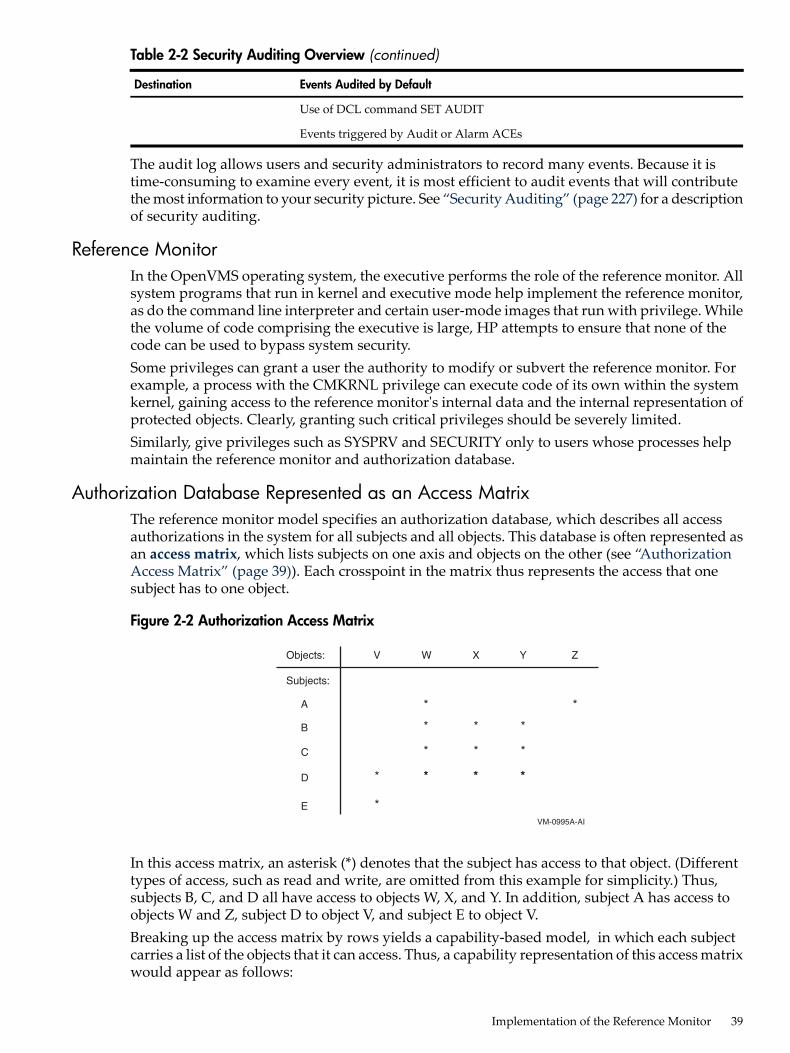
Table 2-2 Security Auditing Overview (continued)
Events Audited by DefaultDestination
Use of DCL command SET AUDIT
Events triggered by Audit or Alarm ACEs
The audit log allows users and security administrators to record many events. Because it istime-consuming to examine every event, it is most efficient to audit events that will contributethe most information to your security picture. See “Security Auditing” (page 227) for a descriptionof security auditing.
Reference MonitorIn the OpenVMS operating system, the executive performs the role of the reference monitor. Allsystem programs that run in kernel and executive mode help implement the reference monitor,as do the command line interpreter and certain user-mode images that run with privilege. Whilethe volume of code comprising the executive is large, HP attempts to ensure that none of thecode can be used to bypass system security.Some privileges can grant a user the authority to modify or subvert the reference monitor. Forexample, a process with the CMKRNL privilege can execute code of its own within the systemkernel, gaining access to the reference monitor's internal data and the internal representation ofprotected objects. Clearly, granting such critical privileges should be severely limited.Similarly, give privileges such as SYSPRV and SECURITY only to users whose processes helpmaintain the reference monitor and authorization database.
Authorization Database Represented as an Access MatrixThe reference monitor model specifies an authorization database, which describes all accessauthorizations in the system for all subjects and all objects. This database is often represented asan access matrix, which lists subjects on one axis and objects on the other (see “AuthorizationAccess Matrix” (page 39)). Each crosspoint in the matrix thus represents the access that onesubject has to one object.
Figure 2-2 Authorization Access Matrix
Objects:
Subjects:
V W X Y Z
*A
B
C
D
E
*
*
*
**
*
*
**
*
*
**
*
*
VM-0995A-AI
In this access matrix, an asterisk (*) denotes that the subject has access to that object. (Differenttypes of access, such as read and write, are omitted from this example for simplicity.) Thus,subjects B, C, and D all have access to objects W, X, and Y. In addition, subject A has access toobjects W and Z, subject D to object V, and subject E to object V.Breaking up the access matrix by rows yields a capability-based model, in which each subjectcarries a list of the objects that it can access. Thus, a capability representation of this access matrixwould appear as follows:
Implementation of the Reference Monitor 39
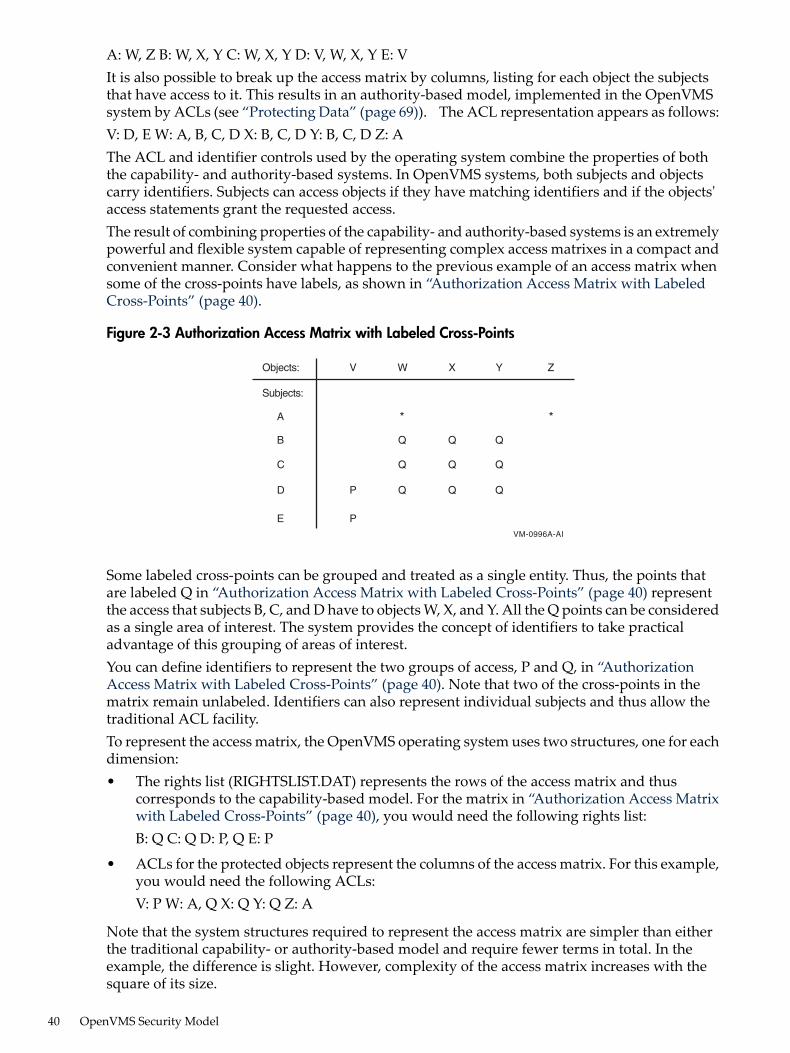
A: W, Z B: W, X, Y C: W, X, Y D: V, W, X, Y E: VIt is also possible to break up the access matrix by columns, listing for each object the subjectsthat have access to it. This results in an authority-based model, implemented in the OpenVMSsystem by ACLs (see “Protecting Data” (page 69)). The ACL representation appears as follows:V: D, E W: A, B, C, D X: B, C, D Y: B, C, D Z: AThe ACL and identifier controls used by the operating system combine the properties of boththe capability- and authority-based systems. In OpenVMS systems, both subjects and objectscarry identifiers. Subjects can access objects if they have matching identifiers and if the objects'access statements grant the requested access.The result of combining properties of the capability- and authority-based systems is an extremelypowerful and flexible system capable of representing complex access matrixes in a compact andconvenient manner. Consider what happens to the previous example of an access matrix whensome of the cross-points have labels, as shown in “Authorization Access Matrix with LabeledCross-Points” (page 40).
Figure 2-3 Authorization Access Matrix with Labeled Cross-Points
Objects:
Subjects:
V W X Y Z
*A
B
C
D
E
*
VM-0996A-AI
P
P
Q
Q
Q
Q
Q
Q
Q
Q
Q
Some labeled cross-points can be grouped and treated as a single entity. Thus, the points thatare labeled Q in “Authorization Access Matrix with Labeled Cross-Points” (page 40) representthe access that subjects B, C, and D have to objects W, X, and Y. All the Q points can be consideredas a single area of interest. The system provides the concept of identifiers to take practicaladvantage of this grouping of areas of interest.You can define identifiers to represent the two groups of access, P and Q, in “AuthorizationAccess Matrix with Labeled Cross-Points” (page 40). Note that two of the cross-points in thematrix remain unlabeled. Identifiers can also represent individual subjects and thus allow thetraditional ACL facility.To represent the access matrix, the OpenVMS operating system uses two structures, one for eachdimension:• The rights list (RIGHTSLIST.DAT) represents the rows of the access matrix and thus
corresponds to the capability-based model. For the matrix in “Authorization Access Matrixwith Labeled Cross-Points” (page 40), you would need the following rights list:B: Q C: Q D: P, Q E: P
• ACLs for the protected objects represent the columns of the access matrix. For this example,you would need the following ACLs:V: P W: A, Q X: Q Y: Q Z: A
Note that the system structures required to represent the access matrix are simpler than eitherthe traditional capability- or authority-based model and require fewer terms in total. In theexample, the difference is slight. However, complexity of the access matrix increases with thesquare of its size.
40 OpenVMS Security Model
Summary: System Security DesignWhen designing an overall system security plan, ask yourself the following questions:• How are users associated with subjects? What is the reliability of the authentication
mechanism?• What objects contain sensitive information in this system or application? Is access to those
objects controlled?• Does the authorization database reflect the site's security policy? Who is authorized to gain
access to sensitive objects? Are adequate restrictions in place?• Is the audit trail recording enough or too much information? Who will monitor it? How
often will it be examined?• What programs are functioning as part of the reference monitor? Which users can modify
the security policy and the authorization database? Is this the desired configuration?These considerations, as well as the underlying reference monitor design, apply equally to atimesharing system, a widespread network, or a single application on a system that grants accessto records in a file or database. The operating system provides general mechanisms that usersand security administrators must apply to achieve system security. See “Managing the Systemand its Data” (page 127) for more information on designing and implementing a security policy.
Summary: System Security Design 41

42
Part II Security for the UserThe chapters in this part describe the following topics:• Password use (“Using the System Responsibly” (page 49))• Login and logout processes (“Using the System Responsibly” (page 49))• Security profiles of subjects and objects (“Protecting Data” (page 69))• Object protection mechanisms (“Protecting Data” (page 69))• Characteristics of object classes (“Descriptions of Object Classes” (page 97))
43

44
Table of Contents
3 Using the System Responsibly.....................................................................................49Choosing a Password for Your Account...............................................................................................49
Obtaining Your Initial Password.....................................................................................................49Observing System Restrictions on Passwords.................................................................................50
Knowing What Type of Password to Use.............................................................................................50Entering a System Password...........................................................................................................50Entering a Secondary Password......................................................................................................51
Password Requirements for Different Types of Accounts....................................................................51Types of Logins and Login Classes.......................................................................................................52
Logging In Interactively: Local, Dialup, and Remote Logins.........................................................52Logging In Using External Authentication.....................................................................................52Reading Informational Messages....................................................................................................52When the System Logs In for You: Network and Batch Logins......................................................54
Login Failures: When You Are Unable to Log In.................................................................................54Using a Terminal That Requires a System Password......................................................................55Observing Your Login Class Restrictions........................................................................................55Using an Account Restricted to Certain Days and Times...............................................................55Failing to Enter the Correct Password During a Dialup Login.......................................................55Knowing When Break-In Evasion Procedures Are in Effect...........................................................56
Changing Your Password.....................................................................................................................56Selecting Your Own Password.........................................................................................................56Using Generated Passwords............................................................................................................56Changing a Secondary Password....................................................................................................58Changing Your Password As You Log In........................................................................................58
Password and Account Expiration Times.............................................................................................58Changing an Expired Password......................................................................................................58Renewing an Expired Account........................................................................................................59
Guidelines for Protecting Your Password.............................................................................................59Network Security Considerations.........................................................................................................60
Protecting Information in Access Control Strings...........................................................................60Using Proxy Login Accounts to Protect Passwords........................................................................61
Auditing Access to Your Account and Files.........................................................................................63Observing Your Last Login Time....................................................................................................63Adding Access Control Entries to Sensitive Files...........................................................................63Asking Your Security Administrator to Enable Auditing...............................................................64
Auditing File Access...................................................................................................................64Additional Events to Audit........................................................................................................65
Logging Out Without Compromising System Security.......................................................................65Clearing Your Terminal Screen........................................................................................................65Disposing of Hardcopy Output.......................................................................................................66Removing Disconnected Processes.................................................................................................66Breaking the Connection to a Dialup Line......................................................................................66Turning Off a Terminal....................................................................................................................66
Checklist for Contributing to System Security.....................................................................................66
4 Protecting Data.............................................................................................................69Contents of a User's Security Profile.....................................................................................................69
Per-Thread Security.........................................................................................................................69Persona Security Block Data Structure (PSB)..................................................................................69Previous Security Model.................................................................................................................70
Table of Contents 45
Per-Thread Security Model..............................................................................................................70User Identification Code (UIC)........................................................................................................71
Format of a UIC..........................................................................................................................71Guidelines for Creating a UIC....................................................................................................72How Your Process Acquires a UIC............................................................................................72
Rights Identifiers.............................................................................................................................72Types of Identifiers.....................................................................................................................72Process and System Rights Lists................................................................................................73Displaying the Rights Identifiers of Your Process.....................................................................73How Rights Identifiers Appear in the Audit Trail.....................................................................74
Privileges.........................................................................................................................................74Security Profile of Objects.....................................................................................................................75
Definition of a Protected Object......................................................................................................75Contents of an Object's Profile.........................................................................................................75Owner..............................................................................................................................................76Protection Code...............................................................................................................................76Access Control List (ACL)...............................................................................................................76
Displaying a Security Profile................................................................................................................77Modifying a Security Profile.................................................................................................................77Specifying an Object's Class..................................................................................................................78Access Required to Modify a Profile....................................................................................................79How the System Determines if a User Can Access a Protected Object................................................79Controlling Access with ACLs..............................................................................................................84
Using Identifier Access Control Entries (ACEs)..............................................................................84Granting Access to Particular Users................................................................................................85Preventing Users from Accessing an Object....................................................................................85Limiting Access to a Device.............................................................................................................85Limiting Access to an Environment................................................................................................86Ordering ACEs Within a List..........................................................................................................86Establishing an Inheritance Scheme for Files..................................................................................87Displaying ACLs.............................................................................................................................88Adding ACEs to an Existing ACL...................................................................................................88Deleting an ACL..............................................................................................................................89Deleting ACEs from an ACL...........................................................................................................89Replacing Part of an ACL................................................................................................................89Restoring a File's Default ACL........................................................................................................90Copying an ACL..............................................................................................................................90
Controlling Access with Protection Codes...........................................................................................90Format of a Protection Code............................................................................................................91Types of Access in a Protection Code..............................................................................................91Processing a Protection Code..........................................................................................................92Changing a Protection Code............................................................................................................92Enhancing Protection for Sensitive Objects.....................................................................................93Providing a Default Protection Code for a Directory Structure......................................................93Restoring a File's Default Security Profile.......................................................................................93
Understanding Privileges and Control Access.....................................................................................94How Privileges Affect Protection Mechanisms...............................................................................94Using Control Access to Modify an Object Profile..........................................................................94Object-Specific Access Considerations............................................................................................95
Auditing Protected Objects...................................................................................................................95Kinds of Events the System Audits.................................................................................................95Enabling Auditing for a Class of Objects........................................................................................95Adding Security-Auditing ACEs....................................................................................................96
46 Table of Contents
5 Descriptions of Object Classes...................................................................................97Capabilities...........................................................................................................................................97
Naming Rules..................................................................................................................................97Types of Access................................................................................................................................97Template Profile...............................................................................................................................97Kinds of Auditing Performed..........................................................................................................98Permanence of the Object................................................................................................................98
Common Event Flag Clusters...............................................................................................................98Naming Rules..................................................................................................................................98Types of Access................................................................................................................................98Template Profile...............................................................................................................................98Privilege Requirements...................................................................................................................99Kinds of Auditing Performed..........................................................................................................99Permanence of the Object................................................................................................................99
Devices..................................................................................................................................................99Naming Rules..................................................................................................................................99Types of Access..............................................................................................................................100Access Requirements for I/O Operations......................................................................................100Template Profile.............................................................................................................................101Setting Up Profiles for New Devices.............................................................................................102Privilege Requirements..................................................................................................................103Kinds of Auditing Performed........................................................................................................103Permanence of the Object..............................................................................................................103
Files.....................................................................................................................................................104Naming Rules................................................................................................................................104Types of Access..............................................................................................................................104Access Requirements.....................................................................................................................104Creation Requirements..................................................................................................................105Profile Assignment........................................................................................................................105
Rules for Assigning Ownership...............................................................................................105Rules for Assigning a Protection Code and ACL.....................................................................105Using the COPY and RENAME Commands...........................................................................106
Kinds of Auditing Performed........................................................................................................107Protecting Information When Disk Space Is Reassigned..............................................................107
Overwriting Disk Blocks..........................................................................................................107Setting a High-water Mark.......................................................................................................108Accessibility of Data in a File...................................................................................................108
Suggestions for Optimizing File Security......................................................................................108Global Sections....................................................................................................................................109
Naming Rules................................................................................................................................109Types of Access..............................................................................................................................109Template Profile.............................................................................................................................109Privilege Requirements..................................................................................................................110Kinds of Auditing Performed........................................................................................................110Permanence of the Object..............................................................................................................110
Logical Name Tables...........................................................................................................................110Naming Rules................................................................................................................................110Types of Access..............................................................................................................................111Template Profile.............................................................................................................................111Privilege Requirements..................................................................................................................111Kinds of Auditing Performed........................................................................................................111Permanence of the Object..............................................................................................................111
Queues.................................................................................................................................................112Naming Rules................................................................................................................................112
Table of Contents 47
Types of Access..............................................................................................................................112Template Profile.............................................................................................................................112Privilege Requirements..................................................................................................................112Kinds of Auditing Performed........................................................................................................112Permanence of the Object..............................................................................................................113
Resource Domains...............................................................................................................................113Naming Rules................................................................................................................................113Types of Access..............................................................................................................................113Template Profile.............................................................................................................................113Privilege Requirements..................................................................................................................113Kinds of Auditing Performed........................................................................................................114Permanence of the Object..............................................................................................................114
Security Classes...................................................................................................................................114Naming Rules................................................................................................................................114Types of Access..............................................................................................................................114Template Profile.............................................................................................................................115Kinds of Auditing Performed........................................................................................................115Permanence of the Object..............................................................................................................115
Volumes...............................................................................................................................................115Naming Rules................................................................................................................................115Types of Access..............................................................................................................................115Template Profile.............................................................................................................................116Privilege Requirements..................................................................................................................116Kinds of Auditing Performed........................................................................................................116Permanence of the Object..............................................................................................................116
48 Table of Contents
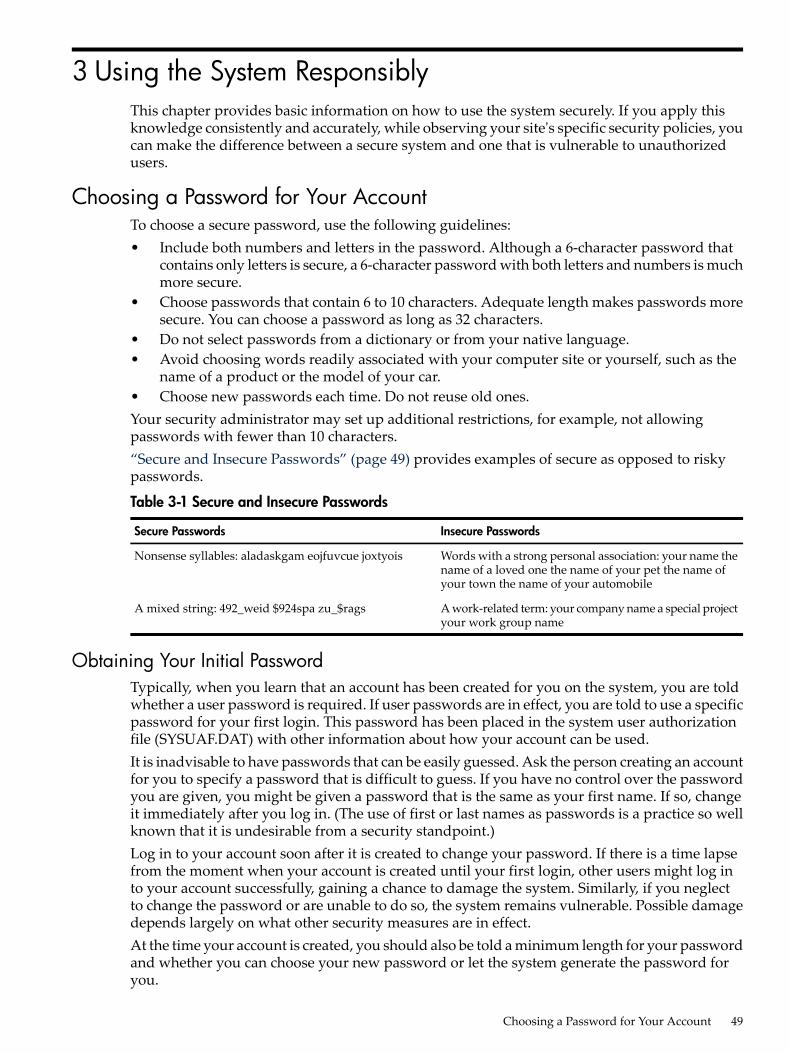
3 Using the System ResponsiblyThis chapter provides basic information on how to use the system securely. If you apply thisknowledge consistently and accurately, while observing your site's specific security policies, youcan make the difference between a secure system and one that is vulnerable to unauthorizedusers.
Choosing a Password for Your AccountTo choose a secure password, use the following guidelines:• Include both numbers and letters in the password. Although a 6-character password that
contains only letters is secure, a 6-character password with both letters and numbers is muchmore secure.
• Choose passwords that contain 6 to 10 characters. Adequate length makes passwords moresecure. You can choose a password as long as 32 characters.
• Do not select passwords from a dictionary or from your native language.• Avoid choosing words readily associated with your computer site or yourself, such as the
name of a product or the model of your car.• Choose new passwords each time. Do not reuse old ones.Your security administrator may set up additional restrictions, for example, not allowingpasswords with fewer than 10 characters.“Secure and Insecure Passwords” (page 49) provides examples of secure as opposed to riskypasswords.
Table 3-1 Secure and Insecure Passwords
Insecure PasswordsSecure Passwords
Words with a strong personal association: your name thename of a loved one the name of your pet the name ofyour town the name of your automobile
Nonsense syllables: aladaskgam eojfuvcue joxtyois
A work-related term: your company name a special projectyour work group name
A mixed string: 492_weid $924spa zu_$rags
Obtaining Your Initial PasswordTypically, when you learn that an account has been created for you on the system, you are toldwhether a user password is required. If user passwords are in effect, you are told to use a specificpassword for your first login. This password has been placed in the system user authorizationfile (SYSUAF.DAT) with other information about how your account can be used.It is inadvisable to have passwords that can be easily guessed. Ask the person creating an accountfor you to specify a password that is difficult to guess. If you have no control over the passwordyou are given, you might be given a password that is the same as your first name. If so, changeit immediately after you log in. (The use of first or last names as passwords is a practice so wellknown that it is undesirable from a security standpoint.)Log in to your account soon after it is created to change your password. If there is a time lapsefrom the moment when your account is created until your first login, other users might log into your account successfully, gaining a chance to damage the system. Similarly, if you neglectto change the password or are unable to do so, the system remains vulnerable. Possible damagedepends largely on what other security measures are in effect.At the time your account is created, you should also be told a minimum length for your passwordand whether you can choose your new password or let the system generate the password foryou.
Choosing a Password for Your Account 49
Observing System Restrictions on PasswordsThe system screens passwords for acceptability, as follows:• It automatically compares new passwords to a system dictionary. This helps to ensure that
a password is not a native language word.• It maintains a history list of your old passwords and compares each new password to this
list to be sure that you do not reuse an old password.• It enforces a minimum password length, which the system manager specifies in your UAF
record.
Knowing What Type of Password to UseThere are several types of passwords recognized by the OpenVMS operating system. In general,you need to provide a user password when you log in. In some cases, you might also need toprovide a system password to gain access to a particular terminal before logging in with youruser password. If you are using a system with high security requirements, you might need toprovide a primary password and a secondary password.If you are an externally authenticated user with external authentication enabled on your system,you enter your external password at the OpenVMS password prompt. See “Enabling ExternalAuthentication” (page 155) for more information. “Types of Passwords” (page 50) describes eachtype of password.
Table 3-2 Types of Passwords
DescriptionPassword
Required for most accounts. After you enter your user name, you are prompted for apassword. If the account requires both primary and secondary passwords, you must entertwo passwords.
User password
Controls access to particular terminals and is required at the discretion of the securityadministrator. System passwords are usually necessary to control access to terminals thatmight be targets for unauthorized use, such as dialup and public terminal lines.
System password
The first of two user passwords to be entered for an account requiring both primary andsecondary passwords.
Primary password
The second of two user passwords to be entered for an account requiring both primary andsecondary passwords. The secondary password provides an additional level of security onuser accounts.Typically, the general user does not know the secondary password; a supervisor or otherkey person must be present to supply it. For certain applications, the supervisor may alsodecide to remain present while the account is in use. Thus, secondary passwords facilitatecontrolled logins and the actions taken after a login.Secondary passwords can be time-consuming and inconvenient. They are justified only atsites with maximum security requirements. An example of an account that justifies dualpasswords would be one that bypasses normal access controls to permit emergency repairto a database.
Secondary password
Entering a System PasswordYour security administrator will tell you if you must specify a system password to log in to oneor more of the terminals designated for your use. Ask your security administrator for the currentsystem password, how often it changes, and how to obtain the new system password when itdoes change.To specify a system password, do the following:1. Press the Return key until the terminal responds with the recognition character, which is
normally a bell.
50 Using the System Responsibly
Return<bell>
2. Enter the system password, and press Return.Return
As this example shows, there is no prompt and no echo of the characters you type. If youfail to specify the correct system password, the system does not notify you. (Initially, youmight think the system is malfunctioning unless you know that a system password is requiredat that terminal.) If you do not receive a response from the system, assume that you haveentered the wrong password, and try again.
3. When you enter the correct system password, you receive the system announcement message,if there is one, followed by the Username: prompt.For example:MAPLE - A member of the Forest ClusterUnauthorized Access Is ProhibitedUsername:
Entering a Secondary PasswordYour security administrator decides whether to require the use of secondary passwords for youraccount at the time your account is created. When your account requires primary and secondarypasswords, you need two passwords to log in. Minimum password length, which the securityadministrator specifies in your UAF record, applies to both passwords.An example of a login requiring primary and secondary passwords follows:
WILLOW - A member of the Forest ClusterWelcome to OpenVMS on node WILLOW
Username: RWOODSPassword:ReturnPassword:Return
Last interactive login on Friday, 12-DEC-2008 10:22$
As with a single password login, the system allots a limited amount of time for the entire login.If you do not enter a secondary password in time, the login period expires.
Password Requirements for Different Types of AccountsFive types of user accounts are available on OpenVMS systems:• Accounts secured with passwords that you or the security administrator change periodically.
This account type is the most common.• Accounts secured with authentication cards that have your password programmed onto
the device. Many third-party products support this type of authentication mechanism.• Accounts that always require passwords but prohibit you from changing the password. By
locking the password (setting the LOCKPWD flag in the UAF record), the securityadministrator controls all changes made to the password.
• Restricted accounts limit your use of the system and sometimes require a password.• Open accounts require no password; the password is null. When you log in to an open
account, the system does not prompt you for a password, and you do not need to enter one.You can begin entering commands immediately. Because open accounts allow anyone togain access to the system, they are used only at sites with minimal security requirementsand should normally be set up as restricted accounts.
Password Requirements for Different Types of Accounts 51
Types of Logins and Login ClassesLogins can be either interactive or noninteractive. When you log in interactively, you enter anOpenVMS user name and a password. In noninteractive logins, the system performs theidentification and authentication for you; you are not prompted for a user name and password.(The term interactive, as used here, differs from an interactive mode process defined by the DCLlexical function F$MODE(). For a description of the F$MODE function, see the HP OpenVMSDCL Dictionary.)In addition to interactive and noninteractive logins, the OpenVMS operating system recognizesdifferent classes of logins. How you log in to the system determines the login class to which youbelong. Based on your login class, as well as the time of day or day of the week, the systemmanager controls your access to the system.
Logging In Interactively: Local, Dialup, and Remote LoginsInteractive logins include the following login classes:• Local
You log in from a terminal connected directly to the central processor or from a terminalserver that communicates directly with the central processor.
• DialupYou log in to a terminal that uses a modem and a telephone line to make a connection to thecomputer system. Depending on the terminal that your system uses, you might need toexecute a few additional steps. Your site security administrator can give you the necessarydetails.
• RemoteYou log in to a node over the network by entering the DCL command SET HOST. Forexample, to access the remote node HUBBUB, enter the following command:$SET HOST HUBBUB
If you have access to an account on node HUBBUB, you can log in to that account from yourlocal node. You have access to the facilities on node HUBBUB, but you remain physicallyconnected to your local node.
Logging In Using External AuthenticationIf you are an externally authenticated user, you log in by entering your external user ID andpassword at the OpenVMS login prompts. Your external user ID may or may not be the sameas your OpenVMS user name.See “Enabling External Authentication” (page 155) for more information on logging in withexternal authentication enabled on your system.
Reading Informational MessagesWhen you log in from a terminal that is directly connected to a computer, the OpenVMS systemdisplays informational system messages. “Local Login Messages” (page 53) illustrates most ofthese messages.
52 Using the System Responsibly
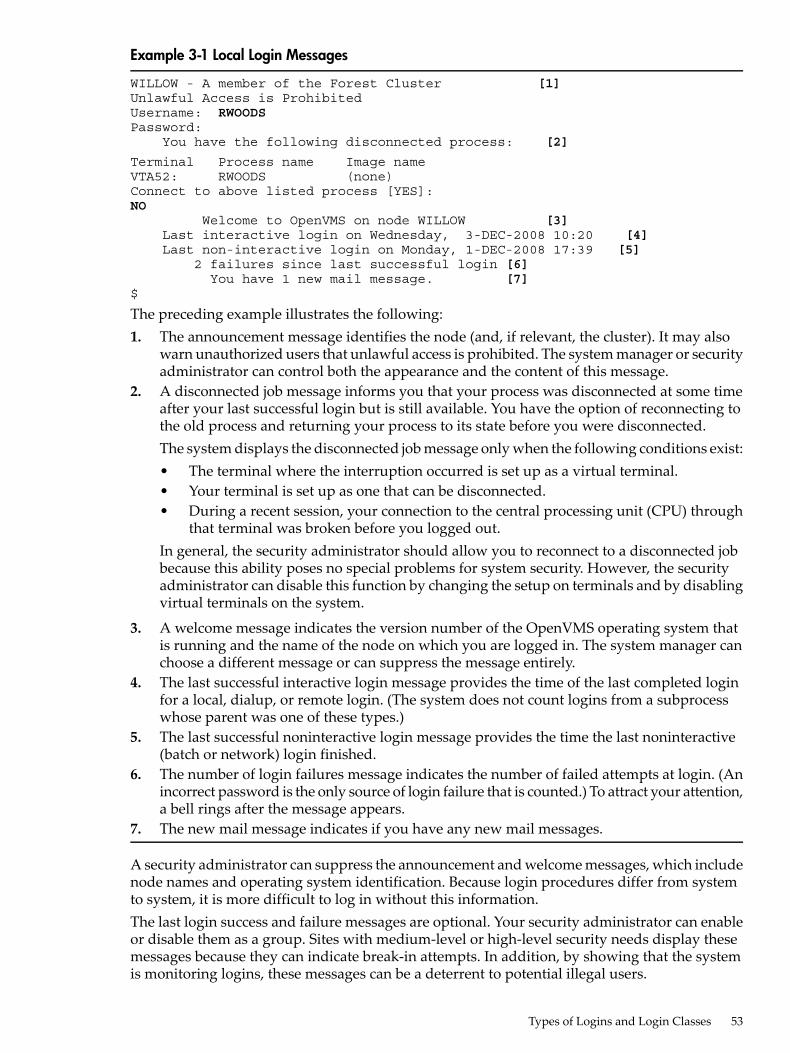
Example 3-1 Local Login Messages
WILLOW - A member of the Forest Cluster [1]Unlawful Access is ProhibitedUsername: RWOODSPassword:
You have the following disconnected process: [2]
Terminal Process name Image nameVTA52: RWOODS (none)Connect to above listed process [YES]:NO
Welcome to OpenVMS on node WILLOW [3]Last interactive login on Wednesday, 3-DEC-2008 10:20 [4]Last non-interactive login on Monday, 1-DEC-2008 17:39 [5]
2 failures since last successful login [6]You have 1 new mail message. [7]
$
The preceding example illustrates the following:1. The announcement message identifies the node (and, if relevant, the cluster). It may also
warn unauthorized users that unlawful access is prohibited. The system manager or securityadministrator can control both the appearance and the content of this message.
2. A disconnected job message informs you that your process was disconnected at some timeafter your last successful login but is still available. You have the option of reconnecting tothe old process and returning your process to its state before you were disconnected.The system displays the disconnected job message only when the following conditions exist:• The terminal where the interruption occurred is set up as a virtual terminal.• Your terminal is set up as one that can be disconnected.• During a recent session, your connection to the central processing unit (CPU) through
that terminal was broken before you logged out.In general, the security administrator should allow you to reconnect to a disconnected jobbecause this ability poses no special problems for system security. However, the securityadministrator can disable this function by changing the setup on terminals and by disablingvirtual terminals on the system.
3. A welcome message indicates the version number of the OpenVMS operating system thatis running and the name of the node on which you are logged in. The system manager canchoose a different message or can suppress the message entirely.
4. The last successful interactive login message provides the time of the last completed loginfor a local, dialup, or remote login. (The system does not count logins from a subprocesswhose parent was one of these types.)
5. The last successful noninteractive login message provides the time the last noninteractive(batch or network) login finished.
6. The number of login failures message indicates the number of failed attempts at login. (Anincorrect password is the only source of login failure that is counted.) To attract your attention,a bell rings after the message appears.
7. The new mail message indicates if you have any new mail messages.
A security administrator can suppress the announcement and welcome messages, which includenode names and operating system identification. Because login procedures differ from systemto system, it is more difficult to log in without this information.The last login success and failure messages are optional. Your security administrator can enableor disable them as a group. Sites with medium-level or high-level security needs display thesemessages because they can indicate break-in attempts. In addition, by showing that the systemis monitoring logins, these messages can be a deterrent to potential illegal users.
Types of Logins and Login Classes 53
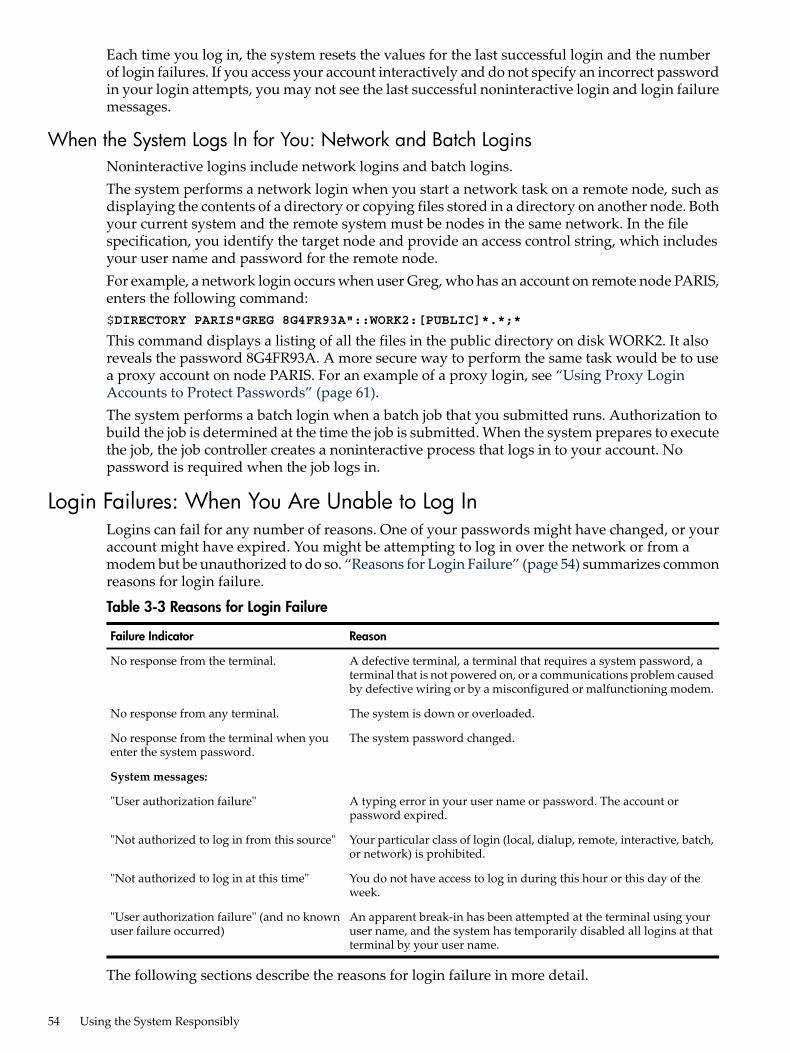
Each time you log in, the system resets the values for the last successful login and the numberof login failures. If you access your account interactively and do not specify an incorrect passwordin your login attempts, you may not see the last successful noninteractive login and login failuremessages.
When the System Logs In for You: Network and Batch LoginsNoninteractive logins include network logins and batch logins.The system performs a network login when you start a network task on a remote node, such asdisplaying the contents of a directory or copying files stored in a directory on another node. Bothyour current system and the remote system must be nodes in the same network. In the filespecification, you identify the target node and provide an access control string, which includesyour user name and password for the remote node.For example, a network login occurs when user Greg, who has an account on remote node PARIS,enters the following command:$DIRECTORY PARIS"GREG 8G4FR93A"::WORK2:[PUBLIC]*.*;*
This command displays a listing of all the files in the public directory on disk WORK2. It alsoreveals the password 8G4FR93A. A more secure way to perform the same task would be to usea proxy account on node PARIS. For an example of a proxy login, see “Using Proxy LoginAccounts to Protect Passwords” (page 61).The system performs a batch login when a batch job that you submitted runs. Authorization tobuild the job is determined at the time the job is submitted. When the system prepares to executethe job, the job controller creates a noninteractive process that logs in to your account. Nopassword is required when the job logs in.
Login Failures: When You Are Unable to Log InLogins can fail for any number of reasons. One of your passwords might have changed, or youraccount might have expired. You might be attempting to log in over the network or from amodem but be unauthorized to do so. “Reasons for Login Failure” (page 54) summarizes commonreasons for login failure.
Table 3-3 Reasons for Login Failure
ReasonFailure Indicator
A defective terminal, a terminal that requires a system password, aterminal that is not powered on, or a communications problem causedby defective wiring or by a misconfigured or malfunctioning modem.
No response from the terminal.
The system is down or overloaded.No response from any terminal.
The system password changed.No response from the terminal when youenter the system password.
System messages:
A typing error in your user name or password. The account orpassword expired.
"User authorization failure"
Your particular class of login (local, dialup, remote, interactive, batch,or network) is prohibited.
"Not authorized to log in from this source"
You do not have access to log in during this hour or this day of theweek.
"Not authorized to log in at this time"
An apparent break-in has been attempted at the terminal using youruser name, and the system has temporarily disabled all logins at thatterminal by your user name.
"User authorization failure" (and no knownuser failure occurred)
The following sections describe the reasons for login failure in more detail.
54 Using the System Responsibly
Using a Terminal That Requires a System PasswordYou cannot log in if the terminal you attempt to use requires a system password and you areunaware of the requirement. All attempts at logging in fail until you enter the system password.If you know the system password, perform the steps described in “Entering a System Password”(page 50). If your attempts fail, it is possible that the system password has been changed. Moveto a different terminal that does not require a system password, or request the new systempassword.If you do not know the system password and you suspect that this is the problem, try loggingin at another terminal.
Observing Your Login Class RestrictionsIf you attempt a class of login that is prohibited in your UAF record, your login fails. For example,your security administrator can restrict you from logging in over the network. If you attempt anetwork login, you receive a message stating that you are not authorized to log in from thissource.Network jobs are not terminated when the allocated work shift for network jobs is exceeded.This restriction applies only to new network connections, not to existing ones.Your security administrator can restrict your logins to include or exclude any of the followingclasses: local, remote, dialup, batch, or network. (For a description of these classes, see “LoggingIn Interactively: Local, Dialup, and Remote Logins” (page 52) and “When the System Logs Infor You: Network and Batch Logins” (page 54).)
Using an Account Restricted to Certain Days and TimesAnother cause of login difficulty is failure to observe your shift restrictions. A system manageror security administrator can control access to the system based on the time of day or the day ofthe week. These restrictions are imposed on classes of logins. The security administrator canapply the same work-time restrictions to all classes of logins or choose to place different restrictionson different login classes. If you attempt a login during a time prohibited for that login class,your login fails. The system notifies you that you are not authorized to log in at this time.When shift restrictions apply to batch jobs, jobs you submit that are scheduled to run outsideyour permitted work times are not run. The system does not automatically resubmit such jobsduring your next available permitted work time. Similarly, if you have initiated any kind of joband attempt to run it beyond your permitted time periods, the job controller aborts theuncompleted job when the end of your allocated work shift is reached. This job terminationbehavior applies to all jobs.
Failing to Enter the Correct Password During a Dialup LoginYour security administrator can control the number of chances you are given to enter a correctpassword during a dialup login before the connection is automatically broken.If your login fails and you have attempts remaining, press the Return key and try again. Youcan do this until you succeed or reach the limit. If the connection is lost, you can redial the accessline and start again.The typical reason for limiting the number of dialup login failures is to discourage unauthorizedusers attempting to learn passwords by trial and error. They already have the advantage ofanonymity because of the dialup line. Of course, limiting the number of tries for each dialupdoes not necessarily stop this kind of intrusion. It only requires the would-be perpetrator toredial and start another login.
Login Failures: When You Are Unable to Log In 55
Knowing When Break-In Evasion Procedures Are in EffectIf anyone has made a number of failed attempts to log in at the same terminal with your username, the system concludes that an intruder is attempting to gain illegal access to the system byusing your user name.At the discretion of your security administrator, break-in evasion measures can be in effect forall users of the system. The security administrator controls how many password attempts areallowed over what period of time. Once break-in evasion tactics are triggered, you cannot login to the terminal---even with your correct password---during a defined interval. Your securityadministrator can tell you how long you must wait before reattempting the login, or you canmove to another terminal to attempt a login.If you suspect that break-in evasion is preventing your login and you have not personallyexperienced any login failures, you should contact your security administrator immediately.Together, you should attempt another login and check the message that reveals the number oflogin failures since the last login to confirm or deny your suspicion of intrusion attempts. (If yoursystem does not normally display the login message, your security administrator can use theAuthorize utility (AUTHORIZE) to examine the data in your UAF record.) With prompt action,your security administrator can locate someone attempting logins at another terminal.
Changing Your PasswordChanging passwords on a regular basis promotes system security. To change your password,enter the DCL command SET PASSWORD.The system manager can allow you to select a password on your own or can require that youuse the automatic password generator when you change your password. If you select your ownpassword, note that the password must follow system restrictions on length and acceptability(see “Observing System Restrictions on Passwords” (page 50)). For example, if your passwordchoice is too short, the system displays the following message:%SET-E-INVPWDLEN, invalid password length - password not changed
“Choosing a Password for Your Account” (page 49) provides guidelines and examples forspecifying secure passwords.There is no restriction on how many times you can change your password in a given period oftime.
Selecting Your Own PasswordIf your system manager does not require use of the automatic password generator, the SETPASSWORD command prompts you to enter the new password. It then prompts you to reenterthe new password for verification, as follows:$SET PASSWORDReturnNew password:Verification:
If you fail to enter the same password twice, the password is not changed. If you succeed in thesetwo steps, there is no notification. The command changes your password and returns you to theDCL prompt.Even though your security administrator may not require the password generator, you arestrongly encouraged to use it to promote the security of your system. “Using GeneratedPasswords” (page 56) describes how to use generated passwords.
Using Generated PasswordsIf your system security administrator decides that you must let the system generate the passwordfor you automatically, the system provides you with a list of password choices when you enter
56 Using the System Responsibly
the DCL command SET PASSWORD. (When the system does not require generated passwords,add the /GENERATE qualifier to SET PASSWORD for a list of password choices.) The charactersequence resembles native language words to make it easy to remember, but it is unusual enoughto be difficult for outsiders to guess. Because system-generated passwords vary in length, theybecome even more difficult to guess.
NOTE: The password generator uses basic syllabic rules to generate words but has no realknowledge of any language. As a result, it can unintentionally produce words that are offensive.
In the following OpenVMS VAX example, the system automatically generates a list of passwordsmade up of random sequences of characters. The minimum password length for the user in thefollowing example has been set to 8 in the UAF record.$ SET PASSWORDOld password:Return [1]
cigtawdpau cig-tawd-pau [2]adehecun a-de-he-cunceebatorai cee-ba-to-raiarhoajabad ar-hoa-ja-badChoose a password from this list, or press Return to get a new list [3]
New password:Return [4]
Verification:Return [5]
$[6]
The preceding example illustrates the following:1. The user correctly specifies the old password and presses the Return key.2. The system responds with a list of five password choices ranging in length from 8 to 10
characters. There are representations of the same word divided into syllables to the right ofeach password choice. Usually the password that is easiest to pronounce is easiest toremember and, therefore, the best choice.
3. The system informs the user that it is possible to request a new list by pressing the Returnkey in response to the prompt for a new password.
4. The user enters one of the first five possible passwords and presses the Return key.5. The system recognizes that this password is one provided by the automatic password
generator and responds with the verification prompt. The user enters the new passwordagain and presses Return.
6. The system changes the password and responds with the DCL prompt.One disadvantage of automatic password generation is the possibility that you might notremember your password choice. However, if you dislike all the password choices in your listor think none are easy to remember, you can always request another list.A more serious drawback of automatic password generation is the potential disclosure ofpassword choices from the display the command produces. To protect your account, changeyour password in private. If you perform the change on a video terminal, clear the display ofpassword choices from the screen after the command finishes. If you perform the change in aDECwindows environment, use the Clear Lines Off Top option from the Commands menu toremove the passwords from the screen recall buffer. If you use a printing terminal, properlydispose of all hardcopy output.If you later realize that you failed to protect your password in these ways, change your passwordimmediately. Depending on site policy or your own judgment concerning the length of timeyour account was exposed, you might decide to notify your security administrator that a securitybreach could have occurred through your account.
Changing Your Password 57
Changing a Secondary PasswordTo change a secondary password, use the DCL command SET PASSWORD/SECONDARY. Youare prompted to specify the old secondary password and the new secondary password, just asin the procedure for changing the primary password. To remove a secondary password, pressthe Return key when you are prompted for a new password and verification.You can change primary and secondary passwords independently, but both are subject to thesame change frequency because they share the same password lifetime. See “Password andAccount Expiration Times” (page 58) for information on password lifetimes.
Changing Your Password As You Log InEven if your current password has not yet expired, you can change your password when youlog in to the system by including the /NEW_PASSWORD qualifier with your user name, asfollows:WILLOW - A member of the Forest Cluster
Username: RWOODS/NEW_PASSWORDPassword:
Welcome to OpenVMS on node WILLOWLast interactive login on Tuesday, 4-NOV-2008 10:20Last non-interactive login on Monday, 3-NOV-2008 14:20
Your password has expired; you must set a new password to log inNew password:Verification:
Entering the /NEW_PASSWORD qualifier after your user name forces you to set a new passwordimmediately after login.
Password and Account Expiration TimesYour system manager can set up your account so that your password, or the account itself, expiresautomatically on a particular date and time. Password expiration times promote system securityby forcing you to change your password on a regular basis. Account expiration times help toensure that accounts are available only for as long as they are needed.
Changing an Expired PasswordAs you approach the expiration time of your password, you receive an advance warning message.The message first appears 5 days before the expiration date and at each subsequent login. Themessage appears immediately below the new mail message and sounds the bell character onyour terminal to attract your attention. The message indicates that your password is expiring,as follows:WARNING -- Your password expires on Thursday 18-DEC-2008 15:00
If you fail to change your password before it expires, you receive the following message whenyou log in:Your password has expired; you must set a new password to log inNew password:
The system prompts you for a new password or, if automatic password generation is enabled,asks you to select a new password from those listed (see “Using Generated Passwords” (page 56)).You can abort the login by pressing Ctrl/Y. At your next login attempt, the system again promptsyou to change your password.
When You Are Using a Secondary PasswordIf secondary passwords are in effect for your account (see “Knowing What Type of Password toUse” (page 50)), the secondary password may expire at the same time as the primary one. You
58 Using the System Responsibly
are prompted to change both passwords. If you change the primary password and press Ctrl/Ybefore changing the secondary password, the login fails. The system does not record a passwordchange.
When You Fail to Change Your PasswordIf the system manager decides not to force you to change your expired password upon loggingin, you receive one final warning when you log in after your password expires, as follows:WARNING -- Your password has expired; update immediately withSET PASSWORD!
At this point, if you do not change the password or if the system fails before you have theopportunity to do so, you will be unable to log in again. To regain access, see your systemmanager.
Renewing an Expired AccountIf you need your account for a specific purpose for a limited time only, the person who createsyour account may specify a period of time after which the account lapses. For example, studentaccounts at universities are typically authorized for a single semester at a time.The system automatically denies access to expired accounts. You receive no advance warningmessage before the account expiration date, so it is important to know in advance your accountduration. The account expiration resides in the UAF record, which can be accessed and displayedonly through the use of the Authorize utility (AUTHORIZE) by users with the SYSPRV privilegeor equivalent---normally, your system manager or security administrator.When your account expires, you receive an authorization failure message at your next attemptedlogin. If you need an extension, follow the procedures defined at your site.
Guidelines for Protecting Your PasswordIllegal system access through the use of a known password is most often caused by the owner'sdisclosing the password. It is vital that you do not reveal your password to anyone.You can best protect your password by observing the following rules:• Select reasonably long passwords that cannot be guessed easily. Avoid using words in your
native language that appear in a dictionary. Consider including numbers in your password.Alternatively, let the system generate passwords for you automatically.
• Never write down your password.• Never give your password to another user. If another user obtains your password, change
it immediately.• Do not include your password in any file, including the body of an electronic mail message.
(If anyone else reveals a password to you, delete the information promptly.)The character strings that appear with your actual password can make it easy for someoneto find your password in a file. For example, a quotation mark followed by two colons ("::)always comes after a user name and password in an access control string. Someone attemptingto break into the system could obtain your password by searching inadequately protectedfiles for this string. Another way in which you might reveal your password is by using theword "password" in a text file, for example:My password is GOBBLEDYGOOK.
• If you submit a batch job on cards, do not leave your password card where others may beable to obtain your password from it.
• Do not use the same password for accounts on different systems.An unauthorized user can try one password on every system where you have an account.The account that first reveals the password might hold little information of interest, but
Guidelines for Protecting Your Password 59
another account might yield more information or more privileges, ultimately leading to afar greater security breach.
• Before you log in to a terminal that is already on, invoke the secure terminal server feature(if enabled) by pressing the Break key. The secure server ensures that the OpenVMS loginprogram is the only program able to receive your login and thereby eliminates the possibilityof revealing a password to a password grabber program. This is particularly relevant whenyou are working in a public terminal room.A password grabber program is a special program that displays an empty video screen, ascreen that appears to show the system has just been initialized after a crash, or a screen thatshows a nonexistent logout. When you attempt to log in, the program runs through thenormal login sequence so you think you are entering your user name and password in anormal manner. However, once the program receives this key information and passes it onto the perpetrator, it displays a login failure. You might think you mistyped your passwordand be unaware that you have just revealed it to someone else.
• Unless you share your password, change it every 3 to 6 months. HP warns against sharingpasswords. If you do share your password, change it every month.
• Change your password immediately if you have any reason to suspect it might have beendiscovered. Report such incidents to your security administrator.
• Do not leave your terminal unattended after you log in.You might think the system failed and came back up again, when actually someone hasloaded a password-stealing program. Even a terminal that displays an apparently validlogout message might not reflect a normally logged out process.
• Routinely check your last login messages. A password-stealing program cannot actuallyincrease the login failure count, although it looks like a login failure to you. Be alert for loginfailure counts that do not appear after you log in incorrectly or that are one less than thenumber you experienced. If you observe this or any other abnormal failure during a login,change your password immediately, and notify your security administrator.
Network Security ConsiderationsThis section describes how to use access control strings in file specifications and how to use proxylogins to help make network access more secure.
Protecting Information in Access Control StringsNetwork access control strings can be included in the file specifications of DCL commandsworking across the DECnet for OpenVMS network. They permit a user on a local node to accessa file on a remote node.An access control string consists of the user name for the remote account and the user's passwordenclosed within quotation marks, as follows:NODE"username password"::DISK:[DIRECTORY]FILE.TYP
Because access control strings include sufficient information to allow someone to break in to theremote account, they create serious security exposure. To protect access control string information,do the following:• Avoid revealing the information on either hardcopy or video terminals. If you use a hardcopy
terminal, dispose of the output properly. If you use a video terminal, clear the screen, andempty the recall buffer with the DCL command RECALL/ERASE when the network job iscompleted. This prevents another user from seeing the password, either by displaying thecommand line with the Ctrl/B key sequence or with the DCL command RECALL/ALL.DECwindows users can clear the screen with the Clear Lines Off Top option from the
60 Using the System Responsibly

Commands menu. Otherwise, a DECwindows user could use the scroll bar to view previouslyentered text.
• Do not place networking commands that include access control strings in commandprocedures where they would be likely targets for discovery.
• If you must put access control strings in your command procedures, provide these files withoptimum file protection by using the techniques described in “Protecting Data” (page 69).
• The use of access control strings in not permitted in an evaluated configuration. Please seeyour system administrator to determine if your system is running in an evaluatedconfiguration.
To avoid the need for access control strings, you might prefer to use proxy login accounts, whichare described in “Using Proxy Login Accounts to Protect Passwords” (page 61).
Using Proxy Login Accounts to Protect PasswordsProxy logins let you access files across a network without specifying a user name or passwordin an access control string. Thus, proxy logins have the following security benefits:• Passwords are not echoed on the terminal where the request originates.• Passwords are not passed between systems where they might be intercepted in unencrypted
form.• Passwords are not needed in command files to perform the remote access steps.Before you can initiate a proxy login, the system or security administrator at the remote nodemust create a proxy account for you. Proxy accounts, like regular accounts, are created with theAuthorize utility (AUTHORIZE). They are usually nonprivileged accounts. Security administratorscan allow you access to one default proxy account and up to 15 other proxy accounts. Whileproxy logins require more setup effort on the part of system managers, they provide more securenetwork access and eliminate the need for users to enter access control strings.The following examples illustrate the differences between a normal network login request anda proxy login request. For each example, the following conditions exist:• The user KMAHOGANY has two user accounts:
— An account on node BIRCH with the password XYZ123ABC— An account on node WALNUT with the password A25D3255
• KMAHOGANY has logged in to node BIRCH.• KMAHOGANY wants to copy the file BIONEWS.MEM from the default device and directory
of the account on the node WALNUT.The following diagram illustrates these conditions:
Network Security Considerations 61
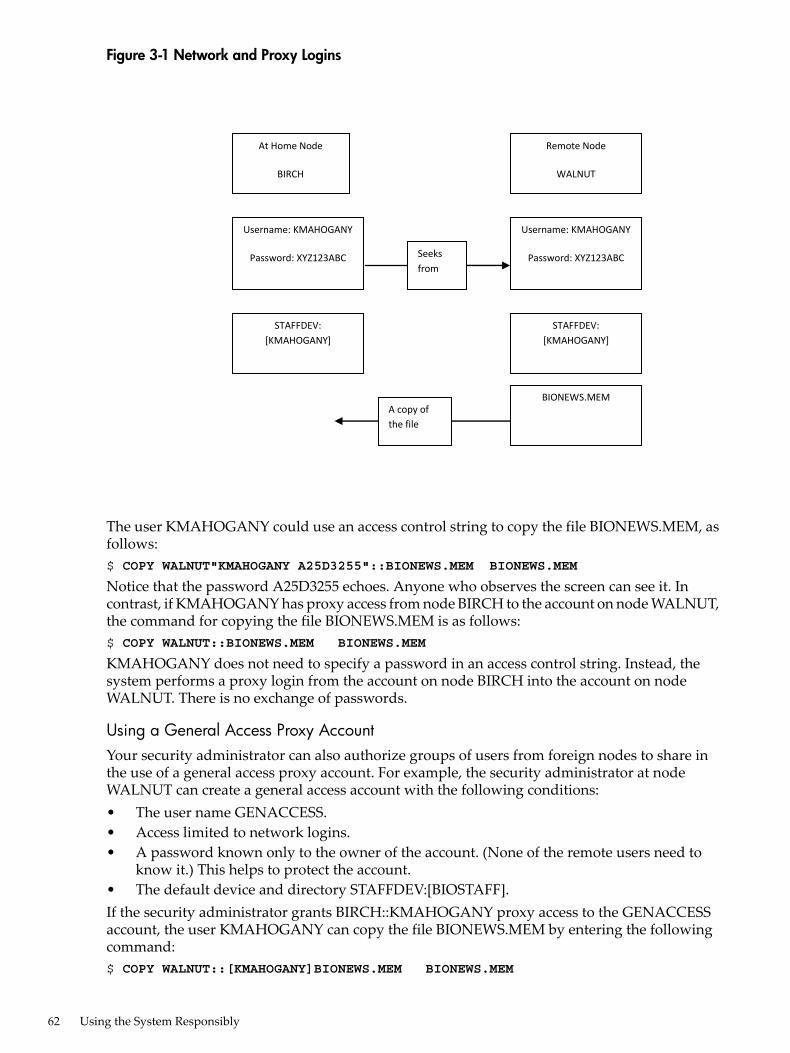
Figure 3-1 Network and Proxy Logins
STAFFDEV:
[KMAHOGANY]
Remote Node
WALNUT
Username: KMAHOGANY
Password: XYZ123ABC
Username: KMAHOGANY
Password: XYZ123ABC
STAFFDEV:
[KMAHOGANY]
BIONEWS.MEM A copy of
the file
At Home Node
BIRCH
Seeks
from
The user KMAHOGANY could use an access control string to copy the file BIONEWS.MEM, asfollows:$ COPY WALNUT"KMAHOGANY A25D3255"::BIONEWS.MEM BIONEWS.MEM
Notice that the password A25D3255 echoes. Anyone who observes the screen can see it. Incontrast, if KMAHOGANY has proxy access from node BIRCH to the account on node WALNUT,the command for copying the file BIONEWS.MEM is as follows:$ COPY WALNUT::BIONEWS.MEM BIONEWS.MEM
KMAHOGANY does not need to specify a password in an access control string. Instead, thesystem performs a proxy login from the account on node BIRCH into the account on nodeWALNUT. There is no exchange of passwords.
Using a General Access Proxy AccountYour security administrator can also authorize groups of users from foreign nodes to share inthe use of a general access proxy account. For example, the security administrator at nodeWALNUT can create a general access account with the following conditions:• The user name GENACCESS.• Access limited to network logins.• A password known only to the owner of the account. (None of the remote users need to
know it.) This helps to protect the account.• The default device and directory STAFFDEV:[BIOSTAFF].If the security administrator grants BIRCH::KMAHOGANY proxy access to the GENACCESSaccount, the user KMAHOGANY can copy the file BIONEWS.MEM by entering the followingcommand:$ COPY WALNUT::[KMAHOGANY]BIONEWS.MEM BIONEWS.MEM
62 Using the System Responsibly
Note that KMAHOGANY must specify the directory [KMAHOGANY] because the fileBIONEWS.MEM is not in the default device and directory for the GENACCESS account(STAFFDEV:[BIOSTAFF]). In addition, the protection for the file BIONEWS.MEM must permitaccess to the GENACCESS account. Otherwise, the command fails.
When You Need to Specify the Name of a Proxy AccountIf you have access to more than one proxy account on a given node and you do not want to usethe default proxy account, specify the name of the proxy account. For example, to use a proxyaccount called PROXY2 instead of the GENACCESS account (the default), KMAHOGANY entersthe following command:$COPY WALNUT"PROXY2"::[KMAHOGANY]BIONEWS.MEM BIONEWS.MEM
This command uses the PROXY2 account to copy the file BIONEWS.MEM from the[KMAHOGANY] directory on node WALNUT.
Auditing Access to Your Account and FilesAlthough it is the security administrator's job to monitor the system for possible intrusions, youcan help the security administrator to audit access to your account and files.This section describes how to monitor your last login time for possible intrusions. It also describeshow to work with your security administrator to enable certain types of auditing.
Observing Your Last Login TimeThe operating system maintains information in your UAF record about the last time you loggedin to your account. Your security administrator decides whether the system should display thisinformation at login time. Sites with medium to high security requirements frequently displaythis information and ask users to check it for unusual or unexplained successful logins andunexplained failed logins.If there is a report of an interactive or a noninteractive login at a time when you were not loggedin, report it promptly to your security administrator. Also change your password. The securityadministrator can investigate further by using accounting files and audit logs.If you receive a login failure message and cannot account for the failure, it is likely that someonehas been trying to access your account unsuccessfully. Check your password to ensure that itadheres to all recommendations for password security described in “Guidelines for ProtectingYour Password” (page 59). If not, change your password immediately.If you expect to see a login failure message and it does not appear or if the count of failures istoo low, change your password. Report either of these indications of login failure problems toyour security administrator.
Adding Access Control Entries to Sensitive FilesIf you have key files that may have been accessed improperly, you may want to develop a strategywith your security administrator to audit access to the files.Once you review the situation and ensure that you have done everything possible to protectyour files with standard protection codes and general ACLs (described in “Protecting Data”(page 69)), you may conclude that security auditing is required.To specify security auditing, you can add special access control entries (ACEs) to files you ownor to which you have control access. Keep in mind, however, that the audit log file is a systemwidemechanism, so HP recommends that a site security administrator control the use of file auditing.Although you can add auditing ACEs to files over which you have control, the securityadministrator has to enable auditing of files on a system level.
Auditing Access to Your Account and Files 63
For example, if user RWOODS and his security administrator agree that they must know whena highly confidential file, CONFIDREVIEW.MEM, is being accessed, RWOODS can add an entryto the existing ACL for the file CONFIDREVIEW.MEM, as follows:
$ SET SECURITY/ACL=(AUDIT=SECURITY,ACCESS=READ+WRITE-_$+DELETE+CONTROL+FAILURE+SUCCESS) CONFIDREVIEW.MEM
After RWOODS adds the security-auditing entry, the security administrator enables file-accessauditing so that access attempts are recorded. See “Auditing File Access” (page 64) for moreinformation on file-access auditing.An access violation of one file frequently indicates access problems with other files. Therefore,the security administrator may need to monitor access to all key files having security-auditingACEs. When undesired access is gained to key files, the security administrator must takeimmediate action.
Asking Your Security Administrator to Enable AuditingA security administrator can direct the operating system to send an audit message to the systemsecurity audit log file or an alarm to terminals enabled as security operator terminals wheneversecurity-relevant events occur. For example, the security administrator might identify one ormore files for which write access is prohibited. An audit message can be sent to indicate attemptedaccess to these files.
Auditing File AccessIf you suspect intrusion attempts to your account, the security administrator may temporarilyenable auditing for all file access. The security administrator can also enable auditing to monitorread access to your files to catch file browsers.For example, assume you decide to audit the file CONFIDREVIEW.MEM, which has asecurity-auditing ACE (see “Adding Access Control Entries to Sensitive Files” (page 63)). If userABADGUY accesses CONFIDREVIEW.MEM and has delete access, the following audit recordis written to the system security audit log file:%%%%%%%%%%% OPCOM 6-DEC-2008 07:21:11.10 %%%%%%%%%%%Message from user AUDIT$SERVER on BOSTONSecurity audit (SECURITY) on BOSTON, system id: 19424Auditable event: Attempted file accessEvent time: 6-DEC-2008 07:21:10.84PID: 23E00231Username: ABADGUYImage name: BOSTON$DUA0:[SYS0.SYSCOMMON.][SYSEXE]DELETE.EXEObject name: _BOSTON$DUA1:[RWOODS]CONFIDREVIEW.MEM;1Object type: fileAccess requested: DELETEStatus: %SYSTEM-S-NORMAL, normal successful completionPrivileges used: SYSPRV
The auditing message reveals the name of the perpetrator, the method of access (successfuldeletion accomplished by using the program [SYSEXE]DELETE.EXE), time of access (7:21 a.m.),and the use of a privilege (SYSPRV) to gain access to the file. With this information, the securityadministrator can take action.Note that the security audit message is written to the security audit log file every time any fileis accessed and meets the conditions specified in the audit entry of the ACL for that file (see“Adding Access Control Entries to Sensitive Files” (page 63)). Access to the fileCONFIDREVIEW.MEM, as well as access to any file on the system that is protected with securityauditing, prompts an audit record to be written to the security audit log file.After auditing has been introduced, check with your security administrator periodically to seeif any additional intrusions have occurred.
64 Using the System Responsibly
Additional Events to AuditIn addition to file auditing, the security administrator can select other types of events that warrantspecial attention when they occur. Events triggering an audit or alarm may include the following:
Events Initiating Security Audits or Alarms
Modifications to: System and user passwords System timeSystem authorization file Network proxy file Rightsdatabase SYSGEN parameters
Logins, logouts, login failures, and break-in attemptsVolume mounts and dismounts
Execution of: SET AUDIT command NCP commandsConnection or termination of logical links
Installation of imagesCreation and deletion of selected protected objects
Access event requested by an ACL on a protected objectSelected types of access and deaccess to selected protectedobjects
Use of the process control system services, including$CREPRC and $DELPRC
Successful or unsuccessful use of a privilege or anidentifier
Logging Out Without Compromising System SecurityLogging out of a session conserves system resources and protects your files. Leaving a terminalon line represents one of the greatest sources of inside intrusions. When you leave your terminalon line and your office open, you have effectively given away your password and your privilegesand have left your files and those of the other members of your group unprotected. Any usercan easily and quickly transfer all files accessible through your account. A malicious insidercould rename and delete your files and any other files to which you have write access. If youhave special privileges, especially privileges in the Files or All category, a malicious user can domajor damage.Log out when you leave your office even for a brief period of time. If you have performed remotelogins, you must log out of each node. The following sections describe security considerationsfor logging out of specific types of terminals or sessions.
Clearing Your Terminal ScreenYou may want to clear your screen each time you log out from a terminal to ensure that youruser name, node name, and operating system are not revealed to anyone else. If you are loggingout after a remote login, the name of the node to which you return (the local node) is also revealed.If you access multiple accounts remotely (over the network), the final sequence of logoutcommands reveals all the nodes and user names that are accessible to you on each node (excludingthe name of the furthest node reached). To those who can recognize the operating system fromthe prompt or a logout message, these displays also reveal the operating system.At some sites, it may be important to leave nothing but the logout message on your screen, asfollows:• If you are using a VT200- or later series terminal, you can clear the screen by pressing the
Set-Up key and selecting the item from the resulting menu that corresponds to theDECwindows Clear Display menu option on the Commands menu.
• If you are using a VT100-series terminal, press the Set-Up key. Then press the key markedfor reset (the 0 key) followed by the Return key.Alternatively, to preserve temporary parameters, press the Set-Up key, and then press thekey marked 80/132 columns (the 9 key) twice.
After the screen clears, the cursor is positioned at the top of the screen, next to the DCL prompt.Enter the DCL command LOGOUT at the prompt. The only information remaining after you logout is your logout command and the logout completion message, for example:
Logging Out Without Compromising System Security 65
$ LOGOUTRDOGWOOD logged out at 14-AUG-2008 19:39:01.43
Disposing of Hardcopy OutputAfter you log out from a hardcopy terminal, properly remove, file, or dispose of all hardcopyoutput that might reveal sensitive information. Your security administrator should providedirection on preferred procedures. Many sites use paper shredders or locked receptacles for thispurpose. Handle output that you plan to save just as carefully.You should also dispose of hardcopy output if the system fails before you log out. In addition,if you will not be present when the system is initialized, turn your terminal off.
Removing Disconnected ProcessesThe system automatically removes your disconnected processes after a certain interval. You canconserve system resources, however, if you directly log out of any disconnected processes, asfollows:1. Enter the DCL command SHOW USERS to determine if you have other disconnected jobs.2. Enter the DCL command CONNECT/LOGOUT to log out of the current process. Connect
back through each of the associated virtual terminals (as noted by the terminal prefix ofVTA) until you reach the last existing process.
3. Enter the DCL command LOGOUT.
Breaking the Connection to a Dialup LineYour security administrator may ask you to break the connection to a dialup line when you logout. If you anticipate no further immediate use of the line, use the LOGOUT command with the/HANGUP qualifier. The /HANGUP qualifier directs the system to automatically break theconnection to the dialup line after you log out.
NOTE: The effectiveness of the /HANGUP qualifier depends on how your system managerconfigures your modem line and how the line connects to the computer. It does not work onlines connected to a terminal server.
Breaking the connection to a dialup line prevents someone from taking advantage of an openaccess line. To access the line, someone must know the access number and must personally redial.Breaking the connection is especially important if the dialup line you use is in a public area orwhere someone might use the terminal after you.This practice also saves resources by reducing the required number of dialup lines.
Turning Off a TerminalIf your site has moderate or high security requirements, your security administrator may askyou to turn off your terminal after logging out. This resets terminal characteristics and clearsmemory buffers. Some Trojan horse attacks use hardware frame buffers and the answerbackcapabilities that are built into newer terminals.
Checklist for Contributing to System SecurityAlthough security features are implemented by the security administrator as requirements forall users, this chapter has described ways in which you can contribute to system security. Thefollowing list reviews voluntary security actions:• Choose a secure password by following the guidelines in “Choosing a Password for Your
Account” (page 49).• Protect your password, and change it often.
66 Using the System Responsibly
• Check your last login messages each time you log in, and report any unexplained messagesto your security administrator (“Reading Informational Messages” (page 52)).
• Use proxy logins when possible (“Types of Logins and Login Classes” (page 52)).• Log out and lock up when you leave your terminal and area (“Logging Out Without
Compromising System Security” (page 65)).• Use the /HANGUP qualifier with your final LOGOUT command from a dialup line (“Breaking
the Connection to a Dialup Line” (page 66)).• Properly dispose of hardcopy output from your terminal (“Disposing of Hardcopy Output”
(page 66)).• Clear your screen, or turn off your video terminal to erase revealing displays (“Using
Generated Passwords” (page 56) and “Clearing Your Terminal Screen” (page 65)).• Lock up backup media. Anyone who has the media in hand can access the information that
is stored on the tape or disk.• Ask your security administrator to enable security auditing for any protected objects, such
as files, that you suspect have been accessed improperly (“Auditing File Access” (page 64)).
Checklist for Contributing to System Security 67

68
4 Protecting DataThis chapter extends the discussion of security design introduced in “OpenVMS Security Model”(page 35). It describes how the operating system controls the way a user process or an applicationcan access a protected object.To summarize, the operating system controls access to any object that contains shareableinformation. These objects are known asprotected objects. Devices, volumes, logical name tables,files, common event flag clusters, group and system global sections, resource domains, queues,capabilities, and security classes fall into this category. An accessing process carries credentialsin the form of rights identifiers, and all protected objects list a set of access requirementsspecifying who has a right to access the object in a given manner.This chapter:• Describes the types of identification the system assigns to processes to define their access
rights to objects (“Contents of a User's Security Profile” (page 69))• Looks at the access controls that objects can hold (“Security Profile of Objects” (page 75))• Shows how the operating system processes access requests (“How the System Determines
if a User Can Access a Protected Object” (page 79))• Explains how to control access to objects (Sections “Controlling Access with ACLs” (page 84),
“Controlling Access with Protection Codes” (page 90), “Understanding Privileges andControl Access” (page 94), and “Auditing Protected Objects” (page 95))
“Descriptions of Object Classes” (page 97) describes the unique features of each class of protectedobject.
Contents of a User's Security ProfileThe profile of a user process or application includes the following elements:• User identification code (UIC) identifying the user• Rights identifiers held by the process• Privileges, if any
Per-Thread SecurityOpenVMS Alpha Version 7.2 includes the implementation of thread-level security. This feature,known as per-thread security, allows each execution thread of a multithreaded process to runan independent security profile without impacting the security profiles of other threads in theprocess.Security profile information previously contained in various process level data structures anddata cells is now stored in a single data structure, the Persona Security Block (PSB), which is thenbound to a thread of execution. All associated references within OpenVMS have been redirectedaccordingly. Every process in the system has at least one PSB that is the natural persona of theprocess. The natural persona is created during process creation.Interaction between a thread manager (for example, the thread manager incorporated withinHP POSIX Threads Library) and the security subsystem provides for the automatic switching ofprofiles while threads are scheduled for execution.
Persona Security Block Data Structure (PSB)The user's security profile (privileges, rights, and identity information) has shifted from theprocess level to the user thread level. The security information previously stored in severalstructures (including the Access Rights Block (ARB), Process Control Block (PCB), Process HeaderDescriptor (PHD), Job Information Block (JIB), and Control (CTL) region fields) has moved to anew Persona Security Block (PSB) data structure and all references are redirected accordingly.
Contents of a User's Security Profile 69
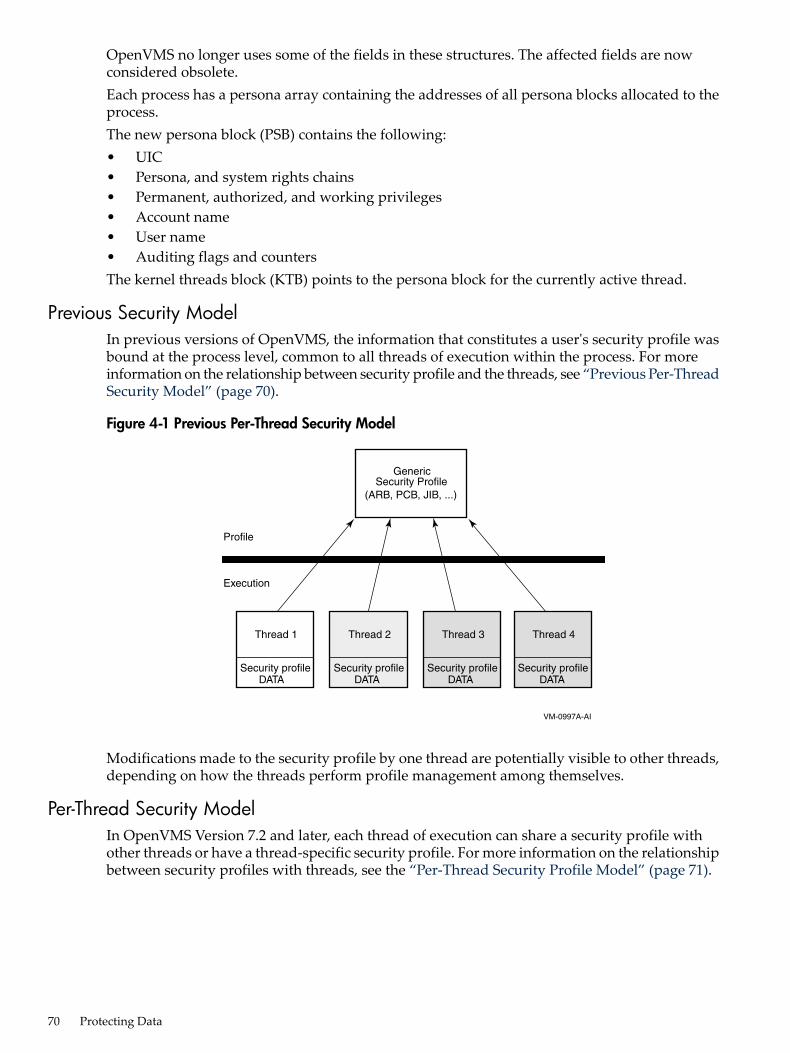
OpenVMS no longer uses some of the fields in these structures. The affected fields are nowconsidered obsolete.Each process has a persona array containing the addresses of all persona blocks allocated to theprocess.The new persona block (PSB) contains the following:• UIC• Persona, and system rights chains• Permanent, authorized, and working privileges• Account name• User name• Auditing flags and countersThe kernel threads block (KTB) points to the persona block for the currently active thread.
Previous Security ModelIn previous versions of OpenVMS, the information that constitutes a user's security profile wasbound at the process level, common to all threads of execution within the process. For moreinformation on the relationship between security profile and the threads, see “Previous Per-ThreadSecurity Model” (page 70).
Figure 4-1 Previous Per-Thread Security Model
VM-0997A-AI
Profile
Execution
GenericSecurity Profile
(ARB, PCB, JIB, ...)
Security profile
Thread 1
Security profile Security profile
Thread 2 Thread 4
Security profile
Thread 3
DATA DATA DATA DATA
Modifications made to the security profile by one thread are potentially visible to other threads,depending on how the threads perform profile management among themselves.
Per-Thread Security ModelIn OpenVMS Version 7.2 and later, each thread of execution can share a security profile withother threads or have a thread-specific security profile. For more information on the relationshipbetween security profiles with threads, see the “Per-Thread Security Profile Model” (page 71).
70 Protecting Data
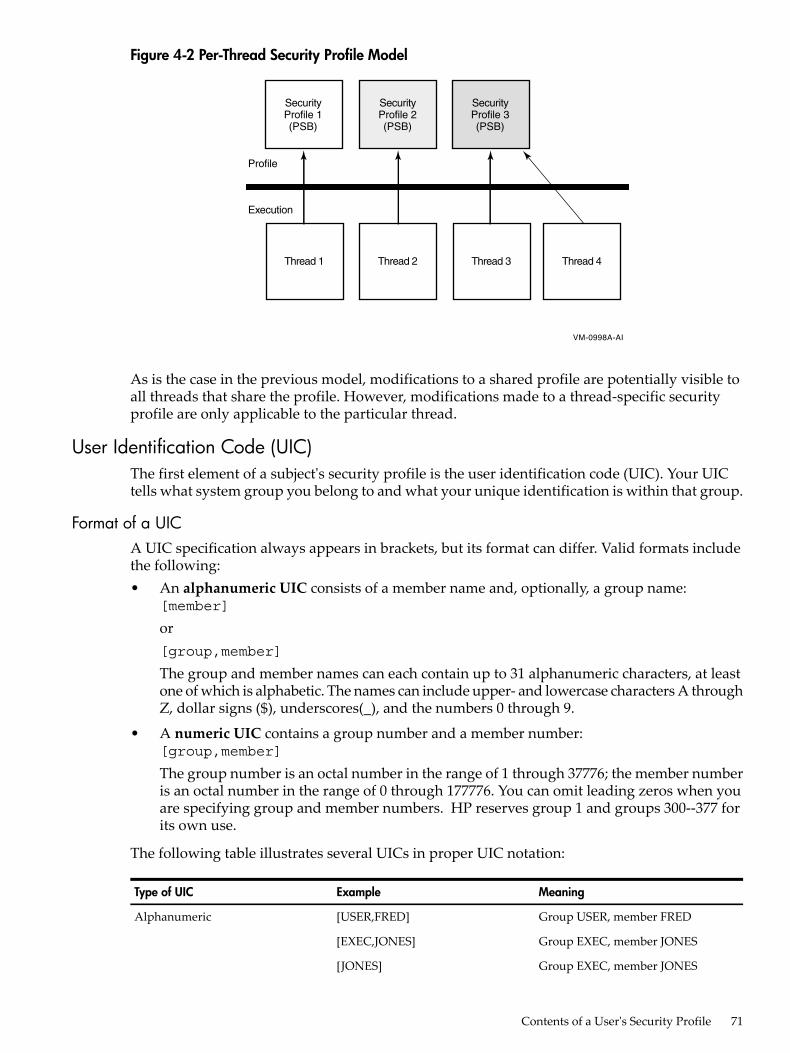
Figure 4-2 Per-Thread Security Profile Model
VM-0998A-AI
Thread 1 Thread 2 Thread 3
SecurityProfile 1(PSB)
Security SecurityProfile 2 Profile 3(PSB) (PSB)
Thread 4
Profile
Execution
As is the case in the previous model, modifications to a shared profile are potentially visible toall threads that share the profile. However, modifications made to a thread-specific securityprofile are only applicable to the particular thread.
User Identification Code (UIC)The first element of a subject's security profile is the user identification code (UIC). Your UICtells what system group you belong to and what your unique identification is within that group.
Format of a UICA UIC specification always appears in brackets, but its format can differ. Valid formats includethe following:• An alphanumeric UIC consists of a member name and, optionally, a group name:
[member]
or[group,member]
The group and member names can each contain up to 31 alphanumeric characters, at leastone of which is alphabetic. The names can include upper- and lowercase characters A throughZ, dollar signs ($), underscores(_), and the numbers 0 through 9.
• A numeric UIC contains a group number and a member number:[group,member]
The group number is an octal number in the range of 1 through 37776; the member numberis an octal number in the range of 0 through 177776. You can omit leading zeros when youare specifying group and member numbers. HP reserves group 1 and groups 300--377 forits own use.
The following table illustrates several UICs in proper UIC notation:
MeaningExampleType of UIC
Group USER, member FRED[USER,FRED]Alphanumeric
Group EXEC, member JONES[EXEC,JONES]
Group EXEC, member JONES[JONES]
Contents of a User's Security Profile 71
MeaningExampleType of UIC
Group 200, member 10[200,10]Numeric
Group 3777, member 3777[3777,3777]
Only one user can have the member name JONES; therefore JONES must belong to the EXECgroup.
Guidelines for Creating a UICUICs cannot be arbitrarily assigned. A security administrator has to observe the followingguidelines when creating them:• Member names must be unique for each user on the system.• No member can participate in more than one UIC group.These guidelines exist because the system translates a UIC to a 32-bit value that represents agroup number and a member number; the high-order 16 bits contain the group number, and thelow-order 16 bits contain the member number. When translating an alphanumeric UIC such as[J_JONES], the operating system equates the member part of the alphanumeric UIC to both thegroup and member parts of a numeric UIC. The resulting 32-bit numeric UIC is kept in the rightsdatabase (which is a file containing information about identifiers, their attributes, and holders).For example, you could not have the two UICs [GROUP1,JONES] and [GROUP2,JONES] on thesame system because the member JONES can have only one associated numeric UIC. The membername of the alphanumeric UIC is normally the same as the associated login user name.
How Your Process Acquires a UICWhen you log in to a system, the operating system copies your UIC from your user authorization(UAF) record in the system user authorization file (SYSUAF.DAT) and assigns it to your process.It serves as an identification for the life of the process.By default, detached processes (created by the DCL command SUBMIT or RUN) and subprocesses(created by the DCL command SPAWN) take the same UICs as their creators. If you haveIMPERSONATE privilege, you can create a detached process with a different UIC (by using the/UIC qualifier of the RUN command).
Rights IdentifiersThe second element of a subject's security profile is a set of rights identifiers.A rights identifier represents an individual user or a group of users. Using the Authorize utility(AUTHORIZE), security administrators create and remove identifiers and assign users to holdthese identifiers. Rights identifiers can be a temporary way of identifying a group of users becauseusers hold certain identifiers only as long as they are necessary.
Types of IdentifiersThe operating system supports several types of rights identifiers. “Major Types of RightsIdentifiers” (page 72) shows the identifiers that are most commonly used in access control.
Table 4-1 Major Types of Rights Identifiers
ExampleFormatDescriptionType
BATCH, NETWORK,INTERACTIVE, LOCAL,DIALUP, REMOTE
Alphanumeric stringsautomatically created by thesystem. See “Types ofLogins and Login Classes”(page 52) for details.
Describe different types ofusers based on their initialentry into the system.
Environmental identifiers
72 Protecting Data
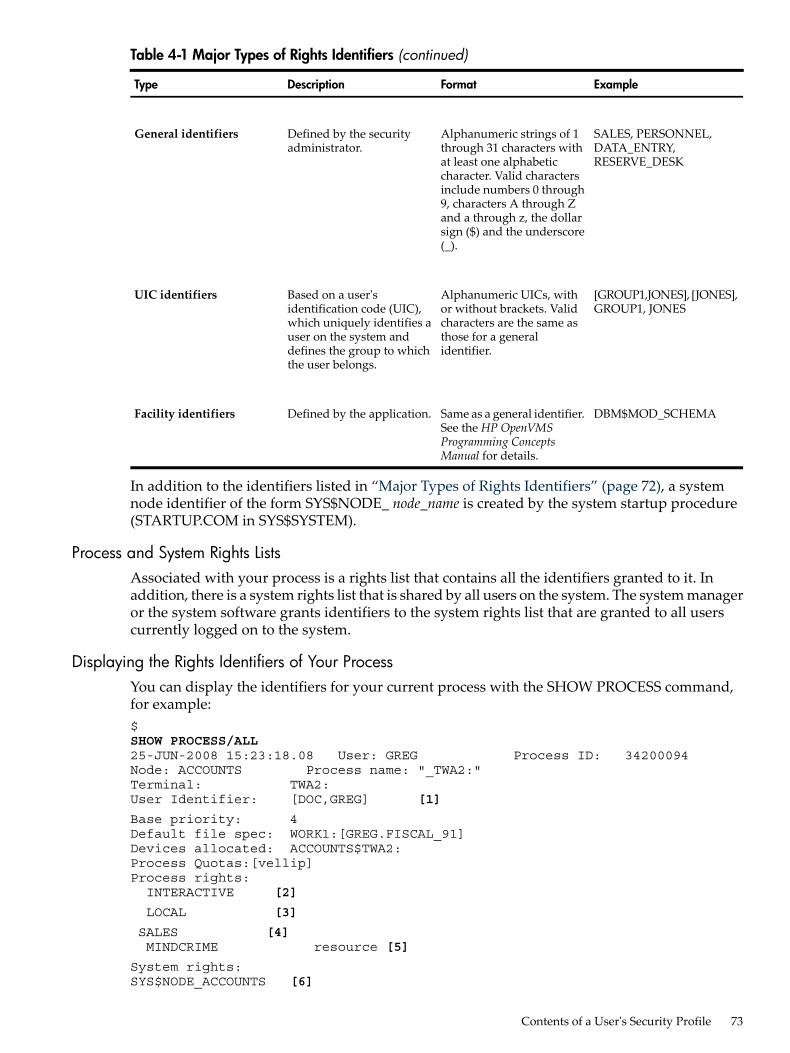
Table 4-1 Major Types of Rights Identifiers (continued)
ExampleFormatDescriptionType
SALES, PERSONNEL,DATA_ENTRY,RESERVE_DESK
Alphanumeric strings of 1through 31 characters withat least one alphabeticcharacter. Valid charactersinclude numbers 0 through9, characters A through Zand a through z, the dollarsign ($) and the underscore(_).
Defined by the securityadministrator.
General identifiers
[GROUP1,JONES], [JONES],GROUP1, JONES
Alphanumeric UICs, withor without brackets. Validcharacters are the same asthose for a generalidentifier.
Based on a user'sidentification code (UIC),which uniquely identifies auser on the system anddefines the group to whichthe user belongs.
UIC identifiers
DBM$MOD_SCHEMASame as a general identifier.See the HP OpenVMSProgramming ConceptsManual for details.
Defined by the application.Facility identifiers
In addition to the identifiers listed in “Major Types of Rights Identifiers” (page 72), a systemnode identifier of the form SYS$NODE_ node_name is created by the system startup procedure(STARTUP.COM in SYS$SYSTEM).
Process and System Rights ListsAssociated with your process is a rights list that contains all the identifiers granted to it. Inaddition, there is a system rights list that is shared by all users on the system. The system manageror the system software grants identifiers to the system rights list that are granted to all userscurrently logged on to the system.
Displaying the Rights Identifiers of Your ProcessYou can display the identifiers for your current process with the SHOW PROCESS command,for example:$SHOW PROCESS/ALL25-JUN-2008 15:23:18.08 User: GREG Process ID: 34200094Node: ACCOUNTS Process name: "_TWA2:"Terminal: TWA2:User Identifier: [DOC,GREG] [1]
Base priority: 4Default file spec: WORK1:[GREG.FISCAL_91]Devices allocated: ACCOUNTS$TWA2:Process Quotas:[vellip]Process rights:INTERACTIVE [2]
LOCAL [3]
SALES [4] MINDCRIME resource [5]
System rights:SYS$NODE_ACCOUNTS [6]
Contents of a User's Security Profile 73
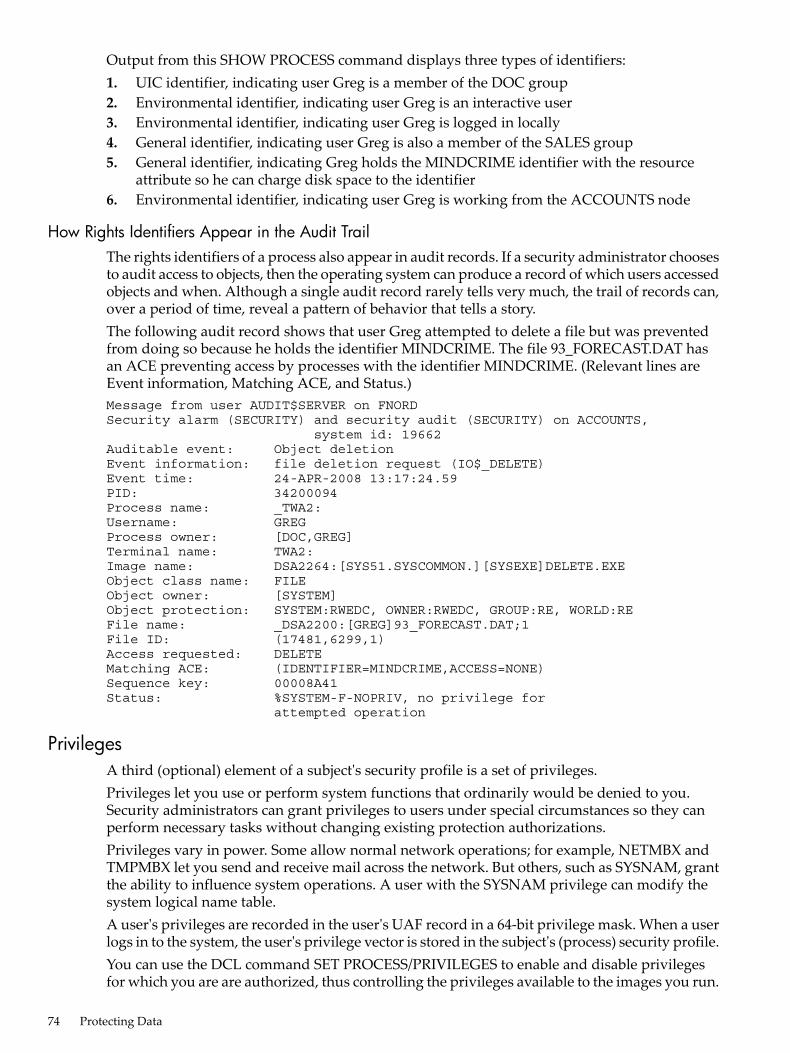
Output from this SHOW PROCESS command displays three types of identifiers:1. UIC identifier, indicating user Greg is a member of the DOC group2. Environmental identifier, indicating user Greg is an interactive user3. Environmental identifier, indicating user Greg is logged in locally4. General identifier, indicating user Greg is also a member of the SALES group5. General identifier, indicating Greg holds the MINDCRIME identifier with the resource
attribute so he can charge disk space to the identifier6. Environmental identifier, indicating user Greg is working from the ACCOUNTS node
How Rights Identifiers Appear in the Audit TrailThe rights identifiers of a process also appear in audit records. If a security administrator choosesto audit access to objects, then the operating system can produce a record of which users accessedobjects and when. Although a single audit record rarely tells very much, the trail of records can,over a period of time, reveal a pattern of behavior that tells a story.The following audit record shows that user Greg attempted to delete a file but was preventedfrom doing so because he holds the identifier MINDCRIME. The file 93_FORECAST.DAT hasan ACE preventing access by processes with the identifier MINDCRIME. (Relevant lines areEvent information, Matching ACE, and Status.)Message from user AUDIT$SERVER on FNORDSecurity alarm (SECURITY) and security audit (SECURITY) on ACCOUNTS, system id: 19662Auditable event: Object deletionEvent information: file deletion request (IO$_DELETE)Event time: 24-APR-2008 13:17:24.59PID: 34200094Process name: _TWA2:Username: GREGProcess owner: [DOC,GREG]Terminal name: TWA2:Image name: DSA2264:[SYS51.SYSCOMMON.][SYSEXE]DELETE.EXEObject class name: FILEObject owner: [SYSTEM]Object protection: SYSTEM:RWEDC, OWNER:RWEDC, GROUP:RE, WORLD:REFile name: _DSA2200:[GREG]93_FORECAST.DAT;1File ID: (17481,6299,1)Access requested: DELETEMatching ACE: (IDENTIFIER=MINDCRIME,ACCESS=NONE)Sequence key: 00008A41Status: %SYSTEM-F-NOPRIV, no privilege for attempted operation
PrivilegesA third (optional) element of a subject's security profile is a set of privileges.Privileges let you use or perform system functions that ordinarily would be denied to you.Security administrators can grant privileges to users under special circumstances so they canperform necessary tasks without changing existing protection authorizations.Privileges vary in power. Some allow normal network operations; for example, NETMBX andTMPMBX let you send and receive mail across the network. But others, such as SYSNAM, grantthe ability to influence system operations. A user with the SYSNAM privilege can modify thesystem logical name table.A user's privileges are recorded in the user's UAF record in a 64-bit privilege mask. When a userlogs in to the system, the user's privilege vector is stored in the subject's (process) security profile.You can use the DCL command SET PROCESS/PRIVILEGES to enable and disable privilegesfor which you are are authorized, thus controlling the privileges available to the images you run.
74 Protecting Data
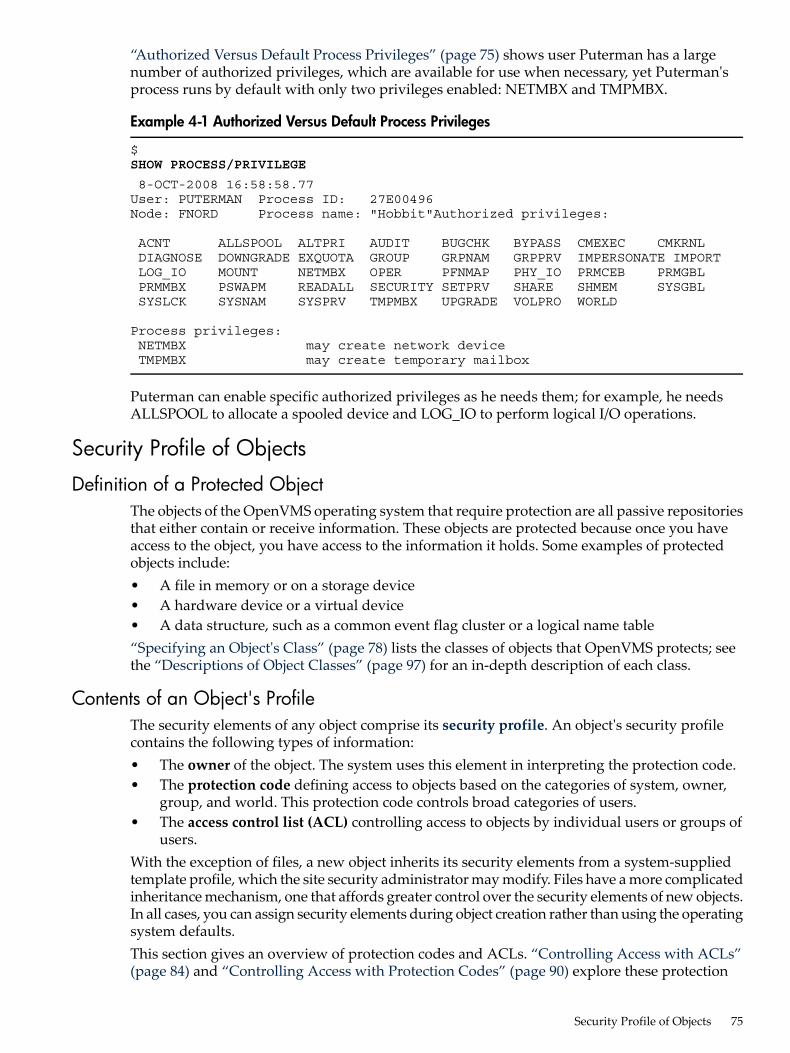
“Authorized Versus Default Process Privileges” (page 75) shows user Puterman has a largenumber of authorized privileges, which are available for use when necessary, yet Puterman'sprocess runs by default with only two privileges enabled: NETMBX and TMPMBX.
Example 4-1 Authorized Versus Default Process Privileges
$SHOW PROCESS/PRIVILEGE
8-OCT-2008 16:58:58.77User: PUTERMAN Process ID: 27E00496Node: FNORD Process name: "Hobbit"Authorized privileges:
ACNT ALLSPOOL ALTPRI AUDIT BUGCHK BYPASS CMEXEC CMKRNL DIAGNOSE DOWNGRADE EXQUOTA GROUP GRPNAM GRPPRV IMPERSONATE IMPORT LOG_IO MOUNT NETMBX OPER PFNMAP PHY_IO PRMCEB PRMGBL PRMMBX PSWAPM READALL SECURITY SETPRV SHARE SHMEM SYSGBL SYSLCK SYSNAM SYSPRV TMPMBX UPGRADE VOLPRO WORLD
Process privileges: NETMBX may create network device TMPMBX may create temporary mailbox
Puterman can enable specific authorized privileges as he needs them; for example, he needsALLSPOOL to allocate a spooled device and LOG_IO to perform logical I/O operations.
Security Profile of Objects
Definition of a Protected ObjectThe objects of the OpenVMS operating system that require protection are all passive repositoriesthat either contain or receive information. These objects are protected because once you haveaccess to the object, you have access to the information it holds. Some examples of protectedobjects include:• A file in memory or on a storage device• A hardware device or a virtual device• A data structure, such as a common event flag cluster or a logical name table“Specifying an Object's Class” (page 78) lists the classes of objects that OpenVMS protects; seethe “Descriptions of Object Classes” (page 97) for an in-depth description of each class.
Contents of an Object's ProfileThe security elements of any object comprise its security profile. An object's security profilecontains the following types of information:• The owner of the object. The system uses this element in interpreting the protection code.• The protection code defining access to objects based on the categories of system, owner,
group, and world. This protection code controls broad categories of users.• The access control list (ACL) controlling access to objects by individual users or groups of
users.With the exception of files, a new object inherits its security elements from a system-suppliedtemplate profile, which the site security administrator may modify. Files have a more complicatedinheritance mechanism, one that affords greater control over the security elements of new objects.In all cases, you can assign security elements during object creation rather than using the operatingsystem defaults.This section gives an overview of protection codes and ACLs. “Controlling Access with ACLs”(page 84) and “Controlling Access with Protection Codes” (page 90) explore these protection
Security Profile of Objects 75
mechanisms in greater detail. See the “Descriptions of Object Classes” (page 97) for a descriptionof individual object classes.
OwnerThe first element of an object's security profile is the UIC of its owner.In most cases, if you create an object, you are its owner. As the owner, you can modify its securityprofile. The system automatically assigns your UIC to the object and uses it in making accessdecisions.There are some exceptions to the ownership rule. Files owned by resource identifiers do not havea UIC. When a user creates a file in the directory of a resource identifier, the file may be ownedby the resource identifier and not the user who created the file (see “Profile Assignment”(page 105)). See the “Descriptions of Object Classes” (page 97) for an explanation of the ownershiprules for each object class.The owner of any object except a file can reassign ownership to another user with the SETSECURITY/OWNER command, as described in “Modifying a Security Profile” (page 77).Changing the owner of a file usually requires privilege (see “Types of Access” (page 104)).
Protection CodeThe second element of an object's security profile is the object's protection code.The system automatically assigns a protection code to each new object. The protection codeassociated with an object determines the type of access allowed to a user, based on the relationshipbetween the user UIC and the owner UIC. With the exception of files and pseudo-terminal (FT)devices, the code a protected object receives is derived from a template profile for the class. (Afile's protection code originates from another source, described in “Files” (page 104).)Typically, you rely on the protection code to protect an object if the object is to be accessed by:(a) only the owner, (b) all users on the system, or (c) a specific UIC-based group of users. If youwant to grant access to specific groups of users outside the UIC group but not to all users on thesystem, then you need to add an ACL (see “Access Control List (ACL)” (page 76)).Interpreting a Protection CodeA protection code defines the access rights for four categories of users: (a) the owner, (b) theusers who share the same group UIC as the owner (the group category), (c) all users on the system(the world category), and (d) those with system privileges or rights (the system category). A codelists access rights in a fixed order: the system category (S), then owner (O), then group (G), andthen world (W). It has the following syntax:[user category: access allowed (,user category: access allowed,...)]
When the operating system processes a request to use a protected object, it compares the user'sUIC to the UIC of the object's owner. If the user's UIC is the same as the UIC of the object's owner,the user is granted the access of the owner protection field. Failing a match of UICs, the systemprogresses through the other user categories. The system tries to find a match of the group fieldsto determine if there is a common group membership. The system may also evaluate whetherthe UIC group number indicates the user belongs to the system category of users. The worldcategory applies to all users.For example, user Jones has a UIC of [14,1], and he tries to read a file that is owned by UIC [14,5].Because Jones is in the same group (14), the system might grant access to the file. The final decisiondepends on the access rights specified in the protection code.See “Controlling Access with Protection Codes” (page 90) for a complete description of how tointerpret and create protection codes.
Access Control List (ACL)The third (optional) element of an object's security profile is the object's access control list.
76 Protecting Data
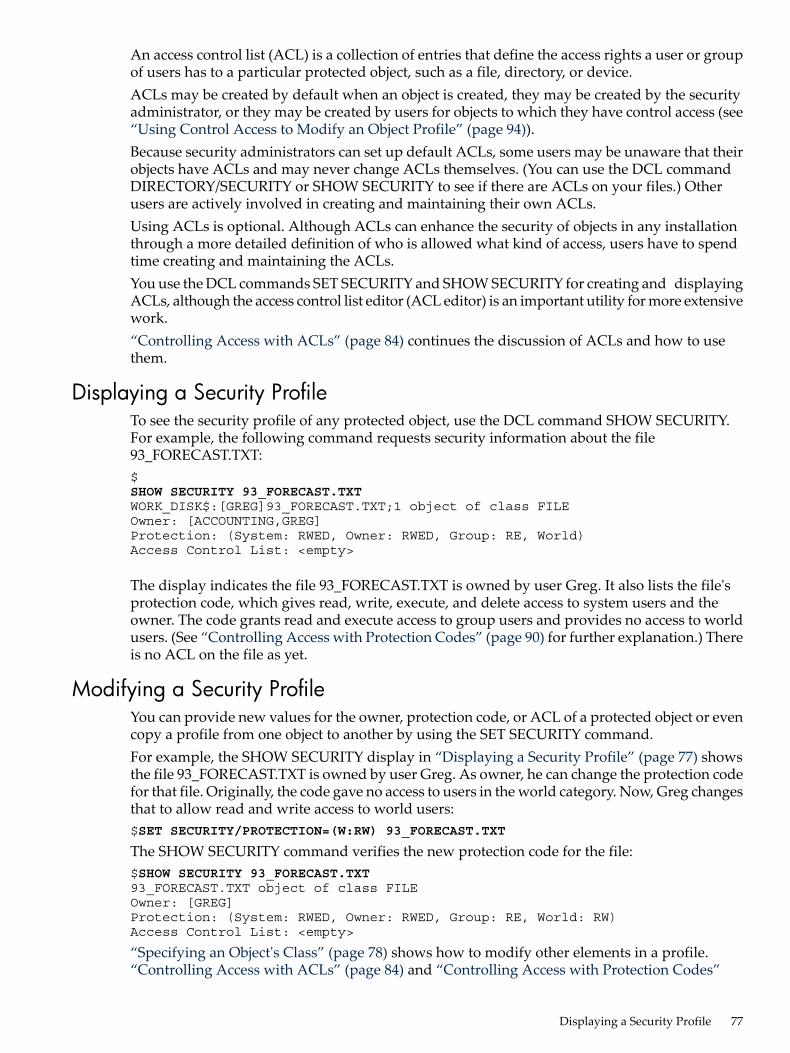
An access control list (ACL) is a collection of entries that define the access rights a user or groupof users has to a particular protected object, such as a file, directory, or device.ACLs may be created by default when an object is created, they may be created by the securityadministrator, or they may be created by users for objects to which they have control access (see“Using Control Access to Modify an Object Profile” (page 94)).Because security administrators can set up default ACLs, some users may be unaware that theirobjects have ACLs and may never change ACLs themselves. (You can use the DCL commandDIRECTORY/SECURITY or SHOW SECURITY to see if there are ACLs on your files.) Otherusers are actively involved in creating and maintaining their own ACLs.Using ACLs is optional. Although ACLs can enhance the security of objects in any installationthrough a more detailed definition of who is allowed what kind of access, users have to spendtime creating and maintaining the ACLs.You use the DCL commands SET SECURITY and SHOW SECURITY for creating and displayingACLs, although the access control list editor (ACL editor) is an important utility for more extensivework.“Controlling Access with ACLs” (page 84) continues the discussion of ACLs and how to usethem.
Displaying a Security ProfileTo see the security profile of any protected object, use the DCL command SHOW SECURITY.For example, the following command requests security information about the file93_FORECAST.TXT:$SHOW SECURITY 93_FORECAST.TXTWORK_DISK$:[GREG]93_FORECAST.TXT;1 object of class FILEOwner: [ACCOUNTING,GREG]Protection: (System: RWED, Owner: RWED, Group: RE, World)Access Control List: <empty>
The display indicates the file 93_FORECAST.TXT is owned by user Greg. It also lists the file'sprotection code, which gives read, write, execute, and delete access to system users and theowner. The code grants read and execute access to group users and provides no access to worldusers. (See “Controlling Access with Protection Codes” (page 90) for further explanation.) Thereis no ACL on the file as yet.
Modifying a Security ProfileYou can provide new values for the owner, protection code, or ACL of a protected object or evencopy a profile from one object to another by using the SET SECURITY command.For example, the SHOW SECURITY display in “Displaying a Security Profile” (page 77) showsthe file 93_FORECAST.TXT is owned by user Greg. As owner, he can change the protection codefor that file. Originally, the code gave no access to users in the world category. Now, Greg changesthat to allow read and write access to world users:$SET SECURITY/PROTECTION=(W:RW) 93_FORECAST.TXT
The SHOW SECURITY command verifies the new protection code for the file:$SHOW SECURITY 93_FORECAST.TXT93_FORECAST.TXT object of class FILEOwner: [GREG]Protection: (System: RWED, Owner: RWED, Group: RE, World: RW)Access Control List: <empty>
“Specifying an Object's Class” (page 78) shows how to modify other elements in a profile.“Controlling Access with ACLs” (page 84) and “Controlling Access with Protection Codes”
Displaying a Security Profile 77

(page 90) discuss protection codes and ACLs extensively. For a full description of the SETSECURITY and SHOW SECURITY commands, see the HP OpenVMS DCL Dictionary.
Specifying an Object's ClassGroups of objects that behave in a particular way and have a common set of attributes are dividedinto classes. Files, queues, and volumes are very common examples. As “Classes of ProtectedObjects” (page 78) shows, the operating system supports 11 classes of protected objects.When you modify the profile of an object, you need to specify the class of the object; otherwise,the SET SECURITY command assumes the object is a file.For example, the following command sequence changes the profile of an object and uses the/CLASS qualifier to identify the object LNM$GROUP as a logical name table:$ SET SECURITY /CLASS=LOGICAL_NAME_TABLE-_$ /OWNER=ACCOUNTING /PROTECTION=(S:RWCD, O:RWCD, G:R, W:R)-_$ /ACL=((IDENTIFIER=CHEKOV,ACCESS=CONTROL),-_$ (IDENTIFIER=WU,ACCESS=READ+WRITE)) LNM$GROUP
The SET SECURITY command makes the Accounting group owner of the logical name table. Itchanges the protection code to allow read, write, create, and delete access for the owner and forsystem users and to limit group and world users to read access. Finally, it creates an ACL toallow control access for user Chekov and to allow read and write access for user Wu.The SHOW SECURITY command displays the results of the changes:$ SHOW SECURITY LNM$GROUP /CLASS=LOGICAL_NAME_TABLELNM$GROUP object of class LOGICAL_NAME_TABLEOwner: [ACCOUNTING]Protection: (System: RWCD, Owner: RWCD, Group: R, World: R)Access Control List:(IDENTIFIER=[USER,CHEKOV],ACCESS=CONTROL)(IDENTIFIER=[USER,WU],ACCESS=READ+WRITE)
Table 4-2 Classes of Protected Objects
DefinitionClass Name
A resource to which the system controls access; currently, the only defined capabilityis the vector processor.
Capability
A set of 32 event flags that enable cooperating processes to post event notificationsto each other.
Common event flag cluster
A class of peripherals connected to a processor that are capable of receiving, storing,or transmitting data.
Device
Files-11 On-Disk Structure Level 2 or 5 (ODS-2 or ODS-5) files and directories.File
A shareable memory section potentially available to all processes in the same group.Group global section
A shareable table of logical names and their equivalence names for the system or aparticular group.
Logical name table
A set of jobs to be processed in a batch, terminal, server, or print job queue.Queue
A namespace controlling access to the lock manager's resources.Resource domain
A data structure containing the elements and management routines for all membersof the security class.
Security class
A shareable memory section potentially available to all processes in the system.System global section
A mass storage medium, such as a disk or tape, that is in ODS-2 or ODS-5 format.Volumes contain files and may be mounted on devices.
Volume
“Descriptions of Object Classes” (page 97) for a detailed description of each class.
78 Protecting Data
Access Required to Modify a ProfileTo modify a security profile, you need control access to the object. An ACL grants control accessexplicitly, whereas a protection code grants it implicitly to anyone who belongs to the owner orsystem category. (See the to “Using Control Access to Modify an Object Profile” (page 94) for afull description of how you can acquire control access.)
How the System Determines if a User Can Access a Protected ObjectWhen a user tries to access a protected object, the operating system calls the Check Protection($CHKPRO) system service to compare the security profile of the user process with the securityprofile of the object. In the protection check, $CHKPRO compares the user's security profileagainst the protected object's profile using the following sequence:1. Evaluate the access control list (ACL).
If the object has an ACL, the system scans it, looking for an entry that matches any of theuser's rights identifiers. If a matching access control entry (ACE) is found, the system eithergrants or denies access, and further checking of the ACL stops.When the matching ACE denies access, a user can still gain access either through the systemand owner fields of the protection code or through privilege. When an ACL has no matchingACE, the system checks all fields of the protection code.
2. Evaluate the protection code.If the ACL did not grant access and the object's owner UIC is not zero,1 the operating systemevaluates the protection code. The operating system grants or denies access based on therelationship between the user's identification code (UIC) and the object's protection code.For cases where an ACL has denied access, the system examines two fields in the protectioncode---the system and owner fields---to determine if the user is allowed access. The user canstill acquire access by being a member of the system or owner categories or by possessingprivileges. A user holding GRPPRV (with a matching group UIC) or SYSPRV is granted theaccess specified for the system category of the protection code.
3. Look for special privileges.If access was not granted by the ACL or the protection code, privileges are evaluated.Users with certain system privileges may be entitled to access regardless of the protectionoffered by the ACLs or the protection code. The bypass privilege (BYPASS), group privilege(GRPPRV), read all privilege (READALL), or system privilege (SYSPRV) amplifies theholder's access to objects. (See “How Privileges Affect Protection Mechanisms” (page 94)for more information on how privileges affect access.)
4. Consider access overrides.For some object classes, access may be granted based on alternate privileges. For example,the queue object allows full access to all queues for users with operator privilege (OPER),and the logical name table object allows access to the system table for users with systemname privilege (SYSNAM).
“Flowchart of Access Request Evaluation” (page 80) charts the sequence the operating systemfollows when it evaluates an access request and shows how the controlling components (ACLs,protection codes, privileges, and access overrides) interact.
1. When an object has an owner UIC of zero, the protection code is not checked. Users have all but control access to theobject, provided the ACL has no Identifier ACEs. If Identifier ACEs are present, then access has to be granted explicitlythrough the ACL or through privilege.
Access Required to Modify a Profile 79
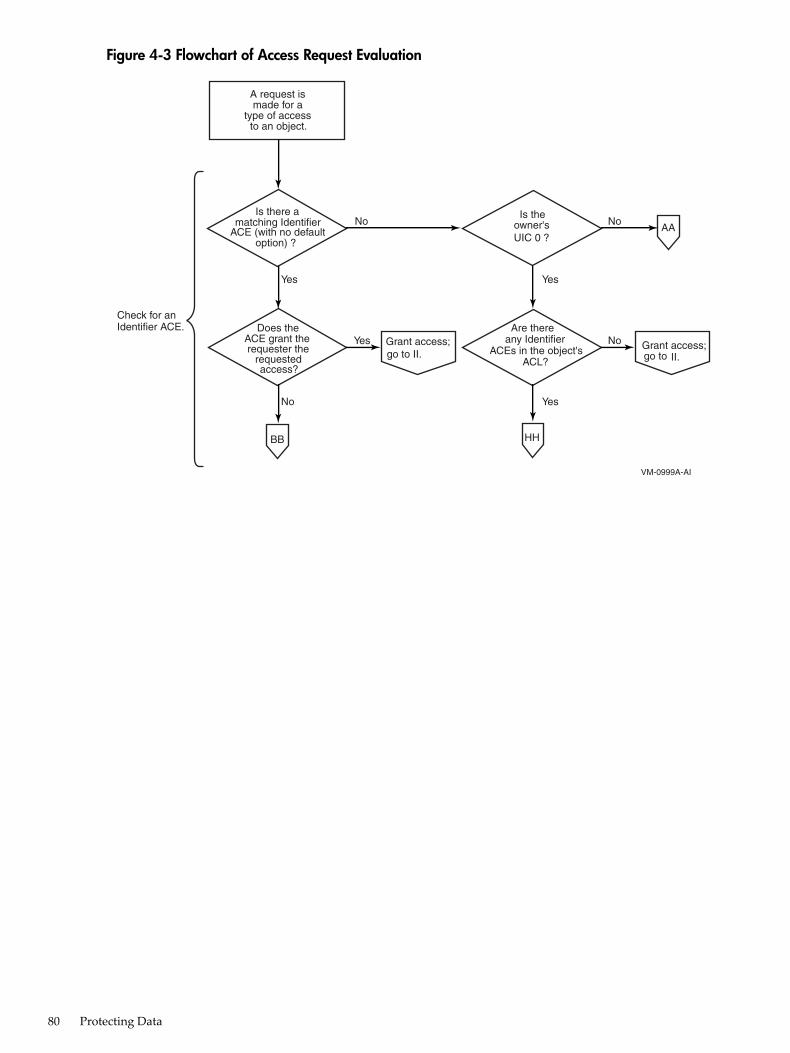
Figure 4-3 Flowchart of Access Request Evaluation
VM-0999A-AI
AANo
No
Yes
YesNo
Yes
to an object.type of access
made for aA request is
Yesgo to II.Grant access;
No
BB HH
option) ?
matching IdentifierIs there a
ACE (with no default
Grant access;go to II.
Is theowner'sUIC 0 ?
access?requested
requester theACE grant the
Does theCheck for anIdentifier ACE.
ACL?
any Identifier ACEs in the object's
Are there
80 Protecting Data
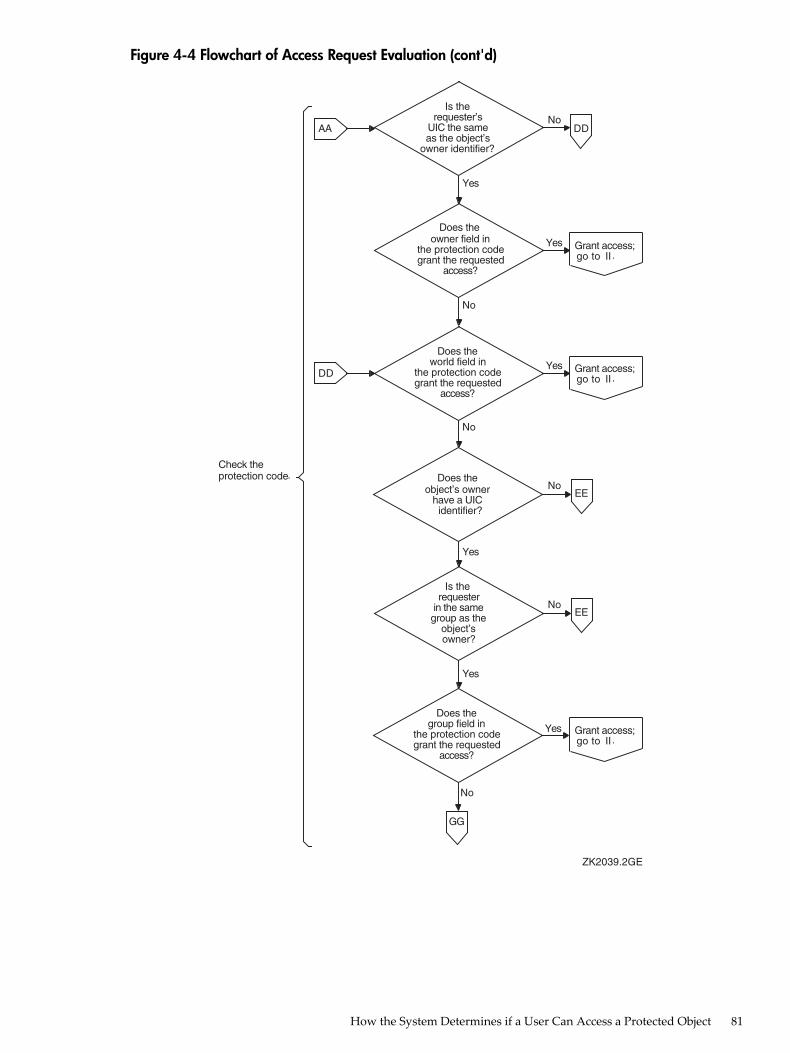
Figure 4-4 Flowchart of Access Request Evaluation (cont'd)
ZK2039.2GE
GG
No
Yes
No
No
Yes
owner identifier?as the object’sUIC the samerequester’s
Is theNo
DD
access?grant the requestedthe protection code
owner field inDoes the
Yes
access?grant the requestedthe protection code
world field inDoes the
YesDD
EENo
owner?object’s
group as thein the samerequester
Is the
Yes
access?grant the requestedthe protection code
group field inDoes the
identifierhave a UIC
object’s ownerDoes the
EENo
Yes
?
AA
Grant access;IIgo to .
Grant access;IIgo to .
Grant access;IIgo to .
Check theprotection code.
How the System Determines if a User Can Access a Protected Object 81
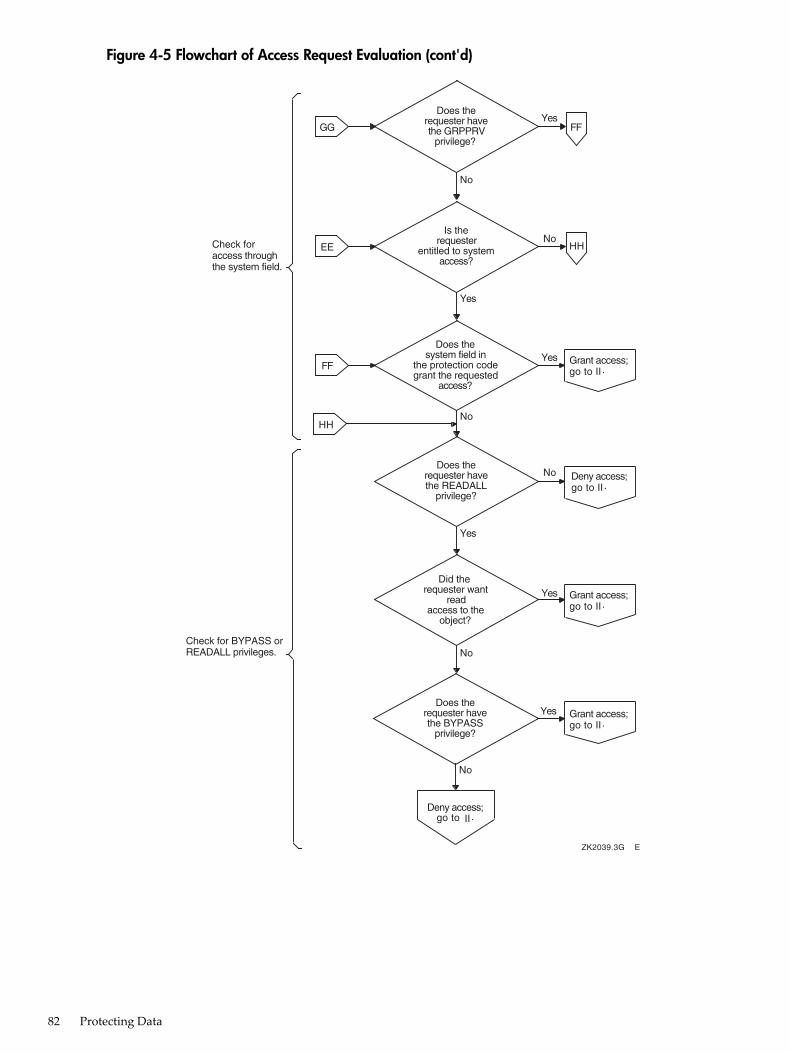
Figure 4-5 Flowchart of Access Request Evaluation (cont'd)
ZK2039.3G E
No
Yes
No
No
Yes
No
GGprivilege?
the GRPPRVrequester have
Does theYes
FF
EE
FF
access?entitled to system
requesterIs the
access?grant the requestedthe protection code
system field inDoes the
No
Yes
HH
privilege?the BYPASS
requester haveDoes the
Yes
HH
privilege?the READALLrequester have
Does theNo
object?access to the
read requester want
Did the Yes
Deny access;IIgo to .
Grant access;IIgo to .
Deny access;IIgo to .
Grant access;IIgo to .
Grant access;IIgo to .
Check foraccess throughthe system field.
Check for BYPASS orREADALL privileges.
82 Protecting Data
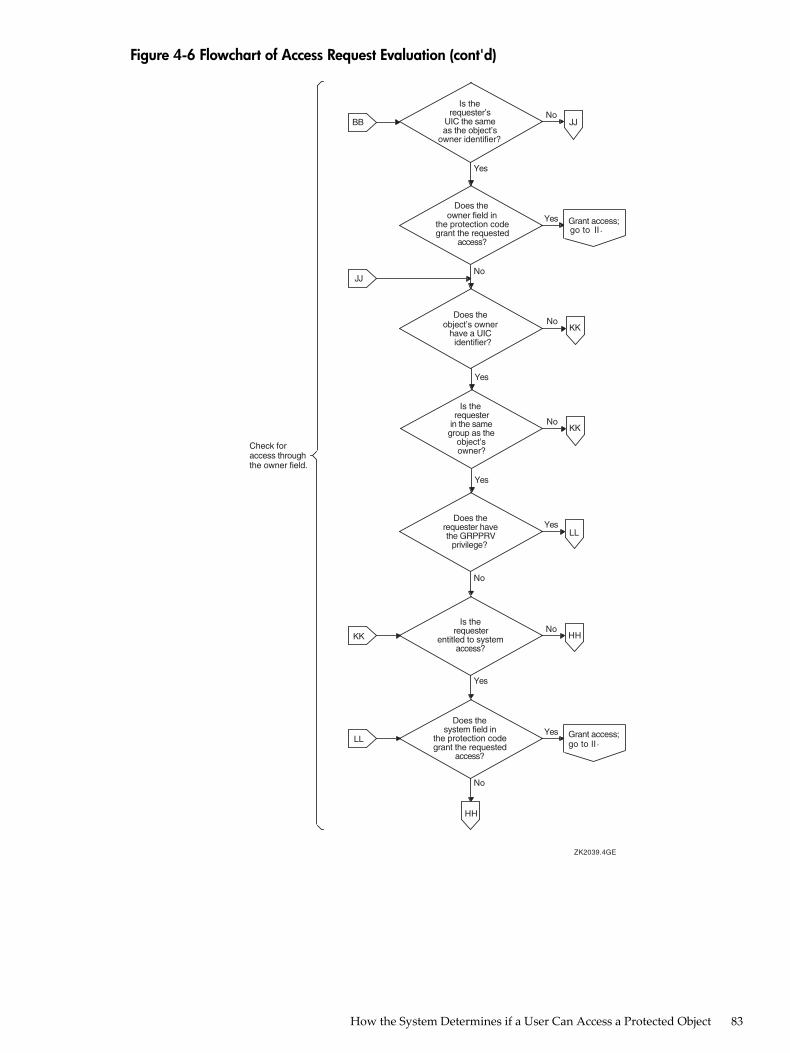
Figure 4-6 Flowchart of Access Request Evaluation (cont'd)
ZK2039.4GE
Check foraccess throughthe owner field.
No
Yes
owner identifier?as the object’sUIC the samerequester’s
Is theNo
access?grant the requestedthe protection code
owner field inDoes the
JJ
Yes Grant access;IIgo to .
BB
Yes
KKNo
owner?object’s
group as thein the samerequester
Is the
identifierhave a UIC
object’s ownerDoes the
KKNo
Yes
?
No
Yes
No
privilege?the GRPPRV
requester haveDoes the
YesLL
KK
LL
access?entitled to system
requesterIs the
access?grant the requestedthe protection code
system field inDoes the
No
Yes
HH
Grant access;IIgo to .
HH
JJ
How the System Determines if a User Can Access a Protected Object 83

Figure 4-7 Flowchart of Access Request Evaluation (cont'd)
ZK2039.5GE
No
Yes
II
Does theoverride grant
access?
Does theobject have an
access override?
Has theuser been
granted access?
Access denied;exit.
Access granted;exit.
Access denied;exit.
Access granted;exit.
No
No
Yes
Yes
Check for anyclassspecificaccess method.
Controlling Access with ACLs“Access Control List (ACL)” (page 76) introduced access control lists (ACLs) as one element ofan object's security profile. This section explores this protection mechanism in depth and providesexamples of how to use ACLs effectively to protect objects.Many users do not need to bother with ACLs because the protection codes that the operatingsystem automatically assigns to objects are often sufficient. But there are times when you needto allow specific users access to your files, for example, when you are working on a commonproject. Because ACLs are an effective mechanism for protecting critical system files, devices,volumes, and other protected objects, system managers and security administrators use ACLsmore often than general users.
Using Identifier Access Control Entries (ACEs)Each entry in an access control list (ACL) is called an access control entry (ACE). An ACL canhave many entries, each of which defines some attribute of an object. There are many kinds ofACEs, which you can read about in the HP OpenVMS System Management Utilities ReferenceManual. Of interest here is the Identifier ACE, which controls access to objects.An Identifier ACE includes one or more rights identifiers and a list of the types of access theusers holding the identifier have permission to exercise. When the system evaluates a user'srights to an object, it scans the object's ACL until it finds an Identifier ACE that matches one ormore rights identifiers held by the accessing user;2 it grants or denies access based on that entry.The types of access that are granted (or denied) by an ACE depend on the object you are protecting.For example, you can read, write to, execute, and delete a file; whereas you can perform physicaland logical operations on a device as well as reading and writing to it. Thus, a file supports read,write, execute, and delete access, and a device supports read, write, physical, and logical access.See “Descriptions of Object Classes” (page 97) for information on the types of access other objectclasses support.To create an ACL with an Identifier ACE, use the DCL command SET SECURITY in the followingformat:2. If an Identifier ACE holds the Default attribute, the ACE is ignored in access evaluations. See “Establishing an
Inheritance Scheme for Files” (page 87).
84 Protecting Data
SET SECURITY/ACL=(IDENTIFIER=identifier,ACCESS=access-type)
For example, to let user Fred read your file PROJECT-DATA.TXT, you would enter the followingcommand:$SET SECURITY/ACL=(IDENTIFIER=FRED,ACCESS=READ) PROJECT-DATA.TXT
The term FRED is the member name of a user identification code (UIC). As such, it serves as aUIC identifier for the entry that grants user Fred read access to the file PROJECT-DATA.TXT.
Granting Access to Particular UsersBecause identifiers define the rights of individual users or groups of users (see “Types ofIdentifiers” (page 72)), you use them in an Identifier ACE to define the access granted (or denied)to those who hold them. A UIC identifier easily identifies an individual user or a group of userson the system. When a group of users from diverse functional groups (and therefore, diverseUIC groups) all need access to a protected object, a security administrator creates a generalidentifier and grants the identifier to all the users who need access.For example, the following command grants user Pat, who is identified by the UIC identifier[PAT], read, write, and execute access to a file located in the ROBERTS directory on DISK1. TheACL denies Pat delete and control access because it omits them from the access statement.$SET SECURITY/ACL=(IDENTIFIER=[PAT],ACCESS=READ+WRITE+EXECUTE)-_$DISK1:[ROBERTS]JULY-SALES.TXT
A security administrator uses the Authorize utility to create a general identifier and grant it toall users who need to use it. Assume, for example, that a security administrator has created andassigned the identifier PAYROLL to employees who need access to a payroll file. For the holdersof the identifier to actually access the file, the administrator has to add an Identifier ACE to thefile. For example, the following command creates an ACL for the PAYROLL file that gives holdersof the PAYROLL identifier read access to the file:$SET SECURITY/ACL=(IDENTIFIER=PAYROLL,ACCESS=READ) PAYROLL.DAT
The order of ACEs in an ACL is important because of the operating system's processing rules.See “Ordering ACEs Within a List” (page 86) for information on ordering ACEs.
Preventing Users from Accessing an ObjectBesides providing access to objects, an Identifier ACE is often used to deny certain users accessto an object. Some sites might use an ACL to restrict users who log in from a modem or over thenetwork. Other sites might place a restricting ACE on expensive equipment or volumes containingsensitive files.To deny all access to holders of a particular identifier, use the NONE keyword as the access typename. For example, the following command denies holders of the environmental identifierDIALUP any access to the files in the PROJECT-ACCOUNTS directory:$SET SECURITY/ACL=(IDENTIFIER=DIALUP,ACCESS=NONE)-_$/CLASS=FILE PROJECT-ACCOUNTS.DIR
Denying access with the NONE keyword requires some additional planning. You must positionthe ACE correctly in the ACL, as “Ordering ACEs Within a List” (page 86) describes, becausethe operating system grants or denies access based on the first matching ACE. (Alternatively,you can eliminate any access allowed through the group or world category of the protectioncode [see “How the System Determines if a User Can Access a Protected Object” (page 79) and“Enhancing Protection for Sensitive Objects” (page 93), in particular].) Security administratorsmay also want to rescind privileges that can override the matching ACE.
Limiting Access to a DeviceAlthough a security administrator may want to provide access to a common file, such as thepayroll file described in “Granting Access to Particular Users” (page 85), the administrator would
Controlling Access with ACLs 85

want to ensure that only a limited number of people could use the letter-quality printer designatedfor printing checks. Otherwise, any holder of the payroll identifier could access the check formsthat are always loaded in the printer TTA8.Because the check printer in the current example is never used for logins and no queues aredirected to it, the security administrator can add an ACL to the printer to ensure that only oneuser, McGrey, is allowed read and write access. At the same time, the administrator must blockprinter access for all other identifier holders. The following command sequence creates such anACL:$SET SECURITY/ACL=((IDENTIFIER=MCGREY,ACCESS=READ+WRITE)-_$(IDENTIFIER=*,ACCESS=NONE))/CLASS=DEVICE TTA8
While McGrey acquires read and write access, all other users are denied access with the NONEkeyword, explained in “Preventing Users from Accessing an Object” (page 85). Still, the ACLon the printer TTA8 might not work exactly as intended until the security administrator modifiesthe printer's protection code. See “Enhancing Protection for Sensitive Objects” (page 93) fordetails.
Limiting Access to an EnvironmentWith an Identifier ACE, it is possible to provide conditional access by combining certain kindsof identifiers. A common situation is to use a UIC identifier with one of the environmentalidentifiers like batch or interactive. (For a complete list of environmental identifiers, see “Typesof Identifiers” (page 72).) Thus, a user can access a protected object only when running in batchmode or interactively but never over a dialup line. For example, the next command grants userFred both submit and manage access to a print queue, but only while he is running a batch job:$SET SECURITY/ACL=(IDENTIFIER=[FRED]+BATCH,ACCESS=SUBMIT+MANAGE)-_$/CLASS=QUEUE SYSTEM6$LPA0
Ordering ACEs Within a ListAn ACL can contain one entry or many entries. With multiple ACEs, the order of the entries iscritical because the system determines access based on the first matching ACE. The operatingsystem searches an ACL sequentially and grants a user the access specified in the first matchingACE, thus ignoring all subsequent entries. See “How the System Determines if a User Can Accessa Protected Object” (page 79) for a description of the evaluation process.When writing ACLs, keep the following principles in mind:• ACEs giving access to critical users belong at the top of the list.• ACEs giving specific access to smaller groups belong before ACEs giving access to larger
groups.• ACEs giving more access rights belong before ACEs giving fewer access rights, unless you
mean to selectively deny access.The following ACL on the directory file PROJECT-ACCOUNTS.DIR demonstrates how to orderentries in an ACL. It places ACEs giving access to critical users (Jones and Fred) at the top of thelist and places general ACEs after them. The ACE denying access goes at the end.$SET SECURITY/ACL=( -_$(IDENTIFIER=[ACCOUNTING,JONES],ACCESS=READ+WRITE+EXECUTE),-_$(IDENTIFIER=[FRED]+BATCH,ACCESS=READ+WRITE+EXECUTE),-_$(IDENTIFIER=PAYROLL,ACCESS=READ),-_$(IDENTIFIER=DIALUP,ACCESS=NONE)) PROJECT-ACCOUNTS.DIR
The ACL on the project accounts directory allows read, write, and execute access to Jones all thetime and to Fred while he is running a batch job. It gives read access to users holding thePAYROLL identifier. All users who are logging in from a modem are denied access unless theygain access through an earlier ACE. For example, Jones, Fred, or holders of the PAYROLLidentifier might be dialing in, but, because their ACE precedes the DIALUP ACE, they wouldbe granted access.
86 Protecting Data
The next example shows an ACL for the data file STAFFING.DAT. It demonstrates how youplace the entry providing the greatest amount of file access at the top of an ACL.$SET SECURITY/ACL=( -_$(IDENTIFIER=SECURITY,OPTIONS=PROTECTED,-_$ACCESS=READ+WRITE+EXECUTE+DELETE+CONTROL),-_$(IDENTIFIER=PERSONNEL,ACCESS=READ+WRITE+EXECUTE+DELETE),-_$(IDENTIFIER=SECRETARIES,ACCESS=READ+WRITE)-_$(IDENTIFIER=[PUB,*],ACCESS=READ),-_$(IDENTIFIER=NETWORK,ACCESS=NONE),-_$(IDENTIFIER=[SALES,JONES],ACCESS=NONE)) STAFFING.DAT
In this ACL, any users holding the SECURITY identifier obtain maximum access rights throughthe first ACE, and users holding the PERSONNEL identifier have the next greatest access. UserJones is prohibited from any access to the file unless Jones also happens to hold one of the generalidentifiers. (This might be an oversight on the part of the creator of the ACL.) If you want to beabsolutely certain that user Jones cannot gain access to the file, move the entry at the bottom ofthe ACL to the top.
Establishing an Inheritance Scheme for FilesYou can create a plan for controlling access to files within a directory or a directory structure,develop an appropriate ACL for the files, and then direct the operating system to automaticallyassign this ACL to new files. To do this, create an Identifier ACE with the Default attribute, andthen add the ACE to the directory file cataloging the files you want to affect. Use the OPTIONSkeyword to include the Default attribute.For example, if you want all new files in the directory [MALCOLM] to have an ACL entry thatpermits read and write access to users with the PERSONNEL identifier, you can add the followingACE to the file MALCOLM.DIR:$SET SECURITY/ACL=(IDENTIFIER=PERSONNEL,OPTIONS=DEFAULT,-_$ACCESS=READ+WRITE) [000000]MALCOLM.DIR
As a result of this ACE, any file created in the [MALCOLM] directory has the following ACL:$SHOW SECURITY APRIL_INTERVIEWS.TXTWORK_DISK$:[MALCOLM]APRIL_INTERVIEWS.TXT;1 object of class FILEOwner: [SALES,MALCOLM]Protection: ...Access Control List:(IDENTIFIER=PERSONNEL,ACCESS=READ+WRITE)[vellip]
Notice that the Default attribute does not appear within a new file's ACL but only in the ACLof directory files. However, any subdirectory created in the MALCOLM directory automaticallyhas the entry (IDENTIFIER=PERSONNEL,OPTIONS=DEFAULT,ACCESS=READ+WRITE) aspart of its ACL. In this way, the ACE is propagated throughout the entire directory tree.The ACE is not applied retroactively to existing versions of files in MALCOLM.DIR. To attachan ACE to existing files, you can use the /DEFAULT qualifier, described in “Restoring a File'sDefault Security Profile” (page 93), or use the following command:$SET SECURITY/ACL=(IDENTIFIER=PERSONNEL,ACCESS=READ+WRITE)-_$[MALCOLM]*.*;*
Any ACE with a Default attribute controls only the propagation of the ACE; it has no effect onaccess control. To control access to the directory as well as all its files, you have to insert twoACEs in the directory's ACL, as follows:$SET SECURITY/ACL=-_$((IDENTIFIER=PERSONNEL,ACCESS=READ+WRITE),-_$(IDENTIFIER=PERSONNEL,OPTIONS=DEFAULT,ACCESS=READ+WRITE))-_$[000000]MALCOLM.DIR
Controlling Access with ACLs 87
Displaying ACLsThe DCL command SHOW SECURITY displays an object's ACL. When working with objectsother than files, you must supply a class name as well as the object name. For example, thefollowing display shows the security attributes of a device called PPA0. It is owned by theoperating system, and its protection code gives full access (read, write, physical, and logical) tousers in the system and owner categories but no access to group and world users; its ACL givescontrol access to user Svensen.$ SHOW SECURITY /CLASS=DEVICE PPA0:_ACCOUNTS$PPA0: object of class DEVICEOwner: [SYSTEM]Protection: (System: RWPL, Owner: RWPL, Group, World)Access Control List:(IDENTIFIER=[ADMIN,SVENSEN],ACCESS=CONTROL)
There are many other ways of displaying ACLs. The access control list editor (ACL editor) is auseful tool for extensive work with ACLs; see the ACL editor documentation in theHPOpenVMSSystem Management Utilities Reference Manual. But any of the following DCL commands displayACLs:
SHOW SECURITY
DIRECTORY/ACL
DIRECTORY/SECURITY
DIRECTORY/FULL
SHOW LOGICAL/FULL/STRUCTURE
SHOW DEVICE/FULL
SHOW QUEUE/FULL
Applications sometimes add a Hidden attribute to an ACE to indicate that the ACE should bechanged only by the application that adds the ACE. Unless users have the SECURITY privilege,they cannot display a hidden ACE by using DCL commands. The ACL editor does display ACEsholding the Hidden attribute but only to show its relative position within the ACL; however,unauthorized users cannot edit the ACE.Sometimes you see other kinds of ACEs, unrelated to access control, in an ACL. For example, ifthe security administrator places a security-auditing ACE on the LN03$PRINT queue, you willsee an ACE at the top of the list that has the format (AUDIT=SECURITY,ACCESS=access-types ).Such an ACE is part of the security-auditing system and has no effect on access, so you can ignoreit.
Adding ACEs to an Existing ACL“Granting Access to Particular Users” (page 85) through “Limiting Access to an Environment”(page 86) discuss how to add entries to an empty ACL with the DCL command SET SECURITY.To modify ACLs extensively, use the ACL editor; however, in many cases the SET SECURITYcommand is more appropriate. This section and those that follow describe how to use SETSECURITY to change an ACL.$SET SECURITY/CLASS=QUEUE/ACL=(IDENTIFIER=WRITERS,-_$ACCESS=READ+WRITE) LN03$PRINT
To add more entries to an ACL, you can use the /ACL qualifier with the SET SECURITY commandand specify the new ACEs. For example, to give the writers access to the print queue LN03$PRINT,use the following command:By default, the system places the new ACE at the top of the ACL, as you see in the followingSHOW SECURITY display:
88 Protecting Data
$ SHOW SECURITY /CLASS=QUEUE LN03$PRINT_LN03$PRINT: object of class QUEUEOwner: [SYSTEM]Protection: (System: RWPL, Owner: RWPL, Group, World)Access Control List:(IDENTIFIER=WRITERS,ACCESS=READ+WRITE)(IDENTIFIER=[PUB,*],ACCESS=READ)(IDENTIFIER=NETWORK,ACCESS=NONE)
Because the default behavior for SET SECURITY is to place a new ACE at the top of an ACL, youneed to use the /AFTER qualifier if you want to put the ACE in another position. For example,to position the TRADERS ACE in the queue's ACL after the WRITERS ACE, use the followingcommand:$SET SECURITY/CLASS=QUEUE/ACL=(IDENTIFIER=TRADERS,ACCESS=WRITE)-_$/AFTER=(IDENTIFIER=WRITERS,ACCESS=READ+WRITE) LN03$PRINT
The resulting display confirms the effectiveness of the /AFTER qualifier. The new ACE is putsecond in the list.$ SHOW SECURITY /CLASS=QUEUE LN03$PRINT_LN03$PRINT: object of class QUEUEOwner: [SYSTEM]Protection: (System: RWPL, Owner: RWPL, Group, World)Access Control List:(IDENTIFIER=WRITERS,ACCESS=READ+WRITE)(IDENTIFIER=TRADERS,ACCESS=WRITE)(IDENTIFIER=[PUB,*],ACCESS=READ)(IDENTIFIER=NETWORK,ACCESS=NONE)
Deleting an ACLThe /DELETE qualifier on the SET SECURITY command erases an ACL. Depending on how thequalifier is used, you can delete all or part of an ACL. For example, the following commanddeletes a disk's ACL:$SET SECURITY/CLASS=DEVICE/ACL/DELETE DUA0
An ACE can be protected against inadvertent deletion if it holds the Protected attribute. Toeliminate a protected ACE, you need to delete it explicitly or use the /DELETE=ALL qualifier onthe SET SECURITY/ACL command.
Deleting ACEs from an ACLYou can eliminate a subset of an ACL by listing the unwanted ACEs with the /ACL qualifier andincluding the /DELETE qualifier. For example, the following command deletes the ACEs givingholders of the TRADERS identifier and the NETWORK identifier write access to volume DBA0:$SET SECURITY/CLASS=VOLUME/ACL=-_$((IDENTIFIER=TRADERS,ACCESS=WRITE),-_$(IDENTIFIER=NETWORK,ACCESS=WRITE))/DELETE DBA0:
Replacing Part of an ACLTo replace one contiguous set of ACEs within an ACL with another set, specify the new ACEswith the /REPLACE qualifier and the ACEs to be deleted with the /ACL qualifier, as follows:$SET SECURITY/CLASS=VOLUME/ACL=(IDENTIFIER=TRADERS,ACCESS=WRITE)-_$/REPLACE=((IDENTIFIER=RESEARCH,ACCESS=WRITE)-_$(IDENTIFIER=STATE_DEPARTMENT,ACCESS=READ+WRITE),-_$(IDENTIFIER=ENERGY_DEPARTMENT,ACCESS=READ+WRITE)-_$DBA0:
The TRADERS ACE specified by /ACL is deleted. Following the deletion, the ACEs specified bythe /REPLACE qualifier (RESEARCH, STATE_DEPARTMENT, ENERGY_DEPARTMENT) areinserted at the location of the old ACE.
Controlling Access with ACLs 89
Restoring a File's Default ACLIf you want to restore the default ACL to a file, you can use the /DEFAULT qualifier to the SETSECURITY command. This qualifier regenerates the full security profile for a file. See “Restoringa File's Default Security Profile” (page 93) for a description.
Copying an ACLYou can copy the security profile of one object to another by using the /LIKE qualifier to the SETSECURITY command. For example, you can save a complicated ACL on a nonpermanent objectlike a logical name table by copying it to a permanent object such as a file. Some administratorscreate a file to serve as a template in copy operations. This way, they can easily transfer an ACLfrom one object to another. For example, the following command copies the ACL from fileACL_TEMPLATE.TXT to the logical name table LNM$GROUP:$ SET SECURITY/LIKE=NAME=ACL_TEMPLATE.TXT-_$ /COPY_ATTRIBUTE=ACL/CLASS=LOGICAL_NAME_TABLE LNM$GROUP
If you add the /COPY_ATTRIBUTE qualifier to the /LIKE qualifier, then you can copy one ortwo elements rather than the complete profile. Notice the ACL on the following directory,KITE_FLYING:$ SHOW SECURITY [000000]KITE_FLYING.DIR;1 -WORK_DISK$:[000000]KITE_FLYING.DIR;1 object of class FILE
Owner: [PROJECTX]Protection: (System: RWED, Owner: RWED, Group:, World)Access Control List:IDENTIFIER=PROJECTX,ACCESS=READ+WRITE+EXECUTEIDENTIFIER=PROJECTX,OPTIONS=DEFAULT,ACCESS=READ+WRITE+EXECUTE
The following command copies the ACL from directory KITE_FLYING to the directoryKITE_DESIGNS:$ SET SECURITY/LIKE=NAME=KITE_FLYING.DIR;1 -_$ /COPY_ATTRIBUTE=ACL KITE_DESIGNS.DIR;1$ SHOW SECURITY [000000]KITE_DESIGNS.DIR;1 -WORK_DISK$:[000000]KITE_DESIGNS.DIR;1 object of class FILE
Owner: [ENGINEERING]Protection: (System: RWED, Owner: RWED, Group:R, World:R)Access Control List:IDENTIFIER=PROJECTX,ACCESS=READ+WRITE+EXECUTEIDENTIFIER=PROJECTX,OPTIONS=DEFAULT,ACCESS=READ+WRITE+EXECUTE
The SET SECURITY/LIKE command does not always duplicate the entire ACL of the sourceobject. For example, the command does not copy any ACEs from the source ACL that have theNopropagate attribute. The command also does not overwrite protected ACEs. It preservesprotected ACEs on the target object and adds them to the ACL being copied. (For example,applications often use a special type of protected ACE to explain how to display file data correctly,and these ACEs have to be preserved.)See the ACL editor documentation in the HP OpenVMS System Management Utilities ReferenceManual for details on the different attributes an ACE can have, and also see the HP OpenVMSProgramming Concepts Manual for a description of all ACE types.
Controlling Access with Protection CodesA protection code controls the type of access allowed (or denied) to a particular user or groupof users. Access types identify the capabilities required to perform an operation on a protectedobject. The operating system can have multiple access requirements to complete an operation(see “Enabling Auditing for a Class of Objects” (page 95)). A user can gain access to an object assoon as the operating system finds a category within the protection code for which the userqualifies that allows the access requested (provided an ACL does not deny access).
90 Protecting Data
Format of a Protection CodeA protection code has the following format:[user category: list of access allowed (, user category: list of accessallowed,...)]
user categoryUser categories include system (S), owner (O), group (G), and world (W). Each category can beabbreviated to its first character. Categories have the following definitions:• System: Members of this category can include any of the following:
— Users with low group numbers, usually from 1 to 10 (octal). These group numbers aregenerally for system managers, security administrators, and system programmers. (Theexact range of system group numbers is determined by the security administrator inthe setting of the system parameter MAXSYSGROUP. It can range as high as 37776(octal).)
— Users with the SYSPRV privilege.— Users with the GRPPRV privilege whose UIC group matches the UIC group of the
object's owner.— In access requests to files on a disk volume, users whose UIC matches the UIC of the
volume's owner.• Owner: The user with the same UIC as the user who currently owns the object. In general,
the creator of an object is entitled to owner access unless explicit action is taken to securethe object from its creator.
• Group: All users who are in the same UIC group as the object's owner.• World: All users, including those in the first three categories.When specifying more than one user category, separate the categories with commas, and enclosethe entire code in parentheses. You can specify user categories and access types in any order(although the system always displays them in the order system, owner, group, world).To deny all access to a user category, specify the user category without any access types. Omitthe colon after the user category when you are denying access to a category of users.Omitting a category entirely means access to the category is unspecified. The current accessallowed that category of user remains unchanged. If the protection code applies to an objectbeing created (for example, with a COPY/PROTECTION command), the omitted category isassigned the default value.access-listAccess types are object-dependent and are described in “Descriptions of Object Classes” (page 97).For files, the access types include read (R), write (W), execute (E), and delete (D). The access typeis assigned to each user category and is separated from its user category by a colon (:), for example,SET SECURITY/PROTECTION=(S:RWE,O:RWE,G:RE,W).
Types of Access in a Protection CodeEach category of user can be allowed or denied different types of access. The exact type isdependent on the object being protected. Each object class defines access types appropriate forits class and representative of the ways in which users operate on the data. For example, whilethe file object supports read, write, execute, and delete access, devices (such as terminals, printers,and disks) support read, write, physical I/O, and logical I/O access. See “Descriptions of ObjectClasses” (page 97) for a listing of the access types each object class supports.All protected objects also support control access, which allows a user to examine and modifythe security elements (ACL, protection code, UIC) and possibly other attributes of the object.Control access is explicitly stated in an ACL but never appears in the UIC-based protection code.All users who qualify for the system or owner categories of a protection code have control access.
Controlling Access with Protection Codes 91
Users in the group and world categories never receive control access through a protection code,but they could receive access through an ACL. See “Using Control Access to Modify an ObjectProfile” (page 94) for more information.The capabilities conveyed by the access types read, write, execute, delete, and control varydepending on the situation where they apply. For example, execute access permits differentoperations depending on whether it is granted for file access or directory access. “Descriptionsof Object Classes” (page 97) explains the capabilities that each access type allows for each typeof protected object.
Processing a Protection CodeWhen the system evaluates a protection code, it looks first at the owner field, then at the worldfield, the group field, and finally the system field. As soon as a user qualifies as a member of thecategory and that category grants the necessary access, the operating system stops processingthe code (see “Flowchart of Access Request Evaluation” (page 80)).The following protection code specifies that users in the system and owner categories have read(R), write (W), execute (E), and delete (D) access, while users in the group and world categorieshave only read and execute access:$SET SECURITY/PROTECTION=(SYSTEM:RWED, OWNER:RWED, GROUP:RE, WORLD:RE)-_$TAXES_91.DAT
When you want to deny access to a user category, you must deny access to all the outermostcategories. As “Format of a Protection Code” (page 91) shows, any user process or applicationqualifies for world access. The group category is more restrictive yet not as restrictive as theowner and system categories.The following protection code, for example, appears to deny delete access to the owner category:$SHOW SECURITY TAXES_91.DAT
WORK_DISK$:[GREG]TAXES_91.DAT;1 object of class FILE
Owner: [FINANCE,GREG] Protection: (System: RWED, Owner: RW, Group:RW, World:RWED) Access Control List: ...
However, the owner of the file can still delete the file. Although delete access is not allowedthrough the owner category, the system continues to check the remaining categories for permissionto grant access. Because the owner also fits in the world category (which applies to all users) andthe world category is permitted delete access, the system grants delete access to the owner.
Changing a Protection CodeYou can change the UIC-based protection on an existing object with the SET SECURITY command.The following command modifies the protection code of the file SURVEY.DIR so that anyone inthe system and owner categories has read, write, execute, and delete access; whereas membersof the group and world categories have read and execute access:$SET SECURITY/PROTECTION=(SYSTEM:RWED,OWNER:RWED, -_$GROUP:RE,WORLD:RE) SURVEY.DIR
Whenever you omit a category from a protection code, the current access remains unchanged.For example, consider the protection code for the file RECORDS_91.DAT:$SHOW SECURITY RECORDS_91.DAT
WORK_DISK$:[GREG]RECORDS_91.DAT object of class FILE Owner: [VMS,GREG] Protection: (System: RWED, Owner: RWED, Group: RWED, World: RE)
As it stands, the file RECORDS_91 allows read, write, execute, and delete access to users in thesystem, owner, and group categories; it allows read and execute access to users in the worldcategory. The following DCL command resets the protection code for RECORDS_91.DAT todeny write and delete access to the group category and to deny all access to the world category:
92 Protecting Data
$SET SECURITY/PROTECTION=(G:RE,W) RECORDS_91.DAT
The next command confirms the modified protection code. It shows that the system and ownercategories of users continue to hold read, write, execute, and delete access, while group usershave only read and execute access and world users have no access.$SHOW SECURITY RECORDS_91.DAT
WORK_DISK$:[GREG]RECORDS_91.DAT object of class FILE Owner: [VMS,GREG] Protection: (System: RWED, Owner: RWED, Group: RE, World:)
Enhancing Protection for Sensitive Objects“Limiting Access to a Device” (page 85) describes how to place an ACL on an important printerso that only one user can have access to it. Before the ACL can be effective, however, the securityadministrator has to eliminate all access provided through the printer's protection code by usingthe following command:$SET SECURITY/PROTECTION=(S,O,G,W)/CLASS=DEVICE TTA8:
The security administrator then uses an ACL to assign access explicitly.For example, to limit access to a queue, you can remove submit access for the world category.Then you can set up an ACL that specifies which users (from the world category) are permittedto submit jobs to the queue. The following command stipulates that only holders of the identifierPROJECTX can submit jobs to the LN03$PRINT queue:$SET SECURITY/CLASS=QUEUE/PROTECTION=(W) -_$/ACL=(IDENTIFIER=PROJECTX,ACCESS=SUBMIT) -_$LN03$PRINT
Important files frequently need special protection. You can prevent users from seeing the contentsof a directory by denying them read access. To further protect the files, you can add a DefaultProtection ACE to the directory file, as “Providing a Default Protection Code for a DirectoryStructure” (page 93) describes.
Providing a Default Protection Code for a Directory StructureTo specify default protection for new files in a particular directory, place a Default ProtectionACE in the ACL of the directory file. The Default Protection ACE affects files that are subsequentlycreated in the directory and in any subdirectories under that directory unless protection isspecified for one of those files individually. This ACE type has the following format:DEFAULT_PROTECTION[,options],protection-code)
For example, the following ACE specifies that users in the system and owner categories haveread, write, execute, and delete access to any files subsequently created in the directory and thatgroup and world users have no access:$SET SECURITY/ACL=(DEFAULT_PROTECTION,S:RWED,O:RWED,G,W) ARCHIVE.DIR
Be aware that the default protection is associated only with newly created files -- not existingfiles in the current directory and its subdirectories. If you add a Default Protection ACE to adirectory file and want the same protection applied to existing files, you must explicitly changethe protection with the following command:$SET DEFAULT [ARCHIVE]$SET SECURITY/PROTECTION=(S:RWED,O:RWED,G,W) [...]*.*;*
Restoring a File's Default Security ProfileThe /DEFAULT qualifier of the SET SECURITY command regenerates the security profile of afile. The /DEFAULT qualifier resets the protection code, the ACL, and the owner elements of thefile to the defaults specified by the file's parent directory (that is, to the directory's default ACL,default protection ACE, if any, and owner UIC).
Controlling Access with Protection Codes 93
The profile is recreated according to the following rules:• The protection code is propagated from the Default Protection ACE on the directory (if one
exists), or else it is propagated from the process default.• The ACL is propagated from the parent directory for those ACEs that have the Default
attribute.• The owner is set to the owner of the parent directory. (Be aware that modifying a file's owner
generally requires privilege; see “Types of Access” (page 104).)With subdirectory files, SET SECURITY assigns the owner, protection, and ACL elements of theparent directory.SET SECURITY does not copy any ACE on the source object if it holds the Nopropagate attribute,nor does it change any ACE on the target object if it holds the Protected attribute. To apply newelements to all versions of the file, specify ;* in the object name.See the “Profile Assignment” (page 105) for more information on propagation rules.
Understanding Privileges and Control AccessAlthough an object can be carefully protected by an ACL and a protection code, a user can stillgain access through the use of privilege or control access.
How Privileges Affect Protection MechanismsSecurity administrators can assign privileges to users when they create or modify user accounts.The system privileges READALL and BYPASS affect user access, regardless of the access dictatedby an ACL for the object or by other elements in its security profile. The privileges SYSPRV andGRPPRV are controlled through the system category of the protection code. The privileges havethe following meanings:
A user with BYPASS privilege receives all types of access to the object, regardless of itsprotection.
BYPASS
A user with GRPPRV privilege whose UIC group matches the group of the owner ofthe object receives the same access accorded to users in the system category. Thus, theuser with GRPPRV privilege is able to manage any of the group's objects.
GRPPRV
A user with READALL privilege receives read access to the object, even if that access isdenied by the ACL and the protection code. In addition, the user can receive any otheraccess granted through the protection code.
READALL
A user with SYSPRV privilege receives the access accorded to users in the systemcategory.
SYSPRV
When you define ACLs or protection codes for your objects, remember that users with amplifiedprivileges are entitled to special access to objects throughout the system. For example, there isno way to stop a user with the BYPASS privilege from accessing your files. Users with GRPPRVprivilege have the power to perform many system management functions for other members oftheir UIC group. Protection of your objects depends on the judgment of your securityadministrator in granting these privileges.
Using Control Access to Modify an Object ProfileAny user with control access to an object can change its protection code and ACL and therebygain access to an object. For all object classes but files, control access also allows a user to modifythe object's owner. To modify the owner of a file generally requires privilege (see “Types ofAccess” (page 104)).
94 Protecting Data
You obtain control access in any of the following ways:• You hold an identifier to which the object's ACL gives control access.• You have the same UIC as the owner of the object.• You qualify as a member of the system user category, and the object has an owner with a
nonzero UIC. For example, you hold GRPPRV (with a matching group UIC) or SYSPRV.(See the “Controlling Access with Protection Codes” (page 90) for a full description of systemusers.)
• You hold BYPASS privilege.Sometimes object classes allow control access through other means. See the “Object-SpecificAccess Considerations” (page 95) and to the individual descriptions of classes in “Descriptionsof Object Classes” (page 97) for any special conditions that may apply.
Object-Specific Access ConsiderationsFor some objects, access can be granted either by a special privilege (beyond those listed in “HowPrivileges Affect Protection Mechanisms” (page 94)) or by an all-inclusive type of access. Thisis particularly true of a queue. A user with operator (OPER) privilege is granted all types ofaccess to a queue. A user with manage access implicitly possesses the three other types of queueaccess: read, submit, and delete. “Descriptions of Object Classes” (page 97) lists each object classwith its access types and meanings and any special privilege.
Auditing Protected ObjectsWhenever a process uses an object or modifies its security profile (see “Modifying a SecurityProfile” (page 77)), the system can send an alarm to an operator terminal or write a message tothe audit log file. By reading the log file, a security administrator can review system activity tosee how protected objects are being used, when they are being used, and who is using them.Exactly which type of information is reported through the auditing system depends on how thesecurity administrator defines the site's requirements. If system administrators choose to haveobject use audited, they can enable auditing for the appropriate categories of events.The operating system can filter security-related events and send system administrators messagesonly when objects are accessed in certain ways. Sites are often more interested in the privilegeduse of a file or the failure to access a file than in every file access. Such a site can request auditingmessages whenever a process fails in accessing a file, but not when it is successful. The systemcan report how the process exercised, or failed to exercise, the right to access the object in thefirst place: through a protection code, an ACE, or a privilege.
Kinds of Events the System AuditsEach object class has its own auditing profile, described in “Descriptions of Object Classes”(page 97), and so it is possible to receive more information on some classes of objects than onothers. For any object, the system can send an auditing message whenever a user or applicationaccesses the object or modifies its security elements. In some instances, the system can send anotification when a process creates an object, stops using it or deletes it.
Enabling Auditing for a Class of ObjectsWhen you are auditing object access events, keep in mind that the operating system may checka user's right to an object several times during a single operation. A file operation, for example,can involve checks for both directory and file access. Before a user deletes a file, the system checksfor delete access to the file and write access to the directory.For this reason, it is best for a security administrator to enable auditing for all types of objectaccess events. For example, to track all instances where a user tries to access a file but fails, asecurity administrator would use the /ENABLE=ACCESS=FAILURE=ALL qualifier to the SETAUDIT command.
Auditing Protected Objects 95
For object classes that support deaccess auditing (for example, the file class), once a process gainsaccess to an object, the system does not audit subsequent access attempts to the object unless theprocess attempts an operation that is incompatible with the access modes previously granted.When this occurs, the system performs an additional protection check that is audited. This accesswindow continues until the object is deaccessed (for example, the file is closed).
Adding Security-Auditing ACEsRather than audit an entire class of objects, security administrators and users with control accessto an object can single out a specific object for auditing by attaching an Alarm or Audit ACE toit (see “Adding Access Control Entries to Sensitive Files” (page 63)). Although you can add anauditing ACE to any file that you own or have control access to, it is best to consult your securityadministrator before doing so. As with object classes, the security administrator has to enablethe ACL auditing category before any auditing messages are generated.
96 Protecting Data
5 Descriptions of Object ClassesThis chapter describes the unique features of each class of protected object: files, volumes, devices,and so on. Each class description contains information on the following topics:
DescriptionTopic
A summary of naming conventions for objects in the class.Naming rules
Access types supported for the class. Boldface type indicates the abbreviation of anaccess type, such as R for read access.
Types of access
The default profile applied to new objects of the class. Site security administrators canmodify the default profiles. Use the SHOW SECURITY command to display currenttemplate settings.
Template profile
Privileges, if any, required for certain operations on the object.Privilege requirements
Events that trigger an audit event message (assuming the event class is enabled).Kinds of auditingperformed
Storage of security profiles. Explains if the security elements are stored from one systemstartup to another and if so, where the elements are stored.
Permanence of the object
If a given topic does not apply to a class, the topic is omitted.
CapabilitiesA capability is a resource to which a site controls access, using the standard access controlmechanisms. The ability to execute vector instructions is a capability object. Only sites with avector processor have such an object.
Naming RulesThe only valid name for a capability object is VECTOR.
Types of AccessThe capability class supports the following types of access:
Gives a process the right to make use of the vector processorUse
Gives you the right to change the protection and ownership elements of the objectControl
Template ProfileThe capability class provides the following template profile:
Protection CodeOwner UICTemplate Name
S:U,O:U,G:U,W:U[SYSTEM]DEFAULT
Modifications to the VECTOR template take effect the next time you boot the system. If you wantto change the elements of the VECTOR object after the system is booted, you must modify theobject directly. For example:$SET SECURITY/CLASS=CAPABILITY/PROTECTION=(S:U,O:U,G:U,W) VECTOR
Capabilities 97
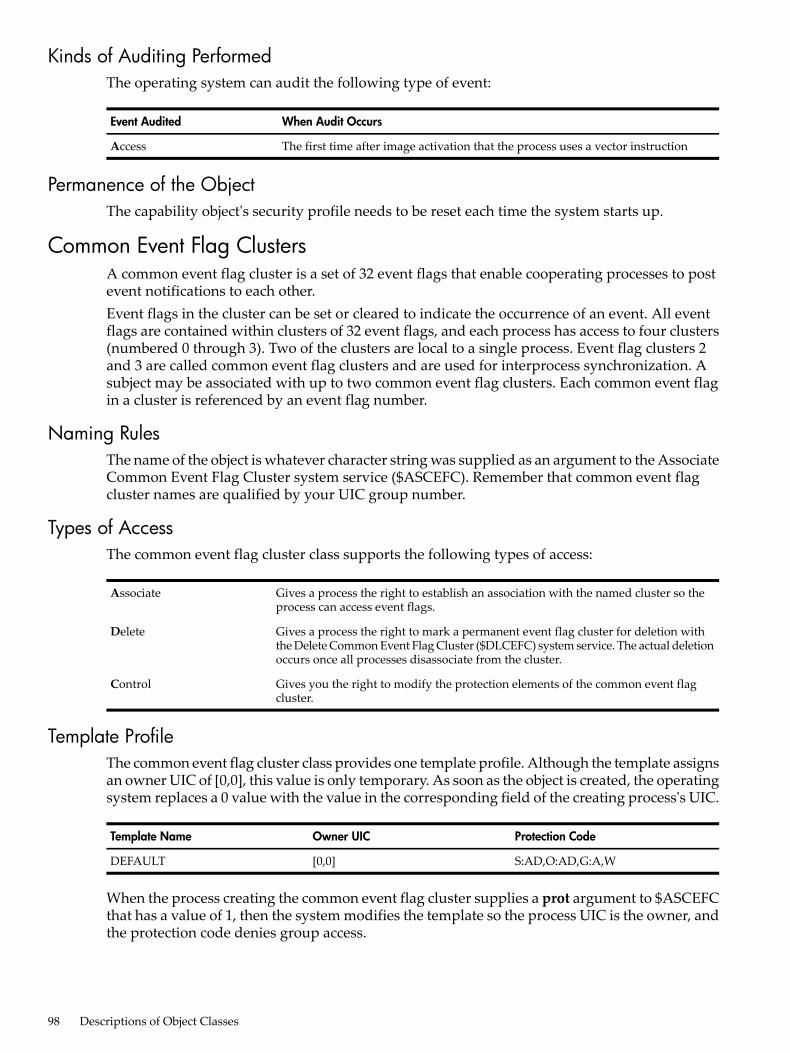
Kinds of Auditing PerformedThe operating system can audit the following type of event:
When Audit OccursEvent Audited
The first time after image activation that the process uses a vector instructionAccess
Permanence of the ObjectThe capability object's security profile needs to be reset each time the system starts up.
Common Event Flag ClustersA common event flag cluster is a set of 32 event flags that enable cooperating processes to postevent notifications to each other.Event flags in the cluster can be set or cleared to indicate the occurrence of an event. All eventflags are contained within clusters of 32 event flags, and each process has access to four clusters(numbered 0 through 3). Two of the clusters are local to a single process. Event flag clusters 2and 3 are called common event flag clusters and are used for interprocess synchronization. Asubject may be associated with up to two common event flag clusters. Each common event flagin a cluster is referenced by an event flag number.
Naming RulesThe name of the object is whatever character string was supplied as an argument to the AssociateCommon Event Flag Cluster system service ($ASCEFC). Remember that common event flagcluster names are qualified by your UIC group number.
Types of AccessThe common event flag cluster class supports the following types of access:
Gives a process the right to establish an association with the named cluster so theprocess can access event flags.
Associate
Gives a process the right to mark a permanent event flag cluster for deletion withthe Delete Common Event Flag Cluster ($DLCEFC) system service. The actual deletionoccurs once all processes disassociate from the cluster.
Delete
Gives you the right to modify the protection elements of the common event flagcluster.
Control
Template ProfileThe common event flag cluster class provides one template profile. Although the template assignsan owner UIC of [0,0], this value is only temporary. As soon as the object is created, the operatingsystem replaces a 0 value with the value in the corresponding field of the creating process's UIC.
Protection CodeOwner UICTemplate Name
S:AD,O:AD,G:A,W[0,0]DEFAULT
When the process creating the common event flag cluster supplies a prot argument to $ASCEFCthat has a value of 1, then the system modifies the template so the process UIC is the owner, andthe protection code denies group access.
98 Descriptions of Object Classes
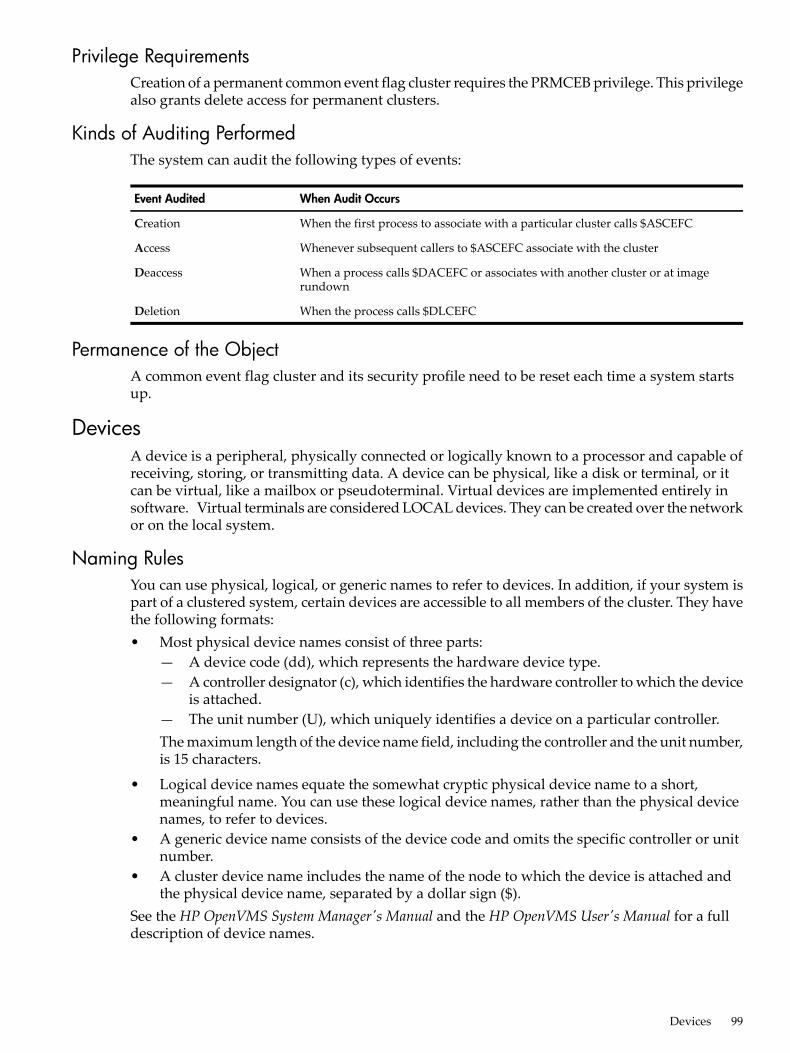
Privilege RequirementsCreation of a permanent common event flag cluster requires the PRMCEB privilege. This privilegealso grants delete access for permanent clusters.
Kinds of Auditing PerformedThe system can audit the following types of events:
When Audit OccursEvent Audited
When the first process to associate with a particular cluster calls $ASCEFCCreation
Whenever subsequent callers to $ASCEFC associate with the clusterAccess
When a process calls $DACEFC or associates with another cluster or at imagerundown
Deaccess
When the process calls $DLCEFCDeletion
Permanence of the ObjectA common event flag cluster and its security profile need to be reset each time a system startsup.
DevicesA device is a peripheral, physically connected or logically known to a processor and capable ofreceiving, storing, or transmitting data. A device can be physical, like a disk or terminal, or itcan be virtual, like a mailbox or pseudoterminal. Virtual devices are implemented entirely insoftware. Virtual terminals are considered LOCAL devices. They can be created over the networkor on the local system.
Naming RulesYou can use physical, logical, or generic names to refer to devices. In addition, if your system ispart of a clustered system, certain devices are accessible to all members of the cluster. They havethe following formats:• Most physical device names consist of three parts:
— A device code (dd), which represents the hardware device type.— A controller designator (c), which identifies the hardware controller to which the device
is attached.— The unit number (U), which uniquely identifies a device on a particular controller.The maximum length of the device name field, including the controller and the unit number,is 15 characters.
• Logical device names equate the somewhat cryptic physical device name to a short,meaningful name. You can use these logical device names, rather than the physical devicenames, to refer to devices.
• A generic device name consists of the device code and omits the specific controller or unitnumber.
• A cluster device name includes the name of the node to which the device is attached andthe physical device name, separated by a dollar sign ($).
See the HP OpenVMS System Manager's Manual and the HP OpenVMS User's Manual for a fulldescription of device names.
Devices 99
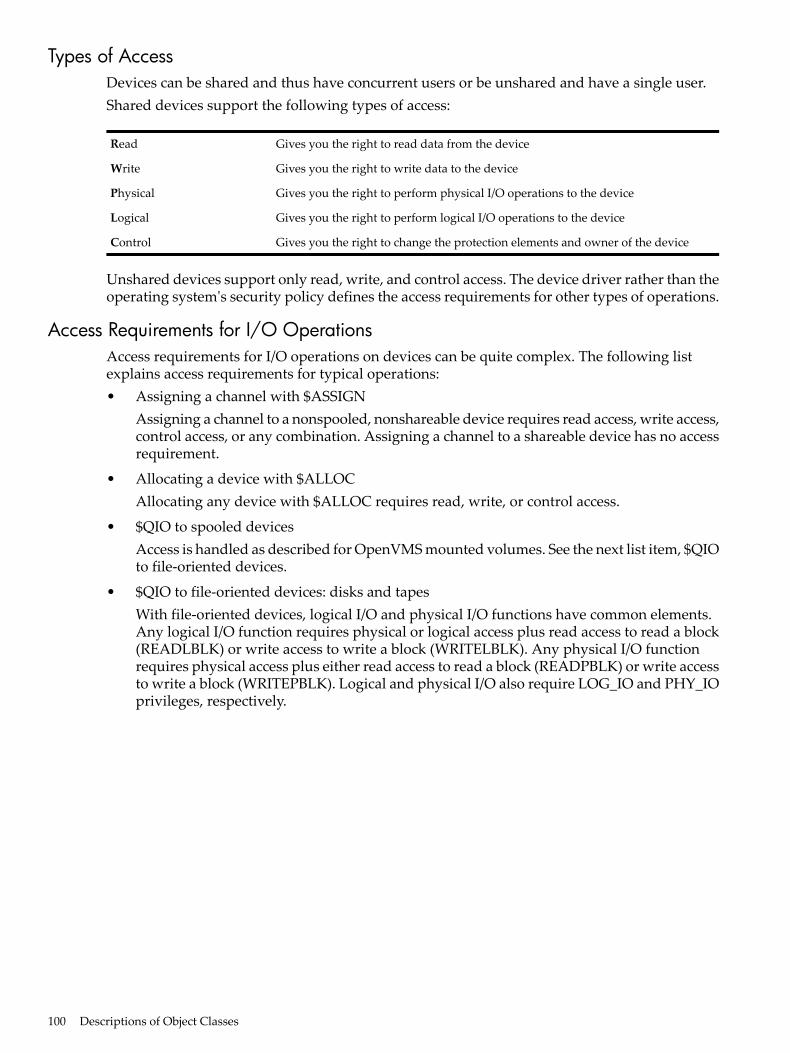
Types of AccessDevices can be shared and thus have concurrent users or be unshared and have a single user.Shared devices support the following types of access:
Gives you the right to read data from the deviceRead
Gives you the right to write data to the deviceWrite
Gives you the right to perform physical I/O operations to the devicePhysical
Gives you the right to perform logical I/O operations to the deviceLogical
Gives you the right to change the protection elements and owner of the deviceControl
Unshared devices support only read, write, and control access. The device driver rather than theoperating system's security policy defines the access requirements for other types of operations.
Access Requirements for I/O OperationsAccess requirements for I/O operations on devices can be quite complex. The following listexplains access requirements for typical operations:• Assigning a channel with $ASSIGN
Assigning a channel to a nonspooled, nonshareable device requires read access, write access,control access, or any combination. Assigning a channel to a shareable device has no accessrequirement.
• Allocating a device with $ALLOCAllocating any device with $ALLOC requires read, write, or control access.
• $QIO to spooled devicesAccess is handled as described for OpenVMS mounted volumes. See the next list item, $QIOto file-oriented devices.
• $QIO to file-oriented devices: disks and tapesWith file-oriented devices, logical I/O and physical I/O functions have common elements.Any logical I/O function requires physical or logical access plus read access to read a block(READLBLK) or write access to write a block (WRITELBLK). Any physical I/O functionrequires physical access plus either read access to read a block (READPBLK) or write accessto write a block (WRITEPBLK). Logical and physical I/O also require LOG_IO and PHY_IOprivileges, respectively.
100 Descriptions of Object Classes
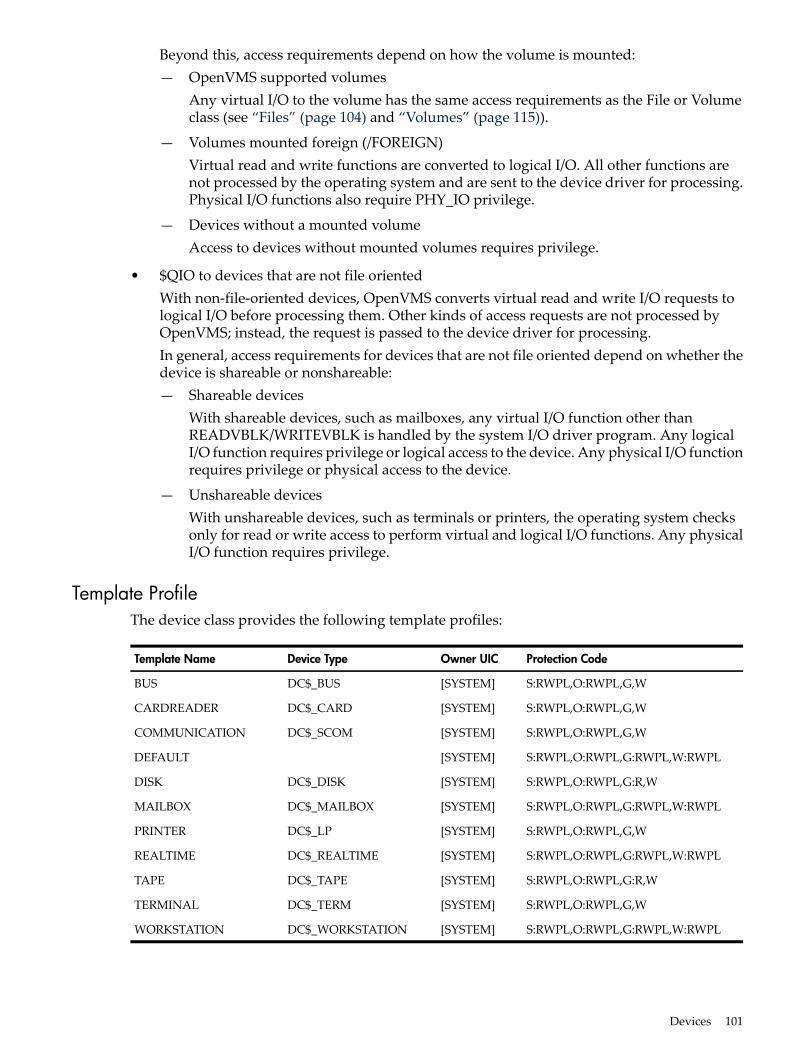
Beyond this, access requirements depend on how the volume is mounted:— OpenVMS supported volumes
Any virtual I/O to the volume has the same access requirements as the File or Volumeclass (see “Files” (page 104) and “Volumes” (page 115)).
— Volumes mounted foreign (/FOREIGN)Virtual read and write functions are converted to logical I/O. All other functions arenot processed by the operating system and are sent to the device driver for processing.Physical I/O functions also require PHY_IO privilege.
— Devices without a mounted volumeAccess to devices without mounted volumes requires privilege.
• $QIO to devices that are not file orientedWith non-file-oriented devices, OpenVMS converts virtual read and write I/O requests tological I/O before processing them. Other kinds of access requests are not processed byOpenVMS; instead, the request is passed to the device driver for processing.In general, access requirements for devices that are not file oriented depend on whether thedevice is shareable or nonshareable:— Shareable devices
With shareable devices, such as mailboxes, any virtual I/O function other thanREADVBLK/WRITEVBLK is handled by the system I/O driver program. Any logicalI/O function requires privilege or logical access to the device. Any physical I/O functionrequires privilege or physical access to the device.
— Unshareable devicesWith unshareable devices, such as terminals or printers, the operating system checksonly for read or write access to perform virtual and logical I/O functions. Any physicalI/O function requires privilege.
Template ProfileThe device class provides the following template profiles:
Protection CodeOwner UICDevice TypeTemplate Name
S:RWPL,O:RWPL,G,W[SYSTEM]DC$_BUSBUS
S:RWPL,O:RWPL,G,W[SYSTEM]DC$_CARDCARDREADER
S:RWPL,O:RWPL,G,W[SYSTEM]DC$_SCOMCOMMUNICATION
S:RWPL,O:RWPL,G:RWPL,W:RWPL[SYSTEM]DEFAULT
S:RWPL,O:RWPL,G:R,W[SYSTEM]DC$_DISKDISK
S:RWPL,O:RWPL,G:RWPL,W:RWPL[SYSTEM]DC$_MAILBOXMAILBOX
S:RWPL,O:RWPL,G,W[SYSTEM]DC$_LPPRINTER
S:RWPL,O:RWPL,G:RWPL,W:RWPL[SYSTEM]DC$_REALTIMEREALTIME
S:RWPL,O:RWPL,G:R,W[SYSTEM]DC$_TAPETAPE
S:RWPL,O:RWPL,G,W[SYSTEM]DC$_TERMTERMINAL
S:RWPL,O:RWPL,G:RWPL,W:RWPL[SYSTEM]DC$_WORKSTATIONWORKSTATION
Devices 101
Setting Up Profiles for New DevicesA device usually derives its security profile from the template profile associated with its devicetype; however, the template is often modified. The following list describes how the operatingsystem assigns a profile to different types of devices:• Devices created during system configuration
Devices introduced during system configuration with the system commands CONNECTand LOAD (for example, pseudodevices and workstations) take their profiles from thetemplate appropriate for the device type.
• Disks and tapesDisk or tape devices take their profile from the DISK or TAPE template profile, respectively.Once the device is visible within a cluster, its profile, with any modifications, is retainedacross system restarts. Changes to the DISK or TAPE template profile after a device has itssecurity profile do not apply to that device; therefore, it is necessary to reset the specificobject profile by using the DCL command SET SECURITY (see “Modifying a Security Profile”(page 77)).
• Devices cloned from template devicesDevices cloned from template devices (for example, Ethernet devices) assume the securityprofile of the template device from which they are cloned. Template devices are loadedduring the autoconfiguration process; at this time, their profile is taken from the profiletemplate appropriate for the device.
• MailboxesMailbox devices assume a modified version of the MAILBOX template profile. The systemmodifies the template so the UIC of the creating process becomes the owner and the protectioncode is set to the value of the promsk argument to the Create Mailbox ($CREMBX) systemservice (provided the value is nonzero).To maintain compatibility with earlier versions of the operating system, the MAILBOXtemplate has a protection code of 0 (allowing all access). Some applications may need a morerestrictive default than the template provides. If you do choose to restrict mailbox access,be aware that the more restrictive access can cause applications to fail in ways that aredifficult to diagnose.
• TerminalsTerminal devices assume a modified version of the TERMINAL template profile.
102 Descriptions of Object Classes
NOTE: In OpenVMS Version 7.2-1 and earlier, all pseudo-terminal (FT) device protectioncodes were set by the driver to (S:RWLP,O:RWLP,G,W). In OpenVMS Version 7.3 and later,only device FTA0 is set to this forced protection. This allows the system manager the optionof modifying the FTA0 device protection later in the boot process. This new protection isinherited from FTA0 by any new FT devices created thereafter (as well as other settingsoriginating from the SECURITY class DEVICE TERMINAL template profile, such as ACLs).A system manager can modify FTA0 manually, or change the SYSTARTUP_VMS.COMcommand procedure. For example:$ SET SECURITY/CLASS=DEVICE -
_$ /PROTECTION=(S:RWLP,O:RWLP,G:RW,W:R) FTA0:
If the device protection for FTA0 is left unmodified, the behavior is unchanged from versionsof OpenVMS prior to Version 7.3. That behavior is that all terminals except FTpseudo-terminal devices inherit their device protection and other security characteristicsfrom the TERMINAL template profile. All FTA pseudo-terminal devices inherit theirprotection from FTA0, which by default is set to (S:RWLP,O:RWLP,G,W). Other settings,such as ACLs, are inherited from the TERMINAL template profile. This ensures compatibilitywith existing applications.
When a user logs in on a terminal, the operating system modifies the profile so the ownerbecomes the UIC of the process logging in to the terminal. The original security profile forthe terminal is restored when the user logs out.
Privilege RequirementsAll logical or physical I/O to a spooled device requires privilege.The LOG_IO privilege allows the user's process to execute the Queue I/O Request ($QIO) systemservice to perform logical-level I/O operations. LOG_IO privilege is also required for certaindevice-control functions, such as setting permanent terminal elements.The PHY_IO privilege allows the user's process to execute the Queue I/O Request ($QIO) systemservice to perform physical-level I/O operations. The PHY_IO privilege also grants LOG_IOprivilege.To create a permanent mailbox or mark it for deletion requires PRMMBX privilege.
Kinds of Auditing PerformedThe following types of events can be audited, provided the security administrator enables auditingfor the appropriate event class:
When Audit OccursEvent Audited
For nonshareable devices, when the process calls $ASSIGN; for a shareable device,when the process calls $QIO
Access
When a process creates a virtual device like a mailboxCreation
When a process deletes a virtual device like a mailboxDeletion
Permanence of the ObjectThe profile of clusterwide disks and tapes is stored in the object database VMS$OBJECTS.DAT,but other object profiles have to be reset each time the system starts up.
Devices 103
FilesA file is a named array of fixed-size (512-byte) data blocks with an associated set of attributes.In OpenVMS systems, the file class includes both data files and directory files. The operatingsystem provides full security protection for individual disk files stored on Files-11 On-DiskStructure Level 2 or 5 (ODS-2 or ODS-5) volumes. Tape files are collectively protected by theprotection code on the volume but are not protected on an individual basis.The file object differs from other protected objects in one important way: because files providemore flexibility than any other object class, files do not acquire their profiles from a template.“Profile Assignment” (page 105) describes the rules the operating system applies in assigning aprofile.
Naming RulesA file specification is a string of 1 to 255 characters. See the HPOpenVMSUser's Manual for a fulldescription.
Types of AccessThe file class supports the following types of access:
Gives you the right to read, print, or copy a disk file. With directory files, read accessgives you the right to read or list a file and use a file name with wildcard charactersto look up files. Read access implies execute access.
Read
Gives you the right to write to or change the contents of a file but not delete it. Writeaccess allows modification of the file elements that describe the contents of the file.Write access allows creation of a new version of an existing file's primary name. Withdirectory files, write access gives you the right to make or delete an entry in thecatalog of files.
Write
Gives you the right to execute a file that contains an executable program image orDCL command procedure. With a directory file, execute access gives you the rightto look up files whose names you know.
Execute
Gives you the right to delete a file. To delete a file, you must have delete access tothe file and write access to the directory that contains the file. To remove or renamea file's primary name also requires delete access.
Delete
Gives you the right to change the protection code and ACL. You need to satisfy oneof the following conditions to change the owner:• Hold both the old and the new owner identifier.• Hold the Resource attribute to the identifier that owns the object while also being
allowed control access to the object through an ACL on the object.• Qualify as a system user, hold SYSPRV or BYPASS privilege, or hold a UIC that
matches that of the owner of the volume containing the file or directory.• Hold the GRPPRV privilege while also holding a UIC in the same group as the
object owner.
Control
Access RequirementsThe following conditions apply to file access:• General rules
To access a file, you must have permission to access the file and the volume on which itresides. When attempting to access a file by name, you must have read or execute access tothe directory containing the file. An access check of the volume is required before either adirectory or a file access is considered. The protection of a directory file can restrict accessto files in the directory, so even though a group of users has access to a file, they can beprevented from accessing it by name if they lack proper access to the directory in which thefile is located.
104 Descriptions of Object Classes
NOTE: You can access a file by its file identifier. When users do so, they bypass the directoryfile protection. Therefore, you must not rely entirely on directory file protection to controlaccess to a file.
• For write accessTo write to a file, the operating system requires that you have both read and write access.
• File ownership changesTo change the ownership of a file, you must have control access and hold both the old andnew identifiers with the Resource attribute. (Your own UIC identifier always carries theResource attribute.)
Creation RequirementsBefore you can create a file, the operating system checks to see that you have satisfied the followingconditions:• You must have adequate disk space. This includes both available disk blocks and sufficient
disk quota (assuming quotas are enabled).• You have read and write access to the previous file version. You must also have delete access
to the oldest file version if the file has a nonzero version limit and the new version wouldexceed this number.
• You have write access to the directory where the file is being created.• You have read, write, and create access to the volume on which the file is to be stored.
Profile AssignmentThe new file obtains its owner, protection code, and ACL from a number of sources. The ownershipassignment of a new file is done independently of protection and ACL.
Rules for Assigning OwnershipIf any of the following conditions are true, then you can assign an identifier as the owner of afile:• The identifier matches your process UIC.• You hold the identifier with the Resource attribute.• You hold GRPPRV privilege and the identifier's group number matches your UIC group.• You hold SYSPRV privilege.A file receives its owner identifier from the first applicable source that you are allowed to assign:• The explicit assignment of an owner at creation with the /OWNER_UIC qualifier to the
CREATE or COPY command• The previous version• The parent directory• The process UICSee “Setting Defaults for a Directory Owned by a Resource Identifier” (page 191) for a descriptionof how resource identifiers can own files and directories.
Rules for Assigning a Protection Code and ACLThe sources of a new file's protection code and ACL are similar to those of ownership and areconsidered in the same order. The system assigns a file's protection code and ACL from one ofthe following sources:
Files 105
1. The explicit assignment of elements at creationYou can create a file with the CREATE command or the COPY command. You use theCREATE/DIRECTORY command in the case of a directory.To assign a protection code when creating a file, add the /PROTECTION qualifier to theCOPY or CREATE command. After creating the file, you can use the SECURITY/ACLcommand to add an ACL.For example, the following command copies a file from the device USE1 to the default diskdirectory. The protection code defines the protection for the newly created file PAYSORT.DATso that users with system UICs can read and write to the file. The owner has all types ofaccess, and other users in the owner's group can read and write to the file. All other usershave no access through the protection code.$ COPY USE1:[PAYDATA]PAYROLL.DAT PAYSORT.DAT -_$/PROTECTION=(SYSTEM:RW,OWNER:RWED,GROUP:RW,WORLD)
2. The profile of the previous version of the file, if one existsWhenever you create a new version of the file, the new version is created with the protectioncode and ACL of the earlier version (unless, of course, you make an explicit assignment).
3. A Default Protection ACE and Default ACL on the parent directoryWithout either an explicit assignment or a previous version of a file, the operating systemlooks at the directory where the file is being created.With data files, the system looks for a Default Protection ACE and assigns the protectioncode specified by that ACE. (See “Providing a Default Protection Code for a DirectoryStructure” (page 93) for an example.) If any ACE in the directory's ACL has the Defaultattribute, then the file inherits that ACE as well. (See the “Establishing an Inheritance Schemefor Files” (page 87) for an example.)With directory files, the system assigns the protection code of the parent directory, less anydelete access. If the directory happens to be a top-level directory, the protection is takenfrom the master file directory (MFD). Newly created subdirectories inherit the ACL of theparent directory, even ACEs with the Default attribute. Only ACEs with the Nopropagateattribute are omitted.
4. The UIC and protection defaults of the process issuing the commandIf the directory ACL does not have a Default Protection ACE, the default process protectionis used. The system parameter RMS_FILEPROT establishes this value, and the operatingsystem assigns it to your process during login. However, the value derived at login may bechanged with the DCL command SET PROTECTION/DEFAULT. (For example, you can putthis command in your login command procedure to set default protection.) Use the DCLcommand SHOW PROTECTION to display the default process protection.
5. One of the above with provision for the user creating the fileWhen you create a file in a directory owned by a resource identifier and you hold theidentifier with the Resource attribute, the new file inherits its protection code and ACL inthe same way as any other file.The operating system modifies the file's ACL in some cases to provide the creator with accessto the new file. If the directory ACL has a Creator ACE, that ACE defines the access thecreator has to the file. If the Creator ACE specifies no access, no additional ACE is created.Without such an ACE, the operating system adds an ACE to the file's ACL that gives thecreator control access plus the access specified in the owner field of the file's protection code.
Using the COPY and RENAME CommandsThe output file of a COPY command is treated as a newly created file and so is assigned a newsecurity profile. The security profiles of the input files are immaterial.
106 Descriptions of Object Classes
However, a renamed file by default retains its existing security profile. To assign a new securityprofile, as if the file were newly created, use the DCL command RENAME/INHERIT_SECURITY.This causes the file to be assigned a security profile.“Rules for Assigning Ownership” (page 105) and “Rules for Assigning a Protection Code andACL” (page 105) explain how a security profile is assigned.
Kinds of Auditing PerformedThe following types of events can be audited, provided the security administrator enables auditingfor the appropriate event class:
When Audit OccursEvent Audited
When a process opens, reads, writes, or executes a file or inquires about its attributesAccess
When a process creates a fileCreation
When a process closes a fileDeaccess
When a process deletes a fileDeletion
Protecting Information When Disk Space Is ReassignedOrdinary file protection mechanisms control who can access a file, but they do not address theproblem of protecting old data that remains on disk after a file is deleted.When a file is deleted, its header is removed from the directory, but its contents remain intacton disk until it is overwritten. Because data exists on a disk, it is necessary to protect deleted orpurged file information from disk scavenging.The OpenVMS operating system solves the problem of disk scavenging with the combinationof the two following techniques:• Overwriting disk blocks before they are allocated• Setting a high-water mark on allocated blocks
Overwriting Disk BlocksA security administrator or user can apply an erasure pattern to individual files on a volume orto a complete volume. An erasure pattern is a repeated sequence of bits written over a file whenthe file is deleted or purged.The security administrator can ensure that every block on a volume starts off with the erasurepattern by specifying the /ERASE qualifier when the volume is initialized, as follows:INITIALIZE/ERASE device-name[:] volume-label
If the volume is mounted, the security administrator can automatically apply the erasure patternto the space occupied by a file when it is deleted by specifying the /ERASE_ON_DELETE qualifier,as follows:SET VOLUME/ERASE_ON_DELETE device-spec[:]
Note that this technique has no effect on existing files.Alternatively, the security administrator may ask users to specify the erasure pattern on afile-by-file basis by using the /ERASE qualifier when entering the DCL commands SET FILE,DELETE, and PURGE.Security administrators can also write an erase routine by using the $ERAPAT system service.The routine specifies to the system the erasure pattern and number of passes to be used to erasedisk blocks.
Files 107
Setting a High-water MarkWhen the operating system allocates disk blocks for a file, it automatically sets a high-watermark. The high-water mark indicates how far the file has been written in its allotted space onthe disk. All blocks in the file up to the high-water mark are guaranteed to have been writtensince they were allocated to the file. Users are not permitted to read beyond the high-water markand thus cannot read stale data that they did not actually write.A more conservative but costly technique is to erase all disk blocks before allocation. Theerase-on-allocate technique is used when the file is open allowing any form of shared access ornonsequential access. When blocks are erased on allocation, the file's high-water mark is set topoint to the end of the newly allocated and erased space.By default, high-water marking is enabled when the volume is initialized. The securityadministrator can disable high-water marking for a specific volume by using the DCL command:SET VOLUME/NOHIGHWATER_MARKING.
Accessibility of Data in a FileOnce the file system allocates disk blocks for a file, users can read or write to them at any time.The high-water mark identifies the physical end of file, beyond which the user cannot read.However, an application can reposition the logical end-of-file mark and leave data in the areabetween the logical and the physical end of the file. Any block of file data can later be read,regardless of the logical end-of-file mark.An application largely determines how allocated disk blocks are managed. For example, OpenVMSRMS services shorten a sequential file by resetting the logical end-of-file position to the beginningof the current record. It does not deallocate space between the end-of-file position and the physicalend of the file, nor does it overwrite the records between the end-of-file position and the physicalend of the file with an erase pattern.Thus, blocks written to a file can remain available regardless of the end-of-file mark. If you wantto erase the data between the logical end of the file and the physical end of the file, yourapplication program must overwrite the data you want deleted. On OpenVMS systems, a commonway to accomplish this is to create a new version of the file using the DCL command COPY.
Suggestions for Optimizing File SecurityUse the following precautions to protect your files and directories:• Purge your files regularly. Delete unnecessary files. This keeps your directories to a minimum
and simplifies the task of regularly checking the protection and ownership on your files.• Use the DCL command DIRECTORY/SECURITY regularly to monitor the ownership,
protection code, and ACLs on your files. A user who succeeds in obtaining sufficient privilegemay change the protection or ownership on your files, allowing access immediately and inthe future. If you perform these checks frequently, you can detect and report unexplainedchanges in file protection or ownership.
• Pay special attention to the protection on your mail files; normally, they should be accessibleonly to you and the system (for mail delivery and backups).
• When you place ACLs on your files, be sure you know exactly which users hold the identifiersyou have specified. (This generally requires consultation with your site securityadministrator.)
• Follow your site security administrator's recommendations to prevent disk scavenging. Youmay be requested to use the /ERASE qualifier on the SET FILE, DELETE, and PURGEcommands for some or all of your files.
• Always protect files and directories that contain command procedures and executableprograms. Carefully control the granting of write access to these directories and files. This
108 Descriptions of Object Classes
is particularly important if you have any of the more powerful privileges or access to sensitivefiles.
CAUTION: Do not run a command procedure or program given to you by another user unlessyou inspect it. Inspect a program or procedure to see if it tries to exercise your special privilegesor access sensitive files. Test the software in an unprivileged account. Programs or commandprocedures offered under one guise, when actually intended to penetrate your defenses anddisrupt your system security, are sometimes called Trojan horse programs.
Global SectionsOpenVMS memory management services allow processes to communicate through sharedmemory pages called global sections. Using global sections, two or more processes can map thesame page into their individual virtual address spaces, thereby sharing the same page of codeor data.A global section can provide access to a disk file (called a file-backed global section), provideaccess to dynamically created storage (called a page file-backed global section), or provide accessto specific physical memory (called a page frame number [PFN] global section). A global sectionobject may be either temporary or permanent.The operating system supports two types of global section objects:• Group global sections are shareable memory sections potentially available to all processes
in the same group.• System global sections are shareable memory sections potentially available to all processes
in the system.
Naming RulesThe name of the object is a string of 1 to 44 characters. For group global sections, the name isqualified by your UIC group number.
Types of AccessThe global section class supports the following types of access:
Gives you the right to map the section for read access.Read
Gives you the right to map the section for write access.Write
Gives you the right to map the section for read access. Only software running inexecutive or kernel mode can request this access.
Execute
Gives you the right to modify the protection elements of PFN global sections andpage file-backed global sections.
Control
Template ProfileFile-backed global sections share the security profile of the associated disk file. Whenever theprofile of the backing file is modified, the global section's profile automatically changes. Tomodify the protection elements of file-backed global sections, you must modify the backing fileinstead.
Global Sections 109
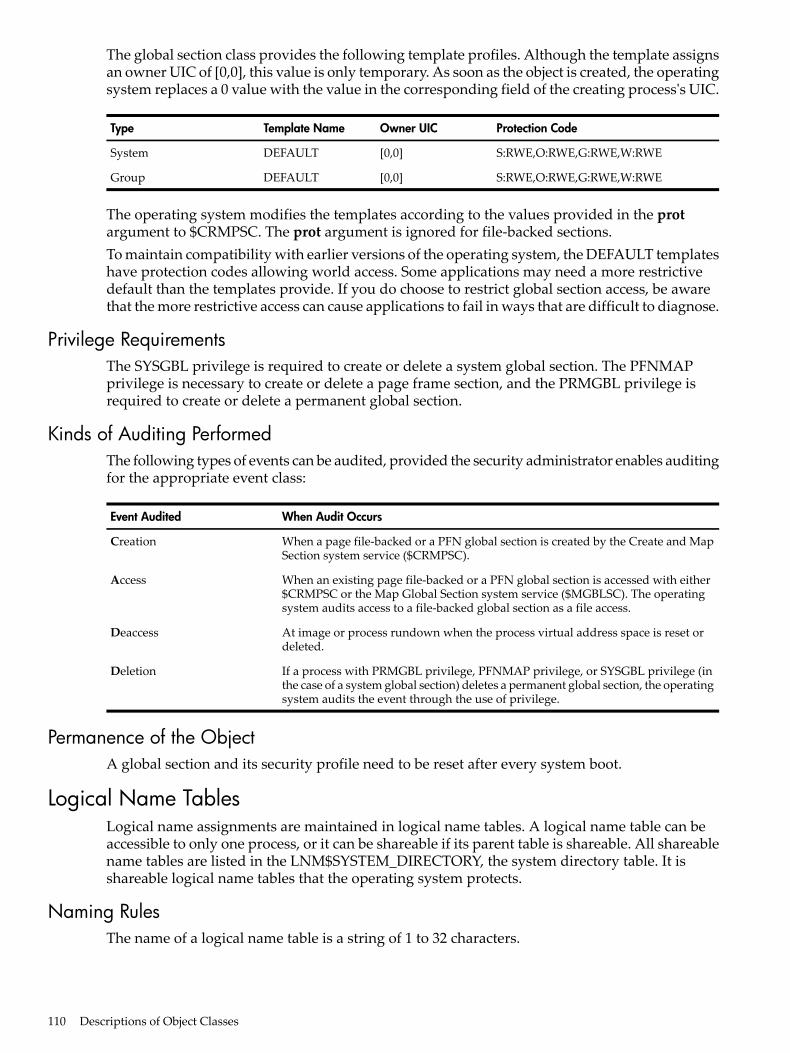
The global section class provides the following template profiles. Although the template assignsan owner UIC of [0,0], this value is only temporary. As soon as the object is created, the operatingsystem replaces a 0 value with the value in the corresponding field of the creating process's UIC.
Protection CodeOwner UICTemplate NameType
S:RWE,O:RWE,G:RWE,W:RWE[0,0]DEFAULTSystem
S:RWE,O:RWE,G:RWE,W:RWE[0,0]DEFAULTGroup
The operating system modifies the templates according to the values provided in the protargument to $CRMPSC. The prot argument is ignored for file-backed sections.To maintain compatibility with earlier versions of the operating system, the DEFAULT templateshave protection codes allowing world access. Some applications may need a more restrictivedefault than the templates provide. If you do choose to restrict global section access, be awarethat the more restrictive access can cause applications to fail in ways that are difficult to diagnose.
Privilege RequirementsThe SYSGBL privilege is required to create or delete a system global section. The PFNMAPprivilege is necessary to create or delete a page frame section, and the PRMGBL privilege isrequired to create or delete a permanent global section.
Kinds of Auditing PerformedThe following types of events can be audited, provided the security administrator enables auditingfor the appropriate event class:
When Audit OccursEvent Audited
When a page file-backed or a PFN global section is created by the Create and MapSection system service ($CRMPSC).
Creation
When an existing page file-backed or a PFN global section is accessed with either$CRMPSC or the Map Global Section system service ($MGBLSC). The operatingsystem audits access to a file-backed global section as a file access.
Access
At image or process rundown when the process virtual address space is reset ordeleted.
Deaccess
If a process with PRMGBL privilege, PFNMAP privilege, or SYSGBL privilege (inthe case of a system global section) deletes a permanent global section, the operatingsystem audits the event through the use of privilege.
Deletion
Permanence of the ObjectA global section and its security profile need to be reset after every system boot.
Logical Name TablesLogical name assignments are maintained in logical name tables. A logical name table can beaccessible to only one process, or it can be shareable if its parent table is shareable. All shareablename tables are listed in the LNM$SYSTEM_DIRECTORY, the system directory table. It isshareable logical name tables that the operating system protects.
Naming RulesThe name of a logical name table is a string of 1 to 32 characters.
110 Descriptions of Object Classes
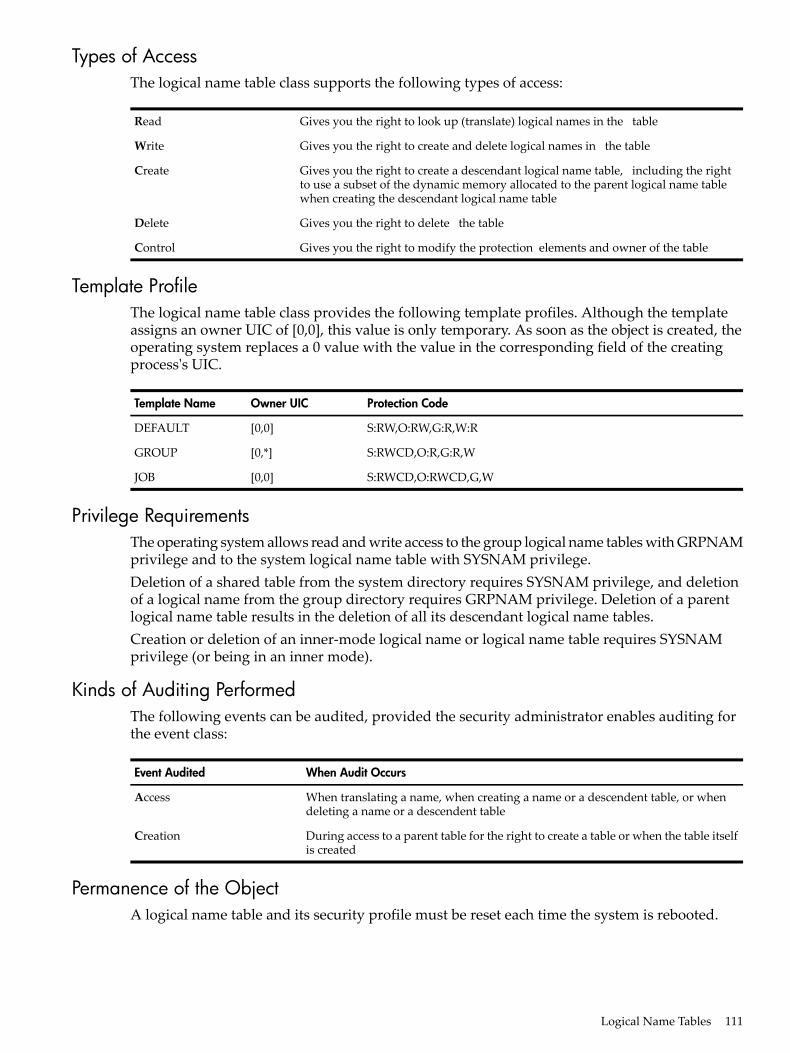
Types of AccessThe logical name table class supports the following types of access:
Gives you the right to look up (translate) logical names in the tableRead
Gives you the right to create and delete logical names in the tableWrite
Gives you the right to create a descendant logical name table, including the rightto use a subset of the dynamic memory allocated to the parent logical name tablewhen creating the descendant logical name table
Create
Gives you the right to delete the tableDelete
Gives you the right to modify the protection elements and owner of the tableControl
Template ProfileThe logical name table class provides the following template profiles. Although the templateassigns an owner UIC of [0,0], this value is only temporary. As soon as the object is created, theoperating system replaces a 0 value with the value in the corresponding field of the creatingprocess's UIC.
Protection CodeOwner UICTemplate Name
S:RW,O:RW,G:R,W:R[0,0]DEFAULT
S:RWCD,O:R,G:R,W[0,*]GROUP
S:RWCD,O:RWCD,G,W[0,0]JOB
Privilege RequirementsThe operating system allows read and write access to the group logical name tables with GRPNAMprivilege and to the system logical name table with SYSNAM privilege.Deletion of a shared table from the system directory requires SYSNAM privilege, and deletionof a logical name from the group directory requires GRPNAM privilege. Deletion of a parentlogical name table results in the deletion of all its descendant logical name tables.Creation or deletion of an inner-mode logical name or logical name table requires SYSNAMprivilege (or being in an inner mode).
Kinds of Auditing PerformedThe following events can be audited, provided the security administrator enables auditing forthe event class:
When Audit OccursEvent Audited
When translating a name, when creating a name or a descendent table, or whendeleting a name or a descendent table
Access
During access to a parent table for the right to create a table or when the table itselfis created
Creation
Permanence of the ObjectA logical name table and its security profile must be reset each time the system is rebooted.
Logical Name Tables 111
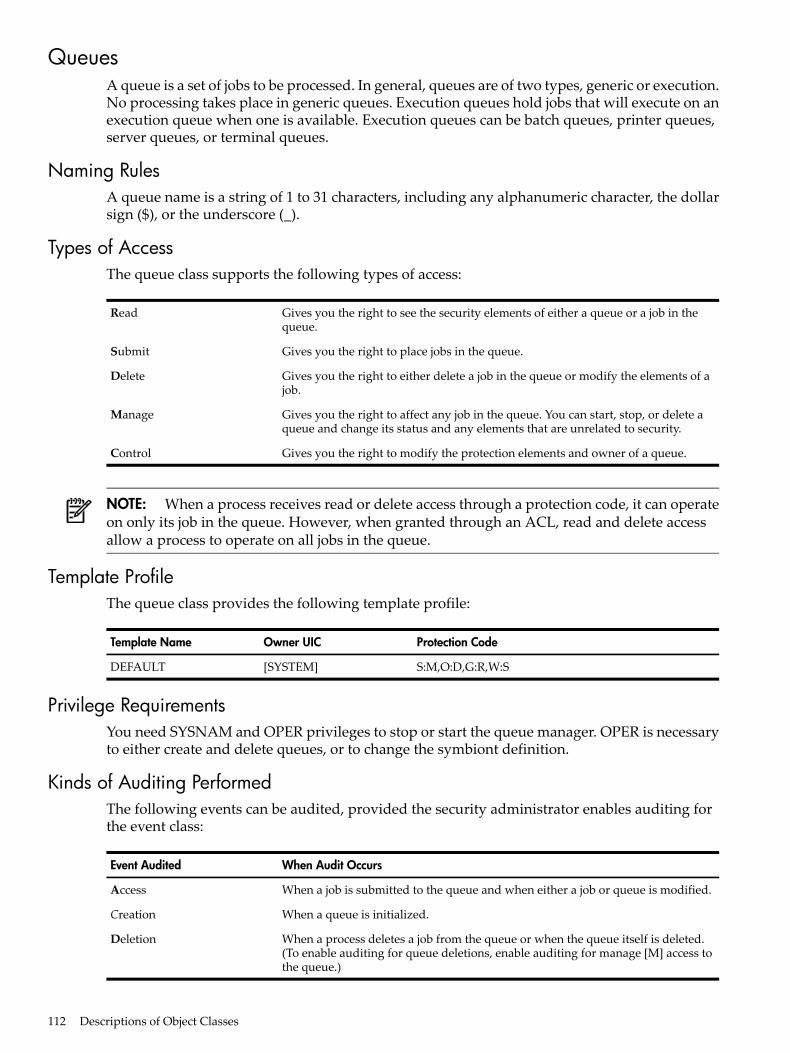
QueuesA queue is a set of jobs to be processed. In general, queues are of two types, generic or execution.No processing takes place in generic queues. Execution queues hold jobs that will execute on anexecution queue when one is available. Execution queues can be batch queues, printer queues,server queues, or terminal queues.
Naming RulesA queue name is a string of 1 to 31 characters, including any alphanumeric character, the dollarsign ($), or the underscore (_).
Types of AccessThe queue class supports the following types of access:
Gives you the right to see the security elements of either a queue or a job in thequeue.
Read
Gives you the right to place jobs in the queue.Submit
Gives you the right to either delete a job in the queue or modify the elements of ajob.
Delete
Gives you the right to affect any job in the queue. You can start, stop, or delete aqueue and change its status and any elements that are unrelated to security.
Manage
Gives you the right to modify the protection elements and owner of a queue.Control
NOTE: When a process receives read or delete access through a protection code, it can operateon only its job in the queue. However, when granted through an ACL, read and delete accessallow a process to operate on all jobs in the queue.
Template ProfileThe queue class provides the following template profile:
Protection CodeOwner UICTemplate Name
S:M,O:D,G:R,W:S[SYSTEM]DEFAULT
Privilege RequirementsYou need SYSNAM and OPER privileges to stop or start the queue manager. OPER is necessaryto either create and delete queues, or to change the symbiont definition.
Kinds of Auditing PerformedThe following events can be audited, provided the security administrator enables auditing forthe event class:
When Audit OccursEvent Audited
When a job is submitted to the queue and when either a job or queue is modified.Access
When a queue is initialized.Creation
When a process deletes a job from the queue or when the queue itself is deleted.(To enable auditing for queue deletions, enable auditing for manage [M] access tothe queue.)
Deletion
112 Descriptions of Object Classes
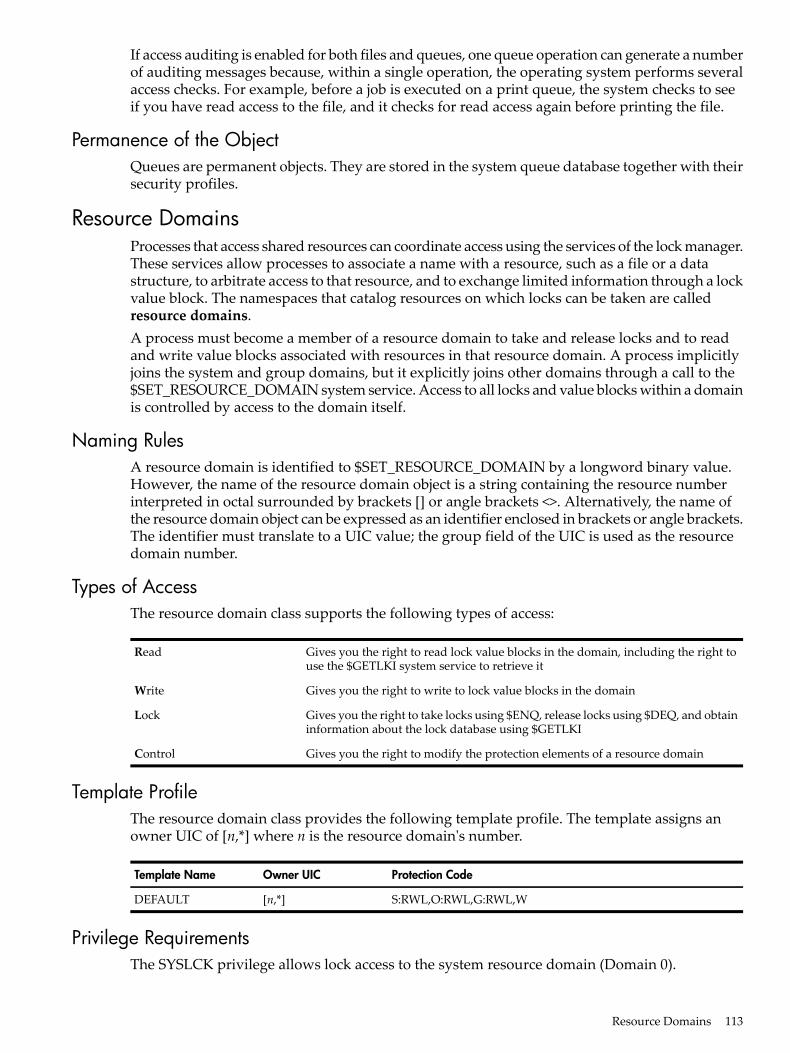
If access auditing is enabled for both files and queues, one queue operation can generate a numberof auditing messages because, within a single operation, the operating system performs severalaccess checks. For example, before a job is executed on a print queue, the system checks to seeif you have read access to the file, and it checks for read access again before printing the file.
Permanence of the ObjectQueues are permanent objects. They are stored in the system queue database together with theirsecurity profiles.
Resource DomainsProcesses that access shared resources can coordinate access using the services of the lock manager.These services allow processes to associate a name with a resource, such as a file or a datastructure, to arbitrate access to that resource, and to exchange limited information through a lockvalue block. The namespaces that catalog resources on which locks can be taken are calledresource domains.A process must become a member of a resource domain to take and release locks and to readand write value blocks associated with resources in that resource domain. A process implicitlyjoins the system and group domains, but it explicitly joins other domains through a call to the$SET_RESOURCE_DOMAIN system service. Access to all locks and value blocks within a domainis controlled by access to the domain itself.
Naming RulesA resource domain is identified to $SET_RESOURCE_DOMAIN by a longword binary value.However, the name of the resource domain object is a string containing the resource numberinterpreted in octal surrounded by brackets [] or angle brackets <>. Alternatively, the name ofthe resource domain object can be expressed as an identifier enclosed in brackets or angle brackets.The identifier must translate to a UIC value; the group field of the UIC is used as the resourcedomain number.
Types of AccessThe resource domain class supports the following types of access:
Gives you the right to read lock value blocks in the domain, including the right touse the $GETLKI system service to retrieve it
Read
Gives you the right to write to lock value blocks in the domainWrite
Gives you the right to take locks using $ENQ, release locks using $DEQ, and obtaininformation about the lock database using $GETLKI
Lock
Gives you the right to modify the protection elements of a resource domainControl
Template ProfileThe resource domain class provides the following template profile. The template assigns anowner UIC of [n,*] where n is the resource domain's number.
Protection CodeOwner UICTemplate Name
S:RWL,O:RWL,G:RWL,W[n,*]DEFAULT
Privilege RequirementsThe SYSLCK privilege allows lock access to the system resource domain (Domain 0).
Resource Domains 113
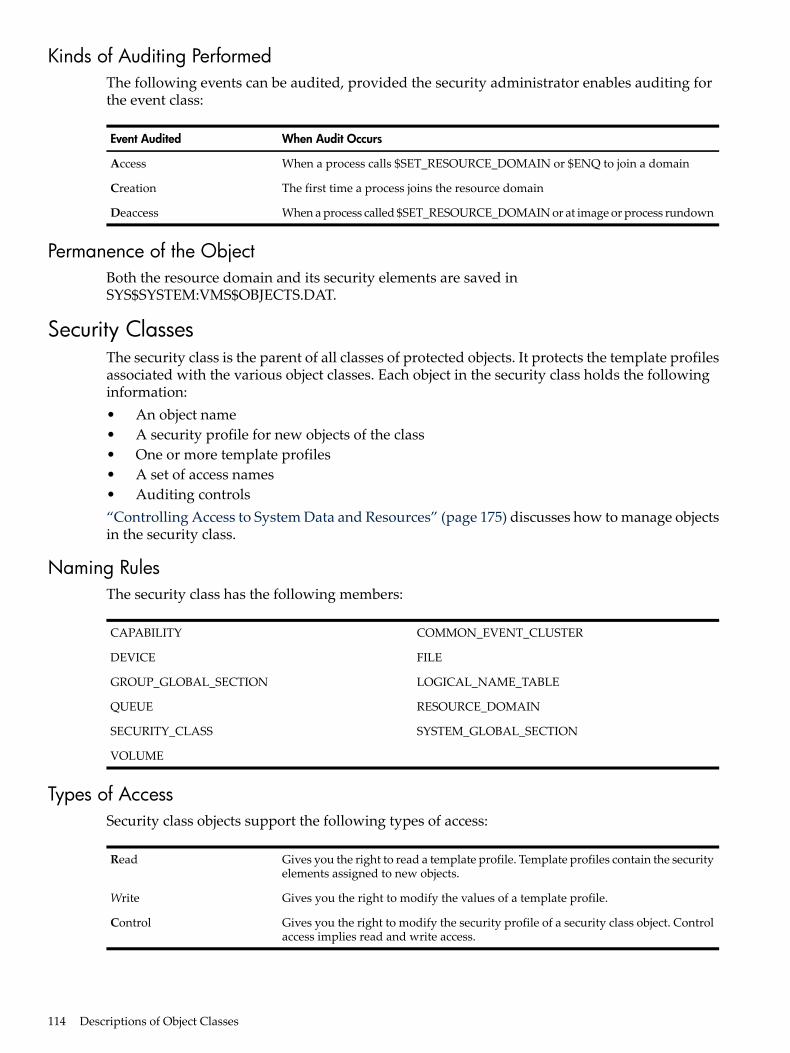
Kinds of Auditing PerformedThe following events can be audited, provided the security administrator enables auditing forthe event class:
When Audit OccursEvent Audited
When a process calls $SET_RESOURCE_DOMAIN or $ENQ to join a domainAccess
The first time a process joins the resource domainCreation
When a process called $SET_RESOURCE_DOMAIN or at image or process rundownDeaccess
Permanence of the ObjectBoth the resource domain and its security elements are saved inSYS$SYSTEM:VMS$OBJECTS.DAT.
Security ClassesThe security class is the parent of all classes of protected objects. It protects the template profilesassociated with the various object classes. Each object in the security class holds the followinginformation:• An object name• A security profile for new objects of the class• One or more template profiles• A set of access names• Auditing controls“Controlling Access to System Data and Resources” (page 175) discusses how to manage objectsin the security class.
Naming RulesThe security class has the following members:
COMMON_EVENT_CLUSTERCAPABILITY
FILEDEVICE
LOGICAL_NAME_TABLEGROUP_GLOBAL_SECTION
RESOURCE_DOMAINQUEUE
SYSTEM_GLOBAL_SECTIONSECURITY_CLASS
VOLUME
Types of AccessSecurity class objects support the following types of access:
Gives you the right to read a template profile. Template profiles contain the securityelements assigned to new objects.
Read
Gives you the right to modify the values of a template profile.Write
Gives you the right to modify the security profile of a security class object. Controlaccess implies read and write access.
Control
114 Descriptions of Object Classes
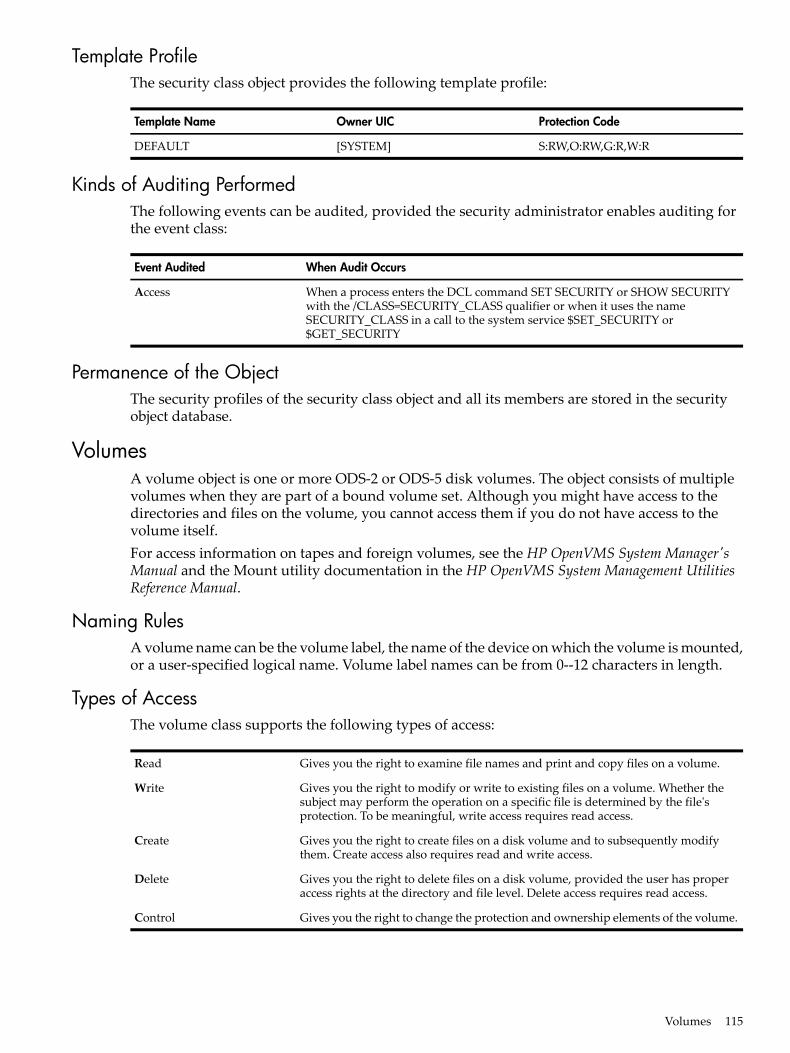
Template ProfileThe security class object provides the following template profile:
Protection CodeOwner UICTemplate Name
S:RW,O:RW,G:R,W:R[SYSTEM]DEFAULT
Kinds of Auditing PerformedThe following events can be audited, provided the security administrator enables auditing forthe event class:
When Audit OccursEvent Audited
When a process enters the DCL command SET SECURITY or SHOW SECURITYwith the /CLASS=SECURITY_CLASS qualifier or when it uses the nameSECURITY_CLASS in a call to the system service $SET_SECURITY or$GET_SECURITY
Access
Permanence of the ObjectThe security profiles of the security class object and all its members are stored in the securityobject database.
VolumesA volume object is one or more ODS-2 or ODS-5 disk volumes. The object consists of multiplevolumes when they are part of a bound volume set. Although you might have access to thedirectories and files on the volume, you cannot access them if you do not have access to thevolume itself.For access information on tapes and foreign volumes, see the HP OpenVMS System Manager'sManual and the Mount utility documentation in the HP OpenVMS System Management UtilitiesReference Manual.
Naming RulesA volume name can be the volume label, the name of the device on which the volume is mounted,or a user-specified logical name. Volume label names can be from 0--12 characters in length.
Types of AccessThe volume class supports the following types of access:
Gives you the right to examine file names and print and copy files on a volume.Read
Gives you the right to modify or write to existing files on a volume. Whether thesubject may perform the operation on a specific file is determined by the file'sprotection. To be meaningful, write access requires read access.
Write
Gives you the right to create files on a disk volume and to subsequently modifythem. Create access also requires read and write access.
Create
Gives you the right to delete files on a disk volume, provided the user has properaccess rights at the directory and file level. Delete access requires read access.
Delete
Gives you the right to change the protection and ownership elements of the volume.Control
Volumes 115
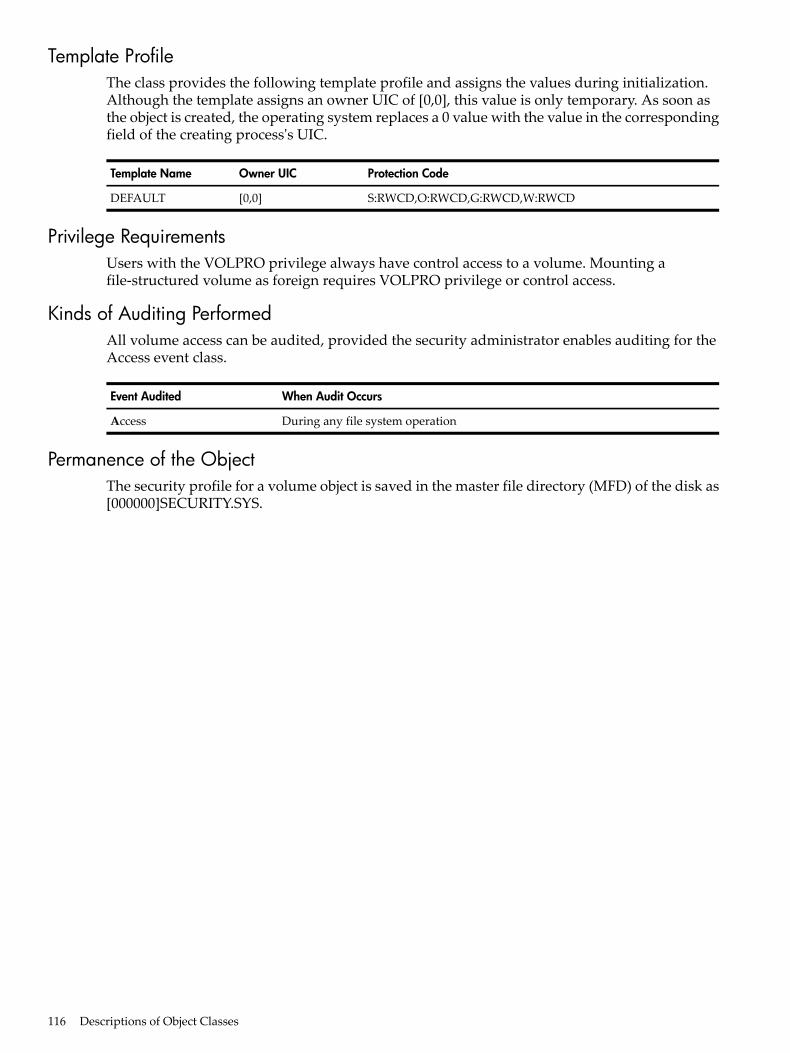
Template ProfileThe class provides the following template profile and assigns the values during initialization.Although the template assigns an owner UIC of [0,0], this value is only temporary. As soon asthe object is created, the operating system replaces a 0 value with the value in the correspondingfield of the creating process's UIC.
Protection CodeOwner UICTemplate Name
S:RWCD,O:RWCD,G:RWCD,W:RWCD[0,0]DEFAULT
Privilege RequirementsUsers with the VOLPRO privilege always have control access to a volume. Mounting afile-structured volume as foreign requires VOLPRO privilege or control access.
Kinds of Auditing PerformedAll volume access can be audited, provided the security administrator enables auditing for theAccess event class.
When Audit OccursEvent Audited
During any file system operationAccess
Permanence of the ObjectThe security profile for a volume object is saved in the master file directory (MFD) of the disk as[000000]SECURITY.SYS.
116 Descriptions of Object Classes
Part III Security for the System AdministratorThe chapters in this part discuss the following topics:• Role of a security administrator (“Managing the System and its Data” (page 127))• Securing the system (“Managing System Access” (page 135))• Securing data and resources (“Controlling Access to System Data and Resources” (page 175))• Using encryption (“Using Encryption” (page 203))• Security auditing (“Security Auditing” (page 227))• Responding to security breaches (“System Security Breaches” (page 253))• Creating a secure cluster (“Securing a Cluster” (page 261))• Considerations for networked systems (“Security in a Network Environment” (page 269))• Setup and management of protected subsystems (“Using Protected Subsystems” (page 291))This part of the manual also includes information on the following topics:• User privileges and who may need them (“Assigning Privileges” (page 303))• Default UIC-based protection of critical system files (“Protection for OpenVMS System Files” (page 319))• Examples of security alarm messages (“Alarm Messages” (page 341))
117

118
Table of Contents
6 Managing the System and its Data.........................................................................127Role of a Security Administrator........................................................................................................127Site Security Policies............................................................................................................................127Tools for Setting Up a Secure System..................................................................................................129Account Requirements for a Security Administrator.........................................................................129Training the New User........................................................................................................................130Logging a User's Session.....................................................................................................................131Ongoing Tasks to Maintain a Secure System......................................................................................132
7 Managing System Access.........................................................................................135Defining Times and Conditions for System Access............................................................................135
Restricting Work Times.................................................................................................................136Restricting Modes of Operation.....................................................................................................136Restricting Account Duration........................................................................................................136Disabling Accounts........................................................................................................................137Restricting Disk Volumes...............................................................................................................137Marking Accounts for External Authentication............................................................................137
Assigning Appropriate Accounts to Users.........................................................................................137Types of System Accounts.............................................................................................................137
Interactive Account Example...................................................................................................138Limited-Account Example.......................................................................................................139
Privileged Accounts.......................................................................................................................139Interactive Accounts......................................................................................................................140Captive Accounts...........................................................................................................................140
Setting Up Captive Accounts...................................................................................................141Guidelines for Captive Command Procedures........................................................................142
Restricted Accounts.......................................................................................................................143Automatic Login Accounts............................................................................................................144Guest Accounts..............................................................................................................................145Proxy Accounts..............................................................................................................................145Externally Authenticated Accounts...............................................................................................146
Using Passwords to Control System Access.......................................................................................146Types of Passwords........................................................................................................................146
Primary Passwords...................................................................................................................146System Passwords....................................................................................................................147Secondary Passwords...............................................................................................................148Console Passwords...................................................................................................................149Authentication Cards...............................................................................................................149
Enforcing Minimum Password Standards....................................................................................150Expiring Passwords..................................................................................................................150Enforcing Change of Expired Password..................................................................................151Requiring a Minimum Password Length.................................................................................151Generated Passwords...............................................................................................................152Site Password Algorithms........................................................................................................152
Screening New Passwords.............................................................................................................152System Dictionary....................................................................................................................153History Lists.............................................................................................................................153Site-Specific Filters....................................................................................................................154
Password Protection Checklist......................................................................................................154Enabling External Authentication.......................................................................................................155
Table of Contents 119
Overriding External Authentication..............................................................................................158Impact on Layered Products and Applications.............................................................................159Setting a New Password................................................................................................................159Case Sensitivity in Passwords and User Names............................................................................159User Name Mapping and Password Verification..........................................................................160Password Synchronization............................................................................................................160Specifying the SYS$SINGLE_SIGNON Logical Name Bits...........................................................161Authentication and Credentials Management Extensions (ACME) Subsystem...........................162
ACME Subsystem Overview....................................................................................................163ACME Agent Operational Environment..................................................................................163ACME Subsystem Controls......................................................................................................164
Start, Stop, Restart, and Configure ACME_SERVER Process and ACME Agents.............164Other ACME Agent Commands.........................................................................................166SYSUAF Flags.....................................................................................................................166System Parameter SECURITY_POLICY Bit Mask Values..................................................166
Authentication Policies.............................................................................................................167OpenVMS policy.................................................................................................................167LDAP authentication policy................................................................................................168Advanced Server for OpenVMS policy...............................................................................168Kerberos authentication policy...........................................................................................168
Controlling the Login Process.............................................................................................................168Informational Display During Login.............................................................................................168
Announcement Message..........................................................................................................168Welcome Message.....................................................................................................................169Last Login Messages.................................................................................................................169New Mail Announcements......................................................................................................169
Limiting Disconnected Processes..................................................................................................169Providing Automatic Login...........................................................................................................170Using the Secure Server.................................................................................................................170Detecting Intruders........................................................................................................................171Understanding the Intrusion Database.........................................................................................171
How Intrusion Detection Works..............................................................................................172Setting the Exclusion Period.....................................................................................................173System Parameters Controlling Login Attempts.....................................................................173
Security Server Process..................................................................................................................174
8 Controlling Access to System Data and Resources................................................175Designing User Groups.......................................................................................................................175
Example of UIC Group Design......................................................................................................175Limitations to UIC Group Design.................................................................................................176
Naming Individual Users in ACLs.....................................................................................................176Defining Sharing of Rights..................................................................................................................177Conditionalizing Identifiers for Different Users.................................................................................177Designing ACLs..................................................................................................................................178Populating the Rights Database..........................................................................................................178
Displaying the Database................................................................................................................179Adding Identifiers.........................................................................................................................179Restoring the Rights Database.......................................................................................................179Assigning Identifiers to Users.......................................................................................................180Removing Holder Records............................................................................................................180Removing Identifiers.....................................................................................................................180Customizing Identifiers.................................................................................................................181
Dynamic Attribute....................................................................................................................181Holder Hidden Attribute.........................................................................................................182
120 Table of Contents

Name Hidden Attribute...........................................................................................................182No Access Attribute.................................................................................................................182Resource Attribute....................................................................................................................182Subsystem Attribute.................................................................................................................183
Modifying a System or Process Rights List...................................................................................183Giving Users Privileges.......................................................................................................................184
Categories of Privilege...................................................................................................................184Suggested Privilege Allocations....................................................................................................185Limiting User Privileges................................................................................................................185Installing Images with Privilege....................................................................................................186Restricting Command Output.......................................................................................................186
Setting Default Protection and Ownership.........................................................................................187Controlling File Access..................................................................................................................187
Adjusting Protection Defaults..................................................................................................190Setting Defaults for a Directory Owned by a Resource Identifier...........................................191
Setting Up the Resource Identifier......................................................................................191Setting Up the Directory of a Resource Identifier...............................................................192Setting Up the ACL.............................................................................................................192
Setting Defaults for Objects Other Than Files...............................................................................193Displaying Class Defaults........................................................................................................193Modifying Class Templates......................................................................................................194
Added Protection for System Data and Resources.............................................................................195Precautions to Take When Installing New Software.....................................................................195
Potentially Harmful Programs.................................................................................................195Installing Programs with Privilege..........................................................................................196
Protecting System Files..................................................................................................................196Restricting DCL Command Usage................................................................................................198Protecting Disks.............................................................................................................................198
Erasing Techniques...................................................................................................................198Prevention Through High-Water Marking..............................................................................199Summary of Prevention Techniques........................................................................................199
Protecting Backup Media...............................................................................................................199Backing Up Disks.....................................................................................................................199Protecting a Backup Save Set....................................................................................................200Retrieving Files from Backup Save Sets...................................................................................200
Protecting Terminals......................................................................................................................201Restricting Terminal Use..........................................................................................................201Restricting Application Terminals and Miscellaneous Devices...............................................201Configuring Terminal Lines for Modems................................................................................201
9 Using Encryption........................................................................................................203Defining Keys......................................................................................................................................203
Specifying the Key Name..............................................................................................................203Specifying the Key Value...............................................................................................................203Verifying Key Creation..................................................................................................................204Specifying Key Storage Tables ......................................................................................................204Maintaining Keys...........................................................................................................................205
Encrypting Files..................................................................................................................................206Input File Specification..................................................................................................................206Output File Specification...............................................................................................................206Displaying Processing Information...............................................................................................207
FILES Keyword.........................................................................................................................207STATISTICS Keyword..............................................................................................................207
Specifying Files to Encrypt............................................................................................................207
Table of Contents 121
/BACKUP Qualifier..................................................................................................................208/BEFORE Qualifier....................................................................................................................208/BY_OWNER Qualifier.............................................................................................................208/CONFIRM Qualifier................................................................................................................209/EXCLUDE Qualifier................................................................................................................209/EXPIRED Qualifier..................................................................................................................209/MODIFIED Qualifier...............................................................................................................210/SINCE Qualifier.......................................................................................................................210
Deleting Encrypted Files................................................................................................................210/DELETE Qualifier....................................................................................................................210/ERASE Qualifier......................................................................................................................211
Encryption Algorithms..................................................................................................................211Encryption Algorithm Qualifiers ..................................................................................................212
/KEY_ALGORITHM Qualifier.................................................................................................213/DATA_ALGORITHM Qualifier .............................................................................................213
Specifying AES Data Algorithm and AES Key Algorithm............................................................213File Compression...........................................................................................................................214Displaying the Version Number....................................................................................................215
Authenticating Files............................................................................................................................215Associating MACs with Files.........................................................................................................216Checking Files................................................................................................................................216Specifying a File for MACs Generated from File Contents...........................................................216Specifying a Security MAC File.....................................................................................................217Specifying a Listing File.................................................................................................................217Logging the Authentication Operation.........................................................................................218
Deleting Key Definitions.....................................................................................................................218Decrypting Files..................................................................................................................................218
Input File Specification..................................................................................................................219Output File Specification ..............................................................................................................219Displaying Processing Information...............................................................................................220
FILES Keyword.........................................................................................................................220STATISTICS Keyword..............................................................................................................220
Specifying Files to Decrypt............................................................................................................220/BACKUP Qualifier .................................................................................................................221/BEFORE Qualifier....................................................................................................................221/BY_OWNER Qualifier.............................................................................................................221/CONFIRM Qualifier................................................................................................................221/EXCLUDE Qualifier................................................................................................................222/EXPIRED Qualifier..................................................................................................................222/MODIFIED Qualifier...............................................................................................................222/SINCE Qualifier.......................................................................................................................223
Deleting Decrypted Files ..............................................................................................................223/DELETE Qualifier ...................................................................................................................223/ERASE Qualifier......................................................................................................................223
Algorithm Qualifiers......................................................................................................................224Encrypting Save Sets...........................................................................................................................224
Restoring Files................................................................................................................................225Encrypting Distribution Files........................................................................................................226
10 Security Auditing.....................................................................................................227Overview of the Auditing Process......................................................................................................227Reporting Security-Relevant Events...................................................................................................228
Ways to Generate Audit Information............................................................................................228Auditing Categories of Activity...............................................................................................228
122 Table of Contents
Attaching a Security-Auditing ACE.........................................................................................230Modifying a User Authorization Record.................................................................................231
Kinds of System Activity the Operating System Can Report........................................................232Suppression of Certain Privilege Audits..................................................................................232Suppression of Certain Process Control Audits.......................................................................233
Sources of Event Information........................................................................................................233Developing an Auditing Plan.............................................................................................................234
Assessing Your Auditing Requirements........................................................................................234Selecting a Destination for the Event Message..............................................................................236Considering the Performance Impact............................................................................................237
Methods of Capturing Event Messages..............................................................................................237Using an Audit Log File.................................................................................................................238
Maintaining the File.................................................................................................................238Moving the File from the System Disk.....................................................................................239
Enabling a Terminal to Receive Alarms.........................................................................................239Secondary Destinations for Event Messages.................................................................................240
Using a Remote Log File...........................................................................................................240Using a Listener Mailbox..........................................................................................................241
Analyzing a Log File...........................................................................................................................241Recommended Procedure..............................................................................................................241Invoking the Audit Analysis Utility..............................................................................................243Providing Report Specifications....................................................................................................243Using the Audit Analysis Utility Interactively..............................................................................245Examining the Report....................................................................................................................245
Managing the Auditing Subsystem....................................................................................................247Tasks Performed by the Audit Server............................................................................................247Disabling and Reenabling Startup of the Audit Server.................................................................248Changing the Point in Startup When the Operating System Initiates Auditing...........................249Choosing the Number of Outstanding Messages That Trigger Process Suspension....................249
Controlling Message Flow........................................................................................................249Preventing Process Suspension................................................................................................250
Reacting to Insufficient Memory...................................................................................................250Maintaining the Accuracy of Message Time-Stamping................................................................251Adjusting the Transfer of Messages to Disk..................................................................................251Allocating Disk Space for the Audit Log File................................................................................251Error Handling in the Auditing Facility........................................................................................252
Disabling Disk Monitoring.......................................................................................................252Losing the Link to a Remote Log File.......................................................................................252
11 System Security Breaches........................................................................................253Forms of System Attacks.....................................................................................................................253Indications of Trouble.........................................................................................................................253
Reports from Users........................................................................................................................253Monitoring the System..................................................................................................................254
Routine System Surveillance...............................................................................................................254System Accounting........................................................................................................................255Security Auditing...........................................................................................................................255
Handling a Security Breach................................................................................................................257Unsuccessful Intrusion Attempts..................................................................................................257
Detecting Intrusion Attempts...................................................................................................257Identifying the Perpetrator.......................................................................................................257Preventing Intrusion Attempts.................................................................................................257
Successful Intrusions.....................................................................................................................258Identifying the Successful Perpetrator.....................................................................................258
Table of Contents 123
Securing the System.................................................................................................................259Repair After a Successful Intrusion..........................................................................................259
12 Securing a Cluster....................................................................................................261Overview of Clusters..........................................................................................................................261Building a Common Environment......................................................................................................261
Required Common System Files...................................................................................................262Recommended Common System Files..........................................................................................262Synchronizing Multiple Versions of Files......................................................................................263
Synchronizing Authorization Data.....................................................................................................264Managing the Audit Log File..............................................................................................................265Protecting Objects...............................................................................................................................265Storing Profiles and Auditing Information.........................................................................................266clusterwide Intrusion Detection..........................................................................................................266Using the System Management Utility...............................................................................................267Managing Cluster Membership..........................................................................................................267Using DECnet Between Cluster Nodes...............................................................................................267
13 Security in a Network Environment........................................................................269Managing Network Security...............................................................................................................269
Requirements for Achieving Security............................................................................................269Auditing in the Network...............................................................................................................270
Hierarchy of Access Controls..............................................................................................................270Using Explicit Access Control.......................................................................................................271Using Proxy Logins.......................................................................................................................271Using Default Application Accounts.............................................................................................271
Proxy Access Control..........................................................................................................................272Special Security Measures with Proxy Access...............................................................................272Setting Up a Proxy Database.........................................................................................................272
Enabling and Disabling Incoming Proxy Access.....................................................................274Removing Proxy Access...........................................................................................................274Procedure for Creating a Proxy Account.................................................................................274
Example of a Proxy Account.........................................................................................................275Using DECnet Application (Object) Accounts....................................................................................276
Summary of Network Objects.......................................................................................................277Configuring Network Objects Manually.......................................................................................278Removing Default DECnet Access to the System..........................................................................280Setting Privilege Requirements for Remote Object Connections..................................................281
Specifying Routing Initialization Passwords......................................................................................281Establishing a Dynamic Asynchronous Connection.....................................................................281
Sharing Files in a Network..................................................................................................................285Using the Mail Utility....................................................................................................................286Setting Up Accounts for Local and Remote Users........................................................................286Admitting Remote Users to Multiple Accounts............................................................................286
14 Using Protected Subsystems....................................................................................291Advantages of Protected Subsystems.................................................................................................291Applications for Protected Subsystems..............................................................................................291How Protected Subsystems Work.......................................................................................................291Design Considerations........................................................................................................................292System Management Requirements...................................................................................................293Building the Subsystem......................................................................................................................294Enabling Protected Subsystems on a Trusted Volume.......................................................................294
124 Table of Contents
Giving Users Access............................................................................................................................295Example of a Protected Subsystem.....................................................................................................295
Protecting the Top-Level Directory...............................................................................................296Protecting Subsystem Directories..................................................................................................297Protecting the Images and Data Files............................................................................................298Protecting the Printer.....................................................................................................................299Command Procedure for Building the Subsystem........................................................................300
A Assigning Privileges..................................................................................................303ACNT Privilege (Devour)...................................................................................................................303ALLSPOOL Privilege (Devour)..........................................................................................................303ALTPRI Privilege (System).................................................................................................................303AUDIT Privilege (System)..................................................................................................................304BUGCHK Privilege (Devour)..............................................................................................................304BYPASS Privilege (All)........................................................................................................................304CMEXEC Privilege (All)......................................................................................................................305CMKRNL Privilege (All).....................................................................................................................305DIAGNOSE Privilege (Objects)..........................................................................................................306DOWNGRADE Privilege (All)............................................................................................................307EXQUOTA Privilege (Devour)............................................................................................................307GROUP Privilege (Group)..................................................................................................................307GRPNAM Privilege (Devour).............................................................................................................307GRPPRV Privilege (Group).................................................................................................................308IMPERSONATE Privilege (All) (Formerly DETACH)........................................................................308IMPORT Privilege (Objects)................................................................................................................309LOG_IO Privilege (All).......................................................................................................................309MOUNT Privilege (Normal)...............................................................................................................309NETMBX Privilege (Normal)..............................................................................................................309OPER Privilege (System).....................................................................................................................309PFNMAP Privilege (All).....................................................................................................................312PHY_IO Privilege (All)........................................................................................................................312PRMCEB Privilege (Devour)...............................................................................................................313PRMGBL Privilege (Devour)..............................................................................................................313PRMMBX Privilege (Devour)..............................................................................................................313PSWAPM Privilege (System)..............................................................................................................314READALL Privilege (Objects).............................................................................................................314SECURITY Privilege (System)............................................................................................................314SETPRV Privilege (All)........................................................................................................................315SHARE Privilege (All).........................................................................................................................315SHMEM Privilege (Devour)................................................................................................................315SYSGBL Privilege (Files).....................................................................................................................315SYSLCK Privilege (System).................................................................................................................315SYSNAM Privilege (All)......................................................................................................................315SYSPRV Privilege (All)........................................................................................................................316TMPMBX Privilege (Normal).............................................................................................................317UPGRADE Privilege (All)...................................................................................................................317VOLPRO Privilege (Objects)...............................................................................................................317WORLD Privilege (System)................................................................................................................318
B Protection for OpenVMS System Files......................................................................319Standard Ownership and Protection..................................................................................................319Listing of OpenVMS System Files.......................................................................................................320
Files in Top-Level Directories........................................................................................................321
Table of Contents 125
Files in SYS$KEYMAP...................................................................................................................321Files in SYS$LDR...........................................................................................................................321Files in SYS$STARTUP and SYS$ERR...........................................................................................323Files in SYSEXE..............................................................................................................................324Files in SYSHLP.............................................................................................................................328Files in SYSLIB...............................................................................................................................331Files in SYSMGR............................................................................................................................335Files in SYSMSG.............................................................................................................................337Files in SYSTEST............................................................................................................................338Files in SYSUPD.............................................................................................................................338Files in VUE$LIBRARY..................................................................................................................339
C Alarm Messages........................................................................................................341
126 Table of Contents
6 Managing the System and its DataThis chapter explains how you, as security administrator, implement security features of theOpenVMS operating system. It provides an overview of security management, based on thesecurity needs of a commercial installation with average security needs. It discusses the followingtopics:• Your role as security administrator• Site security policies• Tools for security administrators• Account requirements for a security administrator• Suggestions for training users• Logging the activities of a new user• Tasks to include in your weekly routineHP recommends that you read the entire chapter and the three chapters that follow beforeestablishing any security measures. After reading the chapters, you will better be able to decidewhich security measures are appropriate for your site, and you will have the tools to implementthem.
Role of a Security AdministratorYour role as security adminstrator is to implement and maintain the organization's securitypolicy. Some organizations include security administrators in the development of the securitypolicy; other organizations charter security administrators to implement and maintain anestablished policy. For an example of a company security policy, see “Site Security Policies”(page 127).As security administrator (or officer), your job is to see that the security policy is implementedand maintained. Regularly monitoring the system for possible security violations andvulnerabilities is absolutely necessary. Whenever you detect problems, you should see that theyare corrected.Many times organizations divide the duties of computer administrators. The security administratormonitors the system and reports problems, and the system manager implements policy andmanages the system. In this management structure, the security administrator works in tandemwith the system manager. Some system managers choose to employ an accounts clerk to set upuser accounts and process the required paperwork justifying the need for an account. This isalways a highly trusted individual who essentially acts as a co-system manager. With a divisionof labor, it is critical for the system manager and security administrator to communicate regularly.The security administrator should report security problems to users or, if necessary, to systemmanagers or the accounts clerk so problems are corrected.Another division of duties, common to many OpenVMS installations, combines the roles ofsecurity administrator and system manager. One person implements the security policy andmaintains the system to meet its requirements.Secure system management, however it is organized, involves training users, setting up accountsand passwords, protecting sensitive system files and resources, and auditing and analyzingsecurity-relevant events. Learning how systems are used and recognizing "normal" system activityare critical to secure management.
Site Security PoliciesAn organization's management usually establishes a brief security policy for its employees toemphasize the behavior it expects of them. For example, such a policy may state that employeesshould not give away company data or share passwords.
Role of a Security Administrator 127
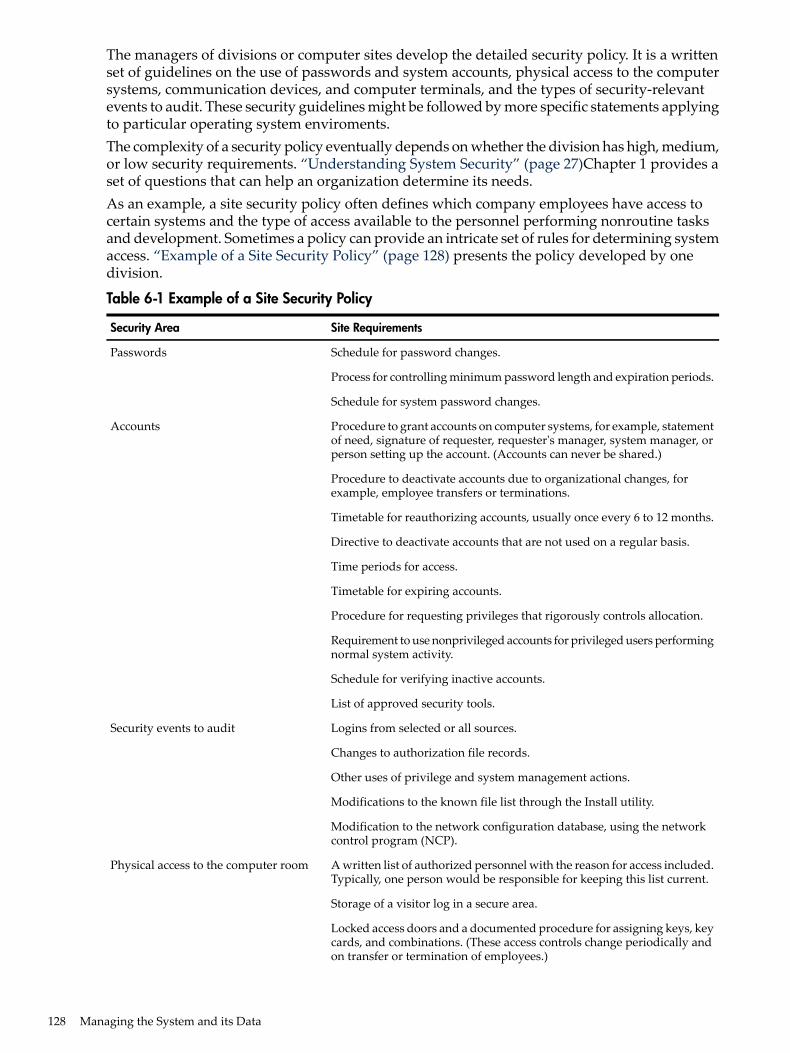
The managers of divisions or computer sites develop the detailed security policy. It is a writtenset of guidelines on the use of passwords and system accounts, physical access to the computersystems, communication devices, and computer terminals, and the types of security-relevantevents to audit. These security guidelines might be followed by more specific statements applyingto particular operating system enviroments.The complexity of a security policy eventually depends on whether the division has high, medium,or low security requirements. “Understanding System Security” (page 27)Chapter 1 provides aset of questions that can help an organization determine its needs.As an example, a site security policy often defines which company employees have access tocertain systems and the type of access available to the personnel performing nonroutine tasksand development. Sometimes a policy can provide an intricate set of rules for determining systemaccess. “Example of a Site Security Policy” (page 128) presents the policy developed by onedivision.
Table 6-1 Example of a Site Security Policy
Site RequirementsSecurity Area
Schedule for password changes.Passwords
Process for controlling minimum password length and expiration periods.
Schedule for system password changes.
Procedure to grant accounts on computer systems, for example, statementof need, signature of requester, requester's manager, system manager, orperson setting up the account. (Accounts can never be shared.)
Accounts
Procedure to deactivate accounts due to organizational changes, forexample, employee transfers or terminations.
Timetable for reauthorizing accounts, usually once every 6 to 12 months.
Directive to deactivate accounts that are not used on a regular basis.
Time periods for access.
Timetable for expiring accounts.
Procedure for requesting privileges that rigorously controls allocation.
Requirement to use nonprivileged accounts for privileged users performingnormal system activity.
Schedule for verifying inactive accounts.
List of approved security tools.
Logins from selected or all sources.Security events to audit
Changes to authorization file records.
Other uses of privilege and system management actions.
Modifications to the known file list through the Install utility.
Modification to the network configuration database, using the networkcontrol program (NCP).
A written list of authorized personnel with the reason for access included.Typically, one person would be responsible for keeping this list current.
Physical access to the computer room
Storage of a visitor log in a secure area.
Locked access doors and a documented procedure for assigning keys, keycards, and combinations. (These access controls change periodically andon transfer or termination of employees.)
128 Managing the System and its Data
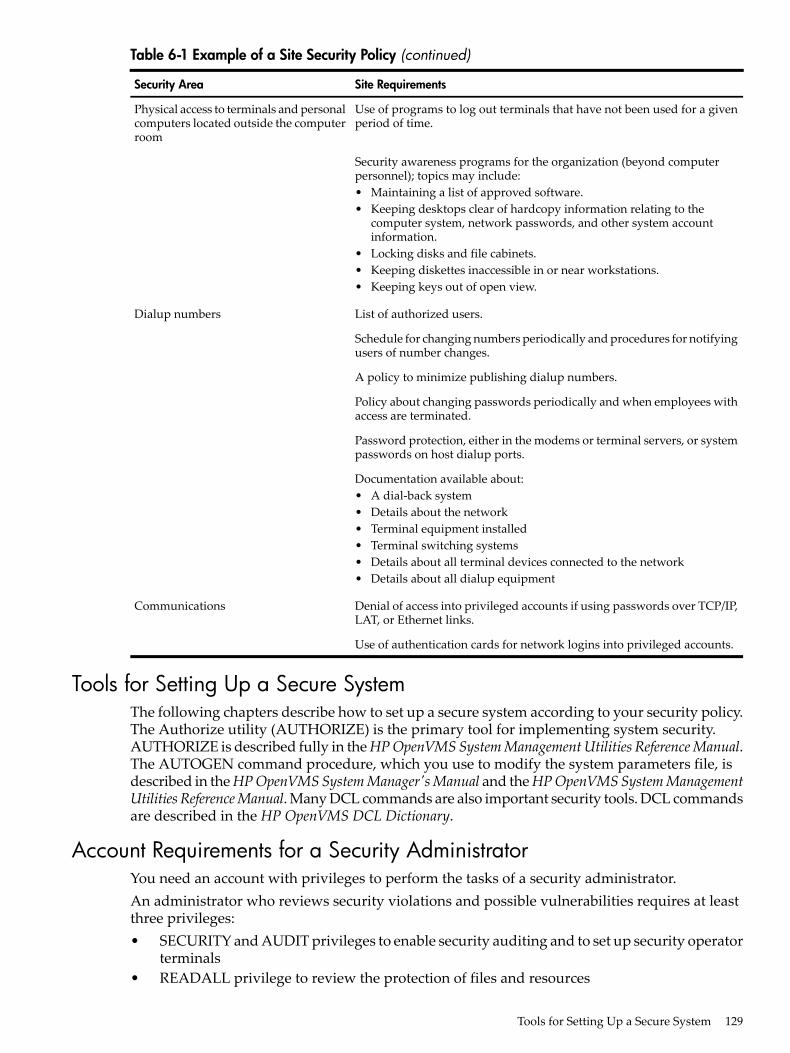
Table 6-1 Example of a Site Security Policy (continued)
Site RequirementsSecurity Area
Use of programs to log out terminals that have not been used for a givenperiod of time.
Physical access to terminals and personalcomputers located outside the computerroom
Security awareness programs for the organization (beyond computerpersonnel); topics may include:• Maintaining a list of approved software.• Keeping desktops clear of hardcopy information relating to the
computer system, network passwords, and other system accountinformation.
• Locking disks and file cabinets.• Keeping diskettes inaccessible in or near workstations.• Keeping keys out of open view.
List of authorized users.Dialup numbers
Schedule for changing numbers periodically and procedures for notifyingusers of number changes.
A policy to minimize publishing dialup numbers.
Policy about changing passwords periodically and when employees withaccess are terminated.
Password protection, either in the modems or terminal servers, or systempasswords on host dialup ports.
Documentation available about:• A dial-back system• Details about the network• Terminal equipment installed• Terminal switching systems• Details about all terminal devices connected to the network• Details about all dialup equipment
Denial of access into privileged accounts if using passwords over TCP/IP,LAT, or Ethernet links.
Communications
Use of authentication cards for network logins into privileged accounts.
Tools for Setting Up a Secure SystemThe following chapters describe how to set up a secure system according to your security policy.The Authorize utility (AUTHORIZE) is the primary tool for implementing system security.AUTHORIZE is described fully in theHPOpenVMSSystemManagementUtilities ReferenceManual.The AUTOGEN command procedure, which you use to modify the system parameters file, isdescribed in theHPOpenVMSSystemManager'sManual and theHPOpenVMSSystemManagementUtilities ReferenceManual. Many DCL commands are also important security tools. DCL commandsare described in the HP OpenVMS DCL Dictionary.
Account Requirements for a Security AdministratorYou need an account with privileges to perform the tasks of a security administrator.An administrator who reviews security violations and possible vulnerabilities requires at leastthree privileges:• SECURITY and AUDIT privileges to enable security auditing and to set up security operator
terminals• READALL privilege to review the protection of files and resources
Tools for Setting Up a Secure System 129
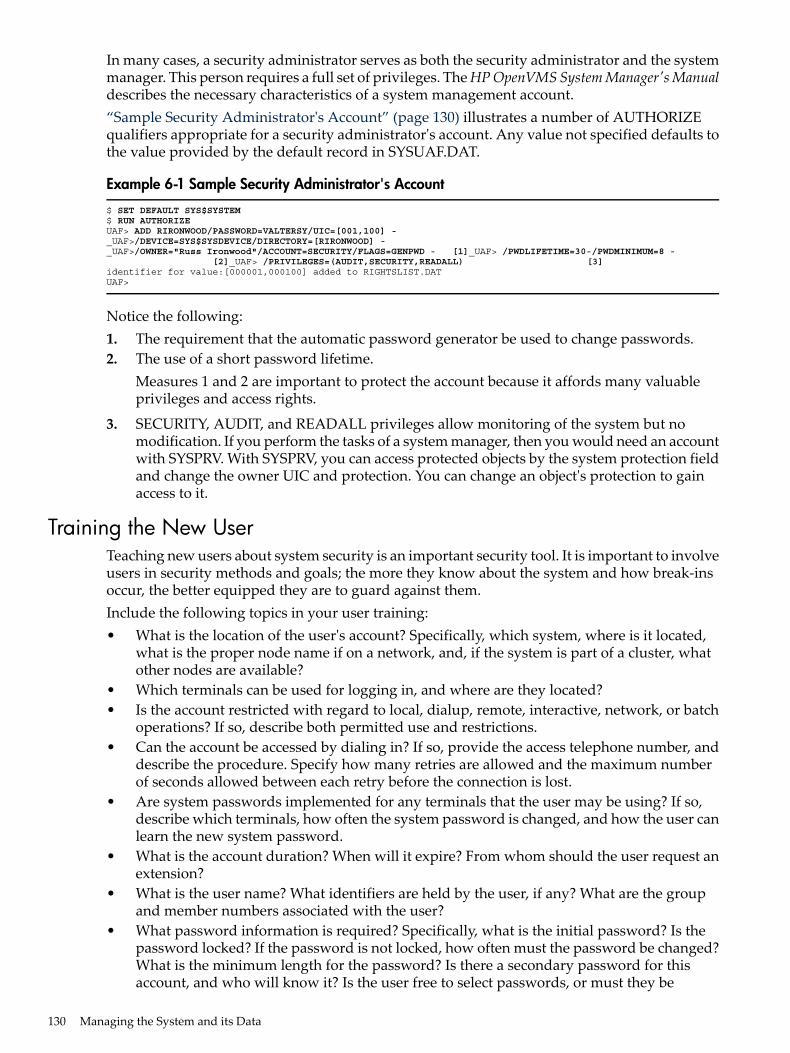
In many cases, a security administrator serves as both the security administrator and the systemmanager. This person requires a full set of privileges. TheHPOpenVMSSystemManager'sManualdescribes the necessary characteristics of a system management account.“Sample Security Administrator's Account” (page 130) illustrates a number of AUTHORIZEqualifiers appropriate for a security administrator's account. Any value not specified defaults tothe value provided by the default record in SYSUAF.DAT.
Example 6-1 Sample Security Administrator's Account
$ SET DEFAULT SYS$SYSTEM$ RUN AUTHORIZEUAF> ADD RIRONWOOD/PASSWORD=VALTERSY/UIC=[001,100] -_UAF>/DEVICE=SYS$SYSDEVICE/DIRECTORY=[RIRONWOOD] -_UAF>/OWNER="Russ Ironwood"/ACCOUNT=SECURITY/FLAGS=GENPWD - [1]_UAF> /PWDLIFETIME=30-/PWDMINIMUM=8 -
[2]_UAF> /PRIVILEGES=(AUDIT,SECURITY,READALL) [3]identifier for value:[000001,000100] added to RIGHTSLIST.DATUAF>
Notice the following:1. The requirement that the automatic password generator be used to change passwords.2. The use of a short password lifetime.
Measures 1 and 2 are important to protect the account because it affords many valuableprivileges and access rights.
3. SECURITY, AUDIT, and READALL privileges allow monitoring of the system but nomodification. If you perform the tasks of a system manager, then you would need an accountwith SYSPRV. With SYSPRV, you can access protected objects by the system protection fieldand change the owner UIC and protection. You can change an object's protection to gainaccess to it.
Training the New UserTeaching new users about system security is an important security tool. It is important to involveusers in security methods and goals; the more they know about the system and how break-insoccur, the better equipped they are to guard against them.Include the following topics in your user training:• What is the location of the user's account? Specifically, which system, where is it located,
what is the proper node name if on a network, and, if the system is part of a cluster, whatother nodes are available?
• Which terminals can be used for logging in, and where are they located?• Is the account restricted with regard to local, dialup, remote, interactive, network, or batch
operations? If so, describe both permitted use and restrictions.• Can the account be accessed by dialing in? If so, provide the access telephone number, and
describe the procedure. Specify how many retries are allowed and the maximum numberof seconds allowed between each retry before the connection is lost.
• Are system passwords implemented for any terminals that the user may be using? If so,describe which terminals, how often the system password is changed, and how the user canlearn the new system password.
• What is the account duration? When will it expire? From whom should the user request anextension?
• What is the user name? What identifiers are held by the user, if any? What are the groupand member numbers associated with the user?
• What password information is required? Specifically, what is the initial password? Is thepassword locked? If the password is not locked, how often must the password be changed?What is the minimum length for the password? Is there a secondary password for thisaccount, and who will know it? Is the user free to select passwords, or must they be
130 Managing the System and its Data
automatically generated? See “Checklist for Contributing to System Security”(page 66)"Checklist for Contributing to System Security" on page 60 for a checklist of goodpractices for users.
• What is the default device and directory?• What is the default protection?• Are there quotas on disk usage? If so, what are the values?• Are there restrictions on use? For example, are there certain days or hours of the day that
are suggested or enforced? Explain primary and secondary days if applicable.• Are there files or directories that are shared? If so, provide the details.• Are there ACLs that affect the user? What identifiers does the user need to know?• Which privileges does the user hold and what do they mean?• What is the command language interpreter?• Which type of account is this: open, captive, restricted, or interactive?• Which nodes permit proxy logins for this user, if any?• What are the names of the queues the user may need to use?• What actions should the user take to ensure physical site security, such as locking up
materials?
Logging a User's SessionWhile users are learning the system, you may choose to monitor terminal sessions if the userperforms an especially sensitive function, such as accessing sensitive data or controlling a systemoperation. (Sometimes users may choose to log their own sessions so they have a record of theiractions. If this is the case, they can use the command SET HOST 0/LOG interactively after theirinitial login.) This section describes one method of logging users' sessions by setting up a restrictedaccount. Many third-party products provide other ways of monitoring sessions that are moreefficient. Regardless of the method you select, you should check with your legal department tomake sure this is acceptable practice.By using a special restricted account and appropriate command procedures, you can enforce thelogging of terminal sessions for selected users. These users would need to log in to the restrictedaccount first and then log in to their own account. The restricted account ensures that the sessionis logged.The following example provides guidelines on how to set up the restricted account (namedUSER_LOG in this example) and includes samples of appropriate command procedures:1. Set up the restricted account USER_LOG as follows:
UAF>ADD USER_LOG /FLAGS=(RESTRICTED,DISMAIL,DISNEWMAIL)-_UAF>/LGICMD=SYS$SYSROOT:[USER_LOG]SESSIONLOG-_UAF>/DEV=SYS$SYSROOT: /DIR=[USER_LOG]-_UAF>/NONETWORK /NOBATCH /UIC=[200,256]
2. The SESSIONLOG.COM command procedure enables logging of the terminal session:$ ! SESSIONLOG.COM - log in to specified account with terminal session$ ! logging enabled.$ !$ WRITE SYS$OUTPUT "Please log in to the account of your choice."$ WRITE SYS$OUTPUT "Your terminal session will be recorded."$ WRITE SYS$OUTPUT ""$ !$ ! Acquire the intended user name and save it in a temporary file. Use$ ! it to name the log file, and pass it as the first line of input to$ ! LOGIN.$ !$ READ/PROMPT="Username: " SYS$COMMAND USERNAME$ PID = F$GETJPI (0, "PID")$ OPEN/WRITE OUTPUT USERNAME'PID'.TMP
Logging a User's Session 131
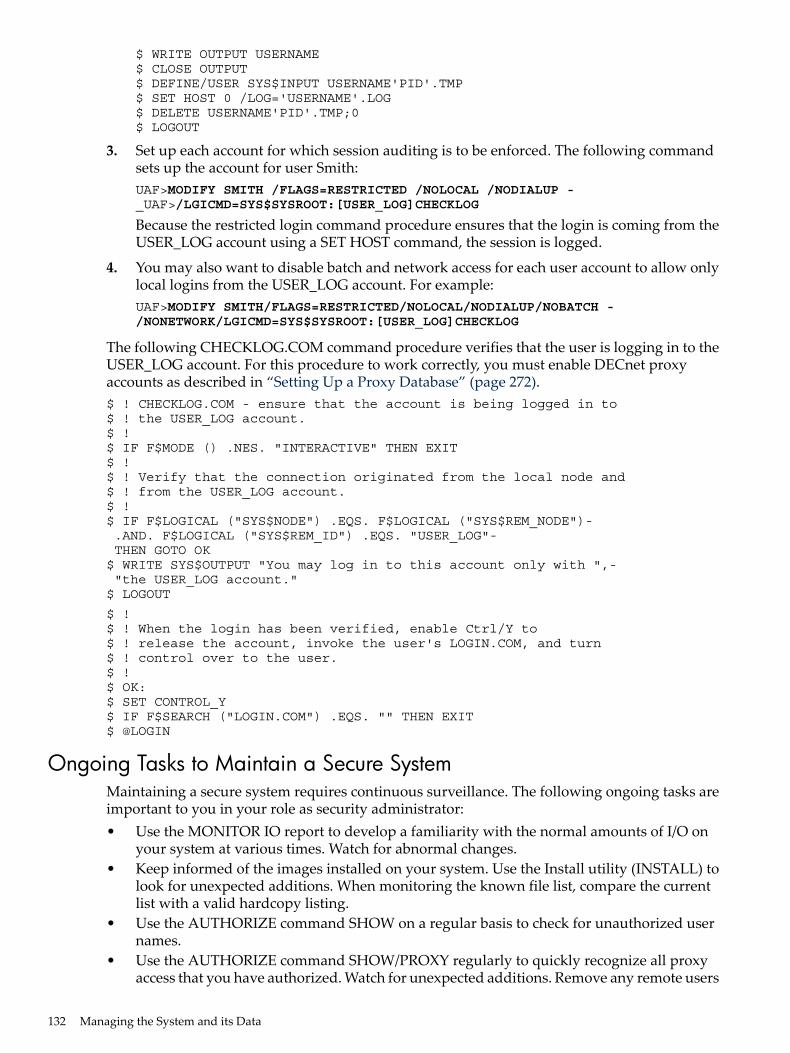
$ WRITE OUTPUT USERNAME$ CLOSE OUTPUT$ DEFINE/USER SYS$INPUT USERNAME'PID'.TMP$ SET HOST 0 /LOG='USERNAME'.LOG$ DELETE USERNAME'PID'.TMP;0$ LOGOUT
3. Set up each account for which session auditing is to be enforced. The following commandsets up the account for user Smith:UAF>MODIFY SMITH /FLAGS=RESTRICTED /NOLOCAL /NODIALUP -_UAF>/LGICMD=SYS$SYSROOT:[USER_LOG]CHECKLOG
Because the restricted login command procedure ensures that the login is coming from theUSER_LOG account using a SET HOST command, the session is logged.
4. You may also want to disable batch and network access for each user account to allow onlylocal logins from the USER_LOG account. For example:UAF>MODIFY SMITH/FLAGS=RESTRICTED/NOLOCAL/NODIALUP/NOBATCH -/NONETWORK/LGICMD=SYS$SYSROOT:[USER_LOG]CHECKLOG
The following CHECKLOG.COM command procedure verifies that the user is logging in to theUSER_LOG account. For this procedure to work correctly, you must enable DECnet proxyaccounts as described in “Setting Up a Proxy Database” (page 272).$ ! CHECKLOG.COM - ensure that the account is being logged in to$ ! the USER_LOG account.$ !$ IF F$MODE () .NES. "INTERACTIVE" THEN EXIT$ !$ ! Verify that the connection originated from the local node and$ ! from the USER_LOG account.$ !$ IF F$LOGICAL ("SYS$NODE") .EQS. F$LOGICAL ("SYS$REM_NODE")- .AND. F$LOGICAL ("SYS$REM_ID") .EQS. "USER_LOG"- THEN GOTO OK $ WRITE SYS$OUTPUT "You may log in to this account only with ",- "the USER_LOG account." $ LOGOUT
$ !$ ! When the login has been verified, enable Ctrl/Y to$ ! release the account, invoke the user's LOGIN.COM, and turn$ ! control over to the user.$ !$ OK:$ SET CONTROL_Y$ IF F$SEARCH ("LOGIN.COM") .EQS. "" THEN EXIT$ @LOGIN
Ongoing Tasks to Maintain a Secure SystemMaintaining a secure system requires continuous surveillance. The following ongoing tasks areimportant to you in your role as security administrator:• Use the MONITOR IO report to develop a familiarity with the normal amounts of I/O on
your system at various times. Watch for abnormal changes.• Keep informed of the images installed on your system. Use the Install utility (INSTALL) to
look for unexpected additions. When monitoring the known file list, compare the currentlist with a valid hardcopy listing.
• Use the AUTHORIZE command SHOW on a regular basis to check for unauthorized usernames.
• Use the AUTHORIZE command SHOW/PROXY regularly to quickly recognize all proxyaccess that you have authorized. Watch for unexpected additions. Remove any remote users
132 Managing the System and its Data

who no longer require access. Institute regular communications with system managers atremote nodes.
• Apply the Accounting utility (ACCOUNTING) on a regular basis to give you a basis ofnormal amounts of processing time. Watch for unexplained changes.
• Regularly check the accounting report produced by ACCOUNTING for known user names,unknown user names, and appropriate hours of system use.
• Develop sufficient familiarity with your system's workload so that you notice normal (aswell as abnormal) processing activity occurring at unusual hours.
• Monitor device allocations routinely with the DCL command SHOW DEVICE so that youimmediately notice any that are unexpected.
• Become familiar with the recurring types of batch jobs that run on the batch queues andwhat times they are most likely to run.
• Monitor the protection and ownership of critical files with the DIRECTORY/SECURITYcommand. Watch for unexplained changes in each.
• Maintain familiarity with the rights list. Keep current listings so that you can recognizeidentifiers that have been added or new holders of the current identifiers.
• Remove identifiers that are not in use. Keep the rights list current.• Regularly review the templates that you use to set up UAF records. Make any necessary
changes.• Use the security-auditing features described in “Security Auditing” (page 227).• Apply the Audit Analysis utility (ANALYZE/AUDIT) regularly to detect abnormal auditing
activity.• When you allow new users to change their initial passwords, assign passwords that users
will want to change or use the password generator. Check back to see if you can log in withthe password you originally assigned. Where necessary, follow up with the user to determinewhy the change did not occur as requested.
• Try searching unprotected user files for passwords embedded in network access controlstrings. The password will precede the 3-character terminator("::). Also search for the nounpassword, and see if any passwords are revealed nearby.
• Check that your users are logging out properly. Make physical checks at the end of normalbusiness hours.
• Check that your users have appropriate default protections in place.• Keep informed about your inventory of magnetic tapes, disks, and program listings. Routinely
check that inventory for possible indications that physical security has degraded.• Keep your office and all important listings locked up.
Ongoing Tasks to Maintain a Secure System 133

134

7 Managing System AccessThis chapter explains how you give users access to a system by assigning user accounts andpasswords. Descriptions are based on the security needs of a commercial installation with averagesecurity needs, where accounts require protection. Descriptions of above-average security needsare also noted. See the“Controlling Access to System Data and Resources” (page 175) forinformation on controlling access to system data and resources. See “Managing the System andits Data” (page 127) and “Security Auditing” (page 227) for information on auditing user actions.The Authorize utility (AUTHORIZE) is the primary tool for establishing accounts and passwords.See the HP OpenVMS System Management Utilities Reference Manual: A-L for a description of theutility.
Defining Times and Conditions for System AccessThe level of system access a user enjoys depends on your site requirements, that user's role inthe organization, and your management of his or her account. A site with low securityrequirements and plenty of system resources may allow access at any time of day whereas a sitewith moderate security requirements may limit logins to daytime hours and permit dialup ornetwork connections only to a subset of users.Using the Authorize utility, you control when and how users can access the system. “AuthorizeQualifiers Controlling Login Times and Conditions” (page 135) identifies the applicable qualifiers.
Table 7-1 Authorize Qualifiers Controlling Login Times and Conditions
DescriptionQaulifierCategories
By default, a user has full access every day. By specifying anaccess time, you prevent access at all other times. Identify hourson primary days with the keyword PRIMARY; identify hourson secondary days with the keyword SECONDARY.
/ACCESSTime of day
Specifies hours of access permitted for dialup logins./DIALUP
Specifies hours of access for interactive logins from localterminals.
/LOCAL
Defines the primary and secondary days of the week for loggingin.
/PRIMEDAYSDays of week
Specifies the hours of access permitted for batch jobs./BATCHMode of operation
Specifies the hours of access for interactive logins./INTERACTIVE
Specifies the hours of access permitted for network batch jobs./NETWORK
Specifies hours during which access is permitted for interactivelogins from network remote terminals (with the DCL commandSET HOST).
/REMOTE
Specifies the name of the user's default device at login./DEVICEAllocation of resources
Specifies the name of the user's default directory at login./DIRECTORY
Specifies the expiration date and time of the account./EXPIRATIONValidity of account
Disables the account so the user cannot log in./FLAGS=DISUSER
Specifies that the user is externally authenticated./FLAGS=EXTAUTHExternal authentication
Specifies that the account can use standard authentication (usingSYSUAF) irrespective of whether the EXTAUTH flag is set, whichrequires external authentication. For more information onexternal authentication, see the section“Overriding ExternalAuthentication” (page 158).
/FLAGS=VMSAUTH
Defining Times and Conditions for System Access 135
Restricting Work TimesAUTHORIZE qualifiers let you restrict system use to certain days of the week and certain periodsof the day. Restricting work times is useful to better balance the workload on your system.Restricting access to accounts is also an effective way of preventing unauthorized use of thesystem outside of normal working hours.Define primary and secondary days of the week with the /PRIMEDAYS qualifier, or conform tothe default where primary days are Monday through Friday and secondary days are Saturdayand Sunday. For example, to modify the defaults for a user who works Tuesday through Saturday,you would specify the /PRIMEDAYS qualifier as follows:/PRIMEDAYS=(NOMONDAY,TUESDAY,WEDNESDAY,THURSDAY,FRIDAY,SATURDAY,NOSUNDAY)
Occasionally an operational change occurs that conflicts with the normal day assignments atyour site, such as a holiday falling on a primary day. To override the normal day assignment,use the DCL command SET DAY, and specify the day-type interpretation you want for thecurrent day. This requires OPER privilege. Note that this change applies to all logged-in users,as well as those who will log in during the day. If users who are currently logged in areunauthorized for the day-type once it changes, they are logged out of the system at the next hour.(The job controller enforces time restrictions on an hourly basis.)Decide which types of login access should be restricted to certain hours. The login access qualifiersare: /LOCAL, /REMOTE, /DIALUP, /INTERACTIVE, /BATCH, and /NETWORK. However, ifyour site applies one set of primary and secondary hours for all types of logins, you can specifythe /ACCESS qualifier, which applies to all modes of access.The following example shows how to apply the /BATCH qualifier to a user's account to disablethe user from running batch jobs during normal working hours:/NOBATCH=(PRIMARY, 9-17)
This specification permits the user to run batch jobs only during the hours of 6:00 p.m. through8:59 a.m. on primary days but all day on secondary days.
Restricting Modes of OperationThe following concerns might cause you to prohibit network access for some of your users:• The user has data that should be accessed only through the local node.• Penetration attempts are more likely to occur over a network because of the increased
anonymity of the connection. (This concern is also relevant to dialup connections.)Use the AUTHORIZE qualifier /NONETWORK to prevent specific users from having networkaccess, as shown in the following example:UAF> ADD JSMITH /NONETWORK, ...
Any of the AUTHORIZE access mode qualifiers (/LOCAL, /REMOTE, /DIALUP, /INTERACTIVE,/BATCH, or /NETWORK) can be negated in this manner to restrict access to the system.
Restricting Account DurationIt is good practice to set an account expiration time that matches the maximum length of timeyou expect the user to require access. When the expiration time arrives, the system automaticallyprohibits access to the account. You must still remove the UAF record and delete the user's files.Use of the /EXPIRATION qualifier also forces you to periodically review accounts and reauthorizeonly those that are necessary.To set the account expiration time, use the AUTHORIZE qualifier /EXPIRATION in the user'sUAF record. For example, the following qualifier specifies that the user's account will expire onthe 30th of December 2008:/EXPIRATION=30-DEC-2008
136 Managing System Access
Disabling AccountsYou may want to severely restrict the use of certain accounts. For example, you may want todisable specific accounts used only periodically, such as the SYSTEST and FIELD accounts, tolimit possible misuse of these accounts. Disable the accounts with the /FLAGS=DISUSER qualifier.Temporarily enable the accounts with the /FLAGS=NODISUSER qualifier when needed.
Restricting Disk VolumesIdentify the user's default device and directory in the UAF record with the AUTHORIZE qualifiers/DEVICE and /DIRECTORY. You can limit the number of blocks available to the user on thatdisk (and any other disk) through the disk quota feature of the System Management utility(SYSMAN), as described in the HP OpenVMS SystemManagement Utilities Reference Manual: A-L.The volume protection in place on other disks controls how much access a user can obtain to thedisks. The user's privileges, which can be extended or limited through the AUTHORIZE qualifier/PRIVILEGES, also influence the access available (see “Giving Users Privileges” (page 184)).
Marking Accounts for External AuthenticationMark a user's account in the UAF record with the AUTHORIZE qualifier /FLAGS=EXTAUTHto allow the user to be externally authenticated.See “Enabling External Authentication” (page 155) for more information.
Assigning Appropriate Accounts to UsersThe type of system access a user holds largely depends on his or her need for system resourcesand your site's security requirements. This section describes the types of user accounts that areavailable on OpenVMS systems and explains why one type of account may be preferable toanother. For a step-by-step description of adding user accounts, see the HP OpenVMS SystemManager's Manual.
Types of System AccountsThere are two major types of accounts:• Interactive accounts have access to system software. Usually, such an account is considered
an individual account.• Limited-access accountsprovide controlled login to the system and, in some cases, controlled
access to user software. Limited-access accounts ensure that the system and process logincommand procedures, as well as any command procedures they call, are executed.There are two types of limited accounts: captive and restricted. Guest, proxy, and automaticlogin accounts are forms of captive and restricted accounts.DECwindows software does not currently support captive or restricted logins in thetraditional sense. Once a user is logged in and creates a DECterm window, however, thetraditional environment of a captive or restricted account applies.
Both interactive and limited-access accounts can be privileged accounts, and can be externallyauthenticated, as “Privileged Accounts” (page 139) describes.The following table shows the kind of account to create based on the task a user performs:
Create This Type ofAccount...
If Users Need to...
InteractivePerform work of a general nature, such as program development or text editing
CaptivePerform routine computer tasks requiring limited activities
CaptiveRun batch operations during unsupervised periods
Assigning Appropriate Accounts to Users 137
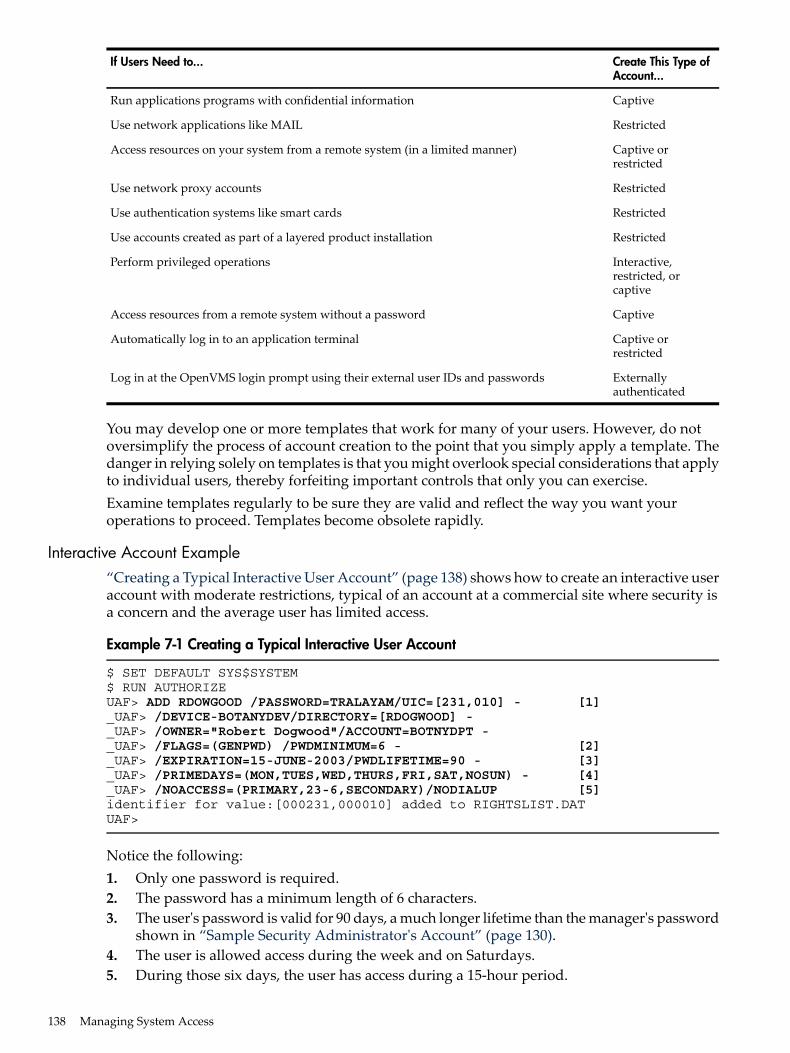
Create This Type ofAccount...
If Users Need to...
CaptiveRun applications programs with confidential information
RestrictedUse network applications like MAIL
Captive orrestricted
Access resources on your system from a remote system (in a limited manner)
RestrictedUse network proxy accounts
RestrictedUse authentication systems like smart cards
RestrictedUse accounts created as part of a layered product installation
Interactive,restricted, orcaptive
Perform privileged operations
CaptiveAccess resources from a remote system without a password
Captive orrestricted
Automatically log in to an application terminal
Externallyauthenticated
Log in at the OpenVMS login prompt using their external user IDs and passwords
You may develop one or more templates that work for many of your users. However, do notoversimplify the process of account creation to the point that you simply apply a template. Thedanger in relying solely on templates is that you might overlook special considerations that applyto individual users, thereby forfeiting important controls that only you can exercise.Examine templates regularly to be sure they are valid and reflect the way you want youroperations to proceed. Templates become obsolete rapidly.
Interactive Account Example“Creating a Typical Interactive User Account” (page 138) shows how to create an interactive useraccount with moderate restrictions, typical of an account at a commercial site where security isa concern and the average user has limited access.
Example 7-1 Creating a Typical Interactive User Account
$ SET DEFAULT SYS$SYSTEM$ RUN AUTHORIZEUAF> ADD RDOWGOOD /PASSWORD=TRALAYAM/UIC=[231,010] - [1]_UAF> /DEVICE-BOTANYDEV/DIRECTORY=[RDOGWOOD] -_UAF> /OWNER="Robert Dogwood"/ACCOUNT=BOTNYDPT -_UAF> /FLAGS=(GENPWD) /PWDMINIMUM=6 - [2]_UAF> /EXPIRATION=15-JUNE-2003/PWDLIFETIME=90 - [3]_UAF> /PRIMEDAYS=(MON,TUES,WED,THURS,FRI,SAT,NOSUN) - [4]_UAF> /NOACCESS=(PRIMARY,23-6,SECONDARY)/NODIALUP [5]identifier for value:[000231,000010] added to RIGHTSLIST.DATUAF>
Notice the following:1. Only one password is required.2. The password has a minimum length of 6 characters.3. The user's password is valid for 90 days, a much longer lifetime than the manager's password
shown in “Sample Security Administrator's Account” (page 130).4. The user is allowed access during the week and on Saturdays.5. During those six days, the user has access during a 15-hour period.
138 Managing System Access
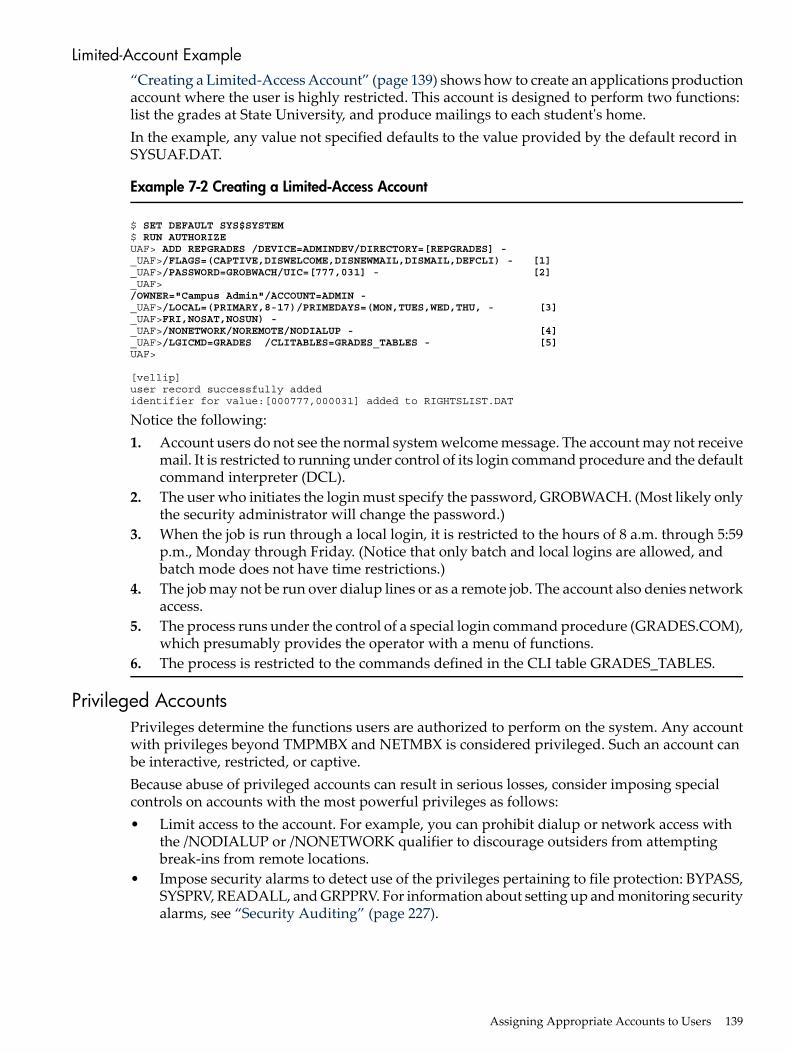
Limited-Account Example“Creating a Limited-Access Account” (page 139) shows how to create an applications productionaccount where the user is highly restricted. This account is designed to perform two functions:list the grades at State University, and produce mailings to each student's home.In the example, any value not specified defaults to the value provided by the default record inSYSUAF.DAT.
Example 7-2 Creating a Limited-Access Account
$ SET DEFAULT SYS$SYSTEM$ RUN AUTHORIZEUAF> ADD REPGRADES /DEVICE=ADMINDEV/DIRECTORY=[REPGRADES] -_UAF>/FLAGS=(CAPTIVE,DISWELCOME,DISNEWMAIL,DISMAIL,DEFCLI) - [1]_UAF>/PASSWORD=GROBWACH/UIC=[777,031] - [2]_UAF>/OWNER="Campus Admin"/ACCOUNT=ADMIN -_UAF>/LOCAL=(PRIMARY,8-17)/PRIMEDAYS=(MON,TUES,WED,THU, - [3]_UAF>FRI,NOSAT,NOSUN) -_UAF>/NONETWORK/NOREMOTE/NODIALUP - [4]_UAF>/LGICMD=GRADES /CLITABLES=GRADES_TABLES - [5]UAF>
[vellip]user record successfully addedidentifier for value:[000777,000031] added to RIGHTSLIST.DAT
Notice the following:1. Account users do not see the normal system welcome message. The account may not receive
mail. It is restricted to running under control of its login command procedure and the defaultcommand interpreter (DCL).
2. The user who initiates the login must specify the password, GROBWACH. (Most likely onlythe security administrator will change the password.)
3. When the job is run through a local login, it is restricted to the hours of 8 a.m. through 5:59p.m., Monday through Friday. (Notice that only batch and local logins are allowed, andbatch mode does not have time restrictions.)
4. The job may not be run over dialup lines or as a remote job. The account also denies networkaccess.
5. The process runs under the control of a special login command procedure (GRADES.COM),which presumably provides the operator with a menu of functions.
6. The process is restricted to the commands defined in the CLI table GRADES_TABLES.
Privileged AccountsPrivileges determine the functions users are authorized to perform on the system. Any accountwith privileges beyond TMPMBX and NETMBX is considered privileged. Such an account canbe interactive, restricted, or captive.Because abuse of privileged accounts can result in serious losses, consider imposing specialcontrols on accounts with the most powerful privileges as follows:• Limit access to the account. For example, you can prohibit dialup or network access with
the /NODIALUP or /NONETWORK qualifier to discourage outsiders from attemptingbreak-ins from remote locations.
• Impose security alarms to detect use of the privileges pertaining to file protection: BYPASS,SYSPRV, READALL, and GRPPRV. For information about setting up and monitoring securityalarms, see “Security Auditing” (page 227).
Assigning Appropriate Accounts to Users 139
For all but the SYSTEM account, also add the following restrictions:• Use the /PRIMEDAYS and /NOACCESS qualifiers to restrict the time of day or days of the
week that logins can be performed. Select periods of time that can be monitored forappropriate use.
• Disable the account when not in use with the AUTHORIZE qualifier /FLAGS=DISUSER.• Use a captive login command procedure for additional validation. Captive login command
procedures are described in “Captive Accounts” (page 140).Naturally, you need to set controls on the SYSTEM account. The most secure practice is to disableit for all but batch access and perform system management through individual privileged useraccounts, which provide accountability.
Special-Purpose Privileged Captive AccountsBecause the safety of a captive account depends on the integrity of its command procedures, itis unadvisable to set up privileged captive accounts for untrusted users. However, there aresome situations that require privilege, and it is safer to perform specific sensitive functionsthrough captive privileged accounts than through general purpose privileged accounts. Forexample, users who perform backup operations require the READALL privilege. By making theaccount that performs backups captive, you can ensure that the procedures are carried outaccording to your system's backup policy.See “Captive Accounts” (page 140) for guidelines for setting up captive accounts.
Interactive AccountsInteractive accounts are very common in environments with low to moderate securityrequirements. They are well suited to work of a general nature, such as program developmentor text editing. The HP OpenVMS System Manager's Manual explains the procedure for settingup this type of account. “Interactive Account Example” (page 138) provides an example.
Captive AccountsA captive account limits the activities of the user and, when properly administered, denies theuser access to the DCL command level. You can set up the account to limit the user to runningunder the complete control of a specific program or the captive login command procedure.The primary feature of the captive account is its login command procedure. This type of accountensures that the system login command procedure (SYLOGIN.COM) and the process logincommand procedure (specified by the /LGICMD qualifier in SYSUAF.DAT), as well as anycommand procedures they call, are executed. A user cannot specify any of the qualifiers shownin “Login Qualifiers Not Allowed by Captive Accounts” (page 140) to modify the captive commandprocedures when logging in.Once logged in to a captive account, a user cannot escape to the DCL command level throughthe Ctrl/Y sequence, the SPAWN command, or the INQUIRE command. Because the DISCTLYflag in the UAF record is turned on, any use of Ctrl/Y fails. If unhandled errors or attemptedinterrupts occur, a system error message is generated, and the session is logged out. Unless theSPAWN command carries the /TRUSTED qualifier, it is ineffective within a captive account.SPAWN is also disabled from MAIL and the DEC Text Processing Utility (DECTPU) (as a built-inprocedure). The INQUIRE command is also disabled to prevent the possible execution ofuser-specified lexical functions.
Table 7-2 Login Qualifiers Not Allowed by Captive Accounts
DescriptionQualifier
Specifies the name of an alternate command language interpreter/CLI
Overrides the default login command procedure/COMMAND
140 Managing System Access
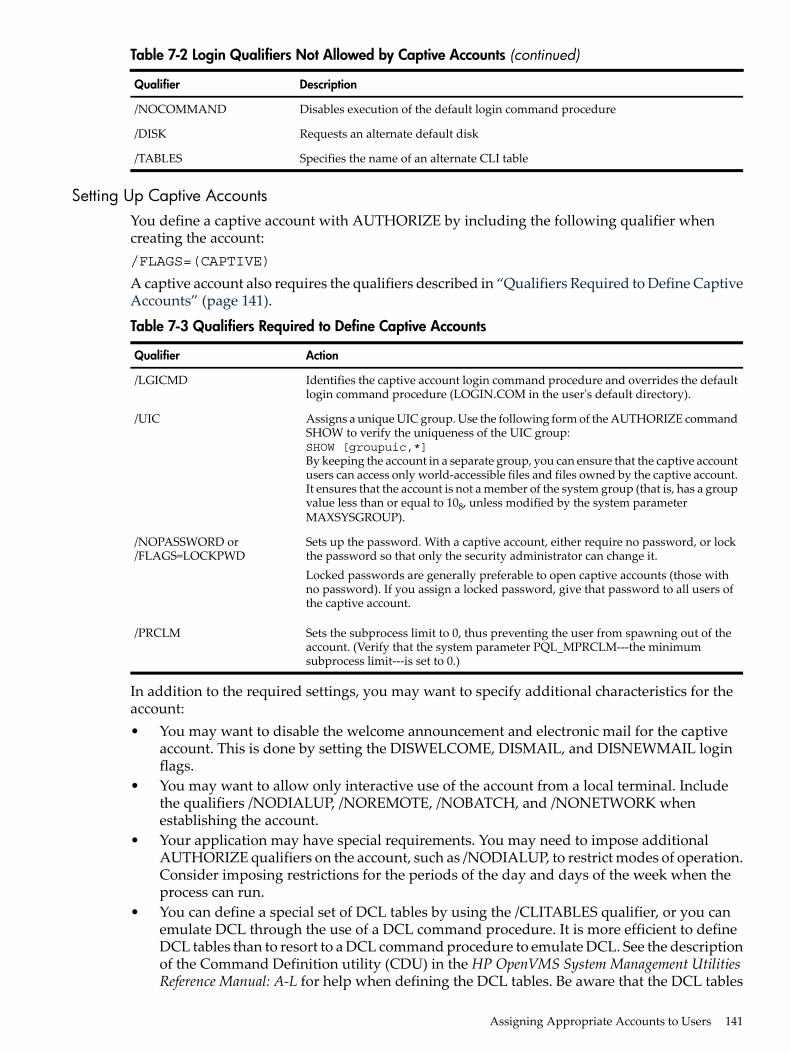
Table 7-2 Login Qualifiers Not Allowed by Captive Accounts (continued)
DescriptionQualifier
Disables execution of the default login command procedure/NOCOMMAND
Requests an alternate default disk/DISK
Specifies the name of an alternate CLI table/TABLES
Setting Up Captive AccountsYou define a captive account with AUTHORIZE by including the following qualifier whencreating the account:/FLAGS=(CAPTIVE)
A captive account also requires the qualifiers described in “Qualifiers Required to Define CaptiveAccounts” (page 141).
Table 7-3 Qualifiers Required to Define Captive Accounts
ActionQualifier
Identifies the captive account login command procedure and overrides the defaultlogin command procedure (LOGIN.COM in the user's default directory).
/LGICMD
Assigns a unique UIC group. Use the following form of the AUTHORIZE commandSHOW to verify the uniqueness of the UIC group:SHOW [groupuic,*]By keeping the account in a separate group, you can ensure that the captive accountusers can access only world-accessible files and files owned by the captive account.It ensures that the account is not a member of the system group (that is, has a groupvalue less than or equal to 108, unless modified by the system parameterMAXSYSGROUP).
/UIC
Sets up the password. With a captive account, either require no password, or lockthe password so that only the security administrator can change it.Locked passwords are generally preferable to open captive accounts (those withno password). If you assign a locked password, give that password to all users ofthe captive account.
/NOPASSWORD or/FLAGS=LOCKPWD
Sets the subprocess limit to 0, thus preventing the user from spawning out of theaccount. (Verify that the system parameter PQL_MPRCLM---the minimumsubprocess limit---is set to 0.)
/PRCLM
In addition to the required settings, you may want to specify additional characteristics for theaccount:• You may want to disable the welcome announcement and electronic mail for the captive
account. This is done by setting the DISWELCOME, DISMAIL, and DISNEWMAIL loginflags.
• You may want to allow only interactive use of the account from a local terminal. Includethe qualifiers /NODIALUP, /NOREMOTE, /NOBATCH, and /NONETWORK whenestablishing the account.
• Your application may have special requirements. You may need to impose additionalAUTHORIZE qualifiers on the account, such as /NODIALUP, to restrict modes of operation.Consider imposing restrictions for the periods of the day and days of the week when theprocess can run.
• You can define a special set of DCL tables by using the /CLITABLES qualifier, or you canemulate DCL through the use of a DCL command procedure. It is more efficient to defineDCL tables than to resort to a DCL command procedure to emulate DCL. See the descriptionof the Command Definition utility (CDU) in the HP OpenVMS System Management UtilitiesReference Manual: A-L for help when defining the DCL tables. Be aware that the DCL tables
Assigning Appropriate Accounts to Users 141
defined by the /CLITABLES qualifier are not used in network jobs, such as those using theTASK object.
• You can grant privileges, although you rarely need to grant any privilege other than TMPMBXto a captive account.
• You can limit the disk quota for the captive account to the amount needed.
Guidelines for Captive Command ProceduresWhen writing captive command procedures for your site, be sure to observe the followingguidelines:• Use the DCL command READ/PROMPT in command procedures. For example, to request
the user to enter the date, enter the following command in the command procedure:READ/PROMPT="Enter date: " SYS$COMMAND DATE
• Avoid use of the INQUIRE command in a captive command procedure. It produces an errorthat, if unhandled by a previous ON declaration, results in deletion of the process.
• When user input is required, never execute it directly. First compare it to what is expected,and screen for illegal characters such as apostrophe ('), at sign (@), dollar sign ($), quotationmark ("), ampersand (&), or hyphen (-).
• Avoid any use of the construction "x, where x contains a string entered by the user. Neverpermit a restricted command procedure to attempt an evaluation of a symbol that the userenters. Use of lexical functions could break the command procedure.
• Avoid executing a line in a captive command procedure that contains the characters @TT:.• Put Audit ACEs on the captive command procedure and its home directory to detect any
modification of the file. See “Attaching a Security-Auditing ACE” (page 230) for moreinformation on Audit ACEs.
• If the captive account user is allowed to create or perform other operations on files, makecertain that write access to the login command procedure and its directory is denied. (Theuser does need execute access.)If the function of the command procedure requires text preparation, you may need to giveusers access to a text editor. Use caution, however. Editors such as TECO or DECTPU canbe dangerous because users can manipulate files and exit from the editor to the DCL interface.When designing this environment, remember that most text editors are capable of readingand writing files (within the access rights of the account). Provide an editor that gives usersthe tools they require but does not allow them to escape from the captive environment.
“Sample Captive Procedure for Privileged Accounts” (page 143) and “Sample Captive CommandProcedure for Unprivileged Accounts” (page 143) provide sample command procedures forprivileged and unprivileged accounts.
142 Managing System Access
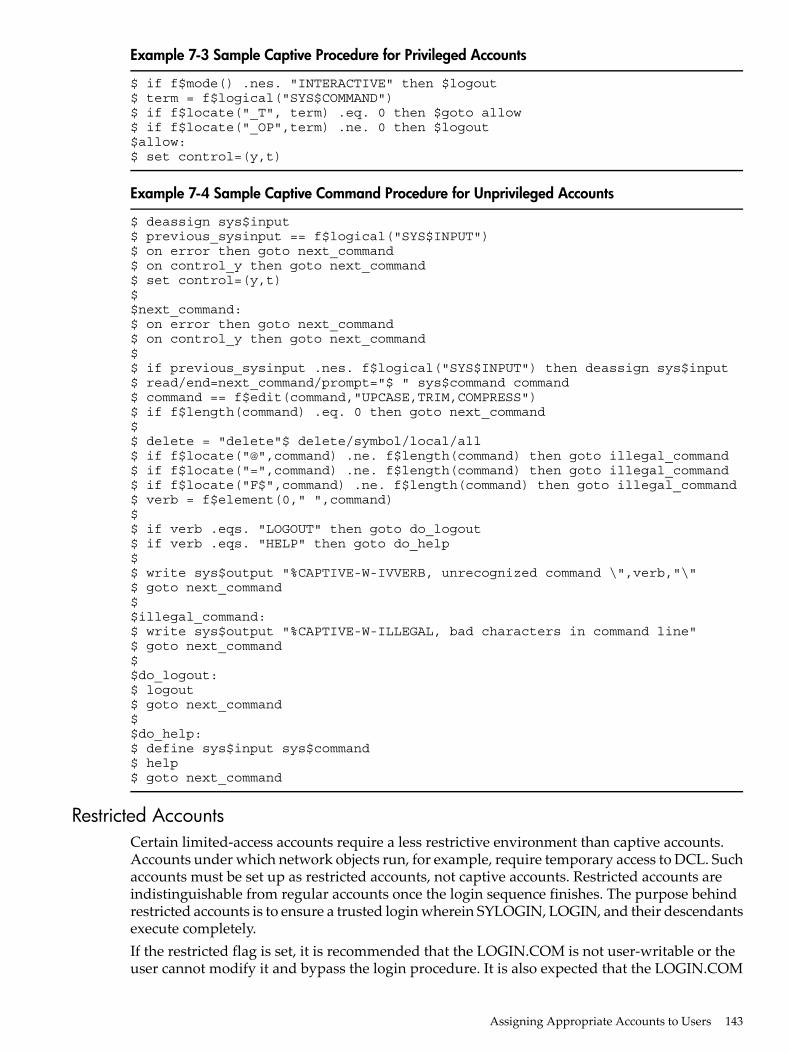
Example 7-3 Sample Captive Procedure for Privileged Accounts
$ if f$mode() .nes. "INTERACTIVE" then $logout$ term = f$logical("SYS$COMMAND")$ if f$locate("_T", term) .eq. 0 then $goto allow$ if f$locate("_OP",term) .ne. 0 then $logout$allow:$ set control=(y,t)
Example 7-4 Sample Captive Command Procedure for Unprivileged Accounts
$ deassign sys$input$ previous_sysinput == f$logical("SYS$INPUT")$ on error then goto next_command$ on control_y then goto next_command$ set control=(y,t)$$next_command:$ on error then goto next_command$ on control_y then goto next_command$$ if previous_sysinput .nes. f$logical("SYS$INPUT") then deassign sys$input$ read/end=next_command/prompt="$ " sys$command command$ command == f$edit(command,"UPCASE,TRIM,COMPRESS")$ if f$length(command) .eq. 0 then goto next_command$$ delete = "delete"$ delete/symbol/local/all$ if f$locate("@",command) .ne. f$length(command) then goto illegal_command$ if f$locate("=",command) .ne. f$length(command) then goto illegal_command$ if f$locate("F$",command) .ne. f$length(command) then goto illegal_command$ verb = f$element(0," ",command)$$ if verb .eqs. "LOGOUT" then goto do_logout$ if verb .eqs. "HELP" then goto do_help$$ write sys$output "%CAPTIVE-W-IVVERB, unrecognized command \",verb,"\"$ goto next_command$$illegal_command:$ write sys$output "%CAPTIVE-W-ILLEGAL, bad characters in command line"$ goto next_command$$do_logout:$ logout$ goto next_command$$do_help:$ define sys$input sys$command$ help$ goto next_command
Restricted AccountsCertain limited-access accounts require a less restrictive environment than captive accounts.Accounts under which network objects run, for example, require temporary access to DCL. Suchaccounts must be set up as restricted accounts, not captive accounts. Restricted accounts areindistinguishable from regular accounts once the login sequence finishes. The purpose behindrestricted accounts is to ensure a trusted login wherein SYLOGIN, LOGIN, and their descendantsexecute completely.If the restricted flag is set, it is recommended that the LOGIN.COM is not user-writable or theuser cannot modify it and bypass the login procedure. It is also expected that the LOGIN.COM
Assigning Appropriate Accounts to Users 143
has error checking and error handling in place using the various error controls such as the $ SETNOON or $ ON ERROR THEN LOGOUT.
NOTE: The purpose of the RESTRICTED flag is to ensure that the user cannot bypass parts ofthe login procedures. It is not intended to invoke a mechanism by which login procedurescontaining bugs cause a logout.
Define a restricted account with the Authorize utility by including the following qualifier whencreating the account:/FLAGS=(RESTRICTED)
This flag ensures that the account is noted as restricted. A restricted account provides the samefeatures as those listed for a captive account in “Captive Accounts” (page 140) except that restrictedaccounts allow the user access to the DCL command level following the execution of the systemand process login command procedures.Sometimes it is appropriate to allow the user to enter the Ctrl/Y key sequence after the commandprocedure starts. For example:• You may want to provide users with a Ctrl/Y feature at points during the execution of the
restricted login command procedure. Include ON CONTROL_Y commands in the procedurewhere you want to test for the Ctrl/Y features, as shown in “Sample Captive CommandProcedure for Unprivileged Accounts” (page 143).
• You may have a restricted command procedure that ultimately turns control over to theuser. For example, consider a SYLOGIN.COM command procedure that performs additionalsecurity validation; its execution should be guaranteed to ensure its effectiveness. However,once SYLOGIN.COM has done its job, control can be passed to the user. To do this, markthe account as restricted, and enter the DCL command SET CONTROL=Y when you areready to release control to the user.
Automatic Login AccountsTo force individuals at specific terminals to log in to an application program, create a separatecaptive account for the application. Then set up automatic logins to the new account for thedesired users using the System Management utility (SYSMAN).Once you set up a terminal for automatic login, it can be used only for the designated account.This is most useful for applications terminals used by people who may be unfamiliar withcomputers.The automatic login feature suppresses the user name prompt. All other login features (systempassword, primary and secondary passwords, and messages) function normally, if enabled.Passwords are optional. If you want the account to be open to all users where the terminals arelocated, eliminate the password. When no password is required, the user has no data to enter atlogin. The operating system logs the terminal in automatically in response to the Break key orthe Return key and immediately enters the application if the account is under the control of acaptive login command procedure.The automatic login file (ALF) lists the terminals and the users who are authorized to access theapplication account. However, automatic login accounts are potentially accessible from terminalsand sources other than the terminals listed in the ALF file and, therefore, require protection,especially if they have no password. Use the following precautions:• Restrict network and dialup access, as appropriate, with the AUTHORIZE qualifiers
/NODIALUP, /NONETWORK, and /NOREMOTE.• Set the AUTOLOGIN flag in the account's UAF record. This flag makes the account available
only by autologin, batch, and network proxy.
144 Managing System Access
Guest AccountsGuest accounts are forms of captive or restricted accounts that allow multiple remote users accessto resources on your system through a common account. For example, users across the networkmay need access to your system to report problems or to read corporate memos.HP does not recommend the practice of setting up guest accounts. Guest accounts, howeverunprivileged, offer malicious users a chance to compromise your system security. Most needsfor a guest account can be handled by special proxy login accounts, which should also belimited-access accounts.If you still need a guest account, take the following steps to make the account secure:• Use an obscure password for the guest account. Change the password frequently. Never
use easily guessed account name and password combinations such as GUEST/GUEST orUSER/USER.
• Maintain a list of people allowed to use the account. (Changing the password regularlyhelps you keep this list current.)
• Set up the guest account in a separate UIC group. Make sure that the account is not a memberof the system group.
• Place the default login command procedure in the directory SYS$MANAGER by using theAUTHORIZE command MODIFY, as follows:MODIFY GUEST-ACCOUNT/LGICMD=SYS$MANAGER:FILENAME.COM
• Make the guest account restricted or captive by setting the AUTHORIZE qualifiers/FLAGS=RESTRICTED or /FLAGS=CAPTIVE, respectively.
• If the guest account is set up as a restricted account, limit the number of subprocesses thatthe account can create to 0 using the AUTHORIZE qualifier /PRCLM=0. (Ensure that thesystem parameter PQL_MPRCLM is also set to 0.)
• Assign the guest account only TMPMBX privilege.• To handle error conditions, include the following commands in the default login command
procedure:SET ONSET NOCONTROLYON ERROR THEN LOGOUT/BRIEF
• If the system has LOGOUT defined as a global symbol and points to a command procedure(enter the DCL command SHOW SYMBOL LOGOUT to confirm this), include the followingDCL command in the default login command procedure for the account:DELETE/SYMBOL LOGOUT/GLOBAL
This command eliminates the possibility that the user could break the restricted account atlogout time by pressing Ctrl/Y.
• To prevent outsiders from misusing your system resources through the submission of batchjobs under the guest account, include the AUTHORIZE qualifier /NOBATCH when youcreate the account.
• Limit the disk quota for the guest account UIC to the amount needed.• Do not allow the DCL command INQUIRE to appear in any of the command procedures.
Proxy AccountsGenerally, proxy login accounts should be set up as restricted accounts. Proxy login accountspermit remote users to access a local account without specifying a password. “Example of aProxy Account” (page 275) describes proxy login accounts. Note that many recommendationsare the same as those for restricted accounts.
Assigning Appropriate Accounts to Users 145
Externally Authenticated AccountsExternally authenticated accounts are those that are marked with the EXTAUTH flag in the user'sSYSUAF record. This enables these users to log in at the OpenVMS login prompt using theirexternal user IDs and passwords. See “Enabling External Authentication” (page 155) for moreinformation on external authentication.
Using Passwords to Control System AccessA site needing average security protection always requires use of passwords. Sites with moresecurity needs frequently impose a generated password scheme (see “Generated Passwords”(page 152)) and possibly system passwords as well.This section describes password management.
Types of PasswordsWith the exception of an automatic login account, all users must have at least one password tolog in. Sites with moderate or high security requirements may impose additional passwords (see“Types of Passwords” (page 50)Table 3-2).Externally authenticated users enter their external password at the OpenVMS password prompt.See “Enabling External Authentication” (page 155) for more information.This section explains how to assign passwords using DCL and AUTHORIZE commands.
Primary PasswordsWhen you open an account for a new user with AUTHORIZE, you must give the user a username and an initial password. When you assign temporary initial passwords, observe allguidelines recommended in “Guidelines for Protecting Your Password” (page 59)"Guidelinesfor Protecting Your Password" on page 53. Avoid any obvious pattern when you assign passwords.You may want to use the automatic password generator.To use the automatic password generator while using AUTHORIZE to open an account, add the/GENERATE_PASSWORD qualifier to either the ADD or the COPY command. The systemresponds by offering you a list of automatically generated password choices. Select one of thesepasswords, and continue setting up the account.
NOTE: There are restrictions on using the /GENERATE_PASSWORD qualifier with the/PWDMINIMUM qualifier. Generated passwords have an absolute length of 12 characters (see“Requiring a Minimum Password Length” (page 151)). Whenever there is a conflict between thevalue of /PWDMINIMUM and a generated password, the operating system uses the lesser ofthe two values.
Passwords you specify with AUTHORIZE are defined as expired by default. This forces the userto change the initial password when first logging in. See “Enforcing Minimum PasswordStandards” (page 150) for more information. Be sure to include information on the first login inyour user training so that users know what to expect. If you do not want the password you definewith AUTHORIZE to be pre-expired, add the qualifier /NOPWDEXPIRED when entering thepassword. This is necessary for accounts when users are not permitted to set their own password.Pre-expired passwords are conspicuous in the UAF record listing. The entry for the date of thelast password change carries the following notation:(pre-expired)
146 Managing System Access
System Passwords“Entering a System Password” (page 50)"Entering a System Password" on page 43 introducessystem passwords, which control access to particular terminals. System passwords are used tocontrol access to terminals that might be targets for unauthorized use, as follows:• All terminals using dialup lines or public data networks for access• Terminals on lines that are publicly accessible and not tightly secured, such as those in
computer laboratories at universities• Terminals not frequently inspected• Terminals intended for use only as spare devices• Terminals you want to reserve for security operationsExecute the following steps to implement system passwords:1. Establish a record in the SYSUAF database for a system password by invoking the Authorize
utility and entering the following command:UAF> MODIFY/SYSTEM_PASSWORD=password
NOTE: You need to establish a record in the SYSUAF database only the first time a systempassword is set up on the system. However, if no record is present,the SETPASSWORD/SYSTEM command returns the following error:%SET-F-UAFERR, error accessing authorization file
-RMS-E-RNF, record not found
2. Decide which terminals require system passwords. Then, for each terminal, enter the DCLcommand SET TERMINAL/SYSPWD/PERMANENT. When you are satisified that you haveselected the right terminals, incorporate these commands intoSYS$MANAGER:SYSTARTUP_VMS.COM so that the terminal setup work is doneautomatically at system startup. You can remove the restriction on a terminal at any timeby invoking the DCL command SET TERMINAL/NOSYSPWD/PERMANENT for thatterminal.
3. Choose a system password, and implement it with the DCL command SETPASSWORD/SYSTEM, which requires the SECURITY privilege. This command promptsyou for the password and then prompts you again for verification, just as for user passwords.To request automatic password generation, include the /GENERATE qualifier.
To enable the use of the system password for the remote class of logins (those accomplishedthrough the DCL command SET HOST), set the appropriate bit in the default terminalcharacteristics parameter by using AUTOGEN. This is bit 19 (hexadecimal value 80000) in theparameter TTY_DEFCHAR2. Note that if you set this bit, you must invoke the DCL commandSET TERMINAL/NOSYSPWD/PERMANENT to disable system passwords for each terminalwhere you do not want the feature. (As before, consider placing the SET TERMINAL commandsyou have tested in SYS$MANAGER:SYSTARTUP_VMS.COM.) Then follow the previouslydefined steps to set the system password.When choosing a system password, follow the recommendations presented in “Guidelines forProtecting Your Password” (page 59)"Guidelines for Protecting Your Password" on page 53.Choose a string of characters and digits, with a minimum length of 6, that is not a valid word.Although the system password is not subject to expiration, change the password frequently.Always change the system password as soon as a person who knows the password leaves thegroup. Share the system password only with those who need to know.The system password is stored in a separate UAF record and cannot be displayed. The DCLcommand SET PASSWORD/SYSTEM (the normal means of setting and changing the systempassword) requires that you enter the old system password before changing it. Use theAUTHORIZE command MODIFY/SYSTEM_PASSWORD to change the system password withoutspecifying the old password, as shown in the following command:
Using Passwords to Control System Access 147
UAF>MODIFY/SYSTEM_PASSWORD=ABRACADABRA
The primary function of the system password is to form a first line of defense for publiclyaccessible ports and to prevent potential intruders from learning the identity of the system.However, requiring system passwords can appear confusing when authorized users are unawarethat they are required on certain terminals. To avoid false reports of defective terminals orsystems, inform your users which terminals allocated for their use require system passwords.Where system passwords are not applied to either control access through dialup lines or onpublicly accessed lines, few people may know the system password. Operations are hamperedif the personnel who know the password are unavailable, incapacitated, or forgetful. Solve thisproblem by invoking AUTHORIZE and entering the MODIFY/SYSTEM_PASSWORD command.SYSPRV privilege is required.
Secondary PasswordsSites with high-level security concerns can require a second password on user accounts. Typically,the user does not know the secondary password, and a supervisor or other key person must bepresent to supply it. For certain applications, the supervisor may also decide to remain presentwhile the account is in use. The effectiveness of a secondary password depends on thetrustworthiness of the supervisor who supplies it because the supervisor can remove the secondarypassword by changing it to a null string.Although the use of dual passwords is cumbersome, they do offer the following advantages:• When used on a widespread basis, dual passwords help verify the identity of each user at
login time because the supervisor or other key person can check each user.• When used in limited cases, dual passwords single out accounts that can be logged in to
only when two persons are present.• Dual passwords also prevent the use of access control strings when users access accounts
through DECnet software.Sites with medium security requirements may use dual passwords as a tool when there areunexplained intrusions after the password has been changed and use of the password generatorhas been enforced. Select problem accounts, and make them a temporary target of this restriction.If the problem goes away when you institute personal verification through the secondarypassword, you know you have a personnel problem. Most likely, the authorized user is revealingthe password for the account to one or more other users who are abusing the account.Implement dual passwords with the AUTHORIZE qualifier /PASSWORD. For example, to imposedual passwords on a new account, invoke AUTHORIZE and use the following form of the ADDcommand:ADD newusername /PASSWORD=(primarypwd, secondarypwd)
To impose a secondary password on an existing account, use the following form of the MODIFYcommand:MODIFY username /PASSWORD=("", secondarypwd)
This command does not affect the primary password that already exists for the account but addsthe requirement that a secondary password be provided at each subsequent login. The secondarypassword acquires the same password lifetime and minimum length values in effect for theprimary password. If the /FLAGS=GENPWD qualifier has been specified for this account, thesecondary password can be changed only under the control of the automatic password generator.You cannot use wildcards in the user name parameter to apply a secondary password to multipleusers with a single command.
148 Managing System Access
NOTE: While you can specify secondary passwords for accounts requiring remote accessthrough the DCL command SET HOST, you cannot specify them for accounts requiring networkfile access using access control strings. If an account with a secondary password is to be used fornetwork access (for example, remote file access), you must set up proxy access for all remotenodes from which the account may be accessed.
Console PasswordsThe console terminal controls operation of the CPU and, consequently, operation of the system.Sites with high security requirements should consider using the password security feature whenit is available. (Certain VAXstation 3100s and later models offer it.)Once the console password is enabled, operators must enter it before using any privilegedcommand in console mode. Privileged commands include the following two types:• Commands that examine or modify memory and registers, such as SET, EXAMINE, DEPOSIT,
FIND, and SHOW.• Commands that transfer control of the CPU from the console monitor to another program,
such as BOOT and START. (Invoking the default boot, which requires a BOOT commandwith no parameters, is not a privileged command and is allowed without the password.)
To enable the console password feature, take the following steps:1. Enter the privileged command:
>>>SET PSWD
2. In response, the console prompts for a password:1 >>>
Enter the new password, and press the Return key. Note that the console does not displaythe password as you enter it.The password must be a hexadecimal string of characters (0 through 9 and A through F)with a length of exactly 16 characters.
3. If the password character string is of the right length, the console prompts for you to reenterthe new password for verification:2 >>>
Reenter the new password, and press Return. Again, note that the password is not displayed.
4. Enable the password security feature with the following command:>>>SET PSE 1
To place the workstation in privileged mode and make all console commands accessible, use theLOGIN command. The SHOW PSE command displays the current status of the password feature.(If a 1 is displayed, the feature is enabled; a 0 indicates it is disabled.) To disable the feature, usethe SET PSE command with a 0 argument.Because the password is stored in nonvolatile memory, you must call the Customer SupportCenter if you forget it.
Authentication CardsRather than distribute passwords and account information, some sites choose to provide systemusers with hand-held devices called authentication cards or smart tokens.Authentication devices have the user's password programmed onto them. Depending on thecomplexity of the hardware design, these devices can support additional login information (forexample, an account name and billing reference number). A variety of authentication devicesare available from third-party vendors. Such devices are supported by a software module that
Using Passwords to Control System Access 149
communicates with the login program (LOGINOUT.EXE). See the HPOpenVMS Utility RoutinesManual for a description of the LOGINOUT routines supporting authentication cards.
Enforcing Minimum Password StandardsYou can use AUTHORIZE to impose minimum password standards for individual users.Specifically, qualifiers and login flags provided by AUTHORIZE control how soon passwordswill expire, whether the user is forced to change passwords at expiration, and the minimumpassword length.
Expiring PasswordsWith the AUTHORIZE qualifier /PWDLIFETIME, you can establish the maximum length of timethat can elapse before the user is forced to change the password or lose access to the account. Bydefault, the value of /PWDLIFETIME is 90 days. You can change the frequency requirements foruser password changes by specifying a different delta time value for the qualifier. For example,to require a user to change the password every 30 days, you would specify the qualifier as/PWDLIFETIME=30-0.The /PWDLIFETIME qualifier applies to both primary and secondary user passwords but notto the system password. Each primary and secondary password for a user is subject to the samemaximum lifetime. However, the passwords can change at separate times. As soon as the usercompletes a password change, that individual password's clock is reset; the new password valuecan exist unchanged for the length of time dictated by /PWDLIFETIME.The qualifier /NOPWDLIFETIME specifies that primary and secondary passwords do not expire.
NOTE: Specifying /NOPWDLIFETIME removes the default behavior that initial passwords bereset. However, if you want to have initial passwords reset but you do not want passwordexpiration, you can specify /PWDLIFETIME="9999-".
AUTHORIZE also provides two login flags related to primary and secondary password expiration.These flags, PWD_EXPIRED and PWD2_EXPIRED, are specified with the /FLAGS qualifier. Thefirst flag, PWD_EXPIRED, is set after the primary password expires and the user has had onelast chance to change the password and has failed to do so. The second flag, PWD2_EXPIRED,is set after the secondary password expires and the user has had one last chance to change thesecondary password and has failed to do so. If either PWD_EXPIRED or PWD2_EXPIRED is set,the account is disabled for logins because the user failed to employ the last chance to change thepassword during the last login.As soon as the user successfully changes the password, the system resets the flags, as appropriate.The flag PWD_EXPIRED becomes NOPWD_EXPIRED as soon as the primary password ischanged. Similarly, the flag PWD2_EXPIRED becomes NOPWD2_EXPIRED as soon as thesecondary password is changed. As security administrator, you may choose to invokeAUTHORIZE and reset the flags, giving the user another chance to reset the password.The use of a password lifetime forces the user to change passwords regularly. The lifetime canbe different for different users. Users with access to critical files generally should have the shortestpassword lifetimes.System passwords have an unlimited lifetime. It is your responsibility as security administratorto change the system password regularly.
150 Managing System Access
NOTE: SYS$PASSWORD_HISTORY_LIFETIME must be larger than the UAF parameterPWDLIFETIME. If you set the SYS$PASSWORD_HISTORY_LIFETIME value to less thanPWDLIFETIME, passwords will expire out of the history file before they expire in SYSUAF. Thisdefeats the purpose of the password history file. For more information about PWDLIFETIMEparameter, see “Enforcing Change of Expired Password” (page 151).
The LGI$PASSWORD_NOCHANGE_DAYS and LGI$EXPIRATION_WARNING_DAYS logicalsare systemwide, executive-mode logical names.You can define the LGI$PASSWORD_NOCHANGE_DAYS logical to set the minimum numberof days before the user can change the password.The LGI$EXPIRATION_WARNING_DAYS logical can be defined to set the number of daysprior to the expiration of password when the user shall start receiving the password expirationwarning messages.
Enforcing Change of Expired PasswordBy default, users are forced to change expired passwords when logging in. Users whose passwordshave expired are prompted for new passwords at login. This password feature is valid only whena password expiration date is specified with the /PWDLIFETIME qualifier.To disable forced password changes, specify the following qualifier to the ADD or the MODIFYcommand:/FLAGS=DISFORCE_PWD_CHANGE
Once you disable the forced password feature, you can re-enable it by clearing the login flag, asshown in the following:/FLAGS=NODISFORCE_PWD_CHANGE
Users who log in and are prompted to change expired passwords can cancel the login by pressingCtrl/Y.
NOTE: If secondary passwords are in effect and both primary and secondary passwords haveexpired, the user is forced to change both passwords. If the user changes the primary passwordand presses Ctrl/Y before changing the secondary password, the user is logged out, and nopassword change is recorded.
Requiring a Minimum Password LengthWith the AUTHORIZE qualifier /PWDMINIMUM, you can direct that all password choices, bothprimary and secondary, must contain a minimum number of characters. (Users can still specifypasswords up to the maximum length of 32 characters.)A user's minimum password length is either the default of 6 characters or another valueestablished by the /PWDMINIMUM qualifier (provided the number is 10 or less).On Alpha systems, the password generator creates passwords of the exact length specified butlimited to 10 characters.On VAX systems, the password generator creates passwords that range in length between n andn+2, where the minimum length n is a value ranging from 1 to 10. So the length of a generatedpassword (/GENERATE_PASSWORD or SET PASSWORD/GENERATE) can conflict with thevalue provided with the /PWDMINIMUM qualifier.When there is a conflict between n and the value set by the /PWDMINIMUM qualifier, theoperating system uses the lesser value, but never more than 10. For example, if you specify alength of 25 with the /PWDMINIMUM qualifier, the operating system generates passwords of10 to 12 characters. The system does not notify you of the difference in values.
Using Passwords to Control System Access 151
The length of a generated password produced by the AUTHORIZE qualifier/GENERATE_PASSWORD comes from the Pwdminimum field of the source UAF record: theDEFAULT record or the UAF record copied. The Pwdminimum field is updated with the valueset by /PWDMINIMUM, so passwords created with SET PASSWORD/GENERATE use the newvalue.The system password is not subject to a minimum length. Guidelines that apply to user passwordsare equally applicable to system passwords. Choose system passwords that are 1 to 32 characterslong.
Generated PasswordsThe /FLAGS=GENPWD qualifier in AUTHORIZE lets you force use of the automatic passwordgenerator when a user changes a password. At some sites, all accounts are created with thisqualifier. At other sites, the security administrator may be more selective.If users will have access to sensitive data that must not be compromised by an intrusion, requirethem to use the password generator.If your policy is to request voluntary use of the password generator and users are not cooperating,you can force users to use the password generator by adding the /FLAGS=GENPWD qualifierto pertinent user accounts. You can also add the AUTHORIZE qualifier /FLAGS=LOCKPWD touser accounts to prevent users from changing passwords. Only you will be authorized to changepasswords.
Site Password AlgorithmsThe operating system protects passwords from disclosure through encryption. OpenVMSalgorithms transform passwords from plaintext strings into ciphertext, which is then stored inthe system user authorization file (SYSUAF.DAT). Whenever a password check is done, the checkis based on the encrypted password, not the plaintext password. The system password is alwaysencrypted with an algorithm known to the operating system.The /ALGORITHM qualifier in AUTHORIZE allows you to define which algorithm the operatingsystem should use to encrypt a user's password. Your choices are the current OpenVMS algorithmor a site-specific algorithm. You can specify the encryption algorithm independently for eachaccount's primary and secondary passwords. The syntax is as follows:/ALGORITHM=keyword=type [=value]
To assign the OpenVMS password encryption algorithm for a user, you would enter a commandlike the following:UAF> MODIFY HOBBIT/ALGORITHM=PRIMARY=VMS
If a site-specific algorithm is selected, you must give a value to identify the algorithm, for example:UAF> MODIFY HOBBIT/ALGORITHM=CURRENT=CUSTOMER=128
The HP OpenVMS Programming Concepts Manual provides directions for using a customeralgorithm. You must create a site-specific system service in which you write code that recognizesthe algorithm number you choose and encrypts the password appropriately. This number hasto correspond with the number used in the AUTHORIZE command MODIFY/ALGORITHM.Whenever a user is assigned a site-specific algorithm, AUTHORIZE reports this information inthe display provided by the SHOW command.
Screening New PasswordsThe system generally compares new passwords against a system dictionary stored inSYS$LIBRARY to ensure that a password is not a native language word. It also maintains ahistory list of a user's passwords and compares each new password against this list to guaranteethat an old password is not reused. You can screen passwords further by developing and installingan image that filters passwords for words that are particularly sensitive to a site.
152 Managing System Access
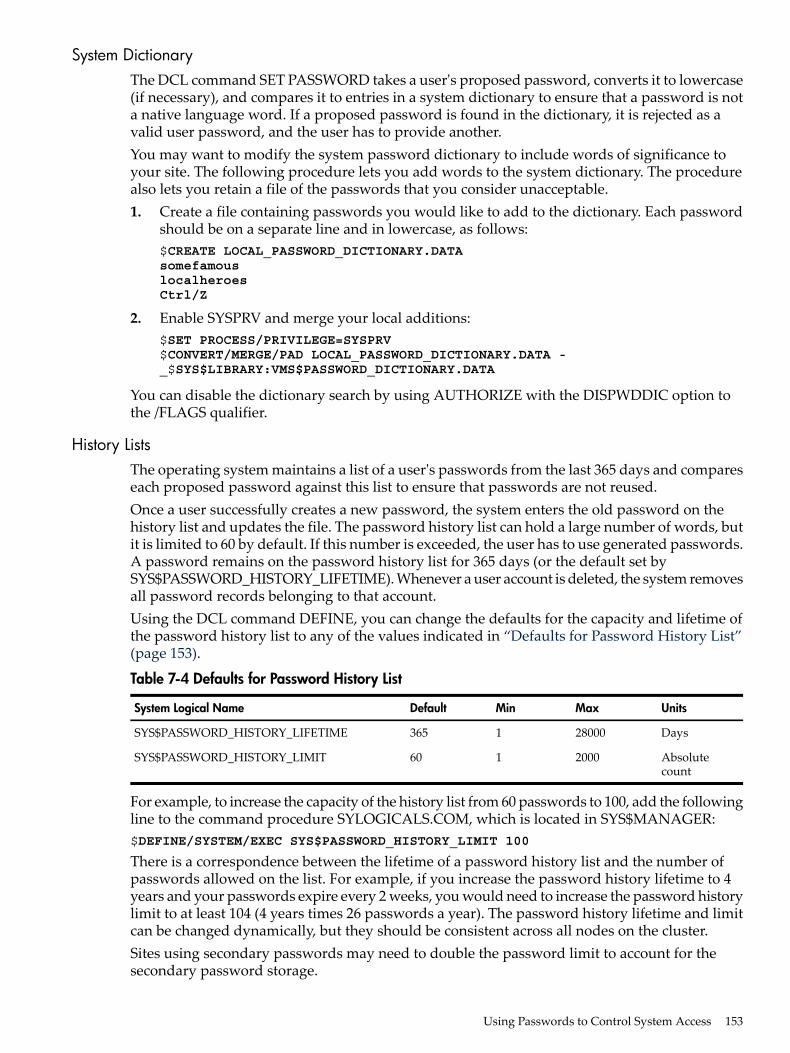
System DictionaryThe DCL command SET PASSWORD takes a user's proposed password, converts it to lowercase(if necessary), and compares it to entries in a system dictionary to ensure that a password is nota native language word. If a proposed password is found in the dictionary, it is rejected as avalid user password, and the user has to provide another.You may want to modify the system password dictionary to include words of significance toyour site. The following procedure lets you add words to the system dictionary. The procedurealso lets you retain a file of the passwords that you consider unacceptable.1. Create a file containing passwords you would like to add to the dictionary. Each password
should be on a separate line and in lowercase, as follows:$CREATE LOCAL_PASSWORD_DICTIONARY.DATAsomefamouslocalheroesCtrl/Z
2. Enable SYSPRV and merge your local additions:$SET PROCESS/PRIVILEGE=SYSPRV$CONVERT/MERGE/PAD LOCAL_PASSWORD_DICTIONARY.DATA -_$SYS$LIBRARY:VMS$PASSWORD_DICTIONARY.DATA
You can disable the dictionary search by using AUTHORIZE with the DISPWDDIC option tothe /FLAGS qualifier.
History ListsThe operating system maintains a list of a user's passwords from the last 365 days and compareseach proposed password against this list to ensure that passwords are not reused.Once a user successfully creates a new password, the system enters the old password on thehistory list and updates the file. The password history list can hold a large number of words, butit is limited to 60 by default. If this number is exceeded, the user has to use generated passwords.A password remains on the password history list for 365 days (or the default set bySYS$PASSWORD_HISTORY_LIFETIME). Whenever a user account is deleted, the system removesall password records belonging to that account.Using the DCL command DEFINE, you can change the defaults for the capacity and lifetime ofthe password history list to any of the values indicated in “Defaults for Password History List”(page 153).
Table 7-4 Defaults for Password History List
UnitsMaxMinDefaultSystem Logical Name
Days280001365SYS$PASSWORD_HISTORY_LIFETIME
Absolutecount
2000160SYS$PASSWORD_HISTORY_LIMIT
For example, to increase the capacity of the history list from 60 passwords to 100, add the followingline to the command procedure SYLOGICALS.COM, which is located in SYS$MANAGER:$DEFINE/SYSTEM/EXEC SYS$PASSWORD_HISTORY_LIMIT 100
There is a correspondence between the lifetime of a password history list and the number ofpasswords allowed on the list. For example, if you increase the password history lifetime to 4years and your passwords expire every 2 weeks, you would need to increase the password historylimit to at least 104 (4 years times 26 passwords a year). The password history lifetime and limitcan be changed dynamically, but they should be consistent across all nodes on the cluster.Sites using secondary passwords may need to double the password limit to account for thesecondary password storage.
Using Passwords to Control System Access 153
The password history list is located in SYS$SYSTEM. You can move the list off the system diskby using the logical name VMS$PASSWORD_HISTORY. Define this logical name as/SYSTEM/EXEC, and place it in SYS$MANAGER:SYLOGICALS.COM.You disable the history search with the DISPWDHIS option to the /FLAGS qualifier inAUTHORIZE.
Site-Specific FiltersBesides screening passwords against a system dictionary and a history list, you can develop asite-specific password filter to ensure that passwords are properly constructed and are not wordsreadily associated with your site. A filter can check for password length, the use of specialcharacters or combinations of characters, and the use of product names or personnel names.To create a list of site-specific words, you write the source code, create a shareable image, installthe image, and, finally, enable the policy by setting a system parameter. See the HP OpenVMSProgramming Concepts Manual for instructions.Installing and enabling a site-specific password filter requires both SYSPRV and CMKRNLprivileges. Multiple security alarms are generated when the password filter image is installed ifINSTALL and SYSPRV file-access auditing are enabled and the required change to the systemparameter is noted on the operator console.The shareable image contains two global routines that are called by the Set Password utility (SETPASSWORD) whenever a user changes a password.
CAUTION: The two global routines let you obtain both the proposed plaintext password andits equivalent quadword hash value. All security administrators should be aware of this featurebecause its subversion by a malicious privileged user will compromise the system's security.HP recommends that you place security Alarm ACEs on the password filter image and its parentdirectory. See the OpenVMS Programming Concepts for instructions.
Password Protection ChecklistIn addition to all the recommendations included in “Guidelines for Protecting Your Password”(page 59)"Guidelines for Protecting Your Password" on page 53, observe the following guidelinesto protect passwords:• Make certain the passwords on the standard accounts like SYSTEM are secure and changed
regularly. You can disable accounts (for example, FIELD and SYSTEST) with the AUTHORIZEqualifier /FLAGS=DISUSER when they are not in use.
• Do not permit an outside or in-house service organization to dictate the password for anaccount they use to service your system. Such service groups tend to use the same passwordon all systems, and their accounts are usually privileged.
• On seldom-used accounts, set the AUTHORIZE qualifier /FLAGS=DISUSER, and enable theaccount only when it is needed. Change the password immediately after each use, and notifythe service group of the new password when they need it next.
• Delete accounts no longer in use.• Do not leave listings of user names where they can be read or stolen because they can be
used as a basis for system attack. (If you do need listing files, use ACLs to limit access onlyto selected individuals.)
• Maintain adequate protection of authorization files. Note that the system user authorizationfile (SYSUAF.DAT), the network proxy authorization file (NETPROXY.DAT), and the rightslist (RIGHTSLIST.DAT) are owned by the system account ([SYSTEM]). Do not create anyother user accounts in this group. Normally the default UIC-based file protection for theseauthorization files is adequate. The system account also owns the file NET$PROXY.DAT.
• Make certain that all users have unique UICs.
154 Managing System Access
The following actions reduce the potential of password detection or limit the extent of the damageif passwords are discovered or bypassed:• Avoid giving multiple users access to the same account.• Protect telephone numbers for dialup lines connected to your system, and consider setting
a system password (SET TERMINAL/SYSPASSWORD) on dialup lines.• If your system has accounts available to outside users, such as guest accounts or accounts
for direct customer inquiry, make these accounts captive (limited-access) accounts containedby captive command procedures. (See “Captive Accounts” (page 140) for information aboutsetting up captive accounts.)
• Make captive all accounts that do not require a password.• Extend privileges to users carefully.• Protect your own files using all the techniques recommended in “Suggestions for Optimizing
File Security” (page 108)"Suggestions for Optimizing File Security" on page 101.• Ensure that the files containing components of the operating system are adequately protected
(see “Protecting System Files” (page 196)).• Use the AUTHORIZE qualifiers /NOINTERACTIVE and /NOBATCH when setting up proxy
login accounts to permit only file access from other nodes. Interactive and batch logins aredisabled for the account.
Enabling External AuthenticationExternal authentication allows users to log in (or sign on) at the OpenVMS login prompt usingtheir external user IDs and passwords. The LDAP external authentication agent, Kerberos externalauthentication agent, PATHWORKS, and Advanced Server for OpenVMS authentication modules(providing NT-compatible authentication) are supported as external authenticators of OpenVMSusers.When successfully authenticated, the external user ID is mapped to the appropriate OpenVMSuser name and the correct user profile is obtained.Before users can log in, the system administrator must enable external authentication byperforming the following tasks:• For OpenVMS Version 8.3 and later:
1. Install and configure ACME login and ACME authentication agents2. Mark user accounts in the SYSUAF
• For OpenVMS Version 8.2–1 and earlier:1. Define external authentication logical names for non-SYS$ACM- enabled external
authentication2. Mark user accounts in the SYSUAF
These tasks are discussed in the following sections.
Install and configure the ACME login and ACME authentication agentsIn order to authenticate users using external authentication for OpenVMS Version 8.3 and later,the system must have SYS$ACM-enabled external authentication. That is, the LOGINOUT.EXEand SETP0.EXE (SET PASSWORD) images must use the SYS$ACM system service forauthentication.The new LOGINOUT.EXE and SETP0.EXE (SET PASSWORD) images are provided with theACMELOGIN PCSI kit. This ACMELOGIN PCSI kit has to be extracted fromSYS$UPDATE:ACME_DEV_KITS.BCK and installed.See the SYS$HELP:ACME_DEV_README.TXT for more details on installing the newLOGINOUT.EXE and SETP0.EXE (SET PASSWORD) images.
Enabling External Authentication 155
Also, see the “Authentication and Credentials Management Extensions (ACME) Subsystem”(page 162) for more details on how external authentication works when SYS$ACM system serviceis used with DCL commands to operate on the ACME subsystem.The default LOGINOUT.EXE and SETP0.EXE images provided with the operating system arethe non-SYS$ACM versions, as provided with the previous versions of OpenVMS.After installing the ACMELOGIN kit, install and configure the authentication agent, based onthe type of authentication requirement.To install and configure the authentication agent, follow the below steps.For a list of generic commands and configuration steps that you can use during the configurationprocess, see the "ACME Subsystem Controls" section.• VMS authentication agent:
The OpenVMS ACME agent that provides the standard OpenVMS authentication policy.The VMS ACME agent is always required for a complete operational environment, thoughthere are other external authentication agents.No separate installation or configuration steps are required for this agent. However, if youstart the ACME_SERVER process manually using SET SERVER ACME commands, youmust configure the VMS ACME software in order to grant persona-based credentials. Usethe following commands to start the ACME_SERVER and configure ACME agents:$ SET SERVER ACME/START/LOG
$ SET SERVER ACME/CONFIG=(NAME=VMS,CRED=VMS)
$ SET SERVER ACME/ENABLE
• LDAP external authentication agent:The LDAP external authentication agent authenticates a user and password against directoryservers such as Active directory and Enterprise directory.For more information on how to install the LDAP external authenticator, see theSYS$HELP:ACMELDAP_STD_CONFIG_INSTALL.PDF orSYS$HELP:ACMELDAP_STD_CONFIG_INSTALL.TXT. PDF version includes images alongwith the procedure.
• MSV1_0 external authentication agent:The MSV1_0 external authentication agent is the Advanced Server for the OpenVMS ACMEagent that provides external authentication using the Microsoft NT LAN distributedauthentication protocol. This agent is included in the installation of the Advanced Serverfor OpenVMS layered product.For more information about implementing external authentication, see theHP Advanced Server for OpenVMS Server Administrator's Guide.For information on installing the external authentication images, see theHP Advanced Server for OpenVMS Server Installation and Configuration Guide.
• Kerberos external authentication agent:The Kerberos SIP kit is installed during the installation of OpenVMS. The Kerberos kit canalso be downloaded and installed from the following website:http://h71000.www7.hp.com/openvms/products/kerberos/index.html.For more information on configuring Kerberos, see the section Configuring and Starting theKerberos ACME Agent in theHP Open Source Security for OpenVMS, Volume 3: Kerberos guide.
156 Managing System Access
Define external authentication logical names for non-SYS$ACM- enabledexternal authenticationFor the non-SYS$ACME enabled authentication (OpenVMS Version 8.2–1 and earlier) externalauthentication is enabled at the system level by defining the SYS$SINGLE_SIGNON systemwideexecutive-mode logical name.For more information, see the “Differences between SYS$ACM and non-SYS$ACM externalauthentication” [p. 158] section.By default, external authentication is disabled at both the system and user levels. However, whenyou invoke PATHWORKS or Advanced Server for OpenVMS, external authentication isautomatically enabled, if the system administrator has defined logical names inSYSTARTUP_VMS.COM and marked user accounts in the SYSUAF, as described in the followingparagraphs. No additional configuration is necessary for cluster members running the AdvancedServer to enable the Advanced Server to participate in the external authentication process.
NOTE: The SYS$SINGLE_SIGNON logical name is automatically defined to 1 (enabled) byPWRK$ACME_STARTUP.COM (the PATHWORKS and Advanced Server for OpenVMS startupprocedure) if it has not yet been defined in SYSTARTUP_VMS.COM. If you want to disableexternal authentication or set the SYS$SINGLE_SIGNON logical name to another value, defineSYS$SINGLE_SIGNON in SYSTARTUP_VMS.COM before PATHWORKS or Advanced Serverfor OpenVMS is started.You have to define the logical name PWRK$ACME_SERVER if you installed only the standaloneAdvanced Server external authentication images, and you have not installed the full AdvancedServer. (Advanced Server installation gives the option of installing only the external authenticationimages instead of the complete Advanced Server file and print server software. See thePATHWORKS (Advanced Server) or Advanced Server for OpenVMS Installation and ConfigurationGuide for more information. (Also, see “SYS$SINGLE_SIGNON Logical Name Bits” (page 161)for more information on the SYS$SINGLE_SIGNON logical name bits.)
For example:$DEFINE/SYSTEM/EXECUTIVE SYS$SINGLE_SIGNON 3
Mark user accounts in the SYSUAFEach externally authenticated user must have an entry in the SYSUAF file from which accountinformation such as account restrictions and quotas are fetched during login.The user name in the SYSUAF record can be the same or different from the user name enteredat the user name prompt. It depends on user name mapping support provided by theauthentication agent, which validates the user.For example, Kerberos external authentication supports one to one mapping where the username entered and the user name in the SYSUAF file must be same.At the user level, external authentication is enabled by a flag, EXTAUTH, in the SYSUAF recordfor the user. When set, the EXTAUTH flag denotes that the user is to be externally authenticated.For example, in the Authorize utility, you can enter commands similar to the following:$ SET DEFAULT SYS$SYSTEM$ RUN AUTHORIZEUAF> ADD username /FLAGS=([NO]EXTAUTH)UAF> MODIFY username /FLAGS=([NO]EXTAUTH)
(See the HP OpenVMS System Management Utilities Reference Manual: A-L for more informationon the Authorize utility EXTAUTH flag. Also, see the HP OpenVMS System Services ReferenceManual: GETUTC-Z for more information on the UAI$V_EXTAUTH bit in the SYS$GETUAI andSYS$SETUAI system services UAI$_FLAGS item code.)
Enabling External Authentication 157
Differences between SYS$ACM and non-SYS$ACM external authenticationThe LOGINOUT.EXE and SETP0.EXE (SET PASSWORD) images, provided with the ACMELOGINkit (upon extracting SYS$UPDATE:ACME_DEV_KITS.BCK), utilize the SYS$ACM system servicefor user authentication and password changes. With these images installed, login and passwordchange requests are sent to the SYS$ACM service and handled by the ACME_SERVER process’sauthentication agents. The effect must be transparent to users, layered products and applications.If your site uses external authentication provided by Advanced Server and you are using theSYS$ACM-enabled LOGINOUT.EXE and SETP0.EXE images, you must be aware of howSYS$ACM-enabled external authentication operates compared with releases prior to Version8.2–1.• Non-SYS$ACM-enabled external authentication (OpenVMS Version 8.2–1 and earlier):
— SYS$SINGLE_SIGNON logical name is used to enable/disable external authenticationand debugging using OPCOM messages.
— Internal hooks in LOGINOUT.EXE and SETP0.EXE enforce authentication and passwordchanges using Advanced Server.
— Microsoft NT LAN Manager is the only authentication option.— /LOCAL requires OPER privilege on the target OpenVMS account.— Users are not prompted for a new LAN Manager password when it expires.— LAN Manager last login information is not displayed.
• SYS$ACM-enabled external authentication (OpenVMS Version 8.3 and later):— External authentication is controlled by SET SERVER ACME commands.— SET SERVER ACME/TRACE writes diagnostic information to
SYS$MANAGER:ACME$SERVER.LOG for debugging purposes.— LOGINOUT.EXE and SETP0.EXE utilize the SYS$ACM system service for authentication
and password changes.— Other authentication options besides Microsoft NT LAN Manager are possible.— /LOCAL requires the VMSUATH flag on the target OpenVMS account.— Users are prompted for a new LAN Manager password when their current LAN Manager
password has expired.— LAN Manager last login information is displayed during login.
Overriding External AuthenticationUsers can enter the /LOCAL_PASSWORD qualifier after their OpenVMS user name at the loginprompt to inform OpenVMS to perform local authentication instead of external authentication.Users should specify their OpenVMS user name and password when using the/LOCAL_PASSWORD qualifier.For SYS$ACM-enabled external authentication (OpenVMS Version 8.3 and later):The SYSUAF flag /VMSAUTH denotes that the account can use standard (SYSUAF) authenticationwhen the EXTAUTH flag requires external authentication. An application specifies the OpenVMSdomain of interpretation when calling SYS$ACM to request standard OpenVMS authenticationfor a user account that normally uses external authentication.For non-SYS$ACM-enabled external authentication (OpenVMS Version 8.2–1 and earlier):As the use of the /LOCAL_PASSWORD qualifier is effectively overriding the security policyestablished by the system manager, it is only allowed under the following conditions:• When the account being logged into has SYSPRV as an authorized privilege.• When bit 1 is set in the SYS$SINGLE_SIGNON logical name, nonprivileged users (who are
normally externally authenticated) can request local authentication.See the HPOpenVMSUtility RoutinesManual for more information on the /LOCAL_PASSWORDqualifier to LOGINOUT.
158 Managing System Access
Impact on Layered Products and ApplicationsCertain layered products and applications that use an authentication mechanism based on thetraditional SYSUAF-based user name and password (for example, software that calls$HASH_PASSWORD or $GETUAI/$SETUAI to alter, fetch, or verify OpenVMS passwords)encounter problems in either of the following cases:• When external authentication is used in an environment where a given user's external user
ID and OpenVMS user name are different• Where the user's SYSUAF password is different from the external user passwordIn such cases, the symptom is a user authentication failure from the layered product or application.For externally authenticated users, the normal system authorization database (SYSUAF.DAT) isused to construct the OpenVMS process profile (UIC, privileges, quotas, and so on) and to applyspecific login restrictions. However, there are two key differences between externally authenticatedusers and normal OpenVMS users. The following is true for externally authenticated users:• The password stored in the SYSUAF is not the password used to verify the user.• The user name stored in the SYSUAF and used to identify the OpenVMS process is not
necessarily the same as the external user ID used to authenticate the user during login.OpenVMS attempts to keep a user's SYSUAF and external user password synchronized tominimize these problems. An up-to-date copy of the user's external password is kept in theSYSUAF, but this is not the case if, for example, the external password contains characters thatare invalid in OpenVMS, or if SYSUAF password synchronization is disabled by the systemmanager. (Password synchronization is enabled by default.)If you enable external authentication, HP recommends you do the following to minimizeincompatibility with layered products or applications that use traditional SYSUAF-basedauthentication:• Do not disable password synchronization.• Limit external user passwords to those characters from the OpenVMS valid password
character set (A--Z, 0--9, underscore (_), and dollar sign ($)).• Assign users the same user name in both the external authentication service and OpenVMS.• Do not assign the same user name or user ID to more than one user.The $GETUAI and $SETUAI system services do not support external passwords. These servicesoperate only in passwords stored in the SYSUAF, and updates are not sent to the externalauthentication service. Sites using software that makes calls to these services to check passwordsor updates must not enable external authentication. HP expects to provide a new programminginterface to support external passwords in a future release.
Setting a New PasswordIf you are an externally authenticated user, the DCL command SET PASSWORD sends thepassword change request to the external authenticator and changes your password on yourOpenVMS system.A system manager can set an externally authenticated user's password by using a utility providedby the external authenticator. For example, in the case of NT compatible authentication,PATHWORKS and Advanced Server for OpenVMS provide the ADMINISTRATOR SETPASSWORD command. Using this method, the new password is propagated to the externalauthenticator immediately.
Case Sensitivity in Passwords and User NamesYou can enter a case-sensitive user name at the OpenVMS username prompt if you enclose it inquotes. If you do not enclose the user name in quotes, LOGINOUT converts the user name touppercase characters.
Enabling External Authentication 159
However, all user name entries in the SYSUAF file are stored in uppercase characters. A caseinsensitive search is performed in the SYSUAF file to locate the user record.Valid characters for external user IDs and passwords belong to the standard IBM extended (8-bit)ASCII character set. LOGINOUT and SET PASSWORD pass these strings case preserved, althoughthe external authentication service uppercases both strings according to this character set.External passwords can contain characters that are not valid in OpenVMS passwords. If anexternal password contains a character that is invalid in an OpenVMS password, passwordsynchronization is not performed and a message is issued.OpenVMS passwords are limited to the 7-bit ASCII characters A-Z, 0-9, _, and $.
User Name Mapping and Password VerificationTo be externally authenticated, a user provides his or her external user ID and password at theOpenVMS login prompt. When performing user name mapping, OpenVMS first tries to locatea match in the SYSUAF and uses that name if it finds a match; otherwise, it queries the externalauthentication database for a matching user ID. When successfully authenticated, the externaluser ID is mapped to the appropriate OpenVMS user name to obtain the correct user profile, andthe login sequence is completed.External authentication is supported for interactive logins (including DECwindows) and networklogins where a proxy is used or a user ID/password is supplied.If you have external authentication enabled on your system, target user names specified inDECnet proxies or Auto-Login (ALF) databases must exist in the SYSUAF.Externally-authenticated users who want to use DECnet proxies must have the same user namein the SYSUAF file and external database.When using DECnet proxies, it is important to maintain unique user names across OpenVMSand external domains. If the same user name appears in the SYSUAF file and external databaseidentifying two different users, the use of this user name as a proxy is ambiguous. LOGINOUTtreats the name as an OpenVMS user name for login purposes, even though the same name maymap to a different OpenVMS user name. This occurs because name-mapping rules specify thatOpenVMS attempt to find a match in the SYSUAF first.Externally authenticated users are considered to have a single password and are not subject tonormal OpenVMS password policy (password expiration, password history, minimum andmaximum password length restrictions), but are instead subject to any defined externalauthenticator policy. All other OpenVMS account restrictions remain in effect, such as disabledaccounts, modal time restrictions, quotas, and so on.Externally authenticated users are identified by having the EXTAUTH flag set in their SYSUAFrecord. OpenVMS users whose accounts do not have the EXTAUTH flag set are not affected byexternal authentication.
Password SynchronizationAlthough passwords are verified using the external authenticator database, OpenVMS attemptsto keep the external and SYSUAF password fields synchronized.Password synchronization is enabled by default.Synchronization takes place at the completion of a successful externally authenticated login. Ifthe external password is different than the password stored in the SYSUAF file, LOGINOUTupdates the SYSUAF password field with the external password. (Synchronization may not bepossible due to the different sets of valid characters allowed by OpenVMS and the externalauthenticator.)For SYS$ACM-enabled external authentication, if required, the password synchronization canbe selectively turned off. See the “System Parameter SECURITY_POLICY Bit Mask Values”
160 Managing System Access
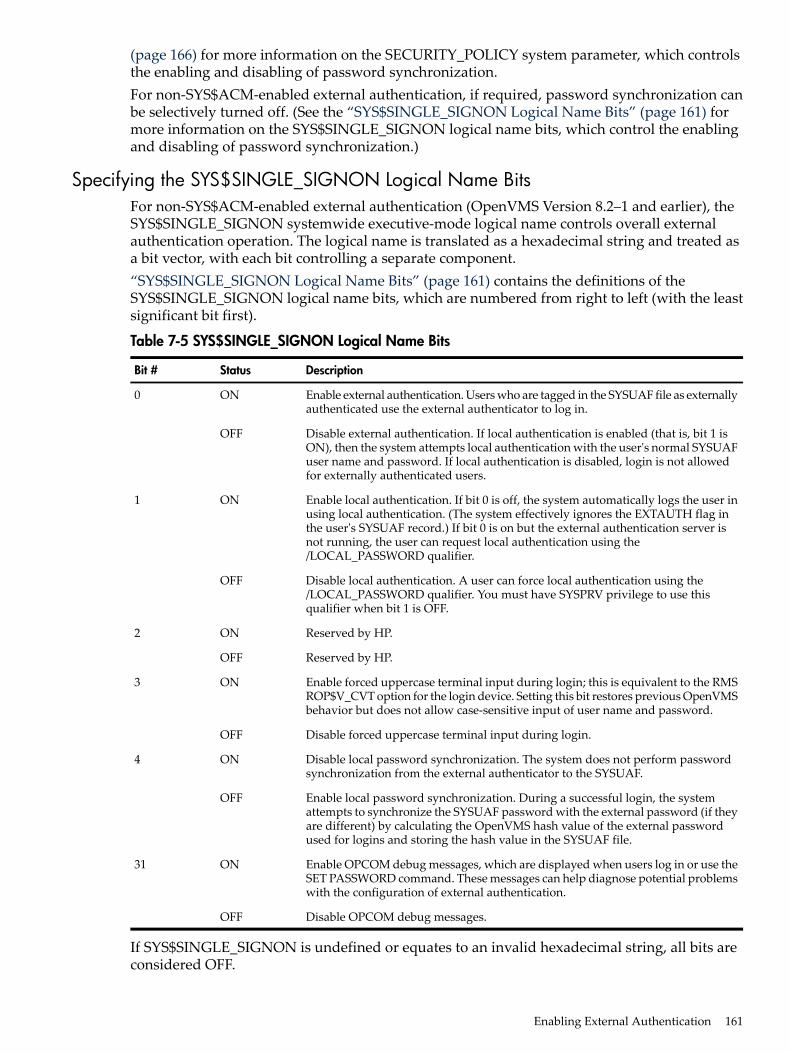
(page 166) for more information on the SECURITY_POLICY system parameter, which controlsthe enabling and disabling of password synchronization.For non-SYS$ACM-enabled external authentication, if required, password synchronization canbe selectively turned off. (See the “SYS$SINGLE_SIGNON Logical Name Bits” (page 161) formore information on the SYS$SINGLE_SIGNON logical name bits, which control the enablingand disabling of password synchronization.)
Specifying the SYS$SINGLE_SIGNON Logical Name BitsFor non-SYS$ACM-enabled external authentication (OpenVMS Version 8.2–1 and earlier), theSYS$SINGLE_SIGNON systemwide executive-mode logical name controls overall externalauthentication operation. The logical name is translated as a hexadecimal string and treated asa bit vector, with each bit controlling a separate component.“SYS$SINGLE_SIGNON Logical Name Bits” (page 161) contains the definitions of theSYS$SINGLE_SIGNON logical name bits, which are numbered from right to left (with the leastsignificant bit first).
Table 7-5 SYS$SINGLE_SIGNON Logical Name Bits
DescriptionStatusBit #
Enable external authentication. Users who are tagged in the SYSUAF file as externallyauthenticated use the external authenticator to log in.
ON0
Disable external authentication. If local authentication is enabled (that is, bit 1 isON), then the system attempts local authentication with the user's normal SYSUAFuser name and password. If local authentication is disabled, login is not allowedfor externally authenticated users.
OFF
Enable local authentication. If bit 0 is off, the system automatically logs the user inusing local authentication. (The system effectively ignores the EXTAUTH flag inthe user's SYSUAF record.) If bit 0 is on but the external authentication server isnot running, the user can request local authentication using the/LOCAL_PASSWORD qualifier.
ON1
Disable local authentication. A user can force local authentication using the/LOCAL_PASSWORD qualifier. You must have SYSPRV privilege to use thisqualifier when bit 1 is OFF.
OFF
Reserved by HP.ON2
Reserved by HP.OFF
Enable forced uppercase terminal input during login; this is equivalent to the RMSROP$V_CVT option for the login device. Setting this bit restores previous OpenVMSbehavior but does not allow case-sensitive input of user name and password.
ON3
Disable forced uppercase terminal input during login.OFF
Disable local password synchronization. The system does not perform passwordsynchronization from the external authenticator to the SYSUAF.
ON4
Enable local password synchronization. During a successful login, the systemattempts to synchronize the SYSUAF password with the external password (if theyare different) by calculating the OpenVMS hash value of the external passwordused for logins and storing the hash value in the SYSUAF file.
OFF
Enable OPCOM debug messages, which are displayed when users log in or use theSET PASSWORD command. These messages can help diagnose potential problemswith the configuration of external authentication.
ON31
Disable OPCOM debug messages.OFF
If SYS$SINGLE_SIGNON is undefined or equates to an invalid hexadecimal string, all bits areconsidered OFF.
Enabling External Authentication 161
The following example definition enables external authentication (bit 0). All other componentstake their default values.$DEFINE/SYSTEM/EXECUTIVE SYS$SINGLE_SIGNON 1
The following example definition enables external authentication (bit 0), forces uppercase terminalinput at the username prompt (bit 3), and disables password synchronization (bit 4).$DEFINE/SYSTEM/EXECUTIVE SYS$SINGLE_SIGNON 19 !19 HEX
HP DECnet-Plus RequirementUsers with the EXTAUTH bit set in their SYSUAF account record cannot use explicit accesscontrol strings with systems running DECnet-Plus unless their externally authenticated passwordis all uppercase characters.For example, if you enter the following command:$DIRECTORY nodename "username password"::
where nodename is a system running DECnet-Plus and username is an EXTAUTH account,DECnet-Plus converts the string supplied in the password to uppercase characters before it ispassed to the external authentication agent (a PATHWORKS or NT domain controller).There are two workarounds:• If you are using DECnet-Plus and you want to use explicit access control strings, define an
uppercase NT password.• Set up a proxy account on your DECnet-Plus nodes so that you do not have to use explicit
access control strings to perform functions.
DECnet-Plus and NET_CALLOUTS ParameterTo run DECnet-Plus for OpenVMS with external authentication enabled, set the system parameterNET_CALLOUTS to 255. This causes user verification and proxy lookups to be done inLOGINOUT rather than DECnet.
Failed Connection Attempts on POP ServerThe Post Office Protocol (POP) server does not use external authentication to authenticateconnection attempts on the OpenVMS system. This causes connection attempts to fail if eitherof the following conditions exist:• The external user ID is different from the OpenVMS user name.• The OpenVMS password is not synchronized with the external user password.
Authentication and Credentials Management Extensions (ACME) SubsystemThis section describes how the SYS$ACM system service provides external authenticationcapability to applications that have to authenticate a user on an OpenVMS system.The Authentication and Credentials Management Extensions (ACME) subsystem providesauthentication and persona-based credential services. Applications can use these services tointeract with the user to perform one or more of the following functions:• User authentication• Password change• Persona creation and modificationACME supports standard OpenVMS authentication and external authentication policies; therefore,applications utilize the same mechanisms as used by the system's LOGINOUT and SETPASSWORD components.
162 Managing System Access
ACME Subsystem OverviewThe ACME subsystem consists of the following components:• SYS$ACM system service
SYS$ACM is a context-driven system service. The service is designed so that applicationsadapt themselves transparently to various authentication dialogs without requiring changesto the application. Applications call SYS$ACM to perform functions such asauthenticate-principal and change-password. Upon successful authentication, the servicecan return a complete security profile of the user in the form of a persona. For furtherinformation about SYS$ACM, see the HP OpenVMS System Services Reference Manual andthe HP OpenVMS Programming Concepts Manual.
• ACME_SERVER processThe ACME_SERVER process is a multithreaded server that supports one or moreauthentication policies. Each authentication policy is installed by configuring an ACMEagent shareable image that "plugs in" to the ACME_SERVER process by way of a standardinterface. The server manages the authentication sequence by calling each ACME agent inturn, according to a defined sequence of phases. ACME agents are also responsible foradhering to certain rules regarding how agents can interact during an authenticationsequence.The ACME_SERVER process must be restarted if the installed password policy is changed.
• ACME agents or authentication agentsACME agents each define a single authentication policy that augments or replaces portionsof the standard OpenVMS authentication policy. OpenVMS currently supports the followingACME/authentication agents:— VMS authentication agent— LDAP external authentication agent— MSV1_0 external authentication agent— Kerberos external authentication agentFor more information on how to install and configure these authentication agents, see the“Install and configure the ACME login and ACME authentication agents” [p. 155] section.
• DCL commands SET and SHOW SERVER ACME
You can configure and manage the ACME subsystem by using the SET and SHOW SERVERACME commands.
ACME Agent Operational EnvironmentThe ACME subsystem supports multiple ACME agents that can interact with each other tocomplete an authentication request. These interactions must occur in a controlled manner.When a user authentication dialog is in process, one ACME agent is the controlling agent andthe other agents operate in the background as secondary agents.The controlling agent directs the user name and password prompts and is ultimately responsiblefor validating the user. The secondary agents can display messages, request additional passwords,issue credentials, or reject the authentication request, depending on how each agent is configuredto interact with other agents.
Enabling External Authentication 163
ACME Subsystem ControlsOperational control of the ACME subsystem includes the following:• “Start, Stop, Restart, and Configure ACME_SERVER Process and ACME Agents” (page 164)
Methods and commands to start, stop, restart, and configure ACME_SERVER and ACMEagents.
• “Other ACME Agent Commands” (page 166)Commands to show ACME_SERVER status, set tracing levels, and the number ofACME_SERVER threads.
• “SYSUAF Flags” (page 166)Select accounts that are eligible for standard and external authentication and passwordsynchronization. The SYSUAF user flags are EXTAUTH, VMSAUTH, and DISPWDSYNCH.
• “System Parameter SECURITY_POLICY Bit Mask Values” (page 166)Controls certain ACME subsystem features on a systemwide basis.
Start, Stop, Restart, and Configure ACME_SERVER Process and ACME Agents
The ACME_SERVER process starts automatically upon system boot, with the VMS ACME agentconfigured.
Start or Restart ACME_SERVER with all required ACME agents configured by default
OpenVMS Version 8.3 and later uses a site specific startup procedure,SYS$MANAGER:ACME$START.COM. You can edit the SYS$MANAGER:ACME$START.COM toenable the configuration of the various ACME agents that are required and also the order inwhich the agents are started.The SYS$MANAGER:ACME$START.COM is run as a result of one of the following conditions:• SET SERVER ACME/START=AUTO command is issued.• SET SERVER ACME/RESTART command is issued.• Unexpected condition causes an automatic server restart.If you enable agents other than VMS ACME agent, edit the SYSTARTUP_VMS.COM procedurealso to include the following command after all the dependent ACME agents:$ SET SERVER ACME/RESTART
This ensures that all the required ACME agents are started automatically upon system boot.The executive-mode logical name ACME$START is used to locate this file.
ACME Agent Ordering
The ACME_SERVER can be configured to enable the agent in a specific order. When the userenters the username, at the user name prompt, the ACME agents are called in the order in whichit is enabled. The first agent to successfully map the user's principal name to a valid user namewithin its domain, validates the user.The ordering of the ACME agents is important if the same principal name exists in two or moreACME agent domains. The first agent to map it successfully controls the authentication request.By default, however, it is recommended that the VMS ACME agent is configured first. Forexample, if the Kerberos authentication agent is configured on OpenVMS and the order of startupfor OpenVMS and Kerberos ACME agent is such that the Kerberos agent is started first, onlythose accounts belonging to Kerberos can login.If the startup order is changed, you can change it back to the default order by performing thefollowing procedure:
164 Managing System Access
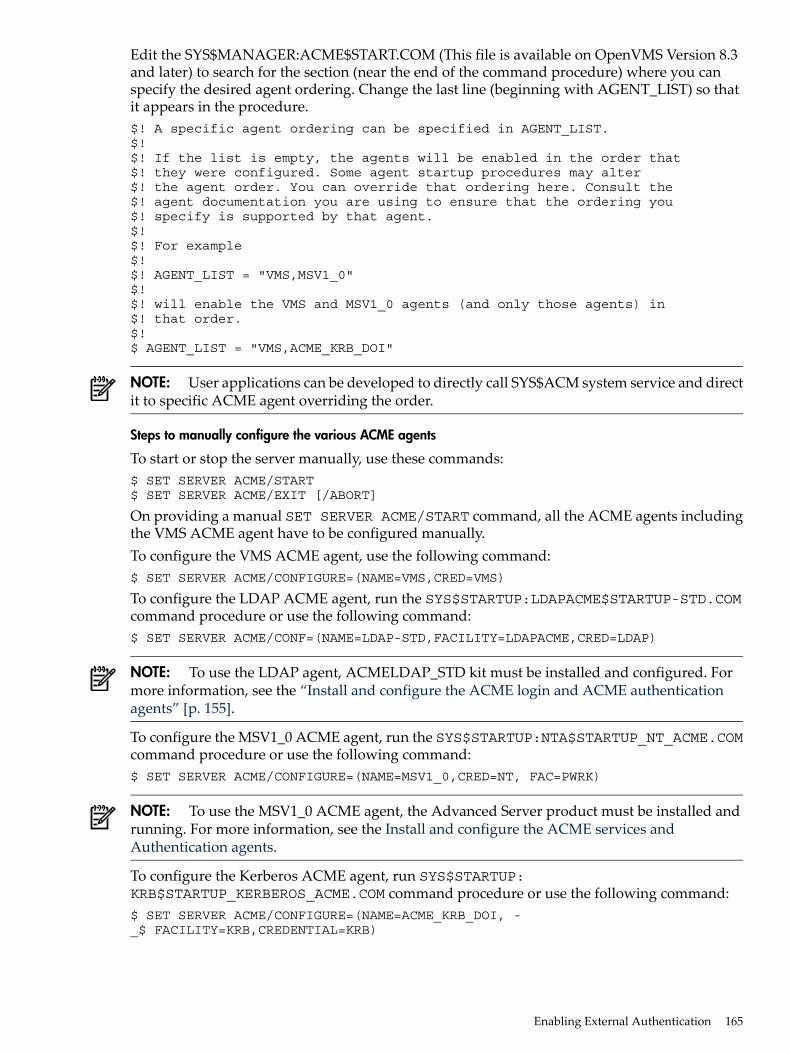
Edit the SYS$MANAGER:ACME$START.COM (This file is available on OpenVMS Version 8.3and later) to search for the section (near the end of the command procedure) where you canspecify the desired agent ordering. Change the last line (beginning with AGENT_LIST) so thatit appears in the procedure.$! A specific agent ordering can be specified in AGENT_LIST.$!$! If the list is empty, the agents will be enabled in the order that$! they were configured. Some agent startup procedures may alter$! the agent order. You can override that ordering here. Consult the$! agent documentation you are using to ensure that the ordering you$! specify is supported by that agent.$!$! For example$!$! AGENT_LIST = "VMS,MSV1_0"$!$! will enable the VMS and MSV1_0 agents (and only those agents) in$! that order.$!$ AGENT_LIST = "VMS,ACME_KRB_DOI"
NOTE: User applications can be developed to directly call SYS$ACM system service and directit to specific ACME agent overriding the order.
Steps to manually configure the various ACME agents
To start or stop the server manually, use these commands:$ SET SERVER ACME/START$ SET SERVER ACME/EXIT [/ABORT]
On providing a manual SET SERVER ACME/START command, all the ACME agents includingthe VMS ACME agent have to be configured manually.To configure the VMS ACME agent, use the following command:$ SET SERVER ACME/CONFIGURE=(NAME=VMS,CRED=VMS)
To configure the LDAP ACME agent, run the SYS$STARTUP:LDAPACME$STARTUP-STD.COMcommand procedure or use the following command:$ SET SERVER ACME/CONF=(NAME=LDAP-STD,FACILITY=LDAPACME,CRED=LDAP)
NOTE: To use the LDAP agent, ACMELDAP_STD kit must be installed and configured. Formore information, see the “Install and configure the ACME login and ACME authenticationagents” [p. 155].
To configure the MSV1_0 ACME agent, run the SYS$STARTUP:NTA$STARTUP_NT_ACME.COMcommand procedure or use the following command:$ SET SERVER ACME/CONFIGURE=(NAME=MSV1_0,CRED=NT, FAC=PWRK)
NOTE: To use the MSV1_0 ACME agent, the Advanced Server product must be installed andrunning. For more information, see the Install and configure the ACME services andAuthentication agents.
To configure the Kerberos ACME agent, run SYS$STARTUP:KRB$STARTUP_KERBEROS_ACME.COM command procedure or use the following command:$ SET SERVER ACME/CONFIGURE=(NAME=ACME_KRB_DOI, -_$ FACILITY=KRB,CREDENTIAL=KRB)
Enabling External Authentication 165
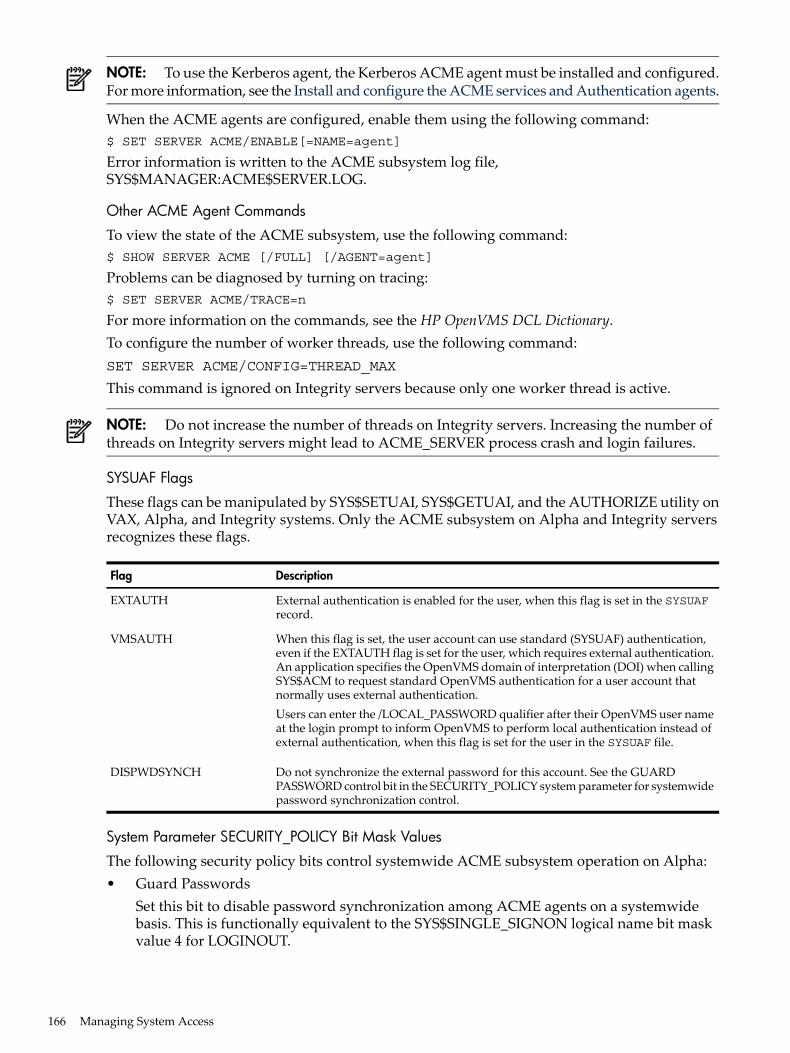
NOTE: To use the Kerberos agent, the Kerberos ACME agent must be installed and configured.For more information, see the Install and configure the ACME services and Authentication agents.
When the ACME agents are configured, enable them using the following command:$ SET SERVER ACME/ENABLE[=NAME=agent]
Error information is written to the ACME subsystem log file,SYS$MANAGER:ACME$SERVER.LOG.
Other ACME Agent Commands
To view the state of the ACME subsystem, use the following command:$ SHOW SERVER ACME [/FULL] [/AGENT=agent]
Problems can be diagnosed by turning on tracing:$ SET SERVER ACME/TRACE=n
For more information on the commands, see the HP OpenVMS DCL Dictionary.To configure the number of worker threads, use the following command:SET SERVER ACME/CONFIG=THREAD_MAX
This command is ignored on Integrity servers because only one worker thread is active.
NOTE: Do not increase the number of threads on Integrity servers. Increasing the number ofthreads on Integrity servers might lead to ACME_SERVER process crash and login failures.
SYSUAF Flags
These flags can be manipulated by SYS$SETUAI, SYS$GETUAI, and the AUTHORIZE utility onVAX, Alpha, and Integrity systems. Only the ACME subsystem on Alpha and Integrity serversrecognizes these flags.
DescriptionFlag
External authentication is enabled for the user, when this flag is set in the SYSUAFrecord.
EXTAUTH
When this flag is set, the user account can use standard (SYSUAF) authentication,even if the EXTAUTH flag is set for the user, which requires external authentication.An application specifies the OpenVMS domain of interpretation (DOI) when callingSYS$ACM to request standard OpenVMS authentication for a user account thatnormally uses external authentication.Users can enter the /LOCAL_PASSWORD qualifier after their OpenVMS user nameat the login prompt to inform OpenVMS to perform local authentication instead ofexternal authentication, when this flag is set for the user in the SYSUAF file.
VMSAUTH
Do not synchronize the external password for this account. See the GUARDPASSWORD control bit in the SECURITY_POLICY system parameter for systemwidepassword synchronization control.
DISPWDSYNCH
System Parameter SECURITY_POLICY Bit Mask Values
The following security policy bits control systemwide ACME subsystem operation on Alpha:• Guard Passwords
Set this bit to disable password synchronization among ACME agents on a systemwidebasis. This is functionally equivalent to the SYS$SINGLE_SIGNON logical name bit maskvalue 4 for LOGINOUT.
166 Managing System Access
The hexadecimal value is 200.
• Allow NoAuthorizationSet this bit to allow privileged applications to successfully authenticate a user whose principalname maps to a SYSUAF record that is either expired or whose modal restrictions wouldotherwise prevent the account from being used. A SYSUAF record that is disabled orpassword-expired (in the case of traditional VMS authentication) cannot be bypassed in thismanner. An application with SECURITY privilege specifies the SYS$ACMACME$M_NOAUTHORIZE function modifier to override authorization checks.The hexadecimal value is 400.
• Ignore ExtAuth and VMSAuth SYSUAF flagsSet this bit to allow any record in the SYSUAF file to be mapped using external authentication.The hexadecimal value is 800.
Authentication PoliciesAn authentication policy is defined by a particular combination of user identification,authentication, and authorization attributes. Policy attributes include:• Identification syntax
Includes simple user name and combination of domain/realm/principal name.
• Authentication token mechanism• Token reuse filters
Includes password dictionary, password history, password legal character set, passwordminimum and maximum lengths, forced change schedule, and expiration.
• Intrusion detection• Case sensitivity• Access restrictions
Includes time of day, day of week, and type of access.
• User account controlsIncludes account lock (disable) and account expiration.
• Credential informationIncludes user and group identifiers and privileges.
The following authentication policies are supported at present:• Standard OpenVMS policy• LDAP authentication policy• External authentication with Advanced Server for OpenVMS distributed authentication
policy• Kerberos authentication policy
OpenVMS policy
The OpenVMS policy is a rich, case-insensitive, password-based authentication policy thatincludes single-password or dual-password accounts, password expiration, password lock,password expiration, minimum password lengths, system-generated passwords, intrusiondetection and evasion, password dictionary and history filters, modal access restrictions, accountexpiration, and account lock.A user's credential information consists of the user's group and member identifier code (UIC),privileges, and rights identifiers. This information is stored in the system authorization(SYSUAF.DAT) and rights identifier (RIGHTSLIST.DAT) databases.
Enabling External Authentication 167

The system authorization database also contains information about how and when the user canaccess the system. These modal restrictions limit access based on time of day, day of week, andtype of access (for example, dialup, remote, or batch).OpenVMS credentials are stored in a persona. A persona is a protected, kernel-based datastructure.
LDAP authentication policy
The LDAP authentication policy is based on the Lightweight Directory Access Protocol. It supportsvalidation against the user name and password located on the Directory Server, mapping theuser to the OpenVMS user name in the SYSUAF file. For more information on LDAP, see theSYS$HELP:ACMELDAP_STD_CONFIG_INSTALL.PDF orSYS$HELP:ACMELDAP_STD_CONFIG_INSTALL.TXT .The credentials, such as the user and group identifiers and privileges, use the standard OpenVMSpolicy.
Advanced Server for OpenVMS policy
The Advanced Server for OpenVMS MSV1_0 authentication policy is a distributed authenticationpolicy based on Microsoft LAN Manager domain protocols. It supports password andchallenge-response (NTLM) mechanisms. The policy supports case-sensitive passwords, passwordexpiration, minimum time before password change, and account lock.A user's credential information consists of the user's system identifiers (primary and secondarySIDs) and privileges.Advanced Server for OpenVMS credentials are stored in an NT persona extension that is attachedto a standard persona containing the OpenVMS credentials of the OpenVMS user name that hasbeen mapped to the Microsoft user name by the Advanced Server database.
Kerberos authentication policy
The Kerberos authentication policy is based on the Kerberos protocol. It supports validationagainst the user name and password located on the Kerberos key distribution center database.The Kerberos principal name must be the same as the OpenVMS user name in SYSUAF.The credentials, such as the user and group identifiers and privileges, use the standard OpenVMSpolicy.
Controlling the Login ProcessThis section describes many operating system features designed to secure systems fromunauthorized users.
Informational Display During LoginThis section describes how you can control the display of various pieces of information thatappear by default at login time, such as announcement, welcome, last login, and new mailmessages. So that you can understand the effect of login restrictions, it also describes how theoperating system processes the login fields of the system user authorization file (SYSUAF.DAT).In addition, this section describes the use of the secure server and how to set up intrusiondetection.
Announcement MessageTo provide an announcement message on your system, define the system logical nameSYS$ANNOUNCE in the site-specific startup command procedureSYS$MANAGER:SYSTARTUP_VMS.COM. TheHPOpenVMSSystemManager'sManualdescribeshow to do this. The announcement message appears at login.
168 Managing System Access
The definition you provide here affects all users on the system. Because this message may providea clue to the identity of the operating system, you may decide not to display it.
Welcome MessageSimilar to the announcement message, the welcome message is controlled through a systemlogical name, SYS$WELCOME. If you do not define SYS$WELCOME, a standard welcomemessage is provided for all users. This welcome message reveals the operating system and versionnumber, as well as the node if SYS$NODE is defined.To define another message for SYS$WELCOME, you can create a text file containing the message.To display the contents of this file, use the following line in SYSTARTUP_VMS.COM:$ DEFINE/SYSTEM SYS$WELCOME "@SYS$MANAGER:WELCOME.TXT"
To disable the welcome message, place the following DCL command inSYS$MANAGER:SYSTARTUP_VMS.COM. This command prints a blank line in place of thestandard welcome message.$ DEFINE/SYSTEM SYS$WELCOME " "
If you prefer to selectively disable the message for individual users, you can use the AUTHORIZEqualifier /FLAGS=DISWELCOME on individual UAF records.
Last Login MessagesBy default, the system displays three messages that provide information about the last loginsand the number of failed login attempts (see “Reading Informational Messages” (page 52)"ReadingInformational Messages" on page 45 ). You can selectively disable the appearance of these threemessages. Enter the AUTHORIZE qualifier /FLAGS=DISREPORT for specific users.
New Mail AnnouncementsBy default, the system tells users the number of new mail messages when they log in. You canprevent users from receiving this notice by specifying the AUTHORIZE qualifier/FLAGS=DISNEWMAIL.The new mail announcement is primarily a user convenience, not a security issue. If a user witha restricted account cannot invoke the Mail utility (MAIL), then you might want to disable thenew mail message at the same time you prohibit mail access. The following AUTHORIZE qualifieraccomplishes both tasks:/FLAGS=(DISMAIL,DISNEWMAIL)
Limiting Disconnected ProcessesVirtual terminals let users maintain more than one disconnected process at a time. Virtualterminals are also required by the secure server feature (see “Using the Secure Server” (page 170)).You may want to restrict the use of virtual terminals. For example, if you are concerned aboutthe amount of nonpaged pool, you may not want to enable this feature on a systemwide basis.Virtual terminals can be disabled at the terminal, user, or system level:• To prevent particular terminals from being used as virtual terminals, use the DCL command
SET TERMINAL/PERMANENT/NODISCONNECT.• To prevent specific users from attaching to disconnected processes, set the AUTHORIZE
qualifier /FLAGS=DISRECONNECT for those users. (An applications account used bymultiple users is a good candidate for the DISRECONNECT flag to prevent the users fromconnecting to each other's processes.)
• To disable virtual terminals on a systemwide basis, remove the DISCONNECT attributefrom the system parameter TTY_DEFCHAR2.
You can also set the amount of time allowed for reconnection to less than the default of 15 minuteswith the system parameter TTY_TIMEOUT. A process that remains disconnected for longer than
Controlling the Login Process 169
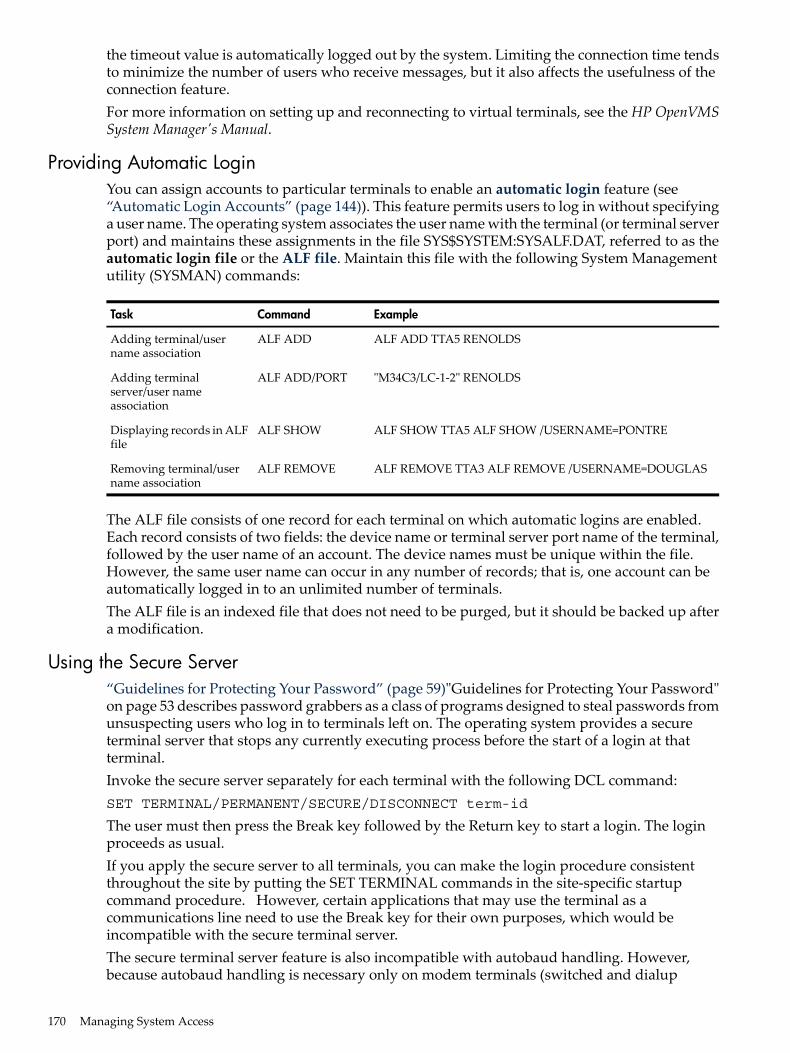
the timeout value is automatically logged out by the system. Limiting the connection time tendsto minimize the number of users who receive messages, but it also affects the usefulness of theconnection feature.For more information on setting up and reconnecting to virtual terminals, see the HP OpenVMSSystem Manager's Manual.
Providing Automatic LoginYou can assign accounts to particular terminals to enable an automatic login feature (see“Automatic Login Accounts” (page 144)). This feature permits users to log in without specifyinga user name. The operating system associates the user name with the terminal (or terminal serverport) and maintains these assignments in the file SYS$SYSTEM:SYSALF.DAT, referred to as theautomatic login file or the ALF file. Maintain this file with the following System Managementutility (SYSMAN) commands:
ExampleCommandTask
ALF ADD TTA5 RENOLDSALF ADDAdding terminal/username association
"M34C3/LC-1-2" RENOLDSALF ADD/PORTAdding terminalserver/user nameassociation
ALF SHOW TTA5 ALF SHOW /USERNAME=PONTREALF SHOWDisplaying records in ALFfile
ALF REMOVE TTA3 ALF REMOVE /USERNAME=DOUGLASALF REMOVERemoving terminal/username association
The ALF file consists of one record for each terminal on which automatic logins are enabled.Each record consists of two fields: the device name or terminal server port name of the terminal,followed by the user name of an account. The device names must be unique within the file.However, the same user name can occur in any number of records; that is, one account can beautomatically logged in to an unlimited number of terminals.The ALF file is an indexed file that does not need to be purged, but it should be backed up aftera modification.
Using the Secure Server“Guidelines for Protecting Your Password” (page 59)"Guidelines for Protecting Your Password"on page 53 describes password grabbers as a class of programs designed to steal passwords fromunsuspecting users who log in to terminals left on. The operating system provides a secureterminal server that stops any currently executing process before the start of a login at thatterminal.Invoke the secure server separately for each terminal with the following DCL command:SET TERMINAL/PERMANENT/SECURE/DISCONNECT term-id
The user must then press the Break key followed by the Return key to start a login. The loginproceeds as usual.If you apply the secure server to all terminals, you can make the login procedure consistentthroughout the site by putting the SET TERMINAL commands in the site-specific startupcommand procedure. However, certain applications that may use the terminal as acommunications line need to use the Break key for their own purposes, which would beincompatible with the secure terminal server.The secure terminal server feature is also incompatible with autobaud handling. However,because autobaud handling is necessary only on modem terminals (switched and dialup
170 Managing System Access
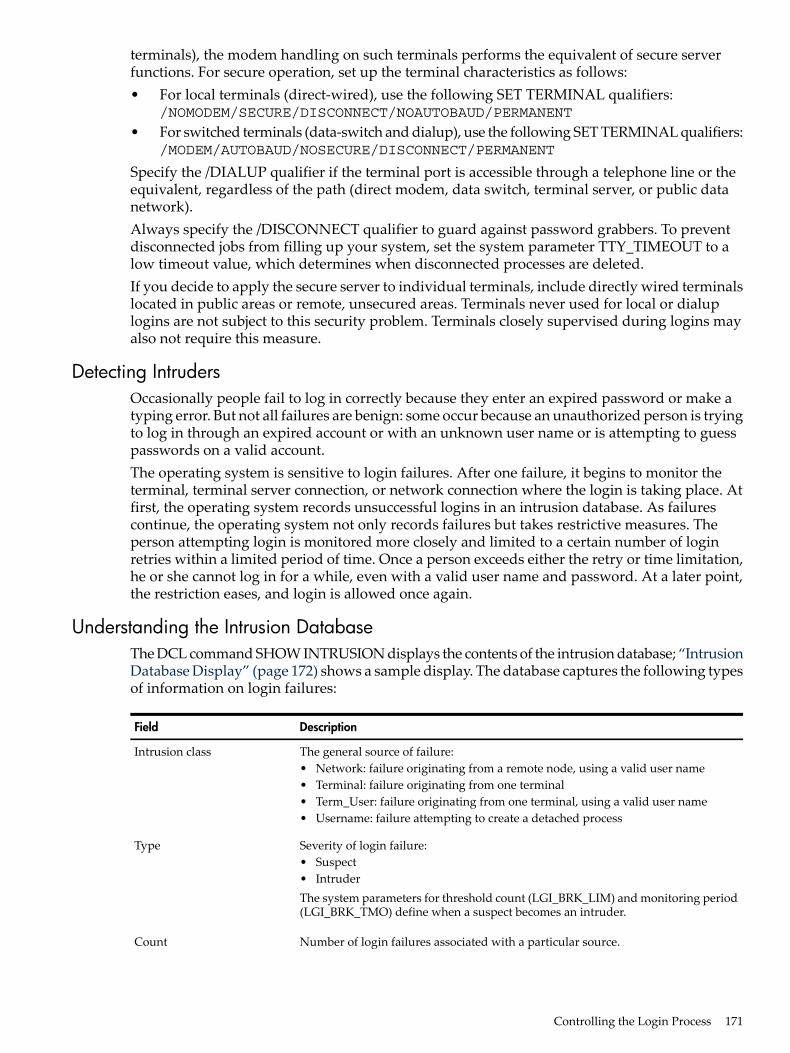
terminals), the modem handling on such terminals performs the equivalent of secure serverfunctions. For secure operation, set up the terminal characteristics as follows:• For local terminals (direct-wired), use the following SET TERMINAL qualifiers:
/NOMODEM/SECURE/DISCONNECT/NOAUTOBAUD/PERMANENT
• For switched terminals (data-switch and dialup), use the following SET TERMINAL qualifiers:/MODEM/AUTOBAUD/NOSECURE/DISCONNECT/PERMANENT
Specify the /DIALUP qualifier if the terminal port is accessible through a telephone line or theequivalent, regardless of the path (direct modem, data switch, terminal server, or public datanetwork).Always specify the /DISCONNECT qualifier to guard against password grabbers. To preventdisconnected jobs from filling up your system, set the system parameter TTY_TIMEOUT to alow timeout value, which determines when disconnected processes are deleted.If you decide to apply the secure server to individual terminals, include directly wired terminalslocated in public areas or remote, unsecured areas. Terminals never used for local or dialuplogins are not subject to this security problem. Terminals closely supervised during logins mayalso not require this measure.
Detecting IntrudersOccasionally people fail to log in correctly because they enter an expired password or make atyping error. But not all failures are benign: some occur because an unauthorized person is tryingto log in through an expired account or with an unknown user name or is attempting to guesspasswords on a valid account.The operating system is sensitive to login failures. After one failure, it begins to monitor theterminal, terminal server connection, or network connection where the login is taking place. Atfirst, the operating system records unsuccessful logins in an intrusion database. As failurescontinue, the operating system not only records failures but takes restrictive measures. Theperson attempting login is monitored more closely and limited to a certain number of loginretries within a limited period of time. Once a person exceeds either the retry or time limitation,he or she cannot log in for a while, even with a valid user name and password. At a later point,the restriction eases, and login is allowed once again.
Understanding the Intrusion DatabaseThe DCL command SHOW INTRUSION displays the contents of the intrusion database; “IntrusionDatabase Display” (page 172) shows a sample display. The database captures the following typesof information on login failures:
DescriptionField
The general source of failure:• Network: failure originating from a remote node, using a valid user name• Terminal: failure originating from one terminal• Term_User: failure originating from one terminal, using a valid user name• Username: failure attempting to create a detached process
Intrusion class
Severity of login failure:• Suspect• IntruderThe system parameters for threshold count (LGI_BRK_LIM) and monitoring period(LGI_BRK_TMO) define when a suspect becomes an intruder.
Type
Number of login failures associated with a particular source.Count
Controlling the Login Process 171
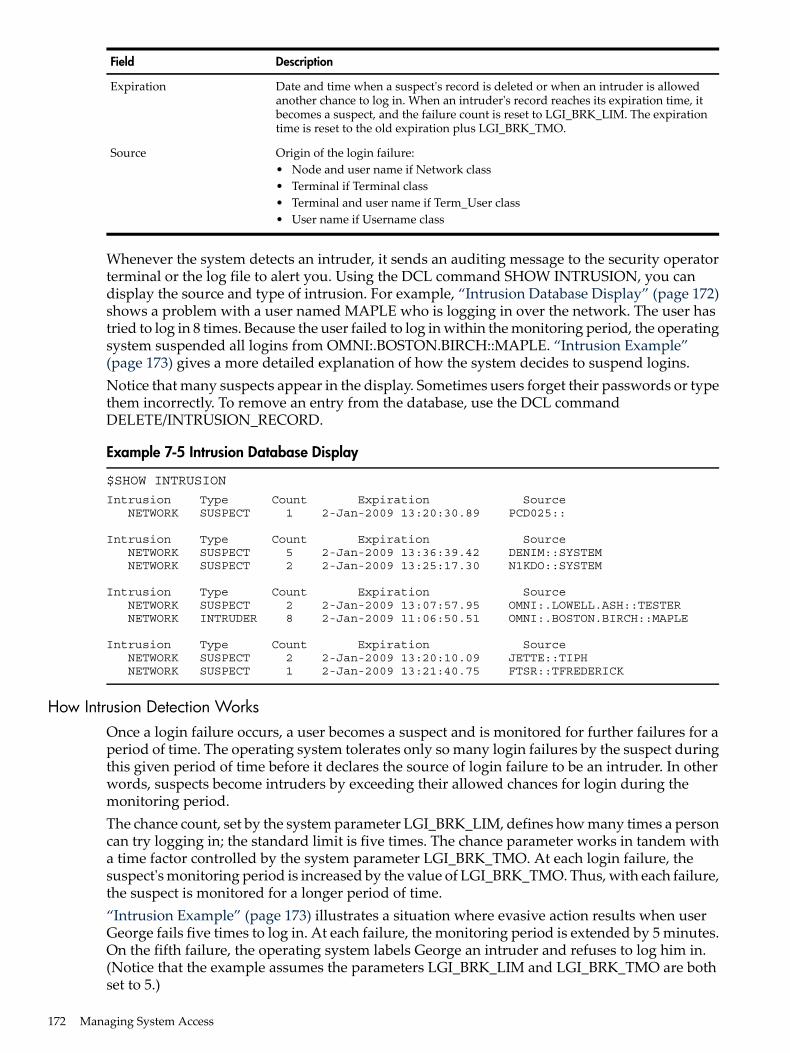
DescriptionField
Date and time when a suspect's record is deleted or when an intruder is allowedanother chance to log in. When an intruder's record reaches its expiration time, itbecomes a suspect, and the failure count is reset to LGI_BRK_LIM. The expirationtime is reset to the old expiration plus LGI_BRK_TMO.
Expiration
Origin of the login failure:• Node and user name if Network class• Terminal if Terminal class• Terminal and user name if Term_User class• User name if Username class
Source
Whenever the system detects an intruder, it sends an auditing message to the security operatorterminal or the log file to alert you. Using the DCL command SHOW INTRUSION, you candisplay the source and type of intrusion. For example, “Intrusion Database Display” (page 172)shows a problem with a user named MAPLE who is logging in over the network. The user hastried to log in 8 times. Because the user failed to log in within the monitoring period, the operatingsystem suspended all logins from OMNI:.BOSTON.BIRCH::MAPLE. “Intrusion Example”(page 173) gives a more detailed explanation of how the system decides to suspend logins.Notice that many suspects appear in the display. Sometimes users forget their passwords or typethem incorrectly. To remove an entry from the database, use the DCL commandDELETE/INTRUSION_RECORD.
Example 7-5 Intrusion Database Display
$SHOW INTRUSION
Intrusion Type Count Expiration Source NETWORK SUSPECT 1 2-Jan-2009 13:20:30.89 PCD025::
Intrusion Type Count Expiration Source NETWORK SUSPECT 5 2-Jan-2009 13:36:39.42 DENIM::SYSTEM NETWORK SUSPECT 2 2-Jan-2009 13:25:17.30 N1KDO::SYSTEM
Intrusion Type Count Expiration Source NETWORK SUSPECT 2 2-Jan-2009 13:07:57.95 OMNI:.LOWELL.ASH::TESTER NETWORK INTRUDER 8 2-Jan-2009 11:06:50.51 OMNI:.BOSTON.BIRCH::MAPLE
Intrusion Type Count Expiration Source NETWORK SUSPECT 2 2-Jan-2009 13:20:10.09 JETTE::TIPH NETWORK SUSPECT 1 2-Jan-2009 13:21:40.75 FTSR::TFREDERICK
How Intrusion Detection WorksOnce a login failure occurs, a user becomes a suspect and is monitored for further failures for aperiod of time. The operating system tolerates only so many login failures by the suspect duringthis given period of time before it declares the source of login failure to be an intruder. In otherwords, suspects become intruders by exceeding their allowed chances for login during themonitoring period.The chance count, set by the system parameter LGI_BRK_LIM, defines how many times a personcan try logging in; the standard limit is five times. The chance parameter works in tandem witha time factor controlled by the system parameter LGI_BRK_TMO. At each login failure, thesuspect's monitoring period is increased by the value of LGI_BRK_TMO. Thus, with each failure,the suspect is monitored for a longer period of time.“Intrusion Example” (page 173) illustrates a situation where evasive action results when userGeorge fails five times to log in. At each failure, the monitoring period is extended by 5 minutes.On the fifth failure, the operating system labels George an intruder and refuses to log him in.(Notice that the example assumes the parameters LGI_BRK_LIM and LGI_BRK_TMO are bothset to 5.)
172 Managing System Access
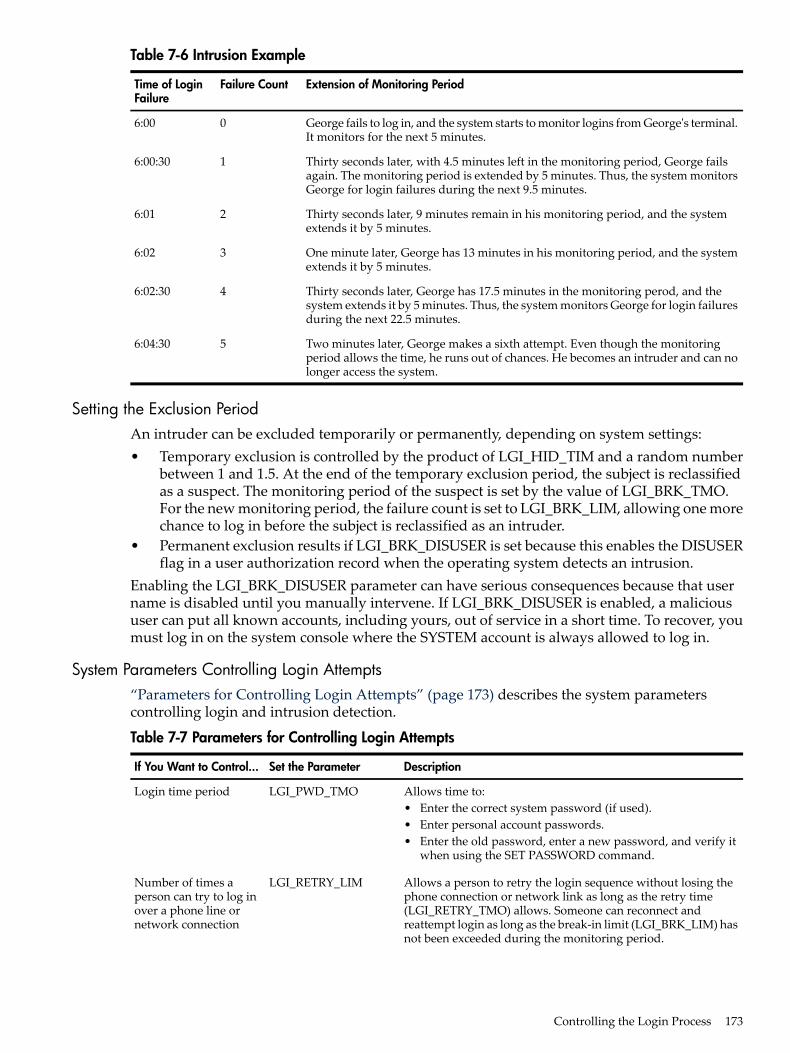
Table 7-6 Intrusion Example
Extension of Monitoring PeriodFailure CountTime of LoginFailure
George fails to log in, and the system starts to monitor logins from George's terminal.It monitors for the next 5 minutes.
06:00
Thirty seconds later, with 4.5 minutes left in the monitoring period, George failsagain. The monitoring period is extended by 5 minutes. Thus, the system monitorsGeorge for login failures during the next 9.5 minutes.
16:00:30
Thirty seconds later, 9 minutes remain in his monitoring period, and the systemextends it by 5 minutes.
26:01
One minute later, George has 13 minutes in his monitoring period, and the systemextends it by 5 minutes.
36:02
Thirty seconds later, George has 17.5 minutes in the monitoring perod, and thesystem extends it by 5 minutes. Thus, the system monitors George for login failuresduring the next 22.5 minutes.
46:02:30
Two minutes later, George makes a sixth attempt. Even though the monitoringperiod allows the time, he runs out of chances. He becomes an intruder and can nolonger access the system.
56:04:30
Setting the Exclusion PeriodAn intruder can be excluded temporarily or permanently, depending on system settings:• Temporary exclusion is controlled by the product of LGI_HID_TIM and a random number
between 1 and 1.5. At the end of the temporary exclusion period, the subject is reclassifiedas a suspect. The monitoring period of the suspect is set by the value of LGI_BRK_TMO.For the new monitoring period, the failure count is set to LGI_BRK_LIM, allowing one morechance to log in before the subject is reclassified as an intruder.
• Permanent exclusion results if LGI_BRK_DISUSER is set because this enables the DISUSERflag in a user authorization record when the operating system detects an intrusion.
Enabling the LGI_BRK_DISUSER parameter can have serious consequences because that username is disabled until you manually intervene. If LGI_BRK_DISUSER is enabled, a malicioususer can put all known accounts, including yours, out of service in a short time. To recover, youmust log in on the system console where the SYSTEM account is always allowed to log in.
System Parameters Controlling Login Attempts“Parameters for Controlling Login Attempts” (page 173) describes the system parameterscontrolling login and intrusion detection.
Table 7-7 Parameters for Controlling Login Attempts
DescriptionSet the ParameterIf You Want to Control...
Allows time to:• Enter the correct system password (if used).• Enter personal account passwords.• Enter the old password, enter a new password, and verify it
when using the SET PASSWORD command.
LGI_PWD_TMOLogin time period
Allows a person to retry the login sequence without losing thephone connection or network link as long as the retry time(LGI_RETRY_TMO) allows. Someone can reconnect andreattempt login as long as the break-in limit (LGI_BRK_LIM) hasnot been exceeded during the monitoring period.
LGI_RETRY_LIMNumber of times aperson can try to log inover a phone line ornetwork connection
Controlling the Login Process 173
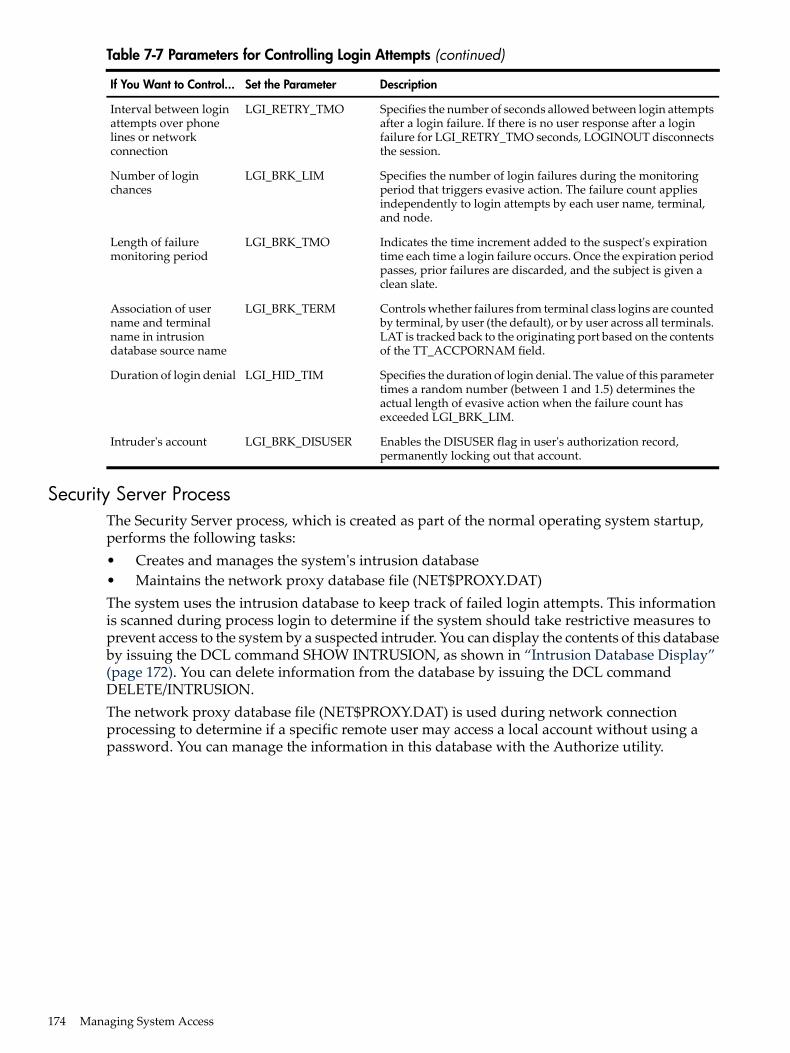
Table 7-7 Parameters for Controlling Login Attempts (continued)
DescriptionSet the ParameterIf You Want to Control...
Specifies the number of seconds allowed between login attemptsafter a login failure. If there is no user response after a loginfailure for LGI_RETRY_TMO seconds, LOGINOUT disconnectsthe session.
LGI_RETRY_TMOInterval between loginattempts over phonelines or networkconnection
Specifies the number of login failures during the monitoringperiod that triggers evasive action. The failure count appliesindependently to login attempts by each user name, terminal,and node.
LGI_BRK_LIMNumber of loginchances
Indicates the time increment added to the suspect's expirationtime each time a login failure occurs. Once the expiration periodpasses, prior failures are discarded, and the subject is given aclean slate.
LGI_BRK_TMOLength of failuremonitoring period
Controls whether failures from terminal class logins are countedby terminal, by user (the default), or by user across all terminals.LAT is tracked back to the originating port based on the contentsof the TT_ACCPORNAM field.
LGI_BRK_TERMAssociation of username and terminalname in intrusiondatabase source name
Specifies the duration of login denial. The value of this parametertimes a random number (between 1 and 1.5) determines theactual length of evasive action when the failure count hasexceeded LGI_BRK_LIM.
LGI_HID_TIMDuration of login denial
Enables the DISUSER flag in user's authorization record,permanently locking out that account.
LGI_BRK_DISUSERIntruder's account
Security Server ProcessThe Security Server process, which is created as part of the normal operating system startup,performs the following tasks:• Creates and manages the system's intrusion database• Maintains the network proxy database file (NET$PROXY.DAT)The system uses the intrusion database to keep track of failed login attempts. This informationis scanned during process login to determine if the system should take restrictive measures toprevent access to the system by a suspected intruder. You can display the contents of this databaseby issuing the DCL command SHOW INTRUSION, as shown in “Intrusion Database Display”(page 172). You can delete information from the database by issuing the DCL commandDELETE/INTRUSION.The network proxy database file (NET$PROXY.DAT) is used during network connectionprocessing to determine if a specific remote user may access a local account without using apassword. You can manage the information in this database with the Authorize utility.
174 Managing System Access
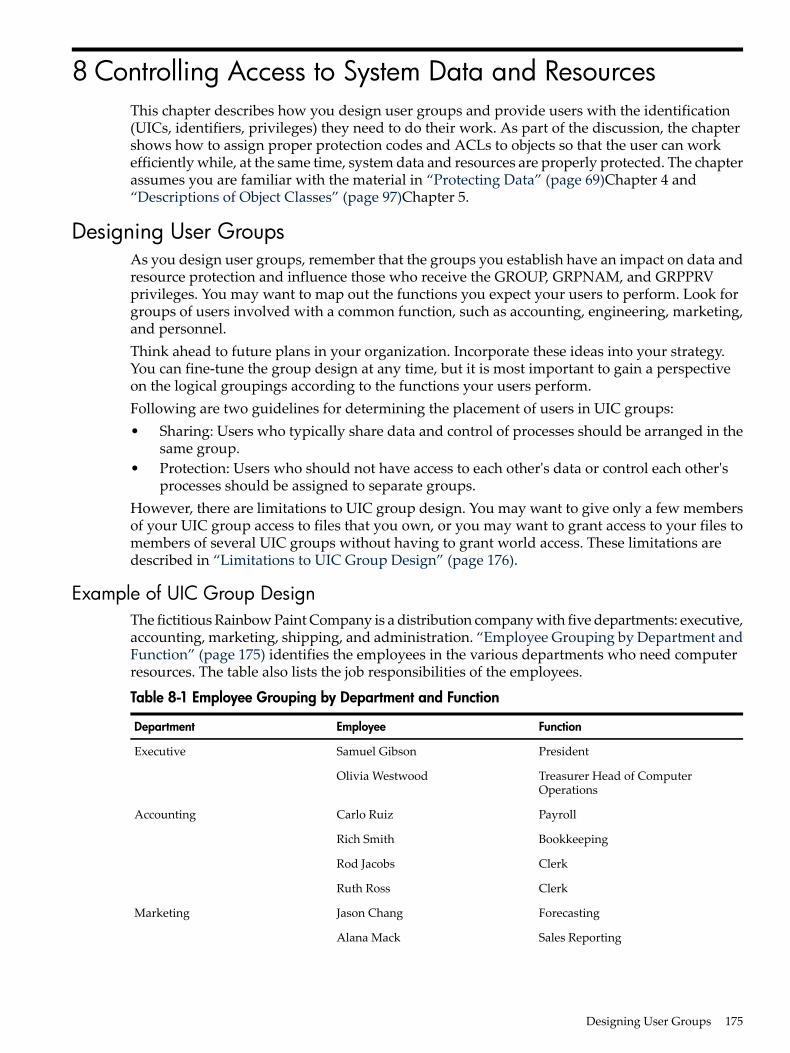
8 Controlling Access to System Data and ResourcesThis chapter describes how you design user groups and provide users with the identification(UICs, identifiers, privileges) they need to do their work. As part of the discussion, the chaptershows how to assign proper protection codes and ACLs to objects so that the user can workefficiently while, at the same time, system data and resources are properly protected. The chapterassumes you are familiar with the material in “Protecting Data” (page 69)Chapter 4 and“Descriptions of Object Classes” (page 97)Chapter 5.
Designing User GroupsAs you design user groups, remember that the groups you establish have an impact on data andresource protection and influence those who receive the GROUP, GRPNAM, and GRPPRVprivileges. You may want to map out the functions you expect your users to perform. Look forgroups of users involved with a common function, such as accounting, engineering, marketing,and personnel.Think ahead to future plans in your organization. Incorporate these ideas into your strategy.You can fine-tune the group design at any time, but it is most important to gain a perspectiveon the logical groupings according to the functions your users perform.Following are two guidelines for determining the placement of users in UIC groups:• Sharing: Users who typically share data and control of processes should be arranged in the
same group.• Protection: Users who should not have access to each other's data or control each other's
processes should be assigned to separate groups.However, there are limitations to UIC group design. You may want to give only a few membersof your UIC group access to files that you own, or you may want to grant access to your files tomembers of several UIC groups without having to grant world access. These limitations aredescribed in “Limitations to UIC Group Design” (page 176).
Example of UIC Group DesignThe fictitious Rainbow Paint Company is a distribution company with five departments: executive,accounting, marketing, shipping, and administration. “Employee Grouping by Department andFunction” (page 175) identifies the employees in the various departments who need computerresources. The table also lists the job responsibilities of the employees.
Table 8-1 Employee Grouping by Department and Function
FunctionEmployeeDepartment
PresidentSamuel GibsonExecutive
Treasurer Head of ComputerOperations
Olivia Westwood
PayrollCarlo RuizAccounting
BookkeepingRich Smith
ClerkRod Jacobs
ClerkRuth Ross
ForecastingJason ChangMarketing
Sales ReportingAlana Mack
Designing User Groups 175

Table 8-1 Employee Grouping by Department and Function (continued)
FunctionEmployeeDepartment
Inventory ControlScott GilesShipping
Correspondence ManagementPaycheck Printing
Jane SimonAdministration
The fact that the company has been organized into departments suggests that individuals in thesame department perform many of the same functions. For example, the advantage of groupingall the employees who perform bookkeeping tasks for the company in the accounting departmentis that employees can easily communicate with one another and gain access to the data they mustshare.As the system manager of Rainbow Paint's computer resources, Olivia Westwood will set upUIC groups based on the existing organizational structure. For example, the employees in theaccounting department (Ruiz, Smith, Jacobs, and Ross) could be members of the UIC groupACCOUNTING. Setting up the UIC group in this way ensures that user Ruiz has easy access todata from user Smith, and so on.Effective department organization ensures that only selected employees will have access to alldata and employees in the company. For example, one of the functions of the accountingdepartment concerns payroll. Because payroll information is confidential, employees in theshipping and marketing departments should not have access to that information.As the system manager of Rainbow Paint's computer resources, Westwood sets up the UICgroups---ACCOUNTING, EXECUTIVE, MARKETING, SHIPPING, andADMINISTRATION---corresponding to the various departments in the company. Members ofa UIC group can be given common access to files, as shown in the following example:$SET SECURITY/PROTECTION=G:RWE GROUP_STATS.DAT
With this command, the owner of the file GROUP_STATS.DAT allows each member of the UICgroup read, write, and execute access to the file.
Limitations to UIC Group DesignIn some cases, UIC-based protection does not present the best solution to your object protectionneeds. If users in several UIC groups need access to common files and other resources on thesystem, the only UIC-based alternatives are to give world access to the object (all users can accessthe object) or to grant extended privileges to each user. Neither choice is desirable.You may also need to allow users in a UIC group several types of access to files; you may wantto deny access to the object to some users in the same group. Again, UIC-based protection doesnot offer a good solution to meet these needs.Access control lists (ACLs), described in the following sections, offer another way to protect filesand other objects on the system.As the site security administrator, it is extremely important to familiarize yourself with thesubtleties of the UIC categories, as described in “Controlling Access with Protection Codes”(page 90). Putting users in certain UIC groups may grant them system privileges, and a userwith system privilege has control access to any protected object on the system. The SYSPRVprivilege is given by default to all UIC groups less than or equal to 10, but the actual range forthe system UIC category is determined by the value of the MAXSYSGROUP system parameter.Putting users with the GRPPRV privilege in groups that own system files might also causesecurity problems.
Naming Individual Users in ACLsRather than attempting to restructure UIC groups to solve data and resource protection problems,you may be able to achieve your goals by using access control lists (ACLs). (“Controlling Access
176 Controlling Access to System Data and Resources
with ACLs” (page 84) provides a detailed description of ACLs.) The UIC can serve as an identifierin an ACE, so you can easily construct ACLs that allow specific users across various UIC groupsaccess to an object.For example, consider the ACL that you might construct to allow specific users from the RainbowPaint Company to access the file PAYROLL.DAT:(IDENTIFIER=OWESTWOOD,ACCESS=READ+WRITE+EXECUTE+DELETE)(IDENTIFIER=CRUIZ,ACCESS=READ+WRITE+EXECUTE+DELETE)(IDENTIFIER=RSMITH,ACCESS=READ+WRITE+EXECUTE+DELETE)(IDENTIFIER=JSIMON,ACCESS=READ)(IDENTIFIER=SGIBSON,ACCESS=READ)
Defining Sharing of RightsMany users often share the same access needs, and an ACL consisting strictly of UIC identifierscan become too lengthy. To shorten the ACL, you can include environmental identifiers, whichare system-defined, or create general identifiers (see “Major Types of Rights Identifiers”(page 72)Table 4-1).When creating general identifiers, you design the names of the identifiers you want on yoursystem and compose the set of holders for the identifiers. Then you add the identifiers to therights database and assign the identifiers to the intended users.For example, the Rainbow Paint Company decided to add the identifier PAYROLL to the rightsdatabase. The holders of that identifier were all users who needed read, write, execute, and deleteaccess to PAYROLL.DAT: OWESTWOOD, CRUIZ, and RSMITH.Once the identifier and its holders were defined, the security administrator used the followingACL to specify the same type of access to PAYROLL.DAT:(IDENTIFIER=PAYROLL,ACCESS=READ+WRITE+EXECUTE+DELETE)(IDENTIFIER=JSIMON,ACCESS=READ)(IDENTIFIER=SGIBSON,ACCESS=READ)
Conditionalizing Identifiers for Different UsersA final step in designing ACLs and identifiers is to consider how and when different identifiersare going to be used. Users often need to hold an identifier for different reasons, such as updatingdatabases or performing system operations. For this reason, you may want to qualify the use ofan identifier.There are several ways to qualify identifiers. One way is to use environmental identifiers, andanother is to add special attributes to identifiers, as described in “Customizing Identifiers”(page 181).Environmental identifiers describe different types of users based on their initial entry into thesystem. These identifiers---local, dialup, remote, interactive, network, and batch---let you definea large potential group of users according to their use of the system. Typically, these types ofidentifiers are used in combination with other identifiers.For example, the following ACE permits user Martin to have read, write, execute, and deleteaccess to the object only when logged in from a local terminal:(IDENTIFIER=MARTIN+LOCAL,ACCESS=READ+WRITE+EXECUTE+DELETE)
You can use the environmental identifiers in ACLs to deny access to an entire class of logins. Forexample, the following ACE denies access to all dialup users:(IDENTIFIER=DIALUP,ACCESS=NONE)
In assigning these environmental identifiers to users in a DECwindows environment, rememberthat DECwindows processes can be virtually any type of process. For example, a user may chooseto run DECwindows Mail in a batch job. Even though the process is communicating interactivelywith a user through a DECwindows workstation, it is still classified as a batch job.
Defining Sharing of Rights 177
Designing ACLsThere are several factors to consider when designing ACLs:• Using shorter ACLs with general identifiers has several advantages. The operating system
processes shorter ACLs more rapidly. In addition, when employees change but the functionsremain the same, you do not have to change every ACL across the system. Instead, youchange the holders of the identifier. If employees leave the project, you can edit their recordsin RIGHTSLIST.DAT so they no longer hold the identifier, or if they leave the company,you can remove their user authorization file (UAF) records altogether. When new employeesare hired for the same jobs, grant the new users the right to hold the identifier. The newusers then have the same ACL-based access as the former users.
• Your overall design should consider the types of files and other objects on your system andthe protection needs of each. If you have successfully designated groups and identifiers,you should be able to easily design ACLs and define standard protection. Time spentclarifying the common access needs of your users simplifies the design of identifiers andACLs. You will also simplify the job for your users who place ACLs on their files.
• Do not use ACLs indiscriminately. They consume paged system dynamic memory whenfiles are open. They also require additional processing time. ACLs are best applied whereprotection is really needed. If your ACLs become too long (for example, more than 200entries or so), you might consider grouping users into discrete categories and creating generalidentifiers.
• At the same time, do not create excessive numbers of identifiers. In particular, do not granttoo many identifiers to one user. Having a user hold more than 10 or 20 identifiers mayresult in excessive time spent processing ACLs. If you find an individual holding too manyidentifiers, you may want to reconsider how your groups are structured. Or, if this is anexception case, consider putting the individual directly on the necessary ACLs.
For more information on defining identifiers, see “Populating the Rights Database” (page 178)and the description of AUTHORIZE in the HP OpenVMS System Management Utilities ReferenceManual. For more information about creating and maintaining ACLs, see “Protecting Data”(page 69)Chapter 4. For extensive work, using the access control list editor (ACL editor) isappropriate; the ACL editor is described in theHPOpenVMSSystemManagementUtilities ReferenceManual.
Populating the Rights DatabaseOnce you have designed the names of the identifiers you want on your system and composedthe set of holders for the identifiers, use AUTHORIZE to add the identifiers to the rights databaseand assign the identifiers to the intended users. These associations are kept in the rights database(RIGHTSLIST.DAT), which you maintain as you add or remove users and identifiers.Initially, the rights database is created at system installation and is located in the [SYSEXE]directory. At creation, it contains the names of the environmental identifiers. As you add usersto the authorization file, one identifier is added for each authorized user. The identifier, calleda UIC identifier, is associated with the user's UIC and user name.There is also an identifier in the rights database equivalent to each UIC group name. When youadd a new user as the first member of a new UIC group and you specify an account group namewith the user, an identifier corresponding to the account group name is added to the rightsdatabase, as shown in the following example:$SET DEFAULT SYS$SYSTEM$RUN AUTHORIZEUAF>ADD ROB/PASSWORD=SP0152/UIC=[014,006] -_UAF>/DIRECTORY=WORK:[ROB]/ACCOUNT=MGMTUAF-I-ADDMSG, user record successfully addedUAF-I-RDBADDMSGU, identifier ROB value: [000014,000006] added to RIGHTSLIST.DAT
178 Controlling Access to System Data and Resources

UAF-I-RDBADDMSGU, identifier MGMT value: [000014,177777] added to RIGHTSLIST.DAT
Because the account name MGMT is specified when adding ROB's account and no UIC groupof that name exists, the MGMT identifier is added to the rights database.Each site adapts its own rights database according to actual use and needs.Note that when you use AUTHORIZE to add, remove, or change user names in the system userauthorization file (SYSUAF.DAT), AUTHORIZE makes corresponding changes for you inRIGHTSLIST.DAT so that the rights list corresponds to SYSUAF.DAT.Because of the automatic creation and maintenance of the rights database, you seldom need touse the AUTHORIZE command CREATE/RIGHTS. However, if the rights database is damagedor deleted, you can create a new one with this command. (See theHPOpenVMSSystemManagementUtilities Reference Manual for more information.)
Displaying the DatabaseYou should regularly display the rights database to check that it is correct and current. TwoAUTHORIZE commands are used for this: SHOW/IDENTIFIER and SHOW/RIGHTS. To displayall holders of an identifier, use the SHOW/IDENTIFIER command, as shown in the followingexample:UAF> SHOW/IDENTIFIER/FULL NETWORK
Use the asterisk (*) wildcard to display all holders of all identifiers on the system, as follows:UAF> SHOW/IDENTIFIER/FULL *
To display the identifiers held by a particular user, use the SHOW/RIGHTS command, as follows:UAF> SHOW/RIGHTS/USER=ROBIN
Use the asterisk wildcard to display all identifiers held by all users, as follows:UAF> SHOW/RIGHTS/USER=*UAF> SHOW/RIGHTS/USER=[*,*]
The first command displays users alphabetically. The second command displays users accordingto UICs.
Adding IdentifiersYou add identifiers to the rights list with the AUTHORIZE command ADD/IDENTIFIER, forexample:UAF> ADD/IDENTIFIER PAYROLLidentifier PAYROLL value %X80080011 added to RIGHTSLIST.DAT
To grant users an identifier with any of the attributes described in “Customizing Identifiers”(page 181), you must name that attribute when adding the identifier. For example, to allow usersto add or modify an identifier, specify the Dynamic attribute:UAF>ADD/IDENTIFIER PROJECT_TEAM1 /ATTRIBUTES=DYNAMIC
Restoring the Rights DatabaseIf you accidentally deleted the rights list and it cannot be recovered from a backup copy, recreateRIGHTSLIST.DAT by entering the CREATE/RIGHTS command, followed by theADD/IDENTIFIER command, as follows:UAF> CREATE/RIGHTS{message}UAF> ADD/IDENTIFIER/USER=* or ADD/IDENTIFIER/USER=[*,*]{messages}
The ADD/IDENTIFIER command generates a UIC identifier in the rights list corresponding toeach user name in SYSUAF.DAT. To complete the task, use the ADD/IDENTIFIER command to
Populating the Rights Database 179
add all general identifiers that were lost. Then redefine the holders of the identifiers withGRANT/IDENTIFIER commands, as described in “Assigning Identifiers to Users” (page 180).
Assigning Identifiers to UsersAfter adding identifiers, you associate users as holders of the existing identifiers by using theAUTHORIZE command GRANT/IDENTIFIER, as shown in the following example:UAF> GRANT/IDENTIFIER PAYROLL MARTINUAF-I-GRANTMSG, identifier PAYROLL granted to MARTINUAF> GRANT/IDENTIFIER PAYROLL IPPOLITOUAF-I-GRANTMSG, identifier PAYROLL granted to IPPOLITO
To give user Martin the EXECUTIVE identifier in addition to the PAYROLL identifier wouldrequire another use of the GRANT/IDENTIFIER command. You can introduce only one holderassociation at a time with the GRANT/IDENTIFIER command.In all cases shown above, AUTHORIZE associates the PAYROLL identifier with the UIC identifiercorresponding to the user, specifically Martin and Ippolito. Both the identifiers must exist in therights database.
Removing Holder RecordsWhen a user leaves the company, remove the UAF record for that user. Notify the managers ofall sites where that user has access to proxy accounts to remove proxy access information in theremote node's NETPROXY.DAT file. When you run AUTHORIZE to remove a user's UAF record,AUTHORIZE also removes the user's connections as a holder of identifiers in the rights database.However, if a departed user is the only remaining holder of a given identifier, remove thatidentifier to avoid future confusion.
Removing IdentifiersBefore you remove an identifier from the rights database:1. Remove all occurrences of the identifier from ACLs on the system. For example, the following
command removes the obsolete identifier 87SUMMER from the ACL of multiple files:$ SET SECURITY/ACL=(IDENTIFIER=87SUMMER)-_$/DELETE/LOG *.*;*
You receive errors for files that do not contain the ACE, but the ACE is deleted from all filesthat do contain it.
2. Remove the identifier 87SUMMER from the rights database with the AUTHORIZE commandREMOVE/IDENTIFIER. For example, use the following AUTHORIZE command to removethe identifier 87TERM3:UAF> REMOVE/IDENTIFIER 87TERM3{message}
Identifiers in hexadecimal format in an ACE indicate that a general identifier has been deletedfrom the rights database. Similarly, if you see an identifier displayed as a numeric UIC, theoriginal identifier was a UIC that has been removed. Delete ACEs with numeric UIC orhexadecimal identifiers.It is wise not to reuse UICs after an employee leaves. The new employee may gain some or allof the access rights of the previous employee through ACL entries that still reference the old UICin numeric format.To rename an identifier, use the AUTHORIZE command RENAME/IDENTIFIER in the followingformat:RENAME/IDENTIFIER old-identifier new-identifier
Renaming an identifier preserves the set of resources available through that identifier. ACLscontaining the renamed identifier automatically display the new identifier name.
180 Controlling Access to System Data and Resources
Customizing IdentifiersWhenever you add identifiers to the rights list or grant identifiers to users, you can stipulate thatthe identifier carry special characteristics called attributes. Although there are many possibleattributes, most sites commonly use the following ones:
Allows holders of the identifier to remove and to restore the identifier from theprocess rights list by using the DCL command SET RIGHTS_LIST.
Dynamic attribute
Allows holders of the identifier to charge disk space to the identifier. It is used forfile objects.
Resource attribute
Allows holders of the identifier to create and maintain protected subsystems byassigning the Subsystem ACE to the application images in the subsystem.
Subsystem attribute
Makes any access rights of the identifier null and void. This attribute is intendedas a modifier for a resource identifier or for purposes unrelated to access control.
No Access attribute
Sites with high security requirements are likely to use two other attributes, which discourageusers from scanning the rights database:
Prevents someone from getting a list of users who hold an identifier unless thatperson owns the identifier.
Holder Hidden attribute
Allows holders of an identifier to have it translated (either from binary to ASCII orvice versa), but prevents unauthorized users from translating the identifier.
Name Hidden attribute
Read access to RIGHTSLIST.DAT overrides the Holder Hidden and Name Hidden attributes.The rights list by default denies access to world users; it has a protection ofS:RWED,O;RWED,G:R,W:.The following sections describe each attribute and explain when you might want to add themto some of your site's identifiers.
Dynamic AttributeOnce you grant an identifier to a user, processes created by that user hold the identifier for thelife of the process. However, if you grant the identifier with the Dynamic attribute, the user whoholds the identifier can use the DCL command SET RIGHTS_LIST to add or remove the identifieror its attributes from the process rights list as needed.To allow users to modify an identifier, specify the Dynamic attribute when adding the identifierto the rights database by using AUTHORIZE, as shown in the following example:$SET DEFAULT SYS$SYSTEM$RUN AUTHORIZEUAF>ADD/IDENTIFIER MGMT101 /ATTRIBUTES=DYNAMIC
To allow specific holders of the identifier to modify the identifier, include the Dynamic attributewhen granting the identifier, as follows:UAF>GRANT/IDENTIFIER MGMT101/ATTRIBUTES=DYNAMIC SCHWARTZ
User Schwartz could then use the following command to remove the MGMT101 identifier fromthe process rights list:$SET RIGHTS_LIST/DISABLE MGMT101
Users who hold identifiers with the Dynamic and Resource attributes can also use the SETRIGHTS_LIST command to remove only the Resource attribute on the identifier.Because users might be able to circumvent intended security policy by removing their identifiers,be careful when granting users an identifier with the Dynamic attribute. If an identifier is usedin an ACL to deny access to users who hold that identifier with the Dynamic attribute, usersmay be able to gain access to the object through another ACL entry by removing the identifierfrom their process rights lists.
Populating the Rights Database 181
Holder Hidden AttributeSites with high security requirements can conceal the holders of certain identifiers, therebypreventing malicious users from determining which accounts are more interesting to target forbreak-ins.You place the attribute on an identifier the user holds by using the AUTHORIZE commandMODIFY/IDENTIFIER, for example:UAF>MODIFY/IDENTIFIER /ATTRIBUTES=HOLDER_HIDDEN SECRET_PROJECT
Now the prober cannot discover who is on the secret project.
Name Hidden AttributeSites with high security requirements can hide the names of identifiers. For example, sitesimplementing mandatory access controls can hide the names of identifiers associated with theirsecurity categories. This prevents people from seeing the names of identifiers unless theypersonally hold them. When an identifier holds the Name Hidden attribute, the operating systemrefuses to translate the identifier from its binary value to ASCII or from ASCII to the binary valueunless the requesting process holds the identifier.To assign the attribute to an identifier, use the AUTHORIZE command MODIFY/IDENTIFIER:UAF>MODIFY/IDENTIFIER SECRET_NEWS /ATTRIBUTES=NAME_HIDDEN
No Access AttributeThe No Access attribute allows a process to hold an identifier but not have the identifier consideredin determining access rights to the object.For example, a user with the Resource and No Access attributes can charge disk space to theidentifier but not have access to objects owned by the identifier. Or a system manager can managedata and perform tasks connected with the data but cannot read from or write to any of the files.You can allow file space to be owned by and charged to an identifier yet prevent the files frombeing accessed in any way. Use AUTHORIZE to specify the No Access attribute with the Resourceattribute when adding the identifier to the rights database, as shown in the following example:UAF>ADD/IDENTIFIER/ATTRIBUTES=(RESOURCE,NOACCESS)-_UAF>MGMT101
To limit the rights of users holding an identifier with the Resource attribute, grant the identifierwith the No Access attribute as well as the Resource attribute to all desired users:UAF>GRANT/IDENTIFIER/ATTRIBUTES=(RESOURCE,NOACCESS)-_UAF>MGMT101 SCHWARTZ
Resource AttributeConsumption of disk space is generally charged to the creator of each file by subtracting the diskspace from the file owner's disk quota. System managers and security administrators mightprefer to track the use of disk space according to logical groups of users (such as departmentsor projects) rather than individual users. General identifiers are used to specify these groups.Thus, when general identifiers own directories, disk space used by files created in the directoriesmay be charged to the identifier rather than the UIC of the file's creator.To allow file space to be owned by and charged to an identifier, use AUTHORIZE to specify theResource attribute when adding the identifier to the rights database, as shown in the followingexample:UAF>ADD/IDENTIFIER MGMT101 /ATTRIBUTES=RESOURCE
To allow specific holders of the identifier to charge disk space to the identifier, perform thefollowing steps:1. Grant the identifier with the Resource attribute to all desired users:
182 Controlling Access to System Data and Resources
UAF>GRANT/IDENTIFIER MGMT101/ATTRIBUTES=RESOURCE SCHWARTZ
2. Modify the directory to allow read and write access to the resource identifier:$SET SECURITY/ACL=(-_$(IDENTIFIER=MGMT101,ACCESS=READ+WRITE ) -_$(IDENTIFIER=MGMT101,OPTIONS=DEFAULT,ACCESS=READ+WRITE))-_$INVENTORY.DIR
3. Change the ownership of the parent directory so that any files in it are owned by the identifierby default:$SET SECURITY/OWNER=MGMT01 INVENTORY.DIR
Because resource identifier MGMT101 is going to own any file you create in directoryINVENTORY.DIR, you use ACEs to determine the type of file access you receive. Include aCreator ACE (CREATOR,ACCESS=READ+WRITE+EXECUTE+DELETE) to set the access grantedto the file's creator. Alternatively, you can let the system assign an ACE; its ACE grants controlaccess to the file's creator plus the access specified in the owner field of the protection code. Youcan set up the protection code by including a Default Protection ACE in the ACL forINVENTORY.DIR, for example, (DEFAULT_PROTECTION, ACCESS=O:RW). (See the“SettingDefaults for a Directory Owned by a Resource Identifier” (page 191) for further information.)Not everyone who holds the identifier will also hold the Resource attribute associated with thatidentifier. If you create a file in a directory owned by an identifier but you do not have theResource attribute for that identifier, the file will be owned by your UIC, and the required diskspace is subtracted from your disk quota.
Subsystem AttributeYou can authorize users to manage protected subsystems by granting them a subsystem identifierwith the Subsystem attribute. This empowers users to enable images to access the objects managedby the subsystem. (See “Using Protected Subsystems” (page 291) for a discussion of protectedsubsystems.)In the following example, user Schwartz is given the authority to create a subsystem with theidentifier MAIL_SUBSYSTEM. Schwartz is also given control access to the application image toset access controls.$SET DEFAULT SYS$SYSTEM$RUN AUTHORIZEUAF>ADD/IDENTIFIER MAIL_SUBSYSTEM /ATTRIBUTES=SUBSYSTEMUAF>GRANT/IDENTIFIER MAIL_SUBSYSTEM -_UAF>/ATTRIBUTES=SUBSYSTEM SCHWARTZUAF>Exit$SET SECURITY/ACL=(IDENTIFIER=MAIL_SUBSYSTEM,ACCESS=CONTROL)-_$MEMBER_LIST.EXE
Modifying a System or Process Rights ListAs a privileged security administrator, you can use the SET RIGHTS_LIST command to modifythe rights list of any process on the system or to modify identifiers in the system rights list.Adding an identifier to the system rights list effectively grants it to all users. You can also usethe SET RIGHTS_LIST command to add attributes to existing identifiers.A possible use of the system rights list is to enable site-specific environmental conditions. Forexample, a batch job scheduled to run at 8:00 a.m. could add the following identifier:$SET RIGHTS_LIST/SYSTEM/ENABLE DAY_SHIFT
Another batch job scheduled for 5:00 p.m. could remove the identifier DAY_SHIFT:$SET RIGHTS_LIST/SYSTEM/DISABLE DAY_SHIFT
The effect is to enable access to protected objects with the identifier DAY_SHIFT during the 8:00a.m. to 5:00 p.m. period.
Populating the Rights Database 183
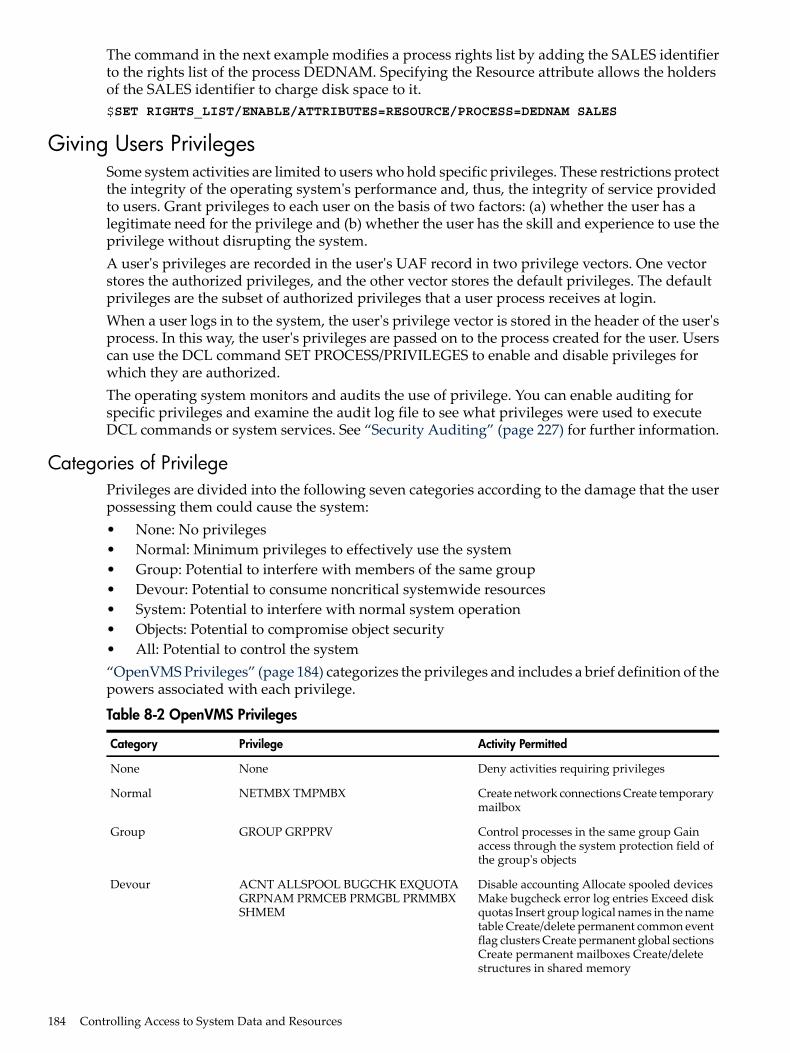
The command in the next example modifies a process rights list by adding the SALES identifierto the rights list of the process DEDNAM. Specifying the Resource attribute allows the holdersof the SALES identifier to charge disk space to it.$SET RIGHTS_LIST/ENABLE/ATTRIBUTES=RESOURCE/PROCESS=DEDNAM SALES
Giving Users PrivilegesSome system activities are limited to users who hold specific privileges. These restrictions protectthe integrity of the operating system's performance and, thus, the integrity of service providedto users. Grant privileges to each user on the basis of two factors: (a) whether the user has alegitimate need for the privilege and (b) whether the user has the skill and experience to use theprivilege without disrupting the system.A user's privileges are recorded in the user's UAF record in two privilege vectors. One vectorstores the authorized privileges, and the other vector stores the default privileges. The defaultprivileges are the subset of authorized privileges that a user process receives at login.When a user logs in to the system, the user's privilege vector is stored in the header of the user'sprocess. In this way, the user's privileges are passed on to the process created for the user. Userscan use the DCL command SET PROCESS/PRIVILEGES to enable and disable privileges forwhich they are authorized.The operating system monitors and audits the use of privilege. You can enable auditing forspecific privileges and examine the audit log file to see what privileges were used to executeDCL commands or system services. See “Security Auditing” (page 227) for further information.
Categories of PrivilegePrivileges are divided into the following seven categories according to the damage that the userpossessing them could cause the system:• None: No privileges• Normal: Minimum privileges to effectively use the system• Group: Potential to interfere with members of the same group• Devour: Potential to consume noncritical systemwide resources• System: Potential to interfere with normal system operation• Objects: Potential to compromise object security• All: Potential to control the system“OpenVMS Privileges” (page 184) categorizes the privileges and includes a brief definition of thepowers associated with each privilege.
Table 8-2 OpenVMS Privileges
Activity PermittedPrivilegeCategory
Deny activities requiring privilegesNoneNone
Create network connections Create temporarymailbox
NETMBX TMPMBXNormal
Control processes in the same group Gainaccess through the system protection field ofthe group's objects
GROUP GRPPRVGroup
Disable accounting Allocate spooled devicesMake bugcheck error log entries Exceed diskquotas Insert group logical names in the nametable Create/delete permanent common eventflag clusters Create permanent global sectionsCreate permanent mailboxes Create/deletestructures in shared memory
ACNT ALLSPOOL BUGCHK EXQUOTAGRPNAM PRMCEB PRMGBL PRMMBXSHMEM
Devour
184 Controlling Access to System Data and Resources
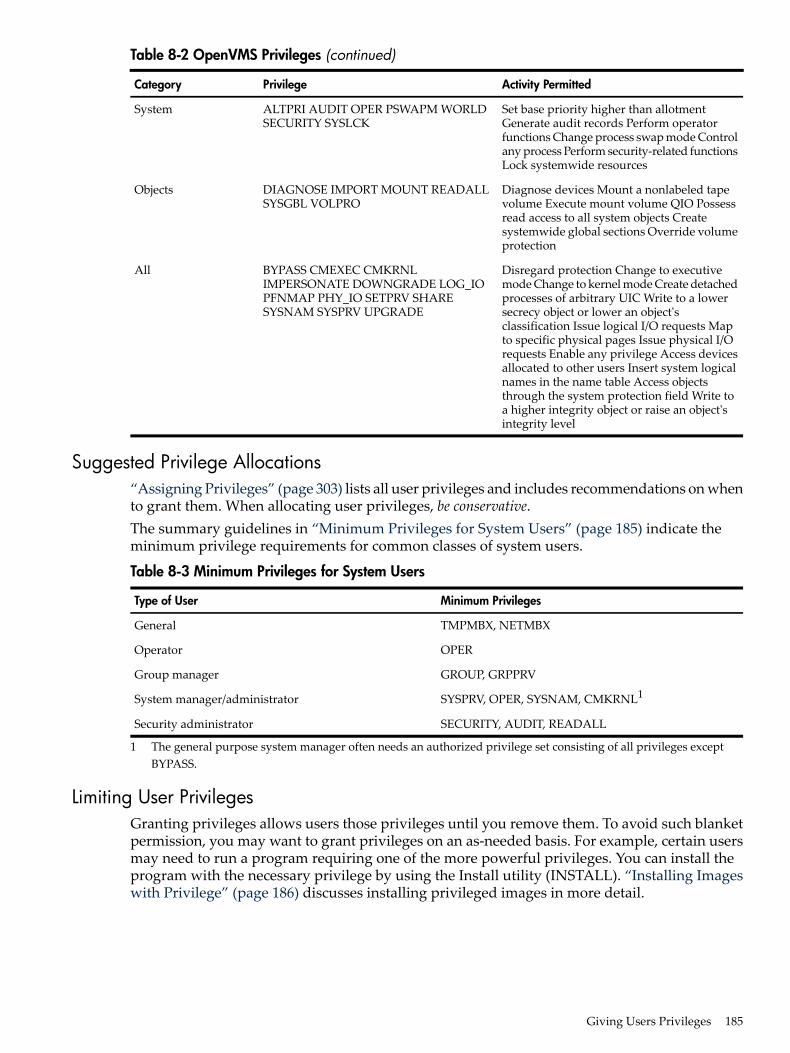
Table 8-2 OpenVMS Privileges (continued)
Activity PermittedPrivilegeCategory
Set base priority higher than allotmentGenerate audit records Perform operatorfunctions Change process swap mode Controlany process Perform security-related functionsLock systemwide resources
ALTPRI AUDIT OPER PSWAPM WORLDSECURITY SYSLCK
System
Diagnose devices Mount a nonlabeled tapevolume Execute mount volume QIO Possessread access to all system objects Createsystemwide global sections Override volumeprotection
DIAGNOSE IMPORT MOUNT READALLSYSGBL VOLPRO
Objects
Disregard protection Change to executivemode Change to kernel mode Create detachedprocesses of arbitrary UIC Write to a lowersecrecy object or lower an object'sclassification Issue logical I/O requests Mapto specific physical pages Issue physical I/Orequests Enable any privilege Access devicesallocated to other users Insert system logicalnames in the name table Access objectsthrough the system protection field Write toa higher integrity object or raise an object'sintegrity level
BYPASS CMEXEC CMKRNLIMPERSONATE DOWNGRADE LOG_IOPFNMAP PHY_IO SETPRV SHARESYSNAM SYSPRV UPGRADE
All
Suggested Privilege Allocations“Assigning Privileges” (page 303) lists all user privileges and includes recommendations on whento grant them. When allocating user privileges, be conservative.The summary guidelines in “Minimum Privileges for System Users” (page 185) indicate theminimum privilege requirements for common classes of system users.
Table 8-3 Minimum Privileges for System Users
Minimum PrivilegesType of User
TMPMBX, NETMBXGeneral
OPEROperator
GROUP, GRPPRVGroup manager
SYSPRV, OPER, SYSNAM, CMKRNL1System manager/administrator
SECURITY, AUDIT, READALLSecurity administrator
1 The general purpose system manager often needs an authorized privilege set consisting of all privileges exceptBYPASS.
Limiting User PrivilegesGranting privileges allows users those privileges until you remove them. To avoid such blanketpermission, you may want to grant privileges on an as-needed basis. For example, certain usersmay need to run a program requiring one of the more powerful privileges. You can install theprogram with the necessary privilege by using the Install utility (INSTALL). “Installing Imageswith Privilege” (page 186) discusses installing privileged images in more detail.
Giving Users Privileges 185
An alternative to granting blanket privileges is to set up emergency or specialized privilegedaccounts. Users would log in to these privileged accounts only to perform specific functions.You have two options with this technique:• Establish a limited group of users who know about the account and are informed how to
use it.• Create two accounts for the user, giving the privileges to one account but not to the other.
In this case, the user would have the same UIC and the same default directory in eachaccount. (This is the only case where HP recommends shared UICs, because there is stillonly one actual user.) If you decide to adopt this dual account practice, avoid obvious usernames that reveal which account is the privileged account.
With both options, you can place special restrictions on the privileged account, such as longpasswords, brief password lifetimes, restricted hours, and limited modes of operation (no dialup,network, remote, or batch logins). In addition, limited account durations would force frequentconsideration of privilege requirements.Yet another alternative is to use protected subsystems, which are described in “Using ProtectedSubsystems” (page 291), and thereby eliminate the need for any system privileges.
Installing Images with PrivilegeA user cannot execute an image that requires a privilege the user does not possess unless theimage is installed as a known image with the privilege in question. (See the HPOpenVMS SystemManagement Utilities Reference Manual for instructions on installing known images.) Executionof a known image with privileges grants those privileges to the user process executing the imagefor the duration of the image's execution. Thus, you should install images with amplified privileges(other than the normal HP-supplied configuration) only after ensuring that the privileges arerequired by the image's function and that the image operates safely. Also consider restrictingaccess to the image to a selected set of users.Images installed with privileges are activated with all amplified privileges enabled. For maximumsafety, images designed to run with amplified privilege should use the $SETPRV system serviceto disable all amplified privileges immediately on activation, and enable them only when theyare needed.Following is an example of installing an image with privilege. The System Dump Analyzer utility(SDA) requires CMKRNL privilege to analyze the running system.1. Install SDA.EXE with the CMKRNL privilege, as follows:
$INSTALL SDA.EXE /PRIVILEGED=CMKRNL
2. Place an ACL on SDA.EXE, and also set the UIC-based protection to deny all access to theworld category of users, as follows:$SET SECURITY/ACL=(IDENTIFIER=SDA,ACCESS=EXECUTE)-_$SYS$SYSTEM:SDA.EXE$SET SECURITY/PROTECTION=(WORLD) SYS$SYSTEM:SDA.EXE
3. Use the AUTHORIZE command to confirm that the users who hold the SDA identifier arethose intended to run the program. If necessary, make adjustments to this list of users.
NOTE: All images that you install with privilege must be linked with the /NOTRACEBACKqualifier to prevent online debugging and traceback.HP ensures that all system programs that are supplied with the operating system (such asthe SDA) are linked with the /NOTRACEBACK qualifier to prevent online debugging ortraceback.
Restricting Command OutputSome DCL commands behave differently depending on the privileges that the user holds.
186 Controlling Access to System Data and Resources
For example, unless a user holds the GROUP or WORLD privilege, the SHOW PROCESScommand limits the display of process information to the user's process. A user with GROUPprivilege can display other processes in the user's UIC group; a user with WORLD privilege candisplay any process on the system.
Setting Default Protection and OwnershipAfter designing user groups and identifiers, you need to address which protected objects yourusers need permission to access and which ones can be unrestricted. Become familiar with thedefault protection of new objects, shown in “Descriptions of Object Classes” (page 97)Chapter 5,and when necessary modify the defaults, as shown in the following sections.The procedure for setting up object protection and ownership defaults varies, depending onwhether the object is a file or another class of protected object.
Controlling File AccessAs “Profile Assignment” (page 105)"Profile Assignment" on page 98 explains, there are fourpossible areas where you can specify protection defaults that would affect the user. In order ofincreasing influence, they are as follows:• The system parameter RMS_FILEPROT sets the systemwide default for file protection. You
can change the value of RMS_FILEPROT with AUTOGEN. However, the effectiveness ofthis value may be overridden by any of the following defaults.
• The DCL command SET PROTECTION/DEFAULT can specify the file protection placed onfiles created or modified by the user during the terminal session. While the commandtypically appears in the user's login command procedure, the user can also enter thiscommand at any time during a session to override the value set by a previous SETPROTECTION/DEFAULT command. The SET PROTECTION/DEFAULT command negatesthe influence of the systemwide protection for this user.
• The default protection for the specific directory can be specified in an ACL applied to thedirectory. If a Default Protection ACE exists for the directory, all new files added to thedirectory, including subdirectories and their files, are subject to this protection code. Thiscode overrides the systemwide default and the user-specified default (if any).
• In special cases where the file being created is not owned by the user identification code(UIC) of the process creating the file (for example, when a directory is owned by a resourceidentifier), the default protection for the new file can be modified by a Creator ACE withinthe directory's ACL. See the“Profile Assignment” (page 105)"Profile Assignment" on page 98for a discussion of the Creator ACE.
Also consider the protection imposed on the volume through the DCL command SETVOLUME/PROTECTION. This protection code, if specified, prevents a user from accessing anypart of the volume, regardless of the protection code on the directory or the file. If no volumeprotection is specified with the SET VOLUME command, the volume is accessible to all users.The assignment of file ownership affects the outcome of any protection check. The operationaleffect of this combined protection structure is depicted in “Flowchart of File Creation” (page 188),“Flowchart of File Creation” (page 189), and “Flowchart of File Creation” (page 190).
Setting Default Protection and Ownership 187
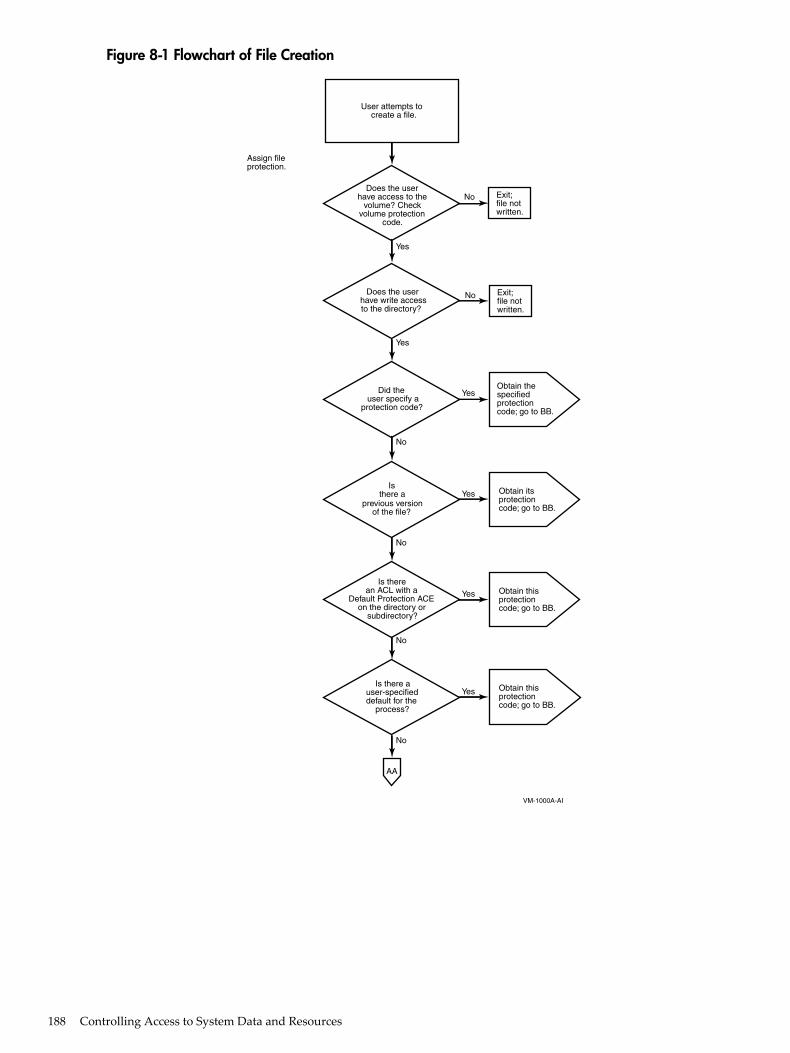
Figure 8-1 Flowchart of File Creation
VM-1000A-AI
Yes
No
create a file.User attempts to
protection.Assign file
code; go to BB.protectionObtain this
code; go to BB.protectionObtain its
Yes
No
No
No
code.volume protectionvolume? Check
have access to theDoes the user
No
written.file notExit;
to the directory?have write access
Does the user No
written.file notExit;
protection code?user specify a
Did the Yes
code; go to BB.protectionspecifiedObtain the
of the file?previous version
there aIs
Yes
subdirectory?on the directory or
Default Protection ACEan ACL with a
Is there
Yes
process?default for theuser-specified
Is there aYes
code; go to BB.protectionObtain this
AA
188 Controlling Access to System Data and Resources

Figure 8-2 Flowchart of File Creation
VM-1000B-AI
No
Yes
previously obtained.protection maskand apply theCreate the file
No
of the file?previous version
Is there a
to previous version?have ownership privileges
Does the creator Yes
of file; go to CC.previous versionSet owner from
to directory?have ownership privileges
the creatorDoes
Yes
file; go to CC.the directorySet owner from
creator's UIC.Set owner to
CC
No
parameter RMS_FILEPROT.default from the
Obtain the systemwide
BB
AA
Setting Default Protection and Ownership 189
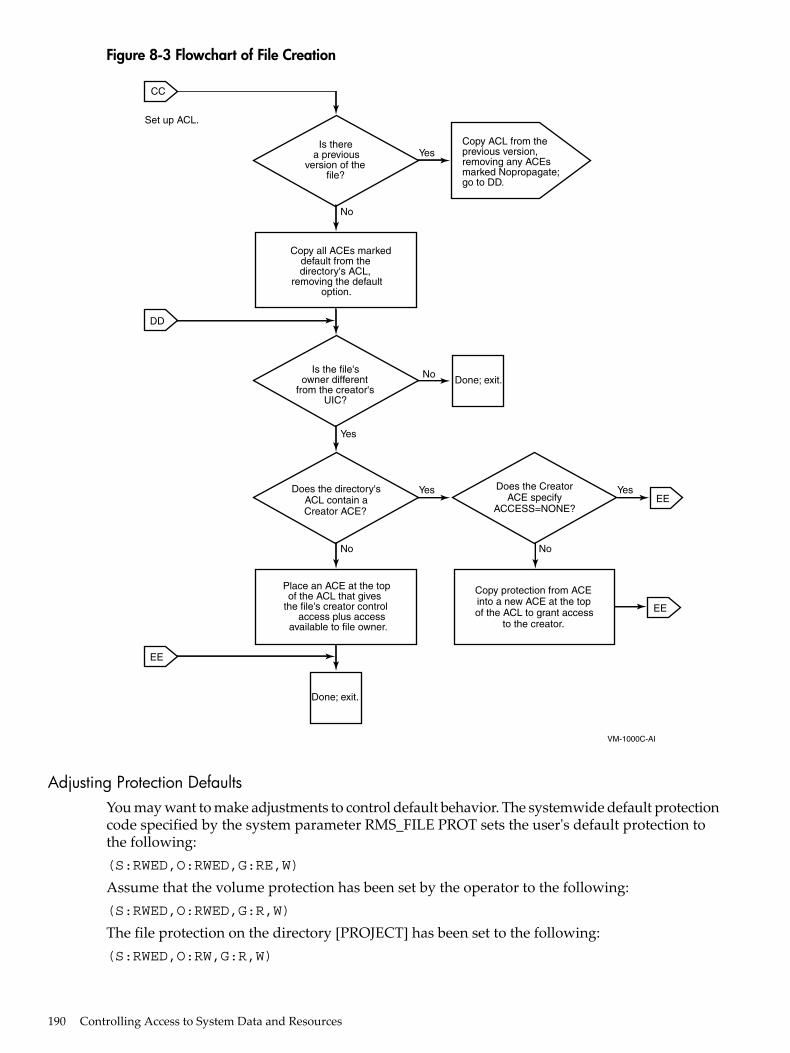
Figure 8-3 Flowchart of File Creation
VM-1000C-AI
DD
Yes
No
option.removing the default
directory's ACL,default from the
Copy all ACEs marked
file?version of the
a previousIs there
UIC?from the creator'sowner different
Is the file's
available to file owner.access plus access
the file's creator controlof the ACL that gives
Place an ACE at the top
Done; exit.
Done; exit.
No
Yes
Set up ACL.
CC
go to DD.marked Nopropagate;removing any ACEsprevious version,Copy ACL from the
Yes
No
EE
Does the directory'sACL contain aCreator ACE?
Yes
No
Does the CreatorACE specify
ACCESS=NONE?
Copy protection from ACEinto a new ACE at the topof the ACL to grant access
to the creator.
EE
EE
Adjusting Protection DefaultsYou may want to make adjustments to control default behavior. The systemwide default protectioncode specified by the system parameter RMS_FILE PROT sets the user's default protection tothe following:(S:RWED,O:RWED,G:RE,W)
Assume that the volume protection has been set by the operator to the following:(S:RWED,O:RWED,G:R,W)
The file protection on the directory [PROJECT] has been set to the following:(S:RWED,O:RW,G:R,W)
190 Controlling Access to System Data and Resources
If all the files created in the subdirectory [PROJECT.DIARY] demand more protection, you, orany user who has control access to the directory, could define a specific default protection codefor this specific directory with an ACL consisting of a Default Protection ACE, as follows:(DEFAULT_PROTECTION,S:RWED,O:RWED,G,W)
The following DCL command would provide the desired default protection:$ SET SECURITY/ACL=(DEFAULT_PROTECTION,S:RWED,O:RWED)-_$[PROJECT]DIARY.DIR
Once this ACE is placed on the directory file, files created or modified in the directory are subjectto the default protection code. Because these protection codes are only defaults, a user who hascontrol access to a file in the directory can include a specific protection code as a replacementfor the default value on the file by using the following DCL commands:• SET SECURITY/PROTECTION• COPY/PROTECTION• APPEND/PROTECTION• CREATE/PROTECTIONOnce the default protection code is replaced, the new code becomes the default and is propagatedto subsequent versions of the file.If you provide a special login command procedure for some of your users, you may want tosupplement the systemwide default process protection specified by the system parameterRMS_FILEPROT for this group of users. Add the SET PROTECTION/DEFAULT command tothe login command procedure to specify the default process protection, as follows:SET PROTECTION=(S:RWED,O:RWED,G,W)/DEFAULT
Files created in users' directories receive this default protection code unless explicitly overridden.
Setting Defaults for a Directory Owned by a Resource IdentifierTo allow for more flexible data management as well as more accurate accounting of disk space,you can set up a directory that is owned by a resource identifier and rely on ACLs to controlaccess to the directory and to files created within it.The ACL can limit file access to all project members holding the project identifier. To achievethis kind of access restriction, you add an Identifier ACE to define the group's access to files. Asecond Identifier ACE is added that duplicates the first but holds the Default attribute. It is theDefault attribute that ensures the ACE is copied to all files created within the directory. Sometimesa third ACE is necessary---a Default Protection ACE, depending on the default protection codefor the directory. A Default Protection ACE establishes the protection code for the directory'sfiles. (As “How the System Determines if a User Can Access a Protected Object” (page 79)"Howthe System Determines If a User Can Access a Protected Object" on page 74 explains, if an ACLdenies access to a file, it is still possible to gain access through a protection code.)In addition to limiting the group's access to files, an ACL can control the type of access usershave to files that they have created within the common directory. Because the file is created inthe resource identifier's directory, the resource identifier owns the file. For users to access filesthey have created, the operating system normally gives control access to the file's creator plusthe access specified in the owner field of the protection code. However, you can modify thisbehavior by adding a Creator ACE to the directory's ACL. A Creator ACE defines the type ofaccess users have to files they have created in the project's directory.
Setting Up the Resource Identifier
A security administrator used the following command sequence to set up the project identifierPROJECTX and grant it to members of the project. Notice that the identifier is added to the rightsdatabase with the resource identifier, and it is also granted to users with the resource identifier.The project identifier needs to carry the Resource attribute so it can own disk space.
Setting Default Protection and Ownership 191
$ RUN SYS$SYSTEM:AUTHORIZEUAF> ADD/IDENTIFIER PROJECTX /ATTRIBUTES=RESOURCEUAF> GRANT/IDENTIFIER PROJECTX user1 /ATTRIBUTES=RESOURCEUAF> GRANT/IDENTIFIER PROJECTX user2 /ATTRIBUTES=RESOURCE[vellip]
Setting Up the Directory of a Resource Identifier
When a project- or department-specific identifier is the owner of a directory, the space used byfiles created in the directory can be charged to the appropriate department or project rather thanto the individual who creates them. When users work on multiple projects, they can charge theirdisk space requirements to the related project rather than to their personal accounts.In setting up a directory for a resource identifier, you first create the disk quota authorizationfor the project identifier. For example, the following command invokes the System Managementutility (SYSMAN) and assigns the identifier PROJECTX 2000 blocks of disk quota with 200 blocksof overdraft:$ RUN SYS$SYSTEM:SYSMANSYSMAN> DISKQUOTA ADD PROJECTX /PERMQUOTA=2000 /OVERDRAFT=200
After setting up the disk quota, you create the project directory. For example, the following DCLcommand creates the project directory [PROJECTX] and establishes the identifier PROJECTX asits owner:$ CREATE/DIRECTORY [PROJECTX] /OWNER=[PROJECTX]
Setting Up the ACL
In setting up the directory [PROJECTX], you use an ACL to provide file access to project members.The following example shows how several ACEs are used to define access:$ SET SECURITY [PROJECTX] /ACL= (-_$ (DEFAULT_PROTECTION,S:RWED,O:RWED,G,W),- [1]_$ (IDENTIFIER=PROJECTX,ACCESS=READ+WRITE+EXECUTE),- [2] _$(IDENTIFIER=PROJECTX,OPTIONS=DEFAULT,ACCESS=READ+WRITE+EXECUTE),- _$ (CREATOR,ACCESS=READ+WRITE+EXECUTE+DELETE))
[3]
1. The Default Protection ACE sets up a protection code for files created within the directory.The ACE denies access to group and world users.
2. The first Identifier ACE gives holders of the PROJECTX identifier read, write, and executeaccess to the directory.
3. The second Identifier ACE guarantees that all files created in the directory will carry thefirst Identifier ACE.
4. The Creator ACE specifies that a user who creates a file in the PROJECTX directory willreceive read, write, execute, and delete access to it.
Thus, when project member Ross creates the file SEPTEMBER-REPORTS.TXT in the [PROJECTX]directory, the file receives the following security profile:$SHOW SECURITY/CLASS=FILE [PROJECTX]SEPTEMBER-REPORTS.TXT
SEPTEMBER-REPORTS.TXT object of class FILEOwner: [PROJECTX]Protection: (System: RWED, Owner: RWED, Group, World)Access Control List:(IDENTIFIER=CRANDALL,ACCESS=READ+WRITE+EXECUTE+DELETE)(IDENTIFIER=PROJECTX,ACCESS=READ+WRITE+EXECUTE)
Project members are not allowed to delete (or control) files created by others; however, the CreatorACE gives them delete access to files they have created.Without a Creator ACE, project members each have complete access to files they have createdin the directory. For example, Ross would receive the following access to files created in theproject directories:
192 Controlling Access to System Data and Resources
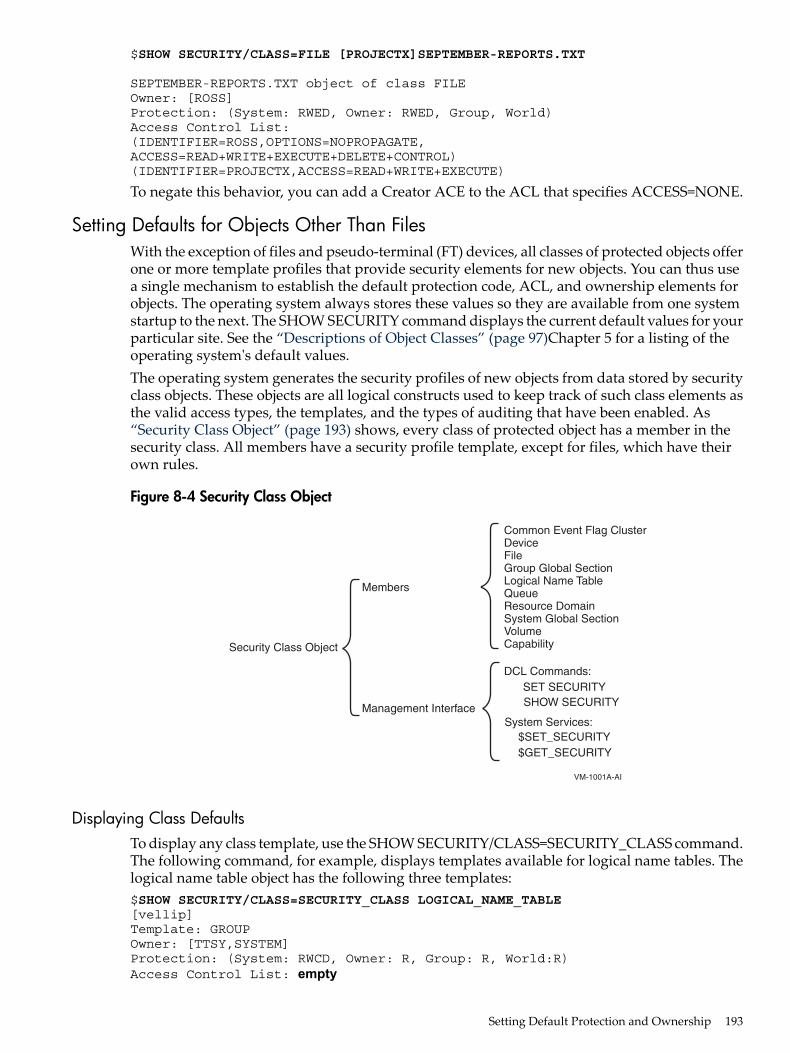
$SHOW SECURITY/CLASS=FILE [PROJECTX]SEPTEMBER-REPORTS.TXT
SEPTEMBER-REPORTS.TXT object of class FILEOwner: [ROSS]Protection: (System: RWED, Owner: RWED, Group, World)Access Control List:(IDENTIFIER=ROSS,OPTIONS=NOPROPAGATE,ACCESS=READ+WRITE+EXECUTE+DELETE+CONTROL)(IDENTIFIER=PROJECTX,ACCESS=READ+WRITE+EXECUTE)
To negate this behavior, you can add a Creator ACE to the ACL that specifies ACCESS=NONE.
Setting Defaults for Objects Other Than FilesWith the exception of files and pseudo-terminal (FT) devices, all classes of protected objects offerone or more template profiles that provide security elements for new objects. You can thus usea single mechanism to establish the default protection code, ACL, and ownership elements forobjects. The operating system always stores these values so they are available from one systemstartup to the next. The SHOW SECURITY command displays the current default values for yourparticular site. See the “Descriptions of Object Classes” (page 97)Chapter 5 for a listing of theoperating system's default values.The operating system generates the security profiles of new objects from data stored by securityclass objects. These objects are all logical constructs used to keep track of such class elements asthe valid access types, the templates, and the types of auditing that have been enabled. As“Security Class Object” (page 193) shows, every class of protected object has a member in thesecurity class. All members have a security profile template, except for files, which have theirown rules.
Figure 8-4 Security Class Object
VM-1001A-AI
Management Interface
Common Event Flag ClusterDeviceFileGroup Global SectionLogical Name TableQueueResource DomainSystem Global SectionVolumeCapability
Members
Security Class Object
DCL Commands: SET SECURITY SHOW SECURITY
System Services:$SET_SECURITY$GET_SECURITY
Displaying Class DefaultsTo display any class template, use the SHOW SECURITY/CLASS=SECURITY_CLASS command.The following command, for example, displays templates available for logical name tables. Thelogical name table object has the following three templates:$SHOW SECURITY/CLASS=SECURITY_CLASS LOGICAL_NAME_TABLE[vellip]Template: GROUPOwner: [TTSY,SYSTEM]Protection: (System: RWCD, Owner: R, Group: R, World:R)Access Control List: empty
Setting Default Protection and Ownership 193
Template: JOBOwner: [TTSY,SYSTEM]Protection: (System: RWCD, Owner: RWCD, Group, World)Access Control List: empty
Template: DEFAULTOwner: [TTSY,SYSTEM]Protection: (System: RW, Owner: RW, Group, World)
Access Control List: empty
All objects in the security class are protected in the same manner as other objects. For this reason,any SHOW SECURITY display of a security class object begins with the security profile for theobject itself. The following display shows a profile for the logical name table object in the securityclass. The object is owned by the system, and its protection code allows read access to any usercategory but allows write access only to system and owner categories.$SHOW SECURITY/CLASS=SECURITY_CLASS LOGICAL_NAME_TABLE
LOGICAL_NAME_TABLE object of class SECURITY_CLASSOwner: [SYSTEM]Protection: (System: RW, Owner: RW, Group: R, World: R)Access Control List: empty
Modifying Class TemplatesSecurity administrators and users with control access to a security class object can modify theelements of a given template with the following command:SET SECURITY/CLASS=SECURITY_CLASS/PROFILE=TEMPLATE=template-name
The following command modifies the MAILBOX template for the device class. It changes thetemplate values from a protection of S:RWPL,O:RWPL,G:RWPL,W:RWPL to a protection thatdisallows group and world access.$SET SECURITY/CLASS=SECURITY_CLASS/TEMPLATE=MAILBOX -_$/PROTECTION=(S:RWPL,ORWPL,G,W) DEVICE
The operating system applies this value to all new mailboxes. To change the protection for eachexisting mailbox, enter an explicit SET SECURITY command for each existing mailbox. Forexample:$SET SECURITY/CLASS=DEVICE -_$/PROTECTION=(S:RWPL,ORWPL,G,W) mailbox_name
The operating system saves the default object protections specified in security templates, sorebooting the system automatically ensures that all objects created after the reboot are createdwith the new default protections.
194 Controlling Access to System Data and Resources
NOTE: In OpenVMS Version 7.2-1 and earlier, all pseudo-terminal (FT) device protection codeswere set by the driver to (S:RWLP,O:RWLP,G,W). In OpenVMS Version 7.3 and later, only deviceFTA0 is set to this forced protection. This allows the system manager the option of modifyingthe FTA0 device protection later in the boot process. This new protection is inherited from FTA0by any new FT devices created thereafter (as well as other settings originating from the SECURITYclass DEVICE TERMINAL template profile, such as ACLs).A system manager can either modify FTA0 manually, or change the SYSTARTUP_VMS.COMcommand procedure. For example:$ SET SECURITY/CLASS=DEVICE -
_$ /PROTECTION=(S:RWLP,O:RWLP,G:RW,W:R) FTA0:
If the device protection for FTA0 is left unmodified, the behavior is unchanged from versions ofOpenVMS prior to Version 7.3. That behavior is that all terminals, except FT pseudo-terminaldevices, inherit their device protection and other security characteristics from the TERMINALtemplate profile. All FTA pseudo-terminal devices inherit their protection from FTA0, which bydefault is set to (S:RWLP,O:RWLP,G,W). Other settings, such as ACLs, are inherited from theTERMINAL template profile. This ensures compatibility with existing applications.
The DCL command SHOW SECURITY displays all available templates with the site values.“Descriptions of Object Classes” (page 97)Chapter 5 lists the default system values.
Added Protection for System Data and ResourcesThis section describes additional ways to restrict the data and resources available to users.
Precautions to Take When Installing New SoftwareWhen you install new software, you must address several security concerns. You want to ensurethat you are not admitting software that will in any way corrupt or undermine your usual securityprecautions. You must also consider whether to install the software with any privileges. Thissection discusses the security aspects of installing new software.
Potentially Harmful ProgramsNew software can contain programs that are potentially harmful to your system. These programs,called Trojan horse programs, are designed to do damage and frequently include features thatdo the following:• Pass privileges of the person running the program back to the author of the program• Allow unauthorized access to the system• Change protection of system files• Patch the system (add special software to the operating system)• Create jobs that scan for easily guessed passwordsTo protect your system from this type of intrusion, always buy software from reputable sources.When training new users, stress the importance of avoiding use of software from an unknownsource.Another risk to programs and directories is known as the virus. While Trojan horse softwaremust rely on the innocent user to unwittingly accept the damaging software by using it, the virusrequires no user cooperation. It is a program that takes advantage of faulty file protection, workingits way through your system and modifying command procedures and executable programs.By modifying command procedures, it can propagate by making use of user access rights andprivileges.Viruses are less of a problem in the OpenVMS environment than in an environment of personalcomputers. The OpenVMS protection features and the environment's larger scale and diversity
Added Protection for System Data and Resources 195
make virus attacks more difficult. However, no environment that permits the sharing of softwareand data is immune from virus attacks.The user's login command procedure is a prime target for this type of security breach. Logincommand procedures generally contain easily modified DCL commands and are executedregularly.ACLs are also targets. File protection designed with users sharing access privileges allows thistype of program to run through many users' programs, acquiring new privileges along the way.Well-designed file protection is critical for protection from this type of security breach. Makesure that likely targets cannot be modified by users. For example, set up file protection so thatyour login command procedure permits at most read access to all other users. Also make surethe directory containing the login command procedure permits write access only to users in thesystem and owner categories.Because most damage occurs when programs like these reach a target account with privileges,users with privileges should be especially cautious with the protection of their root directory,executable files, and command procedures. To deter Trojan horse attacks, users should neverexecute a command procedure or run an image in a privileged account without inspecting thecommand procedure or the image's sources. Application images should be rebuilt from sourceto ensure that the binary image reflects the accompanying source.
Installing Programs with PrivilegeSome software requires privilege to run. You can extend the privilege to all users you expect willneed to run the software, or you can install the program with the required privileges. When youinstall privileged software, you allow users to execute it whether or not they personally possessthe required privilege. In effect, you extend the privilege to the process while it runs the software.While this offers some advantages, it also introduces several security-related dangers. “GivingUsers Privileges” (page 184) describes these options in greater detail.
Protecting System FilesEven on the most open system, you will want protection for the system software. Normally, HPdelivers system programs and databases with adequate UIC protection. However, if for anyreason you are dissatisfied with the default protection, you can change it with the techniquesoutlined in “Protecting Data” (page 69)Chapter 4, provided you have the necessary SYSPRVprivilege. You might also add an ACL to any file that you decide needs additional protection.You can obtain a full listing of system files from the system manager's account during anOpenVMS installation with the following DCL command:$ DIRECTORY/SECURITY/OUTPUT=SYSTEM_FILES.LIS SYS$SYSROOT:[*...]
HP recommends you generate such a listing and store it for reference. Regularly compare thesevalues with current system file protection to ensure that no tampering has occurred. (The DCLcommands DIRECTORY/SECURITY/OUTPUT and DIFFERENCES facilitate such checks.)On Alpha systems, you can obtain a listing of system files and their protections from the read-onlycompact disc distribution media. Your OpenVMS software should have this set of protectioncodes following a correct installation.On VAX systems, see the “Protection for OpenVMS System Files” (page 319) for a listing of systemfiles and their protections. Your OpenVMS software should have this set of protection codesfollowing a correct installation.“DCL Commands Used to Protect Files” (page 197) provides a summary of DCL commands youuse to set up and display file protection; these commands are described in theHPOpenVMSDCLDictionary.
196 Controlling Access to System Data and Resources

Table 8-4 DCL Commands Used to Protect Files
FunctionCommand
Displays the ACL for the fileDIRECTORY/ACL
Displays the file owner's UICDIRECTORY/OWNER
Displays the file's protection codeDIRECTORY/PROTECTION
Combines and displays file information produced byDIRECTORY/ACL, DIRECTORY/OWNER, andDIRECTORY/PROTECTION
DIRECTORY/SECURITY
Invokes the access control list editor (ACL editor)EDIT/ACL
Establishes the default protection to be applied to all filessubsequently created
SET PROTECTION/DEFAULT
Modifies the security profile of any object: the owner,protection code, and ACL
SET SECURITY
Displays the ownership, UIC protection code, and ACLof a protected object
SHOW SECURITY
The OpenVMS installation procedure does not initially install MAIL.EXE with any privileges(because MAIL.EXE does not require privileges to perform its functions). Prior versions of theOpenVMS operating system did include mechanisms that allowed MAIL.EXE to check, ignore,grant, or override certain privileges that a system manager might assign when reinstallingMAIL.EXE. Because these regulatory mechanisms sometimes created unexpected or undesirableconditions, they have been removed.
CAUTION: If you reinstall MAIL.EXE with certain privileges, you must carefully considerpossible ramifications, including the potential for security breaches. For example, becauseMAIL.EXE confers its privileges on any user who invokes the Mail utility, that user will inheritthose privileges if the user creates a subprocess from within Mail by specifying the SPAWNcommand.
As indicated, HP provides default protection for its system programs. However, if you have aspecial requirement, you might examine the potential of ACLs for your needs. For example, youmight use ACLs to restrict the use of system programs such as compilers. (Any number ofconsiderations might prompt this action, ranging from performance to licensing issues.)You might also ask if there are cases where you do not want some or all of your users to be ableto initialize media. If there are, you can put an ACL to good use on the system programSYS$SYSTEM:INIT.EXE. Ensure that you grant no access to the world category in the UIC-basedprotection code. Then create an ACL for the file that grants access to specific users.Similarly, if a department in your company has paid for a license to a software product, you maywant to make that software available to them but not to others. Ensure that the world categoryreceives no access through the standard UIC-based protection code, and create an entry in theACL for that file that allows access through the department's identifier.You may also find that ACL protection is relevant to protect your applications databases, limitingthe access to certain users or to protected subsystems.
Added Protection for System Data and Resources 197

Restricting DCL Command UsageThere are several ways that you can affect the use of DCL commands by your users. Amongthem are the following:• Impose ACLs on the system program files in the directories SYS$SYSROOT:[SYSEXE] and
SYS$SYSROOT:[SYSLIB].• Set the AUTHORIZE flag DISIMAGE to prevent use of the MCR or the RUN command.
This prevents users from executing system or user-written images or from executing imagesdefined as foreign commands.Because the DISIMAGE flag is enforced by the DCL command language interpreter (CLI),you must ensure that the account for which the DISIMAGE flag is set has access to the DCLCLI only. Use the DISIMAGE flag in conjunction with the AUTHORIZE flag DEFCLI orwithin a restricted account. (Setting the RESTRICTED flag for an account implicitly sets theDEFCLI flag.)
• Remove or modify DCL command definitions, and rebuild the DCL tables. (TheHPOpenVMSSystemManagement Utilities ReferenceManual describes how to create command definitions.)Use the /CLITABLES qualifier in the user's UAF record to specify the modified tables. Alsospecify /FLAGS=DEFCLI to ensure that the user can log in only with the specified commandlanguage interpreter (CLI) and tables. Protect the original DCL tables from unauthorizedaccess by imposing ACLs on the system program files in the directoriesSYS$SYSROOT:[SYSEXE] and SYS$SYSROOT:[SYSLIB]. In particular, protectSYS$LIBRARY:DCLTABLES.EXE and SYS$SYSTEM:CDU.EXE.
Protecting DisksDisk scavenging is the process of reading magnetic imprints of data after deletion of the fileheader following a purge or delete operation. (When users delete files from the system, only thefile header is deleted.) Until the data is overwritten, it is a potential target for disk scavenging.Sites with medium or high security needs should be concerned about this procedure.After establishing overall security features, restrict access to disks containing valuable informationby using UIC-based volume protection. Because disk scavenging is frequently performed byauthorized users, consider implementing erasure patterns and high-water marking, as describedin the following sections.
Erasing TechniquesThere are several ways to implement erasing of disks.• The inclusion of the /ERASE qualifier with the DELETE or the PURGE command causes the
system to write an erasure pattern of zeros over the entire file location when you delete orpurge that file. You can encourage users to use this qualifier voluntarily or make inclusionautomatic by including the following command definitions in the system login commandprocedure (usually SYS$MANAGER:SYLOGIN.COM):DEL*ETE :== "DELETE/ERASE"PUR*GE :== "PURGE/ERASE"
However, any user can bypass these definitions by adding the /NOERASE qualifier to theDELETE or the PURGE command.
• To guarantee erase-on-delete, turn on the feature for the entire volume by using the DCLcommand SET VOLUME/ERASE_ON_DELETE. When files are deleted, this commandoverwrites all files on the volume with the erasure pattern of zeros.
• To completely erase the volume and enable erase-on-delete for the volume at volumeinitialization, use the DCL command INITIALIZE/ERASE.By default, when erase-on-delete is enabled, the operating system writes a default datasecurity erase (DSE) pattern of zeros, applied during a single write operation over the area.If you feel that the default pattern of zeros or the single rather than multiple number of
198 Controlling Access to System Data and Resources
erasures does not suit your requirements, you can use the $ERAPAT (Get Security ErasePattern) system service to write a customized erasure pattern. See the description of $ERAPATin the HP OpenVMS System Services Reference Manual for more information.
For sites with high-level security requirements, a random pattern is preferable to a fixed pattern.The technology is already available that can detect and use faint residual magnetic impressions.Thus, if you conclude there is sufficient danger that a disk might be removed and read usingsome of this specialized analysis equipment, you may need to rewrite the erasure pattern severaltimes. You can learn how to customize the data security erase pattern to fit your needs by studyingthe information provided in the file SYS$EXAMPLES:DOD_ERAPAT.MAR.Employ erasing patterns only on disks where the security needs are the greatest. Erasures aretime-consuming and affect system performance.
Prevention Through High-Water MarkingHigh-water marking refers to a technique that tracks the furthest extent to which each file hasbeen written and prohibits user attempts at reading data beyond that point.The operating system implements true high-water marking for all sequential, exclusively accessedfiles, such as the set of files output from various text editors, compilers, and linkers, that is, mostfiles a process writes. The high-water mark is updated in the file header whenever the logicalend-of-file mark is updated (usually when the file is closed).For shared files (both indexed and sequential), the operating system uses the principle oferase-on-allocate to achieve a result similar to true high-water marking. When a file is about tobe created or extended, the system determines how much disk space (the extent of the file) isrequired and applies the security erasure pattern of zeros to the areas (extents) it allocates forwriting. The file is then written into the area just erased for it. Thus, if any user gains access tothe file (including its full extent) and attempts to read the area beyond where the file has beenwritten, only the data security erase pattern is readable.By default, the operating system turns on high-water marking for all volumes. High-watermarking is a deterrent to disk scavenging attempts. However, it does require additional I/O,which affects system performance.You can turn off high-water marking and erase-on-allocate on a volume-by-volume basis byspecifying the DCL command SET VOLUME/NOHIGHWATER_MARKING.
Summary of Prevention TechniquesAs security administrator, you can apply the following controls to discourage disk scavengers:• Provide tight physical security, particularly on those disks with the most valuable
information.• Provide tight volume protection through UIC-based protection.• Encourage the use of the /ERASE qualifier when key files are purged or deleted through
user participation or volume enforcement.• Permit default high-water marking on your most valuable disks.
Protecting Backup MediaYou can guard against data loss or corruption by creating copies of your files, directories, anddisks. In case of a problem, you can restore the backup copy and continue your work. Securemedia storage and controlled access to media are essential parts of the process. It is best to storebackup media off site.
Backing Up DisksHaving an effective backup schedule is critical to protect your data. By performing regularlyscheduled backup operations, you prevent the loss of accidentally deleted or damaged files.
Added Protection for System Data and Resources 199
See the HP OpenVMS System Management Utilities Reference Manual for information aboutperforming backups and setting up backup schedules. Be aware that the Backup utility (BACKUP)does not implement security policy; you must direct it explicitly. It runs with the security profileof the operator, which can often be privileged.
Protecting a Backup Save SetLimiting access to backup save sets is an important part of system security. The file system treatsa backup save set as a single file, whether it is stored on disk or on magnetic tape. Therefore,anyone with access to a save set can read any file in the save set. BACKUP does not checkprotection on individual files.To maintain system security, it is crucial that you protect save sets adequately. Assign restrictiveprotection to save sets on disk and to magnetic tape volumes by using the output save-setqualifiers /BY_OWNER and /PROTECTION. Sufficient protection can prevent nonprivilegedusers from mounting a save-set volume or from reading files from a save set. You should alsotake physical security precautions with save sets stored off line by keeping backup media inlocked cabinets.When you write a save set to a Files--11 disk or a sequential disk and do not specify the/PROTECTION qualifier, BACKUP applies the process default protection to the save set. If youspecify /PROTECTION, any protection categories that you do not specify default to your defaultprocess protection.Protection information is written to the volume header record of a magnetic tape and applies toall save sets stored on the tape. Therefore, the output save-set qualifiers /BY_OWNER and/PROTECTION are effective on magnetic tape save sets only if you specify the output save-setqualifier /REWIND. This qualifier allows the tape to rewind to its beginning, to write the protectiondata to the volume header record, and to initialize the tape. If you specify /PROTECTION, anyprotection categories that you do not specify default to your default process protection. If youdo not specify /REWIND with the /PROTECTION and /BY_OWNER qualifiers, the magnetictape retains its existing protection. However, specifying /REWIND alone results in a magnetictape without any protection.The following example illustrates how a directory is backed up to tape:$ BACKUP_FROM: [PAYROLL]_TO:MFA2:KNOX.BCK/LABEL=BANK01 -_$/REWIND/BY_OWNER_UIC=[030,003] -_$/TAPE_EXPIRATION=15-JAN-2009 -_$/PROTECTION=(S:RWE,O:RWED,G:RE,W)
1. The contents of the directory [PAYROLL] is copied to file KNOX.BCK on the magnetic tapedrive MFA2. The output save-set qualifier /LABEL provides the label BANK01 for the tape.
2. The output save-set qualifier /BY_OWNER assigns an owner UIC of [030,003] to the saveset.
3. The output save-set qualifier /TAPE_EXPIRATION assigns an expiration date of January15, 2009 to the tape.
4. The output save-set qualifier /PROTECTION assigns the owner of the volume read, write,execute, and delete access. System users are assigned read, write, and execute access; groupusers are assigned read and execute access; world users are assigned no access.
Retrieving Files from Backup Save SetsAnyone who has access to a save set can read any file in the save set. Never give a copy of yourbackup media to a user; a malicious user could restore the files from the tape or disk andcompromise the security of the system.
200 Controlling Access to System Data and Resources
When a nonprivileged user wants to restore a particular file, do not lend the volume containingthe save set. You could give away access to all the files on the volume. The safest way to restorea particular file is to restore the file selectively, as shown in the following example:$ BACKUP MTA0:JULY.BCK/SELECT=[JONES.TEXTPROC]LASTMONTH.DAT -_$ [*...]/BY_OWNER=ORIGINAL
The selected file is restored with its original directory, ownership, and protection. In this way,the file system determines if the user is permitted access to the file.
Protecting TerminalsThe next sections describe the controls available for restricting the use of terminals.
Restricting Terminal UseThrough the device object class template TERMINAL, the operating system sets up terminals tobe accessible to the SYSTEM account only. When a user logs in, the operating system transfersownership from a system UIC to the UIC of the current process.You can limit logins on specific terminals in the following ways:• Assign a system password.• Set the terminal to /NOTYPE_AHEAD, making it impossible to log in.The application of system passwords limits the use of those terminals to users who know thesystem password.
Restricting Application Terminals and Miscellaneous DevicesTo make terminals accessible to certain users as application terminals, you may want to changeany or all of the device's security characteristics. You can include the DCL command SETSECURITY/CLASS=DEVICE for specific terminals (with appropriate protection codes) in thecommand procedure SYS$MANAGER:SYSTARTUP_VMS.COM. This DCL command can limitaccess to any device that is not file structured. You might also place an ACL on the device tolimit user access.
Configuring Terminal Lines for ModemsWhen configuring terminal lines for modems, never set the /COMMSYNC qualifier to the DCLcommand SET TERMINAL (or the TT$M_COMMSYNC characteristic for the TTDRIVER interface)on a line with a modem hookup that is intended for interactive use.The qualifier disables the modem terminal characteristic that disconnects a user process fromthe terminal line in case of a modem phone line failure. With the /COMMSYNCH qualifierenabled, the next call on the terminal line could be attached to the previous user's process. The/COMMSYNC qualifier is intended to allow connection of asynchronous printers and otherdevices to terminal ports by using modem signals as flow control.
Added Protection for System Data and Resources 201

202
9 Using EncryptionThis chapter describes the following tasks:• Defining keys• Encrypting files• Authenticating files• Deleting key definitions• Decrypting files• Encrypting save sets
Defining KeysTo encrypt or decrypt any file, a key has to be created first.To define a key, enter the ENCRYPT/CREATE_KEY command:ENCRYPT /CREATE key-name key-value [ qualifiers ]
where
is the name of the key.key-name
is the value you assign to the key.key-value
are options that control the format of the key value or where the key is stored.qualifiers
For AES keys, the /AES qualifier must be added:$ ENCRYPT /CREATE_KEY keyname "This is my secret key" /AES
This generates an AES key with a key length of 21 characters. You can specify a key of any lengthas long as it meets the key-length minimum requirement and does not exceed Encrypt’s maximumnumber of characters (approximately 240). For more information on the /AES qualifier, see theHP OpenVMS DCL Dictionary.In order to specify the key algorithm, use the /KEY_ALGORITHM qualifier. The default keyalgorithm is DESCBC for DES keys and AESCBC128 when the /AES qualifier is used. For moreinformation, see “/KEY_ALGORITHM Qualifier” (page 213).
Specifying the Key NameTo specify key-name on the ENCRYPT /CREATE_KEY command line, specify a character stringusing the following rules:• Valid length: 1 to 243 characters.• Valid: alphanumeric characters, dollar signs, and underscores.• Case sensitive: no.To help you remember the name, use one that has meaning to you.
NOTE: Key names beginning with ENCRYPT$ are reserved for HP.
Specifying the Key ValueTo specify key-value on the ENCRYPT /CREATE_KEY command line, use either a text string ora hexadecimal constant, using the following rules:
Defining Keys 203

ASCII text string (default):• Length: 8 to 240 characters.• The string is not case sensitive.• If you use any non-alphanumeric characters, for example, space characters, enclose them in
quotation marks.Example: This command defines a key named HAMLET with character string value (And youyourself shall keep the key of it):
$ ENCRYPT /CREATE_KEY HAMLET_ Key value: "And you yourself shall keep the key of it"
Hexadecimal constant:• Use the /HEXADECIMAL qualifier.• Valid characters: 0 to 9, A to F.• Valid minimum length: 15 characters.• Do not enclose the value in quotation marks.Example: The following command defines a key named ARCANE with hexadecimal value2F4A98F46BBC11D:$ ENCRYPT /CREATE_KEY /HEX ARCANE 2F4A98F46BBC11D
In addition, when you specify key-value, do not use weak keys. These are key values with apattern of repeated characters or groups of characters. Using a pattern results in an encryptedform that might be easy for unauthorized users to decrypt. For example, the hexadecimal constant0101010101010101 and the text string 'abcabcabc' are weak keys.Using weak keys might produce the following consequences:• Security of encrypted data may be at risk.• Encryption may be the same as decryption.Encryption with one weak key followed by encryption with another weak key may result in theoriginal plaintext.HP supplies a table of known weak keys. The software checks keys you define against this tableand displays an error message when you supply a weak key.
Verifying Key CreationTo verify the successful creation of a key, use the /LOG qualifier. For example, this commandreports that the key HAMLET is defined:$ ENCRYPT /CREATE_KEY /LOG HAMLET _ Key value: "And you yourself shall keep the key of it" %ENCRYPT-S-KEYDEF, key defined for key name = HAMLET
The following example verifies an AES key:$ ENCRYPT/CREATE MY_KEY "This is a sample ASCII key value" /AES/LOG%ENCRYPT-S-KEYDEF, key defined for key name = MY_KEY
The key is flagged as an AES key to distinguish it from a DES key.
Specifying Key Storage TablesWhen you define a key, it is stored in encrypted form in a key storage table. The key value isstored under the key name. When you encrypt files, the process takes this stored informationand does the following:
204 Using Encryption
• It compresses the key value taken from the key storage table into a key consisting of 8 bytesof binary digits.
• It ensures the odd parity of each byte by modifying one of two things for each byte:— Sign bit, as needed (default)— Low bit (bit 0) (if you specify the /HEXADECIMAL qualifier)
• For text string key values, it converts letters to uppercase, reduces multiple consecutivespaces to one space, removes some punctuation characters, and compresses the key string.As a result, you do not have to remember the exact syntax of the key value. For example, ifyou define a key value with two spaces between each word, you do not have to rememberthis spacing to specify the key again.
Key storage tables determine which users can access keys. The following key storage tablescontrol user access:• Process key storage table (default) --- accessible only to the process that defined the keys
within the table.If you are defining a key that is intended for use by other processes, specify the appropriatequalifier (/JOB, /GROUP, or /SYSTEM) so that the intended users of the key can access it.
• Job key storage table — accessible only to processes within the same job tree as the processthat defined the keys within the table.
• Group key storage table — accessible to users in the same UIC group as the process thatdefined the keys in the table.
• System storage table — accessible to all system users.To enter keys into the key storage tables, use the following ENCRYPT /CREATE_KEY qualifiers:• /PROCESS (default)• /JOB• /GROUP (requires GRPNAM or SYSPRV privilege)• /SYSTEM (requires SYSPRV privilege)
Defines a key that anyone working on the system can use to encrypt his or her files. Becausethe key is stored in encrypted form, they cannot see the value of the key. The key is availablefor use until the system is rebooted.For example, the following command defines a key named SYSMASTER and places it inthe system key storage table.$ ENCRYPT /CREATE_KEY /SYSTEM SYSMASTER_$ Key Value: "The human heart has hidden treasures, in secret kept,in silence sealed"
Maintaining KeysWhen you encrypt a file, the key you use is like a password to that file. It is important to keep itsecret. In addition, ensure that you remember the key value. You need both the key and the valueto decrypt the file.A key stored in the process key storage table lasts for the life span of the process that definedthe keys in the table. Like other process-specific structures, the process key storage table disappearswhen you log out.Key values that are meaningful to you are the most memorable, but avoid easily guessed choicessuch as your nickname or the make of your car. Never post a key name or value in your officeor store it online. Like operating system passwords, increasing the length of a key value lessensthe possibility of discovery.The DES algorithm requires that a key value has a minimum length of eight non-null characters.To improve the security of the key value, specify more than eight characters.
Defining Keys 205
For the AES algorithm, the minimum required key sizes are as follows:• 128-bit mode = 16-byte key• 192-bit mode = 24-byte key• 256-bit mode = 32-byte key
Encrypting FilesAfter you define a key with the ENCRYPT /CREATE_KEY command, use this key to encryptfiles. Enter the ENCRYPT command. In addition to the key, specify a plaintext file. The syntaxof the ENCRYPT command is as follows:ENCRYPT file-spec key-name [ qualifiers ]
where
is the plaintext input file specification.file-spec
is the name of the key.key-name
are options that control the encryption process or the selection of files you wantto encrypt.
qualifiers
The following example shows how to define the key and to encrypt a testfile.txt file withthe defined key using AES and DES algorithms:$ ENCRYPT/CREATE_KEY/AES MY_AES_KEY16 "My AES Key length>16"$ ENCRYPT testfile.txt MY_AES_KEY16 /DATA_ALGORITHM=AESCBC128 /KEY_ALGORITHM=AESCBC128$!$ ENCRYPT/CREATE_KEY/AES MY_AES_KEY24 "TEST My AES Key length>24"$ ENCRYPT testfile.txt MY_AES_KEY24 /DATA_ALGORITHM=AESCBC192 /KEY_ALGORITHM=AESCBC192$!$ ENCRYPT/CREATE_KEY/AES MY_AES_KEY32 "TEST TEST TEST My AES Key length>32"$ ENCRYPT testfile.txt MY_AES_KEY32 /DATA_ALGORITHM=AESCBC256 /KEY_ALGORITHM=AESCBC256$!$ ENCRYPT/CREATE_KEY MY_DES_KEY "This is My DES Key"$ ENCRYPT testfile.txt MY_DES_KEY
If an AES key is required, the /DATA_ALGORITHM and /KEY_ALGORITHM have to be specifiedwith an AES algorithm.By default, encryption uses the DESCBC data algorithm, if the /DATA_ALGORITHM qualifieris not specified.By default, encryption uses the DESCBC key algorithm, if the /KEY_ALGORITHM qualifier isnot specified.
Input File SpecificationFor the plaintext file specified on the ENCRYPT command line, use a file that resides on diskand that is not a directory file.To specify multiple input files, use wildcard characters in the file specification. To control fileselection, specify the appropriate ENCRYPT command qualifiers. Do not use wildcard charactersto specify directory files or files containing bad blocks.
Output File SpecificationThe result of the encryption operation is a ciphertext file. One ciphertext file is created for eachinput file that is encrypted.By default, the ENCRYPT command writes each ciphertext file to a separate output file with thesame name except that it has a version number one higher than that of the current input file.To specify an alternate output file specification, use the /OUTPUT qualifier. Specify only the filespecification parts that you want to change from the defaults. For example, the following commandencrypts all the files in the current directory that match the wildcard file specification *.COM.
206 Using Encryption
The /OUTPUT qualifier specifies that any output files created have a file type of .ENC.FRANCISSCOTT is the key used to encrypt the files.$ ENCRYPT *.COM /OUTPUT=.ENC FRANCISSCOTT
Do not specify a file that already exists. For example, you cannot name the output fileNEWS.DAT;2 if NEWS.DAT;2 already exists. However, specifying NEWS.DAT as both the inputand output files is valid.
Displaying Processing InformationBy default, information about the encryption operation is not displayed. To display informationabout file encryption operations on SYS$COMMAND, use the /SHOW qualifier. The /SHOWqualifier has the format:/SHOW=keyword
or/SHOW=keyword-list
Specify one or more of the following keywords:• FILES• STATISTICS
FILES KeywordThe FILES keyword displays the file specifications of the input and output files. For example,/SHOW=FILES in the following command specifies that each input and output file specificationbe displayed as it is encrypted.$ ENCRYPT /SHOW=FILES *.COM FRANCISSCOTT%ENCRYPT-S-ENCRYPTED, DISK2:[FLYNN]MOVE.COM.2 encrypted to DISK2:[FLYNN]MOVE.COM;3 (8 blocks)...
STATISTICS KeywordUse the STATISTICS keyword to display encryption stream statistics after the completion of eachfile operation. The statistics displayed are:• Bytes processed• Internal records processed• CPU time consumed within the encryption algorithmThe following command specifies that encryption stream statistics be displayed onSYS$COMMAND.$ ENCRYPT /SHOW=STATISTICS *.COM FRANCISSCOTT%ENCRYPT-S-STATISTICS, encryption stream statistics: Total Records: 65 Total Bytes: 4083 Total Time: 00:00:01.63...
Specifying Files to EncryptTo specify multiple input files, use the ENCRYPT command with wildcard characters in theinput file specification.The following ENCRYPT command qualifiers can help you select files:• /BACKUP• /BEFORE• /BY_OWNER
Encrypting Files 207
• /CONFIRM• /EXCLUDE• /EXPIRED• /MODIFIED• /SINCE
/BACKUP QualifierThe /BACKUP qualifier selects files for encryption according to the date of their most recentbackup. This qualifier is meaningful only when used with either the /BEFORE or the /SINCEqualifier. The /BACKUP qualifier has the format:/BACKUP /BEFORE[=time]
or/BACKUP /SINCE[=time]
wheretime is an OpenVMS time.If you do not specify a time, TODAY is used. TODAY is the current day, month, and year at00:00:00.The following command selects for encryption all files in the current directory matching thewildcard file specification of *.COM that had backup copies made before 00:00:00 15-APR-2009.$ ENCRYPT /BACKUP /BEFORE=15-APR-2009 *.COM FRANCISSCOTT
Do not use the /BACKUP qualifier with either the /EXPIRED or the /MODIFIED qualifier.
/BEFORE QualifierThe /BEFORE qualifier selects files for encryption that have a creation time before the timespecified with the qualifier. The /BEFORE qualifier has the format:/BEFORE[=time]
wheretime is an OpenVMS time.If you do not specify a time, TODAY is used. TODAY is the current day, month, and year at00:00:00.The following command selects for encryption all files in the current directory matching thewildcard file specification of *.COM that were created before 00:00:00 15-APR-2009.$ ENCRYPT /BEFORE=15-APR-2009 *.COM FRANCISSCOTT
/BY_OWNER QualifierThe /BY_OWNER qualifier allows you to select files for encryption that have a particular ownerUser Identification Code (UIC). If no UIC is specified with the qualifier, the UIC of the currentprocess is used. The /BY_OWNER qualifier has the format:/BY_OWNER=uic
whereuic is the UIC of the owner of the file.The following command selects for encryption all files in the current directory owned by theuser whose UIC is [FLYNN] that match the wildcard file specification of *.COM.$ ENCRYPT /BY_OWNER=[FLYNN] *.COM FRANCISSCOTT
208 Using Encryption
/CONFIRM QualifierBy default, all input files specified on the command line are processed without confirming thatthose files are selected for encryption. Use the /CONFIRM qualifier if you want a prompt withthe name of each file selected for encryption. Your response determines whether or not a particularfile is encrypted, as follows:
MeaningResponse
Encrypt the file.YES
Do not encrypt the file. This is the default.NO or RETURN
Do not encrypt the file or any subsequent files.QUIT or CTRL/Z
Encrypt the file and all subsequent files.ALL
The following command selects for encryption all files in the current directory matching thewildcard file specification of *.COM. Because the /CONFIRM qualifier is specified, the user isprompted on a file-by-file basis to confirm that each file is to be encrypted. Because the promptis answered in the affirmative for the file MOVE.COM;3, the output file MOVE.COM;4 is created.$ ENCRYPT /CONFIRM *.COM FRANCISSCOTT Encrypt DISK2:[FLYNN]MOVE.COM;3 ? [N] YES
/EXCLUDE QualifierUse the /EXCLUDE qualifier to exclude one or more files from an encryption operation. If a filematches the file specification provided with the /EXCLUDE qualifier, the file will not be encrypted.The /EXCLUDE qualifier has the format:/EXCLUDE=(file-spec[,...])
wherefile-spec is the name of the file to remain unencrypted.Wildcard characters are allowed in the file specification. There is no default for the filespecification. Because directory files are never encrypted, you need not specify them with the/EXCLUDE qualifier. However, if you do specify /EXCLUDE=*.DIR, you will not get the warningmessage %ENCRYPT-W-FILNODIR, file encryption of directories is notsupported, filename.dir.The following command selects for encryption all files in the current directory that match thewildcard file specification of *.COM, except LOGIN.COM, which is specified with /EXCLUDE.$ ENCRYPT /EXCLUDE=LOGIN.COM *.COM FRANCISSCOTT
/EXPIRED QualifierThe /EXPIRED qualifier selects files for encryption according to the dates on which they expire.(The expiration date is set with the SET FILE /EXPIRATION_DATE command.) This qualifier ismeaningful only when used with either the /BEFORE or the /SINCE qualifier. The /EXPIREDqualifier has the format:/EXPIRED /BEFORE[=time]
or/EXPIRED /SINCE[=time]
wheretime is an OpenVMS time.If you do not specify a time, TODAY is used. TODAY is the current day, month, and year at00:00:00.
Encrypting Files 209

The following command selects for encryption all files in the current directory matching thewildcard file specification of *.COM that expire after 00:00:00 15-APR-2009.$ ENCRYPT /EXPIRED /SINCE=15-APR-2009 *.COM FRANCISSCOTT
Do not use the /EXPIRED qualifier with either the /BACKUP or the /MODIFIED qualifier.
/MODIFIED QualifierThe /MODIFIED qualifier selects files for encryption according to the dates on which they werelast modified. This qualifier is meaningful only when used with either the /BEFORE or the /SINCEqualifier. The /MODIFIED qualifier has the format:/MODIFIED /BEFORE[=time]
or/MODIFIED /SINCE[=time]
wheretime is an OpenVMS time.If you do not specify a time, TODAY is used. TODAY is the current day, month, and year at00:00:00.The following command selects for encryption all files in the current directory matching thewildcard file specification of *.COM that were modified after 00:00:00 15-APR-2009.$ ENCRYPT /MODIFIED /SINCE=15-APR-2009 *.COM FRANCISSCOTT
Do not use the /MODIFIED qualifier with either the /BACKUP or the /EXPIRED qualifier.
/SINCE QualifierThe /SINCE qualifier selects for encryption files that have a creation date after the time specifiedwith the qualifier. The /SINCE qualifier has the format:/SINCE[=time]
wheretime is an OpenVMS time.If you do not specify a time, TODAY is used. TODAY is the current day, month, and year at00:00:00.The following command selects for encryption all files in the current directory matching thewildcard file specification of *.COM that were created after 00:00:00 15-APR-2009.$ ENCRYPT /SINCE=15-APR-2009 *.COM FRANCISSCOTT
Deleting Encrypted FilesBy default, when the ENCRYPT software encrypts an input file and writes the resulting outputfile, the input file is retained. However, do not encrypt a file and then leave the plaintext fileonline if you are concerned about the security of the file.You can use the DCL DELETE command with the /ERASE qualifier to remove the contents ofthe plaintext file from the disk, or you can use the following qualifiers with the ENCRYPTcommand:• /DELETE• /ERASE
/DELETE QualifierThe /DELETE qualifier deletes the input file after the encryption operation completes and theoutput file is written and closed. If you have multiple versions of the input file, they are not alldeleted. /DELETE acts on only the version of the input file that you encrypted.
210 Using Encryption
To delete the unencrypted input file from the disk, use the /DELETE qualifier. The followingcommand specifies that the SAVEDMAIL.MAI file be encrypted using the TWENTYFIVECENTSencryption key. Because the /DELETE qualifier is specified, the input file is deleted after theencrypted output file is written.$ ENCRYPT /DELETE SAVEDMAIL.MAI TWENTYFIVECENTS
NOTE: There may be scenarios when the ENCRYPT/COMPRESS command executes withouterror, but decryption fails. This can be catastrophic if the /DELETE qualifier is used, deleting theoriginal BACKUP save-set file during the encrypt operation. Therefore, it is recommended notto use /DELETE qualifier along with the /COMPRESS qualifier.
/ERASE QualifierWhen you delete or purge a file, the file's header record is destroyed so that the file can no longerbe accessed by normal means. The information in the file, however, stays on the disk until it isoverwritten. Disk scavenging is a technique used to obtain such file data from a disk. To thwartdisk scavenging, use the /ERASE qualifier with the /DELETE qualifier. When you specify /ERASE,the OpenVMS operating system overwrites the location in which the input file was stored withthe data security pattern. The data no longer exists.The following command specifies that after SAVEDMAIL.MAI is encrypted, the input file iserased with the data security pattern before being deleted.$ ENCRYPT /DELETE /ERASE SAVEDMAIL.MAI TWENTYFIVECENTS
Encryption AlgorithmsFiles are encrypted using a randomly generated data key. One benefit of this procedure is thattwo files identical in plaintext form and encrypted with the same command are not identical intheir encrypted form.The Encryption for OpenVMS implementation of DES uses the following modes of the DESalgorithm:• Cipher Block Chaining (DESCBC)• Electronic Code Book (DESECB)• Cipher Feedback (DESCFB)These modes perform the encryption operation differently, as follows:• DESCBC (default)
1. Input is taken in 8-byte blocks.2. DESCBC performs an exclusive OR operation (XOR) on each block. (An XOR is a
bit-by-bit modulo-2 addition without carrying. For example, the result of performingan XOR on the binary numbers 001 and 111 is 110.)The first XOR operation is performed on the first block of input and the initializationvector. (An initialization vector is used to start the chaining of data because there is nociphertext to affect the encryption of the first block of data.)
3. The resulting block is encrypted.4. The next XOR operation is performed on the resulting block of ciphertext and the next
block of plaintext, and so on.5. If fewer than 8 bytes are left for the last iteration, the block is padded with bytes of
arbitrary value.6. Each block of 8 bytes is encrypted under the same key value.7. The DESCBC algorithm is used to encrypt the data key and the initialization vector.
The encrypted key and initialization vector are stored with the encrypted file. TheDESCBC algorithm is also used by default to encrypt the file data.
• DESECB
Encrypting Files 211
1. Input is taken in 8-byte blocks.2. If the input consists of less than 8 bytes, it is padded with nulls.3. Each block is processed under the DES algorithm with the same key.4. The result is an 8-byte block of output that is independent of all other blocks of output.
• DESCFB1. Input is taken as a series of 1-byte quantities.2. They are shifted to the left and concatenated with the results of previous iterations.3. DESCFB uses an initialization vector in the first iteration.4. Only the exact number of bytes specified in the input are used.5. The output byte count equals the input byte count (no padding).
AES algorithm uses the following modes:• Cipher block chaining:
— AESCBC128 (default)— AESCBC192— AESCBC256
• Electronic code book:— AESECB128— AESECB192— AESECB256
• Cipher feedback:— AESCFB128— AESCFB192— AESCFB256
• Output feedback:— AESOFB128— AESOFB192— AESOFB256
For details about the advantages of each mode, see one of the numerous texts available on thissubject.
Encryption Algorithm QualifiersYou can choose an encryption algorithm for encrypting either the data key or the file data.Figure 9-1 illustrates the relationship of encryption keys and algorithms. The figure shows that:• To encrypt the key — use the /KEY_ALGORITHM or /KEY_ALGORITHM=AESmmmkkk
qualifier to specify an algorithm other than the default DESCBC or AESCBC128 algorithms.• To encrypt the file — use the /DATA_ALGORITHM or /DATA_ALGORITHM=AESmmmkkk
qualifier to specify an algorithm other than the default DESCBC or AESCBC128 algorithms.Here, mmm indicates the mode CBC, ECB, CFB, or OFB; and kkk indicates 128, 192, or 256 bits.
212 Using Encryption
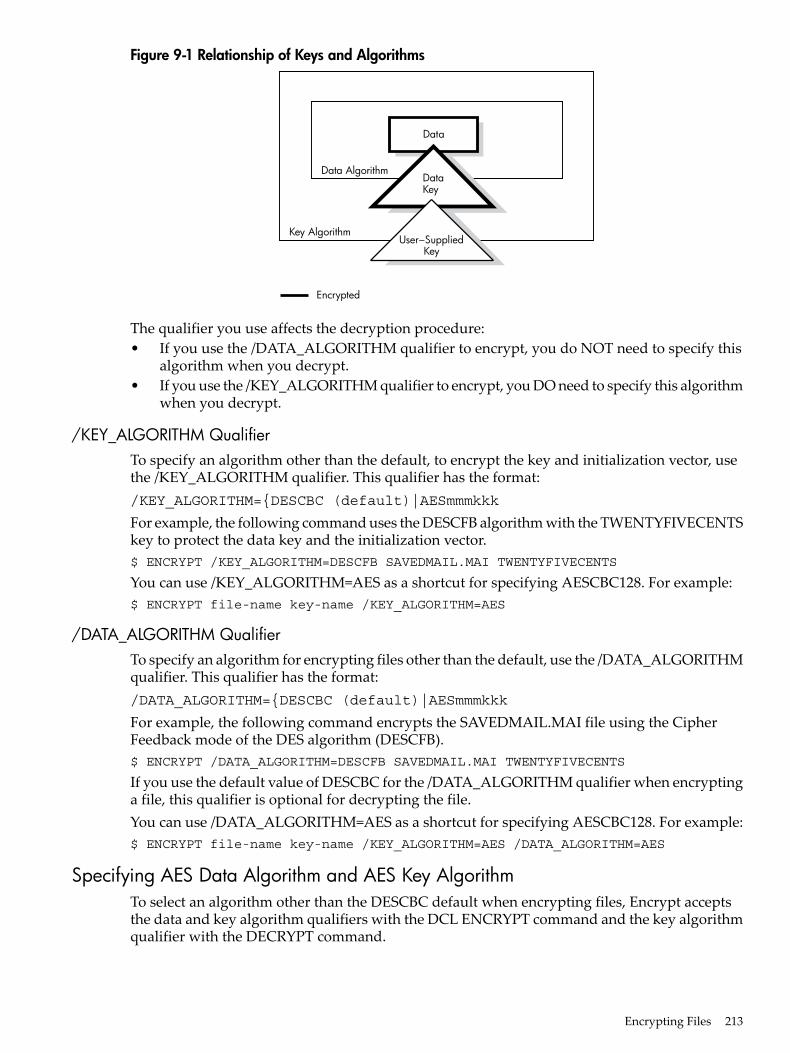
Figure 9-1 Relationship of Keys and Algorithms
Data Algorithm
Key Algorithm
Data
Encrypted
DataKey
KeyUser−Supplied
The qualifier you use affects the decryption procedure:• If you use the /DATA_ALGORITHM qualifier to encrypt, you do NOT need to specify this
algorithm when you decrypt.• If you use the /KEY_ALGORITHM qualifier to encrypt, you DO need to specify this algorithm
when you decrypt.
/KEY_ALGORITHM QualifierTo specify an algorithm other than the default, to encrypt the key and initialization vector, usethe /KEY_ALGORITHM qualifier. This qualifier has the format:/KEY_ALGORITHM={DESCBC (default)|AESmmmkkk
For example, the following command uses the DESCFB algorithm with the TWENTYFIVECENTSkey to protect the data key and the initialization vector.$ ENCRYPT /KEY_ALGORITHM=DESCFB SAVEDMAIL.MAI TWENTYFIVECENTS
You can use /KEY_ALGORITHM=AES as a shortcut for specifying AESCBC128. For example:$ ENCRYPT file-name key-name /KEY_ALGORITHM=AES
/DATA_ALGORITHM QualifierTo specify an algorithm for encrypting files other than the default, use the /DATA_ALGORITHMqualifier. This qualifier has the format:/DATA_ALGORITHM={DESCBC (default)|AESmmmkkk
For example, the following command encrypts the SAVEDMAIL.MAI file using the CipherFeedback mode of the DES algorithm (DESCFB).$ ENCRYPT /DATA_ALGORITHM=DESCFB SAVEDMAIL.MAI TWENTYFIVECENTS
If you use the default value of DESCBC for the /DATA_ALGORITHM qualifier when encryptinga file, this qualifier is optional for decrypting the file.You can use /DATA_ALGORITHM=AES as a shortcut for specifying AESCBC128. For example:$ ENCRYPT file-name key-name /KEY_ALGORITHM=AES /DATA_ALGORITHM=AES
Specifying AES Data Algorithm and AES Key AlgorithmTo select an algorithm other than the DESCBC default when encrypting files, Encrypt acceptsthe data and key algorithm qualifiers with the DCL ENCRYPT command and the key algorithmqualifier with the DECRYPT command.
Encrypting Files 213
When encrypting files with AES, specify both /DATA_ ALGORITHM=AESmmmkkk and/KEY_ALGORITHM=AESmmmkkk:• mmm defines the AES mode: ECB, CBC, CFB, or OFB• kkk defines the key size: 128, 192, or 256 bits (for 16-, 24- or 32-byte keys)The key must match the key algorithm. An AES key must be used with an AES key algorithm,and a DES key must be used with the DES key algorithm. The data algorithm defaults to DES ifthe /DATA_ ALGORITHM=AESmmmkkk is not specified for the ENCRYPT command. Whenusing DES keys and KEY_ALGORITHM=DES, the data is protected with a strong algorithm, butthe key is not.
NOTE: The capability of mixing AES with DES keys and data algorithms is disabled and anyattempt to mix the algorithms results in an ENCRYPT$_AESMIXDES error condition.
When decrypting files with AES, specify only the /KEY_ ALGORITHM=AESmmmkkk qualifier.The reason for this is that the key algorithm is used to decrypt the random-key record thatcontains the random key, which is then used to decrypt the data records of the file. Specifyingthe data algorithm is not necessary and it gives an unrecognized-qualifier error message.
NOTE: For an encrypt operation, if the /DATA_ALGORITHM=AES is specified without the/KEY_ALGORITHM, an error occurs. The default algorithm DESCBC is used to encrypt therandom key record that contains the random key and file information. However, the user keymust match the KEY algorithm; if not, an error occurs. For example, consider that the key-nameis an AES key name and value. When the key is fetched from the logical name table and then isdecrypted with the DES master key, the key decrypts garbage, and the operation fails with thefollowing error message:%STR-F-FATINTERR, fatal internal error
File CompressionTo reduce the size of the plaintext file before encrypting it, use the /COMPRESS qualifier. Datacompression can save media space when physically transporting encrypted files and can savetime when electronically transporting encrypted files across a network.Compression efficiency depends on the structure of the data in your file. Evaluate a performancetradeoff when deciding whether or not to use this qualifier. Decryption is generally faster on acompressed file, but encryption takes longer. You might choose to use the /COMPRESS qualifierwhen the following conditions apply:• The file will be decrypted many times.• The file is at least 200 disk blocks in size.The following command compresses the SAVEDMAIL.MAI file before encrypting it.
NOTE: If you use the /COMPRESS qualifier when encrypting a file, you need not specify thisqualifier when decrypting the file. If necessary, the file is automatically decompressed when itis decrypted.
$ ENCRYPT /COMPRESS SAVEDMAIL.MAI TWENTYFIVECENTS
214 Using Encryption
NOTE: Do not use /DELETE qualifier with /COMPRESS because there may be scenarios whenthe ENCRYPT/COMPRESS command executes without error, but decryption fails. This can becatastrophic if the /DELETE qualifier is used, deleting the original BACKUP save-set file duringthe encrypt operation.
Displaying the Version NumberTo identify the version of Encryption software running on your system, use the /VERSIONqualifier. For example:$ ENCRYPT /VERSION Copyright (c) Compaq 2001, Digital Equipment Corporation. 1978, 1997. Allrights reserved.Compaq Encryption V1.6)
Authenticating FilesAuthentication is the checking of files to determine whether or not they have been modified.The ENCRYPT/AUTHENTICATE command detects any modification of either plaintext orciphertext files. The software calculates a Message Authentication Code (MAC) based on thecontents of the files and associates it with one or more files. An additional MAC is created thatis based on security settings unless you specifically request that the security MAC not be created.At a later time, when you want to check file integrity, the software recalculates the MACs andthen compares the current and stored MACs. Before you use the ENCRYPT /AUTHENTICATEcommand, complete the process that associates MACs with files.
NOTE: AES (Advanced Encryption Standard) is not supported with /AUTHENTICATE qualifier.
The ENCRYPT /AUTHENTICATE command has the following syntax:ENCRYPT /AUTHENTICATE file-spec key-name [ qualifiers ]
where
is the name of the file you want to check.file-spec
is the name of the key. Specify a 1-to-243-character string.key-name
are options that control the encryption process or the selection of files you wantto encrypt.
qualifiers
A summary report on the authentication operation is displayed on SYS$OUTPUT.The following qualifiers are valid with ENCRYPT /AUTHENTICATE:• /[NO]DATABASE[=file-spec]
Specifies a file in which to store binary MAC values created by using the file contents asinput
• /LOGDisplays the results of the authentication operation for each file
• /MULTIPLE_FILESIndicates that the (file-spec) parameter represents a list of file names to be checked
• /[NO]OUTPUT[=file-spec]Specifies a file in which to store readable MAC values
Authenticating Files 215
• /[NO]SECURITY[=file-spec]Generates a MAC using the file's security settings: owner, protection settings, and optionalACL, and specifies the file in which to store the binary MAC values.
• /[NO]UPDATEAssociates new MAC values with one or more files
In addition, you can use all the file selection qualifiers available to the ENCRYPT command:/BACKUP, /BEFORE, /BY_OWNER, /CONFIRM, /EXCLUDE, /EXPIRED, /MODIFIED, and/SINCE.The following sections describe how to use the /DATABASE, /LOG, /SECURITY, /OUTPUT, and/UPDATE qualifiers with ENCRYPT /AUTHENTICATE.
Associating MACs with FilesTo associate MACs with a file or to replace former MAC values with new MAC values, use the/UPDATE qualifier. The /UPDATE qualifer updates two different MACs created from file contentsand from security settings. The following command creates MAC values for all files in the currentdirectory.$ ENCRYPT /AUTHENTICATE *.* whitehen /UPDATE
%ENCRYPT-I-SUMMARY1, Summary: Files successfully authenticated: 0%ENCRYPT-I-SUMMARY2, Files failing authentication: 0 %ENCRYPT-I-SUMMARY3, Files not in database: 3%ENCRYPT-I-SECSUMM1, Summary: Security settings authenticated: 0%ENCRYPT-I-SECSUMM2, Security settings failing authentication: 0%ENCRYPT-I-SECSUMM3, Security settings not in database: 3
Two sets of summary information are displayed: the first set applies to the MAC values generatedfrom the file contents, the second set applies to the MAC values generated from the securitysettings. Because this is the first time MACs are associated with these files, none are reported asauthenticated (summary message 1 for each set) or as having failed authentication (summarymessage 2 for each set). The last message in each set reports that no previous MACs wereassociated with these files.The MACs are stored in a binary database. Therefore, you cannot specify /NODATABASE or/NOSECURITY with /UPDATE.
Checking FilesWith no other qualifiers, the ENCRYPT /AUTHENTICATE command compares previous MACswith current MACs. In addition, the software reports on files with no currently associated MACs.The following command reports on the status of all the files in the current directory.$ ENCRYPT /AUTHENTICATE *.* whitehen
%ENCRYPT-I-NOUPDATE, database will not be updated with new authentication codes%ENCRYPT-I-SUMMARY1, Summary: Files successfully authenticated: 3%ENCRYPT-I-SUMMARY2, Files failing authentication: 0%ENCRYPT-I-SUMMARY3, Files not in database: 0%ENCYRPT-I-SECSUMM1, Summary: Security settings authenticated: 3%ENCYRPT-I-SECSUMM2, Security settings failing authenticated: 0%ENCYRPT-I-SECSUMM3, Security settings not in database:0
Specifying a File for MACs Generated from File ContentsA database file stores MAC values in binary format. By default, binary MAC values created fromthe file contents are stored in SYS$LOGIN:ENCRYPT$MAC.DAT. You can use the /DATABASEqualifier to store the MAC values in an alternate file.The following command selects an alternate file in which to store the MAC values.$ ENCRYPT /AUTHENTICATE *.com whitehen /DATABASE=[MACS]MACCHECK.DAT /UPDATE
216 Using Encryption
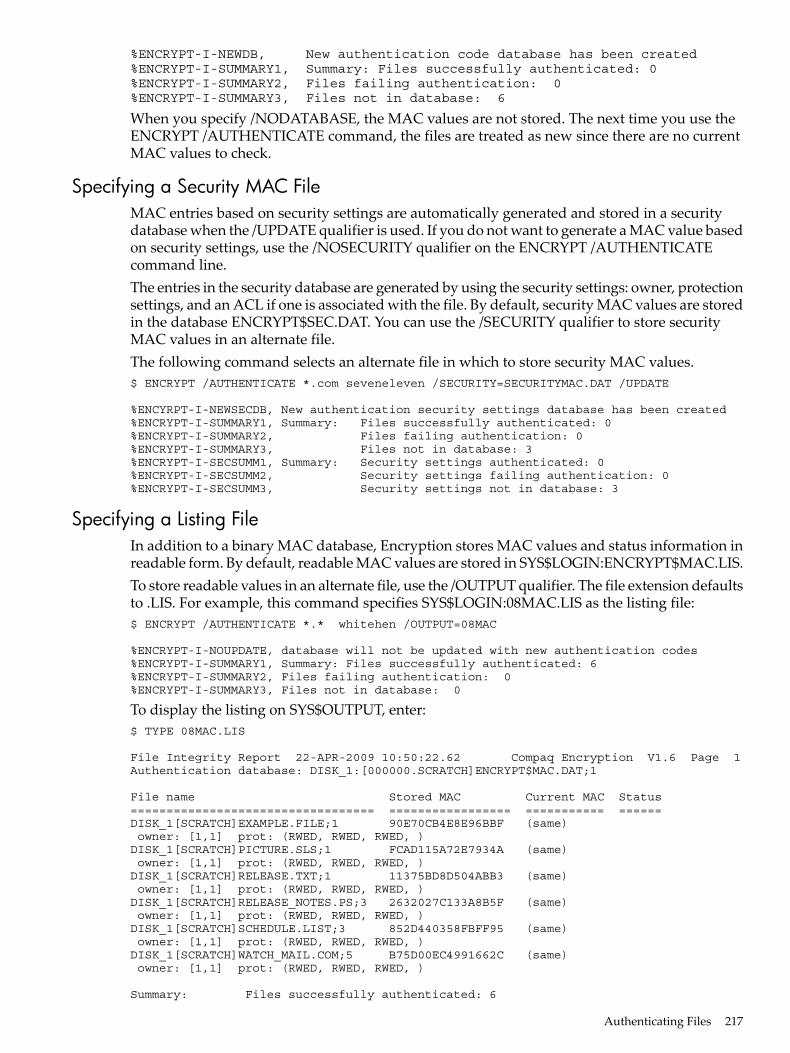
%ENCRYPT-I-NEWDB, New authentication code database has been created%ENCRYPT-I-SUMMARY1, Summary: Files successfully authenticated: 0%ENCRYPT-I-SUMMARY2, Files failing authentication: 0 %ENCRYPT-I-SUMMARY3, Files not in database: 6
When you specify /NODATABASE, the MAC values are not stored. The next time you use theENCRYPT /AUTHENTICATE command, the files are treated as new since there are no currentMAC values to check.
Specifying a Security MAC FileMAC entries based on security settings are automatically generated and stored in a securitydatabase when the /UPDATE qualifier is used. If you do not want to generate a MAC value basedon security settings, use the /NOSECURITY qualifier on the ENCRYPT /AUTHENTICATEcommand line.The entries in the security database are generated by using the security settings: owner, protectionsettings, and an ACL if one is associated with the file. By default, security MAC values are storedin the database ENCRYPT$SEC.DAT. You can use the /SECURITY qualifier to store securityMAC values in an alternate file.The following command selects an alternate file in which to store security MAC values.$ ENCRYPT /AUTHENTICATE *.com seveneleven /SECURITY=SECURITYMAC.DAT /UPDATE
%ENCYRPT-I-NEWSECDB, New authentication security settings database has been created%ENCRYPT-I-SUMMARY1, Summary: Files successfully authenticated: 0%ENCRYPT-I-SUMMARY2, Files failing authentication: 0%ENCRYPT-I-SUMMARY3, Files not in database: 3%ENCRYPT-I-SECSUMM1, Summary: Security settings authenticated: 0%ENCRYPT-I-SECSUMM2, Security settings failing authentication: 0%ENCRYPT-I-SECSUMM3, Security settings not in database: 3
Specifying a Listing FileIn addition to a binary MAC database, Encryption stores MAC values and status information inreadable form. By default, readable MAC values are stored in SYS$LOGIN:ENCRYPT$MAC.LIS.To store readable values in an alternate file, use the /OUTPUT qualifier. The file extension defaultsto .LIS. For example, this command specifies SYS$LOGIN:08MAC.LIS as the listing file:$ ENCRYPT /AUTHENTICATE *.* whitehen /OUTPUT=08MAC
%ENCRYPT-I-NOUPDATE, database will not be updated with new authentication codes%ENCRYPT-I-SUMMARY1, Summary: Files successfully authenticated: 6%ENCRYPT-I-SUMMARY2, Files failing authentication: 0 %ENCRYPT-I-SUMMARY3, Files not in database: 0
To display the listing on SYS$OUTPUT, enter:$ TYPE 08MAC.LIS
File Integrity Report 22-APR-2009 10:50:22.62 Compaq Encryption V1.6 Page 1Authentication database: DISK_1:[000000.SCRATCH]ENCRYPT$MAC.DAT;1
File name Stored MAC Current MAC Status================================== ================= =========== ======DISK_1[SCRATCH]EXAMPLE.FILE;1 90E70CB4E8E96BBF (same) owner: [1,1] prot: (RWED, RWED, RWED, ) DISK_1[SCRATCH]PICTURE.SLS;1 FCAD115A72E7934A (same) owner: [1,1] prot: (RWED, RWED, RWED, ) DISK_1[SCRATCH]RELEASE.TXT;1 11375BD8D504ABB3 (same) owner: [1,1] prot: (RWED, RWED, RWED, ) DISK_1[SCRATCH]RELEASE_NOTES.PS;3 2632027C133A8B5F (same) owner: [1,1] prot: (RWED, RWED, RWED, ) DISK_1[SCRATCH]SCHEDULE.LIST;3 852D440358FBFF95 (same) owner: [1,1] prot: (RWED, RWED, RWED, ) DISK_1[SCRATCH]WATCH_MAIL.COM;5 B75D00EC4991662C (same) owner: [1,1] prot: (RWED, RWED, RWED, )
Summary: Files successfully authenticated: 6
Authenticating Files 217
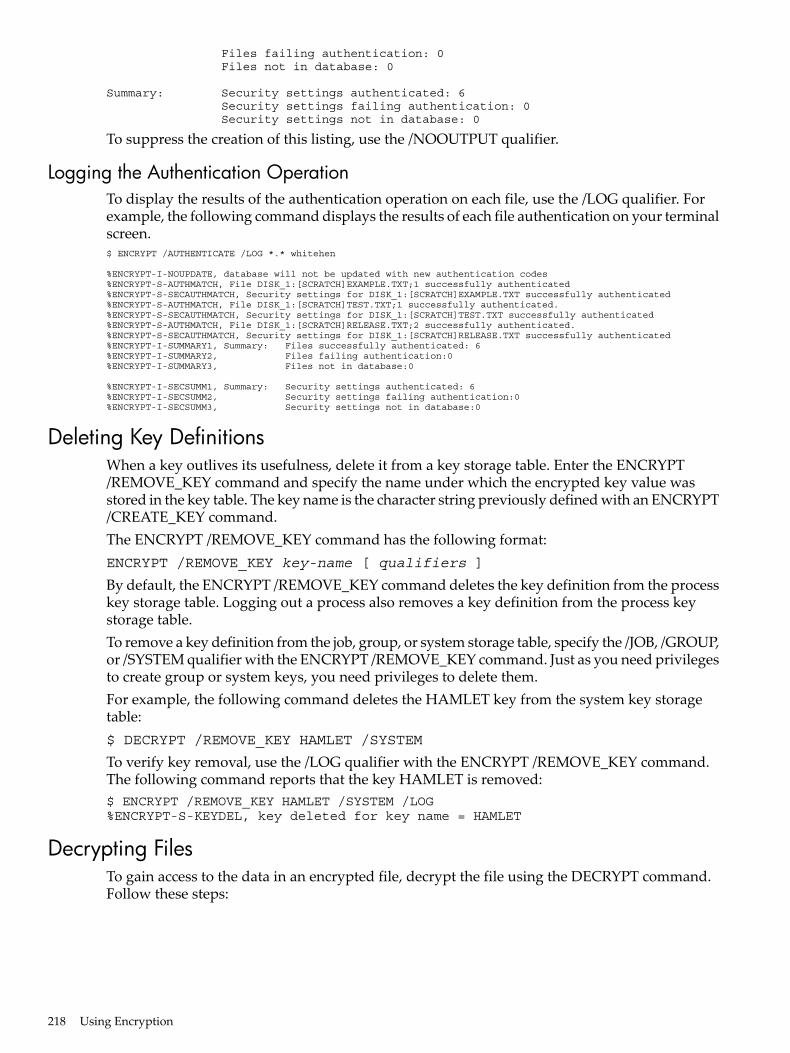
Files failing authentication: 0 Files not in database: 0
Summary: Security settings authenticated: 6 Security settings failing authentication: 0 Security settings not in database: 0
To suppress the creation of this listing, use the /NOOUTPUT qualifier.
Logging the Authentication OperationTo display the results of the authentication operation on each file, use the /LOG qualifier. Forexample, the following command displays the results of each file authentication on your terminalscreen.$ ENCRYPT /AUTHENTICATE /LOG *.* whitehen
%ENCRYPT-I-NOUPDATE, database will not be updated with new authentication codes%ENCRYPT-S-AUTHMATCH, File DISK_1:[SCRATCH]EXAMPLE.TXT;1 successfully authenticated%ENCRYPT-S-SECAUTHMATCH, Security settings for DISK_1:[SCRATCH]EXAMPLE.TXT successfully authenticated%ENCRYPT-S-AUTHMATCH, File DISK_1:[SCRATCH]TEST.TXT;1 successfully authenticated. %ENCRYPT-S-SECAUTHMATCH, Security settings for DISK_1:[SCRATCH]TEST.TXT successfully authenticated%ENCRYPT-S-AUTHMATCH, File DISK_1:[SCRATCH]RELEASE.TXT;2 successfully authenticated.%ENCRYPT-S-SECAUTHMATCH, Security settings for DISK_1:[SCRATCH]RELEASE.TXT successfully authenticated%ENCRYPT-I-SUMMARY1, Summary: Files successfully authenticated: 6%ENCRYPT-I-SUMMARY2, Files failing authentication:0%ENCRYPT-I-SUMMARY3, Files not in database:0
%ENCRYPT-I-SECSUMM1, Summary: Security settings authenticated: 6%ENCRYPT-I-SECSUMM2, Security settings failing authentication:0%ENCRYPT-I-SECSUMM3, Security settings not in database:0
Deleting Key DefinitionsWhen a key outlives its usefulness, delete it from a key storage table. Enter the ENCRYPT/REMOVE_KEY command and specify the name under which the encrypted key value wasstored in the key table. The key name is the character string previously defined with an ENCRYPT/CREATE_KEY command.The ENCRYPT /REMOVE_KEY command has the following format:ENCRYPT /REMOVE_KEY key-name [ qualifiers ]
By default, the ENCRYPT /REMOVE_KEY command deletes the key definition from the processkey storage table. Logging out a process also removes a key definition from the process keystorage table.To remove a key definition from the job, group, or system storage table, specify the /JOB, /GROUP,or /SYSTEM qualifier with the ENCRYPT /REMOVE_KEY command. Just as you need privilegesto create group or system keys, you need privileges to delete them.For example, the following command deletes the HAMLET key from the system key storagetable:$ DECRYPT /REMOVE_KEY HAMLET /SYSTEM
To verify key removal, use the /LOG qualifier with the ENCRYPT /REMOVE_KEY command.The following command reports that the key HAMLET is removed:$ ENCRYPT /REMOVE_KEY HAMLET /SYSTEM /LOG %ENCRYPT-S-KEYDEL, key deleted for key name = HAMLET
Decrypting FilesTo gain access to the data in an encrypted file, decrypt the file using the DECRYPT command.Follow these steps:
218 Using Encryption
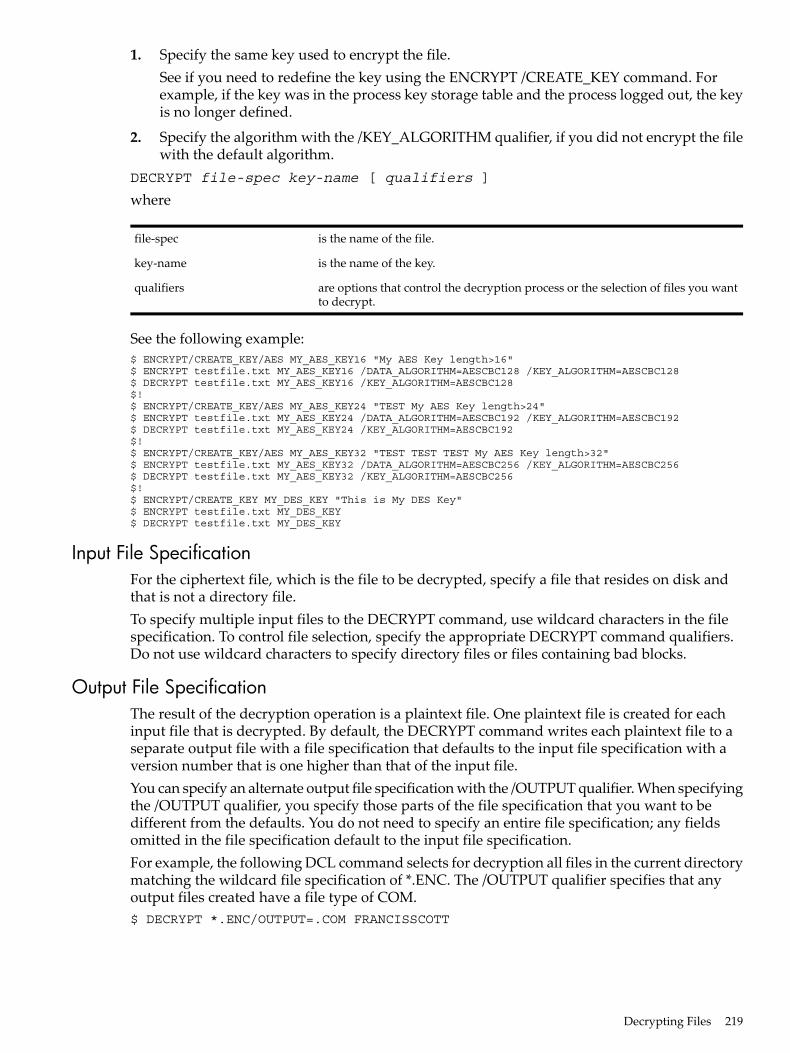
1. Specify the same key used to encrypt the file.See if you need to redefine the key using the ENCRYPT /CREATE_KEY command. Forexample, if the key was in the process key storage table and the process logged out, the keyis no longer defined.
2. Specify the algorithm with the /KEY_ALGORITHM qualifier, if you did not encrypt the filewith the default algorithm.
DECRYPT file-spec key-name [ qualifiers ]
where
is the name of the file.file-spec
is the name of the key.key-name
are options that control the decryption process or the selection of files you wantto decrypt.
qualifiers
See the following example:$ ENCRYPT/CREATE_KEY/AES MY_AES_KEY16 "My AES Key length>16"$ ENCRYPT testfile.txt MY_AES_KEY16 /DATA_ALGORITHM=AESCBC128 /KEY_ALGORITHM=AESCBC128$ DECRYPT testfile.txt MY_AES_KEY16 /KEY_ALGORITHM=AESCBC128$!$ ENCRYPT/CREATE_KEY/AES MY_AES_KEY24 "TEST My AES Key length>24"$ ENCRYPT testfile.txt MY_AES_KEY24 /DATA_ALGORITHM=AESCBC192 /KEY_ALGORITHM=AESCBC192$ DECRYPT testfile.txt MY_AES_KEY24 /KEY_ALGORITHM=AESCBC192$!$ ENCRYPT/CREATE_KEY/AES MY_AES_KEY32 "TEST TEST TEST My AES Key length>32"$ ENCRYPT testfile.txt MY_AES_KEY32 /DATA_ALGORITHM=AESCBC256 /KEY_ALGORITHM=AESCBC256$ DECRYPT testfile.txt MY_AES_KEY32 /KEY_ALGORITHM=AESCBC256$!$ ENCRYPT/CREATE_KEY MY_DES_KEY "This is My DES Key"$ ENCRYPT testfile.txt MY_DES_KEY$ DECRYPT testfile.txt MY_DES_KEY
Input File SpecificationFor the ciphertext file, which is the file to be decrypted, specify a file that resides on disk andthat is not a directory file.To specify multiple input files to the DECRYPT command, use wildcard characters in the filespecification. To control file selection, specify the appropriate DECRYPT command qualifiers.Do not use wildcard characters to specify directory files or files containing bad blocks.
Output File SpecificationThe result of the decryption operation is a plaintext file. One plaintext file is created for eachinput file that is decrypted. By default, the DECRYPT command writes each plaintext file to aseparate output file with a file specification that defaults to the input file specification with aversion number that is one higher than that of the input file.You can specify an alternate output file specification with the /OUTPUT qualifier. When specifyingthe /OUTPUT qualifier, you specify those parts of the file specification that you want to bedifferent from the defaults. You do not need to specify an entire file specification; any fieldsomitted in the file specification default to the input file specification.For example, the following DCL command selects for decryption all files in the current directorymatching the wildcard file specification of *.ENC. The /OUTPUT qualifier specifies that anyoutput files created have a file type of COM.$ DECRYPT *.ENC/OUTPUT=.COM FRANCISSCOTT
Decrypting Files 219

Displaying Processing InformationBy default, information about the decryption operation is not displayed on SYS$COMMAND.To display this information, use the /SHOW qualifier. The /SHOW qualifier has the format:/SHOW=keyword
or/SHOW=keyword-list
Specify one or more of the following keywords:• FILES• STATISTICS
FILES KeywordUse the FILES keyword to display the input and output file specifications as decryption proceeds.For example, /SHOW=FILES in the following command specifies that each input and output filespecification be displayed as it is decrypted.$ DECRYPT /SHOW=FILES *.COM FRANCISSCOTT%ENCRYPT-S-DECRYPTED, DISK2:[FLYNN]MOVE.COM.3 decrypted to DISK2:[FLYNN]MOVE.COM;4 (8 blocks) ...
STATISTICS KeywordUse the STATISTICS keyword to display encryption stream statistics after the completion of eachfile decryption operation. The statistics displayed are:• Bytes processed• Internal records processed• CPU time consumed within the encryption algorithmThe following command specifies that the decryption stream statistics be displayed onSYS$COMMAND.$ DECRYPT /SHOW=STATISTICS *.COM FRANCISSCOTT%ENCRYPT-S-STATISTICS, encryption stream statistics: Total Records: 65 Total Bytes: 4083 Total Time: 00:00:00:01.63. ..
Specifying Files to DecryptYou can use the DECRYPT command to specify multiple input files by using wildcard charactersin the input file specification. The command also provides the following qualifiers for selectingfiles:• /BACKUP• /BEFORE• /BY_OWNER• /CONFIRM• /EXCLUDE• /EXPIRED• /MODIFIED• /SINCEThe following sections describe these qualifiers.
220 Using Encryption
/BACKUP QualifierThe /BACKUP qualifier selects files for decryption according to the date of their most recentbackup. This qualifier is meaningful only when used with either the /BEFORE or the /SINCEqualifier. The /BACKUP qualifier has the format:/BACKUP /BEFORE[=time]
/BACKUP /SINCE[=time]
wheretime is an OpenVMS time.If you do not specify a time, TODAY is used. TODAY is the current day, month, and year at00:00:00.The following command selects for decryption all files in the current directory matching thewildcard file specification of *.COM that had backup copies made before 00:00:00 15-APR-2009.$ DECRYPT /BACKUP /BEFORE=15-APR-2009 *.COM FRANCISSCOTT
Do not use the /BACKUP qualifier with either the /EXPIRED or the /MODIFIED qualifier.
/BEFORE QualifierThe /BEFORE qualifier selects files for decryption that have a creation date before the timespecified with the qualifier. The /BEFORE qualifier has the format:/BEFORE[=time]
wheretime is an OpenVMS time.If you do not specify a time, TODAY is used. TODAY is the current day, month, and year at00:00:00.The following command selects for decryption all files in the current directory matching thewildcard file specification of *.COM that were created before 00:00:00 15-APR-2009.$ DECRYPT /BEFORE=15-APR-2009 *.COM FRANCISSCOTT
/BY_OWNER QualifierUse the /BY_OWNER qualifier to select files for decryption that have a particular owner UserIdentification Code (UIC). If no UIC is specified with the qualifier, the UIC of the current processis used. The /BY_OWNER qualifier has the format:BY_OWNER=uic/whereuic is the UIC of the owner of the file.
/CONFIRM QualifierBy default, all input files specified on the command line are processed without confirming thateach file is selected for decryption. Use the /CONFIRM qualifier if you want a prompt with thename of each file selected for decryption. Your response controls whether or not a particular fileis decrypted.You can choose any of the following responses:
MeaningResponse
Decrypt the file.YES
Do not decrypt the file. This is the default.NO or RETURN
Decrypting Files 221
MeaningResponse
Do not decrypt the file or any subsequent files.QUIT or Ctrl/Z
Decrypt the file and all subsequent files.ALL
The following command selects all files in the current directory matching the wildcard filespecification of *.COM for decryption. Because the /CONFIRM qualifier is specified, the user isprompted on a file-by-file basis to confirm that each file is to be decrypted. Because the promptis answered in the affirmative for the file MOVE.COM;3, the output file MOVE.COM;4 is created.$ DECRYPT /CONFIRM *.COM FRANCISSCOTT Decrypt DISK2:[FLYNN]MOVE.COM;3 ? [N] YES
/EXCLUDE QualifierUse the /EXCLUDE qualifier to exclude one or more files from a decryption operation. If a filematches the file specification provided with the qualifier, the file is not decrypted. The /EXCLUDEqualifier has the format:/EXCLUDE=((file-spec)[,...])
wherefile-spec is the file specification of the file to remain encrypted.When specifying only one file, you can omit the parentheses. Wildcard characters are allowedin the file specification. With the /EXCLUDE qualifier, there is no default for the file specification.Since directory files are never encrypted, you need not specify them with the /EXCLUDE qualifier.However, if you do specify /EXCLUDE=*.DIR, you will not get the warning message%ENCRYPT-W-FILNODIR, file encryption of directories is not supported,filename.dir.The following command selects for decryption all files in the current directory that match thewildcard file specification of *.COM, except LOGIN.COM, which is specified with /EXCLUDE.$ DECRYPT /EXCLUDE=LOGIN.COM *.COM FRANCISSCOTT
/EXPIRED QualifierThe /EXPIRED qualifier selects files for decryption according to the dates on which they expire.(The expiration date is set with the SET FILE/EXPIRATION_DATE command.) This qualifier ismeaningful only when used with either the /BEFORE or the /SINCE qualifier. The /EXPIREDqualifier has the format:/EXPIRED /BEFORE[=time]
/EXPIRED /SINCE[=time]
wheretime is an OpenVMS time.If you do not specify a time, TODAY is used. TODAY is the current day, month, and year at00:00:00.The following command selects for decryption all files in the current directory matching thewildcard file specification of *.COM that expire after 00:00:00 15-APR-2009.$ DECRYPT /EXPIRED /SINCE=15-APR-2009 *.COM FRANCISSCOTT
Do not use the /EXPIRED qualifier with either the /BACKUP or the /MODIFIED qualifier.
/MODIFIED QualifierThe /MODIFIED qualifier selects files for decryption according to the dates on which they werelast modified. This qualifier is meaningful only when used with either the /BEFORE or the /SINCEqualifier. The /MODIFIED qualifier has the format:
222 Using Encryption
/MODIFIED /BEFORE[=time]
/MODIFIED /SINCE[=time]
wheretime is an OpenVMS time.If you do not specify a time, TODAY is used. TODAY is the current day, month, and year at00:00:00.The following command selects for decryption all files in the current directory matching thewildcard file specification of *.COM that were modified after 00:00:00 15-APR-2009.$ DECRYPT /MODIFIED /SINCE=15-APR-2009 *.COM FRANCISSCOTT
Do not use the /MODIFIED qualifier with either the /BACKUP or the /EXPIRE qualifier.
/SINCE QualifierThe /SINCE qualifier selects files for decryption that have a creation date after the time specifiedwith the qualifier. The /SINCE qualifier has the format:/SINCE[=(time)]
wheretime is an OpenVMS time.If you do not specify a time, TODAY is used. TODAY is the current day, month, and year at00:00:00.The following command selects for decryption all files in the current directory matching thewildcard file specification of *.COM that were created after 00:00:00 15-APR-2009.$ DECRYPT /SINCE=15-APR-2009 *.COM FRANCISSCOTT
Deleting Decrypted FilesBy default, the input file is retained after a file is decrypted and written to the resulting outputfile. To save space, after you have decrypted a file, you may want to remove the encrypted filefrom your disk.You can use the DCL DELETE command with the /ERASE qualifier to remove the contents ofthe file from the disk, or you can use the /DELETE and /ERASE qualifiers with the DECRYPTcommand.
/DELETE QualifierThe /DELETE qualifier deletes the input file after the decryption operation completes and theoutput file is written and closed. If you have multiple versions of the input file, they are not alldeleted. /DELETE acts on only the version of the input file that you encrypted.The following command specifies that the SAVEDMAIL.MAI file be decrypted using theTWENTYFIVECENTS encryption key. Because the /DELETE qualifier is specified, the input fileis deleted after the output file is written.$ DECRYPT /DELETE SAVEDMAIL.MAI TWENTYFIVECENTS
/ERASE QualifierTo prevent disk scavenging, use the /ERASE qualifier with the /DELETE qualifier. For example,the following command decrypts the SAVEDMAIL.MAI file using the TWENTYFIVECENTSencryption key, erases the input file with the data security pattern, and deletes the file.$ DECRYPT /DELETE /ERASE SAVEDMAIL.MAI TWENTYFIVECENTS
With the following command, the SAVEDMAIL.MAI file is decrypted using theTWENTYFIVECENTS encryption key, but the input file is not erased with the data securitypattern before being deleted.
Decrypting Files 223
With the following command, the SAVEDMAIL.MAI file is decrypted using theTWENTYFIVECENTS encryption key, but the input file is not erased with the data securitypattern before being deleted.$ DECRYPT /DELETE /NOERASE SAVEDMAIL.MAI TWENTYFIVECENTS
Algorithm QualifiersThe algorithm qualifier you use to encrypt determines the correct decryption procedure:• If you use the /DATA_ALGORITHM qualifier to encrypt, do not specify this algorithm when
you decrypt.• If you use the /KEY_ALGORITHM qualifier to encrypt, specify this algorithm when you
decrypt.The /KEY_ALGORITHM qualifier has the format:/KEY_ALGORITHM=(algorithm)
wherealgorithm is one of the following values:• DESCBC (the default)• DESECB• DESCFBFor example, if SAVEDMAIL.MAI is encrypted with /KEY_ALGORITHM=DESCFB, decrypt thefile with the same /KEY_ALGORITHM=DESCFB qualifier, as follows:$ ENCRYPT /KEY_ALGORITHM=DESCFB SAVEDMAIL.MAI TWENTYFIVECENTS$ DECRYPT /KEY_ALGORITHM=DESCFB SAVEDMAIL.MAI TWENTYFIVECENTS
Encrypting Save SetsThe OpenVMS BACKUP utility provides protection against file or volume corruption by creatingfunctionally equivalent backup copies. Files created by BACKUP are called save sets and arewritten in BACKUP format so that only BACKUP can interpret the data in a save set.When youcreate save sets, you can also encrypt them by using the BACKUP /ENCRYPT command.
NOTE: Standalone BACKUP, which is a version of the BACKUP utility that runs without thesupport of the OpenVMS operating system, does not support the /ENCRYPT qualifier.
BACKUP /ENCRYPT requires a key. All the files in the save set are encrypted under the samekey. When you use the /ENCRYPT qualifier to specify a write operation for an encrypted saveset, the BACKUP utility creates a key by generating a 16-byte random number from the time ofday and other transient data. To make this random number even more random, BACKUP encryptsthis 16-byte value once using itself as a key with the DESCBC algorithm. The first eight bytes ofthe result are used as the encrypting key for the save set, and the second eight bytes are used asthe initialization vector for the context area.One benefit of this procedure is that two save sets created with the same command from thesame set of files are not identical in their encrypted form.You can override the system-generated encrypting key and initialization vector by issuing eitherof the following commands:• ENCRYPT /CREATE_KEY• BACKUP /ENCRYPT=(VALUE=key-value)For greater security, specify the /ENCRYPT qualifier with no parameters. The software promptsyou for a key value. When you enter it, the software does not echo what you type and, forverification, prompts you to retype the value.If you define a key with the ENCRYPT /CREATE_KEY command, specify that key name on theBACKUP command line with the /ENCRYPT=(NAME=(key-name)) qualifier.
224 Using Encryption
By default, BACKUP encrypts save set data using the DESCBC algorithm. The key and algorithmyou specify to override the defaults are used to encrypt only the data key and the initializationvector.BACKUP places the result of the encryption operation in the save set as a BACKUP attributesubrecord of the BACKUP summary record. At the time of a save set restore or listing operation,BACKUP uses the system-generated key or the key you supplied to decrypt the data key andthe initialization vector value.The BACKUP command qualifier /SAVE_SET is both an input save set qualifier and an outputsave set qualifier, as follows:• When you specify the /SAVE_SET and /ENCYRPT qualifiers with an output save set
specification, BACKUP writes file data (including file names and attributes) in an encryptedform into the save set.
• When you specify /SAVE_SET with an input save set specification, BACKUP uses thedecryption key specified to access the file name, attributes, and data from the save set records.The ENCRYPT option decrypts the data files after BACKUP reads the data files from thesave set medium and processes them according to the remaining qualifiers of the BACKUPcommand.
The following example creates an encrypted BACKUP file of the default directory, as follows:1. ENCRYPT /CREATE_KEY defines a key, SANFRANCISCO, with this value: A city set on a
hill cannot be hid.2. BACKUP /ENCRYPT saves all the files in the default directory in a save set named
28JULSAVE.BCK and encrypts the save set.On device MKA600:, the data used to encrypt the file names, attributes, and all the otherfile data are encrypted with the default encryption algorithm DESCBC. The process usesthe key defined as SANFRANCISCO.
$ ENCRYPT /CREATE_KEY SANFRANCISCO "A city set on a hill cannot be hid" $ BACKUP /ENCRYPT=(NAME=SANFRANCISCO) * MKA600:28JULSAVE.BCK /SAVE_SET
The following example creates a save set of the latest version of all the files on a disk. The saveset is encrypted using the DESCFB algorithm and the key value Make peace.$ BACKUP /ENCRYPT=(VALUE="Make peace",ALGORITHM=DESCFB) *.* 28JULSAVE /SAVE_SET
Restoring FilesWhen you encrypt a save set, BACKUP does not store the information within the save set.Consequently, to decrypt an encrypted save set, specify /ENCRYPT with the RESTORE commandso that BACKUP searches for the data encryption control record.If you restore an unencrypted save set and mistakenly specify /ENCRYPT, BACKUP ignores theincorrect qualifier. If you try to restore an encrypted saveset without the /ENCYRPT qualifier orwith a key name, you get the error message:%BACKUP-F-ENCSAVSET, save set is encrypted, /ENCRYPT must be specified
The following commands restore file SALARY.DAT from a save set created with a BACKUP/ENCRYPT command:$ ENCRYPT /CREATE_KEY CASTERBRIDGE "And all her shining keys"$ BACKUP /ENCRYPT=(NAME=CASTERBRIDGE)_$ From: MKA600:28JULSAVE.BCK /SELECT=SALARY.DAT_$ To: SALARY28J.DAT
BACKUP tries to decrypt an encrypted save set by:1. Decrypting the encryption data that was saved in an attribute subrecord.2. Comparing a 32-bit checksum of the decrypted data key with the stored value.
Encrypting Save Sets 225
3. If there is a match, BACKUP assumes the data key is valid and restores the save set.4. If BACKUP finds a mismatch, which is likely if the data key or algorithm you specified in
the BACKUP command is incorrect, the utility displays:%BACKUP-F-ENCKEYMAT, the supplied decryption key does not yield a readable save set
Encrypting Distribution FilesBACKUP /ENCRYPT can create a distribution disc that is useful only to a customer who has thekey used to encrypt the save sets in the distribution kit.In the following example, three keys are defined with ENCRYPT /CREATE_KEY commands.With each of these keys, a software distribution disc is created with each product encrypted intoits respective save set under a unique key.$ ENCRYPT /CREATE_KEY SDXKEY "SDX V9.0 kit 99804034671838302" $ BACKUP /ENCRYPT=(NAME=SDXKEY) /REWIND - _From: MASTER:[SDXKIT]*.* MKA600:SDXKIT /SAVE_SET
$ ENCRYPT /CREATE_KEY RQPKEY "RQP V4.5 kit FWTEBCJDITROEMMKAZXRYTC" $ BACKUP /ENCRYPT=(NAME=RQPKEY) - _From: MASTER:[RQPKIT]*.* MKA600:RQPKIT /SAVE_SET
$ ENCRYPT /CREATE_KEY WOLKEY "WOL V2.0 kit 28374UEJDTLHGD84JF849SK95KD0" $ BACKUP /ENCRYPT=(NAME=WOLKEY) - _From: MASTER:[WOLKIT]*.* MKA600:WOLKIT /SAVE_SET
The resulting save sets can be restored on a customer's system only if the customer has receivedthe appropriate key by licensing arrangement.For example, the following commands restore save set WOLKIT:$ ENCRYPT /CREATE_KEY WOLKEY "WOL V2.0 kit 28374UEJDTLHGD84JF849SK95KD0" $ BACKUP /ENCRYPT=(NAME=WOLKEY) MKA600:WOLKIT /SAVE_SET SYSTEM:[RQPKIT]*.*
In the following example, the save set SDXKIT is restored without typing the key name and keyvalue on the command line. Instead, the BACKUP /ENCRYPT command prompts for thisinformation, which is not echoed on your screen.$ BACKUP /ENCRYPT /REWIND MKA600:SDXKIT /SAVE_SET SYSTEM:[SDXKIT]*.* Enter Key Value: (input not echoed) Verify: (input not echoed)
226 Using Encryption
10 Security AuditingThis chapter describes how to use and manage the OpenVMS auditing system. It explains howyou can monitor security-relevant activity on your system by recording events as they occur onthe system and subsequently analyzing this audit log.
Overview of the Auditing ProcessAuditing is the recording of security-relevant activity as it occurs on the system and the subsequentanalysis of this audit log. With auditing, you can monitor users' activity on the system and, ifnecessary, reconstruct events leading up to attempts to compromise the security of your system.Thus, it is not as much a method of protecting the system and its data as a method of analyzingand recording system use.Anything that has to do with a user's access to the system or to a protected object within thesystem is considered a security-relevant activity. Such activities are called events. Typical eventsinclude the following:• Logins, logouts, or login failures• Changes to the authorization database• Access to a protected object, such as a file, device, or global section• Changes in privileges or the security attributes of protected objectsThe operating system can record both successful and unsuccessful events. Sometimes theunsuccessful can be more revealing. For example, it is less important to record that a programmerdisplayed a file to which he had access than that the same programmer tried to but was preventedfrom displaying a protected file.The event message itself can be written to two places: an audit log file or an operator terminalthat is enabled to receive security class messages. As “Sample Alarm Message” (page 228) shows,a message contains the following data:1. Date and time of the message2. Type of event3. Date and time the event occurred4. The process identification (PID) of the user who caused the eventAdditional information in auditing messages is specific to the type of event. See “Alarm Messages”(page 341) for examples of different messages.
Overview of the Auditing Process 227
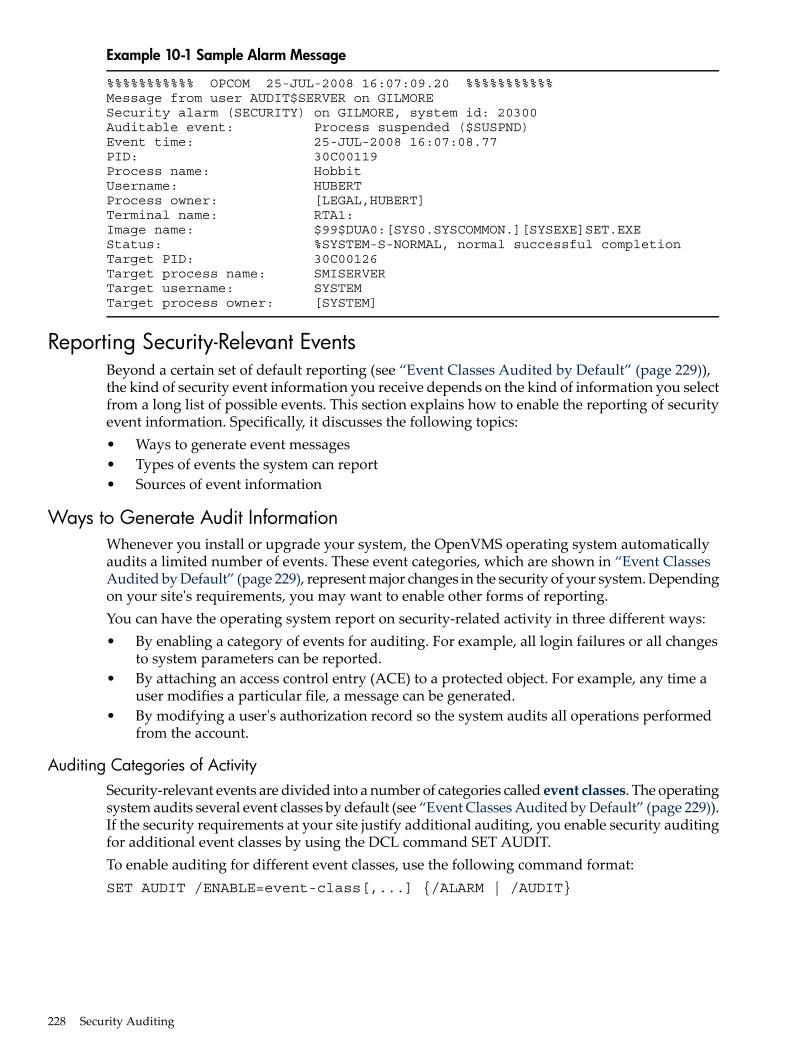
Example 10-1 Sample Alarm Message
%%%%%%%%%%% OPCOM 25-JUL-2008 16:07:09.20 %%%%%%%%%%% Message from user AUDIT$SERVER on GILMORESecurity alarm (SECURITY) on GILMORE, system id: 20300Auditable event: Process suspended ($SUSPND) Event time: 25-JUL-2008 16:07:08.77 PID: 30C00119 Process name: HobbitUsername: HUBERTProcess owner: [LEGAL,HUBERT]Terminal name: RTA1:Image name: $99$DUA0:[SYS0.SYSCOMMON.][SYSEXE]SET.EXEStatus: %SYSTEM-S-NORMAL, normal successful completionTarget PID: 30C00126Target process name: SMISERVERTarget username: SYSTEMTarget process owner: [SYSTEM]
Reporting Security-Relevant EventsBeyond a certain set of default reporting (see “Event Classes Audited by Default” (page 229)),the kind of security event information you receive depends on the kind of information you selectfrom a long list of possible events. This section explains how to enable the reporting of securityevent information. Specifically, it discusses the following topics:• Ways to generate event messages• Types of events the system can report• Sources of event information
Ways to Generate Audit InformationWhenever you install or upgrade your system, the OpenVMS operating system automaticallyaudits a limited number of events. These event categories, which are shown in “Event ClassesAudited by Default” (page 229), represent major changes in the security of your system. Dependingon your site's requirements, you may want to enable other forms of reporting.You can have the operating system report on security-related activity in three different ways:• By enabling a category of events for auditing. For example, all login failures or all changes
to system parameters can be reported.• By attaching an access control entry (ACE) to a protected object. For example, any time a
user modifies a particular file, a message can be generated.• By modifying a user's authorization record so the system audits all operations performed
from the account.
Auditing Categories of ActivitySecurity-relevant events are divided into a number of categories called event classes. The operatingsystem audits several event classes by default (see “Event Classes Audited by Default” (page 229)).If the security requirements at your site justify additional auditing, you enable security auditingfor additional event classes by using the DCL command SET AUDIT.To enable auditing for different event classes, use the following command format:SET AUDIT /ENABLE=event-class[,...] {/ALARM | /AUDIT}
228 Security Auditing
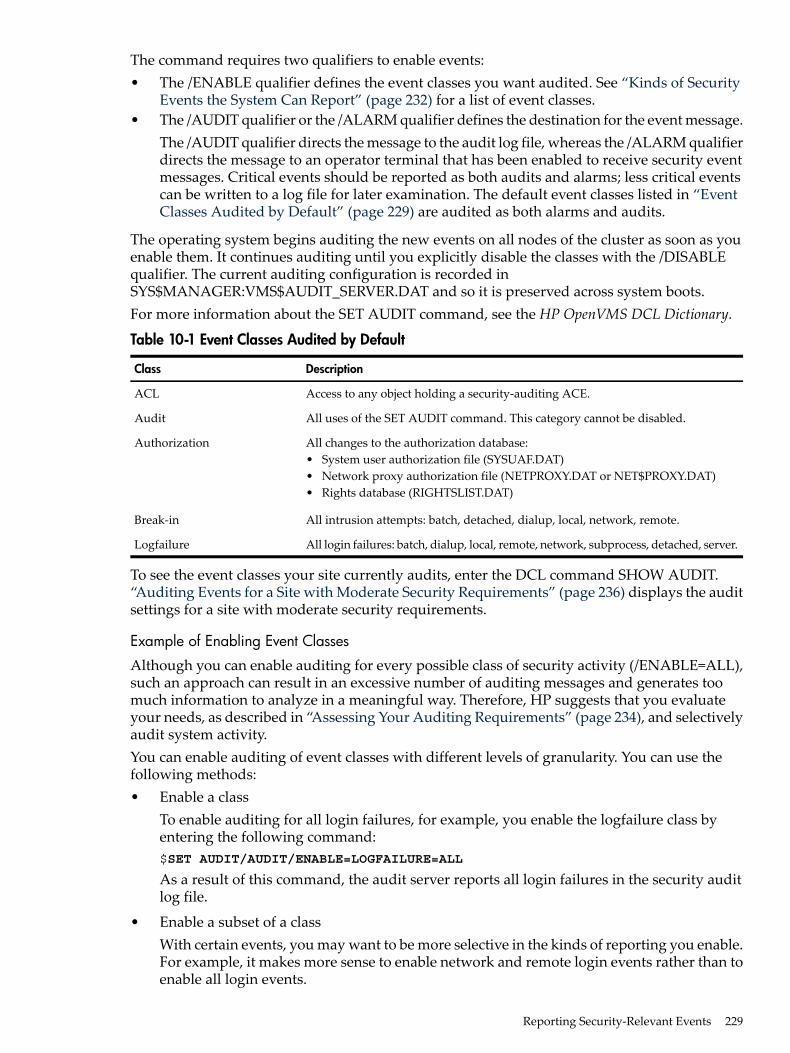
The command requires two qualifiers to enable events:• The /ENABLE qualifier defines the event classes you want audited. See “Kinds of Security
Events the System Can Report” (page 232) for a list of event classes.• The /AUDIT qualifier or the /ALARM qualifier defines the destination for the event message.
The /AUDIT qualifier directs the message to the audit log file, whereas the /ALARM qualifierdirects the message to an operator terminal that has been enabled to receive security eventmessages. Critical events should be reported as both audits and alarms; less critical eventscan be written to a log file for later examination. The default event classes listed in “EventClasses Audited by Default” (page 229) are audited as both alarms and audits.
The operating system begins auditing the new events on all nodes of the cluster as soon as youenable them. It continues auditing until you explicitly disable the classes with the /DISABLEqualifier. The current auditing configuration is recorded inSYS$MANAGER:VMS$AUDIT_SERVER.DAT and so it is preserved across system boots.For more information about the SET AUDIT command, see the HP OpenVMS DCL Dictionary.
Table 10-1 Event Classes Audited by Default
DescriptionClass
Access to any object holding a security-auditing ACE.ACL
All uses of the SET AUDIT command. This category cannot be disabled.Audit
All changes to the authorization database:• System user authorization file (SYSUAF.DAT)• Network proxy authorization file (NETPROXY.DAT or NET$PROXY.DAT)• Rights database (RIGHTSLIST.DAT)
Authorization
All intrusion attempts: batch, detached, dialup, local, network, remote.Break-in
All login failures: batch, dialup, local, remote, network, subprocess, detached, server.Logfailure
To see the event classes your site currently audits, enter the DCL command SHOW AUDIT.“Auditing Events for a Site with Moderate Security Requirements” (page 236) displays the auditsettings for a site with moderate security requirements.
Example of Enabling Event Classes
Although you can enable auditing for every possible class of security activity (/ENABLE=ALL),such an approach can result in an excessive number of auditing messages and generates toomuch information to analyze in a meaningful way. Therefore, HP suggests that you evaluateyour needs, as described in “Assessing Your Auditing Requirements” (page 234), and selectivelyaudit system activity.You can enable auditing of event classes with different levels of granularity. You can use thefollowing methods:• Enable a class
To enable auditing for all login failures, for example, you enable the logfailure class byentering the following command:$SET AUDIT/AUDIT/ENABLE=LOGFAILURE=ALL
As a result of this command, the audit server reports all login failures in the security auditlog file.
• Enable a subset of a classWith certain events, you may want to be more selective in the kinds of reporting you enable.For example, it makes more sense to enable network and remote login events rather than toenable all login events.
Reporting Security-Relevant Events 229
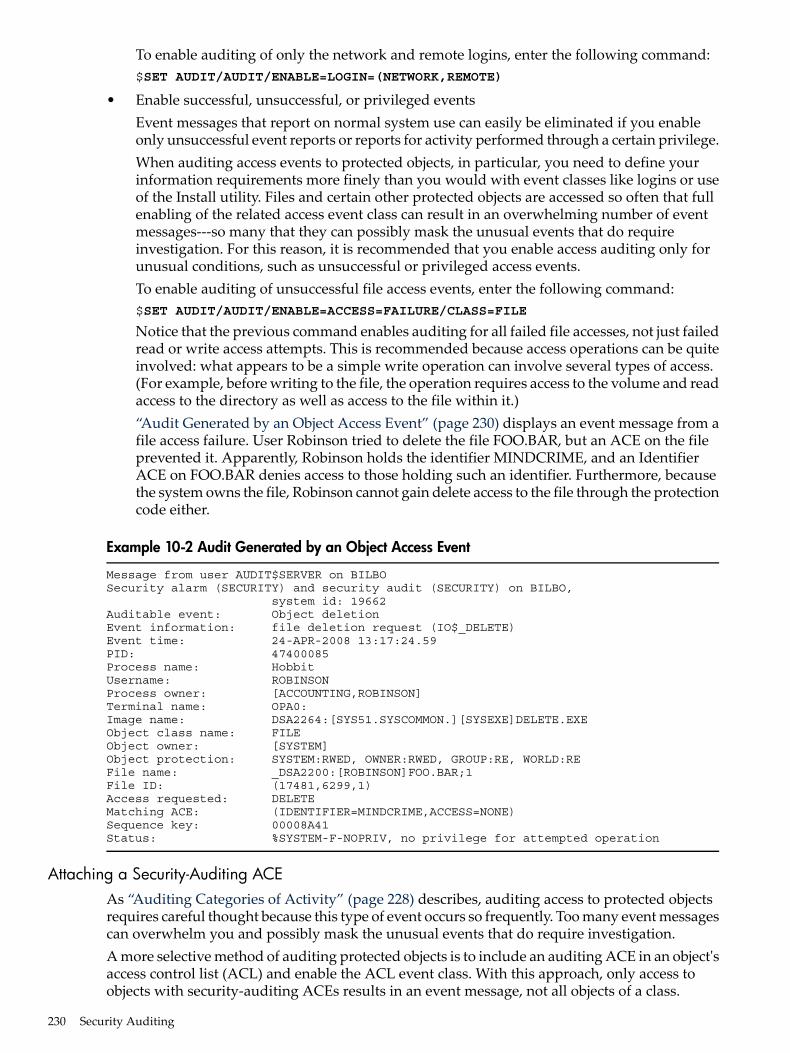
To enable auditing of only the network and remote logins, enter the following command:$SET AUDIT/AUDIT/ENABLE=LOGIN=(NETWORK,REMOTE)
• Enable successful, unsuccessful, or privileged eventsEvent messages that report on normal system use can easily be eliminated if you enableonly unsuccessful event reports or reports for activity performed through a certain privilege.When auditing access events to protected objects, in particular, you need to define yourinformation requirements more finely than you would with event classes like logins or useof the Install utility. Files and certain other protected objects are accessed so often that fullenabling of the related access event class can result in an overwhelming number of eventmessages---so many that they can possibly mask the unusual events that do requireinvestigation. For this reason, it is recommended that you enable access auditing only forunusual conditions, such as unsuccessful or privileged access events.To enable auditing of unsuccessful file access events, enter the following command:$SET AUDIT/AUDIT/ENABLE=ACCESS=FAILURE/CLASS=FILE
Notice that the previous command enables auditing for all failed file accesses, not just failedread or write access attempts. This is recommended because access operations can be quiteinvolved: what appears to be a simple write operation can involve several types of access.(For example, before writing to the file, the operation requires access to the volume and readaccess to the directory as well as access to the file within it.)“Audit Generated by an Object Access Event” (page 230) displays an event message from afile access failure. User Robinson tried to delete the file FOO.BAR, but an ACE on the fileprevented it. Apparently, Robinson holds the identifier MINDCRIME, and an IdentifierACE on FOO.BAR denies access to those holding such an identifier. Furthermore, becausethe system owns the file, Robinson cannot gain delete access to the file through the protectioncode either.
Example 10-2 Audit Generated by an Object Access Event
Message from user AUDIT$SERVER on BILBOSecurity alarm (SECURITY) and security audit (SECURITY) on BILBO, system id: 19662Auditable event: Object deletionEvent information: file deletion request (IO$_DELETE)Event time: 24-APR-2008 13:17:24.59PID: 47400085Process name: HobbitUsername: ROBINSONProcess owner: [ACCOUNTING,ROBINSON]Terminal name: OPA0:Image name: DSA2264:[SYS51.SYSCOMMON.][SYSEXE]DELETE.EXEObject class name: FILEObject owner: [SYSTEM]Object protection: SYSTEM:RWED, OWNER:RWED, GROUP:RE, WORLD:REFile name: _DSA2200:[ROBINSON]FOO.BAR;1File ID: (17481,6299,1)Access requested: DELETEMatching ACE: (IDENTIFIER=MINDCRIME,ACCESS=NONE)Sequence key: 00008A41Status: %SYSTEM-F-NOPRIV, no privilege for attempted operation
Attaching a Security-Auditing ACEAs “Auditing Categories of Activity” (page 228) describes, auditing access to protected objectsrequires careful thought because this type of event occurs so frequently. Too many event messagescan overwhelm you and possibly mask the unusual events that do require investigation.A more selective method of auditing protected objects is to include an auditing ACE in an object'saccess control list (ACL) and enable the ACL event class. With this approach, only access toobjects with security-auditing ACEs results in an event message, not all objects of a class.
230 Security Auditing
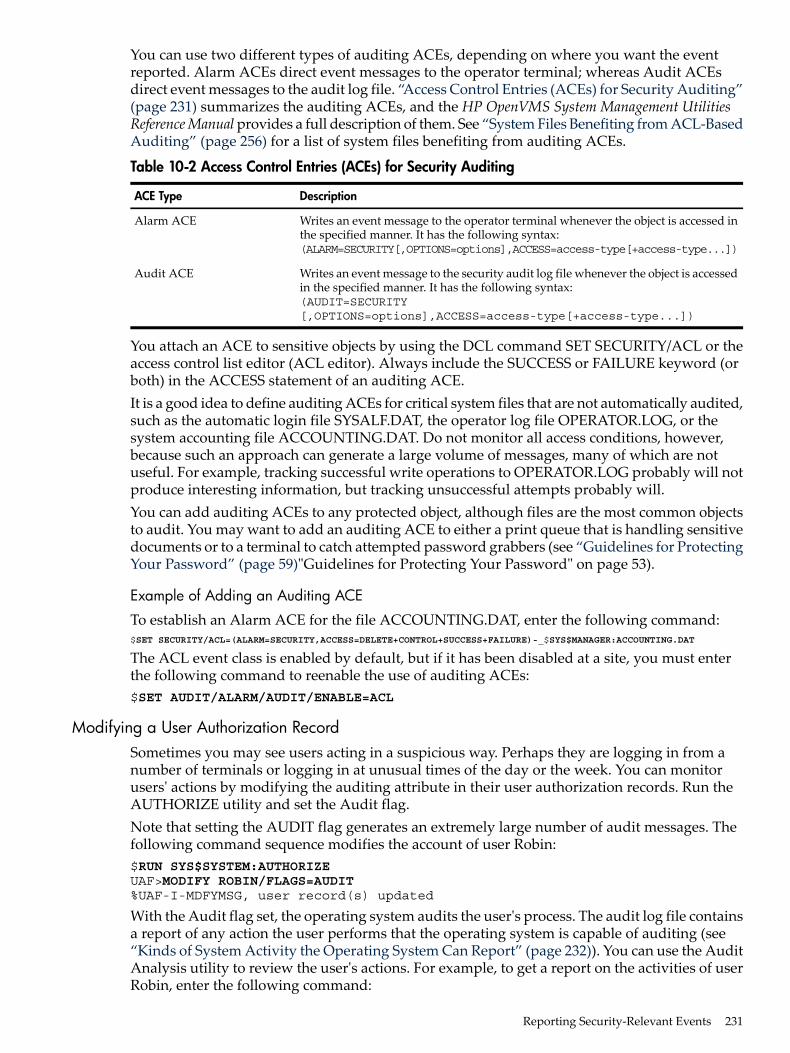
You can use two different types of auditing ACEs, depending on where you want the eventreported. Alarm ACEs direct event messages to the operator terminal; whereas Audit ACEsdirect event messages to the audit log file. “Access Control Entries (ACEs) for Security Auditing”(page 231) summarizes the auditing ACEs, and the HP OpenVMS System Management UtilitiesReferenceManualprovides a full description of them. See “System Files Benefiting from ACL-BasedAuditing” (page 256) for a list of system files benefiting from auditing ACEs.
Table 10-2 Access Control Entries (ACEs) for Security Auditing
DescriptionACE Type
Writes an event message to the operator terminal whenever the object is accessed inthe specified manner. It has the following syntax:(ALARM=SECURITY[,OPTIONS=options],ACCESS=access-type[+access-type...])
Alarm ACE
Writes an event message to the security audit log file whenever the object is accessedin the specified manner. It has the following syntax:(AUDIT=SECURITY[,OPTIONS=options],ACCESS=access-type[+access-type...])
Audit ACE
You attach an ACE to sensitive objects by using the DCL command SET SECURITY/ACL or theaccess control list editor (ACL editor). Always include the SUCCESS or FAILURE keyword (orboth) in the ACCESS statement of an auditing ACE.It is a good idea to define auditing ACEs for critical system files that are not automatically audited,such as the automatic login file SYSALF.DAT, the operator log file OPERATOR.LOG, or thesystem accounting file ACCOUNTING.DAT. Do not monitor all access conditions, however,because such an approach can generate a large volume of messages, many of which are notuseful. For example, tracking successful write operations to OPERATOR.LOG probably will notproduce interesting information, but tracking unsuccessful attempts probably will.You can add auditing ACEs to any protected object, although files are the most common objectsto audit. You may want to add an auditing ACE to either a print queue that is handling sensitivedocuments or to a terminal to catch attempted password grabbers (see “Guidelines for ProtectingYour Password” (page 59)"Guidelines for Protecting Your Password" on page 53).
Example of Adding an Auditing ACE
To establish an Alarm ACE for the file ACCOUNTING.DAT, enter the following command:$SET SECURITY/ACL=(ALARM=SECURITY,ACCESS=DELETE+CONTROL+SUCCESS+FAILURE)-_$SYS$MANAGER:ACCOUNTING.DAT
The ACL event class is enabled by default, but if it has been disabled at a site, you must enterthe following command to reenable the use of auditing ACEs:$SET AUDIT/ALARM/AUDIT/ENABLE=ACL
Modifying a User Authorization RecordSometimes you may see users acting in a suspicious way. Perhaps they are logging in from anumber of terminals or logging in at unusual times of the day or the week. You can monitorusers' actions by modifying the auditing attribute in their user authorization records. Run theAUTHORIZE utility and set the Audit flag.Note that setting the AUDIT flag generates an extremely large number of audit messages. Thefollowing command sequence modifies the account of user Robin:$RUN SYS$SYSTEM:AUTHORIZEUAF>MODIFY ROBIN/FLAGS=AUDIT%UAF-I-MDFYMSG, user record(s) updated
With the Audit flag set, the operating system audits the user's process. The audit log file containsa report of any action the user performs that the operating system is capable of auditing (see“Kinds of System Activity the Operating System Can Report” (page 232)). You can use the AuditAnalysis utility to review the user's actions. For example, to get a report on the activities of userRobin, enter the following command:
Reporting Security-Relevant Events 231
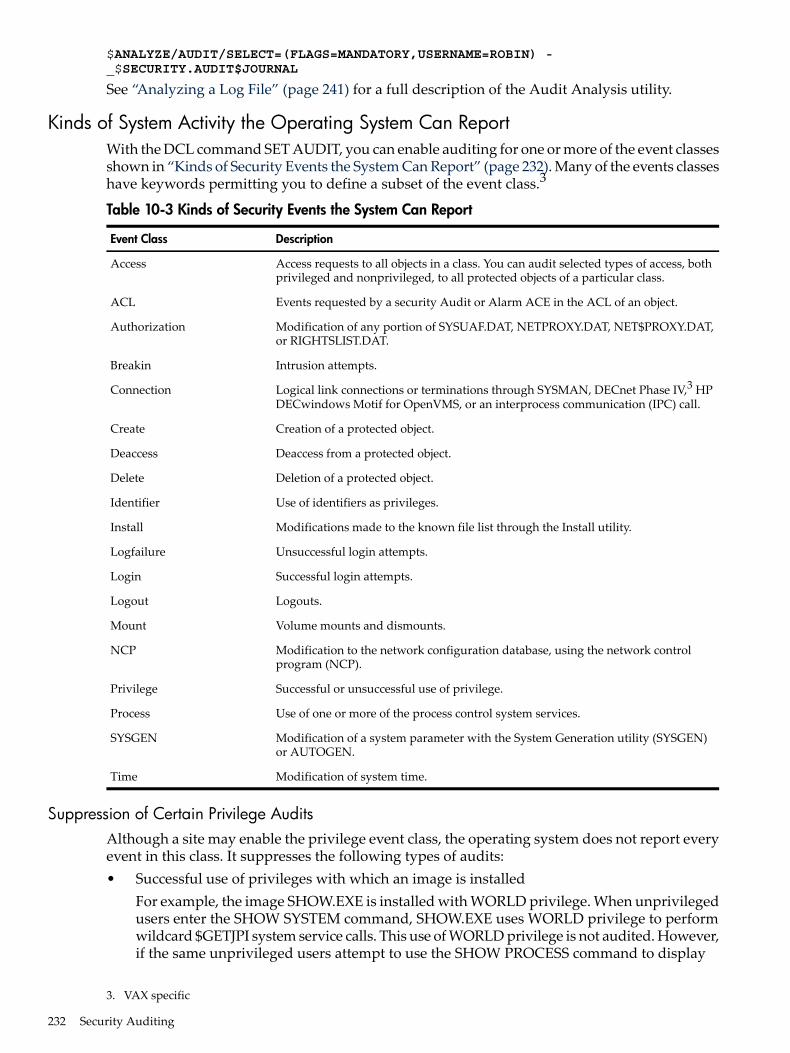
$ANALYZE/AUDIT/SELECT=(FLAGS=MANDATORY,USERNAME=ROBIN) -_$SECURITY.AUDIT$JOURNAL
See “Analyzing a Log File” (page 241) for a full description of the Audit Analysis utility.
Kinds of System Activity the Operating System Can ReportWith the DCL command SET AUDIT, you can enable auditing for one or more of the event classesshown in “Kinds of Security Events the System Can Report” (page 232). Many of the events classeshave keywords permitting you to define a subset of the event class.3
Table 10-3 Kinds of Security Events the System Can Report
DescriptionEvent Class
Access requests to all objects in a class. You can audit selected types of access, bothprivileged and nonprivileged, to all protected objects of a particular class.
Access
Events requested by a security Audit or Alarm ACE in the ACL of an object.ACL
Modification of any portion of SYSUAF.DAT, NETPROXY.DAT, NET$PROXY.DAT,or RIGHTSLIST.DAT.
Authorization
Intrusion attempts.Breakin
Logical link connections or terminations through SYSMAN, DECnet Phase IV,3 HPDECwindows Motif for OpenVMS, or an interprocess communication (IPC) call.
Connection
Creation of a protected object.Create
Deaccess from a protected object.Deaccess
Deletion of a protected object.Delete
Use of identifiers as privileges.Identifier
Modifications made to the known file list through the Install utility.Install
Unsuccessful login attempts.Logfailure
Successful login attempts.Login
Logouts.Logout
Volume mounts and dismounts.Mount
Modification to the network configuration database, using the network controlprogram (NCP).
NCP
Successful or unsuccessful use of privilege.Privilege
Use of one or more of the process control system services.Process
Modification of a system parameter with the System Generation utility (SYSGEN)or AUTOGEN.
SYSGEN
Modification of system time.Time
Suppression of Certain Privilege AuditsAlthough a site may enable the privilege event class, the operating system does not report everyevent in this class. It suppresses the following types of audits:• Successful use of privileges with which an image is installed
For example, the image SHOW.EXE is installed with WORLD privilege. When unprivilegedusers enter the SHOW SYSTEM command, SHOW.EXE uses WORLD privilege to performwildcard $GETJPI system service calls. This use of WORLD privilege is not audited. However,if the same unprivileged users attempt to use the SHOW PROCESS command to display
3. VAX specific
232 Security Auditing
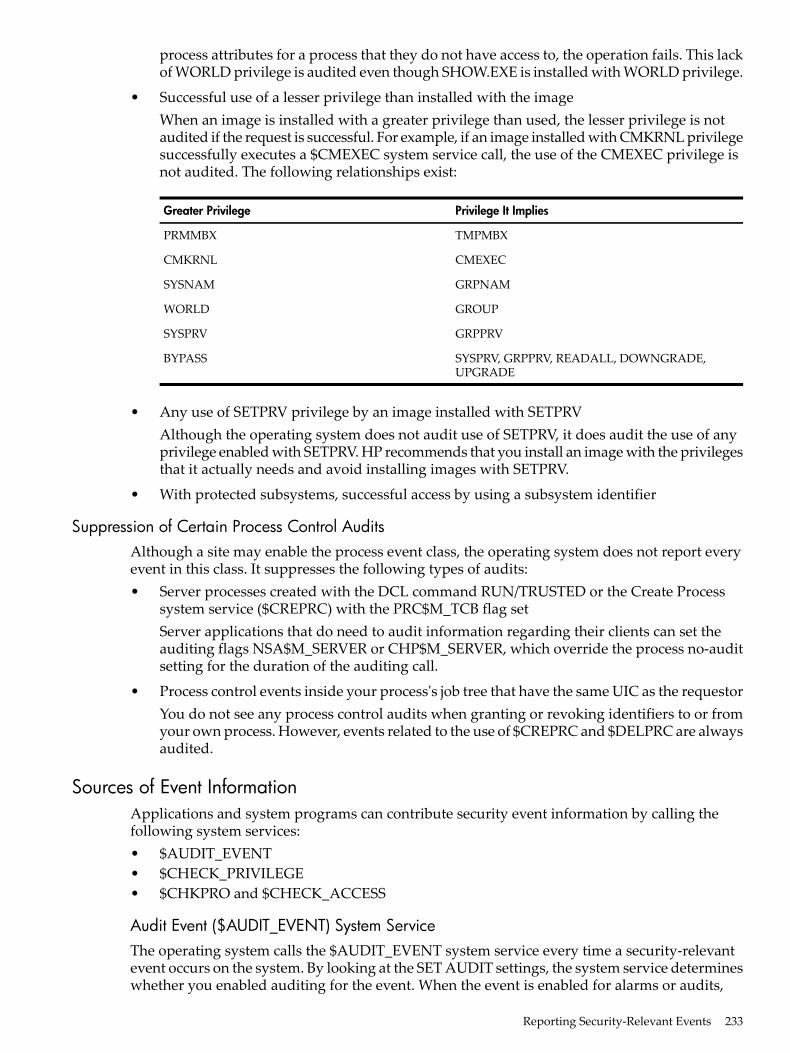
process attributes for a process that they do not have access to, the operation fails. This lackof WORLD privilege is audited even though SHOW.EXE is installed with WORLD privilege.
• Successful use of a lesser privilege than installed with the imageWhen an image is installed with a greater privilege than used, the lesser privilege is notaudited if the request is successful. For example, if an image installed with CMKRNL privilegesuccessfully executes a $CMEXEC system service call, the use of the CMEXEC privilege isnot audited. The following relationships exist:
Privilege It ImpliesGreater Privilege
TMPMBXPRMMBX
CMEXECCMKRNL
GRPNAMSYSNAM
GROUPWORLD
GRPPRVSYSPRV
SYSPRV, GRPPRV, READALL, DOWNGRADE,UPGRADE
BYPASS
• Any use of SETPRV privilege by an image installed with SETPRVAlthough the operating system does not audit use of SETPRV, it does audit the use of anyprivilege enabled with SETPRV. HP recommends that you install an image with the privilegesthat it actually needs and avoid installing images with SETPRV.
• With protected subsystems, successful access by using a subsystem identifier
Suppression of Certain Process Control AuditsAlthough a site may enable the process event class, the operating system does not report everyevent in this class. It suppresses the following types of audits:• Server processes created with the DCL command RUN/TRUSTED or the Create Process
system service ($CREPRC) with the PRC$M_TCB flag setServer applications that do need to audit information regarding their clients can set theauditing flags NSA$M_SERVER or CHP$M_SERVER, which override the process no-auditsetting for the duration of the auditing call.
• Process control events inside your process's job tree that have the same UIC as the requestorYou do not see any process control audits when granting or revoking identifiers to or fromyour own process. However, events related to the use of $CREPRC and $DELPRC are alwaysaudited.
Sources of Event InformationApplications and system programs can contribute security event information by calling thefollowing system services:• $AUDIT_EVENT• $CHECK_PRIVILEGE• $CHKPRO and $CHECK_ACCESS
Audit Event ($AUDIT_EVENT) System ServiceThe operating system calls the $AUDIT_EVENT system service every time a security-relevantevent occurs on the system. By looking at the SET AUDIT settings, the system service determineswhether you enabled auditing for the event. When the event is enabled for alarms or audits,
Reporting Security-Relevant Events 233
$AUDIT_EVENT generates an audit record that identifies the process (subject) involved andlists event information supplied by its caller.
Check Privilege ($CHECK_PRIVILEGE) System ServiceThe operating system calls the $CHECK_PRIVILEGE system service any time a user attemptsto perform a privileged function. (The current set of OpenVMS privileges is listed in “AssigningPrivileges” (page 303).) The system service performs the privilege check and looks at the SETAUDIT settings to determine whether you enabled privilege auditing. When privilege auditingis enabled, $CHECK_PRIVILEGE generates an audit record. The audit record identifies theprocess (subject) and privilege involved, provides the result of the privilege check, and listssupplemental event information supplied by its caller. Privilege audit records usually containthe DCL command line or system service name associated with the privilege check.
Check Protection ($CHKPRO) and Check Access ($CHECK_ACCESS) System ServicesThe operating system calls the $CHKPRO system service any time a process (subject) attemptsto access a protected object. The system service performs the access arbitration according to therules described in “How the System Determines if a User Can Access a Protected Object”(page 79)"How the System Determines If a User Can Access a Protected Object" on page 74. Bylooking at the SET AUDIT settings for the associated object class, the service also determineswhether you enabled auditing for the associated object access event. When an alarm or an auditis required, $CHKPRO generates an audit record that identifies the process (subject) and objectinvolved and includes the final outcome and any supplemental event information supplied byits caller.Privileged server processes use the $CHECK_ACCESS system service to determine whether theirclients should be allowed access to the protected objects being served. The $CHECK_ACCESSsystem service provides a calling interface appropriate for servers and is layered on top of the$CHKPRO service. As a result, it performs object access auditing in the same manner as$CHKPRO.
Developing an Auditing PlanAs system manager or site security administrator, you have to determine the level of securityrequired at your site before you can understand which security events to audit.
Assessing Your Auditing RequirementsAssessing your auditing requirements is a two-step process:1. Determine your site's general security requirements: are they high, moderate, or low? “Event
Tolerance as a Measure of Security Requirements” (page 28) provides some guidance ondetermining your security needs.
2. Once you know your site's needs, see the “Events to Monitor Depending on a Site's SecurityRequirements” (page 235) for a suggested list of event classes to enable.
After developing a general notion of your site requirements, you need to consider how muchsecurity reporting is realistic. Balance the suggestions in “Events to Monitor Depending on aSite's Security Requirements” (page 235) with the following site factors:• The sensitivity of the data at your site• The amount of time you have to analyze log files• The disk space you have available• Your knowledge of a security threat: where is it coming from or likely to come from• The tuning requirements of your system (See “Considering the Performance Impact”
(page 237) for information about performance impact.)
234 Security Auditing
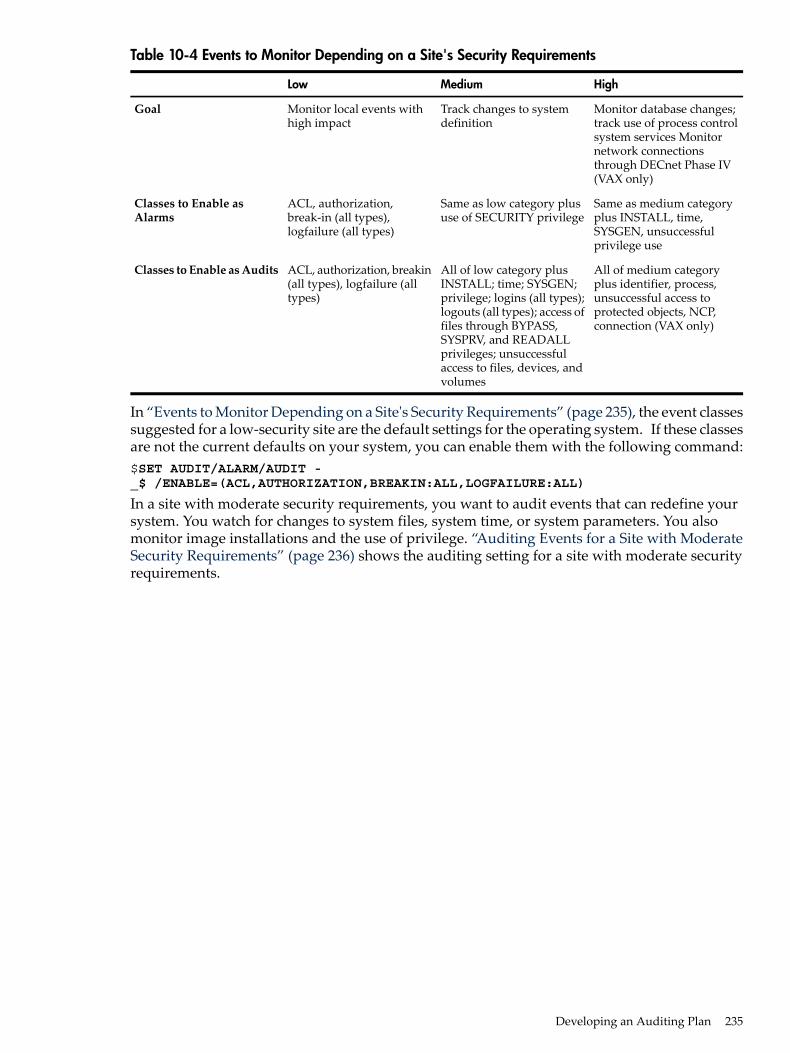
Table 10-4 Events to Monitor Depending on a Site's Security Requirements
HighMediumLow
Monitor database changes;track use of process controlsystem services Monitornetwork connectionsthrough DECnet Phase IV(VAX only)
Track changes to systemdefinition
Monitor local events withhigh impact
Goal
Same as medium categoryplus INSTALL, time,SYSGEN, unsuccessfulprivilege use
Same as low category plususe of SECURITY privilege
ACL, authorization,break-in (all types),logfailure (all types)
Classes to Enable asAlarms
All of medium categoryplus identifier, process,unsuccessful access toprotected objects, NCP,connection (VAX only)
All of low category plusINSTALL; time; SYSGEN;privilege; logins (all types);logouts (all types); access offiles through BYPASS,SYSPRV, and READALLprivileges; unsuccessfulaccess to files, devices, andvolumes
ACL, authorization, breakin(all types), logfailure (alltypes)
Classes to Enable asAudits
In “Events to Monitor Depending on a Site's Security Requirements” (page 235), the event classessuggested for a low-security site are the default settings for the operating system. If these classesare not the current defaults on your system, you can enable them with the following command:$SET AUDIT/ALARM/AUDIT -_$ /ENABLE=(ACL,AUTHORIZATION,BREAKIN:ALL,LOGFAILURE:ALL)
In a site with moderate security requirements, you want to audit events that can redefine yoursystem. You watch for changes to system files, system time, or system parameters. You alsomonitor image installations and the use of privilege. “Auditing Events for a Site with ModerateSecurity Requirements” (page 236) shows the auditing setting for a site with moderate securityrequirements.
Developing an Auditing Plan 235
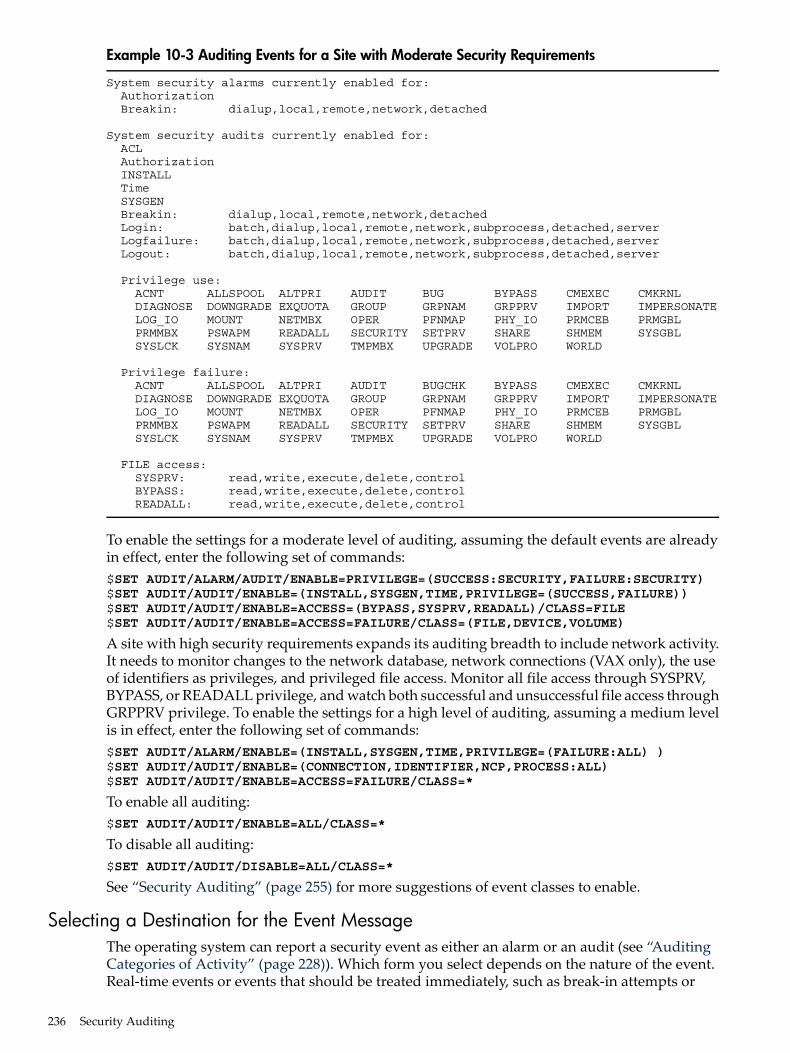
Example 10-3 Auditing Events for a Site with Moderate Security Requirements
System security alarms currently enabled for: Authorization Breakin: dialup,local,remote,network,detached
System security audits currently enabled for: ACL Authorization INSTALL Time SYSGEN Breakin: dialup,local,remote,network,detached Login: batch,dialup,local,remote,network,subprocess,detached,server Logfailure: batch,dialup,local,remote,network,subprocess,detached,server Logout: batch,dialup,local,remote,network,subprocess,detached,server
Privilege use: ACNT ALLSPOOL ALTPRI AUDIT BUG BYPASS CMEXEC CMKRNL DIAGNOSE DOWNGRADE EXQUOTA GROUP GRPNAM GRPPRV IMPORT IMPERSONATE LOG_IO MOUNT NETMBX OPER PFNMAP PHY_IO PRMCEB PRMGBL PRMMBX PSWAPM READALL SECURITY SETPRV SHARE SHMEM SYSGBL SYSLCK SYSNAM SYSPRV TMPMBX UPGRADE VOLPRO WORLD
Privilege failure: ACNT ALLSPOOL ALTPRI AUDIT BUGCHK BYPASS CMEXEC CMKRNL DIAGNOSE DOWNGRADE EXQUOTA GROUP GRPNAM GRPPRV IMPORT IMPERSONATE LOG_IO MOUNT NETMBX OPER PFNMAP PHY_IO PRMCEB PRMGBL PRMMBX PSWAPM READALL SECURITY SETPRV SHARE SHMEM SYSGBL SYSLCK SYSNAM SYSPRV TMPMBX UPGRADE VOLPRO WORLD
FILE access: SYSPRV: read,write,execute,delete,control BYPASS: read,write,execute,delete,control READALL: read,write,execute,delete,control
To enable the settings for a moderate level of auditing, assuming the default events are alreadyin effect, enter the following set of commands:$SET AUDIT/ALARM/AUDIT/ENABLE=PRIVILEGE=(SUCCESS:SECURITY,FAILURE:SECURITY)$SET AUDIT/AUDIT/ENABLE=(INSTALL,SYSGEN,TIME,PRIVILEGE=(SUCCESS,FAILURE))$SET AUDIT/AUDIT/ENABLE=ACCESS=(BYPASS,SYSPRV,READALL)/CLASS=FILE$SET AUDIT/AUDIT/ENABLE=ACCESS=FAILURE/CLASS=(FILE,DEVICE,VOLUME)
A site with high security requirements expands its auditing breadth to include network activity.It needs to monitor changes to the network database, network connections (VAX only), the useof identifiers as privileges, and privileged file access. Monitor all file access through SYSPRV,BYPASS, or READALL privilege, and watch both successful and unsuccessful file access throughGRPPRV privilege. To enable the settings for a high level of auditing, assuming a medium levelis in effect, enter the following set of commands:$SET AUDIT/ALARM/ENABLE=(INSTALL,SYSGEN,TIME,PRIVILEGE=(FAILURE:ALL) )$SET AUDIT/AUDIT/ENABLE=(CONNECTION,IDENTIFIER,NCP,PROCESS:ALL)$SET AUDIT/AUDIT/ENABLE=ACCESS=FAILURE/CLASS=*
To enable all auditing:$SET AUDIT/AUDIT/ENABLE=ALL/CLASS=*
To disable all auditing:$SET AUDIT/AUDIT/DISABLE=ALL/CLASS=*
See “Security Auditing” (page 255) for more suggestions of event classes to enable.
Selecting a Destination for the Event MessageThe operating system can report a security event as either an alarm or an audit (see “AuditingCategories of Activity” (page 228)). Which form you select depends on the nature of the event.Real-time events or events that should be treated immediately, such as break-in attempts or
236 Security Auditing
changes to the system user authorization file (SYSUAF.DAT), are classes to enable as both alarmsand audits. Less critical events can be enabled just as audits. Unless you have a hardcopy operatorterminal, the alarm record is quickly superseded by other system messages. Audit event records,which are written to the system security audit log, are saved so you can study them in volume.There is an advantage to studying event messages. Many times an isolated auditing messageoffers little insight, but numerous audit records reveal a pattern of activity that might indicatesecurity violations. With auditing of object access, for example, a security administrator can seea pattern of time, types of objects being accessed, and other system information that, in total,paint a complete picture of system activity. “Analyzing a Log File” (page 241) describes how toproduce reports from audit log files.
Considering the Performance ImpactThe default auditing performed by the operating system primarily tracks changes to theauthorization databases. System events like changes to the system user authorization file(SYSUAF.DAT) or the installation of images do not occur too often and therefore are not a drainon system resources.Auditing additional event classes, particularly access events and privilege events, can consumesignificant system resources if a site enables the event classes without understanding how theirsystem is used and without evaluating the value of the audit information. In this respect,implementation of the audit reporting system is similar to system tuning: it takes a little whileto reach the appropriate level of reporting that is free of spurious details. For this reason, HPrecommends you turn auditing on in phases, not all at once, and gradually add or subtract eventclasses until you reach a satisfactory balance. Use the following guidelines:• Evaluate your auditing requirements, as described in “Assessing Your Auditing
Requirements” (page 234).• Be selective in auditing object access events. Object access events occur all the time and
therefore have the greatest impact on system performance. Audit file-access failures in mostcases rather than successful file access, or put auditing ACEs on key files rather than enableauditing for the entire file class.
• Examine the layered products you are running so you understand which privileges theymay use. Also become familiar with site-specific procedures, such as the use of the READALLprivilege during a backup operation. Because privilege events occur frequently, they havea great impact on system performance.
• Enable a few event classes at a time and then add or subtract, if necessary, until you havesufficient event information. The more classes you enable, the more overhead you have andthe fewer resources you have for useful work on the system.
Two commands in particular generate a large number of audit messages:• The DCL PIPE command can create a large number of subprocesses to execute a single PIPE
command. This can mean a potential increase in auditing events that are related to subprocessactivities (for example, process creation, process deletion, login, logfailure, and logout).
• The UAF command MODIFY USER/FLAG=AUDIT generates a very large number of auditmessages. It is not usually necessary to set this flag; if you have a particular AUDIT enabled,you do not need to have the user flag set as well.
Methods of Capturing Event MessagesThe operating system can send event messages to an audit log file or to an operator terminal. Ifa site wants additional copies, it can send duplicate messages to a remote log file or an applicationlistener mailbox.
Methods of Capturing Event Messages 237
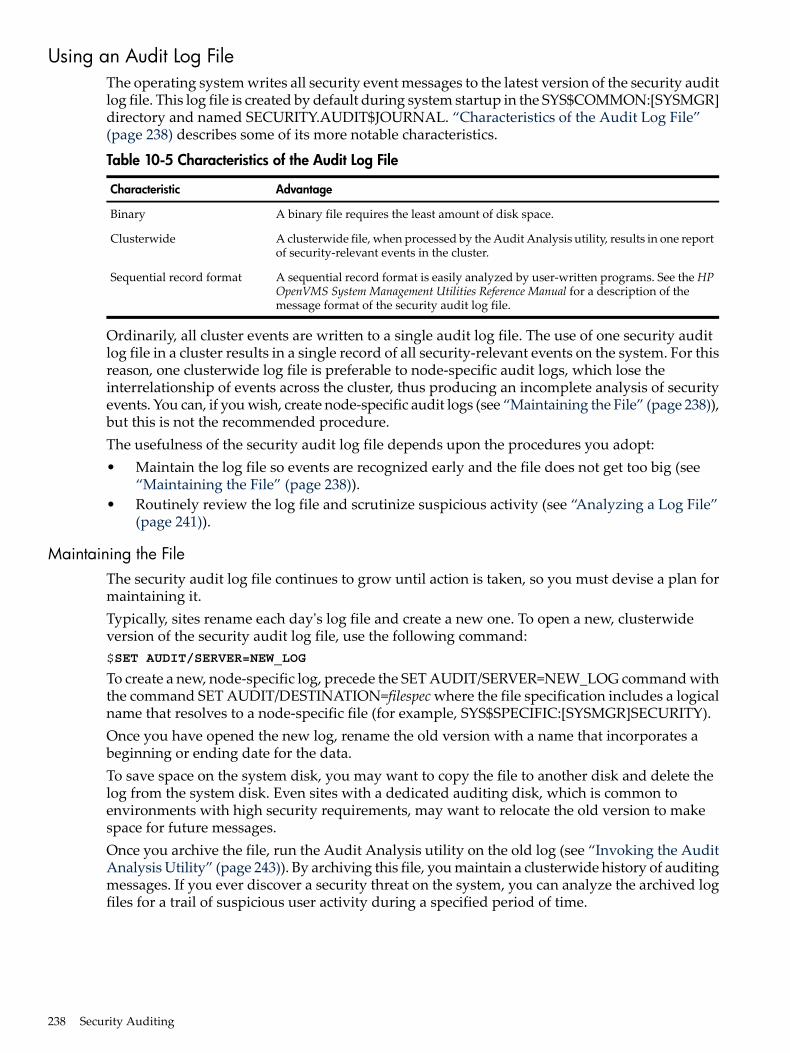
Using an Audit Log FileThe operating system writes all security event messages to the latest version of the security auditlog file. This log file is created by default during system startup in the SYS$COMMON:[SYSMGR]directory and named SECURITY.AUDIT$JOURNAL. “Characteristics of the Audit Log File”(page 238) describes some of its more notable characteristics.
Table 10-5 Characteristics of the Audit Log File
AdvantageCharacteristic
A binary file requires the least amount of disk space.Binary
A clusterwide file, when processed by the Audit Analysis utility, results in one reportof security-relevant events in the cluster.
Clusterwide
A sequential record format is easily analyzed by user-written programs. See the HPOpenVMS System Management Utilities Reference Manual for a description of themessage format of the security audit log file.
Sequential record format
Ordinarily, all cluster events are written to a single audit log file. The use of one security auditlog file in a cluster results in a single record of all security-relevant events on the system. For thisreason, one clusterwide log file is preferable to node-specific audit logs, which lose theinterrelationship of events across the cluster, thus producing an incomplete analysis of securityevents. You can, if you wish, create node-specific audit logs (see “Maintaining the File” (page 238)),but this is not the recommended procedure.The usefulness of the security audit log file depends upon the procedures you adopt:• Maintain the log file so events are recognized early and the file does not get too big (see
“Maintaining the File” (page 238)).• Routinely review the log file and scrutinize suspicious activity (see “Analyzing a Log File”
(page 241)).
Maintaining the FileThe security audit log file continues to grow until action is taken, so you must devise a plan formaintaining it.Typically, sites rename each day's log file and create a new one. To open a new, clusterwideversion of the security audit log file, use the following command:$SET AUDIT/SERVER=NEW_LOG
To create a new, node-specific log, precede the SET AUDIT/SERVER=NEW_LOG command withthe command SET AUDIT/DESTINATION=filespec where the file specification includes a logicalname that resolves to a node-specific file (for example, SYS$SPECIFIC:[SYSMGR]SECURITY).Once you have opened the new log, rename the old version with a name that incorporates abeginning or ending date for the data.To save space on the system disk, you may want to copy the file to another disk and delete thelog from the system disk. Even sites with a dedicated auditing disk, which is common toenvironments with high security requirements, may want to relocate the old version to makespace for future messages.Once you archive the file, run the Audit Analysis utility on the old log (see “Invoking the AuditAnalysis Utility” (page 243)). By archiving this file, you maintain a clusterwide history of auditingmessages. If you ever discover a security threat on the system, you can analyze the archived logfiles for a trail of suspicious user activity during a specified period of time.
238 Security Auditing
Moving the File from the System DiskTo relocate the file from the SYS$COMMON:[SYSMGR] directory, edit the command procedureSYSECURITY.COM. This procedure executes each time the system is rebooted, before the auditserver is started.To relocate the file, perform the following steps:1. Change the startup sequence by adding a line to SYSECURITY.COM that directs the operating
system to mount the designated auditing disk before the audit server process is started ratherthan after. For example:$ IF .NOT. F$GETDVI("$1$DUA2","MNT") -_$ THEN MOUNT/SYSTEM $1$DUA2 AUDIT AUDIT$ /NOREBUILD
The command in this example mounts a volume labeled AUDIT on $1$DUA2 and makes itavailable systemwide. MOUNT also assigns the logical name AUDIT$.
2. Move the audit server database to the auditing disk, if you choose. The database remainssmall and fairly stable so this step is not essential.To move the database, add a second line to SYSECURITY.COM to define the system logicalname VMS$AUDIT_SERVER. (The line follows the one that mounts the auditing disk.) Inthe command, define a system logical name and assign it to the VMS$AUDIT_SERVER datafile on the disk with the logical name AUDIT$. For example:$ DEFINE/SYSTEM/EXEC VMS$AUDIT_SERVER AUDIT$:[AUDIT]VMS$AUDIT_SERVER.DAT
This command redirects the audit server database to the volume on $1$DUA2, which wasmounted in step 1.
3. From the DCL level, redirect the security audit log file to the volume mounted inSYSECURITY.COM (see step 1). Use the SET AUDIT command to update the audit serverdatabase with the new location of the security audit log file, and instruct the audit serverprocess on each node in the cluster to begin using the file. For example:$SET AUDIT/JOURNAL=SECURITY -_$/DESTINATION=AUDIT$:[AUDIT]SECURITY
Do not repeat this command on each system restart.If you use a logical name in the specification of the security audit log file, it must be definedas a /SYSTEM logical name in SYSECURITY.COM.
Enabling a Terminal to Receive AlarmsThe operating system sends alarm messages to terminals enabled for security class messages. Inmost cases, these security alarms appear on the system console by default. Because messagesscroll quickly off the screen, it is a good practice to enable a separate terminal for security classmessages and disable message delivery to the system console. Choose either a terminal in asecure location that provides hardcopy output or have dedicated staff monitor the securityoperator terminal. Any number of terminals can be enabled as security operators.To set up a terminal to receive security class alarms, enter the following DCL command fromthe designated terminal:$REPLY/ENABLE=SECURITY
For long-term use of a specific terminal, you can modify your site-specific startup commandprocedure to automatically enable the terminal. For example, the following command lines in astartup command procedure disable the delivery of security alarms to the system console andenable alarms on terminal TTA3:$ DEFINE/USER SYS$COMMAND OPA0:$ REPLY/DISABLE=SECURITY$ DEFINE/USER SYS$COMMAND TTA3:$ REPLY/ENABLE=SECURITY
Methods of Capturing Event Messages 239
The authorization and SYSGEN event classes occasionally produce such lengthy alarm messagesthat the messages get truncated. For this reason, it is best to enable these classes for both alarmsand audits. When an alarm message is truncated, the text indicates it is incomplete. As long asyou have enabled the classes for audit messages, you can use ANALYZE/AUDIT to display thecomplete message.
Secondary Destinations for Event MessagesThe operator terminal and the audit log file are the primary destinations for security eventmessages. A site can choose to send copies of audit messages to a remote log file (called an archivefile) or a listener mailbox.
Using a Remote Log FileThe operating system allows workstations and other users with limited management resourcesto duplicate their audit log file on another node. This secondary log, the security archive file, isthen available on a remote node to a security administrator who has the skills to analyze the file.In some situations, the archive file can also provide insurance should the local audit log file betampered with in some way. One node can direct auditing messages to an archive file. Onceenabled, the audit server writes a copy of each auditing message to the security archive file aswell as to the security audit log file.
NOTE: Each node in a cluster must have its own archive file. An archive file cannot be sharedby multiple nodes in a cluster.
Use the following procedure to write security audit messages to a remote security archive file:1. Log in to the node where the archive file is located, and create an account for the audit server.
To the account, assign a user name like AUDIT_ARCHIVE; make the account unprivilegedwith only network access. Be sure the account has access to the device and directorycontaining the security archive file.$SET DEFAULT SYS$SYSTEM$RUN AUTHORIZEUAF>ADD AUDIT_ARCHIVE /ACCESS=NETWORK /DEVICE=WORK2-_UAF>/DIRECTORY=[AUDIT_ARCHIVE]
2. Add a proxy account on the remote node for AUDIT$SERVER. This allows the audit serverprocess to write data to its account on the remote node. For example, the following commandsgrant the audit server process on node SMLNOD proxy access to the AUDIT_ARCHIVEaccount on node BIGNOD:UAF>ADD/PROXY SMLNOD::AUDIT$SERVER AUDIT_ARCHIVE/DEFAULTUAF>EXIT
See “Setting Up a Proxy Database” (page 272) for further information about setting up proxyaccounts.
3. Log out from the remote node. On the local node, enable archiving of the log file to the nodeby entering the following command:$SET AUDIT/ARCHIVE=ALL/DESTINATION=BIGNOD::WORK2:-_$[AUDIT_ARCHIVE]SMLNOD_MAY_93.AUDIT$JOURNAL
You must supply a complete directory specification. If you include any logical names, ensurethe local audit server process can translate them.
To create a new archive file, rename the current file; the next time the system starts up, it createsa new one for you.If the network goes down, messages intended for the security archive file are lost. Securityoperator terminals receive notice of the lost connection and the number of lost messages. Oncethe network is up, the audit server reestablishes connection to the original archive file andcontinues writing event messages.
240 Security Auditing
Analyzing the security archive file is identical, in most respects, to analysis of the security auditlog file. You can analyze a remote security archive file at any time, even while the file is open.See “Analyzing a Log File” (page 241) for more information.
Using a Listener MailboxAs an additional feature of the security auditing facility, you can create a listener device to receivea binary copy of all security-auditing messages. (A listener device is a permanent or temporarymailbox that you create with the Create Mailbox [$CREMBX] system service.) You can set up anapplication to receive and process auditing information and react to events as they occur on thesystem. Each system can have one listener device, and it can receive only events that are occurringon the local node.To enable the listener device to receive security-auditing messages, execute the SETAUDIT/LISTENER command in the following format:SET AUDIT/LISTENER=device-name
For the device-name parameter, supply either the logical name specified when you created themailbox or the equivalence name of the mailbox, in the form of MBAn, where n represents theunit number of the mailbox. If you create the device as a temporary mailbox, you must use theGet Device and Volume Information ($GETDVI) system service to return the mailbox devicename.To disable an audit listener device, enter the following command:$SET AUDIT/NOLISTENER
On VAX systems, see the files AUDSRV_LISTENER.B32 (a VAX BLISS program) andAUDSRV_LISTENER.MAR (a VAX MACRO program) in the SYS$EXAMPLES directory forexamples of a program that processes audit-event messages sent to a listener mailbox on aDECtalk device.
Analyzing a Log FileCollecting security audit messages in the security audit log file is useless without periodicallyreviewing it for suspicious activity. You use the Audit Analysis utility (ANALYZE/AUDIT) toexamine the data in the security audit log file.ANALYZE/AUDIT generates a report from the log file so that you become familiar with normalactivity on your system and can easily spot atypical activity. It summarizes events for you andplots where activity is occurring on the cluster. The utility also helps you analyze atypical activitybecause it is capable of selecting a subset of information from an audit report and of providingfuller information for your analysis. While the analysis of a single audit log file might not besignificant, audit records can, over time, reveal a pattern of activity that indicates securityviolations.
Recommended ProcedureThis section describes how to analyze audit log files on your system. Although the way you useANALYZE/AUDIT depends upon the security needs at your site, there are a number of commonsteps that you should follow, regardless of the extent to which you use the utility. Before youcan recognize potential security problems, you need to become familiar with the normal operationof your system. Then you can develop a procedure for generating and reviewing audit reportson a periodic basis. Whenever your regular analysis of audit log files leads you to suspect asecurity problem, you should perform a detailed investigation of selected security events.
Analyzing a Log File 241
Step 1: Know What Is NormalAs a security administrator, you should be able to answer the following questions before analyzingan audit log file:• What are the typical hours of operation for most users of the system?• Are there specific users who normally operate with advanced privileges?• Which images generate system security events as part of other applications?• Are there any regular batch or network jobs that run at specific times of the day?By knowing the answers to these questions, you can eliminate false alarms, which otherwisemay cause you to wrongly suspect a security problem.
Step 2: Periodically Analyze the Audit ReportThe most common type of report to generate is a brief, daily listing of events. You can create acommand procedure that runs in a batch job every evening before midnight to generate a reportof the day's security event messages. (You can use the same procedure to create a new versionof the audit log [see “Maintaining the File” (page 238)].)The following example shows the ANALYZE/AUDIT command line to generate this report:$ANALYZE/AUDIT/SINCE=TODAY/OUTPUT=31DEC2000.AUDIT - [1]
_$SYS$MANAGER:SECURITY.AUDIT$JOURNAL$MAIL/SUBJECT="Security Events" 31DEC2000.AUDIT SYSTEM [2]
1. The first command in this example produces an audit report named 31DEC2000.AUDIT,which contains one-line descriptions of all the security event messages generated duringthe current day.
2. The second command mails the file to the security administrator for examination.Depending on the number of security events that you are auditing on your system, it can beimpractical to review every audit record written to the audit log file. In this case, you can selecta specific set of records from the log file, such as all audit records related to changes in theauthorization database and break-in attempts, or all events occurring outside normal businesshours.Analyze any subprocess-related audits with the knowledge that a pipe subprocess (created bythe DCL PIPE command) can generate the audits. The PIPE command can create a large numberof subprocesses to execute a single PIPE command. This can mean a potential increase in auditingevents that are related to subprocess activities (for example, process creation, process deletion,login, logfailure, and logout).It is important that you review audit reports as soon as possible. The sooner you inspect thereports, the sooner you become aware of any possible breach of security on the system and candetermine the extent of the problem. You can make the inspection of the previous day's auditreport a regular part of your morning routine, or you can create a program that reviews thereport and notifies you through the Mail utility (MAIL) when suspicious events appear.
Step 3: Scrutinize Suspicious ActivityIf, during your review, you find any security events that appear suspicious or out of place, likelogin attempts outside normal business hours, then use the Audit Analysis utility to perform amore detailed inspection of the security audit log file. A full report can help you determine whichsecurity events logged to the audit log file warrant a more thorough investigation.The following command generates a full report of selected security audit records:$ANALYZE/AUDIT/FULL/SINCE=TODAY/OUTPUT=31DEC2000.AUDIT -_$/EVENT_TYPE=(BREAKIN,RIGHTSDB,SYSUAF)$MAIL/SUBJECT="Security Events" 31DEC2000.AUDIT SYSTEM
242 Security Auditing
The audit report for December 31, 2000 contains information on all intrusion attempts and allmodifications to the system user authorization file (SYSUAF.DAT) and the rights database(RIGHTSLIST.DAT).
Invoking the Audit Analysis UtilityThe Audit Analysis utility is the tool you use to produce a meaningful report from a binary logfile. This section and the sections that follow describe how to use the utility, but see the HPOpenVMSSystemManagementUtilities ReferenceManual for complete documentation of the utility'scommands and qualifiers.To invoke the Audit Analysis utility, use the following DCL command:ANALYZE/AUDIT file-name
For the file-name parameter, substitute the name of the file from which audit reports are to begenerated. The default name of the security audit log file is SECURITY.AUDIT$JOURNAL. Youmust specify the directory: SYS$MANAGER.
Providing Report SpecificationsWith the Audit Analysis utility, you are able to extract all or some of the security event messagesfrom a single audit log and produce reports with various levels of detail.The audit report reflects events from the set of event classes a site has enabled (see “ReportingSecurity-Relevant Events” (page 228)). You can tailor the report so only a subset of events areextracted. The selection criteria can be based on time, on event class, or on field of data withinthe event message. (See the documentation of the /SELECT qualifier in the HP OpenVMS SystemManagement Utilities Reference Manual.) “Qualifiers for the Audit Analysis Utility” (page 243)summarizes the qualifiers that determine the content of the report.
Table 10-6 Qualifiers for the Audit Analysis Utility
DescriptionQualifierType
Extracts event messages logged before the specified time./BEFOREContent
Extracts event messages logged after the specified of time./SINCE
Extracts event messages of a specific event class (see “Kinds ofSecurity Events the System Can Report” (page 232) ).
/EVENT_TYPE
Extracts event messages based on data in the messages. (Forexample, /SELECT=USERNAME=JSNOOP lists only security eventmessages generated by user JSNOOP.)
/SELECT
Excludes event messages from the report based on data in themessages.
/IGNORE
Produces a report with one line of information about each recordin the audit log file, such as the type of event, when it occurred,and the terminal from which it originated (see “Brief AuditReport” (page 244)). This is the default.
/BRIEFFormat
Provides all possible data for each record in the audit log file beingprocessed (see “One Record from a Full Audit Report” (page 245)).“Alarm Messages” (page 341) provides sample alarm messagesfor each event class.
/FULL
Lists the total number of audit messages for each event class inthe log file being analyzed (see “Summary of Events in an AuditLog File” (page 245)). It can also plot the aggregate events per houron each node.
/SUMMARY
Analyzing a Log File 243
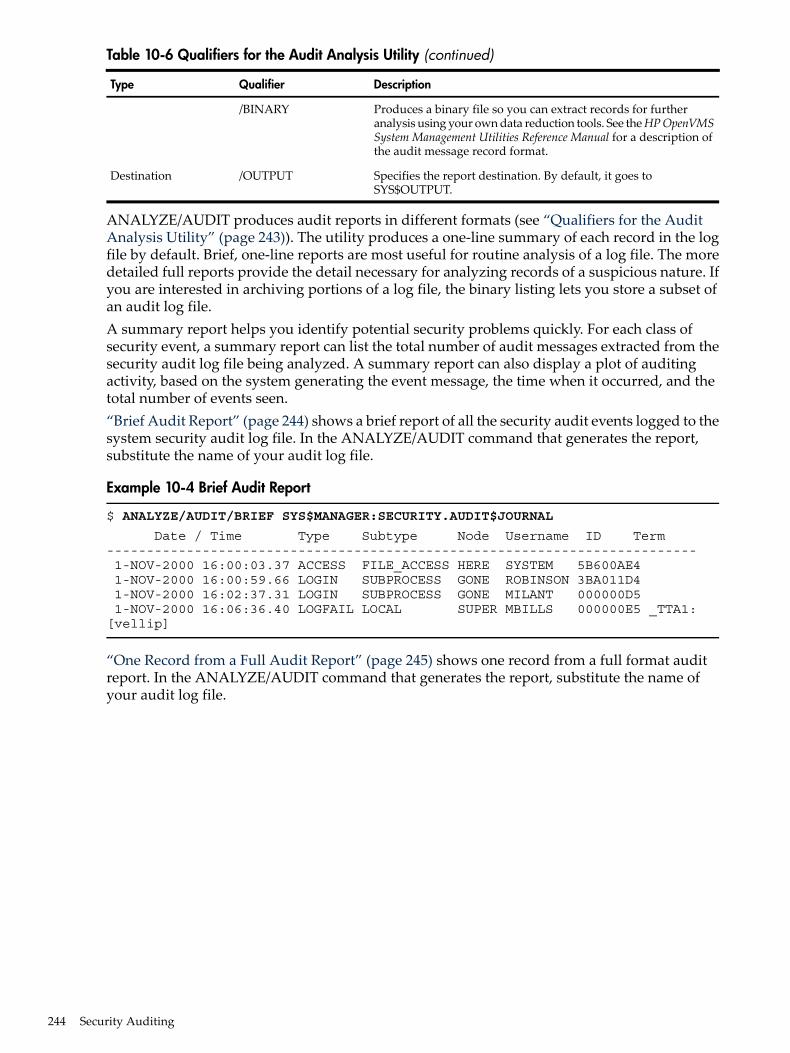
Table 10-6 Qualifiers for the Audit Analysis Utility (continued)
DescriptionQualifierType
Produces a binary file so you can extract records for furtheranalysis using your own data reduction tools. See theHPOpenVMSSystem Management Utilities Reference Manual for a description ofthe audit message record format.
/BINARY
Specifies the report destination. By default, it goes toSYS$OUTPUT.
/OUTPUTDestination
ANALYZE/AUDIT produces audit reports in different formats (see “Qualifiers for the AuditAnalysis Utility” (page 243)). The utility produces a one-line summary of each record in the logfile by default. Brief, one-line reports are most useful for routine analysis of a log file. The moredetailed full reports provide the detail necessary for analyzing records of a suspicious nature. Ifyou are interested in archiving portions of a log file, the binary listing lets you store a subset ofan audit log file.A summary report helps you identify potential security problems quickly. For each class ofsecurity event, a summary report can list the total number of audit messages extracted from thesecurity audit log file being analyzed. A summary report can also display a plot of auditingactivity, based on the system generating the event message, the time when it occurred, and thetotal number of events seen.“Brief Audit Report” (page 244) shows a brief report of all the security audit events logged to thesystem security audit log file. In the ANALYZE/AUDIT command that generates the report,substitute the name of your audit log file.
Example 10-4 Brief Audit Report
$ ANALYZE/AUDIT/BRIEF SYS$MANAGER:SECURITY.AUDIT$JOURNAL
Date / Time Type Subtype Node Username ID Term-------------------------------------------------------------------------- 1-NOV-2000 16:00:03.37 ACCESS FILE_ACCESS HERE SYSTEM 5B600AE4 1-NOV-2000 16:00:59.66 LOGIN SUBPROCESS GONE ROBINSON 3BA011D4 1-NOV-2000 16:02:37.31 LOGIN SUBPROCESS GONE MILANT 000000D5 1-NOV-2000 16:06:36.40 LOGFAIL LOCAL SUPER MBILLS 000000E5 _TTA1:[vellip]
“One Record from a Full Audit Report” (page 245) shows one record from a full format auditreport. In the ANALYZE/AUDIT command that generates the report, substitute the name ofyour audit log file.
244 Security Auditing
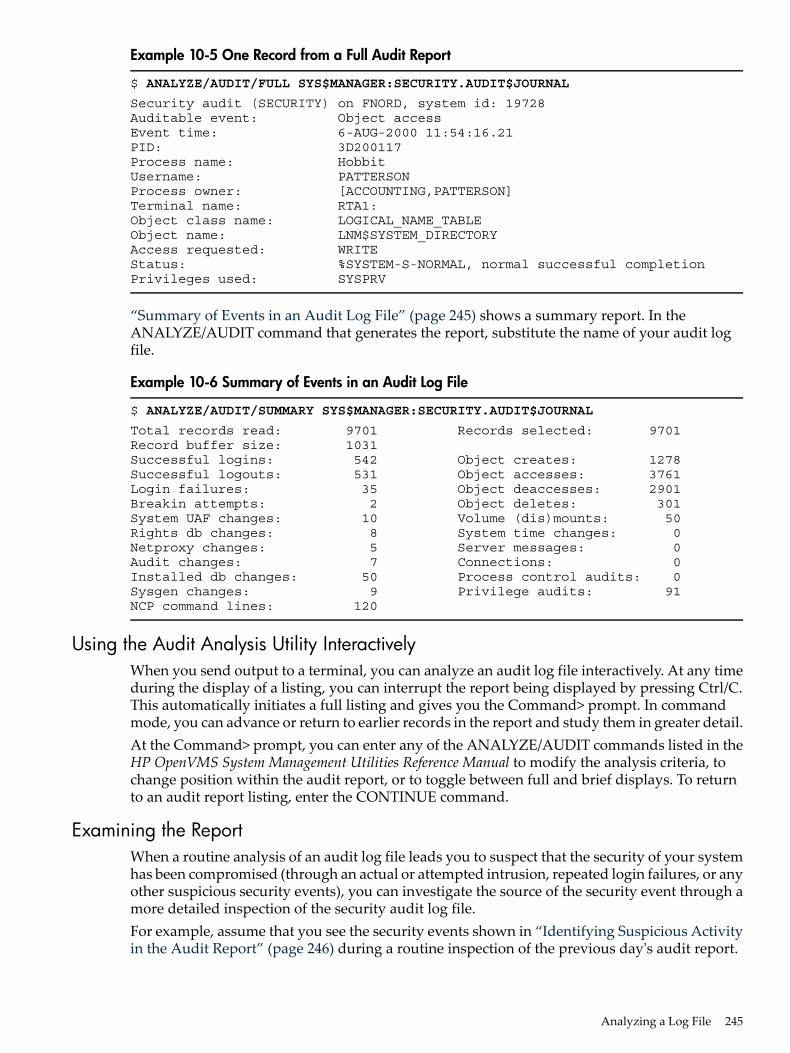
Example 10-5 One Record from a Full Audit Report
$ ANALYZE/AUDIT/FULL SYS$MANAGER:SECURITY.AUDIT$JOURNAL
Security audit (SECURITY) on FNORD, system id: 19728Auditable event: Object accessEvent time: 6-AUG-2000 11:54:16.21PID: 3D200117Process name: HobbitUsername: PATTERSONProcess owner: [ACCOUNTING,PATTERSON]Terminal name: RTA1:Object class name: LOGICAL_NAME_TABLEObject name: LNM$SYSTEM_DIRECTORYAccess requested: WRITEStatus: %SYSTEM-S-NORMAL, normal successful completionPrivileges used: SYSPRV
“Summary of Events in an Audit Log File” (page 245) shows a summary report. In theANALYZE/AUDIT command that generates the report, substitute the name of your audit logfile.
Example 10-6 Summary of Events in an Audit Log File
$ ANALYZE/AUDIT/SUMMARY SYS$MANAGER:SECURITY.AUDIT$JOURNAL
Total records read: 9701 Records selected: 9701Record buffer size: 1031Successful logins: 542 Object creates: 1278Successful logouts: 531 Object accesses: 3761Login failures: 35 Object deaccesses: 2901Breakin attempts: 2 Object deletes: 301System UAF changes: 10 Volume (dis)mounts: 50Rights db changes: 8 System time changes: 0Netproxy changes: 5 Server messages: 0Audit changes: 7 Connections: 0Installed db changes: 50 Process control audits: 0Sysgen changes: 9 Privilege audits: 91NCP command lines: 120
Using the Audit Analysis Utility InteractivelyWhen you send output to a terminal, you can analyze an audit log file interactively. At any timeduring the display of a listing, you can interrupt the report being displayed by pressing Ctrl/C.This automatically initiates a full listing and gives you the Command> prompt. In commandmode, you can advance or return to earlier records in the report and study them in greater detail.At the Command> prompt, you can enter any of the ANALYZE/AUDIT commands listed in theHP OpenVMS System Management Utilities Reference Manual to modify the analysis criteria, tochange position within the audit report, or to toggle between full and brief displays. To returnto an audit report listing, enter the CONTINUE command.
Examining the ReportWhen a routine analysis of an audit log file leads you to suspect that the security of your systemhas been compromised (through an actual or attempted intrusion, repeated login failures, or anyother suspicious security events), you can investigate the source of the security event through amore detailed inspection of the security audit log file.For example, assume that you see the security events shown in “Identifying Suspicious Activityin the Audit Report” (page 246) during a routine inspection of the previous day's audit report.
Analyzing a Log File 245
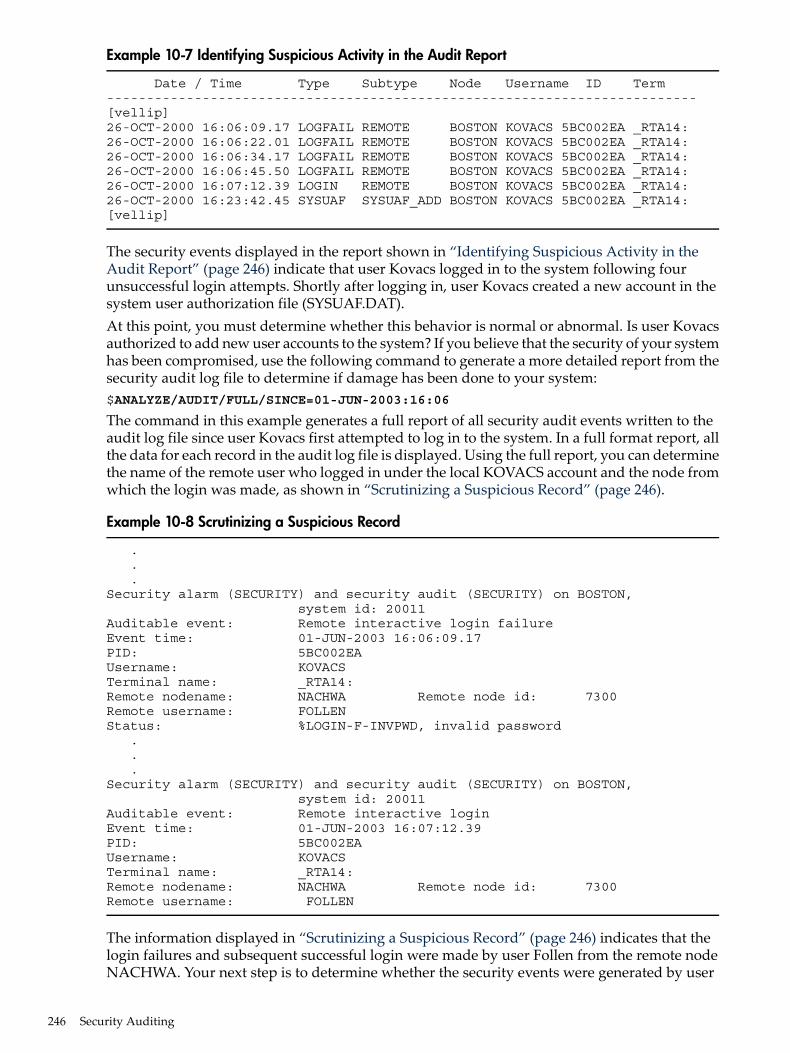
Example 10-7 Identifying Suspicious Activity in the Audit Report
Date / Time Type Subtype Node Username ID Term--------------------------------------------------------------------------[vellip]26-OCT-2000 16:06:09.17 LOGFAIL REMOTE BOSTON KOVACS 5BC002EA _RTA14:26-OCT-2000 16:06:22.01 LOGFAIL REMOTE BOSTON KOVACS 5BC002EA _RTA14:26-OCT-2000 16:06:34.17 LOGFAIL REMOTE BOSTON KOVACS 5BC002EA _RTA14:26-OCT-2000 16:06:45.50 LOGFAIL REMOTE BOSTON KOVACS 5BC002EA _RTA14:26-OCT-2000 16:07:12.39 LOGIN REMOTE BOSTON KOVACS 5BC002EA _RTA14:26-OCT-2000 16:23:42.45 SYSUAF SYSUAF_ADD BOSTON KOVACS 5BC002EA _RTA14:[vellip]
The security events displayed in the report shown in “Identifying Suspicious Activity in theAudit Report” (page 246) indicate that user Kovacs logged in to the system following fourunsuccessful login attempts. Shortly after logging in, user Kovacs created a new account in thesystem user authorization file (SYSUAF.DAT).At this point, you must determine whether this behavior is normal or abnormal. Is user Kovacsauthorized to add new user accounts to the system? If you believe that the security of your systemhas been compromised, use the following command to generate a more detailed report from thesecurity audit log file to determine if damage has been done to your system:$ANALYZE/AUDIT/FULL/SINCE=01-JUN-2003:16:06
The command in this example generates a full report of all security audit events written to theaudit log file since user Kovacs first attempted to log in to the system. In a full format report, allthe data for each record in the audit log file is displayed. Using the full report, you can determinethe name of the remote user who logged in under the local KOVACS account and the node fromwhich the login was made, as shown in “Scrutinizing a Suspicious Record” (page 246).
Example 10-8 Scrutinizing a Suspicious Record
. . .Security alarm (SECURITY) and security audit (SECURITY) on BOSTON, system id: 20011Auditable event: Remote interactive login failureEvent time: 01-JUN-2003 16:06:09.17PID: 5BC002EAUsername: KOVACSTerminal name: _RTA14:Remote nodename: NACHWA Remote node id: 7300Remote username: FOLLENStatus: %LOGIN-F-INVPWD, invalid password . . .Security alarm (SECURITY) and security audit (SECURITY) on BOSTON, system id: 20011Auditable event: Remote interactive loginEvent time: 01-JUN-2003 16:07:12.39PID: 5BC002EAUsername: KOVACSTerminal name: _RTA14:Remote nodename: NACHWA Remote node id: 7300Remote username: FOLLEN
The information displayed in “Scrutinizing a Suspicious Record” (page 246) indicates that thelogin failures and subsequent successful login were made by user Follen from the remote nodeNACHWA. Your next step is to determine whether the security events were generated by user
246 Security Auditing
Follen or by someone who has broken into the remote node NACHWA through the FOLLENaccount.
Managing the Auditing SubsystemThis section discusses how to manage the auditing system. Management tasks include thefollowing:• Enabling and disabling startup of the audit server process• Changing the point in startup when the operating system initiates auditing• Choosing the number of outstanding messages that trigger process suspension• Choosing the audit server response to memory exhaustion• Maintaining the accuracy of message time-stamping• Adjusting the transfer of messages from system auditing buffers to disk• Choosing the amount of disk space periodically allocated to the system audit log
Tasks Performed by the Audit ServerThe operating system creates the audit server as a detached process during system startup toperform the following tasks:• Create a clusterwide security audit log file (SECURITY.AUDIT$JOURNAL) in
SYS$COMMON:[SYS$MGR]• Control the logging of security events to the log file and the delivery of alarms to any operator
terminals enabled to receive security class messages• Enable auditing of a site-defined set of security events• Monitor disk and memory resources• Maintain a database of security-auditing characteristicsThe audit server sends informational and error messages to the operator communication manager(OPCOM). OPCOM broadcasts these messages to operator terminals and writes the messagesto the operator log file.“Default Characteristics of the Audit Server” (page 248) displays the audit server's initial operatingvalues. These settings are stored in the audit server database, VMS$AUDIT_SERVER.DAT inSYS$COMMON:[SYSMGR]. Any time you modify security-auditing characteristics by using theDCL command SET AUDIT, the audit server database is updated. Each time the system isrebooted, it takes the auditing values from this database.
Managing the Auditing Subsystem 247
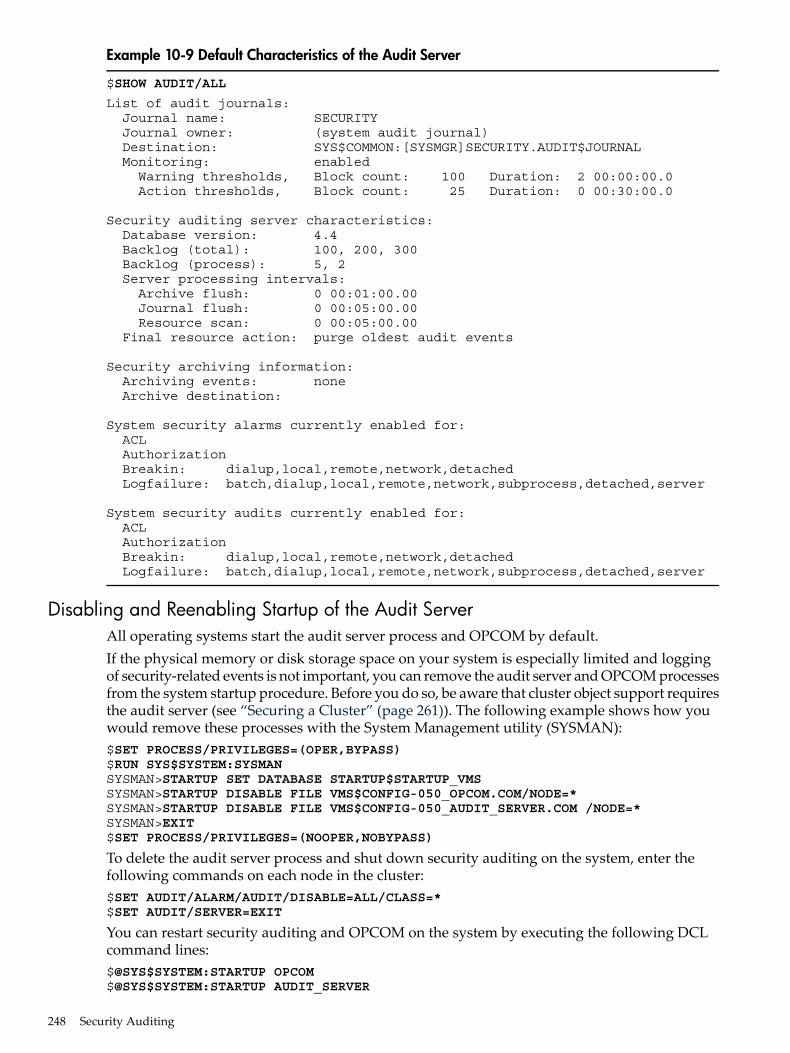
Example 10-9 Default Characteristics of the Audit Server
$SHOW AUDIT/ALL
List of audit journals: Journal name: SECURITY Journal owner: (system audit journal) Destination: SYS$COMMON:[SYSMGR]SECURITY.AUDIT$JOURNAL Monitoring: enabled Warning thresholds, Block count: 100 Duration: 2 00:00:00.0 Action thresholds, Block count: 25 Duration: 0 00:30:00.0
Security auditing server characteristics: Database version: 4.4 Backlog (total): 100, 200, 300 Backlog (process): 5, 2 Server processing intervals: Archive flush: 0 00:01:00.00 Journal flush: 0 00:05:00.00 Resource scan: 0 00:05:00.00 Final resource action: purge oldest audit events
Security archiving information: Archiving events: none Archive destination:
System security alarms currently enabled for: ACL Authorization Breakin: dialup,local,remote,network,detached Logfailure: batch,dialup,local,remote,network,subprocess,detached,server
System security audits currently enabled for: ACL Authorization Breakin: dialup,local,remote,network,detached Logfailure: batch,dialup,local,remote,network,subprocess,detached,server
Disabling and Reenabling Startup of the Audit ServerAll operating systems start the audit server process and OPCOM by default.If the physical memory or disk storage space on your system is especially limited and loggingof security-related events is not important, you can remove the audit server and OPCOM processesfrom the system startup procedure. Before you do so, be aware that cluster object support requiresthe audit server (see “Securing a Cluster” (page 261)). The following example shows how youwould remove these processes with the System Management utility (SYSMAN):$SET PROCESS/PRIVILEGES=(OPER,BYPASS)$RUN SYS$SYSTEM:SYSMANSYSMAN>STARTUP SET DATABASE STARTUP$STARTUP_VMSSYSMAN>STARTUP DISABLE FILE VMS$CONFIG-050_OPCOM.COM/NODE=*SYSMAN>STARTUP DISABLE FILE VMS$CONFIG-050_AUDIT_SERVER.COM /NODE=*SYSMAN>EXIT$SET PROCESS/PRIVILEGES=(NOOPER,NOBYPASS)
To delete the audit server process and shut down security auditing on the system, enter thefollowing commands on each node in the cluster:$SET AUDIT/ALARM/AUDIT/DISABLE=ALL/CLASS=*$SET AUDIT/SERVER=EXIT
You can restart security auditing and OPCOM on the system by executing the following DCLcommand lines:$@SYS$SYSTEM:STARTUP OPCOM$@SYS$SYSTEM:STARTUP AUDIT_SERVER
248 Security Auditing
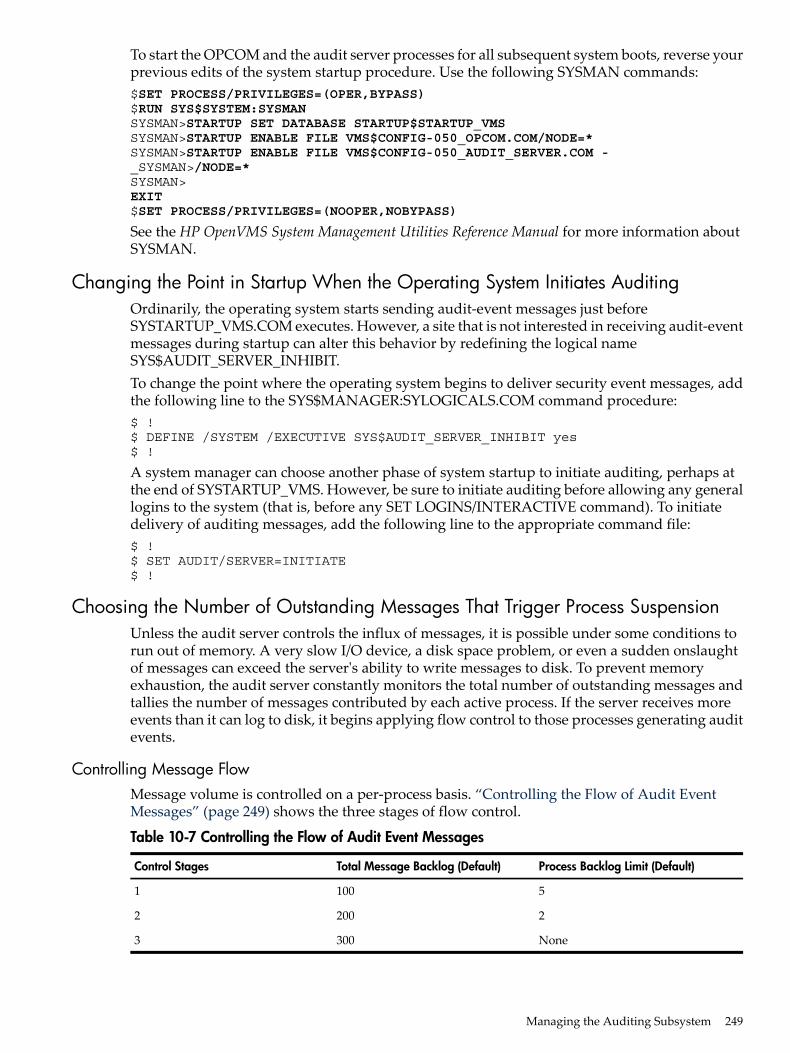
To start the OPCOM and the audit server processes for all subsequent system boots, reverse yourprevious edits of the system startup procedure. Use the following SYSMAN commands:$SET PROCESS/PRIVILEGES=(OPER,BYPASS)$RUN SYS$SYSTEM:SYSMANSYSMAN>STARTUP SET DATABASE STARTUP$STARTUP_VMSSYSMAN>STARTUP ENABLE FILE VMS$CONFIG-050_OPCOM.COM/NODE=*SYSMAN>STARTUP ENABLE FILE VMS$CONFIG-050_AUDIT_SERVER.COM -_SYSMAN>/NODE=*SYSMAN>EXIT$SET PROCESS/PRIVILEGES=(NOOPER,NOBYPASS)
See the HP OpenVMS System Management Utilities Reference Manual for more information aboutSYSMAN.
Changing the Point in Startup When the Operating System Initiates AuditingOrdinarily, the operating system starts sending audit-event messages just beforeSYSTARTUP_VMS.COM executes. However, a site that is not interested in receiving audit-eventmessages during startup can alter this behavior by redefining the logical nameSYS$AUDIT_SERVER_INHIBIT.To change the point where the operating system begins to deliver security event messages, addthe following line to the SYS$MANAGER:SYLOGICALS.COM command procedure:$ !$ DEFINE /SYSTEM /EXECUTIVE SYS$AUDIT_SERVER_INHIBIT yes$ !
A system manager can choose another phase of system startup to initiate auditing, perhaps atthe end of SYSTARTUP_VMS. However, be sure to initiate auditing before allowing any generallogins to the system (that is, before any SET LOGINS/INTERACTIVE command). To initiatedelivery of auditing messages, add the following line to the appropriate command file:$ !$ SET AUDIT/SERVER=INITIATE$ !
Choosing the Number of Outstanding Messages That Trigger Process SuspensionUnless the audit server controls the influx of messages, it is possible under some conditions torun out of memory. A very slow I/O device, a disk space problem, or even a sudden onslaughtof messages can exceed the server's ability to write messages to disk. To prevent memoryexhaustion, the audit server constantly monitors the total number of outstanding messages andtallies the number of messages contributed by each active process. If the server receives moreevents than it can log to disk, it begins applying flow control to those processes generating auditevents.
Controlling Message FlowMessage volume is controlled on a per-process basis. “Controlling the Flow of Audit EventMessages” (page 249) shows the three stages of flow control.
Table 10-7 Controlling the Flow of Audit Event Messages
Process Backlog Limit (Default)Total Message Backlog (Default)Control Stages
51001
22002
None3003
Managing the Auditing Subsystem 249
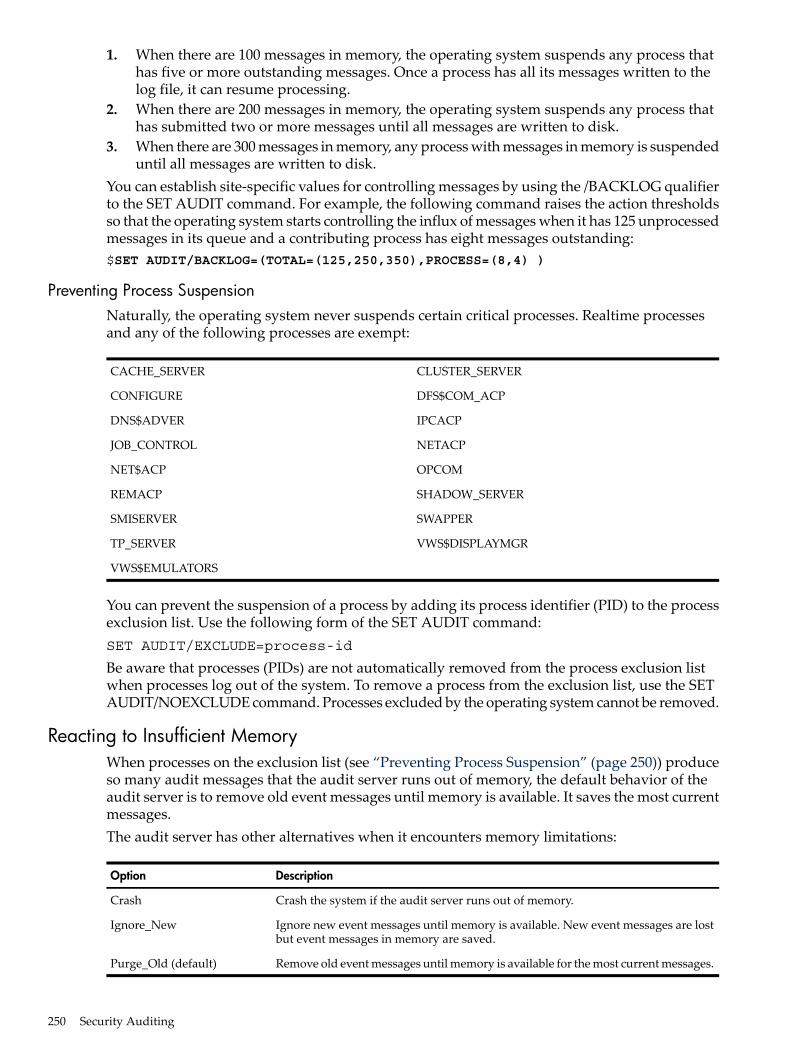
1. When there are 100 messages in memory, the operating system suspends any process thathas five or more outstanding messages. Once a process has all its messages written to thelog file, it can resume processing.
2. When there are 200 messages in memory, the operating system suspends any process thathas submitted two or more messages until all messages are written to disk.
3. When there are 300 messages in memory, any process with messages in memory is suspendeduntil all messages are written to disk.
You can establish site-specific values for controlling messages by using the /BACKLOG qualifierto the SET AUDIT command. For example, the following command raises the action thresholdsso that the operating system starts controlling the influx of messages when it has 125 unprocessedmessages in its queue and a contributing process has eight messages outstanding:$SET AUDIT/BACKLOG=(TOTAL=(125,250,350),PROCESS=(8,4) )
Preventing Process SuspensionNaturally, the operating system never suspends certain critical processes. Realtime processesand any of the following processes are exempt:
CLUSTER_SERVERCACHE_SERVER
DFS$COM_ACPCONFIGURE
IPCACPDNS$ADVER
NETACPJOB_CONTROL
OPCOMNET$ACP
SHADOW_SERVERREMACP
SWAPPERSMISERVER
VWS$DISPLAYMGRTP_SERVER
VWS$EMULATORS
You can prevent the suspension of a process by adding its process identifier (PID) to the processexclusion list. Use the following form of the SET AUDIT command:SET AUDIT/EXCLUDE=process-id
Be aware that processes (PIDs) are not automatically removed from the process exclusion listwhen processes log out of the system. To remove a process from the exclusion list, use the SETAUDIT/NOEXCLUDE command. Processes excluded by the operating system cannot be removed.
Reacting to Insufficient MemoryWhen processes on the exclusion list (see “Preventing Process Suspension” (page 250)) produceso many audit messages that the audit server runs out of memory, the default behavior of theaudit server is to remove old event messages until memory is available. It saves the most currentmessages.The audit server has other alternatives when it encounters memory limitations:
DescriptionOption
Crash the system if the audit server runs out of memory.Crash
Ignore new event messages until memory is available. New event messages are lostbut event messages in memory are saved.
Ignore_New
Remove old event messages until memory is available for the most current messages.Purge_Old (default)
250 Security Auditing
To alter the default behavior of the audit server and instruct it to ignore all new audit messagesrather than purge the old ones, enter the following command:$SET AUDIT/SERVER=FINAL_ACTION=IGNORE_NEW
The audit server runs with a fixed virtual memory limit (PGFLQUOTA) of 20,480 pages. Thismay be further limited by the size of page files installed on the system. You can adjust the sizeof page files by running AUTOGEN. Whenever it detects a page file problem, AUTOGENautomatically resets the size to alleviate the problem.
Maintaining the Accuracy of Message Time-StampingIf you are auditing a set of security events in which the order of occurrence is important, allclocks within a cluster need to remain synchronized. This ensures that message time-stampingon all nodes in the cluster closely reflects the order in which events occurred.Because each node in a cluster configuration maintains time independently, it is possible forcluster times to drift apart over time. To prevent drifting, use the SYSMAN commandCONFIGURATION SET TIME at regular intervals. TheHPOpenVMSSystemManagementUtilitiesReferenceManual provides a sample command procedure that you can run every hour to maintainclock synchronization to within a second.
Adjusting the Transfer of Messages to DiskThe audit server stores security event messages in memory and periodically transfers groups ofmessages from its buffers to the audit log file on disk. Usually, the audit server transfers auditingmessages every 5 minutes and archived messages (see “Using a Remote Log File” (page 240))every minute. Except for some high-security environments and instances where extreme numbersof audit messages are being generated on the system, this default should be sufficient.High-security sites can transfer event messages to disk at higher than normal rates by modifyingthe interval of log transfer operations. The following command, for example, changes the auditserver's characteristics so it writes event messages to the audit log file every 2 minutes:$SET AUDIT/INTERVAL=JOURNAL_FLUSH=00:02
Frequent message transfers can impact system performance, however, because the systemperforms more I/O operations rather than store messages in the system buffers associated withthe audit server process.To immediately force all audit messages to the log file, enter the following command:$SET AUDIT/SERVER=FLUSH
Allocating Disk Space for the Audit Log FileThe audit server constantly monitors the disk space allocated to the security audit log file toensure there is adequate space for event messages. Whenever the file runs low on availableblocks, the audit server extends the audit log file. If disk resource limitations prevent the serverfrom allocating more blocks to the log file, it takes one of the following actions:• Warns you by sending warning messages to the operator terminal. This occurs by default
when less than 100 disk blocks are available.The following command changes the default so the warning occurs when 150 blocks areavailable:$SET AUDIT /JOURNAL=SECURITY /THRESHOLD=WARNING=150
• Takes action by suspending processes that are generating audit records. (Certain processesare immune to this: see “Preventing Process Suspension” (page 250).) When resourcemonitoring is enabled for the log file, process suspension occurs when less than 25 diskblocks are available.To modify the action threshold to 50 blocks, enter the following command:$SET AUDIT /JOURNAL=SECURITY /THRESHOLD=ACTION=50
Managing the Auditing Subsystem 251
The threshold values may be expressed in blocks or as a delta time. Delta time values aremultiplied by the average space consumption rate to yield a number of blocks. The maximumof the block and time threshold values is used as the active threshold value.
Error Handling in the Auditing FacilityResources consumed by the OpenVMS security-auditing facility vary with the number and typeof system events being recorded. Three different error conditions can develop related to theauditing facility:• The audit server can run out of memory. “Reacting to Insufficient Memory” (page 250)
describes different methods of handling the situation.• The disk storing the audit log file can run out of space.• The network connection for a remote log file (archive file) can break.This section discusses the default behavior of the auditing system in monitoring disk space andlogging to an archive file.
Disabling Disk MonitoringThe audit server monitors the audit log file and regularly pre-extends its disk block allocationto ensure there is adequate space for incoming event messages. Whenever disk space isunavailable, the server first warns you through operator messages and then resorts to suspendingcertain contributing processes (see “Allocating Disk Space for the Audit Log File” (page 251) ).If you find many processes suspended for no apparent reason, it is probably because your auditdisk is full. Once you correct the disk space problem, you can resume suspended processes withthe SET AUDIT/SERVER=RESUME command (rather than wait for the next resource scan).You can disable resource monitoring altogether by entering the following command:$SET AUDIT/JOURNAL=SECURITY/RESOURCE=DISABLE
However, if you disable disk resource monitoring, you eliminate the opportunity to receivewarning messages until it is too late. The audit server begins to suspend processes that aregenerating too many audits, as “Choosing the Number of Outstanding Messages That TriggerProcess Suspension” (page 249) describes, and if it runs out of memory, the server takes the actiondescribed in “Reacting to Insufficient Memory” (page 250): it ignores messages, purges oldmessages, or, possibly, crashes the system.Once disk space becomes available, the audit server extends the log file and resumes any processesit suspended.
Losing the Link to a Remote Log FileIf you are writing auditing messages to a remote log file, as described in “Using a Remote LogFile” (page 240), the link between the local and remote node can fail. Should this happen, theaudit server broadcasts a warning message to all operator terminals and attempts to reestablishthe link every minute until the connection is made.
252 Security Auditing
11 System Security BreachesAlong with developing a security policy and selecting appropriate security measures to implementthat policy, a site needs to establish and test procedures for handling system, site, or networkcompromises. The procedure should address two areas:• Appropriate responses once a breach is suspected or confirmed. Site guidelines should help
determine whether to increase site security (eliminating all possibility of further compromise),put proactive measures in place to apprehend the offender, or collect evidence to initiate acriminal or civil suit. Each decision has its own set of rules and guidelines.
• Appropriate contacts and resources outside of the site that may be needed should such anevent occur. For example, a company might want to become familiar with local, state, andfederal authorities (as applicable), local phone carriers (security division), and the HP supportgroups.4
This chapter describes how to recognize when an attack on the system is in progress or has takenplace and what countermeasures can be taken.
Forms of System AttacksAs security administrator, you must monitor the system on a regular basis for possible securitybreaches. Following are the most common forms of system attacks:• Hunting for access lines• Hunting for passwords• Attempting a break-in• Changing or creating user authorization file (UAF) records• Granting/stealing extra privileges• Introducing apparently innocent software (Trojan horse software) that is intended to steal
user passwords or do other damage to the system• Introducing viruses in command procedures and programs to gain access to privileged
accounts• Scavenging disks• Using a node as a gateway to other nodes
Indications of TroubleWhen your system is vulnerable and possibly under attack, your first indications may come fromthe following sources:• Reports from users• System monitoring, for example:
— Unexplained changes or behavior in applications or normal processes— Unexplained messages from OPCOM or the audit server— Unexplained changes to user accounts in the system authorization database (privilege
changes, protections, priorities, quotas)
Reports from UsersUser observations frequently point to system security problems. A user may contact you withthe following situations:• Files are missing.• There are unexplained forms of last login messages, such as successful logins the user did
not perform or unexplained login failures.4. HP support groups include the Software Security Response Team (SSRT) in the United States and the European
Security Program Office (ESPO).
Forms of System Attacks 253

• A user cannot log in, suggesting the user password might have been changed since the lastsuccessful login or some other form of tampering has occurred.
• Break-in evasion appears to be in effect, and the user cannot log in.• Reports from the SHOW USERS command indicate that the user is logged in on another
terminal when the user did not do so.• A disconnected job message appears during a login for a process the user never initiated.• Files exist in the user's directories that the user did not create.• Unexplained changes have been found in the protection or ownership of user files.• Listings appear that are generated under the user name without the user requesting the
listing.• A sudden reduction occurs in the availability of resources, such as dialup lines.Follow up promptly when one of these items is reported to you. You must confirm or deny thatthe condition exists. If you find the complaint is valid, seek a cause and solution.
Monitoring the System“Ongoing Tasks to Maintain a Secure System” (page 132) lists those tasks that can help you detectpotential security breaches on your system. The following list details possible warning signs youmay uncover while performing the recommended tasks:• A user appears on the SHOW USERS report that you know could not be currently logged
in.• You observe an unexplained change in the system load or performance.• You discover media or program listings are missing or notice other indications that physical
security has degraded.• Your locked file cabinet has been tampered with, and the list of authorized users has
disappeared.• You find unfamiliar software in the system executable image library [SYSEXE] or in [SYSLIB].• You observe unfamiliar images running when you examine the MONITOR SYSTEM report.• You observe unauthorized user names when you enter the DCL command SHOW USER.
When you examine the listing that the Authorize utility (AUTHORIZE) produces with theSHOW command, you find that those users have been given system access.
• You discover proxy users that you never authorized.• The accounting report reveals unusual amounts of processing time expended recently,
suggesting outside access.• You observe unexplained batch jobs on the batch queues.• You observe unexpected device allocations when you enter the SHOW DEVICE command.• You observe a high level of processing activity at unusual hours.• The protection codes or the access control lists (ACLs) change on critical files. Identifiers are
added, or holders of identifiers are added to the rights list.• There is high personnel turnover or low morale.All these conditions warrant further investigation. Some indicate that you already have a problem,and some may have simple explanations, while others may indicate serious potential problems.
Routine System SurveillanceThe operating system provides a number of mechanisms that allow systematic surveillance ofthe activity in your system. There are many mechanisms available for monitoring the systemeither manually or by user-written command procedures, for example:• Accounting utility (ACCOUNTING)• Authorize utility (AUTHORIZE)
254 System Security Breaches
• Install utility (INSTALL)• System Management utility (SYSMAN)Proper use of such mechanisms should help you verify settings, alert you to problems, and allowyou to intervene. This section describes the most important system surveillancemechanisms--ACCOUNTING and ANALYZE/AUDIT.
System AccountingYou can learn what the normal pattern of resource use is by studying reports of the Accountingutility (ACCOUNTING). To obtain a report, you run the utility image SYS$SYSTEM:ACC.EXE.The resulting data file is SYS$MANAGER:ACCOUNTNG.DAT. Review ACCOUNTING reportsbecause they can provide early indications of problems. Check for the following:• Unfamiliar user names• Unfamiliar patterns of use, such as unusual activity for a particular time of day or day of
week• Use of an unusual amount of resources• Unfamiliar sources of login, such as network nodes or remote terminals
Security AuditingAs the security administrator, you can have the operating system report on security-relatedactivity by enabling categories of events for auditing using the DCL command SET AUDIT.Using the Audit Analysis utility (ANALYZE/AUDIT), you can periodically review event messagescollected in the security audit log file. (See “Security Auditing” (page 227) for a full descriptionof the process.)The operating system can send event messages to an audit log file or to an operator terminal.You define whether events are reported as audits or alarms in the following way:• Ordinarily, enable audits rather than alarms for security-related events because the audit
records are written to the system security audit log where you can study them in volumeand archive log files for future reference. While an isolated auditing message may offer littleinsight, numerous audit records produce a pattern of security violations. For example, withauditing of object access, you can see a pattern of time, types of objects being accessed, andother system information that, in total, paint a picture of how the system is being used atdifferent times of day.To enable audits for unsuccessful access to files, devices, and volumes, enter the followingcommand:$SET AUDIT/AUDIT/ENABLE=ACCESS=FAILURE/CLASS=(FILE,DEVICE,VOLUME)
This command records unsuccessful access events in the security audit log file but sends noalarms to the operator terminal.
• Enable security alarms for real-time events or events that should be reviewed immediately,for example, intrusion attempts or changes to the system user authorization file(SYSUAF.DAT). For example, to enable alarms for modification to the known file list andchanges to system time, enter the following command:$SET AUDIT/ALARM/ENABLE=(INSTALL,TIME)
This command sends event messages to the operator terminal. To keep a hardcopy recordof these alarms, use a hardcopy operator terminal, or enable the events as both alarms andaudits.
Because security auditing affects system performance, enable auditing only for the most importantevents. The following security-auditing actions are presented in order of decreasing priority andincreasing system cost:
Routine System Surveillance 255
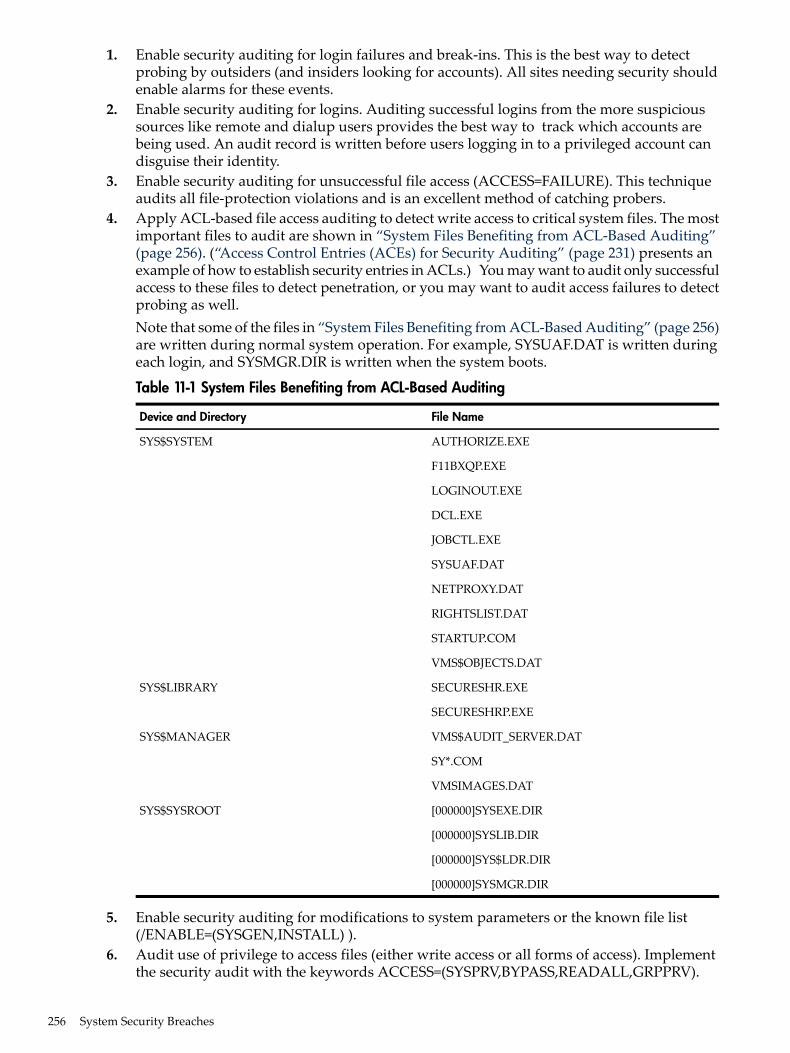
1. Enable security auditing for login failures and break-ins. This is the best way to detectprobing by outsiders (and insiders looking for accounts). All sites needing security shouldenable alarms for these events.
2. Enable security auditing for logins. Auditing successful logins from the more suspicioussources like remote and dialup users provides the best way to track which accounts arebeing used. An audit record is written before users logging in to a privileged account candisguise their identity.
3. Enable security auditing for unsuccessful file access (ACCESS=FAILURE). This techniqueaudits all file-protection violations and is an excellent method of catching probers.
4. Apply ACL-based file access auditing to detect write access to critical system files. The mostimportant files to audit are shown in “System Files Benefiting from ACL-Based Auditing”(page 256). (“Access Control Entries (ACEs) for Security Auditing” (page 231) presents anexample of how to establish security entries in ACLs.) You may want to audit only successfulaccess to these files to detect penetration, or you may want to audit access failures to detectprobing as well.Note that some of the files in “System Files Benefiting from ACL-Based Auditing” (page 256)are written during normal system operation. For example, SYSUAF.DAT is written duringeach login, and SYSMGR.DIR is written when the system boots.
Table 11-1 System Files Benefiting from ACL-Based Auditing
File NameDevice and Directory
AUTHORIZE.EXESYS$SYSTEM
F11BXQP.EXE
LOGINOUT.EXE
DCL.EXE
JOBCTL.EXE
SYSUAF.DAT
NETPROXY.DAT
RIGHTSLIST.DAT
STARTUP.COM
VMS$OBJECTS.DAT
SECURESHR.EXESYS$LIBRARY
SECURESHRP.EXE
VMS$AUDIT_SERVER.DATSYS$MANAGER
SY*.COM
VMSIMAGES.DAT
[000000]SYSEXE.DIRSYS$SYSROOT
[000000]SYSLIB.DIR
[000000]SYS$LDR.DIR
[000000]SYSMGR.DIR
5. Enable security auditing for modifications to system parameters or the known file list(/ENABLE=(SYSGEN,INSTALL) ).
6. Audit use of privilege to access files (either write access or all forms of access). Implementthe security audit with the keywords ACCESS=(SYSPRV,BYPASS,READALL,GRPPRV).
256 System Security Breaches
Note that this class of auditing can produce a large volume of output because privileges areoften used in normal system operation for such tasks as mail delivery and operator backups.
“Developing an Auditing Plan” (page 234) provides further discussion of recommended sets ofsecurity events to audit.
Handling a Security BreachThere are four phases that security administrators experience while handling a security breach,whether the breach actually occurred or was attempted:1. Detection of a problem2. Identification of the perpetrator3. Prevention of further security violations4. Repair of damageThe following sections describe these phases for both attempted and successful break-ins.In all phases, train personnel to retain information and data as evidence, should there be a needto apprehend and prosecute the perpetrator.
Unsuccessful Intrusion AttemptsUnsuccessful intrusion attempts include situations where someone has attempted to guesspasswords or browse through files.
Detecting Intrusion AttemptsYou usually detect intrusion attempts through the following sources:• Reports from users about unexplained login failures• Unusual system activity or unavailability of dialup lines• Security alarms for login failures, break-in attempts, and file-protection violations• Examination of the intrusion database
Identifying the PerpetratorEnabling file auditing simplifies identification of file browsers. If, however, browsing is beinginitiated from another node in the network, you must inspect the network server log file(NETSERVER.LOG) that corresponds to the times of the protection violations. Coordinate yourinvestigation with the security administrator at the remote node.Identifying a perpetrator who is guessing passwords is considerably more difficult, especiallywhen the source is anonymous, as from a dialup line. Usually, you must trade identification forprevention. Often the only way to positively identify an outsider attempting to enter the systemrequires that you permit further attempts while establishing the perpetrator's identity.
Preventing Intrusion AttemptsThe prevention phase for this kind of attack involves preventing the would-be intruder fromactually gaining access to the system and making future attempts more difficult.
Handling a Security Breach 257

Password Guessing
To reduce the opportunities for successful password guessing:• Make certain your users choose appropriate passwords. Consider use of the password
generator (see “Generated Passwords” (page 152)).• Enable system passwords at the points of entry. While a minor inconvenience to your users,
system passwords are the best protection against further probing. If you already had asystem password enabled, change it (see “System Passwords” (page 147)).
• Enable auditing of successful logins to catch the event if the intruder succeeds in getting in(see “Security Auditing” (page 255)).
File Browsing
To reduce the opportunities for successful file browsing:• If you can identify the perpetrator, take action as established at your site.• Warn your users about the importance of adequate protection of their files, and consider
inspecting the protection of user files.• If file browsing from other nodes in the network becomes a persistent problem, eliminate
the default FAL account and authorize individual users through proxy login accounts (see“Setting Up a Proxy Database” (page 272)).
Successful IntrusionsA successful security breach can include a successful password guessing scheme, theft ormodification of either information or system resources, and placement of damaging software onthe system. An intrusion may require a considerable amount of time to repair, depending uponthe skill and intent of the perpetrator.
Identifying the Successful PerpetratorIdentification is often the most difficult part of handling an intrusion. First, you must establishwhether the perpetrator is an authorized user or not. This determines the nature of the preventivemeasures that you will take. However, the distinction between insiders and outsiders may bedifficult to achieve.
Tradeoff Between Identification and Prevention
You may have to make a tradeoff between a positive identification of the intruder and preventingfuture attacks. Often, the data available initially does not allow complete identification. If it isimportant to identify the perpetrator, you will often find it necessary to permit continuedintrusions while you analyze the intrusion activity. Increase your auditing. Consider plantingtraps in system procedures that are under your control (such as SYLOGIN.COM) to obtainadditional information. Increase your system backup efforts to permit easier recovery if filesbecome damaged.
Identification of Outsiders
Identifying external intruders is particularly difficult, especially if they use any switched formsof communication (such as dialup lines or public data networks). DECnet for OpenVMS softwareprovides many features to help you trace the activity through the network back to the sourcenode. If a local terminal is involved, physical surveillance may be appropriate.When a switched connection is involved, one of the major computer security problems is thetelephone system itself. Tracing a telephone or public data network connection is time-consuming.Chasing an intruder through the telephone system is likely to take months and will require theassistance of law enforcement authorities. The existence of multiple long-distance telephoneservices compounds the problem by increasing the number of organizations with whom youmust deal.
258 System Security Breaches
As a result, identifying an outside intruder is usually worthwhile only when you have sustainedsubstantial financial damage. In many cases, it may be more useful if you concentrate onpreventing recurrences of the problem.
Securing the SystemThe actions you must take to secure your system after an intrusion depend on the nature andsource of that intrusion. This section describes these actions in order of priority.1. Restore SYSUAF.DAT, NETPROXY.DAT, NET$PROXY.DAT and RIGHTSLIST.DAT (if
damaged) from backups. Alternatively, generate listings of the files and inspect them closely,looking for improper entries, additional privileges, and changed UICs. If you are unsure ofwhen SYSUAF.DAT might first have been modified, inspect it carefully regardless of whetheryou are using a backup copy or proceeding with the existing one. Be sure all authorizationfiles are secure.
2. The perpetrator may have discovered passwords by browsing either through files or fromother nodes in the network and may be using seldom accessed accounts for personal use.Change passwords for accounts, and have your users appear in person to learn their newpasswords. At a minimum, change passwords on all privileged accounts. Do not use thesame new password for all accounts.
3. A sophisticated penetrator may have planted ways to provide future access to the systemeven though you have taken the obvious steps of securing your system. Therefore, you mayhave to restore selected components of the OpenVMS software from backups or from yourOpenVMS distribution kit. If the intruder was an outsider, the two critical components areLOGINOUT.EXE and NETACP.EXE, which validate all entries to the system.However, if the intruder was an authorized user, restore all system files from backup copies.Authorized users can make use of a wide variety of illicit software patches (called trap doors) that they insert in the executive (SYS.EXE), the file system (F11BXQP.EXE), DCL, and othersystem files. The penetrator may have planted damaging software in any piece of softwareor command procedure likely to be used by a privileged user. Thus, complete assurance ofa secure system requires a wholesale restoration of files from backups. Also reinstall anyimage (even from layered products) installed with privileges because it can also be used fora trap door. An alternate strategy is to restore trustworthy copies of the obvious targets ofattack and to rely on increased auditing for a period of time to catch suspicious events.
4. Consider implementing additional security features, such as system passwords, passwordgeneration, increased auditing, and more stringent file protection to prevent a recurrence.
Repair After a Successful IntrusionAfter an intrusion, restore corrupted files. Decide whether it is appropriate either to do a wholesalerestoration of your system's data or to repair problems as they are discovered. Look formodifications to file protection that would have created paths for viruses and for Trojan horsesthat were introduced into the system and may still reside there.
Handling a Security Breach 259

260
12 Securing a ClusterThis chapter describes concerns for security administrators of clustered systems. Clusteredsystems refer to those systems using hardware and software that permit sharing of disks,resources, and a common operating system among various computers. Clusters of VAX processorsare said to be joined in an OpenVMS cluster environment; whereas clusters including both Alphaprocessors and VAX processors are said to be joined in an OpenVMS Cluster environment. Toproperly secure your cluster, you should be familiar with the information in the HP OpenVMSCluster Systems Manual.The HP OpenVMS Cluster Systems Manual describes the tasks of the cluster manager. The clustermanager's job is the same as that of any system manager, but the cluster manager has to implementchanges across many nodes. The security administrator for a cluster generally requires the sametraining and skills as a cluster manager, and at some cluster sites, the same person serves in therole of security administrator as well as cluster manager. At other sites, there may be one or moresecurity administrators in addition to a cluster management team.When a site separates the security administrator function from the cluster management function,coordination, cooperation, and communication between these functions becomes vital. As inprevious chapters, this chapter uses the title of security administrator to refer to individuals whohave the responsibility for system security, regardless of what other responsibilities they hold.
Overview of ClustersClustered systems provide a uniform computing environment that is highly scalable, highlyavailable, and secure. It is critical that there be a single set of authorized users and that theseusers be able to have processes executing on any cluster member.To achieve a uniform computing environment, a cluster relies on the following componentsoperating across all cluster members:• Lock manager system services ($ENQ/$DEQ) (to provide a framework for building distributed
applications)• File and record management subsystems (coordinated through the lock manager)• Batch and print services• Process control system services• Security auditing systemWithin a cluster, authorization data for users and the security profiles of objects must be consistentacross all nodes so that each cluster member makes the same access control decision whenpresented with a particular user's access request for a particular object. “Building a CommonEnvironment” (page 261) and “Synchronizing Authorization Data” (page 264) describe how toachieve a single security domain.
Building a Common EnvironmentWithin a cluster, access control is mediated by individual nodes using a common set ofauthorization information. In the single security domain model, a process, acting on behalf ofan authorized individual, requests access to a cluster-visible object, and a coordinating nodedetermines the outcome by comparing its copy of the common authorization database with thesecurity profile for the object being accessed. This model enforces security only when theauthorization information and the object security profiles are consistent across all nodes in thecluster.
Overview of Clusters 261
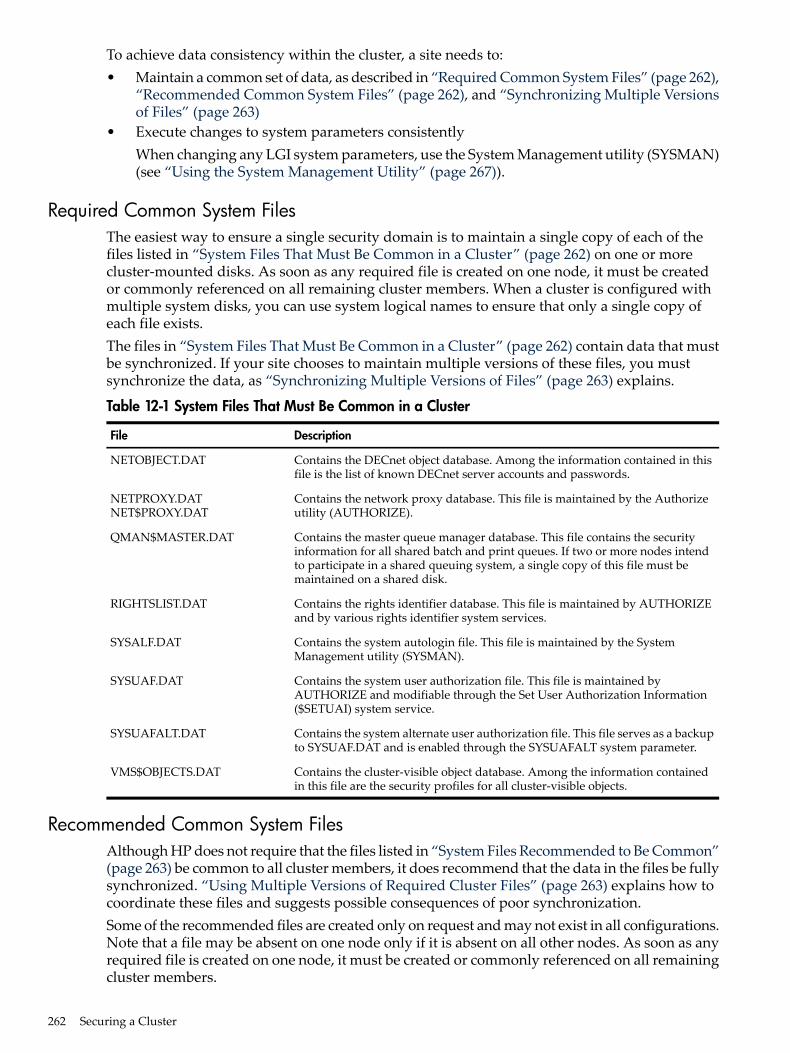
To achieve data consistency within the cluster, a site needs to:• Maintain a common set of data, as described in “Required Common System Files” (page 262),
“Recommended Common System Files” (page 262), and “Synchronizing Multiple Versionsof Files” (page 263)
• Execute changes to system parameters consistentlyWhen changing any LGI system parameters, use the System Management utility (SYSMAN)(see “Using the System Management Utility” (page 267)).
Required Common System FilesThe easiest way to ensure a single security domain is to maintain a single copy of each of thefiles listed in “System Files That Must Be Common in a Cluster” (page 262) on one or morecluster-mounted disks. As soon as any required file is created on one node, it must be createdor commonly referenced on all remaining cluster members. When a cluster is configured withmultiple system disks, you can use system logical names to ensure that only a single copy ofeach file exists.The files in “System Files That Must Be Common in a Cluster” (page 262) contain data that mustbe synchronized. If your site chooses to maintain multiple versions of these files, you mustsynchronize the data, as “Synchronizing Multiple Versions of Files” (page 263) explains.
Table 12-1 System Files That Must Be Common in a Cluster
DescriptionFile
Contains the DECnet object database. Among the information contained in thisfile is the list of known DECnet server accounts and passwords.
NETOBJECT.DAT
Contains the network proxy database. This file is maintained by the Authorizeutility (AUTHORIZE).
NETPROXY.DATNET$PROXY.DAT
Contains the master queue manager database. This file contains the securityinformation for all shared batch and print queues. If two or more nodes intendto participate in a shared queuing system, a single copy of this file must bemaintained on a shared disk.
QMAN$MASTER.DAT
Contains the rights identifier database. This file is maintained by AUTHORIZEand by various rights identifier system services.
RIGHTSLIST.DAT
Contains the system autologin file. This file is maintained by the SystemManagement utility (SYSMAN).
SYSALF.DAT
Contains the system user authorization file. This file is maintained byAUTHORIZE and modifiable through the Set User Authorization Information($SETUAI) system service.
SYSUAF.DAT
Contains the system alternate user authorization file. This file serves as a backupto SYSUAF.DAT and is enabled through the SYSUAFALT system parameter.
SYSUAFALT.DAT
Contains the cluster-visible object database. Among the information containedin this file are the security profiles for all cluster-visible objects.
VMS$OBJECTS.DAT
Recommended Common System FilesAlthough HP does not require that the files listed in “System Files Recommended to Be Common”(page 263) be common to all cluster members, it does recommend that the data in the files be fullysynchronized. “Using Multiple Versions of Required Cluster Files” (page 263) explains how tocoordinate these files and suggests possible consequences of poor synchronization.Some of the recommended files are created only on request and may not exist in all configurations.Note that a file may be absent on one node only if it is absent on all other nodes. As soon as anyrequired file is created on one node, it must be created or commonly referenced on all remainingcluster members.
262 Securing a Cluster

Table 12-2 System Files Recommended to Be Common
DescriptionFile
Contains information related to security auditing, suchas enabled security-auditing events and the destinationof the system security audit log file.
VMS$AUDIT_SERVER.DAT
Contains the system password history database. This fileis maintained by the SET PASSWORD utility.
VMS$PASSWORD_HISTORY.DATA
Contains the system mail database. This file is maintainedby the Mail utility (MAIL). It holds mail profiles for allsystem users as well as a list of all mail forwardingaddresses in use on the system.
VMSMAIL_PROFILE.DATA
Contains the system password dictionary. The systempassword dictionary is a list of English words and phrasesthat cannot be used as account passwords.
VMS$PASSWORD_DICTIONARY.DATA
Contains any site-specific password filters. This file iscreated and installed by the security administrator orsystem manager. (See “Site-Specific Filters” (page 154) fordetails on password filters.)
VMS$PASSWORD_POLICY
Synchronizing Multiple Versions of FilesUsing shared files is not the only way of achieving a single security domain. Some sites mayhave requirements for multiple copies of one or more of these system files on different nodes ina cluster. As long as the security information available to each node in the cluster is exactly thesame, these sites operate in a single security domain.“Using Multiple Versions of Required Cluster Files” (page 263) lists the files that requirecoordination, explains when to update these files, and suggests possible consequences of poorsynchronization.
Table 12-3 Using Multiple Versions of Required Cluster Files
Result of Poor SynchronizationCoordination RequiredFile
Possible partitioning of auditingdomains
Update after any SET AUDITcommand.
VMS$AUDIT_SERVER.DAT
Unexplained network login failuresand unauthorized network access
Update all versions after any NCPSET OBJECT or DEFINE OBJECTcommand.
NETOBJECT.DAT
Unexplained network login failuresand unauthorized network access
Update all versions after anyAUTHORIZE proxy command.
NETPROXY.DAT NET$PROXY.DAT
Possible unauthorized systemaccess and unauthorized access toprotected objects
Update all versions after anychange to any identifier or holderrecords.
RIGHTSLIST.DAT
Unexplained login failures andunauthorized system access
Update all versions after anySYSMAN ALF command.
SYSALF.DAT
Possible unexplained login failuresand unauthorized system access.
Update all versions so the fieldslisted in “Fields in SYSUAF.DATRequiring Synchronization”(page 264) are synchronized foreach user record.
SYSUAF.DAT
Possible unexplained login failuresand unauthorized system access
Update all versions after anychange to any authorizationrecords in this file.
SYSUAFALT.DAT
Building a Common Environment 263
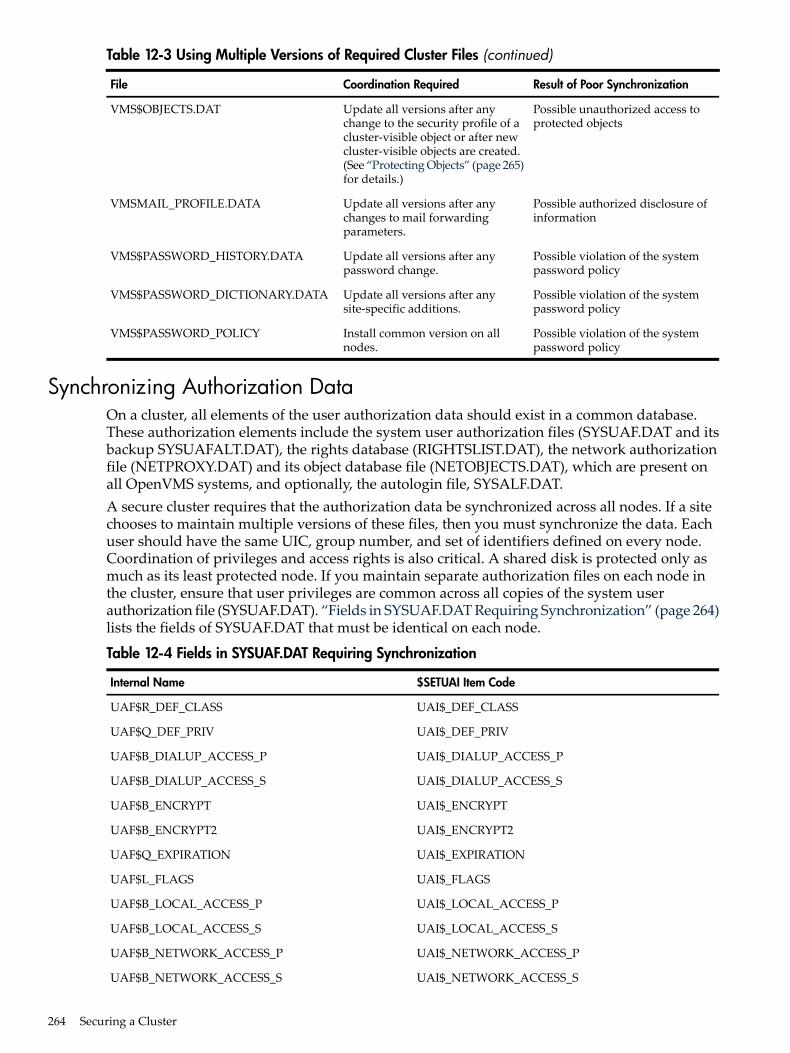
Table 12-3 Using Multiple Versions of Required Cluster Files (continued)
Result of Poor SynchronizationCoordination RequiredFile
Possible unauthorized access toprotected objects
Update all versions after anychange to the security profile of acluster-visible object or after newcluster-visible objects are created.(See “Protecting Objects” (page 265)for details.)
VMS$OBJECTS.DAT
Possible authorized disclosure ofinformation
Update all versions after anychanges to mail forwardingparameters.
VMSMAIL_PROFILE.DATA
Possible violation of the systempassword policy
Update all versions after anypassword change.
VMS$PASSWORD_HISTORY.DATA
Possible violation of the systempassword policy
Update all versions after anysite-specific additions.
VMS$PASSWORD_DICTIONARY.DATA
Possible violation of the systempassword policy
Install common version on allnodes.
VMS$PASSWORD_POLICY
Synchronizing Authorization DataOn a cluster, all elements of the user authorization data should exist in a common database.These authorization elements include the system user authorization files (SYSUAF.DAT and itsbackup SYSUAFALT.DAT), the rights database (RIGHTSLIST.DAT), the network authorizationfile (NETPROXY.DAT) and its object database file (NETOBJECTS.DAT), which are present onall OpenVMS systems, and optionally, the autologin file, SYSALF.DAT.A secure cluster requires that the authorization data be synchronized across all nodes. If a sitechooses to maintain multiple versions of these files, then you must synchronize the data. Eachuser should have the same UIC, group number, and set of identifiers defined on every node.Coordination of privileges and access rights is also critical. A shared disk is protected only asmuch as its least protected node. If you maintain separate authorization files on each node inthe cluster, ensure that user privileges are common across all copies of the system userauthorization file (SYSUAF.DAT). “Fields in SYSUAF.DAT Requiring Synchronization” (page 264)lists the fields of SYSUAF.DAT that must be identical on each node.
Table 12-4 Fields in SYSUAF.DAT Requiring Synchronization
$SETUAI Item CodeInternal Name
UAI$_DEF_CLASSUAF$R_DEF_CLASS
UAI$_DEF_PRIVUAF$Q_DEF_PRIV
UAI$_DIALUP_ACCESS_PUAF$B_DIALUP_ACCESS_P
UAI$_DIALUP_ACCESS_SUAF$B_DIALUP_ACCESS_S
UAI$_ENCRYPTUAF$B_ENCRYPT
UAI$_ENCRYPT2UAF$B_ENCRYPT2
UAI$_EXPIRATIONUAF$Q_EXPIRATION
UAI$_FLAGSUAF$L_FLAGS
UAI$_LOCAL_ACCESS_PUAF$B_LOCAL_ACCESS_P
UAI$_LOCAL_ACCESS_SUAF$B_LOCAL_ACCESS_S
UAI$_NETWORK_ACCESS_PUAF$B_NETWORK_ACCESS_P
UAI$_NETWORK_ACCESS_SUAF$B_NETWORK_ACCESS_S
264 Securing a Cluster
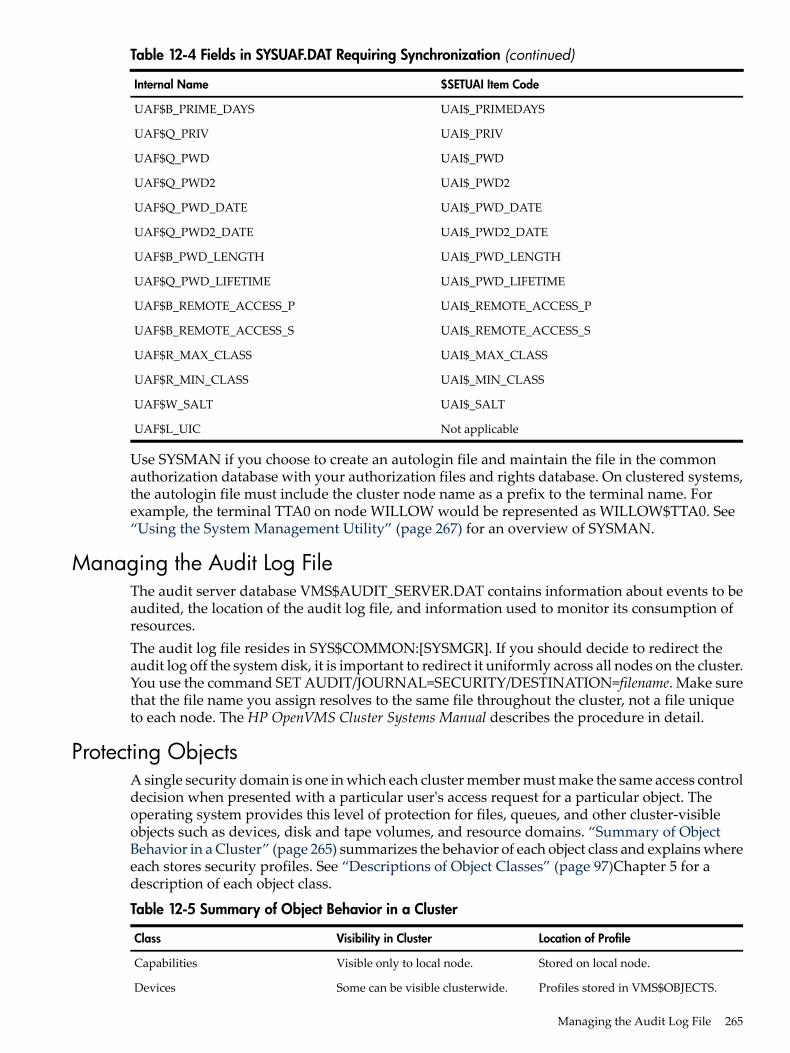
Table 12-4 Fields in SYSUAF.DAT Requiring Synchronization (continued)
$SETUAI Item CodeInternal Name
UAI$_PRIMEDAYSUAF$B_PRIME_DAYS
UAI$_PRIVUAF$Q_PRIV
UAI$_PWDUAF$Q_PWD
UAI$_PWD2UAF$Q_PWD2
UAI$_PWD_DATEUAF$Q_PWD_DATE
UAI$_PWD2_DATEUAF$Q_PWD2_DATE
UAI$_PWD_LENGTHUAF$B_PWD_LENGTH
UAI$_PWD_LIFETIMEUAF$Q_PWD_LIFETIME
UAI$_REMOTE_ACCESS_PUAF$B_REMOTE_ACCESS_P
UAI$_REMOTE_ACCESS_SUAF$B_REMOTE_ACCESS_S
UAI$_MAX_CLASSUAF$R_MAX_CLASS
UAI$_MIN_CLASSUAF$R_MIN_CLASS
UAI$_SALTUAF$W_SALT
Not applicableUAF$L_UIC
Use SYSMAN if you choose to create an autologin file and maintain the file in the commonauthorization database with your authorization files and rights database. On clustered systems,the autologin file must include the cluster node name as a prefix to the terminal name. Forexample, the terminal TTA0 on node WILLOW would be represented as WILLOW$TTA0. See“Using the System Management Utility” (page 267) for an overview of SYSMAN.
Managing the Audit Log FileThe audit server database VMS$AUDIT_SERVER.DAT contains information about events to beaudited, the location of the audit log file, and information used to monitor its consumption ofresources.The audit log file resides in SYS$COMMON:[SYSMGR]. If you should decide to redirect theaudit log off the system disk, it is important to redirect it uniformly across all nodes on the cluster.You use the command SET AUDIT/JOURNAL=SECURITY/DESTINATION=filename. Make surethat the file name you assign resolves to the same file throughout the cluster, not a file uniqueto each node. The HP OpenVMS Cluster Systems Manual describes the procedure in detail.
Protecting ObjectsA single security domain is one in which each cluster member must make the same access controldecision when presented with a particular user's access request for a particular object. Theoperating system provides this level of protection for files, queues, and other cluster-visibleobjects such as devices, disk and tape volumes, and resource domains. “Summary of ObjectBehavior in a Cluster” (page 265) summarizes the behavior of each object class and explains whereeach stores security profiles. See “Descriptions of Object Classes” (page 97)Chapter 5 for adescription of each object class.
Table 12-5 Summary of Object Behavior in a Cluster
Location of ProfileVisibility in ClusterClass
Stored on local node.Visible only to local node.Capabilities
Profiles stored in VMS$OBJECTS.Some can be visible clusterwide.Devices
Managing the Audit Log File 265
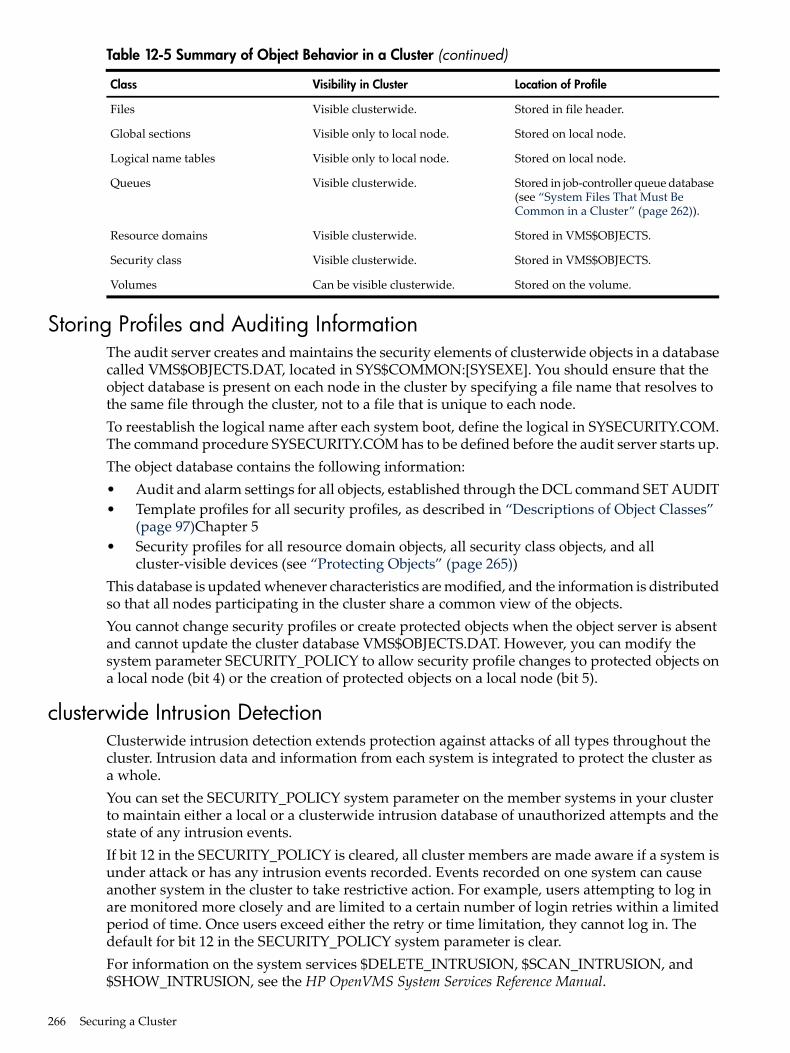
Table 12-5 Summary of Object Behavior in a Cluster (continued)
Location of ProfileVisibility in ClusterClass
Stored in file header.Visible clusterwide.Files
Stored on local node.Visible only to local node.Global sections
Stored on local node.Visible only to local node.Logical name tables
Stored in job-controller queue database(see “System Files That Must BeCommon in a Cluster” (page 262)).
Visible clusterwide.Queues
Stored in VMS$OBJECTS.Visible clusterwide.Resource domains
Stored in VMS$OBJECTS.Visible clusterwide.Security class
Stored on the volume.Can be visible clusterwide.Volumes
Storing Profiles and Auditing InformationThe audit server creates and maintains the security elements of clusterwide objects in a databasecalled VMS$OBJECTS.DAT, located in SYS$COMMON:[SYSEXE]. You should ensure that theobject database is present on each node in the cluster by specifying a file name that resolves tothe same file through the cluster, not to a file that is unique to each node.To reestablish the logical name after each system boot, define the logical in SYSECURITY.COM.The command procedure SYSECURITY.COM has to be defined before the audit server starts up.The object database contains the following information:• Audit and alarm settings for all objects, established through the DCL command SET AUDIT• Template profiles for all security profiles, as described in “Descriptions of Object Classes”
(page 97)Chapter 5• Security profiles for all resource domain objects, all security class objects, and all
cluster-visible devices (see “Protecting Objects” (page 265))This database is updated whenever characteristics are modified, and the information is distributedso that all nodes participating in the cluster share a common view of the objects.You cannot change security profiles or create protected objects when the object server is absentand cannot update the cluster database VMS$OBJECTS.DAT. However, you can modify thesystem parameter SECURITY_POLICY to allow security profile changes to protected objects ona local node (bit 4) or the creation of protected objects on a local node (bit 5).
clusterwide Intrusion DetectionClusterwide intrusion detection extends protection against attacks of all types throughout thecluster. Intrusion data and information from each system is integrated to protect the cluster asa whole.You can set the SECURITY_POLICY system parameter on the member systems in your clusterto maintain either a local or a clusterwide intrusion database of unauthorized attempts and thestate of any intrusion events.If bit 12 in the SECURITY_POLICY is cleared, all cluster members are made aware if a system isunder attack or has any intrusion events recorded. Events recorded on one system can causeanother system in the cluster to take restrictive action. For example, users attempting to log inare monitored more closely and are limited to a certain number of login retries within a limitedperiod of time. Once users exceed either the retry or time limitation, they cannot log in. Thedefault for bit 12 in the SECURITY_POLICY system parameter is clear.For information on the system services $DELETE_INTRUSION, $SCAN_INTRUSION, and$SHOW_INTRUSION, see the HP OpenVMS System Services Reference Manual.
266 Securing a Cluster
For information on the DCL commands DELETE INTRUSION and SHOW INTRUSION, see theHP OpenVMS DCL Dictionary.
Using the System Management UtilityThe System Management utility (SYSMAN) is a facility supporting the cluster work of the securityadministrator. Through its centralized management of nodes and clusters, SYSMAN lets youperform system management tasks from your local node that the utility executes on all nodes inthe target environment.To use SYSMAN requires OPER privilege on the local node and authorization for the OPERprivilege on any remote node. The utility does not require a password when you are operatingwithin a cluster in your own account. The operating system audits any logical link connectionsor any operation in which the utility requires a password.System managers using SYSMAN should be careful that logical names are set to the same nameon each node.
Managing Cluster MembershipClustered systems use a group number and a cluster password to both allow multiple independentclustered systems to coexist on the same extended local area network (LAN) and to preventaccidental access to a cluster by unauthorized computers. The group number uniquely identifieseach cluster system on a LAN. The cluster password serves as an additional check to ensure theintegrity of individual clusters on the same LAN that accidentally use identical group numbers.The password also prevents an intruder who discovers the group number from joining the cluster.The cluster group number and password (in encrypted form) are maintained in the clusterauthorization file, SYS$COMMON:[SYSEXE]CLUSTER_AUTHORIZE.DAT. This file is createdduring installation of the operating system if you indicate that you want to set up a local area ormixed interconnect cluster. The installation procedure then prompts you for the cluster groupnumber and password.Under normal conditions, you need not alter records in the CLUSTER_AUTHORIZE.DAT fileinteractively. However, if you suspect a security breach, you may want to change the clusterpassword. In that case, you use SYSMAN to make the change. The file is accessible only to userswith the SYSPRV privilege. Note that if you change either the group number or the password,you must reboot the entire cluster.If your configuration has multiple system disks, each disk must have a copy ofCLUSTER_AUTHORIZE.DAT. You must run SYSMAN to update all copies.The following command sequence illustrates the use of SYSMAN to change the cluster password:SYSMAN>SET CLUSTER_AUTHORIZATION/GROUP_NUMBER=65353SYSMAN>SET ENVIRONMENT/CLUSTER/NODE21SYSMAN>SET PROFILE /PRIVILEGE=SYSPRVSYSMAN>CONFIGURATION SET CLUSTER_AUTHORIZATION/PASSWORD=HOOVER%SYSMAN-I-CAFOLDGROUP, existing group will not be changed%SYSMAN-I-GRPNOCHG, Group number not changed%SYSMAN-I-CAFREBOOT, cluster authorization file updatedThe entire cluster should be rebooted.
Using DECnet Between Cluster NodesThe cluster environment provides such a rich resource-sharing model (which includes files andvolumes, disk and tape devices, and batch and print queues) that it is usually unnecessary todirectly access another cluster node through DECnet software. Nonetheless, there are situationswhere resources may not be uniformly shared across the cluster. This is particularly true in mixedinterconnect or local area cluster configurations, where you may choose to limit cluster accessto a satellite's disk or tape volumes. In such cases, users need to use the DCL command SETHOST or some form of network access to access a satellite's resources from other cluster members.
Using the System Management Utility 267
See “Proxy Access Control” (page 272) for more information on network access through proxylogins.
268 Securing a Cluster
13 Security in a Network EnvironmentSecurity in a network environment is even more sensitive than security in a single-systemenvironment. Security is also harder to achieve because of operational complexities and thedecentralization of control that commonly exist in networks. The larger the network, the moredifficult the problem of establishing control and communication between security administratorsof the numerous nodes.There are limitations to the degree of security any networking site can expect to achieve due tolimitations currently present in networking technology. Being sensitive to potential problemscan help you avoid operations that could increase the security exposure in your network. Thischapter helps you recognize these problem areas and adjust your operations accordingly.See the HP OpenVMS System Manager's Manual for information on the networking softwareoptions for OpenVMS systems, including the following:• HP TCP/IP Services for OpenVMS• DECnet-Plus for OpenVMS (DECnet Phase V)• DECnet for OpenVMS (DECnet Phase IV)
Managing Network SecurityNetworking software regulates access to the network on various levels:• Privileges for access to the network.
To perform any kind of network activity, all network users must have TMPMBX andNETMBX privileges. Privileged users hold privileges in addition to TMPMBX and NETMBX.
• Access control.To connect to a networked node, a user needs explicit access information, a proxy account,an application account, or a default DECnet account. (See “Hierarchy of Access Controls”(page 270).)
• Routing initialization passwords for connecting local nodes to remote nodes over synchronousor asynchronous lines. (See “Specifying Routing Initialization Passwords” (page 281).)
Requirements for Achieving SecurityThere are three critical requirements for achieving security in a network environment:• Common security policy
There must be a correspondence between the initiating process on the source machine andthe process on the target machine that works on behalf of the initiating process (see “TheReference Monitor in a Network” (page 270)). This correspondence must be managed by thetwo reference monitors and must be consistent with the security policy intended on thetarget machine (which is ultimately responsible for protecting the object). See “OpenVMSSecurity Model” (page 35)Chapter 2 for a description of the reference monitor.
• Shared access control informationThe authorization database on the target machine must have some access authorization,such as an account or a proxy, that corresponds to the initiating process on the sourcemachine.
• Protected circuits, lines, terminals, and processorsThere must be a protected means of communication between the two reference monitors(source and target) so that correspondence between the local and remote subjects can bereliably established and authenticated.
Managing Network Security 269
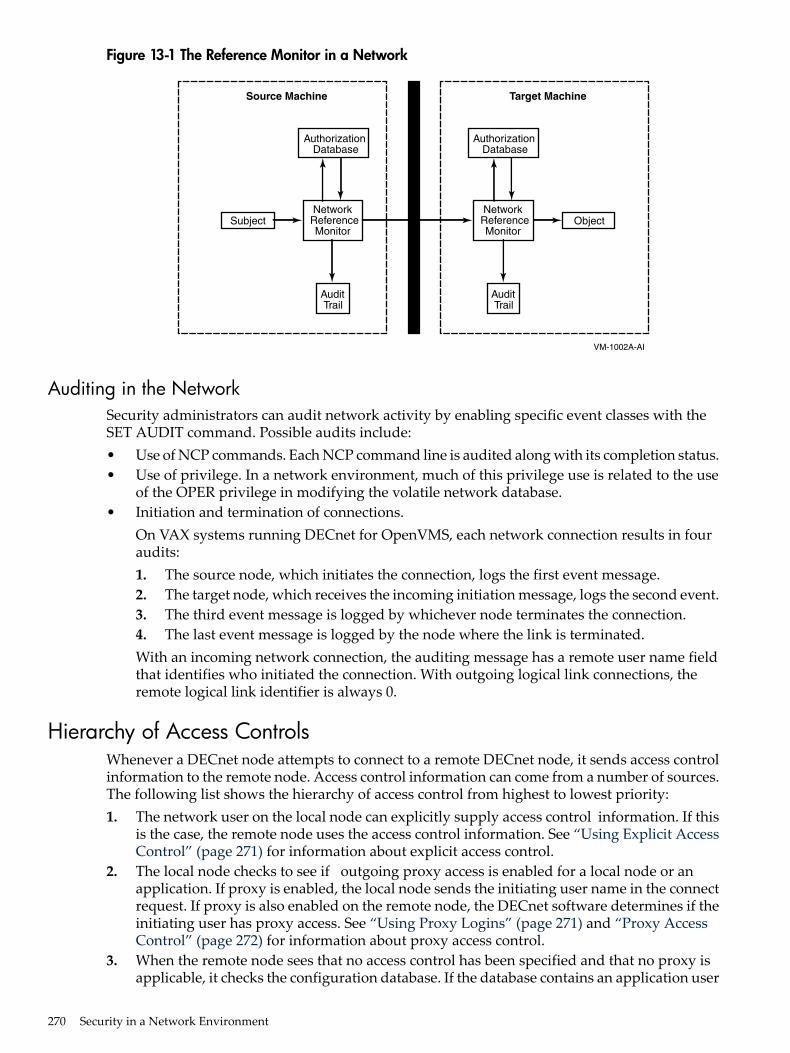
Figure 13-1 The Reference Monitor in a Network
VM-1002A-AI
TrailAudit
MonitorReferenceNetwork
Object
Target Machine
MonitorReferenceNetwork
DatabaseAuthorization
Subject
Source Machine
DatabaseAuthorization
TrailAudit
Auditing in the NetworkSecurity administrators can audit network activity by enabling specific event classes with theSET AUDIT command. Possible audits include:• Use of NCP commands. Each NCP command line is audited along with its completion status.• Use of privilege. In a network environment, much of this privilege use is related to the use
of the OPER privilege in modifying the volatile network database.• Initiation and termination of connections.
On VAX systems running DECnet for OpenVMS, each network connection results in fouraudits:1. The source node, which initiates the connection, logs the first event message.2. The target node, which receives the incoming initiation message, logs the second event.3. The third event message is logged by whichever node terminates the connection.4. The last event message is logged by the node where the link is terminated.With an incoming network connection, the auditing message has a remote user name fieldthat identifies who initiated the connection. With outgoing logical link connections, theremote logical link identifier is always 0.
Hierarchy of Access ControlsWhenever a DECnet node attempts to connect to a remote DECnet node, it sends access controlinformation to the remote node. Access control information can come from a number of sources.The following list shows the hierarchy of access control from highest to lowest priority:1. The network user on the local node can explicitly supply access control information. If this
is the case, the remote node uses the access control information. See “Using Explicit AccessControl” (page 271) for information about explicit access control.
2. The local node checks to see if outgoing proxy access is enabled for a local node or anapplication. If proxy is enabled, the local node sends the initiating user name in the connectrequest. If proxy is also enabled on the remote node, the DECnet software determines if theinitiating user has proxy access. See “Using Proxy Logins” (page 271) and “Proxy AccessControl” (page 272) for information about proxy access control.
3. When the remote node sees that no access control has been specified and that no proxy isapplicable, it checks the configuration database. If the database contains an application user
270 Security in a Network Environment
name, it uses that name. See “Using Default Application Accounts” (page 271) and “UsingDECnet Application (Object) Accounts” (page 276) for information about default applicationaccounts.
4. If there is no default application user name in its configuration database, the remote nodechecks the configuration database for default nonprivileged DECnet user name information.If the information is there, the remote node uses the default nonprivileged DECnet username. See “Using DECnet Application (Object) Accounts” (page 276) for information aboutthe default DECnet account.
Finally, if none of these sources supply the information, the connection fails.
Using Explicit Access ControlUsers can execute either a DCL or an NCP command on a remote node by supplying explicitaccess control information. The access control information contains a user name and passwordand provides access to a specific account on the remote system. To supply explicit access controlinformation, you can use either a standard OpenVMS node specification or an NCP command:• In the OpenVMS node specification, the access control string consists of the user name for
the remote account and the user's password enclosed within quotation marks:NODE"username password"::disk:[directory]file.typ
In the following, user Puterman uses an access control string to copy the file BIONEWS.MEM:$ COPY WALNUT"PUTERMAN A25D3255"::BIONEWS.MEM BIONEWS.MEM
• If you want to execute an NCP command on a remote node, you can do so by specifying auser name and password.In the following example, you can display all characteristics information about the applicationMAIL on the remote node TORONTO:NCP>TELL TORONTO USER A_JOHNSTON PASSWORD XZZOQ87 SHOW OBJECT-_NCP>MAIL CHARACTERISTICS
Using Proxy LoginsA proxy login enables a user logged in at a remote node to be logged in automatically to a specificaccount at the local node, without having to supply any access control information. Note that aproxy login is not the same as an interactive login. A proxy login means that specific networkaccess operations can be executed, such as a copy operation. By contrast, an interactive loginrequires a user to supply a user name and password before the user can perform any interactiveoperations.To establish a proxy login on the local node, the remote user must have a default proxy accounton the local node that maps to a local user name. The remote user assumes the same file access,rights, and privileges as the local user name. You can use the proxy login capability to increasesecurity because it minimizes the need to specify explicit access control information in nodespecifications passed over the network or stored in command procedures.Note that network applications can also be assigned proxy login access.The use of access control strings is not permitted in an evaluated configuration. Proxy loginaccounts should be used in the evaluated configuration.
Using Default Application AccountsAnother form of access control specific to network applications is default account informationused by inbound connects from remote nodes that send no access control information. Becausethe remote node supplies no access control information, the local node uses the default informationyou specify for the application to make the connection.You can use the following command to store default access control information about theapplication in the network configuration database:
Hierarchy of Access Controls 271
NCP>SET OBJECT FAL USER JILL
Proxy Access Control“Using Proxy Logins” (page 271) defines the concept of proxy logins. You can authorize proxyaccess when you encounter situations where users either on different nodes or in different groupswant to share files on your system and you are reluctant to give out passwords or to set thedirectory and file protection to W:RWE. With proxy logins, there is no need to embed passwordsin commands to copy a file across the network. There is also no need to allow world read accessto a file for file transfers. The user enters the following form of the DCL command COPY to adefault proxy account:COPY remotenode::file-spec file-spec
To copy a file over the network using proxy access from an account other than the default, theuser includes the name of the proxy account in the access control string of the DCL command,as follows:COPY remotenode"proxyacct"::file-spec file-spec
Special Security Measures with Proxy AccessProxy access is a selective merging of the authorization databases of the affected systems.Therefore, the security is only as good as the security of the least secure node.Although proxy access eliminates passwords going over the network, it is possible for a personalcomputer to bypass the proxy login mechanism by impersonating one of the authorized nodes.For this reason, implement the following procedures:• Do not enable incoming proxy access to sensitive data.• Set up nonprivileged proxy accounts. If an account does need privilege, be sure those
privileges cannot damage your system. (This practice provides a shield between systems ina network if one node is penetrated. The fact that proxy logins provide admittance only tononprivileged accounts at other nodes may help contain the extent of damage if one systemin the network is penetrated.) If your site has high security requirements, do not grantnetwork or remote access to privileged user names.
• Extend proxy access only to nodes that are always or almost always on the network. (It iseasier for an intruder to impersonate a node when it is off the network.) You must create abalance between using proxies and having access control strings with passwords travelingover the network. A workstation or personal computer on the network that is capable ofimpersonating a node is also capable of monitoring network messages and thus capturingpasswords. Ultimately, you must ensure that all nodes connected to your local network havesome level of trustworthiness.
• Exercise caution when authorizing users. Ideally, you should receive a formal authorizationrequest from the security administrator at the remote site.
• Examine any login command procedures for a proxy account. Make certain that they followthe recommendations in “Guidelines for Captive Command Procedures” (page 142) for logincommand procedures in captive accounts. Login command procedures should reside in awell-protected directory owned by a user other than the owner of the proxy account. Theyshould prohibit write access for those who use the account.
Setting Up a Proxy DatabaseIf a remote user's connection request does not contain access control information, the followingconditions must be met for proxy access to be approved:• The proxy database on the target node must contain a source node's node synonym and
source user name combination that matches the remote source node's node synonym andsource user name. In “Sample Proxy Account” (page 276), for example, the security
272 Security in a Network Environment
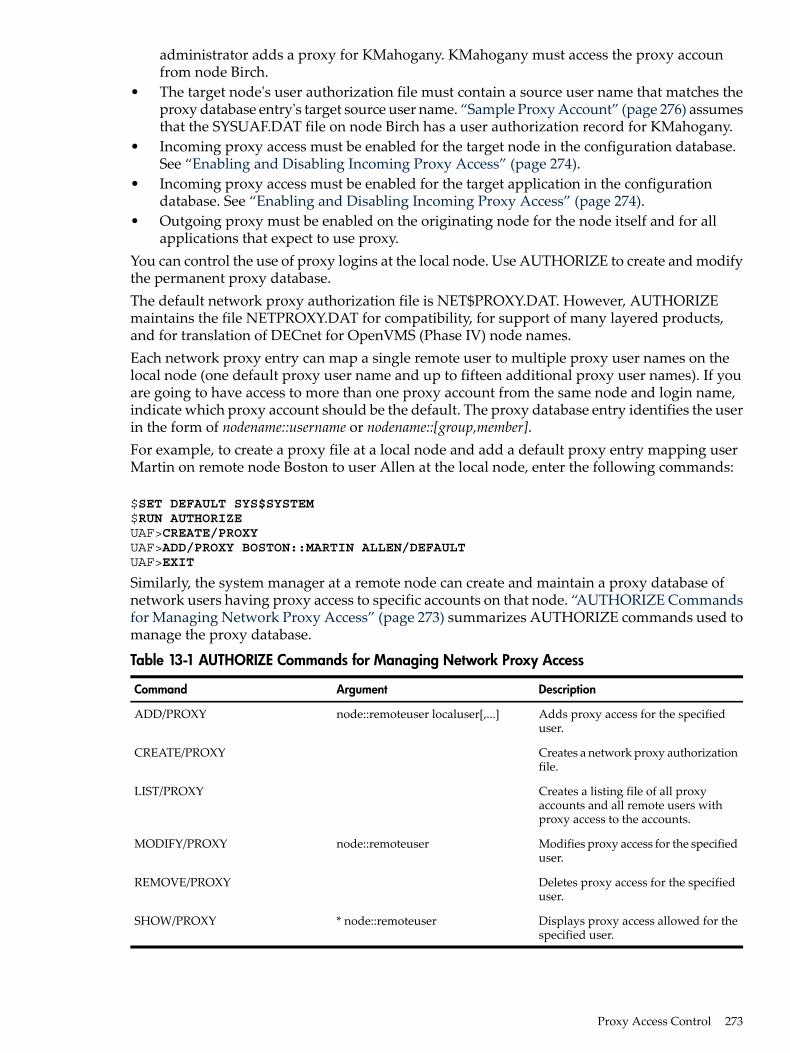
administrator adds a proxy for KMahogany. KMahogany must access the proxy accounfrom node Birch.
• The target node's user authorization file must contain a source user name that matches theproxy database entry's target source user name. “Sample Proxy Account” (page 276) assumesthat the SYSUAF.DAT file on node Birch has a user authorization record for KMahogany.
• Incoming proxy access must be enabled for the target node in the configuration database.See “Enabling and Disabling Incoming Proxy Access” (page 274).
• Incoming proxy access must be enabled for the target application in the configurationdatabase. See “Enabling and Disabling Incoming Proxy Access” (page 274).
• Outgoing proxy must be enabled on the originating node for the node itself and for allapplications that expect to use proxy.
You can control the use of proxy logins at the local node. Use AUTHORIZE to create and modifythe permanent proxy database.The default network proxy authorization file is NET$PROXY.DAT. However, AUTHORIZEmaintains the file NETPROXY.DAT for compatibility, for support of many layered products,and for translation of DECnet for OpenVMS (Phase IV) node names.Each network proxy entry can map a single remote user to multiple proxy user names on thelocal node (one default proxy user name and up to fifteen additional proxy user names). If youare going to have access to more than one proxy account from the same node and login name,indicate which proxy account should be the default. The proxy database entry identifies the userin the form of nodename::username or nodename::[group,member].For example, to create a proxy file at a local node and add a default proxy entry mapping userMartin on remote node Boston to user Allen at the local node, enter the following commands:
$SET DEFAULT SYS$SYSTEM$RUN AUTHORIZEUAF>CREATE/PROXYUAF>ADD/PROXY BOSTON::MARTIN ALLEN/DEFAULTUAF>EXIT
Similarly, the system manager at a remote node can create and maintain a proxy database ofnetwork users having proxy access to specific accounts on that node. “AUTHORIZE Commandsfor Managing Network Proxy Access” (page 273) summarizes AUTHORIZE commands used tomanage the proxy database.
Table 13-1 AUTHORIZE Commands for Managing Network Proxy Access
DescriptionArgumentCommand
Adds proxy access for the specifieduser.
node::remoteuser localuser[,...]ADD/PROXY
Creates a network proxy authorizationfile.
CREATE/PROXY
Creates a listing file of all proxyaccounts and all remote users withproxy access to the accounts.
LIST/PROXY
Modifies proxy access for the specifieduser.
node::remoteuserMODIFY/PROXY
Deletes proxy access for the specifieduser.
REMOVE/PROXY
Displays proxy access allowed for thespecified user.
* node::remoteuserSHOW/PROXY
Proxy Access Control 273
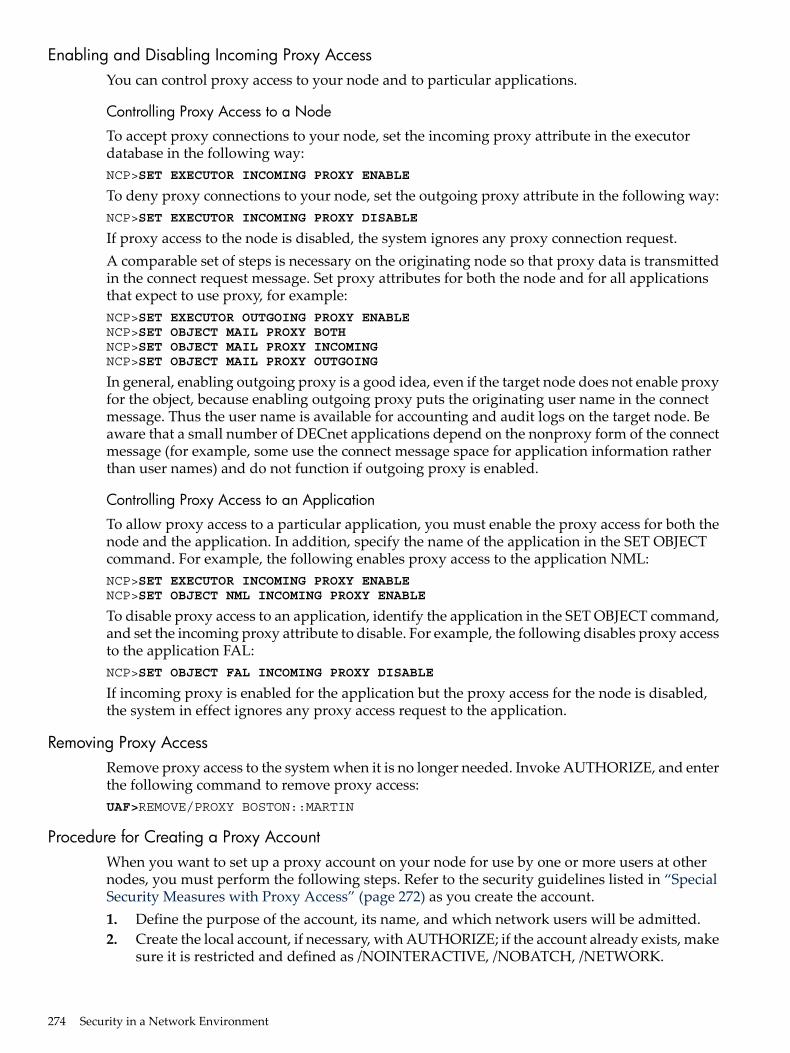
Enabling and Disabling Incoming Proxy AccessYou can control proxy access to your node and to particular applications.
Controlling Proxy Access to a Node
To accept proxy connections to your node, set the incoming proxy attribute in the executordatabase in the following way:NCP>SET EXECUTOR INCOMING PROXY ENABLE
To deny proxy connections to your node, set the outgoing proxy attribute in the following way:NCP>SET EXECUTOR INCOMING PROXY DISABLE
If proxy access to the node is disabled, the system ignores any proxy connection request.A comparable set of steps is necessary on the originating node so that proxy data is transmittedin the connect request message. Set proxy attributes for both the node and for all applicationsthat expect to use proxy, for example:NCP>SET EXECUTOR OUTGOING PROXY ENABLENCP>SET OBJECT MAIL PROXY BOTHNCP>SET OBJECT MAIL PROXY INCOMINGNCP>SET OBJECT MAIL PROXY OUTGOING
In general, enabling outgoing proxy is a good idea, even if the target node does not enable proxyfor the object, because enabling outgoing proxy puts the originating user name in the connectmessage. Thus the user name is available for accounting and audit logs on the target node. Beaware that a small number of DECnet applications depend on the nonproxy form of the connectmessage (for example, some use the connect message space for application information ratherthan user names) and do not function if outgoing proxy is enabled.
Controlling Proxy Access to an Application
To allow proxy access to a particular application, you must enable the proxy access for both thenode and the application. In addition, specify the name of the application in the SET OBJECTcommand. For example, the following enables proxy access to the application NML:NCP>SET EXECUTOR INCOMING PROXY ENABLENCP>SET OBJECT NML INCOMING PROXY ENABLE
To disable proxy access to an application, identify the application in the SET OBJECT command,and set the incoming proxy attribute to disable. For example, the following disables proxy accessto the application FAL:NCP>SET OBJECT FAL INCOMING PROXY DISABLE
If incoming proxy is enabled for the application but the proxy access for the node is disabled,the system in effect ignores any proxy access request to the application.
Removing Proxy AccessRemove proxy access to the system when it is no longer needed. Invoke AUTHORIZE, and enterthe following command to remove proxy access:UAF>REMOVE/PROXY BOSTON::MARTIN
Procedure for Creating a Proxy AccountWhen you want to set up a proxy account on your node for use by one or more users at othernodes, you must perform the following steps. Refer to the security guidelines listed in “SpecialSecurity Measures with Proxy Access” (page 272) as you create the account.1. Define the purpose of the account, its name, and which network users will be admitted.2. Create the local account, if necessary, with AUTHORIZE; if the account already exists, make
sure it is restricted and defined as /NOINTERACTIVE, /NOBATCH, /NETWORK.
274 Security in a Network Environment
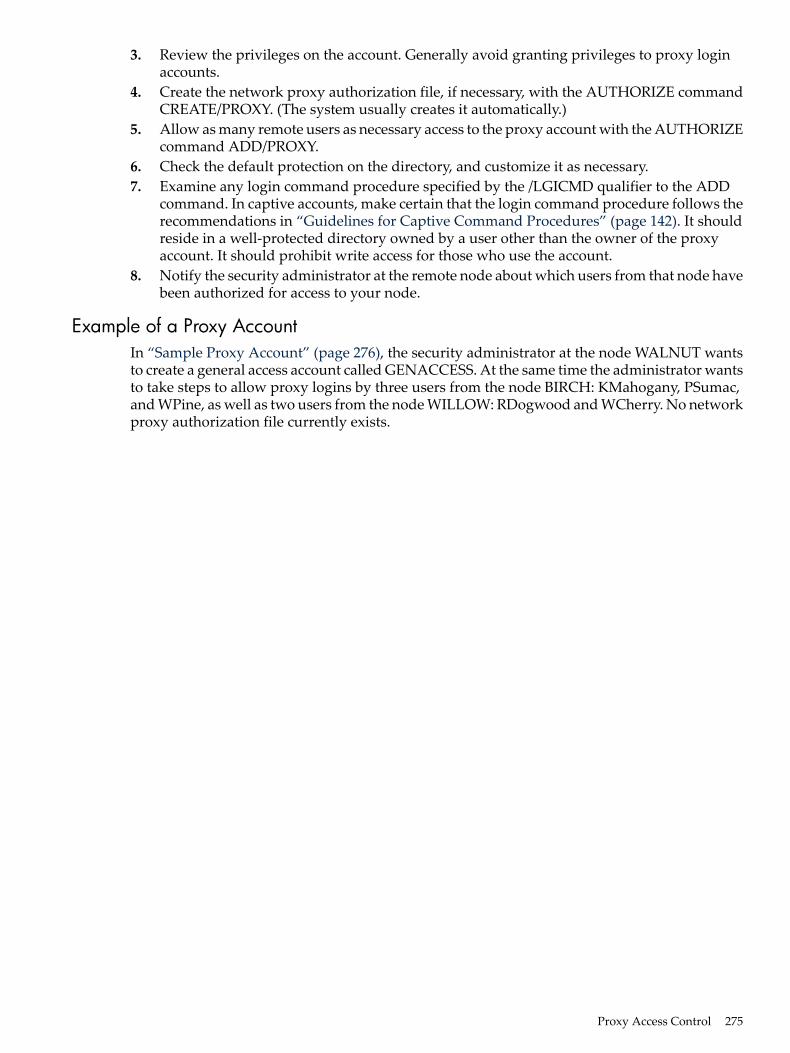
3. Review the privileges on the account. Generally avoid granting privileges to proxy loginaccounts.
4. Create the network proxy authorization file, if necessary, with the AUTHORIZE commandCREATE/PROXY. (The system usually creates it automatically.)
5. Allow as many remote users as necessary access to the proxy account with the AUTHORIZEcommand ADD/PROXY.
6. Check the default protection on the directory, and customize it as necessary.7. Examine any login command procedure specified by the /LGICMD qualifier to the ADD
command. In captive accounts, make certain that the login command procedure follows therecommendations in “Guidelines for Captive Command Procedures” (page 142). It shouldreside in a well-protected directory owned by a user other than the owner of the proxyaccount. It should prohibit write access for those who use the account.
8. Notify the security administrator at the remote node about which users from that node havebeen authorized for access to your node.
Example of a Proxy AccountIn “Sample Proxy Account” (page 276), the security administrator at the node WALNUT wantsto create a general access account called GENACCESS. At the same time the administrator wantsto take steps to allow proxy logins by three users from the node BIRCH: KMahogany, PSumac,and WPine, as well as two users from the node WILLOW: RDogwood and WCherry. No networkproxy authorization file currently exists.
Proxy Access Control 275
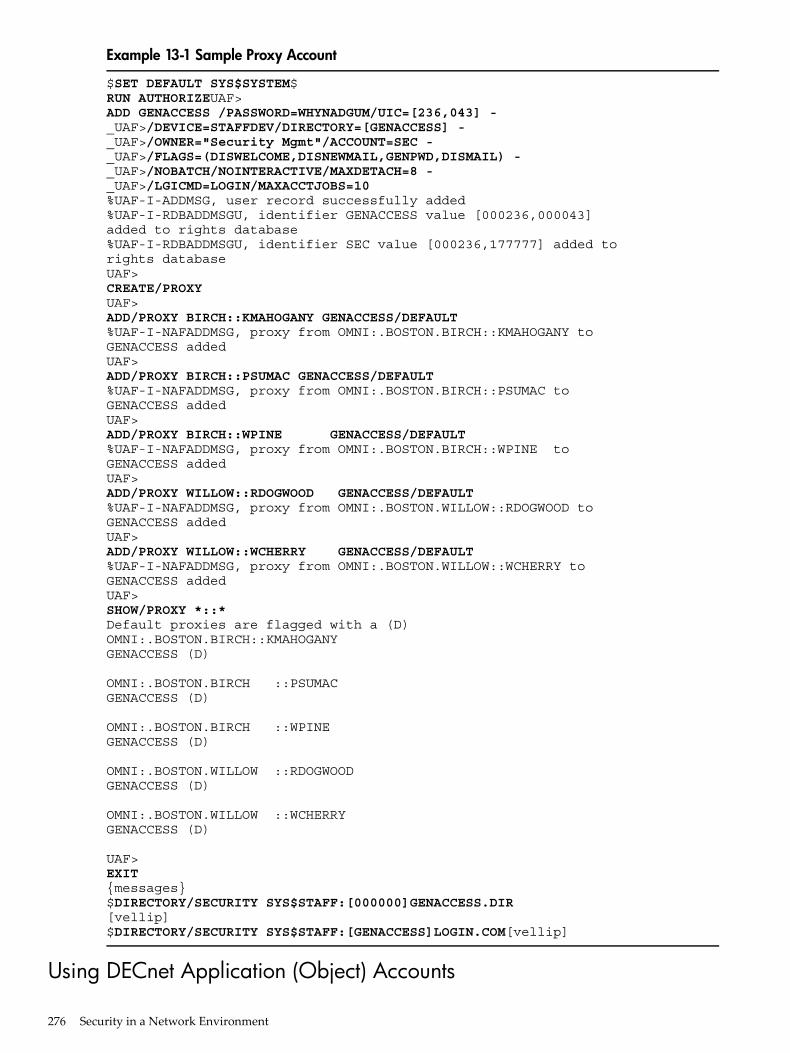
Example 13-1 Sample Proxy Account
$SET DEFAULT SYS$SYSTEM$RUN AUTHORIZEUAF>ADD GENACCESS /PASSWORD=WHYNADGUM/UIC=[236,043] -_UAF>/DEVICE=STAFFDEV/DIRECTORY=[GENACCESS] -_UAF>/OWNER="Security Mgmt"/ACCOUNT=SEC -_UAF>/FLAGS=(DISWELCOME,DISNEWMAIL,GENPWD,DISMAIL) -_UAF>/NOBATCH/NOINTERACTIVE/MAXDETACH=8 -_UAF>/LGICMD=LOGIN/MAXACCTJOBS=10%UAF-I-ADDMSG, user record successfully added%UAF-I-RDBADDMSGU, identifier GENACCESS value [000236,000043]added to rights database%UAF-I-RDBADDMSGU, identifier SEC value [000236,177777] added torights databaseUAF>CREATE/PROXYUAF>ADD/PROXY BIRCH::KMAHOGANY GENACCESS/DEFAULT%UAF-I-NAFADDMSG, proxy from OMNI:.BOSTON.BIRCH::KMAHOGANY toGENACCESS addedUAF>ADD/PROXY BIRCH::PSUMAC GENACCESS/DEFAULT%UAF-I-NAFADDMSG, proxy from OMNI:.BOSTON.BIRCH::PSUMAC toGENACCESS addedUAF>ADD/PROXY BIRCH::WPINE GENACCESS/DEFAULT%UAF-I-NAFADDMSG, proxy from OMNI:.BOSTON.BIRCH::WPINE toGENACCESS addedUAF>ADD/PROXY WILLOW::RDOGWOOD GENACCESS/DEFAULT%UAF-I-NAFADDMSG, proxy from OMNI:.BOSTON.WILLOW::RDOGWOOD toGENACCESS addedUAF>ADD/PROXY WILLOW::WCHERRY GENACCESS/DEFAULT%UAF-I-NAFADDMSG, proxy from OMNI:.BOSTON.WILLOW::WCHERRY toGENACCESS addedUAF>SHOW/PROXY *::*Default proxies are flagged with a (D)OMNI:.BOSTON.BIRCH::KMAHOGANYGENACCESS (D)
OMNI:.BOSTON.BIRCH ::PSUMACGENACCESS (D)
OMNI:.BOSTON.BIRCH ::WPINEGENACCESS (D)
OMNI:.BOSTON.WILLOW ::RDOGWOODGENACCESS (D)
OMNI:.BOSTON.WILLOW ::WCHERRYGENACCESS (D)
UAF>EXIT{messages}$DIRECTORY/SECURITY SYS$STAFF:[000000]GENACCESS.DIR[vellip]$DIRECTORY/SECURITY SYS$STAFF:[GENACCESS]LOGIN.COM[vellip]
Using DECnet Application (Object) Accounts
276 Security in a Network Environment
Network objects are system programs and user-written applications that permit communicationamong nodes in a DECnet network. You need to identify the set of network objects allowedaccess to your system, and set up the appropriate access controls for each object. The followingmechanisms are available:• DECnet object accounts
These are individual accounts for specific network objects (for example, MAIL) automaticallyconfigured on your system. These provide more accountability of remote access to an objectthan the default DECnet account provides. (For example, an object can have a captive accountwith a login command procedure that grants or denies access to the object based on theremote node name or user name.)
• Default DECnet accountThis type of account allows all network objects general access to the system. It is appropriatefor systems with low security requirements (for example, a local area network of systemslocated within a site with no outside connections or dialup lines).The default DECnet user name lets users perform certain network operations, such as theexchange of electronic mail between users on different nodes, without having to supply auser name and password. The default DECnet user name is also used for file operationswhen access control information is not supplied. For example, it lets remote users accesslocal files on which the file protection has been set to allow world access. If you do not wantremote users accessing your node, do not create a default DECnet user name. See “RemovingDefault DECnet Access to the System” (page 280) for information about removing defaultDECnet accounts.
Summary of Network ObjectsYou should understand the function of the network objects supplied with the OpenVMS operatingsystem before you determine the access control to apply to them. This section provides adescription of the most common network objects.
FALThe file access listener (FAL) is the remote file access facility. FAL is an image that receives andprocesses remote file access requests for files at the local node.Use of general FAL access is strongly discouraged. Open access allows general network accessto any files marked world-accessible. It also allows remote users to create files in any directorywith world write access.Sites with high security requirements, or sites where it is difficult to recognize all the intendedusers, should not create a FAL account. To control which users gain access, these sites mayestablish one or more proxy accounts for specific purposes (see “Proxy Access Control” (page 272)).
MAILMAIL is an image that provides personal mail services for OpenVMS systems. In most cases,allow the MAIL object general access to the system.
MIRRORMIRROR is an image used for particular forms of loopback testing. For example, MIRROR is runduring the DECnet phase of the UETP test package.
MOMMOM is the Maintenance Operations Module. The MOM image downline loads unattendedsystems, transferring a copy of an operating system file image from an OpenVMS node to a targetnode. The MOM object is established during a system installation.
Using DECnet Application (Object) Accounts 277
NMLNML is the network management listener. Remote users with access to NML can use NCP TELLcommands to gather and report network information from your DECnet databases.
PHONEPHONE is an image that allows online conversations with users on remote OpenVMS systems.Note that if you allow default DECnet access to PHONE, anyone in the network can get a list ofusers currently logged in to the local system and attempt a login using the list of user names.
TASKThrough the default DECnet account, the TASK object allows arbitrary command procedures(including those that might be used in intrusions) to be executed on your system.Note that if you do not allow default DECnet access on your system or if you disable defaultDECnet access to the TASK object, you can allow remote user-written command procedures(tasks) to run on your system through the use of access control strings or proxy access.
VPMVPM is the Virtual Performance Monitor Server. Access to VPM is required to use the clustermonitoring features of the Monitor utility (MONITOR).
Configuring Network Objects ManuallyThe command procedure NETCONFIG.COM configures the network objects on your systemautomatically, and the command procedure NETCONFIG_UPDATE.COM updates the networkobjects automatically.If you choose not to use the command procedures, you can perform the following steps to allownetwork access to specific objects:1. Create a top-level directory for each network object, and specify a unique owner UIC and
group UIC. For example, the following command sequence creates a top-level directory forthe MAIL object on the system disk:$SET DEFAULT SYS$SPECIFIC:[000000]$CREATE/DIRECTORY [MAIL$SERVER]/OWNER_UIC=[376,374]
“Network Object Defaults” (page 279) lists the directory names, user names, and UICs usedby the NETCONFIG.COM and NETCONFIG_UPDATE.COM command procedures tocreate accounts for specific network accounts. For consistency, you should specify the sameinformation when manually creating network object accounts.Note that the MOM object is created by the operating system during installation.
2. Using AUTHORIZE, create an account for the object, and use a generated password. (Notethat the user name and password that you specify must match the password defined for theobject in the network database [described in step 3].)For example, the following command sequence sets up an account for the MAIL object:$RUN SYS$SYSTEM:AUTHORIZEUAF>ADD MAIL$SERVER/OWNER=MAIL$SERVER DEFAULT -_UAF>/PASSWORD=MDU1294B/UIC=[376,374]/ACCOUNT=DECNET -_UAF>/DEVICE=SYS$SPECIFIC: /DIRECTORY=[MAIL$SERVER] -_UAF>/PRIVILEGE=(TMPMBX,NETMBX) /DEFPRIVILEGE=(TMPMBX,NETMBX) -_UAF>/FLAGS=(RESTRICTED,NODISUSER,NOCAPTIVE) /LGICMD=NL: -_UAF>/NOBATCH /NOINTERACTIVE
The AUTHORIZE command SHOW MAIL$SERVER displays the network account set upfor the MAIL object, as shown in “UAF Record for MAIL$SERVER Account” (page 280).
3. Use the NCP DEFINE command to associate the user name and password of the accountwith the specified object in the network database, as follows:
278 Security in a Network Environment
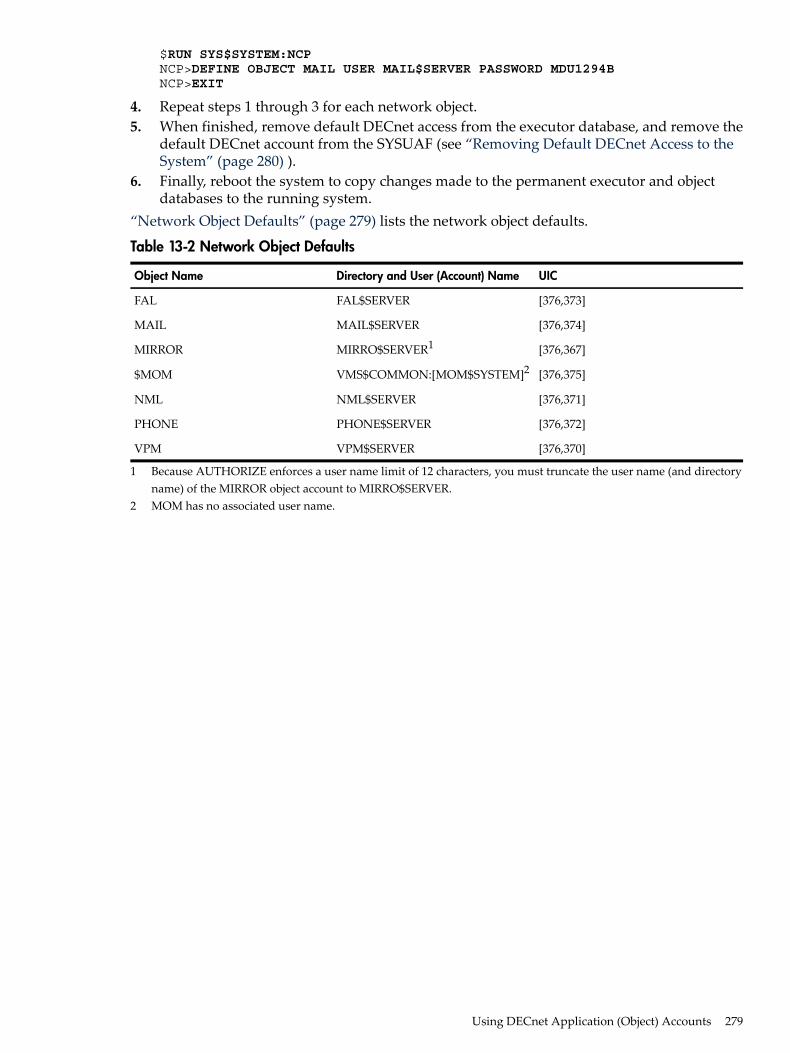
$RUN SYS$SYSTEM:NCPNCP>DEFINE OBJECT MAIL USER MAIL$SERVER PASSWORD MDU1294BNCP>EXIT
4. Repeat steps 1 through 3 for each network object.5. When finished, remove default DECnet access from the executor database, and remove the
default DECnet account from the SYSUAF (see “Removing Default DECnet Access to theSystem” (page 280) ).
6. Finally, reboot the system to copy changes made to the permanent executor and objectdatabases to the running system.
“Network Object Defaults” (page 279) lists the network object defaults.
Table 13-2 Network Object Defaults
UICDirectory and User (Account) NameObject Name
[376,373]FAL$SERVERFAL
[376,374]MAIL$SERVERMAIL
[376,367]MIRRO$SERVER1MIRROR
[376,375]VMS$COMMON:[MOM$SYSTEM]2$MOM
[376,371]NML$SERVERNML
[376,372]PHONE$SERVERPHONE
[376,370]VPM$SERVERVPM
1 Because AUTHORIZE enforces a user name limit of 12 characters, you must truncate the user name (and directoryname) of the MIRROR object account to MIRRO$SERVER.
2 MOM has no associated user name.
Using DECnet Application (Object) Accounts 279
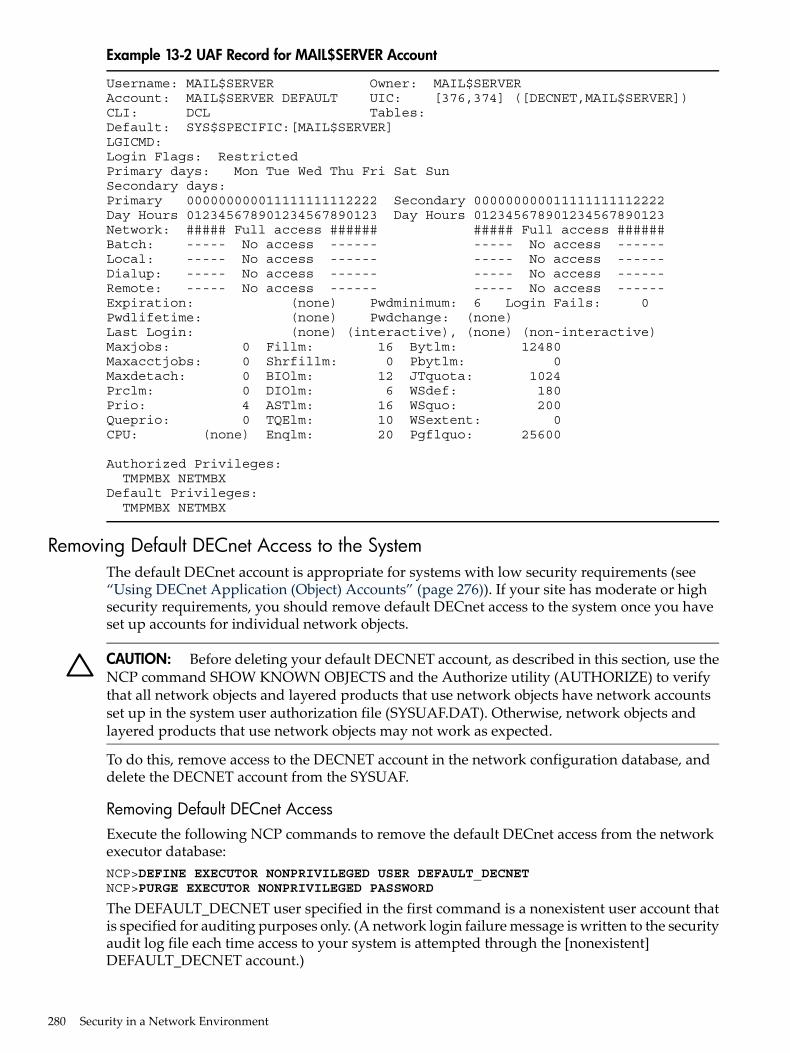
Example 13-2 UAF Record for MAIL$SERVER Account
Username: MAIL$SERVER Owner: MAIL$SERVERAccount: MAIL$SERVER DEFAULT UIC: [376,374] ([DECNET,MAIL$SERVER])CLI: DCL Tables:Default: SYS$SPECIFIC:[MAIL$SERVER]LGICMD:Login Flags: RestrictedPrimary days: Mon Tue Wed Thu Fri Sat SunSecondary days:Primary 000000000011111111112222 Secondary 000000000011111111112222Day Hours 012345678901234567890123 Day Hours 012345678901234567890123Network: ##### Full access ###### ##### Full access ######Batch: ----- No access ------ ----- No access ------Local: ----- No access ------ ----- No access ------Dialup: ----- No access ------ ----- No access ------Remote: ----- No access ------ ----- No access ------Expiration: (none) Pwdminimum: 6 Login Fails: 0Pwdlifetime: (none) Pwdchange: (none)Last Login: (none) (interactive), (none) (non-interactive)Maxjobs: 0 Fillm: 16 Bytlm: 12480Maxacctjobs: 0 Shrfillm: 0 Pbytlm: 0Maxdetach: 0 BIOlm: 12 JTquota: 1024Prclm: 0 DIOlm: 6 WSdef: 180Prio: 4 ASTlm: 16 WSquo: 200Queprio: 0 TQElm: 10 WSextent: 0CPU: (none) Enqlm: 20 Pgflquo: 25600
Authorized Privileges: TMPMBX NETMBXDefault Privileges: TMPMBX NETMBX
Removing Default DECnet Access to the SystemThe default DECnet account is appropriate for systems with low security requirements (see“Using DECnet Application (Object) Accounts” (page 276)). If your site has moderate or highsecurity requirements, you should remove default DECnet access to the system once you haveset up accounts for individual network objects.
CAUTION: Before deleting your default DECNET account, as described in this section, use theNCP command SHOW KNOWN OBJECTS and the Authorize utility (AUTHORIZE) to verifythat all network objects and layered products that use network objects have network accountsset up in the system user authorization file (SYSUAF.DAT). Otherwise, network objects andlayered products that use network objects may not work as expected.
To do this, remove access to the DECNET account in the network configuration database, anddelete the DECNET account from the SYSUAF.
Removing Default DECnet AccessExecute the following NCP commands to remove the default DECnet access from the networkexecutor database:NCP>DEFINE EXECUTOR NONPRIVILEGED USER DEFAULT_DECNETNCP>PURGE EXECUTOR NONPRIVILEGED PASSWORD
The DEFAULT_DECNET user specified in the first command is a nonexistent user account thatis specified for auditing purposes only. (A network login failure message is written to the securityaudit log file each time access to your system is attempted through the [nonexistent]DEFAULT_DECNET account.)
280 Security in a Network Environment
Deleting the DECNET AccountUsing AUTHORIZE, remove the DECNET account from SYSUAF, as follows:$SET DEFAULT SYS$SYSTEM$RUN AUTHORIZEUAF>REMOVE DECNETUAF>EXIT
Delete any files in the [DECNET] directory structure.
Modifying the Volatile Configuration DatabaseTo have the change take effect immediately, modify the volatile database with the followingNCP commands:NCP>SET EXECUTOR NONPRIVILEGED USER DEFAULT_DECNETNCP>CLEAR EXECUTOR NONPRIVILEGED PASSWORD
Setting Privilege Requirements for Remote Object ConnectionsYou can select specific privileges to control the use of DECnet objects that are specified duringnetwork configuration. In such instances, it becomes a privileged operation either to connect toa privileged DECnet object or use an outgoing DECnet object.For example, the following command establishes the requirement that users initiating a DECnetconnection to the remote object MAIL must possess the OPER and SYSNAM privileges:NCP>DEFINE OBJECT MAIL OUTGOING CONNECT PRIVILEGES OPER,SYSNAM
This mechanism is a useful way of limiting access to certain DECnet applications to privilegedusers or programs. However, to be effective, the privilege requirement must be imposedconsistently on all nodes in the network.
Specifying Routing Initialization PasswordsPoint-to-point connections are connections over synchronous and asynchronous lines. Forpoint-to-point connections, especially over dialup lines, you can use routing initializationpasswords to verify that the initiating node is authorized to form a connection with your node.Each end of a point-to-point circuit can establish a verifier to transmit to the other node andspecify a verifier expected from the other node. Before the link is established, each node verifiesthat it received the expected verifier from the other node.Passwords are usually optional for point-to-point connections but are required for dynamicasynchronous connections. To provide for increased security when a remote node requests adynamic asynchronous connection (which is normally maintained only for the duration of atelephone call), the node requesting the dynamic connection supplies a password, but the nodereceiving the login request is prevented from revealing a password to the requesting node. Thenetwork address, node name, and password of the requesting node has to match the local system'srouting authorization data.
Establishing a Dynamic Asynchronous ConnectionA dynamic asynchronous DECnet connection is a temporary connection between two nodes,normally over a telephone line through the use of modems. The line at each end of the connectioncan be switched from a terminal line to a dynamic asynchronous DECnet line. Configuration ofdynamic asynchronous lines is performed automatically by DECnet during establishment of adynamic connection. A dynamic asynchronous connection is normally maintained only for theduration of a telephone call.
Specifying Routing Initialization Passwords 281
NOTE: A dynamic asynchronous connection to an OpenVMS node can be initiated from anynode that supports the DECnet asynchronous DDCMP protocol.
On an OpenVMS node, you can perform steps 1 and 2 of the dynamic asynchronous connectionprocess before you turn on the network at your node (step 3). The later steps of the process(starting with step 4) must occur when the line is being switched to DECnet.Follow the steps outlined below to establish a dynamic asynchronous DECnet connection. Thisprocedure assumes the local OpenVMS node is originating the connection and switching theterminal line on for DECnet use. The connection must be to an OpenVMS node on which youhave an account with NETMBX privilege. The steps also indicate the actions that the systemmanager at the remote OpenVMS node must perform in order for the dynamic asynchronousDECnet link to be established successfully.1. Log in to the SYSTEM account and enter the following commands interactively (or include
them in the SYS$MANAGER:SYSTARTUP_VMS.COM command procedure before youboot the system). These commands load the asynchronous driver NODRIVER (NOA0) andinstall DYNSWITCH software on your system.$ RUN SYS$SYSTEM:SYSGENSYSGEN>CONNECT NOA0/NOADAPTERSYSGEN>EXIT$ INSTALL:=$SYS$SYSTEM:INSTALL$ INSTALL/COMMANDINSTALL>CREATE SYS$LIBRARY:DYNSWITCH/SHARE -_ /PROTECT/HEADER/OPENINSTALL>EXIT
The system manager of the remote OpenVMS node must also enter these commands.Additionally, the system manager at the remote OpenVMS node must enter the commandsgiven below. These commands enable the use of virtual terminals for the terminal line thatis to be switched, and set the DISCONNECT characteristic for the terminal line. (The virtualterminal capability permits the process to continue running if the physical terminal you areusing becomes disconnected.)$ RUN SYS$SYSTEM:SYSGENSYSGEN>CONNECT VTA0/NOADAPTER/DRIVER=TTDRIVERSYSGEN>EXIT$ SET TERMINAL/EIGHT_BIT/PERMANENT/MODEM/DIALUP -_$ /DISCONNECT device-name:
Device-name is the name of the terminal port to which the dynamic asynchronous connectionis made.
2. Establish the required transmit password at the originating end of the dynamic asynchronousdialup link. The transmit password is the password sent to the remote node during connectionstartup. Use NCP to enter a command to define the transmit password for the remotenode. The password can contain one to eight alphanumeric characters and should not containany spaces. Specify the following commands:$ RUN SYS$SYSTEM:NCPNCP>DEFINE NODE node-id TRANSMIT PASSWORD passwordNCP>EXIT
Node-id is the name of the remote node with which your node is forming a connection.In the following example, the node name of your local node is LOCALA, the transmitpassword is PASSA, and the remote node with which you are creating a dynamicasynchronous dialup link is REMOTC:$ RUN SYS$SYSTEM:NCPNCP>DEFINE NODE REMOTC TRANSMIT PASSWORD PASSANCP>EXIT
282 Security in a Network Environment
For each remote node with which you will create a dynamic asynchronous DECnet dialuplink, you must define a transmit password in a separate command.The system manager for the node at the other end of the connection must define that samepassword as a receive password for your node (the password expected to be received fromyour node). The remote system manager should also specify the parameter INBOUNDROUTER or INBOUND ENDNODE, to indicate the type of node (router or end node) thatis expected to initiate the dynamic connection. These are the commands the remote managershould enter:$ RUN SYS$SYSTEM:NCPNCP>DEFINE NODE node-id -_ RECEIVE PASSWORD password INBOUND node-typeNCP>EXIT
For example, if your node LOCALA is an end node and your transmit password is PASSA,the manager at REMOTC should issue the following command:$ RUN SYS$SYSTEM:NCPNCP>DEFINE NODE LOCALA RECEIVE PASSWORD PASSA INBOUND ENDNODENCP>EXIT
3. Ensure that DECnet is running on both nodes for the remaining steps. If you have not alreadydone so, turn on the network by entering the following command (and request that theremote system manager also do so):$ @SYS$MANAGER:STARTNET
If the network was already running before you began the dynamic asynchronous connectionprocedure, enter these commands to cause the permanent database entry to be entered inthe volatile database:$ RUN SYS$SYSTEM:NCPNCP>SET NODE node-id ALLNCP>EXIT
4. The remaining steps can be performed by any OpenVMS user with NETMBX privilege. Login to your local OpenVMS system, and enter the following DCL command on your terminalto cause your process to function as a terminal emulator (which makes the remote terminalappear to be a local terminal connection):SET HOST/DTE device-name:
Device-name is the name of your local terminal port that is connected to the modem. If bothsystems use modems with autodial capabilities, you can optionally include the /DIALqualifier on the SET HOST/DTE command to cause automatic dialing of the modem on theremote node, as follows:SET HOST/DTE/DIAL=number device-name:
5. If you are not using automatic dialing, dial in to the remote node manually.6. Once the dialup connection is made and you receive the remote OpenVMS system welcome
message, log in to your account on the remote node.7. While logged in to your account on the remote node, enter the following command to
cause the line to be switched to a DECnet line automatically:$ SET TERMINAL/PROTOCOL=DDCMP/SWITCH=DECNET
The following message indicates that the DECnet link is being established:%REM-S-END - control returned to local-nodename::$
To check whether the communications link has come up, specify the following commandon the local system:$ RUN SYS$SYSTEM:NCPNCP>SHOW KNOWN CIRCUITSNCP>EXIT
Specifying Routing Initialization Passwords 283
The resulting display should list a circuit identified by the mnemonic TT or TX, dependingon the asynchronous device installed on the line, and indicate that it is in the ON state.When the DCL prompt appears on your terminal screen, you can begin to communicatewith the remote node over the asynchronous DECnet connection.
8. As an alternative to switching the terminal line to a DECnet line automatically (as describedin previous step 7), you can switch the line manually. If you originate a dynamic connectionto an OpenVMS node from a node that is not running OpenVMS software, manual switchingis required; from an OpenVMS system, it is optional. If you are originating the connectionfrom a node that is not running OpenVMS software, follow system-specific procedures tolog in to the remote OpenVMS node by means of terminal emulation.Once you are logged in to the remote node, two steps are required to perform manualswitching:a. Using your account on the remote OpenVMS node, specify the SET TERMINAL
command described in step 7, but add the /MANUAL qualifier:$ SET TERMINAL/PROTOCOL=DDCMP/SWITCH=DECNET/MANUAL
You receive the following message from the remote node indicating the remote systemis switching its line to DECnet use:%SET-I-SWINPRG The line you are currently logged over is becoming a DECnet line
b. You should exit from the terminal emulator and switch your line manually to a DECnetline. The procedure depends on the specific operating system on which you are loggedin.The following example shows how an OpenVMS user originating a dynamic connectionwould perform this procedure:• Exit from the terminal emulator by pressing the backslash (\ ) key and the Ctrl key
simultaneously on your OpenVMS system.• Enter the following command to switch your terminal line to a DECnet line
manually:$ SET TERMINAL/PROTOCOL=DDCMP TTA0:
TTA0 is the name of the terminal port on the local node.
• Enter NCP commands to turn on the line and circuit connected to your terminalport TTA0 manually, as in the following example:$ RUN SYS$SYSTEM:NCPNCP>SET LINE TT-0-0 RECEIVE BUFFERS 4 -_ LINE SPEED 2400 STATE ONNCP>EXIT
Asynchronous DECnet is then started on the local OpenVMS node.
9. You can terminate the dynamic asynchronous link in one of two ways:• Break the telephone connection.• Run NCP and turn off either the asynchronous line or circuit. The two commands you
can use are as follows:$ RUN SYS$SYSTEM:NCPNCP>SET LINE dev-c-u STATE OFFNCP>SET CIRCUIT dev-c-u STATE OFFNCP>EXIT
If either of the above NCP commands is entered at the remote node, the line returns toterminal mode immediately. If the command is entered at the local (originating)OpenVMS node, the remote line and circuit remain on for approximately four minutesand then the line returns to terminal mode.
284 Security in a Network Environment
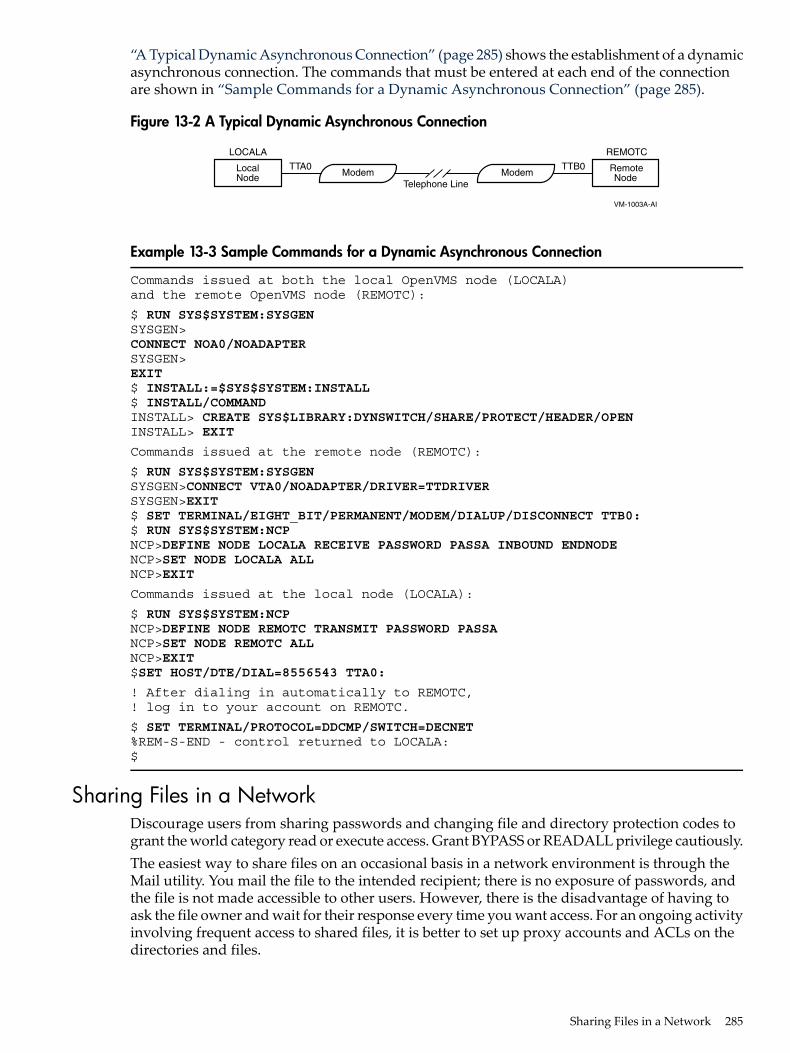
“A Typical Dynamic Asynchronous Connection” (page 285) shows the establishment of a dynamicasynchronous connection. The commands that must be entered at each end of the connectionare shown in “Sample Commands for a Dynamic Asynchronous Connection” (page 285).
Figure 13-2 A Typical Dynamic Asynchronous Connection
LOCALA
TTA0 TTB0
REMOTC
ModemModemTelephone Line
VM-1003A-AI
NodeLocal
NodeRemote
Example 13-3 Sample Commands for a Dynamic Asynchronous Connection
Commands issued at both the local OpenVMS node (LOCALA)and the remote OpenVMS node (REMOTC):
$ RUN SYS$SYSTEM:SYSGENSYSGEN>CONNECT NOA0/NOADAPTERSYSGEN>EXIT$ INSTALL:=$SYS$SYSTEM:INSTALL$ INSTALL/COMMANDINSTALL> CREATE SYS$LIBRARY:DYNSWITCH/SHARE/PROTECT/HEADER/OPENINSTALL> EXIT
Commands issued at the remote node (REMOTC):
$ RUN SYS$SYSTEM:SYSGENSYSGEN>CONNECT VTA0/NOADAPTER/DRIVER=TTDRIVERSYSGEN>EXIT$ SET TERMINAL/EIGHT_BIT/PERMANENT/MODEM/DIALUP/DISCONNECT TTB0:$ RUN SYS$SYSTEM:NCPNCP>DEFINE NODE LOCALA RECEIVE PASSWORD PASSA INBOUND ENDNODENCP>SET NODE LOCALA ALLNCP>EXIT
Commands issued at the local node (LOCALA):
$ RUN SYS$SYSTEM:NCPNCP>DEFINE NODE REMOTC TRANSMIT PASSWORD PASSANCP>SET NODE REMOTC ALLNCP>EXIT$SET HOST/DTE/DIAL=8556543 TTA0:
! After dialing in automatically to REMOTC,! log in to your account on REMOTC.
$ SET TERMINAL/PROTOCOL=DDCMP/SWITCH=DECNET%REM-S-END - control returned to LOCALA:$
Sharing Files in a NetworkDiscourage users from sharing passwords and changing file and directory protection codes togrant the world category read or execute access. Grant BYPASS or READALL privilege cautiously.The easiest way to share files on an occasional basis in a network environment is through theMail utility. You mail the file to the intended recipient; there is no exposure of passwords, andthe file is not made accessible to other users. However, there is the disadvantage of having toask the file owner and wait for their response every time you want access. For an ongoing activityinvolving frequent access to shared files, it is better to set up proxy accounts and ACLs on thedirectories and files.
Sharing Files in a Network 285
Using the Mail UtilityThe easiest way for a user to transfer a text file to another user is to invoke the Mail utility (MAIL)and to send the user a copy of the file. This method is reasonably secure, because passwordsneed not be revealed and the original protection of the file is not changed. The receiving usersimply includes a new file name with the MAIL command EXTRACT/NOHEADER to place acopy in the user's own directory. The copy automatically acquires the user's default protection.The user then uses the MAIL command DELETE to remove the copy from the mail file.
Setting Up Accounts for Local and Remote UsersA network manager may need to admit a number of users from outside nodes into a directoryon the local node for a specific task. Therefore, you create a proxy account and add the proxyaccess to admit the outsiders into that one account (see “Procedure for Creating a Proxy Account”(page 274)). If there are local users who need to share the files in this account's directory, thenyou provide that access and protect the files from outsiders by placing ACLs on the directoryand files.Consider a situation where a corporation needs a central repository for sales update informationthat is accessible to employees throughout the corporation.1. The security administrator at the node where the files will reside (BNORD) creates the special
account SALES_READER. The SALES_READER account is set up as a captive account withmail disabled. The default directory is [SALESINFO], which has the following defaultprotection code:(S:RWED,O:RWED,G:R,W)
Note that this protection code permits users in the same group as SALES_READER on thehome node BNORD to read the files. Furthermore, only the users in the system category orthe owner category, or those who have privileges that give them such access, can updatethe files in the directory. ACLs are used to further define the access, as described in step 3.
2. The security administrator uses the AUTHORIZE command ADD/PROXY to add the proxyaccess for the outside users. For example, to extend proxy access to user Jackson on nodeDEXTER and user Goodwin on node BANGOR, the commands would be as follows:UAF>ADD/PROXY DEXTER::JACKSON SALES_READER/DEFAULTUAF>ADD/PROXY BANGOR::GOODWIN SALES_READER/DEFAULT
3. If later it becomes clear that other users at the home node BNORD need access and they donot belong to the same group as SALES_READER, ACLs could be added to the files in thedirectory [SALESINFO]. For example, suppose R. Grant needs control access to all the filesand J. Martinez needs read access to all the files. The following two DCL commands woulddefine the ACL for the directory and then propagate it to all existing files:$ SET SECURITY/ACL=-_$ ((IDENTIFIER=R_GRANT,ACCESS=CONTROL),-_$ (IDENTIFIER=J_MARTINEZ,ACCESS=READ))-_$ ((IDENTIFIER=R_GRANT,OPTIONS=DEFAULT,ACCESS=CONTROL),-_$ (IDENTIFIER=J_MARTINEZ,OPTIONS=DEFAULT,ACCESS=READ))-_$ [000000]SALESINFO.DIR$ SET SECURITY/DEFAULT *.*;*
Admitting Remote Users to Multiple AccountsWhen a small number of outside users need access, for differing reasons, to files requiring specialprotection, set up access to multiple proxy accounts, and apply extensive ACLs.For example, a large corporation with many branch offices might choose to establish severalproxy accounts for specific file-sharing purposes. Assume the central office wants to grant twokey users from its two nodes in the eastern region read and write access to the project files forcode name LEVIGRAY and read-only access to the BETSEYHARLOW project files. At the same
286 Security in a Network Environment
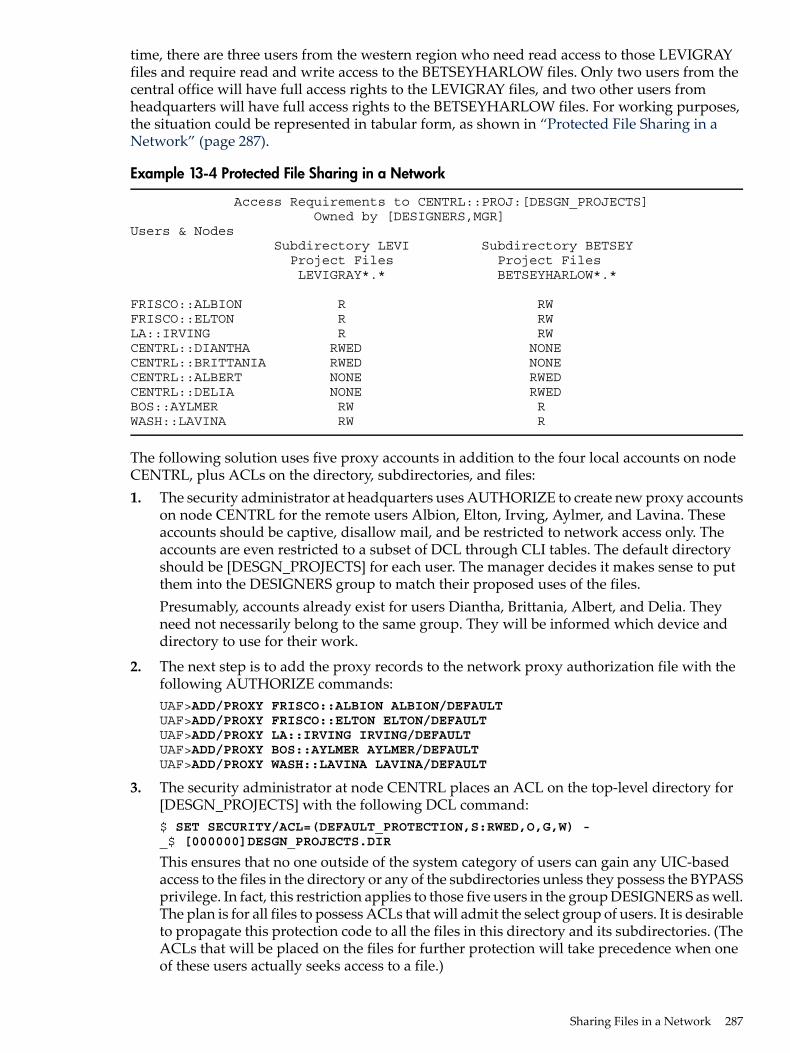
time, there are three users from the western region who need read access to those LEVIGRAYfiles and require read and write access to the BETSEYHARLOW files. Only two users from thecentral office will have full access rights to the LEVIGRAY files, and two other users fromheadquarters will have full access rights to the BETSEYHARLOW files. For working purposes,the situation could be represented in tabular form, as shown in “Protected File Sharing in aNetwork” (page 287).
Example 13-4 Protected File Sharing in a Network
Access Requirements to CENTRL::PROJ:[DESGN_PROJECTS] Owned by [DESIGNERS,MGR]Users & Nodes Subdirectory LEVI Subdirectory BETSEY Project Files Project Files LEVIGRAY*.* BETSEYHARLOW*.*
FRISCO::ALBION R RWFRISCO::ELTON R RWLA::IRVING R RWCENTRL::DIANTHA RWED NONECENTRL::BRITTANIA RWED NONECENTRL::ALBERT NONE RWEDCENTRL::DELIA NONE RWEDBOS::AYLMER RW RWASH::LAVINA RW R
The following solution uses five proxy accounts in addition to the four local accounts on nodeCENTRL, plus ACLs on the directory, subdirectories, and files:1. The security administrator at headquarters uses AUTHORIZE to create new proxy accounts
on node CENTRL for the remote users Albion, Elton, Irving, Aylmer, and Lavina. Theseaccounts should be captive, disallow mail, and be restricted to network access only. Theaccounts are even restricted to a subset of DCL through CLI tables. The default directoryshould be [DESGN_PROJECTS] for each user. The manager decides it makes sense to putthem into the DESIGNERS group to match their proposed uses of the files.Presumably, accounts already exist for users Diantha, Brittania, Albert, and Delia. Theyneed not necessarily belong to the same group. They will be informed which device anddirectory to use for their work.
2. The next step is to add the proxy records to the network proxy authorization file with thefollowing AUTHORIZE commands:UAF>ADD/PROXY FRISCO::ALBION ALBION/DEFAULTUAF>ADD/PROXY FRISCO::ELTON ELTON/DEFAULTUAF>ADD/PROXY LA::IRVING IRVING/DEFAULTUAF>ADD/PROXY BOS::AYLMER AYLMER/DEFAULTUAF>ADD/PROXY WASH::LAVINA LAVINA/DEFAULT
3. The security administrator at node CENTRL places an ACL on the top-level directory for[DESGN_PROJECTS] with the following DCL command:$ SET SECURITY/ACL=(DEFAULT_PROTECTION,S:RWED,O,G,W) -_$ [000000]DESGN_PROJECTS.DIR
This ensures that no one outside of the system category of users can gain any UIC-basedaccess to the files in the directory or any of the subdirectories unless they possess the BYPASSprivilege. In fact, this restriction applies to those five users in the group DESIGNERS as well.The plan is for all files to possess ACLs that will admit the select group of users. It is desirableto propagate this protection code to all the files in this directory and its subdirectories. (TheACLs that will be placed on the files for further protection will take precedence when oneof these users actually seeks access to a file.)
Sharing Files in a Network 287
4. Two subdirectories are created in [DESGN_PROJECTS]:• [DESGN_PROJECTS.LEVI]• [DESGN_PROJECTS.BETSEY]
5. The security administrator uses the ACL editor to place the following additional ACEs inthe ACL for the top-level directory:DESGN_PROJECTS.DIR
(IDENTIFIER=DIANTHA,OPTIONS=PROTECTED,ACCESS=EXECUTE)(IDENTIFIER=BRITTANIA,OPTIONS=PROTECTED,ACCESS=EXECUTE)(IDENTIFIER=ALBERT,OPTIONS=PROTECTED,ACCESS=EXECUTE)(IDENTIFIER=DELIA,OPTIONS=PROTECTED,ACCESS=EXECUTE)(IDENTIFIER=AYLMER,OPTIONS=PROTECTED,ACESS=EXECUTE)(IDENTIFIER=LAVINA,OPTIONS=PROTECTED,ACCESS=EXECUTE)(IDENTIFIER=ALBION,OPTIONS=PROTECTED,ACCESS=EXECUTE)(IDENTIFIER=ELTON,OPTIONS=PROTECTED,ACCESS=EXECUTE)(IDENTIFIER=IRVING,OPTIONS=PROTECTED,ACCESS=EXECUTE)
These protected ACEs ensure that only the select nine users can access the top-level directory.Because no one receives write or delete access to the top directory through the ACL, thedirectory and subdirectories are generally protected from deletion and renaming of files.(Of course, the system category of user obtains write and delete access through the UIC-basedprotection.)
6. Next, the security administrator creates ACLs on the subdirectories. The ACEs that arerequired are shown for their respective subdirectories:[DESGN_PROJECTS]LEVI.DIR
(IDENTIFIER=DIANTHA,OPTIONS=PROTECTED,ACCESS=READ+WRITE+EXECUTE+CONTROL)(IDENTIFIER=DIANTHA,OPTIONS=DEFAULT+PROTECTED,ACCESS=READ+WRITE+EXECUTE +DELETE+CONTROL)(IDENTIFIER=BRITTANIA,OPTIONS=PROTECTED,ACCESS=READ+WRITE+EXECUTE+CONTROL)(IDENTIFIER=BRITTANIA,OPTIONS=DEFAULT+PROTECTED,ACCESS=READ+WRITE+EXECUTE +DELETE+CONTROL)(IDENTIFIER=AYLMER,OPTIONS=PROTECTED,ACCESS=READ+WRITE)(IDENTIFIER=AYLMER,OPTIONS=DEFAULT+PROTECTED,ACCESS=READ+WRITE)(IDENTIFIER=LAVINA,OPTIONS=PROTECTED,ACCESS=READ+WRITE)(IDENTIFIER=LAVINA,OPTIONS=DEFAULT+PROTECTED,ACCESS=READ+WRITE)(IDENTIFIER=ALBION,OPTIONS=PROTECTED,ACCESS=READ)(IDENTIFIER=ALBION,OPTIONS=DEFAULT+PROTECTED,ACCESS=READ)(IDENTIFIER=ELTON,OPTIONS=PROTECTED,ACCESS=READ)(IDENTIFIER=ELTON,OPTIONS=DEFAULT+PROTECTED,ACCESS=READ)(IDENTIFIER=IRVING,OPTIONS=PROTECTED,ACCESS=READ)(IDENTIFIER=IRVING,OPTIONS=DEFAULT+PROTECTED,ACCESS=READ)
[DESGN_PROJECTS]BETSEY.DIR
(IDENTIFIER=ALBERT,OPTIONS=PROTECTED,ACCESS=READ+WRITE+EXECUTE+CONTROL)(IDENTIFIER=ALBERT,OPTIONS=DEFAULT+PROTECTED,ACCESS=READ+WRITE+EXECUTE +DELETE+CONTROL)(IDENTIFIER=DELIA,OPTIONS=PROTECTED,ACCESS=READ+WRITE+EXECUTE+CONTROL)(IDENTIFIER=DELIA,OPTIONS=DEFAULT+PROTECTED,ACCESS=READ+WRITE+EXECUTE +DELETE+CONTROL)(IDENTIFIER=ALBION,OPTIONS=PROTECTED,ACCESS=READ+WRITE)(IDENTIFIER=ALBION,OPTIONS=DEFAULT+PROTECTED,ACCESS=READ+WRITE)(IDENTIFIER=ELTON,OPTIONS=PROTECTED,ACCESS=READ+WRITE)(IDENTIFIER=ELTON,OPTIONS=DEFAULT+PROTECTED,ACCESS=READ+WRITE)(IDENTIFIER=IRVING,OPTIONS=PROTECTED,ACCESS=READ+WRITE)(IDENTIFIER=IRVING,OPTIONS=DEFAULT+PROTECTED,ACCESS=READ+WRITE)(IDENTIFIER=AYLMER,OPTIONS=PROTECTED,ACCESS=READ)(IDENTIFIER=AYLMER,OPTIONS=DEFAULT+PROTECTED,ACCESS=READ)(IDENTIFIER=LAVINA,OPTIONS=PROTECTED,ACCESS=READ)(IDENTIFIER=LAVINA,OPTIONS=DEFAULT+PROTECTED,ACCESS=READ)
Note that both preceding ACLs include two ACEs for each identifier. The first ACE controlsthe access to the subdirectory. It denies delete access for the protection of the subdirectoryand is not propagated to all the files created in the subdirectory. The second ACE for each
288 Security in a Network Environment
identifier will automatically propagate to all files added to its respective subdirectoriesbecause of the inclusion of the Default attribute. Furthermore, the Protected attribute ensuresthat all the ACEs are protected from deletion except by specific action.
At this point, all the groundwork has been completed. Over time, files are added to thesubdirectories. Thus, when the user Lavina in Washington enters the following DCL command,the file LEVIGRAYMEM3.MEM is printed at node WASH:$ COPY CENTRL::LEVIGRAYMEM3.MEM LP:
However, if user Lavina tries to edit this file, the attempt fails because user Lavina is deniedwrite access through the ACL.If there were many users involved in this scheme, it would soon become worthwhile to grantadditional identifiers to the users. For example, each user that would be allowed read access tothe files in the LEVI subdirectory might be given the identifier LEVI_READER, and so forth. TheACLs could then be shortened.
Sharing Files in a Network 289

290
14 Using Protected SubsystemsFor the most part, the OpenVMS operating system bases its security controls on user identity.Protected objects, such as files and devices, are accessible to individual users or groups of users.If an object's ACL or protection code allows a user the necessary access, then the user can usethat object by using any available software. (See the “Protecting Data” (page 69) chapter for adescription of OpenVMS object protection.)In a protected subsystem, an application protected by normal access controls serves as a gatekeeperto objects belonging to the subsystem. Users have no access to the subsystem's objects unlessthey execute the application serving as gatekeeper. Once users run the application, their processrights list acquires identifiers giving them access to objects owned by the subsystem. As soon asthey exit from the application, these identifiers and, therefore, the users' access rights to objectsare taken away.This chapter describes protected subsystems and explains how to build them.
Advantages of Protected SubsystemsUsing protected subsystems offers several advantages:• With protected subsystems, you have a mechanism to provide conditional access to data
that is not available with traditional OpenVMS access controls. Traditionally, you give usersprivileges to bypass protection codes or access control lists (ACLs). In giving these privileges,however, you grant users a wide class of access. (See the “Assigning Privileges” (page 303)chapter for information on the power different privileges carry.) Protected subsystems avoidextensive privilege use by individual users.
• Protected subsystems give you an alternative to installing images with privilege. Writing asecure privileged image requires skill, and failures can compromise system security.
• Protected subsystems give you an alternative to creating protected shareable images (alsocalled user-written system services).
• Protected subsystems make system management easier because unprivileged users canmanage them without much assistance from you. See “System Management Requirements”(page 293) for details on system management requirements.
Applications for Protected SubsystemsProtected subsystems have many applications, from databases to common system managementsituations.One use for a protected subsystem might be a group membership list that you want to makeavailable to all group members. The list contains the names, addresses, personnel numbers, andinterests of group members. When the membership list is set up as a protected subsystem, allmembers of the group can read selected information and update specific types of information.A protected subsystem might also solve the problem of confidential information being sent toprinters in public areas. You could write an application to filter data for sensitive information.Confidential files would be sent to printers in restricted areas, while public files would be sentto any available printer. Any user with execute access to the application could use the restrictedprinters, but only through the protected subsystem.
How Protected Subsystems WorkA protected subsystem is an application that, when run, causes the process running the applicationto be granted one or more identifiers. For as long as a user runs the subsystem, the user's processrights list carries these additional identifiers. “How Protected Subsystems Differ from NormalAccess Control” (page 292) shows how a protected subsystem adds a second level of access controlto traditional controls.
Advantages of Protected Subsystems 291
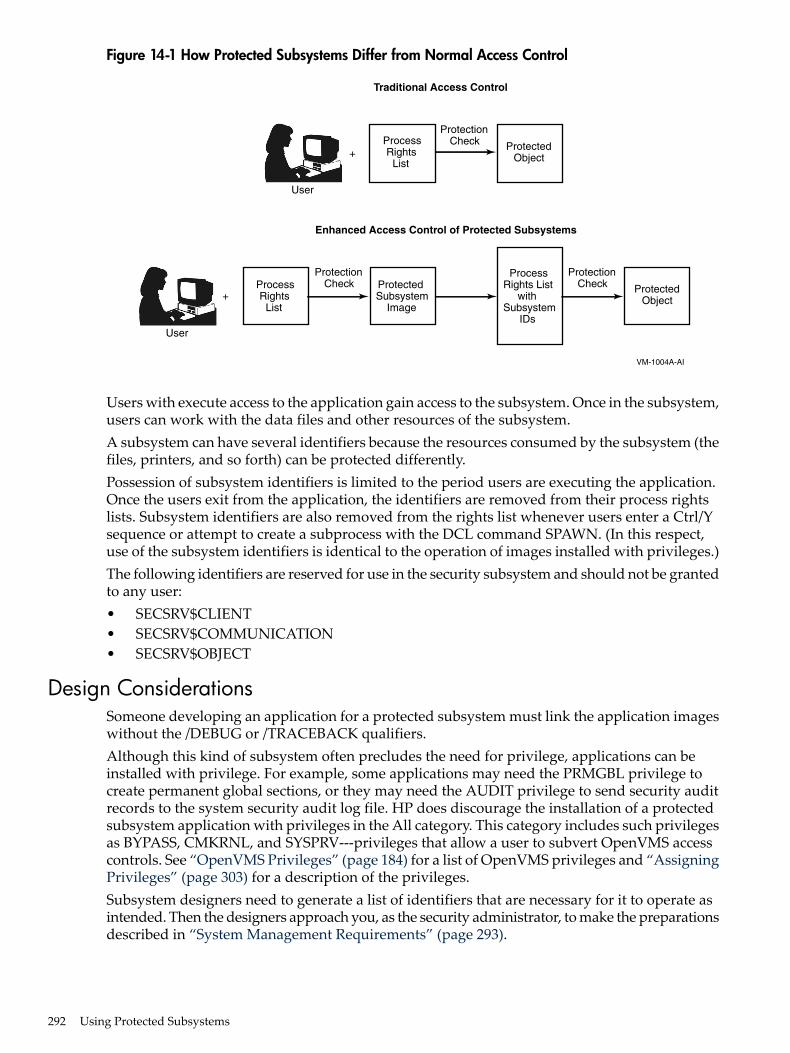
Figure 14-1 How Protected Subsystems Differ from Normal Access Control
Traditional Access Control
Enhanced Access Control of Protected Subsystems
VM-1004A-AI
ProcessRights
List
ProtectedObject
ProtectionCheck
+
User
ProtectedSubsystem
Image
ProcessRights List
withSubsystem
IDs
ProcessRights
List
ProtectedObject+
ProtectionCheck
ProtectionCheck
User
Users with execute access to the application gain access to the subsystem. Once in the subsystem,users can work with the data files and other resources of the subsystem.A subsystem can have several identifiers because the resources consumed by the subsystem (thefiles, printers, and so forth) can be protected differently.Possession of subsystem identifiers is limited to the period users are executing the application.Once the users exit from the application, the identifiers are removed from their process rightslists. Subsystem identifiers are also removed from the rights list whenever users enter a Ctrl/Ysequence or attempt to create a subprocess with the DCL command SPAWN. (In this respect,use of the subsystem identifiers is identical to the operation of images installed with privileges.)The following identifiers are reserved for use in the security subsystem and should not be grantedto any user:• SECSRV$CLIENT• SECSRV$COMMUNICATION• SECSRV$OBJECT
Design ConsiderationsSomeone developing an application for a protected subsystem must link the application imageswithout the /DEBUG or /TRACEBACK qualifiers.Although this kind of subsystem often precludes the need for privilege, applications can beinstalled with privilege. For example, some applications may need the PRMGBL privilege tocreate permanent global sections, or they may need the AUDIT privilege to send security auditrecords to the system security audit log file. HP does discourage the installation of a protectedsubsystem application with privileges in the All category. This category includes such privilegesas BYPASS, CMKRNL, and SYSPRV---privileges that allow a user to subvert OpenVMS accesscontrols. See “OpenVMS Privileges” (page 184) for a list of OpenVMS privileges and “AssigningPrivileges” (page 303) for a description of the privileges.Subsystem designers need to generate a list of identifiers that are necessary for it to operate asintended. Then the designers approach you, as the security administrator, to make the preparationsdescribed in “System Management Requirements” (page 293).
292 Using Protected Subsystems

System Management RequirementsAlthough an unprivileged user can build and manage a protected subsystem, you need to beinvolved at two points in the process: at the beginning to create the necessary identifiers for thesubsystem and at the end to mount the volume with the protected subsystem.You need to perform the following tasks:1. Ensure the SUBSYSTEM attribute is enabled on all volumes, which contain protected
subsystems. To do this, you can use either the MOUNT command or the SET command asshown in the following example:$ MOUNT/SUBSYSTEM $DKA0: WORK1
If the device is already mounted without the /SUBSYSTEM qualifier, you can set thesubsystem attribute using the SET command as follows:SET VOLUME/SUBSYSTEM $DKA0:
2. Create identifiers for the subsystem, each with the Subsystem attribute. The Subsystemattribute empowers the identifier's holder to manage the subsystem.
3. Grant these subsystem identifiers with Subsystem attributes to the people who will serveas managers of the subsystem. This enables them to assign the subsystem identifier to theimages that make up the subsystem.
4. Give the subsystem managers control access to application images. They need control accessso they can add Subsystem ACEs to the image ACLs.
5. Give the subsystem managers control access to existing resources that are to be managedby the protected subsystem.Although subsystem managers may need control access to key system resources, the ACLon the objects limits their access rights to only those resources. This may not be as dangerousas installing an image with SYSPRV.
The following example shows how you can set up identifiers and the necessary application accessso that users can manage a membership list:
Example 14-1 Setting Up Identifiers and Application Access for Managing Membership List
$SET DEFAULT SYS$SYSTEM$RUN AUTHORIZEUAF>ADD/IDENTIFIER MEMBERS_SUBSYSTEM- [1]_UAF>/ATTRIBUTES=(SUBSYSTEM,RESOURCE)UAF>GRANT/IDENTIFIER MEMBERS_SUBSYSTEM - [2]_UAF>/ATTRIBUTES=(SUBSYSTEM,RESOURCE) LOUISUAF>GRANT/IDENTIFIER MEMBERS_SUBSYSTEM -_UAF>/ATTRIBUTES=(SUBSYSTEM,RESOURCE) WU$SET SECURITY/ACL=(IDENTIFIER=MEMBERS_SUBSYSTEM,- [3]_$ACCESS=CONTROL) MEMBER_LIST.EXE
1. Use AUTHORIZE to create a subsystem identifier called MEMBERS_SUBSYSTEM. Noticethat this identifier carries the Subsystem attribute.
2. Make Louis and Wu holders of the identifier so they can manage the subsystem.3. Give Louis and Wu control access to the subsystem image MEMBER_LIST.EXE.
Note that you create the subsystem identifier MEMBERS_SUBSYSTEM with the Resource attribute.This allows disk space to be charged to the identifier MEMBERS_SUBSYSTEM and not theindividuals accessing the subsystem. (When using the Resource attribute, be careful to set theappropriate ACLs on directories [see “Setting Up the ACL” (page 192)].)
System Management Requirements 293
Building the SubsystemOnce managers of the subsystem have the appropriate identifiers and access rights as describedin “System Management Requirements” (page 293), they can add the necessary ACEs to asubsystem image. Two kinds of ACEs are necessary to construct a subsystem: the applicationimage receives a Subsystem ACE, and the objects managed by the subsystem receive IdentifierACEs. Therefore, building a subsystem requires the following steps:1. Create a Subsystem ACE containing the subsystem identifier in the ACLs of the application
images. A Subsystem ACE has the following format:(SUBSYSTEM,{IDENTIFIER=identifier[,ATTRIBUTES=attributes]})
2. Grant access to the objects managed by the subsystem. You need to add an Identifier ACEto the ACL of the various objects belonging to the subsystem. Each Identifier ACE containsone of the subsystem identifiers in the following format:(IDENTIFIER=identifier, ACCESS=access-type[+...])
In the following example, the subsystem manager uses the DCL command SET SECURITY toassociate the subsystem identifier with the images that make up the subsystem. First, thesubsystem manager adds a Subsystem ACE with the identifier MEMBERS_SUBSYSTEM to theACL of the application image MEMBER_LIST.EXE:$SET SECURITY/ACL=(SUBSYSTEM,IDENTIFIER=MEMBERS_SUBSYSTEM,-_$ATTRIBUTES=RESOURCE) MEMBER_LIST.EXE
Then the subsystem manager adds an Identifier ACE with the subsystem identifierMEMBERS_SUBSYSTEM to the data files managed by the subsystem:$SET SECURITY/ACL=(IDENTIFIER=MEMBERS_SUBSYSTEM,-_$ACCESS=READ+WRITE) MEMBER_DATA*.DAT
The DCL command SHOW SECURITY displays the security attributes of the files. For example:$SHOW SECURITY MEMBER_LIST.EXE
MEMBER_LIST.EXE object of class FILE
Owner: [STAFF]Protection: (System: RWED, Owner: RWED, Group, World: RE)Access Control List: (SUBSYSTEM,IDENTIFIER=MEMBERS_SUBSYSTEM,ATTRIBUTES=RESOURCE)
$SHOW SECURITY MEMBER_DATA*.DAT
MEMBER_DATA_1.DAT object of class FILE
Owner: MEMBERS_SUBSYSTEMProtection: (System: RWED, Owner: RWED, Group, World)Access Control List: (IDENTIFIER=MEMBERS_SUBSYSTEM,ACCESS=READ+WRITE)
MEMBER_DATA_2.DAT object of class FILE
Owner: MEMBERS_SUBSYSTEMProtection: (System: RWED, Owner: RWED, Group, World)Access Control List: (IDENTIFIER=MEMBERS_SUBSYSTEM,ACCESS=READ+WRITE)
Enabling Protected Subsystems on a Trusted VolumeA person with the SECURITY privilege can enable subsystems on a volume by using the/SUBSYSTEM qualifier on the MOUNT command. By default, subsystems are enabled only onthe system disk. For other disks, you need to enable subsystems every time a volume is mounted.In the following example, a security administrator uses the MOUNT command with the/SUBSYSTEM qualifier to enable the processing of Subsystem ACEs on device DUA0. Assumethat this disk contains the subsystem with the identifier MEMBERS_SUBSYSTEM.$MOUNT /SUBSYSTEM /SYSTEM DUA0: DOC WORK8
294 Using Protected Subsystems
You can turn the processing of Subsystem ACEs on and off dynamically with the DCL commandSET VOLUME /SUBSYSTEM. This command is especially useful for the system disk, which isnot mounted using the MOUNT command.Any person mounting a subsystem is responsible for knowing what is on the volume beingmounted. Without this knowledge, an operator or system manager can inadvertently subvertsystem security. For example, it is easy for a user with privileges on one cluster to put anapplication holding a subsystem identifier on a volume and then take the volume to a naiveoperator on another cluster and request that it be mounted. Because the application holds anappropriate subsystem identifier, it feigns membership in a subsystem for which it is unauthorized.Therefore, mount volumes of only those users whom you trust, or thoroughly search a volumefor Subsystem ACEs before you mount it with subsystems enabled.
Giving Users AccessAll users with execute access to the main application image of the subsystem can use the datafiles and other objects under control of the subsystem if the subsystem allows the access. However,managers of the subsystem can restrict access to objects of the subsystem in the following ways:• They can create special identifiers for resources belonging to the subsystem that they do not
want all members to access and add ACEs to these resources.• They can use compound expressions in ACEs and thus grant access conditionally. For
example, the following ACE grants access to MEMBERS_ADMIN when runningMEMBERS_SUBSYSTEM but not to MEMBERS_ADMIN alone nor to other users holdingthe MEMBERS_SUBSYSTEM identifier:(ID=MEMBERS_SUBSYSTEM+MEMBERS_ADMIN, ACCESS=READ+WRITE)
Remember that as long as users are executing the application image for the subsystem, theirprocess rights list contains the subsystem identifier as well as their normal identifiers. However,as soon as users interrupt or exit from the application, their process rights list loses the subsystemidentifier, and they lose access rights to the objects in the subsystem. Subsystem identifiers arenot propagated by default when subprocesses are spawned.
Example of a Protected SubsystemR. D. Taylor Inc., a company specializing in building supplies, decides to set up a protectedsubsystem for its purchasing and accounts payable departments. Although the departments arein different parts of the company, they share a common database for recording purchases fromsuppliers.When the company's inventory drops below the desired level, the purchasing department isdirected to order required supplies. Purchasing personnel find suppliers (if necessary), assignpurchase order numbers, and issue a purchase orders.When the goods arrive, the receiving and quality control departments check the contents againstwhat was ordered, ensure the goods meet quality standards, and put the goods into inventory.Once the shipment is processed, the information goes to the accounts payable department, whichsettles the invoices.Administrators in the accounts payable department check the invoices against purchase ordersand run a payments program to calculate the monies due to suppliers each week. Payments arerecorded in a database, and checks are printed on a printer loaded with company checks.Using the subsystem lets the company meet two objectives:• It gives purchasing personnel the right to reference or record purchase orders in the company
database, and it gives personnel in the accounts payable department the right to verify
Giving Users Access 295
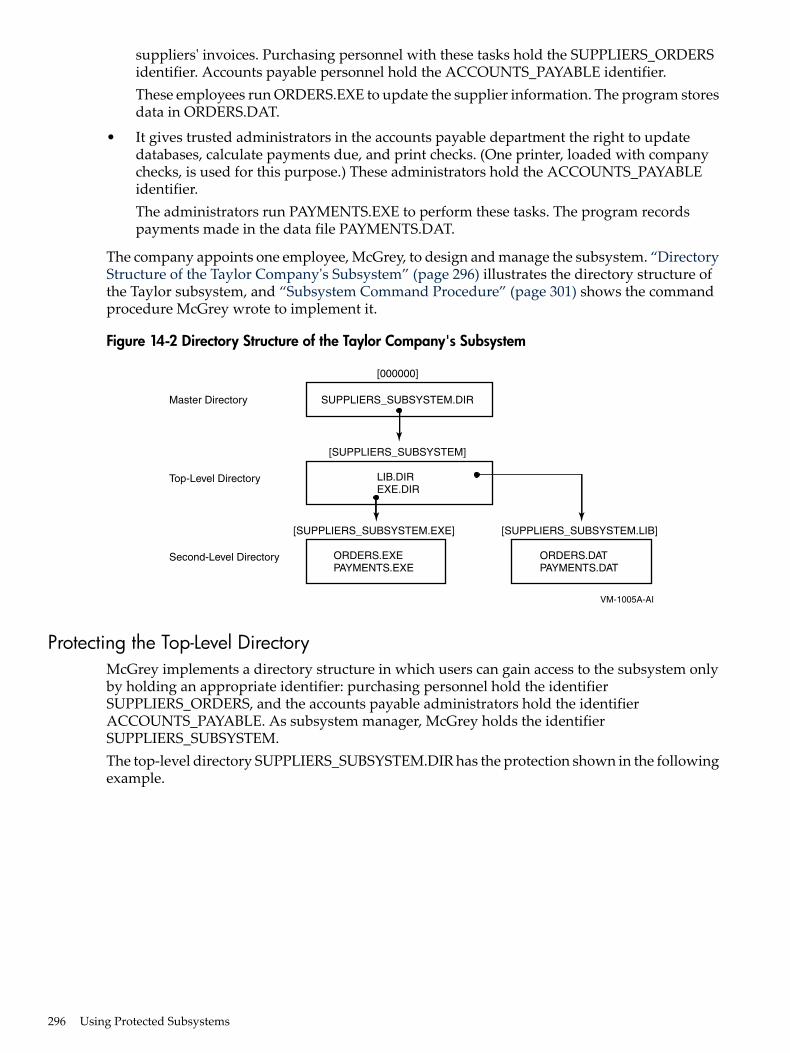
suppliers' invoices. Purchasing personnel with these tasks hold the SUPPLIERS_ORDERSidentifier. Accounts payable personnel hold the ACCOUNTS_PAYABLE identifier.These employees run ORDERS.EXE to update the supplier information. The program storesdata in ORDERS.DAT.
• It gives trusted administrators in the accounts payable department the right to updatedatabases, calculate payments due, and print checks. (One printer, loaded with companychecks, is used for this purpose.) These administrators hold the ACCOUNTS_PAYABLEidentifier.The administrators run PAYMENTS.EXE to perform these tasks. The program recordspayments made in the data file PAYMENTS.DAT.
The company appoints one employee, McGrey, to design and manage the subsystem. “DirectoryStructure of the Taylor Company's Subsystem” (page 296) illustrates the directory structure ofthe Taylor subsystem, and “Subsystem Command Procedure” (page 301) shows the commandprocedure McGrey wrote to implement it.
Figure 14-2 Directory Structure of the Taylor Company's Subsystem
Master Directory
Top-Level Directory
Second-Level Directory
[000000]
SUPPLIERS_SUBSYSTEM.DIR
[SUPPLIERS_SUBSYSTEM]
[SUPPLIERS_SUBSYSTEM.EXE] [SUPPLIERS_SUBSYSTEM.LIB]
LIB.DIREXE.DIR
ORDERS.DATPAYMENTS.DAT
ORDERS.EXEPAYMENTS.EXE
VM-1005A-AI
Protecting the Top-Level DirectoryMcGrey implements a directory structure in which users can gain access to the subsystem onlyby holding an appropriate identifier: purchasing personnel hold the identifierSUPPLIERS_ORDERS, and the accounts payable administrators hold the identifierACCOUNTS_PAYABLE. As subsystem manager, McGrey holds the identifierSUPPLIERS_SUBSYSTEM.The top-level directory SUPPLIERS_SUBSYSTEM.DIR has the protection shown in the followingexample.
296 Using Protected Subsystems

Example 14-2 Protection of SUPPLIERS_SUBSYSTEM.DIR
$DIRECTORY/SECURITY SYS$SYSDEVICE:[000000]SUPPLIERS_SUBSYSTEM.DIR
Directory SYS$SYSDEVICE:[000000]SUPPLIERS_SUBSYSTEM.DIR;1
SUPPLIERS_SUBSYSTEM (RWE,RWE,,)[1]
(CREATOR,ACCESS=NONE)[2]
(DEFAULT_PROTECTION,SYSTEM:RWED,OWNER:RWED,GROUP:,WORLD:)[3]
(IDENTIFIER=SUPPLIERS_SUBSYSTEM,ACCESS=READ+WRITE+CONTROL)[4]
(IDENTIFIER=SUPPLIERS_ORDERS,ACCESS=EXECUTE)[5]
(IDENTIFIER=ACCOUNTS_PAYABLE,ACCESS=EXECUTE)[6]
(IDENTIFIER=*,ACCESS=NONE) [7](IDENTIFIER=SUPPLIERS_SUBSYSTEM,
OPTIONS=DEFAULT,ACCESS=READ+WRITE+CONTROL)[8]
(IDENTIFIER=SUPPLIERS_ORDERS,OPTIONS=DEFAULT,ACCESS=EXECUTE)(IDENTIFIER=ACCOUNTS_PAYABLE,OPTIONS=DEFAULT,ACCESS=EXECUTE)(IDENTIFIER=*,OPTIONS=DEFAULT,ACCESS=NONE)
Total of 1 file.
1. The directory's protection code gives read, write, and execute access to users in the systemand owner categories but no access to group or world users. Therefore, group and worldusers have to gain access through the ACL.
2. A Creator ACE ensures that users creating files in this directory have no special access tothem. (See “Setting Defaults for a Directory Owned by a Resource Identifier” (page 191) forinformation on Creator ACEs.)
3. A Default Protection ACE denies group and world users access to files created in directory.4. McGrey holds the subsystem identifier SUPPLIERS_SUBSYSTEM. This ACE gives McGrey
read, write, and control access so McGrey can manage the subsystem directories and images.5. Holders of the SUPPIERS_ORDERS identifier have execute access so they can access files
in subdirectories.6. Holders of the ACCOUNTS_PAYABLE identifier have execute access so they can access
files in subdirectories.7. Users holding any other identifiers have no access.8. McGrey added the Default attribute to all Identifier ACEs and includes them here so all
Identifier ACEs are propagated to subdirectory ACLs.
Protecting Subsystem DirectoriesThe directory EXE.DIR has the same protection as the top-level directory because subsystemusers need to access the subsystem images: ORDERS.EXE and PAYMENTS.EXE. The otherdirectory, LIB.DIR, is more restricted because only the subsystem images and McGrey needaccess.
Example of a Protected Subsystem 297
Example 14-3 Protection of SYS$SYSDEVICE:[SUPPLIERS_SUBSYSTEM]
$DIRECTORY/SECURITY SYS$SYSDEVICE:[SUPPLIERS_SUBSYSTEM...]
Directory SYS$SYSDEVICE:[SUPPLIERS_SUBSYSTEM]
EXE.DIR;1 SUPPLIERS_SUBSYSTEM (RWE,RWE,,)[1](CREATOR,ACCESS=NONE)(DEFAULT_PROTECTION,SYSTEM:RWED,OWNER:RWED,GROUP:,WORLD:)(IDENTIFIER=SUPPLIERS_SUBSYSTEM,ACCESS=READ+WRITE+CONTROL)(IDENTIFIER=SUPPLIERS_ORDERS,ACCESS=EXECUTE)(IDENTIFIER=ACCOUNTS_PAYABLE,ACCESS=EXECUTE)(IDENTIFIER=*,ACCESS=NONE)(IDENTIFIER=SUPPLIERS_SUBSYSTEM,OPTIONS=DEFAULT,
ACCESS=READ+WRITE+CONTROL)(IDENTIFIER=SUPPLIERS_ORDERS,OPTIONS=DEFAULT,ACCESS=EXECUTE)(IDENTIFIER=ACCOUNTS_PAYABLE,OPTIONS=DEFAULT,ACCESS=EXECUTE)(IDENTIFIER=*,OPTIONS=DEFAULT,ACCESS=NONE)
LIB.DIR;1 SUPPLIERS_SUBSYSTEM (RWE,RWE,,)
[2](CREATOR,ACCESS=NONE)(DEFAULT_PROTECTION,SYSTEM:RWED,OWNER:RWED,GROUP:,WORLD:)(IDENTIFIER=SUPPLIERS_SUBSYSTEM,ACCESS=READ+WRITE+CONTROL)(IDENTIFIER=*,ACCESS=NONE)(IDENTIFIER=SUPPLIERS_SUBSYSTEM,OPTIONS=DEFAULT,
ACCESS=READ+WRITE+CONTROL)(IDENTIFIER=*,OPTIONS=DEFAULT,ACCESS=NONE)
Total of 2 files.[vellip]
1. [SUPPLIERS_SUBSYSTEM.EXE] has the same protection code and ACL as the parentdirectory shown in “Protecting the Top-Level Directory” (page 296). Subsystem users needto run programs stored in this directory.
2. [SUPPLIERS_SUBSYSTEM.LIB] has the same protection code but a more restrictive ACLbecause only the subsystem manager and the subsystem images need access.
Protecting the Images and Data FilesAs the following example shows, the necessary company personnel can access the subsystem'simages, ORDERS.EXE and PAYMENTS.EXE, but only the images can update the data files.
298 Using Protected Subsystems
Example 14-4 Access to Subsystem's Images ORDERS.EXE and PAYMENTS.EXE
Directory SYS$SYSDEVICE:[SUPPLIERS_SUBSYSTEM.EXE]
ORDERS.EXE;1 SUPPLIERS_SUBSYSTEM (RWED,RWED,,) [1]
(SUBSYSTEM,IDENTIFIER=SUPPLIERS_SUBSYSTEM, ATTRIBUTES=RESOURCE)(IDENTIFIER=SUPPLIERS_SUBSYSTEM,
ACCESS=READ+WRITE+CONTROL)(IDENTIFIER=ACCOUNTS_PAYABLE,ACCESS=EXECUTE)(IDENTIFIER=*,ACCESS=NONE)
PAYMENTS.EXE;1 SUPPLIERS_SUBSYSTEM (RWED,RWED,,) [2]SUBSYSTEM,IDENTIFIER=SUPPLIERS_SUBSYSTEM,
ATTRIBUTES=RESOURCE)(IDENTIFIER=SUPPLIERS_SUBSYSTEM,
ACCESS=READ+WRITE+CONTROL)(IDENTIFIER=ACCOUNTS_PAYABLE,ACCESS=EXECUTE)(IDENTIFIER=*,ACCESS=NONE)
Total of 2 files.
Directory SYS$SYSDEVICE:[SUPPLIERS_SUBSYSTEM.LIB] [3]ORDERS.DAT;1 SUPPLIERS_SUBSYSTEM (RWED,RWED,,)(IDENTIFIER=SUPPLIERS_SUBSYSTEM,
ACCESS=READ+WRITE)(IDENTIFIER=*,ACCESS=NONE)
PAYMENTS.DAT;1 SUPPLIERS_SUBSYSTEM (RWED,RWED,,)(IDENTIFIER=SUPPLIERS_SUBSYSTEM,
ACCESS=READ+WRITE)(IDENTIFIER=*,ACCESS=NONE)
Total of 2 files.
Grand total of 3 directories, 6 files.
1. All subsystem users, those holding the SUPPLIERS_ORDERS or ACCOUNTS_PAYABLEidentifier, can run ORDERS.EXE.
2. Only subsystem images and holders of the ACCOUNTS_PAYABLE identifier can runPAYMENTS.EXE.
3. The data files for the subsystem reside in [SUPPLIERS_SUBSYSTEM.LIB]. Only the subsystemimages and McGrey can access them.
Protecting the PrinterThe print queue for checks needs equal protection. Access is restricted to trusted administratorsbecause they are the only ones who hold both the subsystem and the ACCOUNTS_PAYABLEidentifiers. “Queue Protection” (page 300) shows that the queue is protected in such a way thatonly the trusted administrators can queue jobs to the printer:
Example of a Protected Subsystem 299
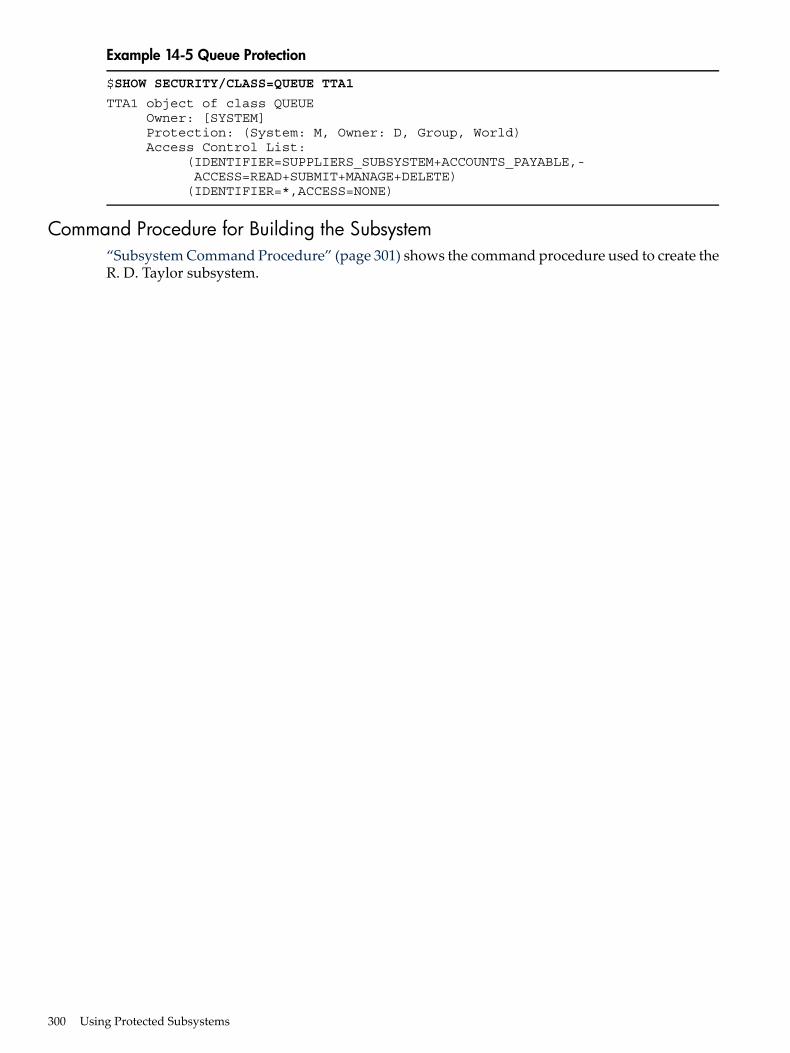
Example 14-5 Queue Protection
$SHOW SECURITY/CLASS=QUEUE TTA1
TTA1 object of class QUEUE Owner: [SYSTEM] Protection: (System: M, Owner: D, Group, World) Access Control List: (IDENTIFIER=SUPPLIERS_SUBSYSTEM+ACCOUNTS_PAYABLE,- ACCESS=READ+SUBMIT+MANAGE+DELETE) (IDENTIFIER=*,ACCESS=NONE)
Command Procedure for Building the Subsystem“Subsystem Command Procedure” (page 301) shows the command procedure used to create theR. D. Taylor subsystem.
300 Using Protected Subsystems
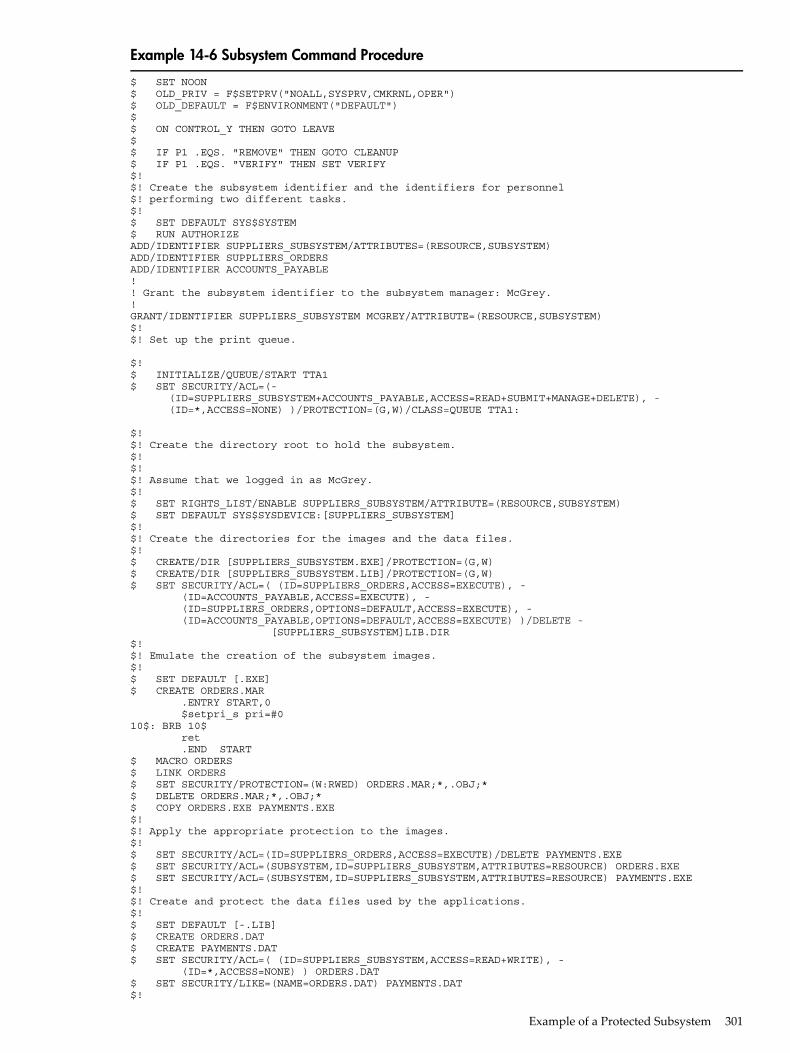
Example 14-6 Subsystem Command Procedure
$ SET NOON$ OLD_PRIV = F$SETPRV("NOALL,SYSPRV,CMKRNL,OPER")$ OLD_DEFAULT = F$ENVIRONMENT("DEFAULT")$$ ON CONTROL_Y THEN GOTO LEAVE$$ IF P1 .EQS. "REMOVE" THEN GOTO CLEANUP$ IF P1 .EQS. "VERIFY" THEN SET VERIFY$!$! Create the subsystem identifier and the identifiers for personnel$! performing two different tasks.$!$ SET DEFAULT SYS$SYSTEM$ RUN AUTHORIZEADD/IDENTIFIER SUPPLIERS_SUBSYSTEM/ATTRIBUTES=(RESOURCE,SUBSYSTEM)ADD/IDENTIFIER SUPPLIERS_ORDERSADD/IDENTIFIER ACCOUNTS_PAYABLE!! Grant the subsystem identifier to the subsystem manager: McGrey.!GRANT/IDENTIFIER SUPPLIERS_SUBSYSTEM MCGREY/ATTRIBUTE=(RESOURCE,SUBSYSTEM)$!$! Set up the print queue.
$!$ INITIALIZE/QUEUE/START TTA1$ SET SECURITY/ACL=(- (ID=SUPPLIERS_SUBSYSTEM+ACCOUNTS_PAYABLE,ACCESS=READ+SUBMIT+MANAGE+DELETE), - (ID=*,ACCESS=NONE) )/PROTECTION=(G,W)/CLASS=QUEUE TTA1:
$!$! Create the directory root to hold the subsystem.$!$!$! Assume that we logged in as McGrey.$!$ SET RIGHTS_LIST/ENABLE SUPPLIERS_SUBSYSTEM/ATTRIBUTE=(RESOURCE,SUBSYSTEM)$ SET DEFAULT SYS$SYSDEVICE:[SUPPLIERS_SUBSYSTEM]$!$! Create the directories for the images and the data files.$!$ CREATE/DIR [SUPPLIERS_SUBSYSTEM.EXE]/PROTECTION=(G,W)$ CREATE/DIR [SUPPLIERS_SUBSYSTEM.LIB]/PROTECTION=(G,W)$ SET SECURITY/ACL=( (ID=SUPPLIERS_ORDERS,ACCESS=EXECUTE), - (ID=ACCOUNTS_PAYABLE,ACCESS=EXECUTE), - (ID=SUPPLIERS_ORDERS,OPTIONS=DEFAULT,ACCESS=EXECUTE), - (ID=ACCOUNTS_PAYABLE,OPTIONS=DEFAULT,ACCESS=EXECUTE) )/DELETE - [SUPPLIERS_SUBSYSTEM]LIB.DIR$!$! Emulate the creation of the subsystem images.$!$ SET DEFAULT [.EXE]$ CREATE ORDERS.MAR .ENTRY START,0 $setpri_s pri=#010$: BRB 10$ ret .END START$ MACRO ORDERS$ LINK ORDERS$ SET SECURITY/PROTECTION=(W:RWED) ORDERS.MAR;*,.OBJ;*$ DELETE ORDERS.MAR;*,.OBJ;*$ COPY ORDERS.EXE PAYMENTS.EXE$!$! Apply the appropriate protection to the images.$!$ SET SECURITY/ACL=(ID=SUPPLIERS_ORDERS,ACCESS=EXECUTE)/DELETE PAYMENTS.EXE$ SET SECURITY/ACL=(SUBSYSTEM,ID=SUPPLIERS_SUBSYSTEM,ATTRIBUTES=RESOURCE) ORDERS.EXE$ SET SECURITY/ACL=(SUBSYSTEM,ID=SUPPLIERS_SUBSYSTEM,ATTRIBUTES=RESOURCE) PAYMENTS.EXE$!$! Create and protect the data files used by the applications.$!$ SET DEFAULT [-.LIB]$ CREATE ORDERS.DAT$ CREATE PAYMENTS.DAT$ SET SECURITY/ACL=( (ID=SUPPLIERS_SUBSYSTEM,ACCESS=READ+WRITE), - (ID=*,ACCESS=NONE) ) ORDERS.DAT$ SET SECURITY/LIKE=(NAME=ORDERS.DAT) PAYMENTS.DAT$!
Example of a Protected Subsystem 301
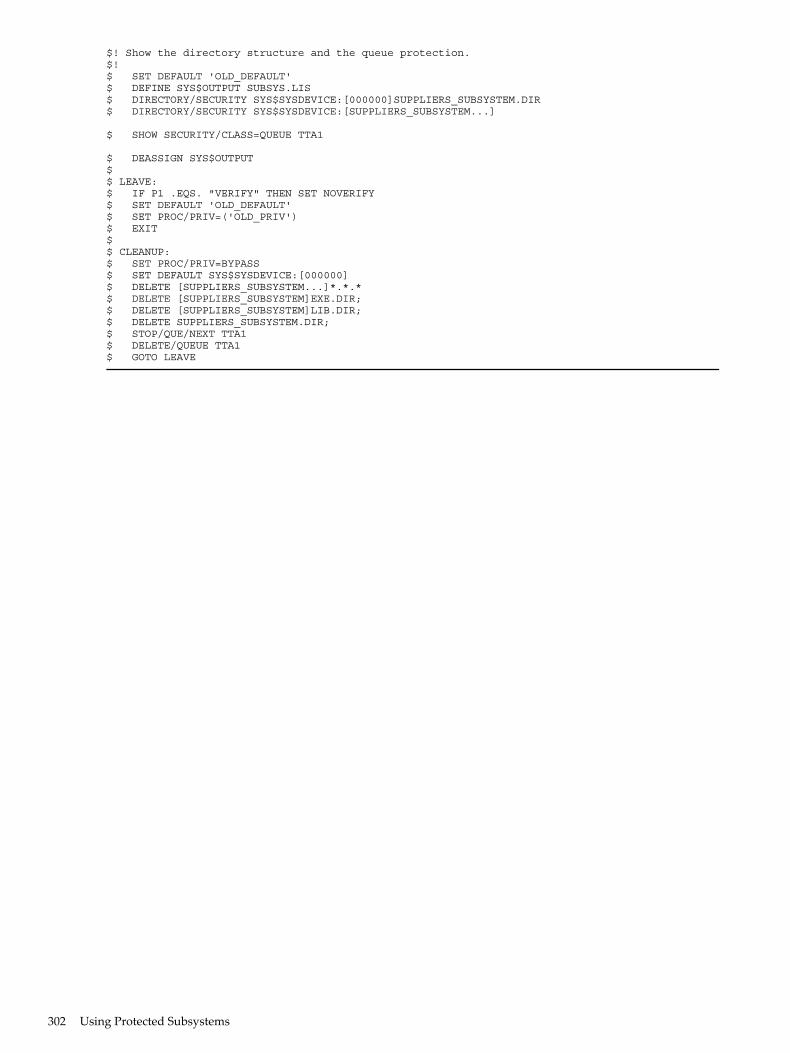
$! Show the directory structure and the queue protection.$!$ SET DEFAULT 'OLD_DEFAULT'$ DEFINE SYS$OUTPUT SUBSYS.LIS$ DIRECTORY/SECURITY SYS$SYSDEVICE:[000000]SUPPLIERS_SUBSYSTEM.DIR$ DIRECTORY/SECURITY SYS$SYSDEVICE:[SUPPLIERS_SUBSYSTEM...]
$ SHOW SECURITY/CLASS=QUEUE TTA1
$ DEASSIGN SYS$OUTPUT$$ LEAVE:$ IF P1 .EQS. "VERIFY" THEN SET NOVERIFY$ SET DEFAULT 'OLD_DEFAULT'$ SET PROC/PRIV=('OLD_PRIV')$ EXIT$$ CLEANUP:$ SET PROC/PRIV=BYPASS$ SET DEFAULT SYS$SYSDEVICE:[000000]$ DELETE [SUPPLIERS_SUBSYSTEM...]*.*.*$ DELETE [SUPPLIERS_SUBSYSTEM]EXE.DIR;$ DELETE [SUPPLIERS_SUBSYSTEM]LIB.DIR;$ DELETE SUPPLIERS_SUBSYSTEM.DIR;$ STOP/QUE/NEXT TTA1$ DELETE/QUEUE TTA1$ GOTO LEAVE
302 Using Protected Subsystems
A Assigning PrivilegesPrivileges restrict the use of certain system functions to processes created on behalf of authorizedusers. These restrictions protect the integrity of the operating system's code, data, and resourcesand thus, the integrity of user service. Grant privileges to individual users only after carefullyconsidering the following two factors:• Whether the user has the skill and experience to use the privilege without disrupting the
system• Whether the user has a legitimate need for the privilegePrivileges fall into the following seven categories according to the damage that the user possessingthem could cause the system:• None: No privileges• Normal: Minimum privileges to use the system effectively• Group: Potential to interfere with members of the same group• Devour: Potential to consume noncritical systemwide resources• System: Potential to interfere with normal system operation• Objects: Potential to compromise the security of protected objects (files, devices, logical name
tables, global sections, and so on)• All: Potential to control the systemA user's privileges are recorded in the user's UAF record in a 64-bit privilege mask. When a userlogs in to the system, the user's privileges are stored in the header of the user's process. In thisway, the user's privileges are passed on to the process created for the user. Users can use theDCL command SET PROCESS/PRIVILEGES to enable and disable privileges for which they areauthorized and to further control the privileges available to the images they run. Moreover, anyuser with the SETPRV privilege can enable any privilege.“OpenVMS Privileges” (page 184)Table 8-2 lists the privileges by category and gives brief, generaldefinitions of them. The following sections describe all privileges available on OpenVMS systemsin detail; each section title identifies the privilege category (Normal, Devour, and so on). Foreach privilege, the appendix describes the capabilities granted by the privilege and the userswho should receive them.
ACNT Privilege (Devour)The ACNT privilege lets a process use the RUN (Process) command and the Create Process($CREPRC) system service to create processes in which accounting is disabled. A process inwhich accounting is disabled is one whose resource usage is not logged in the current accountingfile.
ALLSPOOL Privilege (Devour)The ALLSPOOL privilege lets the user's process allocate a spooled device by executing theAllocate Device ($ALLOC) system service or by using the DCL command ALLOCATE.The $ALLOC system service lets a process allocate or reserve a device for its exclusive use. Ashareable mounted device cannot be allocated.Grant this privilege only to users who need to perform logical or physical I/O operations to aspooled device. Ordinarily, the privilege of allocating a spooled device is granted only tosymbionts.
ALTPRI Privilege (System)The ALTPRI privilege allows the user's process to:• Increase its own base priority• Set the base priority of a target process• Change the priority of its batch or print jobs
ACNT Privilege (Devour) 303
The base priority is increased by executing the Set Priority ($SETPRI) system service or the DCLcommand SET PROCESS/PRIORITY. As a rule, this system service lets a process set its own basepriority or the base priority of another process. However, one process can set the priority of asecond process only if one of the following conditions applies:• The process calling the $SETPRI system service has the same UIC as the target process.• The calling process has process control privilege (GROUP or WORLD) over the target process.With ALTPRI, a process can create a detached process with a priority higher than its own. Itcreates such a process by using an optional argument to the Create Process ($CREPRC) systemservice or to the DCL command RUN/PRIORITY.ALTPRI also lets you adjust the scheduling priority of a job ($SNDJBC) to a value even greaterthan that established with the system parameter MAXQUEPRI.Do not grant this privilege widely; if unqualified users have the unrestricted ability to set basepriorities, fair and orderly scheduling of processes for execution can easily be disrupted.
AUDIT Privilege (System)The AUDIT privilege allows software to append audit records to the system security audit logfile using one of four system services: $AUDIT_EVENT, $CHECK_PRIVILEGE, $CHKPRO, or$CHECK_ACCESS. In addition, the $AUDIT_EVENT system service allows all components ofan audit message to be specified. As a result, this privilege permits the logging of events thatappear to have come from the operating system or a user process.Grant this privilege only to trusted images that need to append audit messages to the systemaudit log file. Users possessing this privilege can provoke a system failure by attempting to loginvalid events with the NSA$M_INTERNAL flag set.
BUGCHK Privilege (Devour)The BUGCHK privilege allows the process either to make bugcheck error log entries from user,supervisor, or compatibility mode (EXE$BUG_CHECK) or to send messages to the system errorlogger ($SNDERR). Restrict this privilege to HP-supplied system software that uses the Bugcheckfacility.
BYPASS Privilege (All)The BYPASS privilege allows the user's process full access to all protected objects, totally bypassingUIC-based protection, access control list (ACL) protection, and mandatory access controls. Withthe BYPASS privilege, a process has unlimited access to the system. Among the operations thatcan be performed are• Modification of all user authorization records (SYSUAF.DAT)• Modification of all rights identifier and holder records (RIGHTSLIST.DAT)• Modification of all network proxy records (NETPROXY.DAT or NET$PROXY.DAT [VAX
only])• Modification of all DECnet object passwords and accounts (NETOBJECT.DAT)• Unlimited access to all files on all volumesGrant this privilege with extreme caution because it overrides all object protection. It should bereserved for use by well-tested, reliable programs and command procedures. The SYSPRVprivilege is adequate for interactive use because it ultimately grants access to all objects whilestill providing access checks. The READALL privilege is adequate for backup operations.The BYPASS privilege lets a process perform the following tasks:
InterfaceTask
Perform file system operations:
SET SECURITY/OWNER, $QIO request to F11BXQPModify file ownership
$QIO request to F11A ACP or F11BXQPAccess a file that is marked for deletion
304 Assigning Privileges
InterfaceTask
$QIO request to F11A ACP or F11BXQPAccess a file that is deaccess locked
$QIO request to F11BXQPOverride creation of an owner ACE on a newly createdfile
$QIO request to F11BXQPClear the directory bit in a directory's file header
$QIO request to F11BXQPOperate on an extension header
$QIO request to F11BXQPAcquire or release a volume lock
$QIO request to F11BXQPForce mount verification on a volume
$QIO request to F11BXQPCreate a file access window with the no access lock bit set
$QIO request to F11BXQPSpecify null lock mode for volume lock
$QIO request to F11BXQPAccess a locked file
$QIO request to F11BXQPEnable or disable disk quotas on a volume
Operate on network databases:
NCPDisplay permanent network database records
NCPDisplay permanent DECnet object password
NCPDisplay volatile DECnet object password
Adjust discretionary or mandatory access controls:
$GETUAIRead a user authorization record
$SETUAIModify a user authorization record
$QIO request request to the mailbox driver (MBDRIVER)Modify mailbox protection
$QIO request request to the mailbox driver (MBXDRIVER)Modify shared memory mailbox protection
$CHKPROBypass discretionary or mandatory object protection
Miscellaneous:
$INIT_VOLInitialize a magnetic tape
$QIO request to the InfoServer system (DADDRIVER)Unload an InfoServer system
CMEXEC Privilege (All)The CMEXEC privilege allows the user's process to execute the Change Mode to Executive($CMEXEC) system service.This system service lets a process change its access mode to executive mode, execute a specifiedroutine, and then return to the access mode that was in effect before the system service wascalled. While in executive mode, the process is allowed to execute the Change Mode to Kernel($CMKRNL) system service.Grant this privilege only to users who need to gain access to protected and sensitive data structuresand internal functions of the operating system. If unqualified users have unrestricted access tosensitive data structures and functions, the operating system and service to other users can beeasily disrupted. Such disruptions can include failure of the system, destruction of all systemand user data, and exposure of confidential information.
CMKRNL Privilege (All)The CMKRNL privilege allows the user's process to execute the Change Mode to Kernel($CMKRNL) system service.
CMEXEC Privilege (All) 305
This system service lets a process change its access mode to kernel mode, execute a specifiedroutine, and then return to the access mode that was in effect before the system service wascalled. While in kernel mode, a process can enable any system privilege.A process holding both CMKRNL and SYSNAM can set the system time.Grant this privilege only to users who need to execute privileged instructions or who need togain access to the most protected and sensitive data structures and functions of the operatingsystem. If unqualified users have unrestricted use of privileged instructions and unrestrictedaccess to sensitive data structures and functions, the operating system and service to other userscan be easily disrupted. Such disruptions can include failure of the system, destruction of allsystem and user data, and exposure of confidential information.The CMKRNL privilege lets a process perform the following tasks:
InterfaceTask
START/CPU, STOP/CPUModify a multiprocessor operation
SET RMS/SYSTEMModify systemwide RMS defaults
SET PROCESS/SUSPEND=KERNELSuspend a process in kernel mode
SET RIGHTS_LISTModify another process' rights list or its nondynamicidentifier attributes
SET RIGHTS/ATTRIBUTEGrant an identifier with modified attributes
SET RIGHTS_LIST/SYSTEMModify the system rights list
SET UICChange a process UIC
$QIO request to an Ethernet 802 driver (DEBNA/NI)Modify the number of interlocked queue retries
$QIO request to an interrupt vector (CONINTERR)Connect to a device interrupt vector
$QIO request to a synchronous communications line(XGDRIVER)
Start or modify a line in Genbyte mode
$QIO request to an Ethernet 802 driver (DEBNA)Set the spin-wait time on the port command register
INSTALLModify a known image list
Send to Job Controller system service ($SNDJBC)Process the following item codes:SJC$_ACCOUNT_NAME itemSJC$_UICSJC$_USERNAME
RUN/DETACHED, $CREPRCCreate a detached process with unrestricted quotas
ANALYZE/SYSTEMExamine the internals of the running system
DIAGNOSE Privilege (Objects)The DIAGNOSE privilege lets a process run online diagnostic programs and intercept and copyall messages written to the error log file.The DIAGNOSE privilege also lets a process perform the following tasks:
InterfaceTask
$QIOIssue a $QIO request with associated diagnostic buffer
$QIO request to an Ethernet 802 driver (DEBNA/NI)Modify the number of interlocked queue retries
$QIO request to an Ethernet 802 driver (DEBNA)Set the spin-wait time on the port command register
$QIO request to the DUP class driver used by SETHOST/HSC (FYDRIVER)
Access the Diagnostic and Utilities Protocol (DUP) classdriver
306 Assigning Privileges
InterfaceTask
$QIO request to the SCSI driver (GKDRIVER)Execute a special passthrough function in the SCSI genericclass driver
$QIO request to a TU58 magnetic tape (TUDRIVER)Process a diagnostic buffer
DOWNGRADE Privilege (All)The DOWNGRADE privilege permits a process to manipulate mandatory access controls. Theprivilege lets a process write to an object of lower secrecy, in violation of the Bell and LaPadulaconfinement (*) property.5This privilege is reserved for enhanced security products such as theSecurity Enhancement Service software (SEVMS).6
EXQUOTA Privilege (Devour)The EXQUOTA privilege allows the space taken by the user's files on given disk volumes toexceed any usage quotas set for the user (as determined by UIC) on those volumes.
GROUP Privilege (Group)The GROUP privilege allows the user's process to affect other processes in its own group byexecuting the following process-control system services:Suspend Process ($SUSPND)Resume Process ($RESUME)Delete Process ($DELPRC)Set Priority ($SETPRI)Wake ($WAKE)Schedule Wakeup ($SCHDWK)Cancel Wakeup ($CANWAK)Force Exit ($FORCEX)With GROUP privilege, a user's process can control another process in the same group. Theuser's process is allowed to examine other processes in its own group by executing the GetJob/Process Information ($GETJPI) system service. A process with GROUP privilege can issuethe SET PROCESS command for other processes in its group.GROUP privilege is not needed for a process to exercise control over, or to examine, subprocessesthat it created or other detached processes of its UIC. You should, however, grant this privilegeto users who need to exercise control over the processes and operations of other members oftheir UIC group.
GRPNAM Privilege (Devour)The GRPNAM privilege lets the user's process bypass discretionary access controls on the systemlogical name table in order to insert names into (and delete names from) the logical name tableof the group to which the process belongs by the use of the Create Logical Name ($CRELNM)and Delete Logical Name ($DELLNM) system services.In addition, the privileged process can issue the DCL commands ASSIGN and DEFINE to addnames to the group logical name table and the DCL command DEASSIGN to delete names fromthe table. The privilege allows the use of the /GROUP qualifier with the DCL commands MOUNTand DISMOUNT (as well as the system services $MOUNT and $DISMOUNT) when sharingvolumes among group members.Do not grant this privilege to all users of the system because it allows the user's process to createan unlimited number of group logical names. When unqualified users have the unrestrictedability to create group logical names, excessive use of system dynamic memory can degradesystem performance. In addition, a process with the GRPNAM privilege can interfere with the
5. Name of the restriction on write-downs. Multilevel security requires the complete prohibition of write-downs byuntrusted software.
6. Support for SEVMS software has ended.
DOWNGRADE Privilege (All) 307
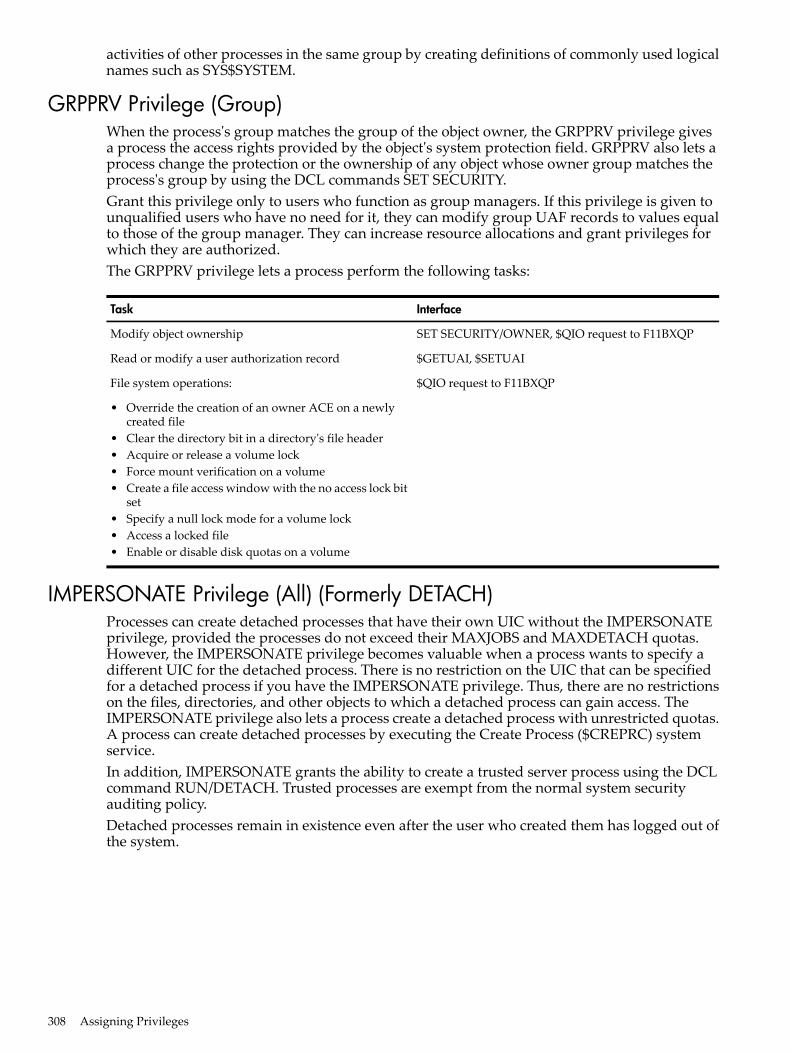
activities of other processes in the same group by creating definitions of commonly used logicalnames such as SYS$SYSTEM.
GRPPRV Privilege (Group)When the process's group matches the group of the object owner, the GRPPRV privilege givesa process the access rights provided by the object's system protection field. GRPPRV also lets aprocess change the protection or the ownership of any object whose owner group matches theprocess's group by using the DCL commands SET SECURITY.Grant this privilege only to users who function as group managers. If this privilege is given tounqualified users who have no need for it, they can modify group UAF records to values equalto those of the group manager. They can increase resource allocations and grant privileges forwhich they are authorized.The GRPPRV privilege lets a process perform the following tasks:
InterfaceTask
SET SECURITY/OWNER, $QIO request to F11BXQPModify object ownership
$GETUAI, $SETUAIRead or modify a user authorization record
$QIO request to F11BXQPFile system operations:
• Override the creation of an owner ACE on a newlycreated file
• Clear the directory bit in a directory's file header• Acquire or release a volume lock• Force mount verification on a volume• Create a file access window with the no access lock bit
set• Specify a null lock mode for a volume lock• Access a locked file• Enable or disable disk quotas on a volume
IMPERSONATE Privilege (All) (Formerly DETACH)Processes can create detached processes that have their own UIC without the IMPERSONATEprivilege, provided the processes do not exceed their MAXJOBS and MAXDETACH quotas.However, the IMPERSONATE privilege becomes valuable when a process wants to specify adifferent UIC for the detached process. There is no restriction on the UIC that can be specifiedfor a detached process if you have the IMPERSONATE privilege. Thus, there are no restrictionson the files, directories, and other objects to which a detached process can gain access. TheIMPERSONATE privilege also lets a process create a detached process with unrestricted quotas.A process can create detached processes by executing the Create Process ($CREPRC) systemservice.In addition, IMPERSONATE grants the ability to create a trusted server process using the DCLcommand RUN/DETACH. Trusted processes are exempt from the normal system securityauditing policy.Detached processes remain in existence even after the user who created them has logged out ofthe system.
308 Assigning Privileges
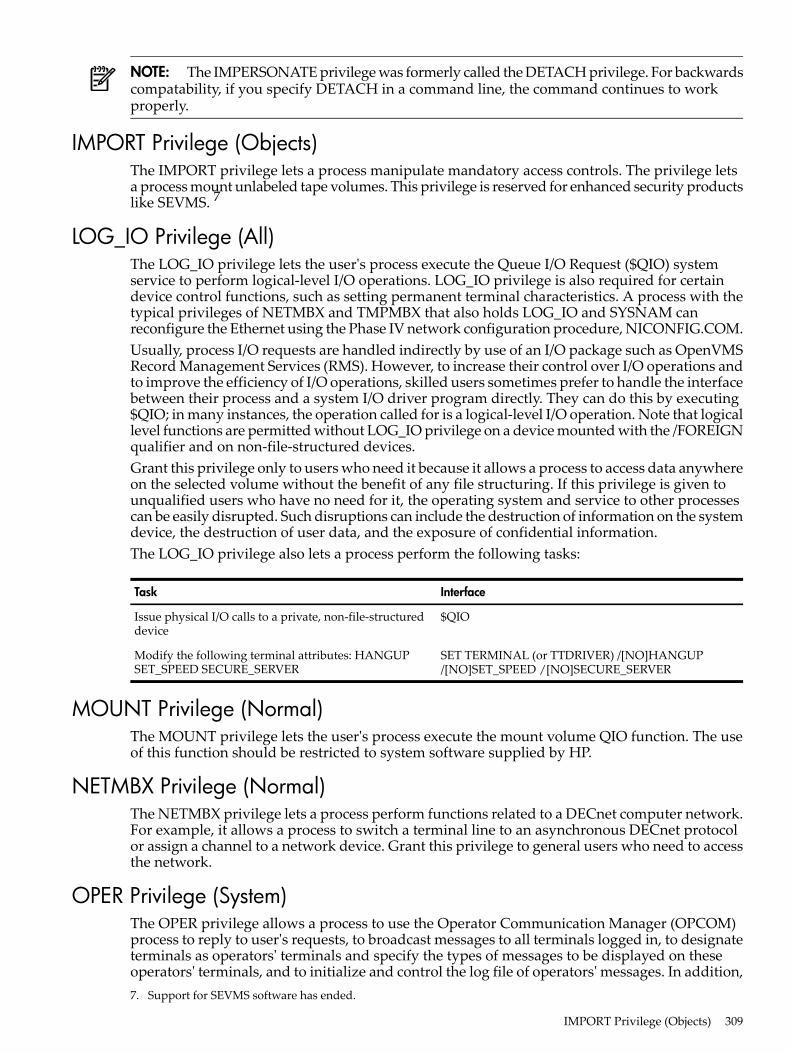
NOTE: The IMPERSONATE privilege was formerly called the DETACH privilege. For backwardscompatability, if you specify DETACH in a command line, the command continues to workproperly.
IMPORT Privilege (Objects)The IMPORT privilege lets a process manipulate mandatory access controls. The privilege letsa process mount unlabeled tape volumes. This privilege is reserved for enhanced security productslike SEVMS. 7
LOG_IO Privilege (All)The LOG_IO privilege lets the user's process execute the Queue I/O Request ($QIO) systemservice to perform logical-level I/O operations. LOG_IO privilege is also required for certaindevice control functions, such as setting permanent terminal characteristics. A process with thetypical privileges of NETMBX and TMPMBX that also holds LOG_IO and SYSNAM canreconfigure the Ethernet using the Phase IV network configuration procedure, NICONFIG.COM.Usually, process I/O requests are handled indirectly by use of an I/O package such as OpenVMSRecord Management Services (RMS). However, to increase their control over I/O operations andto improve the efficiency of I/O operations, skilled users sometimes prefer to handle the interfacebetween their process and a system I/O driver program directly. They can do this by executing$QIO; in many instances, the operation called for is a logical-level I/O operation. Note that logicallevel functions are permitted without LOG_IO privilege on a device mounted with the /FOREIGNqualifier and on non-file-structured devices.Grant this privilege only to users who need it because it allows a process to access data anywhereon the selected volume without the benefit of any file structuring. If this privilege is given tounqualified users who have no need for it, the operating system and service to other processescan be easily disrupted. Such disruptions can include the destruction of information on the systemdevice, the destruction of user data, and the exposure of confidential information.The LOG_IO privilege also lets a process perform the following tasks:
InterfaceTask
$QIOIssue physical I/O calls to a private, non-file-structureddevice
SET TERMINAL (or TTDRIVER) /[NO]HANGUP/[NO]SET_SPEED /[NO]SECURE_SERVER
Modify the following terminal attributes: HANGUPSET_SPEED SECURE_SERVER
MOUNT Privilege (Normal)The MOUNT privilege lets the user's process execute the mount volume QIO function. The useof this function should be restricted to system software supplied by HP.
NETMBX Privilege (Normal)The NETMBX privilege lets a process perform functions related to a DECnet computer network.For example, it allows a process to switch a terminal line to an asynchronous DECnet protocolor assign a channel to a network device. Grant this privilege to general users who need to accessthe network.
OPER Privilege (System)The OPER privilege allows a process to use the Operator Communication Manager (OPCOM)process to reply to user's requests, to broadcast messages to all terminals logged in, to designateterminals as operators' terminals and specify the types of messages to be displayed on theseoperators' terminals, and to initialize and control the log file of operators' messages. In addition,7. Support for SEVMS software has ended.
IMPORT Privilege (Objects) 309

this privilege lets the user spool devices, create and control all queues, and modify the protectionand ownership of all non-file-structured devices.Grant this privilege only to the operators of the system. These are the users who respond to therequests of ordinary users, who tend to the needs of the system's peripheral devices (mountingreels of tape and changing printer forms), and who attend to all the other day-to-day chores ofsystem operation. (A nonprivileged user can log in on the console terminal to respond to operatorrequests, for example, to mount a tape.)The OPER privilege lets a process perform the following tasks:
InterfaceTask
SET PROTECTION/DEVICEModify device protection
SET PROTECTION/DEVICE/OWNERModify device ownership
SYSMANAccess the System Management utility
Perform operator tasks:
REPLY, $SNDOPRIssue a broadcast reply
REPLY/ABORT, $SNDOPRCancel a system operator request
$SNDOPRInitialize the system operator log file
REPLY/TO, REPLY/PENDING,REPLY/INITIALIZE_TAPE, $SNDOPR
Reply to a pending system operator request
REQUEST, $SNDOPRIssue a system operator request
REPLY/ENABLE, $SNDOPR, $SNDMSGEnable system operator classes
REPLY/DISABLE, $SNDOPRDisable system operator classes
$BRKTHRU, $BRDCSTSend a broadcast message
$SNDOPRWrite an event to the operator log
REPLY/LOG, $SNDOPRInitialize a system operator log
REPLY/NOLOG, $SNDOPRClose the current operator log
REPLY, $SNDOPRSend a message to an operator
$SNDJBC (SJC$_DISABLE_AUTO_START,SJC$_ENABLE_AUTO_START)
Enable or disable autostart
$SNDJBC (SJC$_STOP_ALL_QUEUES_ON_NODE)Stop all queues
Modify the characteristics of devices:
SET DEVICE/[NO]AVAILABLEModify device availability
SET DEVICE/[NO]DUAL_PORTModify device dual-porting
SET DEVICE/[NO]ERROR_LOGGINGModify device error logging
SET DEVICE/[NO]SPOOLEDModify device spooling
Modify default definitions of days:
SET DAY/PRIMARYSet default day type to PRIMARY
SET DAY/SECONDARYSet default day type to SECONDARY
SET DAY/DEFAULTReturn day type to DEFAULT
Modify or override login limits:
SET LOGIN/INTERACTIVEModify interactive login limit
SET LOGIN/NETWORKModify network login limit
310 Assigning Privileges
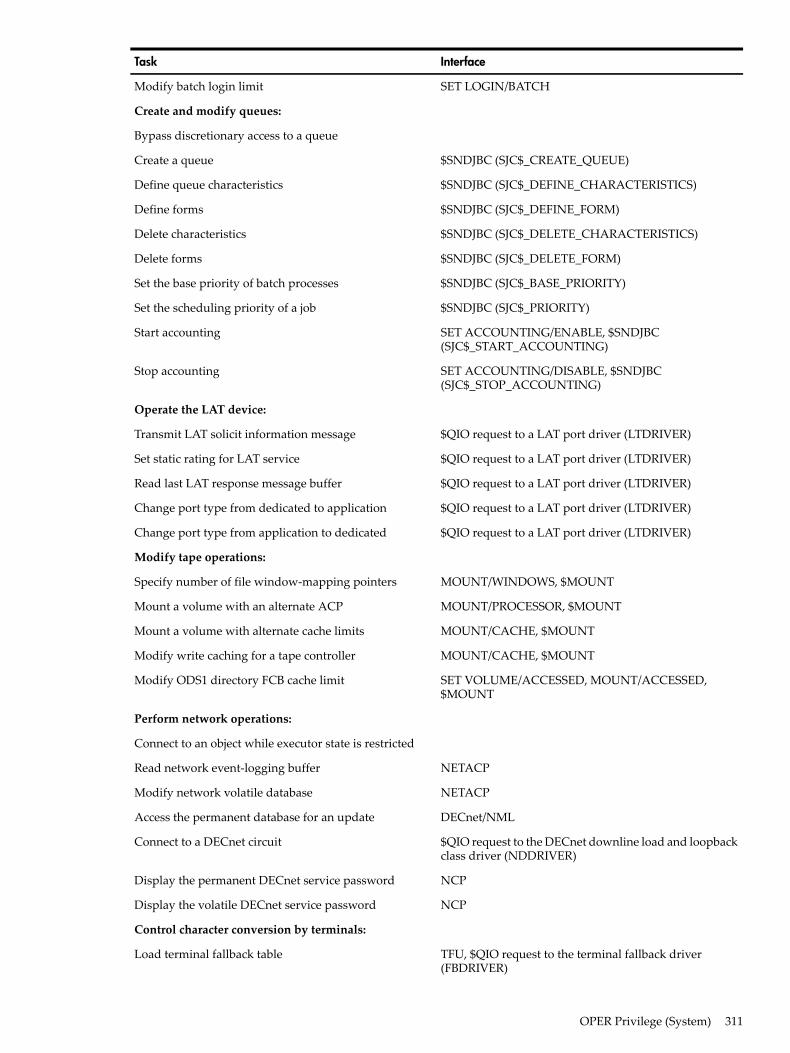
InterfaceTask
SET LOGIN/BATCHModify batch login limit
Create and modify queues:
Bypass discretionary access to a queue
$SNDJBC (SJC$_CREATE_QUEUE)Create a queue
$SNDJBC (SJC$_DEFINE_CHARACTERISTICS)Define queue characteristics
$SNDJBC (SJC$_DEFINE_FORM)Define forms
$SNDJBC (SJC$_DELETE_CHARACTERISTICS)Delete characteristics
$SNDJBC (SJC$_DELETE_FORM)Delete forms
$SNDJBC (SJC$_BASE_PRIORITY)Set the base priority of batch processes
$SNDJBC (SJC$_PRIORITY)Set the scheduling priority of a job
SET ACCOUNTING/ENABLE, $SNDJBC(SJC$_START_ACCOUNTING)
Start accounting
SET ACCOUNTING/DISABLE, $SNDJBC(SJC$_STOP_ACCOUNTING)
Stop accounting
Operate the LAT device:
$QIO request to a LAT port driver (LTDRIVER)Transmit LAT solicit information message
$QIO request to a LAT port driver (LTDRIVER)Set static rating for LAT service
$QIO request to a LAT port driver (LTDRIVER)Read last LAT response message buffer
$QIO request to a LAT port driver (LTDRIVER)Change port type from dedicated to application
$QIO request to a LAT port driver (LTDRIVER)Change port type from application to dedicated
Modify tape operations:
MOUNT/WINDOWS, $MOUNTSpecify number of file window-mapping pointers
MOUNT/PROCESSOR, $MOUNTMount a volume with an alternate ACP
MOUNT/CACHE, $MOUNTMount a volume with alternate cache limits
MOUNT/CACHE, $MOUNTModify write caching for a tape controller
SET VOLUME/ACCESSED, MOUNT/ACCESSED,$MOUNT
Modify ODS1 directory FCB cache limit
Perform network operations:
Connect to an object while executor state is restricted
NETACPRead network event-logging buffer
NETACPModify network volatile database
DECnet/NMLAccess the permanent database for an update
$QIO request to the DECnet downline load and loopbackclass driver (NDDRIVER)
Connect to a DECnet circuit
NCPDisplay the permanent DECnet service password
NCPDisplay the volatile DECnet service password
Control character conversion by terminals:
TFU, $QIO request to the terminal fallback driver(FBDRIVER)
Load terminal fallback table
OPER Privilege (System) 311
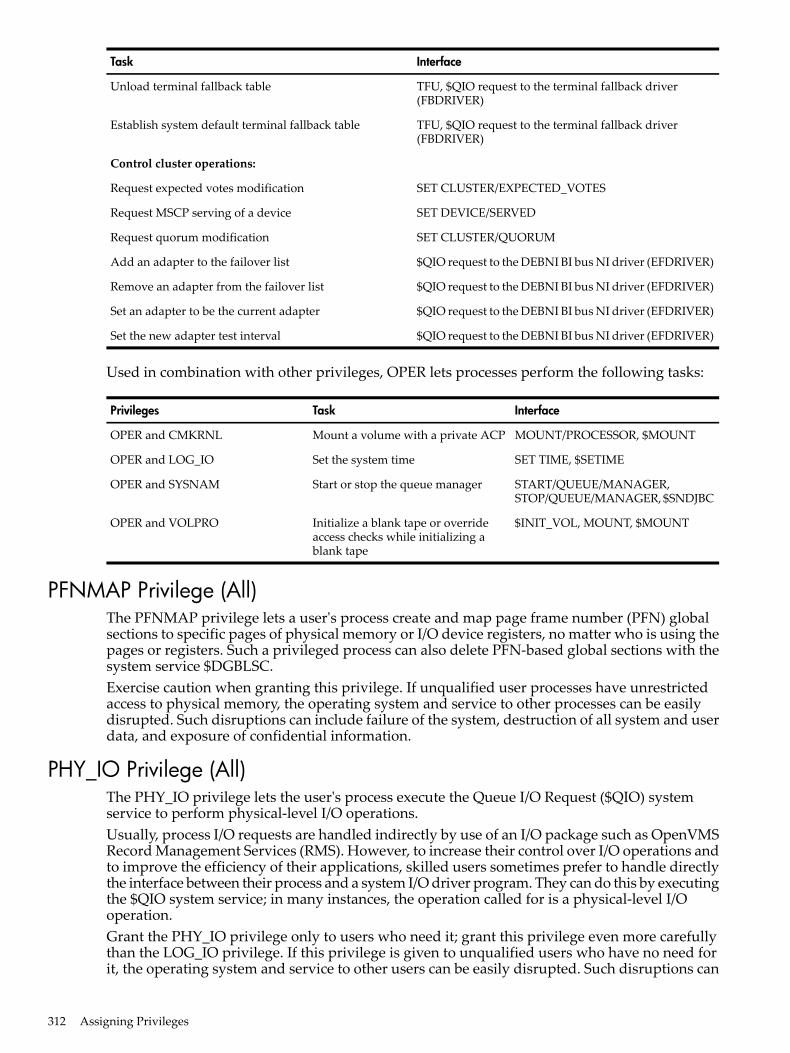
InterfaceTask
TFU, $QIO request to the terminal fallback driver(FBDRIVER)
Unload terminal fallback table
TFU, $QIO request to the terminal fallback driver(FBDRIVER)
Establish system default terminal fallback table
Control cluster operations:
SET CLUSTER/EXPECTED_VOTESRequest expected votes modification
SET DEVICE/SERVEDRequest MSCP serving of a device
SET CLUSTER/QUORUMRequest quorum modification
$QIO request to the DEBNI BI bus NI driver (EFDRIVER)Add an adapter to the failover list
$QIO request to the DEBNI BI bus NI driver (EFDRIVER)Remove an adapter from the failover list
$QIO request to the DEBNI BI bus NI driver (EFDRIVER)Set an adapter to be the current adapter
$QIO request to the DEBNI BI bus NI driver (EFDRIVER)Set the new adapter test interval
Used in combination with other privileges, OPER lets processes perform the following tasks:
InterfaceTaskPrivileges
MOUNT/PROCESSOR, $MOUNTMount a volume with a private ACPOPER and CMKRNL
SET TIME, $SETIMESet the system timeOPER and LOG_IO
START/QUEUE/MANAGER,STOP/QUEUE/MANAGER, $SNDJBC
Start or stop the queue managerOPER and SYSNAM
$INIT_VOL, MOUNT, $MOUNTInitialize a blank tape or overrideaccess checks while initializing ablank tape
OPER and VOLPRO
PFNMAP Privilege (All)The PFNMAP privilege lets a user's process create and map page frame number (PFN) globalsections to specific pages of physical memory or I/O device registers, no matter who is using thepages or registers. Such a privileged process can also delete PFN-based global sections with thesystem service $DGBLSC.Exercise caution when granting this privilege. If unqualified user processes have unrestrictedaccess to physical memory, the operating system and service to other processes can be easilydisrupted. Such disruptions can include failure of the system, destruction of all system and userdata, and exposure of confidential information.
PHY_IO Privilege (All)The PHY_IO privilege lets the user's process execute the Queue I/O Request ($QIO) systemservice to perform physical-level I/O operations.Usually, process I/O requests are handled indirectly by use of an I/O package such as OpenVMSRecord Management Services (RMS). However, to increase their control over I/O operations andto improve the efficiency of their applications, skilled users sometimes prefer to handle directlythe interface between their process and a system I/O driver program. They can do this by executingthe $QIO system service; in many instances, the operation called for is a physical-level I/Ooperation.Grant the PHY_IO privilege only to users who need it; grant this privilege even more carefullythan the LOG_IO privilege. If this privilege is given to unqualified users who have no need forit, the operating system and service to other users can be easily disrupted. Such disruptions can
312 Assigning Privileges
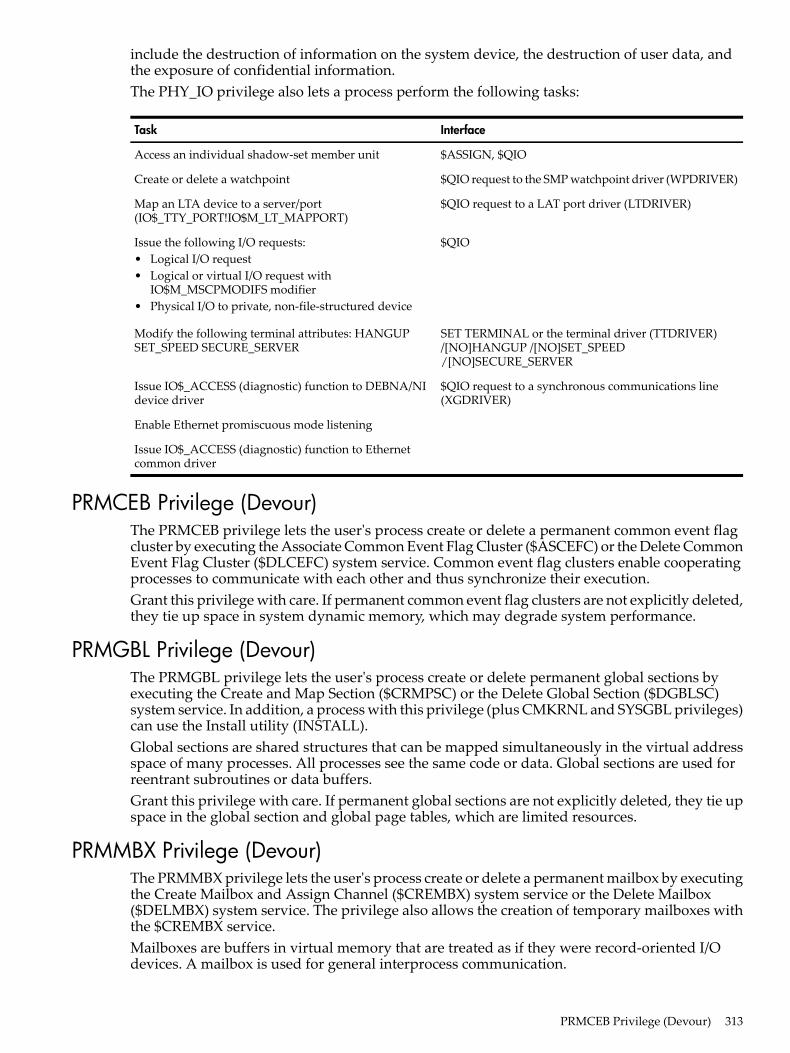
include the destruction of information on the system device, the destruction of user data, andthe exposure of confidential information.The PHY_IO privilege also lets a process perform the following tasks:
InterfaceTask
$ASSIGN, $QIOAccess an individual shadow-set member unit
$QIO request to the SMP watchpoint driver (WPDRIVER)Create or delete a watchpoint
$QIO request to a LAT port driver (LTDRIVER)Map an LTA device to a server/port(IO$_TTY_PORT!IO$M_LT_MAPPORT)
$QIOIssue the following I/O requests:• Logical I/O request• Logical or virtual I/O request with
IO$M_MSCPMODIFS modifier• Physical I/O to private, non-file-structured device
SET TERMINAL or the terminal driver (TTDRIVER)/[NO]HANGUP /[NO]SET_SPEED/[NO]SECURE_SERVER
Modify the following terminal attributes: HANGUPSET_SPEED SECURE_SERVER
$QIO request to a synchronous communications line(XGDRIVER)
Issue IO$_ACCESS (diagnostic) function to DEBNA/NIdevice driver
Enable Ethernet promiscuous mode listening
Issue IO$_ACCESS (diagnostic) function to Ethernetcommon driver
PRMCEB Privilege (Devour)The PRMCEB privilege lets the user's process create or delete a permanent common event flagcluster by executing the Associate Common Event Flag Cluster ($ASCEFC) or the Delete CommonEvent Flag Cluster ($DLCEFC) system service. Common event flag clusters enable cooperatingprocesses to communicate with each other and thus synchronize their execution.Grant this privilege with care. If permanent common event flag clusters are not explicitly deleted,they tie up space in system dynamic memory, which may degrade system performance.
PRMGBL Privilege (Devour)The PRMGBL privilege lets the user's process create or delete permanent global sections byexecuting the Create and Map Section ($CRMPSC) or the Delete Global Section ($DGBLSC)system service. In addition, a process with this privilege (plus CMKRNL and SYSGBL privileges)can use the Install utility (INSTALL).Global sections are shared structures that can be mapped simultaneously in the virtual addressspace of many processes. All processes see the same code or data. Global sections are used forreentrant subroutines or data buffers.Grant this privilege with care. If permanent global sections are not explicitly deleted, they tie upspace in the global section and global page tables, which are limited resources.
PRMMBX Privilege (Devour)The PRMMBX privilege lets the user's process create or delete a permanent mailbox by executingthe Create Mailbox and Assign Channel ($CREMBX) system service or the Delete Mailbox($DELMBX) system service. The privilege also allows the creation of temporary mailboxes withthe $CREMBX service.Mailboxes are buffers in virtual memory that are treated as if they were record-oriented I/Odevices. A mailbox is used for general interprocess communication.
PRMCEB Privilege (Devour) 313

Do not grant PRMMBX to all users of the system. Permanent mailboxes are not automaticallydeleted when the creating processes are deleted and, thus, continue to use a portion of systemdynamic memory. System performance degrades as system dynamic memory becomes scarce.
PSWAPM Privilege (System)The PSWAPM privilege lets the user's process control whether it can be swapped out of thebalance set by executing the Set Process Swap Mode ($SETSWM) system service. A process musthave this privilege to lock itself in the balance set (to disable swapping) or to unlock itself fromthe balance set (to enable swapping).With this privilege, a process can create a process that is locked in the balance set (swap modeis disabled) by using an optional argument to the Create Process ($CREPRC) system service or,when the DCL command RUN is used to create a process, by using the /NOSWAPPING qualifierof the RUN command. Furthermore, a process can lock a page or range of pages in physicalmemory using the Lock Pages in Memory ($LCKPAG) system service.Grant this privilege only to users who need to lock a process in memory for performance reasons.Typically, this will be a real-time process. If unqualified processes have the unrestricted abilityto lock processes in the balance set, physical memory can be held unnecessarily and therebydegrade system performance.
READALL Privilege (Objects)The READALL privilege lets the process bypass existing restrictions that would otherwise preventthe process from reading an object. However, unlike the BYPASS privilege, which permits writingand deleting, READALL permits only the reading of objects and allows updating of suchbackup-related file characteristics as the backup date. See the HP OpenVMS System ManagementUtilities Reference Manual and the HP OpenVMS System Manager's Manual for a discussion ofbackup operations.READALL is intended to be an adequate privilege for backing up volumes, so grant this privilegeto operators so they can perform system backups.The READALL privilege lets a process perform the following tasks:
InterfaceTask
$GETUAIRead a user authorization record
NCPDisplay permanent network database records
SECURITY Privilege (System)The SECURITY privilege lets a process perform security-related functions such as modifying thesystem password with the DCL command SET PASSWORD/SYSTEM or modifying the systemalarm and audit settings using the DCL command SET AUDIT. The privilege not only lets a userprocess start and stop the audit server process with SET AUDIT, it also permits the process touse SET AUDIT to modify the characteristics of the auditing database, including those of theaudit server, the system audit journal, the security archive file, resource monitoring, and theaudit, alarm, or failure mode.Grant this privilege only to security administrators. Irresponsible users who obtain this privilegecan subvert the system's security mechanisms, lock out users through improper application ofsystem passwords, and disable security auditing.The SECURITY privilege also lets a process perform the following tasks:
InterfaceTask
SHOW AUDITDisplay system auditing information about the systemaudit log file, audit server settings, and so on
SHOW SECURITYDisplay Hidden ACEs
314 Assigning Privileges
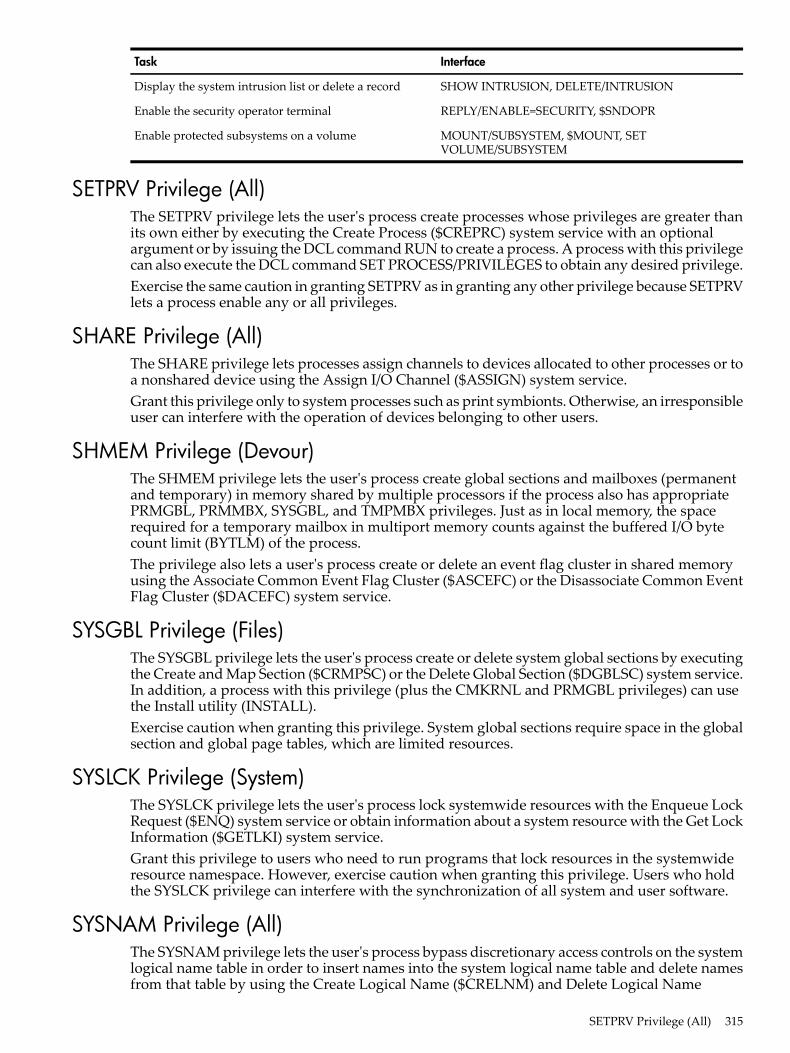
InterfaceTask
SHOW INTRUSION, DELETE/INTRUSIONDisplay the system intrusion list or delete a record
REPLY/ENABLE=SECURITY, $SNDOPREnable the security operator terminal
MOUNT/SUBSYSTEM, $MOUNT, SETVOLUME/SUBSYSTEM
Enable protected subsystems on a volume
SETPRV Privilege (All)The SETPRV privilege lets the user's process create processes whose privileges are greater thanits own either by executing the Create Process ($CREPRC) system service with an optionalargument or by issuing the DCL command RUN to create a process. A process with this privilegecan also execute the DCL command SET PROCESS/PRIVILEGES to obtain any desired privilege.Exercise the same caution in granting SETPRV as in granting any other privilege because SETPRVlets a process enable any or all privileges.
SHARE Privilege (All)The SHARE privilege lets processes assign channels to devices allocated to other processes or toa nonshared device using the Assign I/O Channel ($ASSIGN) system service.Grant this privilege only to system processes such as print symbionts. Otherwise, an irresponsibleuser can interfere with the operation of devices belonging to other users.
SHMEM Privilege (Devour)The SHMEM privilege lets the user's process create global sections and mailboxes (permanentand temporary) in memory shared by multiple processors if the process also has appropriatePRMGBL, PRMMBX, SYSGBL, and TMPMBX privileges. Just as in local memory, the spacerequired for a temporary mailbox in multiport memory counts against the buffered I/O bytecount limit (BYTLM) of the process.The privilege also lets a user's process create or delete an event flag cluster in shared memoryusing the Associate Common Event Flag Cluster ($ASCEFC) or the Disassociate Common EventFlag Cluster ($DACEFC) system service.
SYSGBL Privilege (Files)The SYSGBL privilege lets the user's process create or delete system global sections by executingthe Create and Map Section ($CRMPSC) or the Delete Global Section ($DGBLSC) system service.In addition, a process with this privilege (plus the CMKRNL and PRMGBL privileges) can usethe Install utility (INSTALL).Exercise caution when granting this privilege. System global sections require space in the globalsection and global page tables, which are limited resources.
SYSLCK Privilege (System)The SYSLCK privilege lets the user's process lock systemwide resources with the Enqueue LockRequest ($ENQ) system service or obtain information about a system resource with the Get LockInformation ($GETLKI) system service.Grant this privilege to users who need to run programs that lock resources in the systemwideresource namespace. However, exercise caution when granting this privilege. Users who holdthe SYSLCK privilege can interfere with the synchronization of all system and user software.
SYSNAM Privilege (All)The SYSNAM privilege lets the user's process bypass discretionary access controls on the systemlogical name table in order to insert names into the system logical name table and delete namesfrom that table by using the Create Logical Name ($CRELNM) and Delete Logical Name
SETPRV Privilege (All) 315
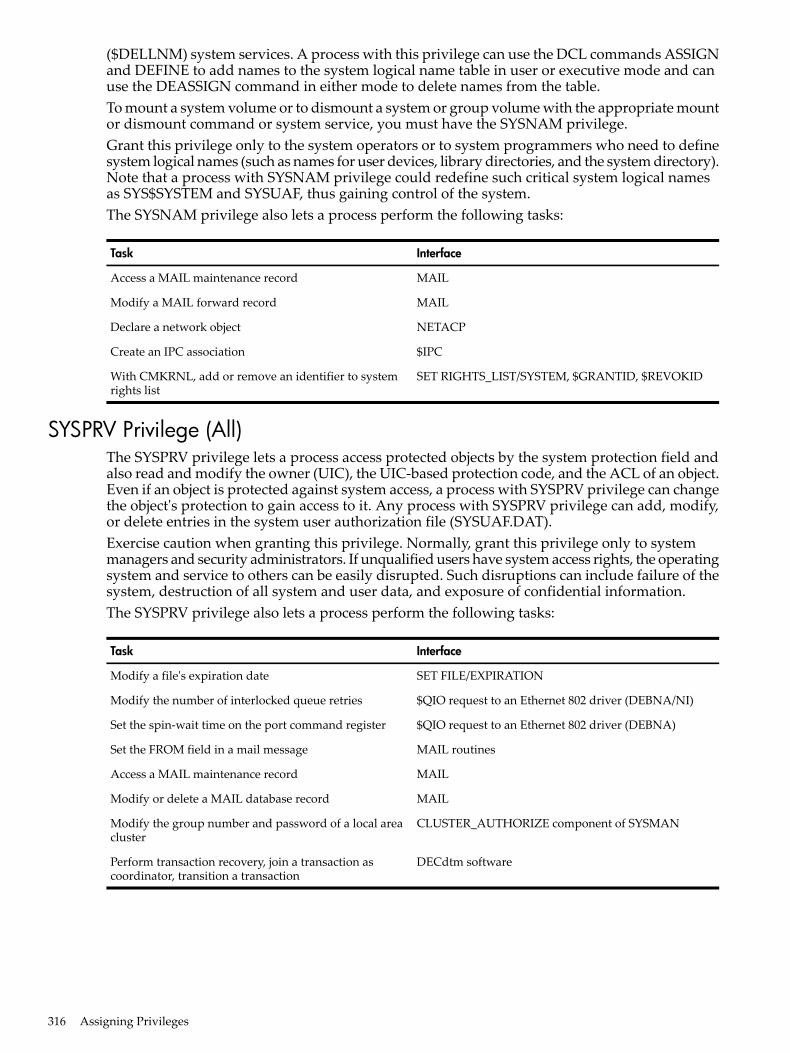
($DELLNM) system services. A process with this privilege can use the DCL commands ASSIGNand DEFINE to add names to the system logical name table in user or executive mode and canuse the DEASSIGN command in either mode to delete names from the table.To mount a system volume or to dismount a system or group volume with the appropriate mountor dismount command or system service, you must have the SYSNAM privilege.Grant this privilege only to the system operators or to system programmers who need to definesystem logical names (such as names for user devices, library directories, and the system directory).Note that a process with SYSNAM privilege could redefine such critical system logical namesas SYS$SYSTEM and SYSUAF, thus gaining control of the system.The SYSNAM privilege also lets a process perform the following tasks:
InterfaceTask
MAILAccess a MAIL maintenance record
MAILModify a MAIL forward record
NETACPDeclare a network object
$IPCCreate an IPC association
SET RIGHTS_LIST/SYSTEM, $GRANTID, $REVOKIDWith CMKRNL, add or remove an identifier to systemrights list
SYSPRV Privilege (All)The SYSPRV privilege lets a process access protected objects by the system protection field andalso read and modify the owner (UIC), the UIC-based protection code, and the ACL of an object.Even if an object is protected against system access, a process with SYSPRV privilege can changethe object's protection to gain access to it. Any process with SYSPRV privilege can add, modify,or delete entries in the system user authorization file (SYSUAF.DAT).Exercise caution when granting this privilege. Normally, grant this privilege only to systemmanagers and security administrators. If unqualified users have system access rights, the operatingsystem and service to others can be easily disrupted. Such disruptions can include failure of thesystem, destruction of all system and user data, and exposure of confidential information.The SYSPRV privilege also lets a process perform the following tasks:
InterfaceTask
SET FILE/EXPIRATIONModify a file's expiration date
$QIO request to an Ethernet 802 driver (DEBNA/NI)Modify the number of interlocked queue retries
$QIO request to an Ethernet 802 driver (DEBNA)Set the spin-wait time on the port command register
MAIL routinesSet the FROM field in a mail message
MAILAccess a MAIL maintenance record
MAILModify or delete a MAIL database record
CLUSTER_AUTHORIZE component of SYSMANModify the group number and password of a local areacluster
DECdtm softwarePerform transaction recovery, join a transaction ascoordinator, transition a transaction
316 Assigning Privileges
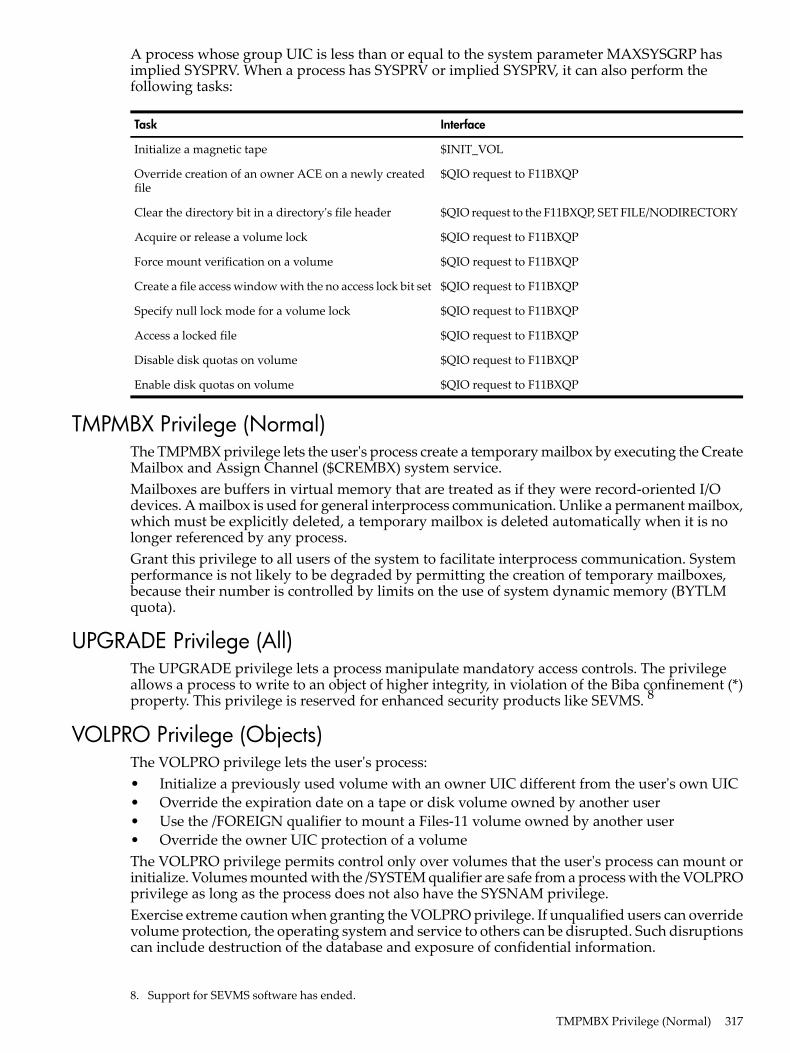
A process whose group UIC is less than or equal to the system parameter MAXSYSGRP hasimplied SYSPRV. When a process has SYSPRV or implied SYSPRV, it can also perform thefollowing tasks:
InterfaceTask
$INIT_VOLInitialize a magnetic tape
$QIO request to F11BXQPOverride creation of an owner ACE on a newly createdfile
$QIO request to the F11BXQP, SET FILE/NODIRECTORYClear the directory bit in a directory's file header
$QIO request to F11BXQPAcquire or release a volume lock
$QIO request to F11BXQPForce mount verification on a volume
$QIO request to F11BXQPCreate a file access window with the no access lock bit set
$QIO request to F11BXQPSpecify null lock mode for a volume lock
$QIO request to F11BXQPAccess a locked file
$QIO request to F11BXQPDisable disk quotas on volume
$QIO request to F11BXQPEnable disk quotas on volume
TMPMBX Privilege (Normal)The TMPMBX privilege lets the user's process create a temporary mailbox by executing the CreateMailbox and Assign Channel ($CREMBX) system service.Mailboxes are buffers in virtual memory that are treated as if they were record-oriented I/Odevices. A mailbox is used for general interprocess communication. Unlike a permanent mailbox,which must be explicitly deleted, a temporary mailbox is deleted automatically when it is nolonger referenced by any process.Grant this privilege to all users of the system to facilitate interprocess communication. Systemperformance is not likely to be degraded by permitting the creation of temporary mailboxes,because their number is controlled by limits on the use of system dynamic memory (BYTLMquota).
UPGRADE Privilege (All)The UPGRADE privilege lets a process manipulate mandatory access controls. The privilegeallows a process to write to an object of higher integrity, in violation of the Biba confinement (*)property. This privilege is reserved for enhanced security products like SEVMS. 8
VOLPRO Privilege (Objects)The VOLPRO privilege lets the user's process:• Initialize a previously used volume with an owner UIC different from the user's own UIC• Override the expiration date on a tape or disk volume owned by another user• Use the /FOREIGN qualifier to mount a Files-11 volume owned by another user• Override the owner UIC protection of a volumeThe VOLPRO privilege permits control only over volumes that the user's process can mount orinitialize. Volumes mounted with the /SYSTEM qualifier are safe from a process with the VOLPROprivilege as long as the process does not also have the SYSNAM privilege.Exercise extreme caution when granting the VOLPRO privilege. If unqualified users can overridevolume protection, the operating system and service to others can be disrupted. Such disruptionscan include destruction of the database and exposure of confidential information.
8. Support for SEVMS software has ended.
TMPMBX Privilege (Normal) 317
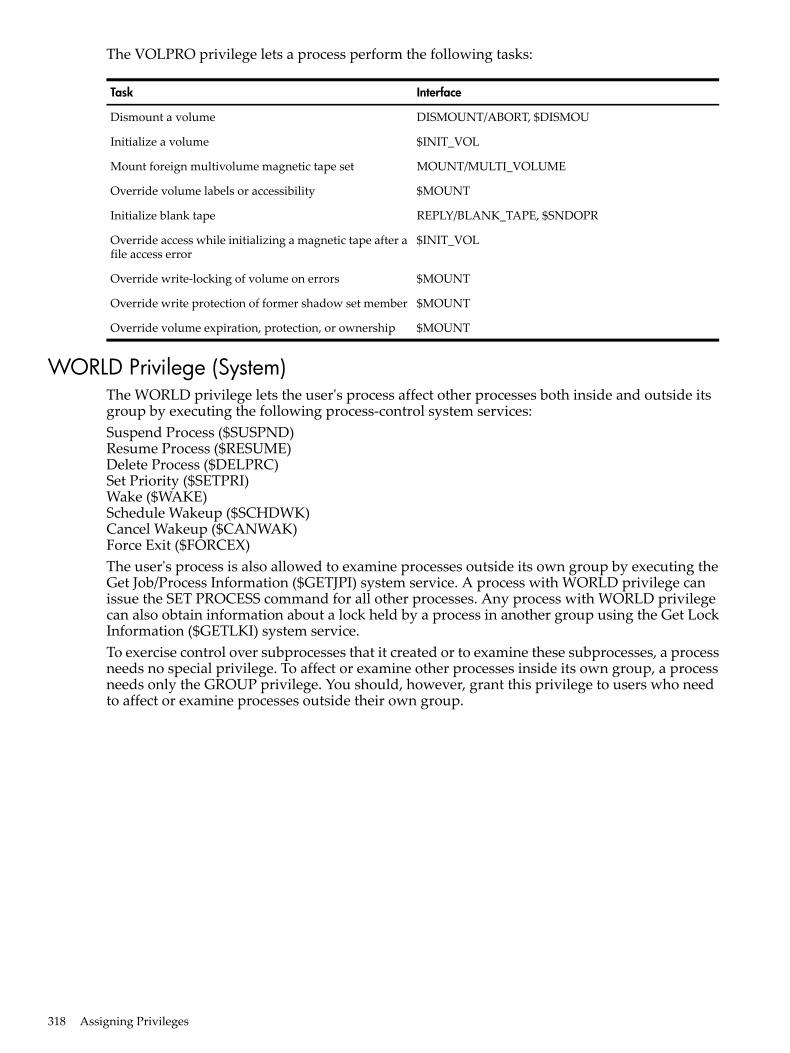
The VOLPRO privilege lets a process perform the following tasks:
InterfaceTask
DISMOUNT/ABORT, $DISMOUDismount a volume
$INIT_VOLInitialize a volume
MOUNT/MULTI_VOLUMEMount foreign multivolume magnetic tape set
$MOUNTOverride volume labels or accessibility
REPLY/BLANK_TAPE, $SNDOPRInitialize blank tape
$INIT_VOLOverride access while initializing a magnetic tape after afile access error
$MOUNTOverride write-locking of volume on errors
$MOUNTOverride write protection of former shadow set member
$MOUNTOverride volume expiration, protection, or ownership
WORLD Privilege (System)The WORLD privilege lets the user's process affect other processes both inside and outside itsgroup by executing the following process-control system services:Suspend Process ($SUSPND)Resume Process ($RESUME)Delete Process ($DELPRC)Set Priority ($SETPRI)Wake ($WAKE)Schedule Wakeup ($SCHDWK)Cancel Wakeup ($CANWAK)Force Exit ($FORCEX)The user's process is also allowed to examine processes outside its own group by executing theGet Job/Process Information ($GETJPI) system service. A process with WORLD privilege canissue the SET PROCESS command for all other processes. Any process with WORLD privilegecan also obtain information about a lock held by a process in another group using the Get LockInformation ($GETLKI) system service.To exercise control over subprocesses that it created or to examine these subprocesses, a processneeds no special privilege. To affect or examine other processes inside its own group, a processneeds only the GROUP privilege. You should, however, grant this privilege to users who needto affect or examine processes outside their own group.
318 Assigning Privileges
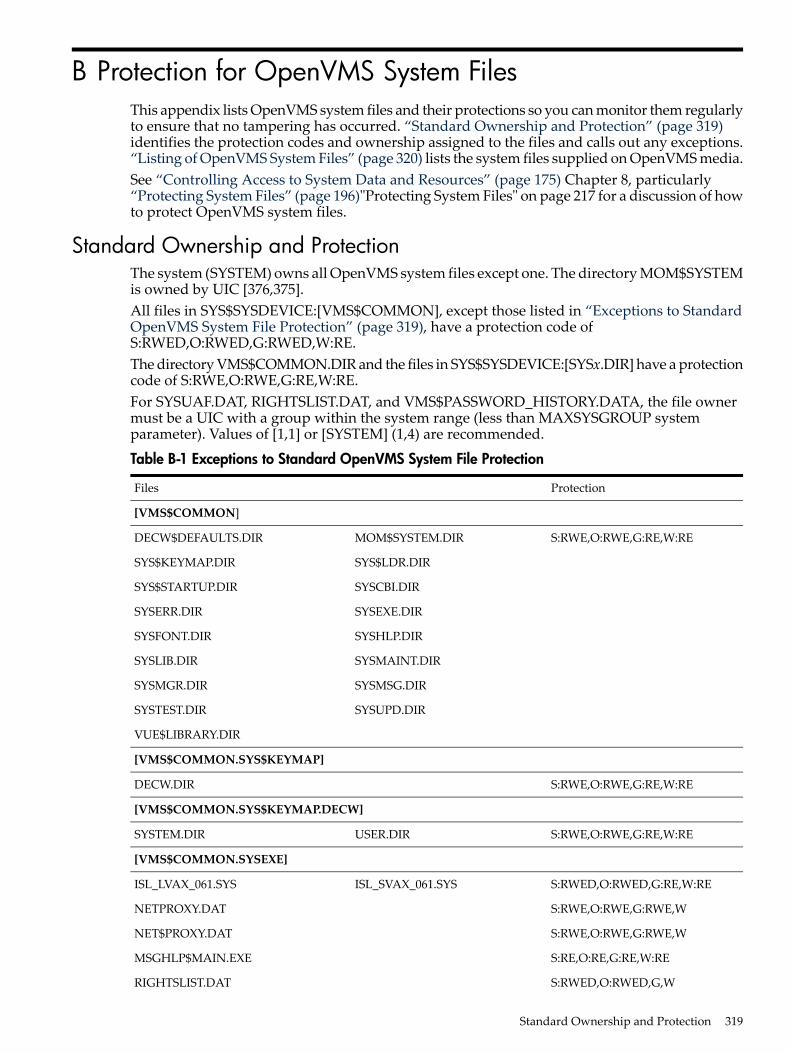
B Protection for OpenVMS System FilesThis appendix lists OpenVMS system files and their protections so you can monitor them regularlyto ensure that no tampering has occurred. “Standard Ownership and Protection” (page 319)identifies the protection codes and ownership assigned to the files and calls out any exceptions.“Listing of OpenVMS System Files” (page 320) lists the system files supplied on OpenVMS media.See “Controlling Access to System Data and Resources” (page 175) Chapter 8, particularly“Protecting System Files” (page 196)"Protecting System Files" on page 217 for a discussion of howto protect OpenVMS system files.
Standard Ownership and ProtectionThe system (SYSTEM) owns all OpenVMS system files except one. The directory MOM$SYSTEMis owned by UIC [376,375].All files in SYS$SYSDEVICE:[VMS$COMMON], except those listed in “Exceptions to StandardOpenVMS System File Protection” (page 319), have a protection code ofS:RWED,O:RWED,G:RWED,W:RE.The directory VMS$COMMON.DIR and the files in SYS$SYSDEVICE:[SYSx.DIR] have a protectioncode of S:RWE,O:RWE,G:RE,W:RE.For SYSUAF.DAT, RIGHTSLIST.DAT, and VMS$PASSWORD_HISTORY.DATA, the file ownermust be a UIC with a group within the system range (less than MAXSYSGROUP systemparameter). Values of [1,1] or [SYSTEM] (1,4) are recommended.
Table B-1 Exceptions to Standard OpenVMS System File Protection
ProtectionFiles
[VMS$COMMON]
S:RWE,O:RWE,G:RE,W:REMOM$SYSTEM.DIRDECW$DEFAULTS.DIR
SYS$LDR.DIRSYS$KEYMAP.DIR
SYSCBI.DIRSYS$STARTUP.DIR
SYSEXE.DIRSYSERR.DIR
SYSHLP.DIRSYSFONT.DIR
SYSMAINT.DIRSYSLIB.DIR
SYSMSG.DIRSYSMGR.DIR
SYSUPD.DIRSYSTEST.DIR
VUE$LIBRARY.DIR
[VMS$COMMON.SYS$KEYMAP]
S:RWE,O:RWE,G:RE,W:REDECW.DIR
[VMS$COMMON.SYS$KEYMAP.DECW]
S:RWE,O:RWE,G:RE,W:REUSER.DIRSYSTEM.DIR
[VMS$COMMON.SYSEXE]
S:RWED,O:RWED,G:RE,W:REISL_SVAX_061.SYSISL_LVAX_061.SYS
S:RWE,O:RWE,G:RWE,WNETPROXY.DAT
S:RWE,O:RWE,G:RWE,WNET$PROXY.DAT
S:RE,O:RE,G:RE,W:REMSGHLP$MAIN.EXE
S:RWED,O:RWED,G,WRIGHTSLIST.DAT
Standard Ownership and Protection 319
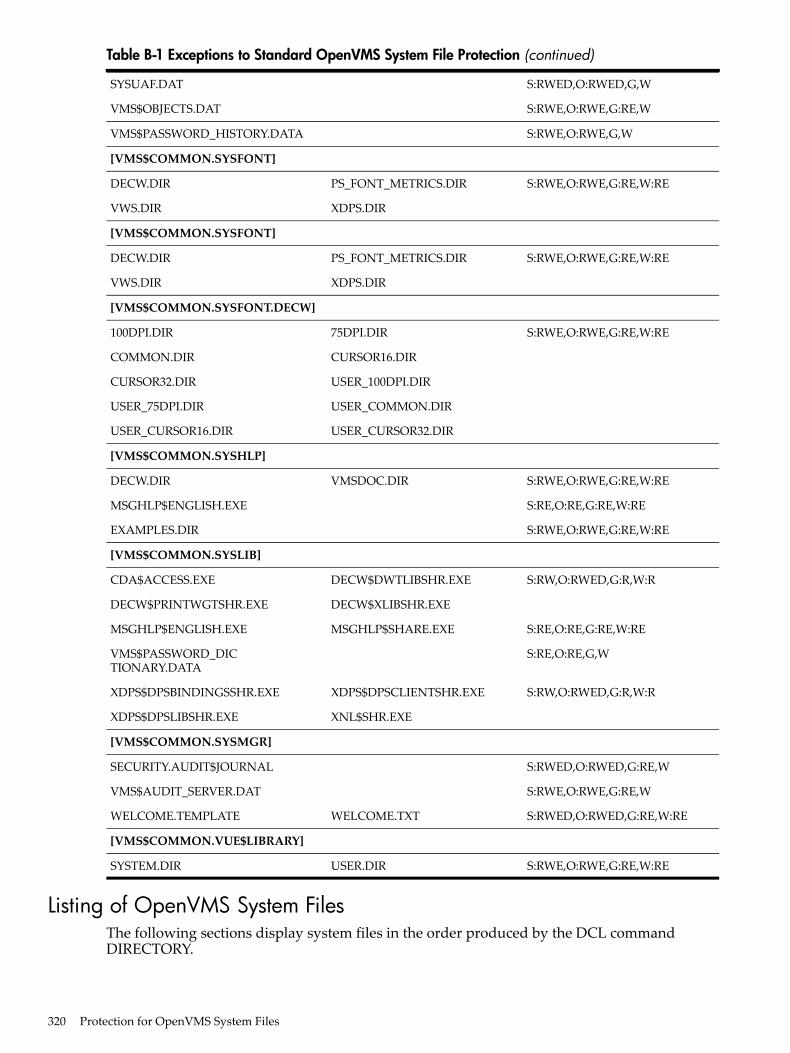
Table B-1 Exceptions to Standard OpenVMS System File Protection (continued)
S:RWED,O:RWED,G,WSYSUAF.DAT
S:RWE,O:RWE,G:RE,WVMS$OBJECTS.DAT
S:RWE,O:RWE,G,WVMS$PASSWORD_HISTORY.DATA
[VMS$COMMON.SYSFONT]
S:RWE,O:RWE,G:RE,W:REPS_FONT_METRICS.DIRDECW.DIR
XDPS.DIRVWS.DIR
[VMS$COMMON.SYSFONT]
S:RWE,O:RWE,G:RE,W:REPS_FONT_METRICS.DIRDECW.DIR
XDPS.DIRVWS.DIR
[VMS$COMMON.SYSFONT.DECW]
S:RWE,O:RWE,G:RE,W:RE75DPI.DIR100DPI.DIR
CURSOR16.DIRCOMMON.DIR
USER_100DPI.DIRCURSOR32.DIR
USER_COMMON.DIRUSER_75DPI.DIR
USER_CURSOR32.DIRUSER_CURSOR16.DIR
[VMS$COMMON.SYSHLP]
S:RWE,O:RWE,G:RE,W:REVMSDOC.DIRDECW.DIR
S:RE,O:RE,G:RE,W:REMSGHLP$ENGLISH.EXE
S:RWE,O:RWE,G:RE,W:REEXAMPLES.DIR
[VMS$COMMON.SYSLIB]
S:RW,O:RWED,G:R,W:RDECW$DWTLIBSHR.EXECDA$ACCESS.EXE
DECW$XLIBSHR.EXEDECW$PRINTWGTSHR.EXE
S:RE,O:RE,G:RE,W:REMSGHLP$SHARE.EXEMSGHLP$ENGLISH.EXE
S:RE,O:RE,G,WVMS$PASSWORD_DICTIONARY.DATA
S:RW,O:RWED,G:R,W:RXDPS$DPSCLIENTSHR.EXEXDPS$DPSBINDINGSSHR.EXE
XNL$SHR.EXEXDPS$DPSLIBSHR.EXE
[VMS$COMMON.SYSMGR]
S:RWED,O:RWED,G:RE,WSECURITY.AUDIT$JOURNAL
S:RWE,O:RWE,G:RE,WVMS$AUDIT_SERVER.DAT
S:RWED,O:RWED,G:RE,W:REWELCOME.TXTWELCOME.TEMPLATE
[VMS$COMMON.VUE$LIBRARY]
S:RWE,O:RWE,G:RE,W:REUSER.DIRSYSTEM.DIR
Listing of OpenVMS System FilesThe following sections display system files in the order produced by the DCL commandDIRECTORY.
320 Protection for OpenVMS System Files
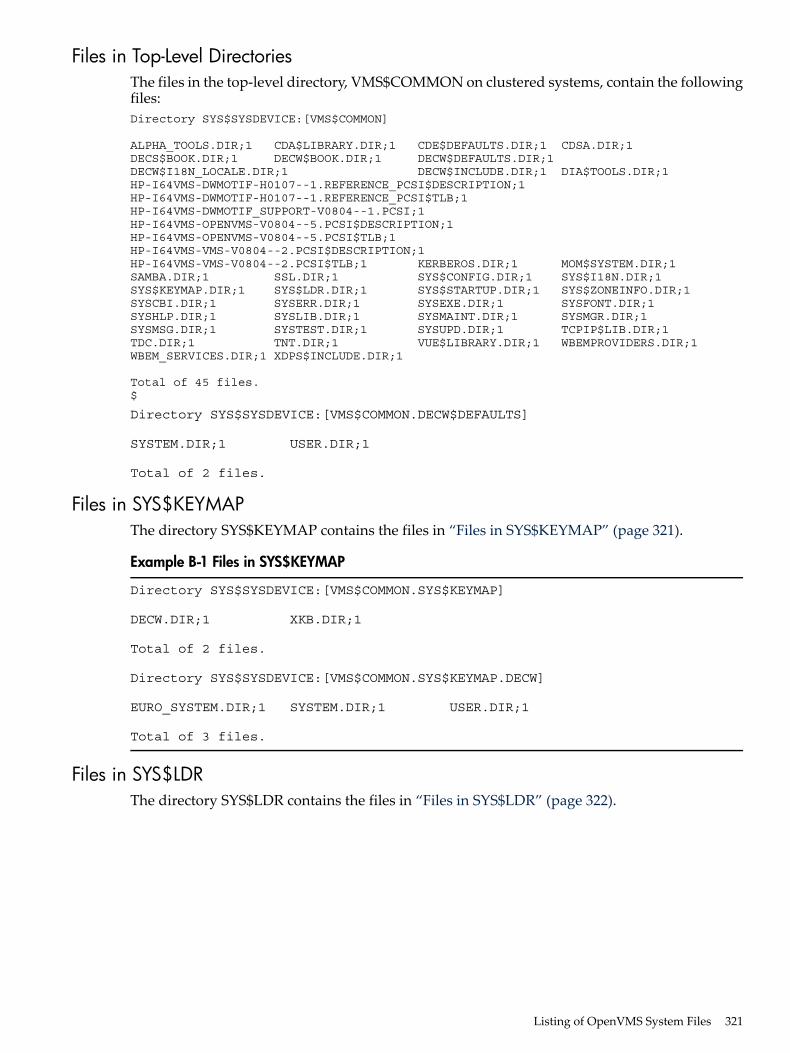
Files in Top-Level DirectoriesThe files in the top-level directory, VMS$COMMON on clustered systems, contain the followingfiles:Directory SYS$SYSDEVICE:[VMS$COMMON]
ALPHA_TOOLS.DIR;1 CDA$LIBRARY.DIR;1 CDE$DEFAULTS.DIR;1 CDSA.DIR;1DECS$BOOK.DIR;1 DECW$BOOK.DIR;1 DECW$DEFAULTS.DIR;1DECW$I18N_LOCALE.DIR;1 DECW$INCLUDE.DIR;1 DIA$TOOLS.DIR;1HP-I64VMS-DWMOTIF-H0107--1.REFERENCE_PCSI$DESCRIPTION;1HP-I64VMS-DWMOTIF-H0107--1.REFERENCE_PCSI$TLB;1HP-I64VMS-DWMOTIF_SUPPORT-V0804--1.PCSI;1HP-I64VMS-OPENVMS-V0804--5.PCSI$DESCRIPTION;1HP-I64VMS-OPENVMS-V0804--5.PCSI$TLB;1HP-I64VMS-VMS-V0804--2.PCSI$DESCRIPTION;1HP-I64VMS-VMS-V0804--2.PCSI$TLB;1 KERBEROS.DIR;1 MOM$SYSTEM.DIR;1SAMBA.DIR;1 SSL.DIR;1 SYS$CONFIG.DIR;1 SYS$I18N.DIR;1SYS$KEYMAP.DIR;1 SYS$LDR.DIR;1 SYS$STARTUP.DIR;1 SYS$ZONEINFO.DIR;1SYSCBI.DIR;1 SYSERR.DIR;1 SYSEXE.DIR;1 SYSFONT.DIR;1SYSHLP.DIR;1 SYSLIB.DIR;1 SYSMAINT.DIR;1 SYSMGR.DIR;1SYSMSG.DIR;1 SYSTEST.DIR;1 SYSUPD.DIR;1 TCPIP$LIB.DIR;1TDC.DIR;1 TNT.DIR;1 VUE$LIBRARY.DIR;1 WBEMPROVIDERS.DIR;1WBEM_SERVICES.DIR;1 XDPS$INCLUDE.DIR;1
Total of 45 files.$
Directory SYS$SYSDEVICE:[VMS$COMMON.DECW$DEFAULTS]
SYSTEM.DIR;1 USER.DIR;1
Total of 2 files.
Files in SYS$KEYMAPThe directory SYS$KEYMAP contains the files in “Files in SYS$KEYMAP” (page 321).
Example B-1 Files in SYS$KEYMAP
Directory SYS$SYSDEVICE:[VMS$COMMON.SYS$KEYMAP]
DECW.DIR;1 XKB.DIR;1
Total of 2 files.
Directory SYS$SYSDEVICE:[VMS$COMMON.SYS$KEYMAP.DECW]
EURO_SYSTEM.DIR;1 SYSTEM.DIR;1 USER.DIR;1
Total of 3 files.
Files in SYS$LDRThe directory SYS$LDR contains the files in “Files in SYS$LDR” (page 322).
Listing of OpenVMS System Files 321
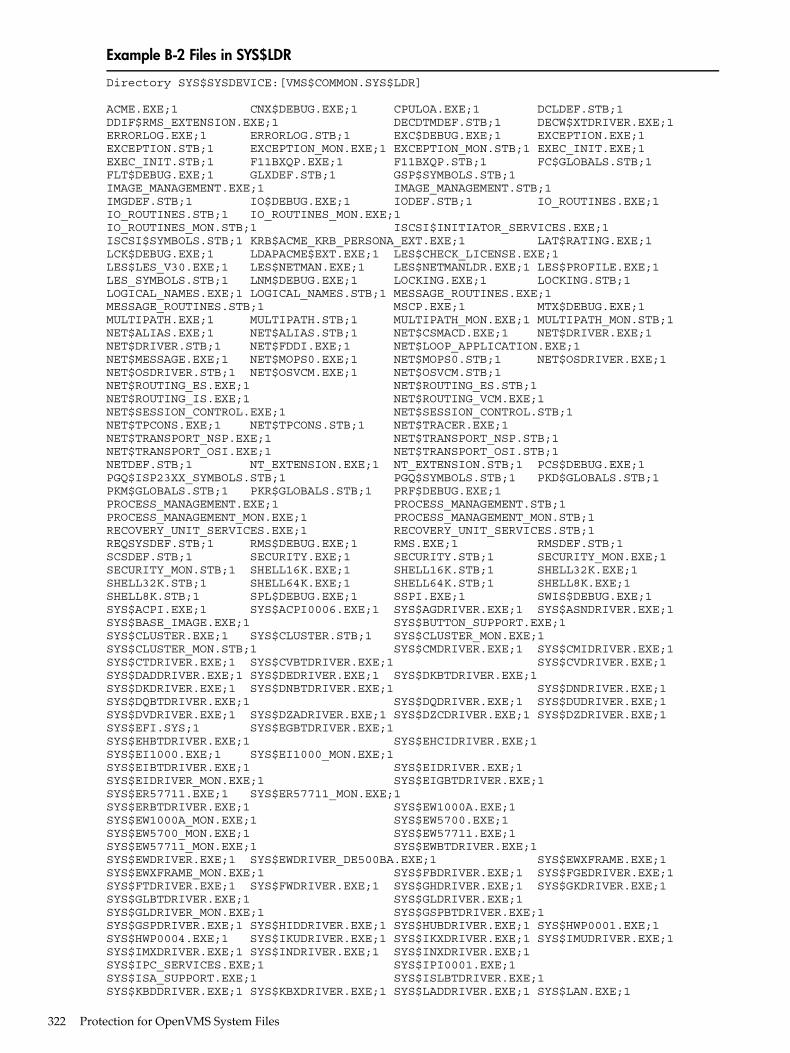
Example B-2 Files in SYS$LDR
Directory SYS$SYSDEVICE:[VMS$COMMON.SYS$LDR]
ACME.EXE;1 CNX$DEBUG.EXE;1 CPULOA.EXE;1 DCLDEF.STB;1DDIF$RMS_EXTENSION.EXE;1 DECDTMDEF.STB;1 DECW$XTDRIVER.EXE;1ERRORLOG.EXE;1 ERRORLOG.STB;1 EXC$DEBUG.EXE;1 EXCEPTION.EXE;1EXCEPTION.STB;1 EXCEPTION_MON.EXE;1 EXCEPTION_MON.STB;1 EXEC_INIT.EXE;1EXEC_INIT.STB;1 F11BXQP.EXE;1 F11BXQP.STB;1 FC$GLOBALS.STB;1FLT$DEBUG.EXE;1 GLXDEF.STB;1 GSP$SYMBOLS.STB;1IMAGE_MANAGEMENT.EXE;1 IMAGE_MANAGEMENT.STB;1IMGDEF.STB;1 IO$DEBUG.EXE;1 IODEF.STB;1 IO_ROUTINES.EXE;1IO_ROUTINES.STB;1 IO_ROUTINES_MON.EXE;1IO_ROUTINES_MON.STB;1 ISCSI$INITIATOR_SERVICES.EXE;1ISCSI$SYMBOLS.STB;1 KRB$ACME_KRB_PERSONA_EXT.EXE;1 LAT$RATING.EXE;1LCK$DEBUG.EXE;1 LDAPACME$EXT.EXE;1 LES$CHECK_LICENSE.EXE;1LES$LES_V30.EXE;1 LES$NETMAN.EXE;1 LES$NETMANLDR.EXE;1 LES$PROFILE.EXE;1LES_SYMBOLS.STB;1 LNM$DEBUG.EXE;1 LOCKING.EXE;1 LOCKING.STB;1LOGICAL_NAMES.EXE;1 LOGICAL_NAMES.STB;1 MESSAGE_ROUTINES.EXE;1MESSAGE_ROUTINES.STB;1 MSCP.EXE;1 MTX$DEBUG.EXE;1MULTIPATH.EXE;1 MULTIPATH.STB;1 MULTIPATH_MON.EXE;1 MULTIPATH_MON.STB;1NET$ALIAS.EXE;1 NET$ALIAS.STB;1 NET$CSMACD.EXE;1 NET$DRIVER.EXE;1NET$DRIVER.STB;1 NET$FDDI.EXE;1 NET$LOOP_APPLICATION.EXE;1NET$MESSAGE.EXE;1 NET$MOPS0.EXE;1 NET$MOPS0.STB;1 NET$OSDRIVER.EXE;1NET$OSDRIVER.STB;1 NET$OSVCM.EXE;1 NET$OSVCM.STB;1NET$ROUTING_ES.EXE;1 NET$ROUTING_ES.STB;1NET$ROUTING_IS.EXE;1 NET$ROUTING_VCM.EXE;1NET$SESSION_CONTROL.EXE;1 NET$SESSION_CONTROL.STB;1NET$TPCONS.EXE;1 NET$TPCONS.STB;1 NET$TRACER.EXE;1NET$TRANSPORT_NSP.EXE;1 NET$TRANSPORT_NSP.STB;1NET$TRANSPORT_OSI.EXE;1 NET$TRANSPORT_OSI.STB;1NETDEF.STB;1 NT_EXTENSION.EXE;1 NT_EXTENSION.STB;1 PCS$DEBUG.EXE;1PGQ$ISP23XX_SYMBOLS.STB;1 PGQ$SYMBOLS.STB;1 PKD$GLOBALS.STB;1PKM$GLOBALS.STB;1 PKR$GLOBALS.STB;1 PRF$DEBUG.EXE;1PROCESS_MANAGEMENT.EXE;1 PROCESS_MANAGEMENT.STB;1PROCESS_MANAGEMENT_MON.EXE;1 PROCESS_MANAGEMENT_MON.STB;1RECOVERY_UNIT_SERVICES.EXE;1 RECOVERY_UNIT_SERVICES.STB;1REQSYSDEF.STB;1 RMS$DEBUG.EXE;1 RMS.EXE;1 RMSDEF.STB;1SCSDEF.STB;1 SECURITY.EXE;1 SECURITY.STB;1 SECURITY_MON.EXE;1SECURITY_MON.STB;1 SHELL16K.EXE;1 SHELL16K.STB;1 SHELL32K.EXE;1SHELL32K.STB;1 SHELL64K.EXE;1 SHELL64K.STB;1 SHELL8K.EXE;1SHELL8K.STB;1 SPL$DEBUG.EXE;1 SSPI.EXE;1 SWIS$DEBUG.EXE;1SYS$ACPI.EXE;1 SYS$ACPI0006.EXE;1 SYS$AGDRIVER.EXE;1 SYS$ASNDRIVER.EXE;1SYS$BASE_IMAGE.EXE;1 SYS$BUTTON_SUPPORT.EXE;1SYS$CLUSTER.EXE;1 SYS$CLUSTER.STB;1 SYS$CLUSTER_MON.EXE;1SYS$CLUSTER_MON.STB;1 SYS$CMDRIVER.EXE;1 SYS$CMIDRIVER.EXE;1SYS$CTDRIVER.EXE;1 SYS$CVBTDRIVER.EXE;1 SYS$CVDRIVER.EXE;1SYS$DADDRIVER.EXE;1 SYS$DEDRIVER.EXE;1 SYS$DKBTDRIVER.EXE;1SYS$DKDRIVER.EXE;1 SYS$DNBTDRIVER.EXE;1 SYS$DNDRIVER.EXE;1SYS$DQBTDRIVER.EXE;1 SYS$DQDRIVER.EXE;1 SYS$DUDRIVER.EXE;1SYS$DVDRIVER.EXE;1 SYS$DZADRIVER.EXE;1 SYS$DZCDRIVER.EXE;1 SYS$DZDRIVER.EXE;1SYS$EFI.SYS;1 SYS$EGBTDRIVER.EXE;1SYS$EHBTDRIVER.EXE;1 SYS$EHCIDRIVER.EXE;1SYS$EI1000.EXE;1 SYS$EI1000_MON.EXE;1SYS$EIBTDRIVER.EXE;1 SYS$EIDRIVER.EXE;1SYS$EIDRIVER_MON.EXE;1 SYS$EIGBTDRIVER.EXE;1SYS$ER57711.EXE;1 SYS$ER57711_MON.EXE;1SYS$ERBTDRIVER.EXE;1 SYS$EW1000A.EXE;1SYS$EW1000A_MON.EXE;1 SYS$EW5700.EXE;1SYS$EW5700_MON.EXE;1 SYS$EW57711.EXE;1SYS$EW57711_MON.EXE;1 SYS$EWBTDRIVER.EXE;1SYS$EWDRIVER.EXE;1 SYS$EWDRIVER_DE500BA.EXE;1 SYS$EWXFRAME.EXE;1SYS$EWXFRAME_MON.EXE;1 SYS$FBDRIVER.EXE;1 SYS$FGEDRIVER.EXE;1SYS$FTDRIVER.EXE;1 SYS$FWDRIVER.EXE;1 SYS$GHDRIVER.EXE;1 SYS$GKDRIVER.EXE;1SYS$GLBTDRIVER.EXE;1 SYS$GLDRIVER.EXE;1SYS$GLDRIVER_MON.EXE;1 SYS$GSPBTDRIVER.EXE;1SYS$GSPDRIVER.EXE;1 SYS$HIDDRIVER.EXE;1 SYS$HUBDRIVER.EXE;1 SYS$HWP0001.EXE;1SYS$HWP0004.EXE;1 SYS$IKUDRIVER.EXE;1 SYS$IKXDRIVER.EXE;1 SYS$IMUDRIVER.EXE;1SYS$IMXDRIVER.EXE;1 SYS$INDRIVER.EXE;1 SYS$INXDRIVER.EXE;1SYS$IPC_SERVICES.EXE;1 SYS$IPI0001.EXE;1SYS$ISA_SUPPORT.EXE;1 SYS$ISLBTDRIVER.EXE;1SYS$KBDDRIVER.EXE;1 SYS$KBXDRIVER.EXE;1 SYS$LADDRIVER.EXE;1 SYS$LAN.EXE;1
322 Protection for OpenVMS System Files
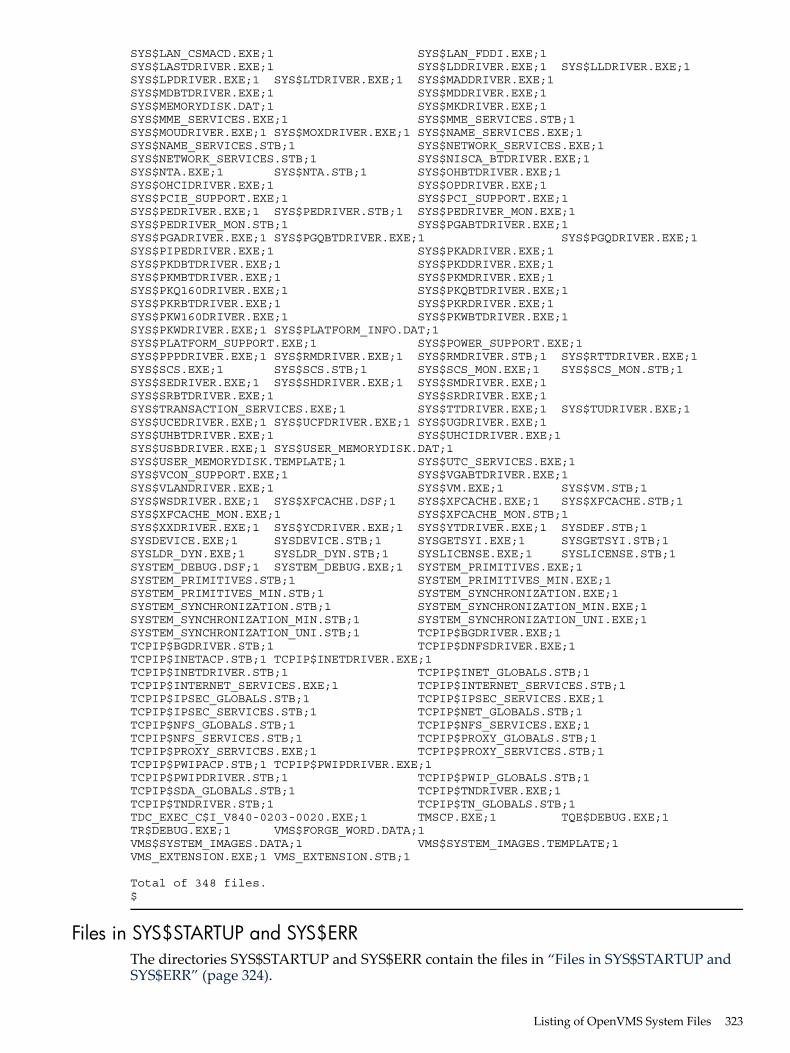
SYS$LAN_CSMACD.EXE;1 SYS$LAN_FDDI.EXE;1SYS$LASTDRIVER.EXE;1 SYS$LDDRIVER.EXE;1 SYS$LLDRIVER.EXE;1SYS$LPDRIVER.EXE;1 SYS$LTDRIVER.EXE;1 SYS$MADDRIVER.EXE;1SYS$MDBTDRIVER.EXE;1 SYS$MDDRIVER.EXE;1SYS$MEMORYDISK.DAT;1 SYS$MKDRIVER.EXE;1SYS$MME_SERVICES.EXE;1 SYS$MME_SERVICES.STB;1SYS$MOUDRIVER.EXE;1 SYS$MOXDRIVER.EXE;1 SYS$NAME_SERVICES.EXE;1SYS$NAME_SERVICES.STB;1 SYS$NETWORK_SERVICES.EXE;1SYS$NETWORK_SERVICES.STB;1 SYS$NISCA_BTDRIVER.EXE;1SYS$NTA.EXE;1 SYS$NTA.STB;1 SYS$OHBTDRIVER.EXE;1SYS$OHCIDRIVER.EXE;1 SYS$OPDRIVER.EXE;1SYS$PCIE_SUPPORT.EXE;1 SYS$PCI_SUPPORT.EXE;1SYS$PEDRIVER.EXE;1 SYS$PEDRIVER.STB;1 SYS$PEDRIVER_MON.EXE;1SYS$PEDRIVER_MON.STB;1 SYS$PGABTDRIVER.EXE;1SYS$PGADRIVER.EXE;1 SYS$PGQBTDRIVER.EXE;1 SYS$PGQDRIVER.EXE;1SYS$PIPEDRIVER.EXE;1 SYS$PKADRIVER.EXE;1SYS$PKDBTDRIVER.EXE;1 SYS$PKDDRIVER.EXE;1SYS$PKMBTDRIVER.EXE;1 SYS$PKMDRIVER.EXE;1SYS$PKQ160DRIVER.EXE;1 SYS$PKQBTDRIVER.EXE;1SYS$PKRBTDRIVER.EXE;1 SYS$PKRDRIVER.EXE;1SYS$PKW160DRIVER.EXE;1 SYS$PKWBTDRIVER.EXE;1SYS$PKWDRIVER.EXE;1 SYS$PLATFORM_INFO.DAT;1SYS$PLATFORM_SUPPORT.EXE;1 SYS$POWER_SUPPORT.EXE;1SYS$PPPDRIVER.EXE;1 SYS$RMDRIVER.EXE;1 SYS$RMDRIVER.STB;1 SYS$RTTDRIVER.EXE;1SYS$SCS.EXE;1 SYS$SCS.STB;1 SYS$SCS_MON.EXE;1 SYS$SCS_MON.STB;1SYS$SEDRIVER.EXE;1 SYS$SHDRIVER.EXE;1 SYS$SMDRIVER.EXE;1SYS$SRBTDRIVER.EXE;1 SYS$SRDRIVER.EXE;1SYS$TRANSACTION_SERVICES.EXE;1 SYS$TTDRIVER.EXE;1 SYS$TUDRIVER.EXE;1SYS$UCEDRIVER.EXE;1 SYS$UCFDRIVER.EXE;1 SYS$UGDRIVER.EXE;1SYS$UHBTDRIVER.EXE;1 SYS$UHCIDRIVER.EXE;1SYS$USBDRIVER.EXE;1 SYS$USER_MEMORYDISK.DAT;1SYS$USER_MEMORYDISK.TEMPLATE;1 SYS$UTC_SERVICES.EXE;1SYS$VCON_SUPPORT.EXE;1 SYS$VGABTDRIVER.EXE;1SYS$VLANDRIVER.EXE;1 SYS$VM.EXE;1 SYS$VM.STB;1SYS$WSDRIVER.EXE;1 SYS$XFCACHE.DSF;1 SYS$XFCACHE.EXE;1 SYS$XFCACHE.STB;1SYS$XFCACHE_MON.EXE;1 SYS$XFCACHE_MON.STB;1SYS$XXDRIVER.EXE;1 SYS$YCDRIVER.EXE;1 SYS$YTDRIVER.EXE;1 SYSDEF.STB;1SYSDEVICE.EXE;1 SYSDEVICE.STB;1 SYSGETSYI.EXE;1 SYSGETSYI.STB;1SYSLDR_DYN.EXE;1 SYSLDR_DYN.STB;1 SYSLICENSE.EXE;1 SYSLICENSE.STB;1SYSTEM_DEBUG.DSF;1 SYSTEM_DEBUG.EXE;1 SYSTEM_PRIMITIVES.EXE;1SYSTEM_PRIMITIVES.STB;1 SYSTEM_PRIMITIVES_MIN.EXE;1SYSTEM_PRIMITIVES_MIN.STB;1 SYSTEM_SYNCHRONIZATION.EXE;1SYSTEM_SYNCHRONIZATION.STB;1 SYSTEM_SYNCHRONIZATION_MIN.EXE;1SYSTEM_SYNCHRONIZATION_MIN.STB;1 SYSTEM_SYNCHRONIZATION_UNI.EXE;1SYSTEM_SYNCHRONIZATION_UNI.STB;1 TCPIP$BGDRIVER.EXE;1TCPIP$BGDRIVER.STB;1 TCPIP$DNFSDRIVER.EXE;1TCPIP$INETACP.STB;1 TCPIP$INETDRIVER.EXE;1TCPIP$INETDRIVER.STB;1 TCPIP$INET_GLOBALS.STB;1TCPIP$INTERNET_SERVICES.EXE;1 TCPIP$INTERNET_SERVICES.STB;1TCPIP$IPSEC_GLOBALS.STB;1 TCPIP$IPSEC_SERVICES.EXE;1TCPIP$IPSEC_SERVICES.STB;1 TCPIP$NET_GLOBALS.STB;1TCPIP$NFS_GLOBALS.STB;1 TCPIP$NFS_SERVICES.EXE;1TCPIP$NFS_SERVICES.STB;1 TCPIP$PROXY_GLOBALS.STB;1TCPIP$PROXY_SERVICES.EXE;1 TCPIP$PROXY_SERVICES.STB;1TCPIP$PWIPACP.STB;1 TCPIP$PWIPDRIVER.EXE;1TCPIP$PWIPDRIVER.STB;1 TCPIP$PWIP_GLOBALS.STB;1TCPIP$SDA_GLOBALS.STB;1 TCPIP$TNDRIVER.EXE;1TCPIP$TNDRIVER.STB;1 TCPIP$TN_GLOBALS.STB;1TDC_EXEC_C$I_V840-0203-0020.EXE;1 TMSCP.EXE;1 TQE$DEBUG.EXE;1TR$DEBUG.EXE;1 VMS$FORGE_WORD.DATA;1VMS$SYSTEM_IMAGES.DATA;1 VMS$SYSTEM_IMAGES.TEMPLATE;1VMS_EXTENSION.EXE;1 VMS_EXTENSION.STB;1
Total of 348 files.$
Files in SYS$STARTUP and SYS$ERRThe directories SYS$STARTUP and SYS$ERR contain the files in “Files in SYS$STARTUP andSYS$ERR” (page 324).
Listing of OpenVMS System Files 323
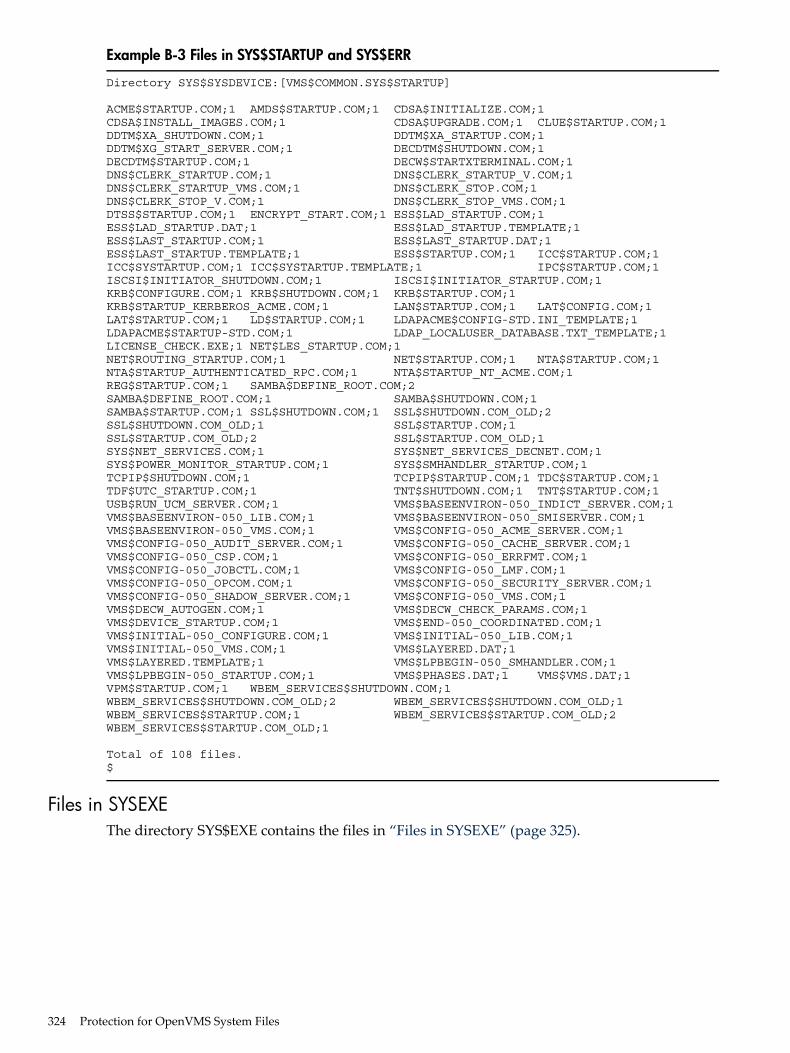
Example B-3 Files in SYS$STARTUP and SYS$ERR
Directory SYS$SYSDEVICE:[VMS$COMMON.SYS$STARTUP]
ACME$STARTUP.COM;1 AMDS$STARTUP.COM;1 CDSA$INITIALIZE.COM;1CDSA$INSTALL_IMAGES.COM;1 CDSA$UPGRADE.COM;1 CLUE$STARTUP.COM;1DDTM$XA_SHUTDOWN.COM;1 DDTM$XA_STARTUP.COM;1DDTM$XG_START_SERVER.COM;1 DECDTM$SHUTDOWN.COM;1DECDTM$STARTUP.COM;1 DECW$STARTXTERMINAL.COM;1DNS$CLERK_STARTUP.COM;1 DNS$CLERK_STARTUP_V.COM;1DNS$CLERK_STARTUP_VMS.COM;1 DNS$CLERK_STOP.COM;1DNS$CLERK_STOP_V.COM;1 DNS$CLERK_STOP_VMS.COM;1DTSS$STARTUP.COM;1 ENCRYPT_START.COM;1 ESS$LAD_STARTUP.COM;1ESS$LAD_STARTUP.DAT;1 ESS$LAD_STARTUP.TEMPLATE;1ESS$LAST_STARTUP.COM;1 ESS$LAST_STARTUP.DAT;1ESS$LAST_STARTUP.TEMPLATE;1 ESS$STARTUP.COM;1 ICC$STARTUP.COM;1ICC$SYSTARTUP.COM;1 ICC$SYSTARTUP.TEMPLATE;1 IPC$STARTUP.COM;1ISCSI$INITIATOR_SHUTDOWN.COM;1 ISCSI$INITIATOR_STARTUP.COM;1KRB$CONFIGURE.COM;1 KRB$SHUTDOWN.COM;1 KRB$STARTUP.COM;1KRB$STARTUP_KERBEROS_ACME.COM;1 LAN$STARTUP.COM;1 LAT$CONFIG.COM;1LAT$STARTUP.COM;1 LD$STARTUP.COM;1 LDAPACME$CONFIG-STD.INI_TEMPLATE;1LDAPACME$STARTUP-STD.COM;1 LDAP_LOCALUSER_DATABASE.TXT_TEMPLATE;1LICENSE_CHECK.EXE;1 NET$LES_STARTUP.COM;1NET$ROUTING_STARTUP.COM;1 NET$STARTUP.COM;1 NTA$STARTUP.COM;1NTA$STARTUP_AUTHENTICATED_RPC.COM;1 NTA$STARTUP_NT_ACME.COM;1REG$STARTUP.COM;1 SAMBA$DEFINE_ROOT.COM;2SAMBA$DEFINE_ROOT.COM;1 SAMBA$SHUTDOWN.COM;1SAMBA$STARTUP.COM;1 SSL$SHUTDOWN.COM;1 SSL$SHUTDOWN.COM_OLD;2SSL$SHUTDOWN.COM_OLD;1 SSL$STARTUP.COM;1SSL$STARTUP.COM_OLD;2 SSL$STARTUP.COM_OLD;1SYS$NET_SERVICES.COM;1 SYS$NET_SERVICES_DECNET.COM;1SYS$POWER_MONITOR_STARTUP.COM;1 SYS$SMHANDLER_STARTUP.COM;1TCPIP$SHUTDOWN.COM;1 TCPIP$STARTUP.COM;1 TDC$STARTUP.COM;1TDF$UTC_STARTUP.COM;1 TNT$SHUTDOWN.COM;1 TNT$STARTUP.COM;1USB$RUN_UCM_SERVER.COM;1 VMS$BASEENVIRON-050_INDICT_SERVER.COM;1VMS$BASEENVIRON-050_LIB.COM;1 VMS$BASEENVIRON-050_SMISERVER.COM;1VMS$BASEENVIRON-050_VMS.COM;1 VMS$CONFIG-050_ACME_SERVER.COM;1VMS$CONFIG-050_AUDIT_SERVER.COM;1 VMS$CONFIG-050_CACHE_SERVER.COM;1VMS$CONFIG-050_CSP.COM;1 VMS$CONFIG-050_ERRFMT.COM;1VMS$CONFIG-050_JOBCTL.COM;1 VMS$CONFIG-050_LMF.COM;1VMS$CONFIG-050_OPCOM.COM;1 VMS$CONFIG-050_SECURITY_SERVER.COM;1VMS$CONFIG-050_SHADOW_SERVER.COM;1 VMS$CONFIG-050_VMS.COM;1VMS$DECW_AUTOGEN.COM;1 VMS$DECW_CHECK_PARAMS.COM;1VMS$DEVICE_STARTUP.COM;1 VMS$END-050_COORDINATED.COM;1VMS$INITIAL-050_CONFIGURE.COM;1 VMS$INITIAL-050_LIB.COM;1VMS$INITIAL-050_VMS.COM;1 VMS$LAYERED.DAT;1VMS$LAYERED.TEMPLATE;1 VMS$LPBEGIN-050_SMHANDLER.COM;1VMS$LPBEGIN-050_STARTUP.COM;1 VMS$PHASES.DAT;1 VMS$VMS.DAT;1VPM$STARTUP.COM;1 WBEM_SERVICES$SHUTDOWN.COM;1WBEM_SERVICES$SHUTDOWN.COM_OLD;2 WBEM_SERVICES$SHUTDOWN.COM_OLD;1WBEM_SERVICES$STARTUP.COM;1 WBEM_SERVICES$STARTUP.COM_OLD;2WBEM_SERVICES$STARTUP.COM_OLD;1
Total of 108 files.$
Files in SYSEXEThe directory SYS$EXE contains the files in “Files in SYSEXE” (page 325).
324 Protection for OpenVMS System Files
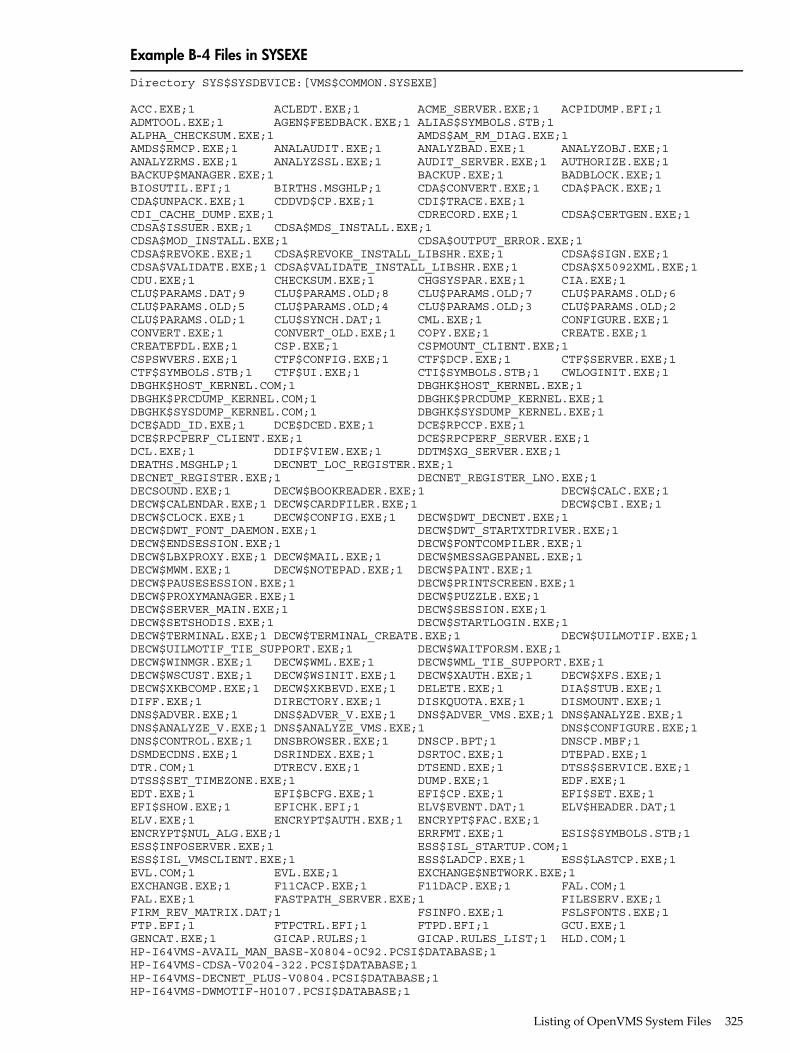
Example B-4 Files in SYSEXE
Directory SYS$SYSDEVICE:[VMS$COMMON.SYSEXE]
ACC.EXE;1 ACLEDT.EXE;1 ACME_SERVER.EXE;1 ACPIDUMP.EFI;1ADMTOOL.EXE;1 AGEN$FEEDBACK.EXE;1 ALIAS$SYMBOLS.STB;1ALPHA_CHECKSUM.EXE;1 AMDS$AM_RM_DIAG.EXE;1AMDS$RMCP.EXE;1 ANALAUDIT.EXE;1 ANALYZBAD.EXE;1 ANALYZOBJ.EXE;1ANALYZRMS.EXE;1 ANALYZSSL.EXE;1 AUDIT_SERVER.EXE;1 AUTHORIZE.EXE;1BACKUP$MANAGER.EXE;1 BACKUP.EXE;1 BADBLOCK.EXE;1BIOSUTIL.EFI;1 BIRTHS.MSGHLP;1 CDA$CONVERT.EXE;1 CDA$PACK.EXE;1CDA$UNPACK.EXE;1 CDDVD$CP.EXE;1 CDI$TRACE.EXE;1CDI_CACHE_DUMP.EXE;1 CDRECORD.EXE;1 CDSA$CERTGEN.EXE;1CDSA$ISSUER.EXE;1 CDSA$MDS_INSTALL.EXE;1CDSA$MOD_INSTALL.EXE;1 CDSA$OUTPUT_ERROR.EXE;1CDSA$REVOKE.EXE;1 CDSA$REVOKE_INSTALL_LIBSHR.EXE;1 CDSA$SIGN.EXE;1CDSA$VALIDATE.EXE;1 CDSA$VALIDATE_INSTALL_LIBSHR.EXE;1 CDSA$X5092XML.EXE;1CDU.EXE;1 CHECKSUM.EXE;1 CHGSYSPAR.EXE;1 CIA.EXE;1CLU$PARAMS.DAT;9 CLU$PARAMS.OLD;8 CLU$PARAMS.OLD;7 CLU$PARAMS.OLD;6CLU$PARAMS.OLD;5 CLU$PARAMS.OLD;4 CLU$PARAMS.OLD;3 CLU$PARAMS.OLD;2CLU$PARAMS.OLD;1 CLU$SYNCH.DAT;1 CML.EXE;1 CONFIGURE.EXE;1CONVERT.EXE;1 CONVERT_OLD.EXE;1 COPY.EXE;1 CREATE.EXE;1CREATEFDL.EXE;1 CSP.EXE;1 CSPMOUNT_CLIENT.EXE;1CSPSWVERS.EXE;1 CTF$CONFIG.EXE;1 CTF$DCP.EXE;1 CTF$SERVER.EXE;1CTF$SYMBOLS.STB;1 CTF$UI.EXE;1 CTI$SYMBOLS.STB;1 CWLOGINIT.EXE;1DBGHK$HOST_KERNEL.COM;1 DBGHK$HOST_KERNEL.EXE;1DBGHK$PRCDUMP_KERNEL.COM;1 DBGHK$PRCDUMP_KERNEL.EXE;1DBGHK$SYSDUMP_KERNEL.COM;1 DBGHK$SYSDUMP_KERNEL.EXE;1DCE$ADD_ID.EXE;1 DCE$DCED.EXE;1 DCE$RPCCP.EXE;1DCE$RPCPERF_CLIENT.EXE;1 DCE$RPCPERF_SERVER.EXE;1DCL.EXE;1 DDIF$VIEW.EXE;1 DDTM$XG_SERVER.EXE;1DEATHS.MSGHLP;1 DECNET_LOC_REGISTER.EXE;1DECNET_REGISTER.EXE;1 DECNET_REGISTER_LNO.EXE;1DECSOUND.EXE;1 DECW$BOOKREADER.EXE;1 DECW$CALC.EXE;1DECW$CALENDAR.EXE;1 DECW$CARDFILER.EXE;1 DECW$CBI.EXE;1DECW$CLOCK.EXE;1 DECW$CONFIG.EXE;1 DECW$DWT_DECNET.EXE;1DECW$DWT_FONT_DAEMON.EXE;1 DECW$DWT_STARTXTDRIVER.EXE;1DECW$ENDSESSION.EXE;1 DECW$FONTCOMPILER.EXE;1DECW$LBXPROXY.EXE;1 DECW$MAIL.EXE;1 DECW$MESSAGEPANEL.EXE;1DECW$MWM.EXE;1 DECW$NOTEPAD.EXE;1 DECW$PAINT.EXE;1DECW$PAUSESESSION.EXE;1 DECW$PRINTSCREEN.EXE;1DECW$PROXYMANAGER.EXE;1 DECW$PUZZLE.EXE;1DECW$SERVER_MAIN.EXE;1 DECW$SESSION.EXE;1DECW$SETSHODIS.EXE;1 DECW$STARTLOGIN.EXE;1DECW$TERMINAL.EXE;1 DECW$TERMINAL_CREATE.EXE;1 DECW$UILMOTIF.EXE;1DECW$UILMOTIF_TIE_SUPPORT.EXE;1 DECW$WAITFORSM.EXE;1DECW$WINMGR.EXE;1 DECW$WML.EXE;1 DECW$WML_TIE_SUPPORT.EXE;1DECW$WSCUST.EXE;1 DECW$WSINIT.EXE;1 DECW$XAUTH.EXE;1 DECW$XFS.EXE;1DECW$XKBCOMP.EXE;1 DECW$XKBEVD.EXE;1 DELETE.EXE;1 DIA$STUB.EXE;1DIFF.EXE;1 DIRECTORY.EXE;1 DISKQUOTA.EXE;1 DISMOUNT.EXE;1DNS$ADVER.EXE;1 DNS$ADVER_V.EXE;1 DNS$ADVER_VMS.EXE;1 DNS$ANALYZE.EXE;1DNS$ANALYZE_V.EXE;1 DNS$ANALYZE_VMS.EXE;1 DNS$CONFIGURE.EXE;1DNS$CONTROL.EXE;1 DNSBROWSER.EXE;1 DNSCP.BPT;1 DNSCP.MBF;1DSMDECDNS.EXE;1 DSRINDEX.EXE;1 DSRTOC.EXE;1 DTEPAD.EXE;1DTR.COM;1 DTRECV.EXE;1 DTSEND.EXE;1 DTSS$SERVICE.EXE;1DTSS$SET_TIMEZONE.EXE;1 DUMP.EXE;1 EDF.EXE;1EDT.EXE;1 EFI$BCFG.EXE;1 EFI$CP.EXE;1 EFI$SET.EXE;1EFI$SHOW.EXE;1 EFICHK.EFI;1 ELV$EVENT.DAT;1 ELV$HEADER.DAT;1ELV.EXE;1 ENCRYPT$AUTH.EXE;1 ENCRYPT$FAC.EXE;1ENCRYPT$NUL_ALG.EXE;1 ERRFMT.EXE;1 ESIS$SYMBOLS.STB;1ESS$INFOSERVER.EXE;1 ESS$ISL_STARTUP.COM;1ESS$ISL_VMSCLIENT.EXE;1 ESS$LADCP.EXE;1 ESS$LASTCP.EXE;1EVL.COM;1 EVL.EXE;1 EXCHANGE$NETWORK.EXE;1EXCHANGE.EXE;1 F11CACP.EXE;1 F11DACP.EXE;1 FAL.COM;1FAL.EXE;1 FASTPATH_SERVER.EXE;1 FILESERV.EXE;1FIRM_REV_MATRIX.DAT;1 FSINFO.EXE;1 FSLSFONTS.EXE;1FTP.EFI;1 FTPCTRL.EFI;1 FTPD.EFI;1 GCU.EXE;1GENCAT.EXE;1 GICAP.RULES;1 GICAP.RULES_LIST;1 HLD.COM;1HP-I64VMS-AVAIL_MAN_BASE-X0804-0C92.PCSI$DATABASE;1HP-I64VMS-CDSA-V0204-322.PCSI$DATABASE;1HP-I64VMS-DECNET_PLUS-V0804.PCSI$DATABASE;1HP-I64VMS-DWMOTIF-H0107.PCSI$DATABASE;1
Listing of OpenVMS System Files 325
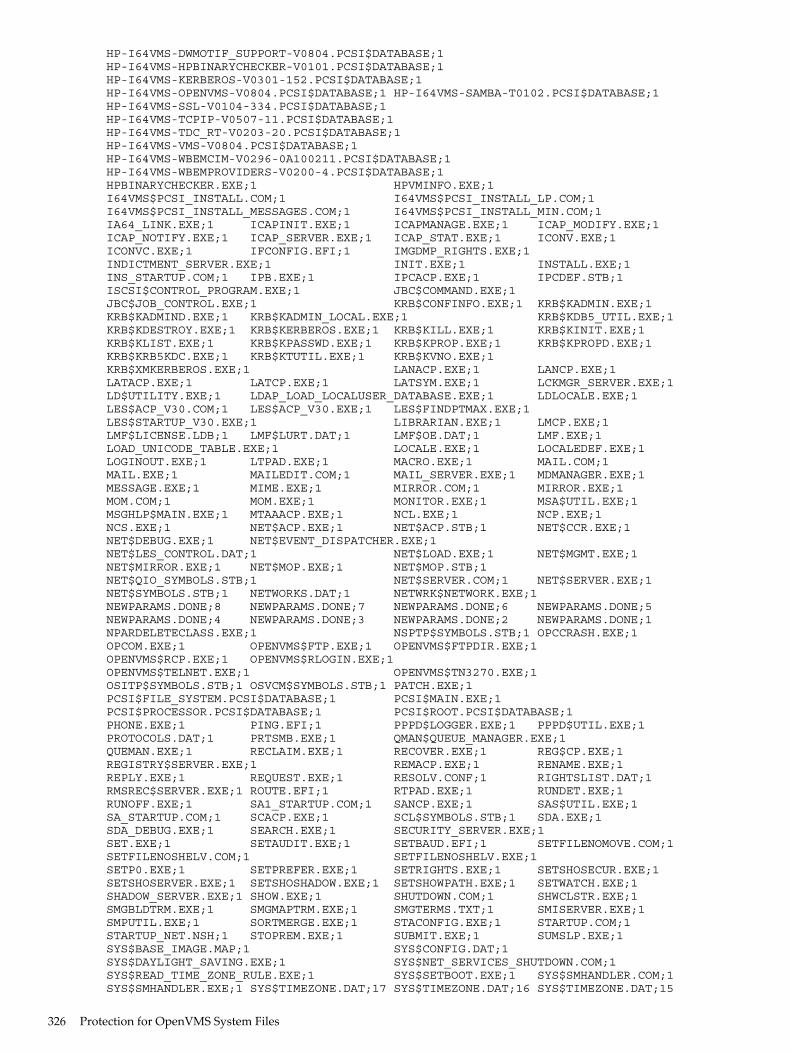
HP-I64VMS-DWMOTIF_SUPPORT-V0804.PCSI$DATABASE;1HP-I64VMS-HPBINARYCHECKER-V0101.PCSI$DATABASE;1HP-I64VMS-KERBEROS-V0301-152.PCSI$DATABASE;1HP-I64VMS-OPENVMS-V0804.PCSI$DATABASE;1 HP-I64VMS-SAMBA-T0102.PCSI$DATABASE;1HP-I64VMS-SSL-V0104-334.PCSI$DATABASE;1HP-I64VMS-TCPIP-V0507-11.PCSI$DATABASE;1HP-I64VMS-TDC_RT-V0203-20.PCSI$DATABASE;1HP-I64VMS-VMS-V0804.PCSI$DATABASE;1HP-I64VMS-WBEMCIM-V0296-0A100211.PCSI$DATABASE;1HP-I64VMS-WBEMPROVIDERS-V0200-4.PCSI$DATABASE;1HPBINARYCHECKER.EXE;1 HPVMINFO.EXE;1I64VMS$PCSI_INSTALL.COM;1 I64VMS$PCSI_INSTALL_LP.COM;1I64VMS$PCSI_INSTALL_MESSAGES.COM;1 I64VMS$PCSI_INSTALL_MIN.COM;1IA64_LINK.EXE;1 ICAPINIT.EXE;1 ICAPMANAGE.EXE;1 ICAP_MODIFY.EXE;1ICAP_NOTIFY.EXE;1 ICAP_SERVER.EXE;1 ICAP_STAT.EXE;1 ICONV.EXE;1ICONVC.EXE;1 IFCONFIG.EFI;1 IMGDMP_RIGHTS.EXE;1INDICTMENT_SERVER.EXE;1 INIT.EXE;1 INSTALL.EXE;1INS_STARTUP.COM;1 IPB.EXE;1 IPCACP.EXE;1 IPCDEF.STB;1ISCSI$CONTROL_PROGRAM.EXE;1 JBC$COMMAND.EXE;1JBC$JOB_CONTROL.EXE;1 KRB$CONFINFO.EXE;1 KRB$KADMIN.EXE;1KRB$KADMIND.EXE;1 KRB$KADMIN_LOCAL.EXE;1 KRB$KDB5_UTIL.EXE;1KRB$KDESTROY.EXE;1 KRB$KERBEROS.EXE;1 KRB$KILL.EXE;1 KRB$KINIT.EXE;1KRB$KLIST.EXE;1 KRB$KPASSWD.EXE;1 KRB$KPROP.EXE;1 KRB$KPROPD.EXE;1KRB$KRB5KDC.EXE;1 KRB$KTUTIL.EXE;1 KRB$KVNO.EXE;1KRB$XMKERBEROS.EXE;1 LANACP.EXE;1 LANCP.EXE;1LATACP.EXE;1 LATCP.EXE;1 LATSYM.EXE;1 LCKMGR_SERVER.EXE;1LD$UTILITY.EXE;1 LDAP_LOAD_LOCALUSER_DATABASE.EXE;1 LDLOCALE.EXE;1LES$ACP_V30.COM;1 LES$ACP_V30.EXE;1 LES$FINDPTMAX.EXE;1LES$STARTUP_V30.EXE;1 LIBRARIAN.EXE;1 LMCP.EXE;1LMF$LICENSE.LDB;1 LMF$LURT.DAT;1 LMF$OE.DAT;1 LMF.EXE;1LOAD_UNICODE_TABLE.EXE;1 LOCALE.EXE;1 LOCALEDEF.EXE;1LOGINOUT.EXE;1 LTPAD.EXE;1 MACRO.EXE;1 MAIL.COM;1MAIL.EXE;1 MAILEDIT.COM;1 MAIL_SERVER.EXE;1 MDMANAGER.EXE;1MESSAGE.EXE;1 MIME.EXE;1 MIRROR.COM;1 MIRROR.EXE;1MOM.COM;1 MOM.EXE;1 MONITOR.EXE;1 MSA$UTIL.EXE;1MSGHLP$MAIN.EXE;1 MTAAACP.EXE;1 NCL.EXE;1 NCP.EXE;1NCS.EXE;1 NET$ACP.EXE;1 NET$ACP.STB;1 NET$CCR.EXE;1NET$DEBUG.EXE;1 NET$EVENT_DISPATCHER.EXE;1NET$LES_CONTROL.DAT;1 NET$LOAD.EXE;1 NET$MGMT.EXE;1NET$MIRROR.EXE;1 NET$MOP.EXE;1 NET$MOP.STB;1NET$QIO_SYMBOLS.STB;1 NET$SERVER.COM;1 NET$SERVER.EXE;1NET$SYMBOLS.STB;1 NETWORKS.DAT;1 NETWRK$NETWORK.EXE;1NEWPARAMS.DONE;8 NEWPARAMS.DONE;7 NEWPARAMS.DONE;6 NEWPARAMS.DONE;5NEWPARAMS.DONE;4 NEWPARAMS.DONE;3 NEWPARAMS.DONE;2 NEWPARAMS.DONE;1NPARDELETECLASS.EXE;1 NSPTP$SYMBOLS.STB;1 OPCCRASH.EXE;1OPCOM.EXE;1 OPENVMS$FTP.EXE;1 OPENVMS$FTPDIR.EXE;1OPENVMS$RCP.EXE;1 OPENVMS$RLOGIN.EXE;1OPENVMS$TELNET.EXE;1 OPENVMS$TN3270.EXE;1OSITP$SYMBOLS.STB;1 OSVCM$SYMBOLS.STB;1 PATCH.EXE;1PCSI$FILE_SYSTEM.PCSI$DATABASE;1 PCSI$MAIN.EXE;1PCSI$PROCESSOR.PCSI$DATABASE;1 PCSI$ROOT.PCSI$DATABASE;1PHONE.EXE;1 PING.EFI;1 PPPD$LOGGER.EXE;1 PPPD$UTIL.EXE;1PROTOCOLS.DAT;1 PRTSMB.EXE;1 QMAN$QUEUE_MANAGER.EXE;1QUEMAN.EXE;1 RECLAIM.EXE;1 RECOVER.EXE;1 REG$CP.EXE;1REGISTRY$SERVER.EXE;1 REMACP.EXE;1 RENAME.EXE;1REPLY.EXE;1 REQUEST.EXE;1 RESOLV.CONF;1 RIGHTSLIST.DAT;1RMSREC$SERVER.EXE;1 ROUTE.EFI;1 RTPAD.EXE;1 RUNDET.EXE;1RUNOFF.EXE;1 SA1_STARTUP.COM;1 SANCP.EXE;1 SAS$UTIL.EXE;1SA_STARTUP.COM;1 SCACP.EXE;1 SCL$SYMBOLS.STB;1 SDA.EXE;1SDA_DEBUG.EXE;1 SEARCH.EXE;1 SECURITY_SERVER.EXE;1SET.EXE;1 SETAUDIT.EXE;1 SETBAUD.EFI;1 SETFILENOMOVE.COM;1SETFILENOSHELV.COM;1 SETFILENOSHELV.EXE;1SETP0.EXE;1 SETPREFER.EXE;1 SETRIGHTS.EXE;1 SETSHOSECUR.EXE;1SETSHOSERVER.EXE;1 SETSHOSHADOW.EXE;1 SETSHOWPATH.EXE;1 SETWATCH.EXE;1SHADOW_SERVER.EXE;1 SHOW.EXE;1 SHUTDOWN.COM;1 SHWCLSTR.EXE;1SMGBLDTRM.EXE;1 SMGMAPTRM.EXE;1 SMGTERMS.TXT;1 SMISERVER.EXE;1SMPUTIL.EXE;1 SORTMERGE.EXE;1 STACONFIG.EXE;1 STARTUP.COM;1STARTUP_NET.NSH;1 STOPREM.EXE;1 SUBMIT.EXE;1 SUMSLP.EXE;1SYS$BASE_IMAGE.MAP;1 SYS$CONFIG.DAT;1SYS$DAYLIGHT_SAVING.EXE;1 SYS$NET_SERVICES_SHUTDOWN.COM;1SYS$READ_TIME_ZONE_RULE.EXE;1 SYS$SETBOOT.EXE;1 SYS$SMHANDLER.COM;1SYS$SMHANDLER.EXE;1 SYS$TIMEZONE.DAT;17 SYS$TIMEZONE.DAT;16 SYS$TIMEZONE.DAT;15
326 Protection for OpenVMS System Files
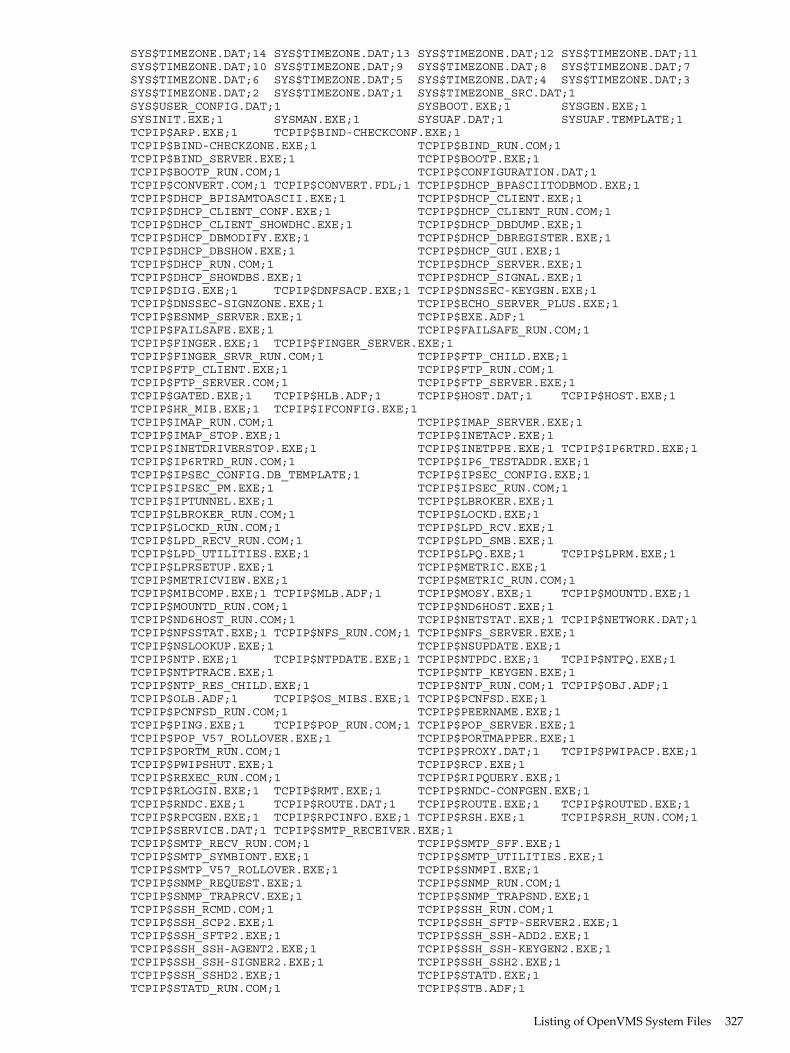
SYS$TIMEZONE.DAT;14 SYS$TIMEZONE.DAT;13 SYS$TIMEZONE.DAT;12 SYS$TIMEZONE.DAT;11SYS$TIMEZONE.DAT;10 SYS$TIMEZONE.DAT;9 SYS$TIMEZONE.DAT;8 SYS$TIMEZONE.DAT;7SYS$TIMEZONE.DAT;6 SYS$TIMEZONE.DAT;5 SYS$TIMEZONE.DAT;4 SYS$TIMEZONE.DAT;3SYS$TIMEZONE.DAT;2 SYS$TIMEZONE.DAT;1 SYS$TIMEZONE_SRC.DAT;1SYS$USER_CONFIG.DAT;1 SYSBOOT.EXE;1 SYSGEN.EXE;1SYSINIT.EXE;1 SYSMAN.EXE;1 SYSUAF.DAT;1 SYSUAF.TEMPLATE;1TCPIP$ARP.EXE;1 TCPIP$BIND-CHECKCONF.EXE;1TCPIP$BIND-CHECKZONE.EXE;1 TCPIP$BIND_RUN.COM;1TCPIP$BIND_SERVER.EXE;1 TCPIP$BOOTP.EXE;1TCPIP$BOOTP_RUN.COM;1 TCPIP$CONFIGURATION.DAT;1TCPIP$CONVERT.COM;1 TCPIP$CONVERT.FDL;1 TCPIP$DHCP_BPASCIITODBMOD.EXE;1TCPIP$DHCP_BPISAMTOASCII.EXE;1 TCPIP$DHCP_CLIENT.EXE;1TCPIP$DHCP_CLIENT_CONF.EXE;1 TCPIP$DHCP_CLIENT_RUN.COM;1TCPIP$DHCP_CLIENT_SHOWDHC.EXE;1 TCPIP$DHCP_DBDUMP.EXE;1TCPIP$DHCP_DBMODIFY.EXE;1 TCPIP$DHCP_DBREGISTER.EXE;1TCPIP$DHCP_DBSHOW.EXE;1 TCPIP$DHCP_GUI.EXE;1TCPIP$DHCP_RUN.COM;1 TCPIP$DHCP_SERVER.EXE;1TCPIP$DHCP_SHOWDBS.EXE;1 TCPIP$DHCP_SIGNAL.EXE;1TCPIP$DIG.EXE;1 TCPIP$DNFSACP.EXE;1 TCPIP$DNSSEC-KEYGEN.EXE;1TCPIP$DNSSEC-SIGNZONE.EXE;1 TCPIP$ECHO_SERVER_PLUS.EXE;1TCPIP$ESNMP_SERVER.EXE;1 TCPIP$EXE.ADF;1TCPIP$FAILSAFE.EXE;1 TCPIP$FAILSAFE_RUN.COM;1TCPIP$FINGER.EXE;1 TCPIP$FINGER_SERVER.EXE;1TCPIP$FINGER_SRVR_RUN.COM;1 TCPIP$FTP_CHILD.EXE;1TCPIP$FTP_CLIENT.EXE;1 TCPIP$FTP_RUN.COM;1TCPIP$FTP_SERVER.COM;1 TCPIP$FTP_SERVER.EXE;1TCPIP$GATED.EXE;1 TCPIP$HLB.ADF;1 TCPIP$HOST.DAT;1 TCPIP$HOST.EXE;1TCPIP$HR_MIB.EXE;1 TCPIP$IFCONFIG.EXE;1TCPIP$IMAP_RUN.COM;1 TCPIP$IMAP_SERVER.EXE;1TCPIP$IMAP_STOP.EXE;1 TCPIP$INETACP.EXE;1TCPIP$INETDRIVERSTOP.EXE;1 TCPIP$INETPPE.EXE;1 TCPIP$IP6RTRD.EXE;1TCPIP$IP6RTRD_RUN.COM;1 TCPIP$IP6_TESTADDR.EXE;1TCPIP$IPSEC_CONFIG.DB_TEMPLATE;1 TCPIP$IPSEC_CONFIG.EXE;1TCPIP$IPSEC_PM.EXE;1 TCPIP$IPSEC_RUN.COM;1TCPIP$IPTUNNEL.EXE;1 TCPIP$LBROKER.EXE;1TCPIP$LBROKER_RUN.COM;1 TCPIP$LOCKD.EXE;1TCPIP$LOCKD_RUN.COM;1 TCPIP$LPD_RCV.EXE;1TCPIP$LPD_RECV_RUN.COM;1 TCPIP$LPD_SMB.EXE;1TCPIP$LPD_UTILITIES.EXE;1 TCPIP$LPQ.EXE;1 TCPIP$LPRM.EXE;1TCPIP$LPRSETUP.EXE;1 TCPIP$METRIC.EXE;1TCPIP$METRICVIEW.EXE;1 TCPIP$METRIC_RUN.COM;1TCPIP$MIBCOMP.EXE;1 TCPIP$MLB.ADF;1 TCPIP$MOSY.EXE;1 TCPIP$MOUNTD.EXE;1TCPIP$MOUNTD_RUN.COM;1 TCPIP$ND6HOST.EXE;1TCPIP$ND6HOST_RUN.COM;1 TCPIP$NETSTAT.EXE;1 TCPIP$NETWORK.DAT;1TCPIP$NFSSTAT.EXE;1 TCPIP$NFS_RUN.COM;1 TCPIP$NFS_SERVER.EXE;1TCPIP$NSLOOKUP.EXE;1 TCPIP$NSUPDATE.EXE;1TCPIP$NTP.EXE;1 TCPIP$NTPDATE.EXE;1 TCPIP$NTPDC.EXE;1 TCPIP$NTPQ.EXE;1TCPIP$NTPTRACE.EXE;1 TCPIP$NTP_KEYGEN.EXE;1TCPIP$NTP_RES_CHILD.EXE;1 TCPIP$NTP_RUN.COM;1 TCPIP$OBJ.ADF;1TCPIP$OLB.ADF;1 TCPIP$OS_MIBS.EXE;1 TCPIP$PCNFSD.EXE;1TCPIP$PCNFSD_RUN.COM;1 TCPIP$PEERNAME.EXE;1TCPIP$PING.EXE;1 TCPIP$POP_RUN.COM;1 TCPIP$POP_SERVER.EXE;1TCPIP$POP_V57_ROLLOVER.EXE;1 TCPIP$PORTMAPPER.EXE;1TCPIP$PORTM_RUN.COM;1 TCPIP$PROXY.DAT;1 TCPIP$PWIPACP.EXE;1TCPIP$PWIPSHUT.EXE;1 TCPIP$RCP.EXE;1TCPIP$REXEC_RUN.COM;1 TCPIP$RIPQUERY.EXE;1TCPIP$RLOGIN.EXE;1 TCPIP$RMT.EXE;1 TCPIP$RNDC-CONFGEN.EXE;1TCPIP$RNDC.EXE;1 TCPIP$ROUTE.DAT;1 TCPIP$ROUTE.EXE;1 TCPIP$ROUTED.EXE;1TCPIP$RPCGEN.EXE;1 TCPIP$RPCINFO.EXE;1 TCPIP$RSH.EXE;1 TCPIP$RSH_RUN.COM;1TCPIP$SERVICE.DAT;1 TCPIP$SMTP_RECEIVER.EXE;1TCPIP$SMTP_RECV_RUN.COM;1 TCPIP$SMTP_SFF.EXE;1TCPIP$SMTP_SYMBIONT.EXE;1 TCPIP$SMTP_UTILITIES.EXE;1TCPIP$SMTP_V57_ROLLOVER.EXE;1 TCPIP$SNMPI.EXE;1TCPIP$SNMP_REQUEST.EXE;1 TCPIP$SNMP_RUN.COM;1TCPIP$SNMP_TRAPRCV.EXE;1 TCPIP$SNMP_TRAPSND.EXE;1TCPIP$SSH_RCMD.COM;1 TCPIP$SSH_RUN.COM;1TCPIP$SSH_SCP2.EXE;1 TCPIP$SSH_SFTP-SERVER2.EXE;1TCPIP$SSH_SFTP2.EXE;1 TCPIP$SSH_SSH-ADD2.EXE;1TCPIP$SSH_SSH-AGENT2.EXE;1 TCPIP$SSH_SSH-KEYGEN2.EXE;1TCPIP$SSH_SSH-SIGNER2.EXE;1 TCPIP$SSH_SSH2.EXE;1TCPIP$SSH_SSHD2.EXE;1 TCPIP$STATD.EXE;1TCPIP$STATD_RUN.COM;1 TCPIP$STB.ADF;1
Listing of OpenVMS System Files 327
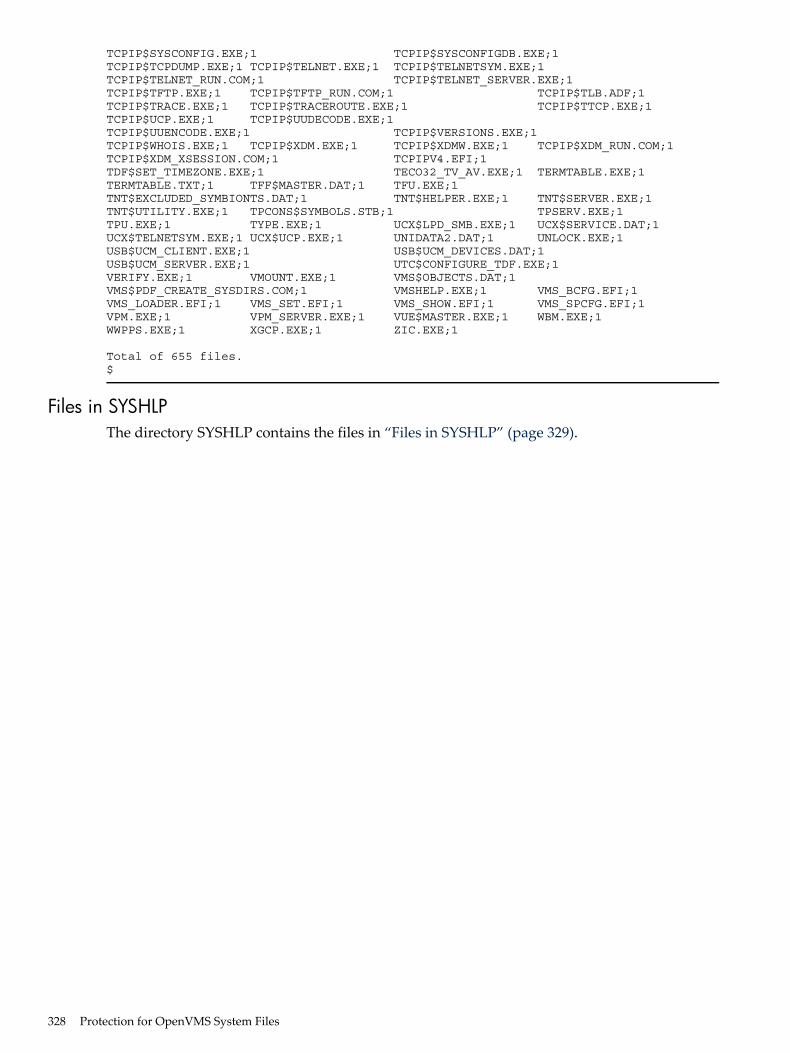
TCPIP$SYSCONFIG.EXE;1 TCPIP$SYSCONFIGDB.EXE;1TCPIP$TCPDUMP.EXE;1 TCPIP$TELNET.EXE;1 TCPIP$TELNETSYM.EXE;1TCPIP$TELNET_RUN.COM;1 TCPIP$TELNET_SERVER.EXE;1TCPIP$TFTP.EXE;1 TCPIP$TFTP_RUN.COM;1 TCPIP$TLB.ADF;1TCPIP$TRACE.EXE;1 TCPIP$TRACEROUTE.EXE;1 TCPIP$TTCP.EXE;1TCPIP$UCP.EXE;1 TCPIP$UUDECODE.EXE;1TCPIP$UUENCODE.EXE;1 TCPIP$VERSIONS.EXE;1TCPIP$WHOIS.EXE;1 TCPIP$XDM.EXE;1 TCPIP$XDMW.EXE;1 TCPIP$XDM_RUN.COM;1TCPIP$XDM_XSESSION.COM;1 TCPIPV4.EFI;1TDF$SET_TIMEZONE.EXE;1 TECO32_TV_AV.EXE;1 TERMTABLE.EXE;1TERMTABLE.TXT;1 TFF$MASTER.DAT;1 TFU.EXE;1TNT$EXCLUDED_SYMBIONTS.DAT;1 TNT$HELPER.EXE;1 TNT$SERVER.EXE;1TNT$UTILITY.EXE;1 TPCONS$SYMBOLS.STB;1 TPSERV.EXE;1TPU.EXE;1 TYPE.EXE;1 UCX$LPD_SMB.EXE;1 UCX$SERVICE.DAT;1UCX$TELNETSYM.EXE;1 UCX$UCP.EXE;1 UNIDATA2.DAT;1 UNLOCK.EXE;1USB$UCM_CLIENT.EXE;1 USB$UCM_DEVICES.DAT;1USB$UCM_SERVER.EXE;1 UTC$CONFIGURE_TDF.EXE;1VERIFY.EXE;1 VMOUNT.EXE;1 VMS$OBJECTS.DAT;1VMS$PDF_CREATE_SYSDIRS.COM;1 VMSHELP.EXE;1 VMS_BCFG.EFI;1VMS_LOADER.EFI;1 VMS_SET.EFI;1 VMS_SHOW.EFI;1 VMS_SPCFG.EFI;1VPM.EXE;1 VPM_SERVER.EXE;1 VUE$MASTER.EXE;1 WBM.EXE;1WWPPS.EXE;1 XGCP.EXE;1 ZIC.EXE;1
Total of 655 files.$
Files in SYSHLPThe directory SYSHLP contains the files in “Files in SYSHLP” (page 329).
328 Protection for OpenVMS System Files
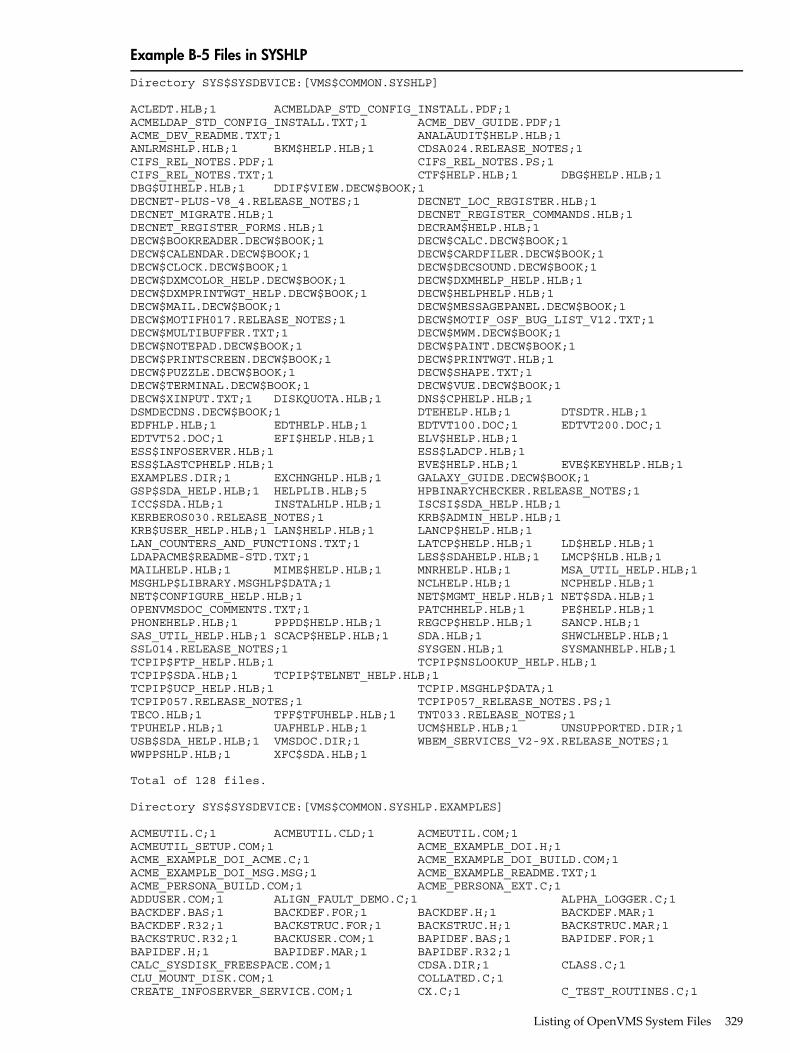
Example B-5 Files in SYSHLP
Directory SYS$SYSDEVICE:[VMS$COMMON.SYSHLP]
ACLEDT.HLB;1 ACMELDAP_STD_CONFIG_INSTALL.PDF;1ACMELDAP_STD_CONFIG_INSTALL.TXT;1 ACME_DEV_GUIDE.PDF;1ACME_DEV_README.TXT;1 ANALAUDIT$HELP.HLB;1ANLRMSHLP.HLB;1 BKM$HELP.HLB;1 CDSA024.RELEASE_NOTES;1CIFS_REL_NOTES.PDF;1 CIFS_REL_NOTES.PS;1CIFS_REL_NOTES.TXT;1 CTF$HELP.HLB;1 DBG$HELP.HLB;1DBG$UIHELP.HLB;1 DDIF$VIEW.DECW$BOOK;1DECNET-PLUS-V8_4.RELEASE_NOTES;1 DECNET_LOC_REGISTER.HLB;1DECNET_MIGRATE.HLB;1 DECNET_REGISTER_COMMANDS.HLB;1DECNET_REGISTER_FORMS.HLB;1 DECRAM$HELP.HLB;1DECW$BOOKREADER.DECW$BOOK;1 DECW$CALC.DECW$BOOK;1DECW$CALENDAR.DECW$BOOK;1 DECW$CARDFILER.DECW$BOOK;1DECW$CLOCK.DECW$BOOK;1 DECW$DECSOUND.DECW$BOOK;1DECW$DXMCOLOR_HELP.DECW$BOOK;1 DECW$DXMHELP_HELP.HLB;1DECW$DXMPRINTWGT_HELP.DECW$BOOK;1 DECW$HELPHELP.HLB;1DECW$MAIL.DECW$BOOK;1 DECW$MESSAGEPANEL.DECW$BOOK;1DECW$MOTIFH017.RELEASE_NOTES;1 DECW$MOTIF_OSF_BUG_LIST_V12.TXT;1DECW$MULTIBUFFER.TXT;1 DECW$MWM.DECW$BOOK;1DECW$NOTEPAD.DECW$BOOK;1 DECW$PAINT.DECW$BOOK;1DECW$PRINTSCREEN.DECW$BOOK;1 DECW$PRINTWGT.HLB;1DECW$PUZZLE.DECW$BOOK;1 DECW$SHAPE.TXT;1DECW$TERMINAL.DECW$BOOK;1 DECW$VUE.DECW$BOOK;1DECW$XINPUT.TXT;1 DISKQUOTA.HLB;1 DNS$CPHELP.HLB;1DSMDECDNS.DECW$BOOK;1 DTEHELP.HLB;1 DTSDTR.HLB;1EDFHLP.HLB;1 EDTHELP.HLB;1 EDTVT100.DOC;1 EDTVT200.DOC;1EDTVT52.DOC;1 EFI$HELP.HLB;1 ELV$HELP.HLB;1ESS$INFOSERVER.HLB;1 ESS$LADCP.HLB;1ESS$LASTCPHELP.HLB;1 EVE$HELP.HLB;1 EVE$KEYHELP.HLB;1EXAMPLES.DIR;1 EXCHNGHLP.HLB;1 GALAXY_GUIDE.DECW$BOOK;1GSP$SDA_HELP.HLB;1 HELPLIB.HLB;5 HPBINARYCHECKER.RELEASE_NOTES;1ICC$SDA.HLB;1 INSTALHLP.HLB;1 ISCSI$SDA_HELP.HLB;1KERBEROS030.RELEASE_NOTES;1 KRB$ADMIN_HELP.HLB;1KRB$USER_HELP.HLB;1 LAN$HELP.HLB;1 LANCP$HELP.HLB;1LAN_COUNTERS_AND_FUNCTIONS.TXT;1 LATCP$HELP.HLB;1 LD$HELP.HLB;1LDAPACME$README-STD.TXT;1 LES$SDAHELP.HLB;1 LMCP$HLB.HLB;1MAILHELP.HLB;1 MIME$HELP.HLB;1 MNRHELP.HLB;1 MSA_UTIL_HELP.HLB;1MSGHLP$LIBRARY.MSGHLP$DATA;1 NCLHELP.HLB;1 NCPHELP.HLB;1NET$CONFIGURE_HELP.HLB;1 NET$MGMT_HELP.HLB;1 NET$SDA.HLB;1OPENVMSDOC_COMMENTS.TXT;1 PATCHHELP.HLB;1 PE$HELP.HLB;1PHONEHELP.HLB;1 PPPD$HELP.HLB;1 REGCP$HELP.HLB;1 SANCP.HLB;1SAS_UTIL_HELP.HLB;1 SCACP$HELP.HLB;1 SDA.HLB;1 SHWCLHELP.HLB;1SSL014.RELEASE_NOTES;1 SYSGEN.HLB;1 SYSMANHELP.HLB;1TCPIP$FTP_HELP.HLB;1 TCPIP$NSLOOKUP_HELP.HLB;1TCPIP$SDA.HLB;1 TCPIP$TELNET_HELP.HLB;1TCPIP$UCP_HELP.HLB;1 TCPIP.MSGHLP$DATA;1TCPIP057.RELEASE_NOTES;1 TCPIP057_RELEASE_NOTES.PS;1TECO.HLB;1 TFF$TFUHELP.HLB;1 TNT033.RELEASE_NOTES;1TPUHELP.HLB;1 UAFHELP.HLB;1 UCM$HELP.HLB;1 UNSUPPORTED.DIR;1USB$SDA_HELP.HLB;1 VMSDOC.DIR;1 WBEM_SERVICES_V2-9X.RELEASE_NOTES;1WWPPSHLP.HLB;1 XFC$SDA.HLB;1
Total of 128 files.
Directory SYS$SYSDEVICE:[VMS$COMMON.SYSHLP.EXAMPLES]
ACMEUTIL.C;1 ACMEUTIL.CLD;1 ACMEUTIL.COM;1ACMEUTIL_SETUP.COM;1 ACME_EXAMPLE_DOI.H;1ACME_EXAMPLE_DOI_ACME.C;1 ACME_EXAMPLE_DOI_BUILD.COM;1ACME_EXAMPLE_DOI_MSG.MSG;1 ACME_EXAMPLE_README.TXT;1ACME_PERSONA_BUILD.COM;1 ACME_PERSONA_EXT.C;1ADDUSER.COM;1 ALIGN_FAULT_DEMO.C;1 ALPHA_LOGGER.C;1BACKDEF.BAS;1 BACKDEF.FOR;1 BACKDEF.H;1 BACKDEF.MAR;1BACKDEF.R32;1 BACKSTRUC.FOR;1 BACKSTRUC.H;1 BACKSTRUC.MAR;1BACKSTRUC.R32;1 BACKUSER.COM;1 BAPIDEF.BAS;1 BAPIDEF.FOR;1BAPIDEF.H;1 BAPIDEF.MAR;1 BAPIDEF.R32;1CALC_SYSDISK_FREESPACE.COM;1 CDSA.DIR;1 CLASS.C;1CLU_MOUNT_DISK.COM;1 COLLATED.C;1CREATE_INFOSERVER_SERVICE.COM;1 CX.C;1 C_TEST_ROUTINES.C;1
Listing of OpenVMS System Files 329
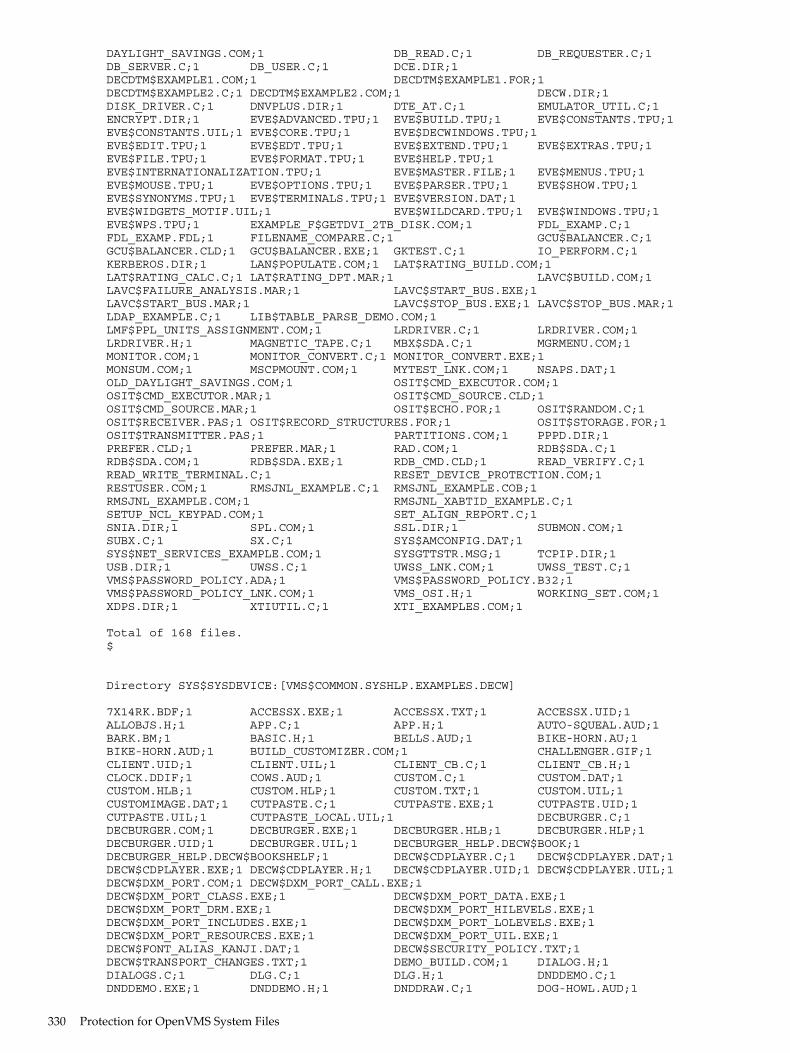
DAYLIGHT_SAVINGS.COM;1 DB_READ.C;1 DB_REQUESTER.C;1DB_SERVER.C;1 DB_USER.C;1 DCE.DIR;1DECDTM$EXAMPLE1.COM;1 DECDTM$EXAMPLE1.FOR;1DECDTM$EXAMPLE2.C;1 DECDTM$EXAMPLE2.COM;1 DECW.DIR;1DISK_DRIVER.C;1 DNVPLUS.DIR;1 DTE_AT.C;1 EMULATOR_UTIL.C;1ENCRYPT.DIR;1 EVE$ADVANCED.TPU;1 EVE$BUILD.TPU;1 EVE$CONSTANTS.TPU;1EVE$CONSTANTS.UIL;1 EVE$CORE.TPU;1 EVE$DECWINDOWS.TPU;1EVE$EDIT.TPU;1 EVE$EDT.TPU;1 EVE$EXTEND.TPU;1 EVE$EXTRAS.TPU;1EVE$FILE.TPU;1 EVE$FORMAT.TPU;1 EVE$HELP.TPU;1EVE$INTERNATIONALIZATION.TPU;1 EVE$MASTER.FILE;1 EVE$MENUS.TPU;1EVE$MOUSE.TPU;1 EVE$OPTIONS.TPU;1 EVE$PARSER.TPU;1 EVE$SHOW.TPU;1EVE$SYNONYMS.TPU;1 EVE$TERMINALS.TPU;1 EVE$VERSION.DAT;1EVE$WIDGETS_MOTIF.UIL;1 EVE$WILDCARD.TPU;1 EVE$WINDOWS.TPU;1EVE$WPS.TPU;1 EXAMPLE_F$GETDVI_2TB_DISK.COM;1 FDL_EXAMP.C;1FDL_EXAMP.FDL;1 FILENAME_COMPARE.C;1 GCU$BALANCER.C;1GCU$BALANCER.CLD;1 GCU$BALANCER.EXE;1 GKTEST.C;1 IO_PERFORM.C;1KERBEROS.DIR;1 LAN$POPULATE.COM;1 LAT$RATING_BUILD.COM;1LAT$RATING_CALC.C;1 LAT$RATING_DPT.MAR;1 LAVC$BUILD.COM;1LAVC$FAILURE_ANALYSIS.MAR;1 LAVC$START_BUS.EXE;1LAVC$START_BUS.MAR;1 LAVC$STOP_BUS.EXE;1 LAVC$STOP_BUS.MAR;1LDAP_EXAMPLE.C;1 LIB$TABLE_PARSE_DEMO.COM;1LMF$PPL_UNITS_ASSIGNMENT.COM;1 LRDRIVER.C;1 LRDRIVER.COM;1LRDRIVER.H;1 MAGNETIC_TAPE.C;1 MBX$SDA.C;1 MGRMENU.COM;1MONITOR.COM;1 MONITOR_CONVERT.C;1 MONITOR_CONVERT.EXE;1MONSUM.COM;1 MSCPMOUNT.COM;1 MYTEST_LNK.COM;1 NSAPS.DAT;1OLD_DAYLIGHT_SAVINGS.COM;1 OSIT$CMD_EXECUTOR.COM;1OSIT$CMD_EXECUTOR.MAR;1 OSIT$CMD_SOURCE.CLD;1OSIT$CMD_SOURCE.MAR;1 OSIT$ECHO.FOR;1 OSIT$RANDOM.C;1OSIT$RECEIVER.PAS;1 OSIT$RECORD_STRUCTURES.FOR;1 OSIT$STORAGE.FOR;1OSIT$TRANSMITTER.PAS;1 PARTITIONS.COM;1 PPPD.DIR;1PREFER.CLD;1 PREFER.MAR;1 RAD.COM;1 RDB$SDA.C;1RDB$SDA.COM;1 RDB$SDA.EXE;1 RDB_CMD.CLD;1 READ_VERIFY.C;1READ_WRITE_TERMINAL.C;1 RESET_DEVICE_PROTECTION.COM;1RESTUSER.COM;1 RMSJNL_EXAMPLE.C;1 RMSJNL_EXAMPLE.COB;1RMSJNL_EXAMPLE.COM;1 RMSJNL_XABTID_EXAMPLE.C;1SETUP_NCL_KEYPAD.COM;1 SET_ALIGN_REPORT.C;1SNIA.DIR;1 SPL.COM;1 SSL.DIR;1 SUBMON.COM;1SUBX.C;1 SX.C;1 SYS$AMCONFIG.DAT;1SYS$NET_SERVICES_EXAMPLE.COM;1 SYSGTTSTR.MSG;1 TCPIP.DIR;1USB.DIR;1 UWSS.C;1 UWSS_LNK.COM;1 UWSS_TEST.C;1VMS$PASSWORD_POLICY.ADA;1 VMS$PASSWORD_POLICY.B32;1VMS$PASSWORD_POLICY_LNK.COM;1 VMS_OSI.H;1 WORKING_SET.COM;1XDPS.DIR;1 XTIUTIL.C;1 XTI_EXAMPLES.COM;1
Total of 168 files.$
Directory SYS$SYSDEVICE:[VMS$COMMON.SYSHLP.EXAMPLES.DECW]
7X14RK.BDF;1 ACCESSX.EXE;1 ACCESSX.TXT;1 ACCESSX.UID;1ALLOBJS.H;1 APP.C;1 APP.H;1 AUTO-SQUEAL.AUD;1BARK.BM;1 BASIC.H;1 BELLS.AUD;1 BIKE-HORN.AU;1BIKE-HORN.AUD;1 BUILD_CUSTOMIZER.COM;1 CHALLENGER.GIF;1CLIENT.UID;1 CLIENT.UIL;1 CLIENT_CB.C;1 CLIENT_CB.H;1CLOCK.DDIF;1 COWS.AUD;1 CUSTOM.C;1 CUSTOM.DAT;1CUSTOM.HLB;1 CUSTOM.HLP;1 CUSTOM.TXT;1 CUSTOM.UIL;1CUSTOMIMAGE.DAT;1 CUTPASTE.C;1 CUTPASTE.EXE;1 CUTPASTE.UID;1CUTPASTE.UIL;1 CUTPASTE_LOCAL.UIL;1 DECBURGER.C;1DECBURGER.COM;1 DECBURGER.EXE;1 DECBURGER.HLB;1 DECBURGER.HLP;1DECBURGER.UID;1 DECBURGER.UIL;1 DECBURGER_HELP.DECW$BOOK;1DECBURGER_HELP.DECW$BOOKSHELF;1 DECW$CDPLAYER.C;1 DECW$CDPLAYER.DAT;1DECW$CDPLAYER.EXE;1 DECW$CDPLAYER.H;1 DECW$CDPLAYER.UID;1 DECW$CDPLAYER.UIL;1DECW$DXM_PORT.COM;1 DECW$DXM_PORT_CALL.EXE;1DECW$DXM_PORT_CLASS.EXE;1 DECW$DXM_PORT_DATA.EXE;1DECW$DXM_PORT_DRM.EXE;1 DECW$DXM_PORT_HILEVELS.EXE;1DECW$DXM_PORT_INCLUDES.EXE;1 DECW$DXM_PORT_LOLEVELS.EXE;1DECW$DXM_PORT_RESOURCES.EXE;1 DECW$DXM_PORT_UIL.EXE;1DECW$FONT_ALIAS_KANJI.DAT;1 DECW$SECURITY_POLICY.TXT;1DECW$TRANSPORT_CHANGES.TXT;1 DEMO_BUILD.COM;1 DIALOG.H;1DIALOGS.C;1 DLG.C;1 DLG.H;1 DNDDEMO.C;1DNDDEMO.EXE;1 DNDDEMO.H;1 DNDDRAW.C;1 DOG-HOWL.AUD;1
330 Protection for OpenVMS System Files
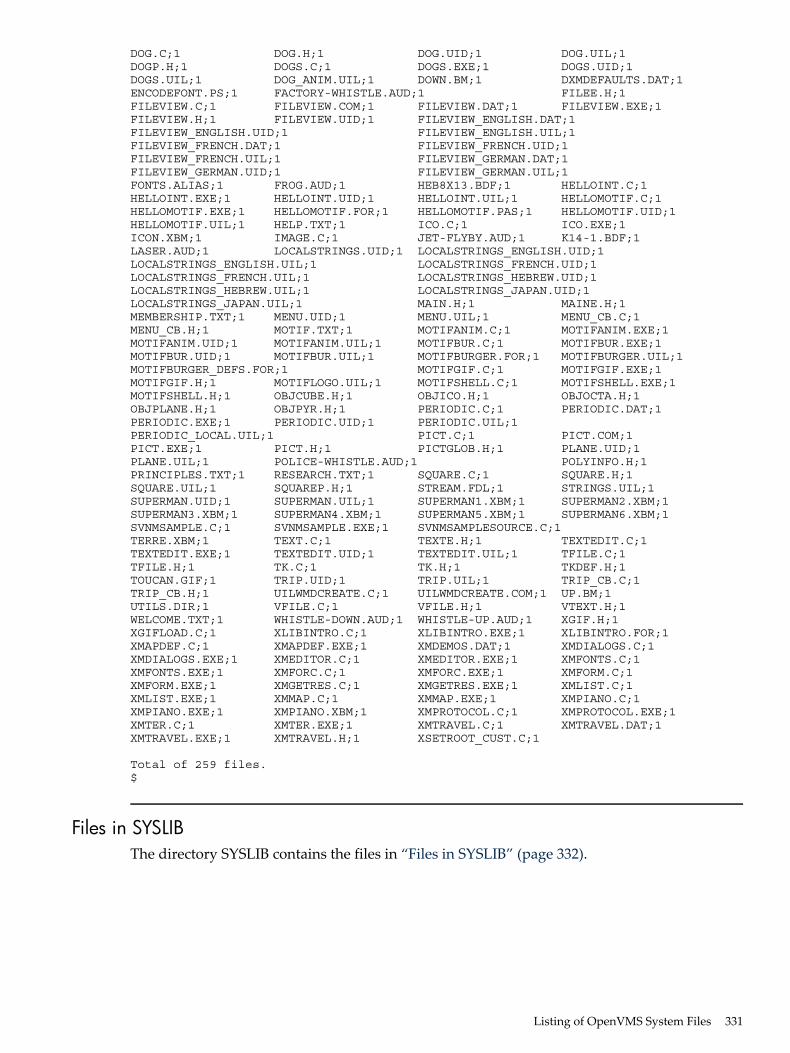
DOG.C;1 DOG.H;1 DOG.UID;1 DOG.UIL;1DOGP.H;1 DOGS.C;1 DOGS.EXE;1 DOGS.UID;1DOGS.UIL;1 DOG_ANIM.UIL;1 DOWN.BM;1 DXMDEFAULTS.DAT;1ENCODEFONT.PS;1 FACTORY-WHISTLE.AUD;1 FILEE.H;1FILEVIEW.C;1 FILEVIEW.COM;1 FILEVIEW.DAT;1 FILEVIEW.EXE;1FILEVIEW.H;1 FILEVIEW.UID;1 FILEVIEW_ENGLISH.DAT;1FILEVIEW_ENGLISH.UID;1 FILEVIEW_ENGLISH.UIL;1FILEVIEW_FRENCH.DAT;1 FILEVIEW_FRENCH.UID;1FILEVIEW_FRENCH.UIL;1 FILEVIEW_GERMAN.DAT;1FILEVIEW_GERMAN.UID;1 FILEVIEW_GERMAN.UIL;1FONTS.ALIAS;1 FROG.AUD;1 HEB8X13.BDF;1 HELLOINT.C;1HELLOINT.EXE;1 HELLOINT.UID;1 HELLOINT.UIL;1 HELLOMOTIF.C;1HELLOMOTIF.EXE;1 HELLOMOTIF.FOR;1 HELLOMOTIF.PAS;1 HELLOMOTIF.UID;1HELLOMOTIF.UIL;1 HELP.TXT;1 ICO.C;1 ICO.EXE;1ICON.XBM;1 IMAGE.C;1 JET-FLYBY.AUD;1 K14-1.BDF;1LASER.AUD;1 LOCALSTRINGS.UID;1 LOCALSTRINGS_ENGLISH.UID;1LOCALSTRINGS_ENGLISH.UIL;1 LOCALSTRINGS_FRENCH.UID;1LOCALSTRINGS_FRENCH.UIL;1 LOCALSTRINGS_HEBREW.UID;1LOCALSTRINGS_HEBREW.UIL;1 LOCALSTRINGS_JAPAN.UID;1LOCALSTRINGS_JAPAN.UIL;1 MAIN.H;1 MAINE.H;1MEMBERSHIP.TXT;1 MENU.UID;1 MENU.UIL;1 MENU_CB.C;1MENU_CB.H;1 MOTIF.TXT;1 MOTIFANIM.C;1 MOTIFANIM.EXE;1MOTIFANIM.UID;1 MOTIFANIM.UIL;1 MOTIFBUR.C;1 MOTIFBUR.EXE;1MOTIFBUR.UID;1 MOTIFBUR.UIL;1 MOTIFBURGER.FOR;1 MOTIFBURGER.UIL;1MOTIFBURGER_DEFS.FOR;1 MOTIFGIF.C;1 MOTIFGIF.EXE;1MOTIFGIF.H;1 MOTIFLOGO.UIL;1 MOTIFSHELL.C;1 MOTIFSHELL.EXE;1MOTIFSHELL.H;1 OBJCUBE.H;1 OBJICO.H;1 OBJOCTA.H;1OBJPLANE.H;1 OBJPYR.H;1 PERIODIC.C;1 PERIODIC.DAT;1PERIODIC.EXE;1 PERIODIC.UID;1 PERIODIC.UIL;1PERIODIC_LOCAL.UIL;1 PICT.C;1 PICT.COM;1PICT.EXE;1 PICT.H;1 PICTGLOB.H;1 PLANE.UID;1PLANE.UIL;1 POLICE-WHISTLE.AUD;1 POLYINFO.H;1PRINCIPLES.TXT;1 RESEARCH.TXT;1 SQUARE.C;1 SQUARE.H;1SQUARE.UIL;1 SQUAREP.H;1 STREAM.FDL;1 STRINGS.UIL;1SUPERMAN.UID;1 SUPERMAN.UIL;1 SUPERMAN1.XBM;1 SUPERMAN2.XBM;1SUPERMAN3.XBM;1 SUPERMAN4.XBM;1 SUPERMAN5.XBM;1 SUPERMAN6.XBM;1SVNMSAMPLE.C;1 SVNMSAMPLE.EXE;1 SVNMSAMPLESOURCE.C;1TERRE.XBM;1 TEXT.C;1 TEXTE.H;1 TEXTEDIT.C;1TEXTEDIT.EXE;1 TEXTEDIT.UID;1 TEXTEDIT.UIL;1 TFILE.C;1TFILE.H;1 TK.C;1 TK.H;1 TKDEF.H;1TOUCAN.GIF;1 TRIP.UID;1 TRIP.UIL;1 TRIP_CB.C;1TRIP_CB.H;1 UILWMDCREATE.C;1 UILWMDCREATE.COM;1 UP.BM;1UTILS.DIR;1 VFILE.C;1 VFILE.H;1 VTEXT.H;1WELCOME.TXT;1 WHISTLE-DOWN.AUD;1 WHISTLE-UP.AUD;1 XGIF.H;1XGIFLOAD.C;1 XLIBINTRO.C;1 XLIBINTRO.EXE;1 XLIBINTRO.FOR;1XMAPDEF.C;1 XMAPDEF.EXE;1 XMDEMOS.DAT;1 XMDIALOGS.C;1XMDIALOGS.EXE;1 XMEDITOR.C;1 XMEDITOR.EXE;1 XMFONTS.C;1XMFONTS.EXE;1 XMFORC.C;1 XMFORC.EXE;1 XMFORM.C;1XMFORM.EXE;1 XMGETRES.C;1 XMGETRES.EXE;1 XMLIST.C;1XMLIST.EXE;1 XMMAP.C;1 XMMAP.EXE;1 XMPIANO.C;1XMPIANO.EXE;1 XMPIANO.XBM;1 XMPROTOCOL.C;1 XMPROTOCOL.EXE;1XMTER.C;1 XMTER.EXE;1 XMTRAVEL.C;1 XMTRAVEL.DAT;1XMTRAVEL.EXE;1 XMTRAVEL.H;1 XSETROOT_CUST.C;1
Total of 259 files.$
Files in SYSLIBThe directory SYSLIB contains the files in “Files in SYSLIB” (page 332).
Listing of OpenVMS System Files 331
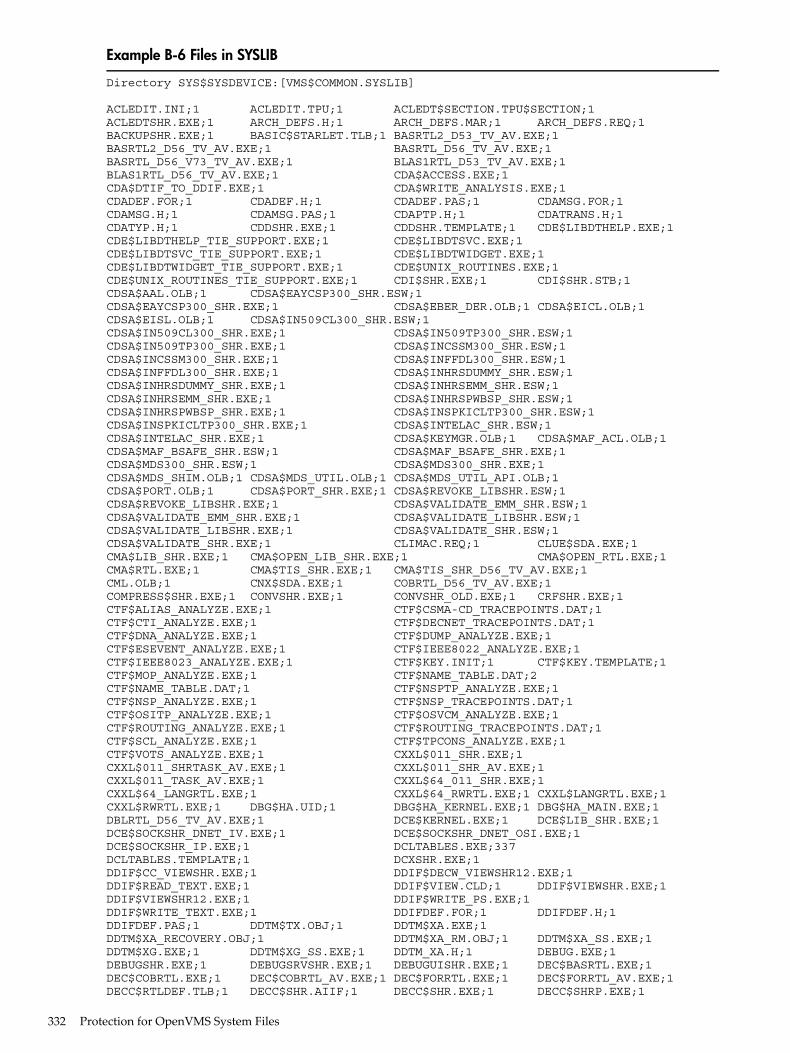
Example B-6 Files in SYSLIB
Directory SYS$SYSDEVICE:[VMS$COMMON.SYSLIB]
ACLEDIT.INI;1 ACLEDIT.TPU;1 ACLEDT$SECTION.TPU$SECTION;1ACLEDTSHR.EXE;1 ARCH_DEFS.H;1 ARCH_DEFS.MAR;1 ARCH_DEFS.REQ;1BACKUPSHR.EXE;1 BASIC$STARLET.TLB;1 BASRTL2_D53_TV_AV.EXE;1BASRTL2_D56_TV_AV.EXE;1 BASRTL_D56_TV_AV.EXE;1BASRTL_D56_V73_TV_AV.EXE;1 BLAS1RTL_D53_TV_AV.EXE;1BLAS1RTL_D56_TV_AV.EXE;1 CDA$ACCESS.EXE;1CDA$DTIF_TO_DDIF.EXE;1 CDA$WRITE_ANALYSIS.EXE;1CDADEF.FOR;1 CDADEF.H;1 CDADEF.PAS;1 CDAMSG.FOR;1CDAMSG.H;1 CDAMSG.PAS;1 CDAPTP.H;1 CDATRANS.H;1CDATYP.H;1 CDDSHR.EXE;1 CDDSHR.TEMPLATE;1 CDE$LIBDTHELP.EXE;1CDE$LIBDTHELP_TIE_SUPPORT.EXE;1 CDE$LIBDTSVC.EXE;1CDE$LIBDTSVC_TIE_SUPPORT.EXE;1 CDE$LIBDTWIDGET.EXE;1CDE$LIBDTWIDGET_TIE_SUPPORT.EXE;1 CDE$UNIX_ROUTINES.EXE;1CDE$UNIX_ROUTINES_TIE_SUPPORT.EXE;1 CDI$SHR.EXE;1 CDI$SHR.STB;1CDSA$AAL.OLB;1 CDSA$EAYCSP300_SHR.ESW;1CDSA$EAYCSP300_SHR.EXE;1 CDSA$EBER_DER.OLB;1 CDSA$EICL.OLB;1CDSA$EISL.OLB;1 CDSA$IN509CL300_SHR.ESW;1CDSA$IN509CL300_SHR.EXE;1 CDSA$IN509TP300_SHR.ESW;1CDSA$IN509TP300_SHR.EXE;1 CDSA$INCSSM300_SHR.ESW;1CDSA$INCSSM300_SHR.EXE;1 CDSA$INFFDL300_SHR.ESW;1CDSA$INFFDL300_SHR.EXE;1 CDSA$INHRSDUMMY_SHR.ESW;1CDSA$INHRSDUMMY_SHR.EXE;1 CDSA$INHRSEMM_SHR.ESW;1CDSA$INHRSEMM_SHR.EXE;1 CDSA$INHRSPWBSP_SHR.ESW;1CDSA$INHRSPWBSP_SHR.EXE;1 CDSA$INSPKICLTP300_SHR.ESW;1CDSA$INSPKICLTP300_SHR.EXE;1 CDSA$INTELAC_SHR.ESW;1CDSA$INTELAC_SHR.EXE;1 CDSA$KEYMGR.OLB;1 CDSA$MAF_ACL.OLB;1CDSA$MAF_BSAFE_SHR.ESW;1 CDSA$MAF_BSAFE_SHR.EXE;1CDSA$MDS300_SHR.ESW;1 CDSA$MDS300_SHR.EXE;1CDSA$MDS_SHIM.OLB;1 CDSA$MDS_UTIL.OLB;1 CDSA$MDS_UTIL_API.OLB;1CDSA$PORT.OLB;1 CDSA$PORT_SHR.EXE;1 CDSA$REVOKE_LIBSHR.ESW;1CDSA$REVOKE_LIBSHR.EXE;1 CDSA$VALIDATE_EMM_SHR.ESW;1CDSA$VALIDATE_EMM_SHR.EXE;1 CDSA$VALIDATE_LIBSHR.ESW;1CDSA$VALIDATE_LIBSHR.EXE;1 CDSA$VALIDATE_SHR.ESW;1CDSA$VALIDATE_SHR.EXE;1 CLIMAC.REQ;1 CLUE$SDA.EXE;1CMA$LIB_SHR.EXE;1 CMA$OPEN_LIB_SHR.EXE;1 CMA$OPEN_RTL.EXE;1CMA$RTL.EXE;1 CMA$TIS_SHR.EXE;1 CMA$TIS_SHR_D56_TV_AV.EXE;1CML.OLB;1 CNX$SDA.EXE;1 COBRTL_D56_TV_AV.EXE;1COMPRESS$SHR.EXE;1 CONVSHR.EXE;1 CONVSHR_OLD.EXE;1 CRFSHR.EXE;1CTF$ALIAS_ANALYZE.EXE;1 CTF$CSMA-CD_TRACEPOINTS.DAT;1CTF$CTI_ANALYZE.EXE;1 CTF$DECNET_TRACEPOINTS.DAT;1CTF$DNA_ANALYZE.EXE;1 CTF$DUMP_ANALYZE.EXE;1CTF$ESEVENT_ANALYZE.EXE;1 CTF$IEEE8022_ANALYZE.EXE;1CTF$IEEE8023_ANALYZE.EXE;1 CTF$KEY.INIT;1 CTF$KEY.TEMPLATE;1CTF$MOP_ANALYZE.EXE;1 CTF$NAME_TABLE.DAT;2CTF$NAME_TABLE.DAT;1 CTF$NSPTP_ANALYZE.EXE;1CTF$NSP_ANALYZE.EXE;1 CTF$NSP_TRACEPOINTS.DAT;1CTF$OSITP_ANALYZE.EXE;1 CTF$OSVCM_ANALYZE.EXE;1CTF$ROUTING_ANALYZE.EXE;1 CTF$ROUTING_TRACEPOINTS.DAT;1CTF$SCL_ANALYZE.EXE;1 CTF$TPCONS_ANALYZE.EXE;1CTF$VOTS_ANALYZE.EXE;1 CXXL$011_SHR.EXE;1CXXL$011_SHRTASK_AV.EXE;1 CXXL$011_SHR_AV.EXE;1CXXL$011_TASK_AV.EXE;1 CXXL$64_011_SHR.EXE;1CXXL$64_LANGRTL.EXE;1 CXXL$64_RWRTL.EXE;1 CXXL$LANGRTL.EXE;1CXXL$RWRTL.EXE;1 DBG$HA.UID;1 DBG$HA_KERNEL.EXE;1 DBG$HA_MAIN.EXE;1DBLRTL_D56_TV_AV.EXE;1 DCE$KERNEL.EXE;1 DCE$LIB_SHR.EXE;1DCE$SOCKSHR_DNET_IV.EXE;1 DCE$SOCKSHR_DNET_OSI.EXE;1DCE$SOCKSHR_IP.EXE;1 DCLTABLES.EXE;337DCLTABLES.TEMPLATE;1 DCXSHR.EXE;1DDIF$CC_VIEWSHR.EXE;1 DDIF$DECW_VIEWSHR12.EXE;1DDIF$READ_TEXT.EXE;1 DDIF$VIEW.CLD;1 DDIF$VIEWSHR.EXE;1DDIF$VIEWSHR12.EXE;1 DDIF$WRITE_PS.EXE;1DDIF$WRITE_TEXT.EXE;1 DDIFDEF.FOR;1 DDIFDEF.H;1DDIFDEF.PAS;1 DDTM$TX.OBJ;1 DDTM$XA.EXE;1DDTM$XA_RECOVERY.OBJ;1 DDTM$XA_RM.OBJ;1 DDTM$XA_SS.EXE;1DDTM$XG.EXE;1 DDTM$XG_SS.EXE;1 DDTM_XA.H;1 DEBUG.EXE;1DEBUGSHR.EXE;1 DEBUGSRVSHR.EXE;1 DEBUGUISHR.EXE;1 DEC$BASRTL.EXE;1DEC$COBRTL.EXE;1 DEC$COBRTL_AV.EXE;1 DEC$FORRTL.EXE;1 DEC$FORRTL_AV.EXE;1DECC$RTLDEF.TLB;1 DECC$SHR.AIIF;1 DECC$SHR.EXE;1 DECC$SHRP.EXE;1
332 Protection for OpenVMS System Files
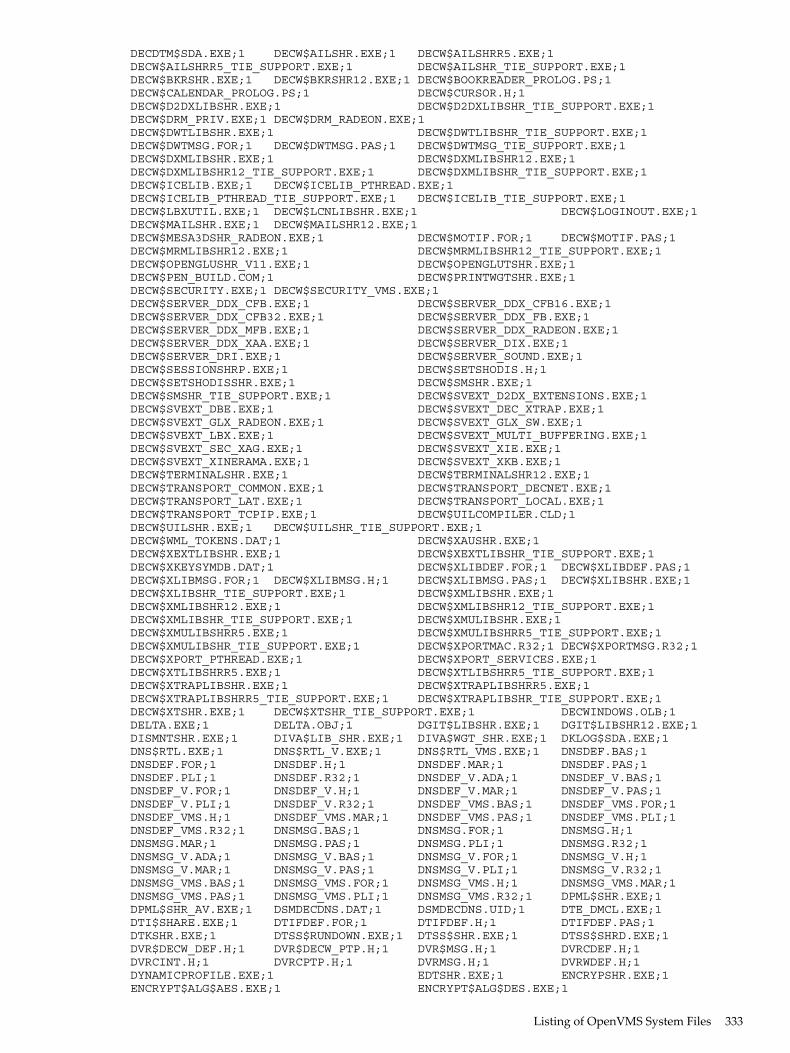
DECDTM$SDA.EXE;1 DECW$AILSHR.EXE;1 DECW$AILSHRR5.EXE;1DECW$AILSHRR5_TIE_SUPPORT.EXE;1 DECW$AILSHR_TIE_SUPPORT.EXE;1DECW$BKRSHR.EXE;1 DECW$BKRSHR12.EXE;1 DECW$BOOKREADER_PROLOG.PS;1DECW$CALENDAR_PROLOG.PS;1 DECW$CURSOR.H;1DECW$D2DXLIBSHR.EXE;1 DECW$D2DXLIBSHR_TIE_SUPPORT.EXE;1DECW$DRM_PRIV.EXE;1 DECW$DRM_RADEON.EXE;1DECW$DWTLIBSHR.EXE;1 DECW$DWTLIBSHR_TIE_SUPPORT.EXE;1DECW$DWTMSG.FOR;1 DECW$DWTMSG.PAS;1 DECW$DWTMSG_TIE_SUPPORT.EXE;1DECW$DXMLIBSHR.EXE;1 DECW$DXMLIBSHR12.EXE;1DECW$DXMLIBSHR12_TIE_SUPPORT.EXE;1 DECW$DXMLIBSHR_TIE_SUPPORT.EXE;1DECW$ICELIB.EXE;1 DECW$ICELIB_PTHREAD.EXE;1DECW$ICELIB_PTHREAD_TIE_SUPPORT.EXE;1 DECW$ICELIB_TIE_SUPPORT.EXE;1DECW$LBXUTIL.EXE;1 DECW$LCNLIBSHR.EXE;1 DECW$LOGINOUT.EXE;1DECW$MAILSHR.EXE;1 DECW$MAILSHR12.EXE;1DECW$MESA3DSHR_RADEON.EXE;1 DECW$MOTIF.FOR;1 DECW$MOTIF.PAS;1DECW$MRMLIBSHR12.EXE;1 DECW$MRMLIBSHR12_TIE_SUPPORT.EXE;1DECW$OPENGLUSHR_V11.EXE;1 DECW$OPENGLUTSHR.EXE;1DECW$PEN_BUILD.COM;1 DECW$PRINTWGTSHR.EXE;1DECW$SECURITY.EXE;1 DECW$SECURITY_VMS.EXE;1DECW$SERVER_DDX_CFB.EXE;1 DECW$SERVER_DDX_CFB16.EXE;1DECW$SERVER_DDX_CFB32.EXE;1 DECW$SERVER_DDX_FB.EXE;1DECW$SERVER_DDX_MFB.EXE;1 DECW$SERVER_DDX_RADEON.EXE;1DECW$SERVER_DDX_XAA.EXE;1 DECW$SERVER_DIX.EXE;1DECW$SERVER_DRI.EXE;1 DECW$SERVER_SOUND.EXE;1DECW$SESSIONSHRP.EXE;1 DECW$SETSHODIS.H;1DECW$SETSHODISSHR.EXE;1 DECW$SMSHR.EXE;1DECW$SMSHR_TIE_SUPPORT.EXE;1 DECW$SVEXT_D2DX_EXTENSIONS.EXE;1DECW$SVEXT_DBE.EXE;1 DECW$SVEXT_DEC_XTRAP.EXE;1DECW$SVEXT_GLX_RADEON.EXE;1 DECW$SVEXT_GLX_SW.EXE;1DECW$SVEXT_LBX.EXE;1 DECW$SVEXT_MULTI_BUFFERING.EXE;1DECW$SVEXT_SEC_XAG.EXE;1 DECW$SVEXT_XIE.EXE;1DECW$SVEXT_XINERAMA.EXE;1 DECW$SVEXT_XKB.EXE;1DECW$TERMINALSHR.EXE;1 DECW$TERMINALSHR12.EXE;1DECW$TRANSPORT_COMMON.EXE;1 DECW$TRANSPORT_DECNET.EXE;1DECW$TRANSPORT_LAT.EXE;1 DECW$TRANSPORT_LOCAL.EXE;1DECW$TRANSPORT_TCPIP.EXE;1 DECW$UILCOMPILER.CLD;1DECW$UILSHR.EXE;1 DECW$UILSHR_TIE_SUPPORT.EXE;1DECW$WML_TOKENS.DAT;1 DECW$XAUSHR.EXE;1DECW$XEXTLIBSHR.EXE;1 DECW$XEXTLIBSHR_TIE_SUPPORT.EXE;1DECW$XKEYSYMDB.DAT;1 DECW$XLIBDEF.FOR;1 DECW$XLIBDEF.PAS;1DECW$XLIBMSG.FOR;1 DECW$XLIBMSG.H;1 DECW$XLIBMSG.PAS;1 DECW$XLIBSHR.EXE;1DECW$XLIBSHR_TIE_SUPPORT.EXE;1 DECW$XMLIBSHR.EXE;1DECW$XMLIBSHR12.EXE;1 DECW$XMLIBSHR12_TIE_SUPPORT.EXE;1DECW$XMLIBSHR_TIE_SUPPORT.EXE;1 DECW$XMULIBSHR.EXE;1DECW$XMULIBSHRR5.EXE;1 DECW$XMULIBSHRR5_TIE_SUPPORT.EXE;1DECW$XMULIBSHR_TIE_SUPPORT.EXE;1 DECW$XPORTMAC.R32;1 DECW$XPORTMSG.R32;1DECW$XPORT_PTHREAD.EXE;1 DECW$XPORT_SERVICES.EXE;1DECW$XTLIBSHRR5.EXE;1 DECW$XTLIBSHRR5_TIE_SUPPORT.EXE;1DECW$XTRAPLIBSHR.EXE;1 DECW$XTRAPLIBSHRR5.EXE;1DECW$XTRAPLIBSHRR5_TIE_SUPPORT.EXE;1 DECW$XTRAPLIBSHR_TIE_SUPPORT.EXE;1DECW$XTSHR.EXE;1 DECW$XTSHR_TIE_SUPPORT.EXE;1 DECWINDOWS.OLB;1DELTA.EXE;1 DELTA.OBJ;1 DGIT$LIBSHR.EXE;1 DGIT$LIBSHR12.EXE;1DISMNTSHR.EXE;1 DIVA$LIB_SHR.EXE;1 DIVA$WGT_SHR.EXE;1 DKLOG$SDA.EXE;1DNS$RTL.EXE;1 DNS$RTL_V.EXE;1 DNS$RTL_VMS.EXE;1 DNSDEF.BAS;1DNSDEF.FOR;1 DNSDEF.H;1 DNSDEF.MAR;1 DNSDEF.PAS;1DNSDEF.PLI;1 DNSDEF.R32;1 DNSDEF_V.ADA;1 DNSDEF_V.BAS;1DNSDEF_V.FOR;1 DNSDEF_V.H;1 DNSDEF_V.MAR;1 DNSDEF_V.PAS;1DNSDEF_V.PLI;1 DNSDEF_V.R32;1 DNSDEF_VMS.BAS;1 DNSDEF_VMS.FOR;1DNSDEF_VMS.H;1 DNSDEF_VMS.MAR;1 DNSDEF_VMS.PAS;1 DNSDEF_VMS.PLI;1DNSDEF_VMS.R32;1 DNSMSG.BAS;1 DNSMSG.FOR;1 DNSMSG.H;1DNSMSG.MAR;1 DNSMSG.PAS;1 DNSMSG.PLI;1 DNSMSG.R32;1DNSMSG_V.ADA;1 DNSMSG_V.BAS;1 DNSMSG_V.FOR;1 DNSMSG_V.H;1DNSMSG_V.MAR;1 DNSMSG_V.PAS;1 DNSMSG_V.PLI;1 DNSMSG_V.R32;1DNSMSG_VMS.BAS;1 DNSMSG_VMS.FOR;1 DNSMSG_VMS.H;1 DNSMSG_VMS.MAR;1DNSMSG_VMS.PAS;1 DNSMSG_VMS.PLI;1 DNSMSG_VMS.R32;1 DPML$SHR.EXE;1DPML$SHR_AV.EXE;1 DSMDECDNS.DAT;1 DSMDECDNS.UID;1 DTE_DMCL.EXE;1DTI$SHARE.EXE;1 DTIFDEF.FOR;1 DTIFDEF.H;1 DTIFDEF.PAS;1DTKSHR.EXE;1 DTSS$RUNDOWN.EXE;1 DTSS$SHR.EXE;1 DTSS$SHRD.EXE;1DVR$DECW_DEF.H;1 DVR$DECW_PTP.H;1 DVR$MSG.H;1 DVRCDEF.H;1DVRCINT.H;1 DVRCPTP.H;1 DVRMSG.H;1 DVRWDEF.H;1DYNAMICPROFILE.EXE;1 EDTSHR.EXE;1 ENCRYPSHR.EXE;1ENCRYPT$ALG$AES.EXE;1 ENCRYPT$ALG$DES.EXE;1
Listing of OpenVMS System Files 333
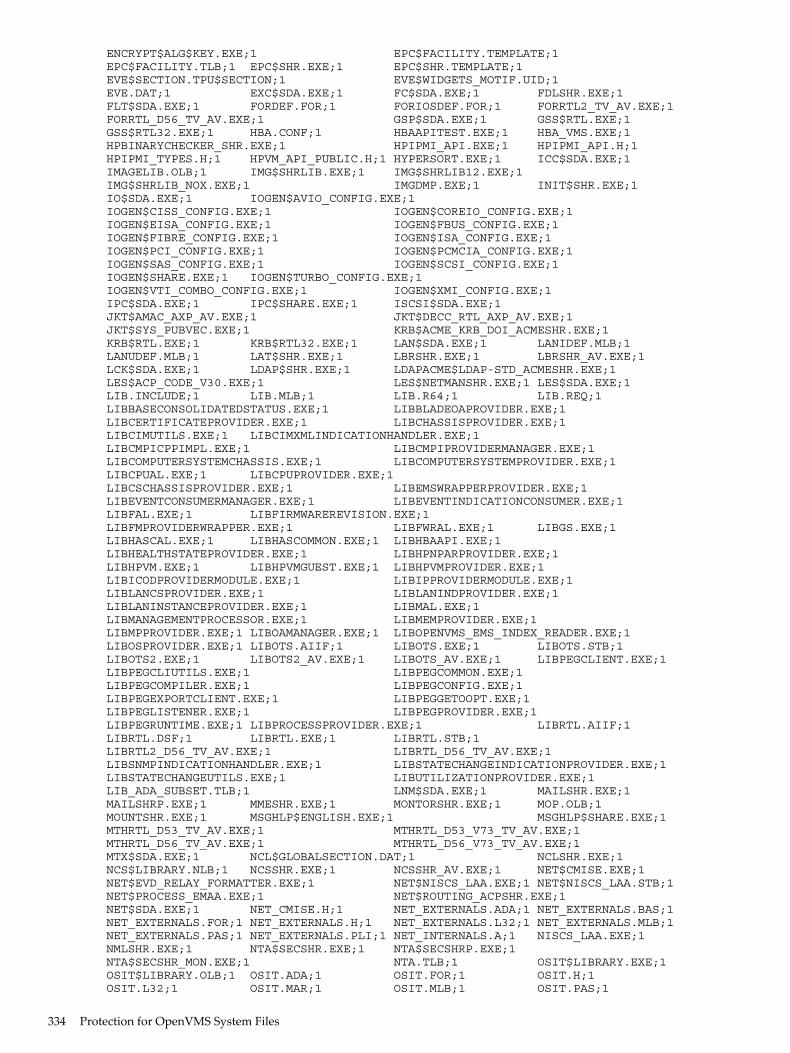
ENCRYPT$ALG$KEY.EXE;1 EPC$FACILITY.TEMPLATE;1EPC$FACILITY.TLB;1 EPC$SHR.EXE;1 EPC$SHR.TEMPLATE;1EVE$SECTION.TPU$SECTION;1 EVE$WIDGETS_MOTIF.UID;1EVE.DAT;1 EXC$SDA.EXE;1 FC$SDA.EXE;1 FDLSHR.EXE;1FLT$SDA.EXE;1 FORDEF.FOR;1 FORIOSDEF.FOR;1 FORRTL2_TV_AV.EXE;1FORRTL_D56_TV_AV.EXE;1 GSP$SDA.EXE;1 GSS$RTL.EXE;1GSS$RTL32.EXE;1 HBA.CONF;1 HBAAPITEST.EXE;1 HBA_VMS.EXE;1HPBINARYCHECKER_SHR.EXE;1 HPIPMI_API.EXE;1 HPIPMI_API.H;1HPIPMI_TYPES.H;1 HPVM_API_PUBLIC.H;1 HYPERSORT.EXE;1 ICC$SDA.EXE;1IMAGELIB.OLB;1 IMG$SHRLIB.EXE;1 IMG$SHRLIB12.EXE;1IMG$SHRLIB_NOX.EXE;1 IMGDMP.EXE;1 INIT$SHR.EXE;1IO$SDA.EXE;1 IOGEN$AVIO_CONFIG.EXE;1IOGEN$CISS_CONFIG.EXE;1 IOGEN$COREIO_CONFIG.EXE;1IOGEN$EISA_CONFIG.EXE;1 IOGEN$FBUS_CONFIG.EXE;1IOGEN$FIBRE_CONFIG.EXE;1 IOGEN$ISA_CONFIG.EXE;1IOGEN$PCI_CONFIG.EXE;1 IOGEN$PCMCIA_CONFIG.EXE;1IOGEN$SAS_CONFIG.EXE;1 IOGEN$SCSI_CONFIG.EXE;1IOGEN$SHARE.EXE;1 IOGEN$TURBO_CONFIG.EXE;1IOGEN$VTI_COMBO_CONFIG.EXE;1 IOGEN$XMI_CONFIG.EXE;1IPC$SDA.EXE;1 IPC$SHARE.EXE;1 ISCSI$SDA.EXE;1JKT$AMAC_AXP_AV.EXE;1 JKT$DECC_RTL_AXP_AV.EXE;1JKT$SYS_PUBVEC.EXE;1 KRB$ACME_KRB_DOI_ACMESHR.EXE;1KRB$RTL.EXE;1 KRB$RTL32.EXE;1 LAN$SDA.EXE;1 LANIDEF.MLB;1LANUDEF.MLB;1 LAT$SHR.EXE;1 LBRSHR.EXE;1 LBRSHR_AV.EXE;1LCK$SDA.EXE;1 LDAP$SHR.EXE;1 LDAPACME$LDAP-STD_ACMESHR.EXE;1LES$ACP_CODE_V30.EXE;1 LES$NETMANSHR.EXE;1 LES$SDA.EXE;1LIB.INCLUDE;1 LIB.MLB;1 LIB.R64;1 LIB.REQ;1LIBBASECONSOLIDATEDSTATUS.EXE;1 LIBBLADEOAPROVIDER.EXE;1LIBCERTIFICATEPROVIDER.EXE;1 LIBCHASSISPROVIDER.EXE;1LIBCIMUTILS.EXE;1 LIBCIMXMLINDICATIONHANDLER.EXE;1LIBCMPICPPIMPL.EXE;1 LIBCMPIPROVIDERMANAGER.EXE;1LIBCOMPUTERSYSTEMCHASSIS.EXE;1 LIBCOMPUTERSYSTEMPROVIDER.EXE;1LIBCPUAL.EXE;1 LIBCPUPROVIDER.EXE;1LIBCSCHASSISPROVIDER.EXE;1 LIBEMSWRAPPERPROVIDER.EXE;1LIBEVENTCONSUMERMANAGER.EXE;1 LIBEVENTINDICATIONCONSUMER.EXE;1LIBFAL.EXE;1 LIBFIRMWAREREVISION.EXE;1LIBFMPROVIDERWRAPPER.EXE;1 LIBFWRAL.EXE;1 LIBGS.EXE;1LIBHASCAL.EXE;1 LIBHASCOMMON.EXE;1 LIBHBAAPI.EXE;1LIBHEALTHSTATEPROVIDER.EXE;1 LIBHPNPARPROVIDER.EXE;1LIBHPVM.EXE;1 LIBHPVMGUEST.EXE;1 LIBHPVMPROVIDER.EXE;1LIBICODPROVIDERMODULE.EXE;1 LIBIPPROVIDERMODULE.EXE;1LIBLANCSPROVIDER.EXE;1 LIBLANINDPROVIDER.EXE;1LIBLANINSTANCEPROVIDER.EXE;1 LIBMAL.EXE;1LIBMANAGEMENTPROCESSOR.EXE;1 LIBMEMPROVIDER.EXE;1LIBMPPROVIDER.EXE;1 LIBOAMANAGER.EXE;1 LIBOPENVMS_EMS_INDEX_READER.EXE;1LIBOSPROVIDER.EXE;1 LIBOTS.AIIF;1 LIBOTS.EXE;1 LIBOTS.STB;1LIBOTS2.EXE;1 LIBOTS2_AV.EXE;1 LIBOTS_AV.EXE;1 LIBPEGCLIENT.EXE;1LIBPEGCLIUTILS.EXE;1 LIBPEGCOMMON.EXE;1LIBPEGCOMPILER.EXE;1 LIBPEGCONFIG.EXE;1LIBPEGEXPORTCLIENT.EXE;1 LIBPEGGETOOPT.EXE;1LIBPEGLISTENER.EXE;1 LIBPEGPROVIDER.EXE;1LIBPEGRUNTIME.EXE;1 LIBPROCESSPROVIDER.EXE;1 LIBRTL.AIIF;1LIBRTL.DSF;1 LIBRTL.EXE;1 LIBRTL.STB;1LIBRTL2_D56_TV_AV.EXE;1 LIBRTL_D56_TV_AV.EXE;1LIBSNMPINDICATIONHANDLER.EXE;1 LIBSTATECHANGEINDICATIONPROVIDER.EXE;1LIBSTATECHANGEUTILS.EXE;1 LIBUTILIZATIONPROVIDER.EXE;1LIB_ADA_SUBSET.TLB;1 LNM$SDA.EXE;1 MAILSHR.EXE;1MAILSHRP.EXE;1 MMESHR.EXE;1 MONTORSHR.EXE;1 MOP.OLB;1MOUNTSHR.EXE;1 MSGHLP$ENGLISH.EXE;1 MSGHLP$SHARE.EXE;1MTHRTL_D53_TV_AV.EXE;1 MTHRTL_D53_V73_TV_AV.EXE;1MTHRTL_D56_TV_AV.EXE;1 MTHRTL_D56_V73_TV_AV.EXE;1MTX$SDA.EXE;1 NCL$GLOBALSECTION.DAT;1 NCLSHR.EXE;1NCS$LIBRARY.NLB;1 NCSSHR.EXE;1 NCSSHR_AV.EXE;1 NET$CMISE.EXE;1NET$EVD_RELAY_FORMATTER.EXE;1 NET$NISCS_LAA.EXE;1 NET$NISCS_LAA.STB;1NET$PROCESS_EMAA.EXE;1 NET$ROUTING_ACPSHR.EXE;1NET$SDA.EXE;1 NET_CMISE.H;1 NET_EXTERNALS.ADA;1 NET_EXTERNALS.BAS;1NET_EXTERNALS.FOR;1 NET_EXTERNALS.H;1 NET_EXTERNALS.L32;1 NET_EXTERNALS.MLB;1NET_EXTERNALS.PAS;1 NET_EXTERNALS.PLI;1 NET_INTERNALS.A;1 NISCS_LAA.EXE;1NMLSHR.EXE;1 NTA$SECSHR.EXE;1 NTA$SECSHRP.EXE;1NTA$SECSHR_MON.EXE;1 NTA.TLB;1 OSIT$LIBRARY.EXE;1OSIT$LIBRARY.OLB;1 OSIT.ADA;1 OSIT.FOR;1 OSIT.H;1OSIT.L32;1 OSIT.MAR;1 OSIT.MLB;1 OSIT.PAS;1
334 Protection for OpenVMS System Files
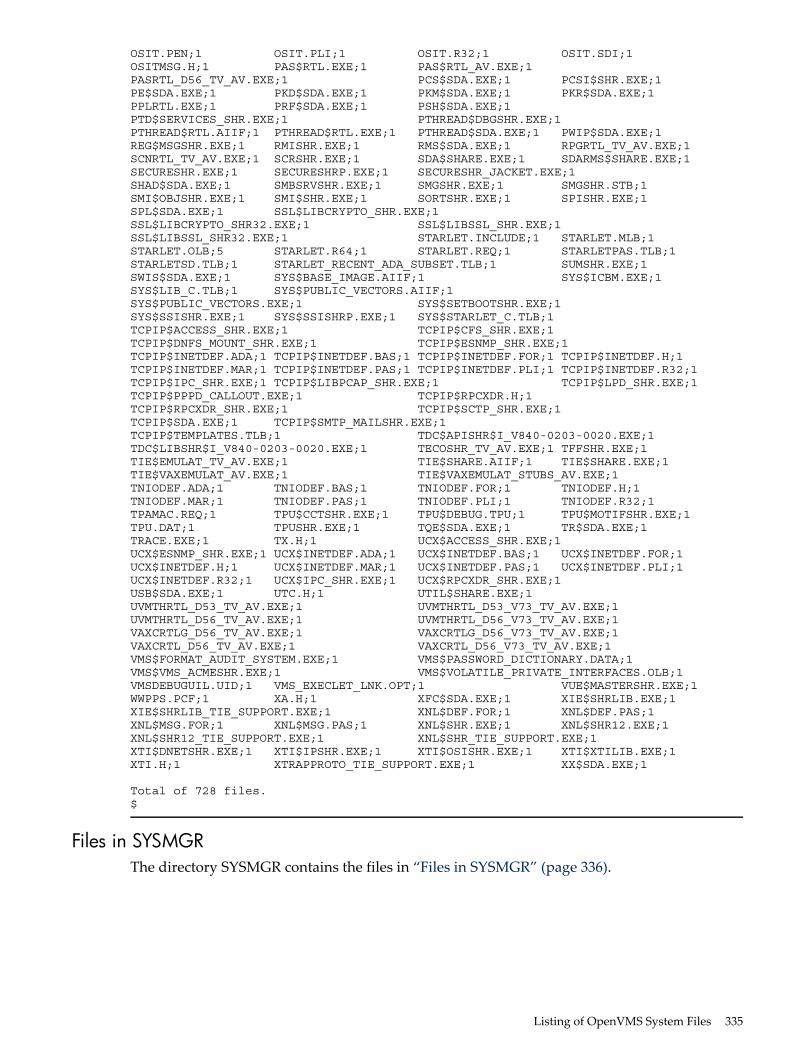
OSIT.PEN;1 OSIT.PLI;1 OSIT.R32;1 OSIT.SDI;1OSITMSG.H;1 PAS$RTL.EXE;1 PAS$RTL_AV.EXE;1PASRTL_D56_TV_AV.EXE;1 PCS$SDA.EXE;1 PCSI$SHR.EXE;1PE$SDA.EXE;1 PKD$SDA.EXE;1 PKM$SDA.EXE;1 PKR$SDA.EXE;1PPLRTL.EXE;1 PRF$SDA.EXE;1 PSH$SDA.EXE;1PTD$SERVICES_SHR.EXE;1 PTHREAD$DBGSHR.EXE;1PTHREAD$RTL.AIIF;1 PTHREAD$RTL.EXE;1 PTHREAD$SDA.EXE;1 PWIP$SDA.EXE;1REG$MSGSHR.EXE;1 RMISHR.EXE;1 RMS$SDA.EXE;1 RPGRTL_TV_AV.EXE;1SCNRTL_TV_AV.EXE;1 SCRSHR.EXE;1 SDA$SHARE.EXE;1 SDARMS$SHARE.EXE;1SECURESHR.EXE;1 SECURESHRP.EXE;1 SECURESHR_JACKET.EXE;1SHAD$SDA.EXE;1 SMBSRVSHR.EXE;1 SMGSHR.EXE;1 SMGSHR.STB;1SMI$OBJSHR.EXE;1 SMI$SHR.EXE;1 SORTSHR.EXE;1 SPISHR.EXE;1SPL$SDA.EXE;1 SSL$LIBCRYPTO_SHR.EXE;1SSL$LIBCRYPTO_SHR32.EXE;1 SSL$LIBSSL_SHR.EXE;1SSL$LIBSSL_SHR32.EXE;1 STARLET.INCLUDE;1 STARLET.MLB;1STARLET.OLB;5 STARLET.R64;1 STARLET.REQ;1 STARLETPAS.TLB;1STARLETSD.TLB;1 STARLET_RECENT_ADA_SUBSET.TLB;1 SUMSHR.EXE;1SWIS$SDA.EXE;1 SYS$BASE_IMAGE.AIIF;1 SYS$ICBM.EXE;1SYS$LIB_C.TLB;1 SYS$PUBLIC_VECTORS.AIIF;1SYS$PUBLIC_VECTORS.EXE;1 SYS$SETBOOTSHR.EXE;1SYS$SSISHR.EXE;1 SYS$SSISHRP.EXE;1 SYS$STARLET_C.TLB;1TCPIP$ACCESS_SHR.EXE;1 TCPIP$CFS_SHR.EXE;1TCPIP$DNFS_MOUNT_SHR.EXE;1 TCPIP$ESNMP_SHR.EXE;1TCPIP$INETDEF.ADA;1 TCPIP$INETDEF.BAS;1 TCPIP$INETDEF.FOR;1 TCPIP$INETDEF.H;1TCPIP$INETDEF.MAR;1 TCPIP$INETDEF.PAS;1 TCPIP$INETDEF.PLI;1 TCPIP$INETDEF.R32;1TCPIP$IPC_SHR.EXE;1 TCPIP$LIBPCAP_SHR.EXE;1 TCPIP$LPD_SHR.EXE;1TCPIP$PPPD_CALLOUT.EXE;1 TCPIP$RPCXDR.H;1TCPIP$RPCXDR_SHR.EXE;1 TCPIP$SCTP_SHR.EXE;1TCPIP$SDA.EXE;1 TCPIP$SMTP_MAILSHR.EXE;1TCPIP$TEMPLATES.TLB;1 TDC$APISHR$I_V840-0203-0020.EXE;1TDC$LIBSHR$I_V840-0203-0020.EXE;1 TECOSHR_TV_AV.EXE;1 TFFSHR.EXE;1TIE$EMULAT_TV_AV.EXE;1 TIE$SHARE.AIIF;1 TIE$SHARE.EXE;1TIE$VAXEMULAT_AV.EXE;1 TIE$VAXEMULAT_STUBS_AV.EXE;1TNIODEF.ADA;1 TNIODEF.BAS;1 TNIODEF.FOR;1 TNIODEF.H;1TNIODEF.MAR;1 TNIODEF.PAS;1 TNIODEF.PLI;1 TNIODEF.R32;1TPAMAC.REQ;1 TPU$CCTSHR.EXE;1 TPU$DEBUG.TPU;1 TPU$MOTIFSHR.EXE;1TPU.DAT;1 TPUSHR.EXE;1 TQE$SDA.EXE;1 TR$SDA.EXE;1TRACE.EXE;1 TX.H;1 UCX$ACCESS_SHR.EXE;1UCX$ESNMP_SHR.EXE;1 UCX$INETDEF.ADA;1 UCX$INETDEF.BAS;1 UCX$INETDEF.FOR;1UCX$INETDEF.H;1 UCX$INETDEF.MAR;1 UCX$INETDEF.PAS;1 UCX$INETDEF.PLI;1UCX$INETDEF.R32;1 UCX$IPC_SHR.EXE;1 UCX$RPCXDR_SHR.EXE;1USB$SDA.EXE;1 UTC.H;1 UTIL$SHARE.EXE;1UVMTHRTL_D53_TV_AV.EXE;1 UVMTHRTL_D53_V73_TV_AV.EXE;1UVMTHRTL_D56_TV_AV.EXE;1 UVMTHRTL_D56_V73_TV_AV.EXE;1VAXCRTLG_D56_TV_AV.EXE;1 VAXCRTLG_D56_V73_TV_AV.EXE;1VAXCRTL_D56_TV_AV.EXE;1 VAXCRTL_D56_V73_TV_AV.EXE;1VMS$FORMAT_AUDIT_SYSTEM.EXE;1 VMS$PASSWORD_DICTIONARY.DATA;1VMS$VMS_ACMESHR.EXE;1 VMS$VOLATILE_PRIVATE_INTERFACES.OLB;1VMSDEBUGUIL.UID;1 VMS_EXECLET_LNK.OPT;1 VUE$MASTERSHR.EXE;1WWPPS.PCF;1 XA.H;1 XFC$SDA.EXE;1 XIE$SHRLIB.EXE;1XIE$SHRLIB_TIE_SUPPORT.EXE;1 XNL$DEF.FOR;1 XNL$DEF.PAS;1XNL$MSG.FOR;1 XNL$MSG.PAS;1 XNL$SHR.EXE;1 XNL$SHR12.EXE;1XNL$SHR12_TIE_SUPPORT.EXE;1 XNL$SHR_TIE_SUPPORT.EXE;1XTI$DNETSHR.EXE;1 XTI$IPSHR.EXE;1 XTI$OSISHR.EXE;1 XTI$XTILIB.EXE;1XTI.H;1 XTRAPPROTO_TIE_SUPPORT.EXE;1 XX$SDA.EXE;1
Total of 728 files.$
Files in SYSMGRThe directory SYSMGR contains the files in “Files in SYSMGR” (page 336).
Listing of OpenVMS System Files 335

Example B-7 Files in SYSMGR
Directory SYS$SYSDEVICE:[VMS$COMMON.SYSMGR]
ACME$START.COM;1 ACME$START.TEMPLATE;1AGEN$NEW_NODE_DEFAULTS.TEMPLATE;1 AGEN$NEW_SATELLITE_DEFAULTS.TEMPLATE;1AMDS$DIAGNOSTICS.COM;1 AMDS$DRIVER_ACCESS.DAT;1AMDS$DRIVER_ACCESS.TEMPLATE;1 AMDS$DRIVER_ACCESS.TEMPLATE_OLD;3AMDS$LOGICALS.COM;1 AMDS$LOGICALS.TEMPLATE;1AMDS$LOGICALS.TEMPLATE_OLD;3 AMDS$SYSTARTUP.TEMPLATE;1BOOT_OPTIONS.COM;1 CCL$ISV_CALLOUTS.TXT;1 CDE$STARTUP.COM;1CDRECORD.COM;1 CDSA$SYMBOLS.COM;1 CLUSTER_CONFIG.COM;1CLUSTER_CONFIG_LAN.COM;1 CREATE_SPECIAL_ACCOUNTS.COM;1CTF$STARTUP.COM;1 DBLSTRTUP.COM;1 DCE$RPC_SHUTDOWN.COM;1DCE$RPC_STARTUP.COM;1 DECNET_DNS_REGISTER.COM;1DECNET_DNS_TOWERS.COM;1 DECNET_LOC_REGISTER.COM;1DECNET_REGISTER_DECDNS.COM;1 DECW$ATOMCONTROL.TEMPLATE;1DECW$CONSOLE.COM;1 DECW$DEFAULT_DESKTOP.COM;1DECW$DEFAULT_DESKTOP.COM_OLD;1 DECW$DEVICE.COM;1DECW$DEVICE_CONFIG_COMMON.COM;1 DECW$DEVICE_CONFIG_GH.COM;1DECW$EURO_APPS_SETUP.TEMPLATE;1 DECW$EURO_SERVER_SETUP.TEMPLATE;1DECW$FS_CONFIG.DAT;1 DECW$GETPARAMS.COM;1DECW$INSTALL_IMAGES.COM;1 DECW$LBXPROXY.COM;1DECW$LBXPROXY.DECW$PMCFG;1 DECW$LBXPROXY_SUB.COM;1DECW$LOGICALS.COM;1 DECW$MWM.COM;1 DECW$PRIVATE_APPS_SETUP.TEMPLATE;1DECW$PRIVATE_SERVER_SETUP.TEMPLATE;1 DECW$RGB.DAT;1DECW$SETPARAMS.COM;1 DECW$STARTAPPS.COM;1DECW$STARTI18N.COM;1 DECW$STARTLIBS.COM;1DECW$STARTSERVER.COM;1 DECW$STARTSM.COM;1 DECW$STARTUP.COM;1DECW$START_PROXY.COM;1 DECW$SYLOGIN.TEMPLATE;1DNS$CLERK_CLUSTER.NCL;1 DNS$CONFIGURE.COM;1 DTSS$CONFIG.COM;1DTSS$CONFIG_TEMPLATE.DAT;1 EDTINI.TEMPLATE;1 GALAXY.GCR;1GCU$ACTIONS.COM;1 GICAP$CONFIG.COM;1 ICAP$CLI_UTILS.COM;1ICAP$CONFIG.COM;1 ICC$ADD_REGISTRY_TABLE.COM;1ICC$CREATE_SECURITY_OBJECT.COM;1 ISA_CONFIG.TEMPLATE;1ISCSI$ISNS_SERVERS.TEMPLATE;1 ISCSI$MANUAL_TARGETS.TEMPLATE;1ISIS$CONFIGURE.COM;1 ISIS$CONFIGURE_HELP.COM;1JBC$DST_COMMAND.COM;1 KRB$LOGICALS.COM;1 KRB$SYMBOLS.COM;1LAT$SYSTARTUP.COM;1 LAT$SYSTARTUP.TEMPLATE;1LIB$DT_STARTUP.COM;1 LMF$COMPLIANCE_REPORT.COM;1LOGIN.COM;1 LOGIN.TEMPLATE;1 NET$APPLICATION_SHUTDOWN.TEMPLATE;1NET$AUTOGEN.COM;1 NET$CONFIGURE.COM;1 NET$DNS_CLERK_STARTUP.NCL;1NET$DNS_CLERK_STOP.NCL;1 NET$DTSS_CLERK_STARTUP.NCL;1NET$DTSS_CLERK_STARTUP.NCL_OLD;1 NET$EVENT_LOCAL.TEMPLATE;1NET$LOGICALS.TEMPLATE;1 NET$SHUTDOWN.COM;1 REG$CONFIG.COM;1RTTLOAD.COM;1 SECURITY.AUDIT$JOURNAL;1 SMISERVER.COM;1SYCONFIG.COM;1 SYCONFIG.TEMPLATE;1 SYLOGICALS.COM;1SYLOGICALS.TEMPLATE;1 SYLOGIN.COM;1 SYLOGIN.TEMPLATE;1SYPAGSWPFILES.COM;1 SYPAGSWPFILES.TEMPLATE;1SYS$INDICTMENT_POLICY.COM;1 SYS$INDICTMENT_POLICY.TEMPLATE;1SYS$NET_SERVICES_TCPIP.COM;1 SYSECURITY.COM;1SYSECURITY.TEMPLATE;1 SYSHUTDWN.COM;1SYSHUTDWN.TEMPLATE;1 SYSHUTDWN_0010.COM;1SYSHUTDWN_0010.TEMPLATE;1 SYSTARTUP_VMS.COM;1SYSTARTUP_VMS.TEMPLATE;1 TCPIP$BINDSETUP.COM;1TCPIP$BINDSETUP_HELP.TXT;1 TCPIP$BIND_CLUSTER_SETUP.COM;1TCPIP$BIND_SHUTDOWN.COM;1 TCPIP$BIND_STARTUP.COM;1TCPIP$BOOTP_SHUTDOWN.COM;1 TCPIP$BOOTP_STARTUP.COM;1TCPIP$CALLBACKS.COM;1 TCPIP$CONFIG.COM;1TCPIP$CUSTOMER_SERVICE_SHUTDOWN.COM;1 TCPIP$CUSTOMER_SERVICE_STARTUP.COM;1TCPIP$DEFINE_COMMANDS.COM;1 TCPIP$DHCP_BOOTPTODHCP.COM;1TCPIP$DHCP_CLIENT_SHUTDOWN.COM;1 TCPIP$DHCP_CLIENT_STARTUP.COM;1TCPIP$DHCP_CLUSTER_SHUTDOWN.COM;1 TCPIP$DHCP_CLUSTER_STARTUP.COM;1TCPIP$DHCP_SETUPCOMMANDS.COM;1 TCPIP$DHCP_SHUTDOWN.COM;1TCPIP$DHCP_STARTUP.COM;1 TCPIP$DHCP_V50_V51_DBROLL.COM;1TCPIP$FAILSAFE_SHUTDOWN.COM;1 TCPIP$FAILSAFE_STARTUP.COM;1TCPIP$FINGER_SHUTDOWN.COM;1 TCPIP$FINGER_STARTUP.COM;1TCPIP$FTP_CLIENT_SHUTDOWN.COM;1 TCPIP$FTP_CLIENT_STARTUP.COM;1TCPIP$FTP_SHUTDOWN.COM;1 TCPIP$FTP_STARTUP.COM;1TCPIP$IMAP_SHUTDOWN.COM;1 TCPIP$IMAP_STARTUP.COM;1TCPIP$INET_DRIVER_SHUTDOWN.COM;1 TCPIP$INET_DRIVER_STARTUP.COM;1TCPIP$INET_SHUTDOWN.COM;1 TCPIP$INET_STARTUP.COM;1
336 Protection for OpenVMS System Files
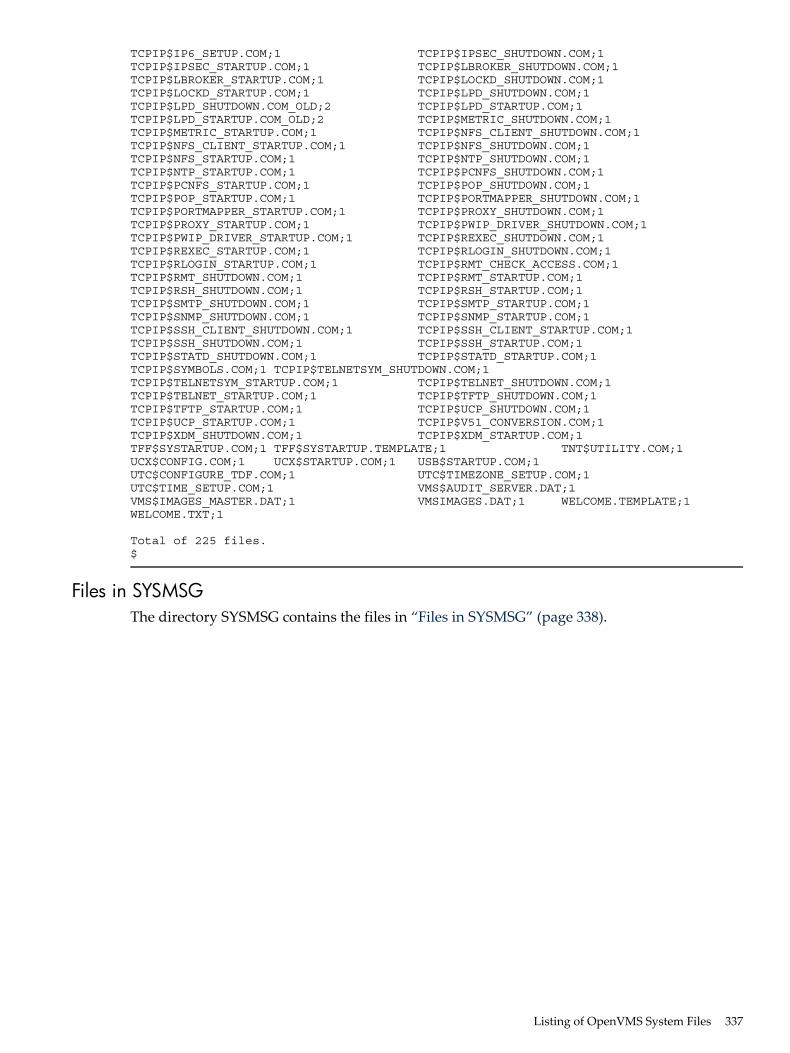
TCPIP$IP6_SETUP.COM;1 TCPIP$IPSEC_SHUTDOWN.COM;1TCPIP$IPSEC_STARTUP.COM;1 TCPIP$LBROKER_SHUTDOWN.COM;1TCPIP$LBROKER_STARTUP.COM;1 TCPIP$LOCKD_SHUTDOWN.COM;1TCPIP$LOCKD_STARTUP.COM;1 TCPIP$LPD_SHUTDOWN.COM;1TCPIP$LPD_SHUTDOWN.COM_OLD;2 TCPIP$LPD_STARTUP.COM;1TCPIP$LPD_STARTUP.COM_OLD;2 TCPIP$METRIC_SHUTDOWN.COM;1TCPIP$METRIC_STARTUP.COM;1 TCPIP$NFS_CLIENT_SHUTDOWN.COM;1TCPIP$NFS_CLIENT_STARTUP.COM;1 TCPIP$NFS_SHUTDOWN.COM;1TCPIP$NFS_STARTUP.COM;1 TCPIP$NTP_SHUTDOWN.COM;1TCPIP$NTP_STARTUP.COM;1 TCPIP$PCNFS_SHUTDOWN.COM;1TCPIP$PCNFS_STARTUP.COM;1 TCPIP$POP_SHUTDOWN.COM;1TCPIP$POP_STARTUP.COM;1 TCPIP$PORTMAPPER_SHUTDOWN.COM;1TCPIP$PORTMAPPER_STARTUP.COM;1 TCPIP$PROXY_SHUTDOWN.COM;1TCPIP$PROXY_STARTUP.COM;1 TCPIP$PWIP_DRIVER_SHUTDOWN.COM;1TCPIP$PWIP_DRIVER_STARTUP.COM;1 TCPIP$REXEC_SHUTDOWN.COM;1TCPIP$REXEC_STARTUP.COM;1 TCPIP$RLOGIN_SHUTDOWN.COM;1TCPIP$RLOGIN_STARTUP.COM;1 TCPIP$RMT_CHECK_ACCESS.COM;1TCPIP$RMT_SHUTDOWN.COM;1 TCPIP$RMT_STARTUP.COM;1TCPIP$RSH_SHUTDOWN.COM;1 TCPIP$RSH_STARTUP.COM;1TCPIP$SMTP_SHUTDOWN.COM;1 TCPIP$SMTP_STARTUP.COM;1TCPIP$SNMP_SHUTDOWN.COM;1 TCPIP$SNMP_STARTUP.COM;1TCPIP$SSH_CLIENT_SHUTDOWN.COM;1 TCPIP$SSH_CLIENT_STARTUP.COM;1TCPIP$SSH_SHUTDOWN.COM;1 TCPIP$SSH_STARTUP.COM;1TCPIP$STATD_SHUTDOWN.COM;1 TCPIP$STATD_STARTUP.COM;1TCPIP$SYMBOLS.COM;1 TCPIP$TELNETSYM_SHUTDOWN.COM;1TCPIP$TELNETSYM_STARTUP.COM;1 TCPIP$TELNET_SHUTDOWN.COM;1TCPIP$TELNET_STARTUP.COM;1 TCPIP$TFTP_SHUTDOWN.COM;1TCPIP$TFTP_STARTUP.COM;1 TCPIP$UCP_SHUTDOWN.COM;1TCPIP$UCP_STARTUP.COM;1 TCPIP$V51_CONVERSION.COM;1TCPIP$XDM_SHUTDOWN.COM;1 TCPIP$XDM_STARTUP.COM;1TFF$SYSTARTUP.COM;1 TFF$SYSTARTUP.TEMPLATE;1 TNT$UTILITY.COM;1UCX$CONFIG.COM;1 UCX$STARTUP.COM;1 USB$STARTUP.COM;1UTC$CONFIGURE_TDF.COM;1 UTC$TIMEZONE_SETUP.COM;1UTC$TIME_SETUP.COM;1 VMS$AUDIT_SERVER.DAT;1VMS$IMAGES_MASTER.DAT;1 VMSIMAGES.DAT;1 WELCOME.TEMPLATE;1WELCOME.TXT;1
Total of 225 files.$
Files in SYSMSGThe directory SYSMSG contains the files in “Files in SYSMSG” (page 338).
Listing of OpenVMS System Files 337
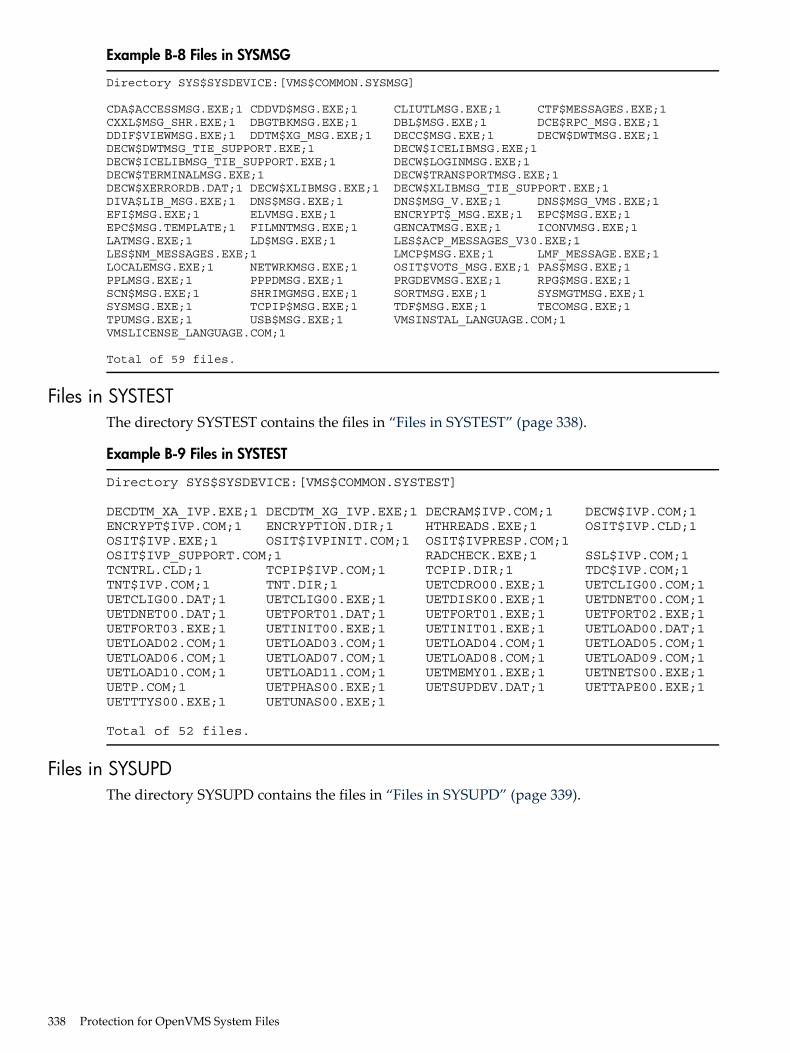
Example B-8 Files in SYSMSG
Directory SYS$SYSDEVICE:[VMS$COMMON.SYSMSG]
CDA$ACCESSMSG.EXE;1 CDDVD$MSG.EXE;1 CLIUTLMSG.EXE;1 CTF$MESSAGES.EXE;1CXXL$MSG_SHR.EXE;1 DBGTBKMSG.EXE;1 DBL$MSG.EXE;1 DCE$RPC_MSG.EXE;1DDIF$VIEWMSG.EXE;1 DDTM$XG_MSG.EXE;1 DECC$MSG.EXE;1 DECW$DWTMSG.EXE;1DECW$DWTMSG_TIE_SUPPORT.EXE;1 DECW$ICELIBMSG.EXE;1DECW$ICELIBMSG_TIE_SUPPORT.EXE;1 DECW$LOGINMSG.EXE;1DECW$TERMINALMSG.EXE;1 DECW$TRANSPORTMSG.EXE;1DECW$XERRORDB.DAT;1 DECW$XLIBMSG.EXE;1 DECW$XLIBMSG_TIE_SUPPORT.EXE;1DIVA$LIB_MSG.EXE;1 DNS$MSG.EXE;1 DNS$MSG_V.EXE;1 DNS$MSG_VMS.EXE;1EFI$MSG.EXE;1 ELVMSG.EXE;1 ENCRYPT$_MSG.EXE;1 EPC$MSG.EXE;1EPC$MSG.TEMPLATE;1 FILMNTMSG.EXE;1 GENCATMSG.EXE;1 ICONVMSG.EXE;1LATMSG.EXE;1 LD$MSG.EXE;1 LES$ACP_MESSAGES_V30.EXE;1LES$NM_MESSAGES.EXE;1 LMCP$MSG.EXE;1 LMF_MESSAGE.EXE;1LOCALEMSG.EXE;1 NETWRKMSG.EXE;1 OSIT$VOTS_MSG.EXE;1 PAS$MSG.EXE;1PPLMSG.EXE;1 PPPDMSG.EXE;1 PRGDEVMSG.EXE;1 RPG$MSG.EXE;1SCN$MSG.EXE;1 SHRIMGMSG.EXE;1 SORTMSG.EXE;1 SYSMGTMSG.EXE;1SYSMSG.EXE;1 TCPIP$MSG.EXE;1 TDF$MSG.EXE;1 TECOMSG.EXE;1TPUMSG.EXE;1 USB$MSG.EXE;1 VMSINSTAL_LANGUAGE.COM;1VMSLICENSE_LANGUAGE.COM;1
Total of 59 files.
Files in SYSTESTThe directory SYSTEST contains the files in “Files in SYSTEST” (page 338).
Example B-9 Files in SYSTEST
Directory SYS$SYSDEVICE:[VMS$COMMON.SYSTEST]
DECDTM_XA_IVP.EXE;1 DECDTM_XG_IVP.EXE;1 DECRAM$IVP.COM;1 DECW$IVP.COM;1ENCRYPT$IVP.COM;1 ENCRYPTION.DIR;1 HTHREADS.EXE;1 OSIT$IVP.CLD;1OSIT$IVP.EXE;1 OSIT$IVPINIT.COM;1 OSIT$IVPRESP.COM;1OSIT$IVP_SUPPORT.COM;1 RADCHECK.EXE;1 SSL$IVP.COM;1TCNTRL.CLD;1 TCPIP$IVP.COM;1 TCPIP.DIR;1 TDC$IVP.COM;1TNT$IVP.COM;1 TNT.DIR;1 UETCDRO00.EXE;1 UETCLIG00.COM;1UETCLIG00.DAT;1 UETCLIG00.EXE;1 UETDISK00.EXE;1 UETDNET00.COM;1UETDNET00.DAT;1 UETFORT01.DAT;1 UETFORT01.EXE;1 UETFORT02.EXE;1UETFORT03.EXE;1 UETINIT00.EXE;1 UETINIT01.EXE;1 UETLOAD00.DAT;1UETLOAD02.COM;1 UETLOAD03.COM;1 UETLOAD04.COM;1 UETLOAD05.COM;1UETLOAD06.COM;1 UETLOAD07.COM;1 UETLOAD08.COM;1 UETLOAD09.COM;1UETLOAD10.COM;1 UETLOAD11.COM;1 UETMEMY01.EXE;1 UETNETS00.EXE;1UETP.COM;1 UETPHAS00.EXE;1 UETSUPDEV.DAT;1 UETTAPE00.EXE;1UETTTYS00.EXE;1 UETUNAS00.EXE;1
Total of 52 files.
Files in SYSUPDThe directory SYSUPD contains the files in “Files in SYSUPD” (page 339).
338 Protection for OpenVMS System Files
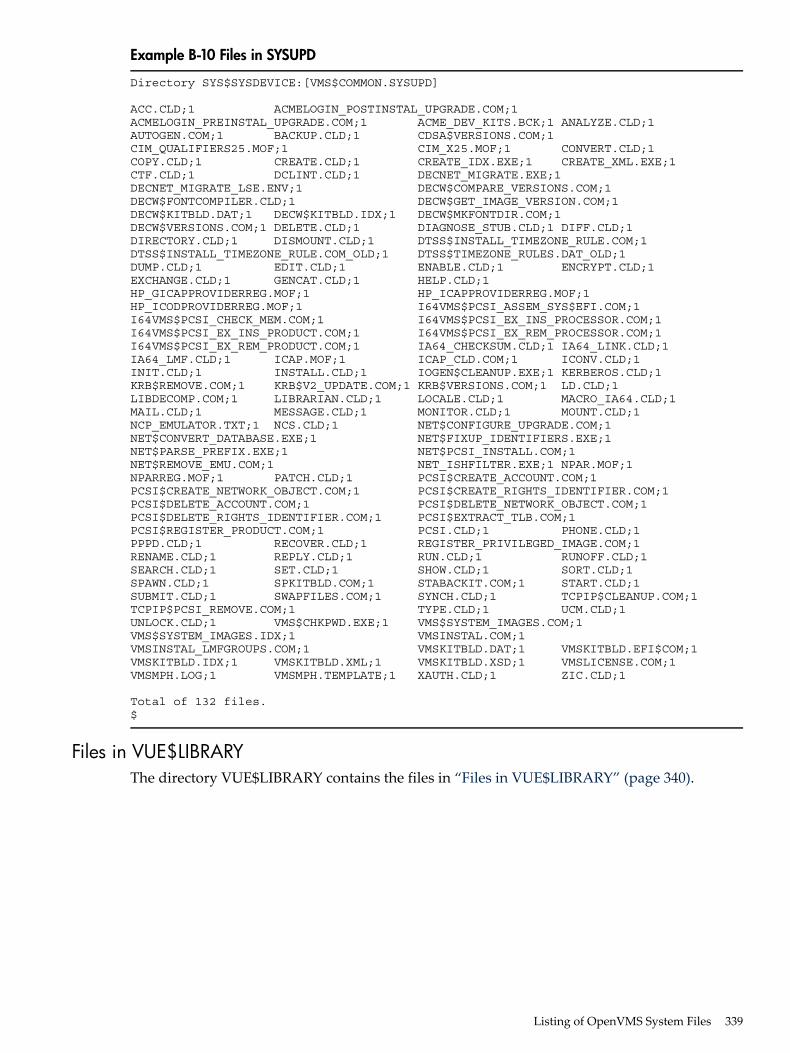
Example B-10 Files in SYSUPD
Directory SYS$SYSDEVICE:[VMS$COMMON.SYSUPD]
ACC.CLD;1 ACMELOGIN_POSTINSTAL_UPGRADE.COM;1ACMELOGIN_PREINSTAL_UPGRADE.COM;1 ACME_DEV_KITS.BCK;1 ANALYZE.CLD;1AUTOGEN.COM;1 BACKUP.CLD;1 CDSA$VERSIONS.COM;1CIM_QUALIFIERS25.MOF;1 CIM_X25.MOF;1 CONVERT.CLD;1COPY.CLD;1 CREATE.CLD;1 CREATE_IDX.EXE;1 CREATE_XML.EXE;1CTF.CLD;1 DCLINT.CLD;1 DECNET_MIGRATE.EXE;1DECNET_MIGRATE_LSE.ENV;1 DECW$COMPARE_VERSIONS.COM;1DECW$FONTCOMPILER.CLD;1 DECW$GET_IMAGE_VERSION.COM;1DECW$KITBLD.DAT;1 DECW$KITBLD.IDX;1 DECW$MKFONTDIR.COM;1DECW$VERSIONS.COM;1 DELETE.CLD;1 DIAGNOSE_STUB.CLD;1 DIFF.CLD;1DIRECTORY.CLD;1 DISMOUNT.CLD;1 DTSS$INSTALL_TIMEZONE_RULE.COM;1DTSS$INSTALL_TIMEZONE_RULE.COM_OLD;1 DTSS$TIMEZONE_RULES.DAT_OLD;1DUMP.CLD;1 EDIT.CLD;1 ENABLE.CLD;1 ENCRYPT.CLD;1EXCHANGE.CLD;1 GENCAT.CLD;1 HELP.CLD;1HP_GICAPPROVIDERREG.MOF;1 HP_ICAPPROVIDERREG.MOF;1HP_ICODPROVIDERREG.MOF;1 I64VMS$PCSI_ASSEM_SYS$EFI.COM;1I64VMS$PCSI_CHECK_MEM.COM;1 I64VMS$PCSI_EX_INS_PROCESSOR.COM;1I64VMS$PCSI_EX_INS_PRODUCT.COM;1 I64VMS$PCSI_EX_REM_PROCESSOR.COM;1I64VMS$PCSI_EX_REM_PRODUCT.COM;1 IA64_CHECKSUM.CLD;1 IA64_LINK.CLD;1IA64_LMF.CLD;1 ICAP.MOF;1 ICAP_CLD.COM;1 ICONV.CLD;1INIT.CLD;1 INSTALL.CLD;1 IOGEN$CLEANUP.EXE;1 KERBEROS.CLD;1KRB$REMOVE.COM;1 KRB$V2_UPDATE.COM;1 KRB$VERSIONS.COM;1 LD.CLD;1LIBDECOMP.COM;1 LIBRARIAN.CLD;1 LOCALE.CLD;1 MACRO_IA64.CLD;1MAIL.CLD;1 MESSAGE.CLD;1 MONITOR.CLD;1 MOUNT.CLD;1NCP_EMULATOR.TXT;1 NCS.CLD;1 NET$CONFIGURE_UPGRADE.COM;1NET$CONVERT_DATABASE.EXE;1 NET$FIXUP_IDENTIFIERS.EXE;1NET$PARSE_PREFIX.EXE;1 NET$PCSI_INSTALL.COM;1NET$REMOVE_EMU.COM;1 NET_ISHFILTER.EXE;1 NPAR.MOF;1NPARREG.MOF;1 PATCH.CLD;1 PCSI$CREATE_ACCOUNT.COM;1PCSI$CREATE_NETWORK_OBJECT.COM;1 PCSI$CREATE_RIGHTS_IDENTIFIER.COM;1PCSI$DELETE_ACCOUNT.COM;1 PCSI$DELETE_NETWORK_OBJECT.COM;1PCSI$DELETE_RIGHTS_IDENTIFIER.COM;1 PCSI$EXTRACT_TLB.COM;1PCSI$REGISTER_PRODUCT.COM;1 PCSI.CLD;1 PHONE.CLD;1PPPD.CLD;1 RECOVER.CLD;1 REGISTER_PRIVILEGED_IMAGE.COM;1RENAME.CLD;1 REPLY.CLD;1 RUN.CLD;1 RUNOFF.CLD;1SEARCH.CLD;1 SET.CLD;1 SHOW.CLD;1 SORT.CLD;1SPAWN.CLD;1 SPKITBLD.COM;1 STABACKIT.COM;1 START.CLD;1SUBMIT.CLD;1 SWAPFILES.COM;1 SYNCH.CLD;1 TCPIP$CLEANUP.COM;1TCPIP$PCSI_REMOVE.COM;1 TYPE.CLD;1 UCM.CLD;1UNLOCK.CLD;1 VMS$CHKPWD.EXE;1 VMS$SYSTEM_IMAGES.COM;1VMS$SYSTEM_IMAGES.IDX;1 VMSINSTAL.COM;1VMSINSTAL_LMFGROUPS.COM;1 VMSKITBLD.DAT;1 VMSKITBLD.EFI$COM;1VMSKITBLD.IDX;1 VMSKITBLD.XML;1 VMSKITBLD.XSD;1 VMSLICENSE.COM;1VMSMPH.LOG;1 VMSMPH.TEMPLATE;1 XAUTH.CLD;1 ZIC.CLD;1
Total of 132 files.$
Files in VUE$LIBRARYThe directory VUE$LIBRARY contains the files in “Files in VUE$LIBRARY” (page 340).
Listing of OpenVMS System Files 339
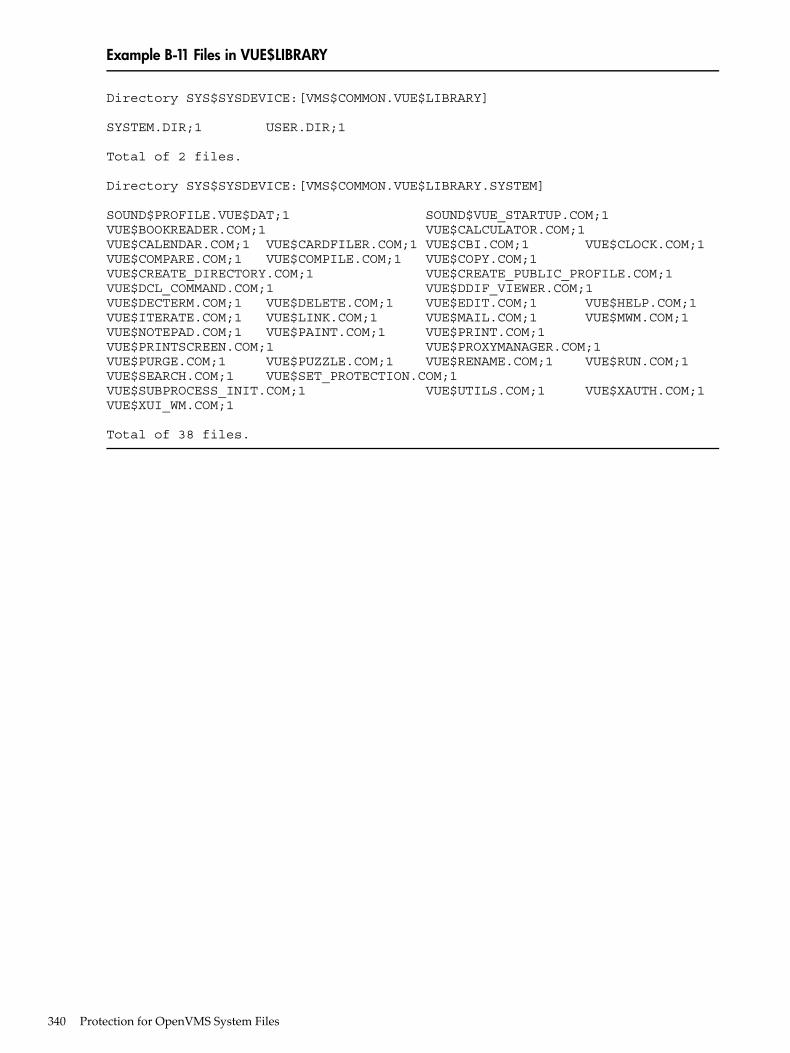
Example B-11 Files in VUE$LIBRARY
Directory SYS$SYSDEVICE:[VMS$COMMON.VUE$LIBRARY]
SYSTEM.DIR;1 USER.DIR;1
Total of 2 files.
Directory SYS$SYSDEVICE:[VMS$COMMON.VUE$LIBRARY.SYSTEM]
SOUND$PROFILE.VUE$DAT;1 SOUND$VUE_STARTUP.COM;1VUE$BOOKREADER.COM;1 VUE$CALCULATOR.COM;1VUE$CALENDAR.COM;1 VUE$CARDFILER.COM;1 VUE$CBI.COM;1 VUE$CLOCK.COM;1VUE$COMPARE.COM;1 VUE$COMPILE.COM;1 VUE$COPY.COM;1VUE$CREATE_DIRECTORY.COM;1 VUE$CREATE_PUBLIC_PROFILE.COM;1VUE$DCL_COMMAND.COM;1 VUE$DDIF_VIEWER.COM;1VUE$DECTERM.COM;1 VUE$DELETE.COM;1 VUE$EDIT.COM;1 VUE$HELP.COM;1VUE$ITERATE.COM;1 VUE$LINK.COM;1 VUE$MAIL.COM;1 VUE$MWM.COM;1VUE$NOTEPAD.COM;1 VUE$PAINT.COM;1 VUE$PRINT.COM;1VUE$PRINTSCREEN.COM;1 VUE$PROXYMANAGER.COM;1VUE$PURGE.COM;1 VUE$PUZZLE.COM;1 VUE$RENAME.COM;1 VUE$RUN.COM;1VUE$SEARCH.COM;1 VUE$SET_PROTECTION.COM;1VUE$SUBPROCESS_INIT.COM;1 VUE$UTILS.COM;1 VUE$XAUTH.COM;1VUE$XUI_WM.COM;1
Total of 38 files.
340 Protection for OpenVMS System Files
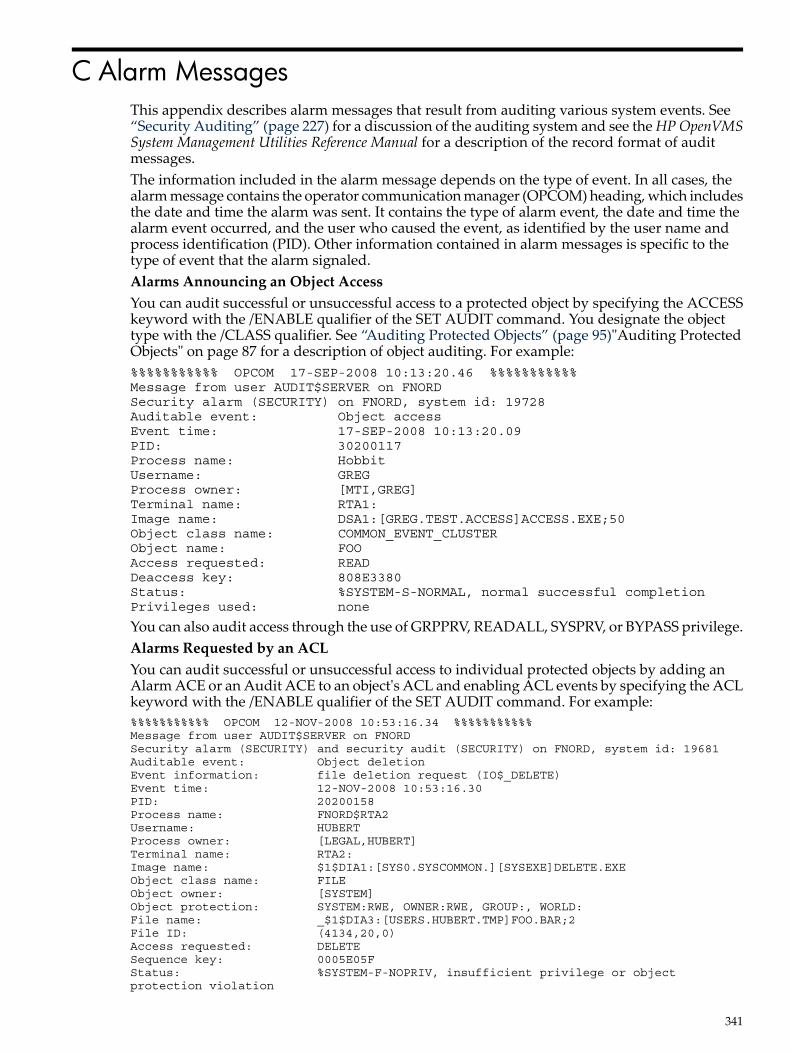
C Alarm MessagesThis appendix describes alarm messages that result from auditing various system events. See“Security Auditing” (page 227) for a discussion of the auditing system and see the HPOpenVMSSystem Management Utilities Reference Manual for a description of the record format of auditmessages.The information included in the alarm message depends on the type of event. In all cases, thealarm message contains the operator communication manager (OPCOM) heading, which includesthe date and time the alarm was sent. It contains the type of alarm event, the date and time thealarm event occurred, and the user who caused the event, as identified by the user name andprocess identification (PID). Other information contained in alarm messages is specific to thetype of event that the alarm signaled.Alarms Announcing an Object AccessYou can audit successful or unsuccessful access to a protected object by specifying the ACCESSkeyword with the /ENABLE qualifier of the SET AUDIT command. You designate the objecttype with the /CLASS qualifier. See “Auditing Protected Objects” (page 95)"Auditing ProtectedObjects" on page 87 for a description of object auditing. For example:%%%%%%%%%%% OPCOM 17-SEP-2008 10:13:20.46 %%%%%%%%%%%Message from user AUDIT$SERVER on FNORDSecurity alarm (SECURITY) on FNORD, system id: 19728Auditable event: Object accessEvent time: 17-SEP-2008 10:13:20.09PID: 30200117Process name: HobbitUsername: GREGProcess owner: [MTI,GREG]Terminal name: RTA1:Image name: DSA1:[GREG.TEST.ACCESS]ACCESS.EXE;50Object class name: COMMON_EVENT_CLUSTERObject name: FOOAccess requested: READDeaccess key: 808E3380Status: %SYSTEM-S-NORMAL, normal successful completionPrivileges used: none
You can also audit access through the use of GRPPRV, READALL, SYSPRV, or BYPASS privilege.Alarms Requested by an ACLYou can audit successful or unsuccessful access to individual protected objects by adding anAlarm ACE or an Audit ACE to an object's ACL and enabling ACL events by specifying the ACLkeyword with the /ENABLE qualifier of the SET AUDIT command. For example:%%%%%%%%%%% OPCOM 12-NOV-2008 10:53:16.34 %%%%%%%%%%%Message from user AUDIT$SERVER on FNORDSecurity alarm (SECURITY) and security audit (SECURITY) on FNORD, system id: 19681Auditable event: Object deletionEvent information: file deletion request (IO$_DELETE)Event time: 12-NOV-2008 10:53:16.30PID: 20200158Process name: FNORD$RTA2Username: HUBERTProcess owner: [LEGAL,HUBERT]Terminal name: RTA2:Image name: $1$DIA1:[SYS0.SYSCOMMON.][SYSEXE]DELETE.EXEObject class name: FILEObject owner: [SYSTEM]Object protection: SYSTEM:RWE, OWNER:RWE, GROUP:, WORLD:File name: _$1$DIA3:[USERS.HUBERT.TMP]FOO.BAR;2File ID: (4134,20,0)Access requested: DELETESequence key: 0005E05FStatus: %SYSTEM-F-NOPRIV, insufficient privilege or objectprotection violation
341
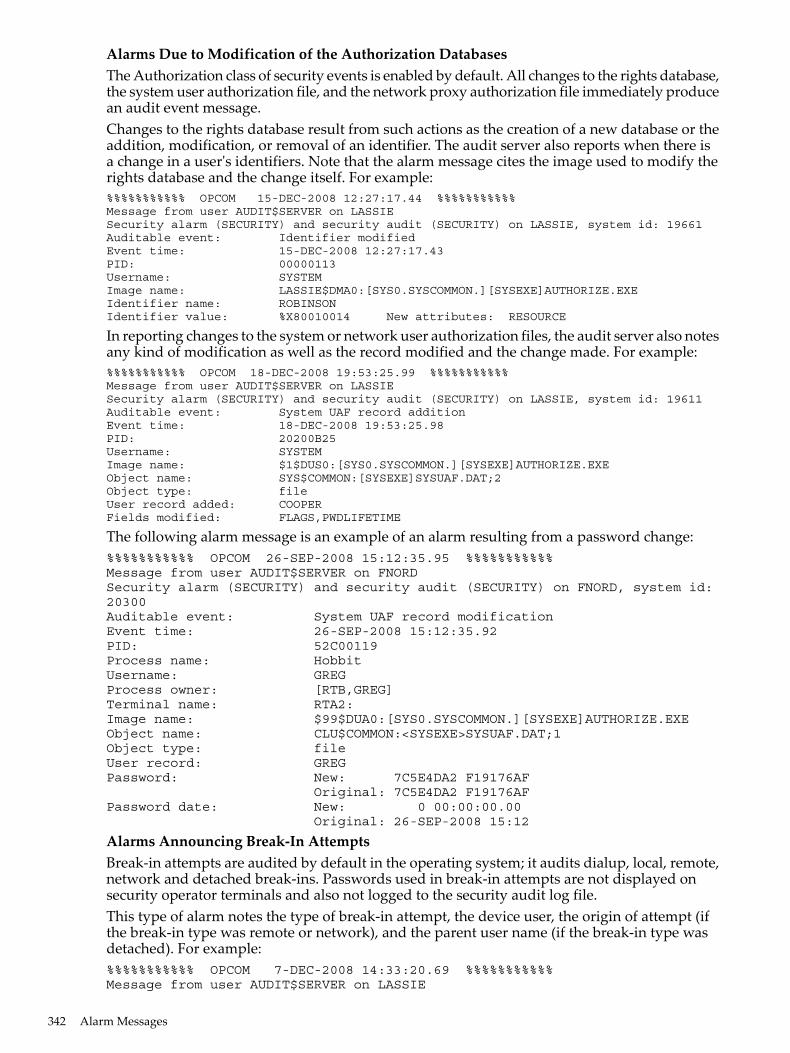
Alarms Due to Modification of the Authorization DatabasesThe Authorization class of security events is enabled by default. All changes to the rights database,the system user authorization file, and the network proxy authorization file immediately producean audit event message.Changes to the rights database result from such actions as the creation of a new database or theaddition, modification, or removal of an identifier. The audit server also reports when there isa change in a user's identifiers. Note that the alarm message cites the image used to modify therights database and the change itself. For example:%%%%%%%%%%% OPCOM 15-DEC-2008 12:27:17.44 %%%%%%%%%%%Message from user AUDIT$SERVER on LASSIESecurity alarm (SECURITY) and security audit (SECURITY) on LASSIE, system id: 19661Auditable event: Identifier modifiedEvent time: 15-DEC-2008 12:27:17.43PID: 00000113Username: SYSTEMImage name: LASSIE$DMA0:[SYS0.SYSCOMMON.][SYSEXE]AUTHORIZE.EXEIdentifier name: ROBINSONIdentifier value: %X80010014 New attributes: RESOURCE
In reporting changes to the system or network user authorization files, the audit server also notesany kind of modification as well as the record modified and the change made. For example:%%%%%%%%%%% OPCOM 18-DEC-2008 19:53:25.99 %%%%%%%%%%%Message from user AUDIT$SERVER on LASSIESecurity alarm (SECURITY) and security audit (SECURITY) on LASSIE, system id: 19611Auditable event: System UAF record additionEvent time: 18-DEC-2008 19:53:25.98PID: 20200B25Username: SYSTEMImage name: $1$DUS0:[SYS0.SYSCOMMON.][SYSEXE]AUTHORIZE.EXEObject name: SYS$COMMON:[SYSEXE]SYSUAF.DAT;2Object type: fileUser record added: COOPERFields modified: FLAGS,PWDLIFETIME
The following alarm message is an example of an alarm resulting from a password change:%%%%%%%%%%% OPCOM 26-SEP-2008 15:12:35.95 %%%%%%%%%%%Message from user AUDIT$SERVER on FNORDSecurity alarm (SECURITY) and security audit (SECURITY) on FNORD, system id:20300Auditable event: System UAF record modificationEvent time: 26-SEP-2008 15:12:35.92PID: 52C00119Process name: HobbitUsername: GREGProcess owner: [RTB,GREG]Terminal name: RTA2:Image name: $99$DUA0:[SYS0.SYSCOMMON.][SYSEXE]AUTHORIZE.EXEObject name: CLU$COMMON:<SYSEXE>SYSUAF.DAT;1Object type: fileUser record: GREGPassword: New: 7C5E4DA2 F19176AF Original: 7C5E4DA2 F19176AFPassword date: New: 0 00:00:00.00 Original: 26-SEP-2008 15:12
Alarms Announcing Break-In AttemptsBreak-in attempts are audited by default in the operating system; it audits dialup, local, remote,network and detached break-ins. Passwords used in break-in attempts are not displayed onsecurity operator terminals and also not logged to the security audit log file.This type of alarm notes the type of break-in attempt, the device user, the origin of attempt (ifthe break-in type was remote or network), and the parent user name (if the break-in type wasdetached). For example:%%%%%%%%%%% OPCOM 7-DEC-2008 14:33:20.69 %%%%%%%%%%%Message from user AUDIT$SERVER on LASSIE
342 Alarm Messages
Security alarm (SECURITY) on LASSIE, system id: 19611Auditable event: Dialup interactive breakin detectionEvent time: 7-DEC-2008 14:33:20.68PID: 00000052Username: SNIDELYTerminal name: _LTA13: (AV47C1/LC-2-10)
Alarms Announcing Creation of an ObjectYou can audit the creation of objects by specifying the CREATE keyword with the /ENABLEqualifier of the SET AUDIT command. This type of alarm notes the class of the object as well asits object name. For example:%%%%%%%%%%% OPCOM 17-SEP-2008 10:13:20.29 %%%%%%%%%%%Message from user AUDIT$SERVER on FNORDSecurity alarm (SECURITY) on FNORD, system id: 19728Auditable event: Object creationEvent time: 17-SEP-2008 10:13:20.01PID: 30200117Process name: HobbitUsername: HUBERTProcess owner: [SST,HUBERT]Terminal name: RTA1:Image name: DSA1:[HUBERT.TEST.ACCESS]ACCESS.EXE;50Object class name: COMMON_EVENT_CLUSTERObject name: FOOStatus: %SYSTEM-S-NORMAL, normal successful completion
Alarms Announcing Deaccess from an ObjectYou can audit the deaccess of a process from an object by specifying the DEACCESS keywordwith the /ENABLE qualifier of the SET AUDIT command. This type of alarm notes the class ofthe object. For example:%%%%%%%%%%% OPCOM 17-SEP-2008 10:13:38.34 %%%%%%%%%%%Message from user AUDIT$SERVER on FNORDSecurity alarm (SECURITY) on FNORD, system id: 19728Auditable event: Object deaccessEvent time: 17-SEP-2008 10:13:38.31PID: 30200117Object class name: COMMON_EVENT_CLUSTERDeaccess key: 808E3380
Alarms Announcing Deletion of an ObjectYou can audit the deletion of objects by specifying the DELETE keyword with the /ENABLEqualifier of the SET AUDIT command. This type of alarm notes the class of the object as well asits object name. For example:%%%%%%%%%%% OPCOM 17-SEP-2008 10:13:36.17 %%%%%%%%%%%Message from user AUDIT$SERVER on FNORDSecurity alarm (SECURITY) on FNORD, system id: 19728Auditable event: Object accessEvent time: 17-SEP-2008 10:13:36.08PID: 30200117Process name: HobbitUsername: HUBERTProcess owner: [MTI,HUBERT]Terminal name: RTA1:Image name: DSA1:[HUBERT.TEST.ACCESS]ACCESS.EXE;50Object class name: COMMON_EVENT_CLUSTERObject name: FOOAccess requested: DELETEStatus: %SYSTEM-S-NORMAL, normal successful completionPrivileges used: none
Alarms Announcing Use of the Install UtilityYou can audit the use of the Install utility (to install an image or to remove an installed image)by specifying the INSTALL keyword with the /ENABLE qualifier of the SET AUDIT command.
343
Install alarms identify the type of operation, the name of the image affected by the operation,the flags set by the Install operation, and the privileges used. For example:%%%%%%%%%%% OPCOM 7-DEC-2008 12:37:49.69 %%%%%%%%%%%Message from user AUDIT$SERVER on LASSIESecurity alarm (SECURITY) on LASSIE, system id: 19661Auditable event: Installed file additionEvent time: 7-DEC-2008 12:37:49.68PID: 00000113Username: SYSTEMObject name: LASSIE$DMA0:[SYS0.SYSCOMMON.][SYSEXE]NCP.EXE;1Object type: fileINSTALL flags: /OPEN/HEADER_RESIDENT/SHARED
Alarms Announcing LoginsYou can audit successful logins by specifying the LOGIN keyword with the /ENABLE qualifierof the SET AUDIT command. You can audit batch, dialup, local, remote, network, subprocessand detached login classes. This type of alarm notes the class of login, the device used, the originof the login (if it was remote or network), the parent PID (if the login was subprocess), and theparent user name (if the login was detached). For example:%%%%%%%%%%% OPCOM 18-DEC-2008 18:49:40.09 %%%%%%%%%%%Message from user AUDIT$SERVER on LASSIESecurity alarm (SECURITY) on LASSIE, system id: 19611Auditable event: Batch process loginEvent time: 18-DEC-2008 18:49:40.08PID: 20002001Username: LEWIS
Alarms Announcing Login FailuresYou can audit login failures by specifying the LOGFAILURE keyword with the /ENABLE qualifierof the SET AUDIT command. You can audit the batch, dialup, local, remote, network, subprocessand detached login failure classes. This type of alarm contains the class of login, the device used,a status message detailing the reason for the failure, the origin of the login (if it was remote ornetwork), the parent PID (if the login was subprocess), and the parent user name (if the loginwas detached). For example:%%%%%%%%%%% OPCOM 7-DEC-2008 12:48:43.50 %%%%%%%%%%%Message from user AUDIT$SERVER on LASSIESecurity alarm (SECURITY) on LASSIE, system id: 19611Auditable event: Network login failureEvent time: 7-DEC-2008 12:48:43.49PID: 0000011DUsername: DECNETRemote nodename: TIGER Remote node id: 3218Remote username: PROBERStatus: %LOGIN-F-INVPWD, invalid password
Alarms Announcing LogoutsYou can audit logouts by specifying the LOGOUT keyword with the /ENABLE qualifier of theSET AUDIT command. You can audit batch, dialup, local, remote, network, subprocess anddetached logout classes. This type of alarm contains the class of logout, the device used, theorigin of the login (if it was remote or network), and the parent PID (if the login was subprocess).For example:%%%%%%%%%%% OPCOM 18-DEC-2008 19:14:22.03 %%%%%%%%%%%Message from user AUDIT$SERVER on LASSIESecurity alarm (SECURITY) on LASSIE, system id: 19611Auditable event: Dialup interactive logoutEvent time: 18-DEC-2008 19:14:22.02PID: 20200001Username: DANCERTerminal name: _TTA1:
Alarms Announcing Volume Mounts and Dismounts
344 Alarm Messages
You can audit mount or dismount requests by specifying the MOUNT keyword with the /ENABLEqualifier of the SET AUDIT command. This type of alarm contains the name of the image usedto mount or dismount the volume, the device used, the log file recording the operation, thevolume name, its UIC and protection code, and the flags set during the operation. For example:%%%%%%%%%%% OPCOM 18-DEC-2008 17:43:26.94 %%%%%%%%%%%Message from user AUDIT$SERVER on CANINESecurity alarm (SECURITY) on CANINE, system id: 19681Auditable event: Volume mountEvent time: 18-DEC-2008 17:43:26.04PID: 00000038Username: HOBBITImage name: CANINE$DUA0:[SYS0.SYSCOMMON.][SYSEXE]VMOUNT.EXE;1Object name: _CANINE$MUA0:Object type: deviceObject owner: [DEVO,HOBBIT]Object protection: SYSTEM:RWEDC, OWNER:RWEDC, GROUP:RWEDC, WORLD:RWEDCLogical name: TAPE$DBACK1Volume name: DBACK1Mount flags: /OVERRIDE=IDENT/MESSAGE
Alarms Reporting Network ConnectionsOn VAX systems, you can audit the creation and termination of logical links with other nodesin the network when the connections were made through DECnet for OpenVMS. To do so, specifythe CONNECTION keyword with the /ENABLE qualifier of the SET AUDIT command. Forexample:Message from user AUDIT$SERVER on FNORDSecurity alarm (SECURITY) on FNORD, system id: 19681Auditable event: DECnet logical link deletedEvent time: 12-NOV-2008 10:54:25.01PID: 202002EBProcess name: FAL_16729Username: HUBERT_NProcess owner: [ACCOUNTS,HUBERT]Image name: $1$DIA1:[SYS0.SYSCOMMON.][SYSEXE]FAL.EXERemote nodename: JPTRemote node id: 19.130Remote username: HUBERTDECnet logical link ID: 16729DECnet object name: FALDECnet object number: 17Remote logical link ID: 35429Status: %SYSTEM-S-NORMAL, normal successful completion
Alarms Reporting Use of Process Control System ServicesYou can audit use of the process control system services, such as $CREPRC or $GETJPI, byspecifying the PROCESS keyword with the /ENABLE qualifier of the SET AUDIT command.This type of alarm reports the system service used to control a process, the device used, the nameof the process and its user name. For example:%%%%%%%%%%% OPCOM 25-JUL-2008 16:07:09.20 %%%%%%%%%%%Message from user AUDIT$SERVER on FNORDSecurity alarm (SECURITY) on FNORD, system id: 20300Auditable event: Process suspended ($SUSPND)Event time: 25-JUL-2008 16:07:08.77PID: 30C00119Process name: HobbitUsername: HUBERTProcess owner: [LEGAL,HUBERT]Terminal name: RTA1:Image name: $99$DUA0:[SYS0.SYSCOMMON.][SYSEXE]SET.EXEStatus: %SYSTEM-S-NORMAL, normal successful completionTarget PID: 30C00126Target process name: SMISERVER
345
Target username: SYSTEMTarget process owner: [SYSTEM]
Alarms Reporting Use of PrivilegeYou can audit the use of privilege by specifying the PRIVILEGE keyword with the /ENABLEqualifier of the SET AUDIT command. The alarm reports the privilege used and what it wasused to do. For example:%%%%%%%%%%% OPCOM 17-SEP-2008 10:13:20.16 %%%%%%%%%%%Message from user AUDIT$SERVER on FNORDSecurity alarm (SECURITY) on FNORD, system id: 19728Auditable event: Privilege usedEvent information: PRMCEB used to create permanent common event flagcluster ($ASCEFC)Event time: 17-SEP-2008 10:13:20.01PID: 30200117Process name: HobbitUsername: HUBERTProcess owner: [MTI,HUBERT]Terminal name: RTA1:Image name: DSA1:[HUBERT.TEST.ACCESS]ACCESS.EXE;50Event flag cluster name: FOOPrivileges used: PRMCEB
Alarms Reporting Modification of a System ParameterYou can audit the modification of a system parameter by specifying the SYSGEN keyword withthe /ENABLE qualifier of the SET AUDIT command. This type of alarm reports on both the activeparameters and the parameters stored on disk. For example:%%%%%%%%%%% OPCOM 25-JUL-2008 16:09:04.67 %%%%%%%%%%%Message from user AUDIT$SERVER on FNORDSecurity alarm (SECURITY) on FNORD, system id: 20300Auditable event: SYSGEN parameter setEvent time: 25-JUL-2008 16:09:04.65PID: 30C00119Process name: HobbitUsername: HUBERTProcess owner: [LEGAL,HUBERT]Terminal name: RTA1:Image name: $99$DUA0:[SYS0.SYSCOMMON.][SYSEXE]SYSGEN.EXEParameters write: SYS$SYSROOT:[SYSEXE]VAXVMSSYS.PAR;68Parameters inuse: SYS$SYSROOT:[SYSEXE]VAXVMSSYS.PAR;68NSA_PAGES: New: 15 Original: 10
Alarms Reporting a Change in System TimeYou can audit changes to system time by specifying the TIME keyword with the /ENABLEqualifier of the SET AUDIT command. This type of alarm reports the old and the new systemtime, the name of the user making the modification, and the device used. For example:%%%%%%%%%%% OPCOM 25-JUL-2008 16:08:25.23 %%%%%%%%%%%Message from user AUDIT$SERVER on FNORDSecurity alarm (SECURITY) on FNORD, system id: 20300Auditable event: System time recalibratedEvent time: 25-JUL-2008 16:08:25.21PID: 30C00119Process name: HobbitUsername: HUBERTProcess owner: [LEGAL,HUBERT]Terminal name: RTA1:Image name: $99$DUA0:[SYS0.SYSCOMMON.][SYSEXE]SET.EXENew system time: 25-JUL-2008 16:08:25.19Old system time: 25-JUL-2008 16:08:25.18
Alarms Resulting from Execution of the SET AUDIT Command
346 Alarm Messages
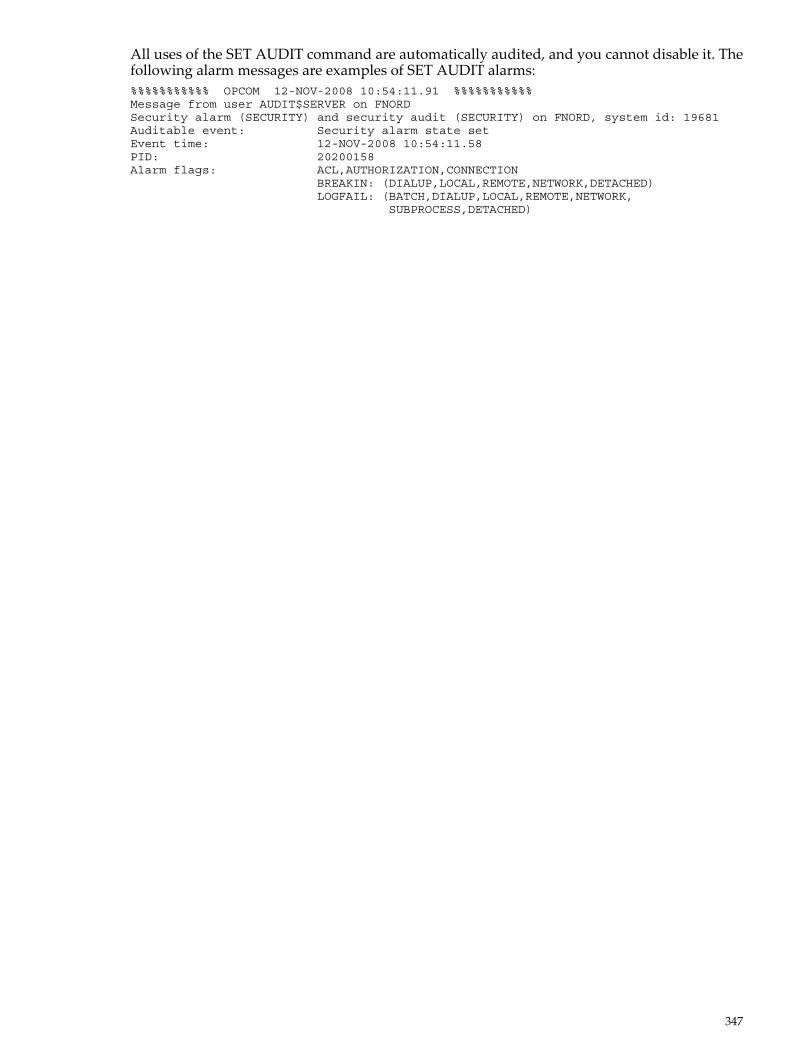
All uses of the SET AUDIT command are automatically audited, and you cannot disable it. Thefollowing alarm messages are examples of SET AUDIT alarms:%%%%%%%%%%% OPCOM 12-NOV-2008 10:54:11.91 %%%%%%%%%%%Message from user AUDIT$SERVER on FNORDSecurity alarm (SECURITY) and security audit (SECURITY) on FNORD, system id: 19681Auditable event: Security alarm state setEvent time: 12-NOV-2008 10:54:11.58PID: 20200158Alarm flags: ACL,AUTHORIZATION,CONNECTION BREAKIN: (DIALUP,LOCAL,REMOTE,NETWORK,DETACHED) LOGFAIL: (BATCH,DIALUP,LOCAL,REMOTE,NETWORK, SUBPROCESS,DETACHED)
347

348
GlossaryThis glossary provides definitions of security-related terms used in this guide.
access control Restrictions on the ability of a subject (user or process) to use the system or an object in thecomputing system. Authentication of the user name and password controls access to the system,while protection codes, access control lists, and privileges regulate access to protected objectsin that system.
access controlentry (ACE)
An entry in an access control list (ACL). Access control entries may specify identifiers and theaccess rights to be granted or denied the holders of the identifiers, default protection fordirectories, or security details. ACLs for each object can hold many entries, limited only byoverall space and performance considerations. See also access control list, identifier .
access control list(ACL)
A list that defines the kinds of access to be granted or denied to users of an object. Access controllists can be created for all protected objects such as files, devices, and logical name tables. EachACL consists of one or more entries known as access control entries (ACEs). See also accesscontrol entry .
access controlstring
A character string used in remote logins. It consists of the user name for the remote accountand the user's password enclosed within quotation marks.
access matrix A table that lists subjects on one axis and objects on the other. Each crosspoint in the matrixthus represents the access that one subject has to one object.
access type The capability required to perform an operation on a protected object. OpenVMS security policycan require multiple capabilities to complete an operation. The most commonly accessed object,a file, can require read, write, execute, delete, or control access.
ACE See access control entry.ACL See access control list.ACL editor An OpenVMS utility that helps users create and maintain access control lists. See also access
control list.alarm See security alarm.ALF file See automatic login.alphanumericUIC
A format of a user identification code (UIC). The group and member names can each containup to 31 alphanumeric characters, at least one of which is alphabetic. The other format of a UICis numeric: it contains a group number and a member number. See also user identification code,numeric UIC .
attribute In the security context, a characteristic of an identifier or the holder of an identifier. Attributescan enhance or limit the rights granted with an identifier; for example, a user holding anidentifier with the Resource attribute can charge disk space to the identifier.
audit See security audit.audit trail A pattern of security-relevant activity sometimes found in the audit log file. The audit log file
maintains a record of security-relevant events, such as access attempts, successful or not, asrequired by the authorization database. See also security audit.
auditing Recording the occurrence of security-relevant events as they occur on the system and, later,examining system activity for possible security violations or improper use of the system.Security-relevant events include activities such as logins, break-ins, changes to the authorizationdatabase, and access to protected objects. Event messages can be sent as alarms to an operatorterminal or written as audit records to a log file. See also security audit, security alarm .
authentication The act of establishing the identity of users when they start to use the system. OpenVMS systems(and most other commercial operating systems) use passwords as the primary authenticationmechanism. See also password .
authorizationdatabase
A database that contains the security attributes of subjects and objects. From these attributes,the reference monitor determines what kind of access (if any) is authorized.
authorization file See system user authorization file.
349
automatic login A feature that permits users to log in without specifying a user name. The operating systemassociates the user name with the terminal (or terminal server port) and maintains theseassignments in the file SYS$SYSTEM:SYSALF.DAT, referred to as the automatic login file orthe ALF file.
breach A break in the system security that results in access to system resources or objects in violationof the system's security policy.
break-in attempt An effort made by an unauthorized source to gain access to the system. Because the first systemaccess is achieved through logging in, intrusion attempts primarily refer to attempts to log inillegally. These attempts focus on supplying passwords for users known to have accounts onthe system through informed guesses or other trial-and-error methods. See also evasive action .
C2 system A U.S. government rating of the security of an operating system; it identifies an operatingsystem as one that meets the criteria of a Division C, class 2 system.
capability A resource to which the system controls access; currently, the only defined capability is thevector processor.OpenVMS security policy protects vector processors from improper access. An operation canrequire use or control access.
captive account A type of account that confines the user to the captive login command procedure. The use ofCtrl/Y is disabled. If errors in the captive command procedure cause the procedure to terminateand attempt to return the user to the DCL command level, the process is deleted. (This type ofaccount is synonymous with a turnkey or tied account.)
common eventflag cluster
A set of 32 event flags that enable cooperating processes to post event notifications to eachother.OpenVMS security policy protects common event flag clusters from improper access. Anoperation can require associate, delete, or control access.
control access The right to modify an object's security profile. Control access is granted explicitly in an ACLand implicitly in a protection code. (All users qualifying for system or owner categories havecontrol access.)
decryption The process that restores encoded information to its original unencoded form. The informationwas encoded by using encryption.
Default attribute An option added to an ACE that indicates the ACE is to be included in the ACL of any filescreated within a directory. When the entry is propagated, the Default attribute is removed fromthe ACE of the created file. An Identifier ACE with the Default attribute has no effect on access.See also access control entry, Identifier ACE.
device A class of peripherals connected to a processor that are capable of receiving, storing, ortransmitting data.OpenVMS security policy protects devices from improper access. An operation can requireread, write, physical, logical, or control access.
discretionaryaccess controls
Security controls that are applied at the user's option; that is, they are not required. Accesscontrol lists (ACLs) are typical of such optional security features. Discretionary controls are theopposite of mandatory controls.
disk scavenging Any method of obtaining information from a disk that the owner intended to discard. Theinformation, although no longer accessible to the original owner by normal means, retains asufficient amount of its original magnetic encoding that it can be retrieved and used by one ofthe scavenging methods. See also erase-on-allocate, erase-on-delete, erasure pattern.
encryption A process of encoding information so that its content is no longer immediately obvious toanyone who obtains a copy of it. The information is decoded using decryption.
environmentalidentifier
One of four classes of identifiers. Environmental identifiers are provided by the system toidentify groups of users according to their usage of the system. Environmental identifierscorrespond to login classes. For example, all users who access the system by dialing up receivethe dialup identifier. See also identifier.
erase-on-allocate A technique that applies an erasure pattern whenever a new area is allocated for a file's extent.The new area is erased with the erasure pattern so that subsequent attempts to read the area
350 Glossary
can yield only the erasure pattern and not some valuable remaining data. This technique isused to discourage disk scavenging. See also disk scavenging, erase-on-delete, erasure pattern,high-water marking.
erase-on-delete A technique that applies an erasure pattern whenever a file is deleted or purged. This techniqueis used to discourage disk scavenging. See also disk scavenging, erase-on-allocate, erasure pattern.
erasure pattern A character string that can be used to overwrite magnetic media for the purpose of erasing theinformation that was previously stored in that area.
evasive action A responsive behavior performed by the operating system to discourage break-in attemptswhen they appear to be in progress. The operating system has a set of criteria it uses to detectthat an intrusion attempt may be underway. Typically, once the operating system becomessuspicious that an unauthorized user is attempting to log in, the evasive action consists oflocking out all login attempts by the offender for a limited period of time.
event classes Categories of security-relevant events. The operating system audits several event classes bydefault, and the security administrator can enable additional ones, if desired.
event messages In terms of security, any notification that has to do with a user's access to the system or to aprotected object within the system. The operating system can record both successful andunsuccessful events so the security administrator can know when security-relevant activityoccurs on the system.
facility identifier An identifier whose binary value contains the facility code of the application defining theidentifier. See also identifier.
file A set of data elements arranged in a structure significant to the user. A file is any named, storedprogram or data, or both, to which the system has access. Access can be of two types: read-only,meaning the file is not to be altered, and read/write, meaning the contents of the file can bealtered. See also volume.OpenVMS security policy protects files from improper access. An operation can require read,write, execute, delete, or control access.
file encryption See encryption.general identifier One of four possible types of identifiers that specify one or more groups of users. The general
identifier is alphanumeric and typically is a convenient term that symbolizes the function ofthe group of users. For example, typical general identifiers might be PAYROLL for all usersallowed to run payroll applications or RESERVATIONS for operators at the reservations desk.See also identifier.
global section A shared memory area (for example, Fortran global common) potentially available to allprocesses in the system. A global section can provide access to a disk file (called a file-backedglobal section), provide access to dynamically created storage (called a page file-backed globalsection), or provide access to specific physical memory (called a page frame number [PFN]global section). See also group global section, system global section.
group A set of users in a system. Any user whose group UIC is identical to the group UIC of the objectqualifies for the access rights granted through a protection code. The group name appears asthe first field of a user identification code (UIC): [group,member].
group globalsection
A shareable memory section potentially available to all processes in the same group.OpenVMS security policy protects group global sections from improper access. Operations onfile-backed sections require read, write, execute, delete, or control access. Operations on othertypes of sections require read, write, execute, or control access. See also global section, systemglobal section.
group number The number or its alphanumeric equivalent in the first field of a user identification code (UIC):[group,member].
Hidden attribute An option added to an access control entry that indicates the ACE should be changed only bythe application that adds it. Although the Hidden attribute is valid for any ACE type, its intendeduse is to hide Application ACEs. See also access control entry.
high-water mark A mark identifying the highest file address written, beyond which the user cannot read.high-watermarking
A technique for discouraging disk scavenging. This technique tracks the furthest extent thatthe owner of a file has written into the file's allocated area (the high-water mark). It then prohibits
351
any attempts at reading beyond the written area, on the premise that any information that existsbeyond the currently written limit is information some user had intended to discard. Theoperating system accomplishes the goals of high-water marking with a combination of truehigh-water marking and an erase-on-allocate strategy. See also erase-on-allocate.
holder A user who possesses a particular identifier. Users and the identifiers they hold are recordedin the rights database. Whenever an object requires an accessor to hold an identifier, the systemchecks the process rights list (which is built from the rights database) in processing the accessrequest.
identifier An alphanumeric string representing a user or group of users recorded in the rights databaseand used by the system in checking access requests. There are four types of identifiers:environmental, facility, general, and UIC. See also environmental identifier, facility identifier,general identifier, resource identifier, UIC identifier.
Identifier ACE An access control entry that controls the type of access allowed to a particular user or group ofusers.
journal Name of the auditing log file where the system records events with security implications, suchas logins, break-ins, or changes to the authorization database.
locked password A password that cannot be changed by the account's owner. Only system managers or userswith the SYSPRV privilege can change locked passwords.
log A record of performance or system-relevant events.logical I/O access Right to perform a set of I/O operations that allow restricted direct access to device-level I/O
operations using logical block addresses.logical name table A shareable table of logical names and their equivalence names for the operating system or a
particular group.OpenVMS security policy protects logical name tables from improper access. An operation canrequire read, write, create, delete, or control access.
login The series of actions involved in authenticating a user to the system and creating a process thatruns on the user's behalf.
login class A user's method of logging into the system. System managers can control system access basedon the login class: local, dialup, remote, batch, or network.
mandatory accesscontrols
Security controls that are imposed by the system upon all users. There are no examples ofmandatory controls within the OpenVMS system. Access controls on this operating system areoptional (discretionary). SEVMS9, the security enhanced version of OpenVMS, providesmandatory access controls (MAC) and enhanced security auditing for secure standalone orclustered OpenVMS systems.
NETPROXY See network proxy authorization file.network proxyauthorization file(NETPROXY.DATorNET$PROXY.DAT[VAX only])
A file containing an entry for each user authorized to connect to the local system from a remotenode in the network.
nondiscretionarycontrols
See mandatory controls.
nonprivileged Describes a type of account with no privilege other than TMPMBX and NETMBX and a useridentification code (UIC) greater than the system parameter MAXSYSGROUP.
Nopropagateattribute
An option added to an access control entry that indicates the ACE cannot be copied by operationsthat usually propagate ACEs, such as SET SECURITY/LIKE. See also access control entry.
numeric UIC A format of a user identification code (UIC) that specifies the user's group and member numberin numeric form. The group number is an octal number in the range of 1 through 37776; themember number is an octal number in the range of 0 through 177776.
object A passive repository of information to which the system controls access. Access to an objectimplies access to the information it contains. See also capability, common event flag cluster, device,9. Support for SEVMS software has ended.
352 Glossary
file, group global section, logical name table, queue, resource domain, security class, system global section,volume.
object class A set of protected objects with common characteristics. For example, all files belong to the fileclass; whereas all devices belong to the device class.
object securityprofile
A set of security elements that defines access requirements. The elements include an owner(UIC), a UIC-based protection code, and, possibly, an ACL. See also access control list, owner,protection code.
open accounts Accounts that do not require passwords.operator terminal A terminal attended by a system operator. The system can send system event messages to the
terminal, provided the event class is enabled.owner A user with the same user identification code (UIC) as the protected object. An owner always
has control access to the object and can therefore modify the object's security profile. When theoperating system processes an access request from an owner, it considers the access rights inthe owner field of a protection code.
password A character string that users provide at login time to validate their identity and as a form ofproof of their authorization to access the account. There are system passwords and userpasswords. User passwords include both primary and secondary passwords. See also primarypassword, secondary password, system password, user password.
physical I/Oaccess
The right to perform a set of I/O functions that allows access to all device-level I/O operationsexcept maintenance mode using physical block addresses.
primarypassword A type of user password that is the first user password requested from the user. Systems mayoptionally require a secondary password. A primary or a secondary password must be associatedwith the user name in the user authorization file. See also secondary password.
privileges A means of protecting the use of certain system functions that can affect system resources andintegrity. System managers grant privileges according to users' needs and deny them to usersas a means of restricting their access to the system.
process securityprofile
The set of security elements the system assigns to a process at creation. Elements include theprocess UIC plus all of its identifiers and privileges. See also identifier, privileges, user identificationcode.
Protectedattribute
An option added to an access control entry that indicates the ACE is protected against casualdeletion. It can be deleted by using the ACL editor or by specifying the ACE explicitly whendeleting it.
protected object An object containing shareable information to which the system controls access. See also object.protectedsubsystem
An application with enhanced access control. While users run the application, their processrights list contains identifiers giving them access to objects owned by the subsystem. As soonas the users exit the application, these identifiers and, therefore, access rights to objects aretaken away.
protection The attributes of an object that limit the type of access available to users. See also access controllist, protection code, user identification code.
protection code A code defining the type of access that users are allowed to objects, based on the user'srelationship to the object's owner. The code defines four sets of users: those with system rights,those with ownership rights, those belonging to the same group, and all users on the system,who are called world users. See also group, owner, system, world.
proxy login A type of login that permits a user from a remote node to effectively log in to a local node as ifthe user owned an account on the local node. However, the user does not specify a passwordin the access control string. The remote user may own the account or share the account withother users.
pseudodevice An entity like a mailbox that is treated as an I/O device by the user or system, although it is notany particular physical device.
queue A set of jobs to be processed. There are four types of execution queues: batch, terminal, server,and print.OpenVMS security policy protects queues from improper access. An operation can requireread, submit, manage, delete, or control access.
353
referencemonitor The control center within the operating system that authenticates subjects and implements andenforces the security policy for every access to an object by a subject.
Resource attribute An option specified when an identifier is added to the rights database, and later when theidentifier is granted to a user. When a user holds the identifier with the Resource attribute, thatuser can charge disk space to the identifier.
resource domain A namespace controlling access to OpenVMS distributed lock management resources.OpenVMS security policy protects resource domains from improper access. An operation canrequire read, write, lock, or control access.
resourceidentifier
An identifier with the Resource attribute. Thus, holders of the identifier can charge disk spaceto the identifier.
restricted account A type of account with a secure login procedure. The user is not allowed to use the Ctrl/Y keysequence during the system or process login command procedure. Control may be turned overto the user following execution of the login command procedures.
rights database The collection of data the system maintains and uses to define identifiers and associate identifierswith the holders of the identifiers.
rights identifier See identifier.rights list The list associated with each process that includes all the identifiers the process holds.RWED The abbreviation for read, write, execute, delete, which are types of access to data files and
directory files.secondarypassword
A user password that may be required at login time immediately after the primary passwordhas been submitted correctly. Primary and secondary passwords can be known by separateusers to ensure that more than one user is present at the login. A less common use is to requirea secondary password as a means of increasing the password length so that the total numberof combinations of characters makes password guessing more time-consuming. See also primarypassword.
secure terminalserver
Operating system software designed to ensure that users can log in only to terminals that arealready logged out. When the user presses the Break key on a terminal, the secure server (ifenabled) responds by first disconnecting any logged-in process and then initiating a login. Ifno process is logged in at the terminal, the login can proceed immediately.
securityadministrator
The person or persons responsible for implementing and maintaining the organization's securitypolicy. This role is sometimes performed by the same person who functions as a system manager.It requires the same skills as the system manager as well as knowledge of the security featuresprovided with the operating system.
security alarm A message sent to an operator terminal that is enabled to receive messages pertaining to securityevents. Security alarms are triggered by the occurrence of an event previously designated asworthy of the alarm because of its security implications.
security audit An auditing message written to the security audit log file. These messages report the occurrenceof events with security implications, such as logins, break-ins, and changes to the authorizationdatabase. A system administrator uses the log file to examine system activity for possiblesecurity violations or improper use of the system.
security auditing See auditing.security class The object class whose members are all object classes. Each member defines the object templates
and management routines for its object class.OpenVMS security policy protects security classes from improper access. An operation canrequire read, write, or control access.
security officer See security administrator.security operatorterminal
A class of terminal that has been enabled to receive messages sent by OPCOM to securityoperators. These messages are security alarm messages. Normally such a terminal is a hardcopyterminal in a protected room. The output provides a log of security-related events and detailsthat identify the source of the event.
security profile A set of elements that describe either an object's access requirements or a subject's access rights.See also object security profile , process security profile .
354 Glossary
socialengineering
The act of gaining unauthorized access to or information about computer systems and resourcesby enlisting the aid of unwitting users or operators. Often involves impersonation or otherfraud.
subject A prinicpal, either a user process or an application, that accesses information or is preventedfrom accessing information. The operating system controls access to any object that containsshareable information. Therefore, subjects must be authorized to access objects. See also processsecurity profile.
system In the context of a protection code, identifies a set of users in a system. System users typicallyhave a UIC is in the range 1 through 10 (octal); however, the exact range of a system UIC isdetermined by the system parameter MAXSYSGROUP. Other ways to become a system userinclude having SYSPRV privilege or being in the same group as the owner and holding GRPPRV.System operators and system managers are usually system users.
system globalsection
A shareable memory section potentially available to all processes in the system.OpenVMS security policy protects system global sections from improper access. Operationson file-backed sections require read, write, execute, delete, or control access. Operations onother types of sections require read, write, execute, or control access.
system password A password controlling access to particular terminals. System passwords are usually necessaryto control access to terminals that might be targets for unauthorized use, such as dialup andpublic terminal lines. After an authorized person enters the system password, a user can enterhis user password. See also user password.
system userauthorization file(SYSUAF.DAT)
A file containing an entry for every user that the system manager authorizes to gain access tothe system. Each entry identifies the user name, password, default account, user identificationcode (UIC), quotas, limits, and privileges assigned to individuals who use the system.
system-definedidentifier
See environmental identifier.
SYSUAF See system user authorization file.TCB See trusted computing base.template profile The default set of security elements applied to new objects of a class. See also object security
profile.tied account See captive account.trap door An illicit piece of software or software modification in an operating system that allows access
in violation of the system's established security policy.Trojan horseprogram
A program that gains access to otherwise secured areas through its pretext of serving onepurpose when its real intent is far more devious and potentially damaging. When an authorizeduser performs an legitimate operation using a program, the unauthorized program within it(the Trojan horse) performs an unauthorized function.
trustedcomputing base(TCB)
A combination of computer hardware and operating system software that enforces a securitypolicy.In OpenVMS systems, the TCB includes the entire executive and file system, all other systemcomponents that do not execute in user mode (such as device drivers, RMS, and DCL), mostsystem programs installed with privilege, and a variety of other utilities used by systemmanagers to maintain data relevant to the TCB.
turnkey account See captive account.UAF See system user authorization file.UIC See user identification code.UIC identifier An identifier in alphanumeric format that is based on a user's identification code (UIC). Such
an identifier can appear with or without brackets. See also identifier.UIC protectioncode
See protection code.
user category One of four fields in a protection code. The code defines the access rights for four categories ofusers: (a) the owner, (b) the users who share the same group UIC as the owner (the groupcategory), (c) all users on the system (the world category), and (d) those with system privileges
355
or rights (the system category). A code lists access rights in a fixed order: System, Owner, Group,World.
useridentificationcode (UIC)
A 32-bit value assigned to users that tells what group users belong to on the system and whattheir unique identification is within that group. Any UIC specification is enclosed in brackets,but it can be in either an alphanumeric or a numeric format. For example, the UIC[SALES,JONES] identifies Jones as a member of the Sales group. Protected objects like files alsohave UICs. In most cases, their UICs come from the users who created them.
userirresponsibility
Situations where the user purposely or accidentally causes some noticeable damage on acomputer system.
user name The name a user enters to log in to the system. Together with a password, the user nameidentifies and authenticates a person as a valid user of the system. See also password, userpassword.
user password A character string recorded in a user's record in the system user authorization file. The passwordand the user's name must be correctly supplied when the user attempts to log in so that theuser is authenticated for access to the system. The two types of user passwords are known asprimary and secondary; the terms also represent the sequence in which they are entered. Seealso primary password, secondary password, system password.
user penetration Situations where the user exploits defects in the system software or system administration tobreak through security controls to gain access to the computer system.
user probing Situations where a user exploits insufficiently protected parts of a computer system.virus A command procedure or executable image written and placed on the system for the sole
purpose of seeking unauthorized access to files and accounts on the system. The virus seeksaccess to a user file through a flaw in the file protection. If successful, the virus modifies thefile so that it carries a copy of the virus. Each time an unsuspecting user executes the code thatcontains the virus, the virus attempts to propagate itself into other poorly protected proceduresor images. The virus seeks to find its way into a procedure that will be run from a privilegedaccount so that the virus can inflict damage to the system.
volume A mass storage medium, such as a disk or tape, that is in ODS-2 or ODS-5 format. Volumescontain files and may be mounted on devices.OpenVMS security policy protects volumes from improper access. An operation can requireread, write, create, delete, or control access.
world A category of users whose access rights to an object are identified in the last field of a protectioncode. The world category encompasses all users or applications on the system, including systemoperators, system managers, and users both in the owner's group and any other group.
worm A procedure that replicates itself over many nodes in a network, typically using default networkaccess or known security flaws. The usual effect of a worm is severe performance degradationas replicas of the worm saturate the computing capacity and bandwidth of the network. Incontrast to a virus, which spreads by modifying existing programs and executing when someuser runs the program, a worm stands by itself, operates in its own process context, and initiatesits own offspring.
356 Glossary
Index
Symbols$AUDIT_EVENT system service, reporting
security-relevant events, 233$CHECK_ACCESS system service, security auditing and,
234$CHECK_PRIVILEGE system service, reporting privilege
use, 234$CHKPRO system service
role in access control, 79security auditing and, 234
/ACCESS qualifier in Authorize utility, 136/CLITABLES qualifier, 142, 198/EXPIRATION qualifier, 136/FLAGS=CAPTIVE qualifier, 141/FLAGS=DISIMAGE qualifier, 198/FLAGS=DISMAIL qualifier, 169/FLAGS=DISNEWMAIL qualifier, 169/FLAGS=DISPWDDIC qualifier, 152/FLAGS=DISPWDHIS qualifier, 152/FLAGS=DISRECONNECT qualifier, 170/FLAGS=DISREPORT qualifier, 169/FLAGS=DISUSER qualifier, 154/FLAGS=DISWELCOME qualifier, 169/FLAGS=GENPWD qualifier, 148, 152/FLAGS=LOCKPWD qualifier, 152/FLAGS=PWD_EXPIRED qualifier, 150/FLAGS=RESTRICTED qualifier, 144/LGICMD qualifier and captive accounts, 141/LOCAL_PASSWORD qualifier, 158/PRCLM qualifier in AUTHORIZE, 141/PRIMEDAYS qualifier, example, 136/PWDLIFETIME qualifier, 150/PWDMINIMUM qualifier, 152
AAccess
auditing of processes, 232BYPASS privilege, 79class-specific overrides, 79denying, 93how the system determines, 79object-oriented, 40performance impact of auditing, 237privileges bypassing ACLs, 94privileges bypassing protection codes, 94subject-oriented, 39through ACLs, 85through GRPPRV privilege, 79through protection codes, 76through READALL privilege, 79through SYSPRV privilege, 79to deleted file data, 108
Access categories, 90Access control
ACE order, importance of, 86
assigning file defaults, 87bypassing ACLs, 94bypassing protection codes, 94comparing security profiles, 69controlling in network environment, 272default application account, 271default for inbound connection, 271denying a class of users, 177denying access through an ACL, 85evaluating a user's access request, 79explicit, 270for a network, 270for applications, 271for connections, 270for protected objects, 69Identifier ACEs and, 85in a network environment, 269limited-access accounts, 137limiting access to an environment, 72, 86limiting device access, 85limiting logins, 135matrix, 39object security profiles, 75object-specific considerations, 95protection code processing rules, 79protection code user categories, 76proxy, 270, 271routing initialization passwords, 281through ACLs, 84, 86using Identifier ACEs, 84, 87using the NCP, 271with Identifier ACEs, 84, 87
Access control strings, 60, 271command procedures and, 61exposing password in, 59protecting information in, 60secondary passwords with, 149
Access requirementsallocating devices, 100capability object, 97common event flag clusters, 98directories, 104file-oriented devices, 100files, 104global sections, 109I/O channel, 100logical name tables, 111non-file-oriented devices, 101queues, 112resource domains, 113security class objects, 114shareable devices, 101spooled devices, 100unshareable devices, 101volumes, 100
Access types
357

abbreviations of, 91ACLs, 87associate, 98capability class, 97class-dependency of, 91common event flag clusters, 98control, 91, 98
files, 104objects in general, 95
createlogical name tables, 111volumes, 115
deletecommon event flag clusters, 98files, 104logical name tables, 111queues, 112volumes, 115
directories, 104execute
files, 104global sections, 109
files, 104global sections, 109lock, 113logical I/O, 100logical name tables, 111manage, 112physical I/O, 100protection codes and, 91queues, 112read
devices, 100files, 104global sections, 109logical name tables, 111queues, 112resource domains, 113security class, 114volumes, 115
resource domains, 113security audit and, 65security class, 114shared devices, 100submit, 112unshared devices, 100volumes, 115write
devices, 100files, 104global section, 109logical name tables, 111resource domains, 113security class, 114volumes, 115
Accounting logsas security tool, 255
Accounting logs as security tool, 255Accounts
accessing after password expires, 59application, 271auditing access, 63captive, 138DECNET account, removing, 280designing secure accounts, 131, 137disabling with DISUSER flag, 137disguising identity, 256expiration, 58, 59first login, 49guest, 145initial password, 49interactive, 137limited-access, 137network objects, 278open, 51password expiration and, 59password requirements for, 51passwords for multiple, 59privileged, 139project, 191, 192proxy, 145renewing expired, 59restricted, 51, 138secondary password, 50setting duration of, 136setting up to use project identifiers, 191types of, 51, 137user passwords for, 50
ACE attributesDefault, 87Hidden, 88None, 85, 86Nopropagate, 90, 94Protected, 89, 90, 94
ACEs (access control entries)adding, 88Alarm ACEs, 96, 230Audit ACEs, 96, 230creating, 84Creator ACEs, 106, 183, 192Default Protection ACEs, 93deleting, 89generating audit event messages, 228inserting in a list, 89order of, 79, 86, 89replacing, 89security auditing, 89sensitive files and, 63Subsystem ACEs, 181subsystem ACEs, 293, 294, 295types of, 84
ACL editordisplaying ACLs, 77modifying ACLs, 88
ACLs (access control lists), 76, 84, 191ACE order, 79, 86, 89alarms generated by, 341assigning by default to new files, 87
358 Index
bypassing with special rights, 94copying, 90creating, 84deleting, 89deleting obsolete identifiers, 180designing, 178disadvantages of, 178displaying, 77, 88effect of privileges, 79effect on performance, 178granting access, 85interaction with protection codes, 93management overview, 177modifying, 88network file sharing, 286priority in access evaluation, 79protection codes and, 85queue access rights, 112reordering entries, 89replacing ACEs, 89restoring default ACL, 90restoring file default, 94security element of an object, 75setting file protection, 187, 192system program files, 198
ACME, 163ACME agents, 163ACME subsystem, 162ACME_SERVER process, 163ACNT privilege, 303ADD/IDENTIFIER command in Authorize utility, 179ADD/PROXY command in Authorize utility, 275, 286AES Algorithm, 30Alarm ACEs, 96
how to use, 230position in ACL, 88
Alarm messages, 341ACL event, 341authorization database modification, 342break-in event, 342INSTALL event, 343login, 344login failure, 344logout, 344network connection, 345object access event, 341object creation, 343object deaccess, 343object deletion, 343privilege use, 346process control event, 345SET AUDIT use, 346system parameter modification, 346time modification, 346volume mount/dismount, 344
Alarmsenabling for security, 64
ALF (automatic login facility), 170Autologin account as security problem, 144
AUTOLOGIN flag, 144cluster requirements for ALF files, 264
ALLSPOOL privilege, 303Alphanumeric UICs, 71ALTPRI privilege, 303ANALYZE/AUDIT command, 243
qualifier summary, 243Announcement messages, 51, 53
security disadvantages, 169APPEND command, /PROTECTION qualifier, 191Applications, setting access control, 271Archive files
analyzing security-relevant events, 241enabling remote, 240for security event messages, 240
Archive flush, 251ASCII output from Audit Analysis utility, 244Associate access, 98Asynchronous connection, dynamic, 285Asynchronous DDCMP driver, 282Attacks, types of system, 253Audit ACEs, 96
how to use, 230Audit Analysis utility (ANALYZE/AUDIT), 227, 241, 245
analyzing archive files, 241ASCII output from, 244binary output from, 244determining criteria of the analysis, 245example, 245generating daily reports, 242interactive commands, 245invoking, 243overview, 241prerequisites, 241report formats, 243, 244types of output, 244when to ignore events, 242
Audit listener mailboxescapturing audit event messages, 241disabling, 241example of programs for, 241
AUDIT privilege, 304Audit server databases, 247Audit server processes
changing disk transfer rate, 251controlling message flow, 249delaying delivery of event messages, 249disabling, 248enabling, 248error handling, 251, 252final server action, 251managing, 247memory limitations and, 250pre-extending log files, 251tasks performed by, 247
Audit trailsin security models, 35
Auditingapplications, 255
359
as security feature, 255of security events, 227
Authentication and credentials management extensions(ACME), 162
Authentication cards, 149Authentication, external, 155Authority-based systems, 40Authorization databases, 37, 39
access matrix, 39, 40adding users, 137auditing, 229auditing modifications to, 232contents, 35synchronizing authorization on clustered systems, 264
Authorize utility (AUTHORIZE)/GENERATE_PASSWORD qualifier, 146ADD/FLAG command, 157ADD/IDENTIFIER command, 179, 192ADD/PROXY command, 275, 286CREATE/PROXY command, 275CREATE/RIGHTS command, 179EXTAUTH flag, 157GRANT/IDENTIFIER command, 180, 192MODIFY/FLAG command, 157MODIFY/SYSTEM_PASSWORD command, 147REMOVE/IDENTIFIER command, 180SHOW/IDENTIFIER command, 179SHOW/RIGHTS command, 179
Autodial protocol, 283Automatic password generation, 56
disadvantages, 57example, 57minimum length, 57
BBackup operations
general recommendations, 199performed from captive privileged account, 140
BACKUP utility, 224Backup utility (BACKUP)
general recommendations, 199performed from captive privileged account, 140
Batch identifiers, 72Batch jobs
affected by shift restrictions, 55authorization, 54password protection and cardreaders, 59
Batch logins, 54Binary output from Audit Analysis utility, 244Break key and secure servers, 170Break-in alarms, 342Break-in attempts, 27, 55
auditing, 229, 232counteraction through dual passwords, 148detecting, 171, 173evading, 56security audit report and, 246
BUGCHK privilege, 304Buses, default security elements, 101
BYPASS privilegedescription, 304effect on control access, 95overriding access controls, 79, 94
CCapability objects
as protected objects, 78elements of, 97reestablishing profile, 98template profile, 97types of access, 97
Capability-based systems, 39Captive accounts, 51, 140
command procedures, 142Ctrl/Y key sequence and, 140disabling mail and notification of delivery, 169example of production account, 139locked passwords and, 141when to use, 137, 138
Card readers, default security elements, 101Case sensitivity
in passwords and user names, 159CDSA, 33Ciphertext, 30Cluster environments
building single security domain, 261managing audit log file, 265protected object databases, 266protected objects, 265security considerations, 261security implementation, 267synchronizing authorization data, 264SYSMAN requirements, 267system file recommendations, 262system file requirements, 262
Cluster managers and security administrators, 261CLUSTER_AUTHORIZE.DAT files, 267Clusterwide intrusion detection, 266CMEXEC privilege, 305CMKRNL privilege, 305Command mode for Audit Analysis utility, manipulating
the display, 245Command procedures
access control strings in, 61STARTNET.COM, 283SYSTARTUP_VMS.COM, 282
Commands, usage restrictions, 198Common Data Security Architecture (CDSA), 33Common event flag clusters
as protected objects, 78events audited, 99privilege requirements, 99reestablishing security profile, 99security elements of, 98system modifications of templates, 98template profile, 98types of access to, 98
Communications devices
360 Index
default security elements, 101Compilers, restricting use with ACLs, 197Confidential files, security auditing and, 63CONNECT command, /LOGOUT qualifier, 66Connections
auditing, 232Connections, auditing of, 232Consoles, enabling passwords for, 149Control access
acquiring, 79, 91, 95common event flag clusters, 98devices, 100files, 104global sections, 109limitations, 95logical name tables, 111queues, 112resource domains, 113security class, 114volumes, 115
COPY command/PROTECTION qualifier, 191security profile assigned, 107
Create accesslogical name tables, 111volumes, 115
CREATE/PROXY command in Authorize utility, 275CREATE/RIGHTS command in Authorize utility, 179Creator ACEs, 106
example, 192with resource identifiers, 183
Ctrl/B key sequence, 60Ctrl/Y key sequence and restricted accounts, 144
DDatabase
volatile network, 283Databases
authorization, 37, 39protected objects, 266rights, 179synchronizing authorization on clustered systems, 264volatile network, 283
DCL commandsSET HOST/DTE in network operations, 283SET TERMINAL in network operations, 282
DCL tables, modifications for security, 198DDCMP (Digital Data Communications Message
Protocol)asynchronous driver, 281
DECnetcluster nodes and, 267dynamic asynchronous connection, 282, 283, 285INBOUND parameter, 283installing dynamic asynchronous connection, 281network objects, 278nonprivileged user name, 277receive password, 282, 283receive passwords, 282
removing, 280transmit password, 282transmit passwords, 282
DECRYPT commandpurpose, 218
Decryptionrequirements, 205
DECwindows screens, clearing, 57, 60, 65Default attribute for ACEs, 87Default ownership
for directories, 193for files, 190for protected objects, 187, 193
Default protectionAlpha system files, 196for directories, 106for files, 105for processes, 187, 190for system files, 319management, 187
Default Protection ACEs, 93, 187, 191examples, 287generating default file protection, 105, 106
Delete accesscommon event flag clusters, 98files, 104granting through protection codes, 91logical name tables, 111queues
through ACLs, 112through protection codes, 112
volumes, 115DELETE command, /ERASE qualifier, 107DES
modes, 211DES algorithm, 30DETACH privilege, 308Devices
access requirements, 100as protected objects, 78controlling access through ACLs, 85default security elements, 101events audited, 103modifying security profiles of, 102privilege requirements, 103profile storage, 103protecting BACKUP save sets, 200security elements of, 99spooled, access requirements, 100template security profiles, 101terminal configuration, 201
DIAGNOSE privilege, 306Dialup identifiers, 72Dialup lines
connection security, 282controlling access to, 50using for dynamic asynchronous connection, 281using in a public area, 66
Dialup logins, 52
361
breaking connections, 66controlling retries, 169failures, 55retries, 55
Directoriesaccess control through ACLs, 86access requirements, 104assigning a security profile, 106controlling access to files, 87, 187creating, 105events audited, 107ownership
by resource identifier, 192changing access to files, 187setting default, 187
setting default file protection, 87setting file protection, 187
DIRECTORY command/SECURITY qualifier, 108
DIRECTORY command, /SECURITY qualifier, 108Disconnected job messages, 53Discretionary access controls, 307, 315DISFORCE_PWD_CHANGE flag, 151Disk quotas
as restriction for users, 137charging to identifiers, 182
Disk scavengingdiscouraging, 198preventing, 107
Disk spacecharging to identifier, 191requirements for security audit log file, 251usage and charging, 182
Disk volumescontrolling access, 115protecting, 115restrictions, 137
Disksaccessing deleted data, 108changing message transfer rate, 251default security elements, 101erase-on-allocate, 107, 108erasing, 108, 198erasure patterns, 107high-water marking, 107, 108managing security profiles, 102protecting
after file deletion, 107protecting after file deletion, 107
DISMOUNT command, alarms, 344DOWNGRADE privilege, 307DSE (data security erase)
tailoring, 198Dual passwords, 148Dynamic asynchronous connections
automatic switching of terminal line, 283connection example, 285manual switching of terminal line, 284passwords for, 282
procedure for establishing, 281security, 282switching of terminal line, 281terminating the link, 284verifier, 281
Dynamic attribute for identifiers, 181Dynamic attributes
for identifiers, 181
EEchoing, passwords and, 51Editing ACLs, 88, 90Emergency accounts and privileges, 186Emulator
terminal, 284ENCRYPT$MAC.LIS
for storing MAC values, 217ENCRYPT/CREATE_KEY command
verifying, 204Encryption, 203
defining keys, 203ENCRYPT command, 206
Encryption processoverview, 29
Environmental factors in security, 29Environmental identifiers, 177
conditionalizing general identifiers, 177example, 72, 74, 87Identifier ACEs and, 86
Erase-on-allocate, 107, 108Erase-on-delete, 107, 198Erasing disks, 198Erasure patterns, 107, 198Event tolerance and security levels, 28Execute access
files, 104global sections, 109granting through protection codes, 91
Expirationof account, 59of password, 58, 146of secondary password, 58password system messages, 58
Expired passwords, system message, 58EXQUOTA privilege, 307EXTAUTH flag, 157External authentication, 155
DECnet-Plus and NET_CALLOUTs parameter, 162DECnet-Plus requirement, 162defining logical names, 157disabling when network is down, 158failed connection attempts on POP server, 162impact on layered products and applications, 159marking user accounts, 157NET PASSWORD command, 159password verification, 160setting a password, 159specifying SYS$SINGLE_SIGNON logical name bits,
161
362 Index
using the /LOCAL_PASSWORD qualifier, 158
FF$MODE lexical function, 52Facility identifiers, 73FAL (file access listener) recommendations, 277File browsers, 64, 256, 257File protection, 75, 104, 187
auditing, 256DCL commands for, 196setting default ACLs, 87
Filesaccess control through ACLs, 87access requirements, 104, 105accessing
allocated disk blocks, 108by file identifier, 104
adding ACEs for security auditing, 63, 96applying an alarm to, 63as protected objects, 78assigning protection codes, 105assigning security profiles, 105, 106, 187auditing access to, 63, 95changing security profiles, 106confidential, protecting, 64controlling access with Identifier ACEs, 84copying
from remote account, 63creating
dependency on directory ownership, 187requirements for, 105
default protection, 93erasing data from disks, 107events audited, 107exceptions to ownership rules, 76managing directory defaults, 193naming rules, 104optimizing security, 108owned by resource identifier, 105, 106, 192ownership rules, 105protecting data after deletion, 107protecting mail, 108protection required for proxy access, 63restoring default security elements, 90restoring default security profiles, 94security auditing and, 63, 107security elements of, 104setting default protection and ownership, 187sharing and exchanging in network environment, 285,
289sharing for a cluster system, 265transfers with MAIL, 285
Flush interval, 251Flushing messages to disk, 251Foreign volumes, access requirements, 101Formats
Identifier ACE, 85protection code, 90rights identifiers, 72
security-auditing ACE, 231UIC (user identification code), 71
GGeneral identifiers, 85
design considerations, 176example, 74, 87format, 73
Generated passwords, 56disadvantages, 57example, 57initial passwords, 146length, 151minimum length, 57requiring, 148, 153
Global sectionsevents audited, 110group, 78privilege requirements, 110reestablishing security profile, 110restricting access, 110security elements of, 109system, 78template profiles, 109types of access, 109
Group numbersin UICs, 71reserved UICs, 71uniqueness requirement for clustered systems, 265
Group numbers and passwords, 267Group numbers and passwords, setting up for cluster,
267GROUP privilege, 307Group UIC names, 71Group users (security category), 76, 91Groups
design of, 179guidelines for organization, 175UIC design, 175
GRPNAM privilege, 111, 307GRPPRV privilege, 308
description, 308effect on protection mechanisms, 94giving rights of system user, 79, 91granting control access, 94
Guest accountsas limited-access accounts, 145
HHardcopy output
disposal of, 66Hardcopy terminals, logout considerations, 66Hidden attribute, 88High-water marking, 107, 108, 199
performance and, 199History, 153Holder Hidden attribute, 182Holders of a rights identifier
associating with identifier, 180
363
displaying records, 179granting access to, 85removing from rights database, 180
II/O channels, access requirements, 100I/O operations, access requirements for devices, 100Identifier ACEs, 84, 88, 294
ACE order, 86adding to an ACL, 88conditionalizing access, 86creating, 85Default attribute, 87denying access, 85format, 84interpreting, 84protected subsystems and, 294using general identifiers, 85
Identifier attributes, 181, 183description of, 181Dynamic, 181Holder Hidden, 182Name Hidden, 182No Access, 182Resource, 182Subsystem, 183
Identifiersadding to rights database, 179as directory owners, 191as file owners, 105assigning to users, 180auditing use of, 232creating, 85customizing, 177displaying process, 73environmental, 72, 74, 177facility, 73format, 72general, 73, 74, 85in ACEs, 84of a process, 69protected subsystems and, 295removing, 180reserved, 292resource
and directory ownership, 187security audit reports and, 74types, 72UIC, 73, 74uniqueness requirement, 265
Imagesinstalling
security ramifications, 186, 291Images, installing
security ramifications, 186, 291subsystem images, 291, 292
IMPERSONATE privilege, 308IMPORT privilege, 309INBOUND parameter for node type specification, 283
Incoming proxy access, enabling or disabling, 274INITIALIZE command
/ERASE qualifier, 107, 198INITIALIZE command, /ERASE qualifier, 107, 198Install utility (INSTALL)
alarms, 343auditing changes made through, 232security ramifications, 186, 291
Interactive accounts, 137Interactive identifiers, 72Interactive logins, 52
classes, 52dialup, 52, 55local, 52remote, 52system message, 53
Interactive modeprocesses, 52
Intrusion databases, 172Intrusions
attempts, 55detection, 171
clusterwide, 266counteraction through dual passwords, 148database, 171evasive procedures, 56reporting events, 65setting exclusion period, 173system parameters for, 172
JJob controllers
affected by shift restrictions, 55enforcing work time restrictions, 136
Job terminationsimposed by shift restrictions, 55
Job terminations imposed by shift restrictions, 55Journal flush, 251
KKerberos, 34
LLast login messages, 63
disabling, 169LGI system parameters, 173
controlling login attempts, 173LGI_BRK_DISUSER, 174LGI_BRK_LIM, 174LGI_BRK_TERM, 174LGI_BRK_TMO, 174LGI_HID_TIM, 174LGI_RETRY_LIM, 173LGI_RETRY_TMO, 173LGI_TWD_TMO, 173
Lifetime of accounts, 59Lifetime of passwords, 56, 58Limited-access accounts, 137LINK command, /NOTRACEBACK qualifier, 186
364 Index

Linksterminating dynamic asynchronous, 284
Listener devices, example of programs for, 241Local identifiers, 72Lock access, 113LOCKPWD flag, 51LOG_IO privilege, 103, 309Logging
access to protected objects, 95security audit events, 228, 237terminal sessions, 131
Logging outbreaking dialup connection, 66deciding when it is necessary, 65from disconnected processes, 66reasons for, 65security considerations, 65
Logical I/O access, 100Logical name tables
as protected objects, 78events audited, 111privilege requirements, 111reestablishing security profile, 111security elements of, 110template profiles, 111types of access, 111
Logical namesdefining for external authentication, 157
Login alarms, 344enabling, 232
Login classes, 52batch, 54dialup, 52interactive, 52local, 52network, 54noninteractive, 54remote, 52restrictions on, 55
Login command proceduresfor restricted accounts, 140, 142proper protection for, 196
Login failuresalarms, 344auditing, 232break-in evasion and, 56causes of, 54dialup logins, 55expired accounts, 59login class restrictions and, 55messages, 53, 63password grabber programs, 60retries and, 55security audit report and, 246shift restrictions, 55system passwords and, 55
Login messages, 52announcement, 53controlling, 168, 169
disconnected job, 53expired password, 58last successful interactive login, 53last successful noninteractive login, 53new mail, 53number of login failures, 53suppressing, 53, 63welcome, 53
Login programs, authentication by secure terminal server,60
Loginsauditing, 232batch, 54changing password, 49changing password during, 58controlling, 50default process protection and, 106dialup, 52
supplying password, 55disabled
by break-in evasion, 56by shift restriction, 55
expired accounts, 59flags, 151interactive, 52
classes of, 52most recent, 53
local, 52monitoring last, 63network, 54noninteractive, 52
classes of, 54most recent, 53
permitted time periods, 55remote, 52
logging out, 65system passwords and, 147
restricting with system passwords, 147secure terminal server, 60, 170security implications, 49simplifying for user with ALF (automatic login facility),
144system parameters controlling, 173time out, 51with external authentication, 52
Logout alarms, 344Logout auditing, 232LOGOUT command, 65
/HANGUP qualifier, 66
MMAC
security, 215specifying database, 216
Mail files, recommended protection for, 108MAIL objects, recommended access, 277Mail utility (MAIL)
controlling notification messages, 169transferring text files, 285
365
MAIL.EXEreinstalling with privileges, 197
Mailboxesdefault security elements, 101for audit event messages, 237modifying security profiles, 102privilege requirements, 103
Maintenance tasks for secure systems, 132Manage access, 112Mandatory access controls, 304, 309, 317MAXSYSGROUP system parameter, 91Media initialization
access requirements, 115restricting with ACLs, 197
Member numbers in UICs, 71Member UIC names, 71Memory consumption by ACLs, 178Messages
announcement, 53security disadvantages, 169
auditing, 228auditing security-relevant events, 64disabling last login, 169last successful interactive login, 53login, 52login failures, 63suppressing, 53, 168suppressing last login, 63welcome, 53
MFD (master file directory), 106MIRROR objects, 277Modems, 281MODIFY user/FLAG=AUDIT command in Authorize
utility, 231, 237MODIFY/SYSTEM_PASSWORD command in Authorize
utility, 147MOM (maintenance operations module) objects, 277MOUNT command, alarms, 344MOUNT privilege, 309Mounting volumes
access requirements, 115security audits and, 65with protected subsystems, 294
NName Hidden attribute, 182Naming conventions
capability objects, 97common event flag clusters, 98devices, 99files, 104global sections, 109logical name tables, 110queues, 112resource domains, 113security class, 114
Naming rulescapability objects, 97common event flag clusters, 98
devices, 99files, 104global sections, 109logical name tables, 110queues, 112resource domains, 113security class, 114
NCP (Network Control Program)auditing database modifications, 232
NET PASSWORD command, 159NET$PROXY.DAT files, 273
auditing, 229NETMBX privilege, 309NETPROXY.DAT files, 273
auditing, 229normal protection, 155
Network access control strings, 59, 60, 149, 271Network accounts
DECNET account, removing, 280network objects, 278
Network databases, 283Network identifiers, 72Network logins, 52, 54Network security, 60, 269, 285
events audited, 270limitations, 269network object configuration, 278requirements for, 269
Networksaccess control, 270INBOUND parameter, 283proxy login for applications, 271
NML (network management listener) objects, 278No Access attribute, 182Nodes, types of, 283Non-file-oriented devices, access requirements, 101None attribute (ACEs), 85, 86Noninteractive logins, 52, 54
batch, 54classes, 54network, 54
Nopropagate attribute, 90, 94, 106Numeric UICs, 71
OObject classes
descriptions of, 97security attributes of, 78
Object ownershipassigning during file creation, 187by resource identifiers, 105changing, 76, 77exceptions to the rules, 76files, 105managing defaults, 187, 190managing directory defaults, 193qualifying for, 76reassigning, 76restoring file defaults, 94
366 Index
security element of an object, 75zero UICs in protection checks, 79
Object permanencecapability object, 98common event flag cluster, 99devices, 103global sections, 110logical name tables, 111queues, 113resource domains, 114security class object, 115volumes, 116
Objects, 69access arranged by, 40access to, comparing security profiles, 69ACLs and, 76adding ACEs for security auditing, 96alarms for creation, 343alarms for deaccess, 343alarms for deletion, 343auditing access, 95, 232capability class, 97changing security profile, 77characteristics of protected objects, 75class descriptions, 97class specification, 78class-specific access overrides, 95classes of, 78classes protected by operating system, 78, 97controlling access with Identifier ACEs, 84, 85displaying default protection and ownership, 193displaying security profiles, 77global sections, 109granting access through protection codes, 90in security models, 35kinds of events audited, 95logical name tables, 110managing default protection and ownership, 187modifying class templates, 194protection codes, 76, 90queues, 112reassigning ownership, 76resource domains, 113role in security models, 37rules for determining access, 79security class, 114security elements source, 75security management overview, 97security profiles, 75, 79volumes, 115
OPCOM (operator communication manager), securityauditing and, 248
Open accounts, 51captive accounts and, 141captive recommendation, 155
Open files and ACL consumption of memory, 178OpenSSL, 33OpenVMS Cluster environments
building single security domain, 261
managing audit log file, 265protected object databases, 266security considerations, 261security implementation, 267synchronizing authorization data, 264system file recommendations, 262system file requirements, 262
OpenVMS Cluster environments, protected objects, 265OPER privilege, 309
overriding access controls, 79queue access, 95queue management, 112
Ownercategory of user access, 91
PPaper shredders, 66Password generators
obtaining initial password, 146when to require, 152
Password grabber programs, 60, 170catching with auditing ACEs, 231
Password history, 153Password protection, 59, 154Password synchronization, 160Passwords
acceptable, 50automatically generated, 56avoiding detection, 57, 257chances to supply during dialups, 55changing, 56
at login, 58expired, 58frequency guidelines, 60secondary, 58using /NEW_PASSWORD qualifier, 58
cluster membership management, 267console passwords, 149dialup retries, 55dual, 50, 146eliminating for networks, 272encoding, 37encryption algorithms, 152expiration, 58expiration time, 150failure to change, 59first, 49forced change, 58, 151format, 49generated, 57, 146guessing, 49history list, 50how to preexpire, 146incorrect, 53initial, 49, 146length, 49, 151lifetime of, 56, 58locked, 51, 141, 152minimum length, 50, 56, 151
367
multiple systems and, 59new, 58null as choice for captive account, 141open accounts and, 51password grabber programs, 60primary, 50, 51, 146proxy logins, 61reason for changing, 63, 65receive, 282restrictions, 50, 150reuse, 49risky, 49routing initialization, 281screening
against dictionary, 153against history list, 153with site-specific filter, 154
secondary, 50, 148advantages, 148changing, 58changing expired, 58entering, 51managing, 148
secure, 49secure choices for, 49secure terminal servers and, 60sharing, 59, 285system, 50, 147
causing login failures, 55dictionary, 50disadvantages, 148guidelines, 147minimum length requirement, 152modifying, 147recommended change frequency, 150setting up, 147
transmit, 282types, 50uniqueness for each account, 59user, 36, 50user guidelines, 49verifying change of, 56when account is created, 49when to change, 49
PerformanceACL length and, 178high-water marking and, 199security-auditing impact, 237
PFMGBL privilege, 110PFNMAP privilege, 110, 312PHONE objects, 278PHY_IO privilege, 103, 312Physical I/O access, 100Physical security, 29
restricting system access, 175violation indicators, 253when logging out, 65
PIPE command, impact on subprocess auditing events,237
PIPE subprocess, analyzing audit messages, 242Plaintext, 30Port, terminal, 283Primary passwords, 50Printers
default security elements, 101Privilege requirements
common event flag clusters, 99devices, 103global sections, 110logical name tables, 111queues, 112resource domains, 113volumes, 116
Privileged accounts, 139, 186Privileges
ACNT, 303affecting object access, 79All category, 184ALLSPOOL, 303ALTPRI, 303AUDIT, 304auditing use of, 65, 232authorized process, 74, 184BUGCHK, 304BYPASS, 79, 94, 95, 304bypassing ACLs, 94bypassing protection codes, 94captive accounts and, 140categories of, 184CMEXEC, 305CMKRNL, 305default process, 74, 184definition, 74DETACH, 308Devour category, 184DIAGNOSE, 306disabling, 74DOWNGRADE, 307enabling through SETPRV, 74EXQUOTA, 307file sharing and, 285GROUP, 307, 308Group category, 184GRPNAM, 307GRPPRV, 79, 91, 94, 95IMPERSONATE, 308IMPORT, 309influence on object access, 79LOG_IO, 309MOUNT, 309NETMBX, 309network requirements, 269Normal category, 184Objects category, 184OPER, 95, 309PFNMAP, 312PHY_IO, 312PRMCEB, 313
368 Index
PRMGBL, 313PRMMBX, 313process, 303PSWAPM, 314READALL, 79, 94, 314recommendations for different users, 185related to group UIC, 175reporting use with $CHECK_PRIVILEGE, 234requirements
common event flag clusters, 99devices, 103global sections, 110logical name tables, 111queues, 112resource domains, 113volumes, 116
SECURITY, 314security administrator requirements, 130SET PROCESS/PRIVILEGES, 74SETPRV, 315SHARE, 315SHMEM, 315storage in UAF record, 184summary of, 184, 303SYSGBL, 315SYSLCK, 315SYSNAM, 315SYSPRV, 79
controlling access through, 95effect on protection mechanisms, 94giving rights of system user, 91tasks requiring, 316
System category, 184TMPMBX, 317UAF records and, 74UPGRADE, 317VOLPRO, 317WORLD, 318
PRMCEB privilege, 99, 313PRMGBL privilege, 313PRMMBX privilege, 103, 313Probers, catching, 254, 256Probing, as security problem, 27Process exclusion list, 250Processes
access rights of, 69activities permitted by privileges, 184adding to exclusion list, 250audit server, 247auditing of, 231, 232auditing system services controlling, 232connecting restrictions, 53creating with different UICs, 72default protection for, 106disconnected, 53, 66displaying default protection, 106displaying process rights identifiers, 73enabling privileges, 74interactive mode, 52
logging out of current, 66modifying the rights list, 183reconnecting, 53security profiles of, 69suspending, 250UIC identifiers, 72
Project accounts, 191as protected subsystems, 291setting up, 192
Prompts, passwords and, 51Propagating protection, example, 287Protected attribute, 90, 94
deleting ACEs with, 89Protected object databases, 266Protected subsystems
advantages of, 291applications for, 291constructing, 294description of, 291, 295design requirements, 292enabling, 294example, 295file protection, 297, 298mounting volumes with, 294printer protection, 299subsystem ACEs, 294system management requirements, 293user access, 295
ProtectionACL-based, 191capability, 97command procedures and, 196common event flag clusters, 98deleted data, 107, 108devices, 101global sections, 109logical name tables, 111managing defaults, 187, 190objects, 75queues, 112resource domains, 113security class, 115through protected subsystems, 291UIC-based codes, 76volumes, 116
Protection checking, 79evaluating an object access request, 79exception with zero UICs, 79influenced by ownership, 187
Protection codes, 319access specification, 91access types, 91assigning during file creation, 187bypassing with special rights, 94changing, 92default file protection, 93, 190definition, 38, 76denying all access, 93effect of privileges, 79
369
evaluation sequence, 76format, 90granting control access, 91Identifier ACEs and, 85interaction with ACLs, 93interpreting, 76multiple user categories and, 92null access specification, 91priority in access evaluation, 79processing, 92queue access rights, 112reading, 92restoring file default, 94security element of an object, 75sequence of checking categories, 92user categories, 76
Protocolsautodial/master, 283
Protocols, autodial/nomaster, 283Proxies
access controlremoving, 274
Proxy access, 271access control, 270removing, 274setting up a proxy database for, 272to applications, 274to nodes, 274
Proxy accounts, 61, 271, 276as captive accounts, 275as restricted accounts, 145default, 63example, 275, 287general-access, 62maximum number allowed, 61multiple-user, 62naming, 63recommended restrictions, 274selecting from multiple, 63single-user, 62
Proxy database, 272setting up, 273
Proxy logins, 54, 61, 271access control, 271account, 271establishing and managing, 272NET$PROXY.DAT, 273NETPROXY.DAT, 273network applications, 271security benefits, 61
PSWAPM privilege, 314PURGE command, /ERASE qualifier, 107
QQueues
access granted by OPER privilege, 95ACL access rights, 112as protected objects, 78events audited, 112
privilege requirements, 112profile storage, 113protection code access rights, 112security elements of, 112template profiles, 112types of access, 112
RRead access
devices, 100files, 104global sections, 109granting through ACLs, 87granting through protection codes, 91logical name tables, 111queues
through ACLs, 112through protection codes, 112
resource domains, 113security class, 114volumes, 115
READALL privilege, 79, 94, 314Recall buffers, 60RECALL command, /ERASE qualifier, 60Receive passwords, 283Reconnection to processes, 170Records displaying holder of a rights identifier, 179Reference monitors, 35
applying to networks, 269concept in security, 35, 39implementation, 36requirements on, 36
Remote identifiers, 72Remote logins, 52
logging out, 65system passwords and, 147
REMOVE/IDENTIFIER command in Authorize utility,180
Removing proxy access, 274RENAME command
/INHERIT_SECURITY qualifier, 107RENAME command, /INHERIT_SECURITY qualifier,
107Reserved UIC group numbers, 71Resource attribute, 182, 191Resource attributes, 182, 191Resource domains, 78
events audited, 114privilege requirements, 113profile storage, 114security elements of, 113template profile, 113types of access, 113
Resource identifiers, 191as file owners, 105, 106
Resource monitoring, 252disabling, 252
Restricted accounts, 51, 143danger of process spawning, 141
370 Index
setting up, 138when to use, 137, 138
Rights databaseadding identifiers, 179assigning identifiers to users, 180creating and maintaining, 178displaying, 179removing identifiers and holders, 180
Rights databasesadding identifiers, 179assigning identifiers to users, 180creating and maintaining, 178displaying, 179removing identifiers and holders, 180
Rights list, access arranged by capability, 40Rights lists
access arranged by capability, 40Rights of users
displaying, 179RIGHTSLIST.DAT files
auditing, 229creating and maintaining, 179how UICs are stored, 72
RMS_FILEPROT system parameter, 106, 187, 190Routing initialization passwords, 281
SSave set (BACKUP), protection of, 200Save sets
encrypting, 224Screen clearing, 65Secondary passwords, 50
advantages, 148changing, 58changing expired, 58disadvantages, 50entering, 51login expiration, 51managing, 148minimum length, 51
SECSRV$CLIENT, reserved identifier, 292SECSRV$COMMUNICATION, reserved identifier, 292SECSRV$OBJECT, reserved identifier, 292Secure Sockets Layer (SSL), 33Secure terminal servers, 60, 170
password protection and, 60Security
assessing auditing requirements, 234clusterwide intrusion detection, 266data protection mechanisms, 75definition of levels, 28environmental factors, 29erasing data on disk, 107high-water marking, 107managing auditing, 247managing default protection and ownership, 187objects protected by system, 78operating system model, 35optimizing file security, 108
performance impactauditing, 237
Trojan horse programs, 109Security administrators
checklist for maintaining a secure system, 132cluster managers and, 261goals of, 27personal accounts, 130privilege requirements, 130role of, 127system passwords and, 50training users, 66, 130
Security alarms, 64disabling on system consoles, 239events to enable as, 229, 236events triggering, 65example of enabling events, 235sample messages, 227, 341
Security archive fileslosing the remote link to, 252
Security archive files, losing the remote link to, 252Security attacks, forms of, 27, 253Security audit event messages
changing disk transfer rate, 251controlling delivery to server, 249delaying delivery at startup, 249when to ignore, 242
Security audit log files, 39, 64advantages of, 237allocating disk space, 251changing location, 239changing message transfer rate, 251characteristics, 238creating, 238description, 238events to report, 236interactive analysis, 245maintaining, 238pre-extending, 252procedures, 238selecting records from, 244
Security audit reports, 241, 245analyzing suspicious activity, 242brief format, 244creating, 241defining contents of, 243, 244destination, 244detailed inspection, 245examples, 244, 245formats, 243, 244full format, 245rights identifiers in, 74routine inspections, 242scheduling, 242summary format, 245
Security auditing, 63, 255account and file access, 63adding ACEs to files, 63analyzing audit log files, 241
371
archive files, 241assessing site requirements, 234audit listener mailboxes, 241audit server databases, 247audit trails, 38capability objects, 98cluster considerations, 265common event flag clusters, 99controlling event messages, 249default auditing events, 39default characteristics, 247devices, 103directories, 107disabling auditing, 248disabling events, 229disabling resource monitoring, 252effective use, 241enabling auditing, 248enabling event classes, 229enabling events, 228error handling, 251, 252excluding processes from suspension, 250files, 63, 107global sections, 110granularity of events, 95high security needs, 28, 236logical name tables, 111low security needs, 28, 235managing the audit server, 247memory limitations and, 250messages, 64moderate security needs, 28, 235, 236object class enabled, 95overview, 227performance impact, 237queues, 112reporting object access, 95reporting object use, 74resource domains, 114security class objects, 115sending event messages to archive files, 240, 241sending event messages to mailboxes, 241sending event messages to operator terminals, 239synchronizing cluster time, 251volumes, 116
Security breaches, handling, 27, 257Security checklists
for designing a secure system, 41for maintaining a secure system, 132for training users, 130for users, 66
Security class object, 114, 115definition, 78events audited, 115profile storage, 115template profile, 115types of access, 114
Security featuresaccess controls, 69, 135
account duration, 58, 59, 136auditing, 63, 227, 255automatic password generation, 56, 146dialup retries, 55erase-on-allocate, 199erase-on-delete, 198erasure patterns, 107high-water marking, 199intrusion detection, 56, 148login class restrictions, 55, 136password changes, 56password expiration, 58, 150password protection, 59, 154password requirements, 51, 151password restrictions, 50, 146passwords, 146, 155protected subsystems, 291proxy accounts, 276proxy logins, 61, 272secondary passwords, 51, 58secure terminal servers, 60, 170security alarms, 64shift restrictions, 55system passwords, 50, 55
Security kernel, definition, 36Security levels, 28, 29
event monitoring and, 234high, 28, 63low, 28, 63medium, 28
Security management, 127for clusters, 261, 262managing audit log file, 265modifying cluster group number, 267modifying cluster password, 267policy development, 28, 127, 253protected objects
cluster-visible, 265databases, 266
synchronizing authorization data, 264SYSMAN requirements, 267
Security models, 35Security operator terminals, 239SECURITY privilege, 314
hidden ACEs and, 88Security problems
anonymity of network and dialup users, 136autologin accounts, reducing, 144categories of, 27disk scavenging, 107hardcopy terminal output, 66logging out, 65network access control strings, 60password detection, 57telephone system as, 258
Security profilesassigning to new devices, 102capability object, 97common event flag clusters, 98
372 Index
devices, 101displaying class defaults, 193files, 93, 104, 105global sections, 109in access evaluations, 79logical name tables, 111modification requirements, 79, 95objects, 75
ACLs, 76changing, 77contents, 75deleting ACLs, 89displaying, 77modifying class templates, 194origin of, 75owner element, 76protection codes, 76, 90
processes, 69displaying, 73, 74identifiers, 72privileges, 74UICs, 71
queues, 112resource domains, 113security class, 115users, 69
displaying, 73, 74identifiers, 72privileges, 74UICs, 71, 72
volumes, 116Security restrictions
captive command procedures, 142login class, 55on command usage, 198on mode of operation, 136shifts, 55, 136time-of-day, 55, 136
Security Server process, 174Security, clusterwide intrusion detection, 266Security-auditing ACEs
position in ACL, 88Security-auditing events, 65
based on security needs, 234classes of, 232default classes, 227, 229, 235disabling all classes, 236displaying, 229enabling all classes, 236enabling as alarms, 235enabling as audits, 235example, 229network, 270reporting, 229, 236, 237sending to audit log files, 238sending to listener mailboxes, 241sending to operator terminals, 239sending to remote archive files, 240suppressing privilege audits, 232
suppressing process control audits, 233system services for, 233
SECURITY.AUDIT$JOURNAL files, 243SECURITY_POLICY system parameter, 266Servers
audit, 247secure terminals, 60security, 174
SET AUDIT command/EXCLUDE qualifier, 250/INTERVAL qualifier, 251/LISTENER qualifier, 241/SERVER qualifier, 251/THRESHOLD qualifier, 251alarms, 346enabling security-relevant events, 228opening new log files, 238suggested auditing applications, 255
SET FILE command, /ERASE qualifier, 107SET HOST command, 52SET HOST/DTE command, using over the network, 283SET PASSWORD command, 56
/GENERATE qualifier, 56, 152/SECONDARY qualifier, 58/SYSTEM qualifier, 147/SYSTEM/GENERATE qualifier, 147automatic password generation, 56
SET PROCESS command, /PRIVILEGES qualifier, 74, 184SET PROTECTION/DEFAULT command, 187SET SECURITY command
/ACL qualifier, 88adding Identifier ACEs, 84deleting, 89deleting ACEs, 89example, 191replacing ACEs, 89
/AFTER qualifier, 89/CLASS qualifier, 78, 85/CLASS=DEVICE qualifier
, 201/COPY_ATTRIBUTE qualifier, 90/DEFAULT qualifier, 90, 286/DELETE qualifier, 89/LIKE qualifier, 90/OWNER qualifier, 77/PROTECTION qualifier, 77, 92
modifying codes, 92modifying for devices, 201
/REPLACE qualifier, 89changing object security profile, 77changing protection codes, 92copying ACLs, 90creating an ACL, 192deleting ACEs, 89example, 286managing site defaults, 193restoring defaults for files, 93setting default file protection, 191
SET TERMINAL command
373
/DISCONNECT qualifier, 170/HANGUP qualifier, 66/NOMODEM/SECURE qualifier, 171/SECURE qualifier, 170/SYSPWD qualifier, 147stopping password grabbers, 171using over the network, 282
SET VOLUME command/ERASE_ON_DELETE qualifier, 107, 198/NOHIGHWATER_MARKING qualifier, 108, 199/PROTECTION qualifier, 187
SET VOLUME command, /ERASE_ON_DELETE qualifier,107, 198
Set-Up key, 65SETPRV privilege, 315SHARE privilege, 315Shareable devices, access requirements, 101Shared files, considerations for a cluster system, 265Shift restrictions, 55SHMEM privilege, 315SHOW AUDIT command, 229, 247SHOW INTRUSION command, 172SHOW PROCESS command, 73
and WORLD privilege, 187SHOW PROTECTION command, 106SHOW SECURITY command, 88
displaying security profiles of objects, 77displaying site defaults, 193displaying the object's class, 78
SHOW USERS command, disconnected jobs and, 66SHOW/IDENTIFIER command in Authorize utility, 179SHOW/RIGHTS command in Authorize utility, 179Sign-on, single, 155Single sign-on, 155Site security, 29Social engineering as security problem, 27SOGW user category abbreviation, 91Spawning processes, security implications in restricted
accounts, 141Spooled devices, access requirements, 100SSL, 33STARTNET.COM command procedure, 283Subjects in security models, 35, 36Submit access, 112Subprocesses
analyzing audit messages, 242increase in auditing events, 237
Subsystem ACEs, 293, 294, 295format, 294
subsystem ACEs, 181Subsystem attribute, 183Surveillance guidelines, 132Synchronization, password, 160SYS$ACM system service, 163SYS$ANNOUNCE logical name, 168SYS$NODE logical name, 169SYS$PASSWORD_HISTORY_LIFETIME, 153SYS$PASSWORD_HISTORY_LIMIT, 153SYS$SINGLE_SIGNON logical name, 157
SYS$SINGLE_SIGNON logical name bits, 161SYS$WELCOME logical name, 169SYSALF, ALF (automatic login facility) file, 170SYSECURITY.COM command procedure, 239SYSGBL privilege, 110, 315SYSLCK privilege, 113, 315SYSNAM privilege, 111, 315
modifying system operations, 74overriding access controls, 79queue management, 112
SYSPRV privilege, 79, 94giving rights of system user, 91tasks requiring, 316
SYSTARTUP_VMS.COM command procedure, 282System failures
disposing of hardcopy output, 66System failures, disposing of hardcopy output, 66System files
adding ACLs, 197Alpha default protection, 196auditing recommendations, 256benefiting from ACLs, 256default protection, 196, 319protecting, 196protection codes and ownership, 319recommended, 262required, 262
System Generation utility (SYSGEN), auditing parametermodifications, 232
System Management utility (SYSMAN)managing clusters, 267modifying cluster security data, 267modifying LGI parameters, 262
System managersassessing auditing requirements, 234
System parametersauditing modification of, 232controlling disconnected processes, 169defining system users (security category), 95
System passwords, 50causing login failures, 55disadvantages, 148entering, 50guidelines, 147minimum length requirement, 152modifying, 147recommended change frequency, 150setting up, 147where stored, 147
System services, auditing event information, 233System users (security category), 76, 95
defining with MAXSYSGROUP parameter, 91qualifications for, 91
Systemscontrolling access to, 52controlling use of, 50
SYSUAF.DAT filesaccount expiration, 59auditing modifications to, 229
374 Index
LOCKPWD flag, 51login class restrictions, 55modifications and security audit, 65, 232normal protection, 155password storage, 37privileges and, 184, 303recording privileges, 74synchronization with rights database, 179
SYSUAFs (system user authorization files)marking for external authentication, 157
TTampering with system files, detecting, 256Tapes
default security elements, 101managing security profiles, 102
TASK objects, 278Template devices, security elements of, 102Terminal emulator, 284Terminal emulators, 284Terminal lines, 283Terminals
breaking dialup connection, 66clearing DECwindows screen, 61clearing the screen, 60, 65controlling access, 50, 147default security elements, 101dialup login, 52failing to respond, 51hardcopy
disposing of output, 66hardcopy, disposing of output, 66limiting access, 201lines for modems, security of, 201logout considerations, 65modifying security profiles, 102port, 283requiring a system password, 55security alarms and, 239session logging, 131system password
requirement for, 50system password, requirement for, 50usage restrictions, 201virtual, 53, 66, 99, 170, 282
Timeauditing changes to system time, 232synchronizing cluster time, 251
Time-of-day login restrictions, 55Time-stamp, synchronizing in cluster, 251Time-stamps
synchronizing in cluster, 251TMPMBX privilege, 317Training
for users, importance to security, 130Training of users, importance to security, 130Trojan horse programs, 109, 195TTY_DEFCHAR2 system parameter
disabling virtual terminals, 170
enabling system passwords for remote logins, 147TTY_TIMEOUT system parameter, setting reconnection
time, 170
UUAFs (user authorization files), 49
auditing modifications to, 229enabling auditing through, 228, 231LOCKPWD flag, 51login class restrictions, 55modifications and security audit, 65, 232MODIFY user/FLAG=AUDIT, 231, 237normal protection, 155password storage, 37performance impact of enabling auditing, 237privileges and, 184, 303record of last login, 63recording privileges, 74synchronization with rights database, 179
UIC groupsdesign limitations, 176designing, 175impact on user privileges, 175
UIC identifiersdeleting when employee leaves, 180example, 74, 87
UICs (user identification codes), 37, 71adding to rights database, 179alphanumeric, 71changing an object's, 76format, 71group restrictions, 71guidelines for creating, 72numeric, 71object access evaluations and, 79process, 72storage of, 72uniqueness requirement for clustered systems, 265zero, 79
Unshareable devices, access requirements, 101UPGRADE privilege, 317Use access, 97User accounts, 131
security considerations, 137User authorization
account expiration, 59login class restrictions, 55privilege use, 74shift restrictions, 55
User irresponsibilityas security problem, 27training as antidote, 130
User name mapping, 160User names
as identifiers, 36, 73User names as identifiers, 36, 73User penetration as security problem, 27User probing as security problem, 27User training, 130
375

User-written system servicesreplacing with protected subsystems, 291
Usersaccess through ACEs, 85displaying process rights identifiers, 73displaying rights, 179file security and, 108granting privileges, 184introduction to system, 130protection code categories, 91requesting access, 79security categories of, 76, 91security profiles of, 69setting default object protection, 187training, 130
VVerification using two passwords, 148Virtual terminals, 170, 282
disabling, 53disconnected processes and, 66LOCAL device, 99logging out of, 66
Viruses, 195VMS$OBJECTS.DAT file, 266Volatile database, network, 283Volatile databases
network, 283VOLPRO privilege, 116, 317Volumes
access requirements, 101as protected objects, 78auditing mounts or dismounts, 232erasing data, 198events audited, 116foreign
access requirements, 101privilege requirements, 116profile storage, 116protection, 115security elements of, 115template profile, 116types of access, 115
VT100-series terminalsclearing screen, 65
VT100-series terminals, clearing screen, 65VT200-series terminals
clearing screen, 65VT200-series terminals, clearing screen, 65
WWeekday login restrictions, 55Welcome messages, 53
security disadvantages, 169Wildcard characters
in ADD/IDENTIFIER command, 180in SHOW/RIGHTS command, 179
Work restrictions, 136Workstations
clearing screen, 65default security elements, 101
WORLD privilege, 318impact on SHOW PROCESS command, 187
World users (security category), 76, 91Write access
devices, 100files, 104global sections, 109granting through ACLs, 87granting through protection codes, 91logical name tables, 111resource domains, 113security class, 114volumes, 115
ZZero UICs, protection checking and, 79
376 Index