hp creative scrapbook assistant - hp® official siteh10032. · hp creative scrapbook assistant...
TRANSCRIPT
i
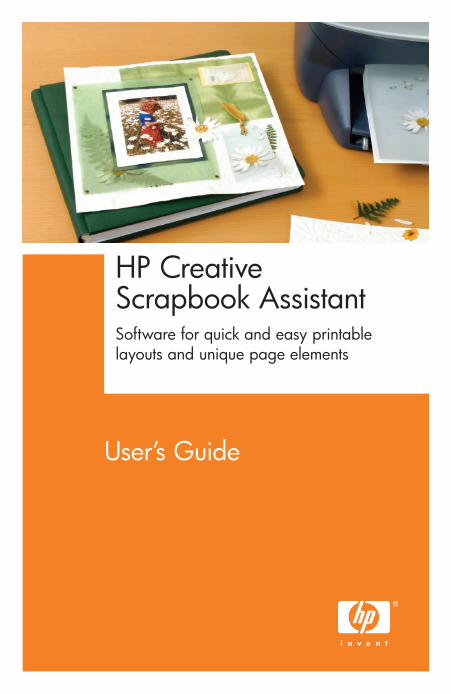
HP CreativeScrapbook AssistantSoftware for quick and easy printablelayouts and unique page elements
User’s Guide

ii 1
ii 1
Contents
Introduction . . . . . . . . . . . . . . . . . . . . . . . . . . . . . . . . . . 4
About this User’s Guide . . . . . . . . . . . . . . . . . . . . . 5
Visit the HP Scrapbooking Web site . . . . . . . . . . . . . 6
Getting started . . . . . . . . . . . . . . . . . . . . . . . . . . . 6
Installing and starting the program . . . . . . . . . . . . . . . . . 7
Windows® installation . . . . . . . . . . . . . . . . . . . . . . 7
Starting the program next time . . . . . . . . . . . . . . 8
Macintosh® installation . . . . . . . . . . . . . . . . . . . . . . 8
Starting the program . . . . . . . . . . . . . . . . . . . . . 8
Getting help . . . . . . . . . . . . . . . . . . . . . . . . . . . . . . . . . . 8
The Help menu: Help and software hints. . . . . . . . . . 8
Contacting HP Customer Care. . . . . . . . . . . . . . . . 10
HP support over the Internet . . . . . . . . . . . . . . . . . 10
HP support by phone . . . . . . . . . . . . . . . . . . . . . . 11
Let’s start scrapping! . . . . . . . . . . . . . . . . . . . . . . . . . . . 12
Software demo . . . . . . . . . . . . . . . . . . . . . . . . . . 12
Overview of the program . . . . . . . . . . . . . . . . . . . 13
Overview of the main window. . . . . . . . . . . . . . . . 14
Contextual menus . . . . . . . . . . . . . . . . . . . . . . 14
Working with items . . . . . . . . . . . . . . . . . . . . . . . . . . . . 18
Working with Themes and Projects. . . . . . . . . . . . . 18
Working with Shapes . . . . . . . . . . . . . . . . . . . . . . 20
Working with Images . . . . . . . . . . . . . . . . . . . . . . 21
Working with Text . . . . . . . . . . . . . . . . . . . . . . . . 22
2
Text and shapes . . . . . . . . . . . . . . . . . . . . . . . 23
Working with Phrases. . . . . . . . . . . . . . . . . . . . . . 24
Working with Frames . . . . . . . . . . . . . . . . . . . . . . 24
Working with Clip Art . . . . . . . . . . . . . . . . . . . . . 25
Working with Backgrounds . . . . . . . . . . . . . . . . . . 26
Working with Pages . . . . . . . . . . . . . . . . . . . . . . . 27
Features up close . . . . . . . . . . . . . . . . . . . . . . . . . . . . . 28
Creating, saving, and printing pages . . . . . . . . . . . 28
Importing your own elements. . . . . . . . . . . . . . . . . 30
Creating new shapes . . . . . . . . . . . . . . . . . . . . . . 34
Selecting items and text . . . . . . . . . . . . . . . . . . . . 36
Resizing and rotating items . . . . . . . . . . . . . . . . . . 38
Setting and matching colors . . . . . . . . . . . . . . . . . 39
Changing transparency . . . . . . . . . . . . . . . . . . . . 41
Cutting, copying, pasting, and duplicating . . . . . . . 43
Working with layers . . . . . . . . . . . . . . . . . . . . . . . 44
Aligning items using rulers and guides . . . . . . . . . . 46
Exporting items, pages, themes, and projects . . . . . 47
Now it’s your turn . . . . . . . . . . . . . . . . . . . . . . . . . . . . . 51
HP research participation . . . . . . . . . . . . . . . . . . . . . . . 52
Notices . . . . . . . . . . . . . . . . . . . . . . . . . . . . . . . . . . . . . 53
Hewlett-Packard company notices . . . . . . . . . . . . . 53
Acknowledgments . . . . . . . . . . . . . . . . . . . . . . . . 53
2
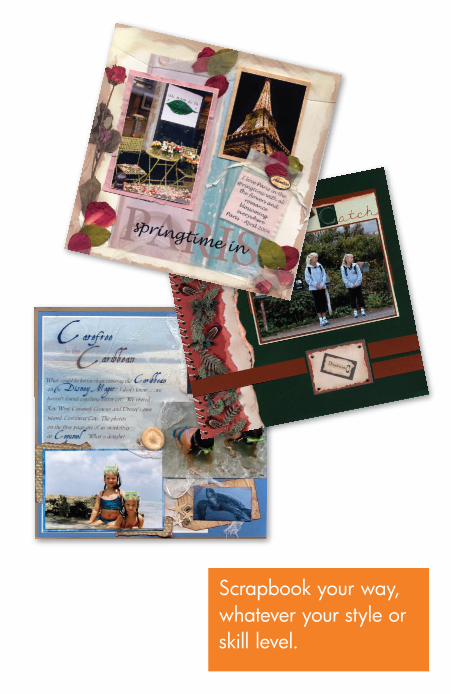
Scrapbook your way, whatever your style or skill level.

4 5
Introduction
Get ready for more scrapbooking fun than ever! HP Creative Scrapbook Assistant gives you the tools and technology to be even more creative in preserving photos, memories, and personal treasures—scrapbooking your way.
HP Creative Scrapbook Assistant will save you time as it enhances your creativity.
• Create and alter scrapbooking elements easily using a wide variety of tools. Create custom elements and embellishments, such as a frame that is the exact size and matching color for a photo or shape in one of your scrapbooks.
• Design master page layouts. Make a blueprint of a page, print it out, and then create the page by hand. Later you can share your layouts with others.
• Create pages from scratch or use ready-made templates to create scrapbook pages, as well as greeting cards, sticker pages, wrapping paper, and more. Email your
pages to friends and relatives, and print multiple copies to share with others.• Organize and store
your items and finished work digitally using a visual filing system. As scrap-booking continues to grow in popularity, many items will become available as electronic files.
4 5
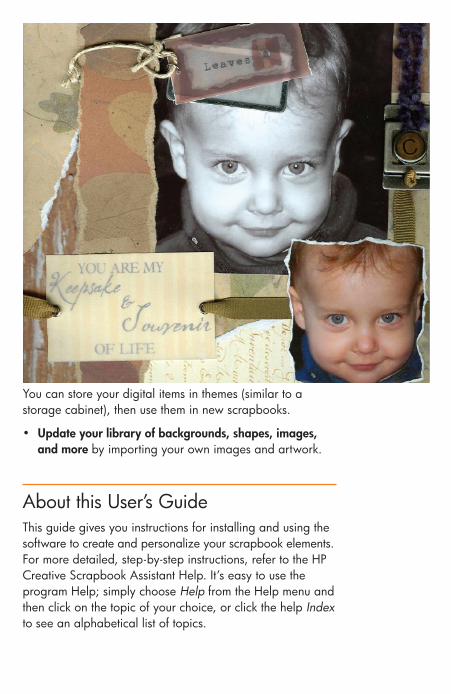
You can store your digital items in themes (similar to a storage cabinet), then use them in new scrapbooks.
• Update your library of backgrounds, shapes, images, and more by importing your own images and artwork.
About this User’s GuideThis guide gives you instructions for installing and using the software to create and personalize your scrapbook elements. For more detailed, step-by-step instructions, refer to the HP Creative Scrapbook Assistant Help. It’s easy to use the program Help; simply choose Help from the Help menu and then click on the topic of your choice, or click the help Index to see an alphabetical list of topics.
6 7
Visit the HP Scrapbooking Web sitewww.hp.com/go/scrapbooking
Be sure to visit the HP Scrapbooking Web site, where you can view the work of other scrapbooking artists and get inspired by fresh ideas and exciting new designs.
View the software demoThe HP Creative Scrapbook Assistant demo will show you expert techniques for scrapbooking your way. You can find the demo in the Help menu at the top of your window.
Getting startedThe fastest way to begin using HP Creative Scrapbook Assistant is to:
1. Follow the step-by-step instructions in this guide for installing the software, and then watch the demo.
2. Read the Overview sections to familiarize yourself with the main window and features of HP Creative Scrapbook Assistant.
3. Use the simple procedures and handy tips in this guide to create scrapbook elements that you can use in your own layouts.
4. Refer to the program help, located in the Help menu at the top of the main HP Creative Scrapbook Assistant window.
6 7
Note: Screen illustrations shown in this booklet were created using HP Creative Scrapbook Assistant on the Microsoft® Windows® XP operating system. The screens you see on your computer may look a bit different, but the program functions the same. Please follow our instructions for creating scrapbook elements, even if your screen looks different.
Installing and starting the program
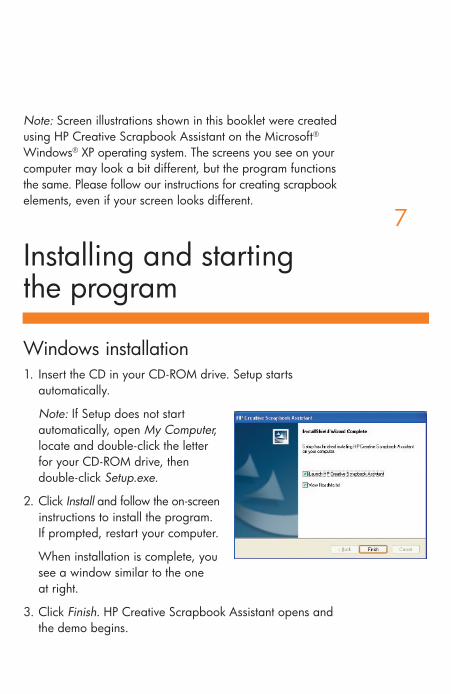
Windows installation1. Insert the CD in your CD-ROM drive. Setup starts
automatically.
Note: If Setup does not start automatically, open My Computer, locate and double-click the letter for your CD-ROM drive, then double-click Setup.exe.
2. Click Install and follow the on-screen instructions to install the program. If prompted, restart your computer.
When installation is complete, you see a window similar to the one at right.
3. Click Finish. HP Creative Scrapbook Assistant opens and the demo begins.
8 9
Starting the program next timeChoose the Start menu, then choose All Programs > HP Creative Scrapbook Assistant > HP Creative Scrapbook Assistant.
Macintosh installation1. Insert the CD into your CD-ROM drive.
Note: If the installer does not start automatically, double-click the HP Creative Scrapbook Assistant CD icon on your desktop. Then double-click the installer icon.
2. Click Install. Install the program in your Applications folder, and then view the demo.
Starting the programIn the Applications folder, double-click the HP Creative Scrapbook Assistant icon.
Getting help
The Help menu: Help and software hintsAs you familiarize yourself with HP Creative Scrapbook Assistant, you’ll find the Help menu to be a handy partner. Step-by-step instructions for using the features of the program are just a click away. You do not need to be connected to the Internet to view help. Simply choose Help from the Help menu at the top of the HP Creative Scrapbook Assistant window. Your Web browser opens and displays the first page of help and a list of software hints. You can read the information on your screen or print it out for easy reference.
8 9
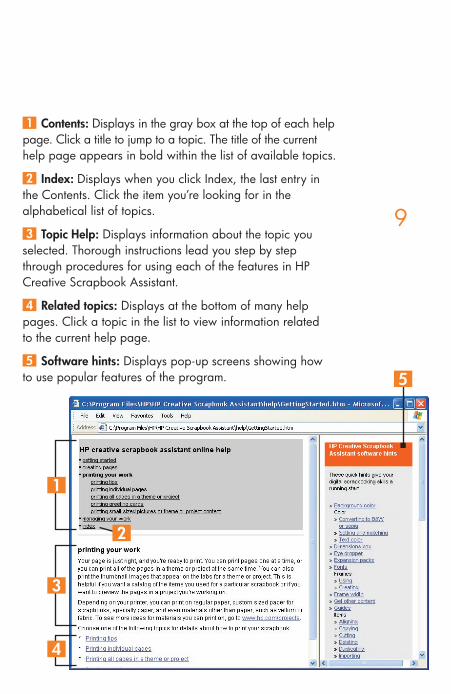
1 Contents: Displays in the gray box at the top of each help page. Click a title to jump to a topic. The title of the current help page appears in bold within the list of available topics.
2 Index: Displays when you click Index, the last entry in the Contents. Click the item you’re looking for in the alphabetical list of topics.
3 Topic Help: Displays information about the topic you selected. Thorough instructions lead you step by step through procedures for using each of the features in HP Creative Scrapbook Assistant.
4 Related topics: Displays at the bottom of many help pages. Click a topic in the list to view information related to the current help page.
5 Software hints: Displays pop-up screens showing how to use popular features of the program. 5
1
3
4
2
10
Contacting HP Customer CareThe HP Customer Care Center provides expert advice on using and solving problems with HP Creative Scrapbook Assistant. The support process works most effectively if you look for assistance in this order:
1. Use the program help, located in the Help menu at the top of your HP Creative Scrapbook Assistant window.
2. For information regarding your printer, refer to the printer documentation.
3. Use the Internet any time of the day to check HP’s Web support pages for product help, or to send HP an email.
4. Contact HP Customer Care by phone during regular business hours.
Please note that email and phone support for HP Creative Scrapbook Assistant is available only in English.
HP support over the InternetIf you have access to the Internet, you can obtain tips and support information about your software, as well as support for any HP product.
• For the HP Creative Scrapbook Assistant support page, go to: www.hp.com/support and choose HP support for the U.S. (English). On the next page, select see support and troubleshooting information and enter HP Creative Scrapbook Assistant, then click the >> button to display the support page.
• For support on any HP product, visit www.hp.com/support.
10 11
• For support by email, enter your question on the Web form linked to the HP Creative Scrapbook Assistant support pages by clicking on contact HP. You can expect a direct reply from an HP support technician who will answer your question by email. Please note that email support for HP Creative Scrapbook Assistant is available only in English.
HP support by phoneHP provides telephone support free of charge. Please note that standard phone charges may apply.
Before calling, remember to try one of the other free support options listed above. If you still need to call for assistance, you can get faster service if you:
• Call from a phone where you can be in front of your computer.
• Keep notes so you can describe how you’ve tried to solve the problem, and the messages displayed around the time the situation occurred.
• Be prepared to identify your computer’s operating system, and, if the problem is a printing issue, the printer manufacturer and model number.
• Note whether this has happened before and whether you can re-create the problem.
When you’re ready, contact the HP Customer Care Center at 1-800 HP INVENT (1-800-474-6836) and say “HP Creative Scrapbook Assistant” when prompted for your complete product name. Please note that phone support for the HP Creative Scrapbook Assistant is available only in English.
12
Let’s start scrapping!
This guide will help you start using HP Creative Scrapbook Assistant right away. As you follow the instructions, try experimenting by choosing menu items and clicking on tabs, task buttons, and format options to see what happens. The more you explore the possibilities, the faster you will learn how to use the software to expand your own creativ-ity. Soon you will be using HP Creative Scrapbook Assistant to create more imaginative scrapbook pages in less time than ever.
And don’t forget to visit www.hp.com/go/scrapbooking, where you can browse and download inspiring projects.
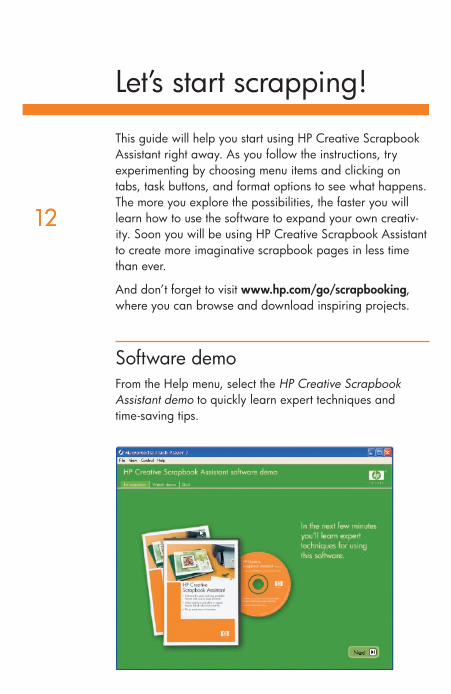
Software demoFrom the Help menu, select the HP Creative Scrapbook Assistant demo to quickly learn expert techniques and time-saving tips.
12
12 13
Overview of the programHP Creative Scrapbook Assistant adds a whole new level of creativity to your scrapbooking toolkit, with digital tools that help you to plan your scrapbooks, import, manipulate, and print the elements you will use, and then archive or share your artwork.
HP Creative Scrapbook Assistant offers loads of fun ideas and time-saving elements, including:
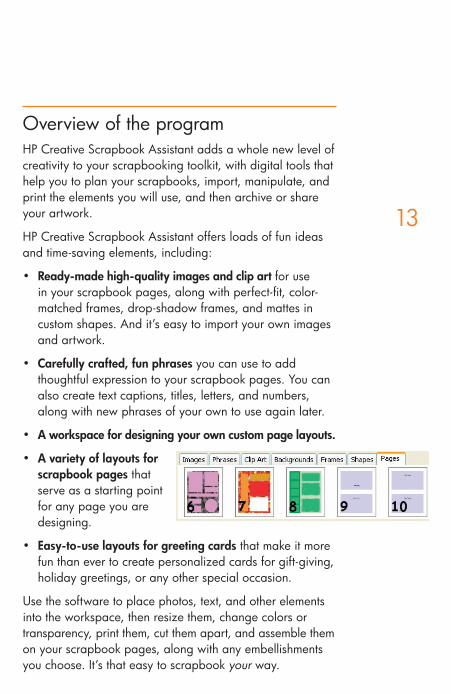
• Ready-made high-quality images and clip art for use in your scrapbook pages, along with perfect-fit, color-matched frames, drop-shadow frames, and mattes in custom shapes. And it’s easy to import your own images and artwork.
• Carefully crafted, fun phrases you can use to add thoughtful expression to your scrapbook pages. You can also create text captions, titles, letters, and numbers, along with new phrases of your own to use again later.
• A workspace for designing your own custom page layouts.
• A variety of layouts for scrapbook pages that serve as a starting point for any page you are designing.
• Easy-to-use layouts for greeting cards that make it more fun than ever to create personalized cards for gift-giving, holiday greetings, or any other special occasion.
Use the software to place photos, text, and other elements into the workspace, then resize them, change colors or transparency, print them, cut them apart, and assemble them on your scrapbook pages, along with any embellishments you choose. It’s that easy to scrapbook your way.
14 15
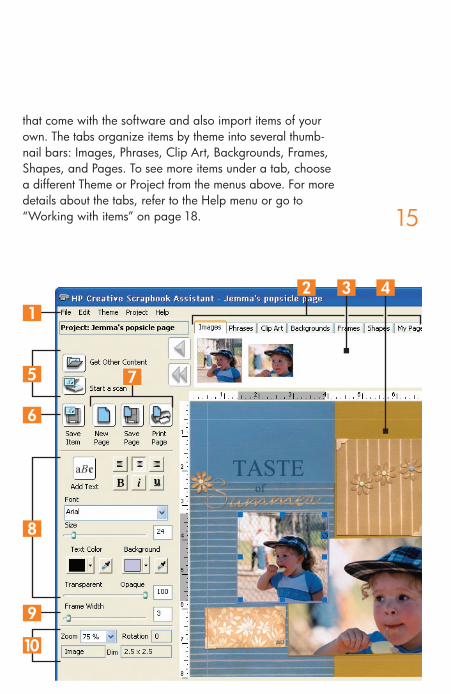
Overview of the main windowThe main window displays frequently used features so you can quickly start using the software.
1 MenusAs with most software programs, HP Creative Scrapbook Assistant organizes menu functions into logical categories: File, Edit, Theme, Project, and Help.
Scrapbooking items included with the software are organized into “Themes” for easy access. “Projects” offer you a place to store your own artwork and custom layouts.
Custom preferences let you set up your working environment to suit your tastes. You can toggle settings that display your font list as actual font styles, display margin guides on your workspace, and specify inches or centimeters for your ruler measurements. The Preferences settings are available in the
Edit menu in Windows, or in the HP Creative Scrapbook Assistant menu on the Macintosh.
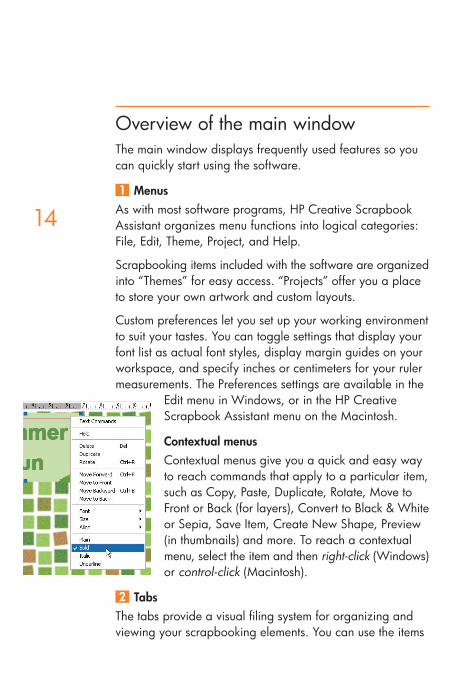
Contextual menusContextual menus give you a quick and easy way to reach commands that apply to a particular item, such as Copy, Paste, Duplicate, Rotate, Move to Front or Back (for layers), Convert to Black & White or Sepia, Save Item, Create New Shape, Preview (in thumbnails) and more. To reach a contextual menu, select the item and then right-click (Windows) or control-click (Macintosh).
2 TabsThe tabs provide a visual filing system for organizing and viewing your scrapbooking elements. You can use the items
14 15
8
6
5
1
9
10
2 3 4
7
that come with the software and also import items of your own. The tabs organize items by theme into several thumb-nail bars: Images, Phrases, Clip Art, Backgrounds, Frames, Shapes, and Pages. To see more items under a tab, choose a different Theme or Project from the menus above. For more details about the tabs, refer to the Help menu or go to “Working with items” on page 18.
16 17
3 Thumbnail barsThumbnail bars for each tab offer you a view of the items available for your use in a particular theme. You can preview a larger version of a thumbnail before you place the item on your workspace. For more details about the thumbnail bars, refer to the Help menu or go to “Working with items” on page 18.
4 WorkspaceConsider the workspace an extension of your worktable at home or wherever you put together your scrapbook pages. Use it to assemble and manipulate elements, draw a design to use as a blueprint or template, or try out different ideas before you print out your pages.
5 Import tools
Get Other Content/Edit Phrases/Create a New Shape/Get Other PagesThis button allows you to import your own images, frames, clip art, backgrounds, and pages. When you select the Phrases tab, this button changes to Edit Phrases. When you select the Shapes tab, this button changes to Create a New Shape. When you select the Pages tab, this button changes to Get Other Pages.
Start a ScanIf you have a scanner connected to your computer, this button makes it easy to scan items and place them on your workspace without having to use other programs.
6 Save ItemSave an item to a project or theme to use again at a later time or to share with others. You can use the Save Item button, or you can choose Save Item to Project or Save Item
16 17
to Theme from the File menu, or by right-clicking (Windows) or control-clicking (Macintosh) the item. This is a great way to save images, clip art, backgrounds, frames, shapes, or items that you scanned or added from a file or disk.
7 Page tools
Use the New Page, Save Page, and Print Page buttons or select from the File menu to work with pages.
8 Formatting toolsThe formatting tools make it easy to change a selected item’s alignment, style, font, size, color, background, and transparency. (See “Selecting items and text” on page 36.)
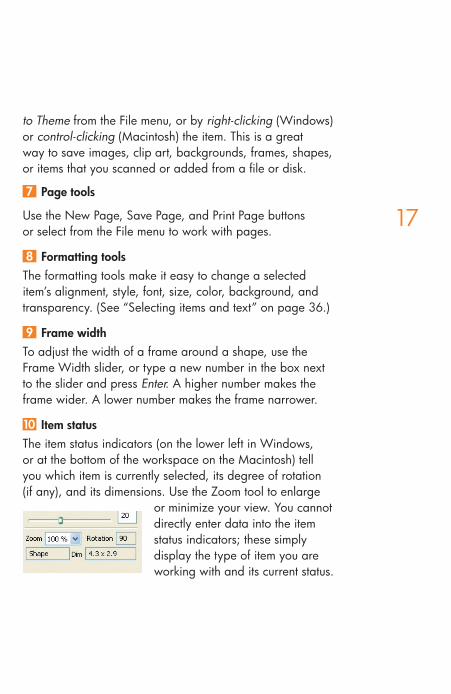
9 Frame width To adjust the width of a frame around a shape, use the Frame Width slider, or type a new number in the box next to the slider and press Enter. A higher number makes the frame wider. A lower number makes the frame narrower.
Item statusThe item status indicators (on the lower left in Windows, or at the bottom of the workspace on the Macintosh) tell you which item is currently selected, its degree of rotation (if any), and its dimensions. Use the Zoom tool to enlarge
or minimize your view. You cannot directly enter data into the item status indicators; these simply display the type of item you are working with and its current status.
18 19
Working with items
When you click one of the tabs above the workspace, the thumbnail bar displays the items available in the currently selected theme or project. You can add your own items to the thumbnails provided with the software.
To see more items, choose a different theme or project, or choose a different tab. To scroll through the thumbnails:
• Click the single arrows to the left or right of the thumbnail bar to scroll one at a time.
• Click the double arrows to view another group of thumbnails.
Tip: Right-click (Windows) or control-click (Macintosh) a thumbnail and choose Preview to see it close up.
Working with Themes and ProjectsUse Themes and Projects to organize scrapbooking items. Here’s how they work.
ThemesThe themes included with HP Creative Scrapbook Assistant contain collections of professional-quality items to use in your scrapbook pages. You’ll find images, phrases, clip art, frames, backgrounds, shapes, and pages. You can save items in a theme and create your own themes to store items until later.
When you select a theme, the program displays thumbnails under each tab. You can choose any theme you like while you are working with scrapbook elements, using items from
18 19
various themes as you desire. Details are available for some themes. If there is more information to view, you will see a More Info button to the left of the tabs.
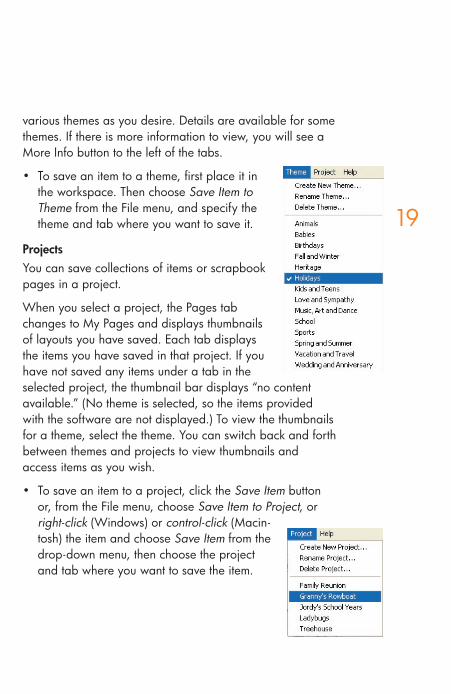
• To save an item to a theme, first place it in the workspace. Then choose Save Item to Theme from the File menu, and specify the theme and tab where you want to save it.
ProjectsYou can save collections of items or scrapbook pages in a project.
When you select a project, the Pages tab changes to My Pages and displays thumbnails of layouts you have saved. Each tab displays the items you have saved in that project. If you have not saved any items under a tab in the selected project, the thumbnail bar displays “no content available.” (No theme is selected, so the items provided with the software are not displayed.) To view the thumbnails for a theme, select the theme. You can switch back and forth between themes and projects to view thumbnails and access items as you wish.
• To save an item to a project, click the Save Item button or, from the File menu, choose Save Item to Project, or right-click (Windows) or control-click (Macin-tosh) the item and choose Save Item from the drop-down menu, then choose the project and tab where you want to save the item.
20 21
Working with Shapes
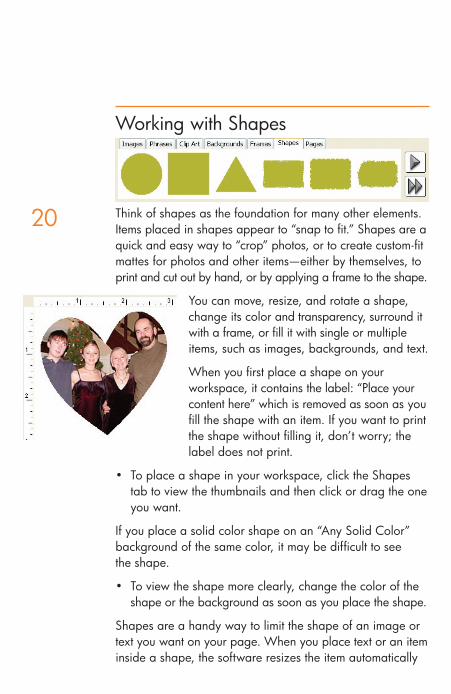
Think of shapes as the foundation for many other elements. Items placed in shapes appear to “snap to fit.” Shapes are a quick and easy way to “crop” photos, or to create custom-fit mattes for photos and other items—either by themselves, to print and cut out by hand, or by applying a frame to the shape.
You can move, resize, and rotate a shape, change its color and transparency, surround it with a frame, or fill it with single or multiple items, such as images, backgrounds, and text.
When you first place a shape on your workspace, it contains the label: “Place your content here” which is removed as soon as you fill the shape with an item. If you want to print the shape without filling it, don’t worry; the label does not print.
• To place a shape in your workspace, click the Shapes tab to view the thumbnails and then click or drag the one you want.
If you place a solid color shape on an “Any Solid Color” background of the same color, it may be difficult to see the shape.
• To view the shape more clearly, change the color of the shape or the background as soon as you place the shape.
Shapes are a handy way to limit the shape of an image or text you want on your page. When you place text or an item inside a shape, the software resizes the item automatically
20 21
while maintaining the original proportions. If the item does not fit the exact shape, it can appear “cropped.” You can adjust this by moving or resizing the item within the shape.
Tip: When you move your cursor over the border of a shape, it becomes highlighted to show that the item will fill the shape and resize (or “snap”) to fit. If you want to place an item near a shape but not inside it, don’t release the mouse button if the shape is highlighted. If you’ve already placed the item inside the shape, you can select Undo from the Edit menu, or double-click to select the item and drag it outside the shape.
Note: If you have applied a frame to a shape or filled a shape with an image, the software treats these as layered items. To make adjustments to any of the layers, you must first select it. (See “Selecting items” and “Selecting shapes” on page 36 and also “Working with layers” on page 44.) You can also save a shape as a new image, clip art, frame, or background, or save images and clip art as new shapes.
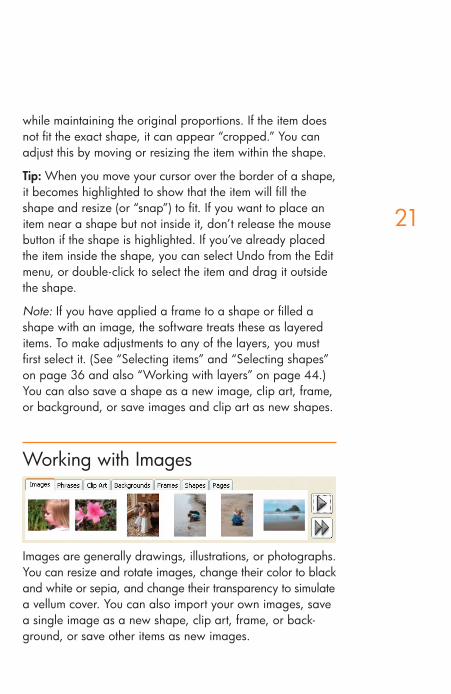
Working with Images
Images are generally drawings, illustrations, or photographs. You can resize and rotate images, change their color to black and white or sepia, and change their transparency to simulate a vellum cover. You can also import your own images, save a single image as a new shape, clip art, frame, or back-ground, or save other items as new images.
22 23
• To place an image in your workspace, click the Images tab to view the thumbnails and then click or drag the one you want.
Placing a shape in your workspace and then putting the image inside the shape allows you to frame the image. Note that if you move an image onto a shape, the software resizes it automatically and may appear to “crop” the image. You can adjust this by moving or resizing the image within the shape. (See “Selecting items and text” on page 36.)
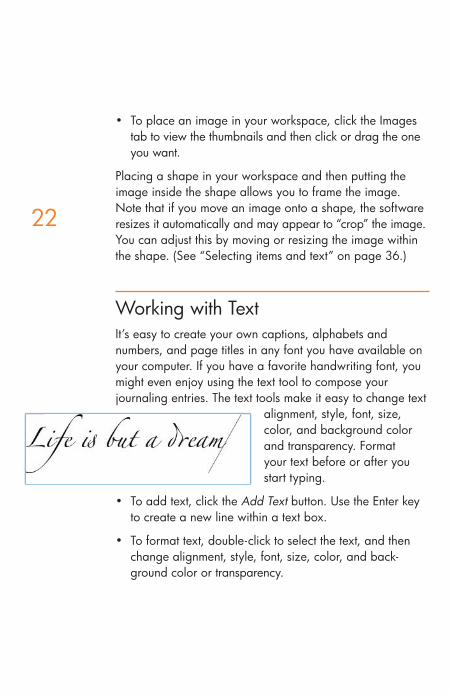
Working with TextIt’s easy to create your own captions, alphabets and numbers, and page titles in any font you have available on your computer. If you have a favorite handwriting font, you might even enjoy using the text tool to compose your journaling entries. The text tools make it easy to change text
alignment, style, font, size, color, and background color and transparency. Format your text before or after you start typing.
• To add text, click the Add Text button. Use the Enter key to create a new line within a text box.
• To format text, double-click to select the text, and then change alignment, style, font, size, color, and back-ground color or transparency.
22 23
• To include text from another application, simply copy and paste it into a text box.
• To reuse your text in other projects, save it in the Phrases tab, in the theme or project of your choice.
Note: The text tools modify all of the text in a text box. For example, you cannot use two font sizes or have only one word in bold in the same text box.
Text and shapesWhen you place a text box in a shape, the text box background colors are independent from the color of the shape.
• To avoid having the text box color conflict with the background, select the text box and move the transparency slider to “0” or coordinate the colors of the text background and the shape background.
Placing a text box inside a shape makes the text align to the top and flow, as closely as possible, to the outline of the shape.
• To align or center text vertically inside a shape, move it by using the mouse or your arrow keys.
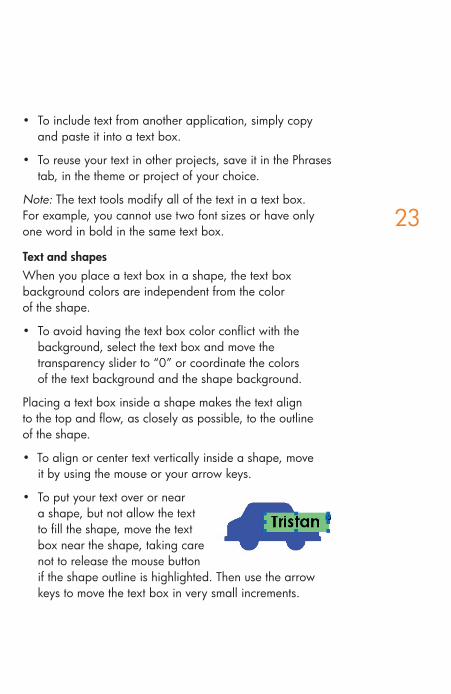
• To put your text over or near a shape, but not allow the text to fill the shape, move the text box near the shape, taking care not to release the mouse button if the shape outline is highlighted. Then use the arrow keys to move the text box in very small increments.
24 25
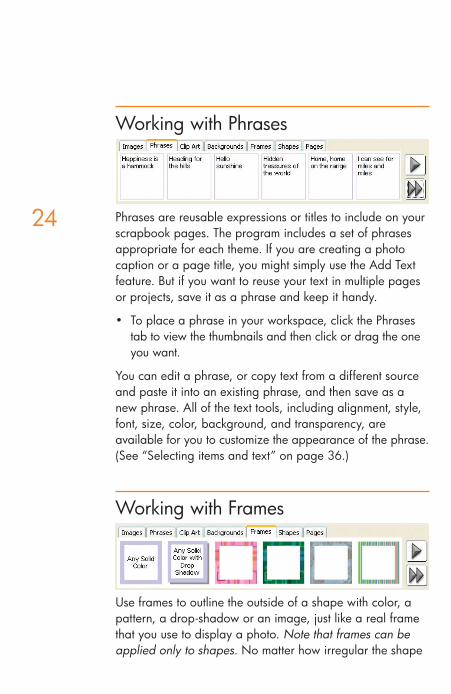
Working with Phrases
Phrases are reusable expressions or titles to include on your scrapbook pages. The program includes a set of phrases appropriate for each theme. If you are creating a photo caption or a page title, you might simply use the Add Text feature. But if you want to reuse your text in multiple pages or projects, save it as a phrase and keep it handy.
• To place a phrase in your workspace, click the Phrases tab to view the thumbnails and then click or drag the one you want.
You can edit a phrase, or copy text from a different source and paste it into an existing phrase, and then save as a new phrase. All of the text tools, including alignment, style, font, size, color, background, and transparency, are available for you to customize the appearance of the phrase. (See “Selecting items and text” on page 36.)
Working with Frames
Use frames to outline the outside of a shape with color, a pattern, a drop-shadow or an image, just like a real frame that you use to display a photo. Note that frames can be applied only to shapes. No matter how irregular the shape
24 25
is, the frame instantly fits around the shape. Using frames, you can apply double, triple, or more mattes to an item inside a shape.
• To frame an item, start with a shape, fill the shape with your selected item, and then click or drag the frame of your choice.
Tip: You can make a shape slightly smaller than a page and then apply a frame to create a border for the entire page.
Use the Frame Width tool to widen or narrow a frame before or after you apply it to a shape, and use the Transparency tool to adjust a frame’s transparency. (See “Selecting items and text” on page 36.) You can also change a frame’s color to another color (if it’s a solid-color frame), or to black and white or sepia. You can import your own frames, save a frame as a new image, clip art, or background, or save other items as new frames.
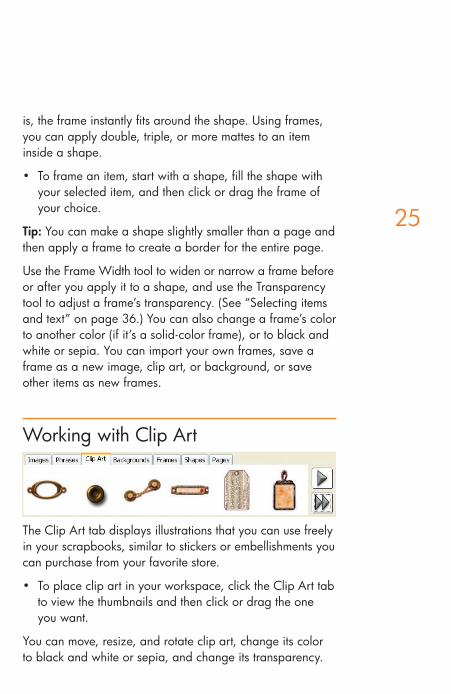
Working with Clip Art
The Clip Art tab displays illustrations that you can use freely in your scrapbooks, similar to stickers or embellishments you can purchase from your favorite store.
• To place clip art in your workspace, click the Clip Art tab to view the thumbnails and then click or drag the one you want.
You can move, resize, and rotate clip art, change its color to black and white or sepia, and change its transparency.
26 27
You can also import your own clip art, save clip art as a new image, frame, background, or shape, or save other items as new clip art. When compared with images, clip art items are generally smaller in file size.
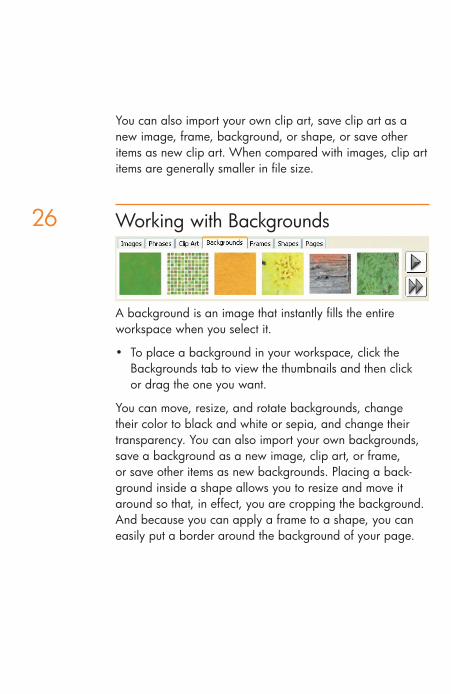
Working with Backgrounds
A background is an image that instantly fills the entire workspace when you select it.
• To place a background in your workspace, click the Backgrounds tab to view the thumbnails and then click or drag the one you want.
You can move, resize, and rotate backgrounds, change their color to black and white or sepia, and change their transparency. You can also import your own backgrounds, save a background as a new image, clip art, or frame, or save other items as new backgrounds. Placing a back-ground inside a shape allows you to resize and move it around so that, in effect, you are cropping the background. And because you can apply a frame to a shape, you can easily put a border around the background of your page.
26 27
Working with Pages
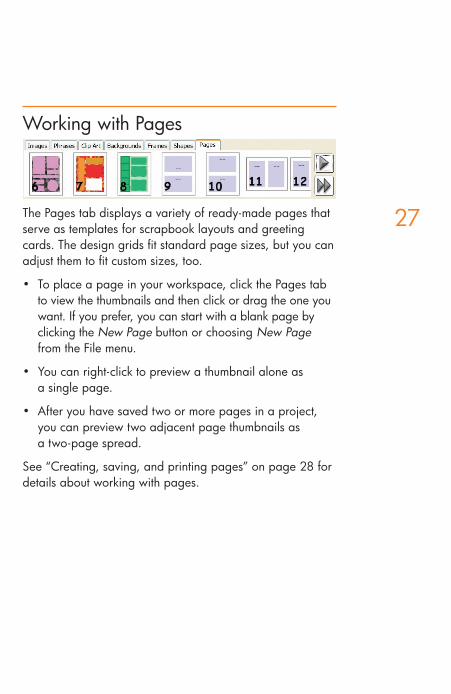
The Pages tab displays a variety of ready-made pages that serve as templates for scrapbook layouts and greeting cards. The design grids fit standard page sizes, but you can adjust them to fit custom sizes, too.
• To place a page in your workspace, click the Pages tab to view the thumbnails and then click or drag the one you want. If you prefer, you can start with a blank page by clicking the New Page button or choosing New Page from the File menu.
• You can right-click to preview a thumbnail alone as a single page.
• After you have saved two or more pages in a project, you can preview two adjacent page thumbnails as a two-page spread.
See “Creating, saving, and printing pages” on page 28 for details about working with pages.
28 29
Features up close
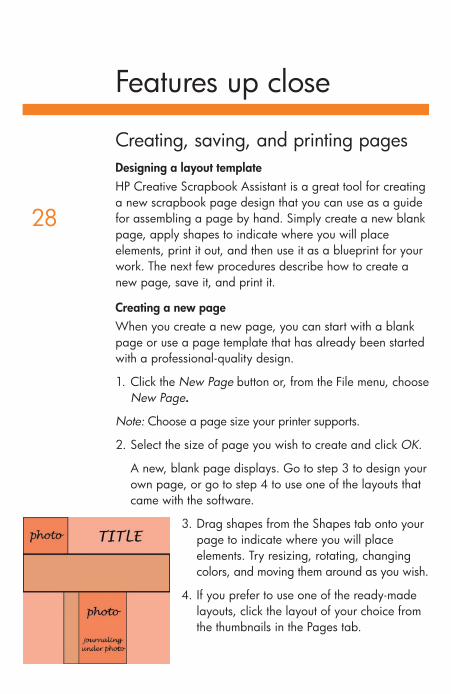
Creating, saving, and printing pagesDesigning a layout templateHP Creative Scrapbook Assistant is a great tool for creating a new scrapbook page design that you can use as a guide for assembling a page by hand. Simply create a new blank page, apply shapes to indicate where you will place elements, print it out, and then use it as a blueprint for your work. The next few procedures describe how to create a new page, save it, and print it.
Creating a new pageWhen you create a new page, you can start with a blank page or use a page template that has already been started with a professional-quality design.
1. Click the New Page button or, from the File menu, choose New Page.
Note: Choose a page size your printer supports.
2. Select the size of page you wish to create and click OK.
A new, blank page displays. Go to step 3 to design your own page, or go to step 4 to use one of the layouts that came with the software.
3. Drag shapes from the Shapes tab onto your page to indicate where you will place elements. Try resizing, rotating, changing colors, and moving them around as you wish.
4. If you prefer to use one of the ready-made layouts, click the layout of your choice from the thumbnails in the Pages tab.
28 29
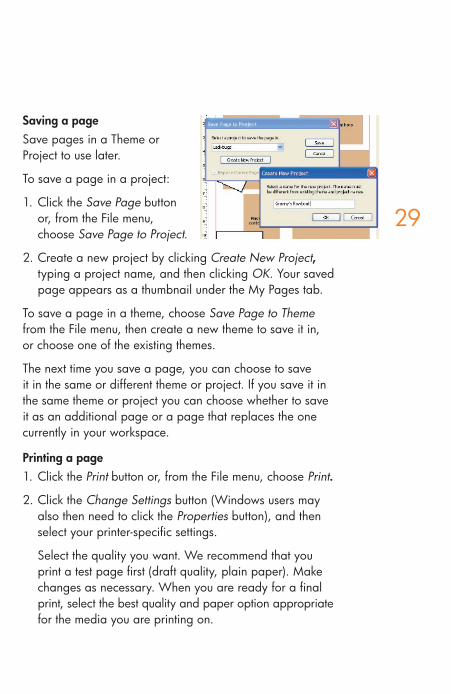
Saving a pageSave pages in a Theme or Project to use later.
To save a page in a project:
1. Click the Save Page button or, from the File menu, choose Save Page to Project.
2. Create a new project by clicking Create New Project, typing a project name, and then clicking OK. Your saved page appears as a thumbnail under the My Pages tab.
To save a page in a theme, choose Save Page to Theme from the File menu, then create a new theme to save it in, or choose one of the existing themes.
The next time you save a page, you can choose to save it in the same or different theme or project. If you save it in the same theme or project you can choose whether to save it as an additional page or a page that replaces the one currently in your workspace.
Printing a page1. Click the Print button or, from the File menu, choose Print.
2. Click the Change Settings button (Windows users may also then need to click the Properties button), and then select your printer-specific settings.
Select the quality you want. We recommend that you print a test page first (draft quality, plain paper). Make changes as necessary. When you are ready for a final print, select the best quality and paper option appropriate for the media you are printing on.
30 31
Exactly how you make these selections depends on your printer and the type of media you are printing on. Refer to your printer’s documentation for more information.
3. Click OK when you are ready to print your page.
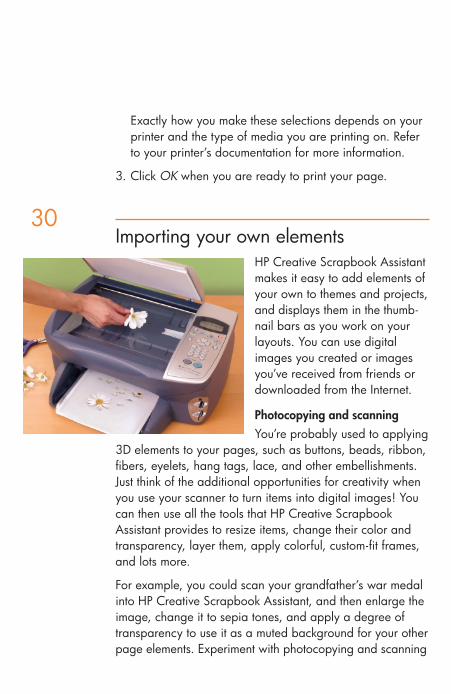
Importing your own elementsHP Creative Scrapbook Assistant makes it easy to add elements of your own to themes and projects, and displays them in the thumb-nail bars as you work on your layouts. You can use digital images you created or images you’ve received from friends or downloaded from the Internet.
Photocopying and scanningYou’re probably used to applying
3D elements to your pages, such as buttons, beads, ribbon, fibers, eyelets, hang tags, lace, and other embellishments. Just think of the additional opportunities for creativity when you use your scanner to turn items into digital images! You can then use all the tools that HP Creative Scrapbook Assistant provides to resize items, change their color and transparency, layer them, apply colorful, custom-fit frames, and lots more.
For example, you could scan your grandfather’s war medal into HP Creative Scrapbook Assistant, and then enlarge the image, change it to sepia tones, and apply a degree of transparency to use it as a muted background for your other page elements. Experiment with photocopying and scanning
30 31
all sorts of objects, and then printing the items on a variety of papers. (We recommend first placing a transparency on the glass to protect it.) One scrapbooker has photocopied butterflies and fern fronds that look so realistic you might try picking them up off the printed page!
If you have a flatbed scanner, you’re all set. Photocopiers are also great for copying items away from your scanner, or if your scanner does not have a flatbed. (Refer to the documentation that came with your photocopier or scanner for operation details.)
The Start a Scan button makes it easy to scan items without ever leaving the HP Creative Scrapbook Assistant workspace.
1. Place the item on your scanner.
2. Click the Start a Scan button or, from the File menu, choose Start a Scan.
3. Follow the prompts for your scanning software. When scanning is completed, the scanned item appears on the workspace, available for you to work with or save to a theme or project.
Using digital photos Another great way to digitize an item is to take a digital photo of it. (Refer to the documentation that came with your digital camera for operation details.) You might have only one copy of your grandparent’s marriage certificate or an old family photo. Why not take a digital photo, import the photo into HP Creative Scrapbook Assistant, and then use the tools and your imagination to make a personalized version that you can print again and again. This also works great for digitizing 3D objects that won’t tolerate the scanner well, such as a pet frog or the spine of a favorite cactus plant.
32 33
Note: For best results, save the digital photo to a folder on your computer before you import it into HP Creative Scrapbook Assistant.
Importing and saving itemsOnce you have clip art, a scanned image, or a digital photo on your hard disk, it’s easy to import it into HP Creative Scrapbook Assistant for use in your scrapbook pages.
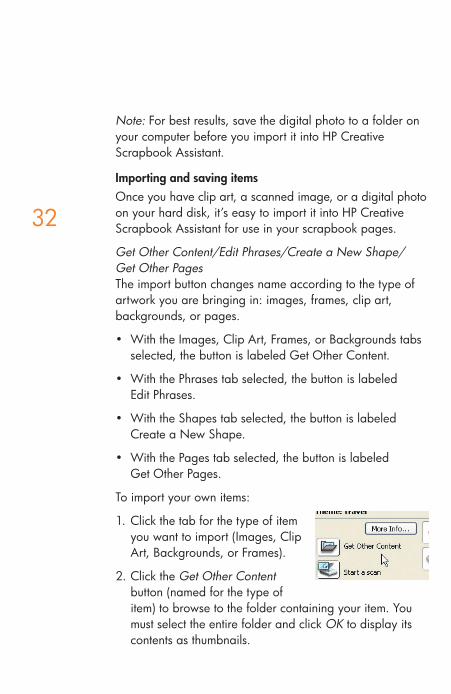
Get Other Content/Edit Phrases/Create a New Shape/Get Other PagesThe import button changes name according to the type of artwork you are bringing in: images, frames, clip art, backgrounds, or pages.
• With the Images, Clip Art, Frames, or Backgrounds tabs selected, the button is labeled Get Other Content.
• With the Phrases tab selected, the button is labeled Edit Phrases.
• With the Shapes tab selected, the button is labeled Create a New Shape.
• With the Pages tab selected, the button is labeled Get Other Pages.
To import your own items:
1. Click the tab for the type of item you want to import (Images, Clip Art, Backgrounds, or Frames).
2. Click the Get Other Content button (named for the type of item) to browse to the folder containing your item. You must select the entire folder and click OK to display its contents as thumbnails.
32 33
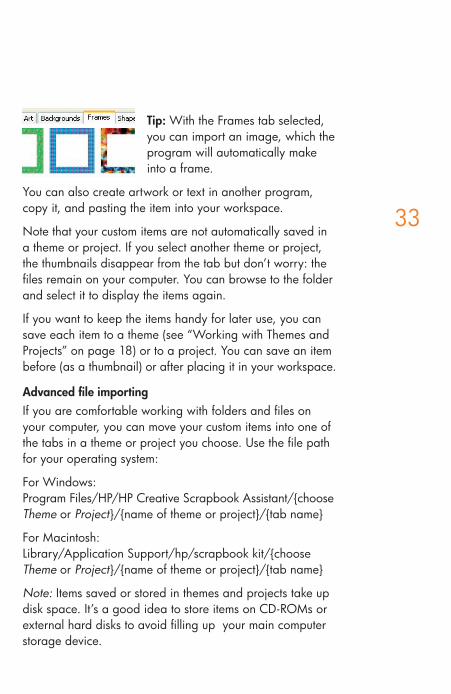
Tip: With the Frames tab selected, you can import an image, which the program will automatically make into a frame.
You can also create artwork or text in another program, copy it, and pasting the item into your workspace.
Note that your custom items are not automatically saved in a theme or project. If you select another theme or project, the thumbnails disappear from the tab but don’t worry: the files remain on your computer. You can browse to the folder and select it to display the items again.
If you want to keep the items handy for later use, you can save each item to a theme (see “Working with Themes and Projects” on page 18) or to a project. You can save an item before (as a thumbnail) or after placing it in your workspace.
Advanced file importing If you are comfortable working with folders and files on your computer, you can move your custom items into one of the tabs in a theme or project you choose. Use the file path for your operating system:
For Windows:Program Files/HP/HP Creative Scrapbook Assistant/{choose Theme or Project}/{name of theme or project}/{tab name}
For Macintosh:Library/Application Support/hp/scrapbook kit/{choose Theme or Project}/{name of theme or project}/{tab name}
Note: Items saved or stored in themes and projects take up disk space. It’s a good idea to store items on CD-ROMs or external hard disks to avoid filling up your main computer storage device.
34 35
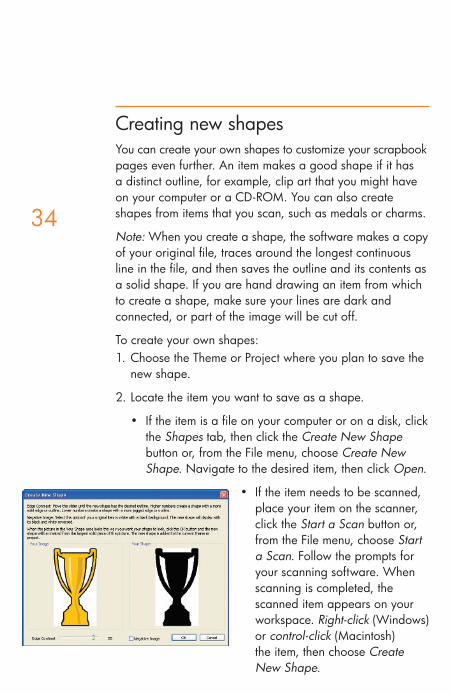
Creating new shapes You can create your own shapes to customize your scrapbook pages even further. An item makes a good shape if it has a distinct outline, for example, clip art that you might have on your computer or a CD-ROM. You can also create shapes from items that you scan, such as medals or charms.
Note: When you create a shape, the software makes a copy of your original file, traces around the longest continuous line in the file, and then saves the outline and its contents as a solid shape. If you are hand drawing an item from which to create a shape, make sure your lines are dark and connected, or part of the image will be cut off.
To create your own shapes:1. Choose the Theme or Project where you plan to save the
new shape.
2. Locate the item you want to save as a shape.
• If the item is a file on your computer or on a disk, click the Shapes tab, then click the Create New Shape button or, from the File menu, choose Create New Shape. Navigate to the desired item, then click Open.
• If the item needs to be scanned, place your item on the scanner, click the Start a Scan button or, from the File menu, choose Start a Scan. Follow the prompts for your scanning software. When scanning is completed, the scanned item appears on your workspace. Right-click (Windows) or control-click (Macintosh) the item, then choose Create New Shape.
34 35
• If the item is already in the Images or Clip Art tab, locate the desired thumbnail. Right-click (Windows) or control-click (Macintosh) the item, then choose Create New Shape.
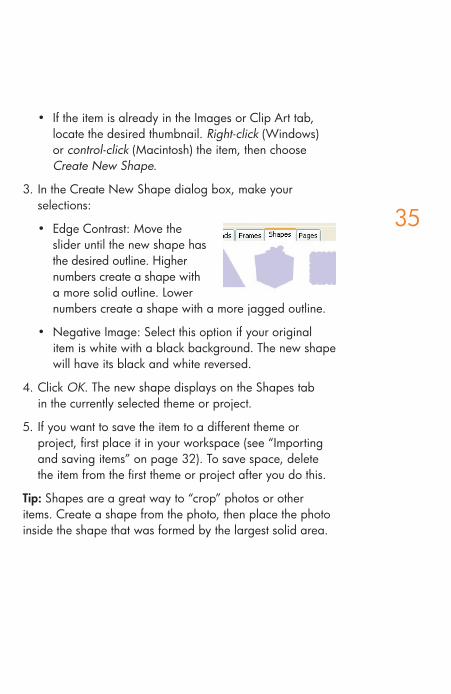
3. In the Create New Shape dialog box, make your selections:
• Edge Contrast: Move the slider until the new shape has the desired outline. Higher numbers create a shape with a more solid outline. Lower numbers create a shape with a more jagged outline.
• Negative Image: Select this option if your original item is white with a black background. The new shape will have its black and white reversed.
4. Click OK. The new shape displays on the Shapes tab in the currently selected theme or project.
5. If you want to save the item to a different theme or project, first place it in your workspace (see “Importing and saving items” on page 32). To save space, delete the item from the first theme or project after you do this.
Tip: Shapes are a great way to “crop” photos or other items. Create a shape from the photo, then place the photo inside the shape that was formed by the largest solid area.
36
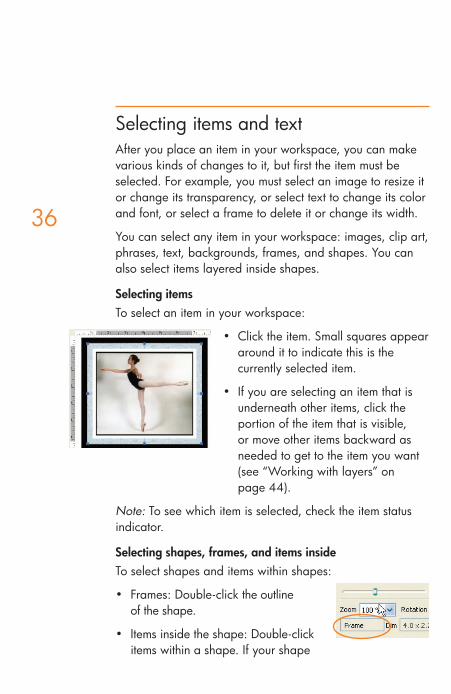
Selecting items and textAfter you place an item in your workspace, you can make various kinds of changes to it, but first the item must be selected. For example, you must select an image to resize it or change its transparency, or select text to change its color and font, or select a frame to delete it or change its width.
You can select any item in your workspace: images, clip art, phrases, text, backgrounds, frames, and shapes. You can also select items layered inside shapes.
Selecting itemsTo select an item in your workspace:
• Click the item. Small squares appear around it to indicate this is the currently selected item.
• If you are selecting an item that is underneath other items, click the portion of the item that is visible, or move other items backward as needed to get to the item you want (see “Working with layers” on page 44).
Note: To see which item is selected, check the item status indicator.
Selecting shapes, frames, and items insideTo select shapes and items within shapes:
• Frames: Double-click the outline of the shape.
• Items inside the shape: Double-click items within a shape. If your shape
3637
contains layered items, you may need to move a layer backward and forward to reach the layer you want to select (see “Working with layers” on page 44).
• Entire shape: Single-click the shape to select the shape and its contents, including its frame and any items within it. This allows you to make changes (such as resizing or rotating) to the shape and all of its contents without selecting each item individually.
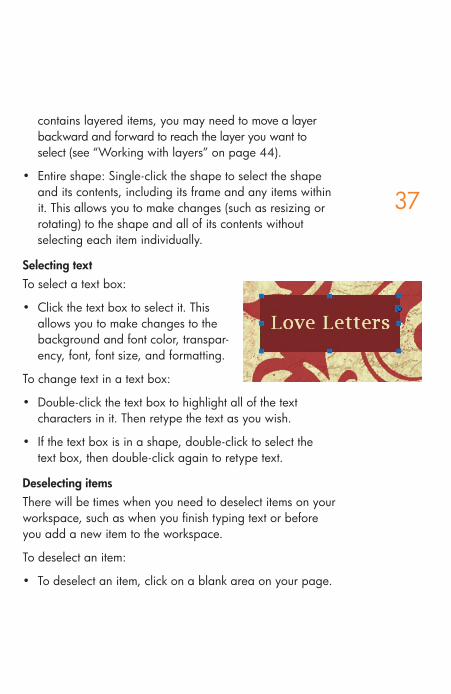
Selecting textTo select a text box:
• Click the text box to select it. This allows you to make changes to the background and font color, transpar-ency, font, font size, and formatting.
To change text in a text box:
• Double-click the text box to highlight all of the text characters in it. Then retype the text as you wish.
• If the text box is in a shape, double-click to select the text box, then double-click again to retype text.
Deselecting itemsThere will be times when you need to deselect items on your workspace, such as when you finish typing text or before you add a new item to the workspace.
To deselect an item:
• To deselect an item, click on a blank area on your page.
3938
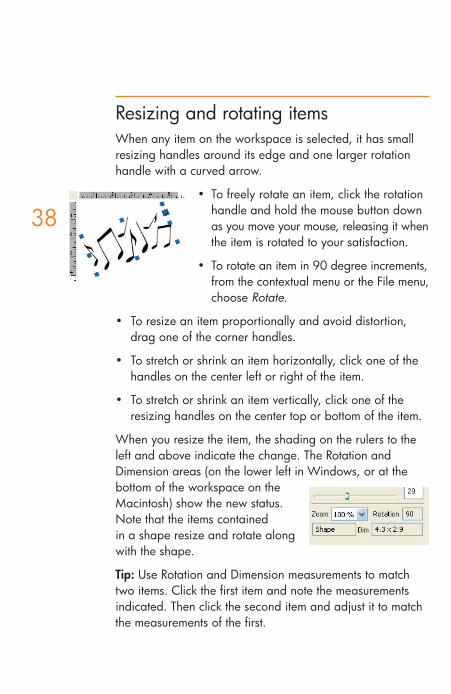
Resizing and rotating itemsWhen any item on the workspace is selected, it has small resizing handles around its edge and one larger rotation handle with a curved arrow.
• To freely rotate an item, click the rotation handle and hold the mouse button down as you move your mouse, releasing it when the item is rotated to your satisfaction.
• To rotate an item in 90 degree increments, from the contextual menu or the File menu, choose Rotate.
• To resize an item proportionally and avoid distortion, drag one of the corner handles.
• To stretch or shrink an item horizontally, click one of the handles on the center left or right of the item.
• To stretch or shrink an item vertically, click one of the resizing handles on the center top or bottom of the item.
When you resize the item, the shading on the rulers to the left and above indicate the change. The Rotation and Dimension areas (on the lower left in Windows, or at the bottom of the workspace on the Macintosh) show the new status. Note that the items contained in a shape resize and rotate along with the shape.
Tip: Use Rotation and Dimension measurements to match two items. Click the first item and note the measurements indicated. Then click the second item and adjust it to match the measurements of the first.
39
Setting and matching colorsIt’s easy to choose the color you want for text characters, text box backgrounds, and solid-color backgrounds, frames, and shapes. (It’s not possible to set the color of patterned backgrounds, frames, clip art, and so forth.) The program provides a variety of predefined colors that you can use as presented or adjust to suit your needs. It also offers an eye dropper for quickly matching the color of an item already on your workspace. You can set or match colors before or after you place the item on your workspace.
• To set an item’s color before you place it in your work-space, deselect any other items (see “Selecting items and text” on page 36). Select the color you want, then add the item.
• To change an item’s color after you place it in your workspace, select the item. Then select the color you want.
Note: If you select a shape, only the shape will change color, not the items within it.
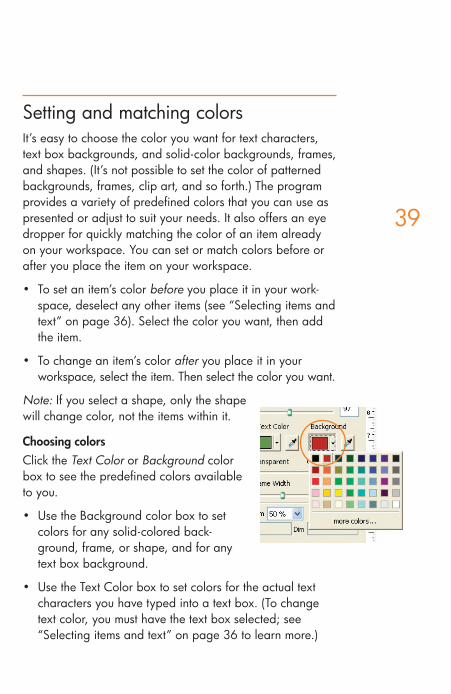
Choosing colorsClick the Text Color or Background color box to see the predefined colors available to you.
• Use the Background color box to set colors for any solid-colored back-ground, frame, or shape, and for any text box background.
• Use the Text Color box to set colors for the actual text characters you have typed into a text box. (To change text color, you must have the text box selected; see “Selecting items and text” on page 36 to learn more.)
40 41
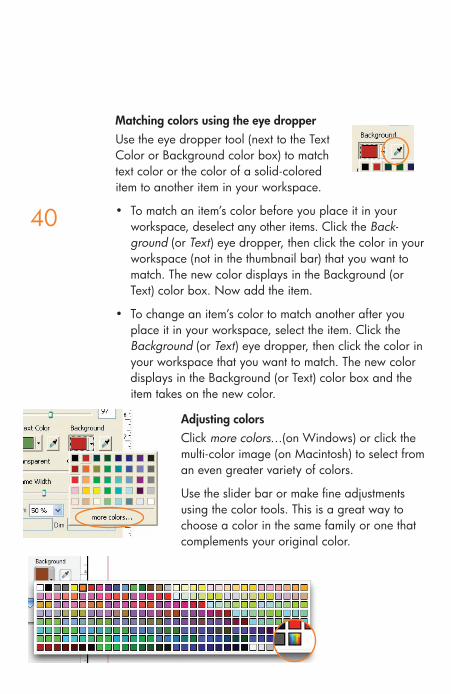
Matching colors using the eye dropperUse the eye dropper tool (next to the Text Color or Background color box) to match text color or the color of a solid-colored item to another item in your workspace.
• To match an item’s color before you place it in your workspace, deselect any other items. Click the Back-ground (or Text) eye dropper, then click the color in your workspace (not in the thumbnail bar) that you want to match. The new color displays in the Background (or Text) color box. Now add the item.
• To change an item’s color to match another after you place it in your workspace, select the item. Click the Background (or Text) eye dropper, then click the color in your workspace that you want to match. The new color displays in the Background (or Text) color box and the item takes on the new color.
Adjusting colorsClick more colors…(on Windows) or click the multi-color image (on Macintosh) to select from an even greater variety of colors.
Use the slider bar or make fine adjustments using the color tools. This is a great way to choose a color in the same family or one that complements your original color.
40 41
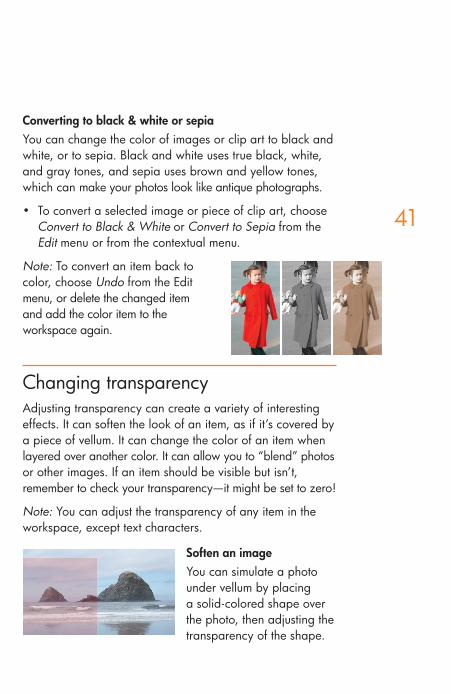
Converting to black & white or sepiaYou can change the color of images or clip art to black and white, or to sepia. Black and white uses true black, white, and gray tones, and sepia uses brown and yellow tones, which can make your photos look like antique photographs.
• To convert a selected image or piece of clip art, choose Convert to Black & White or Convert to Sepia from the Edit menu or from the contextual menu.
Note: To convert an item back to color, choose Undo from the Edit menu, or delete the changed item and add the color item to the workspace again.
Changing transparencyAdjusting transparency can create a variety of interesting effects. It can soften the look of an item, as if it’s covered by a piece of vellum. It can change the color of an item when layered over another color. It can allow you to “blend” photos or other images. If an item should be visible but isn’t, remember to check your transparency—it might be set to zero!
Note: You can adjust the transparency of any item in the workspace, except text characters.
Soften an imageYou can simulate a photo under vellum by placing a solid-colored shape over the photo, then adjusting the transparency of the shape.
43
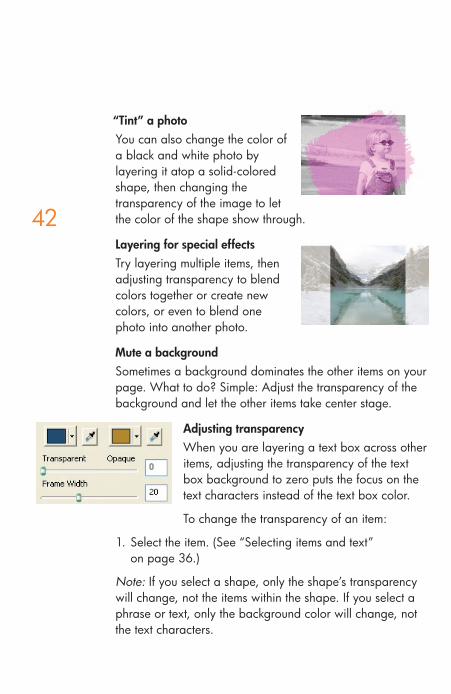
“Tint” a photoYou can also change the color of a black and white photo by layering it atop a solid-colored shape, then changing the transparency of the image to let the color of the shape show through.
Layering for special effectsTry layering multiple items, then adjusting transparency to blend colors together or create new colors, or even to blend one photo into another photo.
Mute a backgroundSometimes a background dominates the other items on your page. What to do? Simple: Adjust the transparency of the background and let the other items take center stage.
Adjusting transparencyWhen you are layering a text box across other items, adjusting the transparency of the text box background to zero puts the focus on the text characters instead of the text box color.
To change the transparency of an item:
1. Select the item. (See “Selecting items and text” on page 36.)
Note: If you select a shape, only the shape’s transparency will change, not the items within the shape. If you select a phrase or text, only the background color will change, not the text characters.
42
43
2. Choose one:• Use your mouse to move the transparency slider right
and left.
• Type a new number in the box next to the slider and press Enter. (This is especially helpful if you are matching the transparency with another item on your page.) Use a higher number to make the item more opaque—100 is fully solid. Use a lower number when you want to make the item more transparent—0 is fully transparent.
Cutting, copying, pasting, and duplicatingYou can cut or copy items and then paste them, as you would in most programs. But when you want to quickly generate multiple copies, the Duplicate command in the software is very handy.
Note: If you are copying or duplicating a shape surrounded by a frame, the frame is duplicated along with the shape. If you are dealing with layered items, be sure the item you want to duplicate is the one selected. (See “Selecting items and text” on page 36.)
When to cut, copy, or duplicate• Cut an item to put it into your computer’s clipboard but
remove it from its current position. If you don’t put anything else in the clipboard, you can then paste the item.
• Copy an item to copy it into the clipboard but leave the original in place. If you don’t put anything else in the clipboard, you can then paste the item.

4544
• Duplicate an item to quickly copy and paste it in one action. Rulers and guides can be helpful for aligning the placement of items you’re duplicating. (See “Aligning items using rulers and guides” on page 45.)
To duplicate an item, first make sure it’s selected. Then choose one:
• To copy a shape plus its contents, from the Edit menu, select Duplicate.
• To copy only the contents of the shape right-click (Windows) or control-click (Macintosh), then select Duplicate.
Cutting, copying, and pastingYou can cut, copy, and paste items between pages while your copy of HP Creative Scrapbook Assistant is open. You can also paste items from other applications into your pages, and you can cut and copy text from the workspace to paste into other applications. For example, you might copy a poem from a word processing application and paste it into a shape or a text box on your page. If you want to use an item from HP Creative Scrapbook Assistant in another application, export the item as an image in a format compatible with the application. (For details about exporting items, see page 47.)
Working with layers A great way to create interesting effects in your scrapbook pages is to layer items in your workspace or inside a shape so they overlap or stack, and the software makes it easy to do.
45
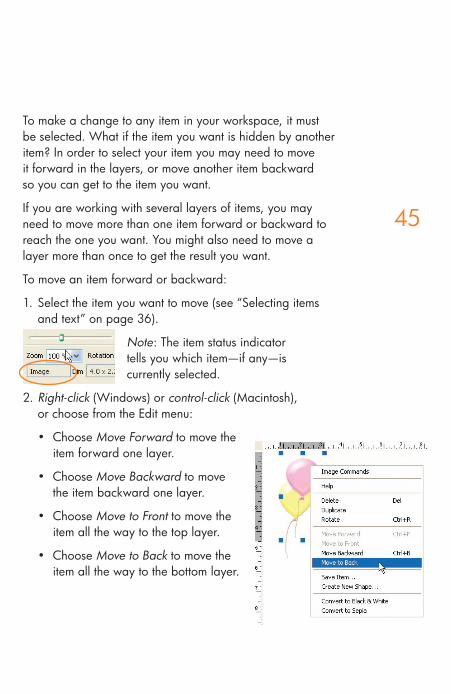
To make a change to any item in your workspace, it must be selected. What if the item you want is hidden by another item? In order to select your item you may need to move it forward in the layers, or move another item backward so you can get to the item you want.
If you are working with several layers of items, you may need to move more than one item forward or backward to reach the one you want. You might also need to move a layer more than once to get the result you want.
To move an item forward or backward:
1. Select the item you want to move (see “Selecting items and text” on page 36).
Note: The item status indicator tells you which item—if any—is currently selected.
2. Right-click (Windows) or control-click (Macintosh), or choose from the Edit menu:
• Choose Move Forward to move the item forward one layer.
• Choose Move Backward to move the item backward one layer.
• Choose Move to Front to move the item all the way to the top layer.
• Choose Move to Back to move the item all the way to the bottom layer.
47
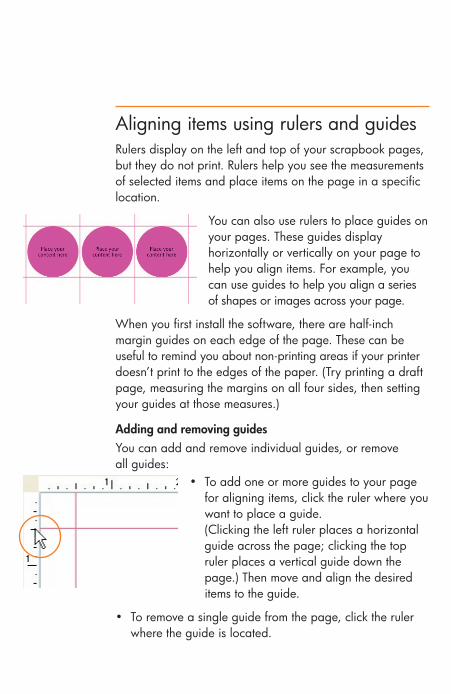
Aligning items using rulers and guides Rulers display on the left and top of your scrapbook pages, but they do not print. Rulers help you see the measurements of selected items and place items on the page in a specific location.
You can also use rulers to place guides on your pages. These guides display horizontally or vertically on your page to help you align items. For example, you can use guides to help you align a series of shapes or images across your page.
When you first install the software, there are half-inch margin guides on each edge of the page. These can be useful to remind you about non-printing areas if your printer doesn’t print to the edges of the paper. (Try printing a draft page, measuring the margins on all four sides, then setting your guides at those measures.)
Adding and removing guidesYou can add and remove individual guides, or remove all guides:
• To add one or more guides to your page for aligning items, click the ruler where you want to place a guide.(Clicking the left ruler places a horizontal guide across the page; clicking the top ruler places a vertical guide down the page.) Then move and align the desired items to the guide.
• To remove a single guide from the page, click the ruler where the guide is located.
47
• To remove all guides from the page, from the Edit menu, choose Remove All Guides.
Tip: To change the position of a guide, simply remove it and add another one.
To remove the default half-inch margin guides:• In Windows, from the Edit menu, choose Preferences,
then uncheck Show Margin Guides.
• On a Macintosh, from the HP Creative Scrapbook Assistant menu, choose Preferences, then uncheck Show Margin Guides.
To display half-inch margin guides later, simply check Show Margin Guides again in your Preferences.
Exporting items, pages, themes, and projectsIt’s so much fun to share scrapbooking with other people. Whether you want to pass along a scrapbook element you created, send a page to friends or family, or share an entire scrapbook project electronically, HP Creative Scrapbook Assistant makes it easy.
Exporting itemsItems such as clip art, images, or backgrounds are digital files in specialized formats. To export an item, place it in the workspace. With the item selected, from the File menu, choose Export Item, rename the file (preserving the file format by keeping the file extension unchanged), and indicate where you want the file placed on your computer.
48 49
Exporting pagesTo save pages you’ve created in the software, export them to a location on your computer or to an external storage device, such as a hard disk or CD. Exporting pages and burning them to a CD frees up space on your computer and gives you a lasting way of storing your work. This is a great way to share your pages with others, too. HP Creative Scrapbook Assistant offers several file formats for exporting pages.
Choosing a file formatYou can export the page in the “HP scrapbook pages” format “.sok” if you are going to share it with another user on the same platform you are using (Windows-to-Windows or Mac-to-Mac).
Note: The .sok format for Macintosh is different from the .sok format for Windows. If you create a .sok file on Windows, you cannot open it on a Macintosh, and vice versa.
To give your page the widest option for other programs to import or display, you can export it as a JPEG. TIFF or BMP file formats are also available if you prefer. However, TIFF files are often very large and BMP files are lower resolution (lower quality image), so your best option is the JPEG format, which is readable by all Internet browsers and a wide variety of applications.
To export a single page:1. Make sure the page you want to export is currently
in your workspace.
2. From the File menu, choose Export Page. (To export all of the pages in a project, choose Export Project.)
3. Specify the location on your computer or external disk where you want to save the file. Name the file, then choose a file type (see below for file type descriptions).
48 49
4. Click Save.
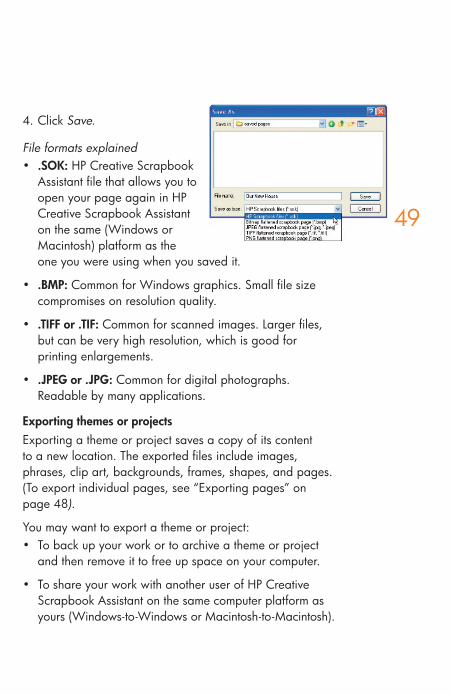
File formats explained• .SOK: HP Creative Scrapbook
Assistant file that allows you to open your page again in HP Creative Scrapbook Assistant on the same (Windows or Macintosh) platform as the one you were using when you saved it.
• .BMP: Common for Windows graphics. Small file size compromises on resolution quality.
• .TIFF or .TIF: Common for scanned images. Larger files, but can be very high resolution, which is good for printing enlargements.
• .JPEG or .JPG: Common for digital photographs. Readable by many applications.
Exporting themes or projectsExporting a theme or project saves a copy of its content to a new location. The exported files include images, phrases, clip art, backgrounds, frames, shapes, and pages. (To export individual pages, see “Exporting pages” on page 48).
You may want to export a theme or project: • To back up your work or to archive a theme or project
and then remove it to free up space on your computer.
• To share your work with another user of HP Creative Scrapbook Assistant on the same computer platform as yours (Windows-to-Windows or Macintosh-to-Macintosh).
50 51
• To take your work with you to a scrapbooking party, and even print some items at the party. (You won’t be able to print entire pages unless the party location has a computer with HP Creative Scrapbook Assistant installed.)
• To export your work to a memory card for use with a card reader-equipped printer or all-in-one printer.
Note: Depending on the theme or project you are exporting, the exported files may require significant disk space.
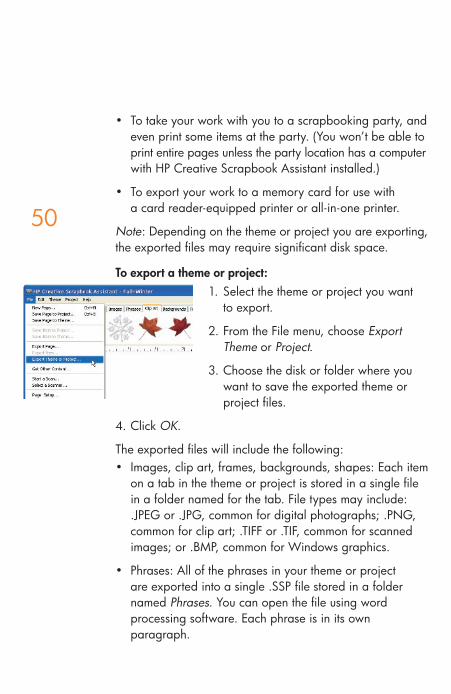
To export a theme or project: 1. Select the theme or project you want
to export.
2. From the File menu, choose Export Theme or Project.
3. Choose the disk or folder where you want to save the exported theme or project files.
4. Click OK.
The exported files will include the following: • Images, clip art, frames, backgrounds, shapes: Each item
on a tab in the theme or project is stored in a single file in a folder named for the tab. File types may include: .JPEG or .JPG, common for digital photographs; .PNG, common for clip art; .TIFF or .TIF, common for scanned images; or .BMP, common for Windows graphics.
• Phrases: All of the phrases in your theme or project are exported into a single .SSP file stored in a folder named Phrases. You can open the file using word processing software. Each phrase is in its own paragraph.
50 51
• Pages: All of the pages in your theme or project are exported into a single .SOK file stored in a folder named Pages. Only HP Creative Scrapbook Assistant can open .SOK files.
Note: Later, when you want to use exported items in HP Creative Scrapbook Assistant, import them from the CD or saved location (see “Importing and saving items” on page 32). To use exported items in a different application, refer to that application’s documentation.
Now it’s your turn
HP Creative Scrapbook Assistant makes an ideal tool for creating a wide variety of elements you can use on your scrapbook pages. The high quality graphics and other items provided with the software give you a starting place from which to launch your own personal style of creativity. Use the ready-made elements under each tab, add some of your own, print everything out, and then assemble the items along with your favorite embellishments to make your own personalized scrapbook pages.
Remember to refer to the HP Creative Scrapbook Assistant Help and software hints for step-by-step instructions for using each feature of the software. Be sure to watch the software demo to quickly learn expert techniques.
We hope HP Creative Scrapbook Assistant will become an indispensable part of your scrapbooking toolkit and inspire you to take your creativity to the next level.
52 53
HP research participation
HP is interested in continually improving HP Creative Scrapbook Assistant to meet your needs. We have a lot to learn from scrapbookers like you! We’ve set up the program to invite your participation in our research the fifth time you start the program. (Note: This option is available only to Windows users.) If you agree, HP will collect data every time you use the program (never more than 5MB of disk space), and send it to HP approximately every 30 days, when you next connect to the Internet. We are not looking at anything else in your system and this is separate from any research you may have signed up for related to an HP inkjet printer or all-in-one device. We are gathering only data about HP Creative Scrapbook Assistant:
• The type of documents you create using the program
• The volume of printing you do with this program
• Which of the provided artwork and phrases you use most often
• Which application features you use most often
• Your name and email address
• System information (processor, memory, hard drive, OS, peripherals)
To show our appreciation, when we receive your usage data, your name will automatically be entered in a drawing for a valuable gift.
To change your participation in the HP Product Research program:
• In Windows, select Start > Programs > HP > Personal Printing Solutions Product Research > Product Research.
52 53
Notices
Hewlett-Packard company noticesThe information contained in this document is subject to change without notice.
Hewlett-Packard (HP) makes no warranty of any kind with regard to this material including, but not limited to, the implied warranties of merchantability and fitness for a particular purpose.
Hewlett-Packard shall not be liable for any errors or for incidental or consequential damages in connection with the furnishing, performance, or use of this material.
AcknowledgmentsMicrosoft, MS, Windows, and XP are registered trademarks of Microsoft Corporation.
Macintosh is a trademark of Apple Computer, Inc., registered in the U.S. and other countries.
© Copyright 2003–2005 Hewlett-Packard Development Company, LP
All rights reserved. Reproduction, adaptation, or translation of this material is prohibited without prior written permission of Hewlett-Packard, except as allowed under copyright laws.

54
Hewlett-Packard CompanyPalo Alto, CA, USA 94304
Microsoft, MS, Windows, and XP are registered trademarks of Microsoft Corporation. Macintosh is a trademark of Apple Computer, Inc., registered in the U.S. and other countries.
© Copyright 2003–2005 Hewlett-Packard Development Company, LP
C9019-90003 Rev. A
Made in the United States.