how to work with resources in sap business one
TRANSCRIPT

How-to GuideDocument Version: 4.4– 2020-09-07
CUSTOMER
How to Work with Resources and Production in SAPBusiness One 9.3 and higher

CUSTOMER© 2020 SAP SE or an SAP affiliate company. All rights reserved.
How to Work with Resources and Production in SAP Business One 9.3 and higherTypographic Conventions
Typographic Conventions
Type Style Description
Example Words or characters quoted from the window. These include field names, window titles,pushbuttons labels, menu names, menu paths, and menu options.Textual cross-references to other documents.
Example Emphasized words or expressions.
EXAMPLE Technical names of system objects. These include report names, program names,transaction codes, table names, and key concepts of a programming language when theyare surrounded by body text, for example, SELECT and INCLUDE.
Example Output on the window. This includes file and directory names and their paths, messages,names of variables and parameters, source text, and names of installation, upgrade anddatabase tools.
Example Exact user entry. These are words or characters that you enter in the system exactly asthey appear in the documentation.
<Example> Variable user entry. Angle brackets indicate that you replace these words and characterswith appropriate entries to make entries in the system.
EXAMPLE Keys on the keyboard, for example, F2 or ENTER .

How to Work with Resources and Production in SAP Business One 9.3 and higherBill of Materials Handling
CUSTOMER© 2020 SAP SE or an SAP affiliate company. All rights reserved.
Document History
Version Date Change
1.0 2014-09-10 First version
2.0 2015-04-13 Minor changes
3.0 2016-12-22 Minor changes
4.0 2017-09-21 · Introduced the concept of Single Run Capacity in Resource Master Dataand Resource Capacity.
· Added production routing related fields in BOM and Production Orders.· Added batch change production order status functionality in Production
Orders.· Added linking resources to non-inventory items functionality.
4.1 2018-03-08 · Updated Bill of Materials - Component Management as follows:o Added a new task - Change BOM Headero Existing management tasks are enhanced to support Bill of Materials
with Route Stages.· Added a new column Status to the Production Order Components grid.· Added a new Chapter 7.5 Recalculate Route Stage Dates
4.2 2018-07-03 Minor changes
4.3 2020-01-20 · 6.2.1 - Changing BOM Componentso Added description and screenshot of Route Stage option in Step 5.
· 6.2.1, 6.2.2, and 6.2.3o Step 4: Added a description of Route Sequence and Route Stage
fields and respective notes.· 7.1 Production Order Window
o Step 3, No. and Description field, added a note that you can use aparent item as a component item in Special type production orders.
· 11 - Tracing Serial and Batches in the Production Process (new)o 11.1 - Forward and Reverse Batches and Serials Trace Report
Added description of the forward and reverse batches and serialstrace reports (Inventory module).
4.4 2020-09-07 · 6.2 - Managing Bill of Material (BOM) Componentso Changed to 6.2 - Managing Bill of Materials (BOMs)o Changed Bill of Materials – Components Management window to Bill
of Materials Management windowo Added section 6.2.5 - Deleting BOMs
· 7.1 - Production Order Window

4CUSTOMER© 2020 SAP SE or an SAP affiliate company. All rights reserved.
How to Work with Resources and Production in SAP Business One 9.3 and higherBill of Materials Handling
Version Date Change
o Added description of procurement related fields and updatedscreenshots
o In Step 2, in the Status field, added a description of the fields thatcan be edited even after a production order is closed.
· 7.14 Creating Procurement Documents Directly from Production Orders(new)o Added a description of creating procurement documents based on
production orders using the Procurement Confirmation Wizard.

How to Work with Resources and Production in SAP Business One 9.3 and higherBill of Materials Handling
CUSTOMER© 2020 SAP SE or an SAP affiliate company. All rights reserved. 5
Contents
Contents .............................................................................................................................................................. 5
1 Introduction ..............................................................................................................................................7
2 Initial Settings ......................................................................................................................................... 82.1 Defining Primary G/L Accounts ............................................................................................................................. 82.2 Advanced G/L Account Determination ................................................................................................................. 92.3 Enabling Fixed Assets Functionality .................................................................................................................... 102.4 Defining Resource Defaults ................................................................................................................................... 112.5 Defining a Default Warehouse ............................................................................................................................... 132.6 Defining Resource Properties ............................................................................................................................... 132.7 Defining Resource Groups .....................................................................................................................................14
3 Working with Resource Master Data .....................................................................................................163.1 Creating Resource Master Data Records.............................................................................................................163.2 Updating Resource Master Data Records........................................................................................................... 233.3 Deleting Resource Master Data Records ............................................................................................................ 233.4 Linking Resources to Non-Inventory Items ........................................................................................................ 24
4 Working with Resource Capacity .......................................................................................................... 254.1 Setting Internal Resource Capacity ..................................................................................................................... 25
4.1.1 Setting Internal Resource Capacities in a Batch (Set Daily Internal Capacities Window) ............. 254.1.2 Setting Daily Internal Resource Capacity for Specific Days Manually (Resource Capacity
Window) ................................................................................................................................................. 294.2 Viewing Resource Capacity ................................................................................................................................... 31
4.2.1 Viewing Resource Capacity from Resource Capacity Window.......................................................... 31
5 Defining Production Data in Item Master Data ................................................................................... 37
6 Bill of Materials Handling ...................................................................................................................... 396.1 Bill of Materials Window ........................................................................................................................................ 396.2 Managing Bill of Materials (BOMs) .......................................................................................................................41
6.2.1 Changing BOM Components ................................................................................................................416.2.2 Adding BOM Components ................................................................................................................... 456.2.3 Deleting BOM Components ................................................................................................................. 486.2.4 Changing BOM Header ......................................................................................................................... 496.2.5 Deleting BOMs ....................................................................................................................................... 51
7 Working with Production Orders .......................................................................................................... 547.1 Production Order Window .................................................................................................................................... 547.2 Managing Resource Allocation in Production Orders ........................................................................................ 657.3 Calculating Required Days and Total Days ......................................................................................................... 667.4 Start Date / End Date Calculation Algorithm ..................................................................................................... 677.5 Recalculate Route Stage Dates ............................................................................................................................. 717.6 By-Product Handling in Production Orders and Production Processes ........................................................... 717.7 Change of Valuation Method of Item Included in Open Production Order....................................................... 727.8 Disassembly Production Order ............................................................................................................................ 727.9 User-Defined Fields (UDF) Handling ................................................................................................................... 727.10 Document Settings and WIP Account ................................................................................................................. 72

6CUSTOMER© 2020 SAP SE or an SAP affiliate company. All rights reserved.
How to Work with Resources and Production in SAP Business One 9.3 and higherBill of Materials Handling
7.11 Closing Production Order and Handling Components Cost .............................................................................. 747.12 Changing Production Order Status in Batch ....................................................................................................... 757.13 Pick and Pack Production Manager ..................................................................................................................... 767.14 Creating Procurement Documents Directly from Production Orders .............................................................. 77
8 Issue for Production .............................................................................................................................. 848.1 Issue for Production Window ............................................................................................................................... 848.2 Posting Behind Issue for Production................................................................................................................... 85
9 Receipt from Production ....................................................................................................................... 879.1 Backflush Components Handling and Impact of Additional Quantity ............................................................. 88
10 Interim WIP Consolidation Account Mapping ...................................................................................... 89
11 Tracing Serial and Batches in the Production Process ....................................................................... 9211.1 Forward and Reverse Batches and Serials Trace Report ................................................................................. 92

How to Work with Resources and Production in SAP Business One 9.3 and higherBill of Materials Handling
CUSTOMER© 2020 SAP SE or an SAP affiliate company. All rights reserved. 7
1 Introduction
The Production module together with the existing resource functionality provides a base platform for managing lightmanufacturing processes in SAP Business One.A resource is defined as a commodity, machine, labor, or other asset used to produce goods and services. Asopposed to items, resources have capacity available throughout a period of time which can be consumed in aproduction process. Resources (resource capacity) can therefore be assigned to production orders. Resourcecapacity is always viewed within a period of time called "capacity period".Consumption of resources in a production process contributes to the overall production costs and can be split intounderlying cost elements for further accounting purposes.
Using the resources functionality, you can perform the following key business functions:· Manage basic production capacity· Analyze real production variances· Simplify BOM management· Use production order more flexibly
8CUSTOMER© 2020 SAP SE or an SAP affiliate company. All rights reserved.
How to Work with Resources and Production in SAP Business One 9.3 and higherBill of Materials Handling
2 Initial Settings
2.1 Defining Primary G/L Accounts
Define G/L accounts to be used for resources. Postings behind transactions are made to these accounts directlyunless you create advanced G/L account determination rules for resources and specify other accounts for certaintransactions.
ExampleYou may have different resource groups which should use different standard cost expense accounts. If youname Standard Cost Expense 1 differently for two different groups, the system posts costs for both resourcegroups to the account defined for the Standard Cost Expense 1 in the G/L Account Determination window. Toenable posting values for Standard Cost Expense 1 to different accounts depending on the resource group,you can define advanced G/L account determination rules, according to which the system will post costexpenses to the accounts determined by each resource group separately. For more information, see 2.2Advanced G/L Account Determination.
ProcedureFrom the SAP Business One Main Menu, choose Administration → Setup → Financials → G/L Account Determination
→ G/L Account Determination → Resources tab.
Account Description
Std. Cost Expense 1… 10
NoteThese fields are available only if you are using a perpetual inventory system.
Define accounts for up to ten standard cost expense components. Each of the standardcost components is posted when the resource is consumed through the productionorder, that is, when a user creates the issue for production document with resource lines.When issuing to production, each separate standard cost component numbered from 1to 10 is credited according to the quantity consumed to the corresponding standard costexpense account and debited to the related WIP account.
Resource WIPAccount Note
This field is available only if you are using a perpetual inventory system.This account maintains the value of resources that are included in the work process, thatis, the period between the start of production and the completion of the final product.The value from this field is copied to the Account Code field for resource lines in the issuefor production document if the following applies:· The Component WIP Account radio button is selected for the production order
document in the Document Settings window. For more information, see 7.6Document Settings and WIP Account.
· You have not defined the Account Code field for a resource line in the ProductionOrder window.If you defined the Account Code field for a resource line in the production ordermanually, or if the value has been copied from the Bill of Materials window, then that

How to Work with Resources and Production in SAP Business One 9.3 and higherBill of Materials Handling
CUSTOMER© 2020 SAP SE or an SAP affiliate company. All rights reserved. 9
Account Description
code is used as the Resource WIP account in the issue for production for theresource in question.
Offset accounts NoteThe offset accounts are available only if you are managing accounting withBalance Sheet accounts and Profit and Loss accounts. To manage accountingwith these accounts, from the SAP Business One Main Menu, chooseAdministration → System Initialization → Document Settings → Per Documenttab, in the Document field, select Production Order. In the Posting Schemas forManufacturing area, select the Accounting with Balance Sheet Accounts andProfit & Loss Accounts radio button.
Postings for resources related to issues for production, receipts from production andproduction order closure impact these accounts. That is, the offset accounts appear inany posting in which the WIP account and the Std Cost Expense accounts are used.The offset postings are dependent on the definition in the Document Settings window forthe production order of whether to use component or parent item WIP accounts forcomponent transactions. For more information, see 7.6 Document Settings and WIPAccount.
WIP Offset P&LAccount
This account is used to offset the WIP resource account posting.
Resource OffsetP&L Account
This account is used to offset all of the Std Cost Expense accounts that are in use. Thisoffset account selects component related account irrespective of the document settingsoption for parent or component WIP accounts.
2.2 Advanced G/L Account Determination
You can manage resource G/L account determination according to a flexible and centralized method. By setting ahierarchy of rules, you can assign resource G/L accounts by the following determination criteria:· Resource groups· Resources· Warehouses· Various combinations of all the above criteria
If defined, the advanced G/L account determination rules have priority over the settings in the G/L AccountDetermination window. However, there are exceptions, for example, if you define the WIP Account field in the Bill ofMaterials or the Production Order window manually, that account will be used as the WIP account regardless of thecriteria you defined in the Advanced G/L Account Determination window. For more information on this functionality,see the How To Set Up and Work with Advanced G/L Account Determination guide in the documentation resourcecenter.

10CUSTOMER© 2020 SAP SE or an SAP affiliate company. All rights reserved.
How to Work with Resources and Production in SAP Business One 9.3 and higherBill of Materials Handling
2.3 Enabling Fixed Assets Functionality
If you want to associate some resources with fixed assets, you need to enable the fixed assets functionality.
ProcedureFrom the SAP Business One Main Menu, choose Administration → System Initialization → Company Details →Basic Initialization tab.Select the Enable Fixed Assets checkbox.
A system message appears informing you that enabling this functionality is an irreversible process. ChooseYes.
On the Basic Initialization tab, in the Calculate Depreciation By field, select one of the following options:o Montho Day
Choose Update.For more information on how to use the fixed assets functionality, see the online help for SAP Business One.

How to Work with Resources and Production in SAP Business One 9.3 and higherBill of Materials Handling
CUSTOMER© 2020 SAP SE or an SAP affiliate company. All rights reserved. 11
2.4 Defining Resource Defaults
To define default settings for resources at the company level, proceed as follows:
From the SAP Business One Main Menu, choose Administration → System Initialization → General Settings →Resources tab.Define the following fields:
Field/Checkbox Activity/Description
DefaultWarehouse
Select a default warehouse. This warehouse will be used for resources in productionorders.
NoteYou can also set a default warehouse at the resource level and at the user level.For more information, see Defining a Default Warehouse.
Auto Add AllWarehouses toNew Resources
If you select this checkbox, when adding a new resource master data record, allwarehouses appear in the Warehouse table on the Capacity Data tab.If you deselect this checkbox, when adding a new resource master data record, only thedefault warehouse appears in the Warehouse table on the Capacity Data tab.
Default CapacityPeriod
Determines the default capacity period displayed upon opening any of the windows thatcontain the Capacity Period From…To fields.
NoteUpon opening windows and tabs which contain the Capacity Period field, theFrom date is always the current system date. The To date is calculated by thesettings for resources in the General Settings window. You can shift betweenperiods using the arrow buttons; the buttons move the capacity periodbackwards and forwards by the same number of days as displayed upon openingthe window.
In the Start From Today Until field, specify the default end date for capacity periodcalculation:
· Today - The current system date is taken as a start date for calculation.· Month Start - The first day of the month of the current system date is taken as a start
date for calculation.· Month End - The last day of the month of the current system date is taken as a start
date for calculation.
In the Months and Days fields, specify the number of months and days from the startdate. Both positive and negative numbers are allowed.

12CUSTOMER© 2020 SAP SE or an SAP affiliate company. All rights reserved.
How to Work with Resources and Production in SAP Business One 9.3 and higherBill of Materials Handling
Example 1You have defined the default capacity period as displayed below.
Upon opening the Capacity Data tab of the Resource Master Data window, theCapacity Period From field is always the current date, for example, September 23,2017. Since the end date of the capacity period is Today, the To field isSeptember 23, 2017. The forward and backward arrows move the capacity periodby one day.
Example 2You have defined the default capacity period as displayed below.
Upon opening the Capacity Data tab of the Resource Master Data window, theCapacity Period From field is the current system date, for example, September23, 2017. The To field is October 1st, 2017. The forward arrow moves the capacityperiod by the same number of days, hence the From date is October 2 and the Todate is October 10.
Example 3You have defined the default capacity period as displayed below.
Upon opening the Capacity Data tab of the Resource Master Data window, theCapacity Period From field is the current date, for example, September 23, 2017.The To field is September 30, 2017 (calculated from October 1, the month start).The forward arrow moves the capacity period by the same number of days, hencethe From date is October 1 and the To date is October 8.

How to Work with Resources and Production in SAP Business One 9.3 and higherBill of Materials Handling
CUSTOMER© 2020 SAP SE or an SAP affiliate company. All rights reserved. 13
Field/Checkbox Activity/Description
Example 4You have defined the default capacity period as displayed below.
Upon opening the Capacity Data tab of the Resource Master Data window, theCapacity Period From field is the current date, for example, September 23, 2017.The To field is October 10, 2017 (calculated from September 30, the month end).The forward arrow moves the capacity period by the same number of days, hencethe From date is October 11 and the To date is October 28.
NoteIf upon opening the Capacity Data tab (or any other window containing theCapacity Period From… To fields) the current date is later than the To date by theset calculation, the capacity period displays results for the current date only.
To save the changes, choose OK.
2.5 Defining a Default Warehouse
You can set a default warehouse for a resource at three levels:· Resource level - in the Resource Master Data window· User level - in the User Defaults window· Company level - in the General Settings window (Administration → System Initialization → General Settings →
Resources tab)The system takes the default warehouse according to the priority order above; for a new transaction, the systemtakes the default warehouse from the resource level. If a resource does not have a defined default warehouse at theresource level, it takes the default warehouse from the user level. If there is no default warehouse defined at the userlevel, it takes the default warehouse defined in the general settings.
2.6 Defining Resource Properties
You can define resource properties and use them for filtering purposes, for example, in reports.

14CUSTOMER© 2020 SAP SE or an SAP affiliate company. All rights reserved.
How to Work with Resources and Production in SAP Business One 9.3 and higherBill of Materials Handling
ProcedureTo define resource properties, proceed as follows:
From the SAP Business One Main Menu, choose Administration → Setup → Resources → Resource Properties.The Resource Properties - Setup window appears.By default, the fields are named Resource Master Data Property 1… 64.To change the name field, click the line and enter a desired property name.Choose Update.
2.7 Defining Resource Groups
Whenever you create a resource, it belongs to a group. The default resource group is Resources. You can create moregroups to classify your resources. Upon creation, a resource obtains setting defaults from its group. You can changethese settings at the resource level in the Resource Master Data window.Use the groups for analysis purposes, reports, evaluations, and to process resources together as a group.
Procedure
To create a resource group, proceed as follows:From the SAP Business One Main Menu, choose Administration → Setup → Resources → Resource Groups. TheResource Groups - Setup window appears.
In the Resource Group Name field, enter the name of the group you want to create.In the Resource Type field, select one of the following options:
· Machine - This type of resource can be linked to fixed assets.· Labor - This type of resource can be linked to employees.· Other - This type of resource cannot be linked to fixed assets or employees.
The default option is Machine.In the field Unit of Measure Text, enter the unit of measure used for this resource group.

How to Work with Resources and Production in SAP Business One 9.3 and higherBill of Materials Handling
CUSTOMER© 2020 SAP SE or an SAP affiliate company. All rights reserved. 15
In the Resource Std Cost table, you can define up to 10 components of the resource standard cost per the definedunit of measure.In the column, User-Definable Name, enter the desired name of the cost component, for example, "Electricity".In the column Default Std Cost, enter costs charged for one defined unit of measure.The names and default standard cost values will be copied into the resource master data if the resource belongsto this group.Choose Update.

16CUSTOMER© 2020 SAP SE or an SAP affiliate company. All rights reserved.
How to Work with Resources and Production in SAP Business One 9.3 and higherBill of Materials Handling
3 Working with Resource Master Data
Use the resource master data to add, update, search and maintain resource data.
3.1 Creating Resource Master Data Records
Procedure
From the SAP Business One Main Menu, choose Resources→ Resource Master Data.The window appears in Find mode. Switch to Add mode.
Define the fields in the header area and on the tabs as described below and choose Add.
General Area (Header)In the general area, define the following fields:
NoteFields that are self-explanatory are not described in the table below:

How to Work with Resources and Production in SAP Business One 9.3 and higherBill of Materials Handling
CUSTOMER© 2020 SAP SE or an SAP affiliate company. All rights reserved. 17
Field/Checkbox Activity/Description Comments
Resource No. Define a number (code) for the resource. Thevalue of this field must be unique; otherresources or items cannot have the same code.
Bar Code Enter a bar code for the resource. You can onlyenter one bar code per resource.
Resource Type From the dropdown list, select one of thefollowing resource types:· Machine· Labor· Other
The default value is defined by the selectedresource group.
Resource Group Select the group to which you want to assign theresource.
NoteThe resource draws default values fromthe resource group as described inDefining Resource Groups. You canupdate them at the resource level in thiswindow.
Unit of MeasureText
Enter a unit of measure for expressing resourcecapacity. For example, machine cycle, hour, orminute.
Time per ResourceUnits
Enter the time per resource units in the<hours:minutes:seconds> format. This fieldis related to the Res. Units per Time Period field.
NoteResource capacity is always expressedin quantity of units of measure; capacitytime in this field is used to translate thecapacity quantity into capacity time forreporting purposes only.
ExampleYou have a machinethat works in cycles.Each cycle takes 15minutes and it canprocess 3 items in 1cycle (3 capacity unitswithin 15 minutes.)In Time per ResourceUnits enter 00:15:00,and in Res. Units perTime Period enter 3.Alternatively, you candefine Time perResource Unit as00:05:00, and Res.Units per Time Periodas 1.
NoteThese definitions areused to calculate the
Res. Units per TimePeriod
Enter the number of resource units to which theTime per Resource Units field relates. Thedefault value is 1.
ExampleThe resource is a circular saw. The unitof measure is a saw cycle. The time perresource units is 00:00:30, and theresource units per time period is 300.This means that in 30 seconds, thecircular saw processes 300 items. Forcalculation purposes, the system then

18CUSTOMER© 2020 SAP SE or an SAP affiliate company. All rights reserved.
How to Work with Resources and Production in SAP Business One 9.3 and higherBill of Materials Handling
Field/Checkbox Activity/Description Comments
divides the resource units per timeperiod with the time per resource units.
Run Time value forresources included in aproduction order. Youcan leave these fieldsblank.
General Tab
On the General tab, view or define the following fields:
NoteFields that are self-explanatory are not described in the table below:
Field/Checkbox Activity/Description
Issue Method Select one of the following issue methods:· Backflush - Upon receiving finished items on a production order, the resource
capacity is automatically consumed, that is, the issue to production is thenautomatically issued.
· Manual - Receipt of finished items on a production order does not impact thecapacity of the resource. Resource consumption (issue to production) must beissued manually.
The default option is Backflush.
Resource Allocation From the dropdown list, choose one of the following options:· On Start Date - All the capacity of the resource is allocated to the start date of
the production order.· On End Date - All the capacity of the resource is allocated to the end date of the
production order regardless of the quantity of the Internal and Availablecapacities on that day.
· Start Date Forwards - The capacity of the resource is allocated to the start dateof the production order; however, if the Planned Qty of the production order isgreater than the Single Run Capacity for the start date, the system allocatesonly as much capacity as there is Single Run Capacity defined for the start dateand continues to allocate the remaining capacity to the day after the start date.The process continues forwards for each day until it allocates all the remainingPlanned Qty.
· End Date Backwards - The capacity of the resource is allocated to the end dateof the production order; however, if the Planned Qty of the production order isgreater than the Single Run Capacity for the end date, the system allocates onlyas much capacity as there is Single Run Capacity defined for the end date, andcontinues to allocate the remaining capacity to the day before the end date.The process continues backwards for each day until it reaches the currentsystem date and allocates all the remaining Planned Qty to the current systemdate, regardless of how much Single Run Capacity is defined for that day.
The default value is On Start Date. This field is later copied to the production order.
Create Link (button) Choose Create Link when you need to link a resource to a non-inventory item. Indoing so, you are allowed to purchase or sell resources as non-inventory items (forexample, when your businesses are service based).

How to Work with Resources and Production in SAP Business One 9.3 and higherBill of Materials Handling
CUSTOMER© 2020 SAP SE or an SAP affiliate company. All rights reserved. 19
Field/Checkbox Activity/Description
On creating a new resource, the Create Link button is displayed. Choose the button,and a non-inventory item is automatically created and linked to the newly createdresource.For more about the properties of the linked non-inventory item, see 3.4 LinkingResources to Non-Inventory Items.
Linked to Item Displays the non-inventory item that is linked to this resource. The item code of thenon-inventory item is the same as the resource code of the linked resource.To delete the link, delete the non-inventory item on the Item Mater Data window(Data → Remove). You cannot delete the link from the Resource Master Datawindow.
Resource Std. Cost The field names and default values of each cost component are defined by theselected resource group. To change the values for this resource, enter them in theDefault Std. Cost column.Consumption of resources on a production order automatically adds theseseparate resource costs to separate WIP and expense accrual accounts.
Active Enter the range of dates to determine a validity period for the resource.
Inactive Enter the range of dates to indicate the period for which you freeze the resource.
Advanced Enter the range of dates to determine the following:· Active Range - a validity period for the resource· Inactive Range - the period for which you freeze the resource

20CUSTOMER© 2020 SAP SE or an SAP affiliate company. All rights reserved.
How to Work with Resources and Production in SAP Business One 9.3 and higherBill of Materials Handling
Capacity Data Tab
On the Capacity Data tab, you can view resource capacity for a desired period per warehouse.Upon opening the window, the From date is always the current system date and the To date is defined by thedefault capacity period defined in the Resources tab of the General Settings window. Use the arrow buttons toshift between capacity periods.To view the capacity data for a different date range, enter the desired date range in the Capacity Period field andclick anywhere in the table.
NoteThe capacity period is restricted to a maximum of one year.
View or define the following fields in the warehouse table:
Field/Checkbox Activity/Description
Whse Code To define an additional warehouse for the resource, select one from thechoose from list in this field.
Locked Selecting this checkbox locks the warehouse for the resource and preventsyou from adding the resource from this warehouse to production orders.
NoteThe setting of this field has no impact on the ability to enter or updatecapacity data.
Internal The capacity that you set for a resource available in your warehouses orproduction areas. The capacity applies to the period specified on this tab. Formore information, see 4.1 Setting Internal Resource Capacity.
Committed The capacity that has not yet been issued and that is assigned to productionorders of either Planned or Released status, and which has been allocatedwithin the capacity period defined on this tab.

How to Work with Resources and Production in SAP Business One 9.3 and higherBill of Materials Handling
CUSTOMER© 2020 SAP SE or an SAP affiliate company. All rights reserved. 21
Field/Checkbox Activity/Description
Available This capacity is defined per warehouse within the specified capacity period asfollows:Internal Capacity - Committed Capacity - Consumed Capacity
Set Default Whse To set a default warehouse at the resource level, select the desired row andchoose this button.
NoteCapacity data in the warehouse table are rounded according to the settings in SAP Business One Main Menu→ Administration → System Initialization → General Settings → Display tab → Quantities field.
NoteTo delete a row, right-click in the row and choose Delete Row. You can only delete a row which has zerocapacity set from today into the future.
Planning Data Tab
On the Planning Data tab, you can plan daily internal capacity which you can later set as default values in theResources - Set Daily Internal Capacity window.
For every day in the table, enter up to four daily capacity factors in numbers that determine the overall dailycapacity of the resource. The total daily standard capacity is automatically calculated in the Daily Capacity fieldby multiplying the factors. Instead of entering daily factors, you can enter the daily capacity directly in the DailyCapacity field.
ExampleThe resource is a wood cutting machine and the unit of measure is machine hour. You have three woodcutting machines which can be operated eight hours a day. In the Daily Capacity Factors fields, enternumbers 3 and 8. In the Daily Capacity field, the total daily capacity of 24 hours is displayed.

22CUSTOMER© 2020 SAP SE or an SAP affiliate company. All rights reserved.
How to Work with Resources and Production in SAP Business One 9.3 and higherBill of Materials Handling
Single Run Capacity is introduced on the assumption that a single production order will only be able to beproduced on a single machine. It reflects the number of capacity hours a production order can consume on eachworking day.Select Yes or No in Relevant to Single Run Capacity field to identify whether the factor is relevant to thecalculation of Single Run Capacity which is automatically calculated by multiplying all relevant factors.
ExampleThe first daily capacity factor represents hours per shift, and the second factor represents shifts per day. Thethird factor may represent number of machines. The first two factors are tagged Yes in Relevant to SingleRun Capacity. The calculation of Single Run Capacity on any one day would therefore be the multiplication thefirst and second factors.
You can enter comments and remarks in the Remarks field.
Fixed AssetsDepending on the resource type you have defined, you can associate it with fixed assets or employees.If the resource type is Machine, on the Fixed Assets tab, you can associate fixed assets with the resource.To do so, in the Fixed Asset Item No field, select a fixed asset from the choose from list. The remaining fields are thenfilled with the values from the relevant fields in the Asset Master Data window.
Noteo This tab is available only if the Enable Fixed Assets checkbox is selected, as described in Enabling Fixed
Assets Functionality.o One resource can be associated with multiple fixed assets, but one fixed asset can be associated with
one resource only.

How to Work with Resources and Production in SAP Business One 9.3 and higherBill of Materials Handling
CUSTOMER© 2020 SAP SE or an SAP affiliate company. All rights reserved. 23
To delete a row, proceed as follows:Select the desired row.In the menu bar, choose Data → Remove.A message appears informing you about the removal process. Choose Yes.
Properties TabOn the Properties tab, you can assign properties to the resource.
Remarks Tab
On the Remarks tab, you can add text or an image to further describe the resource.
Attachments Tab
On the Attachments tab, you can add files related to the resource. Document formats include Word, Excel, .bmp filesand other file extensions.
3.2 Updating Resource Master Data Records
Procedure
From the SAP Business One Main Menu, choose Resources→ Resource Master Data.In the Resource No. field, enter the complete or partial resource number and choose Find.Modify the necessary fields and choose Update.Choose Update to save the changes.
3.3 Deleting Resource Master Data Records
CautionYou can remove a resource only if all of the following apply:o It is not assigned to a document or a draft document.o It is not assigned to any open sales, purchasing or production documents.o The internal capacity of the resource for the current system date and later is zero.
ProcedureFrom the SAP Business One Main Menu, choose Resources→ Resource Master Data.In the Resource No. field, enter the complete or partial resource number and choose Find.In the SAP Business One menu bar, choose Data → Remove.A system message appears informing you that this process is irreversible.Choose Yes.
24CUSTOMER© 2020 SAP SE or an SAP affiliate company. All rights reserved.
How to Work with Resources and Production in SAP Business One 9.3 and higherBill of Materials Handling
3.4 Linking Resources to Non-Inventory Items
By linking resources to non-inventory items, you can purchase and sell these resources in AP/AR order documents(via the existing non-inventory item functionality). This is especially helpful for service-based businesses.Note that you first need to create a resource to link to a non-inventory item. To link a resource to a non-inventoryitem, follow the steps below:
Go to the Resource Master Data window and switch to Add mode; then enter the necessary information for thenew resource.Choose the Add button.Find the newly created resource.On the General tab, in the Linked to Item field, choose the Create Link button.In the confirmation box, choose Yes to create a non-inventory item that will be linked to the resource.A linked item is created.
The linked non-inventory item is automatically created with the following properties:· The Inventory Item checkbox on the Item Master Data is automatically deselected, since it is a non-inventory item
that is created.· The Item Code will be the same as the Resource Code.
NoteCurrently it is not allowed to create a Resource Code with the same name as an existing Item Code. There is,therefore, no possibility that this Item Code already exists.
· The Item Description will be the same as the Resource Description. However, it can be manually changed whennecessary.
· All warehouses (including drop-ship warehouses) associated with the resource will be automatically associatedwith both the non-inventory item and the resource. And any change to warehouse details, in either the item or theresource, will be updated in both places.
· The Valuation Method field for the item (on the Inventory Data tab) will be automatically set to Standard and toread only.
· The Item Cost field for the item (on the Inventory Data tab) will be automatically updated with the Total StdResource Cost field value of the linked resource (on the General tab of the Resource Master Data window).
· The non-inventory item cannot be selected in the MRV document (just like all non-inventory items).

How to Work with Resources and Production in SAP Business One 9.3 and higherBill of Materials Handling
CUSTOMER© 2020 SAP SE or an SAP affiliate company. All rights reserved. 25
4 Working with Resource Capacity
4.1 Setting Internal Resource Capacity
You need to set the internal resource capacity for resources, so that the exact available capacity can be used as ameasure against resource requirements in open production orders. Use the following options:· To set or update daily internal capacity in a batch for a selected range of resources within a period of time, use
the Resources - Set Daily Internal Capacities window, as described in section 4.1.1 Setting Internal ResourceCapacities in a Batch (Set Daily Internal Capacities Window).
· To set or update internal capacity manually for one or more resources for specific days, use the ResourceCapacity window, as described in section 4.1.2 Setting Daily Internal Resource Capacity for Specific Days Manually(Resource Capacity Window).
You can also use this window to view all types of capacities per a period of time (Internal, Committed, Consumed, orAvailable).
4.1.1 Setting Internal Resource Capacities in a Batch (SetDaily Internal Capacities Window)
Procedure
From the SAP Business One Main Menu, choose Resources→ Set Daily Internal Capacities.
NoteYou can access this window from the Resource Capacity window by choosing the Set Daily Internal Capacitiesbutton. In this case, all the selection criteria fields inherit the values from the Resource Capacity window
The Capacity Period fields are defined by the initial settings for the default capacity period.Upon opening the window, the From date is always the current system date. The To date is defined by the defaultcapacity period. Use the arrow buttons to shift between capacity periods. To define a different capacity period,enter the desired date range in the Capacity Period field and click outside the fields.Define the range of the remaining selection criteria in the header area:o Warehouse Codeo Resource No.o Resource Groupo Resource Typeo Resource Properties
NoteIf you leave any of the fields above blank, the system selects all data from the category.
In the Set Daily Capacity Basis Using field, select one of the following options:

26CUSTOMER© 2020 SAP SE or an SAP affiliate company. All rights reserved.
How to Work with Resources and Production in SAP Business One 9.3 and higherBill of Materials Handling
NoteDepending on this selection, different fields in the window are enabled.
· Data from Planning Data Tab of Resource Master Data - Sets the internal capacity for the selected range ofresources using the values specified on the Planning Data tab of the relevant resource master data record.
In the table area, in the Update Data For column, select the checkboxes for the days for which you want to updatethe internal capacity.To modify the data from the Planning Data tab, in the Increase/Decrease Data from Planning Data Tab Byfield, select one of the following:o Fixed Amount - Enter the amount of resource units, positive or negative, by which you want to increase or
decrease the data.o Percentage - Enter the percentage, positive or negative, by which you want to increase or decrease the data.
· Manual Data as Entered Below for Each Weekday - Sets the internal capacity for the selection of resourcesaccording to the data entered manually in this window.In the table area, in the Update Data For column, select the checkboxes for the days for which you want to updateinternal capacity.In the Daily Capacity Factors fields, enter up to four daily capacity factors in numbers that determine the overalldaily capacity of the resource. The total daily standard capacity is automatically calculated in the Daily Capacityfield by multiplying the factors. Instead of entering daily factors, you can enter the daily capacity directly in theDaily Capacity field.

How to Work with Resources and Production in SAP Business One 9.3 and higherBill of Materials Handling
CUSTOMER© 2020 SAP SE or an SAP affiliate company. All rights reserved. 27
In the Additional Comment field, you can enter text which will be accessible from the Resource Capacitywindow. In the mentioned window, the data associated with this comment are displayed in blue.If you do not want the capacity data to be applied to holiday days, select the Do Not Update Holiday Dayscheckbox.Choose Update.
NoteTo view capacity for a resource that you have defined here, use the Resource Capacity window. There youcan update resource capacity for specific days manually.When you access this window from the Main Menu, the Capacity Period From…To values appear according tothe rules defined in the General Settings window, and the remaining criteria are inherited from the lastexecution view
· Update Single Run Capacity with Internal CapacityWhen this option is selected and the Update button is pressed, the data held in the Single Run Capacity fields inthe Resource Capacity window will be overridden with the values from the Internal Capacity fields, for thecorresponding dates and the range of data selected in this window.

28CUSTOMER© 2020 SAP SE or an SAP affiliate company. All rights reserved.
How to Work with Resources and Production in SAP Business One 9.3 and higherBill of Materials Handling
· Update Internal Capacity with Single Run CapacityWhen this option is selected and the Update button is pressed, the data held in the Internal Capacity fields in theResource Capacity window will be overridden with the values from the Single Run Capacity fields, for thecorresponding dates and the range of data selected in this window.

How to Work with Resources and Production in SAP Business One 9.3 and higherBill of Materials Handling
CUSTOMER© 2020 SAP SE or an SAP affiliate company. All rights reserved. 29
4.1.2 Setting Daily Internal Resource Capacity for SpecificDays Manually (Resource Capacity Window)
Procedure
From the SAP Business One Main Menu, choose Resources→ Resource Capacity. The Resource Capacity windowappears.
NoteIf you access this window from the Resource Master Data window, the selection criteria from the ResourceCapacity window are copied to the Resource Capacity window and internal resource capacity data for AllWarehouses is displayed.
In the Capacity Type field, select Internal.The Period Capacity From and To fields are determined by the defined default capacity period. To shift betweencapacity periods, use the arrow buttons. To change the capacity period, enter the desired date range and chooseRefresh.
NoteThe defined capacity period cannot be longer than one year.
Define the range of the remaining selection criteria in the general area, then choose Refresh:o Warehouse Codeo Resource No.o Resource Groupo Resource Typeo Resource Propertieso Resource Properties Status

30CUSTOMER© 2020 SAP SE or an SAP affiliate company. All rights reserved.
How to Work with Resources and Production in SAP Business One 9.3 and higherBill of Materials Handling
Noteo If you leave any of the fields above blank, the system selects all data from the category.o If there is already any internal capacity defined for this period, it is displayed in the table area.
To view data for each day in the table, scroll over the date fields, as displayed below:
In the desired date field, enter capacity for a resource. You can enter decimal values, too.You can repeat this for as many dates and resources as you need.
NoteDates related to holiday days are displayed in red.
To decrease or increase values by 5%, press CTRL and select the desired rows in the table, then choose theDecrease/Increase Percentage buttons or enter a desired percentage value in the field (positive or negative).
To enter a comment, double-click a desired cell in the table and choose Edit Comment. Enter the comment andchoose OK.Fields with comments added from the Resource Capacity window are displayed in red.Fields with comments added from the Resources - Set Daily Internal Capacity window are displayed in blue. Youcan edit those comments in this window, as well. In that case, the fields are no longer displayed in blue, but in red.The following internal capacity totals related to the selection criteria are displayed in the table:o At the bottom of each column - displays the total internal capacity of the displayed items per date.o In the Total column - for each item, displays the total internal capacity for the defined capacity period.
At the bottom of the Total column, the value of the summed totals is displayed.To save the data, choose Update.

How to Work with Resources and Production in SAP Business One 9.3 and higherBill of Materials Handling
CUSTOMER© 2020 SAP SE or an SAP affiliate company. All rights reserved. 31
NoteIf you access this window from the Main Menu, all selection criteria are inherited from the last execution viewexcept the Capacity Period From… To field, which appears according to the definitions in the General Settingswindow. Choose Refresh to display the capacity data in the table.
4.1.2.1 Accessing Resource Capacity Window from ResourceMaster Data
If you access the Resource Capacity window from the Capacity Data tab of the Resource Master Data window, theselection criteria from the Capacity Data tab are copied to the Resource Capacity window. To access the ResourceCapacity window from Resource Master Data, proceed as follows:
On the Capacity Data tab, right-click anywhere in the window and choose Internal Resource Capacity.The Resource Capacity window opens with the following selection criteria copied from the Capacity Data tab:All Warehouses, Capacity Period, and Resource No.
4.1.2.2 Accessing Resource Capacity Window from ProductionOrder Window
You can access the Resource Capacity window from the Production Order window. To do so, in the resource line, click (Link Arrow) in the Available column. The Resource Capacity window opens with the following criteria:
· Capacity Type: All· Capacity Period: Not defined· Warehouse Code: Copied from the resource line of the production order
4.2 Viewing Resource Capacity
To view data for all capacity types for a resource within a desired capacity period, use the Capacity Data tab in theResource Master Data window.To view daily data for all capacity types for a selected range of resources within a desired capacity period, use theResource Capacity window as described below.
4.2.1 Viewing Resource Capacity from Resource CapacityWindow
NoteIf you access this window from the Main Menu, all selection criteria are inherited from the last execution viewexcept the Capacity Period From… To field, which appears according to the definitions in the General Settingswindow. Choose Refresh to display the capacity data in the table.
32CUSTOMER© 2020 SAP SE or an SAP affiliate company. All rights reserved.
How to Work with Resources and Production in SAP Business One 9.3 and higherBill of Materials Handling
ProcedureFrom the SAP Business One Main Menu, choose Resources→ Resource Capacity.From the dropdown list in the Capacity Type field, select the desired option:o Internal - If you select this, you can also manually update the Internal capacity data.o Ordered - Ordered capacity displays the total quantity of the Qty (Inventory UoM) grid line field for the non-
inventory item linked to this resource. (For more about resources linked to non-inventory items, see 3.4Linking Resources to Non-Inventory Items), from the following documents:o Purchase orders with a document grid line field of Del. Date, which falls within the From-To period
specified in the Capacity Period field.
NoteWhen the purchase order is copied to a GRPO or purchase invoice, the ordered capacity from thepurchase order will be reduced by the drawn quantity. Meanwhile, the ordered capacity from the GRPOor purchase invoice will be increased by the drawn quantity.
Also note that if a non-inventory item is linked to a resource, when a purchase order is copied to a GRPO,the quantity in the GRPO cannot be greater than the quantity in the purchase order.
o GRPOs with a document grid line field of Actual Del. Date which falls within the From- To period specifiedin the Capacity Period field.
NoteWhen the GRPO is copied to a purchase invoice, the ordered capacity from the GRPO will remainunchanged. However, when the GRPO is copied to an A/P Return, the ordered capacity from the GRPOwill be reduced by the drawn quantity.Non-based purchase invoices (and purchase invoices generated based on purchase quotations) with adocument grid line field of Actual Del. Date which falls within the From-To period specified in the CapacityPeriod field.
NoteWhen the non-based purchase invoice is copied to an A/P Credit Memo, the ordered capacity from thepurchase invoice will be reduced by the drawn quantity.
o CommittedGenerally, this field displays the resource capacities that are committed to production orders. However, ifthere are resources linked to non-inventory items, it may also contain the total quantity of the Qty (InventoryUoM) grid line field for the non-inventory item linked to this resource, from open Sales Orders.(For more about resources linked to non-inventory items, see 3.4 Linking Resources to Non-Inventory Items.)
NoteWhen the sales order is copied to a sales delivery or A/R invoice, the committed capacity from the salesorder will be reduced by the drawn quantity. Meanwhile, the consumed capacity will be increased fordelivery and A/R invoice.
o ConsumedGenerally, this field displays the resource capacities that are consumed by production orders. However, ifthere are resources linked to non-inventory items, it may also contain the total quantity of the Qty (InventoryUoM) grid line field for the non-inventory item linked to this resource, from the following documents:o A/R deliveries with a document grid line field of Actual Del. Date, which falls within the From-To period
specified in the Capacity Period field.(For more about resources linked to non-inventory items, see 3.4 Linking Resources to Non-InventoryItems)

How to Work with Resources and Production in SAP Business One 9.3 and higherBill of Materials Handling
CUSTOMER© 2020 SAP SE or an SAP affiliate company. All rights reserved. 33
NoteWhen the A/R delivery is copied to an A/R invoice, the consumed capacity remains unchanged.However, if the delivery is copied to a Return, the consumed capacity is reduced by the drawn quantity.
o Non-based A/R invoices (including A/R invoices copied from sales quotations) with a document grid linefield of Actual Del. Date which falls within the From-To period specified in the Capacity Period field.
NoteWhen the non-based A/R invoice is copied to an A/R credit memo, the consumed capacity is reduced bythe drawn quantity.
o Availableo Single Run Capacity - If you select this, you can also manually update the Single Run Capacity data.o All - If you select this, all these capacity types are displayed simultaneously. In the collapsed view, only the
Internal capacity is visible. In the expanded view, all these capacity types are visible, and the Internal capacityand Single Run Capacity can be both manually updated.
The Period Capacity From and To fields are determined by the defined default capacity period. Upon opening thewindow, the From date is the current system date. To shift between capacity periods, use the arrow buttons. Tochange the capacity period, enter the desired date range and choose Refresh.Define the range of the remaining selection criteria in the header area:o Warehouse Codeo Resource No.o Resource Groupo Resource Typeo Resource Properties
NoteIf you leave any of the fields above blank, the system selects all data from the category.
Choose Refresh.

34CUSTOMER© 2020 SAP SE or an SAP affiliate company. All rights reserved.
How to Work with Resources and Production in SAP Business One 9.3 and higherBill of Materials Handling
The capacity data for the defined selection criteria are displayed in the table area.To view data for each day in the table, scroll to the right over the date columns.
NoteFor Internal resource capacity type, the following applies:o Capacity data with comments added from the Resource Capacity window are displayed in blue.o Capacity data with comments added from the Resources - Set Daily Internal Resource Capacity
window are displayed in red.To view the comments, hover over the field.
To view cumulative quantities of the selected capacity type, select the Show Cumulative Capacity from Todaycheckbox. The capacity quantities accumulate with each day starting from the current system date, regardless ofthe Capacity Period you are viewing. Data for days prior to the current system date are in this case blank.
NoteIf you are viewing the Internal capacity type, the fields in the table are read-only; you cannot update theinternal capacity if the Show Cumulative Capacity from Today checkbox is selected.
Example 1 - Show Cumulative Capacity from Todayo You are viewing Available capacity for a resource for a period of 5 days. The From date is the current
system date, July 12. The following information is displayed in the table when the Show CumulativeCapacity from Today checkbox is deselected.
Capacity Type July 12 July 13 July 14 July 15 July 16
Available 5 5 7 5 6
o You are viewing Available capacity for the same resource, for the same period. However, now theShow Cumulative Capacity from Today checkbox is selected.
Capacity Type July 12 July 13 July 14 July 15 July 16
Available 5 10 (5+5) 17 (5 + 5 + 7) 22 (5 + 5 + 7 +5)
28 (5 + 5 + 7 +5 + 6)
Example 2 - Show Cumulative Capacity from TodayYou are viewing Available capacity for a resource for a period of 7 days. The From date is July 10, the currentdate is the current system date, July 12. The following information is displayed in the table when the ShowCumulative Capacity from Today checkbox is selected.
Capacity Type July 10 July 11 July 12 July 13 July 14 July 15 July 16
Available 5 10 (5+5) 17 (5 + 5 +7)
22 (5 + 5 +7 + 5)
28 (5 + 5 +7 + 5 + 6)

How to Work with Resources and Production in SAP Business One 9.3 and higherBill of Materials Handling
CUSTOMER© 2020 SAP SE or an SAP affiliate company. All rights reserved. 35
Example 3 - Show Cumulative Capacity from TodayYou are viewing Available capacity for a resource for a period of 3 days. The From date is July 14, the currentdate is the current system date, July 12. The following information is displayed in the table when the ShowCumulative Capacity from Today checkbox is selected.
Capacity Type July 14 July 15 July 16
Available 17 (5 + 5 + 7) 22 (5 + 5 + 7 +5)
28 (5 + 5 + 7 +5 + 6)
If you are viewing All capacity types in collapsed view, the quantities in resource rows display the Availablecapacity type. Choose the Expand All button, to switch to the expanded view and display all capacity type rows.o In the Internal capacity type row, if you have defined internal capacities for the defined period, the relevant
quantities are displayed. You can update the internal capacity for any of the dates displayed, and view or addcomments.
o In the Ordered, Committed and Consumed capacity type rows, the cells which contain values appear as pushbuttons. Click them to see the relevant source documents related to the committed or the consumedquantity of the resource.

36CUSTOMER© 2020 SAP SE or an SAP affiliate company. All rights reserved.
How to Work with Resources and Production in SAP Business One 9.3 and higherBill of Materials Handling

How to Work with Resources and Production in SAP Business One 9.3 and higherBill of Materials Handling
CUSTOMER© 2020 SAP SE or an SAP affiliate company. All rights reserved. 37
5 Defining Production Data in Item MasterData
The Production Data tab is available on the Item Master Data window to help streamline BOM and resourcemanagement.
To access this tab, from the SAP Business One Main Menu, choose Inventory → Item Master Data →
Production tab.View or define the following:
Field/Checkbox Description/Activity
Phantom Item NoteThis checkbox has been moved from the General tab to the Production Datatab.
Defines the item as a phantom; a phantom item is an item type in BOM that has anengineering or structure function only. Phantom items do not represent a physicalcomponent or a subassembly, thus they are defined as non-inventory items.
Issue Method NoteThis checkbox has been moved from the General tab to the Production Datatab.

38CUSTOMER© 2020 SAP SE or an SAP affiliate company. All rights reserved.
How to Work with Resources and Production in SAP Business One 9.3 and higherBill of Materials Handling
Select one of the following issue methods:· Backflush - after you report the completion of the parent item, the components are
automatically issued to the production order.· Manual - the components are manually issued to the production order, regardless
of the issue of the product.
NoteYou cannot use the Backflush method for items managed by serials or batches.
BOM Type This field indicates if the item is associated with a BOM as a parent item. The field isblank if the item is not associated with any BOM. Otherwise, the following values arepossible:· Assembly - The item is associated with an assembly BOM.· Sales - The item is associated with a sales BOM.· Production - The item is associated with a production order.
To open the related BOM, click (Link Arrow).
No. of Item Components Displays the number of item components that are currently included in this item'sBOM.
No. of ResourceComponents
Shows the number of resource components that are currently included in this item'sBOM.

How to Work with Resources and Production in SAP Business One 9.3 and higherBill of Materials Handling
CUSTOMER© 2020 SAP SE or an SAP affiliate company. All rights reserved. 39
6 Bill of Materials Handling
6.1 Bill of Materials Window
The BOM has a hierarchical arrangement of components. Enter all the child items, raw materials, resources, or evenroute stages required to assemble and produce the finished product.
In the Bill of Materials window, Route Stage can be selected in the Type table field, to allow route stage association ofBoM lines. The Route Sequence field will then be displayed in the table to indicate the order by which the route stateswill be performed.
From the SAP Business One Main Menu, choose Production→ Bill of Materials.
View or define the fields in the Bill of Materials grid:
Field Activity/Description
Type From the dropdown menu, select one of the following options:· Item - Select this to define an item component.· Resource - Select this to define a resource component.· Text - Select this to enter text. With this option, all the remaining fields in the
line are disabled.· Route Stage - To add a route stage line. With a Route Stage type line, a route
stage code would be entered in the No. field of this line.
No. From the choose from list, select an item for the Item type line, or a resource forthe Resource type line. Values from relevant fields in the item master data orresource master data records are copied into the remaining fields in the line.

40CUSTOMER© 2020 SAP SE or an SAP affiliate company. All rights reserved.
How to Work with Resources and Production in SAP Business One 9.3 and higherBill of Materials Handling
Field Activity/Description
Route Sequence Displays the sequence number that is assigned to each route stage. Thesequence indicates the precise order in which the routing stages must beperformed during the production process.This field will not be visible by default. The value of this field is automaticallypopulated by the system upon the creation of lines with a line Type set to RouteStage.The pull-down list will contain a list of all the other route sequence numbers thatcurrently exist in this Bill of Materials grid. No other numbers can be entered.Selecting another Route Sequence number in this field results in it being assignedto the current route stage, and all other route stages move up or downaccordingly.
Quantity Enter the quantity of the item or resource component required to produce thequantity (defined in the Bill of Materials header field) of the parent item.
NoteFor resource components, the value cannot be negative.
Additional Quantity Enter additional quantity for an item or a resource component. The value fromthis field is then copied into the Additional Quantity field in the production orderdocument. The quantity is added to the total planned quantity of items andresources and the total planned time in the production order, regardless of thequantity of the parent item produced.
ExamplePlanned Qty of the parent (in the production order header) = 2Base Qty of the resource = 4Additional Quantity of the resource = 1Planned Qty of the resource = 2*4+1
Noteo The system allows items or resources with a Manual issue method to
have the Base Qty of zero and the Additional Quantity of a numbergreater than zero.
o With resources and items with a Backflush issue method, the entireadditional quantity is consumed upon the completion of the firstparent item. For example, if in one production order you plan toproduce 10 parent items, the additional quantity is consumed uponthe completion of the first parent item.
o The Additional Quantity for by-product lines is always zero.
WIP Account This account is used to post the value of resource and item components that arein the process of production.In the choose from list, select an account from the list of accounts. When theBOM is used in a production order, the value from this field is copied into the WIPAccount field of the production order and is later used in the Account Code field inthe issue from production document.However, if this field is left blank for item or resource component lines, theAccount Code field in the issue for production document defaults to the WIPAccount associated through the document settings options. For moreinformation, see section 7.6 Document Settings and WIP Account.

How to Work with Resources and Production in SAP Business One 9.3 and higherBill of Materials Handling
CUSTOMER© 2020 SAP SE or an SAP affiliate company. All rights reserved. 41
Field Activity/Description
Waiting Days Displays the period of time, presented in days, to wait after the completion of theroute stage. This field will not be visible by default. As soon as a Route Stage typeline is created, you can manually enter the number of waiting days.
Up/Down Arrows You can change the presentation sequence of the component lines. To do so,select the desired component line and click or to move it up or down.
NoteSome fields are not displayed by default. To define which fields should be displayed, click (Form Settings)in the toolbar.
NoteA resource can be a component of a phantom item.
NoteYou can choose to filter and view specific types of lines in the grid. To view only resource and route stagetype lines, right-click on the Bill of Materials, and select Display Route Stages and Display Resources. Thefollowing options are all selected by default, and you can deselect them according to your needs:o Display Route Stageso Display Itemso Display Resourceso Display Texts
In addition, you can also choose to filter type lines by pressing the following shortcut keys:o Press Ctrl + Shift + 1 , and route stages lines will be hidden.o Press Ctrl + Shift + 2 , and item lines will be hidden.o Press Ctrl + Shift + 3 , and resource lines will be hidden.o Press Ctrl + Shift + 4 , and text lines will be hidden.
6.2 Managing Bill of Materials (BOMs)
Using the bill of materials management functionality, you can change, add, or delete components of all types fromBOMs in a batch. Additionally, you can change the header fields of several BOMs at once or delete batches of BOMs.
NoteIf an error occurs during the execution of replacing, adding, or deleting components or headers, none of theselected BOMs are updated.
6.2.1 Changing BOM Components
You can replace component lines of a BOM with different components or update existing ones, for example, thequantity, issue method, route sequence, route stage, and so on.

42CUSTOMER© 2020 SAP SE or an SAP affiliate company. All rights reserved.
How to Work with Resources and Production in SAP Business One 9.3 and higherBill of Materials Handling
Procedure
From the SAP Business One Main Menu, choose Production→ Bill of Materials Management. The Bill of MaterialsManagement - Selection Criteria window appears.
From the Management Task dropdown list, select Change BOM Lines.In the Select BOMs section, define the range of BOMs for which you want to replace or change components.In the Routed section, proceed as follows:o Select Yes if you want to change components for BOMs that contain at least one Route Stage.
If you are using routed BOMs, you must specify at least one of the following fields:o Route Sequence - Enter a positive integer in the From and To fields to specify the route sequence range.o Route Stage - From the choose from list in the From and To fields, specify the route stage range.
Note:Only the selected routed BOM lines will be processed and only lines belonging to specified route stagerange will be affected.
o Select No if you want to change components for BOMs that do not contain a Route Stage.In the Select BOM Lines section, select one of the following:o Item - In the From and To fields, define the range of the item components in the selected BOMs you want to
change or replace.o Resource - In the From and To fields, define the range of the resource components in the selected BOMs you
want to change or replace.o Text - Enter at least part of the text which you want to replace. In the Replacement Text field enter the new
text and move to Step 6, as the fields relevant to items and resources in the BOMs are not available in thewindow.

How to Work with Resources and Production in SAP Business One 9.3 and higherBill of Materials Handling
CUSTOMER© 2020 SAP SE or an SAP affiliate company. All rights reserved. 43
o Route Stage - In the Specify Properties for BOM Lines to Be Changed section, perform the following and thenproceed to step 7:o To change the route stage, select the Change Route Stage checkbox and select the route stage code
from the choose from list. All selected route stages will be updated with the newly entered route stagecode.
Note:Changing the route stage will update all lines associated with the selected route stage lines.
o To change the waiting days for the route stage, select the Change Waiting Days checkbox and enter avalue for the number of days.

44CUSTOMER© 2020 SAP SE or an SAP affiliate company. All rights reserved.
How to Work with Resources and Production in SAP Business One 9.3 and higherBill of Materials Handling
In the Specify Properties for BOM Lines to Be Changed section, proceed as follows:o If you want to replace the selected components with a different one, select the Replacement BOM
Component checkbox. In the choose from list, define the replacement component and define the number ofreplacement components per existing components.
ExampleYou defined a range of BOMs in which you want to replace every Resource A and every Resource B with twounits of Resource C. In each BOM, the system will replace every unit of Resource A with two units ofResource C. It will also replace every unit of Resource B with two units of Resource C.
o If you want to change parameters for the selected components or for the replacement component, selectone or more of the following checkboxes and specify the desired values:o Change Additional Quantityo Change Warehouseo Change Issue Methodo Change WIP Accounto Change Route Sequenceo Change Route Stageo Change Price Listo Change Distr. Ruleo Change Project
Choose OK.The Bill of Materials Management - Change Preview window appears.The Selected checkbox is selected for each BOM in which the system is about to change the component. If you donot want to change the component in a BOM, deselect the relevant checkbox.Each parameter displays a column with the existing value and a column with the replacement value.To execute the task, choose OK.

How to Work with Resources and Production in SAP Business One 9.3 and higherBill of Materials Handling
CUSTOMER© 2020 SAP SE or an SAP affiliate company. All rights reserved. 45
6.2.2 Adding BOM Components
You can add components of all three types to a desired range of BOMs.
Procedure
From the SAP Business One Main Menu, choose Production→ Bill of Materials Management. The Bill of MaterialsManagement - Selection Criteria window appears.

46CUSTOMER© 2020 SAP SE or an SAP affiliate company. All rights reserved.
How to Work with Resources and Production in SAP Business One 9.3 and higherBill of Materials Handling
From the Management Task dropdown list, select Add BOM Lines.In the Select BOMs section, define the range of BOMs for which you want to add a component.In the Routed section, proceed as follows:o Select Yes if you want to change components for BOMs that contain at least one Route Stage.
If you are using routed BOMs, you must specify at least one of the following fields:o Route Sequence - Enter a positive integer in the From and To fields to specify the route sequence range.o Route Stage - From the choose from list in the From and To fields, specify the route stage range.
Note:Lines will only be added to routed BOMs.
Note:If only the Route Stage field is specified, a line will be added to each selected route stage, even if the routestage is repeated in a particular BOM. For example, if a route stage appears three times in a BOM, three lineswill be added to the BOM.
o Select No if you want to change components for Bill of Materials that do not contain any Route Stage.In the Select BOM Lines to Add section, select one of the following:o Item - In the From and To fields, define the range of the item components you want to add to the selected
BOMs.o Resource - In the From and To fields, define the range of the resource components you want to add to the
selected BOMs.o Text - Enter text in the Text to Be Added section and move to Step 6, as the fields relevant to items and
resources in the BOMs are not available in the window.In the BOM Line Details to Be Added section, define the following fields:o Quantityo Additional Quantity

How to Work with Resources and Production in SAP Business One 9.3 and higherBill of Materials Handling
CUSTOMER© 2020 SAP SE or an SAP affiliate company. All rights reserved. 47
o Warehouseo Issue Methodo WIP Accounto Price Listo Distr. Ruleo Project
Choose OK. The Bill of Materials Management - Add Preview window appears.
The Selected checkbox is selected for each BOM to which the system is about to add the component. If you donot want to add the component to a BOM, deselect the relevant checkbox.To execute the task, choose OK.

48CUSTOMER© 2020 SAP SE or an SAP affiliate company. All rights reserved.
How to Work with Resources and Production in SAP Business One 9.3 and higherBill of Materials Handling
6.2.3 Deleting BOM Components
Procedure
From the SAP Business One Main Menu, choose Production→ Bill of Materials Management. The Bill ofMaterials Management - Selection Criteria window appears.
From the Management Task dropdown list, select Delete BOM Lines.In the Select BOMs section, define the range of BOMs for which you want to delete components.In the Routed section, proceed as follows:o Select Yes if you want to change components for BOMs that contain at least one Route Stage.
If you are using routed BOMs, you must specify at least one of the following fields:o Route Sequence - Enter a positive integer in the From and To fields to specify the route sequence
range.o Route Stage - From the choose from list in the From and To fields, specify the route stage range.
Note:Lines will only be deleted according to the selected criteria for routed BOMs.
o Select No if you want to change components for Bill of Materials that do not contain any Route Stage.In the Select BOM Lines to Be Deleted field, select one of the following:o Item - In the From and To fields, define the range of the item components you want to delete from the
selected BOMs.
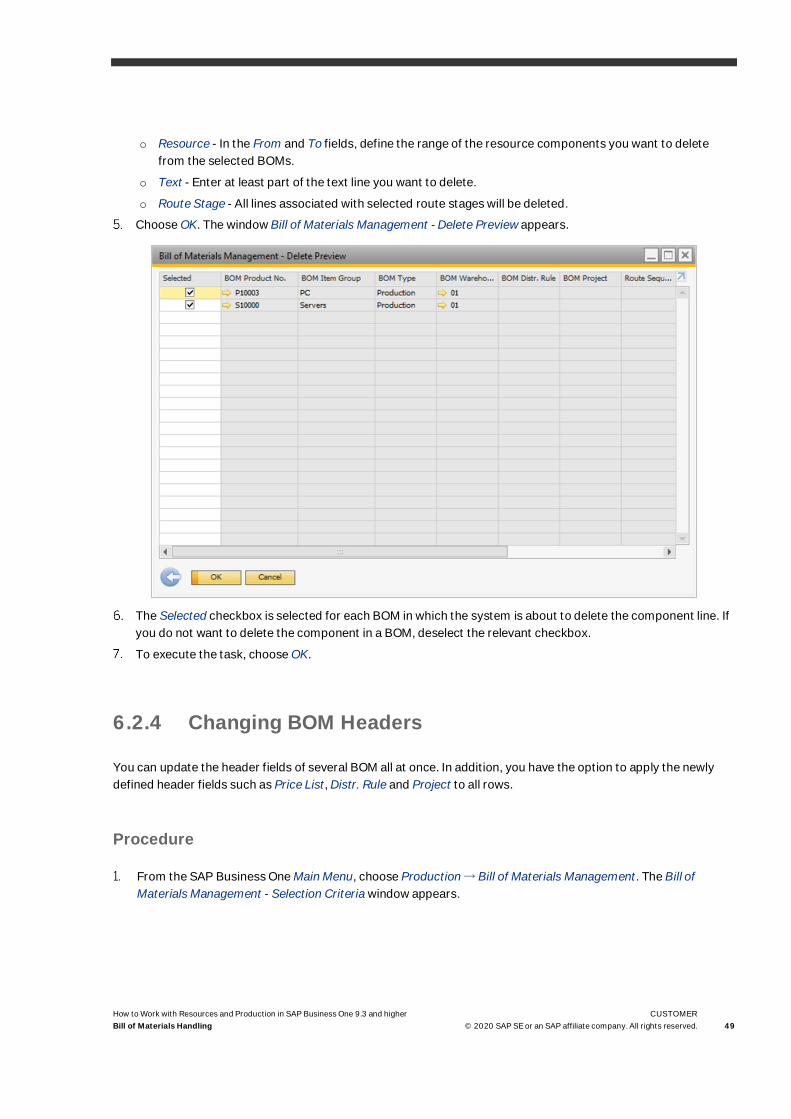
How to Work with Resources and Production in SAP Business One 9.3 and higherBill of Materials Handling
CUSTOMER© 2020 SAP SE or an SAP affiliate company. All rights reserved. 49
o Resource - In the From and To fields, define the range of the resource components you want to deletefrom the selected BOMs.
o Text - Enter at least part of the text line you want to delete.o Route Stage - All lines associated with selected route stages will be deleted.
Choose OK. The window Bill of Materials Management - Delete Preview appears.
The Selected checkbox is selected for each BOM in which the system is about to delete the component line. Ifyou do not want to delete the component in a BOM, deselect the relevant checkbox.To execute the task, choose OK.
6.2.4 Changing BOM Headers
You can update the header fields of several BOM all at once. In addition, you have the option to apply the newlydefined header fields such as Price List, Distr. Rule and Project to all rows.
Procedure
From the SAP Business One Main Menu, choose Production → Bill of Materials Management. The Bill ofMaterials Management - Selection Criteria window appears.

50CUSTOMER© 2020 SAP SE or an SAP affiliate company. All rights reserved.
How to Work with Resources and Production in SAP Business One 9.3 and higherBill of Materials Handling
From the Management Task dropdown list, select Change BOM Header.In the Select BOMs section, define the range of BOMs for which you want to update the header data.In the Specify Properties for BOM Header to Be Changed section, select one or more of the followingcheckboxes and specify the desired values:o Change Quantityo Change Warehouseo Change Price Listo Change Distr. Ruleo Change Projecto Change Planned Average Production Size
If necessary, you can select Update Rows to apply the newly defined value of Price List, Distr. Rule, and Projectto all rows in the selected BOMs.Choose OK.The Bill of Materials Management - Change Header Preview window appears.

How to Work with Resources and Production in SAP Business One 9.3 and higherBill of Materials Handling
CUSTOMER© 2020 SAP SE or an SAP affiliate company. All rights reserved. 51
The Selected checkbox is selected for each BOM in which the system is about to change the header. If you donot want to change the header in a BOM, deselect the relevant checkbox.Each parameter displays a column with the existing value and a column with the replacement value.To execute the task, choose OK.
6.2.5 Deleting BOMs
Procedure
From the SAP Business One Main Menu, choose Production→ Bill of Materials Management. The Bill ofMaterials Management - Selection Criteria window appears.

52CUSTOMER© 2020 SAP SE or an SAP affiliate company. All rights reserved.
How to Work with Resources and Production in SAP Business One 9.3 and higherBill of Materials Handling
From the Management Task dropdown list, select Delete BOM Header.In the Select BOMs to Be Deleted section, define the range of BOMs that you want to delete.Choose OK. The Bill of Materials Management - Delete Header Preview window appears.
The Selected checkbox is selected for each BOM that the system is about to delete. If you do not want todelete the BOM, deselect the relevant checkbox.

How to Work with Resources and Production in SAP Business One 9.3 and higherBill of Materials Handling
CUSTOMER© 2020 SAP SE or an SAP affiliate company. All rights reserved. 53
To execute the task, choose OK.

54CUSTOMER© 2020 SAP SE or an SAP affiliate company. All rights reserved.
How to Work with Resources and Production in SAP Business One 9.3 and higherWorking with Production Orders
7 Working with Production Orders
As in Bill of Materials Handling, the Route Stage in the Type filed allows route stage association of all productionorder lines. In addition, it will facilitate a simple filtering ability of any combination of production order line types.
7.1 Production Order Window
Procedure
From the SAP Business One Main Menu, choose Production→ Production Order.
View or update the following fields in the general area:
NoteFields that are self-explanatory are not described in the table below.
Field Activity/Description
Type Choose one of the following production order types:· Standard (default) - to produce a regular production item, using a Production Bill of
Materials· Special - to produce and repair items that could be any inventory item

How to Work with Resources and Production in SAP Business One 9.3 and higherWorking with Production Orders
CUSTOMER© 2020 SAP SE or an SAP affiliate company. All rights reserved. 55
Field Activity/Description
· Disassembly - to dismantle a parent item to its components, using a Production Bill ofMaterials
Status Choose a production order status as follows:· Planned - initial production order status· Released - you release the production order to the shop floor for work; status at which
receipts and issues are transacted· Closed- you close the production order when all transactions have been completed.
NoteYou can still edit several fields after a production order is closed, such as theRemarks field, user-defined fields, referenced documents, and attachments.
· Canceled - production order is removed from the list before the production processstarts
Product No. Enter the parent item for the Standard and Disassembly production orders.· Choose to display the parent list of the Bill of Materials.· Choose New to define a new Bill of Materials.
For the Special production order type, select the item from the items list.
Priority Displays the degree of importance of a production order, indicated by integer numbers.The default value is 100. You can manually change the number here. The smaller thenumber, the more important the production order.
Routing DateCalculation
Determines how the resource allocation will occur. This field contains a list of the followingoptions:· On Start Date· On End Date· Start Date Forwards· End Date Backwards
For a production order that has at least one route stage, the value of this field will beautomatically copied to the Resource Allocation field in the table. In addition, changingvalues in this field may affect the calculation of Required Days, Start Date and End Datefor Resource type lines in the grid.
For details about how the calculation is affected, see 7.3 Calculating Required Days and TotalDays, and 7.4 Start Date / End Date Calculation Algorithm.
Procure Items Select this checkbox to allow procurement documents to be created from the productionorder and all existing item type component rows in the production order.
Update Now(button)
This button lets you update the resource allocation method that applies to the currentproduction order. For a routed production order that has a Routing Date Calculation set toeither Start Date Forwards or End Date Backwards, the button is highlighted in red for you toclick when one of the following happens:· You manually change the Start Date in the header of the production order.· You manually change the Due Date in the header of the production order.

56CUSTOMER© 2020 SAP SE or an SAP affiliate company. All rights reserved.
How to Work with Resources and Production in SAP Business One 9.3 and higherWorking with Production Orders
Field Activity/Description
· You change the Routing Date Calculation field value to either Start Date Forwards or EndDate Backwards.
· You change the Product No. or Planned Qty. of the production order.· You change the Resource No. or the Planned Qty.· You add or delete a resource type line.· You add or delete a route stage.· You change the sequence of route stages.· The association between the route stage and resources is changed. For example, you
move Resource 1 from Route Stage 1 to Route Stage 2.For more about the results that come with clicking Update Now, and how selecting differentoptions may update different fields, see 7.2 Managing Resource Allocation in ProductionOrders.
Start Date(header)
Displays the start date of the production. By default, this date is the same as Order Date. Youcan change it manually, which may affect Due Date.
Due Date This date displays the planned completion date of the production, and is, by default,calculated based on Start Date and the lead time of the parent item. You can change thisdate manually.
Origin Indicates how the production order was created:· MRP – a result of the MRP report recommendation· Manual – entered by an authorized user· Sales Order – created automatically based on a sales order
Linked To From the dropdown list, specify if the production order is linked to a sales order orproduction order. The Sales Order option is displayed by default.If a production order procurement document was created using the ProcurementConfirmation Wizard, this field displays the base document type (Sales Order or ProductionOrder).
Linked Order Choose the relevant sales or production order linked to this production order.If a production order procurement document was created using the ProcurementConfirmation Wizard, this field displays a link arrow to the base document.
View or update the following fields on the Components tab:
Noteo Fields that are self-explanatory are not described in the table below.o Some of the fields are not visible by default. Use (Form Settings) in the toolbar to define which
fields you want displayed.
Field Activity/Description
Type You can select one of the following options:

How to Work with Resources and Production in SAP Business One 9.3 and higherWorking with Production Orders
CUSTOMER© 2020 SAP SE or an SAP affiliate company. All rights reserved. 57
Field Activity/Description
· Item - This is the default option. The remaining fields for the Item option arepopulated by default from the BOM window associated with the parent itemor from the Item Master Data window.
· Resource - When this option is selected, you can select a desired resourcefrom the choose from list in the No. field. The remaining fields for theResource option are populated by default from the BOM window associatedwith the parent item or from the Resource Master Data window.
· Text - Select this option to add text in the line; the remaining fields mergeinto one. The text is added automatically from the corresponding line in theBill of Materials window associated with the parent item, or you can define itmanually in this window.
· Route Stage - Select this option for a routed production order. Theremaining fields for the Route Stage option are populated by default fromthe BOM associated with the parent item, or you can define them manually.With a Route Stage line, a route stage code would be entered in the No. fieldof this line.
No. and Description These fields were originally Item No. and Item Description.
NoteIf the production order has a Route Stage line, then in the No. field, theroute stage code would be displayed. If necessary, you can manuallyselect another route stage code here.
NoteYou can use a parent item as a component item in Special typeproduction orders. Production orders with a parent item as thecomponent item are not included in MRP calculations and serial andbatch number transactions reports.
Base Qty Quantity of the components necessary to produce the bill of materials for oneparent product. The value is copied from the Bill of Materials window. You canupdate this field if necessary.
NoteThe Base Qty value of a resource component cannot be less than zero.
Planned Qty For each component line, the value of this field is calculated according to thefollowing formula:(Planned Quantity of the parent * Base Qty of the component)
+ Additional Qty of the component
Additional Qty The value is copied from the Additional Qty field in the Bill of Materials window;however, you can change it manually in the production order.

58CUSTOMER© 2020 SAP SE or an SAP affiliate company. All rights reserved.
How to Work with Resources and Production in SAP Business One 9.3 and higherWorking with Production Orders
Field Activity/Description
NoteOnly components of the Manual issue method can have zero Base Qtyand the Additional Quantity larger than zero.The additional quantity for by-products is always zero.
Available For resources, this field displays the total resource availability for the warehousepopulated on the production order line. Click (Link Arrow) to update theinternal capacity of the resource for the mentioned warehouse in the ResourceCapacity window.After you update the internal capacity and return to the production order, thevalue of this field is refreshed.
WIP Account If the production order lines are populated with components from a BOM, theaccount defined in the WIP Account field of the BOM for the relevant componentpopulates this field. If the WIP Account field for the relevant component is blankin the BOM, this account is blank, too.You can manually update the account in this field before the production orderclosure. The value of this field is then copied into the Account Code field of theissue for production.If you leave this field blank, the related WIP Account applies according to thedefinitionsin the Document Settings window. For more information, see section 7.6Document Settings and WIP Account.
Start Date Displays the earliest date on which the component is needed in the productionprocess.By default, this date is copied from the Start Date field on the header. You canchange it manually; however, the date cannot be earlier than the start date onthe header.As for a production order that has route stages, the Start Date for the first RouteStage type line (included in the calculation) is set to the production order headerStart Date. And by default, the Start Date for the next Route Stage type line is thesame as the calculated End Date of the previous route stage.You can manually change the Route Stage type line Start Date to any date thatfalls between or is equal to the production order header Start Date and Due Date.For more about how Start Date is calculated, see 7.4 Start Date / End DateCalculation Algorithm.
End Date Displays the latest date by which a component needs to be used in theproduction process.By default, this date is the same as Due Date on the header of the productionorder. You can change it manually; however, it cannot be later than the due dateon the header.You can manually change the Route Stage type line End Date to any date thatfalls between or is equal to the production order header Start Date and Due Date.

How to Work with Resources and Production in SAP Business One 9.3 and higherWorking with Production Orders
CUSTOMER© 2020 SAP SE or an SAP affiliate company. All rights reserved. 59
Field Activity/Description
For more about how End Date is calculated, see 7.4 Start Date / End DateCalculation Algorithm.
Required Days Displays the number of days required for a specific Resource to complete thePlanned Qty. of a particular route stage. This field will be automaticallycalculated for a production order that has at least one route stage, one resourceline, and whose Routing Date Calculation field is either Start Date Forwards orEnd Date Backwards.The calculation of this field is based on Routing Date Calculation status andSingle Run Capacity of the resources. For more details, please see 7.3Calculating Required Days and Total Days.
Waiting Days Displays a period of time (in days) to wait after the completion of the routestage. This field is not visible by default. As soon as a Route Stage type line iscreated, you can manually enter the number of waiting days.
Total Days Displays the number of days needed to complete one route stage and start thenext route stage. It is the sum of Required Days and Waiting Days.
Resource Allocation The value of this field is taken from the relevant Resource Master Data window. Ifneeded, you can update it manually.However, for a production order that has route stages, the value of this field (forall Resource type lines) is taken from the Routing Date Calculation field in thegeneral area of the production order, and it cannot be edited.The following options are available:· On Start Date - The capacity of the resource is allocated to the start date of
the production order. This means that the value of the resource capacity inthe Planned Qty field is counted as Committed capacity on the start date ofthe production order.
· On End Date - The capacity of the resource is allocated to the end date of theproduction order. This means that the value of the resource capacity in thePlanned Qty field is counted as Committed capacity on the end date of theproduction order.
· Start Date Forwards - The capacity of the resource is allocated to the startdate when it is assigned to the production order; however, if the Planned Qtyis greater than the Single Run Capacity for the start date, the systemallocates only as much capacity as there is Single Run Capacity defined forthe start date and continues to allocate the remaining capacity to the dayafter the start date. The process continues forwards for each day until itallocates all the remaining Planned Qty.
· End Date Backwards - The capacity of the resource is allocated to the enddate when it is assigned to the production order; however, if the Planned Qtyis greater than the Single Run Capacity for the end date, the systemallocates only as much capacity as there is Single Run Capacity defined forthe end date and continues to allocate the remaining capacity to the daybefore the end date. The process continues backwards for each day until itreaches the current system date and allocates all the remaining Planned Qty

60CUSTOMER© 2020 SAP SE or an SAP affiliate company. All rights reserved.
How to Work with Resources and Production in SAP Business One 9.3 and higherWorking with Production Orders
Field Activity/Description
to the current system date regardless of how much Single Run Capacity isdefined for that day.
NoteWith resource allocation of Start Date Forwards and End DateBackwards, the system takes into account the Single Run Capacity, notthe Internal capacity or the Available one. This means that if there aremore production orders with the same start date or end date, theresource allocation is run against the Single Run Capacity for eachproduction separately; it does not take into account whether there arealready production orders which might have consumed the Internalcapacity for that day.
Noteo The triggers for running the resource allocation process are the same as
the triggers for clicking the Update Now button. For details, see UpdateNow (button) field descriptions above, or 7.2 Managing ResourceAllocation in Production Orders.
o Updating the internal capacity does not trigger resource allocation,hence, if you have updated the internal capacity and want the system torun the resource allocation process to update the allocated amounts,you need to update the production order as described above.
Calculation Proportion Displays the percentage of resource capacity that will be consumed in aparticular route stage. The value must be between 0 to 100% (default).· If the Routing Date Calculation field value is Start Date Forwards, you only
need to modify the calculation proportion for the first route stage, ifnecessary. For other route stages, this field will be automatically calculated.
· If the Routing Date Calculation field value is End Date Backwards, you onlyneed to modify the calculation proportion for the last route stage, ifnecessary. For other route stages, this field will be automatically calculated.
After you have changed the field value in either of the above two scenarios,choose the Update Now button to apply it to the calculation of Start Date / EndDate and Required Days.If a production order is not routed (i.e., if it does not have any assigned routestages), then Calculation Proportion can be set independently for each resourceline.
Production Time Displays the quantity of the resource included in the production order expressedin time. The Production Time is calculated according to the following formula:Base Qty of the resource * Planned Qty of the parent item * (Time per ResourceUnit / Resource Units per Time)
Additional Time Displays the additional quantity of the resource needed to complete theproduction order, expressed in time. Additional Time is calculated according tothe following formula:Additional Qty * Time per Resource Units / Resource Units per Time

How to Work with Resources and Production in SAP Business One 9.3 and higherWorking with Production Orders
CUSTOMER© 2020 SAP SE or an SAP affiliate company. All rights reserved. 61
Field Activity/Description
Run Time Displays the total of the Production Time and Additional Time.
Route Sequence Displays the sequence number that is assigned to each route stage. Thesequence indicates the precise order in which the route stages must beperformed during the production process.This field will not be visible by default. It is visible only when there are routestages involved in the production order. The value of this field is automaticallypopulated by the system upon the creation of a Route Stage type line.The pull-down list will contain a list of all the other route sequence numbers thatcurrently exist in this Production Order grid. No other numbers can be entered.The selection of another existing route sequence number in this field will switchall the lines associated with the current route sequence with all the linesassociated with the selected route sequence.
Procurement Doc. Displays the document number of a procurement document generated from thisline using the Procurement Confirmation Wizard.
Note:This field is only relevant to item type components and is non-editable.
Allow Procurmt. Doc. If the checkbox in this field is selected, the item type component is available forselection in the Procurement Confirmation Wizard. After you update or add aproduction order with this checkbox selected for one or more item typecomponents, the Procurement Confirmation Wizard automatically opens anddisplays the Product No. and Product Description from the production order.
Note:This field is only relevant to item type components and is editable.
Status Displays the line status for Item, Resource, or Route Stages. This field must beenabled using Form Settings. The following options are available in the drop-down list of this field:· Planned· In Progress· Complete· For production orders without route stages, changing a status may affect
the following operations:· A line with Complete status is read-only and cannot be deleted.· You can change the Complete status back to Planned or In Progress, unless
the production order is Closed or Canceled.· When the Issued quantity is less than the Planned Qty., if you change to
Complete status, you have the option to reduce Planned Qty. and update itwith Issued quantity.
· For routed production orders, besides the above-mentioned scenarios,changing a status may additionally affect the following operations:

62CUSTOMER© 2020 SAP SE or an SAP affiliate company. All rights reserved.
How to Work with Resources and Production in SAP Business One 9.3 and higherWorking with Production Orders
Field Activity/Description
· Upon a status change on Route Stage, all components belonging to thatroute stage will have the Status field automatically set according to theRoute Stage status.
· When using Routing Date Calculation feature, route stages with Completestatus are considered to be stages with zero duration, and thus are notcounted in the calculation. However, if there is any open quantity on theResource row of such route stages, commitment of this resource stilloccurs.
Up and Down arrows Use the Up and Down arrows to raise or lower a selected component linesimilarly as in the Bill of Materials window.
NoteYou can choose to filter and view specific types of lines in the table. To view only resource and route stagetype lines, right click on the Bill of Material, and select Display Route Stages and Display Resources. Thefollowing options are all checked by default, you can deselect them as required:o Display Route Stageso Display Itemso Display Resourceso Display Texts
In addition, you can also choose to filter type lines by pressing below shortcut keys:o Press Ctrl + Shift + 1 , and route stages lines will be hidden.o Press Ctrl + Shift + 2 , and item lines will be hidden.o Press Ctrl + Shift + 3 , and resource lines will be hidden.o Press Ctrl + Shift + 4 , and text lines will be hidden.
View or update the following fields on the Summary tab:
Field Activity/Description
Actual Item ComponentCost
Total value of all item components (not including non-inventory components)issued for the production order.
NoteAny item component which has been returned through the returncomponents functionality in the Receipt from Production windowreduces the Actual Item Component Cost value by its cost.
Actual ResourceComponent Cost
Records the cost of all resource components which have been issued forproduction.
NoteYou cannot return resources in the Receipt from Production window.

How to Work with Resources and Production in SAP Business One 9.3 and higherWorking with Production Orders
CUSTOMER© 2020 SAP SE or an SAP affiliate company. All rights reserved. 63
Field Activity/Description
Actual Additional Cost The cost of all non-inventory item components which have been issued forproduction.
Actual Product Cost The cost of all received parent items, including any rejected items but excludingthe received by-products.
Actual By-Product Cost Records the cost of all by-product items which have been received fromproduction, including any rejected by-products.Click (Link Arrow) to open the Inventory Posting List window and view therelevant cost breakdown for the posted by-products.
Total Variance Displays the sum of costs of all parent items and by-products reduced by thesum of item costs, resource costs, and additional costs. The following formulaapplies:(Parent Cost + By-Product Cost) - (Item Cost + Resource Cost + Additional Cost)Click (Link Arrow) to open the Variance Report window and view thecontribution of each production component to the final production variance.The value in the Variance column shows the cumulated variance per specificcomponent. The sum of all component variances matches the amount in TotalVariance field.
NotePrerequisites for opening the Variance Report are the following:o Use Perpetual Inventory is selected in Administration → System
Initialization → Company Details → Basic Initialization tab.o There is at least one Issue for Production or Receipt from Production
transaction.
Total Production Time,Total Additional Time,Total Run Time
Display the corresponding fields on the Components tab for the resource withthe longest Total Time.For a production order with at least one Route Stage type line, the following willbe displayed:· Total Production Time
Displays the sum of all the Production Time values from the productionorder Route Stage type lines only.
· Total Additional TimeDisplays the sum of all the “Additional Time” values from the productionorder Route Stage type lines only.
· Total Run TimeDisplays the sum of Total Production Time and Total Additional Time.
Total Required Days Displays the sum of the Required Days values from the production order RouteStage type lines.
Total Waiting Days Displays the sum of the Waiting Days values from the production order RouteStage type lines.
Total Days Displays the sum of Total Required Days and Total Waiting Days.

64CUSTOMER© 2020 SAP SE or an SAP affiliate company. All rights reserved.
How to Work with Resources and Production in SAP Business One 9.3 and higherWorking with Production Orders
NoteParent items associated with sales or assembly BOMs cannot be used as a production order component.
NoteBefore creating a transfer request, a components transfer, a pick list, or an issue for production, you canfilter which components will be used in these documents by filling the Selection Criteria window. To dothis, right-click the production order and choose one of the following options, according to your needs:o Issue Componentso Transfer Requesto Component Transfero Generate Pick Listo View Pick ListsNote that Issue Components will only be displayed once the following conditions have been met:o The Status of the production order is Released.o The Issue Method for components is Manual.
NoteInstead of clicking (Link Arrow), you can additionally right click on a production order to view InventoryPosting List information of below categories in one report:o Actual Item Component Costo Actual Resource Component Costo Actual Product Costo Actual By-Product Cost

How to Work with Resources and Production in SAP Business One 9.3 and higherWorking with Production Orders
CUSTOMER© 2020 SAP SE or an SAP affiliate company. All rights reserved. 65
NoteReferenced Document functionality (also known as Offline Document Linking) is enhanced to allow linkingbetween a production order and other documents. For more details about Offline Document Linking, youmay refer to Note 2273995.
7.2 Managing Resource Allocation in Production Orders
Resource allocation determines how and when resources will be assigned in order to produce the finishedproducts. You can manually change resource allocation methods in production orders according to your needs.Generally, your production orders can be classified into the following types:· Routed production order - a production order with at least one route stage (by default copied from relative Bill
of Materials). The finished product can be produced by following certain route stages.· Non-routed production order - a production order without any route stages. The finished products can be
produced without considering the production stages.Resource allocation for these two types of production orders may differ under different conditions. Usually, for anon-routed production order, the default for the Resource Allocation field value for Resources type lines are takenfrom the Resource Master Data of the specified resource. While for a routed production order, the value is copiedfrom the Routing Date Calculation header field of the production order, and is read only in the grid. However, theResource Allocation field value may change under certain scenarios. The following will focus on describing thesescenarios, and how the resource allocation changes.For the non-routed production order, you may manually change the Resource Allocation field when necessary.Besides that, (for example, regarding routed orders) you are able to change the field value if the Update Nowbutton beside Routing Date Calculation is clicked.If the Routing Date Calculation field is set to Start Date Forwards or End Date Backwards, the Update Now button ishighlighted in red when one of the following happens:· You manually change the Start Date in the header of the production order.· You manually change the Due Date in the header of the production order.· You change the Routing Date Calculation field value.· You change the Product No. or Planned Qty. of the production order.· You change the Resource No. or the Planned Qty.· You add or delete a resource type line.· You add or delete a route stage.· You change the sequence of route stages.· The association between the route stage and resources is changed. For example, you move Resource 1 from
Route Stage 1 to Route Stage 2.The Update Now button lets you update the resource allocation method that applies to the current productionorder. Upon clicking it, the following will occur:· For a non-routed production order, once you click Update Now, you can choose to update the Start Date and
End Date of Item and Resource type lines and the Resource Allocation field for all Resource type lines, or onlythe Routing Date Calculation field.

66CUSTOMER© 2020 SAP SE or an SAP affiliate company. All rights reserved.
How to Work with Resources and Production in SAP Business One 9.3 and higherWorking with Production Orders
No matter which option you select, when you create a new Resource type line subsequently, the defaultResource Allocation field value in the grid will be taken from the Resource Allocation field from ResourceMaster Data of a specified resource.
· For a routed production order whose Routing Date Calculation field value is On Start Date or On End Date, youcan choose to update the Start Date and End Date of Item and Resource type lines and the Resource Allocationfield for all Resource type lines, or update only the Routing Date Calculation field.No matter which option you select, when you create a new Resource type line subsequently, the ResourceAllocation field value in the grid will be taken from the Resource Allocation field from Resource Master Data ofa specified resource.
· For a routed production order whose Routing Date Calculation field value is Start Date Forwards or End DateBackwards, you can choose to update the Resource Allocation field value with that of the Routing DateCalculation field for all Resource type lines, and at the same time, update the Start Date and End Date for allResource type lines, or not to update either of them.No matter which option you select, when you create a new Resource type line subsequently, the ResourceAllocation field value in the grid will be taken from the Routing Date Calculation header field of the productionorder.
7.3 Calculating Required Days and Total Days
Required Days, Waiting Days and Total Days are periods of time measured in days that are used by resourcecomponents in each route stage. That is, these days will be calculated only for Resource type lines for routedproduction orders. Required days are the number of days needed to complete a route stage. Waiting days are thenumber of days needed after the production of one route stage, and before the start of the next route stage.In addition to displaying the Required Days on the Production Order, the calculation allocates the resources to theResource Capacity window as per the calculated Required Days and the Start Date and End Date of the ProductionOrder line.Required Days and Total Days are automatically calculated based on the routing date calculation (resourceallocation method) that is applied to the order. while Waiting Days are usually manually entered according to realproduction scenarios. For each route stage, their relations are: Total Days = Required Days + Waiting Days.Only when the Routing Date Calculation field value is either Start Date Forward or End Date Backwards, will theautomatic calculation of Required Days begin. The following describes how the calculation of Required Daysproceeds.
NoteThe calculation algorithm of Required Days is set up based on the assumption that a single productionorder can be produced on a single machine. So only Single Run Capacity rather than Daily InternalCapacity counts in this calculation.
· When the Routing Date Calculation field value is Start Date Forwardso If Planned Qty. < Single Run Capacity (of the start date) for a Resource line, then the Required Days field
value will be Planned Qty. / Single Run Capacity, and the calculation stops here. This Required Days valuewill be the percentage of the Single Run Capacity of the resource that is allocated on the start date.
o If Planned Qty. > Single Run Capacity (of the start date) for a Resource line, then the system allocates onlyas much resource capacity as there is Single Run Capacity defined for the start date and continues toallocate the remaining capacity to the day after the start date. The process continues forwards for eachday until it allocates all the remaining Planned Qty.

How to Work with Resources and Production in SAP Business One 9.3 and higherWorking with Production Orders
CUSTOMER© 2020 SAP SE or an SAP affiliate company. All rights reserved. 67
ExampleThis is one route stage of a production order. Resource 1 and Resource 2 are used in production of thisstage. The resource capacity data are as follows:
Date 1/1/2017 1/2/2017 1/3/2017 1/4/2017
Resource 1
Single Run Capacity 18 6 6 5
Resource 2
Single Run Capacity 15 3 3 4
The production order header Start Date is 1/1/2017, and header Due Date is 1/2/2017. The ResourceAllocation is Start Day Forwards. The Planned Qty. is 15 for Resource 1, and 20 for Resource 2. Then theRequired Days value for this route stage is calculated as follows:
Planned Qty. 1/1/2017 1/2/2017 1/3/2017 Required Days
Resource 1 15 15 15/18 = 0.83
Resource 2 20 15 3 2 2 + 2/3 = 2.67
So the Required Days value for this route stage is 2.67. If you manually enter the Waiting Days value of1.10, then the Total Days value will be 3.77 (Total Days = Required Days + Waiting Days). The End Date forthis route stage will then be set to Start Date + 3.77 days = 1/4/2017. If this is the only route stage on theProduction Order, the header Due Date will be set to 1/4/2017.
· When Routing Date Calculation field value is End Date Backwardso If Planned Qty. < Single Run Capacity (of the end date) for a Resource line, then the Required Days field
value will be Planned Qty / Single Run Capacity, and the calculation stops here.o If Planned Qty. > Single Run Capacity (of the end date) for a Resource line, then the system allocates only
as much capacity as there is Single Run Capacity defined for the end date and continues to allocate theremaining capacity to the day before the end date. The process continues forwards for each day until itallocates all the remaining Planned Qty.
7.4 Start Date / End Date Calculation Algorithm
Start date and end date display, respectively, the earliest and the latest date when the component is needed in theproduction process. By default, the start date is copied from the Start Date field in the header area, and the enddate is the same as the Due Date field. The start date and the end date are only valid for a routed production order,where there is at least one route stage.When necessary, you can change the start date and end date manually, within the range of the start date and duedate in the header area.For a production order that has route stages, there is an algorithm that automatically calculates the start date andend date of each route stage. The algorithm is explained in detail as follows.

68CUSTOMER© 2020 SAP SE or an SAP affiliate company. All rights reserved.
How to Work with Resources and Production in SAP Business One 9.3 and higherWorking with Production Orders
NoteThis automatic calculation algorithm applies only to routed production orders, that is, production ordersthat have at least one route stage and that have a Routing Date Calculation of Start Date Forwards or EndDate Backwards.
The automatic calculation algorithm starts only when automatic resource allocation is triggered, that is, theRouting Date Calculation field is set to either Start Date Forwards or End Date Backwards. For each route stage,Total Days are used in the automatic calculation, as follows: End Date = Start Date + Total Days (integer number).The following is a description of the calculation algorithm.· Routing Date Calculation field value is set to Start Date Forwards
The start day of the first route stage is the same as the production order Start Date in the header area. For thefirst route stage, the actual resource capacity that can be consumed equals the single run capacity multipliedby the Calculation Proportion of this stage for the first day only.For the first route stage, the end day is calculated by adding to the start day the integer value of Total Days.However, for all Resource type lines in the first stage, the end date is calculated by adding to the start day theinteger number of Required Days.The end day for one route stage is automatically set as the start day of the next route stage. If there are nofurther route stages, the end day will be the same as the production order Due Date in the header area. Ifthere is a further route stage, the end day will be calculated by adding to the start day the integer value of newTotal Days, the total of the remaining total days (from the previous stage) and total days (of the currentstage). The calculation continues as such for the next route stage.
ExampleSuppose there is a production order that uses 2 resources in 2 route stages. Resource 1 and Resource 2are used in each route stage. The Single Run Capacity values of these 2 resources are as follows:
Date 1/1/2017 1/2/2017 1/3/2017 1/4/2017 1/5/2017 1/6/2017
Resource 1
Single Run Capacity 20 6 6 16 18 18
Resource 2
Single Run Capacity 15 3 4 14 15 15
The general information of the production order is:
Start Date 1/1/2017
Due Date 1/8/2017
Resource Allocation Start Date Forwards
Then, according to the above calculation algorithm, together with the one mentioned in 7.3 CalculatingRequired Days and Total Days, the Start Date, End Date and Required Days information will be as follows:
PlannedQty.
RequiredDays
1/1/2017 1/2/2017 1/3/2017 1/4/2017 1/5/2017
Stage1

How to Work with Resources and Production in SAP Business One 9.3 and higherWorking with Production Orders
CUSTOMER© 2020 SAP SE or an SAP affiliate company. All rights reserved. 69
PlannedQty.
RequiredDays
1/1/2017 1/2/2017 1/3/2017 1/4/2017 1/5/2017
Resource1
15 15 / 20 =0.75
15
Resource2
20 2 + 2 / 4 =2.5
15 3 2
Required Days 2.5
Waiting Days 1
Total Days 3.5
Integer Part ofTotal Days
3
Start Date 1/1/2017
End Date 1/4/2017
CalculationProportion forStage 2
3.5 - 3 = 0.5
Stage2
Resource1
14 1 + 6 / 18 =1.34
16 * (1 -0.5) = 8
6
Resource2
19 1 + 12 / 15 =1.8
14 * (1 -0.5) = 7
12
Required Days 1.8
Waiting Days 1
Total Days 2.8
Integer Part ofTotal Days
2
Start Date 1/4/2017
End Date 1/6/2017
· Routing Date Calculation field value is set to End Date BackwardsThe end day of the last route stage is the same as the production order Due Date in the header area. For thelast route stage, the actual resource capacity that can be consumed equals the single run capacity multipliedby the Calculation Proportion of this stage. This actual capacity will be used in the Required Days calculation.For the last route stage, the start date is the end day minus the integer number of Total Days. However, for allResource type lines in the first stage, the start date is the end day minus the integer number of the RequiredDays.The start day for one route stage is automatically set as the end day of the previous route stage. If there areno further route stages, the start day will be the same as the production order Start Date in the header area. If

70CUSTOMER© 2020 SAP SE or an SAP affiliate company. All rights reserved.
How to Work with Resources and Production in SAP Business One 9.3 and higherWorking with Production Orders
there is a further route stage, the start day will be the end day minus the integer number of new Total Days,the total of the remaining total days (from the next stage) and total days (of the current stage). Thecalculation continues as such for the previous route stage.
ExampleSuppose there is a production order that uses 2 resources in 2 route stages. Resource 1 and Resource 2are used in each route stage. The Single Run Capacity values of these 2 resources are as follows:
Date 1/1/2017 1/2/2017 1/3/2017 1/4/2017 1/5/2017 1/6/2017
Resource 1
Single Run Capacity 20 6 6 16 18 20
Resource 2
Single Run Capacity 15 3 4 14 15 15
The general information of the production order is:
Start Date 1/1/2017
Due Date 1/6/2017
Resource Allocation End Date Backwards
Then, according to the above calculation algorithm, together with the one mentioned in 7.3 CalculatingRequired Days and Total Days, the Start Date, End Date and Required Days information will be as follows:
PlannedQty.
RequiredDays
1/1/2017
1/2/2017
1/3/2017
1/4/2017 1/5/2017
1/6/2017
Stage2
Resource 1 15 15 / 20 =0.75
15
Resource 2 18 1 + 3 / 15 =1.2
3 15
Required Days 1.2
Waiting Days 1
Total Days 2.2
Integer Part of TotalDays
2
End Date 1/6/2017
Start Date 1/4/2017
Calculation Proportion 2.2 - 2 = 0.2
Stage 1
Resource 1 20 2 + 1.2 / 6 =2.2
1.2 6 16 * (1 -0.2) = 12.8

How to Work with Resources and Production in SAP Business One 9.3 and higherWorking with Production Orders
CUSTOMER© 2020 SAP SE or an SAP affiliate company. All rights reserved. 71
PlannedQty.
RequiredDays
1/1/2017
1/2/2017
1/3/2017
1/4/2017 1/5/2017
1/6/2017
Resource 2 18 2 + 2.8 / 3 =2.93
2.8 4 14 * (1 -0.2) = 11.2
Required Days 2.93
Waiting Days 1
Total Days 3.93
Integer Part of TotalDays
3
End Date 1/4/2017
Start Date 1/1/2017
NoteIf the Routing Date Calculation is End Date Backwards, and the calculated Start Date is earlier than thecurrent system date, then the production order start date will be automatically changed to CurrentSystem Date, and any resource capacity that would have been allocated to a date earlier than the currentsystem date will be allocated to the Current System Date.
NoteThe Internal Capacity data from the Resource Capacity window will always be ignored when allocatingresources for production orders (both routed and non-routed). A production order will only consider theSingle Run Capacity data from the Resource Capacity window.
7.5 Recalculate Route Stage Dates
When necessary, you can recalculate start and end dates from a specific route stage. When you do this, you caneither change the Start Date or End Date of the route stage from which you want to recalculate, or not. The start orend dates of subsequent route stages will be automatically updated.To recalculate from a specific route stage, right click on that route stage, and select Recalculate Route StageDates option.
7.6 By-Product Handling in Production Orders andProduction Processes
By-product item components are inventory item components entered with a negative quantity in the Bill ofMaterials and Production Order windows.· The Manual issue method for by-products is available in addition to the Backflush issue method, and by-
products are then displayed in receipts from production. The ability to receive by-products with the Manualissue method enables you to manage them with the Serial/Batches valuation method.

72CUSTOMER© 2020 SAP SE or an SAP affiliate company. All rights reserved.
How to Work with Resources and Production in SAP Business One 9.3 and higherWorking with Production Orders
· Upon receiving a by-product in the receipt from production, you can define its cost in the Unit Price field.· By-products can be rejected in the receipt from production document; rejection of a by-product has no
impact on the posting behind nor on the Rejected Quantity field on the Summary tab of the Production Orderwindow.
NoteNon-inventory items and resources cannot be by-products.
7.7 Change of Valuation Method of Item Included in OpenProduction Order
An item's valuation method cannot be changed if the item is a parent item included in an open production order.
7.8 Disassembly Production Order
Resources cannot be included in a disassembly production order. When a BOM automatically populates adisassembly production order, the resource lines are omitted. You cannot change Production Order Type toDisassembly as long as the production order contains resource components.
7.9 User-Defined Fields (UDF) Handling
If a UDF field with the same name and same type exists in both the Bill of Materials window component table andon the Production Order window table, then on entry of the parent item into a production order, the values of theUDF fields from the Bill of Materials window are copied into the corresponding UDF fields in the Production Orderwindow.By setting a UDF field in the Bill of Materials window to hold a link to a file, you cause that link to be copied into thecorresponding UDF field in the Production Order window. This feature is important as a means of handlingattachments such as manufacturing plans or other documents.
7.10 Document Settings and WIP Account
You can decide whether you want the costs of components in the production order to be posted to the WIPaccount of the parent item or to the WIP account defined for each component.To do so, from the SAP Business One Main Menu, choose Administration → System Initialization → DocumentSettings.

How to Work with Resources and Production in SAP Business One 9.3 and higherWorking with Production Orders
CUSTOMER© 2020 SAP SE or an SAP affiliate company. All rights reserved. 73
In the Document Settings window for the production order document, in the Use for Components Transactionssection, choose one of the following options:· Component WIP Accounts - Uses the component WIP accounts throughout the production process. For
example, if a parent item consists of a child item Item01 and a resource Res01, the default accounts are usedas displayed below.
Component Default WIP Account Comment
Item01 Depending on the definition in the Set G/LAccounts By field on the Inventory tab ofthe Item Master Data window of thecomponent item, the WIP Inventoryaccount defined at the warehouse, itemgroup, or item level is used.
NoteIf advanced G/L accountdetermination rules are definedfor the warehouse, item group, or
If you define a different account in the WIPAccount field of the Production Orderwindow for this item component, then thedefined account is used as the WIPaccount. (The value from the WIP Accountfield of the Bill of Materials window iscopied into the production order; however,if no account is defined in the bill ofmaterials, then the WIP Account field in theproduction order is left blank.)

74CUSTOMER© 2020 SAP SE or an SAP affiliate company. All rights reserved.
How to Work with Resources and Production in SAP Business One 9.3 and higherWorking with Production Orders
Component Default WIP Account Comment
the item component in question,other WIP Inventory accountsmay be used.
Res01 The Resource WIP account defined on theResources tab of the G/L AccountDetermination window applies, unless anadvanced G/L account rule requires adifferent Resource WIP account.
If you define a different account in the WIPAccount field of the Production Orderwindow for this resource component, thenthe defined account is used as the WIPaccount. (The value from the WIP Accountfield of the Bill of Materials window iscopied into the production order; however,if no account is defined in the bill ofmaterials, then the WIP Account field in theproduction order is left blank.)
· Parent Item WIP Accounts - Uses the parent WIP account as the WIP account for the journal entries of thecomponent transactions (both for item and resource components) throughout the production process. Theparent item is defined in the bill of materials that was selected in the production order.For example, if a parent item consists of a child item Item01 and a resource Res01, the default accounts areused as displayed below.
Component Default WIP Account Comment
Item01 Depending on the definition in the Set G/LAccounts By field on the Inventory tab of theItem Master Data window of the parent item,the WIP Inventory account defined at thewarehouse, item group, or item level is used.
NoteIf advanced G/L accountdetermination rules are defined for thewarehouse, item group, or the parentitem in question, other WIP Inventoryaccounts may be used.
If you define a different accountin the WIP Account field of theProduction Order window for thisitem or resource component,then the defined account is usedas the WIP account. (The valuefrom the WIP Account field of theBill of Materials window is copiedinto the production order;however, if no account is definedin the bill of materials, then theWIP Account field in theproduction order is left blank.)
Res01
7.11 Closing Production Order and Handling ComponentsCost
Upon the closing of the production order, a journal entry is created automatically in which all WIP accounts usedduring the production process are zeroed down; the value from the WIP accounts is transferred to the WIPInventory Variance account of the parent item.

How to Work with Resources and Production in SAP Business One 9.3 and higherWorking with Production Orders
CUSTOMER© 2020 SAP SE or an SAP affiliate company. All rights reserved. 75
NoteIf an interim WIP consolidation mapping is defined for a WIP account, the WIP account is zeroed down andthe value is transferred to the defined interim WIP account. This process may continue if further interimWIP accounts are defined. The last interim WIP account in the chain of interim WIP account mapping isthen zeroed down and the value is transferred to the WIP Variance account of the parent item. For moreinformation on the interim WIP consolidation mapping, see section 10 Interim WIP Consolidation AccountMapping.
Before posting the journal entry behind the production closure, a check is made to verify if the total componentcost equals the total cost of the received parent items and its by-products. If there is a difference, it is transferredfrom the WIP Inventory Variance account of the parent item back to the Inventory account of the parent item.However, this applies only if the following two conditions are met:· The parent item is managed by a valuation method other than Standard.· The parent item's quantity in the inventory is greater than zero; it has not been sold out before the production
order closure.
7.12 Changing Production Order Status in Batch
It is always important to regularly close production orders. And more than often, it is necessary to changeproduction order status from Planned to Released, or vice versa. To facilitate the efficiency in doing these tasks, abatch update functionality is available to allow you to select and change the status of multiple production orders.
To access this function, go to Production -> Production Reports -> Open Items List, and in Open Documents drop-down list, select Production Orders.

76CUSTOMER© 2020 SAP SE or an SAP affiliate company. All rights reserved.
How to Work with Resources and Production in SAP Business One 9.3 and higherWorking with Production Orders
You can filter production orders by selecting an option in the drop-down list in the Filter field. There are thefollowing options here:· Released - select this option, and all production orders with Release status will be displayed.
You can select the orders you want to handle, and change their status to:o Releasedo Canceled
NoteSelect the production orders by selecting the checkboxes in the Select field. You can select the checkboxone by one, or you can select a range of production orders by selecting the first required production orderand then shift-selecting the last one required in the range.
· Planned - select this option, and all production orders with Planned status will be displayed.You can select the orders you want to handle, and change their status to:o Plannedo Closedo Canceled
NoteIf, apart from any scenario explicitly mentioned above, the status of any individual production order cannot bechanged, then on attempting to change the status, the production orders which could not be updated will remainin the list, with their Select field.
7.13 Pick and Pack Production Manager
By selecting to manage production orders and applying additional selection criteria, the Pick Pack and ProductionManager can function as a basic production manager console.
To use the Pick Pick and Production Manager to view and process production orders, perform the following:From the SAP Business One Main Menu, choose Main Menu → Inventory → Pick and Pack → Pick Pack andProduction Manager.In the Status field, choose the status in which the Pick Pack and Production Manager window opens (open,released, or picked).In the Group By/View field, specify how rows in the Pick Pack and Production Manager are grouped (if Open isselected in the Status field) or how the pick list lines are displayed (if Released or Picked is selected in theStatus field).In the Manage field, select the Production Orders checkbox.In the range-type fields, specify conditions to filter the production orders you want to manage. The followingfilter conditions are available by default, depending on the status of the production orders you selected:

How to Work with Resources and Production in SAP Business One 9.3 and higherWorking with Production Orders
CUSTOMER© 2020 SAP SE or an SAP affiliate company. All rights reserved. 77
Field Activity/Description
Production Order No.From... To ...
Filters the production order number.
Delivery/Due DateFrom... To
Filters the End Date field on the production order.
Customer From... To ... Filters the customer number.
Fulfillment %0.000…100.000
Filters the fulfillment percent (enter values between 0 and 100).
Item From... To ... Filters the item numbers.
Pick List No. From…To…
Filters the pick list numbers.
To display additional fields to filter by, from the dropdown list, choose the relevant field and specify conditions inthe From and To fields.
7.14 Creating Procurement Documents Directly fromProduction Orders
You can use the Procurement Confirmation Wizard to automatically create one or several procurementdocuments, such as purchase quotations, purchase orders, or production orders, directly from one or severalproduction orders. Procurement documents created using this function can include part or all of the items fromthe base production documents.
Prerequisites
· You are authorized to create production orders, purchase orders, purchase requests, and purchasequotations.
· You have created a production order that contains item type components and selected the Procure Itemscheckbox. Alternatively, you have selected the Procure Items checkbox for an existing production order.
Procedure
To create a purchase order, purchase quotation, or purchase request based on a production order, or to procurecomponents on a production order, perform the following:
Create or update a production order as described above and choose the Add or Update button.The Procurement Confirmation Wizard is displayed (at Step 1 of 6: Base Document Type and Customerswindow) with the Production Order option automatically selected in the Base Doc. field. Additionally, the

78CUSTOMER© 2020 SAP SE or an SAP affiliate company. All rights reserved.
How to Work with Resources and Production in SAP Business One 9.3 and higherWorking with Production Orders
Product No. and Product Description fields are automatically displayed based on the production order;selecting the link arrow next to the Product No. field will display the list of relevant items in the Bill of Materialswindow or Item Master Data window (depending on whether the Open Item Master Data Instead of Bill ofMaterials of a BOM Item When Selecting Link Arrow option is selected in Administration → General Settings →Inventory tab→ Items tab). The checkbox next to the Product No. field indicates whether the Product No. isselected to be included in the wizard.
If you already have item type components with the Allow Procurmt. Doc. checkbox selected in a productionorder, you can run the wizard from scratch (Production → Procurement Confirmation Wizard) and choose theAdd button in Step 1. In the Product Numbers – Selection Criteria window, you can enter the item number oritem range. Alternatively, choose items based on item group or properties. Only items which are associatedwith a production type BOM and for which the Allow Procurmt. Doc. checkbox is selected are displayed. Ifnecessary, you can deselect the checkbox next to a product number to exclude it from the procurementdocuments.
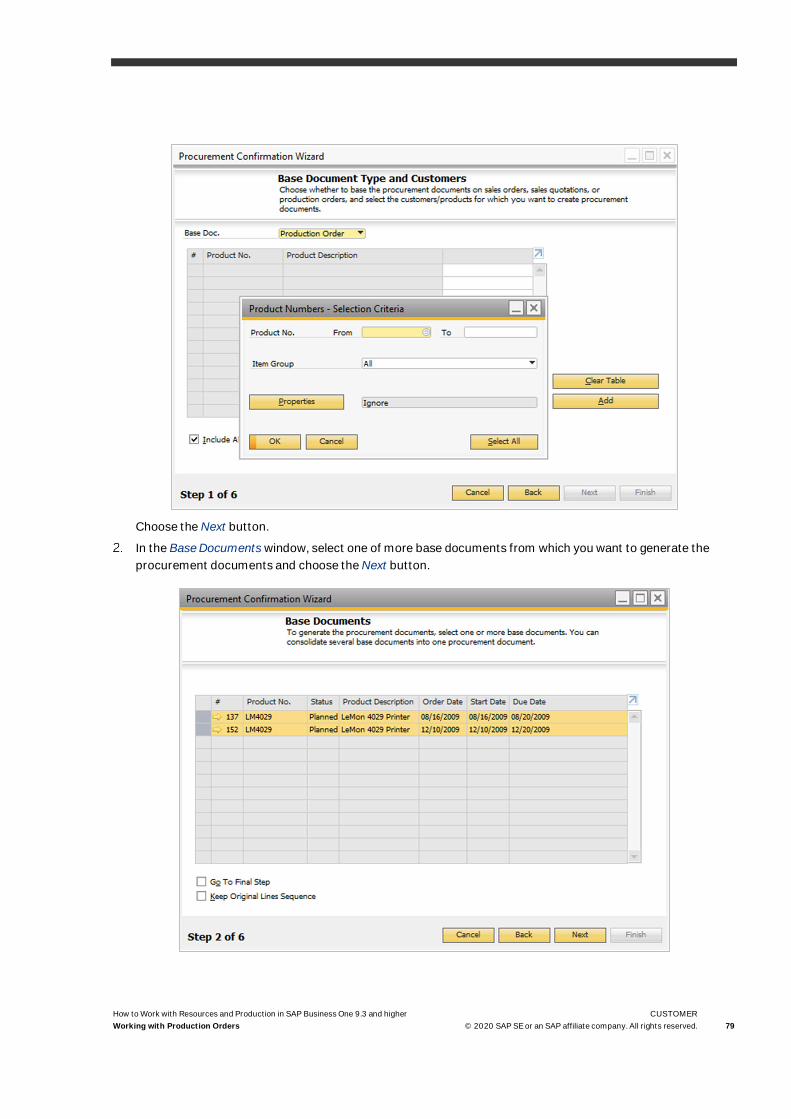
How to Work with Resources and Production in SAP Business One 9.3 and higherWorking with Production Orders
CUSTOMER© 2020 SAP SE or an SAP affiliate company. All rights reserved. 79
Choose the Next button.In the Base Documents window, select one of more base documents from which you want to generate theprocurement documents and choose the Next button.

80CUSTOMER© 2020 SAP SE or an SAP affiliate company. All rights reserved.
How to Work with Resources and Production in SAP Business One 9.3 and higherWorking with Production Orders
In the Base Document Line Items window, from the dropdown list in the Target Document field, select one ofthe following options as the target document type: Purchase Order, Purchase Quotation, Purchase Request, orProduction Order.
\
The table displays the production order lines for which procurement document creation has been allowed (inother words, the Allow Procurmt. Doc. checkbox is selected) in the specified production orders. You maychange the line items for inclusion in the procurement documents.If you chose a purchase order, purchase request, or purchase quotation as the target document, if an itemhas a preferred vendor assigned to it, this vendor is already entered in the line. If required, change the vendorcode. If a preferred vendor is not assigned to the item, you are asked to enter a vendor code.
o To specify the same vendor for all items, enter the vendor code in the Vendor field of the wizard body.o To specify the vendor for each item individually, enter the vendor code in the Vendor column of the
table.To create the procurement document as a draft, select the Create Draft Document checkbox.Choose the Next button.In the Consolidations window, specify whether to consolidate several production orders into one procurementdocument and which consolidation options apply.
To do the following: Choose:
Create one procurement documentfor each production order
No ConsolidationSystem behavior depends on the target document type.· For Purchase Order: The documents are grouped by vendor
and target document series.· For Purchase Quotation: The documents are grouped by
vendor and target document series.

How to Work with Resources and Production in SAP Business One 9.3 and higherWorking with Production Orders
CUSTOMER© 2020 SAP SE or an SAP affiliate company. All rights reserved. 81
To do the following: Choose:
· For Purchase Request: The documents are grouped byrequester and target document series.
· For Production Order: The documents are grouped by itemand target document series.
Create one procurement documentfor each production order
Consolidated By and select the relevant option:· Vendor (System Default)
The documents are grouped by vendor, that is, one purchaseorder is created per vendor. This setting cannot be changed.
· Warehouse (Split)The documents are grouped by the warehouse that is used toship the items. That is, if items are sold from differentwarehouses, one purchase order is created per warehouse.
· OtherYou can specify additional grouping criteria, such as thedelivery date or shipping type.
Choose the Next button.Specify the system response to errors that may occur in the document generation process. To do so, make aselection in the If an Error Occurs field and choose the Next button.

82CUSTOMER© 2020 SAP SE or an SAP affiliate company. All rights reserved.
How to Work with Resources and Production in SAP Business One 9.3 and higherWorking with Production Orders
The Preview Results window appears. It displays all production orders that will be created grouped by thesystem default values and the consolidations options you selected.
To generate the documents, choose the Next button.

How to Work with Resources and Production in SAP Business One 9.3 and higherWorking with Production Orders
CUSTOMER© 2020 SAP SE or an SAP affiliate company. All rights reserved. 83
The system creates the relevant documents and displays a summary report of all documents that werecreated and any errors that occurred.
Results
All procurement documents created by the wizard are linked to the base documents. The procurement documentwill be displayed in the production order in the Procurement Doc. field; you can choose the link arrow in this field toopen the related procurement document.For purchase order, purchase quotation, and purchase request procurement documents created by the wizard,the Base Type field will display Production Order. You can select the Base Document icon in the toolbar of suchdocuments to open the corresponding production order base document.The relationship maps for the base production orders will display the related procurement documents. Likewise,relationship maps for the procurement documents will display the related base production orders.

84CUSTOMER© 2020 SAP SE or an SAP affiliate company. All rights reserved.
How to Work with Resources and Production in SAP Business One 9.3 and higherIssue for Production
8 Issue for Production
The following enhancements have been made to the Issue for Production window:Some routing related fields, such as Route Stage, Route Sequence and Stage Description, are now included in thetable for reference. They will be displayed only when a routed production order is selected for issuing.
8.1 Issue for Production Window
ProcedureFrom the SAP Business One Main Menu, choose Production→ Issue for Production.
View the following fields:
Field Activity/Description
Type For each item or resource component, the value of this field, as well as of theremaining fields, is copied from the Production Order window. The remaining fieldsare also inherited from the production order; however, for resources the followingfields are blank and not editable:· Vendor Catalog No.· Bin Location Allocation

How to Work with Resources and Production in SAP Business One 9.3 and higherIssue for Production
CUSTOMER© 2020 SAP SE or an SAP affiliate company. All rights reserved. 85
Field Activity/Description
· In Stock· Committed· Ordered· Minimum Inventory Level - Displays zero.· Available· Inventory UoM - Displays Yes.· UoM Code· Items per Unit· UoM Group
Account Code For both resource and item components, the value from the WIP Account field ofthe production order is copied into this field unless no WIP account is defined in theproduction order. In such a case, it is defined according to the definitions in theDocument Settings window. For more information, see section 7.6 DocumentSettings and WIP Account.
NoteIf you update the Whse field in the Issue for Production window, this field isupdated accordingly.
Item Cost This field displays the total standard cost value posted in respect of the resourceafter the issue for production document is added.
Distribution Rule,Project Code
For each component, the values of these fields are taken from the relevant fields ofthe Production Order window.
8.2 Posting Behind Issue for Production
When you add an issue for production, in addition to posting expenses for items, in the same journal entry youalso post resource expenses. The resource expenses are transferred from the resource expense account to therelated resource WIP account. The total value posted for each resource unit equals Total Std Resource Cost asdefined in the Resource Master Data window. The actual posting itself is split across up to ten resource expenseaccounts as defined by the advanced G/L account determination rules or the G/L account determination and theWIP account that is defined in the Account Code field of the Issue for Production window.
Exampleo An ExampleResource has a Total Std Resource Cost of 100 per unit which is split between Resource
Std Cost 1 = 60 and Resource Std Cost 2 = 40.
Resource No. Total StdResource Cost
Std CostExpense 1
Std CostExpense 2

86CUSTOMER© 2020 SAP SE or an SAP affiliate company. All rights reserved.
How to Work with Resources and Production in SAP Business One 9.3 and higherIssue for Production
ExampleResource 100 60 40
o The journal entry in respect of the resource component consumption of 10 resource units is asdisplayed in the table below.
Account Debit Credit
Std Cost Expense 1 600
Std Cost Expense 2 400
WIP Account 1000
This posting is added to the posting of any other item and resource component within a single journalentry created upon adding the issue for production. The total value that is posted to all the resource WIPaccounts is added cumulatively to the Actual Resource Component Cost field on the Summary tab of theproduction order whenever an issue for production is added.

How to Work with Resources and Production in SAP Business One 9.3 and higherReceipt from Production
CUSTOMER© 2020 SAP SE or an SAP affiliate company. All rights reserved. 87
9 Receipt from Production
ProcedureFrom the SAP Business One Main Menu, choose Production→ Receipt from Production.
View or update the following fields:
Field Activity/Description
By-Product In addition to displaying the parent item, the receipt from production now displays the by-products as well. If an item is a by-product, the checkbox for this field is selected.
Noteo You cannot delete by-products with the Backflush issue method, only those
with the Manual issue method.o Backflush by-products have their quantity set to read-only and it is
proportional to the quantity of the parent produced, but you can update thequantity for by- products with Manual issue method.
Unit Price Displays the current cost of the by-product. You can update this field manually, unless theby- product has the Standard valuation method. The value in this field is used for postingthe inventory value of the by-product in the journal entry behind the receipt fromproduction.
Quantity · For by-products with the Backflush issue method, you cannot update this field.However, if you update the quantity of the parent item, the value in this field updatesproportionally.

88CUSTOMER© 2020 SAP SE or an SAP affiliate company. All rights reserved.
How to Work with Resources and Production in SAP Business One 9.3 and higherReceipt from Production
Field Activity/Description
· For by-products with the Manual issue method, you can update this field manually.Updating the parent item's quantity does not affect this field.
Item Cost After adding the receipt from production, this field displays the following:· For by-products, the cost of the by-product which has been posted in the journal entry
behind the receipt from production.· For parent items, the cost of the parent item which has been posted in the journal
entry behind the receipt from production.
NoteWhen returning item components, the Account Code field is by default populated with the value of the WIPAccount field in the corresponding production order. If that field is blank, then the system applies theappropriate WIP account according to the definitions in the Document Settings window.
9.1 Backflush Components Handling and Impact ofAdditional Quantity
The following applies when processing Backflush components:· Backflush components are always automatically consumed in proportion to the quantity of the parent item
which is currently being received in the receipt from production.· The consumption of Backflush components which are to be processed together with a receipt from
production of the parent item is recorded in a separate journal entry linked to an issue from productiondocument. The Remarks field of this issue for production reads that the document has been automaticallygenerated to handle Backflush components related to a specific receipt from production.
· If Additional Qty has been specified for a Backflush component, it is automatically consumed on the firstreceipt of the parent item from the production order in addition to the regular proportional receipt ofcomponents.

How to Work with Resources and Production in SAP Business One 9.3 and higherInterim WIP Consolidation Account Mapping
CUSTOMER© 2020 SAP SE or an SAP affiliate company. All rights reserved. 89
10 Interim WIP Consolidation AccountMapping
This functionality enables businesses to automatically identify sub-assembly costs on closing a production orderwithout the need to use nested BOMs and separate production orders for subcomponents.
ExampleYou produce bicycles and you want to identify the cost of bicycle parts at various stages of the productionorder. A bicycle wheel is made up of a number of components whose costs add up to the cost of thewheel. In addition to identifying the overall cost of the bicycle, you need to identify the cost of the wheelwhich would normally not be identified. Using the combination of WIP account settings and the interimWIP consolidation matrix, you can track the cost of the sub-assemblies through the chart of accounts.
This functionality provides mapping for multiple WIP accounts such that upon the closing of a production order,the WIP account postings for sub-assembly components are all zeroed down and transferred to a single sub-assembly interim WIP account. For example, to contain the total wheel cost, and then the sub-assembly, interimWIP accounts are zeroed down and their values are transferred to the WIP Inventory Variance account. If there isany difference between the value posted to the WIP Inventory Variance account and the value of the receivedparent items and its by-products, it is posted back to the Inventory account of the parent item according to theenhancements regarding the production order closing. The mapping matrix allows multiple levels of mapping.
Procedure
From the SAP Business One Main Menu, choose Administration → Setup → Production.

90CUSTOMER© 2020 SAP SE or an SAP affiliate company. All rights reserved.
How to Work with Resources and Production in SAP Business One 9.3 and higherInterim WIP Consolidation Account Mapping
In the Consolidate From Account (left-hand side) column, select a WIP account from which the value will betransferred. In the Consolidate To Account (right-hand side) column, select an interim WIP account to whichyou want to transfer the value.
Noteo If an account in the right-hand side column is also separately defined in the left-hand side column,
then its value will be zeroed down and transferred to the account in the Consolidate To Accountcolumn.
o You cannot define one account in the Consolidate From Account more than once.o Any WIP account or interim WIP account which is not included in the mapping matrix will have its
value automatically transferred to the WIP Variance account of the parent item and subsequently tothe relevant Inventory account.
To save the settings, choose Update.
Example1. You define interim WIP consolidation mapping as displayed below.
2. You open a production order as displayed below.

How to Work with Resources and Production in SAP Business One 9.3 and higherInterim WIP Consolidation Account Mapping
CUSTOMER© 2020 SAP SE or an SAP affiliate company. All rights reserved. 91
The Child1 and Child2 items use WIP account 210102, which is included in the WIP consolidation mappingmatrix.
3. You issue all the components. In the journal entry created behind, the values for Child1 and Child2 arecredited from the Inventory account and debited to the WIP account 210102. The value for R001 iscredited from the relevant standard cost expense accounts and debited to the WIP account 210102.
4. You report the production order's completion. The journal entry created behind credits the WIP Inventoryaccount (defined for the parent item) with the parent item cost and debits the Inventory account.
5. You close the production order. The journal entry created behind closing the production order does thefollowing:o Zeroes down the WIP account 210102 and transfers the value to the interim WIP account 210103
according to the WIP consolidation settings.o Zeroes down the interim WIP account 210103 and transfers the amount to the WIP Variance account.
o If there is a difference between the value transferred to the WIP Variance account and the value of thereceived parent item and its by-product, it is posted to the Inventory of the parent item.
92CUSTOMER© 2020 SAP SE or an SAP affiliate company. All rights reserved.
How to Work with Resources and Production in SAP Business One 9.3 and higherTracing Serial and Batches in the Production Process
11 Tracing Serial and Batches in theProduction Process
The forward and reverse batches and serials trace reports allows you to determine the production and distributiondetails for specific batches and serials.You can use the forward batches and serials trace report to track and trace the complete supply details of anybatch or serial item to production and customers. Based on the batch and serial numbers, you can forward thetrace to production and customers from the supply details. For example, in the case of product recall, you canquickly identify the customers who were supplied.You can use the reverse batches and serials trace report to track and trace the complete source details of anybatch or serial item from production and suppliers. Based on the batch and serial numbers, you can reverse thetrace back to production and suppliers with source details in the production and purchasing documents. Forexample, in the case of product recall, you can quickly identify the suppliers.
NoteThe report is available only for companies using the perpetual inventory system.
11.1 Forward and Reverse Batches and Serials Trace Report
To generate the forward or reverse batches and serials trace report, perform the following:In the SAP Business One Main Menu, choose Inventory → Inventory Reports → Forward Batches and SerialsTrace Report or Forward Batches and Serials Trace Report.
NoteApart from accessing the forward and reverse batches and serial reports from the Inventory Reportsmenu, you can also run the reports by right-clicking any batch or serial number and choosing ForwardBatch/Serial Trace Report in the following windows:o Serial /Batch Number Transactions Report windowo Serial/Batch Number Selection windowo Serial/Batch Number Details windowo Batches and Serials Inventory Audit Report windowo Serial Number/Batch Management – Update/Complete windowo Forward Batches and Serials Trace Report windowo Reverse Batches and Serials Trace Report window
In the Forward/Reverse Batches and Serials Trace Report - Selection Criteria window, in the range-type fields,specify conditions to filter the batch or serial items you want to include in the report. The following filterconditions are available:

How to Work with Resources and Production in SAP Business One 9.3 and higherTracing Serial and Batches in the Production Process
CUSTOMER© 2020 SAP SE or an SAP affiliate company. All rights reserved. 93
Field Activity/Description
Batch No.From…To
Define the range of the batch numbers which you want to include in the report.You can define further criteria for the defined batches using the Batch Attribute 1From...To and Batch Attribute 2 From... To fields.
Serial NumberFrom... To
Define the range of the serial numbers which you want to include in the report usingthe Serial Number field.You can define further criteria for the defined serial numbers using the followingfields:· Mfr Serial No.· Lot Number
Code From... To Specify the range of item codes you wish to include in the report.You can further define items using the dropdown list in the Item Group field anddefining properties by choosing the Properties button.
NoteYou must enter at least one batch number or serial number or item code.
Choose the OK button.The system displays either the Forward Batches and Serials Trace Report or window or the Reverse Batchesand Serials Trace Report window.The report displays the following fields:
Field Activity/Description
Depth Displays the hierarchical levels of the inbound and outbound inventory transactions by theselected batch/serial numbers.

94CUSTOMER© 2020 SAP SE or an SAP affiliate company. All rights reserved.
How to Work with Resources and Production in SAP Business One 9.3 and higherTracing Serial and Batches in the Production Process
Field Activity/Description
NoteIf you right click and choose Highlight Related Document Lines, you can checkwhether the selected batch/serial numbers are consumed by their parentitems or any by-products from depth 1 downwards to the next depths.
Serial Number Displays all the available batch and serial numbers.
Item Code Displays the item code.
Document No. Displays the document number, which can be both inventory receipt documents andinventory issue documents.
DocumentOrigin Code
Displays the document type.
Document RowQuantity
Displays the inventory quantity for this row.The quantity is accumulated when an inbound transaction results in an increase, which isdisplayed as a positive value.


Copyrights, Trademarks, andDisclaimers© 2020 SAP SE or an SAP affiliate company. All rights reserved.No part of this publication may be reproduced or transmitted in anyform or for any purpose without the express permission of SAP SEor an SAP affiliate company.
SAP and other SAP products and servicesmentioned herein as well as their respectivelogos are trademarks or registeredtrademarks of SAP SE (or an SAP affiliatecompany) in Germany and other countries.All other product and service namesmentioned are the trademarks of theirrespective companies. Please seehttp://www.sap.com/corporate-en/legal/copyright/index.epx#trademark foradditional trademark information andnotices.Please see http://www.sap.com/corporate-en/about/legal/copyright/thirdparty-notices.html for third party trademarknotices.Please see https://help.sap.com/disclaimer-full for important disclaimers and legalinformation.JAVATM DISCLAIMERSome components of this product are basedon Java™. Any code change in thesecomponents may cause unpredictable andsevere malfunctions and is thereforeexpressly prohibited, as is any decompilationof these components.Any Java™ Source Code delivered with thisproduct is only to be used by SAP’s SupportServices and may not be modified or alteredin any way.SAP BUSINESS ONE – ADDITIONALCOPYRIGHTS & TRADEMARKSDotNetZip, .NET, SQL Server, Visual C++,Visual #, and Windows Installer areregistered trademarks of MicrosoftCorporation.DynaPDF is a trademark of DynaFormsSoftware for Documents - Jens Boschulte.EDTFTPJ/PRO is a trademark of EnterpriseDistributed Technologies.InstallAnywhere and InstallShield aretrademarks of Flexera Software LLC.SEE4C (SMTP/POP3 Email Engine Libraryfor C/C++) is the copyright of MarshallSoftComputing, Inc.Victor Image Processing Library and VIC32 are trademarks ofCatenary Systems. The Victor Image Processing Library is copyrightmaterial. This includes the source code, object code, dlls, examples,and documentation. This material is protected by United Statescopyright law as well as international copyright treaty provisions.
