how to use prezi- a beginner guide
TRANSCRIPT

© creativesuiteva.wordpress.com
Prepared by: Randy LosaVirtual assistant/Professional
A BEGINNER’S GUIDE
HOW TO USE

© creativesuiteva.wordpress.com
Forget PowerPoint
and Keynote for
now…

© creativesuiteva.wordpress.com
Open your
browser
© creativesuiteva.wordpress.com
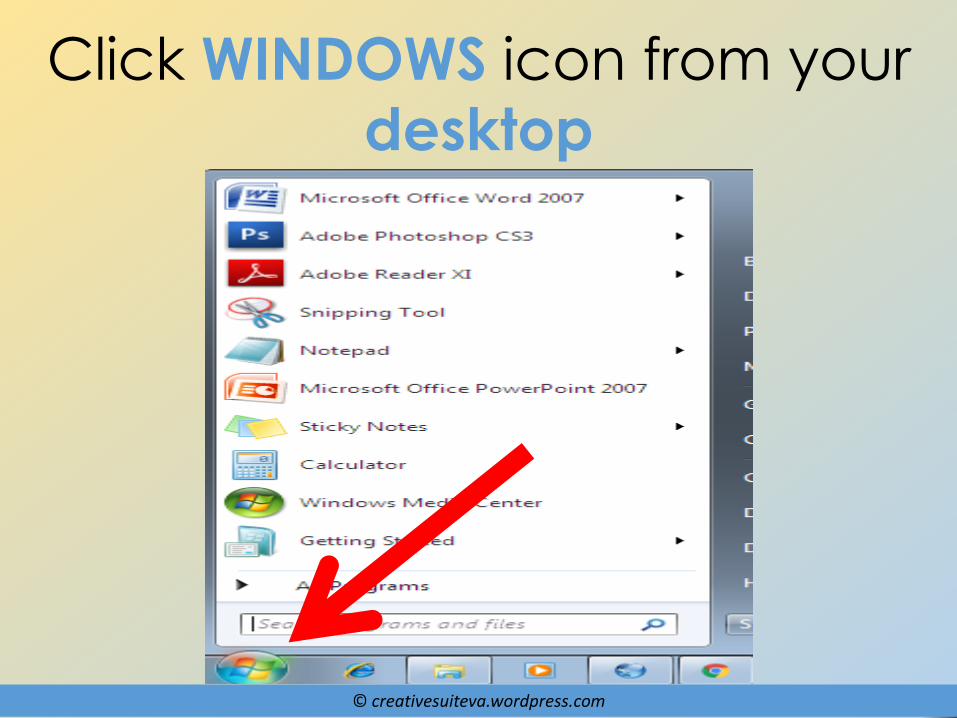
Click WINDOWS icon from your
desktop
© creativesuiteva.wordpress.com
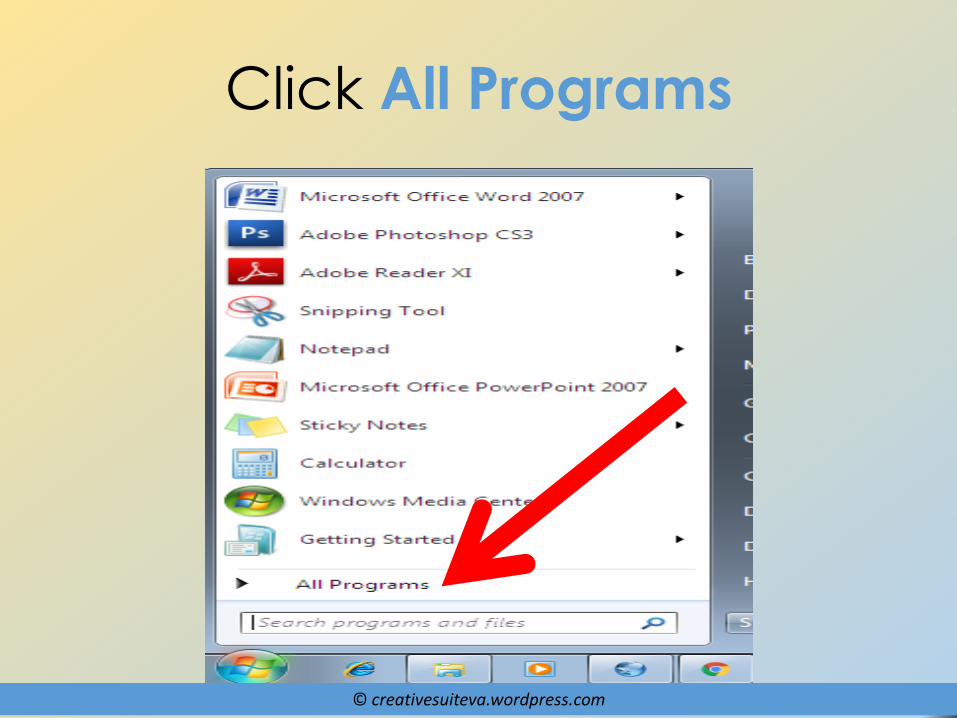
Click All Programs

© creativesuiteva.wordpress.com
Click Google Chrome

© creativesuiteva.wordpress.com
Your Home Page

© creativesuiteva.wordpress.com
Type in Prezi.com to
your address bar

© creativesuiteva.wordpress.com

© creativesuiteva.wordpress.com
Hit ENTER on your keyboard

© creativesuiteva.wordpress.com
And you will be directed here

© creativesuiteva.wordpress.com
Click GET STARTED

© creativesuiteva.wordpress.com
This will lead to this PAGE

© creativesuiteva.wordpress.com
Click the CONTINUE FREE
button

© creativesuiteva.wordpress.com
And you will be directed on
this PAGE

© creativesuiteva.wordpress.com
Create your FREE
PUBLIC ACCOUNT

© creativesuiteva.wordpress.com
Fill up necessary details on this
FORM

© creativesuiteva.wordpress.com
As a sampled fill-up
Form

© creativesuiteva.wordpress.com
Click the Create your FREE PUBLIC account button

© creativesuiteva.wordpress.com
You also have an option to sign in using
your LinkedIn and Facebook account

© creativesuiteva.wordpress.com
Congratulation! Your PREZI
account is all set up

© creativesuiteva.wordpress.com
Click GET STARTED button

© creativesuiteva.wordpress.com
This will direct you to a short
slideshow presentation

© creativesuiteva.wordpress.com
Now let’s create your own
PREZI

© creativesuiteva.wordpress.com
Click START CREATING

© creativesuiteva.wordpress.com
You will be directed on this
PAGE

© creativesuiteva.wordpress.com
You can click this TAKE OFF button…

© creativesuiteva.wordpress.com
for more videos tutorials about
using PREZI

© creativesuiteva.wordpress.com
…or stay on this page and
choose new PREZI template

© creativesuiteva.wordpress.com
To start, Click new PREZI

© creativesuiteva.wordpress.com
Wait while PREZI is uploading

© creativesuiteva.wordpress.com
You will directed to a template
catalog page

© creativesuiteva.wordpress.com
Choose a template here

© creativesuiteva.wordpress.com
Let’s select a JOURNEY
template

© creativesuiteva.wordpress.com
Click Use template

© creativesuiteva.wordpress.com
You will be directed to PREZI user
interface

© creativesuiteva.wordpress.com
Now let’s get to
know and
familiarize the tools
and features of
PREZI

© creativesuiteva.wordpress.com
The interface can be divided
into four parts

© creativesuiteva.wordpress.com
The action Toolbar

© creativesuiteva.wordpress.com
The Edit path Sidebar

© creativesuiteva.wordpress.com
The PREZI Canvas
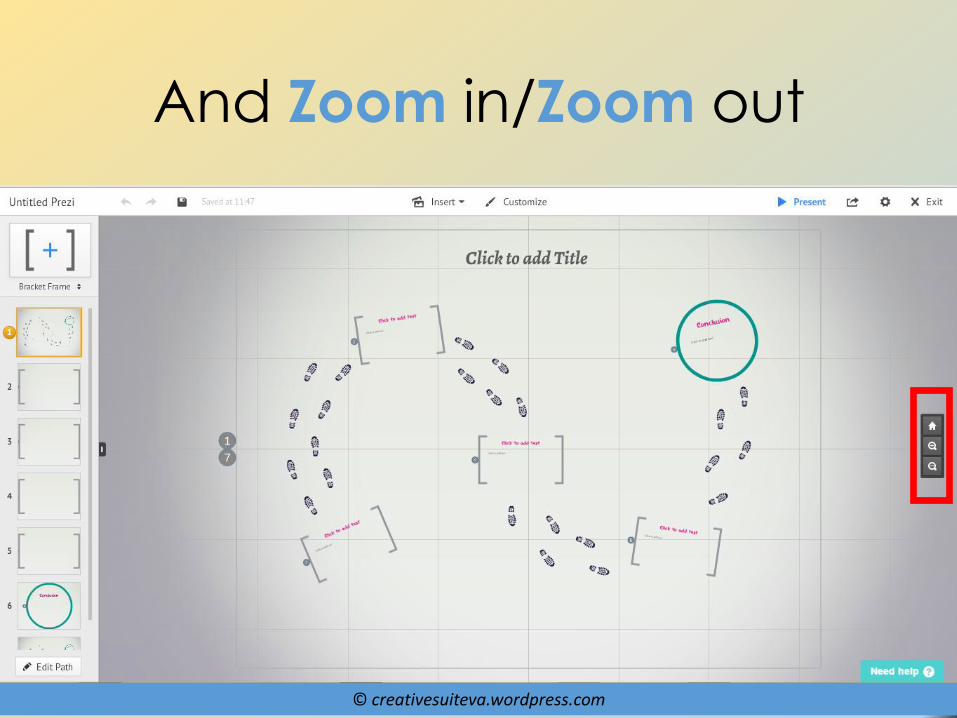
© creativesuiteva.wordpress.com
And Zoom in/Zoom out

© creativesuiteva.wordpress.com
Now let’s add text
next to image…

© creativesuiteva.wordpress.com
Now let’s Click to add TITLE

© creativesuiteva.wordpress.com
Type the Title of your
presentation here

© creativesuiteva.wordpress.com
Example Title

@creativesuiteva.wordpress.com
Click the next PATH and
automatically zoom-in to the
frame

© creativesuiteva.wordpress.com
Click to add a Text

© creativesuiteva.wordpress.com
Click to type a Title

© creativesuiteva.wordpress.com
Click to add text

© creativesuiteva.wordpress.com
Type a Subtitle

© creativesuiteva.wordpress.com
Type in a text

© creativesuiteva.wordpress.com
Click anywhere to add more
texts

© creativesuiteva.wordpress.com
Type to add texts

© creativesuiteva.wordpress.com
Take note of this toolbar

© creativesuiteva.wordpress.com
To animate, Click the Bracket
Frame

© creativesuiteva.wordpress.com
The Bracket Frame will appear

© creativesuiteva.wordpress.com
Drag the Bracket frame to the
path you are working on

© creativesuiteva.wordpress.com
Adjust the Bracket by dragging
its sides and corners

© creativesuiteva.wordpress.com
To animate, Click the Edit Path

© creativesuiteva.wordpress.com
Click the Star

© creativesuiteva.wordpress.com
Your window will look like this

© creativesuiteva.wordpress.com
Click each content the order
you want theme to fade

© creativesuiteva.wordpress.com
You should see the stars and
numbers

© creativesuiteva.wordpress.com
To preview, Click this

© creativesuiteva.wordpress.com
…And click Done

© creativesuiteva.wordpress.com
Click Done again

© creativesuiteva.wordpress.com
Let’s click another path

© creativesuiteva.wordpress.com
Again the frame zooms in

© creativesuiteva.wordpress.com
We can add text
like we did before

© creativesuiteva.wordpress.com
Click to add text

© creativesuiteva.wordpress.com
Click to add title

© creativesuiteva.wordpress.com
To add photo, Click insert

© creativesuiteva.wordpress.com
Click Image

© creativesuiteva.wordpress.com
Click Insert image

© creativesuiteva.wordpress.com
Click Select files

© creativesuiteva.wordpress.com
The window will pop up

© creativesuiteva.wordpress.com
Select the images you want
to include

© creativesuiteva.wordpress.com
Click Open

© creativesuiteva.wordpress.com
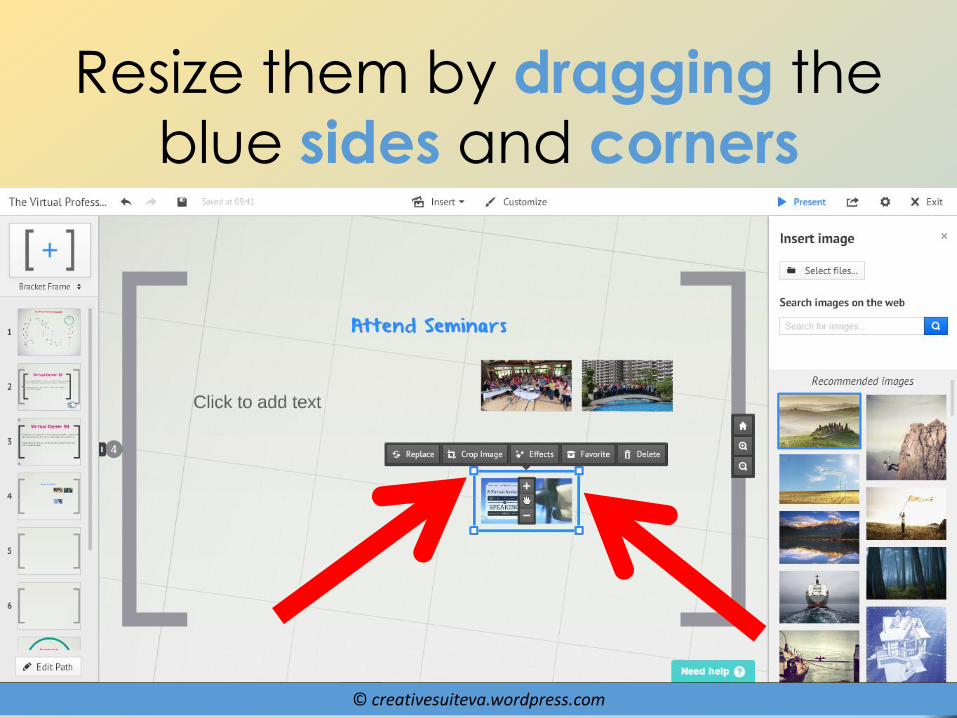
You can move the images by
dragging
© creativesuiteva.wordpress.com
Resize them by dragging the
blue sides and corners

© creativesuiteva.wordpress.com
The window will look like this

© creativesuiteva.wordpress.com
To add text, Just click anywhere
on the canvas

© creativesuiteva.wordpress.com
For example, click here

© creativesuiteva.wordpress.com
The text editor will appear

© creativesuiteva.wordpress.com
Insert a text then click anywhere

© creativesuiteva.wordpress.com
…or you can edit the font, text
size and text color

© creativesuiteva.wordpress.com
To insert arrows, click insert

© creativesuiteva.wordpress.com
Click Draw Arrow from drop
down menu

© creativesuiteva.wordpress.com
Drag your mouse to draw an
arrow

© creativesuiteva.wordpress.com
Click the squares to adjust the
arrow

© creativesuiteva.wordpress.com
To rotate the bracket, drag this

© creativesuiteva.wordpress.com
This is rotated bracket

© creativesuiteva.wordpress.com
To preview your presentation
anytime, click Present

© creativesuiteva.wordpress.com
Click another Frame

© creativesuiteva.wordpress.com
Again it automatically zoom in to
the frame

© creativesuiteva.wordpress.com
To insert Video, click Insert

© creativesuiteva.wordpress.com
Select YouTube Video from drop
drown menu

© creativesuiteva.wordpress.com
Go to
Youtube.com

© creativesuiteva.wordpress.com
Copy the link from YouTube

© creativesuiteva.wordpress.com
Paste the link here

© creativesuiteva.wordpress.com
Click Insert

© creativesuiteva.wordpress.com
Let’s resize the video to fit the
whole slide area

© creativesuiteva.wordpress.com
You can position the video by
dragging the small nodes

© creativesuiteva.wordpress.com
To add music
throughout the
presentation

© creativesuiteva.wordpress.com
Click path 1, the whole canvas

© creativesuiteva.wordpress.com
Click Insert

© creativesuiteva.wordpress.com
Click Add Background Music

© creativesuiteva.wordpress.com
Again the window will Appear

© creativesuiteva.wordpress.com
Click the Song

@creativesuiteva.wordpress.com
Click the Open

© creativesuiteva.wordpress.com
The song is Uploading

© creativesuiteva.wordpress.com
Click Done

© creativesuiteva.wordpress.com
You should see the uploaded
music here

© creativesuiteva.wordpress.com
Check out other stuff you insert

© creativesuiteva.wordpress.com
Your presentation automatically
saved

© creativesuiteva.wordpress.com
Now you can share
your Prezi
presentation in
social media

© creativesuiteva.wordpress.com
Click Share button

© creativesuiteva.wordpress.com
Click Share on Facebook from
the dropdown menu

© creativesuiteva.wordpress.com
Click the Facebook button to share
the slideshow on Facebook

© creativesuiteva.wordpress.com
Again a pop up box will appear,
Click Post to Facebook

© creativesuiteva.wordpress.com
When done, click Exit

© creativesuiteva.wordpress.com
This will lead you to this page

© creativesuiteva.wordpress.com
To view the presentation, Click
the arrow

© creativesuiteva.wordpress.com
Now you are ready to
present PREZI and give a
creative presentation.
Congratulation!

© creativesuiteva.wordpress.com
Now apply what you
have learned and start
your own.

© creativesuiteva.wordpress.com
VISIT:creativesuiteva.wordpress.com

© creativesuiteva.wordpress.com
THANKS!