how to use mailchimp - accomplishing success llc · mailchimp has an optional automated marketing...
TRANSCRIPT

How to use Mailchimp
By Jon Ruddat
Session description: In a lecture style format, participants will be shown step-by-step how to setup a MailChimp account and design campaigns that automatically send your encouraging message to a list of emails. We will be demonstrating how the Ministry Leadership Institute’s 30 day encouragement email program works. The session is intended for beginners.

Where we are going1. Introduction
2. Discovering email marketing
3. Automating emails
4. Using Mailchimp
5. Questions and Next Steps
Welcome!
Here is our agenda for this session.
First, I’ll review the goal for this presentation, why I’m passionate about it, and what tools we will be using.
Next, I’ll share some thoughts about why a ministry would consider using an email marketing service.
Third, I’ll explain the concept of automatic emails and share a few ideas of how that could be used in ministry.
In part 4 we will be setting up a Mailchimp account for the first time, create our first simple email campaign, and we’ll look at automated campaigns.We will walk through every step for beginners with screenshots and descriptions. However, we will not cover all the features that Mailchimp has to offer.
Lastly, we’ll have time for your questions and I have a couple to ask as well.
Why I am here1. To help individuals and ministries
2. To share my experience with Ministry Leadership Institute
3. To encourage you to learn and try something new
1. My goal is to help individuals and ministries with their use of technology to spread the Gospel.
2. It is based on my experience serving with Ministry Leadership Institute for the past 4 years using Mailchimp.
3. I want to encourage you to learn and try new technology solutions.
Who in this session has experience with an email marketing solution like Mailchimp, Aweber, ConvertKit, ConstantContact, etc.?

Tools we are using● Chrome Web Browser (Free)
● Mailchimp (Free)
Note: Screenshots, not a live demo.
We are not doing a live demonstration of Mailchimp because I was uncertain about the reliability of the conference center’s internet connection.
Also by having screenshots included in this presentation, participants will have a step by step guide when they can download these slides.

2. Discovering Email Marketing
First we’ll talk about reasons why a ministry should consider using an email marketing service like Mailchimp.

Convenience● Email templates and content
● Manage all your contacts
● No more CC or BCC
● No more Reply All
For more reasons why to use Mailchimp (or any other email marketing provider) visit:https://mailchimp.com/why-mailchimp/

Compliance● CAN-SPAM
○ Any commercial electronic mail that promotes a product or service
○ No specific exemption for nonprofits
● GDPR (European Union)○ Also applies to organizations located
outside the EU who offer goods or services to people within the EU
An important reason to use an email service is to comply with the CAN-SPAM act and (if serving people in the EU) comply with GDPR.
We’ll focus a little on CAN-SPAM for the US users.
And yes since there is no exemption for nonprofits, ministries should comply.
CAN-SPAM● False or misleading header
● Deceptive subject lines
● Your location
● How to opt out
● Honor opt-out requests promptly
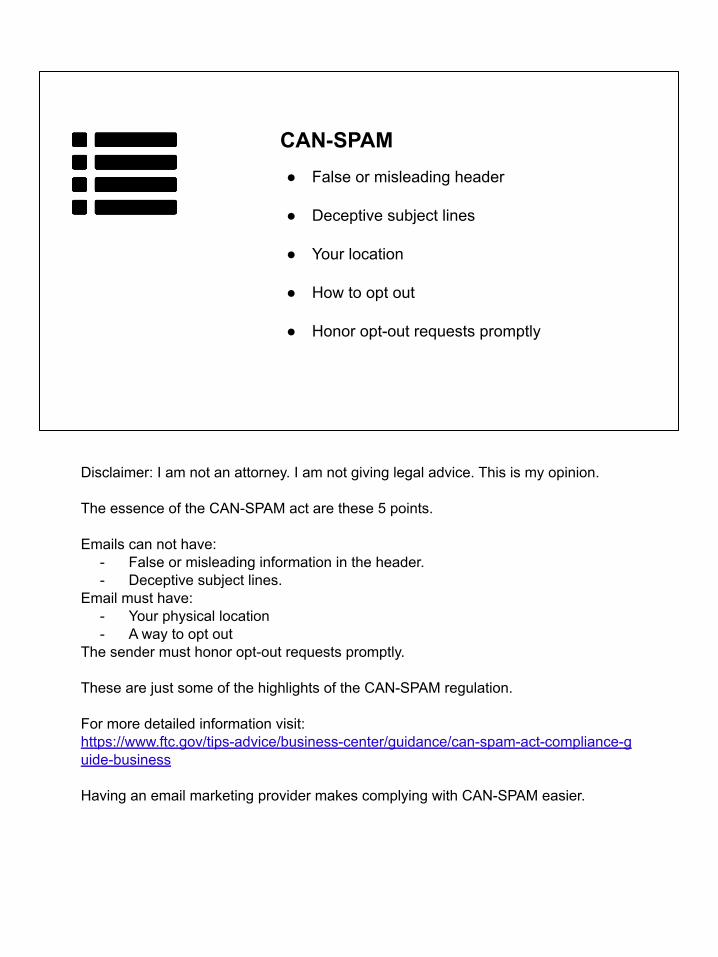
Disclaimer: I am not an attorney. I am not giving legal advice. This is my opinion.
The essence of the CAN-SPAM act are these 5 points.
Emails can not have:- False or misleading information in the header.- Deceptive subject lines.
Email must have:- Your physical location- A way to opt out
The sender must honor opt-out requests promptly.
These are just some of the highlights of the CAN-SPAM regulation.
For more detailed information visit:https://www.ftc.gov/tips-advice/business-center/guidance/can-spam-act-compliance-guide-business
Having an email marketing provider makes complying with CAN-SPAM easier.

Security● Backups
● Multiple data centers
● Server security measures
With an email marketing provider, they take care of security for your mailing list and emails that go out.
To learn more about Mailchimp’s security visithttps://mailchimp.com/about/security/
Analytics● Open rate
● Subscribers○ Sent○ Opened○ Not opened○ Clicked links○ Bounced○ Unsubscribed
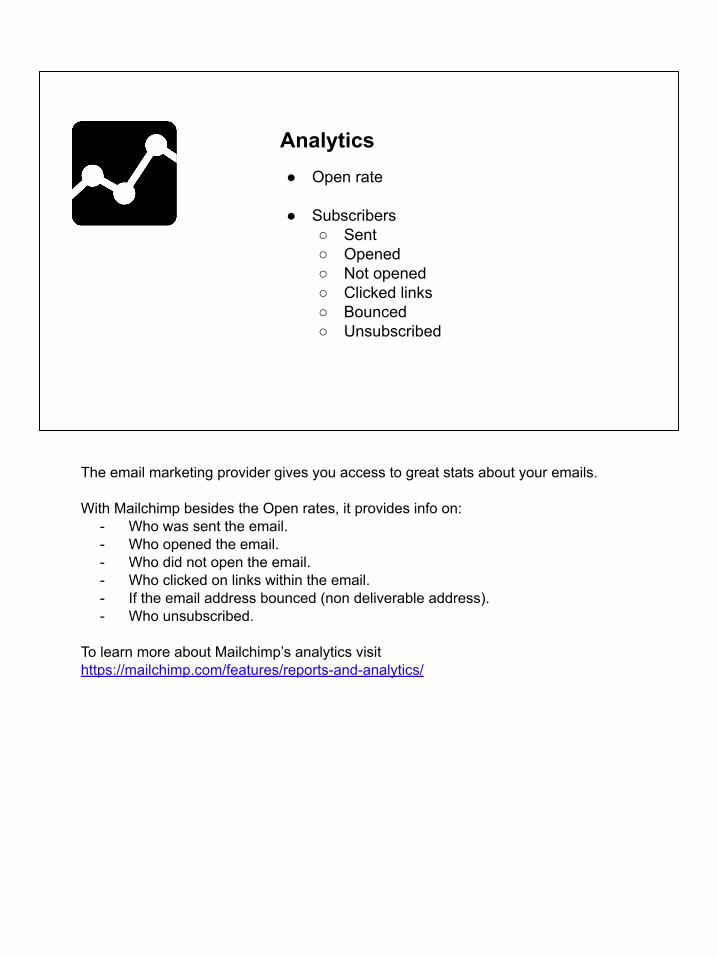
The email marketing provider gives you access to great stats about your emails.
With Mailchimp besides the Open rates, it provides info on:- Who was sent the email.- Who opened the email.- Who did not open the email.- Who clicked on links within the email.- If the email address bounced (non deliverable address).- Who unsubscribed.
To learn more about Mailchimp’s analytics visithttps://mailchimp.com/features/reports-and-analytics/

3. Automating Emails
Next we’ll talk about the concept of automated emails and possible ideas for use in ministry.

Set it up once● Audience (mailing list)
● Design
● Write content
● Make and use templates
With an email marketing service, you set up the mailing list and design it once. Then for all future emails much of the work is already done.
Also your designs and messages can be saved, reused and/or made into a sequence.

Always working for you● People can sign up or unsubscribe at will
● Automatically goes out or stops
● Can be triggered by specific actions
Once an automated email sequence is up and running, it keeps working for you, sending out meaningful content when automatically triggered or when manually activated.

Ideas for ministry use● MLI 30 Days of encouragement
● Visitor follow up
● Devotion series
● Monthly newsletter
We’ll look at in more detail later, how Ministry Leadership Institute (MLI) uses Mailchimp to automatically send out encouraging emails.
Some other ideas for an automated mail system is for visitor follow up, a devotional series, and/or a monthly newsletter.

4. Using Mailchimp
Next we’ll look at how to specifically use Mailchimp.

Using Mailchimp
Part 4a: Account
Part 4b: Audience (List)
Part 4c: Single Campaign
Part 4d: Automated Campaign
We’ll look at Mailchimp in four parts.

Part 4a: Account
First we’ll walk through setting up a free Mailchimp account for the first time.

Mailchimp.com
Goto Mailchimp.com and click on “Sign Up Free”
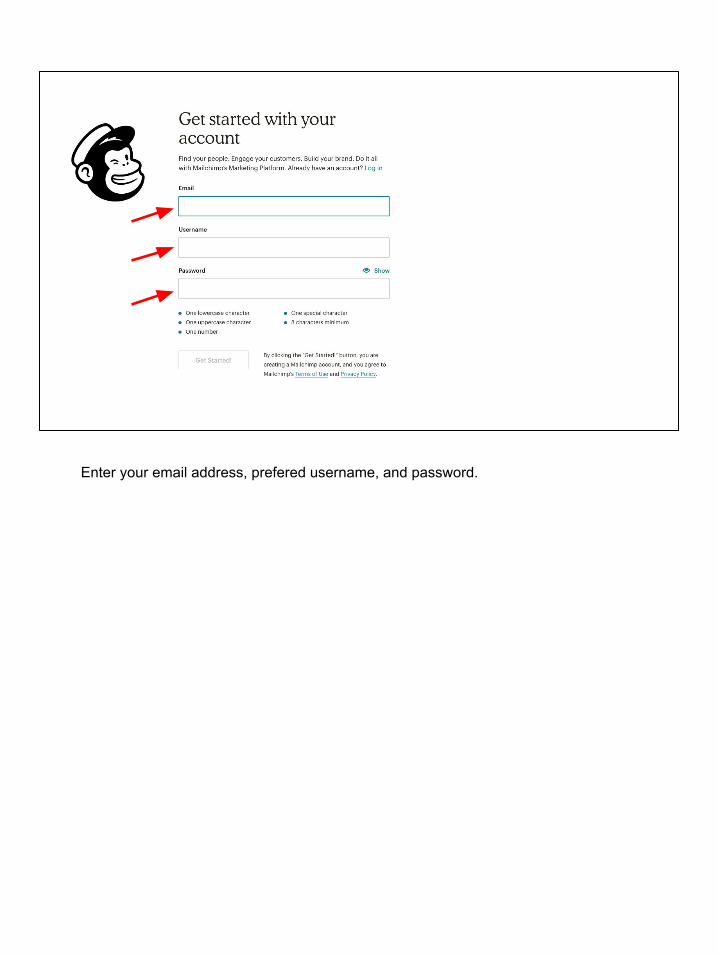
Enter your email address, prefered username, and password.

Go to your email account and open the message from Mailchimp and click the “Activate Account” link.

Click on the button to prove you are human.

Select your plan. Free is great!
Mailchimp has a comparison chart at:https://mailchimp.com/pricing/
If you wanted to pay for Mailchimp and have access to the automated campaigns then you have to select the Standard version.The Standard plan starts at $14.99 per month for 500 contacts. The next level up is 2,500 contacts for $49.99 per month.

Enter your first and last name.
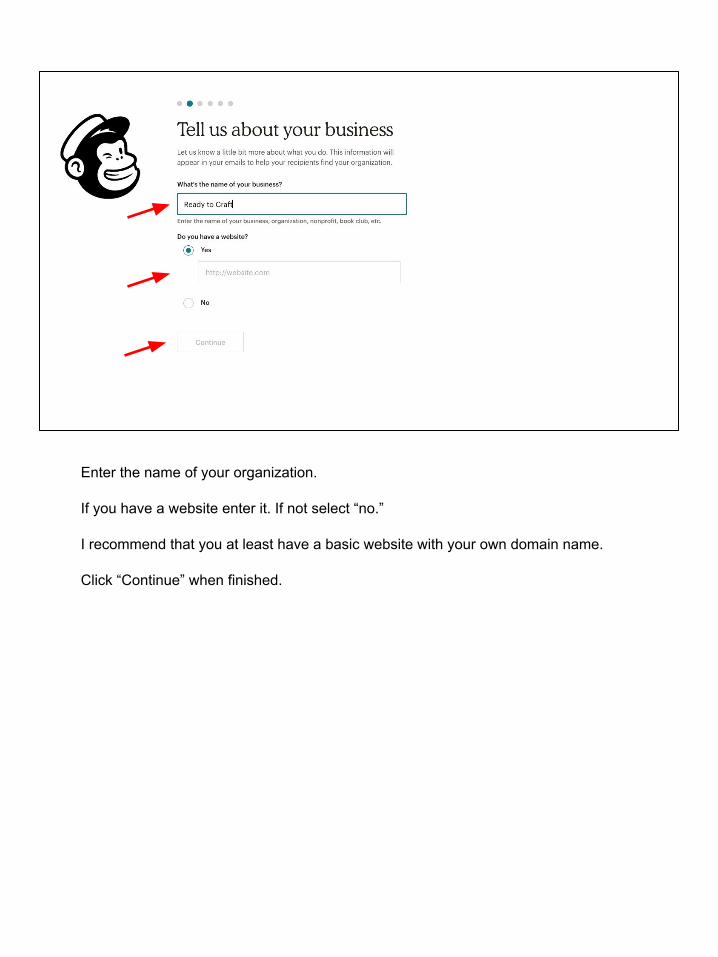
Enter the name of your organization.
If you have a website enter it. If not select “no.”
I recommend that you at least have a basic website with your own domain name.
Click “Continue” when finished.
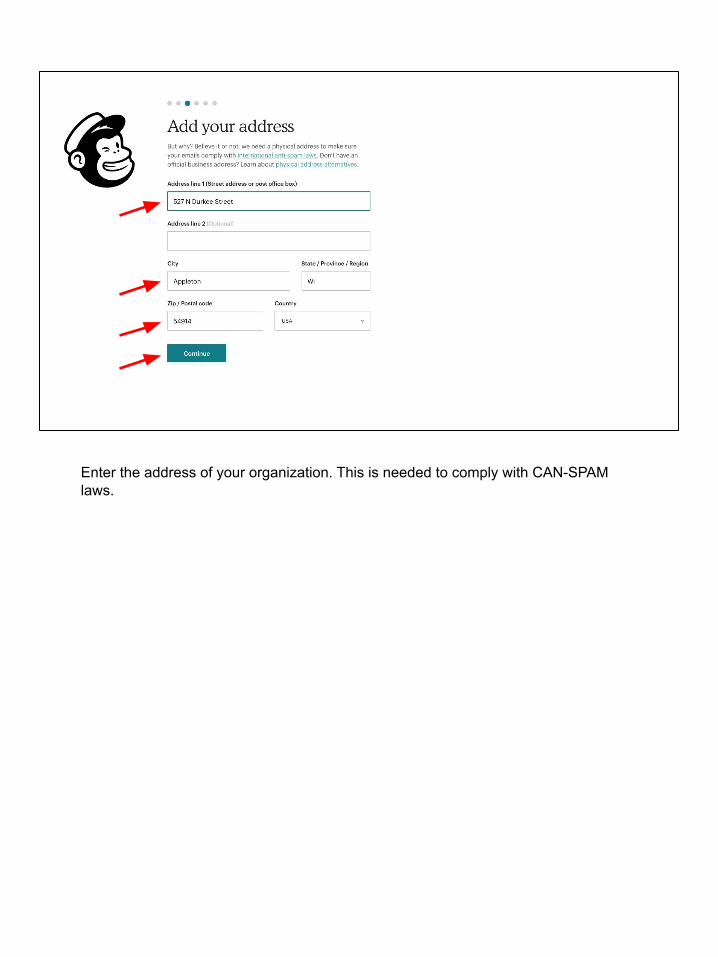
Enter the address of your organization. This is needed to comply with CAN-SPAM laws.

If you have an existing list of email address you plan on using (ie. membership list) then select how many.
If you don’t have any email addresses yet, select “no.”
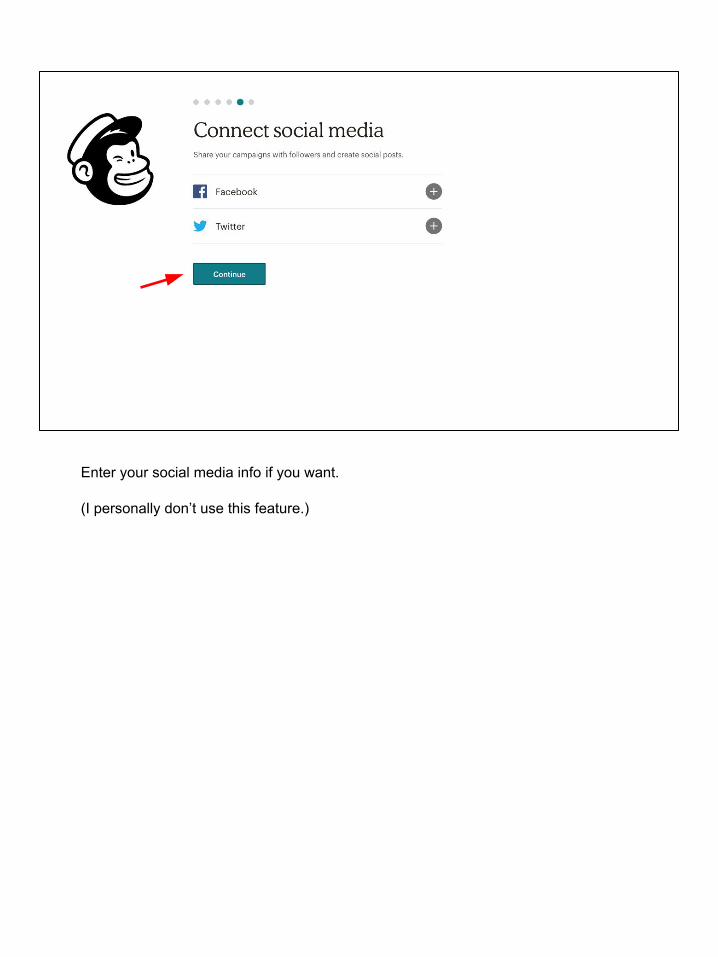
Enter your social media info if you want.
(I personally don’t use this feature.)
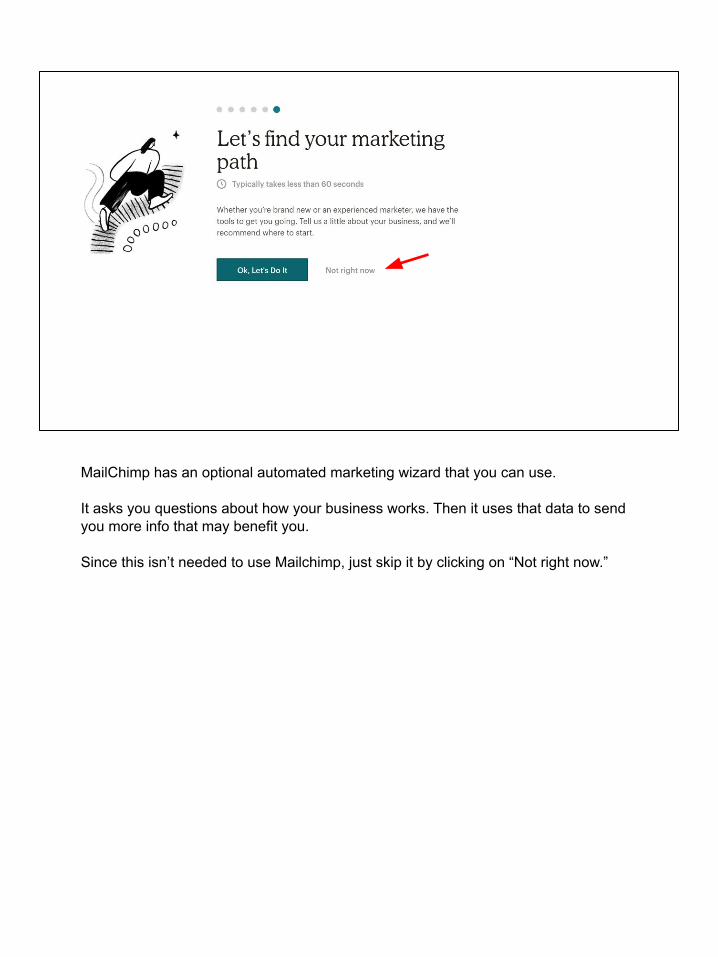
MailChimp has an optional automated marketing wizard that you can use.
It asks you questions about how your business works. Then it uses that data to send you more info that may benefit you.
Since this isn’t needed to use Mailchimp, just skip it by clicking on “Not right now.”

The startup wizard will appear and want you to start designing the first email.
However, we should finish two very important steps first: account security and verifying our domain (website).
Click on the dropdown menu by your account name and select “Profile.”

Under Settings, select “Security.”

Under Account verification enter your cell phone number and check the box to enable two-factor authentication.

Mailchimp will send your phone a message with a code.
Enter that validation code and click “Verify.”

Next, go to Settings and select “Domains.”

The email address and domain of your website will need to be verified.
Note a Gmail or other email provider’s domain name will cause problems if you leave it in Mailchimp.
Click on the button “Verify a Domain.”

Enter an email address that contains your organization’s domain.

The next step is to authenticate the domain name.
First, a little background about the Domain Name System (DNS) is needed. Computers talk to each other in numbers, they don’t understand words very well. So when you want to visit Google and type in google.com the computers use the DNS to find out what number that is. One of Google’s DNS numbers is 172.217.0.142. If you type that number in your web browser then you’ll be directed to Google’s home page. Emails use the same Domain Name System to find out how to deliver email.
For Mailchimp (or any other email marketing service) to send your email campaigns from your domain (website address), you need to add some records to your domain’s DNS settings.
You’ll need to to make two entries in your DNS settings for your domain. The process may be different for your domain registrar.
Add a new CNAME record “k1._domainkey” and give it the value “dkim.mcsv.net” Add a new TXT record @ and give it the value “v=spf1 include:server.mcsv.net ?all”

After the email verification and domain name authentication are completed then you will see a green “Authenticated” icon by your domain name.

We’ll skip the email design for later. So click on the link, “I’ll do this later”

Part 4b: Audience (Import)
Next, we’ll set up our mailing list or contacts, which Mailchimp calls your Audience.

Let’s import contacts, your list of email addresses.
If you don’t have any email addresses yet, then you may skip uploading your contacts and proceed to the next section, Part 4b Audience (Settings).
If you do have some email addresses to import, they should be stored in a spreadsheet. This spreadsheet should have at least 3 columns (email address, first name, last name).

I prefer the CSV file. It’s simple and most spreadsheet programs can export to it.
Click the button on the bottom right to continue.

Click the “Browse” button to find your data file and click the button on the bottom to continue.

Mailchimp will display all the columns it detected from the CSV file.
Some columns may be auto assigned to matching fields within MailChimp.
Others will need to be manually selected or skipped.
To match the data with the correct field, click on the “Edit” link, select the appropriate field, and click “Save.”

To skip a column in the CSV file, click on the “Skip” link.
Be sure to scroll across the screen to match or skip all the available data columns.

After all the columns are matched click “Continue” on the bottom right.

MailChimp gives you the option to add Tags to the contacts that will be imported.
The status should be set to “Subscribed.”
Be sure to check the box for updating existing contacts. This avoids duplicate entries and the person receiving more than one copy of your emails.
Click “Continue” at the bottom.

Mailchimp gives you one last chance to check your import and make any changes needed.
Click “Import” when ready.
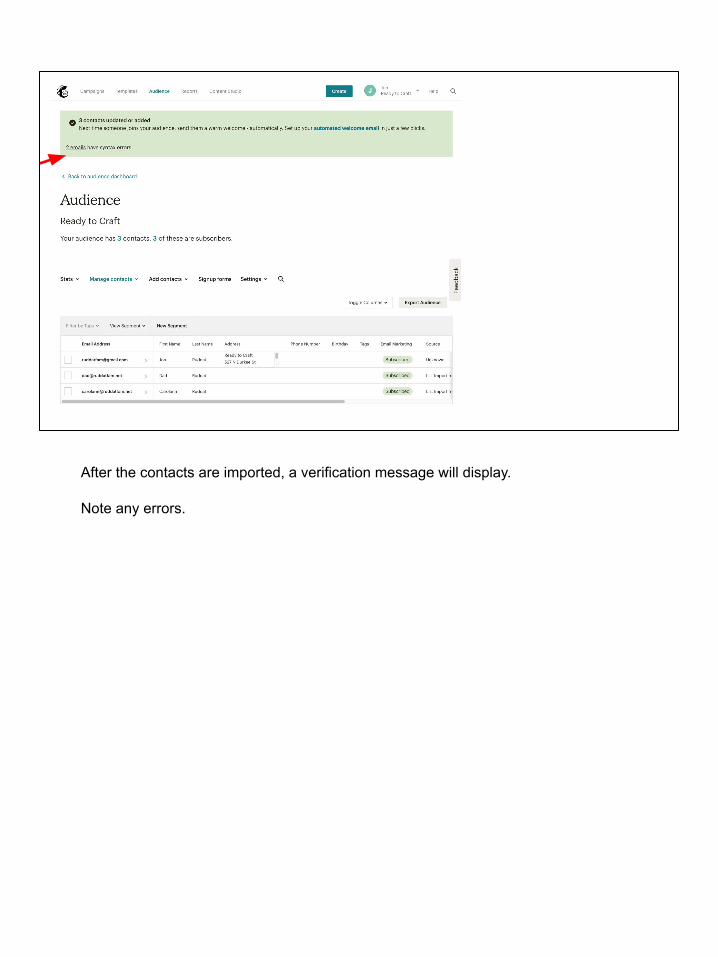
After the contacts are imported, a verification message will display.
Note any errors.

In my experience most errors are blanks or the headers from the CSV file. This is the case here. Two errors were mentioned. One error was the header row (email, first name, and last name) the second error was a blank row.
Other common errors are include duplicate email addresses for different people (ie. same address for husband and wife) or bank email address (ie. the data file has their name but no email address).
If there are errors, take note of them. At this point you can’t fix them. After you close this error message pop up window then you can manually add contacts or import the updated list.
After reviewing the error message you may close this pop up window.

Part 4b: Audience (Settings)
Next, we’ll set up our mailing list or contacts, which Mailchimp calls your Audience.

The Audience menu bar is where the most common functions for managing your list are located.

The “Manage contacts” drop down menu provides options for navigating to viewing the audience, groups, segments, tags, etc.
A simple subscriber list or audience will typically not need groups, segments or tags but they are very useful as your use of Mailchimp grows.
Groups: interests, like categorizesSegments: specific, like a filter

The “Add contacts” drop down menu is where you can add a single subscriber manually or import a data file of contacts.

The Settings menu item gives you access to advanced features and settings for your Audience list.

Fill in the Campaign defaults with the correct “From name” and “From email address.”
The default setting keeps the “From name” informal with just the first name.
A more professional approach is first and last name followed by the organization’s name (ie. Jonathan Ruddat [Accomplishing Success LLC] ).
One box to make sure stays unchecked is the “Send unsubscribe confirmation to subscribers.” If a contact clicks the unsubscribe link in the email that means they no longer want messages from you. So why send another email? It just irritates them.

The “Signup forms” menu item opens a new page for the different options available for building signup forms within Mailchimp.
I prefer to use the “Form builder” or the “Embedded forms”
The “Form builder” lets you create an online signup hosted on Mailchimp. So even if you don’t have a website, you can send or print a link for people to visit in order to sign up.
The “Embedded forms” lets you create a signup that can be used right on your website.
For this tutorial we will use the “Form builder.”

The Form builder screen.

The Form Builder has 19 different forms you can customize.
For this tutorial we are editing the main signup form.Select that from the dropdown menu.

First we’ll “Build it” and change a few fields.Later we’ll “Design it”

For a simple email list we just need a person’s email address and possibly their name.
So we need to make sure that the address, phone, and birthday are hidden.
In our example the address and phone number fields are already hidden, but we need to hide the birthday field. So we’ll click on that field, select hidden from the side menu, and then hit “Save Field.”
If you want to keep it simple for your audience, do the same for the name fields.

I’ll suggest a few simple changes to make the form look like it was designed by you rather than by a computer or template.
First we change the background. White (#ffffff) is a good choice.
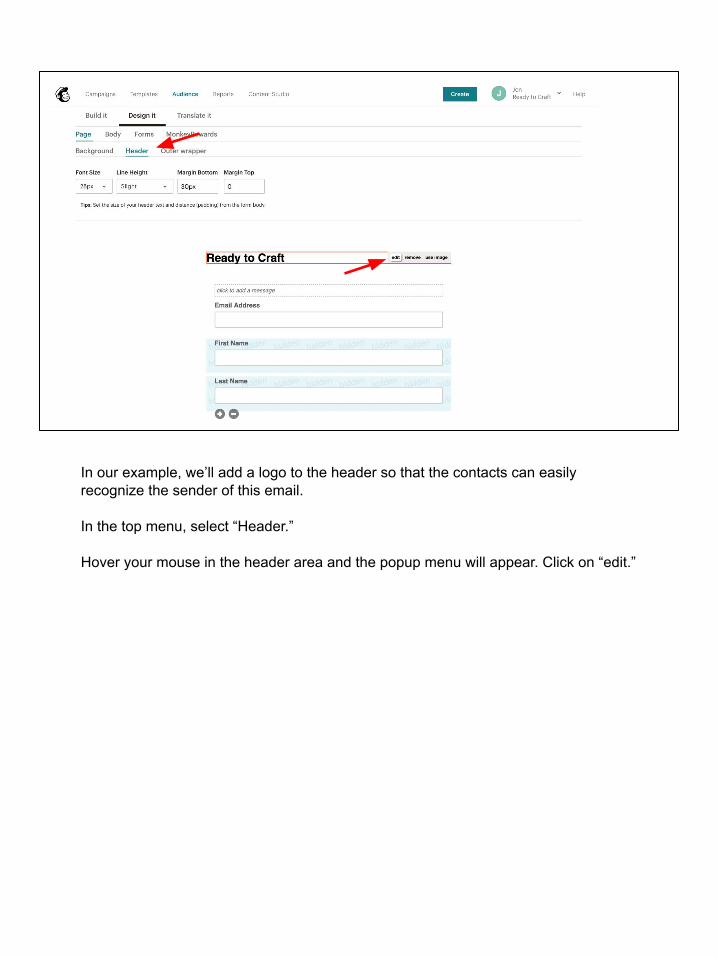
In our example, we’ll add a logo to the header so that the contacts can easily recognize the sender of this email.
In the top menu, select “Header.”
Hover your mouse in the header area and the popup menu will appear. Click on “edit.”

A popup window appears to edit the header.
We want to place our icon to the left of the text.First, place the cursor at the left end of the title.Then click on the picture icon in the menu bar.This will open a new screen.

Drag and drop your image file or use the “Upload” button at the top of the screen.
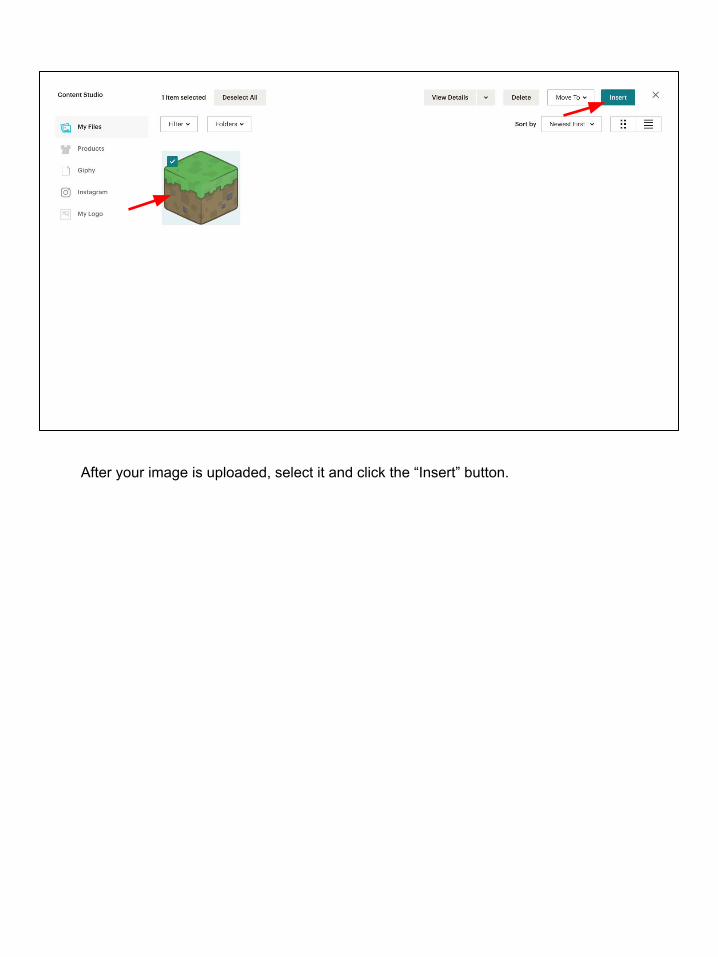
After your image is uploaded, select it and click the “Insert” button.
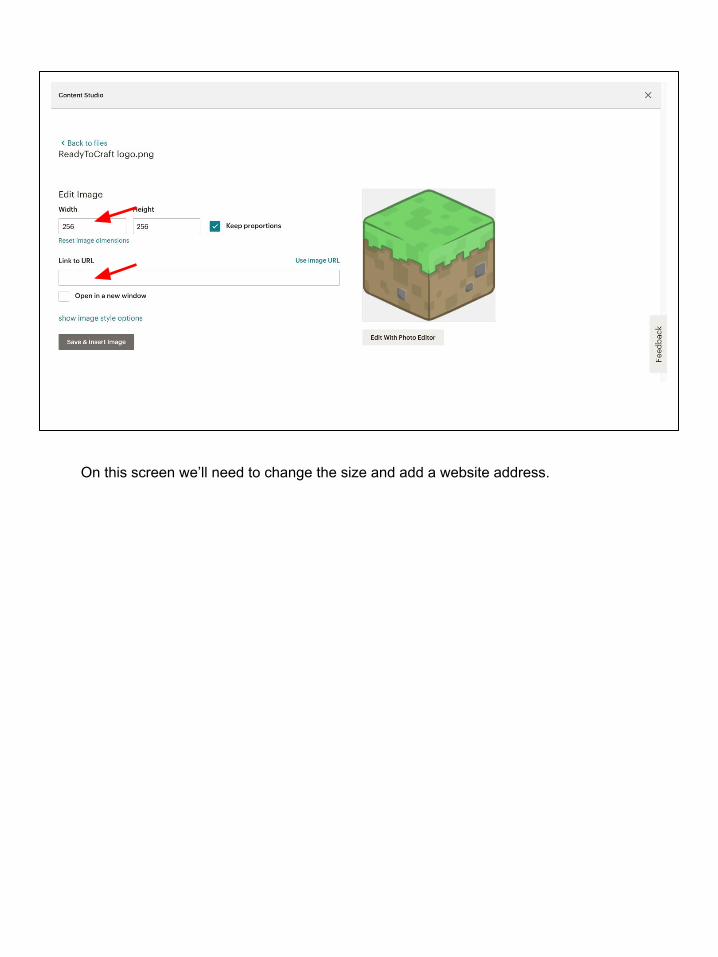
On this screen we’ll need to change the size and add a website address.

After entering the new dimensions and the website address, click “Save & Insert Image.”
If you’re not sure what dimensions will look good or fit in the email form, just try a number less than 100.You can always come back and change the size of your image. (For this example I tried 3 different sizes before settling on 40 x 40.)

OptionalDouble Click
If you like the way it looks, then click “Save & Close.”
If you need to resize the image, then double click on your image to go back to the editing screen.

Next we want to change the button color to match our logo.
Select “Forms” in the menu bar. Then select “Buttons.”
Enter the color number or use the color picker to select the appropriate color for the button.

One last optional item to customize for our simple signup form.
If the black Mailchimp icon doesn’t fit your design, then select “MonkeyRewards” and click on the “Change Image” link.

Click on the white logo.

And change the alignment to “center.”
Now our signup form looks better than the default and it is customized with our logo and color.

You may edit the other features and forms within the Form Builder to your liking.
Keep the following simple pro tips in mind:- Use only one font.- At most use two font colors, one for regular text and headings and the other
for links- Include your logo and branding colors.
Now you’re ready to use the signup link on your website and publications.
This concludes the simple setup of the Audience.

Part 4c: Single Campaign
Next we’ll look at building a simple single email. Email messages in Mailchimp are called Campaigns.

We are going to make a single message email campaign that welcomes people when they signup.
To create a campaign click on the “Create” button at the top of the screen.

Click on “Email” to design our first campaign.

Select “Regular,” enter a name for this campaign, and click “Begin.”

This is the main compose screen for email campaigns.
We’ll start by adding recipients, work our way down the list of features, and finish with designing the message.
Click on “Add Recipients” to start.

Since we’re using the free plan, we have only one Audience. So in the drop down menu select your audience.
Your audience is the list of email addresses that were imported during the previous section (Part 4b Audience).

For this email, we don’t want it be sent to all people in our Audience list, only the new ones.
So we will select the “New Subscribers” pre-build segment.We’ll talk more later about Tags, Groups, and Segments.
If you are collecting names, you may personalize the “To” field by checking the box.
Click “Save” to move on to the next step.
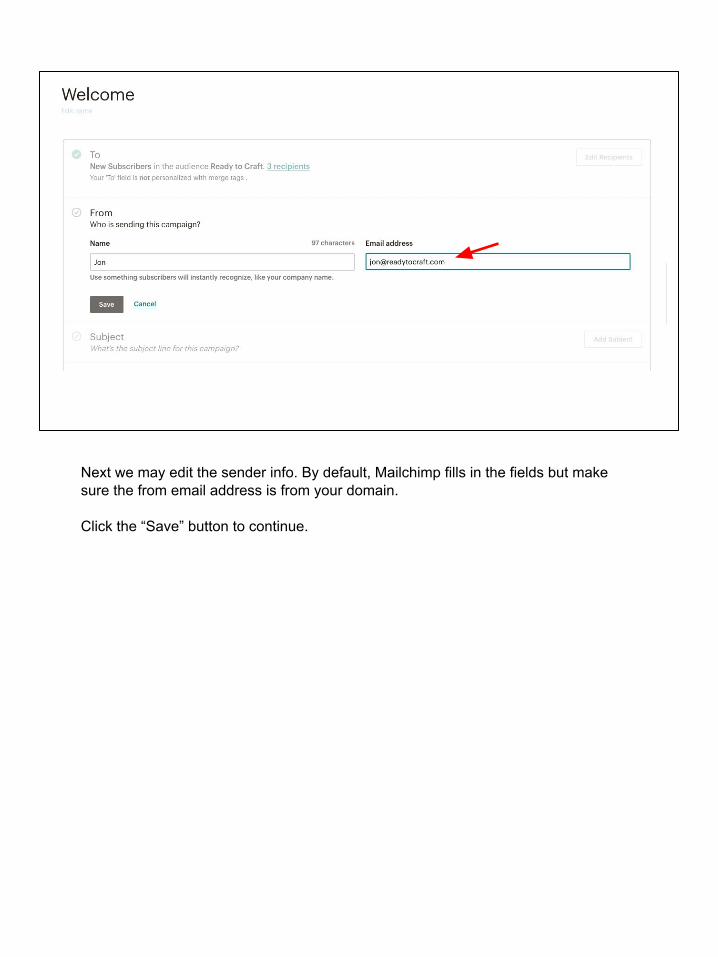
Next we may edit the sender info. By default, Mailchimp fills in the fields but make sure the from email address is from your domain.
Click the “Save” button to continue.

Click on the “Add Subject” button.

Enter your subject line and preview text.
The preview text is what will appear in the inbox after the subject line.
Write subject lines that people will want to open. It’s better to be direct and descriptive rather than trendy. Also shorter is usually better.
Click the “Save” button when finished.

The last step in setting up the email campaign is design and adding content.
Click the “Design Email” button.

While there are a lot of cool looking designs and templates, to start with I recommend using the “Simple Text” layout.
If you’re more adventurous you may try the 1 Column layout.
We’ll use a more complicated layout later for the Automated Campaign.
Keep it simple, plain textIf needed one imageSingle font, 2 colors: text and linksGet to the point as quick a possible

The campaign design wizard screen is split in half. The left side of the screen is a preview of what you’re email will look like. The right side has the tools for designing your email and is the place where you’ll edit the content of specific blocks.

When your mouse hovers over the different content blocks a dark gray menu bar will appear.
The dots on the left, allow you to move the block.The pencil icon opens the content window.The box with a plus icon duplicates that content block.The trash can deletes the block.
In the Content window you can edit the text for your message.You can include links.
It is best not to include images in the body of the message.
Note that most people open their email on their phone. So you’ll want the design to be simple, clear, to the point, and easy to read.
Having an image or icon at the top is good for quick recognition of your organization.
When you’re done editing the content click the “Save & Close” button.

Here is our sample email with a logo to the header line. You can use the same process as we did before on the Signup form by clicking on the image icon in the text editor and inserting it.

After your content is finished click the very bottom “Save & Close” button to continue.

Now your campaign is ready to send. You may send it immediately or with one of the paid plans, schedule a date and time.

After clicking “Send” a pop up window will appear asking you to confirm to send it. Click the “Send Now” button.

Lastly, a confirmation message will appear, letting you know that the email campaign will go out shorty.
Now with the basics out of the way, we’ll dive into a more complex and exciting part of Mailchimp, the automated campaign.

Part 4d: Automated Campaign
Finally, we’ll talk about automating the campaigns and specifically look at MLI’s use of automatic emails.

30 Days of Encouraging Emails
● Bible passage
● 5 encouragements○ Spiritual○ Emotional○ (Physical)
■ Eat■ Move■ Sleep
The goal of Ministry Leadership Institute is to help leadership teams, pastors, and principals by providing Christ-centered practical tools that are immediately life changing.
One of their tools is the 30 Days email campaign sent via Mailchimp.
After participants complete either the online course or the in person workshop they recieve 30 days of emails that encourage and build upon what they learned.
Each email is unique and has a Bible verse and 5 suggestions usually following their formula of SE-EMS: Spiritual, Emotional, Eat, Move, and Sleep.
I thought other ministries could use this feature as well, sending automated messages of encouragement or devotion (ie. welcome visitors, advent or lent devotions, custom Bible reading and prayer program, etc.).
To build these unique emails we used Mailchimp’s templates and then created a campaign of 30 emails using those templates.

On May 15, 2019 Mailchimp changed their plans. :-(
With this change free accounts can no longer create automated campaigns that contain more than one email message.
One has to upgrade to the Standard ($15/month) or Premium ($300/month) plans to have access to these features.
Image from https://mailchimp.com/resources/mailchimps-most-popular-subject-line-emojis/

Templates & Campaign
● Template= Reusable layout
● Campaign= email message(s)
For MLI we created a template, which is a reusable layout, with the first email’s content.
Then we replicated that template to make the other subsequent message templates.
After the 30 messages were made in templates then we made a campaign that put them all together.
This isn’t the only way to create a campaign of 30 messages. We did it this way because we were making different campaigns for different audiences (lists) and different purposes.
Once Mailchimp changed we streamlined our offerings to be just one campaign for the 30 Days of emails.
Also because Mailchimp changed we can not build the MLI template (even in MLI’s Mailchimp account) because only simple templates are available in the free plans. So we will use a simple template as our example.

Create a template
Click on Template in the top menu bar.
Next click on Create Template.

Choose a template
For our design we chose the 1 Column design.

“So when you send an email, what part of the communication delivers the most value?”
- Nathan Barry
Note: I’ve learned since we made MLI’s templates that simpler is better. With most people reading their emails on their phone it is recommended that email campaigns have minimal design.
Nathan Barry asked an important question, “So when you send an email, what part of the communication delivers the most value?”
https://nathanbarry.com/email-templates-hurt-business/
In email, CONTENT is the most important. Not the design or graphics. Therefore keep the design to a minimum.

Preview pane Editor pane
Mailchimp’s template editor has the preview on the left and the tools on the right.

Drag and drop
To add content blocks, click on the right and drag to the left.
Edit content
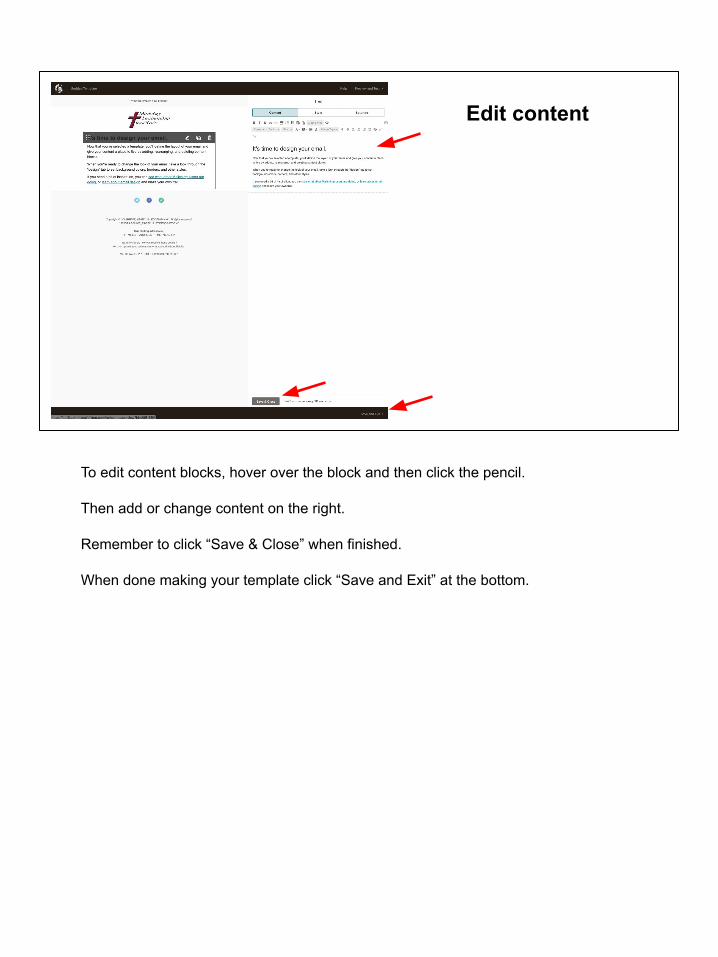
To edit content blocks, hover over the block and then click the pencil.
Then add or change content on the right.
Remember to click “Save & Close” when finished.
When done making your template click “Save and Exit” at the bottom.

Name and save the template
Enter a name for your template and click Save.
Template saved
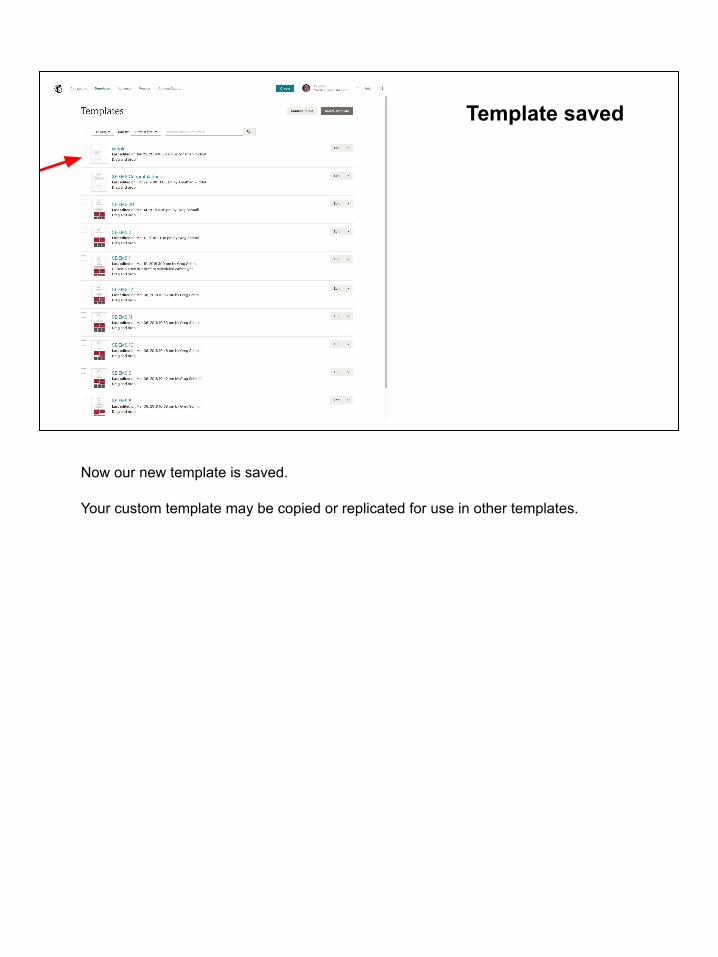
Now our new template is saved.
Your custom template may be copied or replicated for use in other templates.

With a template:
● Create a campaign
● Preview
● Export
● Share
● Replicate
With your template, using the drop down menu, you may:- Create a campaign- Preview- Export- Share- Replicate
For MLI we replicated our first email template so that all other message would have the same design.Then we just replaced the content as appropriate for each day’s message.
Next we’ll look at the automated campaign.

Edit a campaign
When you click on Campaigns in the top menu, then you are able to create a new campaign, replicate an existing one, or edit an existing.
For our example, we’ll edit an existing one to show the features and setup.

5 Important Features:
● Edit Settings
● Trigger
● Design Email
● Post-send action
● Add Another Email
The five most important features of the multiple email campaign are:- Edit Settings- Trigger- Design Email- Post-send action- Add Another Email
We’ll go over these features with examples.

Edit settings
The workflow name is the name you give the campaign.
The from name should be something easily recognized.

Triggers
When you click on the Edit button for the trigger there are many options.
Mailchimp organizes them into 5 categories. We’ll look at 3 that are frequently used.
Note that only one trigger can be selected.

Workflow triggers
● Previous email sent
● Previous email opened
● Previous email not opened
● Previous email clicked
● Previous email not clicked
● Specific link in previous email clicked
The first category of triggers are the Workflow actions.
The Workflow triggers correspond to the sequential emails in the campaign.

Campaign triggers
● Sent campaign
● Opened campaign
● Not opened campaign
● Clicked campaign
● Not clicked campaign
● Specific link in campaign clicked
Since we are not selling online products or services, we’ll skip the E-commerce triggers.
The Campaign triggers correspond to activities with other campaigns.
With MLI when we had multiple campaigns for various groups that were served, we could send them a welcome email using a different campaign and then afterwards follow up encouraging emails, from the 30 Day campaign, were sent.

Audience triggers
● Manual add
● Signup
● Changes in subscriber’s audience field
● Joins group
● Leaves group
● Added tag
Audience triggers correspond to actions in the Audience (list).
Next we’ll look at 4 different types of triggers and post-send actions that MLI uses.

MLI example #1Signup form Trigger
Immediately after a subscriber’s audience field “Code”changes to “30-Days-Auto”
On the MLI website we have a signup form to receive the 30 Days of encouragement emails.The form automatically fills in the audience custom field Code with the phrase “30-Days-Auto.”
When Mailchimp sees a subscriber (new or existing) with the Code field “30-Days-Auto,” it automatically sends out the first email.
The delay setting options are:- Immediately- Wait __ hours- Wait __ days- Wait __ weeks
The audience field could be any field for the audience.
With MLI the fields are:- First name- Last name- Phone number- Congregation- Code

MLI example #2Send next Email
A subscriber is sent the previous Automation Email in your series.
Wait 1 day.
With the 30 Day campaign, emails 2-30 have the trigger to automatically send the next message 1 day after the previous one.

MLI example #3Post-send action
After the email is sent,Add the tag “30 Days Alumni”
After Day 30 is sent, then Mailchimp adds the tag “30 Days Alumii” to the subscriber’s profile so that we can identify the subscribers who have been sent all 30 days of emails.

MLI example #4Post-send action
After the email is sent,Update merge field “Code” to “”
When the final congratulations email is sent out at the conclusion of the 30 Days campaign, the custom audience field “Code” is made blank. This is to keep the code word field clean and available.
If the subscriber wants to restart the 30 Days email program in the future, we can either manually change the Code field or it will change when they use the signup form.

Add Another Email
To add another email to the campaign sequence, click on the “Add Another Email” link.

Add Another Email
Now with the new message you can:- edit the trigger- change the content by clicking on the Design Email button- Add a post-send action (optional)

Using Mailchimp
Part 4a: Account
Part 4b: Audience (List)
Part 4c: Single Campaign
Part 4d: Automated Campaign
That’s all the time I have to go over Mailchimp. We looked at setting up an account, making an audience (mailing list), writing a single campaign, and automated campaigns.
While I am currently using Mailchimp, because of their recent changes that limit features for the free plan, I am changing to ConvertKit. (If I’m going to pay for an email marketing service, I want the simplicity and features that ConvertKit offers.)
5. Questions and Next Steps
This concludes the prepared content for the session.
Next I’ll try to answer your questions and ask 2 of my own.

Questions1. What questions do you have?
2. What is your biggest frustration when learning about email marketing?
3. What video or step-by-step guide do you wish was available?

Next Steps1. Suggested Links (handout)
○ Pat Flynn - SmartPassiveIncome
○ Nathan Barry - ConvertKit
2. Talk more about your email [email protected]
I suggest learning from Pat Flynn and Nathan Barry about how to effectively use email communication.
You are welcome to contact me with with additional questions.
Jon [email protected]://accomplishingsuccessllc.com/

How to use Mailchimp
By Jon Ruddat
End slide.