how to use digitalhiway version 2 - connecticut · double-click on it and let’s get started....
TRANSCRIPT

DigitalHIWAY
User’s Manual
March 2005
ConnDOT Data Services Section (860)258-0319

Table of Contents
ITEM Page(s) DigitalHIWAY Icon 3 Configuring the Image Source(s) 3 News 4 Index Window 5-6 Multiple Windows 6 Image Source(s) 7 A DigitalHIWAY Session 8 Control Window 9-13 Checkpoints Window 14-16 Image Window 17-20 Managing Sessions 21-23 Contact Information 24
2

DigitalHIWAY with Big Picture and Multiple Window Support
User’s Manual
March 2005 Welcome to the new DigitalHIWAY virtual roadway viewing environment! You may have already noticed a new icon on your desktop:
Double-click on it and let’s get started.
Configuring the DigitalHIWAY Image Source(s) The first window that appears is the Image-Source Configuration Initialization
To properly configure DigitalHIWAY you must select from one of two media options from which to view images on: DVD -- DVDs are available fthe Data Services Section containing years 1999-2003. For each year, there is a “pack” of DVDs. In 2003, for instance, there are 21 DVDs. You can only use this method if you have a DVD ROM drive. Advantage
rom
: You can scan along a route quickly and this allows standalone operation with no network connection to the server required. Disadvantage: You
have to change disks when viewing routes from different DVDs.
The Server option is the most commonly used method of viewing photolog. At this time you can access photolog images from 1985 through 2003 by attaching to the server during configuration. Advantage: Multiple route viewing is seamless. Disadvantage: Route-image scanning is limited to 1 frame per second.
3

If your computer is equipped with a DVD-ROM drive and you are on the ConnDOT network, you may choose both the DVD and Server options. Selecting both options gives you the speed of DVD should you need it, and the flexibility of quickly viewing numerous routes without changing disks.
☺NEW! The server setup is preset in the configuration window. If you are on the ConnDOT network you do not have to change the IP Address. When satisfied with your configuration click on Continue. This saves the configuration and starts the DigitalHIWAY Index.
☺NEW! DigitalHIWAY News is a new feature in DigitalHIWAY that will allow the Photolog Services Section to keep users informed of the latest updates and changes to the photolog software as well as other pertinent information.
You can choose how you want to view news by selecting one of the three options listed in the bottom portion of the news window. After choosing, click OK. The DigitalHIWAY Index will now appear on your screen.
4

The DigitalHIWAY Index
The DigitalHIWAY Index consists of the following main subgroups: Select Year, Route Groups, Database Choices, Saved Sessions and Select an Available Route. These are highlighted in the index window with yellow text. Select Year Choose the filming year for the route-images you wish to view. This is done by clicking on the Select Year button located on the top left of the Index window. Once selected, all index information is updated for that year. Years available for network viewing are 1985 through the most current year. The default year is that of the most recent set of images. DVD years are 1999 through the most current year. Contact Photolog Services for information on obtaining discs. Route Groups The list of "Available Routes" can be reduced to a list meeting a particular criterion (for instance, only routes found on a particular DVD). For detailed information on this, click the "Help on Filter" button located next to the filter button just below the Route Groups selection window. Database Choices A Connecticut state-maintained highway route is the only database choice currently available for photolog viewing.
Saved Sessions This window allows you to retrieve previously saved sessions. To go to the main “Sessions” window, click on the “Sessions” command button beneath the Saved Sessions window. ☼TIP Sessions let you save all your selected route windows to be restored to your screen the next time you run DigitalHIWAY. For detailed information on “Managing Sessions” see pages 21-23.
5

Select an Available Route Descriptive information for each indexed route is listed here. The column values available in the listbox are shown in the headings (white text) above the listbox. (You may need to scroll using the horizontal scroll bar just below the Available Routes box to view all fields). Select a route to be viewed by clicking on a direction description in the Available Routes listbox. When you do, both directions of a route will be automatically selected for you.
Multiple Windows
☺NEW! Right-click for the option to specify "Common" or "Separate" windows for the selected route:
Common - All routes selected into the Common Windows share those windows. Only one of the selected routes can appear at a time in a Common Window. A new route selected for viewing in a common window replaces the image being shown currently. (This is the way previous versions of DigitalHIWAY operated, and is the same as a Left-Click to select a route in the index window). Advantage: Fewer windows to manage on-screen. Disadvantage: Cannot view more than one route's images at a time.
Separate - A Route selected into "Separate Windows" cause new separate windows to be created especially for the images for that route. No other route will share these separate windows. Advantage: The route's images remain available even when other route's images are selected and shown in the Common Windows or other Separate Windows. Visual comparisons are easy. Disadvantage: More on-screen windows to manage. Use the "Sessions" feature (see section on Sessions at the end of this document) to help manage large numbers of Separate windows.
Multiple Windows Screenshot
6

☺NEW! When deselected, the Index Window remains onscreen after you make a Route selection, allowing you to open multiple routes without repeatedly bringing up the Index Window.
☺NEW! When selected, this forces the Index Window to ride on top of new Image Windows as they are opened. Use the Help button to get help on Index topics. Choose OK to continue with your DigitalHIWAY Session. If you configured DigitalHIWAY to use only one Image Source (DVD or network), the images for the selected Route appear. If you configured for both DVD and network, then you will have to choose which one you'd like to use:
You will be asked this twice, once for log direction and a second time for reverse direction.
7

The DigitalHIWAY Session
The DigitalHIWAY session consists of multiple windows displaying:
- Control window - Roadway images - Checkpoints or Linear referenced roadway features
Control Window This window allows you to control the position in a selected route/direction that is displayed in the image window. The control window contains sub features including a Views selection listbox and the Selected Segments listbox. Click on a segment description in the Selected Segments listbox to make its images appear in the Common Windows (or make Separate Windows for that route "pop-up" to the top of all windows). Once selected in this manner, the route becomes the currently selected route and the images can be scanned using the movement buttons (see below). The route identification for the currently selected route appears in the title bar of the control window. For player control, use the buttons at the top of the screen to control image display in the style of an audio CD player. See figures on the next page.
8
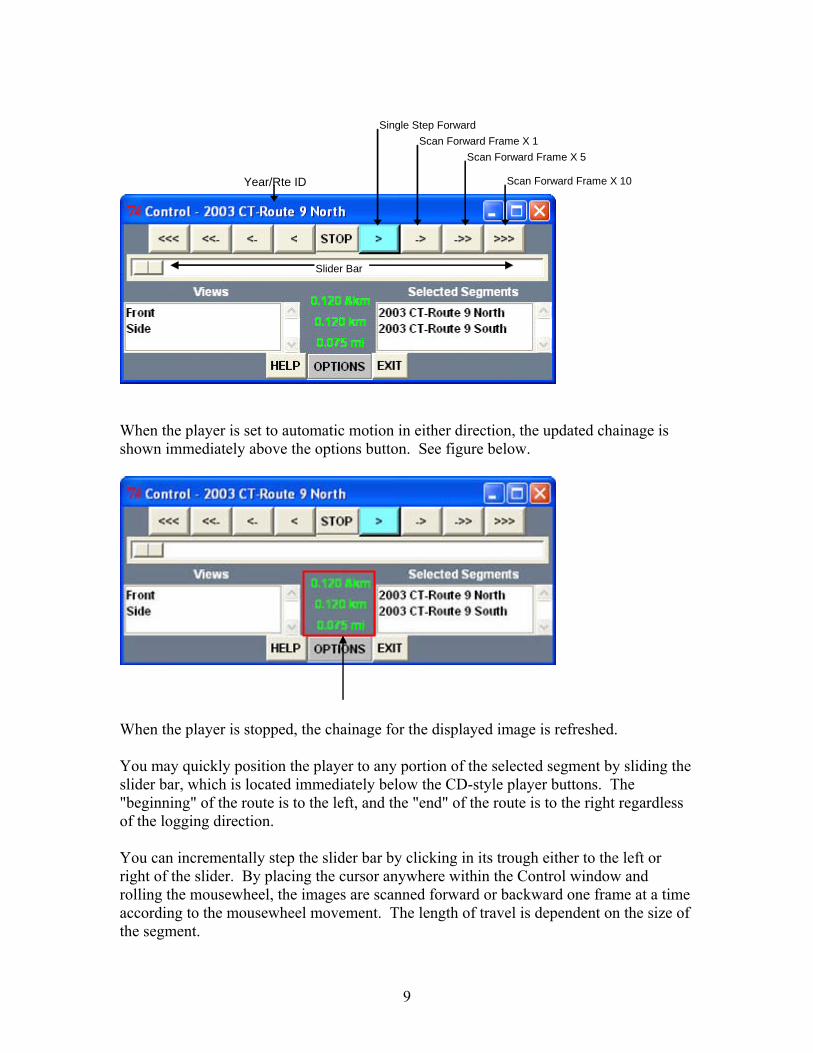
Year/Rte ID
Single Step ForwardScan Forward Frame X 1
Scan Forward Frame X 5
Scan Forward Frame X 10
Slider Bar
When the player is set to automatic motion in either direction, the updated chainage is shown immediately above the options button. See figure below.
When the player is stopped, the chainage for the displayed image is refreshed. You may quickly position the player to any portion of the selected segment by sliding the slider bar, which is located immediately below the CD-style player buttons. The "beginning" of the route is to the left, and the "end" of the route is to the right regardless of the logging direction. You can incrementally step the slider bar by clicking in its trough either to the left or right of the slider. By placing the cursor anywhere within the Control window and rolling the mousewheel, the images are scanned forward or backward one frame at a time according to the mousewheel movement. The length of travel is dependent on the size of the segment.
9

The Views listbox displays the available views for the currently selected segment
☺NEW! When viewing a route that includes side images, you can make more room on your desktop by clicking on “Side” within the Views box. This removes the side image from your screen. To bring it back click on “Side” again.
10

The Selected Segments listbox show the routes selected from the Index. Routes shown in black text and white background represent routes open in common windows. Routes shown in blue text with grey background represent routes open in separate windows. You pick which segment you wish to view by clicking on the desired segment line in the "Selected Segments" listbox. When clicked, all windows for selected segments appear “on top.” Segment Selection Overview When you select a Segment in the INDEX window, it is transferred to this Selected Segments listbox. An associated segment (usually the segment that shows the other direction for the same route) is also transferred to this listbox. A Segment and its associated Segment (both directions) are considered to be linked, in that they share a chainage position. In other words, if you move to location within a segment or direction, when you switch to the associated linked segment, the view shown is for the same location in the opposite directions. You may add segments to the Selected Segments (provided they are available either by network or disk side) by going back to the Index window. Use the Options button to retrieve the Index window. You may scroll the Selected Segments listbox using the scroll bar on the right, or you may stretch the entire Control Window in the vertical direction to enlarge the listbox. (The best approach to enlarging the window is to "grab" the bottom edge using the mouse and drag it down).
☺NEW! You can close a segment within the Selected Segments listbox by right clicking on the segment and choosing Close segment.
11

OPTIONS Button
Click on this button and move the cursor vertically to make one of the following selections: Index Choose this option to re-display the Index Window. This allows you to add to or change the Selected Segments in common windows or separate windows.
☺NEW! Sessions option lets you save the current DigitalHIWAY session or open an existing session. For detailed information on sessions see pages 21-23. Close All Segments Choose this option to close all open segments and automatically redisplay the Index window. Direct to Chainage Choose this option to pop-up a dialog box that allows you to move the displayed position of the current route directly to a specified chainage (either in miles or kilometers). When the dialog box pops up, it is filled with the current chainage. The Units button ("Miles" and "Kilometers") that applies to the initially displayed chainage has a unique border. You may enter a new number and click "Miles" or "Kilometers" to select the interpretation of the chainage number. The closest chainage within the route is displayed. Frame Number Choose this option to pop-up a cascade offering ON or OFF. You can turn ON or OFF the display of the current frame number for the Image window. Additional Tools Choose this option to pop-up a dialog box from which can choose optional Tool Programs.
12

☺NEW! Control on Top
Check this option to keep the DigitalHIWAY Control window on top of all applications running on the desktop.
☺NEW! ☼TIP To quickly make room on your desktop by minimizing all DigitalHIWAY windows, click on the minimize button in the upper right corner of the Control Window.
13

The DigitalHIWAY Checkpoints Window
14

How the Window Works: When a checkpoint is highlighted in GREEN, the roadway image being shown corresponds to the checkpoint.
When a checkpoint is highlighted in YELLOW, the image(s) being shown PRECEDES the highlighted checkpoint. The checkpoint turns GREEN when the checkpoint is reached.
15

You may click on any checkpoint line to move directly to that checkpoint. How the Buttons Work HELP provides help in the use of the Checkpoints Window. NEXT displays the image that corresponds to the next checkpoint the photolog truck encountered while traveling FORWARD from the current position. PREVIOUS displays the image that corresponds to the next checkpoint that the photolog truck would encounter while traveling BACKWARD from the current position.
ord
sful
☺NEW! SEARCH allows you to type in a search word or exact-matching phrase within the Checkpoints Window. Type the wor phrase you’d like to match and then select forward or backward fromyour current position. A succesmatch is highlighted in BLUE.
16

☺NEW! The DigitalHIWAY Image Window
ages at twice the resolution of earlier years as
In 2003, ConnDOT Photolog collected imwell as the standard size images familiar to most users. Not all PC monitors are setup to view such large images. DigitalHIWAY takes care of this for you by allowing you to stretch, zoom, and pan on large images.
17
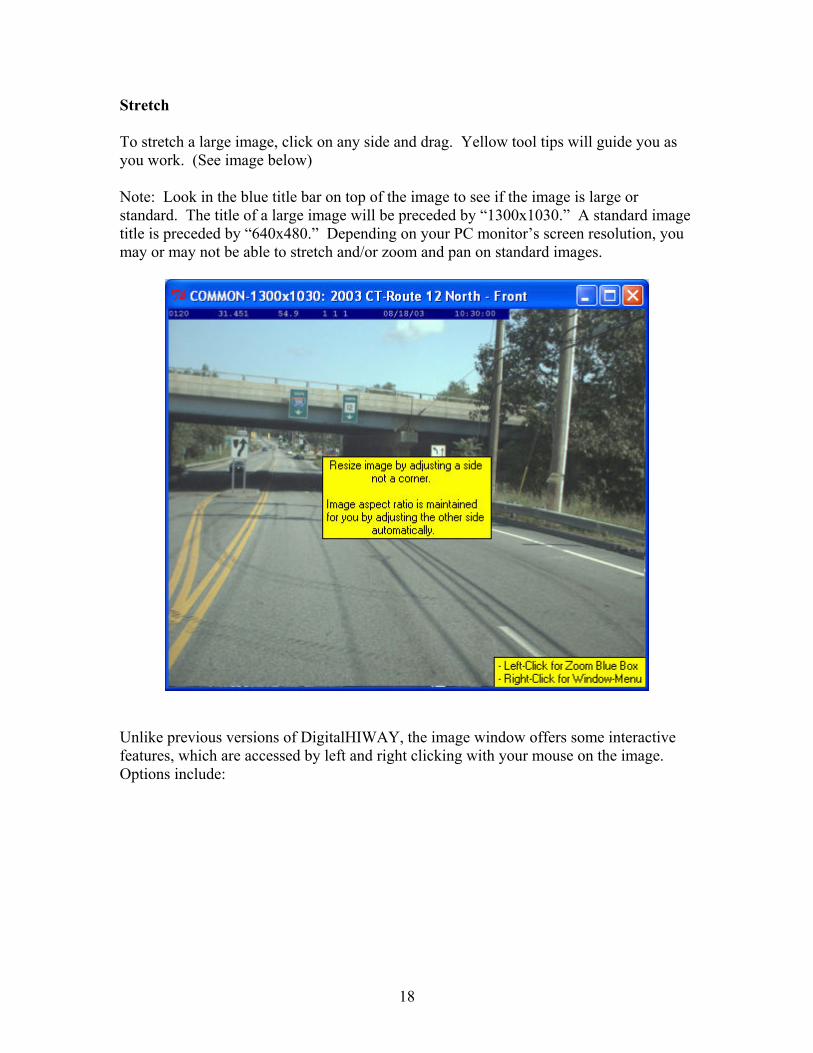
Stretch
h a large image, click on any side and drag. Yellow tool tips will guide you as ou work. (See image below)
on top of the image to see if the image is large or andard. The title of a large image will be preceded by “1300x1030.” A standard image
n, you
To stretcy Note: Look in the blue title barsttitle is preceded by “640x480.” Depending on your PC monitor’s screen resolutiomay or may not be able to stretch and/or zoom and pan on standard images.
Unlike previous versions of DigitalHIWAY, e image window offers some interactive features, which are accessed by left and right ur mouse on the image.
th clicking with yo
Options include:
18

Zoom: To zoom in on an area within the Image Window, left click anywhere on the indow. A blue box appears which can then be moved to the area of interest. Left click w
again to zoom in on that area (See images next page).
Pan: To pan within the zoom image, left click to bring up the green pan box. Click
ithin the box and drag to pan (See image below). w
19

The Image Window Menu
ght click on the zoom image and click the Shrink-to-Fit ption from the image window menu. You can also zoom from this menu by selecting
e NEW
To return to the full image, rioZoom-to-Closeup. This menu is also th location from which images can be printed and saved to jpeg nd bitmap file formats for later use in off-the-shelf PC applications such as word a
processors and graphics packages. Choose the Save Image As selection to accomplish this. (See image below) ☼TIP: The yellow onscreen help tips within the image windows can be turned off by
eselecting Onscreen Help Tips within this menu. d
20

☺NEW! Managing Sessions
W s menu selection within AY Session, click on the SessionTo save a current DigitalHIthe Control Window.
21
he Session Save/Restore Window appears on your desktop. You may then:
ame and save the session me
Resume
Close all segments currently loaded
how and configure the New
View Help on the Window
T Nyou’ve been working in(a namust be typed prior to saving) the current session S s Save and/or Exit DigitalHIWAY

Managing Sessions (continued)
fter you’ve saved a session and exited e software,
hoose to begin a new session.
ou can reconfigure image-source
ou can show or reconfigure the
how help screens (see example next
xit DigitalHIWAY
R
ou can open an existing session (see next page)
ADigitalHIWAY, the next time you start ththe session will be displayed in the Saved Sessions listbox within the Index Window.
CClicking on this will take you to tIndex Window.
he
Y s prior to resuming or starting a new session. YNews. Spage) E O Y
22

Managing Sessions (continued)
To open an existing session, click on saved session located within the “Saved Sessions for X” window. The selected session will then appear in light grey in the Current Session Name box at the top of the window. Then click Resume Session. Your work will be restored where you left off. ☼TIP: Hold your mouse cursor over a saved session to see a detailed content list for that session. Note: Click on the Help Button to activate the context-sensitive display window for each Session Window feature.
23

Contact Information
Feel free to contact the Connecticut Department of Transportation’s Data Services Section for more information: Bradley J. Overturf Transportation Photolog Supervisor Connecticut Department of Transportation Division of Research Data Services Section 280 West Street Rocky Hill, CT 06067 (860)258-0319: Phone (860)258-0316: Fax [email protected]: Email
24