how to use adobe story to write scripts -...
TRANSCRIPT

Adobe Story Guide
How to use Adobe Story to write scriptsYou can use Adobe Story to write, review, manage, and share scripts and screenplays. You can also produce scripts and other pre-production documents that serve as blueprints for your video projects. Create your television and film scripts in Adobe Story, and then export them for easy integration with Adobe Premiere Pro CS6.
Adobe Story workspace
The Adobe Story workspace includes two views: Projects and Authoring. Use Projects view (Figure 1) to create new projects and manage the scripts and supporting documents within a project. Use Authoring view (Figure 2) to create and edit documents, including scripts, character bios, pitches, synopses, and more.
Figure 1 Adobe Story workspace, Projects view
© 2012 Adobe Systems Incorporated How to use Adobe Story to write scripts 1
This document requires Adobe Story CS6. Technical instructions may differ depending on your version.

Guide Adobe Story
2
Figure 2 Adobe Story workspace, Authoring view
How to use Adobe Story to write scripts © 2012 Adobe Systems Incorporated
This document requires Adobe Story CS6. Technical instructions may differ depending on your version.

Adobe Story Guide
Creating a new Adobe Story project
Adobe Story organizes your scripts and other documents into related projects. Use projects to neatly store and manage every script, shot list, character bio, and budget for a given production.
To create a new Adobe Story project:
1. Start Adobe Story.
2. Click Projects in the top bar to open Projects view.
3. Click Projects to open the Projects menu (Figure 3), and select New Project.
The Create New Project dialog box appears (Figure 4).
4. Enter a name for the new project and click Create.
The new project is selected in the Projects pane of the Projects view (Figure 5). The Documents pane shows that there are no documents associated with the new project.
You can import and create new documents in the project.
Figure 3 Projects menu
Figure 4 Create New Project dialog box
Figure 5 Adobe Story workspace, Projects view
Projects pane Documents pane
© 2012 Adobe Systems Incorporated How to use Adobe Story to write scripts 3
This document requires Adobe Story CS6. Technical instructions may differ depending on your version.

Guide Adobe Story
4
Creating documents and using templates
A new Adobe Story project is empty until you import or create documents. Documents can include scripts, character bios, schedules, logs, shot lists, movie pitches, synopses, reports, summaries, and other documents used to plan and manage your production.
Several document templates are available, including film and TV scripts.
To create a document by using a template:
1. Select a project in the Project pane.
2. Click New at the top of the Documents pane (Figure 6).
The Create New Document dialog box appears (Figure 7).
3. Open the Type menu and choose the type of document you want to create (Figure 7). In this example, we chose TV Script.
Note: Some document types include additional template options. When additional templates are available, the Template menu appears in the Create New Document dialog box (Figure 8).
4. Open the Template menu and select a template.
Figure 6 Documents pane
Figure 7 Create New Document dialog box
Figure 8 Create New Document dialog box
How to use Adobe Story to write scripts © 2012 Adobe Systems Incorporated
This document requires Adobe Story CS6. Technical instructions may differ depending on your version.

Adobe Story Guide
5. To modify a template or to import a new template, click Change.
The Change Template dialog box appears (Figure 9). Templates include specific paragraph and text formatting for each type of document and document element.
6. Select the elements you want in the left pane of the Change Template dialog box. Click the Paragraph, Text, Shortcuts, and General tabs to view the settings for several different elements.
You can modify the settings for each element in an existing template and save it as a new template by clicking Save As. You can click Import to locate and import additional templates for creating documents.
7. Click Cancel to close the Change Template dialog box without making any changes to the existing template.
8. Click Create in the Create New Document dialog box.
The new document opens in Authoring view (Figure 10). The Outline pane is on the left and the document is on the right. The Outline is empty because you have not added any elements to the document. As you write your document, you can insert elements such as scenes, actions, and dialog.
In this example, the new TV script includes a placeholder for a title page.
Note: You can edit the title page or remove it by selecting Production > Remove Title Page.
9. Click Projects at the top of the workspace to change to Projects view.
The new documents appears in the Documents pane of the selected project (Figure 11). Notice that the Authoring link at the top of the workspace reads “Authoring (1).” This is because the new document is still open in Authoring view.
10. Click Authoring to return to Authoring view.
11. Click the Close button (x) in the Document tab (Figure 12) to close the document you have open in Authoring view.
With no documents open, you return to Projects view automatically. You can re-open a document for authoring at any time by double-clicking its name in Projects view.
Figure 9 Change Template dialog box
Figure 10 Adobe Story workspace, Authoring view
Figure 11 Adobe Story workspace, Projects view
Figure 12 Document tab
© 2012 Adobe Systems Incorporated How to use Adobe Story to write scripts 5
This document requires Adobe Story CS6. Technical instructions may differ depending on your version.

Guide Adobe Story
6
Creating a script by adding Adobe Story elements
When you create documents in Adobe Story, the type of document you are writing determines the formatting. For example, a film script looks different than a two-column audio visual (A/V) script or a character bio (Figure 13). Adobe Story includes several elements to help you maintain consistency in your documents. The template you use to create the document defines the paragraph and text formatting of each element.
Scene Heading: Identifies the start of a new scene. A script usually opens with the scene heading (also referred to as a slugline) of the first scene and includes set information—interior (INT.), exterior (EXT.), location (CENTRAL PARK), and time of day (NIGHT).
Action: Describes the action in a scene. Action text may also include the time of day, location, weather, characters in the scene, ambient sounds, or any other information that helps describe the setting and the action taking place.
Character: Identifies the name of the character involved in the action or speaking the dialog. The Character element usually precedes dialog in a script.
Parenthetical: Used for parenthetical statements or notes. For example, you may want to place a parenthetical statement within a block of dialog to describe the body language, pacing, or tone in which a character delivers the dialog (energetically, sarcastically, slowly, loudly, and so on).
Dialog: Represents spoken dialog or a character’s thoughts in a script.
Transition: Indicates a transition from one scene to the next.
Shot: Used to describe a camera shot, such as Push In, Medium Shot, Eye Level, or Point Of View.
General: Used to include general notes or text. By default, general text is left-aligned, single-spaced, and spans the entire width of the page margins to help it stand apart from dialog, actions, scene headings, and other script elements.
Figure 13 Sample film script, A/V script, and character bio documents
How to use Adobe Story to write scripts © 2012 Adobe Systems Incorporated
This document requires Adobe Story CS6. Technical instructions may differ depending on your version.

Adobe Story Guide
To create a new script by adding Adobe Story elements:
1. In Adobe Story Projects view, click New to open the Create New Document dialog box.
2. In the Create New Document dialog box, open the Type menu, select Film Script, enter a title for the new script, and click Create.
The new script opens in Authoring view. The first page of the new film script is a title page.
3. Select Production > Remove Title Page.
The title page disappears. The blinking insertion point is at the top of page 1. The default element to begin the script is a scene heading, as indicated in the Elements menu in the upper-right corner of Authoring view (Figure 14).
Note: To add a title page, you can select Production > Insert Title Page.
4. Press Ctrl+space (Windows) or Control+space (Mac OS).
The Smart Type menu appears, offering suggested abbreviations for the scene setting (Figure 15).
E./I.: Beginning in the Exterior set and moving to an Interior set.
EXT.: Exterior set
I/E.: Beginning in the Interior set and moving to an Exterior set
INT: Interior set
P.O.V.: Point of view
5. Select INT. from the Smart Type menu to indicate the current scene is an interior set.
6. Type a location for the scene, such as BREAKFAST TABLE.
7. Press the spacebar and enter a description for the time of day, such as MORNING.
You have just created the first scene heading, or slugline (Figure 16).
8. Press Enter (Windows) or Return (Mac OS).
The insertion point moves down one line on the page, and the script element changes to Action, as shown in the Elements menu (Figure 17). A description of the action typically follows every scene heading.
You can accept the default element (Action) or choose a different element from the Elements menu (Figure 18).
9. For this example, make sure Action is the selected element.
Figure 14 Adobe Story workspace, Authoring view
Figure 15 Smart Type menu
Figure 16 Scene heading
Figure 17 Elements menu
Figure 18 Elements menu
Elements menu
© 2012 Adobe Systems Incorporated How to use Adobe Story to write scripts 7
This document requires Adobe Story CS6. Technical instructions may differ depending on your version.

Guide Adobe Story
8
10. Type a description of the action in the scene (Figure 19).
Note: If you press Enter (Windows) or Return (Mac OS), you begin a new paragraph within the same action element. When you are ready to add a new element or begin a new scene, press Enter (Windows) or Return (Mac OS) and select a different script element from the Elements menu.
11. Press Enter (Windows) or Return (Mac OS) to move the insertion point below the action.
12. Open the Elements menu, and choose Character.
13. Type the name of a character, and press Enter (Windows) or Return (Mac OS).
When you press Enter (Windows) or Return (Mac OS) following a character element, the next line in the script changes to Dialog automatically, as shown in the Elements menu (Figure 20).
14. Enter some dialog, and then press Enter (Windows) or Return (Mac OS).
Adobe Story assumes you want to add another character element. Typically dialog is between two characters.
15. Press Ctrl+space (Windows) or Control+space (Mac OS) to open the Smart Type menu listing characters (Figure 21).
The Smart Type menu includes any characters you entered previously. You can choose from existing characters or enter a new one.
16. Select a character from the Smart Menu or enter the name of a new character.
17. Press Enter (Windows) or Return (Mac OS) to move the insertion point down one line, and type the dialog of the second character.
Notice, the scene heading, action, characters, and dialog have different formatting (Figure 22). This formatting is defined by the Film template you chose when creating the new document.
18. Move the insertion point down one line and then open the Elements menu and choose Scene Heading to begin a new scene.
Figure 19 Scene heading and action
Figure 20 Elements menu
Figure 21 Smart Type menu, characters
Figure 22 Scene with a character and dialog
How to use Adobe Story to write scripts © 2012 Adobe Systems Incorporated
This document requires Adobe Story CS6. Technical instructions may differ depending on your version.

Adobe Story Guide
19. Repeat steps 4 through 10 to add a new scene heading and action text.
As you write your script, the scene headings appear in the Outline pane on the left in Authoring view.
20. In the Outline pane, click the heading for the first scene in the Outline pane (Figure 23).
Note: Be sure to single-click. Double-clicking will not expand the scene.
The scene expands to show its contents, including the action and dialog (Figure 23). You may need to scroll to see the entire contents.
Notice the colored boxes to the right of the scene heading in the Outline pane (Figure 23). Each box represents a different character in the script. Each character has a unique color. In this example, the expanded scene includes dialog between two characters, represented by the blue and pink boxes.
21. Position the pointer over one of the character boxes in the Outline pane.
The name of the character appears in a tool tip (Figure 24). You can quickly see which characters appear in each scene by using the Outline pane.
22. Select View > Shot Duration > Running Time.
The estimated scene length is calculated and appears to the right of each scene in the document (Figure 25). In this example, the first scene is 21 seconds (00:00:21).
Note: Adobe Story determines scene or shot duration based on the following assumptions:
• A page contains 42 lines.
• A page takes 60 seconds of running time in a movie.
To manually adjust a duration, click the duration to open the Change Scene/Shot Duration dialog box (Figure 26), enter a new duration, and click OK.
23. Position the pointer over the first scene duration in the Outline pane.
A tool tip shows the total duration along with the seconds value.
Note: To view the cumulative duration of the script, select View > Shot Duration > Cum. Running Time.
Figure 23 Outline pane
Figure 24 Outline pane
Figure 25 Scene duration
Figure 26 Change Scene/Shot Duration dialog box
Scene heading Character boxes
© 2012 Adobe Systems Incorporated How to use Adobe Story to write scripts 9
This document requires Adobe Story CS6. Technical instructions may differ depending on your version.

Guide Adobe Story
10
Creating a shooting script
A shooting script is a version of a screenplay used during motion picture production. A shooting script includes information such as shot numbers and shot duration. The Adobe Story Shot element contains information about the shot size or camera angle (CLOSE UP), camera (CAMERA 2), and camera movement (ZOOM). Shot size refers to how much a subject is visible in the frame. Camera movement refers to the physical or perceived movement of the camera relative to the subjects in the scene.
You can place the Adobe Story Shot element anywhere within a scene where you want to reference detailed camera information. When you add a Shot element to a script in Adobe Story, the script is automatically converted to a shooting script.
The following lists define the shot size (camera angle) and camera movement abbreviations available when you add Shot elements to a shooting script.
Shot sizes and camera angles
BCU (Big Close Up): Extreme close-up covering the subject’s face, forehead to chin.
CA (Cutaway): A close-up of something other than the current action. It could be a shot of a different subject or a different part of the same subject.
CRASH IN: The camera crashes into the scene containing the subject.
CREEP IN: The camera slowly creeps in behind the subject.
CU (Close Up): Unless otherwise specified, this is a close-up of the subject’s face.
CUT IN: Close-up of part of the subject in detail. For example, a close-up of the subject’s hands.
DIRTY SHOT: Something covers the face of the subject. This could be the back (head and shoulders) of someone interviewing the subject.
DTL: Provides the camera operator with a carpeted work area that extends beyond the front of the dolly.
DUTCH ANGLE: The camera is tilted until the horizon is horizontal to the frame.
EASE IN: Gently zooms into the subject.
ECU (Extreme Close Up): Captures the finer details of the subject without capturing the surroundings. The camera captures only a portion of the subject in the scene.
ESTABLISHING SHOT: Provides a context for the scene or subject. For example, an exterior shot of a building at night, followed by a shot of the people inside the building. Such a shot implies that the people are together in that same building at night.
EWS (Extreme Wide Shot): Establishes the subject’s surroundings. The subject may appear very small in the shot. The extreme wide shot is often used as an establishing shot.
EYE LEVEL: Places the viewer at an equal footing with the subject onscreen.
FS (Full Shot): Shows the entire subject full-length in the scene or frame.
HIGH ANGLE: The camera is placed above eye level, looking down at the subject.
LONG LENSE SHOT: Shot using a long (telephoto) lens. This is usually followed by slowly zooming into the subject.
LONG SHOT: Places the subject in some relation to its surroundings.
LOW ANGLE: The camera is placed below eye level, looking up at the subject.
MCU (Medium Close Up): Shows the subject close up without getting too close.
MEDIUM SHOT: Provides a partial view of the subject, and is sufficient to cover the subject’s expressions and any action around the subject.
How to use Adobe Story to write scripts © 2012 Adobe Systems Incorporated
This document requires Adobe Story CS6. Technical instructions may differ depending on your version.

Adobe Story Guide
MID SHOT: Provides a complete view of the subject, along with the surrounding action in the scene.
MWS (Medium Wide Shot): Captures about 75% of the subject in the frame.
NODDY SHOT: Shows the interviewer responding to the interviewee.
OBLIQUE/CANTED ANGLE: The camera is tilted at an angle to the floor. Used this to suggest imbalance or instability. This can also be used to show the point of view of the subject.
OSS (Over The Shoulder): Close-up of the subject viewed over the shoulder of another subject in the shot.
POV (Point Of View): Shows what the subject is looking at. The camera is placed at or near eye position of the subject or character. In action films, the point-of-view shot is very common and achieved by mounting a camera on the subject’s head or helmet.
PROFILE SHOT: A shot of the subject from the side.
PU (Pick Up): Continuation of another shot.
PUSH IN: The camera physically moves toward the subject (not to be confused with zoom in ).
REVERSE SHOT: The subject and another actor in the scene are part of the same scene but not covered by the camera in the same frame. One of the actors is “invisible” to the camera during the conversation.
SLANTED: Similar to the dutch angle, the camera is held at an angle to the subject.
THE BIRDS EYE VIEW: Oblique view of the subject from above, as though the viewer is a bird.
TWO SHOT: Captures two subjects in the same frame (not necessarily next to each other).
VWS (Very Wide Shot): A shot wide enough to define the surrounding of the subject. The camera is much closer to the subject than in the extremely wide shot, but not as near as in the wide shot.
WEATHER SHOT: Captures the weather as a subject in the scene.
WS (Wide Shot): Provides a panoramic view of the action in a scene.
Camera movement
AERIAL: Shot with a crane or from an aircraft (helicopter) to view large landscapes. You can also achieve this shot by shooting from the top of a tall building or other structure.
ARC: Camera movement that combines trucking and panning. The camera zooms out from the subject while panning and making an arc, but keeping the subject in the frame at all times.
CONTRA-ZOOM: Another name for a dolly shot (see DOLLY ZOOM).
CRAB: A less common term for tracking or trucking.
CRANE: A shot taken by a camera on a crane. In most cases, the camera position changes height as the crane is raised or lowered during the shot.
CRASH ZOOM IN: A very fast zoom in to the subject.
CRASH ZOOM OUT: A very fast zoom out from the subject.
DEFOCUS: The camera begins in focus and then becomes out of focus during the shot.
DOLLY: The camera is mounted on a wheeled platform and then moved smoothly along a path (dolly tracks).
DOLLY IN: As the camera moves toward the subject, more of the background disappears from view.
DOLLY OUT: As the camera moves away from the subject, more of the background is revealed.
DOLLY ZOOM: The camera is pulled away from the subject when the lens zooms in (or the other way around). During the zoom, the perspective continuously distorts, the most notable feature being that the background appears to change size in relation to the subject. Seeing a perspective change without a size change is a highly unsettling effect.
© 2012 Adobe Systems Incorporated How to use Adobe Story to write scripts 11
This document requires Adobe Story CS6. Technical instructions may differ depending on your version.

Guide Adobe Story
12
DUTCH TILT: Achieved by tilting the camera until the subject is at an angle to the bottom of the frame. This is used to create uneasiness or tension.
FOCUS: The camera focuses on the subject, while everything else is less focused or out of focus.
FOLLOW: The camera movement follows the subject.
HAND HELD: The camera operator holds the camera to follow the subject and capture the action. Hand-held camera work is usually unstable and can create tension or represent the point of view of another subject in the scene.
JIB: A boom (long pole) device with a camera mounted on one end and a counterweight attached to the other end. When properly balanced, the camera can move through an extended arc.
PAN: The camera moves horizontally across the scene.
PEDESTAL: The camera moves vertically with respect to the subject.
PULL FOCUS: The camera alternates focus between a subject in the foreground and a subject in the background.
STEADYCAM: A stabilizing mount for a camera, used to create a stable hand-held shot.
THROW FOCUS: Starts the shot focused on a foreground object and then “throws” the focus onto the subject in the background.
TILT: Camera is stationary, but rotates vertically on its axis.
TRACKING/TRUCKING: A tracking shot follows the subject as it moves.
WHIP PAN: A type of pan shot in which the camera moves sideways so quickly the image blurs into streaks.
ZOOM: Produced by a zoom lens, which can vary in focal length across a large range. The camera is stationary but appears to move closer to or farther away from a subject.
To create a shooting script:
1. Continue where you left off in the previous activity or create a new script.
2. Place the insertion point where you want to include information about the first shot. Make sure to begin a separate line in the script for the new Shot element.
Note: In this example, we placed the insertion point after the first scene action description and before the character dialog (Figure 27).
Figure 27 Inserting a shot element
How to use Adobe Story to write scripts © 2012 Adobe Systems Incorporated
This document requires Adobe Story CS6. Technical instructions may differ depending on your version.

Adobe Story Guide
3. Open the Elements menu and choose Shot (Figure 28).
The Change Format message appears asking if you want to create a copy of your script (Figure 29). Because a shooting script changes the formatting of your original script, it is recommended that you create a copy. A copy of your script is created in the Project folder when you click Continue.
4. Click Continue to create a backup copy of your script.
5. Press the spacebar to open the Smart Type menu listing shot sizes and camera angles (Figure 30).
The menu includes abbreviations for each shot size or camera angle. You can scroll the menu to see the complete list of shot sizes and camera angles. You can also search for specific menu items by typing the first few letters of the item name or abbreviation. As soon as you begin typing, the menu changes to list items that match your entry.
6. Select a shot size or camera angle from the Smart Type menu.
Note: You can also manually enter your shot information. You don’t have to use the options in the Smart Type menu.
7. Press the spacebar to open the Smart Type menu listing cameras, and choose a camera, such as CAMERA 1 (Figure 31).
Note: If you manually enter a camera description, it will appear in the Smart Menu the next time you create a Shot element.
Figure 28 Elements menu
Figure 29 Change Format message
Figure 30 Smart Type menu, shot size/camera angle
Figure 31 Smart Type menu, cameras
© 2012 Adobe Systems Incorporated How to use Adobe Story to write scripts 13
This document requires Adobe Story CS6. Technical instructions may differ depending on your version.

Guide Adobe Story
14
8. Press the Spacebar to open the Smart Type menu listing camera movement (Figure 32), and choose a camera movement that provides direction for the camera operator.
The Shot element is complete (Figure 33).
Adobe Story assigns shot numbers to every Shot element in a shooting script.
9. To view shot numbers, select View > Numbering > Shot.
A shot number appears to the left of each shot in the document margin (Figure 34). The first part of the number represents the scene, and the second part represents the shot within that scene. For example, 1.01 indicates scene 1, shot 1.
Note: Adobe Story numbers shots sequentially. If you add a new shot before an existing shot, all shots after the new shot are renumbered.
Figure 32 Smart Type menu, camera movement
Figure 33 Shot element
Figure 34 Shot element
Shot number
How to use Adobe Story to write scripts © 2012 Adobe Systems Incorporated
This document requires Adobe Story CS6. Technical instructions may differ depending on your version.

Adobe Story Guide
Viewing scene properties
Use the Scene Properties panel to view and edit the properties of a scene.
Note: The Scene Properties panel is not available for AV Scripts, multi-column scripts, or free-form documents that you write from scratch by choosing Other in the Create New Document dialog box.
To view scene properties:
1. Open a script in Authoring view.
2. Select View > Scene Properties Panel.
The Scene Properties panel appears to the right of the script (Figure 35). The panel is empty until you select a scene in the script.
3. In the Outline pane, double-click a scene heading.
Double-clicking a scene heading in the Outline pane moves the insertion point to the beginning of the scene in the script. The scene properties appear in the Scene Properties panel (Figure 36). You can view the properties for other scenes by clicking the Previous and Next Scene buttons (Figure 36).
The Scene/Set location and time are listed at the top of the Scene Properties panel (Figure 36). This information is pulled directly from the Scene Heading element. If the scene occurs in more than one location, you can add or edit locations by clicking the M/L button.
Note: If you cannot see the M/L button, drag the left edge of the panel to the left to make it wider.
4. Click the M/L button.
The Multi-Location dialog box appears (Figure 37). You can select a new location for the scene, indicate whether the set is interior or exterior, and add additional sets to the scene by clicking Add Set. The dialog box also shows which characters appear in each set of the current scene.
5. Click Cancel to close the Multi-Location dialog box without adding additional sets.
Figure 35 Authoring view
Figure 36 Scene Properties panel
Figure 37 Multi-Location dialog box Scene Properties panel
Scene/Set location and time
Previous/Next Scene buttons
© 2012 Adobe Systems Incorporated How to use Adobe Story to write scripts 15
This document requires Adobe Story CS6. Technical instructions may differ depending on your version.

Guide Adobe Story
16
6. Click Characters to expand the Characters property (Figure 38).
This lists the speaking characters in the scene. You can click Detect to scan for additional non-speaking characters. You can also click in the empty white box and manually type the names or information for non-speaking characters.
7. Expand the Synopsis property.
8. Click in the empty gray box and type a synopsis for the current scene (Figure 39).
In the Scene Properties panel, you can edit current properties and enter new ones for each scene in the script.
9. Explore the other properties for the current scene. Create or edit each property as needed.
Figure 38 Characters property
Figure 39 Synopsis property
How to use Adobe Story to write scripts © 2012 Adobe Systems Incorporated
This document requires Adobe Story CS6. Technical instructions may differ depending on your version.

Adobe Story Guide
Adding comments in a script
Writing scripts can be a collaborative process, including multiple authors, reviewers, editors, and actors. When writing or reviewing scripts, add comments to express questions or make suggestions to other authors, reviewers, and readers.
You add comments directly in the script by clicking the Comment icon. You can search, view, and delete comments by using the Commenting panel.
To add a comment to a script:
1. Open a script in Authoring view and locate the Comment icon beside a Scene Heading element (Figure 40).
To make a comment icon appear beside any element in a script, click in the element.
2. Click the Comment icon and type a comment (Figure 41).
3. Select View > Commenting Panel.
The Commenting panel opens to the right of the document (Figure 42).
4. Select the comment you just created and click the Delete button (trash can).
The comment is deleted.
Figure 40 Document open in Authoring view
Figure 41 Comment edit area
Figure 42 Commenting panel
Comment icon
Delete button
© 2012 Adobe Systems Incorporated How to use Adobe Story to write scripts 17
This document requires Adobe Story CS6. Technical instructions may differ depending on your version.

Guide Adobe Story
18
Adding tags in a script
You can tag words or phrases in a script by using the Tagging panel. For example, you can tag items in a script as characters, props, sets, wardrobe, or special effects. Adobe Story includes several tags you can choose from, or you can add your own tags to the list.
After tagging a script, you can create lists and reports to manage the items needed during casting, set design, production, and editing. When you export an Adobe Story file (ASTX), the tagging information is saved with your script and can be referenced when you import your file in other Adobe Creative Suite 6 applications.
To add a tag to a script:
1. Open a script in Authoring view.
2. Highlight a word or phrase in the script to tag (Figure 43).
3. Select View > Tagging Panel.
The Tagging Panel opens to the right of the document (Figure 44). You can choose from 46 types of tags, or enter a new tag and click Create.
4. Scroll the list of tags to locate the tag named Props, and click on it to select it.
The Props tag moves to the top of the list in the Tagging panel (Figure 45). The number beside the tag changes to represent the number of items in the script currently tagged as a prop.
You can represent each tag by using a different color (Figure 45).
5. Click the tag color button beside the Props tag. Select a color in the color palette.
The tag color button changes to the new color (Figure 46).
Figure 43 Word to tag in the script
Figure 44 Tagging panel
Figure 45 Tagging panel
Figure 46 Tag color button showing selected color
Tag color
How to use Adobe Story to write scripts © 2012 Adobe Systems Incorporated
This document requires Adobe Story CS6. Technical instructions may differ depending on your version.

Adobe Story Guide
6. In the Tagging panel, make sure both Show Bold and Show Color are selected (Figure 47).
7. In the script, click away from the highlighted text or phrase.
The text is now bold and in the color you selected for the tag (Figure 48). Using bold formatting and color helps to quickly identify items in your script, such as props and special effects.
8. Tag a few other props in the script.
The bold and colored formatting is applied to the text (Figure 49), and the number of props is updated in the Tagging panel (Figure 50).
Note: To un-tag text in the script, Ctrl+double-click the text to open the Applied Tags dialog box. Select the tag to remove, click the Remove This Tag button in the Applied Tags dialog box (Figure 51), and click Close to close the dialog box.
To remove a tag from the Tagging panel, click the Delete This Tag button (Figure 50) in the Tagging panel. Deleting a tag removes it from the list and removes all of its instances applied in the script.
Figure 47 Tagging panel options
Figure 48 Color coded tag in the script document
Figure 49 Tagged props in the script document
Figure 50 Props tag in the Tagging panel
Figure 51 Applied Tags dialog box
Delete This Tag button
Remove This Tag button
© 2012 Adobe Systems Incorporated How to use Adobe Story to write scripts 19
This document requires Adobe Story CS6. Technical instructions may differ depending on your version.

Guide Adobe Story
20
Managing character, actor, and set lists
You can create lists of your characters, actors, and sets in Adobe Story. Once you create a list, you can assign it to an Adobe Story project.
A project’s Smart Type options are populated from these lists. For example, any character you add in a script is added automatically added to the project’s character list.
You can also assign actors (from an actor list) to play certain characters in your project.
To create a character list:
1. In the Projects view, select Manage Lists.
The Manage And Assign Lists dialog box appears (Figure 52).
2. In the Character List section, click Create New.
The Character List dialog box appears (Figure 53).
3. Enter a title for the new character list.
4. Click Create New to create a new character.
5. Enter a first and last name for the character.
Note: Characters are not required to have a last name.
By default, the first name appears as the screen name in your scripts. You can change that in the Screen Name section of the dialog box.
Note: If you have already created an Actor list, you can assign an actor to play this character by clicking Assign in the Actor section of the dialog box.
6. Continue adding characters to the list. When you are finished, click OK.
Figure 52 Manage And Assign Lists dialog box
Figure 53 Character List dialog box
How to use Adobe Story to write scripts © 2012 Adobe Systems Incorporated
This document requires Adobe Story CS6. Technical instructions may differ depending on your version.

Adobe Story Guide
To create a set list:
1. In the Projects view, select Manage Lists.
The Manage And Assign Lists dialog box appears (Figure 54).
2. In the Set List section, click Create New.
The Set List dialog box appears (Figure 55).
3. Enter a title for the new set list.
4. Click Create New to create a new set.
5. Enter a name for the new set.
6. Click Select Location/Studio, and select Location & Studio.
Sets can be on location or in a studio. Sets can also be interior or exterior sets (Figure 56).
7. Enter the remaining information for the new set. Click Create New to create additional sets. When you are finished creating sets, click OK.
Figure 54 Manage And Assign Lists dialog box
Figure 55 Set List dialog box
Figure 56 Location & Studio properties
© 2012 Adobe Systems Incorporated How to use Adobe Story to write scripts 21
This document requires Adobe Story CS6. Technical instructions may differ depending on your version.
Guide Adobe Story
22
To assign lists to a project:
1. In the Projects view, select the project to which you want to assign lists.
2. Select Manage Lists.
The Manage And Assign Lists dialog box appears (Figure 57).
3. Use the pop-up menus to select the character, actor, or set lists you want to assign to your project, and then click Assign.
Figure 57 Manage And Assign Lists dialog box
Exporting a script for use in Adobe Premiere Pro CS6
An ASTX file is an interchangeable format that helps you integrate Adobe Story scripts with other Adobe Creative Suite 6 products.
To export a script:
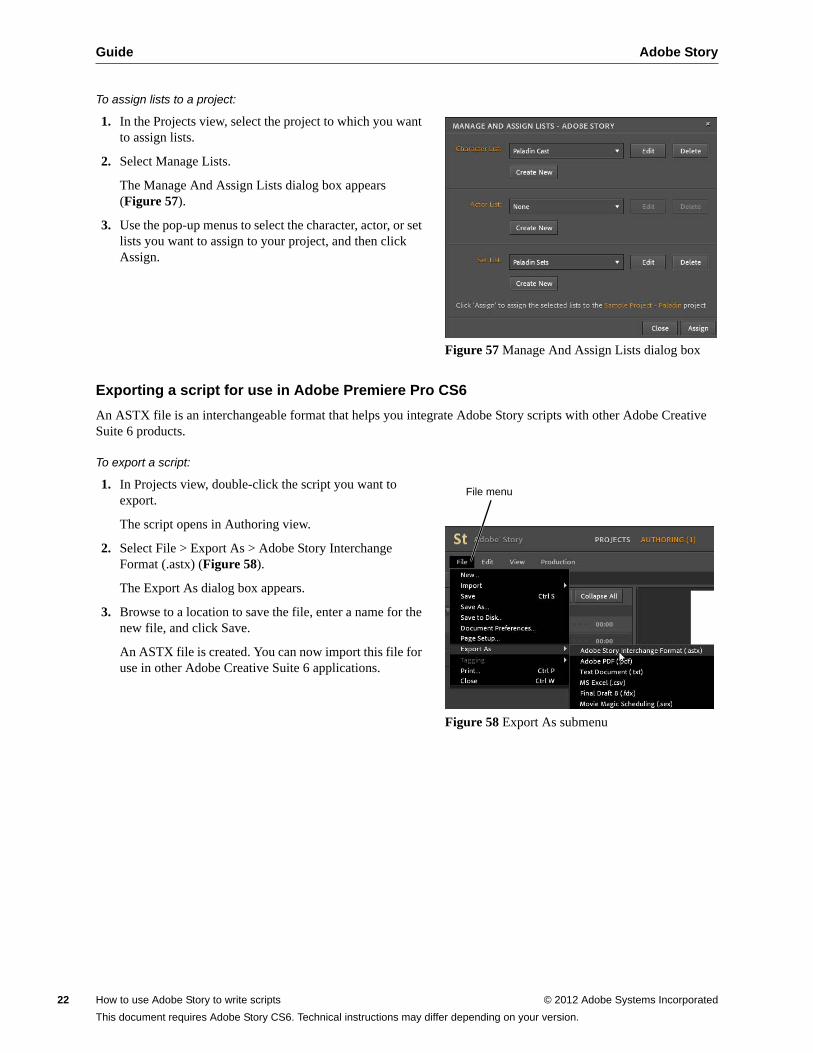
1. In Projects view, double-click the script you want to export.
The script opens in Authoring view.
2. Select File > Export As > Adobe Story Interchange Format (.astx) (Figure 58).
The Export As dialog box appears.
3. Browse to a location to save the file, enter a name for the new file, and click Save.
An ASTX file is created. You can now import this file for use in other Adobe Creative Suite 6 applications.
Figure 58 Export As submenu
File menu
How to use Adobe Story to write scripts © 2012 Adobe Systems Incorporated
This document requires Adobe Story CS6. Technical instructions may differ depending on your version.