how to setup universal repeater mode for f303 · 1.connect your pc to this tenda wireless router...
TRANSCRIPT
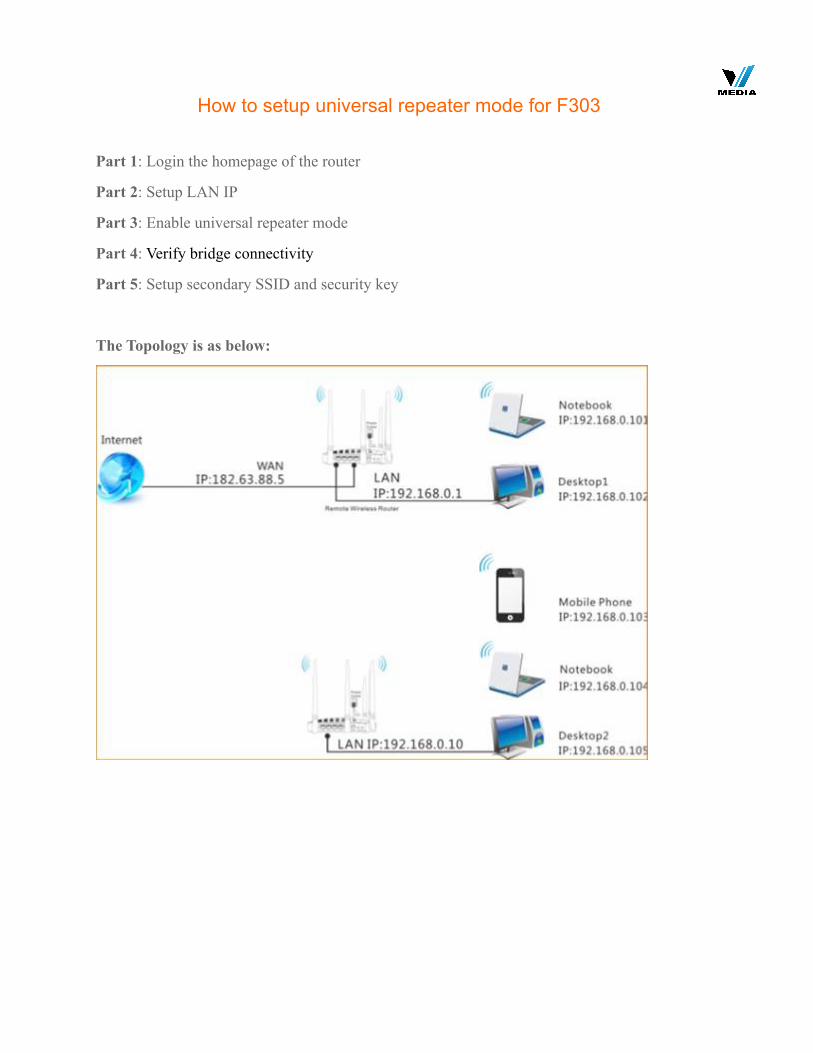
How to setup universal repeater mode for F303
Part 1: Login the homepage of the router
Part 2: Setup LAN IP
Part 3: Enable universal repeater mode
Part 4: Verify bridge connectivity
Part 5: Setup secondary SSID and security key
The Topology is as below:
!
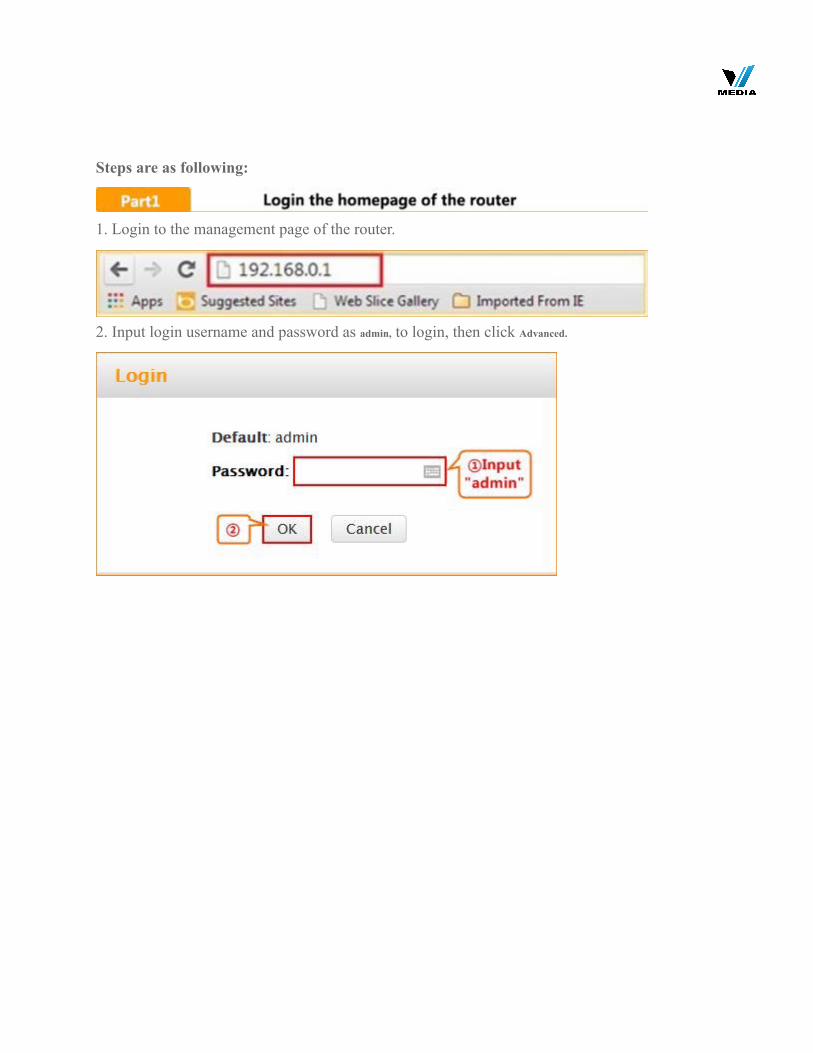
Steps are as following:
! 1. Login to the management page of the router.
! 2. Input login username and password as admin, to login, then click Advanced.
!
!
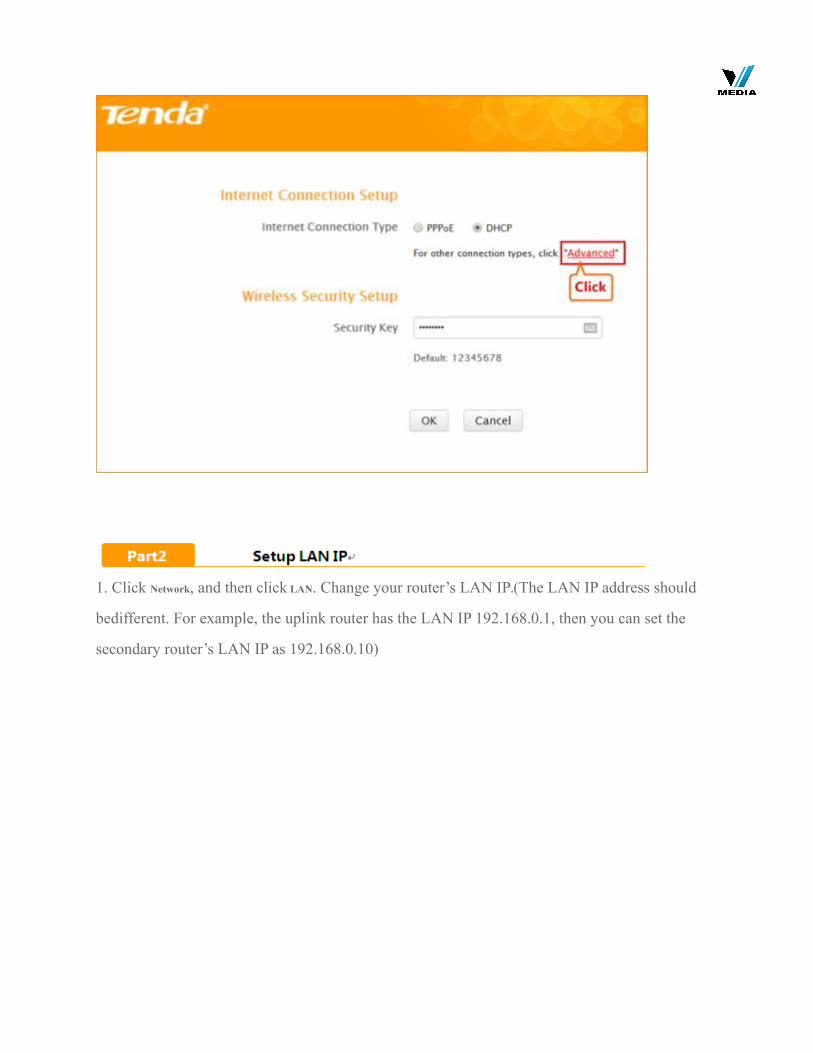
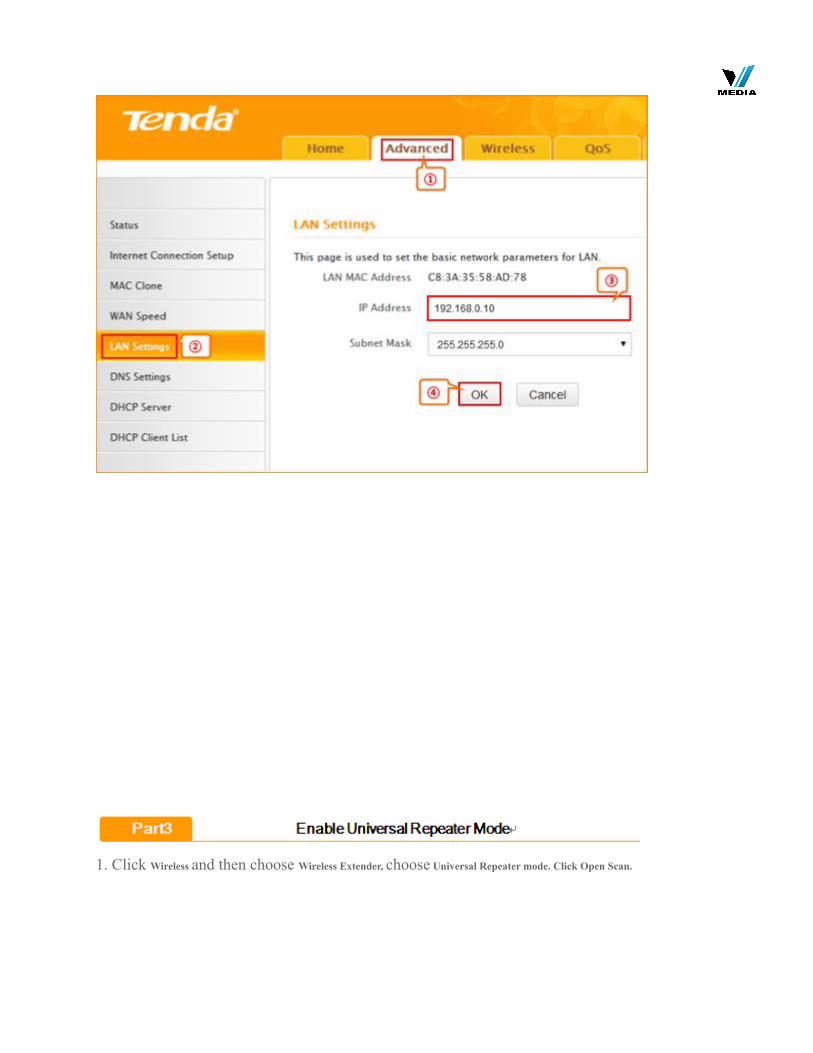
! 1. Click Network, and then click LAN. Change your router’s LAN IP.(The LAN IP address should
bedifferent. For example, the uplink router has the LAN IP 192.168.0.1, then you can set the
secondary router’s LAN IP as 192.168.0.10)
!
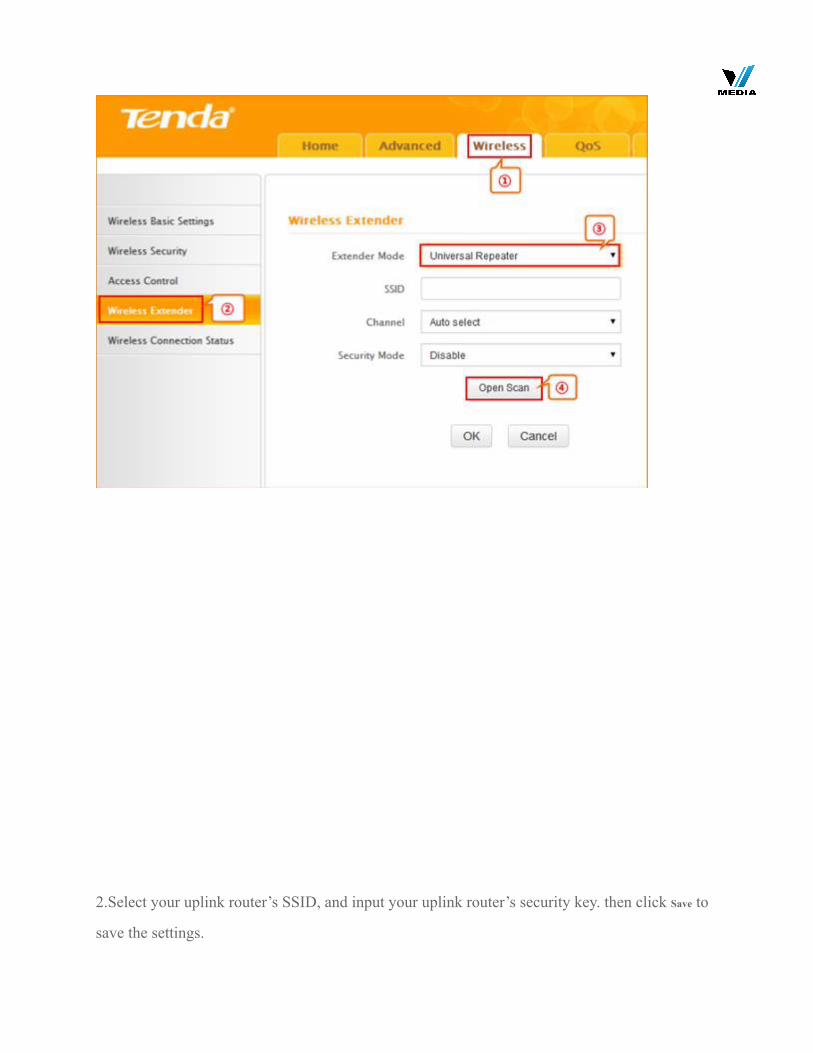
! 1. Click Wireless and then choose Wireless Extender, choose Universal Repeater mode. Click Open Scan.
!
2.Select your uplink router’s SSID, and input your uplink router’s security key. then click Save to
save the settings.

!
!
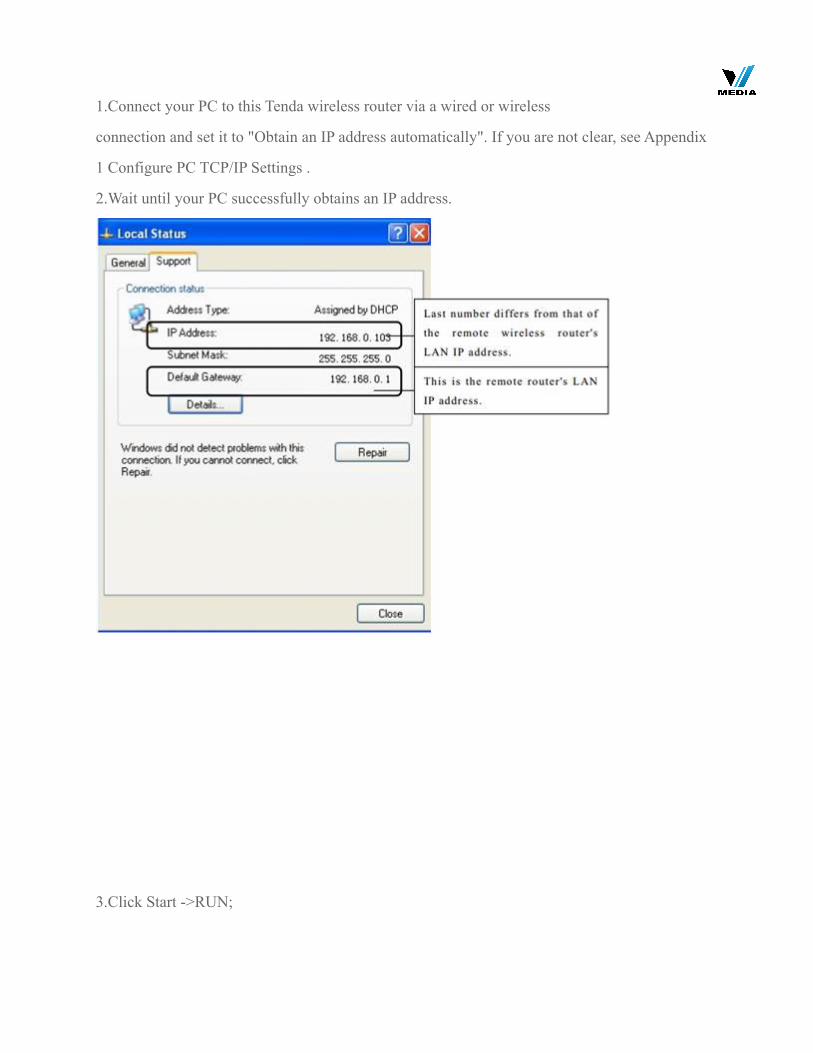
1.Connect your PC to this Tenda wireless router via a wired or wireless
connection and set it to "Obtain an IP address automatically". If you are not clear, see Appendix
1 Configure PC TCP/IP Settings .
2.Wait until your PC successfully obtains an IP address.
!
3.Click Start ->RUN;

! 4. Enter cmd and click OK.
!
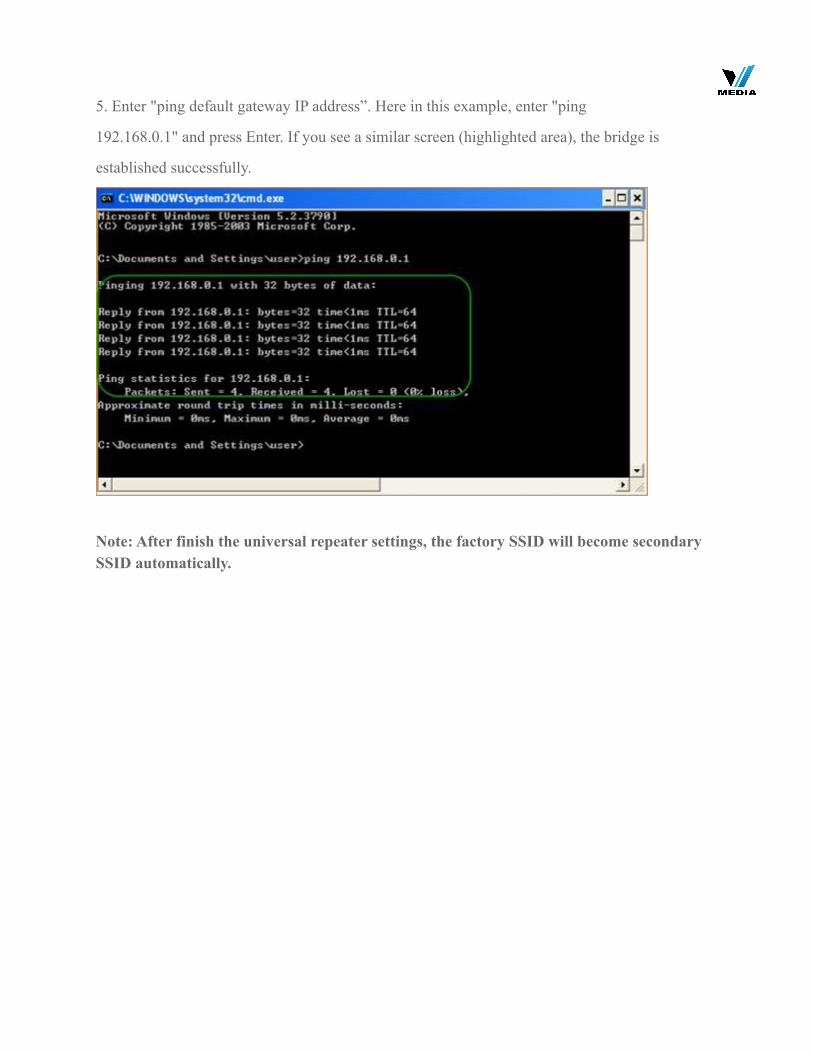
5. Enter "ping default gateway IP address”. Here in this example, enter "ping
192.168.0.1" and press Enter. If you see a similar screen (highlighted area), the bridge is
established successfully.
!
Note: After finish the universal repeater settings, the factory SSID will become secondary SSID automatically.
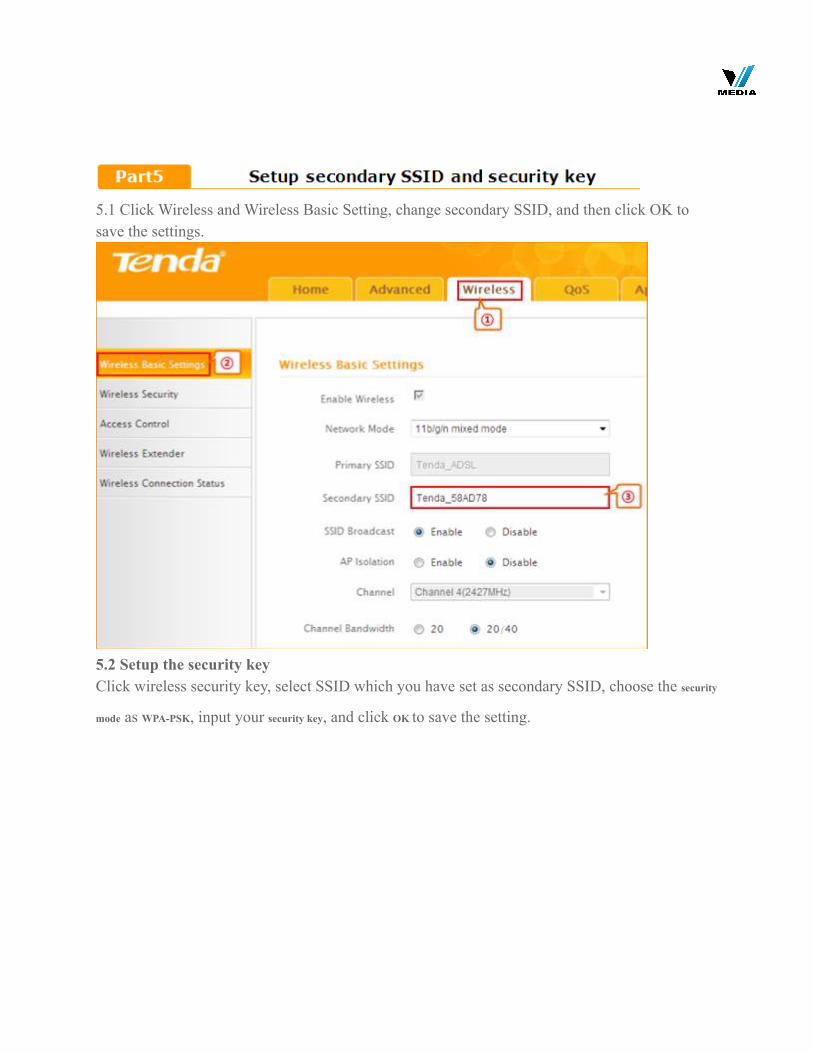
! 5.1 Click Wireless and Wireless Basic Setting, change secondary SSID, and then click OK to save the settings.
! 5.2 Setup the security key Click wireless security key, select SSID which you have set as secondary SSID, choose the security
mode as WPA-PSK, input your security key, and click OK to save the setting.
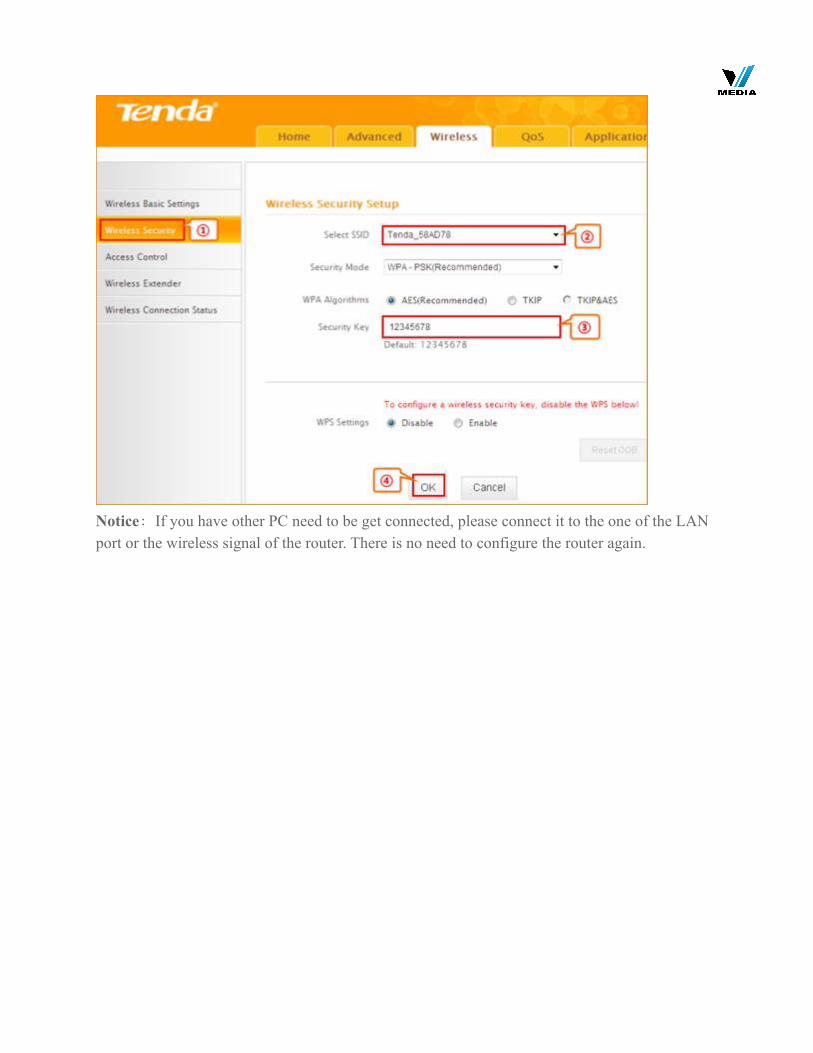
! Notice:If you have other PC need to be get connected, please connect it to the one of the LAN port or the wireless signal of the router. There is no need to configure the router again.

Function configurations How to setup WISP mode for F303
2015/5/19 Clicks: 15 ! ! !
Product line: wireless question category: function config Part 1: Login the homepage of the router
Part 2: Setup connection type and LAN IP
Part 3: Enable WISP mode
Part 4: Setup secondary SSID and security key
The Topology is as below:
!
Steps are as following:

! 1. Login to the management page of the router.
! 2. Input login username and password as admin, to login, then click Advanced.
!
!

! 1.Click Advanced, then click Internet connection setup. Choose DHCP, click Save.
!

2. Click Advanced, and then click LAN Settings. Change your router’s LAN IP.(The LAN IP address
should be in different network segment. For example, the uplink router has the LAN IP
192.168.0.1, then you can set the secondary router’s LAN IP as 192.168.10.1.)
!
!
1. Click Wireless and then choose Wireless Extender, choose WISP mode. Click Open Scan.
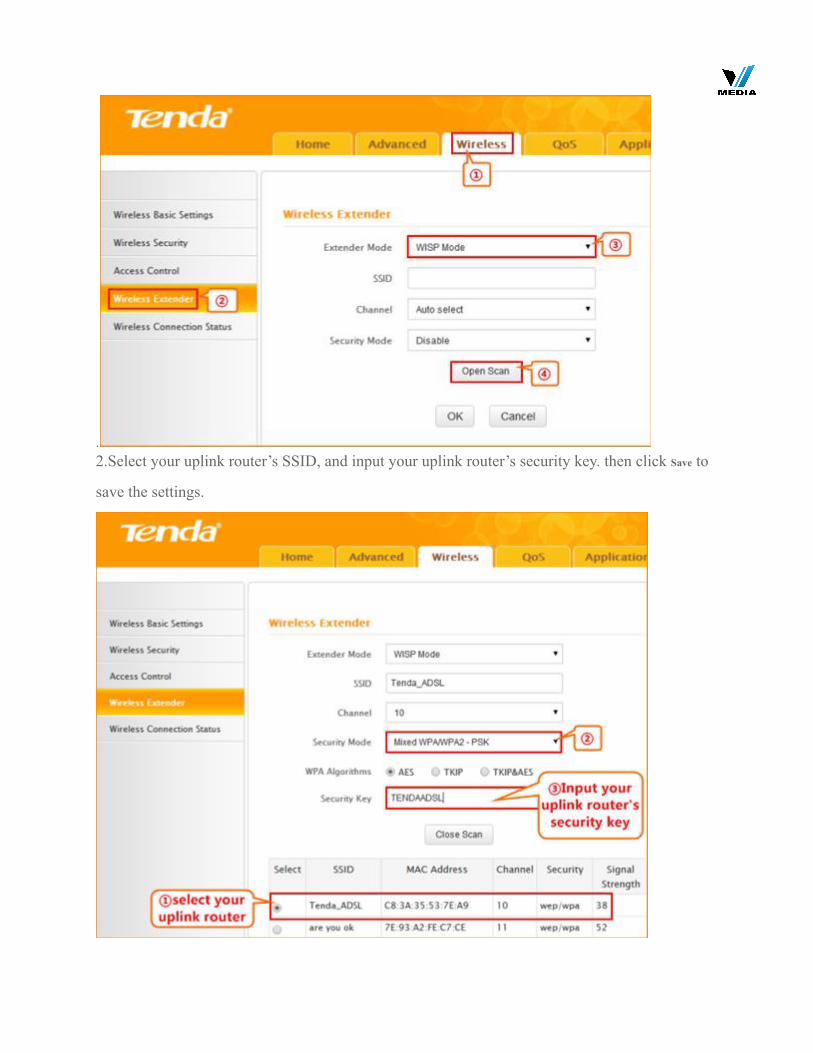
.! 2.Select your uplink router’s SSID, and input your uplink router’s security key. then click Save to
save the settings.
!

3.After reboot, if the connection status shows connected and get the gateway of uplink router,
it means that you can have internet.
!
Note: After finish the WISP settings, the primary SSID will become secondary SSID automatically.
! 4.1 Click Wireless and Wireless Basic Setting, change secondary SSID, and then click OK to save the settings.

! 4.2 Setup the security key Click wireless security key, select SSID which you have set as secondary SSID, choose the security
mode as WPA-PSK, input your security key, and click OK to save the setting.

! Notice:If you have other PC need to be get connected, please connect it to the one of the LAN port or the wireless signal of the router. There is no need to configure the router again.

F303-How to setup the router for Static IP internet connection mode
2013/12/21 Clicks: 2135 ! ! ! How to setup the router for Static IP internet connection mode
Model number: F303
There are three internet connection modes for the router. This article will guide you how to
setup the router for Static IP mode and the steps as below.
Note: If you have no idea about what is the internet connection type and the accounts
please call your ISP for help.
Part 1: Connect the devices
Part 2: Configure your computer
Part 3: Setup the router
Part 4: Check whether you can access internet
! Connect the modem with the WAN port of the router, and then connect your computer with
one of the LAN ports by a cable.
! Note: after connection the SYS light should be blinking, the WLAN light should be on or
blinking, the WAN light should be on or blinking.

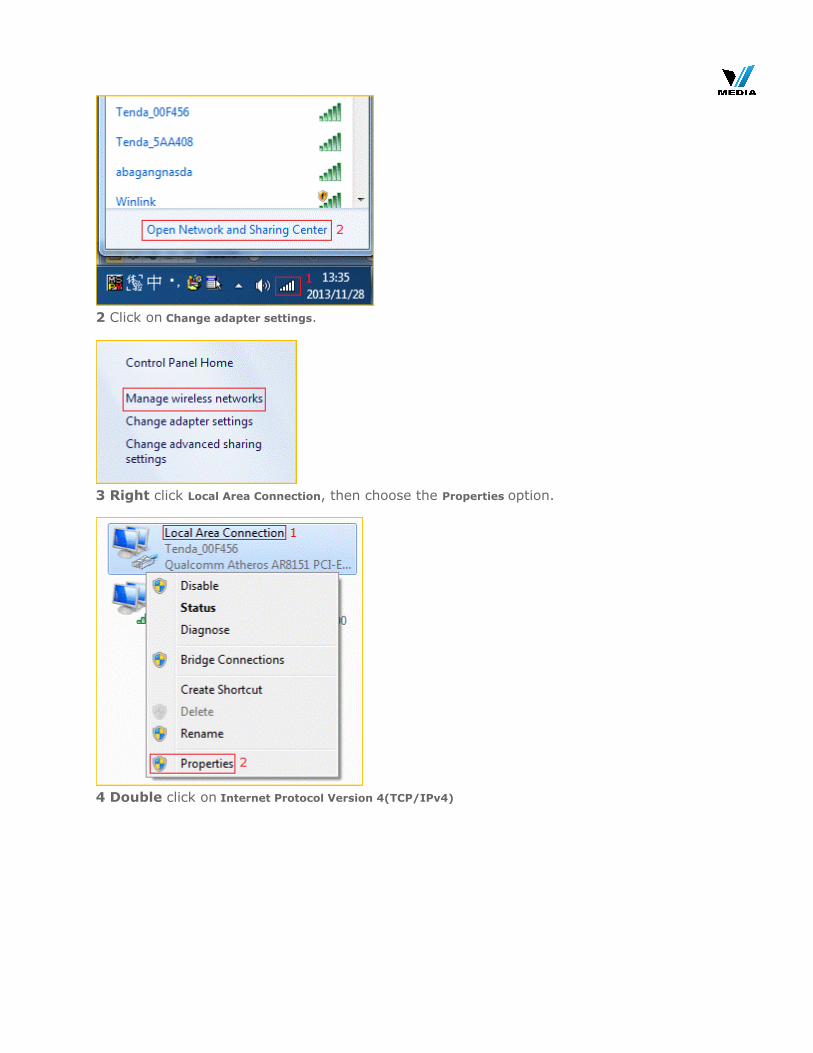
! 1 Click Network Connection Icon on the system bar, then click on Open Network and
Sharing Center. (Here is for win7, other computer please click HERE.)
! 2 Click on Change adapter settings.
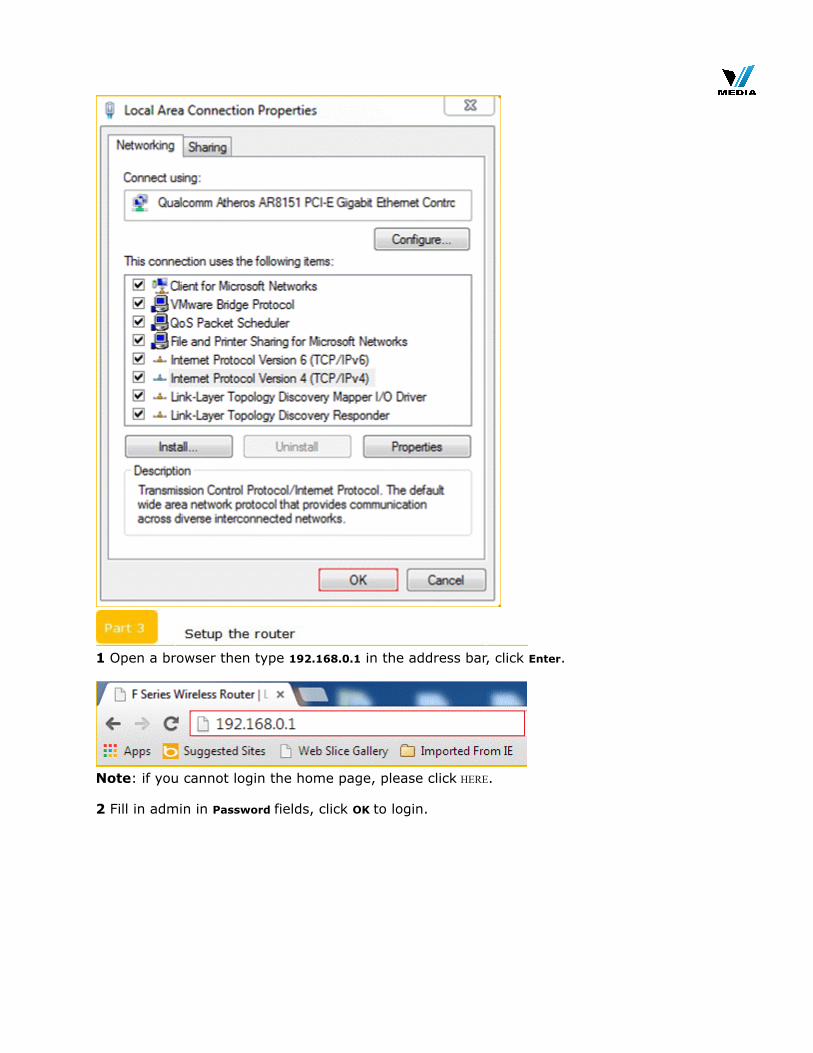
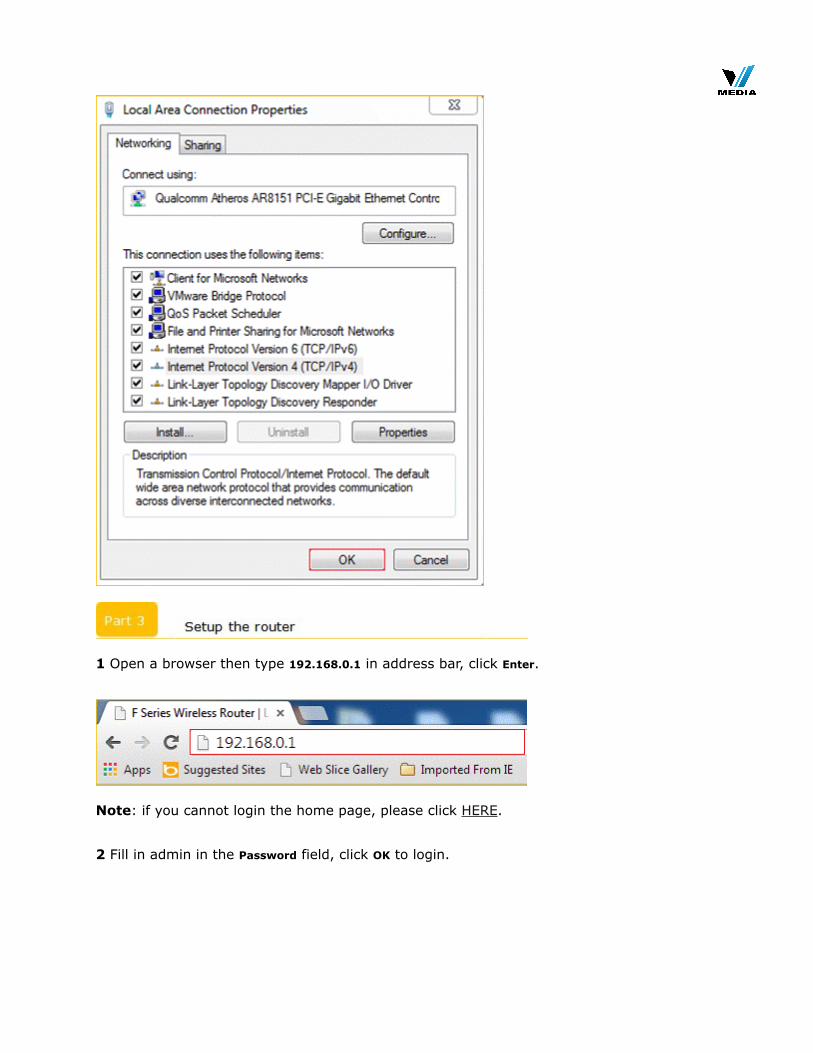
! 3 Right click Local Area Connection, then choose the Properties option.
! 4 Double click on Internet Protocol Version 4(TCP/IPv4)

! 5 Choose Obtain an IP address automatically and Obtain DNS server address
automatically and then click OK.
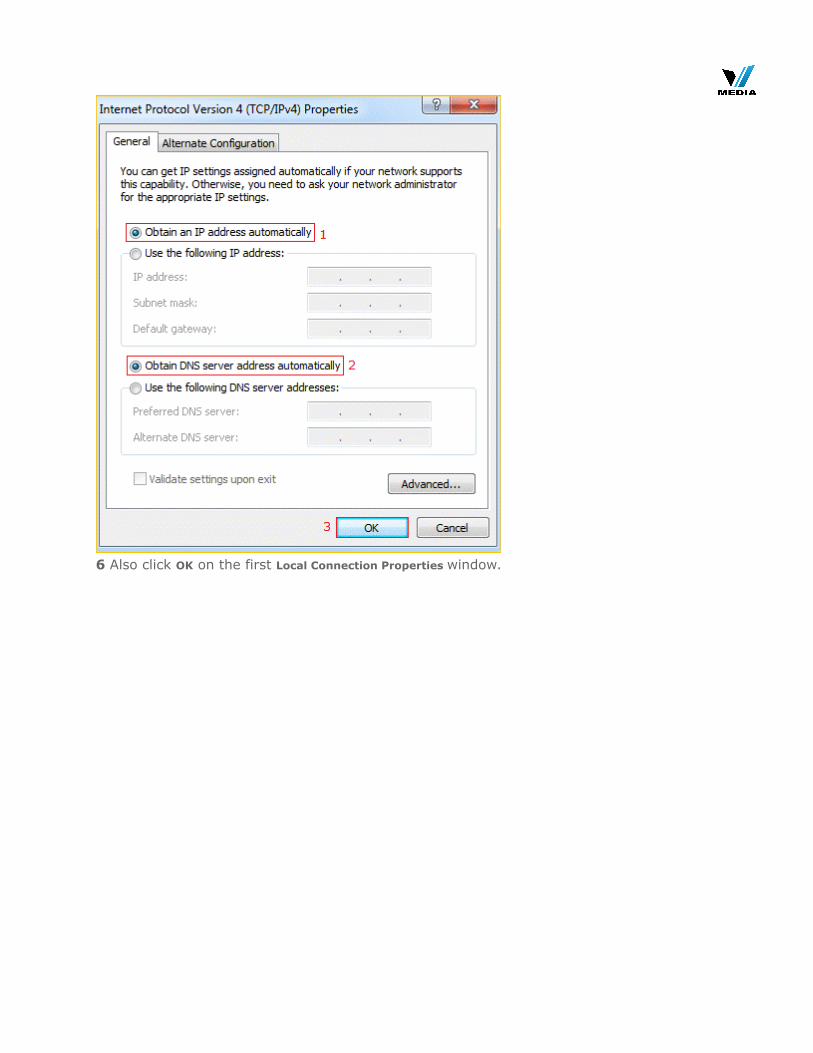
! 6 Also click OK on the first Local Connection Properties window.
!
! 1 Open a browser then type 192.168.0.1 in the address bar, click Enter.
! Note: if you cannot login the home page, please click HERE.
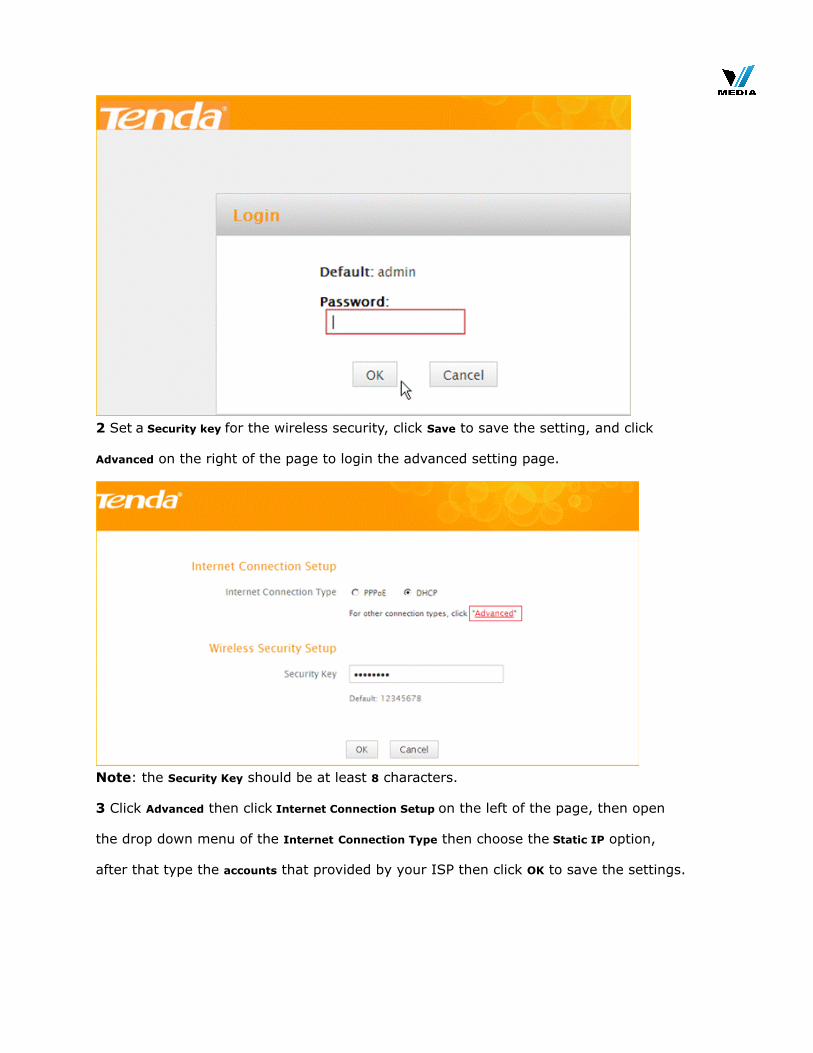
2 Fill in admin in Password fields, click OK to login.
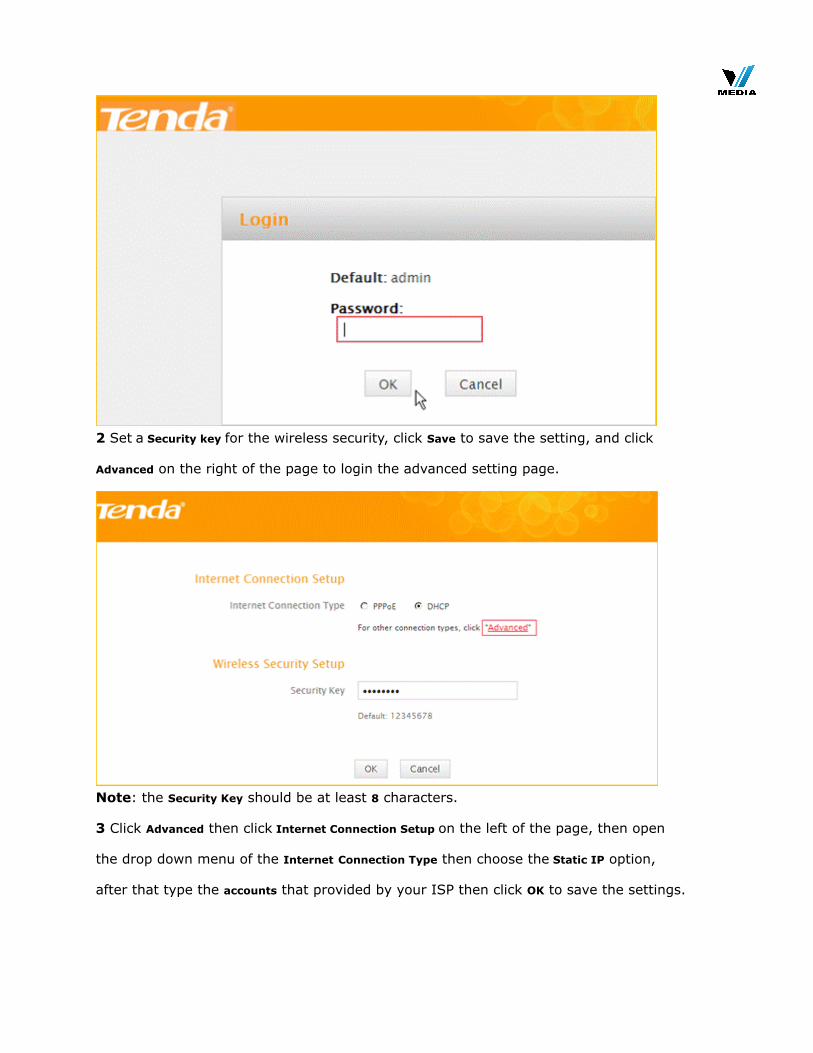
! 2 Set a Security key for the wireless security, click Save to save the setting, and click
Advanced on the right of the page to login the advanced setting page.
! Note: the Security Key should be at least 8 characters.
3 Click Advanced then click Internet Connection Setup on the left of the page, then open
the drop down menu of the Internet Connection Type then choose the Static IP option,
after that type the accounts that provided by your ISP then click OK to save the settings.

! Note: type the Secondary DNS Server as 8.8.8.8 if your ISP does not provide it.
4 After setting, please click on Tools, and click Reboot, hit Reboot The Router button then
click OK for refreshing the device Info
!
! 1 Click Advanced to login the advanced setting page, then check the Status if the

Connection Status shows Connected and WAN IP is correct that means you can access
internet, please check.
!
F303-How to setup the router for Static IP internet connection mode

F303-How to setup the router for PPPOE internet connection mode
2013/12/21 Clicks: 2509 ! ! !
How to setup the router for PPPOE internet connection mode
Model number: F303
There are three internet connection modes for the router. This article will guide you how to
setup the router for PPPOE mode and the steps are as below.
Note: if you have no idea about the internet connection type and the accounts please call
your ISP for help.
Part 1: Connect the device
Part 2: Configure your computer
Part 3: Setup the router
Part 4: Check whether you can access internet
! Connect the modem with the WAN port of the router, and then connect your computer with
one of the LAN ports of the router by a cable.
! Note: After connection the SYS light should be blinking, the WLAN light should be on or
blinking, the WAN light should be on or blinking.

! 1 Click Network Connection Icon on the system tray, then click Open Network and Sharing
Center. (Here is for windows 7, other operating system please click HERE.)
!
2 Click on Change adapter settings.
!
3 Right click Local Area Connection, then choose Properties option.

!
4 Double click on Internet Protocol Version 4(TCP/IPv4)
!
5 Choose Obtain an IP address automatically and Obtain DNS server address

automatically and then click OK.
!
6 Also click OK on the first Local Connection Properties window
!
!
1 Open a browser then type 192.168.0.1 in address bar, click Enter.
!
Note: if you cannot login the home page, please click HERE.
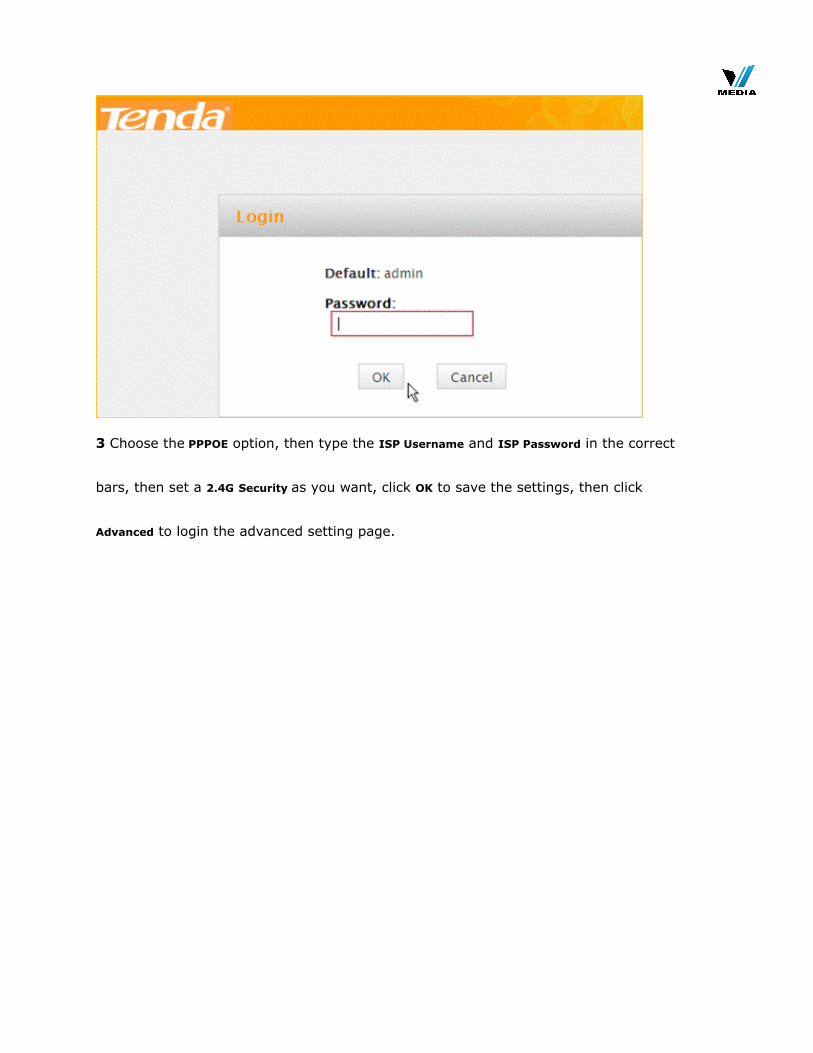
2 Fill in admin in the Password field, click OK to login.
!
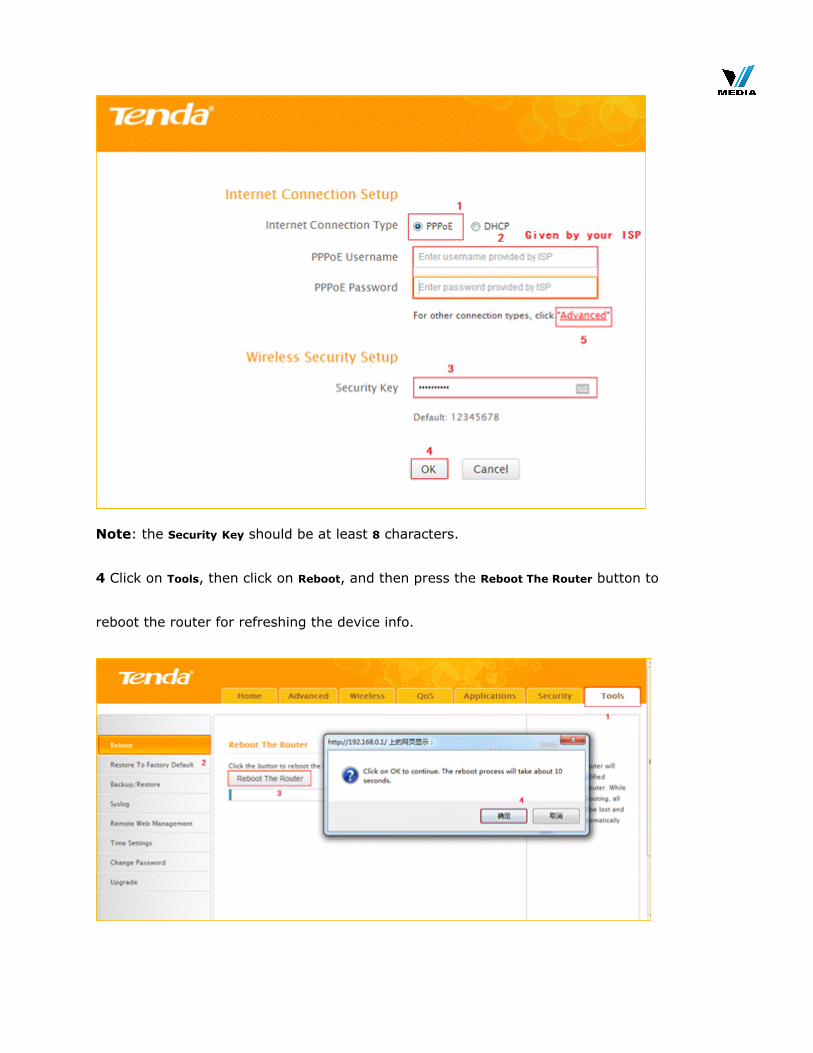
3 Choose the PPPOE option, then type the ISP Username and ISP Password in the correct
bars, then set a 2.4G Security as you want, click OK to save the settings, then click
Advanced to login the advanced setting page.
!
Note: the Security Key should be at least 8 characters.
4 Click on Tools, then click on Reboot, and then press the Reboot The Router button to
reboot the router for refreshing the device info.
!
!
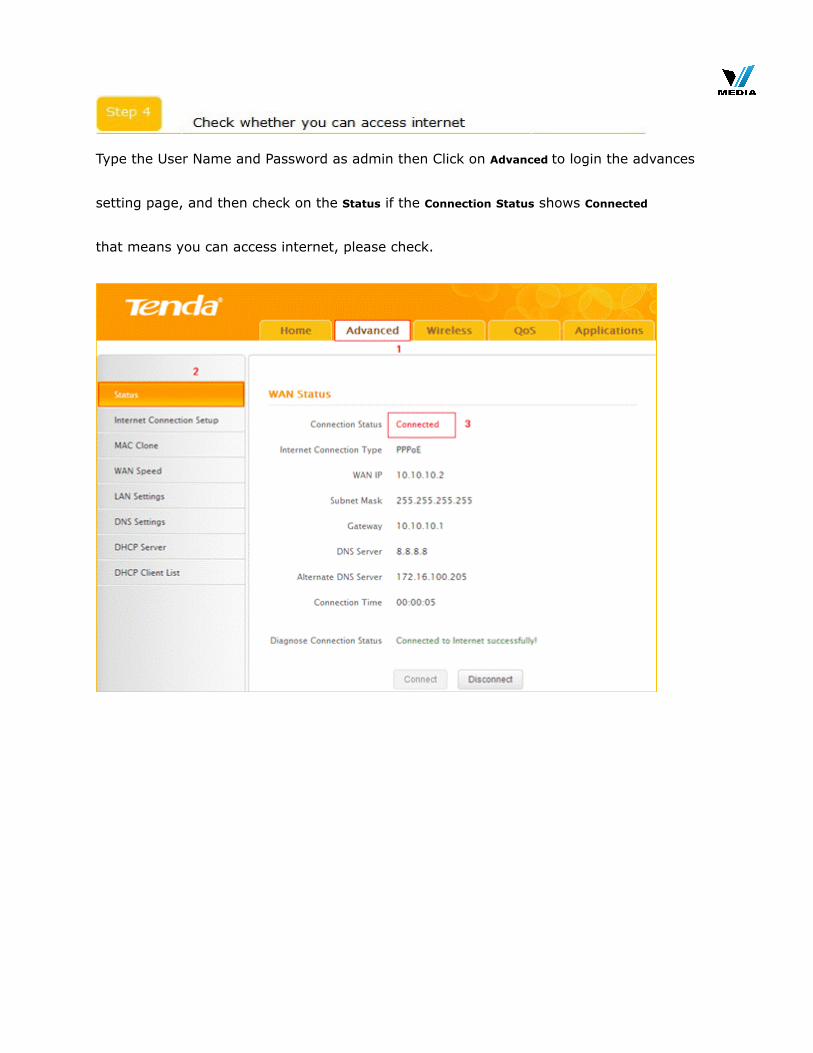
Type the User Name and Password as admin then Click on Advanced to login the advances
setting page, and then check on the Status if the Connection Status shows Connected
that means you can access internet, please check.
!
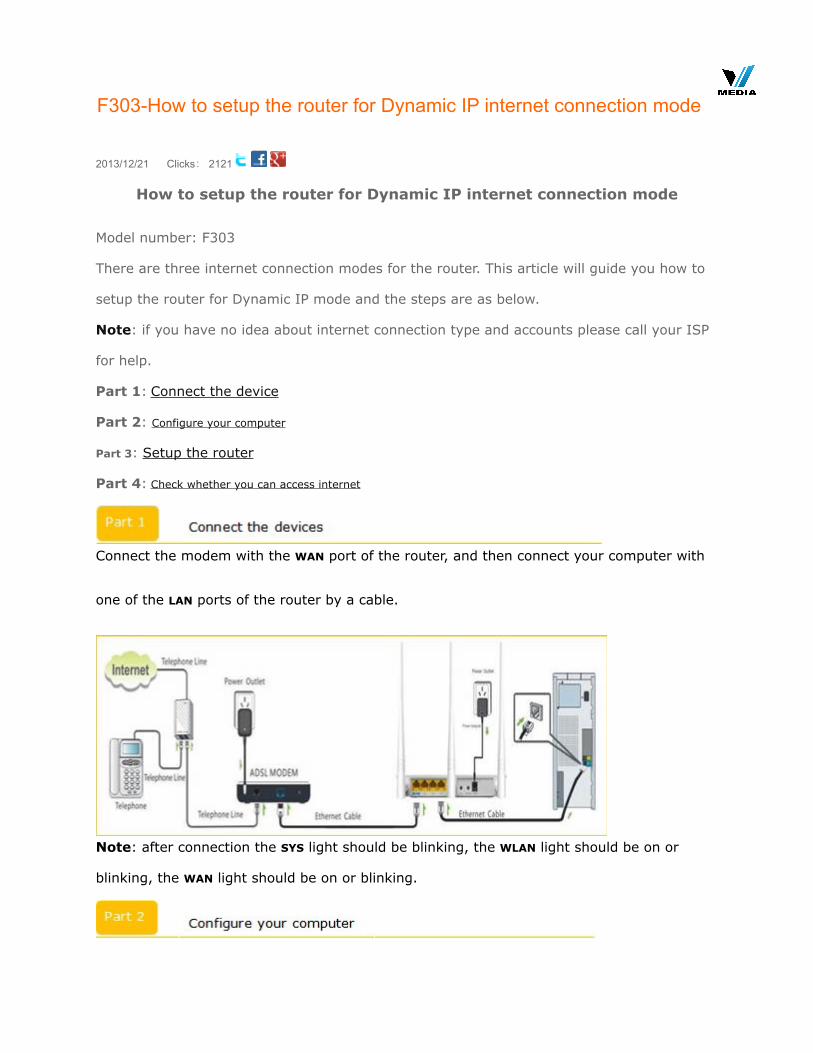
F303-How to setup the router for Dynamic IP internet connection mode
2013/12/21 Clicks: 2121 ! ! !
How to setup the router for Dynamic IP internet connection mode
Model number: F303
There are three internet connection modes for the router. This article will guide you how to
setup the router for Dynamic IP mode and the steps are as below.
Note: if you have no idea about internet connection type and accounts please call your ISP
for help.
Part 1: Connect the device
Part 2: Configure your computer
Part 3: Setup the router
Part 4: Check whether you can access internet
! Connect the modem with the WAN port of the router, and then connect your computer with
one of the LAN ports of the router by a cable.
! Note: after connection the SYS light should be blinking, the WLAN light should be on or
blinking, the WAN light should be on or blinking.
!

1 Click Network Connection Icon on the system tray, then click Open Network and
Sharing Center. (Here is for windows 7, other operating systems please click HERE.)
!
2 Click on Change adapter settings.
!
3 Right click Local Area Connection, then choose Properties option.
!

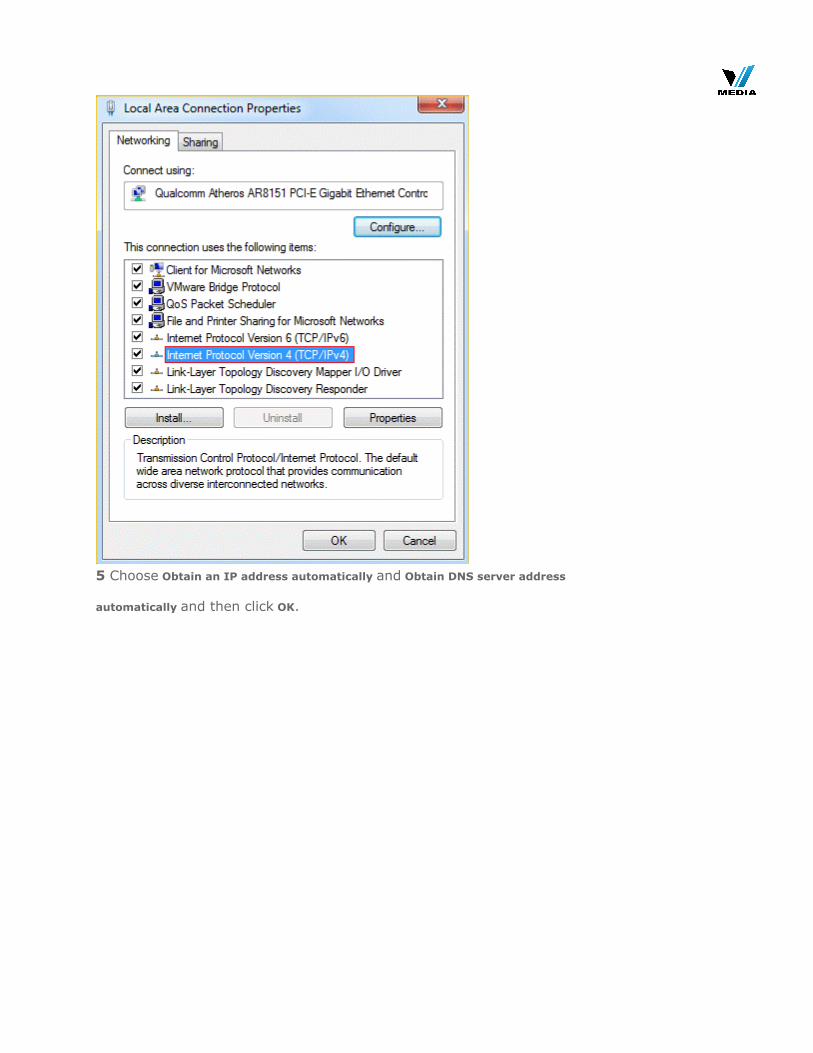
4 Double click Internet Protocol Version 4(TCP/IPv4)
!
5 Choose Obtain an IP address automatically and Obtain DNS server address
automatically and then click OK.
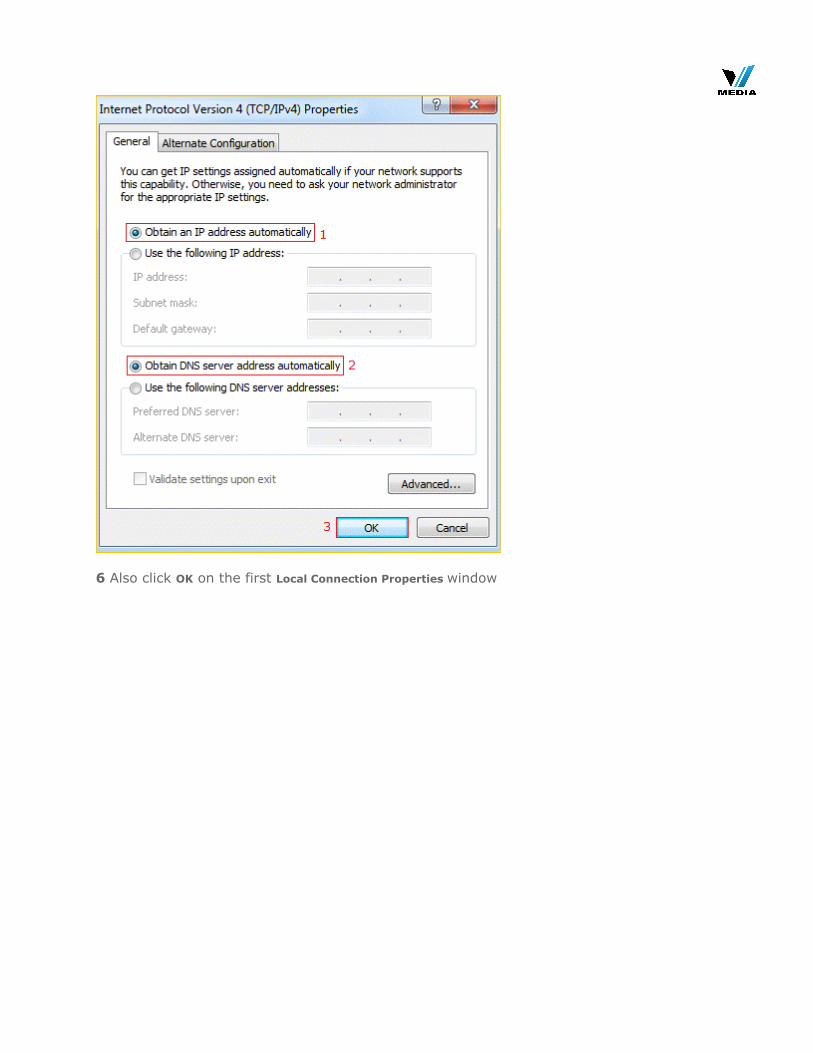
!
6 Also click OK on the first Local Connection Properties window

!
!
1 Open a browser then type 192.168.0.1 in the address bar, click Enter.
!
Note: if you cannot login the home page, please click HERE.
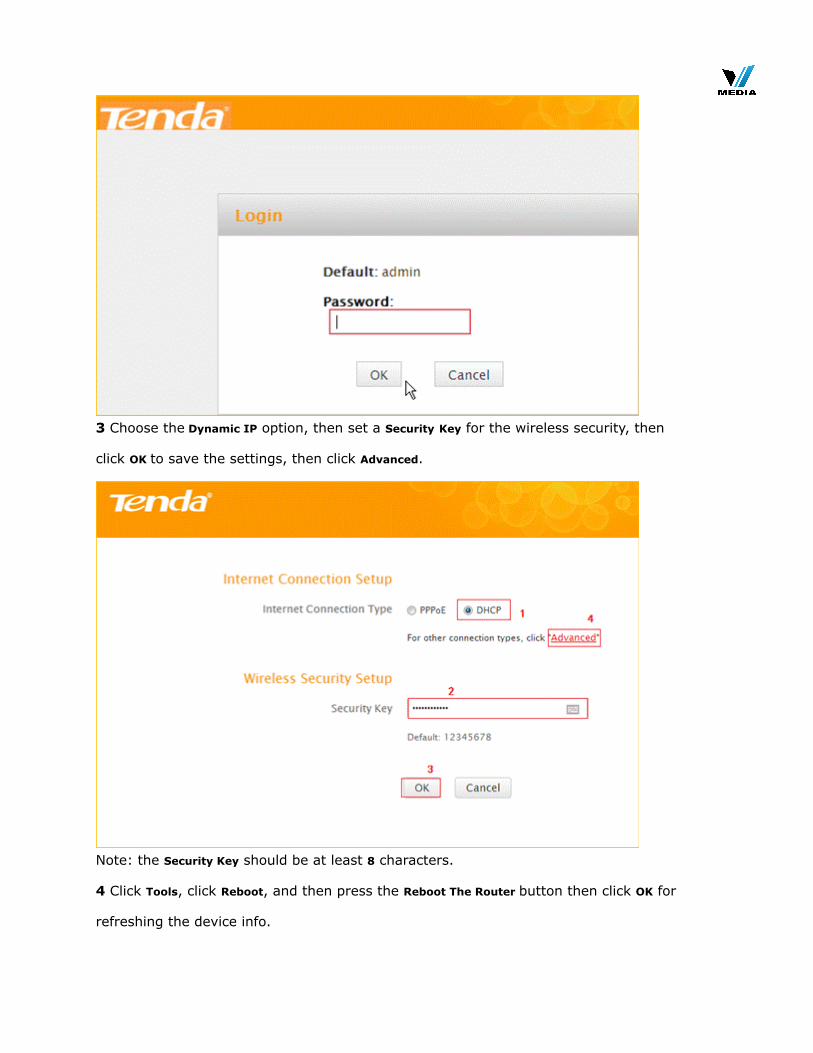
2 Fill admin in the Password field, click OK to Login.
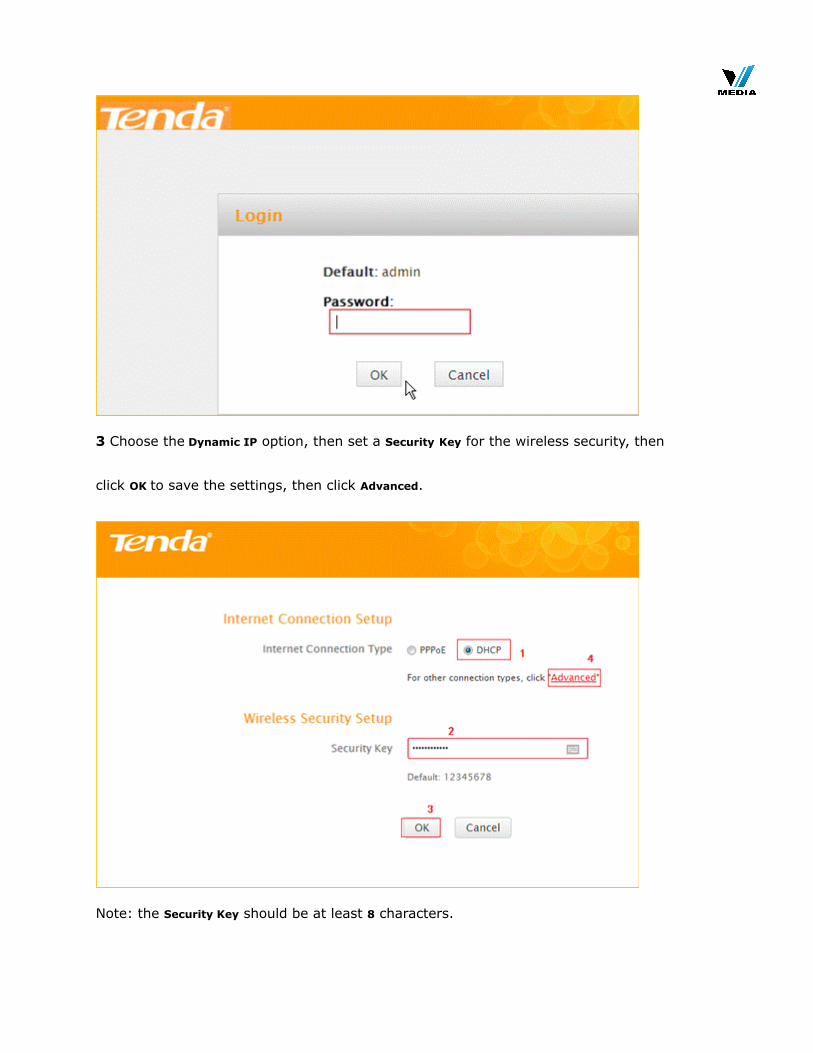
!
3 Choose the Dynamic IP option, then set a Security Key for the wireless security, then
click OK to save the settings, then click Advanced.
!
Note: the Security Key should be at least 8 characters.

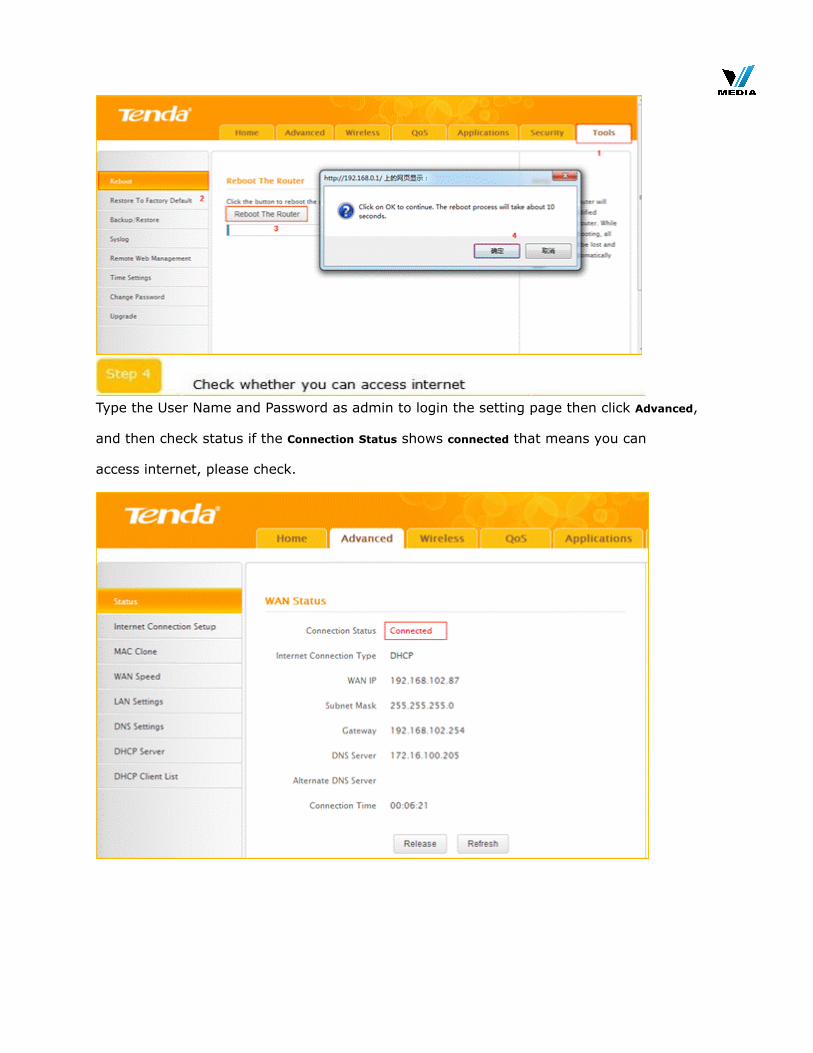
4 Click Tools, click Reboot, and then press the Reboot The Router button then click OK for
refreshing the device info.
!
!
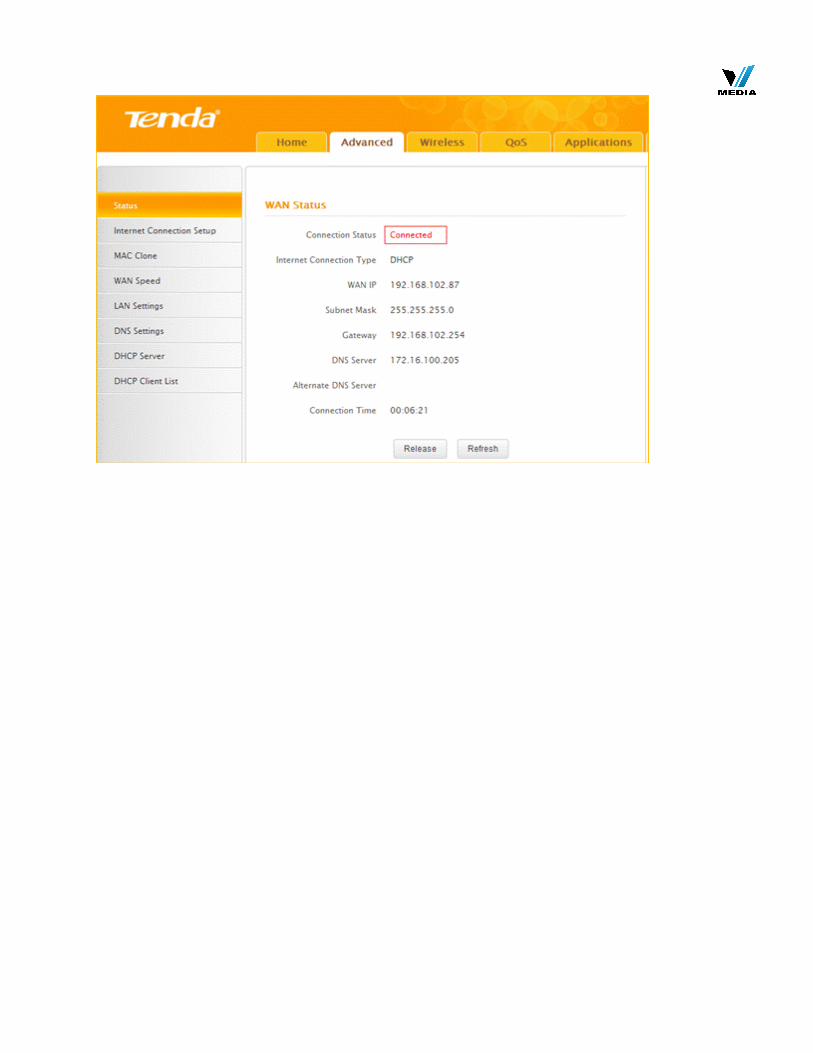
Type the User Name and Password as admin to login the setting page then click Advanced,
and then check status if the Connection Status shows connected that means you can
access internet, please check.
!

How to setup the router for Dynamic IP internet connection mode
Model number: F303
There are three internet connection modes for the router. This article will guide you how to
setup the router for Dynamic IP mode and the steps are as below.
Note: if you have no idea about internet connection type and accounts please call your ISP
for help.
Part 1: Connect the device
Part 2: Configure your computer
Part 3: Setup the router
Part 4: Check whether you can access internet
! Connect the modem with the WAN port of the router, and then connect your computer with
one of the LAN ports of the router by a cable.
! Note: after connection the SYS light should be blinking, the WLAN light should be on or
blinking, the WAN light should be on or blinking.
!

1 Click Network Connection Icon on the system tray, then click Open Network and
Sharing Center. (Here is for windows 7, other operating systems please click HERE.)
! 2 Click on Change adapter settings.
! 3 Right click Local Area Connection, then choose Properties option.
! 4 Double click Internet Protocol Version 4(TCP/IPv4)
! 5 Choose Obtain an IP address automatically and Obtain DNS server address
automatically and then click OK.

! 6 Also click OK on the first Local Connection Properties window

!
! 1 Open a browser then type 192.168.0.1 in the address bar, click Enter.
! Note: if you cannot login the home page, please click HERE.
2 Fill admin in the Password field, click OK to Login.
! 3 Choose the Dynamic IP option, then set a Security Key for the wireless security, then
click OK to save the settings, then click Advanced.
! Note: the Security Key should be at least 8 characters.
4 Click Tools, click Reboot, and then press the Reboot The Router button then click OK for
refreshing the device info.
!
! Type the User Name and Password as admin to login the setting page then click Advanced,
and then check status if the Connection Status shows connected that means you can
access internet, please check.
!

How to setup the router for Static IP internet connection mode
Model number: FH303
There are three internet connection modes for the router. This article will guide you how to
setup the router for Static IP mode and the steps as below.
Note: If you have no idea about what is the internet connection type and the accounts
please call your ISP for help.
Part 1: Connect the devices
Part 2: Configure your computer
Part 3: Setup the router
Part 4: Check whether you can access internet
! Connect the modem with the WAN port of the router, and then connect your computer with
one of the LAN ports by a cable.
! Note: after connection the SYS light should be blinking, the WLAN light should be on or
blinking, the WAN light should be on or blinking.
! 1 Click Network Connection Icon on the system bar, then click on Open Network and
Sharing Center. (Here is for win7, other computer please click HERE.)
! 2 Click on Change adapter settings.
! 3 Right click Local Area Connection, then choose the Properties option.
! 4 Double click on Internet Protocol Version 4(TCP/IPv4)

! 5 Choose Obtain an IP address automatically and Obtain DNS server address
automatically and then click OK.

! 6 Also click OK on the first Local Connection Properties window.

!
! 1 Open a browser then type 192.168.0.1 in the address bar, click Enter.
! Note: if you cannot login the home page, please click HERE.
2 Fill in admin in Password fields, click OK to login.
! 2 Set a Security key for the wireless security, click Save to save the setting, and click
Advanced on the right of the page to login the advanced setting page.
! Note: the Security Key should be at least 8 characters.
3 Click Advanced then click Internet Connection Setup on the left of the page, then open
the drop down menu of the Internet Connection Type then choose the Static IP option,
after that type the accounts that provided by your ISP then click OK to save the settings.

! Note: type the Secondary DNS Server as 8.8.8.8 if your ISP does not provide it.
4 After setting, please click on Tools, and click Reboot, hit Reboot The Router button then
click OK for refreshing the device info
!
!

1 Click Advanced to login the advanced setting page, then check the Status if the
Connection Status shows Connected and WAN IP is correct that means you can access
internet, please check.
!

How to change the Wi-Fi name (SSID) and wireless password
Model number: F303
If you want to manifest personality and protect your wireless network, you can follow this
article to set a special Wi-Fi name and wireless password.
Part 1: Login the homepage of the router
Part 2: Change the SSID and wireless password
Part 3: Reboot the router
! Open a browser then type 192.168.0.1 in the address bar, click “Enter”.
! Note: if you can’t login the home page, please click HERE.
! 1 Fill in admin in Password fields, click OK to login.
!

2 Click Advanced on the home page to login the advanced setting page.
! 3 Click Wireless, then click Wireless Basic Security, making sure Enable Wireless and
SSID Broadcast were checked. Also you can change the Primary SSID as you want, then
click OK to save the settings.

! Note:
I: the Channel 1, Channel 6 and Channel 11 are recommended, since there are a little
interference.
4 Click Wireless, then click Security and choose the Security mode as WPA-PSK, set a
Security Key as you want. At last, let the other options as default and hit OK to save the
settings.

! Note: Security Key should be at least 8 characters.
! Click Tools, and then choose the Reboot option on the left of the page, then hit Reboot
The Router and OK to refresh the device info.
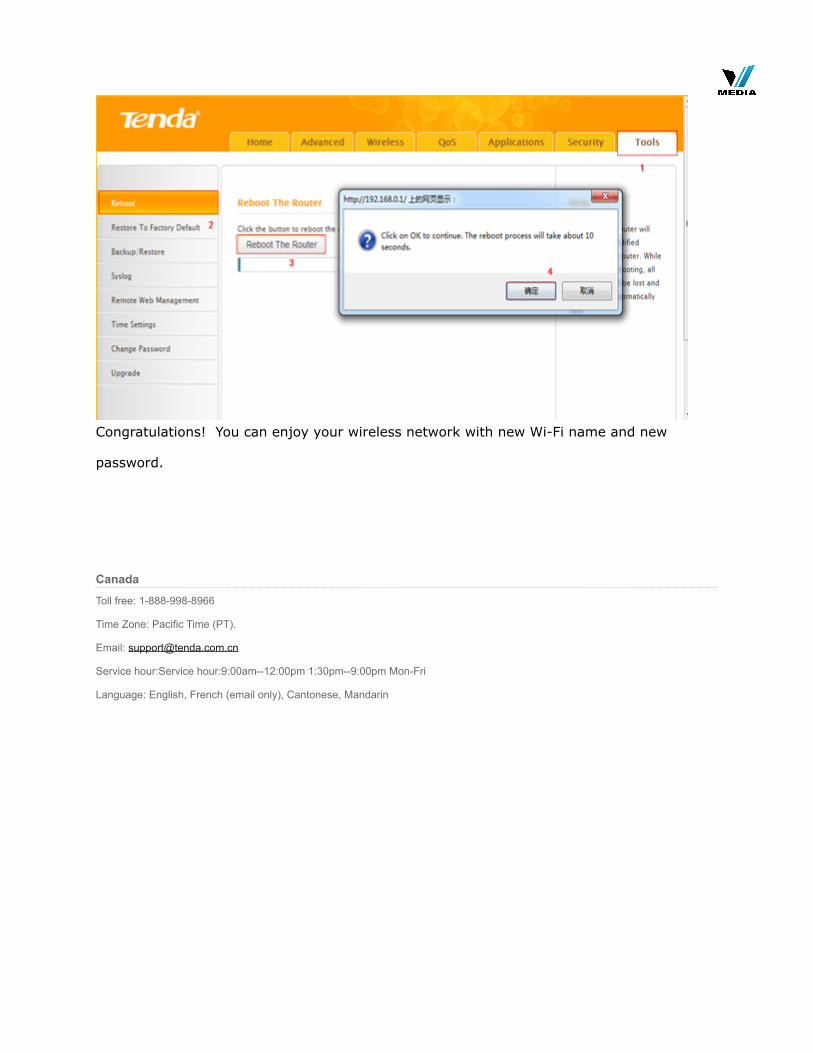
! Congratulations! You can enjoy your wireless network with new Wi-Fi name and new
password.
Canada
Toll free: 1-888-998-8966
Time Zone: Pacific Time (PT).
Email: [email protected]
Service hour:Service hour:9:00am--12:00pm 1:30pm--9:00pm Mon-Fri
Language: English, French (email only), Cantonese, Mandarin