how to set up a self contained branch repeater vpx … repeater vpx admin guide for ... as an...
TRANSCRIPT

WHITE PAPER | Citrix Branch Repeater VPX and XenServer
How to set up a self contained Branch
Repeater VPX demo environment with
WAN emulation.
www.citrix.com

Page 2
Contents
Introduction ........................................................................................................................................................ 3
Products and Tools Required ........................................................................................................................... 3
XenServer Requirements .................................................................................................................................. 4
Demo Virtual Network Topology ................................................................................................................... 4
Configuration – XenServer Host ..................................................................................................................... 5
Configuration – Branch Repeater VPX 1 ...................................................................................................... 6
Configuration – Branch Repeater VPX 2 ...................................................................................................... 7
Configuration – WANem WAN Emulator ................................................................................................... 8
Configuration – Windows Server VM .......................................................................................................... 15
Configuration – Windows Client VM ........................................................................................................... 17
Configuration – WANem WAN Emulation Settings ................................................................................. 18
Configuration – Final Branch Repeater VPX Settings ............................................................................... 19
Conducting a WAN Acceleration Demonstration ...................................................................................... 20
Conclusion ........................................................................................................................................................ 22

Page 3
Introduction
This guide is intended to be a quick step-by-step walk through of the setup and configuration of a
self-contained Branch Repeater VPX demo environment with WAN Emulation. This environment
is designed such that it can be easily replicated to a laptop or portable drive for customer or
tradeshow demonstrations. Some skill set and environmental assumptions are made in this guide
and are required prior to configuration of the demo environment;
XenServer 5.5 is installed and configured on the recommended hardware configuration (see
below).
XenCenter 5.5 is installed and configured on a physical client machine for management.
The Branch Repeater VPX(s) are imported and licensed when possible.
The Windows Server VM has been created and a Windows Server operating system installed.
The Windows Client VM has been created and a Windows Client operating system installed.
The WANem ISO image has been downloaded and burned to a CDROM or DVD. (link
provided above)
Products and Tools Required
1 x XenServer 5.5
1 x XenCenter 5.5
2 x Branch Repeater VPX
1 x Windows Client VM (Windows XP or higher)
1 x Windows Server VM (Windows 2003 or higher)
1 x WANem v2.2 ISO

Page 4
XenServer Requirements
1 multi-core processor
4 GB of RAM
o 1gb – Branch Repeater VPX recommended
o 1gb – Branch Repeater VPX recommended
o 384mb – Windows Server recommended
o 384mb – Windows Client recommended
o 256mb – WANem WAN Emulator recommended
150gb available local disk space (for virtual hard disks.)
o 60gb - Branch Repeater VPX recommended
o 60gb – Branch repeater VPX recommended
o 10gb – Windows Server VM recommended
o 5gb – Windows Client VM recommended
o 0gb - WANem WAN Emulator
1 physical network adapter
1 CD/DVD Drive
Demo Virtual Network Topology

Page 5
Configuration – XenServer Host
Start XenCenter 5.5
and connect to the
XenServer. Highlight
the XenServer name
node and then click
on the Network Tab.
Create four new
virtual networks by
clicking on the Add
Network button.
Follow the creation
steps once per virtual
network. Name them
logically along with
identifications of 1-4

Page 6
Configuration – Branch Repeater VPX 1
While shutdown, configure
Branch Repeater VPX 1
networking such that Device0
and Device1 is attached to
Virtual Network 1 and Virtual
Network 2.
From the console, using the set
adapter command, configure the
IP addressing of the Branch
Repeater VPX 1 accelerated pair
(apA) as;
-IP: 192.168.1.11
-Subnet: 255.255.255.0
-Gateway: 192.168.1.1
Finish by issuing a restart
command.
Once the Windows Client is
configured later in this guide, log
into the Branch Repeater VPX 1
web admin tool at
http://192.168.1.11 and install a
license. See the Branch Repeater
VPX Admin Guide for detailed
steps on licensing. To acquire a
FREE Branch Repeater VPX
Express License, log into
MyCitrix.

Page 7
Configuration – Branch Repeater VPX 2
While shutdown, configure
Branch Repeater VPX 2
networking such that Network
Device0 and Device1 is
attached to the Virtual
Network 3 and Virtual
Network 4.
From the console, using the set
adapter command, configure
the IP addressing of the
Branch Repeater VPX 2
accelerated pair (apA) as;
-IP: 192.168.1.13
-Subnet: 255.255.255.0
-Gateway: 192.168.1.1
Finish by issuing a restart
command.
Once the Windows Client is
configured later in this guide,
log into the Branch Repeater
VPX 2 web admin tool at
http://192.168.1.13 and
install a license. See the
Branch Repeater VPX Admin
Guide for detailed steps on
licensing.

Page 8
Configuration – WANem WAN Emulator
Create a new VM in XenCenter
by right clicking on the
XenServer‟s name and choosing
New VM.
The New VM Wizard will start.
Scroll to the bottom of the list
and select Other Install Media.
Click Next.
Page 9
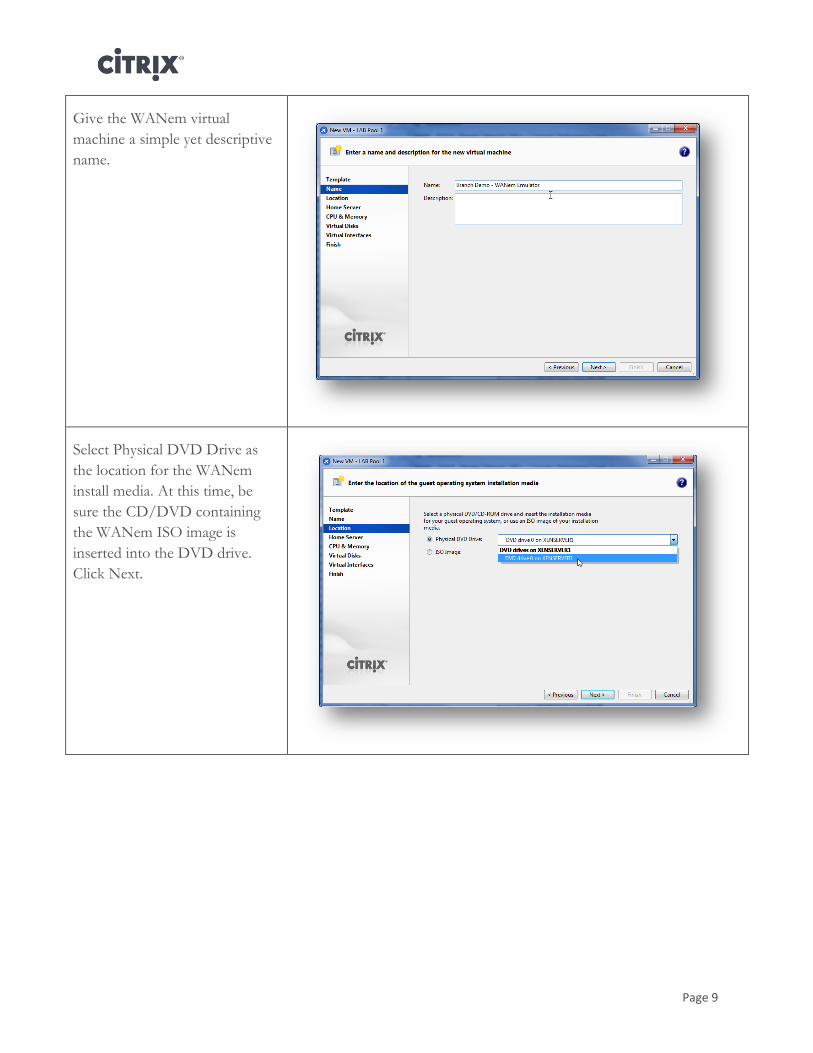
Give the WANem virtual
machine a simple yet descriptive
name.
Select Physical DVD Drive as
the location for the WANem
install media. At this time, be
sure the CD/DVD containing
the WANem ISO image is
inserted into the DVD drive.
Click Next.

Page 10
Chose the local server as the
home for the WANem virtual
machine. Click Next.
Configure the WAN virtual
machine to use 1 virtual CPU
and 256 megabytes of memory.
Click next.

Page 11
Do not chose or create any
virtual disks. Click Next.
Using the Delete button, remove
all network adapters that may
automatically appear in the
interface list. Then click Add and
to add Virtual Network 2 and
Virtual Network 3. Click Next.

Page 12
Check the Start VM
Automatically checkbox. Click
Next.
The WANem virtual machine
will start. Select the new
WANem virtual machine node
on the left, and then the Console
tab. Your console window
should look something like this.
When asked, do not choose to
configure interfaces via DHCP.
Enter an „n‟ and press enter.
Page 13
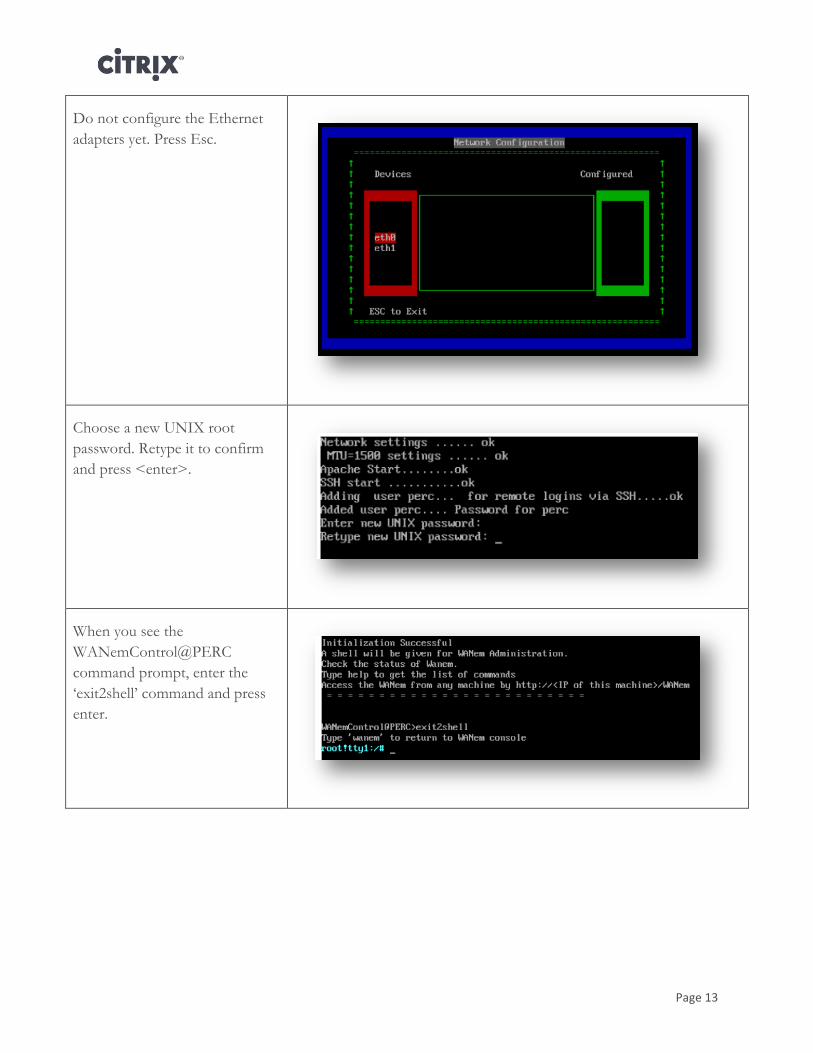
Do not configure the Ethernet
adapters yet. Press Esc.
Choose a new UNIX root
password. Retype it to confirm
and press <enter>.
When you see the
WANemControl@PERC
command prompt, enter the
„exit2shell‟ command and press
enter.

Page 14
At the Knopix prompt
(root!tty1:/#) zero the IP
information for the two Ethernet
adapters and then create a bridge
adapter (br0) by entering the
following:
ifconfig eth0 0.0.0.0 up <enter>
ifconfig eth1 0.0.0.0 up <enter>
brctl addbr br0 <enter>
Now, add the two Ethernet
interfaces (eth0 and eth1) to the
bridge adapter (br0) by entering
the following:
brctl addif br0 eth0 <enter>
brctl addif br0 eth1 <enter>
Now assign the new bridge
adapter (br0) an IP address of
192.168.1.12 by entering the
following:
ifconfig br0 192.168.1.12 netmask
255.255.255.0 <enter>
Return to the WANem prompt
by entering the following:
wanem <enter>

Page 15
Configuration – Windows Server VM
While shutdown, configure
Windows Server VM to have a
single virtual network adapter
(device0). Also ensure that
device0 is attached to Virtual
Network 1.
Start the Windows Server VM
and log in with Administrator
credentials.
From the properties of the
Local Area Connection,
configure the IP addressing of
the Windows Server as;
-IP: 192.168.1.10
-Subnet: 255.255.255.0
-Gateway: 192.168.1.1
Finish by clicking OK twice.

Page 16
Right click on the desktop and
create a new folder called
Public.
Share the folder and ensure
permissions are set accordingly
for access across the WAN.
Copy some random test
documents and images to this
folder. These files will be used
to generate CIFS traffic from
the Windows Client VM.
Page 17
Configuration – Windows Client VM
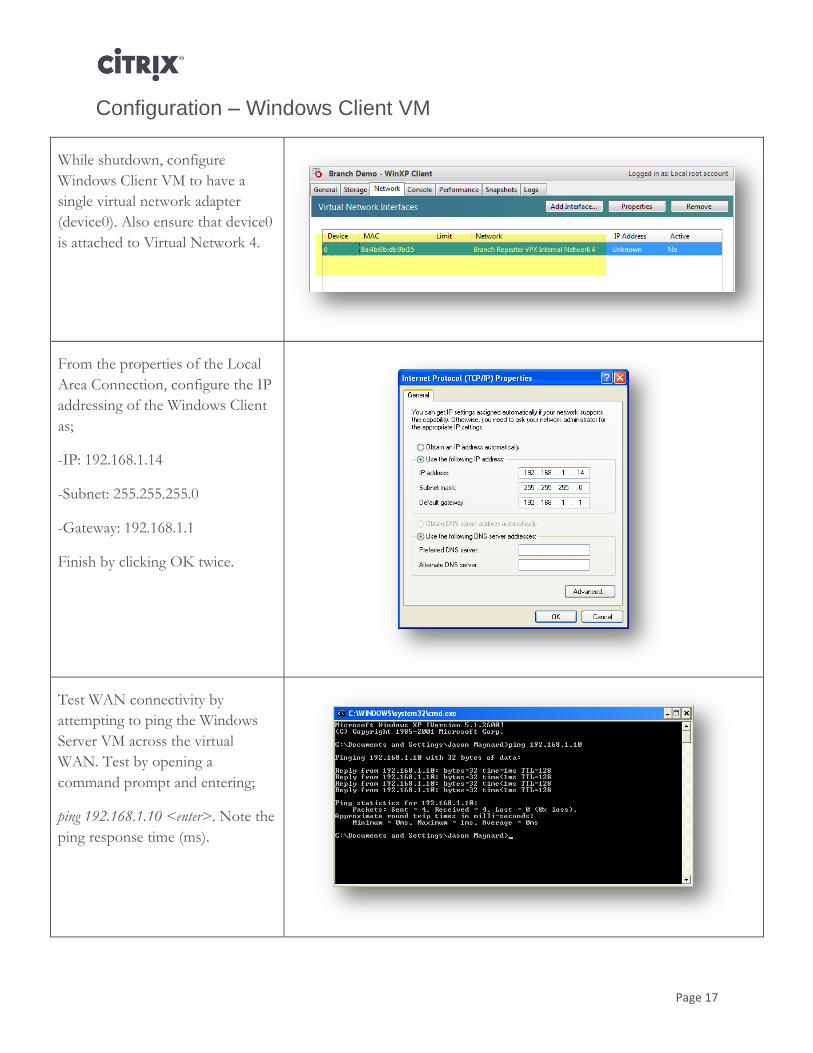
While shutdown, configure
Windows Client VM to have a
single virtual network adapter
(device0). Also ensure that device0
is attached to Virtual Network 4.
From the properties of the Local
Area Connection, configure the IP
addressing of the Windows Client
as;
-IP: 192.168.1.14
-Subnet: 255.255.255.0
-Gateway: 192.168.1.1
Finish by clicking OK twice.
Test WAN connectivity by
attempting to ping the Windows
Server VM across the virtual
WAN. Test by opening a
command prompt and entering;
ping 192.168.1.10 <enter>. Note the
ping response time (ms).

Page 18
Configuration – WANem WAN Emulation Settings
Log into the console of the
Windows Client and open
Internet Explorer. Connect to
WANem at
http://192.168.1.12/WANem.
Note: the URL to the WANem
management console is case
sensitive.
Click on “Basic Mode” on the
WANem management console
toolbar. Ensure that “br0”
appears in the Bridges pull
down.
Chose a Bandwidth level for
both eth0 and eth1. A T-1/DS-
1 has been chosen in this
example.
Enter a packet delay (ms) for
both eth0 and eth1. 100ms for
both directions have been
chosen in this example.
Click Apply Settings.

Page 19
Configuration – Final Branch Repeater VPX Settings
Log into the console of the
Windows Client and open Internet
Explorer. Connect to the Branch
Repeater VPX‟s at
http://192.168.1.11 and
http://192.168.1.13.
If the Branch Repeater VPX is not
licensed yet, click on Manage
Licenses and install a valid license
before continuing. To acquire a
FREE Branch Repeater VPX
Express License, log into MyCitrix.
Repeat this on step for both
Branch Repeater VPX‟s.
Click on the Adjust Using
Bandwidth Management link.
You must configure the Branch
Repeater VPX‟s Bandwidth
Scheduler. Enter values in the Send
and Receive Bandwidth Limit
boxes equal to approx 95% of the
configured WAN link speed you
chose in WANem.
In this example, WANem was
configured to emulate a T-1/DS-1
therefore; 1.544 x .95 = 1470.
Select Softboost, Full Bandwidth
and then click Update. Repeat
these steps on both Branch
Repeater VPX‟s

Page 20
Conducting a WAN Acceleration Demonstration
Open another Internet Explorer
window. Connect to the client side
Branch Repeater VPX admin sole
at http://192.168.1.13 and log in.
Click on the Usage Graph node.
Click on the Auto Refresh Toggle
link to enable refreshing of the
WAN traffic graph. Minimize the
browser.
Within the Windows Client VM
console, Click on Start | Run.
Connect to the Public file share on
the Windows Server VM by
entering \\192.168.1.10\Public
<enter>.
If needed, enter the proper
administrator credentials and
password.
The Public file share will appear
showing the test files copied
earlier. Select all of the files and
then right click on them. Select
Send To | My Documents. A file
copy will begin across the virtual
WAN generating CIFS traffic.

Page 21
Maximize the Branch Repeater
VPX web admin console and click
on the Usage Graph node. Notice
the WAN and LAN traffic graphs.
Blue indicated accelerated traffic.
Click on the Active Connections
node. The new accelerated
connection will appear. Notice the
bytes transferred and effective
compression ratio.

Page 22
Conclusion
This demonstration can easily be repeated with different traffic types and WAN configurations. A
well-rounded demonstration should include a variety of bandwidth levels (dial-up, T1, T3, DS3) as
well as a variety of packet latency profiles (0ms, 100ms, 250ms and 500ms).
For easy portability, these virtual machines can now be exported and copied to a portable hard drive
or other media for easy re-import into another XenServer host.
Be sure to visit the Citrix Community to keep up on all inside product news, best practices, tools
and guides like this one.
About Citrix
Citrix Systems, Inc. (NASDAQ:CTXS) is the leading provider of virtualization, networking and software as a service
technologies for more than 230,000 organizations worldwide. Its Citrix Delivery Center, Citrix Cloud Center (C3)
and Citrix Online Services product families radically simplify computing for millions of users, delivering applications
as an on-demand service to any user, in any location on any device. Citrix customers include the world’s largest
Internet companies, 99 percent of Fortune Global 500 enterprises, and hundreds of thousands of small businesses
and prosumers worldwide. Citrix partners with over 10,000 companies worldwide in more than 100 countries.
Founded in 1989, annual revenue in 2008 was $1.6 billion.
©2010 Citrix Systems, Inc. All rights reserved. Citrix®, Access Gateway™, Branch Repeater™, Citrix Repeater™,
HDX™, XenServer™, XenApp™, XenDesktop™ and Citrix Delivery Center™ are trademarks of Citrix Systems, Inc.
and/or one or more of its subsidiaries, and may be registered in the United States Patent and Trademark Office
and in other countries. All other trademarks and registered trademarks are property of their respective owners.