how to sell your photos - shotkit | the camera gear …how to sell your photos – the process...
TRANSCRIPT


How to Sell your Photosshotkit.com/
Learning how to sell your photos is something that no one really teaches you when you become a photographer. Trying to sell your photos to clients, whether in person or via your website, probably makes youfeel uncomfortable. We’re photographers after all – not salesmen.
It’s with this in mind that I put together this guide on selling your photos. With a little planning and the process I’m about to outline, you can put in place an automated system to sell your photos without even leaving your seat. You’ll quite literally earn money while you sleep.
I’m going to describe the exact steps I took to make $426 in my first week of selling my wedding photography work, both in print and digital photo sales.
I should mention that all the photosI sold were not portfolio standard, or even images I consider particularly interesting. The majority were group portraits or regular dance-floor shots, which really shows how much money can be made from your photos no matter your ability (within reason!)
I believe that everyone from a sports photographer to a street photographer can easily make their first photo salejust by following the steps outlined below.
So with that in mind, let’s dive right in to the process…
Sell your Photos – A Step by Step Guide
First, a caveat – the process of how to sell your photos I’m about to describe does take a bit of time to setup. If youfollow my exact process, I estimate it’ll take at least 2 hours, but it depends on the number of galleries you decideto create.
Preparation
Being able to sell your photos involves two main elements. The first is an online gallery.
My online gallery of choice is ShootProof, which I’ve recently fallen in love with due to its ease of use andslick design.
1/16

Example of a ShootProof gallery cover page
There are several reasons why I chose ShootProof over its competitors. I really like its design, ease of use,excellent support, fast loading times and several other features, but most of all I like its powerful email automationsystem.
Having solid email automation in place can really boost your photo sales, and I’ll show you how to set this up in abit.
I also love the ShootProof Lightroom plugin integration, which means I can easily upload my work to a new onlinegallery all from within Lightroom. With workflows, the less steps the better, and this feature really helps to savetime.
Create ShootProof Publish services in Lightroom for each of your Categories and Galleries to keep everything organised neatly.
ShootProof offers a 30 day free trial , meaning that you can have a go at implementing these tips on how to sell
2/16
your photos for free.
If you make some money from your photo sales, I’d recommend using it to pay for your next month’s subscriptionwith ShootProof. Then keep repeating this process to ensure you’re never out of pocket ;-)
Having an online ShootProof gallery is also a great way to keep an online backup of your work, not to mentionallowing the clients to download all their files digitally, without the need to post USB drives, etc.
The second element that you need to sell your photos is a list of your clients’ email addresses. If you don’t haveany clients yet, a list of friends’ email addresses is fine too.
Once you have your online gallery and your email addresses prepared, let’s have a look at how to sell yourphotos.
[Sidenote: I’m writing this from the perspective of a wedding photographer, but the process can be applied to anygenre. You can even create a gallery of your favourite photos and just email all your mates – maybe they’d like acanvas of your work on their wall!]
How to Sell your Photos – The Process
Section 1 – Email Automation
Step 1
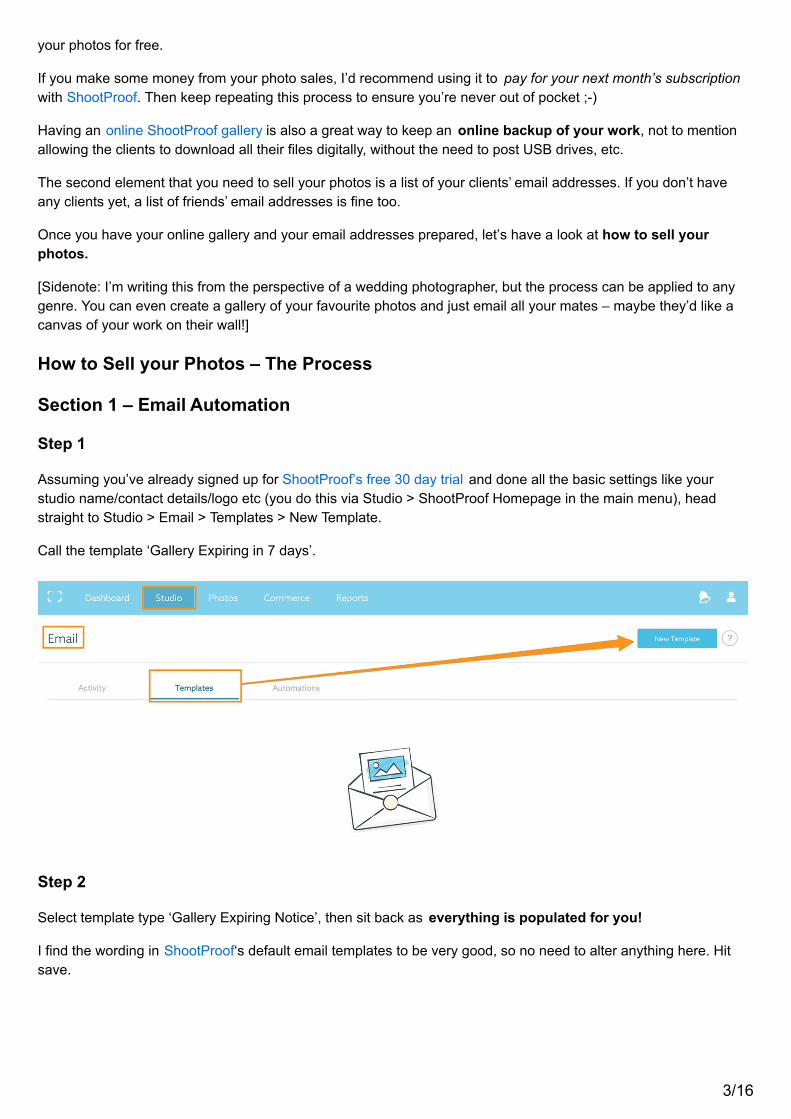
Assuming you’ve already signed up for ShootProof’s free 30 day trial and done all the basic settings like yourstudio name/contact details/logo etc (you do this via Studio > ShootProof Homepage in the main menu), headstraight to Studio > Email > Templates > New Template.
Call the template ‘Gallery Expiring in 7 days’.
Step 2
Select template type ‘Gallery Expiring Notice’, then sit back as everything is populated for you!
I find the wording in ShootProof‘s default email templates to be very good, so no need to alter anything here. Hitsave.
3/16

Step 3
Head back to Studio > Email > Templates > New Template and create a second template called ‘Gallery Expires atMidnight’.
Follow the same process as above, except change the headline to say ‘Your Gallery is Expiring at Midnight’. Hitsave.
Step 4
Next head over to Studio > Email > Automations > New Automation Series. Title it ‘Gallery Expiring’.
4/16
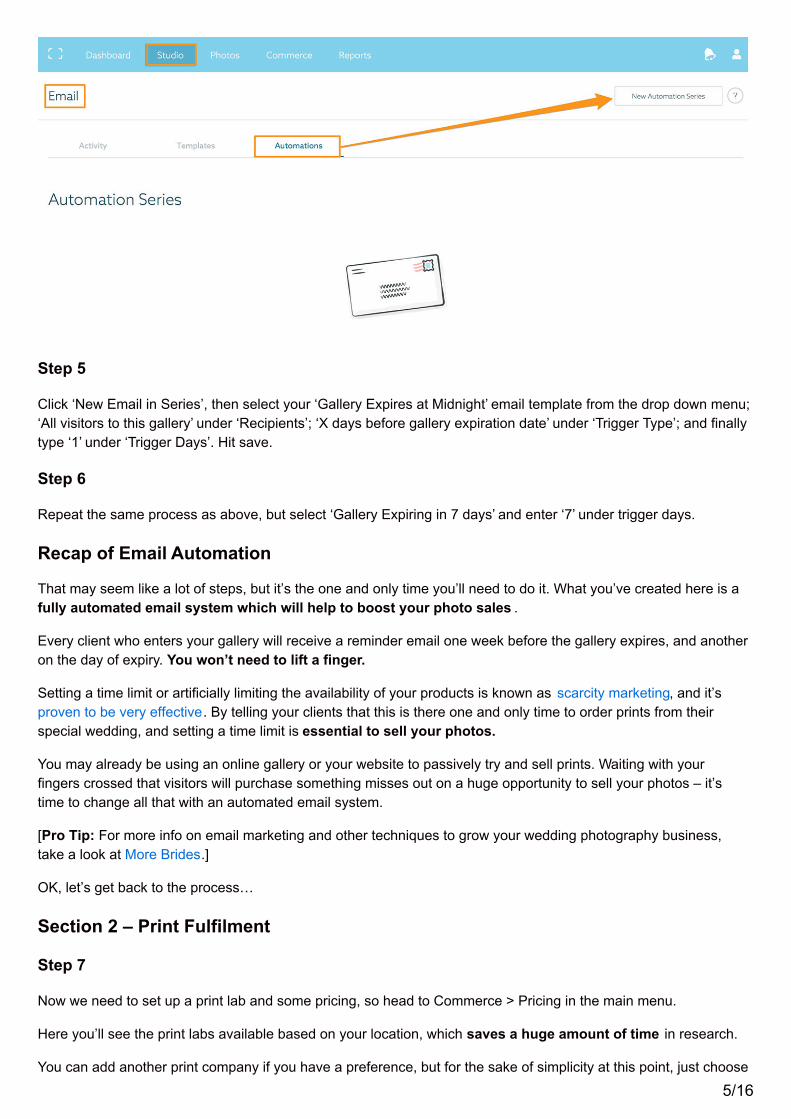
Step 5
Click ‘New Email in Series’, then select your ‘Gallery Expires at Midnight’ email template from the drop down menu;‘All visitors to this gallery’ under ‘Recipients’; ‘X days before gallery expiration date’ under ‘Trigger Type’; and finallytype ‘1’ under ‘Trigger Days’. Hit save.
Step 6
Repeat the same process as above, but select ‘Gallery Expiring in 7 days’ and enter ‘7’ under trigger days.
Recap of Email Automation
That may seem like a lot of steps, but it’s the one and only time you’ll need to do it. What you’ve created here is afully automated email system which will help to boost your photo sales .
Every client who enters your gallery will receive a reminder email one week before the gallery expires, and anotheron the day of expiry. You won’t need to lift a finger.
Setting a time limit or artificially limiting the availability of your products is known as scarcity marketing, and it’sproven to be very effective. By telling your clients that this is there one and only time to order prints from theirspecial wedding, and setting a time limit is essential to sell your photos.
You may already be using an online gallery or your website to passively try and sell prints. Waiting with yourfingers crossed that visitors will purchase something misses out on a huge opportunity to sell your photos – it’stime to change all that with an automated email system.
[Pro Tip: For more info on email marketing and other techniques to grow your wedding photography business,take a look at More Brides.]
OK, let’s get back to the process…
Section 2 – Print Fulfilment
Step 7
Now we need to set up a print lab and some pricing, so head to Commerce > Pricing in the main menu.
Here you’ll see the print labs available based on your location, which saves a huge amount of time in research.
You can add another print company if you have a preference, but for the sake of simplicity at this point, just choose
5/16

one of the recommendations.
[Side note to my Australian friends: ShootProof supports fulfilment by HC Lab, and I’ve found their service to bevery good.]
Step 8
After clicking on your chosen print lab, you need to decide on prices for your prints.
With so many variables involved, this process would normally take ages. Luckily, ShootProof provides a one-clicksolution that pre-populates all the most popular options for you. I love this feature!
There’s also a great time-saving way to apply a global percentage to your prices in one click, by using the handyMarkup Tool.
6/16

Remember that you can always come back and trial different photo sizes and pricing, but for the sake of this test,let’s keep it all simple with a flat rate percentage markup.
[Sidenote: If you’re prompted to add your credit card info at any stage, don’t worry – you won’t be chargedduring the first 30 days of your ShootProof trial .]
Recap of Print Fulfilment
Again, this may have taken you a bit of time to set up, but you’ll only need to do it once. You now have an on-demand print lab that will fulfil any print sales you make. You can decide whether the prints are sent to yourstudio, or direct to your client, and even be notified before the printing process starts.
The automated print process removes a massive headache in my photography business and allows me toeffortlessly sell more photos.
The client can see all their photos in one place in their custom ShootProof gallery, and more importantly for you,they are just a few clicks away from placing their first order.
A key factor in how to sell your photos is to make the purchasing process as effortless as possible for yourclients. Again, there are lots of studies that back this up.
OK, back to the process…
Section 3 – Categories & Defaults
Step 9
Go to Studio > ShootProof Homepage > Manage Categories. Then click ‘Add Category’, and call it ‘Weddings’.
7/16

In the future, you can add other categories and have each one displayed with a thumbnail preview on yourShootProof homepage.
Here’s an example of how your homepage will look with various categories:
Step 10
Go to Photos > Galleries > Default Settings. Click ‘Add Set’ and call it ‘Weddings’.
Step 11
Set the default Weddings gallery up using the following settings:
i) Under ‘Prints’, choose your Price sheet. I also choose ‘DropShip to Client’ since it takes me out of the process.
ii) Under ‘Advanced’, choose the ‘Weddings’ category you just created.
iii) This is the key step – under ‘Send automated emails for this gallery’, select ‘Gallery Expiring.’ Hit save.
[Pro Tip: In the ‘Visitor Information’ box, you can add a message like " Ordering prints and canvases from thisGallery ensures perfect print reproduction and delivery direct to your home.” Remember, sell the benefits, notfeatures!]
8/16
Recap of Categories & Defaults
This section of the process is another set-and-forget. By setting up defaults for your galleries, you won’t need toedit certain settings whenever you upload new photos, which will save you lots of time in the long-run.
There are still some settings you’ll need to adjust each time you upload a gallery, and I’ll go into these below.
Section 4 – Gallery Uploads
Step 12
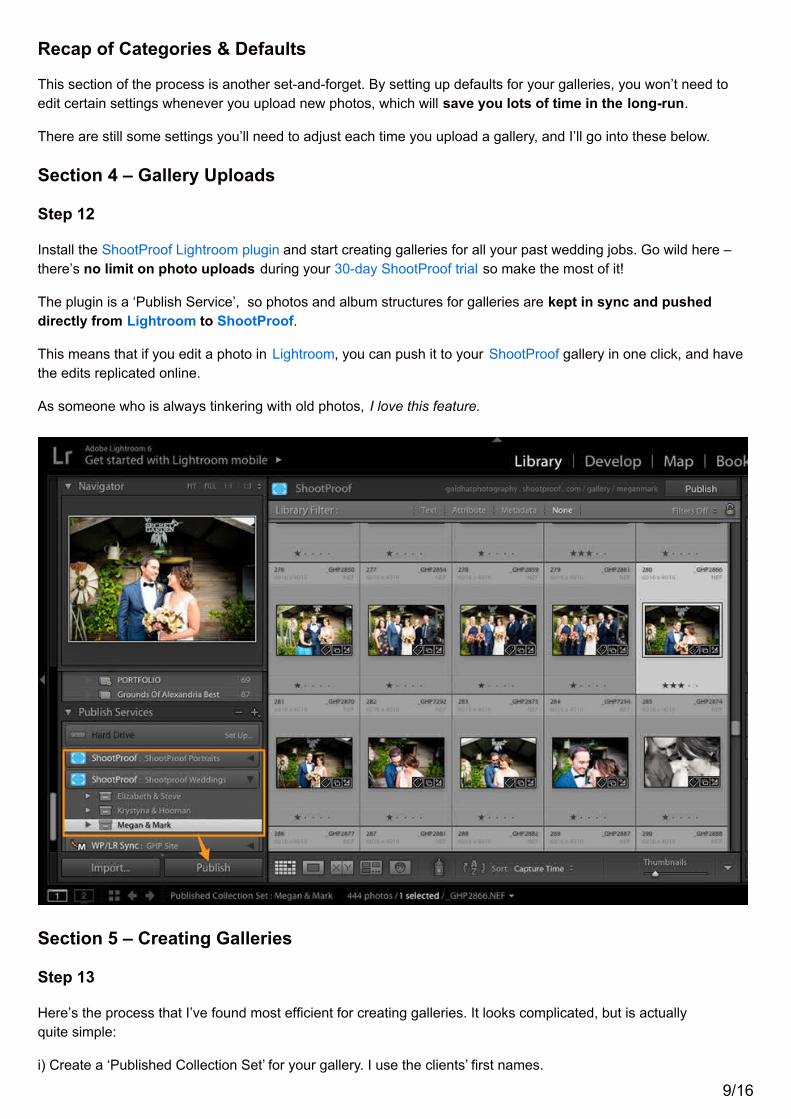
Install the ShootProof Lightroom plugin and start creating galleries for all your past wedding jobs. Go wild here –there’s no limit on photo uploads during your 30-day ShootProof trial so make the most of it!
The plugin is a ‘Publish Service’, so photos and album structures for galleries are kept in sync and pusheddirectly from Lightroom to ShootProof.
This means that if you edit a photo in Lightroom, you can push it to your ShootProof gallery in one click, and havethe edits replicated online.
As someone who is always tinkering with old photos, I love this feature.
Section 5 – Creating Galleries
Step 13
Here’s the process that I’ve found most efficient for creating galleries. It looks complicated, but is actuallyquite simple:
i) Create a ‘Published Collection Set’ for your gallery. I use the clients’ first names.
9/16

ii) Create a Published Collection inside it, naming it your clients’ names + wedding. i.e. Megan & Mark Wedding.
iii) Drag all the photos from your original wedding catalogue into the Published Collection, highlight the galleryname, then hit Publish.
[Pro Tip: for those in Australia and other countries which have terrible upload speeds – choose a smaller photo size to increase the speed of uploads. I’ll show you what to do when a client orders a print at the end of this guide.]
Step 14
When the upload is complete, visit the gallery in your ShootProof account and set a pretty cover photo. Then work your way down the options, doing the following:
i) Set a gallery expiration date 29 days from now. (Or a duration to ensure it’s within your free ShootProof trialperiod.)
ii) Make sure your ‘Gallery Access’ is set to be ‘Public – Password’ (which it should be if you set up your defaultscorrectly in Step 11). Then tick the ‘Email Required’ box and enter a password.
I recommend using the same password for every gallery – you’ll see why in a bit.
Finally, have a quick glance to see all the other gallery settings look ok to you.
Recap of Gallery Creation/Uploads
Hopefully by this stage you’ve already uploaded a few galleries of your previous clients’ weddings.
Depending on your Internet/computer speeds, you should be able to upload multiple galleries at once , then set all the gallery settings in one pass.
[Pro Tip: simultaneously uploading multiple galleries to ShootProof via Lightroom can slow down your LR develop module. If you want to continue with your editing while uploading, I’d recommend your use thefree ShootProof desktop uploader.]
Step 15
Now it’s time to email your previous clients. Here’s the process I use for this:
i) Copy all the clients’ email addresses and paste them into the Bcc field of your mail window. Make it’s Bcc, not To or cc!
[Pro Tip: if you’re pasting a list of email addresses into certain email clients (such as Mac Mail), it may not recognise each one as a separate email address. To get around this, paste your list into an Excel column, then use the formula =XX&”,” to add commas to the end of each email address. Then copy/paste them into the Bcc: field of your email client. Change the XX to whatever your first email address’ cell is in Excel, and place the formula in the adjacent cell.]
ii) Compose your email. Here’s an example that worked well for me:
10/16

Download the text by clicking the image. I’ve highlighted the sections you need to change in red.
The highlighted link you need to insert is the link to your ShootProof homepage (as opposed to the client’s specificgallery). The password will be the global one you created (which is why I recommended keeping it the same foreveryone).
By doing it in this way, you’ll only need to send one template email to all your past clients, saving you lots oftime.
To find the link to your ShootProof homepage, go to Studio > ShootProof Homepage > View Homepage in the mainmenu.
iii) Before hitting send, log out of ShootProof. Then compose an email to yourself with the gallery URL and send it.Next, click the link in the email you receive and run through the entire process as a client, making sure everythingworks.
Unfortunately you can’t test the automated email (since you’d need to wait until 7 days before the gallery expires totrigger the first one), so just double check those settings separately.
When you’re happy everything’s set up, hold your breath and click SEND. All your hard work is about to pay off –it’s time to sell your photos!
Final Recap of Entire Process
All your past clients are about to receive a link to your ShootProof homepage, from where they can accessa gallery of all their photos. There’s a good chance that your clients won’t have looked at their wedding photosrecently, and this will have a big impact on making print sales.
Your clients will no doubt email all their friends and family to let them know about the gallery so they can relive thebig day too (note to self: mention sharing the gallery link in the email to clients!)
11/16
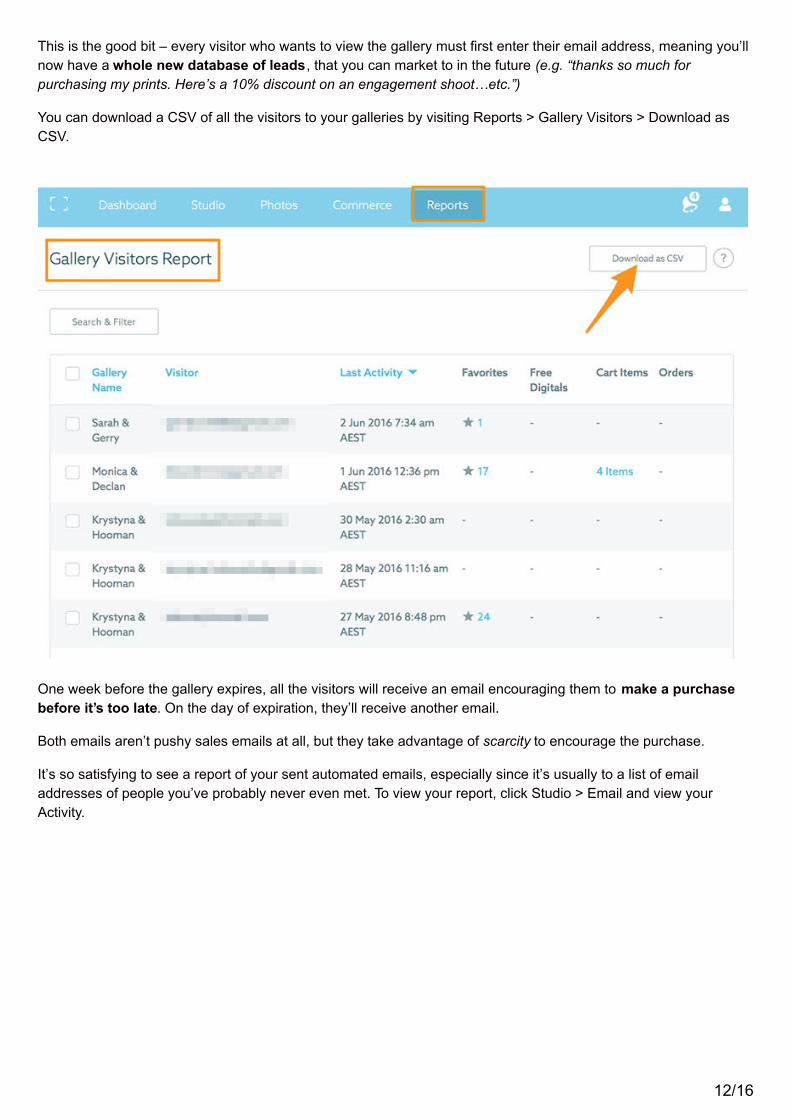
This is the good bit – every visitor who wants to view the gallery must first enter their email address, meaning you’llnow have a whole new database of leads, that you can market to in the future (e.g. “thanks so much forpurchasing my prints. Here’s a 10% discount on an engagement shoot…etc.”)
You can download a CSV of all the visitors to your galleries by visiting Reports > Gallery Visitors > Download asCSV.
One week before the gallery expires, all the visitors will receive an email encouraging them to make a purchasebefore it’s too late. On the day of expiration, they’ll receive another email.
Both emails aren’t pushy sales emails at all, but they take advantage of scarcity to encourage the purchase.
It’s so satisfying to see a report of your sent automated emails, especially since it’s usually to a list of emailaddresses of people you’ve probably never even met. To view your report, click Studio > Email and view yourActivity.
12/16
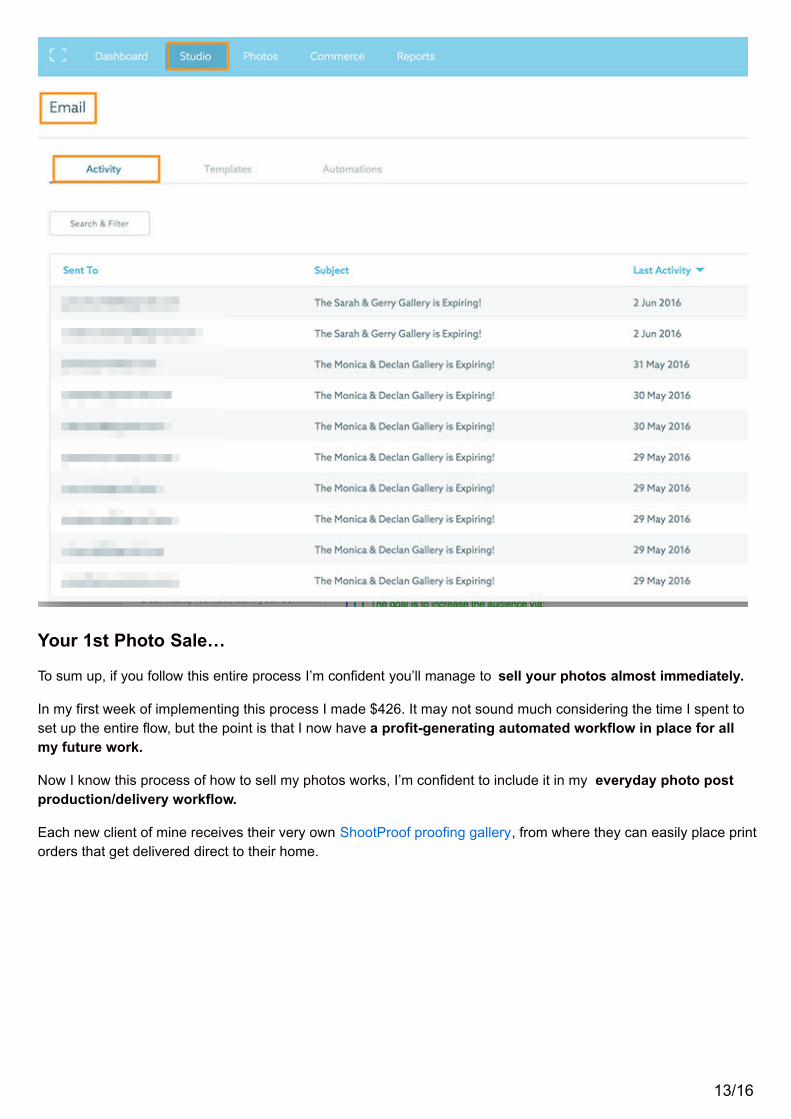
Your 1st Photo Sale…
To sum up, if you follow this entire process I’m confident you’ll manage to sell your photos almost immediately.
In my first week of implementing this process I made $426. It may not sound much considering the time I spent to set up the entire flow, but the point is that I now have a profit-generating automated workflow in place for all my future work.
Now I know this process of how to sell my photos works, I’m confident to include it in my everyday photo post production/delivery workflow.
Each new client of mine receives their very own ShootProof proofing gallery, from where they can easily place print orders that get delivered direct to their home.
13/16

A ShootProof Category Page showing multiple Galleries
Being able to offer an online gallery such as ShootProof to my clients opens up a whole new door to priceexperimentation – I can charge less for portrait and engagement sessions (thus attracting more of them), safe inthe knowledge that the associated print sales will generate new income.
The best part is, whenever the client shares the gallery, there’s another opportunity to sell photos. Most of thephoto sales I make are from people I’ve never heard of, which indicates that the clients’ friends are makingpurchases too.
Print sales are made while I sleep, and products are fulfilled automatically without my intervention. It’s the perfectsales system!
14/16

You can check a summary of your recent sales and gallery activity in the ShootProof dashboard.
One final thing – for those poor people out there with crappy Internet speeds (Australia, you suck!), here’s a handyworkaround:
Upload your photos at a smaller size (I use 580px tall) to speed up the process. Then when you get notified that aclient has placed an order, simply click ‘Replace’ to swap out the files in question with larger versions.
It’s a bit of a pain in the a$$, but thankfully ShootProof makes this process very easy.
15/16
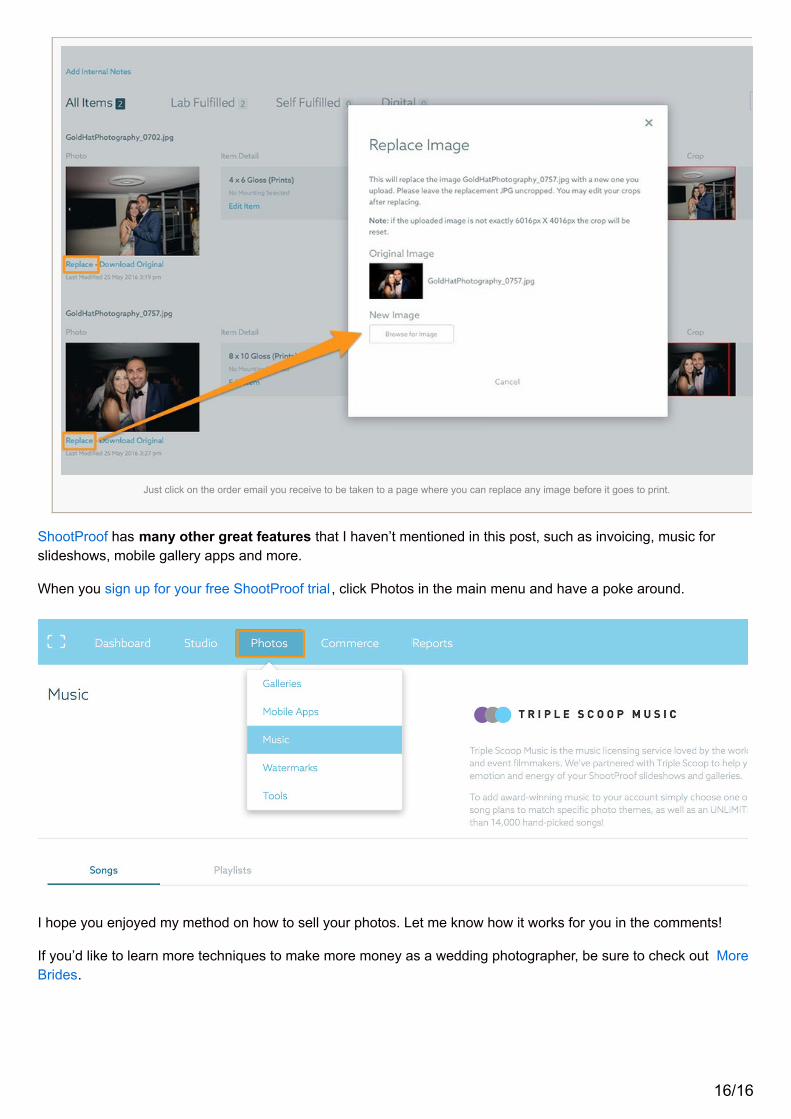
Just click on the order email you receive to be taken to a page where you can replace any image before it goes to print.
ShootProof has many other great features that I haven’t mentioned in this post, such as invoicing, music forslideshows, mobile gallery apps and more.
When you sign up for your free ShootProof trial , click Photos in the main menu and have a poke around.
I hope you enjoyed my method on how to sell your photos. Let me know how it works for you in the comments!
If you’d like to learn more techniques to make more money as a wedding photographer, be sure to check out MoreBrides.
16/16