how to make games in makecode arcade · if this is your first time with raspberry pi, here is the...
TRANSCRIPT

How to Make Games in MakeCode ArcadeCreated by Isaac Wellish
Last updated on 2019-04-04 07:10:15 PM UTC

Overview
Get your joysticks ready, we're throwing an arcade party with games designed by you & me! That's right you heard me.We can design our own games, and, with no coding experience required. Then we can upload these games to our ownhardware like a Raspberry Pi Zero (https://adafru.it/Bi2) to play them on the big screen!
How? With Microsoft MakeCode Arcade (https://adafru.it/DCY). MakeCode Arcade is a web-based, beginner-friendlycode editor to create retro arcade games for the web and for microcontrollers.
Please read through the below guide on using MakeCode Arcade with the Raspberry Pi Zero before continuing:
Guide: MakeCode Arcade with Raspberry Pi Zero (https://adafru.it/DJ3)
First we'll go over how to use and navigate MakeCode Arcade.
After that, we'll learn how to create our own custom games on the platform to upload to the Raspberry Pi Zero.
We'll run through how to build the game below as the main example for the guide.
Beta Zone: MakeCode Arcade is still in its beta. It might still have a few rough edges...�
© Adafruit Industries https://learn.adafruit.com/how-to-make-games-on-makecode-arcade Page 3 of 23

© Adafruit Industries https://learn.adafruit.com/how-to-make-games-on-makecode-arcade Page 4 of 23

Parts and Setup
This guide (https://adafru.it/DJ4) will give most of the necessary info on options for parts and setup with the RaspberryPi Zero. If you are looking for Adafruit M4 boards, try this guide (https://adafru.it/DJ5).
https://adafru.it/DJ6
https://adafru.it/DJ6
If this is your first time with Raspberry Pi, here is the easiest way to get the necessary parts for this project:
1 x Joy Bonnet Pack without Soldering - Includes Pi Zero WHIncludes Raspberry Pi Zero, Joy Bonnet, HDMI adapter, USB adapter and a plastic enclosure
ADD TO CART
1 x SD/MicroSD Memory Card (8 GB SDHC)Holds the code for the games
ADD TO CART
1 x Micro USB CablePowers the Raspberry Pi Zero and connects to computer
ADD TO CART
1 x HDMI CableConnects Raspberry Pi Zero to monitor or TV for viewing the games
ADD TO CART
Other Parts Needed:
1 x Computer with an SD card slot.To program the games and the SD card for the Raspberry Pi
1 x USB MicroSD Card Reader/WriterFor programming a SD card
OUT OF STOCK
If your computer does not have an SD card slot but does have a USB slot, you can use the below USBMicroSD card writer/reader below instead.�
© Adafruit Industries https://learn.adafruit.com/how-to-make-games-on-makecode-arcade Page 5 of 23

Navigating MakeCode Arcade
Head to the MakeCode arcade homepage at https://arcade.makecode.com/ (https://adafru.it/DCY) and click "NewProject".
MakeCode Arcade User Interface
On the right side of the screen is our editing
space. This is where we'll drag and drop blocks
onto to create the game.
The center column is where we'll find all the
different blocks with which to choose from.
The game console on the left-hand side of the
screen is where our code comes to life and where
we can test our games out.
Code Block Types
There are two ways to program in MakeCode Arcade: with blocks and with javascript. Block-based programming isdesigned for beginners and allows users to drag and drop code blocks into an editor to program. Javascript is a syntaxbased language for more experienced programers. We'll be using the block-based method in this guide. Here are thedifferent kinds of code blocks to program our games with in MakeCode Arcade:
Sprites
This category allows us to create and define
Sprites (https://adafru.it/DJ7). Sprites are the
objects what we control in our games. They can
be players, enemies, food, projectiles, and more!
Controller
© Adafruit Industries https://learn.adafruit.com/how-to-make-games-on-makecode-arcade Page 6 of 23

These blocks let us define which buttons control
what. For example if we want button A on our
controller to shoot out arrows.
Game
Let us control the timeline of the game as well as
when the player loses or wins.
Music
Add music and sound
effects.
Scene
© Adafruit Industries https://learn.adafruit.com/how-to-make-games-on-makecode-arcade Page 7 of 23
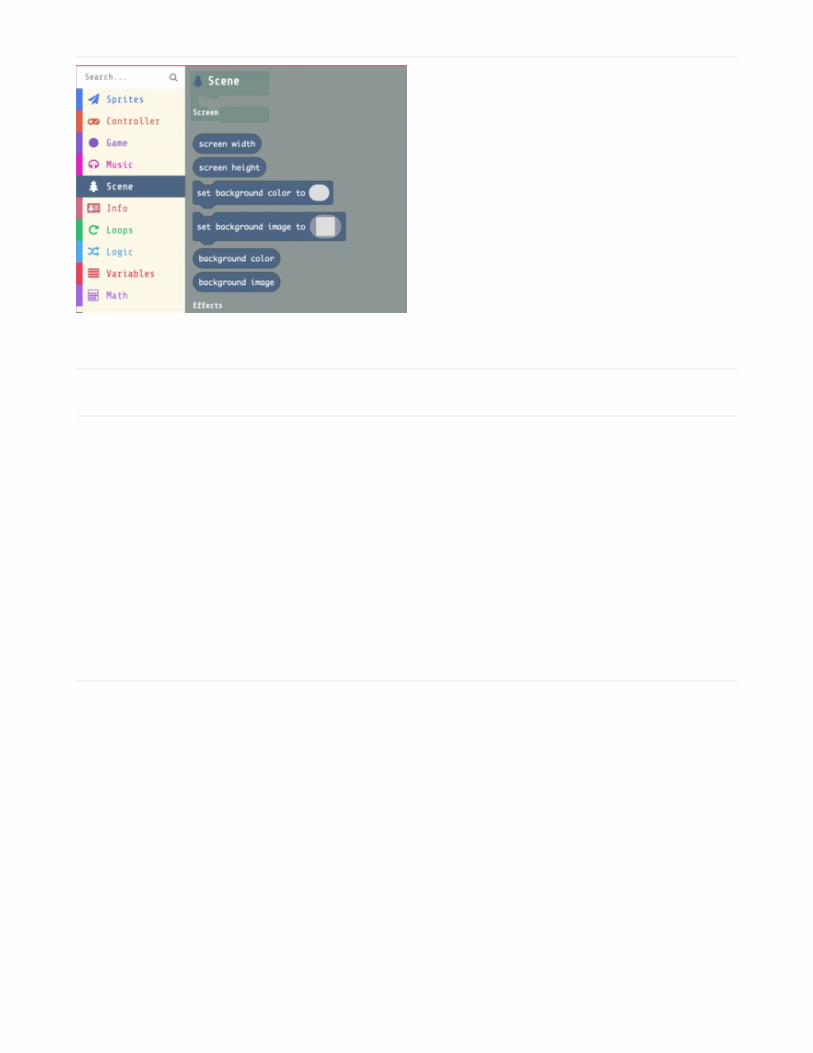
Control the background and screen dimensions of the
game.
Info
Control core game elements such as score, lives
and game clock.
Loops
© Adafruit Industries https://learn.adafruit.com/how-to-make-games-on-makecode-arcade Page 8 of 23

For repeating certain code blocks on different
conditions.
Logic
Tell certain code blocks to execute based on a
condition.
Variables
© Adafruit Industries https://learn.adafruit.com/how-to-make-games-on-makecode-arcade Page 9 of 23

Create variables which are used to store data like
the velocity of a sprite.
Math
Allow various mathematical functions. Can be
used to modify variables for example.
Advanced
© Adafruit Industries https://learn.adafruit.com/how-to-make-games-on-makecode-arcade Page 10 of 23

Access code blocks to:
Images: Create and edit graphics of sprites and
backgrounds.
Functions: Create custom functions to call within
the program.
Arrays: Create lists of data.
Text: Create strings (https://adafru.it/DJ8). Could
be used to create speech bubbles for characters.
Console: Help with debugging or troubleshooting
errors in the program.
Extensions: Access additional block types like
animations.
© Adafruit Industries https://learn.adafruit.com/how-to-make-games-on-makecode-arcade Page 11 of 23

Programming the Game
Game Rules
Blinka the purple snake has 4 seconds to get to the star. Clock resets and the score increases by 1 each time thisis accomplished. Blinka must avoid Sparky the blue smoke monster who is bouncing around the screen. Each time Sparky hitsBlinka, one out of 3 lives is lost.Sparky's speed increases every 5 seconds.
Feel free to follow along by creating a new project in MakeCode Arcade or by viewing the completed project.
© Adafruit Industries https://learn.adafruit.com/how-to-make-games-on-makecode-arcade Page 12 of 23

https://adafru.it/DJ9
https://adafru.it/DJ9
Background
© Adafruit Industries https://learn.adafruit.com/how-to-make-games-on-makecode-arcade Page 13 of 23

In an on start loop, grab a set backgroundimage block and create the desired background
image for the game to start on.
You can edit this image by clicking the part of the
block with the thumbnail.
Next add a pause block to let the intro image stay
on the screen for one second .
Then set the background image and background
color to black.
Creating Blinka's Sprite
Now drag a set mySprite block under the last
block we set.
Click the drop down menu next to mySprite.
Create a new variable and name it Blinka or what
ever character name you want.
© Adafruit Industries https://learn.adafruit.com/how-to-make-games-on-makecode-arcade Page 14 of 23

Next, click the thumbnail for the sprite and create
your desired sprite.*
Click the drop down menu at the end of the block
and select the Player sprite type.
Now add a set position block to place Blinka in a
specific spot each time the game starts. By
clicking on the number values, the program allows
us to set x and y values visually. Just move the
mouse over the game console to choose a place
to put the sprite.
Lastly add a move block and click the plus sign to
set arrow keys as the way we move Blinka around.
*MakeCode Arcade usually allows importing images to
use for background and sprites by dragging and
dropping png files into the editor space. However at the
time of this writing, this functionality is not available due
to being in Beta Mode.
© Adafruit Industries https://learn.adafruit.com/how-to-make-games-on-makecode-arcade Page 15 of 23

Sparky's Sprite
Drag in set mySprite block, create new variable
called Sparky , make the sprite graphic and
change the kind to Enemy .
Set to a position in the game.
Create two new variables called SparkySpeedxand SparkySpeedy .
Also in the variables block section, drag in two setmySprites to blocks. Set one
to SparkySpeedx with a value of 40 and the
other to SparkySpeedy with a value of 60 .
Now, with a set mySprite velocity block, choose
Sparky as the sprite, and drag in
the SparkySpeedx and SparkySpeedy as the
velocity values. This will allow us to increase the
speed of Sparky over time later!
Lastly, drag in a set mySprite to stay in screenblock, change the drop down to bounce on walland switch to on .
Life, Food and Countdown!
© Adafruit Industries https://learn.adafruit.com/how-to-make-games-on-makecode-arcade Page 16 of 23

Drag in a set life block and set the desired value.
Next, drag in set mySprite block, create new
variable called Star , make the sprite graphic and
change the kind to Food .
Set its location.
Drag in a start countdown block and set the
desired value.
Reaching Stars
In the sprite blocks category, drag in an on spriteof kind block, set kind to Player and overlaps
kind to Food .
Play a sound when Blinka hits each star.
Add a change score by 1 block.
Next we want the star to move to a new random
location. To do this drag in a set position block. In
the math blocks category, find and drag in a pickrandom 0 to 0 block inside both x and y values.
Set ranges accordingly.
Start the countdown over.
Losing Lives
© Adafruit Industries https://learn.adafruit.com/how-to-make-games-on-makecode-arcade Page 17 of 23

Drag in an on sprite of kind block, set kind to
Player and overlaps kind to Enemy .
Play desired sound when Sparky hits Blinka.
Lose a life.
Move Sparky to a random new location.
Shake camera to show player a life has just been
lost.
Increasing Sparky's Speed
Drag in an on game update every x ms block and
change value to desired amount of time intervals
in which to increase Sparky's speed. 5000ms is 5
seconds.
From the variables block category, drag in two
change mySprite by blocks and enter value of
desired speed increase.
Then to update Sparky's speed, drag in a setvelocity block, changing the sprite to Sparky and
the vx and vy to SparkySpeedxand SparkySpeedy .
All done with code!
© Adafruit Industries https://learn.adafruit.com/how-to-make-games-on-makecode-arcade Page 18 of 23

Connecting with Hardware
Assembling the Pi and Bonnet and Enclosure
© Adafruit Industries https://learn.adafruit.com/how-to-make-games-on-makecode-arcade Page 19 of 23

Place the Pi Zero inside of the bottom enclosure
piece and snap in place.
Push the Joy Bonnet over the headers on the Pi
and firmly press in place.
Firmware
If your SD card comes with files on it, delete them, or just format the SD card as FAT32 (https://adafru.it/DJa). Thendownload the ZIP file below, unzip it, and copy all files to the root directory of the SD card.
After this, there should for example file named 9.0.3.gz in right in the root folder of the SD card. There should not be
an arcade folder on the SD card. The ZIP below below contains binaries built from https://github.com/Microsoft/uf2-
linux (https://adafru.it/DJb) .
© Adafruit Industries https://learn.adafruit.com/how-to-make-games-on-makecode-arcade Page 20 of 23

https://adafru.it/DJc
https://adafru.it/DJc
When the files have finished copying, eject the SD card from your computer and place it into the MicroSD slot in theRaspberry Pi Zero.
Download the Game and upload to the Pi
Connect the Pi to your computer via micro USB
cable -- be sure to plug into the second USB port
on the Pi, the one closer to the HDMI port. The first
port is power only.
In the MakeCode Arcade program press
the Download button and click the "x" when asked
to "pair your arcade". You should then be given
options to select type of board.
Select "Adafruit Joy Bonnet". Then click the "x"
again when asked to pair the arcade to the editor.
This should create a file named arcacde-something.uf2 .
Copy it to ARCADE drive that should be visible on
the computer to which your Pi is connected with
the USB cable.
With the Pi still connected to the computer, plug into a monitor or TV via HDMI and play away!
Troubleshooting
If you aren't getting a signal on your TV or monitor from the Pi:
Try booting up the Pi after it's connected to the TV or monitor via HDMI.Make sure the Pi is plugged into the computer (via micro USB) that was used to download the arcade files.Try reformatting the SD card to FAT32 (https://adafru.it/DJa) then adding the necessary files from this guide.
© Adafruit Industries https://learn.adafruit.com/how-to-make-games-on-makecode-arcade Page 21 of 23

© Adafruit Industries https://learn.adafruit.com/how-to-make-games-on-makecode-arcade Page 22 of 23

Going Further
How can you modify this game to make it even crazier? Some thoughts:
Add projectiles to dodge which shoot across the screen.Give Blinka the ability to shoot and destroy the projectiles!
Check out the tutorials at https://arcade.makecode.com/ (https://adafru.it/DCY) to learn even more!
Happy gaming!
© Adafruit Industries Last Updated: 2019-04-04 07:10:15 PM UTC Page 23 of 23