how to make a skeleton puppet - montmarte.netmontmarte.net/assets/uploads/skeleton.pdf · how to...
TRANSCRIPT

Copyright of Mont Marte International Pty Ltd ACN 101589897
How to make aSkeleton Puppet
www.montmarte.netwww.montmarte.net
.
What You Need:
macr0011 Mont marte pva craft glue 250gmpn0084 mont marte graphite grip pencilsmmcc1001 mont marte cartoon clay white 100g x2mmcc1002 mont marte cartoon clay black 100gmmsp0002 mont marte clay tool set 11 pce
Long nose pliersroll of 1.25 or 1.57 mm tie wire *Scissorsroll of 3 ply crochet thread black
* 1.57 mm wire is thicker and will provide a stronger armature but it is a little harder to work with.
www.montmarte.netwww.montmarte.netwww.montmarte.netwww.montmarte.netCopyright of Mont Marte International Pty Ltd ACN 101589897
Step 1
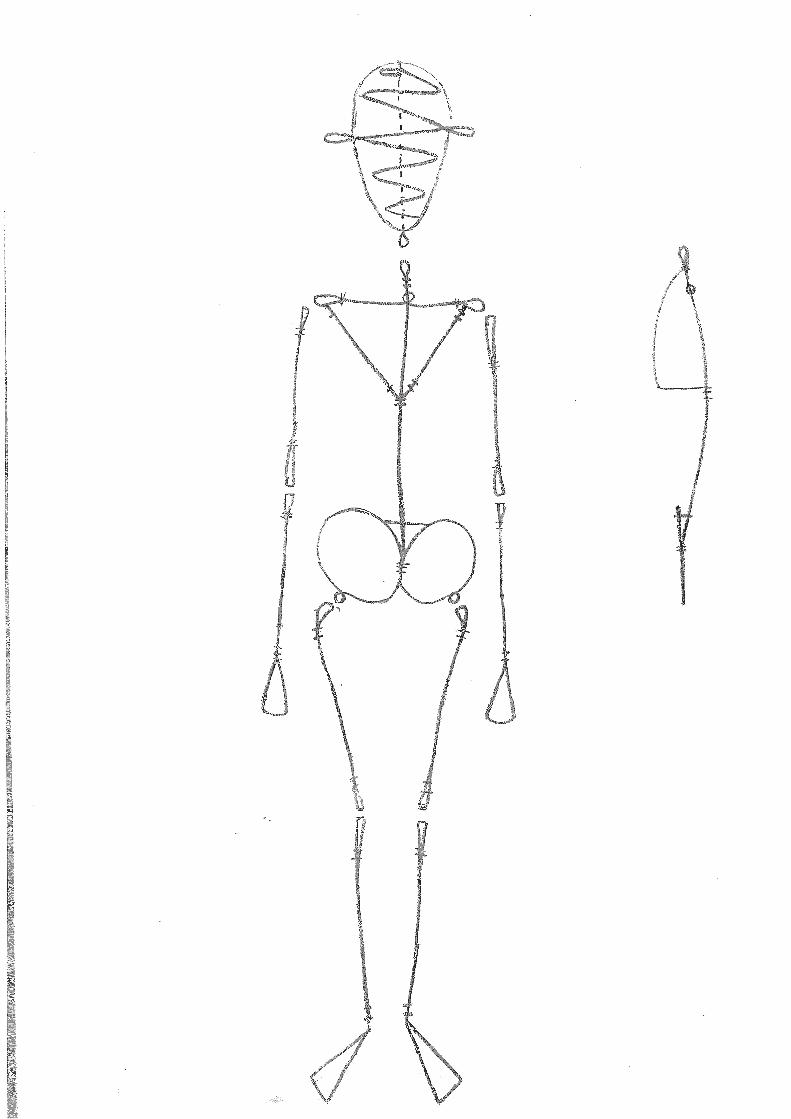
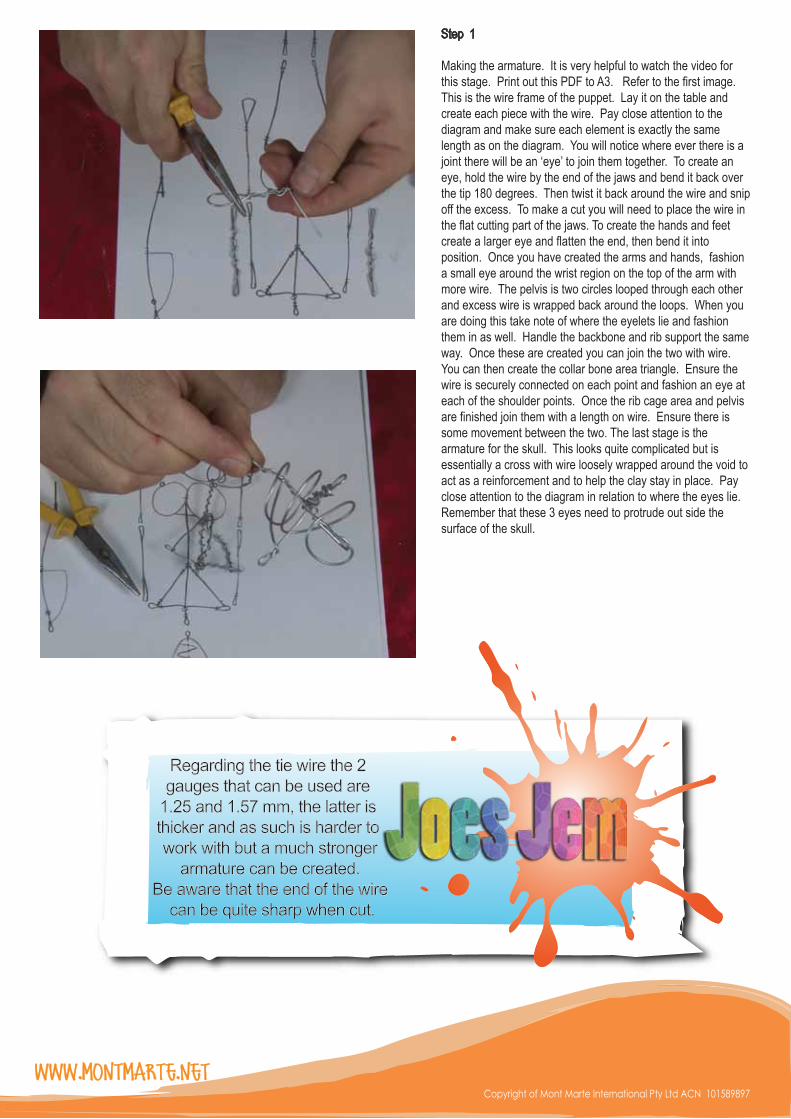
Making the armature. It is very helpful to watch the video for this stage. Print out this PDF to A3. Refer to the first image. This is the wire frame of the puppet. Lay it on the table and create each piece with the wire. Pay close attention to the diagram and make sure each element is exactly the same length as on the diagram. You will notice where ever there is a joint there will be an ‘eye’ to join them together. To create an eye, hold the wire by the end of the jaws and bend it back over the tip 180 degrees. Then twist it back around the wire and snip off the excess. To make a cut you will need to place the wire in the flat cutting part of the jaws. To create the hands and feet create a larger eye and flatten the end, then bend it into position. Once you have created the arms and hands, fashion a small eye around the wrist region on the top of the arm with more wire. The pelvis is two circles looped through each other and excess wire is wrapped back around the loops. When you are doing this take note of where the eyelets lie and fashion them in as well. Handle the backbone and rib support the same way. Once these are created you can join the two with wire. You can then create the collar bone area triangle. Ensure the wire is securely connected on each point and fashion an eye at each of the shoulder points. Once the rib cage area and pelvis are finished join them with a length on wire. Ensure there is some movement between the two. The last stage is the armature for the skull. This looks quite complicated but is essentially a cross with wire loosely wrapped around the void to act as a reinforcement and to help the clay stay in place. Pay close attention to the diagram in relation to where the eyes lie. Remember that these 3 eyes need to protrude out side the surface of the skull.
Regarding the tie wire the 2 gauges that can be used are
1.25 and 1.57 mm, the latter is thicker and as such is harder to work with but a much stronger
armature can be created.Be aware that the end of the wire
can be quite sharp when cut.

www.montmarte.netwww.montmarte.netwww.montmarte.netwww.montmarte.netCopyright of Mont Marte International Pty Ltd ACN 101589897
Step 2
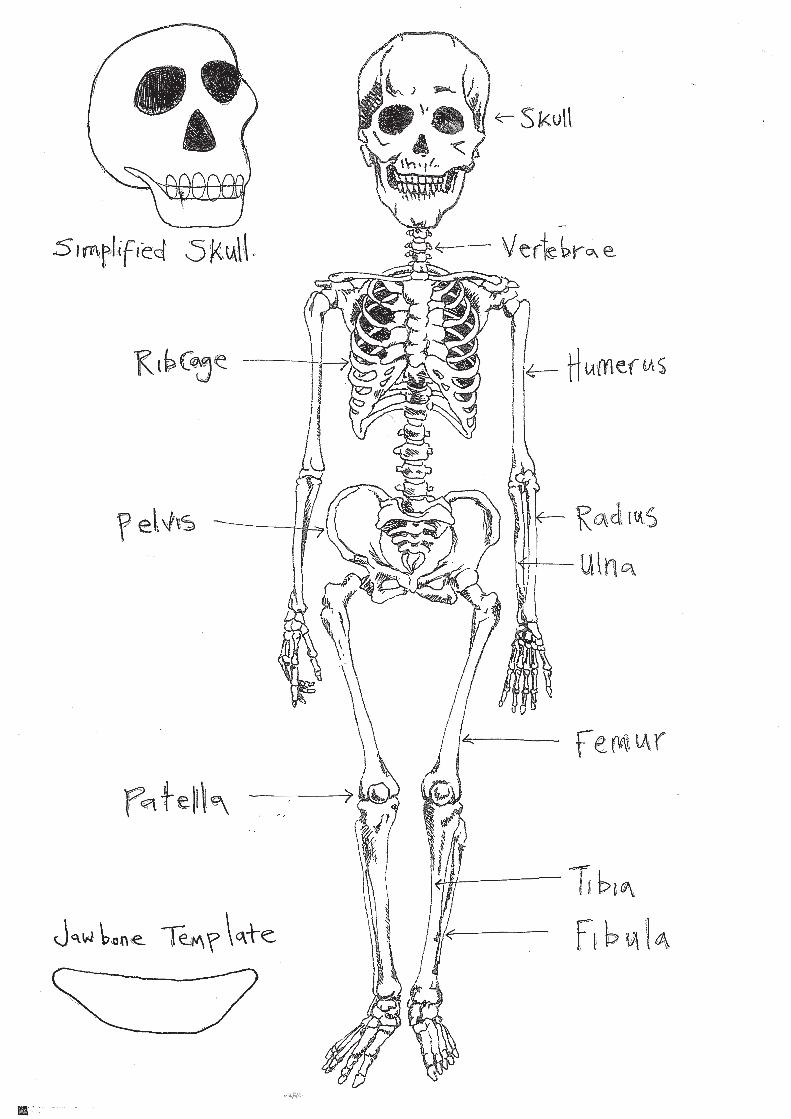
Building up the elements. For this step lay the 2nd image of the skeleton on the table. Lay the wire armature pieces on top of the diagram to familiarise yourself. First create a Medium Grey from 5 parts White Cartoon Clay to 1 part Black. Fill the rib cage with this mix. Ensure it is nice and smooth. Next create a tube about 8 mm thick and lay in the sternum and the backbone. Ensure the wire is covered. Next create another roll 5 mm in diameter and apply it around the grey base to suggest the ribs. Make 4 on each side and smooth the ends on the backbone and the sternum. For the pelvis roll out some clay into a flat form about 4 mm thick, place the pelvis armature onto this and lay another the same on top of the armature and pinch them together. Trim off the excess with some scissors. Ensure the eyes at the bottom of the pelvis are exposed. Fashion a flattened cone and apply it to the back of the pelvis to suggest a coxis. The Humerus and Femur bones are created by sliding the armatures into rolled tubes and snipping them to size. Fashion the bones a little thicker at the extremities with more clay. The fore arms are created the same way but the hands are suggested with a flattened ball and the Phalanges and thumb bones are suggested with very thin tapering tubes that are applied on top and smoothed in. Again ensure the eyelet is exposed. So to the feet are created the same way. The skull is created by filling the interior of the armature. Create a thin skin and wrap it over the skull and smooth the join. Ensure each eyelet on the skull is exposed. To create a jaw refer to the diagram, and using the template on the bottom left of the sheet, faithfully reproduce this with a flattened piece of clay. Create 20 small balls and apply them to the skull on top of the jaw. Wrap this around the bottom part of the skull. To suggest the hollows of the eye sockets and the nasal cavity create two eye shapes and a triangle shape out of black clay and place them into the appropriate positions. Let these parts dry over night.
Step 3
Assembling the Skeleton. Lay all of the elements into position and using the tie wire join each element together by twisting the wire together and trimming off the excess. Be careful not to squash any of the elements when you do this. Refer to the skeleton diagram to get the parts correctly joined.
...Until next time
Keep on creating
www.montmarte.netwww.montmarte.netwww.montmarte.netwww.montmarte.netCopyright of Mont Marte International Pty Ltd ACN 101589897
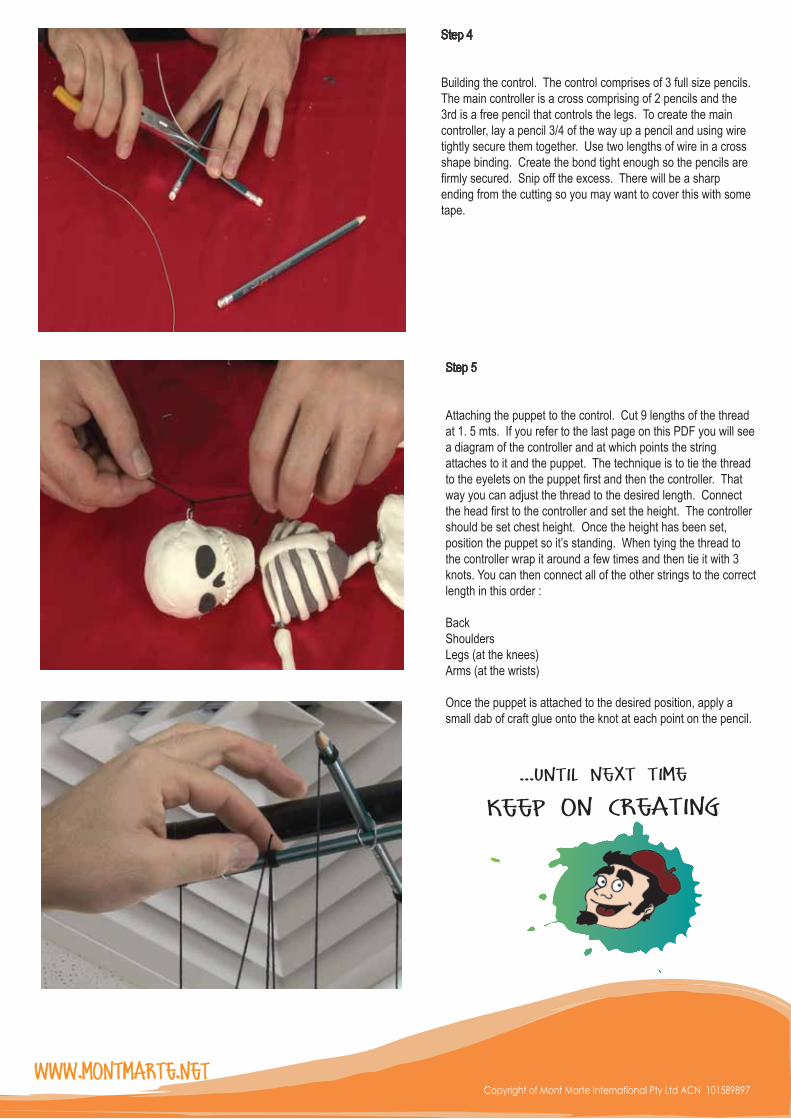
Step 4
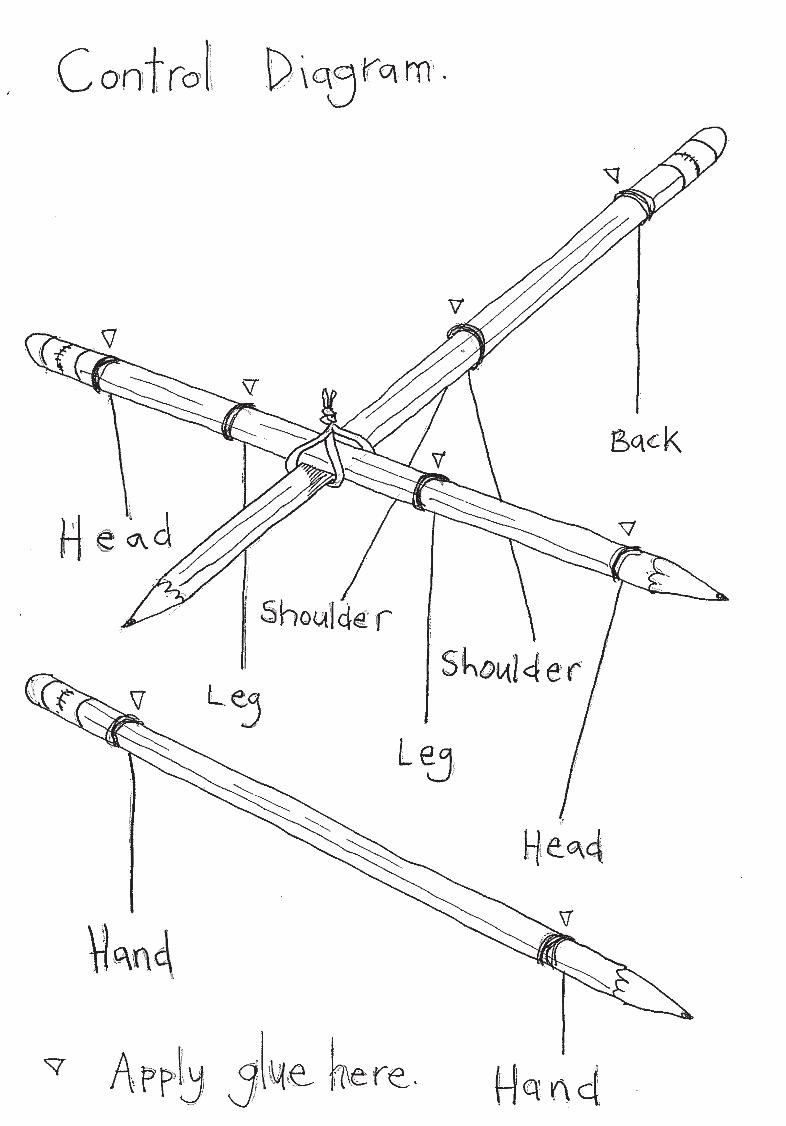
Building the control. The control comprises of 3 full size pencils. The main controller is a cross comprising of 2 pencils and the 3rd is a free pencil that controls the legs. To create the main controller, lay a pencil 3/4 of the way up a pencil and using wire tightly secure them together. Use two lengths of wire in a cross shape binding. Create the bond tight enough so the pencils are firmly secured. Snip off the excess. There will be a sharp ending from the cutting so you may want to cover this with some tape.
Step 5
Attaching the puppet to the control. Cut 9 lengths of the thread at 1. 5 mts. If you refer to the last page on this PDF you will see a diagram of the controller and at which points the string attaches to it and the puppet. The technique is to tie the thread to the eyelets on the puppet first and then the controller. That way you can adjust the thread to the desired length. Connect the head first to the controller and set the height. The controller should be set chest height. Once the height has been set, position the puppet so it’s standing. When tying the thread to the controller wrap it around a few times and then tie it with 3 knots. You can then connect all of the other strings to the correct length in this order :
BackShouldersLegs (at the knees)Arms (at the wrists)
Once the puppet is attached to the desired position, apply a small dab of craft glue onto the knot at each point on the pencil.