how to lay laminate and wood flooring 1 -...
TRANSCRIPT
How to lay laminate and wood flooring
1 Choose the right laminate or wood flooring
Not all laminate and wood flooring is suitable for every room, so check the pack instructions first. Wickes’ laminate, solid and engineered wood flooring is supplied with detailed installation instructions. The range on offer, the choice of methods of installation, its durability, and whether it’s compatible with underfloor heating is shown in Fig. 8 (see page 4).
Calculate how much flooring you needMultiply the maximum length of the room by the maximum width to get the area in square metres and add 10% to allow for wastage. Always round up the number of packs you purchase.
Kit
Wear gloves and goggles when cutting tiles. Always use an RCD device when employing any power tools.
Tool List > Fitting kit
> Tape measure
> Fine-toothed saw or jigsaw
> Hammer
> Drill
> Screwdriver
Safety Equipment> Face mask
> Safety glasses
> Gloves
The Wickes Project Guide
2 Prepare the subfloorAll Wickes’ laminate, solid and engineered wood flooring can be laid on any smooth sub-floor, timber or concrete. The subfloor needs to be flat, dry and clean.
Concrete subfloorsDo not lay flooring on to recently laid concrete. The thickness of the concrete will determine the drying time, but in all cases a minimum of two months is required for concrete to dry thoroughly.
Allow around one day per mm for the first 50mm and then 1½ days for each additional mm of thickness thereafter.
The subfloor must be flat. If it has hollows deeper than 3mm over a 1m length, level it first using Wickes’ Floor Levelling Compound.
Laminate and engineered or solid wood flooring all create a beautiful and hard-wearing floor, which you can fit yourself using this guide. Find out how to prepare the sub-floor, and lay laminate and engineered wood floors – which are the easiest to work with – as well as how to fit both PTG clip-together solid wood floors and those that have to be glued down or nailed, requiring a little more skill.

2
3 How to lay laminate and engineered wood flooringLaminate and engineered wood flooring are the easiest to fit because the boards simply click together.
1. Install the damp-proof membrane and underlay Fig. 1 shows the options available.
2. Begin laying the floor Establish a starting point. This is usually the longest wall and and furthest away from the door. Use spacers to provide the correct expansion gap of around 12mm between the wood and the skirting as you work.
3. Stagger end joints The joints at the end of each board should be a minimum of 100mm apart.
4. Adjust doors and frames To allow the door to be opened once the flooring is installed, you’ll generally need to remove it so it can be shaved down.
Timber subfloorsDon’t use a plastic damp-proof membrane over a timber subfloor. If a moisture barrier is required – for example at ground floor level – use bitumen-backed building paper and then the flooring underlay roll or soft board underlay. Failure to protect the flooring from moisture penetration from below may lead to board expansion and distortion.
Fig. 1 Choosing a damp-proof membrane and underlay
Product Subfloor Damp proof membrane options (DPM) Underlay options
Flooring type Subfloor type
1000 gauge membrane
Bitumen-backed building paper
Liquid DPM
High performance underlay
Underlay roll
High performance underlay
Fibreboard
Laminate 6mm Concrete* *
Laminate 6mm Wood
Laminate 7mm, 8mm & 12mm Concrete *
Laminate 7mm, 8mm & 12mm Wood
Engineered wood 10.5mm & 13.5mm Concrete
Engineered wood 10.5mm & 13.5mm Wood
All solid wood and PTG flooring Concrete ** ** ** ** ** **
All solid wood and PTG flooring Wood
*Not required with high performance underlay. **May be used when fitting the clip system flooring. Each product is supplied with detailed fitting instructions and these should be followed in all cases.
For laminate and engineered wood floors, lay a 1000 gauge damp-proof membrane (DPM) sheet, or use Wickes’ High Performance Underlay, which has an integrated DPM. These can also be used for a solid wood floor that clips together. For solid wood floors that don’t clip together, follow the instructions on page 3.
Fig. 2 Cutting underneath a door frame
Before you start Leave the unopened packs of flooring lying horizontally on the floor in the room where they are to be laid for at least 72 hours so the wood can acclimatise to the room’s temperature. Do not stack near radiators or in direct sunlight.
Fig. 3 Removing the tongue from flooring
Chisel
Cut underneath the door frame (see Fig. 2). Sometimes it is easier to fit the flooring into the doorways if you remove part of the tongue from the flooring so it can be tapped together easily. If so, apply some PVA adhesive to the tongue to keep the flooring in place (see Fig. 3).
5. Remove spacers and add trims When all the flooring is laid, remove the spacers. Leave the expansion gap empty. Fit matching threshold strips in doorways and scotia around the perimeter of the floor to cover the expansion gaps.
4 How to lay solid wood flooring
Installation methods for solid wood flooringThe fixing method is usually determined by the subfloor. Solid wood can be glued to concrete, sand cement screed or anhydrite screed subfloors; glued or nailed to chipboard; glued or nailed to plywood or OSB (oriented strand board); nailed to battens or joists; and glued or PTG flooring can be nailed to existing floorboards.
Gluing a solid wood floorThe subfloor needs to be flat – no more than a 3mm difference over a 2 metre length – and dry. If you are in any doubt about the dryness of the subfloor, use a liquid damp-proof membrane. This option is not possible with an anhydrite (calcium sulphate) floor.
1. Dry lay the first boards Start at the longest wall and lay the first three rows dry with the tongues facing away from the wall. Do not lay the header joints in a line or too close to each other. They should be staggered by 200mm where possible and never less than 100mm.
2. Apply adhesive Do not use straps or clamps to make solid wood flooring tight. Wood flooring needs to be able to expand naturally and adjust to the room temperature. Spread the adhesive evenly do not dab and use the spreader provided in the tub. Pull back the three rows from the wall and apply floor adhesive to the subfloor. Do not apply it to the tongue and groove. Lay the flooring on to the adhesive and insert the spacers to keep the required expansion gap of 15mm.
3. Cut holes for radiator pipes If you have radiator pipes in the room, cut a hole using a self-feed drill bit and then cut away the flooring to leave a keyhole shape that can be placed around the pipe (see Fig. 4). Before drilling, check that your
3
pipe surrounds are big enough to conceal the edges of the hole – a 35mm diameter will often work, but might be too large for some pipe surrounds, especially if the pipe does not end up central in the hole.
4. Adjust doors and frames To allow the door to be opened once the flooring is installed, you’ll generally need to remove it so it can be shaved. Cut underneath the door frame (see Fig 2). Sometimes it is easier to fit the flooring into the doorways if you remove part of the tongue from the flooring so it can be tapped together easily. If so, apply some PVA adhesive to the tongue to keep the flooring in place (see Fig. 3).
5. Remove spacers and add trims When all the flooring is laid, remove the spacers. Leave the expansion gap empty. Fit matching threshold strips in doorways and scotia around the perimeter of the floor to cover the expansion gaps.
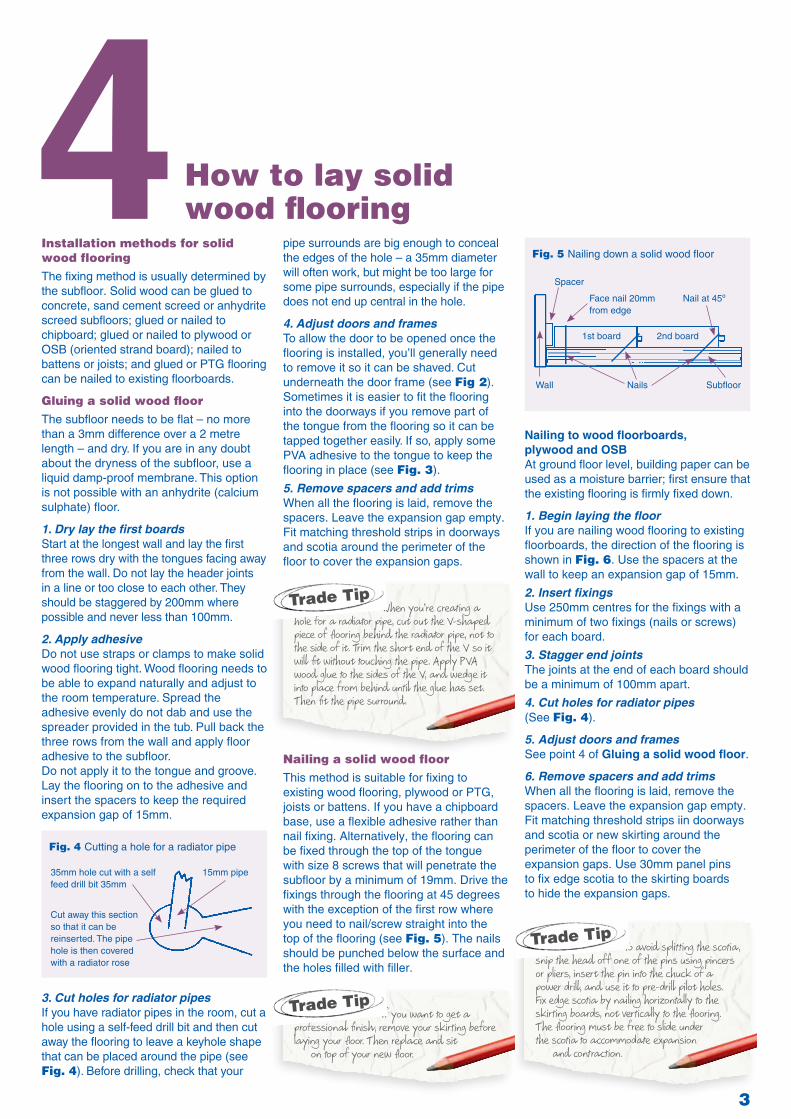
Nailing a solid wood floorThis method is suitable for fixing to existing wood flooring, plywood or PTG, joists or battens. If you have a chipboard base, use a flexible adhesive rather than nail fixing. Alternatively, the flooring can be fixed through the top of the tongue with size 8 screws that will penetrate the subfloor by a minimum of 19mm. Drive the fixings through the flooring at 45 degrees with the exception of the first row where you need to nail/screw straight into the top of the flooring (see Fig. 5). The nails should be punched below the surface and the holes filled with filler.
Nailing to wood floorboards, plywood and OSB At ground floor level, building paper can be used as a moisture barrier; first ensure that the existing flooring is firmly fixed down.
1. Begin laying the floor If you are nailing wood flooring to existing floorboards, the direction of the flooring is shown in Fig. 6. Use the spacers at the wall to keep an expansion gap of 15mm.
2. Insert fixings Use 250mm centres for the fixings with a minimum of two fixings (nails or screws) for each board.
3. Stagger end joints The joints at the end of each board should be a minimum of 100mm apart.
4. Cut holes for radiator pipes (See Fig. 4).
5. Adjust doors and frames See point 4 of Gluing a solid wood floor.
6. Remove spacers and add trims When all the flooring is laid, remove the spacers. Leave the expansion gap empty. Fit matching threshold strips iin doorways and scotia or new skirting around the perimeter of the floor to cover the expansion gaps. Use 30mm panel pins to fix edge scotia to the skirting boards to hide the expansion gaps.
Fig. 4 Cutting a hole for a radiator pipe
35mm hole cut with a self feed drill bit 35mm
Cut away this section so that it can be reinserted. The pipe hole is then covered with a radiator rose
15mm pipe
Fig. 5 Nailing down a solid wood floor
NailsWall
Spacer
1st board 2nd board
Subfloor
Face nail 20mm from edge
Nail at 45º
When you’re creating a hole for a radiator pipe, cut out the V-shaped piece of flooring behind the radiator pipe, not to the side of it. Trim the short end of the V so it will fit without touching the pipe. Apply PVA wood glue to the sides of the V, and wedge it into place from behind until the glue has set. Then fit the pipe surround.
Trade Tip
If you want to get a professional finish, remove your skirting before laying your floor. Then replace and sit on top of your new floor.
Trade Tip
To avoid splitting the scotia, snip the head off one of the pins using pincers or pliers, insert the pin into the chuck of a power drill, and use it to pre-drill pilot holes. Fix edge scotia by nailing horizontally to the skirting boards, not vertically to the flooring. The flooring must be free to slide under the scotia to accommodate expansion and contraction.
Trade Tip

Our Wickes Project Guides cover a wide range of indoor and outdoor projects, and are regularly updated. Pick them up in store or view them online at www.wickes.co.uk.Whilst every care has been taken to ensure that the product design, descriptions, specifications and techniques of constructing the products are accurate at the date of printing. Wickes products will inevitably change from time to time and the customer is advised to check that the design, descriptions, specifications and techniques of constructing any of the products described in this leaflet are still valid at the time of purchase or placing an order.© Wickes Building Supplies Limited 2014.All rights reserved. No part of this publication may be produced or transmitted in any form or by any means electronic, mechanical, photocopying, recording or therwise or stored in any retrieval system of any nature without the written permission of the copyright holder and the publisher.
4
Fig. 8 Installation methods for laminate and wood flooring
Product Installation method Suitable use
Glueless Click Tongue and groove
Floating Glue down Nail down Heavy domestic
Light commercial
Laminate 6mm
Laminate 7mm
Laminate 8mm & 12mm
Engineered wood 10.5mm & 13.5mm optional
Solid parawood 12mm *
Solid oak 18mm **
Bamboo *
*Not suitable for fixing over joists or battens. **May be used when fitting the clip system flooring.
Nailing to joists or battens When nailing PTG flooring to joists at ground level it is recommended that you cover the joists with a bitumen-backed building paper to protect against moisture. Do not use a polythene membrane. Ensure that the air bricks are clear of
debris so that air can circulate freely below the flooring to prevent damp.
1. Lay with spacers Use spacers to maintain an expansion gap of 15mm. The first row should be fixed (see Fig. 5 on page 3). Use a fixing in each joist or batten.
2. Stagger end joints Make sure the joints at the end of the boards are separated and do not sit adjacent to each other in the same row (see Fig. 7).
3. Remove spacers and add trims When all the flooring is laid, remove the spacers. Leave the expansion gap empty. Fit matching threshold strips in doorways and scotia around the perimeter of the floor to cover the expansion gaps.
Fig. 6 Laying wood on existing floorboards
New floor laid at 90º to old floor
Old flooring
New flooring
Fig. 7 Separating end joints
Batten/joist Header together
Incorrect Incorrect Correct
Batten/joist
Header joint separated by 2 boards
Header joint separated by 1 board
1195
63/0
5/20
14
0618