how to integrate gnumake with visual studio - · pdf file1 how to use gnu make with visual...
TRANSCRIPT

How to Integrate GNUmake
With Visual Studio
By Lowell Boggs, Jr.
05/29/2014

1
How To Use GNU Make with Visual Studio The GNU Make program can be used as the build agent in Visual Studio. This document shows you to
how use Visual Studio for development on Windows and also have your project build “seamlessly” on
Linux – assuming of course that you have properly designed your source code and “Gnumake rules” to
make this magic work. This is not necessarily a trivial thing to do but it is possible – if you are willing to
follow a highly stylized build strategy.
There is no guarantee that all visual studio features will work perfectly in the “visual studio makefile
project mode”, but the major features generally do. Blame Microsoft if others don’t. But you must
define the sources in Visual Studio, the normal way, if you want most of the Visual Studio magic to work.
You can’t just add sources to the makefiles and expect VS to magically get it right. Luckily, the names of
most source files never appear in the makefiles – so you only have to declare them in one place.
Step 0: Install needed tools Make sure that you have all the right tools installed before you start:
1. Visual Studio 2013 or higher (lower versions may work too, but I have not test them).
2. GNU Make version 3.81 or higher (I’m betting 3.75+ will work fine but haven’t tested)
3. Lowell Boggs’s make rules package version 1.0, or higher. In particular,you must be able to copy
directories out of that package as part of this document’s instructions. You may find the most
recent version of the package at the following location:
http://www.bordoon.com/backups/make.zip

2
Step 1: Create a “Makefile” project in Visual Studio Create a new Visual Studio Project of type “General / Makefile”
The first step in the process is to create a Visual Studio designed for use with NMake – but of course,
you are going to switch it GNU Make after it is created. Here’s how: Open Visual Studio and click to
create the new project:
Next, select project type ‘General’, then subtype ‘Makefile’

3
Then click on ‘finish’ to let the project be created, without any source files. You should see this in the
Solution Explorer
And if you look at the directory that was just created, using Windows Explorer, you can see this:
This is just the top level directory of the project – actually it is the “solution” top level directory. The
actual project is in subdirectory, MakefileProject. Which contains:
This is where the source files will go.

4
Step 2: Create new or copy existing source files into the project You can now copy your existing source files into this directory and use the Visual Studio “Add Existing
File” mechanism to import them.
Let’s create a couple of new files, outside the visual studio environment, as an example of how to import
existing files. Lets create:
Main.cpp
called.c
One is a C++ source and the other is a plain old C function which will be called by Main.cpp. Here are
their contents:
Main.cpp
#include <iostream>
using namespace std;
extern "C"
{
extern char const *helper();
}
int main()
{
cout << "A call to helper() returns: " << helper() << endl;
return 0;
}
Called.c
char const *helper()
{
return "Hello world!";
}
The directory now looks like this:
But we still see this is the Visual studio Solution Explorer:

5
So let’s now add the two files as “existing item”. Right click on the bold project name, MakefileProject,
and then select ‘Add’ then ‘Existing Item’:

6
You should now see this:
You can then select multiple files, “helper” and “Main” to include them in the project. Don’t include any
other files from the above – they are special to Visual Studio.

7
Pressing ‘Add’ will populate the Visual Studio Solution Explorer like this:
You can then open either of the two new files to see their contents. Et Voila:
At this point, it is tempting to try to build the project. This would work if you were using a different kind
of Visual Studio project, but we are building a “Makefile” project and we have not yet created the
Makefile.

8
Step 3: Creating the Makefile So let’s do that now by adding a new item. Right click on the bold project name in the solution explorer,
then click on add new item:
Then select “C++ / Utility / Text File” and enter “Makefile” as the filename.

9
This will mistakenly create “Makefile.txt”, so we must rename it in order to be consistent with compiling
on linux or unix. Here is the created file:
So right click on Makefile.txt and change the name to “Makefile”. Make sure you remove the “.txt” part
of the name.
And if you look at the directory, you will see the following:
STEP 4: Test the Makefile At this point, we have a Makefile but it is empty and won’t build our project. But we can test it. Let’s
put in something trivial to make sure make is getting invoked by visual studio when we build.

10
Edit the Makefile and add the following trivial build behavior:
Sadly, clicking on BUILD / Build Solution at this point still won’t work because we have not yet instructed
Visual Studio how to “run” our Makefile on the project. Here’s its output:
The actual error message says:
1>------ Build started: Project: MakefileProject, Configuration: Debug Win32 --
----
1>C:\Program Files
(x86)\MSBuild\Microsoft.Cpp\v4.0\V120\Microsoft.MakeFile.Targets(37,5): warning
MSB8005: The property 'NMakeBuildCommandLine' doesn't exist. Skipping...
========== Build: 1 succeeded, 0 failed, 0 up-to-date, 0 skipped ==========
The salient point is this: “The property 'NMakeBuildCommandLine' doesn't exist.”
STEP 5: Instruct Visual Studio to actually use the Makefile This, of course, means that Visual Studio doesn’t know which Make program to run because we have not
yet defined the build property named “NMakeBuildCommandLine” yet. So let’s do that next.

11
Right click on the project name, MakefileProject, in the Solution Explorer, then click on properties at the
bottom of the pop up window:
Then change the “Build Command Line” so that it contains the name of the GNU Make program, as
below:
In case you hadn’t noticed, the act of setting the Build Command Line variable, in the properties dialog,
automatically populates the NMakeBuildCommandLine variable for you. You must also populate the
other build command lines: “Rebuild All Command Line” and “Clean Command Line”.
12
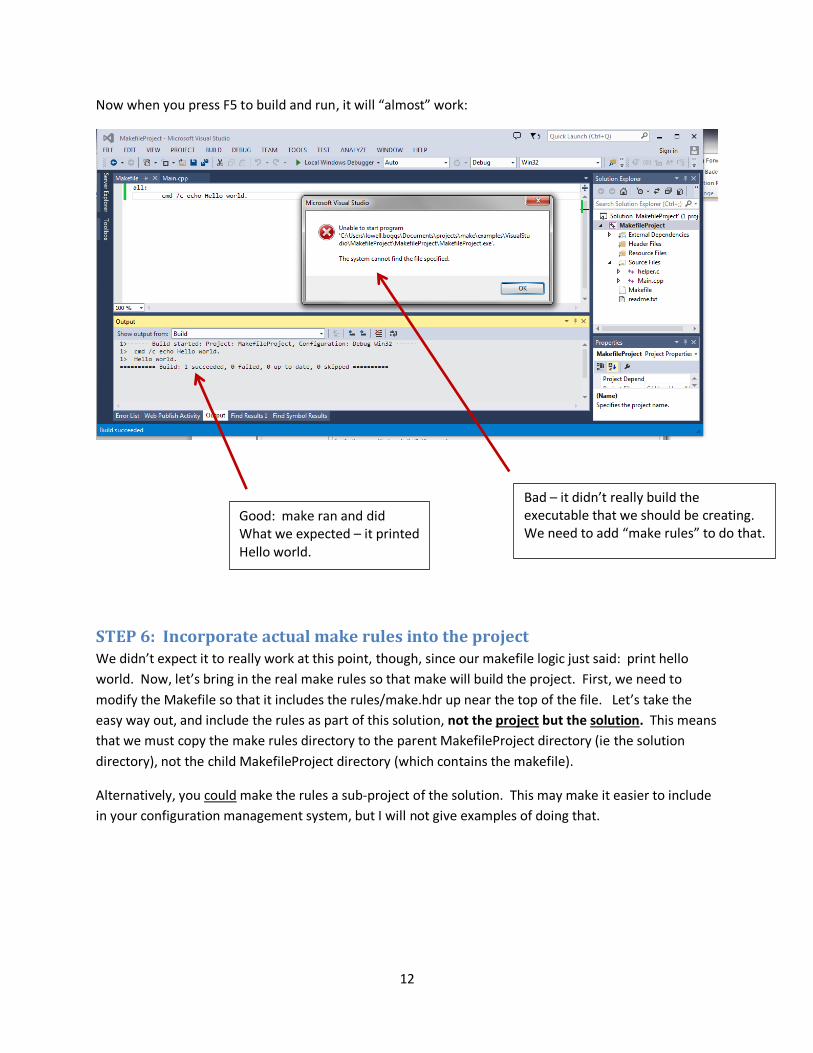
Now when you press F5 to build and run, it will “almost” work:
STEP 6: Incorporate actual make rules into the project We didn’t expect it to really work at this point, though, since our makefile logic just said: print hello
world. Now, let’s bring in the real make rules so that make will build the project. First, we need to
modify the Makefile so that it includes the rules/make.hdr up near the top of the file. Let’s take the
easy way out, and include the rules as part of this solution, not the project but the solution. This means
that we must copy the make rules directory to the parent MakefileProject directory (ie the solution
directory), not the child MakefileProject directory (which contains the makefile).
Alternatively, you could make the rules a sub-project of the solution. This may make it easier to include
in your configuration management system, but I will not give examples of doing that.
Good: make ran and did What we expected – it printed Hello world.
Bad – it didn’t really build the executable that we should be creating. We need to add “make rules” to do that.

13
After making the copy to the solution directory, you should see this:
Note that the rules directory contains make.hdr, and MakefileProject is the directory where the project
source code (including the Makefile) is found.
STEP 7: Modify the makefile to use the rules and build actually compile Now you can use Visual Studio to modify the project Makefile to include ../rules/make.hdr and
incorporate real makefile contents that will actually build the project: For example:

14
As can be seen from the Makefile window, the Makefile asserts that the “all” target is dependent on the
program, MakefileProject.$(EXE_EXT), being built. And that it in turn is dependent on all the .cpp and all
the .c files in the project. The names of these source files must be converted into *.$(OBJ_EXT) before
they can be used properly by the make rule. The symbols, EXE_EXT, and OBJ_EXT are defined in the
rules/make.hdr.
At this point, let us build the project without running it and see what we get:
Great, we have a successful build.
Note that the contents of the Makefile, shown above, are designed to compile all source code in the
project into a single executable. In the examples that come with the make rules, this is called a “Trivial
Project”. There is an example by that name which contains comments about the nature of the makefile
contents.

15
STEP 9: Now try to run with debug again Now let’s try running by pressing the F5 key. At this point, we get a host of confusing errors:
After clicking yes, this is what we see in the run Output log:
Debugger tried To run the executable
But something big is wrong, Click yes to see what happens
16
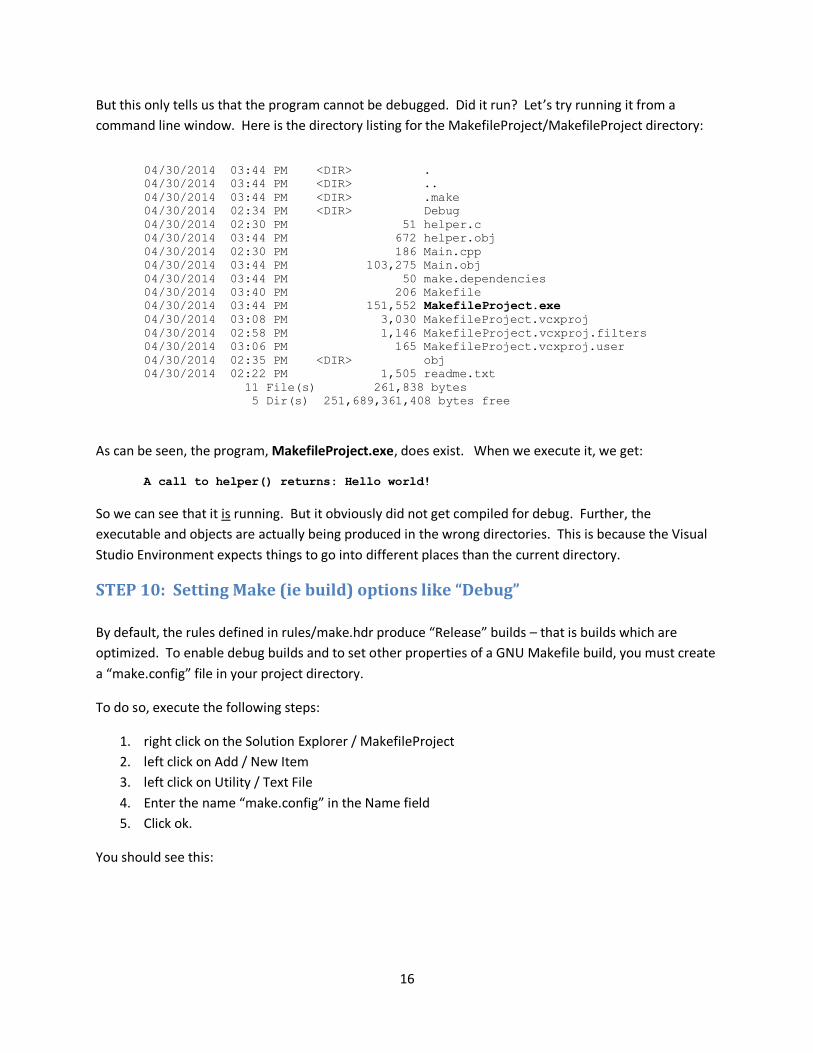
But this only tells us that the program cannot be debugged. Did it run? Let’s try running it from a
command line window. Here is the directory listing for the MakefileProject/MakefileProject directory:
04/30/2014 03:44 PM <DIR> .
04/30/2014 03:44 PM <DIR> ..
04/30/2014 03:44 PM <DIR> .make
04/30/2014 02:34 PM <DIR> Debug
04/30/2014 02:30 PM 51 helper.c
04/30/2014 03:44 PM 672 helper.obj
04/30/2014 02:30 PM 186 Main.cpp
04/30/2014 03:44 PM 103,275 Main.obj
04/30/2014 03:44 PM 50 make.dependencies
04/30/2014 03:40 PM 206 Makefile
04/30/2014 03:44 PM 151,552 MakefileProject.exe
04/30/2014 03:08 PM 3,030 MakefileProject.vcxproj
04/30/2014 02:58 PM 1,146 MakefileProject.vcxproj.filters
04/30/2014 03:06 PM 165 MakefileProject.vcxproj.user
04/30/2014 02:35 PM <DIR> obj
04/30/2014 02:22 PM 1,505 readme.txt
11 File(s) 261,838 bytes
5 Dir(s) 251,689,361,408 bytes free
As can be seen, the program, MakefileProject.exe, does exist. When we execute it, we get:
A call to helper() returns: Hello world!
So we can see that it is running. But it obviously did not get compiled for debug. Further, the
executable and objects are actually being produced in the wrong directories. This is because the Visual
Studio Environment expects things to go into different places than the current directory.
STEP 10: Setting Make (ie build) options like “Debug”
By default, the rules defined in rules/make.hdr produce “Release” builds – that is builds which are
optimized. To enable debug builds and to set other properties of a GNU Makefile build, you must create
a “make.config” file in your project directory.
To do so, execute the following steps:
1. right click on the Solution Explorer / MakefileProject
2. left click on Add / New Item
3. left click on Utility / Text File
4. Enter the name “make.config” in the Name field
5. Click ok.
You should see this:

17
Next, you must mark this new file as being “not included in the build.” To do so follow these steps:
1. Right click on the “make.config” file in the solution explorer
2. Left click on properties
3. Left click on General
4. Left click on Exclude from build
5. Change the value to yes
6. Press apply and ok
You should then see this:
The “make.config” file is read by the GNU make process at a time before the make targets are defined.
In this way, make variable settings can be incorporated into the make rules. Thus, we can set variables
in the “make.config” file to affect the build logic. But what variables exist so that they can be
configured?
The following symbols can be set in the make.config file:
OPT_LEVEL

18
CLEAN_FILES
BUILD_DLL
DLL_OPTIONS
CPP_OPTIONS
C_OPTIONS
CPP_LINK_OPTIONS
C_LINK_OPTIONS
OBJDIR
BINDIR
LIBDIR
The options, above, are described in paragraphs below:
OPT_LEVEL
The OPT_LEVEL variable should be set to either:
Optimized
Debug
With “Optimized” being the default. To turn on debug, modify the “make.config” file and make the
following setting:
OPT_LEVEL:= Debug
CLEAN_FILES
The CLEAN_FILES variable is a space separated list of file name patterns to delete when “make clean” is
invoked. Note that some files are already well known to the clean process, so you only need to set this
for temp files that you create using your own handmade build rules. For example: “*.tmp *.out *.log”
etc.
BUILD_DLL
The BUILD_DLL variable is a flag. The value, “true”, means that we are building a shared library (*.so) or
DLL. DLLs should be built in a directory (Visual Studio Project) by themselves. The make.config file
should contain: BUILD_DLL:= true, and you can set DLL_OPTIONS if you need to add any non-default
logic to the dll construction process.
When building on unix or linux, a .so file will be created.
DLL_OPTIONS
This variable should be set only if BUILD_DLL is true.
DLL_OPTIONS is not required. The rules/make.hdr file knows the default options. Use this only for non-
standard options.

19
To use it, you must write makefile variable settings in GNU make “if” clauses to account for the
difference between unix/linux and Windows settings. Basically, you have to handle the portability
yourself. See the next section for an example of how to do this.
CPP_OPTIONS, C_OPTIONS, CPP_LINK_OPTIONS, C_LINK_OPTIONS
These make variable is passed to the compiler when C/C++ files are being compiled/linked. They are
empty by default. The compilation process knows how to compile for debug versus optimized builds,
see variable, OPT_LEVEL. So these variables should only be set for unusual options.
These variables can be defined in the make.config file but should not be necessary for normal builds.
If you define these symbols, you must make them portable between windows and unix/linux yourself.
Usually this is done with GNU make “if” clauses.
Here is an example of how to set the CPP_OPTIONS based which compiler environment you are in:
ifeq (“$MAKE_OS”,”windows”)
CPP_OPTIONS= /something
else
CPP_OPTIONS= -other
endif
Note that the alternative MAKE_OS values are
windows
unix
cygwin
STEP 11: Separating generated files into separate directories This section describes how to put source and object into different directories.
Visual Studio normally separates source, objects, libraries, and executables into different locations.
Further, these locations are dependent on your build configuration.
It is theoretically possible to convey these directory names on the NMake Build Command Line that
invokes GNU Make, but it is not as easy as it sounds. Further, doing so creates a dependency on the

20
command line as Visual Studio would use and the one that the user would want to use on linux or when
using the command line to run builds. Basically, doing so causes a lot of trouble.
So, I suggest that you just not: When using a makefile based project, make all build configurations part
of either the “Makefile” or the “make.config” file. This lets your run make from a command line with no
options and yet have acorrect build. Doing this though does mean that you have to edit the
“make.config” file whenever you change from a Debug to a Release build – and vice versa.
Here is an example “Makefile” that separates the objects, dll’s and executables:
include ../rules/make.hdr
all:: $(BINDIR)MakefileProject.$(EXE_EXT)
cmd /c echo VS_BLD_CFG=$(VS_BLD_CFG)
$(BINDIR)MakefileProject.$(EXE_EXT): $(patsubst
%.cpp,$(OBJDIR)%.$(OBJ_EXT),$(wildcard *.cpp)) \
$(patsubst %.c,$(OBJDIR)%.$(OBJ_EXT),$(wildcard
*.c))
$(LINK.cpp)
Note that the BINDIR is where the executables and DLL’s go. The OBJDIR is where objects go. If there
were any static libraries, they would go into LIBDIR. Also note that this directory macros MUST have a
trailing / in their names! Not doing this causes the most difficult to debug errors.
And the corresponding “make.config” file looks like this:
#
#
#
OPT_LEVEL:= Debug
BINDIR:= ../Debug/
OBJDIR:= Debug/
LIBDIR:= Debug/
You’ll note that executable is placed in the parent’s Debug subdirectory, not the current project’s Debug
subdirectory.

21
To get the debugger to work with this, please make the following configuration:
STEP 13: Adding a DLL building project DLLs are best built from all the files in a specific project of their own. This is because the “make.config”
file must set an option that will apply to all files in the current directory – “BUILD_DLL:= true”.
The general steps for adding a DLL building project to the existing MakefileProject solution is as follows:
1. Add a new project of type “C++/General/Makefile”, just as we did when we created the first
project, above. Give the project the name, “DllProject”.
2. Once that project has been created, click on the DLLProject line in the Solution Explorer and the
following files:
a. “make.config”, just as was done for the first project. See above.
b. “Makefile”, just as was done for the first project. See above. Don’t forget to manually
rename it from “Makefile.txt” to just “Makefile”.
3. Now add two new source files: DllHeader.h and DllMember.cpp
4. Your Solution Explorer should now look like this:

22
Now populate the new files like this:
“make.config”:
#ifndef DllHeader_h_included
#define DllHeader_h_included
// the following header, dll_portability, is part of the rules/ directory which
is added automatically to the build command line by the rules/make.hdr
#include <dll_portability.h>
extern EXPORT_DLL_MEMBER int EXPORT_DLL_CDECL dllMember();
#endif
“Makefile”
include ../rules/make.hdr
#
# The all:: target tells us what we are building
#
all:: $(BINDIR)DllProject.$(DLL_EXT)
#
# Here's how you compile one source file into a DLL. To add other source
files,
# just append their object file's names on to the j.exe: dependency line.
#
$(BINDIR)DllProject.$(DLL_EXT): $(OBJDIR)DllMember.$(OBJ_EXT)
$(HIDE)$(MKDLL)
“DllHeader.h”
#ifndef DllHeader_h_included
#define DllHeader_h_included
// the following header, dll_portability, is part of the rules/ directory which
is added automatically to the build command line by the rules/make.hdr
#include <dll_portability.h>
extern EXPORT_DLL_MEMBER int EXPORT_DLL_CDECL dllMember();
#endif
“DllMember.cpp”
#include <DllHeader.h>
#include <iostream>
using namespace std;
EXPORT_DLL_MEMBER int EXPORT_DLL_CDECL dllMember()
{
cout << "DllProject.dll is alive" << endl;
return 0;
}
At this point, you should be able to perform a build of the DllProject and get a successful build of
“DllProject.dll”. It will go in the parent directory’s Debug subdirectory. The DllProject/Debug directory
will contain the DllMember.obj file.

23
Now lets have the main project, “MakefileProject” call the function, dllMember(), in the dll. To do this
we must include the header file for the DLL in the source code, and include the DLLProject.dll file in the
link line. Here are the changes to make this happen:
First, let’s modify the “make.config” file to make the parent directory part of the “MakefileProject”
include path. Add the line, INCLUDES += .. to it. The file should now look like this:
#
#
#
INCLUDES += ..
OPT_LEVEL:= Debug
BINDIR:= ../Debug/
OBJDIR:= Debug/
LIBDIR:= Debug/
Next, modify the “Makefile” so that the needed DLL is included on the link line. Add a new dependency
to the “MakefileProject.exe” file. It should now look like this:
include ../rules/make.hdr
all:: $(BINDIR)MakefileProject.$(EXE_EXT)
$(BINDIR)MakefileProject.$(EXE_EXT): \
$(patsubst %.cpp,$(OBJDIR)%.$(OBJ_EXT),$(wildcard *.cpp)) \
$(patsubst %.c,$(OBJDIR)%.$(OBJ_EXT),$(wildcard *.c)) \
../Debug/DllProject.$(DLL_EXT)
$(LINK.cpp)
tests::
../Debug/MakefileProject.exe
Finally, lets modify the .cpp file so that it calls the dllMember() function in the DLL. Here is the new
source code for file “Main.cpp”:
#include <DllProject/DllHeader.h>
#include <iostream>
using namespace std;
extern "C"
{
extern char const *helper();
}
int main()
{
cout << "A call to helper() returns: " << helper() << endl;
dllMember(); // prints to stdout and returns 0.
return 0;
}
Note that only 2 lines have changes.
24
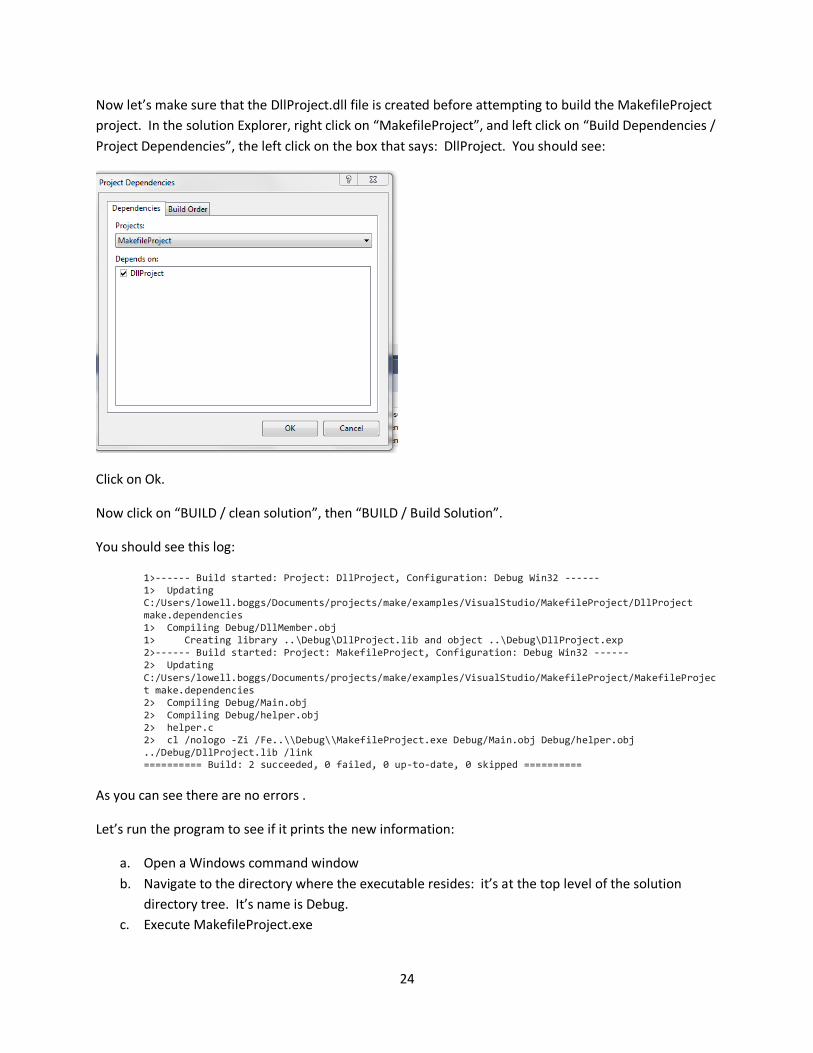
Now let’s make sure that the DllProject.dll file is created before attempting to build the MakefileProject
project. In the solution Explorer, right click on “MakefileProject”, and left click on “Build Dependencies /
Project Dependencies”, the left click on the box that says: DllProject. You should see:
Click on Ok.
Now click on “BUILD / clean solution”, then “BUILD / Build Solution”.
You should see this log:
1>------ Build started: Project: DllProject, Configuration: Debug Win32 ------ 1> Updating C:/Users/lowell.boggs/Documents/projects/make/examples/VisualStudio/MakefileProject/DllProject make.dependencies 1> Compiling Debug/DllMember.obj 1> Creating library ..\Debug\DllProject.lib and object ..\Debug\DllProject.exp 2>------ Build started: Project: MakefileProject, Configuration: Debug Win32 ------ 2> Updating C:/Users/lowell.boggs/Documents/projects/make/examples/VisualStudio/MakefileProject/MakefileProject make.dependencies 2> Compiling Debug/Main.obj 2> Compiling Debug/helper.obj 2> helper.c 2> cl /nologo -Zi /Fe..\\Debug\\MakefileProject.exe Debug/Main.obj Debug/helper.obj ../Debug/DllProject.lib /link ========== Build: 2 succeeded, 0 failed, 0 up-to-date, 0 skipped ==========
As you can see there are no errors .
Let’s run the program to see if it prints the new information:
a. Open a Windows command window
b. Navigate to the directory where the executable resides: it’s at the top level of the solution
directory tree. It’s name is Debug.
c. Execute MakefileProject.exe

25
You should see the following:
A call to helper() returns: Hello world!
DllProject.dll is alive
And we’re done. (Whew!)
STEP 14: Making the parent directory’s Makefile build the new project Well, I thought we were done. There is one last step: Making sure that If you build from the command
line, you will properly build the DllProject before the MakefileProject project. Go to the parent directory
and change its makefile to look like this:
SUBDIRS = DllProject \
MakefileProject
include ../../../rules/make.hdr
Basically, you just have to jam in the name of the new project in the SUBDIRS before the existing
MakefileProject to get the build to work.
Remember that the SUBDIRS must come before the include …/rules/make.hdr line.
Good luck!